Embed Size (px)
Citation preview
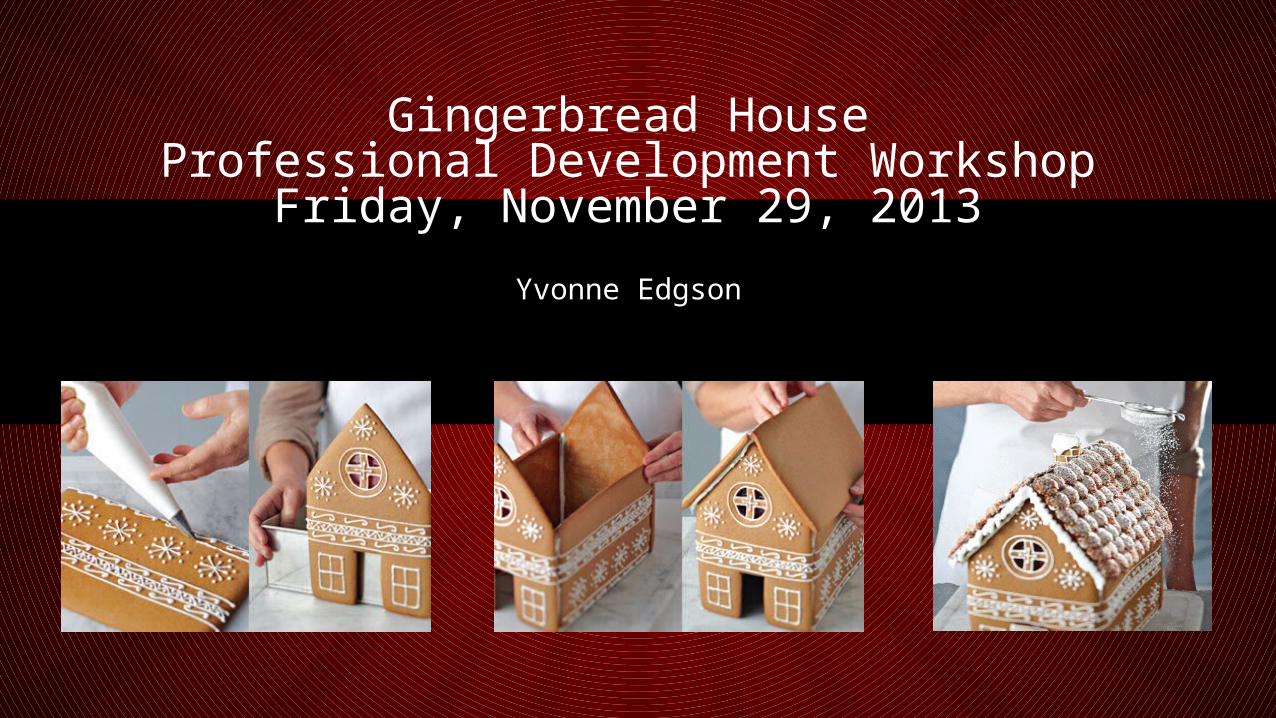
Gingerbread HouseProfessional Development Workshop
Friday, November 29, 2013
Yvonne Edgson
Gingerbread houses are truly a labor of love. Allow plenty of time to complete this project -- it can be done in 2 to 3 days with concentrated work, but some decorators might require a week or two from start to finish.
Topics: Gingerbread house marking scheme Base• Templates and cutting pieces of dough• Dough recipe and tips for dough thickness, and rolling out and
baking• Royal icing recipe• Stained glass windows• Assembly and icing tips• Decorating tips and ideas• Ingredients, candy, food ideas
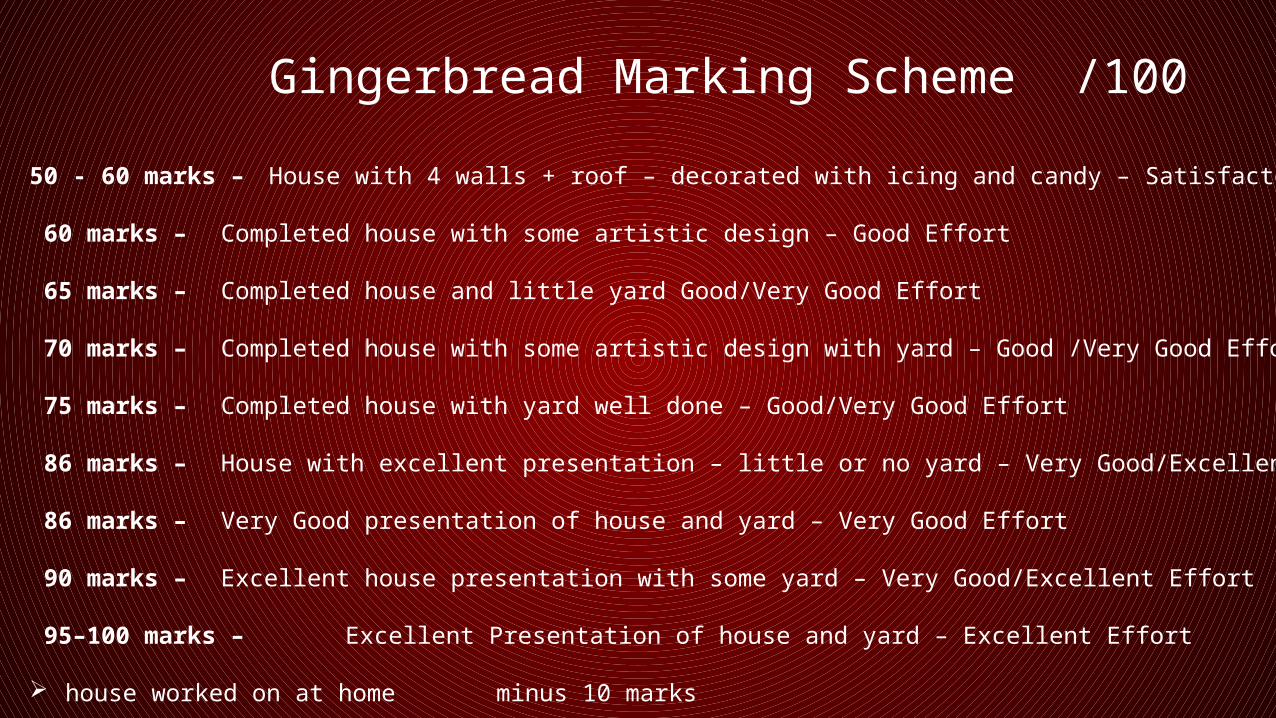
Gingerbread Marking Scheme /100 50 - 60 marks – House with 4 walls + roof – decorated with icing and candy – Satisfactory Effort 60 marks – Completed house with some artistic design – Good Effort 65 marks – Completed house and little yard Good/Very Good Effort 70 marks – Completed house with some artistic design with yard – Good /Very Good Effort 75 marks – Completed house with yard well done – Good/Very Good Effort 86 marks – House with excellent presentation – little or no yard – Very Good/Excellent Effort 86 marks – Very Good presentation of house and yard – Very Good Effort 90 marks – Excellent house presentation with some yard – Very Good/Excellent Effort 95–100 marks – Excellent Presentation of house and yard – Excellent Effort house worked on at home minus 10 marks
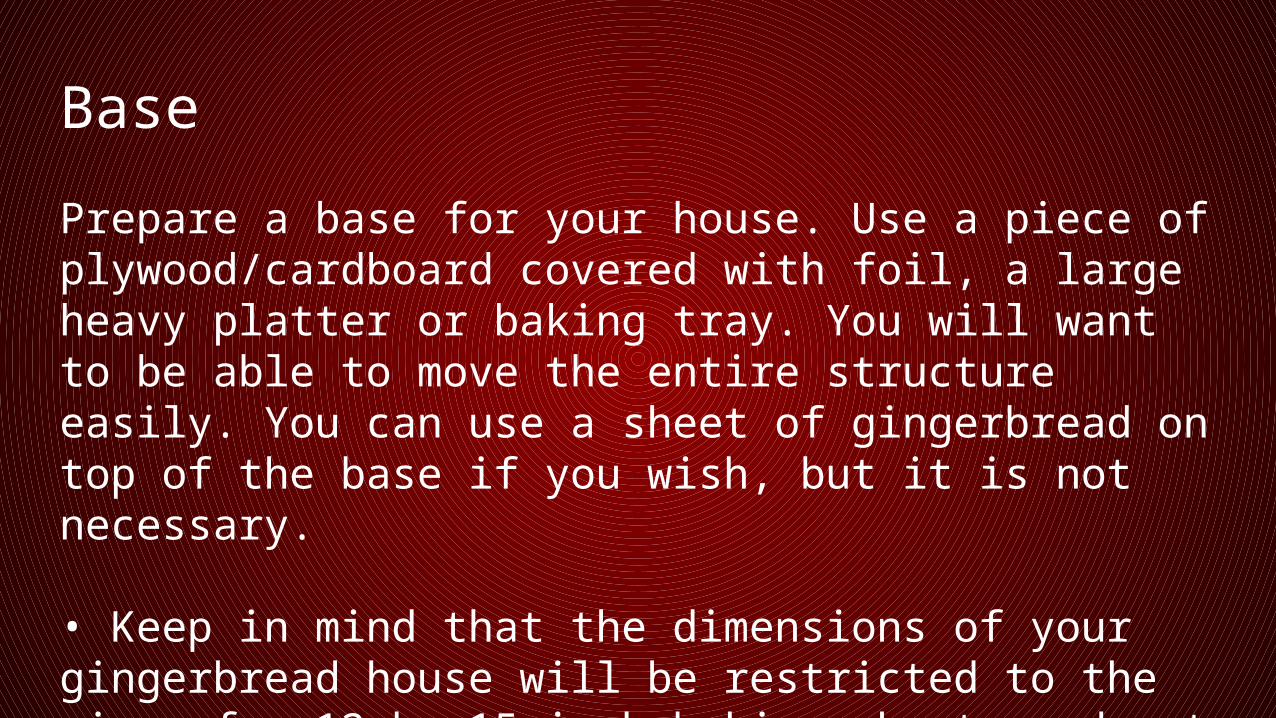
Base
Prepare a base for your house. Use a piece of plywood/cardboard covered with foil, a large heavy platter or baking tray. You will want to be able to move the entire structure easily. You can use a sheet of gingerbread on top of the base if you wish, but it is not necessary.
• Keep in mind that the dimensions of your gingerbread house will be restricted to the size of a 12-by 15-inch baking sheet, and cut your templates accordingly.
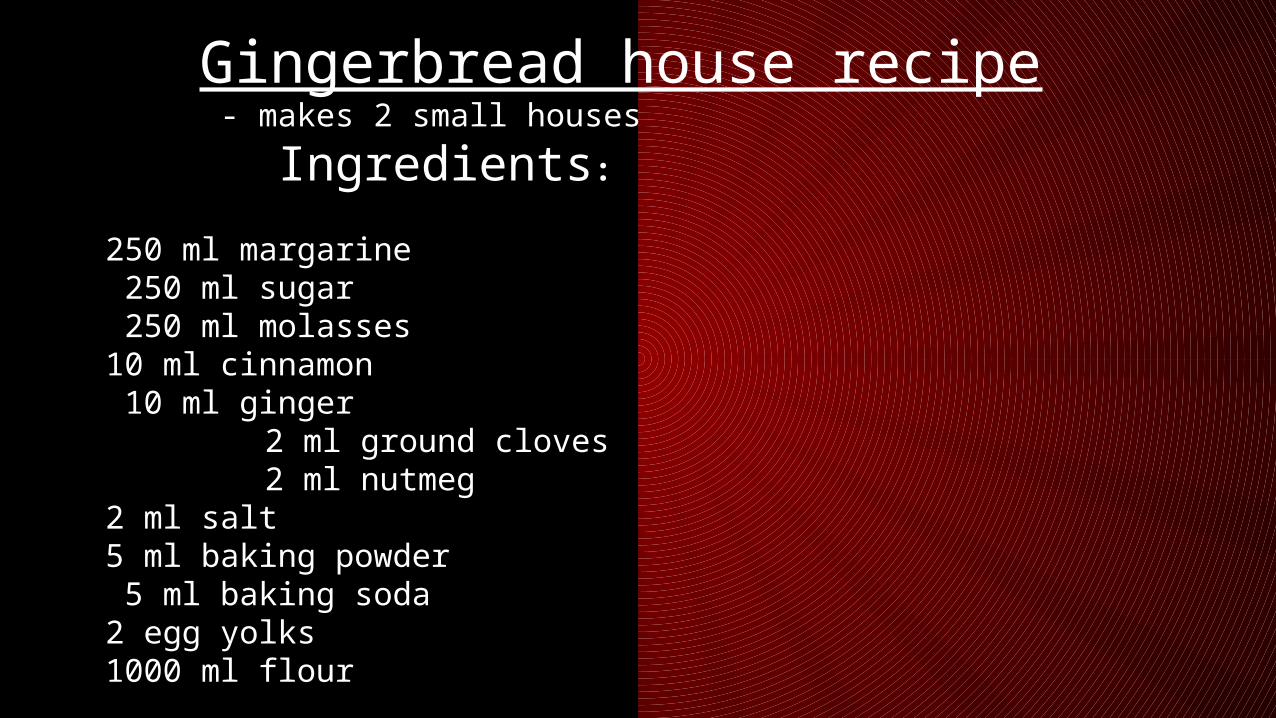
Gingerbread house recipe - makes 2 small houses
Ingredients: 250 ml margarine 250 ml sugar 250 ml molasses
10 ml cinnamon 10 ml ginger
2 ml ground cloves2 ml nutmeg
2 ml salt5 ml baking powder
5 ml baking soda2 egg yolks1000 ml flour
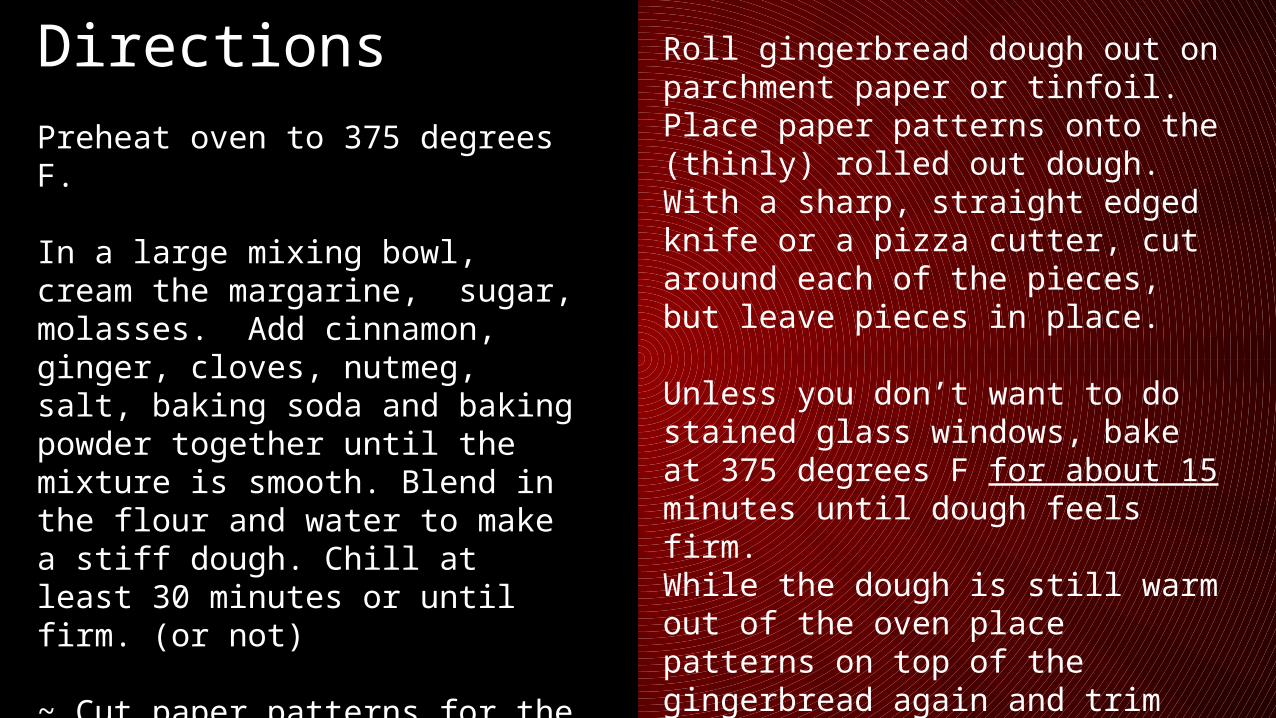
DirectionsPreheat oven to 375 degrees F.
In a large mixing bowl, cream the margarine, sugar, molasses. Add cinnamon, ginger, cloves, nutmeg, salt, baking soda and baking powder together until the mixture is smooth. Blend in the flour and water to make a stiff dough. Chill at least 30 minutes or until firm. (or not) ~ Cut paper patterns for the gingerbread house
Roll gingerbread dough out on parchment paper or tinfoil. Place paper patterns onto the (thinly) rolled out dough. With a sharp, straight edged knife or a pizza cutter, cut around each of the pieces, but leave pieces in place.
Unless you don’t want to do stained glass windows, bake at 375 degrees F for about 15 minutes until dough feels firm. While the dough is still warm out of the oven place patterns on top of the gingerbread again and trim shapes, cutting edges with a straight-edged sharp knife or pizza cutter. Leave to cool.
This smooth, hard-drying icing is perfect for making decorations that last. It is also useful as a "cement" to fasten decorations together. Royal icing is edible, but not recommended for icing cakes.
Ingredients:
45ml of Meringue Powder1000 ml (about 1 lb.) confectioners' sugar 90 ml warm water You may need to add more water to get the right consistency
Makes:About 3 cups of icing.
Royal Icing Recipe
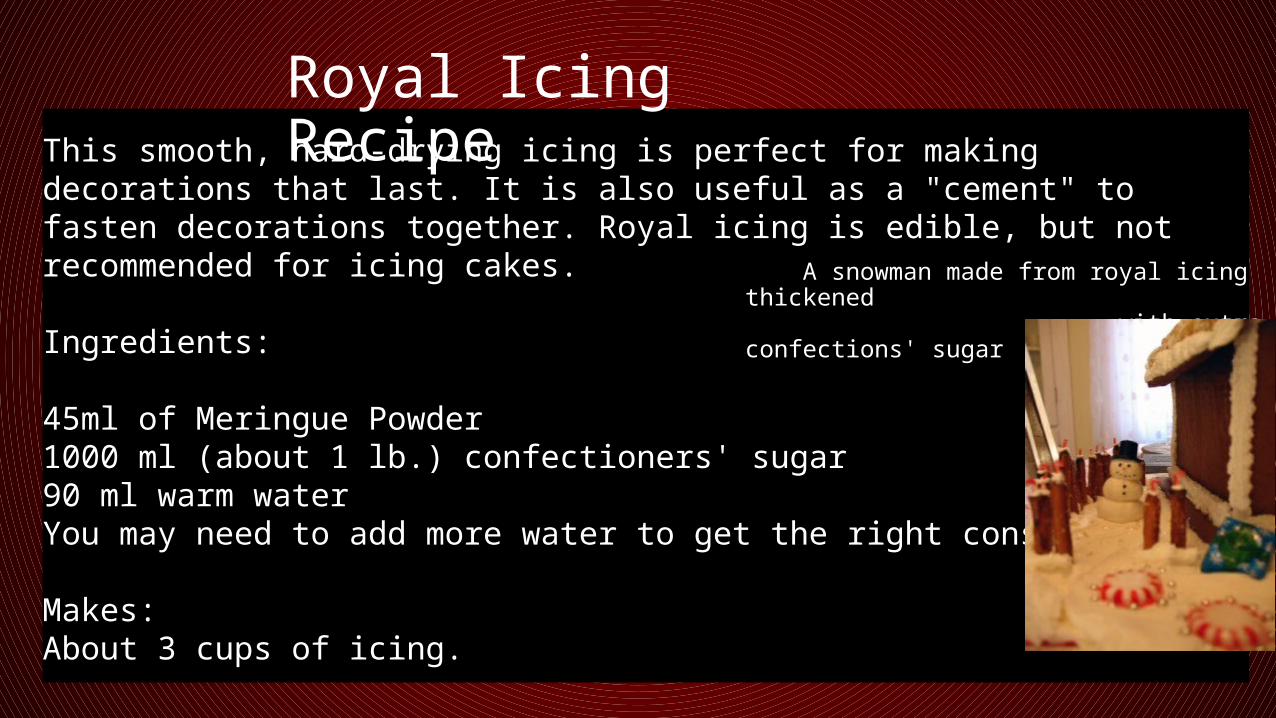
A snowman made from royal icing thickened with extra confections' sugar
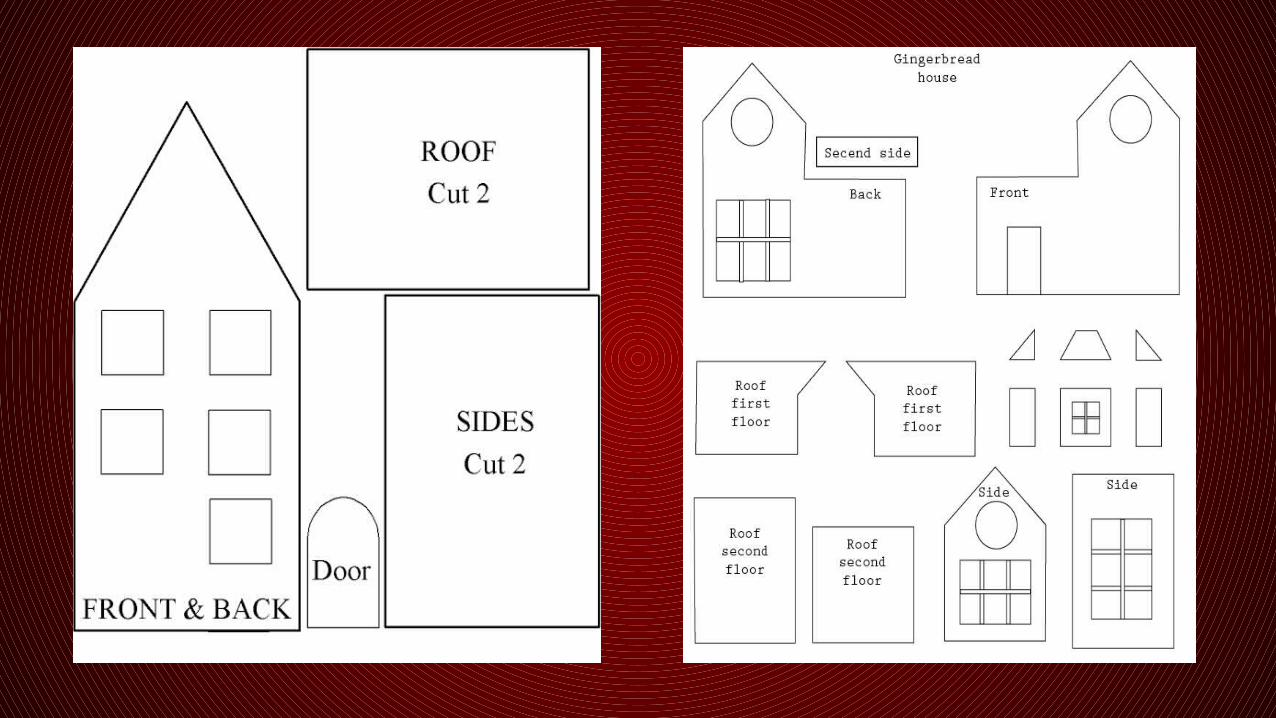
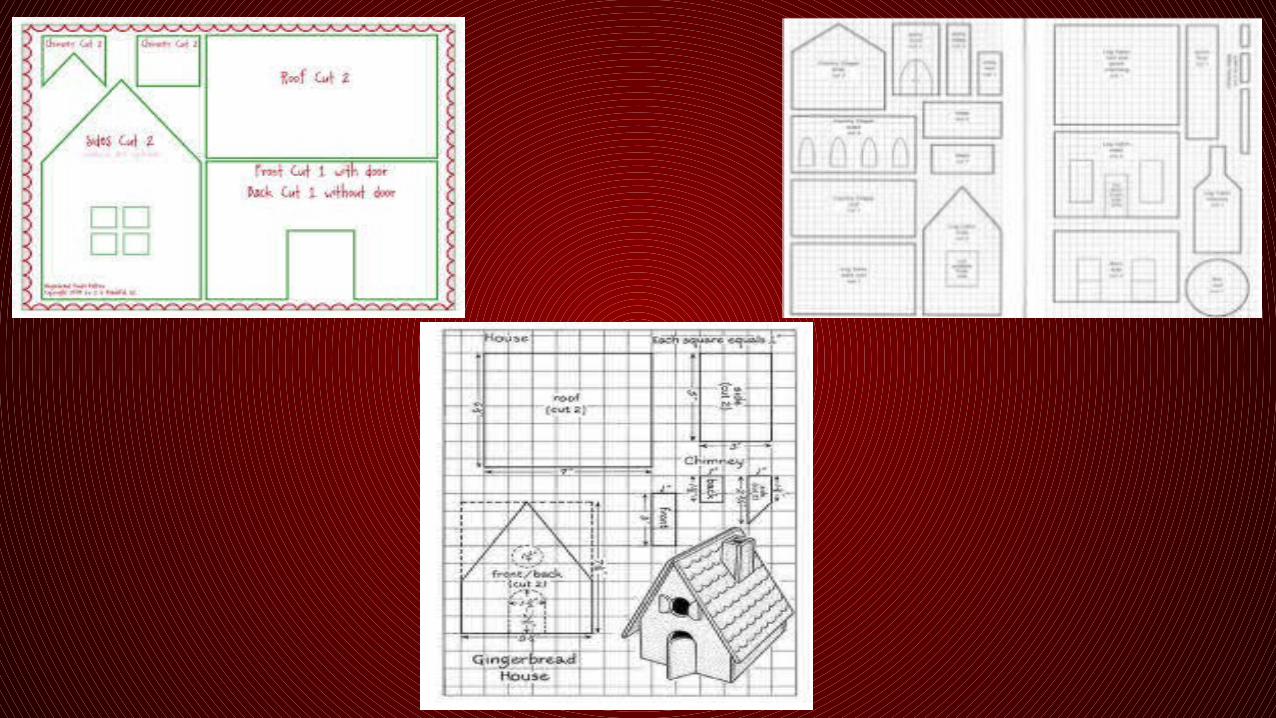
TEMPLATES
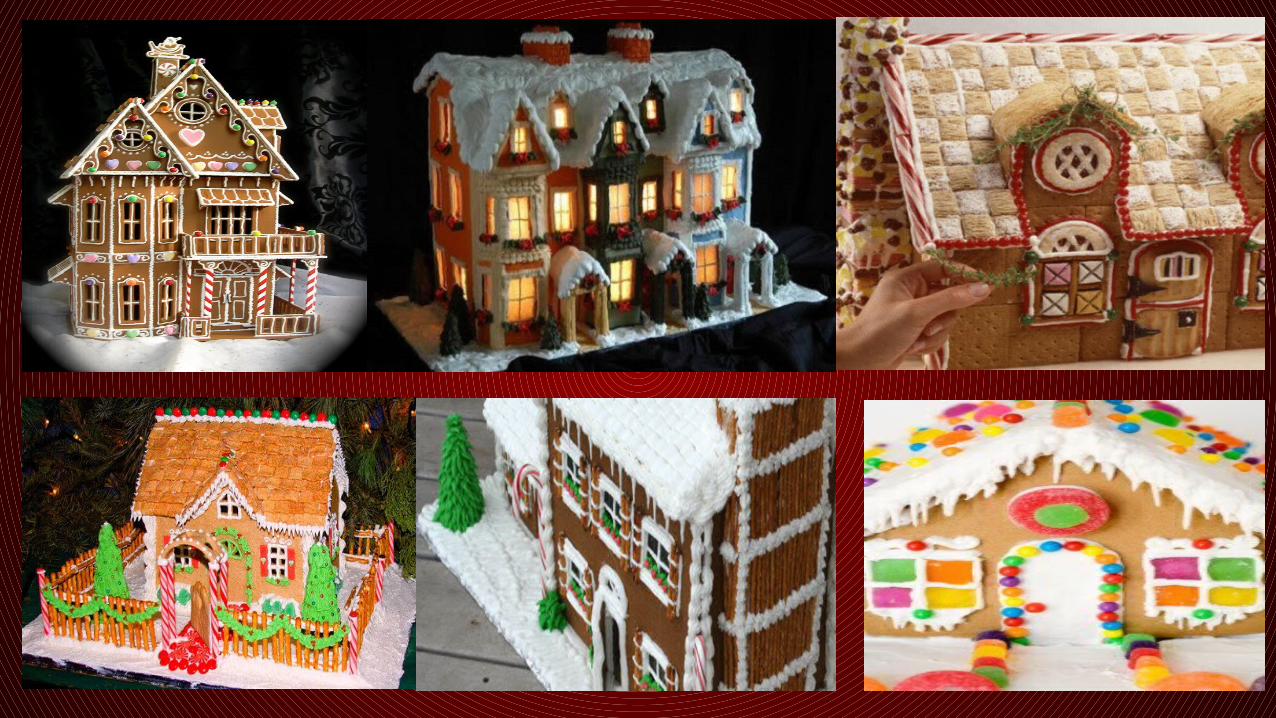
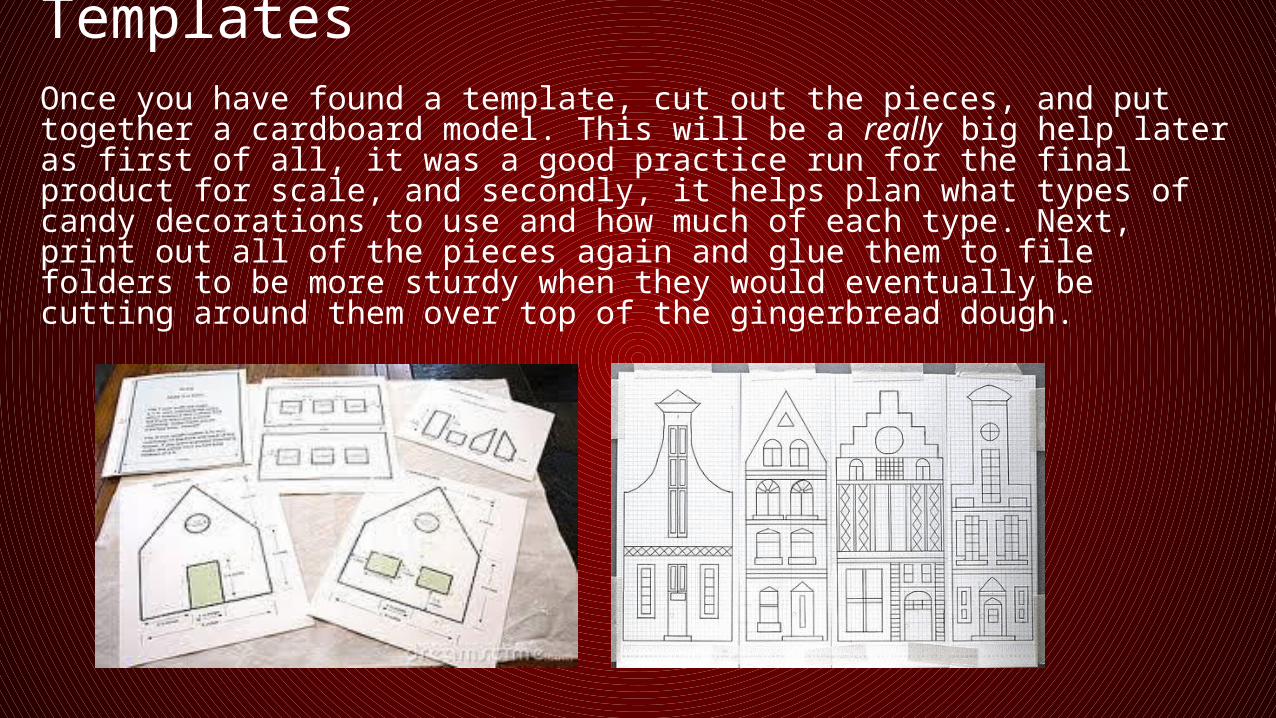
TemplatesOnce you have found a template, cut out the pieces, and put together a cardboard model. This will be a really big help later as first of all, it was a good practice run for the final product for scale, and secondly, it helps plan what types of candy decorations to use and how much of each type. Next, print out all of the pieces again and glue them to file folders to be more sturdy when they would eventually be cutting around them over top of the gingerbread dough.
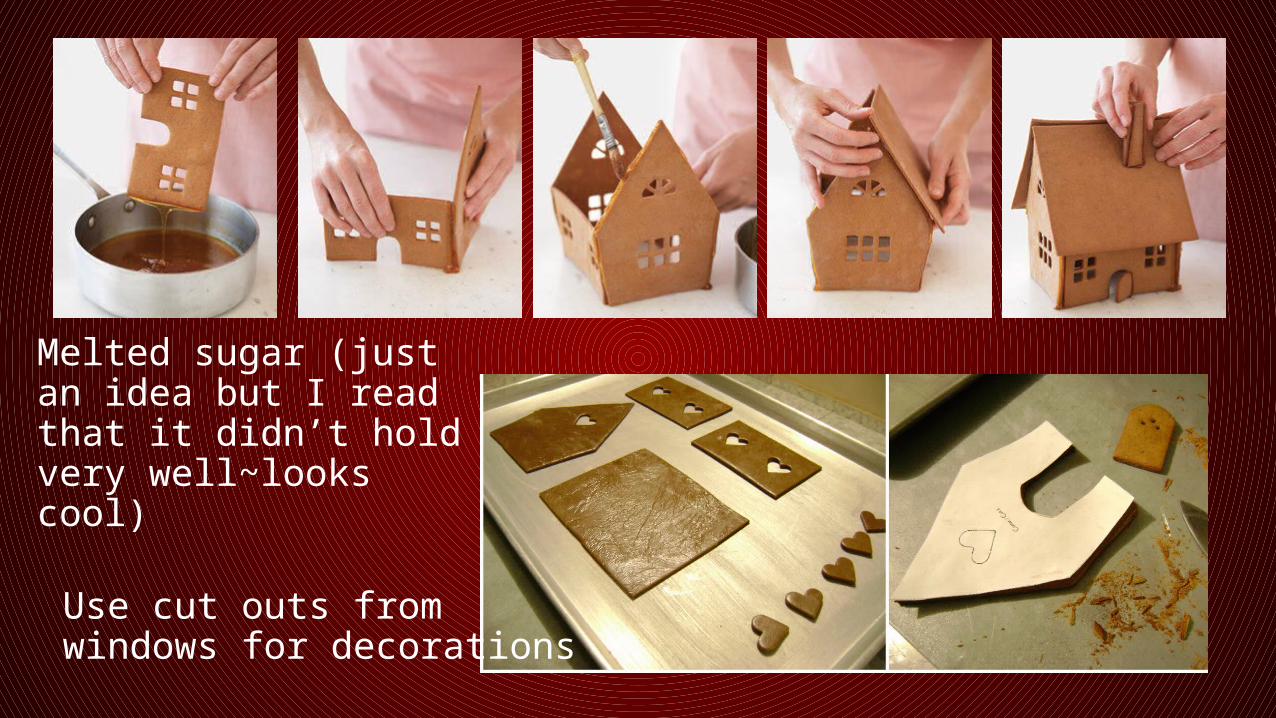
Melted sugar (just an idea but I read that it didn’t hold very well~looks cool)
Use cut outs from windows for decorations
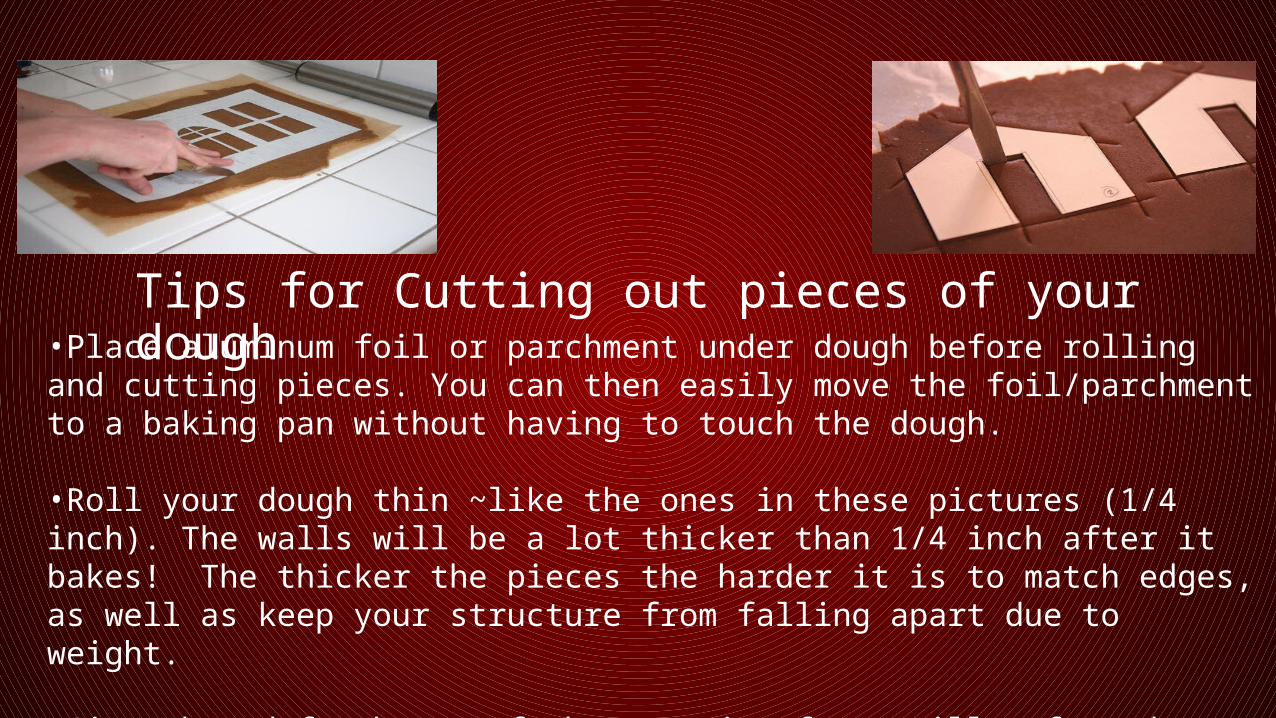
•Place aluminum foil or parchment under dough before rolling and cutting pieces. You can then easily move the foil/parchment to a baking pan without having to touch the dough.
•Roll your dough thin ~like the ones in these pictures (1/4 inch). The walls will be a lot thicker than 1/4 inch after it bakes! The thicker the pieces the harder it is to match edges, as well as keep your structure from falling apart due to weight.
•Gingerbread fresh out of the oven is often still soft and can be molded into shape by placing on cans or other objects while cooling.
Tips for Cutting out pieces of your dough
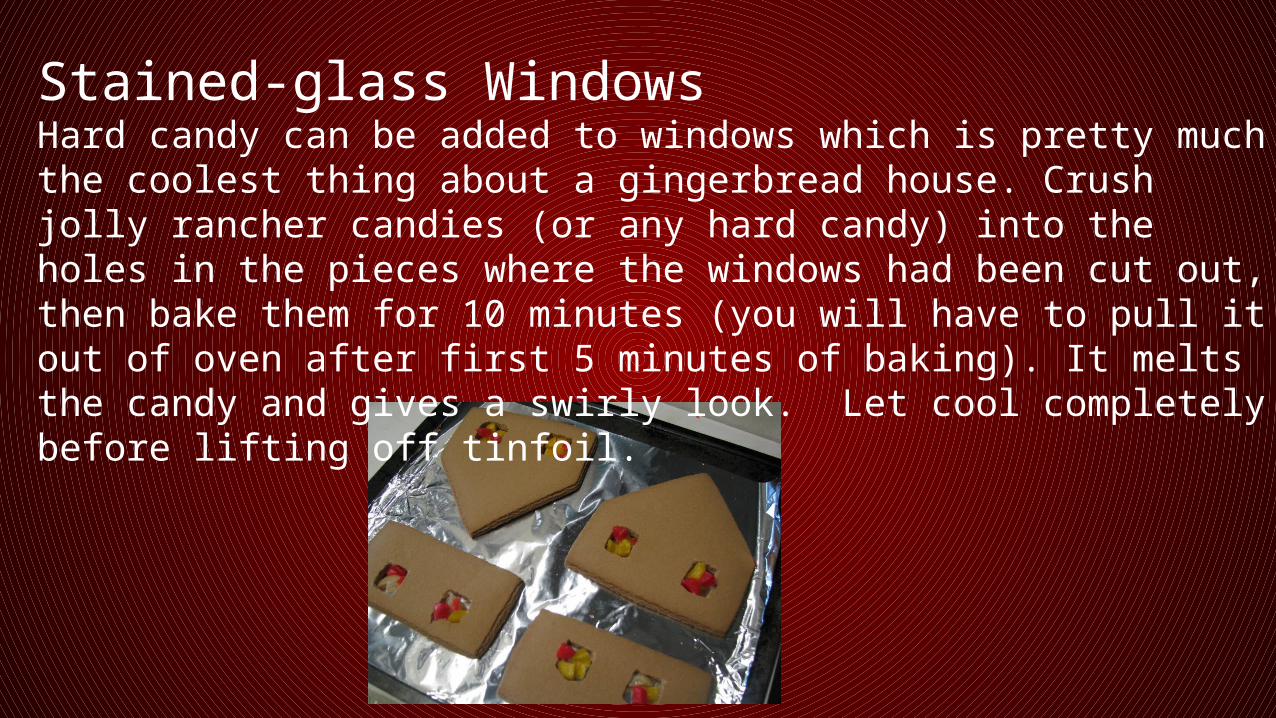
Stained-glass Windows Hard candy can be added to windows which is pretty much the coolest thing about a gingerbread house. Crush jolly rancher candies (or any hard candy) into the holes in the pieces where the windows had been cut out, then bake them for 10 minutes (you will have to pull it out of oven after first 5 minutes of baking). It melts the candy and gives a swirly look. Let cool completely before lifting off tinfoil.
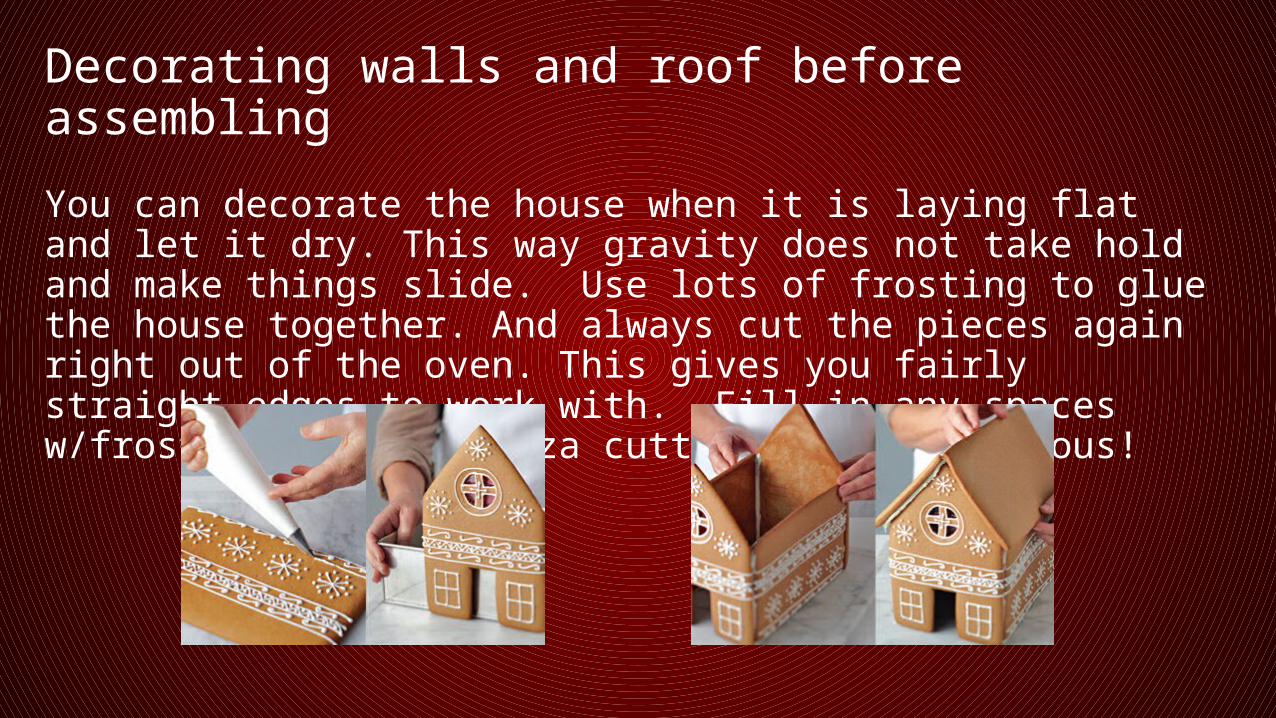
Decorating walls and roof before assembling
You can decorate the house when it is laying flat and let it dry. This way gravity does not take hold and make things slide. Use lots of frosting to glue the house together. And always cut the pieces again right out of the oven. This gives you fairly straight edges to work with. Fill in any spaces w/frosting. Use a pizza cutter ~ it’s ingenious!
Assembly
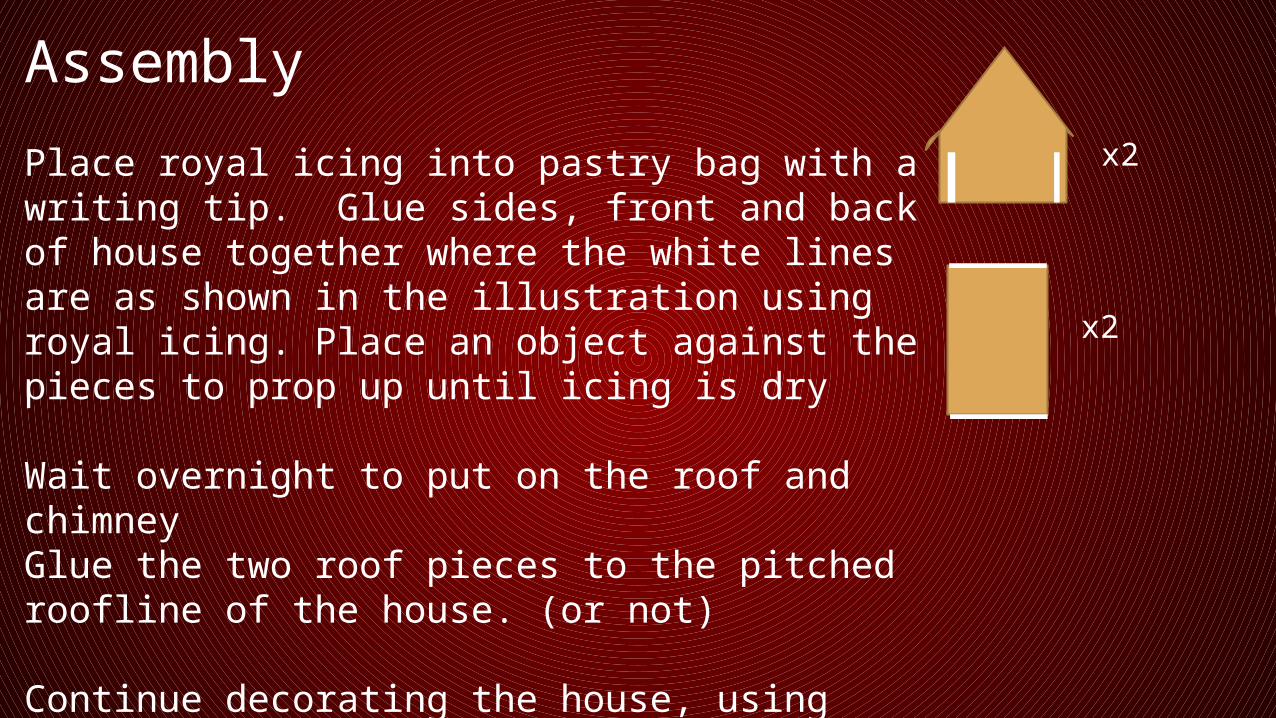
Place royal icing into pastry bag with a writing tip. Glue sides, front and back of house together where the white lines are as shown in the illustration using royal icing. Place an object against the pieces to prop up until icing is dry
Wait overnight to put on the roof and chimneyGlue the two roof pieces to the pitched roofline of the house. (or not)
Continue decorating the house, using candy, cereal, gum, gumdrops, licorice and peppermint etc as desired.
x2
x2
Frosting Tips•Make plenty of royal icing ahead of time. There’s nothing worse than running out in the middle of mortaring a wall or frosting decorations.
•Ziploc baggies are great to use if you run out of disposable pastry bags while piping frosting. The mini sizes work perfectly if you just need a small amount of colored icing.
• If you want the walls covered in icing, you may need to thin the icing with a few drops of water and then spread gently on the sides before assembling. let sit for the icing to dry.
•When assembling, apply a generous (but not dripping) amount of icing glue to one side of the joint. press un-iced piece to the iced edge and hold briefly until the icing sets. if you want more stability, you can also icing-glue the walls to the base.
•TIP: great pastry bag trick ~ use an elastic band to close the end of the piping bag so that icing doesn’t ooze out while you are working. Also, use a clothespin to pinch the cut end of the pastry bag shut if you need to stop in the middle of working.
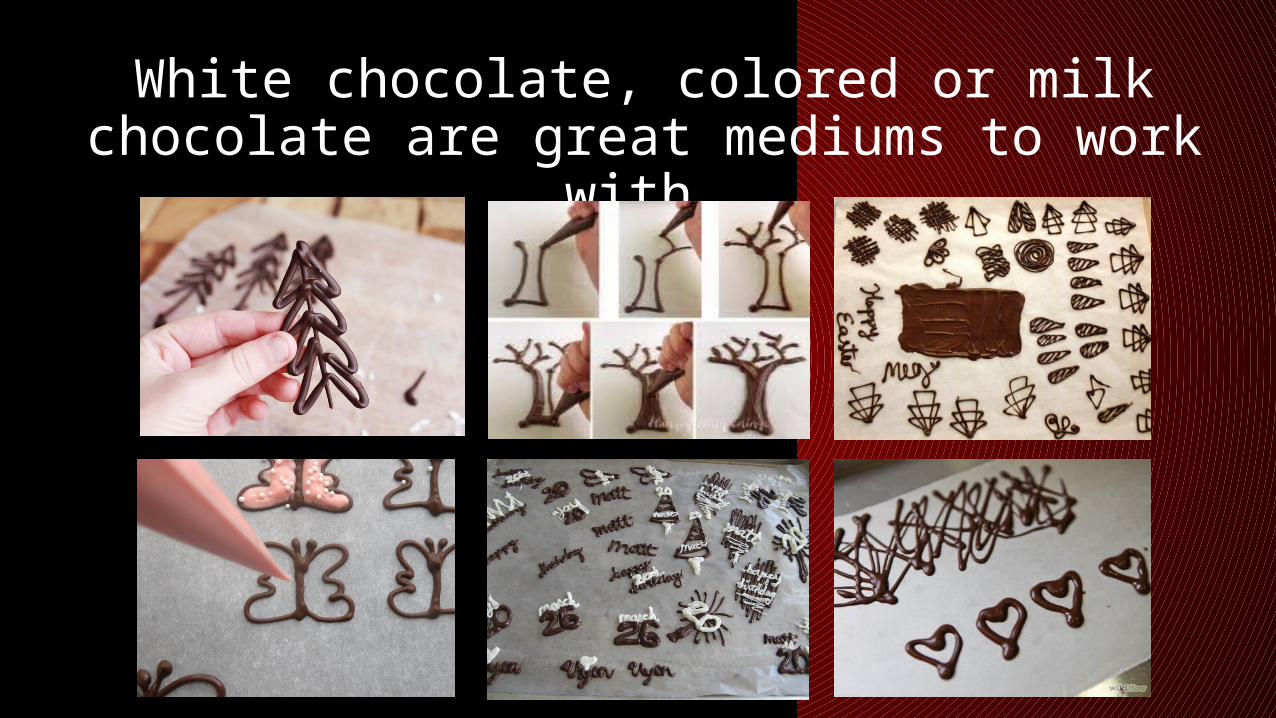
White chocolate, colored or milk chocolate are great mediums to work with
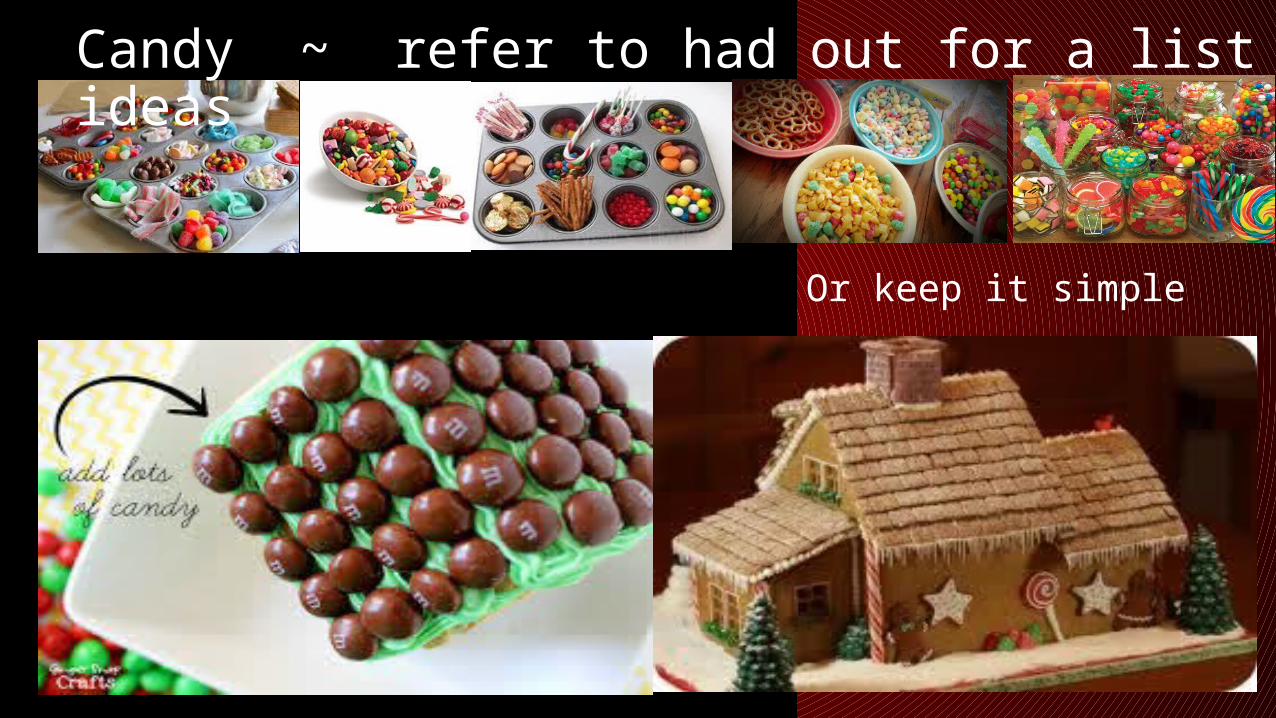
Candy ~ refer to had out for a list of ideas
Or keep it simple
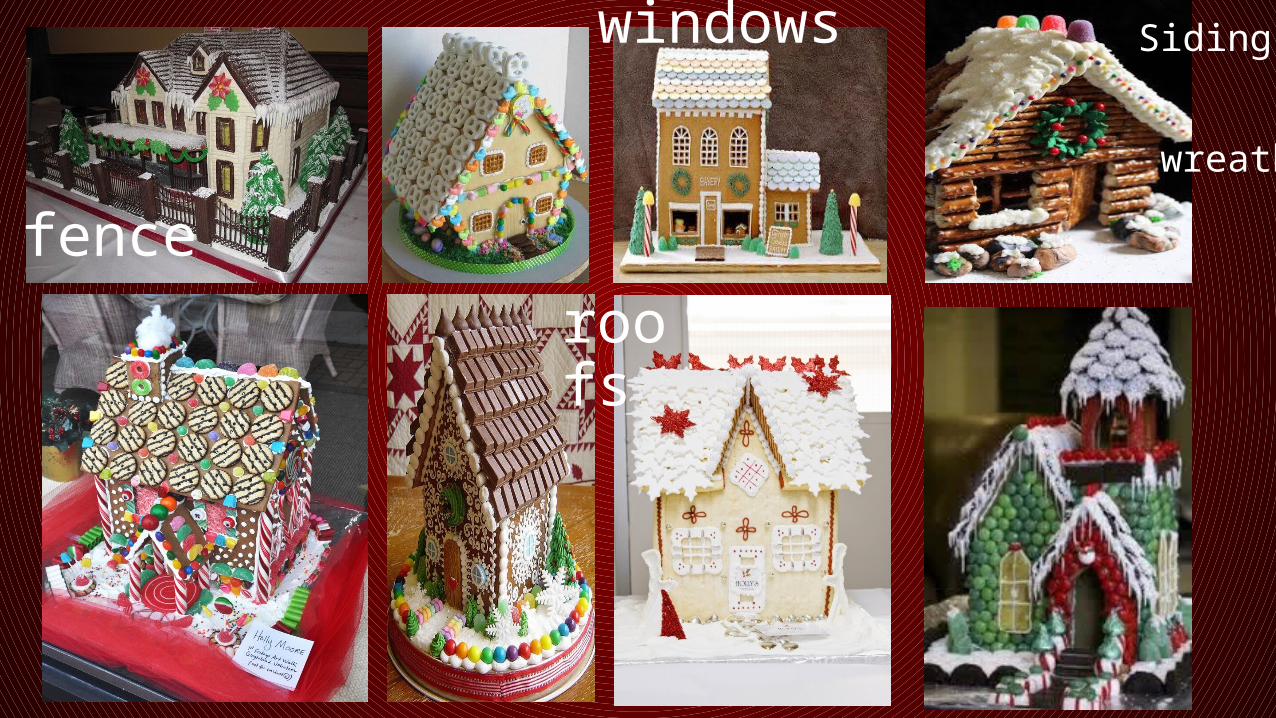
fence
windows Siding
wreaths
roofs
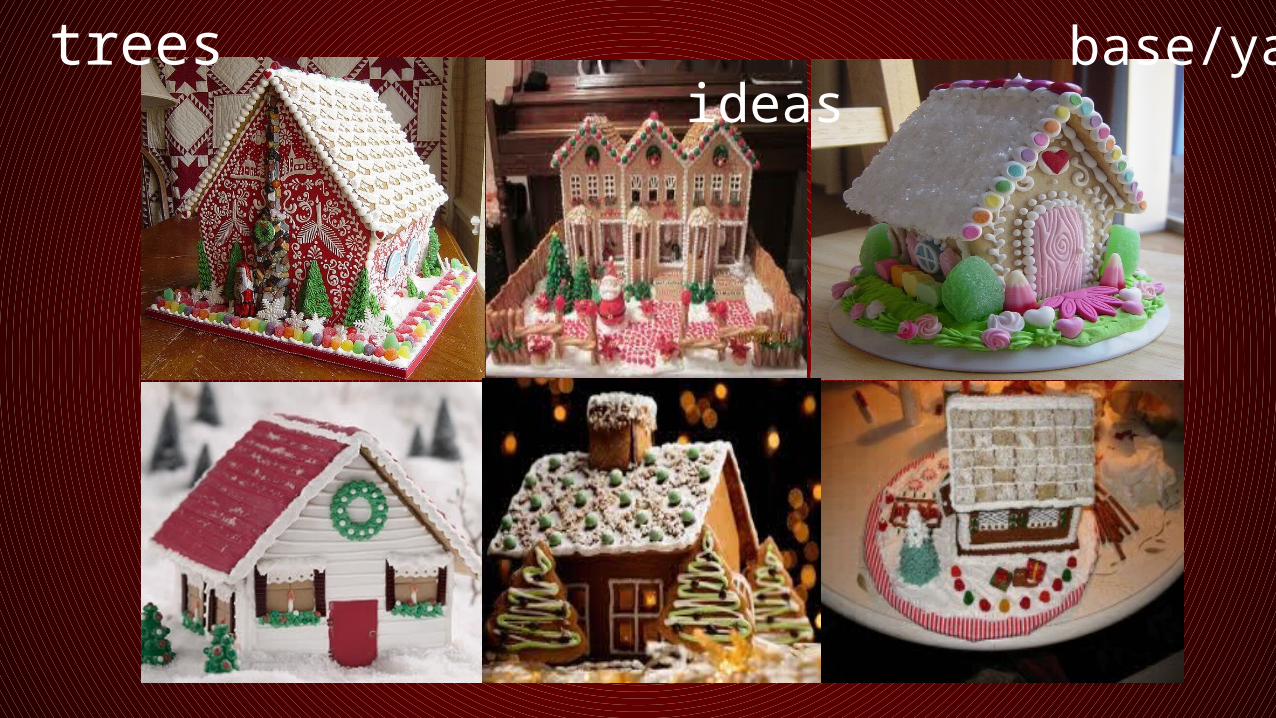
trees base/yard ideas
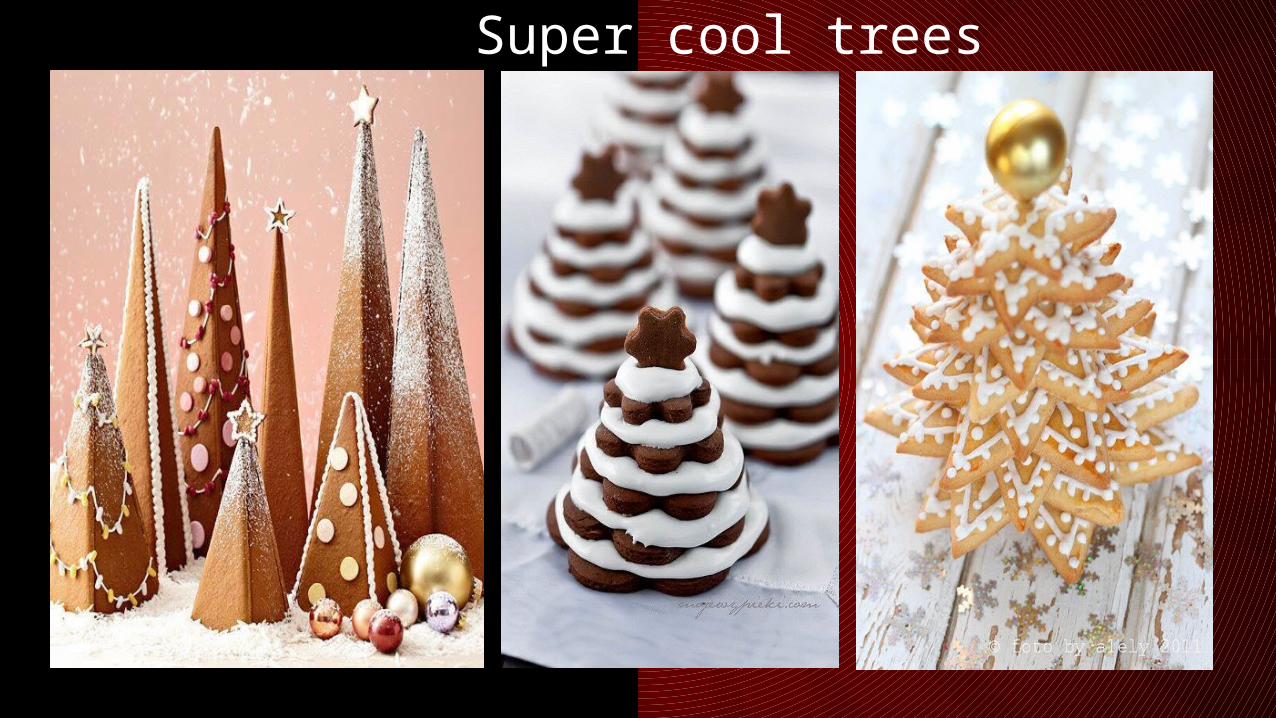
Super cool trees
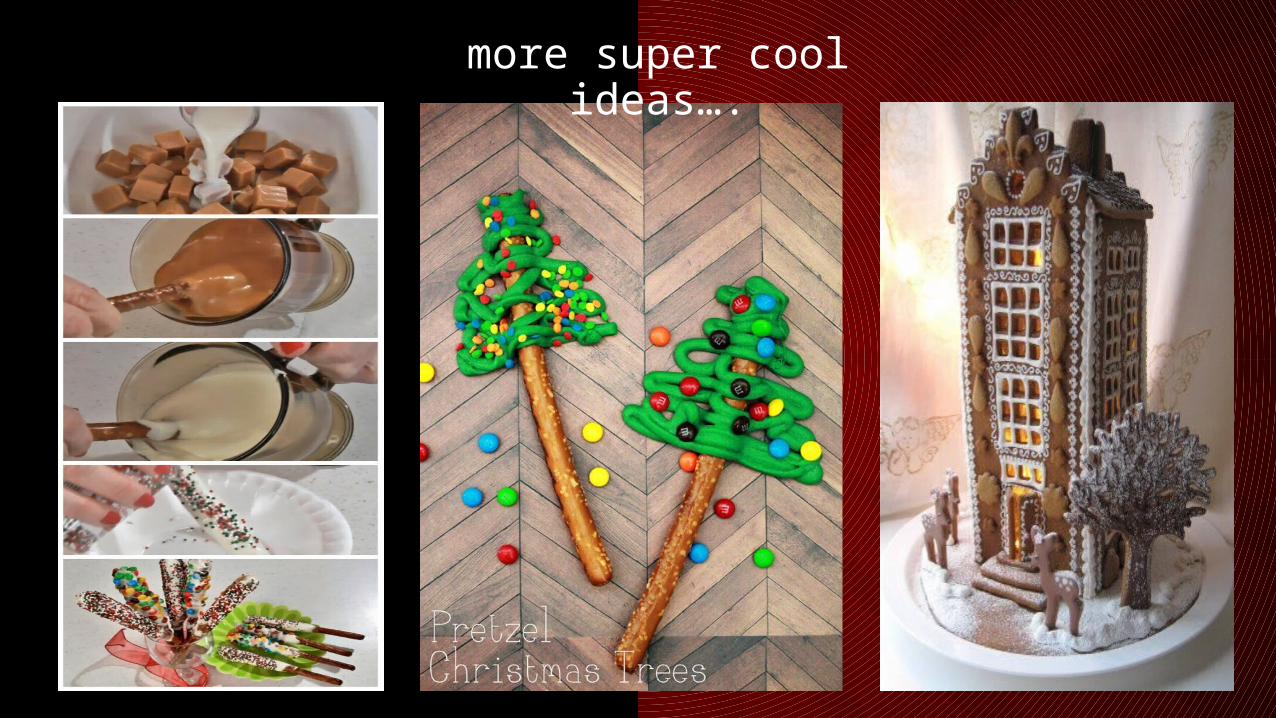
more super cool ideas….
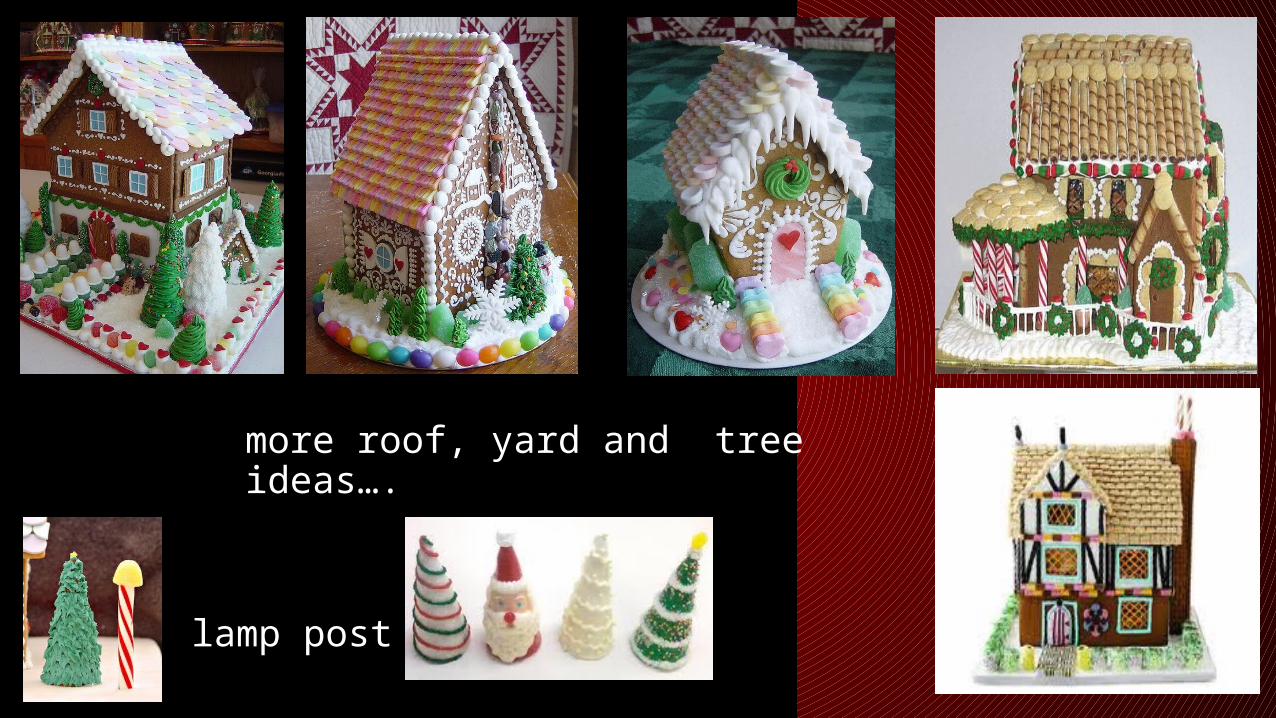
lamp post
more roof, yard and tree ideas….
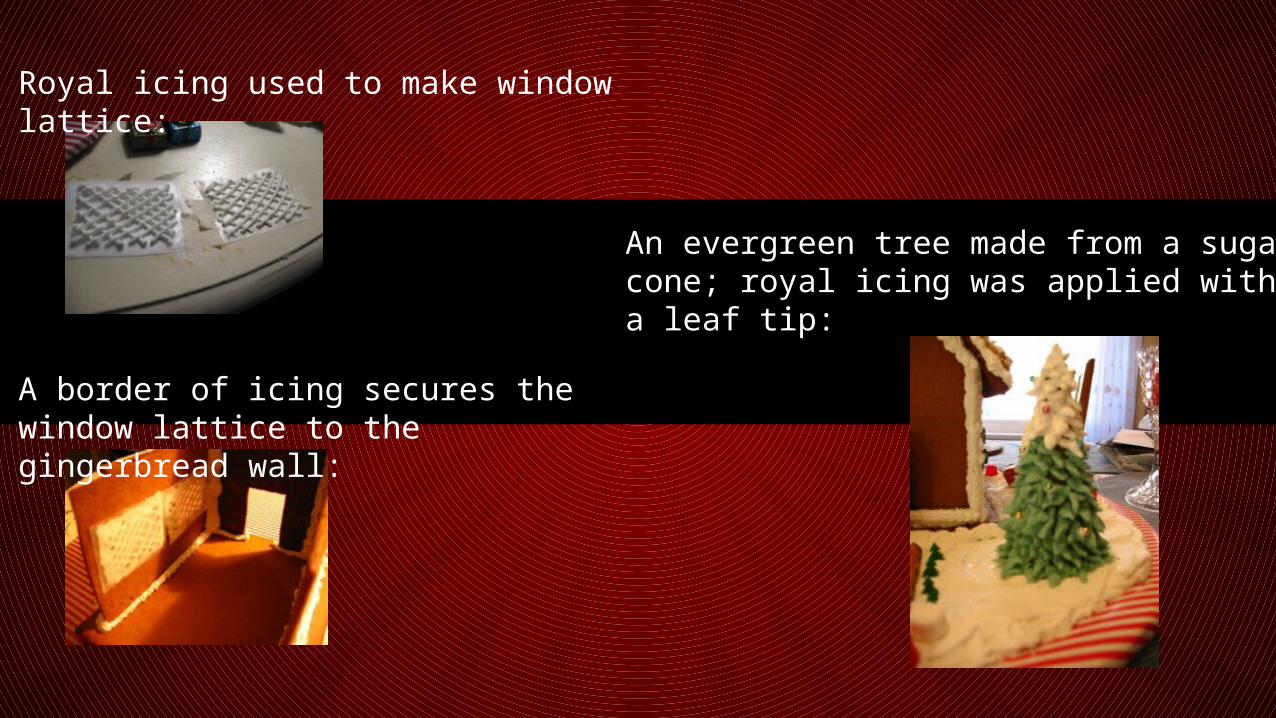
An evergreen tree made from a sugar cone; royal icing was applied with a leaf tip:
Royal icing used to make window lattice:
A border of icing secures the window lattice to the gingerbread wall:
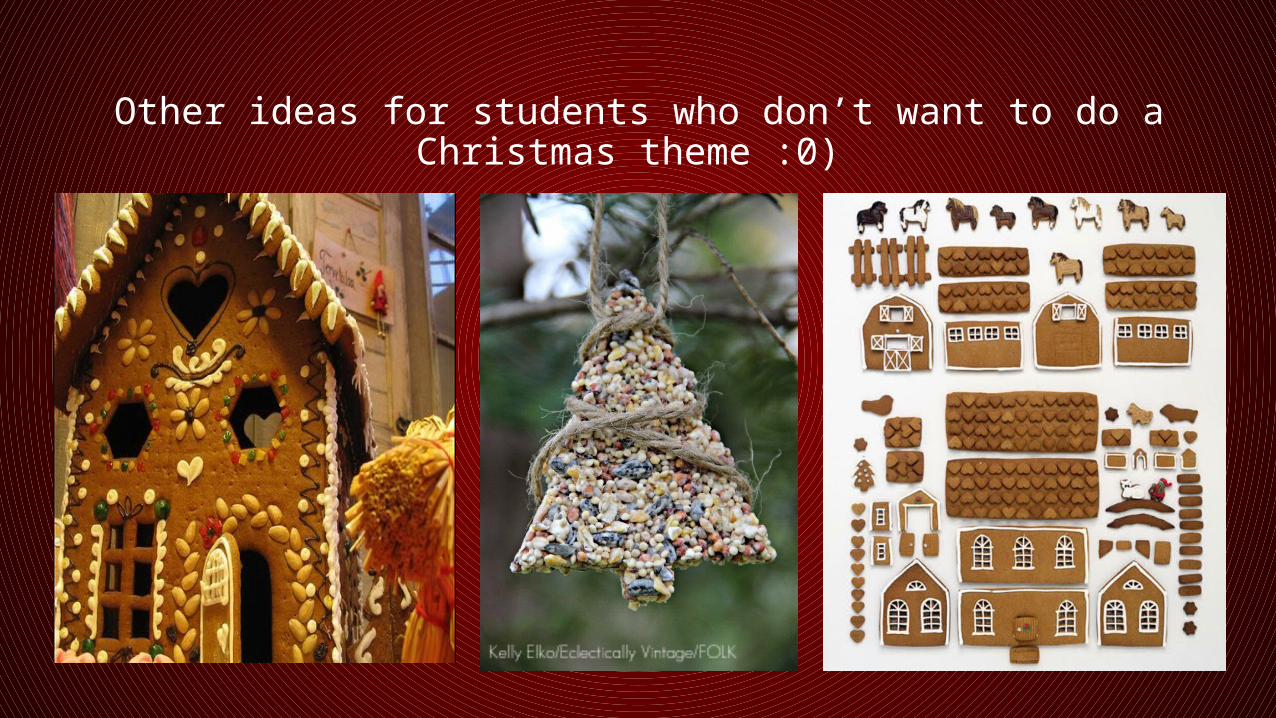
Other ideas for students who don’t want to do a Christmas theme :0)
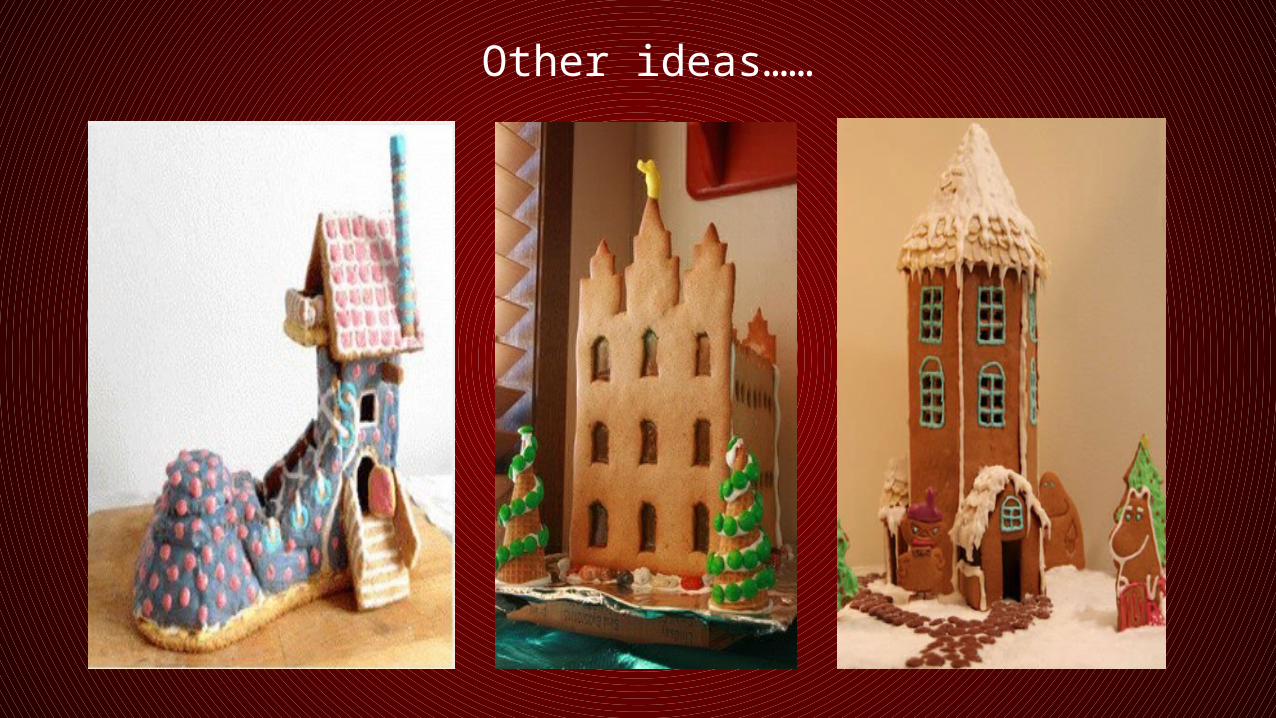
Other ideas……
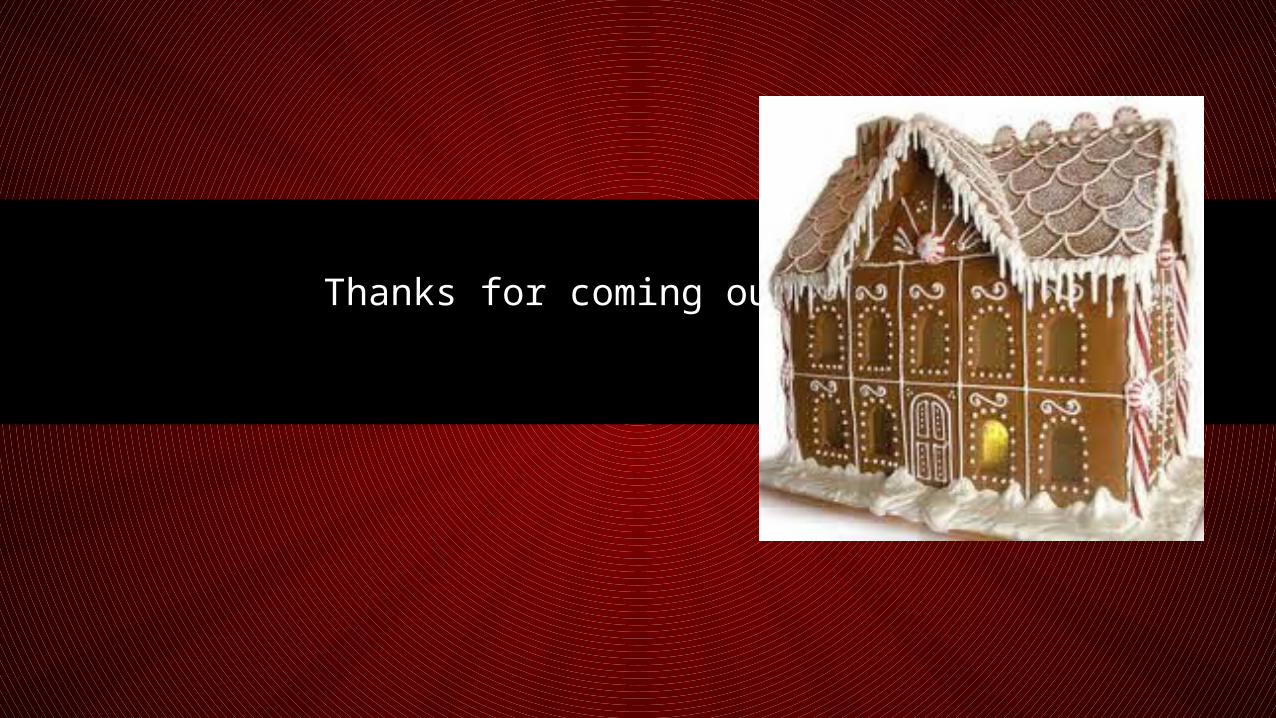
Thanks for coming out…..