Embed Size (px)
Citation preview
Add A Quiet, Graceful Elegance To Any Room In Your Home. Decorative Moulding by CertainTeed are precision made Cove and Cornice mouldings consisting of a gypsum core enclosed in a strong, ivory-coloured paper. Decorative Moulding can eliminate the need to finish the joint where a wall and ceiling meet, and is also an attractive way to conceal wiring or indirect lighting.
o Fine-Toothed Saw (or Power Mitre Saw)o Mitre Box (or Mitre Template in this leaflet)o Sharp Utility Knifeo Sandpaper
o Pencilo 4' (1.2 m) Straightedgeo CertainTeed Joint Compoundo Joint Compound Finishing Knife
o Step Laddero Hammer and Nails (may be needed in some cases)o Drywall Screws and Screwdriver (for attaching Steps)
TooLS YoU wILL NEED
STEP 1: Mark wall and ceiling. Choose the step configuration of your choice and mark the wall and ceiling accordingly. See illustration for guidance.
STEP 2: Cut Steps. To cut a step, score the face paper with a sharp utility knife. Break the core by snapping away from the cut. Finish by cutting through the back paper along the crease.
Tip: Always measure from the finished edge when marking a Step for cutting. When install-ing Steps, leave a gap between the ceiling and wall. This gap will be covered when the Cove or Cornice is put in place.
STEP 3: Apply a generous layer of CertainTeed joint compound to the entire back of the first Step, especially near the exposed finished edge. Use the excess compound to fill any remaining gaps.
STEP 4: Fasten the Step to the wall or ceiling with drywall screws where needed.
Tip: Position the screws so that they will be covered when the next Step or Cove/Cornice is installed.
STEP 5: wipe away excess compound, and install any additional Steps in a similar manner.
STEP 6: Proceed to the Cove or Cornice installation.
Installation Instructions: Steps
STEP
STEP
STEP
For a truly dramatic effect, Steps can be applied to walls and ceilings before installing your Cove/Cornice.
EXAMPLE:
Certa inTeed
Instal lation Instructions
Decorative MouldingGypsum Cove, Cornice and Steps
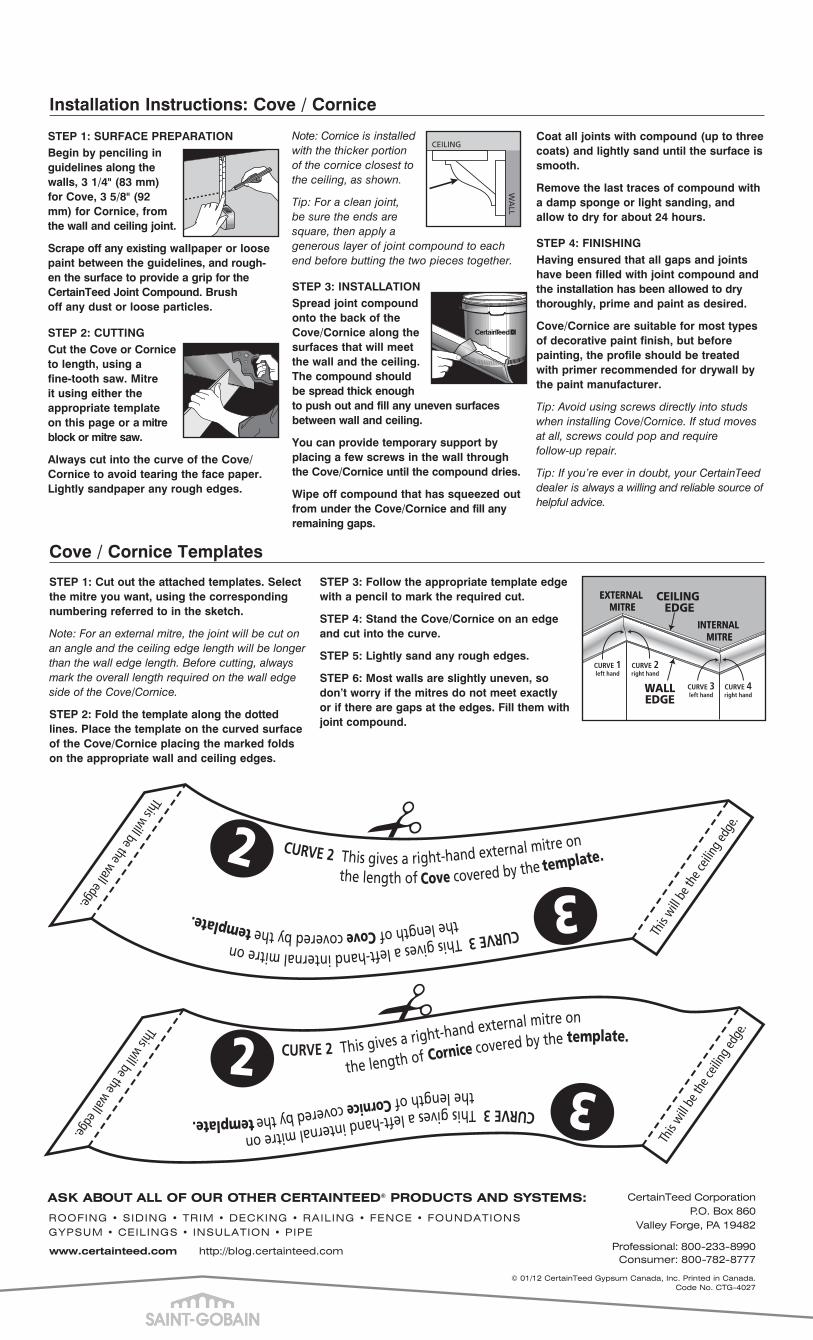
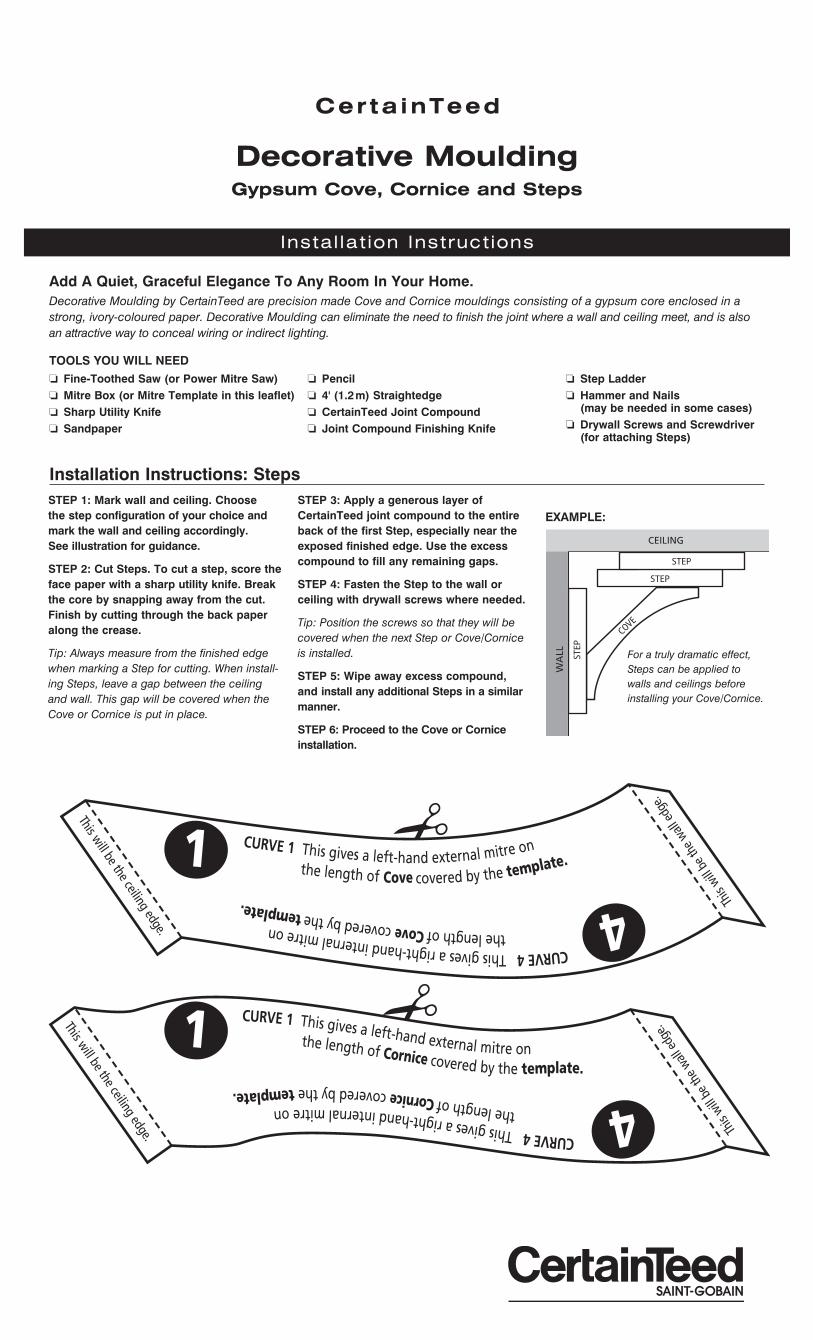
Cove / Cornice Templates
STEP 1: Cut out the attached templates. Select the mitre you want, using the corresponding numbering referred to in the sketch.
Note: For an external mitre, the joint will be cut on an angle and the ceiling edge length will be longer than the wall edge length. Before cutting, always mark the overall length required on the wall edge side of the Cove/Cornice.
STEP 2: Fold the template along the dotted lines. Place the template on the curved surface of the Cove/Cornice placing the marked folds on the appropriate wall and ceiling edges.
STEP 3: Follow the appropriate template edge with a pencil to mark the required cut.
STEP 4: Stand the Cove/Cornice on an edge and cut into the curve.
STEP 5: Lightly sand any rough edges.
STEP 6: Most walls are slightly uneven, so don’t worry if the mitres do not meet exactly or if there are gaps at the edges. Fill them with joint compound.
STEP 1: SURFACE PREPARATIoNBegin by penciling in guidelines along the walls, 3 1/4" (83 mm) for Cove, 3 5/8" (92 mm) for Cornice, from the wall and ceiling joint.
Scrape off any existing wallpaper or loose paint between the guidelines, and rough-en the surface to provide a grip for the CertainTeed Joint Compound. Brush off any dust or loose particles.
STEP 2: CUTTINGCut the Cove or Cornice to length, using a fine-tooth saw. Mitre it using either the appropriate template on this page or a mitre block or mitre saw.
Always cut into the curve of the Cove/Cornice to avoid tearing the face paper. Lightly sandpaper any rough edges.
Note: Cornice is installed with the thicker portion of the cornice closest to the ceiling, as shown.
Tip: For a clean joint, be sure the ends are square, then apply a generous layer of joint compound to each end before butting the two pieces together.
STEP 3: INSTALLATIoN Spread joint compound onto the back of the Cove/Cornice along the surfaces that will meet the wall and the ceiling. The compound should be spread thick enough to push out and fill any uneven surfaces between wall and ceiling.
You can provide temporary support by placing a few screws in the wall through the Cove/Cornice until the compound dries.
wipe off compound that has squeezed out from under the Cove/Cornice and fill any remaining gaps.
Coat all joints with compound (up to three coats) and lightly sand until the surface is smooth.
Remove the last traces of compound with a damp sponge or light sanding, and allow to dry for about 24 hours.
STEP 4: FINISHINGHaving ensured that all gaps and joints have been filled with joint compound and the installation has been allowed to dry thoroughly, prime and paint as desired.
Cove/Cornice are suitable for most types of decorative paint finish, but before painting, the profile should be treated with primer recommended for drywall by the paint manufacturer.
Tip: Avoid using screws directly into studs when installing Cove/Cornice. If stud moves at all, screws could pop and require follow-up repair.
Tip: If you’re ever in doubt, your CertainTeed dealer is always a willing and reliable source of helpful advice.
Installation Instructions: Cove / Cornice
www.certainteed.com http://blog.certainteed.com
ASK ABOUT ALL OF OUR OTHER CERTAINTEED® PRODUCTS AND SYSTEMS:
ROOFING • SIDING • TRIM • DECKING • RAILING • FENCE • FOUNDATIONSGYPSUM • CEILINGS • INSULATION • PIPE
CertainTeed CorporationP.O. Box 860
Valley Forge, PA 19482
Professional: 800-233-8990Consumer: 800-782-8777
© 01/12 CertainTeed Gypsum Canada, Inc. Printed in Canada. Code No. CTG-4027