Embed Size (px)
Citation preview
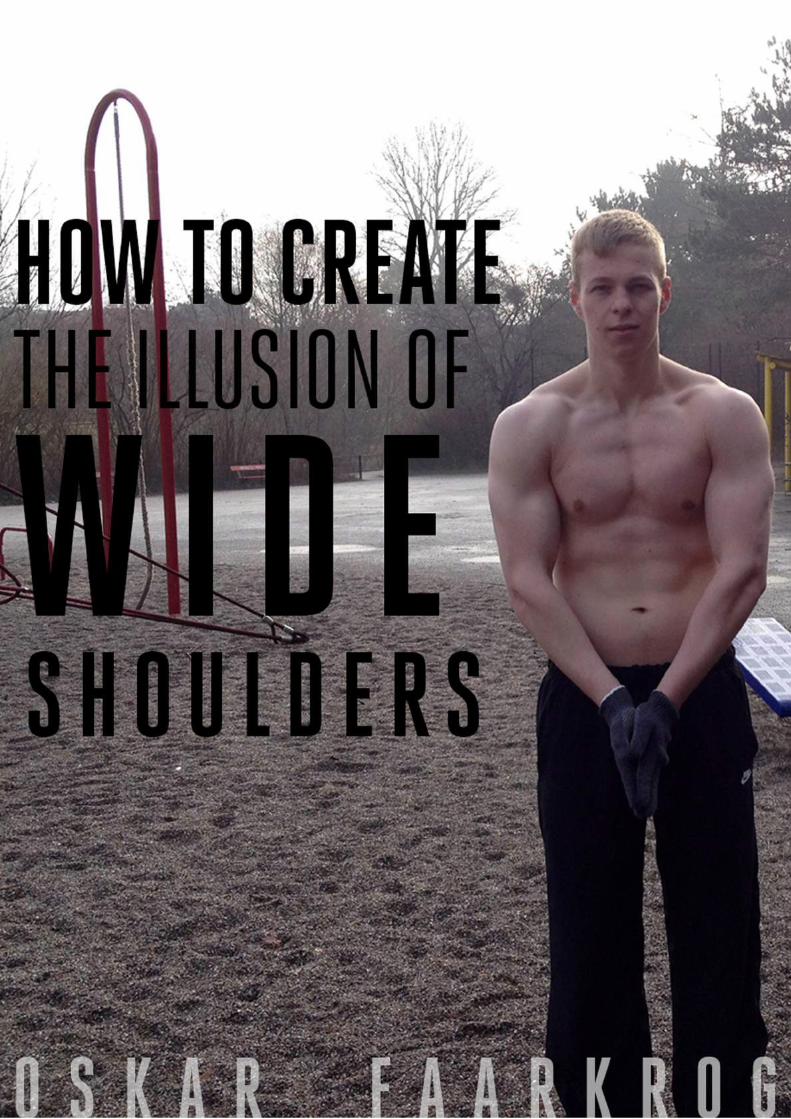

How to Create the Illusion of Wide Shoulders
SkinnyFatTransformation.com Page 1
Contents
The Ideal Shoulder-to-Waist Ratio .......................................................................................................... 2
Chin Ups vs. Deadlifts ............................................................................................................................. 3
Exercise 1: The Deadlift to Build a Solid Foundation ................................................................................ 5
1-2 Work Sets a Week .................................................................................................................................. 6
Warming Up for the Deadlift ........................................................................................................................ 6
Deadlift Workout and Progression ............................................................................................................... 7
Proper Deadlift Form .................................................................................................................................... 8
7 Steps to Get Into the Deadlift Starting Position ................................................................................... 9
How to Deadlift ..................................................................................................................................... 12
5 Common Deadlift Errors ..................................................................................................................... 12
Put in the Effort and Reap the Benefits ...................................................................................................... 14
Exercise 2: The Chin Up for Width and Signalling ................................................................................... 15
Which Chin Up Variation Should You Do? .................................................................................................. 16
Proper Form ............................................................................................................................................... 17
How to get Strong Enough to Perform 1 Chin Up ...................................................................................... 17
How to Progress From 1 to 5 Chin Ups ...................................................................................................... 18
How to Progress From 5 to 15 Chin Ups .................................................................................................... 19
Rest between Sets for Maximum Hypertrophy .......................................................................................... 19
Alternative Chin Up Workouts ................................................................................................................... 20
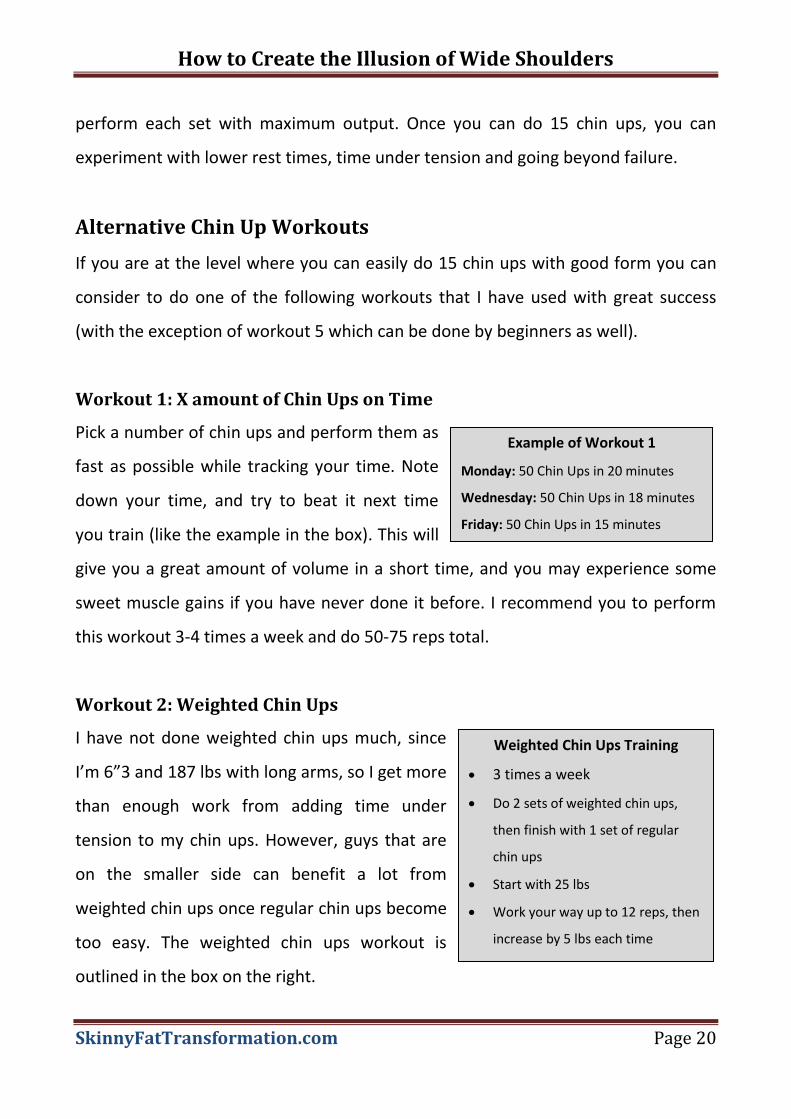
Workout 1: X amount of Chin Ups on Time .......................................................................................... 20
Workout 2: Weighted Chin Ups............................................................................................................. 20
Workout 3: Increase Time under Tension and Go Beyond Failure ....................................................... 21
Workout 4: Thick Bar Training ............................................................................................................... 22
Workout 5: Chin Ups Everyday .............................................................................................................. 22
Build a Wide Back Routine.................................................................................................................... 23
Recommended Gear............................................................................................................................. 26
Deadlift Gear .............................................................................................................................................. 26
Chin Up Gear .............................................................................................................................................. 28
Tracking Progress ................................................................................................................................. 30
Conclusion ........................................................................................................................................... 33
About the Author ................................................................................................................................. 34
List of Recommended Resources .......................................................................................................... 35
How to Create the Illusion of Wide Shoulders
SkinnyFatTransformation.com Page 2
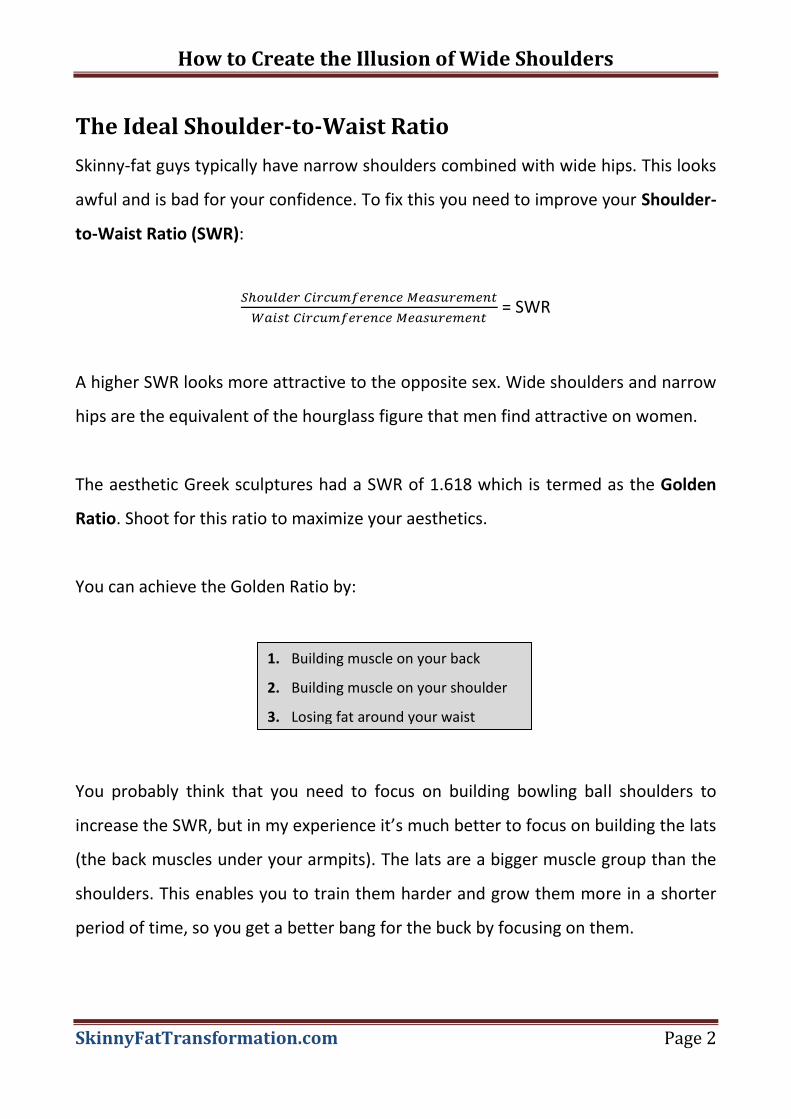
The Ideal Shoulder-to-Waist Ratio
Skinny-fat guys typically have narrow shoulders combined with wide hips. This looks
awful and is bad for your confidence. To fix this you need to improve your Shoulder-
to-Waist Ratio (SWR):
= SWR
A higher SWR looks more attractive to the opposite sex. Wide shoulders and narrow
hips are the equivalent of the hourglass figure that men find attractive on women.
The aesthetic Greek sculptures had a SWR of 1.618 which is termed as the Golden
Ratio. Shoot for this ratio to maximize your aesthetics.
You can achieve the Golden Ratio by:
You probably think that you need to focus on building bowling ball shoulders to
increase the SWR, but in my experience it’s much better to focus on building the lats
(the back muscles under your armpits). The lats are a bigger muscle group than the
shoulders. This enables you to train them harder and grow them more in a shorter
period of time, so you get a better bang for the buck by focusing on them.
1. Building muscle on your back
2. Building muscle on your shoulder
3. Losing fat around your waist
How to Create the Illusion of Wide Shoulders
SkinnyFatTransformation.com Page 3
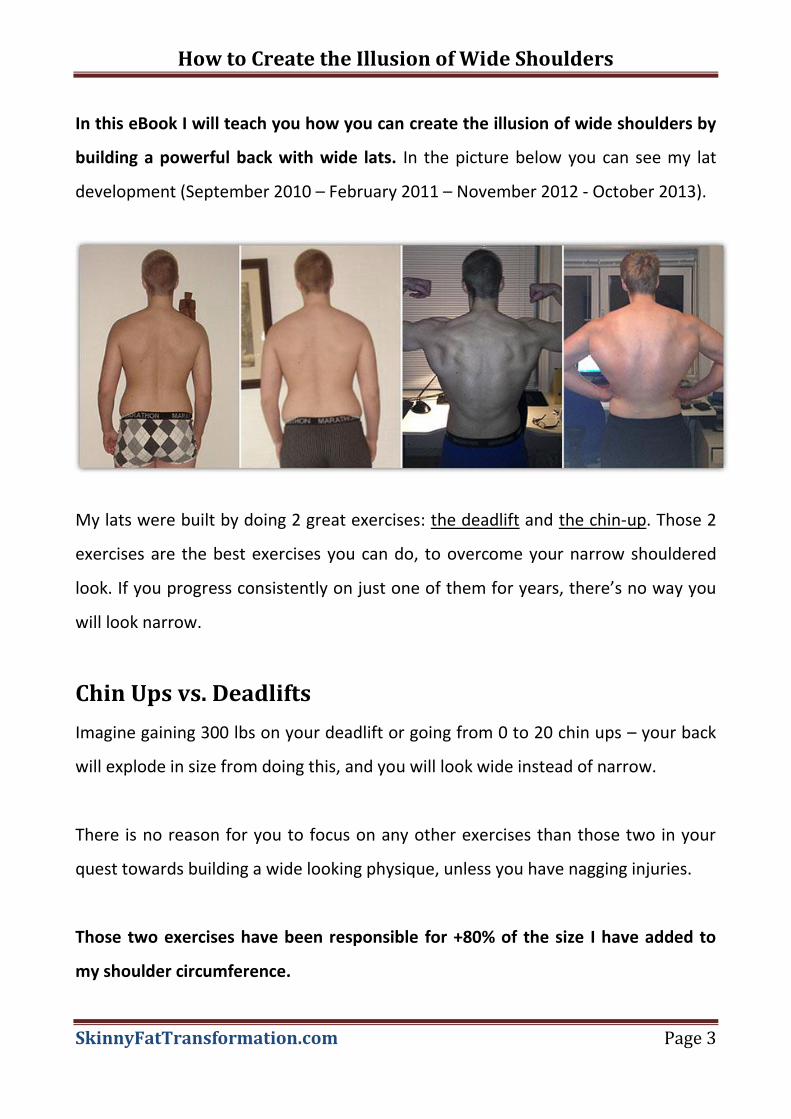
In this eBook I will teach you how you can create the illusion of wide shoulders by
building a powerful back with wide lats. In the picture below you can see my lat
development (September 2010 – February 2011 – November 2012 - October 2013).
My lats were built by doing 2 great exercises: the deadlift and the chin-up. Those 2
exercises are the best exercises you can do, to overcome your narrow shouldered
look. If you progress consistently on just one of them for years, there’s no way you
will look narrow.
Chin Ups vs. Deadlifts
Imagine gaining 300 lbs on your deadlift or going from 0 to 20 chin ups – your back
will explode in size from doing this, and you will look wide instead of narrow.
There is no reason for you to focus on any other exercises than those two in your
quest towards building a wide looking physique, unless you have nagging injuries.
Those two exercises have been responsible for +80% of the size I have added to
my shoulder circumference.
How to Create the Illusion of Wide Shoulders
SkinnyFatTransformation.com Page 4
In the beginning I focused on getting a strong deadlift. I trained the deadlift hard for
12 months and it definitely paid off since I managed to add several hundred lbs to
my measly starting deadlift of 105 lbs.
After getting a strong deadlift, I gradually switched my focus to chin ups since I have
always been impressed by guys that are strong at bodyweight exercises.
Should you do the deadlift or chin-up? It depends. If chin ups have always been easy
for you, perhaps you are very short and light. In this case, focus on the deadlift to
bulk up your back.
In contrast, if you’re weak at chin ups like most skinny-fat guys are, I advise you to
get to 15 reps on chin-ups first, and then add deadlifts to your routine later on.
How to Create the Illusion of Wide Shoulders
SkinnyFatTransformation.com Page 5
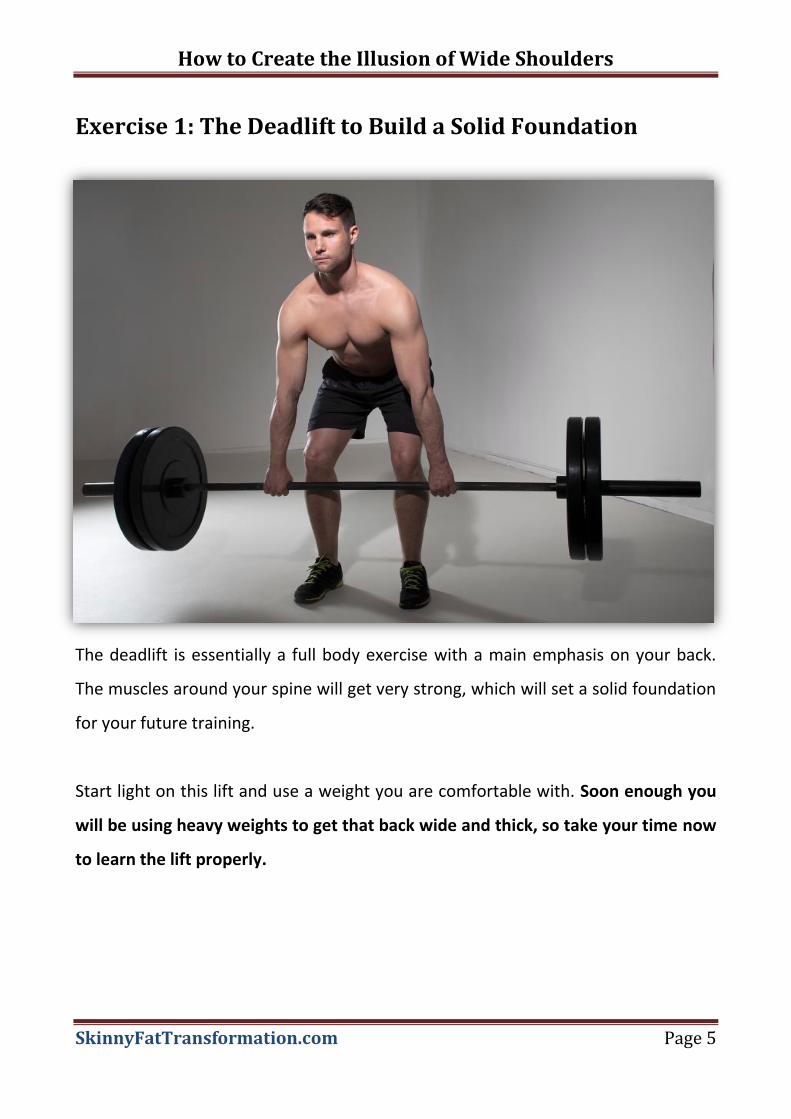
Exercise 1: The Deadlift to Build a Solid Foundation
The deadlift is essentially a full body exercise with a main emphasis on your back.
The muscles around your spine will get very strong, which will set a solid foundation
for your future training.
Start light on this lift and use a weight you are comfortable with. Soon enough you
will be using heavy weights to get that back wide and thick, so take your time now
to learn the lift properly.
How to Create the Illusion of Wide Shoulders
SkinnyFatTransformation.com Page 6
1-2 Work Sets a Week
A lot of people suffer lower back injuries because their back is weak. The deadlift
can fix this issue provided that you train it at a low frequency and start light.
Training Frequency is defined in terms of how often you train or perform a lift. This
is typically measured in the amount of days you train every week or the amount of
times you train a body part on a weekly basis.
People usually do not get injured because of performing heavy deadlifts. They get
injured because they train it too frequently with too many sets.
For optimal results, the deadlift should be performed 1-2 times a week for ONE
heavy set. Yes, that is right: one heavy set.
I never performed more than this, and as a result I never had any serious injuries. As
a beginner, I recommend you to alternate between deadlifting once and twice a
week. When you get stronger you may want to lower it to once a week.
Warming Up for the Deadlift
Before you do your heavy work set, I want you to perform an easy set of back
extensions on the floor followed by 3-5 warm up sets on the deadlift. Those sets will
prepare your back for heavy lifting and help you practice proper form on the lift.
If you’re a beginner and use a relatively light weight on this exercise, 3 warm up sets
should be enough. As you progress you can add warm up sets.
How to Create the Illusion of Wide Shoulders
SkinnyFatTransformation.com Page 7
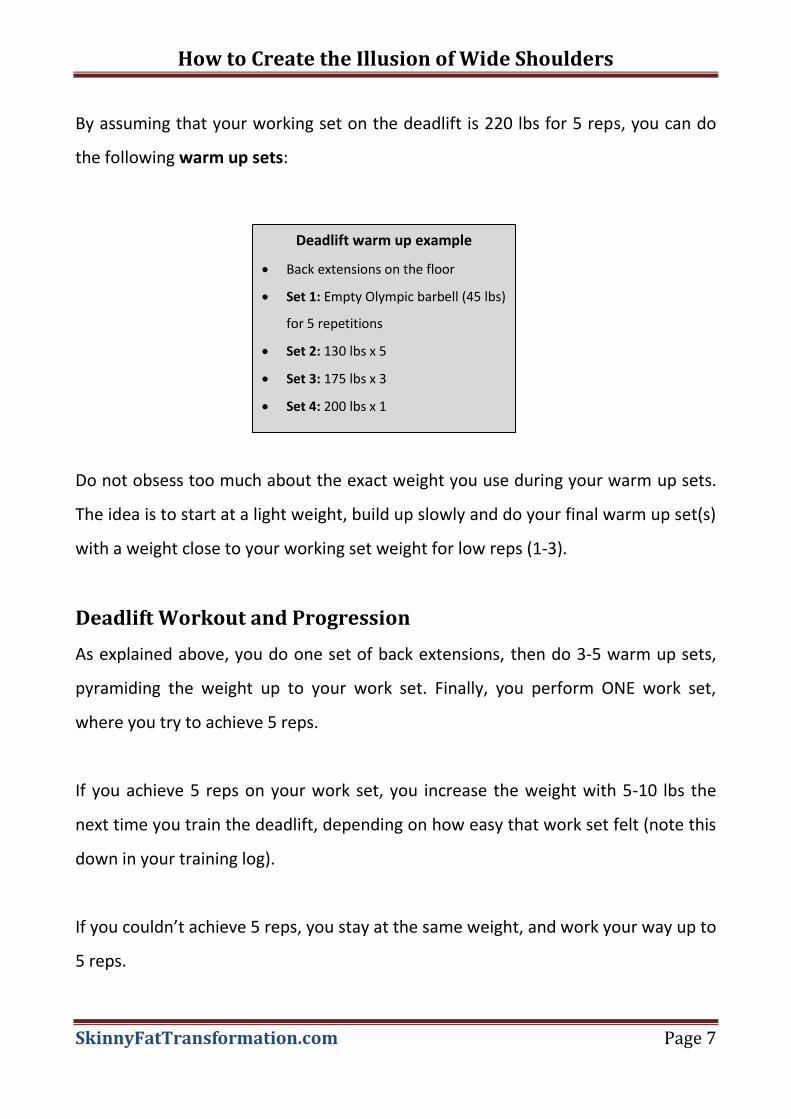
By assuming that your working set on the deadlift is 220 lbs for 5 reps, you can do
the following warm up sets:
Do not obsess too much about the exact weight you use during your warm up sets.
The idea is to start at a light weight, build up slowly and do your final warm up set(s)
with a weight close to your working set weight for low reps (1-3).
Deadlift Workout and Progression
As explained above, you do one set of back extensions, then do 3-5 warm up sets,
pyramiding the weight up to your work set. Finally, you perform ONE work set,
where you try to achieve 5 reps.
If you achieve 5 reps on your work set, you increase the weight with 5-10 lbs the
next time you train the deadlift, depending on how easy that work set felt (note this
down in your training log).
If you couldn’t achieve 5 reps, you stay at the same weight, and work your way up to
5 reps.
Deadlift warm up example
Back extensions on the floor
Set 1: Empty Olympic barbell (45 lbs)
for 5 repetitions
Set 2: 130 lbs x 5
Set 3: 175 lbs x 3
Set 4: 200 lbs x 1
How to Create the Illusion of Wide Shoulders
SkinnyFatTransformation.com Page 8
However, if you have 3 training sessions in a row where you can’t increase weight
and/or reps, then you have plateaued. This means that you need to take a 2 week
break from deadlifting, and once you return to training it, you want to keep the
deadlift to just once a week rather than 1-2 times a week.
During your break from the deadlift, you can still train your back, but you should use
different exercises (completely up to you what exercises you do), and keep the reps
high (10-12). Your goal here is to just get some blood flowing to your back and keep
it active with light weights, rather than wearing yourself out.
Proper Deadlift Form
To deadlift properly, you need to use standard sized 45 lbs plates on each side as a
minimum. If you use anything lower than 45 lbs plates, you will most likely round
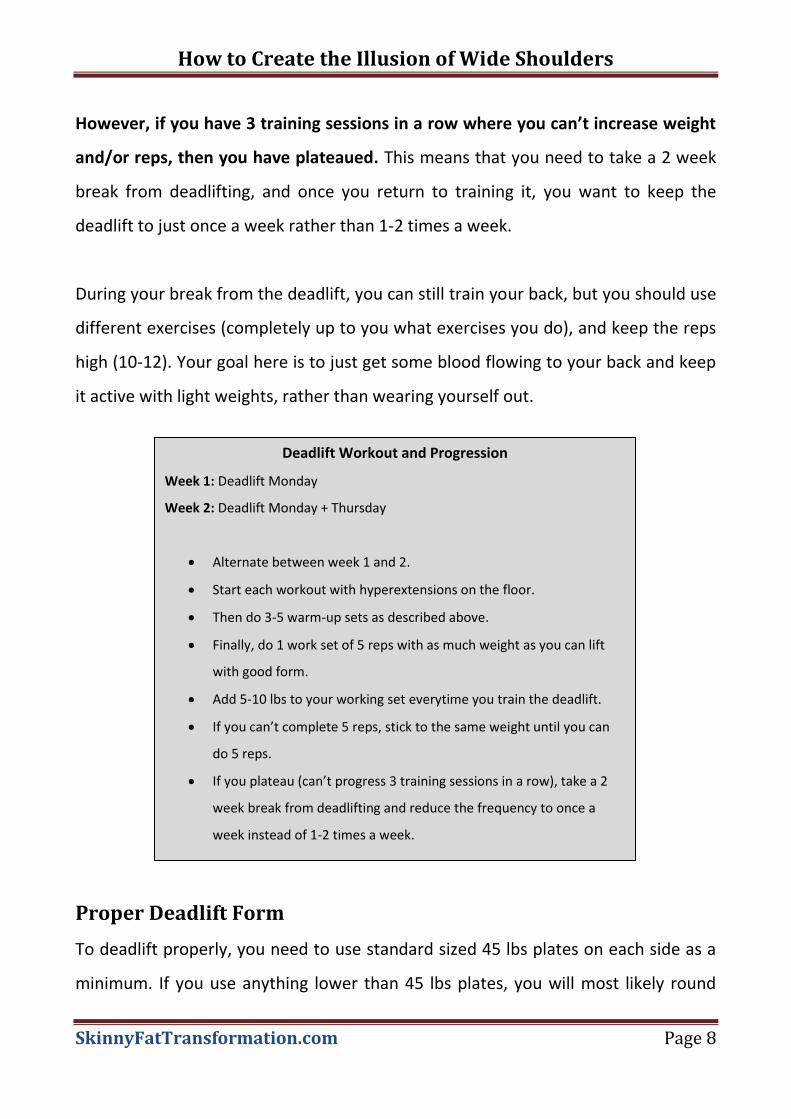
Deadlift Workout and Progression
Week 1: Deadlift Monday
Week 2: Deadlift Monday + Thursday
Alternate between week 1 and 2.
Start each workout with hyperextensions on the floor.
Then do 3-5 warm-up sets as described above.
Finally, do 1 work set of 5 reps with as much weight as you can lift
with good form.
Add 5-10 lbs to your working set everytime you train the deadlift.
If you can’t complete 5 reps, stick to the same weight until you can
do 5 reps.
If you plateau (can’t progress 3 training sessions in a row), take a 2
week break from deadlifting and reduce the frequency to once a
week instead of 1-2 times a week.

How to Create the Illusion of Wide Shoulders
SkinnyFatTransformation.com Page 9
your lower back since the plates are smaller and thereby force you to reach down
further to grab the bar (this doesn’t apply if you’re using bumper plates). Rounding
your lower back during a deadlift should be completely eliminated to avoid injury.
When I began deadlifting, I was using 25 lbs plates on each side; therefore I had to
add some height to the deadlift. This can be done by adjusting the safety bars in a
power rack to a level that simulates 45 lbs plates.
Once you can deadlift 45 lbs plates on both sides of the barbell, it’s time to do your
deadlifts from the floor.
7 Steps to Get Into the Deadlift Starting Position
Step 1 - Position of the Feet: From a side view, the barbell should be over the
middle of your feet. You can point your toes out slightly if that’s comfortable for
you. The barbell should be about 1 inch away from your shins.
Step 2 - Stance: Choose a comfortable stance. I prefer a close stance where my feet
are just a few inches apart. Your stance should probably be closer than you initially
think. Experiment with this and see what stance you can lift the most weight with.
Step 3 - Grip: Grab the bar at shoulder width while keeping your hips up. You can
either do an overhand grip or an alternate grip. The alternate grip consists of your
dominant hand grabbing the bar with an overhand grip while the other hand grabs it
with an underhand grip. The alternate grip is useful once you start lifting heavy
weights since it enables you to lift more weight. Save the alternate grip for deadlifts
that are over 300 lbs. For now, always use an overhand grip to build grip strength.
How to Create the Illusion of Wide Shoulders
SkinnyFatTransformation.com Page 10
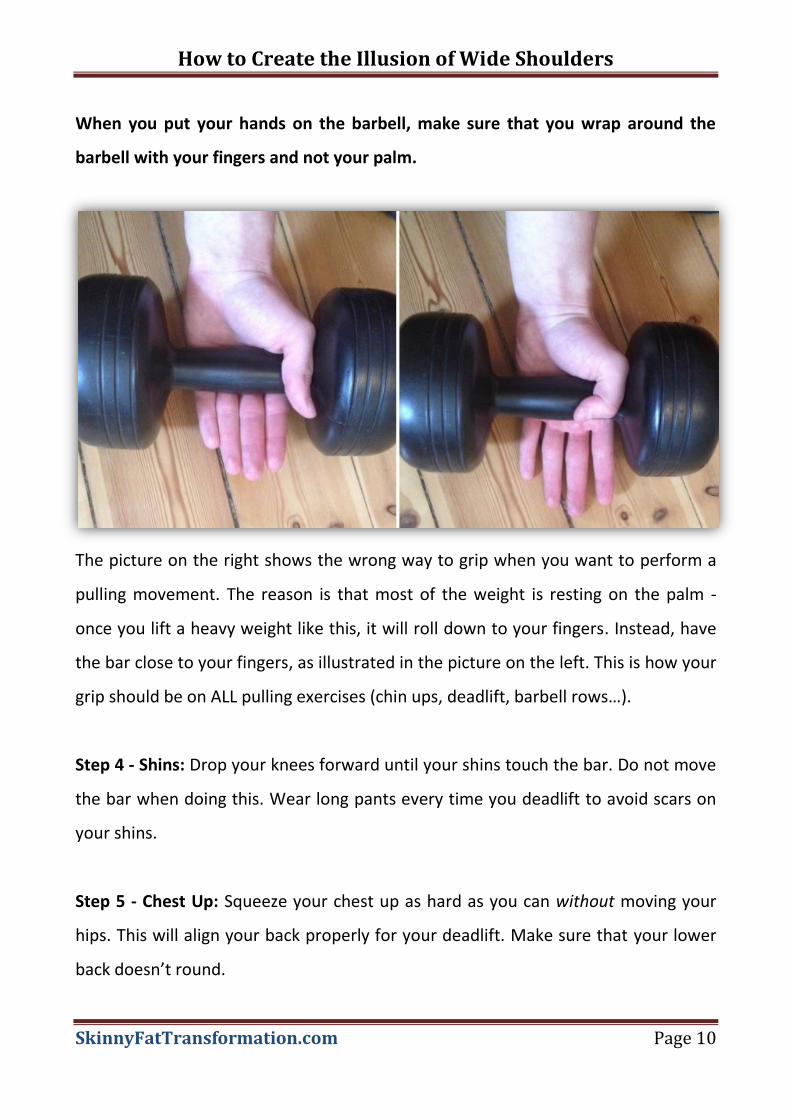
When you put your hands on the barbell, make sure that you wrap around the
barbell with your fingers and not your palm.
The picture on the right shows the wrong way to grip when you want to perform a
pulling movement. The reason is that most of the weight is resting on the palm -
once you lift a heavy weight like this, it will roll down to your fingers. Instead, have
the bar close to your fingers, as illustrated in the picture on the left. This is how your
grip should be on ALL pulling exercises (chin ups, deadlift, barbell rows…).
Step 4 - Shins: Drop your knees forward until your shins touch the bar. Do not move
the bar when doing this. Wear long pants every time you deadlift to avoid scars on
your shins.
Step 5 - Chest Up: Squeeze your chest up as hard as you can without moving your
hips. This will align your back properly for your deadlift. Make sure that your lower
back doesn’t round.
How to Create the Illusion of Wide Shoulders
SkinnyFatTransformation.com Page 11
If you’re in doubt about whether your lower back is rounding, I have a good tip for
you: your lower back should feel exactly the same in the starting position as it did
during the back extensions that you did just before your first warm up set.
Step 6 – Neutral Head Position: Your head must be kept neutral. This means that
you should not look straight forward, down or up – simply neutral.
If you’re a tall guy like me, you will most likely start with your back close to
horizontal to the floor. In other words, you will look at the ground since your back is
horizontal and your head is in a neutral position.
If you’re short, you will most likely look at a spot in front of you, since your back will
be closer to vertical. As you lift the barbell up, you keep the head neutral; therefore
you will be looking straight forward at the top of the movement.
Step 7 – Shoulders in Front of the Barbell: Your shoulders must be slightly in front
of the barbell.
Summing up the starting position: The bar is directly over the middle of your feet, your shins are
touching the bar, your lower back is not rounded, your head is in a neutral position and your
shoulders are slightly in front of the bar.
How to Create the Illusion of Wide Shoulders
SkinnyFatTransformation.com Page 12
How to Deadlift
You should be in the proper deadlifting position now and ready to perform the lift. A
good tip to perform the deadlift is to visualize standing up while pushing your feet
into the ground. As you are standing up with the barbell, focus on pushing your hips
forward and your chest up. Also, keep the barbell as close to your body as possible.
In the beginning I did not put much emphasis on breathing, but this quickly changed
for the better. When performing heavy deadlifts, proper breathing is crucial. Before
you lift, take a deep breath and hold it. While you hold your breath, perform the
movement. Once you put the weight down release the breath. By holding your
breath during the pull, you will squeeze your abs as much as possible which will
ensure that your back stays tight, rather than rounded.
After your first rep you should quickly readjust your starting position and complete
another rep.
5 Common Deadlift Errors
Error 1 – The bar is far away from your body: When the bar is not close to your
body, you will increase the difficulty of the lift. There is absolutely no reason to
make the deadlift more difficult than it already is. When looking from the side, the
barbell should be lifted STRAIGHT up – in other words, it must be as close to your
body as possible and directly over the mid foot at all times.
Fix: Think about “pulling back” instead of “pulling up”.
How to Create the Illusion of Wide Shoulders
SkinnyFatTransformation.com Page 13
Error 2 – Hyperextending the lower back: You may have a tendency to exaggerate
the top position of the deadlift by hyperextending your lower back. This is wrong,
your lower back should be in its natural alignment at the top.
Error 3 – Putting it down wrong: In the past I made the mistake of letting my knees
travel forward while putting the weight down in a controlled fashion. I experienced
knee pain from this.
Error 4 – Trying hard to maintain a neutral upper back: Some people say that your
back must be perfectly neutral throughout the whole deadlift. This sounds nice in
theory but based on experience, my upper back was rounding when I was
deadlifting heavy. When you lift heavy it’s acceptable to round your upper back as
long as you keep your deadlift frequency low. Just make sure that your lower back
doesn’t round.
Error 5 – Bending your arms: Before you even think of deadlifting, verify that your
arms are straight. Failing to keep your arms straight may result in a bicep tear since
your biceps are not strong enough to hold the kind of weight you’re deadlifting.
Fix: Think of sitting back with your hips while holding the
bar and letting it fall to the ground.
How to Create the Illusion of Wide Shoulders
SkinnyFatTransformation.com Page 14
Put in the Effort and Reap the Benefits
At first, it may seem overwhelming to remember all those things. However, learning
to do a proper deadlift and gaining strength on it is a rewarding feeling because of
the heavy weights you will be able to lift soon. In the beginning you may be
deadlifting a silly 135 lbs for repetitions. Soon enough you will be doing 200 lbs and
when you do 200 lbs you will shoot for 300 lbs and so on.
Strength comes with pride, and I cannot think of any lift that matches the deadlift
in terms of rapid strength gains. The strength gains will provide a huge confidence
boost to start your transformation.
How to Create the Illusion of Wide Shoulders
SkinnyFatTransformation.com Page 15
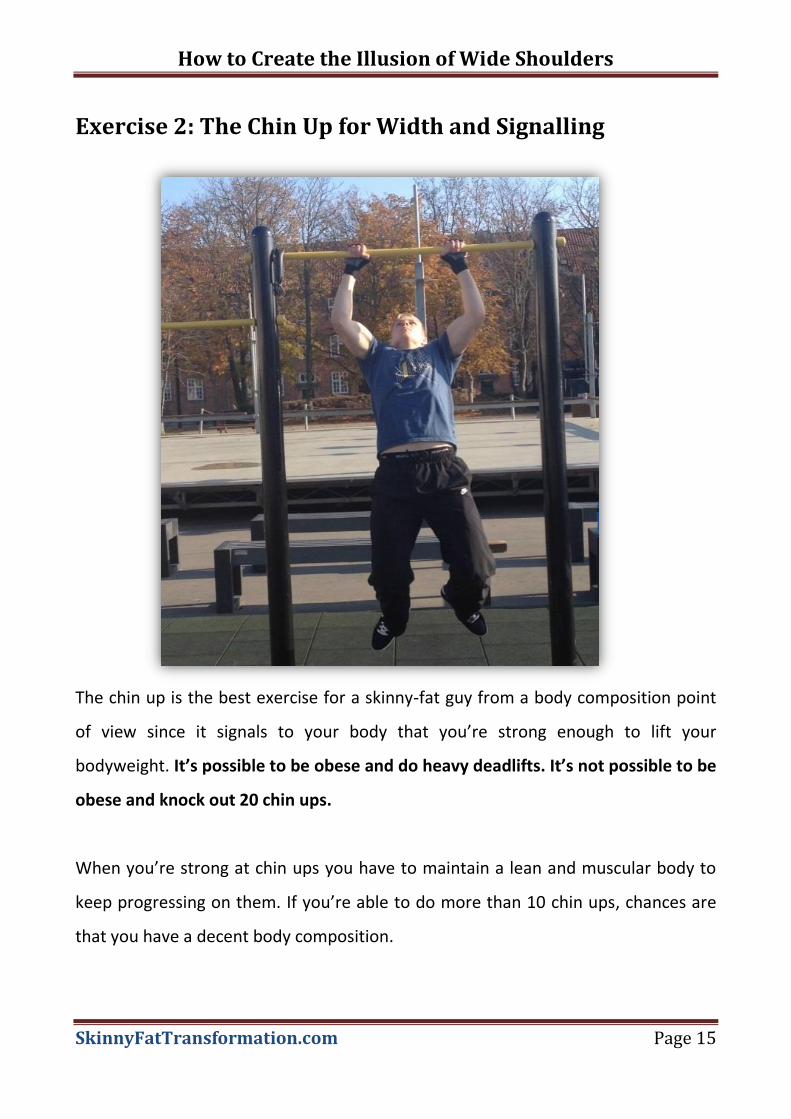
Exercise 2: The Chin Up for Width and Signalling
The chin up is the best exercise for a skinny-fat guy from a body composition point
of view since it signals to your body that you’re strong enough to lift your
bodyweight. It’s possible to be obese and do heavy deadlifts. It’s not possible to be
obese and knock out 20 chin ups.
When you’re strong at chin ups you have to maintain a lean and muscular body to
keep progressing on them. If you’re able to do more than 10 chin ups, chances are
that you have a decent body composition.
How to Create the Illusion of Wide Shoulders
SkinnyFatTransformation.com Page 16
Which Chin Up Variation Should You Do?
The chin up (underhand grip) is with palms facing towards you while the pull up
(overhand grip) is with palms facing away from you. There is also the neutral grip
(palms facing each other), which is just as good as the other two variations. Other
than that, you can use a wide grip, shoulder width grip or narrow grip.
A beginner is usually strongest at chin ups with a shoulder width grip. Both pull ups
and chin ups target the back yet the chin up involves the biceps to a higher degree.
I recommend every beginner to do the chin up (underhand grip), because it’s
easier.
Once you are strong enough to do 5 chin ups you should be able to perform at least
3 pull ups. At this point choose one of the variations and stick to it.
Stay away from the wide grip variations since they are harder and I personally
never got any benefit from them.
My back grew better than anything else by using a shoulder width grip, so unless
your back does not respond to a regular grip, do not bother with the wide grip.
Some people experience joint pain when performing either chin ups or pull ups. This
joint pain is typically in the shoulder, wrist or elbow. If you experience any kind of
joint pain during one of the variations, simply do the other variation. If the pain
persists you may have an injury, in which case you should stop the exercise until it
heals.
How to Create the Illusion of Wide Shoulders
SkinnyFatTransformation.com Page 17
Proper Form
Once you have a solid grip you should be in what I like to call the dead-hang where
your arms are fully extended.
In the dead-hang, tilt your head backwards so you are looking up towards the bar.
Looking up has a psychological benefit, since you can see yourself approaching the
bar.
Lift yourself up until your chin clears the bar and lower yourself in a controlled way.
How to get Strong Enough to Perform 1 Chin Up
Some of you reading this guide cannot do one chin up yet. When I started training I
could not perform a chin up, so it made sense to start lifting weights to get strong
enough to accomplish this task.
Unfortunately, this did not happen. After 3 months of lifting weights I was still far
away from doing a chin up, so I had to change things up. I incorporated assisted chin
ups on a machine into my routine, but I quickly realized that those are a huge waste
of time. The thing that enabled me to do my first chin up after 6 months of training
was doing a lot of negative chin ups. I did 3 sets of negatives 3 times a week.
If you’re in doubt about what a negative chin up, this is how it is done: Find a chin
up bar that you can reach while standing on the ground. Once you have a solid grip
on the bar, jump up until your chin clears the bar and lower yourself SLOWLY to the
ground. After doing negatives for a while and losing excess body fat you should be
able to perform your first chin up.
How to Create the Illusion of Wide Shoulders
SkinnyFatTransformation.com Page 18
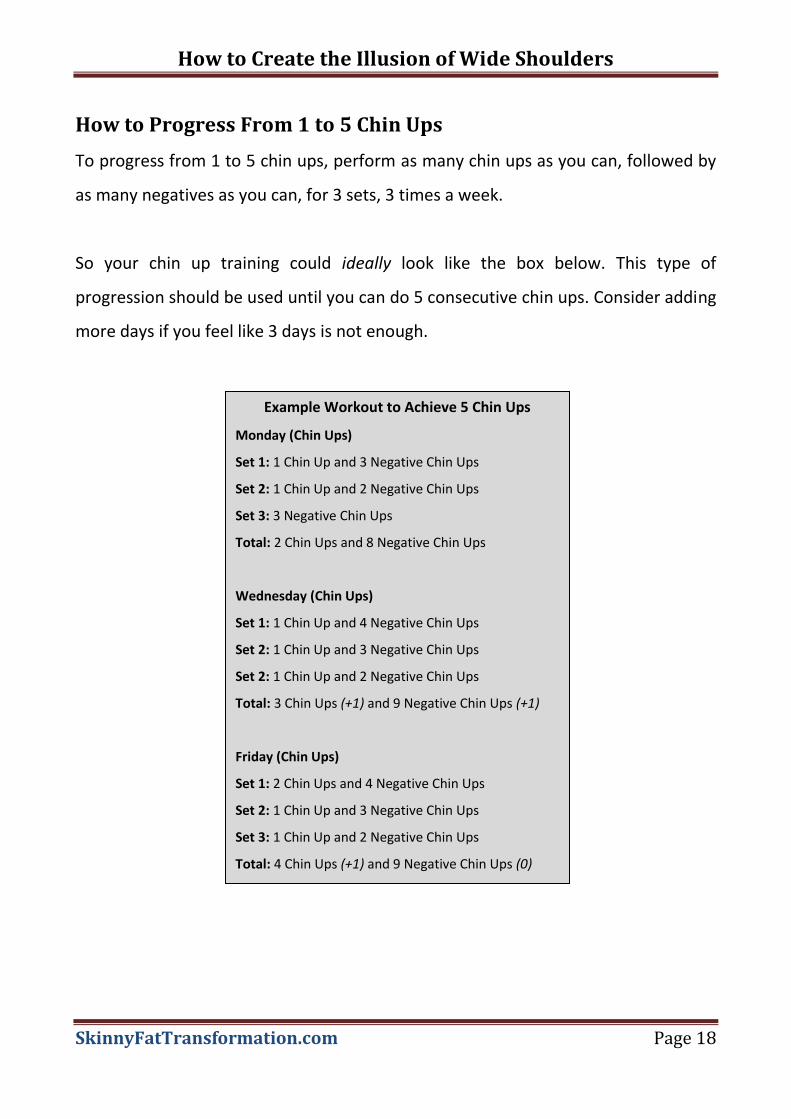
Example Workout to Achieve 5 Chin Ups
Monday (Chin Ups)
Set 1: 1 Chin Up and 3 Negative Chin Ups
Set 2: 1 Chin Up and 2 Negative Chin Ups
Set 3: 3 Negative Chin Ups
Total: 2 Chin Ups and 8 Negative Chin Ups
Wednesday (Chin Ups)
Set 1: 1 Chin Up and 4 Negative Chin Ups
Set 2: 1 Chin Up and 3 Negative Chin Ups
Set 2: 1 Chin Up and 2 Negative Chin Ups
Total: 3 Chin Ups (+1) and 9 Negative Chin Ups (+1)
Friday (Chin Ups)
Set 1: 2 Chin Ups and 4 Negative Chin Ups
Set 2: 1 Chin Up and 3 Negative Chin Ups
Set 3: 1 Chin Up and 2 Negative Chin Ups
Total: 4 Chin Ups (+1) and 9 Negative Chin Ups (0)
How to Progress From 1 to 5 Chin Ups
To progress from 1 to 5 chin ups, perform as many chin ups as you can, followed by
as many negatives as you can, for 3 sets, 3 times a week.
So your chin up training could ideally look like the box below. This type of
progression should be used until you can do 5 consecutive chin ups. Consider adding
more days if you feel like 3 days is not enough.
How to Create the Illusion of Wide Shoulders
SkinnyFatTransformation.com Page 19
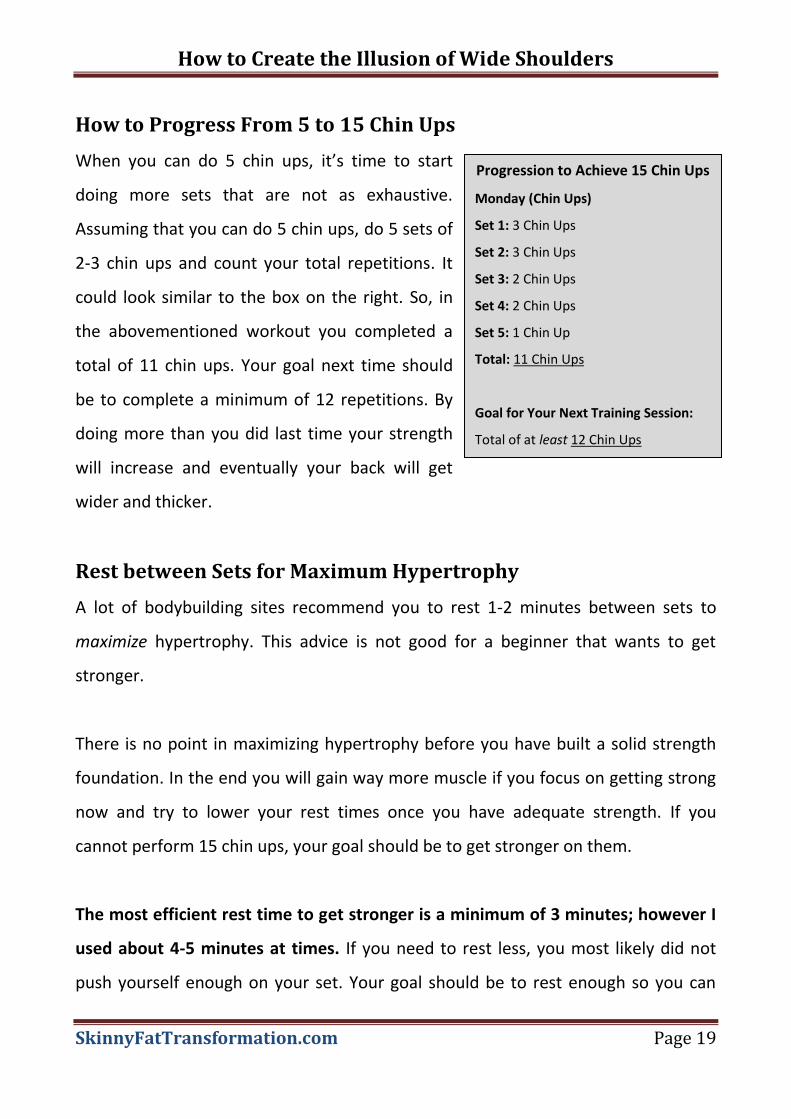
How to Progress From 5 to 15 Chin Ups
When you can do 5 chin ups, it’s time to start
doing more sets that are not as exhaustive.
Assuming that you can do 5 chin ups, do 5 sets of
2-3 chin ups and count your total repetitions. It
could look similar to the box on the right. So, in
the abovementioned workout you completed a
total of 11 chin ups. Your goal next time should
be to complete a minimum of 12 repetitions. By
doing more than you did last time your strength
will increase and eventually your back will get
wider and thicker.
Rest between Sets for Maximum Hypertrophy
A lot of bodybuilding sites recommend you to rest 1-2 minutes between sets to
maximize hypertrophy. This advice is not good for a beginner that wants to get
stronger.
There is no point in maximizing hypertrophy before you have built a solid strength
foundation. In the end you will gain way more muscle if you focus on getting strong
now and try to lower your rest times once you have adequate strength. If you
cannot perform 15 chin ups, your goal should be to get stronger on them.
The most efficient rest time to get stronger is a minimum of 3 minutes; however I
used about 4-5 minutes at times. If you need to rest less, you most likely did not
push yourself enough on your set. Your goal should be to rest enough so you can
Progression to Achieve 15 Chin Ups
Monday (Chin Ups)
Set 1: 3 Chin Ups
Set 2: 3 Chin Ups
Set 3: 2 Chin Ups
Set 4: 2 Chin Ups
Set 5: 1 Chin Up
Total: 11 Chin Ups
Goal for Your Next Training Session:
Total of at least 12 Chin Ups
How to Create the Illusion of Wide Shoulders
SkinnyFatTransformation.com Page 20
perform each set with maximum output. Once you can do 15 chin ups, you can
experiment with lower rest times, time under tension and going beyond failure.
Alternative Chin Up Workouts
If you are at the level where you can easily do 15 chin ups with good form you can
consider to do one of the following workouts that I have used with great success
(with the exception of workout 5 which can be done by beginners as well).
Workout 1: X amount of Chin Ups on Time
Pick a number of chin ups and perform them as
fast as possible while tracking your time. Note
down your time, and try to beat it next time
you train (like the example in the box). This will
give you a great amount of volume in a short time, and you may experience some
sweet muscle gains if you have never done it before. I recommend you to perform
this workout 3-4 times a week and do 50-75 reps total.
Workout 2: Weighted Chin Ups
I have not done weighted chin ups much, since
I’m 6”3 and 187 lbs with long arms, so I get more
than enough work from adding time under
tension to my chin ups. However, guys that are
on the smaller side can benefit a lot from
weighted chin ups once regular chin ups become
too easy. The weighted chin ups workout is
outlined in the box on the right.
Example of Workout 1
Monday: 50 Chin Ups in 20 minutes
Wednesday: 50 Chin Ups in 18 minutes
Friday: 50 Chin Ups in 15 minutes
Weighted Chin Ups Training
3 times a week
Do 2 sets of weighted chin ups,
then finish with 1 set of regular
chin ups
Start with 25 lbs
Work your way up to 12 reps, then
increase by 5 lbs each time
How to Create the Illusion of Wide Shoulders
SkinnyFatTransformation.com Page 21
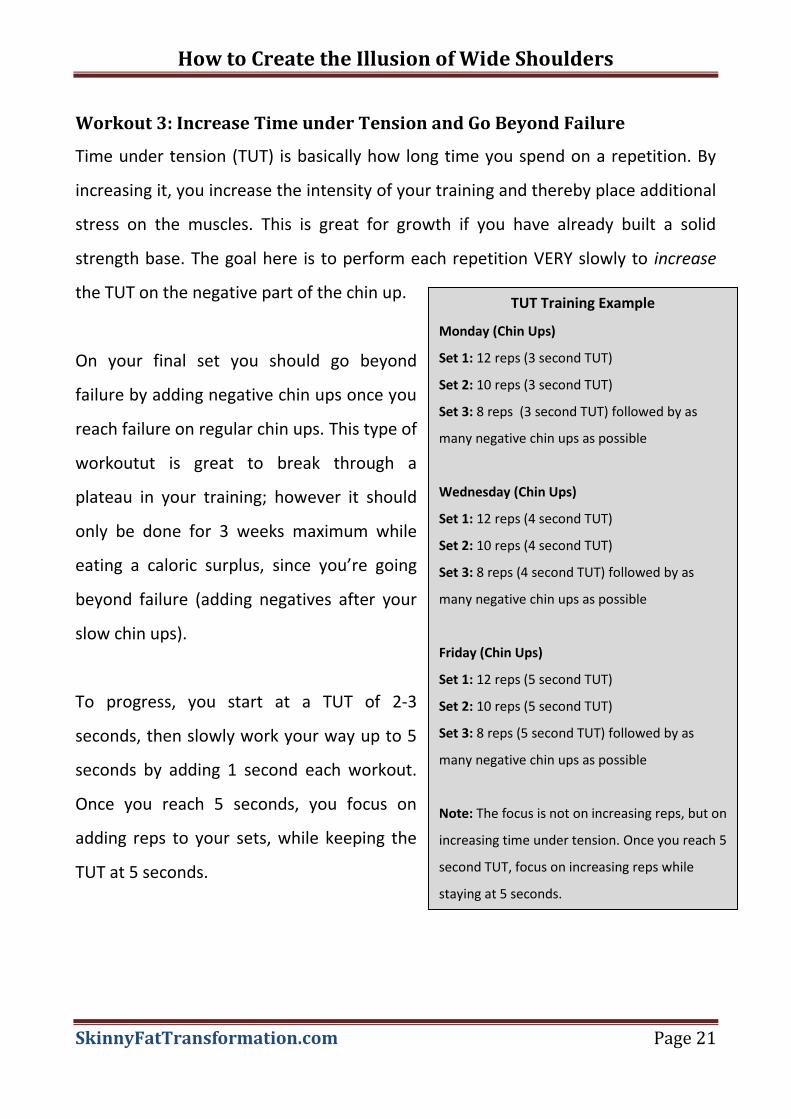
Workout 3: Increase Time under Tension and Go Beyond Failure
Time under tension (TUT) is basically how long time you spend on a repetition. By
increasing it, you increase the intensity of your training and thereby place additional
stress on the muscles. This is great for growth if you have already built a solid
strength base. The goal here is to perform each repetition VERY slowly to increase
the TUT on the negative part of the chin up.
On your final set you should go beyond
failure by adding negative chin ups once you
reach failure on regular chin ups. This type of
workoutut is great to break through a
plateau in your training; however it should
only be done for 3 weeks maximum while
eating a caloric surplus, since you’re going
beyond failure (adding negatives after your
slow chin ups).
To progress, you start at a TUT of 2-3
seconds, then slowly work your way up to 5
seconds by adding 1 second each workout.
Once you reach 5 seconds, you focus on
adding reps to your sets, while keeping the
TUT at 5 seconds.
TUT Training Example
Monday (Chin Ups)
Set 1: 12 reps (3 second TUT)
Set 2: 10 reps (3 second TUT)
Set 3: 8 reps (3 second TUT) followed by as
many negative chin ups as possible
Wednesday (Chin Ups)
Set 1: 12 reps (4 second TUT)
Set 2: 10 reps (4 second TUT)
Set 3: 8 reps (4 second TUT) followed by as
many negative chin ups as possible
Friday (Chin Ups)
Set 1: 12 reps (5 second TUT)
Set 2: 10 reps (5 second TUT)
Set 3: 8 reps (5 second TUT) followed by as
many negative chin ups as possible
Note: The focus is not on increasing reps, but on
increasing time under tension. Once you reach 5
second TUT, focus on increasing reps while
staying at 5 seconds.
How to Create the Illusion of Wide Shoulders
SkinnyFatTransformation.com Page 22
Workout 4: Thick Bar Training
This summer, I trained chin ups in a place that had thick bars. I noticed, that a thick
bar decreases the amount of reps I can do because I need to grip the bar harder.
However, the good thing is that when you have to grip harder, you tense your
muscles more (especially the biceps and forearms), so you actually get more out of
each rep. That’s great news for the skinny-fat guy with naturally small arms. My
recommendation is that you try any of the workouts listed in this eBook on a thick
bar and see how you respond to that.
Workout 5: Chin Ups Everyday
Frequent Chin Ups can be done by beginners that can perform 5 or more chin ups. I
discovered this type of training on a holiday where I spent a lot of time at my
cousin’s house. At this point I was very demotivated since I had been stuck at about
5 chin ups for ages and I had already been training for 14 months. Fortunately, he
had a chin up bar in his room, so I decided to try something new: perform chin ups
several times every day. Every time I entered or left his room I would perform a light
set of chin ups. After 2 weeks I increased my chin up record from 5 to 9! I
progressed because I performed them frequently, but I never performed a set close
to failure. If you have never done this type of training before, I urge you to do so.
How to Create the Illusion of Wide Shoulders
SkinnyFatTransformation.com Page 23
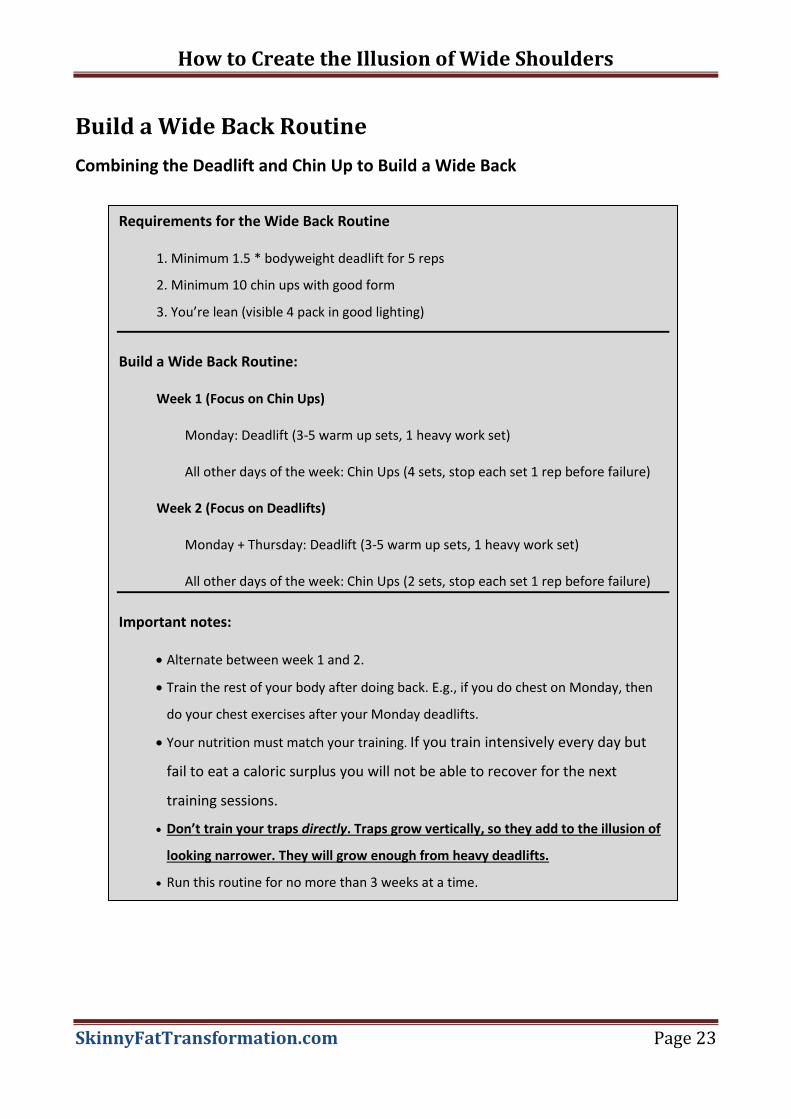
Build a Wide Back Routine
Combining the Deadlift and Chin Up to Build a Wide Back
Requirements for the Wide Back Routine
1. Minimum 1.5 * bodyweight deadlift for 5 reps
2. Minimum 10 chin ups with good form
3. You’re lean (visible 4 pack in good lighting)
Build a Wide Back Routine:
Week 1 (Focus on Chin Ups)
Monday: Deadlift (3-5 warm up sets, 1 heavy work set)
All other days of the week: Chin Ups (4 sets, stop each set 1 rep before failure)
Week 2 (Focus on Deadlifts)
Monday + Thursday: Deadlift (3-5 warm up sets, 1 heavy work set)
All other days of the week: Chin Ups (2 sets, stop each set 1 rep before failure)
Important notes:
Alternate between week 1 and 2.
Train the rest of your body after doing back. E.g., if you do chest on Monday, then
do your chest exercises after your Monday deadlifts.
Your nutrition must match your training. If you train intensively every day but
fail to eat a caloric surplus you will not be able to recover for the next
training sessions.
Don’t train your traps directly. Traps grow vertically, so they add to the illusion of
looking narrower. They will grow enough from heavy deadlifts.
Run this routine for no more than 3 weeks at a time.

How to Create the Illusion of Wide Shoulders
SkinnyFatTransformation.com Page 24
Introduction
So far, I’ve explained how you can train the deadlift and chin up individually, but it
can be a good idea to train both of them at the same time to grow your back faster.
Therefore, I have created the wide back training routine that focuses on those 2
exercises.
Originally, I developed this routine for the readership of the blog Bold and
Determined, thus it was not meant specifically for skinny-fat guys since it requires
you to train intensively everyday and eat a lot.
However, if you fit the requirements listed in the box and you want to specialize in
back training for 2-3 weeks, then this can be the right routine for you.
The Requirements – Why?
I listed 2 strength requirements for the routine and the requirement of having a lean
body with a 4 pack in good lighting. The reason for this is two-fold: 1) the routine
requires you to eat a lot to ensure progress, so you need to start from a lean base to
avoid getting fat, and 2) it’s a very intense routine, so there’s no point in doing it
unless you have some basic strength on the deadlift and chin up.
Build a Wide Back Routine
Do your back training first every time you’re in the gym to progress faster, then
continue with your normal training. For instance, if you usually train chest on
Mondays, you would deadlift every Monday, then continue to your chest routine.
It’s important that you continue to your normal training after you have done your
deadlifts and chin ups, because the body likes to grow as a unit.
How to Create the Illusion of Wide Shoulders
SkinnyFatTransformation.com Page 25
However, keep in mind that you’re focusing on your back during this routine, so the
work that is done after your back training should be kept to a minimum. If you used
to do something like 20 sets for your chest on Mondays, then you may want to
reduce that to the minimum amount required to just maintain your strength. Finally,
it’s important to note, that you should do chin ups (underhand grip) and NOT pull
ups during this routine.
How to Eat While Building a Wide Back
If you train intensively every day but fail to eat a caloric surplus you will not be
able to recover for the next training sessions. Now you may think “but won’t I get
fat if I eat a lot?” Generally speaking, yes, but keep in mind that one of the
requirements was that you are already lean when you start the routine. Also, I want
you to do this routine for no more than 3 weeks while following the advice in my
bulking article.
If you do so, you may gain a few extra lbs, which can be lost in no more than 2
weeks. On the positive side, you may just add 30-40 lbs to your deadlift and 3-5 reps
to your chin up max in those weeks.
How to Create the Illusion of Wide Shoulders
SkinnyFatTransformation.com Page 26
Recommended Gear
Below, I will share links to resources that I recommend you to get to improve the
quality of your training. I personally use all of these things in my own training (with
the exception of fat gripz).
If you buy those products through my links, I will receive a small comission (a few
dollars per purchase) at no additional cost for you.
I highly appreciate any purchase through these since I have invested a lot of money
into the website and spent countless of hours producing free content while asking
for nothing in return.
Deadlift Gear
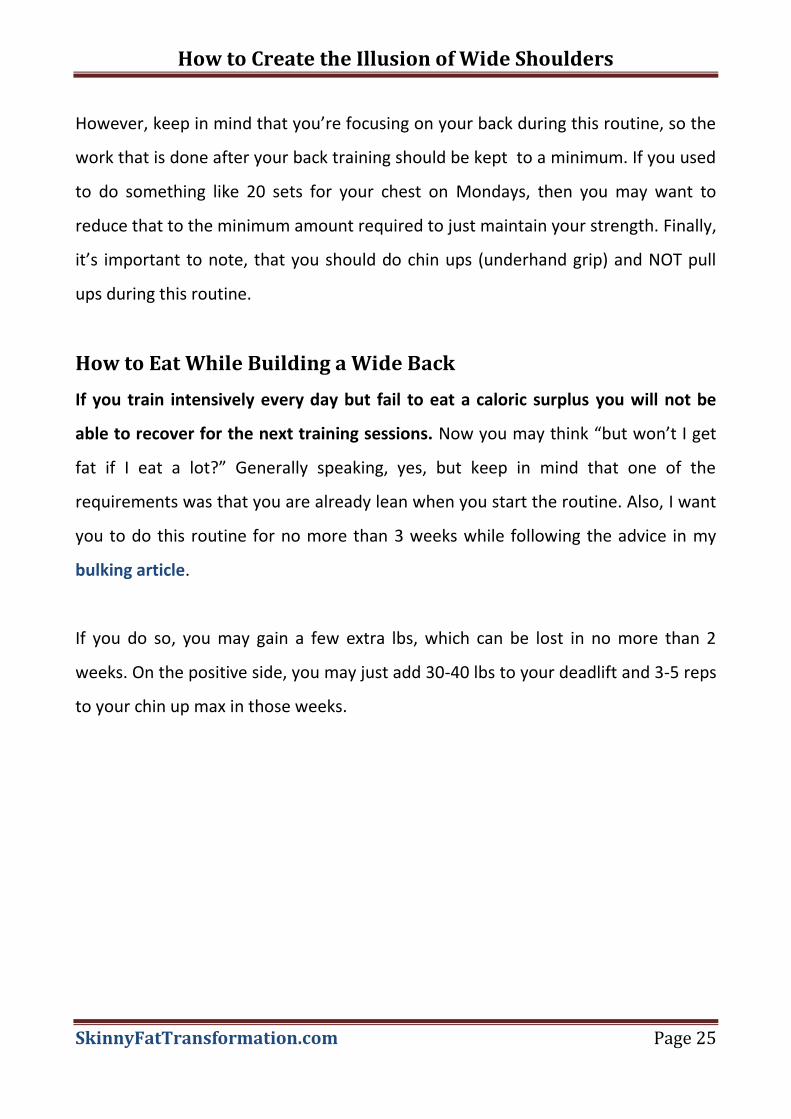
1. Liquid Chalk for Better Grip
The first must-have piece of equipment for deadlifts is chalk. Chalk
dries out your hands, and enables you to keep a tight grip on
pulling exercises. It is ideal for heavy deadlifts, but I also use it for
bodyweight training and yoga. Most gyms do not allow regular
chalk since it leaves a mess, but there’s a solution for this: liquid
chalk. I have used different types of liquid chalk during my training;
however my favourite brand is by far Liquid Grip. This brand is
slightly more expensive than other liquid chalks, but it lasts much
longer. I usually apply it once in the locker room and it lasts me the
whole training session.
How to Create the Illusion of Wide Shoulders
SkinnyFatTransformation.com Page 27
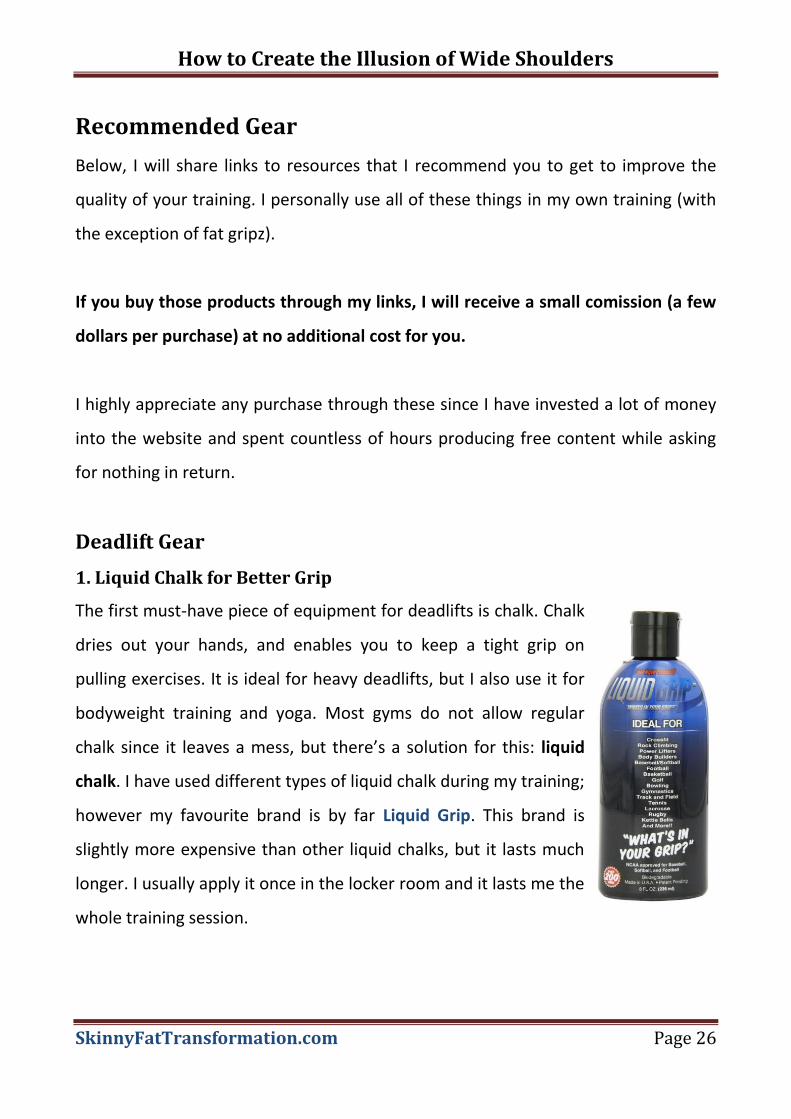
2. Weightlifting Belt for Heavier Weights
The second must-have piece of equipment is a weightlifting belt. This should only
be used once you are deadlifting 300 lbs or more and only for your work set. When
using a belt, I can lift heavier weights with better form, and deadlifting is all about
lifting heavy to make your back
grow. You only perform 1-2 work
sets of deadlifts every week. Make
them count by using a belt!
3. Weightlifting Shoes for Inflexible Guys
Weightlifting shoes are not a necessity for
most people, but if you are an inflexible guy
like me with tight hips and hamstrings and
stretching has gotten you nowhere, you
should consider investing in a pair of
weightlifting shoes that have an elevated
heel. An elevated heel will make it
significantly easier for you to maintain a neutral spine in the deadlift starting
position. Also, they have a hard and non-compressible sole that stabilize your lift
and they can be used for other lifts such as squats, power cleans, push presses and
overhead presses.
How to Create the Illusion of Wide Shoulders
SkinnyFatTransformation.com Page 28
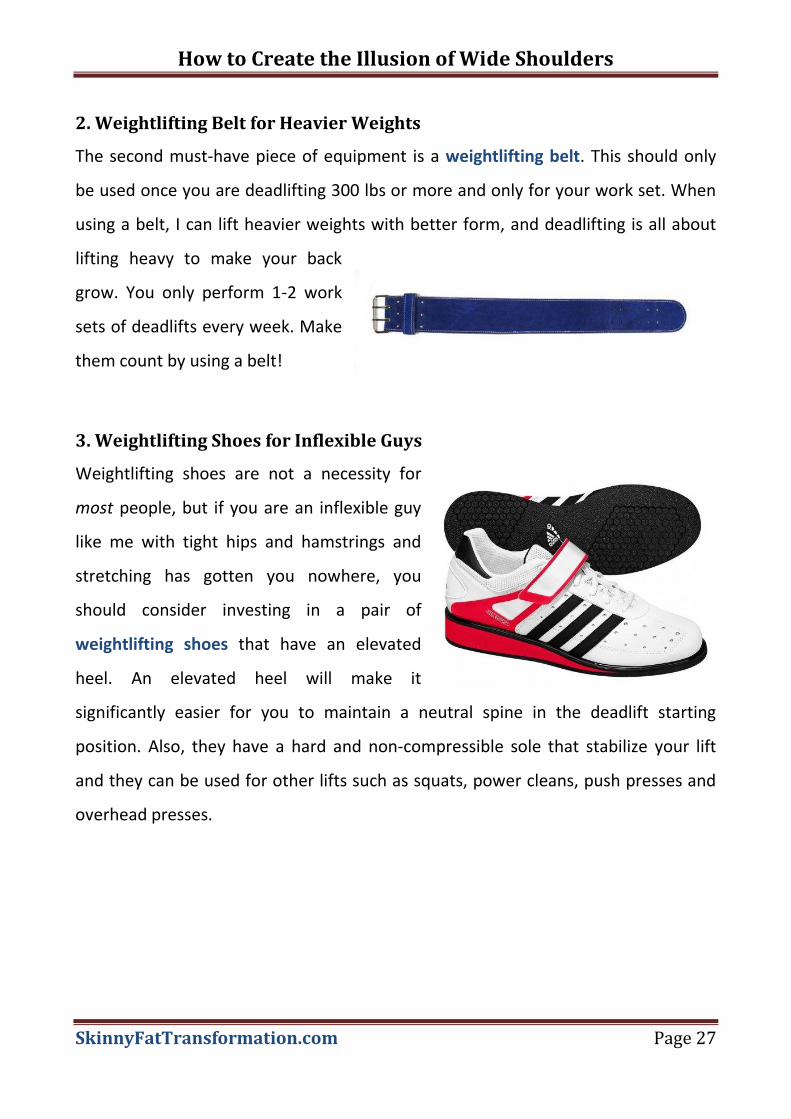
4. Lifting Straps if Your Grip Fails
Finally, lifting straps are great once your deadlift is limited
by your grip. Straps essentially take the grip out of the
deadlift, so you can deadlift much more weight, if your
grip is the limiting factor.
Chin Up Gear
1. Chin-Up Bar for Your Home
To make chin-up training convenient, you should
get a chin up bar for your home. I personally use
one that is identical to the one in the picture and
link. It has different grips, and has been one of my
best investments ever in terms of training gear. I
use it pretty much every day to knock out a set of chins when I’m on my way out, or
on my way to the toilet. It’s especially great if you’re a busy person with weeks
where it’s impossible to fit in gym time, or if you’re doing chin ups often (or if you
just love doing chin ups all the time).
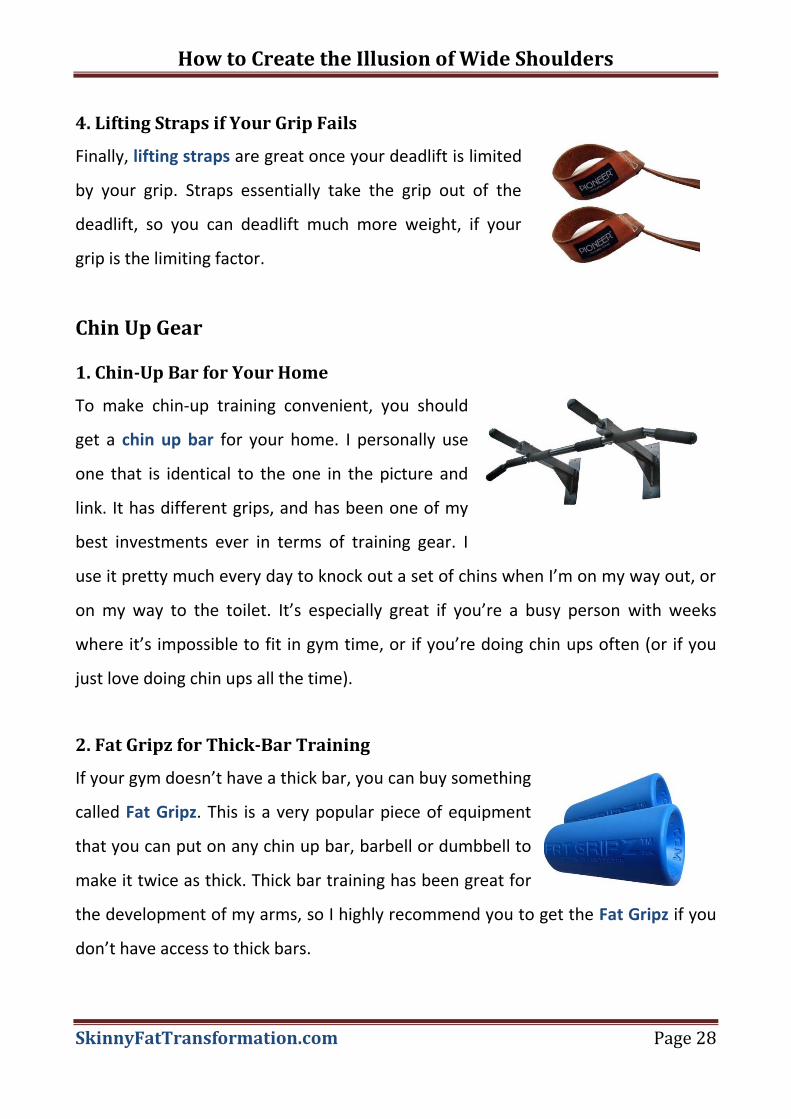
2. Fat Gripz for Thick-Bar Training
If your gym doesn’t have a thick bar, you can buy something
called Fat Gripz. This is a very popular piece of equipment
that you can put on any chin up bar, barbell or dumbbell to
make it twice as thick. Thick bar training has been great for
the development of my arms, so I highly recommend you to get the Fat Gripz if you
don’t have access to thick bars.
How to Create the Illusion of Wide Shoulders
SkinnyFatTransformation.com Page 29
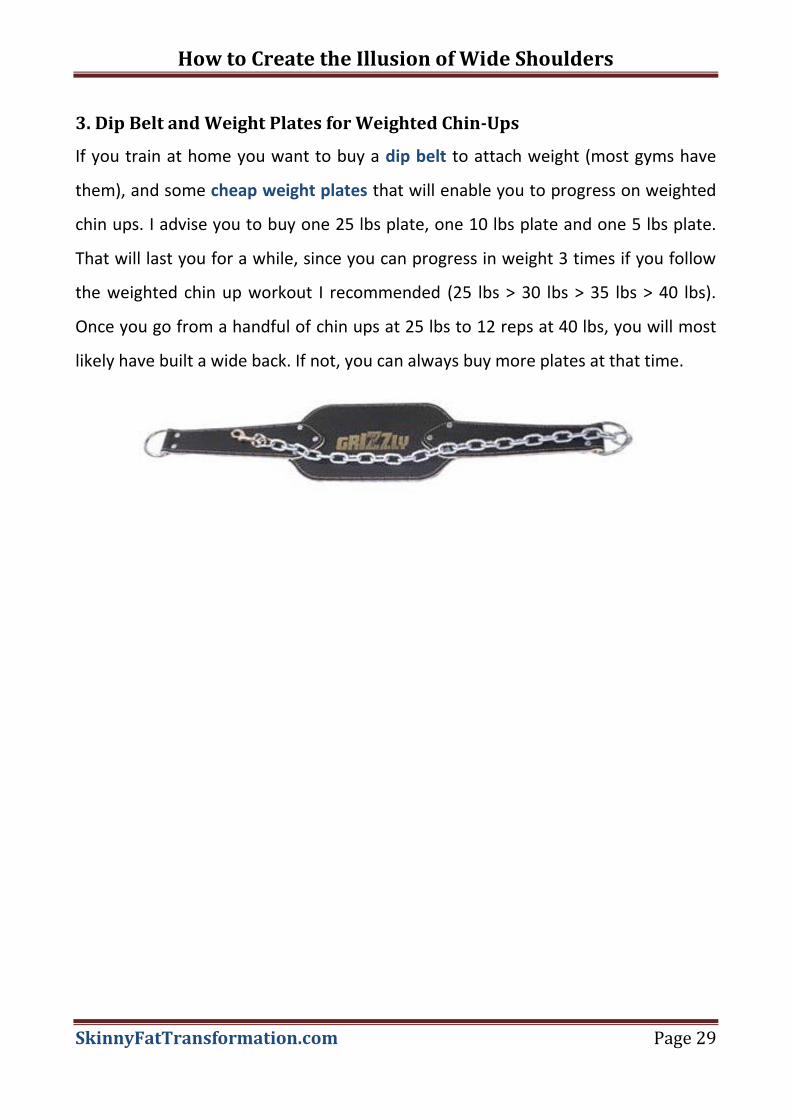
3. Dip Belt and Weight Plates for Weighted Chin-Ups
If you train at home you want to buy a dip belt to attach weight (most gyms have
them), and some cheap weight plates that will enable you to progress on weighted
chin ups. I advise you to buy one 25 lbs plate, one 10 lbs plate and one 5 lbs plate.
That will last you for a while, since you can progress in weight 3 times if you follow
the weighted chin up workout I recommended (25 lbs > 30 lbs > 35 lbs > 40 lbs).
Once you go from a handful of chin ups at 25 lbs to 12 reps at 40 lbs, you will most
likely have built a wide back. If not, you can always buy more plates at that time.

How to Create the Illusion of Wide Shoulders
SkinnyFatTransformation.com Page 30
Tracking Progress
While doing ANY of the routines mentioned in this eBook, you need to track
progress to ensure that you’re actually benefiting from it. Most importantly, you
need to track the following on a weekly basis:
Waist measurement
Hip measurement
Bodyweight
Furthermore, you want to track your shoulder circumference once every two weeks.
You don’t have to track the shoulders every week, because it takes longer to add
size to your shoulders than it does to see your waist and hip measurement change.
If your shoulder measurement and bodyweight are increasing while the waist and
hips stay the same, then you know that you’re getting closer to the golden ratio.
Alternatively, if your waist and hips are getting bigger, while your shoulders stay the
same, then you need to change something.
Keep in mind though, that it’s okay to gain some size on your waist and hips, as long
as you also gain shoulder size. The fat will be lost fast, once you get back to eating
normally, but the shoulders will be bigger.
How to Create the Illusion of Wide Shoulders
SkinnyFatTransformation.com Page 31
I personally use a whiteboard to track my measurements. I have this whiteboard on
a wall close to my working desk, so I can see it every single day. It keeps me
accountable and motivated. If I see progress, I get motivated. If I see that I’m
slipping off, I get my shit together.
Furthermore, you want to track your workouts. Throughout the eBook I have
provided a lot of examples of how your workouts can look like. Similarly, you need
to bring a notebook with you to the gym, and put in your numbers so you can see
if you’re actually gaining strength.
You can have the best training program in the world, but consistency and intelligent
training are considerably more important. By tracking your progress in a training
journal you are less likely to slip off and miss training sessions.
If you ignore the signals your body is sending you, injury is waiting to happen.
If you skip planned training sessions because (insert any bullshit excuse), you
will fail to progress on the lifts.
Also, the notebook can keep you motivated to push harder. If you go to the gym and
see that you did 300 lbs for 5 reps on the deadlift last time, then you know that you
should try to increase the weight rather than stay at the same weight.
Finally, you can use the notebook to make notes about specific things that you
would forget otherwise. For instance, if you experience lower back pain from
deadlifts when you do them in a certain way or when your warm-up isn’t good
enough, then note it down. Once you go to the gym to do deadlifts again, you can
How to Create the Illusion of Wide Shoulders
SkinnyFatTransformation.com Page 32
look at your note, and avoid making the same mistake. This little trick can save you
some serious injuries in the long term, because it enables you to constantly improve
your form, warm-up routine and you learn to listen to your body.

How to Create the Illusion of Wide Shoulders
SkinnyFatTransformation.com Page 33
Conclusion
You may wonder now about building big shoulders and fat loss? Isn’t that a big part
of achieving the golden ratio as well?
Fat loss is crucial. If you’re fat, you should focus on losing that while squeezing out
any gains you can on the chin-up and/or deadlift. Fat loss is simple and has been
addressed in my complete fat loss guide.
Big shoulders are not as important as most people would think. If you build a wide
back, your physique will look wide and nobody will question if you train or not. You
can focus on the shoulder training later, but for now keep your focus on what’s
important – back training.
I often have people tell me that I have wide shoulders, but my shoulders are actually
one of my worst muscle groups and my shoulder circumference isn’t that much
bigger than the average guys. I just look wide because I have wide lats and a lean
waist.
Wide lats combined with a lean waist give you that impressive upper body V-
taper, and that creates the illusion of wide shoulders. Now, get out there and get
your hands dirty with some chin ups and/or deadlifts, and see your physique
transform.
Copyright © Oskar Faarkrog. All rights reserved.
How to Create the Illusion of Wide Shoulders
SkinnyFatTransformation.com Page 34
About the Author
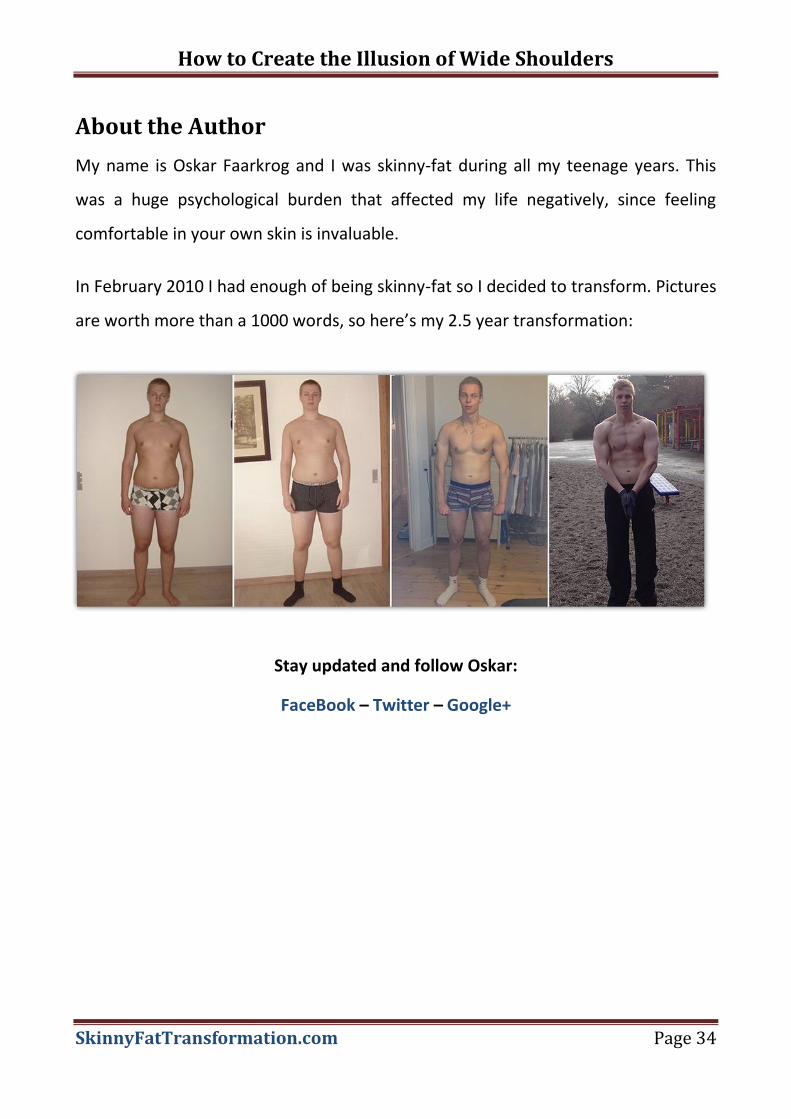
My name is Oskar Faarkrog and I was skinny-fat during all my teenage years. This
was a huge psychological burden that affected my life negatively, since feeling
comfortable in your own skin is invaluable.
In February 2010 I had enough of being skinny-fat so I decided to transform. Pictures
are worth more than a 1000 words, so here’s my 2.5 year transformation:
Stay updated and follow Oskar:
FaceBook – Twitter – Google+

How to Create the Illusion of Wide Shoulders
SkinnyFatTransformation.com Page 35
List of Recommended Resources
SkinnyFatTransformation.com Beginner Section (essential reading for any
skinny-fat guy)
Liquid Grip (chalk for better grip)
Weightlifting belt (for heavy deadlifts)
Lifting straps (for heavy deadlifts)
Weightlifting shoes (for better stability during compound lifts)
Chin up bar for your home
Dip belt (to add weight to chin ups)
Weight plates (to add weight to chin ups)
Fat Gripz (to increase the thickness of a bar and make the exercise harder)
Whiteboard to track progress
Finally, thanks to Mo Hy for designing the eBook cover. If you need any kind of
design work done, I highly recommend you to check out her portfolio at mo-hy.com
and contact her at [email protected].
Disclaimer: I may be compensated, at no
additional cost to the reader, if one of these
great products is purchased through these links.