Embed Size (px)
Citation preview
Centers for Medicare & Medicaid Services
Section 508 Guide for Microsoft Word 2013
Version 2.0 April 02, 2018
Section 508 Guide for MS Word 2013
Centers for Medicare & Medicaid Services ii
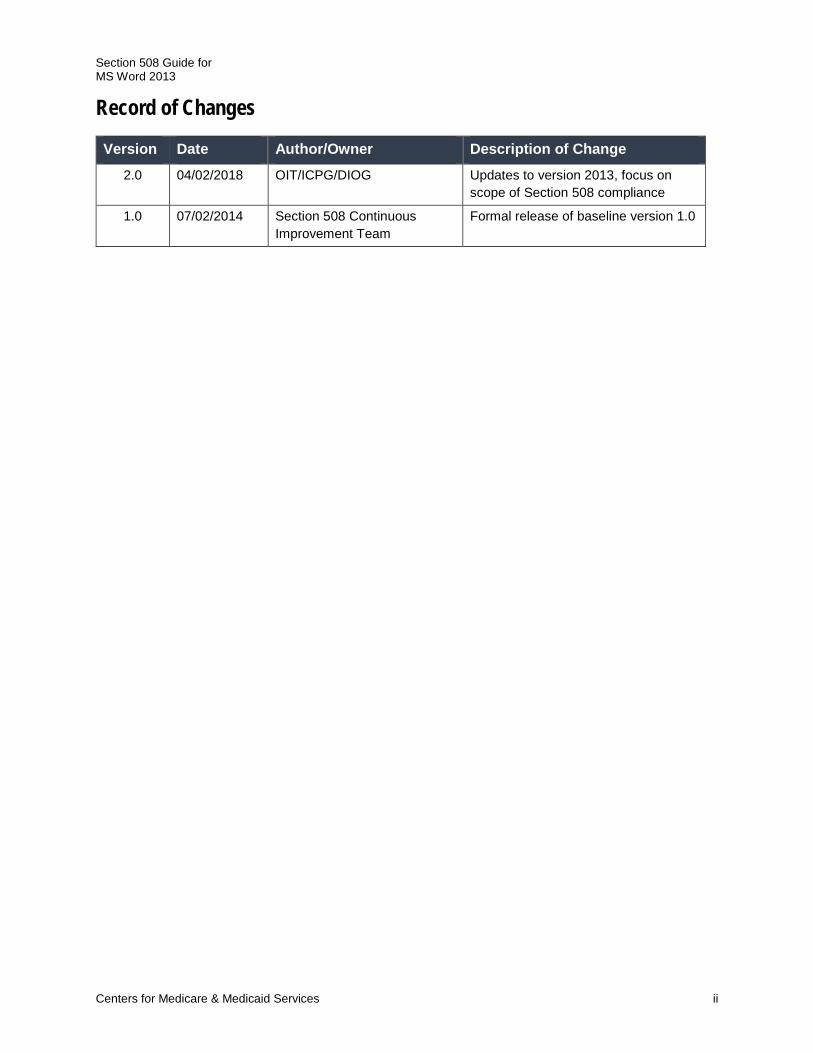
Record of Changes
Version Date Author/Owner Description of Change 2.0 04/02/2018 OIT/ICPG/DIOG Updates to version 2013, focus on
scope of Section 508 compliance 1.0 07/02/2014 Section 508 Continuous
Improvement Team Formal release of baseline version 1.0
Section 508 Guide for MS Word 2013
Centers for Medicare & Medicaid Services iii
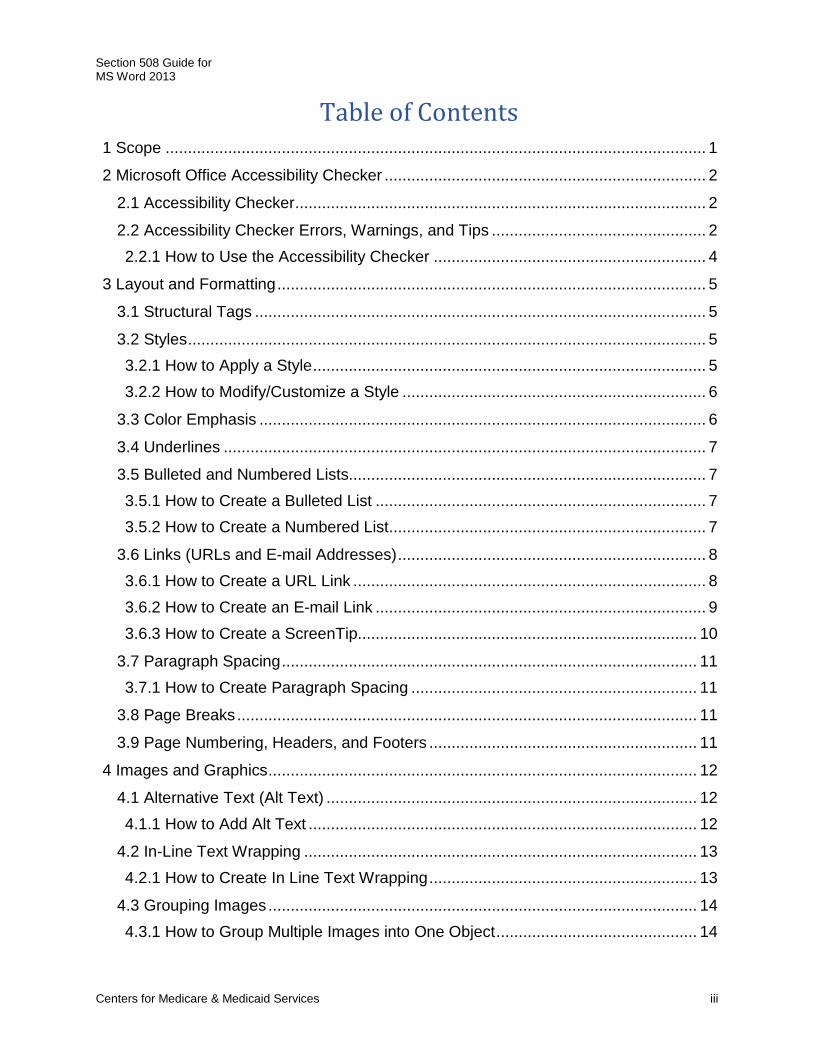
Table of Contents 1 Scope ......................................................................................................................... 1
2 Microsoft Office Accessibility Checker ........................................................................ 2
2.1 Accessibility Checker ............................................................................................ 2
2.2 Accessibility Checker Errors, Warnings, and Tips ................................................ 2
2.2.1 How to Use the Accessibility Checker ............................................................. 4
3 Layout and Formatting ................................................................................................ 5
3.1 Structural Tags ..................................................................................................... 5
3.2 Styles .................................................................................................................... 5
3.2.1 How to Apply a Style ........................................................................................ 5
3.2.2 How to Modify/Customize a Style .................................................................... 6
3.3 Color Emphasis .................................................................................................... 6
3.4 Underlines ............................................................................................................ 7
3.5 Bulleted and Numbered Lists................................................................................ 7
3.5.1 How to Create a Bulleted List .......................................................................... 7
3.5.2 How to Create a Numbered List ....................................................................... 7
3.6 Links (URLs and E-mail Addresses) ..................................................................... 8
3.6.1 How to Create a URL Link ............................................................................... 8
3.6.2 How to Create an E-mail Link .......................................................................... 9
3.6.3 How to Create a ScreenTip............................................................................ 10
3.7 Paragraph Spacing ............................................................................................. 11
3.7.1 How to Create Paragraph Spacing ................................................................ 11
3.8 Page Breaks ....................................................................................................... 11
3.9 Page Numbering, Headers, and Footers ............................................................ 11
4 Images and Graphics ................................................................................................ 12
4.1 Alternative Text (Alt Text) ................................................................................... 12
4.1.1 How to Add Alt Text ....................................................................................... 12
4.2 In-Line Text Wrapping ........................................................................................ 13
4.2.1 How to Create In Line Text Wrapping ............................................................ 13
4.3 Grouping Images ................................................................................................ 14
4.3.1 How to Group Multiple Images into One Object ............................................. 14
Section 508 Guide for MS Word 2013
Centers for Medicare & Medicaid Services iv
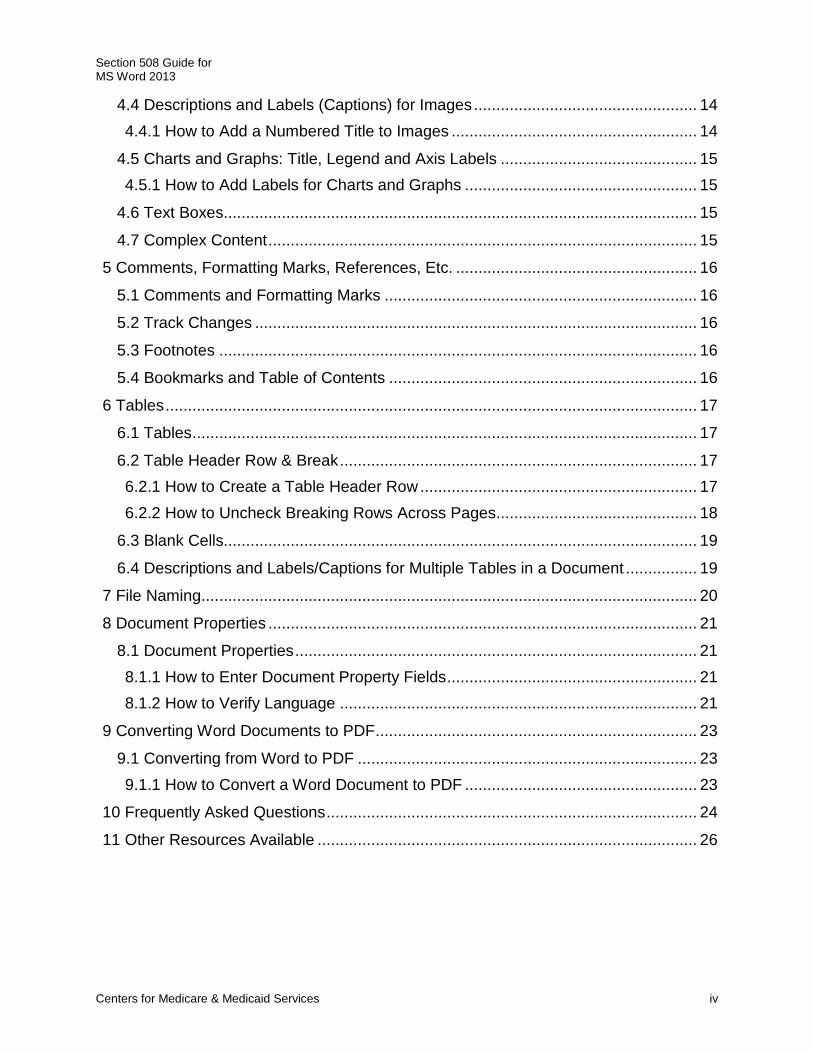
4.4 Descriptions and Labels (Captions) for Images .................................................. 14
4.4.1 How to Add a Numbered Title to Images ....................................................... 14
4.5 Charts and Graphs: Title, Legend and Axis Labels ............................................ 15
4.5.1 How to Add Labels for Charts and Graphs .................................................... 15
4.6 Text Boxes.......................................................................................................... 15
4.7 Complex Content ................................................................................................ 15
5 Comments, Formatting Marks, References, Etc. ...................................................... 16
5.1 Comments and Formatting Marks ...................................................................... 16
5.2 Track Changes ................................................................................................... 16
5.3 Footnotes ........................................................................................................... 16
5.4 Bookmarks and Table of Contents ..................................................................... 16
6 Tables ....................................................................................................................... 17
6.1 Tables ................................................................................................................. 17
6.2 Table Header Row & Break ................................................................................ 17
6.2.1 How to Create a Table Header Row .............................................................. 17
6.2.2 How to Uncheck Breaking Rows Across Pages ............................................. 18
6.3 Blank Cells.......................................................................................................... 19
6.4 Descriptions and Labels/Captions for Multiple Tables in a Document ................ 19
7 File Naming ............................................................................................................... 20
8 Document Properties ................................................................................................ 21
8.1 Document Properties .......................................................................................... 21
8.1.1 How to Enter Document Property Fields ........................................................ 21
8.1.2 How to Verify Language ................................................................................ 21
9 Converting Word Documents to PDF ........................................................................ 23
9.1 Converting from Word to PDF ............................................................................ 23
9.1.1 How to Convert a Word Document to PDF .................................................... 23
10 Frequently Asked Questions ................................................................................... 24
11 Other Resources Available ..................................................................................... 26
Section 508 Guide for MS Word 2013
Centers for Medicare & Medicaid Services v
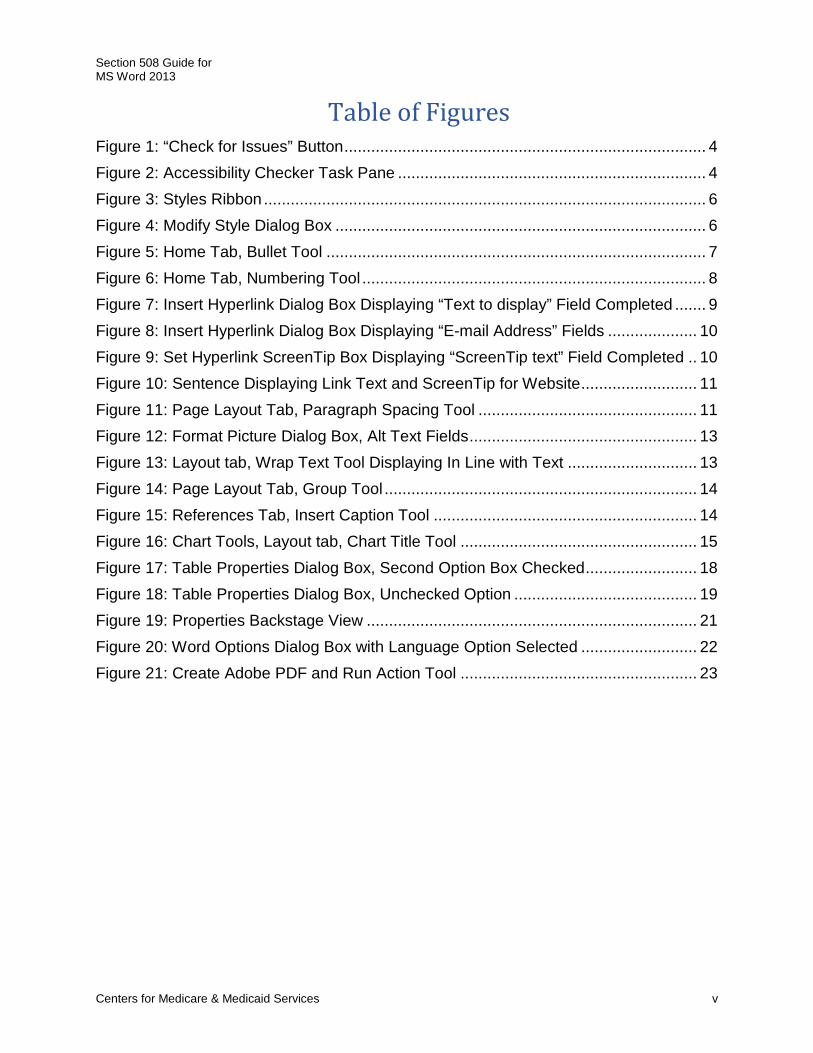
Table of Figures Figure 1: “Check for Issues” Button ................................................................................. 4
Figure 2: Accessibility Checker Task Pane ..................................................................... 4
Figure 3: Styles Ribbon ................................................................................................... 6
Figure 4: Modify Style Dialog Box ................................................................................... 6
Figure 5: Home Tab, Bullet Tool ..................................................................................... 7
Figure 6: Home Tab, Numbering Tool ............................................................................. 8
Figure 7: Insert Hyperlink Dialog Box Displaying “Text to display” Field Completed ....... 9
Figure 8: Insert Hyperlink Dialog Box Displaying “E-mail Address” Fields .................... 10
Figure 9: Set Hyperlink ScreenTip Box Displaying “ScreenTip text” Field Completed .. 10
Figure 10: Sentence Displaying Link Text and ScreenTip for Website .......................... 11
Figure 11: Page Layout Tab, Paragraph Spacing Tool ................................................. 11
Figure 12: Format Picture Dialog Box, Alt Text Fields ................................................... 13
Figure 13: Layout tab, Wrap Text Tool Displaying In Line with Text ............................. 13
Figure 14: Page Layout Tab, Group Tool ...................................................................... 14
Figure 15: References Tab, Insert Caption Tool ........................................................... 14
Figure 16: Chart Tools, Layout tab, Chart Title Tool ..................................................... 15
Figure 17: Table Properties Dialog Box, Second Option Box Checked ......................... 18
Figure 18: Table Properties Dialog Box, Unchecked Option ......................................... 19
Figure 19: Properties Backstage View .......................................................................... 21
Figure 20: Word Options Dialog Box with Language Option Selected .......................... 22
Figure 21: Create Adobe PDF and Run Action Tool ..................................................... 23
Section 508 Guide for MS Word 2013 Scope
Centers for Medicare & Medicaid Services 1
1 Scope The scope of this guide is to provide an overview to assist users, who have a basic knowledge of Microsoft Word, with Section 508 compliance when creating Microsoft Word documents. Documents must be accessible to all individuals including those with physical, sensory, and cognitive disabilities. These guidelines cover the Section 508 requirements and best practices for Microsoft Word established by the U.S. Department of Health and Human Services (HHS). Microsoft includes several options/techniques to perform functions. This guide provides one set of keyboard accessible instructions, where possible. For more detailed information on step-by-step Word instructions, please refer to the Microsoft Office website.
Section 508 Guide for Microsoft Office Accessibility Checker MS Word 2013
Centers for Medicare & Medicaid Services 2
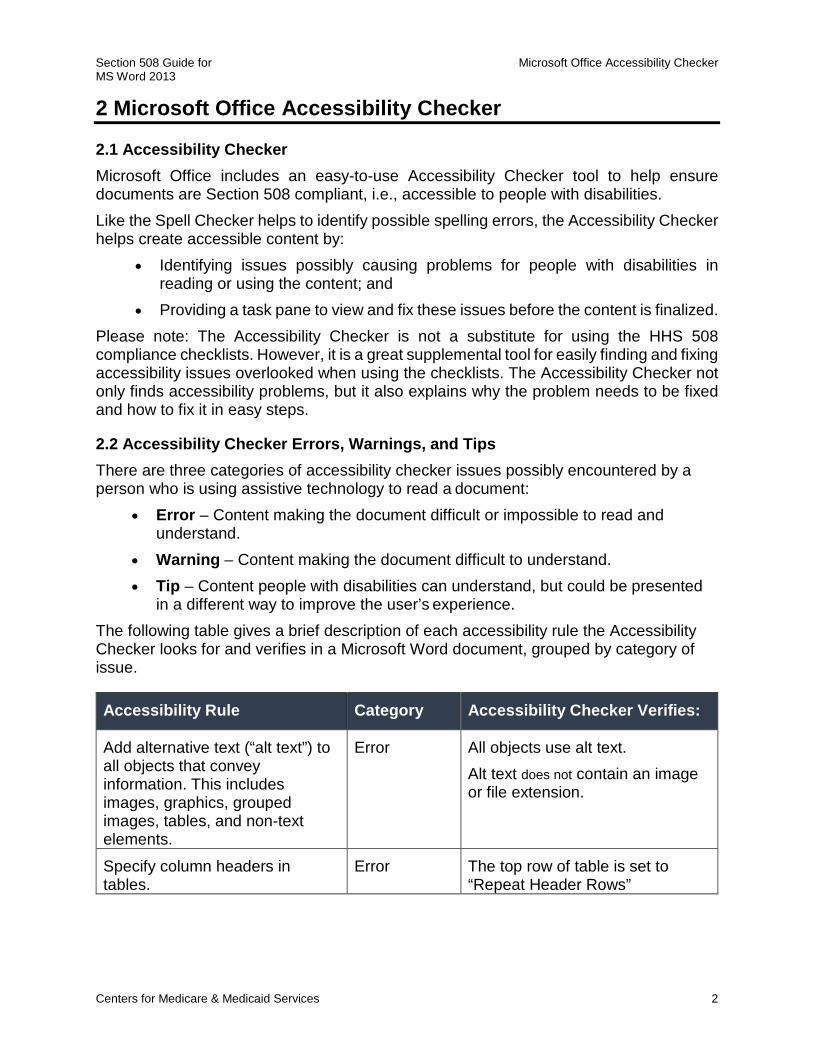
2 Microsoft Office Accessibility Checker
2.1 Accessibility Checker Microsoft Office includes an easy-to-use Accessibility Checker tool to help ensure documents are Section 508 compliant, i.e., accessible to people with disabilities. Like the Spell Checker helps to identify possible spelling errors, the Accessibility Checker helps create accessible content by:
• Identifying issues possibly causing problems for people with disabilities in reading or using the content; and
• Providing a task pane to view and fix these issues before the content is finalized. Please note: The Accessibility Checker is not a substitute for using the HHS 508 compliance checklists. However, it is a great supplemental tool for easily finding and fixing accessibility issues overlooked when using the checklists. The Accessibility Checker not only finds accessibility problems, but it also explains why the problem needs to be fixed and how to fix it in easy steps.
2.2 Accessibility Checker Errors, Warnings, and Tips There are three categories of accessibility checker issues possibly encountered by a person who is using assistive technology to read a document:
• Error – Content making the document difficult or impossible to read and understand.
• Warning – Content making the document difficult to understand. • Tip – Content people with disabilities can understand, but could be presented
in a different way to improve the user’s experience. The following table gives a brief description of each accessibility rule the Accessibility Checker looks for and verifies in a Microsoft Word document, grouped by category of issue.
Accessibility Rule Category Accessibility Checker Verifies:
Add alternative text (“alt text”) to all objects that convey information. This includes images, graphics, grouped images, tables, and non-text elements.
Error All objects use alt text. Alt text does not contain an image or file extension.
Specify column headers in tables.
Error The top row of table is set to “Repeat Header Rows”
Section 508 Guide for Microsoft Office Accessibility Checker MS Word 2013
Centers for Medicare & Medicaid Services 3
Accessibility Rule Category Accessibility Checker Verifies:
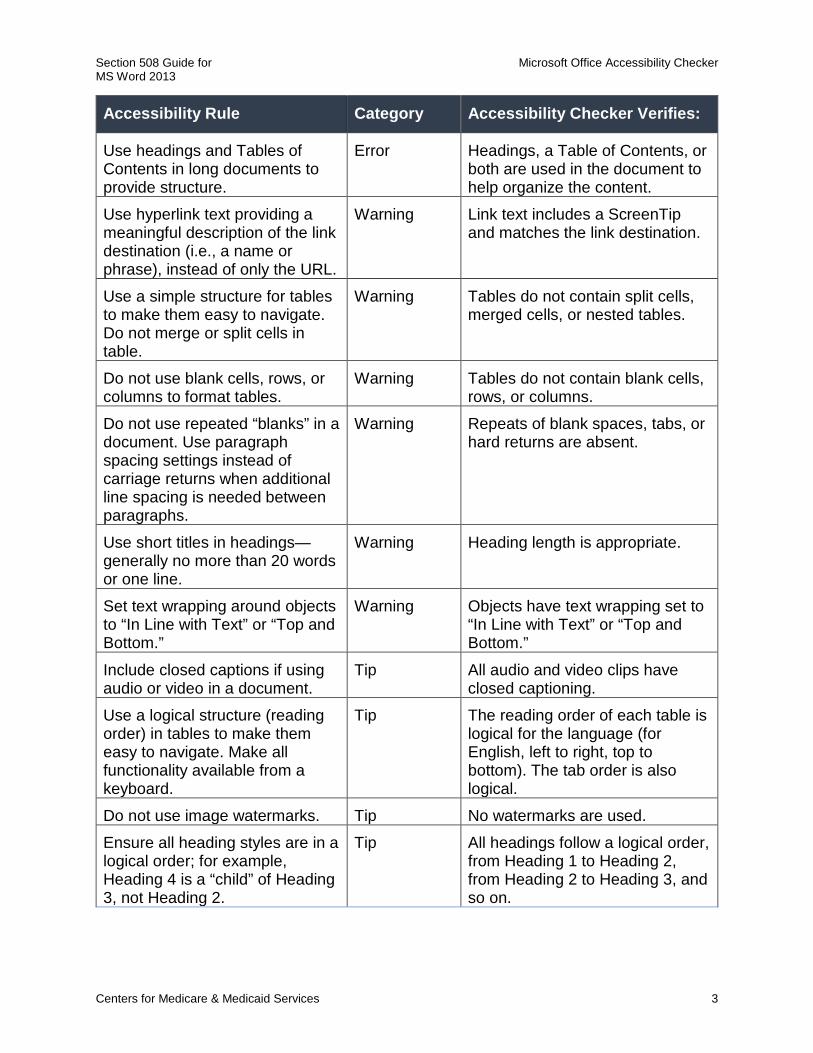
Use headings and Tables of Contents in long documents to provide structure.
Error Headings, a Table of Contents, or both are used in the document to help organize the content.
Use hyperlink text providing a meaningful description of the link destination (i.e., a name or phrase), instead of only the URL.
Warning Link text includes a ScreenTip and matches the link destination.
Use a simple structure for tables to make them easy to navigate. Do not merge or split cells in table.
Warning Tables do not contain split cells, merged cells, or nested tables.
Do not use blank cells, rows, or columns to format tables.
Warning Tables do not contain blank cells, rows, or columns.
Do not use repeated “blanks” in a document. Use paragraph spacing settings instead of carriage returns when additional line spacing is needed between paragraphs.
Warning Repeats of blank spaces, tabs, or hard returns are absent.
Use short titles in headings—generally no more than 20 words or one line.
Warning Heading length is appropriate.
Set text wrapping around objects to “In Line with Text” or “Top and Bottom.”
Warning Objects have text wrapping set to “In Line with Text” or “Top and Bottom.”
Include closed captions if using audio or video in a document.
Tip All audio and video clips have closed captioning.
Use a logical structure (reading order) in tables to make them easy to navigate. Make all functionality available from a keyboard.
Tip The reading order of each table is logical for the language (for English, left to right, top to bottom). The tab order is also logical.
Do not use image watermarks. Tip No watermarks are used. Ensure all heading styles are in a logical order; for example, Heading 4 is a “child” of Heading 3, not Heading 2.
Tip All headings follow a logical order, from Heading 1 to Heading 2, from Heading 2 to Heading 3, and so on.
Section 508 Guide for Microsoft Office Accessibility Checker MS Word 2013
Centers for Medicare & Medicaid Services 4
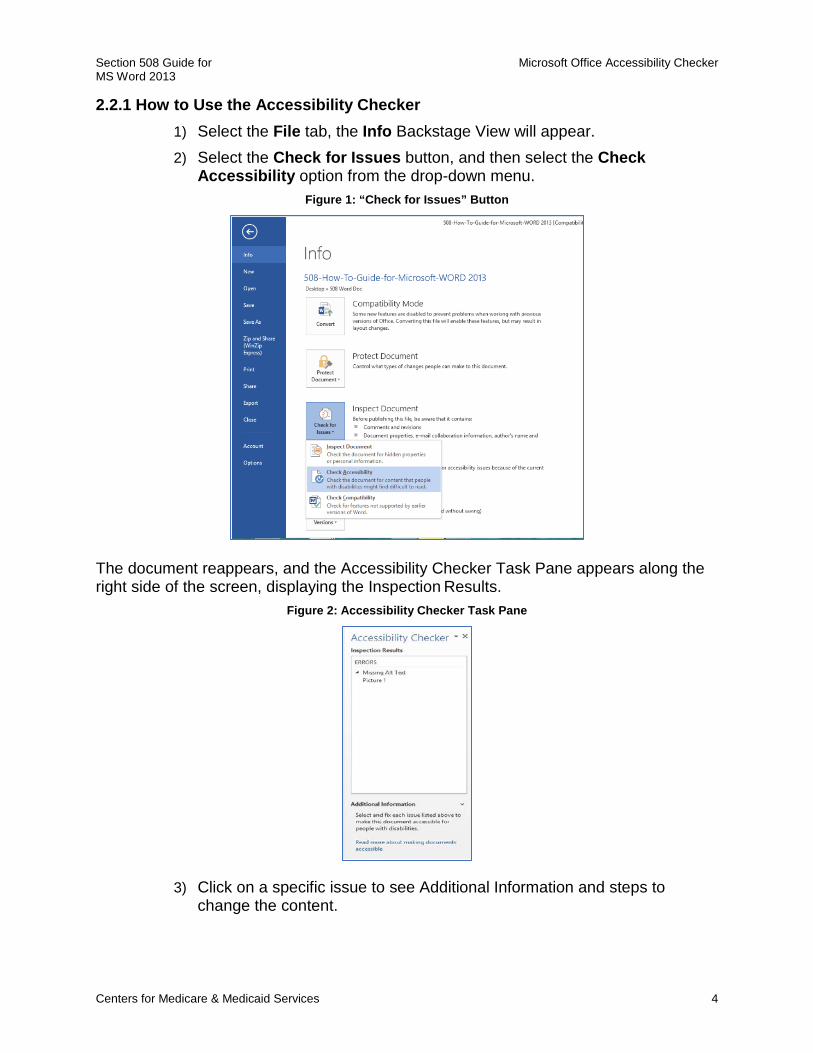
2.2.1 How to Use the Accessibility Checker 1) Select the File tab, the Info Backstage View will appear. 2) Select the Check for Issues button, and then select the Check
Accessibility option from the drop-down menu. Figure 1: “Check for Issues” Button
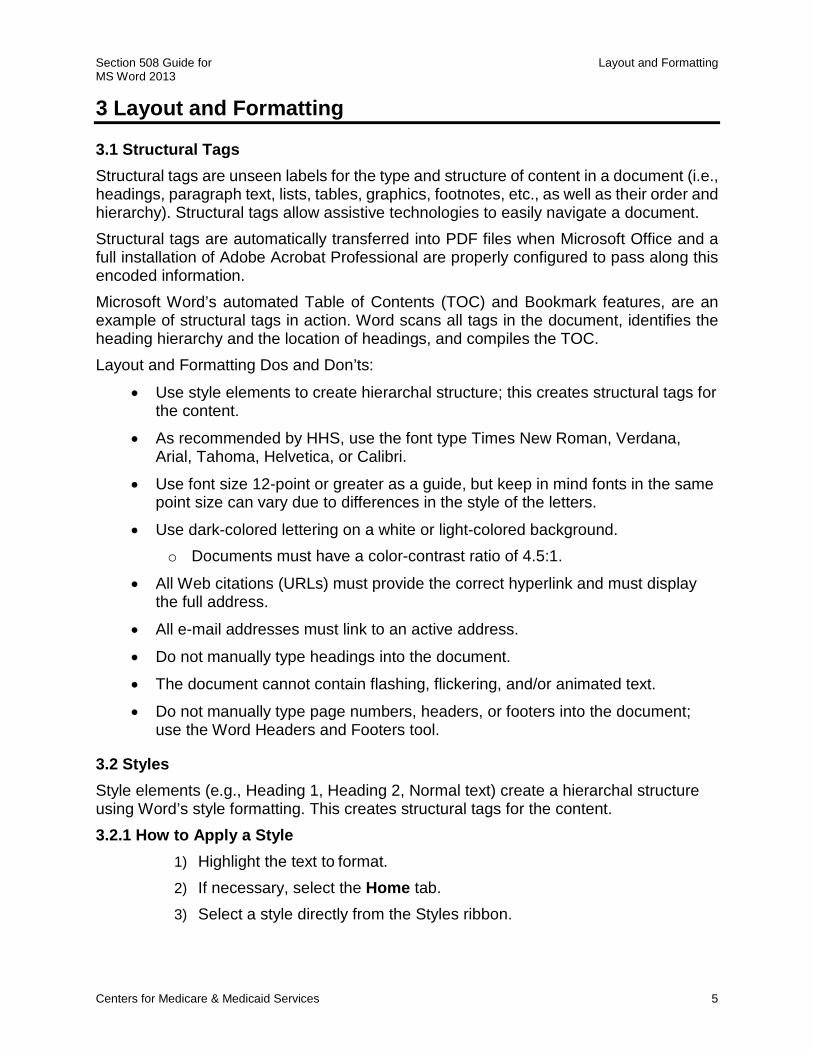
The document reappears, and the Accessibility Checker Task Pane appears along the right side of the screen, displaying the Inspection Results.
Figure 2: Accessibility Checker Task Pane
3) Click on a specific issue to see Additional Information and steps to change the content.
Section 508 Guide for Layout and Formatting MS Word 2013
Centers for Medicare & Medicaid Services 5
3 Layout and Formatting
3.1 Structural Tags Structural tags are unseen labels for the type and structure of content in a document (i.e., headings, paragraph text, lists, tables, graphics, footnotes, etc., as well as their order and hierarchy). Structural tags allow assistive technologies to easily navigate a document. Structural tags are automatically transferred into PDF files when Microsoft Office and a full installation of Adobe Acrobat Professional are properly configured to pass along this encoded information. Microsoft Word’s automated Table of Contents (TOC) and Bookmark features, are an example of structural tags in action. Word scans all tags in the document, identifies the heading hierarchy and the location of headings, and compiles the TOC. Layout and Formatting Dos and Don’ts:
• Use style elements to create hierarchal structure; this creates structural tags for the content.
• As recommended by HHS, use the font type Times New Roman, Verdana, Arial, Tahoma, Helvetica, or Calibri.
• Use font size 12-point or greater as a guide, but keep in mind fonts in the same point size can vary due to differences in the style of the letters.
• Use dark-colored lettering on a white or light-colored background. o Documents must have a color-contrast ratio of 4.5:1.
• All Web citations (URLs) must provide the correct hyperlink and must display the full address.
• All e-mail addresses must link to an active address.
• Do not manually type headings into the document.
• The document cannot contain flashing, flickering, and/or animated text.
• Do not manually type page numbers, headers, or footers into the document; use the Word Headers and Footers tool.
3.2 Styles Style elements (e.g., Heading 1, Heading 2, Normal text) create a hierarchal structure using Word’s style formatting. This creates structural tags for the content. 3.2.1 How to Apply a Style
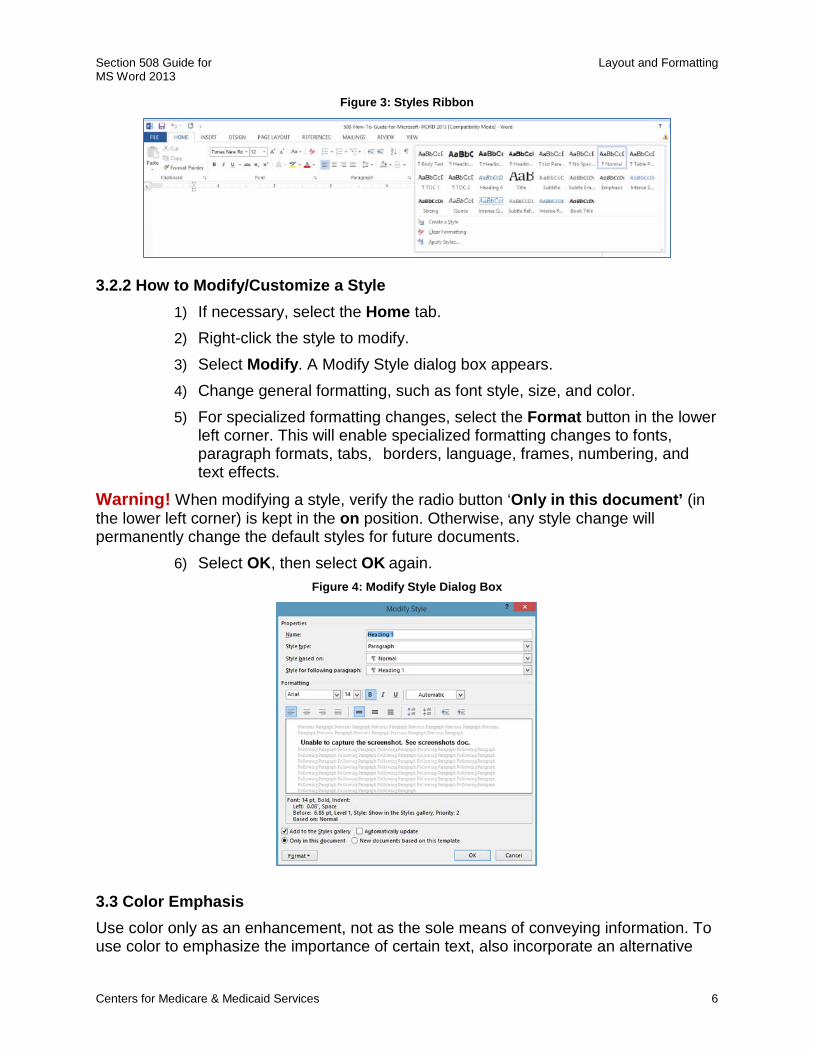
1) Highlight the text to format. 2) If necessary, select the Home tab. 3) Select a style directly from the Styles ribbon.
Section 508 Guide for Layout and Formatting MS Word 2013
Centers for Medicare & Medicaid Services 6
Figure 3: Styles Ribbon
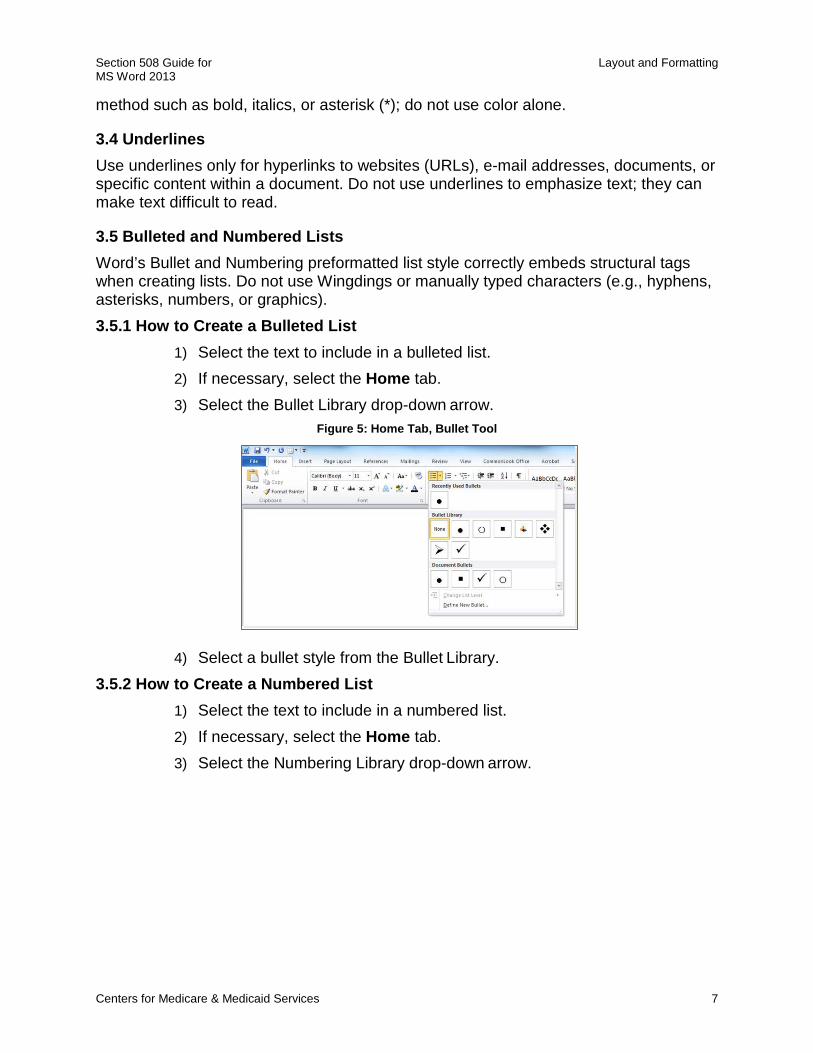
3.2.2 How to Modify/Customize a Style 1) If necessary, select the Home tab. 2) Right-click the style to modify. 3) Select Modify. A Modify Style dialog box appears. 4) Change general formatting, such as font style, size, and color. 5) For specialized formatting changes, select the Format button in the lower
left corner. This will enable specialized formatting changes to fonts, paragraph formats, tabs, borders, language, frames, numbering, and text effects.
Warning! When modifying a style, verify the radio button ‘Only in this document’ (in the lower left corner) is kept in the on position. Otherwise, any style change will permanently change the default styles for future documents.
6) Select OK, then select OK again. Figure 4: Modify Style Dialog Box
3.3 Color Emphasis Use color only as an enhancement, not as the sole means of conveying information. To use color to emphasize the importance of certain text, also incorporate an alternative
Section 508 Guide for Layout and Formatting MS Word 2013
Centers for Medicare & Medicaid Services 7
method such as bold, italics, or asterisk (*); do not use color alone.
3.4 Underlines Use underlines only for hyperlinks to websites (URLs), e-mail addresses, documents, or specific content within a document. Do not use underlines to emphasize text; they can make text difficult to read.
3.5 Bulleted and Numbered Lists Word’s Bullet and Numbering preformatted list style correctly embeds structural tags when creating lists. Do not use Wingdings or manually typed characters (e.g., hyphens, asterisks, numbers, or graphics). 3.5.1 How to Create a Bulleted List
1) Select the text to include in a bulleted list. 2) If necessary, select the Home tab. 3) Select the Bullet Library drop-down arrow.
Figure 5: Home Tab, Bullet Tool
4) Select a bullet style from the Bullet Library. 3.5.2 How to Create a Numbered List
1) Select the text to include in a numbered list. 2) If necessary, select the Home tab. 3) Select the Numbering Library drop-down arrow.
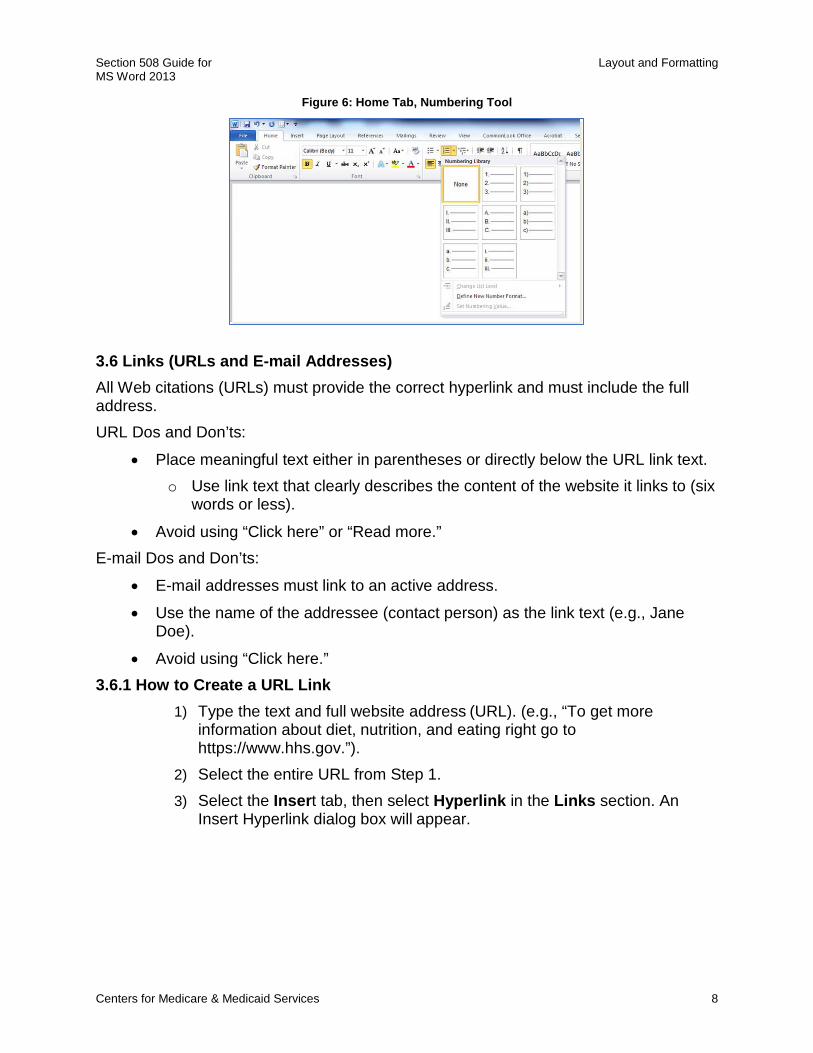
Section 508 Guide for Layout and Formatting MS Word 2013
Centers for Medicare & Medicaid Services 8
Figure 6: Home Tab, Numbering Tool
3.6 Links (URLs and E-mail Addresses) All Web citations (URLs) must provide the correct hyperlink and must include the full address. URL Dos and Don’ts:
• Place meaningful text either in parentheses or directly below the URL link text. o Use link text that clearly describes the content of the website it links to (six
words or less).
• Avoid using “Click here” or “Read more.” E-mail Dos and Don’ts:
• E-mail addresses must link to an active address.
• Use the name of the addressee (contact person) as the link text (e.g., Jane Doe).
• Avoid using “Click here.” 3.6.1 How to Create a URL Link
1) Type the text and full website address (URL). (e.g., “To get more information about diet, nutrition, and eating right go to https://www.hhs.gov.”).
2) Select the entire URL from Step 1. 3) Select the Insert tab, then select Hyperlink in the Links section. An
Insert Hyperlink dialog box will appear.
Section 508 Guide for Layout and Formatting MS Word 2013
Centers for Medicare & Medicaid Services 9
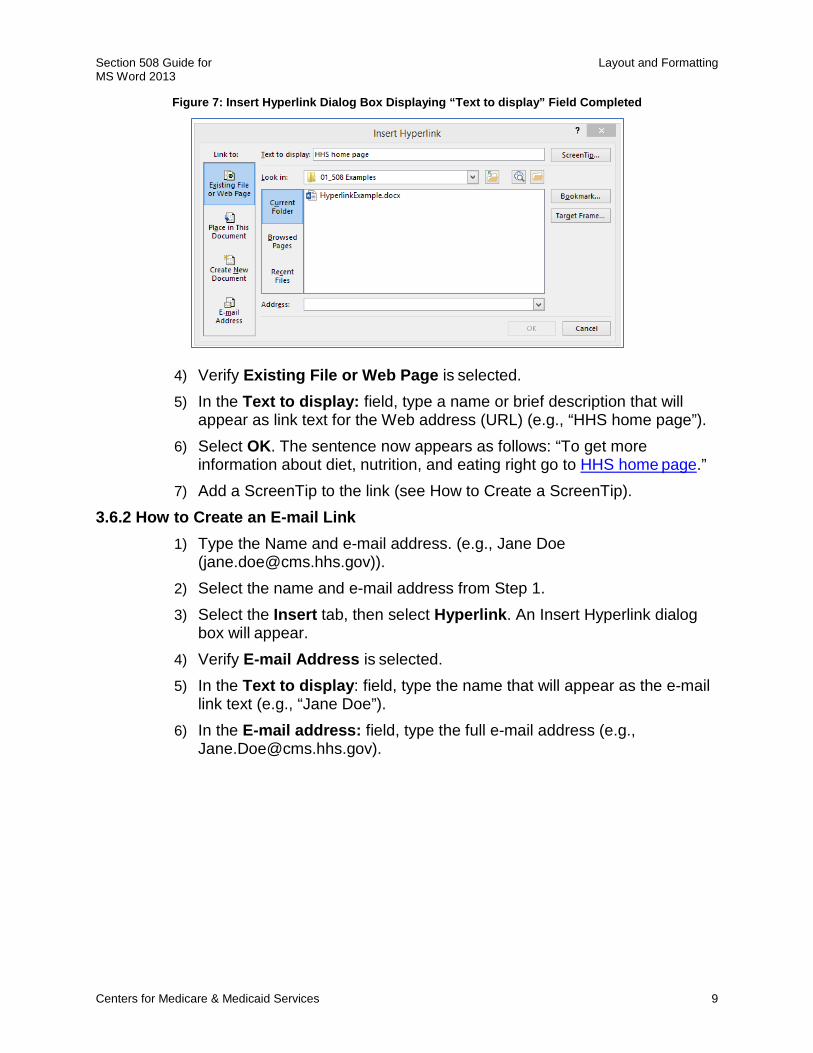
Figure 7: Insert Hyperlink Dialog Box Displaying “Text to display” Field Completed
4) Verify Existing File or Web Page is selected. 5) In the Text to display: field, type a name or brief description that will
appear as link text for the Web address (URL) (e.g., “HHS home page”). 6) Select OK. The sentence now appears as follows: “To get more
information about diet, nutrition, and eating right go to HHS home page.” 7) Add a ScreenTip to the link (see How to Create a ScreenTip).
3.6.2 How to Create an E-mail Link 1) Type the Name and e-mail address. (e.g., Jane Doe
([email protected])). 2) Select the name and e-mail address from Step 1. 3) Select the Insert tab, then select Hyperlink. An Insert Hyperlink dialog
box will appear. 4) Verify E-mail Address is selected. 5) In the Text to display: field, type the name that will appear as the e-mail
link text (e.g., “Jane Doe”). 6) In the E-mail address: field, type the full e-mail address (e.g.,
Section 508 Guide for Layout and Formatting MS Word 2013
Centers for Medicare & Medicaid Services 10
Figure 8: Insert Hyperlink Dialog Box Displaying “E-mail Address” Fields
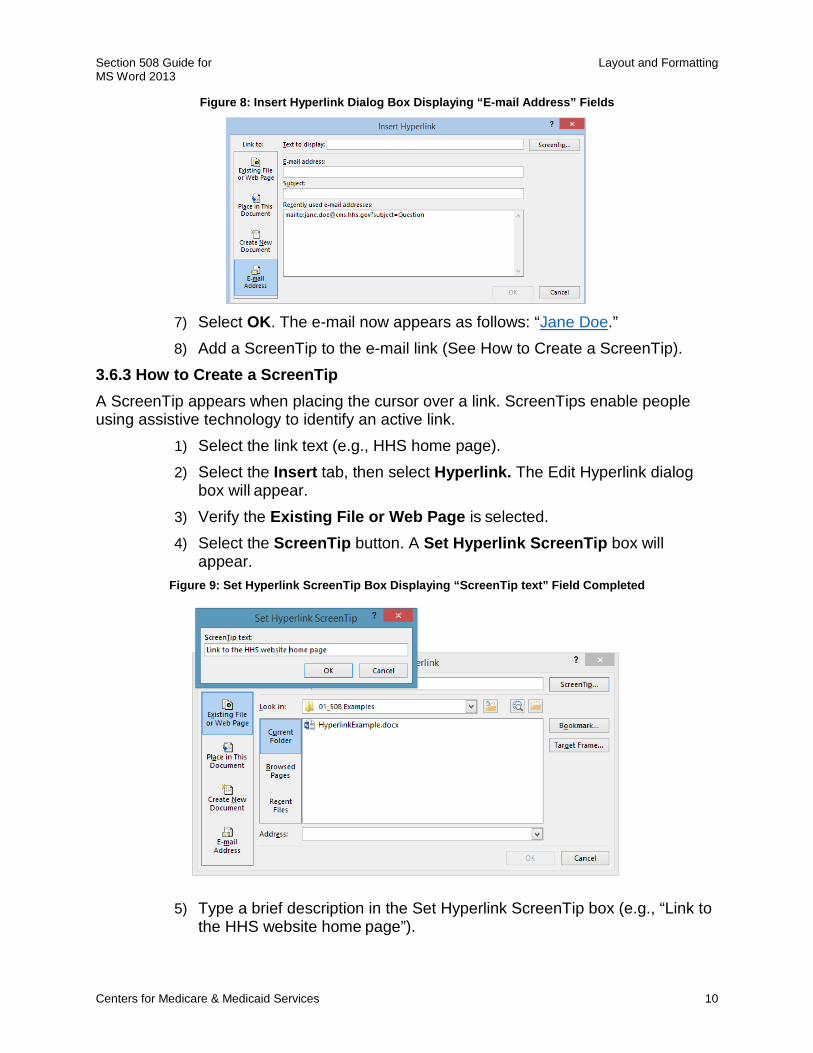
7) Select OK. The e-mail now appears as follows: “Jane Doe.” 8) Add a ScreenTip to the e-mail link (See How to Create a ScreenTip).
3.6.3 How to Create a ScreenTip A ScreenTip appears when placing the cursor over a link. ScreenTips enable people using assistive technology to identify an active link.
1) Select the link text (e.g., HHS home page). 2) Select the Insert tab, then select Hyperlink. The Edit Hyperlink dialog
box will appear. 3) Verify the Existing File or Web Page is selected. 4) Select the ScreenTip button. A Set Hyperlink ScreenTip box will
appear. Figure 9: Set Hyperlink ScreenTip Box Displaying “ScreenTip text” Field Completed
5) Type a brief description in the Set Hyperlink ScreenTip box (e.g., “Link to the HHS website home page”).
Section 508 Guide for Layout and Formatting MS Word 2013
Centers for Medicare & Medicaid Services 11
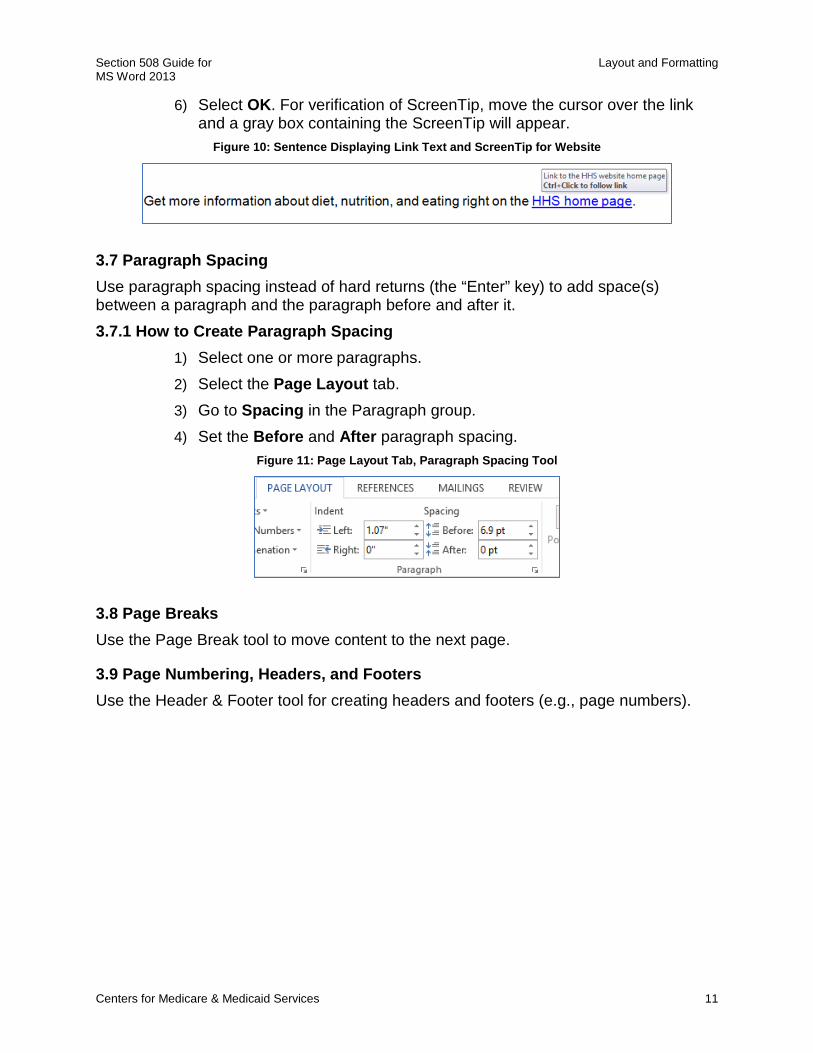
6) Select OK. For verification of ScreenTip, move the cursor over the link and a gray box containing the ScreenTip will appear.
Figure 10: Sentence Displaying Link Text and ScreenTip for Website
3.7 Paragraph Spacing Use paragraph spacing instead of hard returns (the “Enter” key) to add space(s) between a paragraph and the paragraph before and after it. 3.7.1 How to Create Paragraph Spacing
1) Select one or more paragraphs. 2) Select the Page Layout tab. 3) Go to Spacing in the Paragraph group. 4) Set the Before and After paragraph spacing.
Figure 11: Page Layout Tab, Paragraph Spacing Tool
3.8 Page Breaks Use the Page Break tool to move content to the next page.
3.9 Page Numbering, Headers, and Footers Use the Header & Footer tool for creating headers and footers (e.g., page numbers).
Section 508 Guide for Images and Graphics MS Word 2013
Centers for Medicare & Medicaid Services 12
4 Images and Graphics Images and graphics (including tables) must also comply with 508 standards. Images and Graphics Dos and Don’ts:
• Apply alternative text to appropriate images and graphics.
• Verify proper text wrapping is selected for all images (i.e., in line with text).
• Group multiple associated images as one image.
• Images and graphics must be clear and legible.
• Include a Title (numbered and brief description) for each image or graphic.
• Create an accessible version of content in a separate document when there is no other way to make content 508 compliant (e.g., organizational charts).
• Do not use background images or watermarks.
• Do not use text boxes for simple graphics unless the final format of the document will be PDF or HTML.
4.1 Alternative Text (Alt Text) All images, grouped images, and non-text elements conveying information must have alternative text (“alt text”) descriptions. Alt text allows people with disabilities equal access to the information conveyed by the image, grouped image, or other non-text elements. Non-text elements include, (but are not limited to):
• Charts • Diagrams • Graphs • Logos • Screenshots
Alt text is not necessary for images not conveying information, such as images that are purely decorative or redundant with the text. 4.1.1 How to Add Alt Text
1) Right-click on the image. 2) Select Format Picture from the drop-down menu. A Format Picture task
pane will appear on the right side of the screen. 3) Select Layout and Properties icon.
Section 508 Guide for Images and Graphics MS Word 2013
Centers for Medicare & Medicaid Services 13
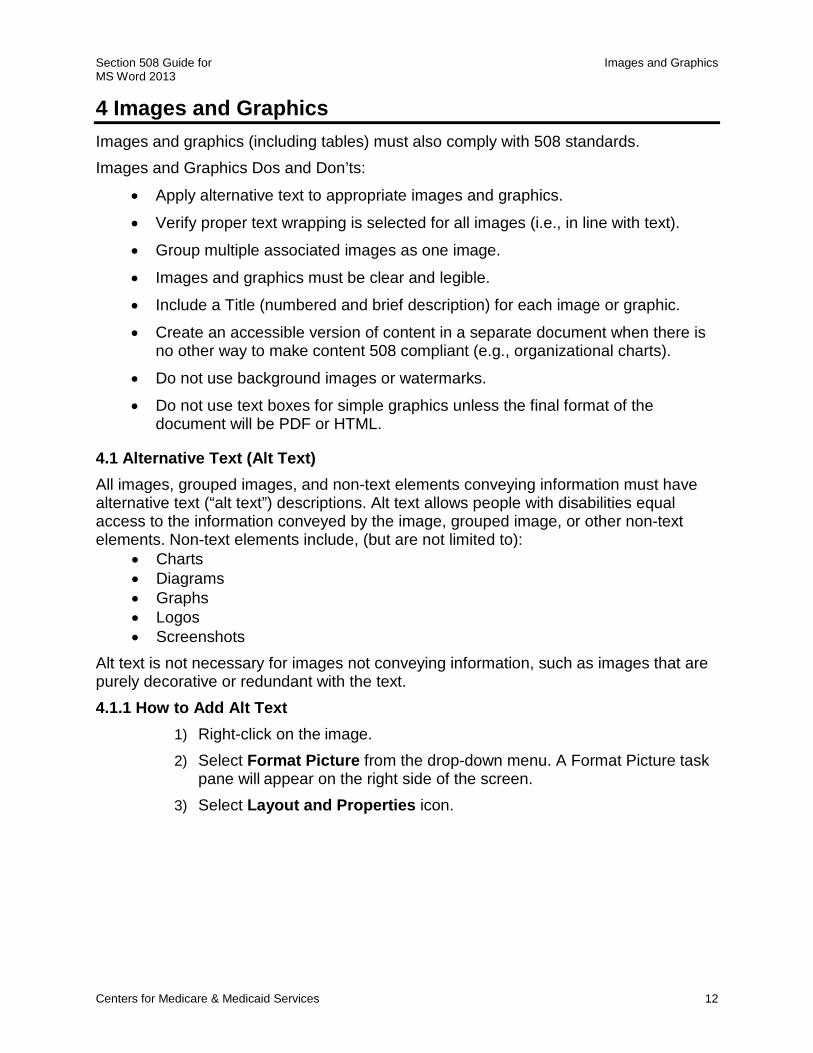
Figure 12: Format Picture Dialog Box, Alt Text Fields
4) Select Alt Text. 5) In the Description field, type a brief but complete description of the image
and the key information it is conveying. Note: It is not necessary to complete the Title field for alt text.
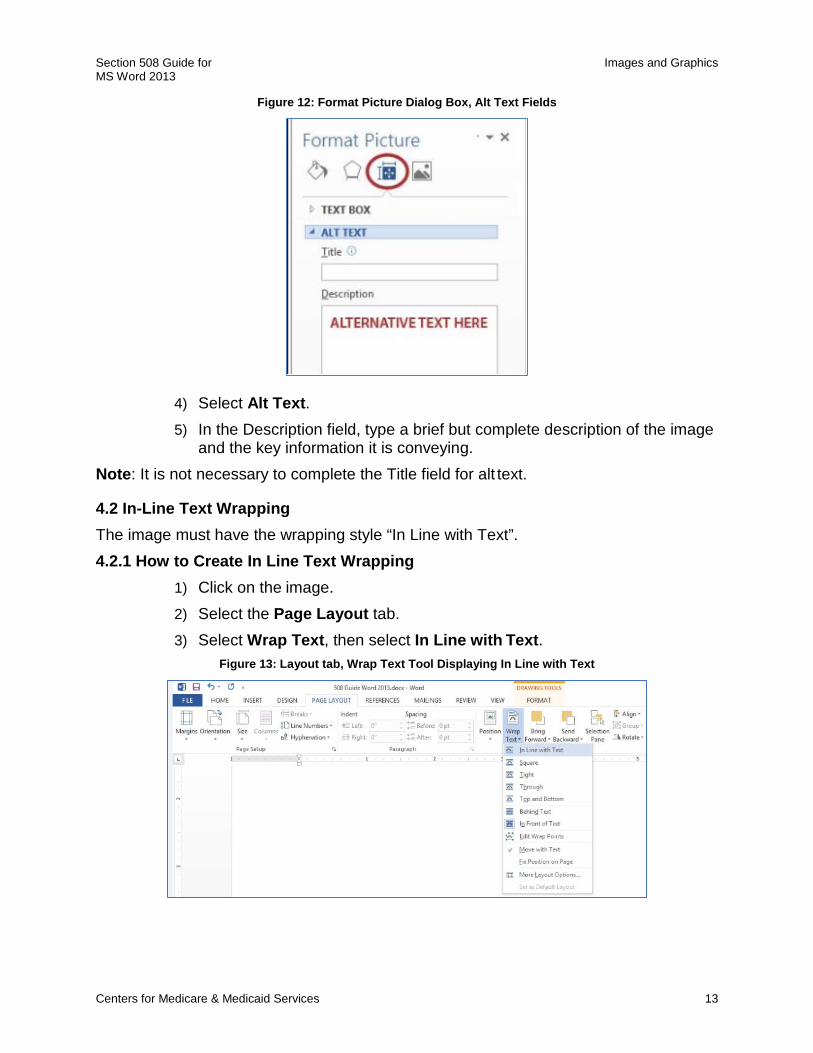
4.2 In-Line Text Wrapping The image must have the wrapping style “In Line with Text”. 4.2.1 How to Create In Line Text Wrapping
1) Click on the image. 2) Select the Page Layout tab. 3) Select Wrap Text, then select In Line with Text.
Figure 13: Layout tab, Wrap Text Tool Displaying In Line with Text
Section 508 Guide for Images and Graphics MS Word 2013
Centers for Medicare & Medicaid Services 14
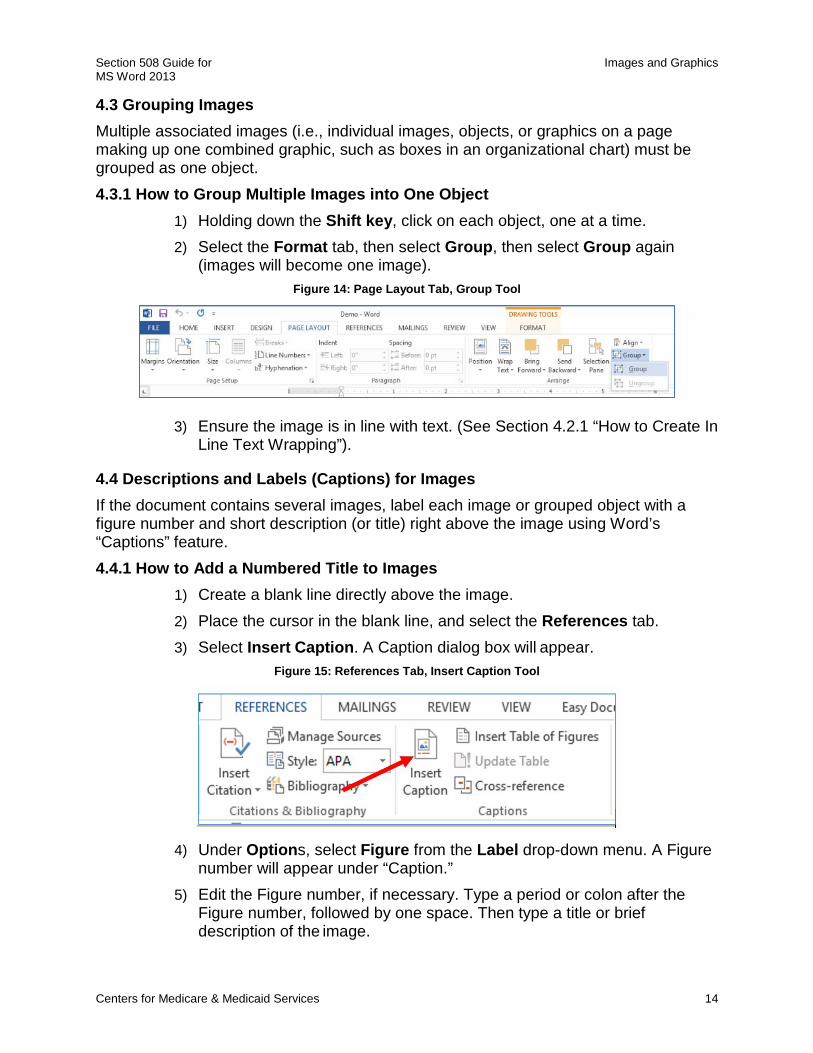
4.3 Grouping Images Multiple associated images (i.e., individual images, objects, or graphics on a page making up one combined graphic, such as boxes in an organizational chart) must be grouped as one object. 4.3.1 How to Group Multiple Images into One Object
1) Holding down the Shift key, click on each object, one at a time. 2) Select the Format tab, then select Group, then select Group again
(images will become one image). Figure 14: Page Layout Tab, Group Tool
3) Ensure the image is in line with text. (See Section 4.2.1 “How to Create In Line Text Wrapping”).
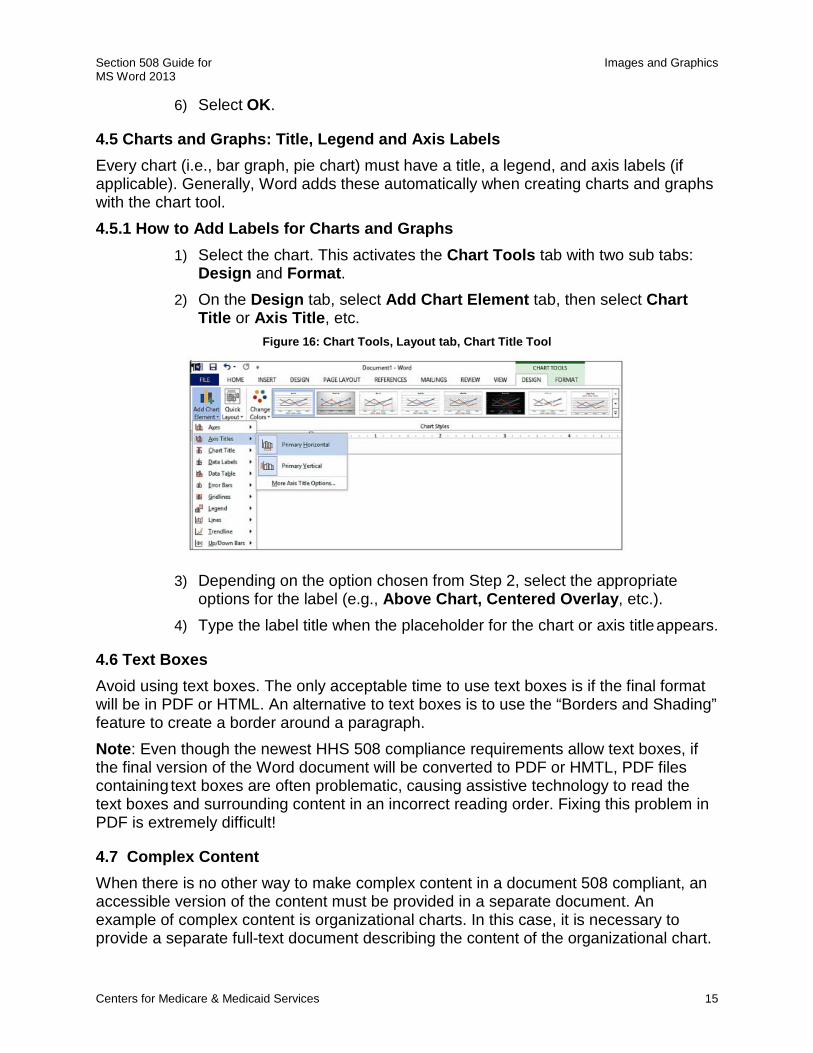
4.4 Descriptions and Labels (Captions) for Images If the document contains several images, label each image or grouped object with a figure number and short description (or title) right above the image using Word’s “Captions” feature. 4.4.1 How to Add a Numbered Title to Images
1) Create a blank line directly above the image. 2) Place the cursor in the blank line, and select the References tab. 3) Select Insert Caption. A Caption dialog box will appear.
Figure 15: References Tab, Insert Caption Tool
4) Under Options, select Figure from the Label drop-down menu. A Figure
number will appear under “Caption.” 5) Edit the Figure number, if necessary. Type a period or colon after the
Figure number, followed by one space. Then type a title or brief description of the image.
Section 508 Guide for Images and Graphics MS Word 2013
Centers for Medicare & Medicaid Services 15
6) Select OK.
4.5 Charts and Graphs: Title, Legend and Axis Labels Every chart (i.e., bar graph, pie chart) must have a title, a legend, and axis labels (if applicable). Generally, Word adds these automatically when creating charts and graphs with the chart tool. 4.5.1 How to Add Labels for Charts and Graphs
1) Select the chart. This activates the Chart Tools tab with two sub tabs: Design and Format.
2) On the Design tab, select Add Chart Element tab, then select Chart Title or Axis Title, etc.
Figure 16: Chart Tools, Layout tab, Chart Title Tool
3) Depending on the option chosen from Step 2, select the appropriate options for the label (e.g., Above Chart, Centered Overlay, etc.).
4) Type the label title when the placeholder for the chart or axis title appears.
4.6 Text Boxes Avoid using text boxes. The only acceptable time to use text boxes is if the final format will be in PDF or HTML. An alternative to text boxes is to use the “Borders and Shading” feature to create a border around a paragraph. Note: Even though the newest HHS 508 compliance requirements allow text boxes, if the final version of the Word document will be converted to PDF or HMTL, PDF files containing text boxes are often problematic, causing assistive technology to read the text boxes and surrounding content in an incorrect reading order. Fixing this problem in PDF is extremely difficult!
4.7 Complex Content When there is no other way to make complex content in a document 508 compliant, an accessible version of the content must be provided in a separate document. An example of complex content is organizational charts. In this case, it is necessary to provide a separate full-text document describing the content of the organizational chart.
Section 508 Guide for Comments, Formatting Marks, References, Etc. MS Word 2013
Centers for Medicare & Medicaid Services 16
5 Comments, Formatting Marks, References, Etc. Comments and formatting marks are often overlooked when creating Word documents. Comments, formatting and references Dos and Don’ts:
• All comments and formatting marks must be turned off when preparing the final version.
• Accept or reject all tracked changes when preparing the final version.
• Footnotes must be created using the footnote linking tool.
• Bookmarks or Table of Contents must be created using appropriate tools.
5.1 Comments and Formatting Marks All comments must be removed from the document, prior to finalizing. Prior to finalizing the document, or converting the document to a PDF file, check for any unwanted formatting marks. Formatting marks such as paragraph breaks, page breaks, and extra spaces are hidden by default in Word. To view formatting marks, select the Home tab, then select the Show/Hide button in the paragraph group. Note: Remember to turn this feature off before saving/closing the document.
5.2 Track Changes All track changes should be accepted or rejected prior to finalizing.
5.3 Footnotes Footnotes are used to reflect referenced information and should be created using the Footnote tool.
5.4 Bookmarks and Table of Contents Documents that are 10 or more pages must contain Bookmarks or a Table of Contents (TOC). As a reminder, if Styles are used properly, the TOC tool will properly tag and link pages.
Section 508 Guide for Tables MS Word 2013
Centers for Medicare & Medicaid Services 17
6 Tables
6.1 Tables Tables help organize data and must be created using the Table tool. Table Dos and Don’ts:
• Tables should be created with the Table tool. Do not use tabs and/or spaces to create a table.
• Always provide a table Title.
• Headers must appear for each column (top) and rows (left column) of data and must be descriptive yet concise.
• Ensure logical reading order is from left to right, top to bottom.
• Avoid merged cells unless the final format of the document will be PDF or HTML. Instead of using merged cells, create multiple tables when needing to convey a lot of information.
• Avoid using blank cells, rows, or columns.
• Do not use the “Draw Table” feature in the “Insert Table” drop-down menu. Tables created using “Draw Table” are not 508 compliant.
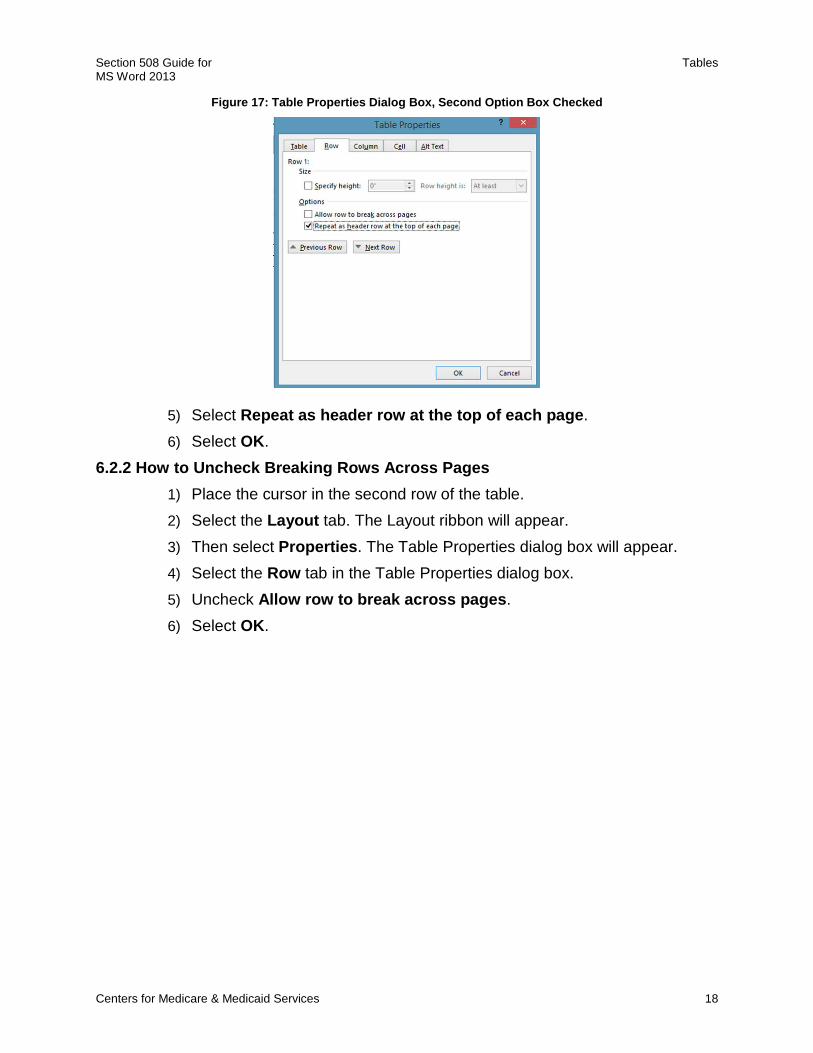
6.2 Table Header Row & Break When creating tables, a Table Header Row must be identified and positioned as the top row of the table. Additionally, there is a special requirement for selecting/deselecting the appropriate table headers and rows “Options” boxes, even if the table fits on one page. 6.2.1 How to Create a Table Header Row
1) Place the cursor in the top row of the table. The “Table Tools” Group will appear with two sub tabs: Design and Layout.
2) Select the Layout tab. The Layout ribbon will appear. 3) Then select Properties. The Table Properties dialog box will appear. 4) Select the Row tab in the Table Properties dialog box.
Section 508 Guide for Tables MS Word 2013
Centers for Medicare & Medicaid Services 18
Figure 17: Table Properties Dialog Box, Second Option Box Checked
5) Select Repeat as header row at the top of each page. 6) Select OK.
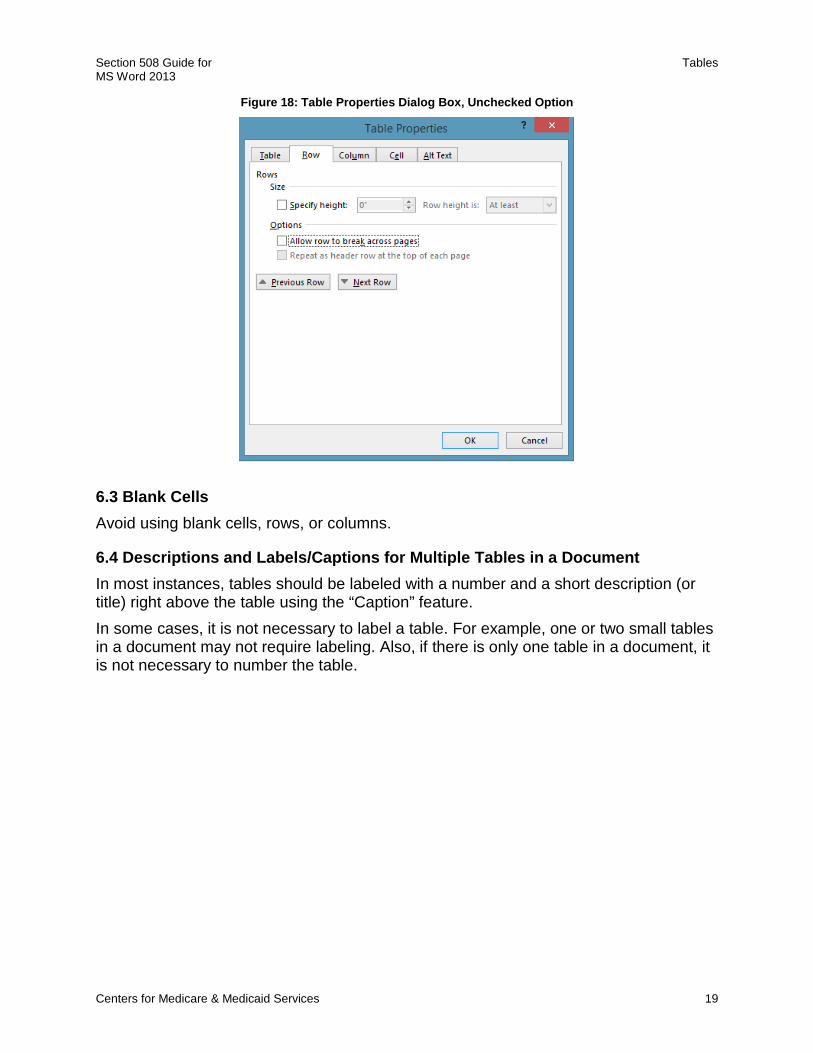
6.2.2 How to Uncheck Breaking Rows Across Pages 1) Place the cursor in the second row of the table. 2) Select the Layout tab. The Layout ribbon will appear. 3) Then select Properties. The Table Properties dialog box will appear. 4) Select the Row tab in the Table Properties dialog box. 5) Uncheck Allow row to break across pages. 6) Select OK.
Section 508 Guide for Tables MS Word 2013
Centers for Medicare & Medicaid Services 19
Figure 18: Table Properties Dialog Box, Unchecked Option
6.3 Blank Cells Avoid using blank cells, rows, or columns.
6.4 Descriptions and Labels/Captions for Multiple Tables in a Document In most instances, tables should be labeled with a number and a short description (or title) right above the table using the “Caption” feature. In some cases, it is not necessary to label a table. For example, one or two small tables in a document may not require labeling. Also, if there is only one table in a document, it is not necessary to number the table.
Section 508 Guide for File Naming MS Word 2013
Centers for Medicare & Medicaid Services 20
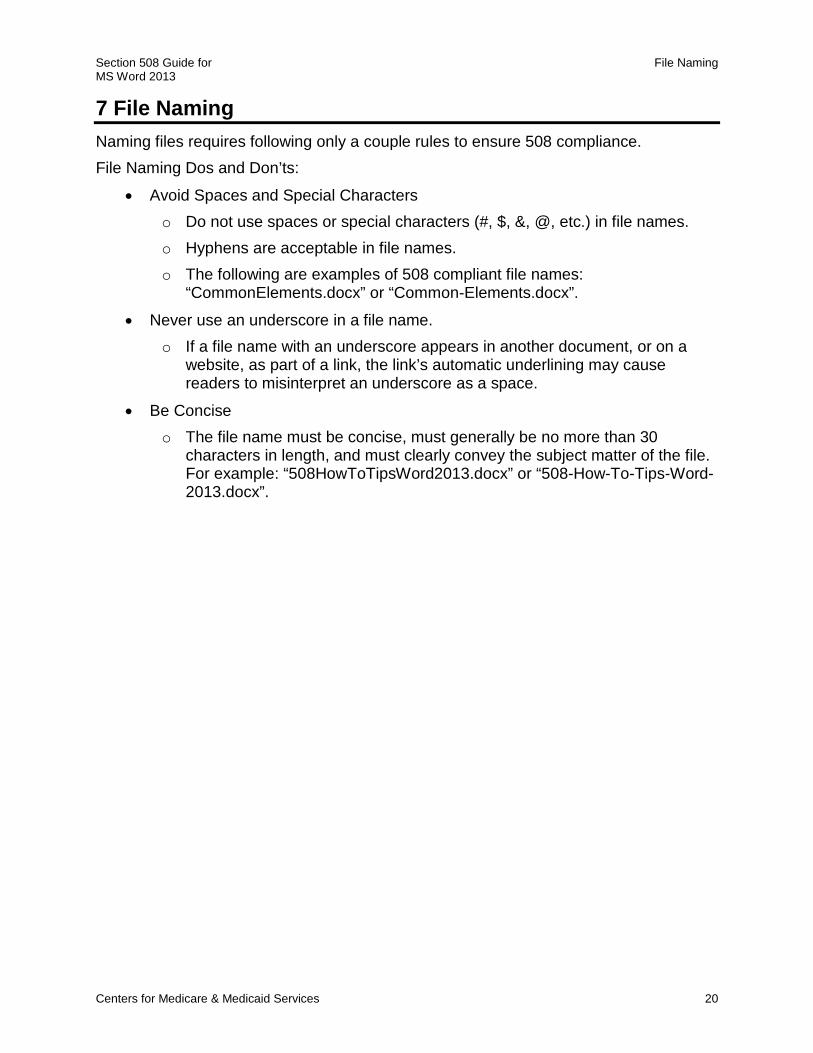
7 File Naming Naming files requires following only a couple rules to ensure 508 compliance. File Naming Dos and Don’ts:
• Avoid Spaces and Special Characters o Do not use spaces or special characters (#, $, &, @, etc.) in file names. o Hyphens are acceptable in file names. o The following are examples of 508 compliant file names:
“CommonElements.docx” or “Common-Elements.docx”.
• Never use an underscore in a file name. o If a file name with an underscore appears in another document, or on a
website, as part of a link, the link’s automatic underlining may cause readers to misinterpret an underscore as a space.
• Be Concise o The file name must be concise, must generally be no more than 30
characters in length, and must clearly convey the subject matter of the file. For example: “508HowToTipsWord2013.docx” or “508-How-To-Tips-Word-2013.docx”.
Section 508 Guide for Document Properties MS Word 2013
Centers for Medicare & Medicaid Services 21
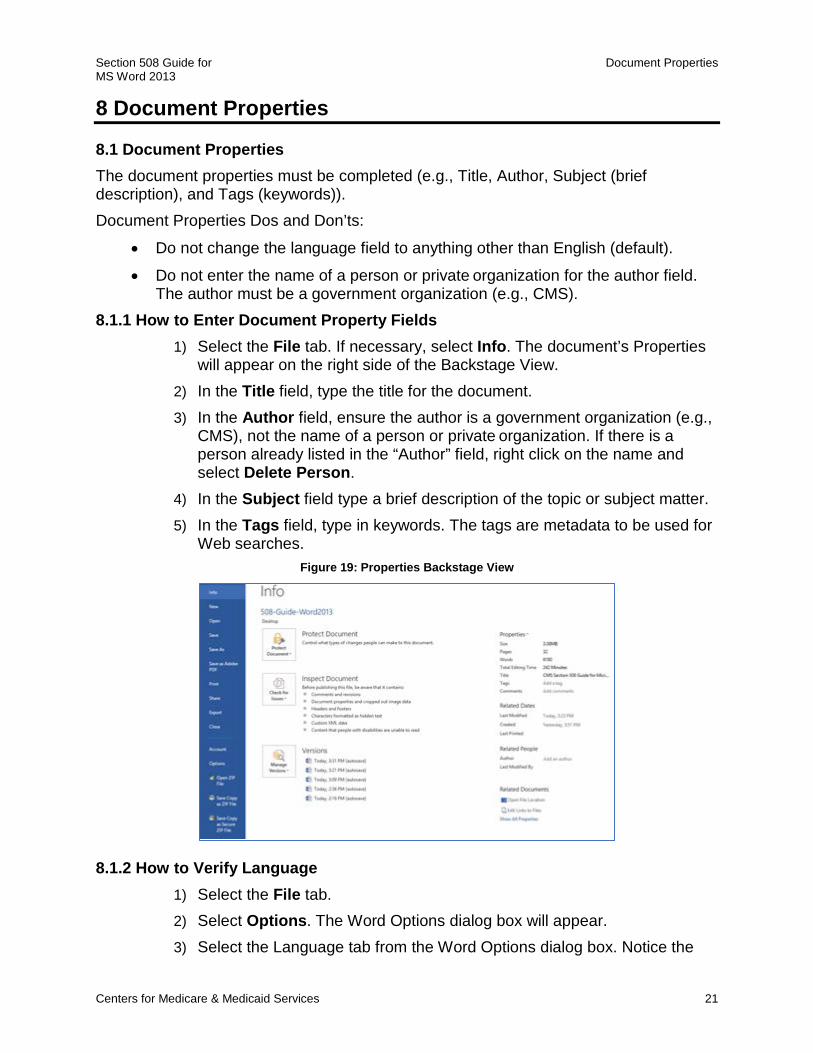
8 Document Properties
8.1 Document Properties The document properties must be completed (e.g., Title, Author, Subject (brief description), and Tags (keywords)). Document Properties Dos and Don’ts:
• Do not change the language field to anything other than English (default).
• Do not enter the name of a person or private organization for the author field. The author must be a government organization (e.g., CMS).
8.1.1 How to Enter Document Property Fields 1) Select the File tab. If necessary, select Info. The document’s Properties
will appear on the right side of the Backstage View. 2) In the Title field, type the title for the document. 3) In the Author field, ensure the author is a government organization (e.g.,
CMS), not the name of a person or private organization. If there is a person already listed in the “Author” field, right click on the name and select Delete Person.
4) In the Subject field type a brief description of the topic or subject matter. 5) In the Tags field, type in keywords. The tags are metadata to be used for
Web searches. Figure 19: Properties Backstage View
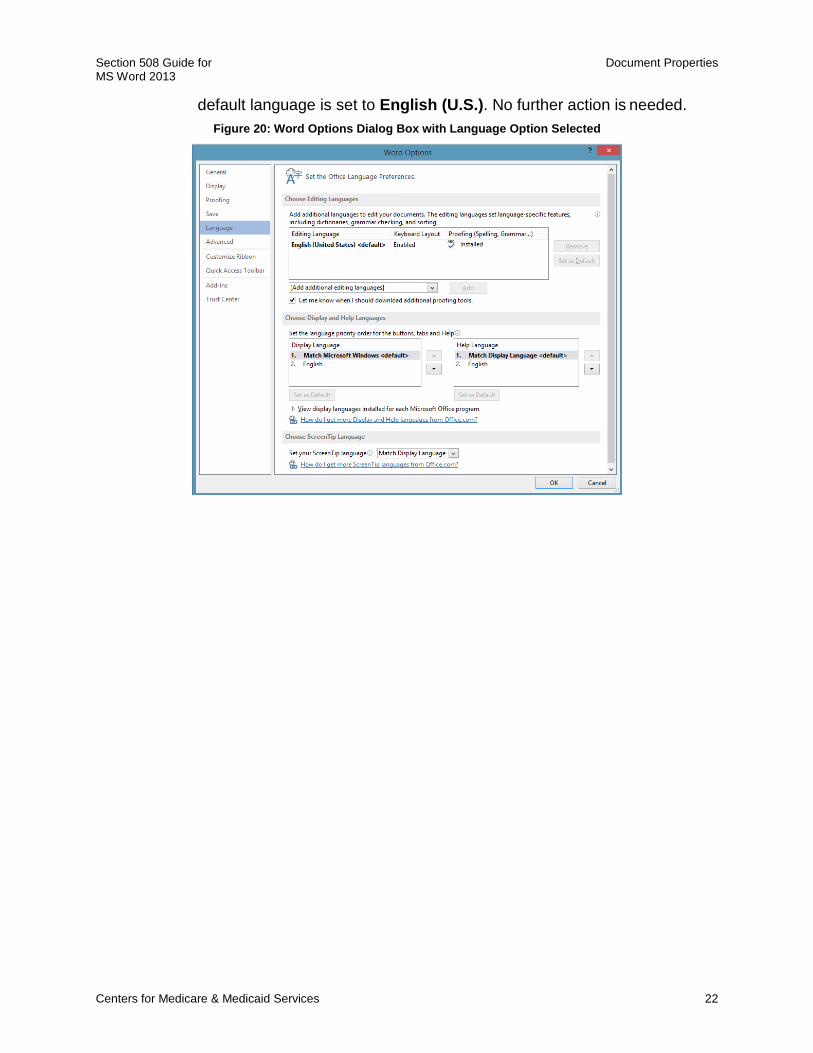
8.1.2 How to Verify Language 1) Select the File tab. 2) Select Options. The Word Options dialog box will appear. 3) Select the Language tab from the Word Options dialog box. Notice the
Section 508 Guide for Document Properties MS Word 2013
Centers for Medicare & Medicaid Services 22
default language is set to English (U.S.). No further action is needed. Figure 20: Word Options Dialog Box with Language Option Selected

Section 508 Guide for Converting Word Documents to PDF MS Word 2013
Centers for Medicare & Medicaid Services 23
9 Converting Word Documents to PDF
9.1 Converting from Word to PDF To convert a Word document to PDF, use the PDF conversion tool. Converting from Word to PDF Dos and Don’ts:
• The Acrobat tool is the preferred and most reliable method of converting Word documents to PDF to carry over formatting elements and accessibility tags.
• If the Acrobat conversion does not carry over all the formatting elements and accessibility tags, try using File, then Save as Adobe PDF.
• Do not use the File, Print, Print to Adobe PDF, as this does not properly convert the formatting elements and accessibility tags in Word documents.
• Before converting the document to a PDF file, view the document in Print Preview to verify it flows correctly from page to page. Look for image placement, table formatting, and stray (“orphaned” or “widowed”) lines and characters.
9.1.1 How to Convert a Word Document to PDF 1) Select the Acrobat tab. 2) Select Create PDF and Run Action.
Figure 21: Create Adobe PDF and Run Action Tool
3) Name and save the file to the appropriate location. 4) The Make Accessible task pane will appear on the right side of the
screen. Select the Start button to begin checking for compliance. 5) Follow the prompts on the screen and answer in accordance to the
document. 6) When the Accessibility Checker dialog box appears, select the Start
Checking button. Results of the Accessibility Check will appear on the left pane.
Section 508 Guide for Frequently Asked Questions MS Word 2013
Centers for Medicare & Medicaid Services 24
10 Frequently Asked Questions Who is Responsible for Ensuring Word Documents are 508 Compliant? Everyone who works for CMS is responsible for making sure all written materials created are 508 compliant, regardless of whether these materials are intended for internal or external distribution. Likewise, contractors, state agencies, and other public and private organizations receiving federal funding to carry out particular programs or projects on behalf of CMS are required to make sure the written materials produced in conjunction with those programs or projects are 508 compliant. Why is 508 Compliance Important? Making a document 508 compliant does not just help make it accessible to people with disabilities. It also increases a document’s usability and adds new features everyone can use:
• 508 compliant PDF files can be read aloud using the free Adobe Acrobat Reader, providing all the information received by someone viewing the document.
• The structural tags of a 508 compliant document can turn into a hyperlinked Table of Contents in a Word file or bookmarks in a PDF file, allowing the user to easily skip to a particular section in a long document.
• 508 compliance provides easy ways to view and navigate documents independent of the original format, allowing documents to be easily formatted for cell phones or other mobile devices.
What Types of Word Documents Must be 508 Compliant? All written materials must be 508 compliant, regardless of whether they are intended for internal or external distribution. The final version must always be 508 compliant. Also, working drafts must be 508 compliant if they are being reviewed by one or more individuals who have a disability preventing them from reading or navigating the draft. Must a Converted Word File to PDF still be 508 Compliant? Yes. In many cases, the CMS component Section 508 Clearance Officer can assist with creating a 508 compliant PDF file which may be posted or distributed electronically (e.g., via the Internet or e-mail). Where is the list of CMS Section 508 Clearance Officers? The most current list of CMS Section 508 Clearance Officers can be found on the cms.gov Section 508 page (https://www.cms.gov/Research-Statistics-Data-and-Systems/CMS-Information-Technology/Section508/index.html). What is Assistive Technology (AT)? People with disabilities may use a variety of technologies, many of which depend on structural tags to function properly. Assistive technology allows people with impaired vision to enlarge an area of the screen, increase font size, change document colors, increase contrast, or even “read” the computer screen using an audible or tactile Braille device.
Section 508 Guide for Frequently Asked Questions MS Word 2013
Centers for Medicare & Medicaid Services 25
People who are mobility impaired may navigate the screen by means other than a mouse or keyboard. Some may use a keyboard with Tab key or Arrow key based navigation. Some may use a mouse or joystick with a virtual software based keyboard. Some even employ physical input methods such as eye movement tracking, or an oral sip-and-puff system controlled by breathing through a tube.
What if Other Types of Content Not Addressed In This Guide are Used? This guide is not intended to be a complete guide to Section 508 compliance. If a document contains rich media, such as audio, video, animation, or interactive navigation features, additional requirements not covered in this guide will apply. Please see the Other Resources Available Section for more information.
Section 508 Guide for Other Resources Available MS Word 2013
Centers for Medicare & Medicaid Services 26
11 Other Resources Available The guide contains content from and expands on the following sources:
• “Word Document 508 Checklist”. To get a copy of the checklist, go to the HHS Section 508 Website Word Document 508 Checklist (https://www.hhs.gov/web/section-508/making-files-accessible/checklist/word/index.html).
• “PDF File 508 Checklist”. To get a copy of the checklist, go to the HHS Section 508 Website PDF File 508 Checklist (https://www.hhs.gov/web/section-508/making-files-accessible/checklist/pdf/index.html).
This guide also draws from the following Microsoft Office online sources: • "Creating accessible Word documents" (http://office.microsoft.com/en-us/word-
help/creating- accessible-word-documents-HA101999993.aspx). • "Use the acccessibility checker on your Windows desktop to find accessibility
issues"(http://office.microsoft.com/en-us/word-help/check-for- accessibility-issues-HA010369192.aspx?CTT=5&origin=HA101999993).
• "Rules For the Accessibility Checker" (http://office.microsoft.com/en-us/word-help/rules- used-by-the-accessibility-checker-HA101823437.aspx?CTT=5&origin=HA010369192).