Embed Size (px)
Citation preview
1
To further troubleshoot your printer please visit:
http://www.inkjet411.com
HP Inkjet Printer Diagnostic Tests
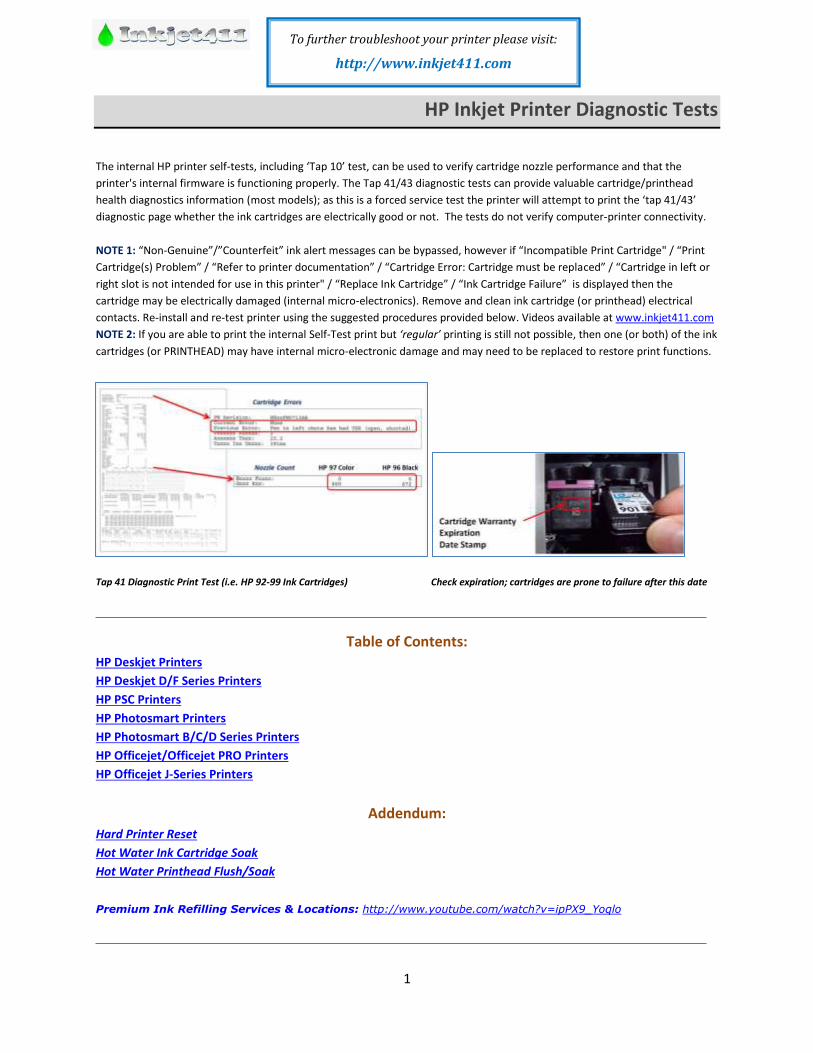
The internal HP printer self-tests, including ‘Tap 10’ test, can be used to verify cartridge nozzle performance and that the
printer's internal firmware is functioning properly. The Tap 41/43 diagnostic tests can provide valuable cartridge/printhead
health diagnostics information (most models); as this is a forced service test the printer will attempt to print the ‘tap 41/43’
diagnostic page whether the ink cartridges are electrically good or not. The tests do not verify computer-printer connectivity.
NOTE 1: “Non-Genuine”/”Counterfeit” ink alert messages can be bypassed, however if “Incompatible Print Cartridge" / “Print
Cartridge(s) Problem” / “Refer to printer documentation” / “Cartridge Error: Cartridge must be replaced” / “Cartridge in left or
right slot is not intended for use in this printer" / “Replace Ink Cartridge” / “Ink Cartridge Failure” is displayed then the
cartridge may be electrically damaged (internal micro-electronics). Remove and clean ink cartridge (or printhead) electrical
contacts. Re-install and re-test printer using the suggested procedures provided below. Videos available at www.inkjet411.com
NOTE 2: If you are able to print the internal Self-Test print but ‘regular’ printing is still not possible, then one (or both) of the ink
cartridges (or PRINTHEAD) may have internal micro-electronic damage and may need to be replaced to restore print functions.
Tap 41 Diagnostic Print Test (i.e. HP 92-99 Ink Cartridges) Check expiration; cartridges are prone to failure after this date
Table of Contents: HP Deskjet Printers
HP Deskjet D/F Series Printers
HP PSC Printers
HP Photosmart Printers
HP Photosmart B/C/D Series Printers
HP Officejet/Officejet PRO Printers
HP Officejet J-Series Printers
Addendum: Hard Printer Reset
Hot Water Ink Cartridge Soak
Hot Water Printhead Flush/Soak
Premium Ink Refilling Services & Locations: http://www.youtube.com/watch?v=ipPX9_Yoqlo
2
To further troubleshoot your printer please visit:
http://www.inkjet411.com
HP Deskjet Printers
Print the HP Self-Test Report (older HP printer models) – click here for instructions/sample prints:
http://h10025.www1.hp.com/ewfrf/wc/document?cc=us&lc=en&dlc=en&docname=bpu00734
Deskjet Printers (most models)
Tap 10 Diagnostic Test (Extended Self-Test):
1. Press and hold the Power button, and then press the Cancel button once.
2. Release the buttons. The Extended Self-Test (“Tap 10”) prints.
3. Review test pattern; ensure all colors are firing. A missing horizontal block or blocks within the nozzle stair
step pattern indicates a misfiring ink nozzle. Perform cartridge cleaning to correct.
Deskjet 400, 400L, 420c series printers (HP 25, 26 ink cartridges)
Running a self-test:
1. Turn the printer off.
2. Press and hold down the PAPER FEED button.
3. Turn the printer on.
4. Release the PAPER FEED button.
Running a clean test:
1. Turn the printer on.
2. Press and hold down the CHANGE CARTRIDGE button for five seconds.
Deskjet 460 and Officejet H470 (H100?) Mobile Printer series (HP 94, 95, 97, 100 cartridges) HP 92-99 Ink Refilling Services & Additional Cautions: http://www.youtube.com/watch?v=VfYlrQUS_PI
Running a self-test:
1. Make sure the product is on and loaded with unused, plain white paper.
2. Hold down the Power button, and then press the Resume button 10 times. Release both buttons, and the
test page prints.
NOTE: If test page prints then the printer is functioning normally and the problem can be isolated to an ink cartridge.
Replace ink cartridge and retest.
Deskjet 500, 510, 520 series printers (HP 26 black ink cartridge)
Deskjet 550c, 560c series printers (HP 25, 26 ink cartridges)
Running a self-test:
1. Press FONT and RESET, or LOAD EJECT while turning on the printer.
Running a clean test:
1. Turn the printer on.
2. Press the CLEAN button.
Running an alignment test:
1. Turn the printer on.
2. Press the ALIGNMENT TEST button.
Deskjet 540 printers (HP 25, 26 ink cartridges)
Running a self-test
1. Turn the printer on.
3
To further troubleshoot your printer please visit:
http://www.inkjet411.com
2. Press and hold down the RESUME button until the printer starts printing.
Running a clean test:
1. Turn the printer on.
2. Press and hold down the POWER button.
3. Press the RESUME button seven times.
4. Release the POWER button.
Running a diagnostic test:
Regular Test:
1. Turn the printer on.
2. Press and hold down the POWER button.
3. Press the RESUME button five times.
4. Release the POWER button.
Extended Test:
1. Turn the printer on.
2. Press and hold down the POWER button.
3. Press the RESUME button twelve times.
4. Release the POWER button.
Deskjet 600, 600c, 610c, 630c, 632c, 640c, 642c, 648c, 656c series printers (HP 20, 49 ink cartridges)
Deskjet 660c, 670c, 680c, 690c, 692c, 693c, 694c, 695c, 697c series printers (HP 29, 49 ink cartridges)
Running a self-test:
1. Turn the printer on.
2. Press and hold the RESUME button until the printer starts printing.
3. Release the RESUME button.
Running a clean-test:
1. Turn the printer on.
2. Press and hold the POWER button.
3. Press the RESUME button seven times.
4. Release the POWER button.
Running a diagnostic-test:
A. Regular Test
1. Turn the printer on.
2. Press and hold the POWER button.
3. Press the RESUME button five times.
4. Release the POWER button.
B. Extended Test
1. Turn the printer on.
2. Press and hold the POWER button.
3. Press the RESUME button twelve times.
4. Release the POWER button.
4
To further troubleshoot your printer please visit:
http://www.inkjet411.com
Deskjet 700 series printers (HP 23, 45 Ink Cartridges)
Deskjet 710c and 720c series printers (HP 23, 45 ink cartridges) HP 23/45 Ink Refilling Services & Additional Cautions: http://www.youtube.com/watch?v=JOnL4YmTJFo
Running a self-test:
1. Turn the printer on.
2. Press and hold the POWER button.
3. Press the RESUME button four times.
4. Release the POWER button.
NOTE 1: This may need to be performed several times before the printer prints the page.
NOTE 2: There are no internal clean or diagnostic tests for the HP Deskjet 710c and 720c series printers. The clean
test can be performed from the printer’s toolbox.
Deskjet 800 series printers (HP 15, 23 ink cartridges) HP 15/23 Ink Refilling Services & Additional Cautions: http://www.youtube.com/watch?v=1GMaXXmTk8s Deskjet 820c printers (HP 41, 45 ink cartridges) HP 15/23/45/78 Ink Refilling Services & Additional Cautions: http://www.youtube.com/watch?v=oZFKWZ_wEEk Running a self-test:
1. Turn the printer on.
2. Press and hold the POWER button.
3. Press the RESUME button four times.
4. Release the POWER button.
NOTE: There are no internal clean or diagnostic tests for the HP Deskjet 820cse and 820cxi printers.
Deskjet 810c, 840c, 841, 842, 843, 845, 845c (HP 15, 17 ink cartridges) HP 15/17 Ink Refilling Services & Additional Cautions: http://www.youtube.com/watch?v=QvRx8QWAxqM Deskjet 825c (HP 15, 23 ink cartridges) HP 15/23 Ink Refilling Services & Additional Cautions: http://www.youtube.com/watch?v=1GMaXXmTk8s Deskjet 830c, 880, 880c, and 895c series printers (HP 23, 45 ink cartridges) HP 23/45 Ink Refilling Services & Additional Cautions: http://www.youtube.com/watch?v=JOnL4YmTJFo Running a sample page:
1. Turn the printer on.
2. Press and hold the RESUME button until the printer starts printing.
3. Release the RESUME button.
Running a diagnostic test:
1. Turn the printer on.
2. Press and hold the POWER button.
3. Press the RESUME button four times.
4. Release the POWER button.
NOTE: There is no internal clean test for the HP Deskjet 810c, 830c, 880c, and 895c series printers.
Deskjet 850, 850c, 855, 855c, 870c series printers (HP 41, 45 ink cartridges) HP 15/23/45/78 Ink Refilling Services & Additional Cautions: http://www.youtube.com/watch?v=oZFKWZ_wEEk Deskjet 890c, 895 series printers (HP 23, 45 ink cartridges) HP 23/45 Ink Refilling Services & Additional Cautions: http://www.youtube.com/watch?v=JOnL4YmTJFo Running a self-test:
1. Turn the printer on.
2. Press and hold the RESUME button until the printer starts printing.
3. Release the RESUME button.
Running a clean-test:
5
To further troubleshoot your printer please visit:
http://www.inkjet411.com
1. Turn the printer on.
2. Press and hold the POWER button.
3. Press the RESUME button seven times.
4. Release the POWER button.
Running a diagnostic test:
1. Turn the printer on.
2. Press and hold the POWER button.
3. Press the RESUME button five times.
4. Release the POWER button.
Deskjet 900c, 916c, 920c, 940, 940c series printers (HP 15, 78 ink cartridges) HP 15/78 Ink Refilling Services & Additional Cautions: http://www.youtube.com/watch?v=oePjBGdqW2Y Deskjet 930c, 950c, 952, 960c, 970c, 980c, 990c (HP 45, 78 ink cartridges) HP 45/78 Ink Refilling Services & Additional Cautions: http://www.youtube.com/watch?v=M7Q8t2pr2WA Running a sample page:
1. Turn the printer on.
2. Press and hold the RESUME button until the printer starts printing.
3. Release the RESUME button.
Running a self-test:
1. Turn the printer on.
2. Press and hold the POWER button.
3. Press the RESUME button four times.
4. Release the POWER button.
Running a diagnostic test:
1. Turn the printer on.
2. Press and hold the POWER button.
3. Press the X (Cancel) button eight times.
4. Press the RESUME button four times.
5. Release the POWER button.
Print a HP Self-Test Report (older HP printer models) – click here for instructions & sample prints:
http://h10025.www1.hp.com/ewfrf/wc/document?cc=us&lc=en&dlc=en&docname=bpu00734
TBD: A good HP 45 black cartridge should display xxx good nozzles, while a good HP 78 color ink
cartridge should show xxx good nozzles.
DeskJet 1000 J110a, 1000 J110c, 1000 J110d, 1000 J110e, 1000 J110f, 1050 J410a, 1050 J410c, 1050 J410d, 1050
J410e, 1051A, 1055 J410e, 2000 J210a, 2000 J210b, 2000 J210c, 2000 J210d, 2050 J510a, 2050 J510c, 2050 J510d,
2050 J510e, 3000 J310a, 3000 J310c, 3050, 3050A e, 3050A J611a, 3051A, 3052A e, 3054 J610a, 3054A e J611j,
(HP 61, 61XL Ink Cartridges) HP 61 Ink Refilling Services & Additional Cautions: http://www.youtube.com/watch?v=ArEKcQSBlnY Tap 10 Diagnostics Print:
1. Press and hold the Power button, and then press the Cancel button once.
2. Release the buttons. The 10-tap test prints.
Tap 41 Diagnostic Test (Deskjet 1000-3056 only- see video: http://inkjet411.com/?page_id=1476)
1. Turn printer Power ON – allow printer to fully energize.
2. PRESS AND HOLD the Power Button
6
To further troubleshoot your printer please visit:
http://www.inkjet411.com
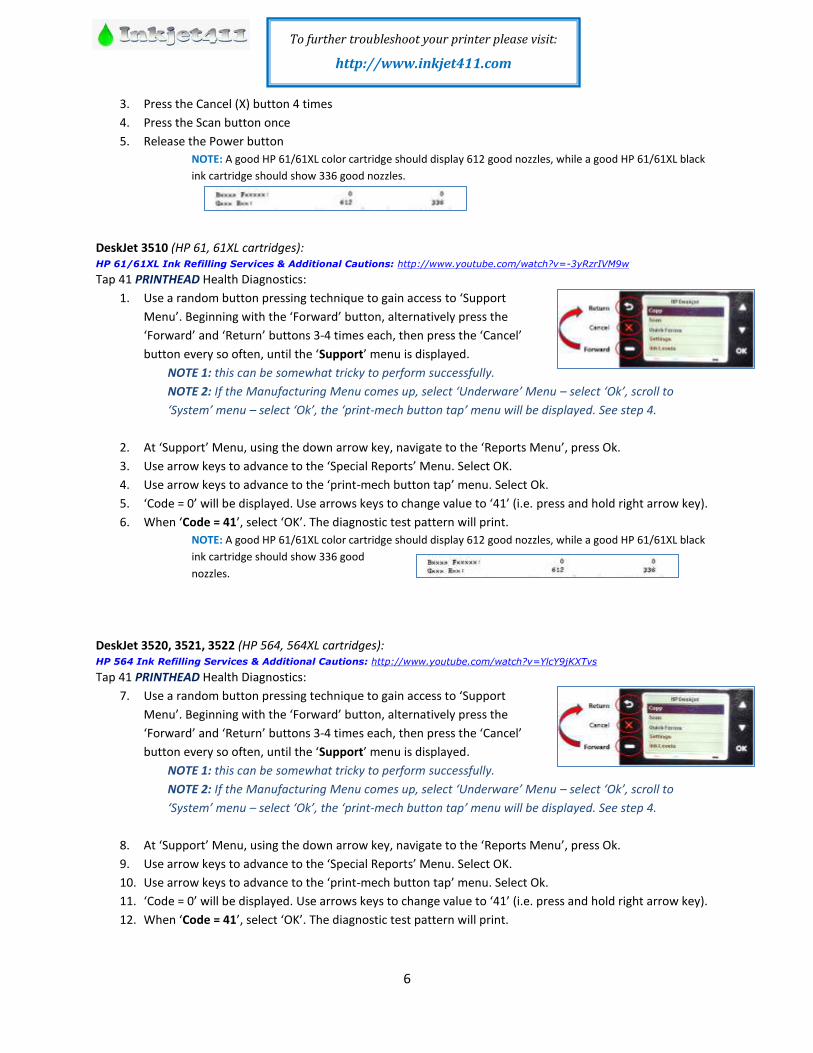
3. Press the Cancel (X) button 4 times
4. Press the Scan button once
5. Release the Power button
NOTE: A good HP 61/61XL color cartridge should display 612 good nozzles, while a good HP 61/61XL black
ink cartridge should show 336 good nozzles.
DeskJet 3510 (HP 61, 61XL cartridges): HP 61/61XL Ink Refilling Services & Additional Cautions: http://www.youtube.com/watch?v=-3yRzrIVM9w Tap 41 PRINTHEAD Health Diagnostics:
1. Use a random button pressing technique to gain access to ‘Support
Menu’. Beginning with the ‘Forward’ button, alternatively press the
‘Forward’ and ‘Return’ buttons 3-4 times each, then press the ‘Cancel’
button every so often, until the ‘Support’ menu is displayed.
NOTE 1: this can be somewhat tricky to perform successfully.
NOTE 2: If the Manufacturing Menu comes up, select ‘Underware’ Menu – select ‘Ok’, scroll to
‘System’ menu – select ‘Ok’, the ‘print-mech button tap’ menu will be displayed. See step 4.
2. At ‘Support’ Menu, using the down arrow key, navigate to the ‘Reports Menu’, press Ok.
3. Use arrow keys to advance to the ‘Special Reports’ Menu. Select OK.
4. Use arrow keys to advance to the ‘print-mech button tap’ menu. Select Ok.
5. ‘Code = 0’ will be displayed. Use arrows keys to change value to ‘41’ (i.e. press and hold right arrow key).
6. When ‘Code = 41’, select ‘OK’. The diagnostic test pattern will print.
NOTE: A good HP 61/61XL color cartridge should display 612 good nozzles, while a good HP 61/61XL black
ink cartridge should show 336 good
nozzles.
DeskJet 3520, 3521, 3522 (HP 564, 564XL cartridges): HP 564 Ink Refilling Services & Additional Cautions: http://www.youtube.com/watch?v=YlcY9jKXTvs
Tap 41 PRINTHEAD Health Diagnostics:
7. Use a random button pressing technique to gain access to ‘Support
Menu’. Beginning with the ‘Forward’ button, alternatively press the
‘Forward’ and ‘Return’ buttons 3-4 times each, then press the ‘Cancel’
button every so often, until the ‘Support’ menu is displayed.
NOTE 1: this can be somewhat tricky to perform successfully.
NOTE 2: If the Manufacturing Menu comes up, select ‘Underware’ Menu – select ‘Ok’, scroll to
‘System’ menu – select ‘Ok’, the ‘print-mech button tap’ menu will be displayed. See step 4.
8. At ‘Support’ Menu, using the down arrow key, navigate to the ‘Reports Menu’, press Ok.
9. Use arrow keys to advance to the ‘Special Reports’ Menu. Select OK.
10. Use arrow keys to advance to the ‘print-mech button tap’ menu. Select Ok.
11. ‘Code = 0’ will be displayed. Use arrows keys to change value to ‘41’ (i.e. press and hold right arrow key).
12. When ‘Code = 41’, select ‘OK’. The diagnostic test pattern will print.
7
To further troubleshoot your printer please visit:
http://www.inkjet411.com
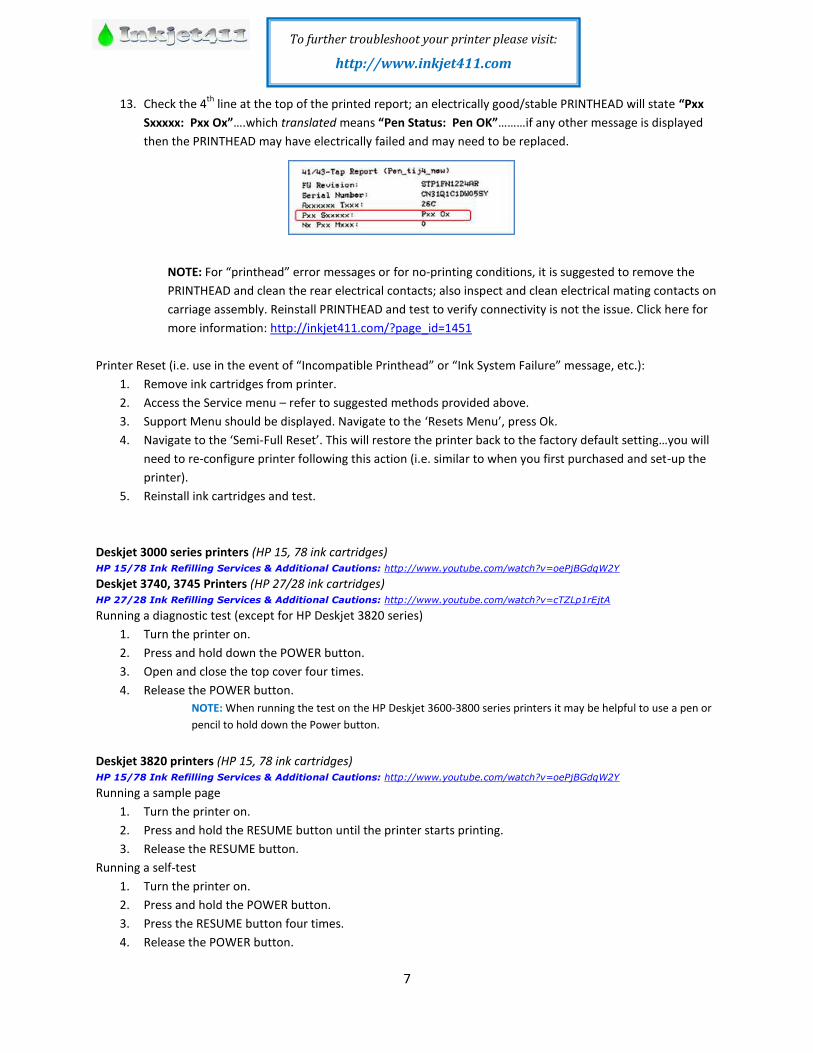
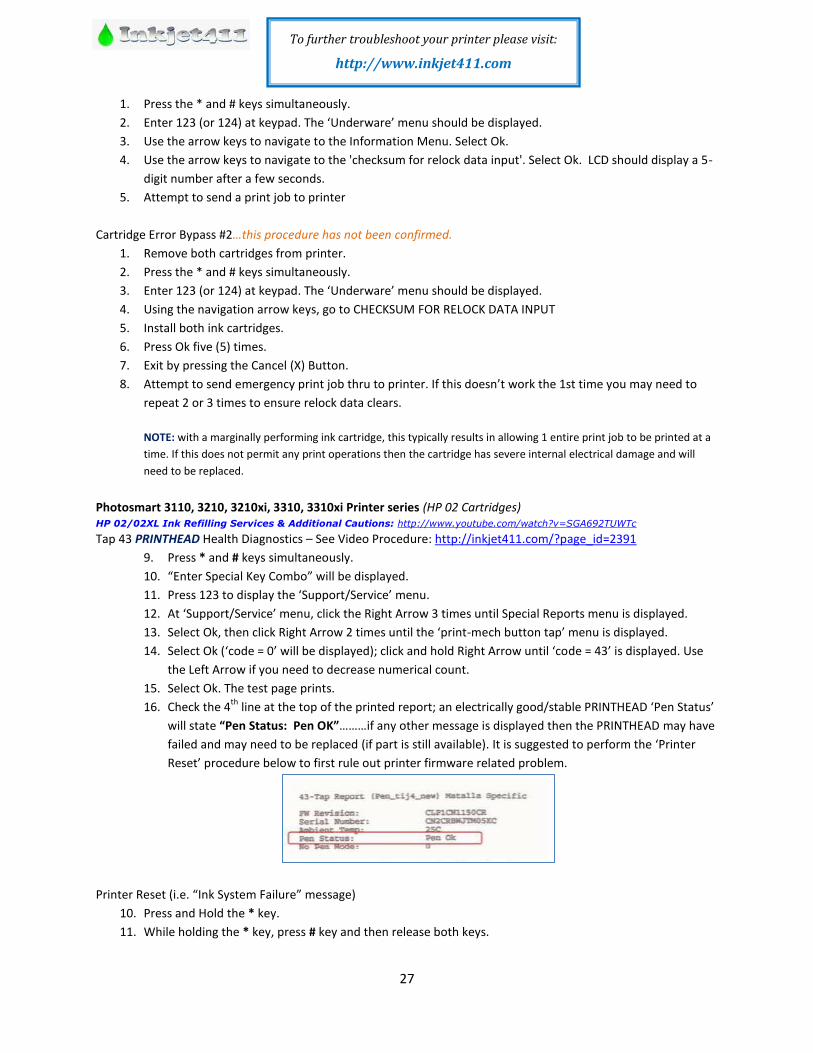
13. Check the 4th
line at the top of the printed report; an electrically good/stable PRINTHEAD will state “Pxx
Sxxxxx: Pxx Ox”….which translated means “Pen Status: Pen OK”………if any other message is displayed
then the PRINTHEAD may have electrically failed and may need to be replaced.
NOTE: For “printhead” error messages or for no-printing conditions, it is suggested to remove the
PRINTHEAD and clean the rear electrical contacts; also inspect and clean electrical mating contacts on
carriage assembly. Reinstall PRINTHEAD and test to verify connectivity is not the issue. Click here for
more information: http://inkjet411.com/?page_id=1451
Printer Reset (i.e. use in the event of “Incompatible Printhead” or “Ink System Failure” message, etc.):
1. Remove ink cartridges from printer.
2. Access the Service menu – refer to suggested methods provided above.
3. Support Menu should be displayed. Navigate to the ‘Resets Menu’, press Ok.
4. Navigate to the ‘Semi-Full Reset’. This will restore the printer back to the factory default setting…you will
need to re-configure printer following this action (i.e. similar to when you first purchased and set-up the
printer).
5. Reinstall ink cartridges and test.
Deskjet 3000 series printers (HP 15, 78 ink cartridges) HP 15/78 Ink Refilling Services & Additional Cautions: http://www.youtube.com/watch?v=oePjBGdqW2Y Deskjet 3740, 3745 Printers (HP 27/28 ink cartridges) HP 27/28 Ink Refilling Services & Additional Cautions: http://www.youtube.com/watch?v=cTZLp1rEjtA Running a diagnostic test (except for HP Deskjet 3820 series)
1. Turn the printer on.
2. Press and hold down the POWER button.
3. Open and close the top cover four times.
4. Release the POWER button.
NOTE: When running the test on the HP Deskjet 3600-3800 series printers it may be helpful to use a pen or
pencil to hold down the Power button.
Deskjet 3820 printers (HP 15, 78 ink cartridges) HP 15/78 Ink Refilling Services & Additional Cautions: http://www.youtube.com/watch?v=oePjBGdqW2Y Running a sample page
1. Turn the printer on.
2. Press and hold the RESUME button until the printer starts printing.
3. Release the RESUME button.
Running a self-test
1. Turn the printer on.
2. Press and hold the POWER button.
3. Press the RESUME button four times.
4. Release the POWER button.
8
To further troubleshoot your printer please visit:
http://www.inkjet411.com
Deskjet 3900 Printer series (HP 21/22 Ink Cartridges) HP 21/22 Ink Refilling Services & Additional Cautions: http://www.youtube.com/watch?v=f_r_7B4jauc
1. Press and hold the power button.
2. Raise and lower the product cover four times.
3. Release the power button, and the self-test page prints.
4. Refer to video at link below to help evaluate test pattern.
NOTE: A good HP 21 black cartridge should display 416 good nozzles, while a good HP 22 color ink cartridge
should show 300 good nozzles.
REFERENCE: Tap 43 Diagnostics [HP Deskjet 5650 -use HP 56/57/58 cartridges]: http://inkjet411.com/?page_id=2358
Deskjet 5000, 5100, 5160, 5500 series printers (HP 56, 57, 58 ink cartridges) HP 56/57/58 Ink Refilling Services & Additional Cautions: http://www.youtube.com/watch?v=ynRwTkiI5mE Running a sample page:
1. Turn the printer on.
2. Press and hold the RESUME button until the printer starts printing.
3. Release the RESUME button.
Running a self-test:
1. Turn the printer on.
2. Press and hold the POWER button.
3. Press the RESUME button four times.
4. Release the POWER button.
Activate 'Tap 43' Cartridge Health Diagnostics: http://inkjet411.com/?page_id=2358
NOTE: You must first stop the blinking ink error light by pressing the Cancel button. You may need to
remove one of the ink cartridges first in order to do this before you can proceed, then re-install cartridge
just prior to commencing the diagnostic test.
1. To begin, Press and HOLD the Power Button.
2. Press the Cancel (X) button 4 times, then…
3. Press the Resume/Down Arrow button 3 times.
4. Release the Power button; the Tap 43 report will print.
NOTE 1: The Tap 43 test report will be printed using the black ink cartridge by default; if a blank page appears
then remove the black ink cartridge from the printer and repeat steps; report will be printed using the Color
cartridge. This can also help you isolate the problem to one of the ink cartridges.
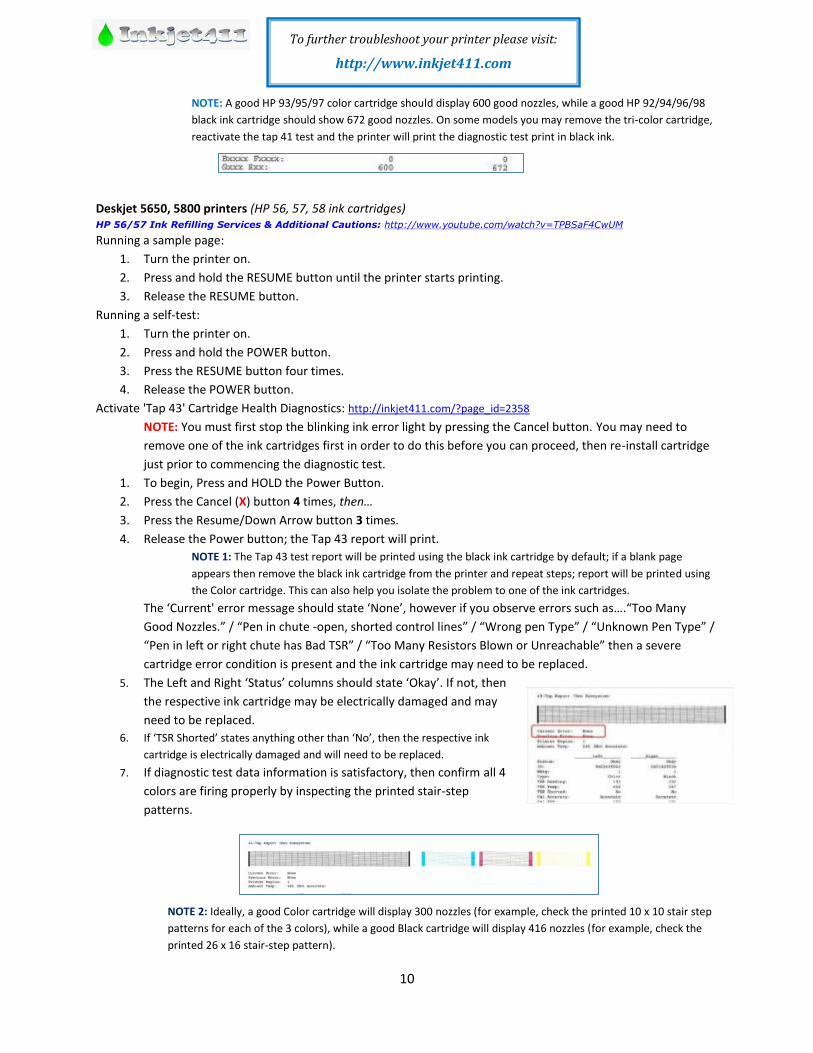
The ‘Current' error message should state ‘None’, however if you observe errors such as….“Too Many Good
Nozzles.” / “Pen in chute -open, shorted control lines” / “Wrong pen Type” / “Unknown Pen Type” / “Pen in
left or right chute has Bad TSR” / “Too Many Resistors Blown or Unreachable” then a severe cartridge error
condition is present and the ink cartridge may need to be replaced.
5. The Left and Right ‘Status’ columns should state ‘Okay’. If not, then
the respective ink cartridge may be electrically damaged and may
need to be replaced.
6. If ‘TSR Shorted’ states anything other than ‘No’, then the respective ink
cartridge is electrically damaged and will need to be replaced.
7. If diagnostic test data information is satisfactory, then confirm all 4
colors are firing properly by inspecting the printed stair-step
patterns.
9
To further troubleshoot your printer please visit:
http://www.inkjet411.com
NOTE 2: Ideally, a good Color cartridge will display 300 nozzles (for example, check the printed 10 x 10 stair step
patterns for each of the 3 colors), while a good Black cartridge will display 416 nozzles (for example, check the
printed 26 x 16 stair-step pattern).
NOTE 3: Ensure the top cover is closed and that the interlock switch at top-right side is properly closing the
circuit – you may need to depress with a small pencil to ensure this is not causing a false error condition.
Deskjet 5440 Printer (HP 92, 93, 98 ink cartridges) HP 92/93 Ink Refilling Services & Additional Cautions: http://www.youtube.com/watch?v=fYZ8R0TBX3k Running a sample page:
1. Turn the printer on.
2. Press and hold the RESUME button until the printer starts printing.
3. Release the RESUME button.
Tap 41 Cartridge Health Diagnostics (see video: http://inkjet411.com/?page_id=1741):
1. Turn the printer on.
2. Press and hold the POWER button.
3. Press the RESUME button four times.
4. Release the POWER button.
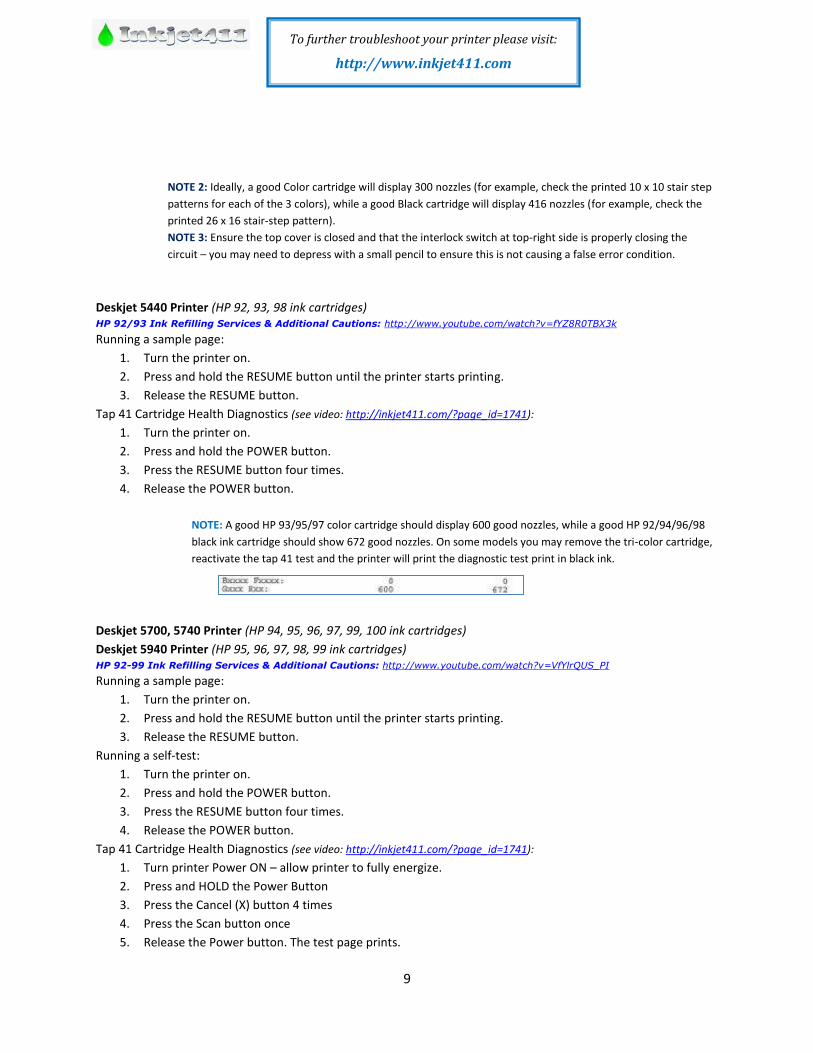
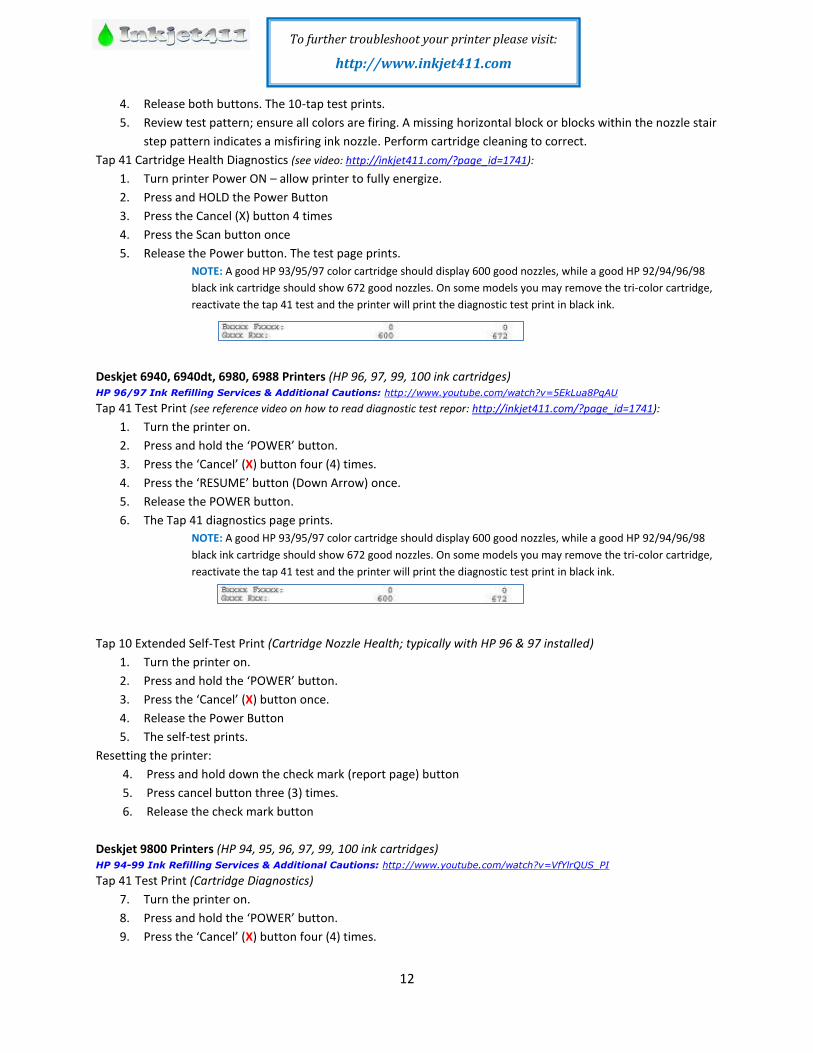
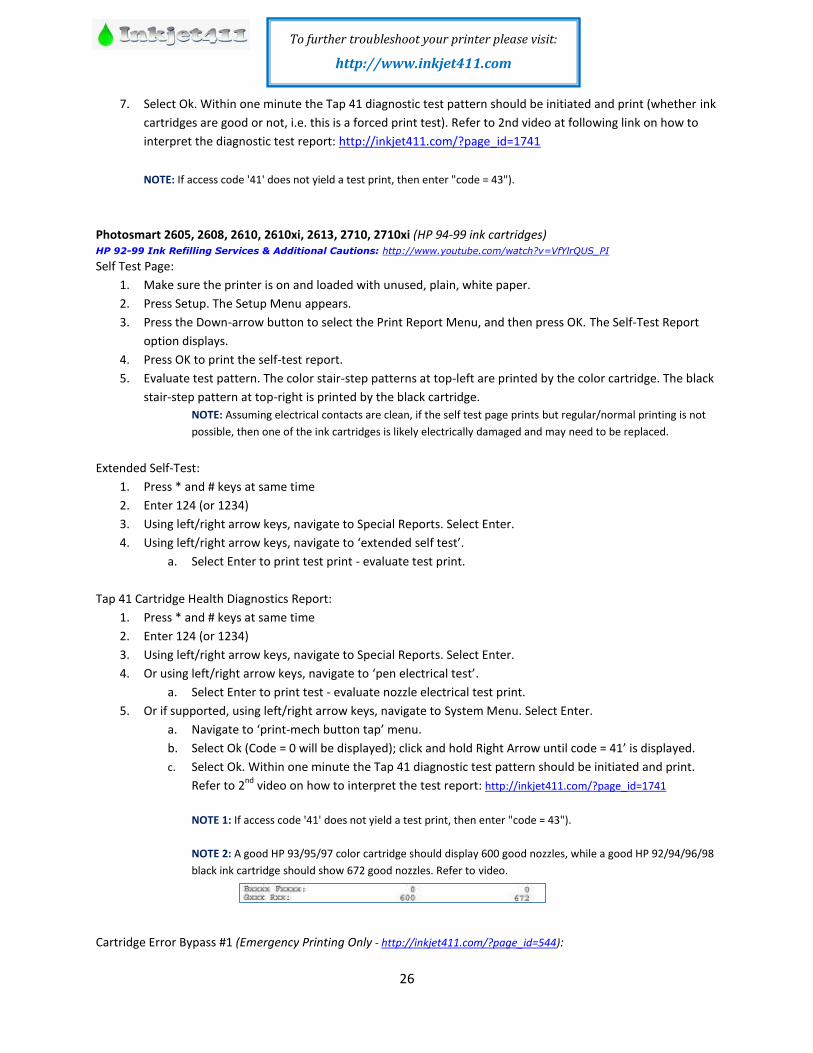
NOTE: A good HP 93/95/97 color cartridge should display 600 good nozzles, while a good HP 92/94/96/98
black ink cartridge should show 672 good nozzles. On some models you may remove the tri-color cartridge,
reactivate the tap 41 test and the printer will print the diagnostic test print in black ink.
Deskjet 5700, 5740 Printer (HP 94, 95, 96, 97, 99, 100 ink cartridges)
Deskjet 5940 Printer (HP 95, 96, 97, 98, 99 ink cartridges) HP 92-99 Ink Refilling Services & Additional Cautions: http://www.youtube.com/watch?v=VfYlrQUS_PI Running a sample page:
1. Turn the printer on.
2. Press and hold the RESUME button until the printer starts printing.
3. Release the RESUME button.
Running a self-test:
1. Turn the printer on.
2. Press and hold the POWER button.
3. Press the RESUME button four times.
4. Release the POWER button.
Tap 41 Cartridge Health Diagnostics (see video: http://inkjet411.com/?page_id=1741):
1. Turn printer Power ON – allow printer to fully energize.
2. Press and HOLD the Power Button
3. Press the Cancel (X) button 4 times
4. Press the Scan button once
5. Release the Power button. The test page prints.
10
To further troubleshoot your printer please visit:
http://www.inkjet411.com
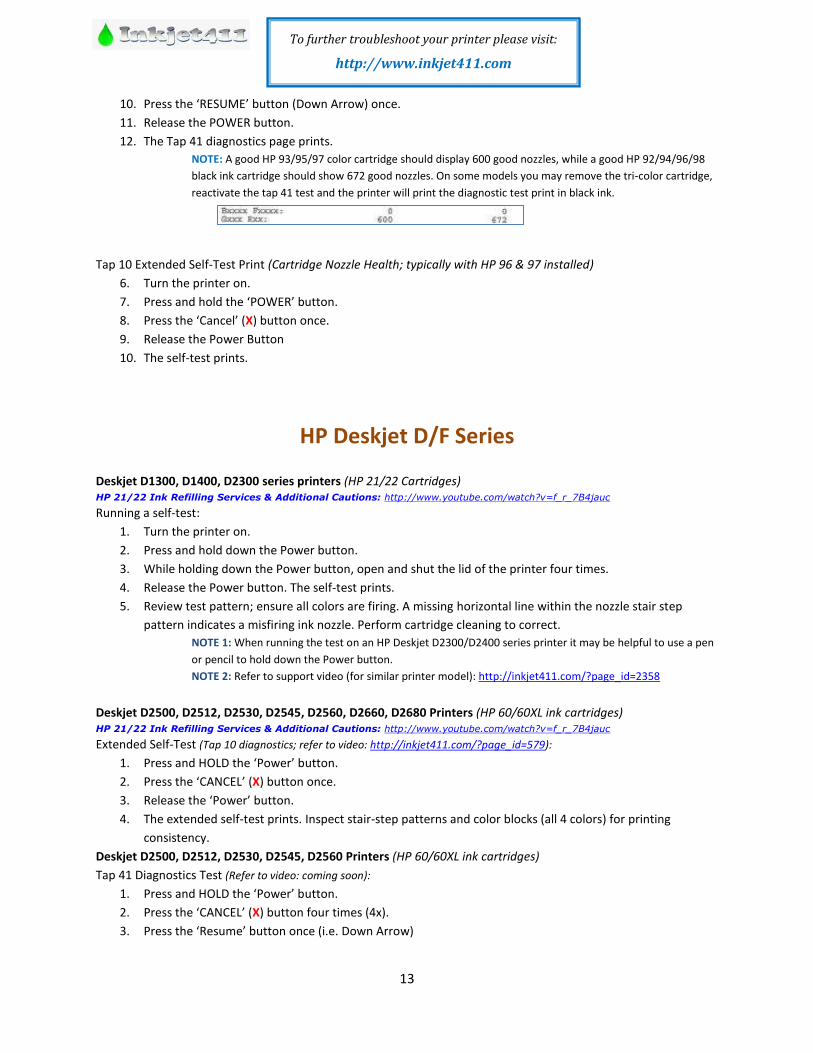
NOTE: A good HP 93/95/97 color cartridge should display 600 good nozzles, while a good HP 92/94/96/98
black ink cartridge should show 672 good nozzles. On some models you may remove the tri-color cartridge,
reactivate the tap 41 test and the printer will print the diagnostic test print in black ink.
Deskjet 5650, 5800 printers (HP 56, 57, 58 ink cartridges) HP 56/57 Ink Refilling Services & Additional Cautions: http://www.youtube.com/watch?v=TPBSaF4CwUM Running a sample page:
1. Turn the printer on.
2. Press and hold the RESUME button until the printer starts printing.
3. Release the RESUME button.
Running a self-test:
1. Turn the printer on.
2. Press and hold the POWER button.
3. Press the RESUME button four times.
4. Release the POWER button.
Activate 'Tap 43' Cartridge Health Diagnostics: http://inkjet411.com/?page_id=2358
NOTE: You must first stop the blinking ink error light by pressing the Cancel button. You may need to
remove one of the ink cartridges first in order to do this before you can proceed, then re-install cartridge
just prior to commencing the diagnostic test.
1. To begin, Press and HOLD the Power Button.
2. Press the Cancel (X) button 4 times, then…
3. Press the Resume/Down Arrow button 3 times.
4. Release the Power button; the Tap 43 report will print.
NOTE 1: The Tap 43 test report will be printed using the black ink cartridge by default; if a blank page
appears then remove the black ink cartridge from the printer and repeat steps; report will be printed using
the Color cartridge. This can also help you isolate the problem to one of the ink cartridges.
The ‘Current' error message should state ‘None’, however if you observe errors such as….“Too Many
Good Nozzles.” / “Pen in chute -open, shorted control lines” / “Wrong pen Type” / “Unknown Pen Type” /
“Pen in left or right chute has Bad TSR” / “Too Many Resistors Blown or Unreachable” then a severe
cartridge error condition is present and the ink cartridge may need to be replaced.
5. The Left and Right ‘Status’ columns should state ‘Okay’. If not, then
the respective ink cartridge may be electrically damaged and may
need to be replaced.
6. If ‘TSR Shorted’ states anything other than ‘No’, then the respective ink
cartridge is electrically damaged and will need to be replaced.
7. If diagnostic test data information is satisfactory, then confirm all 4
colors are firing properly by inspecting the printed stair-step
patterns.
NOTE 2: Ideally, a good Color cartridge will display 300 nozzles (for example, check the printed 10 x 10 stair step
patterns for each of the 3 colors), while a good Black cartridge will display 416 nozzles (for example, check the
printed 26 x 16 stair-step pattern).
11
To further troubleshoot your printer please visit:
http://www.inkjet411.com
NOTE 3: Ensure the top cover is closed and that the interlock switch at top-right side is properly closing the
circuit – you may need to depress with a small pencil to ensure this is not causing a false error condition.
Deskjet 5900 printers (HP 95, 96, 97, 98, 99 ink cartridges) HP 94-99 Ink Refilling Services & Additional Cautions: http://www.youtube.com/watch?v=VfYlrQUS_PI Running a self-test:
1. Turn the printer on.
2. Press and hold the POWER button.
3. Press the RESUME button four times.
4. Release the POWER button.
Deskjet 6000 series printers (HP 45, 78 ink cartridges) HP 45/78 Ink Refilling Services & Additional Cautions: http://www.youtube.com/watch?v=M7Q8t2pr2WA Running a sample page:
1. Turn the printer on.
2. Press and hold the RESUME button until the printer starts printing.
3. Release the RESUME button.
Running a self-test:
1. Turn the printer on.
2. Press and hold the POWER button.
3. Press the RESUME button (Down Arrow) four times.
4. Release the POWER button.
Deskjet 6500, 6520, 6540 printers (HP 94, 95, 96, 97, 99, 100 ink cartridges) HP 96/97 Ink Refilling Services & Additional Cautions: http://www.youtube.com/watch?v=5EkLua8PqAU Running a self-test:
1. Turn the printer on.
2. Press and hold the POWER button.
3. Press the RESUME (Down Arrow) button four times.
4. Release the POWER button.
NOTE: Refer to Video: http://inkjet411.com/?page_id=1741):
Deskjet 6830v series printers (HP 96, 97, 99, 100 ink cartridges) HP 96/97 Ink Refilling Services & Additional Cautions: http://www.youtube.com/watch?v=5EkLua8PqAU Customer Support Diagnostic test page
1. Press and hold the Power button.
2. While holding the Power button, press the Cancel (X) button, and then release both buttons.
Resetting the printer:
1. Press and hold down the check mark (report page) button
2. Press cancel button three (3) times.
3. Release the check mark button
Deskjet 6900 Printer series (HP 92-99 Ink Cartridges) HP 94-99 Ink Refilling Services & Additional Cautions: http://www.youtube.com/watch?v=VfYlrQUS_PI Extended Self-Test Print:
1. Turn the product on.
2. Press and hold the Power button.
3. Press the Cancel button.
12
To further troubleshoot your printer please visit:
http://www.inkjet411.com
4. Release both buttons. The 10-tap test prints.
5. Review test pattern; ensure all colors are firing. A missing horizontal block or blocks within the nozzle stair
step pattern indicates a misfiring ink nozzle. Perform cartridge cleaning to correct.
Tap 41 Cartridge Health Diagnostics (see video: http://inkjet411.com/?page_id=1741):
1. Turn printer Power ON – allow printer to fully energize.
2. Press and HOLD the Power Button
3. Press the Cancel (X) button 4 times
4. Press the Scan button once
5. Release the Power button. The test page prints.
NOTE: A good HP 93/95/97 color cartridge should display 600 good nozzles, while a good HP 92/94/96/98
black ink cartridge should show 672 good nozzles. On some models you may remove the tri-color cartridge,
reactivate the tap 41 test and the printer will print the diagnostic test print in black ink.
Deskjet 6940, 6940dt, 6980, 6988 Printers (HP 96, 97, 99, 100 ink cartridges) HP 96/97 Ink Refilling Services & Additional Cautions: http://www.youtube.com/watch?v=5EkLua8PqAU Tap 41 Test Print (see reference video on how to read diagnostic test repor: http://inkjet411.com/?page_id=1741):
1. Turn the printer on.
2. Press and hold the ‘POWER’ button.
3. Press the ‘Cancel’ (X) button four (4) times.
4. Press the ‘RESUME’ button (Down Arrow) once.
5. Release the POWER button.
6. The Tap 41 diagnostics page prints.
NOTE: A good HP 93/95/97 color cartridge should display 600 good nozzles, while a good HP 92/94/96/98
black ink cartridge should show 672 good nozzles. On some models you may remove the tri-color cartridge,
reactivate the tap 41 test and the printer will print the diagnostic test print in black ink.
Tap 10 Extended Self-Test Print (Cartridge Nozzle Health; typically with HP 96 & 97 installed)
1. Turn the printer on.
2. Press and hold the ‘POWER’ button.
3. Press the ‘Cancel’ (X) button once.
4. Release the Power Button
5. The self-test prints.
Resetting the printer:
4. Press and hold down the check mark (report page) button
5. Press cancel button three (3) times.
6. Release the check mark button
Deskjet 9800 Printers (HP 94, 95, 96, 97, 99, 100 ink cartridges) HP 94-99 Ink Refilling Services & Additional Cautions: http://www.youtube.com/watch?v=VfYlrQUS_PI Tap 41 Test Print (Cartridge Diagnostics)
7. Turn the printer on.
8. Press and hold the ‘POWER’ button.
9. Press the ‘Cancel’ (X) button four (4) times.
13
To further troubleshoot your printer please visit:
http://www.inkjet411.com
10. Press the ‘RESUME’ button (Down Arrow) once.
11. Release the POWER button.
12. The Tap 41 diagnostics page prints.
NOTE: A good HP 93/95/97 color cartridge should display 600 good nozzles, while a good HP 92/94/96/98
black ink cartridge should show 672 good nozzles. On some models you may remove the tri-color cartridge,
reactivate the tap 41 test and the printer will print the diagnostic test print in black ink.
Tap 10 Extended Self-Test Print (Cartridge Nozzle Health; typically with HP 96 & 97 installed)
6. Turn the printer on.
7. Press and hold the ‘POWER’ button.
8. Press the ‘Cancel’ (X) button once.
9. Release the Power Button
10. The self-test prints.
HP Deskjet D/F Series
Deskjet D1300, D1400, D2300 series printers (HP 21/22 Cartridges) HP 21/22 Ink Refilling Services & Additional Cautions: http://www.youtube.com/watch?v=f_r_7B4jauc Running a self-test:
1. Turn the printer on.
2. Press and hold down the Power button.
3. While holding down the Power button, open and shut the lid of the printer four times.
4. Release the Power button. The self-test prints.
5. Review test pattern; ensure all colors are firing. A missing horizontal line within the nozzle stair step
pattern indicates a misfiring ink nozzle. Perform cartridge cleaning to correct.
NOTE 1: When running the test on an HP Deskjet D2300/D2400 series printer it may be helpful to use a pen
or pencil to hold down the Power button.
NOTE 2: Refer to support video (for similar printer model): http://inkjet411.com/?page_id=2358
Deskjet D2500, D2512, D2530, D2545, D2560, D2660, D2680 Printers (HP 60/60XL ink cartridges) HP 21/22 Ink Refilling Services & Additional Cautions: http://www.youtube.com/watch?v=f_r_7B4jauc Extended Self-Test (Tap 10 diagnostics; refer to video: http://inkjet411.com/?page_id=579):
1. Press and HOLD the ‘Power’ button.
2. Press the ‘CANCEL’ (X) button once.
3. Release the ‘Power’ button.
4. The extended self-test prints. Inspect stair-step patterns and color blocks (all 4 colors) for printing
consistency.
Deskjet D2500, D2512, D2530, D2545, D2560 Printers (HP 60/60XL ink cartridges)
Tap 41 Diagnostics Test (Refer to video: coming soon):
1. Press and HOLD the ‘Power’ button.
2. Press the ‘CANCEL’ (X) button four times (4x).
3. Press the ‘Resume’ button once (i.e. Down Arrow)
14
To further troubleshoot your printer please visit:
http://www.inkjet411.com
4. Release the ‘Power’ button.
5. The 'Tap 41' diagnostic test print should print.
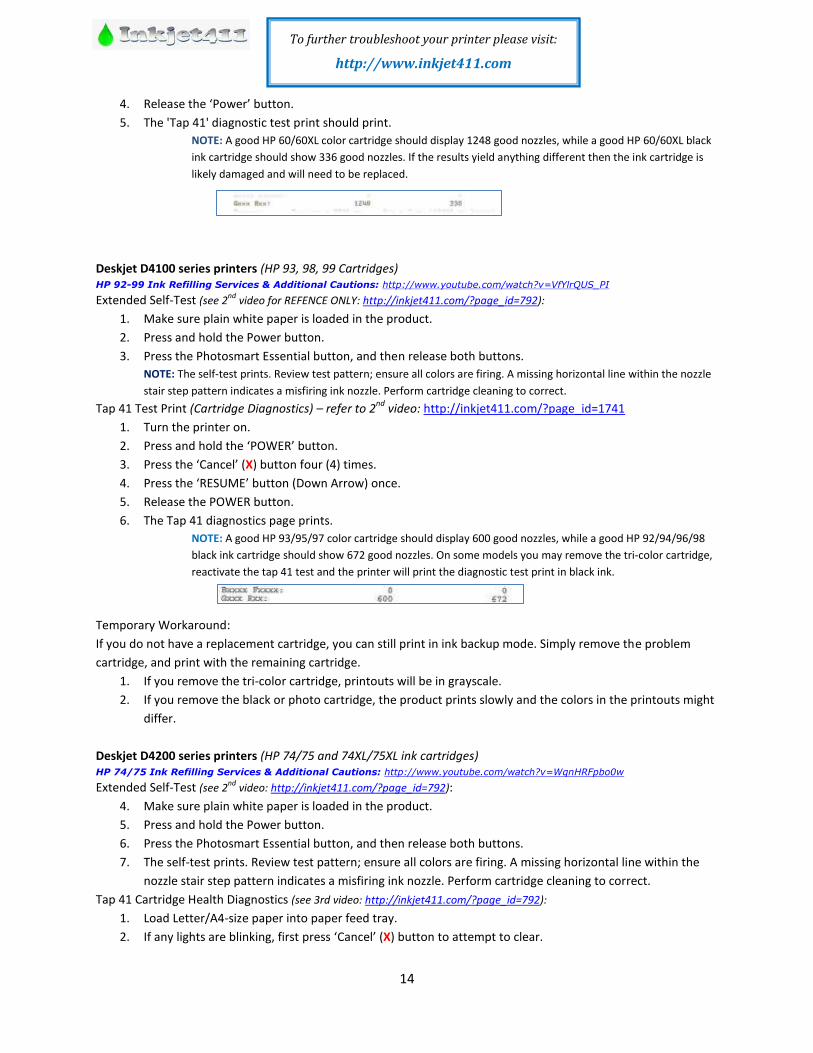
NOTE: A good HP 60/60XL color cartridge should display 1248 good nozzles, while a good HP 60/60XL black
ink cartridge should show 336 good nozzles. If the results yield anything different then the ink cartridge is
likely damaged and will need to be replaced.
Deskjet D4100 series printers (HP 93, 98, 99 Cartridges) HP 92-99 Ink Refilling Services & Additional Cautions: http://www.youtube.com/watch?v=VfYlrQUS_PI Extended Self-Test (see 2
nd video for REFENCE ONLY: http://inkjet411.com/?page_id=792):
1. Make sure plain white paper is loaded in the product.
2. Press and hold the Power button.
3. Press the Photosmart Essential button, and then release both buttons.
NOTE: The self-test prints. Review test pattern; ensure all colors are firing. A missing horizontal line within the nozzle
stair step pattern indicates a misfiring ink nozzle. Perform cartridge cleaning to correct.
Tap 41 Test Print (Cartridge Diagnostics) – refer to 2nd
video: http://inkjet411.com/?page_id=1741
1. Turn the printer on.
2. Press and hold the ‘POWER’ button.
3. Press the ‘Cancel’ (X) button four (4) times.
4. Press the ‘RESUME’ button (Down Arrow) once.
5. Release the POWER button.
6. The Tap 41 diagnostics page prints.
NOTE: A good HP 93/95/97 color cartridge should display 600 good nozzles, while a good HP 92/94/96/98
black ink cartridge should show 672 good nozzles. On some models you may remove the tri-color cartridge,
reactivate the tap 41 test and the printer will print the diagnostic test print in black ink.
Temporary Workaround:
If you do not have a replacement cartridge, you can still print in ink backup mode. Simply remove the problem
cartridge, and print with the remaining cartridge.
1. If you remove the tri-color cartridge, printouts will be in grayscale.
2. If you remove the black or photo cartridge, the product prints slowly and the colors in the printouts might
differ.
Deskjet D4200 series printers (HP 74/75 and 74XL/75XL ink cartridges) HP 74/75 Ink Refilling Services & Additional Cautions: http://www.youtube.com/watch?v=WqnHRFpbo0w Extended Self-Test (see 2
nd video: http://inkjet411.com/?page_id=792):
4. Make sure plain white paper is loaded in the product.
5. Press and hold the Power button.
6. Press the Photosmart Essential button, and then release both buttons.
7. The self-test prints. Review test pattern; ensure all colors are firing. A missing horizontal line within the
nozzle stair step pattern indicates a misfiring ink nozzle. Perform cartridge cleaning to correct.
Tap 41 Cartridge Health Diagnostics (see 3rd video: http://inkjet411.com/?page_id=792):
1. Load Letter/A4-size paper into paper feed tray.
2. If any lights are blinking, first press ‘Cancel’ (X) button to attempt to clear.

15
To further troubleshoot your printer please visit:
http://www.inkjet411.com
3. Press and HOLD the Power button, press ‘Cancel’ (X) button 4 times, then ‘Resume’ button (down arrow)
once.
4. Release the Power button. The Tap 41 diagnostic test should print.
NOTE: A good HP 75/75XL color cartridge should display 600 good nozzles, while a good HP 74/74XL black
ink cartridge should show 672 good nozzles. Refer to video on how to read the test print.
Deskjet F2110, F4135, F4140, F4172, F4180, F4185, F4190 Printer series (HP 21/22 ink cartridges) HP 21/22 Ink Refilling Services & Additional Cautions: http://www.youtube.com/watch?v=f_r_7B4jauc
Self-Test Page (also refer to printer’s User Manual):
1. Press and hold the ‘Cancel’ button and then press the ‘Start Copy Color’ button. Release both buttons.
2. The self-test report should print.
3. Review test pattern; ensure all 4 colors are firing. A missing horizontal line within the nozzle stair step
pattern indicates a misfiring ink nozzle.
NOTE 1: A good HP 21 black cartridge should have 416 good nozzles (26 x 16 stair-step pattern), while a good HP 22
color ink cartridge should have 300 good nozzles (100 for each color, 10x10 stair-step pattern).
NOTE 2: Reference Video: http://inkjet411.com/?page_id=2358
Tap 41/43 Diagnostic Report (this procedure has not yet been validated):
1. Press and hold the Power Button.
2. Press ‘Cancel’ button 4 times, then open and close the top cover 3 times. Release power button.
……or Press and Hold the Cancel button, open and close the Top Cover 4 times.
The product prints a printer diagnostic report.
NOTE: Reference Video: http://inkjet411.com/?page_id=2358
Deskjet F2200 Printer series (HP 21/22 ink cartridges) HP 21/22 Ink Refilling Services & Additional Cautions: http://www.youtube.com/watch?v=f_r_7B4jauc
Self-Test Page:
1. Press the Setup or Menu button until Print Report appears in the display then press Enter.
2. Press the Setup or Menu button until Self-Test appears in the display, and then press Enter.
3. Review test patterns; ensure all 4 colors are firing. A missing horizontal line within the nozzle stair step
pattern indicates a misfiring ink nozzle.
NOTE 1: A good HP 21 black cartridge should have 416 good nozzles (26 x 16 stair-step pattern), while a good HP 22
color ink cartridge should have 300 good nozzles (100 for each color, 10x10 stair-step pattern).
NOTE 2: Reference Video: http://inkjet411.com/?page_id=2358
Additional Solutions from HP:
http://h10025.www1.hp.com/ewfrf/wc/document?docname=c01000539&tmp_track_link=ot_faqs/top_issues/en_us/c010005
39/loc:4&cc=us&dlc=fi&lang=fi&lc=en&product=3235678&sw_lang=pl#N2318
16
To further troubleshoot your printer please visit:
http://www.inkjet411.com
Deskjet F2400/F4400/F4500 Printer series (HP 60/60XL ink cartridges) HP 60XL Ink Refilling Services & Additional Cautions: http://www.youtube.com/watch?v=KYm_iHMRG-0 Self Test Page:
1. Press and HOLD the Power button, press the Cancel button. Release both buttons.
2. The self test page should print.
Tap 41 Cartridge Health Diagnostics Report: (See Video: http://inkjet411.com/?page_id=440 )
1. While holding the Power button, press Cancel (X) button 4 times, then press the Color Copy button once.
2. Release the Power button.
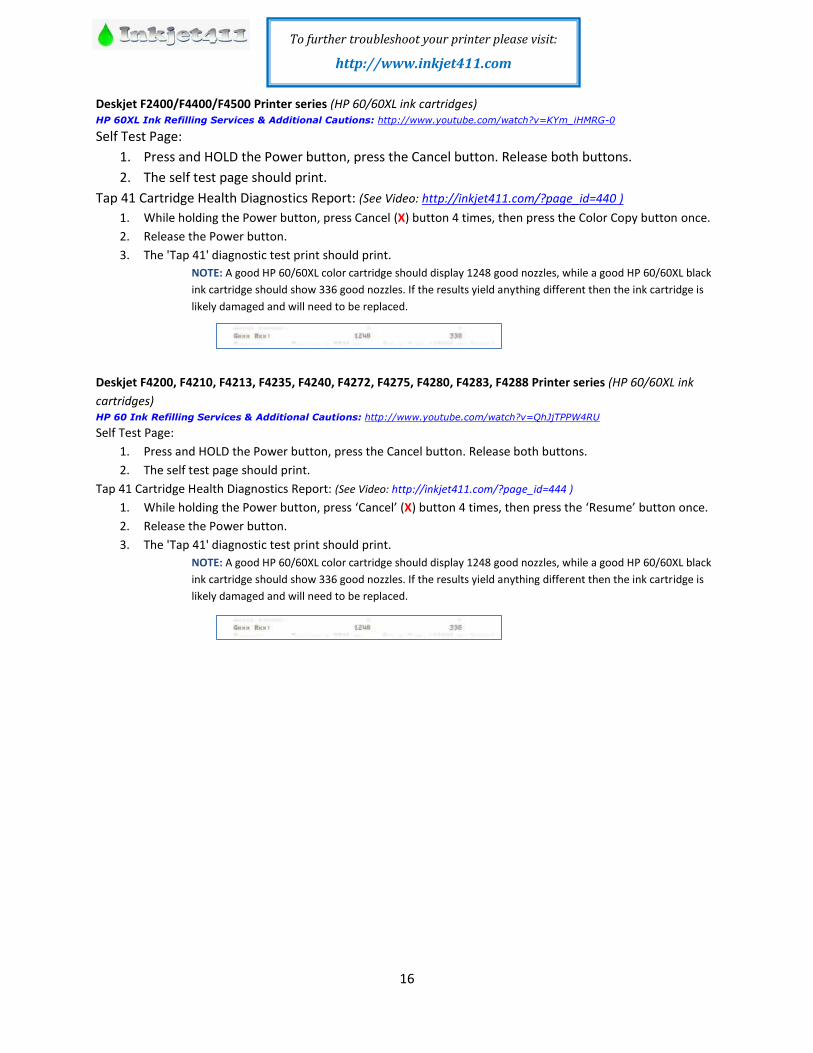
3. The 'Tap 41' diagnostic test print should print.
NOTE: A good HP 60/60XL color cartridge should display 1248 good nozzles, while a good HP 60/60XL black
ink cartridge should show 336 good nozzles. If the results yield anything different then the ink cartridge is
likely damaged and will need to be replaced.
Deskjet F4200, F4210, F4213, F4235, F4240, F4272, F4275, F4280, F4283, F4288 Printer series (HP 60/60XL ink
cartridges) HP 60 Ink Refilling Services & Additional Cautions: http://www.youtube.com/watch?v=QhJjTPPW4RU Self Test Page:
1. Press and HOLD the Power button, press the Cancel button. Release both buttons.
2. The self test page should print.
Tap 41 Cartridge Health Diagnostics Report: (See Video: http://inkjet411.com/?page_id=444 )
1. While holding the Power button, press ‘Cancel’ (X) button 4 times, then press the ‘Resume’ button once.
2. Release the Power button.
3. The 'Tap 41' diagnostic test print should print.
NOTE: A good HP 60/60XL color cartridge should display 1248 good nozzles, while a good HP 60/60XL black
ink cartridge should show 336 good nozzles. If the results yield anything different then the ink cartridge is
likely damaged and will need to be replaced.
17
To further troubleshoot your printer please visit:
http://www.inkjet411.com
HP PSC Printers
NOTE 1: HP Self-Test Reports (older HP printer models) – click here for instructions/sample prints:
http://h10025.www1.hp.com/ewfrf/wc/document?cc=us&lc=en&dlc=en&docname=bpu00734
Self-Test Report printing instructions for newer HP models:
http://h10025.www1.hp.com/ewfrf/wc/document?docname=c02875698&tmp_task=setupCategory&cc=gr&dlc=el&lc=e
n&product=1146331
NOTE 2: If you have colored paper loaded in the paper tray when you align the print cartridges, the alignment fails. Load
unused plain white letter or A4 paper into the paper tray, and then try the alignment again.
PSC 950, 950vr, 950xi Printer series (HP 15, 45, 78, 78+, 78XL ink cartridges) HP 15/78 Ink Refilling Services & Additional Cautions: http://www.youtube.com/watch?v=oePjBGdqW2Y Self Test Report:
1. On the front panel of the product, press Menu (or Setup) .
2. Press the Right Arrow until Print Reports displays, and then press Enter, Start, or OK.
3. Press the Right Arrow until Self-Test Report displays, and then press Enter, Start, or OK.
http://h10025.www1.hp.com/ewfrf/wc/document?cc=us&lc=en&dlc=en&docname=bpu00734
PSC 1200, 1310, 1315, 1340, 1350 Printer series (HP 27, 28, 56, 57 ink cartridge) HP 27/28 Ink Refilling Services & Additional Cautions: http://www.youtube.com/watch?v=cTZLp1rEjtA
HP 56/57/58 Ink Refilling Services & Additional Cautions: http://www.youtube.com/watch?v=ynRwTkiI5mE
Self Test Report:
1. Load plain, white paper into the paper tray.
2. Press and hold the Cancel button, and then press the Start Copy Color button.
3. The product prints a self-test report.
--- Examine the resulting self-test page that prints. There should be lines extending all the way across the page in
black, yellow, cyan and magenta. A missing black line indicates a problem with the black or photo cartridge. Faded,
streaked or missing lines in the other colors indicates a problem with the color ink cartridge. Refer to video at link
below to help evaluate test pattern.
NOTE: A good HP 56 black cartridge should display 416 good nozzles, while a good HP 57/58 color ink cartridge should
show 300 good nozzles.
REFERENCE: [HP Deskjet 5650 -use HP 56/57/58 cartridges]: http://inkjet411.com/?page_id=2358
Alignment Test Page (Manual Force Test):
If the alignment page does not print automatically, follow these steps to print one manually:
1. If the product is off, press the On/Resume button to turn on the product.
2. Disconnect the USB cable from the rear of the product.
A sequence of buttons on the control panel must now be pressed in the order presented. The sequence must
be completed within ten seconds. It might take several tries to complete the sequence within ten seconds.
3. Press and hold the Cancel button.
4. While holding the Cancel button, press and hold the On/Resume button.
5. When the Check Paper and Check Print Cartridge lights begin to blink simultaneously, release both
the Cancel button and the On/Resume button.
6. Press and release the Cancel button again.
18
To further troubleshoot your printer please visit:
http://www.inkjet411.com
7. Press and release the Copies button.
8. Press and release the Paper Type button.
9. Press and release the Color Start Copy button.
10. The alignment page prints.
NOTE: If the alignment page fails to print, repeat the button-press sequence in this step. The sequence must
be completed within ten seconds. Ensure plain white paper (only) is loaded.
Printer Reset:
1. Power off printer and remove power plug; wait 15 seconds.
2. Reconnect the power cord to the rear of the product.
3. When the lights begin to blink, press and hold both the On/Resume button and the Paper Size button at
the same time.
4. When only the On/Resume button is blinking, release both buttons.
5. Wait until the On/Resume button is steady. The reset is now complete.
PSC 1401, 1402, 1403, 1408, 1410, 1410v, 1410xi and 1417 Printer series (HP 21, 22 Cartridges) HP 21/22 Ink Refilling Services & Additional Cautions: http://www.youtube.com/watch?v=f_r_7B4jauc
Self Test Report:
1. Load plain, white paper into the paper tray.
2. Press and hold the Cancel button, and then press the Start Copy Color button.
3. The product prints a self-test report.
Inspect the self-test page that prints. There should be lines extending all the way across the page in black,
yellow, cyan and magenta. A missing black line indicates a problem with the black or photo cartridge. Faded,
streaked or missing lines in the other colors indicates a problem with the color ink cartridge. Refer to video at
link below to help evaluate test pattern. NOTE: A good HP 21 black cartridge should display 416 good nozzles,
while a good HP 22 color ink cartridge should show 300 good nozzles.
REFERENCE: [NOTE: HP 56/57/58 and HP21/22 cartridges are similar]: http://inkjet411.com/?page_id=2358
To help determine which cartridge is causing an ink cartridge alert/message:
1. Open the cartridge access door.
2. Remove either cartridge (not both).
3. Close the cartridge access door.
If the computer message shows ‘Print Cartridge Error’, then the print cartridge that is still in the printer is
the problem cartridge. If the message is NOT Print Cartridge Error (instead, it says that the cartridge you
have removed is ...Either missing, not detected, or incorrectly installed), then the cartridge you have
removed is the problem cartridge. Source: http://h10025.www1.hp.com/ewfrf/wc/document?docname=c00094661&cc=us&destPage=document&lang=cs&lc=en&product=441115&tmp_docname=c00094661
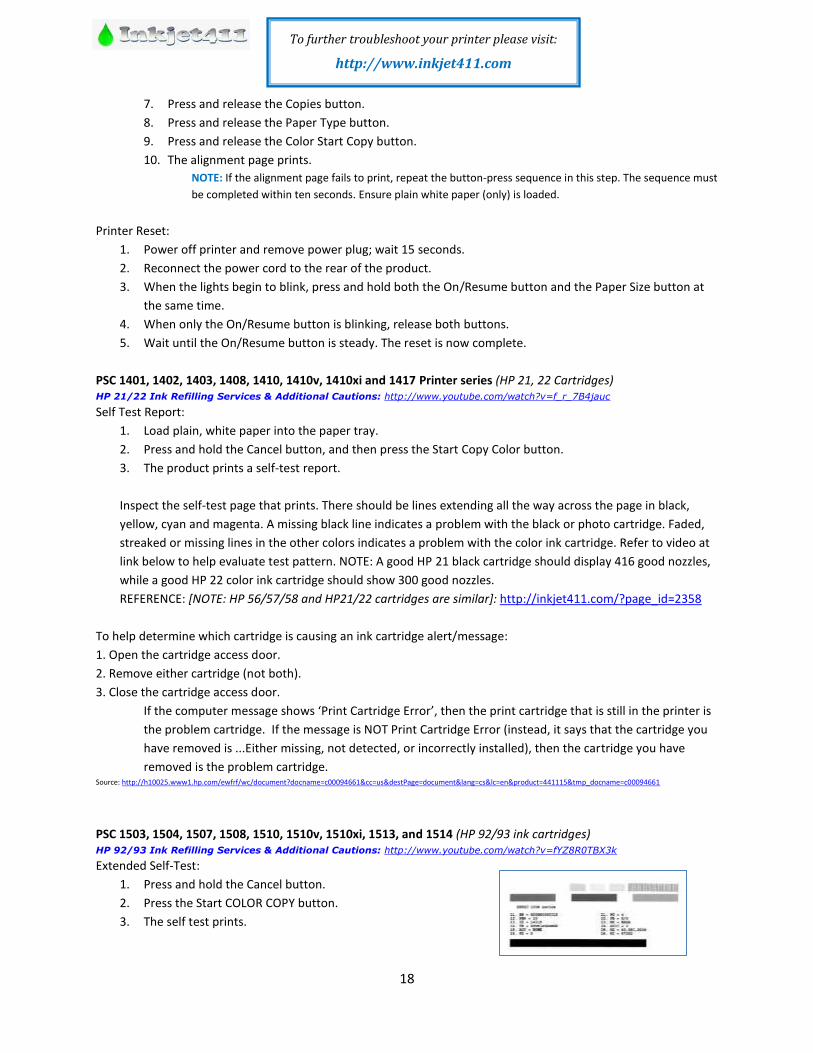
PSC 1503, 1504, 1507, 1508, 1510, 1510v, 1510xi, 1513, and 1514 (HP 92/93 ink cartridges) HP 92/93 Ink Refilling Services & Additional Cautions: http://www.youtube.com/watch?v=fYZ8R0TBX3k
Extended Self-Test:
1. Press and hold the Cancel button.
2. Press the Start COLOR COPY button.
3. The self test prints.
19
To further troubleshoot your printer please visit:
http://www.inkjet411.com
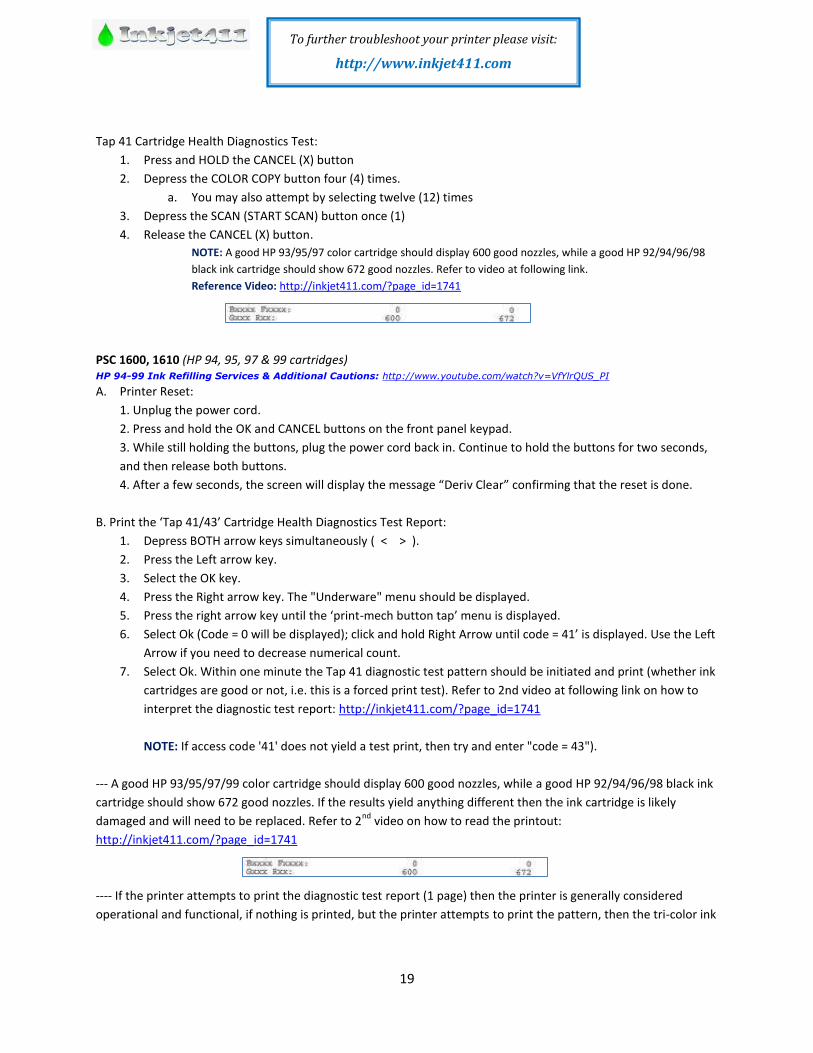
Tap 41 Cartridge Health Diagnostics Test:
1. Press and HOLD the CANCEL (X) button
2. Depress the COLOR COPY button four (4) times.
a. You may also attempt by selecting twelve (12) times
3. Depress the SCAN (START SCAN) button once (1)
4. Release the CANCEL (X) button.
NOTE: A good HP 93/95/97 color cartridge should display 600 good nozzles, while a good HP 92/94/96/98
black ink cartridge should show 672 good nozzles. Refer to video at following link.
Reference Video: http://inkjet411.com/?page_id=1741
PSC 1600, 1610 (HP 94, 95, 97 & 99 cartridges) HP 94-99 Ink Refilling Services & Additional Cautions: http://www.youtube.com/watch?v=VfYlrQUS_PI
A. Printer Reset:
1. Unplug the power cord.
2. Press and hold the OK and CANCEL buttons on the front panel keypad.
3. While still holding the buttons, plug the power cord back in. Continue to hold the buttons for two seconds,
and then release both buttons.
4. After a few seconds, the screen will display the message “Deriv Clear” confirming that the reset is done.
B. Print the ‘Tap 41/43’ Cartridge Health Diagnostics Test Report:
1. Depress BOTH arrow keys simultaneously ( < > ).
2. Press the Left arrow key.
3. Select the OK key.
4. Press the Right arrow key. The "Underware" menu should be displayed.
5. Press the right arrow key until the ‘print-mech button tap’ menu is displayed.
6. Select Ok (Code = 0 will be displayed); click and hold Right Arrow until code = 41’ is displayed. Use the Left
Arrow if you need to decrease numerical count.
7. Select Ok. Within one minute the Tap 41 diagnostic test pattern should be initiated and print (whether ink
cartridges are good or not, i.e. this is a forced print test). Refer to 2nd video at following link on how to
interpret the diagnostic test report: http://inkjet411.com/?page_id=1741
NOTE: If access code '41' does not yield a test print, then try and enter "code = 43").
--- A good HP 93/95/97/99 color cartridge should display 600 good nozzles, while a good HP 92/94/96/98 black ink
cartridge should show 672 good nozzles. If the results yield anything different then the ink cartridge is likely
damaged and will need to be replaced. Refer to 2nd
video on how to read the printout:
http://inkjet411.com/?page_id=1741
---- If the printer attempts to print the diagnostic test report (1 page) then the printer is generally considered
operational and functional, if nothing is printed, but the printer attempts to print the pattern, then the tri-color ink
20
To further troubleshoot your printer please visit:
http://www.inkjet411.com
cartridge is either empty, clogged or electrically damaged (black ink cartridge is not used). You can remove the tri-
color cartridge, reactivate the tap 41/43 test and the printer may print the diagnostic test print in black ink.
C. Print Self-Test Page:
1. Ensure letter size paper is loaded.
2. Press Setup until Print Report appears on the display.
3. Select OK.
4. Press OK again. The self-test page should attempt to print.
-- If the Self Test Page prints ok then the printer is functioning correctly and the problem is with the ink cartridges -
replace the suspect ink cartridge and retest. Refer to 2nd video procedure at the following link on how to read the
Tap 10 test (NOTE: the HP 74/75 cartridges are electrically identical to the HP 92 thru 98 cartridges):
http://inkjet411.com/?page_id=579
D. Cartridge Error Bypass Procedure (this procedure has not yet been validated):
1. Depress BOTH arrow keys ( < > ) simultaneously.
2. Press the Left arrow key.
3. Select the OK key.
4. Press the Left arrow key. The "Service" menu should be displayed (…or Press Right arrow key and enter
the ‘Underware’ menu)
5. Navigate until you locate the ‘Checksum’ menu. Select OK.
6. Press Cancel 2-3 times to exit menu from service menus.
7. Attempt to send a print job to the printer. If successful, please note this action typically only allows 1
single print job to come thru at a time with each ‘Checksum’ clearing action.
PSC 2110xi (HP 56/57/58 cartridges) HP 56/57/58 Ink Refilling Services & Additional Cautions: http://www.youtube.com/watch?v=ynRwTkiI5mE
Print self-test report:
http://h20000.www2.hp.com/bizsupport/TechSupport/Document.jsp?objectID=c00042632&lang=en&cc=us&taskId=135&cont
entType=SupportFAQ&prodSeriesId=295848
1. Press Setup on the product control panel.
2. The Setup menu displays.
3. Press the Right Arrow ( > ) until Print Report displays, and then press OK . The Print Report menu displays.
4. Press the Right Arrow ( > ) until Self-Test Report displays, and then press OK .
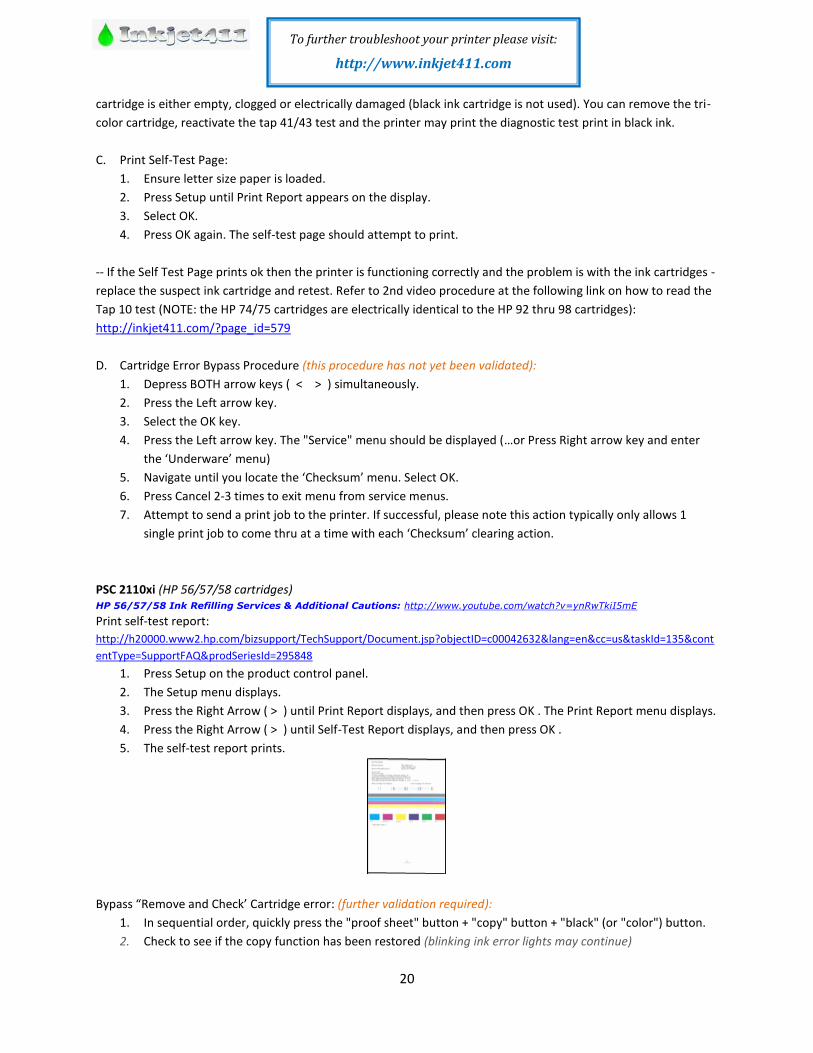
5. The self-test report prints.
Bypass “Remove and Check’ Cartridge error: (further validation required):
1. In sequential order, quickly press the "proof sheet" button + "copy" button + "black" (or "color") button.
2. Check to see if the copy function has been restored (blinking ink error lights may continue)
21
To further troubleshoot your printer please visit:
http://www.inkjet411.com
Bypass “Align Print Cartridge" error: (further validation required):
1. Press ‘Set-up’ + ‘Options’ simultaneously
Partial Reset:
NOTE: A partial reset returns user settings to factory defaults. You might have to reset the language and
country/region settings after the partial reset.
1. Disconnect the power cord from the product.
2. Press and hold the Cancel button (X) and then Left Arrow button ( < ).
3. While still holding the buttons down, plug the power cord back in.
4. When 'Reset' displays on the control panel, release both buttons.
PSC 2175xi, 2210, 2400, 2500 Series (HP 56/57/58 cartridges) HP 56/57 Ink Refilling Services & Additional Cautions: http://www.youtube.com/watch?v=TPBSaF4CwUM Self Test Print (Reference Video: http://inkjet411.com/?page_id=2358):
1. From the front panel, press Setup, press 1, and then press 4.
2. Refer to test print sample at HP’s website to evaluate your test print. Inspect nozzle test pattern; missing
bars or lines in the stair-step pattern represent an ink clog, a mis-firing nozzle or a damaged ink nozzle. If
the test print prints, but normal printing is still not possible then one of the ink cartridges likely has
internal micro-electronic damage.
NOTE: A good HP 56 black cartridge should have 416 good nozzles (26 x 16 stair-step pattern), while a good HP
57/58 color ink cartridge should have 300 good nozzles (100 for each color, 10x10 stair-step pattern)..
http://h20000.www2.hp.com/bizsupport/TechSupport/Document.jsp?objectID=c00048607
Semi-full reset:
NOTE: A semi-full reset will return printer to factory defaults.
1. Remove both ink cartridges from printer.
2. Press and hold "#" and "6" buttons on the front panel keypad and simultaneously plug in the power cord.
3. Allow printer to energize for a few seconds, release the # & 6 buttons.
4. Re-install the ink cartridges.
Tap 41/43 Cartridge Diagnostics (validation still required):
1. Press * and # keys at same time
2. Enter 124 (or 1234)
3. Using left/right arrow keys, navigate to either System Menu or Special Reports menu. Select Enter.
4. Select Ok, then click Right Arrow until the ‘print-mech button tap’ menu is displayed.
5. Select Ok (‘code = 0’ will be displayed); click and hold Right Arrow until ‘code = 43’ is displayed. Use the
Left Arrow if you need to decrease numerical count.
6. Select Ok. The test page prints. NOTE: If the test page does not print, then try and enter 'code = 41'.
7. Select Enter to print test print.
Providing the color cartridge is partially functioning, the diagnostic test print will be printed (this is a forced
service print test which is mainly used for the evaluation of ink cartridge electrical health). A good HP
21/27/56 black cartridge should display 416 good nozzles (26x16 stair-step pattern/grid), while a good HP
22/28/57/58 color ink cartridge should show 300 good nozzles (100 for each color in a 10x10 color grid). For
reference, please refer to video at link below to help evaluate test pattern. [NOTE: HP 56/57/58 and HP21/22
cartridges are electrically similar]: http://inkjet411.com/?page_id=2358
22
To further troubleshoot your printer please visit:
http://www.inkjet411.com
PSC 2350, 2335, 2355xi, (HP 94, 95, 97 & 99 cartridges)…. HP 92-99 Ink Refilling Services & Additional Cautions: http://www.youtube.com/watch?v=VfYlrQUS_PI
A. Printer Reset:
NOTE: A semi-full reset will return printer to factory defaults.
1. Remove both ink cartridges from printer.
2. Press and hold "#" and "6" buttons on the front panel keypad and simultaneously plug in the power cord.
3. Allow printer to energize for a few seconds, release the # & 6 buttons when display illuminates.
4. Re-install both ink cartridges.
B. Self-Test & Tap 41 CARTRIDGE HEALTH Diagnostic Test Report (models with keypads only; validation still
required):
1. Press * and # keys at same time (you may observe "Enter special key combo")
2. Enter ‘123’ (or 124) using number keys.
3. Using left/right arrow keys, navigate to Special Reports. Select Enter.
4. Using left/right arrow keys, navigate to Extended Self Test.
a. Select Enter to print test print - evaluate test print.
5. Access 'Special Reports' menu again, using left/right arrow keys, navigate to ‘print-mech button tap’
menu.
6. Select Ok (‘code = 0’ will be displayed); click and hold Right Arrow until ‘code = 41’ is displayed.
7. Select Ok. Within one minute the Tap 41 diagnostic test pattern should be initiated and print. Refer to 2nd
video at following link on how to interpret the diagnostic test report (FOR REFERENCE ONLY):
http://inkjet411.com/?page_id=1741
NOTE: If access code '41' does not yield a test print, then enter "code = 43").
--- A good HP 93/95/97/99 color cartridge should display 600 good nozzles, while a good HP 92/94/96/98 black ink
cartridge should show 672 good nozzles. If the results yield anything different then the ink cartridge is likely damaged
and will need to be replaced. Refer to 2nd
video on how to read the printout: http://inkjet411.com/?page_id=1741
PSC 7280 (HP 02 Cartridges) HP 02/02XL Ink Refilling Services & Additional Cautions: http://www.youtube.com/watch?v=SGA692TUWTc Tap 43 PRINTHEAD Health Diagnostics – See Video Procedure: http://inkjet411.com/?page_id=2391
1. Press * and # keys simultaneously.
2. “Enter Special Key Combo” will be displayed.
3. Press 123 to display the ‘Support/Service’ menu.
4. At ‘Support/Service’ menu, click the Right Arrow 3 times until Special Reports menu is displayed.
5. Select Ok, then click Right Arrow 2 times until the ‘print-mech button tap’ menu is displayed.
6. Select Ok (‘code = 0’ will be displayed); click and hold Right Arrow until ‘code = 43’ is displayed. Use
the Left Arrow if you need to decrease numerical count.
7. Select Ok. The test page prints.
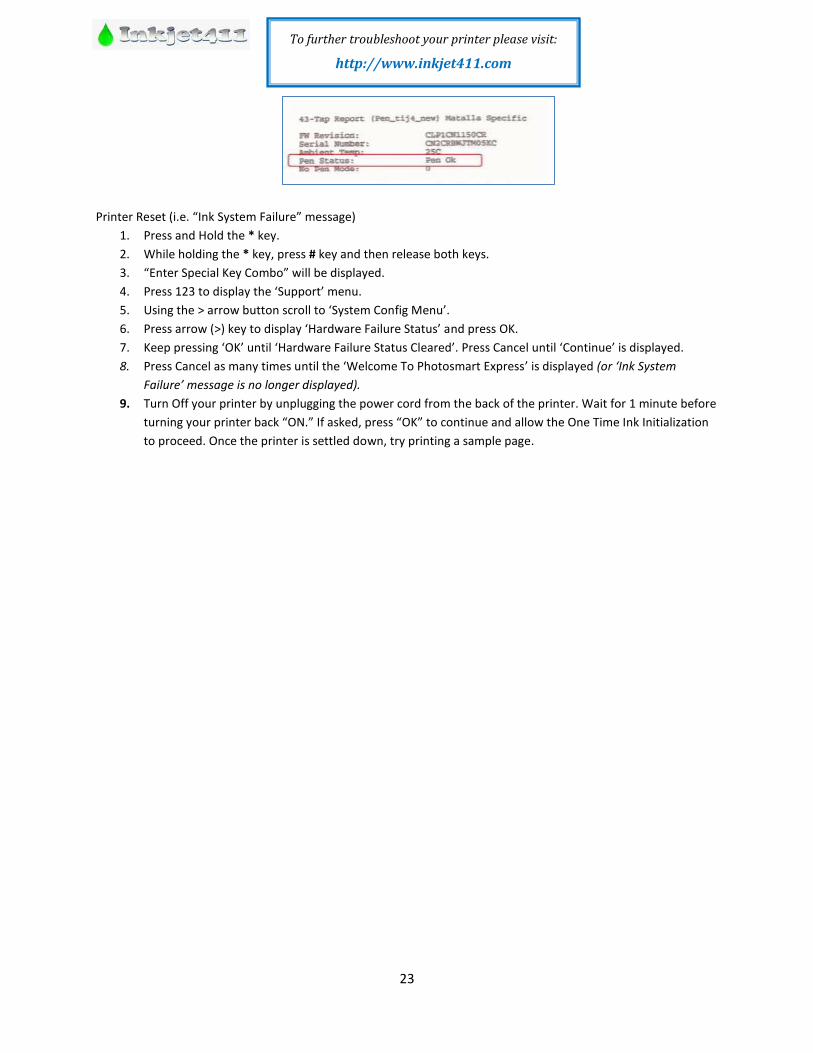
8. Check the 4th
line at the top of the printed report; an electrically good/stable PRINTHEAD ‘Pen Status’
will state “Pen Status: Pen OK”………if any other message is displayed then the PRINTHEAD may have
failed and may need to be replaced (if part is still available). It is suggested to perform the ‘Printer
Reset’ procedure below to first rule out printer firmware related problem.
23
To further troubleshoot your printer please visit:
http://www.inkjet411.com
Printer Reset (i.e. “Ink System Failure” message)
1. Press and Hold the * key.
2. While holding the * key, press # key and then release both keys.
3. “Enter Special Key Combo” will be displayed.
4. Press 123 to display the ‘Support’ menu.
5. Using the > arrow button scroll to ‘System Config Menu’.
6. Press arrow (>) key to display ‘Hardware Failure Status’ and press OK.
7. Keep pressing ‘OK’ until ‘Hardware Failure Status Cleared’. Press Cancel until ‘Continue’ is displayed.
8. Press Cancel as many times until the ‘Welcome To Photosmart Express’ is displayed (or ‘Ink System
Failure’ message is no longer displayed).
9. Turn Off your printer by unplugging the power cord from the back of the printer. Wait for 1 minute before
turning your printer back “ON.” If asked, press “OK” to continue and allow the One Time Ink Initialization
to proceed. Once the printer is settled down, try printing a sample page.
24
To further troubleshoot your printer please visit:
http://www.inkjet411.com
HP Photosmart Printers
How to print the Self-Test Report: http://h10025.www1.hp.com/ewfrf/wc/document?docname=c02875698&tmp_task=setupCategory&cc=gr&dlc=el&lc=en&product=1146331
Photosmart 245, 320, 330, 370, 375, 380 & 385 Printer series (HP 95, 97, 100 ink cartridges) HP 94-99 Ink Refilling Services & Additional Cautions: http://www.youtube.com/watch?v=VfYlrQUS_PI
1. Press either the Right Arrow button or the Left Arrow button. Main Menu displays on the control panel.
2. Press OK to select Tools.
3. Press the Right Arrow button to select ‘Print Test Page’, and then press OK. The test page prints.
Photosmart 230 and 420 Printer series (HP 95, 97, 100 ink cartridges) HP 92-99 Ink Refilling Services & Additional Cautions: http://www.youtube.com/watch?v=VfYlrQUS_PI
1. Make sure the camera is in the camera dock.
2. Load paper in the input tray.
3. Press Menu/OK on the control panel to select Print Menu (or Press the Up/Down arrow button to display
the Tools menu).
4. Press the Up/Down Arrow button to select Print Test Page, and then press OK. The test page prints.
Photosmart 470, 475 Printer series (HP 95, 97, 100 ink cartridges) HP 94-99 Ink Refilling Services & Additional Cautions: http://www.youtube.com/watch?v=VfYlrQUS_PI
1. Press Menu. Main Menu displays on the control panel.
2. Press the Down Arrow button to select Tools, and then press OK.
3. Press the Down Arrow button to select Print Test Page, and then press OK. The test page prints.
Photosmart 1000, 1100 & 1115 Printer series (HP 45, 78 ink cartridges) HP 45/78 Ink Refilling Services & Additional Cautions: http://www.youtube.com/watch?v=M7Q8t2pr2WA
Internal Test Print:
1. Ensure that the memory card has been removed from the memory card slot.
2. Make sure plain paper is loaded in the In Tray.
3. On the control panel, press the Right arrow in the ‘Tools’ button until ‘Print a Test Page’ is displayed.
4. Press the OK/Yes button.
Photosmart 1215 & 1218 Printer series (HP 45, 78 ink cartridges) HP 45/78 Ink Refilling Services & Additional Cautions: http://www.youtube.com/watch?v=M7Q8t2pr2WA
Internal Test Print:
1. Ensure that the memory card has been removed from the memory card slot.
2. Make sure plain paper is loaded.
3. On the control panel, press the Right arrow in the Menu button until ‘Print a Test Page’ is displayed.
4. Press the OK/Yes button.
Photosmart 1315 Printer series (HP 45, 78 ink cartridges) HP 45/78 Ink Refilling Services & Additional Cautions: http://www.youtube.com/watch?v=M7Q8t2pr2WA
Self Test Page:
1. Ensure that the memory card has been removed from the memory card slot.
2. Make sure plain paper is loaded.

25
To further troubleshoot your printer please visit:
http://www.inkjet411.com
3. Press the Menu button.
4. Press the Up/Down arrow button to highlight ‘Print a Test Page’. Then press the tick symbol button.
Photosmart 2570, 2575, 2575xi Printers (HP 95-99 ink cartridges) HP 94-99 Ink Refilling Services & Additional Cautions: http://www.youtube.com/watch?v=VfYlrQUS_PI
Self Test Page:
1. Make sure the printer is on and loaded with unused, plain, white paper.
2. Press Setup. The Setup Menu appears.
3. Press the Down-arrow button to select the Print Report Menu, and then press OK. The Self-Test Report
option displays.
4. Press OK to print the self-test report.
5. Evaluate test pattern. The color stair-step patterns at top-left are printed by the color cartridge. The black
stair-step pattern at top-right is printed by the black cartridge.
NOTE: Assuming electrical contacts are clean, if the self test page prints but regular/normal printing is not
possible, then one of the ink cartridges is likely electrically damaged and may need to be replaced.
Cartridge Health Diagnostics Test Report (two procedures provided depending on printer model):
Procedure A:
1. Depress BOTH arrow keys simultaneously ( < > ).
2. Press the Left arrow key.
3. Select the OK key.
4. Press the Right arrow key. The "Underware" menu should be displayed.
5. Press the right arrow key until the ‘print-mech button tap’ menu is displayed.
6. Select Ok (Code = 0 will be displayed); click and hold Right Arrow until code = 41’ is displayed. Use the Left
Arrow if you need to decrease numerical count.
7. Select Ok. Within one minute the Tap 41 diagnostic test pattern should be initiated and print (whether ink
cartridges are good or not, i.e. this is a forced print test). Refer to 2nd video at following link on how to interpret
the diagnostic test report: http://inkjet411.com/?page_id=1741
NOTE: If access code '41' does not yield a test print, then try and enter "code = 43").
--- A good HP 93/95/97/99 color cartridge should display 600 good nozzles, while a good HP 92/94/96/98 black ink
cartridge should show 672 good nozzles. If the results yield anything different then the ink cartridge is likely damaged
and will need to be replaced. Refer to 2nd video on how to read the printout: http://inkjet411.com/?page_id=1741
Procedure B:
1. Load Letter/A4-size paper into paper feed tray.
2. Press and HOLD the Cancel button, press Ok button once.
3. At ‘Mfg Commands’ menu, click Right Arrow until ‘uiaux service’ menu is displayed.
4. At ‘uiaux service’ menu, click the Right Arrow until Special Reports menu is displayed.
5. Select Ok, then click Right Arrow until the ‘print-mech button tap’ menu is displayed.
6. Select Ok (Code = 0 will be displayed); click and hold Right Arrow until code = 41’ is displayed. Use the Left
Arrow if you need to decrease numerical count.
26
To further troubleshoot your printer please visit:
http://www.inkjet411.com
7. Select Ok. Within one minute the Tap 41 diagnostic test pattern should be initiated and print (whether ink
cartridges are good or not, i.e. this is a forced print test). Refer to 2nd video at following link on how to
interpret the diagnostic test report: http://inkjet411.com/?page_id=1741
NOTE: If access code '41' does not yield a test print, then enter "code = 43").
Photosmart 2605, 2608, 2610, 2610xi, 2613, 2710, 2710xi (HP 94-99 ink cartridges) HP 92-99 Ink Refilling Services & Additional Cautions: http://www.youtube.com/watch?v=VfYlrQUS_PI
Self Test Page:
1. Make sure the printer is on and loaded with unused, plain, white paper.
2. Press Setup. The Setup Menu appears.
3. Press the Down-arrow button to select the Print Report Menu, and then press OK. The Self-Test Report
option displays.
4. Press OK to print the self-test report.
5. Evaluate test pattern. The color stair-step patterns at top-left are printed by the color cartridge. The black
stair-step pattern at top-right is printed by the black cartridge.
NOTE: Assuming electrical contacts are clean, if the self test page prints but regular/normal printing is not
possible, then one of the ink cartridges is likely electrically damaged and may need to be replaced.
Extended Self-Test:
1. Press * and # keys at same time
2. Enter 124 (or 1234)
3. Using left/right arrow keys, navigate to Special Reports. Select Enter.
4. Using left/right arrow keys, navigate to ‘extended self test’.
a. Select Enter to print test print - evaluate test print.
Tap 41 Cartridge Health Diagnostics Report:
1. Press * and # keys at same time
2. Enter 124 (or 1234)
3. Using left/right arrow keys, navigate to Special Reports. Select Enter.
4. Or using left/right arrow keys, navigate to ‘pen electrical test’.
a. Select Enter to print test - evaluate nozzle electrical test print.
5. Or if supported, using left/right arrow keys, navigate to System Menu. Select Enter.
a. Navigate to ‘print-mech button tap’ menu.
b. Select Ok (Code = 0 will be displayed); click and hold Right Arrow until code = 41’ is displayed.
c. Select Ok. Within one minute the Tap 41 diagnostic test pattern should be initiated and print.
Refer to 2nd
video on how to interpret the test report: http://inkjet411.com/?page_id=1741
NOTE 1: If access code '41' does not yield a test print, then enter "code = 43").
NOTE 2: A good HP 93/95/97 color cartridge should display 600 good nozzles, while a good HP 92/94/96/98
black ink cartridge should show 672 good nozzles. Refer to video.
Cartridge Error Bypass #1 (Emergency Printing Only - http://inkjet411.com/?page_id=544):
27
To further troubleshoot your printer please visit:
http://www.inkjet411.com
1. Press the * and # keys simultaneously.
2. Enter 123 (or 124) at keypad. The ‘Underware’ menu should be displayed.
3. Use the arrow keys to navigate to the Information Menu. Select Ok.
4. Use the arrow keys to navigate to the 'checksum for relock data input'. Select Ok. LCD should display a 5-
digit number after a few seconds.
5. Attempt to send a print job to printer
Cartridge Error Bypass #2…this procedure has not been confirmed.
1. Remove both cartridges from printer.
2. Press the * and # keys simultaneously.
3. Enter 123 (or 124) at keypad. The ‘Underware’ menu should be displayed.
4. Using the navigation arrow keys, go to CHECKSUM FOR RELOCK DATA INPUT
5. Install both ink cartridges.
6. Press Ok five (5) times.
7. Exit by pressing the Cancel (X) Button.
8. Attempt to send emergency print job thru to printer. If this doesn’t work the 1st time you may need to
repeat 2 or 3 times to ensure relock data clears.
NOTE: with a marginally performing ink cartridge, this typically results in allowing 1 entire print job to be printed at a
time. If this does not permit any print operations then the cartridge has severe internal electrical damage and will
need to be replaced.
Photosmart 3110, 3210, 3210xi, 3310, 3310xi Printer series (HP 02 Cartridges) HP 02/02XL Ink Refilling Services & Additional Cautions: http://www.youtube.com/watch?v=SGA692TUWTc Tap 43 PRINTHEAD Health Diagnostics – See Video Procedure: http://inkjet411.com/?page_id=2391
9. Press * and # keys simultaneously.
10. “Enter Special Key Combo” will be displayed.
11. Press 123 to display the ‘Support/Service’ menu.
12. At ‘Support/Service’ menu, click the Right Arrow 3 times until Special Reports menu is displayed.
13. Select Ok, then click Right Arrow 2 times until the ‘print-mech button tap’ menu is displayed.
14. Select Ok (‘code = 0’ will be displayed); click and hold Right Arrow until ‘code = 43’ is displayed. Use
the Left Arrow if you need to decrease numerical count.
15. Select Ok. The test page prints.
16. Check the 4th
line at the top of the printed report; an electrically good/stable PRINTHEAD ‘Pen Status’
will state “Pen Status: Pen OK”………if any other message is displayed then the PRINTHEAD may have
failed and may need to be replaced (if part is still available). It is suggested to perform the ‘Printer
Reset’ procedure below to first rule out printer firmware related problem.
Printer Reset (i.e. “Ink System Failure” message)
10. Press and Hold the * key.
11. While holding the * key, press # key and then release both keys.
28
To further troubleshoot your printer please visit:
http://www.inkjet411.com
12. “Enter Special Key Combo” will be displayed.
13. Press 123 to display the ‘Support’ menu.
14. Using the > arrow button scroll to ‘System Config Menu’.
15. Press arrow (>) key to display ‘Hardware Failure Status’ and press OK.
16. Keep pressing ‘OK’ until ‘Hardware Failure Status Cleared’. Press Cancel until ‘Continue’ is displayed.
17. Press Cancel as many times until the ‘Welcome To Photosmart Express’ is displayed (or ‘Ink System
Failure’ message is no longer displayed).
18. Turn Off your printer by unplugging the power cord from the back of the printer. Wait for 1 minute before
turning your printer back “ON.” If asked, press “OK” to continue and allow the One Time Ink Initialization
to proceed. Once the printer is settled down, try printing a sample page
Photosmart 5510, 5511, 5512, 5514, 5515, 6510, 6512, 6515, 7510, 7515 (HP 564 cartridges): HP 564XL Ink Refilling Services & Additional Cautions: http://www.youtube.com/watch?v=zF7OM61ErO0
NOTE: If this service menu access procedure does not work refer to ‘Photosmart Plus B Series’ printers
Tap 41 PRINTHEAD Health Diagnostics:
1. Using two fingers, gently tap the ‘Return’ and ‘Home’ keys on touchscreen until the Engineering
Menu is displayed (for example, press the button 3-4 times each in alternating succession).
Using arrow keys navigate to Service Menu.
……..or if a keypad is available: Press * and # keys simultaneously. Service Menu should be
displayed.
2. Use arrow keys to advance to the Special Reports Menu. Select OK.
3. Use arrow keys to advance to the ‘print mech button tap’ menu. Select Ok.
4. ‘Code = 0’ will be displayed. Use arrows keys to change value to ‘41’ (i.e. press and hold right arrow key).
5. When ‘code = 41’, select ‘OK’. The diagnostic test pattern will print.
NOTE: The Tap 10 self-test print may also be initiated via ‘code = 10’ (use to verify all nozzles are firing)
6. Check the 4th
line at the top of the printed report; an electrically good/stable PRINTHEAD will state “Pen
OK”………if any other message is displayed then the PRINTHEAD has likely failed and may need to be
replaced. Re-seat PRINTHEAD and repeat ‘Tap 41’ test to verify connectivity is not the issue.
SEVERE PRINT QUALITY ISSUES (i.e. missing colors):
If, after activating the ‘Clean Printhead’ routine 2 times in a row, along with manufacturer’s suggested printer
cleaning procedures, blank pages are observed or output print quality is extremely poor (for example, you observe
several missing colors in the Print Quality Diagnostic Report where otherwise all colors should normally be present
with no visible streaking), then the printhead may have partially dried out and a hot water flush may be necessary
to help recover the ink system*. Refer to instructions and video procedures here:
http://inkjet411.com/?page_id=1451
NOTE: If the HP564 system PRINTHEAD is not easily removable, then it is suggested you take a damp cloth and
repeatedly blot/saturate the respective color ink port with water (distilled water is recommended):
(video coming soon)
1. Remove suspect ink cartridge (or cartridges).
29
To further troubleshoot your printer please visit:
http://www.inkjet411.com
2. Place a paper towel under the PRINTHEAD assembly.
3. You’ll see a round mesh ink port where ink flows into the PRINTHEAD.
4. Thoroughly dampen the ink port with 0.5 to 1 teaspoon of distilled water (use an eye-dropper or similar,
pour or drip directly into ink port).
5. Reinstall ink cartridge(s).
6. Activate the ‘Clean Printhead’ routine once or twice to see if the respective color(s) have recovered.
Photosmart 5520, 5522, 5524, 5525, 6520, 7520, 7525 – with Touchscreens (HP 564 Cartridges): HP 564 Ink Refilling Services & Additional Cautions: http://www.youtube.com/watch?v=YlcY9jKXTvs
Tap 41 PRINTHEAD Health Diagnostics (NOTE: applies to touchscreen printer models only):
1. Press ‘Return’ button (lower left side) four (4) times until ‘Support’ menu is displayed.
2. At ‘Support’ Menu, using the arrow key, navigate to the ‘Service Menu’, press Ok.
3. Use arrow keys to advance to the ‘Special Reports’ Menu. Select OK.
4. Use arrow keys to advance to the ‘print mech button tap’ menu. Select Ok.
5. ‘code = 0’ will be displayed. Use arrows keys to change value to ‘41’ (i.e. press and hold right arrow key).
6. When ‘Code = 41’, select ‘OK’. The diagnostic test pattern will print.
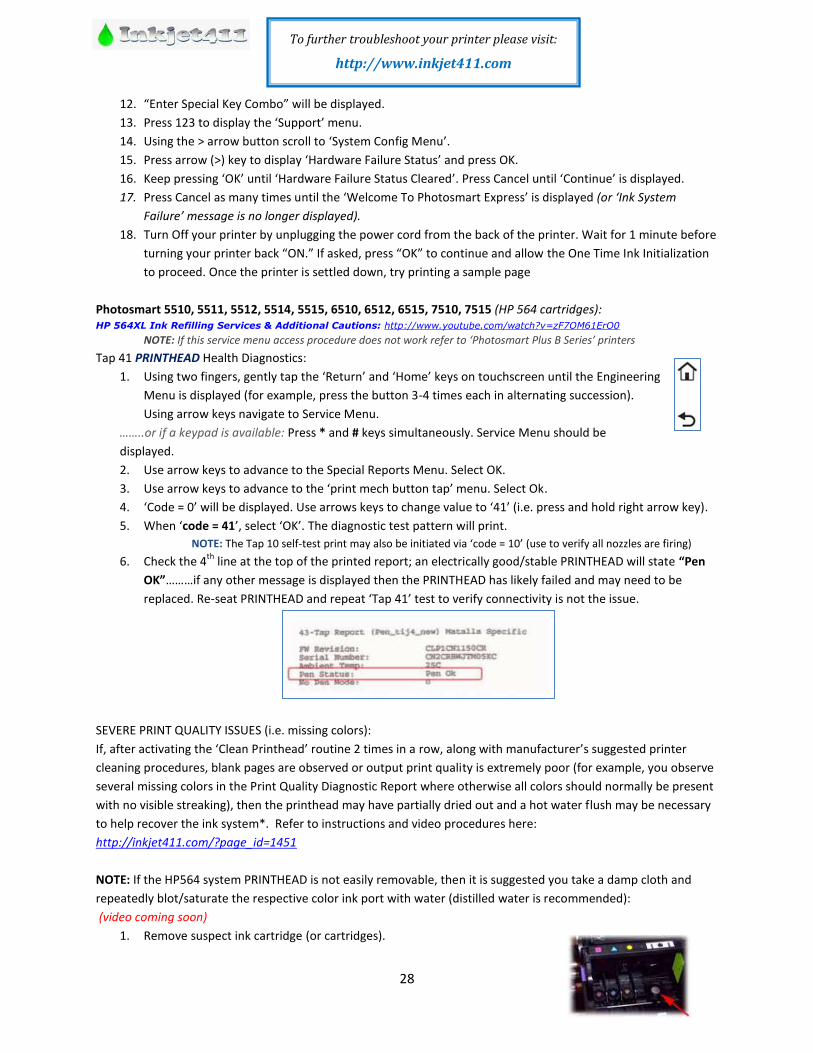
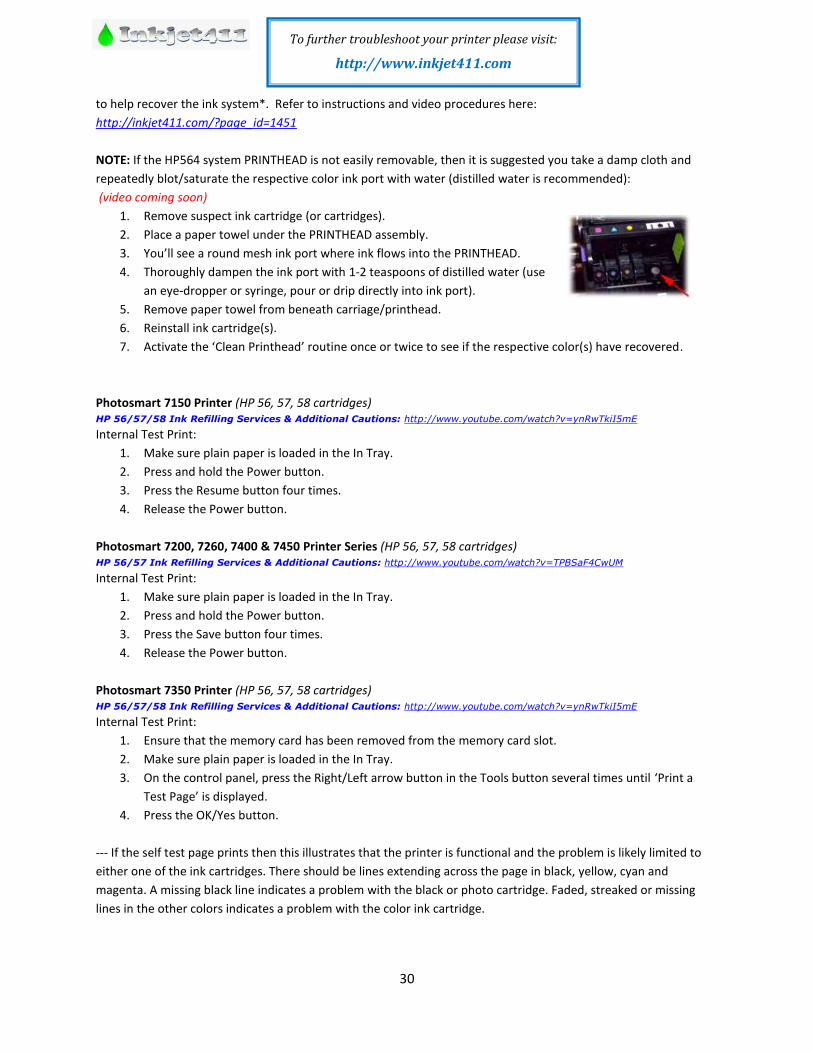
7. Check the 4th
line at the top of the printed report; an electrically good/stable PRINTHEAD will state “Pxx
Sxxxxx: Pxx Ox”….which translated means “Pen Status: Pen OK”………if any other message is displayed
then the PRINTHEAD may have electrically failed and may need to be replaced.
NOTE: For “printhead” error messages or for no-printing conditions, it is suggested to remove the
PRINTHEAD and clean the rear electrical contacts; also inspect and clean electrical mating contacts on
carriage assembly. Reinstall PRINTHEAD and test to verify connectivity is not the issue. Click here for
more information: http://inkjet411.com/?page_id=1451
Printer Reset (i.e. use in the event of “Incompatible Printhead” or “Ink System Failure” message, etc.):
1. Remove ink cartridges from printer.
2. Access the Service menu – refer to suggested methods provided above.
3. Support Menu should be displayed. Navigate to the ‘Resets Menu’, press Ok.
4. Navigate to the ‘Semi-Full Reset’. This will restore the printer back to the factory default setting…you will
need to re-configure printer following this action (i.e. similar to when you first purchased and set-up the
printer).
5. Reinstall ink cartridges and test.
SEVERE PRINT QUALITY ISSUES (i.e. missing colors):
If, after activating the ‘Clean Printhead’ routine 2 times in a row, along with manufacturer’s suggested printer
cleaning procedures, blank pages are observed or output print quality is extremely poor (for example, you observe
several missing colors in the Print Quality Diagnostic Report where otherwise all colors should normally be present
with no visible streaking), then the printhead may have partially dried out and a hot water flush may be necessary
30
To further troubleshoot your printer please visit:
http://www.inkjet411.com
to help recover the ink system*. Refer to instructions and video procedures here:
http://inkjet411.com/?page_id=1451
NOTE: If the HP564 system PRINTHEAD is not easily removable, then it is suggested you take a damp cloth and
repeatedly blot/saturate the respective color ink port with water (distilled water is recommended):
(video coming soon)
1. Remove suspect ink cartridge (or cartridges).
2. Place a paper towel under the PRINTHEAD assembly.
3. You’ll see a round mesh ink port where ink flows into the PRINTHEAD.
4. Thoroughly dampen the ink port with 1-2 teaspoons of distilled water (use
an eye-dropper or syringe, pour or drip directly into ink port).
5. Remove paper towel from beneath carriage/printhead.
6. Reinstall ink cartridge(s).
7. Activate the ‘Clean Printhead’ routine once or twice to see if the respective color(s) have recovered.
Photosmart 7150 Printer (HP 56, 57, 58 cartridges) HP 56/57/58 Ink Refilling Services & Additional Cautions: http://www.youtube.com/watch?v=ynRwTkiI5mE
Internal Test Print:
1. Make sure plain paper is loaded in the In Tray.
2. Press and hold the Power button.
3. Press the Resume button four times.
4. Release the Power button.
Photosmart 7200, 7260, 7400 & 7450 Printer Series (HP 56, 57, 58 cartridges) HP 56/57 Ink Refilling Services & Additional Cautions: http://www.youtube.com/watch?v=TPBSaF4CwUM
Internal Test Print:
1. Make sure plain paper is loaded in the In Tray.
2. Press and hold the Power button.
3. Press the Save button four times.
4. Release the Power button.
Photosmart 7350 Printer (HP 56, 57, 58 cartridges) HP 56/57/58 Ink Refilling Services & Additional Cautions: http://www.youtube.com/watch?v=ynRwTkiI5mE
Internal Test Print:
1. Ensure that the memory card has been removed from the memory card slot.
2. Make sure plain paper is loaded in the In Tray.
3. On the control panel, press the Right/Left arrow button in the Tools button several times until ‘Print a
Test Page’ is displayed.
4. Press the OK/Yes button.
--- If the self test page prints then this illustrates that the printer is functional and the problem is likely limited to
either one of the ink cartridges. There should be lines extending across the page in black, yellow, cyan and
magenta. A missing black line indicates a problem with the black or photo cartridge. Faded, streaked or missing
lines in the other colors indicates a problem with the color ink cartridge.
31
To further troubleshoot your printer please visit:
http://www.inkjet411.com
NOTE: Ideally, a good Color cartridge will have/display 300 nozzles (for example, check the printed 10 x 10 stair step patterns
for each of the 3 colors), while a good Black cartridge will have/display 416 nozzles (for example, check the printed 26 x 16 stair-
step pattern).
Cartridge Health Diagnostics Test (Pen Tests)…………VALIDATION REQUIRED!
1. To enter the Manufacturing Tests menu, press the 3 small, round buttons on the front panel
simultaneously for >5secs: ‘OK’, ‘CANCEL’, & ‘PRINTS’ (…service menu button combination?)
2. Using left/right arrow keys, navigate to Special Reports (or System Menu). Select Enter.
3. Navigate to 'print-mech button tap' menu.
4. Select Ok (‘code = 0’ will be displayed); click and hold Right Arrow until ‘code = 41' (or attempt ‘code = 43’
if nothing prints using ‘41’) is displayed.
5. Select Ok. Within one minute the Tap 41 (or 43) diagnostic test pattern should be initiated and print.
Refer to video to help evaluate test pattern: http://inkjet411.com/?page_id=2358
NOTE: The Tap 41/43 test report will be printed using the black ink cartridge by default; if a blank page appears then remove
the black ink cartridge from the printer and repeat steps; report will be printed using the Color cartridge. This can also help you
isolate the problem to one of the ink cartridges. The ‘Current' error message should state ‘None’, however if you any other
message then either the ink cartridge is incorrectly seated in the carriage assembly or a severe cartridge error condition is
present and the ink cartridge may need to be replaced.
Photosmart 7550 Printer (HP 56, 57, 58 cartridges) HP 56/57/58 Ink Refilling Services & Additional Cautions: http://www.youtube.com/watch?v=ynRwTkiI5mE Internal Test Print:
1. Ensure that the memory card has been removed from the memory card slot.
2. Make sure plain paper is loaded in the In Tray.
3. Press the Menu button.
4. Press the Up/Down arrow button to display the ‘Tools’ menu. Then press the OK button.
5. Press the Down arrow button to highlight ‘Print a Test Page’. Then press the OK button.
--- If the self test page prints then this illustrates that the printer is functional and the problem is likely limited to
either one of the ink cartridges. There should be lines extending across the page in black, yellow, cyan and
magenta. A missing black line indicates a problem with the black or photo cartridge. Faded, streaked or missing
lines in the other colors indicates a problem with the color ink cartridge.
NOTE: Ideally, a good Color cartridge will have/display 300 nozzles (for example, check the printed 10 x 10 stair step patterns
for each of the 3 colors), while a good Black cartridge will have/display 416 nozzles (for example, check the printed 26 x 16 stair-
step pattern).
Cartridge Health Diagnostics Test (Pen Tests)…………VALIDATION REQUIRED!
6. To enter the Manufacturing Tests menu, press the 3 small, round buttons on the front panel
simultaneously for >5secs: ‘OK’, ‘CANCEL’, & ‘PRINTS’ (…service menu button combination?)
7. Using left/right arrow keys, navigate to Special Reports (or System Menu). Select Enter.
8. Navigate to 'print-mech button tap' menu.
9. Select Ok (‘code = 0’ will be displayed); click and hold Right Arrow until ‘code = 41' (or attempt ‘code = 43’
if nothing prints using ‘41’) is displayed.

32
To further troubleshoot your printer please visit:
http://www.inkjet411.com
10. Select Ok. Within one minute the Tap 41 (or 43) diagnostic test pattern should be initiated and print.
Refer to video to help evaluate test pattern: http://inkjet411.com/?page_id=2358
NOTE: The Tap 41/43 test report will be printed using the black ink cartridge by default; if a blank page appears then remove
the black ink cartridge from the printer and repeat steps; report will be printed using the Color cartridge. This can also help you
isolate the problem to one of the ink cartridges. The ‘Current' error message should state ‘None’, however if you any other
message then either the ink cartridge is incorrectly seated in the carriage assembly or a severe cartridge error condition is
present and the ink cartridge may need to be replaced.
Photosmart 7600 Printer series (HP 56, 57, 58 ink cartridges) HP 56/57 Ink Refilling Services & Additional Cautions: http://www.youtube.com/watch?v=TPBSaF4CwUM
Internal Test Print:
1. Ensure that the memory card has been removed from the memory card slot.
2. Make sure plain paper is loaded.
3. On the control panel, press the Right arrow in the Menu button until ‘Print a Test Page’ is displayed.
4. Press the OK/Yes button.
Photosmart 7700 & 7960 Printer series (HP 56, 57, 58 cartridges) HP 56/57/58 Ink Refilling Services & Additional Cautions: http://www.youtube.com/watch?v=ynRwTkiI5mE Internal Test Print:
1. Ensure that the memory card has been removed from the memory card slot.
2. Make sure plain paper is loaded in the In Tray.
3. Press the Menu button.
4. Press the Up/Down arrow button to display the Tools menu. Then press the OK button.
5. Press the Down arrow button to highlight Print a Test Page. Then press the OK button.
--- If the self test page prints then this illustrates that the printer is functional and the problem is likely limited to
either one of the ink cartridges. There should be lines extending across the page in black, yellow, cyan and
magenta. A missing black line indicates a problem with the black or photo cartridge. Faded, streaked or missing
lines in the other colors indicates a problem with the color ink cartridge.
NOTE: Ideally, a good Color cartridge will have/display 300 nozzles (for example, check the printed 10 x 10 stair step patterns
for each of the 3 colors), while a good Black cartridge will have/display 416 nozzles (for example, check the printed 26 x 16 stair-
step pattern).
Cartridge Health Diagnostics Test (Pen Tests)…………VALIDATION REQUIRED!
1. To enter the Manufacturing Tests menu, press the 3 small, round buttons on the front panel
simultaneously for >5secs: ‘OK’, ‘CANCEL’, & ‘PRINTS’ (…service menu button combination?)
2. Using left/right arrow keys, navigate to Special Reports (or System Menu). Select Enter.
3. Navigate to 'print-mech button tap' menu.
4. Select Ok (‘code = 0’ will be displayed); click and hold Right Arrow until ‘code = 41' (or attempt ‘code = 43’
if nothing prints using ‘41’) is displayed.
5. Select Ok. Within one minute the Tap 41 (or 43) diagnostic test pattern should be initiated and print.
Refer to video to help evaluate test pattern: http://inkjet411.com/?page_id=2358
NOTE: The Tap 41/43 test report will be printed using the black ink cartridge by default; if a blank page appears then remove
the black ink cartridge from the printer and repeat steps; report will be printed using the Color cartridge. This can also help you

33
To further troubleshoot your printer please visit:
http://www.inkjet411.com
isolate the problem to one of the ink cartridges. The ‘Current' error message should state ‘None’, however if you any other
message then either the ink cartridge is incorrectly seated in the carriage assembly or a severe cartridge error condition is
present and the ink cartridge may need to be replaced.
Photosmart 7800 & 7850 Printer series (HP 92-95, 99 cartridges) HP 92-99 Ink Refilling Services & Additional Cautions: http://www.youtube.com/watch?v=VfYlrQUS_PI
Internal Test Print:
1. Press and hold the OK button, and then press the Left Arrow button once.
2. Release the buttons. The internal test page prints.
Pen Electrical Test (available on select printer models only):
1. Press and hold Cancel and Save. Hold both buttons for about five seconds. The Service menu displays on
the control panel.
2. Scroll to Using left/right arrow keys, navigate to ‘pen electrical test’.
3. Select Enter to print test - evaluate nozzle test pattern.
4. Check for presence of ‘Current Error’ & ‘Previous Error’ messages.
Tap 41/43 Diagnostics Test (available on select printer models only):
1. To enter the Manufacturing Tests menu, press the 3 small, round buttons on the front panel
simultaneously for >5secs: ‘OK’, ‘CANCEL’, & ‘SELECT PHOTOS’ (…or ‘Print Photos’)
2. Using left/right arrow keys, navigate to Special Reports (or System Menu). Select Enter.
3. Navigate to ‘Perform Tap Test' menu.
4. Select Ok (‘code = 0’ will be displayed); click and hold Right Arrow until ‘code = 41' (or attempt ‘code = 43’
if nothing prints using ‘41’) is displayed.
5. Select Ok. Within one minute the Tap 41 (or 43) diagnostic test pattern should be initiated and print.
Refer to video to help evaluate test pattern. Refer to 2nd video for guidance on how to read the
diagnostic test pattern: http://inkjet411.com/?page_id=1741
NOTE 1: A good HP 93/95/97 color cartridge should display 600 good nozzles, while a good HP 92/94/96/98 black ink
cartridge should show 672 good nozzles. Refer to video.
Photosmart 8000 Printer Series (HP 02 cartridges) HP 02/02XL Ink Refilling Services & Additional Cautions: http://www.youtube.com/watch?v=SGA692TUWTc Internal Test Print:
1. Press the Menu button, press the Right Arrow button to select ‘Tools’, and then press ‘OK’.
2. Press the Right Arrow button several times to select ‘Print Test Page’, and then press ‘OK’. The test page
prints.
Tap 43 PRINTHEAD Health Diagnostics – See Video Procedure: http://inkjet411.com/?page_id=2377
1. Turn ON the printer.
2. Press and Hold the “Print Photos” & “Red Eye Removal” buttons.
3. Release both buttons.
4. You will see a new screen that says, “Enter Special Key Combo”… The Key combo is: press and
release in sequence the “Red Eye Removal”, “Print Photos”, and then “Red Eye Removal”
5. Scroll through the menu by pressing the right arrow button until the display says ‘Special Reports’.
6. Select Ok, then press the arrow button until the ‘print-mech button tap’ menu is displayed.
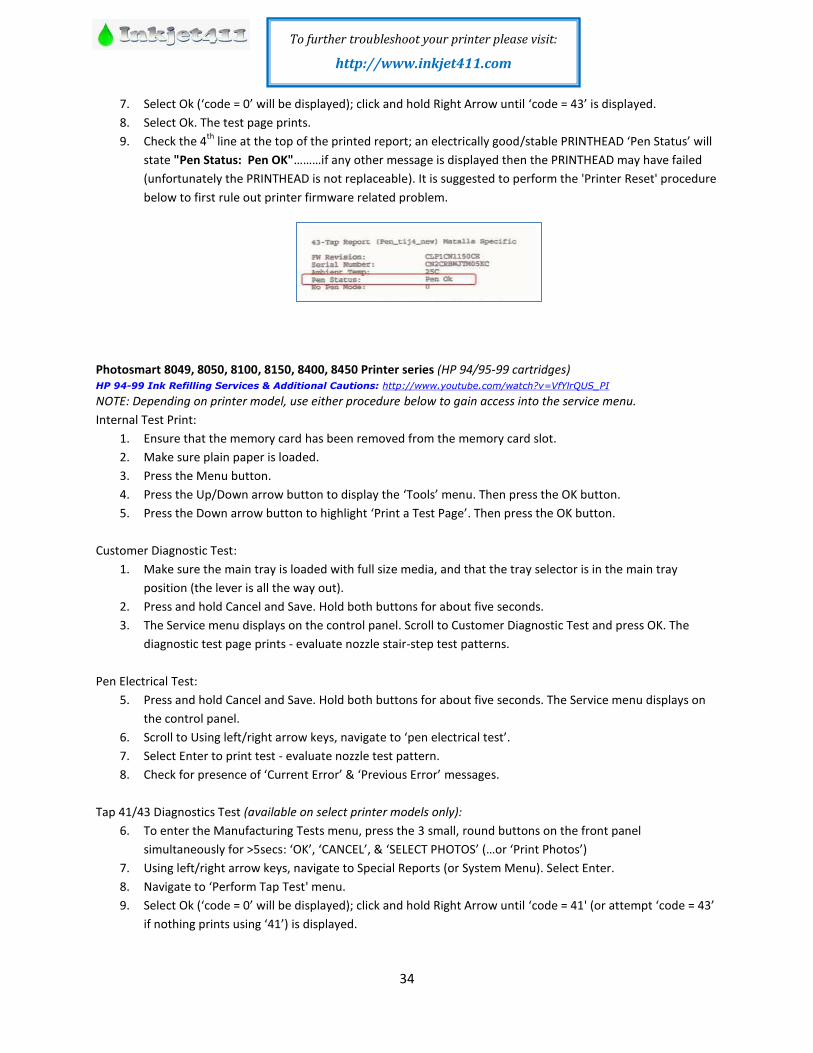
34
To further troubleshoot your printer please visit:
http://www.inkjet411.com
7. Select Ok (‘code = 0’ will be displayed); click and hold Right Arrow until ‘code = 43’ is displayed.
8. Select Ok. The test page prints.
9. Check the 4th
line at the top of the printed report; an electrically good/stable PRINTHEAD ‘Pen Status’ will
state "Pen Status: Pen OK"………if any other message is displayed then the PRINTHEAD may have failed
(unfortunately the PRINTHEAD is not replaceable). It is suggested to perform the 'Printer Reset' procedure
below to first rule out printer firmware related problem.
Photosmart 8049, 8050, 8100, 8150, 8400, 8450 Printer series (HP 94/95-99 cartridges) HP 94-99 Ink Refilling Services & Additional Cautions: http://www.youtube.com/watch?v=VfYlrQUS_PI
NOTE: Depending on printer model, use either procedure below to gain access into the service menu.
Internal Test Print:
1. Ensure that the memory card has been removed from the memory card slot.
2. Make sure plain paper is loaded.
3. Press the Menu button.
4. Press the Up/Down arrow button to display the ‘Tools’ menu. Then press the OK button.
5. Press the Down arrow button to highlight ‘Print a Test Page’. Then press the OK button.
Customer Diagnostic Test:
1. Make sure the main tray is loaded with full size media, and that the tray selector is in the main tray
position (the lever is all the way out).
2. Press and hold Cancel and Save. Hold both buttons for about five seconds.
3. The Service menu displays on the control panel. Scroll to Customer Diagnostic Test and press OK. The
diagnostic test page prints - evaluate nozzle stair-step test patterns.
Pen Electrical Test:
5. Press and hold Cancel and Save. Hold both buttons for about five seconds. The Service menu displays on
the control panel.
6. Scroll to Using left/right arrow keys, navigate to ‘pen electrical test’.
7. Select Enter to print test - evaluate nozzle test pattern.
8. Check for presence of ‘Current Error’ & ‘Previous Error’ messages.
Tap 41/43 Diagnostics Test (available on select printer models only):
6. To enter the Manufacturing Tests menu, press the 3 small, round buttons on the front panel
simultaneously for >5secs: ‘OK’, ‘CANCEL’, & ‘SELECT PHOTOS’ (…or ‘Print Photos’)
7. Using left/right arrow keys, navigate to Special Reports (or System Menu). Select Enter.
8. Navigate to ‘Perform Tap Test' menu.
9. Select Ok (‘code = 0’ will be displayed); click and hold Right Arrow until ‘code = 41' (or attempt ‘code = 43’
if nothing prints using ‘41’) is displayed.
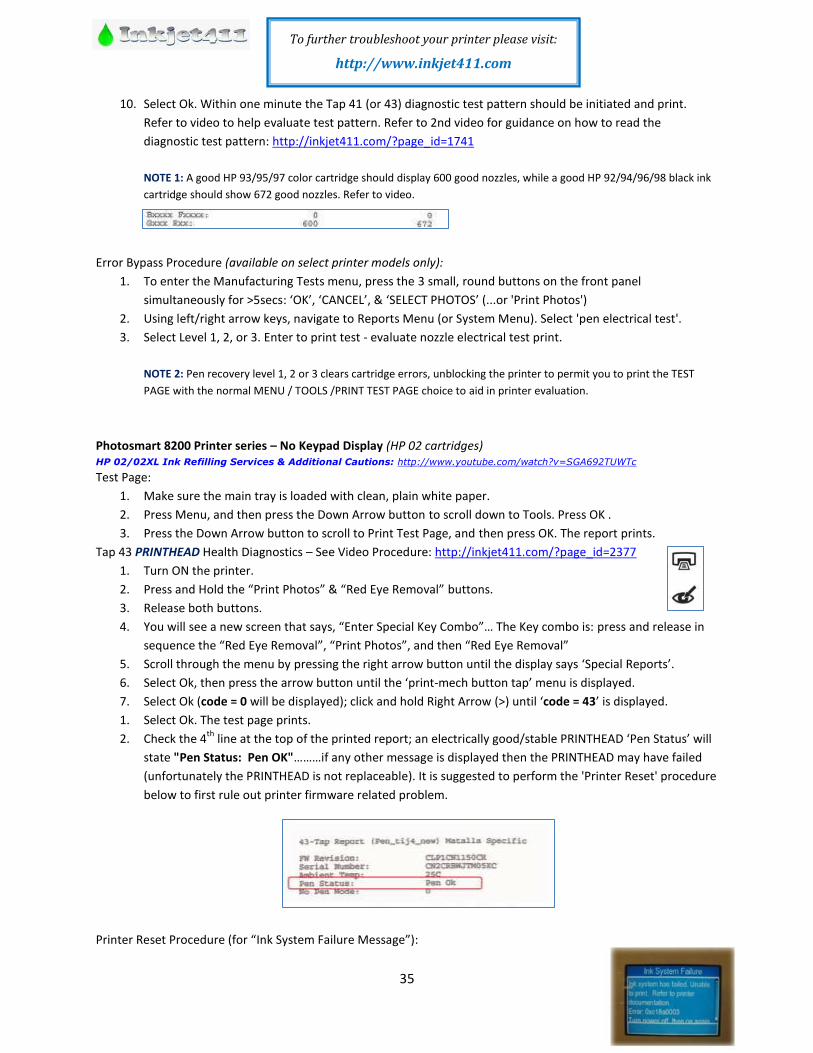
35
To further troubleshoot your printer please visit:
http://www.inkjet411.com
10. Select Ok. Within one minute the Tap 41 (or 43) diagnostic test pattern should be initiated and print.
Refer to video to help evaluate test pattern. Refer to 2nd video for guidance on how to read the
diagnostic test pattern: http://inkjet411.com/?page_id=1741
NOTE 1: A good HP 93/95/97 color cartridge should display 600 good nozzles, while a good HP 92/94/96/98 black ink
cartridge should show 672 good nozzles. Refer to video.
Error Bypass Procedure (available on select printer models only):
1. To enter the Manufacturing Tests menu, press the 3 small, round buttons on the front panel
simultaneously for >5secs: ‘OK’, ‘CANCEL’, & ‘SELECT PHOTOS’ (...or 'Print Photos')
2. Using left/right arrow keys, navigate to Reports Menu (or System Menu). Select 'pen electrical test'.
3. Select Level 1, 2, or 3. Enter to print test - evaluate nozzle electrical test print.
NOTE 2: Pen recovery level 1, 2 or 3 clears cartridge errors, unblocking the printer to permit you to print the TEST
PAGE with the normal MENU / TOOLS /PRINT TEST PAGE choice to aid in printer evaluation.
Photosmart 8200 Printer series – No Keypad Display (HP 02 cartridges) HP 02/02XL Ink Refilling Services & Additional Cautions: http://www.youtube.com/watch?v=SGA692TUWTc Test Page:
1. Make sure the main tray is loaded with clean, plain white paper.
2. Press Menu, and then press the Down Arrow button to scroll down to Tools. Press OK .
3. Press the Down Arrow button to scroll to Print Test Page, and then press OK. The report prints.
Tap 43 PRINTHEAD Health Diagnostics – See Video Procedure: http://inkjet411.com/?page_id=2377
1. Turn ON the printer.
2. Press and Hold the “Print Photos” & “Red Eye Removal” buttons.
3. Release both buttons.
4. You will see a new screen that says, “Enter Special Key Combo”… The Key combo is: press and release in
sequence the “Red Eye Removal”, “Print Photos”, and then “Red Eye Removal”
5. Scroll through the menu by pressing the right arrow button until the display says ‘Special Reports’.
6. Select Ok, then press the arrow button until the ‘print-mech button tap’ menu is displayed.
7. Select Ok (code = 0 will be displayed); click and hold Right Arrow (>) until ‘code = 43’ is displayed.
1. Select Ok. The test page prints.
2. Check the 4th
line at the top of the printed report; an electrically good/stable PRINTHEAD ‘Pen Status’ will
state "Pen Status: Pen OK"………if any other message is displayed then the PRINTHEAD may have failed
(unfortunately the PRINTHEAD is not replaceable). It is suggested to perform the 'Printer Reset' procedure
below to first rule out printer firmware related problem.
Printer Reset Procedure (for “Ink System Failure Message”):
36
To further troubleshoot your printer please visit:
http://www.inkjet411.com
1. Turn ON the printer.
2. Press and Hold the “Print Photos” & “Red Eye Removal” buttons.
3. Release both buttons.
4. You will see a new screen that says, “Enter Special Key Combo”… The Key combo is: press and release in
sequence the ‘Red Eye Removal’, ‘Print Photos’, and then ‘Red Eye Removal’.
5. Scroll through the menu by pressing the right arrow button until the display says “System Configuration
Menu”. Select Ok.
6. Using arrow keys scroll to “Hardware failure status”. Press OK to clear
7. If you still see the error message, click “Cancel” repeatedly until the ‘error’ message is no longer
displayed.
Photosmart 8750 Professional Photo Printer (HP 96-99 cartridges) HP 96/97 Ink Refilling Services & Additional Cautions: http://www.youtube.com/watch?v=5EkLua8PqAU Extended Self Test (Tap 10 Test Page):
1. Load plain paper.
2. Press and hold Layout and the Right Arrow button for several seconds until Tap Test #0 displays on the
control panel.
3. Press the Layout button once. Tap Test #10 displays on the control panel.
4. Press OK. The 10-tap test prints. Evaluate stair-step patterns for missing nozzles.
or……
1. Load plain paper.
2. Press the Menu button on the printer control panel.
3. Press the Right arrow button six times.
4. Confirm the display says Print a test page.
5. Press the Select Photo button on the control panel to print the test page.
HP Photosmart B/C/D Series Printers
How to print the Self-Test Report: http://h10025.www1.hp.com/ewfrf/wc/document?docname=c02875698&tmp_task=setupCategory&cc=gr&dlc=el&lc=en&product=1146331
Photosmart C3100, C3110, C3125, C3135, C3140, C3150, C3170, C3173, C3175, C3180, C3183, C3188, C3190,
C3193, C3194 (HP 92/93/99 ink cartridges) HP 92/93 Ink Refilling Services & Additional Cautions: http://www.youtube.com/watch?v=fYZ8R0TBX3k
Self Test Page (might only work with electrically good cartridges):
1. Press and hold the CANCEL button.
2. Press the COLOR COPY button. Release both buttons.
3. The self test prints. The printed pattern will verify printer is generally functional. Inspect color bars to
verify proper nozzle/jetting health.
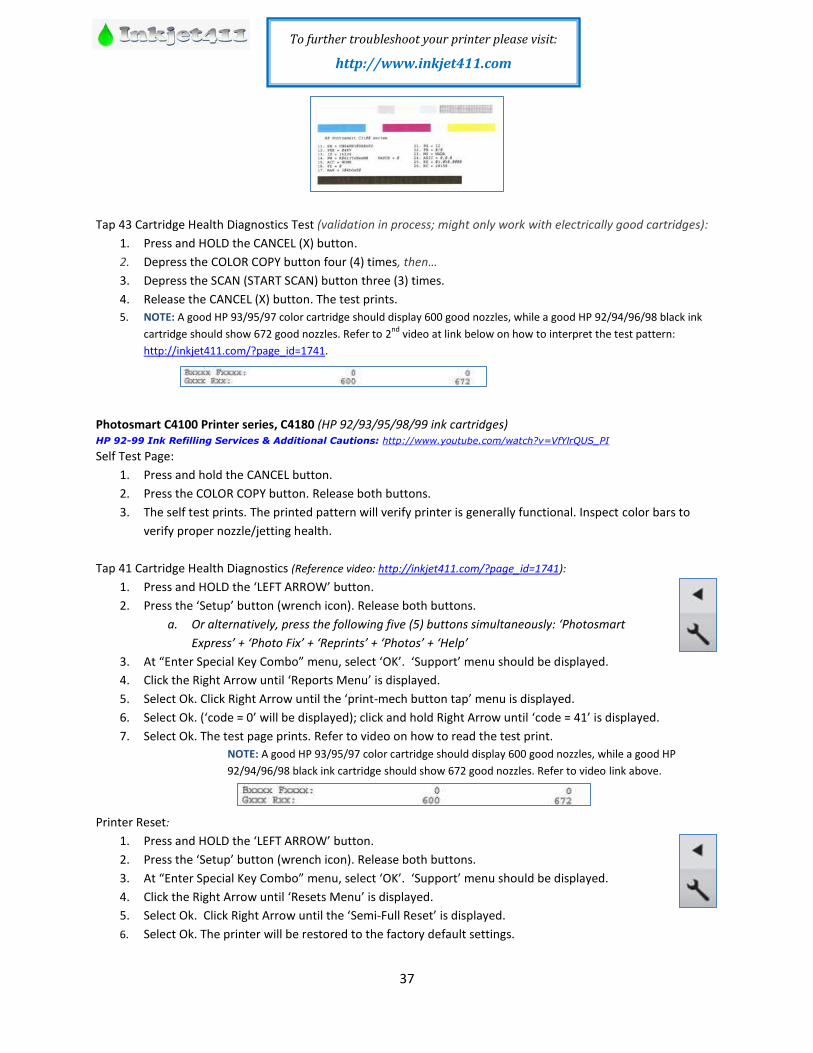
37
To further troubleshoot your printer please visit:
http://www.inkjet411.com
Tap 43 Cartridge Health Diagnostics Test (validation in process; might only work with electrically good cartridges):
1. Press and HOLD the CANCEL (X) button.
2. Depress the COLOR COPY button four (4) times, then…
3. Depress the SCAN (START SCAN) button three (3) times.
4. Release the CANCEL (X) button. The test prints.
5. NOTE: A good HP 93/95/97 color cartridge should display 600 good nozzles, while a good HP 92/94/96/98 black ink
cartridge should show 672 good nozzles. Refer to 2nd
video at link below on how to interpret the test pattern:
http://inkjet411.com/?page_id=1741.
Photosmart C4100 Printer series, C4180 (HP 92/93/95/98/99 ink cartridges) HP 92-99 Ink Refilling Services & Additional Cautions: http://www.youtube.com/watch?v=VfYlrQUS_PI
Self Test Page:
1. Press and hold the CANCEL button.
2. Press the COLOR COPY button. Release both buttons.
3. The self test prints. The printed pattern will verify printer is generally functional. Inspect color bars to
verify proper nozzle/jetting health.
Tap 41 Cartridge Health Diagnostics (Reference video: http://inkjet411.com/?page_id=1741):
1. Press and HOLD the ‘LEFT ARROW’ button.
2. Press the ‘Setup’ button (wrench icon). Release both buttons.
a. Or alternatively, press the following five (5) buttons simultaneously: ‘Photosmart
Express’ + ‘Photo Fix’ + ‘Reprints’ + ‘Photos’ + ‘Help’
3. At “Enter Special Key Combo” menu, select ‘OK’. ‘Support’ menu should be displayed.
4. Click the Right Arrow until ‘Reports Menu’ is displayed.
5. Select Ok. Click Right Arrow until the ‘print-mech button tap’ menu is displayed.
6. Select Ok. (‘code = 0’ will be displayed); click and hold Right Arrow until ‘code = 41’ is displayed.
7. Select Ok. The test page prints. Refer to video on how to read the test print.
NOTE: A good HP 93/95/97 color cartridge should display 600 good nozzles, while a good HP
92/94/96/98 black ink cartridge should show 672 good nozzles. Refer to video link above.
Printer Reset:
1. Press and HOLD the ‘LEFT ARROW’ button.
2. Press the ‘Setup’ button (wrench icon). Release both buttons.
3. At “Enter Special Key Combo” menu, select ‘OK’. ‘Support’ menu should be displayed.
4. Click the Right Arrow until ‘Resets Menu’ is displayed.
5. Select Ok. Click Right Arrow until the ‘Semi-Full Reset’ is displayed.
6. Select Ok. The printer will be restored to the factory default settings.
38
To further troubleshoot your printer please visit:
http://www.inkjet411.com
Photosmart C4200-C4300 Printer series (HP 74/75 ink cartridges) HP 74/75 Ink Refilling Services & Additional Cautions: http://www.youtube.com/watch?v=WqnHRFpbo0w
HP 74XL/75XL Ink Refilling Services & Additional Cautions: http://www.youtube.com/watch?v=0tt7xmYVa4o Self Test Page:
1. Press and hold the CANCEL button.
2. Press the COLOR COPY button. Release both buttons.
3. The self test prints. The printed pattern will verify printer is generally functional. Inspect color bars to
verify proper nozzle/jetting health.
Tap 41 Cartridge Health Diagnostics (see video: http://inkjet411.com/?page_id=536):
1. Load Letter/A4-size paper into paper feed tray.
2. If any lights are blinking, first press ‘Cancel’ to attempt to clear.
3. Press and HOLD the ‘Cancel’ button, press ‘Ok’ button once.
4. At ‘Mfg Commands’ menu, click Right Arrow once until ‘uiaux service’ menu is displayed.
5. At ‘uiaux service’ menu, click the Right Arrow 3 times until Special Reports menu is displayed.
6. Select Ok, then click Right Arrow 2 times until the ‘print-mech button tap’ menu is displayed.
7. Select Ok (Code = 0 will be displayed); click and hold Right Arrow until code = 41’ is displayed. Use the Left
Arrow if you need to decrease numerical count.
8. Select Ok. The test page prints.
NOTE: A good HP 75/75XL color cartridge should display 600 good nozzles, while a good HP 74/74XL black
ink cartridge should show 672 good nozzles.
Cartridge Error Bypass (Emergency Printing Only)
1. With the error message displayed at printers LCD screen, press and hold the Power and Cancel buttons
down together.
2. When it says “Enter Special Key Combo”, press the blue button (Scan), Green button (Color Copy), then
the grey button (Copy Black).
3. Press the green button (bottom or Copy Color) several times until display says “Information Menu”.
4. Press the green button (Copy Color), then the grey button (Copy Black); now it says “checksum for relock
data input”.
5. Wait a few seconds for a random number to appear on display (i.e. “checksum for relock data input:
3865”).
6. Press the Cancel button three (3) times; code may or may not disappear.
7. Attempt to send emergency print job thru; in most cases the cartridge error message will immediately
return.
Photosmart C4400-C4500 Printer series (HP 74/75 ink cartridges) HP 74/75 Ink Refilling Services & Additional Cautions: http://www.youtube.com/watch?v=WqnHRFpbo0w
HP 74XL/75XL Ink Refilling Services & Additional Cautions: http://www.youtube.com/watch?v=0tt7xmYVa4o Self Test Page:
1. Press and hold the CANCEL button.
2. Press the COLOR COPY button. Release both buttons.
3. The self test prints. The printed pattern will verify printer is generally functional. Inspect color bars to
verify proper nozzle/jetting health.
Tap 41 Cartridge Health Diagnostics (see video: http://inkjet411.com/?page_id=536):
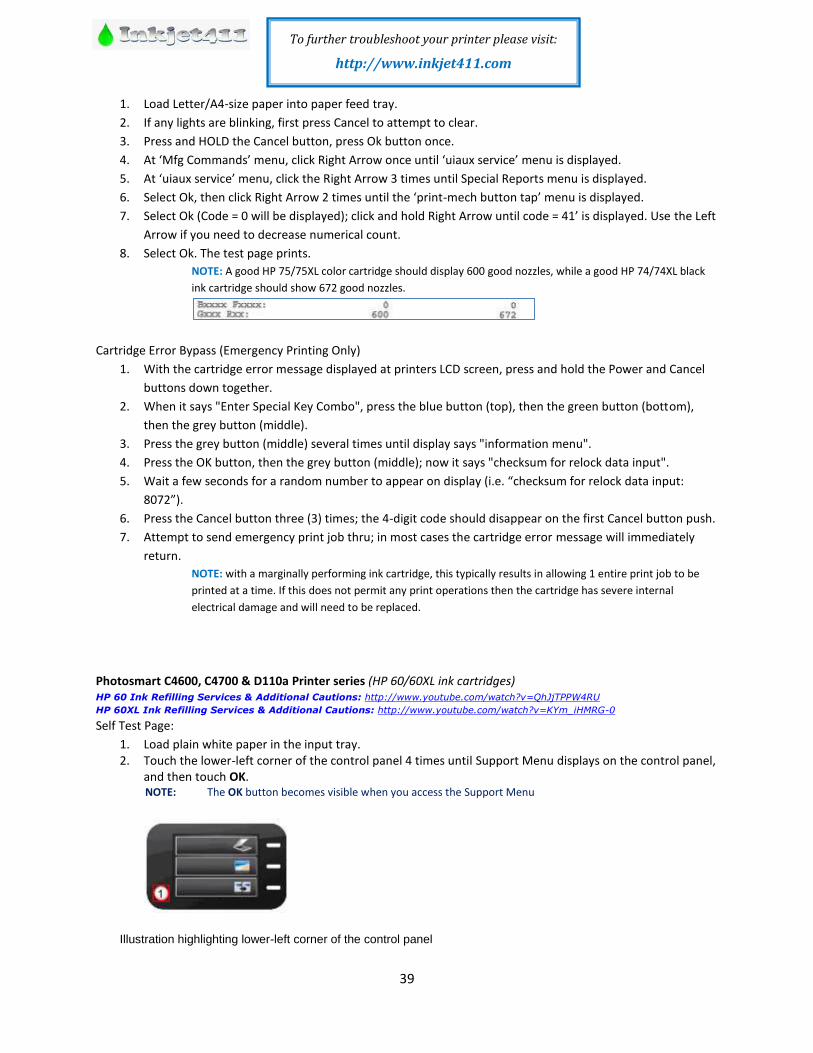
39
To further troubleshoot your printer please visit:
http://www.inkjet411.com
1. Load Letter/A4-size paper into paper feed tray.
2. If any lights are blinking, first press Cancel to attempt to clear.
3. Press and HOLD the Cancel button, press Ok button once.
4. At ‘Mfg Commands’ menu, click Right Arrow once until ‘uiaux service’ menu is displayed.
5. At ‘uiaux service’ menu, click the Right Arrow 3 times until Special Reports menu is displayed.
6. Select Ok, then click Right Arrow 2 times until the ‘print-mech button tap’ menu is displayed.
7. Select Ok (Code = 0 will be displayed); click and hold Right Arrow until code = 41’ is displayed. Use the Left
Arrow if you need to decrease numerical count.
8. Select Ok. The test page prints.
NOTE: A good HP 75/75XL color cartridge should display 600 good nozzles, while a good HP 74/74XL black
ink cartridge should show 672 good nozzles.
Cartridge Error Bypass (Emergency Printing Only)
1. With the cartridge error message displayed at printers LCD screen, press and hold the Power and Cancel
buttons down together.
2. When it says "Enter Special Key Combo", press the blue button (top), then the green button (bottom),
then the grey button (middle).
3. Press the grey button (middle) several times until display says "information menu".
4. Press the OK button, then the grey button (middle); now it says "checksum for relock data input".
5. Wait a few seconds for a random number to appear on display (i.e. “checksum for relock data input:
8072”).
6. Press the Cancel button three (3) times; the 4-digit code should disappear on the first Cancel button push.
7. Attempt to send emergency print job thru; in most cases the cartridge error message will immediately
return.
NOTE: with a marginally performing ink cartridge, this typically results in allowing 1 entire print job to be
printed at a time. If this does not permit any print operations then the cartridge has severe internal
electrical damage and will need to be replaced.
Photosmart C4600, C4700 & D110a Printer series (HP 60/60XL ink cartridges) HP 60 Ink Refilling Services & Additional Cautions: http://www.youtube.com/watch?v=QhJjTPPW4RU
HP 60XL Ink Refilling Services & Additional Cautions: http://www.youtube.com/watch?v=KYm_iHMRG-0 Self Test Page:
1. Load plain white paper in the input tray. 2. Touch the lower-left corner of the control panel 4 times until Support Menu displays on the control panel,
and then touch OK. NOTE: The OK button becomes visible when you access the Support Menu
Illustration highlighting lower-left corner of the control panel
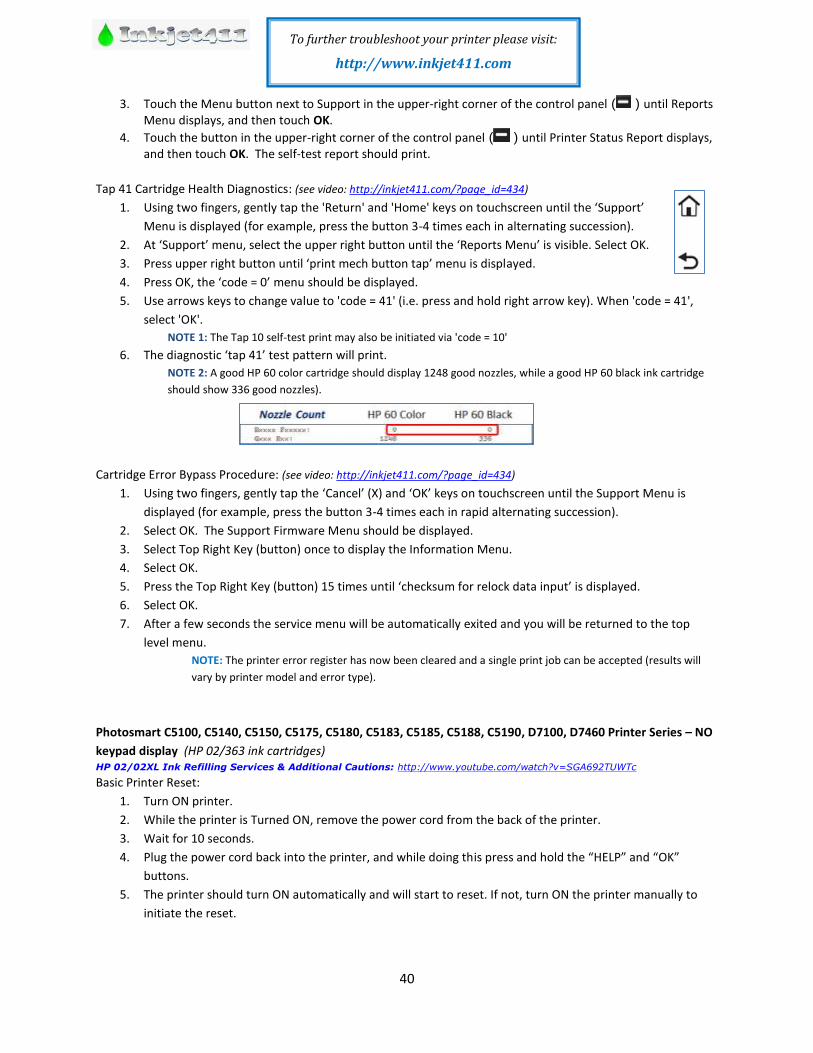
40
To further troubleshoot your printer please visit:
http://www.inkjet411.com
3. Touch the Menu button next to Support in the upper-right corner of the control panel ( ) until Reports Menu displays, and then touch OK.
4. Touch the button in the upper-right corner of the control panel ( ) until Printer Status Report displays, and then touch OK. The self-test report should print.
Tap 41 Cartridge Health Diagnostics: (see video: http://inkjet411.com/?page_id=434)
1. Using two fingers, gently tap the 'Return' and 'Home' keys on touchscreen until the ‘Support’
Menu is displayed (for example, press the button 3-4 times each in alternating succession).
2. At ‘Support’ menu, select the upper right button until the ‘Reports Menu’ is visible. Select OK.
3. Press upper right button until ‘print mech button tap’ menu is displayed.
4. Press OK, the ‘code = 0’ menu should be displayed.
5. Use arrows keys to change value to 'code = 41' (i.e. press and hold right arrow key). When 'code = 41',
select 'OK'.
NOTE 1: The Tap 10 self-test print may also be initiated via 'code = 10'
6. The diagnostic ‘tap 41’ test pattern will print.
NOTE 2: A good HP 60 color cartridge should display 1248 good nozzles, while a good HP 60 black ink cartridge
should show 336 good nozzles).
Cartridge Error Bypass Procedure: (see video: http://inkjet411.com/?page_id=434)
1. Using two fingers, gently tap the ‘Cancel’ (X) and ‘OK’ keys on touchscreen until the Support Menu is
displayed (for example, press the button 3-4 times each in rapid alternating succession).
2. Select OK. The Support Firmware Menu should be displayed.
3. Select Top Right Key (button) once to display the Information Menu.
4. Select OK.
5. Press the Top Right Key (button) 15 times until ‘checksum for relock data input’ is displayed.
6. Select OK.
7. After a few seconds the service menu will be automatically exited and you will be returned to the top
level menu.
NOTE: The printer error register has now been cleared and a single print job can be accepted (results will
vary by printer model and error type).
Photosmart C5100, C5140, C5150, C5175, C5180, C5183, C5185, C5188, C5190, D7100, D7460 Printer Series – NO
keypad display (HP 02/363 ink cartridges) HP 02/02XL Ink Refilling Services & Additional Cautions: http://www.youtube.com/watch?v=SGA692TUWTc Basic Printer Reset:
1. Turn ON printer.
2. While the printer is Turned ON, remove the power cord from the back of the printer.
3. Wait for 10 seconds.
4. Plug the power cord back into the printer, and while doing this press and hold the “HELP” and “OK”
buttons.
5. The printer should turn ON automatically and will start to reset. If not, turn ON the printer manually to
initiate the reset.
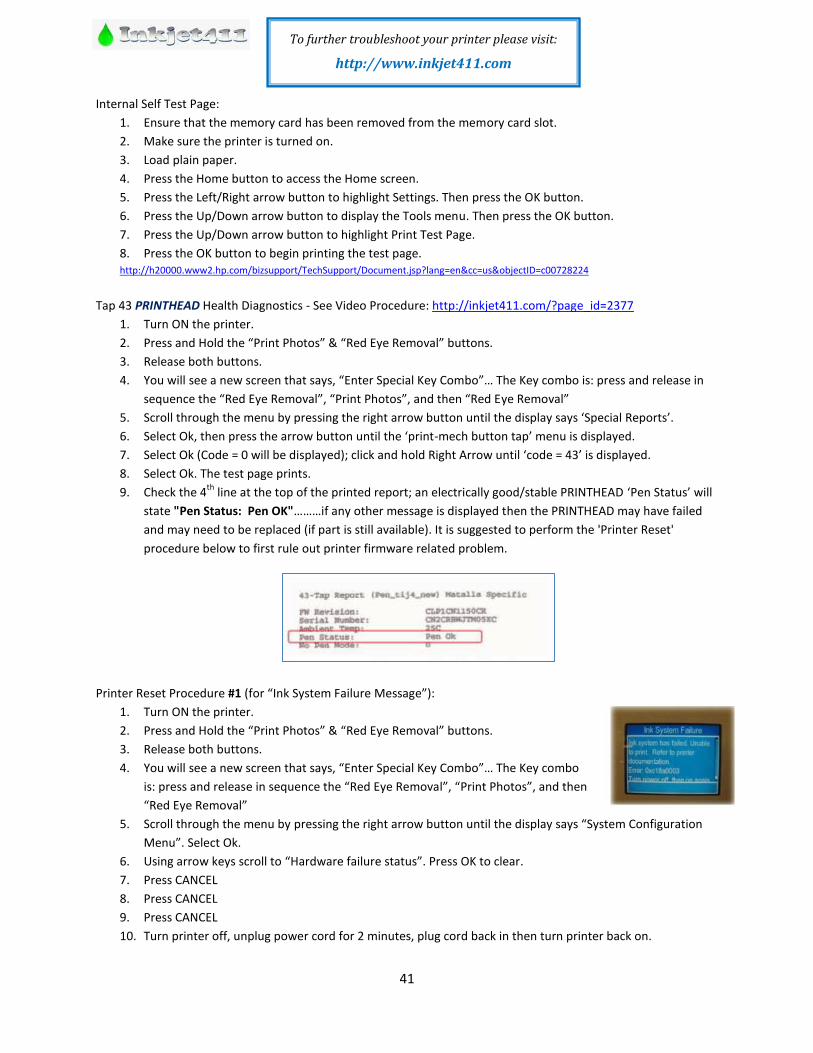
41
To further troubleshoot your printer please visit:
http://www.inkjet411.com
Internal Self Test Page:
1. Ensure that the memory card has been removed from the memory card slot.
2. Make sure the printer is turned on.
3. Load plain paper.
4. Press the Home button to access the Home screen.
5. Press the Left/Right arrow button to highlight Settings. Then press the OK button.
6. Press the Up/Down arrow button to display the Tools menu. Then press the OK button.
7. Press the Up/Down arrow button to highlight Print Test Page.
8. Press the OK button to begin printing the test page. http://h20000.www2.hp.com/bizsupport/TechSupport/Document.jsp?lang=en&cc=us&objectID=c00728224
Tap 43 PRINTHEAD Health Diagnostics - See Video Procedure: http://inkjet411.com/?page_id=2377
1. Turn ON the printer.
2. Press and Hold the “Print Photos” & “Red Eye Removal” buttons.
3. Release both buttons.
4. You will see a new screen that says, “Enter Special Key Combo”… The Key combo is: press and release in
sequence the “Red Eye Removal”, “Print Photos”, and then “Red Eye Removal”
5. Scroll through the menu by pressing the right arrow button until the display says ‘Special Reports’.
6. Select Ok, then press the arrow button until the ‘print-mech button tap’ menu is displayed.
7. Select Ok (Code = 0 will be displayed); click and hold Right Arrow until ‘code = 43’ is displayed.
8. Select Ok. The test page prints.
9. Check the 4th
line at the top of the printed report; an electrically good/stable PRINTHEAD ‘Pen Status’ will
state "Pen Status: Pen OK"………if any other message is displayed then the PRINTHEAD may have failed
and may need to be replaced (if part is still available). It is suggested to perform the 'Printer Reset'
procedure below to first rule out printer firmware related problem.
Printer Reset Procedure #1 (for “Ink System Failure Message”):
1. Turn ON the printer.
2. Press and Hold the “Print Photos” & “Red Eye Removal” buttons.
3. Release both buttons.
4. You will see a new screen that says, “Enter Special Key Combo”… The Key combo
is: press and release in sequence the “Red Eye Removal”, “Print Photos”, and then
“Red Eye Removal”
5. Scroll through the menu by pressing the right arrow button until the display says “System Configuration
Menu”. Select Ok.
6. Using arrow keys scroll to “Hardware failure status”. Press OK to clear.
7. Press CANCEL
8. Press CANCEL
9. Press CANCEL
10. Turn printer off, unplug power cord for 2 minutes, plug cord back in then turn printer back on.
42
To further troubleshoot your printer please visit:
http://www.inkjet411.com
11. Test printer by sending a print job.
Printer Reset Procedure #2 (for “Ink System Failure Message”):
1. Remove all ink cartridges.
2. Close all covers back up.
3. Disconnect the power cord right at the back of the unit.
4. Wait 30 Seconds.
5. Hold down the # key and 6 key on the front panel of the machine, while holding the 2 buttons in, reach
around with your other hand and reconnect the power cord.
6. It should say something on the screen about a reset being performed.
7. Wait until it says the cartridges are missing and then reinstall them.
NOTE: If neither reset does not correct, then this could be a permanent hardware issue.
Photosmart D7345, D7355, D7360, D7363 & D7368 Printers – NO keypad display (HP 02/363 ink cartridges) HP 02/02XL Ink Refilling Services & Additional Cautions: http://www.youtube.com/watch?v=SGA692TUWTc Internal Self Test Page:
1. Ensure that the memory card has been removed from the memory card slot.
2. Make sure the printer is turned on.
3. Load plain paper.
4. Touch the home icon in the upper left-hand corner to access the home screen.
5. Touch Settings on the screen.
6. Touch Tools on the screen.
7. Touch the Up/Down arrow on the right of the screen to scroll for more options.
8. Touch Print Test Page to begin printing the test page. http://h20000.www2.hp.com/bizsupport/TechSupport/Document.jsp?lang=en&cc=us&objectID=c00728224
Tap 43 PRINTHEAD Health Diagnostics – refer to general instructions on previous page:
See Video Procedure: http://inkjet411.com/?page_id=2377
Photosmart C5200-C5500 Printer series (HP 74/75 ink cartridges) HP 74/75 Ink Refilling Services & Additional Cautions: http://www.youtube.com/watch?v=WqnHRFpbo0w
HP 74XL/75XL Ink Refilling Services & Additional Cautions: http://www.youtube.com/watch?v=0tt7xmYVa4o Tap 41 Cartridge Health Diagnostics (see video: http://inkjet411.com/?page_id=536):
1. Load Letter/A4-size paper into paper feed tray.
2. If any lights are blinking, first press Cancel to attempt to clear.
3. Press and HOLD the Cancel button, press Ok button once.
4. At ‘Mfg Commands’ menu, click Right Arrow once until ‘uiaux service’ menu is displayed.
5. At ‘uiaux service’ menu, click the Right Arrow 3 times until Special Reports menu is displayed.
6. Select Ok, then click Right Arrow 2 times until the ‘print-mech button tap’ menu is displayed.
7. Select Ok (Code = 0 will be displayed); click and hold Right Arrow until code = 41’ is displayed. Use the Left
Arrow if you need to decrease numerical count.
3. Select Ok. The test page prints.
NOTE: A good HP 75/75XL color cartridge should display 600 good nozzles, while a good HP 74/74XL black
ink cartridge should show 672 good nozzles.

43
To further troubleshoot your printer please visit:
http://www.inkjet411.com
Cartridge Error Bypass (Emergency Printing Only - see video: http://inkjet411.com/?page_id=536):
1. Press ‘Red Eye Removal’ & ‘Print Photo’ buttons simultaneously
2. “Enter Special Key Combo” should be displayed on the screen.
3. Press and release in sequence ‘Red Eye Removal’, ‘Print Photos’, then ‘Red Eye Removal’
4. Display should read ‘Support’ and display the FW rev XXXXX.
5. Press ‘Right Arrow’ button until ‘Information Menu’ is displayed. Press OK.
6. Press ‘Left Arrow’ button to display "checksum for relock data input”.
7. Select OK, a four (4) or five (5) digit number will be displayed (i.e. “checksum for relock data input:
53588”).
8. Press the Cancel button once (the 4/5 digit number should disappear); press Cancel two more times.
9. Attempt to send emergency print job thru; in most cases the cartridge error message will immediately
return.
NOTE: with a marginally performing ink cartridge, this typically results in allowing 1 entire print job to be
printed at a time. If this does not permit any print operations then the cartridge has severe internal
electrical damage and will need to be replaced.
Photosmart C6100, C6150, C6175, C6180, C6183, C6185, C6188, C7100, C7180, C7200, C7280, C8100 Printer
Series – printers with a keypad display (HP 02/HP 363 ink cartridges) HP 02/02XL Ink Refilling Services & Additional Cautions: http://www.youtube.com/watch?v=SGA692TUWTc Self-Test Page:
1. Load letter, A4, or legal, unused plain white paper into the input tray. 2. Press the Setup button.
3. Press to select Print Report and then press OK . 4. Self-Test Report is selected. Press OK and the self-test diagnostic page prints. or…….. 1. Touch Setup on the display. 2. Touch Tools. 3. Touch Self-Test diagnostic page. The self-test diagnostic page prints. http://h20000.www2.hp.com/bizsupport/TechSupport/Document.jsp?lang=en&cc=us&objectID=c00728224
Tap 10 Extended Self-Test:
1. Press * and # keys simultaneously.
2. Enter ‘123’ on keypad.
3. At ‘Service’ menu, click the Right Arrow 7 times until ‘Special Reports’ menu is displayed.
4. Select Ok, then click Right Arrow 2 times until the ‘print-mech button tap’ menu is displayed.
5. Select Ok (Code = 0 will be displayed); click and hold Right Arrow until ‘code = 10’ is displayed (or enter 10
on keypad).
6. Select Ok. The extended self-test (‘Tap 10’) page prints.
7. Printed pattern verifies printer is generally functional. Inspect color bars.
NOTE: As an option, you may just select ‘extended self test’ under the Reports menu.
Tap 43 PRINTHEAD Health Diagnostics – See Video Procedure: http://inkjet411.com/?page_id=2391
1. Press * and # keys simultaneously.
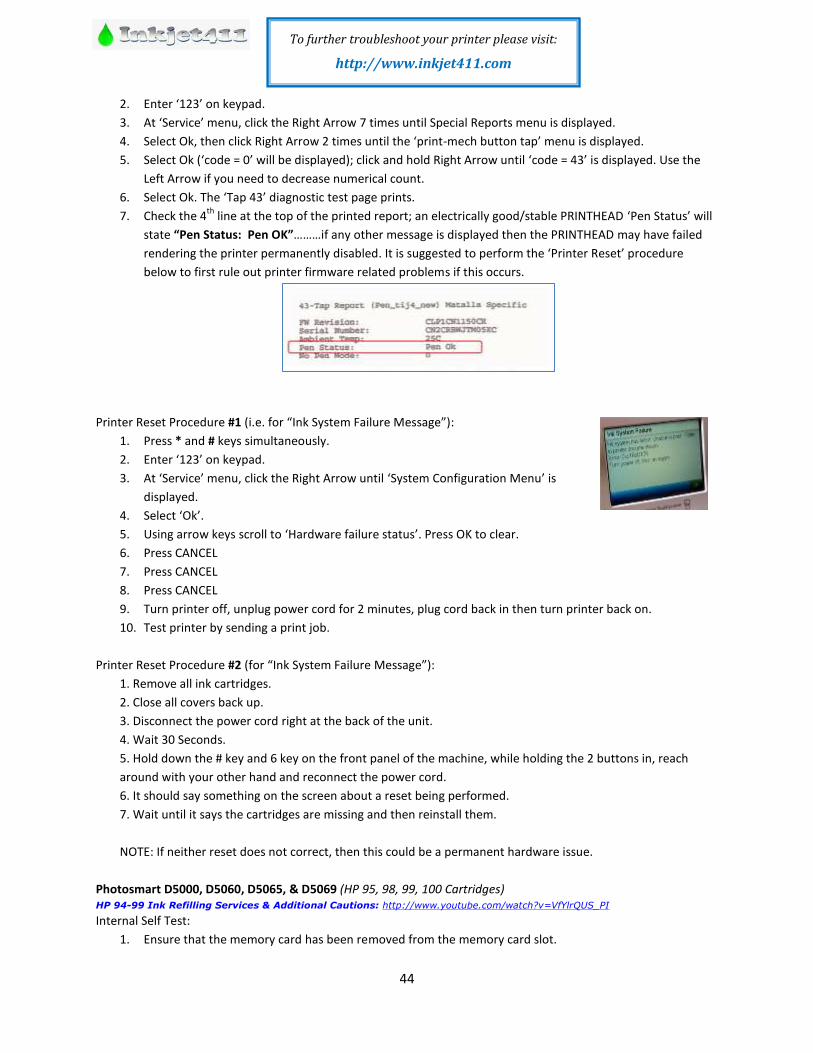
44
To further troubleshoot your printer please visit:
http://www.inkjet411.com
2. Enter ‘123’ on keypad.
3. At ‘Service’ menu, click the Right Arrow 7 times until Special Reports menu is displayed.
4. Select Ok, then click Right Arrow 2 times until the ‘print-mech button tap’ menu is displayed.
5. Select Ok (‘code = 0’ will be displayed); click and hold Right Arrow until ‘code = 43’ is displayed. Use the
Left Arrow if you need to decrease numerical count.
6. Select Ok. The ‘Tap 43’ diagnostic test page prints.
7. Check the 4th
line at the top of the printed report; an electrically good/stable PRINTHEAD ‘Pen Status’ will
state “Pen Status: Pen OK”………if any other message is displayed then the PRINTHEAD may have failed
rendering the printer permanently disabled. It is suggested to perform the ‘Printer Reset’ procedure
below to first rule out printer firmware related problems if this occurs.
Printer Reset Procedure #1 (i.e. for “Ink System Failure Message”):
1. Press * and # keys simultaneously.
2. Enter ‘123’ on keypad.
3. At ‘Service’ menu, click the Right Arrow until ‘System Configuration Menu’ is
displayed.
4. Select ‘Ok’.
5. Using arrow keys scroll to ‘Hardware failure status’. Press OK to clear.
6. Press CANCEL
7. Press CANCEL
8. Press CANCEL
9. Turn printer off, unplug power cord for 2 minutes, plug cord back in then turn printer back on.
10. Test printer by sending a print job.
Printer Reset Procedure #2 (for “Ink System Failure Message”):
1. Remove all ink cartridges.
2. Close all covers back up.
3. Disconnect the power cord right at the back of the unit.
4. Wait 30 Seconds.
5. Hold down the # key and 6 key on the front panel of the machine, while holding the 2 buttons in, reach
around with your other hand and reconnect the power cord.
6. It should say something on the screen about a reset being performed.
7. Wait until it says the cartridges are missing and then reinstall them.
NOTE: If neither reset does not correct, then this could be a permanent hardware issue.
Photosmart D5000, D5060, D5065, & D5069 (HP 95, 98, 99, 100 Cartridges) HP 94-99 Ink Refilling Services & Additional Cautions: http://www.youtube.com/watch?v=VfYlrQUS_PI
Internal Self Test:
1. Ensure that the memory card has been removed from the memory card slot.
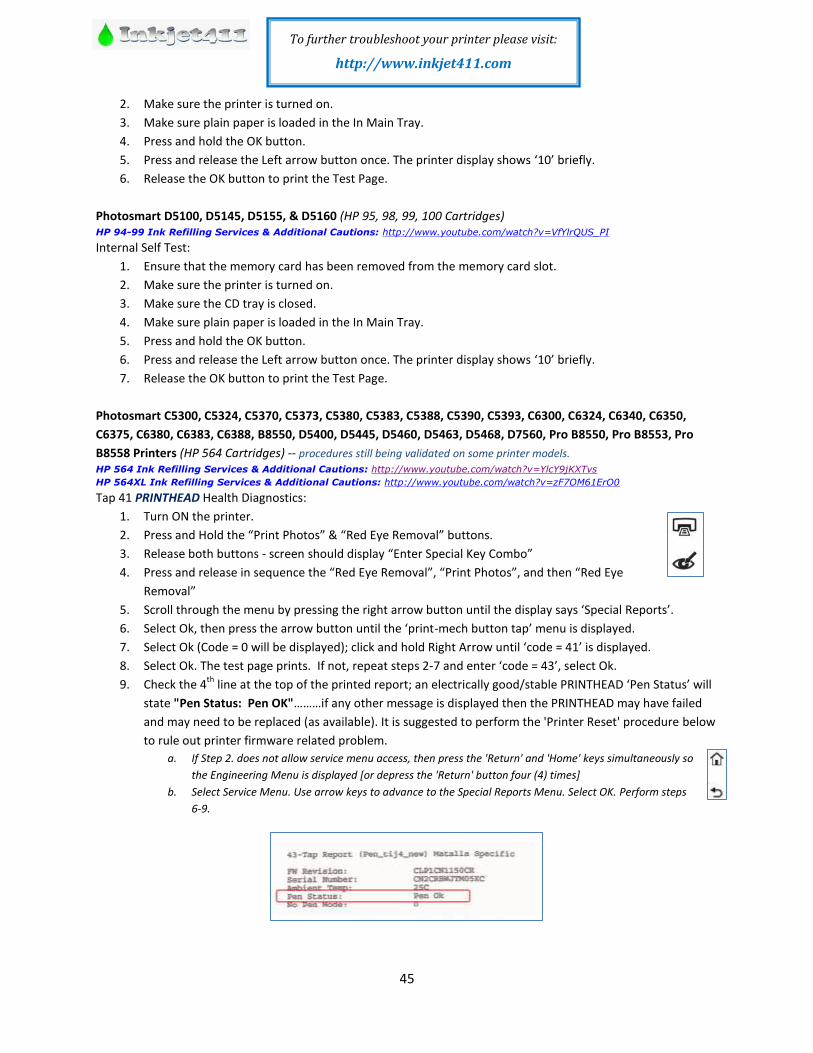
45
To further troubleshoot your printer please visit:
http://www.inkjet411.com
2. Make sure the printer is turned on.
3. Make sure plain paper is loaded in the In Main Tray.
4. Press and hold the OK button.
5. Press and release the Left arrow button once. The printer display shows ‘10’ briefly.
6. Release the OK button to print the Test Page.
Photosmart D5100, D5145, D5155, & D5160 (HP 95, 98, 99, 100 Cartridges) HP 94-99 Ink Refilling Services & Additional Cautions: http://www.youtube.com/watch?v=VfYlrQUS_PI
Internal Self Test:
1. Ensure that the memory card has been removed from the memory card slot.
2. Make sure the printer is turned on.
3. Make sure the CD tray is closed.
4. Make sure plain paper is loaded in the In Main Tray.
5. Press and hold the OK button.
6. Press and release the Left arrow button once. The printer display shows ‘10’ briefly.
7. Release the OK button to print the Test Page.
Photosmart C5300, C5324, C5370, C5373, C5380, C5383, C5388, C5390, C5393, C6300, C6324, C6340, C6350,
C6375, C6380, C6383, C6388, B8550, D5400, D5445, D5460, D5463, D5468, D7560, Pro B8550, Pro B8553, Pro
B8558 Printers (HP 564 Cartridges) -- procedures still being validated on some printer models.
HP 564 Ink Refilling Services & Additional Cautions: http://www.youtube.com/watch?v=YlcY9jKXTvs
HP 564XL Ink Refilling Services & Additional Cautions: http://www.youtube.com/watch?v=zF7OM61ErO0
Tap 41 PRINTHEAD Health Diagnostics:
1. Turn ON the printer.
2. Press and Hold the “Print Photos” & “Red Eye Removal” buttons.
3. Release both buttons - screen should display “Enter Special Key Combo”
4. Press and release in sequence the “Red Eye Removal”, “Print Photos”, and then “Red Eye
Removal”
5. Scroll through the menu by pressing the right arrow button until the display says ‘Special Reports’.
6. Select Ok, then press the arrow button until the ‘print-mech button tap’ menu is displayed.
7. Select Ok (Code = 0 will be displayed); click and hold Right Arrow until ‘code = 41’ is displayed.
8. Select Ok. The test page prints. If not, repeat steps 2-7 and enter ‘code = 43’, select Ok.
9. Check the 4th
line at the top of the printed report; an electrically good/stable PRINTHEAD ‘Pen Status’ will
state "Pen Status: Pen OK"………if any other message is displayed then the PRINTHEAD may have failed
and may need to be replaced (as available). It is suggested to perform the 'Printer Reset' procedure below
to rule out printer firmware related problem.
a. If Step 2. does not allow service menu access, then press the 'Return' and 'Home' keys simultaneously so
the Engineering Menu is displayed [or depress the 'Return' button four (4) times]
b. Select Service Menu. Use arrow keys to advance to the Special Reports Menu. Select OK. Perform steps
6-9.
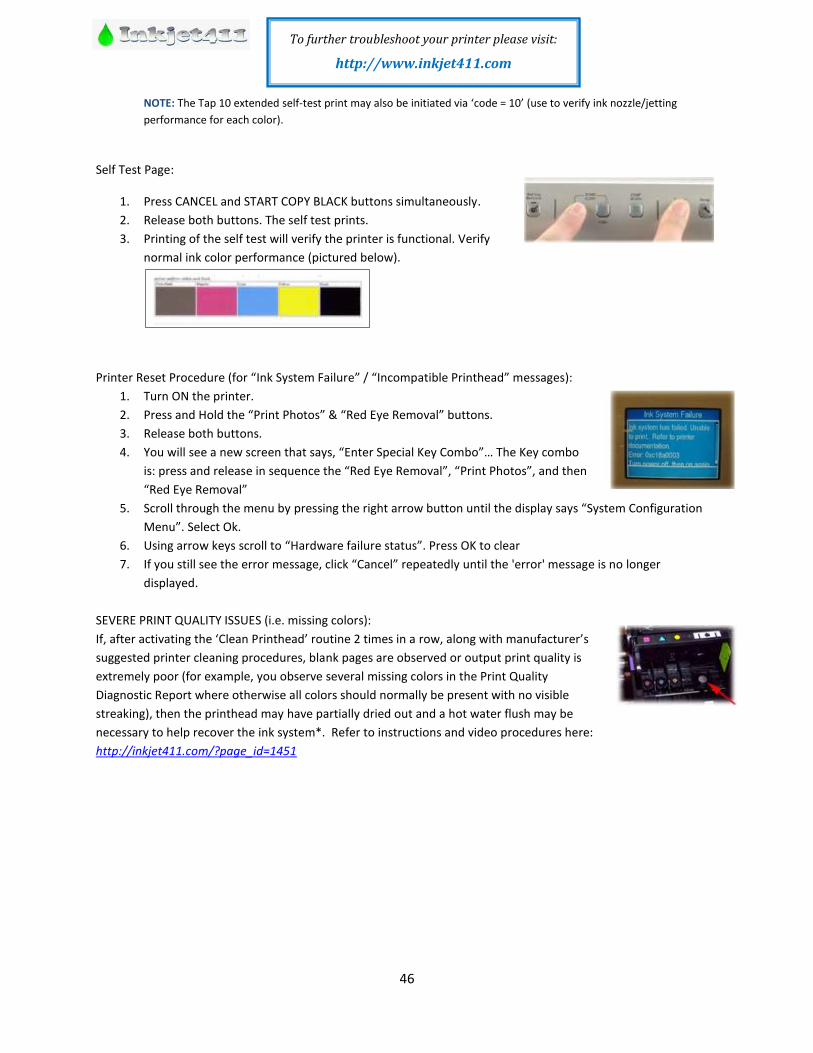
46
To further troubleshoot your printer please visit:
http://www.inkjet411.com
NOTE: The Tap 10 extended self-test print may also be initiated via ‘code = 10’ (use to verify ink nozzle/jetting
performance for each color).
Self Test Page:
1. Press CANCEL and START COPY BLACK buttons simultaneously.
2. Release both buttons. The self test prints.
3. Printing of the self test will verify the printer is functional. Verify
normal ink color performance (pictured below).
Printer Reset Procedure (for “Ink System Failure” / “Incompatible Printhead” messages):
1. Turn ON the printer.
2. Press and Hold the “Print Photos” & “Red Eye Removal” buttons.
3. Release both buttons.
4. You will see a new screen that says, “Enter Special Key Combo”… The Key combo
is: press and release in sequence the “Red Eye Removal”, “Print Photos”, and then
“Red Eye Removal”
5. Scroll through the menu by pressing the right arrow button until the display says “System Configuration
Menu”. Select Ok.
6. Using arrow keys scroll to “Hardware failure status”. Press OK to clear
7. If you still see the error message, click “Cancel” repeatedly until the 'error' message is no longer
displayed.
SEVERE PRINT QUALITY ISSUES (i.e. missing colors):
If, after activating the ‘Clean Printhead’ routine 2 times in a row, along with manufacturer’s
suggested printer cleaning procedures, blank pages are observed or output print quality is
extremely poor (for example, you observe several missing colors in the Print Quality
Diagnostic Report where otherwise all colors should normally be present with no visible
streaking), then the printhead may have partially dried out and a hot water flush may be
necessary to help recover the ink system*. Refer to instructions and video procedures here:
http://inkjet411.com/?page_id=1451

47
To further troubleshoot your printer please visit:
http://www.inkjet411.com
PhotoSmart Premium C309c, C309a, C309n, C310a, C310b, C310c, C410a, Touchsmart Web, PhotoSmart
Premium Web C309n (HP 564 cartridges): HP 564 Ink Refilling Services & Additional Cautions: http://www.youtube.com/watch?v=YlcY9jKXTvs
HP 564XL Ink Refilling Services & Additional Cautions: http://www.youtube.com/watch?v=zF7OM61ErO0
Tap 41 PRINTHEAD Health Diagnostics:
NOTE: If this service menu access procedure does not work then refer to ‘Photosmart Plus B series’ printers
1. Using two fingers, gently tap the ‘Return’ and ‘Home’ keys on touchscreen until the Engineering
Menu is displayed (for example, press the button 3-4 times each in alternating succession).
Using arrow keys navigate to Service Menu.
2. ……..or if a keypad is available: Press * and # keys simultaneously. Service Menu should be displayed.
3. Use arrow keys to advance to the Special Reports Menu. Select OK.
4. Use arrow keys to advance to the ‘print mech button tap’ menu. Select Ok.
5. ‘Code = 0’ will be displayed. Use arrows keys to change value to ‘41’ (i.e. press and hold right arrow key).
6. When ‘code = 41’, select ‘OK’. The diagnostic test pattern will print.
i. NOTE: The Tap 10 self-test print may also be initiated via ‘code = 10’ (use to verify all nozzles are
firing)
7. Check the 4th
line at the top of the printed report; an electrically good/stable PRINTHEAD will state “Pen
OK”………if any other message is displayed then the PRINTHEAD has likely failed and may need to be
replaced. Re-seat PRINTHEAD and repeat ‘Tap 41’ test to verify connectivity is not the issue.
SEVERE PRINT QUALITY ISSUES (i.e. missing colors):
If, after activating the ‘Clean Printhead’ routine 2 times in a row, along with manufacturer’s suggested printer
cleaning procedures, blank pages are observed or output print quality is extremely poor (for example, you observe
several missing colors in the Print Quality Diagnostic Report where otherwise all colors should normally be present
with no visible streaking), then the printhead may have partially dried out and a hot water flush may be necessary
to help recover the ink system*. Refer to instructions and video procedures here:
http://inkjet411.com/?page_id=1451
PhotoSmart Plus B209a, B210a, B210b, B210c, B210d, B210e, C510 eStation (HP 564 cartridges): HP 564 Ink Refilling Services & Additional Cautions: http://www.youtube.com/watch?v=YlcY9jKXTvs
HP 564XL Ink Refilling Services & Additional Cautions: http://www.youtube.com/watch?v=zF7OM61ErO0 Tap 41 PRINTHEAD Health Diagnostics:
1. Access the Service Menu (2 different methods depending on printer model); the ‘Support/Manufacturing’
menu will be displayed once entry is successful:
a. Press ‘Down’ arrow, press ‘Cancel’, then press the ‘Return’ button (older non-touchscreen
models)
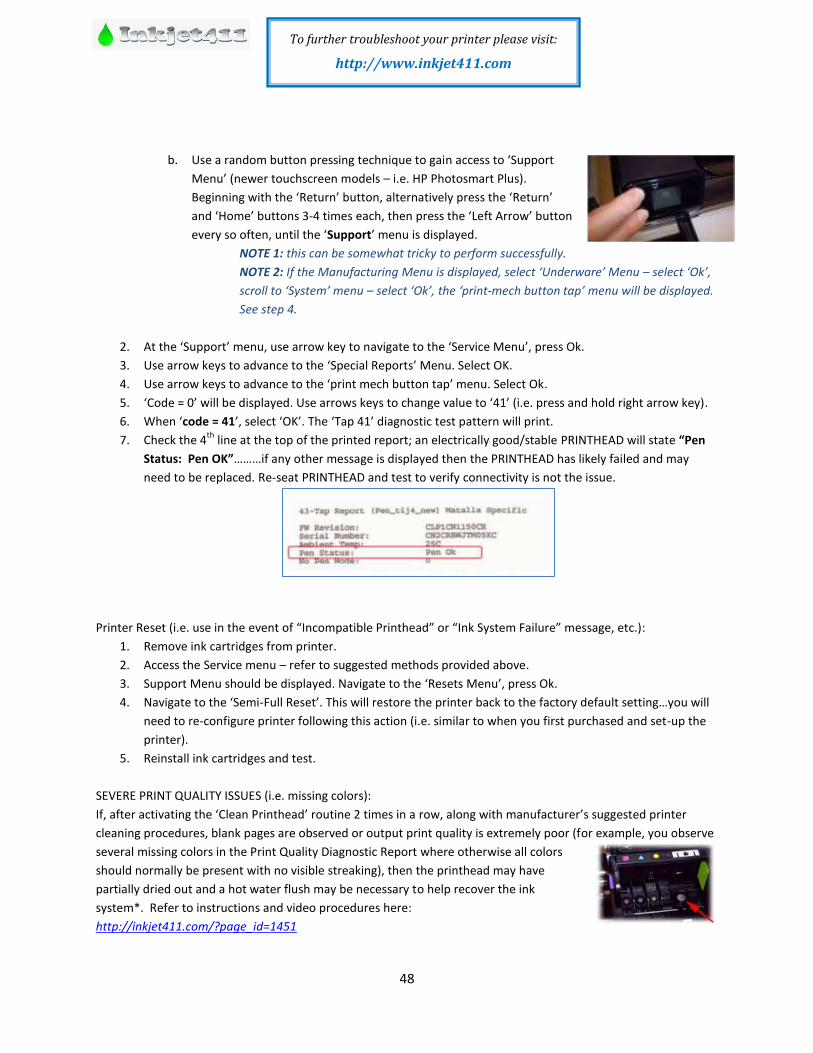
48
To further troubleshoot your printer please visit:
http://www.inkjet411.com
b. Use a random button pressing technique to gain access to ‘Support
Menu’ (newer touchscreen models – i.e. HP Photosmart Plus).
Beginning with the ‘Return’ button, alternatively press the ‘Return’
and ‘Home’ buttons 3-4 times each, then press the ‘Left Arrow’ button
every so often, until the ‘Support’ menu is displayed.
NOTE 1: this can be somewhat tricky to perform successfully.
NOTE 2: If the Manufacturing Menu is displayed, select ‘Underware’ Menu – select ‘Ok’,
scroll to ‘System’ menu – select ‘Ok’, the ‘print-mech button tap’ menu will be displayed.
See step 4.
2. At the ‘Support’ menu, use arrow key to navigate to the ‘Service Menu’, press Ok.
3. Use arrow keys to advance to the ‘Special Reports’ Menu. Select OK.
4. Use arrow keys to advance to the ‘print mech button tap’ menu. Select Ok.
5. ‘Code = 0’ will be displayed. Use arrows keys to change value to ‘41’ (i.e. press and hold right arrow key).
6. When ‘code = 41’, select ‘OK’. The ‘Tap 41’ diagnostic test pattern will print.
7. Check the 4th
line at the top of the printed report; an electrically good/stable PRINTHEAD will state “Pen
Status: Pen OK”………if any other message is displayed then the PRINTHEAD has likely failed and may
need to be replaced. Re-seat PRINTHEAD and test to verify connectivity is not the issue.
Printer Reset (i.e. use in the event of “Incompatible Printhead” or “Ink System Failure” message, etc.):
1. Remove ink cartridges from printer.
2. Access the Service menu – refer to suggested methods provided above.
3. Support Menu should be displayed. Navigate to the ‘Resets Menu’, press Ok.
4. Navigate to the ‘Semi-Full Reset’. This will restore the printer back to the factory default setting…you will
need to re-configure printer following this action (i.e. similar to when you first purchased and set-up the
printer).
5. Reinstall ink cartridges and test.
SEVERE PRINT QUALITY ISSUES (i.e. missing colors):
If, after activating the ‘Clean Printhead’ routine 2 times in a row, along with manufacturer’s suggested printer
cleaning procedures, blank pages are observed or output print quality is extremely poor (for example, you observe
several missing colors in the Print Quality Diagnostic Report where otherwise all colors
should normally be present with no visible streaking), then the printhead may have
partially dried out and a hot water flush may be necessary to help recover the ink
system*. Refer to instructions and video procedures here:
http://inkjet411.com/?page_id=1451

49
To further troubleshoot your printer please visit:
http://www.inkjet411.com
HP Officejet/Officejet PRO Printers
How to print the Self-Test Report: http://h10025.www1.hp.com/ewfrf/wc/document?docname=c02875698&tmp_task=setupCategory&cc=gr&dlc=el&lc=en&product=1146331
Officejet and LX (HP 45/78 ink cartridges)
Officejet 300 series, 700 series, T series, D series, K series, G series, V series (HP 45/78 ink cartridges)
Officejet 4100 series, 5100 series, 6100 series, 7100 series (HP 45/78 ink cartridges) HP 45/78 Ink Refilling Services & Additional Cautions: http://www.youtube.com/watch?v=M7Q8t2pr2WA
Self Test Print: http://h10025.www1.hp.com/ewfrf/wc/document?cc=us&lc=en&dlc=en&docname=bpu00734
1. On the front panel of the product, press Menu (or Setup).
2. Press the Right Arrow until Print Reports displays, and then press Enter, Start, or OK.
3. Press the Right Arrow until Self-Test Report displays, and then press Enter, Start, or OK.
Printer Error Reset:
1. Open the printer/cover as if replacing the cartridge and allow the carriage assembly to move to the
cartridges access/loading position.
2. Unplug the power cable from the rear of printer and close the printer’s cover.
3. While depressing the power button, plug in the power cable. Keep the power button pressed for about
10-15 seconds, allowing the error flag to reset.
4. After printer powers on, cycle printer power once again and allow printer to fully initialize (may take ~5
minutes for the message/error condition to disappear).
NOTE: If ink cartridge error persists then replace ink cartridge.
Officejet 4100 series (HP 28/56/57 ink cartridges) HP 27/28 Ink Refilling Services & Additional Cautions: http://www.youtube.com/watch?v=cTZLp1rEjtA
HP 56/57/58 Ink Refilling Services & Additional Cautions: http://www.youtube.com/watch?v=ynRwTkiI5mE
Self Test Print: http://h10025.www1.hp.com/ewfrf/wc/document?cc=us&lc=en&dlc=en&docname=bpu00734
1. On the front panel of the product, press Menu (or Setup).
2. Press the Right Arrow until Print Reports displays, and then press Enter, Start, or OK.
3. Press the Right Arrow until Self-Test Report displays, and then press Enter, Start, or OK.
4. Refer to video at link below to help evaluate test pattern.
NOTE: A good HP 21/27/56 black cartridge should display 416 good nozzles, while a good HP 22/28/57/58
color ink cartridge should show 300 good nozzles.
REFERENCE: Tap 43 Diagnostics [HP Deskjet 5650 -use HP 56/57/58 cartridges]: http://inkjet411.com/?page_id=2358

50
To further troubleshoot your printer please visit:
http://www.inkjet411.com
Officejet 4500 Printer series (HP 901/901XL ink cartridges) HP 901 Ink Refilling Services & Additional Cautions: http://www.youtube.com/watch?v=oZXVKonkfpo
HP 901 & 901XL Ink Refilling Services & Additional Cautions: http://www.youtube.com/watch?v=4Bau-Iv2YiA Printer Reset:
1. Unplug printer power cord (do not press power button to turn off).
2. Press and hold the ‘#’ and ‘6’ keys, plug in the printer power cord.
3. Wait approximately 30 seconds for printer to boot up. Release both keys.
Extended Self Test:
4. Press CANCEL + OK buttons at the same time.
5. The extended self test page prints. Verify all colors and all stair-step nozzles are firing (i.e. no missing
horizontal lines should be visible in the stair-step grid patterns)
Tap 41 Cartridge Health Diagnostics (see video http://inkjet411.com/?page_id=620):
1. Load Letter/A4-size paper into paper feed tray.
2. If any lights are blinking, first press Cancel to attempt to clear.
3. Press the * and # keys simultaneously.
4. Enter 124 at keypad. The 'Underware' menu should be displayed.
5. Use the arrow keys to navigate to the System Menu. Select Ok.
6. Use the arrow keys to navigate to the “print-mech button tap”. Select Ok. Should display “code = 0”.
7. Use the arrow keys to enter “code = 41” (or just enter 41 on keypad). Select Ok. The Tap 41 diagnostic
test pattern prints.
NOTE: A good HP 901 color cartridge should display 1248 good nozzles, while a good HP 901/901XL black
ink cartridge should show 336 good nozzles.
Cartridge Error Bypass (Emergency Printing Only - http://inkjet411.com/?page_id=620):
1. Remove ink cartridges from printer:
2. press 4 + # + OK simultaneously, this should display the Information Menu.
3. Using the navigation arrow keys, go to CHECKSUM FOR RELOCK DATA INPUT
4. Install ink cartridges.
5. Press Ok five (5) times.
6. Exit by pressing the Cancel (X) Button.
7. Attempt to send emergency print job thru to printer. If this doesn’t work at the 1st time you may need to
initiate 2 or 3 times to ensure relock data clears.
NOTE: with a marginally performing ink cartridge, this typically results in allowing 1 entire print job to be
printed at a time. If this does not permit any print operations then the cartridge has severe internal
electrical damage and will need to be replaced.
OfficeJet 4620 (HP 564 cartridges): HP 564 Ink Refilling Services & Additional Cautions: http://www.youtube.com/watch?v=YlcY9jKXTvs
Tap 41 PRINTHEAD Health Diagnostics (NOTE: printhead cannot be easily removed):
1. Use a random button pressing technique to gain access to ‘Support
Menu’. Beginning with the ‘Forward’ button, alternatively press the
‘Forward’ and ‘Return’ buttons 3-4 times each, then press the ‘Cancel’
button every so often, until the ‘Support’ menu is displayed.
NOTE 1: this can be somewhat tricky to perform successfully.

51
To further troubleshoot your printer please visit:
http://www.inkjet411.com
NOTE 2: If the Manufacturing Menu comes up, select ‘Underware’ Menu – select ‘Ok’, scroll to ‘System’ menu –
select ‘Ok’, the ‘print-mech button tap’ menu will be displayed. See step 4.
2. At ‘Support’ Menu, using the down arrow key, navigate to the ‘Reports Menu’, press Ok.
3. Use arrow keys to advance to the ‘Special Reports’ Menu. Select OK.
4. Use arrow keys to advance to the ‘print-mech button tap’ menu. Select Ok.
5. ‘Code = 0’ will be displayed. Use arrows keys to change value to ‘41’ (i.e. press and hold right arrow key).
6. When ‘Code = 41’, select ‘OK’. The diagnostic test pattern will print.
7. Check the 4th
line at the top of the printed report; an electrically good/stable PRINTHEAD will state “Pxx
Sxxxxx: Pxx Ox”….which translated means “Pen Status: Pen OK”………if any other message is displayed
then the PRINTHEAD may have electrically failed and may need to be replaced.
NOTE 3: For “printhead” error messages or for no-printing conditions, it is suggested to remove the PRINTHEAD
(some disassembly required!) and thoroughly clean the rear electrical contacts. Also inspect and clean electrical
mating contacts on carriage assembly. Reinstall PRINTHEAD and test to verify connectivity is not the issue. Click
here for more information: http://inkjet411.com/?page_id=1451
Printer Reset (i.e. use in the event of “Incompatible Printhead” or “Ink System Failure” message, etc.):
1. Remove ink cartridges from printer.
2. Press ‘Down’ arrow, press ‘Cancel’, then press the ‘Return’ button.
3. Support/Manufacturing Menu should be displayed. Navigate to the ‘Resets Menu’, press Ok.
4. Navigate to the ‘Semi-Full Reset’. This will restore the printer back to the factory default setting…you will
need to re-configure printer following this action (i.e. similar to when you first purchased and set-up the
printer).
5. Reinstall ink cartridges and test.
SEVERE PRINT QUALITY ISSUES (i.e. missing colors):
If, after activating the ‘Clean Printhead’ routine 2 times in a row, along with manufacturer’s suggested printer
cleaning procedures, blank pages are observed or output print quality is extremely poor (for example, you observe
several missing colors in the Print Quality Diagnostic Report where otherwise all colors should normally be present
with no visible streaking), then the printhead may have partially dried out and a water cleaning/flush may be
necessary to help recover the ink system*.
NOTE: If the HP564 system PRINTHEAD is not easily removable, then it is suggested you take a damp cloth and
repeatedly blot/saturate the respective color ink port with water (distilled water is recommended):
1. Remove suspect ink cartridge (or cartridges).
2. Place a paper towel under the PRINTHEAD assembly.
3. You’ll see a round mesh ink port where ink flows into the PRINTHEAD.
4. Thoroughly dampen the ink port with 0.5 to 1 teaspoon of distilled water
(use an eye-dropper or similar).
52
To further troubleshoot your printer please visit:
http://www.inkjet411.com
5. Reinstall ink cartridge(s).
6. Activate the ‘Clean Printhead’ routine once or twice to see if the respective color(s) have recovered.
Officejet 5100 series (HP 15/78 ink cartridges) HP 15/78 Ink Refilling Services & Additional Cautions: http://www.youtube.com/watch?v=oePjBGdqW2Y
Self Test Print: http://h10025.www1.hp.com/ewfrf/wc/document?cc=us&lc=en&dlc=en&docname=bpu00734
1. On the front panel of the product, press Menu (or Setup).
2. Press the Right Arrow until Print Reports displays, and then press Enter, Start, or OK.
3. Press the Right Arrow until Self-Test Report displays, and then press Enter, Start, or OK.
Officejet 5500 (56/57 cartridges) HP 56/57 Ink Refilling Services & Additional Cautions: http://www.youtube.com/watch?v=TPBSaF4CwUM
Self Test Print:
1. From the front panel, press Setup, press 1, and then press 4.
2. Refer to video at link below to help evaluate test pattern.
NOTE: A good HP 56 black cartridge should display 416 good nozzles, while a good HP 57/58 color ink
cartridge should show 300 good nozzles.
REFERENCE: Tap 43 Diagnostics [HP Deskjet 5650 -use HP 56/57/58 cartridges]: http://inkjet411.com/?page_id=2358
Officejet 5600 (HP 22/27/56/58 cartridges) HP 21/22 Ink Refilling Services & Additional Cautions: http://www.youtube.com/watch?v=f_r_7B4jauc
HP 27/28 Ink Refilling Services & Additional Cautions: http://www.youtube.com/watch?v=cTZLp1rEjtA
HP 56/57/58 Ink Refilling Services & Additional Cautions: http://www.youtube.com/watch?v=ynRwTkiI5mE
Self Test Print:
1. Press the Setup Button located on the bottom center of the control panel, beneath the LED readout.
2. Press 2 to select “Print Reports”
3. Press 6 to select “Self-Test Report” on the number keypad
4. Examine the resulting self-test page that prints. There should be lines extending all the way across the
page in black, yellow, cyan and magenta. A missing black line indicates a problem with the black or photo
cartridge. Faded, streaked or missing lines in the other colors indicates a problem with the color ink
cartridge. Refer to video at link below to help evaluate test pattern.
NOTE: A good HP 21/27/56 black cartridge should display 416 good nozzles, while a good HP 22/28/57/58
color ink cartridge should show 300 good nozzles.
REFERENCE: Tap 43 Diagnostics [HP Deskjet 5650 -use HP 56/57/58 cartridges]: http://inkjet411.com/?page_id=2358
Officejet 6100 Series, 6110xi (HP 56/57/58 ink cartridges) HP 56/57 Ink Refilling Services & Additional Cautions: http://www.youtube.com/watch?v=TPBSaF4CwUM
Self Test Print: http://h10025.www1.hp.com/ewfrf/wc/document?cc=us&lc=en&dlc=en&docname=bpu00734
1. On the front panel of the product, press Menu (or Setup).
2. Press the Right Arrow until Print Reports displays, and then press Enter, Start, or OK.
3. Press the Right Arrow until Self-Test Report displays, and then press Enter, Start, or OK.
Extended Self-Test (printer models with keypads only):
53
To further troubleshoot your printer please visit:
http://www.inkjet411.com
1. Press * and # keys at same time
2. Enter 124 (or 1234). The ‘Underware’ menu should be displayed.
3. Using left/right arrow keys, navigate to ‘Special Reports’. Select Enter.
4. Using left/right arrow keys, navigate to ‘extended self test’.
a. Select Enter to print test print - evaluate test print.
5. Or using left/right arrow keys, navigate to ‘pen electrical test’.
a. Select Enter to print test - evaluate nozzle electrical test print.
6. Or if supported, using left/right arrow keys, navigate to System Menu. Select Enter.
7. Navigate to ‘print-mech button tap’ menu.
8. Select Ok (“code = 0” will be displayed); click and hold Right Arrow until “code = 41” is displayed.
a. If nothing prints, then repeat test using “code = 43”.
9. Select Ok. Within one minute the Tap 41 (or Tap 43) diagnostic test pattern should be initiated and print.
Refer to video at link below to help evaluate test pattern.
NOTE: A good HP 21/27/56 black cartridge should display 416 good nozzles, while a good HP
22/28/57/58 color ink cartridge should show 300 good nozzles.
REFERENCE: Tap 43 Diagnostics [HP Deskjet 5650 also uses HP 56/57/58 cartridges]: http://inkjet411.com/?page_id=2358
Cartridge Error Bypass #1 (Emergency Printing Only - http://inkjet411.com/?page_id=544):
6. Press the * and # keys simultaneously.
7. Enter 123 (or 124) at keypad. The ‘Underware’ menu should be displayed.
8. Use the arrow keys to navigate to the Information Menu. Select Ok.
9. Use the arrow keys to navigate to the 'checksum for relock data input'. Select Ok. LCD should display a 5-
digit number after a few seconds.
10. Attempt to send a print job to printer
NOTE: with a marginally performing ink cartridge, this typically results in allowing 1 entire print job to be
printed at a time. If this does not permit any print operations then the cartridge has severe internal
electrical damage and will need to be replaced.
Cartridge Error Bypass #2 (Not Yet Validated):
9. Remove ink cartridges from printer:
10. press 4 + # + OK simultaneously, this should display the Information Menu.
11. Using the navigation arrow keys, go to CHECKSUM FOR RELOCK DATA INPUT
12. Install both ink cartridges.
13. Press Ok five (5) times.
14. Exit by pressing the Cancel (X) Button.
15. Attempt to send emergency print job thru to printer. If this doesn’t work the 1st time you may need to
repeat 2 or 3 times to ensure relock data clears.
Officejet 6210 / 6310 / 7210 / 7310 / 7410 Printer Series (HP 94, 95, 96, 97, 98 ink cartridges) HP 94-99 Ink Refilling Services & Additional Cautions: http://www.youtube.com/watch?v=VfYlrQUS_PI
Internal Self Test Report:
1. Press setup.
2. Scroll to print reports.
3. Scroll to ‘self test report’. Press OK.
4. The test page will print.
54
To further troubleshoot your printer please visit:
http://www.inkjet411.com
The Test page includes a nozzle pattern with a rectangular outline and solid well defined lines. If
there are random misdirected or partially complete short segments (the ones about 1/8" long) this
would indicate a problem with the printhead nozzles which may be corrected with nozzle cleaning. If
there are missing nozzles in regular patterns then the issue could be electrical, and may be corrected
by cleaning the electrical flex cable contacts inside the printer and the cartridge’s rear electrical (gold)
contacts. Refer to cleaning procedures: http://inkjet411.com/?page_id=1519
Tap 41 Cartridge Health Diagnostics:
1. Load Letter/A4-size paper into paper feed tray.
2. If any lights are blinking, first press Cancel to attempt to clear.
3. Press the * and # keys simultaneously.
4. Enter 124 (or 123) at keypad. The ‘Underware’ menu should be displayed (or ‘Support xxxx’ menu)
5. Use the arrow keys to navigate to the System Menu (for select Officejet printer models you may need to
go to ‘Reports Menu’). Select Ok.
6. Use the arrow keys to navigate to the 'print-mech button tap'. Select Ok. Should display “code = 0”.
7. Use the arrow keys to enter “code = 41” (or just enter 41 on keypad). Select Ok. The Tap 41 diagnostic
test pattern prints. Refer to 2nd video at link below on how to analyze the printed diagnostic pattern.
NOTE 1: If ‘code=41’ does not initiate a test report, then enter ‘code = 43’.
REFERENCE: Tap 41 Diagnostics [HP Deskjet 6900 -use HP 93 thru 97 cartridges]: http://inkjet411.com/?page_id=1741
NOTE 2: A good HP 93/95/97 color cartridge should display 600 good nozzles, while a good HP 92/94/96/98
black ink cartridge should show 672 good nozzles. On some models you may remove the tri-color cartridge,
reactivate the tap 41 test and the printer will print the diagnostic test print in black ink.
CARTRIDGE ERROR BYPASS PROCEDURE: http://inkjet411.com/?page_id=544 It is possible to 'temporarily' bypass the cartridge error message (for emergency printing purposes only - REFER TO 3RD VIDEO). However, if the cartridge is determined to be electrically damaged it will eventually need to be replaced with a new one.
1. Press the * and # keys simultaneously. 2. Enter 123 (or 124) at keypad. The ‘Underware’ menu should be displayed. 3. Use the arrow keys to navigate to the Information Menu. Select Ok. 4. Use the arrow keys to navigate to the 'checksum for relock data input'. Select Ok. LCD should display a 5-
digit number after a few seconds. 5. Attempt to send a print job to printer
NOTE: with a marginally performing ink cartridge, this typically results in allowing 1 entire print job to be printed at a time. If this does not permit any print operations then the cartridge has severe internal electrical damage and will need to be replaced.
.......or......
1. Remove ink cartridges from printer: 2. press 4 + # + OK simultaneously, this should display the Information Menu. 3. Using the navigation arrow keys, go to CHECKSUM FOR RELOCK DATA INPUT 4. Install ink cartridges. 5. Press Ok five (5) times. 6. Exit by pressing the Cancel (X) Button.
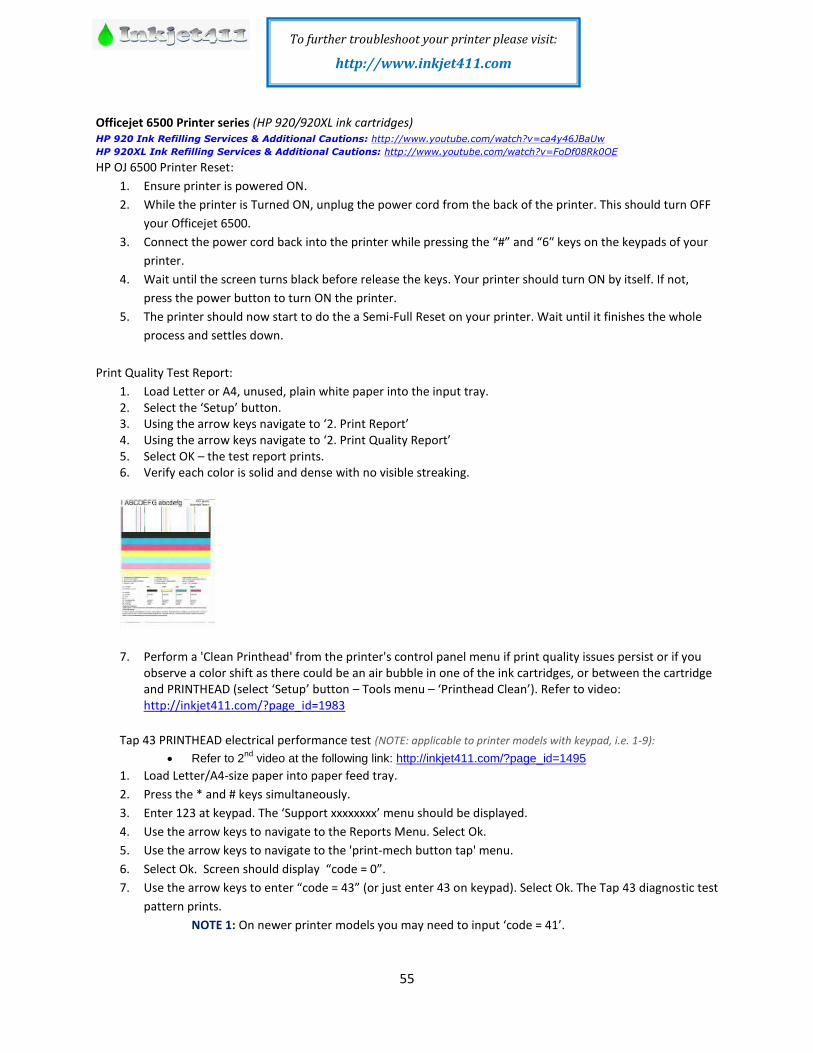
55
To further troubleshoot your printer please visit:
http://www.inkjet411.com
Officejet 6500 Printer series (HP 920/920XL ink cartridges) HP 920 Ink Refilling Services & Additional Cautions: http://www.youtube.com/watch?v=ca4y46JBaUw
HP 920XL Ink Refilling Services & Additional Cautions: http://www.youtube.com/watch?v=FoDf08Rk0OE HP OJ 6500 Printer Reset:
1. Ensure printer is powered ON.
2. While the printer is Turned ON, unplug the power cord from the back of the printer. This should turn OFF
your Officejet 6500.
3. Connect the power cord back into the printer while pressing the “#” and “6″ keys on the keypads of your
printer.
4. Wait until the screen turns black before release the keys. Your printer should turn ON by itself. If not,
press the power button to turn ON the printer.
5. The printer should now start to do the a Semi-Full Reset on your printer. Wait until it finishes the whole
process and settles down.
Print Quality Test Report:
1. Load Letter or A4, unused, plain white paper into the input tray. 2. Select the ‘Setup’ button. 3. Using the arrow keys navigate to ‘2. Print Report’ 4. Using the arrow keys navigate to ‘2. Print Quality Report’ 5. Select OK – the test report prints. 6. Verify each color is solid and dense with no visible streaking.
7. Perform a 'Clean Printhead' from the printer's control panel menu if print quality issues persist or if you observe a color shift as there could be an air bubble in one of the ink cartridges, or between the cartridge and PRINTHEAD (select ‘Setup’ button – Tools menu – ‘Printhead Clean’). Refer to video: http://inkjet411.com/?page_id=1983
Tap 43 PRINTHEAD electrical performance test (NOTE: applicable to printer models with keypad, i.e. 1-9):
Refer to 2nd
video at the following link: http://inkjet411.com/?page_id=1495
1. Load Letter/A4-size paper into paper feed tray.
2. Press the * and # keys simultaneously.
3. Enter 123 at keypad. The ‘Support xxxxxxxx’ menu should be displayed.
4. Use the arrow keys to navigate to the Reports Menu. Select Ok.
5. Use the arrow keys to navigate to the 'print-mech button tap' menu.
6. Select Ok. Screen should display “code = 0”.
7. Use the arrow keys to enter “code = 43” (or just enter 43 on keypad). Select Ok. The Tap 43 diagnostic test
pattern prints.
NOTE 1: On newer printer models you may need to input ‘code = 41’.
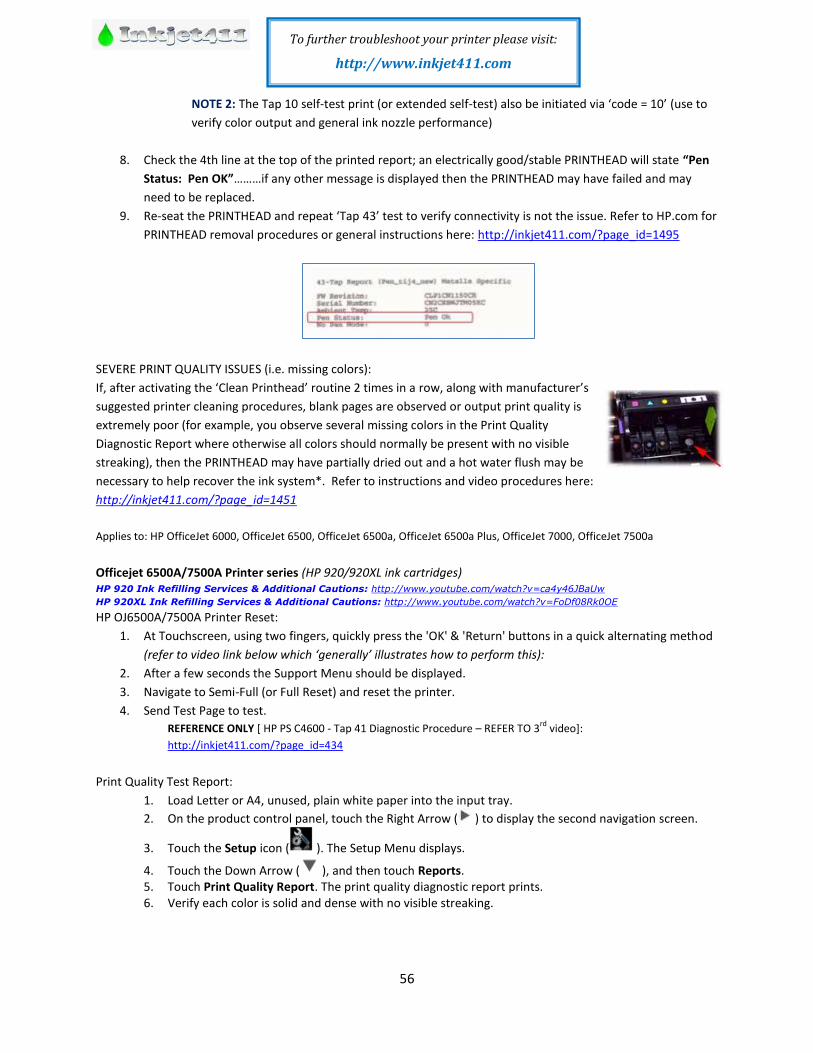
56
To further troubleshoot your printer please visit:
http://www.inkjet411.com
NOTE 2: The Tap 10 self-test print (or extended self-test) also be initiated via ‘code = 10’ (use to
verify color output and general ink nozzle performance)
8. Check the 4th line at the top of the printed report; an electrically good/stable PRINTHEAD will state “Pen
Status: Pen OK”………if any other message is displayed then the PRINTHEAD may have failed and may
need to be replaced.
9. Re-seat the PRINTHEAD and repeat ‘Tap 43’ test to verify connectivity is not the issue. Refer to HP.com for
PRINTHEAD removal procedures or general instructions here: http://inkjet411.com/?page_id=1495
SEVERE PRINT QUALITY ISSUES (i.e. missing colors):
If, after activating the ‘Clean Printhead’ routine 2 times in a row, along with manufacturer’s
suggested printer cleaning procedures, blank pages are observed or output print quality is
extremely poor (for example, you observe several missing colors in the Print Quality
Diagnostic Report where otherwise all colors should normally be present with no visible
streaking), then the PRINTHEAD may have partially dried out and a hot water flush may be
necessary to help recover the ink system*. Refer to instructions and video procedures here:
http://inkjet411.com/?page_id=1451
Applies to: HP OfficeJet 6000, OfficeJet 6500, OfficeJet 6500a, OfficeJet 6500a Plus, OfficeJet 7000, OfficeJet 7500a
Officejet 6500A/7500A Printer series (HP 920/920XL ink cartridges) HP 920 Ink Refilling Services & Additional Cautions: http://www.youtube.com/watch?v=ca4y46JBaUw
HP 920XL Ink Refilling Services & Additional Cautions: http://www.youtube.com/watch?v=FoDf08Rk0OE HP OJ6500A/7500A Printer Reset:
1. At Touchscreen, using two fingers, quickly press the 'OK' & 'Return' buttons in a quick alternating method
(refer to video link below which ‘generally’ illustrates how to perform this):
2. After a few seconds the Support Menu should be displayed.
3. Navigate to Semi-Full (or Full Reset) and reset the printer.
4. Send Test Page to test.
REFERENCE ONLY [ HP PS C4600 - Tap 41 Diagnostic Procedure – REFER TO 3rd
video]:
http://inkjet411.com/?page_id=434
Print Quality Test Report:
1. Load Letter or A4, unused, plain white paper into the input tray.
2. On the product control panel, touch the Right Arrow ( ) to display the second navigation screen.
3. Touch the Setup icon ( ). The Setup Menu displays.
4. Touch the Down Arrow ( ), and then touch Reports. 5. Touch Print Quality Report. The print quality diagnostic report prints. 6. Verify each color is solid and dense with no visible streaking.
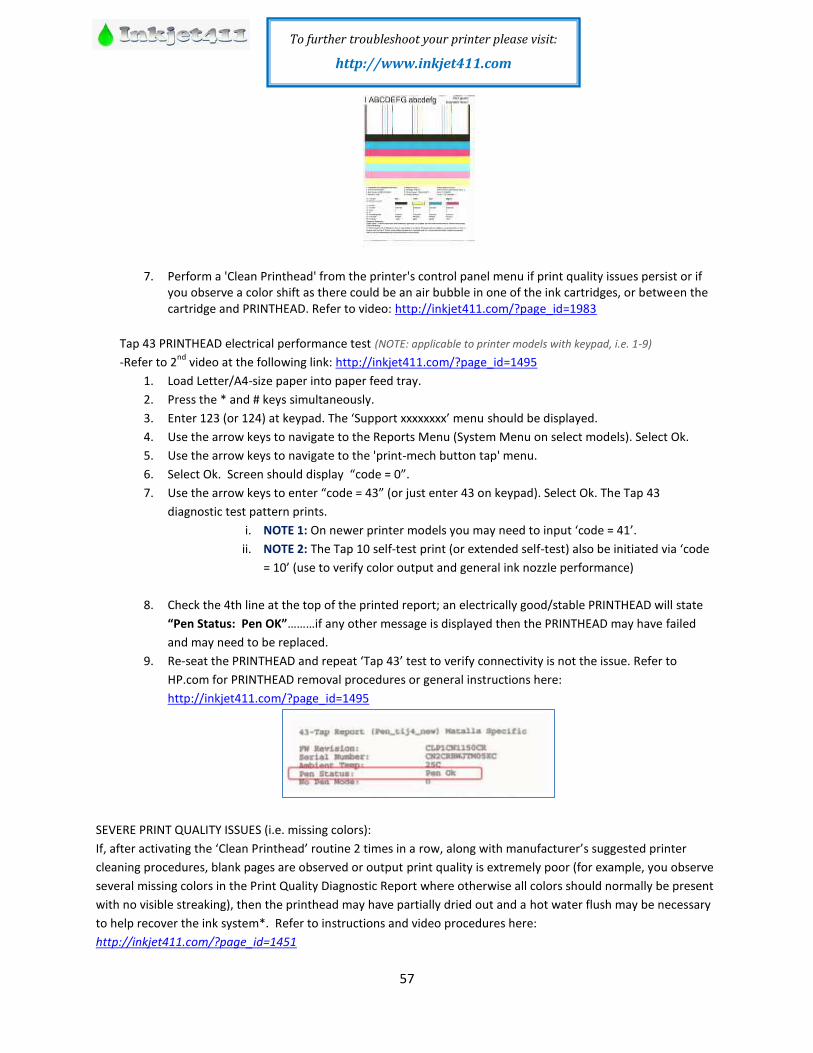
57
To further troubleshoot your printer please visit:
http://www.inkjet411.com
7. Perform a 'Clean Printhead' from the printer's control panel menu if print quality issues persist or if you observe a color shift as there could be an air bubble in one of the ink cartridges, or between the cartridge and PRINTHEAD. Refer to video: http://inkjet411.com/?page_id=1983
Tap 43 PRINTHEAD electrical performance test (NOTE: applicable to printer models with keypad, i.e. 1-9)
-Refer to 2nd
video at the following link: http://inkjet411.com/?page_id=1495
1. Load Letter/A4-size paper into paper feed tray.
2. Press the * and # keys simultaneously.
3. Enter 123 (or 124) at keypad. The ‘Support xxxxxxxx’ menu should be displayed.
4. Use the arrow keys to navigate to the Reports Menu (System Menu on select models). Select Ok.
5. Use the arrow keys to navigate to the 'print-mech button tap' menu.
6. Select Ok. Screen should display “code = 0”.
7. Use the arrow keys to enter “code = 43” (or just enter 43 on keypad). Select Ok. The Tap 43
diagnostic test pattern prints.
i. NOTE 1: On newer printer models you may need to input ‘code = 41’.
ii. NOTE 2: The Tap 10 self-test print (or extended self-test) also be initiated via ‘code
= 10’ (use to verify color output and general ink nozzle performance)
8. Check the 4th line at the top of the printed report; an electrically good/stable PRINTHEAD will state
“Pen Status: Pen OK”………if any other message is displayed then the PRINTHEAD may have failed
and may need to be replaced.
9. Re-seat the PRINTHEAD and repeat ‘Tap 43’ test to verify connectivity is not the issue. Refer to
HP.com for PRINTHEAD removal procedures or general instructions here:
http://inkjet411.com/?page_id=1495
SEVERE PRINT QUALITY ISSUES (i.e. missing colors):
If, after activating the ‘Clean Printhead’ routine 2 times in a row, along with manufacturer’s suggested printer
cleaning procedures, blank pages are observed or output print quality is extremely poor (for example, you observe
several missing colors in the Print Quality Diagnostic Report where otherwise all colors should normally be present
with no visible streaking), then the printhead may have partially dried out and a hot water flush may be necessary
to help recover the ink system*. Refer to instructions and video procedures here:
http://inkjet411.com/?page_id=1451
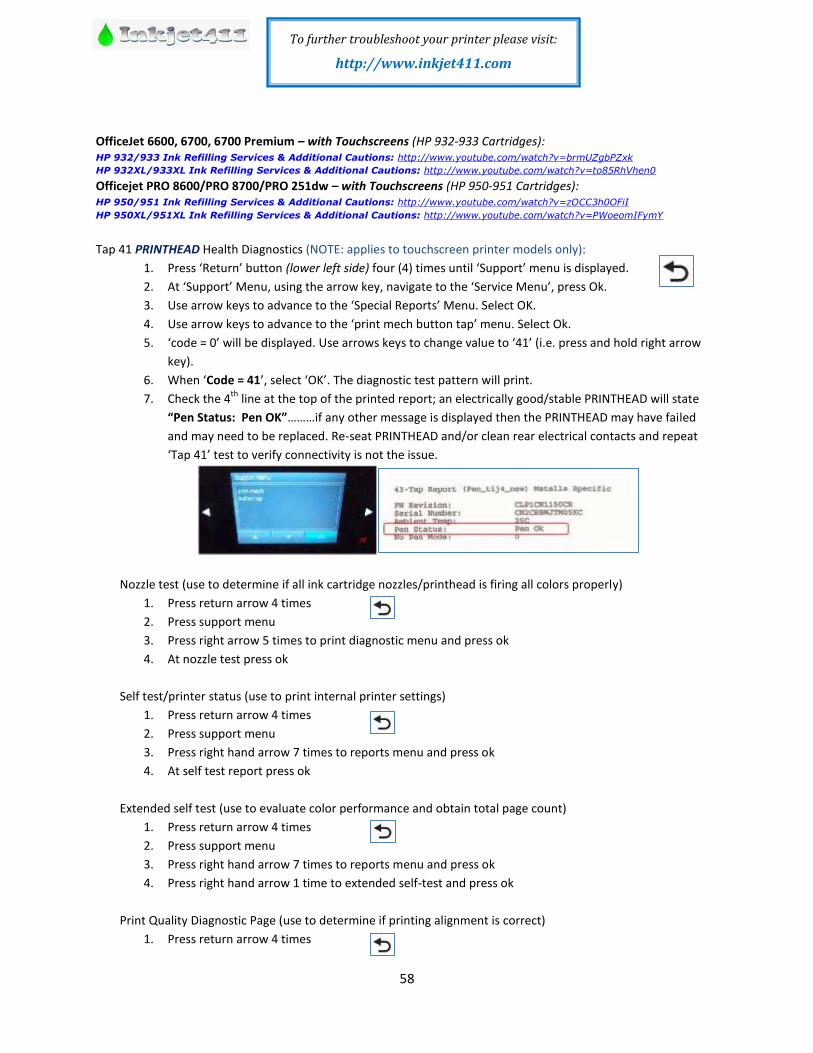
58
To further troubleshoot your printer please visit:
http://www.inkjet411.com
OfficeJet 6600, 6700, 6700 Premium – with Touchscreens (HP 932-933 Cartridges): HP 932/933 Ink Refilling Services & Additional Cautions: http://www.youtube.com/watch?v=brmUZgbPZxk
HP 932XL/933XL Ink Refilling Services & Additional Cautions: http://www.youtube.com/watch?v=to85RhVhen0 Officejet PRO 8600/PRO 8700/PRO 251dw – with Touchscreens (HP 950-951 Cartridges): HP 950/951 Ink Refilling Services & Additional Cautions: http://www.youtube.com/watch?v=zOCC3h0OFiI
HP 950XL/951XL Ink Refilling Services & Additional Cautions: http://www.youtube.com/watch?v=PWoeomIFymY
Tap 41 PRINTHEAD Health Diagnostics (NOTE: applies to touchscreen printer models only):
1. Press ‘Return’ button (lower left side) four (4) times until ‘Support’ menu is displayed.
2. At ‘Support’ Menu, using the arrow key, navigate to the ‘Service Menu’, press Ok.
3. Use arrow keys to advance to the ‘Special Reports’ Menu. Select OK.
4. Use arrow keys to advance to the ‘print mech button tap’ menu. Select Ok.
5. ‘code = 0’ will be displayed. Use arrows keys to change value to ‘41’ (i.e. press and hold right arrow
key).
6. When ‘Code = 41’, select ‘OK’. The diagnostic test pattern will print.
7. Check the 4th
line at the top of the printed report; an electrically good/stable PRINTHEAD will state
“Pen Status: Pen OK”………if any other message is displayed then the PRINTHEAD may have failed
and may need to be replaced. Re-seat PRINTHEAD and/or clean rear electrical contacts and repeat
‘Tap 41’ test to verify connectivity is not the issue.
Nozzle test (use to determine if all ink cartridge nozzles/printhead is firing all colors properly)
1. Press return arrow 4 times
2. Press support menu
3. Press right arrow 5 times to print diagnostic menu and press ok
4. At nozzle test press ok
Self test/printer status (use to print internal printer settings)
1. Press return arrow 4 times
2. Press support menu
3. Press right hand arrow 7 times to reports menu and press ok
4. At self test report press ok
Extended self test (use to evaluate color performance and obtain total page count)
1. Press return arrow 4 times
2. Press support menu
3. Press right hand arrow 7 times to reports menu and press ok
4. Press right hand arrow 1 time to extended self-test and press ok
Print Quality Diagnostic Page (use to determine if printing alignment is correct)
1. Press return arrow 4 times
59
To further troubleshoot your printer please visit:
http://www.inkjet411.com
2. Press support menu
3. Press right hand arrow 7 times to reports menu and press ok
4. Press right hand arrow 2 times to Print Quality diagnostic report and press ok
Print head recovery (runs ‘intensive’ printhead service cleaning routines, i.e. for a clogged printhead)
1. Press home key twice
2. Then return key
3. Then home key twice
4. Then return key
5. Then home key twice……………this will gain access to the Engineering Menu
6. Press the ‘service menu’
7. Press right arrow 4 times to ‘service test’ and press ok
8. Press right arrow:
a. 16 times to ‘print head rec level 1’ (basic recovery)
b. 17 times to ‘print head rec level 2’ (medium recovery)
c. 18 times to ‘print head rec level 3’ (thorough recovery)….suggested for severe streaking
9. Press ‘ok’ to activate either of the 3 selections above.
Semi full reset (can be used to help address intermittent or incorrect printer behavior issues)
1. Press return arrow 4 times
2. Press support menu
3. Press right hand arrow 2 times to Resets menu and press ok
4. Press right hand arrow 2 times to semi full reset and press ok (Note: this will return printer to factory
default condition; regional setup will be required following this action)
Ink Cartridge Re-initialization (touchscreen models only):
1) Press the ‘Return’ button at lower left of touchscreen a total of 4 times (please note the Return button
will NOT be lit).
2) At ‘support’ menu, navigate to the ‘system configuration’ menu.
3) Navigate to the ‘ink initialization’ menu.
4) At Ink Initialization menu, select Set, Clear or Reset (varies by printer model)
WARNING: When the ink status is cleared it treats the cartridges like brand new first time set up cartridges
which goes through a lengthy printhead/cartridge priming sequence where the printer pulls ~3 grams of ink
per cartridge, which is roughly 50% of total ink volume (i.e. standard size refilled cartridge).
OfficeJet 6100 – No Touchscreen (HP 932-933 Cartridges): HP 932/933 Ink Refilling Services & Additional Cautions: http://www.youtube.com/watch?v=brmUZgbPZxk
HP 932XL/933XL Ink Refilling Services & Additional Cautions: http://www.youtube.com/watch?v=to85RhVhen0 Officejet 8100 – No Touchscreen (HP 950-951 Cartridges): HP 950/951 Ink Refilling Services & Additional Cautions: http://www.youtube.com/watch?v=zOCC3h0OFiI
HP 950XL/951XL Ink Refilling Services & Additional Cautions: http://www.youtube.com/watch?v=PWoeomIFymY
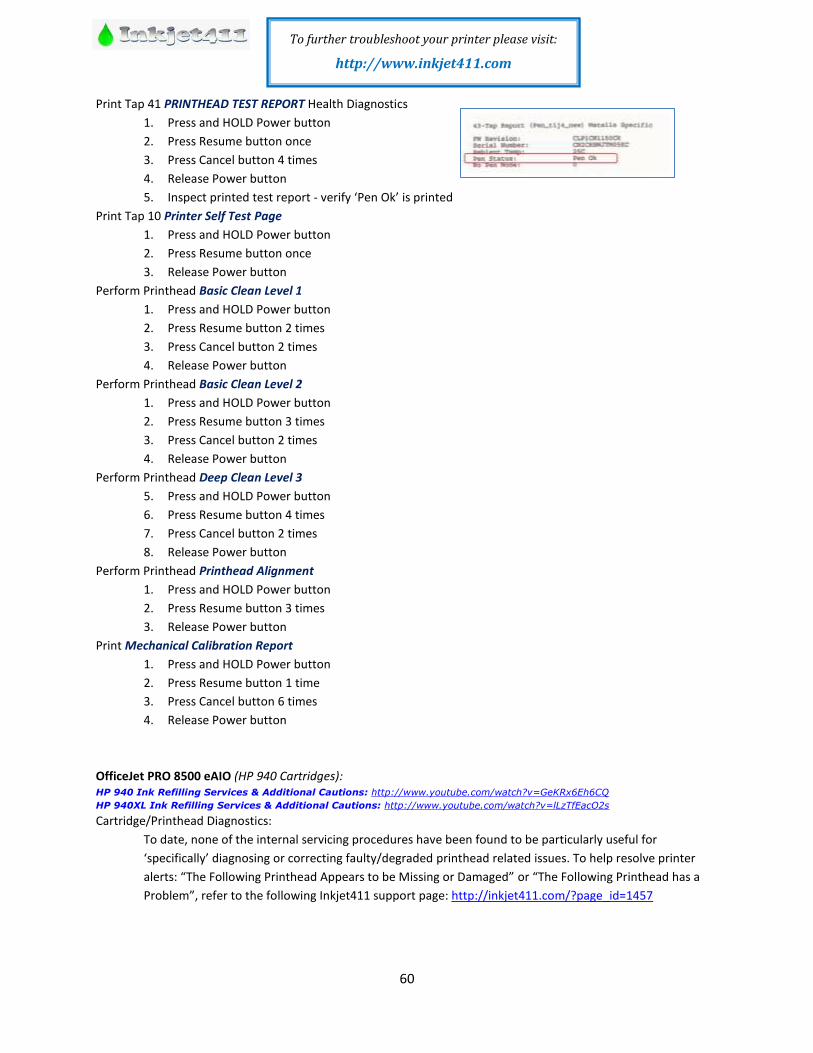
60
To further troubleshoot your printer please visit:
http://www.inkjet411.com
Print Tap 41 PRINTHEAD TEST REPORT Health Diagnostics
1. Press and HOLD Power button
2. Press Resume button once
3. Press Cancel button 4 times
4. Release Power button
5. Inspect printed test report - verify ‘Pen Ok’ is printed
Print Tap 10 Printer Self Test Page
1. Press and HOLD Power button
2. Press Resume button once
3. Release Power button
Perform Printhead Basic Clean Level 1
1. Press and HOLD Power button
2. Press Resume button 2 times
3. Press Cancel button 2 times
4. Release Power button
Perform Printhead Basic Clean Level 2
1. Press and HOLD Power button
2. Press Resume button 3 times
3. Press Cancel button 2 times
4. Release Power button
Perform Printhead Deep Clean Level 3
5. Press and HOLD Power button
6. Press Resume button 4 times
7. Press Cancel button 2 times
8. Release Power button
Perform Printhead Printhead Alignment
1. Press and HOLD Power button
2. Press Resume button 3 times
3. Release Power button
Print Mechanical Calibration Report
1. Press and HOLD Power button
2. Press Resume button 1 time
3. Press Cancel button 6 times
4. Release Power button
OfficeJet PRO 8500 eAIO (HP 940 Cartridges): HP 940 Ink Refilling Services & Additional Cautions: http://www.youtube.com/watch?v=GeKRx6Eh6CQ
HP 940XL Ink Refilling Services & Additional Cautions: http://www.youtube.com/watch?v=lLzTfEacO2s Cartridge/Printhead Diagnostics:
To date, none of the internal servicing procedures have been found to be particularly useful for
‘specifically’ diagnosing or correcting faulty/degraded printhead related issues. To help resolve printer
alerts: “The Following Printhead Appears to be Missing or Damaged” or “The Following Printhead has a
Problem”, refer to the following Inkjet411 support page: http://inkjet411.com/?page_id=1457
61
To further troubleshoot your printer please visit:
http://www.inkjet411.com
- Remove all four (4) ink cartridges and both PRINTHEADs from the printer. Thoroughly clean the
electrical contacts on one (or both) PRINTHEAD assemblies. Reinstall PRINTHEAD(s) and ink
cartridges. Retest.
Self Test Page:….TEST VALIDATION STILL REQUIRED
1. Load Letter/A4-size paper into paper feed tray.
2. Press the * and # keys simultaneously.
3. 329 at keypad. The ‘Support xxxxxxxx’ menu should be displayed.
4. Use the arrow keys to navigate to the ‘Special Reports’ menu. Select Ok.
5. Use arrow keys to advance to the ‘print mech button tap’ menu. Select Ok.
6. ‘code = 0’ will be displayed. Use down arrow keys to change value to ‘10’. Select Ok.
7. The printer should print the Self-Test Page.
Possible additional tests:
When ‘code = 60’, select ‘OK’. The Ink Delivery System Report will print.
When ‘code = 62’, select ‘OK’. The Low-Level Hardware System Report will print.
When ‘code = 63’, select ‘OK’. The Ink Supply Report Report will print.
NOTE: There is no correlation between a refilled ink cartridge and the failure of a PRINTHEAD assembly. All printheads
will eventually fail depending on printed content, usage and time via natural electronics degradation. The HP 940
printer models (i.e. HP OJPRO 8500/8500A) have two electronic PRINTHEADS (each of these electronic devices are
responsible for pulling ink from the ink cartridges and then firing the ink droplets onto the paper) – both PRINTHEADS
will eventually fail depending on printed content, printer duty cycle (i.e. typically rated for ~20,000+ printed pages
depending on image content & frequency of printing). The average inkjet printer can typically be refilled with ~8+
complete sets of ink cartridges over the life of the printhead, after which, either the Yellow/Black or Cyan/Magenta
printhead will eventually need to be replaced (available at HP.com). Based on HP.com’s customer support forum,
some PRINTHEADS have reportedly only functioned for 1100-2000 printed pages, so performance results will vary
widely. Refer to video on how the HP PRINTHEAD functions: http://inkjet411.com/?page_id=2054
OfficeJet PRO 8500A/8500A Plus/8500A Premium (HP 940 Cartridges): HP 940 Ink Refilling Services & Additional Cautions: http://www.youtube.com/watch?v=GeKRx6Eh6CQ
HP 940XL Ink Refilling Services & Additional Cautions: http://www.youtube.com/watch?v=lLzTfEacO2s Hard Printer Reset:
1. Make sure the printer is ON.
2. While the printer is ON, unplug the power-cord from the back of the printer.
3. Wait for 30 seconds and plug the power-cord back into the printer.
4. Turn ON the printer and let the printer do its initialization process.
Semi-Full Printer Reset:
1. Turn OFF the Printer.
2. While the printer is turned OFF, press and hold the power button for 5 seconds.
3. On the front panel of the printer, press the key sequence combo (Top Left, Bottom Left, Top Left, Top
Left).
4. Select Menu.
5. Select Semi-Full Reset.
Full Printer Reset:
1. Turn OFF the Printer.
2. While the printer is turned OFF, press and hold the power button for 5 seconds.
62
To further troubleshoot your printer please visit:
http://www.inkjet411.com
3. On the front panel of the printer, press the key sequence combo (Top Left, Bottom Left, Top Left, Top
Left).
4. Select Menu.
5. Select Full Reset.
Advanced Printer Diagnostics (may not work when Printheads errors ‘Missing’, ‘Damaged’, or ‘Problem’ is
displayed):
1. Load Letter/A4-size paper into paper feed tray.
2. Press ‘Return’ button (lower left side of touchscreen) four (4) times until the ‘Support'
menu is displayed. Press Ok.
3. At ‘Support’ Menu, using the arrow key, navigate to the ‘Reports Menu’, press Ok.
4. Use arrow keys to advance to the ‘Reports Menu'. Select OK.
5. Use arrow keys to advance to the ‘print mech button tap’ menu. Select Ok.
6. ‘code = 0’ will be displayed. Use down arrow keys to change value to ‘60’.
7. When ‘Code = 60’, select ‘OK’. The Ink Delivery System Report will print.
8. Repeat steps 4 thru 6, but enter 'code = 62'. The Low-Level Hardware System Report will print.
9. Repeat steps 4 thru 6, but enter 'code = 63'. The Ink Supply Report Report will print.
NOTE: There is no correlation between a refilled ink cartridge and the failure of a PRINTHEAD assembly. All printheads
will eventually fail depending on printed content, usage and time via natural electronics degradation. The HP 940
printer models (i.e. HP OJPRO 8500/8500A) have two electronic PRINTHEADS (each of these electronic devices are
responsible for pulling ink from the ink cartridges and then firing the ink droplets onto the paper) – both PRINTHEADS
will eventually fail depending on printed content, printer duty cycle (i.e. typically rated for ~20,000+ printed pages
depending on image content & frequency of printing). The average inkjet printer can typically be refilled with ~8+
complete sets of ink cartridges over the life of the printhead, after which, either the Yellow/Black or Cyan/Magenta
printhead will eventually need to be replaced (available at HP.com). Based on HP.com’s customer support forum,
some PRINTHEADS have reportedly only functioned for 1100-2000 printed pages, so performance results will vary
widely. Refer to video on how the HP PRINTHEAD functions: http://inkjet411.com/?page_id=2054
HP Officejet J-Series Printers
How to print the Self-Test Report: http://h10025.www1.hp.com/ewfrf/wc/document?docname=c02875698&tmp_task=setupCategory&cc=gr&dlc=el&lc=en&product=1146331
Officejet J3600, J3680 Printers (HP 21/22 ink cartridges) HP 21/22 Ink Refilling Services & Additional Cautions: http://www.youtube.com/watch?v=f_r_7B4jauc
Self-Test Page:
1. Press the Setup Button.
2. Press 2 to select “Print Reports”
3. Press 6 to select “Self-Test Report” on the number keypad
4. Examine the resulting self-test page that prints. There should be lines extending all the way across the
page in black, yellow, cyan and magenta. A missing black line indicates a problem with the black or photo
63
To further troubleshoot your printer please visit:
http://www.inkjet411.com
cartridge. Faded, streaked or missing lines in the other colors indicates a problem with the color ink
cartridge. Refer to video at link below to help evaluate test pattern.
NOTE: A good HP 21/27/56 black cartridge should display 416 good nozzles, while a good HP 22/28/57/58
color ink cartridge should show 300 good nozzles. http://inkjet411.com/?page_id=2358
Cartridge Health Diagnostics (Tap 41/43 Report): [procedures vary by model -need to confirm both]
Procedure A:
1. Depress BOTH arrow keys simultaneously ( < > ).
2. Press the Left arrow key.
3. Select the OK key.
4. Press the Right arrow key. The "Underware" menu should be displayed.
5. Press the right arrow key until the ‘print-mech button tap’ menu is displayed.
6. Select Ok (Code = 0 will be displayed); click and hold Right Arrow until code = 41’ is displayed. Use the Left
Arrow if you need to decrease numerical count.
7. Select Ok. Within one minute the Tap 41 diagnostic test pattern should be initiated and print (whether ink
cartridges are good or not, i.e. this is a forced print test). Refer to 2nd video at following link on how to interpret
the diagnostic test report: http://inkjet411.com/?page_id=2358
NOTE 1: If access code '41' does not yield a test print, then try and enter "code = 43").
NOTE 2: Providing the color cartridge is partially functioning, the Tap 43 diagnostic test print will be printed (this is a
forced service print test which is mainly used for the evaluation of ink cartridge electrical health). A good HP 21/27
black cartridge should display 416 good nozzles, while a good HP 22/28 color ink cartridge should show 300 good
nozzles. http://inkjet411.com/?page_id=2358
Procedure B:
1. Press * and # keys at same time
2. Enter 123 (or 124)
3. Using left/right arrow keys, navigate to Special Reports (……or ‘System Menu’ or ‘Information Menu’). Select
Enter.
4. Using left/right arrow keys, navigate to ‘Extended Self-Test’.
5. Select Enter to print test print - evaluate test print. If excessive nozzles are missing from the stair step pattern,
then perform cartridge cleaning to correct.
6. Using left/right arrow keys, navigate to ‘print-mech button tap’ menu.
7. Select Ok (‘code = 0’ will be displayed); click and hold Right Arrow until ‘code = 43’ is displayed. NOTE: enter
'code = 41' if ‘code =43’ this does not activate the diagnostic print report.
8. Select Ok. Within one minute the Tap 43/41 diagnostic test pattern should be initiated and print. The test page
prints. Refer to link to video on how to generally interpret the printed test report:
http://inkjet411.com/?page_id=2358
NOTE 1: If access code '41' does not yield a test print, then try and enter "code = 43").
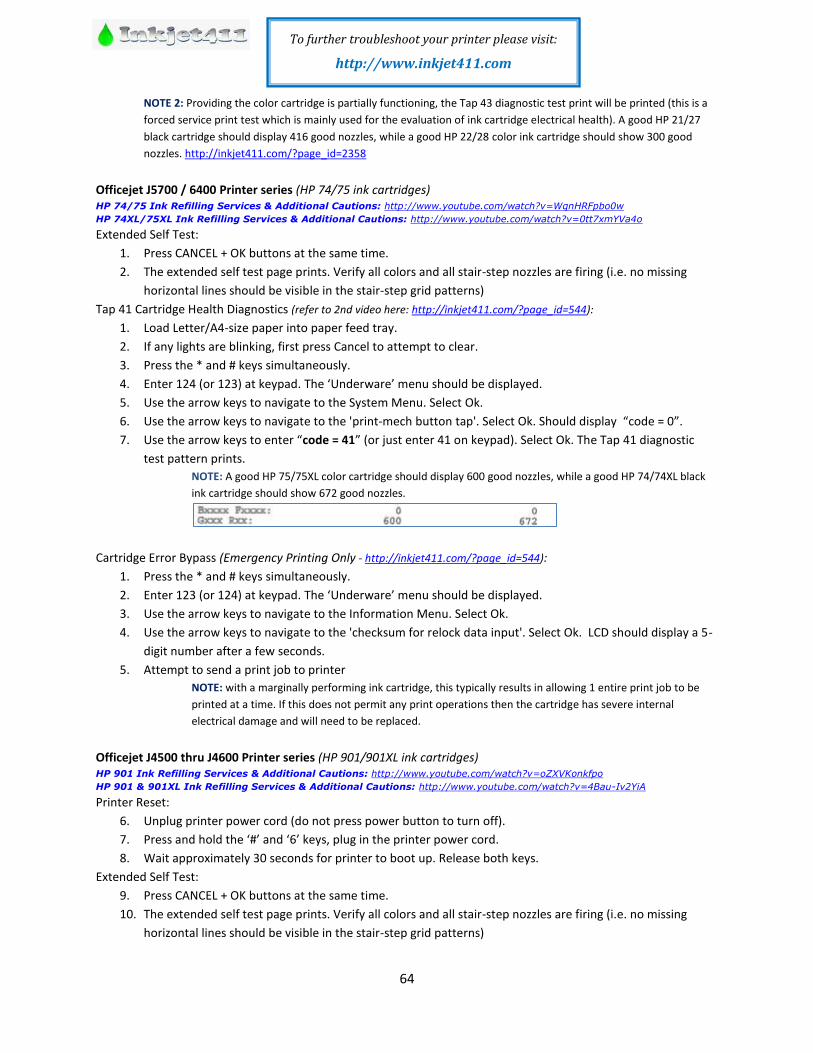
64
To further troubleshoot your printer please visit:
http://www.inkjet411.com
NOTE 2: Providing the color cartridge is partially functioning, the Tap 43 diagnostic test print will be printed (this is a
forced service print test which is mainly used for the evaluation of ink cartridge electrical health). A good HP 21/27
black cartridge should display 416 good nozzles, while a good HP 22/28 color ink cartridge should show 300 good
nozzles. http://inkjet411.com/?page_id=2358
Officejet J5700 / 6400 Printer series (HP 74/75 ink cartridges) HP 74/75 Ink Refilling Services & Additional Cautions: http://www.youtube.com/watch?v=WqnHRFpbo0w
HP 74XL/75XL Ink Refilling Services & Additional Cautions: http://www.youtube.com/watch?v=0tt7xmYVa4o Extended Self Test:
1. Press CANCEL + OK buttons at the same time.
2. The extended self test page prints. Verify all colors and all stair-step nozzles are firing (i.e. no missing
horizontal lines should be visible in the stair-step grid patterns)
Tap 41 Cartridge Health Diagnostics (refer to 2nd video here: http://inkjet411.com/?page_id=544):
1. Load Letter/A4-size paper into paper feed tray.
2. If any lights are blinking, first press Cancel to attempt to clear.
3. Press the * and # keys simultaneously.
4. Enter 124 (or 123) at keypad. The ‘Underware’ menu should be displayed.
5. Use the arrow keys to navigate to the System Menu. Select Ok.
6. Use the arrow keys to navigate to the 'print-mech button tap'. Select Ok. Should display “code = 0”.
7. Use the arrow keys to enter “code = 41” (or just enter 41 on keypad). Select Ok. The Tap 41 diagnostic
test pattern prints.
NOTE: A good HP 75/75XL color cartridge should display 600 good nozzles, while a good HP 74/74XL black
ink cartridge should show 672 good nozzles.
Cartridge Error Bypass (Emergency Printing Only - http://inkjet411.com/?page_id=544):
1. Press the * and # keys simultaneously.
2. Enter 123 (or 124) at keypad. The ‘Underware’ menu should be displayed.
3. Use the arrow keys to navigate to the Information Menu. Select Ok.
4. Use the arrow keys to navigate to the 'checksum for relock data input'. Select Ok. LCD should display a 5-
digit number after a few seconds.
5. Attempt to send a print job to printer
NOTE: with a marginally performing ink cartridge, this typically results in allowing 1 entire print job to be
printed at a time. If this does not permit any print operations then the cartridge has severe internal
electrical damage and will need to be replaced.
Officejet J4500 thru J4600 Printer series (HP 901/901XL ink cartridges) HP 901 Ink Refilling Services & Additional Cautions: http://www.youtube.com/watch?v=oZXVKonkfpo
HP 901 & 901XL Ink Refilling Services & Additional Cautions: http://www.youtube.com/watch?v=4Bau-Iv2YiA Printer Reset:
6. Unplug printer power cord (do not press power button to turn off).
7. Press and hold the ‘#’ and ‘6’ keys, plug in the printer power cord.
8. Wait approximately 30 seconds for printer to boot up. Release both keys.
Extended Self Test:
9. Press CANCEL + OK buttons at the same time.
10. The extended self test page prints. Verify all colors and all stair-step nozzles are firing (i.e. no missing
horizontal lines should be visible in the stair-step grid patterns)
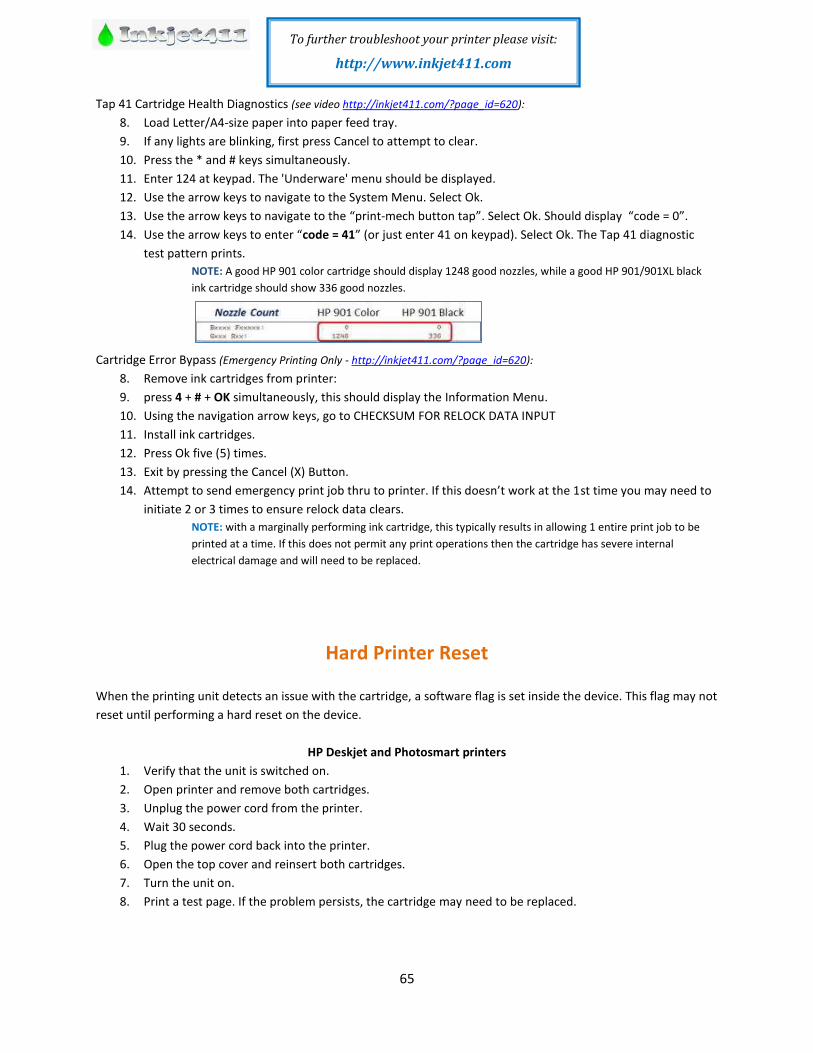
65
To further troubleshoot your printer please visit:
http://www.inkjet411.com
Tap 41 Cartridge Health Diagnostics (see video http://inkjet411.com/?page_id=620):
8. Load Letter/A4-size paper into paper feed tray.
9. If any lights are blinking, first press Cancel to attempt to clear.
10. Press the * and # keys simultaneously.
11. Enter 124 at keypad. The 'Underware' menu should be displayed.
12. Use the arrow keys to navigate to the System Menu. Select Ok.
13. Use the arrow keys to navigate to the “print-mech button tap”. Select Ok. Should display “code = 0”.
14. Use the arrow keys to enter “code = 41” (or just enter 41 on keypad). Select Ok. The Tap 41 diagnostic
test pattern prints.
NOTE: A good HP 901 color cartridge should display 1248 good nozzles, while a good HP 901/901XL black
ink cartridge should show 336 good nozzles.
Cartridge Error Bypass (Emergency Printing Only - http://inkjet411.com/?page_id=620):
8. Remove ink cartridges from printer:
9. press 4 + # + OK simultaneously, this should display the Information Menu.
10. Using the navigation arrow keys, go to CHECKSUM FOR RELOCK DATA INPUT
11. Install ink cartridges.
12. Press Ok five (5) times.
13. Exit by pressing the Cancel (X) Button.
14. Attempt to send emergency print job thru to printer. If this doesn’t work at the 1st time you may need to
initiate 2 or 3 times to ensure relock data clears.
NOTE: with a marginally performing ink cartridge, this typically results in allowing 1 entire print job to be
printed at a time. If this does not permit any print operations then the cartridge has severe internal
electrical damage and will need to be replaced.
Hard Printer Reset
When the printing unit detects an issue with the cartridge, a software flag is set inside the device. This flag may not
reset until performing a hard reset on the device.
HP Deskjet and Photosmart printers
1. Verify that the unit is switched on.
2. Open printer and remove both cartridges.
3. Unplug the power cord from the printer.
4. Wait 30 seconds.
5. Plug the power cord back into the printer.
6. Open the top cover and reinsert both cartridges.
7. Turn the unit on.
8. Print a test page. If the problem persists, the cartridge may need to be replaced.
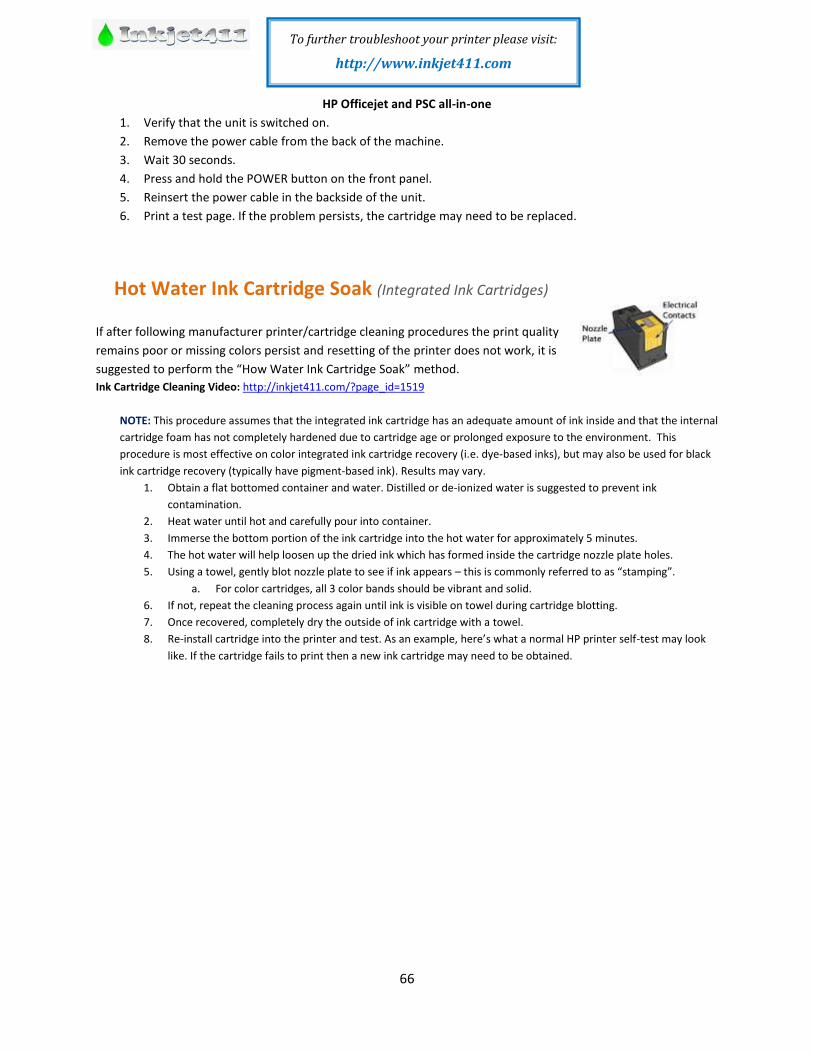
66
To further troubleshoot your printer please visit:
http://www.inkjet411.com
HP Officejet and PSC all-in-one
1. Verify that the unit is switched on.
2. Remove the power cable from the back of the machine.
3. Wait 30 seconds.
4. Press and hold the POWER button on the front panel.
5. Reinsert the power cable in the backside of the unit.
6. Print a test page. If the problem persists, the cartridge may need to be replaced.
Hot Water Ink Cartridge Soak (Integrated Ink Cartridges)
If after following manufacturer printer/cartridge cleaning procedures the print quality
remains poor or missing colors persist and resetting of the printer does not work, it is
suggested to perform the “How Water Ink Cartridge Soak” method.
Ink Cartridge Cleaning Video: http://inkjet411.com/?page_id=1519
NOTE: This procedure assumes that the integrated ink cartridge has an adequate amount of ink inside and that the internal
cartridge foam has not completely hardened due to cartridge age or prolonged exposure to the environment. This
procedure is most effective on color integrated ink cartridge recovery (i.e. dye-based inks), but may also be used for black
ink cartridge recovery (typically have pigment-based ink). Results may vary.
1. Obtain a flat bottomed container and water. Distilled or de-ionized water is suggested to prevent ink
contamination.
2. Heat water until hot and carefully pour into container.
3. Immerse the bottom portion of the ink cartridge into the hot water for approximately 5 minutes.
4. The hot water will help loosen up the dried ink which has formed inside the cartridge nozzle plate holes.
5. Using a towel, gently blot nozzle plate to see if ink appears – this is commonly referred to as “stamping”.
a. For color cartridges, all 3 color bands should be vibrant and solid.
6. If not, repeat the cleaning process again until ink is visible on towel during cartridge blotting.
7. Once recovered, completely dry the outside of ink cartridge with a towel.
8. Re-install cartridge into the printer and test. As an example, here’s what a normal HP printer self-test may look
like. If the cartridge fails to print then a new ink cartridge may need to be obtained.
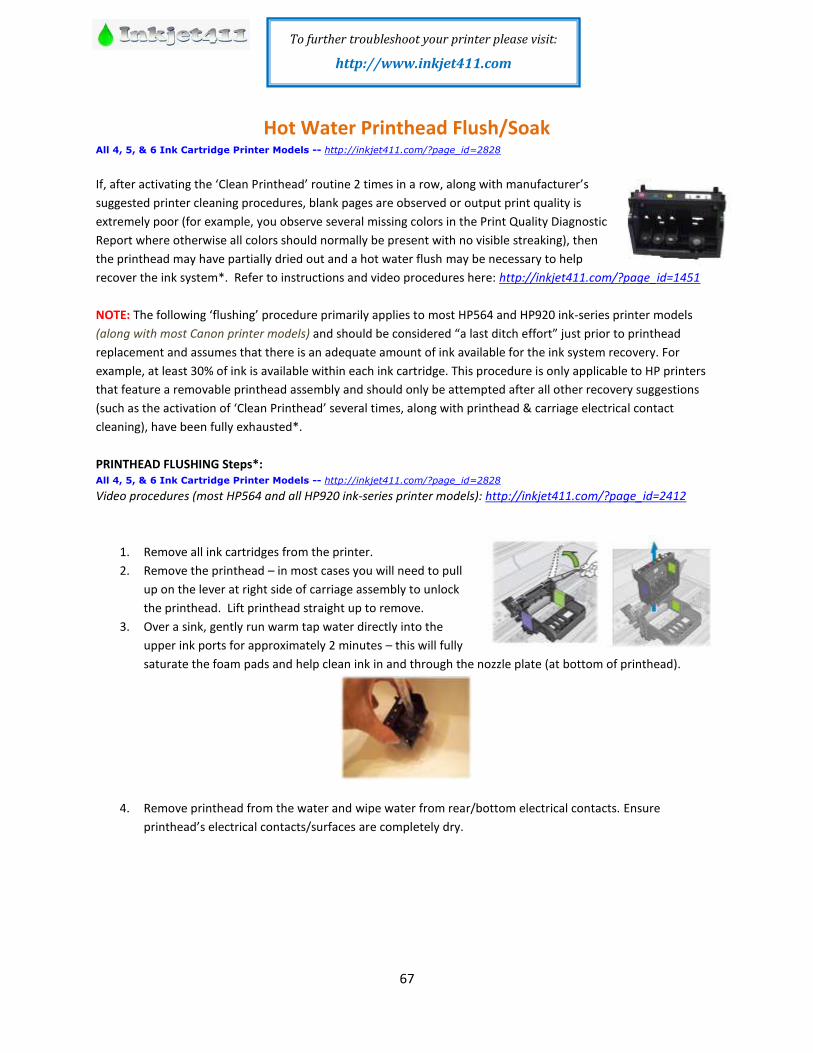
67
To further troubleshoot your printer please visit:
http://www.inkjet411.com
Hot Water Printhead Flush/Soak All 4, 5, & 6 Ink Cartridge Printer Models -- http://inkjet411.com/?page_id=2828
If, after activating the ‘Clean Printhead’ routine 2 times in a row, along with manufacturer’s
suggested printer cleaning procedures, blank pages are observed or output print quality is
extremely poor (for example, you observe several missing colors in the Print Quality Diagnostic
Report where otherwise all colors should normally be present with no visible streaking), then
the printhead may have partially dried out and a hot water flush may be necessary to help
recover the ink system*. Refer to instructions and video procedures here: http://inkjet411.com/?page_id=1451
NOTE: The following ‘flushing’ procedure primarily applies to most HP564 and HP920 ink-series printer models
(along with most Canon printer models) and should be considered “a last ditch effort” just prior to printhead
replacement and assumes that there is an adequate amount of ink available for the ink system recovery. For
example, at least 30% of ink is available within each ink cartridge. This procedure is only applicable to HP printers
that feature a removable printhead assembly and should only be attempted after all other recovery suggestions
(such as the activation of ‘Clean Printhead’ several times, along with printhead & carriage electrical contact
cleaning), have been fully exhausted*.
PRINTHEAD FLUSHING Steps*: All 4, 5, & 6 Ink Cartridge Printer Models -- http://inkjet411.com/?page_id=2828
Video procedures (most HP564 and all HP920 ink-series printer models): http://inkjet411.com/?page_id=2412
1. Remove all ink cartridges from the printer.
2. Remove the printhead – in most cases you will need to pull
up on the lever at right side of carriage assembly to unlock
the printhead. Lift printhead straight up to remove.
3. Over a sink, gently run warm tap water directly into the
upper ink ports for approximately 2 minutes – this will fully
saturate the foam pads and help clean ink in and through the nozzle plate (at bottom of printhead).
4. Remove printhead from the water and wipe water from rear/bottom electrical contacts. Ensure
printhead’s electrical contacts/surfaces are completely dry.
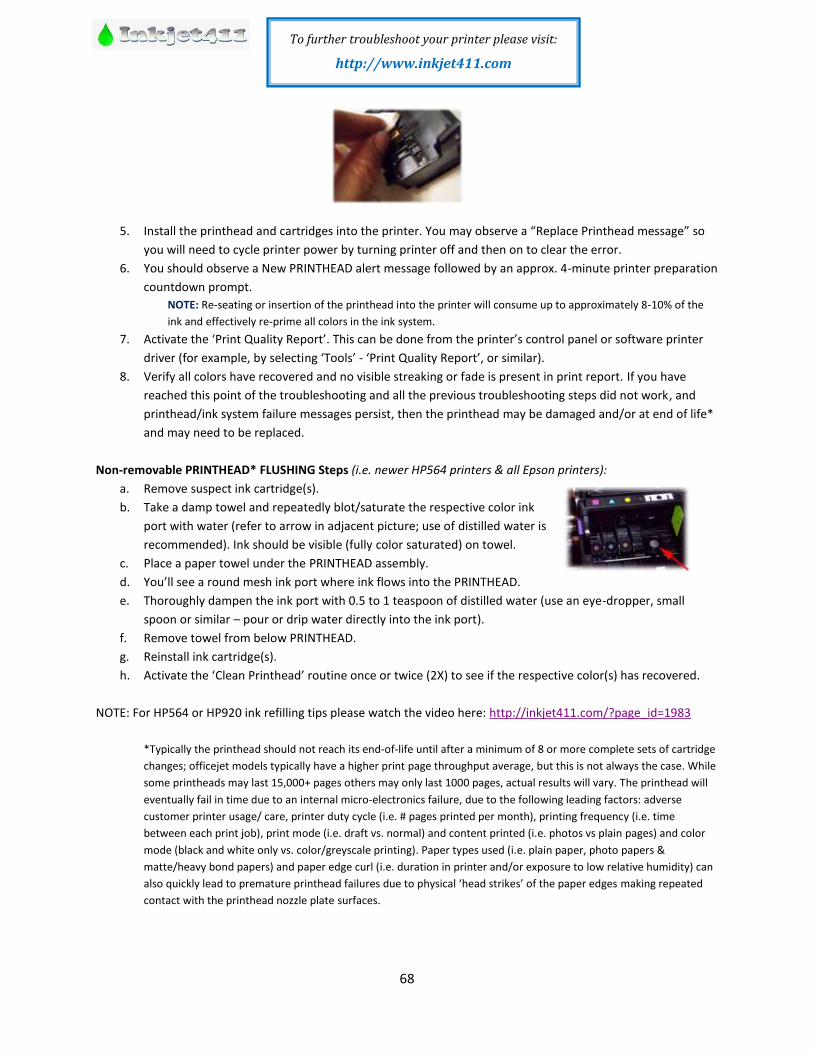
68
To further troubleshoot your printer please visit:
http://www.inkjet411.com
5. Install the printhead and cartridges into the printer. You may observe a “Replace Printhead message” so
you will need to cycle printer power by turning printer off and then on to clear the error.
6. You should observe a New PRINTHEAD alert message followed by an approx. 4-minute printer preparation
countdown prompt.
NOTE: Re-seating or insertion of the printhead into the printer will consume up to approximately 8-10% of the
ink and effectively re-prime all colors in the ink system.
7. Activate the ‘Print Quality Report’. This can be done from the printer’s control panel or software printer
driver (for example, by selecting ‘Tools’ - ‘Print Quality Report’, or similar).
8. Verify all colors have recovered and no visible streaking or fade is present in print report. If you have
reached this point of the troubleshooting and all the previous troubleshooting steps did not work, and
printhead/ink system failure messages persist, then the printhead may be damaged and/or at end of life*
and may need to be replaced.
Non-removable PRINTHEAD* FLUSHING Steps (i.e. newer HP564 printers & all Epson printers):
a. Remove suspect ink cartridge(s).
b. Take a damp towel and repeatedly blot/saturate the respective color ink
port with water (refer to arrow in adjacent picture; use of distilled water is
recommended). Ink should be visible (fully color saturated) on towel.
c. Place a paper towel under the PRINTHEAD assembly.
d. You’ll see a round mesh ink port where ink flows into the PRINTHEAD.
e. Thoroughly dampen the ink port with 0.5 to 1 teaspoon of distilled water (use an eye-dropper, small
spoon or similar – pour or drip water directly into the ink port).
f. Remove towel from below PRINTHEAD.
g. Reinstall ink cartridge(s).
h. Activate the ‘Clean Printhead’ routine once or twice (2X) to see if the respective color(s) has recovered.
NOTE: For HP564 or HP920 ink refilling tips please watch the video here: http://inkjet411.com/?page_id=1983
*Typically the printhead should not reach its end-of-life until after a minimum of 8 or more complete sets of cartridge
changes; officejet models typically have a higher print page throughput average, but this is not always the case. While
some printheads may last 15,000+ pages others may only last 1000 pages, actual results will vary. The printhead will
eventually fail in time due to an internal micro-electronics failure, due to the following leading factors: adverse
customer printer usage/ care, printer duty cycle (i.e. # pages printed per month), printing frequency (i.e. time
between each print job), print mode (i.e. draft vs. normal) and content printed (i.e. photos vs plain pages) and color
mode (black and white only vs. color/greyscale printing). Paper types used (i.e. plain paper, photo papers &
matte/heavy bond papers) and paper edge curl (i.e. duration in printer and/or exposure to low relative humidity) can
also quickly lead to premature printhead failures due to physical ‘head strikes’ of the paper edges making repeated
contact with the printhead nozzle plate surfaces.