Embed Size (px)
Citation preview

HP Instrument BASIC User’s HandbookSupplement
Agilent Technologies8712ET/ES and 8714ET/ES
RF Network Analyzers
Part No. 08714-90019
Printed in USA
Print Date: June 2000
Supersedes October 1998
© Copyright 1998-2000 Agilent Technologies, Inc.
Notice
The information contained in this document is subject to change withoutnotice.
Agilent Technologies makes no warranty of any kind with regard to thismaterial, including but not limited to, the implied warranties ofmerchantability and fitness for a particular purpose. AgilentTechnologies shall not be liable for errors contained herein or forincidental or consequential damages in connection with the furnishing,performance, or use of this material.
Firmware Revision
This manual documents analyzers with firmware revisions E.06.00 andabove.
ii HP IBASIC Supplement
Contents
1. IntroductionIntroduction . . . . . . . . . . . . . . . . . . . . . . . . . . . . . . . . . . . . . . . . . . . . . . . . . . . . . . . . . . . 1-2Overview of HP Instrument BASIC . . . . . . . . . . . . . . . . . . . . . . . . . . . . . . . . . . . . . . . . 1-3Using HP Instrument BASIC . . . . . . . . . . . . . . . . . . . . . . . . . . . . . . . . . . . . . . . . . . . . . 1-4Allocating Internal Memory for IBASIC Use . . . . . . . . . . . . . . . . . . . . . . . . . . . . . . . . . 1-5Typographical Conventions. . . . . . . . . . . . . . . . . . . . . . . . . . . . . . . . . . . . . . . . . . . . . . . 1-6
2. Recording ProgramsKeystroke Recording . . . . . . . . . . . . . . . . . . . . . . . . . . . . . . . . . . . . . . . . . . . . . . . . . . . . 2-3
What Is Keystroke Recording?. . . . . . . . . . . . . . . . . . . . . . . . . . . . . . . . . . . . . . . . . . . 2-3IBASIC Programs and the Input Buffer . . . . . . . . . . . . . . . . . . . . . . . . . . . . . . . . . . . 2-4
What's in a Recorded Program . . . . . . . . . . . . . . . . . . . . . . . . . . . . . . . . . . . . . . . . . . . . 2-5The OUTPUT Statement . . . . . . . . . . . . . . . . . . . . . . . . . . . . . . . . . . . . . . . . . . . . . . . 2-6The ASSIGN Statement. . . . . . . . . . . . . . . . . . . . . . . . . . . . . . . . . . . . . . . . . . . . . . . . 2-6SCPI Mnemonics . . . . . . . . . . . . . . . . . . . . . . . . . . . . . . . . . . . . . . . . . . . . . . . . . . . . . 2-7
How Recording Works . . . . . . . . . . . . . . . . . . . . . . . . . . . . . . . . . . . . . . . . . . . . . . . . . . . 2-8Operations That Do Not Record . . . . . . . . . . . . . . . . . . . . . . . . . . . . . . . . . . . . . . . . . . . 2-9
Front Panel Operations without Mnemonics . . . . . . . . . . . . . . . . . . . . . . . . . . . . . . . 2-9HP Instrument BASIC Operations . . . . . . . . . . . . . . . . . . . . . . . . . . . . . . . . . . . . . . 2-10Operations Requiring Additional Programming. . . . . . . . . . . . . . . . . . . . . . . . . . . . 2-10Mnemonics with No Corresponding Front Panel Operation . . . . . . . . . . . . . . . . . . 2-12
Avoiding Recording Errors . . . . . . . . . . . . . . . . . . . . . . . . . . . . . . . . . . . . . . . . . . . . . . 2-13Use Instrument Preset . . . . . . . . . . . . . . . . . . . . . . . . . . . . . . . . . . . . . . . . . . . . . . . . 2-13Specifically Select Parameters . . . . . . . . . . . . . . . . . . . . . . . . . . . . . . . . . . . . . . . . . . 2-13Use GPIB Echo . . . . . . . . . . . . . . . . . . . . . . . . . . . . . . . . . . . . . . . . . . . . . . . . . . . . . . 2-14
3. Running, Pausing, and Stopping ProgramsStarting Programs Automatically. . . . . . . . . . . . . . . . . . . . . . . . . . . . . . . . . . . . . . . . . . 3-3Running and Continuing a Program . . . . . . . . . . . . . . . . . . . . . . . . . . . . . . . . . . . . . . . 3-4Pausing and Continuing a Program . . . . . . . . . . . . . . . . . . . . . . . . . . . . . . . . . . . . . . . . 3-6
Using LOCAL LOCKOUT 8 to Disable the Pause Key . . . . . . . . . . . . . . . . . . . . . . . 3-7Stopping a Program. . . . . . . . . . . . . . . . . . . . . . . . . . . . . . . . . . . . . . . . . . . . . . . . . . . . . 3-8
4. Saving and Recalling ProgramsSelecting a Disk . . . . . . . . . . . . . . . . . . . . . . . . . . . . . . . . . . . . . . . . . . . . . . . . . . . . . . . . 4-3Saving a Program . . . . . . . . . . . . . . . . . . . . . . . . . . . . . . . . . . . . . . . . . . . . . . . . . . . . . . 4-4
Contents-iii
Contents
AUTOST Programs . . . . . . . . . . . . . . . . . . . . . . . . . . . . . . . . . . . . . . . . . . . . . . . . . . . . .4-6Recalling a Program. . . . . . . . . . . . . . . . . . . . . . . . . . . . . . . . . . . . . . . . . . . . . . . . . . . . .4-7CAT to a String Array Exception. . . . . . . . . . . . . . . . . . . . . . . . . . . . . . . . . . . . . . . . . . .4-7Accessing Mass Storage within Programs . . . . . . . . . . . . . . . . . . . . . . . . . . . . . . . . . . .4-8
5. Developing ProgramsExternal Editors . . . . . . . . . . . . . . . . . . . . . . . . . . . . . . . . . . . . . . . . . . . . . . . . . . . . . . . .5-3
HP BASIC . . . . . . . . . . . . . . . . . . . . . . . . . . . . . . . . . . . . . . . . . . . . . . . . . . . . . . . . . . .5-3ASCII Word Processors . . . . . . . . . . . . . . . . . . . . . . . . . . . . . . . . . . . . . . . . . . . . . . . . .5-4Programming Editors . . . . . . . . . . . . . . . . . . . . . . . . . . . . . . . . . . . . . . . . . . . . . . . . . .5-4
Editing Your Program Using Edit . . . . . . . . . . . . . . . . . . . . . . . . . . . . . . . . . . . . . . . . . .5-5The IBASIC Editor Softkeys. . . . . . . . . . . . . . . . . . . . . . . . . . . . . . . . . . . . . . . . . . . . .5-6Recording into an Existing Program . . . . . . . . . . . . . . . . . . . . . . . . . . . . . . . . . . . . . .5-7Editing with an External Keyboard. . . . . . . . . . . . . . . . . . . . . . . . . . . . . . . . . . . . . . .5-7Entering Program Lines . . . . . . . . . . . . . . . . . . . . . . . . . . . . . . . . . . . . . . . . . . . . . . .5-10Accessing the IBASIC Command Line. . . . . . . . . . . . . . . . . . . . . . . . . . . . . . . . . . . .5-10Editing from the Front Panel . . . . . . . . . . . . . . . . . . . . . . . . . . . . . . . . . . . . . . . . . . .5-11Removing Program Text . . . . . . . . . . . . . . . . . . . . . . . . . . . . . . . . . . . . . . . . . . . . . . .5-13Renumbering, Copying, Moving, and Indenting Lines . . . . . . . . . . . . . . . . . . . . . . .5-15
Using IBASIC Display . . . . . . . . . . . . . . . . . . . . . . . . . . . . . . . . . . . . . . . . . . . . . . . . . .5-16Using UTILITIES. . . . . . . . . . . . . . . . . . . . . . . . . . . . . . . . . . . . . . . . . . . . . . . . . . . . . .5-19
6. Debugging ProgramsSetting Breakpoints . . . . . . . . . . . . . . . . . . . . . . . . . . . . . . . . . . . . . . . . . . . . . . . . . . . . .6-3Examining Variables . . . . . . . . . . . . . . . . . . . . . . . . . . . . . . . . . . . . . . . . . . . . . . . . . . . .6-4
Examining Strings . . . . . . . . . . . . . . . . . . . . . . . . . . . . . . . . . . . . . . . . . . . . . . . . . . . .6-5Examining Arrays . . . . . . . . . . . . . . . . . . . . . . . . . . . . . . . . . . . . . . . . . . . . . . . . . . . . .6-5
Displaying the Last Error Encountered . . . . . . . . . . . . . . . . . . . . . . . . . . . . . . . . . . . . .6-6
7. Graphics and Display TechniquesDisplay Partitions. . . . . . . . . . . . . . . . . . . . . . . . . . . . . . . . . . . . . . . . . . . . . . . . . . . . . . .7-2Using the Display Partitions . . . . . . . . . . . . . . . . . . . . . . . . . . . . . . . . . . . . . . . . . . . . . .7-3
Allocating Display Partitions . . . . . . . . . . . . . . . . . . . . . . . . . . . . . . . . . . . . . . . . . . . .7-4De-Allocating Display Partitions . . . . . . . . . . . . . . . . . . . . . . . . . . . . . . . . . . . . . . . . .7-5Operation with No Display Partition . . . . . . . . . . . . . . . . . . . . . . . . . . . . . . . . . . . . . .7-5
Displaying Text. . . . . . . . . . . . . . . . . . . . . . . . . . . . . . . . . . . . . . . . . . . . . . . . . . . . . . . . .7-7
Contents-iv
Contents
Getting Text to the Screen Quickly . . . . . . . . . . . . . . . . . . . . . . . . . . . . . . . . . . . . . . . 7-9Pop-Up Message Windows and Custom Annotations. . . . . . . . . . . . . . . . . . . . . . . . . 7-9Graphics Initialization and Scaling. . . . . . . . . . . . . . . . . . . . . . . . . . . . . . . . . . . . . . 7-10
Using Graphics . . . . . . . . . . . . . . . . . . . . . . . . . . . . . . . . . . . . . . . . . . . . . . . . . . . . . . . 7-11Drawing Figures . . . . . . . . . . . . . . . . . . . . . . . . . . . . . . . . . . . . . . . . . . . . . . . . . . . . . . 7-12
Graphics Exceptions. . . . . . . . . . . . . . . . . . . . . . . . . . . . . . . . . . . . . . . . . . . . . . . . . . 7-14Labeling with Different Partitions . . . . . . . . . . . . . . . . . . . . . . . . . . . . . . . . . . . . . . 7-15
SCPI Graphics Commands . . . . . . . . . . . . . . . . . . . . . . . . . . . . . . . . . . . . . . . . . . . . . . 7-16For More Information. . . . . . . . . . . . . . . . . . . . . . . . . . . . . . . . . . . . . . . . . . . . . . . . . 7-18
8. Interfacing with External DevicesCommunication with Devices . . . . . . . . . . . . . . . . . . . . . . . . . . . . . . . . . . . . . . . . . . . . . 8-3
GPIB Device Selectors . . . . . . . . . . . . . . . . . . . . . . . . . . . . . . . . . . . . . . . . . . . . . . . . . 8-3Moving Data through the GPIB. . . . . . . . . . . . . . . . . . . . . . . . . . . . . . . . . . . . . . . . . . 8-4General Structure of the GPIB . . . . . . . . . . . . . . . . . . . . . . . . . . . . . . . . . . . . . . . . . . 8-5Using the Serial and Parallel Ports. . . . . . . . . . . . . . . . . . . . . . . . . . . . . . . . . . . . . . . 8-6Using the Analyzer Ports in IBASIC Programs . . . . . . . . . . . . . . . . . . . . . . . . . . . . . 8-6
General Bus Management. . . . . . . . . . . . . . . . . . . . . . . . . . . . . . . . . . . . . . . . . . . . . . . . 8-9REMOTE. . . . . . . . . . . . . . . . . . . . . . . . . . . . . . . . . . . . . . . . . . . . . . . . . . . . . . . . . . . 8-10LOCAL LOCKOUT. . . . . . . . . . . . . . . . . . . . . . . . . . . . . . . . . . . . . . . . . . . . . . . . . . . 8-10LOCAL . . . . . . . . . . . . . . . . . . . . . . . . . . . . . . . . . . . . . . . . . . . . . . . . . . . . . . . . . . . . 8-11TRIGGER . . . . . . . . . . . . . . . . . . . . . . . . . . . . . . . . . . . . . . . . . . . . . . . . . . . . . . . . . . 8-11CLEAR . . . . . . . . . . . . . . . . . . . . . . . . . . . . . . . . . . . . . . . . . . . . . . . . . . . . . . . . . . . . 8-12ABORT . . . . . . . . . . . . . . . . . . . . . . . . . . . . . . . . . . . . . . . . . . . . . . . . . . . . . . . . . . . . 8-12GPIB Service Reqsts. . . . . . . . . . . . . . . . . . . . . . . . . . . . . . . . . . . . . . . . . . . . . . . . . . 8-13Passing and Regaining Control . . . . . . . . . . . . . . . . . . . . . . . . . . . . . . . . . . . . . . . . . 8-16
The IBASIC GPIB Model. . . . . . . . . . . . . . . . . . . . . . . . . . . . . . . . . . . . . . . . . . . . . . . . 8-17The External Bus and the Internal Bus . . . . . . . . . . . . . . . . . . . . . . . . . . . . . . . . . . 8-17Service Request Indicators. . . . . . . . . . . . . . . . . . . . . . . . . . . . . . . . . . . . . . . . . . . . . 8-17IBASIC as the Active Controller . . . . . . . . . . . . . . . . . . . . . . . . . . . . . . . . . . . . . . . . 8-18Passing Active Control to the Instrument. . . . . . . . . . . . . . . . . . . . . . . . . . . . . . . . . 8-19IBASIC as a Non-Active Controller. . . . . . . . . . . . . . . . . . . . . . . . . . . . . . . . . . . . . . 8-20
Interfacing with an External Controller . . . . . . . . . . . . . . . . . . . . . . . . . . . . . . . . . . . 8-21Synchronizing IBASIC with an External Controller . . . . . . . . . . . . . . . . . . . . . . . . 8-22Transferring Data between Programs. . . . . . . . . . . . . . . . . . . . . . . . . . . . . . . . . . . . 8-24Transferring Programs. . . . . . . . . . . . . . . . . . . . . . . . . . . . . . . . . . . . . . . . . . . . . . . . 8-26
Contents-v
Contents
IBASIC Communication across the LAN. . . . . . . . . . . . . . . . . . . . . . . . . . . . . . . . . .8-28
9. Using SubprogramsUser-Created Subprograms . . . . . . . . . . . . . . . . . . . . . . . . . . . . . . . . . . . . . . . . . . . . . . .9-2Built-In High-Speed Subprograms . . . . . . . . . . . . . . . . . . . . . . . . . . . . . . . . . . . . . . . . .9-3
Avoiding Multiple Loads of Subprograms . . . . . . . . . . . . . . . . . . . . . . . . . . . . . . . . . .9-9
10. IBASIC Keyword SummaryKeywords in Alphabetic Order . . . . . . . . . . . . . . . . . . . . . . . . . . . . . . . . . . . . . . . . . . .10-3Keywords in Category Order . . . . . . . . . . . . . . . . . . . . . . . . . . . . . . . . . . . . . . . . . . . .10-15
Contents-vi

1 Introduction
1-1

IntroductionIntroduction
IntroductionThis manual describes how to create and use HP Instrument BASIC(IBASIC) software in the analyzer. It demonstrates how to use IBASIC'sprogramming, editing and debugging features. It also describes how tosave and recall programs and how certain instrument-specific IBASICfeatures are implemented in the analyzer. The reader should be familiarwith the operation of the analyzer and BASIC before programming theanalyzer.
Related information can be found in the following references that wereshipped with your analyzer:
• The Programmer’s Guide, a companion to this book, providesgeneral-purpose programming information. The Programmer’s Guidedescribes all valid instrument commands.
• The User’s Guide provides information on making measurementswith the analyzer.
• The HP Instrument BASIC User’s Handbook provides information onHP Instrument BASIC (IBASIC) .
• The Example Programs Disk — DOS format: part number08714-10003, is included with the analyzer. This disk provides copiesof all of the example programs in the Example Programs Guide.
• Additional information on HP BASIC programming is available in themanual set for the BASIC revision being used. For example: BASIC7.0 Programming Techniques and BASIC 7.0 Language Reference.
Other information that may be helpful can be found in the followingreference materials:
• The Tutorial Description of the Hewlett-Packard Interface Bus(literature no. 5021-1927) provides information on using the GPIB.
Contact the nearest Agilent sales office for ordering information. A list ofsales and service offices can be found in the “Specifications andCharacteristics” chapter of the User’s Guide.
1-2 HP IBASIC Supplement
IntroductionOverview of HP Instrument BASIC
Overview of HP Instrument BASICHP Instrument BASIC (IBASIC) can be used for a wide range ofapplications, from simple recording and playback of measurementsequences to remote control of other instruments. IBASIC is a completelanguage with over 200 keywords.
IBASIC is a complete system controller residing inside your analyzer. Itcommunicates with the analyzer via GPIB commands over an internalinterface bus (select code 8). It can also communicate with otherinstruments, computers, and peripherals using the external GPIBinterface (select code 7) or the serial (select code 9) or parallel (select code15) I/O ports.
NOTE The analyzer can also be controlled by an external controller. It has afactory default external GPIB address of 16. When using IBASIC tocontrol other instruments, no other device should use the sameaddress.The external GPIB address can be changed using either thefront panel keys under the , menu, or theSCPI mnemonic SYST:COMM:GPIB:ADDR.
SYSTEM OPTIONS GPIB
HP IBASIC Supplement 1-3
IntroductionUsing HP Instrument BASIC
Using HP Instrument BASICYou need not be proficient in a programming language to successfully useIBASIC. In keystroke recording mode, IBASIC automatically builds anexecutable program by capturing measurement sequences as they areperformed. With little or no editing of these program lines, you canimmediately put your program to work to control and automate youranalyzer.
The IBASIC language is a subset of the HP BASIC language. In fact,IBASIC programs can be run on any HP BASIC workstation with veryfew changes. When an external PC keyboard (with a DIN connector) isconnected to the analyzer, the IBASIC user interface emulates the userinterface of the HP BASIC. The PC keyboard can be used for commandentry, editing and program inputs.
You can use IBASIC to do the following:
• create on screen graphics
• control other instruments and peripherals
• create interactive prompts
• simplify keystrokes with the key
• create programs by recording keystrokes
• run applications
IBASIC also works in conjunction with an external controller which candownload and run programs, query variables and respond to servicerequests (SRQs).
BEGIN
1-4 HP IBASIC Supplement

IntroductionAllocating Internal Memory for IBASIC Use
Allocating Internal Memory for IBASICUseYour analyzer contains a volatile RAM disk that is configured for usewith IBASIC. The default condition set at the factory allocates most ofthis disk's memory for IBASIC use. To see what the current allocationsare for this disk, press
. A message will appear on the analyzer'sdisplay that shows total memory available, and how the memory iscurrently allocated.
To change the allocations, use the softkey. The numberyou enter with the softkey, is the percentage of memorythat will be used for normal disk functions (such as storing instrumentstates). The remainder will be allocated for use with IBASIC.
NOTE Cycle power after changing the allocations. You must cycle the power onthe analyzer for new allocations to take effect.
SAVE RECALL Select Disk Configure VOL_RAM
Modify Size Modify Size
HP IBASIC Supplement 1-5
IntroductionTypographical Conventions
Typographical ConventionsThe following conventions are used in this manual when referring tovarious parts of the HP Instrument BASIC and analyzer operationenvironments:
The name of a hardkey on the front panel of the analyzer. Thisnotation is also used to represent keys on an external keyboardconnected to the analyzer's DIN interface.
The label of a softkey.
Upper case selection in a softkey indicates the state after thesoftkey is pressed.
A series of hardkeys and softkeys represents the path to a givensoftkey or menu.
<element> Angle brackets are used to signify a syntax element in a statement.
computer font User input and computer output is shown with a mono-spaced font.
HARDKEY
Softkey
Softkey ON off
HARDKEY
Softkey 1
Softkey 2
1-6 HP IBASIC Supplement

2 Recording Programs
2-1
Recording Programs
Keystroke recording, described in this chapter, is ideal for creatingsimple programs or measurement sequences for instrument control.Other methods of program development may be used to supplementkeystroke recording and create more sophisticated programs. If aprogram requires data processing, decision making, operator input, or adisplay of graphical diagrams, other program development methods areneeded. These methods are covered in Chapter 5, “DevelopingPrograms.”
IBASIC programs for the analyzer can be created and edited using thefollowing methods:
• the front panel keys and knob
• an external keyboard (Option 1CL)
• an Agilent controller running HP BASIC
• a workstation or PC using a text editor or programming editor
2-2 HP IBASIC Supplement
Recording ProgramsKeystroke Recording
Keystroke RecordingKeystroke recording is the easiest way to create IBASIC programs. Itrequires only a couple of steps to set up and run, and very littleprogramming knowledge is required.
What Is Keystroke Recording?Keystroke recording is a way to automatically create IBASICmeasurement sequence programs. To record a program, press thefollowing keys:
•
• Normal key sequences for the measurement
• toterminate recording
The resulting program can then be run by pressing in the menu.
Keystroke recording works by finding the SCPI mnemonic that fits eachoperation performed by the instrument; then it builds a program line toperform that operation when the recorded program is executed. Allprogram lines built by keystroke recording are entered into theanalyzer's program buffer. If the buffer contains no existing lines, acomplete executable program will be created. If there is a program in thebuffer when recording is turned on, the recorded statements are insertedinto the existing program. Refer to Chapter 5, “Developing Programs,”for a description of how to record into existing programs.
SYSTEM OPTIONS IBASIC Key Record on OFF
SYSTEM OPTIONS IBASIC Key Record on OFF
RunSYSTEM OPTIONS IBASIC
HP IBASIC Supplement 2-3
Recording ProgramsKeystroke Recording
IBASIC Programs and the Input BufferRecorded programs send commands to the instrument, and use the sameset of commands used by external controllers for remote operation of theinstrument.
These commands are stored in an input buffer by the instrument. AnIBASIC program generally outputs the commands much faster than theinstrument can execute them. This often causes the program to completewhile the instrument is still executing commands in the input buffer. Theinstrument continues processing these commands until the buffer isempty.
This may have some side-effects if you are not aware of this interaction.For example, it may not be immediately obvious that the program hasactually finished, since the instrument is still functioning “remotely.”This could cause confusion if you try to pause and continue a programthat has actually ended.
You can clear the buffer from within your program by inserting thestatement CLEAR 8 at the beginning of your program (see Chapter 5 forinformation on editing programs).
Another side-effect of the speed with which the analyzer processescommands is that it is possible for a command to execute before aprevious command has completed execution. The most common exampleof this is a data query that executes before a measurement sweep iscomplete. This interaction can lead to erroneous data being collected. Formore information on synchronizing the execution of commands, refer to“Synchronizing the Analyzer and a Controller” in the Programmer'sGuide.
2-4 HP IBASIC Supplement
Recording ProgramsWhat's in a Recorded Program
What's in a Recorded ProgramA program created using keystroke recording is composed of threefundamental IBASIC statements: ASSIGN, OUTPUT and END. Thefollowing simple program demonstrates these statements:
1 ASSIGN @Rfna TO 800
2 OUTPUT @Rfna;”SOUR1:POW -10 dBm”
10 END
The ASSIGN and END statements are automatically created whenkeystroke recording is used to create a new program (as opposed tomodifying an existing one).
There will only be one ASSIGN statement at the beginning of a programand one END statement at the end, but in a typical program there will bemany OUTPUT statements. Since the OUTPUT statement does the actualwork of controlling the analyzer, let's take a closer look at how it is used.
NOTE Each analyzer model requires a unique ASSIGN statement. The ASSIGNstatement, which is automatically created, will vary depending on themodel of the analyzer:
8712ES/ET ASSIGN @Hp8712 To 8008714ES/ET ASSIGN @Hp8714 TO 800
HP IBASIC Supplement 2-5
Recording ProgramsWhat's in a Recorded Program
The OUTPUT StatementThe IBASIC statement
OUTPUT <destination>;<data >
tells the internal computer to send some information(data ) to a deviceat a specific address(destination ). The destination can be a deviceselector number (example: OUTPUT 800), or a name representing anumber, called a path name (example: OUTPUT@Rfna). In recordedIBASIC programs, the data are strings containing commands for theinstrument (mnemonics).
The following represents a typical OUTPUT command from a recordingsession:
OUTPUT @Rfna;”SOUR1:POW -10 dBm”
Notice that the OUTPUT command is followed by a name representing adevice selector (@Rfna), followed by a semicolon and the data(SOUR1:POW -10 dBm).
The ASSIGN StatementThe destination in an OUTPUT statement specifies the address of thedevice. In recorded programs this address is represented by the I/O pathname @Rfna. The following line appears in all recorded programs beforeany OUTPUT statements:
ASSIGN @Rfna to 800
The ASSIGN statement allows you to substitute an I/O path name (avariable preceded by the @ symbol) for a device selector number.Therefore, after the above ASSIGN statement, the program line
OUTPUT @Rfna;”SOUR1:POW -10 dBm”
is equivalent to
OUTPUT 800;”SOUR1:POW -10 dBm”
The device selector 800 specifies the host instrument as the destinationof any data sent by the OUTPUT command. The program communicateswith the analyzer via select code 8, the internal GPIB interface, which isused only for communication between IBASIC programs and theanalyzer. The analyzer will respond to any address on the internalinterface from 800 to 899 (800 is typically used).
2-6 HP IBASIC Supplement
Recording ProgramsWhat's in a Recorded Program
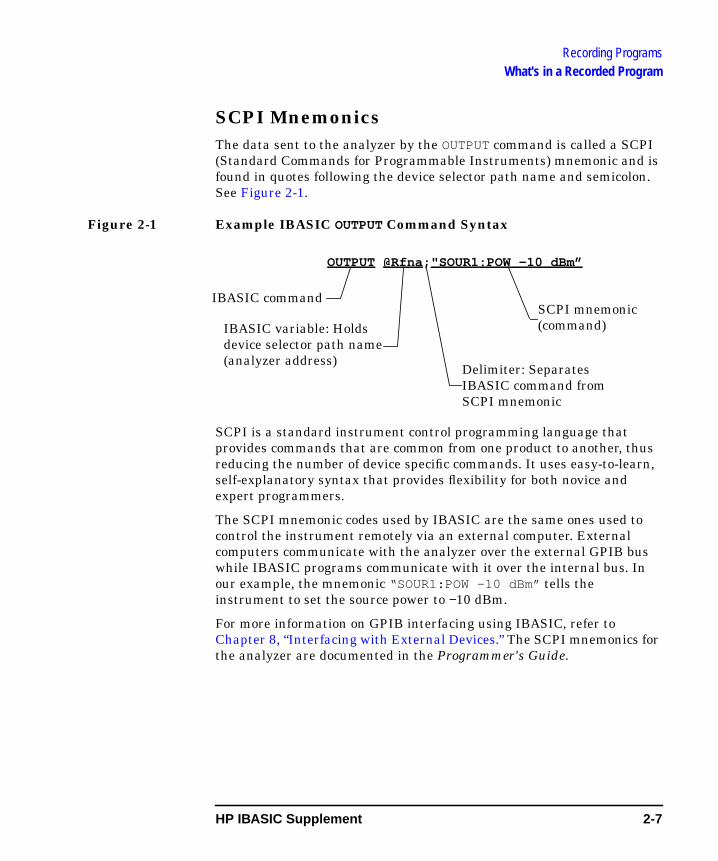
SCPI MnemonicsThe data sent to the analyzer by the OUTPUT command is called a SCPI(Standard Commands for Programmable Instruments) mnemonic and isfound in quotes following the device selector path name and semicolon.See Figure 2-1.
Figure 2-1 Example IBASIC OUTPUT Command Syntax
SCPI is a standard instrument control programming language thatprovides commands that are common from one product to another, thusreducing the number of device specific commands. It uses easy-to-learn,self-explanatory syntax that provides flexibility for both novice andexpert programmers.
The SCPI mnemonic codes used by IBASIC are the same ones used tocontrol the instrument remotely via an external computer. Externalcomputers communicate with the analyzer over the external GPIB buswhile IBASIC programs communicate with it over the internal bus. Inour example, the mnemonic “SOUR1:POW -10 dBm” tells theinstrument to set the source power to −10 dBm.
For more information on GPIB interfacing using IBASIC, refer toChapter 8, “Interfacing with External Devices.” The SCPI mnemonics forthe analyzer are documented in the Programmer's Guide.
IBASIC command
OUTPUT@Rfna; "SOUR1:POW -10 dBm”
IBASIC variable: Holdsdevice selector path name(analyzer address)
Delimiter: SeparatesIBASIC command fromSCPI mnemonic
SCPI mnemonic(command)
HP IBASIC Supplement 2-7
Recording ProgramsHow Recording Works
How Recording WorksKeystroke recording works by recording the functional operation of theinstrument, not by recording every keystroke. A sequence of SCPImnemonics forms the recorded sequence of operations.
As you press a sequence of keys to perform an operation, SCPImnemonics for that operation are generated and recorded. The operationmay take one keystroke or several keystrokes, but the mnemonic is notgenerated until the operation is complete.
In other words, it is the functional operation of the instrument that isrecorded as a mnemonic. The separate, individual keystrokes to performthat operation are not recorded.
For example, recording the simple key sequence: requires six keystrokes and produces a single
mnemonic that is generated after the keystroke sequence is completed:
“SOUR1:POW -10dBm”
This mnemonic is then automatically formed into the command
OUTPUT @Rfna;”SOUR1:POW -10 dBm”
and is inserted into the program.
If you accidentally press an incorrect key in a sequence, it may not showup in the recorded program. Also, you cannot exactly mimic keystrokes toleave the instrument in a specific front panel state, unless this stateappears as a natural consequence of a completed operation.
As shown in the above example, pressing the hardkey in arecording session has the effect of bringing up the menu, butdoes not, by itself, generate a program line. You could not, therefore,leave the instrument with the menu displayed.
POWER Level −1 02 Enter
POWERPOWER
POWER
2-8 HP IBASIC Supplement
Recording ProgramsOperations That Do Not Record
Operations That Do Not RecordAlthough keystroke recording works automatically in most situations,some operations cannot be captured or can only be partially capturedusing this method. This is true for one of the following reasons:
• There is no corresponding SCPI mnemonic for the front panelkeystrokes (such as transitional key sequences).
• The keystrokes are IBASIC front panel operations (such as some ofthe softkey operations found under the
menu).
• The operation requires additional programming steps (such aspassing control of the GPIB to the instrument for hardcopy output).
• The GPIB operation has no front panel equivalent (such as GPIBquery commands or data transfer).
• The keystrokes are service menu keys (in general).
NOTE Do not recall programs in keystroke record mode. This will overwritepreviously recorded program steps.
Front Panel Operations without MnemonicsThe following descriptions indicate areas of front panel operation whichhave no corresponding SCPI mnemonics:
• Most operations on the front panel requiring numeric entry allow useof the knob to increment or decrement the current value. This will notrecord as a program line. Always use the numeric keypad or step keysto enter any value if you want the operation to be recorded.
• During a measurement sequence, it may take several key presses tocause an operation that will generate a mnemonic. The transitionalsequences between actual instrument events are not recordable. Forexample, pressing the key displays the scale numeric entry,but nothing is recorded until you enter a value for the scaleparameter.
SYSTEM OPTIONS IBASIC
SCALE
HP IBASIC Supplement 2-9
Recording ProgramsOperations That Do Not Record
• Any default states which you set up prior to recording or which youencounter while recording (and consequently do not select) are notrecorded.
• Use of step keys is not recommended because the results may dependon the function's step size, which may change as other parameterschange.
NOTE Instrument states that are not specifically selected or changed are notrecorded. Since these default states are not recorded, you must eitheractively select them to generate a program statement, or make sure theinstrument is in exactly the same state when the program is run as whenit was recorded. This is discussed further in “Avoiding Recording Errors”on page 2-13.
HP Instrument BASIC OperationsSome softkeys under the menu cannotbe recorded. Operations on programs, such as , ,
and , do not record. You can,however, record display partitions and all other save and recalloperations not having to do with IBASIC programs.
Although IBASIC operations cannot be recorded, many do havecorresponding SCPI mnemonics that allow an external controller tocontrol and communicate with internal IBASIC programs. For moreinformation, refer to Chapter 8, “Interfacing with External Devices.”
Operations Requiring AdditionalProgrammingSome operations that work well when performed manually from thefront panel require special attention when used in a program. This is dueto two interactions: synchronization and active control.
SynchronizationOften, one event must be completed before another can occur. Supposeyou want your program to perform a limit test on data, but only after asweep has been completed. You can record the command to perform thelimit test by pressing key sequences. However, to detect when the
SYSTEM OPTIONS IBASIC Run Continue
Edit SAVE RECALL Programs
2-10 HP IBASIC Supplement
Recording ProgramsOperations That Do Not Record
instrument has completed a sweep, you must edit the program andinclude a routine that waits for a status register to indicate the end ofthe sweep.
CAUTION Synchronization is required only with overlapped commands.Overlapped commands, such as the command to trigger a sweep, don'thold off the processing of subsequent commands, and are not necessarilycompleted when the next command begins. The analyzer adds a “wait”command (*WAI) when an overlapped command is created usingkeystroke recording. *WAI delays processing of subsequent commandsuntil previous commands have been parsed. *WAI does not insureprevious commands have completed. For more information onsynchronization, see “Synchronizing the Analyzer and a Controller” inthe Programmer's Guide.
Active Control of the GPIB InterfaceSome operations require the analyzer to be the active controller on theexternal GPIB bus. The analyzer must be the System Controller (oractive control must be passed to it from an external controller). When anIBASIC program begins running, control of the external interface isautomatically passed to the program, so active control must be passedback to the analyzer before these operations can be performed.
These operations include all of the following actions when they aredirected to GPIB devices.
•
•
NOTE Active control of the GPIB interface is only a problem if that bus is beingused. Hardcopy output to devices on the serial or parallel ports do notrequire control of the GPIB.
The example program “PASSCTRL” in the Example Programs Guide andon the Example Programs Disk illustrates these concepts.
You can use keystroke recording for any of these operations but you willnot be able to successfully run the program that is generated. You willneed to enter the program lines necessary to first pass control to theanalyzer and then wait for control to be passed back to the program.
See “Passing and Regaining Control” on page 8-16 for an example ofpassing control to the analyzer.
HARDCOPY Start
HARDCOPY Abort
HP IBASIC Supplement 2-11
Recording ProgramsOperations That Do Not Record
Mnemonics with No Corresponding FrontPanel OperationSeveral of the analyzer SCPI mnemonics for the instrument performoperations that are not available from the front panel and cannot berecorded. These include operations such as querying instrument status,transferring data over GPIB, setting and clearing status registers, andgeneral GPIB housekeeping.
These operations are useful for the more advanced GPIB programmerusing IBASIC. Because they fall outside the direct operating realm of theanalyzer, they cannot be recorded. They can be added to a recordedprogram using the built-in editor or another editing environment. Seeyour analyzer's Programmer's Guide for a complete description of theanalyzer's GPIB command set. See also “Built-In High-SpeedSubprograms” on page 9-3.
2-12 HP IBASIC Supplement
Recording ProgramsAvoiding Recording Errors
Avoiding Recording Errors
Use Instrument PresetIn most cases, the key/operation should be the first keystrokerecorded. This sets the instrument to its default state and avoids the riskof creating a program that depends on prior instrument settings.
You can include the command to perform a preset in your program bypressing immediately after turning recording on. Thisinserts the following line prior to all other OUTPUT statements in yourprogram:
OUTPUT @Rfna;”SYST:PRES;*WAI”
See your analyzer's User's Guide to determine the specific preset statefor your particular analyzer.
Specifically Select ParametersIf you do not want to preset the instrument before running a recordedprogram (for example, you may be recording a section of a largermeasurement sequence), be sure to specifically activate everyinstrument setting that you will need in your automated sequence. Forexample, if you want the data format to be Log Mag, pressand then , even though Log Mag is already the defaultsetting. This will generate a program line to specifically set the dataformat to Log Mag.
In some cases you may have to select another setting first and thenre-select the original setting in order to generate the correct programline. For example, if you want to generate a program line to set the sweeptrigger to Continuous, and you discover that it is already set toContinuous when you start recording, pressfirst—then press . You can easily remove unwantedprogram lines generated by this procedure in the editor.
NOTE Do not rely on the step keys or the front panel knob to set parameters.Use of step keys is not recommended because the results may depend onthe function's step size, which may change as other parameters change.
PRESET
PRESET
FORMAT Log Mag
MENU Trigger Hold Continuous
HP IBASIC Supplement 2-13
Recording ProgramsAvoiding Recording Errors
Use GPIB EchoGPIB echo is a useful analyzer feature that allows you to view the SCPImnemonic or mnemonics corresponding to any operation executed fromthe front panel. To turn on GPIB echo, press
and . After doing this, you will see amnemonic appear in a dialogue box on the screen as you complete anykey sequence that has a matching SCPI mnemonic.
This mnemonic is used in your recorded program during a recordingsession.
Using GPIB echo, you can preview the SCPI mnemonic commands thatwill be stored in your program before you actually record them. Whilethis is not essential, it can be very useful when you are in doubt as towhat a particular key sequence will record, or precisely when a keysequence corresponding to a mnemonic is completed.
SYSTEM OPTIONS GPIB GPIB Echo on OFF
2-14 HP IBASIC Supplement

3 Running, Pausing, and StoppingPrograms
3-1
Running, Pausing, and Stopping Programs
This chapter describes how to start, stop, and pause a program from thefront panel. Automatic execution of a program is described.
IBASIC programs can also be remotely controlled via SCPI commandsover the GPIB. For information on running, pausing and stoppingprograms using an external controller, see Chapter 8, “Interfacing withExternal Devices.”
3-2 HP IBASIC Supplement
Running, Pausing, and Stopping ProgramsStarting Programs Automatically
Starting Programs AutomaticallyWhen the analyzer is powered up, it automatically searches for aprogram named AUTOST or AUTOST.BAS. When an AUTOST program isfound, it is automatically loaded and executed. The analyzer searches inthe following order:
• internal non-volatile RAM disk
• internal floppy disk drive
The AUTOST program can be used for anything from configuring theanalyzer for specific measurements, much like an internal instrumentstate Save/Recall register, to diagramming measurement setups usinggraphics commands, as in a guided measurement sequence.
Refer to Chapter 4, “Saving and Recalling Programs,” for information onusing the analyzer to name programs before they are saved.
HP IBASIC Supplement 3-3
Running, Pausing, and Stopping ProgramsRunning and Continuing a Program
Running and Continuing a ProgramTo run an IBASIC program that is already in the analyzer programbuffer, press the softkey in themenu. The RUN command can also be executed from an externalkeyboard in three ways:
• Press the function key that corresponds to the softkey(see note below).
• Type RUN on a command line and press . A command line isalways available when an IBASIC display is partitioned. (SeeChapter 5, “Developing Programs,” for information about displaypartitions.) You can also activate a command line from an externalkeyboard with no IBASIC displays partitioned by pressing thekey on your external keyboard.
• Press the function key when the command line is available.
NOTE The keyboard function keys duplicate softkey actions.When an external keyboard is connected, the function keys through
always represent the analyzer's eight softkeys. The analyzer'shardkeys are each represented by a combination of or andone of the function keys. Refer to your analyzer's User's Guide for moreinformation on the external keyboard interface. The
menu can be accessed from an externalkeyboard using + (for ) and (for
). A keyboard template showing which keys to press for specificanalyzer functions is supplied with your analyzer (part number08712-80028).
Run SYSTEM OPTIONS IBASIC
F1 Run
Enter
ESC
F9
F1F8
Shift Ctrl
SYSTEM OPTIONS IBASICCtrl F3 SYSTEM OPTIONS F1
IBASIC
3-4 HP IBASIC Supplement
Running, Pausing, and Stopping ProgramsRunning and Continuing a Program
The RUN command is executed in two phases: prerun initialization andprogram execution.
The following occurs during the prerun initialization phase:
• Memory is reserved for variables specified in COM (both labeled andblank), DIM, REAL or INTEGER statements, or implied in the mainprogram segment. Numeric variables are initialized to 0; stringvariables are initialized to the null string.
NOTE Variables in COM are initialized only once—the first time a program isrun.
• The program is checked for syntax errors that require more than oneprogram line to detect. Included in this are errors such as incorrectarray references, and mismatched parameter or COM lines.
After prerun is successfully completed, the program begins the executionphase. Program lines are executed until one of the following eventsoccurs:
1. An END or STOP statement is encountered in the program.
2. The hardkey is pressed to reset the instrument.
3. The softkey is pressed to pause the program.
4. A PAUSE statement is encountered in the program.
PRESET
Pause
HP IBASIC Supplement 3-5
Running, Pausing, and Stopping ProgramsPausing and Continuing a Program
Pausing and Continuing a ProgramThe program control softkey menu is always available when an IBASICprogram is running. This “Program Running” menu has sevenuser-defined softkeys and a softkey. Press the softkeyto suspend execution of a program. is the eighth softkey and isrepresented by on an external keyboard.
The program can also be paused by inserting a PAUSE statement in theprogram. The instrument responds as if you had pressed thesoftkey. Refer to Chapter 5, “Developing Programs,” to learn how toinsert statements in your recorded program. Note that PAUSE is one ofthe IBASIC keywords included in the editor's label window (alsodescribed in Chapter 5).
To continue the program from a paused state, press thesoftkey in the menu or on anexternal keyboard. Continuing a paused program resumes programoperation from where it was paused, retaining the current programcontext (variable values, etc.).
Pausing a program does not close any files that have been opened by theprogram. You will not be able to perform any of the following diskoperations after pausing a program that has left a file open on thatmedium:
• RENAME FILE
• DELETE FILE
• DELETE ALL FILES
• COPY FILES
• COPY DISK
• FORMAT DISK
To close all open files, you must complete the execution of the program orperform an IBASIC RESET. This can be done by pressing thehardkey. The hardkey is represented by + on anexternal keyboard. Keystroke recorded programs do not open files andtherefore avoid this problem.
Pause Pause Pause
F8
Pause
ContinueSYSTEM OPTIONS IBASIC F2
PRESETPRESET Ctrl F4
3-6 HP IBASIC Supplement
Running, Pausing, and Stopping ProgramsPausing and Continuing a Program
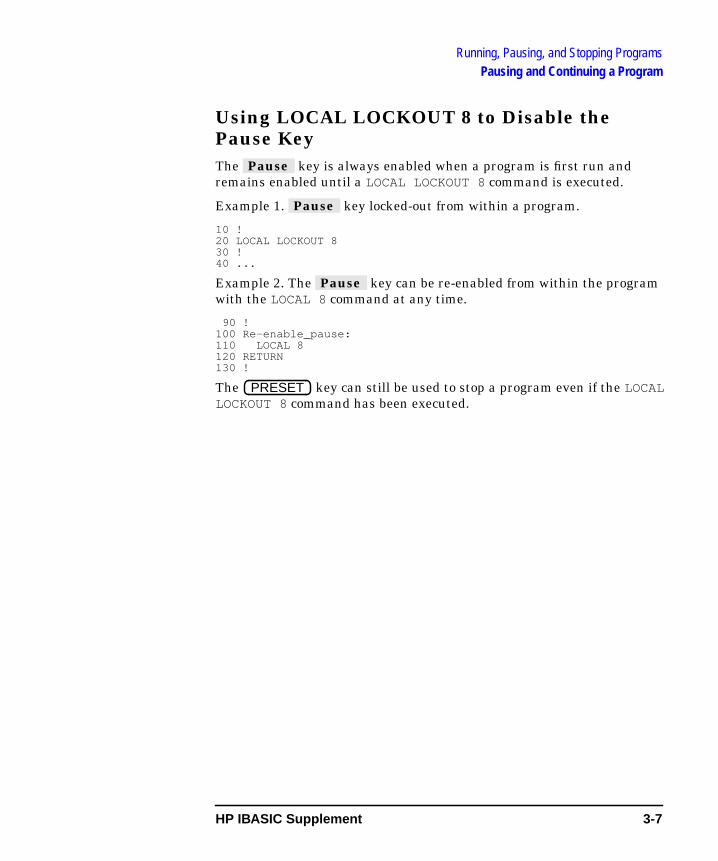
Using LOCAL LOCKOUT 8 to Disable thePause KeyThe key is always enabled when a program is first run andremains enabled until a LOCAL LOCKOUT 8 command is executed.
Example 1. key locked-out from within a program.
10 !20 LOCAL LOCKOUT 830 !40 ...
Example 2. The key can be re-enabled from within the programwith the LOCAL 8 command at any time.
90 !100 Re-enable_pause:110 LOCAL 8120 RETURN130 !
The key can still be used to stop a program even if the LOCALLOCKOUT 8 command has been executed.
Pause
Pause
Pause
PRESET
HP IBASIC Supplement 3-7

Running, Pausing, and Stopping ProgramsStopping a Program
Stopping a ProgramTo stop a program completely, press the hardkey at any timewhile the program is running. This causes an IBASIC RESET. Placing aSTOP statement in your program will also terminate the program, butdoes not perform an IBASIC RESET operation. The END statement canalso be used to stop program execution, but it must be the last line in themain program segment.
The program remains in the program buffer after execution stops. Toclear the program buffer, press
or turn off the instrument.
For more information on the PAUSE and STOP statements, see the “HPInstrument BASIC Language Reference” section of the HP InstrumentBASIC User’s Handbook.
PRESET
SYSTEM OPTIONS IBASIC Utilities Clear Program
3-8 HP IBASIC Supplement
4 Saving and Recalling Programs
4-1
Saving and Recalling Programs
IBASIC programs are stored in memory, on disk, or in an externalcomputer.
To transfer a program between the instrument's buffer and a disk massstorage device, use the Programs menu. To access the Programs menuusing an external keyboard, use Ctrl + F1 (for ) and F5(for Programs).
The GET, SAVE, LOAD, STORE, RE-STORE, and RE-SAVE commands canbe used within a program or from an IBASIC command line to transferprogram files to and from mass storage. An autoload feature also existsto allow for a program (named AUTOST or AUTOST.BAS) to beautomatically recalled from the internal non-volatile RAM disk or thebuilt-in floppy disk and run at power-up.
Using an external controller, such as an HP Series 200/300/700workstation, you can combine the convenience of keystroke recording inIBASIC with the ease of program editing on a dedicated externalworkstation. Record the measurement sequence and transfer theprogram to the workstation for further editing. In addition, fullydeveloped programs may be transferred from an external controller tothe analyzer. Transferring programs between the analyzer and anexternal computer is described in detail in Chapter 8, “Interfacing withExternal Devices.”
This chapter describes all program transfer operations between theprogram buffer and the analyzer's internal non-volatile RAM disk,internal volatile RAM disk, and internal floppy disk drive.
SAVE RECALL
4-2 HP IBASIC Supplement
Saving and Recalling ProgramsSelecting a Disk
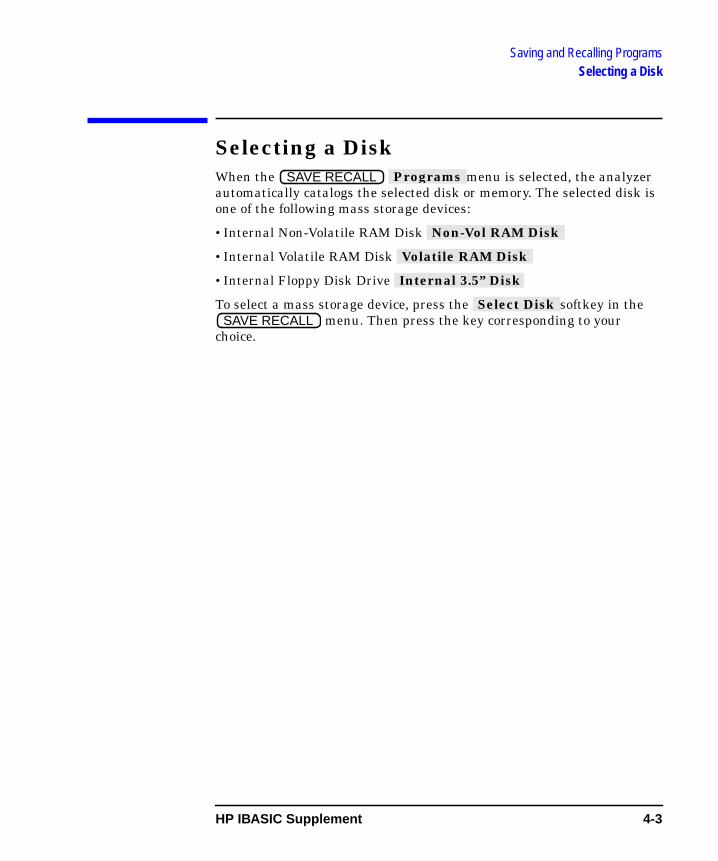
Selecting a DiskWhen the menu is selected, the analyzerautomatically catalogs the selected disk or memory. The selected disk isone of the following mass storage devices:
•Internal Non-Volatile RAM Disk
•Internal Volatile RAM Disk
•Internal Floppy Disk Drive
To select a mass storage device, press the softkey in the menu. Then press the key corresponding to your
choice.
SAVE RECALL Programs
Non-Vol RAM Disk
Volatile RAM Disk
Internal 3.5” Disk
Select DiskSAVE RECALL
HP IBASIC Supplement 4-3
Saving and Recalling ProgramsSaving a Program
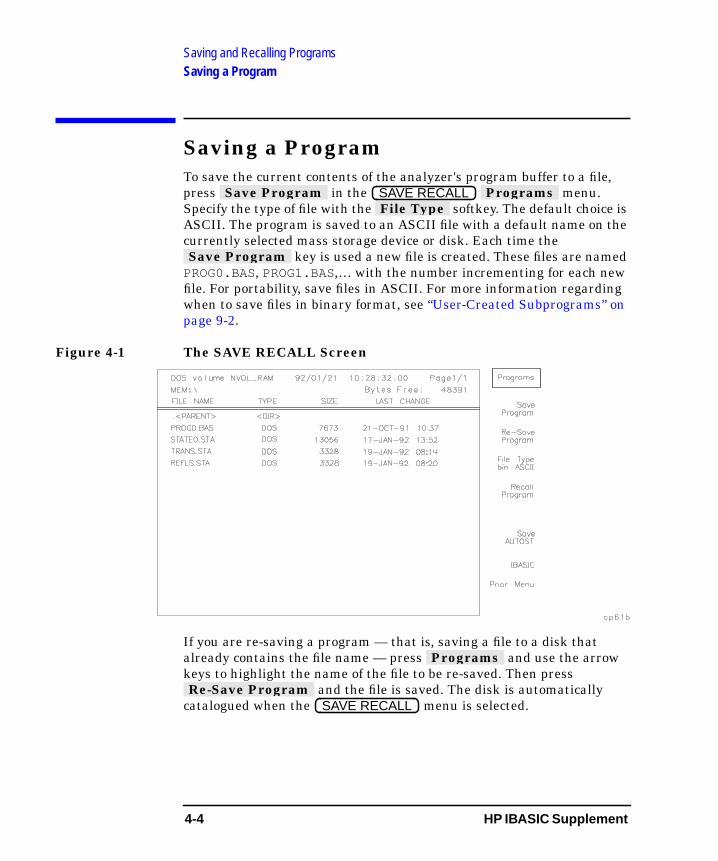
Saving a ProgramTo save the current contents of the analyzer's program buffer to a file,press in the menu.Specify the type of file with the softkey. The default choice isASCII. The program is saved to an ASCII file with a default name on thecurrently selected mass storage device or disk. Each time the
key is used a new file is created. These files are namedPROG0.BAS, PROG1.BAS,… with the number incrementing for each newfile. For portability, save files in ASCII. For more information regardingwhen to save files in binary format, see “User-Created Subprograms” onpage 9-2.
Figure 4-1 The SAVE RECALL Screen
If you are re-saving a program — that is, saving a file to a disk thatalready contains the file name — press and use the arrowkeys to highlight the name of the file to be re-saved. Then press
and the file is saved. The disk is automaticallycatalogued when the menu is selected.
Save Program SAVE RECALL Programs File Type
Save Program
Programs
Re-Save ProgramSAVE RECALL
4-4 HP IBASIC Supplement

Saving and Recalling ProgramsSaving a Program
The softkey can also be used to save a newprogram with a non-default file name. Press . Enterthe new program's name using the external keyboard or the internallabel maker. If no file with that name exists on the disk, a new file iscreated.
NOTE Whenever possible use ASCII as the file type for the following reasons:
• ASCII format is faster.
• Binary format is not compatible from one model of analyzer toanother.
• HP BASIC cannot read a binary file from the analyzer.
Re-Save Program Re-Save Program
HP IBASIC Supplement 4-5
Saving and Recalling ProgramsAUTOST Programs
AUTOST ProgramsIBASIC allows you to designate a program to be automatically loadedand run when the instrument is first powered up. To make anautoloading program, save it with the file name AUTOST on the internalfloppy disk drive or internal non-volatile RAM disk. This can be donefrom the menu by pressing
or by using the softkey andentering the file name AUTOST.
When the analyzer is powered up, it automatically searches the internalnon-volatile RAM disk and then the built-in floppy disk drive for aprogram named AUTOST or AUTOST.BAS. When an AUTOST program isfound, it is automatically loaded and executed.
SAVE RECALL Programs Save AUTOST Re-Save Program
4-6 HP IBASIC Supplement
Saving and Recalling ProgramsRecalling a Program
Recalling a ProgramTo recall a program file from mass storage to the program buffer, use the
menu to catalog the disk. Select thedesired mass storage device or disk, use the arrow keys to highlight thefile and press .
The recalled program file is entered into the program buffer one line at atime and checked for syntax errors. Lines with syntax errors arecommented out and the IBASIC syntax error is displayed briefly in anerror message and written to the CRT at the same time. To view errormessages logged to the CRT, use the
menu to allocate a screen partition for IBASIC.
NOTE Recalled programs overwrite the current program. Any program recalledto the program buffer using the menu will overwrite thecurrent contents of the program buffer. Be sure to save your currentprogram before recalling another program from disk.
CAT to a String Array ExceptionThe analyzer's treatment of CAT to a string array is not the standard asdocumented in the HP IBASIC Language Reference. If you send thecatalog to a string array, the array must contain at least 59 charactersfor a directory listing rather than the standard 80.
SAVE RECALL Programs
Recall Program
SYSTEM OPTIONS IBASIC IBASIC Display
Programs
HP IBASIC Supplement 4-7
Saving and Recalling ProgramsAccessing Mass Storage within Programs
Accessing Mass Storage withinProgramsThe following mass storage specifiers may be used with many of thecommands listed in Table 10-10, “Mass Storage Keywords.”
MEMORY,0,0 = non-volatile RAM disk
MEMORY,0,1 = volatile RAM disk
INTERNAL = floppy disk drive
Example
GET “PROG1.TXT:MEMORY,0,1”
Copies the file named PROG1.TXT from the volatile RAM disk toIBASIC program memory.
NOTE Access to NFS mounted file system is not supported directly underIBASIC. SCPI commands must be used to access NFS mounted filesystems.
4-8 HP IBASIC Supplement

5 Developing Programs
5-1
Developing Programs
For many applications, keystroke recording alone is sufficient to createand run programs. However, with some knowledge of the IBASIClanguage and the program development capabilities of the analyzer, youcan significantly increase the power of your recorded programs or createyour own original programs.
This chapter describes the operation of the following keys in the menu, and any softkeys found in their
underlying menus:
•
•
•
starts the editor. You can make changes to your program on aline-by-line basis, or create a new program.
The menu allows you to select the part of the CRTdisplay available for use by IBASIC. An IBASIC display partitionprovides you with a place to enter IBASIC commands from an externalkeyboard. It also provides an area for viewing graphics and programoutput.
allows you to clear programs from the program buffer,allocate memory for program use, or secure program lines.
SYSTEM OPTIONS IBASIC
Edit
IBASIC Display
Utilities
Edit
IBASIC Display
Utilities
5-2 HP IBASIC Supplement
Developing ProgramsExternal Editors
External EditorsIn addition to the built-in IBASIC editor, programs can be developed inthe following external environments:
• HP BASIC editors
• ASCII word processors
• programming editors
These external editing environments provide many advantages, the mostnotable are improved speed and flexibility. Precautions must be takenwhen using ASCII word processors because they do not provide thesyntax checking available when using the internal editor.
After editing a program in an external environment, the best practice isto GET the program from an IBASIC command line using the followingprocedure (instead of using the keys described inChapter 4, “Saving and Recalling Programs”).
1. Partition an IBASIC display (as described later in this chapter).
2. Use an external keyboard to enter the command GET “PROG0:,4”(this command loads a program file PROG0 from the internal floppydisk drive).
3. Watch the IBASIC display as the program is loaded — syntax errorsresult in error messages which are displayed on the screen.
4. Edit the program to correct any errors found.
HP BASICThe HP BASIC editor checks for the syntax of the version of HP BASICbeing used. Because IBASIC is a subset of HP BASIC, it may not find allof the errors — the most common error is the use of HP BASICcommands that are not supported by IBASIC. For a listing of thecommands supported by IBASIC, refer to Chapter 10, “IBASIC KeywordSummary.”
SAVE RECALL
HP IBASIC Supplement 5-3
Developing ProgramsExternal Editors
ASCII Word ProcessorsWhen an ASCII word processor is used to edit a program, syntaxchecking does not occur until the program is loaded by the instrument.Also, program line numbers are not automatically renumbered whennew lines are inserted.
It is recommended that you renumber the program, as described later inthis chapter, to reduce the possibility of errors. Errors in numbering linesusually do not result in a syntax error; they write over other programlines.
Programming EditorsEditors designed for computer programming offer some advantages:
• methods to visually distinguish language elements with color or othertype style
• complex search-and-replace utilities
These editors are available as part of some programming languageproducts and as individual products.
5-4 HP IBASIC Supplement
Developing ProgramsEditing Your Program Using Edit
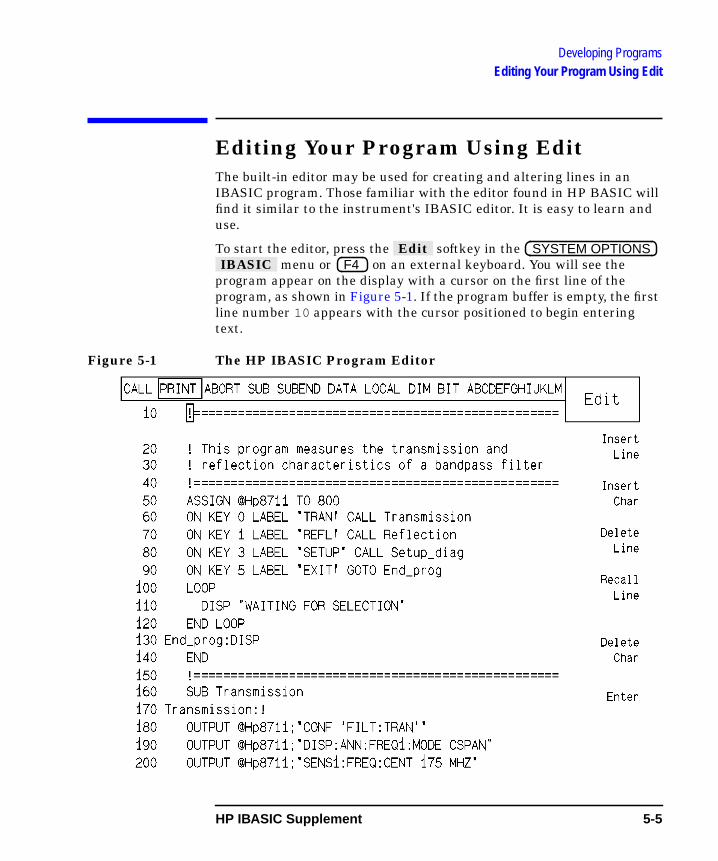
Editing Your Program Using EditThe built-in editor may be used for creating and altering lines in anIBASIC program. Those familiar with the editor found in HP BASIC willfind it similar to the instrument's IBASIC editor. It is easy to learn anduse.
To start the editor, press the softkey in the menu or on an external keyboard. You will see the
program appear on the display with a cursor on the first line of theprogram, as shown in Figure 5-1. If the program buffer is empty, the firstline number 10 appears with the cursor positioned to begin enteringtext.
Figure 5-1 The HP IBASIC Program Editor
Edit SYSTEM OPTIONS IBASIC F4
HP IBASIC Supplement 5-5
Developing ProgramsEditing Your Program Using Edit
The analyzer editor is accompanied by a “Label Window” at the top of thescreen. This window is filled with characters and IBASIC keywordcommands and has its own cursor.
The current program line (the line containing the cursor) always appearsas two lines on the screen, allowing you to enter up to 108 characters ifneeded. All other lines have only their first 51 characters displayed(excluding line numbers).
Each line has a numeric field in the first 6 columns in which programline numbers are right justified. Although program lines areautomatically numbered by the editor, you can edit the current linenumber to copy or move it to a different location in the program. Therange of line numbers is from 1 to 32767. To end an editing session, pressthe softkey in the edit menu or on an externalkeyboard. This will return you to themenu.
The IBASIC Editor SoftkeysThe editor has two sets of softkey menus, the Edit keys and theCharacter Entry keys. The edit menu is activated when you press
. The menu box above thesoftkeys shows the label Edit.
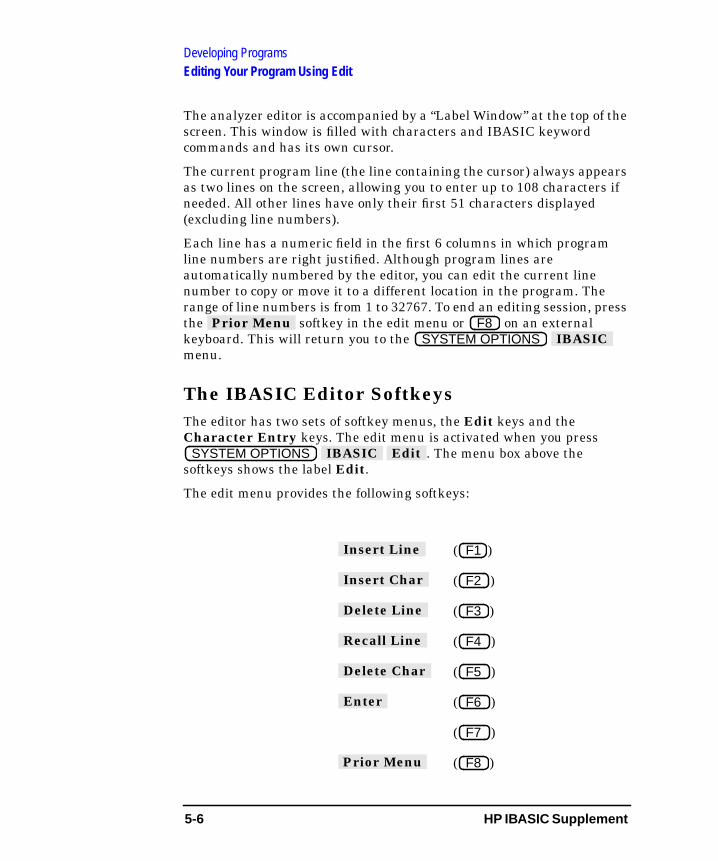
The edit menu provides the following softkeys:
( )
( )
( )
( )
( )
( )
( )
( )
Prior Menu F8SYSTEM OPTIONS IBASIC
SYSTEM OPTIONS IBASIC Edit
Insert Line F1
Insert Char F2
Delete Line F3
Recall Line F4
Delete Char F5
Enter F6
F7
Prior Menu F8
5-6 HP IBASIC Supplement

Developing ProgramsEditing Your Program Using Edit
The character entry menu is described “Editing from the Front Panel” onpage 5-11.
Recording into an Existing ProgramOne way to enter lines into your program is to use the keystrokerecording capabilities of IBASIC. To record measurement sequences orother front panel operations into your program, follow the proceduredescribed below.
1. Activate the editor by pressing.
2. Use the step keys on the analyzer or the cursor keypad on an externalkeyboard to position the cursor on the line above where you want toinsert the recorded statements.
3. Press to exit the editor.
4. Press to activate keystroke recording.
5. Record the measurement sequence or front panel operation.
6. Press to conclude the recordingsession.
The inserted recording acts the same as if you had pressedin the editor, and generated OUTPUT statements in insert mode.
NOTE An ASSIGN statement is required. The ASSIGN statement (for example,ASSIGN; @Hp8711 to 800 ) is not generated when you are recordinginto an existing program and must be included in your program prior toany recorded OUTPUT commands. If you initially created the programusing recording, this statement should already exist. If it does not exist,you will need to enter it.
Editing with an External KeyboardWith an external keyboard connected to the analyzer, it is easy to edit orcreate an IBASIC program using the internal editor. Note that the frontpanel editor described in the next section is always available, even whenan external keyboard is in use.
SYSTEM OPTIONS IBASIC Edit
Prior Menu
Key Record on OFF
IBASIC Key Record on OFF
Insert Line
HP IBASIC Supplement 5-7
Developing ProgramsEditing Your Program Using Edit
NOTE The external PC-AT compatible keyboard requires a mini-DIN connectorThe analyzer and the IBASIC editor work with IBM PC-AT compatiblekeyboards (US only) that have a mini-DIN connector. Non-US languagekeyboards will not cause an error, they simply will not be recognized asdifferent from the US keyboard. A compatible keyboard can bepurchased by ordering option 1CL with the analyzer. Keyboards with astandard DIN connector will need a mini-DIN to DIN adapter, partnumber 1252-4141.
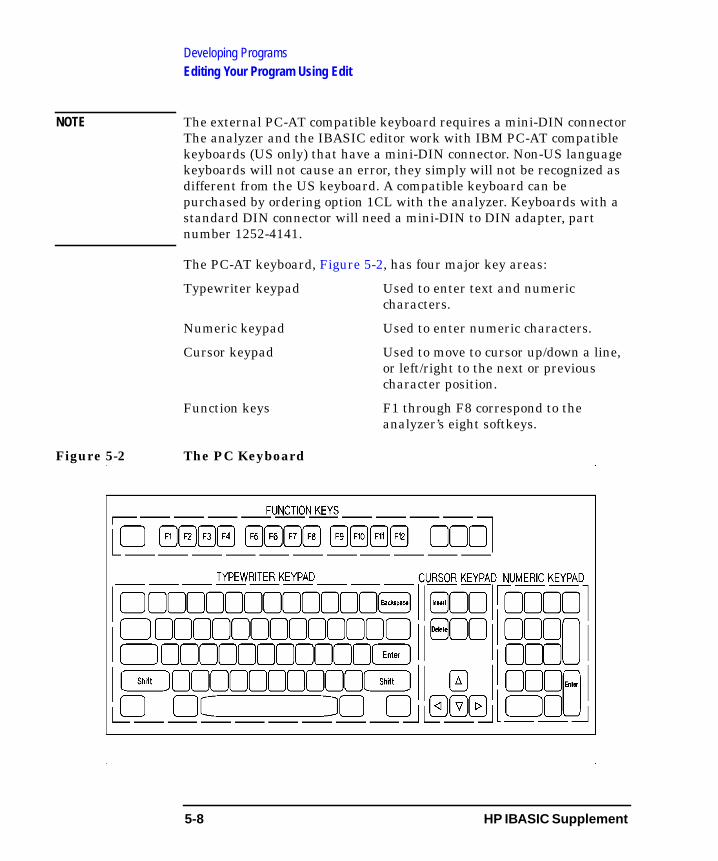
The PC-AT keyboard, Figure 5-2, has four major key areas:
Typewriter keypad Used to enter text and numericcharacters.
Numeric keypad Used to enter numeric characters.
Cursor keypad Used to move to cursor up/down a line,or left/right to the next or previouscharacter position.
Function keys F1 through F8 correspond to theanalyzer’s eight softkeys.
Figure 5-2 The PC Keyboard
5-8 HP IBASIC Supplement
Developing ProgramsEditing Your Program Using Edit
Installing an External Keyboard
1. Remove power from the analyzer.
2. Connect the keyboard to the rear panel DIN KEYBOARD connector.
3. Turn on power to the analyzer.
4. Test the keyboard:
a. Select the menu and usethe cursor keypad to position the cursor within the program forediting operations.
b. Use the Page Up and Page Down keys on the keyboard to scrollthrough the program listing
Inserting LinesInsert one or more program lines above an existing line by placing thecursor on that line and pressing + on the keyboard. Thiskey combination functions as a toggle to turn insert mode on and off.
As an example, assume you want to insert some lines between twoadjacent program lines numbered 90 and 100. Place line 100 in thecurrent line position and press + . The program display“opens” and a new line, number 91, appears between line 90 and line100. Enter the inserted line and another inserted line, number 92, willappear. If, after continuing to enter lines in this manner, the inserted linenumber increments to 100, then the current line 100 will be incrementedone higher to accommodate the inserted line.
To stop inserting lines, press + again or use the cursorkeys to move to another program line. Make sure you have entered anychanges to your final inserted line (with the key) before exitingthe insert mode.
CAUTION Any changes you have made to the current line will be lost if you movethe cursor to another line without pressing .
SYSTEM OPTIONS IBASIC Edit
Shift Insert
Shift Insert
Shift Insert
Enter
Enter
HP IBASIC Supplement 5-9
Developing ProgramsEditing Your Program Using Edit
Editing LinesUse the cursor keypad on the keyboard to move around the program forediting. The left and right arrow keys move within a program line andthe up and down arrow keys move between lines. The alphanumerickeypad on the keyboard can be used for entering or editing text. The
key deletes the character highlighted by the cursor.
When you finish editing or changing a program line, store it into theprogram by pressing on the keyboard. The computer checks theline for syntax errors and converts letter case to the required form fornames and keywords (IBASIC commands). If no errors are detected, itstores the line in the program buffer.
Entering Program LinesWhen you finish entering or changing a program line, it must be storedinto the program buffer by entering it in one of four ways:
1. Use the key on the front panel of the analyzer.
2. Use the softkey on the instrument.
3. Use the or key on the external keyboard.
4. Use the function key on the keyboard ( ) that represents theanalyzer's softkey.
The computer checks the line for syntax errors and converts letter case tothe required form for names and keywords (IBASIC commands).
If no errors are detected, it then stores the line.
CAUTION If you move to another line without pressing ENTER, changes are lost. Ifyou edit or enter text on the current program line and then move off theline without pressing ENTER, all editing on the line will be lost.
Accessing the IBASIC Command LineWhen an external keyboard is attached, pressing the key willtoggle the IBASIC command line on or off. The IBASIC command line isactive when a box shaped cursor is displayed near the lower left-handcorner of the display.
Delete
Enter
ENTER
Enter
Enter Return
F6 Enter
ESC
5-10 HP IBASIC Supplement
Developing ProgramsEditing Your Program Using Edit
Editing from the Front PanelUse the step keys to move the cursor up and down to select the line in theprogram. With the cursor located at the beginning of the line you want tochange, use the knob to position the cursor within the line.
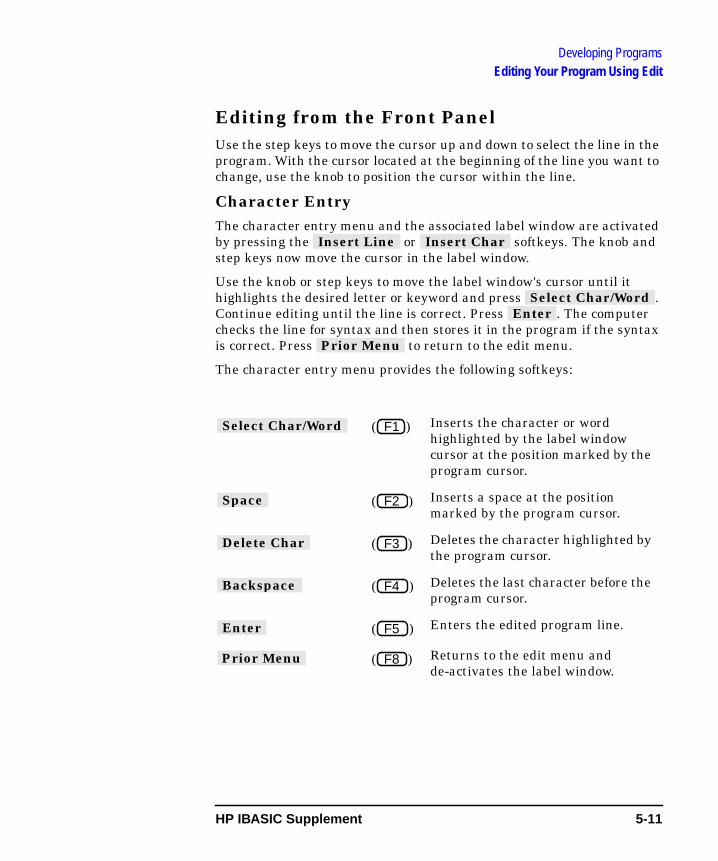
Character EntryThe character entry menu and the associated label window are activatedby pressing the or softkeys. The knob andstep keys now move the cursor in the label window.
Use the knob or step keys to move the label window's cursor until ithighlights the desired letter or keyword and press .Continue editing until the line is correct. Press . The computerchecks the line for syntax and then stores it in the program if the syntaxis correct. Press to return to the edit menu.
The character entry menu provides the following softkeys:
( ) Inserts the character or wordhighlighted by the label windowcursor at the position marked by theprogram cursor.
( ) Inserts a space at the positionmarked by the program cursor.
( ) Deletes the character highlighted bythe program cursor.
( ) Deletes the last character before theprogram cursor.
( ) Enters the edited program line.
( ) Returns to the edit menu andde-activates the label window.
Insert Line Insert Char
Select Char/Word Enter
Prior Menu
Select Char/Word F1
Space F2
Delete Char F3
Backspace F4
Enter F5
Prior Menu F8
HP IBASIC Supplement 5-11
Developing ProgramsEditing Your Program Using Edit
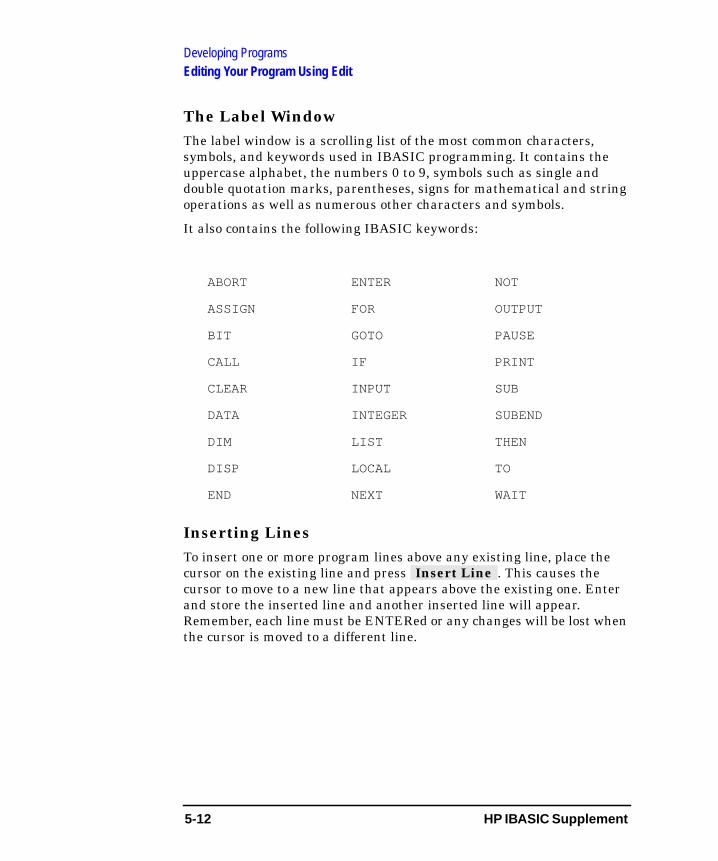
The Label WindowThe label window is a scrolling list of the most common characters,symbols, and keywords used in IBASIC programming. It contains theuppercase alphabet, the numbers 0 to 9, symbols such as single anddouble quotation marks, parentheses, signs for mathematical and stringoperations as well as numerous other characters and symbols.
It also contains the following IBASIC keywords:
Inserting LinesTo insert one or more program lines above any existing line, place thecursor on the existing line and press . This causes thecursor to move to a new line that appears above the existing one. Enterand store the inserted line and another inserted line will appear.Remember, each line must be ENTERed or any changes will be lost whenthe cursor is moved to a different line.
ABORT ENTER NOT
ASSIGN FOR OUTPUT
BIT GOTO PAUSE
CALL IF PRINT
CLEAR INPUT SUB
DATA INTEGER SUBEND
DIM LIST THEN
DISP LOCAL TO
END NEXT WAIT
Insert Line
5-12 HP IBASIC Supplement
Developing ProgramsEditing Your Program Using Edit
Removing Program TextYou can remove individual characters or entire lines with the editor.
Deleting CharactersThe softkey removes the character under the cursor andmoves all characters to the left one place. Repeatedly pressing
will cause text to the right of the cursor to be removedone character at a time. The softkey works the same wayin both the line number and program statement fields. When used in theline number field, it deletes only line numbers to the right of the cursor(not program statement characters).
When using an external keyboard, there are other keys that perform thesame function as the softkey. These are the keyin the cursor keypad and the function key that maps to the appropriatesoftkey, for the edit menu or for the character entry menu.
Another way to remove text on a line is by backspacing. Pressing the hardkey or the softkey on the front panel of the
analyzer removes the letter to the left of the cursor and moves the cursor(and all characters to the right of the cursor) one space to the left. The
function key or the key on the typewriter keypad ofthe external keyboard perform the same function. When the cursor is ona line number, using backspace simply moves the cursor back oneposition without deleting the number.
Delete Char
Delete Char Delete Char
Delete Char Delete
F5 F3
– / <— Backspace
F4 Backspace
HP IBASIC Supplement 5-13
Developing ProgramsEditing Your Program Using Edit
Deleting LinesThe softkey allows you to remove the current programline. When the current program line disappears, all subsequent lines inthe display move up one line, but are not renumbered. The cursor staysin the same column and moves to the next-highest numbered line.
If is pressed when the cursor is on the last program line,the line text is removed but the line number remains with the cursor inthe first column of line. This puts the editor in insert mode on the lastline of the program (see “Inserting Lines”). (To get out of insert mode,move the cursor up one line with the arrow key.)
Pressing will not remove a subprogram line with the SUBkeyword in it unless all program lines belonging to that subprogramhave already been deleted. A block of program lines can be deleted byexecuting the command DELETE x,y from an IBASIC command line(where x is the first line number in the block and y is the last linenumber).
When using an external keyboard, there are other keys that perform thesame function as the softkey. These are +
in the cursor keypad, and the function key ( ) that maps tothe softkey in the edit menu.
Recalling a Deleted LineThe last line that was deleted using is saved in theanalyzer. To recall this line, press the softkey or onan external keyboard. Press to restore the line to the program.
Delete Line
Delete Line
Delete Line
Delete Line ShiftDelete F3
Delete Line
Delete Line Recall Line F4
Enter
5-14 HP IBASIC Supplement
Developing ProgramsEditing Your Program Using Edit
Renumbering, Copying, Moving, andIndenting LinesIf you want to change the line number of an edited program line, movethe cursor to the line number field and enter the line number you want.Changing the line number causes a copy operation, not a move.Therefore, if you only want to move the line, change the line numberfirst, press and then delete the original line. If you want tocreate an edited copy of the current line, edit the line and then changethe line number and press . The edits will only appear in thecopied line.
If you are inserting a program line and you change the line number, theline will move to its new location when you ENTER it. The editor willremain in insert mode at the new location in the program.
You will notice that when the cursor is in the line number field, entriesoperate in an overtype fashion rather than in the insert fashion as in thetext portion of the program line. Also the ← (backspace) key moves thecursor over line numbers without deleting the number.
NOTE Renumbering the entire program with RENumber. To renumber theentire program, IBASIC supports the RENumber command but you needan external keyboard to execute it. The command can be executed byfollowing the steps listed below.
1. Exit the edit mode by pressing until the menu is active.
2. Partition an IBASIC display as described next in this chapter, orpress the Esc (Escape) key on the keyboard to enable the commandline.
3. Enter the command REN x,y (where x is the new beginning linenumber and y is the increment) from the command line of the IBASICdisplay
4. Another way to “renumber” program lines with an external keyboardis to use the COPYLINES and MOVELINES commands. Use the INDENTcommand to make your code more readable.
Enter
Enter
Prior MenuSYSTEM OPTIONS IBASIC
HP IBASIC Supplement 5-15
Developing ProgramsUsing IBASIC Display
Using IBASIC DisplayPressing thesoftkey ( on an external keyboard) allows you to allocate a partitionof the analyzer's display to be used by your program or, alternately, toreturn any allocated partition to the analyzer.
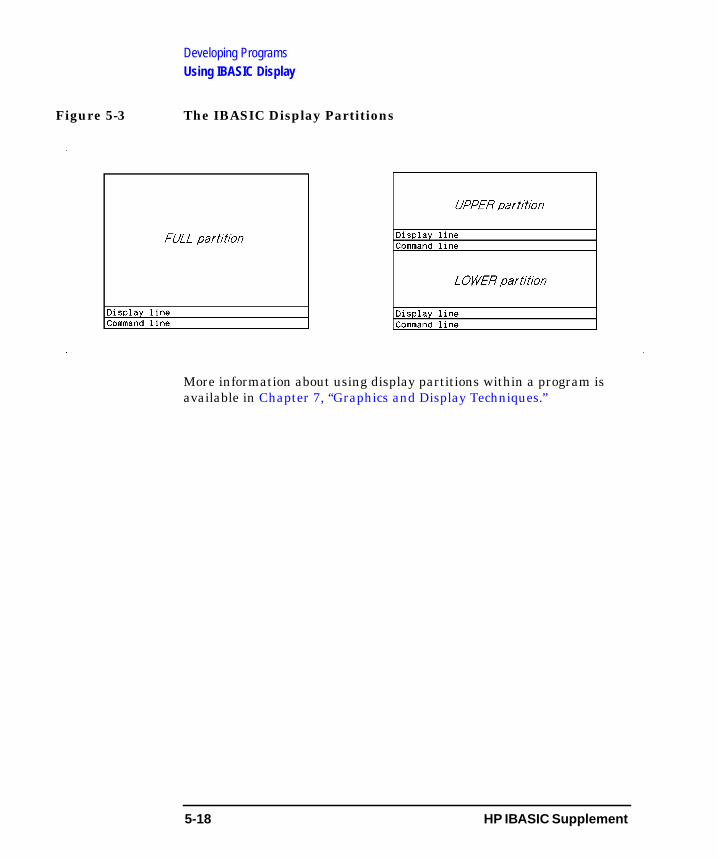
The analyzer display is divided into two small partition areas (Upperand Lower) or one large area (Full), which encompasses both the Upperand Lower partition areas. See Figure 5-3 on page 5-18.
All screen output commands, such as PRINT and DRAW, require that youallocate a partition of the screen in order to view the results of thecommand. This can be performed in your program or interactively usingthe softkey. Allocating display partitions can beaccomplished from within your program using the SCPI mnemonic“DISP:PROG” and specifying the parameter UPPER, LOWER or FULL. Forexample, the statement
OUTPUT 800;”DISP:PROG FULL”
allocates the entire display, corresponding to selecting from the menu.
An IBASIC display partition cannot occupy the same location as ameasurement channel display. When an IBASIC display is partitioned, itlimits the amount of the screen available to simultaneously showmeasurement data. Table 5-1 shows the menusoftkeys, their corresponding SCPI mnemonics, their functions, and themeasurement data that can be viewed when the display partition isallocated.
SYSTEM OPTIONS IBASIC IBASIC DisplayF7
IBASIC Display
Full IBASIC Display
IBASIC Display
5-16 HP IBASIC Supplement
Developing ProgramsUsing IBASIC Display
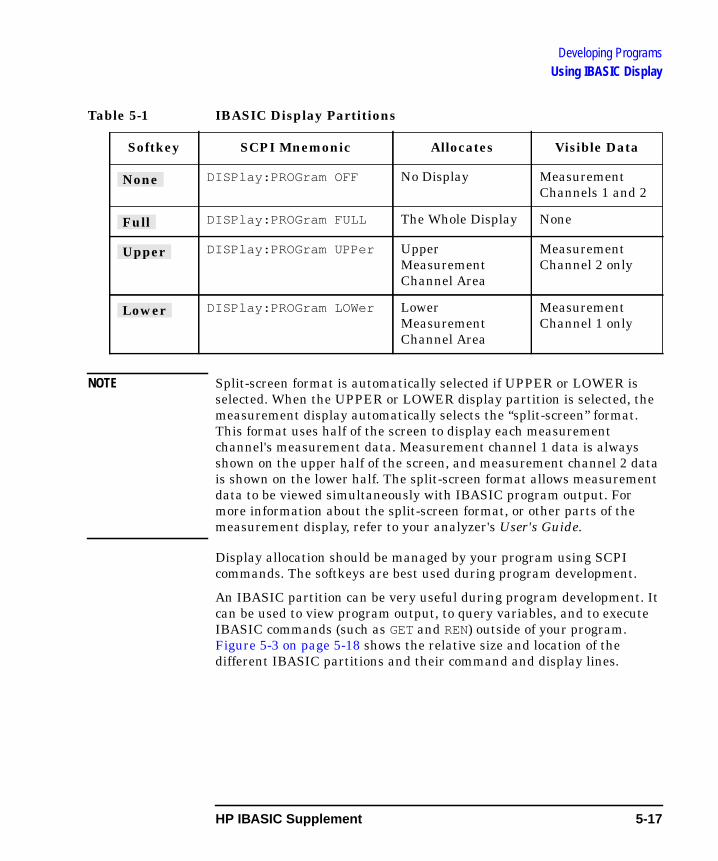
Table 5-1 IBASIC Display Partitions
NOTE Split-screen format is automatically selected if UPPER or LOWER isselected. When the UPPER or LOWER display partition is selected, themeasurement display automatically selects the “split-screen” format.This format uses half of the screen to display each measurementchannel's measurement data. Measurement channel 1 data is alwaysshown on the upper half of the screen, and measurement channel 2 datais shown on the lower half. The split-screen format allows measurementdata to be viewed simultaneously with IBASIC program output. Formore information about the split-screen format, or other parts of themeasurement display, refer to your analyzer's User's Guide.
Display allocation should be managed by your program using SCPIcommands. The softkeys are best used during program development.
An IBASIC partition can be very useful during program development. Itcan be used to view program output, to query variables, and to executeIBASIC commands (such as GET and REN) outside of your program.Figure 5-3 on page 5-18 shows the relative size and location of thedifferent IBASIC partitions and their command and display lines.
Softkey SCPI Mnemonic Allocates Visible Data
DISPlay:PROGram OFF No Display MeasurementChannels 1 and 2
DISPlay:PROGram FULL The Whole Display None
DISPlay:PROGram UPPer UpperMeasurementChannel Area
MeasurementChannel 2 only
DISPlay:PROGram LOWer LowerMeasurementChannel Area
MeasurementChannel 1 only
None
Full
Upper
Lower
HP IBASIC Supplement 5-17
Developing ProgramsUsing IBASIC Display
Figure 5-3 The IBASIC Display Partitions
More information about using display partitions within a program isavailable in Chapter 7, “Graphics and Display Techniques.”
5-18 HP IBASIC Supplement
Developing ProgramsUsing UTILITIES
Using UTILITIESPressing the ( on anexternal keyboard) allows you to clear the program buffer, allocatememory for program use, or secure your program.
• Clear Program (F1)
• Stack Size (F2)
• Secure (F3)
Executing erases the current program buffer andfrees all memory currently allocated. Memory size (see below) is reset to8192 bytes. You will be prompted to ensure you do not accidentally erasethe program.
allows you to set the stack memory to be used by yourprogram. At power up it is set by default to 8192 bytes. However, when aprogram is RUN, the analyzer will try to automatically set the memorysize large enough to accommodate the program's stack and COMmemory requirements.
For some programs the automatic memory sizing will be too small andyou will get the message:
Error 2 in 100 Memory overflow
When this error occurs, you must manually set the to thevalue in bytes required by your program, up to the available memory inyour system.
NOTE The total amount of memory available for IBASIC and VolRAMdisk maychange from firmware revision to revision. To determine the currentavailable memory, press
. A memory report will appear on the analyzer'sdisplay.
SYSTEM OPTIONS IBASIC Utilities F6
Clear Program
Stack Size
Stack Size
SAVE RECALL Select Disk Configure VOL_RAM
HP IBASIC Supplement 5-19
Developing ProgramsUsing UTILITIES
is used to secure lines of your program. Secured lines cannot belisted, edited, or displayed. After you press this key you will see thefollowing:
• Start Line # (softkey 1)
• End Line # (softkey 2)
• Perform Secure (softkey 4)
After you have set the start and stop line numbers, execute the operation.
CAUTION Do not secure the only copy of a program. Once you have secured yourprogram lines, there is no way to remove the security. Therefore, do notsecure the only copy of your program. Make a copy of your originalprogram, the copy, and keep the original in a safe place. Thisprevents unauthorized users from listing your program.
Secure
Perform Secure
Secure
5-20 HP IBASIC Supplement
6 Debugging Programs
6-1
Debugging Programs
The process of creating programs usually involves correcting errors. Youcan minimize errors by using keystroke recording for measurements andother front panel sequences and by writing structured, well-designedprograms.
IBASIC includes features that can help you find problems in a program.You can do the following:
• RUN or CONTINUE your program
• STEP through your program, executing one line at a time
• display the last error encountered in your program
• examine program variables
By examining the values assigned to variables at various places in theprogram, you can get a much better idea of what is really happening inyour program.
By inserting a PAUSE statement in your program, you can pause theprogram at any line and then examine the values of variables at thatpoint in the program. You can then press in the
menu to resume operation to the nextPAUSE statement (or the program end).
These capabilities can be used together to effectively examine theprogram's operation and solve your particular problems.
NOTE An external keyboard is required for effective program debugging. Mostof the debugging techniques described in this chapter make use of anexternal keyboard. The analyzer and the IBASIC editor work with IBMPC-AT compatible keyboards (US only) that have a mini-DIN connector.Non-US language keyboards will not cause an error, they simply will notbe recognized as different from the US keyboard. A compatible keyboardcan be purchased by ordering option 1CL with the analyzer. Keyboardswith a standard DIN connector will need a mini-DIN to DIN adapter,part number 1252-4141.
ContinueSYSTEM OPTIONS IBASIC
6-2 HP IBASIC Supplement
Debugging ProgramsSetting Breakpoints
Setting BreakpointsA common method of debugging a program involves the use ofbreakpoints. A breakpoint causes the program to stop before executing aspecified line so that you can examine the program state at that point. InIBASIC this can be accomplished by inserting PAUSE statements in theprogram code. Note that PAUSE is one of the IBASIC keywords includedin the editor's label window (described in Chapter 5, “DevelopingPrograms”). When the program is then run, you can use the commandline to check or change variable values.
Execution of the program can be resumed in one of two ways.
• Press ( on an external keyboard) to execute the nextprogram line.
• Press ( on an external keyboard) to continue theprogram until the next PAUSE, STOP or END statement is encountered.
Step F3
Continue F2
HP IBASIC Supplement 6-3
Debugging ProgramsExamining Variables
Examining VariablesTo examine a variable, it is necessary to pause the program. Pause theprogram by pressing the softkey ( on an externalkeyboard) when a program is running, or by inserting a PAUSE statementin your program.
A command line becomes active when an IBASIC program is paused orstopped and an IBASIC display partition is present. (For information oncreating an IBASIC display partition, see “Using IBASIC Display” onpage 5-16.) You may also activate the command line when no IBASICwindow is partitioned by pressing the key on the externalkeyboard. A cursor will appear in the lower left portion of the screenwhen the command line is active. Strike the key again tode-activate. Once the command line is active, a variable can be examinedin two ways. Both methods require the use of an external keyboard.
1. Enter the variable name (without a line number) on the commandline. This results in the value assigned to that variable being shownin the display line of the IBASIC window.
2. Execute the command PRINT Value from the command line (whereValue is the name of the variable being examined). This results inthe value assigned to that variable being shown on the print screen ofthe IBASIC window.
To examine a variable without accessing a command line, it is necessaryto add the statement PRINT Value (or DISP Value ) to the programbefore the PAUSE statement that temporarily stops the program. PAUSE,PRINT and DISP are all keywords that are included in the IBASICeditor's label window (see Chapter 5, “Developing Programs,” for adescription of the label window).
NOTE An IBASIC display partition must be active to view the results of aPRINT statement or to access a command line. The display line (accessedwith the DISP command) is available even when no IBASIC display ispresent.
Pause F8
ESC
ESC
6-4 HP IBASIC Supplement
Debugging ProgramsExamining Variables
Examining StringsEnter string variables as you would any other variable. Any stringvariable entered without delimiters will display as much of the string aswill fit on the display line of the screen (up to 58 characters).
To select only a section of a string, use the IBASIC substring syntax (seethe “HP Instrument BASIC Programming Techniques” section of the HPInstrument BASIC Users Handbook). For example, to examine the 7character substring starting at the second character of A$, enterA$[2;7] on the command line or execute the commandPRINT A$[2;7] .
Examining ArraysTo select an array to be examined, you can either select individualelements or the entire array. For example, the following entry:
I_array(1),I_array(2),I_array(3)
selects the elements 1 through 3 of the array I_array to be displayed.
You may select an entire array to be examined by entering the arrayvariable name and specifying a wildcard (* ) for the element (such asI_array(*) ). If I_array(20) is an integer array, and the first and secondelements are set to 100, entering I_array(*) would display thefollowing:
100 100 0 0 0 0 0 0 0 0 0 0 0 0 0 0 0 0 0 0
Individual array elements (e.g., I_array(17)) can also be specified in thesame way as any other single variable.
HP IBASIC Supplement 6-5
Debugging ProgramsDisplaying the Last Error Encountered
Displaying the Last Error EncounteredIt is sometimes useful to review the last error encountered by a programthat is being run. This is done from the command line by examining thevalue assigned to the variable name ERRM$. This value will include theerror number and message of the last error encountered by the program.
An additional method of displaying the error message is to use an errortrapping subroutine.
For example, insert the following line at the beginning of a program.
ON ERROR GOSUB Errormsg
The subroutine Errormsg should then be included at the end of theprogram (after execution is stopped but before the END command).
100 Errormsg:!
110 DISP ERRM$
120 PAUSE
130 RETURN
The error message is automatically shown on the display line of theIBASIC window and program execution is paused when an errormessage is encountered.
You may also encounter SCPI errors in addition to IBASIC errors. SCPIerrors can occur when a command syntax is unrecognized or incorrect.For more details on SCPI errors, refer to the Programmer's Guide.
6-6 HP IBASIC Supplement

7 Graphics and DisplayTechniques
7-1
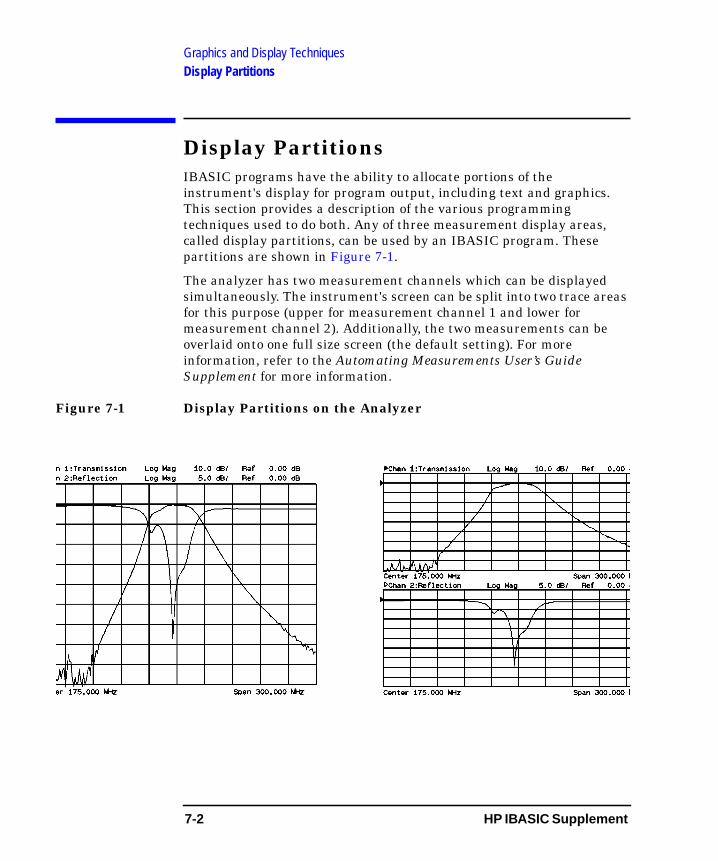
Graphics and Display TechniquesDisplay Partitions
Display PartitionsIBASIC programs have the ability to allocate portions of theinstrument's display for program output, including text and graphics.This section provides a description of the various programmingtechniques used to do both. Any of three measurement display areas,called display partitions, can be used by an IBASIC program. Thesepartitions are shown in Figure 7-1.
The analyzer has two measurement channels which can be displayedsimultaneously. The instrument's screen can be split into two trace areasfor this purpose (upper for measurement channel 1 and lower formeasurement channel 2). Additionally, the two measurements can beoverlaid onto one full size screen (the default setting). For moreinformation, refer to the Automating Measurements User’s GuideSupplement for more information.
Figure 7-1 Display Partitions on the Analyzer
7-2 HP IBASIC Supplement

Graphics and Display TechniquesUsing the Display Partitions
Using the Display PartitionsMany IBASIC commands (such as PRINT, DISP, CLEAR SCREEN, MOVE,DRAW and GCLEAR) require a display as an output device. Thesecommands output data to the screen by writing to a screen buffer. SinceIBASIC programs share all the hardware resources with the instrument,the display must be shared for instrument and program use.
In order to view this output buffer, a portion of the display must bereleased from the instrument. When no program is running, you can dothis manually using the
softkey menu. To do this within a running programrequires sending a command to the analyzer both to borrow a part of thedisplay and again to return it for the instrument's use.
This process is called allocation of display partitions. Manual allocation ofdisplay partitions is described in Chapter 5, “Developing Programs.” Table7-1 below includes a summary of the available partitions, their locationsand the SCPI mnemonic used to select each partition.
Table 7-1 IBASIC Display Partitions
SYSTEM OPTIONS IBASIC IBASIC Display
Softkey SCPI Mnemonic Allocates
( )
DISPlay:PROGram OFF No Display
( )
DISPlay:PROGram FULL The Whole Display
( )
DISPlay:PROGram UPPer Upper Measurement ChannelArea
( )
DISPlay:PROGram LOWer Lower Measurement ChannelArea
NoneF1
FullF2
UpperF3
LowerF4
HP IBASIC Supplement 7-3
Graphics and Display TechniquesUsing the Display Partitions
Allocating Display PartitionsTo request a display partition from the analyzer for use by an IBASICprogram, send the instrument the corresponding SCPI mnemonic.
DISP:PROG UPPer Allocates upper partition
DISP:PROG LOWer Allocates lower partition
DISP:PROG FULL Allocates full-screen partition
For example, to print a message to the upper partition area, you mightuse a program segment like this:
30 ASSIGN @Hp8711 TO 800
40 OUTPUT @Hp8711;”DISP:PROG UPPer”
50 CLEAR SCREEN
60 PRINT “This is the upper partition”
To be sure that you are not writing to a partition that has not yet beenassigned, you should include a WAIT statement or, preferably, add a SCPIquery command followed by an ENTER statement to synchronize theprogram with the instrument. The previous example might then looklike this:
30 ASSIGN @Hp8711 TO 800
40 OUTPUT @Hp8711;”DISP:PROGUPPer”
42 OUTPUT @Hp8711;”DISP:PROG?”
44 ENTER @Hp8711;Screen$
46 IF Screen$<>”UPP” THEN GOTO 42
50 CLEAR SCREEN
60 PRINT “This is the upper partition”
The mnemonic DISP:PROG? (line 42 above) requests the instrument tosend the current partition status. The ENTER statement on the next linereads that status, assigns the value to the variable Screen$ , andcontinues.
7-4 HP IBASIC Supplement
Graphics and Display TechniquesUsing the Display Partitions
De-Allocating Display PartitionsTo return the display partition to the analyzer for use as a measurementscreen, use the “DISP:PROG OFF” mnemonic. This should be donebefore the termination of any program that has allocated a displaypartition. It may also be required within the program to allow the user toview instrument measurement data. The following exampledemonstrates this command:
830 OUTPUT @Hp8711;”DISP:PROG OFF”
Operation with No Display PartitionIBASIC programs can also access the analyzer's display when nopartition has been allocated. This can be done through the use of certainareas of the screen. One of these areas is the area reserved for softkeylabels. It is accessed using the ON KEY statement.
A second area is a display line (or command line) that appears when nopart of the display is allocated for use by IBASIC. This display line,which is located at the lower left corner of the active measurementchannel graticule, appears when needed by the INPUT or DISPcommands or when activated. To activate the command line, press
on an external keyboard.
Figure 7-2 on page 7-6 shows an example of the use of this display line.When the INPUT command is being used, the IBASIC editor's labelwindow and character entry softkey menu appear. Refer to Chapter 5,“Developing Programs,” for a description of the IBASIC editor.
ESC
HP IBASIC Supplement 7-5
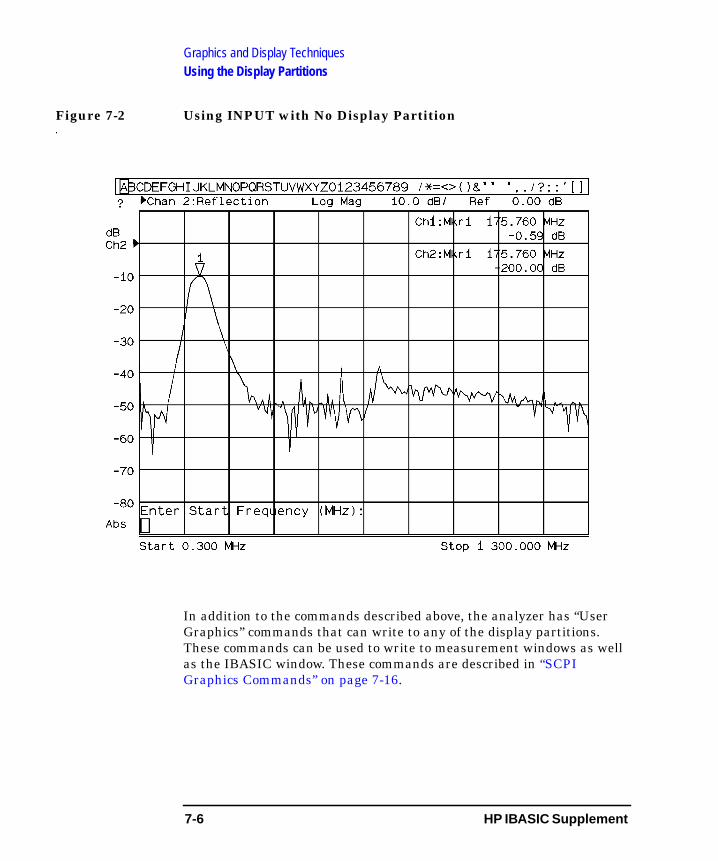
Graphics and Display TechniquesUsing the Display Partitions
Figure 7-2 Using INPUT with No Display Partition
In addition to the commands described above, the analyzer has “UserGraphics” commands that can write to any of the display partitions.These commands can be used to write to measurement windows as wellas the IBASIC window. These commands are described in “SCPIGraphics Commands” on page 7-16.
7-6 HP IBASIC Supplement
Graphics and Display TechniquesDisplaying Text
Displaying TextMost of IBASIC's text capabilities are covered in detail in the “HPInstrument BASIC Programming Techniques” section of the HPInstrument BASIC Users Handbook. The PRINT statement works thesame way in every display partition. Information is printed starting atthe top left corner of the current partition and continues until the displayline of the partition is reached. The screen then scrolls up to allowadditional lines to be printed. Figure 7-3 on page 7-8 shows the differentdisplay partitions and the location of text printed to them. Note thatcausing the screen to scroll does not affect any graphics displayed on thescreen, since text and graphics are written to different planes of thedisplay.
All partitions have a width of 58 characters. The height varies accordingto partition. Both upper and lower partitions contain 10 lines, while thefull partition contains 22 lines.
HP IBASIC Supplement 7-7
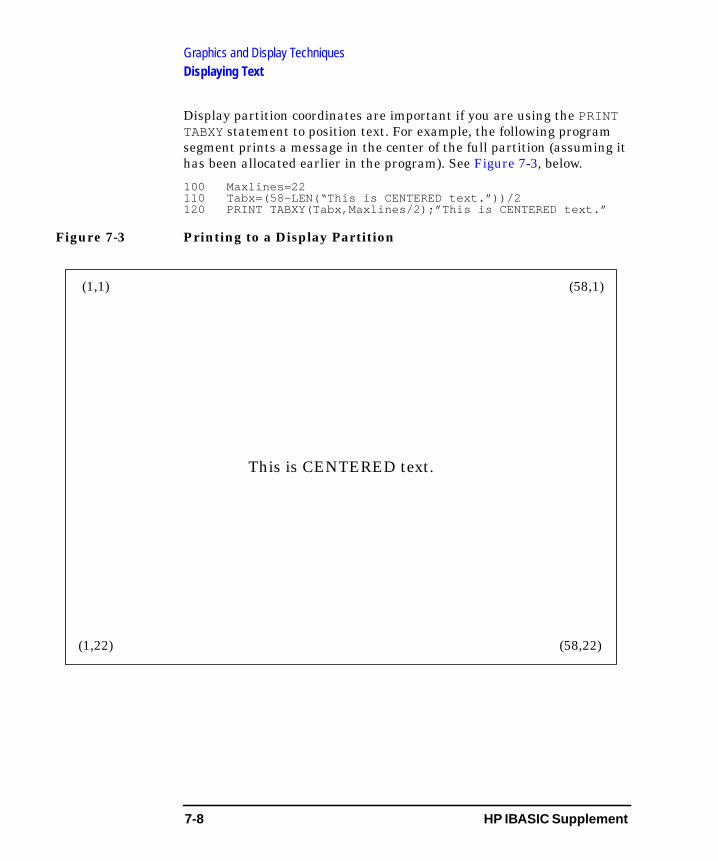
Graphics and Display TechniquesDisplaying Text
Display partition coordinates are important if you are using the PRINTTABXY statement to position text. For example, the following programsegment prints a message in the center of the full partition (assuming ithas been allocated earlier in the program). See Figure 7-3, below.
100 Maxlines=22110 Tabx=(58-LEN(“This is CENTERED text.”))/2120 PRINT TABXY(Tabx,Maxlines/2);”This is CENTERED text.”
Figure 7-3 Printing to a Display Partition
(1,1) (58,1)
(1,22) (58,22)
This is CENTERED text.
7-8 HP IBASIC Supplement
Graphics and Display TechniquesDisplaying Text
Getting Text to the Screen QuicklyA useful technique to get text onto the screen quickly is to write yourdisplay message to a long string using the OUTPUT statement, and thenprint the string to the screen. For large amounts of text, this speeds upscreen display time considerably. The following program segmentdemonstrates this:
60 DIM Temp$[100],Big$[2000]
70 OUTPUT Big$;”This is the first line of text”
80 OUTPUT Temp$;”This is the second line of text”
90 Big$=Big$&Temp$
100 PRINTER IS CRT; WIDTH 2000
110 PRINT Big$
The OUTPUT statements in this example are used to copy each line of themessage into the variable Temp$ and append a carriage return.
You can also print to the screen using the OUTPUT statement inconjunction with the display address (1). For example, line 120 belowwrites a string to the screen.
120 OUTPUT CRT;”OUTPUT 1 WORKS WELL TOO”
Pop-Up Message Windows and CustomAnnotationsFrom your IBASIC program, you can replace instrument annotationswith user-defined annotations. You can change the X-axis labels andmeasurement channel annotations to customize the display. Pop-upmessages can also be used to display permanent or temporary messages.Refer to the Automating Measurements User’s Guide Supplement.
HP IBASIC Supplement 7-9
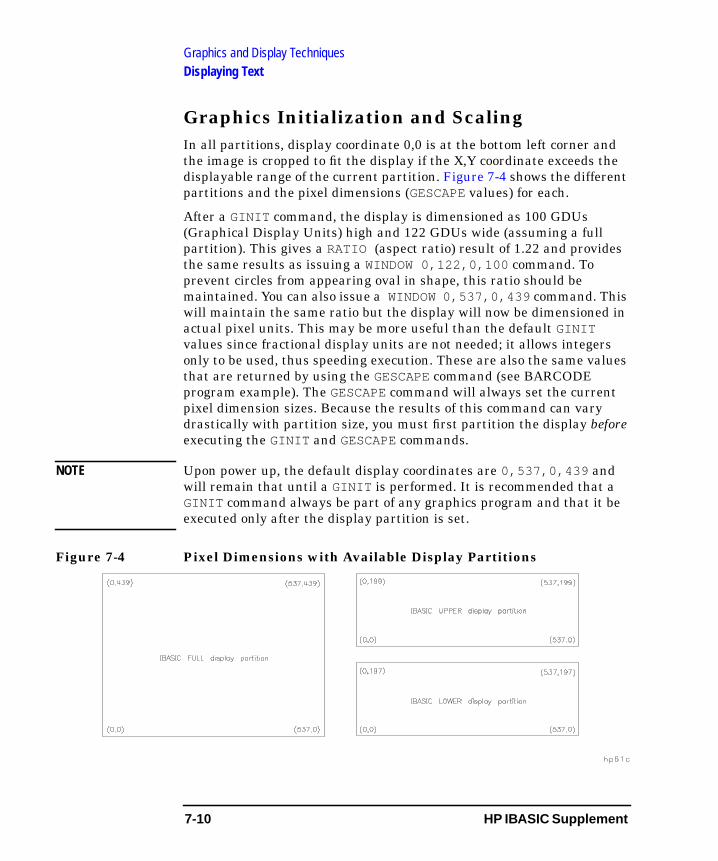
Graphics and Display TechniquesDisplaying Text
Graphics Initialization and ScalingIn all partitions, display coordinate 0,0 is at the bottom left corner andthe image is cropped to fit the display if the X,Y coordinate exceeds thedisplayable range of the current partition. Figure 7-4 shows the differentpartitions and the pixel dimensions (GESCAPE values) for each.
After a GINIT command, the display is dimensioned as 100 GDUs(Graphical Display Units) high and 122 GDUs wide (assuming a fullpartition). This gives a RATIO (aspect ratio) result of 1.22 and providesthe same results as issuing a WINDOW 0,122,0,100 command. Toprevent circles from appearing oval in shape, this ratio should bemaintained. You can also issue a WINDOW 0,537,0,439 command. Thiswill maintain the same ratio but the display will now be dimensioned inactual pixel units. This may be more useful than the default GINITvalues since fractional display units are not needed; it allows integersonly to be used, thus speeding execution. These are also the same valuesthat are returned by using the GESCAPE command (see BARCODEprogram example). The GESCAPE command will always set the currentpixel dimension sizes. Because the results of this command can varydrastically with partition size, you must first partition the display beforeexecuting the GINIT and GESCAPE commands.
NOTE Upon power up, the default display coordinates are 0,537,0,439 andwill remain that until a GINIT is performed. It is recommended that aGINIT command always be part of any graphics program and that it beexecuted only after the display partition is set.
Figure 7-4 Pixel Dimensions with Available Display Partitions
7-10 HP IBASIC Supplement

Graphics and Display TechniquesUsing Graphics
Using GraphicsIBASIC graphics commands are easy to understand and use. You can usethe MOVE statement to move the “pen” to a specific pixel location (withoutdrawing) and then draw a line from the current pen location to anotherpixel coordinate using the DRAW statement. The GCLEAR statementremoves all graphics.
The PEN command provides an easy method of erasing lines drawn bythe DRAW command. When PEN 1 is issued (the default state), all DRAWcommands act normally, drawing a line with the full intensity. When PEN0 is issued, all DRAW commands erase any pixels their path encounters.Where there are no lines in the path, no change is visible. As an exampleof using the MOVE and DRAW commands, the following statement movesthe logical pen to a point 100 units to the right of, and 150 units above,the lower left corner of the display:
100 MOVE 100,150
This statement then draws a line to coordinates (200,10):
110 DRAW 200,10
Finally, these two statements erase the previously drawn line:
120 PEN 0
130 DRAW 100,150
Although text and graphics appear together, you can clear themseparately. Use CLEAR SCREEN to clear the text. Use GCLEAR to clear thegraphics.
HP IBASIC Supplement 7-11
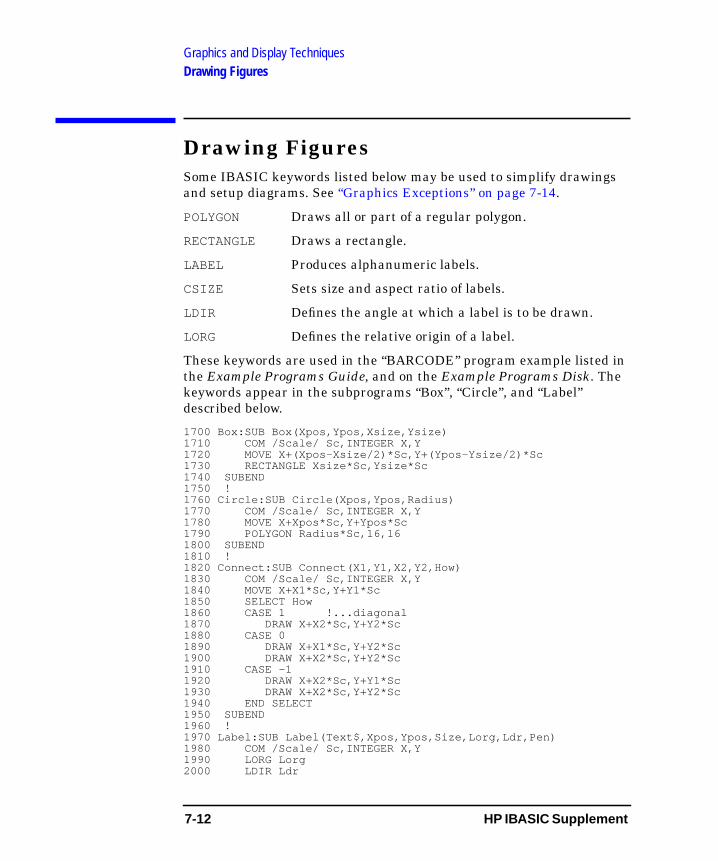
Graphics and Display TechniquesDrawing Figures
Drawing FiguresSome IBASIC keywords listed below may be used to simplify drawingsand setup diagrams. See “Graphics Exceptions” on page 7-14.
POLYGON Draws all or part of a regular polygon.
RECTANGLE Draws a rectangle.
LABEL Produces alphanumeric labels.
CSIZE Sets size and aspect ratio of labels.
LDIR Defines the angle at which a label is to be drawn.
LORG Defines the relative origin of a label.
These keywords are used in the “BARCODE” program example listed inthe Example Programs Guide, and on the Example Programs Disk. Thekeywords appear in the subprograms “Box”, “Circle”, and “Label”described below.
1700 Box:SUB Box(Xpos,Ypos,Xsize,Ysize)1710 COM /Scale/ Sc,INTEGER X,Y1720 MOVE X+(Xpos-Xsize/2)*Sc,Y+(Ypos-Ysize/2)*Sc1730 RECTANGLE Xsize*Sc,Ysize*Sc1740 SUBEND1750 !1760 Circle:SUB Circle(Xpos,Ypos,Radius)1770 COM /Scale/ Sc,INTEGER X,Y1780 MOVE X+Xpos*Sc,Y+Ypos*Sc1790 POLYGON Radius*Sc,16,161800 SUBEND1810 !1820 Connect:SUB Connect(X1,Y1,X2,Y2,How)1830 COM /Scale/ Sc,INTEGER X,Y1840 MOVE X+X1*Sc,Y+Y1*Sc1850 SELECT How1860 CASE 1 !...diagonal1870 DRAW X+X2*Sc,Y+Y2*Sc1880 CASE 01890 DRAW X+X1*Sc,Y+Y2*Sc1900 DRAW X+X2*Sc,Y+Y2*Sc1910 CASE -11920 DRAW X+X2*Sc,Y+Y1*Sc1930 DRAW X+X2*Sc,Y+Y2*Sc1940 END SELECT1950 SUBEND1960 !1970 Label:SUB Label(Text$,Xpos,Ypos,Size,Lorg,Ldr,Pen)1980 COM /Scale/ Sc,INTEGER X,Y1990 LORG Lorg2000 LDIR Ldr
7-12 HP IBASIC Supplement
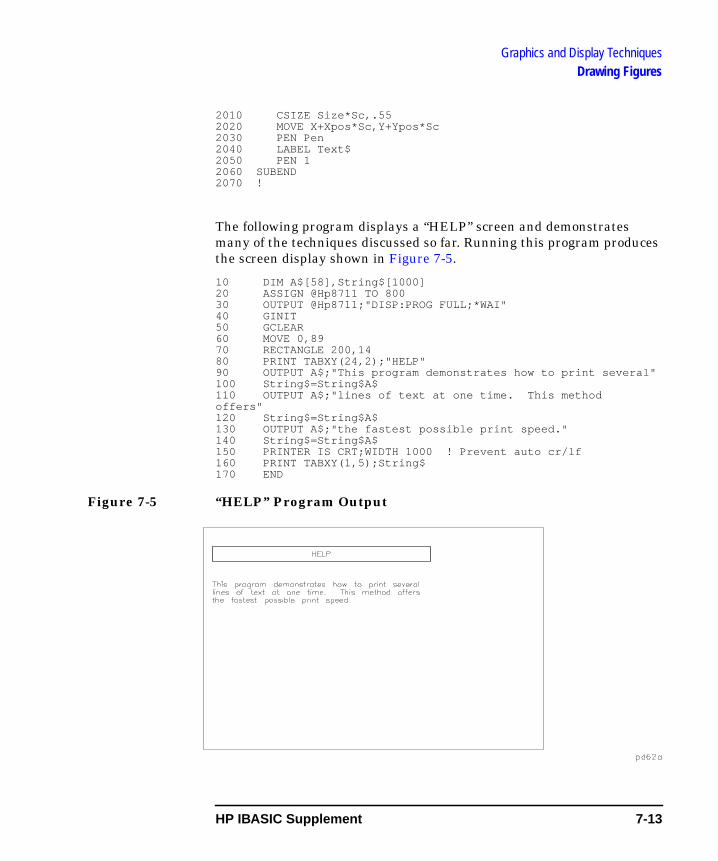
Graphics and Display TechniquesDrawing Figures
2010 CSIZE Size*Sc,.552020 MOVE X+Xpos*Sc,Y+Ypos*Sc2030 PEN Pen2040 LABEL Text$2050 PEN 12060 SUBEND2070 !
The following program displays a “HELP” screen and demonstratesmany of the techniques discussed so far. Running this program producesthe screen display shown in Figure 7-5.
10 DIM A$[58],String$[1000]20 ASSIGN @Hp8711 TO 80030 OUTPUT @Hp8711;"DISP:PROG FULL;*WAI"40 GINIT50 GCLEAR60 MOVE 0,8970 RECTANGLE 200,1480 PRINT TABXY(24,2);"HELP"90 OUTPUT A$;"This program demonstrates how to print several"100 String$=String$A$110 OUTPUT A$;"lines of text at one time. This methodoffers"120 String$=String$A$130 OUTPUT A$;"the fastest possible print speed."140 String$=String$A$150 PRINTER IS CRT;WIDTH 1000 ! Prevent auto cr/lf160 PRINT TABXY(1,5);String$170 END
Figure 7-5 “HELP” Program Output
HP IBASIC Supplement 7-13
Graphics and Display TechniquesDrawing Figures
Graphics ExceptionsThe following graphics commands do not conform to the keyworddescription found in the HP Instrument BASIC Users Handbook:
VIEWPORT Does not create isotropic units that are physicallysquare. Does not soft clip the display area.
CLIP The analyzer does not support graphics clipping.
SHOW Does not create isotropic units.
LINE TYPE The analyzer does not support different line types.
POLYLINE, POLYGON, RECTANGLE, RPLOT—The analyzer does notsupport the FILL or EDGE options. Also see next paragraph.
GRID, RECTANGLE, POLYGON, and POLYLINE scalingdifferencesWhen the display is initialized using GINIT , the display will be scaled toa height of 100 GDUs and a width of 122 GDUs.
The ratio is 1.22 and the pixel height-to-width ratio is fixed at 1.0(square pixels).
NOTE Previous analyzer models may have scaling differences. When convertingprograms from previous models (such as 8711A/B and family) to run onan 8712ET/ES or 8714ET/ES, scaling differences will affect all graphicscommands. The ET/ES family of network analyzers (as well as the 8711Cfamily) have square pixels. The older “A” and “B” family networkanalyzers had a non-square pixel height-to-width ratio of 1.79.
7-14 HP IBASIC Supplement
Graphics and Display TechniquesDrawing Figures
Labeling with Different PartitionsThe LABEL command can be used to label graphs, however, note thatlabels that may be of the correct size for a full screen partition willappear half as big if a GINIT is performed after the analyzer has beenset to either the upper or lower half partition. This is because the CSIZEcommand scales according to display height, not width. Since the displayheight is one-half, the character size will also be one-half. Labels that arescaled properly for full screen displays will not be scaled properly for halfscreen displays and vice-versa.
HP IBASIC Supplement 7-15

Graphics and Display TechniquesSCPI Graphics Commands
SCPI Graphics CommandsIn addition to the commands described earlier in this chapter, there areseveral SCPI mnemonics that can be used to create graphics andmessages on the display of the analyzer.
These commands are instrument-specific mnemonics, not standardIBASIC commands. They are also different from the previously describedIBASIC commands because an IBASIC display partition is not required.This means that they can be used to write or draw directly to ameasurement window.
These commands, listed in Table 7-2 on page 7-17, are SCPI mnemonicsand are programmable from an external controller as well as fromIBASIC. The commands are of the following form
DISPlay:WINDow[1|2|10]:GRAPhics:<command>
The number specified in the WINDow part of the command selects wherethe graphics are to be written.
WINDow1 draws the graphics to the channel 1 measurement window.
WINDow2 draws the graphics to the channel 2 measurement window.
WINDow10 draws the graphics to an IBASIC display partition.
TIP Graphics written directly to a measurement window are not redrawnsweep-to-sweep. When SCPI graphics commands are used to writedirectly to a measurement window, they write to the static graphicsplane (the same plane where the graticule is drawn). There is nosweep-to-sweep speed penalty once the graphics have been drawn.
7-16 HP IBASIC Supplement
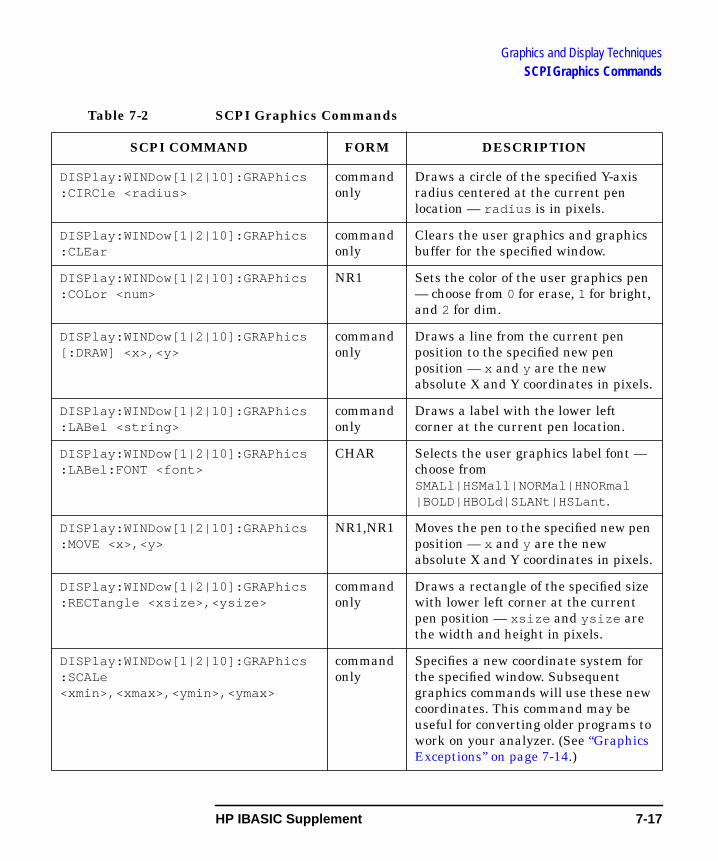
Graphics and Display TechniquesSCPI Graphics Commands
DIS:CI
DIS:CL
DIS:CO
DIS[:D
DIS:LA
DIS:LA
DIS:MO
DIS:RE
DIS:SC<xm
Table 7-2 SCPI Graphics Commands
SCPI COMMAND FORM DESCRIPTION
Play:WINDow[1|2|10]:GRAPhicsRCle <radius>
commandonly
Draws a circle of the specified Y-axisradius centered at the current penlocation — radius is in pixels.
Play:WINDow[1|2|10]:GRAPhicsEar
commandonly
Clears the user graphics and graphicsbuffer for the specified window.
Play:WINDow[1|2|10]:GRAPhicsLor <num>
NR1 Sets the color of the user graphics pen— choose from 0 for erase, 1 for bright,and 2 for dim.
Play:WINDow[1|2|10]:GRAPhicsRAW] <x>,<y>
commandonly
Draws a line from the current penposition to the specified new penposition — x and y are the newabsolute X and Y coordinates in pixels.
Play:WINDow[1|2|10]:GRAPhicsBel <string>
commandonly
Draws a label with the lower leftcorner at the current pen location.
Play:WINDow[1|2|10]:GRAPhicsBel:FONT <font>
CHAR Selects the user graphics label font —choose fromSMALl|HSMall|NORMal|HNORmal|BOLD|HBOLd|SLANt|HSLant .
Play:WINDow[1|2|10]:GRAPhicsVE <x>,<y>
NR1,NR1 Moves the pen to the specified new penposition — x and y are the newabsolute X and Y coordinates in pixels.
Play:WINDow[1|2|10]:GRAPhicsCTangle <xsize>,<ysize>
commandonly
Draws a rectangle of the specified sizewith lower left corner at the currentpen position — xsize and ysize arethe width and height in pixels.
Play:WINDow[1|2|10]:GRAPhicsALein>,<xmax>,<ymin>,<ymax>
commandonly
Specifies a new coordinate system forthe specified window. Subsequentgraphics commands will use these newcoordinates. This command may beuseful for converting older programs towork on your analyzer. (See “GraphicsExceptions” on page 7-14.)
HP IBASIC Supplement 7-17
Graphics and Display TechniquesSCPI Graphics Commands
For More InformationFor more information about the analyzer's user graphics commands,refer to Chapter 7 of the Programmer's Guide. Refer also to the exampleprogram titled “GRAPHICS” in the Example Programs Guide.
7-18 HP IBASIC Supplement
8 Interfacing with ExternalDevices
8-1
Interfacing with External Devices
This chapter describes the techniques necessary for programming theGPIB interface. It describes how this interface works and how to use it tocontrol or interface with systems containing various GPIB devices. Italso describes how to interface with external devices using the serial andparallel interfaces.
The GPIB interface is Agilent's implementation of the IEEE-488.2Digital Interface for Programmable Instrumentation. The acronym GPIBstands for “General Purpose Interface Bus,” and is often referred to asthe “bus.” The interface is easy to use and allows great flexibility incommunicating data and control information between an HP InstrumentBASIC program and external devices.
IBASIC is a GPIB instrument controller residing inside an instrument.It uses the instrument's GPIB interface for external communication andan internal GPIB interface to communicate with the instrument. Thisunique arrangement presents a few differences between IBASIC'simplementation of GPIB control and HP BASIC controllers. Adescription of the interaction of IBASIC with the host instrument andthe external GPIB interface is given in the section entitled “The IBASICGPIB Model” on page 8-17.
8-2 HP IBASIC Supplement
Interfacing with External DevicesCommunication with Devices
Communication with Devices
GPIB Device SelectorsSince the GPIB allows several devices to be interconnected, each devicemust be uniquely identified. Specifying the select code (such as 7 or 8) ofthe GPIB interface to which a device is connected, is not enough touniquely identify each specific device on the bus.
Each device on the bus has a primary address that identifies it. Thisaddress can be set by the user. It must be unique to allow individualaccess of each device. When a particular GPIB device is to be accessed, itmust be identified with both its interface select code and its bus address.
The interface select code is the first part of an GPIB device selector.IBASIC programs run inside an instrument and communicate with itover an internal bus (interface select code 8). IBASIC programs can alsocommunicate with external devices using the instrument's GPIBinterface (select code 7).
The second part of an GPIB device selector is the device's primaryaddress, an integer in the range of 0 through 30. For example, to specifythe device on the interface at select code 7 with a primary address of 22,use device selector 722. Secondary GPIB addressing is also supported forthose devices requiring it. These devices will have at least 5-digit serviceselection such as 72201.
Since the analyzer is the only device on the internal interface, itsprimary address on that interface is arbitrary and the instrument willrespond to any primary address with a select code equal to 8 (e.g., 800,811, 822, etc.).
NOTE Each GPIB device address must have a unique GPIB address. Theanalyzer is shipped from the factory with a primary address of 16. Noother device on the bus should use the same address.
Setting Device AddressesThe procedure for setting the address of an GPIB device is given in theinstallation manual for each device. To set the address of the analyzer,use the softkeys in the menu, or the SCPImnemonic SYST:COMM:GPIB:ADDR.
SYSTEM OPTIONS GPIB
HP IBASIC Supplement 8-3
Interfacing with External DevicesCommunication with Devices
Moving Data through the GPIBData is output and entered into the program through the GPIB with theOUTPUT and ENTER statements, respectively. The only difference betweenthe OUTPUT and ENTER statements for the GPIB and those for otherinterfaces is the addressing information within GPIB device selectors.
The following examples show several different syntax styles which youcan use.
100 Hpib=7
110 Device_addr=22
120 Device_selector=Hpib * 100 + Device_addr
130 !
140 OUTPUT Device_selector;”F1R7T2T3”
150 ENTER Device_selector;Reading
320 ASSIGN @Hpib_device TO 702
330 OUTPUT @Hpib_device;”Data message”
340 ENTER @Hpib_device;Number
440 OUTPUT 800;”SOUR1:POW -10 dBm”
480 ENTER 724;Readings(*)
8-4 HP IBASIC Supplement
Interfacing with External DevicesCommunication with Devices
General Structure of the GPIBCommunications through the GPIB are made according to a preciselydefined standard, IEEE 488.1. The rules set by IEEE 488.1 ensure thatorderly communication takes place on the bus. For more informationabout the structure of the GPIB and the IEEE 488.1 standard, refer tothe Tutorial Description of the Hewlett-Packard Interface Bus.
Devices that communicate over the GPIB perform one or more of thefollowing three functions:
Talk — send data over the bus
Listen — receive data over the bus
Control — control the exchange of data on the bus
The System ControllerThe controller is a device that has been designated to control allcommunication occurring on the bus. It specifies which device talks,which device listens, and when the exchange of data takes place.
A GPIB system can have more than one device with the ability to controlthe bus, but only one of these devices is allowed to control the exchangeof data at any given time. The device that is currently controlling theexchange of data is called the Active Controller.
One device must be able to take control of the bus even if it is not theactive controller. The device designated as the System Controller is theonly device with this ability. To designate the analyzer as the systemcontroller, use the softkey in the
menu.
The system controller is generally designated before running a programand should not be changed under program control. An exception to this iswhen an IBASIC program is running on the analyzer's internalcontroller. If the IBASIC program controls other GPIB devices, theanalyzer must be designated as the system controller.
A SCPI mnemonic SYST:COMM:GPIB:CONT <ON|OFF> can be used tomake the analyzer the system controller. Program execution should becarefully synchronized by using the Operation Complete command(*OPC?) and waiting for a reply before any OUTPUT 7xx command issent. (Refer to the “Synchronizing the Analyzer and a Controller” chapterin the Programmer's Guide for more information on the *OPC?command.)
System ControllerSYSTEM OPTIONS GPIB
HP IBASIC Supplement 8-5
Interfacing with External DevicesCommunication with Devices
Using the Serial and Parallel PortsThe analyzer has a parallel port and a serial port for use withperipherals (like printers and plotters), material handlers and otherdevices. Active control of the GPIB interface is not needed when theseports are being used.
In addition to the serial and parallel ports, there are also two BNCconnectors on the rear panel of the analyzer. These connectors provideaccess (using TTL signal levels) to two programmable bits:
Limit Test TTL bit — indicates the results of a pass/fail limit test
User TTL bit — to be used as needed (for example to be used with afoot pedal)
Using the Analyzer Ports in IBASIC ProgramsIBASIC can directly control the serial port, the parallel port, thePass/Fail TTL bit, and the User bit without using the GPIB commandsalong with READIO and WRITEIO commands. However, READIO andWRITEIO are faster than GPIB commands.
8-6 HP IBASIC Supplement
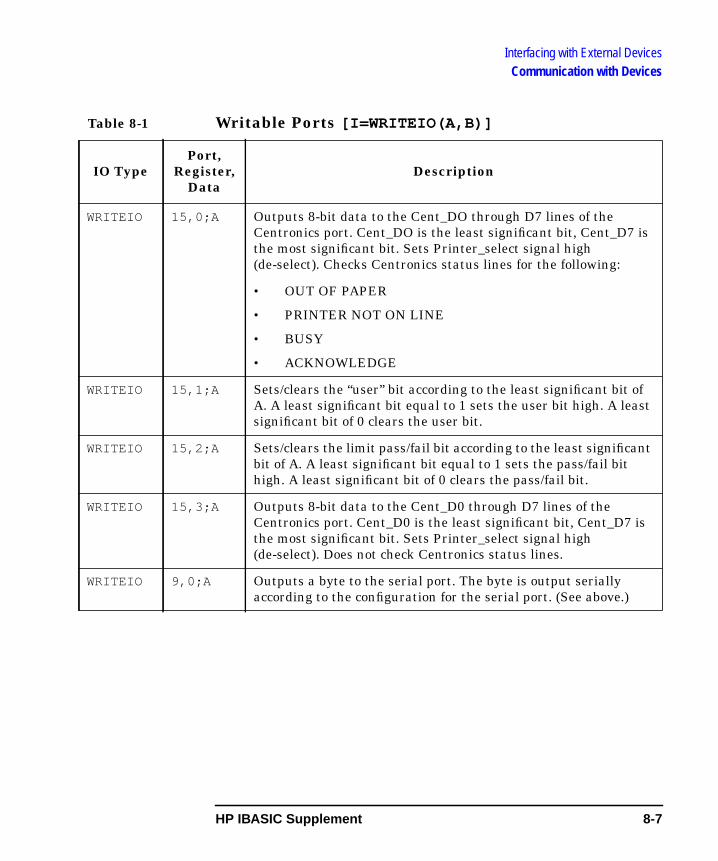
Interfacing with External DevicesCommunication with Devices
Table 8-1 Writable Ports [I=WRITEIO(A,B)]
IO TypePort,
Register,Data
Description
WRITEIO 15,0;A Outputs 8-bit data to the Cent_DO through D7 lines of theCentronics port. Cent_DO is the least significant bit, Cent_D7 isthe most significant bit. Sets Printer_select signal high(de-select). Checks Centronics status lines for the following:
• OUT OF PAPER
• PRINTER NOT ON LINE
• BUSY
• ACKNOWLEDGE
WRITEIO 15,1;A Sets/clears the “user” bit according to the least significant bit ofA. A least significant bit equal to 1 sets the user bit high. A leastsignificant bit of 0 clears the user bit.
WRITEIO 15,2;A Sets/clears the limit pass/fail bit according to the least significantbit of A. A least significant bit equal to 1 sets the pass/fail bithigh. A least significant bit of 0 clears the pass/fail bit.
WRITEIO 15,3;A Outputs 8-bit data to the Cent_D0 through D7 lines of theCentronics port. Cent_D0 is the least significant bit, Cent_D7 isthe most significant bit. Sets Printer_select signal high(de-select). Does not check Centronics status lines.
WRITEIO 9,0;A Outputs a byte to the serial port. The byte is output seriallyaccording to the configuration for the serial port. (See above.)
HP IBASIC Supplement 8-7
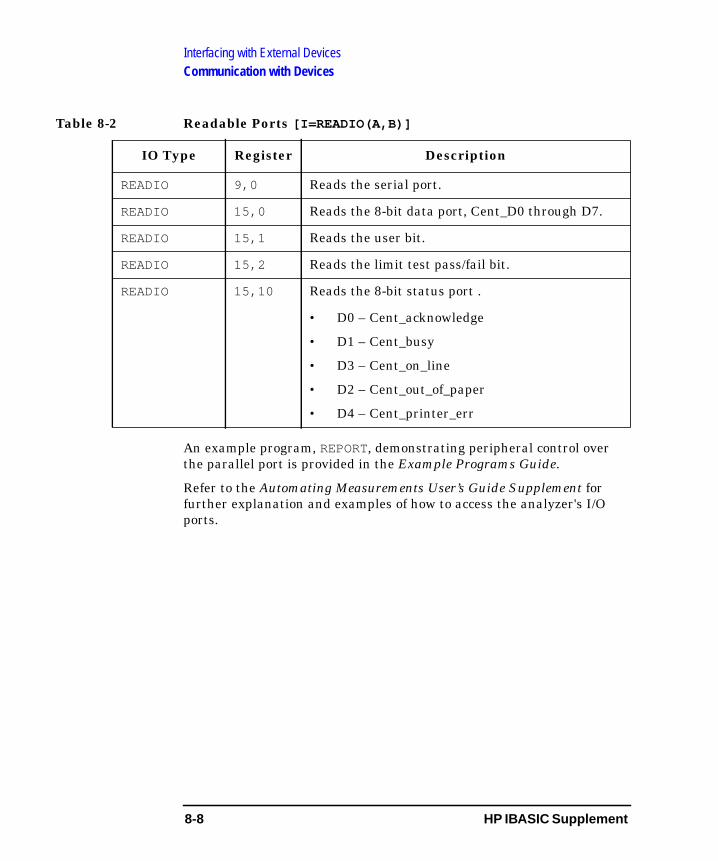
Interfacing with External DevicesCommunication with Devices
Table 8-2 Readable Ports [I=READIO(A,B)]
An example program, REPORT, demonstrating peripheral control overthe parallel port is provided in the Example Programs Guide.
Refer to the Automating Measurements User’s Guide Supplement forfurther explanation and examples of how to access the analyzer's I/Oports.
IO Type Register Description
READIO 9,0 Reads the serial port.
READIO 15,0 Reads the 8-bit data port, Cent_D0 through D7.
READIO 15,1 Reads the user bit.
READIO 15,2 Reads the limit test pass/fail bit.
READIO 15,10 Reads the 8-bit status port .
• D0 – Cent_acknowledge
• D1 – Cent_busy
• D3 – Cent_on_line
• D2 – Cent_out_of_paper
• D4 – Cent_printer_err
8-8 HP IBASIC Supplement
Interfacing with External DevicesGeneral Bus Management
General Bus ManagementThe GPIB standard provides several mechanisms to manage the bus andthe devices on the bus. Here is a summary of the IBASIC statements thatuse these control mechanisms:
ABORT abruptly terminates all bus activity and resets alldevices to their power-on GPIB states.
CLEAR sets selected (or all) devices to a pre-defined,device-dependent GPIB state.
LOCAL returns selected (or all) devices to local (front panel)control.
LOCAL LOCKOUT disables selected (or all) devices' front panel controls.
REMOTE puts selected (or all) devices into theirdevice-dependent, remote modes.
SPOLL performs a serial poll of the specified device (whichmust be capable of responding).
TRIGGER sends the trigger message to a device (or selected groupof devices).
The actions that a device takes upon receiving each of the abovecommands are different for each device. For external devices, refer to theparticular device's manuals to determine how it will respond.
All of the bus management commands, with the exception of ABORT,require that the program be the active controller on the interface. Arunning IBASIC program is always the active controller on the internalinterface (select code 8). The instrument must either be set as systemcontroller or have control passed to it from an external controller for theprogram to be the active controller on the external interface (select code7). The program automatically assumes the controller status of the hostinstrument. For more information, refer to “The IBASIC GPIB Model” onpage 8-17.
NOTE In this section, the term Host Instrument refers to the instrument wherethe IBASIC controller is located.
HP IBASIC Supplement 8-9
Interfacing with External DevicesGeneral Bus Management
REMOTEMost GPIB devices can be controlled from the front panel or from thebus. If the device's front panel controls are currently functional, it is inthe Local state. If it is being controlled through the GPIB, it is in theRemote state. Unless operating in the Local Lockout mode, each GPIBdevice has method (usually a key) to return itself to Local (front panel)control.
When the analyzer is being controlled by a program running on anexternal controller, the softkey is always available toreturn the analyzer to Local control.
The Remote message is automatically sent to all devices whenever thesystem controller is powered on, reset, or when it sends the Abortmessage. A device also enters the Remote state automatically wheneverit is addressed. The REMOTE statement also outputs the Remote message,which causes all (or specified) devices on the bus to change from localcontrol to remote control. The host instrument must be designated as thesystem controller before an IBASIC program can execute the REMOTEstatement on select code 7.
Host InstrumentThe REMOTE statement has no effect on the host instrument since it isalways in remote control whenever an IBASIC program is running.Specifying the internal interface in a REMOTE statement will notgenerate an error, but will have no effect.
LOCAL LOCKOUTThe Local Lockout message effectively locks out the “local” switchpresent on most GPIB device front panels. It maintains system integrityby preventing a user from interfering with system operations by pressingbuttons. As long as Local Lockout is in effect, no bus device can bereturned to local control from its front panel.
The Local Lockout message is sent by executing the LOCAL LOCKOUTstatement. This message can be sent to all devices on the externalinterface by specifying the bus address (7). Specifying a single address onthe bus (i.e. 722) sends the command to only the device at that address.The Local Lockout message is cleared when the Local message is sent byexecuting the LOCAL statement. However, executing the ABORTstatement does not cancel the Local Lockout message.
Return to Local
8-10 HP IBASIC Supplement
Interfacing with External DevicesGeneral Bus Management
Host InstrumentThe Local Lockout message is not supported for the host instrumentsince front panel control is always necessary in order to pause or abortthe program. Specifying the internal interface in a LOCAL LOCKOUTstatement will not generate an error, but will have no effect.
LOCALDuring system operation, it may be necessary for an operator to interactwith one or more external devices. For instance, an operator might needto work from the front panel to make special tests or to troubleshoot. It isalso good systems practice to return all devices to local control whenremote-control operations are complete. Executing the LOCAL statementreturns the specified devices to local (front panel) control.
If primary addressing is specified, the Go-to-Local message is sent onlyto the specified device(s). However, if only the interface select code isspecified (LOCAL 7), the Local message is sent to all devices on theexternal interface and any previous Local Lockout message (which is stillin effect) is automatically cleared.
Host InstrumentThe LOCAL statement has no effect on the host instrument since it isalways in remote control whenever an IBASIC program is running.Specifying the internal interface in a LOCAL statement will not generatean error.
TRIGGERThe TRIGGER statement sends a Trigger message to a selected device orgroup of devices. The purpose of the Trigger message is to initiate somedevice-dependent action; for example, it can be used to trigger a digitalvoltmeter to perform its measurement cycle. Because the response of adevice to a Trigger message is strictly device-dependent, neither theTrigger message nor the interface indicates what action is initiated bythe device.
Specifying only the interface select code outputs a Trigger message to alldevices currently addressed to listen on the bus. Including a deviceaddress in the statement triggers only the device addressed by thestatement.
HP IBASIC Supplement 8-11
Interfacing with External DevicesGeneral Bus Management
Host InstrumentThe TRIGGER statement is supported by the analyzer. Issuing a TRIGGERcommand will initiate a single sweep assuming the analyzer is inTRIGGER hold mode. TRIGGER is ignored if not in hold mode.
CLEARThe CLEAR statement provides a means of “initializing” a device to itspredefined device-dependent state. When the CLEAR statement isexecuted, the Clear message is sent either to all devices or to thespecified device, depending on the information contained within thedevice selector. If only the interface select code is specified, all devices onthe specified GPIB interface are cleared. If primary-address informationis specified, the Clear message is sent only to the specified device. Onlythe active controller can send the Clear message.
Host InstrumentThe CLEAR statement is fully compatible on the internal interface.
ABORTThis statement may be used to terminate all activity on the external busand return the GPIB interfaces of all devices to reset (or power-on)condition. Whether this affects other modes of the device depends on thedevice itself. The IBASIC program must be either the active or thesystem controller to perform this function. If it is the system controllerand has passed active control to another device, executing this statementcauses active control to be returned. Only the interface select code maybe specified; primary-addressing information (such as 724) must not beincluded.
Aborting the Internal BusABORT is not supported for select code 8. Executing ABORT 8 will notgenerate an error.
8-12 HP IBASIC Supplement
Interfacing with External DevicesGeneral Bus Management
GPIB Service ReqstsMost GPIB devices, such as voltmeters, frequency counters, andanalyzers, are capable of generating a “service request” when theyrequire the active controller to take action. Service requests aregenerally made after the device has completed a task (such as making ameasurement) or when an error condition exists (such as a printer beingout of paper). The operating and/or programming manuals for eachdevice describe the device's capability to request service and conditionsunder which the device will request service. To request service, thedevice sends a Service Request message (SRQ) to the active controller.The mechanism by which the active controller detects these requests isthe SRQ interrupt. Interrupts allow an efficient use of system resources,because the system may be executing a program until interrupted by anevent's occurrence. If enabled, the external event initiates a programbranch to a routine which “services” the event by performing someaction.
Setting Up and Enabling SRQ InterruptsIn order for an GPIB device to be able to initiate a service routine in theactive controller, two prerequisites must be met: the SRQ interrupt eventmust have a service routine defined, and the SRQ interrupt must beenabled to initiate the branch to the service routine.
The following program segment shows an example of setting up andenabling an SRQ interrupt.
100 Hpib=7
110 ON INTR Hpib GOSUB Service_routine
120 !
130 Mask=2
140 ENABLE INTR Hpib;Mask
Since IBASIC recognizes only SRQ interrupts, the value assigned to themask is meaningless. However, a mask value may be present as aplaceholder for compatibility with HP Series BASIC programs.
HP IBASIC Supplement 8-13
Interfacing with External DevicesGeneral Bus Management
When an SRQ interrupt is generated by any device on the bus, theprogram branches to the service routine when the current line is exited(either when the line's execution is finished or when the line is exited bya call to a user-defined function). The service routine, in general, mustperform the following operations in order:
1. Determine which device(s) are requesting service.
2. Determine what action is requested.
3. Clear the SRQ line.
4. Perform the requested action.
5. Re-enable interrupts.
6. Return to the former task (if applicable).
NOTE The ON INTR statement must always precede the ENABLE INTRstatement when the two are used in the same program.
Servicing SRQ InterruptsThe SRQ is a level-sensitive interrupt; in other words, if an SRQ ispresent momentarily but does not remain long enough to be sensed bythe controller, an interrupt will not be generated. The level-sensitivenature of the SRQ line also has further implications, which are describedin the following paragraphs.
ExampleAssume that only one device is currently on the bus. The followingservice routine serially polls the device requesting service and clears theinterrupt request. In this case, the controller does not have to determinewhich device was requesting service because only one device is present.Since only service request interrupts are enabled in IBASIC, the type ofinterrupt does not need to be determined either. The service isperformed, and the SRQ event is re-enabled to generate subsequentinterrupts.
500 Serv_rtn:Ser_poll=SPOLL(@Device)
510 ENTER @Device;Value
520 PRINT Value
530 ENABLE INTR 7 ! Use previous mask.
540 RETURN
8-14 HP IBASIC Supplement
Interfacing with External DevicesGeneral Bus Management
The IEEE standard states that when an interrupting device is seriallypolled, it is to stop interrupting until a new condition occurs (or the samecondition occurs again). To “clear” the SRQ line, a serial poll must beperformed on the device. By performing this serial poll, the controlleracknowledges to the device that it has seen the request for service and isresponding. The device then removes its request for service (by releasingSRQ).
If the SRQ line had not been released, the controller would havebranched to the service routine immediately upon re-enabling interruptson this interface. This is due to the level-sensitive nature of the SRQinterrupt.
Also note that once an interrupt is sensed and logged, the interfacecannot generate another interrupt until the first interrupt is serviced.The controller disables all subsequent interrupts from an interface untila pending interrupt is serviced.
Conducting a Serial PollA sequential poll of individual devices on the bus is known as a SerialPoll. A byte of device-specific status is returned in response to a SerialPoll. This byte is called the “Status Byte” message and, depending on thedevice, may indicate an overload, a request for service, or a printer beingout of paper. The particular response of each device depends on thedevice.
The SPOLL function performs a Serial Poll of the specified device; theprogram must currently be the active controller in order to execute thisfunction.
Examples
Status_byte=SPOLL(@Device)
ASSIGN @Device TO 700
Spoll_724=SPOLL(724)
The Serial Poll is meaningless for an interface since it must pollindividual devices on the interface. Therefore, primary addressing mustbe used with the SPOLL function.
HP IBASIC Supplement 8-15
Interfacing with External DevicesGeneral Bus Management
Passing and Regaining ControlActive control of the bus can be passed between controllers using thePASS CONTROL command. The following statements first define theGPIB interface's select code and the new active controller's primaryaddress and then pass control to that controller.
100 Hp_ib=7
110 New_ac_addr=20
120 PASS CONTROL 100*Hp_ib+New_ac_addr
Once the new active controller has accepted active control, the controllerpassing control assumes the role of a non-active controller on thespecified GPIB interface. The concept of using pass control with IBASICis discussed in the next section, “The IBASIC GPIB Model.”
8-16 HP IBASIC Supplement
Interfacing with External DevicesThe IBASIC GPIB Model
The IBASIC GPIB ModelThe fact that IBASIC resides in, and coexists with an instrument poses alarge set of possible interactions, both internal to the instrument andexternally with other controllers and instruments. This section definesthe principal players and rules of order when IBASIC is running withinthe host instrument.
The External Bus and the Internal BusThere is physically only one GPIB port and one GPIB address for theanalyzer. IBASIC has access to two GPIB ports: the “real” external port(select code 7) and a “virtual” internal port (select code 8), through whichit communicates with the analyzer.
The analyzer has only one output buffer, one input buffer, and one set ofstatus registers. Commands and data from both ports are placed in thesame input buffer and data read out of both ports comes from the sameoutput buffer. The instrument will not provide any kind of arbitrationbetween an external controller and an IBASIC program.
The analyzer always behaves as if there is only one controller. If anIBASIC program is running, it is assumed to be the controller andtherefore will receive all SRQs from the host instrument (via the internalport).
Service Request IndicatorsAn external controller may perform a serial poll (SPOLL) at any timewithout affecting a running IBASIC program. There are two ServiceRequest Indicators (SRI) — one for the external port and one for theinternal port. The internal SRI can only be cleared by an IBASICprogram performing an SPOLL on device 800. The external SRI can onlybe cleared by an SPOLL from an external controller and can only be setwhen there is not an active IBASIC program.
The two SRIs will be set to their OR'd value when a program starts, andagain when it finishes. This assures that any pending SRQs can beserviced by the instrument's new controller.
HP IBASIC Supplement 8-17
Interfacing with External DevicesThe IBASIC GPIB Model
The pausing or termination of a program will cause the ProgramRunning bit in the Device Status register to go low. This can be used togenerate an external SRQ. (For an example, see the DUALCTRL programin the Example Programs Guide.)
IBASIC as the Active ControllerThe IBASIC program is always the active controller on the internalinterface (select code 8). When a program starts running, the GPIBcontroller status of the instrument is automatically passed to theprogram. For example, if the instrument is set as System Controller, aprogram running in the instrument automatically becomes systemcontroller and active controller on the external bus, and the instrumentrelinquishes active control. When the program stops, the instrumentregains active control.
Also, if an instrument set as Talker/Listener is passed control from anexternal controller, any program running in the instrument becomesactive controller on the external interface.
Thus, there are two cases where a program running in an instrumentcan be the active controller on the external interface:
1. When the host instrument is set as System Controller and theprogram has not passed control.
2. When the host instrument is set as Talker/Listener and theinstrument has been passed control from an external controller.
8-18 HP IBASIC Supplement
Interfacing with External DevicesThe IBASIC GPIB Model
Passing Active Control to the InstrumentThe only way that the analyzer can gain active control of the externalinterface while a program is running, is if the program is currently theactive controller on select code 7 and passes control to the instrument.Normally, the active controller on the 7 bus can pass control to anydevice on the interface by using the statement
PASS CONTROL 7xx
where “xx” represents the address of the device on the bus. Because anIBASIC program does not interface with the host instrument over selectcode 7, a different method is used to pass control in this case. To passactive control of the external interface from an IBASIC program to thehost instrument, use the statement
PASS CONTROL 8xx
where “xx ” represents any two digit number from 00 to 99. This allowsthe instrument to control external plotters, printers and disk drives.When the instrument is finished with its GPIB control activity, itautomatically passes control back to the program.
NOTE Control over the internal bus is used to govern access to the external bus.When the instrument is given control over the internal bus, it is actuallygiven access to the external GPIB hardware.
HP IBASIC Supplement 8-19
Interfacing with External DevicesThe IBASIC GPIB Model
IBASIC as a Non-Active ControllerThe IBASIC program is always the active controller on the internalinterface. There are two cases where an IBASIC program does not havecontrol of the external GPIB interface:
1. When the host instrument is set as Talker/Listener and active controlhas not been passed from an external device.
2. When the host instrument is set as System Controller and theprogram has passed control to either the analyzer or another deviceon the external interface.
In both of these cases, the program cannot perform activities of any kindon the external interface.
NOTE An IBASIC program cannot act as a device on the external bus. Tocommunicate with an external controller, the IBASIC program must beactive controller and the external controller must act as the device (see“Interfacing with an External Controller” on page 8-21).
8-20 HP IBASIC Supplement
Interfacing with External DevicesInterfacing with an External Controller
Interfacing with an External ControllerSo far, we have discussed the ability to interface IBASIC programs witha network of external devices using the GPIB. The idea of including anexternal controller in that network, and interfacing an IBASIC programwith a program running in that computer, presents some newpossibilities.
External controller programs can interface with IBASIC programs(referred to as “internal programs”) over GPIB in two basic ways:
First, the two programs can pass data back and forth using simpleOUTPUT and ENTER statements. This requires coordination of both theinternal and external programs and also requires that the internalprogram be the active controller during the interaction. To get aninternal program and an external program to work together successfully,you should have a good understanding of the GPIB model, presentedearlier in this chapter.
Second, the external program can make use of the extensive set ofanalyzer GPIB commands that interface with IBASIC programs. Thesemnemonics fall under the subsystem PROGram and allow the externalcontroller to remotely perform many of the IBASIC front panel activities.This includes the ability to run, stop, pause, continue and delete aninternal program. You can also remotely query or set the values ofnumeric and string variables.
Also included in the analyzer GPIB command set are commands thatallow you to transfer programs and program data to and from theinstrument. Programs can be transferred (uploaded and downloaded)between an external controller and the program buffer in theinstrument, and data can be transferred between an external programand a non-running internal program by setting and querying internalprogram variables. These SCPI mnemonics are described in theProgrammer's Guide.
Also, refer to example programs included on the IBASIC ExamplePrograms Disk: DUALCTRL, TRICTRL, UPLOAD and DOWNLOAD. Theseprograms demonstrate using IBASIC with an external controller.
HP IBASIC Supplement 8-21
Interfacing with External DevicesInterfacing with an External Controller
Synchronizing IBASIC with an ExternalController
Using OUTPUT and ENTER StatementsCommands sent to the analyzer with OUTPUT and ENTER statementsfrom IBASIC and from the external controller at the same time must besynchronized by the programmer. These commands cannot be allowed tooverlap. Overlapped commands sent from the external controller andIBASIC will result in unpredictable behavior or deadlocks.
For example:
If the external controller executes:
OUTPUT 716;”<command>”
and IBASIC simultaneously executes:
OUTPUT 800;”<command>”
the results are unpredictable.
To avoid overlapped commands, you must ensure that only the controlleris allowed to send commands or only IBASIC is allowed to sendcommands at any one time. One possible method to avoid overlap isdescribed below. For this method, when the respective controller is donesending commands, the other controller is informed. The alternatecontroller may then begin sending commands. After each set ofcommands is completed, the alternate controller is informed and given asignal to send commands to the analyzer. See example program TRICTRLin the Example Programs Guide.
8-22 HP IBASIC Supplement
Interfacing with External DevicesInterfacing with an External Controller
Using Status InformationStatus information must also be synchronized between the IBASICprogram and a program running on an external controller. The statusinformation is shared between these programs. Commands which affectthe status information should not overlap between the IBASIC programand the external controller.
For example:
From an external controller:
OUTPUT 716;”<command>;*OPC?”
ENTER 716;Opc
From IBASIC, simultaneously execute:
OUTPUT 800;”*CLS”
may cause the external controller to not complete execution. The *CLScommand clears status information which the external controller may bewaiting for. The commands which affect status information include*OPC, *OPC?, *WAI, *CLS, *RST, *SRE, *ESE, and STAT:PRES.
Design RulesDesign your IBASIC and External Controller with the following rules:
• Do not overlap commands between the external controller andIBASIC.
• Do not change status information which is expected by the alternatecontroller. Design programs so status information does not overlap.
See the example program, TRICTRL, which implements asynchronization protocol between an external controller and twoinstruments running IBASIC programs.
HP IBASIC Supplement 8-23
Interfacing with External DevicesInterfacing with an External Controller
Transferring Data between Programs
Using OUTPUT and ENTER StatementsAll data sent from an external controller to the instrument's externalport is received by the instrument and not by any program running in it.Therefore, a non-active controller IBASIC program can never enter oroutput data via the external interface. In order to pass data between anexternal controller and an internal program using OUTPUT and ENTERstatements, the internal program must be given active control and theexternal controller must become the non-active controller. HP IBASICfor Windows and HP BASIC controllers have the ability to enter andoutput data via GPIB while acting as a non-active controller.
NOTE Moving data through the GPIB and running a measurement in the hostinstrument at the same time can slow both operations significantly. It isrecommended that you do not perform these operations simultaneously.
One method of passing data between the two controllers is to set theinstrument as Talker/Listener and run a program on the externalcontroller that starts the IBASIC program and passes control to it. TheIBASIC program can then output data to, and enter data from, theexternal controller. Two programs listed in the Example Programs Guidedemonstrate how to transfer data between an internal program and anexternal controller program. The first program, DATA_EXT, is run froman external controller. It assumes that a disk containing thecorresponding IBASIC program DATA_INT is in the disk drive of theanalyzer. It remotely loads the IBASIC program, starts it, and thentransfers active control to it. The IBASIC program DATA_INT, withactive control of the interface, queries the external program for the nameof the drive to catalog, and then outputs the catalogued string to theexternal program, and then passes active control back. After receivingthe catalog data, the external program goes into a loop (line 1080)executing a command that continues to generate an error until the hostcomputer again becomes the active controller, when control is passedback.
8-24 HP IBASIC Supplement
Interfacing with External DevicesInterfacing with an External Controller
Setting and Querying VariablesAnother means of transferring data between an internal and an externalprogram involves the ability to set and query internal program variablesfrom an external program. The “PROGram[:SELected]:NUMBer” and“PROGram[:SELected]:STRing” mnemonics (and their querycounterparts) are analyzer GPIB commands. The internal program mustnot be running when these commands are executed.
The command
PROG:NUMB <string>, <value>
sets the value of a numeric variable in the program. The command
PROG:STR <string>, <value>
sets the value of a string variable in the program. In both thePROG:NUMB and PROG:STR commands and queries, <string> is thevariable name and must be string data (in quotes). In the PROG:STRcommand, <value> is also string data (in quotes).
Numeric and string parameters can also be queried. The query
PROG:NUMBer? <string>
returns the value of the specified numeric variable.
Arrays of REAL or INTEGER type may be sent or queried but arrays ofstrings are not allowed. Array elements are separated by commas.
Examples
OUTPUT 716;”PROG:NUMBER 'Test',99”
OUTPUT @Ibasic;”PROG:STRING 'A$','String Data'”
OUTPUT 716;”PROG:NUMB? 'Iarray(*)'”
HP IBASIC Supplement 8-25

Interfacing with External DevicesInterfacing with an External Controller
The following program segment sends both numeric and string variablequeries and enters the resulting data:
10 ASSIGN @Prog TO 716
20 OUTPUT @Prog;”FORM ASCII,3”
30 OUTPUT @Prog;”PROG:NUMB? ’Test’”
40 ENTER @Prog;Testval
50 PRINT “The value of the variable Test=”;Testval
60 OUTPUT @Prog;”PROG:STR? ’A$’”
70 ENTER @Prog;STR$
80 PRINT “A$=”;Str$
90 End
Transferring ProgramsPrograms can be transferred between an external controller andprogram memory using the GPIB download command“PROGram[:SELected]:DEFine” and its upload query“PROGram[:SELected]:DEFine?” . Programs that use thesemnemonics are run in the external controller.
DownloadingProgram data transferred (downloaded) from the external controller tothe instrument is always transferred as an “arbitrary block.” Thearbitrary block may be a definite length or indefinite length block. Theindefinite length block is by far the easiest and is simply a block of datathat begins with the characters “#0” preceding the first line, and endswith a line-feed character accompanied by an EOI signal on the GPIBinterface.
When using the mnemonic PROG:DEF to download program lines, the #0must not be followed by a line-feed. Each program line must have a linenumber at its beginning and a line-feed at its end. To end the arbitraryblock of program lines, a single line-feed must be output with the OUTPUTEND parameter, which sends the EOI (End or Identify) signal on theGPIB control lines.
Refer to the Example Programs Guide for a listing of the exampleprogram DOWNLOAD.
8-26 HP IBASIC Supplement
Interfacing with External DevicesInterfacing with an External Controller
Notice that the OUTPUT statement on line 460 is terminated with asemicolon. This suppresses the line-feed that would otherwise occur.
As each line of the program is downloaded, it is checked for syntax.
If an error is found, the error message is displayed on the screen and theline is commented and checked for syntax again. If it still causes an error(for example the line may be too long), the line is discarded.
Any lines that currently exist in the memory buffer will remain unlessthey are overwritten by downloaded program lines. This makes it easy toedit lines in an external controller and then download only the editedlines into an existing program. If you want to completely overwrite thecurrent program in memory, you must delete the program first. This canbe done remotely using the extended command PROG:DEL:ALL (see line350 in the example program DOWNLOAD).
UploadingThe mnemonic PROG:DEF? is used to upload a program from theprogram buffer. The entire program is then returned as a definite lengtharbitrary block. A definite length block starts with the “#” characterfollowed by a single digit defining the number of following digits to readas the block length.
Refer to the Example Programs Guide for a listing of the exampleprogram UPLOAD, which demonstrates an uploading routine run on anexternal controller.
The subroutine Openfile (lines 570 through 770) creates an ASCII filein which to save the uploaded program. The number of 256 byte recordsdeclared in the CREATE ASCII statement (line 730) is the file size(declared in the definite block header) divided by 256. Line 720accommodates any remainder in this calculation by increasing the filesize number by one record, if any remainder exists.
HP IBASIC Supplement 8-27
Interfacing with External DevicesInterfacing with an External Controller
IBASIC Communication across the LANYou may need a way for an IBASIC program running on the analyzer tosignal a remote computer that it has completed some operation.
IBASIC cannot communicate directly across LAN using the ASSIGN andOUTPUT or ENTER commands. However, IBASIC can use the followingSCPI command to send a message to a remote computer via LAN:
DIAGnostic:COMMunicate:LAN:SEND <IP_ADDR>,<PORT_NUM>,<STRING>
This command opens a socket to the remote computer, and sends thespecified string. The <IP_ADDR> argument specifies the IP address of theremote computer. The <PORT_NUM> argument specifies the port numberto use. The <STRING> is the message to be sent.
For example:
DIAGnostic:COMMunicate:LAN:SEND ‘15.4.40.49’,8001,’Ready!’
If the remote computer is not listening for a LAN connection at thespecified port, this command will block, and wait for the remotecomputer to accept the connection. After about 75 seconds, it will timeout. This is the standard TCP/IP timeout period.
See the LAN Interface User’s Guide Supplement for more information.
8-28 HP IBASIC Supplement
9 Using Subprograms
9-1
Using SubprogramsUser-Created Subprograms
User-Created SubprogramsYou can use the LOADSUB keyword with subprograms of your owncreation. LOADSUB enables you to append subprograms to otherprograms and is supported as described in the IBASIC Guide. Whenusing LOADSUB, keep in mind the following:
• Subprograms must be stored to files using the STORE keyword whenfirst created.
• Subprograms may be stored from the external keyboard or from thefront panel if the [File Type] format is BIN.
• BIN type files are generally not transportable between the analyzerand other development systems (only ASCII files are compatible withother systems).
Typical examples of LOAD/STORE:
From an external keyboard:
LOAD “MYFILE”
STORE “MYFILE”
From the front panel:
Typical examples of LOADSUB:
LOADSUB subprogram_name FROM “filename”
LOADSUB ALL FROM “filename”
User-created subprograms are appended to the end of the BASICprogram currently stored in the EDIT buffer.
SAVE RECALL Programs File Type BIN Save Program
SAVE RECALL Programs File Type BIN Recall Program
9-2 HP IBASIC Supplement
Using SubprogramsBuilt-In High-Speed Subprograms
Built-In High-Speed SubprogramsYou can use LOADSUB to access pre-compiled routines stored asinstrument firmware in internal memory. Any IBASIC program runningon the analyzer can access these subprograms; programs running onexternal computers cannot. The external program must use theequivalent code listed in this chapter in place of a built-in subprogram.
IBASIC programs which use the built-in subprograms are simpler andrun faster. For example, most data transfer operations run twice as fastwhen using the built-in subprograms; math operations run many timesfaster. Built-in subprograms are stored in memory designated as“MEM,0,0”.
To access a subprogram, the subprogram first must be loaded into themain program using the LOADSUB keyword. The LOADSUB keywordrequires a filename be specified from which to load the subprogram.Three built-in files are “XFER”, “MATH”, and “RPG”.
• “XFER” file adds support to transfer trace data between theinstrument and the IBASIC program.
• “MATH” file adds high speed support for complex array operations.
• “RPG” file adds fast RPG (rotary pulse generator — front panel knob)response for markers.
LOADSUB <Subprogram name> FROM <Filename:MEM,O,O> loadsthe named subprogram from the built-in file “FILENAME”.
LOADSUB ALL FROM <Filename:MEM,O,O> loads all thesubprograms in the named built-in file “FILENAME”. See the followingtable for subprogram names within the files “XFER”, “MATH”, and“RPG”.
HP IBASIC Supplement 9-3
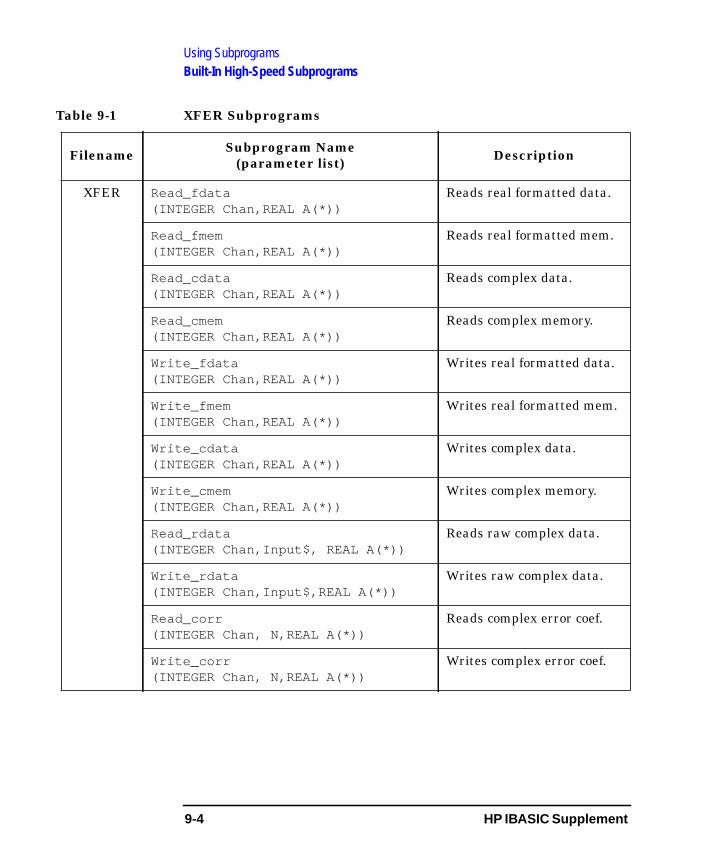
Using SubprogramsBuilt-In High-Speed Subprograms
Table 9-1 XFER Subprograms
Filename Subprogram Name(parameter list) Description
XFER Read_fdata(INTEGER Chan,REAL A(*))
Reads real formatted data.
Read_fmem(INTEGER Chan,REAL A(*))
Reads real formatted mem.
Read_cdata(INTEGER Chan,REAL A(*))
Reads complex data.
Read_cmem(INTEGER Chan,REAL A(*))
Reads complex memory.
Write_fdata(INTEGER Chan,REAL A(*))
Writes real formatted data.
Write_fmem(INTEGER Chan,REAL A(*))
Writes real formatted mem.
Write_cdata(INTEGER Chan,REAL A(*))
Writes complex data.
Write_cmem(INTEGER Chan,REAL A(*))
Writes complex memory.
Read_rdata(INTEGER Chan,Input$, REAL A(*))
Reads raw complex data.
Write_rdata(INTEGER Chan,Input$,REAL A(*))
Writes raw complex data.
Read_corr(INTEGER Chan, N,REAL A(*))
Reads complex error coef.
Write_corr(INTEGER Chan, N,REAL A(*))
Writes complex error coef.
9-4 HP IBASIC Supplement
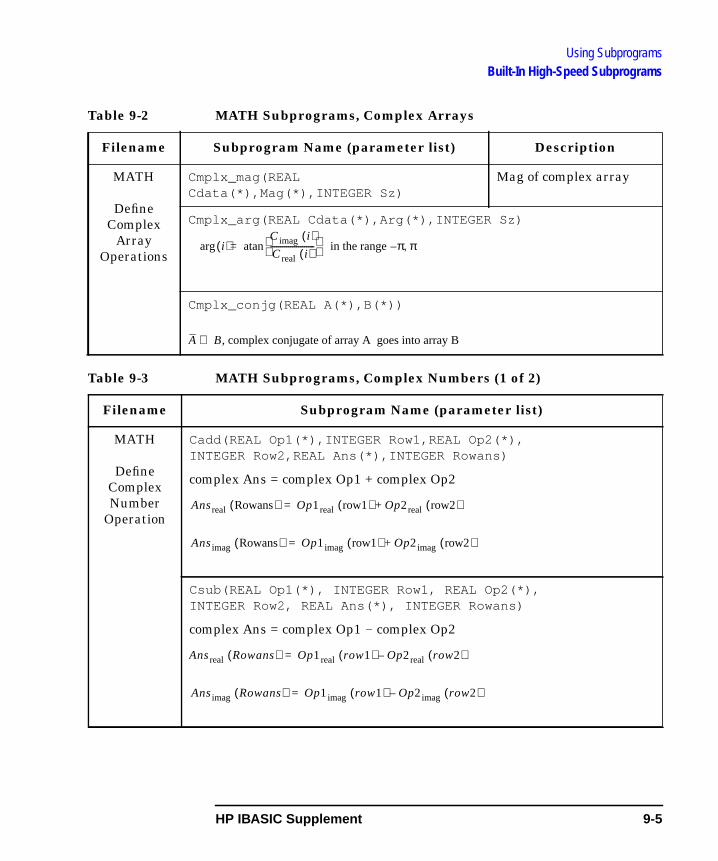
Using SubprogramsBuilt-In High-Speed Subprograms
Table 9-2 MATH Subprograms, Complex Arrays
Table 9-3 MATH Subprograms, Complex Numbers (1 of 2)
Filename Subprogram Name (parameter list) Description
MATH
DefineComplex
ArrayOperations
Cmplx_mag(REALCdata(*),Mag(*),INTEGER Sz)
Mag of complex array
Cmplx_arg(REAL Cdata(*),Arg(*),INTEGER Sz)
Cmplx_conjg(REAL A(*),B(*))
Filename Subprogram Name (parameter list)
MATH
DefineComplexNumber
Operation
Cadd(REAL Op1(*),INTEGER Row1,REAL Op2(*),INTEGER Row2,REAL Ans(*),INTEGER Rowans)
complex Ans = complex Op1 + complex Op2
Csub(REAL Op1(*), INTEGER Row1, REAL Op2(*),INTEGER Row2, REAL Ans(*), INTEGER Rowans)
complex Ans = complex Op1 - complex Op2
i( )C imag i( )Creal i( )----------------------
in the range π– π,atan=arg
A B, complex conjugate of array A goes into array B⇒
Ansreal Rowans( ) Op1real row1( ) Op2real row2( )+=
Ansimag Rowans( ) Op1imag row1( ) Op2imag row2( )+=
Ansreal Rowans( ) Op1real row1( ) Op2real row2( )–=
Ansimag Rowans( ) Op1imag row1( ) Op2imag row2( )–=
HP IBASIC Supplement 9-5
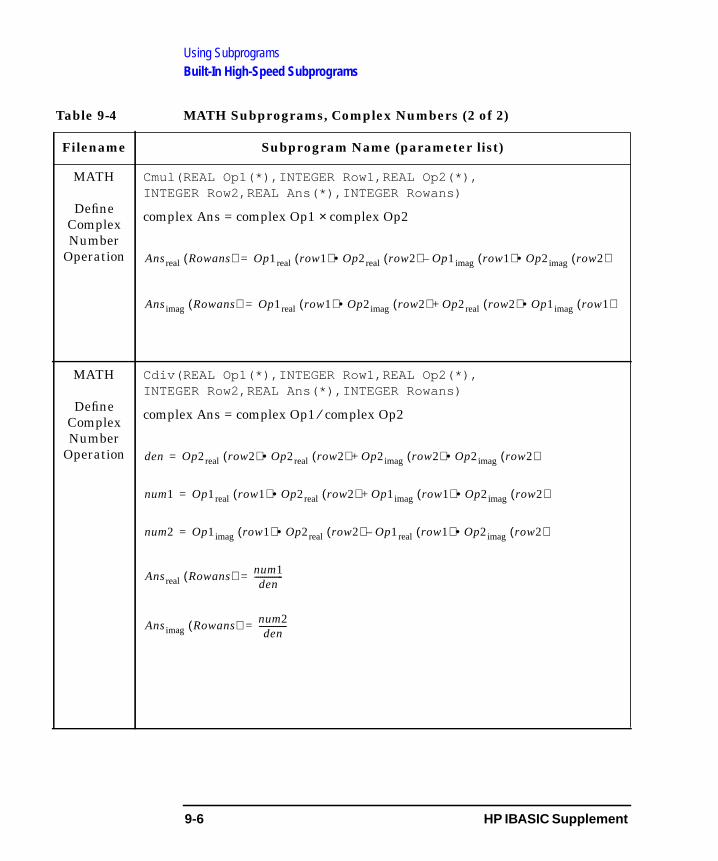
Using SubprogramsBuilt-In High-Speed Subprograms
Table 9-4 MATH Subprograms, Complex Numbers (2 of 2)
Filename Subprogram Name (parameter list)
MATH
DefineComplexNumber
Operation
Cmul(REAL Op1(*),INTEGER Row1,REAL Op2(*),INTEGER Row2,REAL Ans(*),INTEGER Rowans)
complex Ans = complex Op1 × complex Op2
MATH
DefineComplexNumber
Operation
Cdiv(REAL Op1(*),INTEGER Row1,REAL Op2(*),INTEGER Row2,REAL Ans(*),INTEGER Rowans)
complex Ans = complex Op1 ⁄ complex Op2
Ansreal Rowans( ) Op1real row1( ) Op2real row2( )• Op1imag row1( ) Op2imag row2( )•–=
Ansimag Rowans( ) Op1real row1( ) Op2imag row2( )• Op2real row2( ) Op1imag• row1( )+=
den Op2real row2( ) Op2real row2( )• Op2imag row2( ) Op2imag• row2( )+=
num1 Op1real row1( ) Op2real row2( )• Op1imag row1( ) Op2imag• row2( )+=
num2 Op1imag row1( ) Op2real row2( )• Op1real row1( ) Op2imag• row2( )–=
Ansreal Rowans( ) num1den
--------------=
Ansimag Rowans( ) num2den
--------------=
9-6 HP IBASIC Supplement
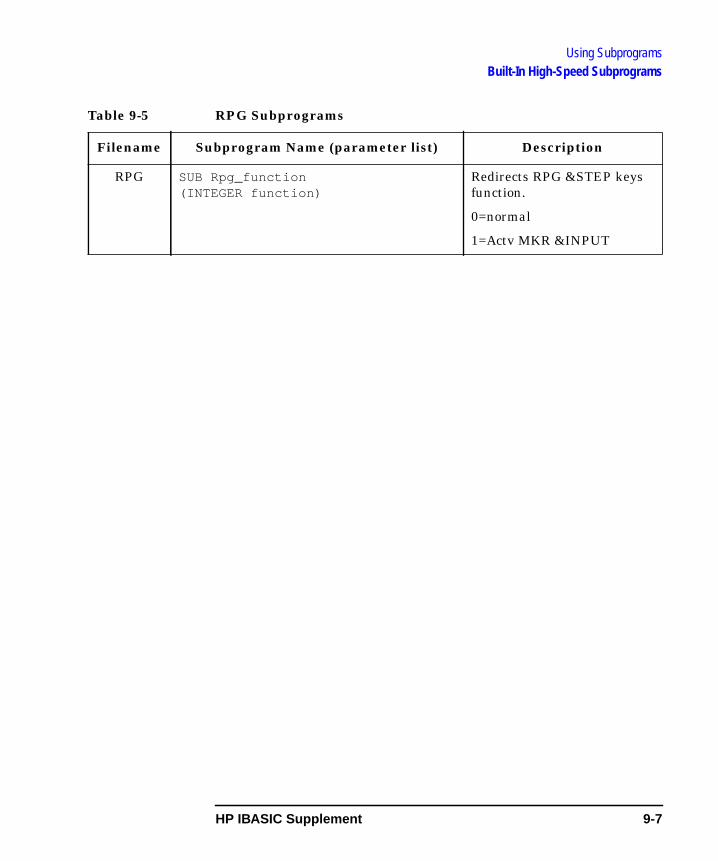
Using SubprogramsBuilt-In High-Speed Subprograms
Table 9-5 RPG Subprograms
Filename Subprogram Name (parameter list) Description
RPG SUB Rpg_function(INTEGER function)
Redirects RPG &STEP keysfunction.
0=normal
1=Actv MKR &INPUT
HP IBASIC Supplement 9-7
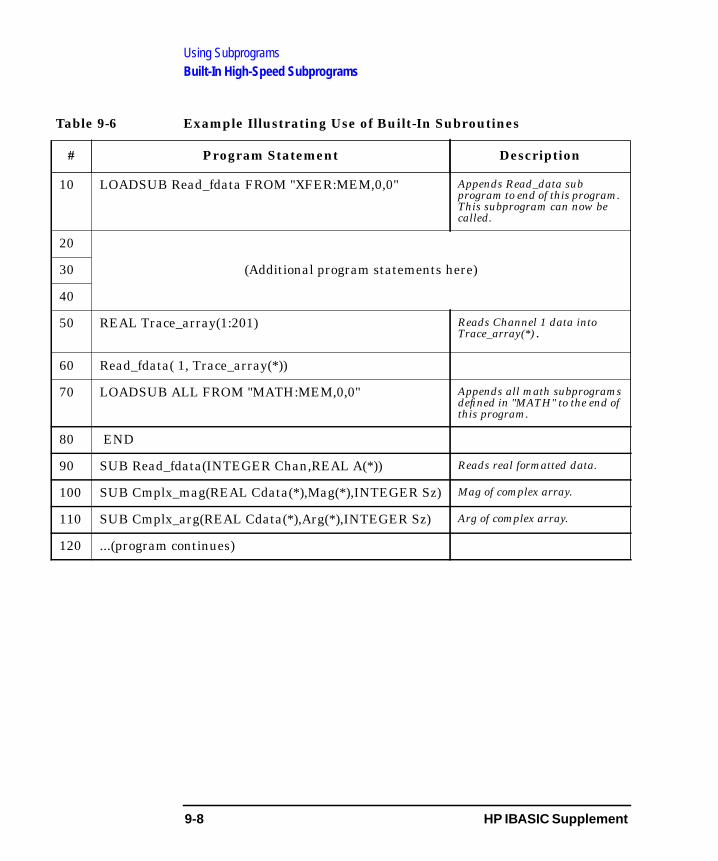
Using SubprogramsBuilt-In High-Speed Subprograms
Table 9-6 Example Illustrating Use of Built-In Subroutines
# Program Statement Description
10 LOADSUB Read_fdata FROM "XFER:MEM,0,0" Appends Read_data subprogram to end of this program.This subprogram can now becalled.
20
(Additional program statements here)30
40
50 REAL Trace_array(1:201) Reads Channel 1 data intoTrace_array(*).
60 Read_fdata( 1, Trace_array(*))
70 LOADSUB ALL FROM "MATH:MEM,0,0" Appends all math subprogramsdefined in "MATH" to the end ofthis program.
80 END
90 SUB Read_fdata(INTEGER Chan,REAL A(*)) Reads real formatted data.
100 SUB Cmplx_mag(REAL Cdata(*),Mag(*),INTEGER Sz) Mag of complex array.
110 SUB Cmplx_arg(REAL Cdata(*),Arg(*),INTEGER Sz) Arg of complex array.
120 ...(program continues)
9-8 HP IBASIC Supplement
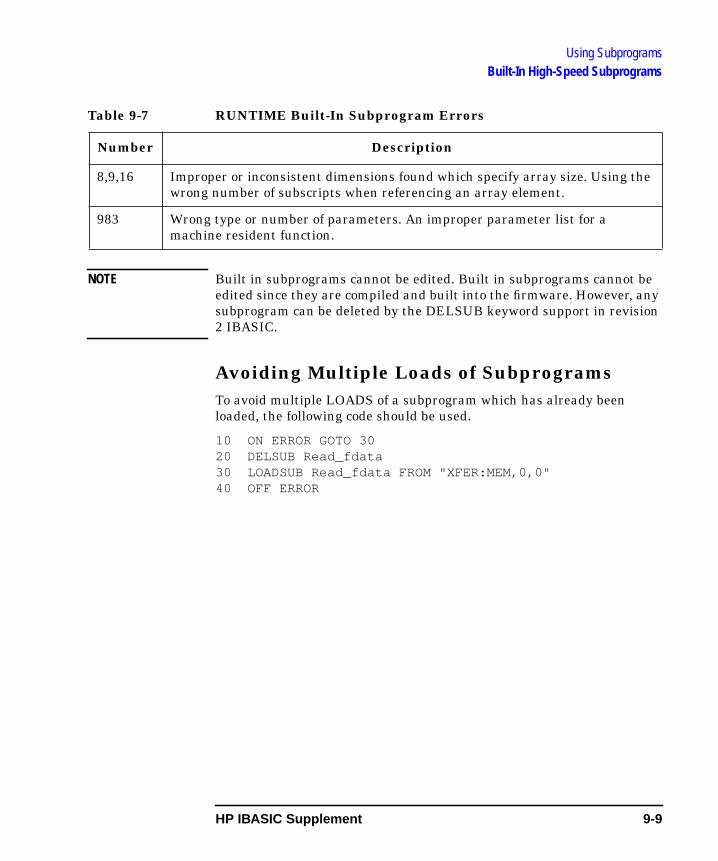
Using SubprogramsBuilt-In High-Speed Subprograms
Table 9-7 RUNTIME Built-In Subprogram Errors
NOTE Built in subprograms cannot be edited. Built in subprograms cannot beedited since they are compiled and built into the firmware. However, anysubprogram can be deleted by the DELSUB keyword support in revision2 IBASIC.
Avoiding Multiple Loads of SubprogramsTo avoid multiple LOADS of a subprogram which has already beenloaded, the following code should be used.
10 ON ERROR GOTO 3020 DELSUB Read_fdata30 LOADSUB Read_fdata FROM "XFER:MEM,0,0"40 OFF ERROR
Number Description
8,9,16 Improper or inconsistent dimensions found which specify array size. Using thewrong number of subscripts when referencing an array element.
983 Wrong type or number of parameters. An improper parameter list for amachine resident function.
HP IBASIC Supplement 9-9
10 IBASIC Keyword Summary
10-1
IBASIC Keyword Summary
Keywords and Keyword Support
This chapter summarizes the HP Instrument BASIC keywordimplementation in the analyzer. Table 10-1 lists the keywords by namein alphabetic order. The type of support for each keyword is shown andany exceptions are noted. Exceptions are important differences betweenthe keyword description in the HP Instrument BASIC LanguageReference and the implementation in the analyzer. If a keyword is notlisted in Table 10-1, it may not be supported in the analyzer.
Keyword and Operator Tables
Table 10-2 through Table 10-20 contain the same information as Table10-1, with the keywords and operators organized by category.
10-2 HP IBASIC Supplement
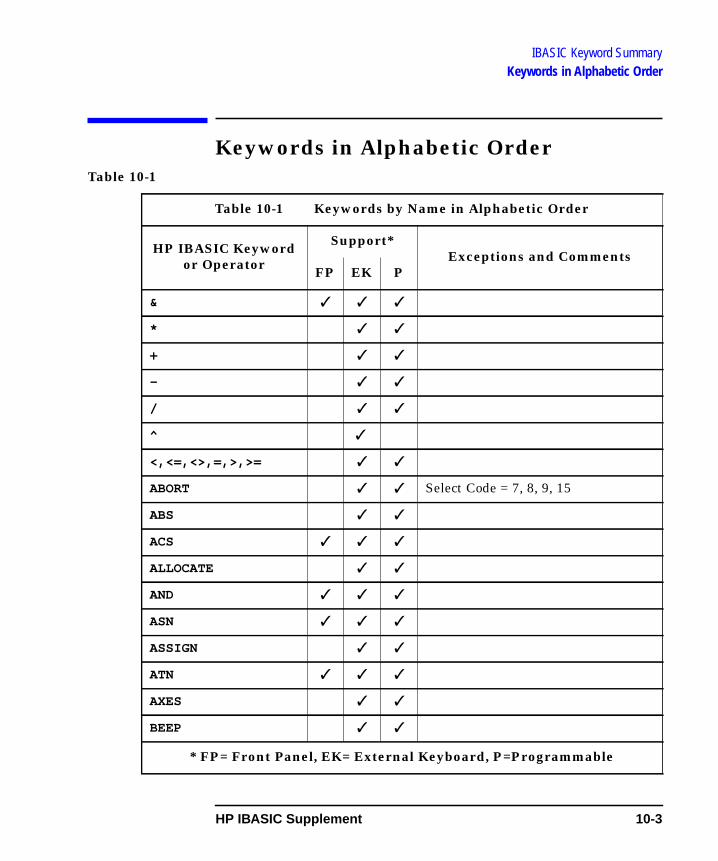
IBASIC Keyword SummaryKeywords in Alphabetic Order
Keywords in Alphabetic OrderTable 10-1
Table 10-1 Keywords by Name in Alphabetic Order
HP IBASIC Keywordor Operator
Support*Exceptions and Comments
FP EK P
& ✓ ✓ ✓
* ✓ ✓
+ ✓ ✓
- ✓ ✓
/ ✓ ✓
^ ✓
<,<=,<>,=,>,>= ✓ ✓
ABORT ✓ ✓ Select Code = 7, 8, 9, 15
ABS ✓ ✓
ACS ✓ ✓ ✓
ALLOCATE ✓ ✓
AND ✓ ✓ ✓
ASN ✓ ✓ ✓
ASSIGN ✓ ✓
ATN ✓ ✓ ✓
AXES ✓ ✓
BEEP ✓ ✓
* FP= Front Panel, EK= External Keyboard, P=Programmable
HP IBASIC Supplement 10-3
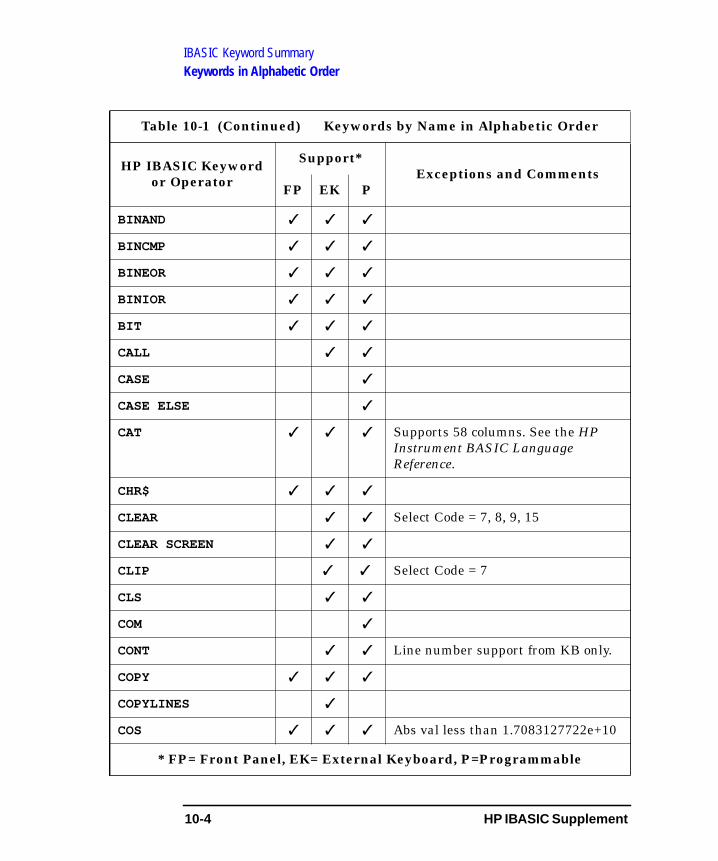
IBASIC Keyword SummaryKeywords in Alphabetic Order
BINAND ✓ ✓ ✓
BINCMP ✓ ✓ ✓
BINEOR ✓ ✓ ✓
BINIOR ✓ ✓ ✓
BIT ✓ ✓ ✓
CALL ✓ ✓
CASE ✓
CASE ELSE ✓
CAT ✓ ✓ ✓ Supports 58 columns. See the HPInstrument BASIC LanguageReference.
CHR$ ✓ ✓ ✓
CLEAR ✓ ✓ Select Code = 7, 8, 9, 15
CLEAR SCREEN ✓ ✓
CLIP ✓ ✓ Select Code = 7
CLS ✓ ✓
COM ✓
CONT ✓ ✓ Line number support from KB only.
COPY ✓ ✓ ✓
COPYLINES ✓
COS ✓ ✓ ✓ Abs val less than 1.7083127722e+10
Table 10-1 (Continued) Keywords by Name in Alphabetic Order
HP IBASIC Keywordor Operator
Support*Exceptions and Comments
FP EK P
* FP= Front Panel, EK= External Keyboard, P=Programmable
10-4 HP IBASIC Supplement
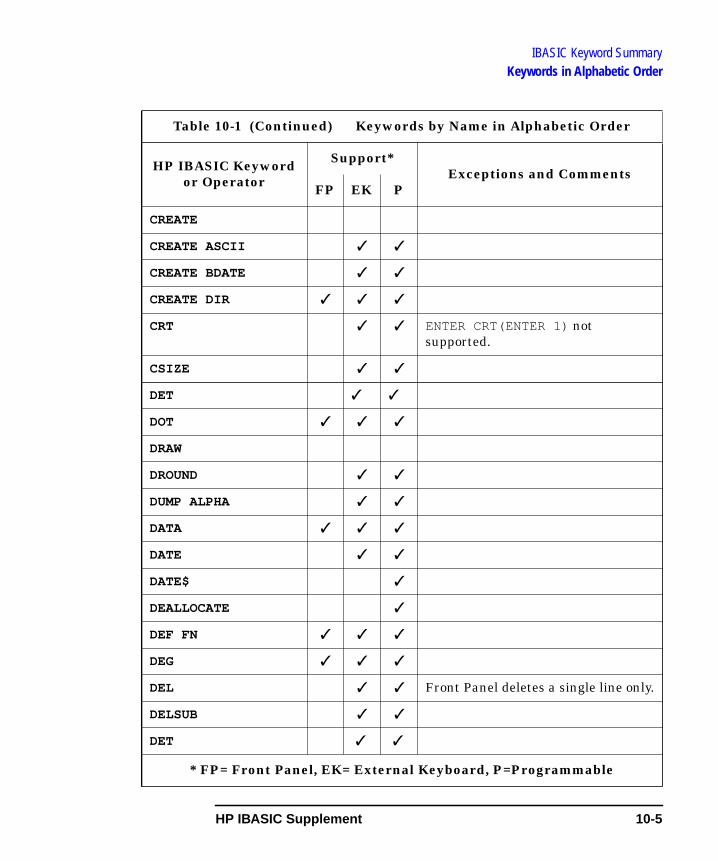
IBASIC Keyword SummaryKeywords in Alphabetic Order
CREATE
CREATE ASCII ✓ ✓
CREATE BDATE ✓ ✓
CREATE DIR ✓ ✓ ✓
CRT ✓ ✓ ENTER CRT(ENTER 1) notsupported.
CSIZE ✓ ✓
DET ✓ ✓
DOT ✓ ✓ ✓
DRAW
DROUND ✓ ✓
DUMP ALPHA ✓ ✓
DATA ✓ ✓ ✓
DATE ✓ ✓
DATE$ ✓
DEALLOCATE ✓
DEF FN ✓ ✓ ✓
DEG ✓ ✓ ✓
DEL ✓ ✓ Front Panel deletes a single line only.
DELSUB ✓ ✓
DET ✓ ✓
Table 10-1 (Continued) Keywords by Name in Alphabetic Order
HP IBASIC Keywordor Operator
Support*Exceptions and Comments
FP EK P
* FP= Front Panel, EK= External Keyboard, P=Programmable
HP IBASIC Supplement 10-5
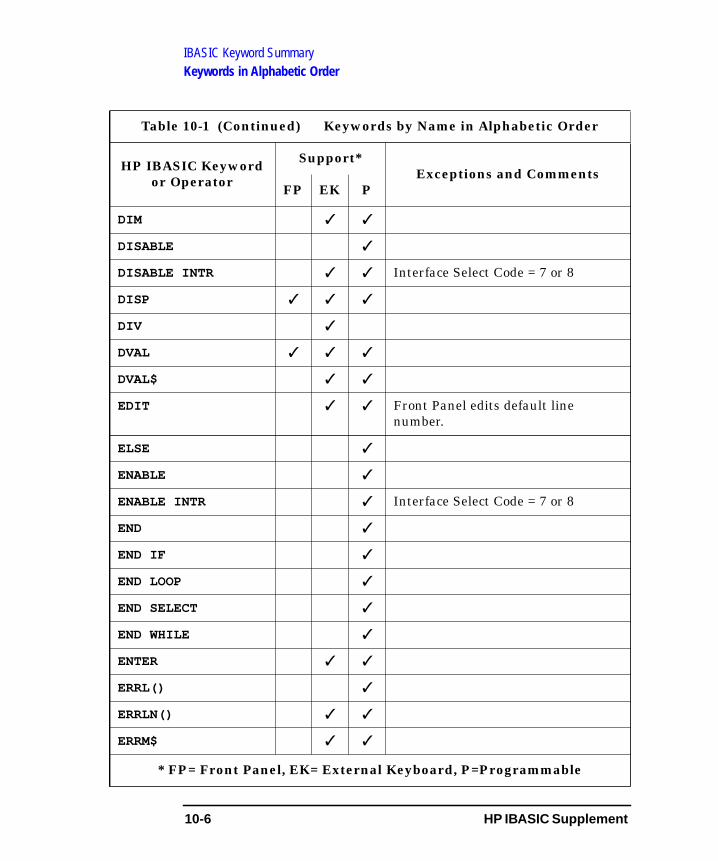
IBASIC Keyword SummaryKeywords in Alphabetic Order
DIM ✓ ✓
DISABLE ✓
DISABLE INTR ✓ ✓ Interface Select Code = 7 or 8
DISP ✓ ✓ ✓
DIV ✓
DVAL ✓ ✓ ✓
DVAL$ ✓ ✓
EDIT ✓ ✓ Front Panel edits default linenumber.
ELSE ✓
ENABLE ✓
ENABLE INTR ✓ Interface Select Code = 7 or 8
END ✓
END IF ✓
END LOOP ✓
END SELECT ✓
END WHILE ✓
ENTER ✓ ✓
ERRL() ✓
ERRLN() ✓ ✓
ERRM$ ✓ ✓
Table 10-1 (Continued) Keywords by Name in Alphabetic Order
HP IBASIC Keywordor Operator
Support*Exceptions and Comments
FP EK P
* FP= Front Panel, EK= External Keyboard, P=Programmable
10-6 HP IBASIC Supplement
IBASIC Keyword SummaryKeywords in Alphabetic Order
ERRN ✓ ✓
EXIT IF ✓
EXOR ✓ ✓ ✓
EXP ✓ ✓
FN ✓
FNEND ✓
FOR NEXT ✓
FRACT ✓ ✓
FRAME ✓ ✓
GCLEAR ✓ ✓
GET ✓ ✓ ✓ See Chapter 4 for usage details.
GINIT ✓ ✓
GOSUB ✓
GOTO ✓
GRID ✓ ✓
IDRAW ✓ ✓
IF THEN ✓
IMAGE ✓
IMOVE ✓ ✓
INDENT ✓
Table 10-1 (Continued) Keywords by Name in Alphabetic Order
HP IBASIC Keywordor Operator
Support*Exceptions and Comments
FP EK P
* FP= Front Panel, EK= External Keyboard, P=Programmable
HP IBASIC Supplement 10-7
IBASIC Keyword SummaryKeywords in Alphabetic Order
INITIALIZE ✓ ✓ ✓
INPUT ✓ See the HP Instrument BASICLanguage Reference.
INT ✓ ✓
INTEGER ✓
IPLOT ✓ ✓
IVAL ✓ ✓ ✓
IVAL$ ✓ ✓ ✓
KBD ✓ Returns select code = 2
LABEL ✓ ✓
LDIR ✓ ✓
LEN ✓ ✓ ✓
LET ✓ ✓
LGT ✓ ✓
LIST ✓ ✓ Valid Device Selectors
LOAD ✓ ✓ ✓ See Chapter 4 for usage details.
LOADSUB ✓ ✓ ✓
LOADSUB ALL FROM...
✓ ✓ ✓
LOCAL ✓ ✓ Select Code 7 only
Table 10-1 (Continued) Keywords by Name in Alphabetic Order
HP IBASIC Keywordor Operator
Support*Exceptions and Comments
FP EK P
* FP= Front Panel, EK= External Keyboard, P=Programmable
10-8 HP IBASIC Supplement
IBASIC Keyword SummaryKeywords in Alphabetic Order
LOCAL LOCKOUT ✓ ✓ Select Code 7 = all keysSelect Code 8 = all keys except Preset
LOG ✓ ✓
LOOP ✓
LORG ✓ ✓
LCW$ ✓ ✓ ✓
MAT ✓ ✓
MAT REORDER ✓ ✓
MAT REORDER...BY ✓ ✓
MAT foo=CSUM(bar) ✓ ✓
MAT foo=IDN ✓ ✓
MAT foo=INV(bar) ✓ ✓
MAT foo=RSUM(bar) ✓ ✓
MAX ✓ ✓
MAXLEN ✓ ✓ ✓
MAXREAL ✓ ✓
MIN ✓ ✓
MINREAL ✓ ✓
MOD ✓ ✓
MODULO ✓ ✓
MOVE ✓ ✓
Table 10-1 (Continued) Keywords by Name in Alphabetic Order
HP IBASIC Keywordor Operator
Support*Exceptions and Comments
FP EK P
* FP= Front Panel, EK= External Keyboard, P=Programmable
HP IBASIC Supplement 10-9

IBASIC Keyword SummaryKeywords in Alphabetic Order
MOVELINES ✓ Valid Device Selectors #7xx, #7xxxx,#9, #15
MSI ✓ ✓ ✓ MSI may be altered by theinstrument.
NOT ✓ ✓ ✓
NUM ✓ ✓ ✓
NUT ✓ ✓ ✓
ON|OFF CYCLE ✓
ON|OFF ERROR ✓
ON|OFF INTR ✓ Interface Select Code = 7 or 8.Must precede ENABLE INTRstatement.
ON|OFF KEY ✓ Key selectors 1 through 7
ON|OFF TIMEOUT ✓ Interface Select Code = 7 or 8
OPTION BASE ✓
OR ✓ ✓ ✓
OUTPUT ✓ ✓ Select Code 1,7, 8, 9, 15
PASS CONTROL ✓ ✓ Select Code 7 or 8
PAUSE ✓ ✓ ✓
PDIR ✓ ✓
PEN ✓ ✓ 0=erase, 1=draw
PENUP ✓ ✓
Table 10-1 (Continued) Keywords by Name in Alphabetic Order
HP IBASIC Keywordor Operator
Support*Exceptions and Comments
FP EK P
* FP= Front Panel, EK= External Keyboard, P=Programmable
10-10 HP IBASIC Supplement
IBASIC Keyword SummaryKeywords in Alphabetic Order
PI ✓ ✓
PIVOT ✓ ✓
PLOT ✓ ✓
POLYGON ✓ ✓ FILL not supported, scaling diffs.
POLYLINE ✓ ✓
POS ✓ ✓ ✓
PRINT ✓ ✓
PRINTER IS ✓ ✓
PROUND ✓ ✓
PRT ✓ ✓
PURGE ✓ ✓ ✓
RAD ✓ ✓ ✓
RANDOMIZE ✓ ✓
RATIO ✓ ✓
RE-SAVE ✓ ✓ ✓
RE-STORE ✓ ✓ ✓
READ ✓ ✓
READIO ✓ ✓ Select Code 9 or 15. See the HPInstrument BASIC LanguageReference.
REAL ✓
Table 10-1 (Continued) Keywords by Name in Alphabetic Order
HP IBASIC Keywordor Operator
Support*Exceptions and Comments
FP EK P
* FP= Front Panel, EK= External Keyboard, P=Programmable
HP IBASIC Supplement 10-11
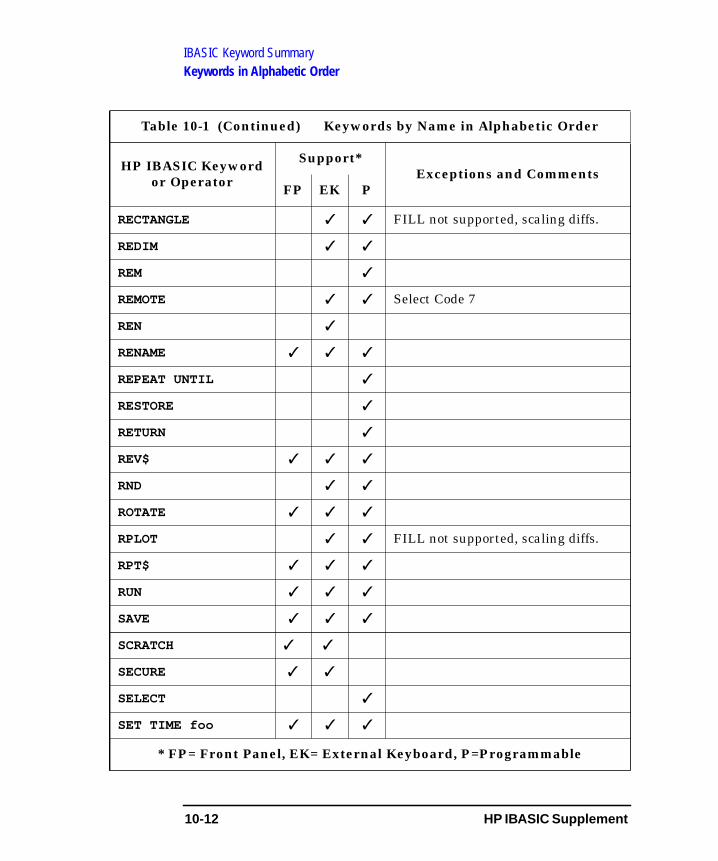
IBASIC Keyword SummaryKeywords in Alphabetic Order
RECTANGLE ✓ ✓ FILL not supported, scaling diffs.
REDIM ✓ ✓
REM ✓
REMOTE ✓ ✓ Select Code 7
REN ✓
RENAME ✓ ✓ ✓
REPEAT UNTIL ✓
RESTORE ✓
RETURN ✓
REV$ ✓ ✓ ✓
RND ✓ ✓
ROTATE ✓ ✓ ✓
RPLOT ✓ ✓ FILL not supported, scaling diffs.
RPT$ ✓ ✓ ✓
RUN ✓ ✓ ✓
SAVE ✓ ✓ ✓
SCRATCH ✓ ✓
SECURE ✓ ✓
SELECT ✓
SET TIME foo ✓ ✓ ✓
Table 10-1 (Continued) Keywords by Name in Alphabetic Order
HP IBASIC Keywordor Operator
Support*Exceptions and Comments
FP EK P
* FP= Front Panel, EK= External Keyboard, P=Programmable
10-12 HP IBASIC Supplement
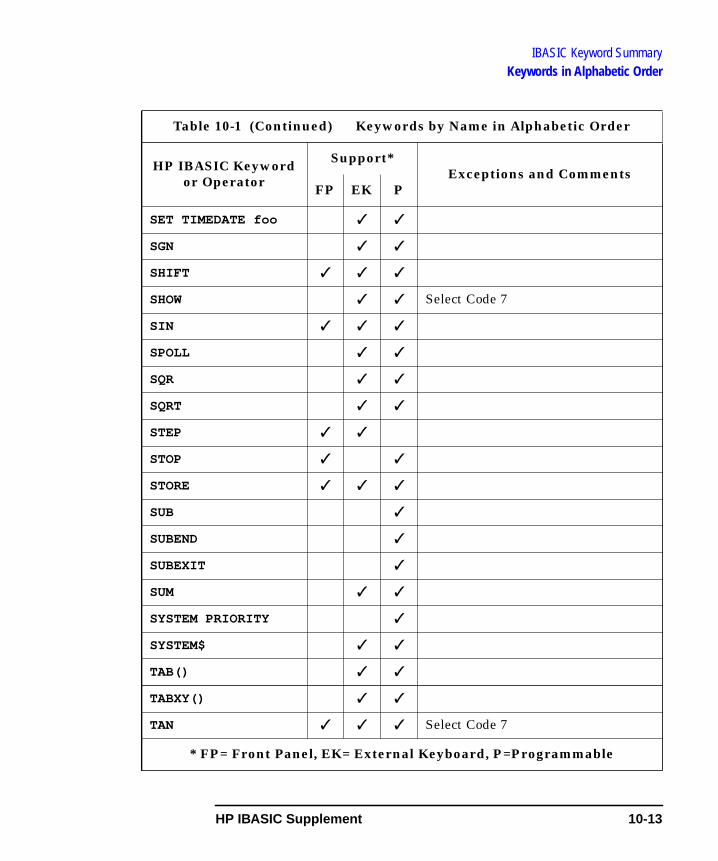
IBASIC Keyword SummaryKeywords in Alphabetic Order
SET TIMEDATE foo ✓ ✓
SGN ✓ ✓
SHIFT ✓ ✓ ✓
SHOW ✓ ✓ Select Code 7
SIN ✓ ✓ ✓
SPOLL ✓ ✓
SQR ✓ ✓
SQRT ✓ ✓
STEP ✓ ✓
STOP ✓ ✓
STORE ✓ ✓ ✓
SUB ✓
SUBEND ✓
SUBEXIT ✓
SUM ✓ ✓
SYSTEM PRIORITY ✓
SYSTEM$ ✓ ✓
TAB() ✓ ✓
TABXY() ✓ ✓
TAN ✓ ✓ ✓ Select Code 7
Table 10-1 (Continued) Keywords by Name in Alphabetic Order
HP IBASIC Keywordor Operator
Support*Exceptions and Comments
FP EK P
* FP= Front Panel, EK= External Keyboard, P=Programmable
HP IBASIC Supplement 10-13
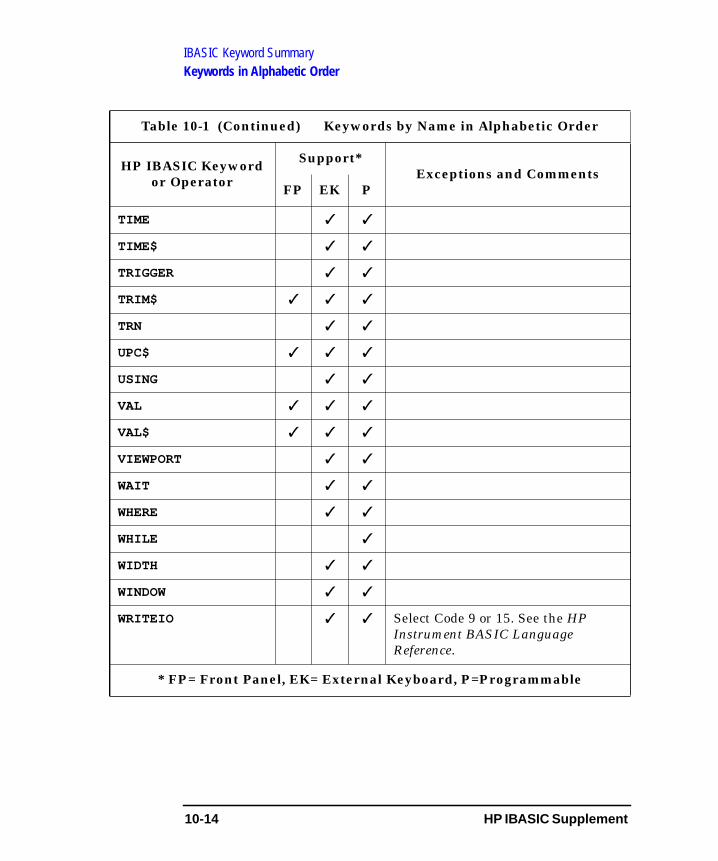
IBASIC Keyword SummaryKeywords in Alphabetic Order
TIME ✓ ✓
TIME$ ✓ ✓
TRIGGER ✓ ✓
TRIM$ ✓ ✓ ✓
TRN ✓ ✓
UPC$ ✓ ✓ ✓
USING ✓ ✓
VAL ✓ ✓ ✓
VAL$ ✓ ✓ ✓
VIEWPORT ✓ ✓
WAIT ✓ ✓
WHERE ✓ ✓
WHILE ✓
WIDTH ✓ ✓
WINDOW ✓ ✓
WRITEIO ✓ ✓ Select Code 9 or 15. See the HPInstrument BASIC LanguageReference.
Table 10-1 (Continued) Keywords by Name in Alphabetic Order
HP IBASIC Keywordor Operator
Support*Exceptions and Comments
FP EK P
* FP= Front Panel, EK= External Keyboard, P=Programmable
10-14 HP IBASIC Supplement
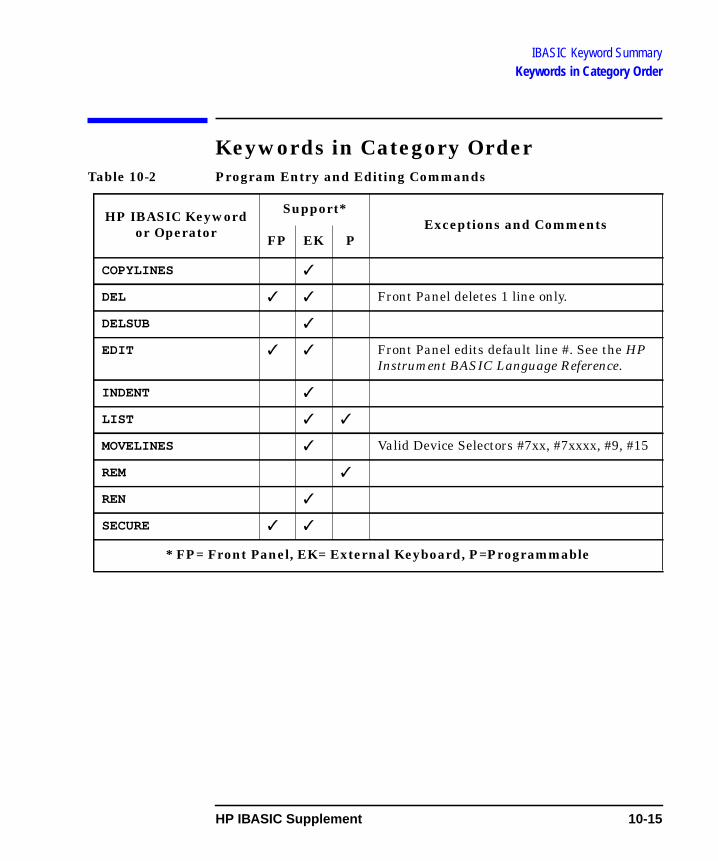
IBASIC Keyword SummaryKeywords in Category Order
Keywords in Category OrderTable 10-2 Program Entry and Editing Commands
HP IBASIC Keywordor Operator
Support*Exceptions and Comments
FP EK P
COPYLINES ✓
DEL ✓ ✓ Front Panel deletes 1 line only.
DELSUB ✓
EDIT ✓ ✓ Front Panel edits default line #. See the HPInstrument BASIC Language Reference.
INDENT ✓
LIST ✓ ✓
MOVELINES ✓ Valid Device Selectors #7xx, #7xxxx, #9, #15
REM ✓
REN ✓
SECURE ✓ ✓
* FP= Front Panel, EK= External Keyboard, P=Programmable
HP IBASIC Supplement 10-15
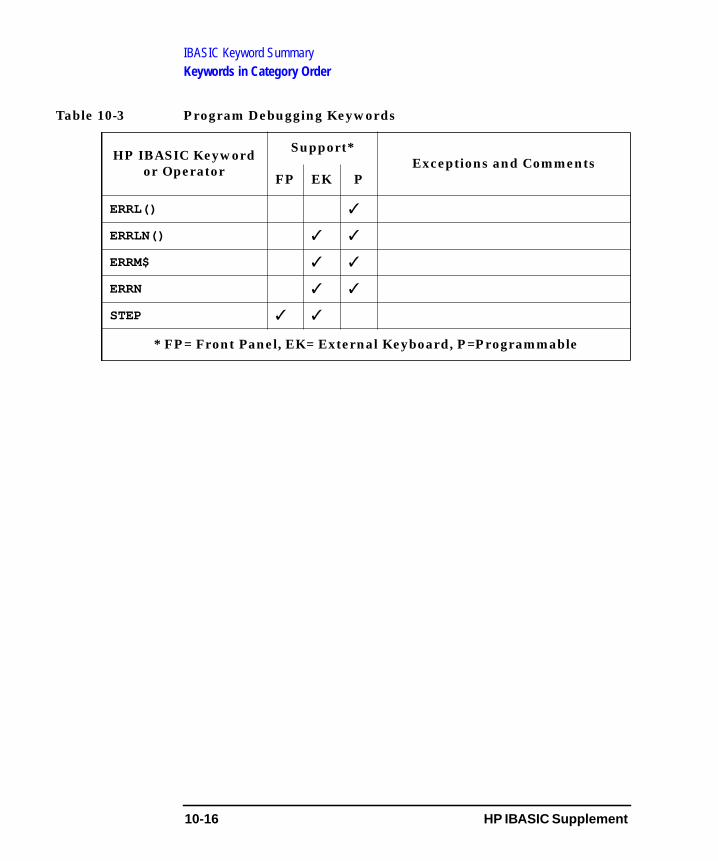
IBASIC Keyword SummaryKeywords in Category Order
Table 10-3 Program Debugging Keywords
HP IBASIC Keywordor Operator
Support*Exceptions and Comments
FP EK P
ERRL() ✓
ERRLN() ✓ ✓
ERRM$ ✓ ✓
ERRN ✓ ✓
STEP ✓ ✓
* FP= Front Panel, EK= External Keyboard, P=Programmable
10-16 HP IBASIC Supplement
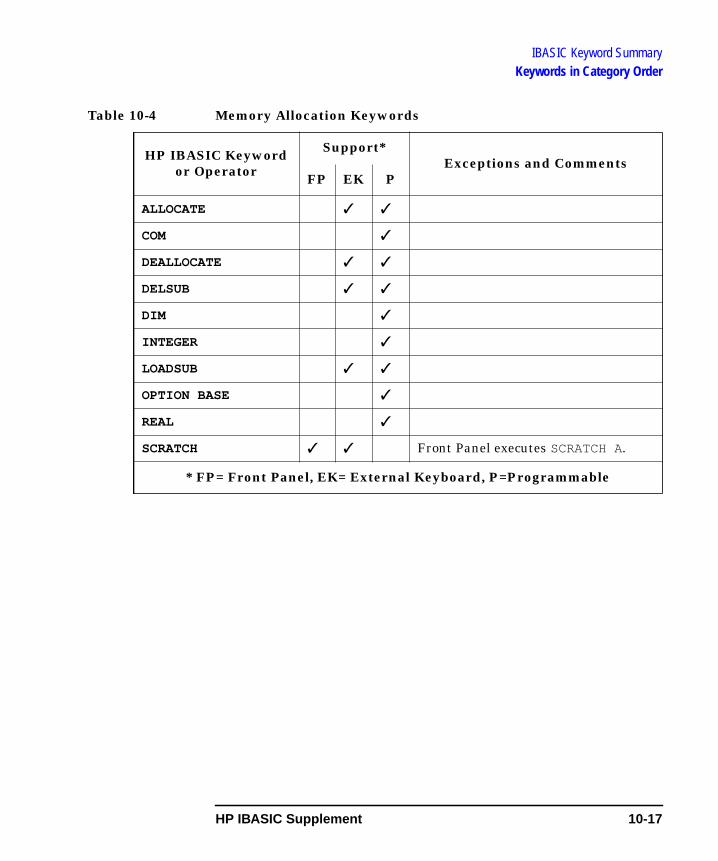
IBASIC Keyword SummaryKeywords in Category Order
Table 10-4 Memory Allocation Keywords
HP IBASIC Keywordor Operator
Support*Exceptions and Comments
FP EK P
ALLOCATE ✓ ✓
COM ✓
DEALLOCATE ✓ ✓
DELSUB ✓ ✓
DIM ✓
INTEGER ✓
LOADSUB ✓ ✓
OPTION BASE ✓
REAL ✓
SCRATCH ✓ ✓ Front Panel executes SCRATCH A.
* FP= Front Panel, EK= External Keyboard, P=Programmable
HP IBASIC Supplement 10-17
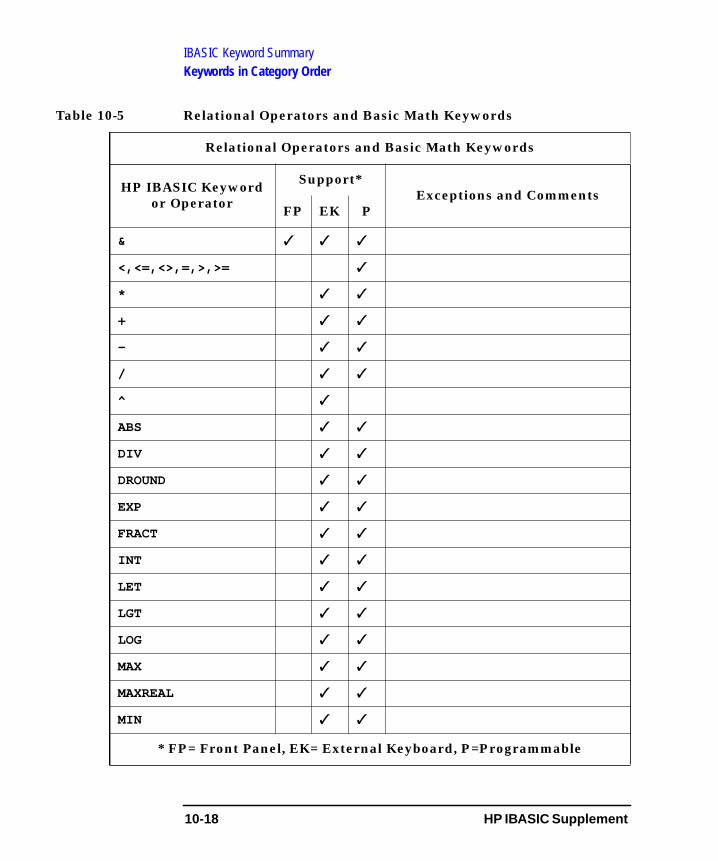
IBASIC Keyword SummaryKeywords in Category Order
Table 10-5 Relational Operators and Basic Math Keywords
Relational Operators and Basic Math Keywords
HP IBASIC Keywordor Operator
Support*Exceptions and Comments
FP EK P
& ✓ ✓ ✓
<,<=,<>,=,>,>= ✓
* ✓ ✓
+ ✓ ✓
- ✓ ✓
/ ✓ ✓
^ ✓
ABS ✓ ✓
DIV ✓ ✓
DROUND ✓ ✓
EXP ✓ ✓
FRACT ✓ ✓
INT ✓ ✓
LET ✓ ✓
LGT ✓ ✓
LOG ✓ ✓
MAX ✓ ✓
MAXREAL ✓ ✓
MIN ✓ ✓
* FP= Front Panel, EK= External Keyboard, P=Programmable
10-18 HP IBASIC Supplement
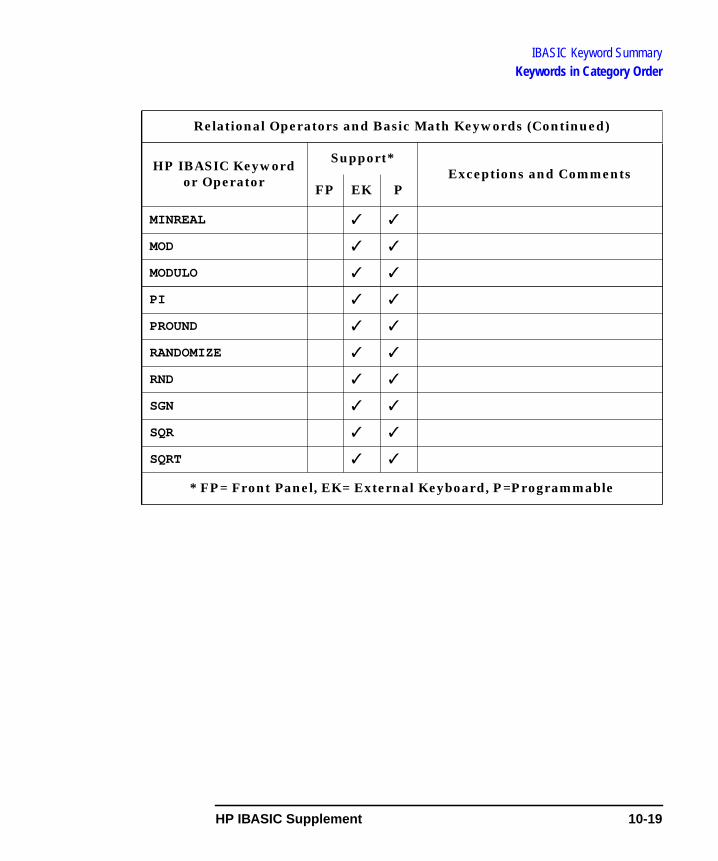
IBASIC Keyword SummaryKeywords in Category Order
MINREAL ✓ ✓
MOD ✓ ✓
MODULO ✓ ✓
PI ✓ ✓
PROUND ✓ ✓
RANDOMIZE ✓ ✓
RND ✓ ✓
SGN ✓ ✓
SQR ✓ ✓
SQRT ✓ ✓
Relational Operators and Basic Math Keywords (Continued)
HP IBASIC Keywordor Operator
Support*Exceptions and Comments
FP EK P
* FP= Front Panel, EK= External Keyboard, P=Programmable
HP IBASIC Supplement 10-19
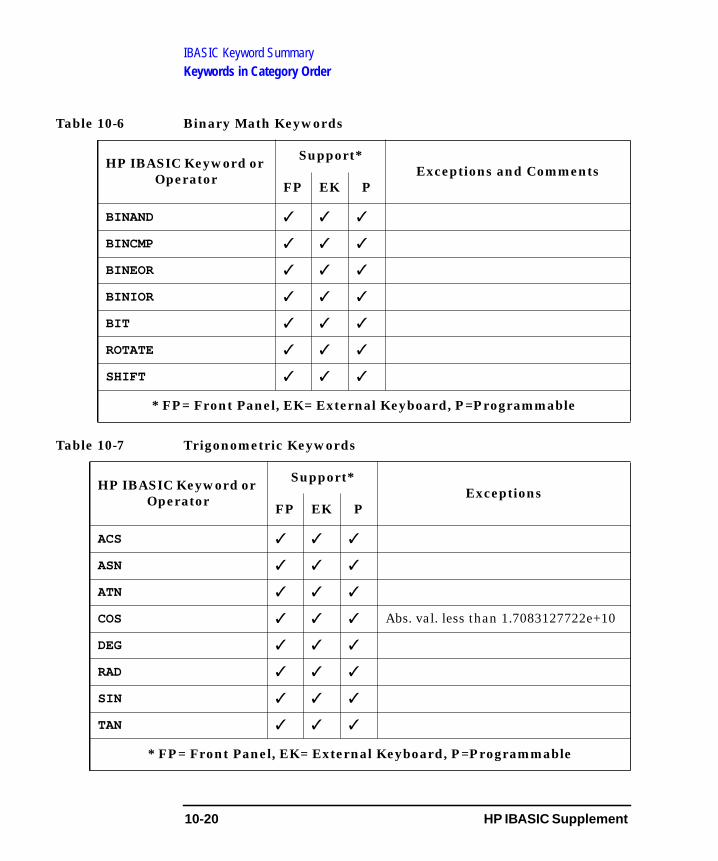
IBASIC Keyword SummaryKeywords in Category Order
Table 10-6 Binary Math Keywords
Table 10-7 Trigonometric Keywords
HP IBASIC Keyword orOperator
Support*Exceptions and Comments
FP EK P
BINAND ✓ ✓ ✓
BINCMP ✓ ✓ ✓
BINEOR ✓ ✓ ✓
BINIOR ✓ ✓ ✓
BIT ✓ ✓ ✓
ROTATE ✓ ✓ ✓
SHIFT ✓ ✓ ✓
* FP= Front Panel, EK= External Keyboard, P=Programmable
HP IBASIC Keyword orOperator
Support*Exceptions
FP EK P
ACS ✓ ✓ ✓
ASN ✓ ✓ ✓
ATN ✓ ✓ ✓
COS ✓ ✓ ✓ Abs. val. less than 1.7083127722e+10
DEG ✓ ✓ ✓
RAD ✓ ✓ ✓
SIN ✓ ✓ ✓
TAN ✓ ✓ ✓
* FP= Front Panel, EK= External Keyboard, P=Programmable
10-20 HP IBASIC Supplement
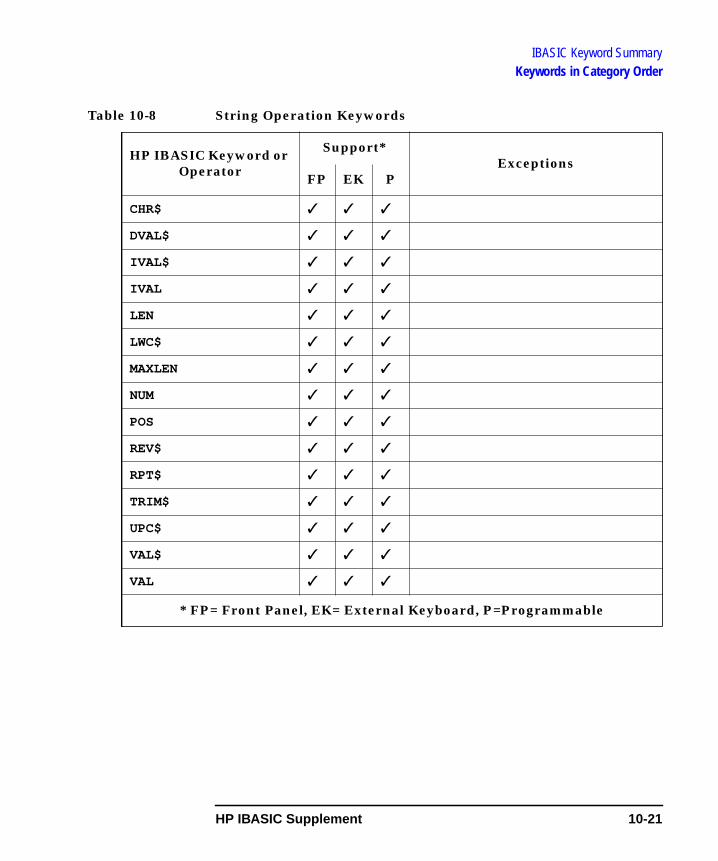
IBASIC Keyword SummaryKeywords in Category Order
Table 10-8 String Operation Keywords
HP IBASIC Keyword orOperator
Support*Exceptions
FP EK P
CHR$ ✓ ✓ ✓
DVAL$ ✓ ✓ ✓
IVAL$ ✓ ✓ ✓
IVAL ✓ ✓ ✓
LEN ✓ ✓ ✓
LWC$ ✓ ✓ ✓
MAXLEN ✓ ✓ ✓
NUM ✓ ✓ ✓
POS ✓ ✓ ✓
REV$ ✓ ✓ ✓
RPT$ ✓ ✓ ✓
TRIM$ ✓ ✓ ✓
UPC$ ✓ ✓ ✓
VAL$ ✓ ✓ ✓
VAL ✓ ✓ ✓
* FP= Front Panel, EK= External Keyboard, P=Programmable
HP IBASIC Supplement 10-21
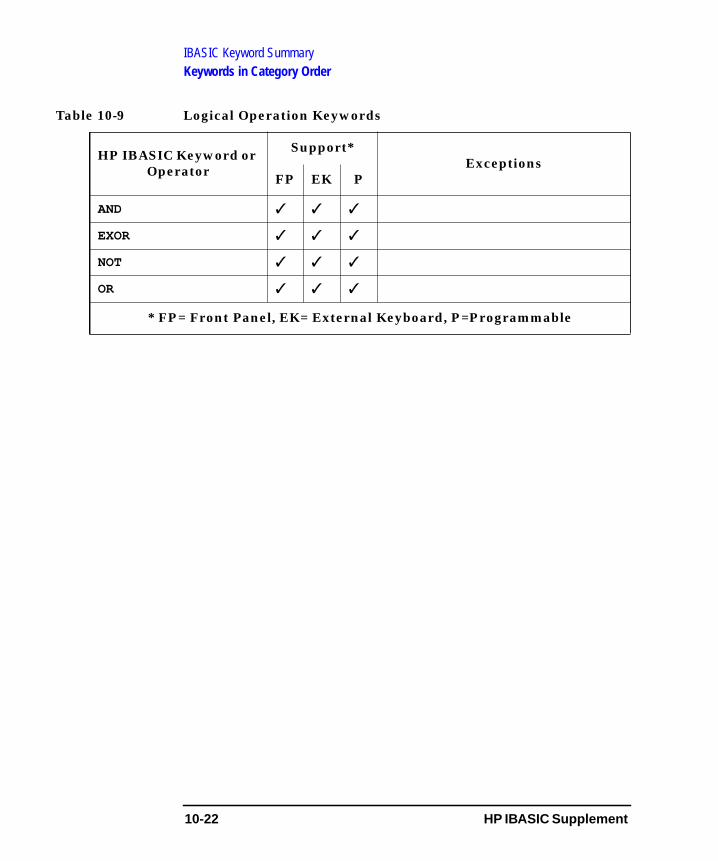
IBASIC Keyword SummaryKeywords in Category Order
Table 10-9 Logical Operation Keywords
HP IBASIC Keyword orOperator
Support*Exceptions
FP EK P
AND ✓ ✓ ✓
EXOR ✓ ✓ ✓
NOT ✓ ✓ ✓
OR ✓ ✓ ✓
* FP= Front Panel, EK= External Keyboard, P=Programmable
10-22 HP IBASIC Supplement
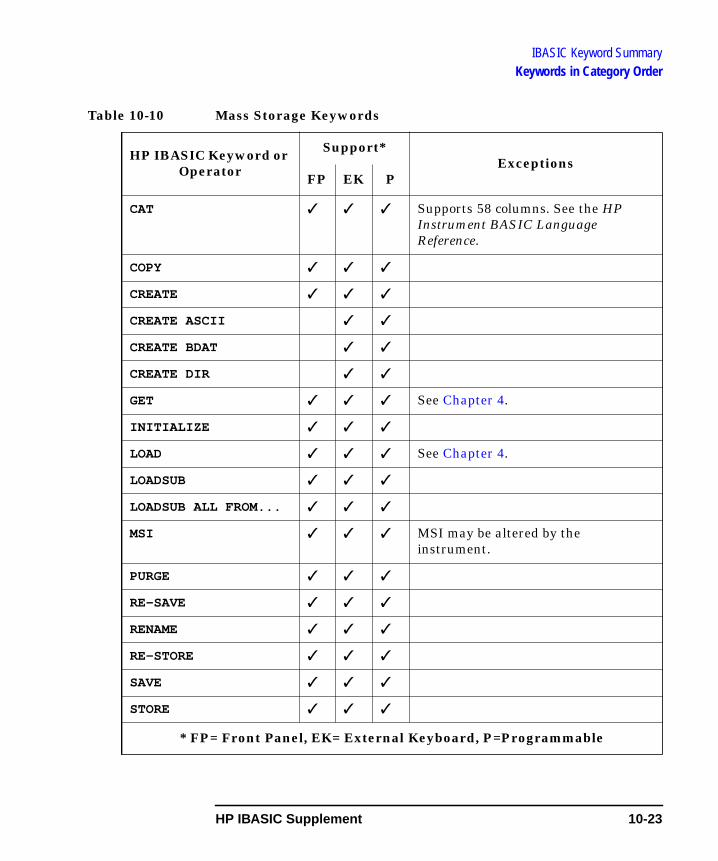
IBASIC Keyword SummaryKeywords in Category Order
Table 10-10 Mass Storage Keywords
HP IBASIC Keyword orOperator
Support*Exceptions
FP EK P
CAT ✓ ✓ ✓ Supports 58 columns. See the HPInstrument BASIC LanguageReference.
COPY ✓ ✓ ✓
CREATE ✓ ✓ ✓
CREATE ASCII ✓ ✓
CREATE BDAT ✓ ✓
CREATE DIR ✓ ✓
GET ✓ ✓ ✓ See Chapter 4.
INITIALIZE ✓ ✓ ✓
LOAD ✓ ✓ ✓ See Chapter 4.
LOADSUB ✓ ✓ ✓
LOADSUB ALL FROM... ✓ ✓ ✓
MSI ✓ ✓ ✓ MSI may be altered by theinstrument.
PURGE ✓ ✓ ✓
RE-SAVE ✓ ✓ ✓
RENAME ✓ ✓ ✓
RE-STORE ✓ ✓ ✓
SAVE ✓ ✓ ✓
STORE ✓ ✓ ✓
* FP= Front Panel, EK= External Keyboard, P=Programmable
HP IBASIC Supplement 10-23
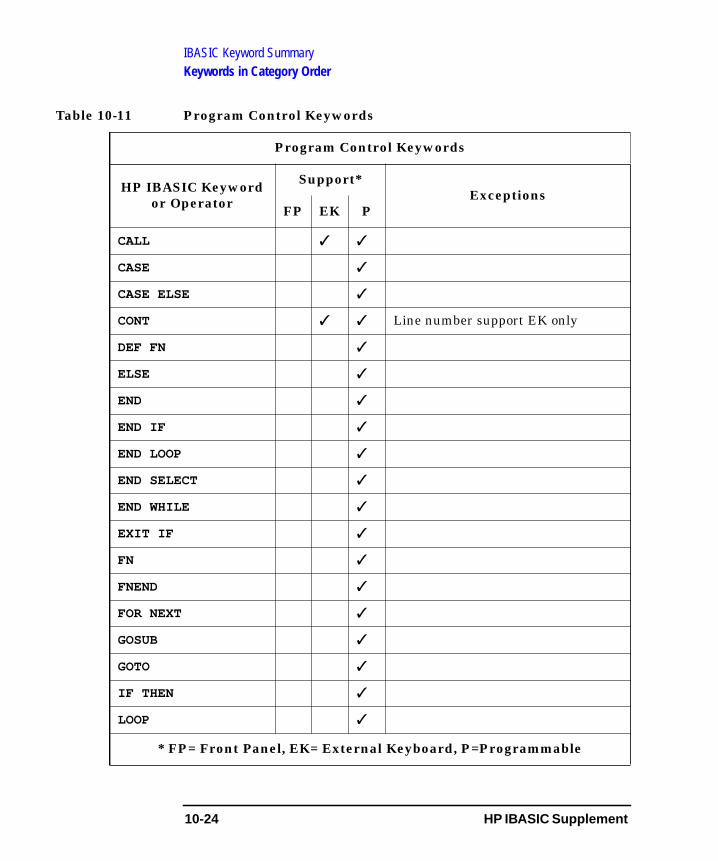
IBASIC Keyword SummaryKeywords in Category Order
Table 10-11 Program Control Keywords
Program Control Keywords
HP IBASIC Keywordor Operator
Support*Exceptions
FP EK P
CALL ✓ ✓
CASE ✓
CASE ELSE ✓
CONT ✓ ✓ Line number support EK only
DEF FN ✓
ELSE ✓
END ✓
END IF ✓
END LOOP ✓
END SELECT ✓
END WHILE ✓
EXIT IF ✓
FN ✓
FNEND ✓
FOR NEXT ✓
GOSUB ✓
GOTO ✓
IF THEN ✓
LOOP ✓
* FP= Front Panel, EK= External Keyboard, P=Programmable
10-24 HP IBASIC Supplement
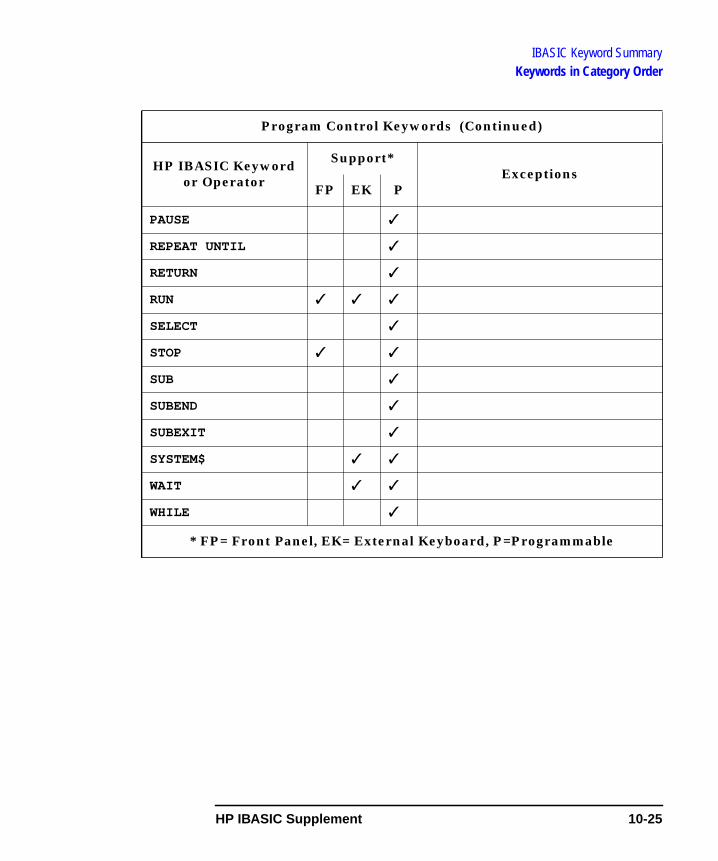
IBASIC Keyword SummaryKeywords in Category Order
PAUSE ✓
REPEAT UNTIL ✓
RETURN ✓
RUN ✓ ✓ ✓
SELECT ✓
STOP ✓ ✓
SUB ✓
SUBEND ✓
SUBEXIT ✓
SYSTEM$ ✓ ✓
WAIT ✓ ✓
WHILE ✓
Program Control Keywords (Continued)
HP IBASIC Keywordor Operator
Support*Exceptions
FP EK P
* FP= Front Panel, EK= External Keyboard, P=Programmable
HP IBASIC Supplement 10-25
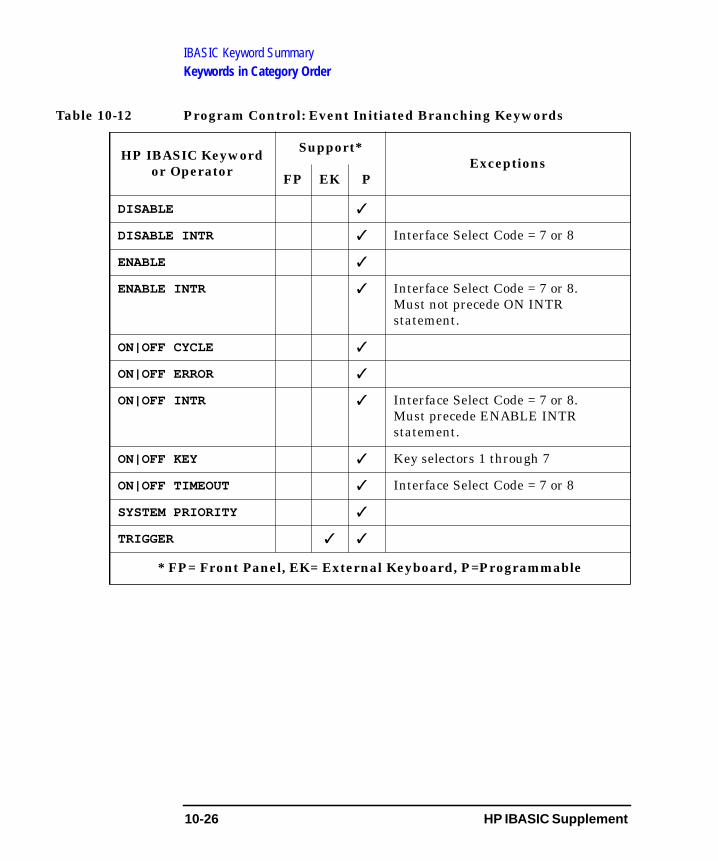
IBASIC Keyword SummaryKeywords in Category Order
Table 10-12 Program Control: Event Initiated Branching Keywords
HP IBASIC Keywordor Operator
Support*Exceptions
FP EK P
DISABLE ✓
DISABLE INTR ✓ Interface Select Code = 7 or 8
ENABLE ✓
ENABLE INTR ✓ Interface Select Code = 7 or 8.Must not precede ON INTRstatement.
ON|OFF CYCLE ✓
ON|OFF ERROR ✓
ON|OFF INTR ✓ Interface Select Code = 7 or 8.Must precede ENABLE INTRstatement.
ON|OFF KEY ✓ Key selectors 1 through 7
ON|OFF TIMEOUT ✓ Interface Select Code = 7 or 8
SYSTEM PRIORITY ✓
TRIGGER ✓ ✓
* FP= Front Panel, EK= External Keyboard, P=Programmable
10-26 HP IBASIC Supplement
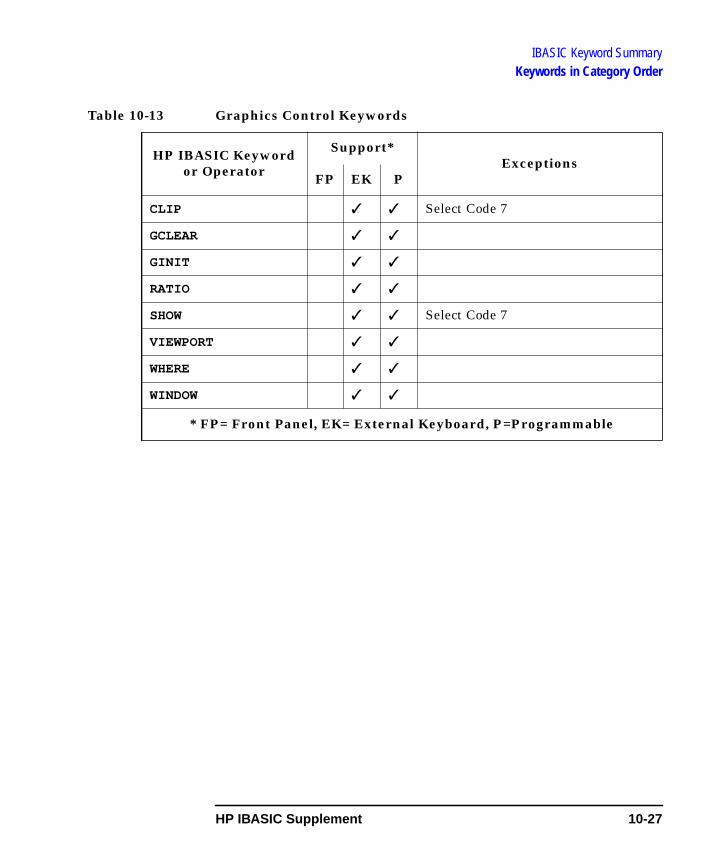
IBASIC Keyword SummaryKeywords in Category Order
Table 10-13 Graphics Control Keywords
HP IBASIC Keywordor Operator
Support*Exceptions
FP EK P
CLIP ✓ ✓ Select Code 7
GCLEAR ✓ ✓
GINIT ✓ ✓
RATIO ✓ ✓
SHOW ✓ ✓ Select Code 7
VIEWPORT ✓ ✓
WHERE ✓ ✓
WINDOW ✓ ✓
* FP= Front Panel, EK= External Keyboard, P=Programmable
HP IBASIC Supplement 10-27
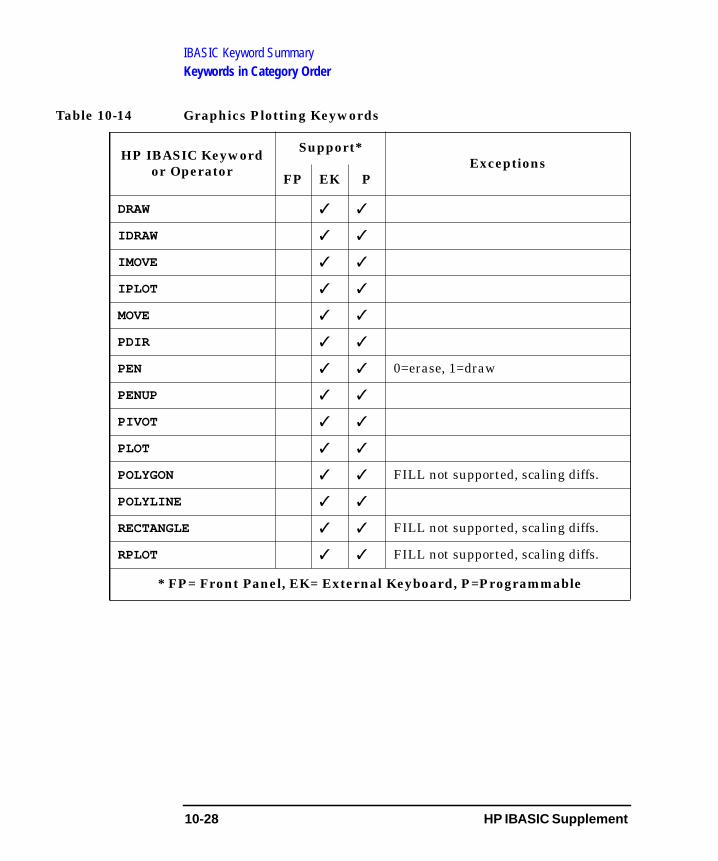
IBASIC Keyword SummaryKeywords in Category Order
Table 10-14 Graphics Plotting Keywords
HP IBASIC Keywordor Operator
Support*Exceptions
FP EK P
DRAW ✓ ✓
IDRAW ✓ ✓
IMOVE ✓ ✓
IPLOT ✓ ✓
MOVE ✓ ✓
PDIR ✓ ✓
PEN ✓ ✓ 0=erase, 1=draw
PENUP ✓ ✓
PIVOT ✓ ✓
PLOT ✓ ✓
POLYGON ✓ ✓ FILL not supported, scaling diffs.
POLYLINE ✓ ✓
RECTANGLE ✓ ✓ FILL not supported, scaling diffs.
RPLOT ✓ ✓ FILL not supported, scaling diffs.
* FP= Front Panel, EK= External Keyboard, P=Programmable
10-28 HP IBASIC Supplement
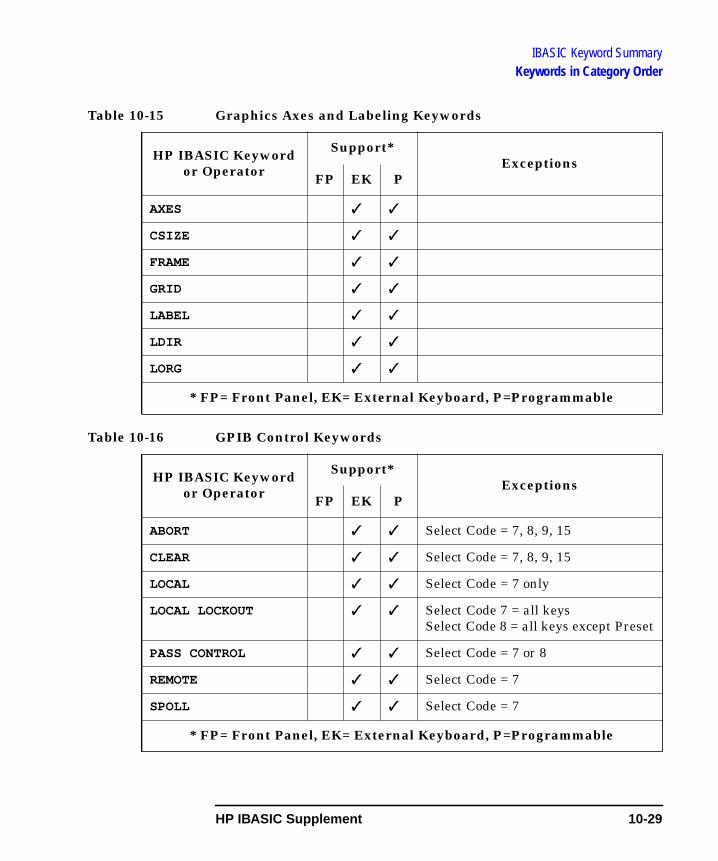
IBASIC Keyword SummaryKeywords in Category Order
Table 10-15 Graphics Axes and Labeling Keywords
Table 10-16 GPIB Control Keywords
HP IBASIC Keywordor Operator
Support*Exceptions
FP EK P
AXES ✓ ✓
CSIZE ✓ ✓
FRAME ✓ ✓
GRID ✓ ✓
LABEL ✓ ✓
LDIR ✓ ✓
LORG ✓ ✓
* FP= Front Panel, EK= External Keyboard, P=Programmable
HP IBASIC Keywordor Operator
Support*Exceptions
FP EK P
ABORT ✓ ✓ Select Code = 7, 8, 9, 15
CLEAR ✓ ✓ Select Code = 7, 8, 9, 15
LOCAL ✓ ✓ Select Code = 7 only
LOCAL LOCKOUT ✓ ✓ Select Code 7 = all keysSelect Code 8 = all keys except Preset
PASS CONTROL ✓ ✓ Select Code = 7 or 8
REMOTE ✓ ✓ Select Code = 7
SPOLL ✓ ✓ Select Code = 7
* FP= Front Panel, EK= External Keyboard, P=Programmable
HP IBASIC Supplement 10-29
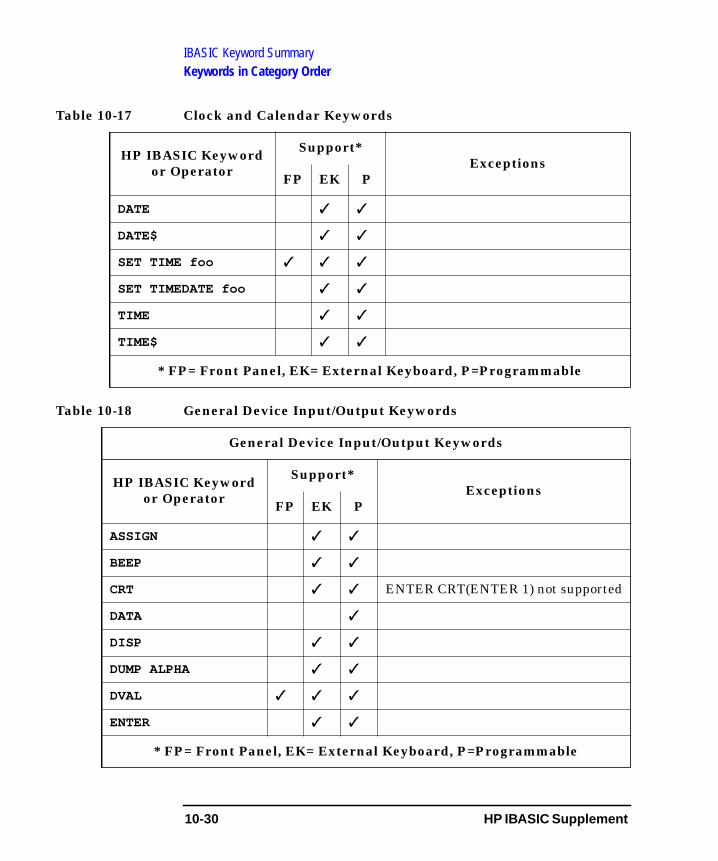
IBASIC Keyword SummaryKeywords in Category Order
Table 10-17 Clock and Calendar Keywords
Table 10-18 General Device Input/Output Keywords
HP IBASIC Keywordor Operator
Support*Exceptions
FP EK P
DATE ✓ ✓
DATE$ ✓ ✓
SET TIME foo ✓ ✓ ✓
SET TIMEDATE foo ✓ ✓
TIME ✓ ✓
TIME$ ✓ ✓
* FP= Front Panel, EK= External Keyboard, P=Programmable
General Device Input/Output Keywords
HP IBASIC Keywordor Operator
Support*Exceptions
FP EK P
ASSIGN ✓ ✓
BEEP ✓ ✓
CRT ✓ ✓ ENTER CRT(ENTER 1) not supported
DATA ✓
DISP ✓ ✓
DUMP ALPHA ✓ ✓
DVAL ✓ ✓ ✓
ENTER ✓ ✓
* FP= Front Panel, EK= External Keyboard, P=Programmable
10-30 HP IBASIC Supplement
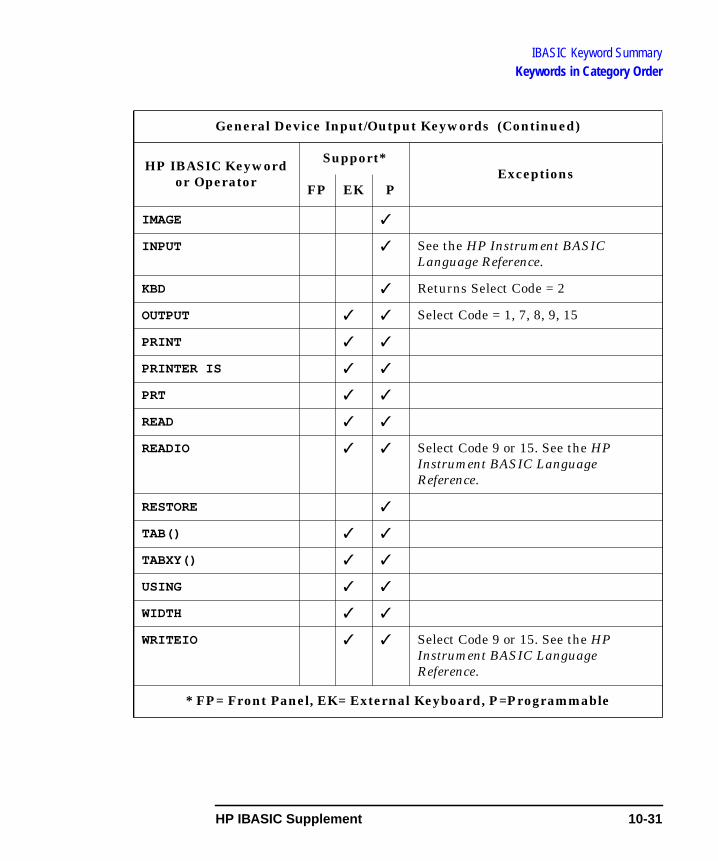
IBASIC Keyword SummaryKeywords in Category Order
IMAGE ✓
INPUT ✓ See the HP Instrument BASICLanguage Reference.
KBD ✓ Returns Select Code = 2
OUTPUT ✓ ✓ Select Code = 1, 7, 8, 9, 15
PRINT ✓ ✓
PRINTER IS ✓ ✓
PRT ✓ ✓
READ ✓ ✓
READIO ✓ ✓ Select Code 9 or 15. See the HPInstrument BASIC LanguageReference.
RESTORE ✓
TAB() ✓ ✓
TABXY() ✓ ✓
USING ✓ ✓
WIDTH ✓ ✓
WRITEIO ✓ ✓ Select Code 9 or 15. See the HPInstrument BASIC LanguageReference.
General Device Input/Output Keywords (Continued)
HP IBASIC Keywordor Operator
Support*Exceptions
FP EK P
* FP= Front Panel, EK= External Keyboard, P=Programmable
HP IBASIC Supplement 10-31
IBASIC Keyword SummaryKeywords in Category Order
Table 10-19 Display and Keyboard Keywords
Table 10-20 Array Operation Keywords
HP IBASIC Keywordor Operator
Support*Exceptions
FP EK P
CLEARSCREEN ✓ ✓
CLS ✓ ✓
* FP= Front Panel, EK= External Keyboard, P=Programmable
HP IBASIC Keywordor Operator
Support*Exceptions
FP EK P
DET ✓ ✓
DOT ✓ ✓
FRACT ✓ ✓
MAT ✓ ✓
MAT foo=IDN ✓ ✓
MAT foo=INV(bar) ✓ ✓
MAT foo=CSUM(bar) ✓ ✓
MAT foo=RSUM(bar) ✓ ✓
MAT REORDER ✓ ✓
MAT REORDER...BY ✓ ✓
REDIM ✓ ✓
SUM ✓ ✓
TRN ✓ ✓
* FP= Front Panel, EK= External Keyboard, P=Programmable
10-32 HP IBASIC Supplement
Index
AABORT, 8-12active controller, 2-11allocating memory, 1-5annotations
custom, 7-9arrays, 6-5ASCII file, 4-4ASCII word processors, 5-4ASSIGN, 2-5, 2-6AUTOSTART, 4-6AUTOSTART programs, 3-3avoiding recording errors, 2-13
Bbinary file, 4-4breakpoints
setting, 6-3buffer
GPIB, 2-4program, 2-3
buffer, input, 2-4buffer, program, 2-3bus
external, 8-17internal, 8-17
bus managementgeneral, 8-9
Ccharacter entry, 5-11CLEAR, 8-12clearing the input buffer, 2-4command synchronization, 2-4continue command, 3-4control
passing, 8-16controller
active, 2-11synchronization, 8-22system, 2-11
controller, external
HP IBASIC
interfacing with, 8-21controlling with IBASIC, 8-28conventions
typographical, 1-6
Ddata transfer, 8-24debugging, 6-2deleted text
to recall, 5-14deleting text, 5-13disabling the Pause key, 3-7disk
RAM, 1-5to select, 4-3
display partitions, 5-16, 7-2displaying text, 7-7downloading programs, 8-26drawing figures, 7-12
Eecho
GPIB, 2-14Edit key, 5-5editing, 5-3, 5-10editor
HP BASIC, 5-3END, 2-5errors
displaying, 6-6external bus, 8-17external controller
interfacing with, 8-21external keyboard, 3-4, 5-7
Ffile
ASCII, 4-4binary, 4-4
File Type key, 4-4
Supplement
GGET, 4-2GPIB
general structure, 8-5GPIB buffer, 2-4GPIB device selectors, 8-3GPIB echo, 2-14graphics, 7-10
SCPI commands, 7-16
HHP BASIC editor, 5-3
II/O ports, 1-3IBASIC
synchronize with an externalcontroller, 8-22
IBASIC Display key, 5-16IBASIC editor, 5-5IBASIC operations, 2-10IBASIC programming, 8-28IBASIC Utilities key, 5-19input buffer, 2-4
clearing, 2-4instrument preset, 2-13interface bus, 1-3internal bus, 8-17
Kkeyboard
connector type, 1-4external, 3-4, 5-7
keyboard overlay, 3-4keystroke recording, 1-4, 2-2–2-
14how it works, 2-3, 2-8operations that do not record,
2-9
Index-1
Index
Llabel window, 5-12LINE TYPE, 7-14LOAD, 4-2local, 8-11LOCAL 8, 3-7local lockout, 8-10LOCAL LOCKOUT 8, 3-7lockout
local, 8-10
Mmanuals
related information, 1-2memory allocation, 1-5, 3-5message windows, 7-9methods of programming the
analyzer, 2-2mnemonics
no corresponding front paneloperation, 2-12
SCPI, 2-7
Ooperations
IBASIC, 2-10OUTPUT, 2-5, 2-6overview, 1-3
Pparallel port, 8-6partitions
display, 5-16, 7-2PASS CONTROL, 8-19passing control, 8-16PAUSE key, 3-6Pause key, to disable, 3-7pausing a program, 3-6peripherals, 1-3pop-up messages, 7-9ports
Index-2
serial and parallel, 8-6PRESET key, 2-13preset operation, 2-13program
to pause, 3-6to recall, 4-7to run, 3-4to stop, 3-8
program buffer, 2-3program recording, 2-2programming methods, 2-2programming with IBASIC, 8-28programs
downloading and uploading, 8-26
Qquerying variables, 8-25
RRAM disk, 1-5READIO, 8-6Recall Program key, 4-7recalling a deleted line, 5-14recalling a program, 4-7recording
keystroke, 2-3recording errors
avoiding, 2-13recording keystrokes, 1-4, 2-2–
2-14how it works, 2-3
recording programs, 2-2related information, 1-2remote, 8-10renumbering, 5-15RE-SAVE, 4-2RE-STORE, 4-2RUN, 3-4running a program, 3-4
SSAVE, 4-2Save Program key, 4-4SAVE RECALL key, 4-3SCPI mnemonics, 2-7select code, 1-3selecting a disk, 4-3serial poll, 8-15serial port, 8-6service request, 1-4service requests, 8-13setting variables, 8-25softkey, 1-6SRQs, 8-13status information, 8-23STOP, 3-8stopping a program, 3-8STORE, 4-2strings, 6-5synchronization, 2-10, 8-22synchronizing commands, 2-4syntax element, 1-6system controller, 2-11
Ttemplate
keyboard, 3-4text
to display, 7-7timing, 2-10transferring data, 8-24trigger, 8-11typographical conventions, 1-6
Uuploading programs, 8-26Utilities key, 5-19
Vvariables, 6-4
setting and querying, 8-25
HP IBASIC Supplement
Index
Wwindow
label, 5-12word processors, 5-4WRITEIO, 8-6
HP IBASIC
Supplement Index-3