Embed Size (px)
Citation preview
If your ready, here you go.
INSTRUCTIONS FOR REFINISHING A UBERTI STOCK. I also do refinish for people who would rather not tackle the job themselves. I have been refinishing gunstocks for 30 years on and off. Over the past several years I have done quite a few Uberti rifles and handgun grips to get the red sprayed finish off. Here is the method I use all the time for great results. List of items needed.
1.) Quart of Orange Citristrip gel. Available at most larger Hardware stores. 2.) 00 Steel wool and 0000 steel wool. 3.) Minwax Oil Base stain in your choice of color. 4.) 1 paint stick. 5.) Formby's Tung Oil, either high or low gloss. 6.) Old cotton Tee shirt. 7.) Steam Iron. 8.) 400 grit wet or dry sandpaper. 9.) Rubber disposable gloves. 10) Disposable foam brush. 11) Cheap white 1 inch bristle brush 12) Old Newspapers. 13) Old toothbrush (if checkered)
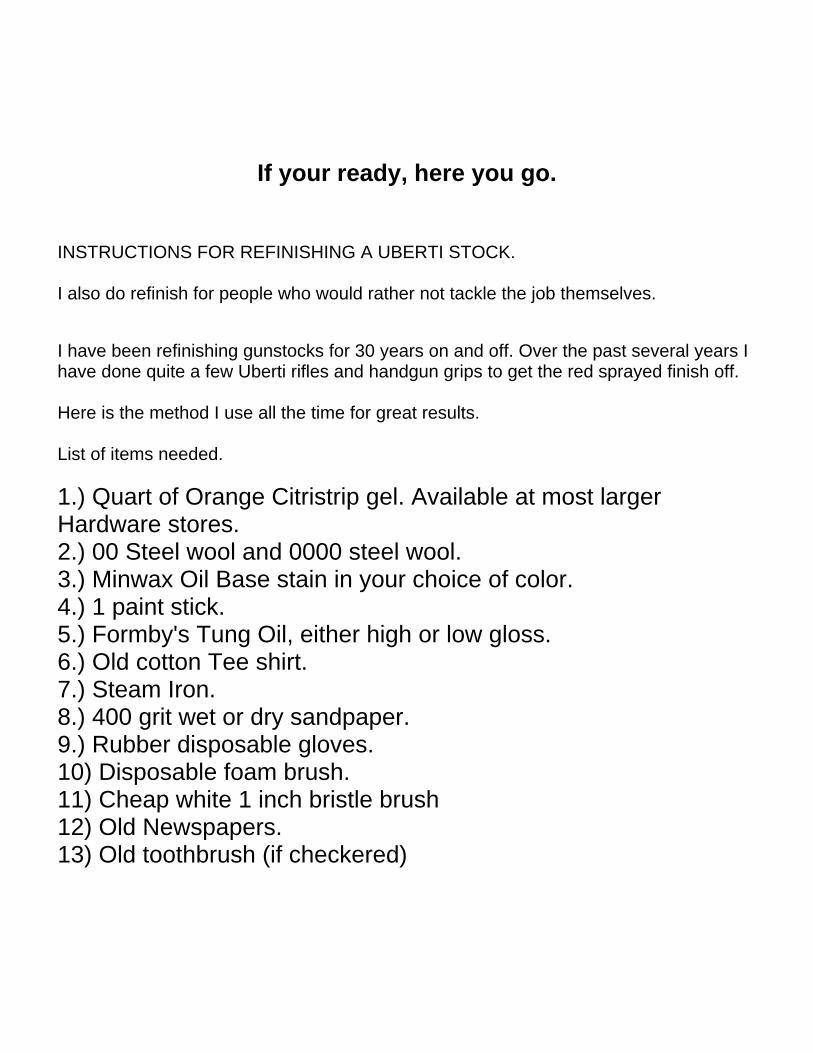
On a 73 - To remove the fore-stock, you first have to remove the two screws that hold the fore end cap on, and then remove the block that the screws mount to from it's dovetail. Then tap out the pin in the mag tube mounting block on the end of the barrel (this locks the mag tube in place). Slide the mag tube forward and out, then the block out of the dovetail. The fore end will then slide off. You may be able to remove the fore end without removing the block at the end of the barrel by just sliding the mag tube forward enough to drop off the fore end. The rifle should be disassembled and the wood placed aside on a good work bench free of debris and clutter. Lay out a piece of newspaper and lay the forearm and butt stock down. Apply the Citristrip with the bristle brush liberally ( as thick as you can ) to both pieces covering the sides as much as you can. Now forget about it for about 40 minutes minimum. This stuff stays active for 24 hours so you could even put it on and leave it for a long time.
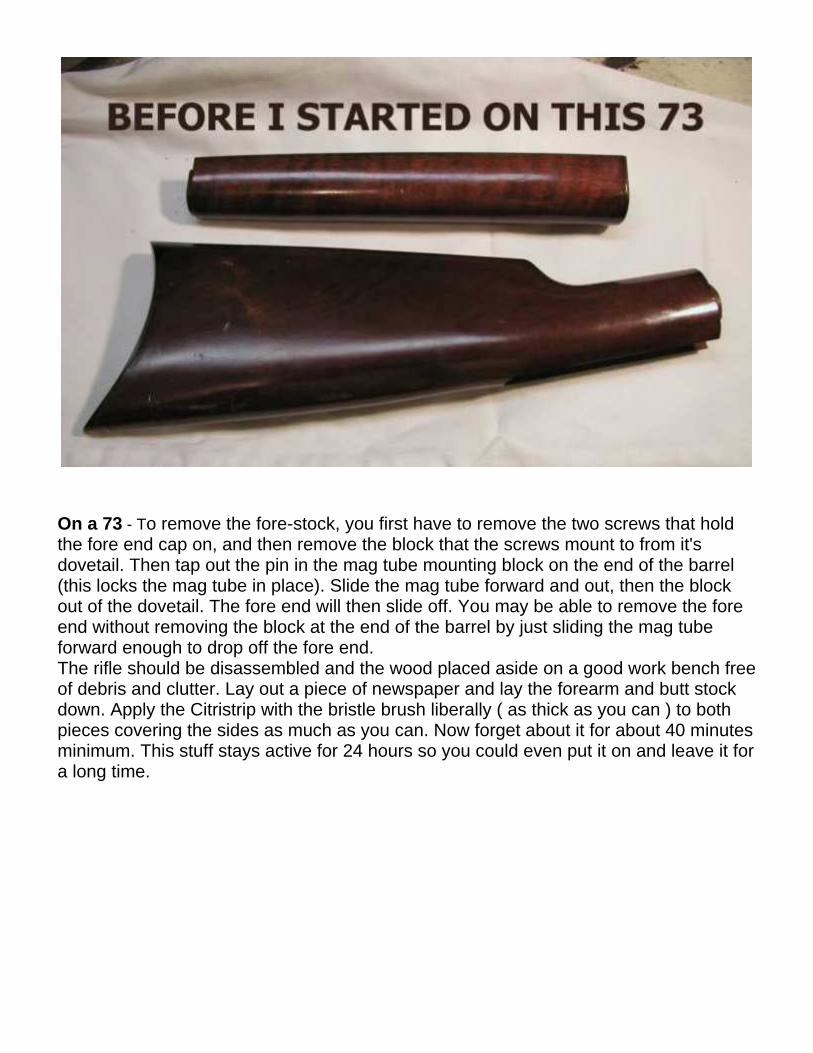
This wood now will be mostly free of the finish where you applied the citristrip ( It smells nice so you wife won't kill you ) Use the paint stick wearing the rubber gloves and scrape the finish off. it won't all come off the first time and will need to be repeated. The 00 Steel wool is excellent for taking the finish off after scraping. Change the newspaper and lay the wood down again and do another area. You will go through a few pieces of newspaper before your done. As you go follow the same routine with the paint stick and steel wool. Once the wood is bare and clean you can apply one more coat of the citristrip, let it sit a few minutes and then wipe it off following with a good rub down with the 0000 (Extra fine steel wool). You will be amazed at the results.
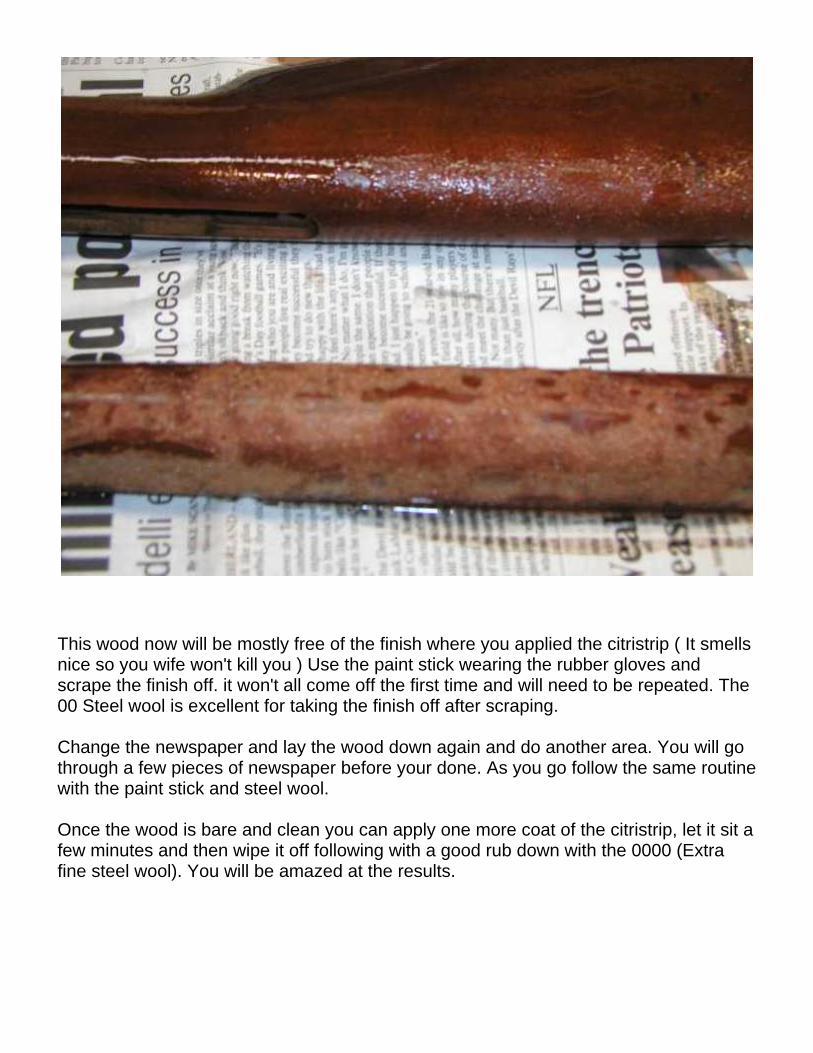
If the stocks are checkered the old toothbrush works well taking the finish out of the checkering. Now to look over the stock for damage. If there are actual gouges where the wood grain is cut you will have to decide if sanding them out is an option. If there are dents (most likely) then move onto the next step. With the flat iron set hot enough to produce steam (no hotter) take a 6 inch piece of the old tee shirt and soak it in water and squeeze it out. Fold it over a couple of time and place it over the dent. Put the steam iron over it and you will see what happens. The water in the cotton is forced into the wood grain and raises the dent out of the wood. Repeat until it's all out. This take very little time. Once you are happy with your work take it to the kitchen and quickly run the stock under water and pat it quickly to get the excess water off it. Now hold it about two feet over the stove burner constantly moving it until dry. You will feel whiskers all over. These are the end grains of the wood. Use the 400 grit paper very lightly to knock them off followed by a good rub down with 0000 steel wool.
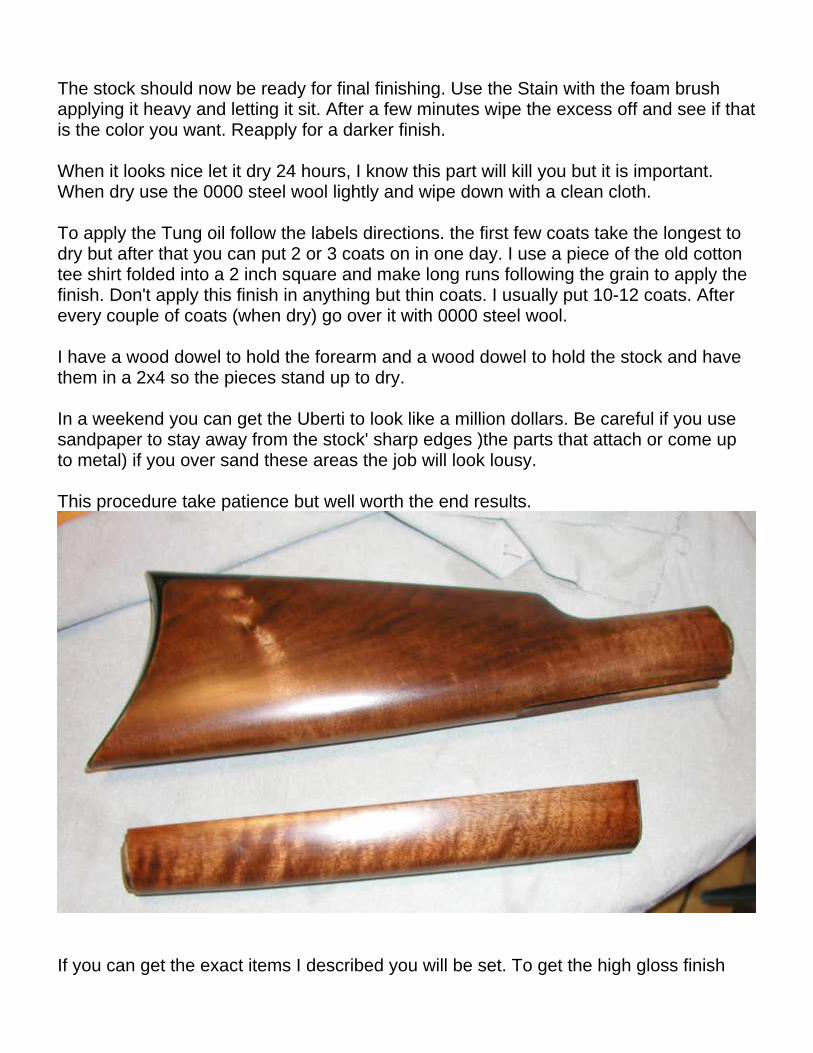
The stock should now be ready for final finishing. Use the Stain with the foam brush applying it heavy and letting it sit. After a few minutes wipe the excess off and see if that is the color you want. Reapply for a darker finish. When it looks nice let it dry 24 hours, I know this part will kill you but it is important. When dry use the 0000 steel wool lightly and wipe down with a clean cloth. To apply the Tung oil follow the labels directions. the first few coats take the longest to dry but after that you can put 2 or 3 coats on in one day. I use a piece of the old cotton tee shirt folded into a 2 inch square and make long runs following the grain to apply the finish. Don't apply this finish in anything but thin coats. I usually put 10-12 coats. After every couple of coats (when dry) go over it with 0000 steel wool. I have a wood dowel to hold the forearm and a wood dowel to hold the stock and have them in a 2x4 so the pieces stand up to dry. In a weekend you can get the Uberti to look like a million dollars. Be careful if you use sandpaper to stay away from the stock' sharp edges )the parts that attach or come up to metal) if you over sand these areas the job will look lousy. This procedure take patience but well worth the end results.
If you can get the exact items I described you will be set. To get the high gloss finish
just end with a coat of tung oil. To get the low gloss after several layers and when dry just go slowly and steel wool with 0000 followed by furniture polish. This finish can be touched up easily. Longshot Logan
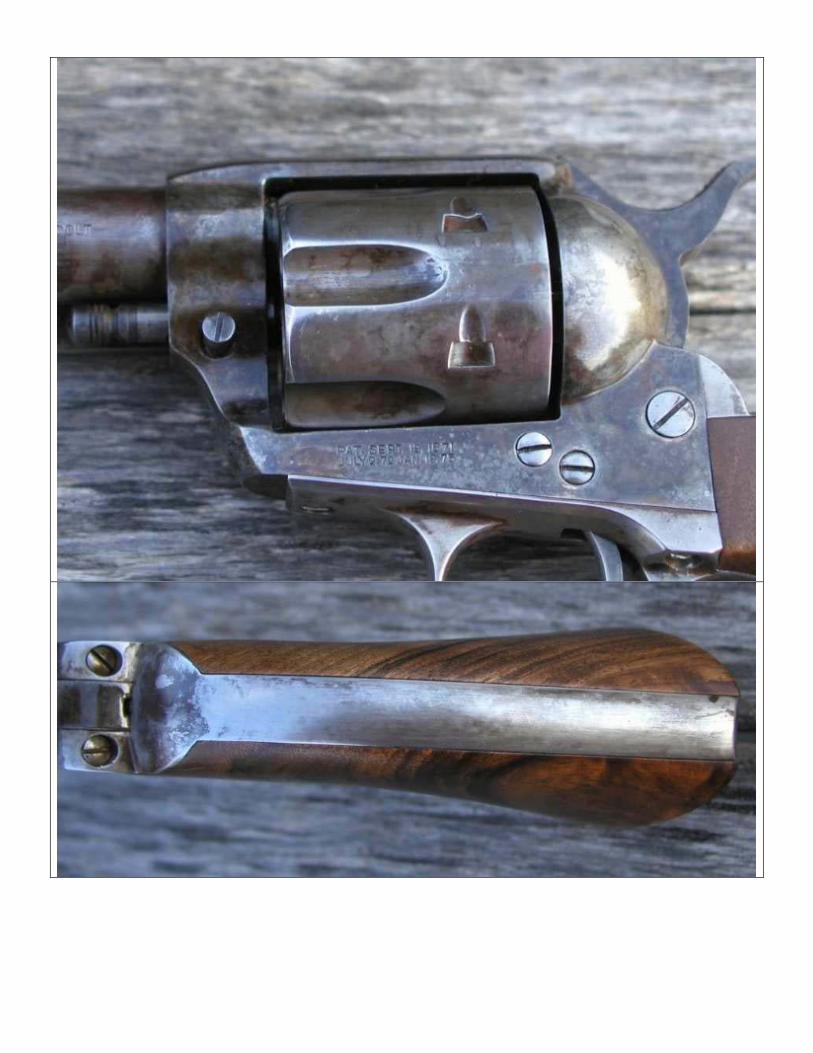
Antiquing a SAA Revolver
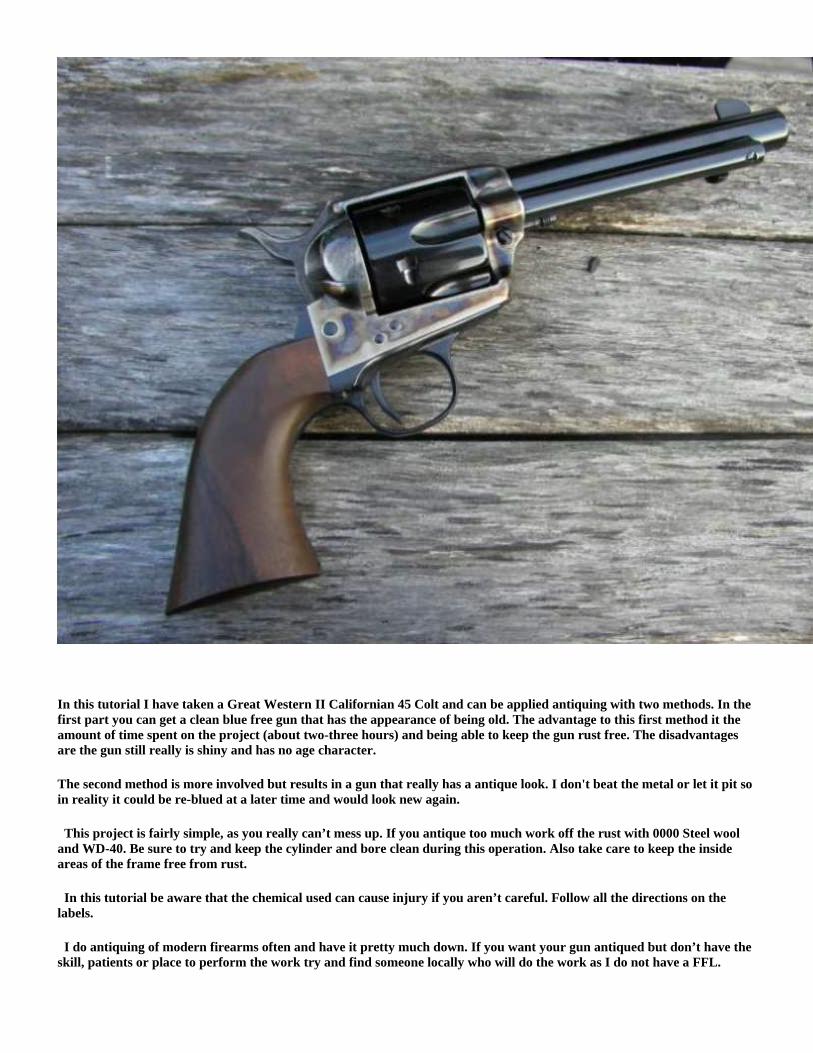
In this tutorial I have taken a Great Western II Californian 45 Colt and can be applied antiquing with two methods. In the first part you can get a clean blue free gun that has the appearance of being old. The advantage to this first method it the amount of time spent on the project (about two-three hours) and being able to keep the gun rust free. The disadvantages are the gun still really is shiny and has no age character.
The second method is more involved but results in a gun that really has a antique look. I don't beat the metal or let it pit so in reality it could be re-blued at a later time and would look new again.
This project is fairly simple, as you really can’t mess up. If you antique too much work off the rust with 0000 Steel wool and WD-40. Be sure to try and keep the cylinder and bore clean during this operation. Also take care to keep the inside areas of the frame free from rust.
In this tutorial be aware that the chemical used can cause injury if you aren’t careful. Follow all the directions on the labels.
I do antiquing of modern firearms often and have it pretty much down. If you want your gun antiqued but don’t have the skill, patients or place to perform the work try and find someone locally who will do the work as I do not have a FFL.
On each section I have a small thumbnail picture of the stage of the project. Click on these thumbnails to see a larger detailed picture.
I use Vinegar as a blue remover for the following reasons. It does a relatively quick job of removing the blue for a tiny fraction of Blue and rust remover costs and is safe to use. You can supplement ingredients I have listed if you like. You just need to get the end goal.
The items I used in this project are as follows.
First Method.
1 Gallon of common cheap white vinegar.
WD-40
Birtchwood Casey Degreaser
0000 Steel Wool
Plastic or Glass Tray
Second Method
1 Gallon of common cheap white vinegar.
WD-40
Birtchwood Casey Degreaser
Birtchwood Casey Perma Blue
Birtchwood Casey Plumb Browning
0000 Steel Wool
Plastic or Glass Tray
Small bristle brush
Click here to Continue to Next Page
Lets get started. Please forgive me for totally and utterly desecrating this brand new EMF Great Western II Single Action. I wanted to use this gun as it was a perfect example and had no wear or damage (until I got my hands on it).
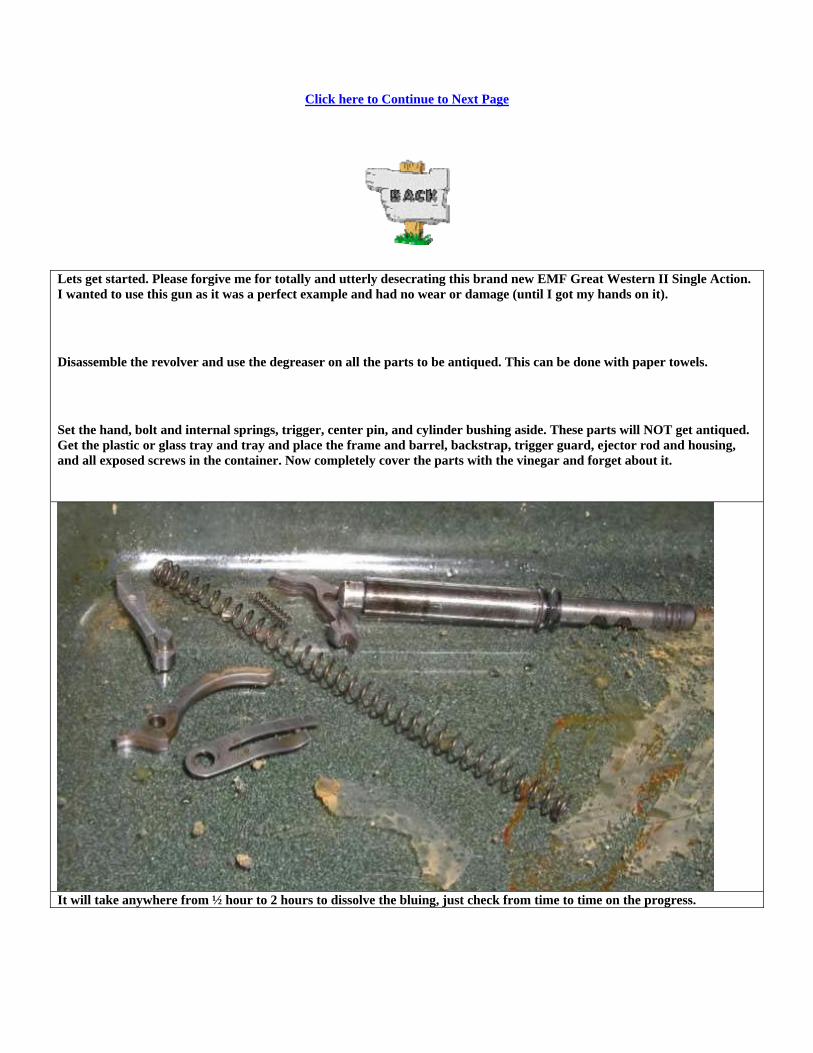
Disassemble the revolver and use the degreaser on all the parts to be antiqued. This can be done with paper towels.
Set the hand, bolt and internal springs, trigger, center pin, and cylinder bushing aside. These parts will NOT get antiqued. Get the plastic or glass tray and tray and place the frame and barrel, backstrap, trigger guard, ejector rod and housing, and all exposed screws in the container. Now completely cover the parts with the vinegar and forget about it.
It will take anywhere from ½ hour to 2 hours to dissolve the bluing, just check from time to time on the progress.
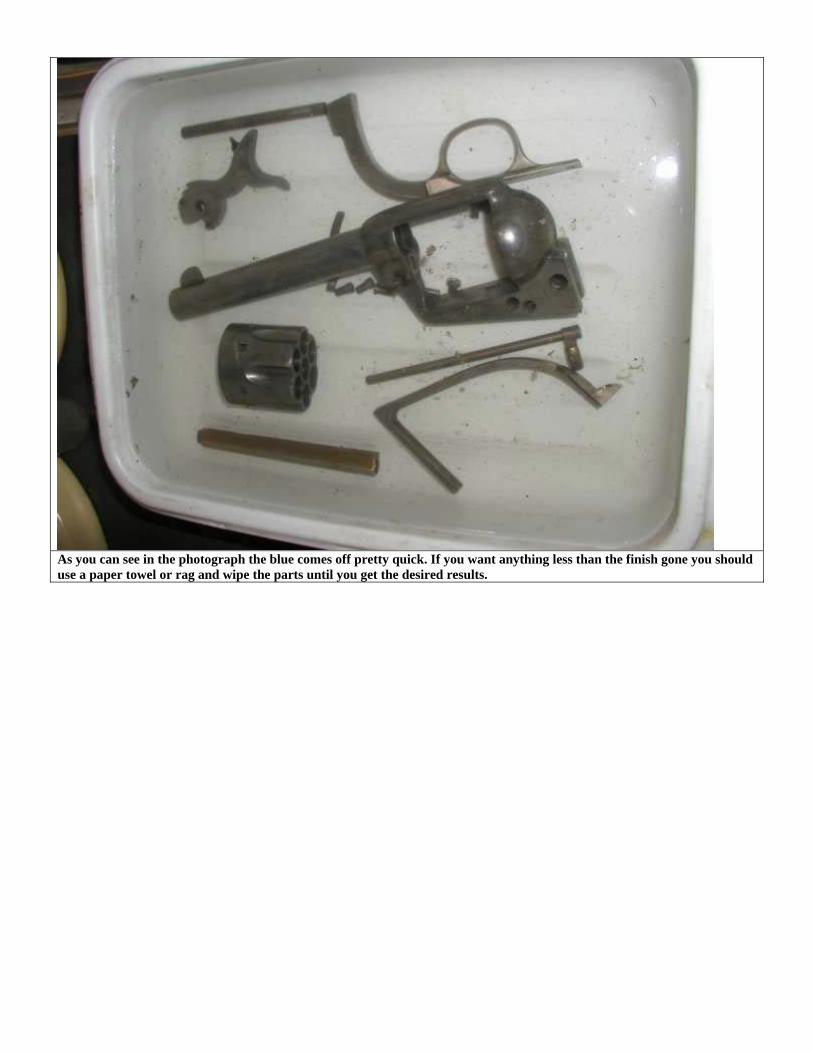
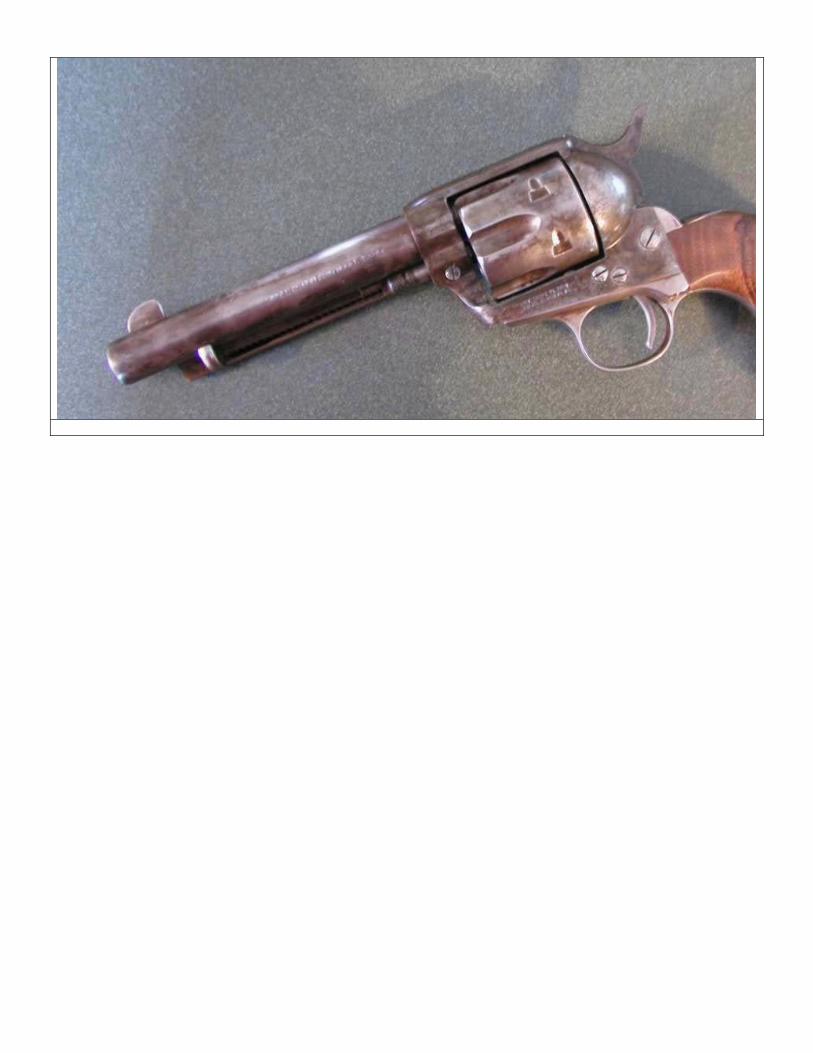
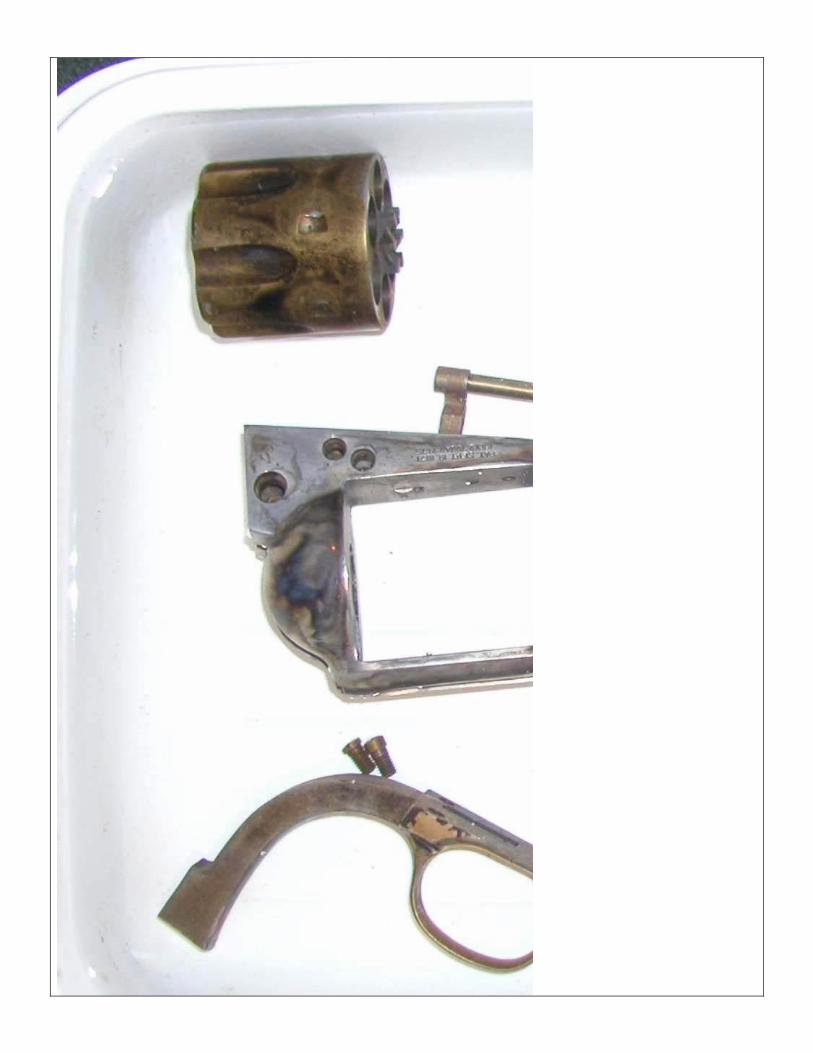
As you can see in the photograph the blue comes off pretty quick. If you want anything less than the finish gone you should use a paper towel or rag and wipe the parts until you get the desired results.
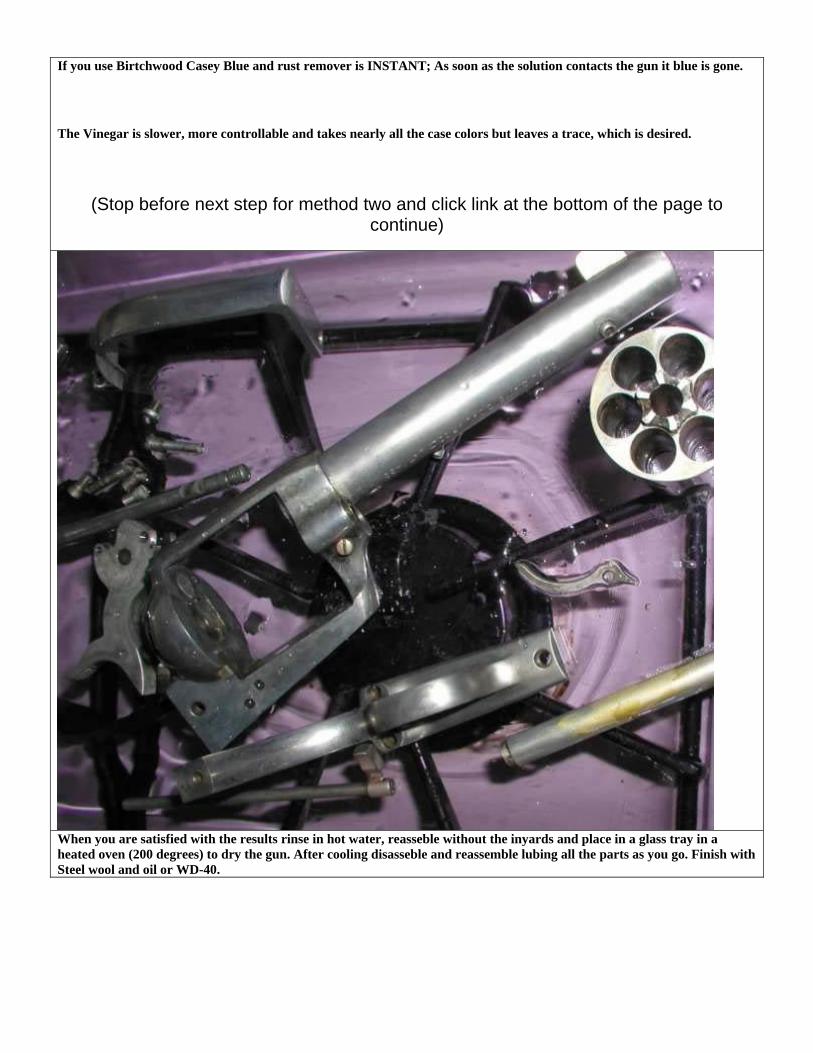
If you use Birtchwood Casey Blue and rust remover is INSTANT; As soon as the solution contacts the gun it blue is gone.
The Vinegar is slower, more controllable and takes nearly all the case colors but leaves a trace, which is desired.
(Stop before next step for method two and click link at the bottom of the page to continue)
When you are satisfied with the results rinse in hot water, reasseble without the inyards and place in a glass tray in a heated oven (200 degrees) to dry the gun. After cooling disasseble and reassemble lubing all the parts as you go. Finish with Steel wool and oil or WD-40.
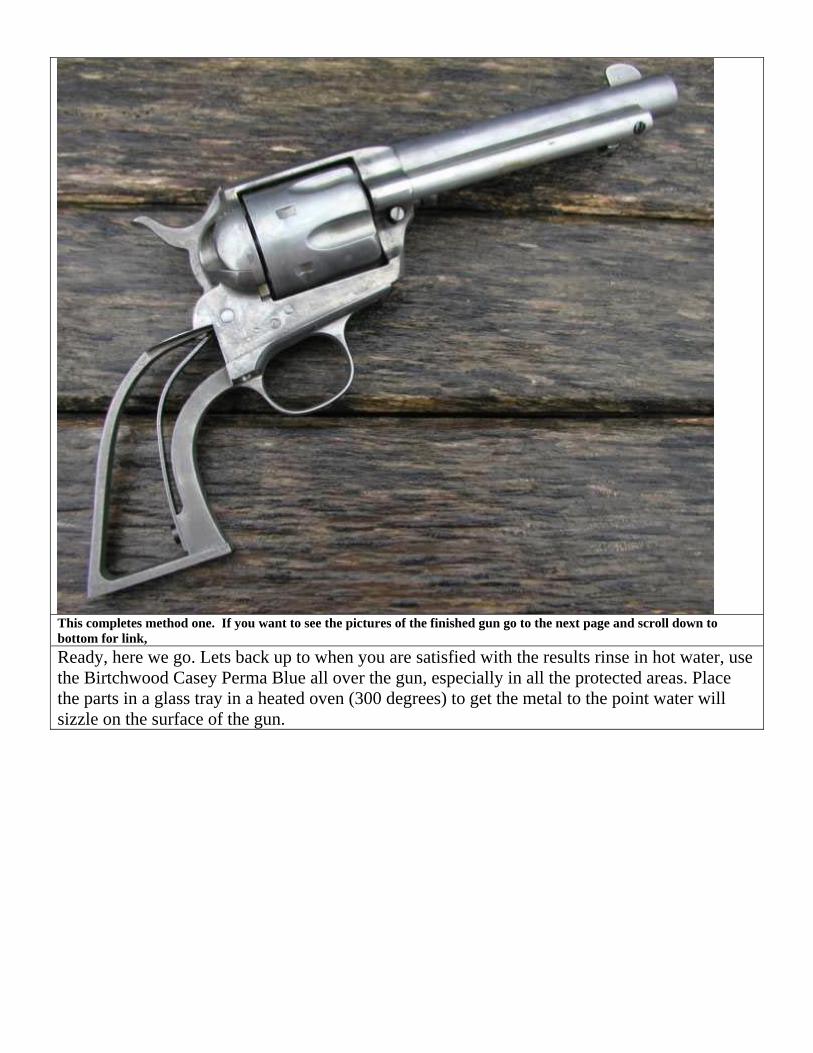
This completes method one. If you want to see the pictures of the finished gun go to the next page and scroll down to bottom for link,
Ready, here we go. Lets back up to when you are satisfied with the results rinse in hot water, use the Birtchwood Casey Perma Blue all over the gun, especially in all the protected areas. Place the parts in a glass tray in a heated oven (300 degrees) to get the metal to the point water will sizzle on the surface of the gun.
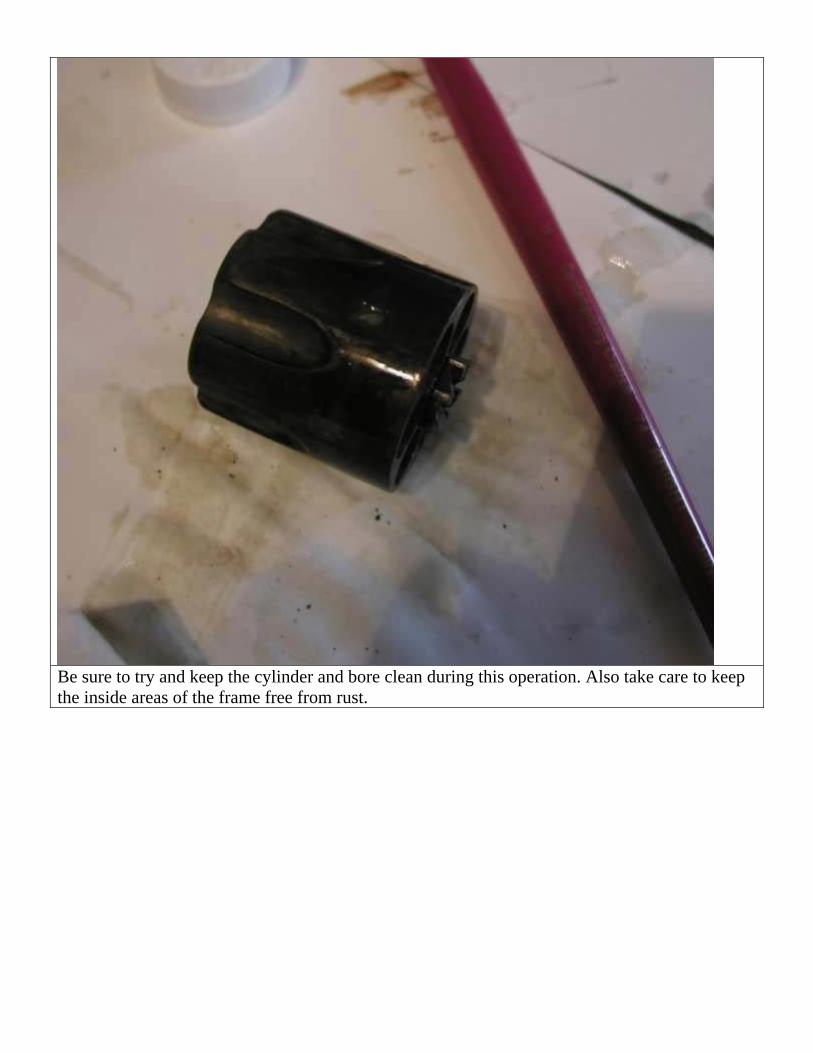
Be sure to try and keep the cylinder and bore clean during this operation. Also take care to keep the inside areas of the frame free from rust.
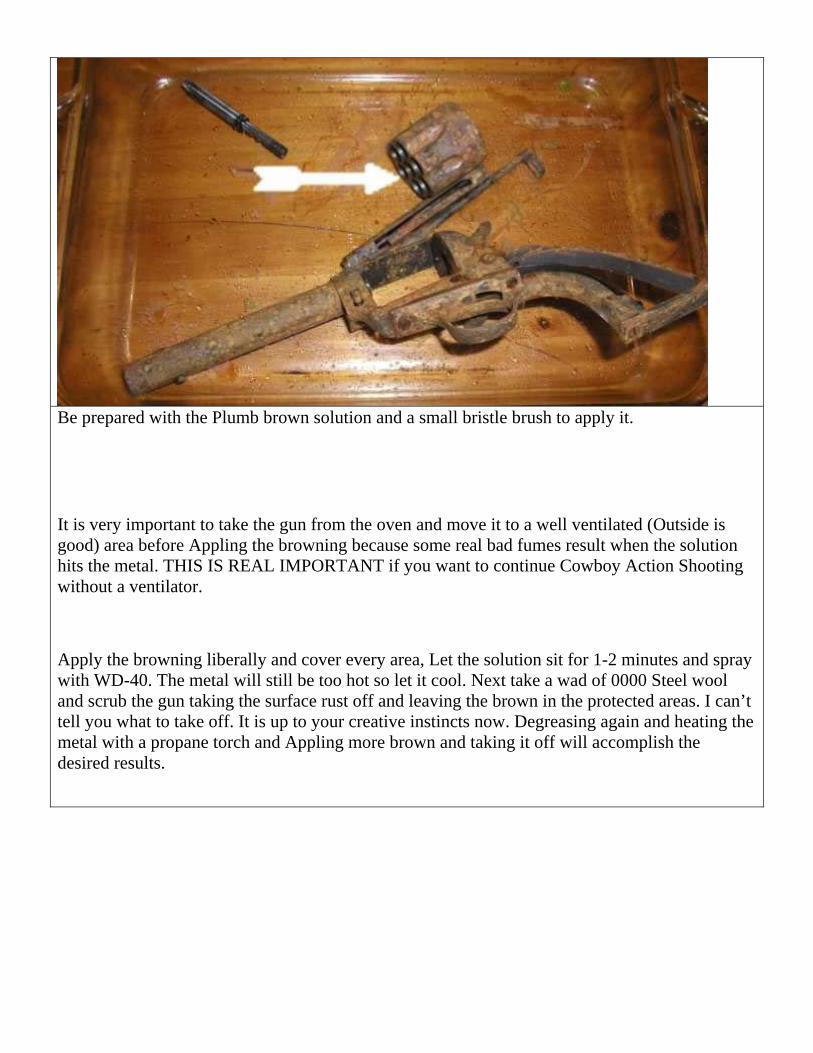
Be prepared with the Plumb brown solution and a small bristle brush to apply it.
It is very important to take the gun from the oven and move it to a well ventilated (Outside is good) area before Appling the browning because some real bad fumes result when the solution hits the metal. THIS IS REAL IMPORTANT if you want to continue Cowboy Action Shooting without a ventilator.
Apply the browning liberally and cover every area, Let the solution sit for 1-2 minutes and spray with WD-40. The metal will still be too hot so let it cool. Next take a wad of 0000 Steel wool and scrub the gun taking the surface rust off and leaving the brown in the protected areas. I can’t tell you what to take off. It is up to your creative instincts now. Degreasing again and heating the metal with a propane torch and Appling more brown and taking it off will accomplish the desired results.
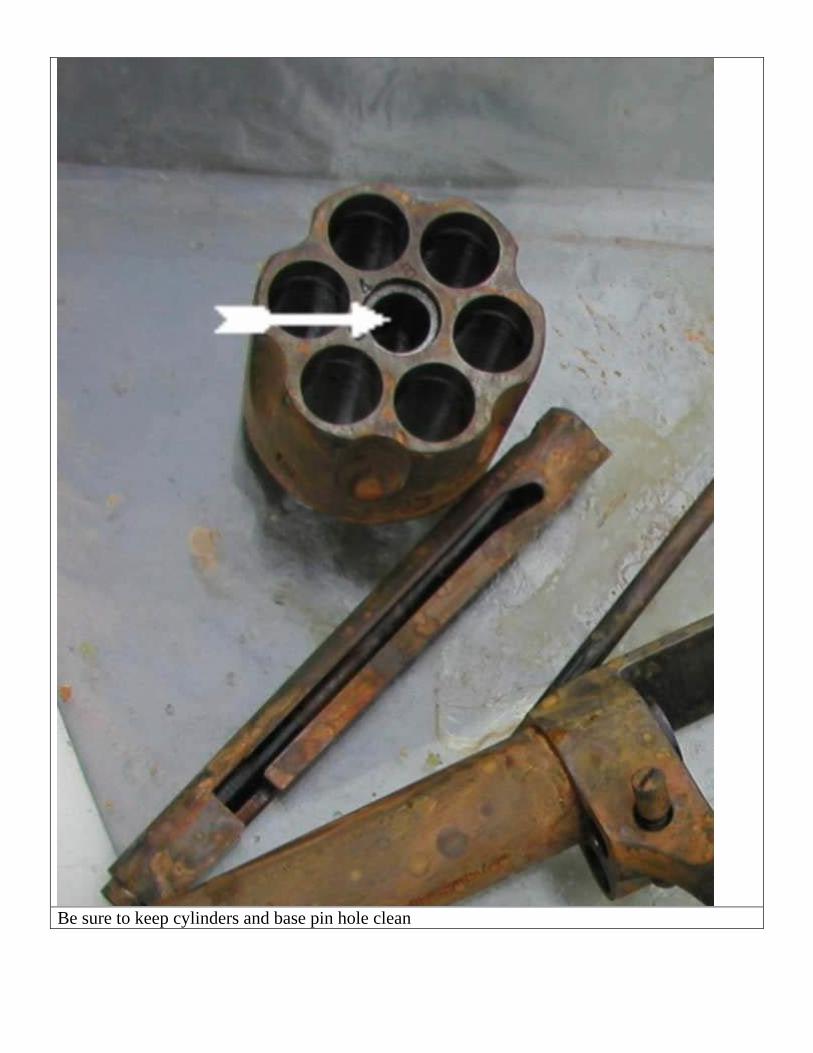
Be sure to keep cylinders and base pin hole clean