Embed Size (px)
Citation preview
Ignition HMI interface to Fanuc Industrial Robots
(Fanuc R30iA controller)
Communication from Ignition HMI directly to the Fanuc robot R30iA controller requires that the
robot have the “HMI Device (SNPX)” software option installed in the robot controller and
communications established with the Kepware GE Fanuc Ethernet OPC-UA server.
1. FANUC ROBOT
After purchasing the “HMI Device (SNPX)” software option from Fanuc (part number RTL-R553-HT)
you will receive an install code called a “PAC code”. With the controllers factory PCMCIA card
installed cycle power while holding the Prev & Next keys on the teach pendant. Select
controlled start then from the menu select (#2) SW install, select (#3) Option, make sure the
PCMCIA card is installed and press F3 done. Find the HMI Device (SNPX) option on the list and
press F4 authorize and then enter the PAC code, then Press F1 install. After installation is
complete press Function select (#1) cold start.
2. KEPWARE OPC SERVER
Download and install the Kepware GE Fanuc Ethernet OPC-UA server software from the
Hepware website: http://www.kepware.com/Spec_Sheets/GE_Ethernet.asp
The software demo operates on a 2 hour timer. To reset the demo timer right click the
Kepware icon in the system tray and select “Stop Runtime Service” then select “Start Runtime
Service”.
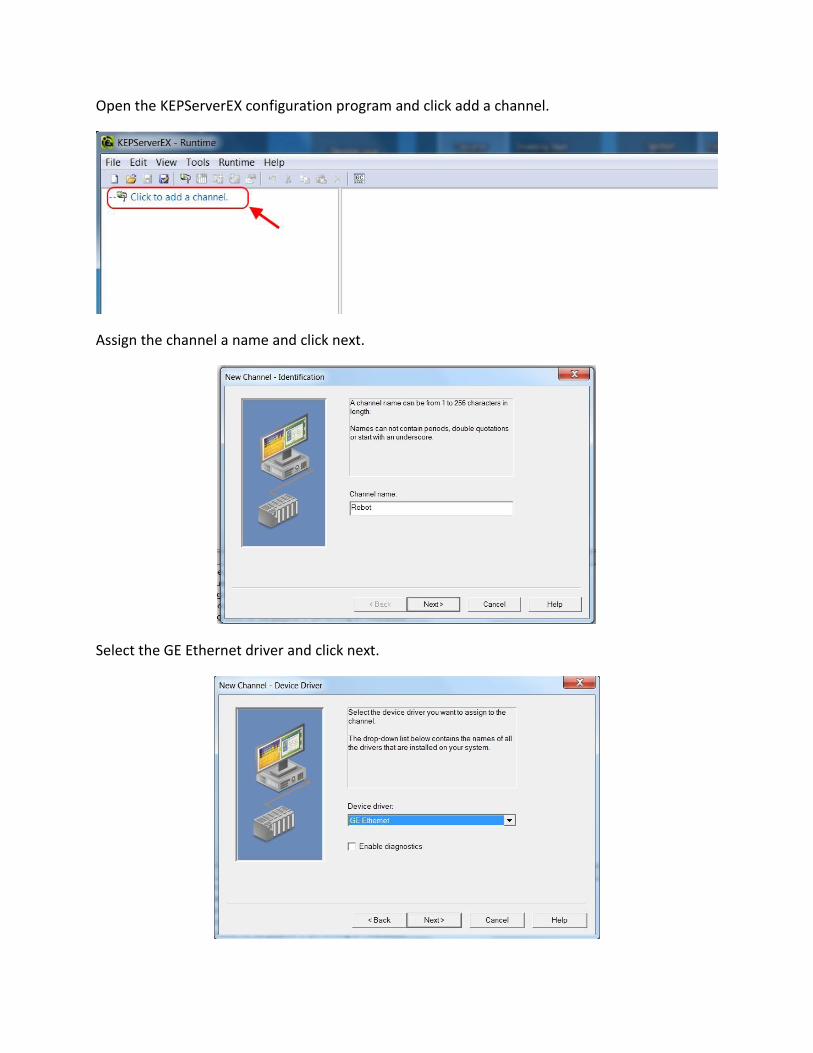
Open the KEPServerEX configuration program and click add a channel.
Assign the channel a name and click next.
Select the GE Ethernet driver and click next.
Click next for the following 3 options leaving them at their default settings (network interface, write
optimizations & float handling) then click finish on the summary screen.
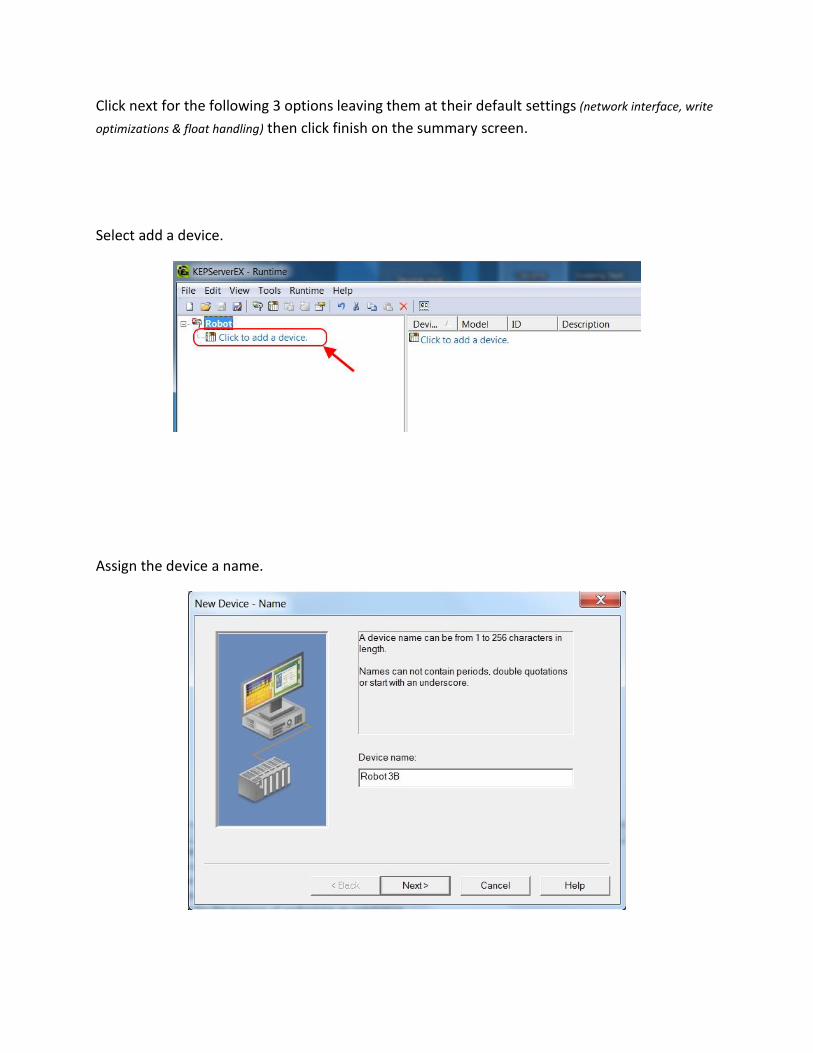
Select add a device.
Assign the device a name.
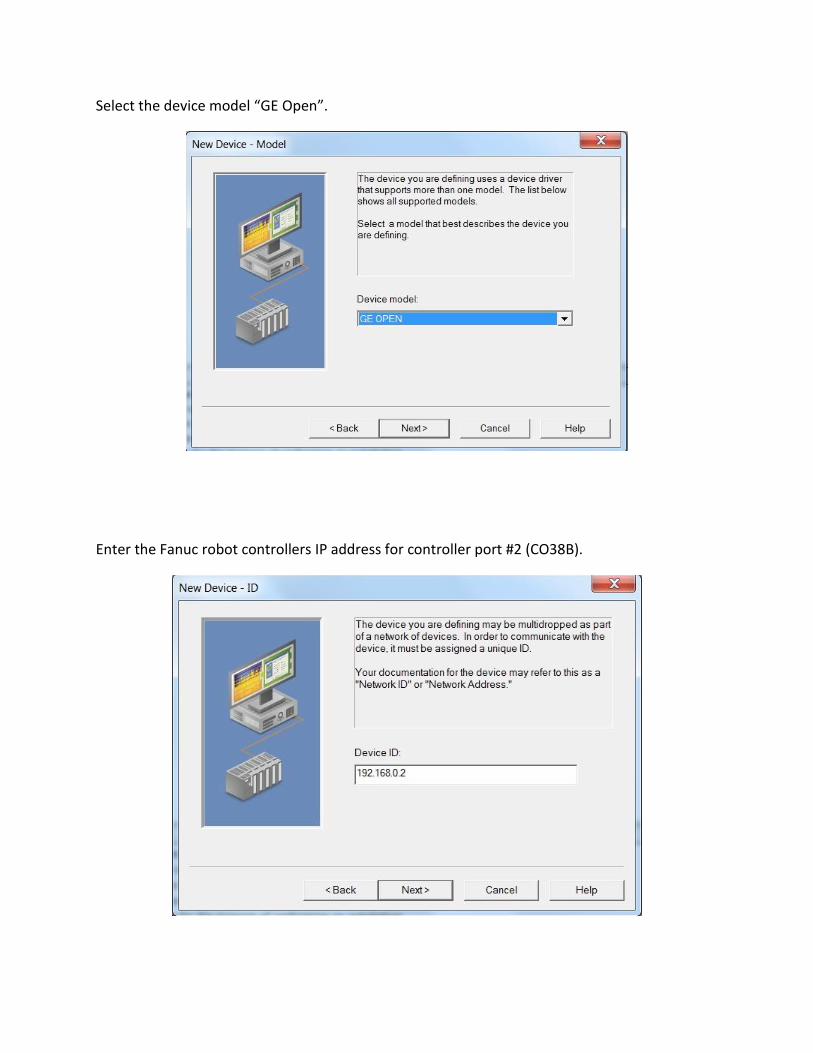
Select the device model “GE Open”.
Enter the Fanuc robot controllers IP address for controller port #2 (CO38B).
Click next for the following 7 options leaving them at their default settings (scan mode, timing, auto-
demotion, database creation, communication parameters, variable import settings & plc settings ) then click
finish on the summary screen.
The next 4 examples will be setting up tags for digital input - outputs, Karel
variables, position registers and standard registers.
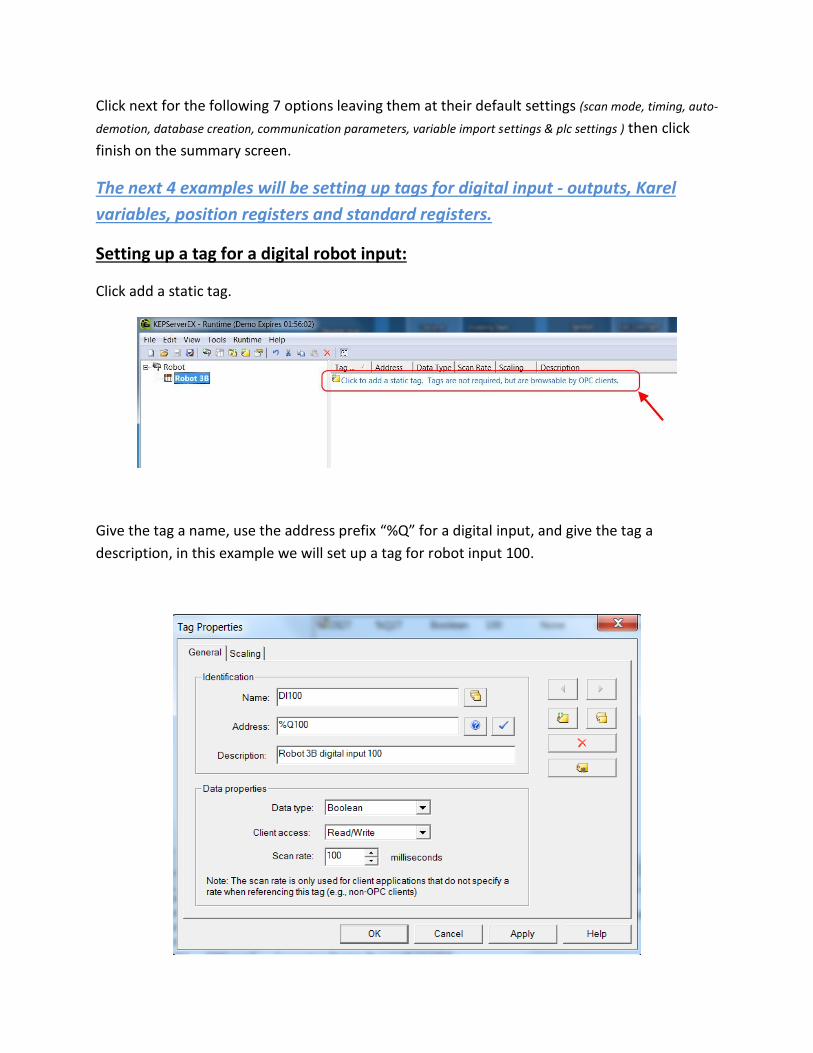
Setting up a tag for a digital robot input:
Click add a static tag.
Give the tag a name, use the address prefix “%Q” for a digital input, and give the tag a
description, in this example we will set up a tag for robot input 100.

To test the new tag click the Quick Client button.
Select the robot name in the left column, then right click the new tag under ‘item id’ and select
Synchronous Write. The ‘synchronous write’ window will pop up. Change the value to “1” then
click ‘apply’ and you will see the input come on in the robot teach pendant IO screen.
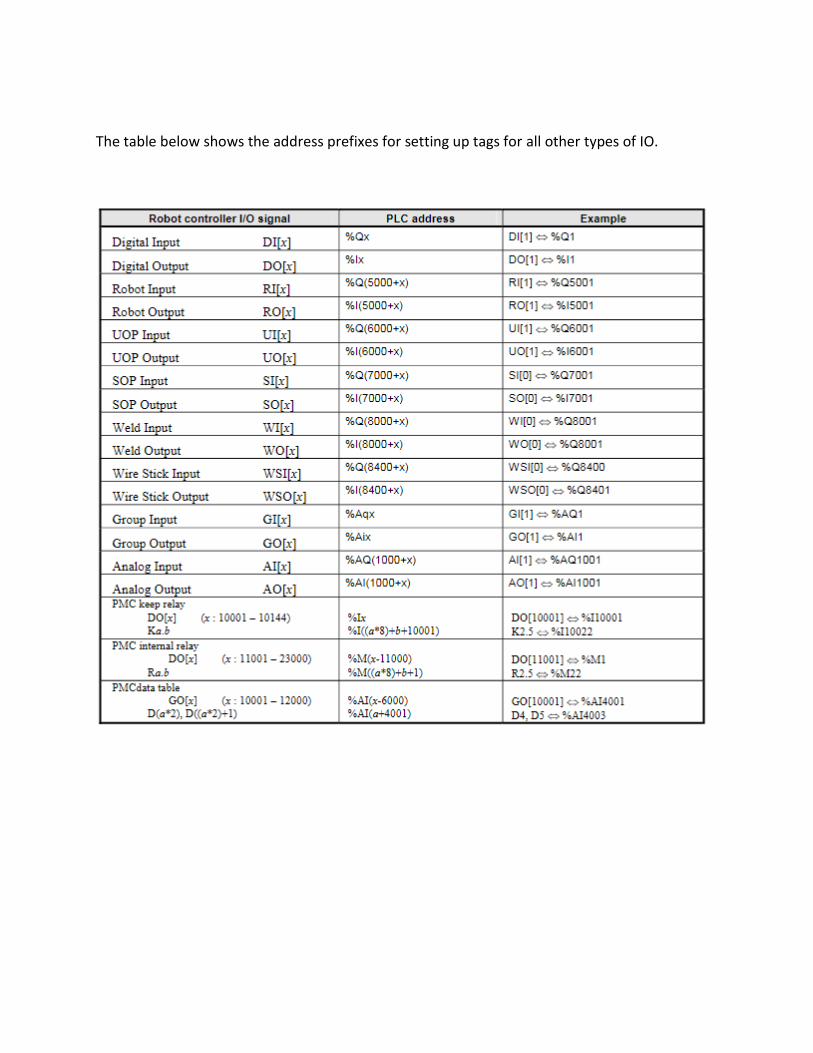
The table below shows the address prefixes for setting up tags for all other types of IO.
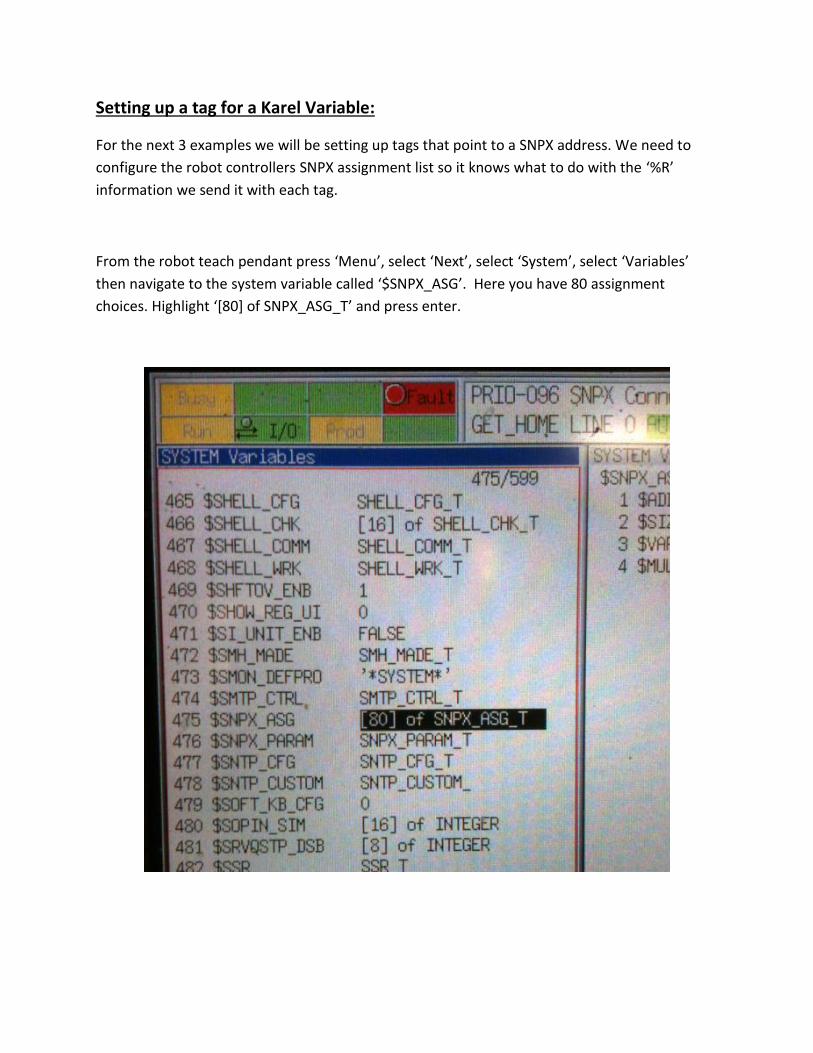
Setting up a tag for a Karel Variable:
For the next 3 examples we will be setting up tags that point to a SNPX address. We need to
configure the robot controllers SNPX assignment list so it knows what to do with the ‘%R’
information we send it with each tag.
From the robot teach pendant press ‘Menu’, select ‘Next’, select ‘System’, select ‘Variables’
then navigate to the system variable called ‘$SNPX_ASG’. Here you have 80 assignment
choices. Highlight ‘[80] of SNPX_ASG_T’ and press enter.
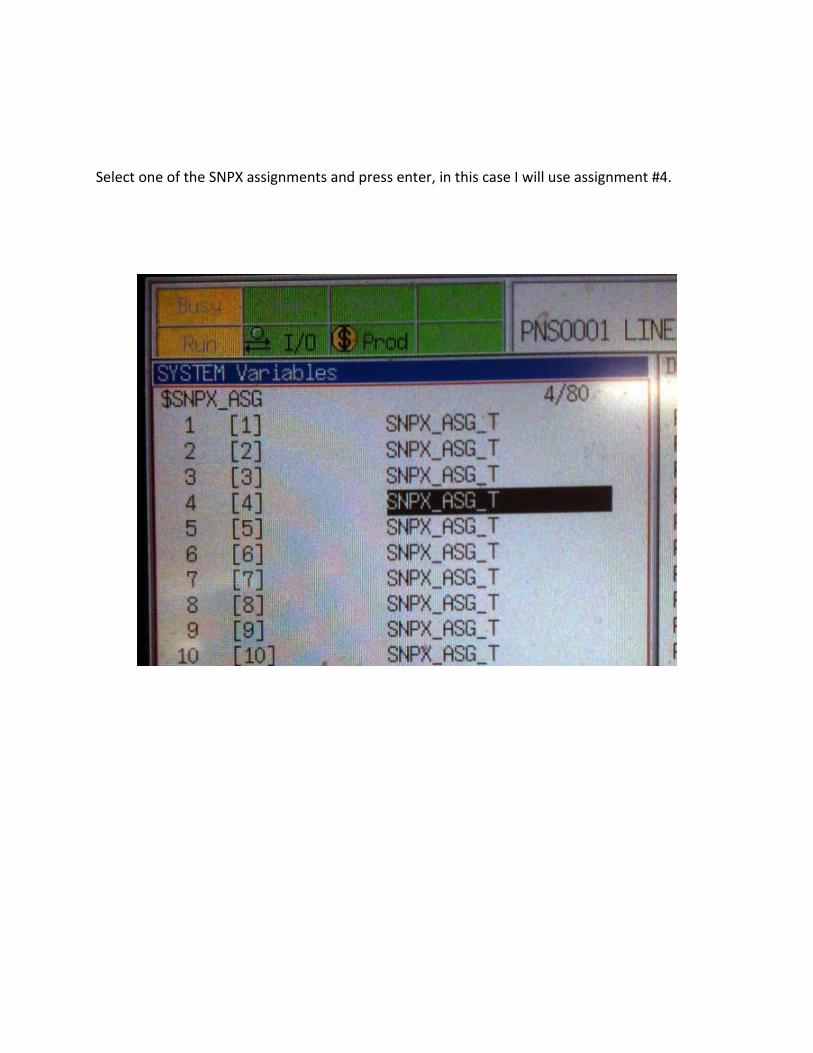
Select one of the SNPX assignments and press enter, in this case I will use assignment #4.
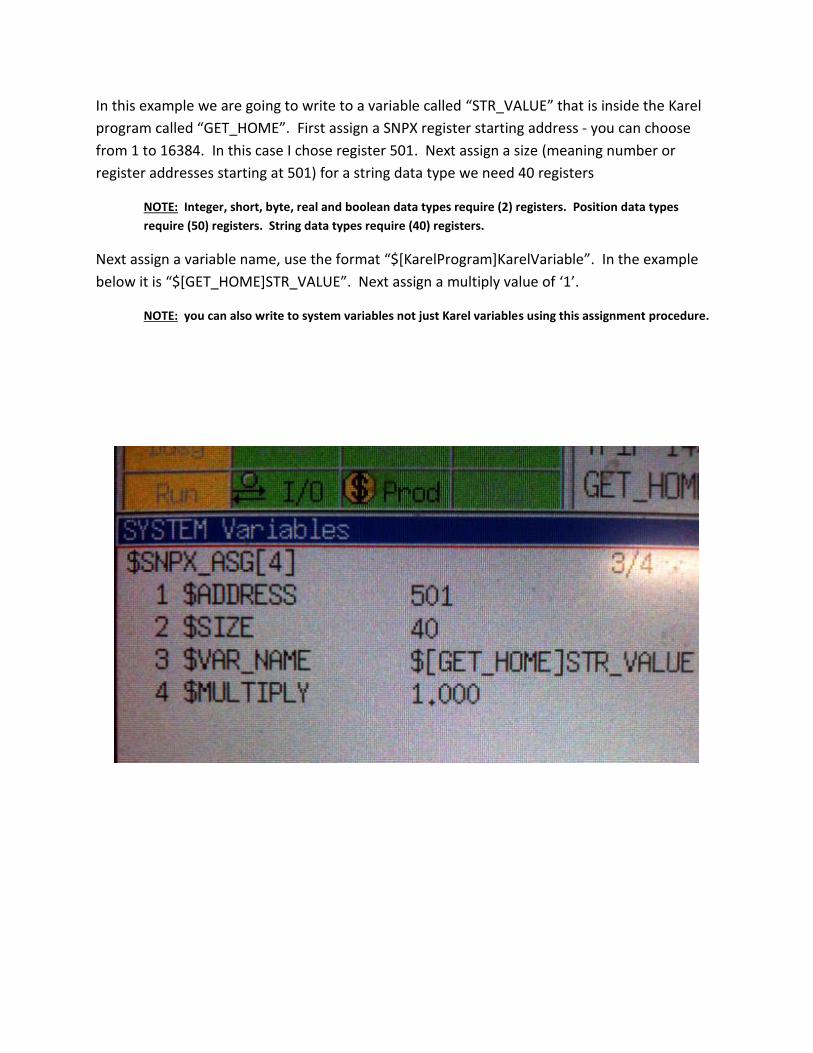
In this example we are going to write to a variable called “STR_VALUE” that is inside the Karel
program called “GET_HOME”. First assign a SNPX register starting address - you can choose
from 1 to 16384. In this case I chose register 501. Next assign a size (meaning number or
register addresses starting at 501) for a string data type we need 40 registers
NOTE: Integer, short, byte, real and boolean data types require (2) registers. Position data types
require (50) registers. String data types require (40) registers.
Next assign a variable name, use the format “$[KarelProgram]KarelVariable”. In the example
below it is “$[GET_HOME]STR_VALUE”. Next assign a multiply value of ‘1’.
NOTE: you can also write to system variables not just Karel variables using this assignment procedure.
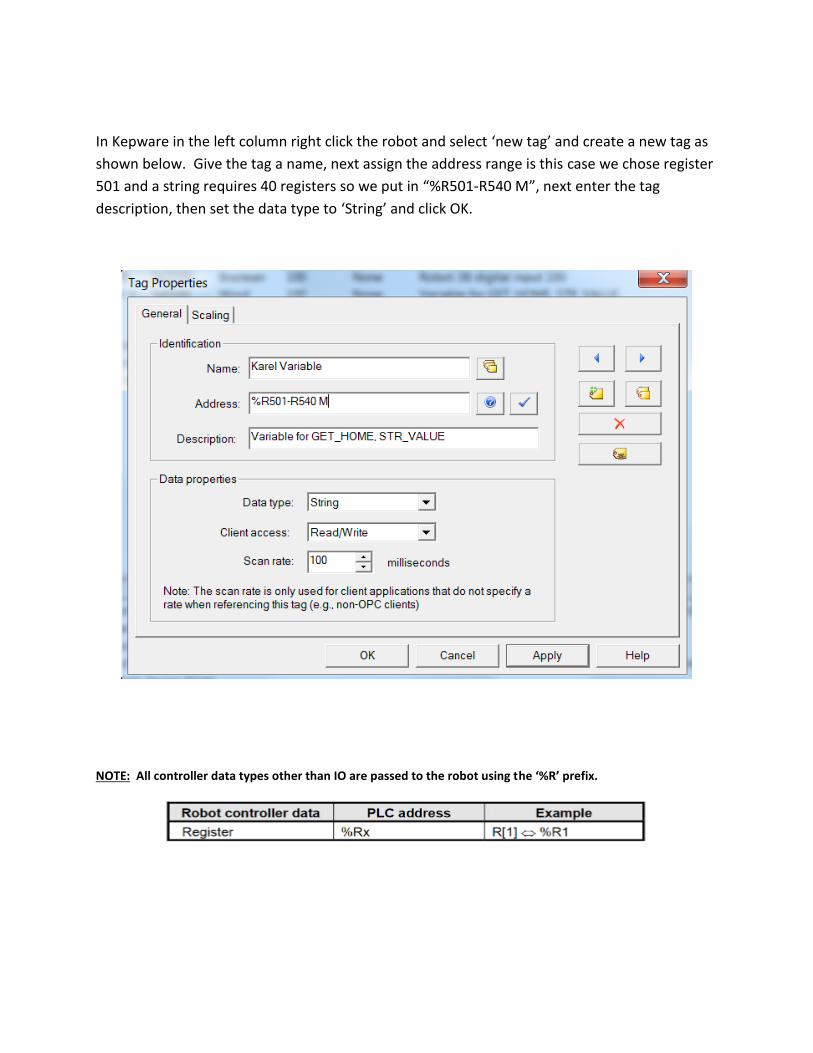
In Kepware in the left column right click the robot and select ‘new tag’ and create a new tag as
shown below. Give the tag a name, next assign the address range is this case we chose register
501 and a string requires 40 registers so we put in “%R501-R540 M”, next enter the tag
description, then set the data type to ‘String’ and click OK.
NOTE: All controller data types other than IO are passed to the robot using the ‘%R’ prefix.
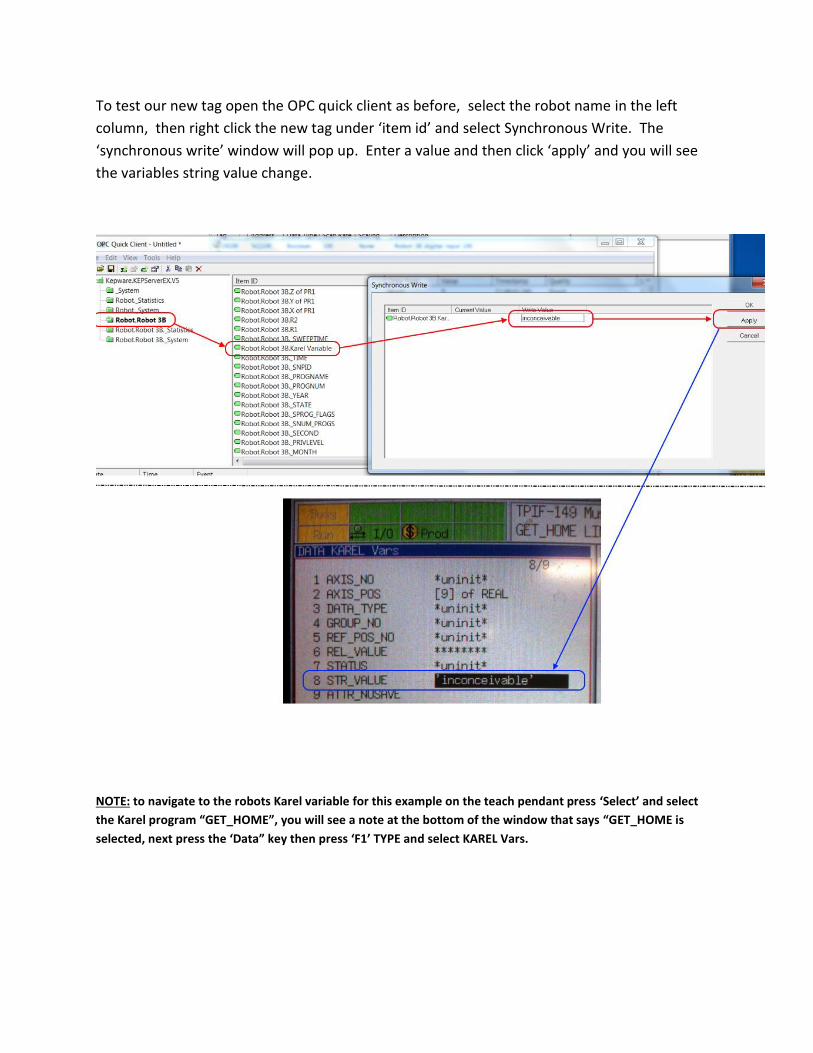
To test our new tag open the OPC quick client as before, select the robot name in the left
column, then right click the new tag under ‘item id’ and select Synchronous Write. The
‘synchronous write’ window will pop up. Enter a value and then click ‘apply’ and you will see
the variables string value change.
NOTE: to navigate to the robots Karel variable for this example on the teach pendant press ‘Select’ and select
the Karel program “GET_HOME”, you will see a note at the bottom of the window that says “GET_HOME is
selected, next press the ‘Data” key then press ‘F1’ TYPE and select KAREL Vars.
Setting up a tag for a Position Register:
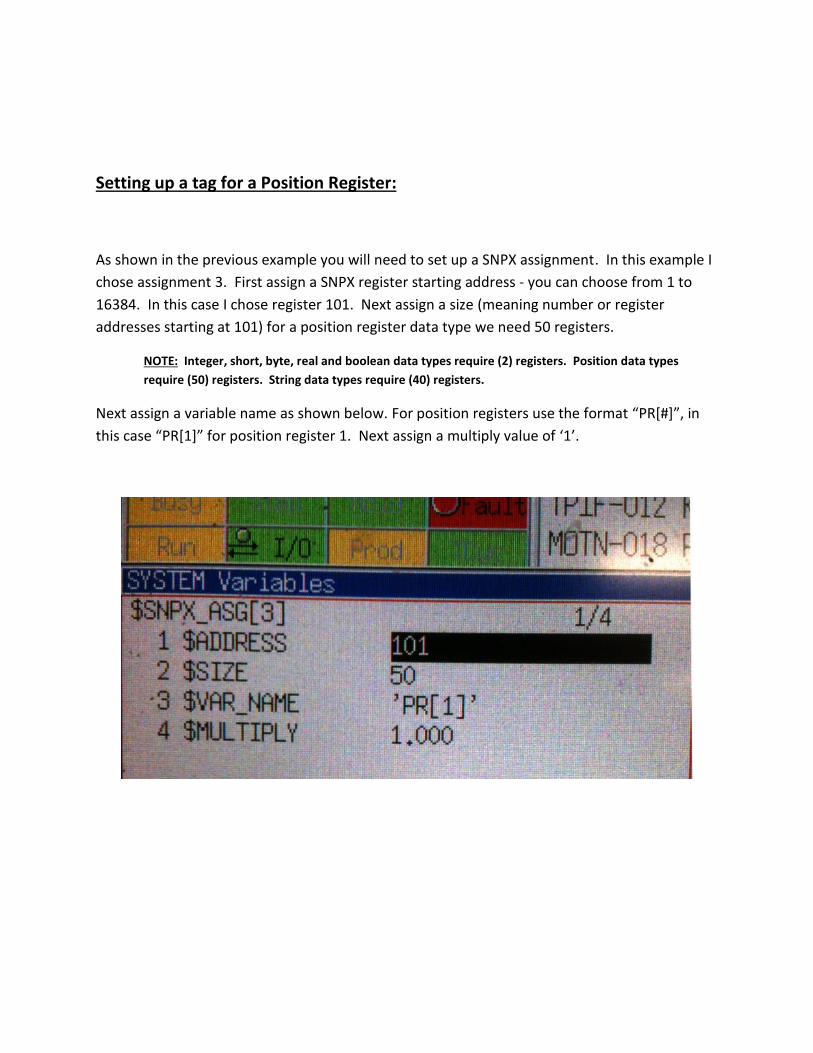
As shown in the previous example you will need to set up a SNPX assignment. In this example I
chose assignment 3. First assign a SNPX register starting address - you can choose from 1 to
16384. In this case I chose register 101. Next assign a size (meaning number or register
addresses starting at 101) for a position register data type we need 50 registers.
NOTE: Integer, short, byte, real and boolean data types require (2) registers. Position data types
require (50) registers. String data types require (40) registers.
Next assign a variable name as shown below. For position registers use the format “PR[#]”, in
this case “PR[1]” for position register 1. Next assign a multiply value of ‘1’.
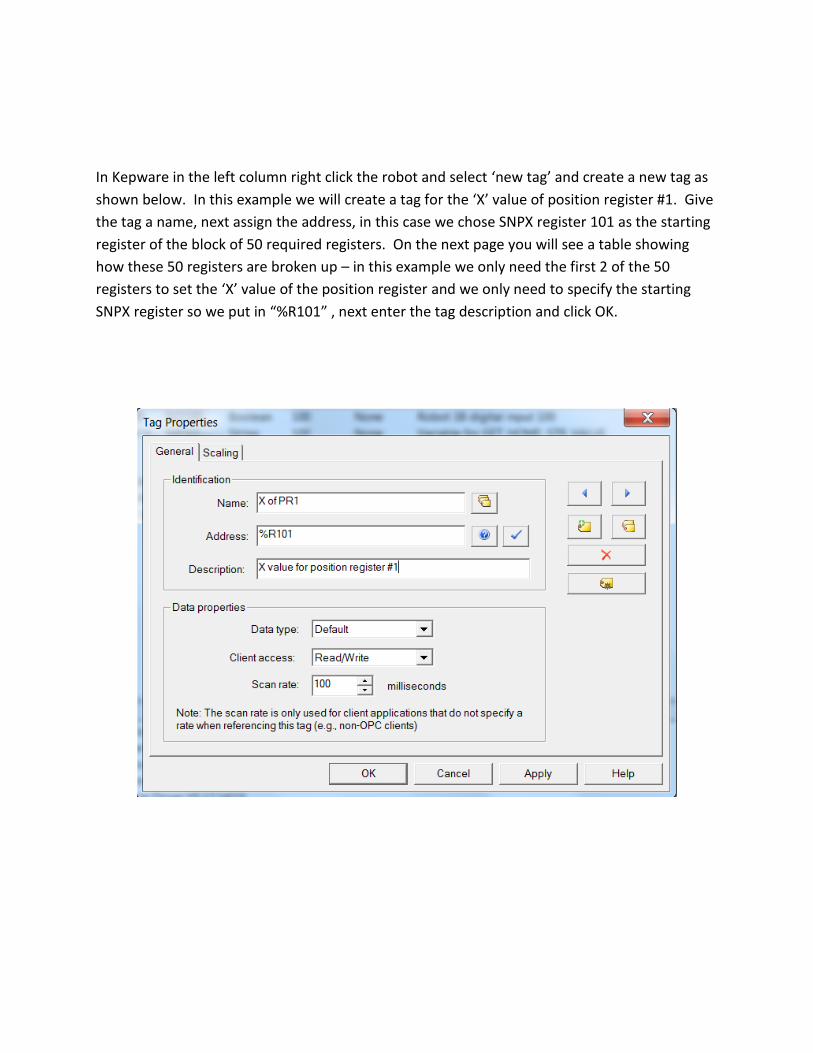
In Kepware in the left column right click the robot and select ‘new tag’ and create a new tag as
shown below. In this example we will create a tag for the ‘X’ value of position register #1. Give
the tag a name, next assign the address, in this case we chose SNPX register 101 as the starting
register of the block of 50 required registers. On the next page you will see a table showing
how these 50 registers are broken up – in this example we only need the first 2 of the 50
registers to set the ‘X’ value of the position register and we only need to specify the starting
SNPX register so we put in “%R101” , next enter the tag description and click OK.
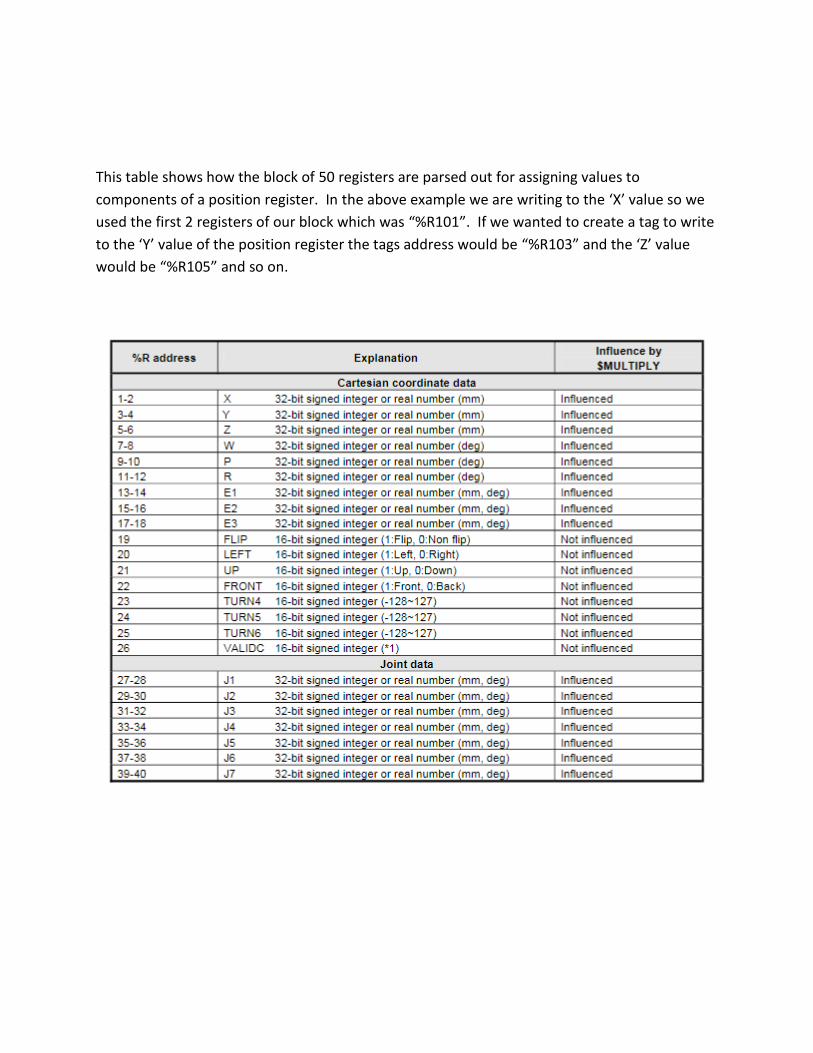
This table shows how the block of 50 registers are parsed out for assigning values to
components of a position register. In the above example we are writing to the ‘X’ value so we
used the first 2 registers of our block which was “%R101”. If we wanted to create a tag to write
to the ‘Y’ value of the position register the tags address would be “%R103” and the ‘Z’ value
would be “%R105” and so on.
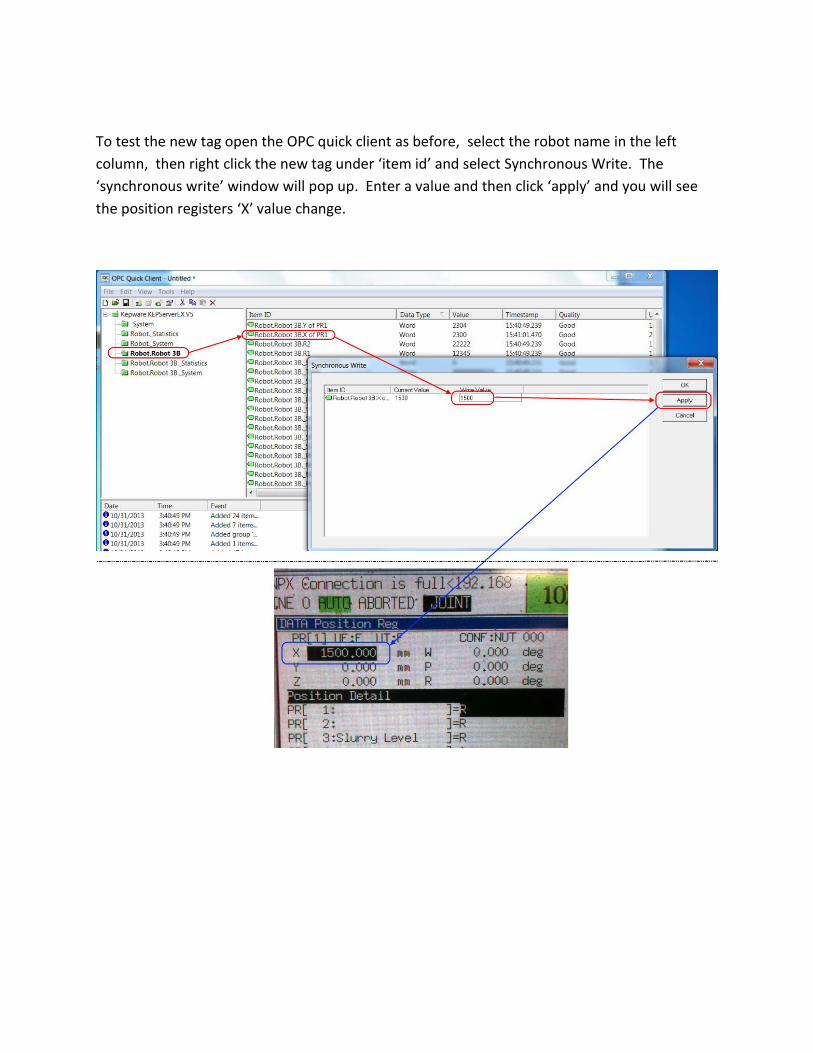
To test the new tag open the OPC quick client as before, select the robot name in the left
column, then right click the new tag under ‘item id’ and select Synchronous Write. The
‘synchronous write’ window will pop up. Enter a value and then click ‘apply’ and you will see
the position registers ‘X’ value change.
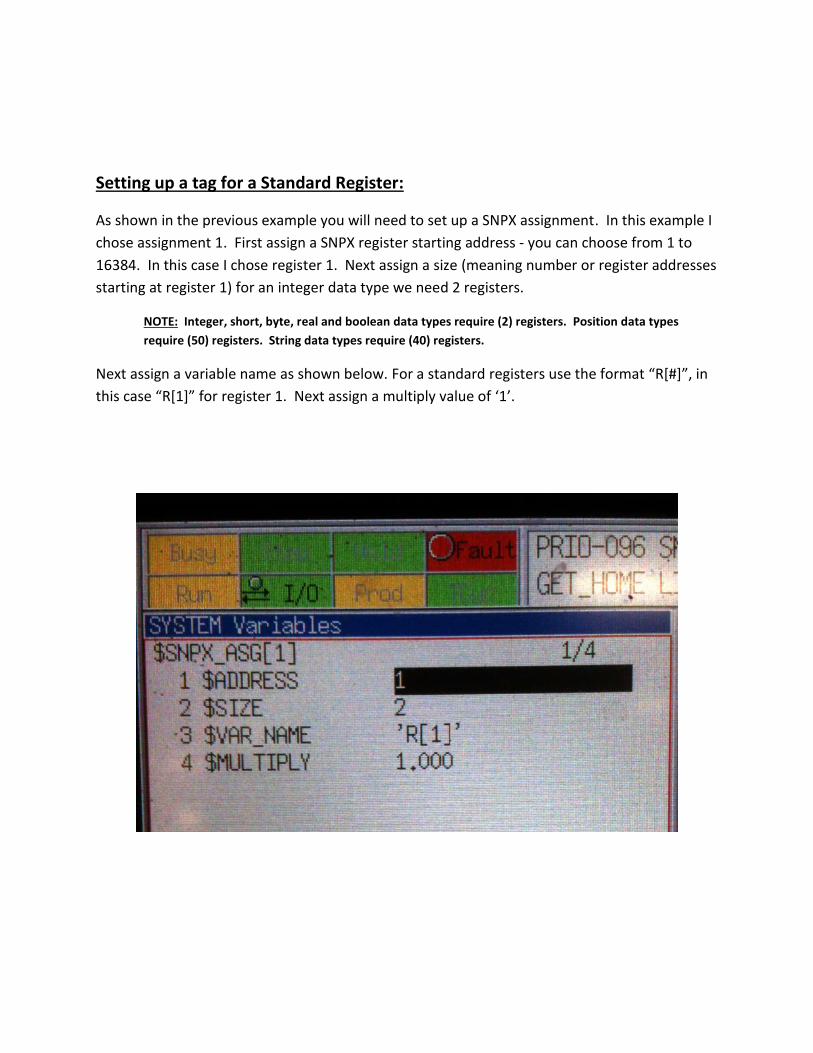
Setting up a tag for a Standard Register:
As shown in the previous example you will need to set up a SNPX assignment. In this example I
chose assignment 1. First assign a SNPX register starting address - you can choose from 1 to
16384. In this case I chose register 1. Next assign a size (meaning number or register addresses
starting at register 1) for an integer data type we need 2 registers.
NOTE: Integer, short, byte, real and boolean data types require (2) registers. Position data types
require (50) registers. String data types require (40) registers.
Next assign a variable name as shown below. For a standard registers use the format “R[#]”, in
this case “R[1]” for register 1. Next assign a multiply value of ‘1’.
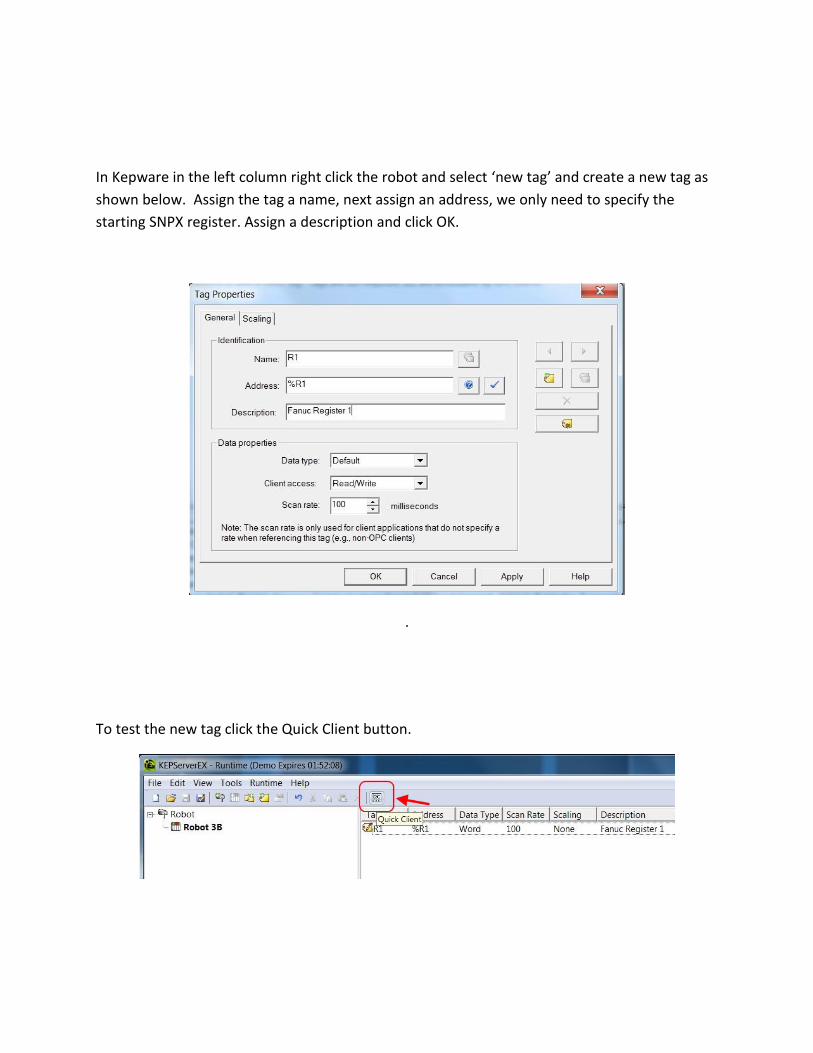
In Kepware in the left column right click the robot and select ‘new tag’ and create a new tag as
shown below. Assign the tag a name, next assign an address, we only need to specify the
starting SNPX register. Assign a description and click OK.
.
To test the new tag click the Quick Client button.
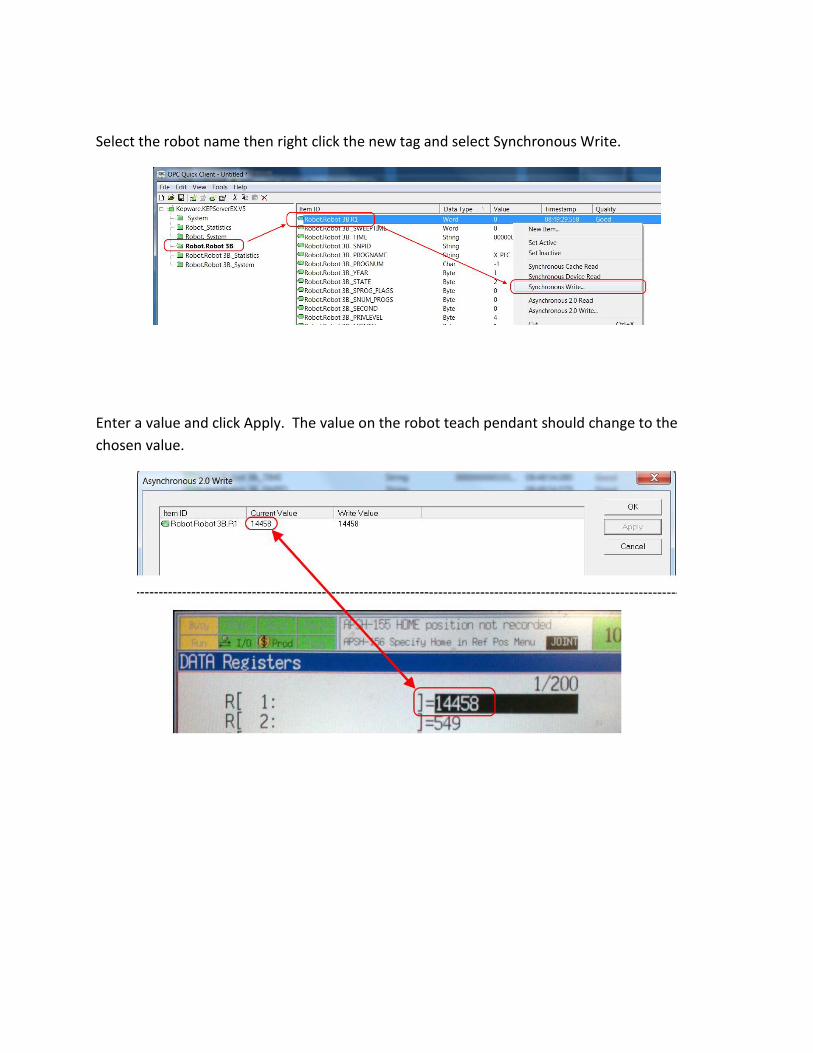
Select the robot name then right click the new tag and select Synchronous Write.
Enter a value and click Apply. The value on the robot teach pendant should change to the
chosen value.
NOTE: Refer to Chapter 6 of the Fanuc Cimplicity HMI manual for more details on address
assignments.
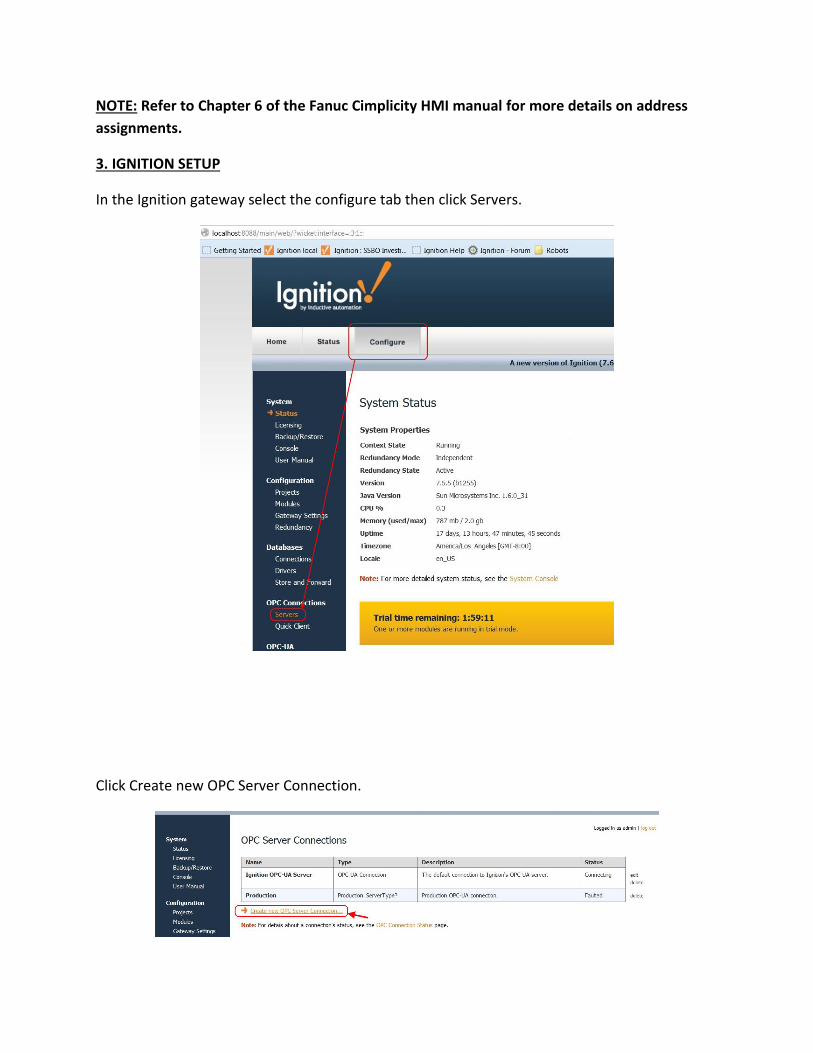
3. IGNITION SETUP
In the Ignition gateway select the configure tab then click Servers.
Click Create new OPC Server Connection.
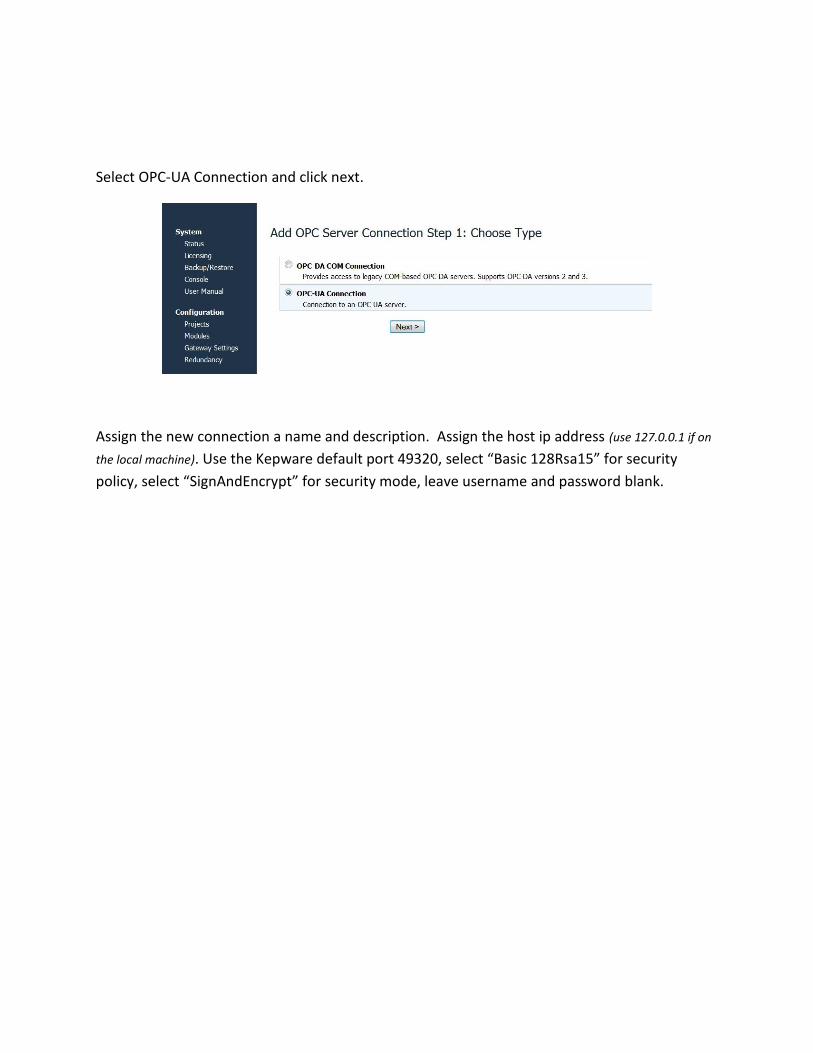
Select OPC-UA Connection and click next.
Assign the new connection a name and description. Assign the host ip address (use 127.0.0.1 if on
the local machine). Use the Kepware default port 49320, select “Basic 128Rsa15” for security
policy, select “SignAndEncrypt” for security mode, leave username and password blank.
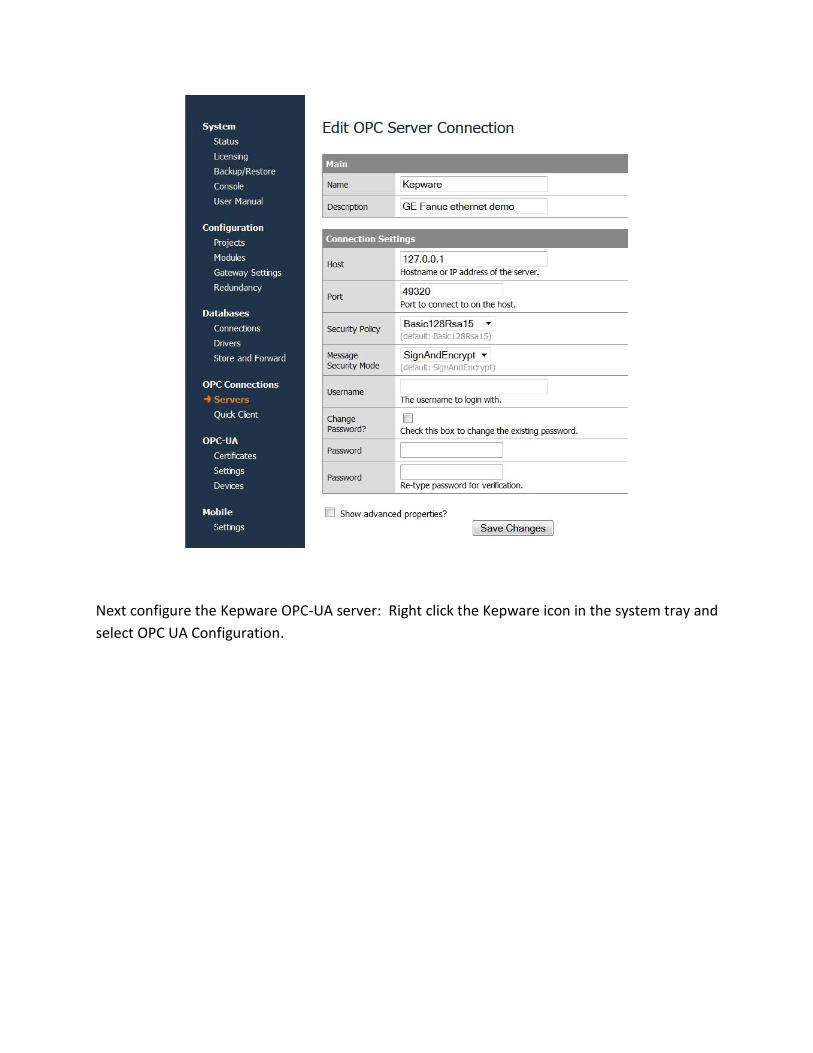
Next configure the Kepware OPC-UA server: Right click the Kepware icon in the system tray and
select OPC UA Configuration.
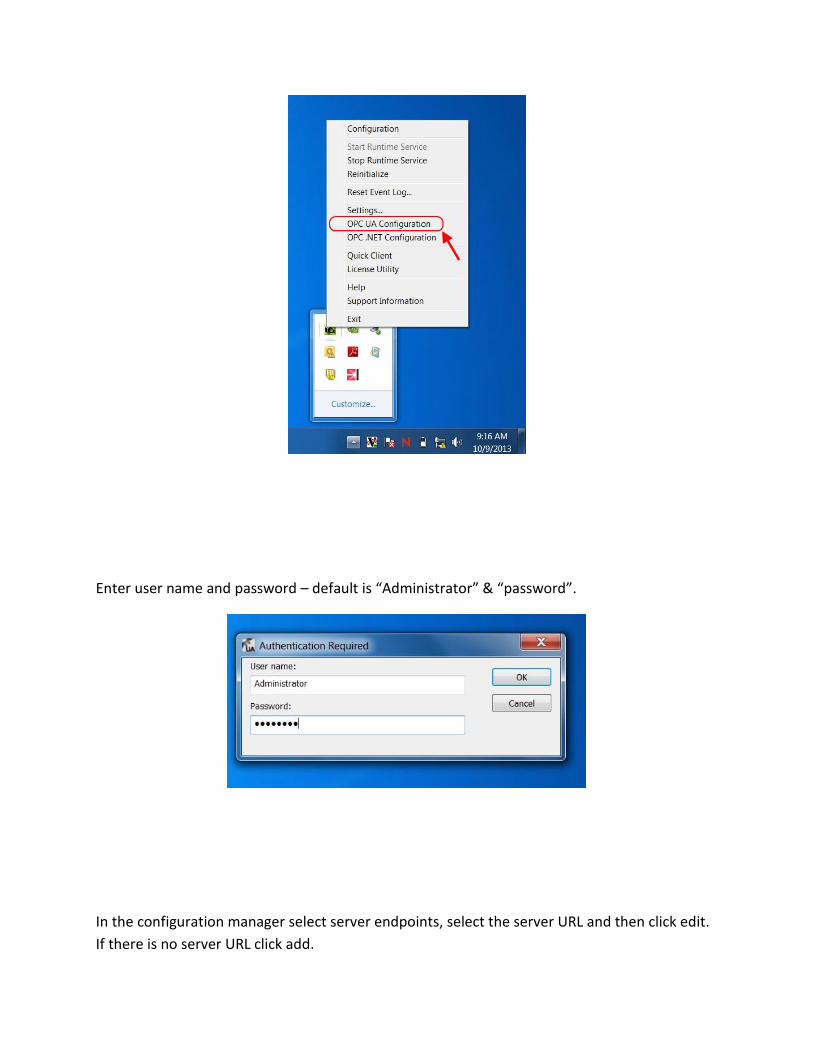
Enter user name and password – default is “Administrator” & “password”.
In the configuration manager select server endpoints, select the server URL and then click edit.
If there is no server URL click add.
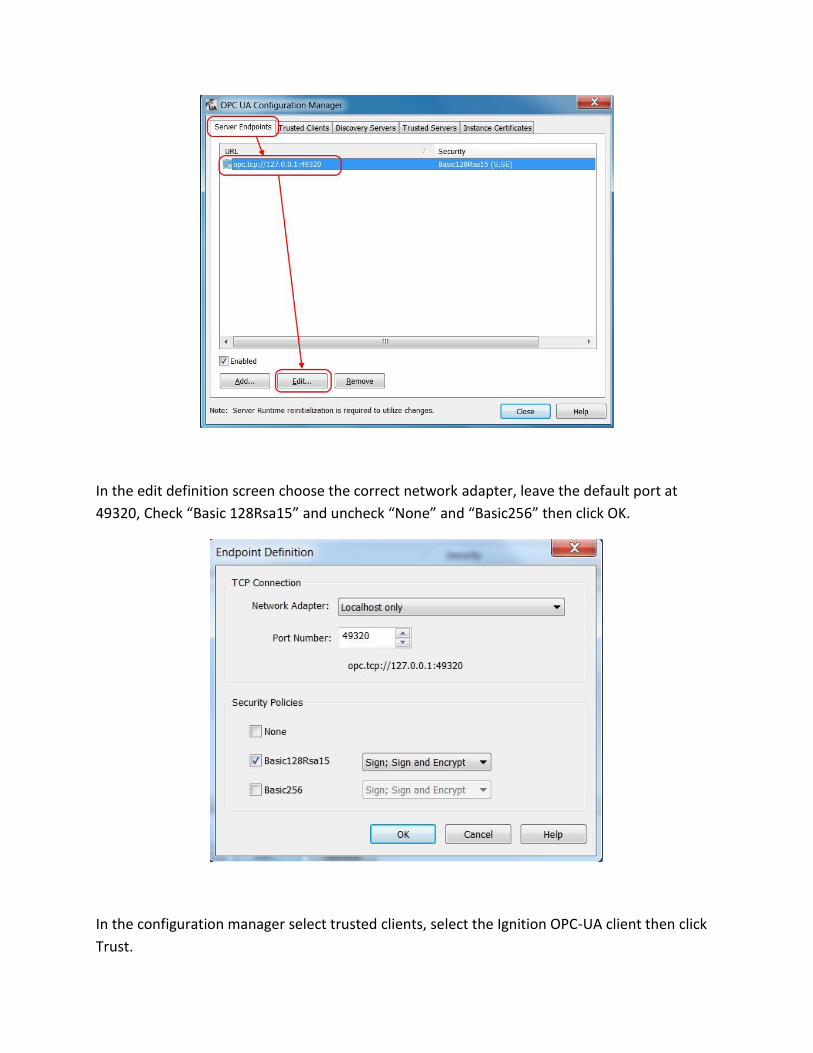
In the edit definition screen choose the correct network adapter, leave the default port at
49320, Check “Basic 128Rsa15” and uncheck “None” and “Basic256” then click OK.
In the configuration manager select trusted clients, select the Ignition OPC-UA client then click
Trust.
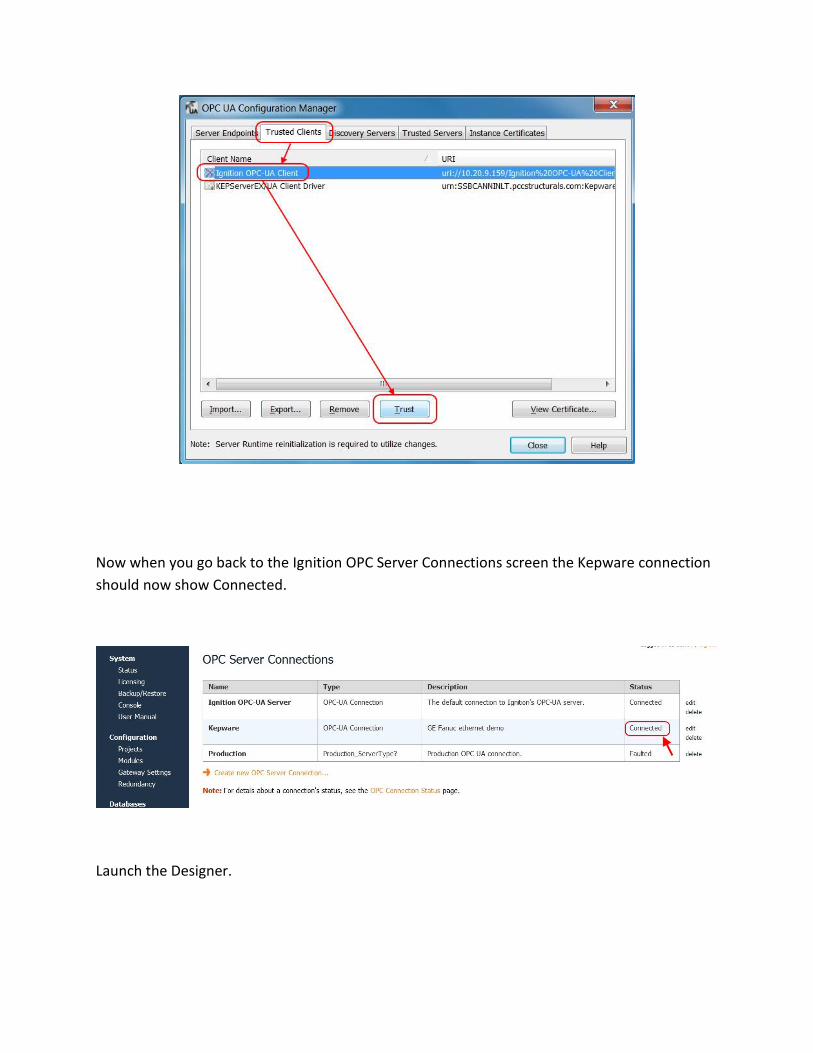
Now when you go back to the Ignition OPC Server Connections screen the Kepware connection
should now show Connected.
Launch the Designer.
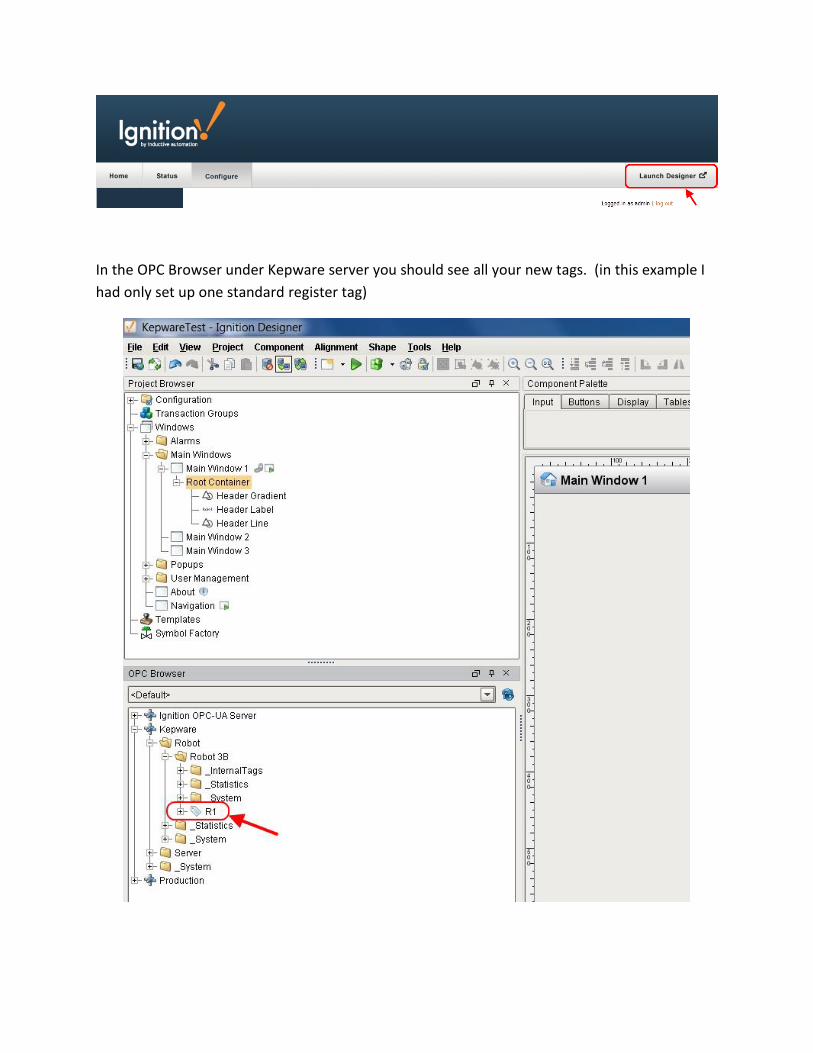
In the OPC Browser under Kepware server you should see all your new tags. (in this example I
had only set up one standard register tag)
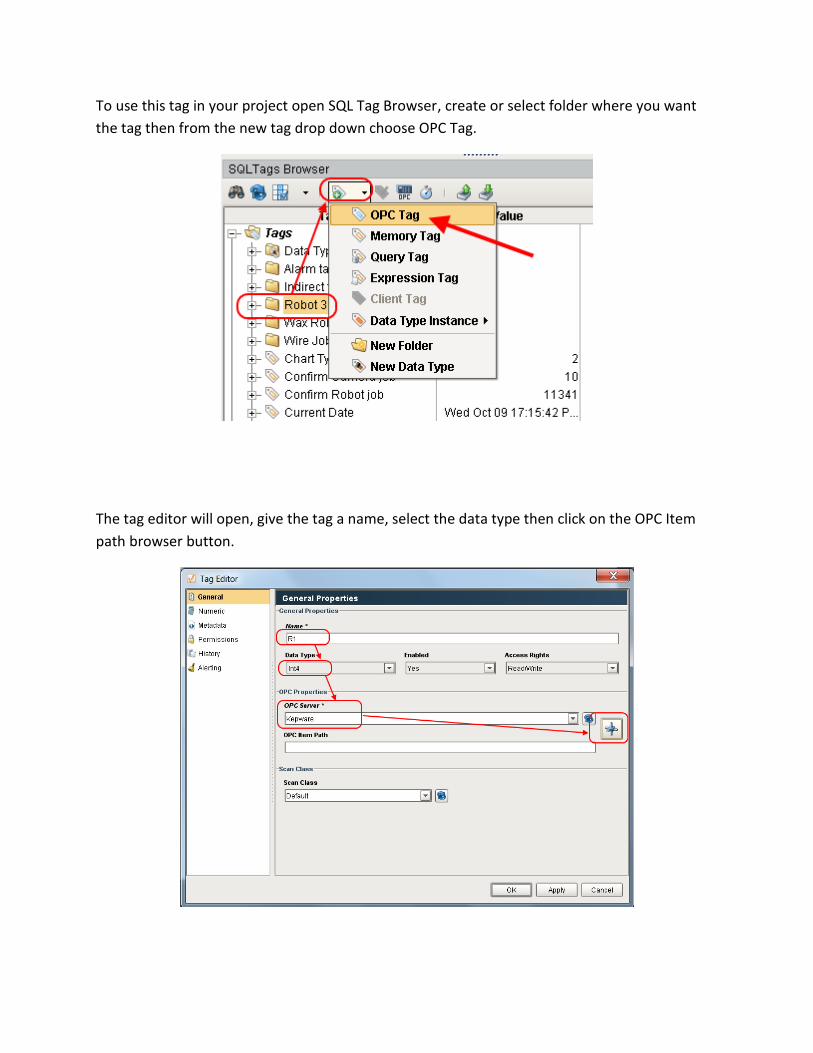
To use this tag in your project open SQL Tag Browser, create or select folder where you want
the tag then from the new tag drop down choose OPC Tag.
The tag editor will open, give the tag a name, select the data type then click on the OPC Item
path browser button.
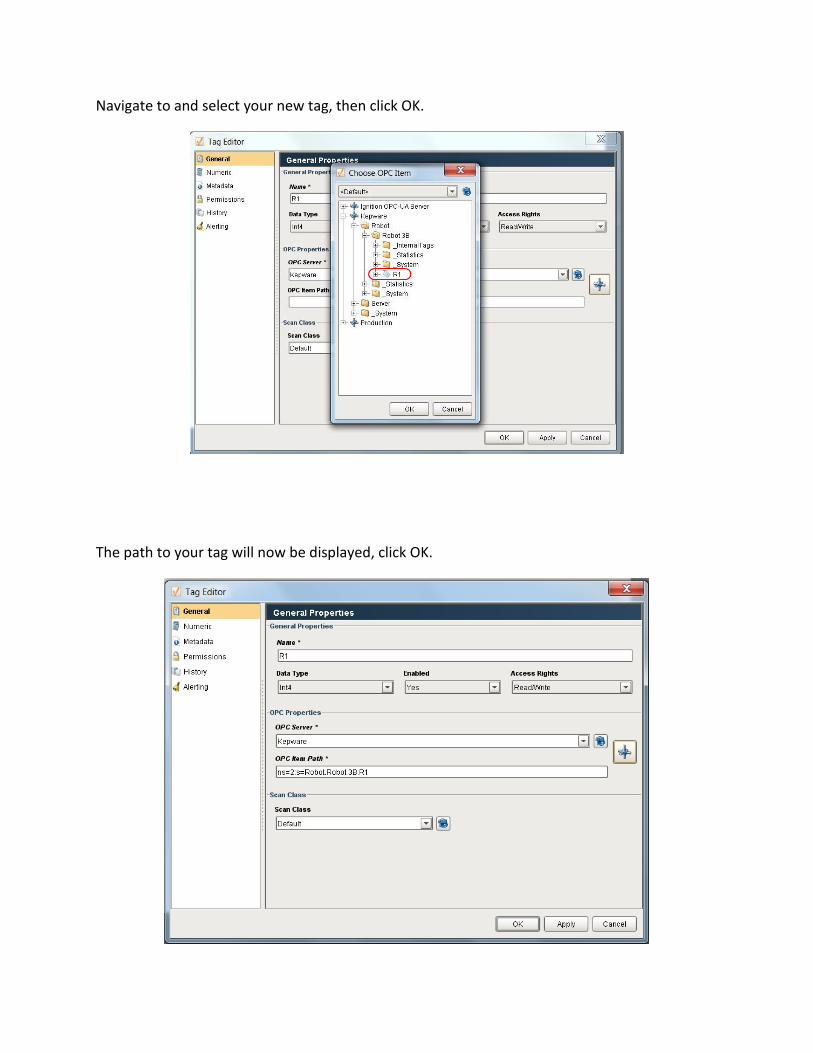
Navigate to and select your new tag, then click OK.
The path to your tag will now be displayed, click OK.
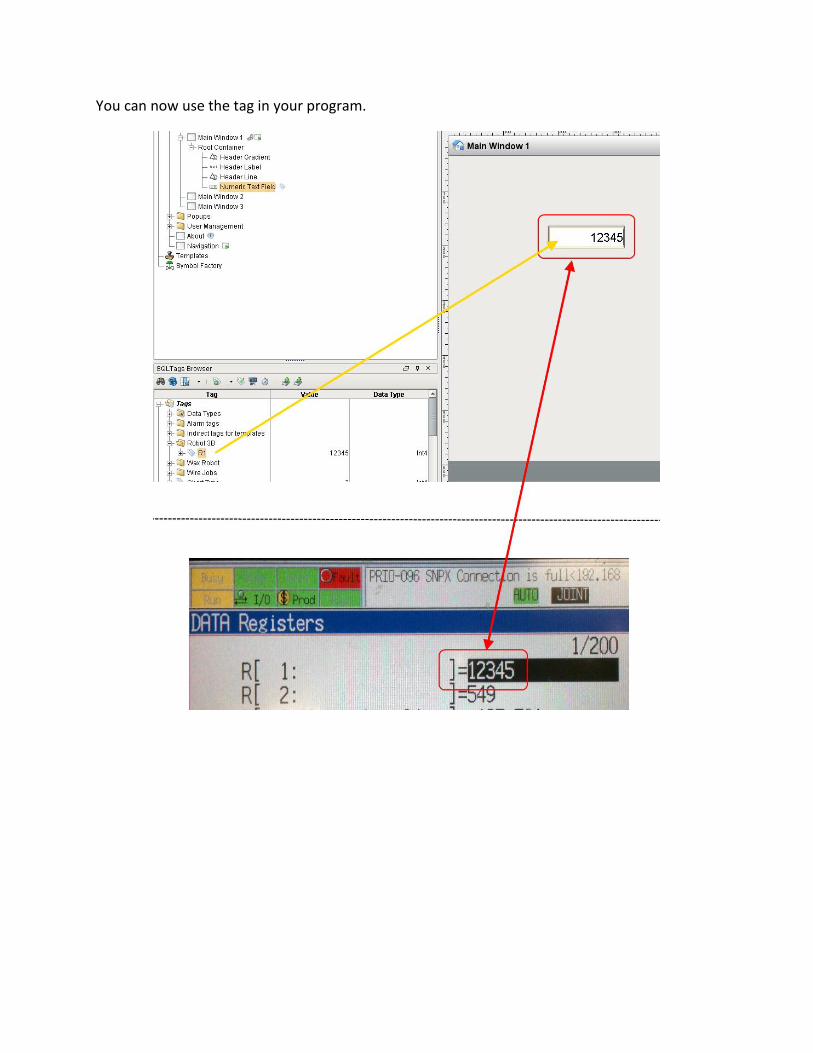
You can now use the tag in your program.