Embed Size (px)
Citation preview
SAGES Abstract Submission Software Instructions http://www.sages.org/meetings/abstracts
1
Thank you for your interest in submitting an abstract for the upcoming Scientific Session. This document is intended to be your guide in using the online submission software and we strongly suggest you print this out for future reference. If you have any questions regarding the abstract process or the use of the submission site, please call 310-437-0544 and ask to speak to Dan Berlant (x118) or Jason Levine (x100). You may also email abstracts -AT- sages -DOT- org with your questions and comments.
The abstract submission system includes the following features:
User Accounts:
All users must register to use the system. All abstracts submitted by an account can be viewed and managed from the account. Abstracts may be edited or deleted without having to contact the SAGES office.
Save for Later:
If you need to leave before finishing a submission, simply logout and log back in later. Your abstract will be saved at the last point you saved data.
Improved Support for Special Characters, Images, and Table:
Most of the standard ASCII character set can be copied from your word processor and into the abstract text. Abstracts may now contain formatting, multiple images and tables, and improved scientific character recognition.
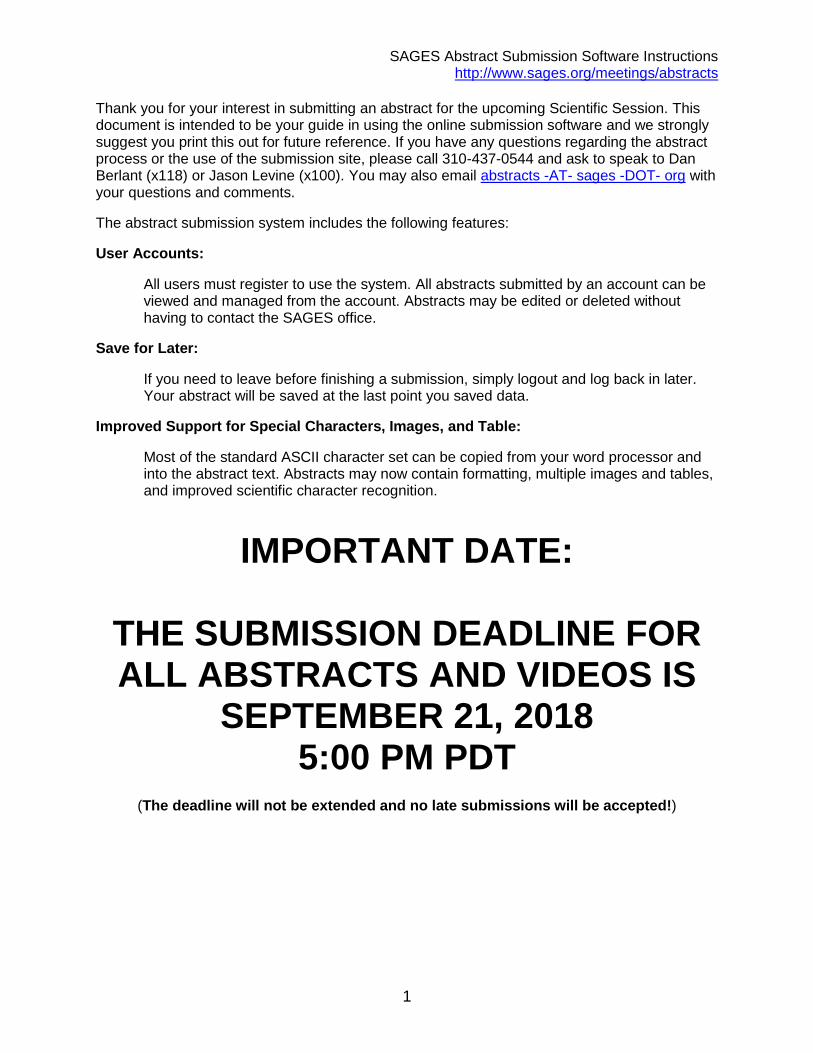
IMPORTANT DATE:
THE SUBMISSION DEADLINE FOR ALL ABSTRACTS AND VIDEOS IS
SEPTEMBER 21, 2018 5:00 PM PDT
(The deadline will not be extended and no late submissions will be accepted!)
SAGES Abstract Submission Software Instructions http://www.sages.org/meetings/abstracts
2
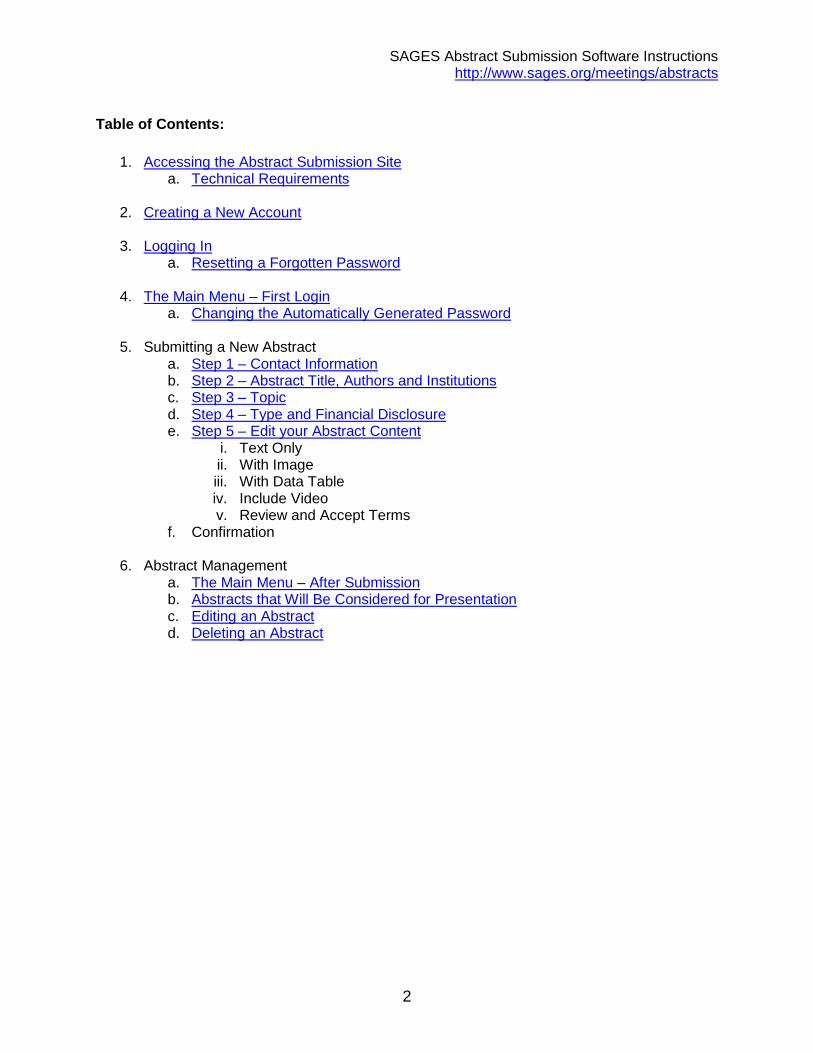
Table of Contents:
1. Accessing the Abstract Submission Site
a. Technical Requirements
2. Creating a New Account
3. Logging In a. Resetting a Forgotten Password
4. The Main Menu – First Login
a. Changing the Automatically Generated Password
5. Submitting a New Abstract a. Step 1 – Contact Information b. Step 2 – Abstract Title, Authors and Institutions c. Step 3 – Topic d. Step 4 – Type and Financial Disclosure e. Step 5 – Edit your Abstract Content
i. Text Only ii. With Image iii. With Data Table iv. Include Video v. Review and Accept Terms
f. Confirmation
6. Abstract Management a. The Main Menu – After Submission b. Abstracts that Will Be Considered for Presentation c. Editing an Abstract d. Deleting an Abstract
SAGES Abstract Submission Software Instructions http://www.sages.org/meetings/abstracts
3
Part 1 – Accessing the Abstract Submission Site
To access the abstract submission site, please go to the following page:
https://www.sages.org/meetings/abstracts/
On that page, you will see a link to access the abstract submission site. Please follow that link after reading the instructions on the SAGES site.
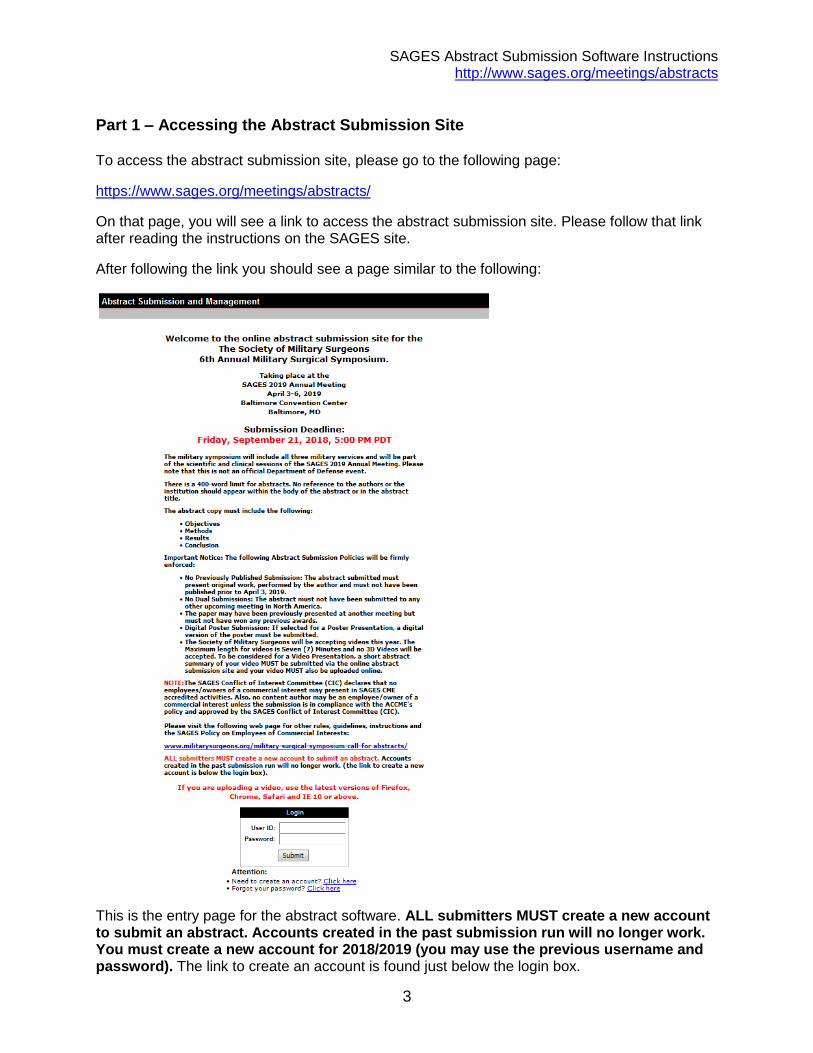
After following the link you should see a page similar to the following:
This is the entry page for the abstract software. ALL submitters MUST create a new account to submit an abstract. Accounts created in the past submission run will no longer work. You must create a new account for 2018/2019 (you may use the previous username and password). The link to create an account is found just below the login box.
SAGES Abstract Submission Software Instructions http://www.sages.org/meetings/abstracts
4
Part 1a – Technical Requirements
We have tested the software with multiple browsers and operating systems. Please use one of the following to access the abstract submission system.
Browsers:
Windows:
MS Internet Explorer 9 or newer Current versions of:
Firefox
Chrome
Macintosh:
Current versions of:
Safari
Firefox
Chrome
Mobile Devices:
We do not currently support mobile browsers
Screen Resolution:
We recommend setting your screen resolution to AT LEAST 800x600 pixels. Users with a screen resolution of 640x480 pixels will have a hard time navigating the site. What you see will vary depending on your computer and browser settings.
SAGES Abstract Submission Software Instructions http://www.sages.org/meetings/abstracts
5
Part 2 – Creating a New Account
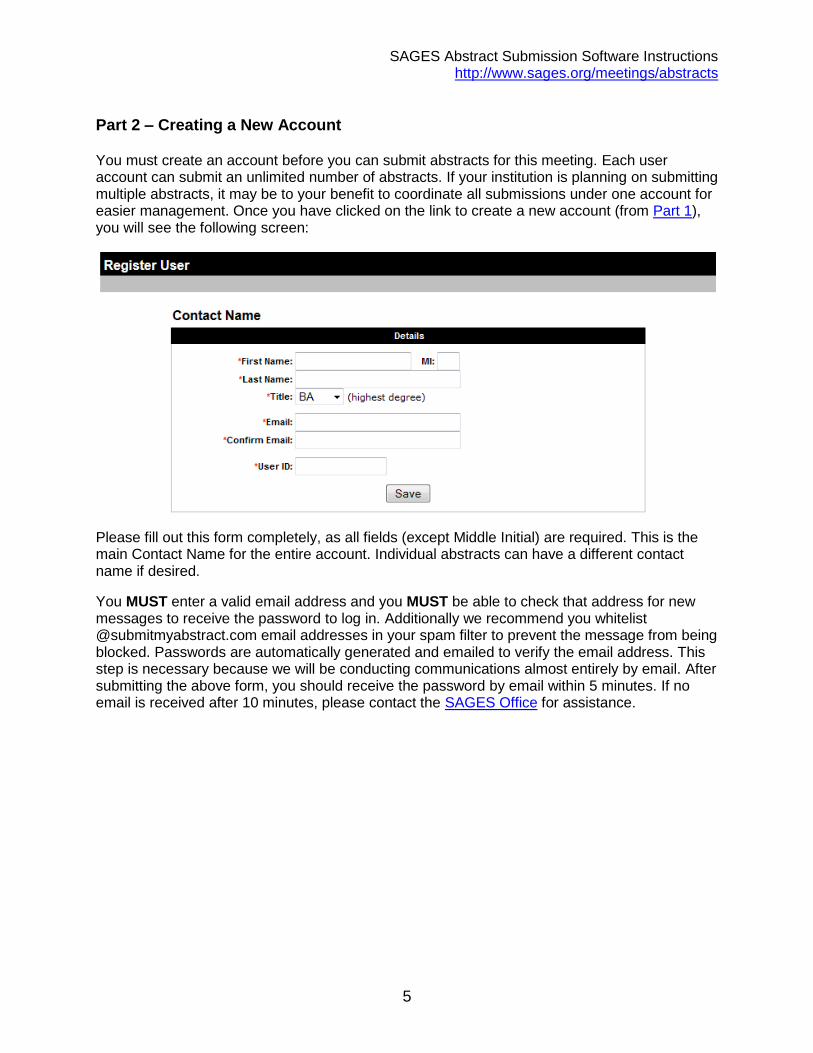
You must create an account before you can submit abstracts for this meeting. Each user account can submit an unlimited number of abstracts. If your institution is planning on submitting multiple abstracts, it may be to your benefit to coordinate all submissions under one account for easier management. Once you have clicked on the link to create a new account (from Part 1), you will see the following screen:
Please fill out this form completely, as all fields (except Middle Initial) are required. This is the main Contact Name for the entire account. Individual abstracts can have a different contact name if desired.
You MUST enter a valid email address and you MUST be able to check that address for new messages to receive the password to log in. Additionally we recommend you whitelist @submitmyabstract.com email addresses in your spam filter to prevent the message from being blocked. Passwords are automatically generated and emailed to verify the email address. This step is necessary because we will be conducting communications almost entirely by email. After submitting the above form, you should receive the password by email within 5 minutes. If no email is received after 10 minutes, please contact the SAGES Office for assistance.
SAGES Abstract Submission Software Instructions http://www.sages.org/meetings/abstracts
6
Part 3 – Logging In
By now, you have created an account using the form from Part 2 and you have received your password by email to the address you provided. The randomly generated password will look something like this:
6TZIdrK3S2
Follow the link in the email to go back to the abstract site login screen and enter the User ID you created into the User ID box (see below). The passwords ARE CASE SENSITIVE, so you must enter capital and lowercase letters exactly as shown in the email. We suggest that you copy and paste the password from the email into the login box. Once you have entered your User ID and password, click the Submit button to log in.
SAGES Abstract Submission Software Instructions http://www.sages.org/meetings/abstracts
7
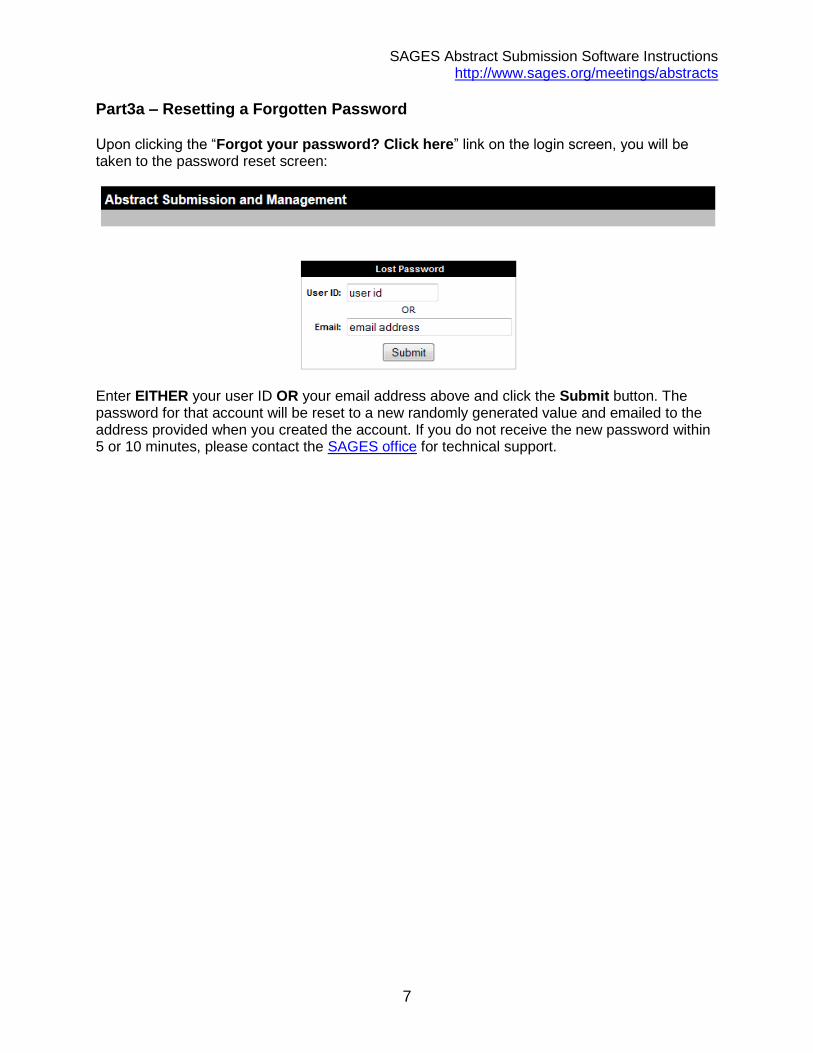
Part3a – Resetting a Forgotten Password
Upon clicking the “Forgot your password? Click here” link on the login screen, you will be taken to the password reset screen:
Enter EITHER your user ID OR your email address above and click the Submit button. The password for that account will be reset to a new randomly generated value and emailed to the address provided when you created the account. If you do not receive the new password within 5 or 10 minutes, please contact the SAGES office for technical support.
SAGES Abstract Submission Software Instructions http://www.sages.org/meetings/abstracts
8
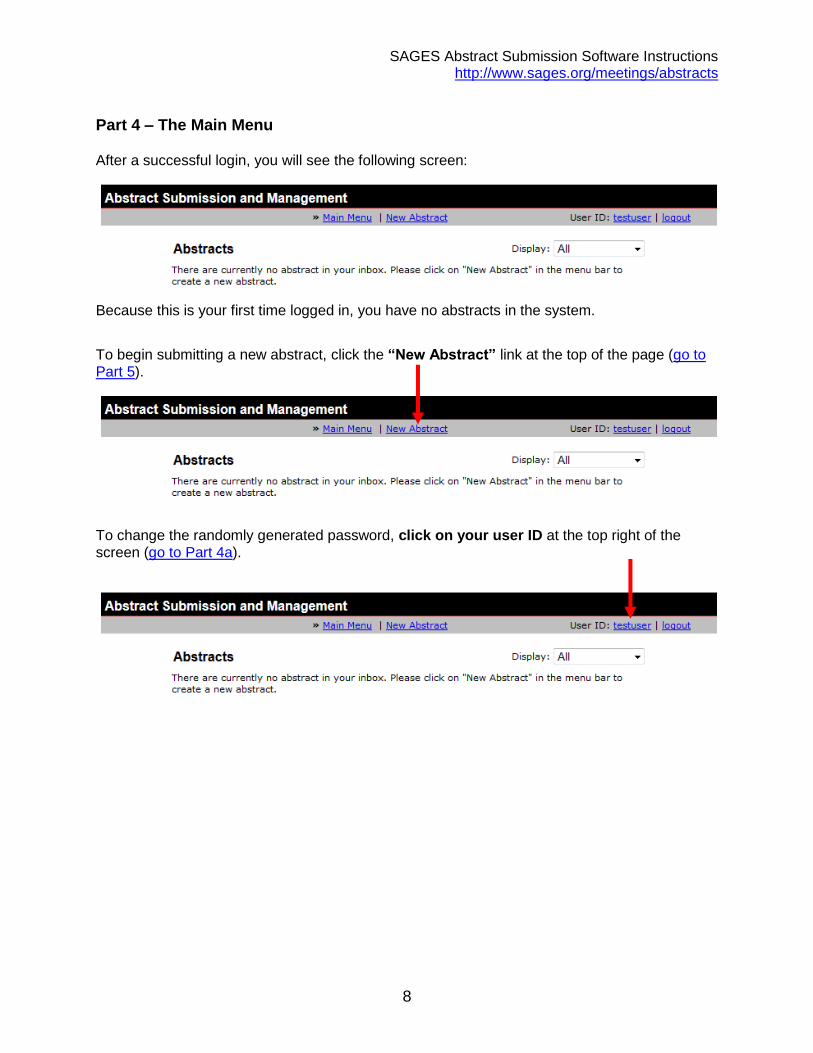
Part 4 – The Main Menu
After a successful login, you will see the following screen:
Because this is your first time logged in, you have no abstracts in the system.
To begin submitting a new abstract, click the “New Abstract” link at the top of the page (go to Part 5).
To change the randomly generated password, click on your user ID at the top right of the screen (go to Part 4a).
SAGES Abstract Submission Software Instructions http://www.sages.org/meetings/abstracts
9
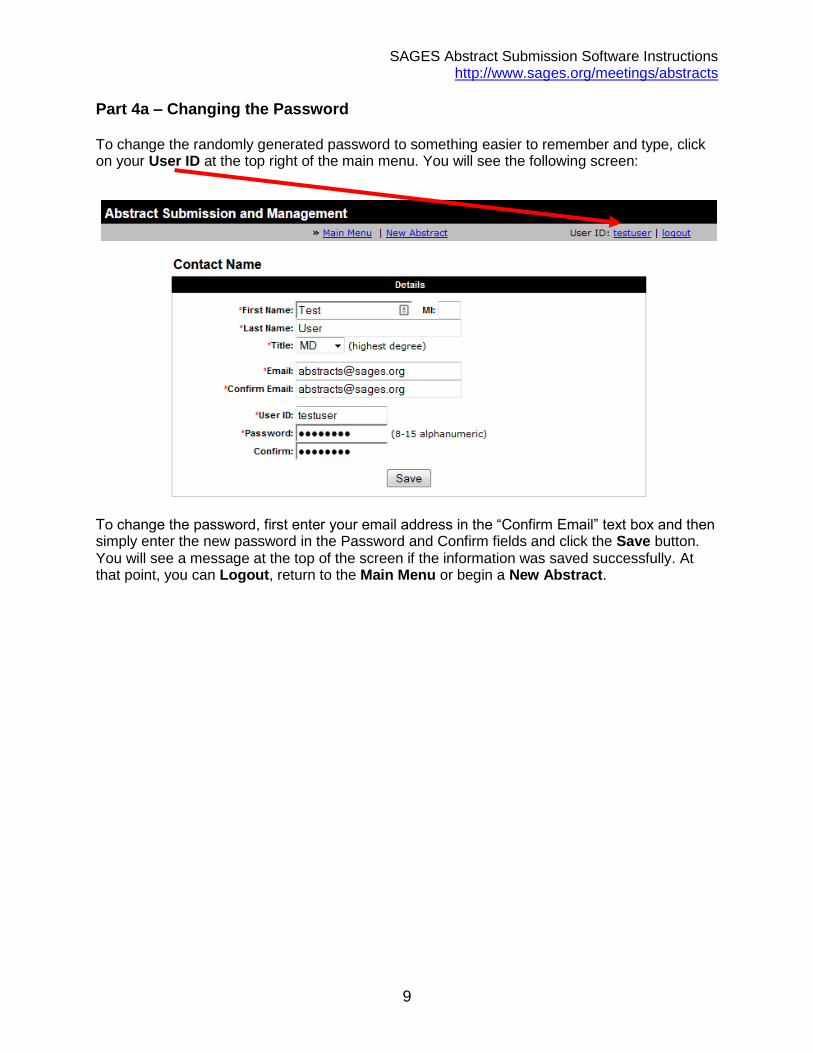
Part 4a – Changing the Password
To change the randomly generated password to something easier to remember and type, click on your User ID at the top right of the main menu. You will see the following screen:
To change the password, first enter your email address in the “Confirm Email” text box and then simply enter the new password in the Password and Confirm fields and click the Save button. You will see a message at the top of the screen if the information was saved successfully. At that point, you can Logout, return to the Main Menu or begin a New Abstract.
SAGES Abstract Submission Software Instructions http://www.sages.org/meetings/abstracts
10
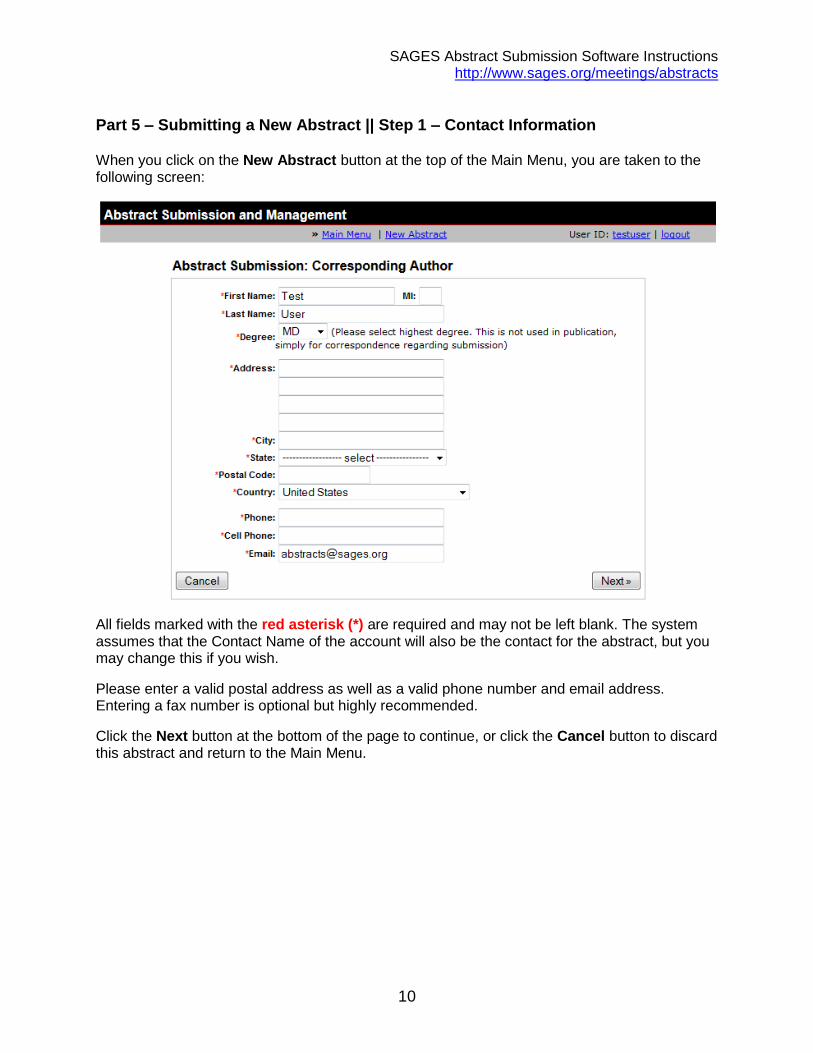
Part 5 – Submitting a New Abstract || Step 1 – Contact Information
When you click on the New Abstract button at the top of the Main Menu, you are taken to the following screen:
All fields marked with the red asterisk (*) are required and may not be left blank. The system assumes that the Contact Name of the account will also be the contact for the abstract, but you may change this if you wish.
Please enter a valid postal address as well as a valid phone number and email address. Entering a fax number is optional but highly recommended.
Click the Next button at the bottom of the page to continue, or click the Cancel button to discard this abstract and return to the Main Menu.
SAGES Abstract Submission Software Instructions http://www.sages.org/meetings/abstracts
11
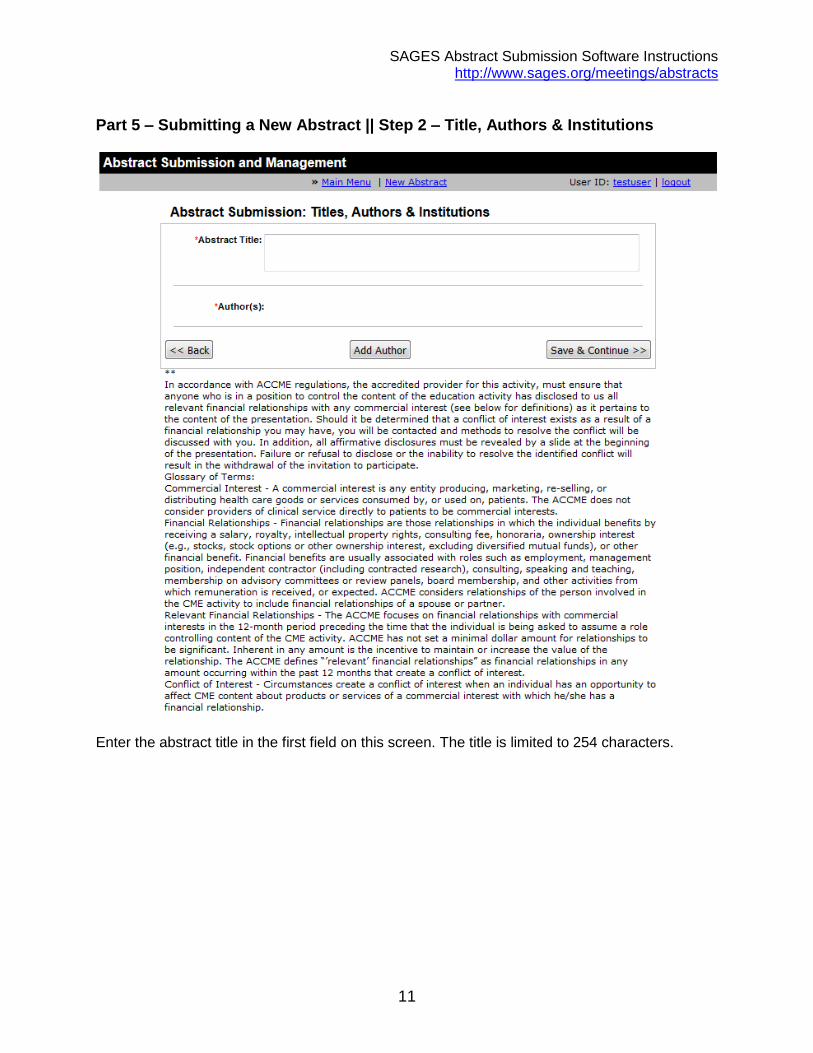
Part 5 – Submitting a New Abstract || Step 2 – Title, Authors & Institutions
Enter the abstract title in the first field on this screen. The title is limited to 254 characters.
SAGES Abstract Submission Software Instructions http://www.sages.org/meetings/abstracts
12
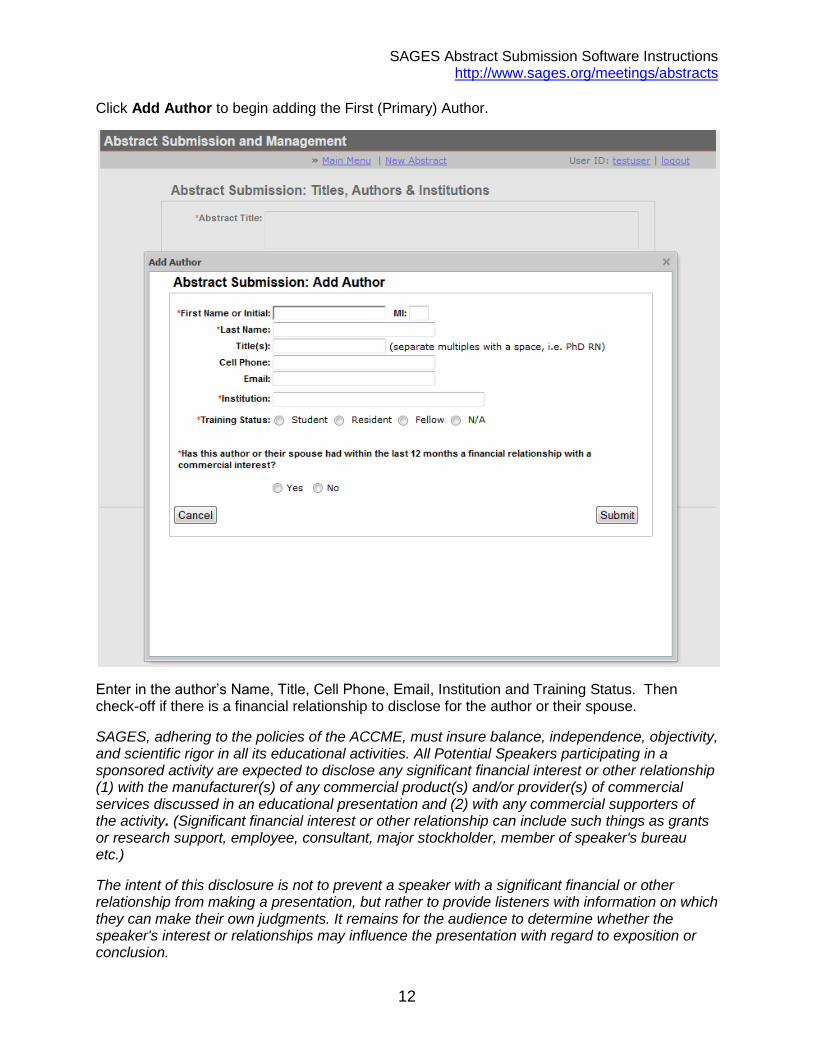
Click Add Author to begin adding the First (Primary) Author.
Enter in the author’s Name, Title, Cell Phone, Email, Institution and Training Status. Then check-off if there is a financial relationship to disclose for the author or their spouse.
SAGES, adhering to the policies of the ACCME, must insure balance, independence, objectivity, and scientific rigor in all its educational activities. All Potential Speakers participating in a sponsored activity are expected to disclose any significant financial interest or other relationship (1) with the manufacturer(s) of any commercial product(s) and/or provider(s) of commercial services discussed in an educational presentation and (2) with any commercial supporters of the activity. (Significant financial interest or other relationship can include such things as grants or research support, employee, consultant, major stockholder, member of speaker's bureau etc.)
The intent of this disclosure is not to prevent a speaker with a significant financial or other relationship from making a presentation, but rather to provide listeners with information on which they can make their own judgments. It remains for the audience to determine whether the speaker's interest or relationships may influence the presentation with regard to exposition or conclusion.
SAGES Abstract Submission Software Instructions http://www.sages.org/meetings/abstracts
13
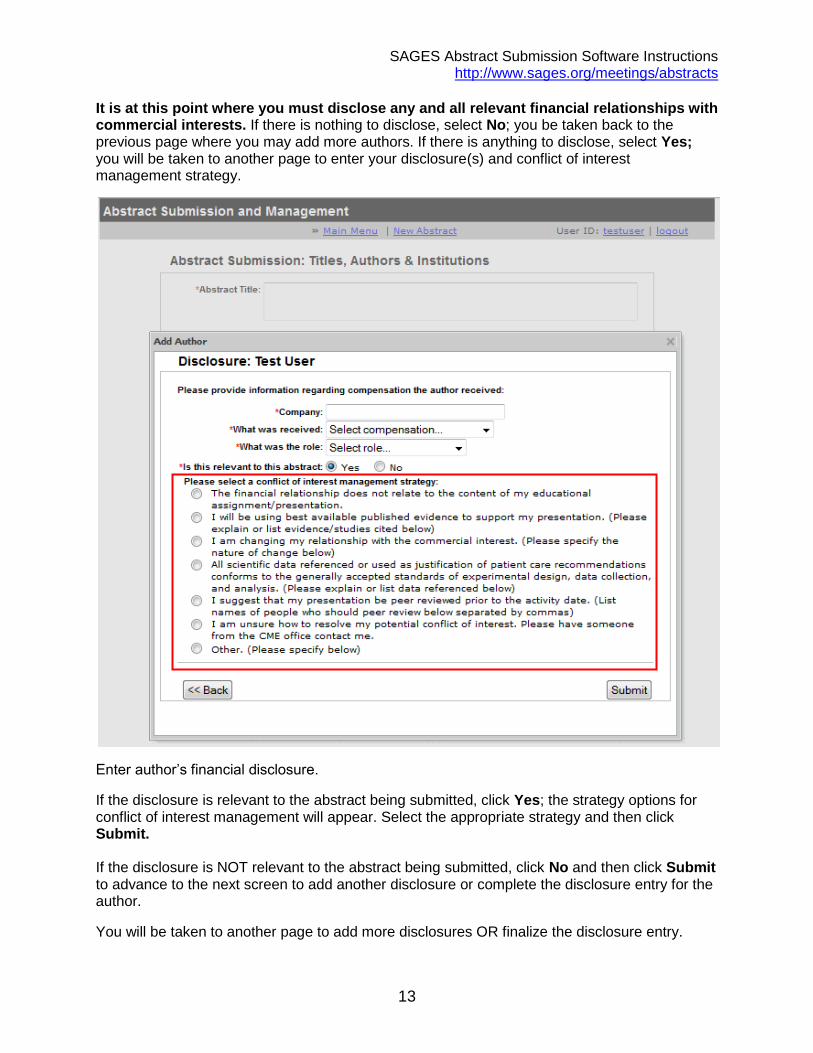
It is at this point where you must disclose any and all relevant financial relationships with commercial interests. If there is nothing to disclose, select No; you be taken back to the previous page where you may add more authors. If there is anything to disclose, select Yes; you will be taken to another page to enter your disclosure(s) and conflict of interest management strategy.
Enter author’s financial disclosure.
If the disclosure is relevant to the abstract being submitted, click Yes; the strategy options for conflict of interest management will appear. Select the appropriate strategy and then click Submit. If the disclosure is NOT relevant to the abstract being submitted, click No and then click Submit to advance to the next screen to add another disclosure or complete the disclosure entry for the author.
You will be taken to another page to add more disclosures OR finalize the disclosure entry.
SAGES Abstract Submission Software Instructions http://www.sages.org/meetings/abstracts
14
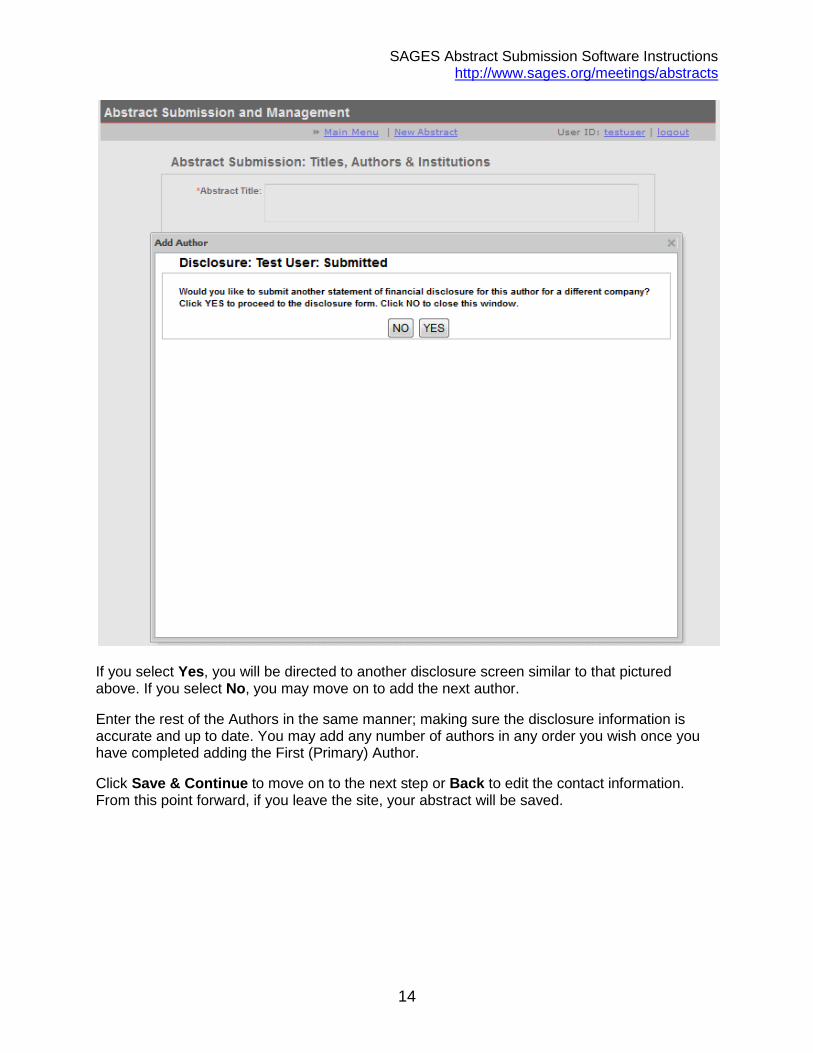
If you select Yes, you will be directed to another disclosure screen similar to that pictured above. If you select No, you may move on to add the next author.
Enter the rest of the Authors in the same manner; making sure the disclosure information is accurate and up to date. You may add any number of authors in any order you wish once you have completed adding the First (Primary) Author.
Click Save & Continue to move on to the next step or Back to edit the contact information. From this point forward, if you leave the site, your abstract will be saved.
SAGES Abstract Submission Software Instructions http://www.sages.org/meetings/abstracts
15
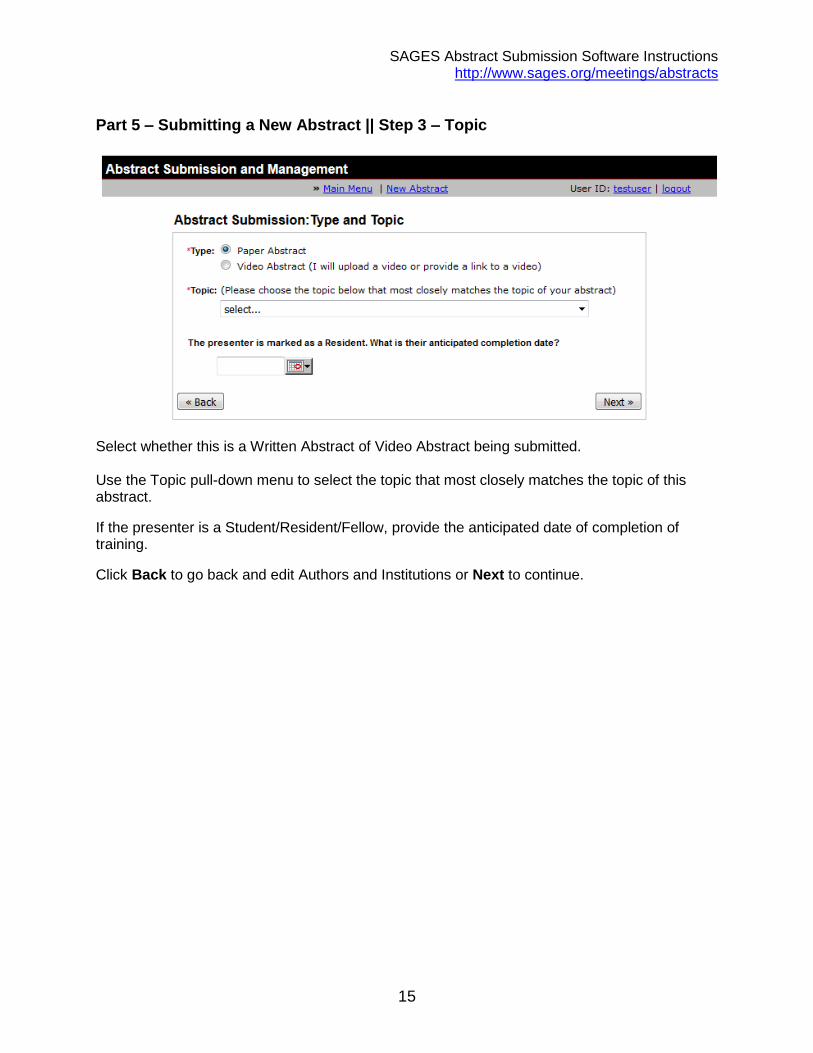
Part 5 – Submitting a New Abstract || Step 3 – Topic
Select whether this is a Written Abstract of Video Abstract being submitted. Use the Topic pull-down menu to select the topic that most closely matches the topic of this abstract.
If the presenter is a Student/Resident/Fellow, provide the anticipated date of completion of training.
Click Back to go back and edit Authors and Institutions or Next to continue.
SAGES Abstract Submission Software Instructions http://www.sages.org/meetings/abstracts
16
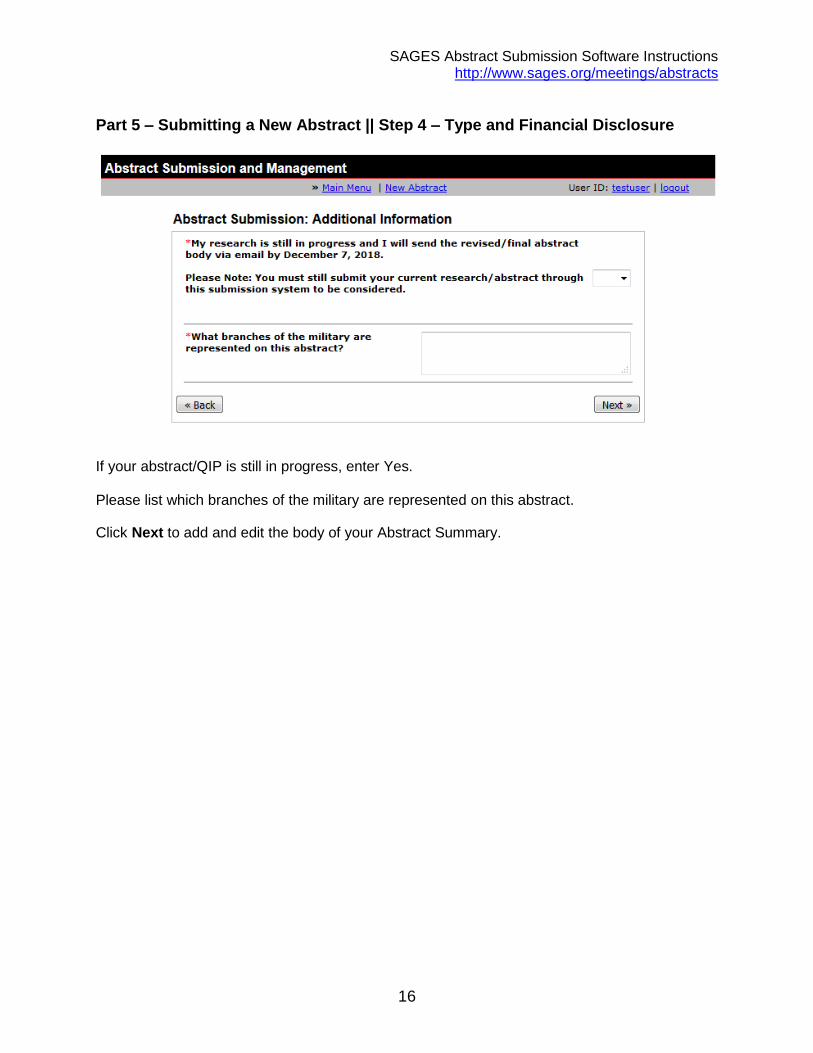
Part 5 – Submitting a New Abstract || Step 4 – Type and Financial Disclosure
If your abstract/QIP is still in progress, enter Yes. Please list which branches of the military are represented on this abstract.
Click Next to add and edit the body of your Abstract Summary.
SAGES Abstract Submission Software Instructions http://www.sages.org/meetings/abstracts
17
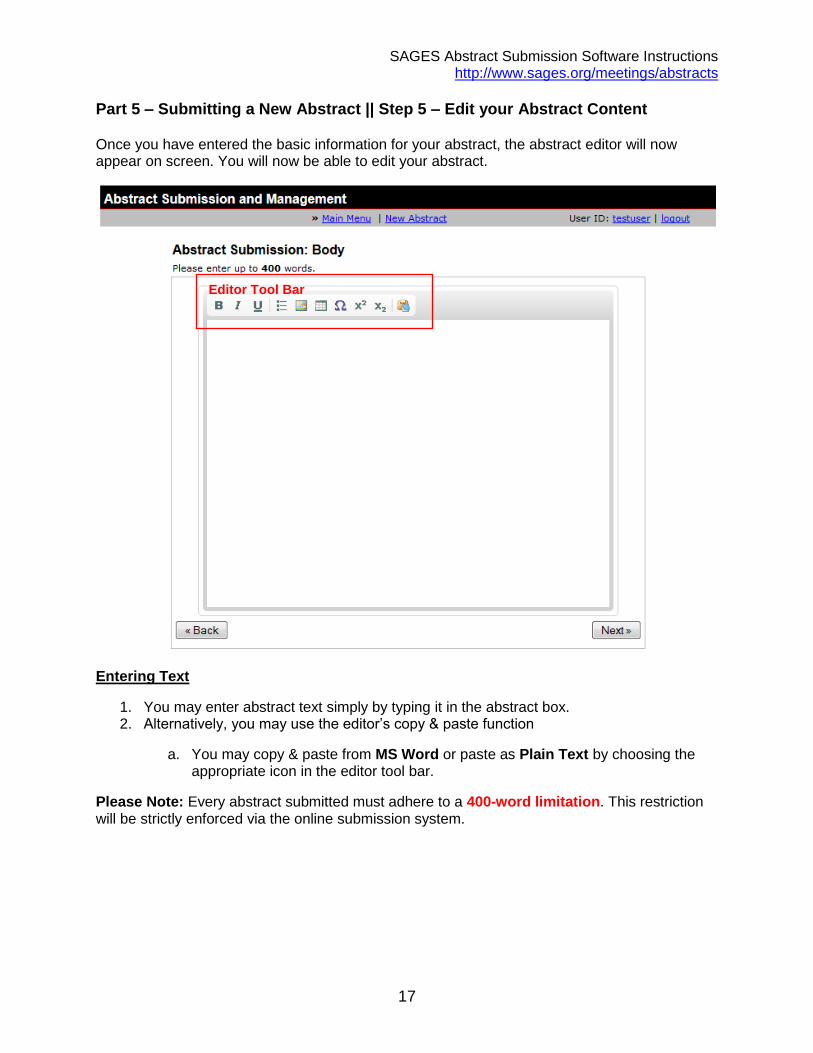
Part 5 – Submitting a New Abstract || Step 5 – Edit your Abstract Content
Once you have entered the basic information for your abstract, the abstract editor will now appear on screen. You will now be able to edit your abstract.
Entering Text
1. You may enter abstract text simply by typing it in the abstract box. 2. Alternatively, you may use the editor’s copy & paste function
a. You may copy & paste from MS Word or paste as Plain Text by choosing the appropriate icon in the editor tool bar.
Please Note: Every abstract submitted must adhere to a 400-word limitation. This restriction will be strictly enforced via the online submission system.
Editor Tool Bar
SAGES Abstract Submission Software Instructions http://www.sages.org/meetings/abstracts
18
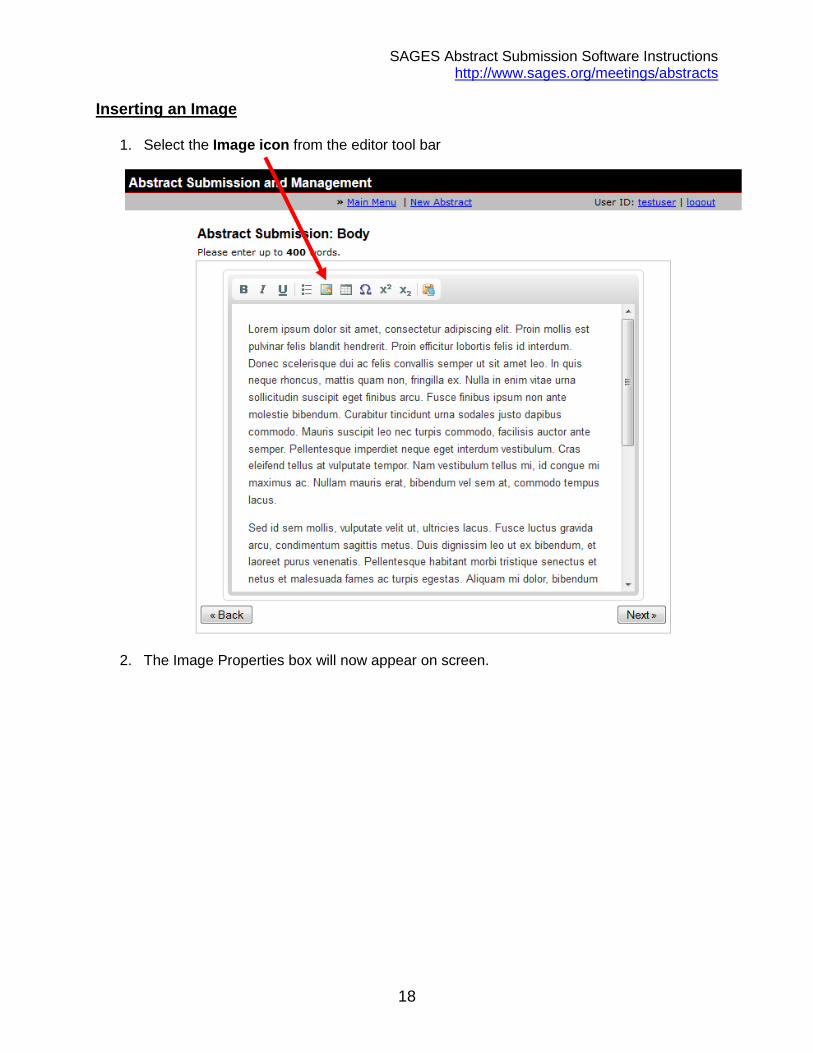
Inserting an Image
1. Select the Image icon from the editor tool bar
2. The Image Properties box will now appear on screen.
SAGES Abstract Submission Software Instructions http://www.sages.org/meetings/abstracts
19
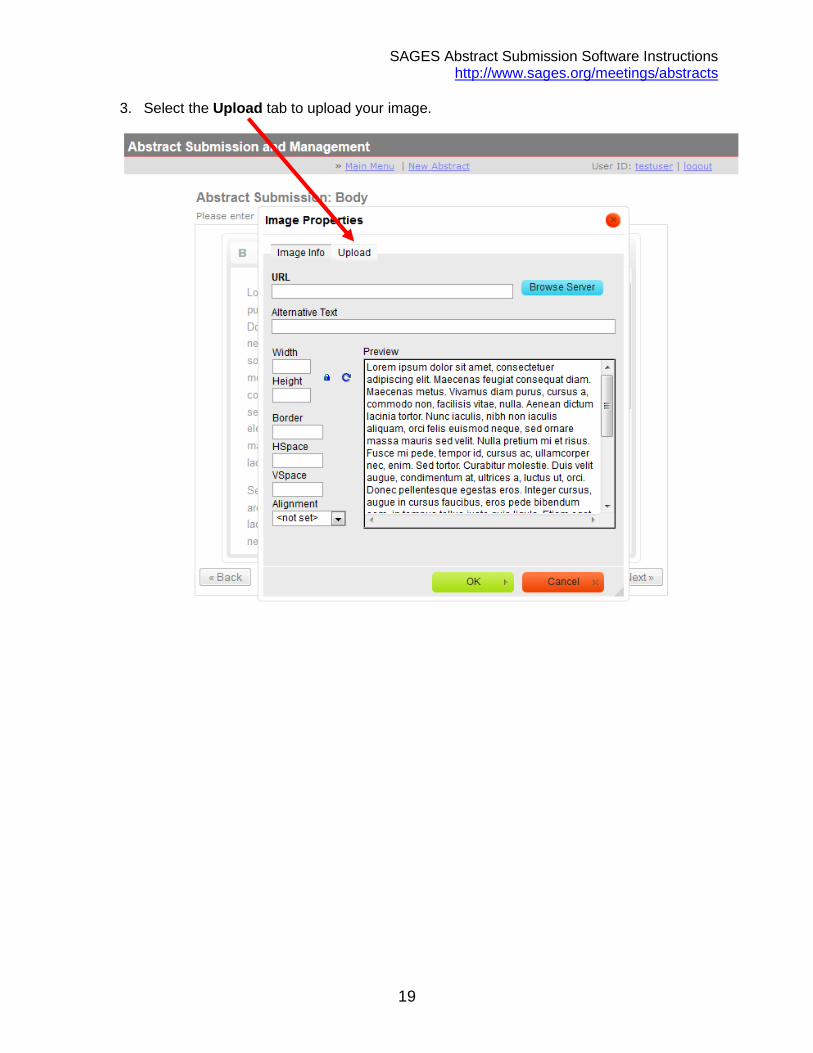
3. Select the Upload tab to upload your image.
SAGES Abstract Submission Software Instructions http://www.sages.org/meetings/abstracts
20
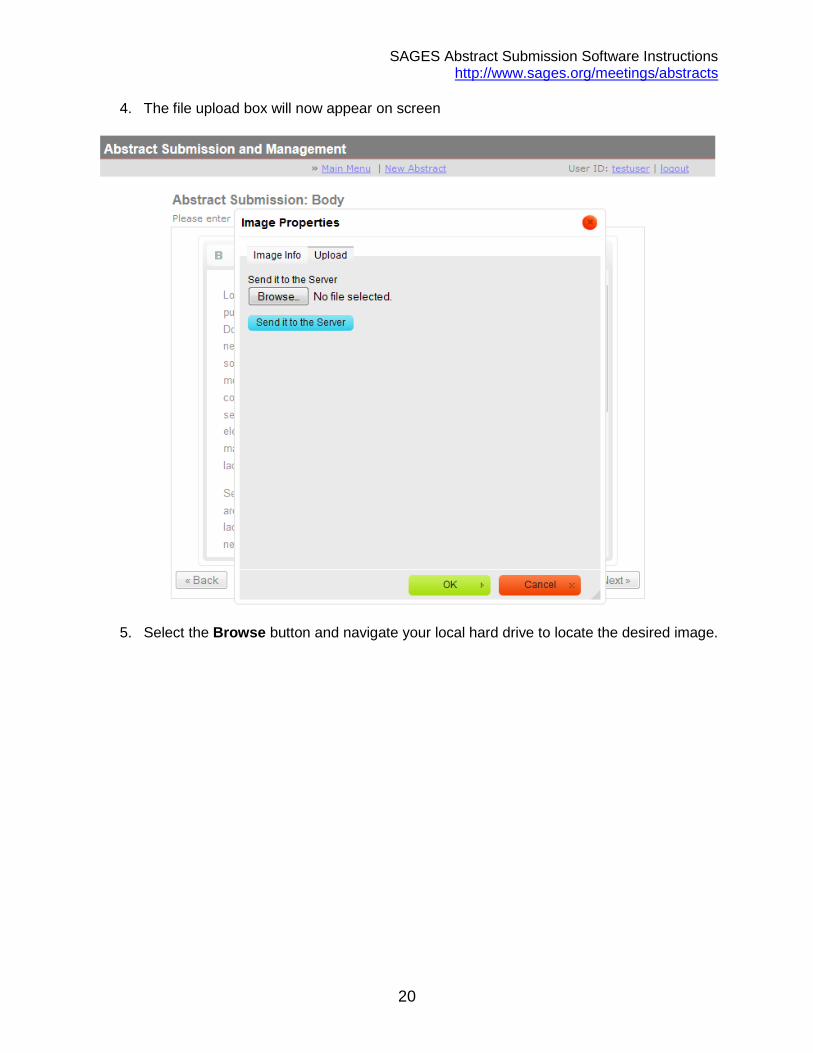
4. The file upload box will now appear on screen
5. Select the Browse button and navigate your local hard drive to locate the desired image.
SAGES Abstract Submission Software Instructions http://www.sages.org/meetings/abstracts
21
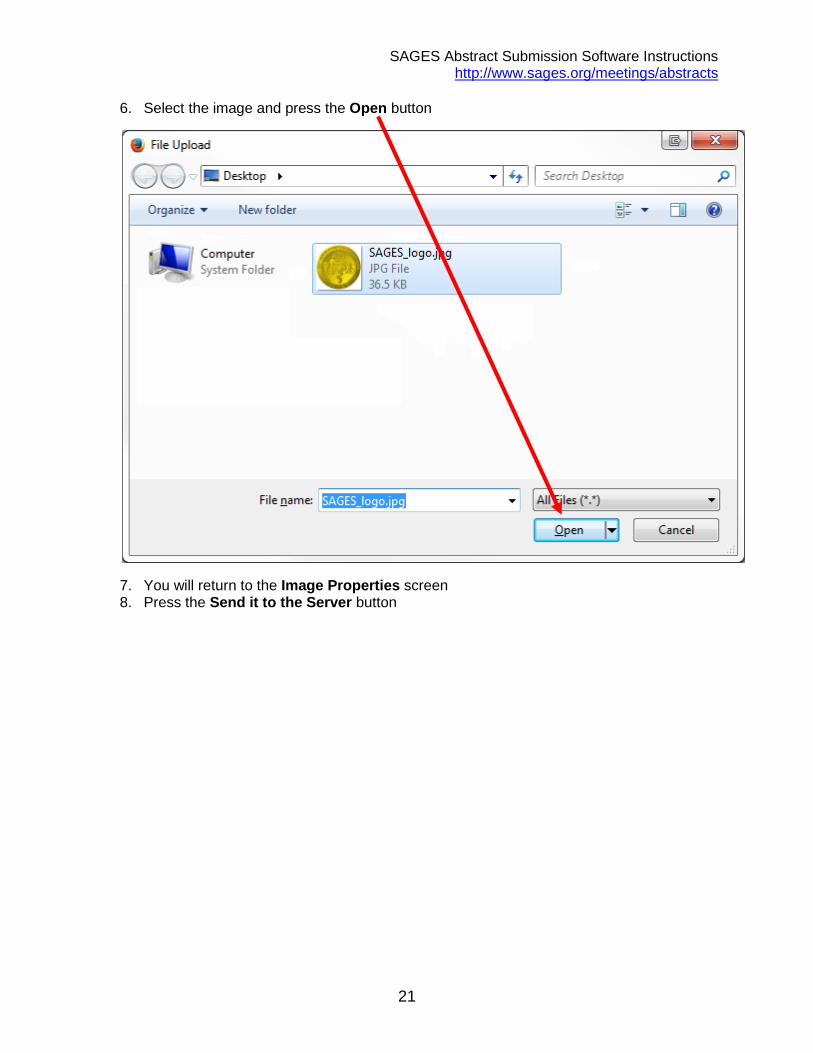
6. Select the image and press the Open button
7. You will return to the Image Properties screen 8. Press the Send it to the Server button
SAGES Abstract Submission Software Instructions http://www.sages.org/meetings/abstracts
22
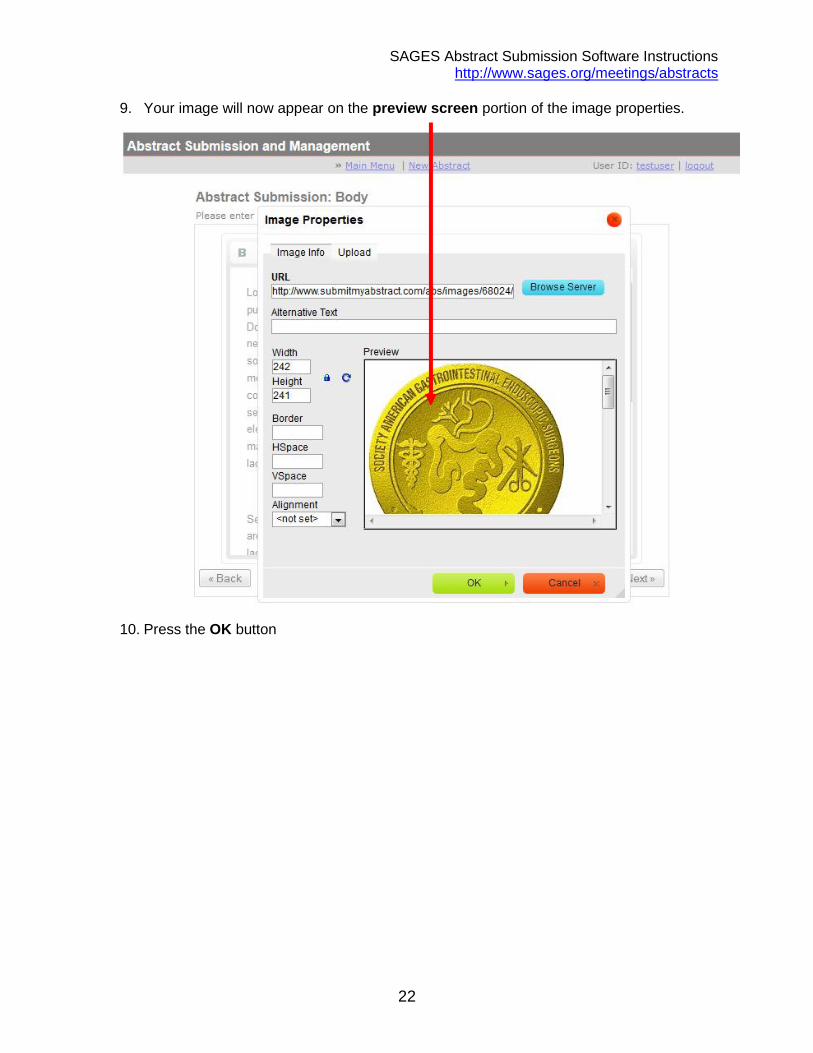
9. Your image will now appear on the preview screen portion of the image properties.
10. Press the OK button
SAGES Abstract Submission Software Instructions http://www.sages.org/meetings/abstracts
23
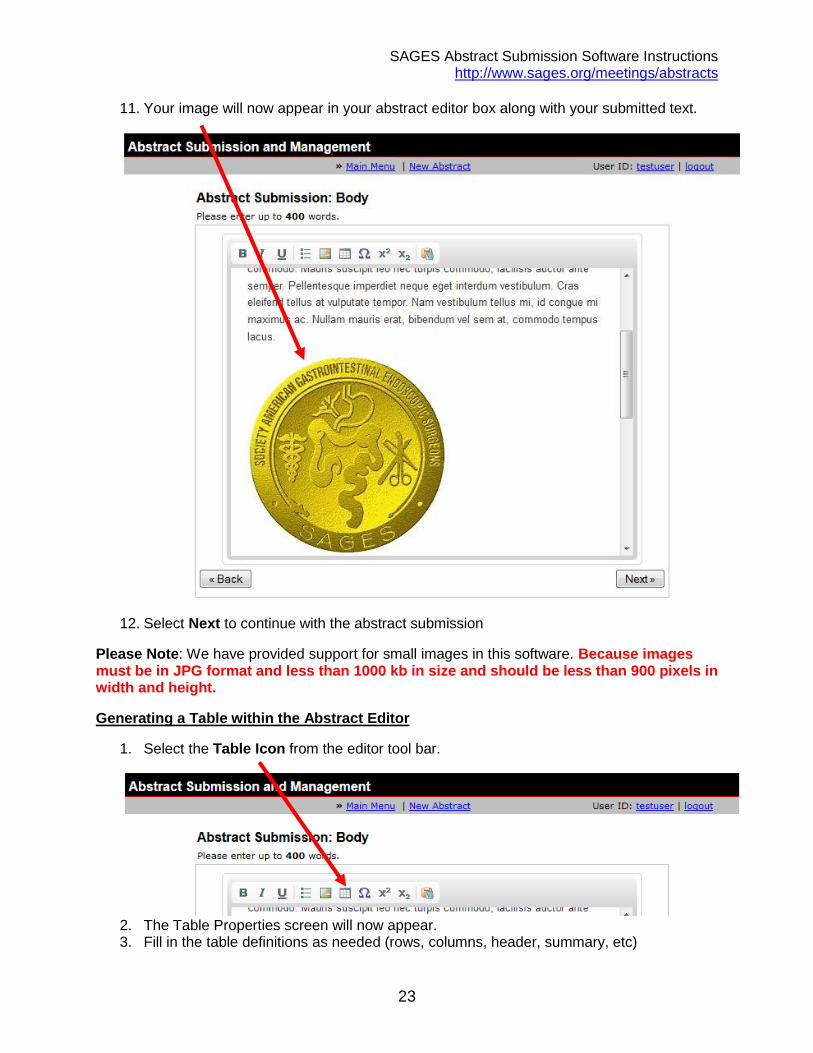
11. Your image will now appear in your abstract editor box along with your submitted text.
12. Select Next to continue with the abstract submission
Please Note: We have provided support for small images in this software. Because images must be in JPG format and less than 1000 kb in size and should be less than 900 pixels in width and height.
Generating a Table within the Abstract Editor
1. Select the Table Icon from the editor tool bar.
2. The Table Properties screen will now appear. 3. Fill in the table definitions as needed (rows, columns, header, summary, etc)

SAGES Abstract Submission Software Instructions http://www.sages.org/meetings/abstracts
24
4. Press OK
SAGES Abstract Submission Software Instructions http://www.sages.org/meetings/abstracts
25
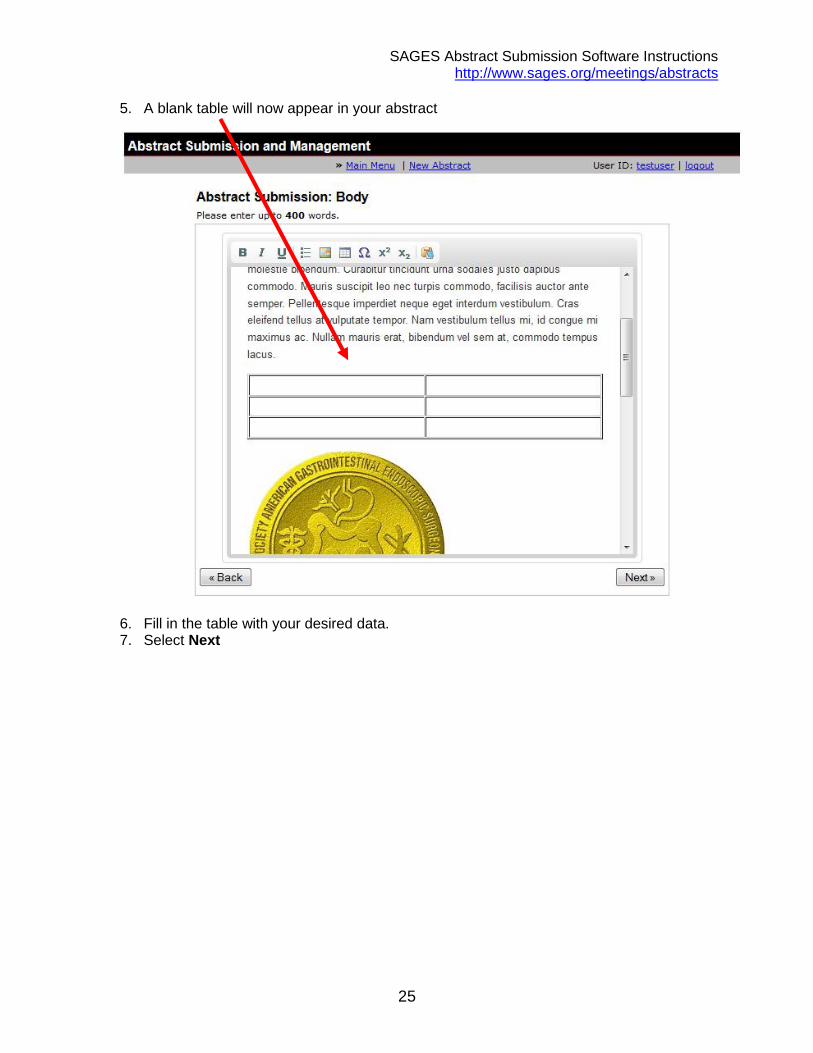
5. A blank table will now appear in your abstract
6. Fill in the table with your desired data. 7. Select Next
SAGES Abstract Submission Software Instructions http://www.sages.org/meetings/abstracts
26
Including a Video
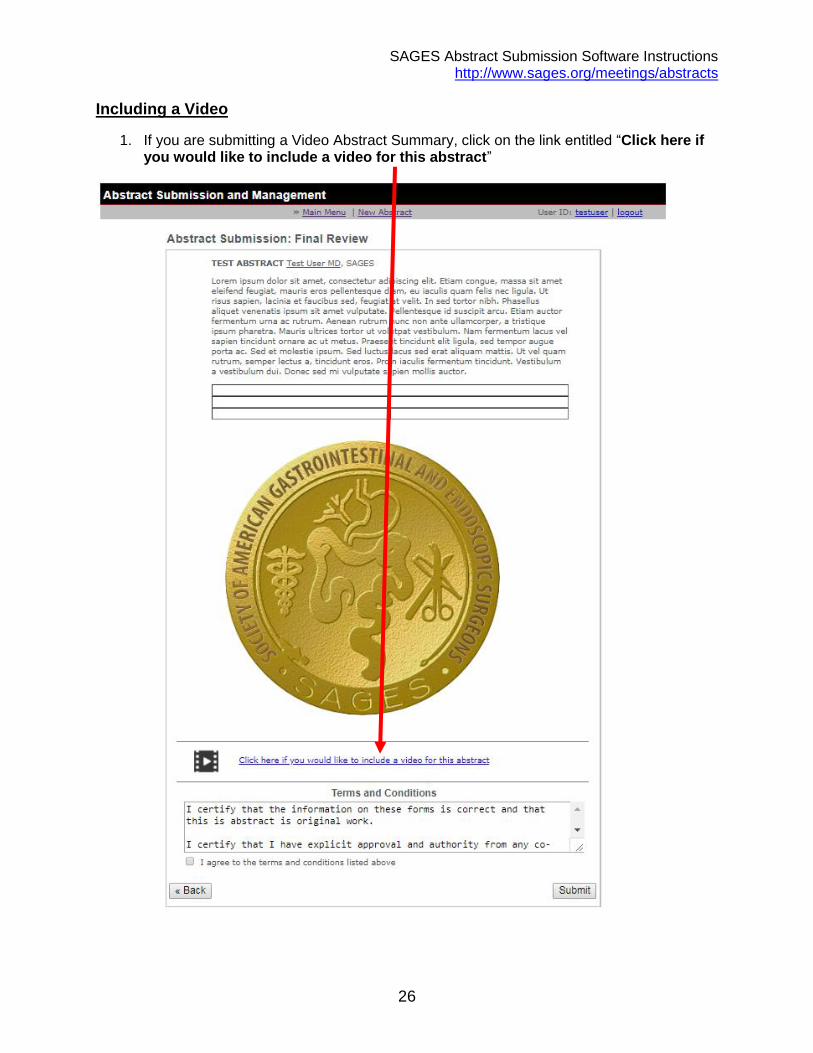
1. If you are submitting a Video Abstract Summary, click on the link entitled “Click here if you would like to include a video for this abstract”
SAGES Abstract Submission Software Instructions http://www.sages.org/meetings/abstracts
27
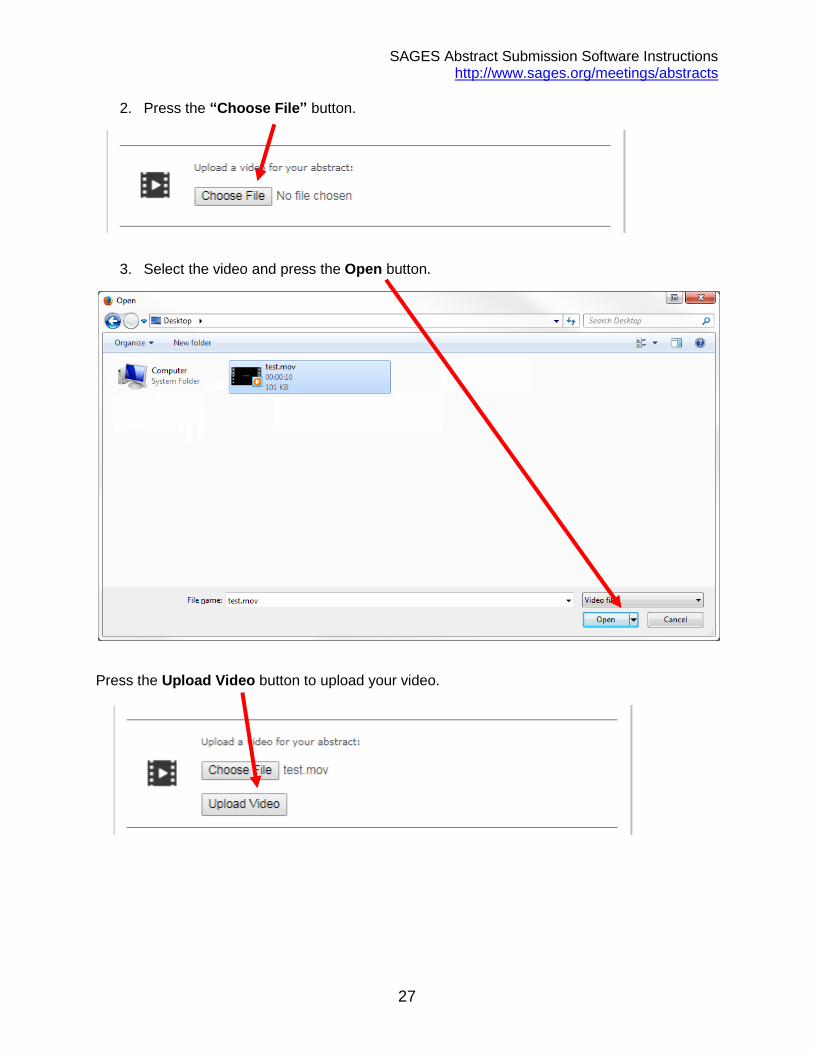
2. Press the “Choose File” button.
3. Select the video and press the Open button.
Press the Upload Video button to upload your video.
SAGES Abstract Submission Software Instructions http://www.sages.org/meetings/abstracts
28
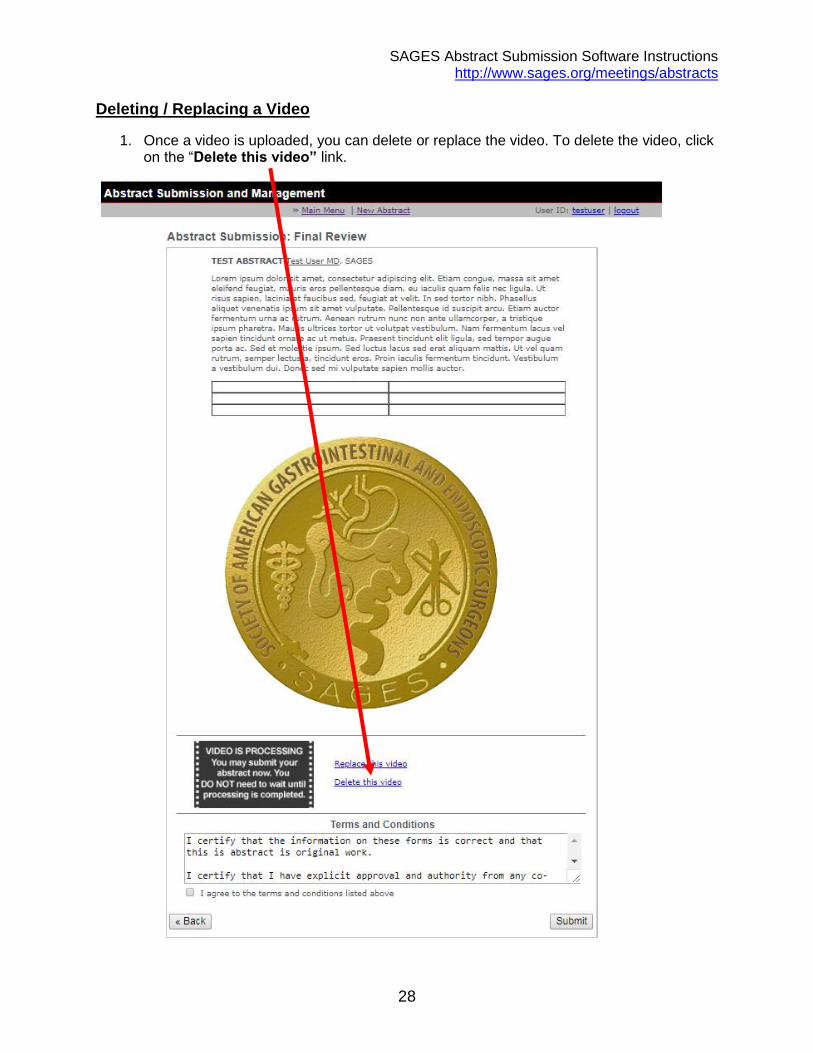
Deleting / Replacing a Video
1. Once a video is uploaded, you can delete or replace the video. To delete the video, click on the “Delete this video” link.
SAGES Abstract Submission Software Instructions http://www.sages.org/meetings/abstracts
29
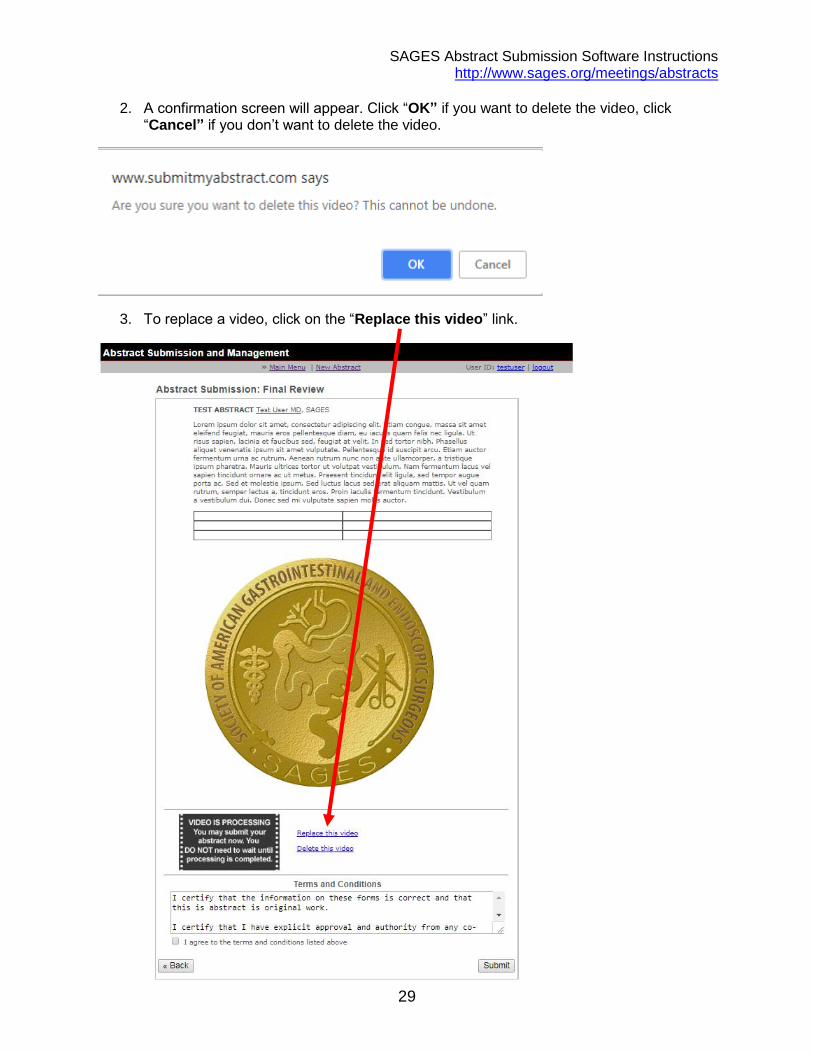
2. A confirmation screen will appear. Click “OK” if you want to delete the video, click “Cancel” if you don’t want to delete the video.
3. To replace a video, click on the “Replace this video” link.
SAGES Abstract Submission Software Instructions http://www.sages.org/meetings/abstracts
30
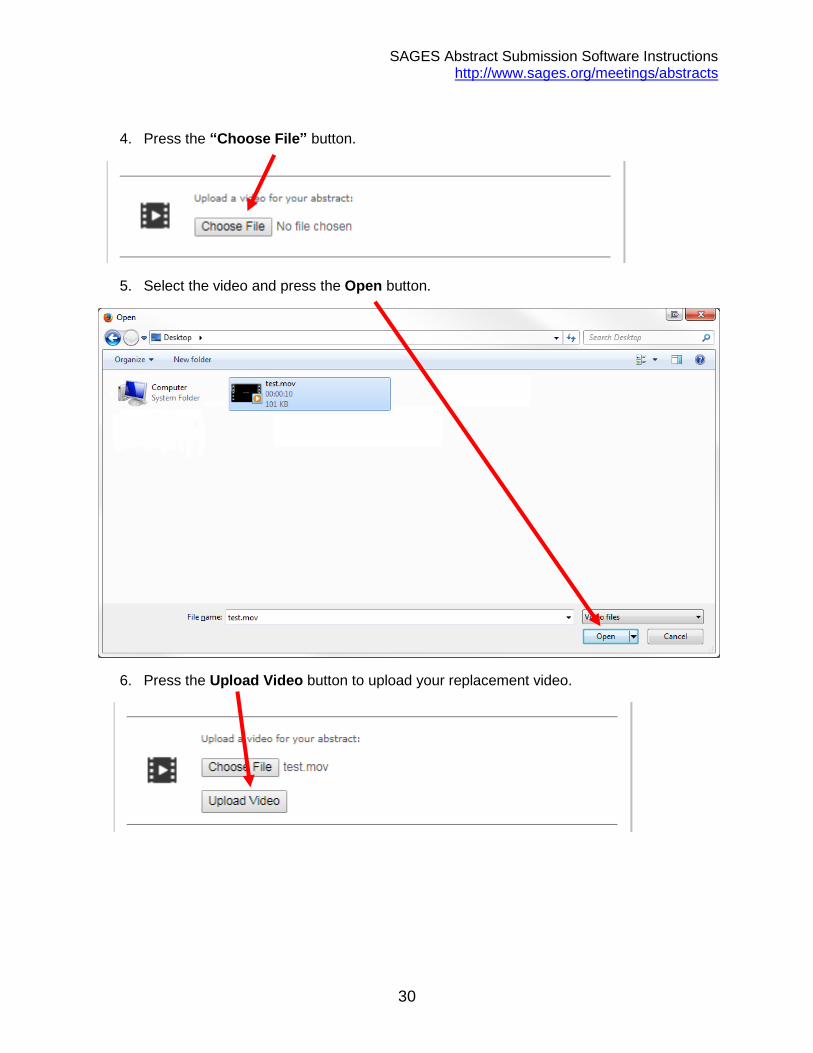
4. Press the “Choose File” button.
5. Select the video and press the Open button.
6. Press the Upload Video button to upload your replacement video.
SAGES Abstract Submission Software Instructions http://www.sages.org/meetings/abstracts
31
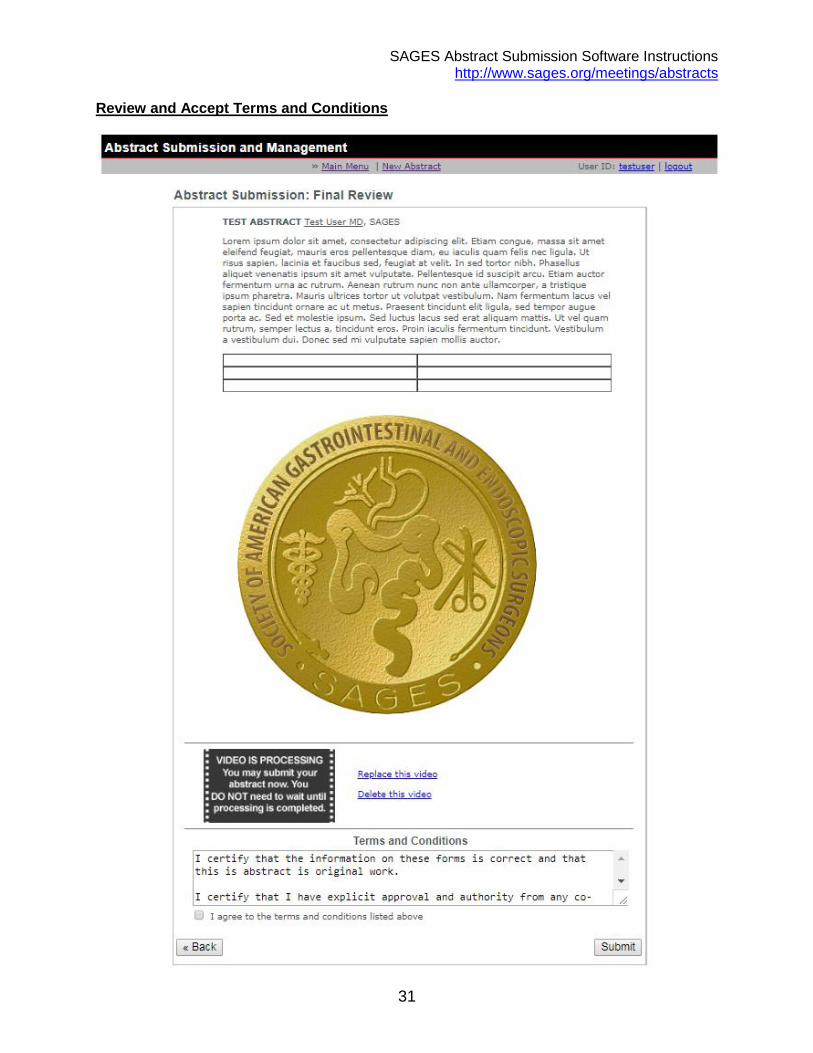
Review and Accept Terms and Conditions

SAGES Abstract Submission Software Instructions http://www.sages.org/meetings/abstracts
32
Please Note: Once you have successfully created an abstract that conforms to our specifications, you are presented the above screen and are given the opportunity to review the abstract. If you need to make changes, use the Back button located at the bottom of the screen to go back. Do not use the built-in browser back button, as this may cause problems.
If you are ready to submit your abstract for consideration, then please read the Terms and Conditions in the box below your abstract. You must indicate your agreement to the Terms and Conditions by clicking the “I agree to the terms and conditions listed above” box.
Click the Submit button to submit this abstract for review. You will get a confirmation email as a receipt and see the Confirmation Screen in your browser.
If your abstract contains an image or table please confirm the placement and presentation of the object before continuing.
An onscreen confirmation screen will appear once you have successfully submitted your abstract.
Please Note: If you see the screen below, you have successfully submitted your abstract. ALSO note the Abstract ID (5-digit number) for your submission; this will be the unique identifier for your submission. Click Logout if you are finished, Main Menu if you wish to continue managing your abstracts or New Abstract to begin entering a new abstract.
SAGES Abstract Submission Software Instructions http://www.sages.org/meetings/abstracts
33
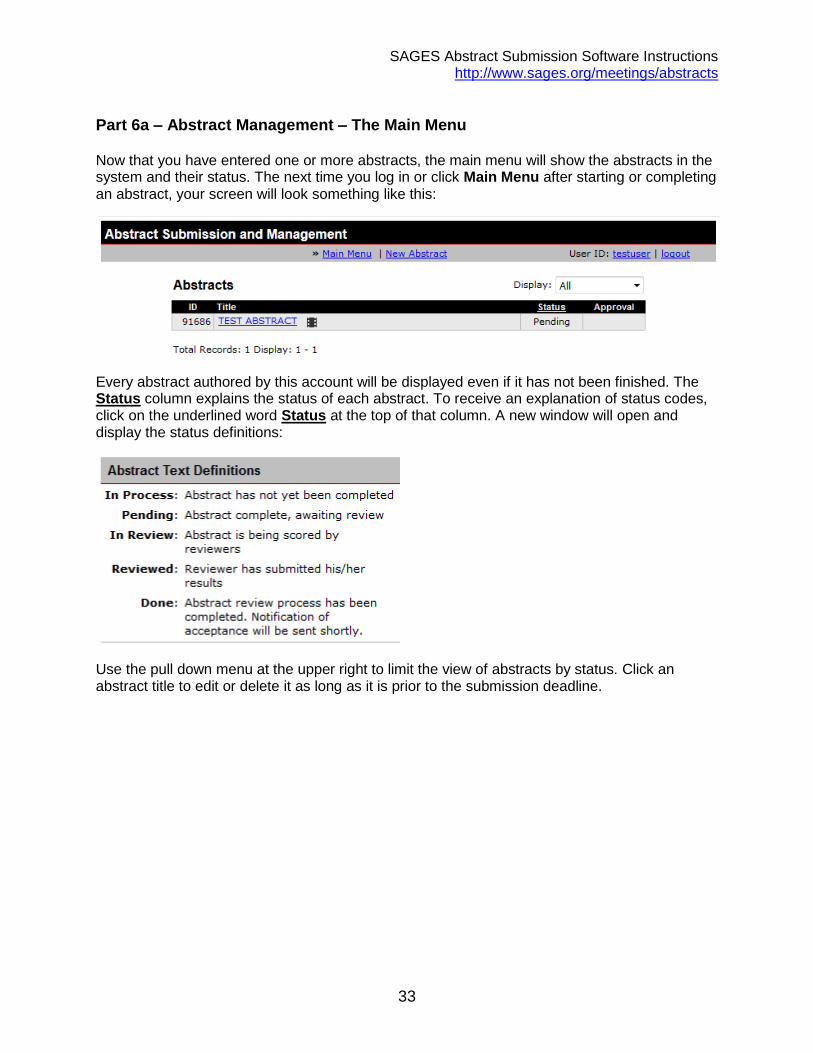
Part 6a – Abstract Management – The Main Menu
Now that you have entered one or more abstracts, the main menu will show the abstracts in the system and their status. The next time you log in or click Main Menu after starting or completing an abstract, your screen will look something like this:
Every abstract authored by this account will be displayed even if it has not been finished. The Status column explains the status of each abstract. To receive an explanation of status codes, click on the underlined word Status at the top of that column. A new window will open and display the status definitions:
Use the pull down menu at the upper right to limit the view of abstracts by status. Click an abstract title to edit or delete it as long as it is prior to the submission deadline.
SAGES Abstract Submission Software Instructions http://www.sages.org/meetings/abstracts
34
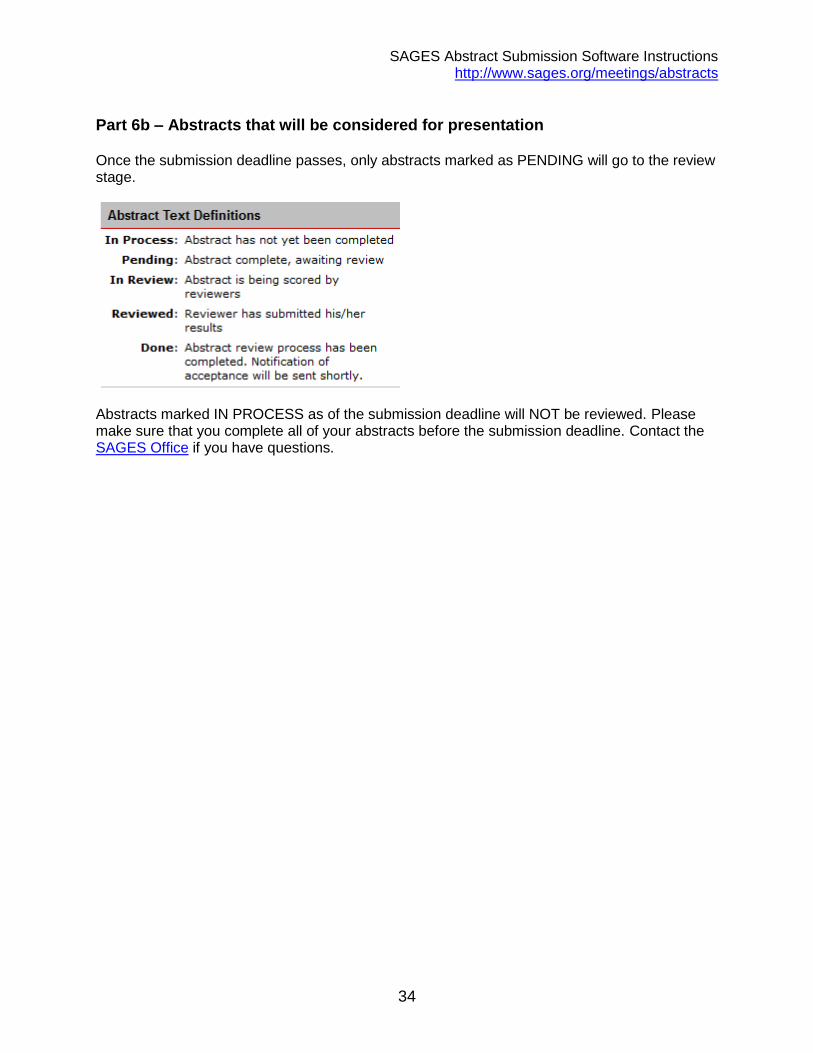
Part 6b – Abstracts that will be considered for presentation
Once the submission deadline passes, only abstracts marked as PENDING will go to the review stage.
Abstracts marked IN PROCESS as of the submission deadline will NOT be reviewed. Please make sure that you complete all of your abstracts before the submission deadline. Contact the SAGES Office if you have questions.
SAGES Abstract Submission Software Instructions http://www.sages.org/meetings/abstracts
35
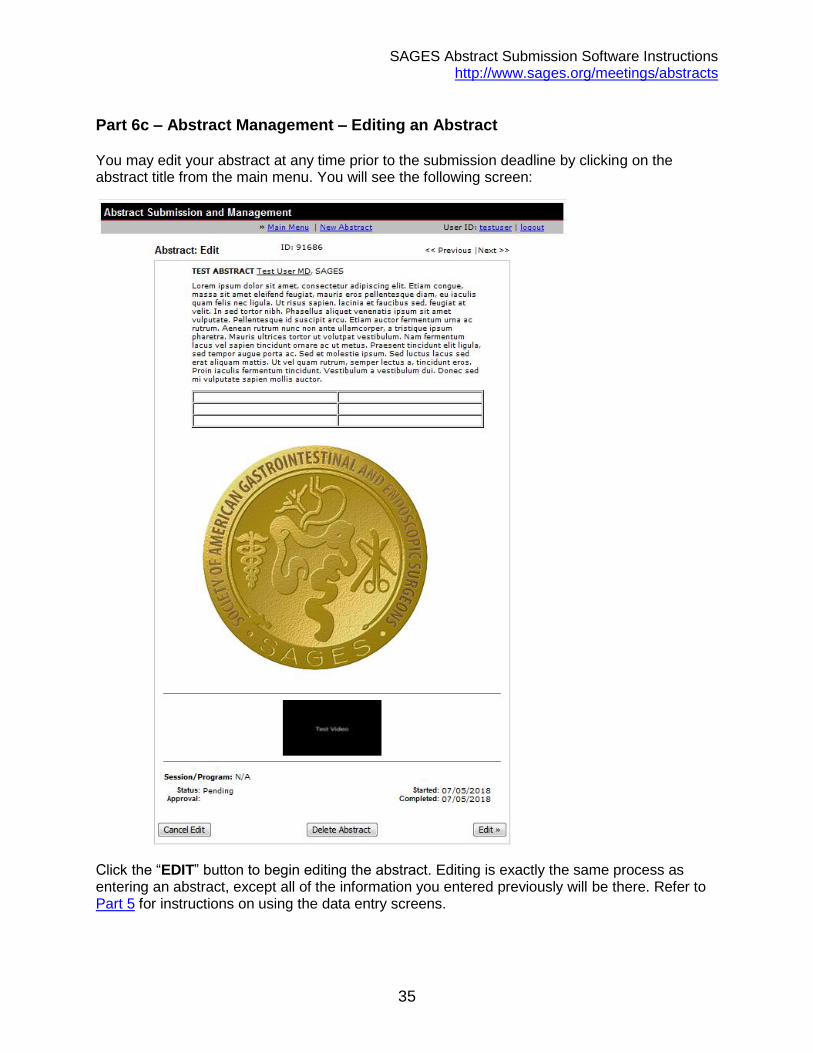
Part 6c – Abstract Management – Editing an Abstract
You may edit your abstract at any time prior to the submission deadline by clicking on the abstract title from the main menu. You will see the following screen:
Click the “EDIT” button to begin editing the abstract. Editing is exactly the same process as entering an abstract, except all of the information you entered previously will be there. Refer to Part 5 for instructions on using the data entry screens.
SAGES Abstract Submission Software Instructions http://www.sages.org/meetings/abstracts
36
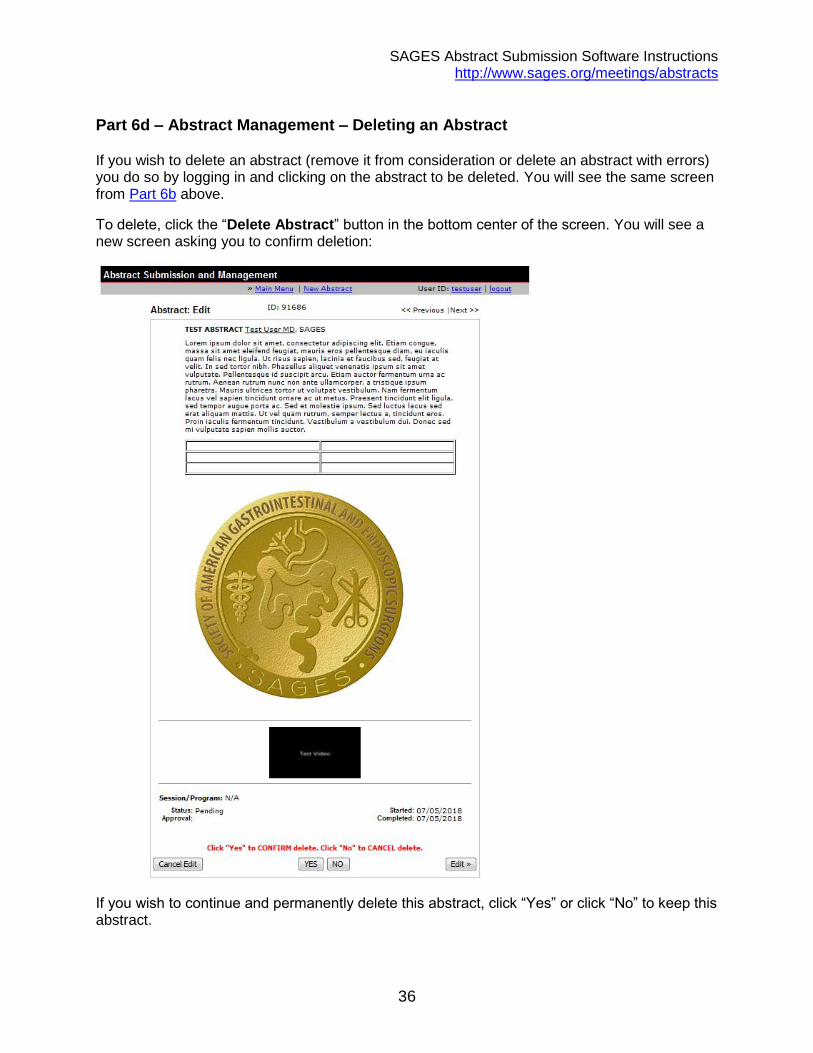
Part 6d – Abstract Management – Deleting an Abstract
If you wish to delete an abstract (remove it from consideration or delete an abstract with errors) you do so by logging in and clicking on the abstract to be deleted. You will see the same screen from Part 6b above.
To delete, click the “Delete Abstract” button in the bottom center of the screen. You will see a new screen asking you to confirm deletion:
If you wish to continue and permanently delete this abstract, click “Yes” or click “No” to keep this abstract.


![Abstract Submission [1]](https://img.pdfslide.net/doc/110x75/61fb3c3b2e268c58cd5bc3fb/abstract-submission-1.jpg)