Embed Size (px)
Citation preview
Infor10 ERP Enterprise
Infor Workflow extension and Infor ERP Enterprise
User guide
Copyright © 2012 Infor All rights reserved. The word and design marks set forth herein are trademarks and/or registered trademarks of Infor and/or related affiliates and subsidiaries. All rights reserved. All other trademarks listed herein are the property of their respective owners. Important Notices The material contained in this publication (including any supplementary information) constitutes and contains confidential and proprietary information of Infor. By gaining access to the attached, you acknowledge and agree that the material (including any modification, translation or adaptation of the material) and all copyright, trade secrets and all other right, title and interest therein, are the sole property of Infor and that you shall not gain right, title or interest in the material (including any modification, translation or adaptation of the material) by virtue of your review thereof other than the non-exclusive right to use the material solely in connection with and the furtherance of your license and use of software made available to your company from Infor pursuant to a separate agreement ("Purpose"). In addition, by accessing the enclosed material, you acknowledge and agree that you are required to maintain such material in strict confidence and that your use of such material is limited to the Purpose described above. Although Infor has taken due care to ensure that the material included in this publication is accurate and complete, Infor cannot warrant that the information contained in this publication is complete, does not contain typographical or other errors, or will meet your specific requirements. As such, Infor does not assume and hereby disclaims all liability, consequential or otherwise, for any loss or damage to any person or entity which is caused by or relates to errors or omissions in this publication (including any supplementary information), whether such errors or omissions result from negligence, accident or any other cause. Trademark Acknowledgements All other company, product, trade or service names referenced may be registered trademarks or trademarks of their respective owners. Publication Information Release: 11 Publication date: April 26, 2012 Document code: U9589D US
Infor10 ERP Enterprise Infor Workflow extension and Infor ERP Enterprise | 3
Contents
About this guide ................................................................................................................................ 5
Contacting Infor ............................................................................................................................. 5
Chapter 1 Introduction .................................................................................................................. 7
Chapter 2 Using the Infor Custom Node in IBPM Studio ........................................................... 9
Modeling using the Infor Action Type: ERP Enterprise ................................................................. 9 Selecting the best ERP Enterprise session ............................................................................. 9 Modeling the session ............................................................................................................ 10 Company Number ................................................................................................................. 12 Authorization Type ................................................................................................................ 13 Start-Up Type ........................................................................................................................ 13 Start Option – User Option .................................................................................................... 13 Menu options ........................................................................................................................ 15
Chapter 3 Concept of Attributes ................................................................................................ 17
To initialize particular fields ......................................................................................................... 17
To retrieve field values for use in later activities .......................................................................... 21 Segmented fields .................................................................................................................. 22
Concept of sub-session authorization ......................................................................................... 22 Running the ERP Enterprise session .................................................................................... 23
Chapter 4 Workflow Limitations ................................................................................................ 25
Sessions that are not Workflow-enabled ..................................................................................... 25
3GL sessions .............................................................................................................................. 26
Multi Main Table sessions ........................................................................................................... 27
Sub sessions ............................................................................................................................... 29
Hard-coded Workflow .................................................................................................................. 29
Chapter 5 Modeling Using the Infor Action Type: Call Program ............................................. 31
Contents
4 | Infor10 ERP Enterprise Infor Workflow extension and Infor ERP Enterprise
Chapter 6 Workflow Triggering Configuration ......................................................................... 33
Configuring a workflow trigger ..................................................................................................... 33
Application Invocation ................................................................................................................. 39
Workflow triggering runtime ........................................................................................................ 41
Infor10 ERP Enterprise Infor Workflow extension and Infor ERP Enterprise | 5
About this guide
Infor ERP Enterprise Workflow 11 is an extension on Fujitsu IBPM 11. This document describes the Infor extension on the Fujitsu IBPM 11 product.
For more specific information about Fujitsu IBPM 11, see the User Guide of Fujitsu IBPM 11.
Infor ERP Enterprise is from this point onwards simply referred to as ERP Enterprise.
Intended audience This guide is intended for system administrators
Contacting Infor If you have questions about Infor products, go to the Infor Xtreme Support portal at www.infor.com/inforxtreme.
If we update this document after the product release, we will post the new version on this Web site. We recommend that you check this Web site periodically for updated documentation.
If you have comments about Infor documentation, contact [email protected]..

Infor10 ERP Enterprise Infor Workflow extension and Infor ERP Enterprise | 7
Chapter 1 Introduction 1
The ERP Enterprise Workflow extension enables you to use ERP Enterprise sessions to create workflows.
The ERP Enterprise Server can export Dynamic Enterprise Modeling (DEM) processes as eXtended Process Definition Language (XPDL) to the Workflow Server.
For triggers, the path of triggering is from the ERP Enterprise server to the Workflow Server by mean of a File Transfer Protocol (FTP).

Infor10 ERP Enterprise Infor Workflow extension and Infor ERP Enterprise | 9
Chapter 2 Using the Infor Custom Node in IBPM Studio 2
This section describes how to select the best Infor ERP Enterprise session to run a particular activity and how to model that Infor ERP Enterprise session using the Infor Action Type.
Modeling using the Infor Action Type: ERP Enterprise Modeling activities for workflow is intended to present the user with a session best fit to the task to carry out. To ensure the user to work efficiently, you can limit the options in the session to be used. The user is more focused on his task and cannot divert from the task.
Selecting the best ERP Enterprise session To use Workflow in an efficient way, link the best session to an activity. In other words, the session must exactly represent the action that the activity requires. That can mean that linking a main session to an activity is not useful, because the main session is too general and does not specify the particular action that must be performed. If a sub session is available, model the sub session to avoid ambiguity about the action that is required from the Workflow user.
To select the most suitable session to link to an activity, take these steps:
1 Categorize the intended actions that must be carried out by means of the activities, for example, an order for sales, purchase, or manufacturing.
2 Find the main session that deals with this topic or category. In ERP Enterprise, most sessions that you start from the menu start in so-called multi-occurrence mode. As a result, you see, for example, a list of sales orders and details of that sales order only are shown if you double-click a sales order. This type of detail session is called the Synchronized dialog box of the main session. To use that session in your activity, model the main session with start-up type Single Occurrence and send attributes to that session. More information on this topic is provided in the description of the startup type model option.
Using the Infor Custom Node in IBPM Studio
10 | Infor10 ERP Enterprise Infor Workflow extension and Infor ERP Enterprise
Check whether the required action can best be carried out from the main session. If you find a main session that fits, model that session. If you do not find an appropriate main session, go to Step 3.
3 Select the sub session that can carry out the desired action and model the sub session. If the sub session contains insufficient information to carry out the task, you must model the main session. The Workflow user must then manually start the sub session from the Special menu.
Modeling the session 1 Start the IBPM Studio
2 Create a new Process Definition. Process Definitions can be created for Application or Server Projects in IBPM Studio.
Recommended is to start the new Process Definitions for Application Projects. In this case no manual copying is needed after the Infor Actions has been modeled. (You can place these applications online by uploading the application or to export a bar-file from IBPM Studio. This bar-file can be installed on the server through Install Application in IBPM Console.)
When the Process Definition is created for Server projects, you can copy the files in the <IBPM Studio install directory>\ibpm\Data\attachments folder to the System folder of the IBPM Console web application.
After closing the Infor Action dialog a message displays reminding the user of the actions to take in case of an Application or Server Project.
Note: Infor Actions cannot be edited outside IBPM Studio. For example the Actions cannot be edited through IBPM Console.
3 Click the Infor Action tab to place a node for an ERP Enterprise session in the template.
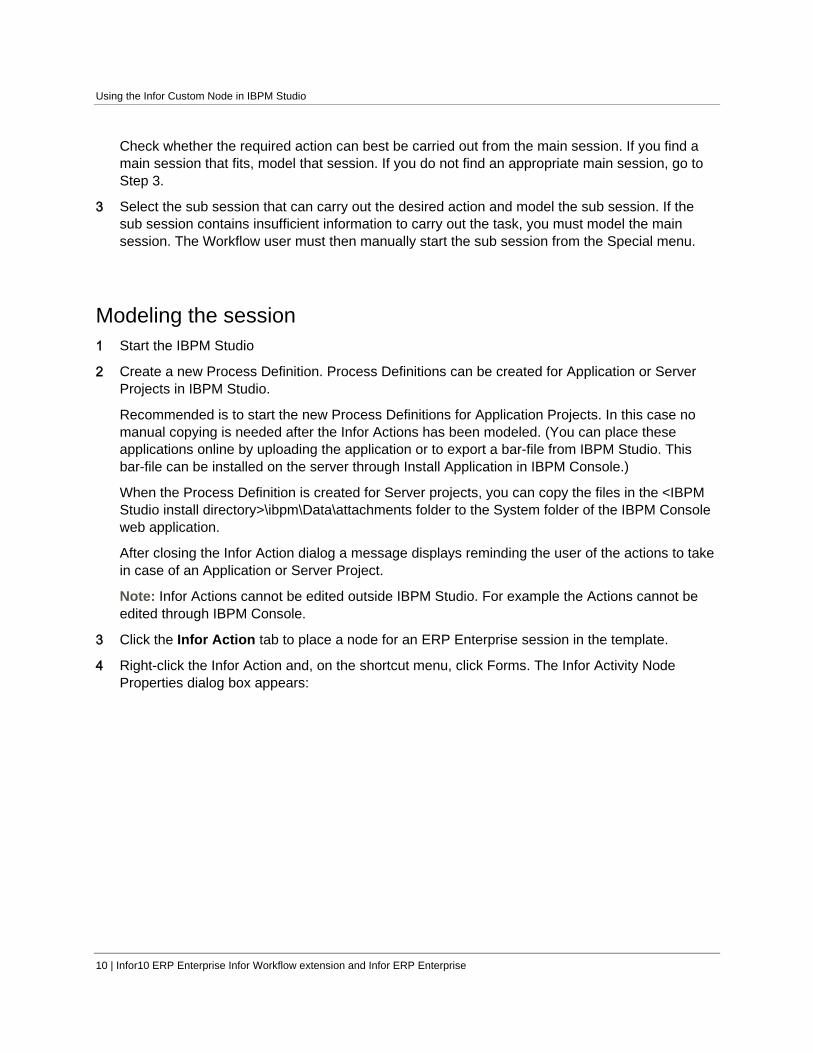
4 Right-click the Infor Action and, on the shortcut menu, click Forms. The Infor Activity Node Properties dialog box appears:
Using the Infor Custom Node in IBPM Studio
Infor10 ERP Enterprise Infor Workflow extension and Infor ERP Enterprise | 11
5 Select action type: Infor ERP Enterprise.
On the Session Code field, you can specify these session codes:
• Manual method • Browse option
Manual method: Specify the session code in the Session Code Field. Type the session code directly in the text field. No check on validity is the performed; therefore, make sure to type the correct session code.
Browse option: Click browse next to the Session Code field. The Session Codes panel opens. Type a URL of a running Web UI Server in the corresponding field. The information is retrieved from this Web UI Server. After login all session codes are retrieved from the backend. This information is cached in the Session Info-folder to improve the load time the next time the dialog is requested. If you want the information to be retrieved from the backend again you must delete the contents of this folder.
Using the Infor Custom Node in IBPM Studio
12 | Infor10 ERP Enterprise Infor Workflow extension and Infor ERP Enterprise
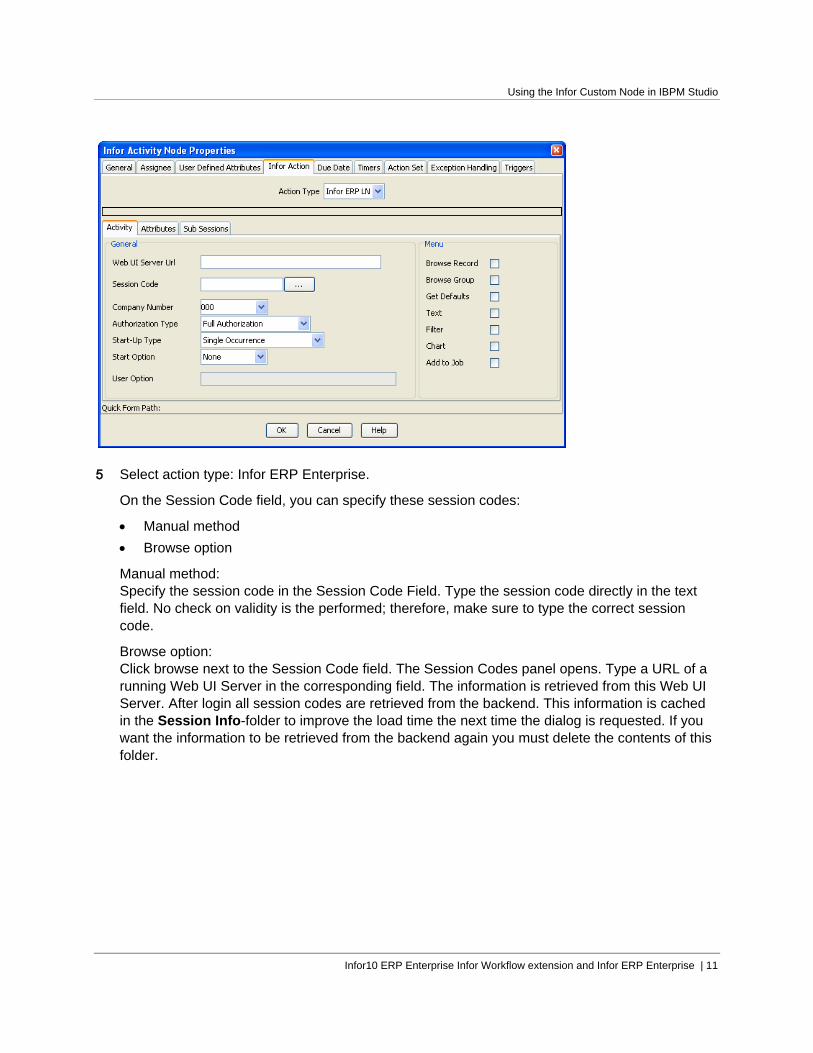
6 Select the package in the Package field; values in the Module field are populated based on the package specified.
7 Select a module in the Module field; sessions of the selected package and module are retrieved from the workflow repository.
Note: Some combinations of Package and module can be empty, indicating that there are no sessions. In such cases the Session Codes list is empty.
8 Double-click on the row / record or select a row / record and click OK.
9 Instead, a user can search for a session by entering the description or part of description of the session in the Session Description text field. Following scenarios are possible to search for a session
• When the Package and Module fields are empty, the search is performed on all the sessions of the Package – Module combinations.
• When you specify the Package only, the search is performed on all the modules of the package.
• When you specify the Package and Module, a search is performed on the sessions of the specified package – module combination.
Company Number If you have a multisite setup, it is possible to run specific ERP sessions in a fixed company. For example, Finance sessions must always run in the Finance company you have defined. By default, if you leave this field set to 0 (zero), the ERP sessions start in the start-up company of the user who carries out the activity.
To run the ERP sessions in another company only works if the user is also in the normal menu and can switch to that company. Therefore, check user and company authorizations prior to implementation.
By selecting one of the UDA’s (User Defined Attribute) it is also possible to dynamically determine in which company the session must run. This UDA must contain the company number at runtime.
Using the Infor Custom Node in IBPM Studio
Infor10 ERP Enterprise Infor Workflow extension and Infor ERP Enterprise | 13
Authorization Type If you start an ERP session, by default, options as Insert, Copy, and Delete are selected. If particular options are unnecessary during some steps in the template, you can restrict the access to those options. If, for example, existing data must be modified in a step and no new data must be entered or existing data deleted, you must model here the value Modify/Print/Display. If, for example, you want a user only to view data in this step, select Display in this field.
Depending on the authorization type, some menu choices and/or buttons will or will not appear within a session. For example, a Display authorization can disable a ‘Process’ button or even hide (invisible) the button in certain sessions. (For Processing you normally need at least Modify/Print/Display authorization).
By default, the sub sessions that you start from a session inherit the authorization type for the modeled session. If you want sub sessions to start with other authorization types, you must model that on the Sub-Sessions tab.
Start-Up Type To specify how the selected ERP session is presented at run time to the Workflow user, select a value in the Start-Up Type. If the functionality which the activity requires is present in the single-occurrence session, always select Single Occurrence Session. In ERP Enterprise, most sessions that you start from the menu start in so-called multi-occurrence mode. As a result, for example, a list of sales orders is shown. After you select and double-click a sales order you can view the details of that sales order. This type of detail session is called the Synchronized dialog box of the main session.
The main session partly controls these synchronized dialog boxes. Therefore, to use these dialog boxes in a workflow context, you must model the dialog boxes with the session code of the main session and start-up type Single Occurrence.
Because the synchronized dialog box is always about one record, you must define the key values as input attributes to the session. No input attributes are required only if you selected the Insert Record option.
In some cases, you can still want the user to work with one record, and need access to menu options only available in the main session. Than you must model the start-up type as Multi-occurrence Single Record and send the key values as input attributes.
Print, process, and update sessions are regarded as single-occurrence sessions.
Start Option – User Option A start option in the Start Option field enables the Workflow system to automatically run a command when the session is started at run time. For example, you can start a session with the Insert Record
Using the Infor Custom Node in IBPM Studio
14 | Infor10 ERP Enterprise Infor Workflow extension and Infor ERP Enterprise
command. The session will directly start as with the insert option already activated. In addition, the Workflow system checks when a record was actually added to close the activity.
Note that if you use the start option Get Defaults, data sent as input for the session will be overwritten with the defaults.
If you select Specific as the start option, you can select a form command in the User Option field. However, modeling the session started through Special menu command directly is preferable. In that case, the data is send and retrieved from the specified session in the Session Code field.
If you select Specific, make sure to also send data to the session.
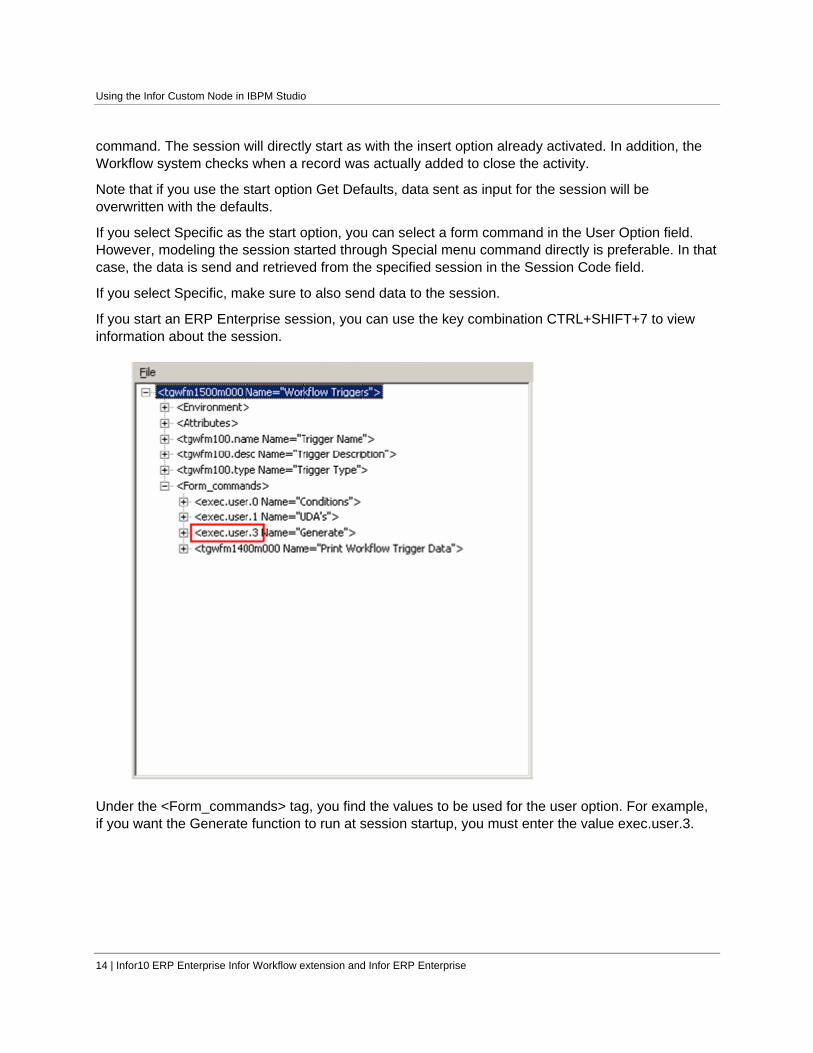
If you start an ERP Enterprise session, you can use the key combination CTRL+SHIFT+7 to view information about the session.
Under the <Form_commands> tag, you find the values to be used for the user option. For example, if you want the Generate function to run at session startup, you must enter the value exec.user.3.
Using the Infor Custom Node in IBPM Studio
Infor10 ERP Enterprise Infor Workflow extension and Infor ERP Enterprise | 15
Menu options To let the user focus on the task, some menu options in the session are unavailable by default. You can add the following menu options if you think it is useful for the task. Model these options to be enabled at run time:
• Browse Record
This menu option enables the user to browse between records in the started session. If you modeled that the session must start for a specific record, do not select this option.
• Browse Group
This menu option enables the user to browse between groups of records in the started session. If you modeled that the session must start for a specific record, do not select this option.
• Get Defaults
This menu option enables the user to use previous saved values to set the values of the fields in the session. However, this can disturb the values you modeled as input for a session. For this reason, it is not recommended to select this option.
• Text
This menu option enables the user to add text in the session.
• Filter
This menu option enables the user to use the Filter command on the View menu in the session.
• Chart
This menu option enables the user to work with charts in the session.
• Make Job
This menu option enables the user to place this session into a job.
Note:
You cannot enable menu options which are disabled when you start the session from the Menu Browser. At runtime, you will receive an error. Therefore, start the session from the menu and study the working and appearance before you model the session for Workflow.

Infor10 ERP Enterprise Infor Workflow extension and Infor ERP Enterprise | 17
Chapter 3 Concept of Attributes 3
Attributes, which are also known as user-defined attributes (UDA), are named variables defined for a particular template and bound to the templates activities. You can use attributes to exchange data back and forth among ERP Enterprise sessions and the Workflow Management System. You can also use the same attributes in other applications present in the template.
Together with the design of the template and specification of the activities, you must investigate the flow of data in the process and determine how to retrieve the data.
After you evaluate which data flows are necessary, you must design the attributes in detail. To design the attributes, keep the following in mind:
• Does the activity (session) require data from other activities? • Must the activity (session) provide data to other activities? • Does the activity (session) require a single value of a single ERP Enterprise field?
The general task of attributes is to enable the transfer of data between Workflow and the ERP Enterprise sessions. In detail, you must differentiate between the following tasks:
• Transfer key data • Evaluate decisions • Display additional information in the Workflow client
The online Help of the workflow clients describes how to customize the view, so you can see attributes in your workflow client’s work list.
To initialize particular fields To set particular session fields, for example, the order number, to a value based on data in earlier activities, you must bind the field to an attribute.
For sessions to maintain or display data, you can only send data to the key-fields of the session.
For sessions to process or print data, you can send data to all fields on the forms.
To use attributes you must define so-called attribute bindings on the Infor Action tab of the Infor Activity Node Properties dialog box.
Concept of Attributes
18 | Infor10 ERP Enterprise Infor Workflow extension and Infor ERP Enterprise
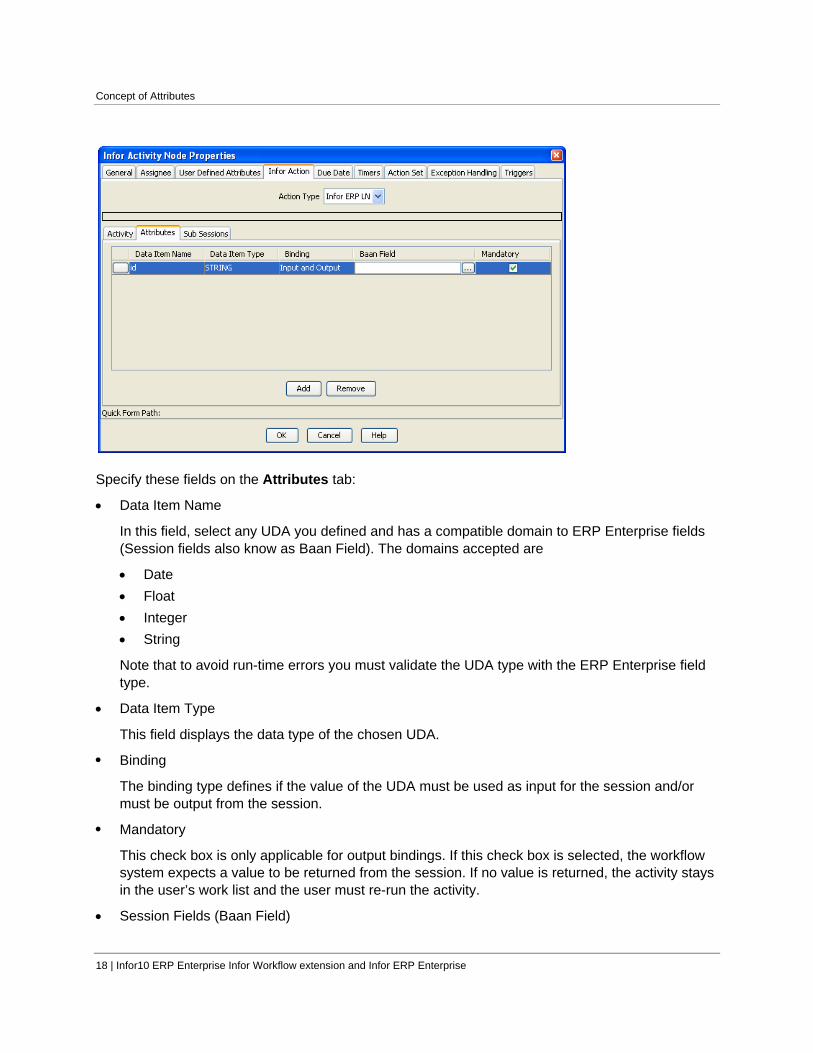
Specify these fields on the Attributes tab:
• Data Item Name
In this field, select any UDA you defined and has a compatible domain to ERP Enterprise fields (Session fields also know as Baan Field). The domains accepted are
• Date • Float • Integer • String
Note that to avoid run-time errors you must validate the UDA type with the ERP Enterprise field type.
• Data Item Type
This field displays the data type of the chosen UDA.
• Binding
The binding type defines if the value of the UDA must be used as input for the session and/or must be output from the session.
• Mandatory
This check box is only applicable for output bindings. If this check box is selected, the workflow system expects a value to be returned from the session. If no value is returned, the activity stays in the user’s work list and the user must re-run the activity.
• Session Fields (Baan Field)
Concept of Attributes
Infor10 ERP Enterprise Infor Workflow extension and Infor ERP Enterprise | 19
The ERP Enterprise field related to the session started, to which data must be sent or from which data must be retrieved.
You can specify the session codes in these ways:
• Manual method • Using the browse option
Manual Method
To identify the ERP Enterprise fields to which the attribute must be bound, take these steps:
1 Start the ERP Enterprise session
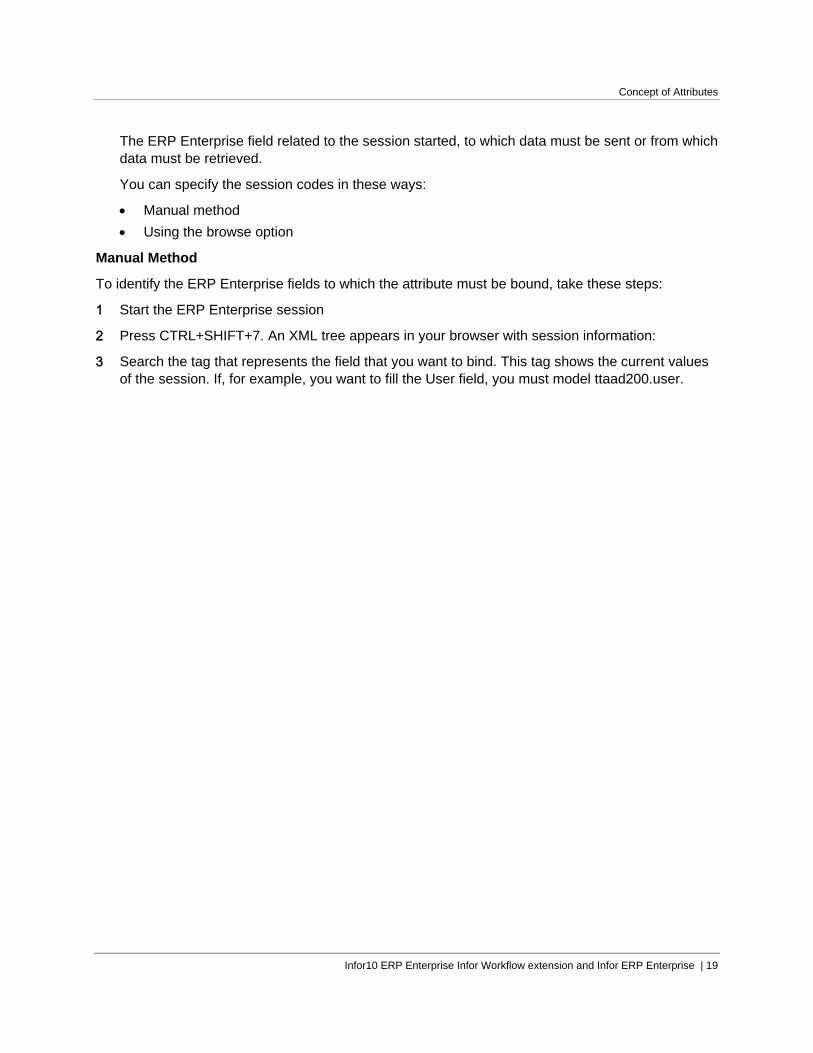
2 Press CTRL+SHIFT+7. An XML tree appears in your browser with session information:
3 Search the tag that represents the field that you want to bind. This tag shows the current values of the session. If, for example, you want to fill the User field, you must model ttaad200.user.
Concept of Attributes
20 | Infor10 ERP Enterprise Infor Workflow extension and Infor ERP Enterprise
4 The Domain_type of the ERP Enterprise field must be compatible with the data type of the user-defined attribute to which you bind the Domain_type.
Using the Browse option
Take these steps:
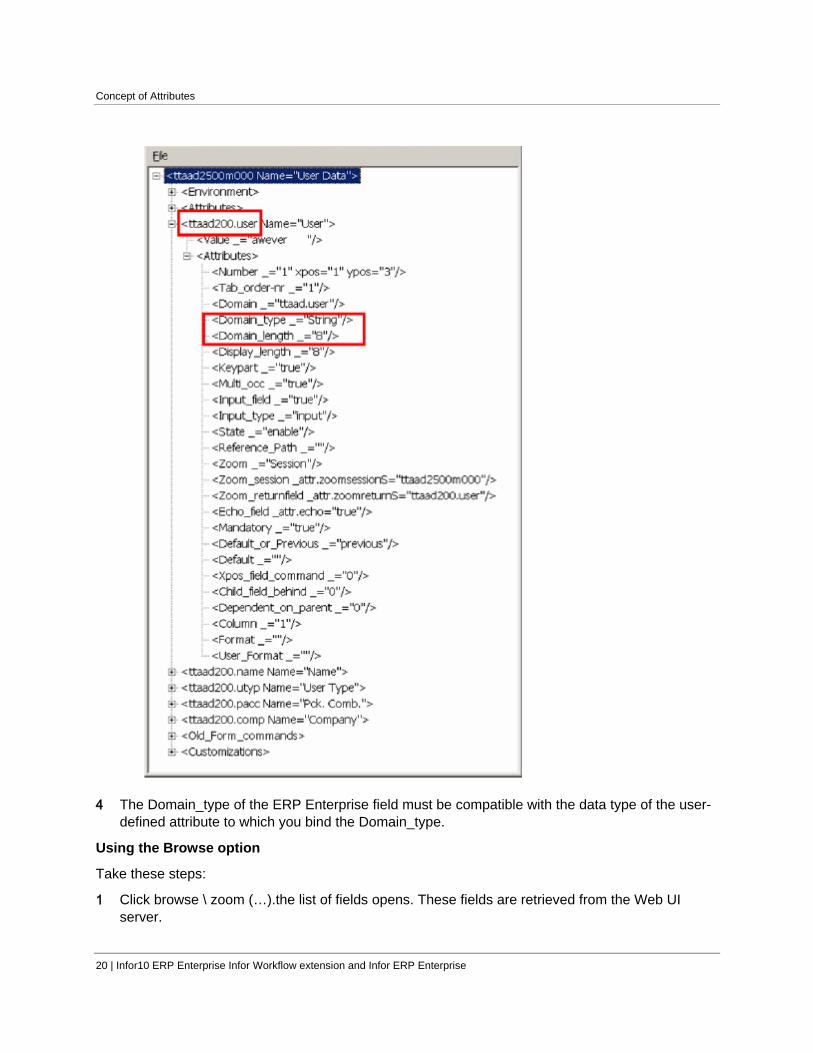
1 Click browse \ zoom (…).the list of fields opens. These fields are retrieved from the Web UI server.
Concept of Attributes
Infor10 ERP Enterprise Infor Workflow extension and Infor ERP Enterprise | 21
2 Double-click to select the field.
3 Click OK.
To be able to use the browse option a valid session code must be selected in the Activity Tab. The fields belonging to that session code will be displayed.
If the session code is not entered in the Activity Tab or if the session code entered is invalid, the Session Fields List will be empty.
This repository contains the fields of all forms and main table of the session.
Explanation of the Session Fields list Columns
• Field Name: Name of the field. • Data Type: Data type the field belongs to. • Description: Field description. • Key Field: a selected field indicates that this field was the key field \ primary key of the table. • Field Type: The field nature or display type, like input or display field.
To retrieve a value from an ERP Enterprise session, you must select a record. Either one record is visible in the session, or in a multi-record session, you must select one record before you exit the session.
To retrieve field values for use in later activities To use the value of a field in a later activity, you must bind the field to an attribute. The attribute can then later also be used in a decision, or the attribute value can be shown as part of the view of the workflow client.
You can retrieve data from all fields visible on the forms of the session and for all fields of the main table of the session.
Concept of Attributes
22 | Infor10 ERP Enterprise Infor Workflow extension and Infor ERP Enterprise
To retrieve values, the Binding type is Output from Session. If the Mandatory check box is selected, the activity will not be completed if no value is returned from the ERP Enterprise session.
Segmented fields Within ERP Enterprise a new type of field is introduced. The segmented field.
A segmented field is in fact a combination of fields, although it is stored as a single field.
For example consider the ‘item’ field, which contains the item code. This field contains two segments, an ‘item.segment.1’ field and an ‘item.segment.2’ field.
For data transfer you must use the field segments instead of the entire field: if you use the entire field Workflow strips the leading and trailing spaces, and the field will therefore not match with the database values.
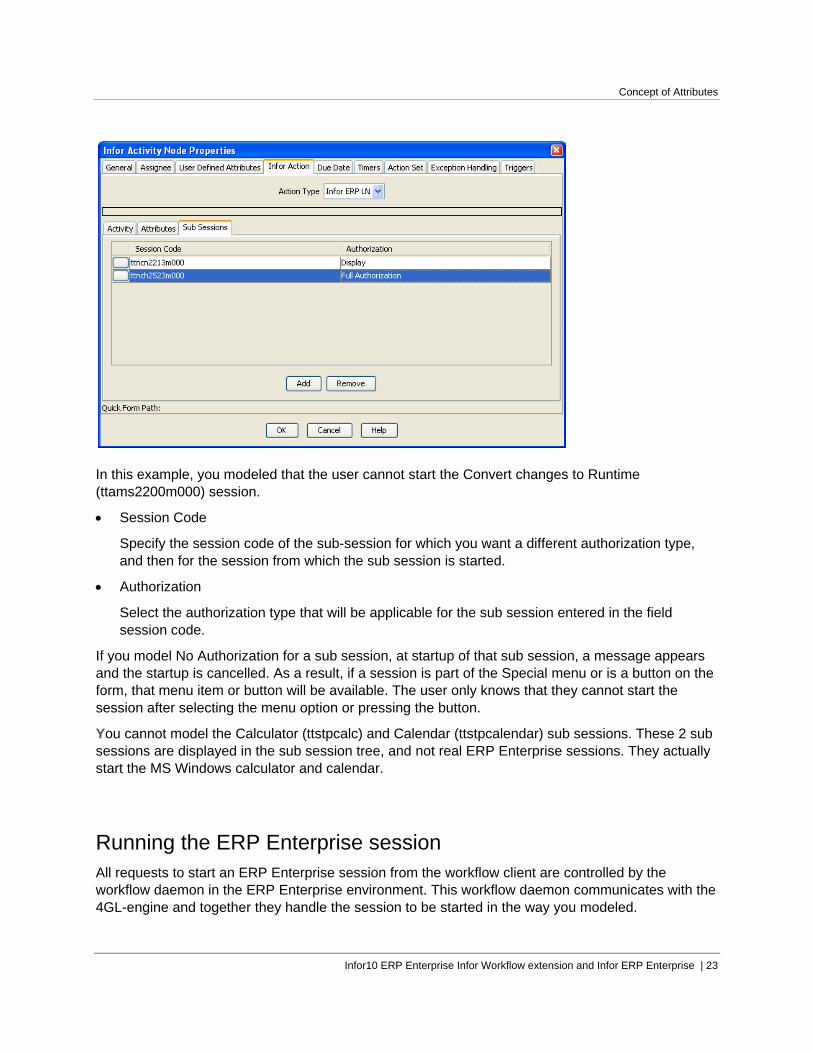
Concept of sub-session authorization You can start additional sessions from practically every session in ERP Enterprise. Those sessions are called sub sessions. From those sub sessions, you can call a third set of sessions. The sub sessions by ERP Session (tgbrg5162m000) session lists the possible sub sessions for a particular ERP Enterprise session.
To carry out the workflow task, you can model, for example, a user with full authorization for the session specified on the Activity tab. By default, that authorization type is inherited to the sub sessions of the modeled session. However, in some cases, you want to have a different authorization type valid for some of the sub sessions. In that case, you must model those exceptions on the Sub-Sessions tab. The sessions that you start from one of the sub-sessions inherits the new authorization type of that session. If you want to make an exception, you must also model that session with a specific authorization type on the Sub Sessions tab.
Concept of Attributes
Infor10 ERP Enterprise Infor Workflow extension and Infor ERP Enterprise | 23
In this example, you modeled that the user cannot start the Convert changes to Runtime (ttams2200m000) session.
• Session Code
Specify the session code of the sub-session for which you want a different authorization type, and then for the session from which the sub session is started.
• Authorization
Select the authorization type that will be applicable for the sub session entered in the field session code.
If you model No Authorization for a sub session, at startup of that sub session, a message appears and the startup is cancelled. As a result, if a session is part of the Special menu or is a button on the form, that menu item or button will be available. The user only knows that they cannot start the session after selecting the menu option or pressing the button.
You cannot model the Calculator (ttstpcalc) and Calendar (ttstpcalendar) sub sessions. These 2 sub sessions are displayed in the sub session tree, and not real ERP Enterprise sessions. They actually start the MS Windows calculator and calendar.
Running the ERP Enterprise session All requests to start an ERP Enterprise session from the workflow client are controlled by the workflow daemon in the ERP Enterprise environment. This workflow daemon communicates with the 4GL-engine and together they handle the session to be started in the way you modeled.
Concept of Attributes
24 | Infor10 ERP Enterprise Infor Workflow extension and Infor ERP Enterprise
However, if code constructions are used in the sessions that conflict with the workflow daemon control, errors will occur.
In general, errors that result from conflicting code constructions are not logged. The session either stops responding or fails completely; in those cases restart your workflow client.
Most errors are logged in the log-files log.events or log.wfdaemon. These log files describe, for example, whether a particular menu option was not enabled in the session.
To see the content of the log files on your screen, you can start the ttstperrlog session and select D (display) as device.
Infor10 ERP Enterprise Infor Workflow extension and Infor ERP Enterprise | 25
Chapter 4 Workflow Limitations 4
ERP Enterprise software is predominantly Workflow-enabled. This means that the software can be controlled at run-time by the Workflow system. However, a small number of ERP Enterprise sessions have limitations if you want to incorporate the sessions in processes that are used by Workflow. A small number of ERP Enterprise applications cannot be used by Workflow at all.
These categories of limitations can be distinguished:
• Sessions that are not Workflow-enabled • Sessions that are 3GL instead of 4GL • Multi main table sessions • Particular types of sub sessions • Sessions that are part of hard-coded Workflow
This chapter describes the consequences for each limitation and the workarounds to model particular ERP Enterprise applications in Workflow processes.
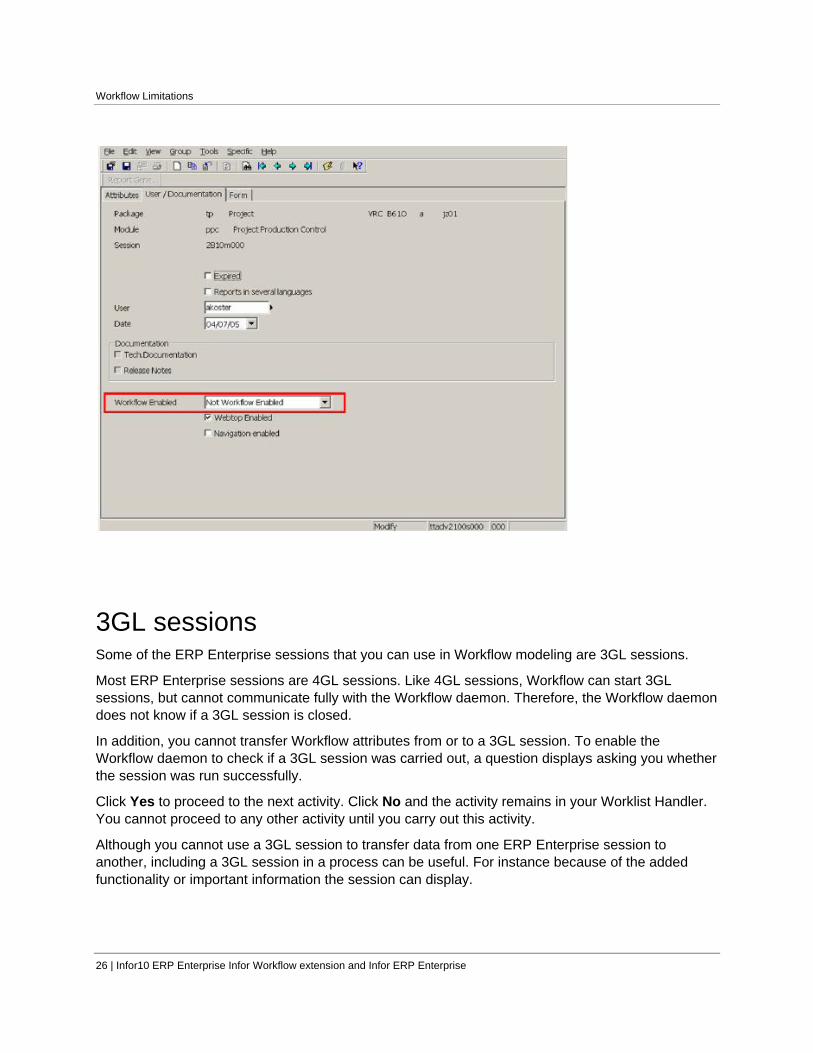
Sessions that are not Workflow-enabled You can use most ERP Enterprise sessions in Workflow. However, due to specific programming characteristics, a number of sessions can cause problems when used in Workflow.
These sessions are not fully controlled by Workflow, which lead to incorrect data transfers, unsatisfactory messages, and eventually to an obstruction of the Workflow processes.
Part of those problems can be caused by the use of bshell commands. These problems can occur if messages regarding sessions are stopped by unknown processes or by a total block of the Workflow Client. Recoding the session can resolve most of these problems.
Do not model problem sessions in a template. In this case, you must try to find another session with the same functionality and decide not to run this session in Workflow. In the definition of the session (ttadv2100s000), you must specify that the session is Not Workflow Enabled.
When running the session, the workflow daemon checks this field and then displays a message, if a session is not Workflow enabled.
Workflow Limitations
26 | Infor10 ERP Enterprise Infor Workflow extension and Infor ERP Enterprise
3GL sessions Some of the ERP Enterprise sessions that you can use in Workflow modeling are 3GL sessions.
Most ERP Enterprise sessions are 4GL sessions. Like 4GL sessions, Workflow can start 3GL sessions, but cannot communicate fully with the Workflow daemon. Therefore, the Workflow daemon does not know if a 3GL session is closed.
In addition, you cannot transfer Workflow attributes from or to a 3GL session. To enable the Workflow daemon to check if a 3GL session was carried out, a question displays asking you whether the session was run successfully.
Click Yes to proceed to the next activity. Click No and the activity remains in your Worklist Handler. You cannot proceed to any other activity until you carry out this activity.
Although you cannot use a 3GL session to transfer data from one ERP Enterprise session to another, including a 3GL session in a process can be useful. For instance because of the added functionality or important information the session can display.
Workflow Limitations
Infor10 ERP Enterprise Infor Workflow extension and Infor ERP Enterprise | 27
If you use a 3GL session to change data, through startup of so-called detailed sessions, modeling the detail sessions is preferable. This enables you to send and receive data from the session and control the authorization type of the session.
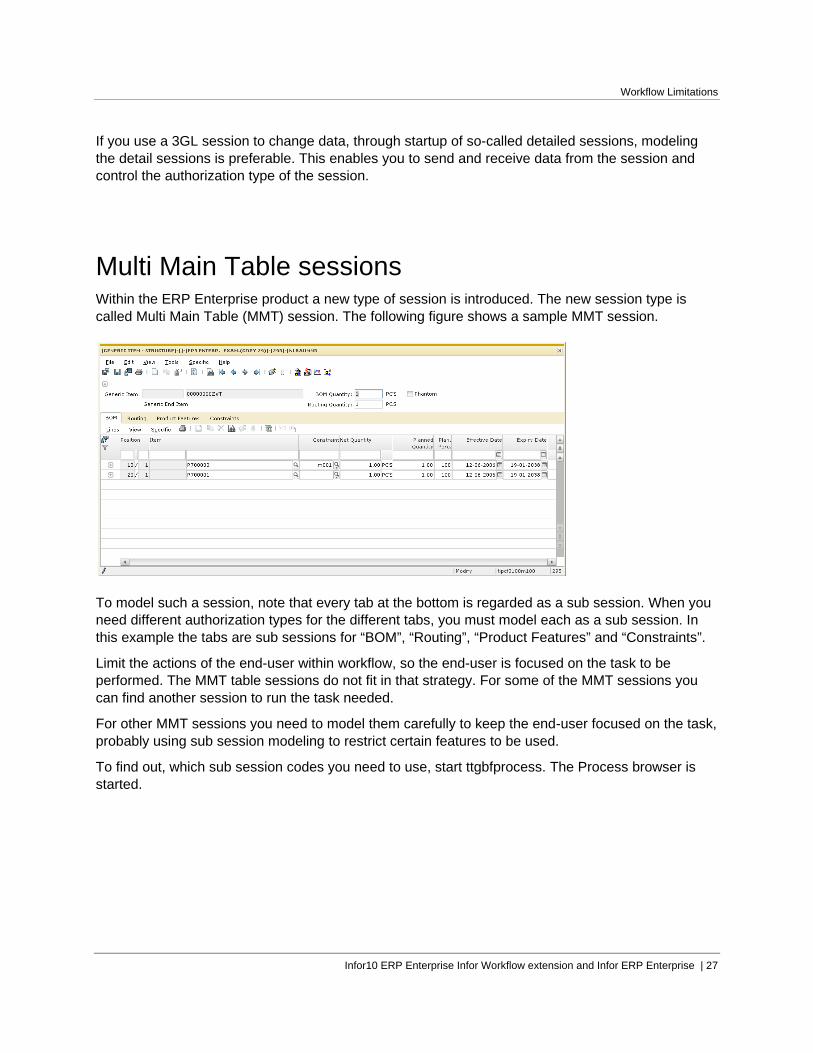
Multi Main Table sessions Within the ERP Enterprise product a new type of session is introduced. The new session type is called Multi Main Table (MMT) session. The following figure shows a sample MMT session.
To model such a session, note that every tab at the bottom is regarded as a sub session. When you need different authorization types for the different tabs, you must model each as a sub session. In this example the tabs are sub sessions for “BOM”, “Routing”, “Product Features” and “Constraints”.
Limit the actions of the end-user within workflow, so the end-user is focused on the task to be performed. The MMT table sessions do not fit in that strategy. For some of the MMT sessions you can find another session to run the task needed.
For other MMT sessions you need to model them carefully to keep the end-user focused on the task, probably using sub session modeling to restrict certain features to be used.
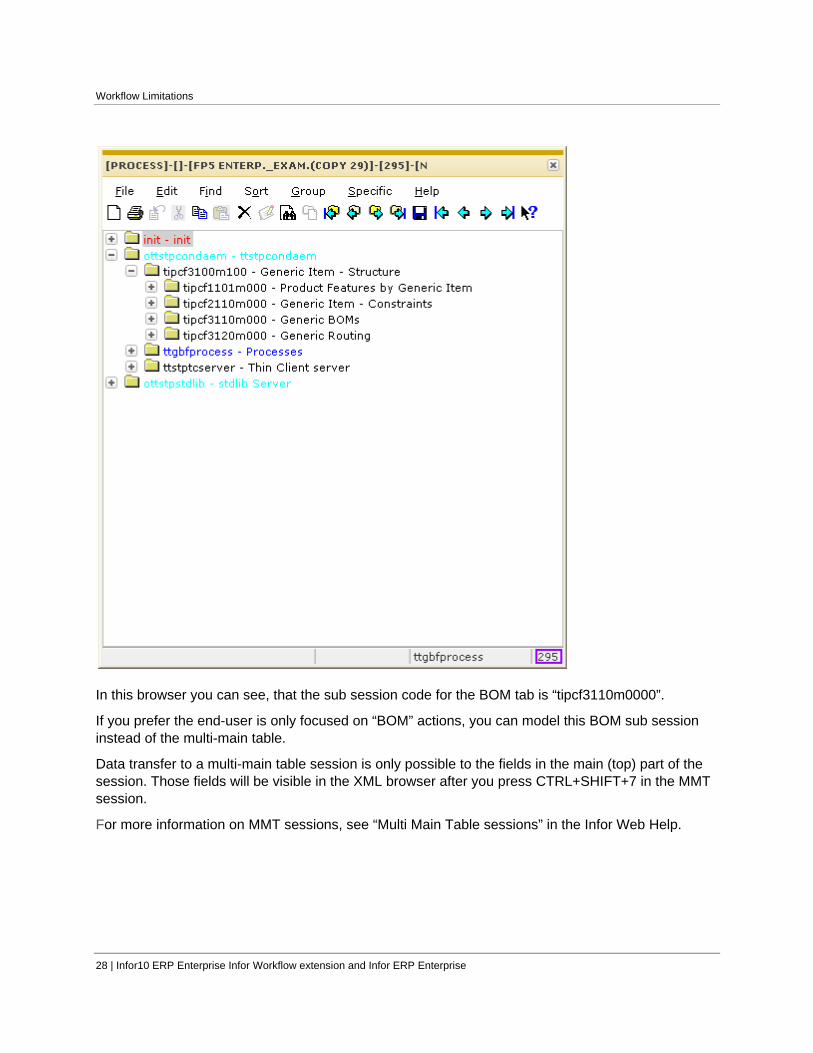
To find out, which sub session codes you need to use, start ttgbfprocess. The Process browser is started.
Workflow Limitations
28 | Infor10 ERP Enterprise Infor Workflow extension and Infor ERP Enterprise
In this browser you can see, that the sub session code for the BOM tab is “tipcf3110m0000”.
If you prefer the end-user is only focused on “BOM” actions, you can model this BOM sub session instead of the multi-main table.
Data transfer to a multi-main table session is only possible to the fields in the main (top) part of the session. Those fields will be visible in the XML browser after you press CTRL+SHIFT+7 in the MMT session.
For more information on MMT sessions, see “Multi Main Table sessions” in the Infor Web Help.
Workflow Limitations
Infor10 ERP Enterprise Infor Workflow extension and Infor ERP Enterprise | 29
Sub sessions Start the sub sessions that you model in business processes directly by Workflow without running the main session first. However, if you model sub sessions in such a way that they can be directly started by Workflow, you can run into problems if the sub sessions are not properly prepared by the main session. As a result, you must send the right key field values to the sub sessions by means of Workflow attributes.
Some sub sessions will terminate abnormally regardless of how you close the sub sessions, because the sub sessions are not suitable to be directly started by Workflow.
In this case, you must either have the sub session changed or model the main session.
Hard-coded Workflow ERP Enterprise uses hard-coded Workflow. Hard-coded Workflow means that the sequence of activities in certain areas of ERP Enterprise is determined by the application design. In other words, the application logic determines whether a next step can be carried out. If you do not follow the sequence of sessions as described in the application logic, the application and the Workflow Management System will no longer be synchronized. To avoid this loss of synchronization, the processes must be modeled exactly as described in the application logic. If a predefined sequence of activities is modeled correctly, the Workflow Management System can handle these processes.
Modeling such processes within Workflow means that you probably extend the basic application logic processes with manual tasks and/or approval steps.
Examples of areas that contain this kind of application logic are:
• Sales Order Management • Purchase Order Management • Warehouse Order management • Project Structure
You can find the structure of the application logic in the online-help of the major sessions within the relevant area.

Infor10 ERP Enterprise Infor Workflow extension and Infor ERP Enterprise | 31
Chapter 5 Modeling Using the Infor Action Type: Call Program 5
The Call Program activity type enables you to include a call to an external program in a workflow template. For example, you can include a call to Microsoft Excel to create a spreadsheet, or you can refine the call and not only open Excel but also open an existing spreadsheet. You can call any program on your computer, but the program must also exist on the computer of the client who performs the activity.
The Call Program activity type has many of the same properties as other activity nodes. For a description of the other properties, refer to the IBPM documentation.
Add a call to an external program to a workflow template. Take these steps:
1 Start the IBPM Studio.
2 Select an existing process definition to edit or create a new process definition.
3 Select the Call Program activity type as described in “To select an Activity Type.”
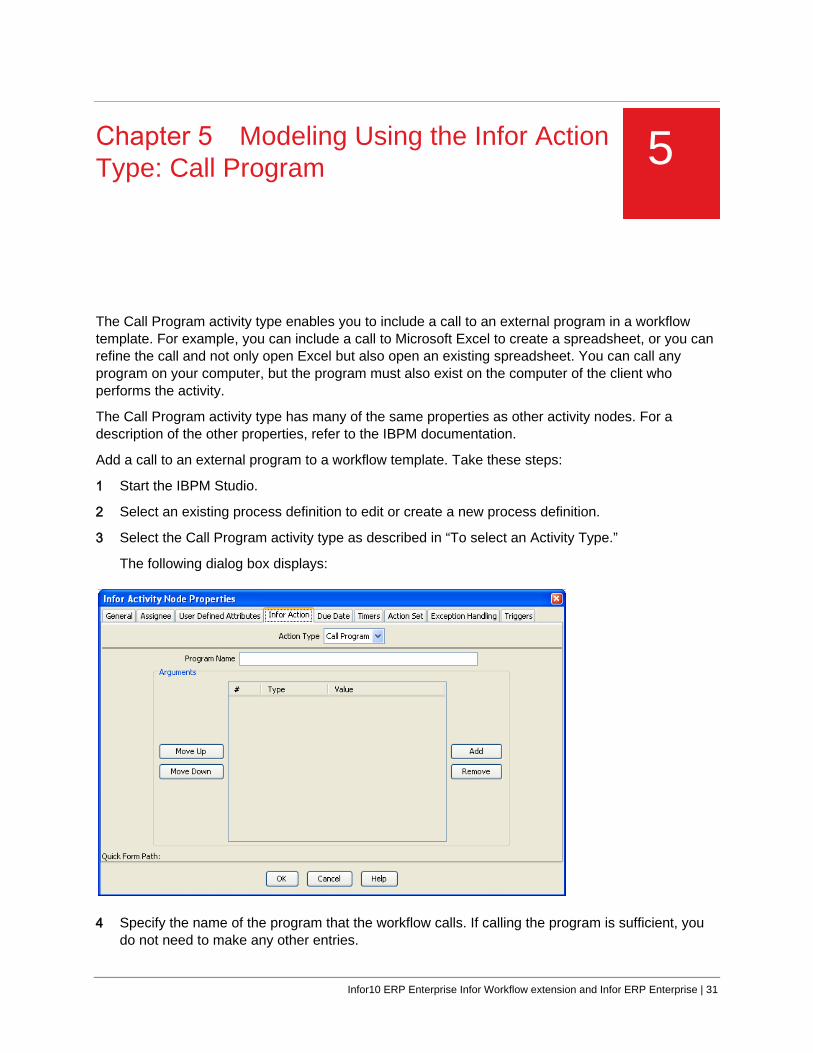
The following dialog box displays:
4 Specify the name of the program that the workflow calls. If calling the program is sufficient, you do not need to make any other entries.
Modeling Using the Infor Action Type: Call Program
32 | Infor10 ERP Enterprise Infor Workflow extension and Infor ERP Enterprise
5 Click Add to activate the fields.
6 Specify this information in the fields to refine the call. The program automatically generates the step numbers.
Type:
Select one of the following:
• Constant Value • UDA Variable
Value
Enter a value to refine the call. For example, to call Microsoft Excel and open a particular file, enter the pathway and file name.
7 Enter any other step in the order in which the steps must be performed. If the steps are out of sequence, select an entry and use Move Up/Move Down to position the steps appropriately. To remove an entry from the list, select the entry and click Remove.
8 Click OK to save your entries.
Infor10 ERP Enterprise Infor Workflow extension and Infor ERP Enterprise | 33
Chapter 6 Workflow Triggering Configuration 6
This chapter describes how to configure a Workflow Trigger. For more detailed information about a particular session, you can click Using Session on the Help menu in the sessions.
The Workflow Trigger, which will be configured, is to ensure that when a new sales order is entered by means of EDI, a process starts to perform several basic checks.
Before you begin to configure, you must select a default text group for your ERP Enterprise user. This text group must exist in the company in which you want to define the workflow trigger. Attach a Default Text Group template to that user in the User Data (ttaad2500m000) session.
The best procedure is to have the template in IBPM modeled before you configure the Workflow Trigger.
Configuring a workflow trigger Specify the master data that will be applicable for all Workflow Triggers.
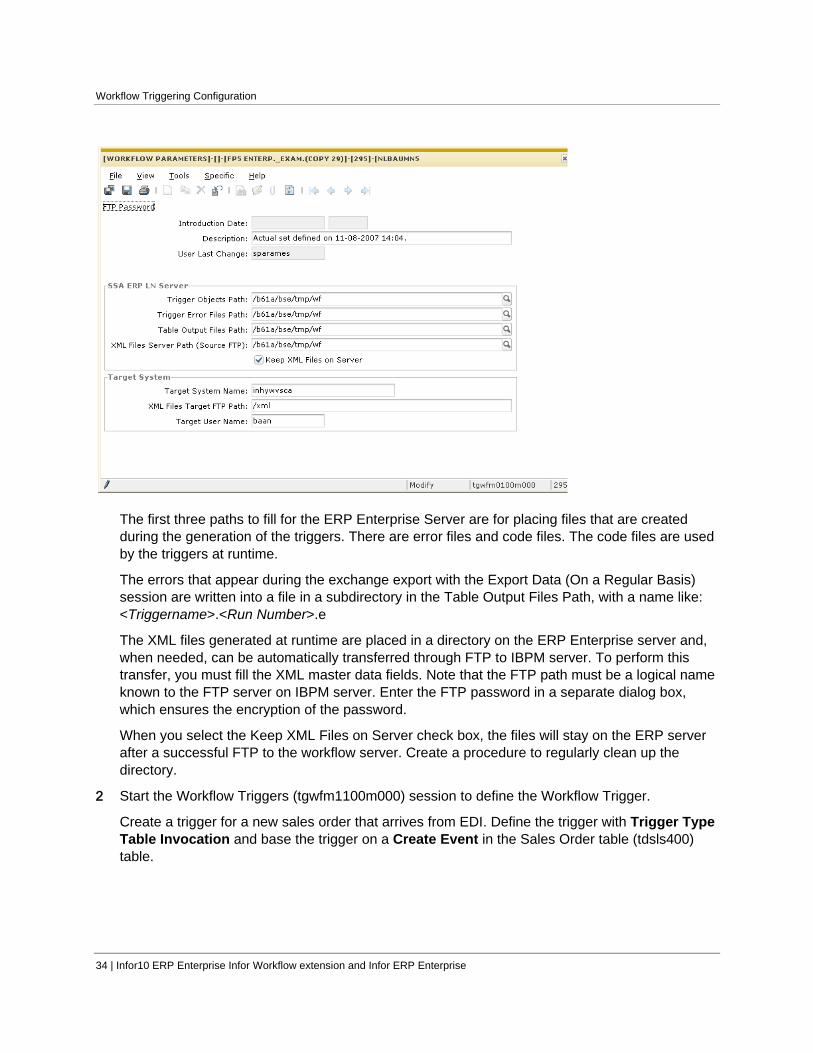
1 Start the Workflow Parameters (tgwfm0100m000) session and click New to add a parameter set.
Workflow Triggering Configuration
34 | Infor10 ERP Enterprise Infor Workflow extension and Infor ERP Enterprise
The first three paths to fill for the ERP Enterprise Server are for placing files that are created during the generation of the triggers. There are error files and code files. The code files are used by the triggers at runtime.
The errors that appear during the exchange export with the Export Data (On a Regular Basis) session are written into a file in a subdirectory in the Table Output Files Path, with a name like: <Triggername>.<Run Number>.e
The XML files generated at runtime are placed in a directory on the ERP Enterprise server and, when needed, can be automatically transferred through FTP to IBPM server. To perform this transfer, you must fill the XML master data fields. Note that the FTP path must be a logical name known to the FTP server on IBPM server. Enter the FTP password in a separate dialog box, which ensures the encryption of the password.
When you select the Keep XML Files on Server check box, the files will stay on the ERP server after a successful FTP to the workflow server. Create a procedure to regularly clean up the directory.
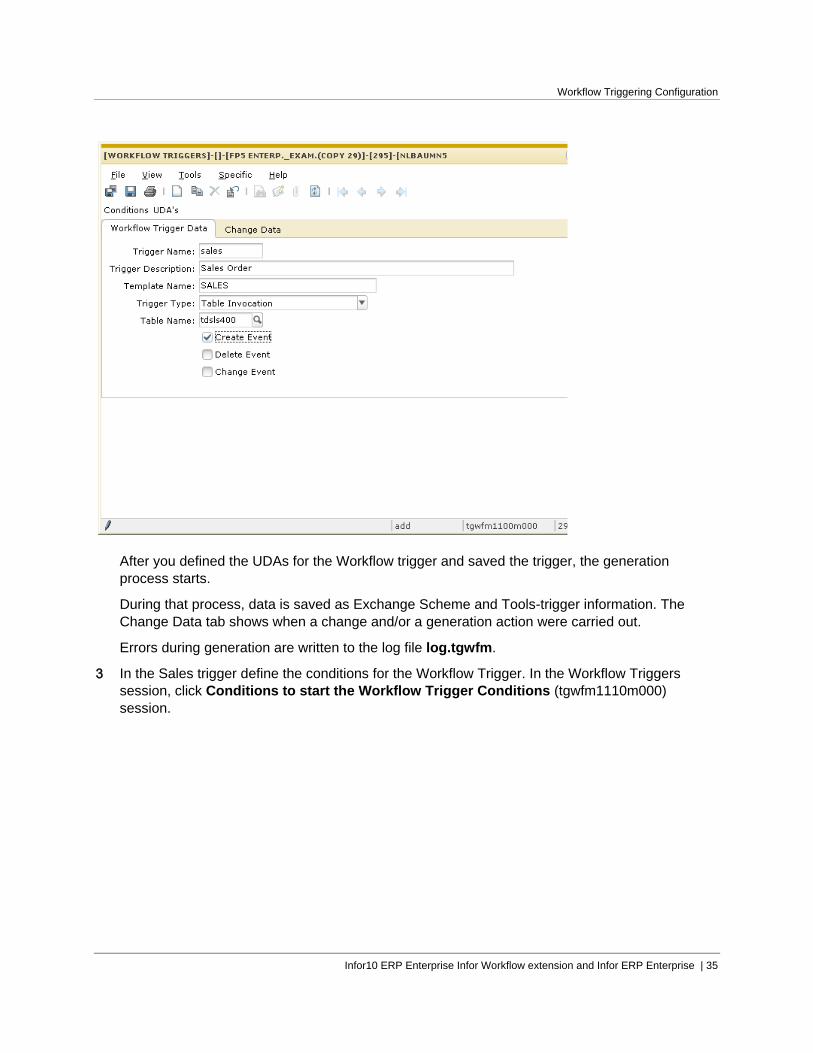
2 Start the Workflow Triggers (tgwfm1100m000) session to define the Workflow Trigger.
Create a trigger for a new sales order that arrives from EDI. Define the trigger with Trigger Type Table Invocation and base the trigger on a Create Event in the Sales Order table (tdsls400) table.
Workflow Triggering Configuration
Infor10 ERP Enterprise Infor Workflow extension and Infor ERP Enterprise | 35
After you defined the UDAs for the Workflow trigger and saved the trigger, the generation process starts.
During that process, data is saved as Exchange Scheme and Tools-trigger information. The Change Data tab shows when a change and/or a generation action were carried out.
Errors during generation are written to the log file log.tgwfm.
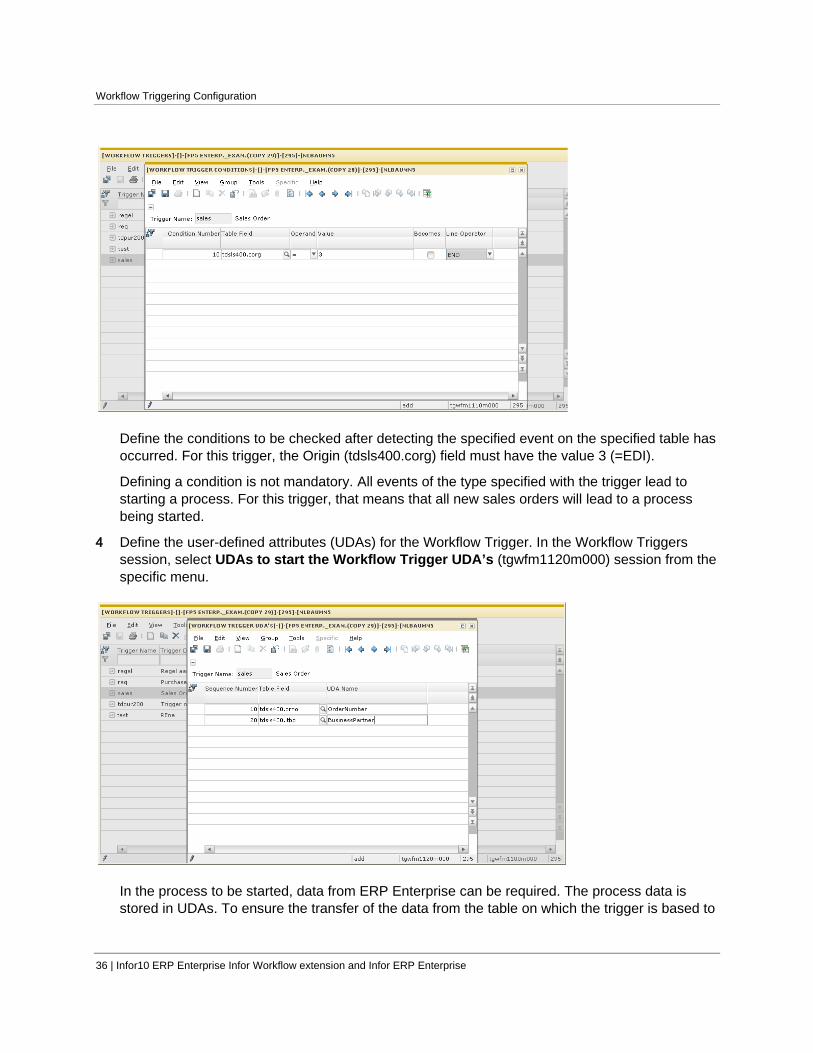
3 In the Sales trigger define the conditions for the Workflow Trigger. In the Workflow Triggers session, click Conditions to start the Workflow Trigger Conditions (tgwfm1110m000) session.
Workflow Triggering Configuration
36 | Infor10 ERP Enterprise Infor Workflow extension and Infor ERP Enterprise
Define the conditions to be checked after detecting the specified event on the specified table has occurred. For this trigger, the Origin (tdsls400.corg) field must have the value 3 (=EDI).
Defining a condition is not mandatory. All events of the type specified with the trigger lead to starting a process. For this trigger, that means that all new sales orders will lead to a process being started.
4 Define the user-defined attributes (UDAs) for the Workflow Trigger. In the Workflow Triggers session, select UDAs to start the Workflow Trigger UDA’s (tgwfm1120m000) session from the specific menu.
In the process to be started, data from ERP Enterprise can be required. The process data is stored in UDAs. To ensure the transfer of the data from the table on which the trigger is based to

Workflow Triggering Configuration
Infor10 ERP Enterprise Infor Workflow extension and Infor ERP Enterprise | 37
the triggered process, in this session, you define the link between the table fields and the UDAs. The UDA name is case sensitive.
5 Set up the audit for the involved table.
The Workflow Triggering functionality is based on the generic Triggering functionality. The generic Triggering in turn is based on auditing; you must turn on auditing for the involved tables.
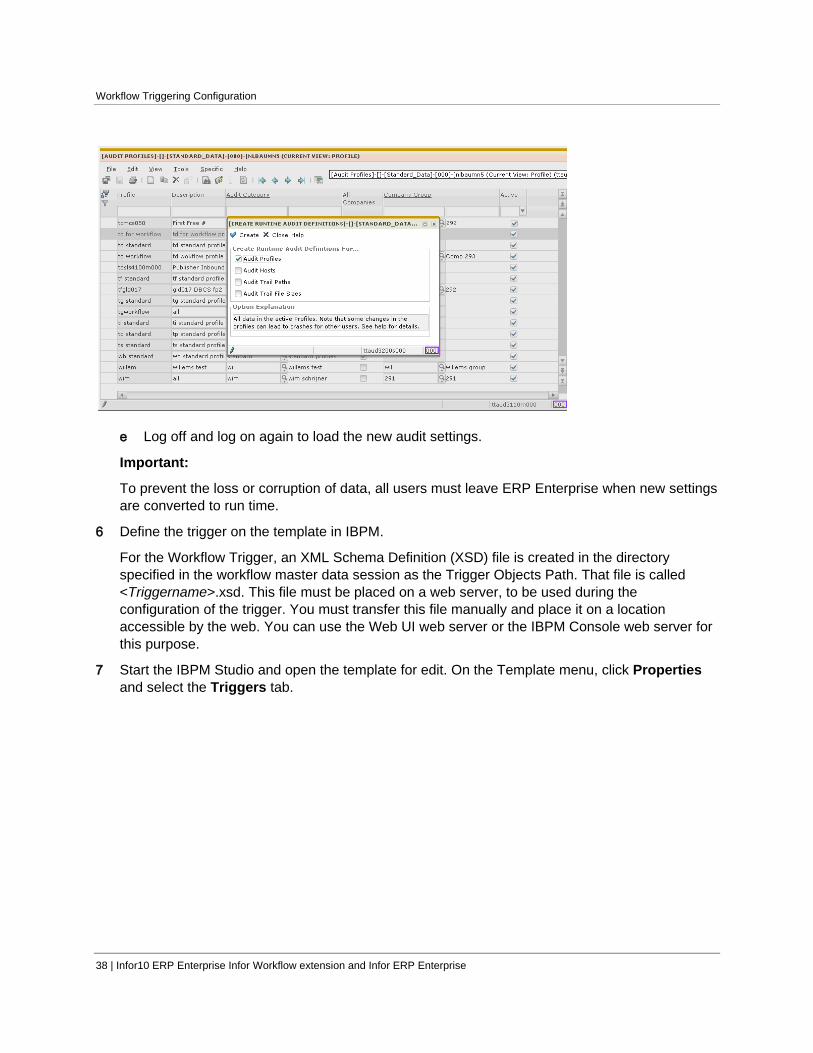
To activate the audit trail for a table, you must link the table to the “workflow” audit profile of the package to which the table belongs. Take the following steps:
a Start the Audit Profiles (ttaud3110m000) session and select the “workflow” audit profile of the package to which the table belongs. For example: select the “td workflow” profile if you want to activate audit trail for the tdsls400 table.
b Subsequently on the Specific menu, select Table Settings by Profile. The Audit Tables by Profile (ttaud3120m000) session is started.
If there is no “workflow” audit profile for the relevant package, you must first create one, for example, “td workflow”, and link it to the “workflow” audit category. If the “workflow” category does not exist, you must create it in the Audit Categories (ttaud3100m000) session.
If you are not permitted to set up audit trail for the tables used in your Workflow triggers the following sessions, request for assistance in your organization. For more information on Audit Management, refer to the Infor Web Help.
c Click New to add the table(s) to the profile. Set the Field Selection to “All” and the Audit Type to “Always”. In this way the events generated by Workflow will contain all fields (changed + unchanged) of the records involved. Note that if you set the Audit Type to “Changed”, the events only contain the primary key fields and the changed fields. This is not recommended for Workflow.
d Run the Create Runtime Audit Definitions (ttaud3200s000) session. Ensure that at least the Audit Profiles check box is selected.
Workflow Triggering Configuration
38 | Infor10 ERP Enterprise Infor Workflow extension and Infor ERP Enterprise
e Log off and log on again to load the new audit settings.
Important:
To prevent the loss or corruption of data, all users must leave ERP Enterprise when new settings are converted to run time.
6 Define the trigger on the template in IBPM.
For the Workflow Trigger, an XML Schema Definition (XSD) file is created in the directory specified in the workflow master data session as the Trigger Objects Path. That file is called <Triggername>.xsd. This file must be placed on a web server, to be used during the configuration of the trigger. You must transfer this file manually and place it on a location accessible by the web. You can use the Web UI web server or the IBPM Console web server for this purpose.
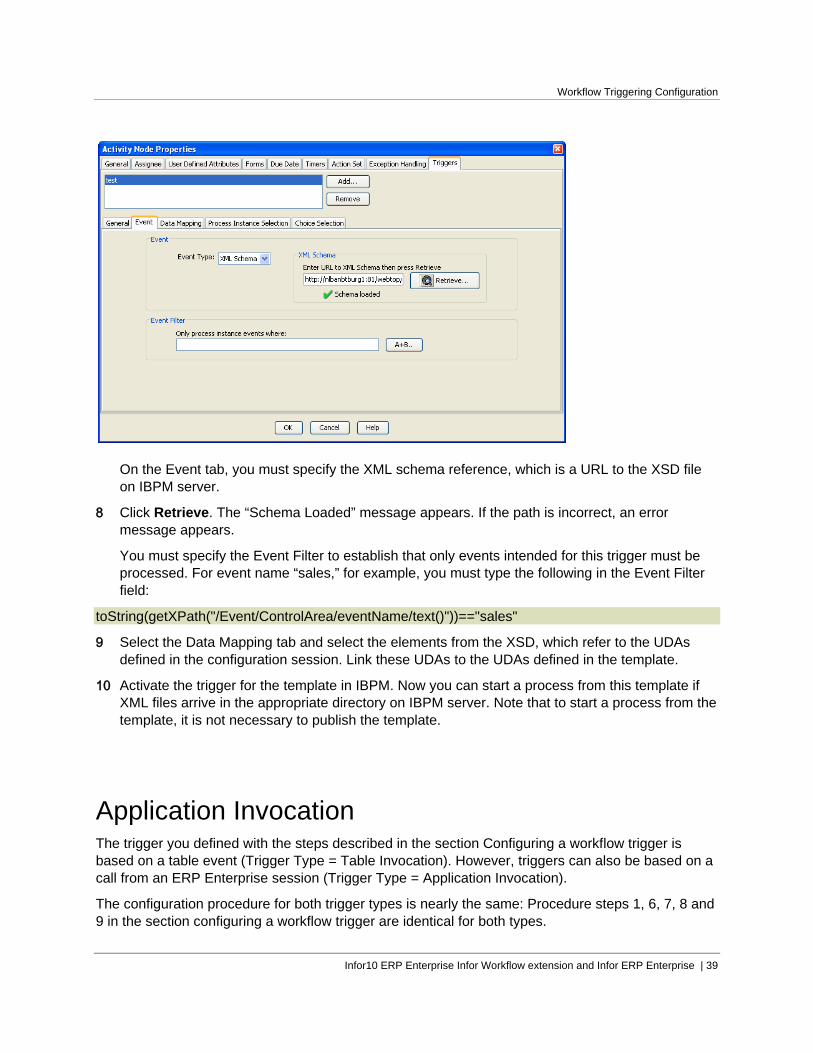
7 Start the IBPM Studio and open the template for edit. On the Template menu, click Properties and select the Triggers tab.
Workflow Triggering Configuration
Infor10 ERP Enterprise Infor Workflow extension and Infor ERP Enterprise | 39
On the Event tab, you must specify the XML schema reference, which is a URL to the XSD file on IBPM server.
8 Click Retrieve. The “Schema Loaded” message appears. If the path is incorrect, an error message appears.
You must specify the Event Filter to establish that only events intended for this trigger must be processed. For event name “sales,” for example, you must type the following in the Event Filter field:
toString(getXPath("/Event/ControlArea/eventName/text()"))=="sales"
9 Select the Data Mapping tab and select the elements from the XSD, which refer to the UDAs defined in the configuration session. Link these UDAs to the UDAs defined in the template.
10 Activate the trigger for the template in IBPM. Now you can start a process from this template if XML files arrive in the appropriate directory on IBPM server. Note that to start a process from the template, it is not necessary to publish the template.
Application Invocation The trigger you defined with the steps described in the section Configuring a workflow trigger is based on a table event (Trigger Type = Table Invocation). However, triggers can also be based on a call from an ERP Enterprise session (Trigger Type = Application Invocation).
The configuration procedure for both trigger types is nearly the same: Procedure steps 1, 6, 7, 8 and 9 in the section configuring a workflow trigger are identical for both types.
Workflow Triggering Configuration
40 | Infor10 ERP Enterprise Infor Workflow extension and Infor ERP Enterprise
For a trigger based on Application Invocation you can skip step 3 and 5.
Steps 2 and 4 are different. See the following examples:
For a trigger that is based on Application Invocation the information for step 3 must be as follows:
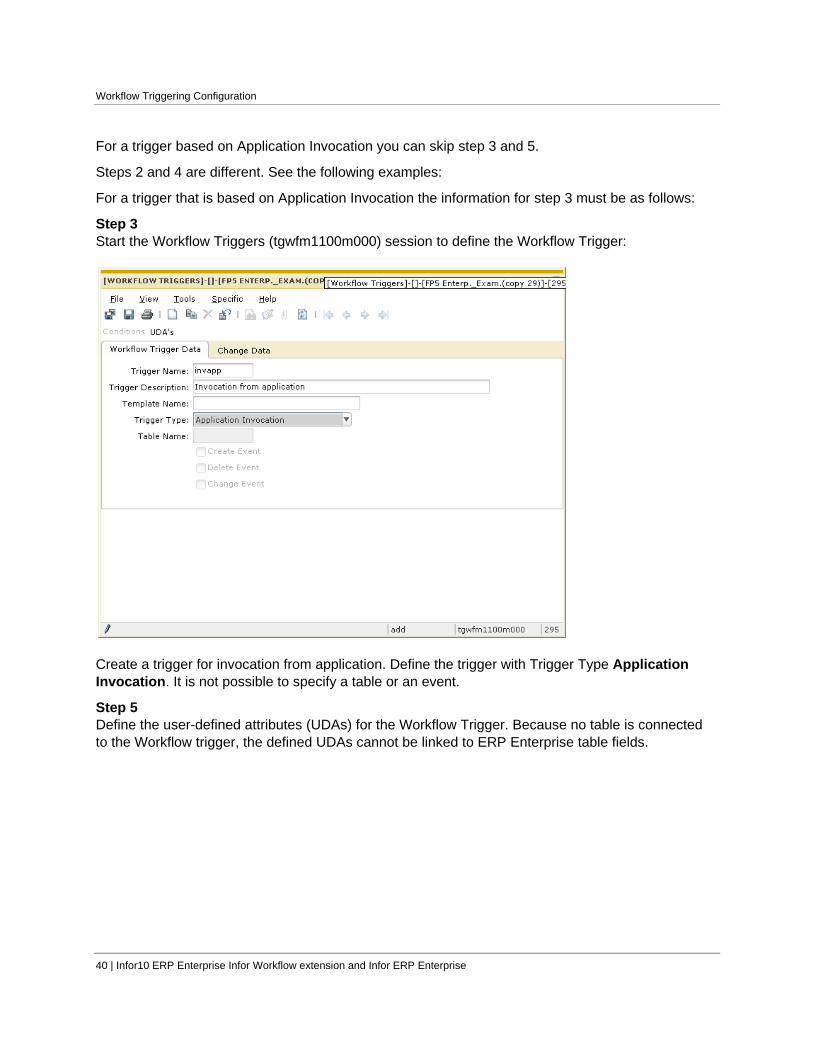
Step 3 Start the Workflow Triggers (tgwfm1100m000) session to define the Workflow Trigger:
Create a trigger for invocation from application. Define the trigger with Trigger Type Application Invocation. It is not possible to specify a table or an event.
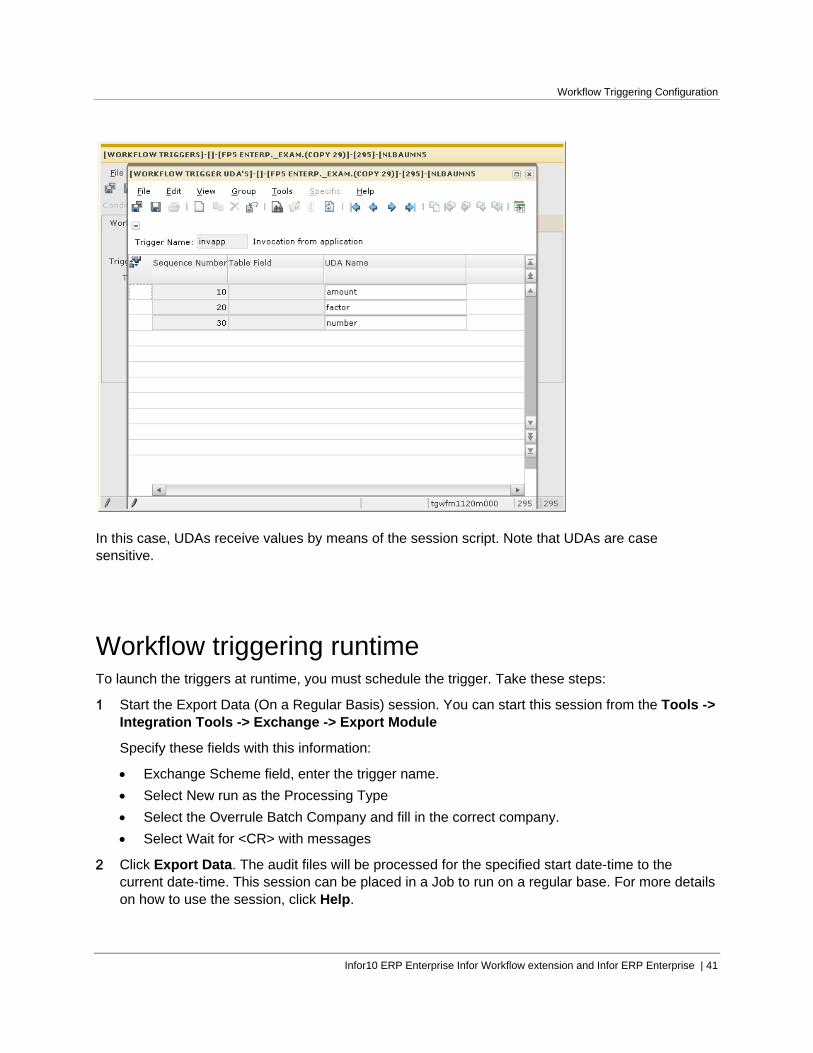
Step 5 Define the user-defined attributes (UDAs) for the Workflow Trigger. Because no table is connected to the Workflow trigger, the defined UDAs cannot be linked to ERP Enterprise table fields.
Workflow Triggering Configuration
Infor10 ERP Enterprise Infor Workflow extension and Infor ERP Enterprise | 41
In this case, UDAs receive values by means of the session script. Note that UDAs are case sensitive.
Workflow triggering runtime To launch the triggers at runtime, you must schedule the trigger. Take these steps:
1 Start the Export Data (On a Regular Basis) session. You can start this session from the Tools -> Integration Tools -> Exchange -> Export Module
Specify these fields with this information:
• Exchange Scheme field, enter the trigger name. • Select New run as the Processing Type • Select the Overrule Batch Company and fill in the correct company. • Select Wait for <CR> with messages
2 Click Export Data. The audit files will be processed for the specified start date-time to the current date-time. This session can be placed in a Job to run on a regular base. For more details on how to use the session, click Help.
Workflow Triggering Configuration
42 | Infor10 ERP Enterprise Infor Workflow extension and Infor ERP Enterprise
The errors that occur during the use of this session are written into a file in a subdirectory of the Table output Files Path. This file is specified in the Workflow Trigger master data, and will have a name such as <Triggername>.<Run Number>.e.
When the triggers are running, the trigger XML files are transported between the ERP Enterprise server and IBPM server. If the two systems are not connected, the trigger XML files present on the ERP Enterprise server must be transferred manually to IBPM server.
If the option to keep the trigger XML files on the ERP Enterprise server is selected, it is difficult to check which files are transferred. The normal IBPM working procedure will remove the XML files after a successful start of the process.
To start a trigger from an ERP Enterprise session, you must include a function call (to datrgapi.trigger.do) in the program script of that session.