Embed Size (px)
Citation preview
7/22/2019 Informatica Installation Doc
http://slidepdf.com/reader/full/informatica-installation-doc 1/37
Download Installation Pack
Step : 1 Informatica PowerCenter trail version can be downloaded from https://edelivery.oracle.com Log on to https://edelivery.oracle.com and accept the Terms and Conditions.
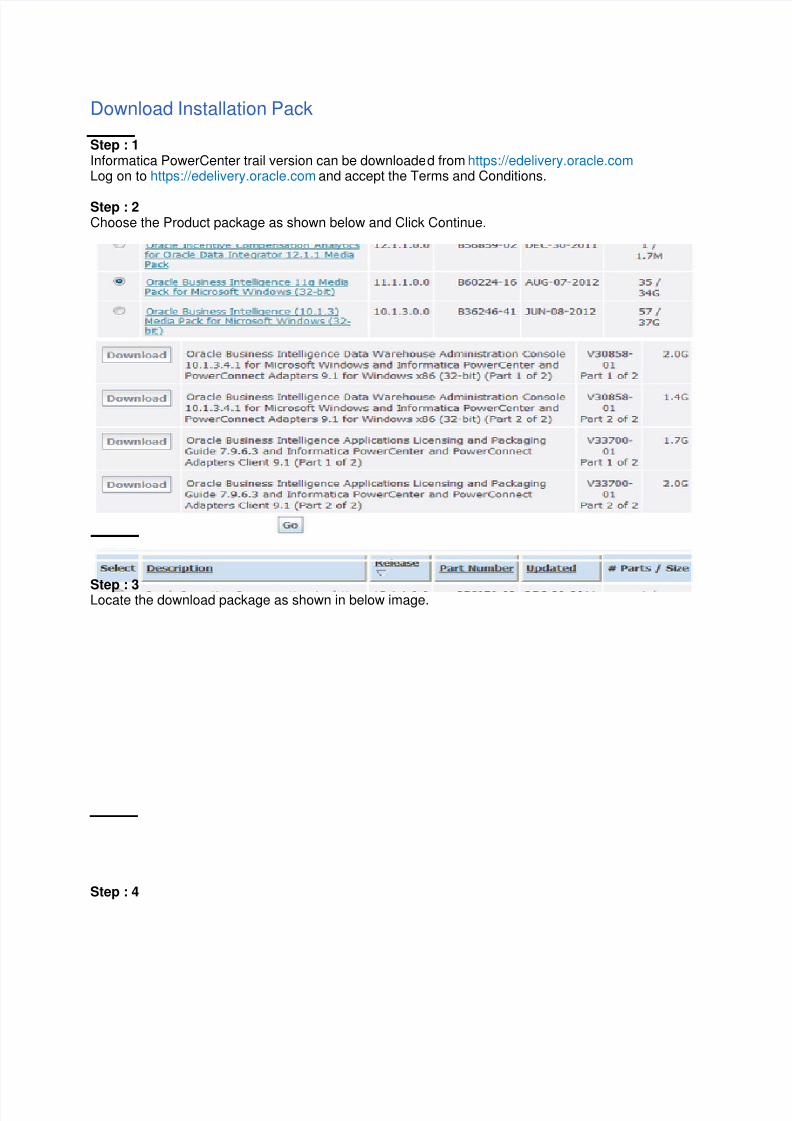
Step : 2 Choose the Product package as shown below and Click Continue.
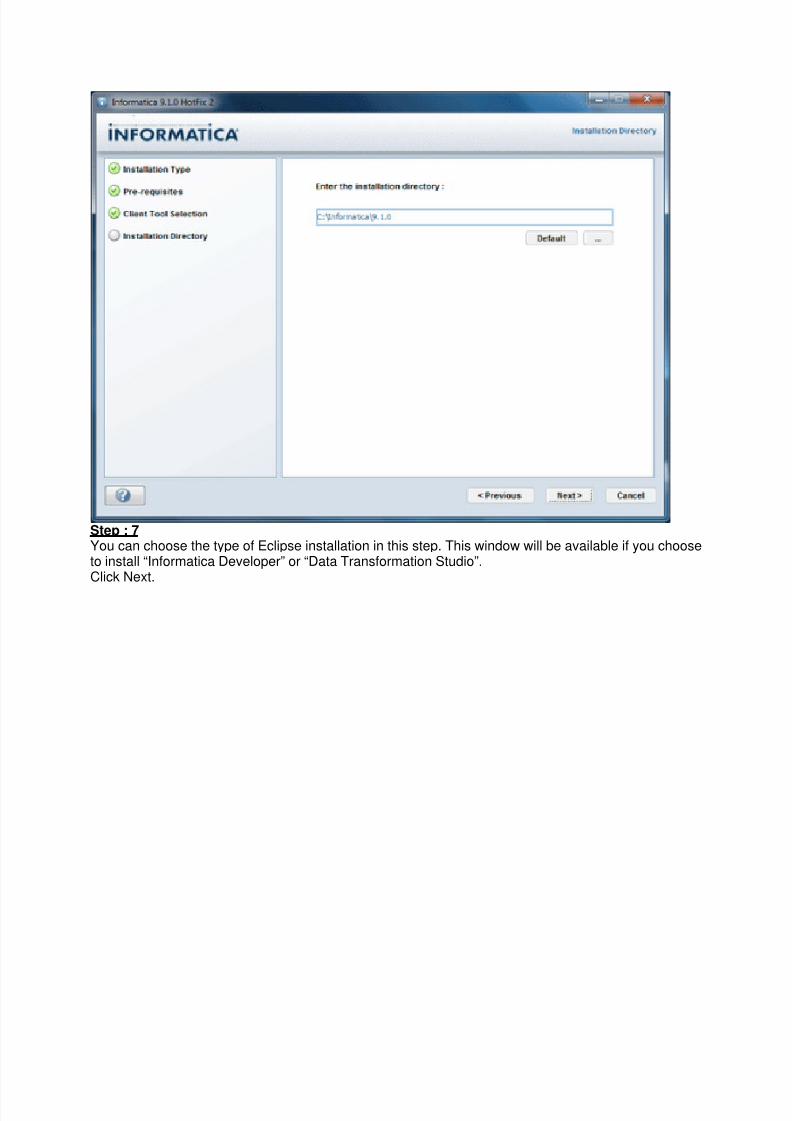
Step : 3 Locate the download package as shown in below image.
Step : 4
7/22/2019 Informatica Installation Doc
http://slidepdf.com/reader/full/informatica-installation-doc 2/37
Download the packages to D:\INFA9X
Unpack the Installation Package
Step : 1
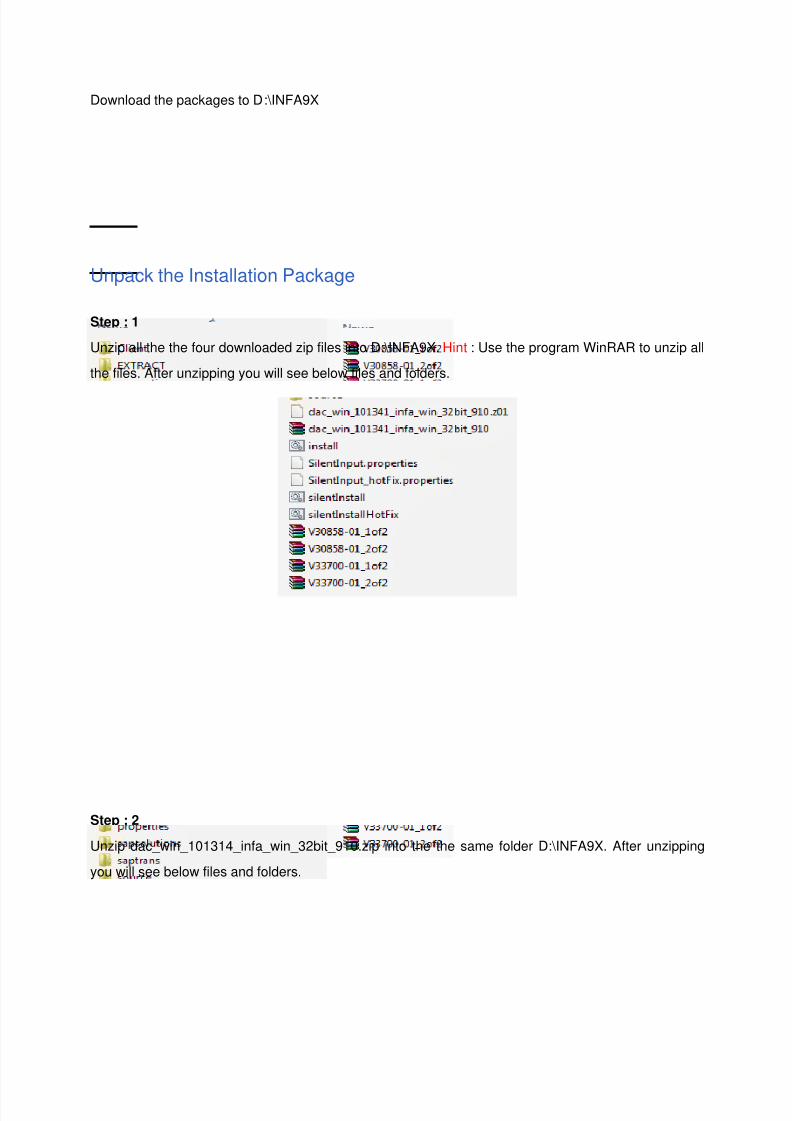
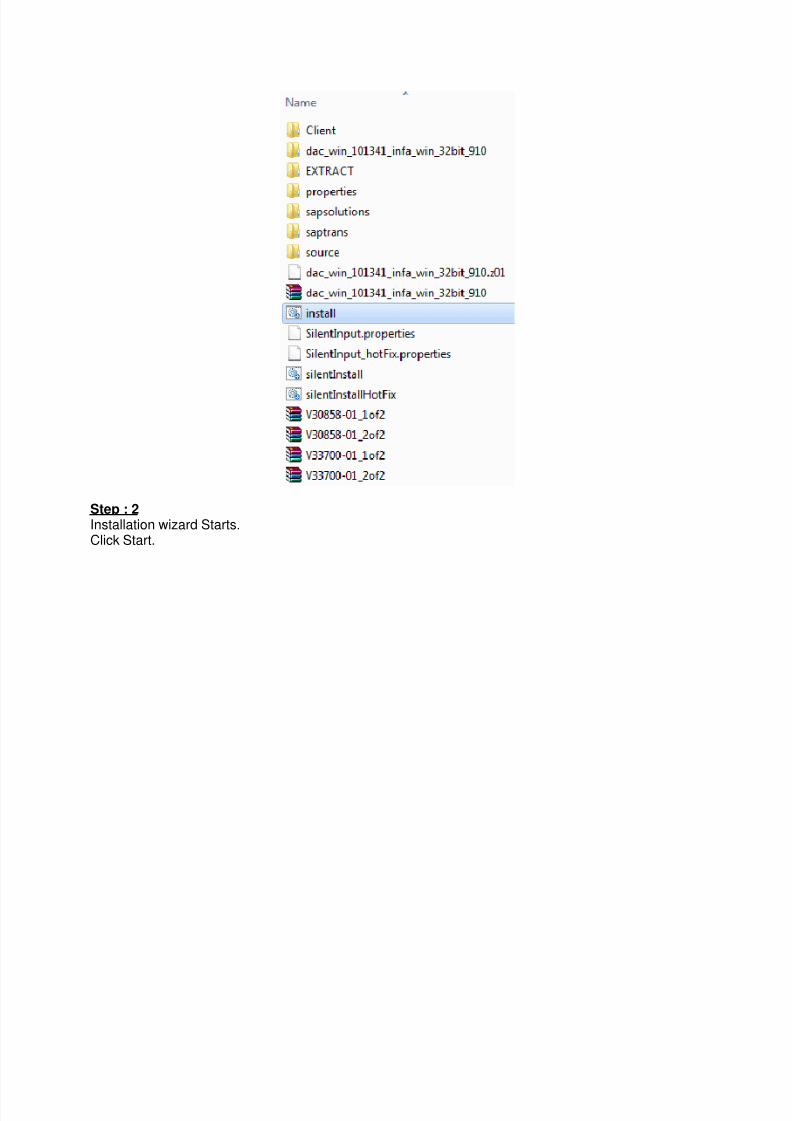
Unzip all the the four downloaded zip files into D:\INFA9X. Hint : Use the program WinRAR to unzip all
the files. After unzipping you will see below files and folders.
Step : 2
Unzip dac_win_101314_infa_win_32bit_910.zip into the the same folder D:\INFA9X. After unzipping
you will see below files and folders.
7/22/2019 Informatica Installation Doc
http://slidepdf.com/reader/full/informatica-installation-doc 3/37
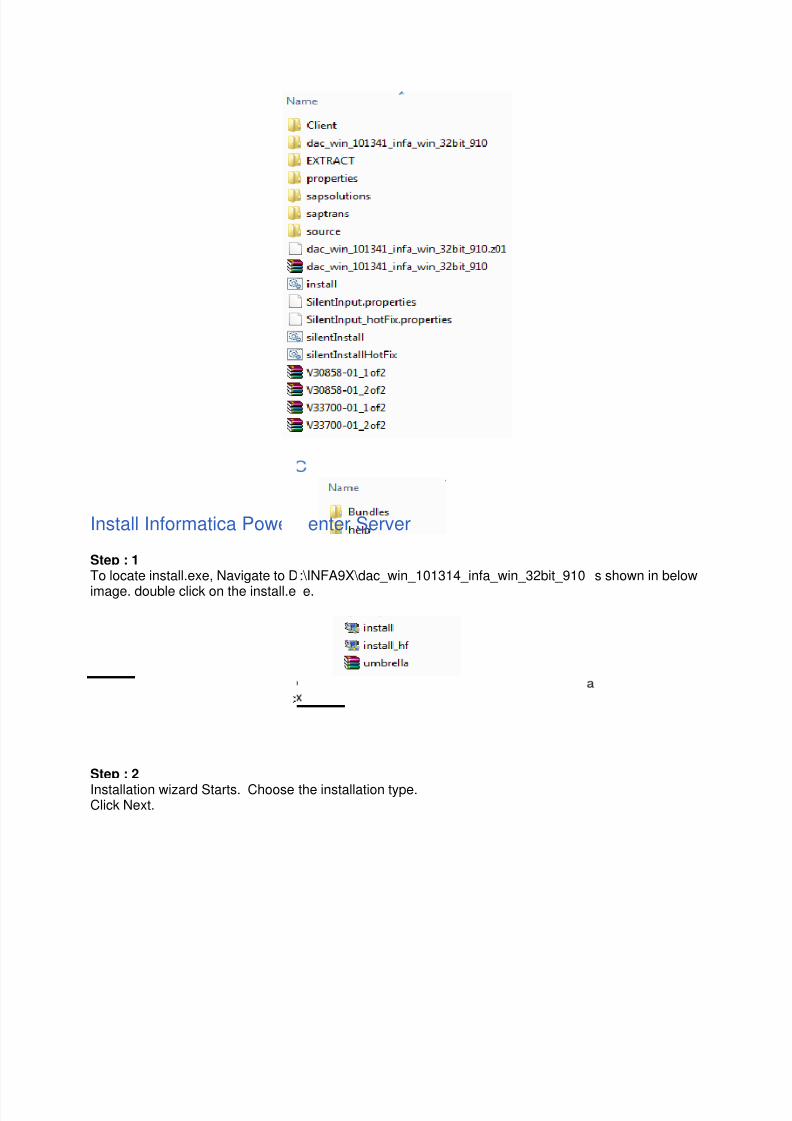
Install Informatica Power
Step : 1 To locate install.exe, Navigate to D
image. double click on the install.e
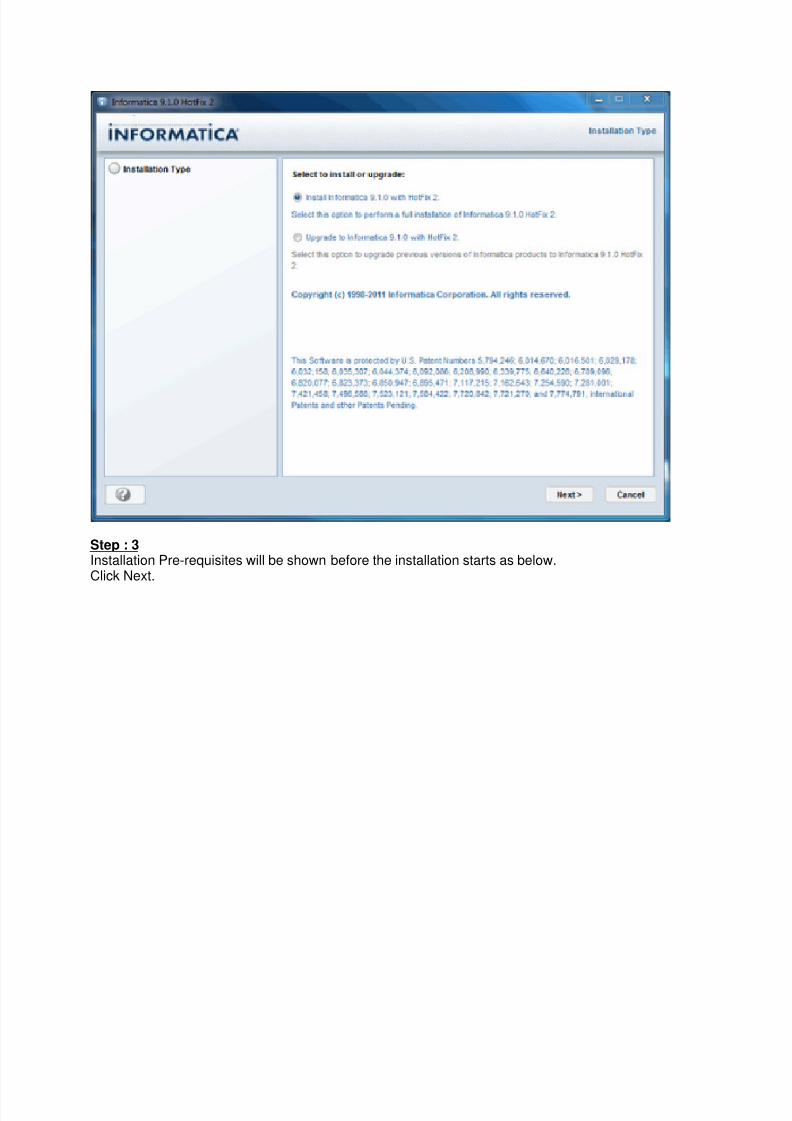
Step : 2
Installation wizard Starts. ChooseClick Next.
enter Server
:\INFA9X\dac_win_101314_infa_win_32bit_910
e.
the installation type.
s shown in below
7/22/2019 Informatica Installation Doc
http://slidepdf.com/reader/full/informatica-installation-doc 4/37
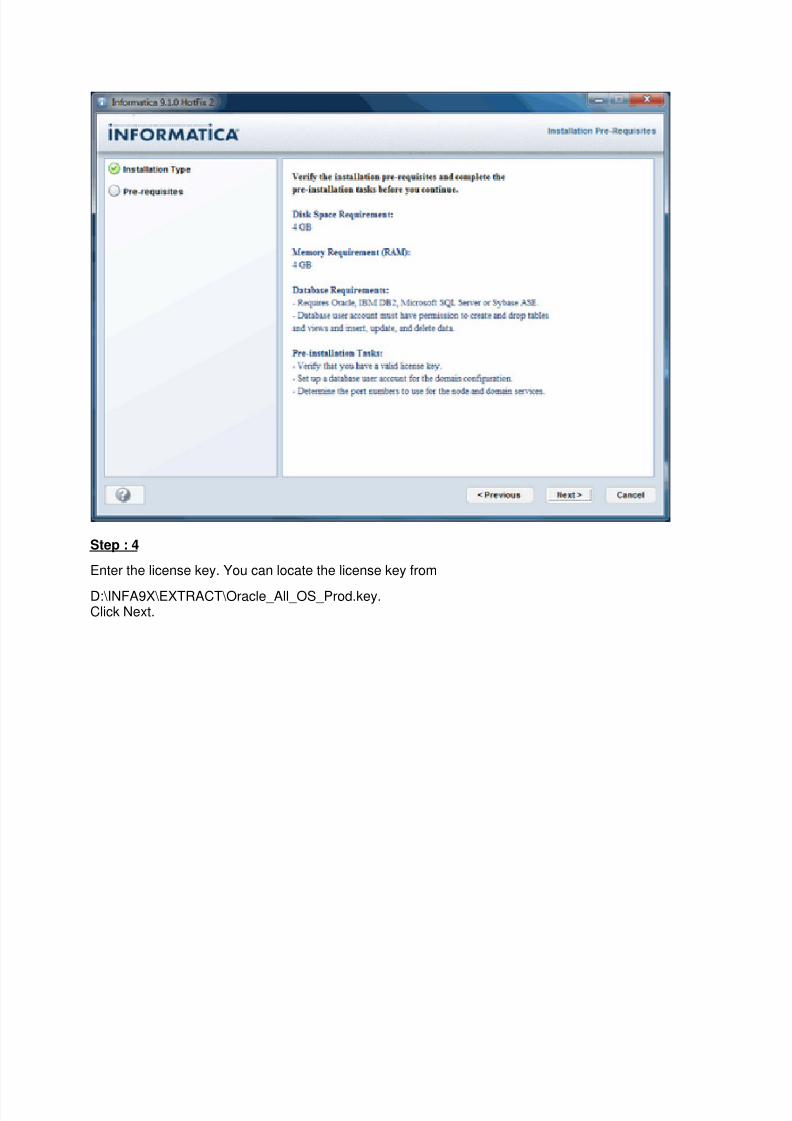
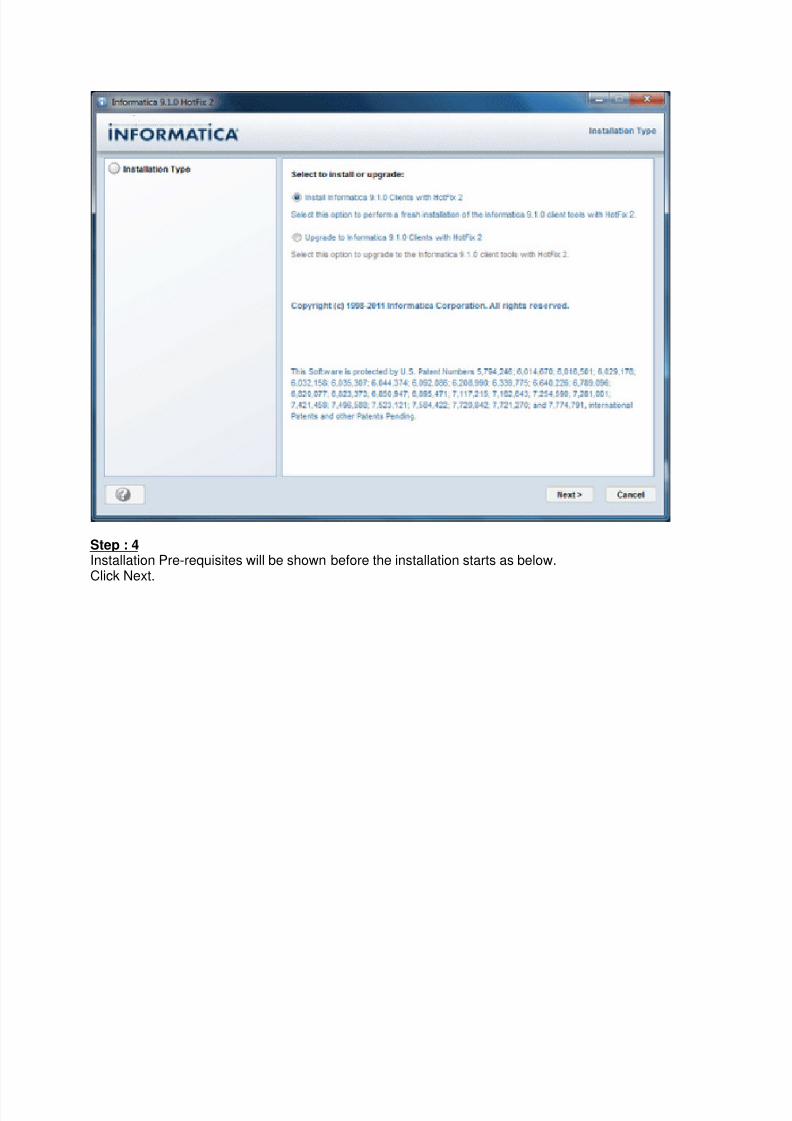
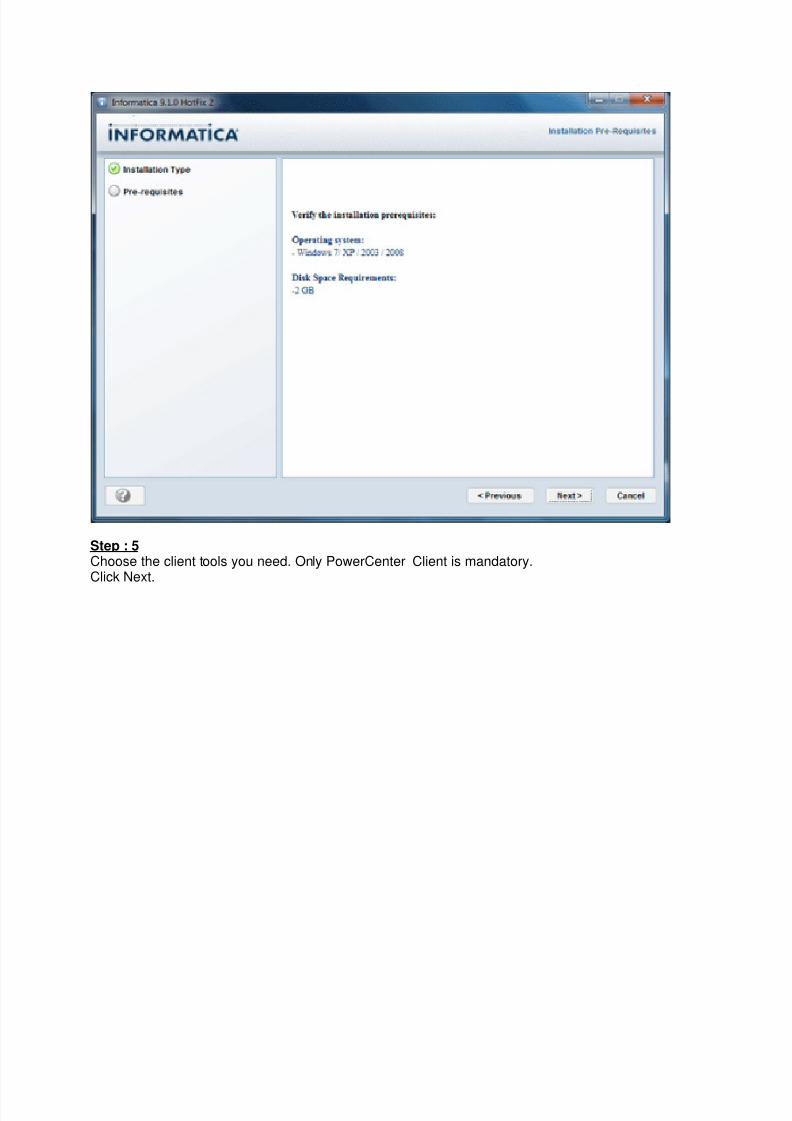
Step : 3 Installation Pre-requisites will be shown before the installation starts as below.Click Next.
7/22/2019 Informatica Installation Doc
http://slidepdf.com/reader/full/informatica-installation-doc 5/37
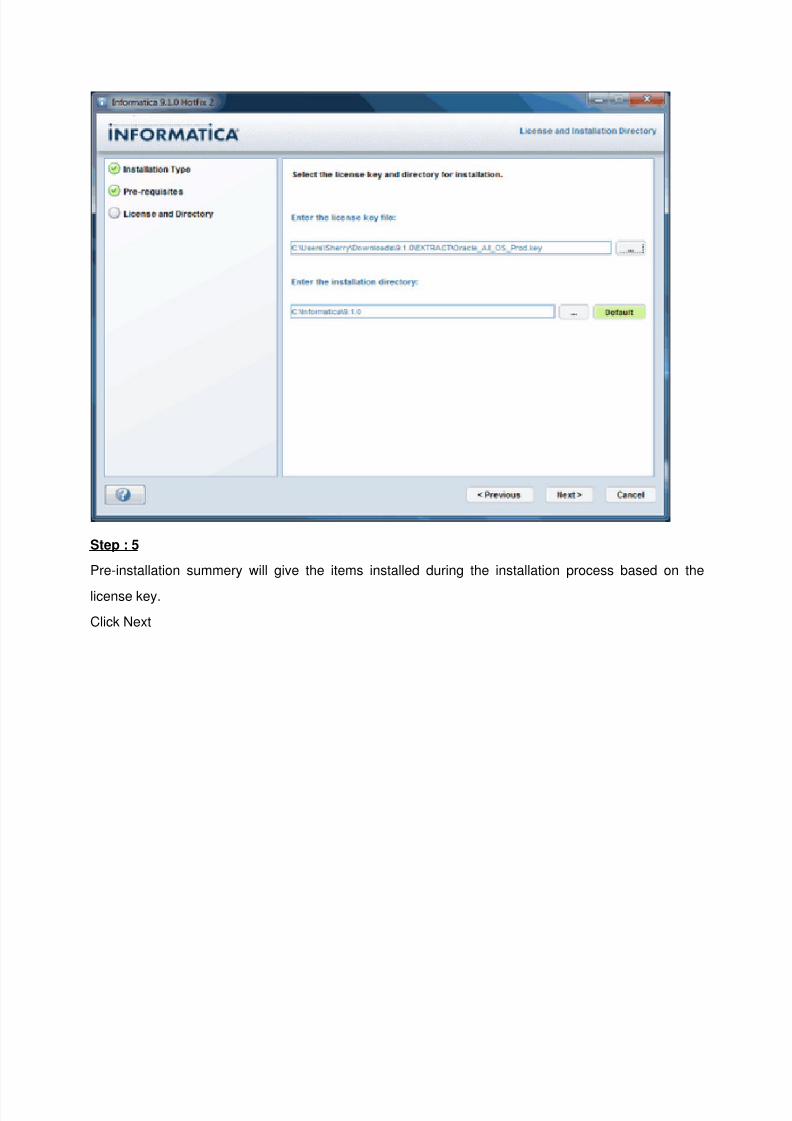
Step : 4 Enter the license key. You can locate the license key from
D:\INFA9X\EXTRACT\Oracle_All_OS_Prod.key.Click Next.
7/22/2019 Informatica Installation Doc
http://slidepdf.com/reader/full/informatica-installation-doc 6/37
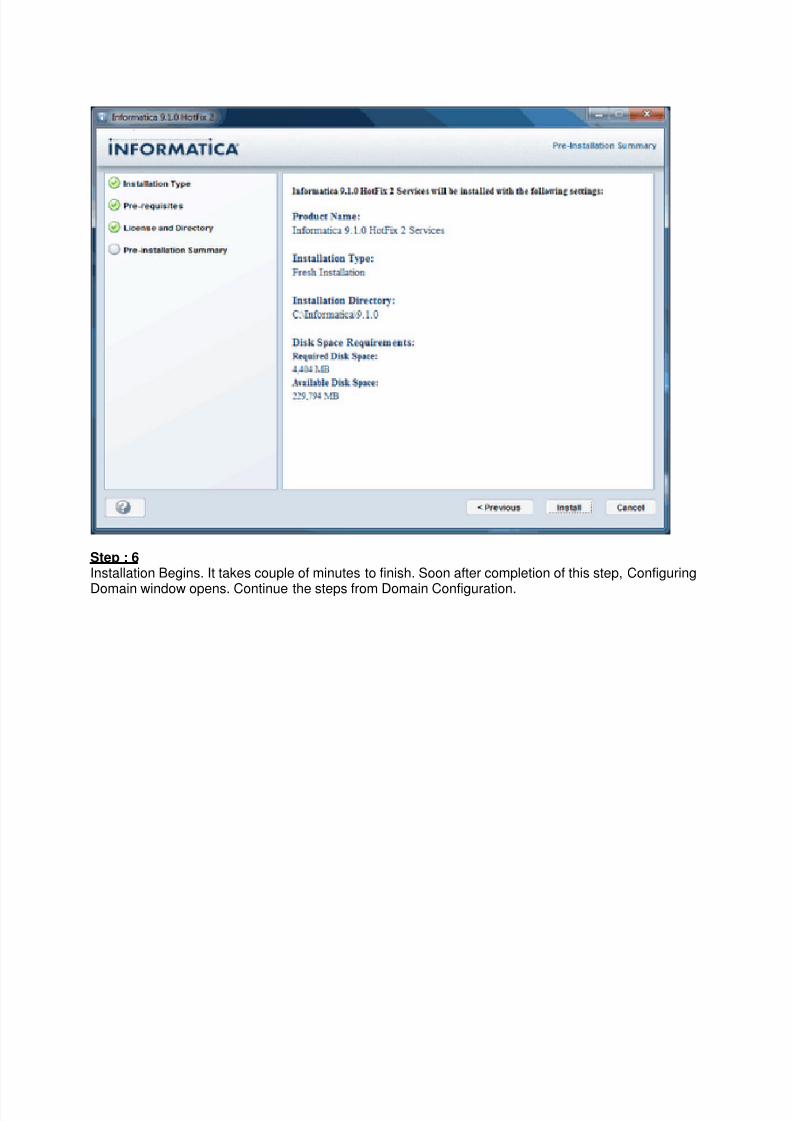
Step : 5 Pre-installation summery will give the items installed during the installation process based on the
license key.
Click Next
7/22/2019 Informatica Installation Doc
http://slidepdf.com/reader/full/informatica-installation-doc 7/37
Step : 6 Installation Begins. It takes couple of minutes to finish. Soon after completion of this step, Configuring
Domain window opens. Continue the steps from Domain Configuration.

7/22/2019 Informatica Installation Doc
http://slidepdf.com/reader/full/informatica-installation-doc 8/37
Domain Configuration.
Step : 1
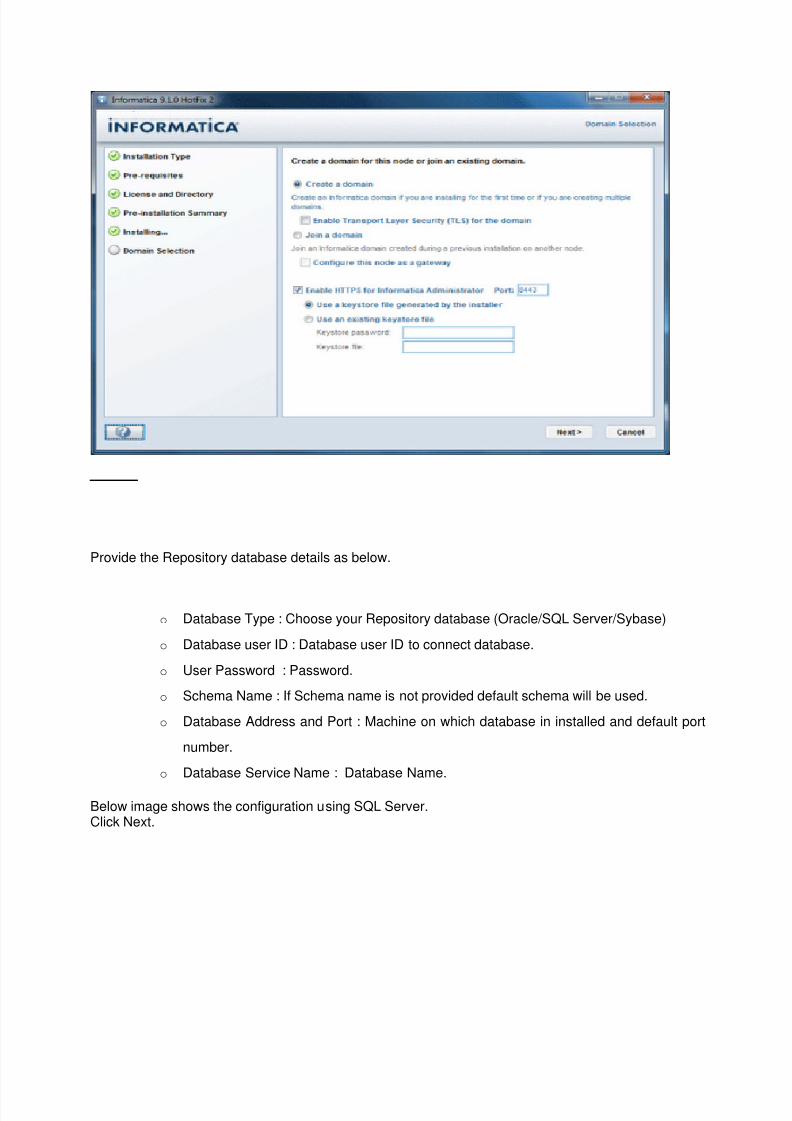
o Choose “Create a Domain” radio button.
o Check “Enable HTTPS for Informatica Administrator”
o Leave the Port number as it is and choose “Use a keystore file generated by the
installer”
Click Next.
7/22/2019 Informatica Installation Doc
http://slidepdf.com/reader/full/informatica-installation-doc 9/37
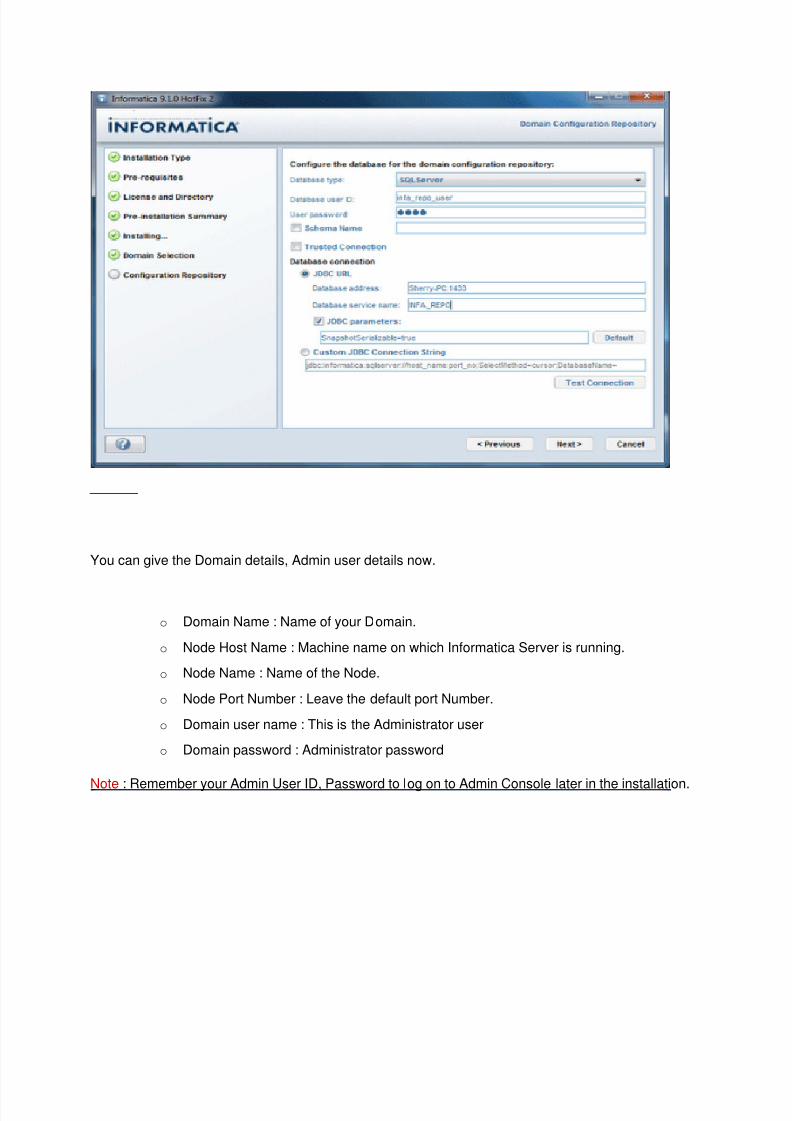
Step : 2 Provide the Repository database details as below.
o Database Type : Choose your Repository database (Oracle/SQL Server/Sybase)
o Database user ID : Database user ID to connect database.
o User Password : Password.
o Schema Name : If Schema name is not provided default schema will be used.
o Database Address and Port : Machine on which database in installed and default port
number.
o Database Service Name : Database Name.
Below image shows the configuration using SQL Server.Click Next.
7/22/2019 Informatica Installation Doc
http://slidepdf.com/reader/full/informatica-installation-doc 10/37
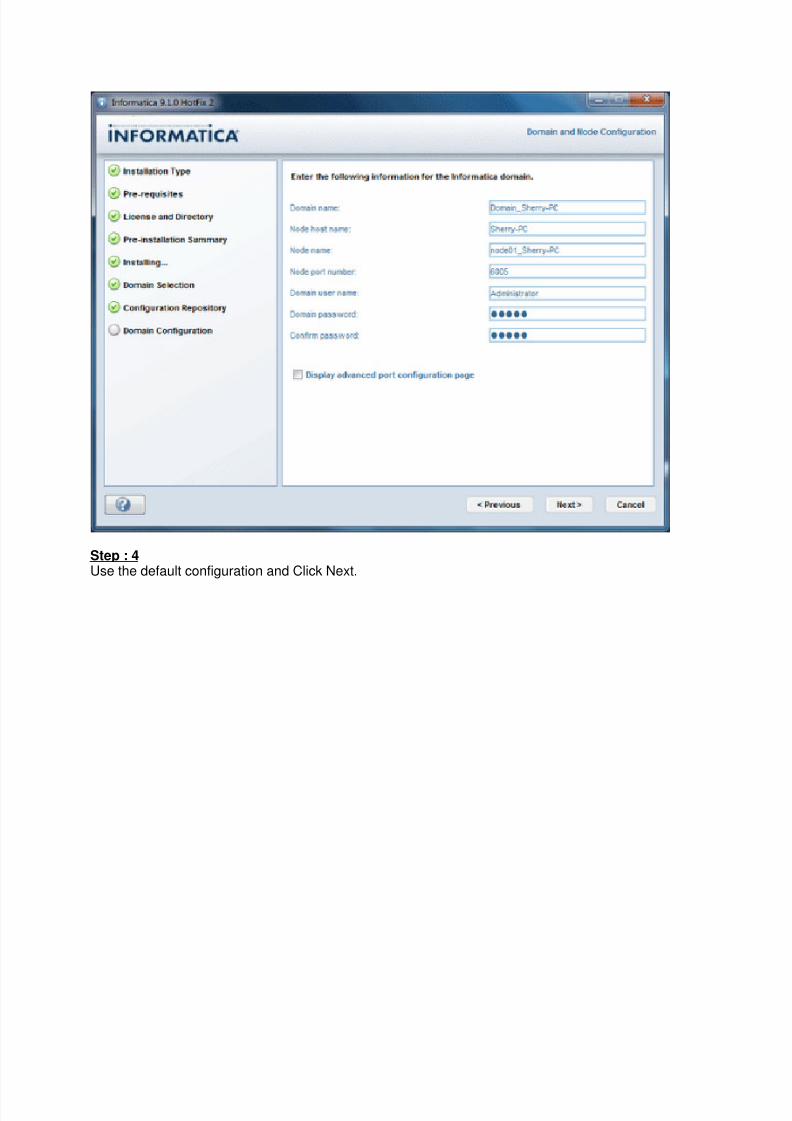
Step : 3 You can give the Domain details, Admin user details now.
o Domain Name : Name of your Domain.
o Node Host Name : Machine name on which Informatica Server is running.
o Node Name : Name of the Node.
o Node Port Number : Leave the default port Number.
o Domain user name : This is the Administrator user
o Domain password : Administrator password
Note : Remember your Admin User ID, Password to log on to Admin Console later in the installation.
7/22/2019 Informatica Installation Doc
http://slidepdf.com/reader/full/informatica-installation-doc 11/37
Step : 4 Use the default configuration and Click Next.
7/22/2019 Informatica Installation Doc
http://slidepdf.com/reader/full/informatica-installation-doc 12/37
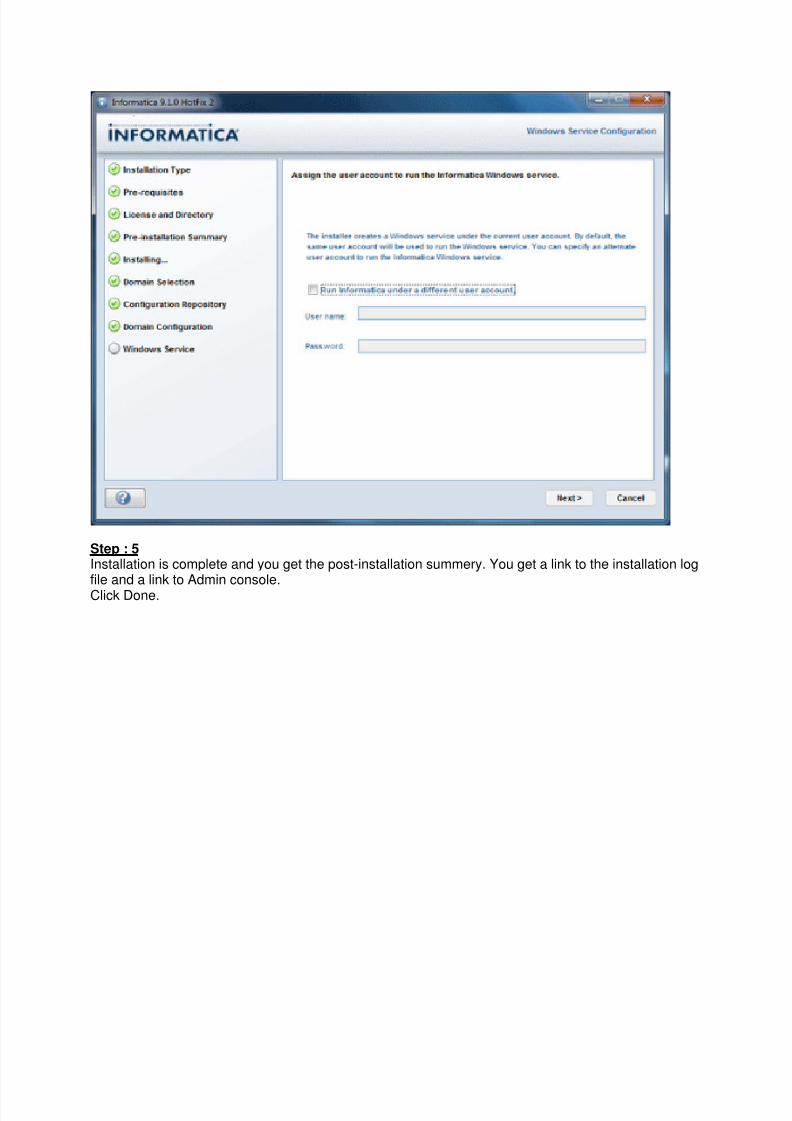
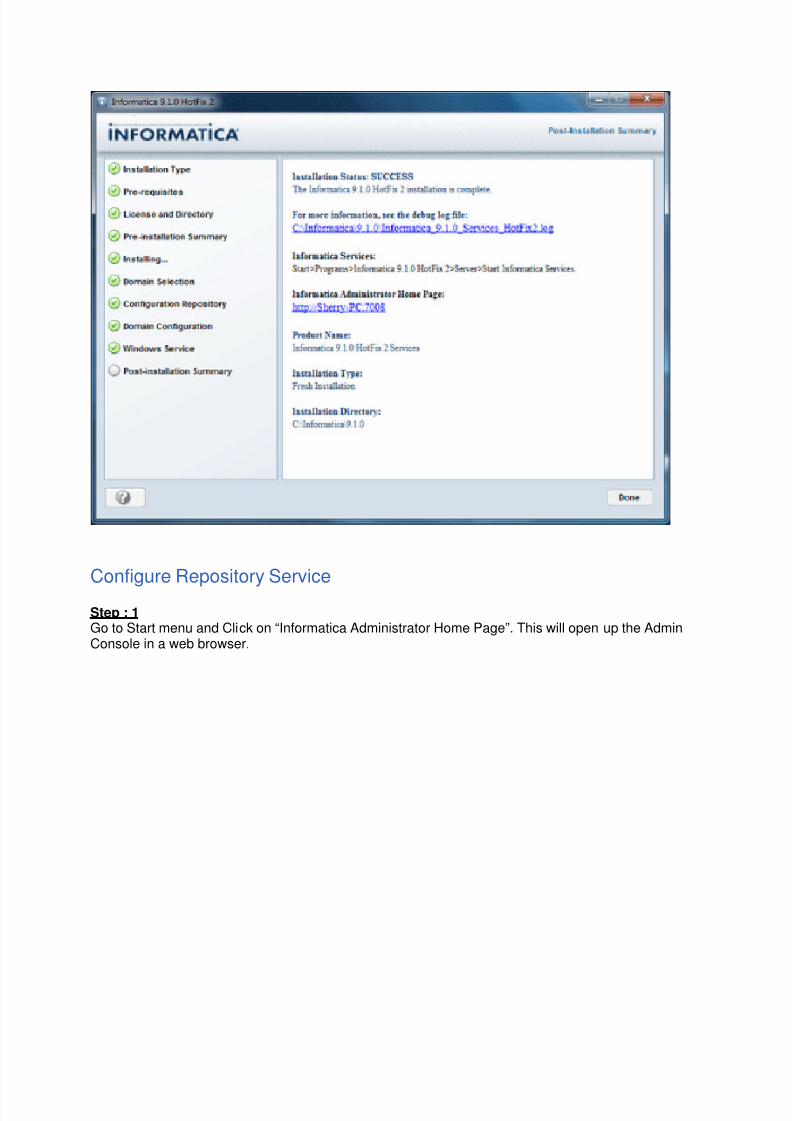
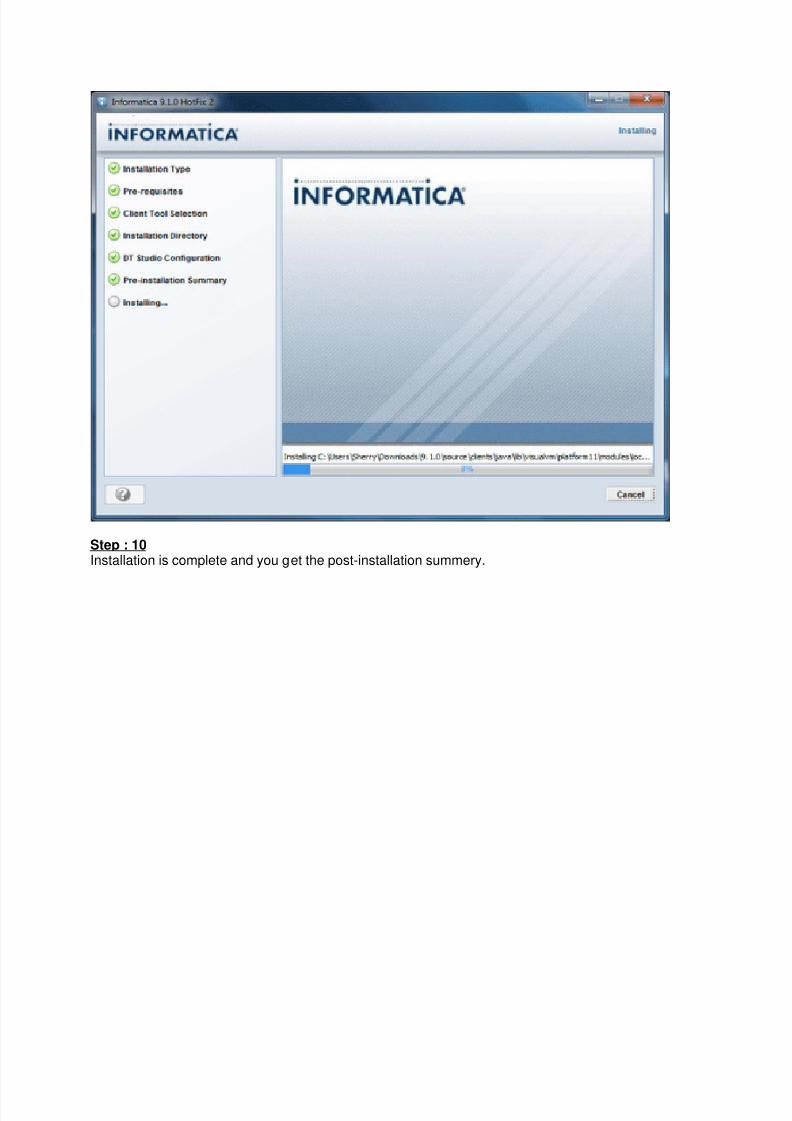
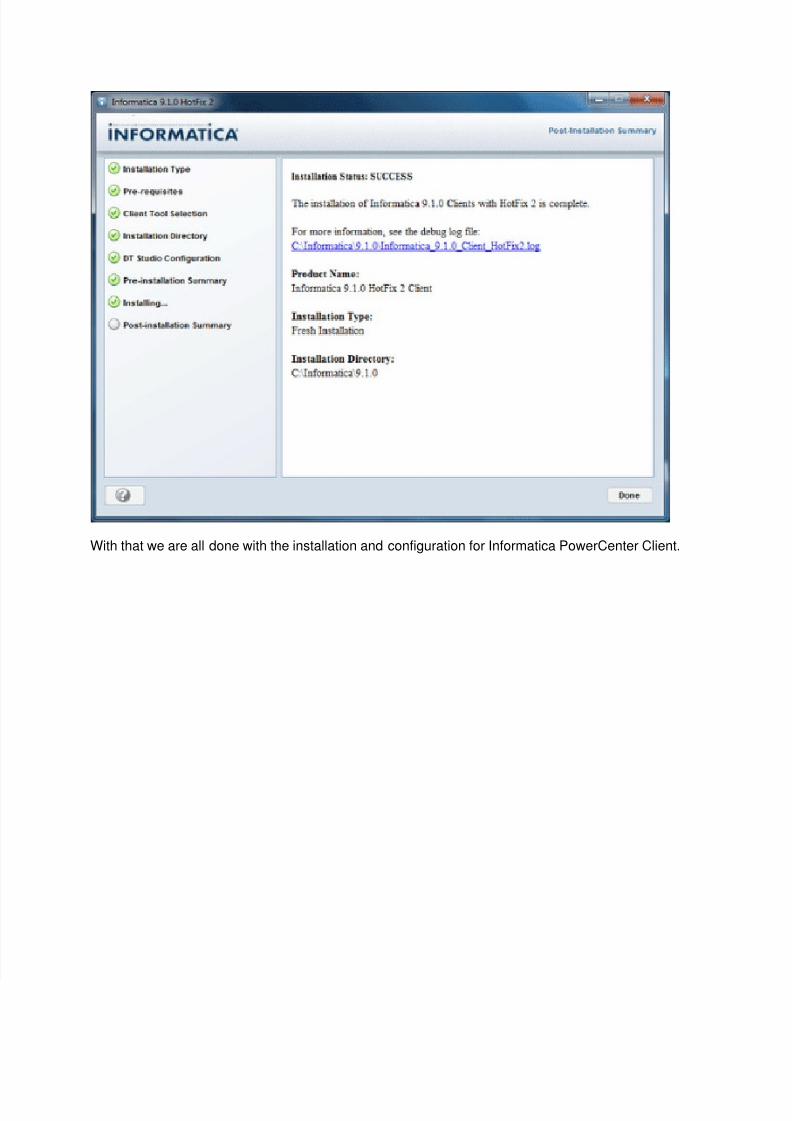
Step : 5 Installation is complete and you get the post-installation summery. You get a link to the installation logfile and a link to Admin console.Click Done.
7/22/2019 Informatica Installation Doc
http://slidepdf.com/reader/full/informatica-installation-doc 13/37
Configure Repository Service
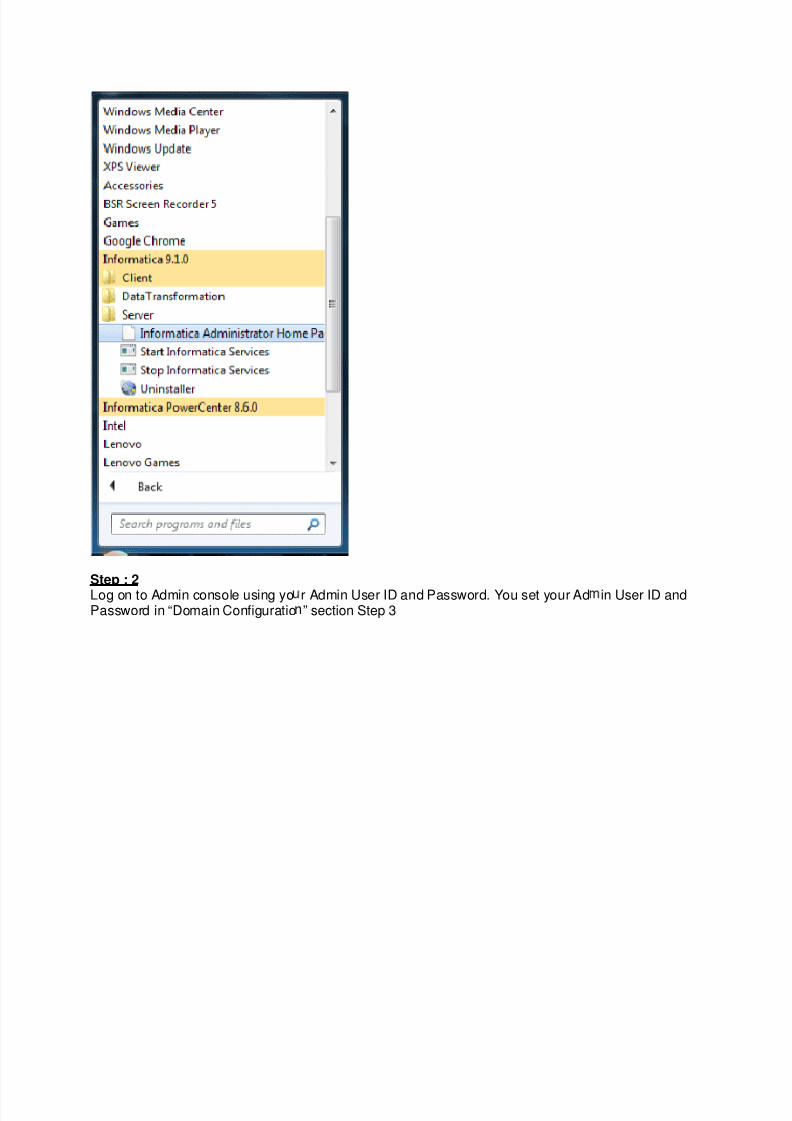
Step : 1 Go to Start menu and Click on “Informatica Administrator Home Page”. This will open up the AdminConsole in a web browser.
7/22/2019 Informatica Installation Doc
http://slidepdf.com/reader/full/informatica-installation-doc 14/37
Step : 2 Log on to Admin console using yoPassword in “Domain Configuratio
r Admin User ID and Password. You set your Ad” section Step 3
in User ID and
7/22/2019 Informatica Installation Doc
http://slidepdf.com/reader/full/informatica-installation-doc 15/37
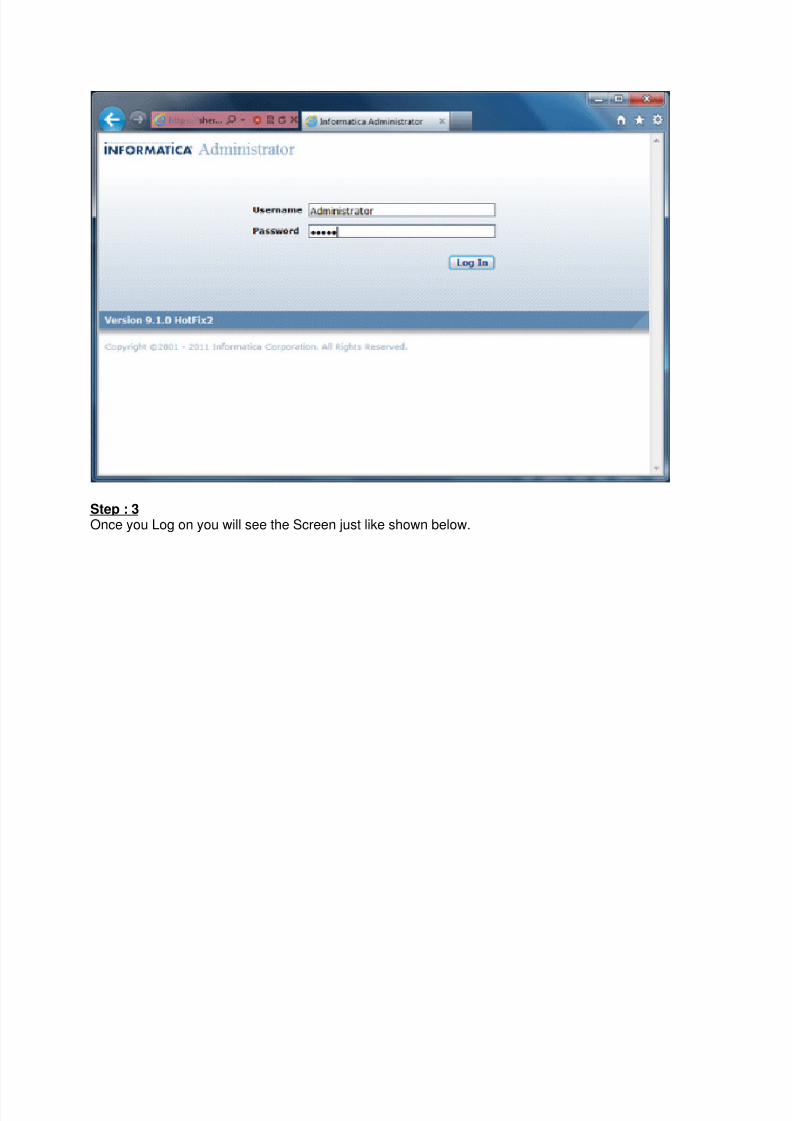
Step : 3 Once you Log on you will see the Screen just like shown below.
7/22/2019 Informatica Installation Doc
http://slidepdf.com/reader/full/informatica-installation-doc 16/37
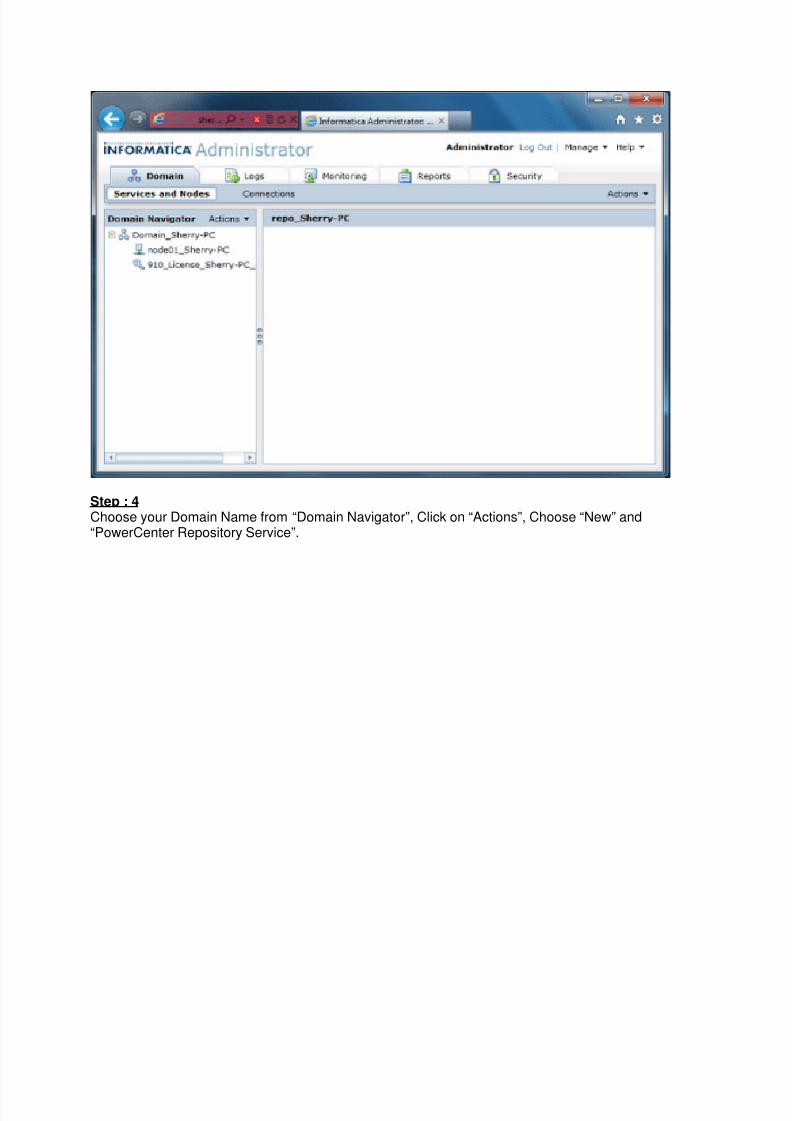
Step : 4 Choose your Domain Name from “Domain Navigator”, Click on “Actions”, Choose “New” and“PowerCenter Repository Service”.
7/22/2019 Informatica Installation Doc
http://slidepdf.com/reader/full/informatica-installation-doc 17/37
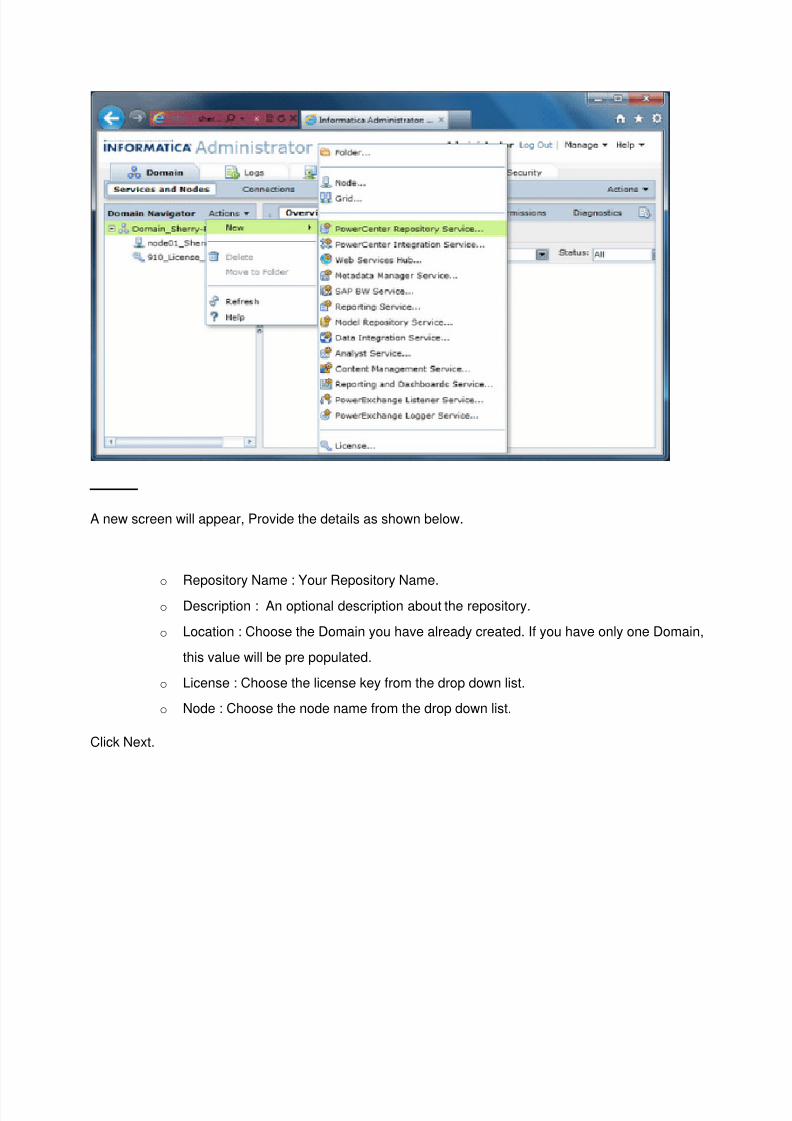
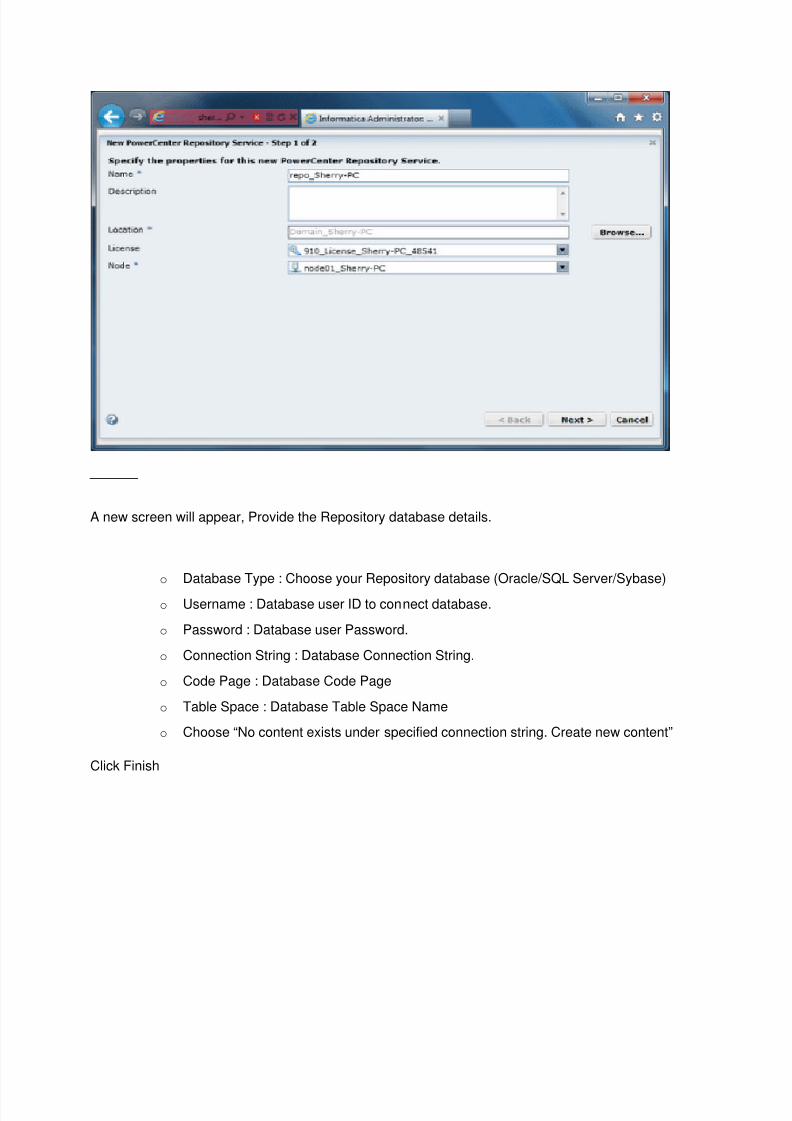
Step : 5 A new screen will appear, Provide the details as shown below.
o Repository Name : Your Repository Name.
o Description : An optional description about the repository.
o Location : Choose the Domain you have already created. If you have only one Domain,
this value will be pre populated.
o License : Choose the license key from the drop down list.
o Node : Choose the node name from the drop down list.
Click Next.
7/22/2019 Informatica Installation Doc
http://slidepdf.com/reader/full/informatica-installation-doc 18/37
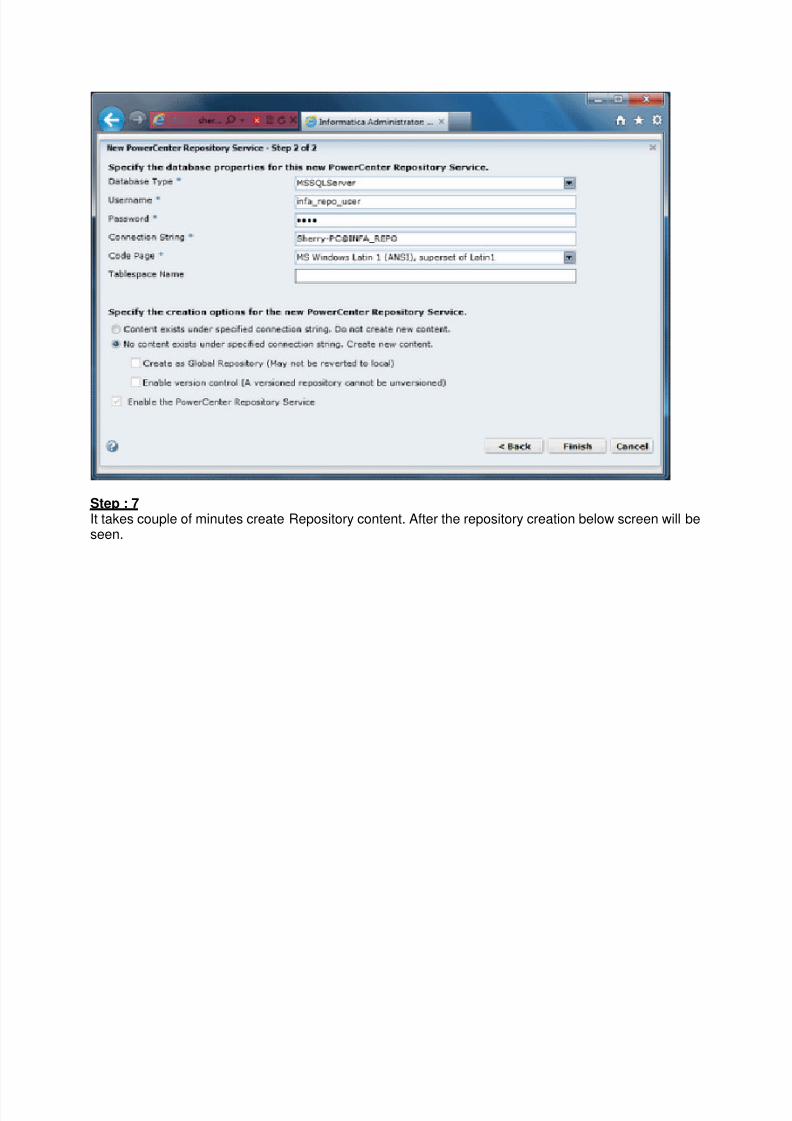
Step : 6 A new screen will appear, Provide the Repository database details.
o Database Type : Choose your Repository database (Oracle/SQL Server/Sybase)
o Username : Database user ID to connect database.
o Password : Database user Password.
o Connection String : Database Connection String.
o Code Page : Database Code Page
o Table Space : Database Table Space Name
o Choose “No content exists under specified connection string. Create new content”
Click Finish
7/22/2019 Informatica Installation Doc
http://slidepdf.com/reader/full/informatica-installation-doc 19/37

7/22/2019 Informatica Installation Doc
http://slidepdf.com/reader/full/informatica-installation-doc 20/37
7/22/2019 Informatica Installation Doc
http://slidepdf.com/reader/full/informatica-installation-doc 21/37
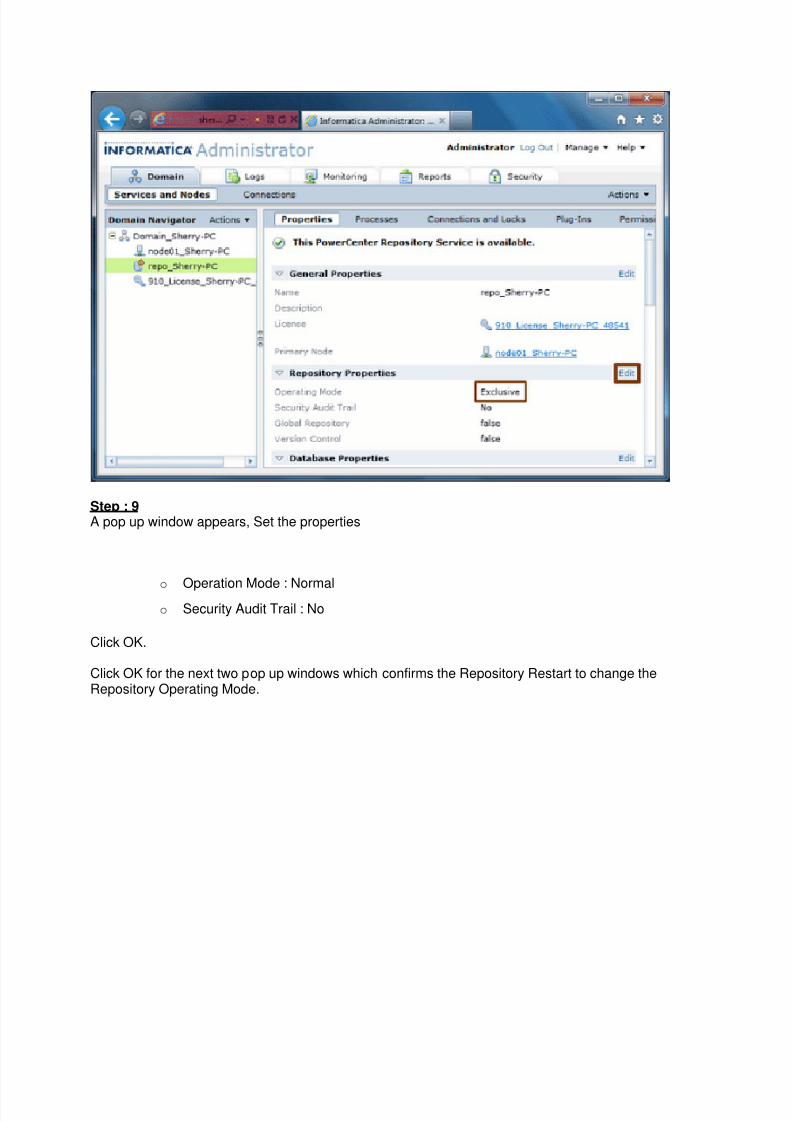
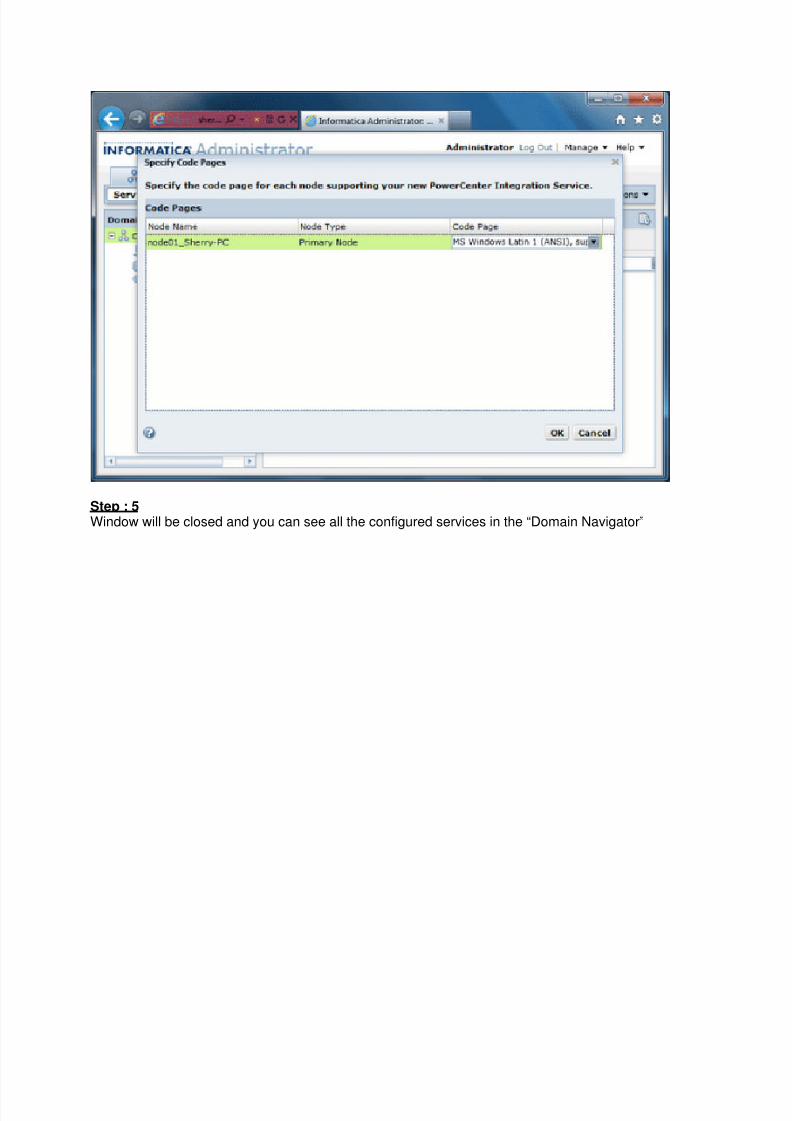
Step : 9 A pop up window appears, Set the properties
o
Operation Mode : Normalo Security Audit Trail : No
Click OK.
Click OK for the next two pop up windows which confirms the Repository Restart to change theRepository Operating Mode.
7/22/2019 Informatica Installation Doc
http://slidepdf.com/reader/full/informatica-installation-doc 22/37
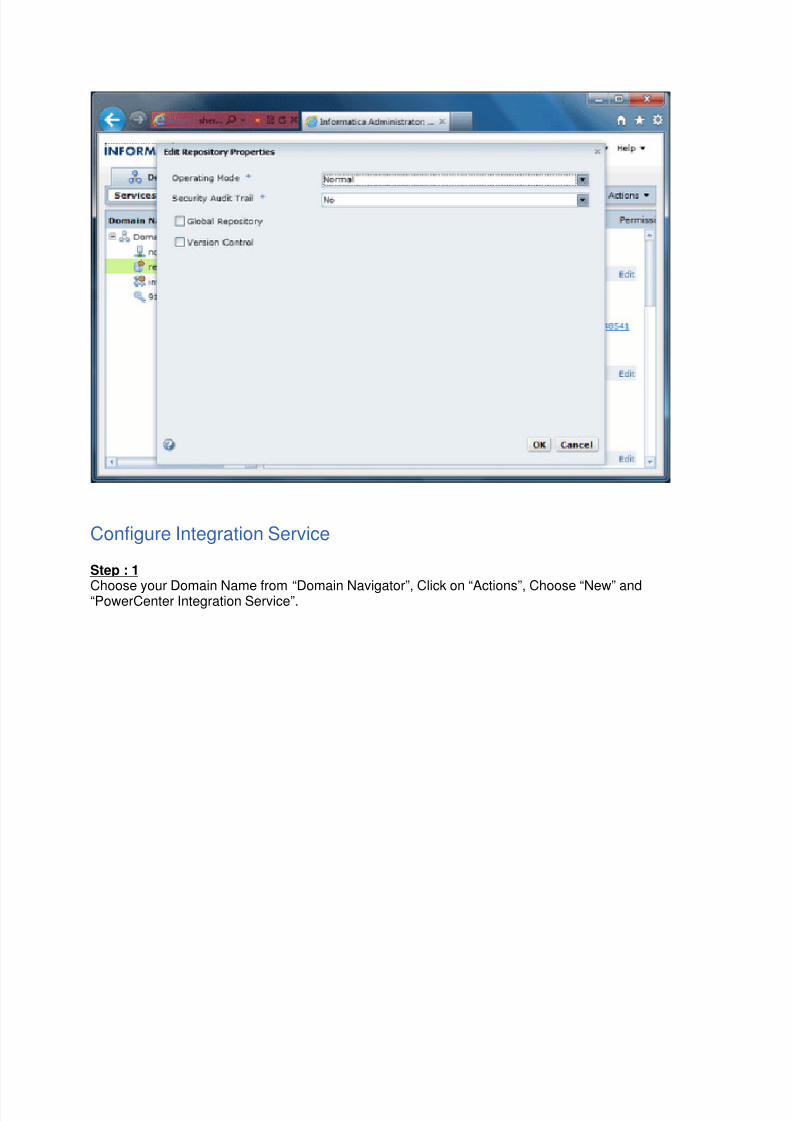
Configure Integration Service
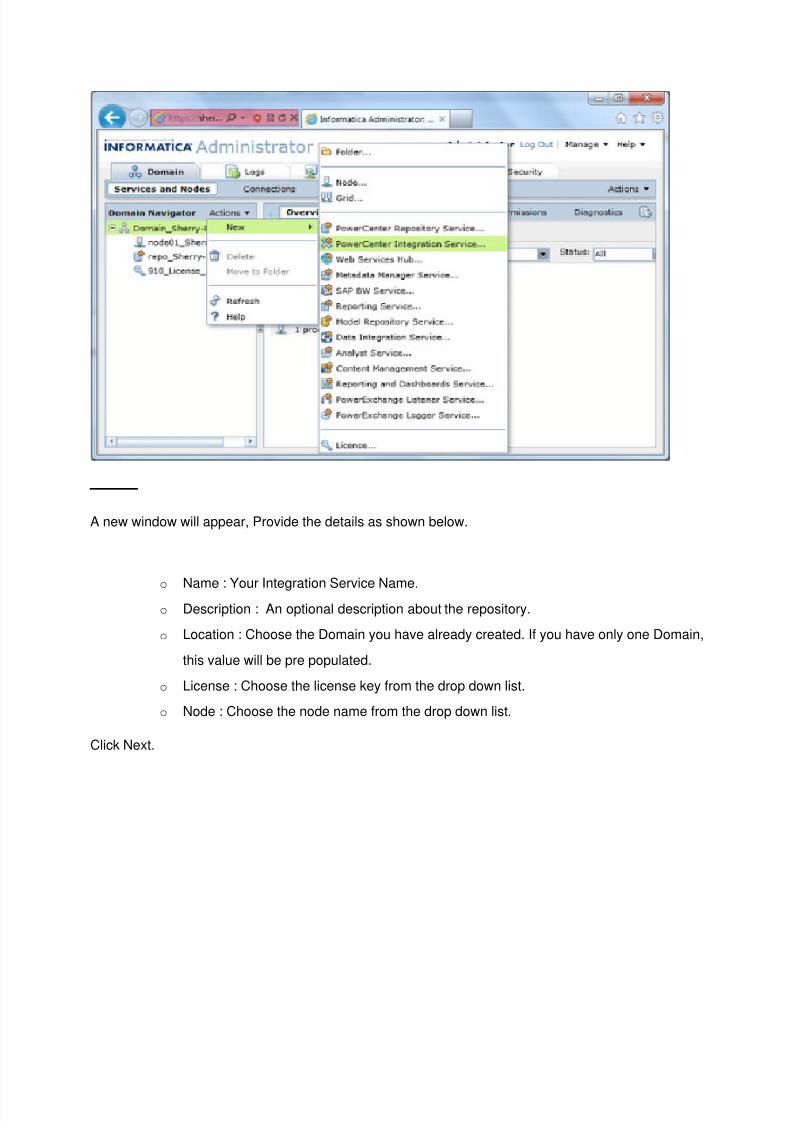
Step : 1
Choose your Domain Name from “Domain Navigator”, Click on “Actions”, Choose “New” and“PowerCenter Integration Service”.
7/22/2019 Informatica Installation Doc
http://slidepdf.com/reader/full/informatica-installation-doc 23/37
7/22/2019 Informatica Installation Doc
http://slidepdf.com/reader/full/informatica-installation-doc 24/37
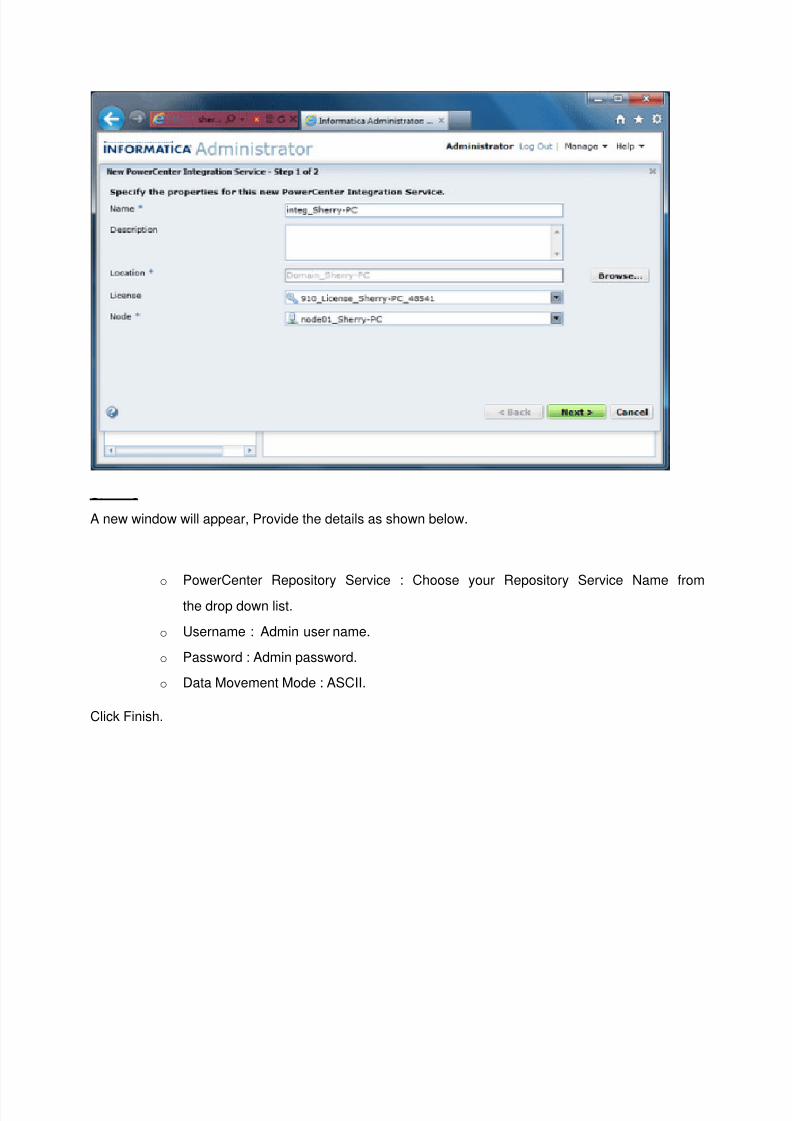
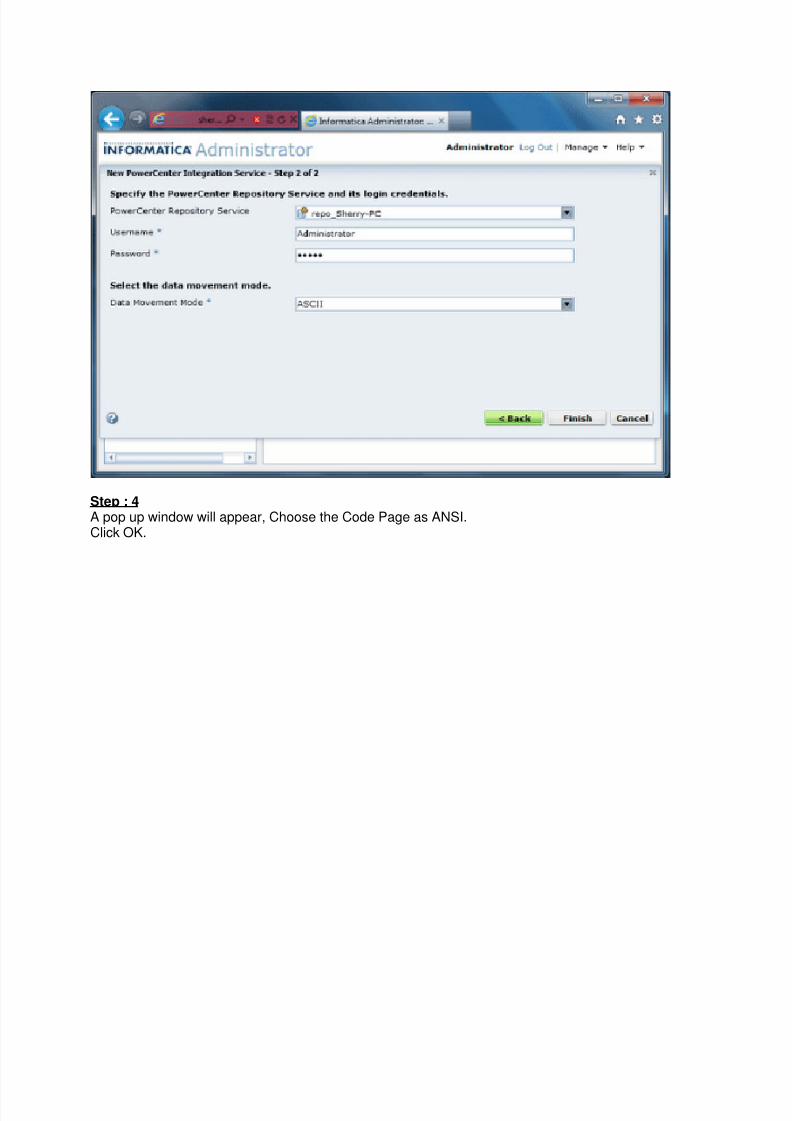
Step : 3 A new window will appear, Provide the details as shown below.
o PowerCenter Repository Service : Choose your Repository Service Name from
the drop down list.
o Username : Admin user name.
o Password : Admin password.
o Data Movement Mode : ASCII.
Click Finish.
7/22/2019 Informatica Installation Doc
http://slidepdf.com/reader/full/informatica-installation-doc 25/37
7/22/2019 Informatica Installation Doc
http://slidepdf.com/reader/full/informatica-installation-doc 26/37
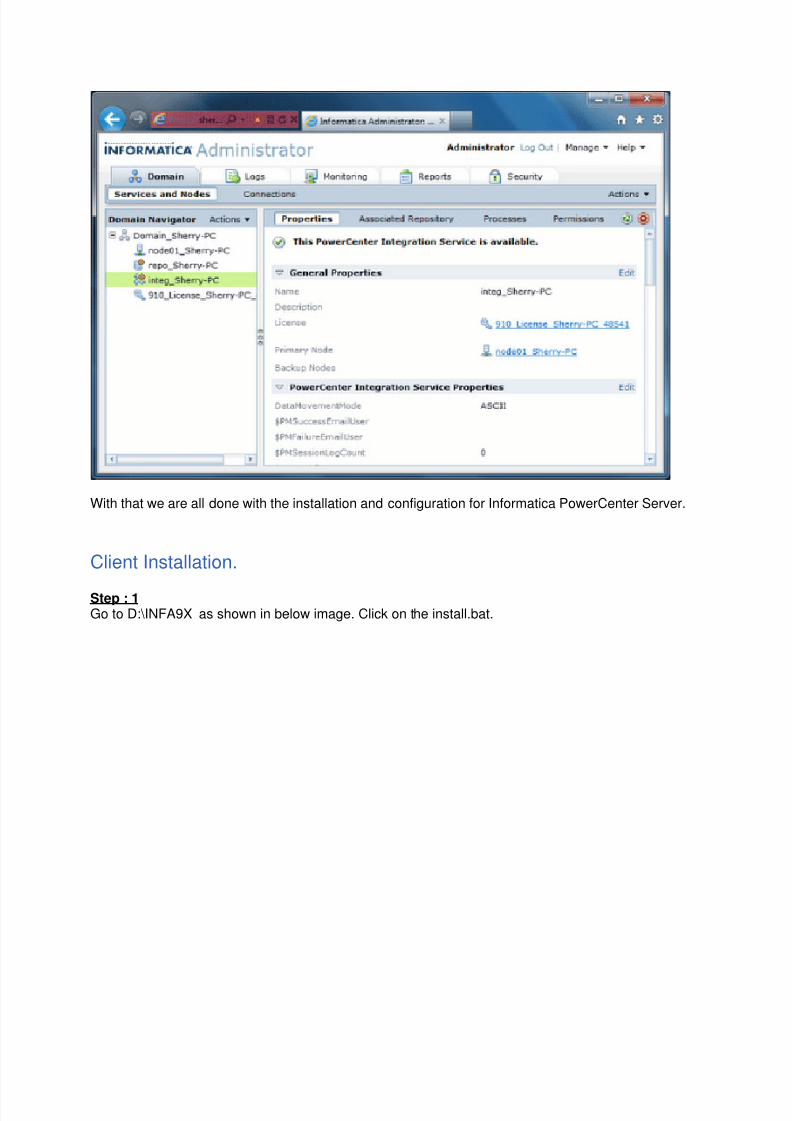
Step : 5 Window will be closed and you can see all the configured services in the “Domain Navigator”
7/22/2019 Informatica Installation Doc
http://slidepdf.com/reader/full/informatica-installation-doc 27/37
7/22/2019 Informatica Installation Doc
http://slidepdf.com/reader/full/informatica-installation-doc 28/37
7/22/2019 Informatica Installation Doc
http://slidepdf.com/reader/full/informatica-installation-doc 29/37
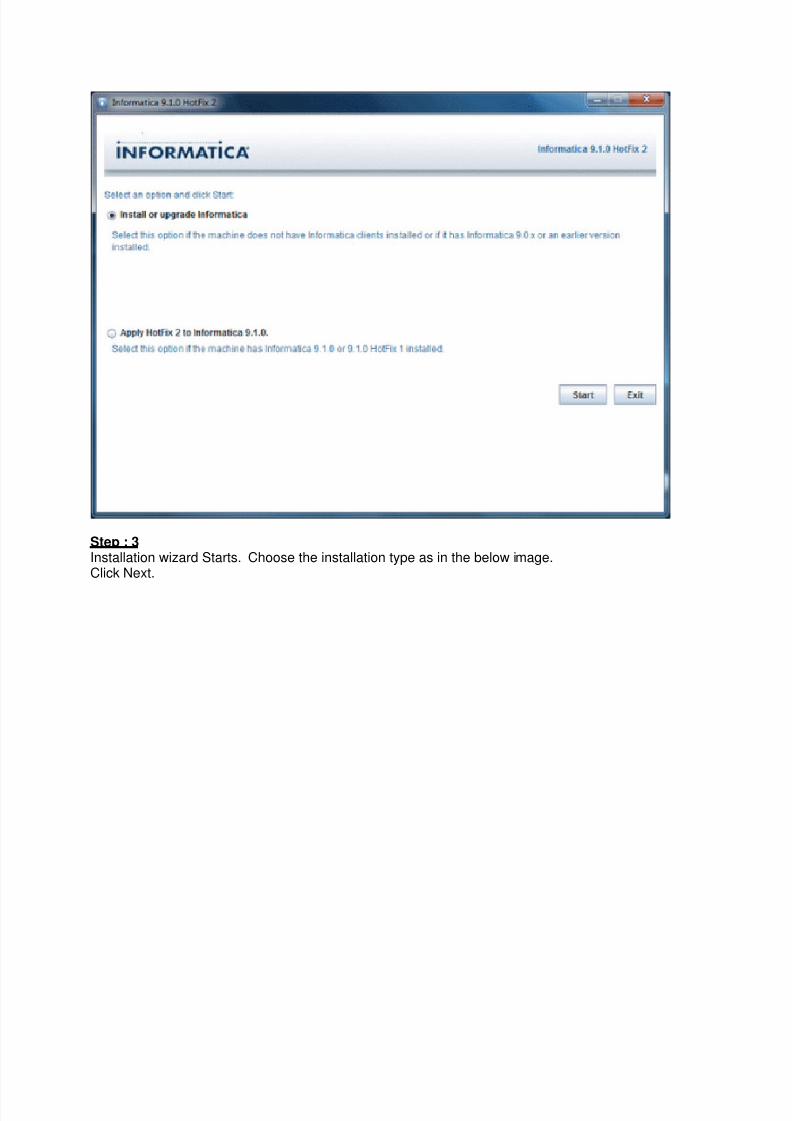
Step : 3 Installation wizard Starts. Choose the installation type as in the below image.Click Next.
7/22/2019 Informatica Installation Doc
http://slidepdf.com/reader/full/informatica-installation-doc 30/37
7/22/2019 Informatica Installation Doc
http://slidepdf.com/reader/full/informatica-installation-doc 31/37
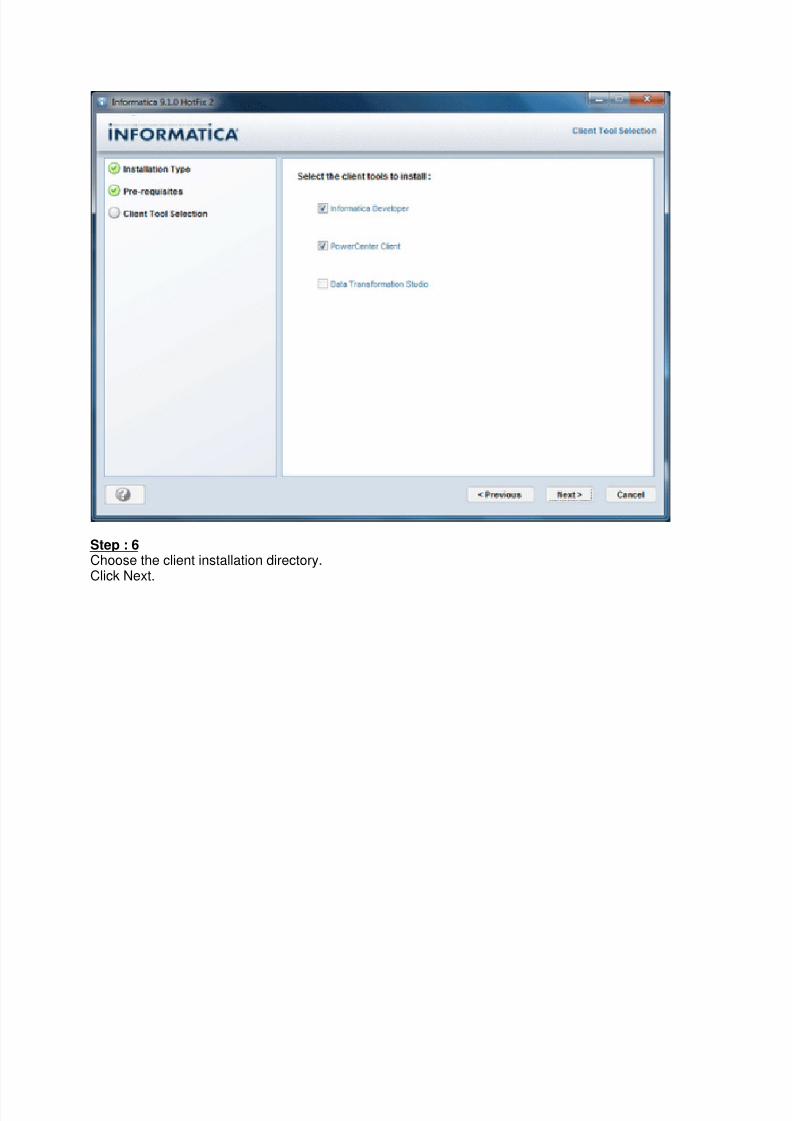
Step : 5 Choose the client tools you need. Only PowerCenter Client is mandatory.Click Next.
7/22/2019 Informatica Installation Doc
http://slidepdf.com/reader/full/informatica-installation-doc 32/37
7/22/2019 Informatica Installation Doc
http://slidepdf.com/reader/full/informatica-installation-doc 33/37
7/22/2019 Informatica Installation Doc
http://slidepdf.com/reader/full/informatica-installation-doc 34/37
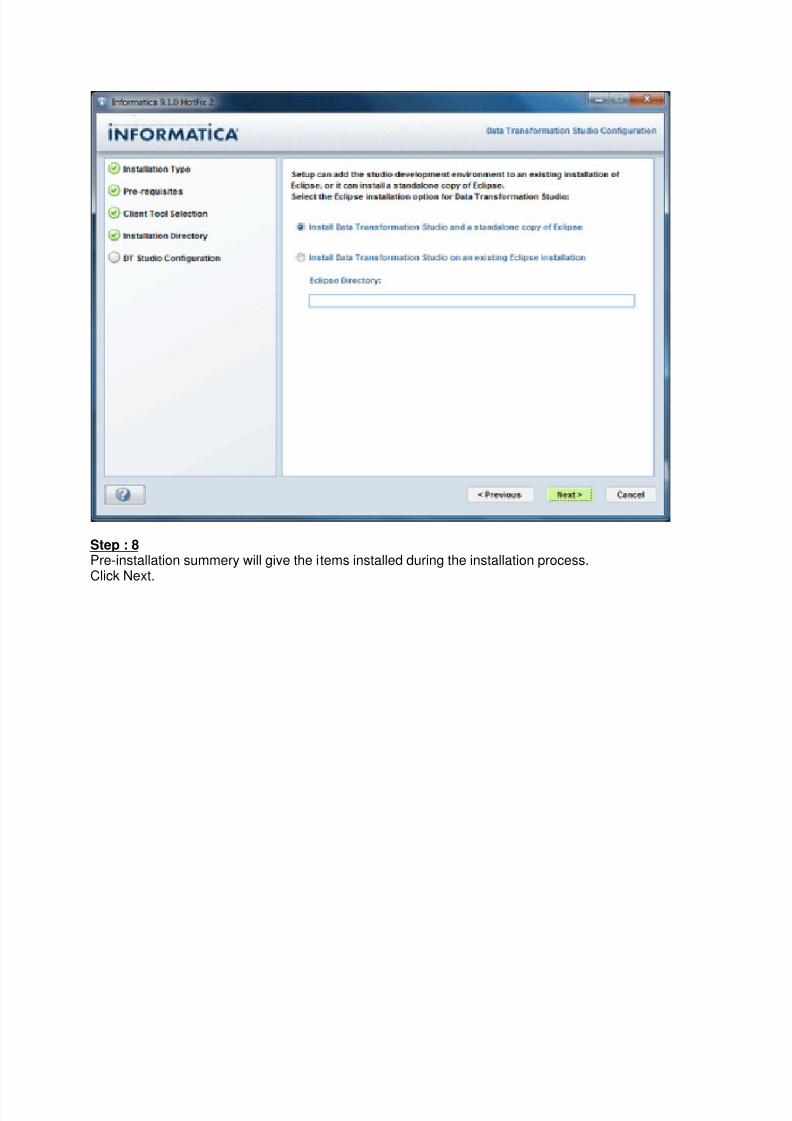
Step : 8 Pre-installation summery will give the items installed during the installation process.Click Next.

7/22/2019 Informatica Installation Doc
http://slidepdf.com/reader/full/informatica-installation-doc 35/37
Step : 9 Installation Begins. It takes one or two minutes to complete this step.
7/22/2019 Informatica Installation Doc
http://slidepdf.com/reader/full/informatica-installation-doc 36/37
7/22/2019 Informatica Installation Doc
http://slidepdf.com/reader/full/informatica-installation-doc 37/37
With that we are all done with the installation and configuration for Informatica PowerCenter Client.