Embed Size (px)
DESCRIPTION
Informatica xml Transformation
Citation preview
Informatica Power Center 9.0.1
Building Financial Data Mode - Lab#20Update Strategy transformation
Description: BISP is committed to provide BEST learning material to the beginners and advance learners. In the same series, we have prepared a complete end-to end Hands-on Guide for building financial data model in Informatica. The document focuses on how the real world requirement should be interpreted. The mapping document template with very simplified steps and screen shots makes the complete learning so easy. The document focuses on XML Transformations( Oracle to XML and XML to Oracle). Join our professional training program and learn from experts.
History:Version Description Change Author Publish Date0.1 Initial Draft Upendra Upadhyay 12th Aug 20110.1 Review#1 Amit Sharma 18th Aug 2011
www.bispsolutions.com www.bisptrainigs.com www.hyperionguru.com Page 1
ContentsContents .......................................................................................................................... 2
XML Transformation in Informatica .............................................................................. 3
XML Source Qualifier Transformation: ....................................................................... 3
XML Parser Transformation ....................................................................................... 3
XML Generator Transformation Overview: ................................................................. 3
Case I : Oracle Source to XML Target ........................................................................... 4
Case II : XML Source to Oracle Target .......................................................................... 4
Case I : Oracle Source to XML Target ............................................................................... 5
Importing Source and Target Table .............................................................................. 5
Creating Mapping ....................................................................................................... 13
Create Workflow ......................................................................................................... 15
Workflow Monitor and View Target Data .................................................................... 23
Case II : XML Source to Oracle Target ............................................................................ 27
Importing Source and Target Table ............................................................................ 27
Create Mapping .......................................................................................................... 34
Create Workflow ......................................................................................................... 37
Workflow Monitor and View Target Data .................................................................... 43
www.bispsolutions.com www.bisptrainigs.com www.hyperionguru.com Page 2
XML Transformation in Informatica The XML Parser transformation lets you extract XML data from messaging systems, such as TIBCO or MQ Series, and from other sources, such as files or databases. The XML Parser transformation functionality is similar to the XML source functionality, except it parses the XML in the pipeline.
Types of XML Transformations XML Source Qualifier Transformation XML Parser Transformation XML Generator Transformation Overview
XML Source Qualifier Transformation: It is an active transformation, as well as connected transformation . Just like the normal Source Qualifier Transformation we can use the XML Source Qualifier Transformation by dragging an XML source definition to the Mapping Designer workspace or by manually creating one. The source definition needs to be connected to the target via XML Source Qualifier Transformation. This Source qualifier defines the data elements that the Integration Service reads when it executes a session. XML Source Qualifier has one input or output port for every column in the source. If you remove an XML source definition from a mapping, the Designer also removes the corresponding XML Source Qualifier transformation.
XML Parser Transformation It’s an also active transformation, as well as Connected. We use an XML Parser transformation to extract XML inside a pipeline and then pass this to the target. The XML is extracted from the source systems such as files or databases. The XML Parser transformation reads XML data from a single input port and writes data to one or more output ports.
XML Generator Transformation Overview: It’s an also active transformation, as well as connected. We use XML Generator Transformation Overview to create XML inside a pipeline. It reads data from source such as files and databases and generates XML in the pipeline. The XML Generator transformation accepts data from multiple ports and writes XML through a single output port.
www.bispsolutions.com www.bisptrainigs.com www.hyperionguru.com Page 3
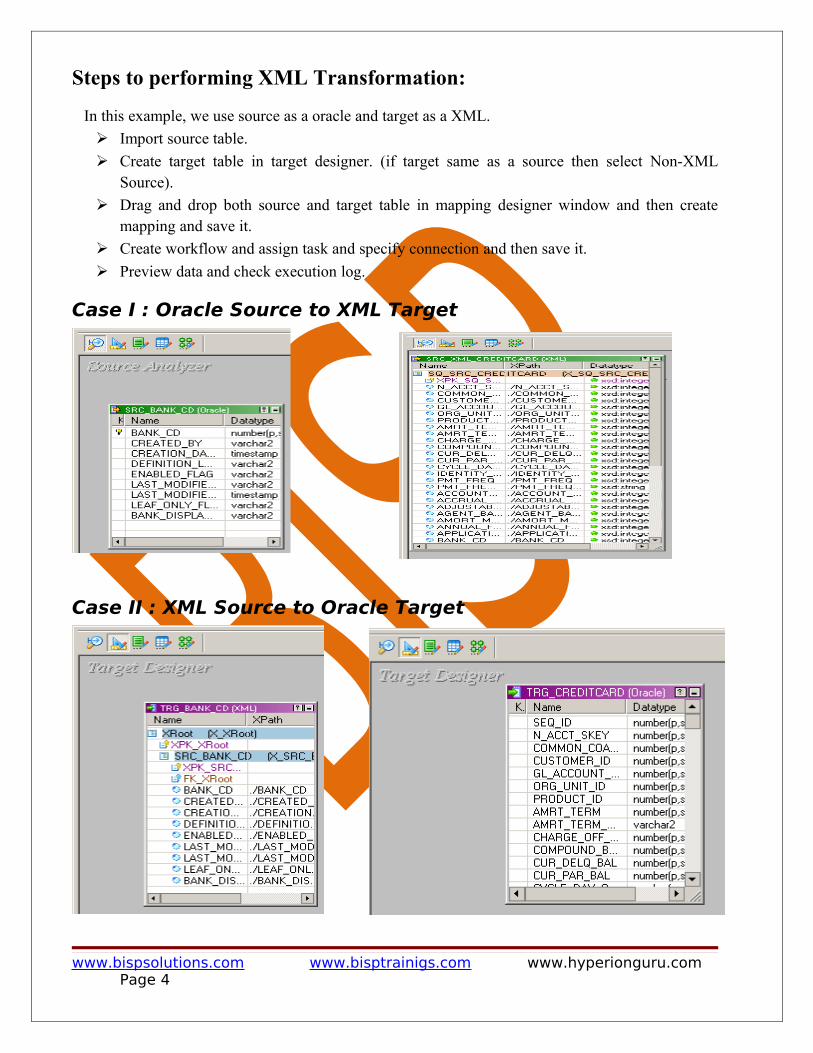
Steps to performing XML Transformation:
In this example, we use source as a oracle and target as a XML.
Import source table.
Create target table in target designer. (if target same as a source then select Non-XML Source).
Drag and drop both source and target table in mapping designer window and then create mapping and save it.
Create workflow and assign task and specify connection and then save it.
Preview data and check execution log.
Case I : Oracle Source to XML Target
Case II : XML Source to Oracle Target
www.bispsolutions.com www.bisptrainigs.com www.hyperionguru.com Page 4
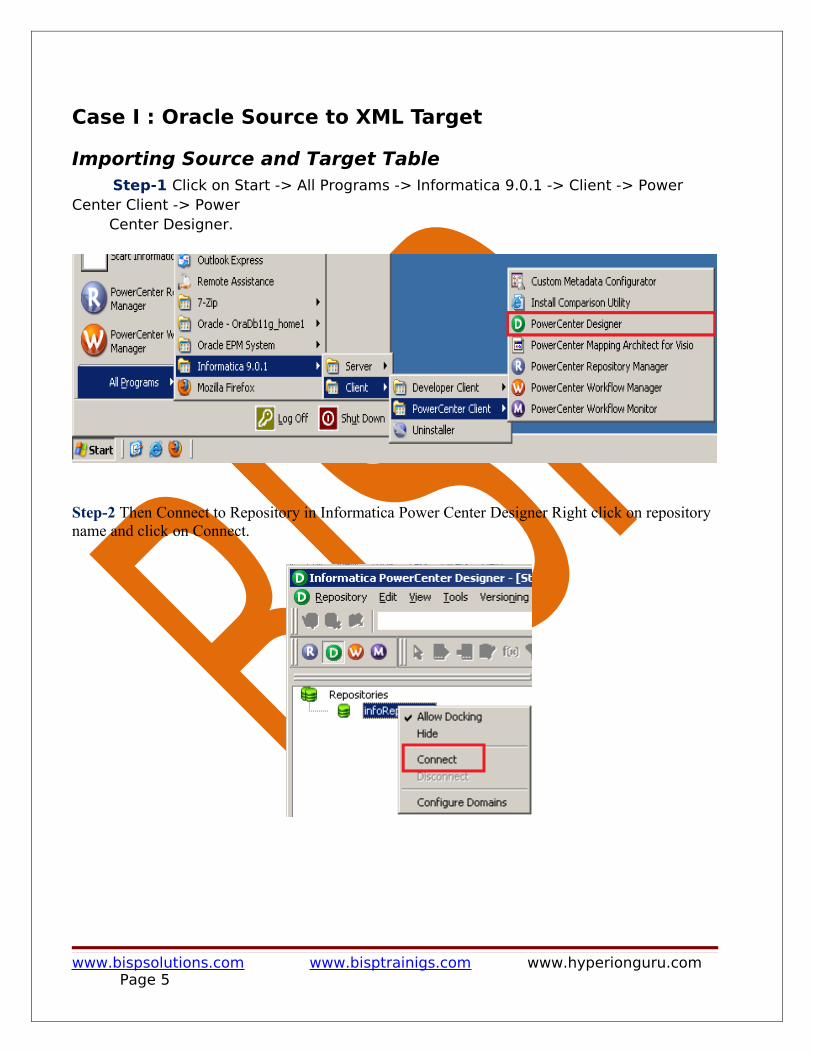
Case I : Oracle Source to XML Target
Importing Source and Target Table Step-1 Click on Start -> All Programs -> Informatica 9.0.1 -> Client -> Power Center Client -> Power Center Designer.
Step-2 Then Connect to Repository in Informatica Power Center Designer Right click on repository name and click on Connect.
www.bispsolutions.com www.bisptrainigs.com www.hyperionguru.com Page 5
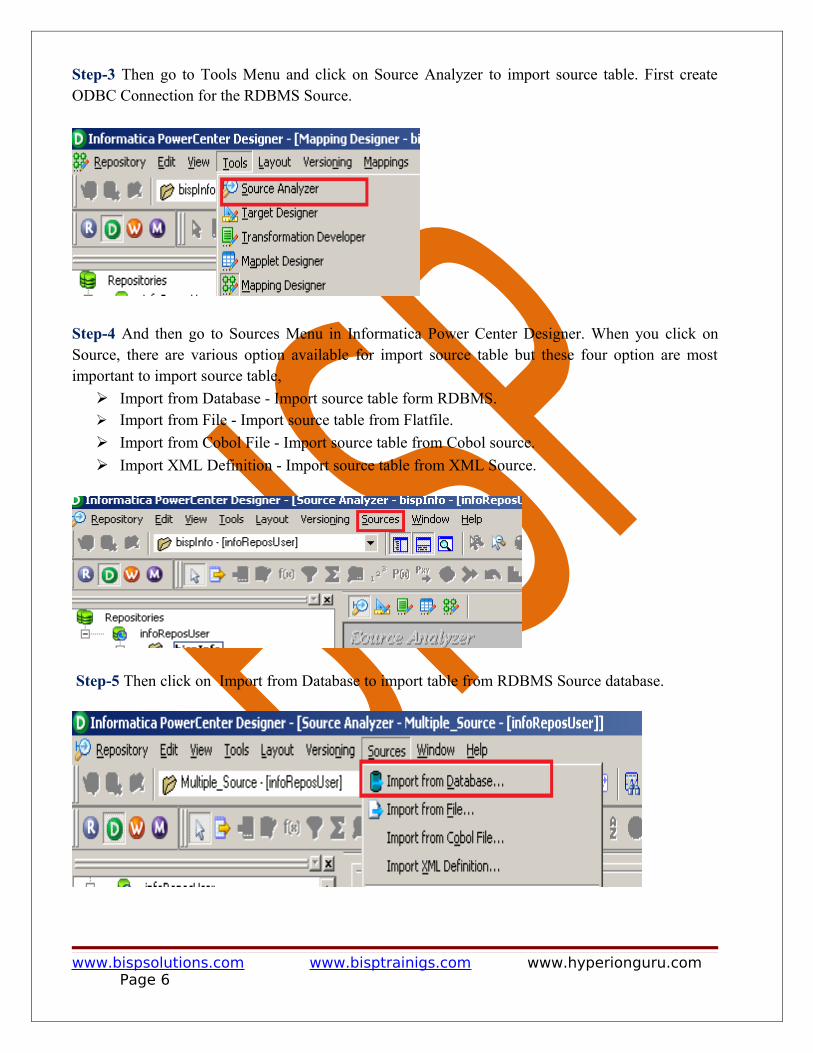
Step-3 Then go to Tools Menu and click on Source Analyzer to import source table. First create ODBC Connection for the RDBMS Source.
Step-4 And then go to Sources Menu in Informatica Power Center Designer. When you click on Source, there are various option available for import source table but these four option are most important to import source table,
Import from Database - Import source table form RDBMS. Import from File - Import source table from Flatfile.
Import from Cobol File - Import source table from Cobol source.
Import XML Definition - Import source table from XML Source.
Step-5 Then click on Import from Database to import table from RDBMS Source database.
www.bispsolutions.com www.bisptrainigs.com www.hyperionguru.com Page 6
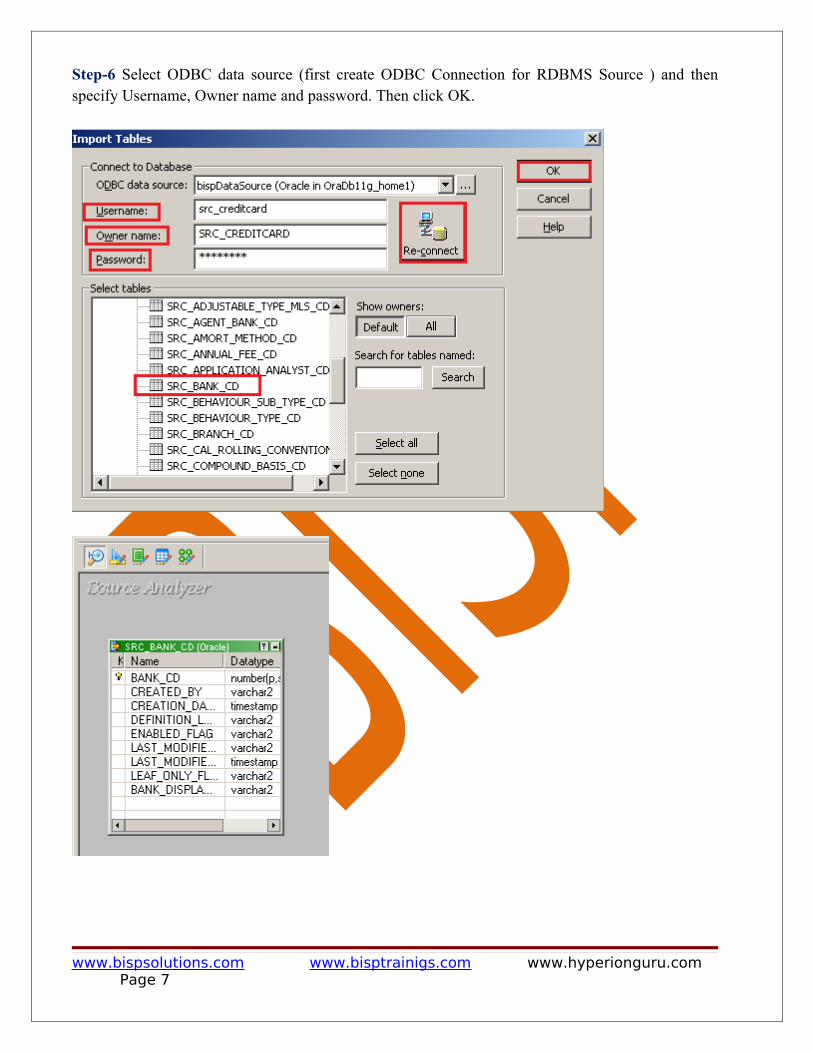
Step-6 Select ODBC data source (first create ODBC Connection for RDBMS Source ) and then specify Username, Owner name and password. Then click OK.
www.bispsolutions.com www.bisptrainigs.com www.hyperionguru.com Page 7
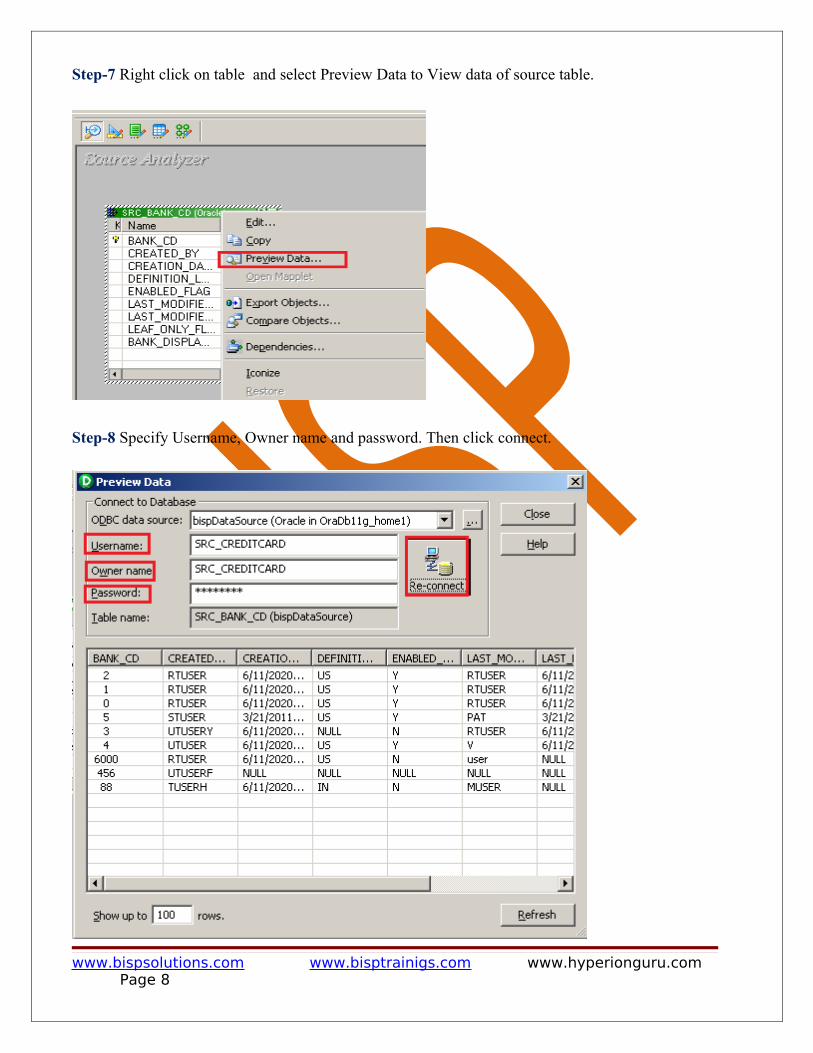
Step-7 Right click on table and select Preview Data to View data of source table.
Step-8 Specify Username, Owner name and password. Then click connect.
www.bispsolutions.com www.bisptrainigs.com www.hyperionguru.com Page 8
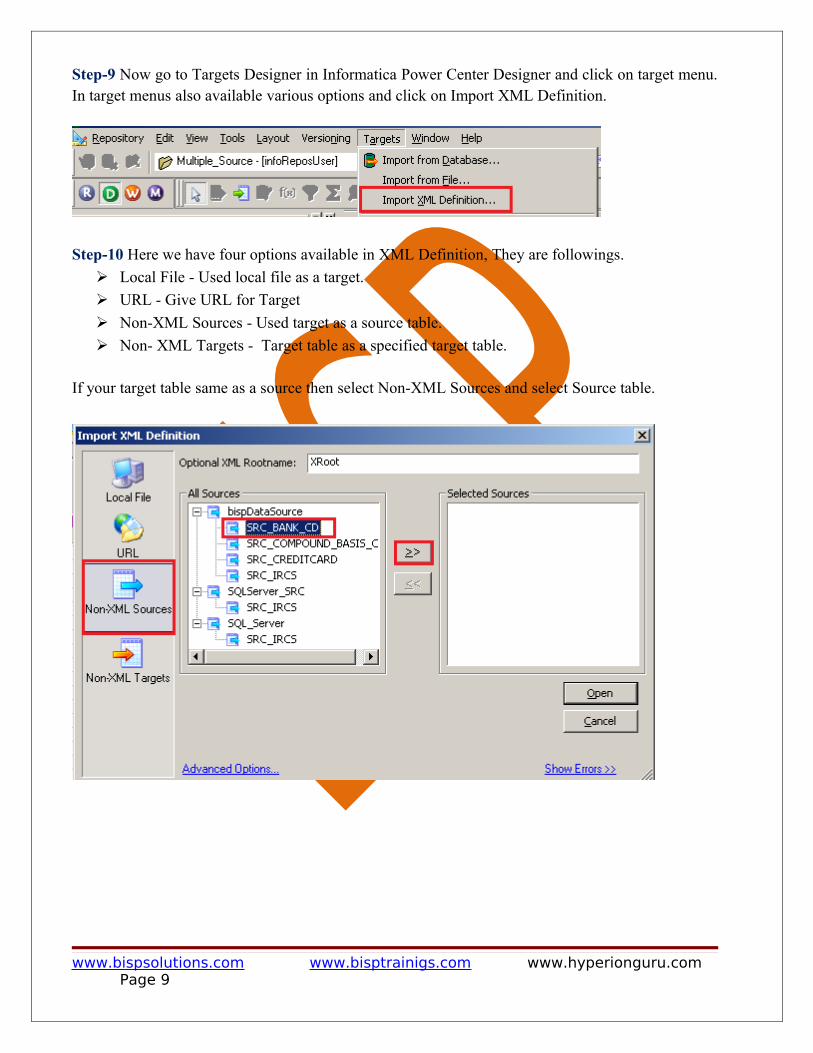
Step-9 Now go to Targets Designer in Informatica Power Center Designer and click on target menu. In target menus also available various options and click on Import XML Definition.
Step-10 Here we have four options available in XML Definition, They are followings.
Local File - Used local file as a target.
URL - Give URL for Target
Non-XML Sources - Used target as a source table.
Non- XML Targets - Target table as a specified target table.
If your target table same as a source then select Non-XML Sources and select Source table.
www.bispsolutions.com www.bisptrainigs.com www.hyperionguru.com Page 9
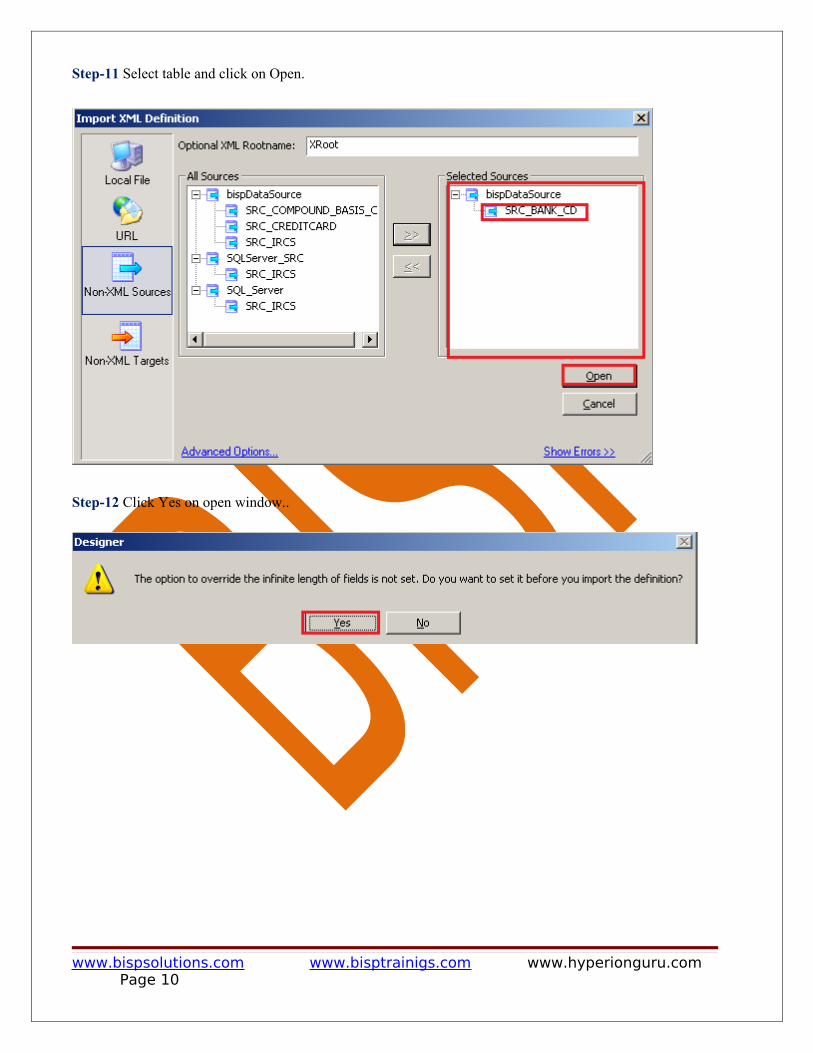
Step-11 Select table and click on Open.
Step-12 Click Yes on open window..
www.bispsolutions.com www.bisptrainigs.com www.hyperionguru.com Page 10
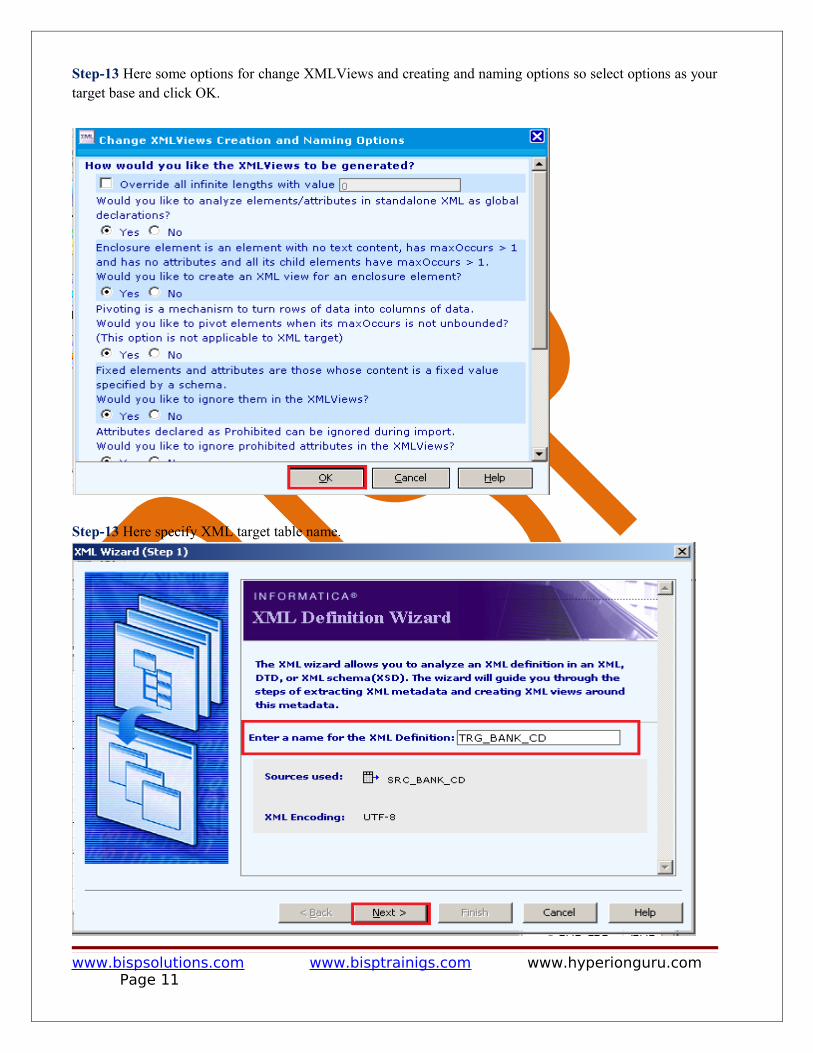
Step-13 Here some options for change XMLViews and creating and naming options so select options as your target base and click OK.
Step-13 Here specify XML target table name.
www.bispsolutions.com www.bisptrainigs.com www.hyperionguru.com Page 11
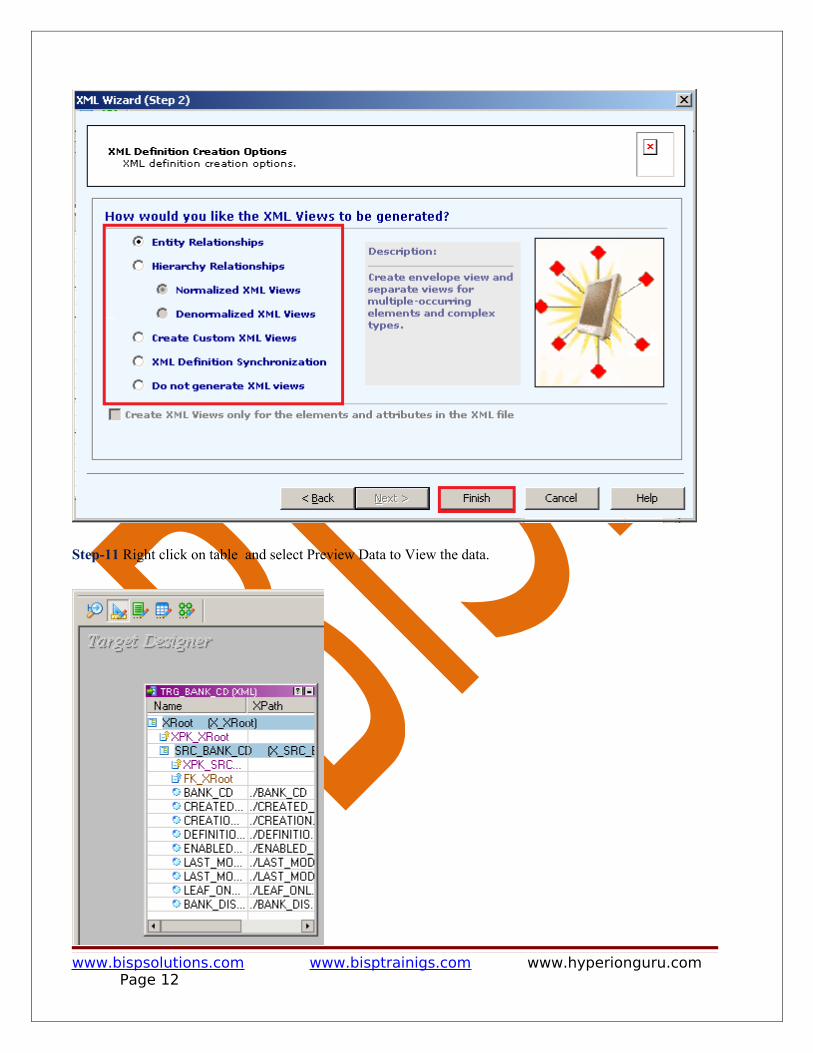
Step-11 Right click on table and select Preview Data to View the data.
www.bispsolutions.com www.bisptrainigs.com www.hyperionguru.com Page 12

Creating Mapping
Step-1 Go to Mapping Designer and Create New Mapping and then name of mapping and click OK.
Step-2 Then drag and drop source and target data in Mapping Designer.
www.bispsolutions.com www.bisptrainigs.com www.hyperionguru.com Page 13
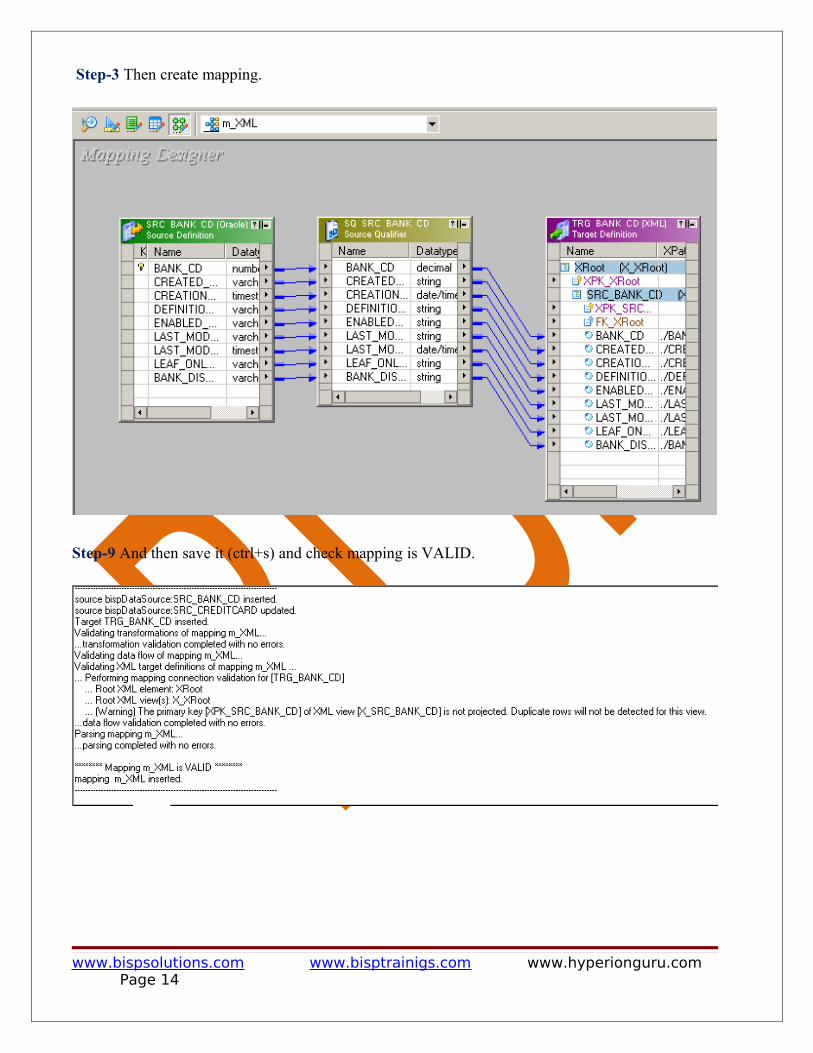
Step-3 Then create mapping.
Step-9 And then save it (ctrl+s) and check mapping is VALID.
www.bispsolutions.com www.bisptrainigs.com www.hyperionguru.com Page 14

Create WorkflowStep-1 Now go to Informatica Power Center Workflow Manager, and go to Tools menu and select Workflow Designer.
Step-2 Now to create workflows, go to Workflows menu and select Create. Then Name of workflow and click OK buttons.
www.bispsolutions.com www.bisptrainigs.com www.hyperionguru.com Page 15
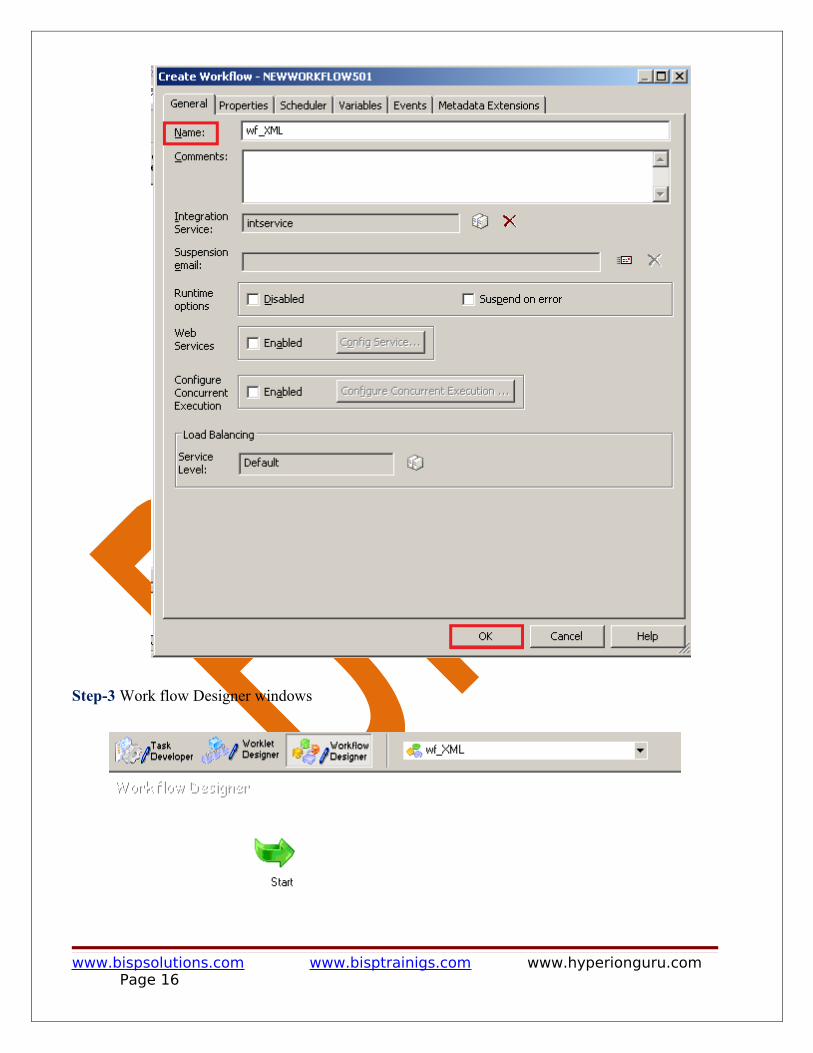
Step-3 Work flow Designer windows
www.bispsolutions.com www.bisptrainigs.com www.hyperionguru.com Page 16
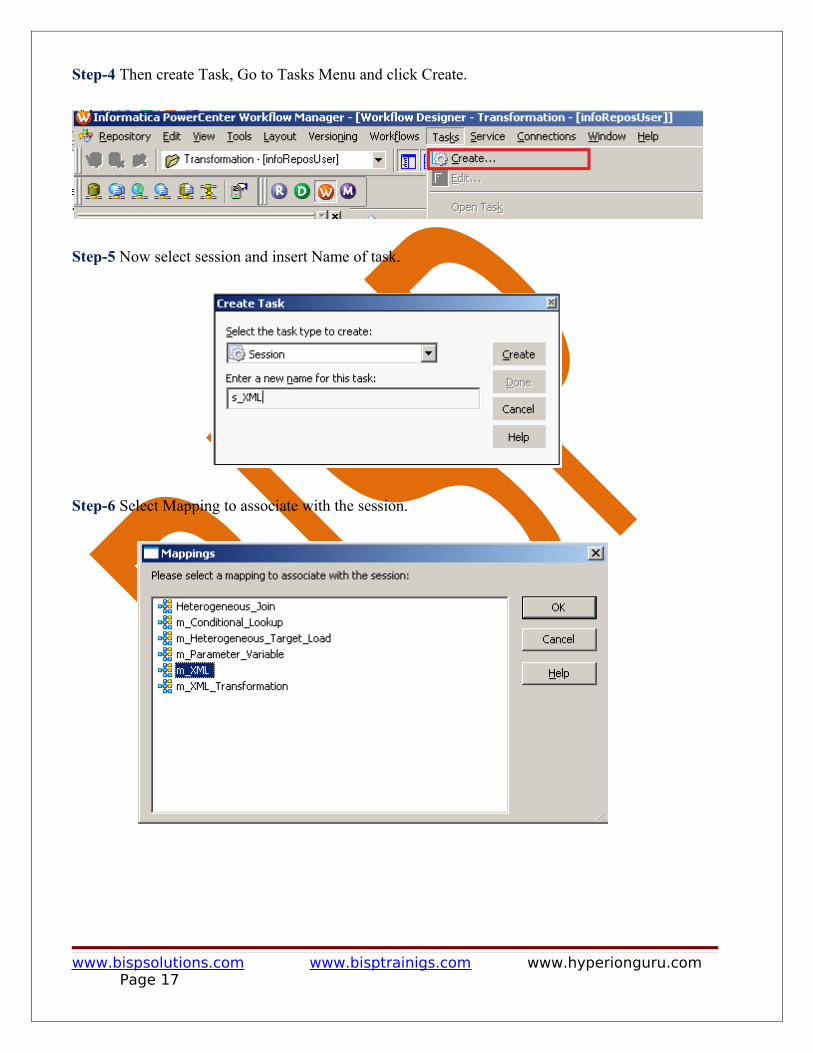
Step-4 Then create Task, Go to Tasks Menu and click Create.
Step-5 Now select session and insert Name of task.
Step-6 Select Mapping to associate with the session.
www.bispsolutions.com www.bisptrainigs.com www.hyperionguru.com Page 17
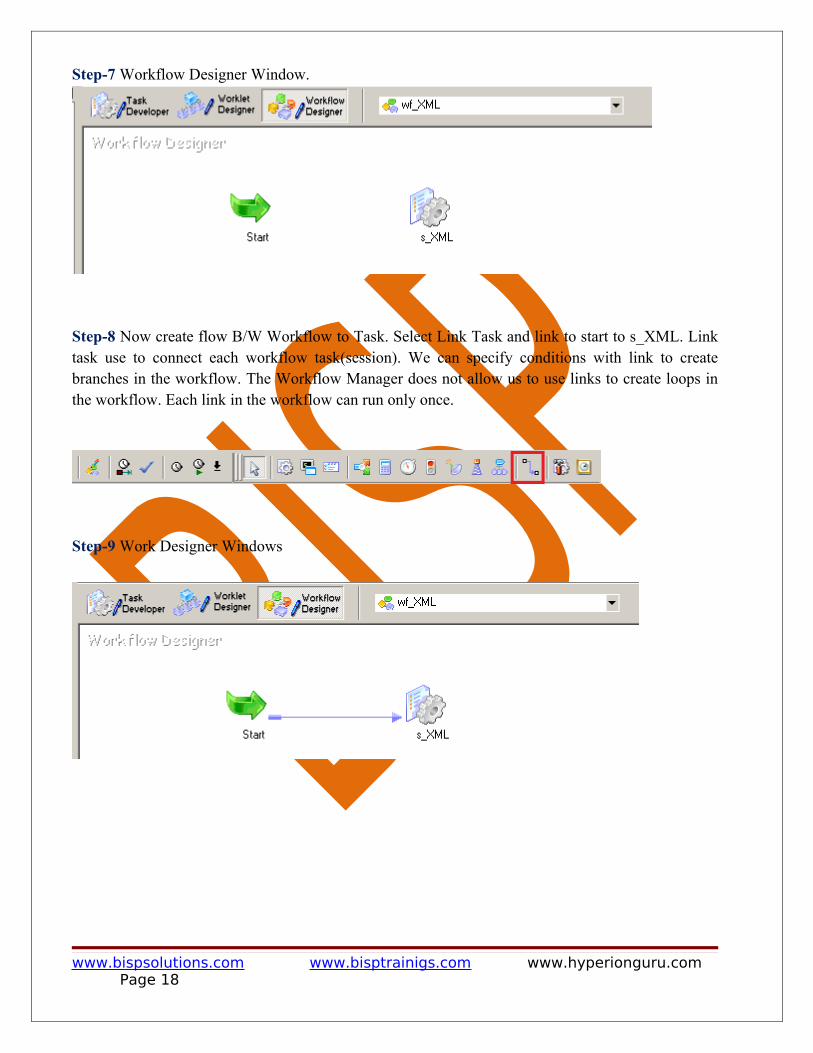
Step-7 Workflow Designer Window.
Step-8 Now create flow B/W Workflow to Task. Select Link Task and link to start to s_XML. Link task use to connect each workflow task(session). We can specify conditions with link to create branches in the workflow. The Workflow Manager does not allow us to use links to create loops in the workflow. Each link in the workflow can run only once.
Step-9 Work Designer Windows
www.bispsolutions.com www.bisptrainigs.com www.hyperionguru.com Page 18
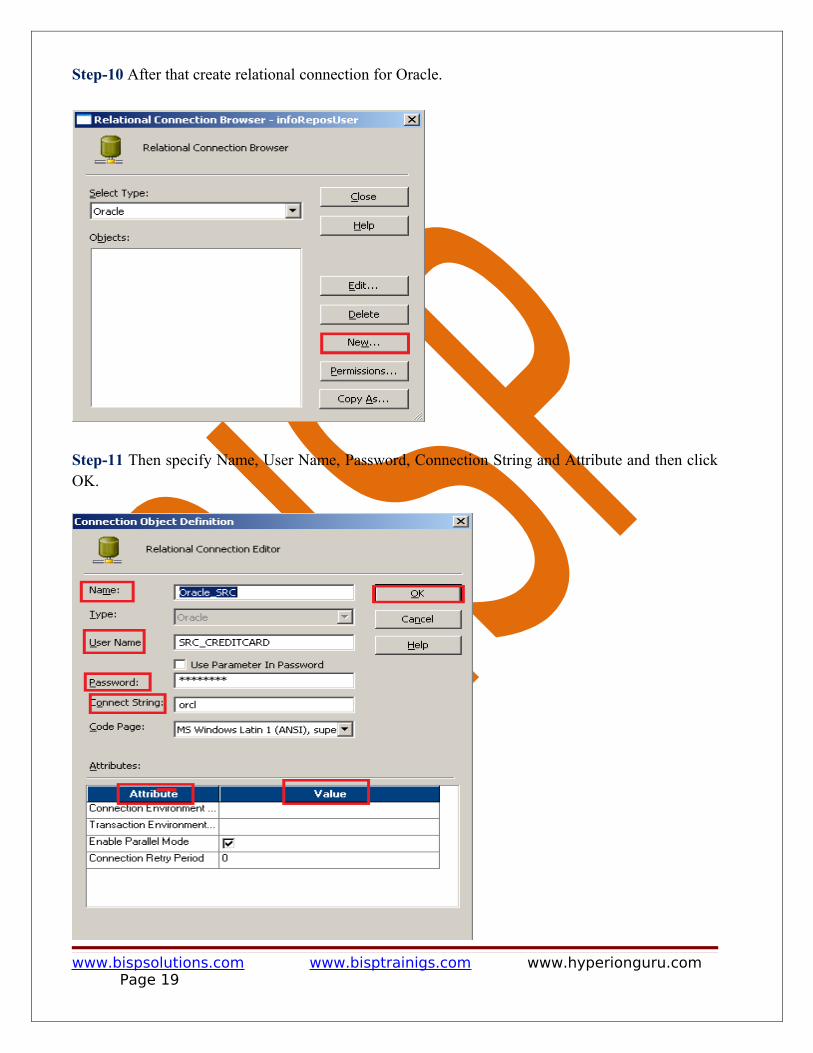
Step-10 After that create relational connection for Oracle.
Step-11 Then specify Name, User Name, Password, Connection String and Attribute and then click OK.
www.bispsolutions.com www.bisptrainigs.com www.hyperionguru.com Page 19
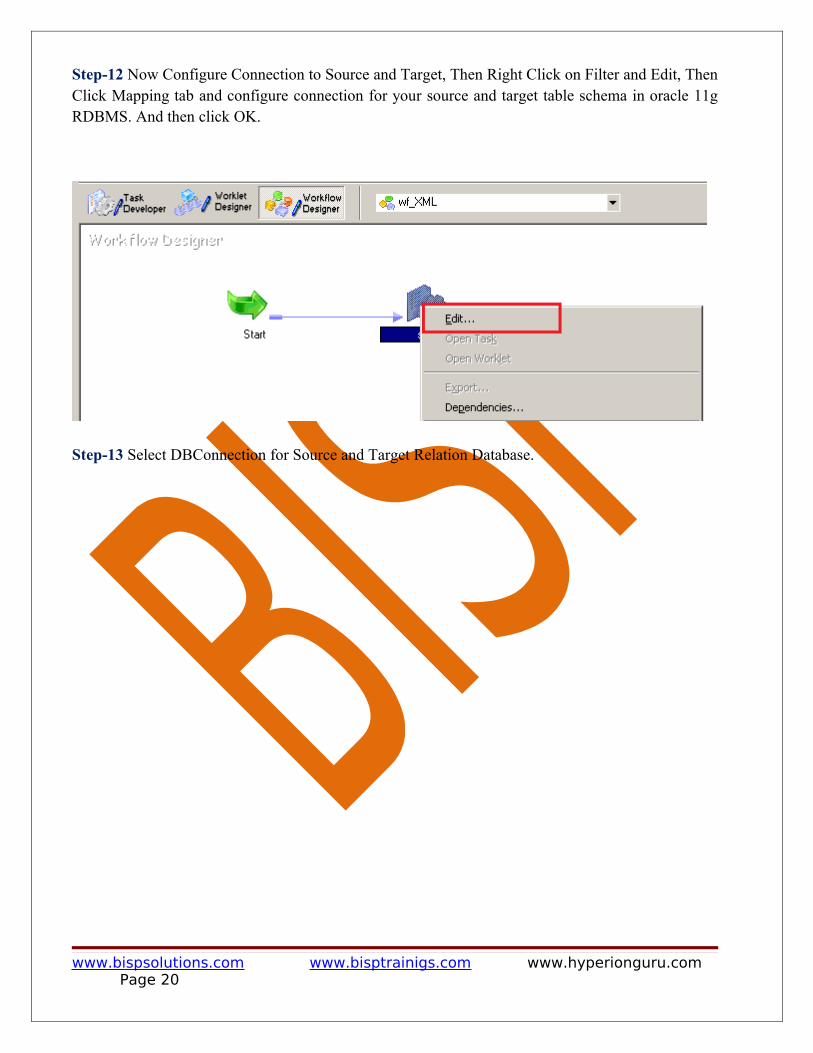
Step-12 Now Configure Connection to Source and Target, Then Right Click on Filter and Edit, Then Click Mapping tab and configure connection for your source and target table schema in oracle 11g RDBMS. And then click OK.
Step-13 Select DBConnection for Source and Target Relation Database.
www.bispsolutions.com www.bisptrainigs.com www.hyperionguru.com Page 20
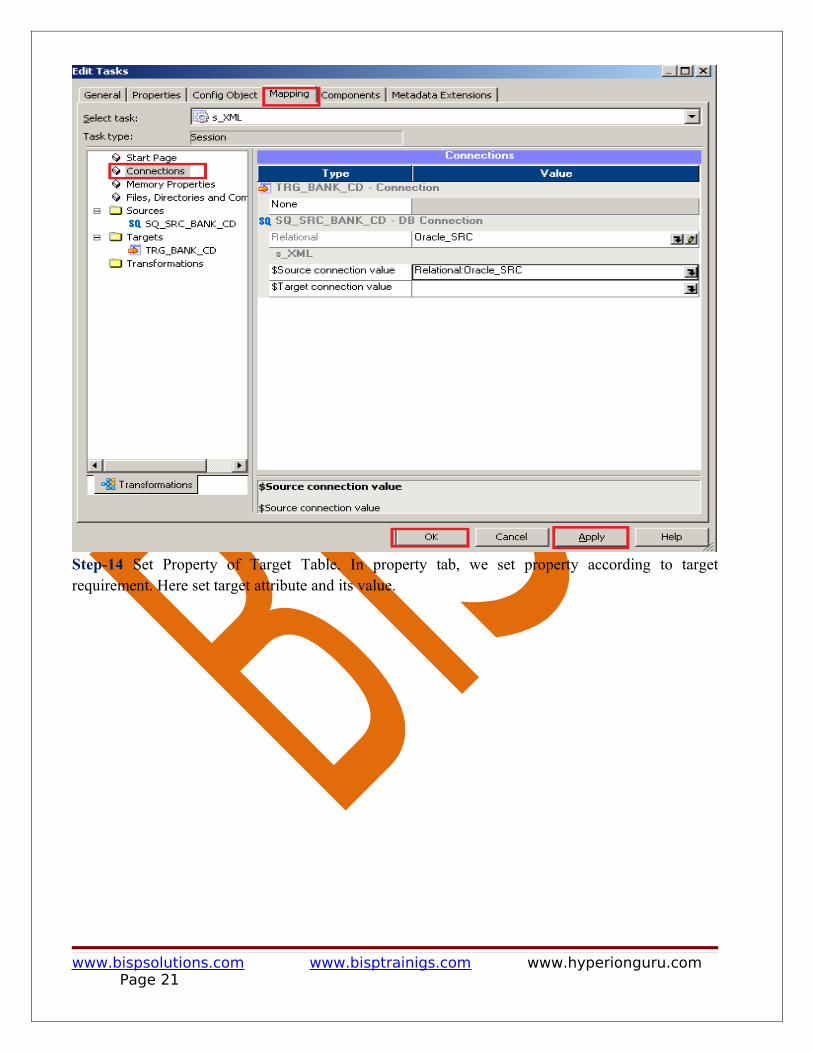
Step-14 Set Property of Target Table. In property tab, we set property according to target requirement. Here set target attribute and its value.
www.bispsolutions.com www.bisptrainigs.com www.hyperionguru.com Page 21
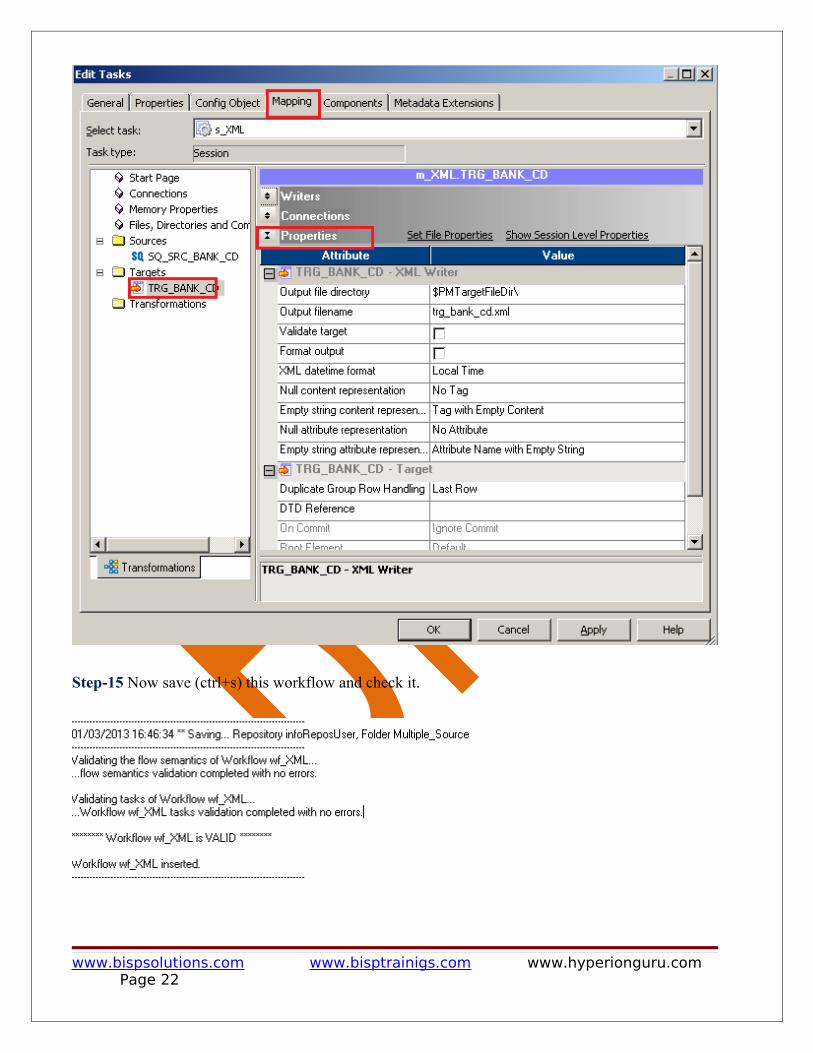
Step-15 Now save (ctrl+s) this workflow and check it.
www.bispsolutions.com www.bisptrainigs.com www.hyperionguru.com Page 22

Workflow Monitor and View Target DataStep-1 Now Start Workflow, Right click on Workflow Designer Window and Click on Start Workflow.
www.bispsolutions.com www.bisptrainigs.com www.hyperionguru.com Page 23
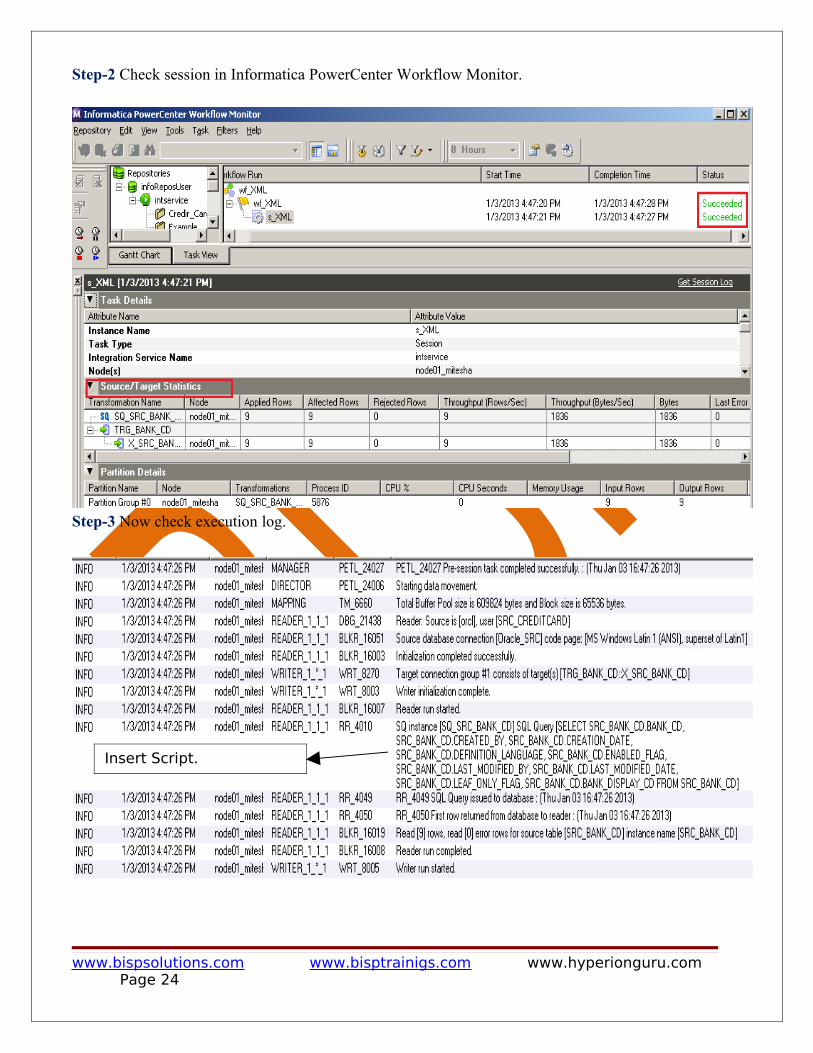
Step-2 Check session in Informatica PowerCenter Workflow Monitor.
Step-3 Now check execution log.
www.bispsolutions.com www.bisptrainigs.com www.hyperionguru.com Page 24
Insert Script.
www.bispsolutions.com www.bisptrainigs.com www.hyperionguru.com Page 25
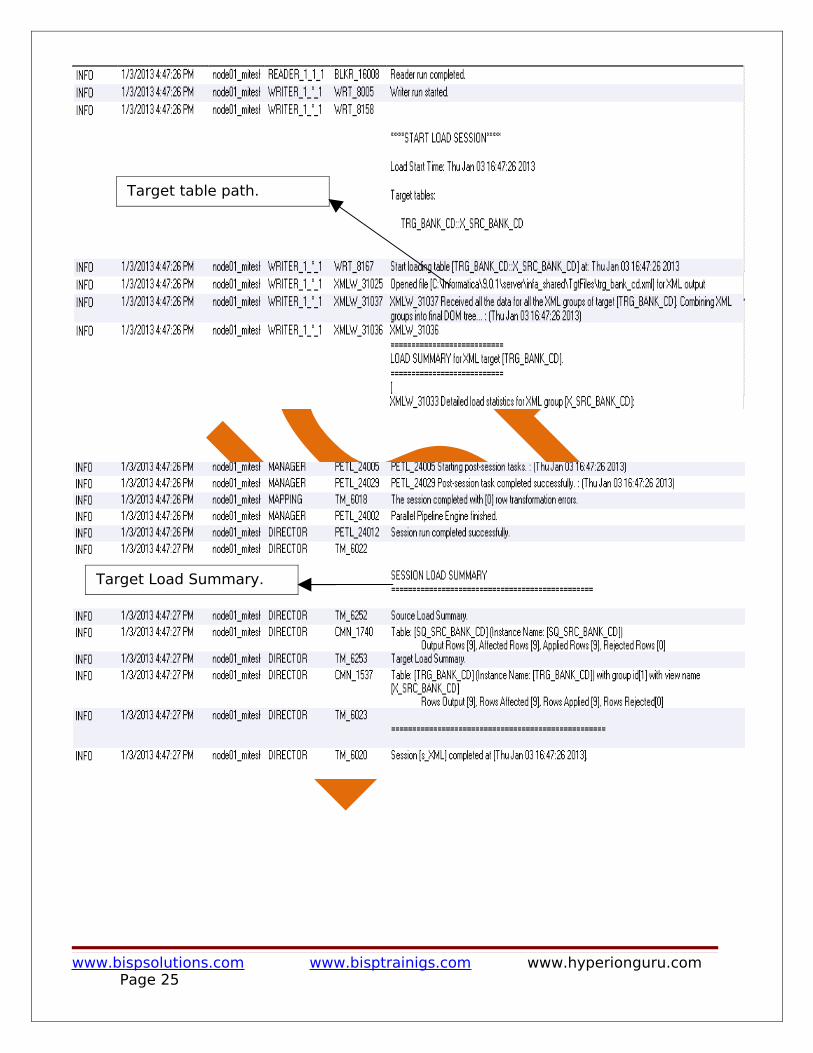
Target Load Summary.
Target table path.
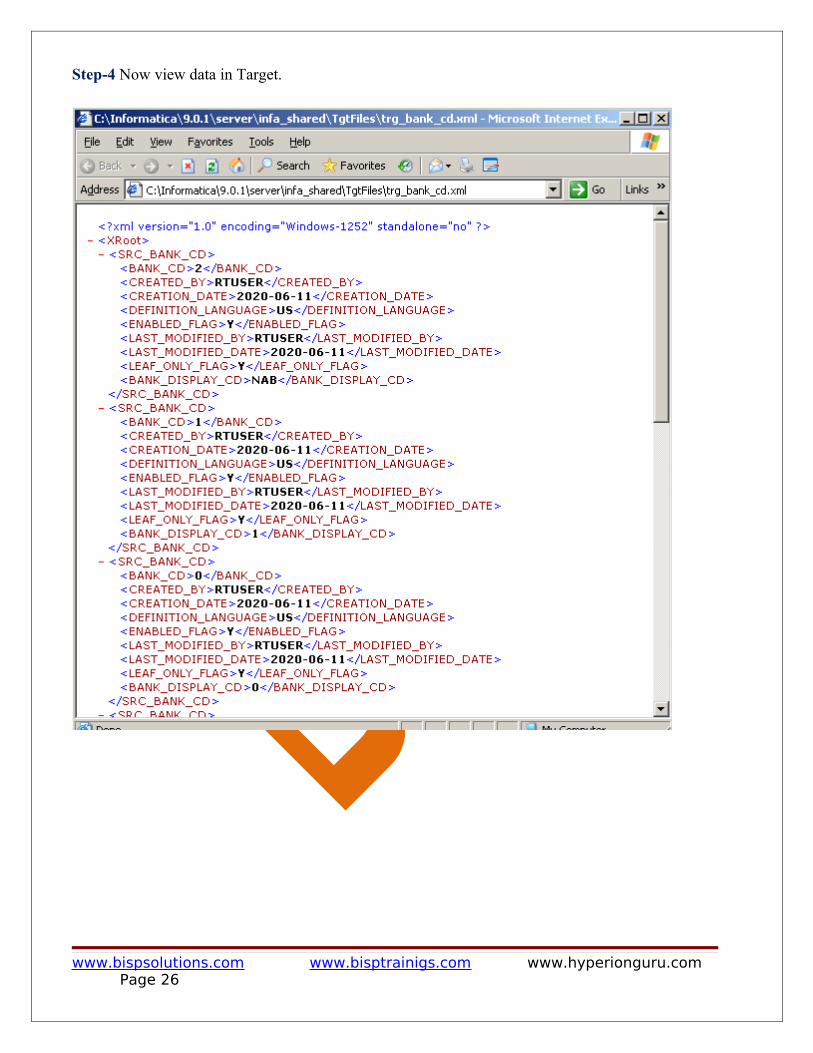
Step-4 Now view data in Target.
www.bispsolutions.com www.bisptrainigs.com www.hyperionguru.com Page 26
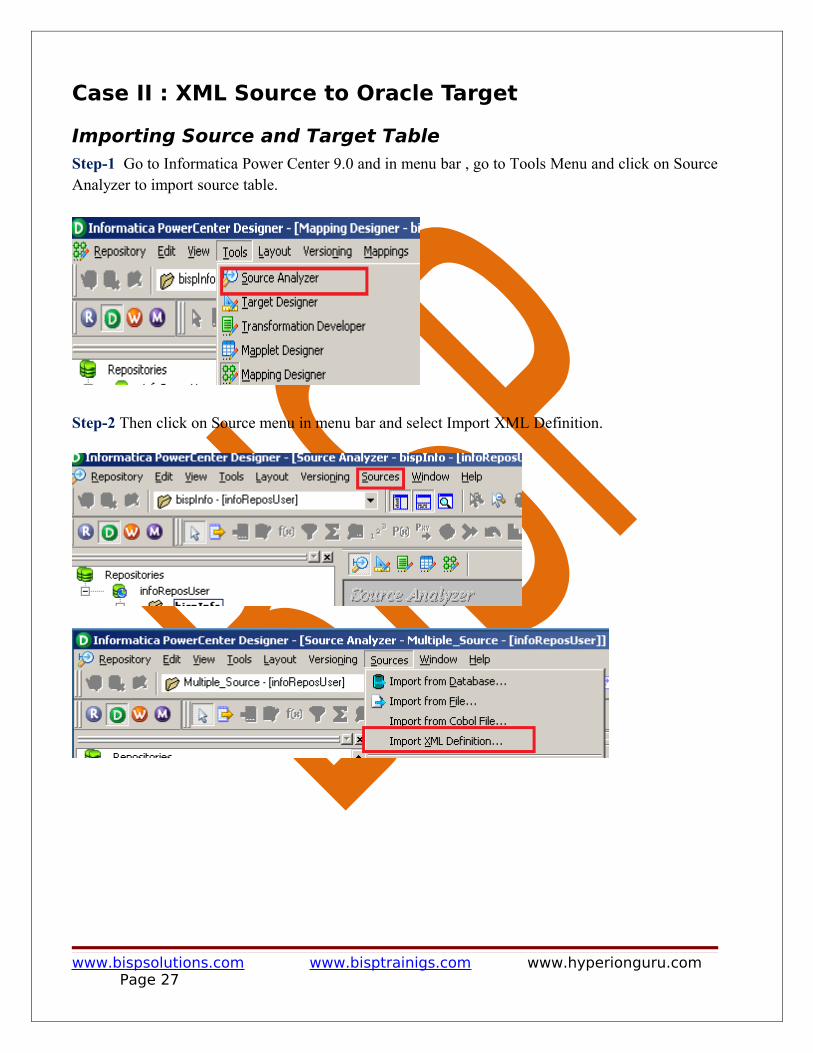
Case II : XML Source to Oracle Target
Importing Source and Target TableStep-1 Go to Informatica Power Center 9.0 and in menu bar , go to Tools Menu and click on Source Analyzer to import source table.
Step-2 Then click on Source menu in menu bar and select Import XML Definition.
www.bispsolutions.com www.bisptrainigs.com www.hyperionguru.com Page 27
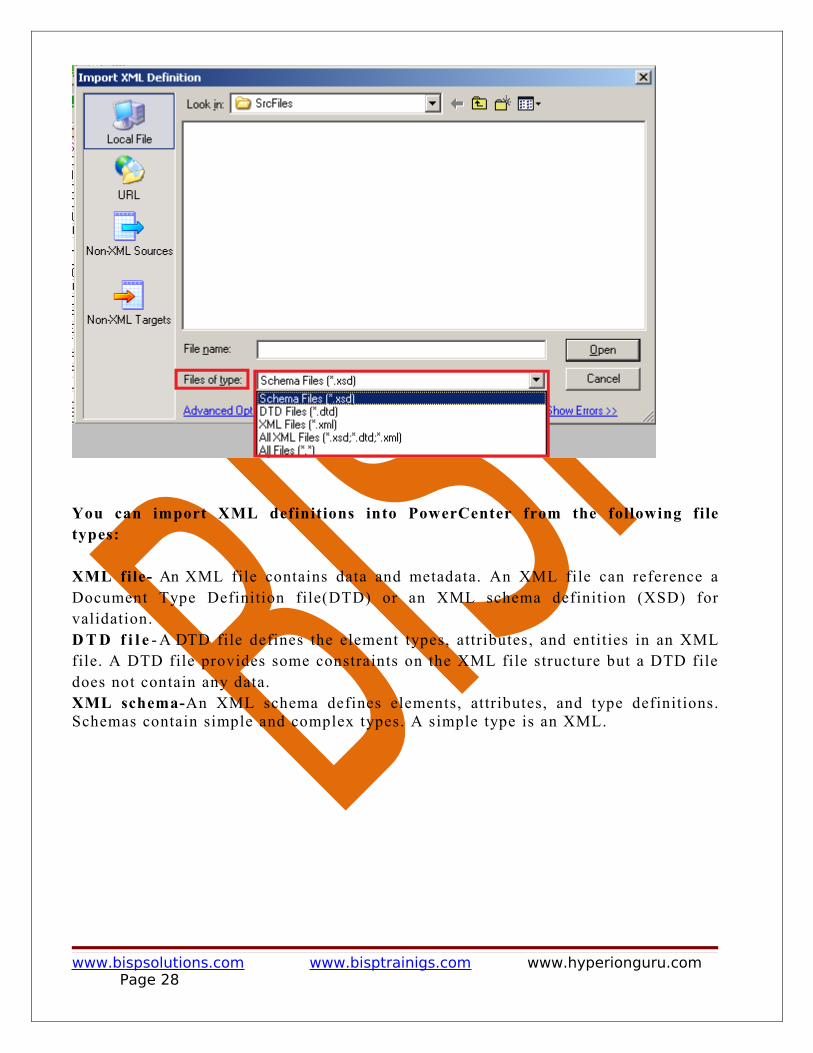
You can import XML definitions into PowerCenter from the following file types:
XML file- An XML file contains data and metadata. An XML file can reference a Document Type Definition file(DTD) or an XML schema definition (XSD) for validation.D T D f i l e - A DTD file defines the element types, attributes, and entities in an XML file. A DTD file provides some constraints on the XML file structure but a DTD file does not contain any data.XML schema-An XML schema defines elements, attributes, and type definitions. Schemas contain simple and complex types. A simple type is an XML.
www.bispsolutions.com www.bisptrainigs.com www.hyperionguru.com Page 28
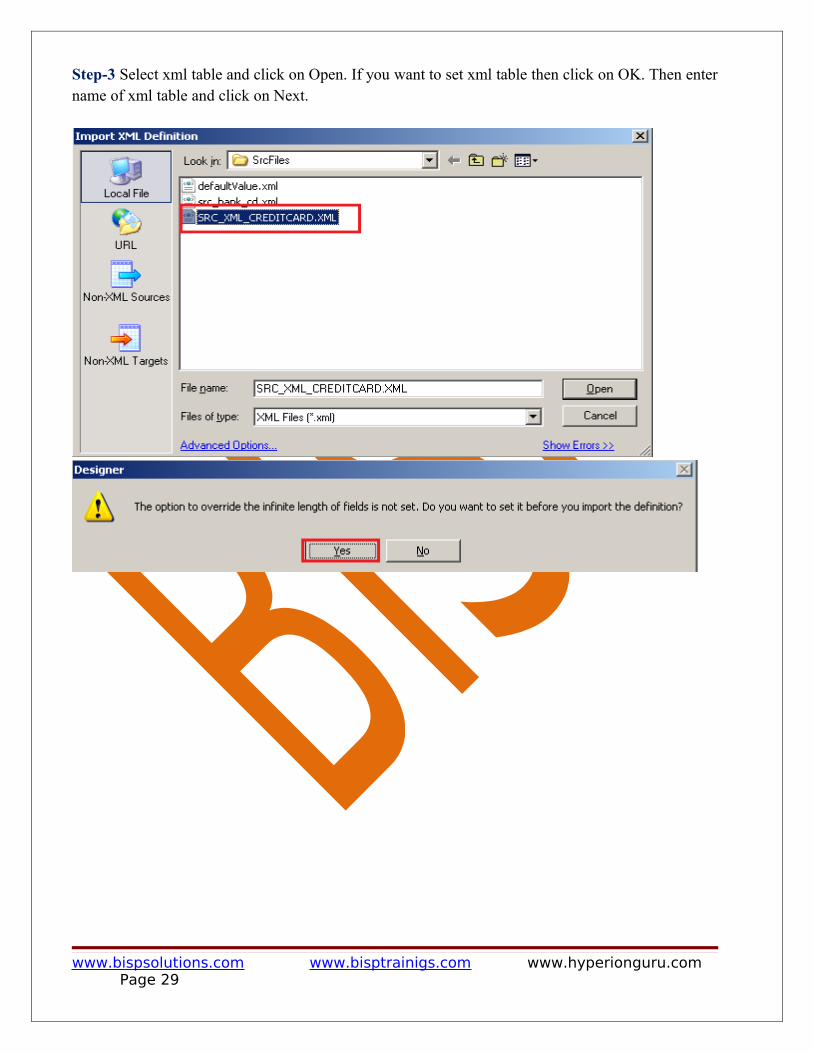
Step-3 Select xml table and click on Open. If you want to set xml table then click on OK. Then enter name of xml table and click on Next.
www.bispsolutions.com www.bisptrainigs.com www.hyperionguru.com Page 29
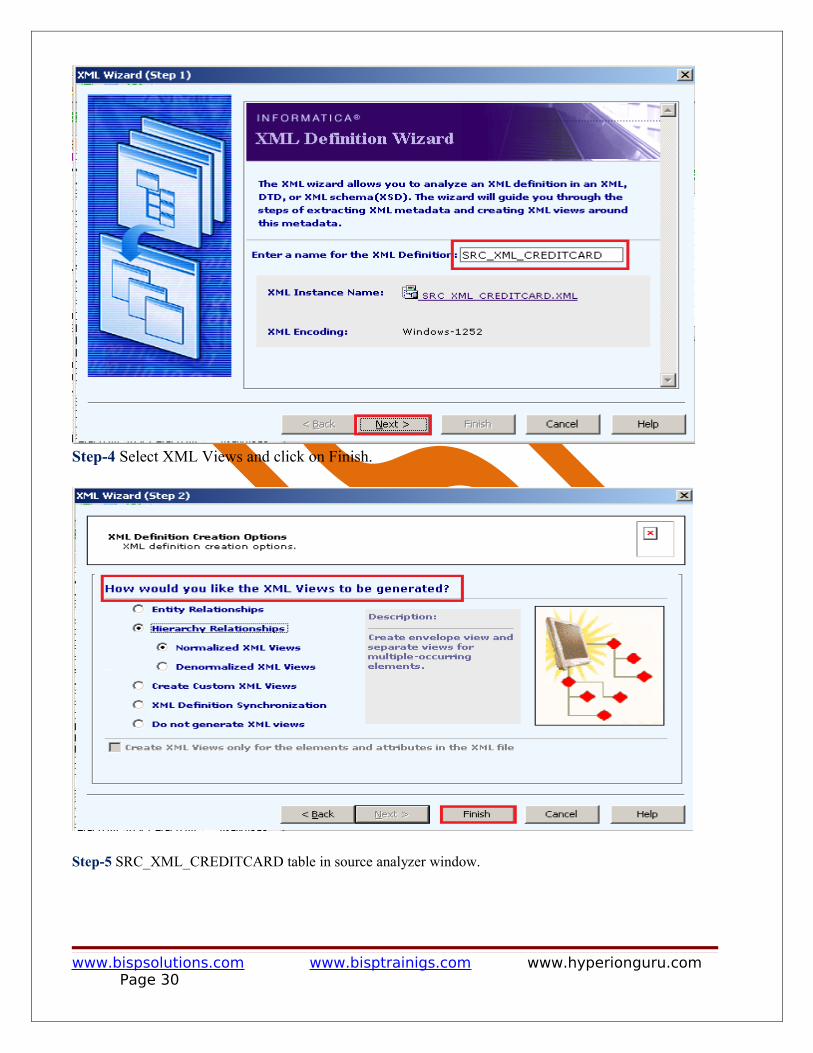
Step-4 Select XML Views and click on Finish.
Step-5 SRC_XML_CREDITCARD table in source analyzer window.
www.bispsolutions.com www.bisptrainigs.com www.hyperionguru.com Page 30
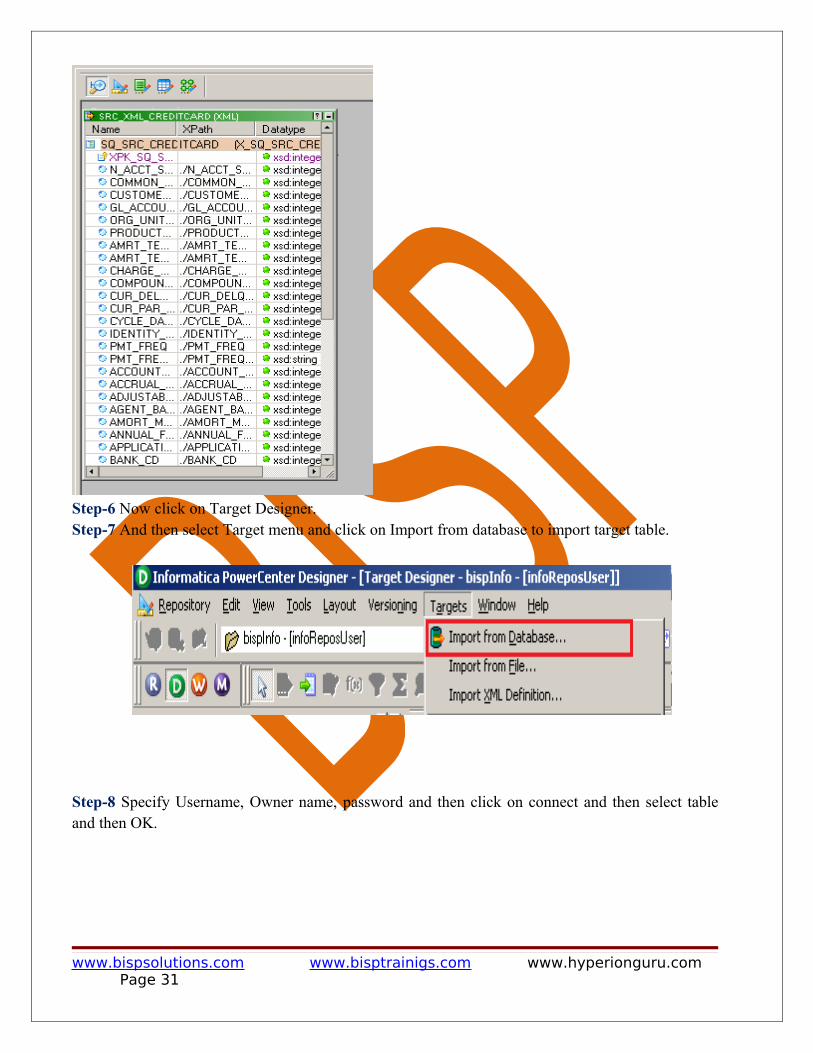
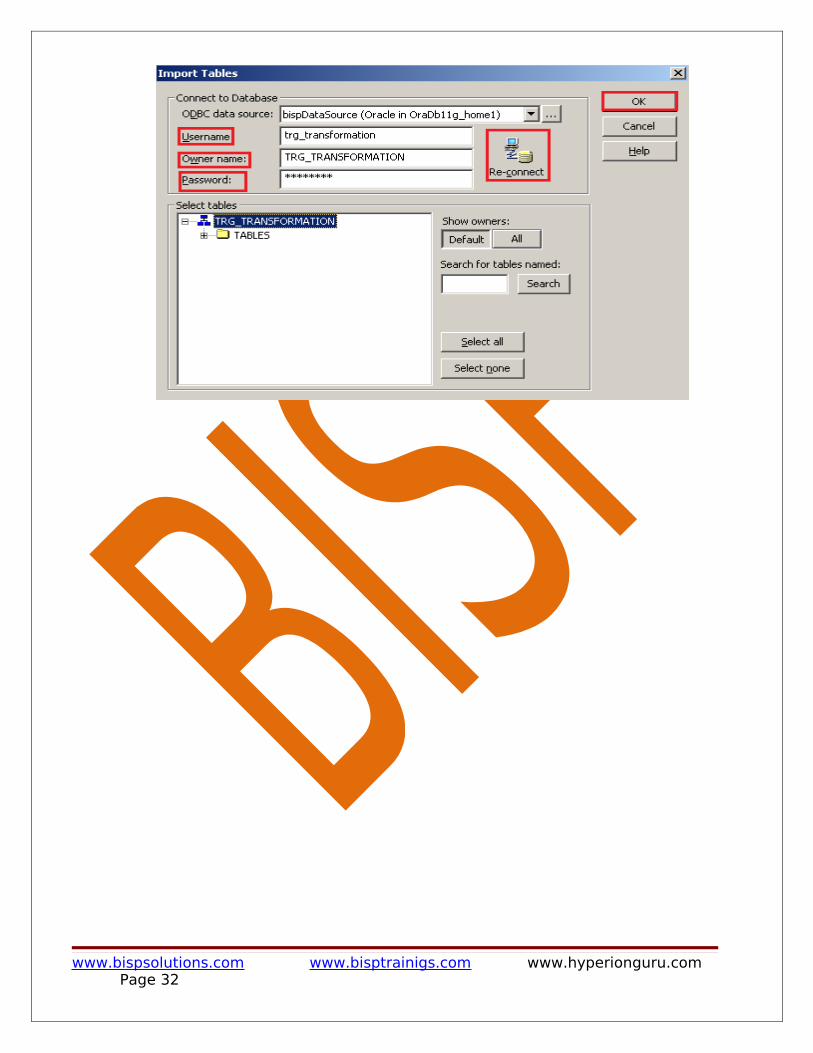
Step-6 Now click on Target Designer.Step-7 And then select Target menu and click on Import from database to import target table.
Step-8 Specify Username, Owner name, password and then click on connect and then select table and then OK.
www.bispsolutions.com www.bisptrainigs.com www.hyperionguru.com Page 31
www.bispsolutions.com www.bisptrainigs.com www.hyperionguru.com Page 32
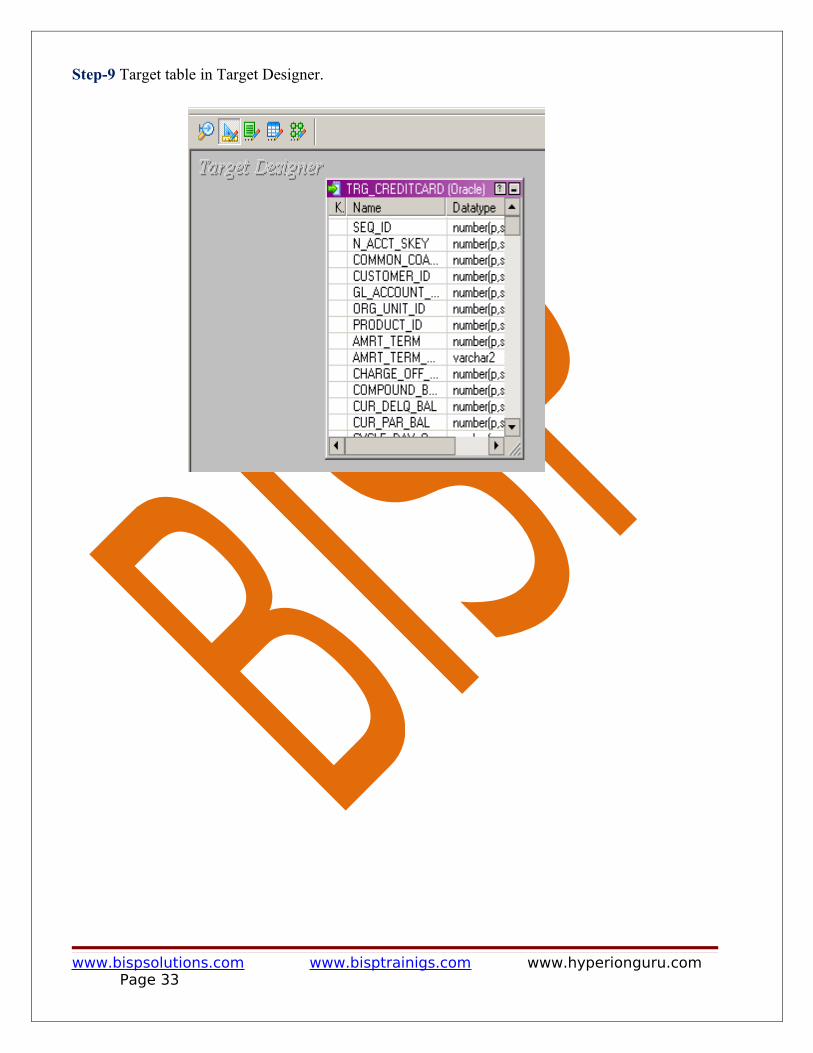
Step-9 Target table in Target Designer.
www.bispsolutions.com www.bisptrainigs.com www.hyperionguru.com Page 33
Create Mapping
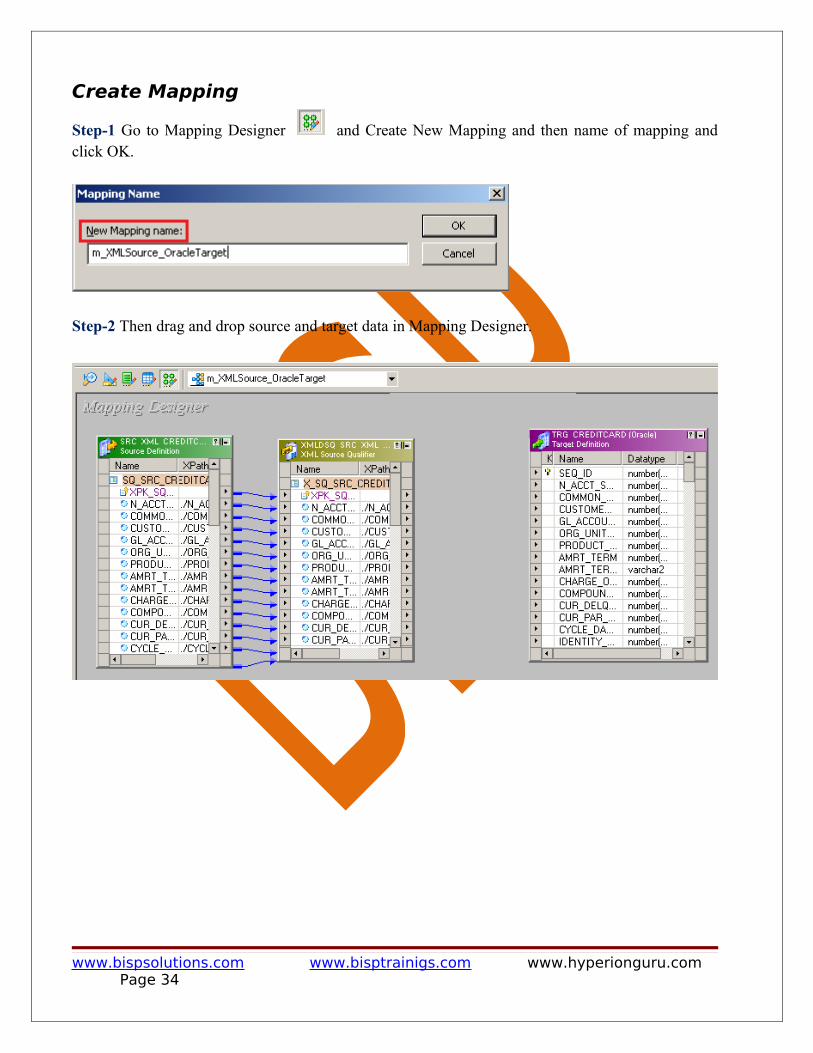
Step-1 Go to Mapping Designer and Create New Mapping and then name of mapping and click OK.
Step-2 Then drag and drop source and target data in Mapping Designer.
www.bispsolutions.com www.bisptrainigs.com www.hyperionguru.com Page 34
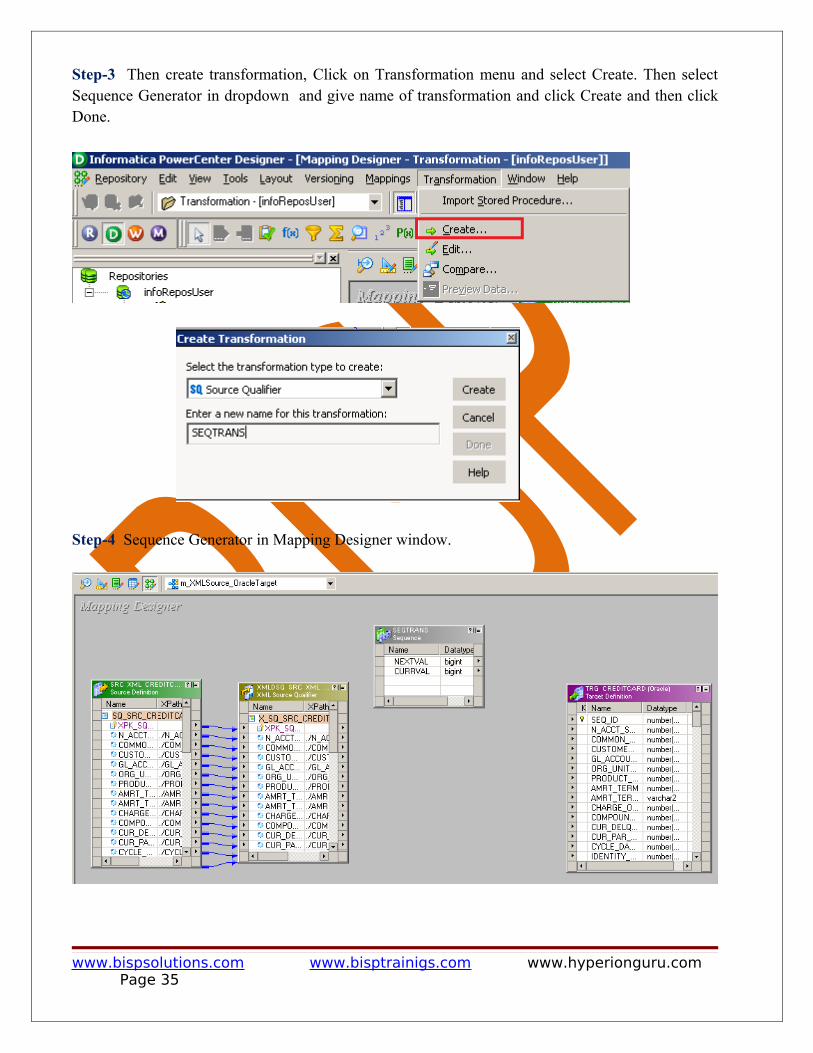
Step-3 Then create transformation, Click on Transformation menu and select Create. Then select Sequence Generator in dropdown and give name of transformation and click Create and then click Done.
Step-4 Sequence Generator in Mapping Designer window.
www.bispsolutions.com www.bisptrainigs.com www.hyperionguru.com Page 35
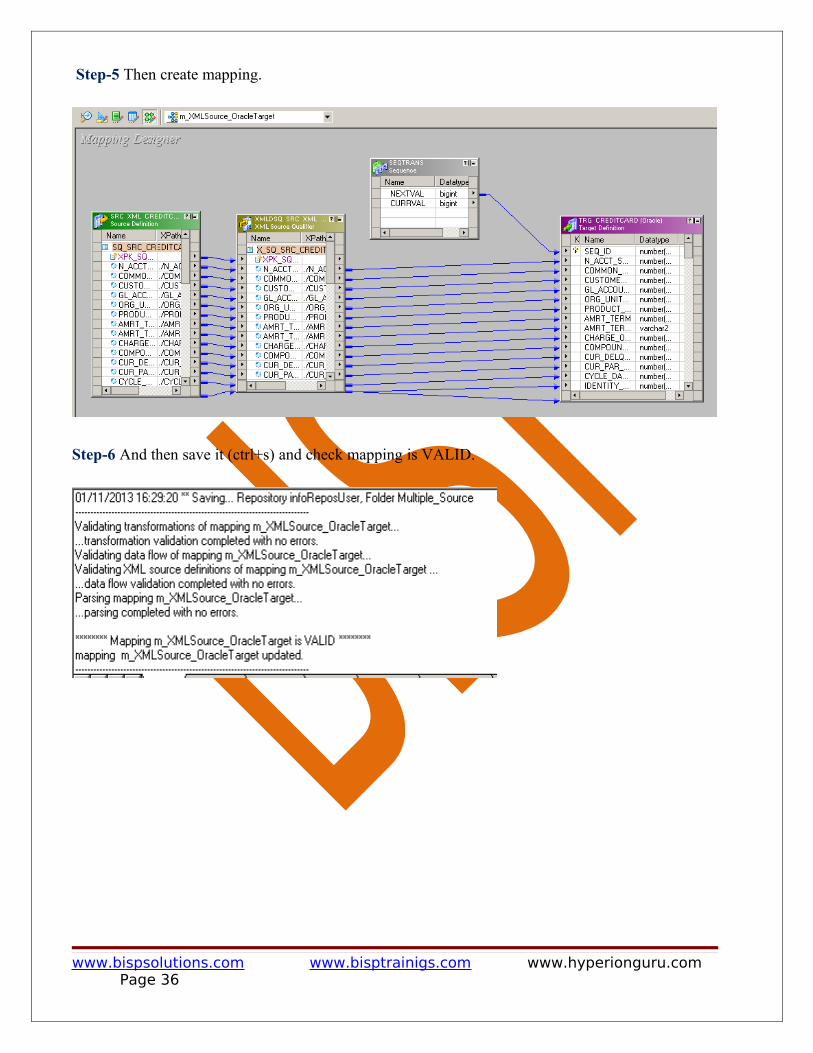
Step-5 Then create mapping.
Step-6 And then save it (ctrl+s) and check mapping is VALID.
www.bispsolutions.com www.bisptrainigs.com www.hyperionguru.com Page 36
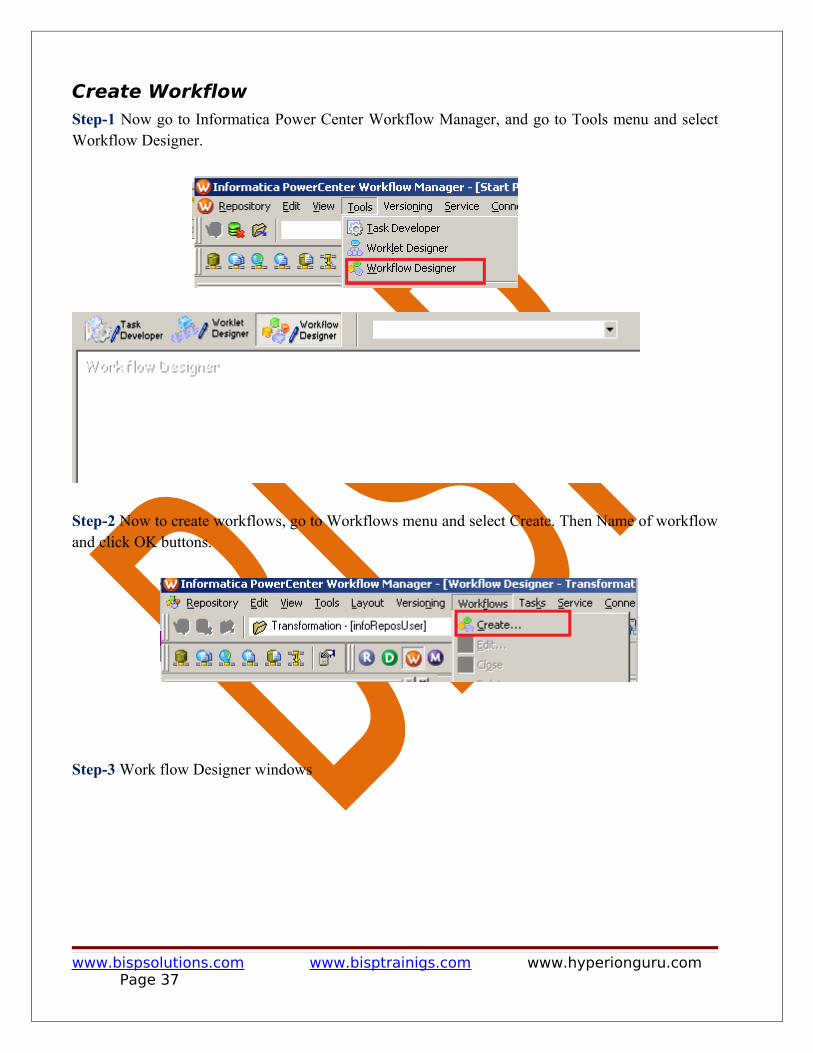
Create WorkflowStep-1 Now go to Informatica Power Center Workflow Manager, and go to Tools menu and select Workflow Designer.
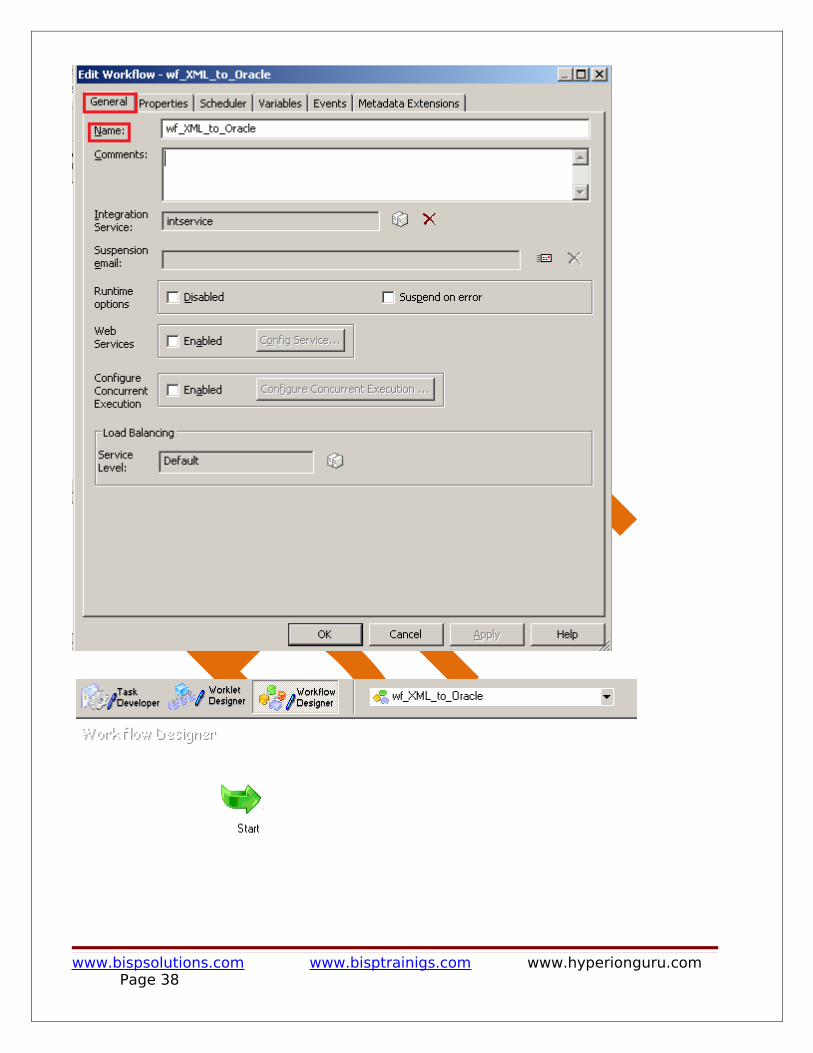
Step-2 Now to create workflows, go to Workflows menu and select Create. Then Name of workflow and click OK buttons.
Step-3 Work flow Designer windows
www.bispsolutions.com www.bisptrainigs.com www.hyperionguru.com Page 37
www.bispsolutions.com www.bisptrainigs.com www.hyperionguru.com Page 38
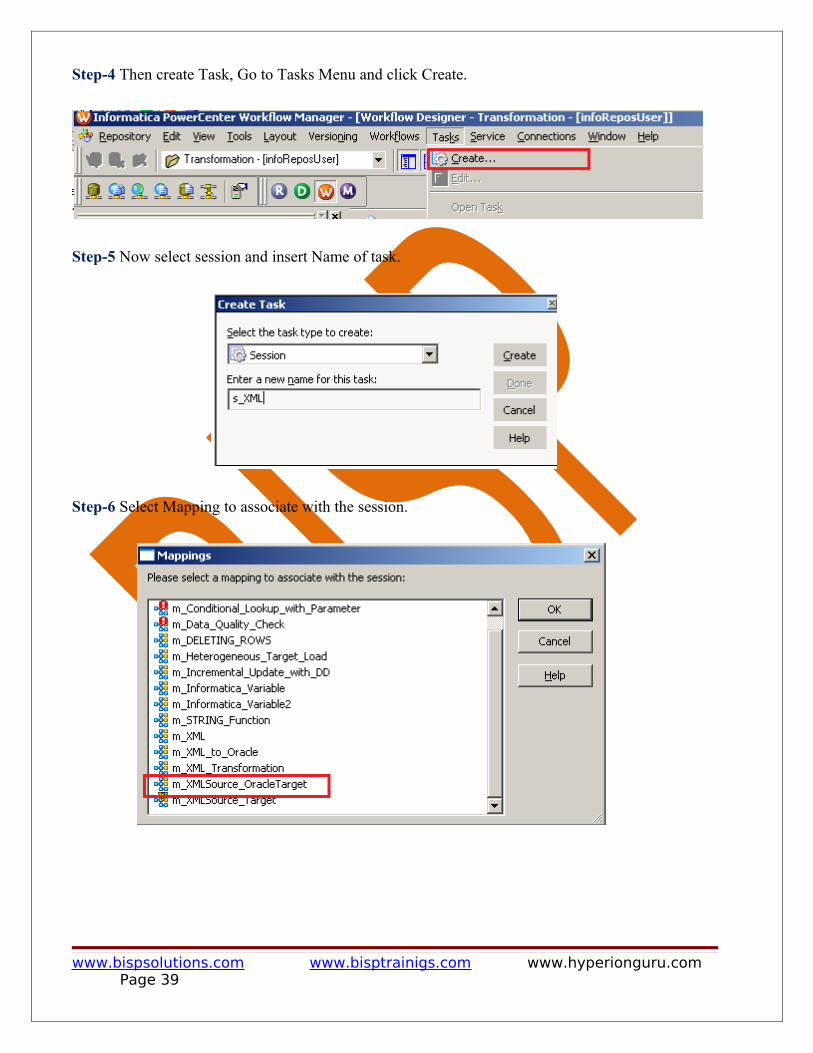
Step-4 Then create Task, Go to Tasks Menu and click Create.
Step-5 Now select session and insert Name of task.
Step-6 Select Mapping to associate with the session.
www.bispsolutions.com www.bisptrainigs.com www.hyperionguru.com Page 39
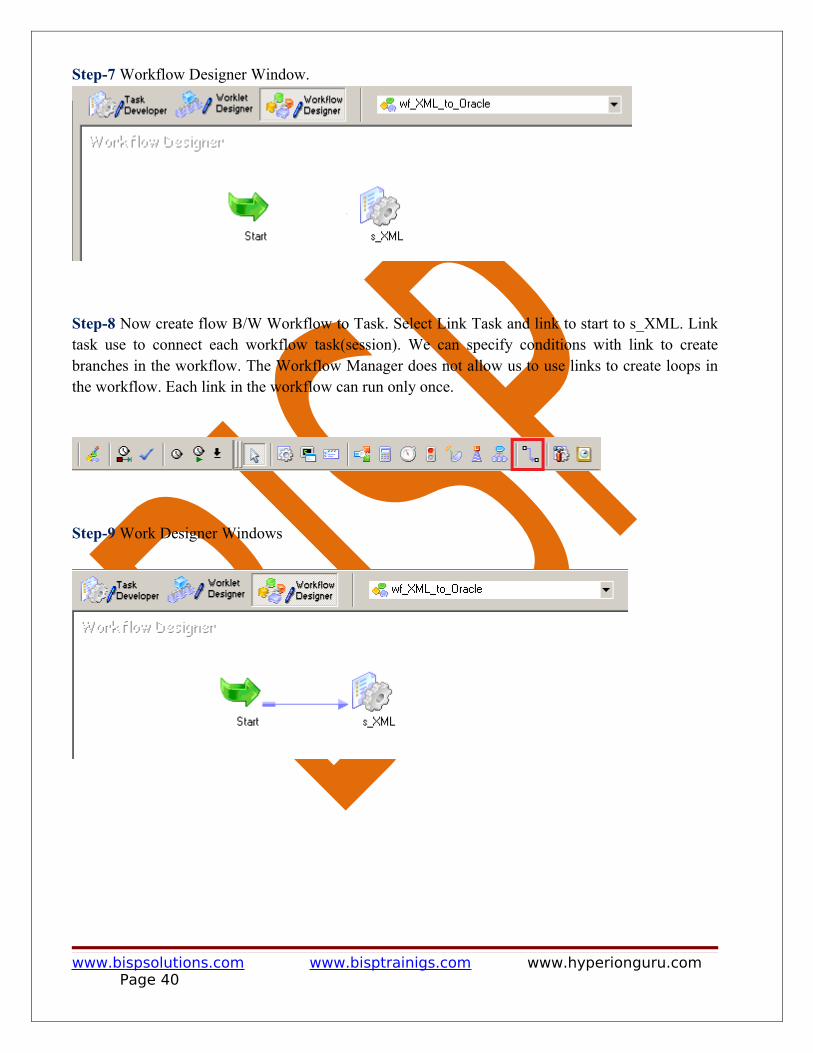
Step-7 Workflow Designer Window.
Step-8 Now create flow B/W Workflow to Task. Select Link Task and link to start to s_XML. Link task use to connect each workflow task(session). We can specify conditions with link to create branches in the workflow. The Workflow Manager does not allow us to use links to create loops in the workflow. Each link in the workflow can run only once.
Step-9 Work Designer Windows
www.bispsolutions.com www.bisptrainigs.com www.hyperionguru.com Page 40
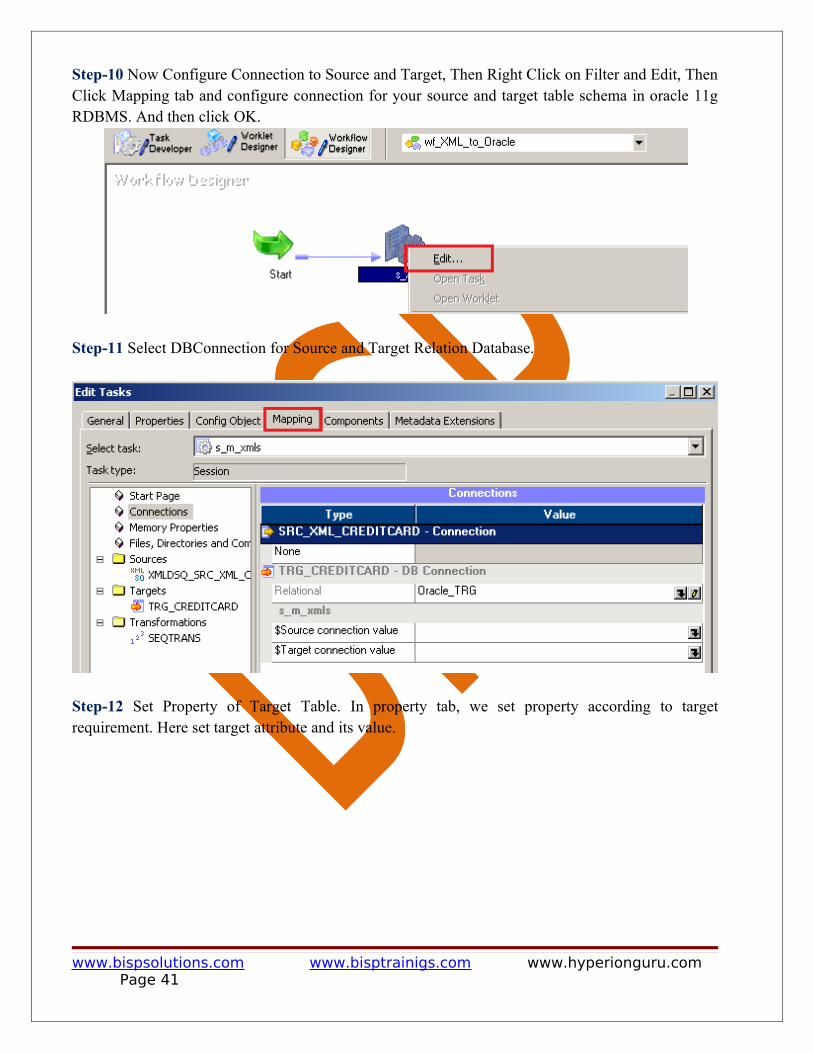
Step-10 Now Configure Connection to Source and Target, Then Right Click on Filter and Edit, Then Click Mapping tab and configure connection for your source and target table schema in oracle 11g RDBMS. And then click OK.
Step-11 Select DBConnection for Source and Target Relation Database.
Step-12 Set Property of Target Table. In property tab, we set property according to target requirement. Here set target attribute and its value.
www.bispsolutions.com www.bisptrainigs.com www.hyperionguru.com Page 41
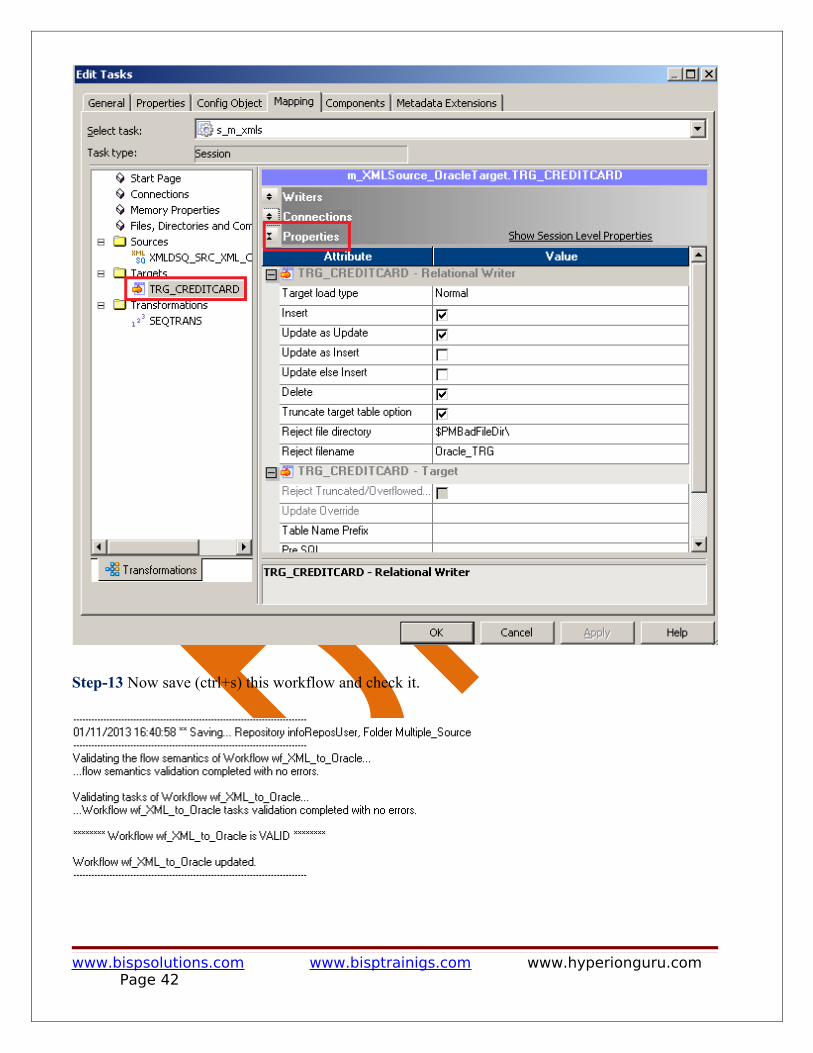
Step-13 Now save (ctrl+s) this workflow and check it.
www.bispsolutions.com www.bisptrainigs.com www.hyperionguru.com Page 42
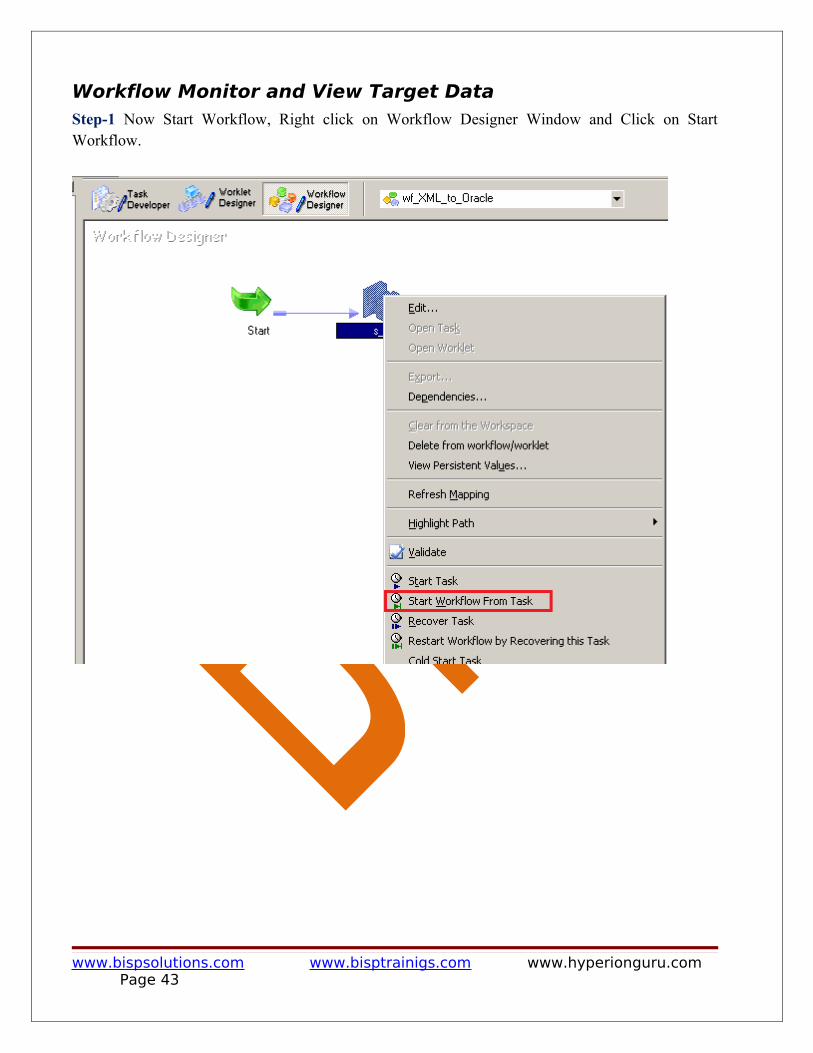
Workflow Monitor and View Target DataStep-1 Now Start Workflow, Right click on Workflow Designer Window and Click on Start Workflow.
www.bispsolutions.com www.bisptrainigs.com www.hyperionguru.com Page 43
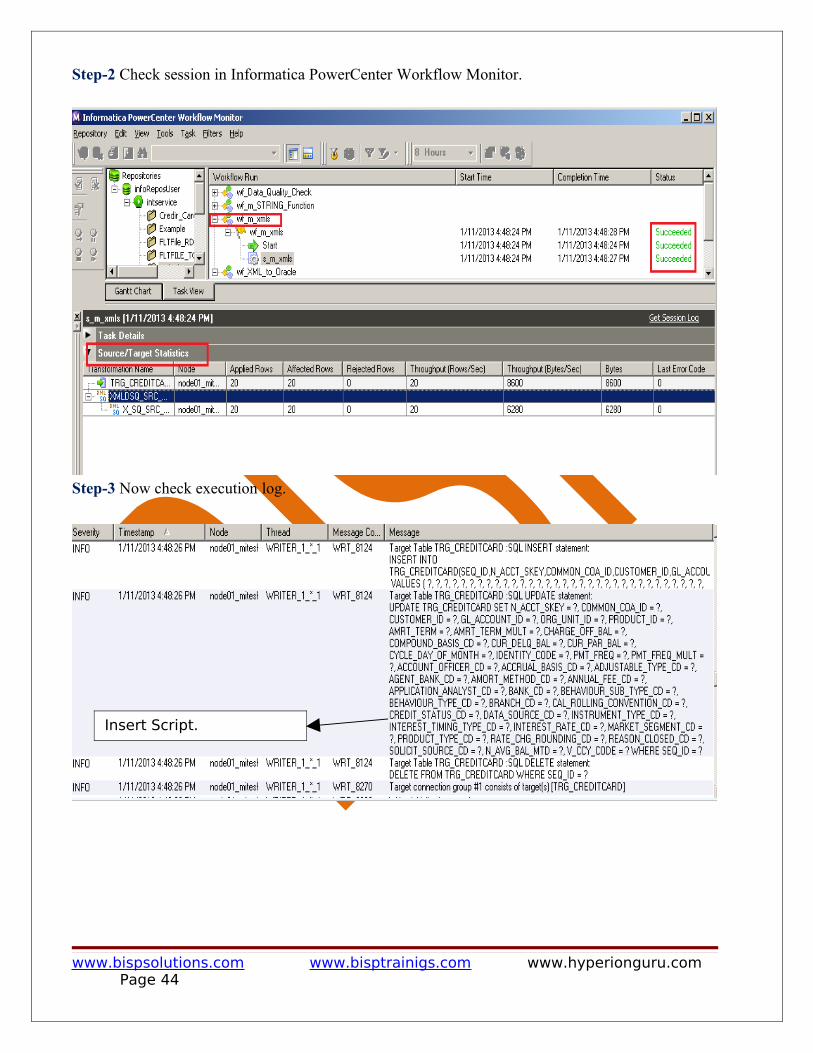
Step-2 Check session in Informatica PowerCenter Workflow Monitor.
Step-3 Now check execution log.
www.bispsolutions.com www.bisptrainigs.com www.hyperionguru.com Page 44
Insert Script.
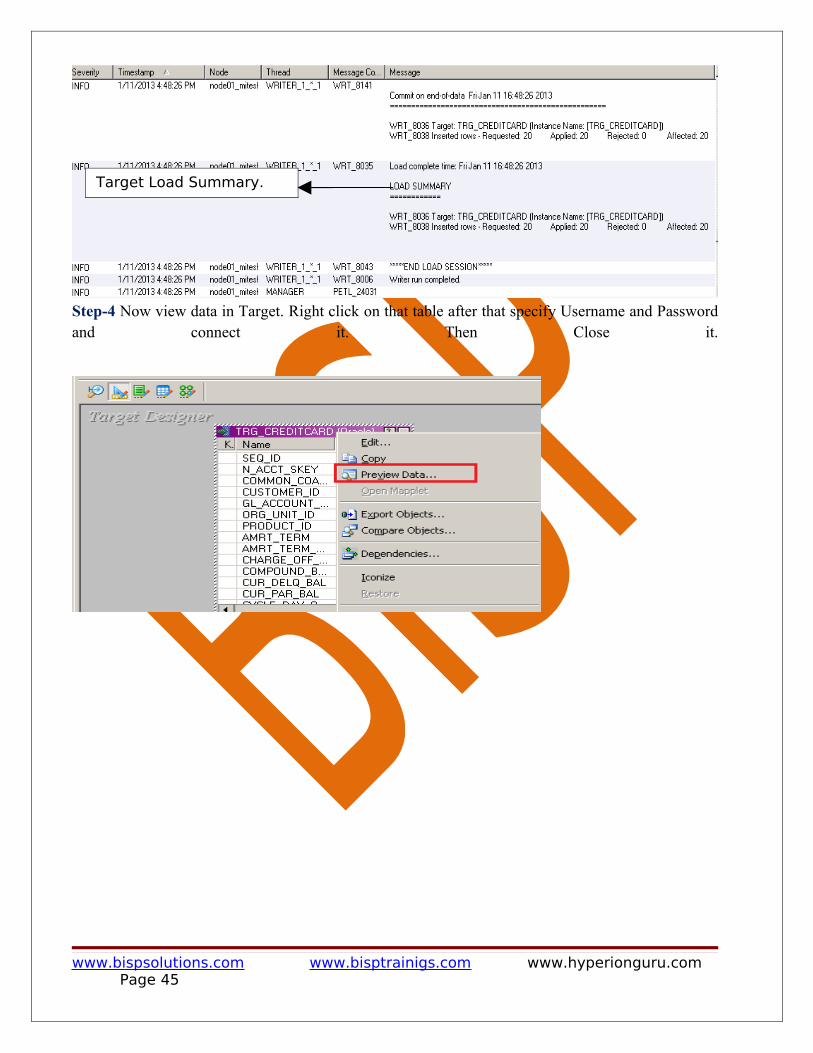
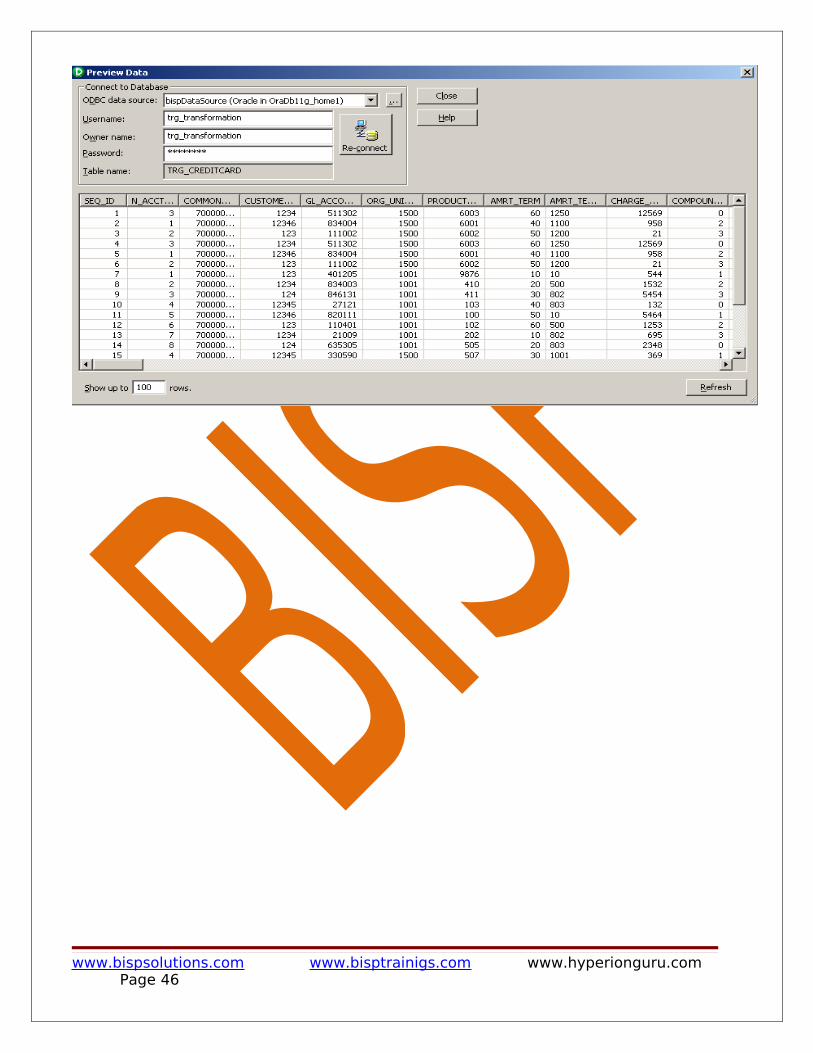
Step-4 Now view data in Target. Right click on that table after that specify Username and Password and connect it. Then Close it.
www.bispsolutions.com www.bisptrainigs.com www.hyperionguru.com Page 45
Target Load Summary.
www.bispsolutions.com www.bisptrainigs.com www.hyperionguru.com Page 46