Embed Size (px)
Citation preview

INSIDE–OUT ORNAMENT – Wayland Loftin, Nov. 2010
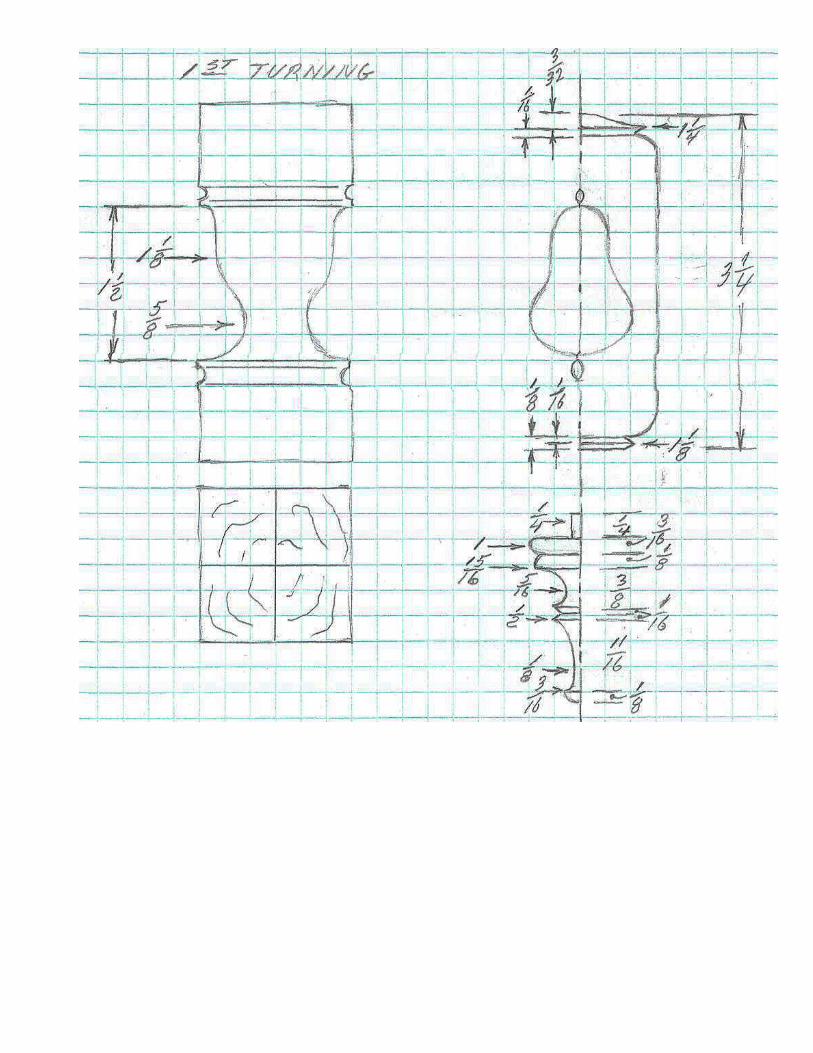
Reference Articles: Woodturning Design Magazine Issue #4 Winter 2005 Issue #12 Winter 2007 Issue #20 Winter 2009 Safety: Use safety glasses or face shield Button long sleeves or roll up sleeves After setting up wood on lathe, rotate wood by hand one complete rotation to be sure wood doesn’t hit tool rest. Stand to one side when turning lathe on. Select and machine wood: Select a board wide enough to rip four strips three fourths inches wide Run board across jointer to obtain one smooth face and edge Plane board to three fourths inches thick Rip four strips three fourths inches wide Cut strips approximately six inches long Assemble wood for turning: Assemble the four strips into a square that measures one and a half by one and half inches by applying glue one fourths to three eights inched from each end of strips on sides that will be touching and wrapping painters tape around each end to serve as “clamps” to hold wood strips together. Wrap tape around strips at least three times. After blank has had time for glue to dry, punch a hole in one end for tailstock center. Assemble blank on lathe in headstock chuck and support opposite end with tailstock center. Turning the interior:
Lay pattern on blank and mark overall length and mark the top and bottom of bell shape. Turn the blank round between lines representing top and bottom of bell. Make parting tool cuts in center of largest part of bell and in center of upper part of bell shape, according to drawing. Use pattern to check shape. Sand shape and remove assembly from lathe. Cut about one fourth to three eights of an inch off of each end of assembly. Remove tape and pieces should come apart. If they don’t come apart, lightly tap with a chisel at joints of pieces.
Reassembling three fourths x three fourths pieces: Rotate three fourths inch pieces one hundred and eighty degrees. Previous turned areas should now be on interior of blank. Apply glue to all surfaces that touch each other and wrap tape around each end again to help “clamp” wood until glue dries. After assembly dries, center punch exactly in center of end to be held by tailstock center. Place assembly on lathe (center punched end to tailstock and place opposite end in chuck. Turn outside to shape of drawing and sand. Remove tailstock center from end of turning. Put drill chuck in tailstock and using a one-fourth inch drill bit, drill a one-fourth inch deep hole in end of turning for securing finial.
Turn finial: Turn finial remembering to turn one-fourth inch diameter x three sixteenths long tenon to secure finial to main turning.
Glue finial and main turning together. Pre-drill top of turning for eye screw and assemble eye screw. Apply finish: I use Valspar clear gloss lacquer in spray can from Lowe’s. Sand after coats with finish sandpaper. Heavy sewing thread or narrow ribbon from craft store works good for hanging ornament. Note:
Author of these instructions assumes no responsibility for accidents that may occur from making this turning. Use proven safety methods. If you are new to turning, receive instructions before using lathe and lathe tools.