Embed Size (px)
Citation preview
TIBCO WebFOCUS®
Copyright © 2021. TIBCO Software Inc. All Rights Reserved.
Installation and Configuration for Windows
Release 8207April 2021DN4501632.0421

Contents
1. Introducing WebFOCUS Installation . . . . . . . . . . . . . . . . . . . . . . . . . . . . . . . . . . . . . . . . . . . . . 9
About WebFOCUS . . . . . . . . . . . . . . . . . . . . . . . . . . . . . . . . . . . . . . . . . . . . . . . . . . . . . . . . . . . . . . . . . . . . .9
WebFOCUS Installation Overview . . . . . . . . . . . . . . . . . . . . . . . . . . . . . . . . . . . . . . . . . . . . . . . . . . . . . . . .9
WebFOCUS and Your Network. . . . . . . . . . . . . . . . . . . . . . . . . . . . . . . . . . . . . . . . . . . . . . . . . . . . 10
WebFOCUS Components. . . . . . . . . . . . . . . . . . . . . . . . . . . . . . . . . . . . . . . . . . . . . . . . . . . . . . . . . 10
WebFOCUS Processing. . . . . . . . . . . . . . . . . . . . . . . . . . . . . . . . . . . . . . . . . . . . . . . . . . . . . . . . . . 11
WebFOCUS Configuration. . . . . . . . . . . . . . . . . . . . . . . . . . . . . . . . . . . . . . . . . . . . . . . . . . . . . . . . 12
ReportCaster Installation Overview . . . . . . . . . . . . . . . . . . . . . . . . . . . . . . . . . . . . . . . . . . . . . . . . . . . . . 15
ReportCaster Components. . . . . . . . . . . . . . . . . . . . . . . . . . . . . . . . . . . . . . . . . . . . . . . . . . . . . . . 15
ReportCaster Processing. . . . . . . . . . . . . . . . . . . . . . . . . . . . . . . . . . . . . . . . . . . . . . . . . . . . . . . . .15
ReportCaster Configuration. . . . . . . . . . . . . . . . . . . . . . . . . . . . . . . . . . . . . . . . . . . . . . . . . . . . . . .16
WebFOCUS Installation and Configuration Steps . . . . . . . . . . . . . . . . . . . . . . . . . . . . . . . . . . . . . . . . . 17
Application Server and Web Application Overview . . . . . . . . . . . . . . . . . . . . . . . . . . . . . . . . . . . . . . . . .17
Web Servers and Application Servers. . . . . . . . . . . . . . . . . . . . . . . . . . . . . . . . . . . . . . . . . . . . . . 17
Web Applications. . . . . . . . . . . . . . . . . . . . . . . . . . . . . . . . . . . . . . . . . . . . . . . . . . . . . . . . . . . . . . . 18
Running Web Applications. . . . . . . . . . . . . . . . . . . . . . . . . . . . . . . . . . . . . . . . . . . . . . . . . . . . . . . .18
Accessing Web Applications. . . . . . . . . . . . . . . . . . . . . . . . . . . . . . . . . . . . . . . . . . . . . . . . . . . . . . 18
Security and User IDs for WebFOCUS . . . . . . . . . . . . . . . . . . . . . . . . . . . . . . . . . . . . . . . . . . . . . . . . . . .19
Managed Reporting and ReportCaster IDs. . . . . . . . . . . . . . . . . . . . . . . . . . . . . . . . . . . . . . . . . . 19
WebFOCUS Reporting Server Security Providers. . . . . . . . . . . . . . . . . . . . . . . . . . . . . . . . . . . . . 20
WebFOCUS Reporting Server User IDs. . . . . . . . . . . . . . . . . . . . . . . . . . . . . . . . . . . . . . . . . . . . . 20
2. WebFOCUS Installation Requirements . . . . . . . . . . . . . . . . . . . . . . . . . . . . . . . . . . . . . . . . . 23
WebFOCUS Installation Requirements . . . . . . . . . . . . . . . . . . . . . . . . . . . . . . . . . . . . . . . . . . . . . . . . . . 23
JVM and J2SE Support Information. . . . . . . . . . . . . . . . . . . . . . . . . . . . . . . . . . . . . . . . . . . . . . . . 23
WebFOCUS Machine Requirements. . . . . . . . . . . . . . . . . . . . . . . . . . . . . . . . . . . . . . . . . . . . . . . .24
End User Machine Requirements. . . . . . . . . . . . . . . . . . . . . . . . . . . . . . . . . . . . . . . . . . . . . . . . . .27
Desktop Requirements. . . . . . . . . . . . . . . . . . . . . . . . . . . . . . . . . . . . . . . . . . . . . . . . . . . . . 28
Communication Requirements. . . . . . . . . . . . . . . . . . . . . . . . . . . . . . . . . . . . . . . . . . . . . . . . . . . . 28
Web Server and Application Server Requirements. . . . . . . . . . . . . . . . . . . . . . . . . . . . . . . . . . . 29
WebFOCUS Java Requirements. . . . . . . . . . . . . . . . . . . . . . . . . . . . . . . . . . . . . . . . . . . . . . . . . . . 30
ReportCaster Distribution Requirements. . . . . . . . . . . . . . . . . . . . . . . . . . . . . . . . . . . . . . . . . . . 30
WebFOCUS Repository Setup . . . . . . . . . . . . . . . . . . . . . . . . . . . . . . . . . . . . . . . . . . . . . . . . . . . . . . . . . .30
Installation and Configuration for Windows 3
Repository Options. . . . . . . . . . . . . . . . . . . . . . . . . . . . . . . . . . . . . . . . . . . . . . . . . . . . . . . . . . . . . . 31
WebFOCUS Repository Pre-Installation Tasks. . . . . . . . . . . . . . . . . . . . . . . . . . . . . . . . . . . . . . . 34
Database Collation Utilities . . . . . . . . . . . . . . . . . . . . . . . . . . . . . . . . . . . . . . . . . . . . . . . . . . . . . . . . . . . 35
Possible Errors When Running Scripts. . . . . . . . . . . . . . . . . . . . . . . . . . . . . . . . . . . . . . . . . . . . . 39
3. Installing the WebFOCUS Client . . . . . . . . . . . . . . . . . . . . . . . . . . . . . . . . . . . . . . . . . . . . . . . 41
Installing the WebFOCUS Client . . . . . . . . . . . . . . . . . . . . . . . . . . . . . . . . . . . . . . . . . . . . . . . . . . . . . . . .41
Troubleshooting the Installation. . . . . . . . . . . . . . . . . . . . . . . . . . . . . . . . . . . . . . . . . . . . . . . . . . .59
Upgrading From an Earlier 8.2.x Release to Release 8207 . . . . . . . . . . . . . . . . . . . . . . . . . . . . . . . . 59
Upgrade Installation Steps. . . . . . . . . . . . . . . . . . . . . . . . . . . . . . . . . . . . . . . . . . . . . . . . . . . . . . . 60
WebFOCUS Search Feature. . . . . . . . . . . . . . . . . . . . . . . . . . . . . . . . . . . . . . . . . . . . . . . . . 66
Migrating Configuration Files from Release 8.1 Version 05M to Release 8207 . . . . . . . . . . . . . . . 66
Configuration File Migration Utility Implementation. . . . . . . . . . . . . . . . . . . . . . . . . . . . . . . . . . . 67
Upgrading In Place from Release 8.1 Version 05M to Release 8207 . . . . . . . . . . . . . . . . . . . . . . . .70
Prerequisites for Upgrading In Place. . . . . . . . . . . . . . . . . . . . . . . . . . . . . . . . . . . . . . . . . . . . . . . 70
Post-Installation Review for Upgrading In Place. . . . . . . . . . . . . . . . . . . . . . . . . . . . . . . . . . . . . . 75
Performing a New Release 8207 Installation Using an Existing 8.2.x WebFOCUS Repository . . . 76
WebFOCUS Client and ReportCaster Directory Structures . . . . . . . . . . . . . . . . . . . . . . . . . . . . . . . . . .79
WebFOCUS Client Directories. . . . . . . . . . . . . . . . . . . . . . . . . . . . . . . . . . . . . . . . . . . . . . . . . . . . . 79
ReportCaster Distribution Server Directories. . . . . . . . . . . . . . . . . . . . . . . . . . . . . . . . . . . . . . . . 81
File Permissions for WebFOCUS Client Directories. . . . . . . . . . . . . . . . . . . . . . . . . . . . . . . . . . . 82
Uninstalling the WebFOCUS Client . . . . . . . . . . . . . . . . . . . . . . . . . . . . . . . . . . . . . . . . . . . . . . . . . . . . . 83
4. Configuring Web and Application Servers . . . . . . . . . . . . . . . . . . . . . . . . . . . . . . . . . . . . . . 85
Configuration Overview and Options . . . . . . . . . . . . . . . . . . . . . . . . . . . . . . . . . . . . . . . . . . . . . . . . . . . . 86
Configuration Steps Overview. . . . . . . . . . . . . . . . . . . . . . . . . . . . . . . . . . . . . . . . . . . . . . . . . . . . . 86
Configuring Apache Tomcat . . . . . . . . . . . . . . . . . . . . . . . . . . . . . . . . . . . . . . . . . . . . . . . . . . . . . . . . . . . 89
Java Memory Requirement. . . . . . . . . . . . . . . . . . . . . . . . . . . . . . . . . . . . . . . . . . . . . . . . . . . . . . . 89
Preparing Tomcat for WebFOCUS. . . . . . . . . . . . . . . . . . . . . . . . . . . . . . . . . . . . . . . . . . . . . . . . . .90
Creating WebFOCUS Contexts for Tomcat. . . . . . . . . . . . . . . . . . . . . . . . . . . . . . . . . . . . . . . . . . 92
Accessing the Shortcut to the Apache Tomcat Properties Window. . . . . . . . . . . . . . . . .96
Accessing the Tomcat Manager Application. . . . . . . . . . . . . . . . . . . . . . . . . . . . . . . . . . . .97
Verifying the WebFOCUS Configuration With Apache Tomcat. . . . . . . . . . . . . . . . . . . . . . . . . . .97
Configuring Microsoft IIS Version 7.x . . . . . . . . . . . . . . . . . . . . . . . . . . . . . . . . . . . . . . . . . . . . . . . . . . 100
Contents
4
Manually Configuring Microsoft IIS Version 7.x. . . . . . . . . . . . . . . . . . . . . . . . . . . . . . . . . . . . . 102
Configuring IBM WebSphere . . . . . . . . . . . . . . . . . . . . . . . . . . . . . . . . . . . . . . . . . . . . . . . . . . . . . . . . . 110
Configuring Oracle WebLogic . . . . . . . . . . . . . . . . . . . . . . . . . . . . . . . . . . . . . . . . . . . . . . . . . . . . . . . . . 120
Java Version Requirement. . . . . . . . . . . . . . . . . . . . . . . . . . . . . . . . . . . . . . . . . . . . . . . . . . . . . . 120
Update Java Settings. . . . . . . . . . . . . . . . . . . . . . . . . . . . . . . . . . . . . . . . . . . . . . . . . . . . . . . . . . .120
WebLogic Post-Installation Step. . . . . . . . . . . . . . . . . . . . . . . . . . . . . . . . . . . . . . . . . . . . . . . . . .121
5. Post-Installation Verification and Configuration . . . . . . . . . . . . . . . . . . . . . . . . . . . . . . .123
WebFOCUS Client Post-Installation Tasks . . . . . . . . . . . . . . . . . . . . . . . . . . . . . . . . . . . . . . . . . . . . . . 123
Configuring WebFOCUS in a Split Web-Tier and Application Server-Only Environment. . . . . 123
Using the Static Content Server Option. . . . . . . . . . . . . . . . . . . . . . . . . . . . . . . . . . . . . . 124
WebFOCUS Client Verification and Configuration. . . . . . . . . . . . . . . . . . . . . . . . . . . . . . . . . . . 125
Accessing the WebFOCUS Home Page. . . . . . . . . . . . . . . . . . . . . . . . . . . . . . . . . . . . . . .126
Accessing the WebFOCUS Administration Console. . . . . . . . . . . . . . . . . . . . . . . . . . . . 128
Running the Verification Tool. . . . . . . . . . . . . . . . . . . . . . . . . . . . . . . . . . . . . . . . . . . . . . . 130
Setting WebFOCUS Administration Console Authentication. . . . . . . . . . . . . . . . . . . . . 130
Defining Communications to WebFOCUS Reporting Servers. . . . . . . . . . . . . . . . . . . . .131
Setting Tomcat HTTP POST Maximum Size. . . . . . . . . . . . . . . . . . . . . . . . . . . . . . . . . . . . . . . . 132
WebFOCUS Repository Post-Installation Tasks . . . . . . . . . . . . . . . . . . . . . . . . . . . . . . . . . . . . . . . . . .132
WebFOCUS Repository Table Creation. . . . . . . . . . . . . . . . . . . . . . . . . . . . . . . . . . . . . . . . . . . . 132
6. WebFOCUS ReportCaster Post-Installation Tasks . . . . . . . . . . . . . . . . . . . . . . . . . . . . . .135
ReportCaster Verification . . . . . . . . . . . . . . . . . . . . . . . . . . . . . . . . . . . . . . . . . . . . . . . . . . . . . . . . . . . . 135
Testing the WebFOCUS Client. . . . . . . . . . . . . . . . . . . . . . . . . . . . . . . . . . . . . . . . . . . . . . . . . . . 135
Starting and Stopping the ReportCaster Distribution Server. . . . . . . . . . . . . . . . . . . . . . . . . . 136
Verifying ReportCaster. . . . . . . . . . . . . . . . . . . . . . . . . . . . . . . . . . . . . . . . . . . . . . . . . . . . . . . . . .137
Importing and Exporting the ReportCaster Configuration File . . . . . . . . . . . . . . . . . . . . . . . . . . . . . . 138
ReportCaster Configuration . . . . . . . . . . . . . . . . . . . . . . . . . . . . . . . . . . . . . . . . . . . . . . . . . . . . . . . . . . 140
Configuring the Memory Available for the ReportCaster Log Report. . . . . . . . . . . . . . . . . . . .140
Configuring the Heap Size for the ReportCaster Distribution Server. . . . . . . . . . . . . . . . . . . 140
Configuring ReportCaster Failover and Workload Distribution. . . . . . . . . . . . . . . . . . . . . . . . . 141
Adding Support for UTF-8 to the Distribution Server . . . . . . . . . . . . . . . . . . . . . . . . . . . . . . . . 142
Important Configuration Considerations When the Distribution Server is Installed
Separately From the WebFOCUS Client. . . . . . . . . . . . . . . . . . . . . . . . . . . . . . . . . . . . . . . . .143
Contents
Installation and Configuration for Windows 5
Configuring Secure Communications to the ReportCaster Distribution Server. . . . . . . . . . . 143
Configuring ReportCaster Web Services in an SSL Environment. . . . . . . . . . . . . . . . . . . . . . 143
Using the ReportCaster SFTP Key Generation Utility. . . . . . . . . . . . . . . . . . . . . . . . . . . . . . . . 144
7. Business Intelligence Portal and Home Page Verification and Security . . . . . . . . . 145
Verifying and Configuring WebFOCUS Business Intelligence Portal . . . . . . . . . . . . . . . . . . . . . . . . . 145
WebFOCUS Home Page Verification. . . . . . . . . . . . . . . . . . . . . . . . . . . . . . . . . . . . . . . . . . . . . . 146
8. Troubleshooting WebFOCUS and ReportCaster . . . . . . . . . . . . . . . . . . . . . . . . . . . . . . . . 149
WebFOCUS Troubleshooting Tips . . . . . . . . . . . . . . . . . . . . . . . . . . . . . . . . . . . . . . . . . . . . . . . . . . . . . 149
General Tips. . . . . . . . . . . . . . . . . . . . . . . . . . . . . . . . . . . . . . . . . . . . . . . . . . . . . . . . . . . . . . . . . . 149
HTTP 500 Internal Server Message. . . . . . . . . . . . . . . . . . . . . . . . . . . . . . . . . . . . . . . . . . . . . . .150
Web Browser Issues. . . . . . . . . . . . . . . . . . . . . . . . . . . . . . . . . . . . . . . . . . . . . . . . . . . . . . . . . . . 150
JVM Support Issue with IBM WebSphere Application Server. . . . . . . . . . . . . . . . . . . . . . . . . .151
Web and Application Server Debugging. . . . . . . . . . . . . . . . . . . . . . . . . . . . . . . . . . . . . . . . . . . 151
Java Memory Issues. . . . . . . . . . . . . . . . . . . . . . . . . . . . . . . . . . . . . . . . . . . . . . . . . . . . . . . . . . . 152
Graphics Issues. . . . . . . . . . . . . . . . . . . . . . . . . . . . . . . . . . . . . . . . . . . . . . . . . . . . . . . . . . . . . . . 153
WebFOCUS Web Server Host Name and Port Settings. . . . . . . . . . . . . . . . . . . . . . . . . . . . . . .154
Using the jar Utility. . . . . . . . . . . . . . . . . . . . . . . . . . . . . . . . . . . . . . . . . . . . . . . . . . . . . . . . . . . . .154
WebFOCUS File Extensions. . . . . . . . . . . . . . . . . . . . . . . . . . . . . . . . . . . . . . . . . . . . . . . . . . . . . .156
Missing Tomcat Context Definition Files. . . . . . . . . . . . . . . . . . . . . . . . . . . . . . . . . . . . . . . . . . .157
ReportCaster Troubleshooting Tips . . . . . . . . . . . . . . . . . . . . . . . . . . . . . . . . . . . . . . . . . . . . . . . . . . . .158
Troubleshooting Web and Application Server Errors. . . . . . . . . . . . . . . . . . . . . . . . . . . . . . . . . 159
Troubleshooting Java Errors. . . . . . . . . . . . . . . . . . . . . . . . . . . . . . . . . . . . . . . . . . . . . . . . . . . . . 159
Troubleshooting ReportCaster Distribution Server Errors. . . . . . . . . . . . . . . . . . . . . . . . . . . . .160
Troubleshooting Repository Errors. . . . . . . . . . . . . . . . . . . . . . . . . . . . . . . . . . . . . . . . . . . . . . . .160
Troubleshooting Reporting or Delivery Errors. . . . . . . . . . . . . . . . . . . . . . . . . . . . . . . . . . . . . . . 161
Turning Distribution Server Traces ON/OFF. . . . . . . . . . . . . . . . . . . . . . . . . . . . . . . . . . . . . . . . 162
9. Solr Installation and Configuration . . . . . . . . . . . . . . . . . . . . . . . . . . . . . . . . . . . . . . . . . . . 163
Indexing Existing Content . . . . . . . . . . . . . . . . . . . . . . . . . . . . . . . . . . . . . . . . . . . . . . . . . . . . . . . . . . . .163
A. On-Premises Installation of Automated Insights . . . . . . . . . . . . . . . . . . . . . . . . . . . . . . 167
Hardware Requirements . . . . . . . . . . . . . . . . . . . . . . . . . . . . . . . . . . . . . . . . . . . . . . . . . . . . . . . . . . . . .167
Docker Installation . . . . . . . . . . . . . . . . . . . . . . . . . . . . . . . . . . . . . . . . . . . . . . . . . . . . . . . . . . . . . . . . . 167
Running the Automated Insights Container . . . . . . . . . . . . . . . . . . . . . . . . . . . . . . . . . . . . . . . . . . . . .167
Contents
6
WebFOCUS Server Configuration . . . . . . . . . . . . . . . . . . . . . . . . . . . . . . . . . . . . . . . . . . . . . . . . . . . . . .169
B. Metadata Classification On-Premises Installation . . . . . . . . . . . . . . . . . . . . . . . . . . . . 171
Using the Metadata Classification Feature . . . . . . . . . . . . . . . . . . . . . . . . . . . . . . . . . . . . . . . . . . . . . 171
Hardware Requirements . . . . . . . . . . . . . . . . . . . . . . . . . . . . . . . . . . . . . . . . . . . . . . . . . . . . . . . . . . . . .172
Docker Installation . . . . . . . . . . . . . . . . . . . . . . . . . . . . . . . . . . . . . . . . . . . . . . . . . . . . . . . . . . . . . . . . . 172
WebFOCUS Server Configuration . . . . . . . . . . . . . . . . . . . . . . . . . . . . . . . . . . . . . . . . . . . . . . . . . . . . . .174
Metadata Classification Containers By Release . . . . . . . . . . . . . . . . . . . . . . . . . . . . . . . . . . . . . . . . .175
C. Configuring WebFOCUS Help . . . . . . . . . . . . . . . . . . . . . . . . . . . . . . . . . . . . . . . . . . . . . . . . . 177
Deploying WebFOCUS Online Help On-Premise . . . . . . . . . . . . . . . . . . . . . . . . . . . . . . . . . . . . . . . . . .177
Requirements. . . . . . . . . . . . . . . . . . . . . . . . . . . . . . . . . . . . . . . . . . . . . . . . . . . . . . . . . . . . . . . . . 178
Verifying the WebFOCUS Online Help Download File . . . . . . . . . . . . . . . . . . . . . . . . . . . . . . . . . . . . . 178
Deploying the WebFOCUS Online Help Web Application Using a Context File in Tomcat . . . . . . . 180
Configuring WebFOCUS to Point to the WebFOCUS Help on the Remote Server . . . . . . . . . . . . . . 181
D. Additional Graph Configuration Options . . . . . . . . . . . . . . . . . . . . . . . . . . . . . . . . . . . . . . 183
Graph Options . . . . . . . . . . . . . . . . . . . . . . . . . . . . . . . . . . . . . . . . . . . . . . . . . . . . . . . . . . . . . . . . . . . . . 183
Graph Invocation and Generation Options . . . . . . . . . . . . . . . . . . . . . . . . . . . . . . . . . . . . . . . . . . . . . .183
PCHOLD (Server Side) Graphics Overview . . . . . . . . . . . . . . . . . . . . . . . . . . . . . . . . . . . . . . . . . . . . . . 184
HOLD Graphs Overview. . . . . . . . . . . . . . . . . . . . . . . . . . . . . . . . . . . . . . . . . . . . . . . . . . . . . . . . . 184
Configurations for HOLD Graphics . . . . . . . . . . . . . . . . . . . . . . . . . . . . . . . . . . . . . . . . . . . . . . . . . . . . 185
Configuring GRAPHSERVURL. . . . . . . . . . . . . . . . . . . . . . . . . . . . . . . . . . . . . . . . . . . . . . . . . . . . 186
Configuring for JSCOM3 HOLD. . . . . . . . . . . . . . . . . . . . . . . . . . . . . . . . . . . . . . . . . . . . . . . . . . . 186
E. Additional WebFOCUS Repository Topics and Tasks . . . . . . . . . . . . . . . . . . . . . . . . . . . 189
Repository JDBC Concepts . . . . . . . . . . . . . . . . . . . . . . . . . . . . . . . . . . . . . . . . . . . . . . . . . . . . . . . . . . .189
JDBC Overview. . . . . . . . . . . . . . . . . . . . . . . . . . . . . . . . . . . . . . . . . . . . . . . . . . . . . . . . . . . . . . . . 190
User ID and Password. . . . . . . . . . . . . . . . . . . . . . . . . . . . . . . . . . . . . . . . . . . . . . . . . . . . . . . . . . 190
JDBC Driver. . . . . . . . . . . . . . . . . . . . . . . . . . . . . . . . . . . . . . . . . . . . . . . . . . . . . . . . . . . . . . . . . . . 190
JDBC Path. . . . . . . . . . . . . . . . . . . . . . . . . . . . . . . . . . . . . . . . . . . . . . . . . . . . . . . . . . . . . . . . . . . . 191
JDBC Class. . . . . . . . . . . . . . . . . . . . . . . . . . . . . . . . . . . . . . . . . . . . . . . . . . . . . . . . . . . . . . . . . . . 192
JDBC URL. . . . . . . . . . . . . . . . . . . . . . . . . . . . . . . . . . . . . . . . . . . . . . . . . . . . . . . . . . . . . . . . . . . . 192
Repository Connection Information . . . . . . . . . . . . . . . . . . . . . . . . . . . . . . . . . . . . . . . . . . . . . . . . . . . .192
Db2 Connection Information. . . . . . . . . . . . . . . . . . . . . . . . . . . . . . . . . . . . . . . . . . . . . . . . . . . . .193
Derby Connection Information. . . . . . . . . . . . . . . . . . . . . . . . . . . . . . . . . . . . . . . . . . . . . . . . . . . 194
Contents
Installation and Configuration for Windows 7
MySQL Connection Information. . . . . . . . . . . . . . . . . . . . . . . . . . . . . . . . . . . . . . . . . . . . . . . . . . 195
Oracle Connection Information. . . . . . . . . . . . . . . . . . . . . . . . . . . . . . . . . . . . . . . . . . . . . . . . . . .195
SQL Server Connection Information. . . . . . . . . . . . . . . . . . . . . . . . . . . . . . . . . . . . . . . . . . . . . . 196
Sizing Guidelines . . . . . . . . . . . . . . . . . . . . . . . . . . . . . . . . . . . . . . . . . . . . . . . . . . . . . . . . . . . . . . . . . . . 197
Other WebFOCUS Repository Utilities and Tasks . . . . . . . . . . . . . . . . . . . . . . . . . . . . . . . . . . . . . . . . 199
WebFOCUS Repository Table Creation. . . . . . . . . . . . . . . . . . . . . . . . . . . . . . . . . . . . . . . . . . . . 199
Changing the WebFOCUS Repository. . . . . . . . . . . . . . . . . . . . . . . . . . . . . . . . . . . . . . . . . . . . . 199
SQL Server Pre-Installation Steps . . . . . . . . . . . . . . . . . . . . . . . . . . . . . . . . . . . . . . . . . . . . . . . . . . . . .202
MySQL Repository Set Up . . . . . . . . . . . . . . . . . . . . . . . . . . . . . . . . . . . . . . . . . . . . . . . . . . . . . . . . . . . 205
Installing MySQL. . . . . . . . . . . . . . . . . . . . . . . . . . . . . . . . . . . . . . . . . . . . . . . . . . . . . . . . . . . . . . .206
Increasing the max_allowed_packet Parameter Value. . . . . . . . . . . . . . . . . . . . . . . . . . . . . . . 206
Running MySQL. . . . . . . . . . . . . . . . . . . . . . . . . . . . . . . . . . . . . . . . . . . . . . . . . . . . . . . . . . . . . . . 206
Administering MySQL. . . . . . . . . . . . . . . . . . . . . . . . . . . . . . . . . . . . . . . . . . . . . . . . . . . . . . . . . . .207
Creating the WebFOCUS Reporting Database and User. . . . . . . . . . . . . . . . . . . . . . . . . . . . . .207
Installing the MySQL JDBC Driver. . . . . . . . . . . . . . . . . . . . . . . . . . . . . . . . . . . . . . . . . . . . . . . . 210
F. Additional WebFOCUS Configuration Options . . . . . . . . . . . . . . . . . . . . . . . . . . . . . . . . . .211
Installing Multiple WebFOCUS Instances on the Same Machine . . . . . . . . . . . . . . . . . . . . . . . . . . . 211
Installing Additional WebFOCUS Instances. . . . . . . . . . . . . . . . . . . . . . . . . . . . . . . . . . . . . . . . 211
Configuring Multiple Web and Application Servers. . . . . . . . . . . . . . . . . . . . . . . . . . . . . . . . . . 213
Tomcat Security Tips . . . . . . . . . . . . . . . . . . . . . . . . . . . . . . . . . . . . . . . . . . . . . . . . . . . . . . . . . . . . . . . .214
Tomcat User ID and NTFS Permissions. . . . . . . . . . . . . . . . . . . . . . . . . . . . . . . . . . . . . . . . . . . 214
Legal and Third-Party Notices . . . . . . . . . . . . . . . . . . . . . . . . . . . . . . . . . . . . . . . . . . . . . . . . . . 217
Contents
8
Chapter1Introducing WebFOCUS Installation
This chapter provides an overview of the WebFOCUS installation and configurationprocedures.
In this chapter:
About WebFOCUS
WebFOCUS Installation Overview
ReportCaster Installation Overview
WebFOCUS Installation and Configuration Steps
Application Server and Web Application Overview
Security and User IDs for WebFOCUS
About WebFOCUS
WebFOCUS is a complete, web-ready data access and reporting system that connects users todata. WebFOCUS accesses and processes information located in any format on any platformand presents that information to users through a web browser or through formats, such asPDF, XLS, and XML. Using HTML and user-friendly GUI tools, WebFOCUS developers can buildpowerful webpage interfaces that allow users to create and view reports.
WebFOCUS data access, network communications, and server operations are provided throughWebFOCUS technology. WebFOCUS technology accesses data without concern for thecomplexities and incompatibilities of different operating systems, databases, file systems, fileformats, and networks. You can access both local and remote data on over 35 platforms frommore than 65 database formats, including SQL Server™, Oracle®, Ingres®, SAP®, and Db2®.
WebFOCUS Installation Overview
This section briefly explains the different WebFOCUS installation components, as well as howthose components interact and are configured.
Installation and Configuration for Windows 9
WebFOCUS and Your Network
WebFOCUS seamlessly integrates into your existing network by connecting web servers andapplication servers to your data. End users, developers, and administrators then accessWebFOCUS through a web browser.
The main requirements for installing WebFOCUS are:
Web Browser. To access WebFOCUS applications, you need a web browser and a TCP/IPconnection to a web server or application server.
Web Server and Application Server. WebFOCUS runs in part through a web server orapplication server. WebFOCUS is flexible and offers several configuration options, so youcan choose whether to use both a web server and an application server or just anapplication server. Apache Tomcat™ is provided and can be used as both a web server andapplication server.
Web servers handle requests by returning static files to a web browser or by executingprocesses that provide additional functionality. Application servers execute Java servlets orother processes that the web server does not handle.
WebFOCUS functionality can be implemented using Java servlets. Connecting with Javaservlets is required for most advanced features. For Java servlets, an application server isrequired and you can use WebFOCUS with or without an external web server.
Note: Either an application server or a servlet container or engine can be used to processWebFOCUS Java requests. However, the term application server is used in thisdocumentation unless referring to a specific third-party product.
Data. WebFOCUS can access data from almost anywhere. To access data, you shouldknow its location on your network and any necessary sign-in information.
A complete list of requirements is provided in WebFOCUS Installation Requirements on page23.
WebFOCUS Components
There are two main WebFOCUS components to install:
WebFOCUS Client. The WebFOCUS Client runs as part of your application server andconnects WebFOCUS to the web. When a user makes a request from a browser, theWebFOCUS Client receives and processes the request by passing it to the WebFOCUSReporting Server. The WebFOCUS Client installation includes:
Java-based web connectivity components.
WebFOCUS Installation Overview
10
User interfaces, tools, and utilities.
The following tools are available:
BI Portal. Enables your organization to grant authorized users access to informationthey need while restricting unauthorized users from sensitive or confidential data.
Designer. Enables you to create interactive, responsive pages and meaningful InfoApps,using content that you or other members of your organization create.
InfoAssist. Provides business users with the most advanced, yet simple to use, ad hocreporting features needed to create intricate reports and perform insightful analysis.
ReportCaster. Provides advanced scheduling and distribution capabilities forWebFOCUS reports, procedures, and alerts, as well as independent files and URLs.
Web Services. Allows you to develop applications in the .NET or Java environments andperform WebFOCUS functionality from it.
Quick Data. A Microsoft® Office® add-on that enables you to connect Microsoft Excel®
directly to WebFOCUS reporting tools, where you can access and analyze all of yourenterprise data.
Open Portal Services. Provides seamless integration to Enterprise Information Portals(EIPs) through a Single Sign On enabling you to consume and interact with WebFOCUScontent in an easy and secure way.
WebFOCUS Reporting Server. The WebFOCUS Reporting Server resides on machines thatcan access your data. The WebFOCUS Reporting Server provides data access, numbercrunching, and report generation functionality using WebFOCUS integration technology.
WebFOCUS Processing
The following steps and figure describe how WebFOCUS processes WebFOCUS reportrequests:
1. A user requests a report and passes parameters by calling a WebFOCUS servlet throughlinks and forms on a webpage.
2. The request and parameters come to the WebFOCUS Client on the web or applicationserver, which processes the parameters and creates a request for the WebFOCUSReporting Server.
3. The WebFOCUS Reporting Server receives the request, processes it, and accesses anyneeded data.
4. Data is retrieved from data sources to process the request.
1. Introducing WebFOCUS Installation
Installation and Configuration for Windows 11
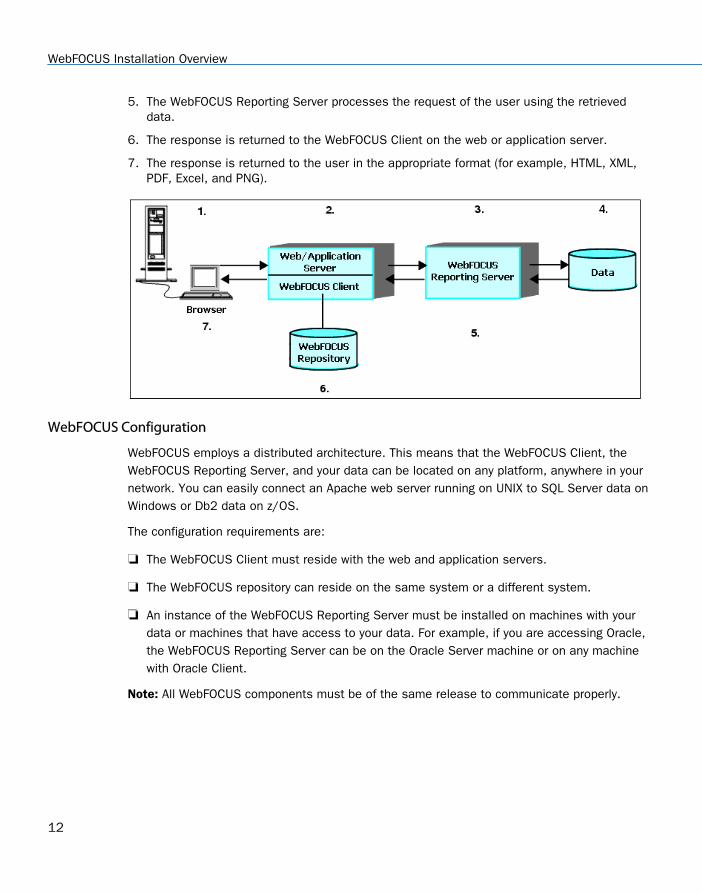
5. The WebFOCUS Reporting Server processes the request of the user using the retrieveddata.
6. The response is returned to the WebFOCUS Client on the web or application server.
7. The response is returned to the user in the appropriate format (for example, HTML, XML,PDF, Excel, and PNG).
WebFOCUS Configuration
WebFOCUS employs a distributed architecture. This means that the WebFOCUS Client, theWebFOCUS Reporting Server, and your data can be located on any platform, anywhere in yournetwork. You can easily connect an Apache web server running on UNIX to SQL Server data onWindows or Db2 data on z/OS.
The configuration requirements are:
The WebFOCUS Client must reside with the web and application servers.
The WebFOCUS repository can reside on the same system or a different system.
An instance of the WebFOCUS Reporting Server must be installed on machines with yourdata or machines that have access to your data. For example, if you are accessing Oracle,the WebFOCUS Reporting Server can be on the Oracle Server machine or on any machinewith Oracle Client.
Note: All WebFOCUS components must be of the same release to communicate properly.
WebFOCUS Installation Overview
12
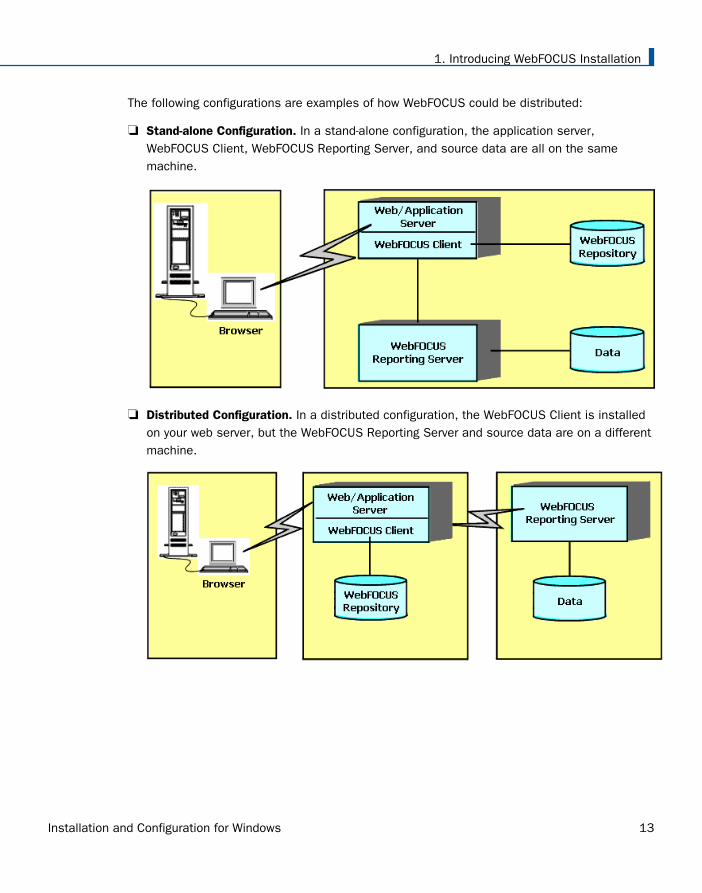
The following configurations are examples of how WebFOCUS could be distributed:
Stand-alone Configuration. In a stand-alone configuration, the application server,WebFOCUS Client, WebFOCUS Reporting Server, and source data are all on the samemachine.
Distributed Configuration. In a distributed configuration, the WebFOCUS Client is installedon your web server, but the WebFOCUS Reporting Server and source data are on a differentmachine.
1. Introducing WebFOCUS Installation
Installation and Configuration for Windows 13
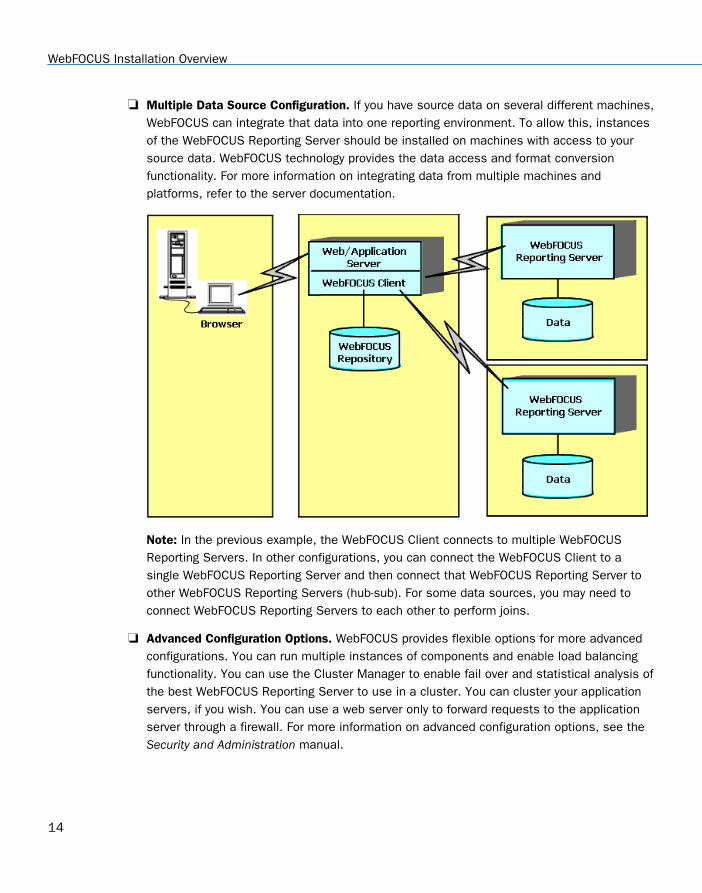
Multiple Data Source Configuration. If you have source data on several different machines,WebFOCUS can integrate that data into one reporting environment. To allow this, instancesof the WebFOCUS Reporting Server should be installed on machines with access to yoursource data. WebFOCUS technology provides the data access and format conversionfunctionality. For more information on integrating data from multiple machines andplatforms, refer to the server documentation.
Note: In the previous example, the WebFOCUS Client connects to multiple WebFOCUSReporting Servers. In other configurations, you can connect the WebFOCUS Client to asingle WebFOCUS Reporting Server and then connect that WebFOCUS Reporting Server toother WebFOCUS Reporting Servers (hub-sub). For some data sources, you may need toconnect WebFOCUS Reporting Servers to each other to perform joins.
Advanced Configuration Options. WebFOCUS provides flexible options for more advancedconfigurations. You can run multiple instances of components and enable load balancingfunctionality. You can use the Cluster Manager to enable fail over and statistical analysis ofthe best WebFOCUS Reporting Server to use in a cluster. You can cluster your applicationservers, if you wish. You can use a web server only to forward requests to the applicationserver through a firewall. For more information on advanced configuration options, see theSecurity and Administration manual.
WebFOCUS Installation Overview
14
ReportCaster Installation Overview
This section briefly explains the different ReportCaster installation components, as well as howthose components interact. If you are not using ReportCaster, proceed to WebFOCUSInstallation and Configuration Steps on page 17.
ReportCaster Components
ReportCaster enables you to schedule the delivery and automatic running of WebFOCUSreports and alerts, as well as independent files and URLs. ReportCaster distributes reportsand files to individuals or lists through FTP, email, or a printer, and it can store reports in aReport Library.
There are three ReportCaster components:
ReportCaster Web Components. ReportCaster web components are installed with theWebFOCUS Client as a J2EE web application. They include a user interface, an API, andconnectivity components for managing delivery jobs and the Report Library.
ReportCaster Distribution Server. The ReportCaster Distribution Server is a Java-basedprogram that provides the back-end functionality to deliver reports and files. TheDistribution Server can be installed with the WebFOCUS Client or installed on a separatemachine.
Note: The ReportCaster Distribution Server is also referred to as the ReportCaster Server orthe Distribution Server.
ReportCaster Tables. The ReportCaster tables are part of the WebFOCUS repository, whichReportCaster uses for schedule, distribution, Report Library, and log information. You canstore the WebFOCUS repository in a Derby™, Oracle, SQL Server, Db2, or any othersupported JDBC™-compliant database.
ReportCaster Processing
To schedule a delivery job, the ReportCaster Distribution Server is accessed through either aReportCaster user interface or an external API. The ReportCaster API allows independentapplications to schedule delivery jobs on the ReportCaster Distribution Server.
After jobs have been scheduled, the ReportCaster Distribution Server handles their executionand delivery. The following steps and figure describe how the Distribution Server processingidentifies schedules to be run and distributes scheduled reports for scheduled WebFOCUSprocedures (FEX).
1. The Distribution Server checks the repository every minute for jobs that are scheduled torun. You can change the default value of 1 minute within the ReportCaster configurationtool.
1. Introducing WebFOCUS Installation
Installation and Configuration for Windows 15
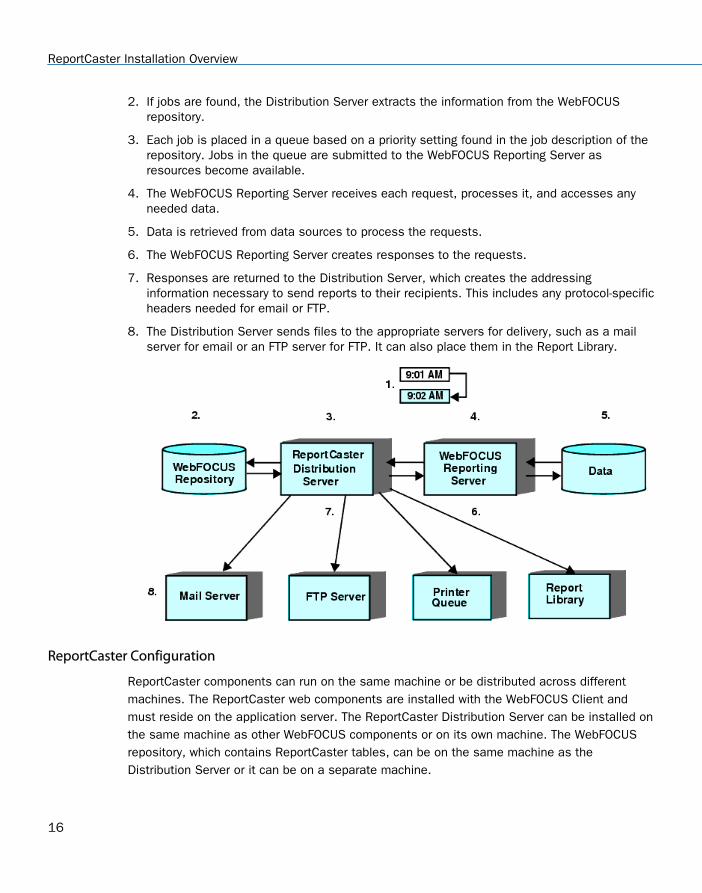
2. If jobs are found, the Distribution Server extracts the information from the WebFOCUSrepository.
3. Each job is placed in a queue based on a priority setting found in the job description of therepository. Jobs in the queue are submitted to the WebFOCUS Reporting Server asresources become available.
4. The WebFOCUS Reporting Server receives each request, processes it, and accesses anyneeded data.
5. Data is retrieved from data sources to process the requests.
6. The WebFOCUS Reporting Server creates responses to the requests.
7. Responses are returned to the Distribution Server, which creates the addressinginformation necessary to send reports to their recipients. This includes any protocol-specificheaders needed for email or FTP.
8. The Distribution Server sends files to the appropriate servers for delivery, such as a mailserver for email or an FTP server for FTP. It can also place them in the Report Library.
ReportCaster Configuration
ReportCaster components can run on the same machine or be distributed across differentmachines. The ReportCaster web components are installed with the WebFOCUS Client andmust reside on the application server. The ReportCaster Distribution Server can be installed onthe same machine as other WebFOCUS components or on its own machine. The WebFOCUSrepository, which contains ReportCaster tables, can be on the same machine as theDistribution Server or it can be on a separate machine.
ReportCaster Installation Overview
16
WebFOCUS Installation and Configuration Steps
There are several steps to the installation and configuration process:
1. WebFOCUS Introduction. Review this section to ensure you understand the differentcomponents involved in the installation.
2. Pre-Installation Tasks. Before installing WebFOCUS, review all the requirements.
3. WebFOCUS Reporting Server Installation. Install the WebFOCUS Reporting Server onmachines with access to your source data. For more information, see the Server Installationmanual.
4. WebFOCUS Client Installation. Install the WebFOCUS Client, as explained in Installing theWebFOCUS Client on page 41.
5. Web Server or Application Server Configuration. Configure your web server or applicationserver, as explained in Configuring Web and Application Servers on page 85.
Important: For a split-tier environment, see WebFOCUS Client Post-Installation Tasks onpage 123.
6. WebFOCUS Post-Installation Tasks. Verify the WebFOCUS configuration and optionallychange default settings, as explained in WebFOCUS Client Post-Installation Tasks on page123.
7. Post-Installation Data Access and Description. Use the WebFOCUS Reporting Server WebConsole and its Help system to configure adapters (data access) and create synonyms(data description) for your data sources. These steps are also documented in the ServerAdministration manual.
Review the WebFOCUS Release Notes document for information on known issues anddocumentation updates.
Application Server and Web Application Overview
This section provides some background information about third-party technologies used withWebFOCUS. It provides simplified overviews to assist those new to this technology.
Web Servers and Application Servers
The WebFOCUS Client web components run as part of your application server.
Web servers generally handle HTML, images (for example, PNG), and other traditional webcontent and processing. The terms web server and HTTP server are sometimes usedinterchangeably. Microsoft IIS and Apache HTTP Server are common web servers.
1. Introducing WebFOCUS Installation
Installation and Configuration for Windows 17
Application servers (or servlet containers) generally handle Java and non-traditionalprocessing. In TIBCO WebFOCUS documentation, the term application server refers to anapplication server, servlet container, servlet engine, or J2EE engine. IBM® WebSphere®,Oracle® WebLogic®, Oracle Java® System Application Server, and Apache Tomcat™ arecommon application servers or servlet containers.
Some application servers have a robust web server (HTTP) component and do not require anexternal web server. For example, Apache Tomcat can be used both as a web server andapplication server. You use an application server for all WebFOCUS processing, but you canuse a web server to forward requests through a firewall to the application server.
Web Applications
Some WebFOCUS functionality is provided in J2EE web applications (webapps). A J2EE webapplication is a packaged collection of Java, text, graphic, and other files that function as anapplication or service. A web application is organized as a set of directories that can be placedinto a Web Archive (.war) file. A WAR file is similar to a ZIP or TAR file in that it contains otherfiles and preserves their directory structure.
A web application must follow certain conventions and always contains a WEB-INF directory.The WEB-INF directory must contain a web.xml file. The web.xml file is known as thedeployment descriptor and contains configuration information. The WEB-INF directory usuallyhas lib or class subdirectories containing its main Java code.
Running Web Applications
A web application runs inside an application server or servlet container. To run a webapplication, you deploy it to an application server, either as a WAR file or an EAR file.Theoretically, any web application could run in any application server on any platform, providedit is written to the Java Servlet API 3.0 specification. However, application servers vary and youshould ensure your application server is supported with WebFOCUS. For more information onsupported application servers, see WebFOCUS Installation Requirements on page 23.
Accessing Web Applications
After it is deployed, the web application context root is used to access the application in a webbrowser. The context root is the directory name used to access a web application and isnormally specified when you deploy a web application. A context root is sometimes referred toas a context path or a context.
For example, the default WebFOCUS context root is /ibi_apps. Therefore, you can access theweb application using:
http://hostname:port/ibi_apps/signin
Application Server and Web Application Overview
18
where:hostname:port
Are the host name and HTTP port of the web server or application server. If you requireSSL, use https instead of http.
A valid user name and password are required to access the WebFOCUS web application.
If your application server is separate from your web server, you must ensure that the webserver can route requests to the application server. For example, when a request comes to theweb server for ibi_apps, the web server must know to send the request to the applicationserver. For some web and application server combinations, this occurs automatically, butothers must be configured.
Security and User IDs for WebFOCUS
This section provides a brief overview of default WebFOCUS security and authentication issues.These defaults can be changed using security exits and other features. In addition, yourenterprise may require additional security and authentication for the web server, mail server,data sources, or other third-party components. For a complete discussion of WebFOCUSsecurity, see the Security and Administration manual.
By default, WebFOCUS uses two completely independent user ID types, although it is possibleto synchronize them:
Managed Reporting and ReportCaster User IDs (Front End)
All requests processed by the WebFOCUS Client require a user ID. For information onWebFOCUS security authentication and authorization, see the Security and Administrationmanual.
WebFOCUS Reporting Server User IDs (Back End)
The WebFOCUS Reporting Server has both user IDs to run reports and procedures(Execution IDs) and user IDs to administer and start the server (Administrator IDs). Inaddition, the WebFOCUS Reporting Server can run with different security providers.
Managed Reporting and ReportCaster IDs
A user has the same ID for Managed Reporting and ReportCaster. This ID determines whichfeatures, reports, and data are accessible through these products. By default, these IDs arecreated and maintained by a WebFOCUS administrator using the WebFOCUS Security Center.
When WebFOCUS is first installed, the default WebFOCUS administrator ID and password areboth admin. After completely installing WebFOCUS, an administrator should sign in as admin,update the password for the admin account, and create accounts for other users.
1. Introducing WebFOCUS Installation
Installation and Configuration for Windows 19
For information on integration with basic web server authentication or WebFOCUS ReportingServer security, see the Security and Administration manual.
WebFOCUS Reporting Server Security Providers
Necessary IDs for the WebFOCUS Reporting Server depend on which security provider theserver uses. Each time you start the WebFOCUS Reporting Server, you can specify a securityprovider that determines how authentication occurs when running reports and accessing theWeb Console. The Web Console is a web-based tool for configuring and administering theWebFOCUS Reporting Server.
For more information, see the Server Installation manual.
You can run the server with:
Security ON
Security OFF
The following are the most common security providers, which are set through the Web Console:
OPSYS. Authentication is performed by the operating system of the WebFOCUS ReportingServer machine. Users are authenticated when running reports and when accessing theWeb Console to configure the server.
PTH. Authentication is internal. User IDs and encrypted passwords are stored in a filecreated by the server:
drive:\ibi\profiles\admin.cfg
Users are authenticated only when accessing the Web Console to configure the server.Authentication is not required to run reports.
Security providers DBMS and LDAP are other options. For more information, see the ServerAdministration manual.
WebFOCUS Reporting Server User IDs
Regardless of security provider, there is a distinction between WebFOCUS Client execution IDsand server administrator IDs.
Execution IDs are user IDs needed to run reports or applications. With security OFF or ONwith provider PTH, no authentication is needed for these tasks. With security providerOPSYS, the authentication is performed by the operating system of the WebFOCUSReporting Server machine. Since authentication is performed by the operating system,these IDs are not created, stored, or maintained through WebFOCUS.
Security and User IDs for WebFOCUS
20
With security provider OPSYS, when you run a report in a WebFOCUS application, theWebFOCUS Client must pass an execution ID to the server. End users can be prompted toprovide this execution ID, or the WebFOCUS Client can automatically send a predeterminedexecution ID. For more information on configuring how the WebFOCUS Client providesexecution IDs to the server, see WebFOCUS Client Post-Installation Tasks on page 123.
Server administrator IDs are user IDs needed to start the server and access the WebConsole. During the server installation, you are prompted for a PTH user ID and passwordto administer the server. After installation, you can change and add security providers andadministrators through the Web Console. The server stores administrator IDs and encryptedpasswords in:
drive:\ibi\profiles\admin.cfg
These server administrator user IDs and passwords are needed for the following:
Web Console Authentication. With security providers OPSYS and PTH, only user IDsstored in the admin.cfg file can sign in to the Web Console as administrators. Withsecurity provider OPSYS, passwords are authenticated through the operating system.For security provider PTH, the server uses the passwords stored in the admin.cfg file.
Starting the Server. With all security providers, only user IDs stored in the admin.cfg filehave the authority to start the server. To start the server, a server administrator IDstored in admin.cfg must have the same name as an operating system user ID with fullfile permissions to the server directories.
To run with security provider OPSYS on Windows, both the user ID and password storedin admin.cfg must match the Windows user ID and password of the user starting theserver. If your operating system password changes or you did not provide the correctpassword during installation, you must update the password stored by the serverthrough the Web Console. The user ID and password stored by the server in admin.cfgmust be kept in sync with the operating system (or domain).
Note: To access data sources needed for reports, the type of authentication is determined byhow you configure the adapter for the data source, as explained in the Server Administrationmanual.
1. Introducing WebFOCUS Installation
Installation and Configuration for Windows 21

Security and User IDs for WebFOCUS
22
Chapter2WebFOCUS Installation Requirements
This chapter lists requirements for installing and configuring WebFOCUS on Windowssystems.
Review the WebFOCUS Release Notes document for information on known issues anddocumentation updates.
In this chapter:
WebFOCUS Installation Requirements
WebFOCUS Repository Setup
Database Collation Utilities
WebFOCUS Installation Requirements
Release 8207 is a new feature release that supports new application development, includesincremental maintenance, and supports upgrade of content and applications.
Review the sections that follow to ensure that your machine or machines meet the necessaryWebFOCUS requirements.
JVM and J2SE Support Information
Release 8207 supports Java Virtual Machine (Java VM) Version 8 and Version 11 on thesystem that is hosting the application server where WebFOCUS and the ReportCasterDistribution Server are installed.
In addition, any supported portal server (for example, SAP Enterprise Portal Server, IBMWebSphere Portal Server, and so on) that is integrated with WebFOCUS Open Portal Servicesmust be hosted on a system that is using Java VM Version 8 or Version 11.
Note: For information regarding WebFOCUS release support for the different Oracle JDKversions that WebFOCUS and ReportCaster web applications are installed, see WebFOCUSSupport Statement for Java 2 Platform, Standard Edition (J2SE) at:
https://kb.informationbuilders.com/topic/webfocus-support-statement-java-platform-standard-edition-java-se
Installation and Configuration for Windows 23
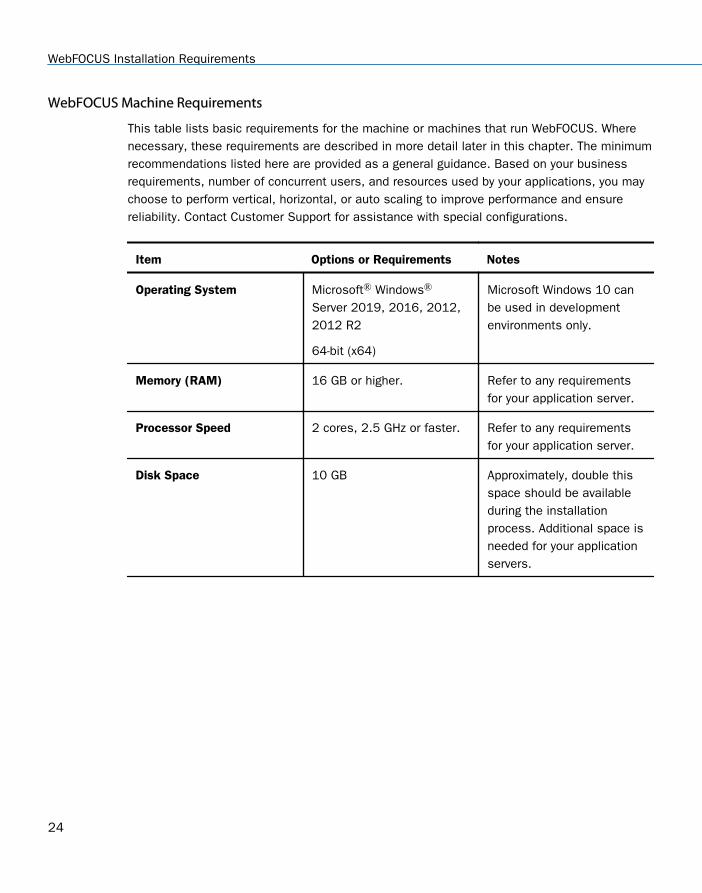
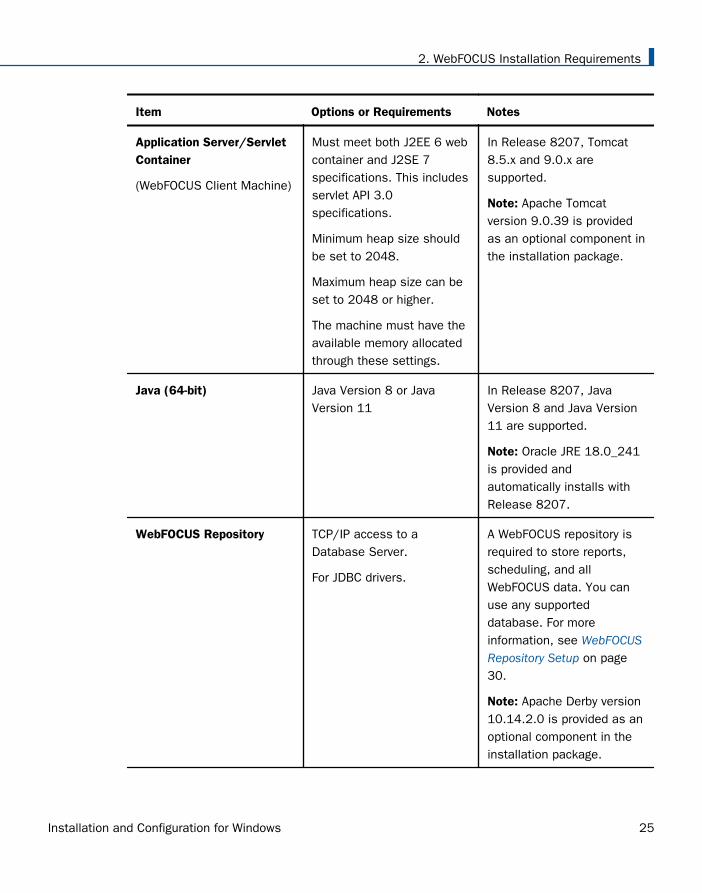
WebFOCUS Machine Requirements
This table lists basic requirements for the machine or machines that run WebFOCUS. Wherenecessary, these requirements are described in more detail later in this chapter. The minimumrecommendations listed here are provided as a general guidance. Based on your businessrequirements, number of concurrent users, and resources used by your applications, you maychoose to perform vertical, horizontal, or auto scaling to improve performance and ensurereliability. Contact Customer Support for assistance with special configurations.
Item Options or Requirements Notes
Operating System Microsoft® Windows®
Server 2019, 2016, 2012,2012 R2
64-bit (x64)
Microsoft Windows 10 canbe used in developmentenvironments only.
Memory (RAM) 16 GB or higher. Refer to any requirementsfor your application server.
Processor Speed 2 cores, 2.5 GHz or faster. Refer to any requirementsfor your application server.
Disk Space 10 GB Approximately, double thisspace should be availableduring the installationprocess. Additional space isneeded for your applicationservers.
WebFOCUS Installation Requirements
24
Item Options or Requirements Notes
Application Server/ServletContainer
(WebFOCUS Client Machine)
Must meet both J2EE 6 webcontainer and J2SE 7specifications. This includesservlet API 3.0specifications.
Minimum heap size shouldbe set to 2048.
Maximum heap size can beset to 2048 or higher.
The machine must have theavailable memory allocatedthrough these settings.
In Release 8207, Tomcat8.5.x and 9.0.x aresupported.
Note: Apache Tomcatversion 9.0.39 is providedas an optional component inthe installation package.
Java (64-bit) Java Version 8 or JavaVersion 11
In Release 8207, JavaVersion 8 and Java Version11 are supported.
Note: Oracle JRE 18.0_241is provided andautomatically installs withRelease 8207.
WebFOCUS Repository TCP/IP access to aDatabase Server.
For JDBC drivers.
A WebFOCUS repository isrequired to store reports,scheduling, and allWebFOCUS data. You canuse any supporteddatabase. For moreinformation, see WebFOCUSRepository Setup on page30.
Note: Apache Derby version10.14.2.0 is provided as anoptional component in theinstallation package.
2. WebFOCUS Installation Requirements
Installation and Configuration for Windows 25
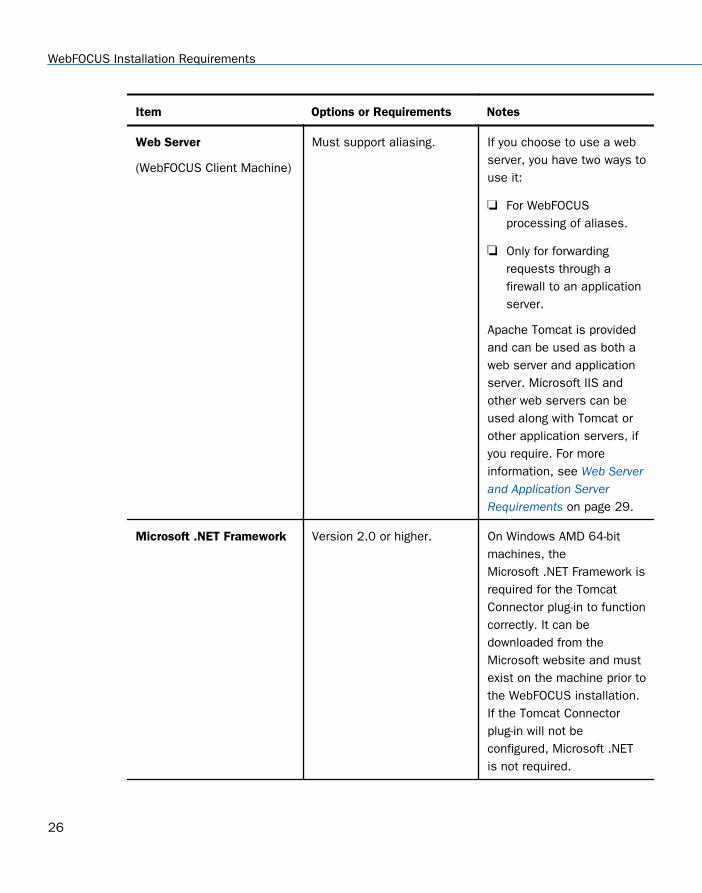
Item Options or Requirements Notes
Web Server
(WebFOCUS Client Machine)
Must support aliasing. If you choose to use a webserver, you have two ways touse it:
For WebFOCUSprocessing of aliases.
Only for forwardingrequests through afirewall to an applicationserver.
Apache Tomcat is providedand can be used as both aweb server and applicationserver. Microsoft IIS andother web servers can beused along with Tomcat orother application servers, ifyou require. For moreinformation, see Web Serverand Application ServerRequirements on page 29.
Microsoft .NET Framework Version 2.0 or higher. On Windows AMD 64-bitmachines, theMicrosoft .NET Framework isrequired for the TomcatConnector plug-in to functioncorrectly. It can bedownloaded from theMicrosoft website and mustexist on the machine prior tothe WebFOCUS installation.If the Tomcat Connectorplug-in will not beconfigured, Microsoft .NETis not required.
WebFOCUS Installation Requirements
26
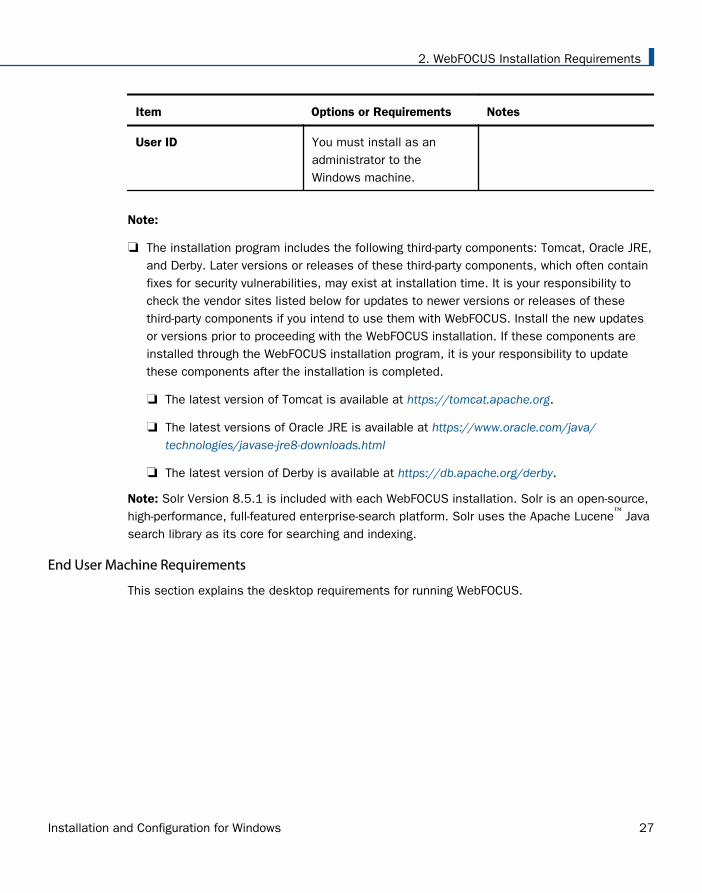
Item Options or Requirements Notes
User ID You must install as anadministrator to theWindows machine.
Note:
The installation program includes the following third-party components: Tomcat, Oracle JRE,and Derby. Later versions or releases of these third-party components, which often containfixes for security vulnerabilities, may exist at installation time. It is your responsibility tocheck the vendor sites listed below for updates to newer versions or releases of thesethird-party components if you intend to use them with WebFOCUS. Install the new updatesor versions prior to proceeding with the WebFOCUS installation. If these components areinstalled through the WebFOCUS installation program, it is your responsibility to updatethese components after the installation is completed.
The latest version of Tomcat is available at https://tomcat.apache.org.
The latest versions of Oracle JRE is available at https://www.oracle.com/java/technologies/javase-jre8-downloads.html
The latest version of Derby is available at https://db.apache.org/derby.
Note: Solr Version 8.5.1 is included with each WebFOCUS installation. Solr is an open-source,high-performance, full-featured enterprise-search platform. Solr uses the Apache Lucene
™ Java
search library as its core for searching and indexing.
End User Machine Requirements
This section explains the desktop requirements for running WebFOCUS.
2. WebFOCUS Installation Requirements
Installation and Configuration for Windows 27
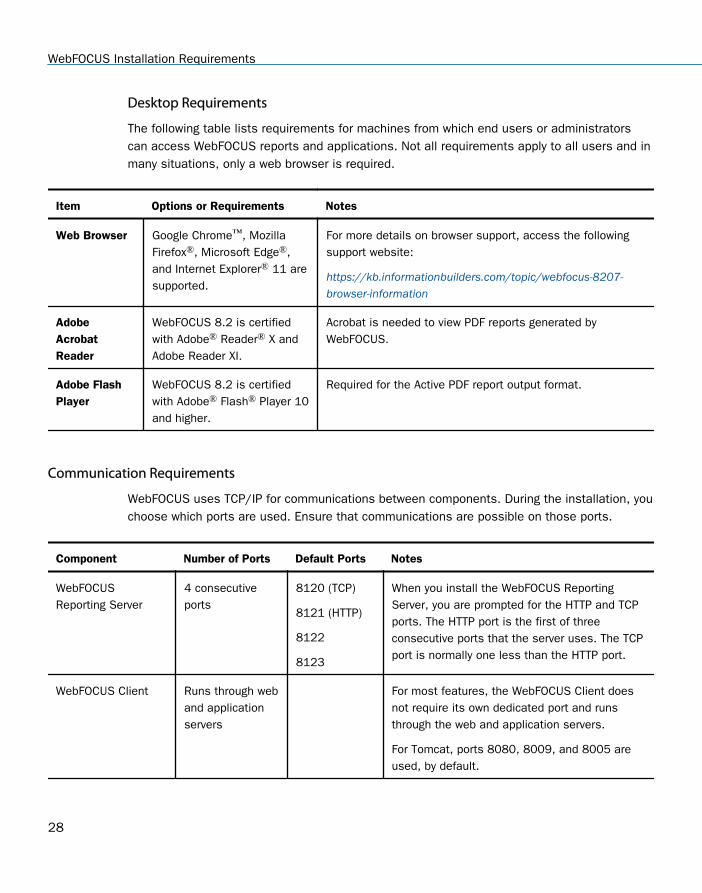
Desktop Requirements
The following table lists requirements for machines from which end users or administratorscan access WebFOCUS reports and applications. Not all requirements apply to all users and inmany situations, only a web browser is required.
Item Options or Requirements Notes
Web Browser Google Chrome™, MozillaFirefox®, Microsoft Edge®,and Internet Explorer® 11 aresupported.
For more details on browser support, access the followingsupport website:
https://kb.informationbuilders.com/topic/webfocus-8207-browser-information
AdobeAcrobatReader
WebFOCUS 8.2 is certifiedwith Adobe® Reader® X andAdobe Reader XI.
Acrobat is needed to view PDF reports generated byWebFOCUS.
Adobe FlashPlayer
WebFOCUS 8.2 is certifiedwith Adobe® Flash® Player 10and higher.
Required for the Active PDF report output format.
Communication Requirements
WebFOCUS uses TCP/IP for communications between components. During the installation, youchoose which ports are used. Ensure that communications are possible on those ports.
Component Number of Ports Default Ports Notes
WebFOCUSReporting Server
4 consecutiveports
8120 (TCP)
8121 (HTTP)
8122
8123
When you install the WebFOCUS ReportingServer, you are prompted for the HTTP and TCPports. The HTTP port is the first of threeconsecutive ports that the server uses. The TCPport is normally one less than the HTTP port.
WebFOCUS Client Runs through weband applicationservers
For most features, the WebFOCUS Client doesnot require its own dedicated port and runsthrough the web and application servers.
For Tomcat, ports 8080, 8009, and 8005 areused, by default.
WebFOCUS Installation Requirements
28
Component Number of Ports Default Ports Notes
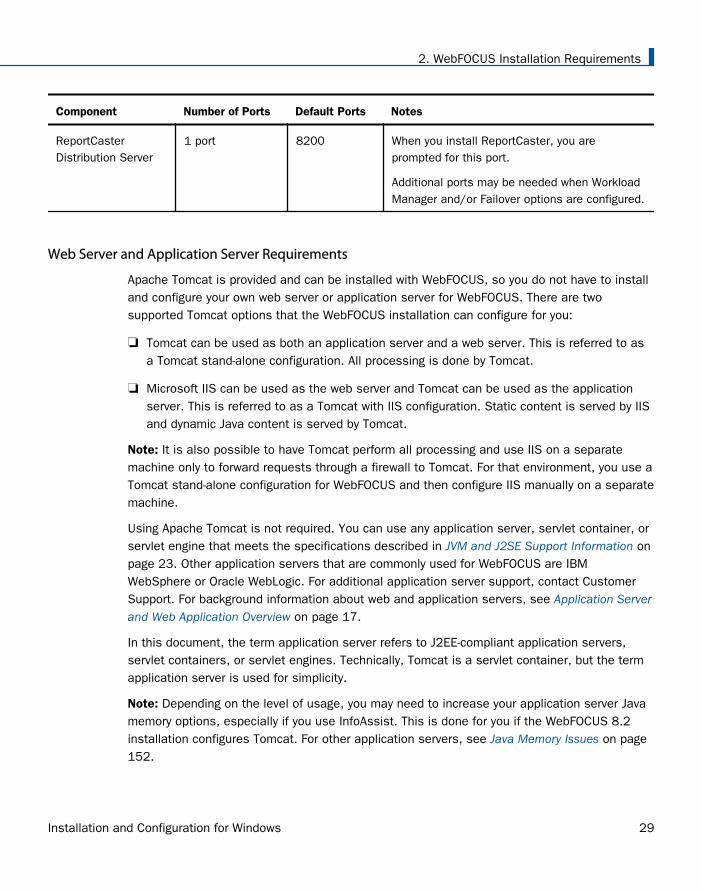
ReportCasterDistribution Server
1 port 8200 When you install ReportCaster, you areprompted for this port.
Additional ports may be needed when WorkloadManager and/or Failover options are configured.
Web Server and Application Server Requirements
Apache Tomcat is provided and can be installed with WebFOCUS, so you do not have to installand configure your own web server or application server for WebFOCUS. There are twosupported Tomcat options that the WebFOCUS installation can configure for you:
Tomcat can be used as both an application server and a web server. This is referred to asa Tomcat stand-alone configuration. All processing is done by Tomcat.
Microsoft IIS can be used as the web server and Tomcat can be used as the applicationserver. This is referred to as a Tomcat with IIS configuration. Static content is served by IISand dynamic Java content is served by Tomcat.
Note: It is also possible to have Tomcat perform all processing and use IIS on a separatemachine only to forward requests through a firewall to Tomcat. For that environment, you use aTomcat stand-alone configuration for WebFOCUS and then configure IIS manually on a separatemachine.
Using Apache Tomcat is not required. You can use any application server, servlet container, orservlet engine that meets the specifications described in JVM and J2SE Support Information onpage 23. Other application servers that are commonly used for WebFOCUS are IBMWebSphere or Oracle WebLogic. For additional application server support, contact CustomerSupport. For background information about web and application servers, see Application Serverand Web Application Overview on page 17.
In this document, the term application server refers to J2EE-compliant application servers,servlet containers, or servlet engines. Technically, Tomcat is a servlet container, but the termapplication server is used for simplicity.
Note: Depending on the level of usage, you may need to increase your application server Javamemory options, especially if you use InfoAssist. This is done for you if the WebFOCUS 8.2installation configures Tomcat. For other application servers, see Java Memory Issues on page152.
2. WebFOCUS Installation Requirements
Installation and Configuration for Windows 29
WebFOCUS Java Requirements
Java Version 8 is the minimum version required for the WebFOCUS and ReportCasterapplication servers, as well as the Distribution Server. The WebFOCUS Client installationinstalls JRE 8 for you. We recommend installing the JDK on a WebFOCUS Reporting Servermachine.
A JRE contains a subset of JDK features and both the JRE and JDK are needed. When youinstall the JDK, a JRE is also installed, by default. Accept default settings when you install theJDK.
Note:
Java SDK and JDK are synonymous.
Some application servers require a specific release of the JDK. If you are not using Tomcat,review the documentation for your application server to determine the JDK requirements.
ReportCaster Distribution Requirements
The following communication requirements are necessary to schedule and distribute reports:
Email distribution requires TCP/IP communication to an SMTP-enabled mail server thatsupports base-64 encoding for MIME type attachments.
FTP distribution requires TCP/IP communication to an FTP server.
Printer distribution requires a networked printer accessible to the ReportCaster DistributionServer.
Managed Reporting distribution requires TCP/IP communications to the WebFOCUS Clientmachine.
Note: The ReportCaster web components and the ReportCaster Distribution Server need acommon time zone for proper operation. Therefore, if ReportCaster components run ondifferent machines, all machines must be in the same time zone.
WebFOCUS Repository Setup
The ReportCaster repository structure has changed from previous 7.7.x releases and is now apart of the WebFOCUS repository. Therefore, you cannot use a repository from an early releasewithout migrating its contents or creating a new repository. The ReportCaster tables inWebFOCUS 8.2 are now part of the WebFOCUS repository, and a database repository muststore ReportCaster scheduling data. If you want to use the Report Library, the database can beany supported database with an available JDBC driver.
WebFOCUS Repository Setup
30
Depending on the platform used, the WebFOCUS Repository can be stored in a Derby,Microsoft SQL Server, Oracle, Db2, MySQL®, or PostgreSQL database. For more information,see Installing the WebFOCUS Client on page 41.
Repository Options
Review the information below and decide on the database server to use.
Note: Versions of supported databases and drivers certified are posted on:
https://kb.informationbuilders.com/topic/supported-rdbms-and-drivers
Db2. To use a Db2 repository, a Db2 JDBC driver must be on the machine or machines thatrun the WebFOCUS Client and the ReportCaster Distribution Server.
Note:
The Db2 collation must be set to case sensitive for the WebFOCUS database. Case-insensitive collation is not supported.
If you are using Db2 as the WebFOCUS Repository, the database needs to be createdwith a pagesize of 32K.
For more information on using a Db2 repository, see Additional WebFOCUS RepositoryTopics and Tasks on page 189.
Derby. If you choose, Derby can be installed with WebFOCUS. If you are also installingTomcat, the required JDBC driver (derbyclient.jar) will be added to the Tomcat configurationfile.
2. WebFOCUS Installation Requirements
Installation and Configuration for Windows 31
Microsoft SQL Server. To use SQL Server, the appropriate SQL Server JDBC driver must beon the machine or machines that run the WebFOCUS Client and the ReportCasterDistribution Server. You can download and install the specific driver from the Microsoftwebsite.
If you are unfamiliar with the JDBC driver and its requirements, information is provided in Additional WebFOCUS Repository Topics and Tasks on page 189.
Requirements:
The repository database must be created by a DBA prior to installing and configuringWebFOCUS.
The database collation must be set to case sensitive. Case-insensitive collation is notsupported.
At installation, upgrade, or configuration time, the account used by the WebFOCUSinstallation process to connect to the repository database must be granteddb_datawriter, db_datareader, and db_ddladmin roles on the repository database andschema. Alternatively, the object creation and initial data load may be run as a separateutility by a DBA.
For normal run-time activity, the account used by WebFOCUS to connect to therepository database must be granted db_datawriter and db_datareader roles on therepository database and schema.
MySQL. To use a MySQL Server repository, the MySQL driver should be installed on themachine or machines that run the WebFOCUS Client and the ReportCaster DistributionServer. This is typically named mysql-connector-java-nn-bin.jar, where nn is the versionnumber. MySQL Repository Set Up on page 205 contains information on installing andconfiguring the MySQL database server and this driver.
Note:
The collation for MySQL must be set to case sensitive for the WebFOCUS database.Case-insensitive collation is not supported.
The default character set and collation for MySQL is latin1 and latin1_swedish_ci, sonon-binary string comparisons are case insensitive, by default.
For use with WebFOCUS, the collation needs to be set as latin1_general_cs orlatin1_swedish_cs, depending on the character set required.
WebFOCUS Release 8.2 does not support the MySQL utf8 encoding character set.
WebFOCUS Repository Setup
32
Oracle™. To use an Oracle repository, the Oracle JDBC™ Thin Client 9.0.1 driver must beon the machine or machines that run the WebFOCUS Client and the ReportCasterDistribution Server. This is typically named ojdbc7.jar depending on the Java release.
Note:
The WebFOCUS repository requires character semantics. When creating a database foruse with WebFOCUS, it needs to be done with CHAR semantics. This is applicable whenusing the following character sets:
UTF8
JA16SJISTILDE - Japanese
ZHS16CGB231280 - Simplified Chinese
ZHT16BIG5 - Traditional Chinese
KO16KSC5601 - Korean
This is not needed when using the following character sets:
Western European: WE8ISO8859P15 or WE8MSWIN1252
Eastern European: WE8ISO8859P2 or EE8MSWIN1250
Oracle database blocks (db_block_size) require 8K or higher.
The maximum number of open cursors (open_cursors) must be set to 500 or higherwhen all tables are created and inserted.
Tablespace requirements depend on customer usage.
WebFOCUS requires case-sensitive collation. For Oracle, string comparisons are casesensitive, by default.
Comparison and sort can be configured through the sort system parameters NLS_COMPand NLS_SORT.
The RDBMS user account privileges used by WebFOCUS need to have the ability tocreate tables, modify tables, execute queries, and insert and delete records.
PostgreSQL. Requires the JDBC 4.2 driver. In the WebFOCUS install.cfg file, theIBI_REPOS_DB_URL setting, which contains the JDBC connection path for the database,should be modified and the currentSchema parameter should be added to the URL.
2. WebFOCUS Installation Requirements
Installation and Configuration for Windows 33
For example:
IBI_REPOS_DB_URL=jdbc:postgresql://localhost:5432/myDatabase?currentSchema=mySchema
where:
mySchema
Is a string identifying the schema name for the specified database user.
The schema will be used to resolve the fully qualified name of the table provided by theJDBC driver for the specific connection.
Other JDBC-Compliant Databases. To use other JDBC-compliant databases, you need theirJDBC drivers. You must also know the JDBC Path to connect to the database.
WebFOCUS Repository Pre-Installation Tasks
During the WebFOCUS installation, you are prompted for information that WebFOCUS andReportCaster need to access your repository. After WebFOCUS receives this information, youcan use the WebFOCUS utilities to create repository tables and perform other repository-related tasks.
Procedure: How to Prepare for a WebFOCUS Repository
Ask your DBA to perform the following tasks:
1. Install the JDBC driver for your WebFOCUS repository database on the WebFOCUS Clientand ReportCaster Distribution Server machine or machines. You will be prompted for thepath to the driver during the WebFOCUS and ReportCaster installation.
2. Create or assign a user ID and password that will own the repository. You will be promptedfor this information during the WebFOCUS and ReportCaster installation.
For SQL Server, the database must use SQL Server authentication rather than Windowsauthentication, and the user ID must have db_owner rights to the repository database.
3. If applicable, create a database within your database server for the WebFOCUS repositoryand ensure the user ID you created is the database owner. You will need the name of thisdatabase during the ReportCaster installation.
WebFOCUS Repository Setup
34
Note: Database collation must be case sensitive for WebFOCUS. The installation program andthe database load utilities check for the database collation. For Microsoft SQL Server andMySQL, if a case-insensitive database is detected, the installation attempts to change thedatabase collation to the best matched case sensitive (CS) collation. If the collation changefails, a message displays and the database creation does not take place. You can do either ofthe following:
Continue with the installation and correct the database collation post-install. Then, run theWFReposUtilCMDLine.
Exit the installation, correct the database collation, and rerun the installation.
Database Collation Utilities
WebFOCUS includes utilities that enable you to check and change the database collation toensure it meets WebFOCUS requirements. Databases used as the WebFOCUS repository mustbe case sensitive.
These utilities are supported with MS SQL Server and MySQL databases and enable you tochange the database collation from case insensitive to case sensitive.
The following is a list and description of the available utilities. The utilities are located in thedrive:\ibi\WebFOCUS82\utilities\dbupdate\collation\ folder.
check_db_collation.bat
Checks if the database collation is case sensitive.
Prompts the user to use the database configured in install.cfg (select Y) or use a differentdatabase instance (select N).
Prompts for the database repository ID and password.
Prompts for the connection information, if the database configured with the installation isnot being used.
Output example:
[2017-11-21 17:08:53,729] INFO stdout - Starting collation_tool(check_cs_collation) process ...[2017-11-21 17:08:54,278] OFF stdout - Database collation is NOT case sensitive or does not meet WebFOCUS requirementsOr[2017-12-13 12:41:11,117] INFO stdout - Starting collation_tool_install(check_cs_collation) process ...[2017-12-13 12:41:11,831] OFF stdout - Database collation is case sensitive[2017-12-13 12:41:11,831] INFO stdout - DoneDatabase IS case sensitive
2. WebFOCUS Installation Requirements
Installation and Configuration for Windows 35
check_install_db_collation.bat
Checks if the database collation is case sensitive.
Prompts for the database repository ID and password.
Output example:
[2017-11-21 09:54:23,996] INFO stdout - Starting collation_tool_install(check_cs_collation) process ...[2017-11-21 09:54:24,384] OFF stdout - Database collation is case sensitivedb_help.bat
change_db_collation.bat
Changes the database collation to the best matched CS collation.
Prompts the user to use the database configured in install.cfg (select Y) or use a differentdatabase instance (select N).
Prompts for the database repository ID and password.
Prompts for the connection information, if the database configured with the installation isnot being used.
Output example:
[2017-12-05 13:26:53,714] INFO stdout - Starting collation_tool_install(collation_change) process ...[2017-12-05 13:26:55,081] OFF stdout - Collation changed.
change_install_db_collation.bat
Changes the database collation to the best matched CS collation.
Prompts for the database repository ID and password.
Output example:
[2017-11-21 09:56:18,174] INFO stdout - Starting collation_tool_install(collation_change) process ...[2017-11-21 09:56:19,616] OFF stdout - Collation changed.
get_db_collation.bat
Retrieves database collation.
Prompts the user to use the database configured in install.cfg (select Y) or use a differentdatabase instance (select N).
Prompts for the database repository ID and password.
Database Collation Utilities
36
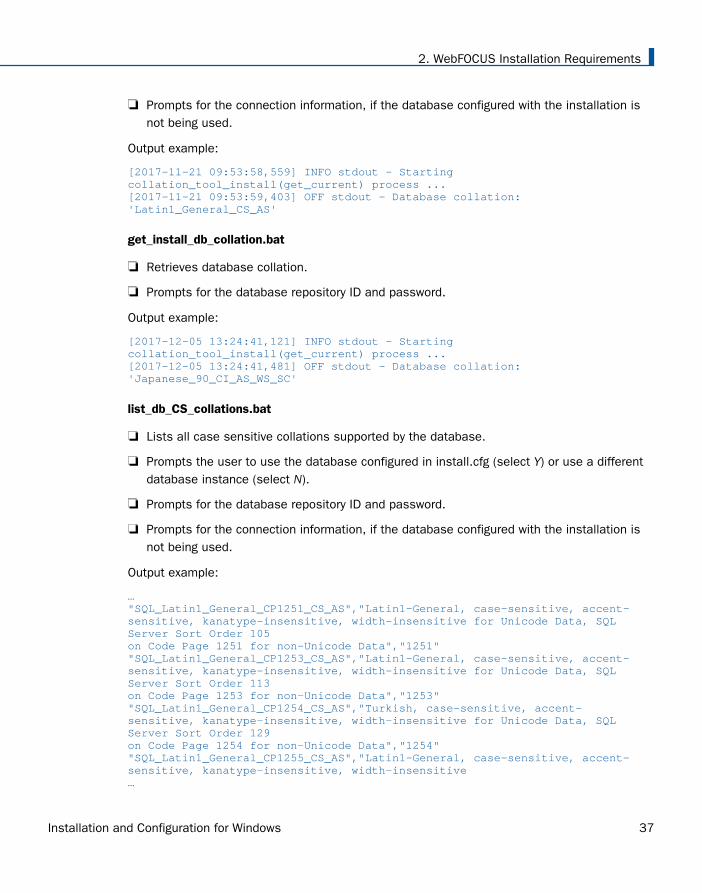
Prompts for the connection information, if the database configured with the installation isnot being used.
Output example:
[2017-11-21 09:53:58,559] INFO stdout - Starting collation_tool_install(get_current) process ...[2017-11-21 09:53:59,403] OFF stdout - Database collation: 'Latin1_General_CS_AS'
get_install_db_collation.bat
Retrieves database collation.
Prompts for the database repository ID and password.
Output example:
[2017-12-05 13:24:41,121] INFO stdout - Starting collation_tool_install(get_current) process ...[2017-12-05 13:24:41,481] OFF stdout - Database collation: 'Japanese_90_CI_AS_WS_SC'
list_db_CS_collations.bat
Lists all case sensitive collations supported by the database.
Prompts the user to use the database configured in install.cfg (select Y) or use a differentdatabase instance (select N).
Prompts for the database repository ID and password.
Prompts for the connection information, if the database configured with the installation isnot being used.
Output example:
…"SQL_Latin1_General_CP1251_CS_AS","Latin1-General, case-sensitive, accent-sensitive, kanatype-insensitive, width-insensitive for Unicode Data, SQL Server Sort Order 105on Code Page 1251 for non-Unicode Data","1251""SQL_Latin1_General_CP1253_CS_AS","Latin1-General, case-sensitive, accent-sensitive, kanatype-insensitive, width-insensitive for Unicode Data, SQL Server Sort Order 113on Code Page 1253 for non-Unicode Data","1253""SQL_Latin1_General_CP1254_CS_AS","Turkish, case-sensitive, accent-sensitive, kanatype-insensitive, width-insensitive for Unicode Data, SQL Server Sort Order 129on Code Page 1254 for non-Unicode Data","1254""SQL_Latin1_General_CP1255_CS_AS","Latin1-General, case-sensitive, accent-sensitive, kanatype-insensitive, width-insensitive…
2. WebFOCUS Installation Requirements
Installation and Configuration for Windows 37
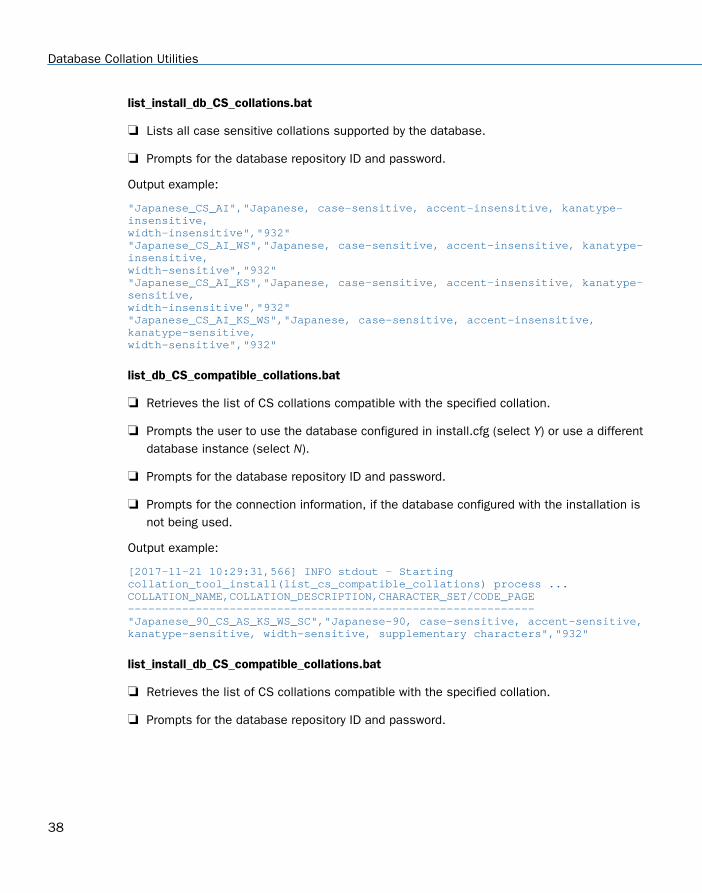
list_install_db_CS_collations.bat
Lists all case sensitive collations supported by the database.
Prompts for the database repository ID and password.
Output example:
"Japanese_CS_AI","Japanese, case-sensitive, accent-insensitive, kanatype-insensitive,width-insensitive","932""Japanese_CS_AI_WS","Japanese, case-sensitive, accent-insensitive, kanatype-insensitive,width-sensitive","932""Japanese_CS_AI_KS","Japanese, case-sensitive, accent-insensitive, kanatype-sensitive,width-insensitive","932""Japanese_CS_AI_KS_WS","Japanese, case-sensitive, accent-insensitive, kanatype-sensitive,width-sensitive","932"
list_db_CS_compatible_collations.bat
Retrieves the list of CS collations compatible with the specified collation.
Prompts the user to use the database configured in install.cfg (select Y) or use a differentdatabase instance (select N).
Prompts for the database repository ID and password.
Prompts for the connection information, if the database configured with the installation isnot being used.
Output example:
[2017-11-21 10:29:31,566] INFO stdout - Starting collation_tool_install(list_cs_compatible_collations) process ...COLLATION_NAME,COLLATION_DESCRIPTION,CHARACTER_SET/CODE_PAGE------------------------------------------------------------"Japanese_90_CS_AS_KS_WS_SC","Japanese-90, case-sensitive, accent-sensitive,kanatype-sensitive, width-sensitive, supplementary characters","932"
list_install_db_CS_compatible_collations.bat
Retrieves the list of CS collations compatible with the specified collation.
Prompts for the database repository ID and password.
Database Collation Utilities
38
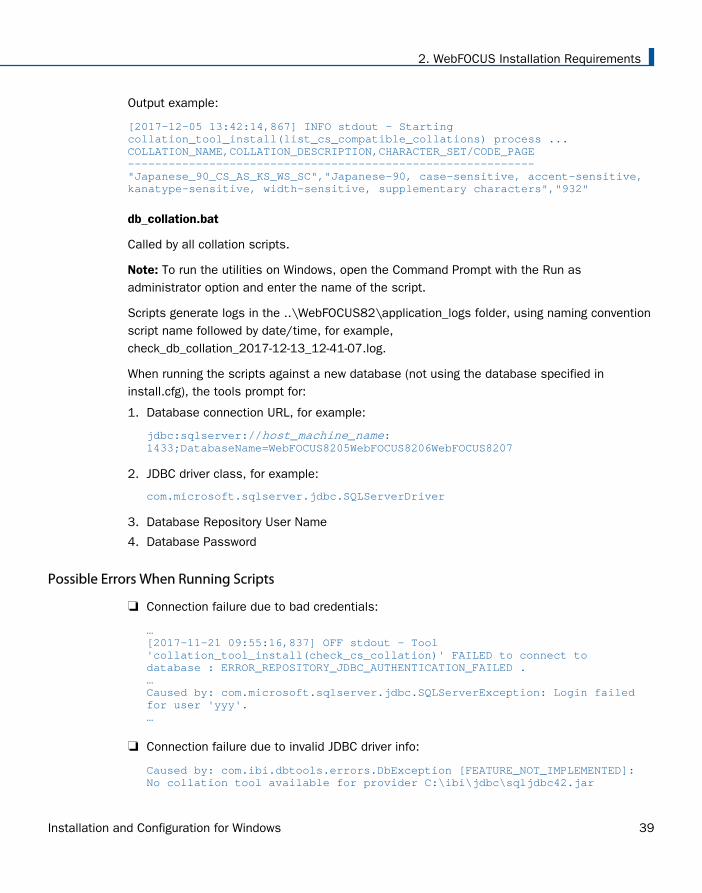
Output example:
[2017-12-05 13:42:14,867] INFO stdout - Startingcollation_tool_install(list_cs_compatible_collations) process ...COLLATION_NAME,COLLATION_DESCRIPTION,CHARACTER_SET/CODE_PAGE------------------------------------------------------------"Japanese_90_CS_AS_KS_WS_SC","Japanese-90, case-sensitive, accent-sensitive,kanatype-sensitive, width-sensitive, supplementary characters","932"
db_collation.bat
Called by all collation scripts.
Note: To run the utilities on Windows, open the Command Prompt with the Run asadministrator option and enter the name of the script.
Scripts generate logs in the ..\WebFOCUS82\application_logs folder, using naming conventionscript name followed by date/time, for example,check_db_collation_2017-12-13_12-41-07.log.
When running the scripts against a new database (not using the database specified ininstall.cfg), the tools prompt for:
1. Database connection URL, for example:
jdbc:sqlserver://host_machine_name:1433;DatabaseName=WebFOCUS8205WebFOCUS8206WebFOCUS8207
2. JDBC driver class, for example:
com.microsoft.sqlserver.jdbc.SQLServerDriver
3. Database Repository User Name
4. Database Password
Possible Errors When Running Scripts
Connection failure due to bad credentials:
…[2017-11-21 09:55:16,837] OFF stdout - Tool 'collation_tool_install(check_cs_collation)' FAILED to connect to database : ERROR_REPOSITORY_JDBC_AUTHENTICATION_FAILED .…Caused by: com.microsoft.sqlserver.jdbc.SQLServerException: Login failed for user 'yyy'.…
Connection failure due to invalid JDBC driver info:
Caused by: com.ibi.dbtools.errors.DbException [FEATURE_NOT_IMPLEMENTED]:No collation tool available for provider C:\ibi\jdbc\sqljdbc42.jar
2. WebFOCUS Installation Requirements
Installation and Configuration for Windows 39
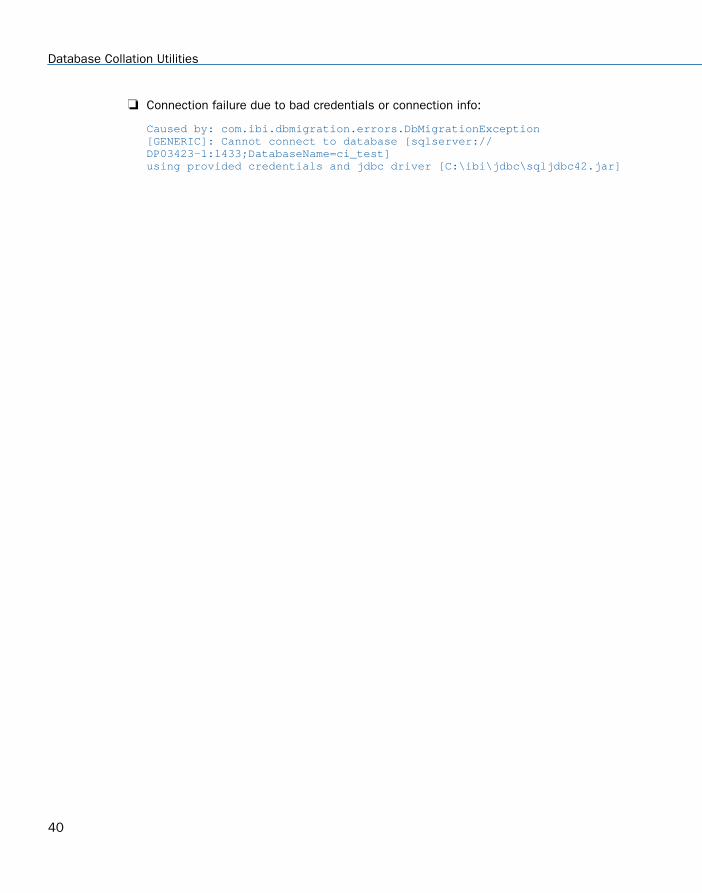
Connection failure due to bad credentials or connection info:
Caused by: com.ibi.dbmigration.errors.DbMigrationException[GENERIC]: Cannot connect to database [sqlserver://DP03423-1:1433;DatabaseName=ci_test]using provided credentials and jdbc driver [C:\ibi\jdbc\sqljdbc42.jar]
Database Collation Utilities
40
Chapter3Installing the WebFOCUS Client
This topic provides details about installing the WebFOCUS Client.
In this chapter:
Installing the WebFOCUS Client
Upgrading From an Earlier 8.2.x Release to Release 8207
Migrating Configuration Files from Release 8.1 Version 05M to Release 8207
Upgrading In Place from Release 8.1 Version 05M to Release 8207
Performing a New Release 8207 Installation Using an Existing 8.2.x WebFOCUSRepository
WebFOCUS Client and ReportCaster Directory Structures
Uninstalling the WebFOCUS Client
Installing the WebFOCUS Client
The following procedures describe how to install the WebFOCUS Client.
Note: WebFOCUS requires a WebFOCUS Reporting Server, which provides data access,translation, computation, formatting, and other back-end processes. For information oninstalling the WebFOCUS Reporting Server, see the Server Installation manual.
Procedure: How to Install Using the Typical Installation Option
1. Download the WebFOCUS Client installation file, then double-click the file.
The software download page provides download links for obtaining the installationpackage.
Note: You must verify the integrity of the downloaded files. All files posted in the downloadsite are signed by the release manager using the SHA-512 algorithm, and SHA-512checksums are available along with the files. After you download the file, you shouldcalculate a checksum for your download, and make sure it is the same as the posted hashfile.
2. Choose the appropriate language from the drop-down list and click OK.
Installation and Configuration for Windows 41
The Welcome to WebFOCUS 8.2 window opens, recommending that you quit all programsbefore continuing with the installation.
3. Click Next to continue the installation.
The License Agreement dialog box opens.
4. Select I accept the terms of the License Agreement, and click Next to continue theinstallation.
Note: If you have an earlier release of WebFOCUS installed on your machine, the ChooseInstall Type window opens.
To update your existing Release 8207 installation to a later 8207 version, selectUpdate and the existing instance you want to update.
If you select Update, a dialog box opens with a prompt to provide WebFOCUSAdministrator credentials. This is used to import new roles and new portal pagetemplates into the WebFOCUS repository. For this to be successful, the database mustbe running. The installation validates the connection to the database and thecredentials to ensure that they have permission to perform the import of the ChangeManagement packages that load the roles and templates.
The Pre-Installation Summary dialog box opens. Continue to step 11.
To install all available features of WebFOCUS, select Full Install. Continue to step 5.
5. Click Next to continue the installation.
The Choose Install Set dialog box opens.
6. Select Typical and click Next to continue the installation.
The Select Program Folder dialog box opens.
7. Accept the default program folder (WebFOCUS 82) or specify a different program foldername by adding a suffix to the Program Folder name. Then, click Next.
Note: A message displays if the provided folder name already exists. The folder namemust be unique in order to proceed.
The Choose Destination Locations dialog box opens.
8. Perform the following steps:
a. Specify a path for the WebFOCUS application folder. The default is C:\ibi.
Note: You can specify any path on the local machine or use a Universal NamingConvention (UNC) path.
b. Choose the appropriate disk from the Disk Space Information drop-down list.
Installing the WebFOCUS Client
42
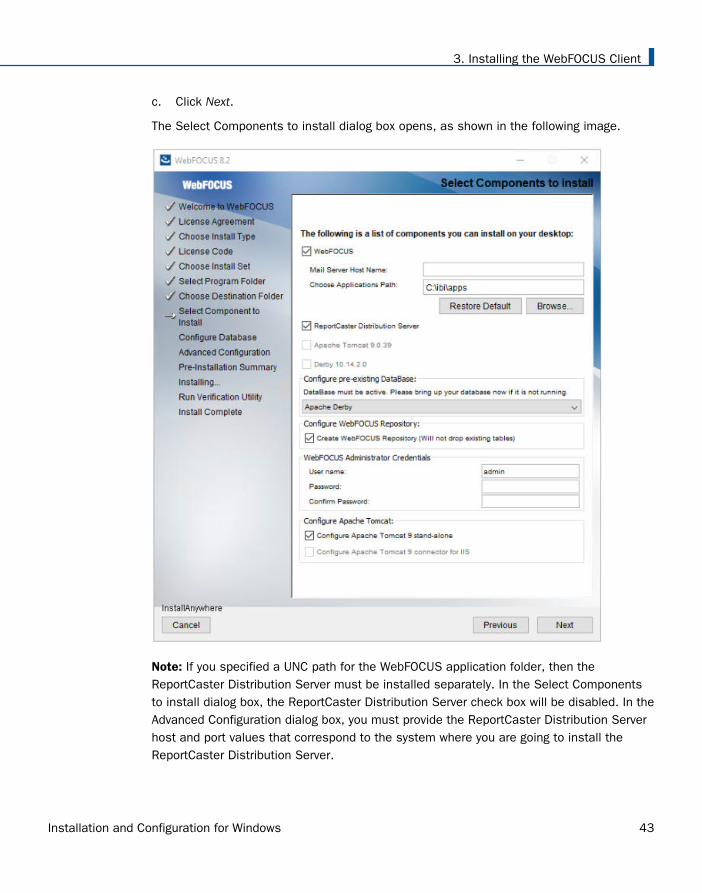
c. Click Next.
The Select Components to install dialog box opens, as shown in the following image.
Note: If you specified a UNC path for the WebFOCUS application folder, then theReportCaster Distribution Server must be installed separately. In the Select Componentsto install dialog box, the ReportCaster Distribution Server check box will be disabled. In theAdvanced Configuration dialog box, you must provide the ReportCaster Distribution Serverhost and port values that correspond to the system where you are going to install theReportCaster Distribution Server.
3. Installing the WebFOCUS Client
Installation and Configuration for Windows 43
9. Perform the following steps:
a. In the WebFOCUS component area, type the host name or IP address for your mailserver in the Mail Server Host Name field.
b. Type a path where WebFOCUS applications will be saved in the Choose ApplicationsPath field or accept the default location (C:\ibi\apps).
Options to install Tomcat and Derby are enabled if these components are notpreinstalled on your system. Allow these options to be installed and configured withWebFOCUS if you want to use default configuration options.
If you clear the options to install and configure Tomcat, an application serverneeds to be configured post-installation.
If you clear the option to install Derby, or Derby is preinstalled, continue to thenext substep.
c. Select a database (for example, Apache Derby or Microsoft SQL Server) from theConfigure pre-existing Database drop-down list.
Note:
If you want to use an existing WebFOCUS repository that already has tablesdefined, clear the Create WebFOCUS Repository option. After the installation iscompleted, you must drop and recreate the existing tables in the repository if youplan on working with a new WebFOCUS repository. Alternatively, you can run theWFReposUtilCMDLine.bat file with the CREATE_INSERT mode to update yourdatabase and create the required tables and columns.
If you select the Create WebFOCUS Repository option, you will be prompted forWebFOCUS administrator credentials. The credentials that you enter will becomethe WebFOCUS administrator credentials. During the database creation, the username and password supports ASCII characters from 32 to 126 and cannot includethe following characters: caret ( ^), ampersand (&), percent ( %), double quotationmarks ("). Refer to the ASCII character table to determine the characters to use forthe WebFOCUS administrator credentials.
The password for the user name must be between four and 20 characters. Leadingblanks and trailing blanks will be removed. You will not be prompted for credentialsif the Create WebFOCUS Repository option is not selected.
Installing the WebFOCUS Client
44
If you select the Create WebFOCUS Repository option, the installation checks thedatabase to see if it contains existing tables. If it contains tables, the CreateWebFOCUS Repository option will not be performed and a message displays. Inthis case, you can:
Provide information for a new empty database.
Post-installation, create the tables using the WFReposUtilCMDLine WebFOCUSutility. For more information, see WebFOCUS Repository Post-Installation Taskson page 132.
In the case you are performing a new installation and pointing to a databasecreated in an earlier 8.2.x release, follow the post-installation steps required toupdate the database to a Release 8207 level. For more information, see Performing a New Release 8207 Installation Using an Existing 8.2.x WebFOCUSRepository on page 76.
3. Installing the WebFOCUS Client
Installation and Configuration for Windows 45
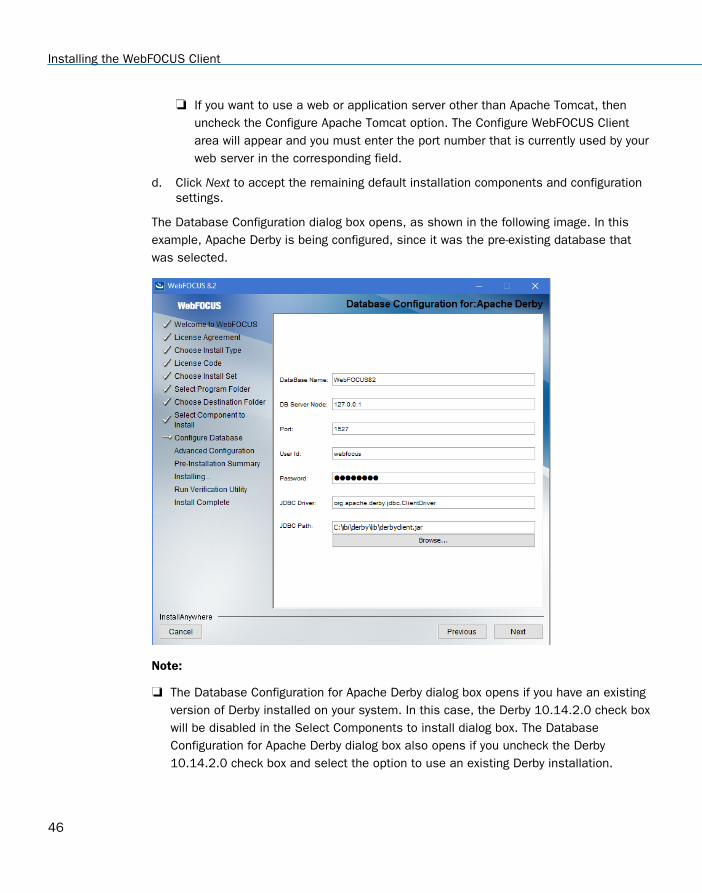
If you want to use a web or application server other than Apache Tomcat, thenuncheck the Configure Apache Tomcat option. The Configure WebFOCUS Clientarea will appear and you must enter the port number that is currently used by yourweb server in the corresponding field.
d. Click Next to accept the remaining default installation components and configurationsettings.
The Database Configuration dialog box opens, as shown in the following image. In thisexample, Apache Derby is being configured, since it was the pre-existing database thatwas selected.
Note:
The Database Configuration for Apache Derby dialog box opens if you have an existingversion of Derby installed on your system. In this case, the Derby 10.14.2.0 check boxwill be disabled in the Select Components to install dialog box. The DatabaseConfiguration for Apache Derby dialog box also opens if you uncheck the Derby10.14.2.0 check box and select the option to use an existing Derby installation.
Installing the WebFOCUS Client
46
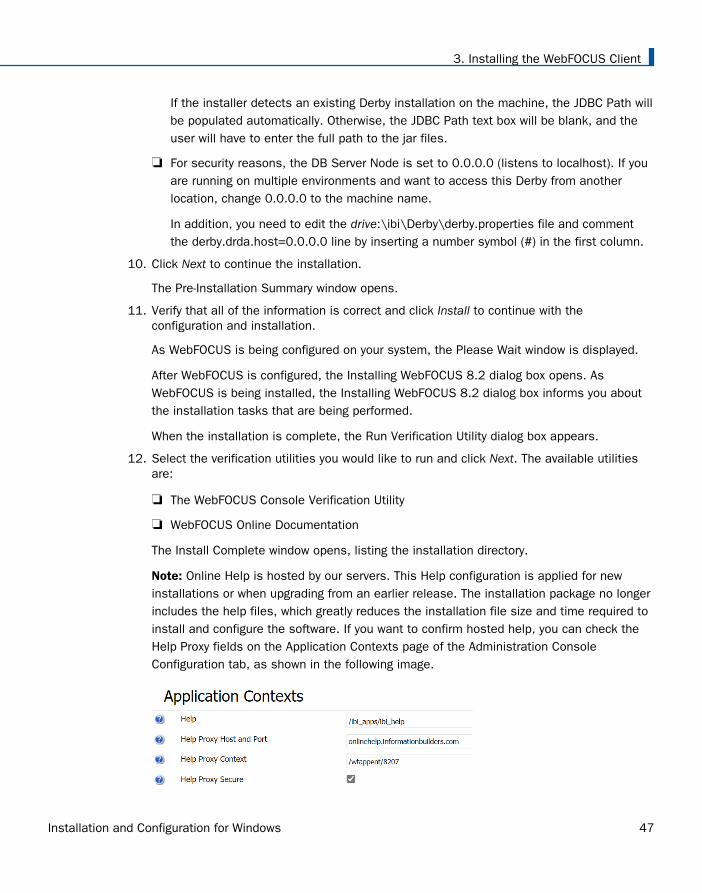
If the installer detects an existing Derby installation on the machine, the JDBC Path willbe populated automatically. Otherwise, the JDBC Path text box will be blank, and theuser will have to enter the full path to the jar files.
For security reasons, the DB Server Node is set to 0.0.0.0 (listens to localhost). If youare running on multiple environments and want to access this Derby from anotherlocation, change 0.0.0.0 to the machine name.
In addition, you need to edit the drive:\ibi\Derby\derby.properties file and commentthe derby.drda.host=0.0.0.0 line by inserting a number symbol (#) in the first column.
10. Click Next to continue the installation.
The Pre-Installation Summary window opens.
11. Verify that all of the information is correct and click Install to continue with theconfiguration and installation.
As WebFOCUS is being configured on your system, the Please Wait window is displayed.
After WebFOCUS is configured, the Installing WebFOCUS 8.2 dialog box opens. AsWebFOCUS is being installed, the Installing WebFOCUS 8.2 dialog box informs you aboutthe installation tasks that are being performed.
When the installation is complete, the Run Verification Utility dialog box appears.
12. Select the verification utilities you would like to run and click Next. The available utilitiesare:
The WebFOCUS Console Verification Utility
WebFOCUS Online Documentation
The Install Complete window opens, listing the installation directory.
Note: Online Help is hosted by our servers. This Help configuration is applied for newinstallations or when upgrading from an earlier release. The installation package no longerincludes the help files, which greatly reduces the installation file size and time required toinstall and configure the software. If you want to confirm hosted help, you can check theHelp Proxy fields on the Application Contexts page of the Administration ConsoleConfiguration tab, as shown in the following image.
3. Installing the WebFOCUS Client
Installation and Configuration for Windows 47
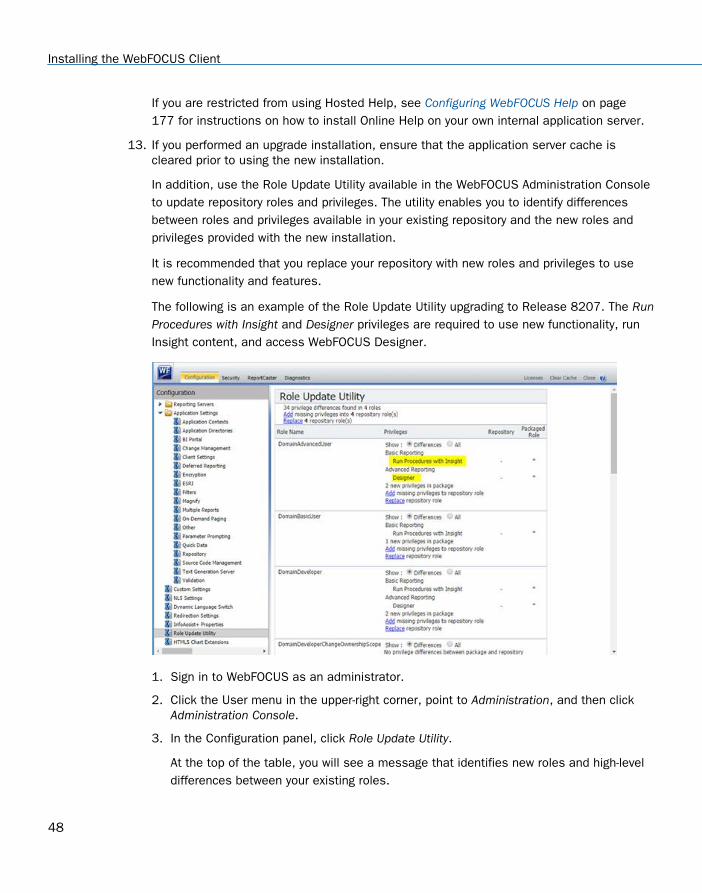
If you are restricted from using Hosted Help, see Configuring WebFOCUS Help on page177 for instructions on how to install Online Help on your own internal application server.
13. If you performed an upgrade installation, ensure that the application server cache iscleared prior to using the new installation.
In addition, use the Role Update Utility available in the WebFOCUS Administration Consoleto update repository roles and privileges. The utility enables you to identify differencesbetween roles and privileges available in your existing repository and the new roles andprivileges provided with the new installation.
It is recommended that you replace your repository with new roles and privileges to usenew functionality and features.
The following is an example of the Role Update Utility upgrading to Release 8207. The RunProcedures with Insight and Designer privileges are required to use new functionality, runInsight content, and access WebFOCUS Designer.
1. Sign in to WebFOCUS as an administrator.
2. Click the User menu in the upper-right corner, point to Administration, and then clickAdministration Console.
3. In the Configuration panel, click Role Update Utility.
At the top of the table, you will see a message that identifies new roles and high-leveldifferences between your existing roles.
Installing the WebFOCUS Client
48
4. Examine the differences between the Repository and Packaged roles and privileges andapply the new roles and privileges to enable new functionality and features.
Procedure: How to Install Using the Custom Installation Option
1. Download the WebFOCUS Client installation file, then double-click the file.
The software download page provides download links for obtaining the installationpackage.
Note: You must verify the integrity of the downloaded files. All files posted in the downloadsite are signed by the release manager using the SHA-512 algorithm, and SHA-512checksums are available along with the files. After you download the file, you shouldcalculate a checksum for your download, and make sure it is the same as the posted hashfile.
2. Choose the appropriate language from the drop-down list and click OK.
The Welcome to WebFOCUS 8.2 window opens, recommending that you quit all programsbefore continuing with the installation.
3. Click Next to continue the installation.
4. Select I accept the terms of the License Agreement, and click Next to continue theinstallation.
The Choose Install Type dialog box opens. Select one of the following:
To update your existing Release 8207 installation to a later 8207 version, selectUpdate and the existing instance you want to update.
If you select Update, a dialog box opens with a prompt to provide WebFOCUSAdministrator credentials. This is used to import new roles and new portal pagetemplates into the WebFOCUS repository. For this to be successful, connection to thedatabase must be available (database must be running). The installation validates theconnection to the database and the credentials to ensure that they have permission toperform the import of the Change Management packages.
The Pre-Installation Summary dialog box opens. Continue to step 13.
To install all available features of WebFOCUS, select Full Install. Continue to step 5.
5. Click Next.
The Choose Install Set dialog box opens.
6. Select Custom and click Next to continue the installation.
The Select Program Folder dialog box opens.
3. Installing the WebFOCUS Client
Installation and Configuration for Windows 49
7. Accept the default program folder (WebFOCUS 82) or specify a different program foldername by adding a suffix to the Program Group name. Then, click Next.
Note: A message displays if the provided folder name already exists. The folder namemust be unique in order to proceed.
The Choose Destination Locations dialog box opens.
8. Perform the following steps:
a. Specify a path for the WebFOCUS application folder. The default is C:\ibi.
Note: You can specify any path on the local machine or use a Universal NamingConvention (UNC) path.
b. Choose the appropriate disk from the Disk Space Information drop-down list.
c. Click Next.
Installing the WebFOCUS Client
50
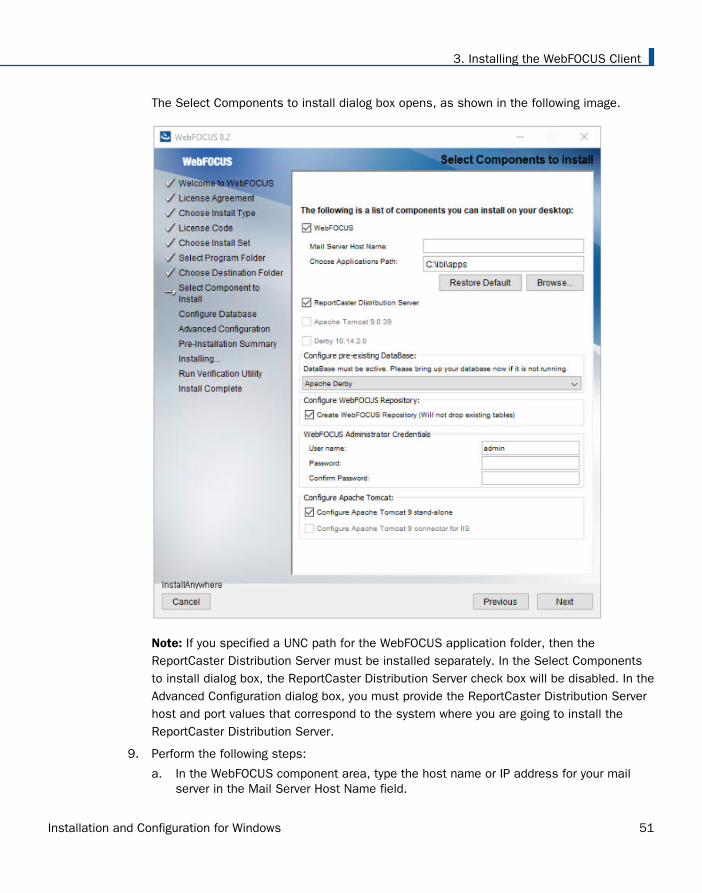
The Select Components to install dialog box opens, as shown in the following image.
Note: If you specified a UNC path for the WebFOCUS application folder, then theReportCaster Distribution Server must be installed separately. In the Select Componentsto install dialog box, the ReportCaster Distribution Server check box will be disabled. In theAdvanced Configuration dialog box, you must provide the ReportCaster Distribution Serverhost and port values that correspond to the system where you are going to install theReportCaster Distribution Server.
9. Perform the following steps:
a. In the WebFOCUS component area, type the host name or IP address for your mailserver in the Mail Server Host Name field.
3. Installing the WebFOCUS Client
Installation and Configuration for Windows 51
b. Type a path where WebFOCUS applications will be saved in the Choose ApplicationsPath field or accept the default location (C:\ibi\apps).
Options to install Tomcat and Derby are enabled if these components are notpreinstalled on your system. Allow these options to be installed and configured withWebFOCUS if you want to use default configuration options.
If you clear the options to install and configure Tomcat, an application serverneeds to be configured post-installation.
If you clear the option to install Derby, or Derby is preinstalled, continue to thenext substep.
c. Select a database (for example, Apache Derby or Microsoft SQL Server) from theConfigure pre-existing Database drop-down list.
Note:
If you want to use an existing WebFOCUS repository that already has tablesdefined, clear the Create WebFOCUS Repository option. After the installation iscompleted, you must drop and recreate the existing tables in the repository if youplan on working with a new WebFOCUS repository. Alternatively, you can run theWFReposUtilCMDLine.bat file with the CREATE_INSERT mode to update yourdatabase and create the required tables and columns.
If you select the Create WebFOCUS Repository option, you will be prompted forWebFOCUS administrator credentials. The credentials that you enter will becomethe WebFOCUS administrator credentials. During the database creation, the username and password supports ASCII characters from 32 to 126 and cannot includethe following characters: caret ( ^), ampersand (&), percent ( %), double quotationmarks ("). Refer to the ASCII character table to determine the characters to use forthe WebFOCUS administrator credentials. For more information, see the followingwebsite:
https://msdn.microsoft.com/en-us/library/60ecse8t(v=vs.71).aspx
The password for the user name must be between four and 20 characters. Leadingblanks and trailing blanks will be removed. You will not be prompted for credentialsif the Create WebFOCUS Repository option is not selected.
Installing the WebFOCUS Client
52
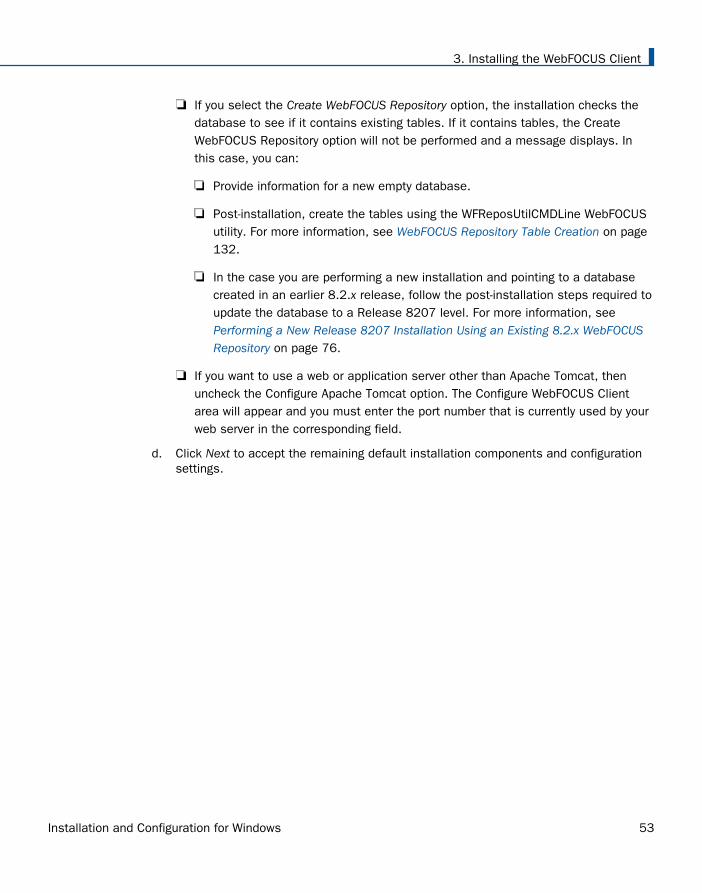
If you select the Create WebFOCUS Repository option, the installation checks thedatabase to see if it contains existing tables. If it contains tables, the CreateWebFOCUS Repository option will not be performed and a message displays. Inthis case, you can:
Provide information for a new empty database.
Post-installation, create the tables using the WFReposUtilCMDLine WebFOCUSutility. For more information, see WebFOCUS Repository Table Creation on page132.
In the case you are performing a new installation and pointing to a databasecreated in an earlier 8.2.x release, follow the post-installation steps required toupdate the database to a Release 8207 level. For more information, see Performing a New Release 8207 Installation Using an Existing 8.2.x WebFOCUSRepository on page 76.
If you want to use a web or application server other than Apache Tomcat, thenuncheck the Configure Apache Tomcat option. The Configure WebFOCUS Clientarea will appear and you must enter the port number that is currently used by yourweb server in the corresponding field.
d. Click Next to accept the remaining default installation components and configurationsettings.
3. Installing the WebFOCUS Client
Installation and Configuration for Windows 53
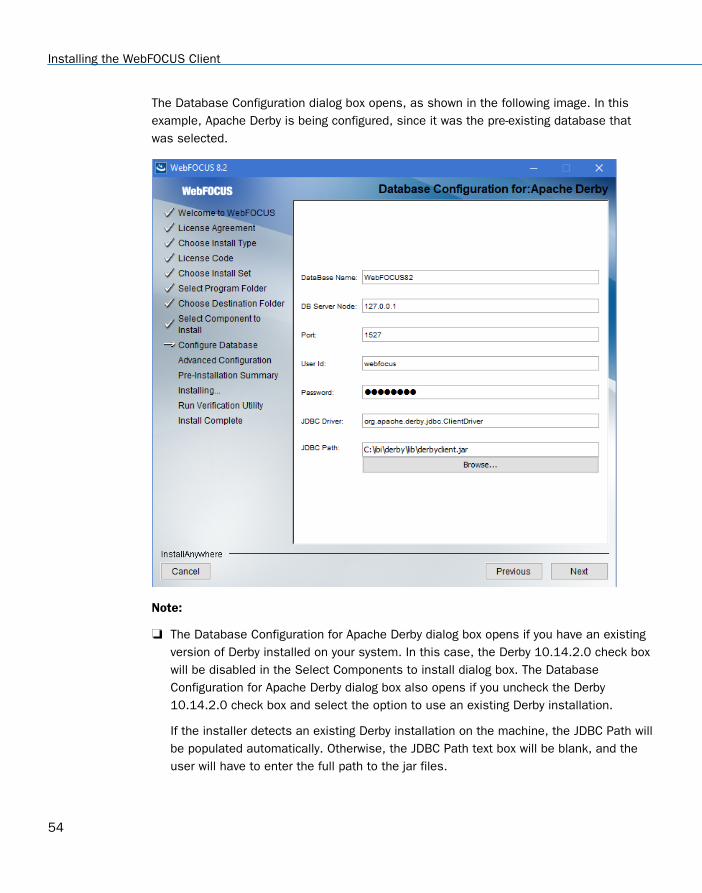
The Database Configuration dialog box opens, as shown in the following image. In thisexample, Apache Derby is being configured, since it was the pre-existing database thatwas selected.
Note:
The Database Configuration for Apache Derby dialog box opens if you have an existingversion of Derby installed on your system. In this case, the Derby 10.14.2.0 check boxwill be disabled in the Select Components to install dialog box. The DatabaseConfiguration for Apache Derby dialog box also opens if you uncheck the Derby10.14.2.0 check box and select the option to use an existing Derby installation.
If the installer detects an existing Derby installation on the machine, the JDBC Path willbe populated automatically. Otherwise, the JDBC Path text box will be blank, and theuser will have to enter the full path to the jar files.
Installing the WebFOCUS Client
54
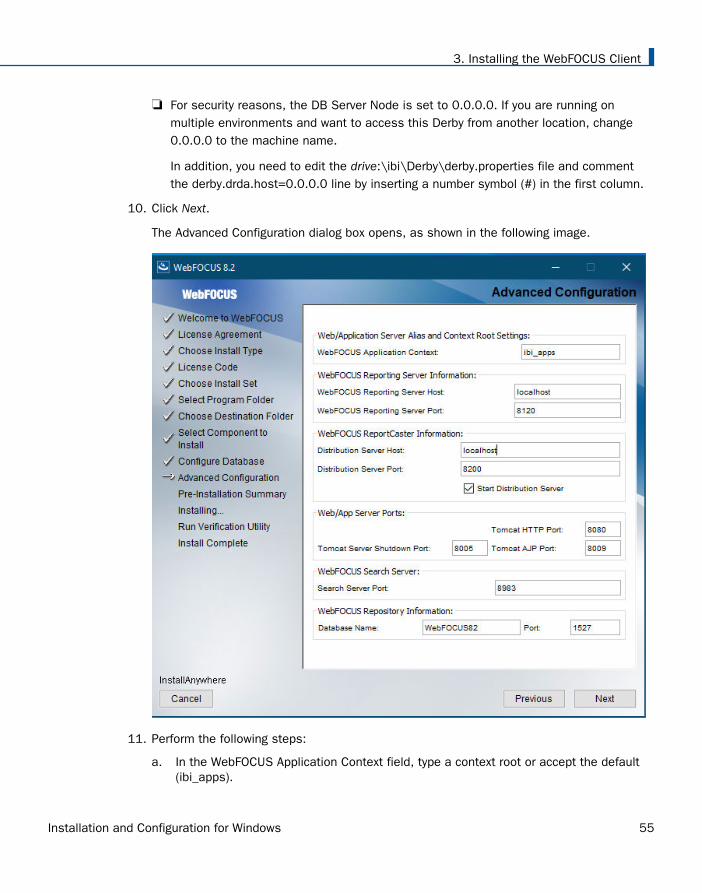
For security reasons, the DB Server Node is set to 0.0.0.0. If you are running onmultiple environments and want to access this Derby from another location, change0.0.0.0 to the machine name.
In addition, you need to edit the drive:\ibi\Derby\derby.properties file and commentthe derby.drda.host=0.0.0.0 line by inserting a number symbol (#) in the first column.
10. Click Next.
The Advanced Configuration dialog box opens, as shown in the following image.
11. Perform the following steps:
a. In the WebFOCUS Application Context field, type a context root or accept the default(ibi_apps).
3. Installing the WebFOCUS Client
Installation and Configuration for Windows 55
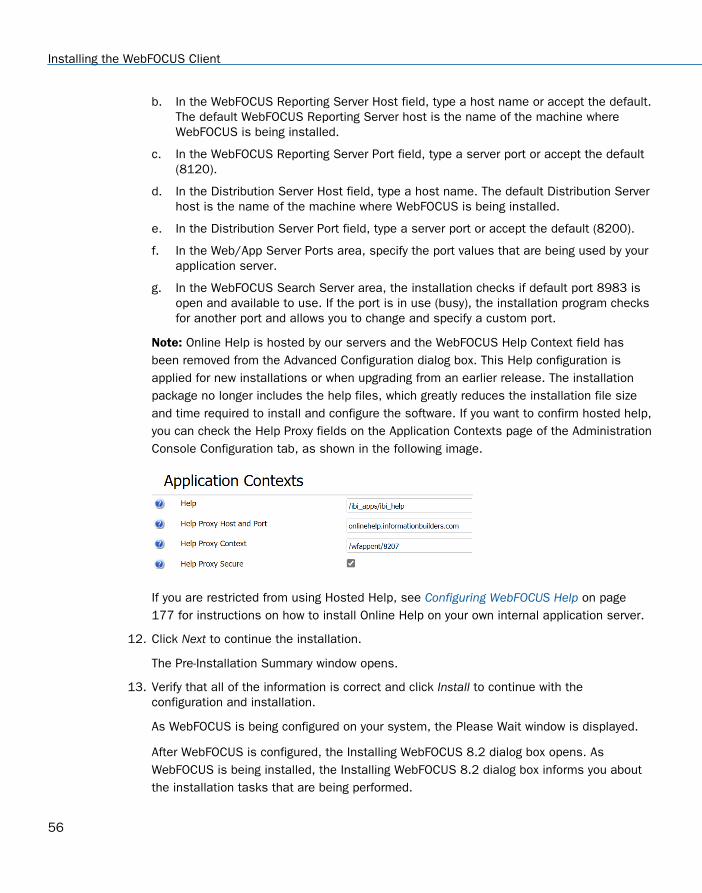
b. In the WebFOCUS Reporting Server Host field, type a host name or accept the default.The default WebFOCUS Reporting Server host is the name of the machine whereWebFOCUS is being installed.
c. In the WebFOCUS Reporting Server Port field, type a server port or accept the default(8120).
d. In the Distribution Server Host field, type a host name. The default Distribution Serverhost is the name of the machine where WebFOCUS is being installed.
e. In the Distribution Server Port field, type a server port or accept the default (8200).
f. In the Web/App Server Ports area, specify the port values that are being used by yourapplication server.
g. In the WebFOCUS Search Server area, the installation checks if default port 8983 isopen and available to use. If the port is in use (busy), the installation program checksfor another port and allows you to change and specify a custom port.
Note: Online Help is hosted by our servers and the WebFOCUS Help Context field hasbeen removed from the Advanced Configuration dialog box. This Help configuration isapplied for new installations or when upgrading from an earlier release. The installationpackage no longer includes the help files, which greatly reduces the installation file sizeand time required to install and configure the software. If you want to confirm hosted help,you can check the Help Proxy fields on the Application Contexts page of the AdministrationConsole Configuration tab, as shown in the following image.
If you are restricted from using Hosted Help, see Configuring WebFOCUS Help on page177 for instructions on how to install Online Help on your own internal application server.
12. Click Next to continue the installation.
The Pre-Installation Summary window opens.
13. Verify that all of the information is correct and click Install to continue with theconfiguration and installation.
As WebFOCUS is being configured on your system, the Please Wait window is displayed.
After WebFOCUS is configured, the Installing WebFOCUS 8.2 dialog box opens. AsWebFOCUS is being installed, the Installing WebFOCUS 8.2 dialog box informs you aboutthe installation tasks that are being performed.
Installing the WebFOCUS Client
56
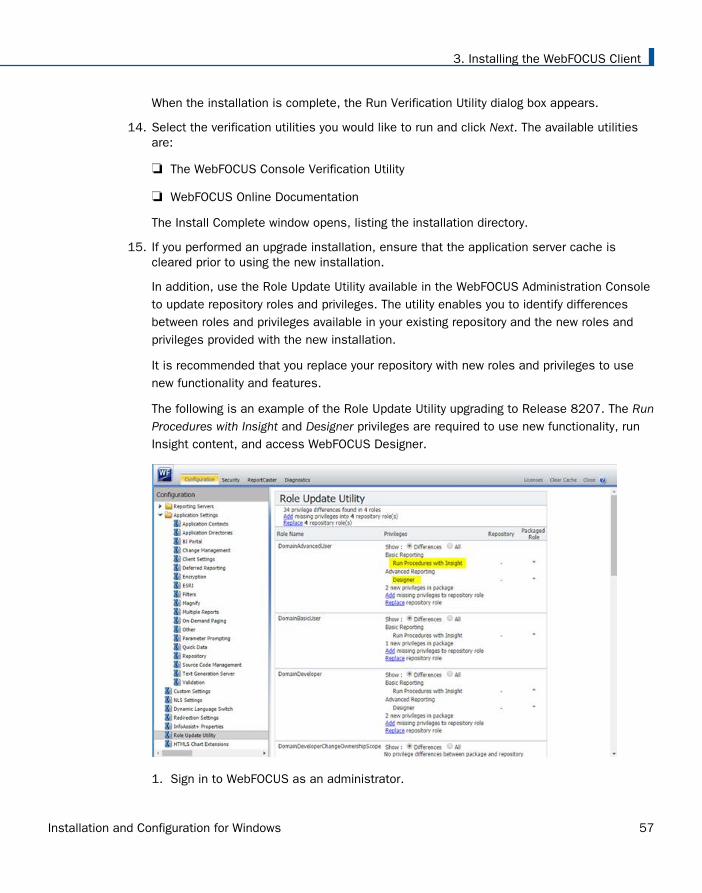
When the installation is complete, the Run Verification Utility dialog box appears.
14. Select the verification utilities you would like to run and click Next. The available utilitiesare:
The WebFOCUS Console Verification Utility
WebFOCUS Online Documentation
The Install Complete window opens, listing the installation directory.
15. If you performed an upgrade installation, ensure that the application server cache iscleared prior to using the new installation.
In addition, use the Role Update Utility available in the WebFOCUS Administration Consoleto update repository roles and privileges. The utility enables you to identify differencesbetween roles and privileges available in your existing repository and the new roles andprivileges provided with the new installation.
It is recommended that you replace your repository with new roles and privileges to usenew functionality and features.
The following is an example of the Role Update Utility upgrading to Release 8207. The RunProcedures with Insight and Designer privileges are required to use new functionality, runInsight content, and access WebFOCUS Designer.
1. Sign in to WebFOCUS as an administrator.
3. Installing the WebFOCUS Client
Installation and Configuration for Windows 57
2. Click the User menu, point to Administration, and then click Administration Console.
3. In the Configuration panel, click Role Update Utility.
At the top of the table, you will see a message that identifies new roles and high-leveldifferences between your existing roles.
4. Examine the differences between the Repository and Packaged roles and privileges andapply the new roles and privileges to enable new functionality and features.
Procedure: How to Install WebFOCUS Client Using the Silent Install
1. To generate the silent install properties file from the command prompt, navigate to thedirectory where the installWebFOCUS82nn.exe file resides.
2. Enter the following command:
installWebFOCUS82nn.exe -r drive:\fullpath\name.properties
Note:
Replace nn with the specific WebFOCUS 82 release, for example,installWebFOCUS8207.exe.
Always generate the properties file before performing the silent install to ensure thatthe properties are correct.
The properties file has the extension *.properties.
You need to specify the full path to where the properties file will be created.
3. To install in silent mode, navigate to the directory where the installWebFOCUS82nn.exefile resides and enter the following command:
installWebFOCUS82nn.exe -i silent -f drive:\fullpath\name.properties
Installing the WebFOCUS Client
58
Troubleshooting the Installation
If you experience issues during the installation, due to Java memory resources:
1. Start the Command Window with the option Run as administrator and issue the followingcommand:
set _JAVA_OPTIONS=-Xmx1024m
or
set _JAVA_OPTIONS=-Xmx2048m
Note: The set _JAVA_OPTIONS=-Xmx2048m command is recommended.
The memory allocated through this command must be available on your system.
This is a temporary variable applicable for the duration of the Command Windowsession.
2. From the same Command Window, navigate to the location of the WebFOCUSinstallation program and run the installation program.
The following are the main trace files for the installation. The names are generated with adate and random number, where userprofile is the user ID logged on during the installation.
C:\Users\userprofile\WebFOCUS82_inst_date_######.log
C:\Users\userprofile\WebFOCUS82_Install_inst_date_######.log
If the server cannot find the Java VM, the JSCOM Listener will not be able to start and themessages will be written to the server log file (edaprint.log), stating that the Java VMcannot be found. To resolve this issue, specify the location of the Java VM in JDK_HOME orIBI_JNIPATH. For more information, see the Server Installation manual.
Upgrading From an Earlier 8.2.x Release to Release 8207
Due to changes in the WebFOCUS Release 8.2 repository database structure, a databaseupdate is required to enable you to use an existing Release 8.2.x database with Release8207.
3. Installing the WebFOCUS Client
Installation and Configuration for Windows 59
Note: When upgrading to Release 8207.21 and higher, ReportCaster might fail to start if thereare encrypted password credentials in the configuration file. For example, for the SMTP Server,if the Java version that is used, does not contain the Java Cryptography Extension (JCE),ReportCaster might fail to start. In order for ReportCaster to work to encrypt and decryptpasswords, ReportCaster requires Java Cryptography Extension (JCE). This applies to both theApplication Server and the ReportCaster Distribution Server. This is not an issue if you areusing a current version of Java that includes the JCE by default, such as Java version 180_62.
Upgrade Installation Steps
The database update is performed during the upgrade installation. The installation checks thedatabase version used for the WebFOCUS repository to determine if a database update isrequired. Database updates are performed when upgrading from Release 8.2.x.
If a database update is required, the db_inplace_update.bat utility runs, using thecredentials configured with the installation.
If the database update was successful, the following information is entered in theinstallation log:
Update process SUCCEEDED
Note: Credentials used for the database update utility need privileges to allow tablechanges.
If the database update fails, the WebFOCUS web application does not start and you arenot able to connect to WebFOCUS. This can occur if the connection to the database isnot available. In this case, you need to review the installation log and the WebFOCUSevent log for more information, and manually run the db_inplace_update utility post-installation.
The following are examples of failures captured in the installation log file:
Version checker process FAILED to connect to database ERROR:connecting to DB, DBCHECK:connect_error-not going to execute:C:\ibi\WebFOCUS82\utilities\dbupdate\db_inplace_update.bat
The following is an example of a failure captured in the WebFOCUS event.log file:
ERROR_DB_NOT_UP_TO_DATE Database is not up to date. Please run the update utility first.
For more information on how to manually run the db_inplace_update utility post-installation, see How to Manually Run the Database Utility Post-Installation on page 62.
Upgrading From an Earlier 8.2.x Release to Release 8207
60
The update_repos utility runs automatically. This utility imports the following ChangeManagement packages:
managers_group_and_rules.zip
bip_page_templates_Vnn.zip, where nn is the version of the package.
roles.zip
pgx_page_templates_Vnn.zip, where nn is the version of the package.
themes_Vnn.zip, where nn is the version of the package.
You are prompted for WebFOCUS Administrator credentials during the installation. Ifcommunication to the database is not available, or the provided credentials do not havepermissions to import Change Management packages, you must manually run theupdate_repos utility post-installation. See step 6 in How to Manually Run the DatabaseUtility Post-Installation on page 62.
Note: This step is required for all Release 8.2.x upgrades to Release 8207.
Use the Role Update Utility available in the WebFOCUS Administration Console to updaterepository roles and privileges. The utility enables you to identify differences between rolesand privileges available in your existing repository and the new roles and privileges providedwith the new installation.
It is recommended that you replace your repository with new roles and privileges to usenew functionality and features.
3. Installing the WebFOCUS Client
Installation and Configuration for Windows 61
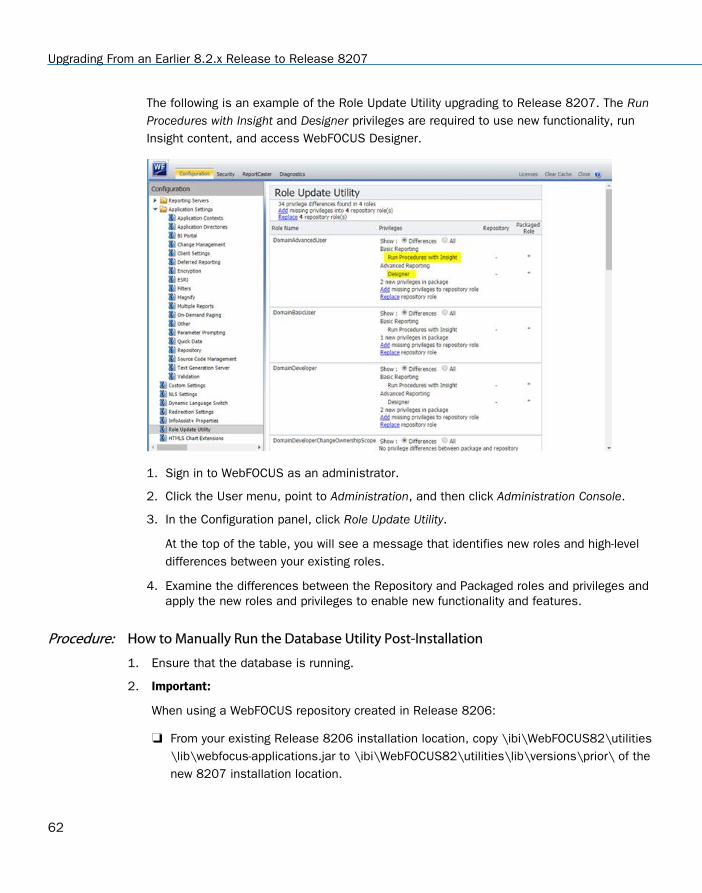
The following is an example of the Role Update Utility upgrading to Release 8207. The RunProcedures with Insight and Designer privileges are required to use new functionality, runInsight content, and access WebFOCUS Designer.
1. Sign in to WebFOCUS as an administrator.
2. Click the User menu, point to Administration, and then click Administration Console.
3. In the Configuration panel, click Role Update Utility.
At the top of the table, you will see a message that identifies new roles and high-leveldifferences between your existing roles.
4. Examine the differences between the Repository and Packaged roles and privileges andapply the new roles and privileges to enable new functionality and features.
Procedure: How to Manually Run the Database Utility Post-Installation
1. Ensure that the database is running.
2. Important:
When using a WebFOCUS repository created in Release 8206:
From your existing Release 8206 installation location, copy \ibi\WebFOCUS82\utilities\lib\webfocus-applications.jar to \ibi\WebFOCUS82\utilities\lib\versions\prior\ of thenew 8207 installation location.
Upgrading From an Earlier 8.2.x Release to Release 8207
62
When using a WebFOCUS repository created in Release 8205 or earlier release:
From your existing 82xx installation location, copy \ibi\WebFOCUS82\utilities\lib\IBFSCommands.jar to \ibi\WebFOCUS82\utilities\lib\versions\prior\ of the new8207 installation location and rename it to webfocus-applications.jar.
3. Run the db_inplace_update.bat utility. The db_inplace_update database utility is stored inthe drive:\ibi\WebFOCUS82\utilities\dbupdate folder.
Note: The application server should not be running when running the database updateutility.
4. Type the database repository user name and password, when prompted.
Note: Credentials used for the database update utility need privileges to allow tablechanges.
5. After a successful database update, clear the application server cache and then start theapplication server.
6. Confirm that the connection to WebFOCUS is functional and that the content is correct.
7. Run the following utility to load new roles and BI Portal page templates into theWebFOCUS repository:
drive:\ibi\WebFOCUS82\utilities\WFReposUtil\update_repos.bat
You will get prompted to provide WebFOCUS administrator credentials.
This utility imports the following Change Management packages:
drive:\ibi\WebFOCUS82\features\bip\managers_group_and_rules.zip
drive:\ibi\WebFOCUS82\features\bip\bip_page_templates_Vnn.zip, where nn is theversion of the package.
drive:\ibi\WebFOCUS82\features\bip\pgx_page_templates_Vnn.zip, where nn is theversion of the package.
drive:\ibi\WebFOCUS82\features\bip\themes_Vnn.zip, where nn is the version of thepackage.
drive:\ibi\WebFOCUS82\features\roles\roles.zip.
Logs are created in the drive:\ibi\WebFOCUS82\application_logs folder under thefollowing names:
cm_import_bip_page_templates_<date_time>.log
cm_import_managers_group_and_rules_<date_time>.log
3. Installing the WebFOCUS Client
Installation and Configuration for Windows 63
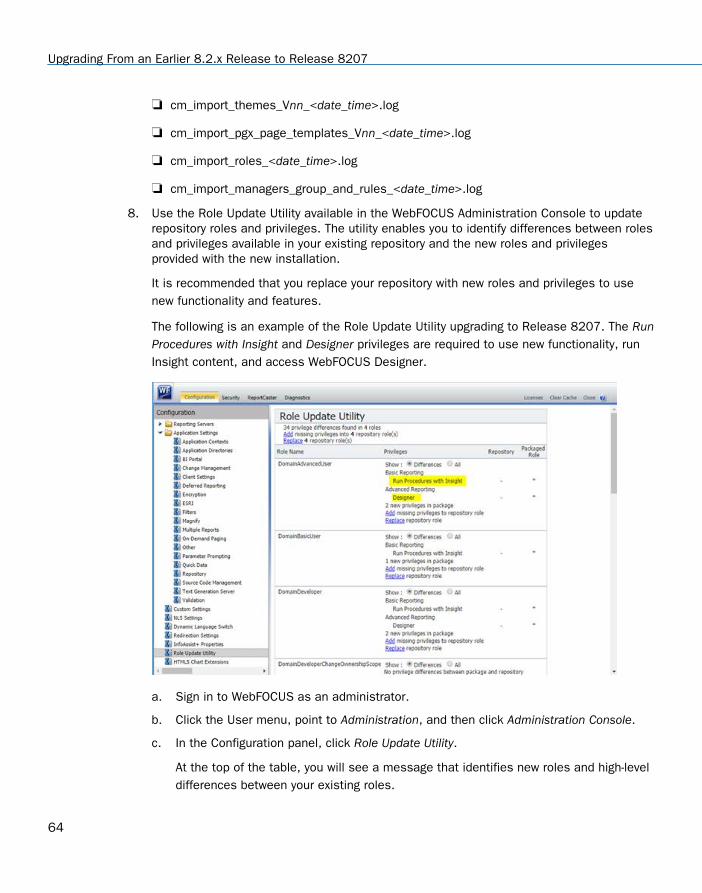
cm_import_themes_Vnn_<date_time>.log
cm_import_pgx_page_templates_Vnn_<date_time>.log
cm_import_roles_<date_time>.log
cm_import_managers_group_and_rules_<date_time>.log
8. Use the Role Update Utility available in the WebFOCUS Administration Console to updaterepository roles and privileges. The utility enables you to identify differences between rolesand privileges available in your existing repository and the new roles and privilegesprovided with the new installation.
It is recommended that you replace your repository with new roles and privileges to usenew functionality and features.
The following is an example of the Role Update Utility upgrading to Release 8207. The RunProcedures with Insight and Designer privileges are required to use new functionality, runInsight content, and access WebFOCUS Designer.
a. Sign in to WebFOCUS as an administrator.
b. Click the User menu, point to Administration, and then click Administration Console.
c. In the Configuration panel, click Role Update Utility.
At the top of the table, you will see a message that identifies new roles and high-leveldifferences between your existing roles.
Upgrading From an Earlier 8.2.x Release to Release 8207
64
d. Examine the differences between the Repository and Packaged roles and privilegesand apply the new roles and privileges to enable new functionality and features.
Reference: Troubleshooting the Upgrade Installation
If the database update fails, you must ensure that the database is running and that the dbowner is allowed to make changes to the database tables.
Run the drive:\ibi\WebFOCUS82\utilities\dbupdate\db_check_version.bat utility to verify ifthe database was updated.
In case the application server cannot load the WebFOCUS web application, review theapplication server logs and WebFOCUS logs, such as the event.log for errors.
WebFOCUS system event logs are created in the drive:\ibi\WebFOCUS82\logs folder.
Log names for the dbupdate and dbcheck utilities are nameddb_inplace_update_<timestamp>.log and db_check_version__<timestamp>.log and arecreated in the drive:\ibi\WebFOCUS82\application_logs folder.
If the database update was successful, and the application server fails to start anddb_check_version indicates that the database is not up to date, ensure that the applicationserver cache is cleared and attempt to restart the application server and connect toWebFOCUS.
ReportCaster configuration post-installation:
Upgrades remove and recreate the WebFOCUS ReportCaster service.
If the WebFOCUS ReportCaster service was configured using a domain user account asa service logon account, the service needs to be reconfigured with this option after theupgrade completes.
Note:
Upgrades backup the entire existing installation in the following folder:
drive:\ibi\WebFOCUS82\backup_files\
If multiple upgrades are performed, the latest existing backup is renamed, with the currentdate/time stamp appended to the folder name, for example:
drive:\ibi\WebFOCUS82\backup_files_02.22.2020.13.46\
During the upgrade installation, configuration changes are applied to the new installationwhile restoring files from the backup location or by merging configuration changes from thebackup files to the files created by the new installation.
3. Installing the WebFOCUS Client
Installation and Configuration for Windows 65
If you made custom changes to files that are not restored during upgrades, restore therequired files manually.
WebFOCUS Search Feature
Solr is used by the WebFOCUS Search feature.
When performing an upgrade to Release 8207 from an earlier release, the installation programinstalls and configures Solr as done for new installations and creates a Windows Servicenamed WebFOCUS Search Server WF82.
The Solr software is installed under the WebFOCUS installation directory, for example, \ibi\WebFOCUS82\Solr\ and the software is configured to use default port 8983.
Perform the following steps if you want to modify the port number used by the Search Server.
1. Stop the WebFOCUS Search Server WF82 service.
2. Remove the service, using the \ibi\WebFOCUS82\Solr\remove_solr_service.bat command.
3. Edit the \ibi\WebFOCUS82\Solr\ibi_solr_service_cfg.ps1 file and change the port numberby modifying the $solrPort = '8983' line. Ensure that the new port number is available andnot used by another application.
4. Install the new service, using the \ibi\WebFOCUS82\Solr\install_solr_service.batcommand.
5. Update the service startup type and set it to Automatic.
6. If you changed the Solr Server port, you should also apply it in the Solr URL setting of theWebFOCUS Administration Console. This setting is available under Configuration,Application Settings, Search. For example:
https://host_name:8983/solr
Note: If you want to use a different Solr server instance, update the Search Server informationfrom the WebFOCUS Administration Console.
Migrating Configuration Files from Release 8.1 Version 05M to Release 8207
Due to architecture changes in WebFOCUS, the configuration of WebFOCUS has changedbetween Release 8.1.x and Release 8.2.x. If you are upgrading content from Release 8.1Version 05M to Release 8207, use the configuration file migration utility to ensure that theconfiguration applied in the earlier release is properly migrated to the new installation.
Note: Run the configuration file migration utility before updating the WebFOCUS databaserepository.
Migrating Configuration Files from Release 8.1 Version 05M to Release 8207
66
Configuration File Migration Utility Implementation
The configuration file migration utility is implemented using Java. A supported version of Javais required to run the configuration file migration utility. You can perform the migration byrunning Java commands from the Command line.
The following configuration files will be migrated:
webconfig.xml and install.cfg
The install.cfg file in Release 8207 will be updated and the following settings will be addedwhile moving entries from the install.cfg and webconfig.xml files from the earlier Release8.1 Version 05M installation.
IBI_APPROOT_DIRECTORYIBI_WEBAPP_CONTEXT_DEFAULTIBI_WEBFOCUS_CONTEXTIBI_STATIC_CONTENT_CONTEXTIBI_HELP_CONTEXTIBI_REPORTCASTER_CONTEXTIBI_REPOS_DB_USERIBI_REPOS_DB_PASSWORDIBI_REPOS_DB_DRIVERIBI_REPOS_DB_URL
After running the migration utility, check the updated install.cfg file to ensure it has thecorrect entries in the following settings related to database name and user.
IBI_REPOS_DB_USERIBI_REPOS_DB_PASSWORDIBI_REPOS_DB_DRIVERIBI_REPOS_DB_URL
Note: Any additional updated settings found in the webconfig.xml file will be moved to thewebfocus.cfg file.
The configuration file migration utility will not move the following settings. The Release8207 defaults will be used for the following.
IBI_CSRF_ENFORCEIBI_CM_RETAIN_HANDLESIBI_CUSTOM_SECURITY_PARAMETERIBI_CUSTOM_SECURITY_DRIVERIBI_ENCRYPTION_PROVIDERIBI_MOVE_CONFIRMATION_MESSAGEIBI_REPOSITORY_SYNC_INTERVALIBI_REST_METHOD_ENFORCE
languages.xml. Configuration entries in this file for Release 8.1 Version 05M will becombined with the entries in the Release 8207 version of the file.
3. Installing the WebFOCUS Client
Installation and Configuration for Windows 67

mime.wfs. Configuration entries in this file for Release 8.1 Version 05M will be combinedwith the entries in the Release 8207 version of the file.
Security files:
securitysettings.xml
securitysettings-mobile.xml
securitysettings-portlet.xml
securitysettings-zone.xml
These security files will get copied from Release 8.1 Version 05M to Release 8207.
If you use SAML authentication, update the migrated securitysettings.xml file and ensurethe path to the location of the SAML certificate is correct.
The default path for Release 8.1.05 is:
{IBI_CONFIGURATION_DIRECTORY}/was/saml/samlKeystore.jks
The default location for Release 8207 is:
{IBI_CONFIGURATION_DIRECTORY}/was/wfKeystore.jks
Note:
The original files modified through the configuration file migration utility will be backed up inthe following directory:
..\ibi\WebFOCUS82\merge_files\
The log file name and location are:
..\ibi\WebFOCUS82\application_logs\configMigration.log
To preserve additional customizations done in Release 8.1 Version 05M, it isrecommended that you copy the following configuration files from your Release 8.1 Version05M installation to the corresponding folder of your Release 8207 installation.
Prior to proceeding with the copy, ensure you have backed up the original files fromRelease 8207.
..\ibi\WebFOCUS81\client\wfc\etc\odin.cfg
Reporting Servers specified in the odin.cfg file must meet requirements of WebFOCUSRelease 8.2.x.
Migrating Configuration Files from Release 8.1 Version 05M to Release 8207
68
..\ibi\WebFOCUS81\client\wfc\etc\site.wfs
Restore this file if it has been customized.
..\ibi\WebFOCUS81\config\license.cfg
..\ibi\WebFOCUS81\config\wflicense.key
..\ibi\WebFOCUS81\ibi_html\javaassist\ibi\html\olap\olapdefaults.js
..\ibi\WebFOCUS81\config\caster\ApplicationPreferences.xml
..\ibi\WebFOCUS81\ibi_html\javaassist\nls.txt
..\ibi\WebFOCUS81\config\security_metadatasource.xml
..\ibi\WebFOCUS81\ibi_html\javaassist\ibi\html\js\multidrill.css
Restore this file if it has been customized.
..\ibi\WebFOCUS81\config\was\
..\ibi\WebFOCUS81\config\web_resource\map\
Ensure the JDBC driver configuration in the Release 8207 installation is correct andsupports the database repository that is configured in the install.cfg file.
..\ibi\WebFOCUS82\utilities\setenv\utiluservars.bat
The migration of other customized files needs to be manually applied to the newinstallation.
Procedure: How to Run the Configuration File Migration Utility
1. From the Command line, navigate to the following directory:
..\ibi\WebFOCUS82\utilities\lib\
2. Run the following command:
java -classpath webfocus-applications.jar com.ibi.applications.config.WFMigrateConfig oldDocumentRoot newDocumentRoot
where:
oldDocumentRoot
Is the root location of the Release 8.1 Version 05M installation.
3. Installing the WebFOCUS Client
Installation and Configuration for Windows 69
newDocumentRoot
Is the location of the new installation directory.
For example:
java -classpath webfocus-applications.jar com.ibi.applications.config.WFMigrateConfig C:\ibi\WebFOCUS81 C:\ibi\WebFOCUS82
Note:
A supported version of Java is required to run the configuration file migration utility.
When running the Java command to migrate the configuration files, you can alsospecify the location of Java to be used.
For example:
“C:\Program Files\AdoptOpenJDK\jdk-11.0.9.11-hotspot\bin\java” -classpath webfocus-applications.jarIBFSCommands.jar com.ibi.applications.config.WFMigrateConfig C:\ibi\WebFOCUS81 C:\ibi\WebFOCUS82
Upgrading In Place from Release 8.1 Version 05M to Release 8207
The following topic describes how to perform an upgrade in place of content from Release 8.1Version 05M to Release 8207 while using the existing WebFOCUS 8.1 installation directory.
Note: The upgrade in place feature only applies to Release 8.1 Version 05M Gen 172 andhigher. If you are using Release 8.1 Version 05M Gen 14, contact Customer Support Services.
Prerequisites for Upgrading In Place
The following are prerequisites for upgrading in place from Release 8.1 Version 05M toRelease 8207:
Ensure the database used for the WebFOCUS repository is backed up prior to proceedingwith the upgrade installation.
This is required as the installation program performs database changes and a restore maybe required in case of failures.
For the installation that will be upgraded, it is recommended to back up the existinginstallation folder and files on disk.
Upgrading In Place from Release 8.1 Version 05M to Release 8207
70
The installation program backs up the entire directory prior to upgrading and will restore allfiles in case there are failures that do not allow the installation to proceed. This is a safetymeasure in case there are installation failures.
Ensure the application server used by the Release 8.1 Version 05M installation meets theWebFOCUS Release 8207 requirements:
WebFOCUS is configured for a supported version of Java.
Application server supports the servlet API 3.0 specifications.
If using Tomcat, it is recommended that you use the latest 9.0.x version. Tomcat 8.5.xand 9.0.x are supported.
You are using a supported database.
Prior to running the upgrade installation, ensure the application server used by the existingWebFOCUS installation is stopped to ensure files are not locked and there is no productusage.
If Tomcat is used, the installation program attempts to stop the Apache Tomcat service.
Ensure the ReportCaster service for the existing installation is stopped.
The installation program attempts to stop the ReportCaster service.
To avoid files being locked, ensure files from the existing installation are not opened by FileExplorer, CMD Window, or another application, such as an editor or browser.
Ensure the connection to the database hosting the WebFOCUS repository is running.
The following are tasks performed by the installation after selecting to upgrade an existingRelease 8.1 Version 05M to Release 8207 on Windows:
1. Check for existence of a supported version of Java.
2. Check for Tomcat and stop service.
3. Check for ReportCaster service and attempt to stop it.
4. Check database connection to run required database scripts.
This is done based on connection information available in the install.cfg file.
5. Upon successful connection, you are prompted to provide WebFOCUS administratorcredentials to be used when the installation runs the update_repos script.
6. User authentication and authorization is performed to ensure the provided WebFOCUSaccount is valid and has privileges to perform import of Change Management packages.
3. Installing the WebFOCUS Client
Installation and Configuration for Windows 71
7. Backup all files to the following folder:
..\ibi\WebFOCUS81\backup_files\
If the backup fails, for example, due to locked files, a message displays. The installationrestores all backed up files and exits.
8. The new Release 8207 installation is performed in the same WebFOCUS Release 8.1.xfolder and the installation properly applies required edits to configuration files, in additionto restoring files, as specified in step 9.
9. Files updated by the installation get backed up in the following folder:
..\ibi\WebFOCUS81\update_files\
The following files are restored and updated during installation:
web.xml. Updated during installation, using default values.
odin.cfg. Restored from backup.
site.wfs. Restored from backup.
license.cfg. Restored from backup.
wflicense.key. Restored from backup.
olapdefaults.js. Restored from backup.
nls.txt. Restored from backup.
security_metadatasource.xml. Restored from backup.
multidrill.css. Restored from backup.
config/caster/ApplicationPreferences.xml. Restored from backup.
/config/was/. Restored from backup.
/config/web_resource/map/. Restored from backup.
nlscfg.err. Language and code page will be updated, based on configuration of existinginstallation. If the WebFOCUS Client code page in the Release 8.1 Version 05Minstallation was configured as 137 or 437, the code page gets changed to 1252, whichis the new replacement value for Release 8.2.x.
Upgrading In Place from Release 8.1 Version 05M to Release 8207
72
10.Migration of configuration files is performed.
Files updated by the migration utility are backed up in the following folder:
..\ibi\WebFOCUS81\merge_files\
webconfig.xml and install.cfg
The install.cfg file in Release 8207 will be updated. The following settings will be addedwhile moving entries from the install.cfg and webconfig.xml files from the earlierRelease 8.1.x installation:
IBI_APPROOT_DIRECTORYIBI_WEBAPP_CONTEXT_DEFAULTIBI_WEBFOCUS_CONTEXTIBI_STATIC_CONTENT_CONTEXTIBI_HELP_CONTEXTIBI_REPORTCASTER_CONTEXTIBI_REPOS_DB_USERIBI_REPOS_DB_PASSWORDIBI_REPOS_DB_DRIVERIBI_REPOS_DB_URL
Note:
Any additional updated settings found in the webconfig.xml file will be moved to thewebfocus.cfg file.
File types specified in the WebFOCUS Administration Console for inclusion in theChange Management export packages are preserved during upgrades and an entrywith these values is added to the webfocus.cfg file. By default, 8.2.x releasessupport the following file types for exports created by the change managementfeature: acx, bmp, css, fex, gif, htm, html, ico, jpe, jpeg, jpg, js, mas, mnt, png, sty,and svg. The file type list can be adjusted from the WebFOCUS AdministrationConsole.
The configuration file migration utility will not move the following settings. The Release8207 defaults will be used for the following:
IBI_CSRF_ENFORCEIBI_CM_RETAIN_HANDLESIBI_CUSTOM_SECURITY_PARAMETERIBI_CUSTOM_SECURITY_DRIVERIBI_ENCRYPTION_PROVIDERIBI_MOVE_CONFIRMATION_MESSAGEIBI_REPOSITORY_SYNC_INTERVALIBI_REST_METHOD_ENFORCE
3. Installing the WebFOCUS Client
Installation and Configuration for Windows 73

The IBI_WEBAPP_DEFAULT_URL setting is created in install.cfg and is used by theInfoSearch Dimension Index Loader. The default value is:
http://<hostname>:80
This can be configured through the WebFOCUS Administration Console to provide theproper WebFOCUS protocol, host name, and port.
mime.wfs. Entries in this file for Release 8.1.x will be combined with the entries in theRelease 8207 version of the file.
Security files:
securitysettings.xml
securitysettings-mobile.xml
securitysettings-portlet.xml
securitysettings-zone.xml
These security files will get copied from Release 8.1.x to Release 8207.
languages.xml. Entries in this file for Release 8.1.x will be combined with the entries inthe Release 8207 version of the file.
cgivars.wfs. Settings stored in ..\client\wfc\etc\cgivars.wfs, such as Default ServerNode, OLAP, and Parameter Prompting settings are not maintained during the migrationprocess. These settings should be reapplied through the Administration Console.Changes to settings applied through the Administration Console are written to the ..\config\webfocus.cfg file, starting with Release 8.2.
11.Check database collation.
12.If the database is MS SQL Server or MySQL and collation is CI, the installation programchanges the database collation to the best matched CS collation.
13.The upgrade updates the Program group, ReportCaster service, and registry entries.
If the WebFOCUS ReportCaster service was configured using a domain user account as aservice logon account, the service needs to be reconfigured with this option after theupgrade completes.
14.Tomcat cache is cleared.
15.Tomcat is restarted.
16.Installation completes by running the verification page.
Upgrading In Place from Release 8.1 Version 05M to Release 8207
74

Note: If you are using another application server, redeploy the WebFOCUS web applicationWAR or EAR file, clear cache manually, and restart the application server.
Note: If any of the database update tasks fail, for example due to connectivity issues or nothaving database or WebFOCUS account credentials, the database update tasks can beperformed post installation.
Post-Installation Review for Upgrading In Place
1. Run ..\ibi\WebFOCUS81\utilities\dbupdate\db_inplace update.bat.
2. Run ..\ibi\WebFOCUS8105M\utilities\WFReposUtil\update_repos.bat.
3. Restart the application server.
4. Ensure all required services are running (application server, ReportCaster service,WebFOCUS Search Server).
5. Ensure the connection to the database is working.
6. Connect to WebFOCUS to ensure the product is working and content is accessible.
WebFOCUS uses the web application context that was configured in the earlier Release8.1.x version.
7. If the web application fails to load, check the application logs and WebFOCUS event.log.
8. Ensure configuration file migration was successful by checking the existence of thefollowing folder:
..\ibi\WebFOCUS81\merge_files\
9. Verify the contents of the install.cfg and webfocus.cfg files in the following folder:
..\ibi\WebFOCUS81\config\
10.Ensure the jdbc driver set in the following folder is correct, based on the database used asthe WebFOCUS repository.
..\ibi\WebFOCUS81\utilities\setenv\utiluservars.bat
11.If collation check or change failed during the installation, the following needs to beperformed post installation:
a. Stop the application server.
b. Ensure connection to the database is accessible and you have credentials that allowdatabase changes (create/edit tables).
c. Change database collation manually or using the tools available with the updatedinstallation in the following folder:
..\ibi\WebFOCUS81\utilities\dbupdate\collation\
3. Installing the WebFOCUS Client
Installation and Configuration for Windows 75
d. Run the database update by opening a Command Window (or a UNIX shell) andnavigating to the following folder:
..\ibi\WebFOCUS81\utilities\dbupdate\
e. From this location, run:
db_inplace_update.bat
For example:
C:\ibi\WebFOCUS81\utilities\dbupdate\db_inplace_update.bat
f. Run the following to import the required Change Management packages.
..\ibi\WebFOCUS81\utilities\WFReposUtil\update_repos.bat
g. Clear the application server cache.
h. Restart the application server.
Performing a New Release 8207 Installation Using an Existing 8.2.x WebFOCUS Repository
The following procedure describes how to perform a new Release 8207 installation while usinga WebFOCUS repository from an earlier 8.2.x installation.
Procedure: How to Perform a New Release 8207 Installation Using an Existing 8.2.x WebFOCUSRepository
1. Make a copy of your 8.2.x database to be used by the new Release 8207 installation.
2. Ensure the collation of the database, including all tables and columns, is case sensitive.
3. Ensure the database is running.
4. Perform a new full installation of Release 8207.
Note: During the installation, you will point to the copy of the 8.2.x database that youmade in Step 1.
5. During the installation of Release 8207, specify the type of database repository, as wellas the database repository information for the earlier database repository that you areusing. Specifically, in the Select Components to install dialog box, under Configure pre-existing Database, select the type of database repository that you are using, such asMicrosoft SQL Server or Oracle. In addition, ensure the Create WebFOCUS Repositoryoption is not selected.
6. Next, type the database repository name, connection, and configuration information.
Note: The credentials you provide need privileges to create and edit database tables.
Performing a New Release 8207 Installation Using an Existing 8.2.x WebFOCUS Repository
76
Once completed, the new installation of Release 8207 is available in the drive:\ibi\WebFOCUS82 directory.
7. Stop your application server, for example, Apache Tomcat.
8. Ensure that your database repository, for example Microsoft SQL Server, where yourWebFOCUS 8.2.x database repository is stored, is running.
9. Important:
When using a WebFOCUS repository created in Release 8206:
From your existing Release 8206 installation location, copy \ibi\WebFOCUS82\utilities\lib\webfocus-applications.jar to \ibi\WebFOCUS82\utilities\lib\versions\prior\ of thenew 8207 installation location.
When using a WebFOCUS repository created in Release 8205 or earlier release:
From your existing 82xx installation location, copy \ibi\WebFOCUS82\utilities\lib\IBFSCommands.jar to \ibi\WebFOCUS82\utilities\lib\versions\prior\ of the new8207 installation location and rename it to webfocus-applications.jar.
10. Run the drive:\ibi\WebFOCUS82\utilities\dbupdate\db_inplace_update utility.
Note:
You will be prompted for database credentials. Ensure the user name provided isallowed to create and edit database tables.
After the script completes, you should receive an Update process SUCCEEDEDmessage.
11. After a successful database update, clear the application server cache and then start theapplication server.
12. Confirm that the connection to WebFOCUS is functional and that the content is correct.
13. Run the following utility to load new roles and BI Portal page templates into theWebFOCUS repository:
drive:\ibi\WebFOCUS82\utilities\WFReposUtil\update_repos.bat
You will be prompted to provide WebFOCUS administrator credentials.
This utility imports the following Change Management packages:
drive:\ibi\WebFOCUS82\features\bip\managers_group_and_rules.zip
drive:\ibi\WebFOCUS82\features\bip\bip_page_templates_Vnn.zip, where nn is theversion of the package.
3. Installing the WebFOCUS Client
Installation and Configuration for Windows 77
drive:\ibi\WebFOCUS82\features\bip\pgx_page_templates_Vnn.zip, where nn is theversion of the package.
drive:\ibi\WebFOCUS82\features\bip\themes_Vnn.zip, where nn is the version of thepackage.
drive:\ibi\WebFOCUS82\features\roles\roles.zip.
Logs are created in the drive:\ibi\WebFOCUS82\application_logs folder under thefollowing names:
cm_import_bip_page_templates_<date_time>.log
cm_import_managers_group_and_rules_<date_time>.log
cm_import_themes_Vnn<date_time>.log
cm_import_pgx_page_templates_Vnn<date_time>.log
cm_import_roles_<date_time>.log
cm_import_managers_group_and_rules_<date_time>.log
14. Use the Role Update Utility available in the WebFOCUS Administration Console to updaterepository roles and privileges. The utility enables you to identify differences between rolesand privileges available in your existing repository and the new roles and privilegesprovided with the new installation.
It is recommended that you replace your repository with new roles and privileges to usenew functionality and features.
Performing a New Release 8207 Installation Using an Existing 8.2.x WebFOCUS Repository
78
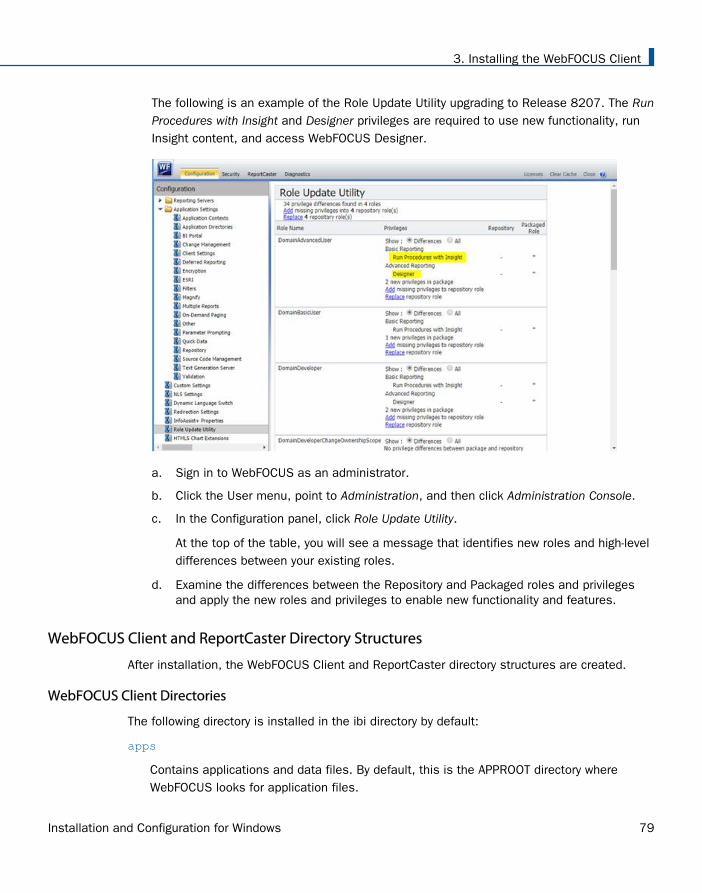
The following is an example of the Role Update Utility upgrading to Release 8207. The RunProcedures with Insight and Designer privileges are required to use new functionality, runInsight content, and access WebFOCUS Designer.
a. Sign in to WebFOCUS as an administrator.
b. Click the User menu, point to Administration, and then click Administration Console.
c. In the Configuration panel, click Role Update Utility.
At the top of the table, you will see a message that identifies new roles and high-leveldifferences between your existing roles.
d. Examine the differences between the Repository and Packaged roles and privilegesand apply the new roles and privileges to enable new functionality and features.
WebFOCUS Client and ReportCaster Directory Structures
After installation, the WebFOCUS Client and ReportCaster directory structures are created.
WebFOCUS Client Directories
The following directory is installed in the ibi directory by default:
apps
Contains applications and data files. By default, this is the APPROOT directory whereWebFOCUS looks for application files.
3. Installing the WebFOCUS Client
Installation and Configuration for Windows 79
The default location for other directories is in the WebFOCUS82 directory. For example:
drive:\ibi\WebFOCUS82
The WebFOCUS82 directory contains the following subdirectories:
application_logs
Contains log files generated from application utilities, such as change managementimports or database updates.
backup_files
Upgrades backup the entire existing installation in the following folder:
..\WebFOCUS82\backup_files\
If multiple upgrades are performed, the latest existing backup is renamed, with the currentdate/time stamp appended to the folder name, for example:
/WebFOCUS82/backup_files_05.22.2019.13.46/
The restore of configuration files and changes to configuration files are performed at theend of the installation upgrade process and information is written to the following log file:
WebFOCUS82_<date_time>.log
client
Contains configuration files.
cm
Default location for Change Management import and export packages.
config
Contains additional configuration files and files for optional security configurations.
features
Contains templates for new portals and resources related to security configuration.
ibi_html
Contains Java tools, templates, and other files used by WebFOCUS.
jre
Contains Java bundled with WebFOCUS.
licenses
Contains licenses for WebFOCUS and third-party software components.
WebFOCUS Client and ReportCaster Directory Structures
80
logs
Contains space for log files of system events.
maptiles
Legacy folder that contains local map tiles, which were used when rendering maps usingOpenStreetMap® data.
migration_import
Location for migration packages created from an earlier release.
ReportCaster
Contains the ReportCaster Distribution Server directories and files.
samples
Contains sample WebFOCUS API applications and demos.
Solr
Contains installation files for the Solr engine used by WebFOCUS.
temp
Contains space used during internal processing.
Uninstall_WebFOCUS82
Contains files used by the uninstall program.
utilities
Contains tools for configuration, migration, and other tasks.
webapps
Contains the WebFOCUS and ReportCaster web applications.
ReportCaster Distribution Server Directories
The default directory for the Distribution Server is:
drive:\ibi\WebFOCUS82\ReportCaster
The directory contains the following subdirectories:
bin
Contains application and other executable files.
cfg
Contains configuration and NLS resource files.
3. Installing the WebFOCUS Client
Installation and Configuration for Windows 81
lib
Contains ReportCaster libraries.
log
Contains configuration and error messages.
resources
Contains resources.
samples
Contains sample API files.
temp
Contains space for internal processing.
trc
Contains the trace files.
Note: ReportCaster web components are installed with WebFOCUS Client.
File Permissions for WebFOCUS Client Directories
Since the WebFOCUS Client runs as part of your web and application servers, the user IDs thatrun web and application server processes require access to the WebFOCUS Client directories.For Windows, default NTFS permissions are usually sufficient. However, the necessary stepsdepend on your web and application server.
For Tomcat, there is normally no need to set NTFS permissions. When Tomcat runs as aservice, it runs as the Local System account which has sufficient permissions, by default.
You can optionally enhance security by changing the user ID under which Tomcat runs to anID with less authority on the machine, and then setting NTFS permissions for this user ID.For more information, see Additional WebFOCUS Configuration Options on page 211.
For other web and applications servers, consult your web and application serverdocumentation to determine the user IDs under which your servers run. If your servers donot run as Windows services, the default file system permissions are probably sufficient.
For additional information about permissions and security, see the Security and Administrationmanual.
WebFOCUS Client and ReportCaster Directory Structures
82
Uninstalling the WebFOCUS Client
Prior to uninstalling the WebFOCUS Client software, ensure that the application server andHTTP server used by WebFOCUS are stopped, and that the WebFOCUS ReportCaster WF82service is also stopped. You can use the following options to uninstall the WebFOCUS Client:
The Information Builders app from the Start menu. You can uninstall the software byselecting the WebFOCUS 82 folder, and then double-clicking the Uninstall WebFOCUS 82shortcut.
The command line by executing the uninstall program Uninstall_WebFOCUS82.exe (forexample, C:\ibi\WebFOCUS82\Uninstall_WebFOCUS82\Uninstall_WebFOCUS82.exe).
A silent uninstall, using the command line, by adding the option -i silent after the uninstallexecutable file. For example:
C:\ibi\WebFOCUS82\Uninstall_WebFOCUS82\Uninstall_WebFOCUS82.exe -i silent
3. Installing the WebFOCUS Client
Installation and Configuration for Windows 83
Uninstalling the WebFOCUS Client
84
Chapter4Configuring Web and Application Servers
This chapter explains how to configure web and application servers to run WebFOCUS. Ifthe WebFOCUS installation configured them for you and the verification tool ransuccessfully, then this chapter is optional. However, you should review it if you need totroubleshoot. In addition, if you are new to Apache Tomcat or WebFOCUS, it is a goodidea to review this chapter to understand what was configured.
The term application server is used in this section to refer to a servlet container, J2EEEngine, or application server.
The following abbreviation is used for the drive letter of the ibi directory where you installWebFOCUS components on your system:
drive:\
Substitute the actual letter on your system when reviewing procedures and examples inthis document. Procedures and examples assume default locations and directory names.If you change defaults, substitute accordingly.
In this chapter:
Configuration Overview and Options
Configuring Apache Tomcat
Configuring Microsoft IIS Version 7.x
Configuring IBM WebSphere
Configuring Oracle WebLogic
Installation and Configuration for Windows 85
Configuration Overview and Options
WebFOCUS Client components run as part of web servers and application servers.Configuration steps vary depending on which web servers or application servers you use. Whenusing file and folder names that use NLS characters, the application server and the operatingsystem must be configured with the same language encoding.
Apache Tomcat Stand-alone
Tomcat can be used as both the web server and application server. If you choose thisoption, be aware that the default HTTP port for Tomcat is 8080, not 80. Therefore, whencalling web server pages in a browser, you must use:
http://hostname:8080
instead of
http://hostname
Manual configuration is described in Configuring Apache Tomcat on page 89.
Microsoft IIS and Apache Tomcat
Tomcat can be used as the application server while Microsoft IIS is used as the webserver. This requires two servers and the configuration of their communications.
Manual configuration is described in Configuring Apache Tomcat on page 89.
IBM WebSphere Application Server
For details, see Configuring IBM WebSphere on page 110.
Other
Other web servers or application servers can be manually configured. Review your serverdocumentation and perform steps that correspond to the information that follows.
If no web server is available, an application server can be used to handle all processing ifthe application server has robust HTTP capabilities.
Configuration Steps Overview
The following is an overview of the steps needed to configure web or application servers forWebFOCUS. For Apache Tomcat, you can review this overview or proceed directly to ConfiguringApache Tomcat on page 89.
Configuration Overview and Options
86
Important: If you want to install WebFOCUS in a clustered or split-tier environment, see Configuring WebFOCUS in a Split Web-Tier and Application Server-Only Environment on page123.
The steps vary depending on the type of configuration you use:
Web Server and Application Server Configuration (aliases and web applications). In astandard configuration, you can create aliases to traditional static web content in aWebFOCUS directory (ibi\apps) and you deploy the webfocus.war web application on yourapplication server. This is supported when both a web server and an application server areused for WebFOCUS processing. It is also supported when using an application server likeApache Tomcat that can behave like a web server and serve content outside of webapplications.
You can also use the web server to only pass requests to Tomcat through a firewall. In thatcase, you must deploy all three web applications on your application server.
If your web server and application server are located on different machines, see ConfiguringWebFOCUS in a Split Web-Tier and Application Server-Only Environment on page 123.
Application Server Only Configuration (all web applications). For application servers likeIBM WebSphere, Oracle WebLogic, Oracle Application Server, SAP NetWeaver, and OracleJava System Application Server, you can deploy all WebFOCUS content through webapplications (WAR files). In this configuration, you deploy approot.war, in addition towebfocus.war, and you do not create web server aliases.
For important information on configuring approot.war, see Configuring WebFOCUS in a SplitWeb-Tier and Application Server-Only Environment on page 123.
Procedure: How to Configure a Web Server and an Application Server for WebFOCUS
1. Ensure application server and web server components are installed and properlyfunctioning. Refer to third-party documentation, if necessary.
If you do not have an application server, the WebFOCUS Client installation can install andconfigure Apache Tomcat for you.
4. Configuring Web and Application Servers
Installation and Configuration for Windows 87
2. Add the WebFOCUS repository JDBC driver to your application server CLASSPATH.
For information on JDBC drivers, see Additional WebFOCUS Repository Topics and Tasks onpage 189.
3. Deploy the WebFOCUS web application on the application server.
WebFOCUS components are packaged as a J2EE web application. The web application isprovided as the following WAR file:
drive:\ibi\WebFOCUS82\webapps\webfocus.war
It is also provided as the following expanded directory:
drive:\ibi\WebFOCUS82\webapps\webfocus
You can deploy either the WAR files or expanded directories, depending on your preferenceand the capabilities of your application server. For Tomcat stand-alone, using theexpanded directories is recommended. Be aware that when applying a service pack, anychanges made to the web applications must be in the expanded directories to bemaintained.
The default deployment parameters for WebFOCUS are:
Context Root/Path
Doc base or location
/ibi_apps drive:\ibi\WebFOCUS82\webapps\webfocus.war
/approot drive:\ibi\WebFOCUS82\webapps\approot.war
If you are using a web server, you can create aliases for the static content. This mapsdirectories containing WebFOCUS data to directories the web server can reference. Thedefault settings are:
Default Alias Path Access
approot drive:\ibi\apps Read Only
On some Windows Servers, you may need to grant Scripts only executable permissions aswell.
4. Ensure your web server routes requests for the /ibi_apps and /approot web applicationcontext roots to the application server.
Configuration Overview and Options
88
5. Verify the configuration using the tools in the WebFOCUS Administration Console, asexplained in WebFOCUS Client Post-Installation Tasks on page 123.
Note: If you are installing multiple instances, completely install and configure a singleinstance, and then refer to Additional WebFOCUS Repository Topics and Tasks on page189 for instructions on configuring the second instance.
Configuring Apache Tomcat
This section explains how to manually configure Apache Tomcat for use with WebFOCUS. TheWebFOCUS installation provided the option to install and configure Apache Tomcat for you. Ifyou chose this option and the verification tool ran successfully, you do not need to manuallyconfigure Tomcat. However, if you are new to Tomcat or receive errors, you should review thissection to understand the configuration process.
There are two configurations available when using Apache Tomcat:
Tomcat can be used as both a web server and application server. This is referred to as aTomcat stand-alone configuration and all WebFOCUS processing is done by Tomcat.
Microsoft IIS can be used as the web server and Tomcat can be used as the applicationserver. This requires configuring two servers and their communications. Processing is thensplit between Tomcat and IIS.
Note: To use IIS to only forward requests to Tomcat through a firewall, configure a Tomcatstand-alone configuration, as explained in this section, and then manually configure theTomcat Connector.
Java Memory Requirement
You may need to adjust the Java VM memory options if you run into performance issues.
4. Configuring Web and Application Servers
Installation and Configuration for Windows 89
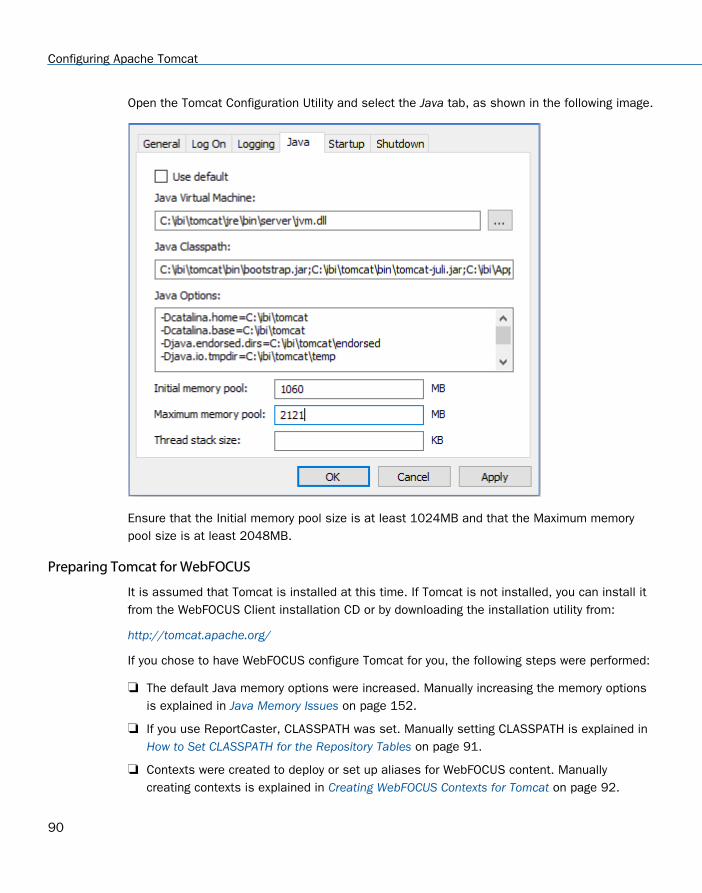
Open the Tomcat Configuration Utility and select the Java tab, as shown in the following image.
Ensure that the Initial memory pool size is at least 1024MB and that the Maximum memorypool size is at least 2048MB.
Preparing Tomcat for WebFOCUS
It is assumed that Tomcat is installed at this time. If Tomcat is not installed, you can install itfrom the WebFOCUS Client installation CD or by downloading the installation utility from:
http://tomcat.apache.org/
If you chose to have WebFOCUS configure Tomcat for you, the following steps were performed:
The default Java memory options were increased. Manually increasing the memory optionsis explained in Java Memory Issues on page 152.
If you use ReportCaster, CLASSPATH was set. Manually setting CLASSPATH is explained in How to Set CLASSPATH for the Repository Tables on page 91.
Contexts were created to deploy or set up aliases for WebFOCUS content. Manuallycreating contexts is explained in Creating WebFOCUS Contexts for Tomcat on page 92.
Configuring Apache Tomcat
90
The following steps can be performed to further configure Tomcat:
You can secure the web administration tools installed with Tomcat.
You can change the default ports that Tomcat uses. This is not normally required, but canbe changed, as explained in Tomcat Ports on page 92.
When Apache Tomcat is configured to use Secure Sockets Layer (SSL), it is recommendedfor security reasons to allow communication only over the Transport Layer Security (TLS)1.2 protocol.
To enable TLS 1.2 only, perform the following:
1. Edit the $CATALINA_BASE/conf/server.xml file.
2. In the Connector port section add the following attribute:
sslEnabledProtocols="TLSv1.2"
3. Save and close the file.
4. Restart Apache Tomcat.
Procedure: How to Set CLASSPATH for the Repository Tables
The JDBC driver location must be in the Tomcat CLASSPATH. Tomcat runs as a Windowsservice, so CLASSPATH is set in the registry. If you chose to configure Tomcat when youinstalled WebFOCUS, the install should have set this for you.
To manually set Java Classpath or troubleshoot, check your CLASSPATH field and be sure toinclude the JDBC driver.
Note: If the driver does not appear, add a semicolon (;) to the end of the Java Classpath field.Then, add the absolute path to the JDBC driver for your repository. If more than one file isneeded, separate each path with a semicolon (;). Spaces can occur in directory names, but notbetween the paths and the semicolons (;). Be sure to include the file name and not just thedirectory containing the file. For example:
C:\ibi\tomcat\bin\bootstrap.jar;C:\drivers\sqljdbc.jar
For information on JDBC drivers, see Additional WebFOCUS Repository Topics and Tasks onpage 189.
4. Configuring Web and Application Servers
Installation and Configuration for Windows 91
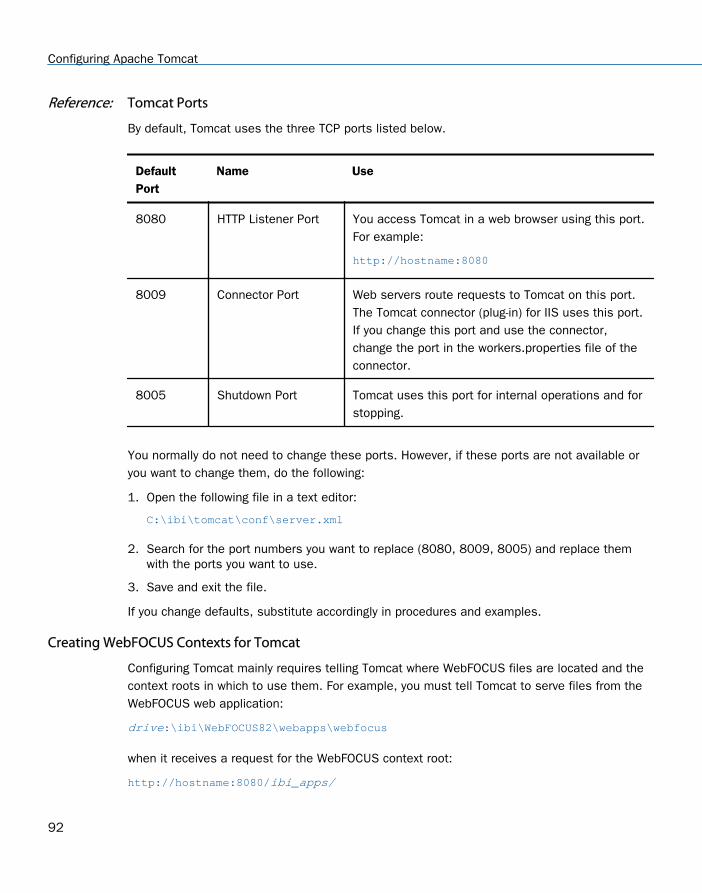
Reference: Tomcat Ports
By default, Tomcat uses the three TCP ports listed below.
DefaultPort
Name Use
8080 HTTP Listener Port You access Tomcat in a web browser using this port.For example:
http://hostname:8080
8009 Connector Port Web servers route requests to Tomcat on this port.The Tomcat connector (plug-in) for IIS uses this port.If you change this port and use the connector,change the port in the workers.properties file of theconnector.
8005 Shutdown Port Tomcat uses this port for internal operations and forstopping.
You normally do not need to change these ports. However, if these ports are not available oryou want to change them, do the following:
1. Open the following file in a text editor:
C:\ibi\tomcat\conf\server.xml
2. Search for the port numbers you want to replace (8080, 8009, 8005) and replace themwith the ports you want to use.
3. Save and exit the file.
If you change defaults, substitute accordingly in procedures and examples.
Creating WebFOCUS Contexts for Tomcat
Configuring Tomcat mainly requires telling Tomcat where WebFOCUS files are located and thecontext roots in which to use them. For example, you must tell Tomcat to serve files from theWebFOCUS web application:
drive:\ibi\WebFOCUS82\webapps\webfocus
when it receives a request for the WebFOCUS context root:
http://hostname:8080/ibi_apps/
Configuring Apache Tomcat
92
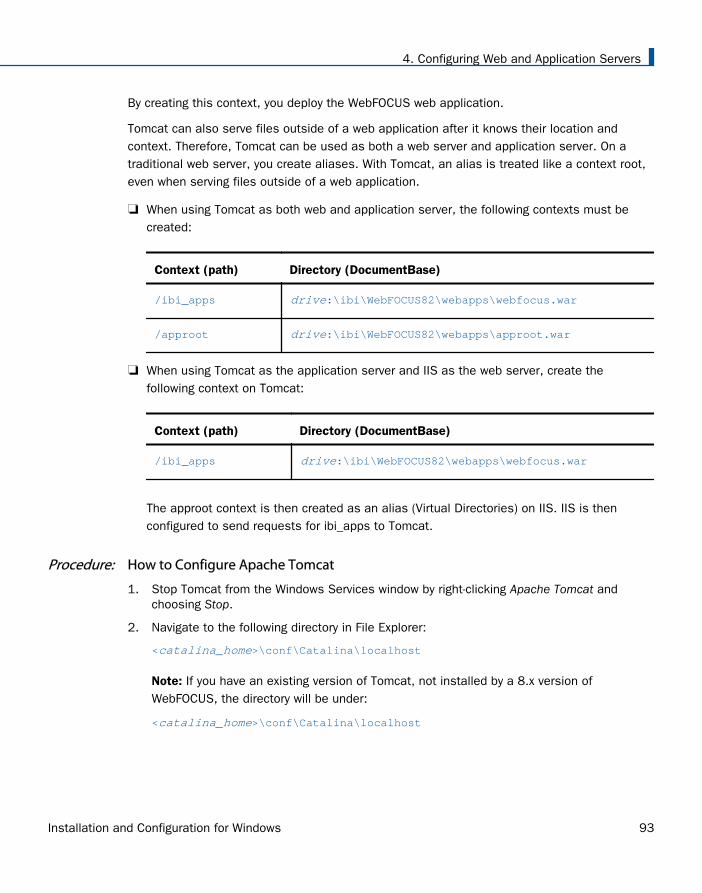
By creating this context, you deploy the WebFOCUS web application.
Tomcat can also serve files outside of a web application after it knows their location andcontext. Therefore, Tomcat can be used as both a web server and application server. On atraditional web server, you create aliases. With Tomcat, an alias is treated like a context root,even when serving files outside of a web application.
When using Tomcat as both web and application server, the following contexts must becreated:
Context (path) Directory (DocumentBase)
/ibi_apps drive:\ibi\WebFOCUS82\webapps\webfocus.war
/approot drive:\ibi\WebFOCUS82\webapps\approot.war
When using Tomcat as the application server and IIS as the web server, create thefollowing context on Tomcat:
Context (path) Directory (DocumentBase)
/ibi_apps drive:\ibi\WebFOCUS82\webapps\webfocus.war
The approot context is then created as an alias (Virtual Directories) on IIS. IIS is thenconfigured to send requests for ibi_apps to Tomcat.
Procedure: How to Configure Apache Tomcat
1. Stop Tomcat from the Windows Services window by right-clicking Apache Tomcat andchoosing Stop.
2. Navigate to the following directory in File Explorer:
<catalina_home>\conf\Catalina\localhost
Note: If you have an existing version of Tomcat, not installed by a 8.x version ofWebFOCUS, the directory will be under:
<catalina_home>\conf\Catalina\localhost
4. Configuring Web and Application Servers
Installation and Configuration for Windows 93
This directory can contain XML files that define contexts. If the WebFOCUS installationinstalled and configured Tomcat for you, the following file should appear to define theibi_apps context that deploys the WebFOCUS directory:
ibi_apps.xml
If you are using Tomcat stand-alone, the following should appear as well:
approot.xml
The XML files are named for the context root you would use to access the web applicationand should have the following syntax:
<?xml version='1.0' encoding='utf-8'?><Context docBase="path_To_WebApplication" path="/contextRoot"></Context>
where:
path_To_WebApplication
Is the absolute path to the WAR file or directory you are deploying.
contextRoot
Is the context root.
Note: They can optionally contain additional information, as explained in the Tomcatdocumentation.
You can create or edit the files in a text editor, such as Notepad.
3. If the ibi_apps.xml file does not exist, create it. For example:
<?xml version='1.0' encoding='utf-8'?><Context docBase="C:\ibi\WebFOCUS82\webapps\webfocus" path="/ibi_apps" useHttpOnly="true"></Context>
Be sure to specify the correct directory on your machine and change the context root if youare not using the default (ibi_apps).
4. If you are using Tomcat stand-alone, create an approot.xml file if it does not exist. Forexample:
<?xml version='1.0' encoding='utf-8'?><Context docBase="C:\ibi\apps" path="/approot"></Context>
Be sure to specify the correct directory on your machine.
5. Restart Tomcat from the Services window.
Configuring Apache Tomcat
94
Reference: Reloading Web Applications
This is not a consideration if you just installed WebFOCUS for the first time, but you should beaware of it for when you update your existing Release 8207 installation to a later 8207version. When you upgrade WebFOCUS, Tomcat must use the new web applications, ratherthan cached copies of the old version.
If you install a service pack in the same location and you had previously deployed theexpanded directories, the new web applications should be used automatically, but youshould remove the following work directory and then restart Tomcat:
<catalina_home>\work\Catalina\localhost\ibi_apps
<catalina_home>\work\Catalina\localhost\approot (if previously deployed)
If you are installing in a different location or you deployed WAR files, you need to completelyremove the existing WebFOCUS contexts and then recreate them. To remove contexts, youcan use the Tomcat Manager application or remove the corresponding files and directoriesfrom the context. For example:
<catalina_home>\conf\Catalina\localhost\ibi_apps.xml
<catalina_home>\work\Catalina\localhost\ibi_apps
<catalina_home>\webapps\ibi_apps
Note: When you deploy WAR files, Tomcat expands them into its own directory structureand does not always know the original location.
4. Configuring Web and Application Servers
Installation and Configuration for Windows 95
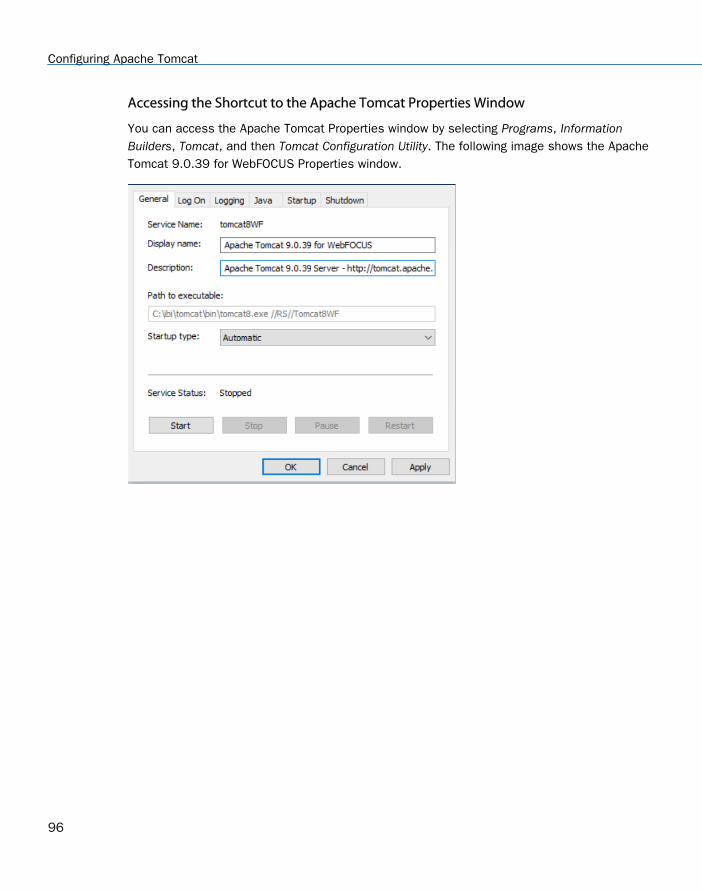
Accessing the Shortcut to the Apache Tomcat Properties Window
You can access the Apache Tomcat Properties window by selecting Programs, InformationBuilders, Tomcat, and then Tomcat Configuration Utility. The following image shows the ApacheTomcat 9.0.39 for WebFOCUS Properties window.
Configuring Apache Tomcat
96
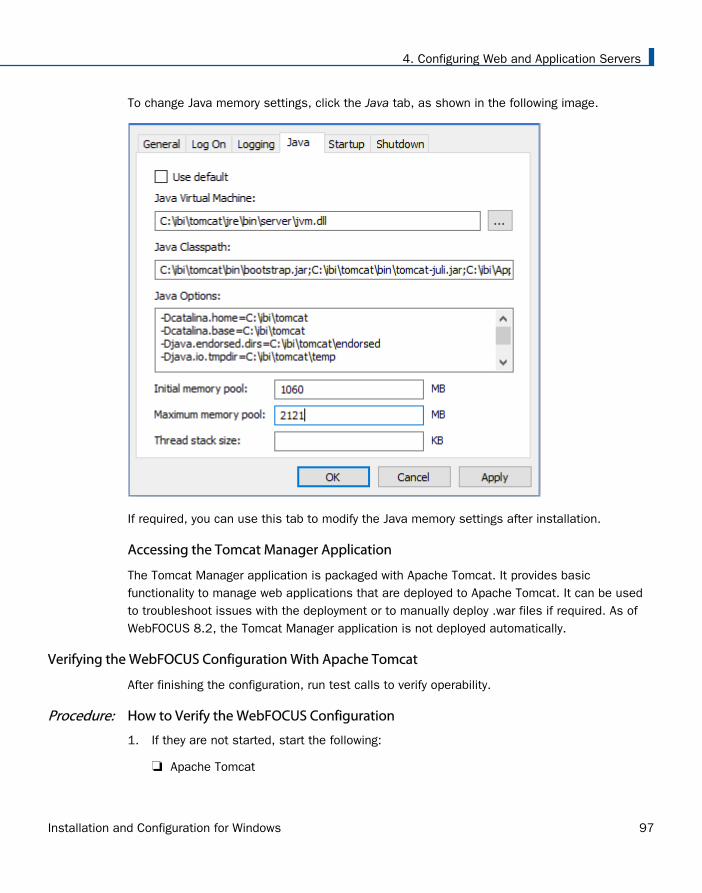
To change Java memory settings, click the Java tab, as shown in the following image.
If required, you can use this tab to modify the Java memory settings after installation.
Accessing the Tomcat Manager Application
The Tomcat Manager application is packaged with Apache Tomcat. It provides basicfunctionality to manage web applications that are deployed to Apache Tomcat. It can be usedto troubleshoot issues with the deployment or to manually deploy .war files if required. As ofWebFOCUS 8.2, the Tomcat Manager application is not deployed automatically.
Verifying the WebFOCUS Configuration With Apache Tomcat
After finishing the configuration, run test calls to verify operability.
Procedure: How to Verify the WebFOCUS Configuration
1. If they are not started, start the following:
Apache Tomcat
4. Configuring Web and Application Servers
Installation and Configuration for Windows 97
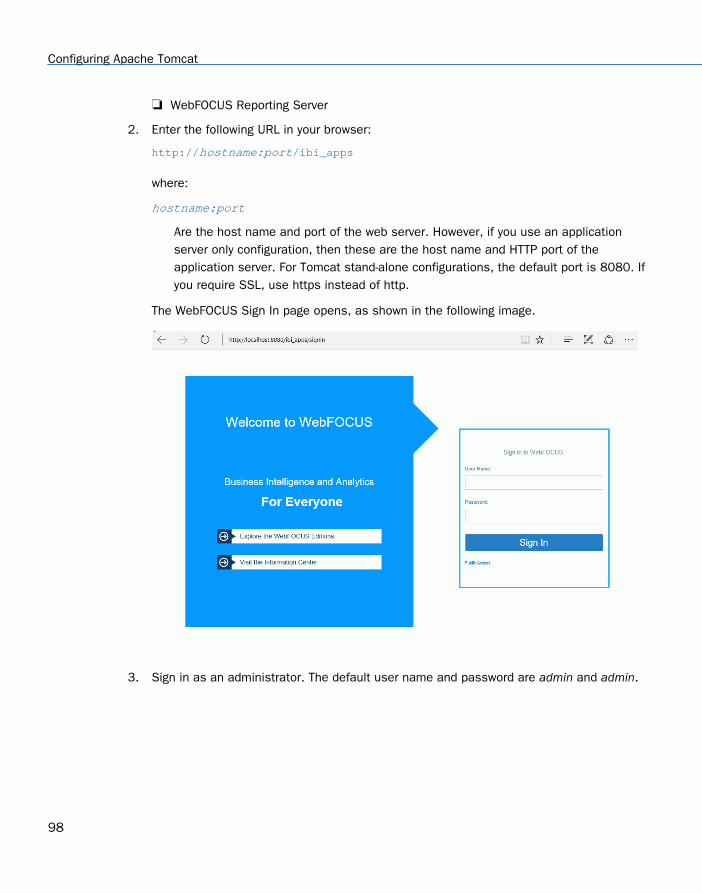
WebFOCUS Reporting Server
2. Enter the following URL in your browser:
http://hostname:port/ibi_apps
where:
hostname:port
Are the host name and port of the web server. However, if you use an applicationserver only configuration, then these are the host name and HTTP port of theapplication server. For Tomcat stand-alone configurations, the default port is 8080. Ifyou require SSL, use https instead of http.
The WebFOCUS Sign In page opens, as shown in the following image.
3. Sign in as an administrator. The default user name and password are admin and admin.
Configuring Apache Tomcat
98
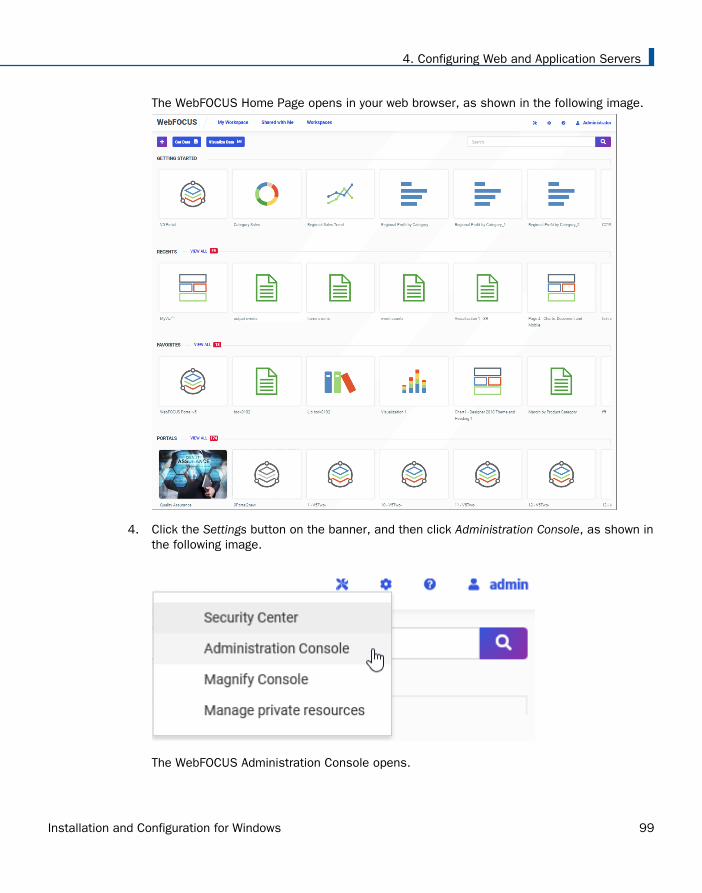
The WebFOCUS Home Page opens in your web browser, as shown in the following image.
4. Click the Settings button on the banner, and then click Administration Console, as shown inthe following image.
The WebFOCUS Administration Console opens.
4. Configuring Web and Application Servers
Installation and Configuration for Windows 99
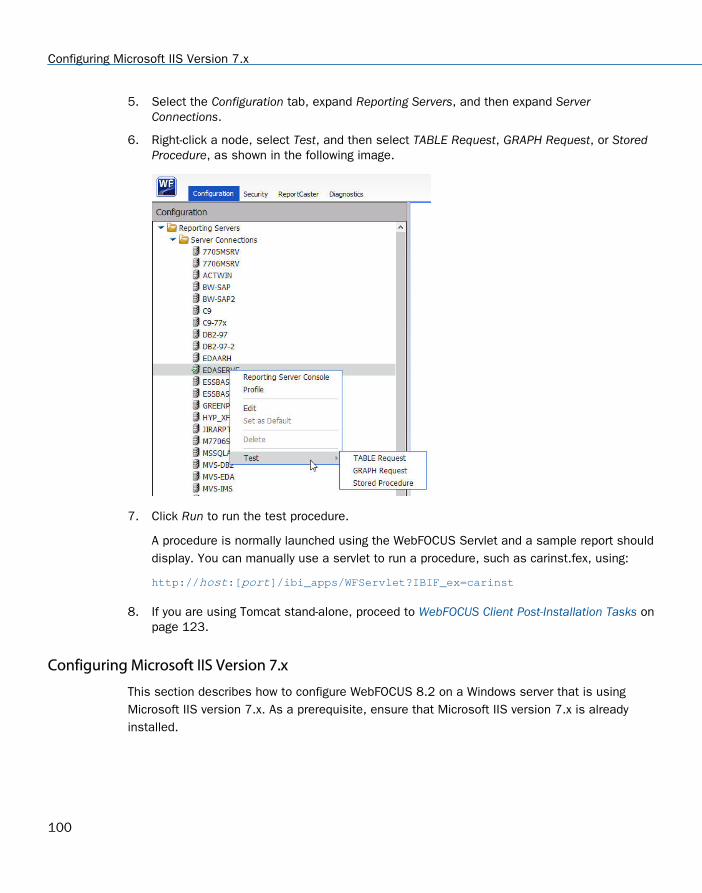
5. Select the Configuration tab, expand Reporting Servers, and then expand ServerConnections.
6. Right-click a node, select Test, and then select TABLE Request, GRAPH Request, or StoredProcedure, as shown in the following image.
7. Click Run to run the test procedure.
A procedure is normally launched using the WebFOCUS Servlet and a sample report shoulddisplay. You can manually use a servlet to run a procedure, such as carinst.fex, using:
http://host:[port]/ibi_apps/WFServlet?IBIF_ex=carinst
8. If you are using Tomcat stand-alone, proceed to WebFOCUS Client Post-Installation Tasks onpage 123.
Configuring Microsoft IIS Version 7.x
This section describes how to configure WebFOCUS 8.2 on a Windows server that is usingMicrosoft IIS version 7.x. As a prerequisite, ensure that Microsoft IIS version 7.x is alreadyinstalled.
Configuring Microsoft IIS Version 7.x
100
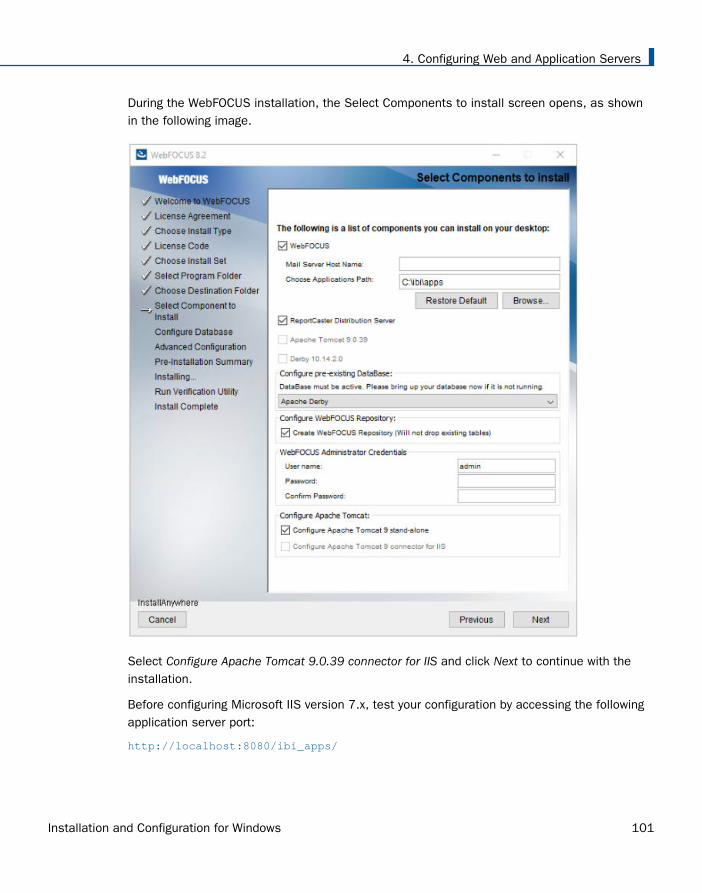
During the WebFOCUS installation, the Select Components to install screen opens, as shownin the following image.
Select Configure Apache Tomcat 9.0.39 connector for IIS and click Next to continue with theinstallation.
Before configuring Microsoft IIS version 7.x, test your configuration by accessing the followingapplication server port:
http://localhost:8080/ibi_apps/
4. Configuring Web and Application Servers
Installation and Configuration for Windows 101
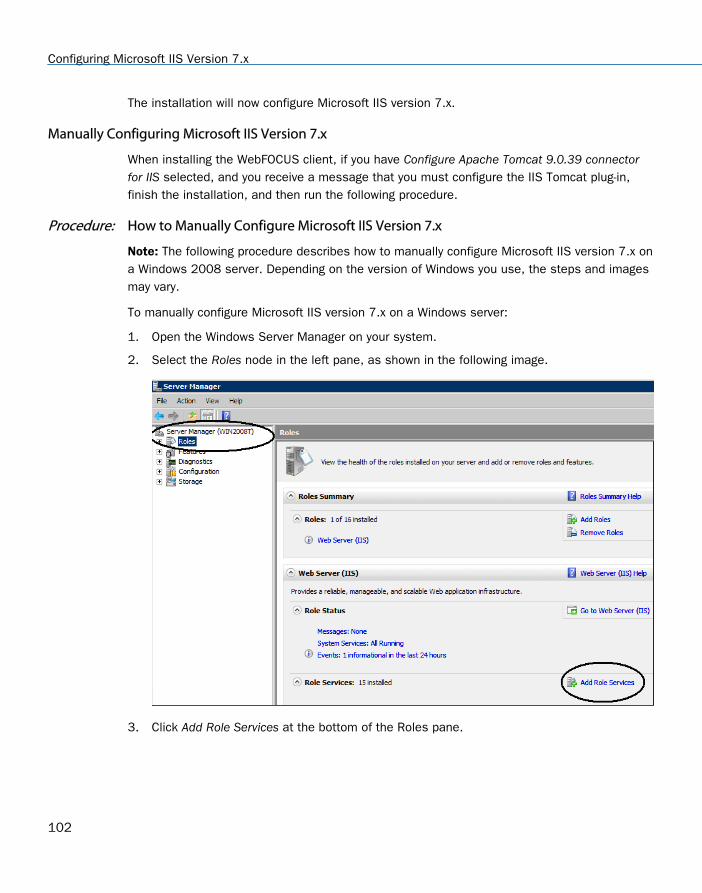
The installation will now configure Microsoft IIS version 7.x.
Manually Configuring Microsoft IIS Version 7.x
When installing the WebFOCUS client, if you have Configure Apache Tomcat 9.0.39 connectorfor IIS selected, and you receive a message that you must configure the IIS Tomcat plug-in,finish the installation, and then run the following procedure.
Procedure: How to Manually Configure Microsoft IIS Version 7.x
Note: The following procedure describes how to manually configure Microsoft IIS version 7.x ona Windows 2008 server. Depending on the version of Windows you use, the steps and imagesmay vary.
To manually configure Microsoft IIS version 7.x on a Windows server:
1. Open the Windows Server Manager on your system.
2. Select the Roles node in the left pane, as shown in the following image.
3. Click Add Role Services at the bottom of the Roles pane.
Configuring Microsoft IIS Version 7.x
102
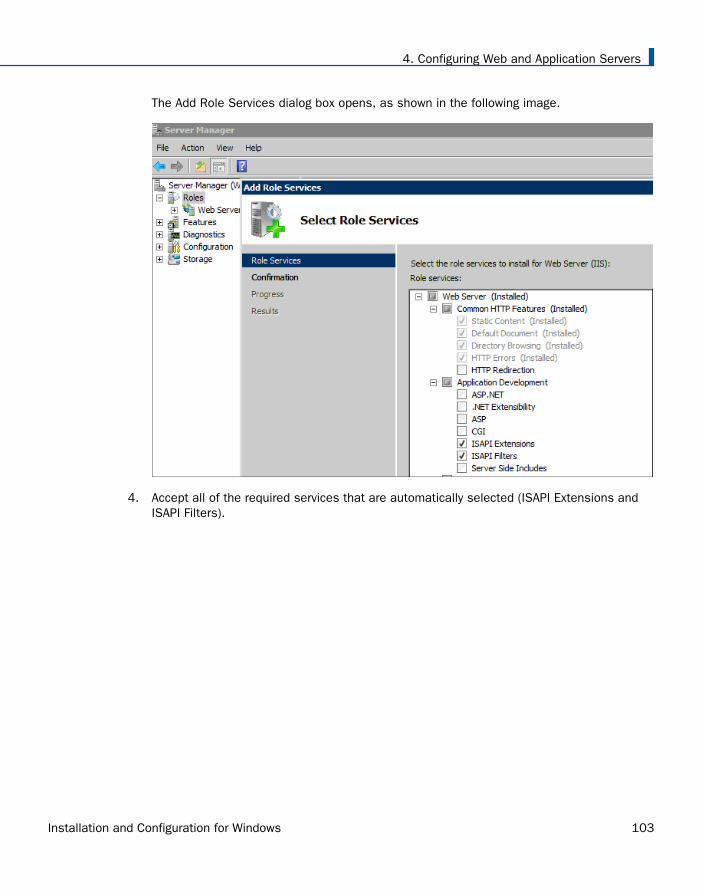
The Add Role Services dialog box opens, as shown in the following image.
4. Accept all of the required services that are automatically selected (ISAPI Extensions andISAPI Filters).
4. Configuring Web and Application Servers
Installation and Configuration for Windows 103
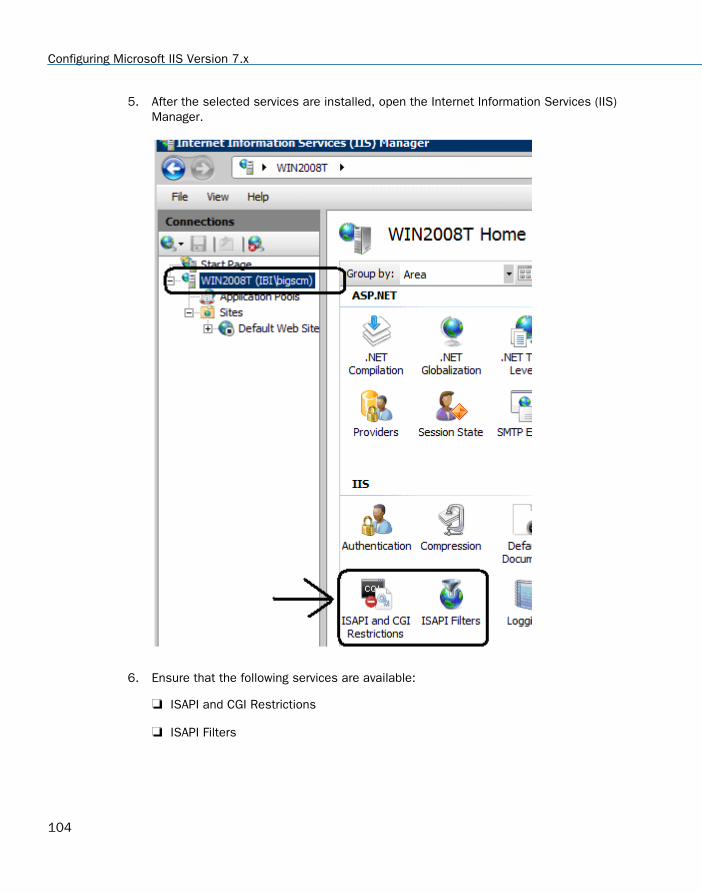
5. After the selected services are installed, open the Internet Information Services (IIS)Manager.
6. Ensure that the following services are available:
ISAPI and CGI Restrictions
ISAPI Filters
Configuring Microsoft IIS Version 7.x
104
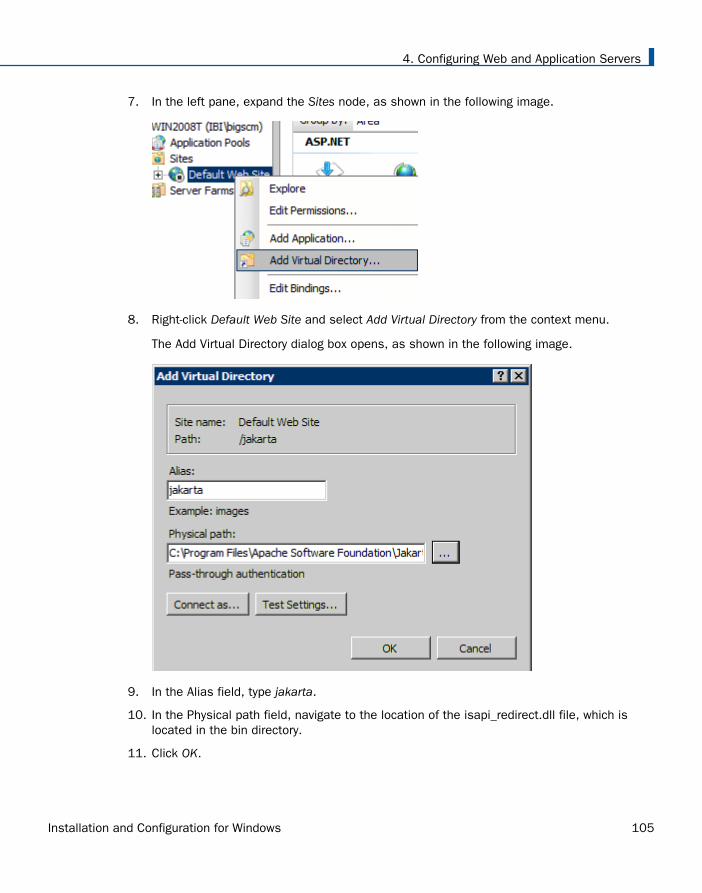
7. In the left pane, expand the Sites node, as shown in the following image.
8. Right-click Default Web Site and select Add Virtual Directory from the context menu.
The Add Virtual Directory dialog box opens, as shown in the following image.
9. In the Alias field, type jakarta.
10. In the Physical path field, navigate to the location of the isapi_redirect.dll file, which islocated in the bin directory.
11. Click OK.
4. Configuring Web and Application Servers
Installation and Configuration for Windows 105
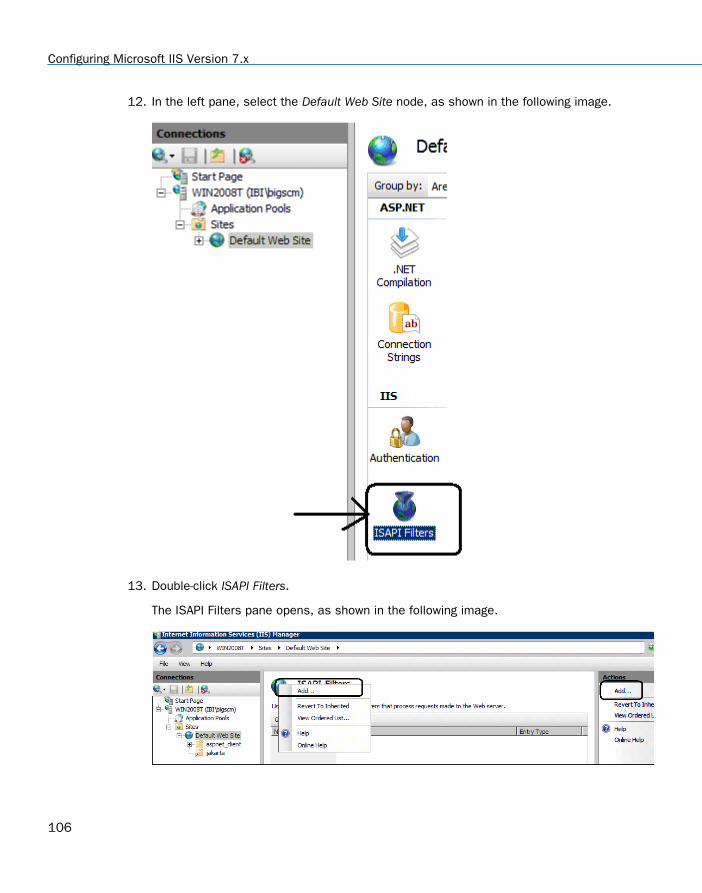
12. In the left pane, select the Default Web Site node, as shown in the following image.
13. Double-click ISAPI Filters.
The ISAPI Filters pane opens, as shown in the following image.
Configuring Microsoft IIS Version 7.x
106
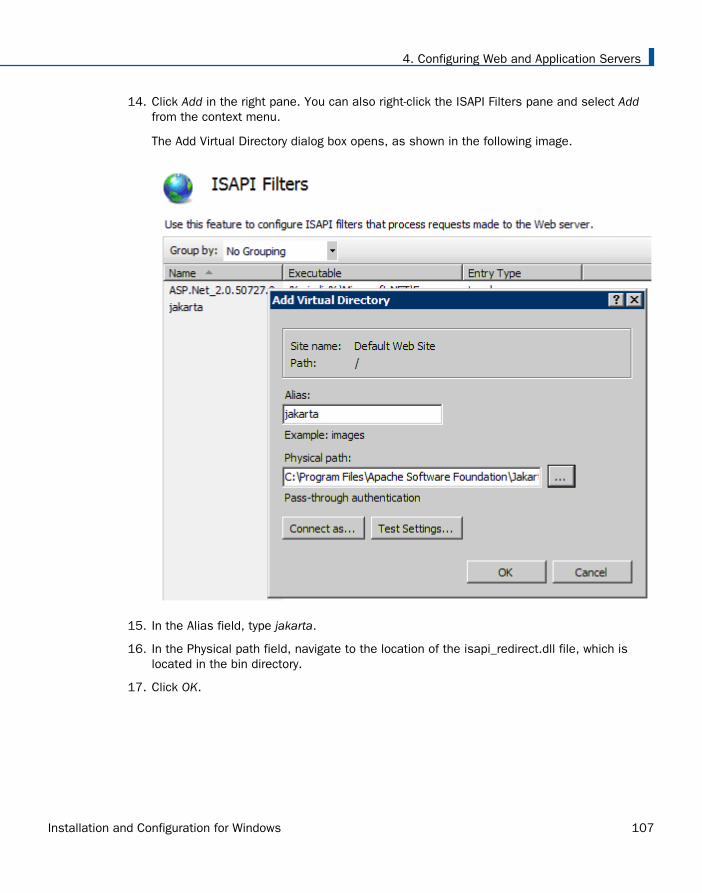
14. Click Add in the right pane. You can also right-click the ISAPI Filters pane and select Addfrom the context menu.
The Add Virtual Directory dialog box opens, as shown in the following image.
15. In the Alias field, type jakarta.
16. In the Physical path field, navigate to the location of the isapi_redirect.dll file, which islocated in the bin directory.
17. Click OK.
4. Configuring Web and Application Servers
Installation and Configuration for Windows 107
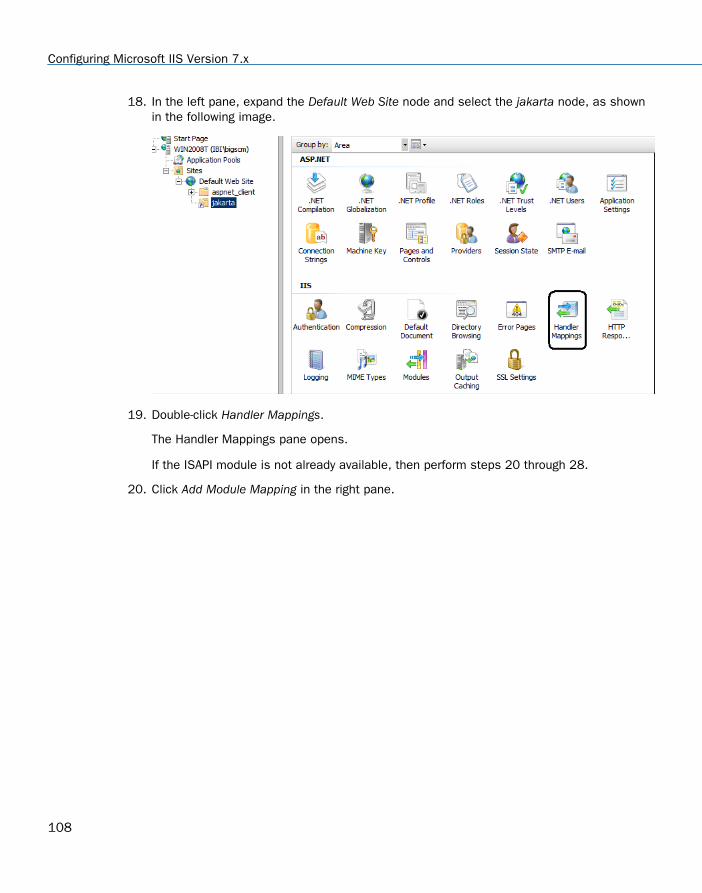
18. In the left pane, expand the Default Web Site node and select the jakarta node, as shownin the following image.
19. Double-click Handler Mappings.
The Handler Mappings pane opens.
If the ISAPI module is not already available, then perform steps 20 through 28.
20. Click Add Module Mapping in the right pane.
Configuring Microsoft IIS Version 7.x
108
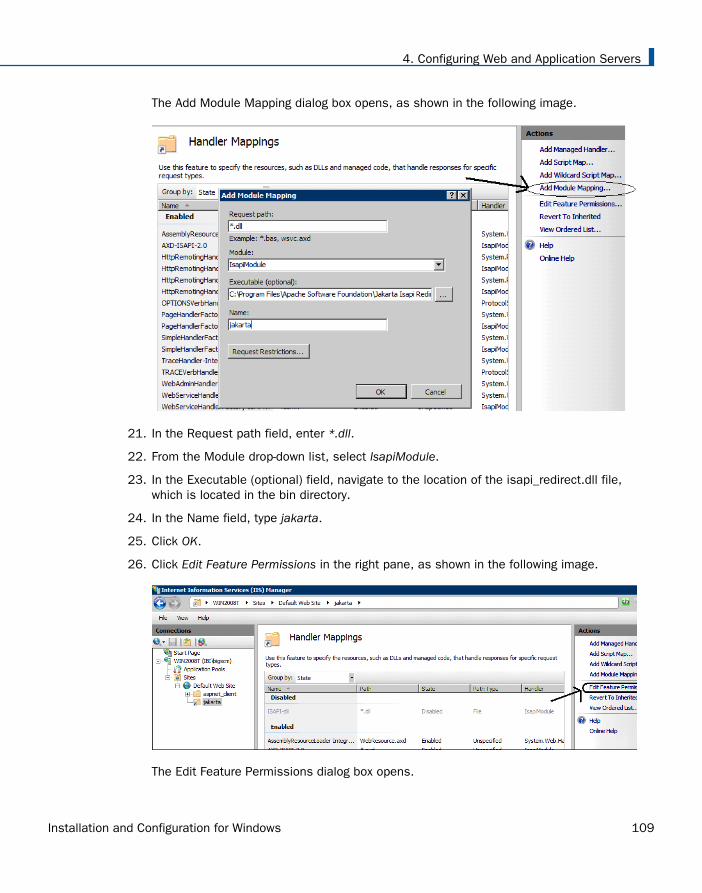
The Add Module Mapping dialog box opens, as shown in the following image.
21. In the Request path field, enter *.dll.
22. From the Module drop-down list, select IsapiModule.
23. In the Executable (optional) field, navigate to the location of the isapi_redirect.dll file,which is located in the bin directory.
24. In the Name field, type jakarta.
25. Click OK.
26. Click Edit Feature Permissions in the right pane, as shown in the following image.
The Edit Feature Permissions dialog box opens.
4. Configuring Web and Application Servers
Installation and Configuration for Windows 109
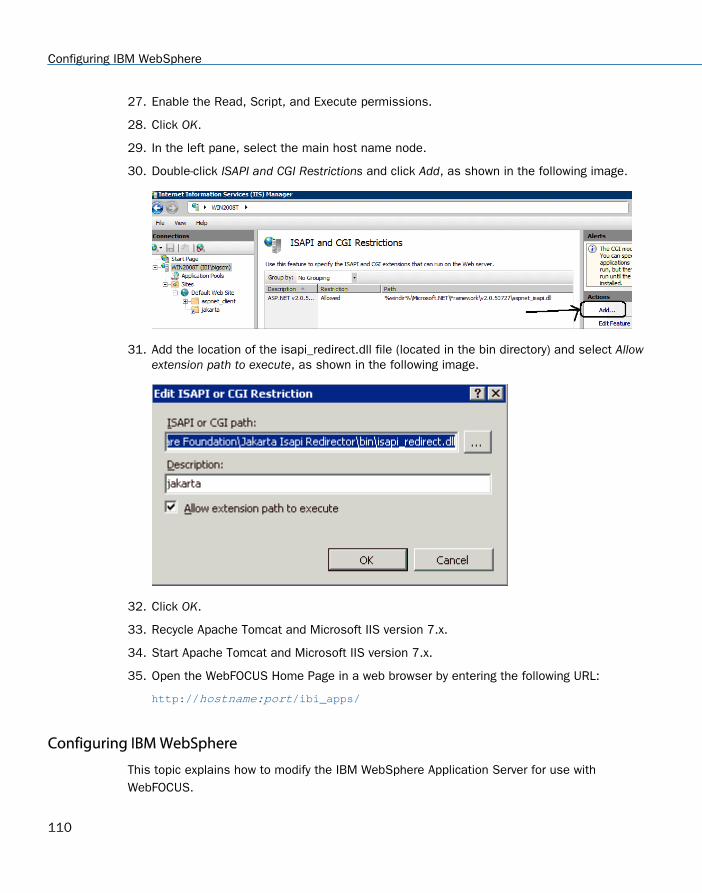
27. Enable the Read, Script, and Execute permissions.
28. Click OK.
29. In the left pane, select the main host name node.
30. Double-click ISAPI and CGI Restrictions and click Add, as shown in the following image.
31. Add the location of the isapi_redirect.dll file (located in the bin directory) and select Allowextension path to execute, as shown in the following image.
32. Click OK.
33. Recycle Apache Tomcat and Microsoft IIS version 7.x.
34. Start Apache Tomcat and Microsoft IIS version 7.x.
35. Open the WebFOCUS Home Page in a web browser by entering the following URL:
http://hostname:port/ibi_apps/
Configuring IBM WebSphere
This topic explains how to modify the IBM WebSphere Application Server for use withWebFOCUS.
Configuring IBM WebSphere
110
It is assumed that WebSphere components are installed and configured and that a WebSphereApplication Server has been created for use with WebFOCUS.
The WebFOCUS web application (webfocus.war) requires a shared library in order to overridecertain libraries provided by WebSphere.
Procedure: How to Create the WebSphere Application Server Shared Library
1. Create a new directory to use for the shared library. This directory must be accessible bythe WebSphere Application Server user. For example:
mkdir drive:\ibi\shared
2. Copy the following files from the drive:\ibi\WebFOCUS82\webapps\webfocus\WEB-INF\lib\ directory to the directory created in step 1.
jackson*.jar
http*.jar
org.eclipse.persistence.jpa-*.jar
org.eclipse.persistence.asm-*.jar
org.eclipse.persistence.antlr-*.jar
org.eclipse.persistence.jpa.jpql-*.jar
org.eclipse.persistence.core-*.jar
jakarta.persistence-*.jar
commons-*.jar
For example:
Copy drive:\ibi\WebFOCUS82\webapps\webfocus\WEB-INF\lib\jackson*.jar drive:\ibi\shared\
3. Sign in to the WebSphere Console.
4. Configuring Web and Application Servers
Installation and Configuration for Windows 111
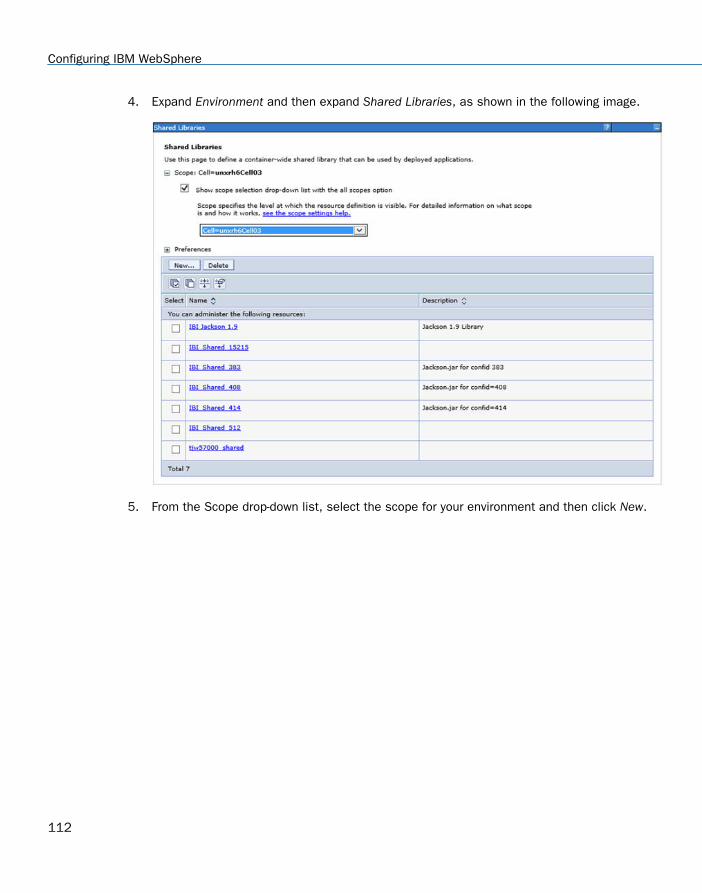
4. Expand Environment and then expand Shared Libraries, as shown in the following image.
5. From the Scope drop-down list, select the scope for your environment and then click New.
Configuring IBM WebSphere
112
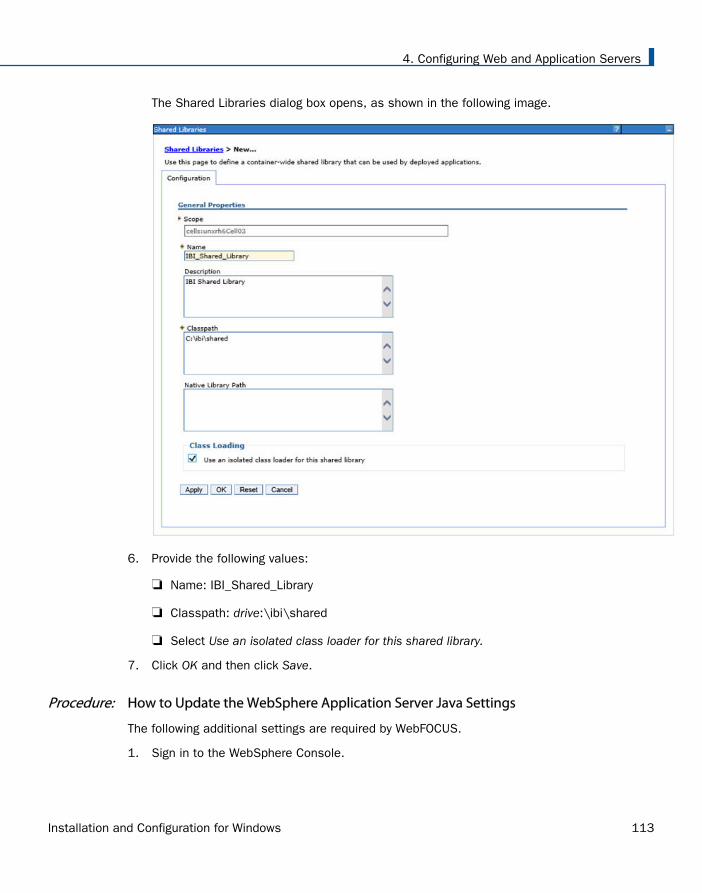
The Shared Libraries dialog box opens, as shown in the following image.
6. Provide the following values:
Name: IBI_Shared_Library
Classpath: drive:\ibi\shared
Select Use an isolated class loader for this shared library.
7. Click OK and then click Save.
Procedure: How to Update the WebSphere Application Server Java Settings
The following additional settings are required by WebFOCUS.
1. Sign in to the WebSphere Console.
4. Configuring Web and Application Servers
Installation and Configuration for Windows 113
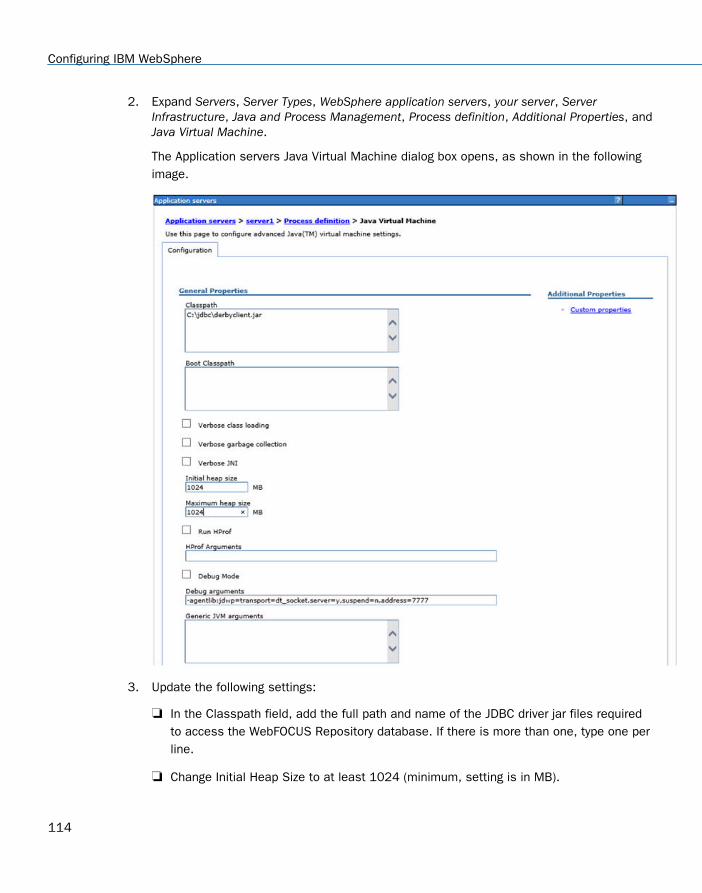
2. Expand Servers, Server Types, WebSphere application servers, your server, ServerInfrastructure, Java and Process Management, Process definition, Additional Properties, andJava Virtual Machine.
The Application servers Java Virtual Machine dialog box opens, as shown in the followingimage.
3. Update the following settings:
In the Classpath field, add the full path and name of the JDBC driver jar files requiredto access the WebFOCUS Repository database. If there is more than one, type one perline.
Change Initial Heap Size to at least 1024 (minimum, setting is in MB).
Configuring IBM WebSphere
114
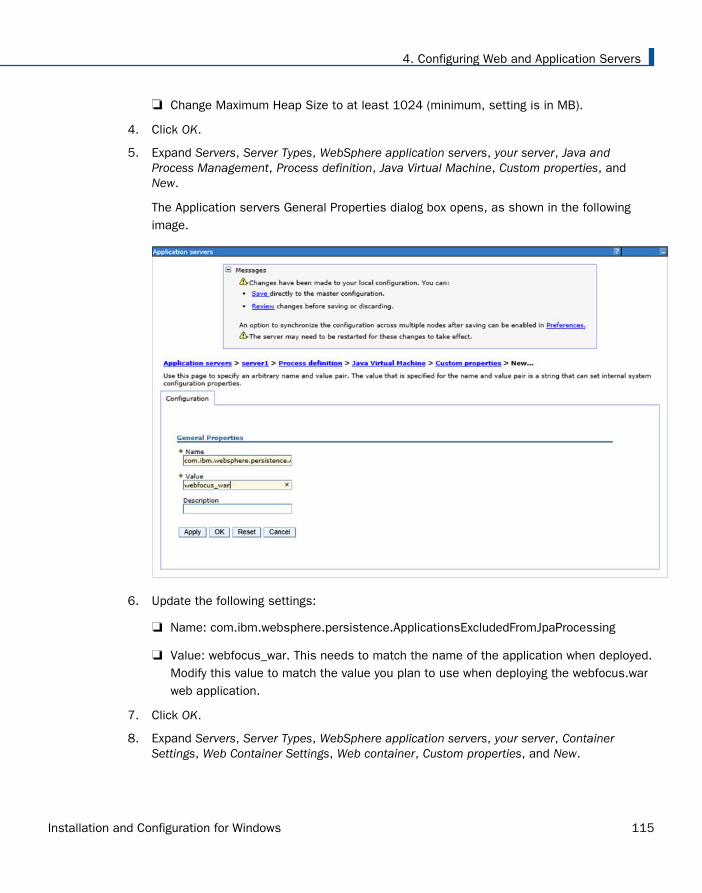
Change Maximum Heap Size to at least 1024 (minimum, setting is in MB).
4. Click OK.
5. Expand Servers, Server Types, WebSphere application servers, your server, Java andProcess Management, Process definition, Java Virtual Machine, Custom properties, andNew.
The Application servers General Properties dialog box opens, as shown in the followingimage.
6. Update the following settings:
Name: com.ibm.websphere.persistence.ApplicationsExcludedFromJpaProcessing
Value: webfocus_war. This needs to match the name of the application when deployed.Modify this value to match the value you plan to use when deploying the webfocus.warweb application.
7. Click OK.
8. Expand Servers, Server Types, WebSphere application servers, your server, ContainerSettings, Web Container Settings, Web container, Custom properties, and New.
4. Configuring Web and Application Servers
Installation and Configuration for Windows 115
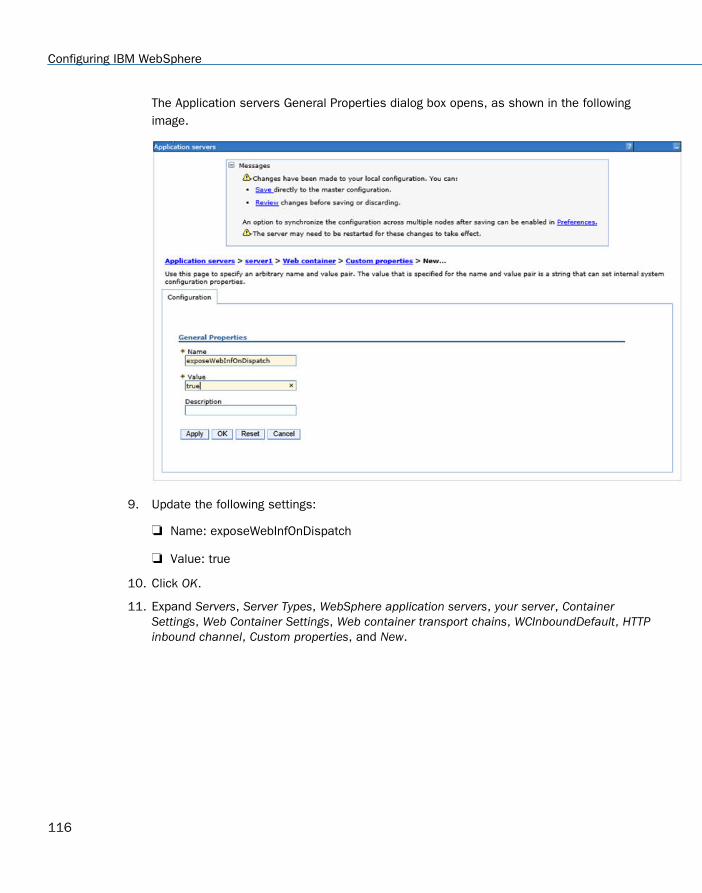
The Application servers General Properties dialog box opens, as shown in the followingimage.
9. Update the following settings:
Name: exposeWebInfOnDispatch
Value: true
10. Click OK.
11. Expand Servers, Server Types, WebSphere application servers, your server, ContainerSettings, Web Container Settings, Web container transport chains, WCInboundDefault, HTTPinbound channel, Custom properties, and New.
Configuring IBM WebSphere
116

The Application servers General Properties dialog box opens, as shown in the followingimage.
12. Update the following settings:
Name: CookiesConfigureNoCache
Value: false
13. Click OK and then click Save.
Procedure: How to Verify the WebSphere Application Server is Configured to Run Java 1.8
1. Sign in to the WebSphere Console.
2. Expand Servers, Server Types, WebSphere application servers, your server, ServerInfrastructure, and Java SDKs.
4. Configuring Web and Application Servers
Installation and Configuration for Windows 117

The Application servers Java SDKs dialog box opens, as shown in the following image.
3. Verify that the Java 1.8 SDK, if present, is set to true. If not, contact your WebSphereAdministrator and request your server be updated to 1.8.
Procedure: How to Assign the IBI_Shared_Library to the WebFOCUS Web Application(webfocus.war)
The following procedure assumes that the webfocus.war file has been deployed.
1. Sign in to the WebSphere Console.
2. Select Applications, Application Types, WebSphere enterprise applications, and yourWebFOCUS web application, as shown in the following image.
Configuring IBM WebSphere
118
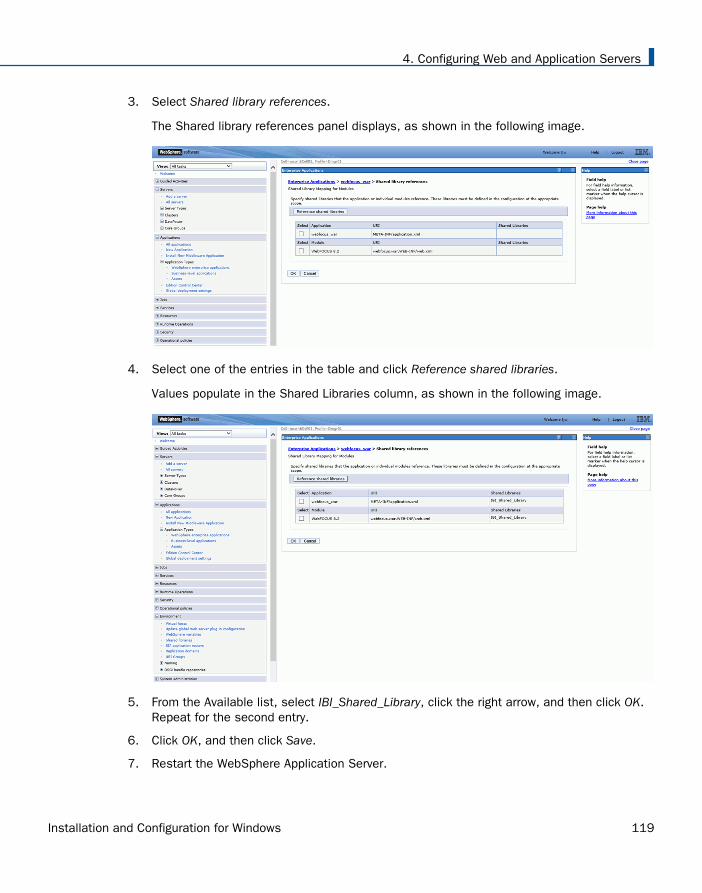
3. Select Shared library references.
The Shared library references panel displays, as shown in the following image.
4. Select one of the entries in the table and click Reference shared libraries.
Values populate in the Shared Libraries column, as shown in the following image.
5. From the Available list, select IBI_Shared_Library, click the right arrow, and then click OK.Repeat for the second entry.
6. Click OK, and then click Save.
7. Restart the WebSphere Application Server.
4. Configuring Web and Application Servers
Installation and Configuration for Windows 119
Note: It is not sufficient to only restart the WebFOCUS web application.
Configuring Oracle WebLogic
This section describes the pre-requisites and post-requisites for configuring the OracleWebLogic® Application Server for use with WebFOCUS and ReportCaster. It is assumed thatWebLogic components are installed and configured. For additional information, see theWebLogic documentation.
Java Version Requirement
In Release 8207, Java Version 8 is supported. The WebLogic server used to run theWebFOCUS Client must be configured to use a release of Java Version 8 that is supported bythe WebLogic version being used. Consult the WebLogic server documentation for supportedJava releases and how to modify your Java version, if required.
Update Java Settings
Consult the WebLogic server documentation for instructions on where to place the updatedsettings in your environment.
Java minimum memory settings: –Xms1024m –Xmx1024m
Classpath: Add the full path and name of the JDBC driver jar files required to access theWebFOCUS Repository database.
Temp directory: To avoid potential conflicts, your Java temporary directory should point to aunique location. Create an empty directory on a local filesystem that is writeable to theuser that the WebLogic Server is running as, and then set the following Java variable:
–Djava.io.tmpdir=\fullpath\yourprivatetmpdir
For example, if you are on a Windows system using a standalone WebLogic domain and thestartWebLogic.cmd script to start it, you could insert the following into the domain-directory\bin\setDomainEnv.cmd script beginning on the second line:
set USER_MEM_ARGS=”–Xms1024m –Xmx1024m”set PRE_CLASSPATH=”C:\ibi\derby\lib\derbyclient.jar”set JAVA_OPTIONS="–Djava.io.tmpdir=C:\yourprivatetmpdir”
Configuring Oracle WebLogic
120
WebLogic Post-Installation Step
Prior to deploying the webfocus.war web archive to WebLogic, you must perform the followingsteps.
1. Create a file called weblogic.xml in the ..\ibi\WebFOCUS82\webapps\webfocus\WEB-INFdirectory with the following:
<?xml version="1.0" encoding="UTF-8"?><wls:weblogic-web-appxmlns:wls="http://xmlns.oracle.com/weblogic/weblogic-web-app"xmlns:xsi="http://www.w3.org/2001/XMLSchema-instance"xsi:schemaLocation="http://java.sun.com/xml/ns/javaeehttp://java.sun.com/xml/ns/javaee/ejb-jar_3_0.xsdhttp://xmlns.oracle.com/weblogic/weblogic-web-apphttp://xmlns.oracle.com/weblogic/weblogic-web-app/1.4/weblogic-web-app.xsd">
<wls:container-descriptor> <wls:prefer-application-packages> <wls:package-name>org.bouncycastle.util</wls:package-name> <wls:package-name>org.apache.commons</wls:package-name> <wls:package-name>org.opensaml</wls:package-name> <wls:package-name>org.eclipse.persistence</wls:package-name> </wls:prefer-application-packages> </wls:container-descriptor></wls:weblogic-web-app>
2. Recreate the webfocus.war web archive and call the new archive ibi_apps.war, the followingassumes the jar command is in your path and that you want to use /ibi_apps as yourWebFOCUS context root:
a. cd …\ibi\WebFOCUS82\webapps\webfocus
b. jar cf ..\ibi_apps.war .
3. Deploy the ibi_apps.war archive in place of the webfocus.war.
4. Configuring Web and Application Servers
Installation and Configuration for Windows 121

Configuring Oracle WebLogic
122
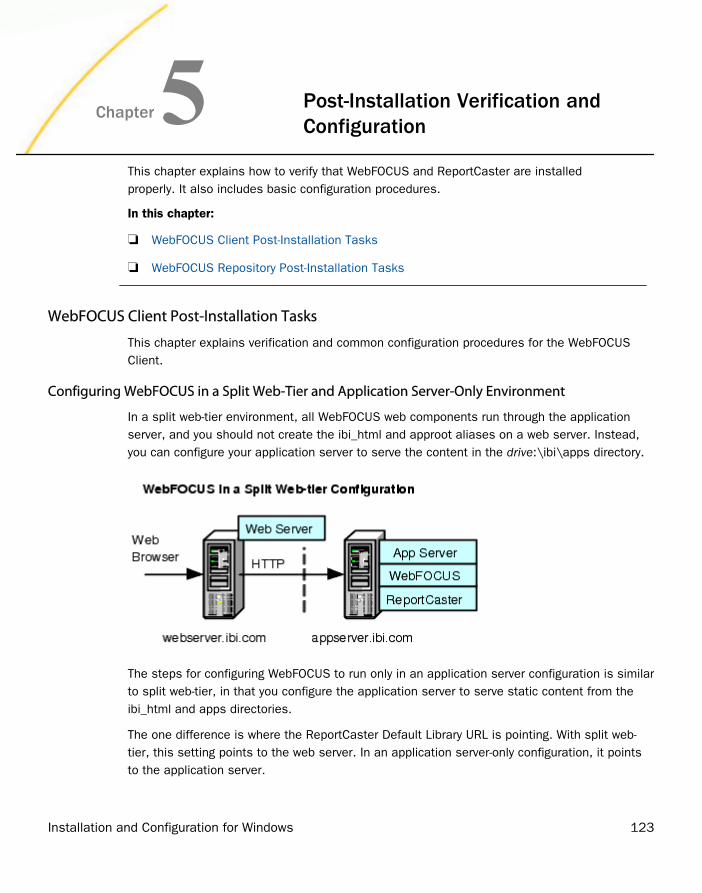
Chapter5 Post-Installation Verification andConfiguration
This chapter explains how to verify that WebFOCUS and ReportCaster are installedproperly. It also includes basic configuration procedures.
In this chapter:
WebFOCUS Client Post-Installation Tasks
WebFOCUS Repository Post-Installation Tasks
WebFOCUS Client Post-Installation Tasks
This chapter explains verification and common configuration procedures for the WebFOCUSClient.
Configuring WebFOCUS in a Split Web-Tier and Application Server-Only Environment
In a split web-tier environment, all WebFOCUS web components run through the applicationserver, and you should not create the ibi_html and approot aliases on a web server. Instead,you can configure your application server to serve the content in the drive:\ibi\apps directory.
The steps for configuring WebFOCUS to run only in an application server configuration is similarto split web-tier, in that you configure the application server to serve static content from theibi_html and apps directories.
The one difference is where the ReportCaster Default Library URL is pointing. With split web-tier, this setting points to the web server. In an application server-only configuration, it pointsto the application server.
Installation and Configuration for Windows 123
Using the Static Content Server Option
WebFOCUS installs a pair of web applications into the drive:\ibi\WebFOCUS82\webappsdirectory, which are designed to serve static content from the file system to the browser:
approot.war. Serves content from the drive:\ibi\apps directory.
ibi_html.war. Serves content from the drive:\ibi\WebFOCUS82\ibi_html directory.
Deploy one or both of these applications to address the following split web-tier and stand-aloneapplication server configurations:
The web server is unable to access the static content because it is located on theapplication server machine.
There is no web server and you wish to use an application server by itself.
Note: Tomcat can be used by itself without these applications because it can map adirectory on the file system to a context path. This configuration is referred to as theTomcat Stand-alone option and can be configured during installation on Windows.
Each application includes a deployment descriptor (webconfig.xml) that is used to locate thedirectory containing its configuration file. The context parameter IBI_Configuration_Directory inwebconfig.xml is updated during installation to point to drive:/ibi/WebFOCUS82/config, whichcontains the configuration file approotConfig.xml. The configuration file is shared by bothcontent server applications even though its name suggests it would be used by only one. Theconfiguration file is used to maintain MIME mappings, the physical path of the directoriesbeing served, and the logging level.
The applications also include a Log4J property file (log4j.xml), which contains the path to thelog file used by each application. The installation updates each log4j.xml file with the path toits own log file, drive:/ibi/WebFOCUS82/logs/wfapproot.log and drive:/ibi/WebFOCUS82/logs/wfibihtml.log, respectively.
The content server applications roll the log files over daily by appending the date to the log fileand creating a new one (for example, wfibihtml.log.2017-01-01). You can increase the log levelby editing drive:/ibi/WebFOCUS82/config/approotConfig.xml and changing the log level settingto DEBUG, INFO, WARN, ERROR, or FATAL, where DEBUG is the most verbose.
There are special considerations for using the content server option in a clustered web-tierenvironment.
WebFOCUS Client Post-Installation Tasks
124
Reference: Using the IBIARCFG and IBIARLOG –D Options With the Content Server WebApplications
Generally speaking, the approach of specifying a fully qualified path to the configuration file(approotConfig.xml) in webconfig.xml and of specifying a fully qualified path to the log files inlog4j.xml is sufficient for most installations. These paths are properly set during installation.
However, there is an option to pass the content servers these paths from the Java VMcommand line. To do this, complete the following steps:
1. Edit the WebFOCUS webconfig.xml file found inside both the approot.war and ibi_html.warfiles. Replace the fully qualified path defined in the IBI_Configuration_Directory parameterwith the notation shown below.
<context-param> <param-name>IBI_Configuration_Directory</param-name> <param-value>${IBIARCFG}</param-value></context-param>
2. Edit the WebFOCUS log4j.xml file located in the approot.war file and replace the fullyqualified path specified by the File parameter, as follows:
<param name="File" value="${IBIARLOG}/wfapproot.log"/>
Use a forward slash, even on Windows systems.
3. Edit the WebFOCUS log4j.xml file located inside the ibi_html.war file and replace the fullyqualified path specified by the File parameter, as follows:
<param name="File" value="${IBIARLOG}/wfibihtml.log"/>
Use a forward slash even on Windows systems.
4. Add the following –D options in the manner appropriate for the Java VM for your applicationserver.
The settings below are slightly different in a clustered web-tier environment.
–DIBIARCFG=install_directory/ibi/WebFOCUS82/config –DIBIARLOG=install_directory/ibi/WebFOCUS82/logs
WebFOCUS Client Verification and Configuration
To configure the WebFOCUS Client, edit files either through a text editor or the WebFOCUSAdministration Console. The WebFOCUS Administration Console also provides tools to verifythe installation.
For NLS configuration information, see the Security and Administration manual.
5. Post-Installation Verification and Configuration
Installation and Configuration for Windows 125
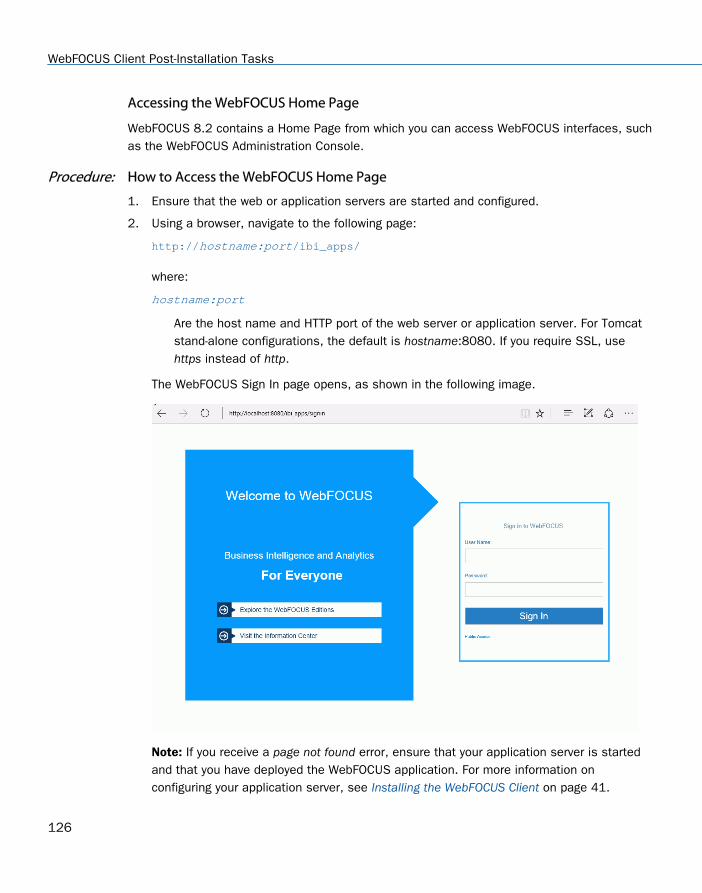
Accessing the WebFOCUS Home Page
WebFOCUS 8.2 contains a Home Page from which you can access WebFOCUS interfaces, suchas the WebFOCUS Administration Console.
Procedure: How to Access the WebFOCUS Home Page
1. Ensure that the web or application servers are started and configured.
2. Using a browser, navigate to the following page:
http://hostname:port/ibi_apps/
where:
hostname:port
Are the host name and HTTP port of the web server or application server. For Tomcatstand-alone configurations, the default is hostname:8080. If you require SSL, usehttps instead of http.
The WebFOCUS Sign In page opens, as shown in the following image.
Note: If you receive a page not found error, ensure that your application server is startedand that you have deployed the WebFOCUS application. For more information onconfiguring your application server, see Installing the WebFOCUS Client on page 41.
WebFOCUS Client Post-Installation Tasks
126
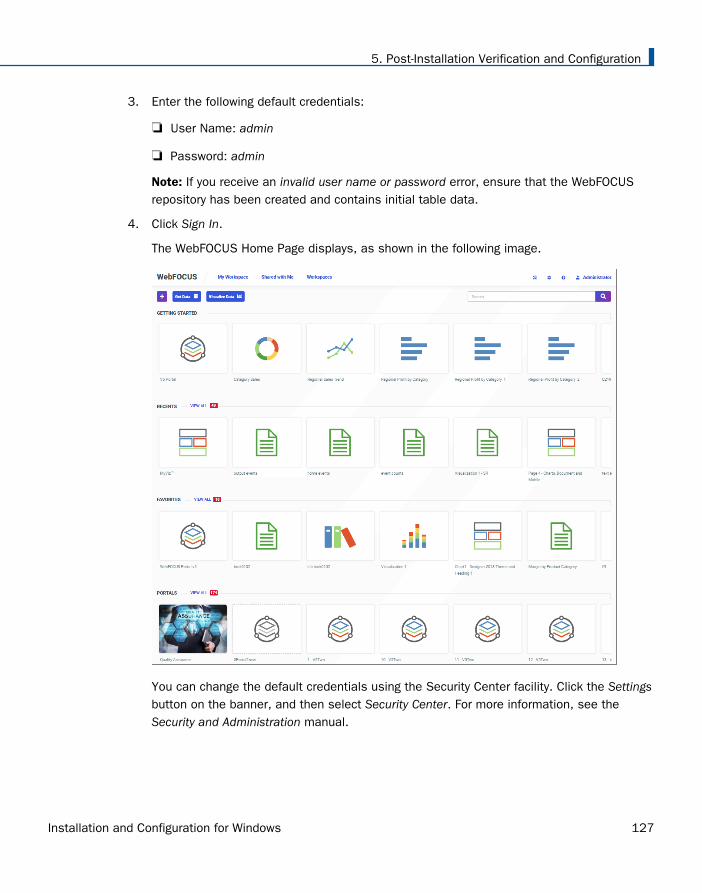
3. Enter the following default credentials:
User Name: admin
Password: admin
Note: If you receive an invalid user name or password error, ensure that the WebFOCUSrepository has been created and contains initial table data.
4. Click Sign In.
The WebFOCUS Home Page displays, as shown in the following image.
You can change the default credentials using the Security Center facility. Click the Settingsbutton on the banner, and then select Security Center. For more information, see theSecurity and Administration manual.
5. Post-Installation Verification and Configuration
Installation and Configuration for Windows 127
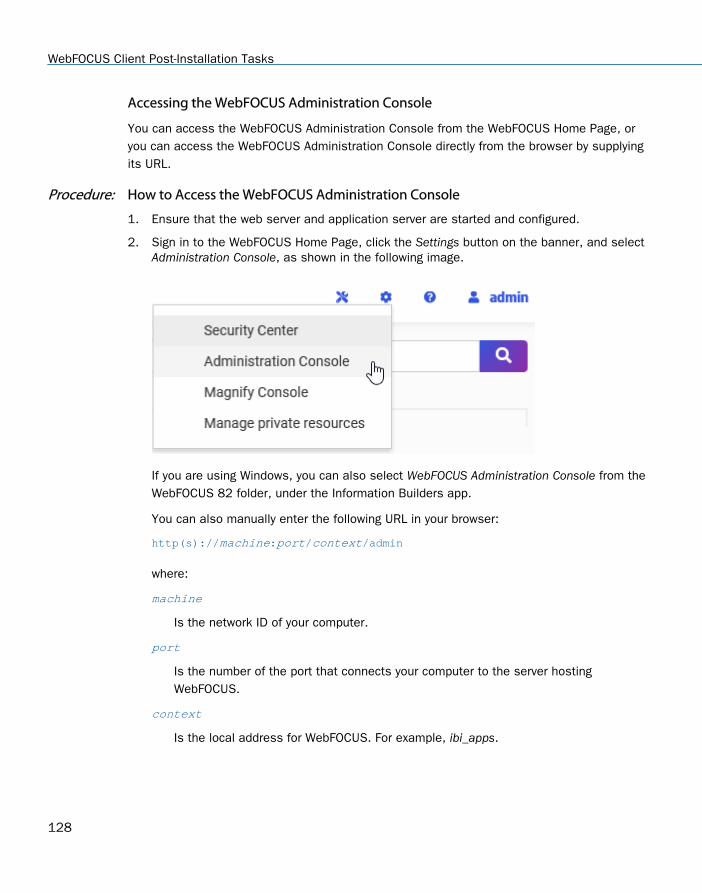
Accessing the WebFOCUS Administration Console
You can access the WebFOCUS Administration Console from the WebFOCUS Home Page, oryou can access the WebFOCUS Administration Console directly from the browser by supplyingits URL.
Procedure: How to Access the WebFOCUS Administration Console
1. Ensure that the web server and application server are started and configured.
2. Sign in to the WebFOCUS Home Page, click the Settings button on the banner, and selectAdministration Console, as shown in the following image.
If you are using Windows, you can also select WebFOCUS Administration Console from theWebFOCUS 82 folder, under the Information Builders app.
You can also manually enter the following URL in your browser:
http(s)://machine:port/context/admin
where:
machine
Is the network ID of your computer.
port
Is the number of the port that connects your computer to the server hostingWebFOCUS.
context
Is the local address for WebFOCUS. For example, ibi_apps.
WebFOCUS Client Post-Installation Tasks
128
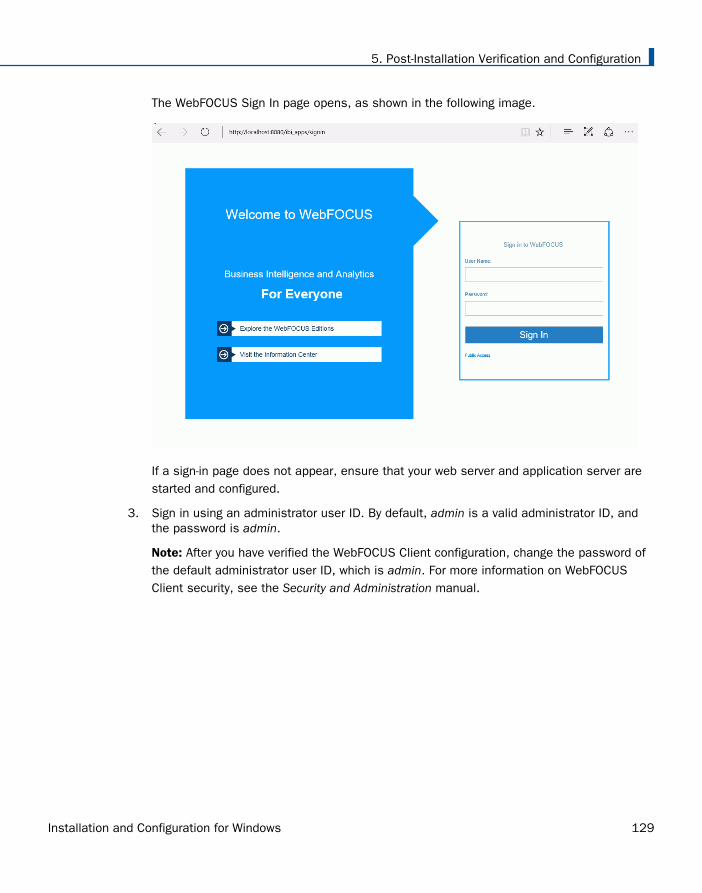
The WebFOCUS Sign In page opens, as shown in the following image.
If a sign-in page does not appear, ensure that your web server and application server arestarted and configured.
3. Sign in using an administrator user ID. By default, admin is a valid administrator ID, andthe password is admin.
Note: After you have verified the WebFOCUS Client configuration, change the password ofthe default administrator user ID, which is admin. For more information on WebFOCUSClient security, see the Security and Administration manual.
5. Post-Installation Verification and Configuration
Installation and Configuration for Windows 129
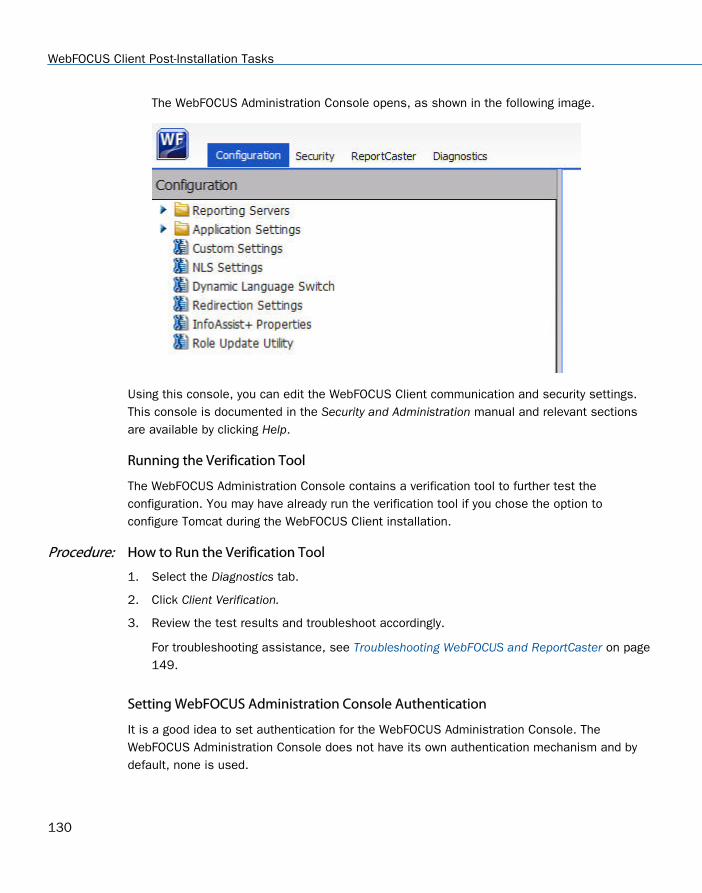
The WebFOCUS Administration Console opens, as shown in the following image.
Using this console, you can edit the WebFOCUS Client communication and security settings.This console is documented in the Security and Administration manual and relevant sectionsare available by clicking Help.
Running the Verification Tool
The WebFOCUS Administration Console contains a verification tool to further test theconfiguration. You may have already run the verification tool if you chose the option toconfigure Tomcat during the WebFOCUS Client installation.
Procedure: How to Run the Verification Tool
1. Select the Diagnostics tab.
2. Click Client Verification.
3. Review the test results and troubleshoot accordingly.
For troubleshooting assistance, see Troubleshooting WebFOCUS and ReportCaster on page149.
Setting WebFOCUS Administration Console Authentication
It is a good idea to set authentication for the WebFOCUS Administration Console. TheWebFOCUS Administration Console does not have its own authentication mechanism and bydefault, none is used.
WebFOCUS Client Post-Installation Tasks
130
If you wish to set authentication for the console, you can choose to do this through theWebFOCUS Reporting Server or the web server. For more information, see the Security andAdministration manual.
Defining Communications to WebFOCUS Reporting Servers
WebFOCUS Client communication settings are stored in the following file:
drive:\ibi\WebFOCUS82\client\wfc\etc\odin.cfg
This file contains node blocks defining WebFOCUS Reporting Servers that the client accesses.A node block is a set of parameters that define a server, listener, or other communicationcomponent.
When you installed the WebFOCUS Client, you specified a default WebFOCUS Reporting Serverthat the client accesses.
To change connection information for the default server or define additional servers, use theprocedures that follow.
Procedure: How to Define WebFOCUS Reporting Servers
1. On the left pane of the WebFOCUS Administration Console, expand Reporting Servers.
2. Expand Server Connections.
The left pane displays all defined WebFOCUS Reporting Servers. To edit parameters of adefined WebFOCUS Reporting Server, right-click the node and select Edit.
3. To define an additional node, right-click Server Connections and select New.
4. Enter a unique name for the new node. Use this name when you wish to access theserver.
This page lets you choose to define a single server (Client), CLM Processing, or a Clusternode. A cluster node is a node that consists of multiple servers. When the client accessesthe cluster, it chooses one of the servers in that cluster. This is used for load balancingand failover. The best way to use clusters is through the Cluster Manager component thatyou can optionally add to your WebFOCUS environment.
5. Click Next.
6. Complete the HOST and PORT fields.
The remaining fields are optional in most environments.
Note: Setting the User ID and Password here is not recommended and may not have thedesired result.
5. Post-Installation Verification and Configuration
Installation and Configuration for Windows 131
7. Click Save.
8. On the top of the page, click Clear Cache so your changes take effect.
Procedure: How to Set the Default WebFOCUS Reporting Server
When you make a connection from client to server without specifying a server, the defaultserver is used. The default server and many other settings are set in the following file:
drive:\ibi\WebFOCUS82\client\wfc\etc\cgivars.wfs
1. From the Administration Console, select the Configuration tab, expand Reporting Servers,and then expand Server Connections.
2. Right-click the node name and select Set as Default.
3. On the Administration Console menu bar, click Clear Cache.
Setting Tomcat HTTP POST Maximum Size
As a default, Apache Tomcat sets the maximum size limit to 2097152 (2MB) limit foraccepting HTTP POST requests. Since EXL07 MIME files can easily reach this limit,ExcelServlet will fail with a HTTP 400 error or produce a corrupted .XLSX file. To fix thisproblem, Tomcat needs to be configured by setting an attribute in the server.xml file.
In the /tomcat_home/conf/server.xml file, add the maxPostSize attribute and set it to -1 todisable the limit check. The following example demonstrates this with the <Connector port>element block:
<Connector port="8080" protocol="HTTP/1.1"connectionTimeout="20000"redirectPort="8443" maxPostSize="-1" />
WebFOCUS Repository Post-Installation Tasks
This section explains how to create the WebFOCUS Repository and verify the WebFOCUS Clientconfiguration.
For NLS configuration information, review this section and consult the Security andAdministration manual.
WebFOCUS Repository Table Creation
The table creation utility creates or drops and creates all Repository tables. To drop and re-create only specific table groups, you can use utilities available with your database software.This is useful if you wish to remove all library data, but keep your schedules and addressbooks.
WebFOCUS Repository Post-Installation Tasks
132
Since the WebFOCUS Repository has been restructured as of WebFOCUS 8.2 and is differentfrom previous WebFOCUS releases, you must create a new Repository when migrating fromearlier WebFOCUS 7.7.x versions. For more information on migrating existing ReportCasterdata, see the Migration manual.
Procedure: How to Create the Repository Tables
To create the Repository tables:
1. Navigate to the following directory:
drive:\ibi\WebFOCUS82\utilities\WFReposUtil
Note: During installation, if the Create WebFOCUS Repository check box is selected, thenthe installer will run the WFReposUtilCMDLine.bat file in CREATE_INSERT mode. If anyerrors occur during this process, you can view the WFReposUtilCMDLine.log file for details.If the Create WebFOCUS Repository check box is not selected during installation (in thecase of an existing Repository), then you must manually run the WFReposUtilGUI.bat file inDROP_CREATE_INSERT mode. Alternatively, you can run the WFReposUtilCMDLine.bat filein DROP_CREATE_INSERT mode.
2. Run the WFReposUtilCMDLine.bat file by right-clicking the file and selecting the Run asAdministrator option.
This utility creates a .log file with the same name in the same location after running it.
A Command Window opens, which allows you to create tables or to drop and re-createtables.
3. Enter a selection from the list of available options:
create
create_or_extend
insert
create_insert
update
drop
extract
create_ddl
quit
5. Post-Installation Verification and Configuration
Installation and Configuration for Windows 133
4. Press Enter to continue.
A prompt for credentials displays. These are credentials for the database connection.
Note:
If updates are performed, the User ID needs to have permissions to create and altertables.
Depending on the option selected, you may be prompted for WebFOCUS Administratorcredentials.
A message appears if any errors occur during the Repository creation or re-creationprocess.
WebFOCUS Repository Post-Installation Tasks
134
Chapter6 WebFOCUS ReportCaster Post-InstallationTasks
This section explains ReportCaster post-installation tasks.
In this chapter:
ReportCaster Verification
Importing and Exporting the ReportCaster Configuration File
ReportCaster Configuration
ReportCaster Verification
After the repository is created, you should test the WebFOCUS Client and the ReportCasterconfiguration.
If you have problems with the verification, see Troubleshooting WebFOCUS and ReportCaster onpage 149.
Make sure you have carried out the procedures in the preceding chapters before starting theDistribution Server.
Before starting or testing the Distribution Server, components it communicates with must bestarted. These include the following:
Web server
Application server where the WebFOCUS web application is deployed
WebFOCUS Reporting Server
Database Server containing WebFOCUS Repository tables
Mail Server
FTP Server (if using FTP)
Testing the WebFOCUS Client
This section describes how to test the WebFOCUS Client.
Installation and Configuration for Windows 135
Procedure: How to Test the WebFOCUS Client
1. Ensure the web and application servers are started and configured.
2. Go to the following page using a browser:
http://hostname:port/ibi_apps/
where:
hostname:port
Are the host name and HTTP port of the web server or application server. For Tomcatstand-alone configurations, the default is hostname:8080. If you require SSL, usehttps instead of http.
The WebFOCUS Sign In page opens.
Note: If you receive a page not found error, ensure that your application server is startedand that you have deployed the WebFOCUS application. For more information onconfiguring your application server, see Installing the WebFOCUS Client on page 41.
3. Enter the following default credentials:
User Name: admin
Password: admin
Note: If you receive an invalid user name or password error, ensure that the WebFOCUSrepository has been created and contains initial table data.
4. Click Sign In.
The WebFOCUS Home page opens.
You can change the default credentials using the Security Center facility. To do this, clickAdministration from the top menu and then click Security Center. For more information, seethe Security and Administration manual.
Starting and Stopping the ReportCaster Distribution Server
This section describes how to start and stop the ReportCaster Distribution Server.
Procedure: How to Test the WebFOCUS Repository Connectivity Settings
To verify, change, or test the Repository connectivity settings:
1. Sign in to the WebFOCUS Administration Console.
ReportCaster Verification
136
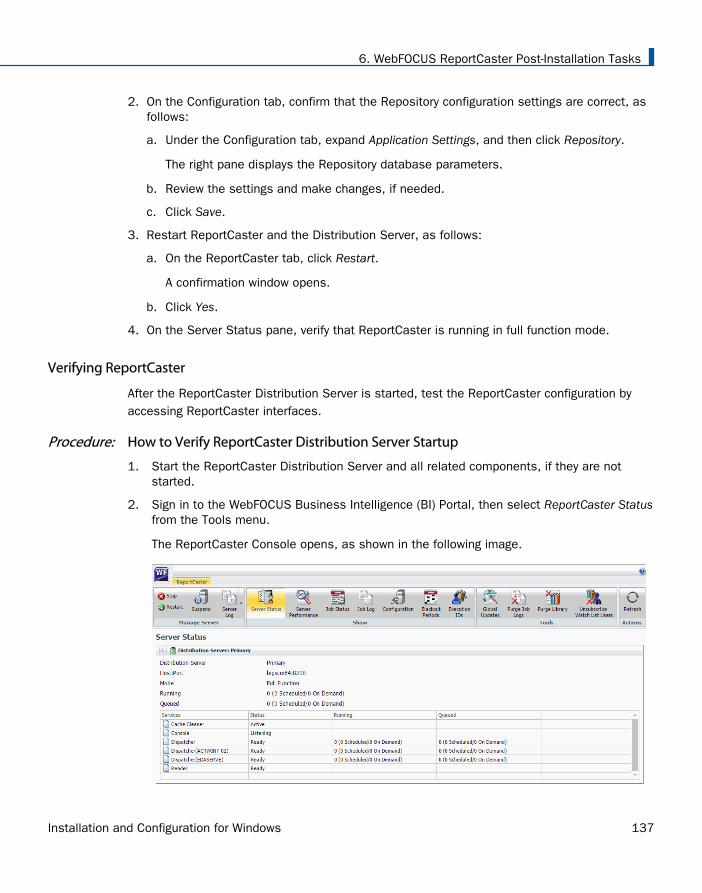
2. On the Configuration tab, confirm that the Repository configuration settings are correct, asfollows:
a. Under the Configuration tab, expand Application Settings, and then click Repository.
The right pane displays the Repository database parameters.
b. Review the settings and make changes, if needed.
c. Click Save.
3. Restart ReportCaster and the Distribution Server, as follows:
a. On the ReportCaster tab, click Restart.
A confirmation window opens.
b. Click Yes.
4. On the Server Status pane, verify that ReportCaster is running in full function mode.
Verifying ReportCaster
After the ReportCaster Distribution Server is started, test the ReportCaster configuration byaccessing ReportCaster interfaces.
Procedure: How to Verify ReportCaster Distribution Server Startup
1. Start the ReportCaster Distribution Server and all related components, if they are notstarted.
2. Sign in to the WebFOCUS Business Intelligence (BI) Portal, then select ReportCaster Statusfrom the Tools menu.
The ReportCaster Console opens, as shown in the following image.
6. WebFOCUS ReportCaster Post-Installation Tasks
Installation and Configuration for Windows 137
3. Verify that the Distribution Server is started on the host and port specified in yourconfiguration.
Importing and Exporting the ReportCaster Configuration File
It is important to note that if you are installing a later version of WebFOCUS, but intend to usean existing repository from any earlier version of WebFOCUS 8.2, you may need to run thefollowing utilities in order to update the dserver.xml, rc_preference.xml, and sendmodes.xmlfiles:
exportcfg and importcfg
exportrcpref and importrcpref
exportsndmode and importsndmode
Note: Each utility will create a utility_name.log file in the ...ibi\WebFOCUS82\ReportCaster\logdirectory, where utility_name is the name of the utility.
dserver.xml
The ReportCaster configuration file (dserver.xml) is placed in a WebFOCUS repository tableduring installation. Changes to this file can be made using the ReportCaster Configuration tooland the WebFOCUS Administration Console. You can export the dserver.xml file from theWebFOCUS repository to your file system or import the dserver.xml file from your file system tothe WebFOCUS repository.
To export the dserver.xml file to your file system, run the exportcfg utility, which is located inthe following directory:
ibi\WebFOCUS82\ReportCaster\bin
The dserver.xml file will be exported to the following directory:
ibi\WebFOCUS82\ReportCaster\cfg
To import the dserver.xml file from your file system, copy the dserver.xml file to the followingdirectory:
ibi\WebFOCUS82\ReportCaster\cfg
Run the importcfg utility, which is located in the following directory:
ibi\WebFOCUS82\ReportCaster\bin
Importing and Exporting the ReportCaster Configuration File
138
rc_preference.xml
The ReportCaster user interface control file (rc_preference.xml) is placed in a WebFOCUSrepository table during installation. You can export the rc_preference.xml file from theWebFOCUS repository to your file system or import the rc_preference.xml file from your filesystem to the WebFOCUS repository.
To export the rc_preference.xml file to your file system, run the exportrcpref utility, which islocated in the following directory:
ibi\WebFOCUS82\ReportCaster\bin
The rc_preference.xml file will be exported to the following directory:
ibi\WebFOCUS82\ReportCaster\cfg
To import the rc_preference.xml file from your file system, copy the rc_preference.xml file tothe following directory:
ibi\WebFOCUS82\ReportCaster\cfg
Run the importrcpref utility, which is located in the following directory:
ibi\WebFOCUS82\ReportCaster\bin
sendmodes.xml
The file that contains the list of ReportCaster formats and mime types (sendmodes.xml) isplaced in a WebFOCUS repository table during installation. You can export the sendmodes.xmlfile from the WebFOCUS repository to your file system or import the sendmodes.xml file fromyour file system to the WebFOCUS repository.
To export the sendmodes.xml file to your file system, run the exportsendmode utility, which islocated in the following directory:
ibi\WebFOCUS82\ReportCaster\bin
The sendmodes.xml file will be exported to the following directory:
ibi\WebFOCUS82\ReportCaster\cfg
To import the sendmodes.xml file from your file system, copy the sendmodes.xml file to thefollowing directory:
ibi\WebFOCUS82\ReportCaster\cfg
6. WebFOCUS ReportCaster Post-Installation Tasks
Installation and Configuration for Windows 139
Run the importsendmode utility, which is located in the following directory:
ibi\WebFOCUS82\ReportCaster\bin
ReportCaster Configuration
ReportCaster configuration parameters are managed within the ReportCaster ConsoleConfiguration tab. For additional ReportCaster configuration information, see the ReportCastermanual.
Configuring the Memory Available for the ReportCaster Log Report
The size of the ReportCaster log report is limited by the amount of memory available to theJava VM. When the memory of the Java VM is exceeded, a Java OutOfMemoryException erroroccurs.
To control the size of the log report, you can set the following ReportCaster ServerConfiguration tool parameters:
In the Distribution Servers folder, Max Messages per Task from Data Server limits thenumber of messages written to the log file. The default value is 1000.
In the Log Settings folder, Log Purge Period designates the number of days in which thelogs will be purged. The default value is every 30 days.
Configuring the Heap Size for the ReportCaster Distribution Server
If the ReportCaster Distribution Server experiences a Java out of memory error, you mustincrease the amount of memory (heap size) available to Java on the Distribution Server. This isdone by passing parameters on the Java command line, as follows:
java -Xms<initial heap size> -Xmx<maximum heap size>
For example,
java -Xms1024m -Xmx2048m
In addition:
If the Distribution Server is running on Windows from the command line, then edit theschbkr file located in the ReportCaster bin directory.
If the Distribution Server is running as a Windows service, then use the Registry Editor tochange the value of the JvmMs and JvmMx registry keys.
You must restart the Distribution Server to enable this change.
ReportCaster Configuration
140
Configuring ReportCaster Failover and Workload Distribution
The Distribution Server Failover feature allows you to configure a backup Distribution Serverthat can resume ReportCaster operations when there is an interruption (planned or unplanned)in the primary Distribution Server service. The primary Distribution Server is monitored to verifythat it is operational. If there is an interruption in service, the failover Distribution Server istriggered to take over the role of the primary server.
The Workload Distribution feature allows ReportCaster to distribute scheduled jobs acrossmultiple Distribution Servers, providing an efficient and fast way to process large numbers ofReportCaster schedules. Multiple Distribution Servers can be installed on one or more hosts.One instance is designated as the Workload Manager, while the others are designated asWorkers. The WebFOCUS Repository will be shared by the Workload Manager and the Workers.Workload Distribution is set up through the ReportCaster Configuration tool. All servers willshare one set of configuration information, and the Workload Manager will push anyconfiguration changes to the Workers.
For your application of ReportCaster, you can configure either Failover or Workload Distribution,or both at the same time. The following procedure includes instructions to configure both, butnotes when to skip to the appropriate steps if you are only configuring one or the other.
Procedure: How to Configure Distribution Server Failover
To configure distribution server failover:
1. Open the ReportCaster Console and click Configuration in the top pane.
2. Click the Distribution Servers folder in the left pane.
3. Click the button to the right of the Secondary Distribution Server field.
The Secondary Distribution Server dialog box opens.
4. Select the Enabled check box.
5. Enter the host name and port number of the Secondary server.
6. Click OK.
7. Click Save and then OK when you are prompted to save.
8. Install the Distribution Server on the specified host with the specified port number for thathost.
Procedure: How to Configure Workload Distribution
To configure workload distribution:
1. Open the ReportCaster Console and click Configuration in the top pane.
6. WebFOCUS ReportCaster Post-Installation Tasks
Installation and Configuration for Windows 141
2. Click the Distribution Servers folder in the left pane.
3. Click the button to the right of the Workload Distribution field.
The Workload Distribution dialog box opens.
4. Select the Enabled check box.
5. Click Add.
6. Double-click the Worker Name, Worker Distribution Server Host, and Worker DistributionServer Port fields to add the new Worker Distribution Server.
Repeat this step for each Worker Distribution Server instance that you want to add.
7. Click OK.
8. Click Save and then OK when you are prompted to save.
9. Install the Distribution Server on each of the specified hosts with the specified portnumber for that host.
Adding Support for UTF-8 to the Distribution Server
Support for UTF-8 can be added to the Distribution Server by adding -Dfile.encoding=UTF8 tothe Distribution Server Java command. If the Distribution Server is being run from thecommand line, modify the schbkr bat or script file and add -Dfile.encoding=UTF8 to the Javacommand. If the Distribution Server is being run as a Windows Service, modify the Windowsregistry by accessing
HKEY_LOCAL_MACHINE\SOFTWARE\InformationBuilders\ReportCaster\WFXXXX \Parameters\Java
and adding the following to the Options string:
-Dfile.encoding=UTF8
where:
WFXXXX
Is the release number in which you are working.
ReportCaster Configuration
142
Important Configuration Considerations When the Distribution Server is Installed Separately Fromthe WebFOCUS Client
When the ReportCaster Distribution Server is installed as a stand-alone server, on a machinethat is separate from the WebFOCUS Client, you must perform additional manual steps toensure that configuration changes made through the WebFOCUS Administration Console areavailable to ReportCaster. This is because the stand-alone Distribution Server does not haveaccess to the WebFOCUS configuration files being updated by the console. This is especiallyimportant when configuring external security for WebFOCUS, since your ReportCaster jobs maynot run properly if the Distribution Server is not using the same security settings as theWebFOCUS Client.
The recommended procedure is to make changes to WebFOCUS, as per the documentation,and then test them with a web browser. When the settings are verified, perform the followingsteps to ensure that the configuration is available to ReportCaster:
1. Copy the webfocus.cfg file and the install.cfg file from the …\ibi\WebFOCUS82\configdirectory to the …\ibi\WebFOCUS82\config directory on the stand-alone Distribution Servermachine.
2. Copy the odin.cfg file from the …\ibi\WebFOCUS82\client\wfc\etc directory to the …\ibi\WebFOCUS82\client\wfc\etc directory on the stand-alone Distribution Server machine.
3. Copy the cgivars1.wfs file from the …\ibi\WebFOCUS82\client\wfc\etc directory to the …\ibi\WebFOCUS82\client\wfc\etc directory on the stand-alone Distribution Server machine.
4. Restart the Distribution Server and test the scheduled job behavior.
Configuring Secure Communications to the ReportCaster Distribution Server
ReportCaster encryption can be enabled to secure communications between the ReportCasterapplication and the ReportCaster Distribution Server. For more information, see DistributionServer Settings in the ReportCaster manual.
Configuring ReportCaster Web Services in an SSL Environment
By default, the Axis Servlet only accepts HTTP requests. If you use ReportCaster Web Servicesin an SSL environment, you will need to manually configure the Axis Servlet to accept HTTPSrequests. To do so, add a second AxisServletListener with the name https to axis2.xml andspecify the port parameter for both listeners. The axis2.xml file is located in the drive:\ibi\WebFOCUS82\webapps\webfocus\WEB-INF\conf folder.
The following code is an example of a second AxisServletListener.
<transportReceiver name="https" class="org.apache_1_6_2.axis2.transport.http.AxisServletListener"><parameter name="port">8443</parameter></transportReceiver>
6. WebFOCUS ReportCaster Post-Installation Tasks
Installation and Configuration for Windows 143
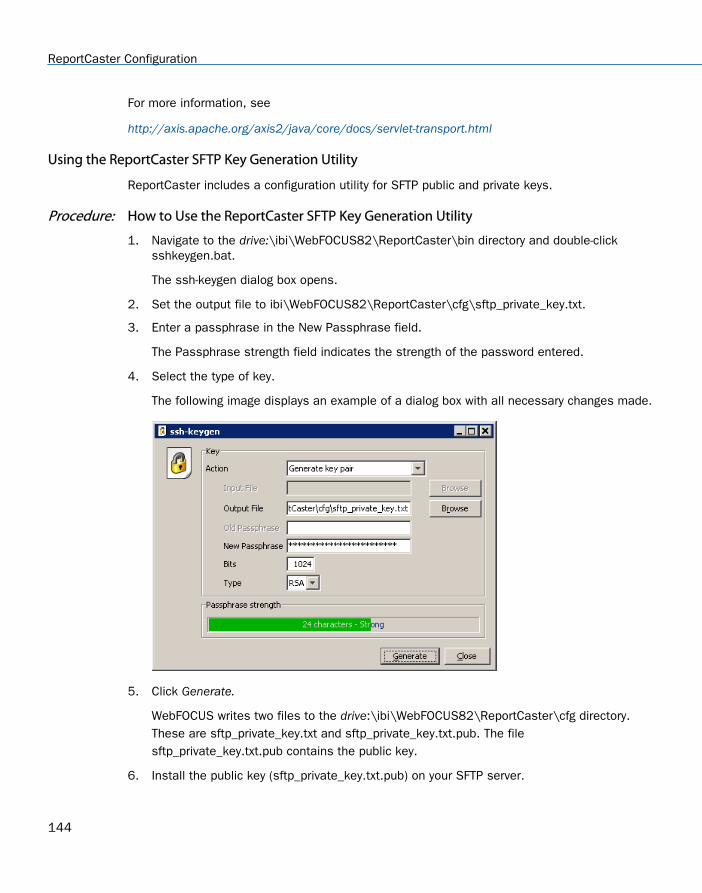
For more information, see
http://axis.apache.org/axis2/java/core/docs/servlet-transport.html
Using the ReportCaster SFTP Key Generation Utility
ReportCaster includes a configuration utility for SFTP public and private keys.
Procedure: How to Use the ReportCaster SFTP Key Generation Utility
1. Navigate to the drive:\ibi\WebFOCUS82\ReportCaster\bin directory and double-clicksshkeygen.bat.
The ssh-keygen dialog box opens.
2. Set the output file to ibi\WebFOCUS82\ReportCaster\cfg\sftp_private_key.txt.
3. Enter a passphrase in the New Passphrase field.
The Passphrase strength field indicates the strength of the password entered.
4. Select the type of key.
The following image displays an example of a dialog box with all necessary changes made.
5. Click Generate.
WebFOCUS writes two files to the drive:\ibi\WebFOCUS82\ReportCaster\cfg directory.These are sftp_private_key.txt and sftp_private_key.txt.pub. The filesftp_private_key.txt.pub contains the public key.
6. Install the public key (sftp_private_key.txt.pub) on your SFTP server.
ReportCaster Configuration
144
Chapter7 Business Intelligence Portal and HomePage Verification and Security
This chapter explains how to verify and secure WebFOCUS Business Intelligence Portal.
If you do not use WebFOCUS Business Intelligence Portal, proceed to TroubleshootingWebFOCUS and ReportCaster on page 149.
In this chapter:
Verifying and Configuring WebFOCUS Business Intelligence Portal
Verifying and Configuring WebFOCUS Business Intelligence Portal
WebFOCUS Business Intelligence Portal provides user interfaces that allow administrators,developers, and end users to access WebFOCUS through a web browser.
BI Portal enables you to build complete, modern websites with multi-levels of navigation. Youcan have as many levels as you like.
Content is dynamic and end users experience the click-and-drag behavior that they are familiarwith in popular online portals. This is a key feature, as end users do not need to learn anythingnew.
While at work, people should have the same satisfying experiences that they have every daywhen reading news, reading email, and performing other activities. With BI Portal, the result iszero product training and a high usage rate.
With this product, a portal is easy to build. BI Portal uses the same familiar ribbon interface asthe WebFOCUS InfoAssist report development tool. Building a portal is just a matter of a fewclicks and click-and-drag actions. With BI Portal, anyone who can build a report usingWebFOCUS InfoAssist can develop an impressive portal without any knowledge of web design.For more information on BI Portal, see the Business Intelligence Portal manual.
If you installed the BI Portal with the WebFOCUS Client, you should verify that the interfacesare accessible, as explained below.
Caution: If you installed a pop-up blocker for your browser, you must disable it when accessingthe BI Portal.
Installation and Configuration for Windows 145
WebFOCUS Home Page Verification
It is recommended to access the WebFOCUS Home Page to confirm the installation and setthe administrator password.
Procedure: How to Access the WebFOCUS Home Page
1. Confirm that the following are started:
WebFOCUS Reporting Server
Web Servers and Application Servers
ReportCaster Distribution Server
2. Go to the following URL:
http://hostname:port/ibi_apps
where:
hostname:port
Are the host name and port of the web server. However, if you use an applicationserver only configuration, then these are the host name and HTTP port of theapplication server. For Tomcat stand-alone configurations, the default port is 8080. Ifyou require SSL, use https instead of http.
The WebFOCUS Sign In page opens.
3. Sign in as an administrator. The default user name and password are admin and admin,respectively.
By default, BI Portal accounts are created and administered from within the SecurityCenter interface and are not related to the accounts used for the WebFOCUS ReportingServer. This default sign-in behavior can be customized using the procedures and stepsdetailed in the Security and Administration manual.
The WebFOCUS Home Page opens in your web browser.
Note: If the WebFOCUS Home Page does not appear, verify that your web server is runningand that the proper aliases have been defined.
4. Set a new password and email address for the admin account as follows. If you use bothReport Library and Managed Reporting, this is required.
a. Select Security Center from the Administration menu.
The Security Center opens.
b. Right-click a user name and select Edit from the context menu.
Verifying and Configuring WebFOCUS Business Intelligence Portal
146

The Edit User dialog box opens, as shown in the following image.
c. Enter an email address to use for the administrator in the EMail Address field.
d. Click Set Password.
The Set Password dialog box opens.
e. Set and confirm the password. If you use ReportCaster, this should match thepassword you set for the ReportCaster Administrator in Verifying ReportCaster on page137.
f. Click OK.
You are returned to the Edit User dialog box.
g. Click OK.
You are returned to the Security Center dialog box.
h. Click Close.
5. Return to the WebFOCUS Home Page and optionally create a report using InfoAssist.
If you receive errors while using InfoAssist, your application server may not be properlycompiling JSP files.
7. Business Intelligence Portal and Home Page Verification and Security
Installation and Configuration for Windows 147

Verifying and Configuring WebFOCUS Business Intelligence Portal
148
Chapter8 Troubleshooting WebFOCUS andReportCaster
This chapter contains information for tracking errors and debugging problems.
Since much WebFOCUS Client processing is done through your web and applicationservers, their configuration is a common cause of problems. If you run into any problems,carefully review the configuration information in Configuring Web and Application Serverson page 85. You should also be aware of the trace files generated by the installation.
If you encounter any problems with ReportCaster, review ReportCaster TroubleshootingTips on page 158 to determine if your system is configured properly.
In this chapter:
WebFOCUS Troubleshooting Tips
ReportCaster Troubleshooting Tips
WebFOCUS Troubleshooting Tips
Troubleshooting WebFOCUS considers all the places where a problem can occur. These includethe following:
Web Browser and its Java Plug-In
Web Server
Application Server and its Java VM
WebFOCUS Client Configuration Files
WebFOCUS Reporting Server
General Tips
Try some of these solutions when troubleshooting WebFOCUS problems:
1. Clear your web browser cache and close all browser instances. Often, even after you havetaken steps to correct a problem, the page or pages that contained the original problemstill reside in cache.
2. Ensure that all components are started and are listening on their expected ports. TheWebFOCUS web application may take some time to load.
3. Ensure that you typed in the correct URL. WebFOCUS URLs are case-sensitive.
Installation and Configuration for Windows 149
4. If your web server is not listening on port 80, make sure you are calling with the correctport in the URL.
5. Ensure that the correct application names are listed in your WebFOCUS Reporting ServerAPP PATH. This is defined in:
drive:\ibi\srv82\wfs\etc\edasprof.prf
If you receive a Resource not found message, then this may be the problem.
6. During testing, be sure to call pages using HTTP or HTTPS requests and not by selectingOpen from the File menu in the web browser.
7. Turn on tracing through the WebFOCUS Administration Console.
8. Clear the cache in your application server after completing the upgrade installation. Forexample, if you are using Apache Tomcat, the cache can be cleared by manually deletingany subdirectories that correspond to the context root that you deployed (for example,/ibi_apps), which is located in the following directory:
<catalina_home>\work\Catalina\localhost
Note: If installed by WebFOCUS Client, Tomcat will be installed in the root directory of theWebFOCUS installation which, by default, is c:\ibi\tomcat.
9. In the WebFOCUS Administration Console, select the Diagnostics tab and use the availableoptions to troubleshoot.
10.Restart all components, especially your web or application servers.
HTTP 500 Internal Server Message
If you receive an HTTP 500 server message on the Configuration Verification Utility page afterinstallation, clear your browser cache and access the Diagnostics page again from either theProgram Menu option or by copying the URL into another browser window. This may occur on afull installation or on an upgrade.
Web Browser Issues
If you are planning to use WebFOCUS products, note that browsers released after theproduction date of a WebFOCUS version are subject to certification. Certification is done withthe current release level of WebFOCUS and App Studio. For additional information, see WebBrowser Support for WebFOCUS, which can be accessed by clicking on the following URL:
https://kb.informationbuilders.com/topic/webfocus-8207-browser-information
Note: Some browsers may function differently depending on the operating system. See theWebFOCUS Release Notes for detailed information on known issues related to browser versionor configuration.
WebFOCUS Troubleshooting Tips
150

JVM Support Issue with IBM WebSphere Application Server
In Release 8207, Java VM Version 8 is supported on the system that is hosting the applicationserver where the WebFOCUS Client web application is displayed and the ReportCasterDistribution Server is installed.
Procedure: How to Verify JVM Version
There are two methods for verifying the Java VM version installed on the machine where theWebFOCUS client is deployed.
From the WebFOCUS Administration Console:
1. Sign in to WebFOCUS and select Administration Console from the Administration menu.
2. Select the Diagnostics tab.
3. Select JVM Property Info.
The version is listed under java.runtime.version.
From a browser, type the following URL:
http://hostname:port/ibi_apps/diagnostics/properties.jsp
The version is listed under java.vm.version.
Web and Application Server Debugging
Ensure that your web and application servers are configured, as explained in Configuring Weband Application Servers on page 85.
WebFOCUS relies on processing by the Java VM, web server, and application server. Theirdebugging tools and log files can help troubleshoot common WebFOCUS issues. Review thedocumentation for your web and application servers for information on their tracing and logfiles.
For Apache Tomcat, review the log information generated in the following directory:
C:\ibi\tomcat\logs
Note: You can safely ignore the following error:
org.apache.catalina.core.AprLifecycleListener lifecycleEvent - INFO:The Apache Tomcat Native library which allows optimal performance in production environments was not found on the java.library.path.
8. Troubleshooting WebFOCUS and ReportCaster
Installation and Configuration for Windows 151
Java Memory Issues
Depending on your application server default settings, you may need to adjust the Java VMmemory options if you run into performance issues. If the WebFOCUS installation configuredTomcat for you, this is done automatically.
The most common Java VM options you need to set involve the size of the Java heap andstack, which determine memory availability for Java programs and the Java VM. Errors canoccur if not enough memory is available, and the heap size impacts performance, since itdetermines how often garbage collection occurs.
The following are the most common Java VM options related to memory settings. Replace the#### with the size you wish to set:
-Xmx####M
Sets the maximum Java heap size. It is common to make this 1/4 of the system RAM, butit must be at least 1536 MB (1.5 GB).
-Xms####M
Sets the initial Java heap size. It is common to make this 1/8 of the system RAM, but itmust be at least 1536 MB (1.5 GB).
-Xss####M
Sets the Java thread stack size. You do not need to set this unless you are fine tuningyour environment.
The size is normally set in Megabytes. For example:
-Xms1536M-Xmx2048M
To view your current Java VM memory settings, access the WebFOCUS Administration Console.Select the Diagnostics tab and select JVM Property Info.
WebFOCUS Troubleshooting Tips
152
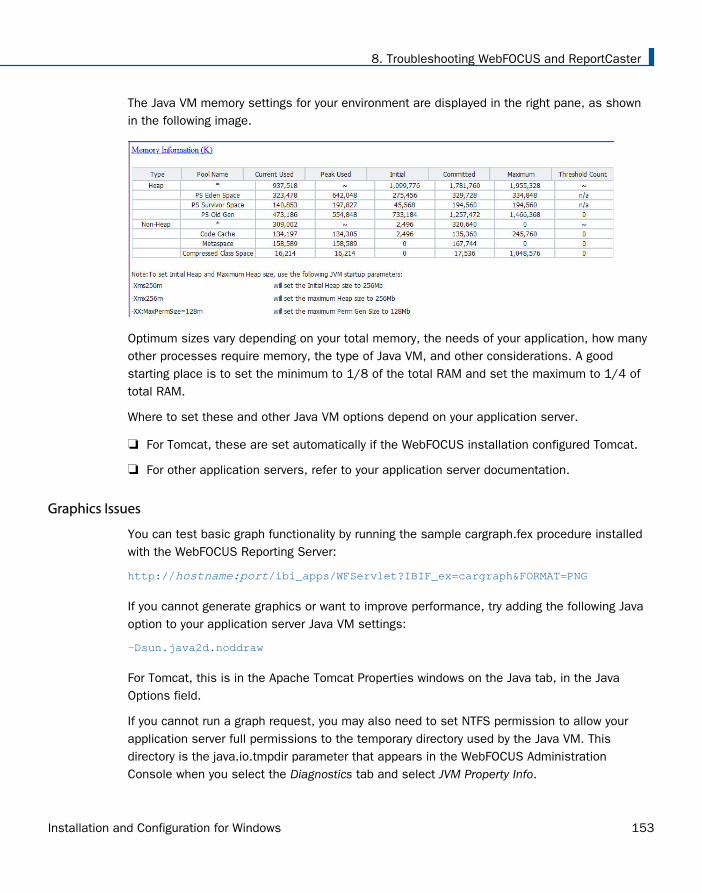
The Java VM memory settings for your environment are displayed in the right pane, as shownin the following image.
Optimum sizes vary depending on your total memory, the needs of your application, how manyother processes require memory, the type of Java VM, and other considerations. A goodstarting place is to set the minimum to 1/8 of the total RAM and set the maximum to 1/4 oftotal RAM.
Where to set these and other Java VM options depend on your application server.
For Tomcat, these are set automatically if the WebFOCUS installation configured Tomcat.
For other application servers, refer to your application server documentation.
Graphics Issues
You can test basic graph functionality by running the sample cargraph.fex procedure installedwith the WebFOCUS Reporting Server:
http://hostname:port/ibi_apps/WFServlet?IBIF_ex=cargraph&FORMAT=PNG
If you cannot generate graphics or want to improve performance, try adding the following Javaoption to your application server Java VM settings:
-Dsun.java2d.noddraw
For Tomcat, this is in the Apache Tomcat Properties windows on the Java tab, in the JavaOptions field.
If you cannot run a graph request, you may also need to set NTFS permission to allow yourapplication server full permissions to the temporary directory used by the Java VM. Thisdirectory is the java.io.tmpdir parameter that appears in the WebFOCUS AdministrationConsole when you select the Diagnostics tab and select JVM Property Info.
8. Troubleshooting WebFOCUS and ReportCaster
Installation and Configuration for Windows 153

WebFOCUS Web Server Host Name and Port Settings
During the WebFOCUS Client installation, you are asked for the host name and HTTP port ofyour web server. This should be the host name and port that your end users use to accessWebFOCUS and ReportCaster. These values are used for communications betweenReportCaster and Report Library. If you use Report Library, ensure this is set to the end useraccessible web server host name and port, even if it is not on the same machine asWebFOCUS and only forwards requests through a firewall.
If you need to change the web server host name and port that you entered during theinstallation:
1. If you use ReportCaster, correct the host name and port number stored in the ReportCasterconfiguration for the Report Library. To do this, access the ReportCaster Console, whichcan be accessed from the WebFOCUS Home Page. After you sign in to the WebFOCUSHome Page, click Tools from the top menu and select ReportCaster Status.
The ReportCaster Console opens in a new browser window.
2. Click the Configuration tab.
3. Click Report Library in the left pane and change the host name and port in the DefaultLibrary URL for Email Notification field.
4. Click the Save icon, followed by Restart to restart all WebFOCUS components.
5. Optionally, update the shortcuts that appear in the Start menu for accessing WebFOCUSpages. To do this, right-click each of the following, select Properties, and adjust the hostname and port that appear in the URL:
drive:\ibi\WebFOCUS82\utilities\showconsole
drive:\ibi\WebFOCUS82\utilities\ReportCasterMain
drive:\ibi\WebFOCUS82\utilities\ReportCasterConsole
For example:
http://hostname.domain.com:8080/ibi_html/wfconsole.htm
If you are not using ReportCaster, the ReportCaster links do not appear.
Using the jar Utility
A jar.exe utility is installed with the Java JDK. It lets you create, extract, and edit the contentsof JAR, WAR, EAR, ZIP, RAR, and other archive files. If you deploy the WebFOCUS webapplication as a WAR file, the jar utility lets you change the webfocus file contents.
WebFOCUS Troubleshooting Tips
154
Note: The default WebFOCUS Apache Tomcat configuration does not use the WAR file, so thisutility is normally not needed with Tomcat.
Procedure: How to Ensure You Can Use the jar Utility
To use the jar command, ensure that the JAVA_HOME\bin directory is in your search PATH. Forexample:
C:\Program Files\AdoptOpenJDK\jdk-11.0.9.11-hotspot\bin
To add this to your search PATH:
1. Go to the Windows Control Panel and open the System folder.
2. Click Advanced system settings and then click the Environment Variables button.
3. In the bottom System variables frame, select Path.
4. Click Edit.
5. At the end of the line, add a semicolon (;) and the path to the JAVA_HOME\bin directory.For example:
C:\Program Files\AdoptOpenJDK\jdk-11.0.9.11-hotspot\bin
6. Click OK to close out.
Procedure: How to Edit the WebFOCUS Web Application
The WebFOCUS web application is provided as both an expanded directory and a WAR file:
drive:\ibi\WebFOCUS82\webapps\webfocus
drive:\ibi\WebFOCUS82\webapps\webfocus.war
The easiest way to edit the web application is the following:
1. Undeploy the webfocus.war file from your application server.
2. Rename the webfocus.war file to webfocus-old.war. This ensures you have a backup andcan keep track of where the latest version resides.
3. Edit or add files to the expanded webfocus directory and subdirectories. You should dothis even if you deploy the WAR file instead of the expanded directories. This ensures thatservice packs maintain your changes. When you apply a service pack, any changes mustbe in the expanded directories to be maintained.
4. Open a Command Prompt.
5. Navigate to the webfocus directory. For example:
drive:\ibi\WebFOCUS82\webapps\webfocus
8. Troubleshooting WebFOCUS and ReportCaster
Installation and Configuration for Windows 155
6. Use the jar command to create a new webfocus.war file that contains the contents of thewebfocus directory and subdirectories. For example:
jar cvf ../webfocus.war *
This creates a webfocus.war file containing all files and subdirectories in your currentdirectory. The webfocus.war file will be located one directory above your current locationbecause you prefaced it with "../".
7. Redeploy the WebFOCUS web application to your application server.
Procedure: How to Execute the jar Utility
The options for using the jar commands are useful to know. You execute the jar utility from theCommand Prompt.
To create a new jar file:
jar cvf FileToCreate.war FileToAdd1 FileToAdd2
You can add all files and subdirectories using an asterisk (*).
jar cvf FileToCreate.war *
To extract the contents of an existing jar file:
jar xvf ExistingFile.war FileToExtract1 FileToExtract2
Files are extracted to your current location.
You can extract all files and subdirectories by not specifying any files to extract.
jar xvf ExistingFile.war
To add or replace a file in an existing jar file:
jar uvf ExistingFile.war FileToAdd1
WebFOCUS File Extensions
WebFOCUS files have several non-standard file extensions on Windows, suchas .mas, .prf, .acx, .wfs, .cfg, and .xmls files. Depending on the software installed on yourmachine, these file extensions may already be in use for other applications. Normally, thiscauses no conflicts when using either WebFOCUS or the other applications. However, shouldyou attempt to open a WebFOCUS file that is mapped for another application by double-clickingit in File Explorer, problems can arise.
WebFOCUS Troubleshooting Tips
156
Note: By default, you might not see file extensions in File Explorer. To see extensions, openFile Explorer. On the View tab, enable View file name extensions.
Specific instances where WebFOCUS extensions may conflict are the following:
PRF files, such as drive:\ibi\srv82\wfs\etc\edasprof.prf
PRF files are normally mapped to Microsoft Outlook Profile settings. On some Windowsreleases, opening edasprof.prf by double-clicking it in File Explorer, can cause damage toyour Microsoft Outlook settings. Therefore, if you need to edit this file, open it from within atext editor.
MAS files, such as drive:\ibi\apps\ibisamp\car.mas
MAS files may be mapped as Microsoft Access files if you have Microsoft Access installed.
Missing Tomcat Context Definition Files
Symptom: The context definition files for Tomcat are being deleted periodically.
The following files will be deleted randomly:
<catalina_home>\conf\Catalina\localhost\ibi_apps.xml
<catalina_home>\conf\Catalina\localhost\ibi_html.xml
<catalina_home>\conf\Catalina\localhost\approot.xml
Problem: This is a problem with Tomcat in certain environments. The exact cause of the issueis unknown.
Solution: Within the Tomcat configuration (server.xml), turn off autoDeploy.
1. Edit your Tomcat server.xml.
On Windows, this is typically found at:
<catalina_home>\conf\server.xml
or, if the WebFOCUS Client installation installed Tomcat, it is located under
<catalina_home>\conf\server.xml
2. Find the following section within your server.xml:
<Host name="localhost" appBase="webapps"unpackWARs="true" autoDeploy="true" xmlValidation="false" xmlNamespaceAware="false">
8. Troubleshooting WebFOCUS and ReportCaster
Installation and Configuration for Windows 157
and change autoDeploy to false:
<Host name="localhost" appBase="webapps/localhost"unpackWARs="true" autoDeploy="false" xmlValidation="false" xmlNamespaceAware="false">
3. Restart Tomcat.
ReportCaster Troubleshooting Tips
ReportCaster relies on communications between the following components:
Web browser (for user interfaces)
Application server
Java VM
ReportCaster web components
ReportCaster Distribution Server
Database server where WebFOCUS Repository tables are located
WebFOCUS Reporting Server
Mail server
FTP server (for FTP distribution)
If ReportCaster fails to perform properly, confirm that all components are installed, started,and listening on their expected ports. The ReportCaster Distribution Server will not start if itcannot connect to the repository. All components are related, so what appears to be a problemin one component may be caused by a different component. If possible, restart componentsand reboot, especially after making changes.
All components can run on one machine, or they can be distributed across different machinesrunning different operating systems. If components are distributed, ensure all machines arerunning and can communicate using the expected protocols.
ReportCaster Troubleshooting Tips
158
Note:
All WebFOCUS and ReportCaster components must be the same release number.
If the Distribution Server is not started, you can edit the ReportCaster Server Configurationinterface from the WebFOCUS BI Portal. After you sign in to the WF BI Portal, click Toolsfrom the top menu bar and select ReportCaster Status. The ReportCaster Console opens ina new browser window. Click the Configuration tab, which contains the ReportCasterconfiguration settings.
Troubleshooting Web and Application Server Errors
Review the installation and configuration instructions in Installing the WebFOCUS Client on page41 and Configuring Web and Application Servers on page 85.
Ensure the web server and application server are running.
If your repository requires JDBC drivers, ensure they are in your application serverCLASSPATH. The path up to and including any file names must be specified. Specifying adirectory containing a driver file is not sufficient. Be sure to restart your application serverafter changing CLASSPATH.
For Tomcat, you can set CLASSPATH from the Start menu by selecting Tomcat ConfigurationUtility, under the Information Builders app.
Troubleshooting Java Errors
If the Distribution Server fails to start, or starts as a non-Windows service but fails to start as aWindows service, check your Java configuration.
Confirm that Java executes by checking the version at a command prompt. Open aCommand Window and type:
java -version
Something similar to the following should appear:
java version "OpenJDK 11 JRE version 11.0.9"
If you receive an error, ensure the Java JDK is properly installed.
8. Troubleshooting WebFOCUS and ReportCaster
Installation and Configuration for Windows 159
Troubleshooting ReportCaster Distribution Server Errors
Review the installation and configuration instructions in Installing the WebFOCUS Client on page41 and WebFOCUS ReportCaster Post-Installation Tasks on page 135.
Ensure the ReportCaster Distribution Server is running.
Ensure that the ReportCaster web application knows where the Distribution Server is. Editthe dserver.xml file, which is located in the following directory:
drive:\ibi\WebFOCUS82\utilities\WFReposUtil\xml
Locate the <host_name> and <port> elements in the dserver.xml file. For example:
<host_name>hostname1</host_name><port>8200</port>
If the values within these elements are incorrect, correct them. Specify the host name andTCP port for the Distribution Server according to your configuration.
After you save the dserver.xml file, you must reload the repository tables and restartTomcat or the application server where WebFOCUS is deployed.
Check the Java configuration, as explained in Troubleshooting Java Errors on page 159. IfReportCaster starts as a non-Windows service but does not start as a Windows service, theJava installation is a likely cause.
Check settings using the ReportCaster Console, which can be accessed from theWebFOCUS Home Page. After you sign in to the WebFOCUS Home Page, click Tools fromthe top menu and select ReportCaster Status. The ReportCaster Console opens in a newbrowser window. Click the Configuration tab, which contains the ReportCaster configurationsettings.
Troubleshooting Repository Errors
Review the installation and configuration instructions in Installing the WebFOCUS Client on page41, WebFOCUS Repository Post-Installation Tasks on page 132, and Additional WebFOCUSRepository Topics and Tasks on page 189.
Ensure the database server is running.
Ensure the repository tables exist.
Ensure that the Distribution Server machine contains the correct information to connect tothe database. For more information on these parameters, see Repository ConnectionInformation on page 192.
ReportCaster Troubleshooting Tips
160
Ensure the correct JDBC driver is installed on the web server and ReportCaster DistributionServer machines.
Ensure that your application server or servlet container has the correct CLASSPATH to theJDBC driver. You can also add the driver files to the WEB-INF/lib directory for theReportCaster web application. To do this, copy the files into:
drive:\ibi\WebFOCUS82\webapps\webfocus\WEB-INF\lib
If you deployed the expanded directory, redeploy it. If you deployed the webfocus.war file,use the jar utility to insert the driver files or create a new web application, as explained in Using the jar Utility on page 154. Then redeploy the WAR file.
Ensure the Distribution Server has the correct CLASSPATH to the JDBC driver. This is set ina file:
drive:\ibi\WebFOCUS82\ReportCaster\bin\classpath.bat
and in the registry:
HKEY_LOCAL_MACHINE\SOFTWARE\Wow6432Node\Information Builders\ReportCaster\WF82\Parameters\Java\Classpath
For SQL Server, ensure SQL Server authentication is supported, as explained in SQL ServerPre-Installation Steps on page 202.
Troubleshooting Reporting or Delivery Errors
Review the WebFOCUS and ReportCaster documentation and review the documentation foryour Mail or FTP server.
Ensure the WebFOCUS Reporting Server is running.
Ensure the report, file, or URL is valid.
Ensure the Mail or FTP server is running.
Check the settings in the ReportCaster Server Configuration interface.
Check the files in the logs directory:
drive:\ibi\WebFOCUS82\ReportCaster\log
8. Troubleshooting WebFOCUS and ReportCaster
Installation and Configuration for Windows 161
Turning Distribution Server Traces ON/OFF
Normally, you should turn the Distribution Server traces on and off using the ReportCasterConsole, which can be accessed from the WebFOCUS Home Page. After you sign in to theWebFOCUS Home Page, click Tools from the top menu and select ReportCaster Status. TheReportCaster Console opens in a new browser window. Click the Configuration tab. TheDistribution Server trace and log settings can be accessed in the left pane.
The trace files appear in drive:\ibi\WebFOCUS82\ReportCaster\trc. In addition, check the logfiles in drive:\ibi\WebFOCUS82\ReportCaster\log for more information.
ReportCaster Troubleshooting Tips
162
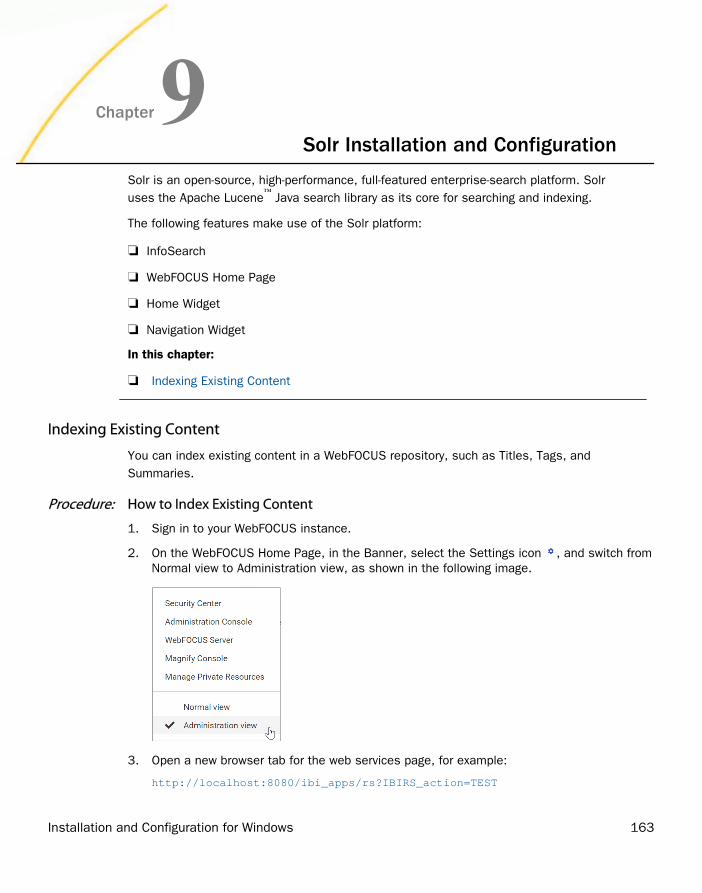
Chapter9Solr Installation and Configuration
Solr is an open-source, high-performance, full-featured enterprise-search platform. Solruses the Apache Lucene
™ Java search library as its core for searching and indexing.
The following features make use of the Solr platform:
InfoSearch
WebFOCUS Home Page
Home Widget
Navigation Widget
In this chapter:
Indexing Existing Content
Indexing Existing Content
You can index existing content in a WebFOCUS repository, such as Titles, Tags, andSummaries.
Procedure: How to Index Existing Content
1. Sign in to your WebFOCUS instance.
2. On the WebFOCUS Home Page, in the Banner, select the Settings icon , and switch fromNormal view to Administration view, as shown in the following image.
3. Open a new browser tab for the web services page, for example:
http://localhost:8080/ibi_apps/rs?IBIRS_action=TEST
Installation and Configuration for Windows 163
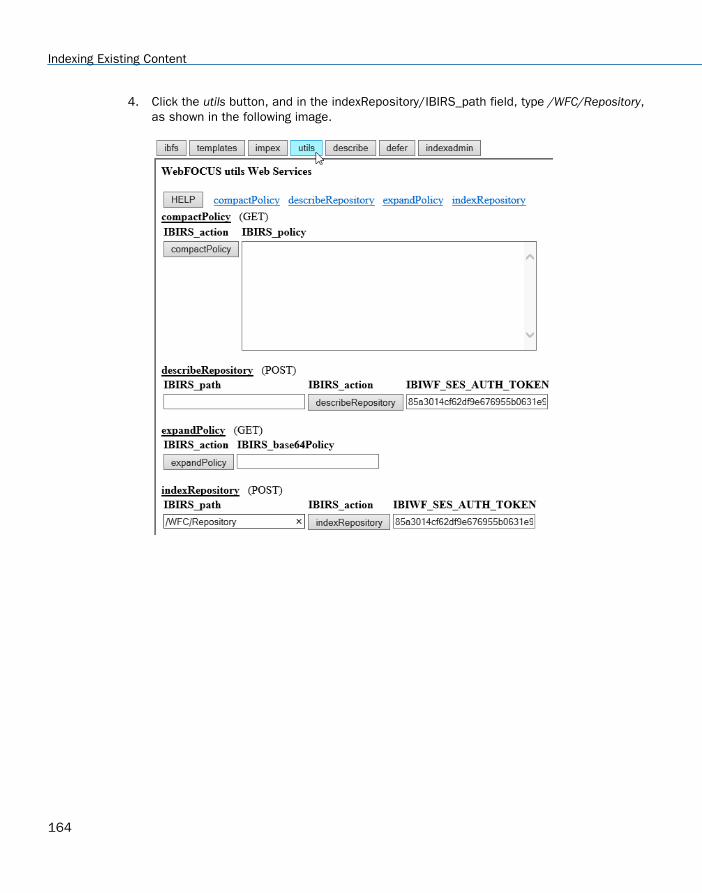
4. Click the utils button, and in the indexRepository/IBIRS_path field, type /WFC/Repository,as shown in the following image.
Indexing Existing Content
164
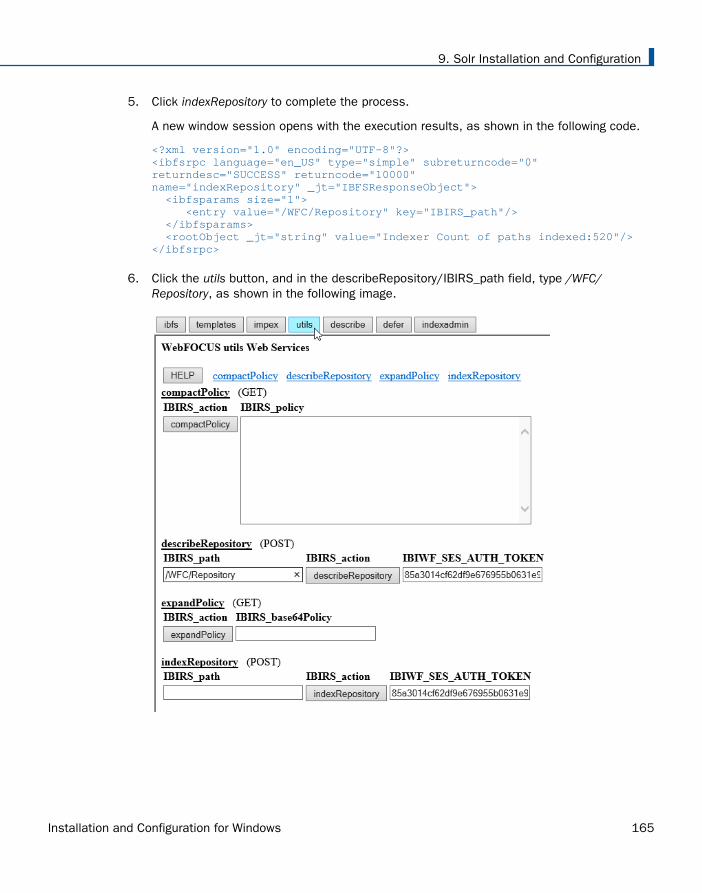
5. Click indexRepository to complete the process.
A new window session opens with the execution results, as shown in the following code.
<?xml version="1.0" encoding="UTF-8"?><ibfsrpc language="en_US" type="simple" subreturncode="0"returndesc="SUCCESS" returncode="10000"name="indexRepository" _jt="IBFSResponseObject"> <ibfsparams size="1"> <entry value="/WFC/Repository" key="IBIRS_path"/> </ibfsparams> <rootObject _jt="string" value="Indexer Count of paths indexed:520"/></ibfsrpc>
6. Click the utils button, and in the describeRepository/IBIRS_path field, type /WFC/Repository, as shown in the following image.
9. Solr Installation and Configuration
Installation and Configuration for Windows 165
7. Click describeRepository to complete the process.
A new window session opens with execution results, as shown in the following code.
<?xml version="1.0" encoding="UTF-8"?><ibfsrpc _jt="IBFSResponseObject" language="en_US" name="describeRepository" returncode="10000" returndesc="SUCCESS" subreturncode="0" type="simple"> <ibfsparams size="1"> <entry key="IBIRS_path" value="/WFC/Repository"/> </ibfsparams> <rootObject _jt="string" value="Processed count: 345. Described count: 310. Have parameters count: 86. Non writable files skipped: 0"/></ibfsrpc>
8. From the WebFOCUS Administration Console menu bar, click Clear Cache and, when youreceive a confirmation message, click OK.
9. Sign out of WebFOCUS and then sign back in to WebFOCUS.
10. Depending on the widget you want to use, navigate to webfocus_instance/ibi_apps/home_widget or webfocus_instance/ibi_apps/navigation_widget.
Indexing Existing Content
166
AppendixA On-Premises Installation of AutomatedInsights
Automated Insights is provided as a Docker container, which makes it easy to install andupdate for on-premises installations. After installing the Automated Insights container,minimal changes are required to the WebFOCUS Server to complete the configuration.
Once the Automated Insights container is started, it can support multiple WebFOCUSinstances that are installed on Linux or Windows.
In this appendix:
Hardware Requirements
Docker Installation
Running the Automated Insights Container
WebFOCUS Server Configuration
Hardware Requirements
The following are the hardware requirements for the on-premises installation of AutomatedInsights:
Memory: 16GB
CPU: 4 cores
Disk space: 100GB
Docker Installation
To get started, install the Docker Engine, which is available on a variety of Linux platforms,including CentOS, Red Hat, Ubuntu, Debian, and SUSE, and also available on Windows.
As a reference, you may visit the following website:
https://docs.docker.com/docker-for-windows/install
Running the Automated Insights Container
The Automated Insights Docker container is available for download as a TAR file, along with theWebFOCUS Client and WebFOCUS Integrated Installation software. The name of the TAR file isibiAutoAnalytics8207.tar.
Installation and Configuration for Windows 167
Perform the following steps to download and run the container:
1. FTP the ibiAutoAnalytics8207.tar file, as binary, from the download site.
The software download page provides download links for obtaining the installation package.
Note: You must verify the integrity of the downloaded files. All files posted in the downloadsite are signed by the release manager using the SHA-512 algorithm, and SHA-512checksums are available along with the files. After you download the file, you shouldcalculate a checksum for your download, and make sure it is the same as the posted hashfile.
2. Run the following command:
docker load –i <absolute-path>/ibiAutoAnalytics8207.tar
3. Run the following command.
Note: Type the command on one line.
docker run --name Insights -d -p 8888:8888-e SECRET_KEY=QI9TSNCVWY39U7M0L756XBXKA4P1OOKC IMAGE:TAG
where IMAGE:TAG for Release 8207.27 is:
ibi2020/auto-analytics:1.4.0-rc
For example:
docker run --name Insights -d -p 8888:8888-e SECRET_KEY=QI9TSNCVWY39U7M0L756XBXKA4P1OOKCibi2020/auto-analytics:1.4.0-rc
You may replace the first 8888 value with a valid open port on the local machine. This isthe mapping from the Docker container to the parent port.
You may replace the name assigned to the container Insights with a different containername.
Unique container name and port are required, if you want to run multiple AutomatedInsights containers on the same machine.
4. Test the Docker container by using the URL: <scheme>://<machine_name>:<port>/status,replacing <scheme>, <machine_name>, and <port> with actual values.
For example:
pyserv_url=https://server:8888/status
You should see output: status: "success".
Running the Automated Insights Container
168
WebFOCUS Server Configuration
In the /srv82/wfs/bin/edaserve.cfg Insert server file, insert the following as the first line,replacing <scheme>, <machine_name> and <port> with actual values.
pyserv_url=<scheme>://<machine_name>:<port>/api/<version>
where version for Release 8207.27 is:
1.0.0
For example:
pyserv_url=https://server:8888/api/1.0.0
The following table lists the Automated Insights containers by release.
WebFOCUS/WebFOCUSServerRelease
Container Version Version Entry in Server pyserv_url Setting
8207.26 and8207.27
ibi2020/auto-analytics:1.4.0-rc
1.0.0
For example:
pyserv_url=https://server:8888/api/1.0.0
8207.24 and8207.25
ibi2020/auto-analytics:1.3.0-rc
1.0.0
For example:
pyserv_url=https://server:8888/api/1.0.0
8207.23through8207.17
ibi2020/auto-analytics:1.2.0-rc
1.0.0
For example:
pyserv_url=https://server:8888/api/1.0.0
A. On-Premises Installation of Automated Insights
Installation and Configuration for Windows 169
WebFOCUS/WebFOCUSServerRelease
Container Version Version Entry in Server pyserv_url Setting
8207.16 and8207.15
ibi2020/auto-analytics:1.1.0-rc
1.0.0
For example:
pyserv_url=https://server:8888/api/1.0.0
8207.14 ibi2020/auto-analytics:1.0.2-rc
1.0.0
For example:
pyserv_url=https://server:8888/api/1.0.0
8207.13 ibi2020/auto-analytics N/A
For example:
pyserv_url=https://server:8888/api/
To check the version number of the running container run:
<scheme>://<host>:<port>/api/<version>/system
For example:
https://server:8888/api/1.0.0/system
The output for 8207.27 is:
{"data": {"version": "1.4.0", "gitCommit": "2d659a54ba8", "buildDate": "2021-02-03T16:23:34Z"}}
WebFOCUS Server Configuration
170
AppendixB Metadata Classification On-PremisesInstallation
Metadata Classification examines your data and assigns classifications to the columns,which can then be used to match columns from separate data sources. You can classifydata that you upload, and use it to match fields in a Union in a Data Flow.
When uploading a data file, using a tech preview flag, you can now view therecommended metadata classification values for each character-valued column. You canchoose to keep the recommended values, or to change them.
Including classification values in your data improves the accuracy of mapping columntables correctly to each other. This is useful if you are integrating data from multiplesources, or if integrating data into a system with a predefined hierarchy.
The new Data Classification engine is a machine learning application, provided as aservice, that will base class assignments on examining actual data values. It is trainedby being given access to large volumes of data gathered throughout the world. Thisapplication will continually learn more about data and how to classify it, and new classeswill be added as needed.
In this appendix:
Using the Metadata Classification Feature
Hardware Requirements
Docker Installation
WebFOCUS Server Configuration
Metadata Classification Containers By Release
Using the Metadata Classification Feature
For instructions on how to use this feature, see Classifying Metadata During Upload and Usingit in a Data Flow.
Installation and Configuration for Windows 171
Hardware Requirements
The following are the hardware requirements for the Metadata Classification on-premisesinstallation:
Memory: 16GB
CPU: 4 cores
Disk space: 100GB
Docker Installation
To get started, install the Docker Engine, which is available on a variety of Linux platforms,including CentOS, Red Hat, Ubuntu, Debian, and SUSE, and also available on Windowsplatforms.
As a reference, you may visit the following websites:
For Linux:
https://docs.docker.com/engine/install/#server
For Windows:
https://docs.docker.com/docker-for-windows/install
The following is an example of installing and running the Docker Engine on CentOS:
$ sudo yum install docker-ce docker-ce-cli containerd.io$ sudo systemctl start docker
Note: For Linux, create a group called docker that includes users that require access forrunning the Docker Engine.
Procedure: How to Run the Metadata Classification Container
The Metadata Classification Docker container is available for download as a TAR file, alongwith the WebFOCUS Client and WebFOCUS Integrated Installation software. The name of theTAR file is dataclassification8207.tar.
1. FTP the dataclassification8207.tar file, as binary, from the download site.
The software download page provides download links for obtaining the installationpackage.
Hardware Requirements
172
Note: You must verify the integrity of the downloaded files. All files posted in the downloadsite are signed by the release manager using the SHA-512 algorithm, and SHA-512checksums are available along with the files. After you download the file, you shouldcalculate a checksum for your download, and make sure it is the same as the posted hashfile.
2. Type the following command:
docker load –i <absolute-path>/dataclassification8207.tar
3. Run the following command.
Note: Type the command on one line.
For Linux:
docker run --name Metadata -d -p 8888:8888 -v /etc/localtime:/etc/localtime:ro -e SECRET_KEY=KOM6A8BNGC2L0WTAA2HUB8NJG9V9ZKD3 IMAGE:TAG
where IMAGE:TAG is:
ibi2020/metadata:0.9.1-rc
For example:
docker run --name Metadata -d -p 11000:8888 -v /etc/localtime:/etc/localtime:ro -e SECRET_KEY=KOM6A8BNGC2L0WTAA2HUB8NJG9V9ZKD3ibi2020/metadata:0.9.1-rc
For Windows:
docker run --name Metadata -d -p 8888:8888 -e SECRET_KEY=KOM6A8BNGC2L0WTAA2HUB8NJG9V9ZKD3 IMAGE:TAG
where IMAGE:TAG is:
ibi2020/metadata:0.9.1-rc
For example:
docker run --name Metadata -d -p 11000:8888 -eSECRET_KEY=KOM6A8BNGC2L0WTAA2HUB8NJG9V9ZKD3 ibi2020/metadata:0.9.1-rc
Note:
You may replace the first 8888 value with a valid open port on the local machine. Thisis the mapping from the Docker container to the parent port.
You may replace the name assigned to the container Metadata with a differentcontainer name.
B. Metadata Classification On-Premises Installation
Installation and Configuration for Windows 173

A unique container name and port are required if you want to run multiple MetadataClassification containers on the same machine or if you are running other ibi providedcontainers, such as Automated Insights.
4. Test the Docker container by using the following URL, replacing <scheme>,<machine_name>, and <port> with actual values:
<scheme>://<machine_name>:<port>/status
For example:
http://myserver:11000/status
You should see output: status: "success".
WebFOCUS Server Configuration
The URLs pointing to the services you installed must be added to the /srv82/wfs/bin/edaserve.cfg server file.
1. On the Server Console, navigate to the Workspace page using the Tools menu.
2. On the Resources Tree, expand Configuration Files.
3. Right-click Workspace - edaserve.cfg and click Edit.
The edaserve.cfg file opens in the Text Editor.
4. Enter values for the following keywords:
lblfeat_url = url_to_service_that_encodes_valueslblpred_url = url_to_service_calculates_labels_based_on_encoded_values
where:
url_to_service_that_encodes_values
Is the URL to the service that resides in the customer environment. For example:
lblfeat_url = https://myserver/api/1.0.0
This service is called by passing values of rows in a column, and it passes back afeature vector that describes the patterns of values in the column.
url_to_service_calculates_labels_based_on_encoded_values
Is the URL to the service that resides in the WebFOCUS environment. For example:
lblpred_url = https://ibiserver/api/1.0.0
This service is called using the feature vector created by the first service and returnsthe classification for the column.
WebFOCUS Server Configuration
174

The Text Editor should look similar to the following.
5. Click the Save icon and close the tab.
Metadata Classification Containers By Release
The following table shows the Metadata Classification containers by release.
WebFOCUSandWebFOCUSServerRelease
Container Version Version entry in Server settings lblfeat_urland lblpred_url
8207.27 ibi2020/metadata:0.9.1-rc 1.0.0
For example:
lblfeat_url = http://myserver:11000/api/1.0.0
lblpred_url = https://dev-metadata.dev-aws.ibi.com/api/1.0.0
To check the version number of the running container, run:
<scheme>://<host>:<port>/api/<version>/system
B. Metadata Classification On-Premises Installation
Installation and Configuration for Windows 175
For example:
http://myserver:11000/api/1.0.0/system
{"data": {"version": "1.0.0", "gitCommit": "ed6cfbf32f6", "buildDate": "2021-02-01T22:07:03Z"}}
Metadata Classification Containers By Release
176
AppendixCConfiguring WebFOCUS Help
WebFOCUS Help is configured, by default, to use Online Help that is hosted by ibiservers. This Help configuration is applied for new installations or when upgrading froman earlier release. The installation package no longer includes the help files, whichgreatly reduces the installation file size and time required to install and configure thesoftware.
Benefits include:
Hosted Help model that enables you to access the most current Online Help contentat any time.
Upgraded delivery model that reduces the size of the product software package, andsimplifies installation and configuration.
Online Help access using a secure connection to the ibi server hosting the OnlineHelp system (HTTPS).
In this appendix:
Deploying WebFOCUS Online Help On-Premise
Verifying the WebFOCUS Online Help Download File
Deploying the WebFOCUS Online Help Web Application Using a Context File in Tomcat
Configuring WebFOCUS to Point to the WebFOCUS Help on the Remote Server
Deploying WebFOCUS Online Help On-Premise
If you are restricted from using Hosted Help, the following procedure describes how to installOnline Help on your own internal application server.
For Release 8207.26, you have the option to obtain WebFOCUS Online Help from the SoftwareDownloads Facility. WebFOCUS Online Help will be posted within the same product softwarefolder for each release and platform. This enables you to readily correlate the posted Help witheach specific gen of the product.
Installation and Configuration for Windows 177
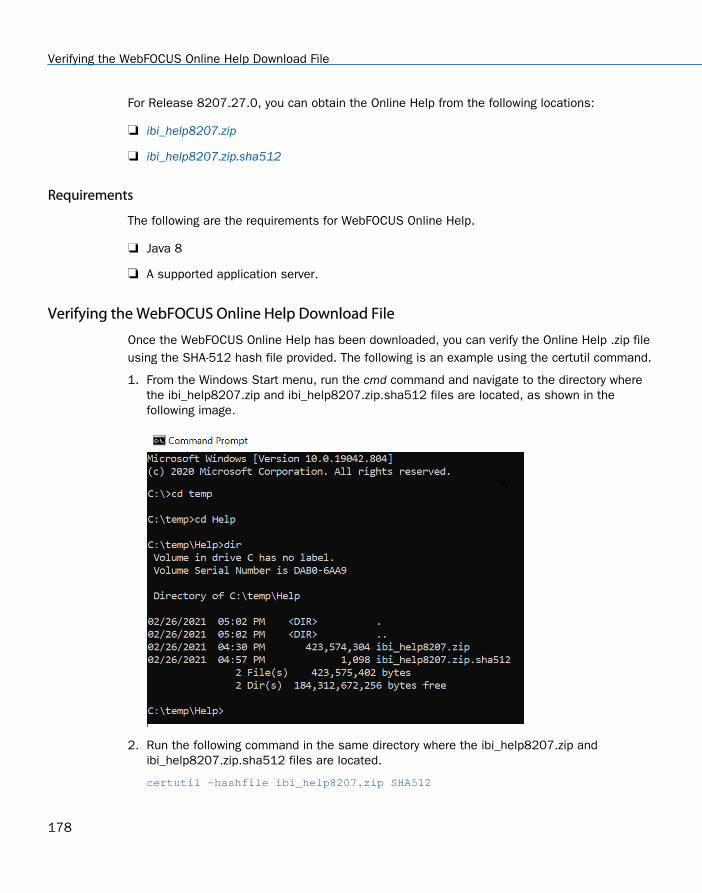
For Release 8207.27.0, you can obtain the Online Help from the following locations:
ibi_help8207.zip
ibi_help8207.zip.sha512
Requirements
The following are the requirements for WebFOCUS Online Help.
Java 8
A supported application server.
Verifying the WebFOCUS Online Help Download File
Once the WebFOCUS Online Help has been downloaded, you can verify the Online Help .zip fileusing the SHA-512 hash file provided. The following is an example using the certutil command.
1. From the Windows Start menu, run the cmd command and navigate to the directory wherethe ibi_help8207.zip and ibi_help8207.zip.sha512 files are located, as shown in thefollowing image.
2. Run the following command in the same directory where the ibi_help8207.zip andibi_help8207.zip.sha512 files are located.
certutil -hashfile ibi_help8207.zip SHA512
Verifying the WebFOCUS Online Help Download File
178
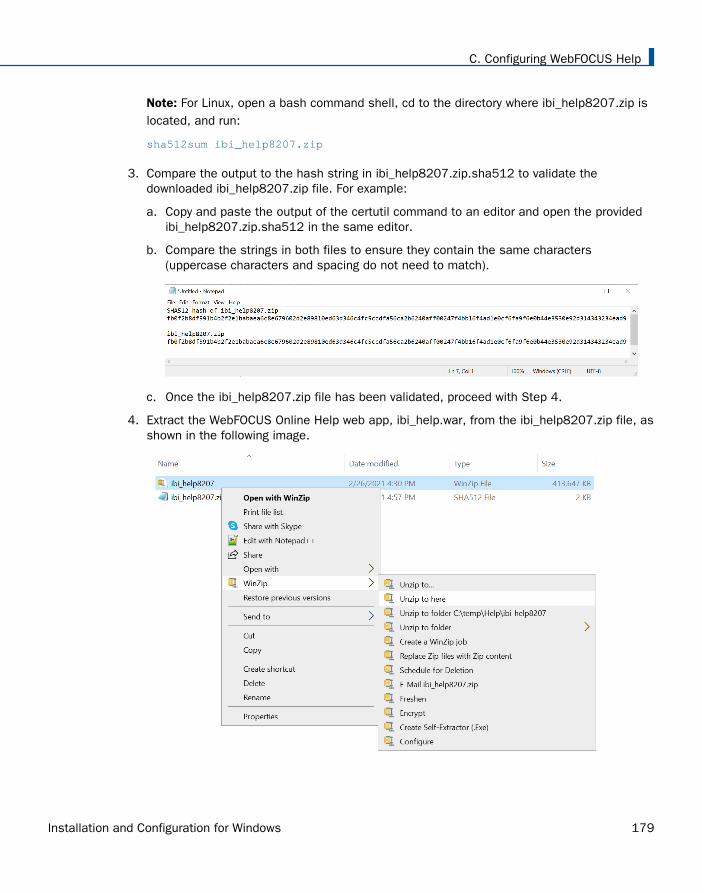
Note: For Linux, open a bash command shell, cd to the directory where ibi_help8207.zip islocated, and run:
sha512sum ibi_help8207.zip
3. Compare the output to the hash string in ibi_help8207.zip.sha512 to validate thedownloaded ibi_help8207.zip file. For example:
a. Copy and paste the output of the certutil command to an editor and open the providedibi_help8207.zip.sha512 in the same editor.
b. Compare the strings in both files to ensure they contain the same characters(uppercase characters and spacing do not need to match).
c. Once the ibi_help8207.zip file has been validated, proceed with Step 4.
4. Extract the WebFOCUS Online Help web app, ibi_help.war, from the ibi_help8207.zip file, asshown in the following image.
C. Configuring WebFOCUS Help
Installation and Configuration for Windows 179
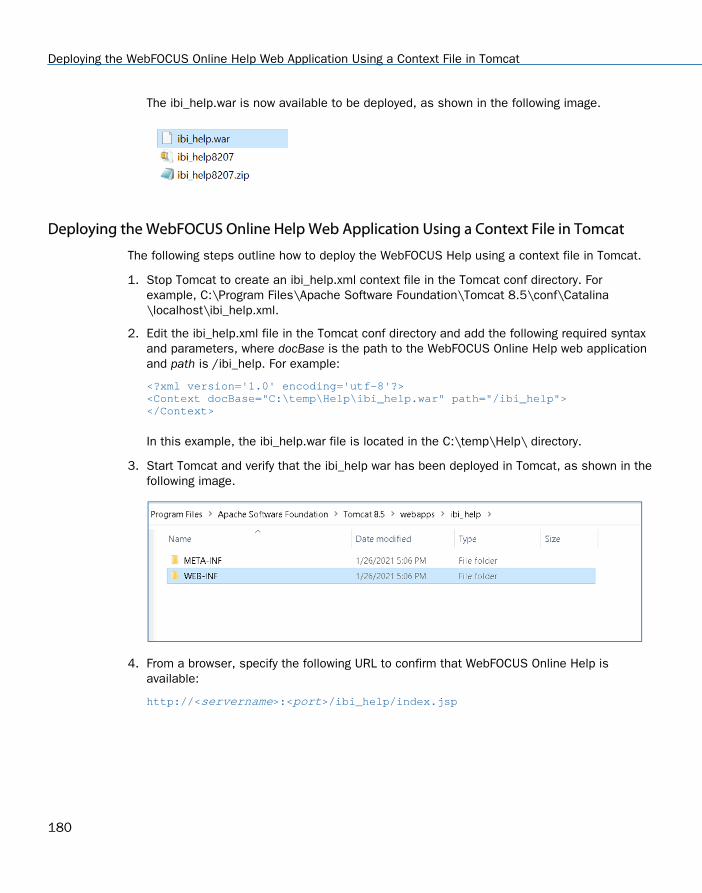
The ibi_help.war is now available to be deployed, as shown in the following image.
Deploying the WebFOCUS Online Help Web Application Using a Context File in Tomcat
The following steps outline how to deploy the WebFOCUS Help using a context file in Tomcat.
1. Stop Tomcat to create an ibi_help.xml context file in the Tomcat conf directory. Forexample, C:\Program Files\Apache Software Foundation\Tomcat 8.5\conf\Catalina\localhost\ibi_help.xml.
2. Edit the ibi_help.xml file in the Tomcat conf directory and add the following required syntaxand parameters, where docBase is the path to the WebFOCUS Online Help web applicationand path is /ibi_help. For example:
<?xml version='1.0' encoding='utf-8'?><Context docBase="C:\temp\Help\ibi_help.war" path="/ibi_help"></Context>
In this example, the ibi_help.war file is located in the C:\temp\Help\ directory.
3. Start Tomcat and verify that the ibi_help war has been deployed in Tomcat, as shown in thefollowing image.
4. From a browser, specify the following URL to confirm that WebFOCUS Online Help isavailable:
http://<servername>:<port>/ibi_help/index.jsp
Deploying the WebFOCUS Online Help Web Application Using a Context File in Tomcat
180
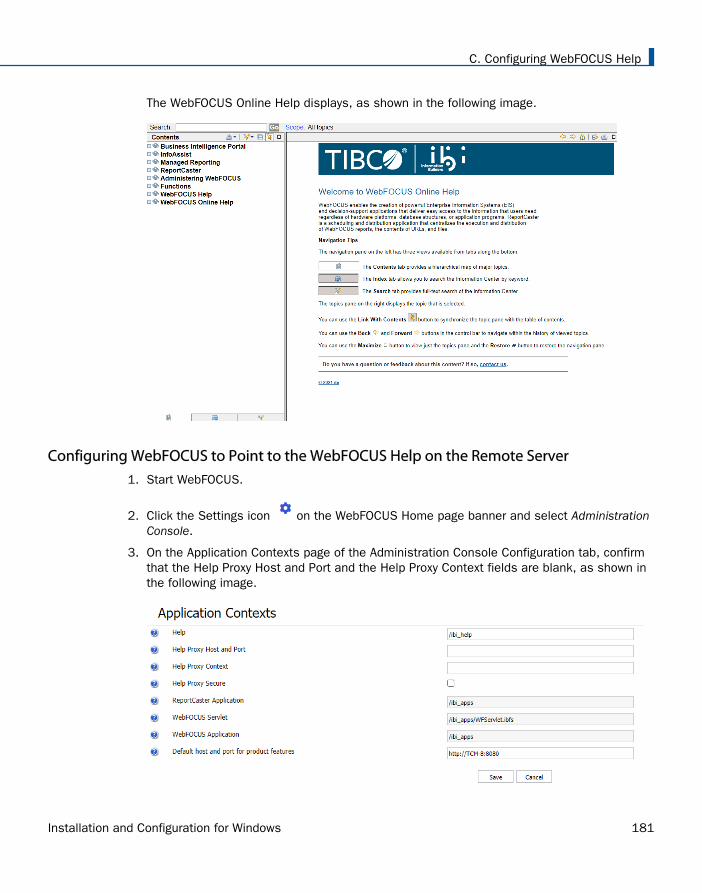
The WebFOCUS Online Help displays, as shown in the following image.
Configuring WebFOCUS to Point to the WebFOCUS Help on the Remote Server1. Start WebFOCUS.
2. Click the Settings icon on the WebFOCUS Home page banner and select AdministrationConsole.
3. On the Application Contexts page of the Administration Console Configuration tab, confirmthat the Help Proxy Host and Port and the Help Proxy Context fields are blank, as shown inthe following image.
C. Configuring WebFOCUS Help
Installation and Configuration for Windows 181
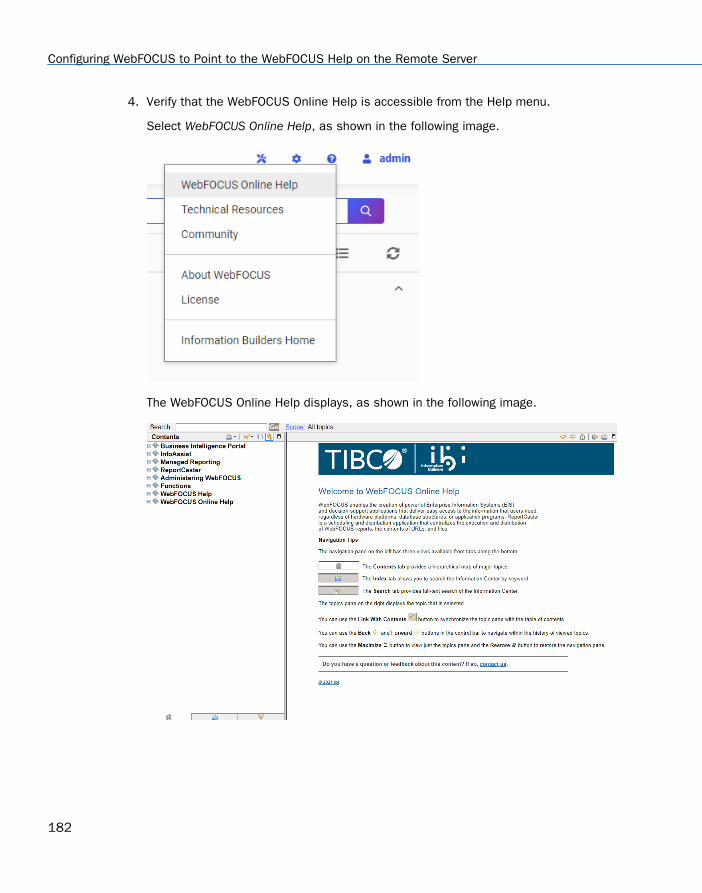
4. Verify that the WebFOCUS Online Help is accessible from the Help menu.
Select WebFOCUS Online Help, as shown in the following image.
The WebFOCUS Online Help displays, as shown in the following image.
Configuring WebFOCUS to Point to the WebFOCUS Help on the Remote Server
182
AppendixDAdditional Graph Configuration Options
This appendix explains how to configure WebFOCUS graph options. For ReportCaster todistribute graphics in a PDF, you must review the HOLD options.
In this appendix:
Graph Options
Graph Invocation and Generation Options
PCHOLD (Server Side) Graphics Overview
Configurations for HOLD Graphics
Graph Options
Server-side WebFOCUS graphs are generated by a Java-based graph engine installed withWebFOCUS components. GRAPH53 is the server-side WebFOCUS graph engine. It containssupport for many different graph types and advanced 3D graph options. HTML5 graphs arealso available. HTML5 graphs are created as Java code that runs directly in the browser.
Graph Invocation and Generation Options
There are several ways to create WebFOCUS graphs.
Using FORMAT JSCHART to generate HTML5 graphs. HTML5 graphs are delivered to thebrowser as java code and run in the browser.
On the web or application server (Server Side Graphics/PCHOLD), as explained in PCHOLD(Server Side) Graphics Overview on page 184.
Installation and Configuration for Windows 183
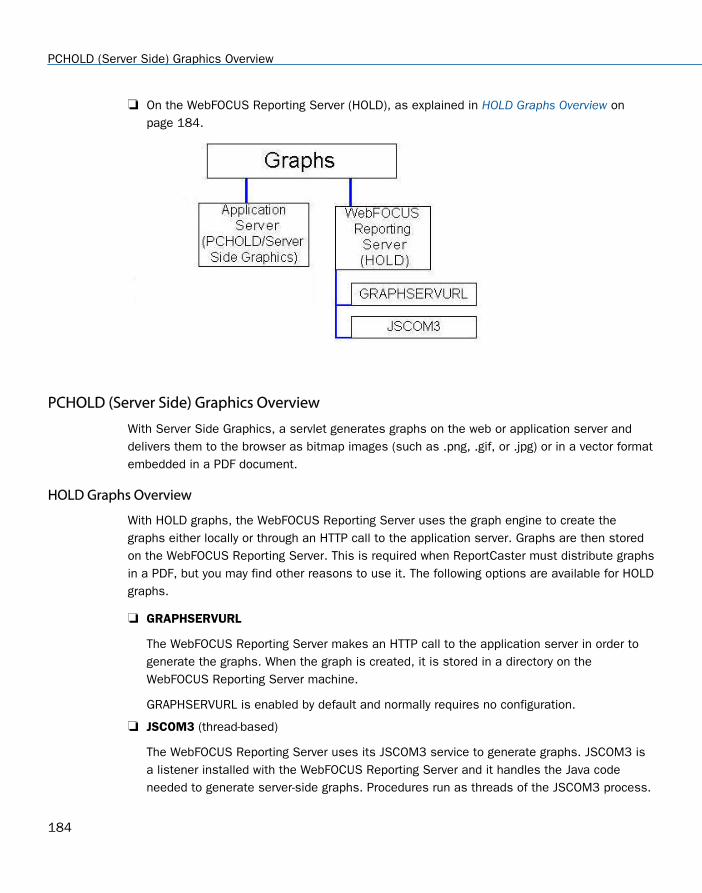
On the WebFOCUS Reporting Server (HOLD), as explained in HOLD Graphs Overview onpage 184.
PCHOLD (Server Side) Graphics Overview
With Server Side Graphics, a servlet generates graphs on the web or application server anddelivers them to the browser as bitmap images (such as .png, .gif, or .jpg) or in a vector formatembedded in a PDF document.
HOLD Graphs Overview
With HOLD graphs, the WebFOCUS Reporting Server uses the graph engine to create thegraphs either locally or through an HTTP call to the application server. Graphs are then storedon the WebFOCUS Reporting Server. This is required when ReportCaster must distribute graphsin a PDF, but you may find other reasons to use it. The following options are available for HOLDgraphs.
GRAPHSERVURL
The WebFOCUS Reporting Server makes an HTTP call to the application server in order togenerate the graphs. When the graph is created, it is stored in a directory on theWebFOCUS Reporting Server machine.
GRAPHSERVURL is enabled by default and normally requires no configuration.
JSCOM3 (thread-based)
The WebFOCUS Reporting Server uses its JSCOM3 service to generate graphs. JSCOM3 isa listener installed with the WebFOCUS Reporting Server and it handles the Java codeneeded to generate server-side graphs. Procedures run as threads of the JSCOM3 process.
PCHOLD (Server Side) Graphics Overview
184
JSCOM3 is used if GRAPHSERVURL is not set in cgivars.wfs or a procedure. It can also beused if GRAPHSERVURL is overridden in a procedure. It is not used if you set anIBIJAVAPATH environment variable.
Configurations for HOLD Graphics
When using PCHOLD, a procedure is invoked on the WebFOCUS Reporting Server and theserver accesses data sources to determine values. These values are usually passed back tothe WebFOCUS Client on the web or application server and the client uses the graph engine tocreate graphics.
When using HOLD, after a procedure is invoked and the values determined, the WebFOCUSReporting Server uses the graph engine to create the graphics itself or makes an HTTP call tothe web server.
Using a HOLD can be specified in a procedure, as shown in the following example.
Example: Creating a Sample Procedure for HOLD
To test whether HOLD works in your environment, create a procedure like the following:
APP HOLD BASEAPPGRAPH FILE CARSUM SALESBY COUNTRYON GRAPH HOLD AS HOLDTEST FORMAT PNGEND
Save this procedure in the ibisamp directory on the WebFOCUS Reporting Server machine. Forexample:
drive:\ibi\apps\ibisamp\cargrsrv.fex
This procedure creates a file called holdtest.png in baseapp. You can use the procedure totest the HOLD configurations that follow. If GRAPHSERVURL is set in cgivars.wfs, you canoverride it and use JSCOM3 or IBIJAVAPATH, by adding the following as the second line of thesample procedure.
SET GRAPHSERVURL=""
D. Additional Graph Configuration Options
Installation and Configuration for Windows 185
Configuring GRAPHSERVURL
No special configuration is needed to use GRAPHSERVURL, provided you have deployed theWebFOCUS web application to your application server. GRAPHSERVURL is set as theIBIF_graphservurl value in cgivars.wfs. The value in cgivars.wfs is passed to the WebFOCUSReporting Server when you launch a procedure through a servlet call. The value can also be setor overridden in a procedure using:
SET GRAPHSERVURL=http://hostname:port/ibi_apps/IBIGraphServlet
where:
hostname:port
Are the host name and port of the web server or application server.
GRAPHSERVURL is not supported when used against a secured web server (SSL, BasicAuthentication, or other third-party security), because there is no mechanism for supplyingcredentials.
If you are using a secured web server in front of your application server, you can reset thisvalue to directly call the application server host and port instead of the web server. You can dothis in cgivars.wfs through the WebFOCUS Administration Console.
For ReportCaster, this must be set in a procedure, since it is not inherited from cgivars.wfs.Otherwise, a procedure launched by ReportCaster makes use of JSCOM3 or IBIJAVAPATH.
You can disable GRAPHSERVURL and use JSCOM3 or IBIJAVAPATH for a specific procedure bysetting GRAPHSERVURL to nothing:
SET GRAPHSERVURL=""
Configuring for JSCOM3 HOLD
JSCOM3 is a listener installed with the WebFOCUS Reporting Server. It normally uses thefourth port used by the server. By default, this is port 8123. It is only used for HOLD graphicsif GRAPHSERVURL and IBIJAVAPATH is not set.
Be aware that if you create graphs that use templates, JSCOM3 uses a different copy of thetemplates than the WebFOCUS Client. If you modify templates, be sure to modify both. One isinstalled with the server for JSCOM3 and one is installed with the WebFOCUS Client:
drive:\ibi\WebFOCUS82\ibi_html\javaassist\images\tdg
Configurations for HOLD Graphics
186
Provided the JSCOM3 listener is started, no steps are needed to configure it in WebFOCUS8.2. In order for JSCOM3 to start on Windows, your search PATH must contain the jvm.dll filefor your Java release. The jvm.dll file is installed with the Java JDK in the jre\bin\clientdirectory. For example:
C:\ibi\WebFOCUS82\jre\bin\client
The exact JDK directory depends on your Java release. For a different JDK release, substituteaccordingly. If you need assistance, see the Server Installation manual.
Note: If the server is not on Windows, see the documentation for your server for information onstarting the JSCOM3 listener. On most UNIX platforms, this requires that you set and export aJDK_HOME variable to the location of the Java JDK.
D. Additional Graph Configuration Options
Installation and Configuration for Windows 187

Configurations for HOLD Graphics
188
AppendixE Additional WebFOCUS RepositoryTopics and Tasks
This appendix optionally applies to WebFOCUS Managed Reporting and ReportCasterusers. It contains:
Reference information about repositories (Repository JDBC Concepts on page 189and Repository Connection Information on page 192).
Sizing information for creating tablespaces (Sizing Guidelines on page 197).
Lesser used tasks and configuration information (Other WebFOCUS Repository Utilitiesand Tasks on page 199).
SQL Server configuration information for those less familiar with SQL Server (SQLServer Pre-Installation Steps on page 202).
MySQL database installation and configuration information (MySQL Repository Set Upon page 205).
In this appendix:
Repository JDBC Concepts
Repository Connection Information
Sizing Guidelines
Other WebFOCUS Repository Utilities and Tasks
SQL Server Pre-Installation Steps
MySQL Repository Set Up
Repository JDBC Concepts
This section provides a brief overview of repository concepts related to the WebFOCUS Clientand ReportCaster.
Repositories should be stored in a certified relational database management system (RDBMS),such as Derby, SQL Server, Oracle, MySQL, or Db2. WebFOCUS and ReportCastercommunicates with an RDBMS using Java Database Connectivity (JDBC).
Installation and Configuration for Windows 189
JDBC Overview
JDBC provides a way for Java programs to access databases and other data sources. UsingJDBC, WebFOCUS and ReportCaster connects to your repository. It then creates and executesSQL statements to access and write repository information. In theory, JDBC provides a level ofabstraction so that most SQL statements work on most databases. However, in practice,differences occur and you should ensure you choose a database and driver that are supportedby WebFOCUS.
In order for the WebFOCUS Client to connect to a repository using JDBC, the following arerequired:
User ID and Password
JDBC Driver
JDBC Path
User ID and Password
The credentials you provide to the database are critical, as they determine how you access therepository. Depending on the type of database, if you wish to maintain separate repositoriesfor separate instances of WebFOCUS Client, you may need separate user IDs.
During the WebFOCUS Client installation, the credentials are set in the WebFOCUSconfiguration file, install.cfg. If you need to change these values, you can edit this file. TheWebFOCUS Administration Console allows you to change the password.
JDBC Driver
The JDBC driver is a class name used to access the driver. This varies depending on thedriver.
During the Distribution Server installation, this is determined and set.
For Derby, Oracle, SQL Server, MySQL, and Db2, the installation automatically writes theJDBC driver class name for the standard driver.
For other databases and drivers, you are prompted to provide the JDBC driver class name.This value is stored in the WebFOCUS configuration file, install.cfg. If you need to changethis value, you can edit this file.
Repository JDBC Concepts
190
JDBC Path
A JDBC driver is usually packaged as one or more JAR or ZIP files. Each target data source hasits own JDBC driver, so you would use the Oracle JDBC driver to access Oracle and the SQLServer JDBC driver to access SQL Server. Some vendors may also require different drivers fordifferent database releases.
WebFOCUS uses a JDBC type 4 driver to connect to the database.
The JDBC driver must be installed on the machine or machines that run WebFOCUS Client andReportCaster Distribution Server.
The JDBC driver is used by both the Distribution Server and the application server. ForReportCaster to find the driver, the JDBC driver must be included in their CLASSPATHvariables.
For the Distribution Server, you provide the location of the driver during the DistributionServer installation. The installation uses this information to add the location of the driver tothe CLASSPATH variable used by ReportCaster scripts and utilities. This is set in thefollowing file:
drive:\ibi\WebFOCUS82\ReportCaster\bin\classpath.bat
and in the registry:
HKEY_LOCAL_MACHINE\SOFTWARE\WOW6432Node\Information Builders\ReportCaster\WF82\Parameters\Java\Classpath
For the application server, you set your application server CLASSPATH variable to includethe driver file or files.
For Apache Tomcat, this is set if you choose to configure Tomcat when you installWebFOCUS Client. To manually set it, use the Start menu to select Tomcat ConfigurationUtility, under the Information Builders app. Then, select the Java tab and add a semicolon(;) plus the full path of the file to the end of the Java Classpath field.
Note: You can also copy driver files into the WEB-INF/lib directory located inside thewebfocus.war file or WebFOCUS82 directory before you deploy the web application.
You must always specify the driver file or files, not just the directory containing the driver. Youenter the JDBC driver file name in the JDBC Path field.
During the WebFOCUS and Distribution Server installation, this is created and set.
Depending on the database selected, Oracle, SQL Server, and so on, you are prompted toprovide the full path to the JDBC driver.
E. Additional WebFOCUS Repository Topics and Tasks
Installation and Configuration for Windows 191
For the WebFOCUS installation, the value for the JDBC path is set in the ..\utilities\setenv\utiluservars.bat file and is used when running WebFOCUS utilities, such as createdatabase tables, update a database, and so on. If you need to change the value, you canedit this file.
JDBC Class
The JDBC class is a value used to access the JDBC driver. The JDBC class value variesdepending on the driver.
During the WebFOCUS Client installation, the JDBC class value is determined and set basedon the database selection.
For Oracle, SQL Server, MySQL, and Db2, the installation automatically writes the JDBCCLASS for the standard driver.
For other databases and drivers, you are prompted to provide the JDBC CLASS.
The JDBC class value is stored in the WebFOCUS configuration file, install.cfg. You can editthis file if you need to alter the JDBC driver information and provide a different JDBC classvalue.
JDBC URL
The JDBC URL is a value used to access the driver and repository. This varies depending onthe driver and other connection information.
During the WebFOCUS Client installation, the JDBC URL is set based on the selecteddatabase.
For Oracle, SQL Server, MySQL, and Db2, you are prompted for specific information neededto access your repository. This varies depending on the type of database and may includethe host name or port where your database resides. The installation uses this informationto create the JDBC URL.
For other databases and drivers, you must provide the JDBC URL.
The JDBC URL value is stored in the WebFOCUS configuration file, install.cfg. You can edit thisfile if you need to alter the JDBC driver information and provide a different JDBC URL value.
Repository Connection Information
The connection information varies depending on the type of driver and database.
For Db2, see Db2 Connection Information on page 193.
Repository Connection Information
192
For Derby, see Derby Connection Information on page 194.
For MySQL, see MySQL Connection Information on page 195.
For Oracle, see Oracle Connection Information on page 195.
For SQL Server, see SQL Server Connection Information on page 196.
For other repositories, refer to the documentation for your JDBC driver.
Db2 Connection Information
When using a Db2 repository, the connection information varies depending on the operatingsystems and the driver. The most common Db2 JDBC driver is the Db2 Universal JDBC driver.
During the WebFOCUS Client installation, you are prompted for:
Database Name.
Database Server Node (host name).
Location Name.
Port (50000 by default).
Credentials for the account that will own the repository.
JDBC Driver (com.ibm.db2.jcc.DB2Driver).
JDBC Path (db2jcc.jar and db2jcc_license_cisuz.jar).
Based on this information, the installation creates the connection information:
CLASS:
com.ibm.db2.jcc.DB2Driver
URL
For Universal Db2 JDBC (UDB) Type 4 Driver:
jdbc:db2://hostname:port/DBName
where:
DBName
Is the database name for the repository.
E. Additional WebFOCUS Repository Topics and Tasks
Installation and Configuration for Windows 193
LOCName
Is the Db2 location name.
hostname
Is the host name for the Db2 server.
port
Is the port for the Db2 server. The default is 324.
For Universal Db2 JDBC (UDB) Type 2 Driver:
jdbc:db2:DBName
Derby Connection Information
In Derby, you create a database and user ID within a Derby Database Server.
During the WebFOCUS Client installation, you are prompted for:
Database name for the repository (WebFOCUS82, by default).
Database Server Node (hostname, by default).
Port (1527, by default).
Account to access the repository (webfocus, by default).
Database password to access the repository (webfocus, by default).
JDBC Driver (org.apache.derby.jdbc.ClientDriver).
JDBC Path (derbyclient.jar).
ClassName: org.apache.derby.jdbc.ClientDriverConnection URL:
jdbc:derby://<host>:<port>/<database>
Based on this information, the installation creates the connection information:
CLASS:
org.apache.derby.jdbc.ClientDriver
URL:
jdbc:derby://<host>:<port>/<database>
Repository Connection Information
194
If you install multiple instances of the WebFOCUS Client, you need multiple repositories. Tomaintain multiple repositories in the same Derby Database Server, create a unique databasefor each instance.
MySQL Connection Information
In MySQL, you create a database and user ID within a MySQL Database Server. These stepsare described in MySQL Repository Set Up on page 205.
During the WebFOCUS Client installation, you are prompted for:
Database name for the repository.
Database Server Node (host name).
Port (3306, by default).
Account and password to access the repository.
JDBC Driver (com.mysql.jdbc.Driver).
JDBC Path (mysql-connector-java-nn-bin.jar where nn is the version number).
Based on this information, the installation creates the connection information:
CLASS:
com.mysql.jdbc.Driver
URL:
jdbc:mysql://<server>:<port3306>/<database>
If you install multiple instances of the WebFOCUS Client, you need multiple repositories. Tomaintain multiple repositories in the same MySQL Database Server, create a unique databasefor each instance.
Oracle Connection Information
In Oracle, the account determines which tables and tablespaces are accessible within anOracle Instance (ORASID). Your DBA should set up access to Oracle for you.
During the WebFOCUS Client installation, you are prompted for:
Database Server Node (host name).
Port (1521, by default).
Credentials for the account that will own the repository.
E. Additional WebFOCUS Repository Topics and Tasks
Installation and Configuration for Windows 195
Oracle Instance (ORASID) for the repository.
JDBC Driver (oracle.jdbc.OracleDriver).
JDBC Path (ojdbc8.jar).
Based on this information, the installation creates the connection information:
CLASS (Oracle 12c or higher):
oracle.jdbc.OracleDriver
URL:
jdbc:oracle:thin:@hostname:port:orasid
If you install multiple instances of the WebFOCUS Client, you need multiple repositories. Tomaintain multiple repositories in the same Oracle Instance (ORASID), each repository musthave a unique account (owner).
SQL Server Connection Information
In Microsoft SQL Server, you create a database and user ID within a SQL Server DatabaseServer. These steps are described in SQL Server Pre-Installation Steps on page 202.
During the WebFOCUS Client installation, you are prompted for:
Database name for the repository.
Database Server Node (host name).
Port (1433, by default).
Account and password to access the repository. At installation, upgrade, or configurationtime, the account used by the WebFOCUS installation process to connect to the repositorydatabase must be granted db_datawriter, db_datareader, and db_ddladmin roles on therepository database and schema. Alternatively, the object creation and initial data load maybe run as a separate utility by a DBA.
JDBC Driver (com.microsoft.sqlserver.jdbc.SQLServerDriver).
JDBC Path (type the full path to the JDBC driver. Supported versions of JDBC drivers areposted at
https://kb.informationbuilders.com/topic/supported-rdbms-and-drivers
Repository Connection Information
196
Based on this information, the installation creates the connection information:
CLASS:
com.microsoft.sqlserver.jdbc.SQLServerDriver
URL:
jdbc:sqlserver://hostname:port;databasename=database_name
If you install multiple instances of the WebFOCUS Client, you need multiple repositories. Tomaintain multiple repositories in the same SQL Server Database Server, create a uniquedatabase for each instance. You can use the same user ID for each instance or create a newuser ID for each instance.
Sizing Guidelines
You can optionally use the following information to set up your repository. The numbers belowassume a maximum of 10,000 schedules will be created at this site. In addition, review thelogic below to be sure it applies to your environment.
Reference: ReportCaster Guidelines for Sizing the Relational Tablespaces
Table Name Rows Max RowsWidth(bytes)
Notes
BOTACCES(Report Libraryonly)
2,000 292 One record per access list and 1:m withBOTLIST.
BOTADDR 2,000 101 One record per address list and 1:m withBOTDEST.
BOTCAT (ReportLibrary only)
20,000 751 One record for each schedule in the library. Ifthe schedule is burst, each burst report is arecord.
BOTCDATE 20,000 807 Could have multiple records per record in theBOTSCIT file (an average number might be 20).Added for the custom scheduling intervalfeature.
E. Additional WebFOCUS Repository Topics and Tasks
Installation and Configuration for Windows 197
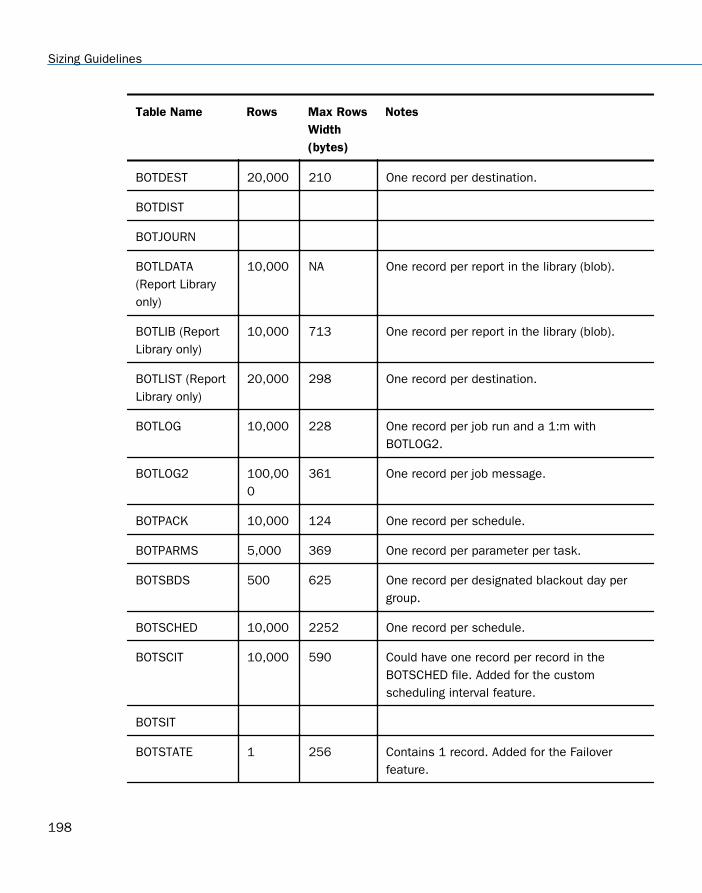
Table Name Rows Max RowsWidth(bytes)
Notes
BOTDEST 20,000 210 One record per destination.
BOTDIST
BOTJOURN
BOTLDATA(Report Libraryonly)
10,000 NA One record per report in the library (blob).
BOTLIB (ReportLibrary only)
10,000 713 One record per report in the library (blob).
BOTLIST (ReportLibrary only)
20,000 298 One record per destination.
BOTLOG 10,000 228 One record per job run and a 1:m withBOTLOG2.
BOTLOG2 100,000
361 One record per job message.
BOTPACK 10,000 124 One record per schedule.
BOTPARMS 5,000 369 One record per parameter per task.
BOTSBDS 500 625 One record per designated blackout day pergroup.
BOTSCHED 10,000 2252 One record per schedule.
BOTSCIT 10,000 590 Could have one record per record in theBOTSCHED file. Added for the customscheduling interval feature.
BOTSIT
BOTSTATE 1 256 Contains 1 record. Added for the Failoverfeature.
Sizing Guidelines
198
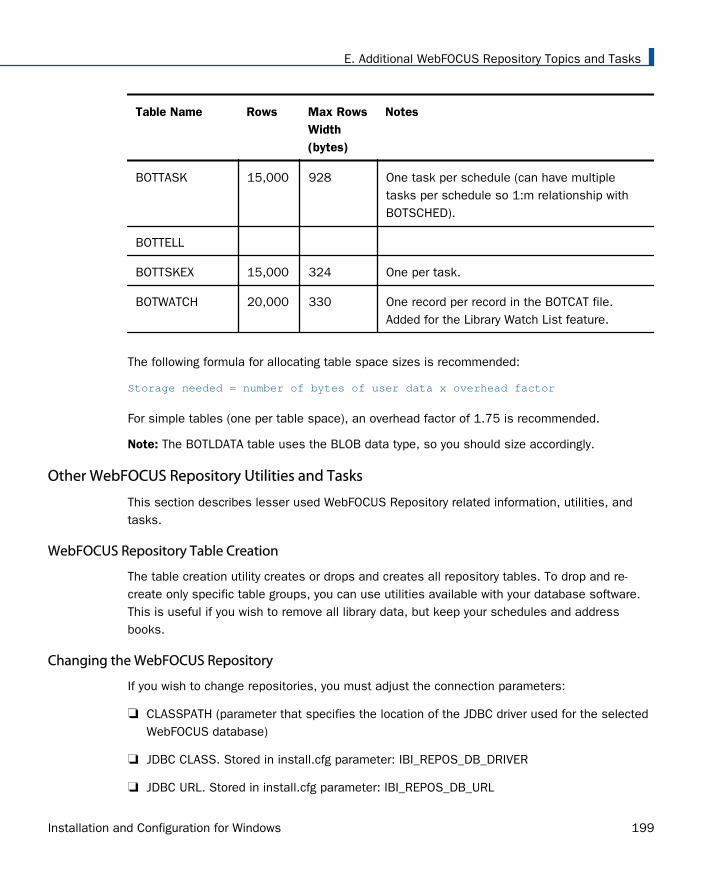
Table Name Rows Max RowsWidth(bytes)
Notes
BOTTASK 15,000 928 One task per schedule (can have multipletasks per schedule so 1:m relationship withBOTSCHED).
BOTTELL
BOTTSKEX 15,000 324 One per task.
BOTWATCH 20,000 330 One record per record in the BOTCAT file.Added for the Library Watch List feature.
The following formula for allocating table space sizes is recommended:
Storage needed = number of bytes of user data x overhead factor
For simple tables (one per table space), an overhead factor of 1.75 is recommended.
Note: The BOTLDATA table uses the BLOB data type, so you should size accordingly.
Other WebFOCUS Repository Utilities and Tasks
This section describes lesser used WebFOCUS Repository related information, utilities, andtasks.
WebFOCUS Repository Table Creation
The table creation utility creates or drops and creates all repository tables. To drop and re-create only specific table groups, you can use utilities available with your database software.This is useful if you wish to remove all library data, but keep your schedules and addressbooks.
Changing the WebFOCUS Repository
If you wish to change repositories, you must adjust the connection parameters:
CLASSPATH (parameter that specifies the location of the JDBC driver used for the selectedWebFOCUS database)
JDBC CLASS. Stored in install.cfg parameter: IBI_REPOS_DB_DRIVER
JDBC URL. Stored in install.cfg parameter: IBI_REPOS_DB_URL
E. Additional WebFOCUS Repository Topics and Tasks
Installation and Configuration for Windows 199
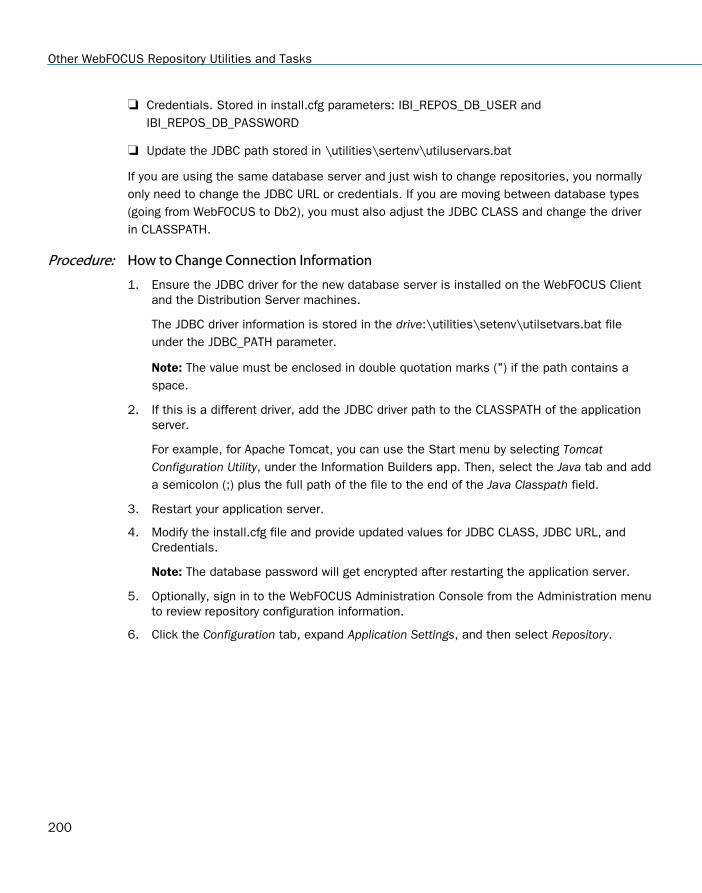
Credentials. Stored in install.cfg parameters: IBI_REPOS_DB_USER andIBI_REPOS_DB_PASSWORD
Update the JDBC path stored in \utilities\sertenv\utiluservars.bat
If you are using the same database server and just wish to change repositories, you normallyonly need to change the JDBC URL or credentials. If you are moving between database types(going from WebFOCUS to Db2), you must also adjust the JDBC CLASS and change the driverin CLASSPATH.
Procedure: How to Change Connection Information
1. Ensure the JDBC driver for the new database server is installed on the WebFOCUS Clientand the Distribution Server machines.
The JDBC driver information is stored in the drive:\utilities\setenv\utilsetvars.bat fileunder the JDBC_PATH parameter.
Note: The value must be enclosed in double quotation marks (") if the path contains aspace.
2. If this is a different driver, add the JDBC driver path to the CLASSPATH of the applicationserver.
For example, for Apache Tomcat, you can use the Start menu by selecting TomcatConfiguration Utility, under the Information Builders app. Then, select the Java tab and adda semicolon (;) plus the full path of the file to the end of the Java Classpath field.
3. Restart your application server.
4. Modify the install.cfg file and provide updated values for JDBC CLASS, JDBC URL, andCredentials.
Note: The database password will get encrypted after restarting the application server.
5. Optionally, sign in to the WebFOCUS Administration Console from the Administration menuto review repository configuration information.
6. Click the Configuration tab, expand Application Settings, and then select Repository.
Other WebFOCUS Repository Utilities and Tasks
200
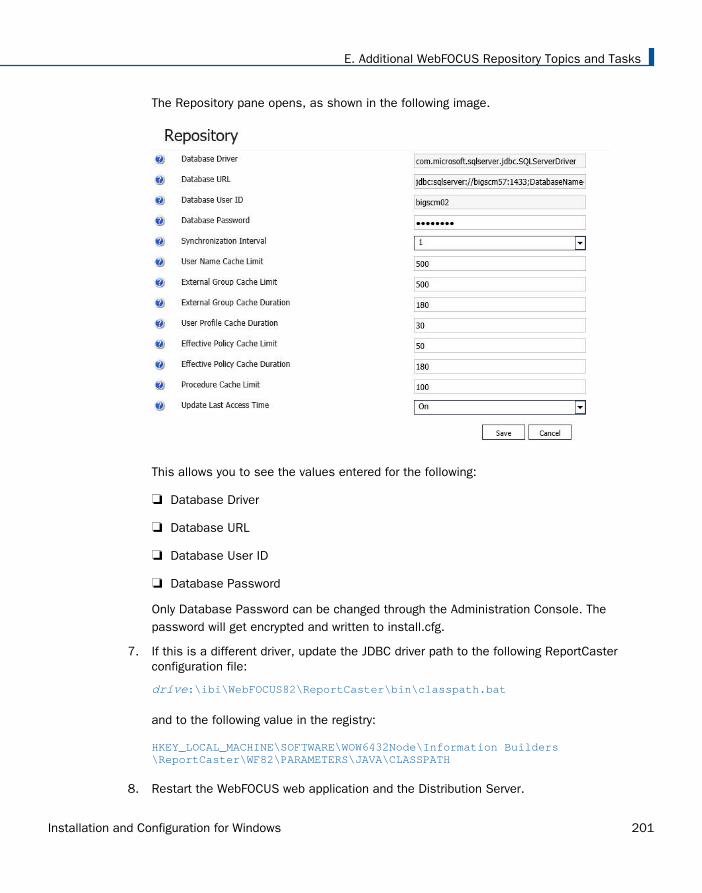
The Repository pane opens, as shown in the following image.
This allows you to see the values entered for the following:
Database Driver
Database URL
Database User ID
Database Password
Only Database Password can be changed through the Administration Console. Thepassword will get encrypted and written to install.cfg.
7. If this is a different driver, update the JDBC driver path to the following ReportCasterconfiguration file:
drive:\ibi\WebFOCUS82\ReportCaster\bin\classpath.bat
and to the following value in the registry:
HKEY_LOCAL_MACHINE\SOFTWARE\WOW6432Node\Information Builders\ReportCaster\WF82\PARAMETERS\JAVA\CLASSPATH
8. Restart the WebFOCUS web application and the Distribution Server.
E. Additional WebFOCUS Repository Topics and Tasks
Installation and Configuration for Windows 201
Note: You do not have to restart the entire application server which may have otherapplications deployed on it.
SQL Server Pre-Installation Steps
The following are general guidelines and information for creating an SQL Server database to beused as the WebFOCUS repository. These steps should be performed by a DBA to applyoptions and configuration settings that meets your organizations specifications.
Ensure that SQL Server Authentication is enabled. See How to Configure Security on page202.
Create a SQL Server account that you will use to own this database. See How to Create theLogin ID on page 203.
Create a SQL Server database for the repository. See How to Create the RepositoryDatabase on page 204.
Set up connectivity between the WebFOCUS Client and the SQL Server. See How to Installthe JDBC Driver for SQL Server on page 204.
If you are using SQL Server, you must enable TCP/IP since it is disabled by default. See How to Enable TCP/IP in SQL Server on page 205.
The WebFOCUS repository can reside on the same system as the WebFOCUS Client or on adifferent system, and can be stored in any JDBC-compliant database for which a driver exists.For more information, see WebFOCUS Client Post-Installation Tasks on page 123. When theDistribution Server is installed (as explained in Installing the WebFOCUS Client on page 41), youwill be required to provide a supported database, JDBC driver, and authentication information(user ID and password).
Procedure: How to Configure Security
SQL Server provides the following authentication modes:
Windows Authentication. Uses the same IDs as the Windows operating system.
SQL Server Authentication. Uses IDs defined within SQL Server.
The JDBC driver that is used by WebFOCUS to connect to the SQL Server database does notsupport Windows Authentication mode. Perform the following steps to ensure that SQL ServerAuthentication mode is set:
1. Open the SQL Server Management Studio.
2. Connect to your database server.
SQL Server Pre-Installation Steps
202
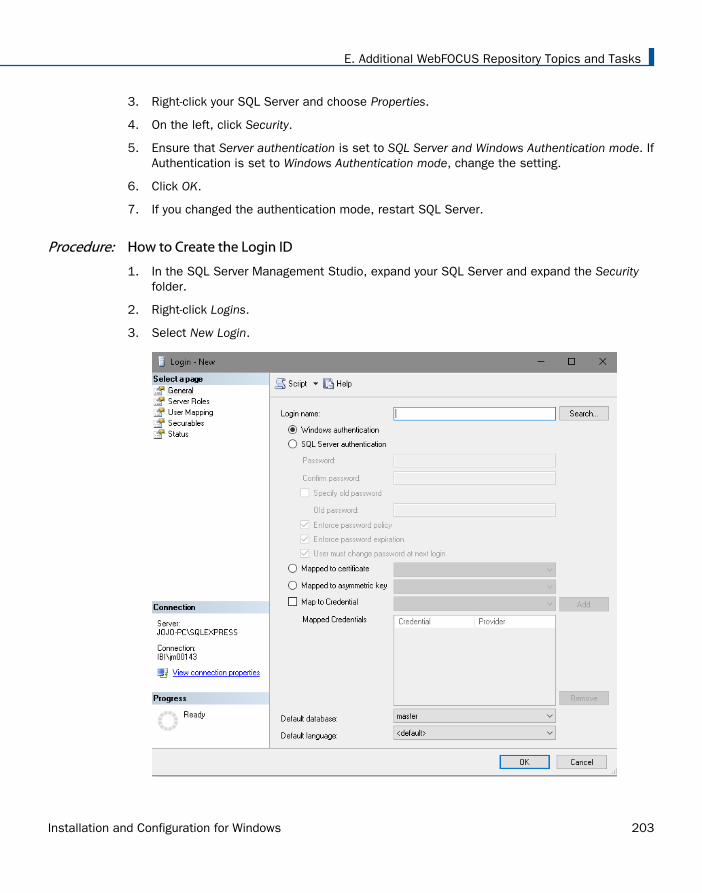
3. Right-click your SQL Server and choose Properties.
4. On the left, click Security.
5. Ensure that Server authentication is set to SQL Server and Windows Authentication mode. IfAuthentication is set to Windows Authentication mode, change the setting.
6. Click OK.
7. If you changed the authentication mode, restart SQL Server.
Procedure: How to Create the Login ID
1. In the SQL Server Management Studio, expand your SQL Server and expand the Securityfolder.
2. Right-click Logins.
3. Select New Login.
E. Additional WebFOCUS Repository Topics and Tasks
Installation and Configuration for Windows 203
4. Enter the user ID you wish to use in the Login name field.
5. Select SQL Server authentication.
6. Enter and confirm your password.
7. Uncheck the boxes for Enforce password policy, Enforce password expiration, and Usermust change password at next login.
8. Click OK.
Procedure: How to Create the Repository Database
1. In the SQL Server Management Studio, right-click the Databases folder.
2. Select New Database.
A form appears for adding a database.
3. Type a name for the repository database in the Database name field.
4. In the Owner field, enter the user ID you created in How to Create the Login ID on page203.
You can leave the remaining defaults. An initial size of 50MB for the database should beadequate for most departmental applications, but you may want to increase the initial sizeof the database if you anticipate a lot of use.
5. Under the Options panel, ensure you click Collation and select a Case-sensitive (CS)collation.
6. Click OK, and the database is created.
It is a good idea to set this database as the default for your user ID. To do this, underSecurity and Logins, right-click your user ID and choose Properties. Then set the Defaultdatabase and click OK.
Procedure: How to Install the JDBC Driver for SQL Server
The application server where the WebFOCUS Client and the ReportCaster Distribution Server isdeployed on use the SQL Server JDBC driver to access the WebFOCUS Repository. You shoulddownload the SQL Server JDBC driver for your SQL Server release.
Supported versions of JDBC drivers are posted on:
https://kb.informationbuilders.com/topic/supported-rdbms-and-drivers
If WebFOCUS Client and ReportCaster Distribution Server are on separate machines, the drivermust be on both machines. Running the driver installation program is not necessary, so youcan manually copy the driver files between different machines.
SQL Server Pre-Installation Steps
204
During the ReportCaster Distribution Server installation, you are prompted for the file or files,as explained in Installing the WebFOCUS Client on page 41. In addition, if you manuallyconfigure your application server, you must also provide the file or files, as explained in Configuring Web and Application Servers on page 85.
Procedure: How to Enable TCP/IP in SQL Server
SQL Server have TCP/IP disabled, by default. Since the WebFOCUS Client and ReportCasterrequire TCP/IP, you must perform the following steps to enable TCP/IP in SQL Server.
1. Open the SQL Server Configuration Manager.
2. Under the SQL Server Network Configuration select Protocols for MSSQLSERVER.
A list of valid network protocols for the SQL Server engine is displayed in the right pane.
3. Select TCP/IP from the list of available protocols.
4. Right-click TCP/IP and select Enable from the context menu.
A message is displayed, which indicates that the MSSQLSERVER service must berestarted before the change is applied.
5. Restart the MSSQLSERVER service.
MySQL Repository Set Up
MySQL is a free open source database server that you can use for the WebFOCUS Repository.Official information on MySQL is available at:
http://www.mysql.com/
This section is provided to help those less familiar with MySQL with the installation andconfiguration of MySQL for use with WebFOCUS.
E. Additional WebFOCUS Repository Topics and Tasks
Installation and Configuration for Windows 205
Installing MySQL
You can install MySQL as follows:
1. Download the MySQL installation program from:
http://www.mysql.com/
The following page contains links to download MySQL:
http://dev.mysql.com/downloads/mysql/5.0.html
You can download either the regular Windows install or the Windows essential install.
The following page includes documentation on installing, configuring, administering, andusing MySQL:
http://dev.mysql.com/doc/mysql/en/index.html
2. Execute the MySQL installation program.
A typical installation is sufficient for WebFOCUS. You can keep all default settings duringthe installation and configuration.
3. Be sure to provide a password for the root account when prompted.
Increasing the max_allowed_packet Parameter Value
When you configure or migrate a MySQL repository for WebFOCUS 8.2, you must increase thesize of the max_allowed_packet parameter. MySQL recommends that the value of themax_allowed_packet parameter for MySQL Client and MySQL Server should be increased forapplications that use of binary large objects (BLOBs) and character large objects (CLOBs), suchas WebFOCUS.
For more information on this topic and how to change the value of the max_allowed_packetparameter for MySQL Client and MySQL Server, see the following website:
http://dev.mysql.com/doc/refman/5.1/en/packet-too-large.html
Running MySQL
By default, you run MySQL as a Windows service. To start, stop, or restart MySQL:
1. Open the Services Window by selecting Control Panel, Administrative Tools, and thenServices.
2. Right-click MySQL and choose Start, Stop, or Restart.
After you install MySQL, it may be running by default and may start automatically withWindows.
MySQL Repository Set Up
206
Administering MySQL
You administer MySQL using a command line tool. You can launch this from the Start menu byselecting Programs, MySQL, MySQL Server 5.0, and then MySQL Command Line Client.
Sign in to the command line tool using the password you specified during the MySQLinstallation.
The following prompt should appear:
mysql>
From this prompt, you can execute SQL commands and administer the database server.
MySQL documentation is available online at the following website:
http://dev.mysql.com/doc/mysql/en/index.html
Creating the WebFOCUS Reporting Database and User
You can use the MySQL command line tool to create a database and user for ReportCaster.
Procedure: How to Create a MySQL Database and User
1. Open and sign in to the MySQL Command Line Tool.
You can do this by selecting Start, Programs, MySQL, MySQL Server 5.0, and then MySQLCommand Line Client.
2. At the mysql> prompt, type the following to create a new empty database for WebFOCUS:
CREATE DATABASE webfocus8;
where:
webfocus8
Is the name of the database you will use for WebFOCUS repository. This is case-sensitive.
You should receive a response like the following:
Query OK, 1 row affected (0.03 sec)
3. Optionally, confirm that the database was created by typing the following command at themysql> prompt:
show databases;
E. Additional WebFOCUS Repository Topics and Tasks
Installation and Configuration for Windows 207
You should receive a response that includes your new database. For example:
+----------+| Database |+----------+| mysql || webfocus8|| test |+----------+3 rows in set (0.00 sec)
4. At the mysql> prompt, type the following to create a new MySQL user ID and grant itaccess to the WebFOCUS database:
GRANT ALL PRIVILEGES ON wf.* TO 'wfuser'@'%' IDENTIFIED BY 'wfpass';
where:
webfocus8
Is the name of the database you will use for WebFOCUS. This is case-sensitive insome environments.
%
Indicates that the database is accessible from any host. To limit which hosts canaccess the database, provide the host name or IP address of the machine running theWebFOCUS Client and the ReportCaster Distribution Server in place of %. If theapplication server is on a different machine, you will need to type the command twiceto grant access from both hosts.
webfocus8
Is the user ID you are creating. This is case-sensitive in some environments. The userID and password are part of MySQL and not the operating system.
rcpass
Is the password for the user ID. This is case-sensitive.
If you need to change your password, you can retype the GRANT command to provide thenew password. The new values will overwrite any existing password.
5. Optionally, confirm that the user ID was added to the MySQL user table by typing thefollowing command at the mysql> prompt:
use mysql
This selects the default mysql database within the MySQL Database Server.
MySQL Repository Set Up
208
Ensure that the user ID you created exists and is associated with your database by typingthe following command at the mysql> prompt:
select user,host,db from db;
This query returns all user IDs and associated host names with the databases they canaccess.
For example:
+--------+------+---------+| user | host | db |+--------+------+---------+| wfuser |% | wf+--------+------+---------+
After making user ID changes, you can ensure they are refreshed by typing the followingcommand at the mysql> prompt:
FLUSH PRIVILEGES;
6. Optionally, specify the database you created for the repository by typing the followingcommand at the mysql> prompt:
use wf
where:
wf
Is the name of the database you will use for WebFOCUS. This is case-sensitive insome environments.
7. Optionally, confirm there are no tables in the database by typing the following command atthe mysql> prompt:
show tables;
If you have not yet created tables, you should receive the following:
Empty set (0.00 sec)
After creating the repository tables, you can use this to confirm that the tables exist.
E. Additional WebFOCUS Repository Topics and Tasks
Installation and Configuration for Windows 209
Installing the MySQL JDBC Driver
The MySQL JDBC driver is known as MySQL Connector/J 3.1.
1. Download the latest MySQL Connector/J 3.1 from:
http://www.mysql.com/
The following page contains links to download MySQL Connector/J 3.1:
http://dev.mysql.com/downloads/connector/j/3.1.html
Download the latest ZIP file containing the source code and Java binary. For example:
mysql-connector-java-3.1.14.zip
MySQL has an aggressive release cycle, so the number in this file name may vary.
2. Use Winzip to extract the MySQL JDBC driver JAR file. For example:
mysql-connector-java-3.1.14-bin.jar
3. Specify the path to and including this JAR file when prompted during the WebFOCUS Clientand ReportCaster Distribution Server installation. The path to and including this JAR filemust be in the CLASSPATH variable used by the WebFOCUS Client application server andby the ReportCaster Distribution Server. Specifying the directory containing the JAR file isnot sufficient.
MySQL Repository Set Up
210

AppendixFAdditional WebFOCUS ConfigurationOptions
This appendix includes uncommon configurations. Most users do not need theconfigurations discussed in this appendix. The following configuration options arediscussed:
Installing multiple instances of WebFOCUS on a single machine (Installing MultipleWebFOCUS Instances on the Same Machine on page 211).
Setting optional Tomcat security options (Tomcat Security Tips on page 214).
In this appendix:
Installing Multiple WebFOCUS Instances on the Same Machine
Tomcat Security Tips
Installing Multiple WebFOCUS Instances on the Same Machine
You can run multiple copies (instances) of WebFOCUS on the same machine, if necessary. Todo this, install WebFOCUS multiple times, making sure to change default locations, programfolders, and ports.
This section provides an overview. Detailed information varies depending on your web serverand application server.
Installing Additional WebFOCUS Instances
No special steps are required to install and configure the first instance of WebFOCUS. IfWebFOCUS is already installed and you just wish to add a second instance, you can keep theexisting instance as is. However, if no WebFOCUS instances have been installed yet, you maywish to use non-default locations and names for all instances.
When installing a second WebFOCUS instance, keep the following in mind:
When installing the second WebFOCUS Reporting Server, do not choose to update anexisting installation or create a new configuration. Instead, run a completely newinstallation.
Installation and Configuration for Windows 211
If a WebFOCUS Reporting Server is already installed, select No if prompted to replace theexisting installation. If multiple WebFOCUS Reporting Servers are installed, select the NewInstallation/Configuration option to not upgrade any of them.
Note: It is possible to use the same WebFOCUS Reporting Server with two instances ofWebFOCUS Client.
Place the components for each instance in a different directory. Some WebFOCUScomponents must be installed in an \ibi\ directory, so use root directories such as:
C:\wfTest\ibi
C:\wfDev\ibi
Change the default program folders when installing additional instances. For example, addsome text to the end of the default names.
WebFOCUS 82 Server - Test
WebFOCUS 82 Server - Dev
WebFOCUS 82 - Test
WebFOCUS 82 - Dev
ReportCaster 82 - Test
ReportCaster 82 - Dev
Change the default ports for the WebFOCUS Reporting Server and ReportCaster DistributionServer, so that each instance uses a different set of ports.
When specifying the web server host name, be sure to use the correct port and the exacthost name you will use for the website. If this is a separate port, provide the correct port. Ifthis is a virtual host name, be sure to use the name you will set up in the DNS, includingthe domain.
For the WebFOCUS repository, create a separate instance.
If you are using IIS, ensure you are using a server operating system.
Do not choose any of the automatic web server or application server configuration optionsfor additional WebFOCUS instances. You must manually configure all but the firstWebFOCUS instance you install.
Installing Multiple WebFOCUS Instances on the Same Machine
212
Install WebFOCUS components, keeping these points in mind. For details, see Installing theWebFOCUS Client on page 41.
Configuring Multiple Web and Application Servers
Each instance of WebFOCUS requires a separate web server, website, or application serverinstance. You can set up each web server or application server instance to either listen on aseparate port or use a virtual host name. Your options depend on whether you use ApacheTomcat with or without Microsoft IIS.
Apache Tomcat Stand-alone
When using Tomcat as both the web server and application server, you run two separateinstances of Tomcat and set them up to listen on different ports. For example, you couldaccess one WebFOCUS instance at:
http://hostname:8080/ibi_apps/WFServlet
and the other WebFOCUS instance at:
http://hostname:9080/ibi_apps/WFServlet
To create a second Tomcat 8 or Tomcat 9 instance, you can copy the Tomcat directorystructure, set unique ports, and create a new service using the tomcat8.exe //IS//Tomcat8Test or tomcat9.exe //IS//Tomcat9Test option. You must then edit the registryvalues for the new service so they are similar to those for the default service, but specifythe new instance paths.
Microsoft IIS with Apache Tomcat
Microsoft IIS can be used as the web server, while Tomcat can be used as the applicationserver. This can involve IIS listening on separate ports or using the HTTP host header(virtual host name) feature.
When using virtual host names, you configure the DNS server so that multiple host namesresolve to the same machine. When IIS receives a request for a webpage or other resource,IIS can determine which host name was used when the request was made by looking at theHTTP host header. IIS then uses the host name to determine which website was requested.
For example, if you are using virtual host names, you could access one instance ofWebFOCUS at:
http://www.wfDevhost.com/ibi_apps/WFServlet
and the other WebFOCUS instance at:
http://www.wfTesthost.com/ibi_apps/WFServlet
F. Additional WebFOCUS Configuration Options
Installation and Configuration for Windows 213
Although different host names are used, they both resolve to the same machine and arereceived by the same IIS web server.
For Tomcat with IIS, you run two separate instances of Tomcat and set them up to listen ondifferent ports. You then create two IIS websites and ensure that each IIS website sendsservlet requests to a different Tomcat instance. You can configure the two IIS websites toeither use different ports or virtual host names.
To create a second Tomcat 8 or Tomcat 9 instance, copy the Tomcat directory structure,set unique ports, and create a new service using the tomcat8.exe //IS//Tomcat8Test ortomcat9.exe //IS//Tomcat9Test option. You must then edit the registry values for the newservice so they are similar to those for the default service, but specify the new instancepaths.
Tomcat Security Tips
This section provides some basic tips on security concerns when running Tomcat in aproduction WebFOCUS environment. For development environments that are safely behind afirewall, this section is normally optional. You must be an administrator to the Windowsmachine to perform tasks in this section.
Tomcat User ID and NTFS Permissions
By default, when Tomcat runs as a Windows service, it runs as the Local System account thatwas created with Windows. The Local System account has full access to your Windows system.In a production environment, it is a good idea to run Tomcat as a user who has more restrictedaccess. To do this, create a user ID for Tomcat, configure Tomcat to use that ID, and set NTFSpermissions to grant that ID full access to Tomcat, WebFOCUS, and other directories it needs.
Procedure: How to Create a Tomcat User ID
1. Open the Windows Control Panel, Administrative Tools, and Computer Management.
2. Under System Tools, expand Local Users and Groups.
3. Right-click Users and select New User.
4. Name the new user and provide a password.
5. Deselect User must change password at next logon, and select Password never expires.
6. Click Create.
The Tomcat user is created and added to the users group. An administrator may wish tomove Tomcat into a special group with even less access to the system. However, if you dothis, you must ensure Tomcat can read and execute from all the Java directories and anyrequired JDBC drivers.
Tomcat Security Tips
214
7. Click Close to close the New User window.
Procedure: How to Configure Tomcat to Use the Tomcat User ID
1. Open the Windows Services window.
2. If Tomcat is started, right-click Apache Tomcat and select Stop.
3. Right-click Apache Tomcat and select Properties.
The Apache Tomcat Properties window appears.
4. Select the Log On tab.
By default, this is set to the Local System account.
5. Click This account.
6. Specify the Tomcat user ID in the This account field.
7. Type and confirm the password you defined for the Tomcat user ID. If you ever change thispassword, you must change it here as well.
8. Click OK.
A message similar to the following should display:
This account .\Tomcat has been granted Log On As a Service right.
Reference: Permissions Concerns
Required NTFS permissions and user IDs vary depending on your system, environment,security needs, and administrator preferences. Tomcat, IIS, and the WebFOCUS ReportingServer normally run as separate accounts and there are cases where they all read or write tothe same directory or file. It is a good idea to create a group containing all the required userIDs.
The Security and Administration manual contains additional information on permissions.
If the Tomcat user is not in the default Users group and/or you have restricted permissionsthroughout your system, ensure the Tomcat user ID can read from the directories containingany JDBC drivers. In addition, ensure Tomcat can read and execute the directories containingthe Java JDK.
F. Additional WebFOCUS Configuration Options
Installation and Configuration for Windows 215
Tomcat Security Tips
216
Legal and Third-Party Notices
SOME TIBCO SOFTWARE EMBEDS OR BUNDLES OTHER TIBCO SOFTWARE. USE OF SUCHEMBEDDED OR BUNDLED TIBCO SOFTWARE IS SOLELY TO ENABLE THE FUNCTIONALITY (ORPROVIDE LIMITED ADD-ON FUNCTIONALITY) OF THE LICENSED TIBCO SOFTWARE. THEEMBEDDED OR BUNDLED SOFTWARE IS NOT LICENSED TO BE USED OR ACCESSED BY ANYOTHER TIBCO SOFTWARE OR FOR ANY OTHER PURPOSE.
USE OF TIBCO SOFTWARE AND THIS DOCUMENT IS SUBJECT TO THE TERMS AND CONDITIONSOF A LICENSE AGREEMENT FOUND IN EITHER A SEPARATELY EXECUTED SOFTWARE LICENSEAGREEMENT, OR, IF THERE IS NO SUCH SEPARATE AGREEMENT, THE CLICKWRAP END USERLICENSE AGREEMENT WHICH IS DISPLAYED DURING DOWNLOAD OR INSTALLATION OF THESOFTWARE (AND WHICH IS DUPLICATED IN THE LICENSE FILE) OR IF THERE IS NO SUCHSOFTWARE LICENSE AGREEMENT OR CLICKWRAP END USER LICENSE AGREEMENT, THELICENSE(S) LOCATED IN THE "LICENSE" FILE(S) OF THE SOFTWARE. USE OF THIS DOCUMENTIS SUBJECT TO THOSE TERMS AND CONDITIONS, AND YOUR USE HEREOF SHALL CONSTITUTEACCEPTANCE OF AND AN AGREEMENT TO BE BOUND BY THE SAME.
This document is subject to U.S. and international copyright laws and treaties. No part of thisdocument may be reproduced in any form without the written authorization of TIBCO SoftwareInc.
TIBCO, the TIBCO logo, the TIBCO O logo, FOCUS, iWay, Omni-Gen, Omni-HealthData, andWebFOCUS are either registered trademarks or trademarks of TIBCO Software Inc. in theUnited States and/or other countries.
Java and all Java based trademarks and logos are trademarks or registered trademarks ofOracle Corporation and/or its affiliates.
All other product and company names and marks mentioned in this document are the propertyof their respective owners and are mentioned for identification purposes only.
This software may be available on multiple operating systems. However, not all operatingsystem platforms for a specific software version are released at the same time. See thereadme file for the availability of this software version on a specific operating system platform.
THIS DOCUMENT IS PROVIDED "AS IS" WITHOUT WARRANTY OF ANY KIND, EITHER EXPRESSOR IMPLIED, INCLUDING, BUT NOT LIMITED TO, THE IMPLIED WARRANTIES OFMERCHANTABILITY, FITNESS FOR A PARTICULAR PURPOSE, OR NON-INFRINGEMENT.
THIS DOCUMENT COULD INCLUDE TECHNICAL INACCURACIES OR TYPOGRAPHICAL ERRORS.CHANGES ARE PERIODICALLY ADDED TO THE INFORMATION HEREIN; THESE CHANGES WILLBE INCORPORATED IN NEW EDITIONS OF THIS DOCUMENT. TIBCO SOFTWARE INC. MAY MAKEIMPROVEMENTS AND/OR CHANGES IN THE PRODUCT(S) AND/OR THE PROGRAM(S)DESCRIBED IN THIS DOCUMENT AT ANY TIME.
217
THE CONTENTS OF THIS DOCUMENT MAY BE MODIFIED AND/OR QUALIFIED, DIRECTLY ORINDIRECTLY, BY OTHER DOCUMENTATION WHICH ACCOMPANIES THIS SOFTWARE, INCLUDINGBUT NOT LIMITED TO ANY RELEASE NOTES AND "READ ME" FILES.
This and other products of TIBCO Software Inc. may be covered by registered patents. Pleaserefer to TIBCO's Virtual Patent Marking document (https://www.tibco.com/patents) for details.
Copyright © 2021. TIBCO Software Inc. All Rights Reserved.
218
Index
A
Access Files 17
AGENT_NODE parameter 160
AGENT_PORT parameter 160
aliases 86
configuring for Apache Tomcat 93
Apache Tomcat 89
CLASSPATH 91
configuration options 86
configuring manually 89
ports 92
security 214
configuration options 29
APP PATH settings 150
applet issues 150
application servers 10, 17, 85
configuring Apache Tomcat 89
configuring for WebFOCUS 85
installation with WebFOCUS components 123
overview 10
requirements 24, 25, 29
approot alias 88
APPROOT directory 79, 88
authentication for ReportCaster Repositories 34,
189
Automated Insights 167
C
CLASSPATH 191
for Apache Tomcat 91
for ReportCaster Distribution Server 191
Client for WebFOCUS 10
verifying 97, 130
communication requirements 28
communication settings for WebFOCUS Client 131
configuration files for WebFOCUS Client 125
configuration verification program 125
configuring aliases 85
configuring Apache Tomcat 89
configuring application servers
Apache Tomcat 89
configuring ReportCaster Distribution Server 154
configuring ReportCaster Failover 141
configuring ReportCaster Workload Distribution
141
configuring servlets 85
configuring WebFOCUS in a split web-tier
environment 123
context paths 18, 88
context roots 18, 88
D
Db2 repositories
configuring with ReportCaster 30
JDBC connection parameters 193
Installation and Configuration for Windows 219
Db2 repositories
JDBC driver types 193
JDBC software configuration 30
requirements 30
requirements for ReportCaster 31
deploying web applications 85, 88
on Apache Tomcat 93
deployment descriptor 18
Derby repositories
JDBC connection parameters 194
describeRepository 165
diagnostic tools 130, 150
directory structure 79
for ReportCaster Distribution Servers 81
for WebFOCUS Clients 79
distributed WebFOCUS configurations 13
distributing reports 15
Distribution Server 15
requirements 23
default port 28
directory structure 81
disk space requirements 24
Failover 141
logs 140, 162
processing 15
requirements 23, 30
starting 135
stopping 135
testing 135, 137
traces 162
Distribution Server 15
troubleshooting 149
user IDs 19
verifying 135, 137
Workload 141
E
distribution 30
servers 30
F
file extensions 156
file permissions
for Apache Tomcat 214
for WebFOCUS Client 82
Firefox requirements 28
FTP distribution 30
G
GRAPHENGINE setting 183
graphics
errors 153
options 183
GRAPHSERVURL 184, 186
H
HOLD graphics 184, 185
HTTP host header 211
Index
220
I
ibi_apps context root 88
ibi_html alias 88
indexRepository 164
installation
verification tool 130
installing all WebFOCUS components on the
application server 123
installing multiple WebFOCUS instances 211
iWay software
J
jar command 154
Java JDK vs. SDK 30
Java requirements 30
JDBC (Java Database Connectivity) 30
class 192
class for Db2 193
class for MySQL 195
class for Oracle 195
class for SQL Server 196
driver 190
driver requirements 31, 191
overview 189
path 191
path for Derby 194
requirements 31, 189
URL 192
URL for Db2 193
URL for MySQL 195
JDBC (Java Database Connectivity) 30
URL for Oracle 195
URL for SQL Server 196
JSCOM3 185, 186
L
load balancing 14
M
Managed Reporting
user IDs 19
Master Files 17
Metadata Classification 171
running 172
Microsoft IIS (Internet Information Server)
creating a website 211
ISAPI filter 102
configuration options 29
Microsoft SQL Server requirements for
ReportCaster 202
Mozilla Firefox requirements 28
MySQL repositories 205
configuration 205
installation 205
JDBC connection parameters 195
JDBC driver installation 210
requirements for ReportCaster 32
N
node blocks 131
Index
Installation and Configuration for Windows 221
NTFS permissions
for Apache Tomcat 214
for WebFOCUS Client 82
O
odin.cfg file for WebFOCUS Client 131
Oracle
JDBC connection parameters 195
Server requirements for ReportCaster 33
P
PCHOLD 184
Performance Management Framework (PMF)
PTH 20
R
remote servers 131
report distribution 15
report processing 11
report scheduling 15
ReportCaster
processing 15
requirements 23
servlets 15
tables 15
traces 162
APIs 15
authentication for repositories 34, 189
Client Servlets 15
communication requirements 28
ReportCaster
components 15
default port 28
Development and Administration interface
137
directory structure 81
disk space requirements 24
Distribution Server 15
Failover 141
graphics configuration 183
logs 140, 162
mail server requirements 30
ports 28
requirements 23
security 19
starting 135
stopping 135
testing 135, 137
troubleshooting 149
user IDs 19
verifying 137
Workload 141
Reporting Server for WebFOCUS 10
reports
scheduling 15
repository tables for ReportCaster 189
S
security 19
PTH 20
Index
222
security 19
for ReportCaster 19
for WebFOCUS 19
options 19
server JSCOM3 185, 186
Server Side Graphics 184
servlet containers 10, 17
configuring 85
requirements 25, 29
servlets 10
ReportCaster 15, 85
WebFOCUS 97
ReportCaster 88
ReportCaster troubleshooting 159
WebFOCUS 88
SMTP (Simple Mail Transfer Protocol)
requirements 30
Solr 27, 163
indexing existing content 163
split web-tier configuration 123
SQL Server repositories 32, 202
database creation 202
JDBC connection parameters 196
logon ID creation 203
ReportCaster pre-installation tasks 202
requirements 202
supported JVMs for applets 150
T
time zones 30
Tomcat 89
CLASSPATH setting 91
configuration options 86
configuring manually 89
effective user ID 214
ports 92
security 214
stand-alone configuration 86, 89
configuration options 29
troubleshooting 149
graphics 153
ReportCaster 149
WebFOCUS 149
U
Universal Object Access Repository
changing 199
URL servlet calls 100
V
verification tool 130
virtual hosts 211
virtual servers with IIS 211
W
web applications 17
deploying 85
deploying on Apache Tomcat 89
deploying 18, 88
editing 154
Index
Installation and Configuration for Windows 223
web browsers 10
Web Console 125
web servers 10
configuring for WebFOCUS 85
requirements 23
WebFOCUS installation requirements 23
WEB-INF directory 18
web.xml file 18
WebFOCUS 9
application server configurations 85
installation 9
requirements 23
web server configurations 85
authentication options 19
communication requirements 28
components 10, 11
configurations 12
WebFOCUS 9
disk space requirements 24
distributed configurations 13
operating system requirements 24
overview 9
processing 11
security 19
stand-alone configurations 13
TCP/IP ports 28
troubleshooting 149
user ID requirements 24
user interfaces 125, 145
welcome page 126
Windows
operating system requirements 24
Workload Distribution 141
Index
224