Embed Size (px)
Citation preview
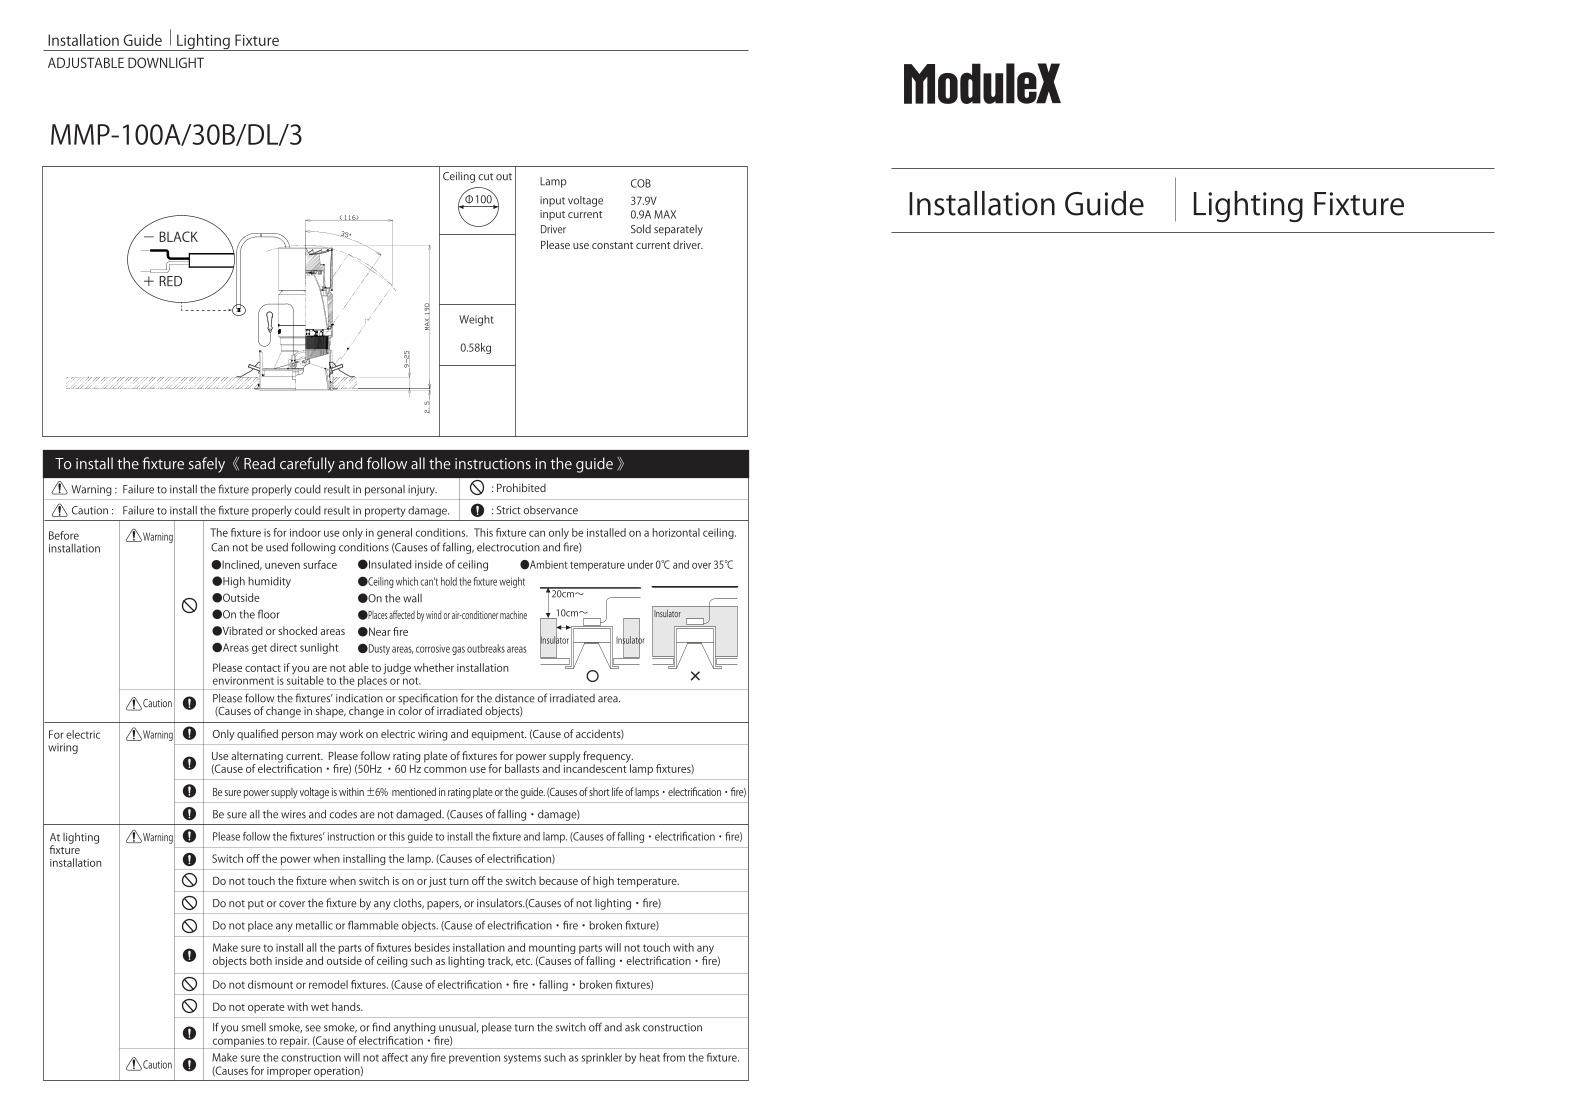
MMP-100A/30B/DL/3
The fixture is for indoor use only in general conditions.Can not be used following conditions (Causes of falling, electrocution and fire)
●Ambient temperature under 0℃ and over 35℃●High humidity●Outside●On the floor
●Insulated inside of ceiling
20cm~
10cm~
●Vibrated or shocked areas●Areas get direct sunlight
●Inclined, uneven surface●Ceiling which can’t hold the fixture weight●On the wall●Places affected by wind or air-conditioner machine●Near fire●Dusty areas, corrosive gas outbreaks areas
Beforeinstallation
For electricwiring
At lightingfixture installation
Warning
Warning
Warning
Warning : Failure to install the fixture properly could result in personal injury.
Failure to install the fixture properly could result in property damage.
: Prohibited
: Strict observanceCaution :
Caution
Caution
To install the fixture safely《 Read carefully and follow all the instructions in the guide 》
Please follow the fixtures’ indication or specification for the distance of irradiated area. (Causes of change in shape, change in color of irradiated objects)
Please contact if you are not able to judge whether installation environment is suitable to the places or not.
Only qualified person may work on electric wiring and equipment. (Cause of accidents)
Be sure power supply voltage is within ±6% mentioned in rating plate or the guide. (Causes of short life of lamps・electrification・fire)
Be sure all the wires and codes are not damaged. (Causes of falling・damage)
Please follow the fixtures’ instruction or this guide to install the fixture and lamp. (Causes of falling・electrification・fire)
Switch off the power when installing the lamp. (Causes of electrification)
Do not touch the fixture when switch is on or just turn off the switch because of high temperature.
Do not put or cover the fixture by any cloths, papers, or insulators.(Causes of not lighting・fire)
Do not place any metallic or flammable objects. (Cause of electrification・fire・broken fixture)
Make sure to install all the parts of fixtures besides installation and mounting parts will not touch with anyobjects both inside and outside of ceiling such as lighting track, etc. (Causes of falling・electrification・fire)
Do not dismount or remodel fixtures. (Cause of electrification・fire・falling・broken fixtures)
Do not operate with wet hands.
If you smell smoke, see smoke, or find anything unusual, please turn the switch off and ask constructioncompanies to repair. (Cause of electrification・fire)Make sure the construction will not affect any fire prevention systems such as sprinkler by heat from the fixture. (Causes for improper operation)
Use alternating current. Please follow rating plate of fixtures for power supply frequency. (Cause of electrification・fire) (50Hz ・60 Hz common use for ballasts and incandescent lamp fixtures)
Installation Guide Lighting Fixture
Installation Guide Lighting FixtureLamp COBinput voltageinput current
37.9V0.9A MAX
Driver Sold separately
Φ100
Ceiling cut out
Weight
0.58kg
ADJUSTABLE DOWNLIGHT
Insulator Insulator
Insulator
- BLACK
+ RED
Please use constant current driver.
This fixture can only be installed on a horizontal ceiling.
Wiring connectionPlease connect according to the description of a power supply.
Wiring diagramPE
PE
L
L +
+RED
-BLACK
-
N
N
DC900mA MAX
LED
Driver
37.9V
h
h
1
12
2
not touched by hand .※An inside glass filter is
Body
Safety wire
Mounting frameCeiling
Installation to ceiling
Install the safety wire to the mounting frame.Install the fixture to the mounting frame.
Make sure to install the safety wire to the mounting frame securely.
Make sure the fixture will not touchany objects in ceiling.
Do not touch inner side of the bodywith bare hands. Use clean soft cloth to clean up and maintain inner side of the body.
As you support edge of a main part, please push it.
Safety wire
MMP-100A/30B/DL/3
Installation Guide Lighting FixtureMUSEUM platform / adjustable down light
1
2
4
Tilting angle setting
Please loose a screw by the hexagonal wrench,and unrock.
Please regulate a point of viewto a scale.
Please use an attached hexagonwrench by all means.
1
1
1
2
2
2
3
3 5
45
Pull out the body from the hood.
Put a filter in hood.Turn around the option holder,and put in.
Please attention that
Don’t put in the filters than the rule number of pieces.Causes of falling and damage.
the sharpener lens is countedtwo pieces of filter lenses.
Turn around the body.
Turn around the option holder,and put out .
Inner HOOD
hexagonal wrench
OPTIONHOLDER
OPTIONHOLDER
UP to 3FILTERS
UP to 3FILTERS
FILTER Sharpnerlends
Sharpnerlends
f
f
To install ModuleX safety
Installation Details Installation Diagram CautionInstallation Details Installation Diagram Caution
Optional parts installationBody
Hood
CAUTION!Do not reverse polarity!
- BLACK
+ RED
When connecting the driver, careful attention should be paid to connecting + and -.
Metal part in a cable point, please don't touch with bare hand directly.
5/F, Longbow House,14-20 Chiswell Street, London, EC1Y 4TW, UKTel : +44-01273-616649
Concord Lighting(Contact) (Manufacturer)
ModuleX Inc.#21 AraiBldg, 1-20-6 Ebisu-Minami Shibuya-ku, TokyoTel : +81-3-5768-3131
The luminaire should be positioned so that prolonged staring into the luminaire at a distance closed than6.5m is not expected.