Embed Size (px)
Citation preview
Autodesk® Moldflow® Insight 2012
Installation Guide

Revision 15, 09 March 2011.
Autodesk® Moldflow® Insight
© 2011 Autodesk, Inc. All rights reserved. Except as otherwise permitted by Autodesk, Inc., this publication, or parts thereof, may not bereproduced in any form, by any method, for any purpose.
Certain materials included in this publication are reprinted with the permission of the copyright holder.
Trademarks
The following are registered trademarks or trademarks of Autodesk, Inc., and/or its subsidiaries and/or affiliates in the USA and other countries:3DEC (design/logo), 3December, 3December.com, 3ds Max, Algor, Alias, Alias (swirl design/logo), AliasStudio, Alias|Wavefront (design/logo),ATC, AUGI, AutoCAD, AutoCAD Learning Assistance, AutoCAD LT, AutoCAD Simulator, AutoCAD SQL Extension, AutoCAD SQL Interface,Autodesk, Autodesk Intent, Autodesk Inventor, Autodesk MapGuide, Autodesk Streamline, AutoLISP, AutoSnap, AutoSketch, AutoTrack,Backburner, Backdraft, Beast, Built with ObjectARX (logo), Burn, Buzzsaw, CAiCE, Civil 3D, Cleaner, Cleaner Central, ClearScale, ColourWarper, Combustion, Communication Specification, Constructware, Content Explorer, Dancing Baby (image), DesignCenter, Design Doctor,Designer's Toolkit, DesignKids, DesignProf, DesignServer, DesignStudio, Design Web Format, Discreet, DWF, DWG, DWG (logo), DWGExtreme, DWG TrueConvert, DWG TrueView, DXF, Ecotect, Exposure, Extending the Design Team, Face Robot, FBX, Fempro, Fire, Flame,Flare, Flint, FMDesktop, Freewheel, GDX Driver, Green Building Studio, Heads-up Design, Heidi, HumanIK, IDEA Server, i-drop, IlluminateLabs AB (design/logo), ImageModeler, iMOUT, Incinerator, Inferno, Inventor, Inventor LT, Kynapse, Kynogon, LandXplorer, LiquidLight,LiquidLight (design/logo), Lustre, MatchMover, Maya, Mechanical Desktop, Moldflow, Moldflow Plastics Advisers, MPI, Moldflow PlasticsInsight, Moldflow Plastics Xpert, Moondust, MotionBuilder, Movimento, MPA, MPA (design/logo), MPX, MPX (design/logo), Mudbox,Multi-Master Editing, Navisworks, ObjectARX, ObjectDBX, Opticore, Pipeplus, PolarSnap, PortfolioWall, Powered with Autodesk Technology,Productstream, ProMaterials, RasterDWG, RealDWG, Real-time Roto, Recognize, Render Queue, Retimer, Reveal, Revit, RiverCAD, Robot,Showcase, Show Me, ShowMotion, SketchBook, Smoke, Softimage, Softimage|XSI (design/logo), Sparks, SteeringWheels, Stitcher, Stone,StormNET, StudioTools, ToolClip, Topobase, Toxik, TrustedDWG, U-Vis, ViewCube, Visual, Visual LISP, Volo, Vtour, WaterNetworks, Wire,Wiretap, WiretapCentral, XSI.
All other brand names, product names or trademarks belong to their respective holders.
Disclaimer
THIS PUBLICATION AND THE INFORMATION CONTAINED HEREIN IS MADE AVAILABLE BY AUTODESK, INC. "AS IS." AUTODESK, INC.DISCLAIMS ALL WARRANTIES, EITHER EXPRESS OR IMPLIED, INCLUDING BUT NOT LIMITED TO ANY IMPLIED WARRANTIES OFMERCHANTABILITY OR FITNESS FOR A PARTICULAR PURPOSE REGARDING THESE MATERIALS.
Published by:
Autodesk, Inc.111 McInnis ParkwaySan Rafael, CA 94903, USA

Contents
Autodesk Moldflow Insight installation. . . . . . . . . . . . . . . . . . 1Chapter 1 Installation overview. . . . . . . . . . . . . . . . . . . . . . . . . . . . . . . . . . . . . . . . 1
License server location. . . . . . . . . . . . . . . . . . . . . . . . . . . . . . . . . . . . 2
Hardware requirements and supported platforms. . . . . . . . . . . . . . . . . . . . . . 2
Autodesk Moldflow Insight supported platforms. . . . . . . . . . . . . . . . . . . 2
Disk space requirements. . . . . . . . . . . . . . . . . . . . . . . . . . . . . . . . . . . 5
Graphics requirements. . . . . . . . . . . . . . . . . . . . . . . . . . . . . . . . . . . . 6
2 GB memory limit on 32-bit Windows systems. . . . . . . . . . . . . . . . . . . 8
License types. . . . . . . . . . . . . . . . . . . . . . . . . . . . . . . . . . . . . . . . . . . . 10
Network license. . . . . . . . . . . . . . . . . . . . . . . . . . . . . . . . . . . . . . . 10
License functionality. . . . . . . . . . . . . . . . . . . . . . . . . . . . . . . . . . . . 11
Getting help. . . . . . . . . . . . . . . . . . . . . . . . . . . . . . . . . . . . . . . . . . . . 11
Installing on Windows systems. . . . . . . . . . . . . . . . . . . . . . . . . 12Chapter 2 Before installing software . . . . . . . . . . . . . . . . . . . . . . . . . . . . . . . . . . . . 12
Exit all Autodesk programs . . . . . . . . . . . . . . . . . . . . . . . . . . . . . . . . 12
Uninstall pre-release versions of Autodesk Moldflow Insight. . . . . . . . . . 12
iii

Running previous version of Autodesk Moldflow products on 64-bit
machines. . . . . . . . . . . . . . . . . . . . . . . . . . . . . . . . . . . . . . . . . . . 13
Language pack. . . . . . . . . . . . . . . . . . . . . . . . . . . . . . . . . . . . . . . . 14
Installing the Autodesk Moldflow Synergy - User Interface application—Windows. 14
Resetting the user interface default options. . . . . . . . . . . . . . . . . . . . . . 20
Installing the Autodesk Moldflow Insight - Solvers application—Windows. . . . 20
Command line installation. . . . . . . . . . . . . . . . . . . . . . . . . . . . . . . . . . . 26
Installing from a downloaded executable, using the command line. . . . . . 26
Installing from the installation disk, using the command line. . . . . . . . . 26
Autodesk Moldflow Insight command line installation options . . . . . . . . 27
Installing Autodesk Moldflow Insight - Solvers—Linux. . . . 31Chapter 3 Supported Linux platforms. . . . . . . . . . . . . . . . . . . . . . . . . . . . . . . . . . . 31
Required subsystems and system patches on Linux. . . . . . . . . . . . . . . . 31
Before installing software . . . . . . . . . . . . . . . . . . . . . . . . . . . . . . . . . . . . 32
Access the Job Manager. . . . . . . . . . . . . . . . . . . . . . . . . . . . . . . . . . 32
Perform a system backup. . . . . . . . . . . . . . . . . . . . . . . . . . . . . . . . . 32
Stop all running jobs. . . . . . . . . . . . . . . . . . . . . . . . . . . . . . . . . . . . 32
Check if Autodesk Moldflow Insight solvers have been installed previously. . 32
Uninstall any previous Autodesk Moldflow Insight 2012 release. . . . . . . . 32
Preparing to install Autodesk Moldflow Insight - Solvers on Linux. . . . . . . . . . 33
Local installation. . . . . . . . . . . . . . . . . . . . . . . . . . . . . . . . . . . . . . 33
Network installation. . . . . . . . . . . . . . . . . . . . . . . . . . . . . . . . . . . . 36
Installing the Autodesk Moldflow Insight - Solvers application on Linux systems. 37
Setting up client machines from a file server. . . . . . . . . . . . . . . . . . . . . . . . 38
Setting up each user's environment . . . . . . . . . . . . . . . . . . . . . . . . . . 39
Minimum license requirements. . . . . . . . . . . . . . . . . . . . . . . . 41Appendix A
iv

1Autodesk Moldflow Insightinstallation
To complete the Autodesk Moldflow Insight 2012 installation, you must install twoapplications: Autodesk Moldflow Synergy - User Interface and Autodesk Moldflow Insight- Solvers.
Installation overviewThe following items need to be considered prior to installation.
1 Check that your computer complies with the supported platforms.2 Ensure that you have permissions to install applications on the computer
or network.3 Obtain serial numbers and product keys for all the products you want to
install. These are provided at the time you download the software or on theproduct package.
4 Review the product documentation to clarify installation procedures. TheAutodesk Network License Manager Installation Guide should also bereviewed if that product is being installed on this machine.
NOTE: 30 day trial installation is not available for Autodesk Moldflow Synergy- User Interface or Autodesk Moldflow Insight - Solvers.
5 Obtain the name of the server on which the licenses will be installed.6 Close all running programs.
IMPORTANT: Autodesk products share some licensing components. If anyAutodesk product is running when you attempt to install another Autodeskproduct, the installation may fail.
Once you have completed these tasks, prepare to install the followingapplications:
Autodesk Moldflow Synergy - User InterfaceAutodesk Moldflow Insight - SolversAutodesk Network License Manager if required on this machine.
NOTE: There is no specific order in which these products have to be installed.However, the Autodesk Network License Manager must be installed and you
1
must be able to access it either locally or remotely on your network. Referto the Autodesk Network License Manager Installation Guide for furtherinformation.
Your licenses must be activated on the license server before you run yourAutodesk Moldflow product for the first time.
To take advantage of certain functionality in Autodesk Moldflow Insight,you also may choose to install Autodesk Moldflow Design Link andAutodesk Inventor Fusion applications.
License server locationAscertain the server to be used for license management.
The first installation of an Autodesk Moldflow product on this machinewill define the server location and settings for subsequent installations ofAutodesk Moldflow products.
If another Autodesk Moldflow product is installed on this machine, theserver defined in that installation will apply for this product.
If you want to change the license server details set in a previous installation,you must uninstall all Autodesk Moldflow products. Contact TechnicalSupport via the Subscription Center (http://subscription.autodesk.com) if youneed assistance.
Hardware requirements and supported platformsSupported operating systems, hardware platforms and related informationare described.
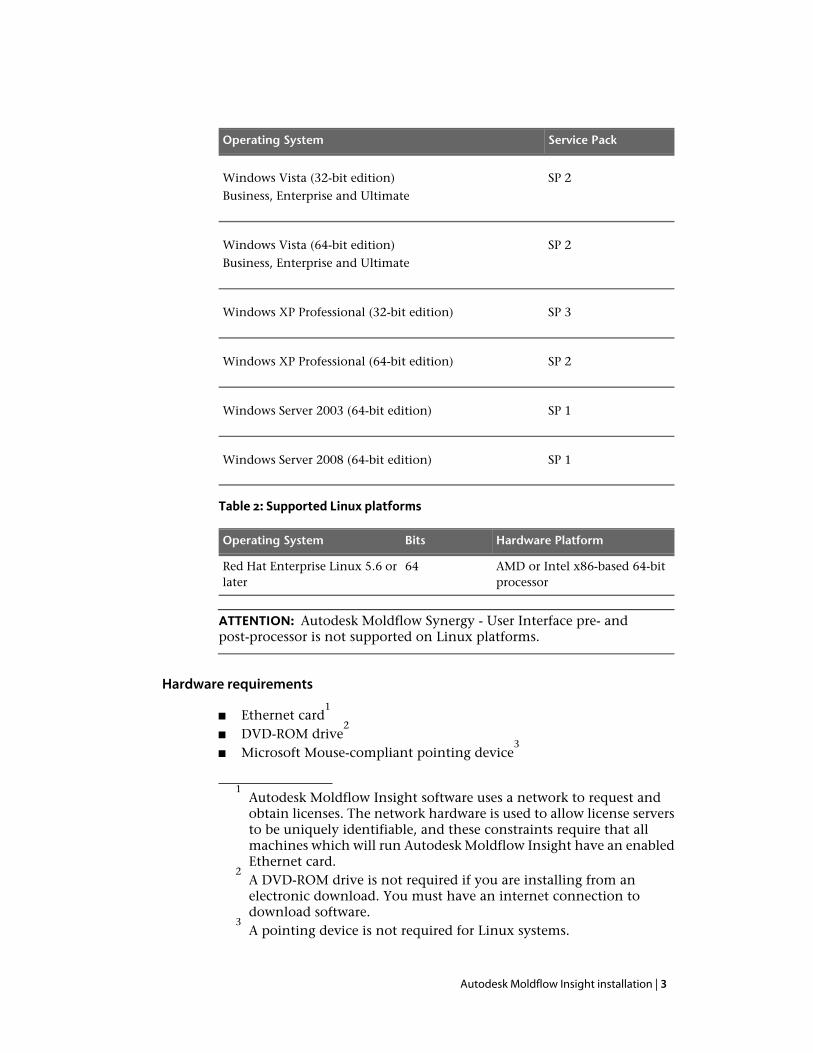
Autodesk Moldflow Insight supported platformsAutodesk Moldflow Insight 2012 user interface and analysis solvers aresupported on Windows platforms. Only analysis solvers are supported onLinux platforms.
Table 1: Supported Windows platforms
Service PackOperating System
Windows 7 (32-bit edition)
Professional, Enterprise and Ultimate
Windows 7 (64-bit edition)
Professional, Enterprise and Ultimate
2 | Autodesk Moldflow Insight installation
Service PackOperating System
Windows Vista (32-bit edition) SP 2
Business, Enterprise and Ultimate
Windows Vista (64-bit edition) SP 2
Business, Enterprise and Ultimate
SP 3Windows XP Professional (32-bit edition)
SP 2Windows XP Professional (64-bit edition)
SP 1Windows Server 2003 (64-bit edition)
SP 1Windows Server 2008 (64-bit edition)
Table 2: Supported Linux platforms
Hardware PlatformBitsOperating System
AMD or Intel x86-based 64-bitprocessor
64Red Hat Enterprise Linux 5.6 orlater
ATTENTION: Autodesk Moldflow Synergy - User Interface pre- andpost-processor is not supported on Linux platforms.
Hardware requirements
■ Ethernet card1
■ DVD-ROM drive2
■ Microsoft Mouse-compliant pointing device3
1Autodesk Moldflow Insight software uses a network to request andobtain licenses. The network hardware is used to allow license serversto be uniquely identifiable, and these constraints require that allmachines which will run Autodesk Moldflow Insight have an enabledEthernet card.
2A DVD-ROM drive is not required if you are installing from anelectronic download. You must have an internet connection todownload software.
3A pointing device is not required for Linux systems.
Autodesk Moldflow Insight installation | 3
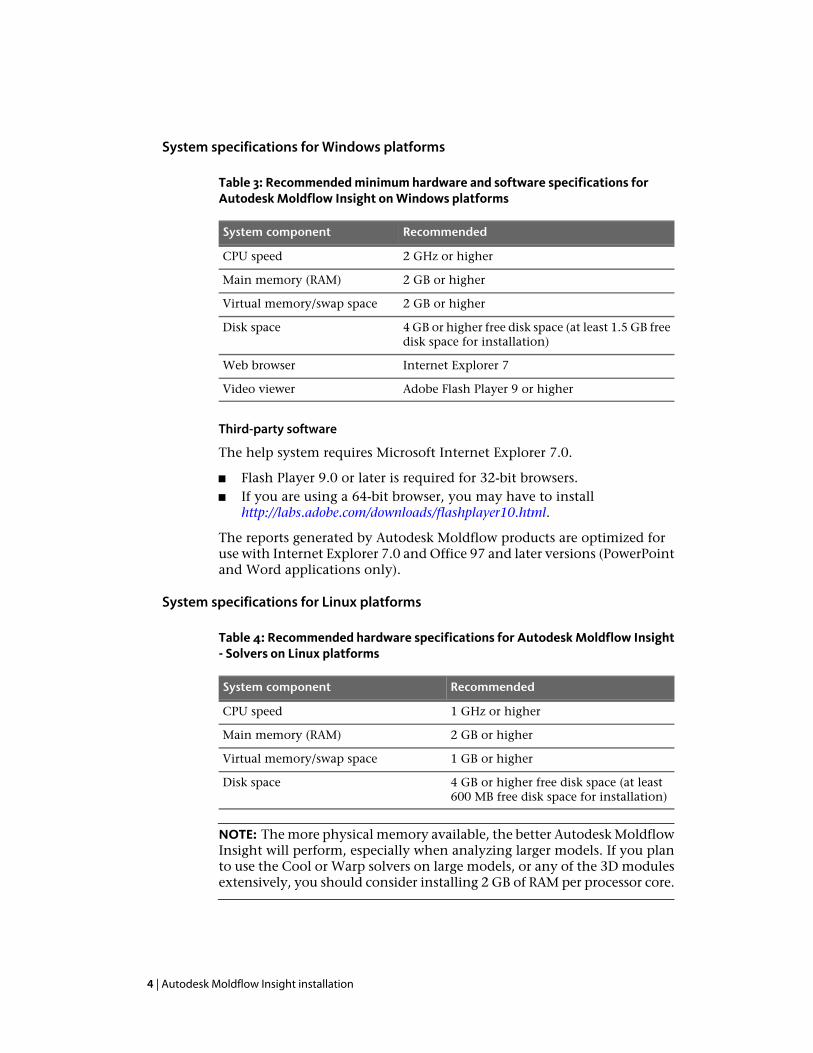
System specifications for Windows platforms
Table 3: Recommended minimum hardware and software specifications forAutodesk Moldflow Insight on Windows platforms
RecommendedSystem component
2 GHz or higherCPU speed
2 GB or higherMain memory (RAM)
2 GB or higherVirtual memory/swap space
4 GB or higher free disk space (at least 1.5 GB freedisk space for installation)
Disk space
Internet Explorer 7Web browser
Adobe Flash Player 9 or higherVideo viewer
Third-party software
The help system requires Microsoft Internet Explorer 7.0.
■ Flash Player 9.0 or later is required for 32-bit browsers.■ If you are using a 64-bit browser, you may have to install
http://labs.adobe.com/downloads/flashplayer10.html.
The reports generated by Autodesk Moldflow products are optimized foruse with Internet Explorer 7.0 and Office 97 and later versions (PowerPointand Word applications only).
System specifications for Linux platforms
Table 4: Recommended hardware specifications for Autodesk Moldflow Insight- Solvers on Linux platforms
RecommendedSystem component
1 GHz or higherCPU speed
2 GB or higherMain memory (RAM)
1 GB or higherVirtual memory/swap space
4 GB or higher free disk space (at least600 MB free disk space for installation)
Disk space
NOTE: The more physical memory available, the better Autodesk MoldflowInsight will perform, especially when analyzing larger models. If you planto use the Cool or Warp solvers on large models, or any of the 3D modulesextensively, you should consider installing 2 GB of RAM per processor core.
4 | Autodesk Moldflow Insight installation
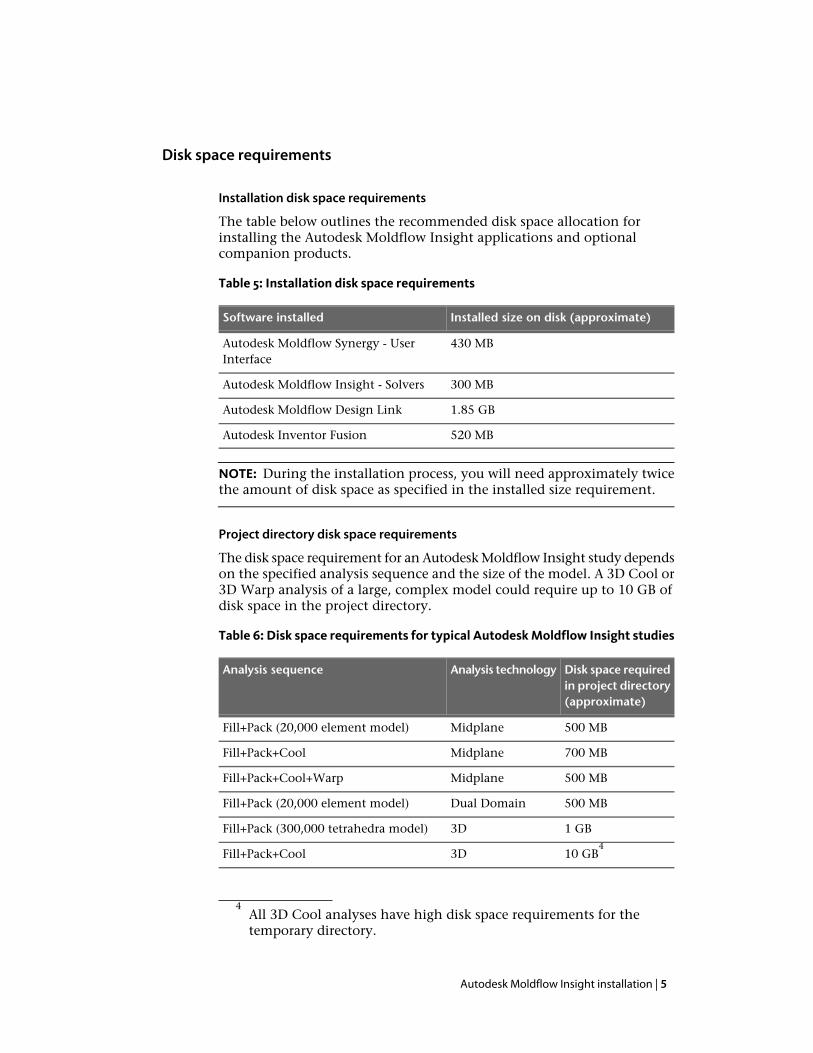
Disk space requirements
Installation disk space requirements
The table below outlines the recommended disk space allocation forinstalling the Autodesk Moldflow Insight applications and optionalcompanion products.
Table 5: Installation disk space requirements
Installed size on disk (approximate)Software installed
430 MBAutodesk Moldflow Synergy - UserInterface
300 MBAutodesk Moldflow Insight - Solvers
1.85 GBAutodesk Moldflow Design Link
520 MBAutodesk Inventor Fusion
NOTE: During the installation process, you will need approximately twicethe amount of disk space as specified in the installed size requirement.
Project directory disk space requirements
The disk space requirement for an Autodesk Moldflow Insight study dependson the specified analysis sequence and the size of the model. A 3D Cool or3D Warp analysis of a large, complex model could require up to 10 GB ofdisk space in the project directory.
Table 6: Disk space requirements for typical Autodesk Moldflow Insight studies
Disk space requiredin project directory(approximate)
Analysis technologyAnalysis sequence
500 MBMidplaneFill+Pack (20,000 element model)
700 MBMidplaneFill+Pack+Cool
500 MBMidplaneFill+Pack+Cool+Warp
500 MBDual DomainFill+Pack (20,000 element model)
1 GB3DFill+Pack (300,000 tetrahedra model)
10 GB4
3DFill+Pack+Cool
4All 3D Cool analyses have high disk space requirements for thetemporary directory.
Autodesk Moldflow Insight installation | 5
Graphics requirementsThe graphic requirements listed here reflect the minimum required toobtain acceptable simulations.
■ 512 MB DRAM or higher, OpenGL-capable graphics card. Ensure youhave installed the latest driver for your card. Please refer to the cardmanufacturer's website for drivers and instructions.
■ 24-bit color setting at 1280×1024 or higher screen resolution.
NOTE: Autodesk does not guarantee the use of any particular graphics cardwith Autodesk Moldflow products.
Autodesk will make every effort to work with card manufacturers to resolveany problems that may arise in the use of our software with a particularcard. However, we cannot guarantee that all graphics-related issues can befixed, as they may lie within the card manufacturer's drivers rather thanAutodesk Moldflow software.
Recommended
Autodesk Moldflow software makes extensive use of OpenGL and texturemapping, therefore any device offering OpenGL acceleration and texturememory will give improved performance.
GPU cardAutodesk Moldflow Insight software takes advantage of GPUs (GraphicsProcessing Units) to improve analysis time.
Through GPU technology, you can benefit from the following:
GPU cards have their own built-in memory and havethe ability to resolve complex simulations. The
Reduced load onthe CPU
additional built-in processing power in GPUs relievestask-intensive strain on the CPU, enabling yourapplication to run faster.
The software leverages the processing power offeredby CUDA technology in GPU cards. This allows
Shortenedanalysis time
analyses to run at a much greater speed, thusresulting in a faster analysis time. On a very largemodel, this can reduce the analysis time by a fewhours.
GPU technology and our parallel solver complementeach other. If you use GPU technology in
Efficient use ofdata-parallelcomputing conjunction with a parallel solver, you can achieve
even greater speed improvements.
By default, the software automatically detects and uses a compatible GPUcard for 3D Fill+Pack analyses, if one is found.
6 | Autodesk Moldflow Insight installation
You also can enable the GPU option for 3D Warp analyses. The option isoff by default.
You can change GPU option settings on the Fill+Pack Analysis tab or WarpAnalysis tab of the solver parameters dialog, depending on the specifiedmolding process.
Compatible graphics card
You will benefit from speed enhancements offered by GPU technologyonly if you have a compatible graphics card installed.
To determine if you have a compatible GPU card installed, please checkthe specifications provided by the card's manufacturer.
The minimum required hardware is a CUDA-enabled card capable ofdouble-precision (64-bit floating point precision) computations. Cardswhich meet these requirements will have a CUDA Compute Capability of1.3 or higher.
For optimal performance when using an NVIDIA FermiGPU card, it is important that the latest drivers areinstalled.
NVIDIA FermiGPU card
NOTE: The automatic Windows Update function maynot install the most recent version of the drivers.
Supported operating systems
GPU technology is available on all Windows operating systems supportedby Autodesk Moldflow products, for both 32-bit and 64-bit systems.
GPU card limitations
Certain constraints apply when using GPU (Graphics Processing Unit)technology within Autodesk Moldflow software.
Use of GPU technology is limited to certain types ofanalyses. At present, 3D Fill+Pack, 3D Flow and 3D Warpanalyses support GPU technology.
Analysistypes
Some graphics cards have multiple GPUs. At present,Autodesk Moldflow software does not support multiple
MultipleGPUs
GPUs. If your card has multiple GPUs, the analysis willselect the fastest GPU among the available GPUs withadequate memory to perform the analysis.
The analysis you run is restricted by the size of theavailable memory on the GPU. For example, if your GPU
Maximummodel size
card memory size is not large enough to run the fullmodel, then the analysis will use the GPU for smallertime steps when the model is partially filled.
Autodesk Moldflow Insight installation | 7
The analysis size is determined by the number ofelements a model has. The more elements there are, thebigger the model size. Approximately one tetrahedralelement equates to 1 KB of memory, so a model with 1million elements will require 1 GB of device memory onthe GPU card to run the model completely on the GPU.
When running computation-intensive tasks on a GPUcard, the card will be diverted from other tasks such as
Computerstopsresponding redrawing the Windows desktop or refreshing other
applications. This can be especially noticeable whenrunning multiple jobs simultaneously or when runninga very large analysis.
CAUTION: In extreme circumstances, Microsoft Windowsmay determine that the card has reached a locked upstate and trigger a reset of the graphics drivers. If thishappens, it is possible that the system will stopresponding. Details on this behavior are available fromMicrosoft here.
Windows Remote Desktop does not support direct accessto GPU resources. If an analysis which is set to use GPU
WindowsRemoteDesktop resources is launched through a Remote Desktop
command line (for example, using the runstudycommand), it will not be able to utilize the GPU card onthe remote machine.
There is a limitation for Windows Vista and Windows 7users when using GPU technology. If you launch a job
Launching ajob in
locally on a Windows Vista or Windows 7 machine, orWindowsif you remotely launch a job through Job Manager whereVista or
Windows 7 the remote server is a Windows Vista or Windows 7machine, we recommend that you do not log out.Logging out will cause the analysis to fail.
The latest drivers for any installed card will need to beupdated.
GPU carddrivers
NOTE: The automatic Windows Update function maynot install the most recent version of the drivers.
2 GB memory limit on 32-bit Windows systemsWindows 32-bit operating systems have a 2 GB memory limit per process;however there are some guidelines to help you avoid errors due to thismemory limit.
■ A large number of open studies in a project may exceed the memorylimit.
8 | Autodesk Moldflow Insight installation

Close any open studies that are not being used at a given time.■
■ Consider splitting one project with a large number of studies intotwo or more projects with a smaller number of studies in each.
■ Even a small number of large studies open in a project may exceed thememory limit.
■ It is recommended to open only one study per project.
■ Post-processing large result files may exceed the memory limit. Inparticular, 3D results require greater amounts of memory.
■ Consider using the Optimize memory for results display options inthe results preferences (Application menu > Options > Results tab)to minimize the amount of memory required to display results.
■ Running a Fill+Pack analysis on a model with a large number ofelements may exceed the memory limit.
■ Try remeshing the model using a coarser mesh to reduce the numberof elements.
NOTE: Note that using a coarse mesh may affect analysis accuracy,in particular for 3D models.
■ For a 3D model only, turn off the AMG matrix solver. Change theAMG matrix solver selection option setting to Off in the SolverParameters dialog. This option is set to Auto by default.
■ Running a Cool analysis on a model with a large number of elementsmay exceed the memory limit.
■ Review the mesh density in the part and on cooling circuits, andremesh using a coarser mesh if possible.
■ Running a 3D Warp analysis may exceed the memory limit.
■ If the model contains more than 800,000 elements, change the UseAMG matrix solver option to No on the Warp Settings page of theProcess Settings Wizard. This option is on by default. Turning thisoption off enables the legacy (SSORCG) matrix solver. The AMGmatrix solver is faster but requires more memory compared to thelegacy solver.
■ Enable mesh aggregation to reduce memory requirement for analysesof thin-wall parts. Make sure the Use mesh aggregation and2nd-order tetrahedral elements option is selected on the WarpSettings page of the Process Settings Wizard. This option is on bydefault.
NOTE: If the part geometry is thick or solid (true 3D geometry),using mesh aggregation is not recommended. Turning off the meshaggregation option causes the original mesh to be used for the
Autodesk Moldflow Insight installation | 9
analysis. This increases analysis time and memory requirement butimproves accuracy for true 3D parts.
■ The maximum model size on which a 3D Warp analysis can be runon a 32-bit operating system is up to 1.5 million elements (usinglegacy solver and mesh aggregation options).
■ Free resources (memory, swap space) on the machine running theanalysis.
■ Add more resources (memory, swap space) on the machine runningthe analysis.
If you have tried the above options but still exceed the 2GB memory limit,consider changing to a computer with a 64-bit Windows operating system.
License typesDuring installation you will be asked to select your License type.
Supports a specified number of users who are connectedto a network. The Autodesk Network License Manager
Networklicense
needs to be installed on one or more servers on thenetwork to manage the distribution of licenses to users.
Within the product there are also tiers of functionality. These aredetermined by the license that is purchased.
A detailed list of the functionality enabled by each license type is includedin the Minimum license requirements appendix.
Network licenseA valid Serial Number and Product key must be entered before you cancontinue the installation.
NOTE: When a Network License is selected, Autodesk Network LicenseManager must be installed on the designated server before you run theproduct.
If you are using a Network License, you must choose the server configurationmodel for the Autodesk Network License Manager.
One server manages all licenses on the network.You need to enter the host name or IP address ofthe server.
Single License Server
Three servers are available to authenticate eachlicense. You need to enter the host name or IPaddress of the three servers.
Redundant LicenseServer
10 | Autodesk Moldflow Insight installation

License functionality
The functionality of Autodesk Moldflow Insight depends on which licensesare available on the Autodesk Network License Manager server.
The license types are listed below in order of increasing functionality
■ Autodesk® Moldflow® Synergy—Enables the use of the AutodeskMoldflow Synergy - User Interface application
■ Autodesk® Moldflow® Insight Basic—Enables the use of the Basictier of functionality in the Autodesk Moldflow Insight - Solversapplication
■ Autodesk® Moldflow® Insight Performance—Enables the useof the Performance tier of functionality in the Autodesk MoldflowInsight - Solvers application
■ Autodesk® Moldflow® Insight Advanced—Enables the use of theAdvanced tier of functionality in the Autodesk Moldflow Insight -Solvers application
When performing an operation such as an analysis, the Autodesk NetworkLicense Manager client will request the minimum level license which allowsthat operation. If there are no licenses available at the minimum level, theclient will attempt to reserve a license of a higher level.
If you attempt to perform an operation that requires a license which hasnot been installed, you will receive a message advising you to purchase therequired license. If there are no licenses available because they have beenreserved by other clients, you will receive a message advising you of this.
NOTE: The Autodesk Moldflow Synergy license allows pre- andpost-processing tasks only.
Getting helpFind information resources or contact Technical Support via the SubscriptionCenter.
Log in and access the Subscription Center at http://subscription.autodesk.com.
Autodesk Moldflow Insight installation | 11
2Installing on Windows systems
Before installing Autodesk Moldflow Insight applications, check that your platformand hardware are supported.
Before installing softwareTo prevent problems during the installation of Autodesk Moldflow Insightapplications, there are initial tasks that should be performed.
Exit all Autodesk programs
Exit all Autodesk programs that are running before beginning theinstallation of Autodesk Moldflow Insight applications.This ensures no “File in use” errors occur during installation.
IMPORTANT: Autodesk products share some licensing components. Ifany Autodesk product is running when you attempt to install anotherAutodesk product, the installation may fail.
Uninstall pre-release versions of Autodesk Moldflow Insight
If a pre-release version of Autodesk Moldflow Insight has been previouslyinstalled on the current machine, you must uninstall it before beginningthe current installation.
To check if a pre-release version has previously been installed, open theControl Panel (Start > Control Panel), select Programs and Features(Add/Remove Programs on Windows XP systems) and look for entriestitled Autodesk Moldflow Insight 2012 or Autodesk Moldflow Synergy 2012- User Interface and Autodesk Moldflow Insight 2012 - Solvers.
To uninstall a pre-release version of Autodesk Moldflow Insight:
1 Exit all Autodesk Moldflow products.
2 Open the Autodesk Moldflow Insight xxxx Command Shell (Start > AllPrograms > Autodesk > Autodesk Moldflow Insight xxxx > AutodeskMoldflow Insight xxxx Command Shell), where xxxx is 2012. At thecommand prompt, type cleanreg.
12 | Installing on Windows systems

Alternatively, run the cleanreg.exe command. This is found in the binfolder where the pre-release version was installed (typically,C:\Program Files\Autodesk\Moldflow Insight xxxx\bin).
A dialog appears which asks you to confirm the deletion of all personalsettings.
3 Click Yes to delete personal settings.This will remove all registry entries associated with the pre-releaseversion.
4 Uninstall the pre-release version.
a Open the Control Panel (Start > Control Panel).b Select Programs and Features (Add/Remove Programs on Windows
XP systems).c Select the entry you want to remove and click Uninstall
(Change/Remove on Windows XP systems) to launch the uninstallprocedure.
Depending on which pre-release version you have installed, possibleentries are:
■ Autodesk Moldflow Insight 2012■ Autodesk Moldflow Insight 2012 - Solvers■ Autodesk Moldflow Synergy 2012 - User Interface
IMPORTANT: Uninstall both Autodesk Moldflow Insight 2012 -Solvers and Autodesk Moldflow Synergy 2012 - User Interfaceapplications if both entries appear in the list of programs.
5 Restart the computer to complete the uninstall of the software.
Running previous version of Autodesk Moldflow products on 64-bit machines
If you no longer require the Autodesk Moldflow 2011 software, proceeddirectly to the next section. To ensure Autodesk Moldflow 2011 productscontinue to work on a 64-bit machine after installing the AutodeskMoldflow 2012 products, you must update the existing version of AutodeskNetwork License Manager.
To uninstall the existing version of Autodesk Network License Manager,complete the following steps.
1 Before uninstalling Autodesk Network License Manager, ensure youtake a copy of the current license file as this information will be requiredat a later stage.The location of this file can be found at Start > All Programs > Autodesk> Network License Manager > LMTOOLS Utility. Select the ConfigServices tab. If you have an existing license file, the Path to the licensefile indicates its location.
2 Open LMTOOLS Utility which can be found at Start > All Programs >Autodesk > Network License Manager > LMTOOLS Utility.
Installing on Windows systems | 13
3 Select the Config Services tab.
4 Select the Autodesk service from the Service Name drop-down list.
5 Click Remove Service.
6 Exit LMTOOLS.
7 Click Start > Control Panel > Programs and Features
8 Right-click on Autodesk Network License Manager and select Uninstall.The previous version of Autodesk Network License Manager is removed.
9 Restart the computer to complete the uninstall of the software.
CAUTION: The computer must be restarted for this change to take effect,otherwise Autodesk Network License Manager might remain active inthe Windows service.
IMPORTANT: Do not uninstall Autodesk License Manager (Moldflow)because this component is still required for Autodesk Moldflow 2011products.
Language packThe English version of the product must be installed before installing alanguage pack.
Installing the Autodesk Moldflow Synergy - User Interfaceapplication—Windows
NOTE: If you are installing on a Windows 7 system, make sure the UserAccount Control (UAC) is disabled first (Control Panel > System Security> Change User Account Control settings).
The Autodesk Moldflow Synergy - User Interface application uses a SetupWizard that steps you through the installation process.
1 Log in using an account with Administrator privileges.
2 Exit any Autodesk programs that are currently running.
IMPORTANT: Autodesk products share some licensing components. Ifany Autodesk product is running when you attempt to install anotherAutodesk product, the installation may fail.
3 You can install the Autodesk Moldflow Synergy - User Interfaceapplication from an executable file that you have downloaded or froman installation disk.
14 | Installing on Windows systems

If you are installing from a downloaded executable file (amipc-ui.exe),navigate to that file and double-click on it to launch the SetupWizard.
■
■ If you are installing from an installation disk, insert it the DVD drive.If the Autorun facility is enabled on the PC, the DVD main menu isdisplayed automatically. If this is not the case, navigate to thecdstartup folder on the DVD and double-click on cdstartup.exe todisplay the main menu.
a Click Autodesk Moldflow Insight 2012 to navigate to the installationoptions.
b Click Install Autodesk Moldflow Synergy - User Interface to launchthe Setup Wizard.
While the installer is initializing, the following checks are performed,and warnings are given or the installer exits if any of these conditionsis found:
A warning message notifies you thatanother Autodesk Moldflow installer is
Two instances of thesame installer, or both
already running. When you click OK tothe Autodesk Moldflowdismiss the message dialog, the currentSynergy - User Interfaceinstaller exits, and the other installercontinues
installer and theAutodesk MoldflowInsight - Solversinstaller are running atthe same time
A warning message notifies you thatanother copy of Autodesk Moldflow
A previous installationof Autodesk Moldflow
Synergy - User Interface 2012 or AutodeskSynergy - User Interface2012 is detected. Moldflow Insight 2012 is already
installed. You must uninstall the previous2012 installation before installing thenew version.
A warning message notifies you that youmust close the version that is in use
Another version of theuser interface is in use
before continuing the installation. If youwhen the Autodeskclick OK, the installer waits until theMoldflow Synergy - Userversion in use is closed, then the installerInterface installer is
running continues. If you click Cancel, theinstaller exits.
If you attempt to install a differentversion of Autodesk Moldflow Synergy -
You attempt to installincompatible versions
User Interface compared to the versionof the Autodeskof Autodesk Moldflow Insight - SolversMoldflow Synergy - Userthat is already installed (or vice versa), aInterface and Autodeskwarning message notifies you that youMoldflow Insight -
Solvers applications are trying to install incompatible versionsof the applications and prompts you touninstall all existing versions of the
Installing on Windows systems | 15
Autodesk Moldflow Synergy - UserInterface and Autodesk Moldflow Insight- Solvers applications before you attemptthe installation again. The installer exits.
NOTE: Both the Autodesk MoldflowSynergy - User Interface and AutodeskMoldflow Insight - Solvers applicationsmust come from the same installationpackage (build numbers must beidentical).
If none of these conditions is found, the installer initializes successfully.
The Welcome page appears.
4 Click Next to begin the installation process.The License Agreement page appears.
5 Review the license agreement.
a Select the appropriate entry from the Country or Region list.b Select the option to accept the agreement.c Click Next to continue.
The Product Information page appears.
NOTE: Network License is the only license type available for theAutodesk Moldflow Synergy - User Interface application. It requires aserial number and product key.
6 Enter your Serial Number and Product key, then click Next.
NOTE: The Next button is disabled until both a valid serial number anda valid product key have been provided.
The Install the Autodesk Network License Manager on this machine?page appears.
NOTE: This page does not appear if you have already installed anotherAutodesk Moldflow product.
7 If you want the current machine to be the network license manager,select I want to install the Network License Manager on this machine.
Download and follow the instructions in the Autodesk Network LicenseManager Installation Guide for more detailed information about installingand configuring the Autodesk Network License Manager product.
5
5The Autodesk Network License Manager Installation Guide and theAutodesk Network License Manager installer executables are available
16 | Installing on Windows systems

NOTE: If you wish to use another machine as the network licensemanager, you can specify the server details in the next step.
a Specify the location on the current machine where the AutodeskNetwork License Manager application will be installed.
Accept the default install path, or click Browse to select anotherlocation.
b Choose whether to install Autodesk Network License Manager foranyone who uses this computer or for only yourself.
Everyone is selected by default.
CAUTION: If you choose Just me, no other users will be able to accessthe Autodesk Network License Manager on this machine to runAutodesk Moldflow software.
c Click Next.If you choose to install Autodesk Network License Manager locally,and the installer detects an older version of the network licensemanager is already installed on the current machine, a warningmessage notifies you to uninstall the older version. Click OK todismiss the message dialog and continue with the installation.
The Network License page appears.
8 Select either Single License Server (one server) or Redundant LicenseServer (three servers).
RESTRICTION: If you want to change the license server details set in aprevious installation, you must uninstall all Autodesk Moldflowproducts. Contact Technical Support via the Subscription Center(http://subscription.autodesk.com) if you need assistance.
■ If you select the Single License Server model, enter the name or IPaddress of the server, or click Browse to select a server machine onyour network.
ATTENTION: If any other Autodesk Moldflow product is alreadyinstalled, the name of the selected server machine appears in thetext box, and you will not be able to select a different server machine.
NOTE: The Next button is disabled until a server name has beenprovided.
■ If you select the Redundant License Server model, enter the namesor IP addresses of three servers, or click Browse to select each of threeserver machines on your network.
on the Subscription Center (http://subscription.autodesk.com) or on theinstallation disk, Autodesk Network License Manager 2012 page.
Installing on Windows systems | 17

ATTENTION: If any other Autodesk Moldflow product is alreadyinstalled, and a redundant license server configuration wasestablished during that installation, the selected server names appearin the Server 1, Server 2 and Server 3 text boxes, and you will notbe able to select different server machines.
NOTE: The Next button is disabled until three server names havebeen provided.
When the license server details are complete, click Next.The Select Destination Location page appears.
NOTE: If the Autodesk Moldflow Insight - Solvers application is alreadyinstalled, you will not be able to select a different destination location.
9 Accept the default installation folder or click the Browse button tolocate and select a different folder. Click Next to continue.The Project Files Location page appears. This is the location where yourproject files will be stored.
NOTE: This page does not appear if the Autodesk Moldflow Insight -Solvers application is already installed and you specified the user folderlocation during that installation.
10 Select the user folder location option. In each user's 'My Documents'folder is selected by default. To accept this option, click Next.You may choose In a folder shared by all users. When you click Next,the All Users' Project Files Location page appears. Accept the defaultuser folder location, or click the Browse button to locate and select adifferent folder, then click Next.The Select Temporary Files Folder page appears. This is where temporaryfiles will be written whenever an analysis is run on the current machine.
NOTE: This page does not appear if the Autodesk Moldflow Insight -Solvers application is already installed and you specified the temporaryfiles folder during that installation.
11 Accept the default Temporary Files Folder, or click the Browse buttonto locate and select a different folder, then click Next.
NOTE: For optimum performance, it is important that you select a localdrive, rather than a network drive. The amount of temporary space thatwill be required depends primarily on the size and complexity of themodel being analyzed, the number of analyses being run simultaneously,and the frequency with which analyses are launched. You should selecta temporary directory with at least 2 GB of free space.
18 | Installing on Windows systems
The Configure Job Manager page appears.
12 Enter the server name or IP address of the machine that will be thedefault Job Manager server, then click Next.The local machine is specified by default. You can change the JobManager configuration after installation in the Job Manager dialog.
The Select Active User Interface Style page appears.
13 Select the user interface style you want to use. Ribbon UI is selected bydefault.
This is the Autodesk standard user interface style. However, the ClassicUI style is still available for selection.
NOTE: You can change the active user interface style after installationin the application Options. The product Help supports the Ribbon userinterface workflow and functionality.
Click Next.If you have a 3Dconnexion device installed, the Checking existing3Dconnexion installation page appears.
14 Ensure that you have closed all applications that use the 3Dconnexiondevice, then click Next.The Ready to Install page appears.
15 Review the installation settings. You can change settings by clickingBack until the relevant screen appears. When you are satisfied with thesettings, click Install to continue.The Installing page appears and the Wizard begins installing theAutodesk Moldflow Synergy - User Interface software. A progressindicator shows how much of the installation has been completed.
NOTE: If you selected I want to install the Network License Manageron this machine and the Autodesk Network License Manager applicationis not already installed, it will be installed automatically.
16 If you have not yet installed the Autodesk Moldflow Insight - Solversapplication, a warning message appears to remind you. Click OK toclose the message dialog.
17 Click Finish to complete the Autodesk Moldflow Synergy - User Interfaceinstallation.
a If you selected I want to install the Network License Manager on thismachine, the option to Register your product and activate licensesonline appears and is selected by default, and a browser window willopen at the Autodesk - RegisterOnce web page.
NOTE: If you deselect this option, you can register and activate yourlicenses later. Go to registeronce.autodesk.com to register your productand activate your licenses.
The installation completes, and the installer exits.
Installing on Windows systems | 19
IMPORTANT:
■ Before you can use the Autodesk Moldflow Synergy - User Interfaceapplication, the Autodesk Network License Manager must be installedand you must be able to access it either locally or remotely on yournetwork.
NOTE: You must have activated your licenses on the license servermachine.
■ Before you can run an Autodesk Moldflow Insight analysis, the AutodeskMoldflow Insight - Solvers application must be installed.
■ If you want to install Autodesk Inventor Fusion 2012 with AutodeskMoldflow Insight, we recommend that you also install AutodeskInventor Fusion 2012 Service Pack 1. On the Autodesk InventorFusion 2012 Install - Configure page, click the small down arrow toexpand the Autodesk Inventor Fusion 2012 configuration section, andthen select the service pack along with configuration options.
Resetting the user interface default optionsIf required, the registry and user default settings can be reset to the factorydefaults.
1 Exit all Autodesk Moldflow products.
2 Open the Autodesk Moldflow Synergy xxxx Command Shell (Start >All Programs > Autodesk > Autodesk Moldflow Insight xxxx > AutodeskMoldflow Synergy xxxx Command Shell). At the command prompt,type cleanreg.
Alternatively, run the cleanreg.exe command. This is found in the binfolder where the application is installed (typically,C:\Program Files\Autodesk\Moldflow Insight xxxx\bin).
A dialog appears which asks you to confirm the deletion of all personalsettings.
3 Click Yes to delete personal settings.
Any user-defined registry or user default settings will be replaced with thestandard default settings.
Installing the Autodesk Moldflow Insight - Solversapplication—Windows
NOTE: If you are installing on a Windows 7 system, make sure the UserAccount Control (UAC) is disabled first (Control Panel > System Security> Change User Account Control settings).
20 | Installing on Windows systems
The Autodesk Moldflow Insight - Solvers application uses a Setup Wizardthat steps you through the installation process.
1 Log in using an account with Administrator privileges.
2 Exit any Autodesk programs that are currently running.
IMPORTANT: Autodesk products share some licensing components. Ifany Autodesk product is running when you attempt to install anotherAutodesk product, the installation may fail.
3 You can install the Autodesk Moldflow Insight - Solvers applicationfrom an executable file that you have downloaded or from aninstallation disk.
■ If you are installing from a downloaded executable file(amipc-solvers.exe), navigate to that file and double-click on it tolaunch the Setup Wizard.
■ If you are installing from an installation disk, insert it the DVD drive.If the Autorun facility is enabled on the PC, the DVD main menu isdisplayed automatically. If this is not the case, navigate to thecdstartup folder on the DVD and double-click on cdstartup.exe todisplay the main menu.
a Click Autodesk Moldflow Insight 2012 to navigate to the installationoptions.
b Click Install Autodesk Moldflow Insight - Solvers to launch the SetupWizard.
While the installer is initializing, the following checks are performed,and warnings are given or the installer exits if any of these conditionsis found:
A warning message notifies you thatanother Autodesk Moldflow installer is
Two instances of thesame installer, or both
already running. When you click OK tothe Autodeskdismiss the message dialog, the currentMoldflow Synergy -installer exits, and the other installercontinues.
User Interfaceinstaller and theAutodesk Moldflow
NOTE: Only one Autodesk Moldflowinstaller can run at a time.
Insight - Solversinstaller are runningat the same time
A warning message notifies you thatanother copy of Autodesk Moldflow
A previous installationof Autodesk Moldflow
Insight - Solvers 2012 or AutodeskInsight - Solvers 2012is detected. Moldflow Insight 2012 is already installed.
You must uninstall the previous 2012installation before installing the newversion.
Installing on Windows systems | 21

A warning message notifies you that youmust close the version that is in use before
Another version of thesolvers is in use when
continuing the installation. If you clickthe AutodeskOK, the installer waits until the version inMoldflow Insight -use is closed, then the installer continues.If you click Cancel, the installer exits.
Solvers installer isrunning
NOTE: You cannot install a new version ofan Autodesk Moldflow product while aprevious version of the product is in use.
If you attempt to install a different versionof Autodesk Moldflow Synergy - User
You attempt to installincompatible versions
Interface compared to the version ofof the AutodeskAutodesk Moldflow Insight - Solvers thatMoldflow Synergy -is already installed (or vice versa), aUser Interface andwarning message notifies you that you areAutodesk Moldflowtrying to install incompatible versions ofInsight - Solvers
applications the applications and prompts you touninstall all existing versions of theAutodesk Moldflow Synergy - UserInterface and Autodesk Moldflow Insight- Solvers applications before you attemptthe installation again. The installer exits.
NOTE: Both the Autodesk MoldflowSynergy - User Interface and AutodeskMoldflow Insight - Solvers applicationsmust come from the same installationpackage (build numbers must be identical).
If none of these conditions is found, the installer initializes successfully.
The Welcome page appears.
4 Click Next to begin the installation process.The License Agreement page appears.
5 Review the license agreement.
a Select the appropriate entry from the Country or Region list.b Select the option to accept the agreement.c Click Next to continue.
The Product Information page appears.
NOTE: Network License is the only license type available for theAutodesk Moldflow Insight - Solvers application. It requires a serialnumber and product key.
6 Enter your Serial Number and Product key, then click Next to continue.
22 | Installing on Windows systems

NOTE: The Next button is disabled until both a valid serial number anda valid product key have been provided.
The Install the Autodesk Network License Manager on this machine?page appears.
NOTE: This page does not appear if you have already installed anotherAutodesk Moldflow product.
7 If you want the current machine to be the network license manager,select I want to install the Network License Manager on this machine.
Download and follow the instructions in the Autodesk Network LicenseManager Installation Guide for more detailed information about installingand configuring the Autodesk Network License Manager product.
6
NOTE: If you wish to use another machine as the network licensemanager, you can specify the server details in the next step.
a Specify the location on the current machine where the AutodeskNetwork License Manager application will be installed.
Accept the default install path, or click Browse to select anotherlocation.
b Choose whether to install Autodesk Network License Manager foranyone who uses this computer or for only yourself.
Everyone is selected by default.
CAUTION: If you choose Just me, no other users will be able to accessthe Autodesk Network License Manager on this machine to runAutodesk Moldflow software.
c Click Next.If you choose to install Autodesk Network License Manager locally,and the installer detects an older version of the network licensemanager is already installed on the current machine, a warningmessage notifies you to uninstall the older version. Click OK todismiss the message dialog and continue with the installation.
The Network License page appears.
8 Select either Single License Server (one server) or Redundant LicenseServer (three servers).
RESTRICTION: If you want to change the license server details set in aprevious installation, you must uninstall all Autodesk Moldflow
6The Autodesk Network License Manager Installation Guide and theAutodesk Network License Manager installer executables are availableon the Subscription Center (http://subscription.autodesk.com) or on theinstallation disk, Autodesk Network License Manager 2012 page.
Installing on Windows systems | 23

products. Contact Technical Support via the Subscription Center(http://subscription.autodesk.com) if you need assistance.
■ If you select the Single License Server model, enter the name or IPaddress of the server, or click Browse to select a server machine onyour network.
ATTENTION: If any other Autodesk Moldflow product is alreadyinstalled, the name of the selected server machine appears in thetext box, and you will not be able to select a different server machine.
NOTE: The Next button is disabled until a server name has beenprovided.
■ If you select the Redundant License Server model, enter the namesor IP addresses of three servers, or click Browse to select each of threeserver machines on your network.
ATTENTION: If any other Autodesk Moldflow product is alreadyinstalled, and a redundant license server configuration wasestablished during that installation, the selected server names appearin the Server 1, Server 2 and Server 3 text boxes, and you will notbe able to select different server machines.
NOTE: The Next button is disabled until three server names havebeen provided.
When the license server details are complete, click Next.The Select Destination Location page appears.
NOTE: If the Autodesk Moldflow Synergy - User Interface applicationis already installed, you will not be able to select a different destinationlocation.
9 Accept the default installation folder or click the Browse button tolocate and select a different folder. Click Next to continue.The Project Files Location page appears. This is the location where yourproject files will be stored.
NOTE: This page does not appear if the Autodesk Moldflow Synergy -User Interface application is already installed and you specified the userfolder location during that installation.
10 Select the user folder location option. In each user's 'My Documents'folder is selected by default. To accept this option, click Next.You may choose In a folder shared by all users. When you click Next,the All Users' Project Files Location page appears. Accept the default
24 | Installing on Windows systems

user folder location, or click the Browse button to locate and select adifferent folder, then click Next.The Select Temporary Files Folder page appears. This is where temporaryfiles will be written whenever an analysis is run on the current machine.
NOTE: This page does not appear if the Autodesk Moldflow Synergy -User Interface application is already installed and you specified thetemporary files folder during that installation.
11 Accept the default Temporary Files Folder, or click the Browse buttonto locate and select a different folder, then click Next.
NOTE: For optimum performance, it is important that you select a localdrive, rather than a network drive. The amount of temporary space thatwill be required depends primarily on the size and complexity of themodel being analyzed, the number of analyses being run simultaneously,and the frequency with which analyses are launched. You should selecta temporary directory with at least 2 GB of free space.
The Ready to Install page appears.
12 Review the installation settings. You can change settings by clickingBack until the relevant screen appears. When you are satisfied with thesettings, click Install to continue.The Installing page appears and the Wizard begins installing theAutodesk Moldflow Insight - Solvers software. A progress indicatorshows how much of the installation has been completed.
NOTE: If you selected I want to install the Network License Manageron this machine and the Autodesk Network License Manager applicationis not already installed, it will be installed automatically.
13 If you have not yet installed the Autodesk Moldflow Synergy - UserInterface application, a warning message appears to remind you. ClickOK to close the message dialog.
14 Click Finish to complete the Autodesk Moldflow Insight - Solversinstallation.
a If you selected I want to install the Network License Manager on thismachine, the option to Register your product and activate licensesonline appears and is selected by default, and a browser window willopen at the Autodesk - RegisterOnce web page.
NOTE: If you deselect this option, you can register and activate yourlicenses later. Go to registeronce.autodesk.com to register your productand activate your licenses.
The installation completes, and the installer exits.
IMPORTANT:
Installing on Windows systems | 25

■ Before you can use the Autodesk Moldflow Insight - Solvers application,the Autodesk Moldflow Synergy - User Interface application must beinstalled, and the Autodesk Network License Manager must be installedand you must be able to access it either locally or remotely on yournetwork.
NOTE: You must have activated your licenses on the license servermachine.
■ If you want to install Autodesk Inventor Fusion 2012 with AutodeskMoldflow Insight, we recommend that you also install AutodeskInventor Fusion 2012 Service Pack 1. On the Autodesk InventorFusion 2012 Install - Configure page, click the small down arrow toexpand the Autodesk Inventor Fusion 2012 configuration section, andthen select the service pack along with configuration options.
Command line installationAutodesk Moldflow Insight applications may be installed using commandline instructions.
Installing from a downloaded executable, using the command line
1 Click Start > Run.
2 Enter cmd in the Open text box.
3 Click OK to open the command prompt.
NOTE: Windows Vista Users should click Start and enter cmd in theStart Search dialog at the bottom of the Start menu. PressCTRL+SHIFT+ENTER to open the Administrator Command Prompt.
4 Navigate to the directory where you downloaded the installer executablefile.
5 Type the name of the executable file.For example: amipc-ui.exe or amipc-solvers.exe
Installing from the installation disk, using the command line
1 Click Start > Run.
2 Enter cmd in the Open text box.
3 Click OK.
26 | Installing on Windows systems

NOTE: Windows Vista Users should click Start and enter cmd in theStart Search dialog at the bottom of the Start menu. PressCTRL+SHIFT+ENTER to open the Administrator Command Prompt.
4 Navigate to the DVD-ROM drive.
5 Navigate to the {rel}\windows directory where {rel} is the currentAutodesk Moldflow release.For example: cd ami2012\windows
6 Type the name of the executable file.For example: amipc-ui.exe or amipc-solvers.exe
Autodesk Moldflow Insight command line installation options
There are several command line options that can be used to create silentinstalls and to set Autodesk Moldflow Insight component install options.
The command line installer requires the following items as mandatoryfields. If any of these are not supplied, the installer will fail.
■ Valid serial number (SN) and product code (PK)■ End User License Agreement (EULA) country selection■ License type (which must be set to Network)■ Network license server model and server name(s)■ Whether or not to install the Network License Manager■ When installing the user interface, the name or IP address of the default
Job Manager server.
To install the user interface:
NOTE: If you have already installed the solvers, certain options cannot bechanged and certain pages of the installer may not appear, even if youspecify different variables during the user interface installation. Thisbehavior is consistent with the installation process using the installationwizard.
amipc-ui.exe /eulalang="country_code" /sn="serial_number" /pk="product_key"/license="network"/networks="server_name"|/networkr="server_name1:server_name2:server_name3"/installnlm="yes"|"no" /jmserver="hostname"|"ipaddress" [/silent] [/verysilent][/dir="x:\dirname"] [/userdir="x:\dirname"] [/tmpdir="x:\dirname"]
To install the solvers:
NOTE: If you have already installed the user interface, certain optionscannot be changed and certain pages of the installer may not appear, evenif you specify different variables during the solvers installation. Thisbehavior is consistent with the installation process using the installationwizard.
Installing on Windows systems | 27

amipc-solvers.exe /eulalang="country_code" /sn="serial_number"/pk="product_key" /license="network"/networks="server_name"|/networkr="server_name1:server_name2:server_name3"/installnlm="yes"|"no" [/silent] [/verysilent] [/dir="x:\dirname"][/userdir="x:\dirname"] [/tmpdir="x:\dirname"]
Options/eulalang=country_code
Specify the country for the EULA. Options forcountry_code are:
enu = English—United Statesjpn = Japanchs = Chinacht = Taiwanfra = Francedeu = Deutschlandesn = Españaita = Italiakor = Korea, Southptg = Portugalptb = Brazilrus = Russiacze = Ceska Republikanld = Netherlandpol = Polskahun = Magyarországoth = Other Countries
/sn="serial_number"Specify the serial number provided with your product.
/pk="product_key"
Specify the product key provided with your product.
/license="network"Specify the type of license to install. This choiceinstalls a network license setup.
/networks="server_name"Specify the name of the server machine to use if youare installing a Single Network License.
/networkr="server_name1:server_name2:server_name3"Specify a quoted, colon-separated list of three servermachines to use if you are installing a RedundantNetwork License.
/installnlm="yes"Install the Network License Manager on this machine.
28 | Installing on Windows systems

/installnlm="no"Do not install the Network License Manager on thismachine.
/jmserver="hostname"|"ipaddress"Specify the hostname or IP address of the default JobManager server.
/silentOnly the Installing progress page is displayed, but noquestions are asked of the user.
/verysilentThe installer is completely silent, nothing is displayed.
/dir="x:\dirname"A quoted, fully specified pathname to an alternativeinstall directory.
/userdir="x:\dirname"A quoted, fully specified pathname to the user’s defaultprojects folder.
/tmpdir="x:\dirname"A quoted, fully specified pathname to the temporarydirectory.
Examples
Silently install the AutodeskMoldflow Insight - Solvers
amipc-solvers.exe/license="network"
application on this/sn="serial_number"machine. Also install the/pk="product_key" /eulalang="enu"Autodesk Network License/networks="localhost"
/installnlm="yes" /silent Manager on this machine.A Single Network Licenseconfiguration is specified,and the license server nameis set to localhost. Theinstallation wizardInstalling progress page isdisplayed but does notprompt for user input. TheUnited States Englishversion of the EULA will beapplied.
Silently install the AutodeskMoldflow Synergy - User
amipc-ui.exe /license="network"/sn="serial_number"
Interface application on/pk="product_key" /eulalang="fra"this machine. The user/networks="server2"chose not to install the/installnlm="no"
/jmserver="server1" /verysilent Autodesk Network License
Installing on Windows systems | 29

Manager on this machine.A Single Network Licenseconfiguration is specified,and the license server nameis set to server2. The user setthe default Job Managerserver to be server1. Theinstallation wizard is notdisplayed. The Frenchversion of the EULA will beapplied.
Install the AutodeskMoldflow Insight - Solvers
amipc-solvers.exe/sn="serial_number"
application on this/pk="product_key" /eulalang="ptb"machine. A Redundant/license="network"Network License/networkr="server1:server2:server3"
/installnlm="no" configuration is specified,and the license servernames are set to server1,server2, and server3. The userchose not to install theAutodesk Network LicenseManager on this machine.The installation wizard isdisplayed. The BrazilianPortuguese version of theEULA will be applied.
30 | Installing on Windows systems
3Installing Autodesk MoldflowInsight - Solvers—Linux
Before installing the Autodesk Moldflow Insight - Solvers application on a Linux system,check that your platform and hardware are supported.
Supported Linux platforms
Table 7: Supported Linux platforms
Hardware PlatformBitsOperating System
AMD or Intel x86-based 64-bitprocessor
64Red Hat Enterprise Linux 5.6 orlater
NOTE: The Autodesk Network License Manager application cannot be installedon Linux systems. Any Autodesk Moldflow product installation must be able toaccess a Windows machine running the license manager server.
Required subsystems and system patches on Linux
To run the installation script, the Korn shell must be loaded.
Autodesk Moldflow Insight requires relevant subsystems and system patches tobe installed.
Subsystems
■ C/C++ runtime libraries
The installation script will check for the availability of these subsystems anddisplay a warning if any are missing. If this occurs, please consult the hardwarevendor to obtain the required components.
Patches
Autodesk advises that you install all supplier recommended patches.
31
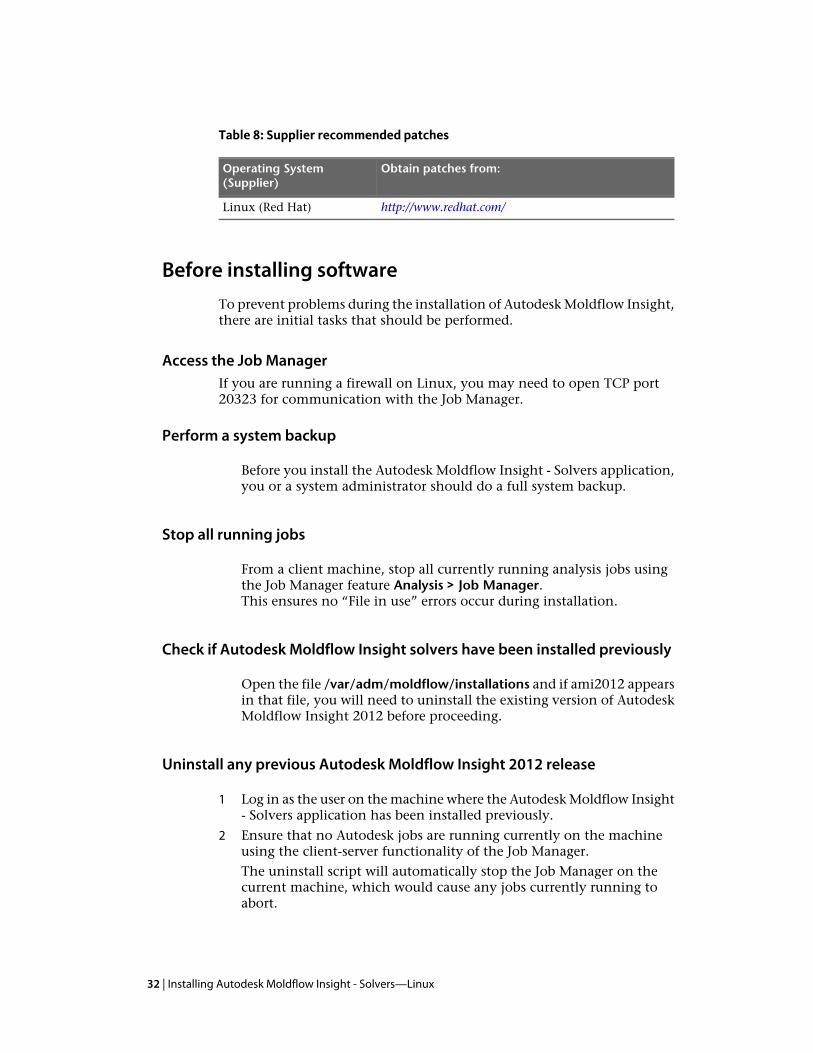
Table 8: Supplier recommended patches
Obtain patches from:Operating System(Supplier)
http://www.redhat.com/Linux (Red Hat)
Before installing softwareTo prevent problems during the installation of Autodesk Moldflow Insight,there are initial tasks that should be performed.
Access the Job ManagerIf you are running a firewall on Linux, you may need to open TCP port20323 for communication with the Job Manager.
Perform a system backup
Before you install the Autodesk Moldflow Insight - Solvers application,you or a system administrator should do a full system backup.
Stop all running jobs
From a client machine, stop all currently running analysis jobs usingthe Job Manager feature Analysis > Job Manager.This ensures no “File in use” errors occur during installation.
Check if Autodesk Moldflow Insight solvers have been installed previously
Open the file /var/adm/moldflow/installations and if ami2012 appearsin that file, you will need to uninstall the existing version of AutodeskMoldflow Insight 2012 before proceeding.
Uninstall any previous Autodesk Moldflow Insight 2012 release
1 Log in as the user on the machine where the Autodesk Moldflow Insight- Solvers application has been installed previously.
2 Ensure that no Autodesk jobs are running currently on the machineusing the client-server functionality of the Job Manager.
The uninstall script will automatically stop the Job Manager on thecurrent machine, which would cause any jobs currently running toabort.
32 | Installing Autodesk Moldflow Insight - Solvers—Linux
3 Log in as root, then run the script bin/mfuninstall in the directory thatwas specified for the ami2012 release in the/var/adm/moldflow/installations file.
4 Change to the parent directory in which the Autodesk Moldflow Insight- Solvers application is installed (for example, /opt/Autodesk/moldflow),and delete the ami2012 directory and subdirectories below it.For example: rm -r ami2012).
Preparing to install Autodesk Moldflow Insight - Solverson Linux
Installing the Autodesk Moldflow Insight - Solvers in a Linux environmentinvolves several steps.
1 Installation of the Autodesk Moldflow Insight - Solvers application.There are three ways to install the software on the local machine:
■ Directly from the DVD.■ From a tar file that you have copied from the DVD.■ Over the network.
Instructions for all methods are included.2 Configuration of each Autodesk Moldflow Insight user’s environment.
Local installation
Installing the Autodesk Moldflow Insight solvers on the local machineprovides the best performance but requires approximately 600 MB of diskspace on the local machine for the installed software.
Preparing to install directly from DVD
You must be logged in as root to install the Autodesk Moldflow Insightsoftware. Use the following command to ensure that you are using the rootenvironment:
su -
1 Mount the Autodesk Moldflow Insight installation DVD.
Many Linux systems require a DVD-ROM to be explicitly mountedbefore it can be accessed. Insert the DVD into the DVD-ROM drive andthen enter the appropriate mount command for your system from thefollowing table.
Installing Autodesk Moldflow Insight - Solvers—Linux | 33

Table 9: Example DVD mount commands on Linux
Example commandOperating System
mount /media/dvdromRed Hat EnterpriseLinux
The device names and mount points may be different on your system.If necessary, consult your system administrator for the actual devicenames and mount points used at your site.
2 Launch the installation setup script by entering the following command:
DVDPATH/ami2012/unix/setup
where DVDPATH specifies the path to the root directory of theDVD-ROM). The setup script will automatically detect the currentplatform.
NOTE: If you are installing the software via the network, enter thefollowing command on the file server machine:
DVDPATH/ami2012/unix/setup -p CODE
where DVDPATH specifies the path to the root directory of theDVD-ROM, and CODE specifies the platform for which you are installingAutodesk Moldflow Insight on the file server. The option for CODE is:lx26ol.
The Autodesk Moldflow Insight Setup Installation Menu is displayed.
Now continue to follow the instructions in Installing the Autodesk MoldflowInsight - Solvers application on Linux systems on page 37.
Preparing to install from tar files on DVD
You must be logged in as root to install the Autodesk Moldflow Insight -Solvers software. Use the following command to ensure that you are usingthe root environment:
su -
First copy the appropriate archive file (in tar format) for the platform onwhich the software is to be installed from the DVD to a network drive andthen extract the archive and perform the installation from the networkdrive.
This installation method can be advantageous if you have many installationsto perform because the extraction of files only needs to be performed once.
34 | Installing Autodesk Moldflow Insight - Solvers—Linux
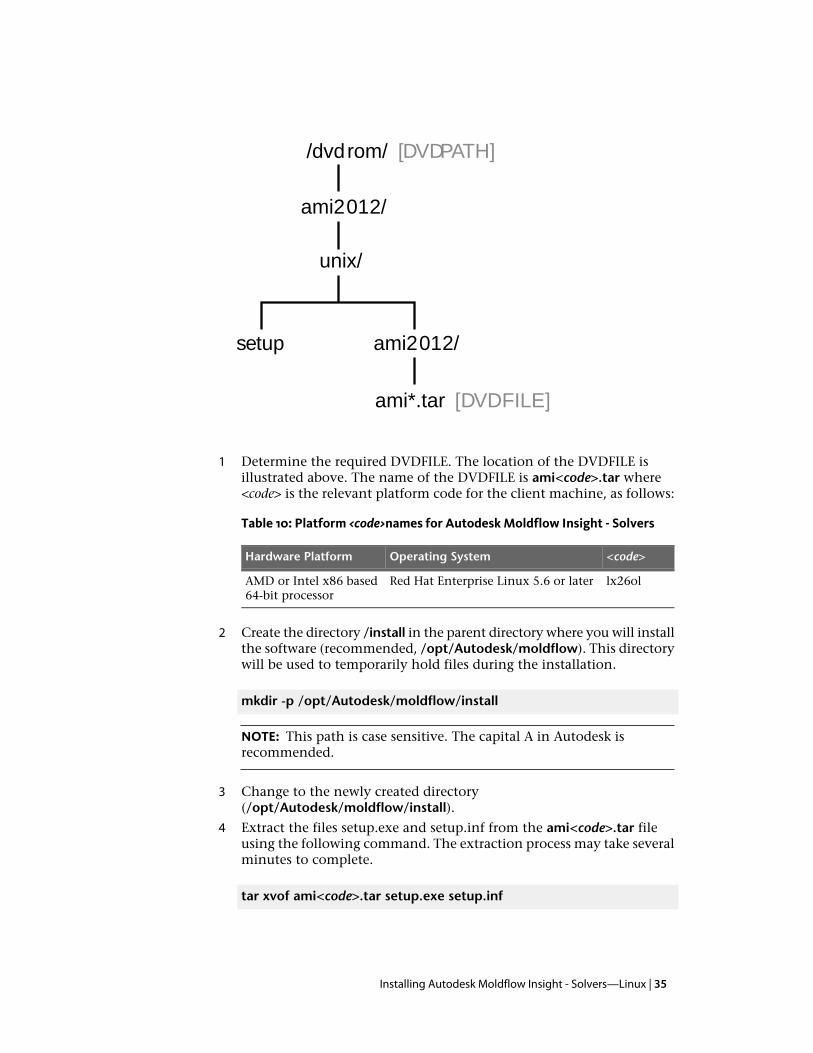
/dvdrom/ [DVDPATH]
ami2012/
setup
ami*.tar [DVDFILE]
unix/
ami2012/
1 Determine the required DVDFILE. The location of the DVDFILE isillustrated above. The name of the DVDFILE is ami<code>.tar where<code> is the relevant platform code for the client machine, as follows:
Table 10: Platform <code>names for Autodesk Moldflow Insight - Solvers
<code>Operating SystemHardware Platform
lx26olRed Hat Enterprise Linux 5.6 or laterAMD or Intel x86 based64-bit processor
2 Create the directory /install in the parent directory where you will installthe software (recommended, /opt/Autodesk/moldflow). This directorywill be used to temporarily hold files during the installation.
mkdir -p /opt/Autodesk/moldflow/install
NOTE: This path is case sensitive. The capital A in Autodesk isrecommended.
3 Change to the newly created directory(/opt/Autodesk/moldflow/install).
4 Extract the files setup.exe and setup.inf from the ami<code>.tar fileusing the following command. The extraction process may take severalminutes to complete.
tar xvof ami<code>.tar setup.exe setup.inf
Installing Autodesk Moldflow Insight - Solvers—Linux | 35
5 Run the setup.exe script in the install directory:
./setup.exe
Now continue to follow the instructions in Installing the Autodesk MoldflowInsight - Solvers application on Linux systems on page 37.
Preparing to install by downloading tar files
You must be logged in as root to install the Autodesk Moldflow Insight -Solvers software. Use the following command to ensure that you are usingthe root environment:
su -
1 Create the directory /opt/Autodesk/moldflow/install. This directorywill be used to temporarily hold files during the installation.
mkdir -p /opt/Autodesk/moldflow/install
NOTE: This path is case sensitive. The capital A in Autodesk isrecommended.
2 Change to the /opt/Autodesk/moldflow/install directory.
3 Extract the files setup.exe and setup.inf from the <downloaded tar file>using the following command. The extraction process may take severalminutes to complete.
tar xvof <downloaded tar file> setup.exe setup.inf
4 Run the setup.exe script in the install directory:
./setup.exe
Now continue to follow the instructions in Installing the Autodesk MoldflowInsight - Solvers application on Linux systems on page 37.
Network installation
Many customers choose to install the Autodesk Moldflow Insight softwareon one machine (the file server) and then run the solvers on other machinesin the network (the client machines) via an NFS mounted disk.
If you wish to install the Autodesk Moldflow Insight software on a fileserver, and then set up the client machines, you will launch the AutodeskMoldflow Insight installation script in a different manner than if you are
36 | Installing Autodesk Moldflow Insight - Solvers—Linux

installing on the local machine. Specific instructions for this step areincluded in Setting up client machines from a file server on page 38.
Installing the Autodesk Moldflow Insight - Solversapplication on Linux systems
1 Select Autodesk Moldflow Insight - Solvers by entering the numberassociated with that menu item.
2 Enter the number corresponding to the menu item Install SelectedProducts.
3 Choose whether you are installing from a CD-ROM.
■ If you enter y, then you must enter the name of the tar filecorresponding to the platform that you wish to use:
Table 11: Platform tar files
File NameOperating SystemHardware Platform
amilx26ol.tarRed Hat Enterprise Linux 5.6 or laterAMD or Intel x86 based64-bit processor
■ If you enter n, you will be prompted to enter the path and name ofthe tar file. Type in this information and press Enter.
The installation script will now load and extract the files. This may takea while depending on the speed of your machine and DVD-ROM driveif you are installing from a DVD.
4 Choose whether you want to install the Autodesk client machine setup.
NOTE: The Autodesk client machine will install the Autodesk JobManager on the client machine, allow you to set your temporarydirectory location and set values for a selection of environment variables.
■ If you enter y, you will launch the Autodesk client machine setupscript now. Continue to complete the remaining steps to installAutodesk Moldflow Insight - Solvers.
■ If you enter n, you will launch the client setup script manually at alater time. You will be returned to the Autodesk Moldflow InsightSetup Installation Menu and you do not have to complete theremaining steps to install Autodesk Moldflow Insight - Solvers.
NOTE: To run the client setup script at a later time, enter:/opt/Autodesk/moldflow/ami2012/bin/mfclient
5 Select the location of a temporary files directory.
Installing Autodesk Moldflow Insight - Solvers—Linux | 37
This is where the Job Manager will write temporary files whenever ananalysis is run on the current machine. For optimum performance, itis essential that you select a local drive rather than a network drive.The amount of temporary space that will be required depends primarilyon the size and complexity of the models being analyzed, the numberof simulations being run simultaneously, and the frequency with whichsimulations are launched. You should select a temporary directoryproviding several gigabytes of disk space as a minimum.
NOTE: The /tmp directory on many Linux systems will not havesufficient space for use as the Job Manager temporary directory. Pleasecheck the available disk space carefully.
6 Enter y to confirm the default location of the temporary directory(/tmp), or enter n to specify an alternate directory.
NOTE: You can change the location of the Job Manager temporarydirectory at any time. To do so, log in as root on the client machine,and stop the Job Manager (./ami2012jmrc stop in the/var/adm/moldflow/ directory). Edit the MFSYN_TMP variable in theami2012jm_perhost_vars.ksh file found in the /var/adm/moldflow/directory. Restart the Job Manager (./ami2012jmrc start in the/var/adm/moldflow/ directory.
If you selected an alternative directory, the script will display theavailable disk space in the specified directory and ask for confirmationbefore proceeding.
When the setup script has restarted the Job Manager, your Autodeskclient machine setup for Autodesk Moldflow Insight - Solvers iscomplete.
Setting up client machines from a file server
1 If you have installed the required software components on a file server,and you wish to set up other Autodesk client machines, you will needto follow the steps below to mount the directory on the file server wherethe Autodesk Moldflow Insight server has been installed, and then startthe mfclient script manually on each machine that is to act as anAutodesk client.
NOTE: If you have installed the software locally, you can still use thismachine as an Autodesk file server for other same-platform machinesin your network. That is, you can always mount the file system andconfigure other Autodesk client machines, regardless of how theAutodesk file server has been configured.
38 | Installing Autodesk Moldflow Insight - Solvers—Linux

2 To mount the installation directory and manually launch the mfclientscript, you must log in as root on the client machine.
3 Mount the directory <servername>:/opt/Autodesk/moldflow/ami2012on the current machine.For example, for a file server with hostname hawk and software installedin /opt/Autodesk/moldflow/ami2012, you would enter the command:
mount hawk:/opt/Autodesk/moldflow/ami2012
NOTE: The directory path where the software is mounted must be thesame on all same-platform Autodesk client machines. This is becausethe settings in the MFENV.csh or MFENV.sh file include the path.
4 Start the mfclient script by changing to the directory/opt/Autodesk/moldflow/ami2012/bin and typing
./mfclient
5 The mfclient script prompts you to confirm whether you wish toproceed: Do you wish to proceed with the Autodesk ClientMachine setup? (y/n) [yes]:
6 Enter y to continue.
The script will now check for the required operating system componentsand patches and configure the relevant Autodesk Moldflow Insightrelated script files.
If you wish to run the Autodesk Moldflow Insight solvers from thecommand line rather than via the Job Manager, you will need to set upeach user's environment.
Setting up each user's environment
Each Autodesk Moldflow Insight user's environment must include PATHand other environment variables that enable Autodesk Moldflow Insightto function correctly.
NOTE: Setting up an environment should be done by the user. This willensure correct ownership and permissions for the altered files.
C-shell user environment setup
1 Open the user's .cshrc file in their home directory in a text editor.
2 If present, remove any previous release Autodesk Moldflow Insight orDynamic Series environment variable settings.
3 Add the following line to the bottom of the file:
Installing Autodesk Moldflow Insight - Solvers—Linux | 39

source /opt/Autodesk/moldflow/ami2012/data/MFENV.csh
4 Save the changes to the .cshrc file and exit the editor.
5 Source the .cshrc file by entering:
source .cshrc
Bourne-shell and Korn-shell user environment setup
1 Open the user's .profile file in their home directory in a text editor.
2 If present, remove any Autodesk Moldflow environment variable settingsfor a previous Autodesk Moldflow Insight or Dynamic Series release.
3 Add the following line to the bottom of the file:
. /opt/Autodesk/moldflow/ami2012/data/MFENV.sh
NOTE: The dot and space character ( . ) at the start of the line areessential. The dot is actually a shell command similar to the C-shellsource command.
4 Save the changes to the .profile file and exit the editor.
5 Source the .profile file by entering:
. ./.profile
40 | Installing Autodesk Moldflow Insight - Solvers—Linux

AMinimum licenserequirements
This table lists the minimum license requirements for different analysis types and generaloperations.
Autodesk Moldflow InsightAutodesk Moldflow AdviserAnalysis type /operation
SynergyDesignOpen Synergy (GUI)
SynergyDesignView Results
SynergyDesignGenerate Model
SynergyDesignGenerate Report
BasicDesignFill Analysis
BasicDesignGate Location Analysis
BasicDesignMolding Window Analysis
Not ApplicableDesignCooling Quality Analysis
Not ApplicableDesignDesign Adviser Analysis
BasicDesignSink Mark Analysis
BasicNot ApplicableMidplane Analysis Technology
BasicDesignDual Domain Analysis Technology
BasicManufacturing3D Analysis Technology
Not ApplicableManufacturingRunner Adviser Analysis
BasicManufacturingRunner Balance Analysis
BasicNot ApplicableMesh Model
BasicNot ApplicableReactive Molding
BasicNot ApplicableMultiple Barrel
BasicNot ApplicableRTM/SRIM
BasicNot ApplicableDesign of Experiments Analysis
BasicNot ApplicableOvermolding
BasicAdvancedFill+Pack Analysis
PerformanceAdvancedCool Analysis
PerformanceAdvancedWarp Analysis
41
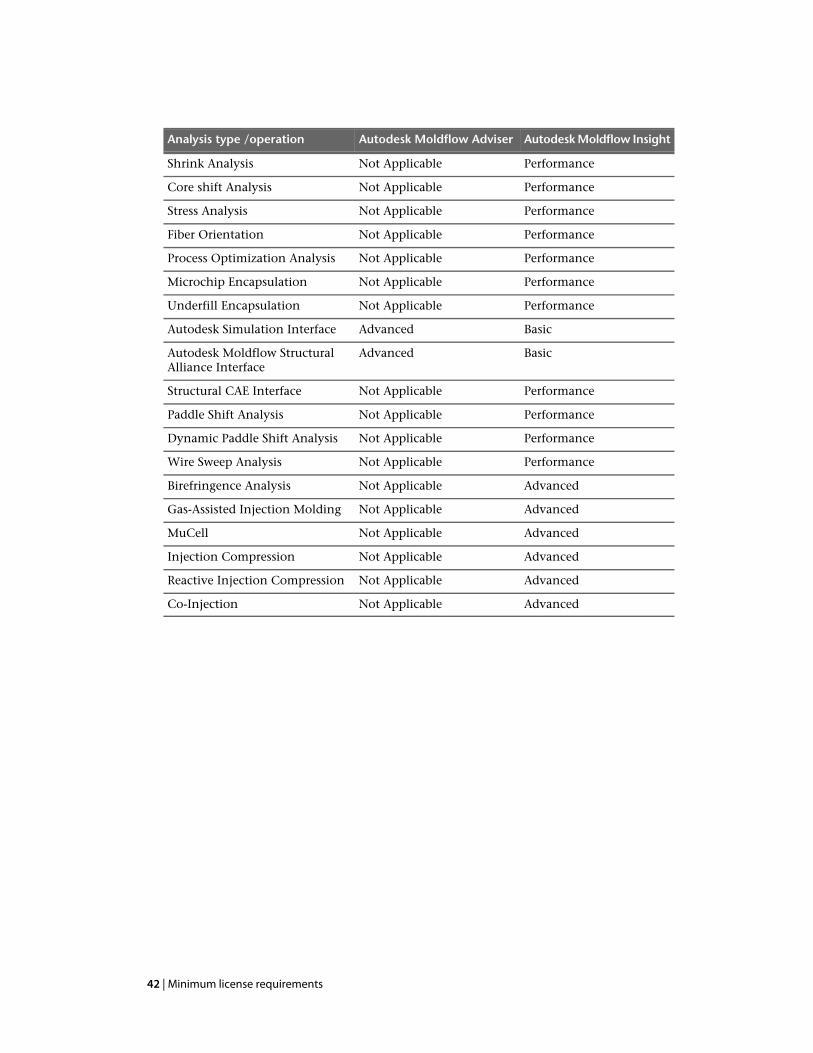
Autodesk Moldflow InsightAutodesk Moldflow AdviserAnalysis type /operation
PerformanceNot ApplicableShrink Analysis
PerformanceNot ApplicableCore shift Analysis
PerformanceNot ApplicableStress Analysis
PerformanceNot ApplicableFiber Orientation
PerformanceNot ApplicableProcess Optimization Analysis
PerformanceNot ApplicableMicrochip Encapsulation
PerformanceNot ApplicableUnderfill Encapsulation
BasicAdvancedAutodesk Simulation Interface
BasicAdvancedAutodesk Moldflow StructuralAlliance Interface
PerformanceNot ApplicableStructural CAE Interface
PerformanceNot ApplicablePaddle Shift Analysis
PerformanceNot ApplicableDynamic Paddle Shift Analysis
PerformanceNot ApplicableWire Sweep Analysis
AdvancedNot ApplicableBirefringence Analysis
AdvancedNot ApplicableGas-Assisted Injection Molding
AdvancedNot ApplicableMuCell
AdvancedNot ApplicableInjection Compression
AdvancedNot ApplicableReactive Injection Compression
AdvancedNot ApplicableCo-Injection
42 | Minimum license requirements