Embed Size (px)
Citation preview
Installation Instructions Fascia for Bead Chain Clutch Dual Roller FlexShade
Copyright © 2016 Draper Inc. Form FasciaBeadChainClutchDualRoller_Inst16 Printed in U.S.A.
Caution 1 Inspect all boxes to make sure you have received the proper shades and parts. Controls may be shipped separately, or in same carton as shades.2 Open cartons lengthwise.3 If shades are to be installed in areas accessible to young children, be certain to use cord tension device and heed warning below.4 It is the installer’s responsibility to make sure appropriate fasteners are used for mounting surface.5 All endcaps, fascia, pocket headbox and other hardware must be installed level. Shades must be level and square.6 Please read the following installation guidelines thoroughly and follow them carefully. Failure to do so may cause product to fall or otherwise fail, and invalidates warranty.
ContinuedIf you encounter any difficulties installing or servicing your Fascia for Dual Roller FlexShade System, call your dealer or Draper, Inc., Spiceland, Ind., (765) 987-7999 or fax (765) 987-7142.
Mounting Endcaps (Brackets)(1) Snap endcap covers onto endcaps. The proper orientation of Left-Hand, Right-Hand, Front and Back is molded into endcap covers (see Fig. 1).
(2) Mark wall, jamb or ceiling for placement of mounting endcaps.
Caution: Before mounting shades, verify measurements on the card provided with the shade, and ensure the endcaps are installed at the correct width.
(3) Drill small starter hole (if necessary) in mounting surface. (4) Mount endcaps using appropriate fasteners for surface.
NOTE: The installer is responsible for selecting appropriate mounting hardware for site conditions.
NOTE: It is essential that endcaps are fastened securely to the mounting surface and are not able to move from side to side.
(5) Remove chain guides from idler end bracket (Fig. 2).
Warning For the Safety of Young Children
Young children can STRANGLE in cord and bead chain loops. They can also wrap cords around their necks and STRANGLE. • Always keep cords and bead chains out of children’s reach. • Move cribs, playpens, and other furniture away from cords and bead chains. Children can climb furniture to get to cords. • Attach tension device to wall or floor. This can prevent children from pulling cords and bead chains around their necks. Fasteners provided with the tension device may not be appropriate for all mounting sur- faces. Use appropriate anchors for the mounting surface conditions (see instructions on page 2).
LEFT-HAND TOPRIGHT-HAND TOP
LEFT-HAND TOP RIGHT-HAND TOP
BEAD CHAIN CLUTCHOPERATOR ENDCAPS
ENDCAP COVER
SNAP-ON
OPOP
SNAP-ON
ENDCAP COVER
SNAP-ON
L
SNAP-ON
Figure (1)
Idler EndFigure (2)
Figure (3)
Operator EndFigure (4)
Tools Required:
Tape Measure Pencil Power Drill Fastening Hardware (By others)
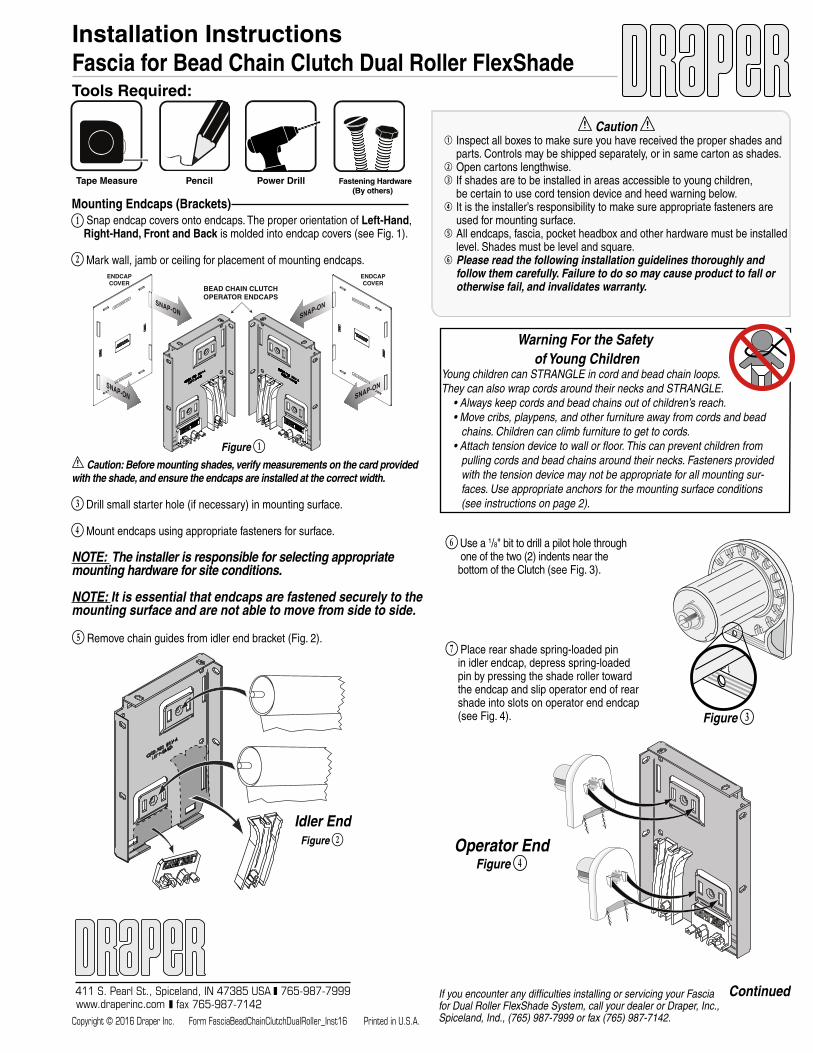
(6) Use a 1/8" bit to drill a pilot hole through one of the two (2) indents near the bottom of the Clutch (see Fig. 3).
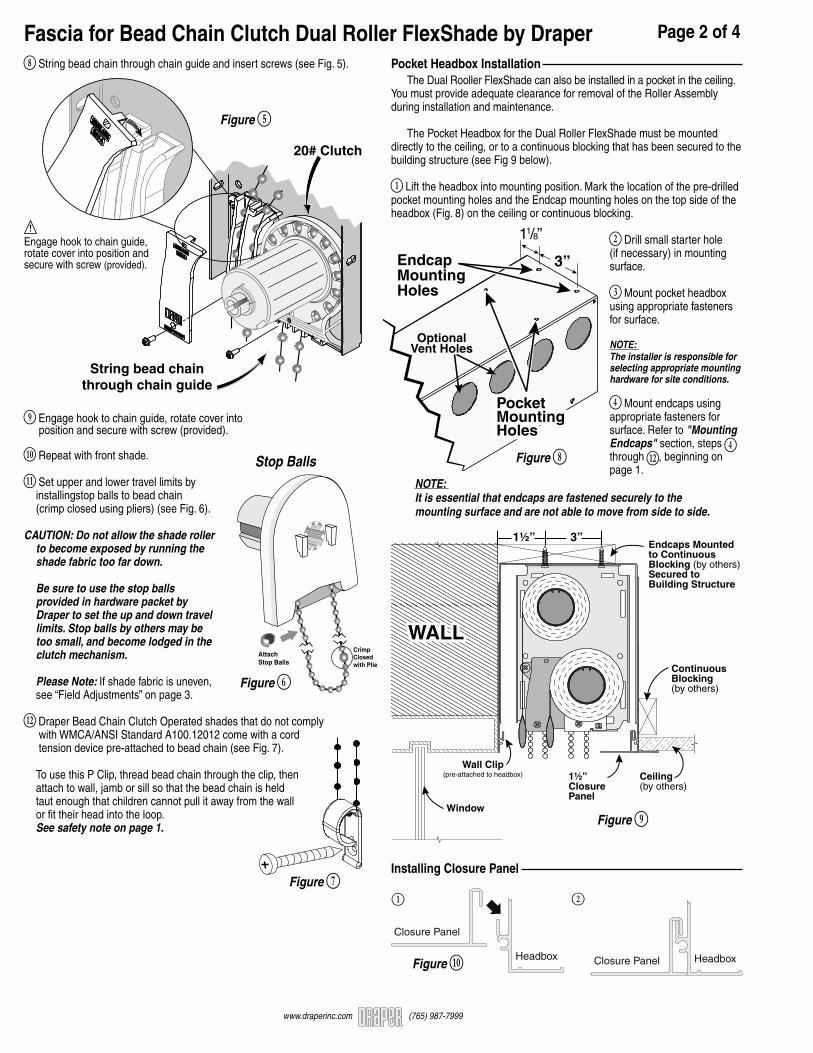
(7) Place rear shade spring-loaded pin in idler endcap, depress spring-loaded pin by pressing the shade roller toward the endcap and slip operator end of rear shade into slots on operator end endcap (see Fig. 4).
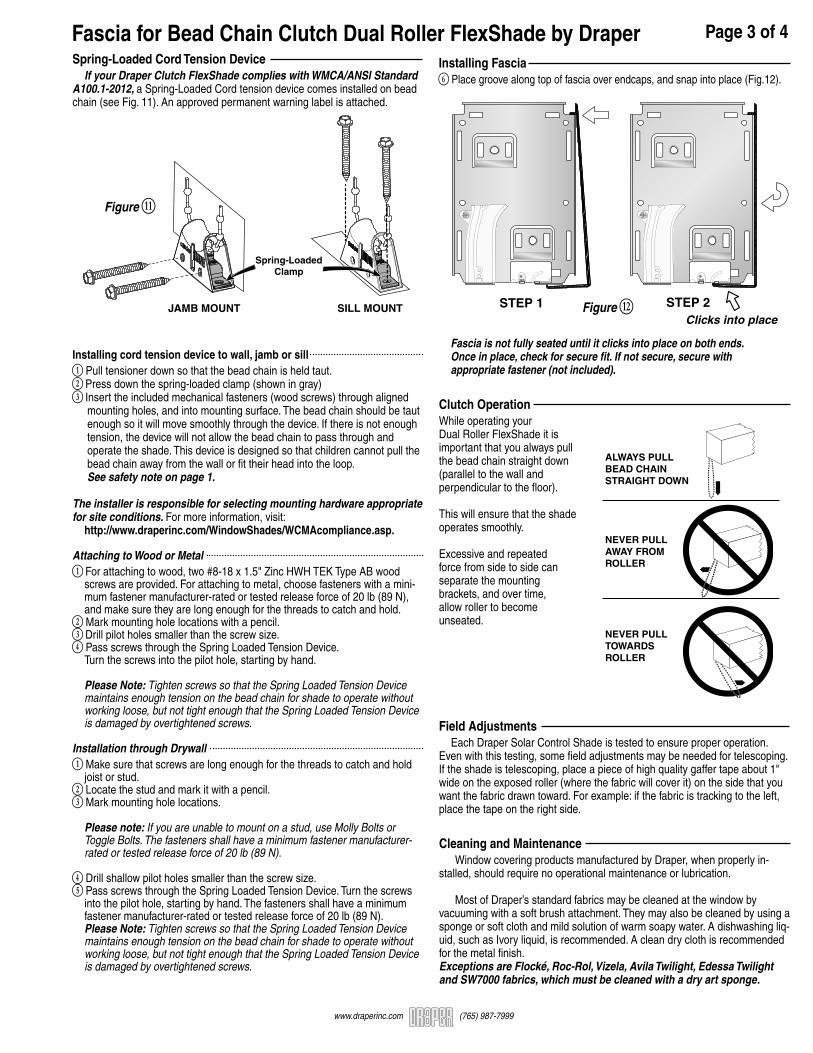
Pocket Headbox Installation The Dual Rooller FlexShade can also be installed in a pocket in the ceiling. You must provide adequate clearance for removal of the Roller Assembly during installation and maintenance. The Pocket Headbox for the Dual Roller FlexShade must be mounted directly to the ceiling, or to a continuous blocking that has been secured to the building structure (see Fig 9 below).
(1) Lift the headbox into mounting position. Mark the location of the pre-drilled pocket mounting holes and the Endcap mounting holes on the top side of the headbox (Fig. 8) on the ceiling or continuous blocking.
(2) Drill small starter hole (if necessary) in mounting surface.
(3) Mount pocket headbox using appropriate fasteners for surface.
NOTE: The installer is responsible for selecting appropriate mounting hardware for site conditions. (4) Mount endcaps using appropriate fasteners for surface. Refer to "Mounting Endcaps" section, steps (4) through (12), beginning on page 1.
NOTE: It is essential that endcaps are fastened securely to the mounting surface and are not able to move from side to side.
Installing Closure Panel
Fascia for Bead Chain Clutch Dual Roller FlexShade by Draper Page 2 of 4
www.draperinc.com (765) 987-7999
(8) String bead chain through chain guide and insert screws (see Fig. 5).
(9) Engage hook to chain guide, rotate cover into position and secure with screw (provided).
(10) Repeat with front shade.
(11) Set upper and lower travel limits by installingstop balls to bead chain (crimp closed using pliers) (see Fig. 6). CAUTION: Do not allow the shade roller to become exposed by running the shade fabric too far down. Be sure to use the stop balls provided in hardware packet by Draper to set the up and down travel limits. Stop balls by others may be too small, and become lodged in the clutch mechanism. Please Note: If shade fabric is uneven, see “Field Adjustments” on page 3. (12) Draper Bead Chain Clutch Operated shades that do not comply with WMCA/ANSI Standard A100.12012 come with a cord tension device pre-attached to bead chain (see Fig. 7). To use this P Clip, thread bead chain through the clip, then attach to wall, jamb or sill so that the bead chain is held taut enough that children cannot pull it away from the wall or fit their head into the loop. See safety note on page 1.
String bead chain through chain guide
20# Clutch
Engage hook to chain guide, rotate cover into position and secure with screw (provided).
Figure (5)
Stop Balls
Crimp Closed with Pliers
Attach Stop Balls
Figure (6)
Figure (7)
3”
Pocket Mounting Holes
Pocket Mounting Holes
Endcap Mounting Holes
11/8”
OptionalVent Holes
Figure (8)
Window
Ceiling(by others)
Continuous Blocking(by others)
Endcaps Mountedto Continuous Blocking (by others)Secured to Building Structure
WALL
1½”Closure Panel
Wall Clip(pre-attached to headbox)
1½” 3”
Figure (9)
HeadboxClosure Panel
Headbox
Closure Panel
B
C
HeadboxClosure Panel
Headbox
Closure Panel
B
C
Figure (10)
Installing Fascia(6) Place groove along top of fascia over endcaps, and snap into place (Fig.12).
Fascia is not fully seated until it clicks into place on both ends. Once in place, check for secure fit. If not secure, secure with appropriate fastener (not included).
Field Adjustments Each Draper Solar Control Shade is tested to ensure proper operation. Even with this testing, some field adjustments may be needed for telescoping. If the shade is telescoping, place a piece of high quality gaffer tape about 1" wide on the exposed roller (where the fabric will cover it) on the side that you want the fabric drawn toward. For example: if the fabric is tracking to the left, place the tape on the right side.
Cleaning and Maintenance Window covering products manufactured by Draper, when properly in-stalled, should require no operational maintenance or lubrication.
Most of Draper’s standard fabrics may be cleaned at the window by vacuuming with a soft brush attachment. They may also be cleaned by using a sponge or soft cloth and mild solution of warm soapy water. A dishwashing liq-uid, such as Ivory liquid, is recommended. A clean dry cloth is recommended for the metal finish. Exceptions are Flocké, Roc-Rol, Vizela, Avila Twilight, Edessa Twilight and SW7000 fabrics, which must be cleaned with a dry art sponge.
Fascia for Bead Chain Clutch Dual Roller FlexShade by Draper Page 3 of 4
www.draperinc.com (765) 987-7999
Spring-Loaded Cord Tension Device If your Draper Clutch FlexShade complies with WMCA/ANSI Standard A100.1-2012, a Spring-Loaded Cord tension device comes installed on bead chain (see Fig. 11). An approved permanent warning label is attached.
Installing cord tension device to wall, jamb or sill (1) Pull tensioner down so that the bead chain is held taut. (2) Press down the spring-loaded clamp (shown in gray) (3) Insert the included mechanical fasteners (wood screws) through aligned mounting holes, and into mounting surface. The bead chain should be taut enough so it will move smoothly through the device. If there is not enough tension, the device will not allow the bead chain to pass through and operate the shade. This device is designed so that children cannot pull the bead chain away from the wall or fit their head into the loop. See safety note on page 1. The installer is responsible for selecting mounting hardware appropriate for site conditions. For more information, visit: http://www.draperinc.com/WindowShades/WCMAcompliance.asp. Attaching to Wood or Metal(1) For attaching to wood, two #8-18 x 1.5" Zinc HWH TEK Type AB wood screws are provided. For attaching to metal, choose fasteners with a mini- mum fastener manufacturer-rated or tested release force of 20 lb (89 N), and make sure they are long enough for the threads to catch and hold.(2) Mark mounting hole locations with a pencil.(3) Drill pilot holes smaller than the screw size. (4) Pass screws through the Spring Loaded Tension Device. Turn the screws into the pilot hole, starting by hand.
Please Note: Tighten screws so that the Spring Loaded Tension Device maintains enough tension on the bead chain for shade to operate without working loose, but not tight enough that the Spring Loaded Tension Device is damaged by overtightened screws. Installation through Drywall(1) Make sure that screws are long enough for the threads to catch and hold joist or stud.(2) Locate the stud and mark it with a pencil.(3) Mark mounting hole locations. Please note: If you are unable to mount on a stud, use Molly Bolts or Toggle Bolts. The fasteners shall have a minimum fastener manufacturer- rated or tested release force of 20 lb (89 N).
(4) Drill shallow pilot holes smaller than the screw size.(5) Pass screws through the Spring Loaded Tension Device. Turn the screws into the pilot hole, starting by hand. The fasteners shall have a minimum fastener manufacturer-rated or tested release force of 20 lb (89 N). Please Note: Tighten screws so that the Spring Loaded Tension Device maintains enough tension on the bead chain for shade to operate without working loose, but not tight enough that the Spring Loaded Tension Device is damaged by overtightened screws.
Clutch OperationWhile operating your Dual Roller FlexShade it is important that you always pull the bead chain straight down (parallel to the wall and perpendicular to the floor). This will ensure that the shade operates smoothly.
Excessive and repeated force from side to side can separate the mounting brackets, and over time, allow roller to become unseated.
ALWAYS PULL BEAD CHAIN STRAIGHT DOWN NEVER PULL AWAY FROM ROLLER NEVER PULL TOWARDSROLLER
JAMB MOUNT SILL MOUNT
Spring-LoadedClamp
Figure (11)
STEP 2Clicks into place
STEP 1 Figure (12)
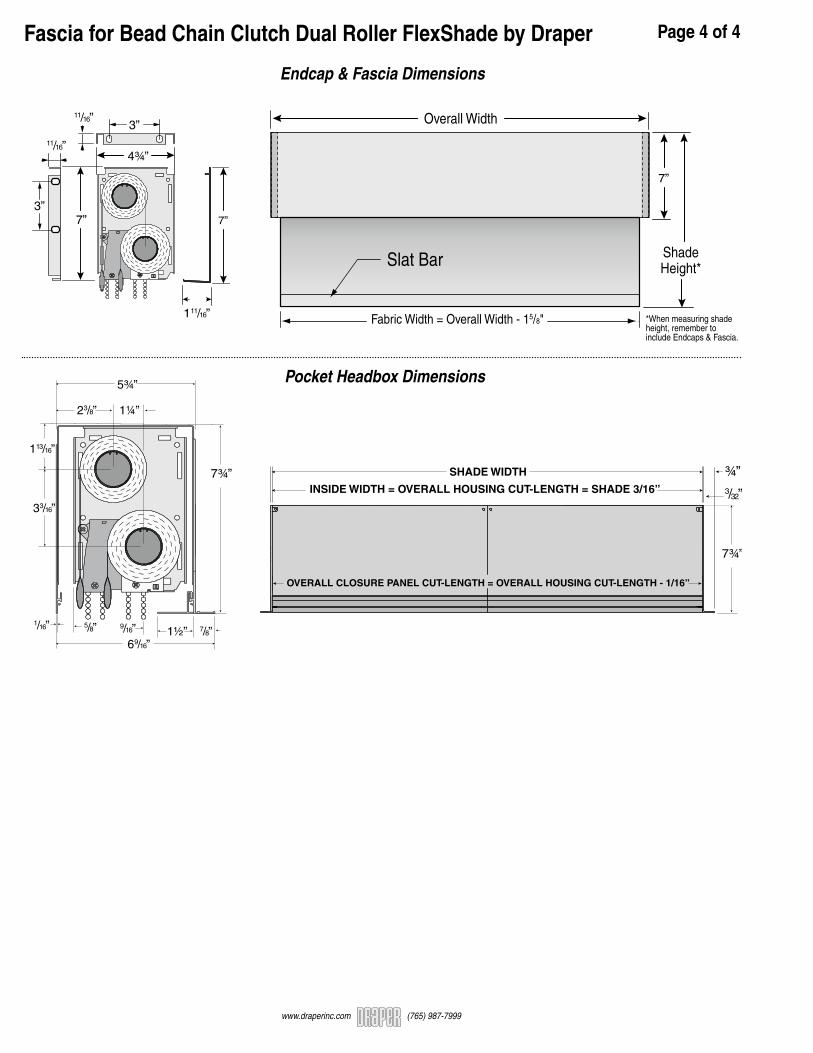
*When measuring shade height, remember to include Endcaps & Fascia.
Overall Width
Slat Bar
Fabric Width = Overall Width - 15/8"
ShadeHeight*
7”
1 11/16”
4¾”
7”
3”11/16”
11/16”
3” 7”
www.draperinc.com (765) 987-7999
Fascia for Bead Chain Clutch Dual Roller FlexShade by Draper Page 4 of 4
3/32”
¾”
OVERALL CLOSURE PANEL CUT-LENGTH = OVERALL HOUSING CUT-LENGTH - 1/16”
INSIDE WIDTH = OVERALL HOUSING CUT-LENGTH = SHADE 3/16”
SHADE WIDTH
7¾”
23/8” 1¼”
5¾”
33/16”
113/16”
7/8”6 9/16”
9/16”5/8” 1½”1/16”
7¾”
Endcap & Fascia Dimensions
Pocket Headbox Dimensions
*When measuring shade height, remember to include Endcaps & Fascia.
Overall Width
Slat Bar
Fabric Width = Overall Width - 15/8"
ShadeHeight*
7”
1 11/16”
4¾”
7”
3”11/16”
11/16”
3” 7”