Embed Size (px)
Citation preview

The Ultimate Android™ Tablet for Families™
INSTRUCTION MANUAL
1) FEATURES
CONTENT
Included in the box.......................................................................................................................................................................Overview.........................................................................................................................................................................................Charging..........................................................................................................................................................................................Automatic lock..............................................................................................................................................................................Home screen..................................................................................................................................................................................Portrait / Landscape orientation............................................................................................................................................Multi-touch screen.......................................................................................................................................................................Camera ...........................................................................................................................................................................................Connect Kurio to PC/Mac®........................................................................................................................................................External storage.........................................................................................................................................................................Transfer file....................................................................................................................................................................................Android interface .........................................................................................................................................................................Connect Kurio to TV screen......................................................................................................................................................
1-11-21-31-41-51-61-71-81-91-101-111-121-13
12334568910111113

2) STARTING WITH KURIO 7
Setup Kurio............................................................................................................................................................................Choose your language.......................................................................................................................................................Set-Up date and time..........................................................................................................................................................Select and connecting to Wi-Fi.......................................................................................................................................Serial number.........................................................................................................................................................................Create Parental account...................................................................................................................................................Create User account...........................................................................................................................................................Internet security level........................................................................................................................................................Content filtering parameters...........................................................................................................................................Time management................................................................................................................................................................App management..................................................................................................................................................................Initial setup completed.......................................................................................................................................................
Step 1 Step 2Step 3Step 4Step 5Step 6Step 7Step 8Step 9Step 10Step 11
3) PARENTAL AREA
How to get access to the Parental area?..........................................................................................................................Profile...........................................................................................................................................................................................Tablet setup.................................................................................................................................................................................Kurio Store ...................................................................................................................................................................................Main account...............................................................................................................................................................................Android ..........................................................................................................................................................................................
3-13-23-33-43-53-6
141415171819212325262831
323435353737
4) SUPPORT AND IMPORTANT INFORMATION
4-14-24-34-44-54-64-74-84-9
383940404041414243
Update Kurio system................................................................................................................................................................Warning........................................................................................................................................................................................Tech support and warranty information...........................................................................................................................Restricted use of electronic devices.................................................................................................................................FAQ / Troubleshooting..............................................................................................................................................................Exposure to radio frequency energy.................................................................................................................................Recycling .................................................................................................................................................................................... Declaration of conformity.......................................................................................................................................................Copyrights .................................................................................................................................................................................
1
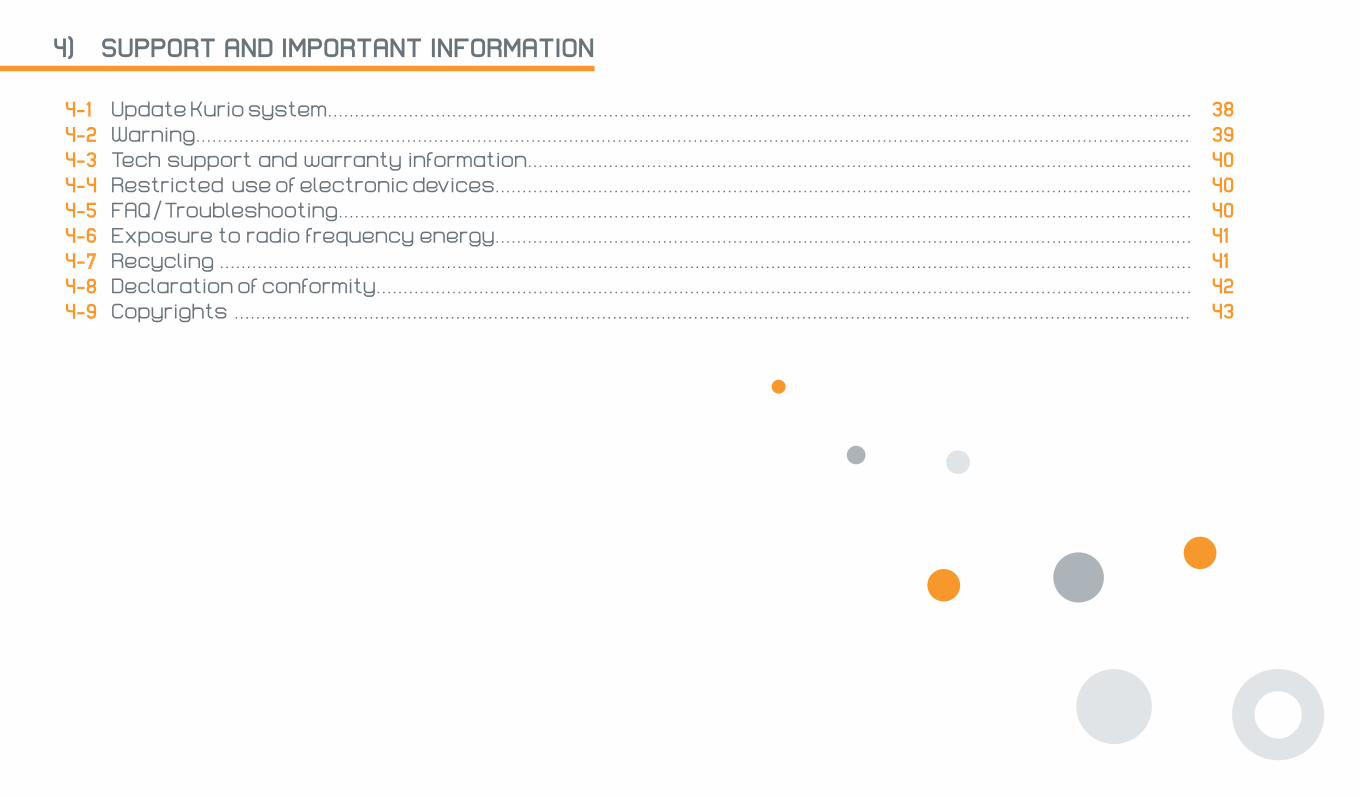
The following accessories are included in the box:
Included in the box1-1
1- FEATURES
Kurio tablet7 inch
Anti-shock cover
USB Cable
USB to Mini-USB adapter
Power Adapter (DC 5V–2A)
2
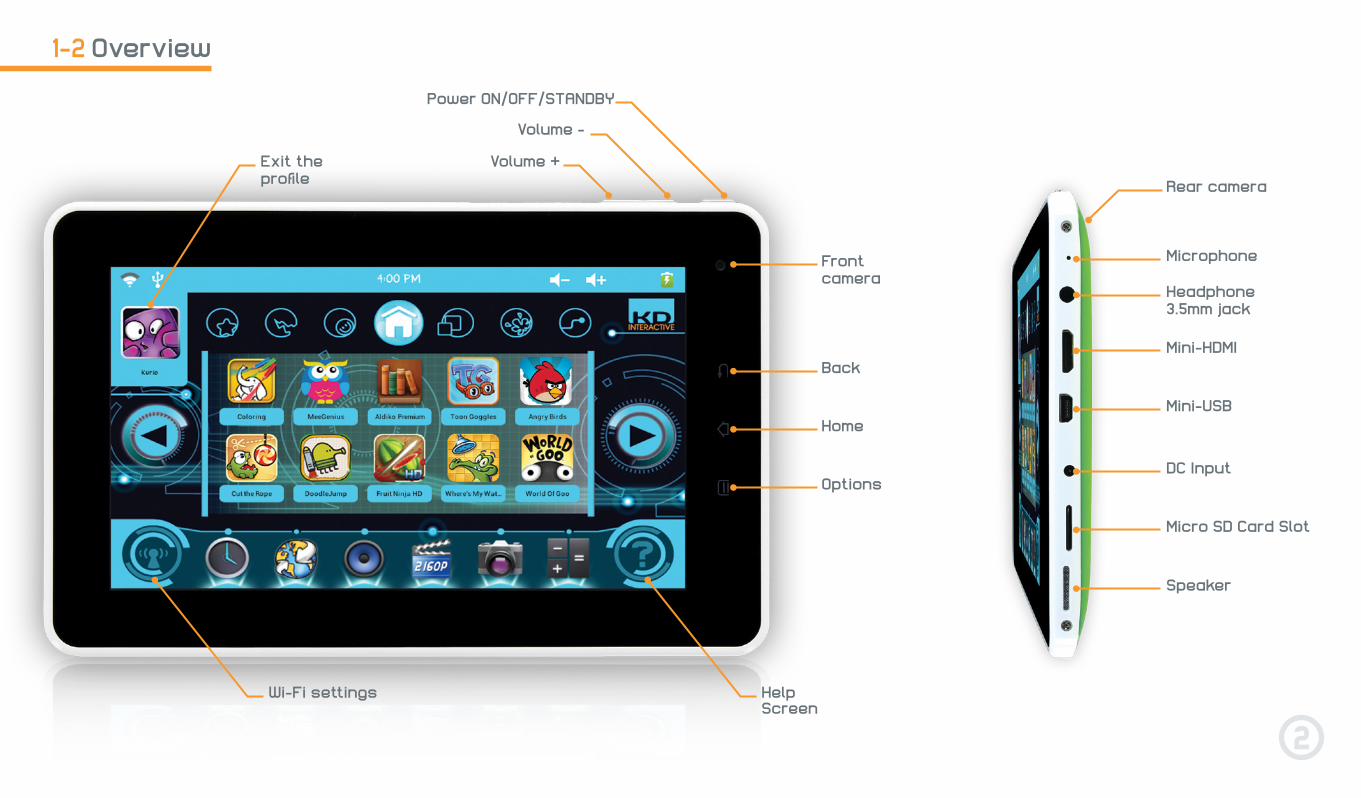
Overview1-2
Power ON/OFF/STANDBY
Volume -
Volume +Exit the profile
Wi-Fi settings Help Screen
Back
Front camera
Microphone
Rear camera
Headphone3.5mm jack
Mini-HDMI
Mini-USB
DC Input
Micro SD Card Slot
Speaker
Home
Options
3
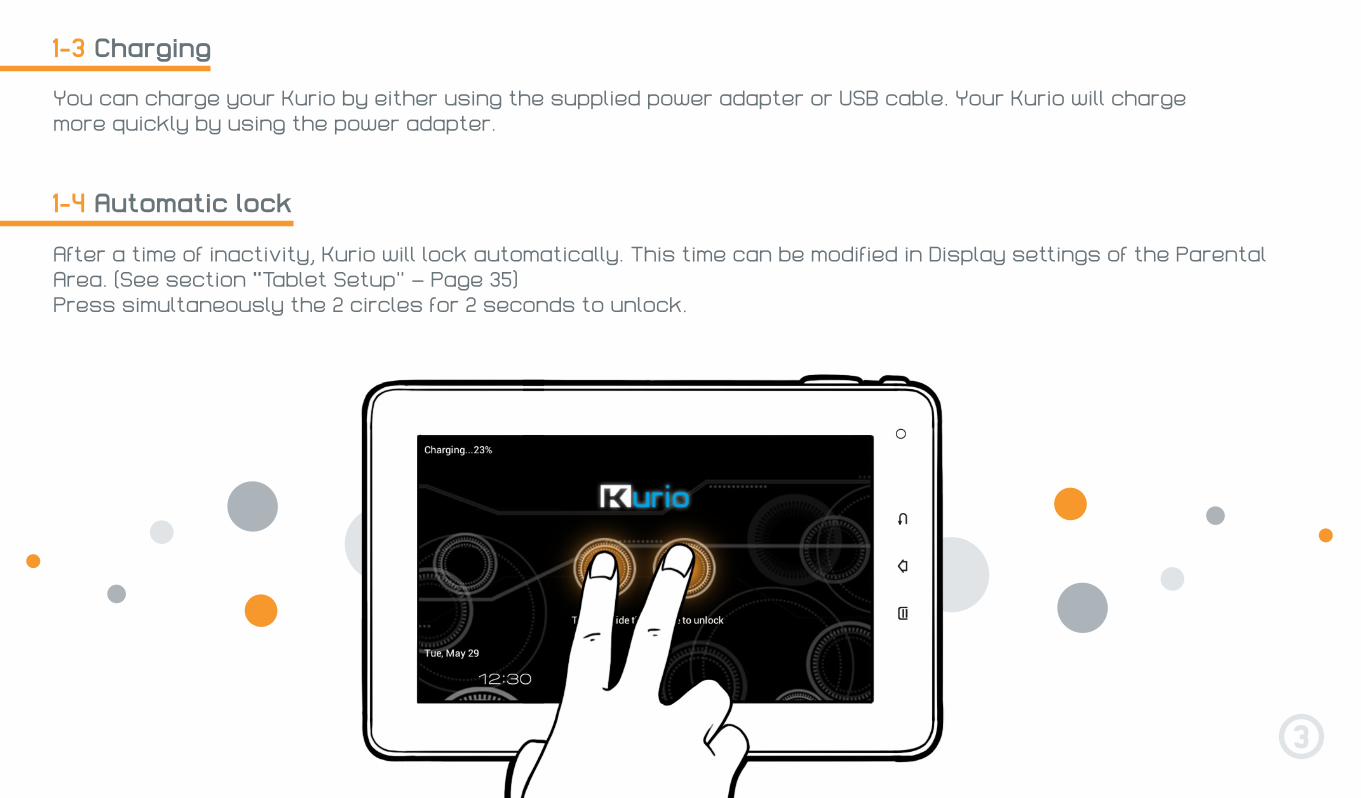
Charging1-3
You can charge your Kurio by either using the supplied power adapter or USB cable. Your Kurio will charge more quickly by using the power adapter.
Automatic lock1-4
After a time of inactivity, Kurio will lock automatically. This time can be modified in Display settings of the Parental Area. (See section ″Tablet Setup″ – Page 35)Press simultaneously the 2 circles for 2 seconds to unlock.
4
Home screen1-5
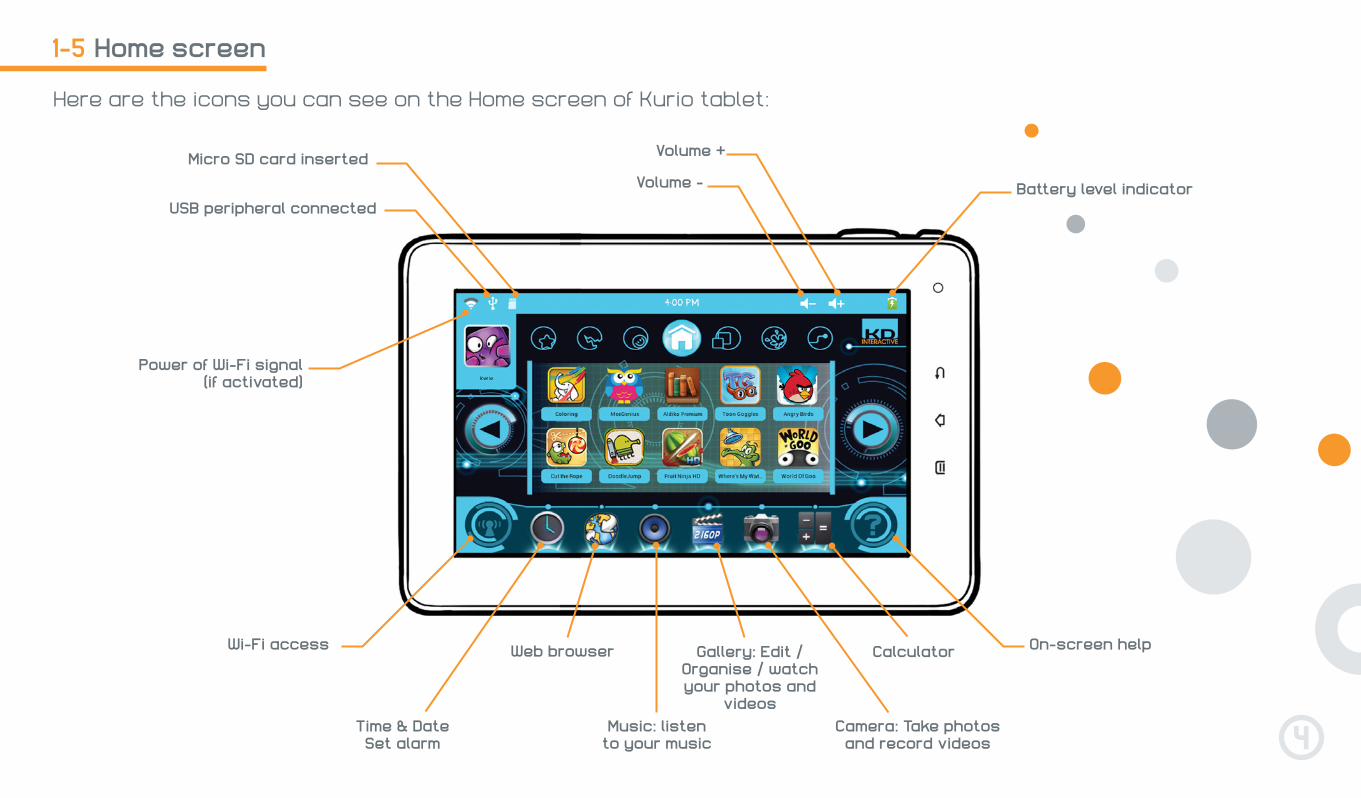
Here are the icons you can see on the Home screen of Kurio tablet:
Wi-Fi access On-screen helpWeb browser Gallery: Edit / Organise / watch your photos and
videos
Calculator
Time & Date Set alarm
Music: listen to your music
Camera: Take photos and record videos
Battery level indicator
Power of Wi-Fi signal (if activated)
Micro SD card inserted
USB peripheral connected
Volume +
Volume -

5
Portrait / landscape orientation
Depending on the application you are using, you might prefer having the tablet in Portrait or Landscape orientation. Kurio tablet has a built-in accelerometer (gravity sensor) which allows you to switch between the two modes simply by rotating the tablet in the orientation you like.
The main screen and Parental area are only available in Landscape orientation.
1-6
6
1-7 Multi-touch screen
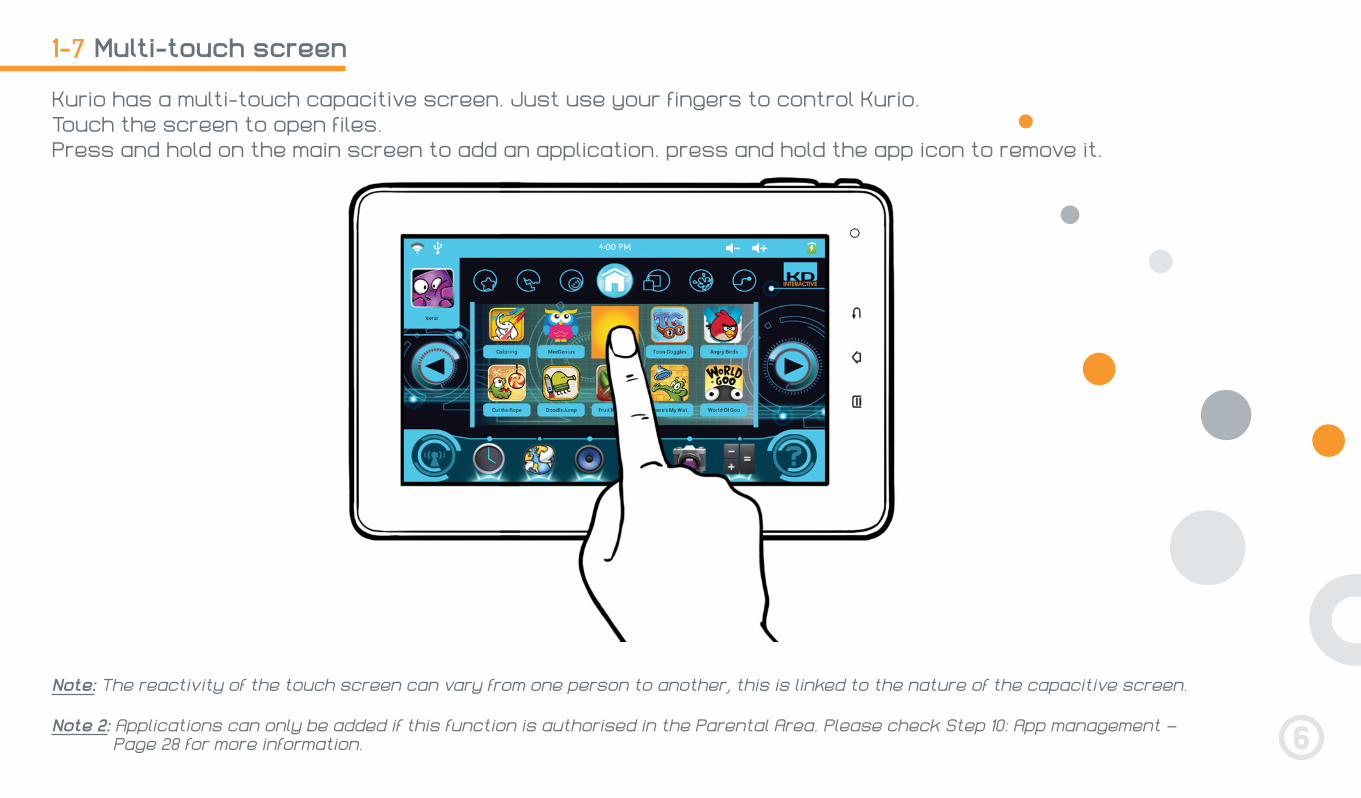
Kurio has a multi-touch capacitive screen. Just use your fingers to control Kurio.Touch the screen to open files.Press and hold on the main screen to add an application. press and hold the app icon to remove it.
Note: The reactivity of the touch screen can vary from one person to another, this is linked to the nature of the capacitive screen.
Note 2: Applications can only be added if this function is authorised in the Parental Area. Please check Step 10: App management – Page 28 for more information.
7
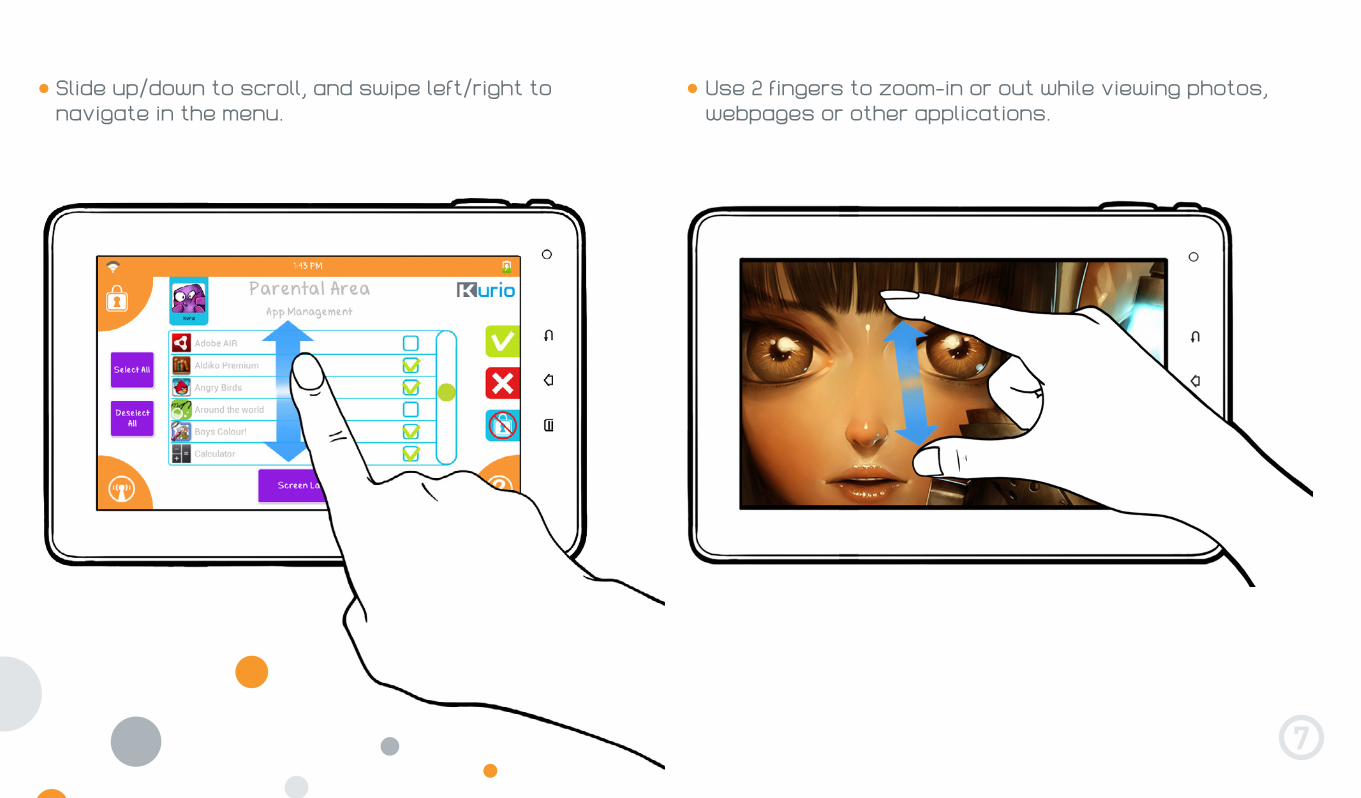
Slide up/down to scroll, and swipe left/right to navigate in the menu.
Use 2 fingers to zoom-in or out while viewing photos, webpages or other applications.
8
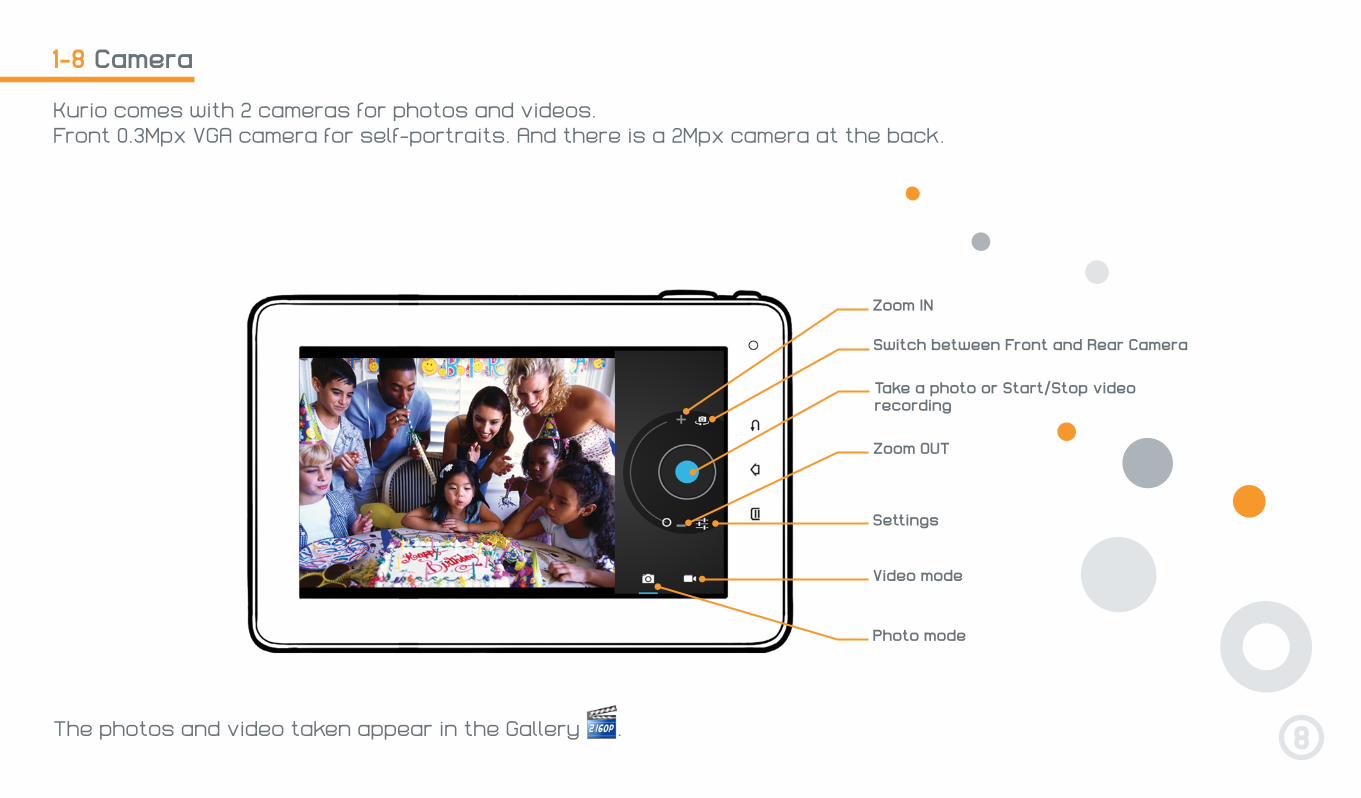
Camera1-8
Kurio comes with 2 cameras for photos and videos.Front 0.3Mpx VGA camera for self-portraits. And there is a 2Mpx camera at the back.
The photos and video taken appear in the Gallery .
Take a photo or Start/Stop video recording
Zoom OUT
Switch between Front and Rear Camera
Photo mode
Settings
Video mode
Zoom IN
9
Connect Kurio to PC/MAC®1-9
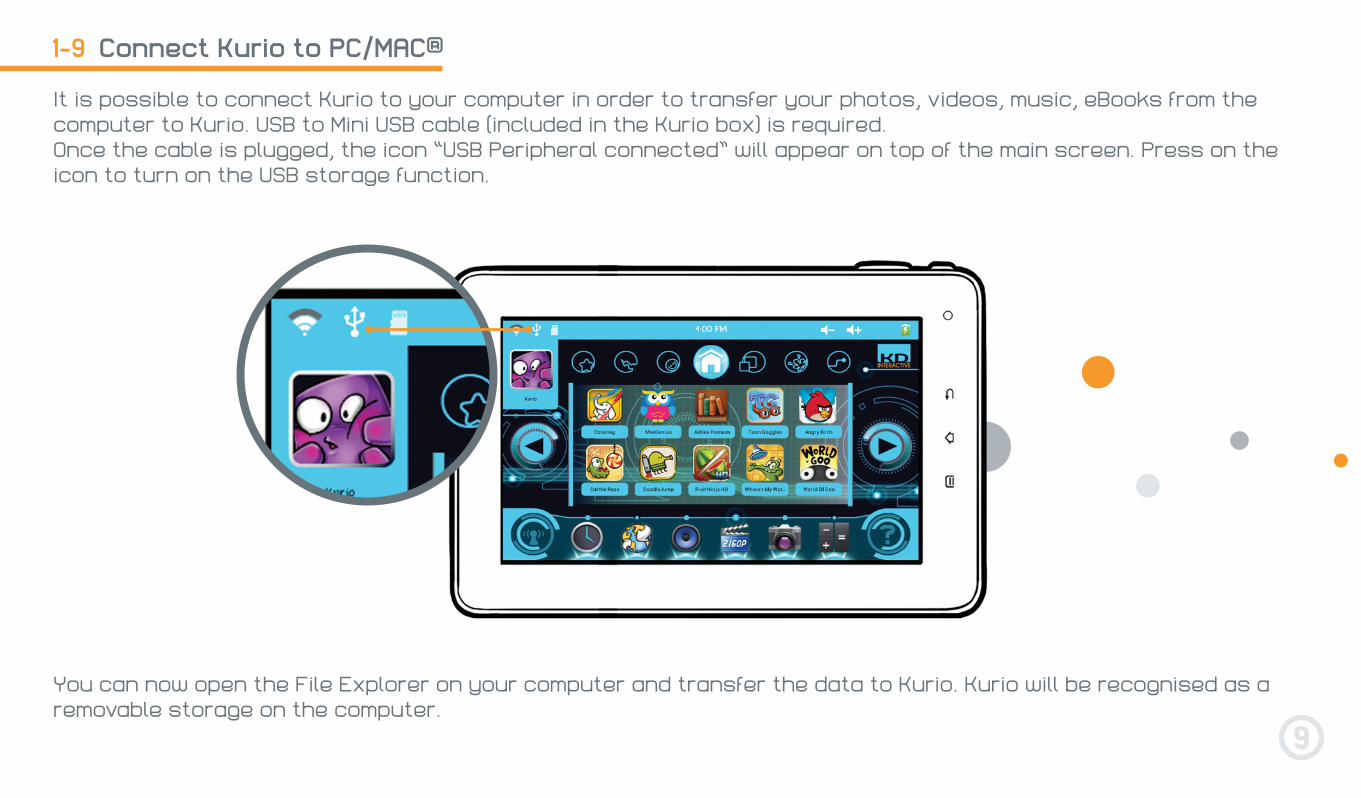
It is possible to connect Kurio to your computer in order to transfer your photos, videos, music, eBooks from the computer to Kurio. USB to Mini USB cable (included in the Kurio box) is required. Once the cable is plugged, the icon “USB Peripheral connected” will appear on top of the main screen. Press on the icon to turn on the USB storage function.
You can now open the File Explorer on your computer and transfer the data to Kurio. Kurio will be recognised as a removable storage on the computer.
10
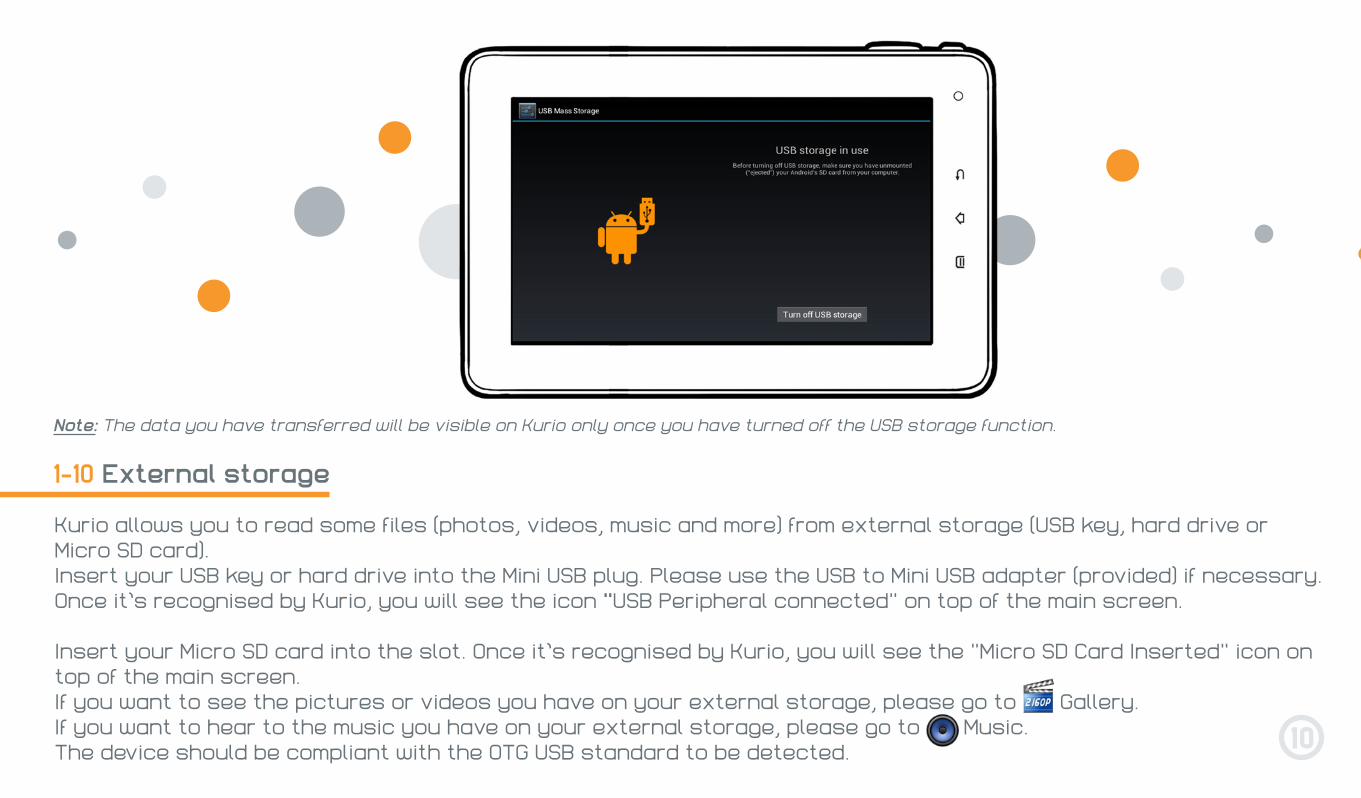
Note: The data you have transferred will be visible on Kurio only once you have turned off the USB storage function.
External storage1-10
Kurio allows you to read some files (photos, videos, music and more) from external storage (USB key, hard drive or Micro SD card).Insert your USB key or hard drive into the Mini USB plug. Please use the USB to Mini USB adapter (provided) if necessary. Once it’s recognised by Kurio, you will see the icon ″USB Peripheral connected″ on top of the main screen.
Insert your Micro SD card into the slot. Once it’s recognised by Kurio, you will see the ″Micro SD Card Inserted″ icon on top of the main screen.If you want to see the pictures or videos you have on your external storage, please go to Gallery. If you want to hear to the music you have on your external storage, please go to Music.The device should be compliant with the OTG USB standard to be detected.
11
Transfer file
Android Interface
1-11
1-12
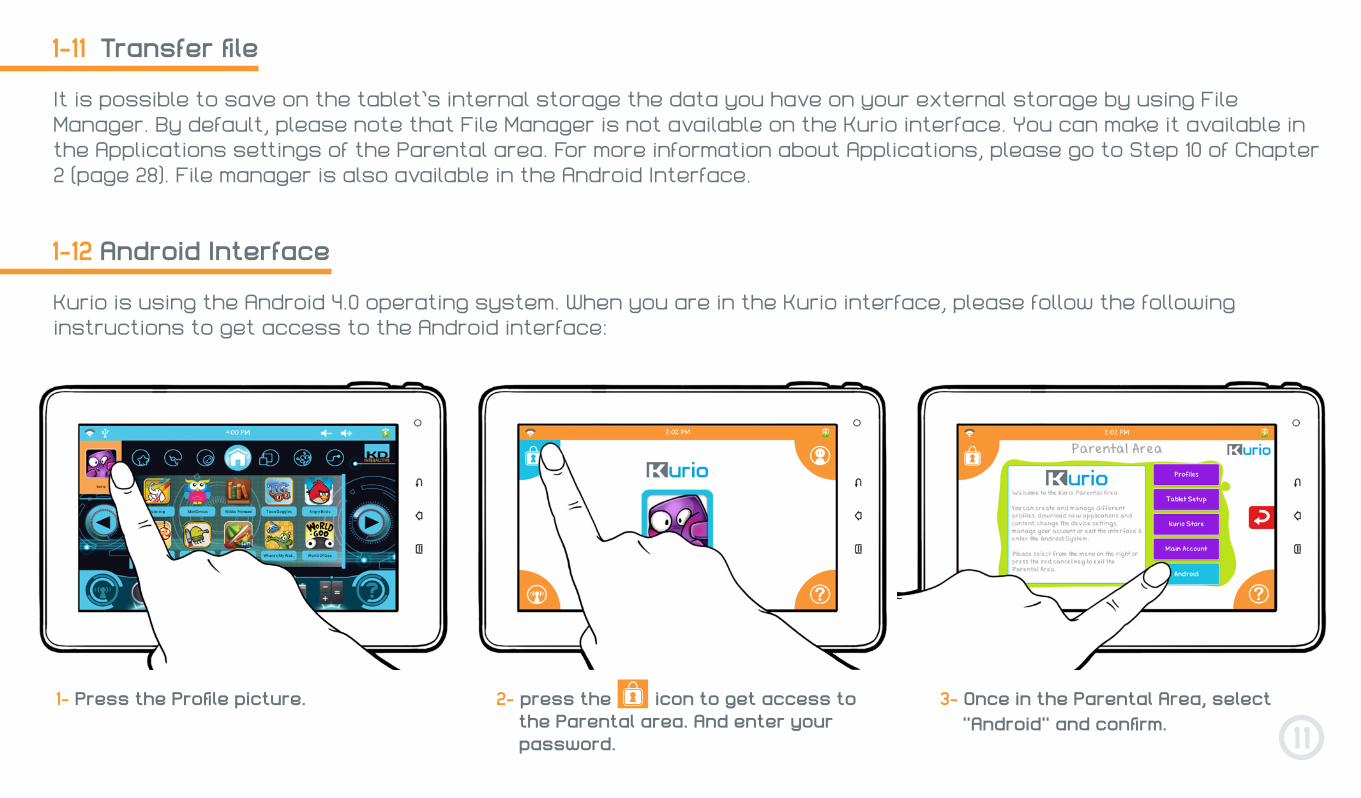
It is possible to save on the tablet’s internal storage the data you have on your external storage by using File Manager. By default, please note that File Manager is not available on the Kurio interface. You can make it available in the Applications settings of the Parental area. For more information about Applications, please go to Step 10 of Chapter 2 (page 28). File manager is also available in the Android Interface.
Kurio is using the Android 4.0 operating system. When you are in the Kurio interface, please follow the following instructions to get access to the Android interface:
1- Press the Profile picture. 3- Once in the Parental Area, select ″Android″ and confirm.
2- press the icon to get access to the Parental area. And enter your password.
12
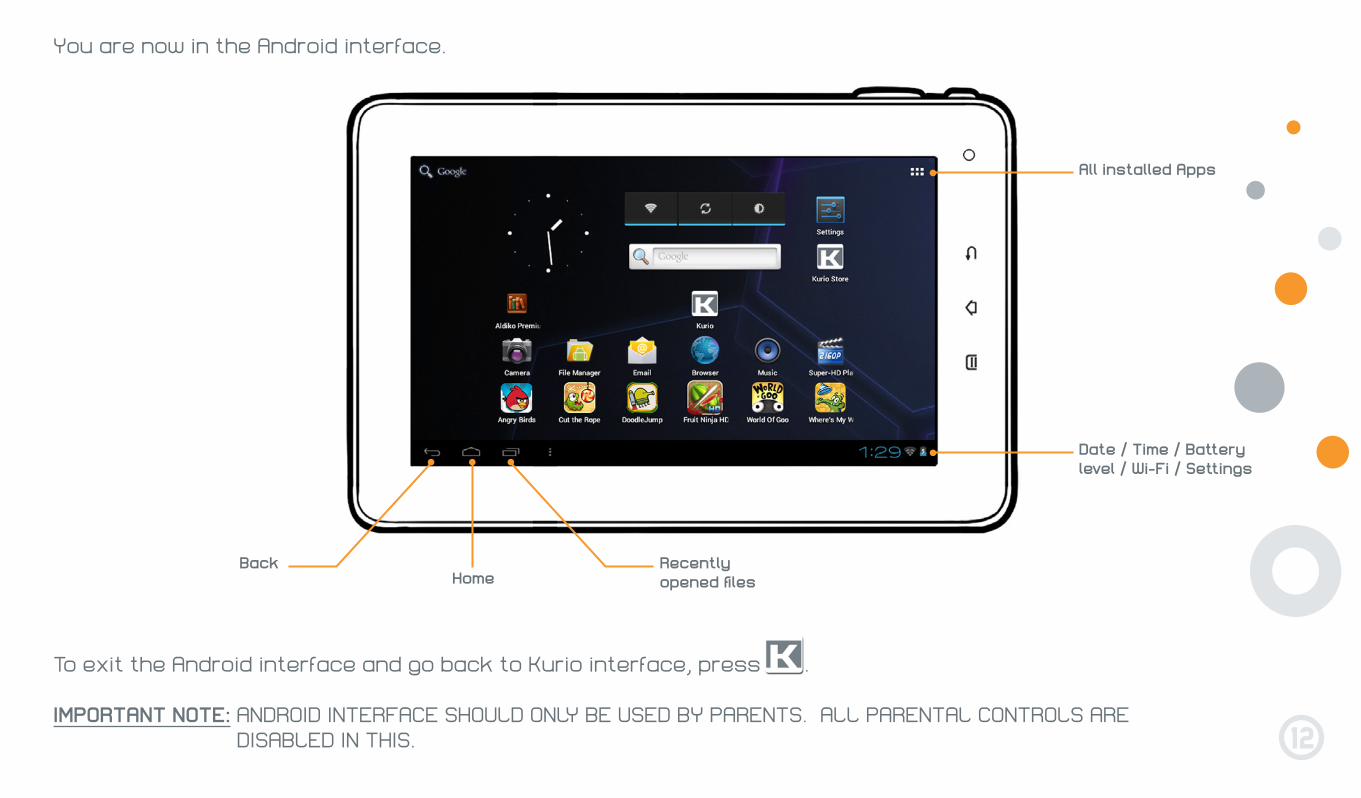
You are now in the Android interface.
To exit the Android interface and go back to Kurio interface, press .
IMPORTANT NOTE: ANDROID INTERFACE SHOULD ONLY BE USED BY PARENTS. ALL PARENTAL CONTROLS ARE DISABLED IN THIS.
All installed Apps
Date / Time / Battery level / Wi-Fi / Settings
BackHome
Recently opened files
13
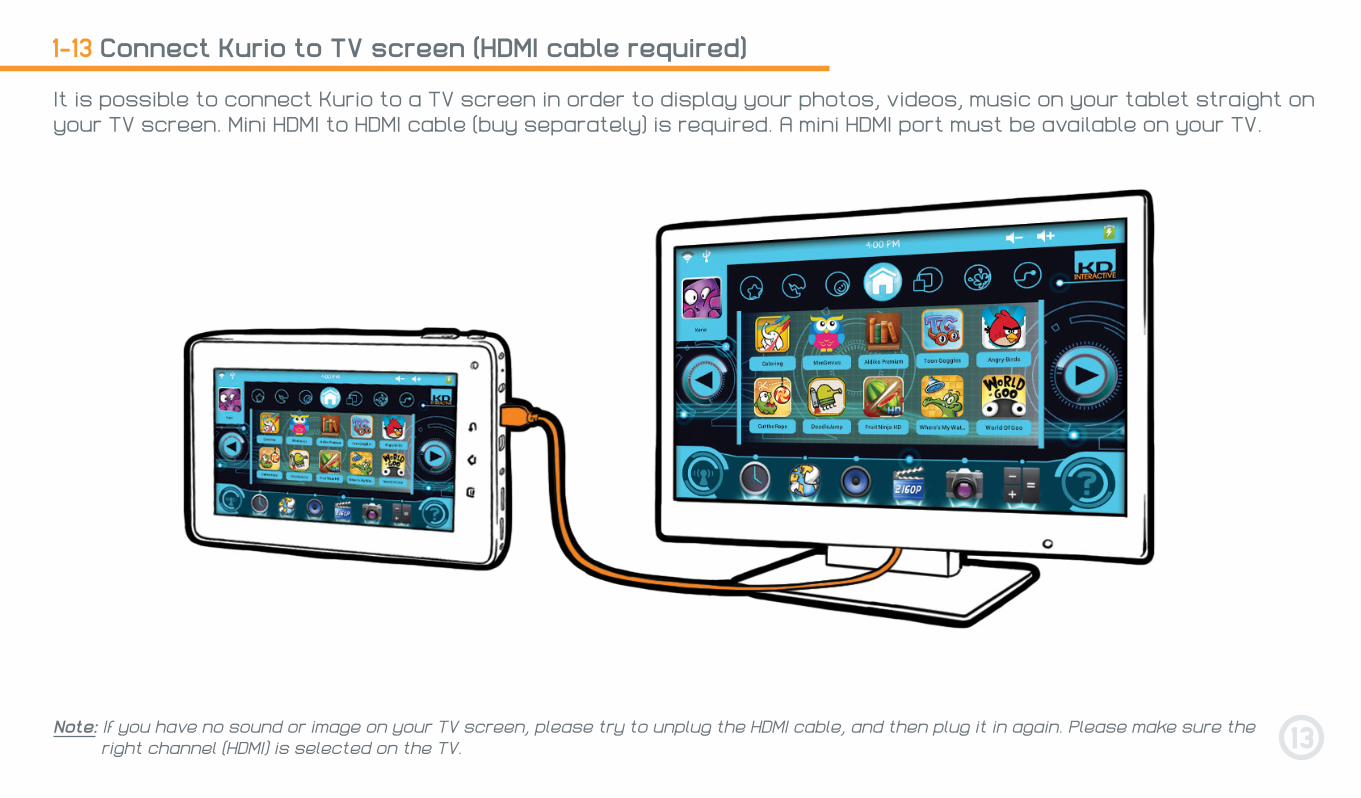
Connect Kurio to TV screen (HDMI cable required)1-13
It is possible to connect Kurio to a TV screen in order to display your photos, videos, music on your tablet straight on your TV screen. Mini HDMI to HDMI cable (buy separately) is required. A mini HDMI port must be available on your TV.
Note: If you have no sound or image on your TV screen, please try to unplug the HDMI cable, and then plug it in again. Please make sure the right channel (HDMI) is selected on the TV.
14
2 - STARTING WITH KURIO 7
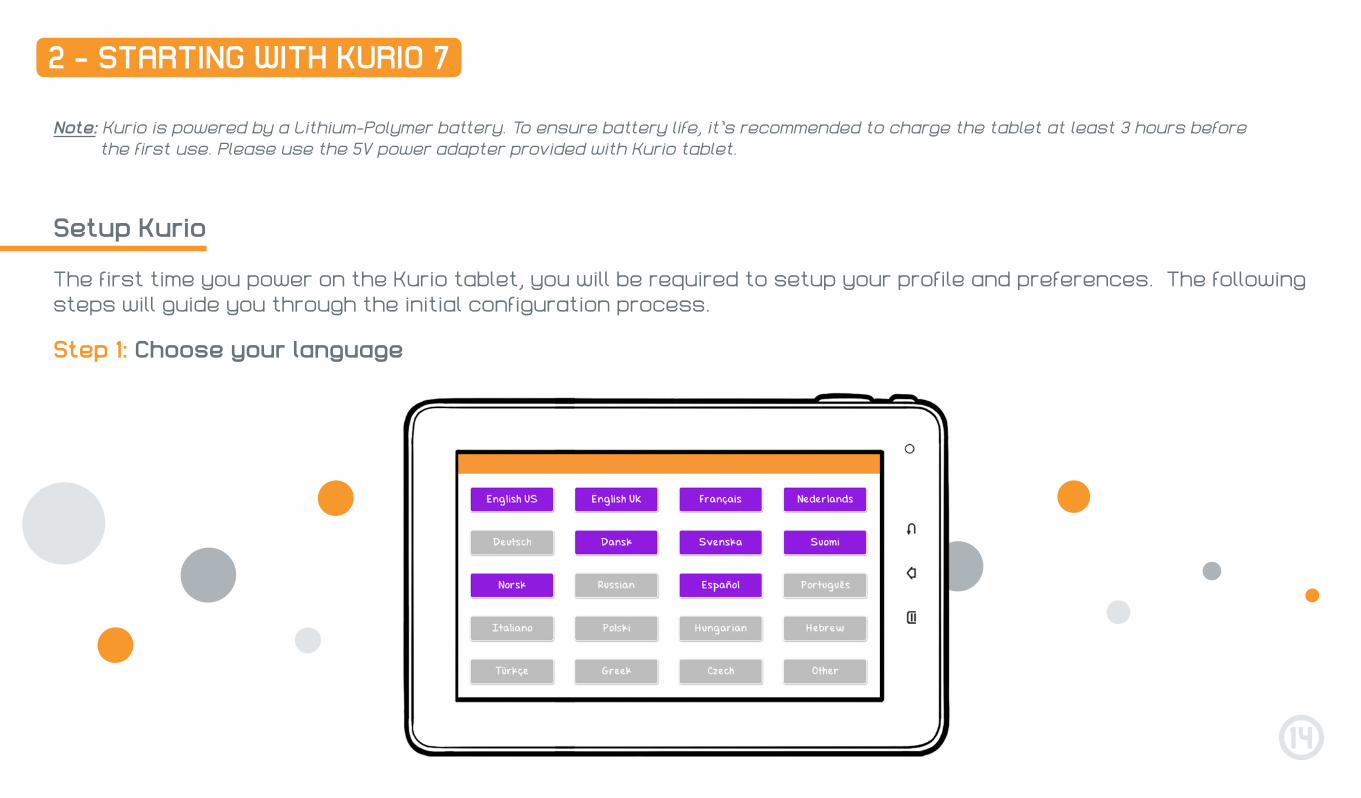
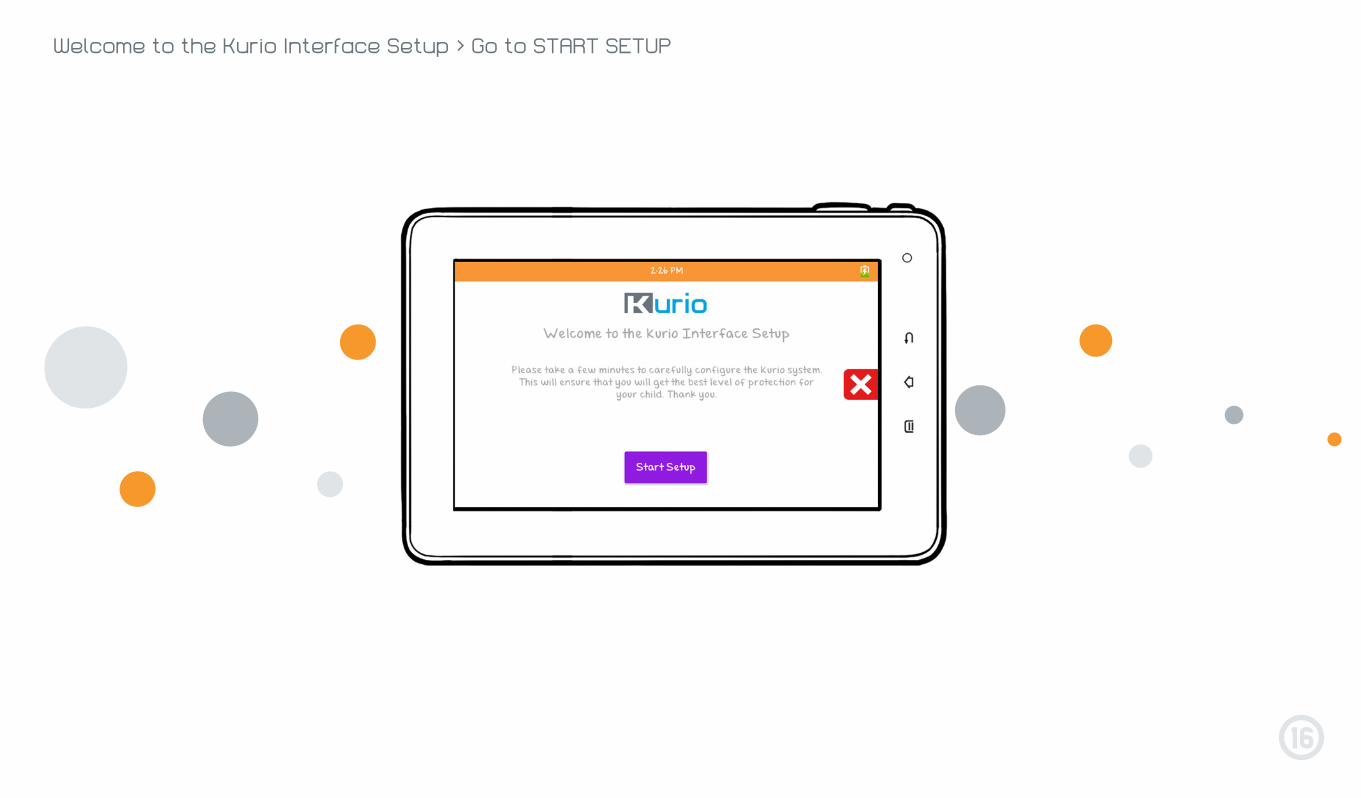
Setup Kurio
The first time you power on the Kurio tablet, you will be required to setup your profile and preferences. The following steps will guide you through the initial configuration process.
Step 1: Choose your language
Note: Kurio is powered by a Lithium-Polymer battery. To ensure battery life, it’s recommended to charge the tablet at least 3 hours before the first use. Please use the 5V power adapter provided with Kurio tablet.
15
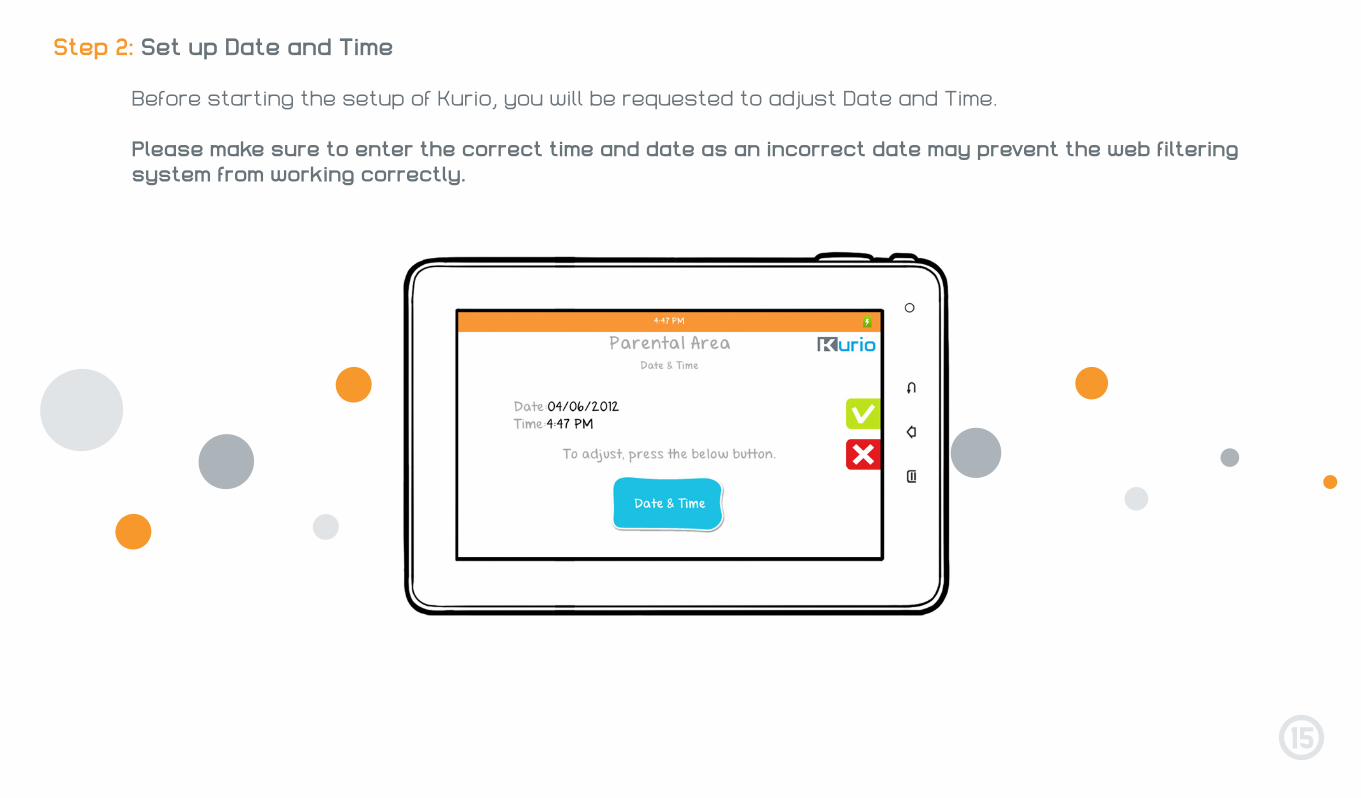
Step 2: Set up Date and Time
Before starting the setup of Kurio, you will be requested to adjust Date and Time.
Please make sure to enter the correct time and date as an incorrect date may prevent the web filtering system from working correctly.
16
Welcome to the Kurio Interface Setup > Go to START SETUP
17
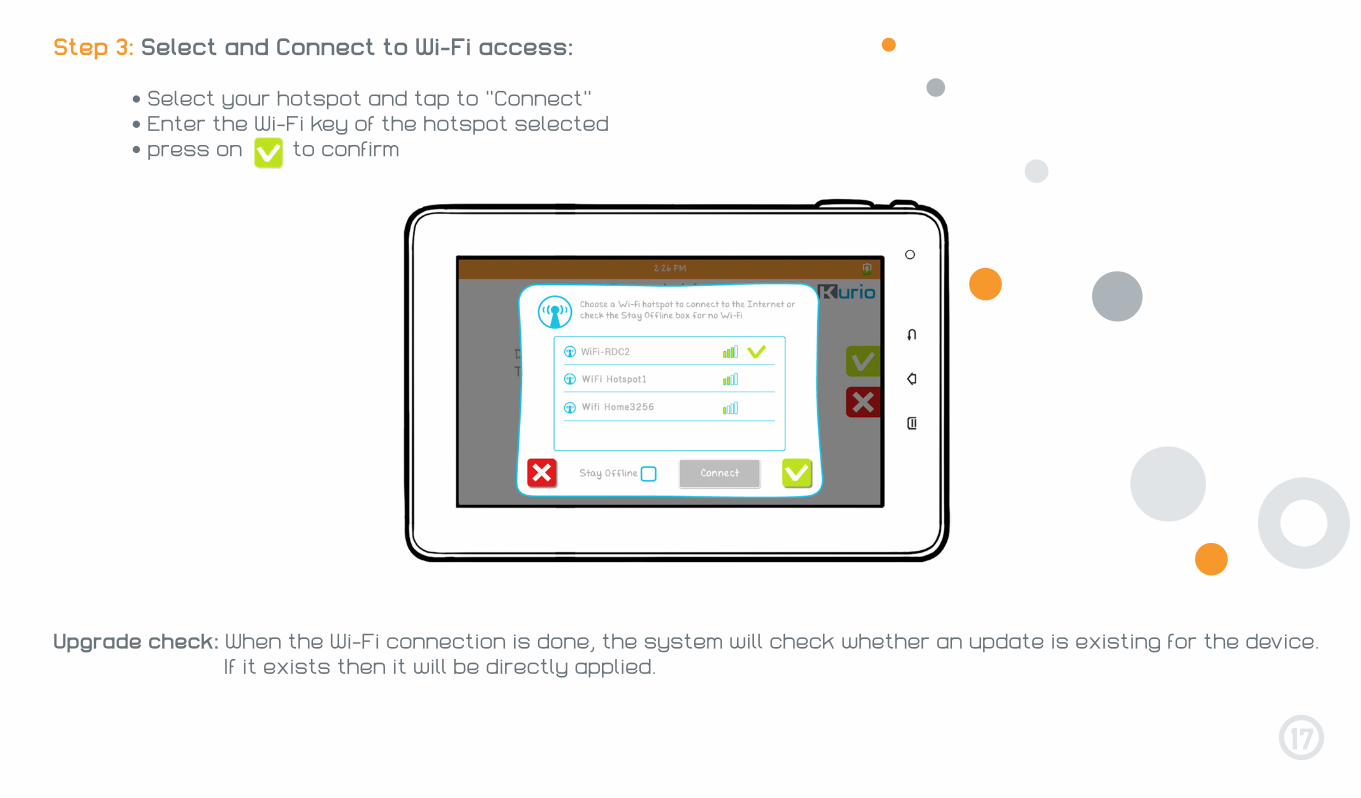
Step 3: Select and Connect to Wi-Fi access:
• Select your hotspot and tap to ″Connect″• Enter the Wi-Fi key of the hotspot selected• press on to confirm
Upgrade check: When the Wi-Fi connection is done, the system will check whether an update is existing for the device. If it exists then it will be directly applied.
18
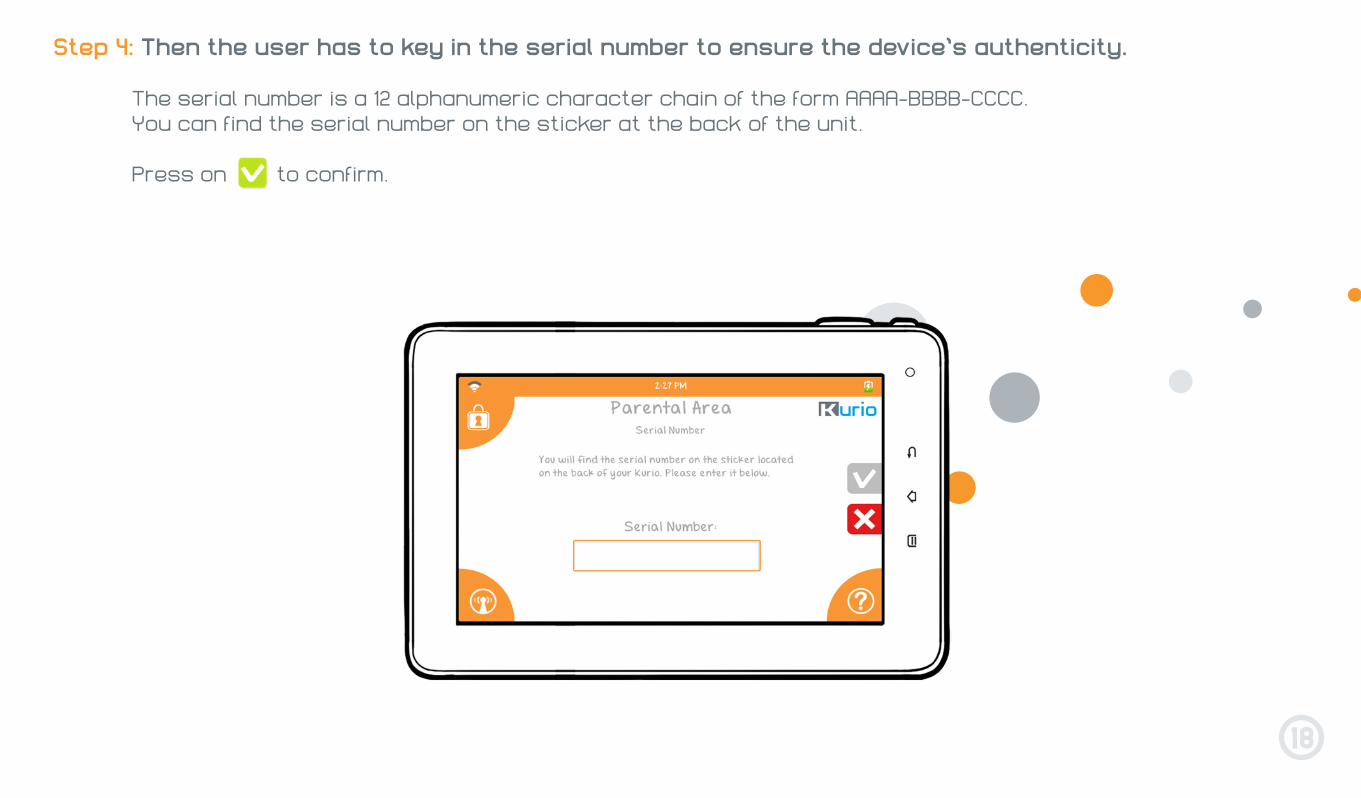
Step 4: Then the user has to key in the serial number to ensure the device’s authenticity.
The serial number is a 12 alphanumeric character chain of the form AAAA-BBBB-CCCC.You can find the serial number on the sticker at the back of the unit.
Press on to confirm.
19
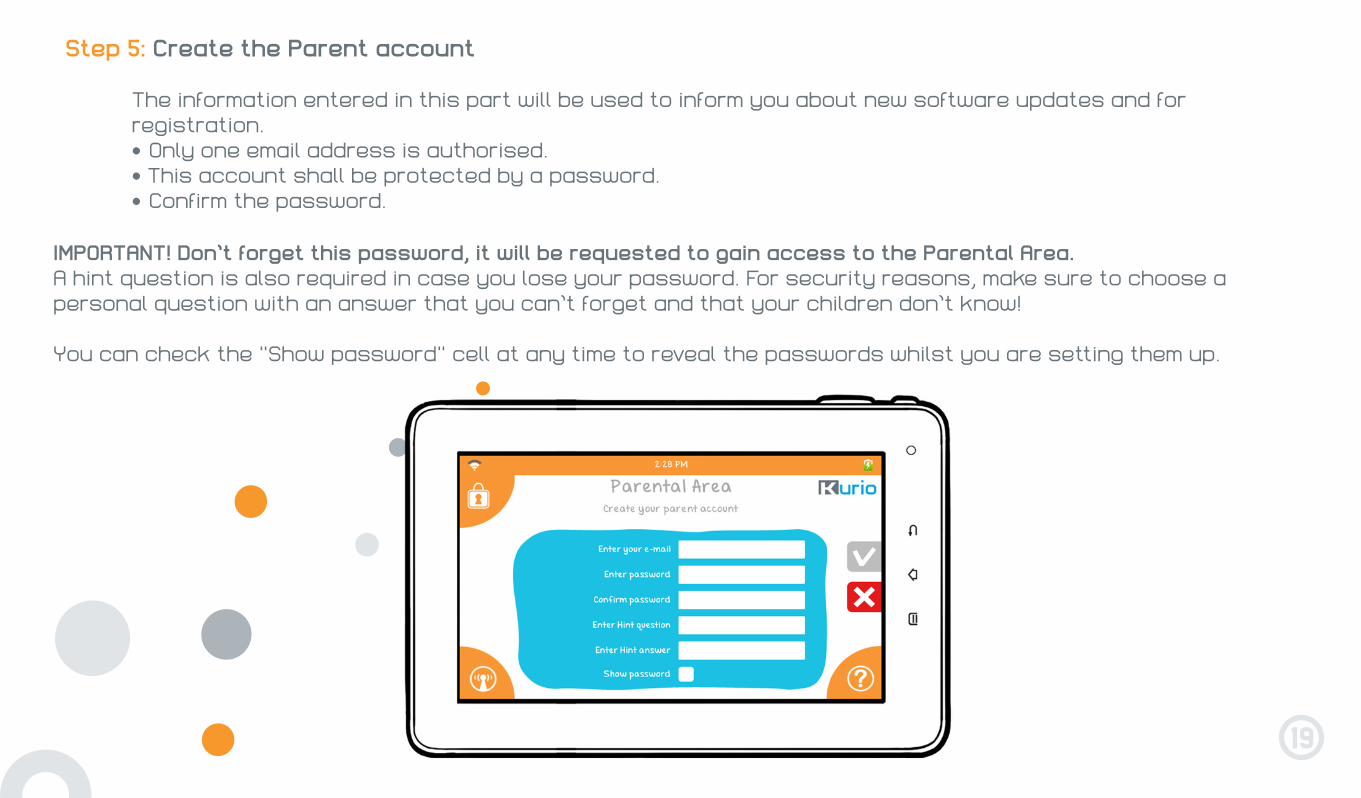
Step 5: Create the Parent account
The information entered in this part will be used to inform you about new software updates and for registration.• Only one email address is authorised.• This account shall be protected by a password.• Confirm the password.
IMPORTANT! Don’t forget this password, it will be requested to gain access to the Parental Area.A hint question is also required in case you lose your password. For security reasons, make sure to choose a personal question with an answer that you can’t forget and that your children don’t know!
You can check the ″Show password″ cell at any time to reveal the passwords whilst you are setting them up.

20
Press on to confirm.
The parental account is now set, you can start creating the first user profile!
21
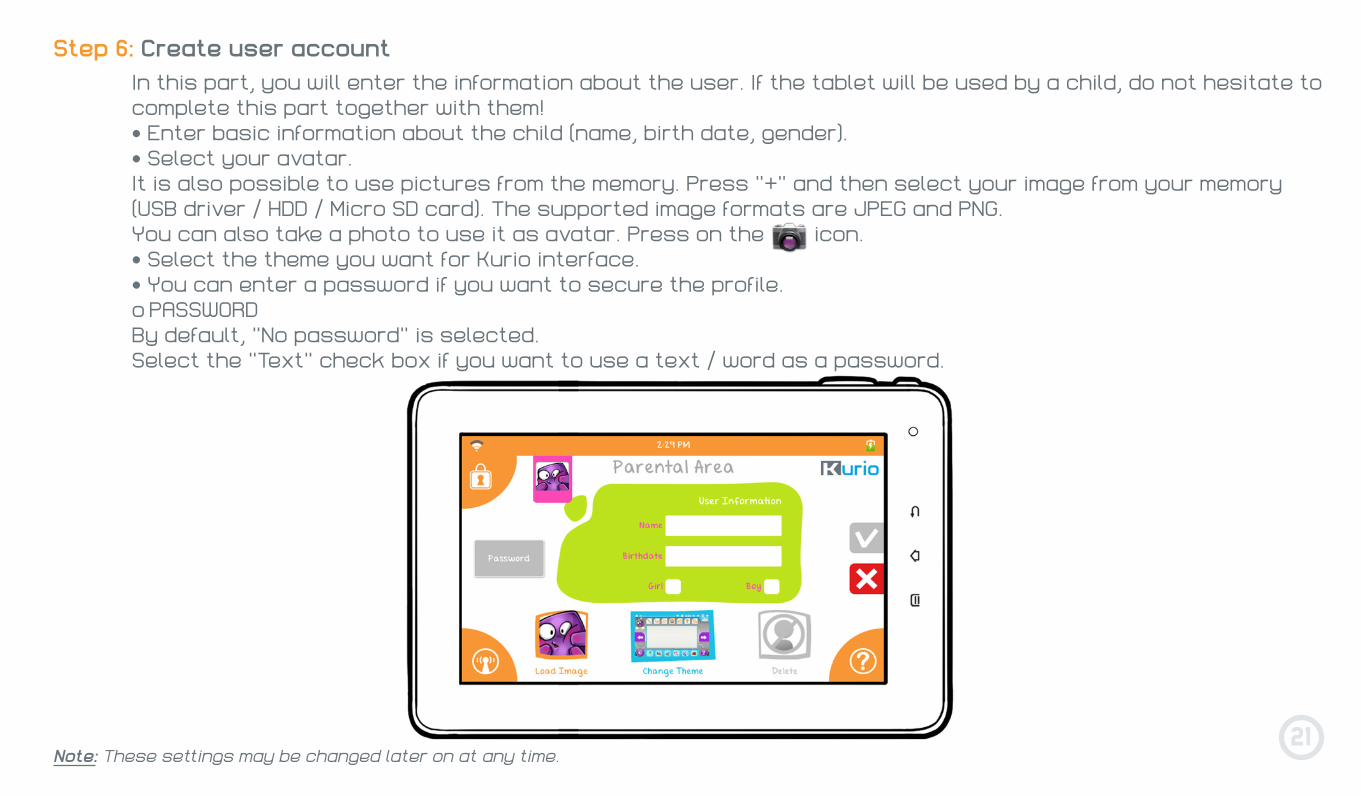
Step 6: Create user accountIn this part, you will enter the information about the user. If the tablet will be used by a child, do not hesitate to complete this part together with them!• Enter basic information about the child (name, birth date, gender).• Select your avatar.It is also possible to use pictures from the memory. Press ″+″ and then select your image from your memory (USB driver / HDD / Micro SD card). The supported image formats are JPEG and PNG.You can also take a photo to use it as avatar. Press on the icon.• Select the theme you want for Kurio interface.• You can enter a password if you want to secure the profile.o PASSWORDBy default, ″No password″ is selected.Select the ″Text″ check box if you want to use a text / word as a password.
Note: These settings may be changed later on at any time.

22
The password should be 1 to 16 characters long, with only letters and numbers.
Select ″Gesture″ check box if you want to use a gesture pattern as password, then press “Define gesture”.You can now create your pattern with a sliding movement that links 5 dots. You can’t validate your password if it has more or less than 5 dots. You can’t use the same dot twice.
23
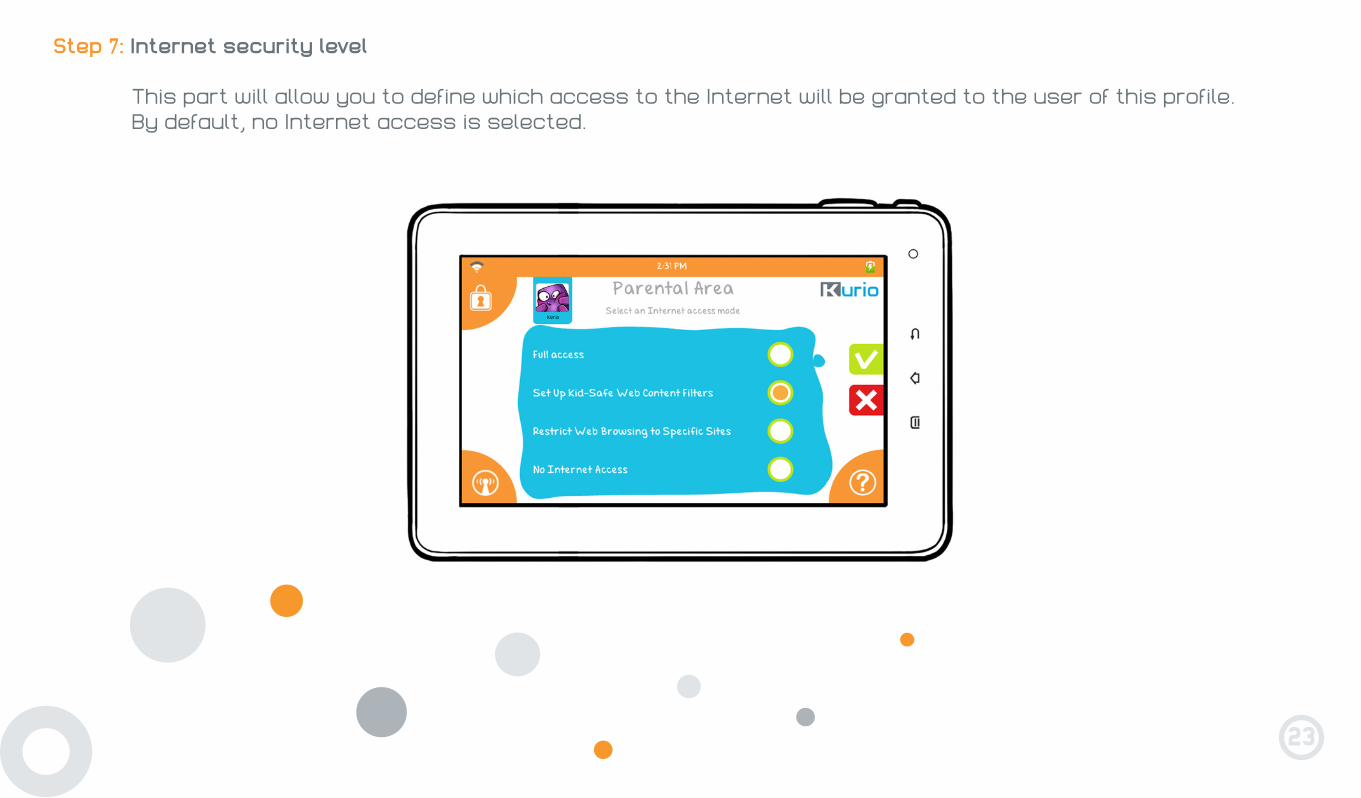
Step 7: Internet security level
This part will allow you to define which access to the Internet will be granted to the user of this profile.By default, no Internet access is selected.
24
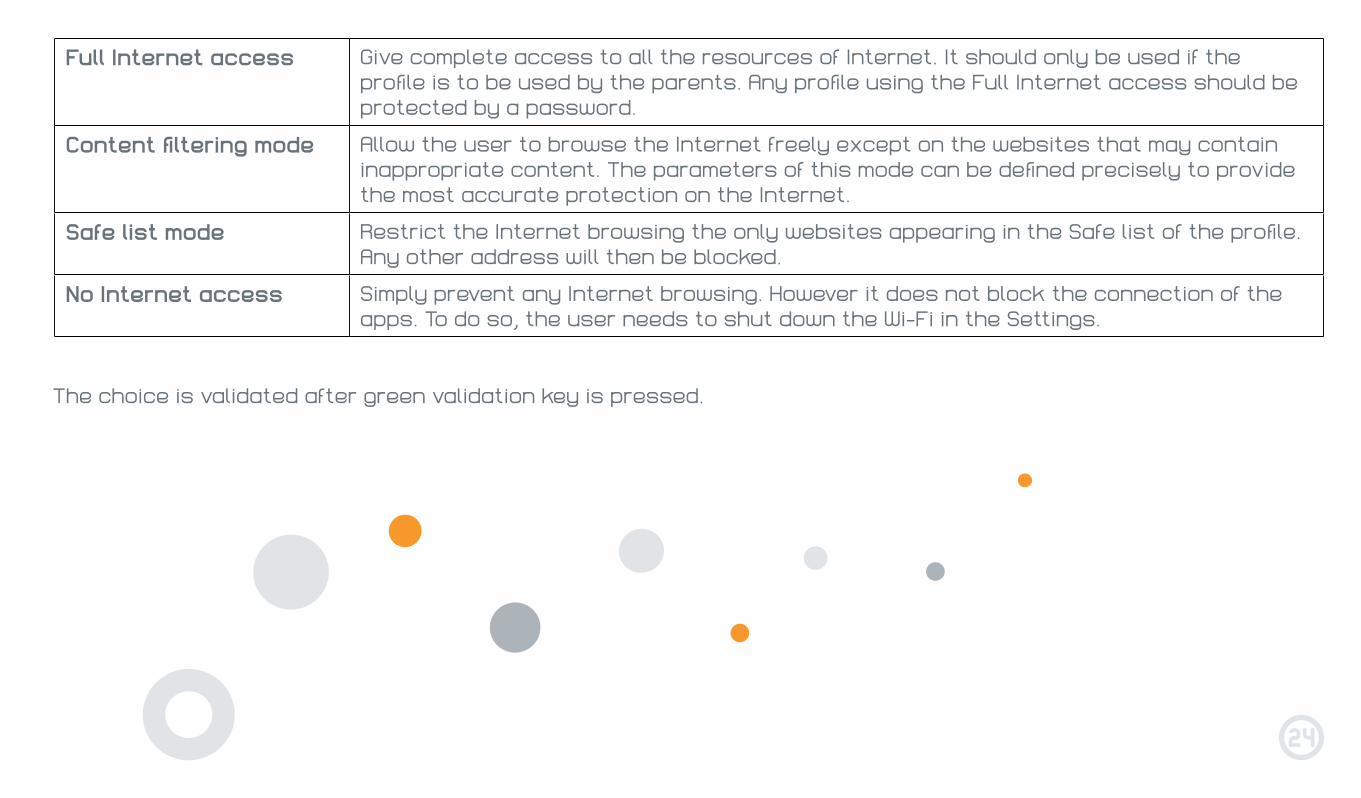
Full Internet access Give complete access to all the resources of Internet. It should only be used if the profile is to be used by the parents. Any profile using the Full Internet access should be protected by a password.
Content filtering mode Allow the user to browse the Internet freely except on the websites that may contain inappropriate content. The parameters of this mode can be defined precisely to provide the most accurate protection on the Internet.
Safe list mode Restrict the Internet browsing the only websites appearing in the Safe list of the profile. Any other address will then be blocked.
No Internet access Simply prevent any Internet browsing. However it does not block the connection of the apps. To do so, the user needs to shut down the Wi-Fi in the Settings.
The choice is validated after green validation key is pressed.
25
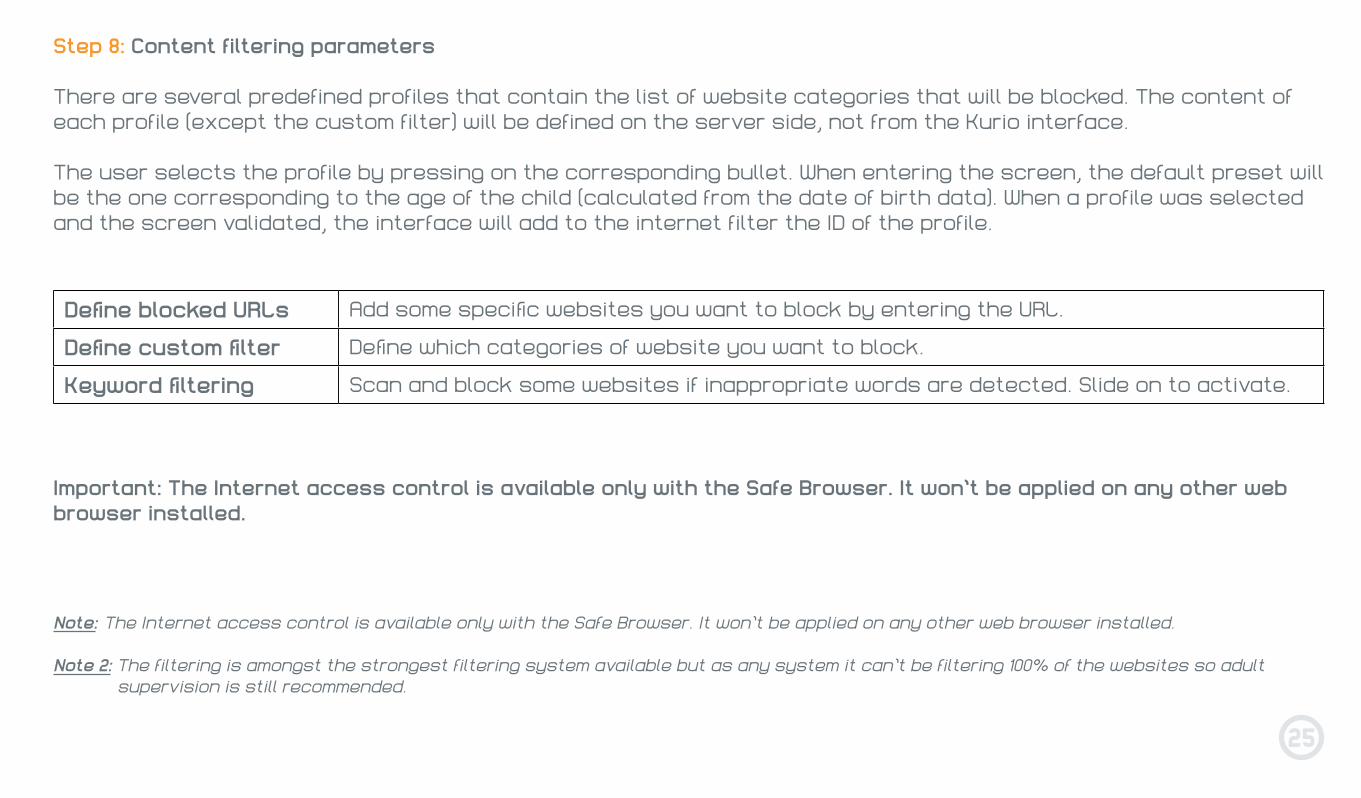
Define blocked URLs Add some specific websites you want to block by entering the URL.
Define custom filter Define which categories of website you want to block.
Keyword filtering Scan and block some websites if inappropriate words are detected. Slide on to activate.
Step 8: Content filtering parameters
There are several predefined profiles that contain the list of website categories that will be blocked. The content of each profile (except the custom filter) will be defined on the server side, not from the Kurio interface.
The user selects the profile by pressing on the corresponding bullet. When entering the screen, the default preset will be the one corresponding to the age of the child (calculated from the date of birth data). When a profile was selected and the screen validated, the interface will add to the internet filter the ID of the profile.
Important: The Internet access control is available only with the Safe Browser. It won’t be applied on any other web browser installed.
Note: The Internet access control is available only with the Safe Browser. It won’t be applied on any other web browser installed.
Note 2: The filtering is amongst the strongest filtering system available but as any system it can’t be filtering 100% of the websites so adult supervision is still recommended.
26
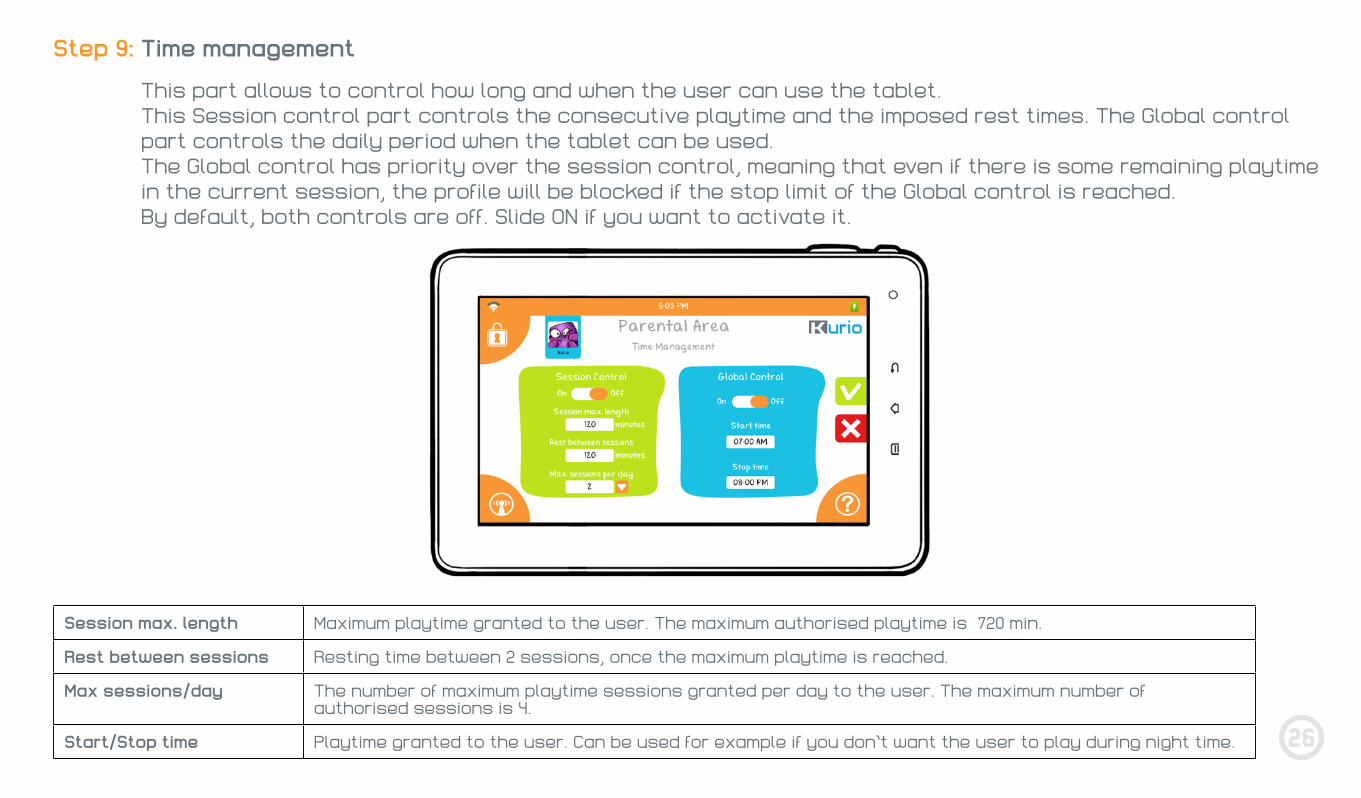
Step 9: Time management
This part allows to control how long and when the user can use the tablet.This Session control part controls the consecutive playtime and the imposed rest times. The Global control part controls the daily period when the tablet can be used.The Global control has priority over the session control, meaning that even if there is some remaining playtime in the current session, the profile will be blocked if the stop limit of the Global control is reached.By default, both controls are off. Slide ON if you want to activate it.
Session max. length Maximum playtime granted to the user. The maximum authorised playtime is 720 min.
Rest between sessions Resting time between 2 sessions, once the maximum playtime is reached.
Max sessions/day The number of maximum playtime sessions granted per day to the user. The maximum number of authorised sessions is 4.
Start/Stop time Playtime granted to the user. Can be used for example if you don’t want the user to play during night time.
27
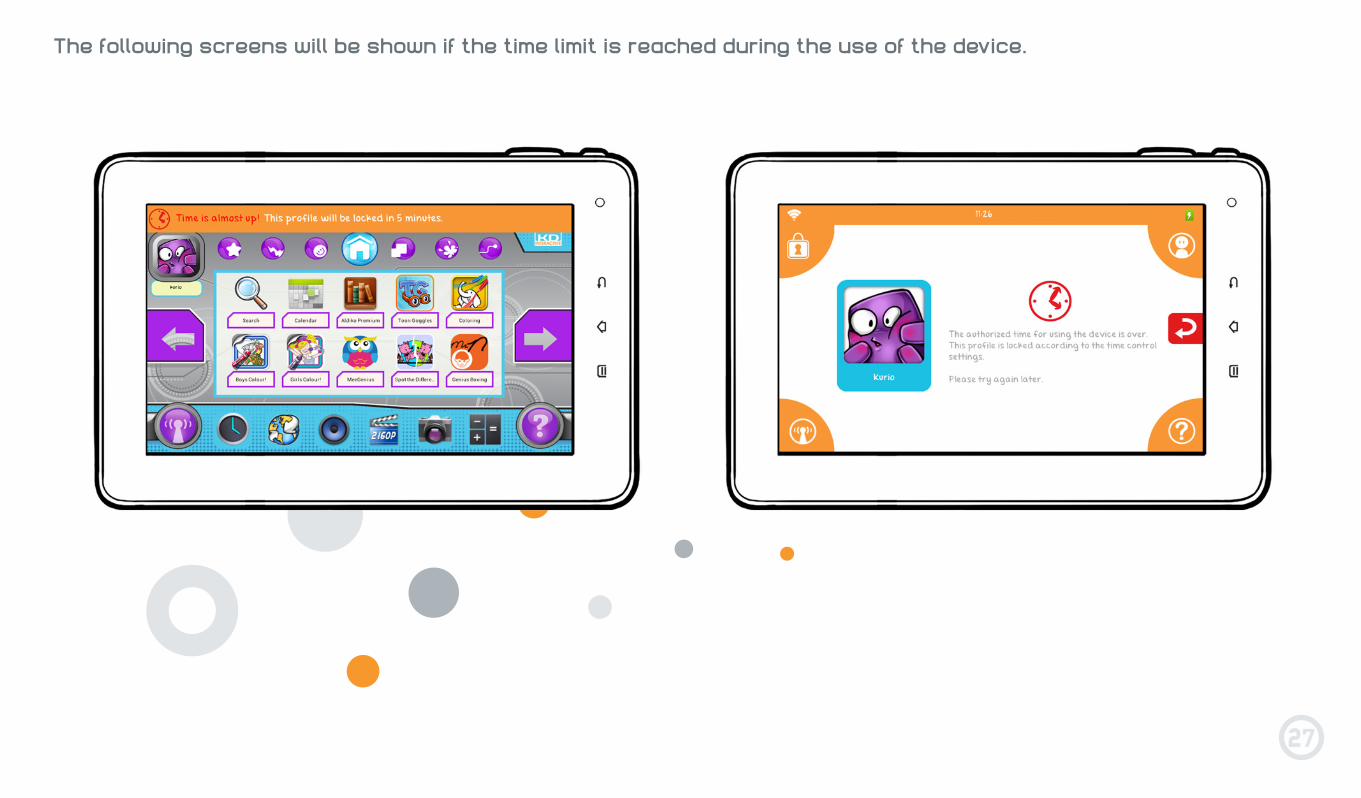
The following screens will be shown if the time limit is reached during the use of the device.
28
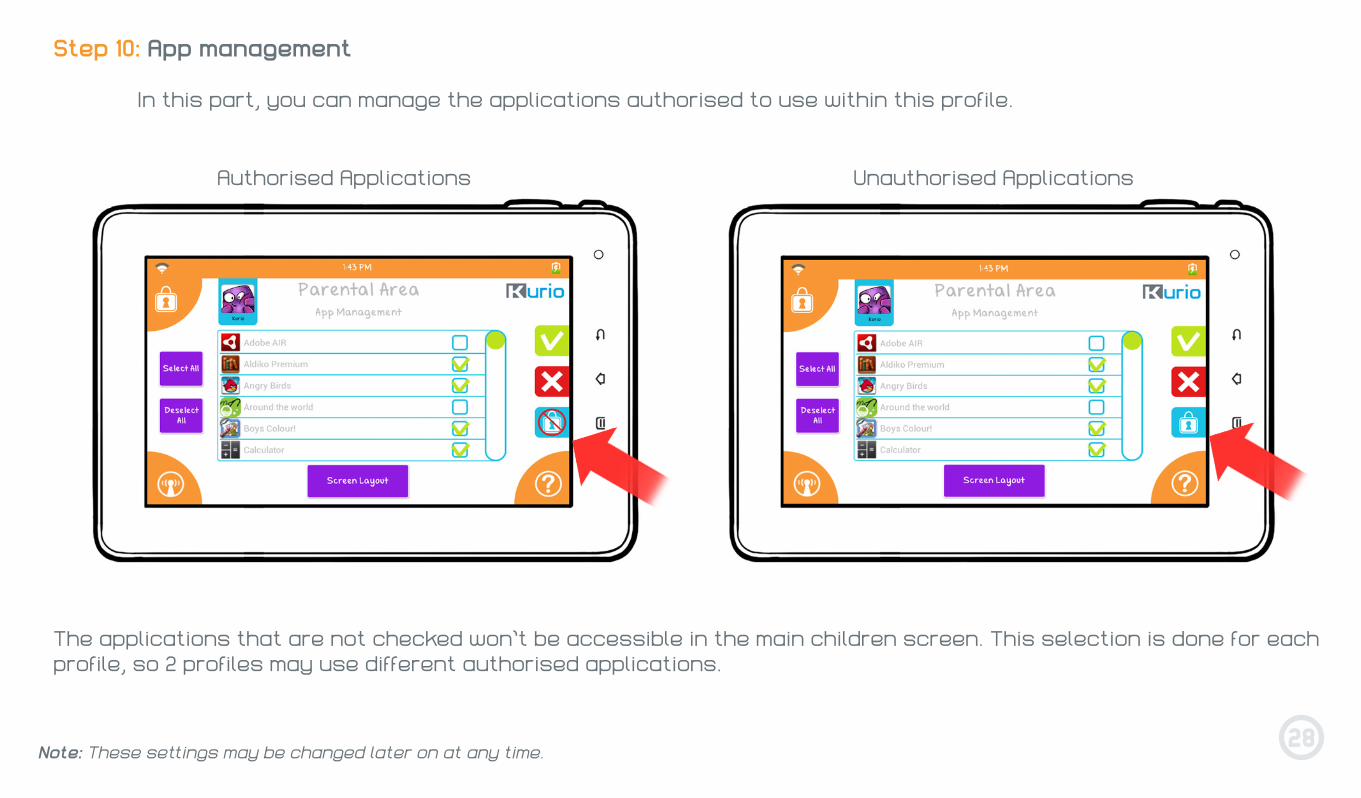
Step 10: App management
In this part, you can manage the applications authorised to use within this profile.
The applications that are not checked won’t be accessible in the main children screen. This selection is done for each profile, so 2 profiles may use different authorised applications.
Note: These settings may be changed later on at any time.
Unauthorised Applications Authorised Applications
29
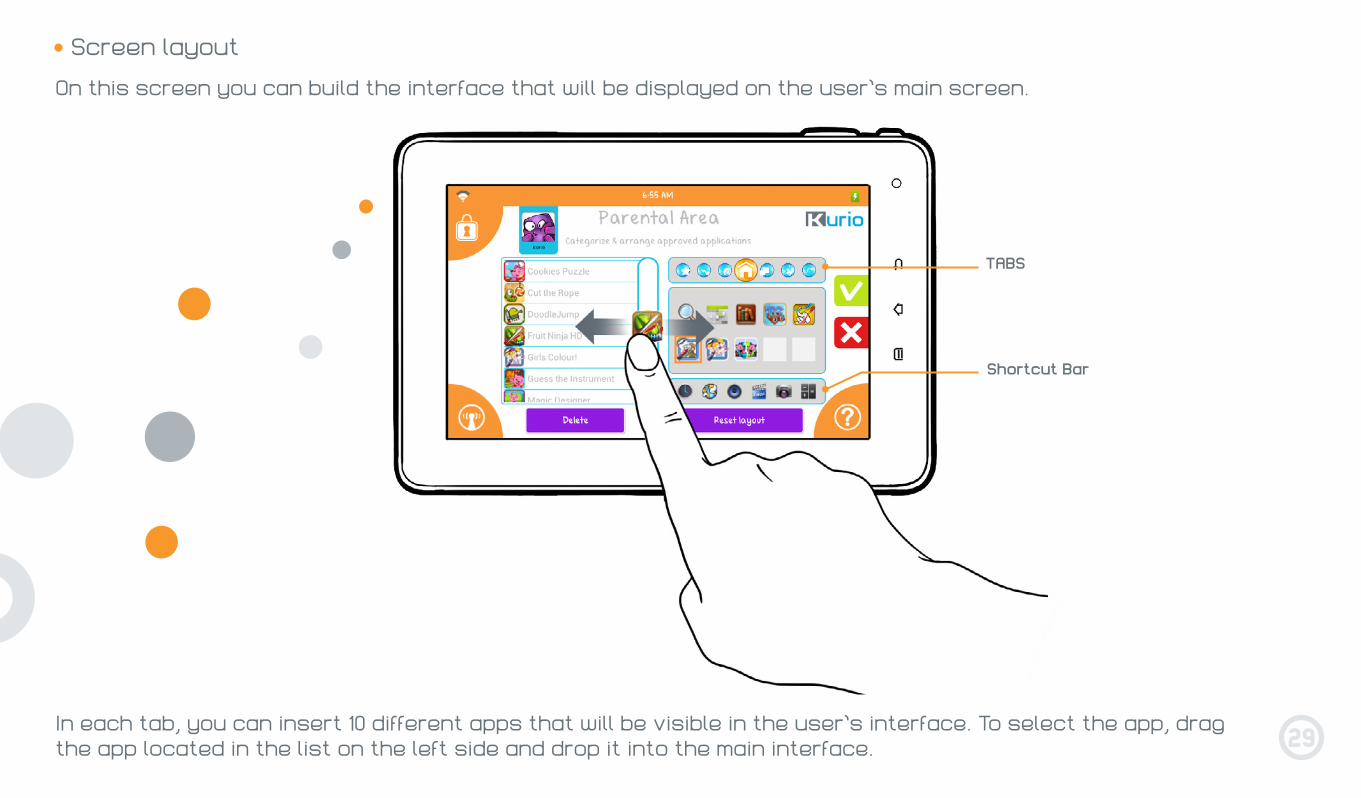
• Screen layout
On this screen you can build the interface that will be displayed on the user’s main screen.
Shortcut Bar
TABS
In each tab, you can insert 10 different apps that will be visible in the user’s interface. To select the app, drag the app located in the list on the left side and drop it into the main interface.
30Note: These settings may be changed later on at any time.
The apps you can see at the left side in the list are the ones you have selected in the previous step ″App management″.If you want to remove an app from the user’s interface, just select it and press ″Delete″.
Any newly installed application will have to be approved to be used in the user profile. By default, when an application is installed its status in unchecked (unauthorised).
Note: By default, the user will be allowed to add or remove all the authorised apps by him-self in the Kurio interface. If you want to prevent this, press the lock icon. When the icon is like this , the user won’t be able to delete or add any app from the interface.
You can also delete and replace any of the icons located in the shortcuts bar:• Time & Date / Set alarm• Web browser• Music: listen to your music• Gallery: Edit / Organise / watch your photos and videos• Camera: Take photos and record videos• Calculator
31
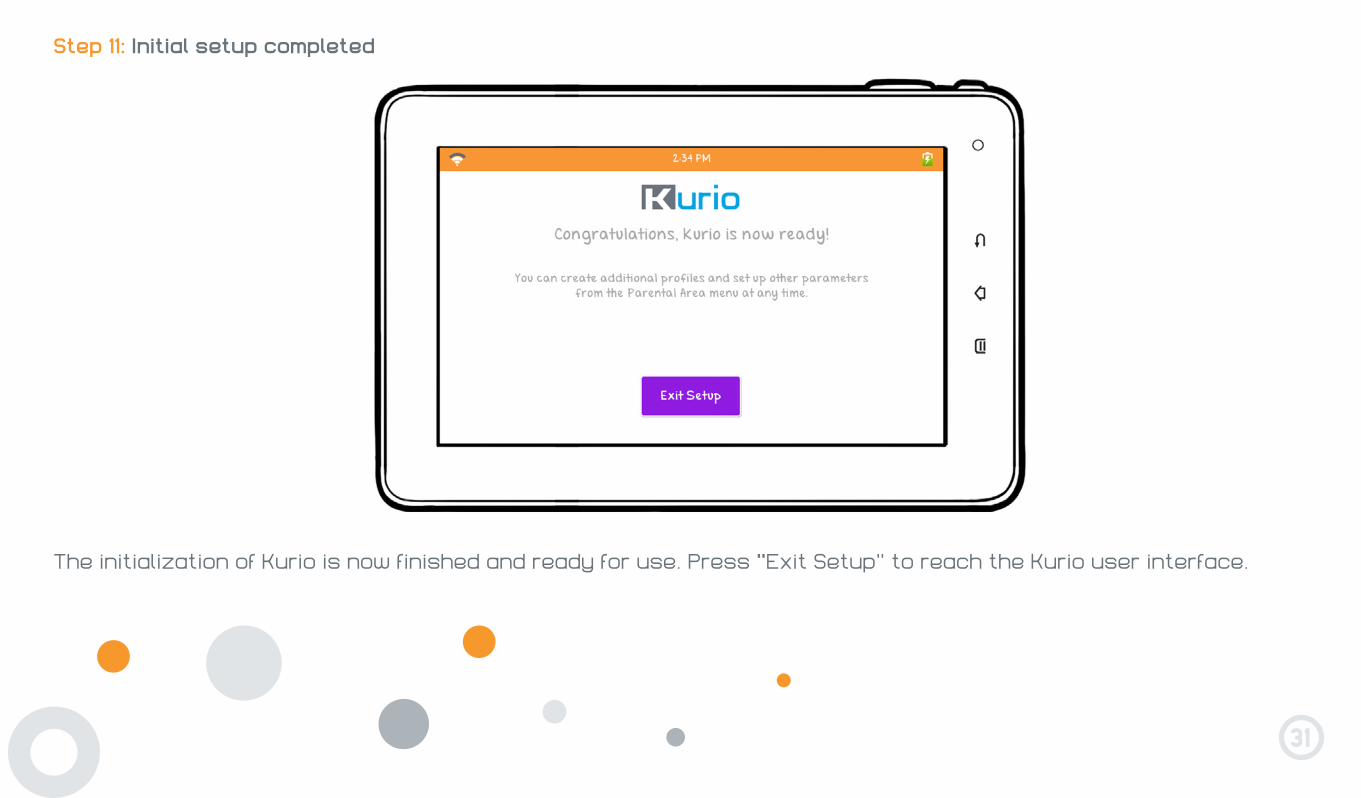
Step 11: Initial setup completed
The initialization of Kurio is now finished and ready for use. Press ″Exit Setup″ to reach the Kurio user interface.
32
3 – PARENTAL AREA
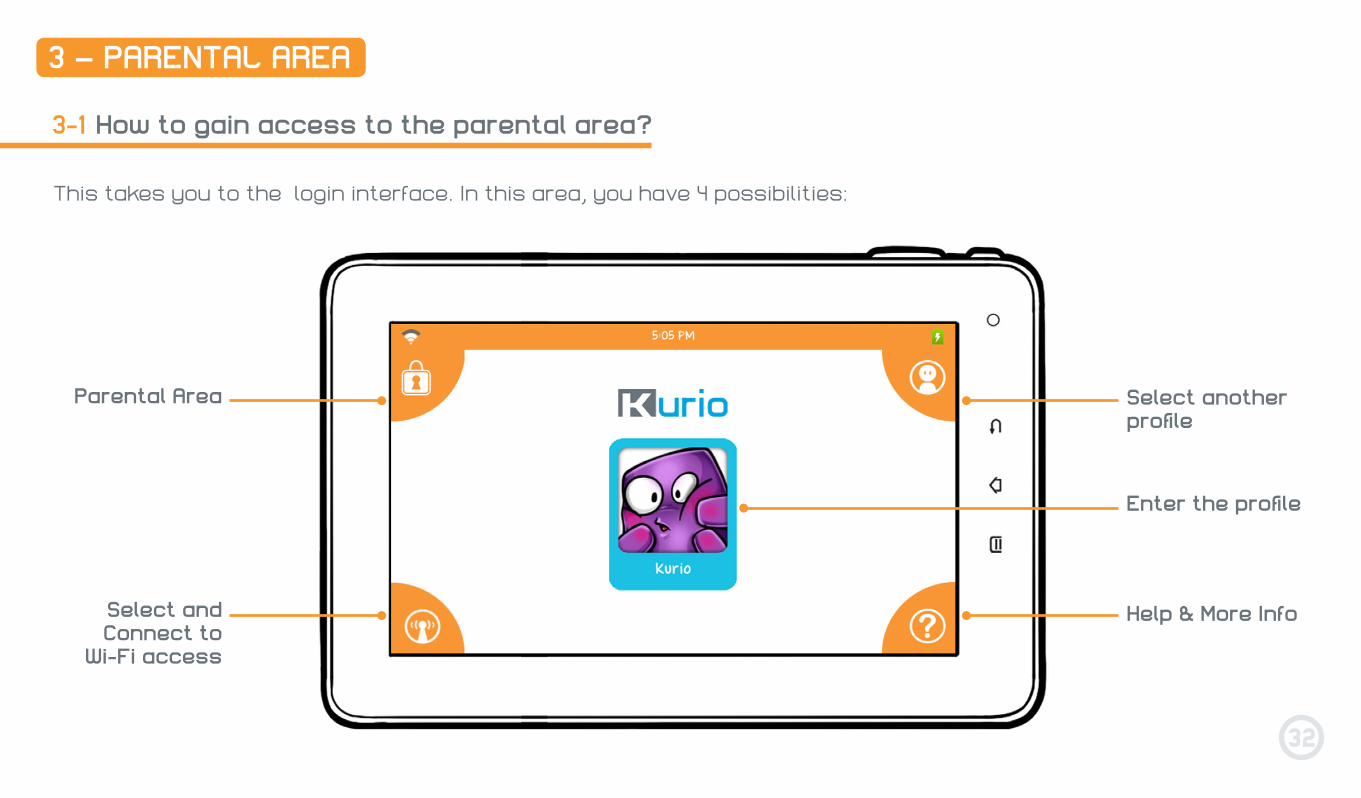
How to gain access to the parental area?3-1
This takes you to the login interface. In this area, you have 4 possibilities:
Parental Area Select another profile
Select and Connect to
Wi-Fi access
Help & More Info
Enter the profile
33
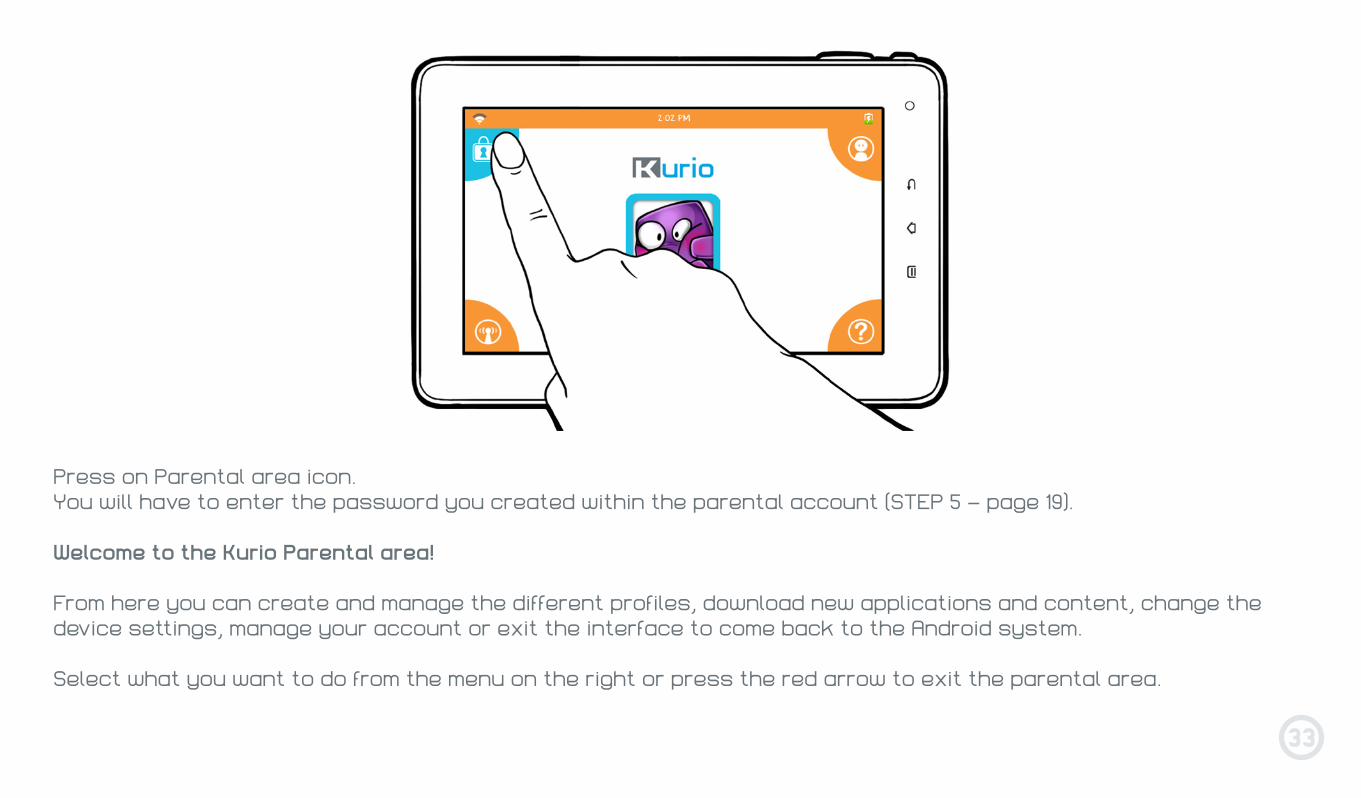
Press on Parental area icon.You will have to enter the password you created within the parental account (STEP 5 – page 19).
Welcome to the Kurio Parental area!
From here you can create and manage the different profiles, download new applications and content, change the device settings, manage your account or exit the interface to come back to the Android system.
Select what you want to do from the menu on the right or press the red arrow to exit the parental area.

34
a
b
c
d
e
Change the settings for each profile, or add a new profile. For more information, please read steps within the Kurio Set-Up.
Profiles3-2
Press the red arrow to go back to the login interface.
a Profiles Change the settings for each profile (Time Control,User account, Applications, Internet access, Filtering settings, Safe list settings)
b Tablet setup Change the System settings of the tablet or reset the interface
c Kurio store Search, purchase, download, review any apps for Kurio
d Main account Change your email or password, and learn more about KD Interactive
e Android Go to Android interface
35
Load the Kurio system on startup: If this function isn’t checked, then the Android Interface will be loaded on startup.In this function, the parental controls will be deactivated.
Keep currently used rules: the Internet security settings of the safe browser used in Kurio interface will be maintained in Android interface. No impact on any other browser.
Full access: the Internet security settings of the web browser used in Kurio interface will not be maintained in Android interface. Which means you can go through web browser without any restrictions.
Allow USB connection: If this option is checked, you will be allowed to plug USB peripherals (USB key, Hard disk drive, keyboard, camera, mouse, etc.). If the USB is blocked, only the charge will work when connecting a USB cable.
Reset Interface: Reset the interface to its factory settings. All user profiles will be deleted. But you will not delete the data (photos, videos, music).
System settings: Setup some Android parameters such as date & time, display, email account, uninstall applications, etc…
Get access to the Kurio application and content online store and to purchase / download thousands of apps and various contents dedicated to Kurio.By default, for safety control reasons the Kurio Store is not available in the Kurio Interface. If you want to allow the user to get access to the Kurio Store on the Kurio Interface, please check it in the Parental Area > Profiles > Select a profile > Applications.
Tablet setup
Kurio Store
3-3
3-4
36
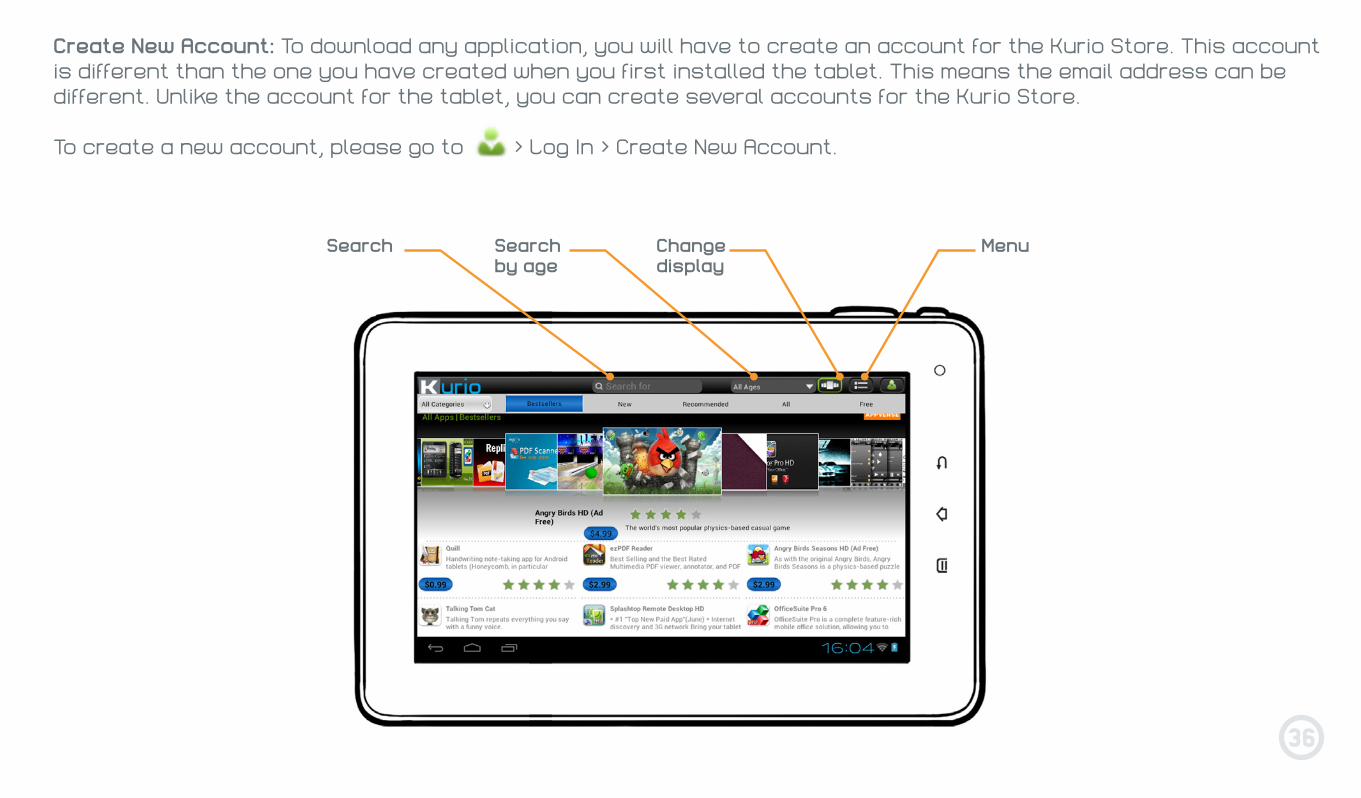
Create New Account: To download any application, you will have to create an account for the Kurio Store. This account is different than the one you have created when you first installed the tablet. This means the email address can be different. Unlike the account for the tablet, you can create several accounts for the Kurio Store.
To create a new account, please go to > Log In > Create New Account.
Search Search by age
Change display
Menu
37
Note 1: Once it is downloaded, the App doesn’t appear automatically in the Kurio interface. Select it in the App Management/Authorised Application menu of the Parental Area.
Note 2: You can find several Internet browsers on the Kurio Store. Please note that Internet Access mode is only available with Safe browser.
Buy New Apps: If you want to buy a new app, you have to create an account and enter your credit card information.
Security & Privacy: The personal information collected is only used to inform the user about new updates, services or information about Kurio. Personal information WILL NEVER BE disclosed to any third-parties.
If you want to remove an App, please go in the Android interface > Settings > Apps > Uninstall
Manage the parameters of the parental account, like changing your email and password, getting customer service information, etc…
Quit the Kurio Parental area and go back to the Android System Interface. Out of the Kurio Interface, the protection systems will be disabled.
Main account
Android
3-5
3-6
• Delete applications
38
4 - SUPPORT AND IMPORTANT INFORMATION
Update Kurio system4-1
You can update the Kurio system by using Kurio Store. When a new update is available, you will be warned in Kurio Store. You will also automatically be informed by email. The email address you entered when installing the system will be used. Do the update in My account.
Do not damage or deform the power supply cord. If it’s damaged or deformed, it may cause electric shock or malfunction when used. When removing from wall outlet, be sure to remove by holding the plug attachment and not by pulling the cord.
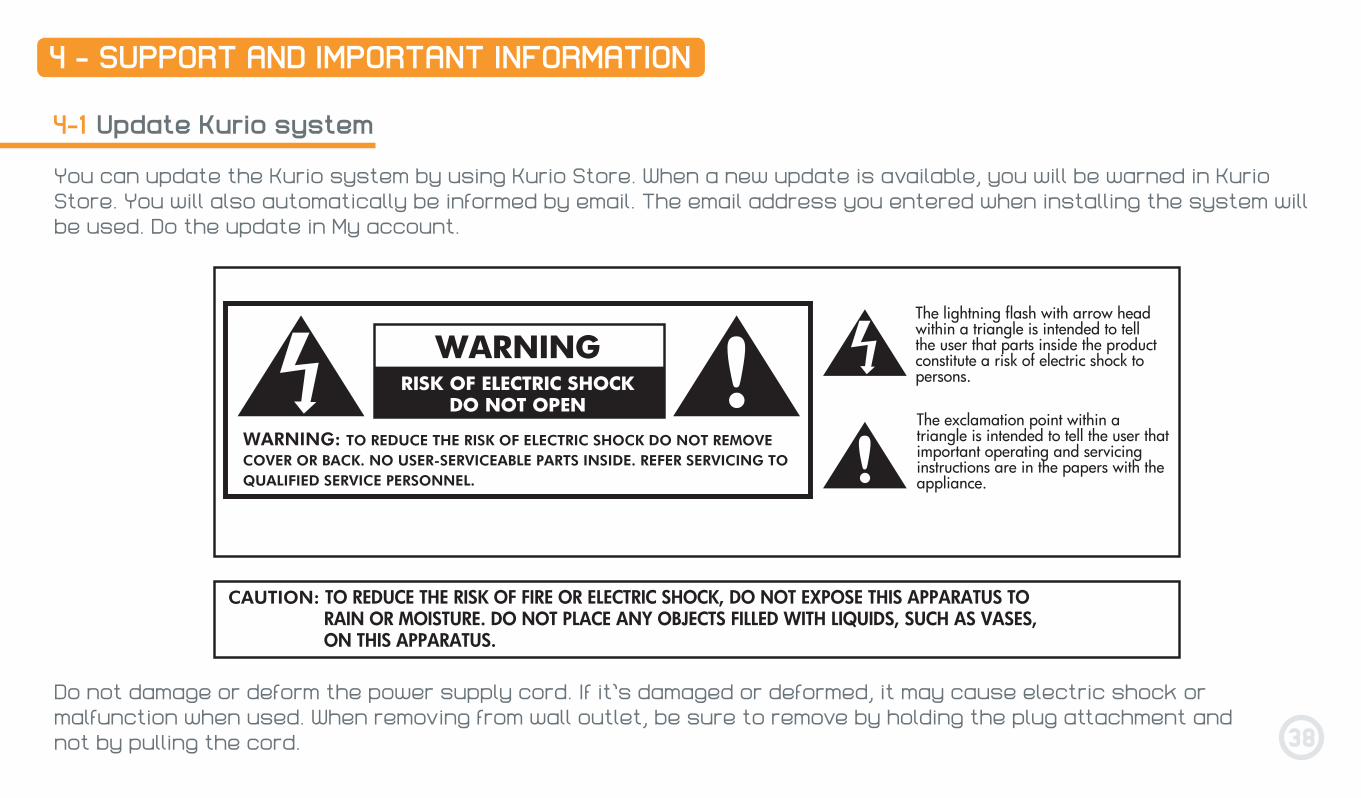
WARNINGRISK OF ELECTRIC SHOCK
DO NOT OPEN
WARNING: TO REDUCE THE RISK OF ELECTRIC SHOCK DO NOT REMOVE COVER OR BACK. NO USER-SERVICEABLE PARTS INSIDE. REFER SERVICING TO QUALIFIED SERVICE PERSONNEL.
CAUTION: TO REDUCE THE RISK OF FIRE OR ELECTRIC SHOCK, DO NOT EXPOSE THIS APPARATUS TO RAIN OR MOISTURE. DO NOT PLACE ANY OBJECTS FILLED WITH LIQUIDS, SUCH AS VASES, ON THIS APPARATUS.
The lightning flash with arrow head within a triangle is intended to tell the user that parts inside the product constitute a risk of electric shock to persons.
The exclamation point within a triangle is intended to tell the user that important operating and servicing instructions are in the papers with the appliance.
39
Warning4-2
• All packing materials such as internal bags, plastic collars, plastic films, carton inserts are not part of this product and should be discarded for your child’s safety.
• Do not try to disassemble the unit.• To charge Kurio, only use the power adapter supplied with Kurio tablet.• Keep the unit out of direct sunlight and away from any direct heat source.• Do not expose the unit to moisture or water.• Keep the unit clean by wiping it with a slightly damp cloth.• To prevent hearing damage, never use earphones at excessive volume levels. Listening to loud sounds for an
extended period may cause temporary or permanent hearing loss.• Never use Kurio while operating a motor vehicle or bicycle.• If you feel discomfort in your hands or any pain using Kurio, please stop immediately.• In case of long period of use, do frequent breaks. • If small part is coming out of the Kurio, don’t try to remove it. Keep it away from small children.• Never force a connector into a port of Kurio. If a connector and a port do not join with reasonable force, make sure
that the connector matches the port and that you have positioned the connector correctly in relation to the port.• To clean up the screen, simply use a soft damp cloth. Do not you use alcohol, solvent, aerosol spray or abrasive
cleaners to clean up Kurio.• The silicone bumper is designed to protect from light use and drops, but is not guaranteed to protect this delicate
piece of electronics from severe drops, abuse, misuse, etc.• The product and the adapter should be periodically examined for conditions that may result in the risk of fire,
electric shock, or injury to persons and that, in an event such conditions, the adapter should not be used until properly repaired.
• CAUTION – ELECTRICALLY OPERATED PRODUCT – As with all electric products, precautions should be observed during handling and use to prevent electric shock. Adult supervision is recommended.
40
Tech support and warranty information
Restricted use of electronic devices
4-3
4-4
• The use of electronic/electric devices may interfere with safe operation of some aircraft and can be restricted with some airline companies. Please check with your airline company before traveling.
• Kurio 7 has an Airplane Mode. Please go into the Settings of the Android Interface to switch the tablet into Airplane Mode. All wireless connections will be turned off.
FAQ / Troubleshooting4-5
If you encounter any problem with the device, please try to relaunch it before doing anything else.If the problem remains, please check FAQ & Troubleshooting in the Parental Area > Main Account > Customer Service, or go to www.kurioworld.com.If none of the solutions can fix your problem, try to reset Kurio. Press and hold simultaneously on ″Vol+″ and ″Power″ buttons until your Kurio resets.
• If you have any questions setting up or using your tablet, please visit www.kurioworld.com to find out more about Kurio, read our related FAQs, download the full user manual and for any technical support.All of our products have a 1 Year Limited Warranty. In the unlikely event you experience any problems with your Kurio, please visit www.kurioworld.com to contact Kurio Customer Service. If the service representative is unable to solve the issue, he or she will provide instructions regarding how to have your Kurio serviced if it is under warranty.
• Please note that this tablet is warranted only to the original purchaser for a period of twelve months from the original purchase date, under normal use and service, against defective workmanship and materials. If the product is damaged due to accident, improper or unreasonable use or maintenance, such as a broken screen, fall, water damage, etc., this damage is not covered by the warranty.Please visit www.kurioworld.com for the full details of Kurio’s 1 Year Limited Warranty.
41
Exposure to radio frequency energy4-6
This product emits and receives radio frequency electromagnetic energy. If not installed and used in accordance with the instructions, it may cause harmful interference to radio communications, electronic equipment and personal medical devices. If Kurio does cause harmful interference, try to co rrect it by reorienting or relocating the receiving antenna. You can also try to increase the separation between the device and the receiver, or connect the equipment to another outlet. Consult an experienced radio/TV technician for help.The maximum amount of power that a Wi-Fi device can transmit is limited by local regulations, such as FCC (Federal Communications Commission) or ETSI (European Telecommunications Standards Institute). Kurio is designed and manufactured to comply with the limits.This product complies with Part 15 of the FCC rules. Operation is subjected to the following two conditions: (1) This device may not cause harmful interference, and (2) this device must accept any interference received, including interference that may cause undesired operation.This device has been tested and found to comply with the limits for a Class B digital device, pursuant to part 15 of the FCC rules. These limits are designed to provide reasonable protection against harmful interference in a residential installation.
This device meets the FCC Radio Frequency Emission guidelines and is certified with the FCC as FCC number: NXM-CI1100
For more information about FCC, please visit www.fcc.govFor more information about ETSI, please visit www.etsi.org
Recycling
Waste electrical products and batteries should not be disposed of with household waste. Please recycle where facilities exist. Check with your local authority for recycling advice.
4-7
42
Declaration of conformity
CIDE Interactive declares that Kurio 7 device complies with the basic requirements and the other relevant provisions required by directive 1999/5/CE. The original declaration of conformity can be obtained at the following address:
CIDE InteractiveEdificio Europa - Avenida Electricitat n°19Piso 6P4P.O. Box 12108191 RUBI - BARCELONA – SPAIN
Product: Kurio 7Model: CI1100
We declare that the product above complies with the basic requirements and the other relevant provisions required by R&TTE Directive (1999/5/CE), the Low Voltage Directive (2006/95/EC), EMC Directive (2004/108/EC) and is in conformity with the following standards:
EN300328: 2006, EN301489-1: 2008, EN301489-17: 2009, EN62209: 2006, EN55022: 2006, EN55024: 2010, EN61000-3-3: 2008, EN60950-1: 2006, EN50332-2: 2003.
The undersigned does hereby declare that the product complies with the above Directives.Eric WolffGeneral Manager
Issue date: May 14th 2012
4-8
43
Copyrights4-9
© 2012 Copyrights. Kurio™, Kurio™ logo, KD Interactive™ and KD Interactive™ logo are trademarks or registered trademarks of CIDE Interactive Inc. All rights reserved. Angry Birds is a trademark of Rovio Entertainment Ltd. © 2009-2012 Rovio Entertainment Ltd. All rights reserved. Doodle Jump® © 2011 RealNetworks, Inc and Lima Sky, LLC. All rights reserved. © 2012 Halfbrick Studios Pty. Ltd. Fruit Ninja™ is a trademark of Halfbrick Studios Pty. Ltd. All Rights Reserved. World of Goo is a trademark of 2D BOY. ZeptoLab, Cut the Rope, Cut the Rope Experiments, Om Nom, and Feed with Candy are the trademarks or registered trademarks of ZeptoLab UK Ltd. © 2012. All rights reserved. © Disney. © 2012 Xiamen Bluebird Cartoon Co. Ltd. Star Fox. All Rights Reserved. Copyright © 2010-2012 MeeGenius. MEEGENIUS and OWL logo are trademarks of MeeGenius. © 2012 Nussbaum Education Network, LLC. All Rights Reserved. Copyright © 2012 Aldiko Limited, All Rights Reserved. © 2012 Tipitap 2012. © 2012 Toon Goggles, Inc. The Alligator logo is a registered trade mark of Alligator Books Limited. CronLab® is a CronLab Limited registered trademark. Android is a trademark of Google Inc.
For more information about Kurio, please go to www.kurioworld.com or contact:
InspirationWorksCharlotte CourtProctor WayLuton, Beds LU2 9PEUNITED KINGDOM

The Ultimate Android™ Tablet for Families™