Embed Size (px)
Citation preview
Integration Note
Manufacturer: Linear
Model Number(s): LV-B2MDI-312, LV-D2-2MIV-3.6F, LV-D4-2MDI-312, LV-D4-2MDIV-312, ND3-10VR-28, ND4-13VR-312HB, ND5-13RE-312, NTL-10DN-312
Minimum Core Module Version: g! 6.7.12
Comments: Firmware: 1.7.1001.64.0.13 ONVIF 2.20, Profile S Compliant
Document Revision Date: 08/08/2014
IMPORTANT: This Integration note only applies to the “ONVIF (Static)” and “ONVIF (Dynamic)” drivers available in version 6.7 of g! software when used with Linear Cameras. If your camera is not a Linear ONVIF 2.20, you must
use the Integration Note for the specific camera rather than this document, or the generic ONVIF Integration Note.
OVERVIEW AND SUPPORTED FEATURES
THE ONVIF CAMERA DRIVER SUPPORTS THE FOLLOWING FEATURES:
Pan / Tilt / Zoom: Some Linear ONVIF 2.20 Profile S compliant cameras can be turned to see various locations and zoom in and out. This feature is supported in the driver, and is configurable using a dropdown menu.
IMPORTANT: Only Optical zoom is supported. Digital Zoom is essentially cropping the existing image and does not actually magnify what the camera sees, and is not supported.
Auto Detection: Some Linear ONVIF 2.20 Profile S compliant cameras can be auto detected on the network by the ONVIF (Dynamic) driver. This feature is supported in the driver and is available during configuration.
IMPORTANT: Any ONVIF camera that does not support Auto Detection will need to be configured using the ONVIF (Static) driver.
Image Flip: The camera can be mounted with its base up or down, and the image will appear normal. Simply set the “flip 180” option in the g! Configurator.
Motion Detection: Some Linear ONVIF 2.20 Profile S compliant cameras support motion detection to trigger events in the g! system. This feature is not supported by the g! system at this time.
THESE CAMERAS DO NOT SUPPORT THE FOLLOWING FEATURES:
Input/Output: Some Linear ONVIF 2.20 Profile S compliant cameras include an I/O connector for sensor inputs and alarm outputs. These are not supported by the g! system at this time.
One-Way Audio: Some Linear ONVIF 2.20 Profile S compliant cameras support Listen function for audio. This feature is not supported by the g! system at this time. Two-Way Audio: Some Linear ONVIF 2.20 Profile S compliant cameras support two way audio (speaking from a touch screen and outputting from Camera). This feature is not supported by the g! system at this time.
Any feature not specifically noted as “supported” is not supported.
INSTALLATION OVERVIEW
Installing Linear ONVIF 2.20 Profile S compliant cameras can be broken down into the following steps:
1. Install cameras at desired locations, and pull power and Cat5 cabling as needed. Refer to the camera manufacturer’s documentation for mounting details.
2. Connect the cameras electrically to the home network and configure the cameras. See Camera Configuration.
3. Integrate the cameras into the g! system and test proper operation. This step is outlined in g! Configuration/g! Configuration Details.
CAMERA CONFIGURATION
The camera configuration is done with Linear’s IPSEARCH.EXE tool and the ONVIF Device Manager 2.2.250, which must be run from a computer with Windows also connected to the same network as the camera.
The ONVIF Device Manager 2.2.250 is a free open source tool that can be used to configure and test ONVIF cameras prior to g! integration. It can be obtained from sourceforge:
http://sourceforge.net/projects/onvifdm/?source=directory
IMPORTANT: The instructions below assume that you have gone through the Manufacturer’s installation and configuration process and that the camera is functional and available on the network. Please check the Manufacturer’s
documentation for any configuration modifications that need to be made to enable ONVIF for the camera model, including but not limited to Settings, Modes of Operation, and Firmware Revisions required.
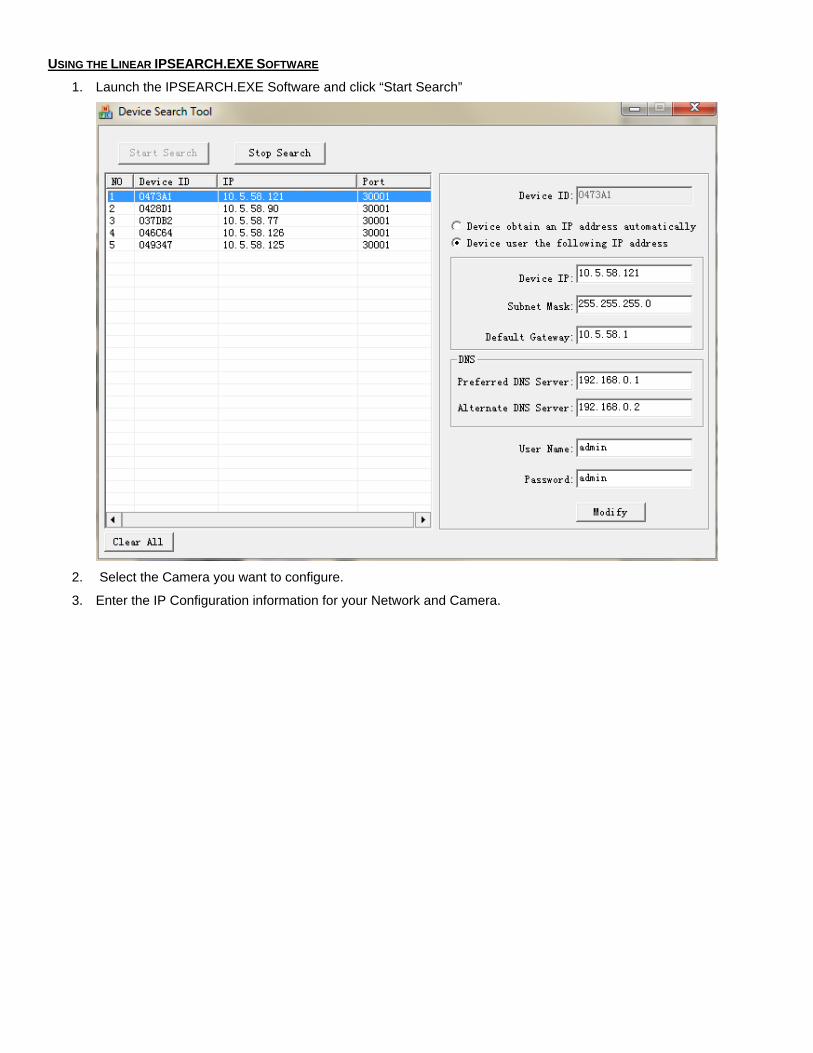
USING THE LINEAR IPSEARCH.EXE SOFTWARE
1. Launch the IPSEARCH.EXE Software and click “Start Search”
2. Select the Camera you want to configure.
3. Enter the IP Configuration information for your Network and Camera.
CONFIGURING MOTION FOR THE LINEAR CAMERAS
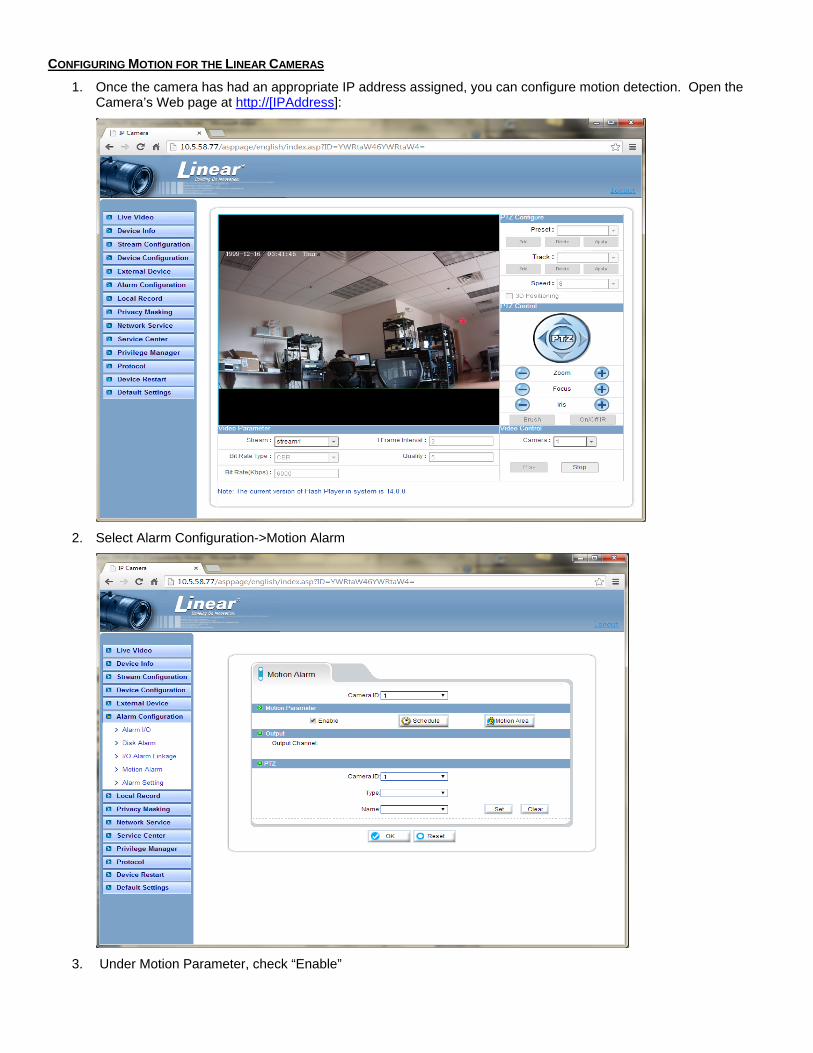
1. Once the camera has had an appropriate IP address assigned, you can configure motion detection. Open the Camera’s Web page at http://[IPAddress]:
2. Select Alarm Configuration->Motion Alarm
3. Under Motion Parameter, check “Enable”
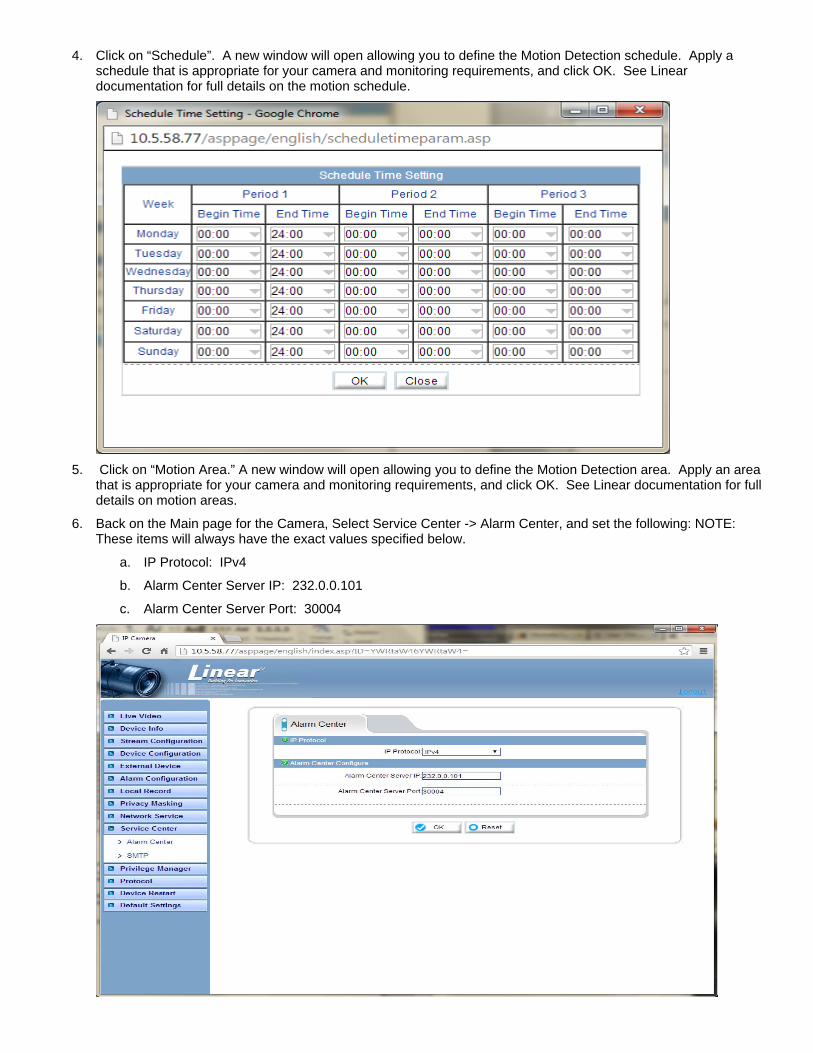
4. Click on “Schedule”. A new window will open allowing you to define the Motion Detection schedule. Apply a schedule that is appropriate for your camera and monitoring requirements, and click OK. See Linear documentation for full details on the motion schedule.
5. Click on “Motion Area.” A new window will open allowing you to define the Motion Detection area. Apply an area that is appropriate for your camera and monitoring requirements, and click OK. See Linear documentation for full details on motion areas.
6. Back on the Main page for the Camera, Select Service Center -> Alarm Center, and set the following: NOTE: These items will always have the exact values specified below.
a. IP Protocol: IPv4
b. Alarm Center Server IP: 232.0.0.101
c. Alarm Center Server Port: 30004
USING THE ONVIF DEVICE MANAGER SOFTWARE
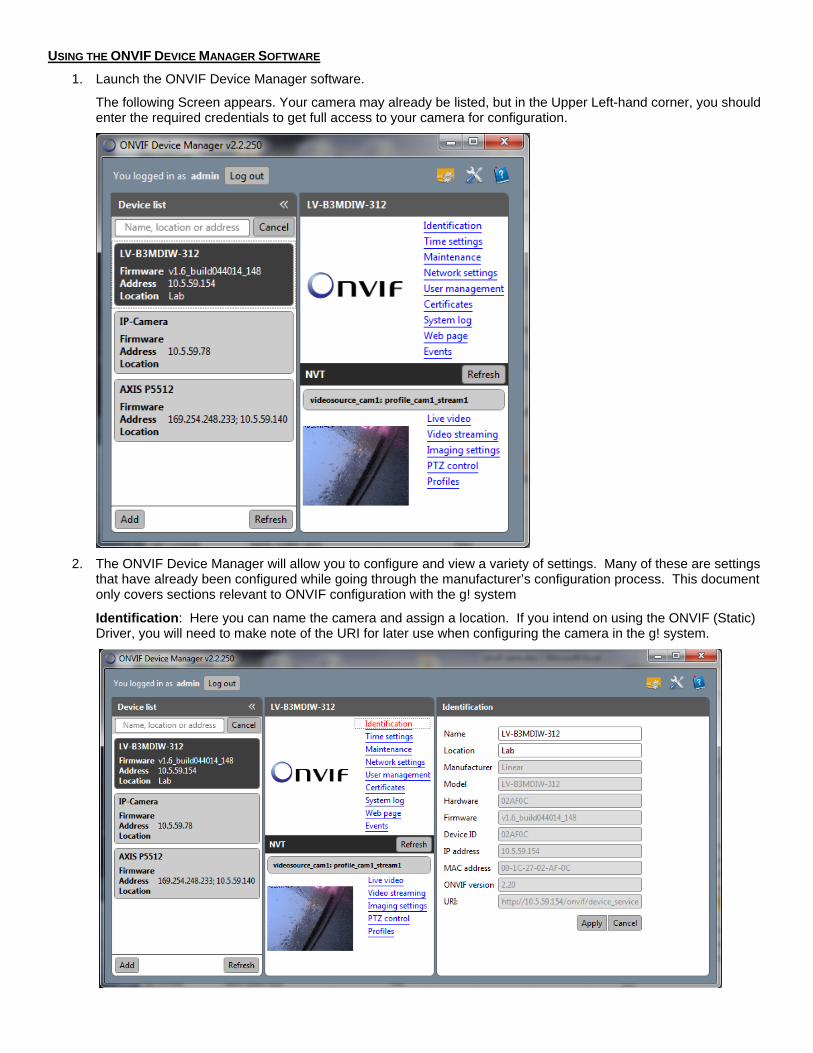
1. Launch the ONVIF Device Manager software.
The following Screen appears. Your camera may already be listed, but in the Upper Left-hand corner, you should enter the required credentials to get full access to your camera for configuration.
2. The ONVIF Device Manager will allow you to configure and view a variety of settings. Many of these are settings that have already been configured while going through the manufacturer’s configuration process. This document only covers sections relevant to ONVIF configuration with the g! system
Identification: Here you can name the camera and assign a location. If you intend on using the ONVIF (Static) Driver, you will need to make note of the URI for later use when configuring the camera in the g! system.
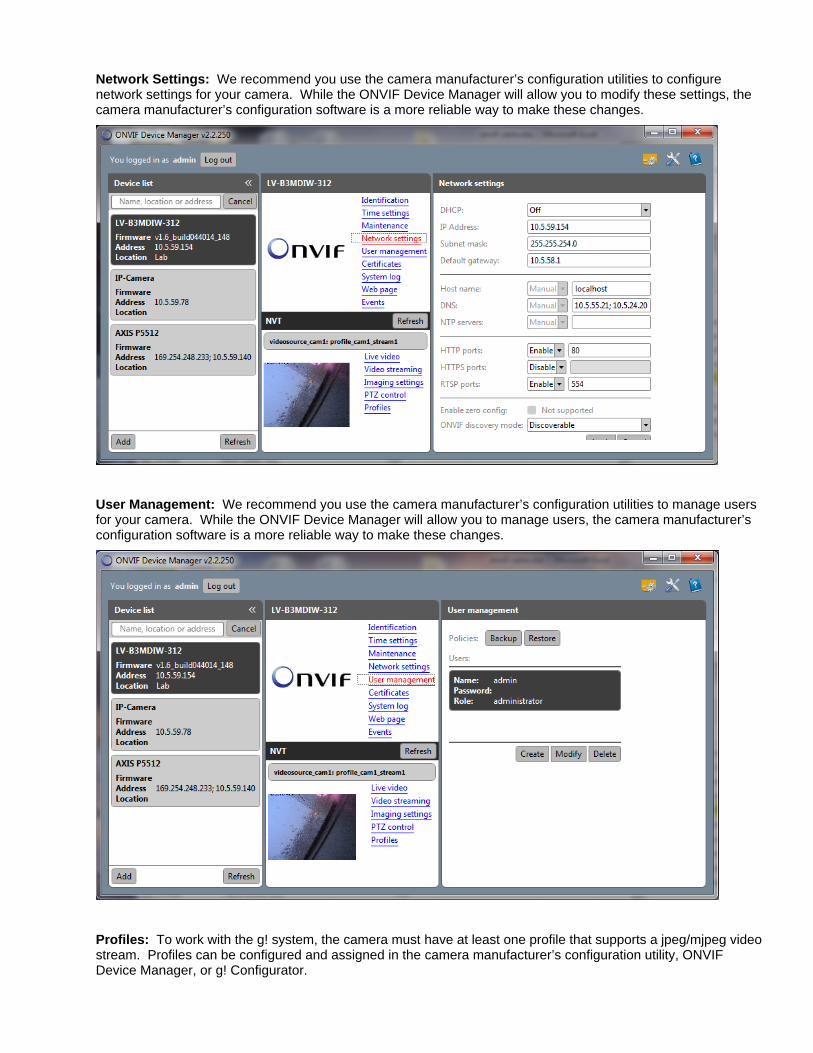
Network Settings: We recommend you use the camera manufacturer’s configuration utilities to configure network settings for your camera. While the ONVIF Device Manager will allow you to modify these settings, the camera manufacturer’s configuration software is a more reliable way to make these changes.
User Management: We recommend you use the camera manufacturer’s configuration utilities to manage users for your camera. While the ONVIF Device Manager will allow you to manage users, the camera manufacturer’s configuration software is a more reliable way to make these changes.
Profiles: To work with the g! system, the camera must have at least one profile that supports a jpeg/mjpeg video stream. Profiles can be configured and assigned in the camera manufacturer’s configuration utility, ONVIF Device Manager, or g! Configurator.
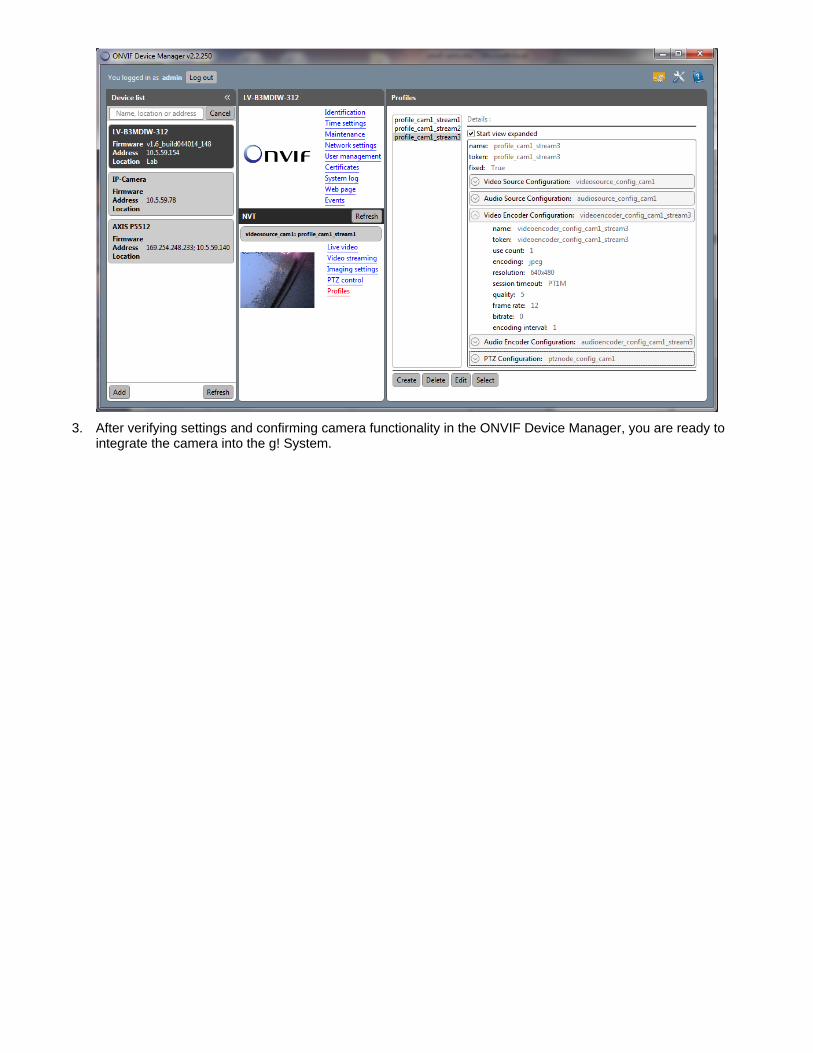
3. After verifying settings and confirming camera functionality in the ONVIF Device Manager, you are ready to integrate the camera into the g! System.
g! CONFIGURATION
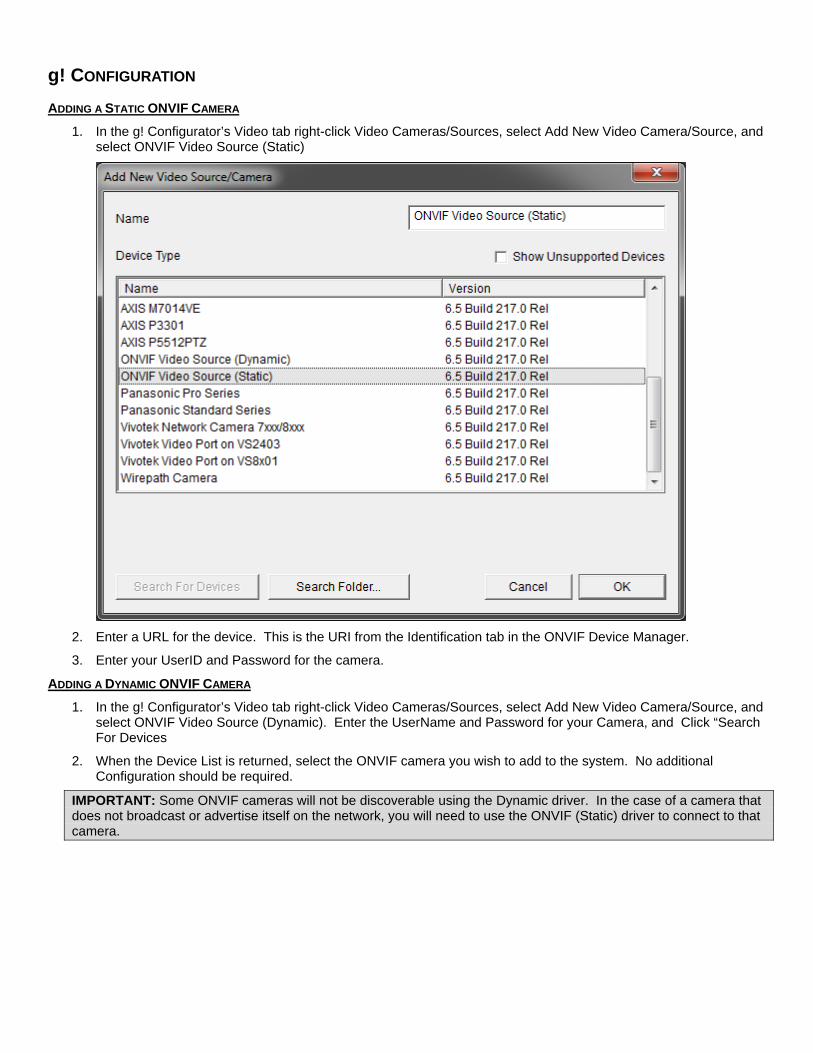
ADDING A STATIC ONVIF CAMERA
1. In the g! Configurator’s Video tab right-click Video Cameras/Sources, select Add New Video Camera/Source, and select ONVIF Video Source (Static)
2. Enter a URL for the device. This is the URI from the Identification tab in the ONVIF Device Manager.
3. Enter your UserID and Password for the camera.
ADDING A DYNAMIC ONVIF CAMERA
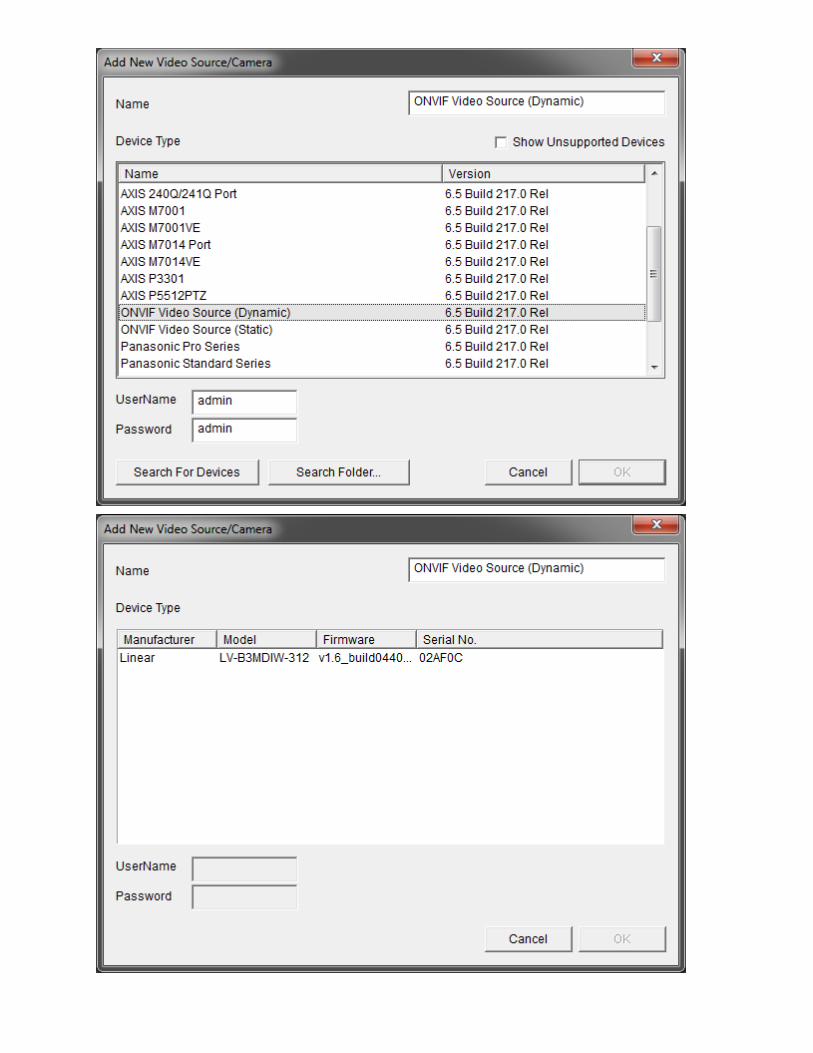
1. In the g! Configurator’s Video tab right-click Video Cameras/Sources, select Add New Video Camera/Source, and select ONVIF Video Source (Dynamic). Enter the UserName and Password for your Camera, and Click “Search For Devices
2. When the Device List is returned, select the ONVIF camera you wish to add to the system. No additional Configuration should be required.
IMPORTANT: Some ONVIF cameras will not be discoverable using the Dynamic driver. In the case of a camera that does not broadcast or advertise itself on the network, you will need to use the ONVIF (Static) driver to connect to that camera.
ONVIF PROFILES
After you have added your Linear ONVIF 2.20 Profile S complaint camera to the g! system, you will need to verify that there is an available profile for the system to use.
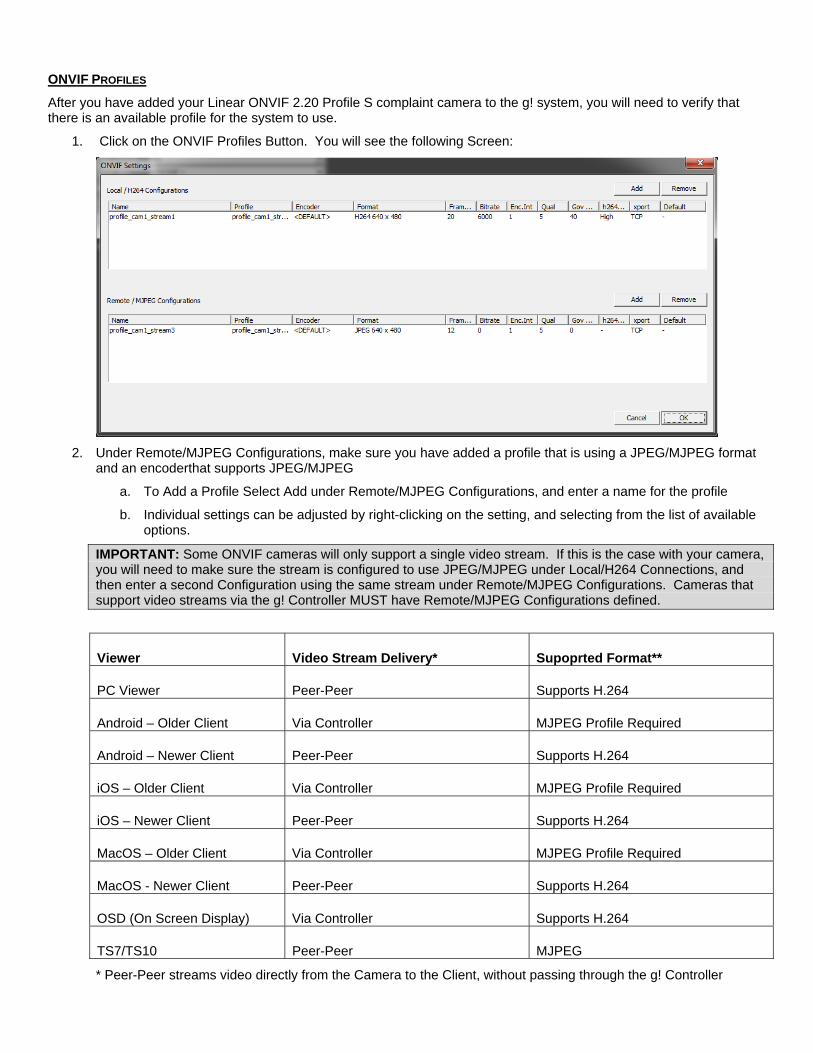
1. Click on the ONVIF Profiles Button. You will see the following Screen:
2. Under Remote/MJPEG Configurations, make sure you have added a profile that is using a JPEG/MJPEG format and an encoderthat supports JPEG/MJPEG
a. To Add a Profile Select Add under Remote/MJPEG Configurations, and enter a name for the profile
b. Individual settings can be adjusted by right-clicking on the setting, and selecting from the list of available options.
IMPORTANT: Some ONVIF cameras will only support a single video stream. If this is the case with your camera, you will need to make sure the stream is configured to use JPEG/MJPEG under Local/H264 Connections, and then enter a second Configuration using the same stream under Remote/MJPEG Configurations. Cameras that support video streams via the g! Controller MUST have Remote/MJPEG Configurations defined.
Viewer Video Stream Delivery* Supoprted Format**
PC Viewer Peer-Peer Supports H.264
Android – Older Client Via Controller MJPEG Profile Required
Android – Newer Client Peer-Peer Supports H.264
iOS – Older Client Via Controller MJPEG Profile Required
iOS – Newer Client Peer-Peer Supports H.264
MacOS – Older Client Via Controller MJPEG Profile Required
MacOS - Newer Client Peer-Peer Supports H.264
OSD (On Screen Display) Via Controller Supports H.264
TS7/TS10 Peer-Peer MJPEG
* Peer-Peer streams video directly from the Camera to the Client, without passing through the g! Controller
** MJPEG is supported on all Viewers.
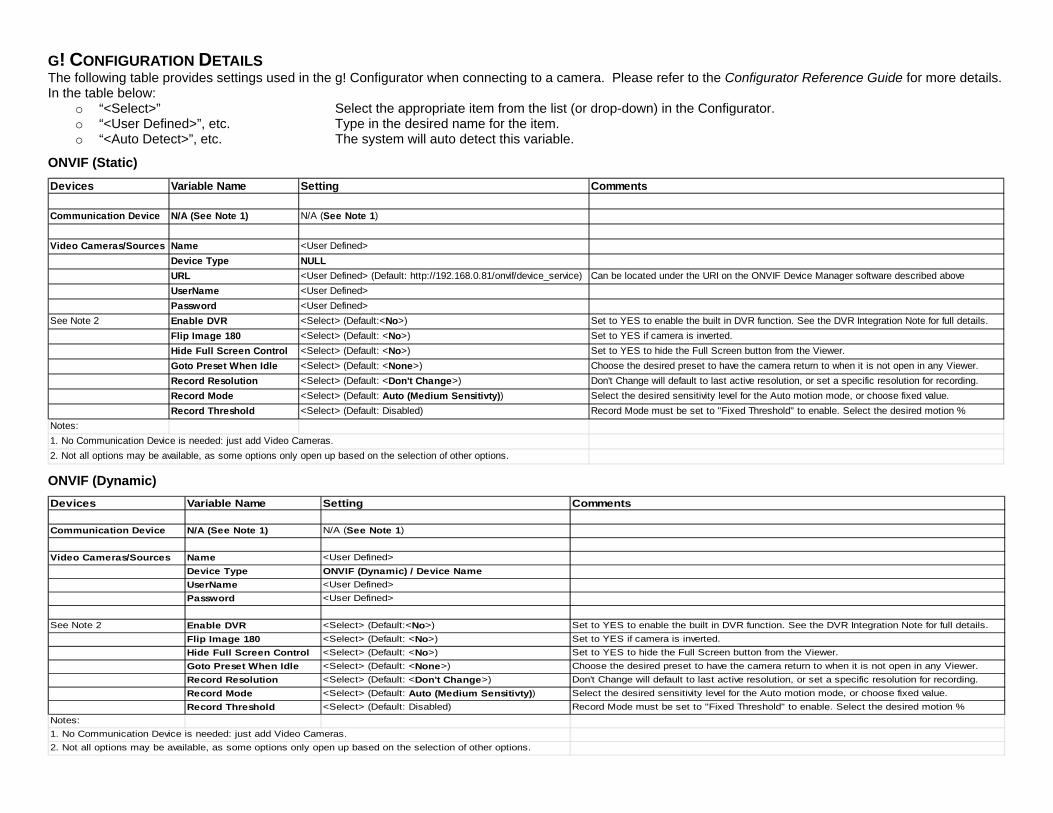
G! CONFIGURATION DETAILS The following table provides settings used in the g! Configurator when connecting to a camera. Please refer to the Configurator Reference Guide for more details. In the table below:
o “<Select>” Select the appropriate item from the list (or drop-down) in the Configurator. o “<User Defined>”, etc. Type in the desired name for the item. o “<Auto Detect>”, etc. The system will auto detect this variable.
ONVIF (Static)
Devices Variable Name Setting Comments
Communication Device N/A (See Note 1) N/A (See Note 1)
Video Cameras/Sources Name <User Defined>
Device Type NULL
URL <User Defined> (Default: http://192.168.0.81/onvif/device_service) Can be located under the URI on the ONVIF Device Manager software described above
UserName <User Defined>
Password <User Defined>
See Note 2 Enable DVR <Select> (Default:<No>) Set to YES to enable the built in DVR function. See the DVR Integration Note for full details.
Flip Image 180 <Select> (Default: <No>) Set to YES if camera is inverted.
Hide Full Screen Control <Select> (Default: <No>) Set to YES to hide the Full Screen button from the Viewer.
Goto Preset When Idle <Select> (Default: <None>) Choose the desired preset to have the camera return to when it is not open in any Viewer.
Record Resolution <Select> (Default: <Don't Change>) Don't Change will default to last active resolution, or set a specific resolution for recording.
Record Mode <Select> (Default: Auto (Medium Sensitivty)) Select the desired sensitivity level for the Auto motion mode, or choose fixed value.
Record Threshold <Select> (Default: Disabled) Record Mode must be set to "Fixed Threshold" to enable. Select the desired motion %
Notes:
1. No Communication Device is needed: just add Video Cameras.
2. Not all options may be available, as some options only open up based on the selection of other options.
ONVIF (Dynamic)
Devices Variable Name Setting Comments
Communication Device N/A (See Note 1) N/A (See Note 1)
Video Cameras/Sources Name <User Defined>
Device Type ONVIF (Dynamic) / Device Name
UserName <User Defined>
Password <User Defined>
See Note 2 Enable DVR <Select> (Default:<No>) Set to YES to enable the built in DVR function. See the DVR Integration Note for full details.
Flip Image 180 <Select> (Default: <No>) Set to YES if camera is inverted.
Hide Full Screen Control <Select> (Default: <No>) Set to YES to hide the Full Screen button from the Viewer.
Goto Preset When Idle <Select> (Default: <None>) Choose the desired preset to have the camera return to when it is not open in any Viewer.
Record Resolution <Select> (Default: <Don't Change>) Don't Change will default to last active resolution, or set a specific resolution for recording.
Record Mode <Select> (Default: Auto (Medium Sensitivty)) Select the desired sensitivity level for the Auto motion mode, or choose fixed value.
Record Threshold <Select> (Default: Disabled) Record Mode must be set to "Fixed Threshold" to enable. Select the desired motion %
Notes:
1. No Communication Device is needed: just add Video Cameras.
2. Not all options may be available, as some options only open up based on the selection of other options.

COMMON MISTAKES:
1. No Video:
a. The camera must have a Local/JPEG configuration defined under ONVIF Settings in the configurator. This configuration must support JPEG/MJPEG video.
b. Invalid Credentials. Some ONVIF cameras will allow discovery with no credentials entered. These cameras will not display a video stream until the proper credentials have been entered in configurator.
2. Blank Presets:
a. Presets must be configured through the camera first. They can be reassigned in the g! Viewer.
b. If the g! Controller is started with the camera off-line; the list of presets will be blank. We will attempt to restore the list when the camera comes back on line
3. Incorrect Frame Rates in Communication Status: The Communication Status for the ONVIF device will only report on frames being processed through the controller. It will not report on peer-peer streaming frame rates.
4. Inoperable PTZ: The g! System will offer the user PTZ controls if the camera is advertising that it has PTZ capability. Occasionally a NON-PTZ camera will advertise to the system that it has PTZ capability. This will cause the g! Viewer to
5. No Motion Events: The Linear Camera must have Motion Alarm configured as well as an Alarm Center Server IP configured. See instructions above in “Configuring Motion”