Embed Size (px)
Citation preview
INTERMEDIATE
MATRIX
Technical Support: 818 947 2202 or 661 295 7117
EMAIL: [email protected]
WEB Site: www. SRAR.com
Phone Hours: Monday - Friday 8:00a.m. – 6:00p.m.
Saturday 8:00a.m. – 5:00p.m.
REV 5/2013
Intermediate Matrix
www.SRAR.com Tech Support SRAR-SFV 818 947 2202 SRAR-SCV 661 295 7117 [email protected]
[2]
TABLE OF CONTENTS
Introduction ............................................................................................................................................................................................... 4
Minimum System Requirements ........................................................................................................................................................... 4
Disabling Pop-up Blockers ...................................................................................................................................................................... 5
Accessing the CRISNetMLS Matrix platform .......................................................................................................................................... 6
Hot Sheets .................................................................................................................................................................................................. 7
Customizing Hot Sheets ......................................................................................................................................................................... 7
Running Your Hot Sheets ....................................................................................................................................................................... 8
Intermediate Search Techniques ............................................................................................................................................................. 10
Detail Search ........................................................................................................................................................................................ 10
Keyword Search ................................................................................................................................................................................... 11
Keyword Inclusion ............................................................................................................................................................................ 11
Keyword Exclusion ........................................................................................................................................................................... 11
Date Range Search ............................................................................................................................................................................... 12
Creating A Custom Search.................................................................................................................................................................... 14
Saving Searches ........................................................................................................................................................................................ 18
Saving a Search .................................................................................................................................................................................... 18
Managing Saved Searches.................................................................................................................................................................... 21
My Favorite Searches ............................................................................................................................................................................... 22
Searching with Speed Bar ........................................................................................................................................................................ 23
Using Speed Bar Shortcuts ................................................................................................................................................................... 23
Saving Speed Bar Shortcuts ................................................................................................................................................................. 24
Using Saved Speed Bar Shortcuts ........................................................................................................................................................ 25
Modifying or Deleting Speed Bar Shortcuts ......................................................................................................................................... 25
Managing Contacts .................................................................................................................................................................................. 27
Adding Contacts ................................................................................................................................................................................... 27
Importing Multiple Contacts ................................................................................................................................................................ 28
Viewing Contacts ................................................................................................................................................................................. 30
Managing Contacts .............................................................................................................................................................................. 31
Customizing Email Settings ...................................................................................................................................................................... 32
Creating an Email Signature ................................................................................................................................................................. 32
Customizing Your Header/Footer ........................................................................................................................................................ 33
Emailing Listings ....................................................................................................................................................................................... 35
Emailing Listings as Reports ................................................................................................................................................................. 35
Intermediate Matrix
www.SRAR.com Tech Support SRAR-SFV 818 947 2202 SRAR-SCV 661 295 7117 [email protected]
[3]
Emailing Listings as Links ...................................................................................................................................................................... 38
Emailing Listings Automatically (Auto Emails) ......................................................................................................................................... 40
Creating Auto Emails from Search Results ........................................................................................................................................... 40
Creating Auto Emails from Saved Searches ......................................................................................................................................... 43
Managing Auto Emails ......................................................................................................................................................................... 47
Auto Email Concierge ............................................................................................................................................................................... 49
Creating a Concierge Auto Email.......................................................................................................................................................... 49
Managing Listings in Concierge Mode ................................................................................................................................................. 52
Enabling Concierge Mode for Existing Auto Emails ............................................................................................................................. 54
Disabling Concierge Mode for an Auto Email ...................................................................................................................................... 56
Auto Email Displays for Concierge Mode ............................................................................................................................................. 58
Viewing Sent Email History ...................................................................................................................................................................... 59
Viewing Email History .......................................................................................................................................................................... 59
Viewing Your Client’s Auto Email Portal .............................................................................................................................................. 61
Reverse Prospecting................................................................................................................................................................................. 63
Carts ......................................................................................................................................................................................................... 64
Adding Listings to a Cart ...................................................................................................................................................................... 64
Accessing Carts..................................................................................................................................................................................... 65
Accessing a Cart from the Home Tab ............................................................................................................................................... 65
Accessing a Cart from the Search tab .............................................................................................................................................. 65
Accessing a Cart from the Search Results Page ............................................................................................................................... 65
Accessing a Cart from the Contacts Page ......................................................................................................................................... 66
Removing Listings from A Cart ............................................................................................................................................................. 68
CRisnetMLS Support Resources ............................................................................................................................................................... 69
CRISNetMLS Website ........................................................................................................................................................................... 69
Training Resources ............................................................................................................................................................................... 70
Customer Care ..................................................................................................................................................................................... 71
Appendix .................................................................................................................................................................................................. 72
Searching for Listings on Your Mobile Devices .................................................................................................................................... 72
Adding a Public Search Link to Your Website ...................................................................................................................................... 73

Intermediate Matrix
www.SRAR.com Tech Support SRAR-SFV 818 947 2202 SRAR-SCV 661 295 7117 [email protected]
[4]
INTRODUCTION
The CRISNetMLS Matrix platform is the industry’s top rated MLS platform offering an ultra-modern
and flexible environment. This manual will guide you through intermediate search techniques, contact
and prospect management, and using carts in Matrix. Follow the steps in these sections to get
started.
“Minimum System Requirements” on page 4
“Disabling Pop-up Blockers” on page 5
“Accessing the CRISNetMLS Matrix platform” on page 6
MINIMUM SYSTEM REQUIREMENTS
To use the CRISNetMLS Matrix Platform, your system should meet these minimum requirements:
Operating System: Windows XP, Windows Vista, Windows 7, Windows 8, or Mac OS X
Internet Connection: 56k Modem (high speed internet access recommended)
Web Browser: Internet Explorer 7.0 or later, Firefox, Safari, or Chrome
Intermediate Matrix
www.SRAR.com Tech Support SRAR-SFV 818 947 2202 SRAR-SCV 661 295 7117 [email protected]
[5]
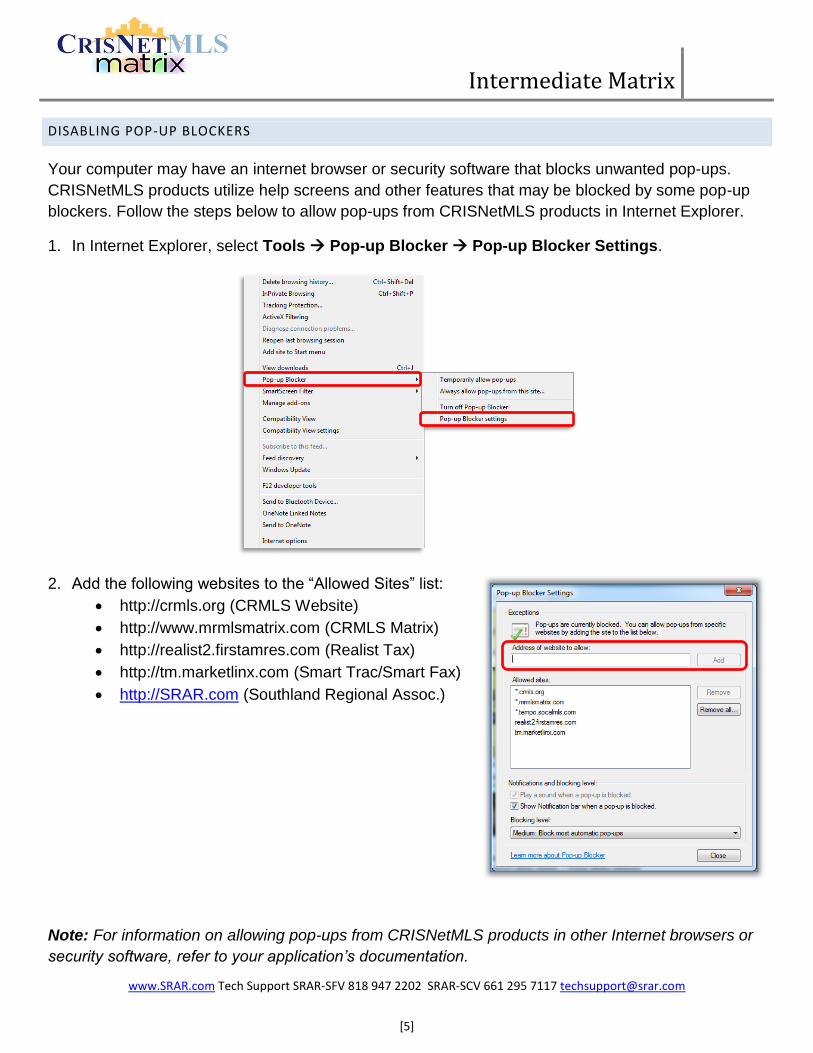
DISABLING POP-UP BLOCKERS
Your computer may have an internet browser or security software that blocks unwanted pop-ups.
CRISNetMLS products utilize help screens and other features that may be blocked by some pop-up
blockers. Follow the steps below to allow pop-ups from CRISNetMLS products in Internet Explorer.
1. In Internet Explorer, select Tools Pop-up Blocker Pop-up Blocker Settings.
2. Add the following websites to the “Allowed Sites” list:
http://crmls.org (CRMLS Website)
http://www.mrmlsmatrix.com (CRMLS Matrix)
http://realist2.firstamres.com (Realist Tax)
http://tm.marketlinx.com (Smart Trac/Smart Fax)
http://SRAR.com (Southland Regional Assoc.)
Note: For information on allowing pop-ups from CRISNetMLS products in other Internet browsers or
security software, refer to your application’s documentation.
Intermediate Matrix
www.SRAR.com Tech Support SRAR-SFV 818 947 2202 SRAR-SCV 661 295 7117 [email protected]
[6]
ACCESSING THE CRISNETMLS MATRIX PLATFORM
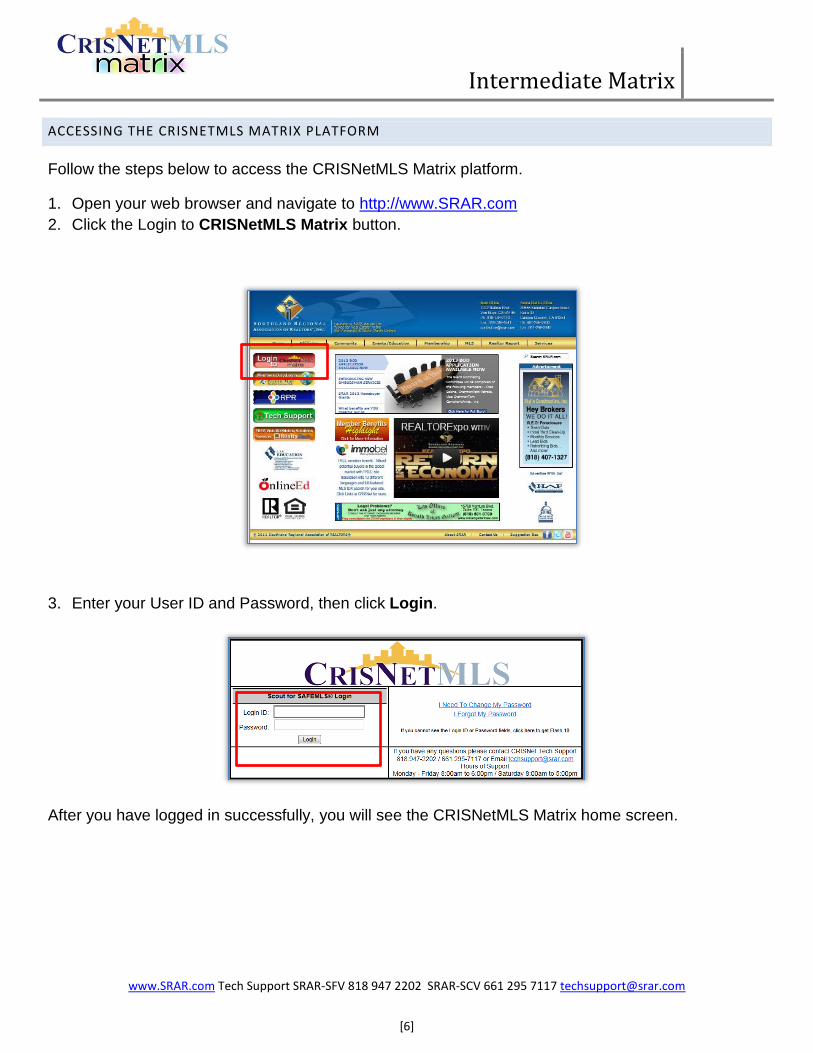
Follow the steps below to access the CRISNetMLS Matrix platform.
1. Open your web browser and navigate to http://www.SRAR.com
2. Click the Login to CRISNetMLS Matrix button.
3. Enter your User ID and Password, then click Login.
After you have logged in successfully, you will see the CRISNetMLS Matrix home screen.
Intermediate Matrix
www.SRAR.com Tech Support SRAR-SFV 818 947 2202 SRAR-SCV 661 295 7117 [email protected]
[7]
HOT SHEETS
Hot Sheets give you quick access to recent market activity and updates, such as new listings, price
changes, back on market, and expired listings. There are two types of Hot Sheets available, Personal
and Residential. Personal Hot Sheets give you recent updates for all property types and Residential
Hot Sheets give you recent updates for the Residential Property type only.
“Customizing Hot Sheets” on page 7
“Running Your Hot Sheets” on page 8
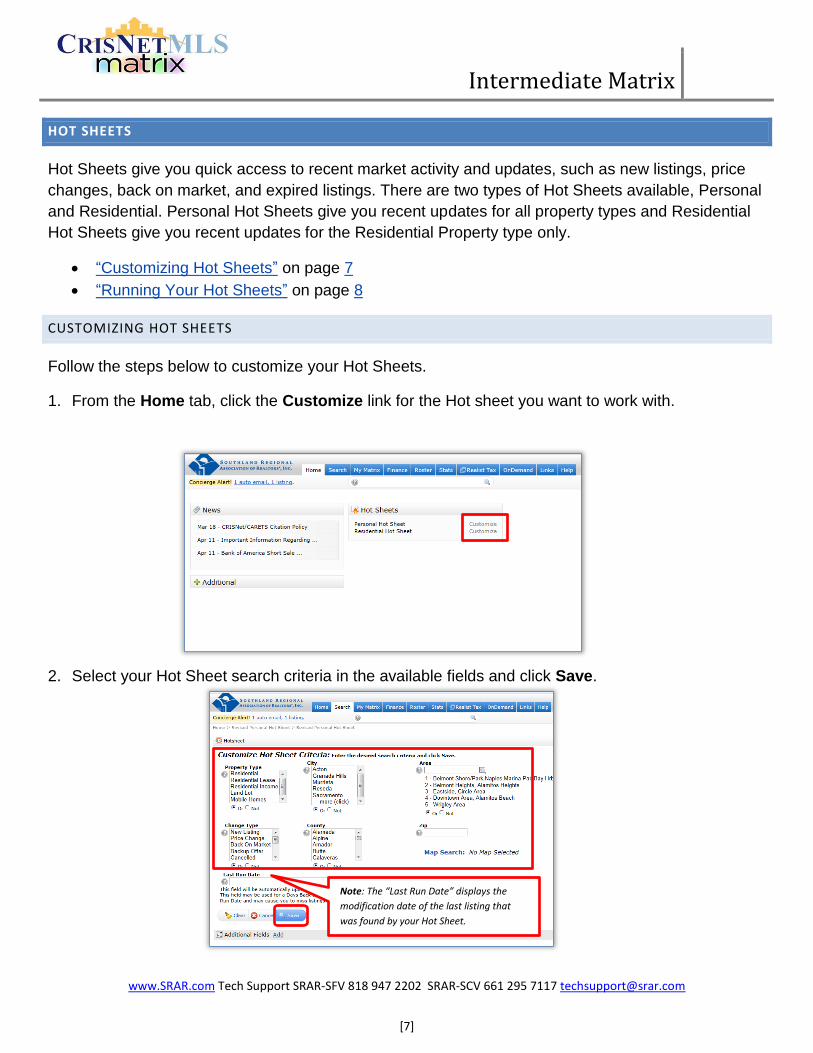
CUSTOMIZING HOT SHEETS
Follow the steps below to customize your Hot Sheets.
1. From the Home tab, click the Customize link for the Hot sheet you want to work with.
2. Select your Hot Sheet search criteria in the available fields and click Save.
Note: The “Last Run Date” displays the
modification date of the last listing that
was found by your Hot Sheet.
Intermediate Matrix
www.SRAR.com Tech Support SRAR-SFV 818 947 2202 SRAR-SCV 661 295 7117 [email protected]
[8]
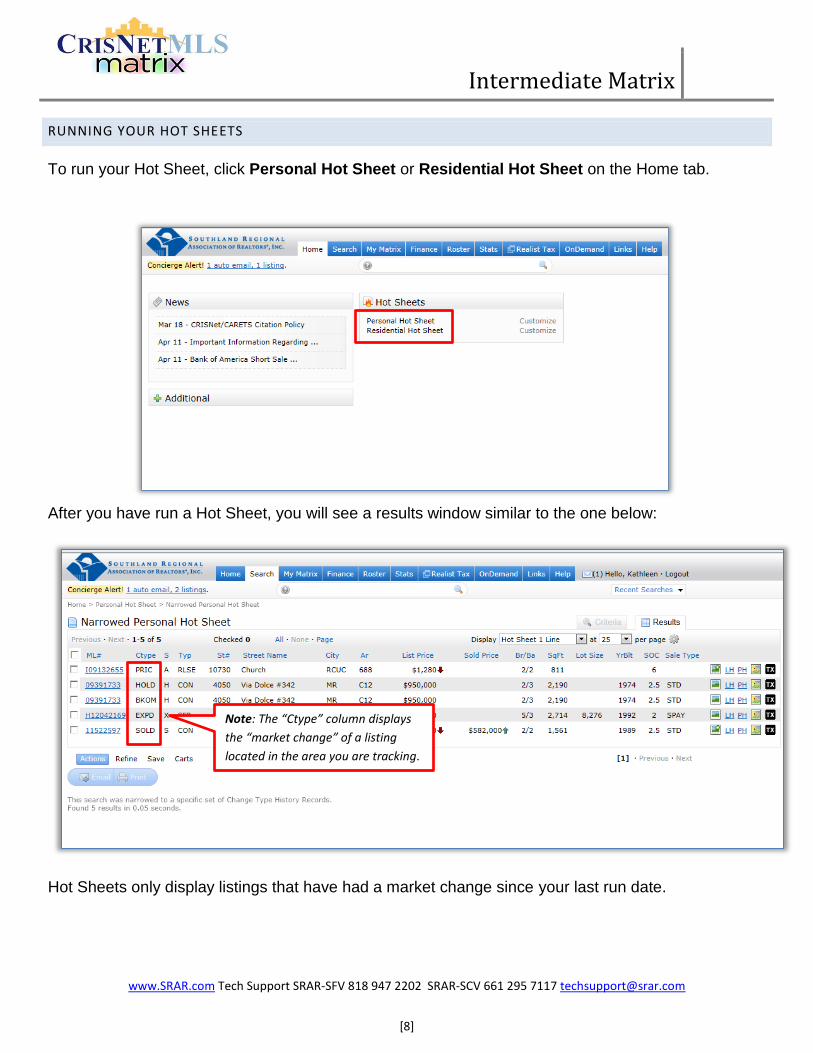
RUNNING YOUR HOT SHEETS
To run your Hot Sheet, click Personal Hot Sheet or Residential Hot Sheet on the Home tab.
After you have run a Hot Sheet, you will see a results window similar to the one below:
Hot Sheets only display listings that have had a market change since your last run date.
Note: The “Ctype” column displays
the “market change” of a listing
located in the area you are tracking.
Intermediate Matrix
www.SRAR.com Tech Support SRAR-SFV 818 947 2202 SRAR-SCV 661 295 7117 [email protected]
[9]
Refer to the table below for Change Types (Ctype) and their definitions:
Change Type (Ctype) Definition
NEWL New Listing
BKOF Backup Offer
PEND Pending
BKOM Back On Market
PRIC Price Change
HOLD Hold Do Not Show
EXPD Expired
WDRN Withdrawn
CANC Canceled
SOLD Sold
LEAS Lease
Refer to the table below for Status (S) definitions:
Status (S) Definition
A Active
B Backup Offer
P Pending
H Hold Do Not Show
W Withdrawn
K Cancelled
X Expired
S Sold
For complete details on status definitions, refer to the CARETS Standardized Rules and Regulations.
Intermediate Matrix
www.SRAR.com Tech Support SRAR-SFV 818 947 2202 SRAR-SCV 661 295 7117 [email protected]
[10]
INTERMEDIATE SEARCH TECHNIQUES
The CRISNetMLS Matrix platform allows you to search for listings in a variety of ways. Follow the
steps in these sections to search for listings.
“Detail Search” on page 10
“Keyword Search” on page 11
“Date Range Search” on page 12
“Creating A Custom Search” on page 14
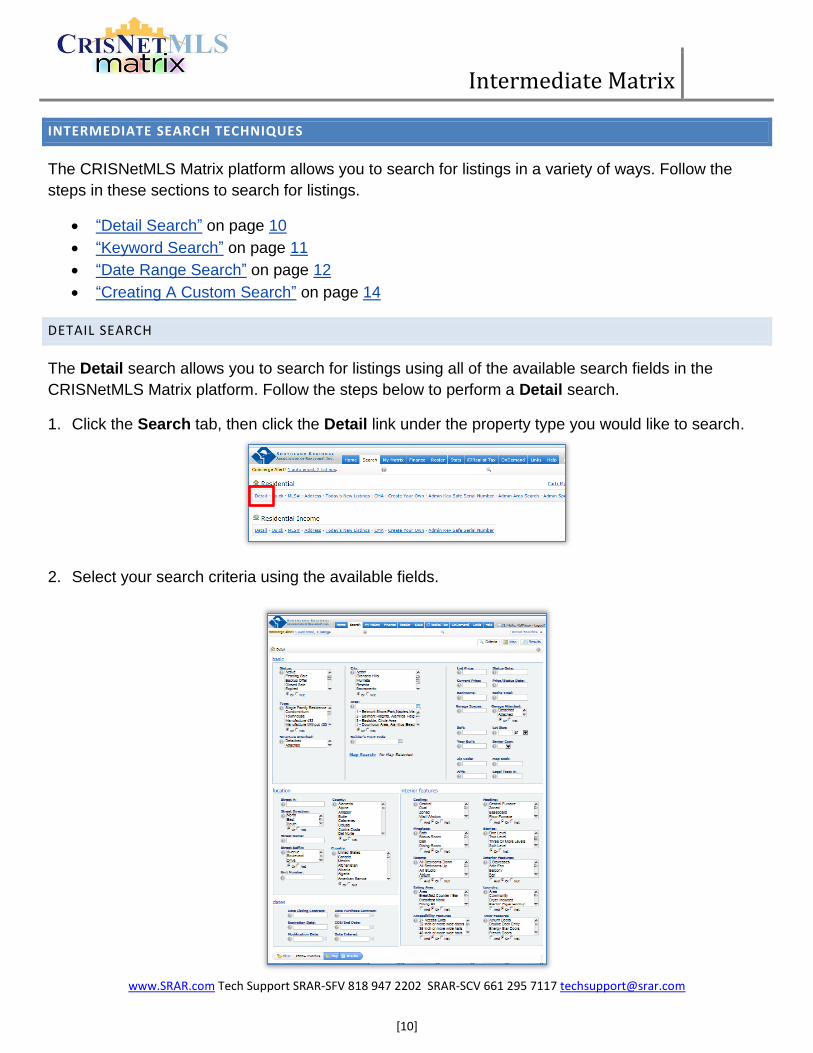
DETAIL SEARCH
The Detail search allows you to search for listings using all of the available search fields in the
CRISNetMLS Matrix platform. Follow the steps below to perform a Detail search.
1. Click the Search tab, then click the Detail link under the property type you would like to search.
2. Select your search criteria using the available fields.
Intermediate Matrix
www.SRAR.com Tech Support SRAR-SFV 818 947 2202 SRAR-SCV 661 295 7117 [email protected]
[11]
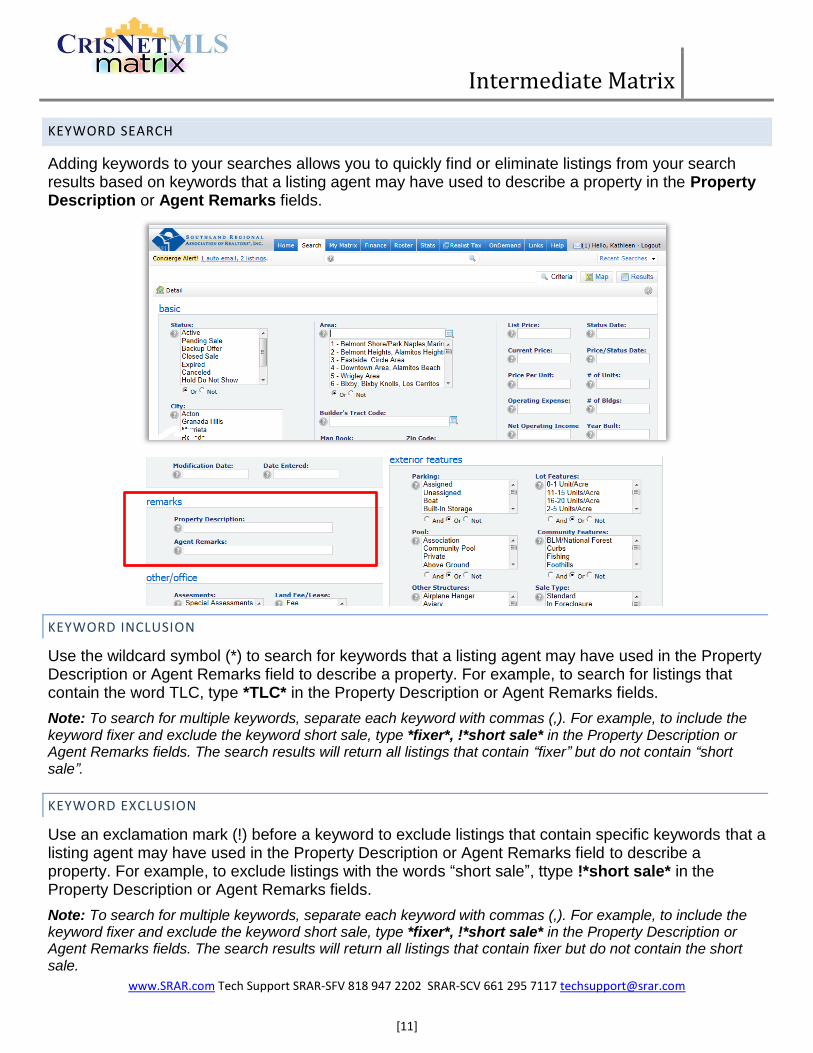
KEYWORD SEARCH
Adding keywords to your searches allows you to quickly find or eliminate listings from your search results based on keywords that a listing agent may have used to describe a property in the Property Description or Agent Remarks fields.
KEYWORD INCLUSION
Use the wildcard symbol (*) to search for keywords that a listing agent may have used in the Property Description or Agent Remarks field to describe a property. For example, to search for listings that contain the word TLC, type *TLC* in the Property Description or Agent Remarks fields.
Note: To search for multiple keywords, separate each keyword with commas (,). For example, to include the keyword fixer and exclude the keyword short sale, type *fixer*, !*short sale* in the Property Description or Agent Remarks fields. The search results will return all listings that contain “fixer” but do not contain “short sale”.
KEYWORD EXCLUSION
Use an exclamation mark (!) before a keyword to exclude listings that contain specific keywords that a listing agent may have used in the Property Description or Agent Remarks field to describe a property. For example, to exclude listings with the words “short sale”, ttype !*short sale* in the Property Description or Agent Remarks fields.
Note: To search for multiple keywords, separate each keyword with commas (,). For example, to include the keyword fixer and exclude the keyword short sale, type *fixer*, !*short sale* in the Property Description or Agent Remarks fields. The search results will return all listings that contain fixer but do not contain the short sale.
Intermediate Matrix
www.SRAR.com Tech Support SRAR-SFV 818 947 2202 SRAR-SCV 661 295 7117 [email protected]
[12]
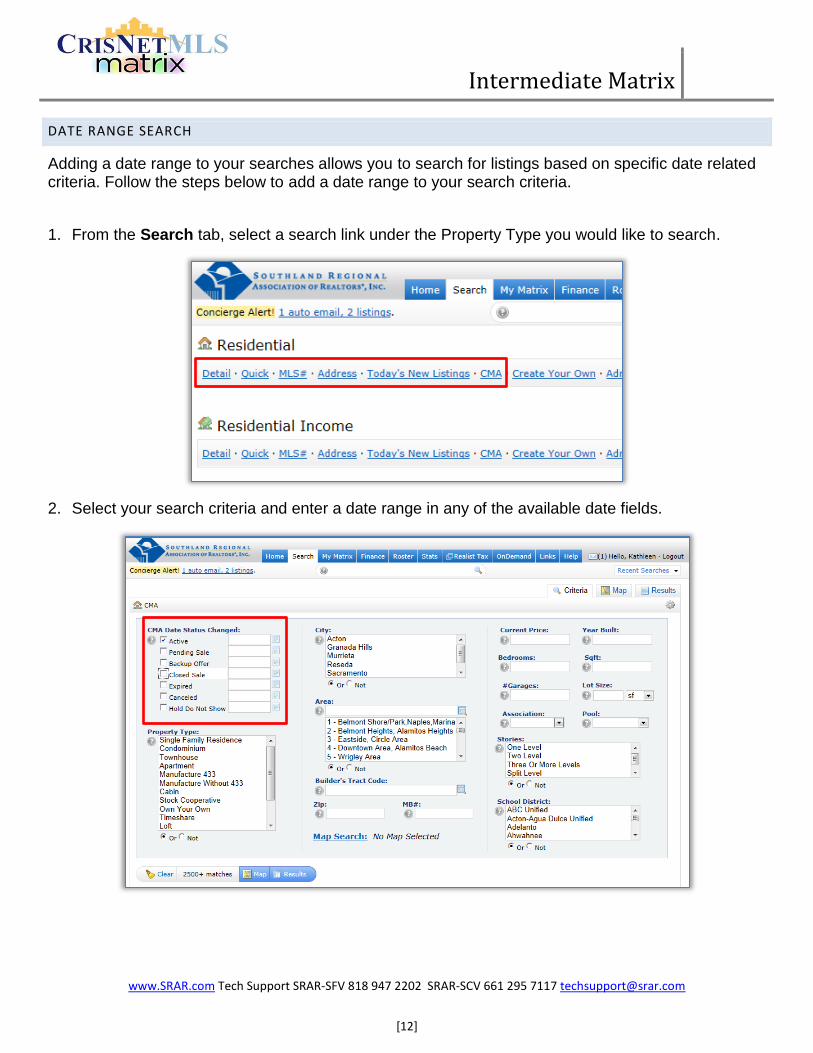
DATE RANGE SEARCH
Adding a date range to your searches allows you to search for listings based on specific date related criteria. Follow the steps below to add a date range to your search criteria.
1. From the Search tab, select a search link under the Property Type you would like to search.
2. Select your search criteria and enter a date range in any of the available date fields.
Intermediate Matrix
www.SRAR.com Tech Support SRAR-SFV 818 947 2202 SRAR-SCV 661 295 7117 [email protected]
[13]
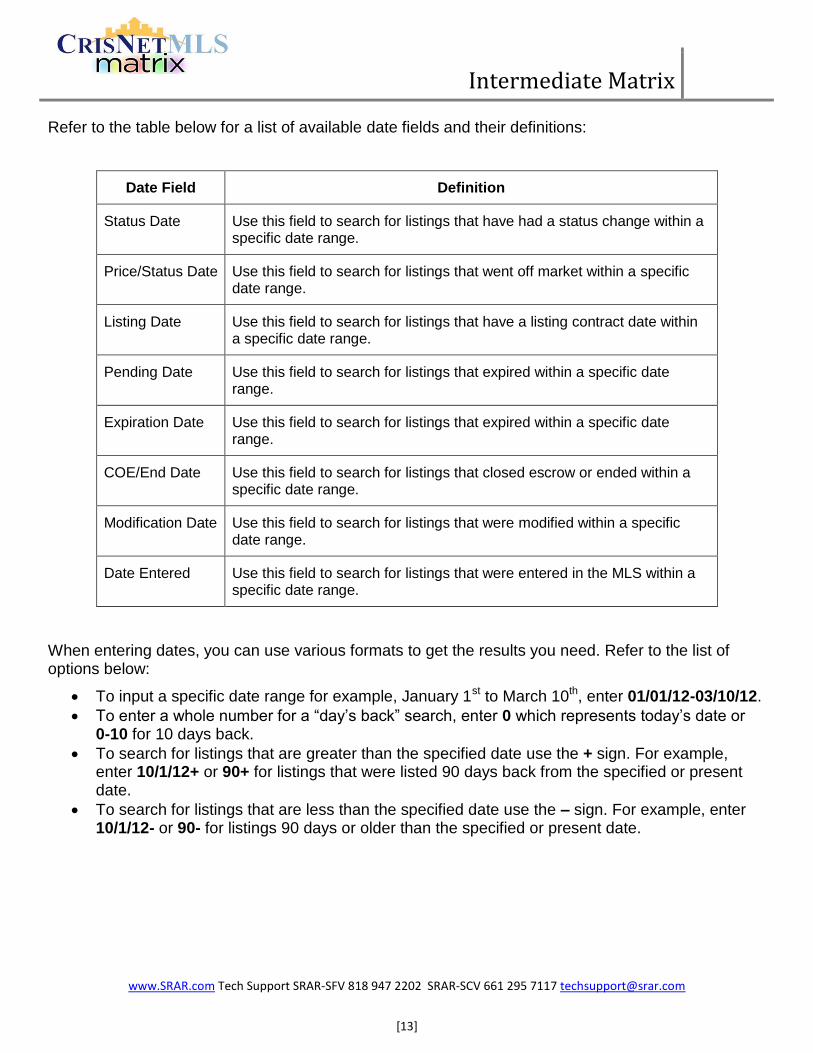
Refer to the table below for a list of available date fields and their definitions:
Date Field Definition
Status Date Use this field to search for listings that have had a status change within a specific date range.
Price/Status Date Use this field to search for listings that went off market within a specific date range.
Listing Date Use this field to search for listings that have a listing contract date within a specific date range.
Pending Date Use this field to search for listings that expired within a specific date range.
Expiration Date Use this field to search for listings that expired within a specific date range.
COE/End Date Use this field to search for listings that closed escrow or ended within a specific date range.
Modification Date Use this field to search for listings that were modified within a specific date range.
Date Entered Use this field to search for listings that were entered in the MLS within a specific date range.
When entering dates, you can use various formats to get the results you need. Refer to the list of options below:
To input a specific date range for example, January 1st to March 10th, enter 01/01/12-03/10/12.
To enter a whole number for a “day’s back” search, enter 0 which represents today’s date or 0-10 for 10 days back.
To search for listings that are greater than the specified date use the + sign. For example, enter 10/1/12+ or 90+ for listings that were listed 90 days back from the specified or present date.
To search for listings that are less than the specified date use the – sign. For example, enter 10/1/12- or 90- for listings 90 days or older than the specified or present date.
Intermediate Matrix
www.SRAR.com Tech Support SRAR-SFV 818 947 2202 SRAR-SCV 661 295 7117 [email protected]
[14]
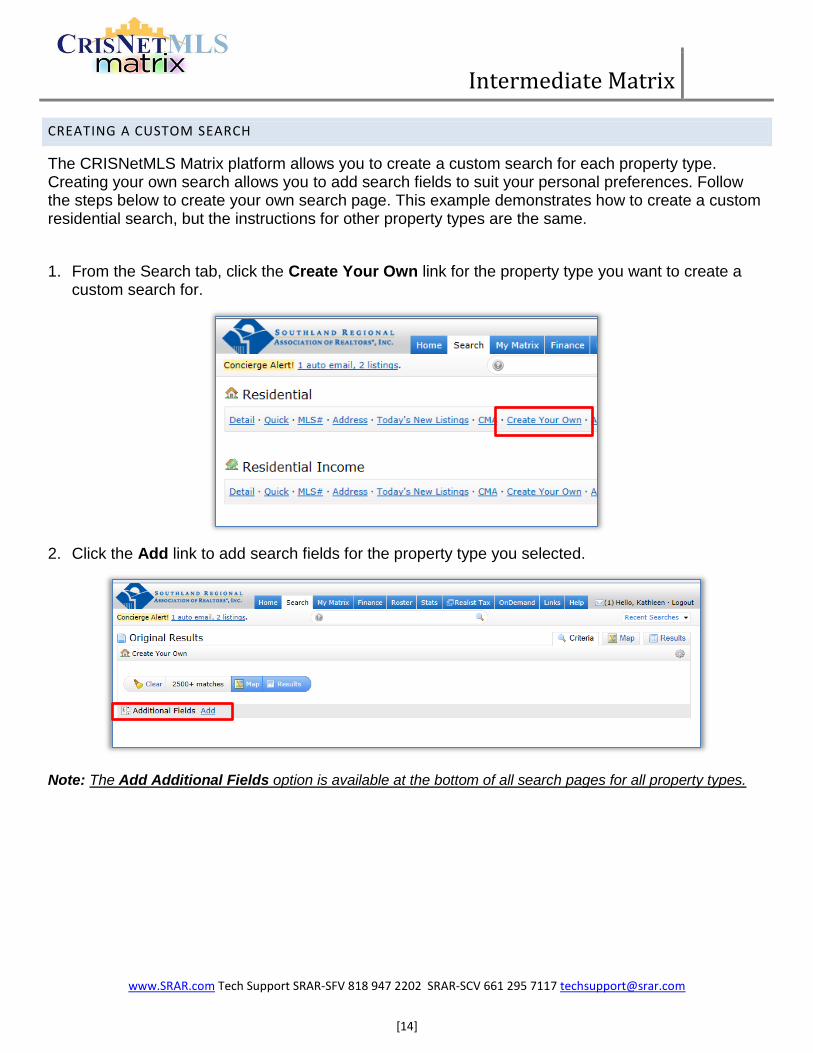
CREATING A CUSTOM SEARCH
The CRISNetMLS Matrix platform allows you to create a custom search for each property type. Creating your own search allows you to add search fields to suit your personal preferences. Follow the steps below to create your own search page. This example demonstrates how to create a custom residential search, but the instructions for other property types are the same.
1. From the Search tab, click the Create Your Own link for the property type you want to create a custom search for.
2. Click the Add link to add search fields for the property type you selected.
Note: The Add Additional Fields option is available at the bottom of all search pages for all property types.
Intermediate Matrix
www.SRAR.com Tech Support SRAR-SFV 818 947 2202 SRAR-SCV 661 295 7117 [email protected]
[15]
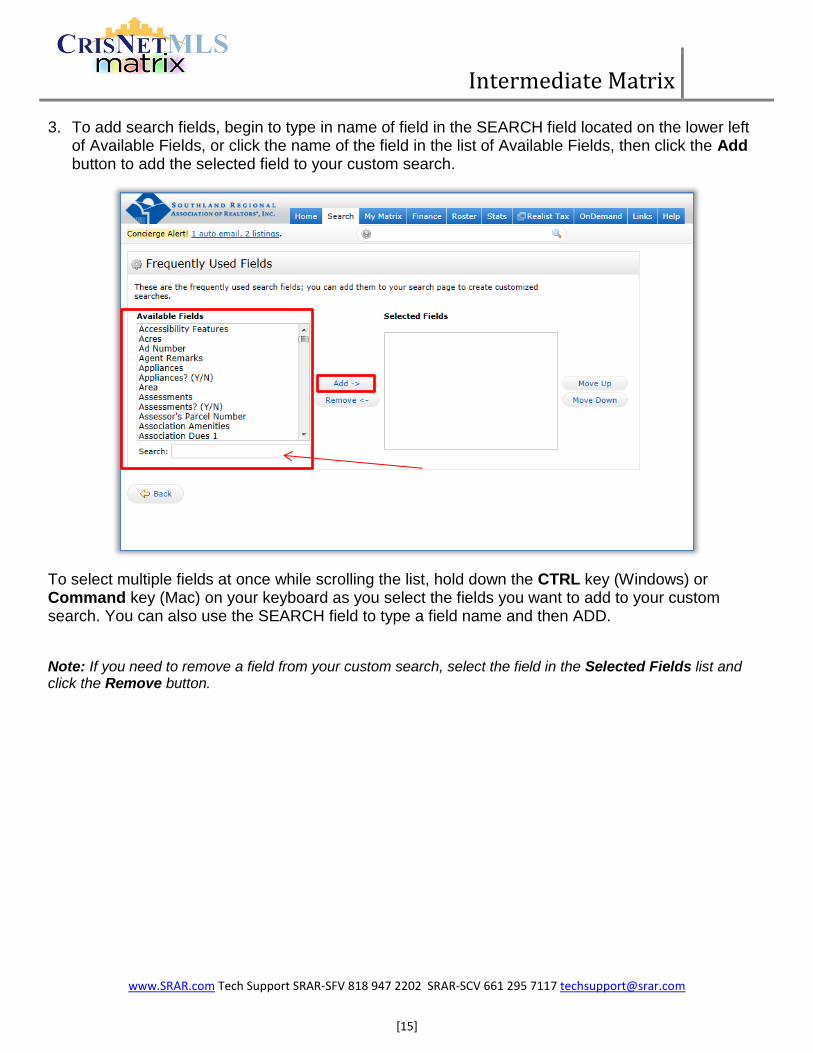
3. To add search fields, begin to type in name of field in the SEARCH field located on the lower left of Available Fields, or click the name of the field in the list of Available Fields, then click the Add button to add the selected field to your custom search.
To select multiple fields at once while scrolling the list, hold down the CTRL key (Windows) or Command key (Mac) on your keyboard as you select the fields you want to add to your custom search. You can also use the SEARCH field to type a field name and then ADD.
Note: If you need to remove a field from your custom search, select the field in the Selected Fields list and click the Remove button.
Intermediate Matrix
www.SRAR.com Tech Support SRAR-SFV 818 947 2202 SRAR-SCV 661 295 7117 [email protected]
[16]
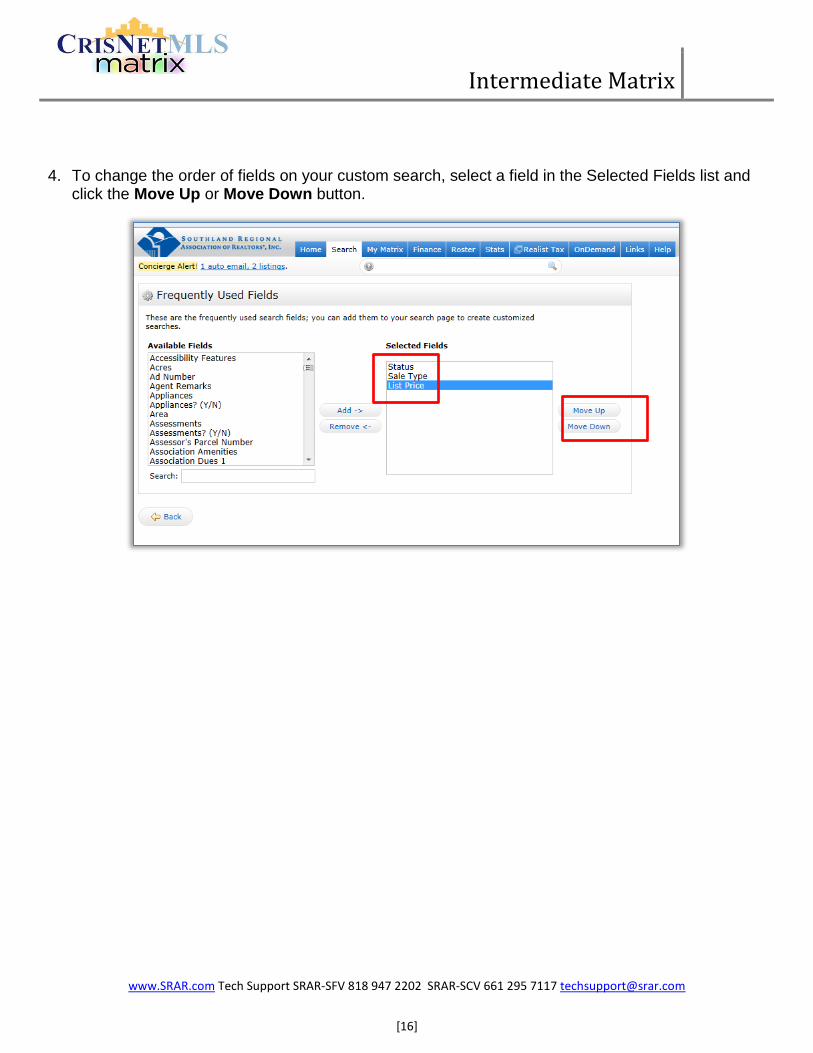
4. To change the order of fields on your custom search, select a field in the Selected Fields list and click the Move Up or Move Down button.
Intermediate Matrix
www.SRAR.com Tech Support SRAR-SFV 818 947 2202 SRAR-SCV 661 295 7117 [email protected]
[17]
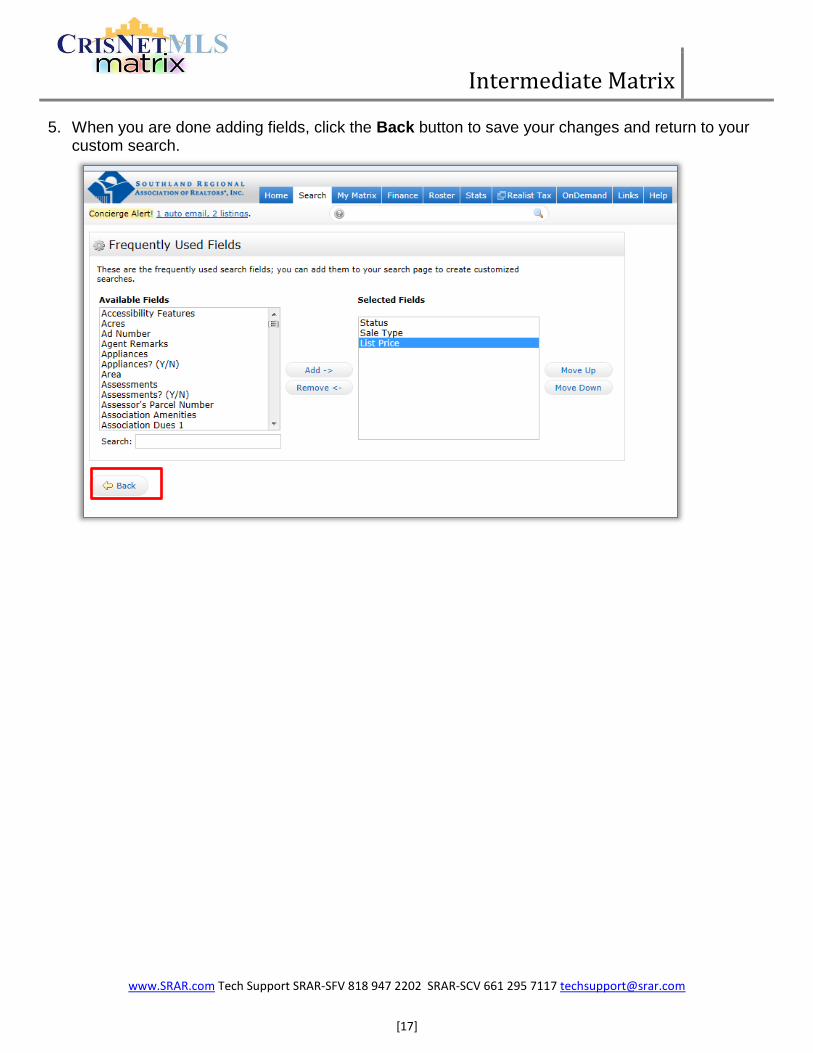
5. When you are done adding fields, click the Back button to save your changes and return to your custom search.
Intermediate Matrix
www.SRAR.com Tech Support SRAR-SFV 818 947 2202 SRAR-SCV 661 295 7117 [email protected]
[18]
SAVING SEARCHES
Saved searches allow you to set up customized search criteria for each of your clients. You can also use saved searches as a base for creating Auto Emails and Favorite Searches.
“Saving a Search” on page 18
“Managing Saved Searches” on page 21
SAVING A SEARCH
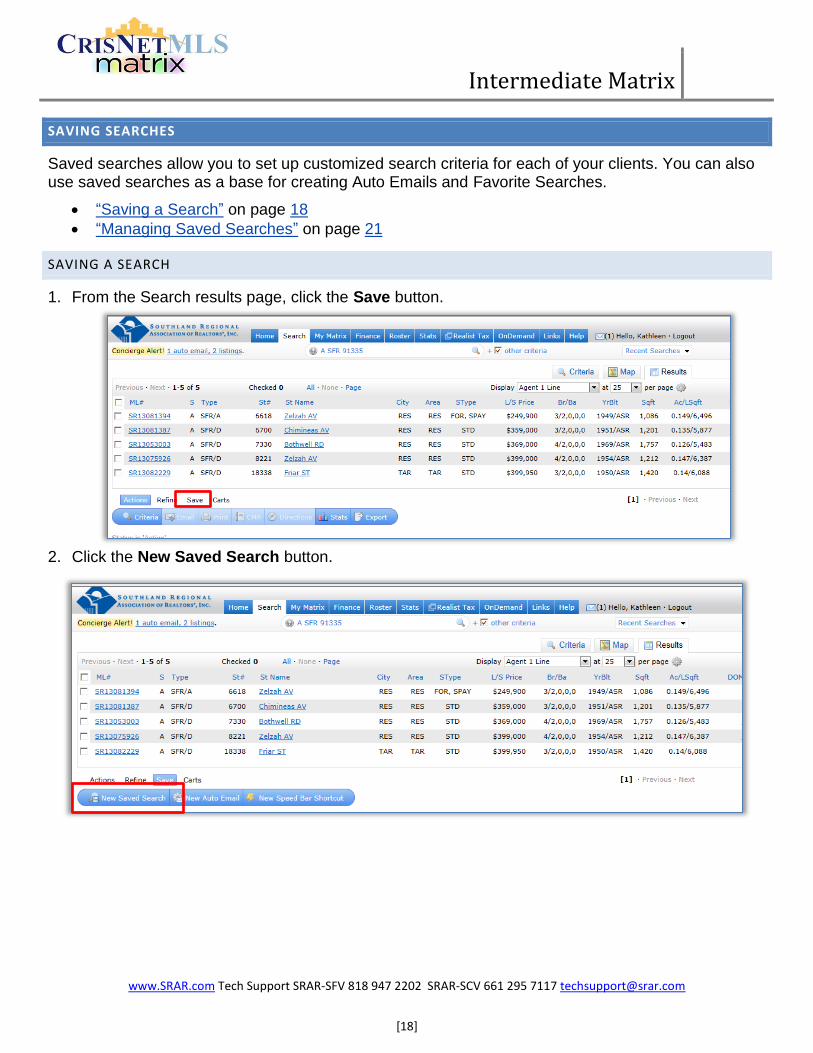
1. From the Search results page, click the Save button.
2. Click the New Saved Search button.
Intermediate Matrix
www.SRAR.com Tech Support SRAR-SFV 818 947 2202 SRAR-SCV 661 295 7117 [email protected]
[19]
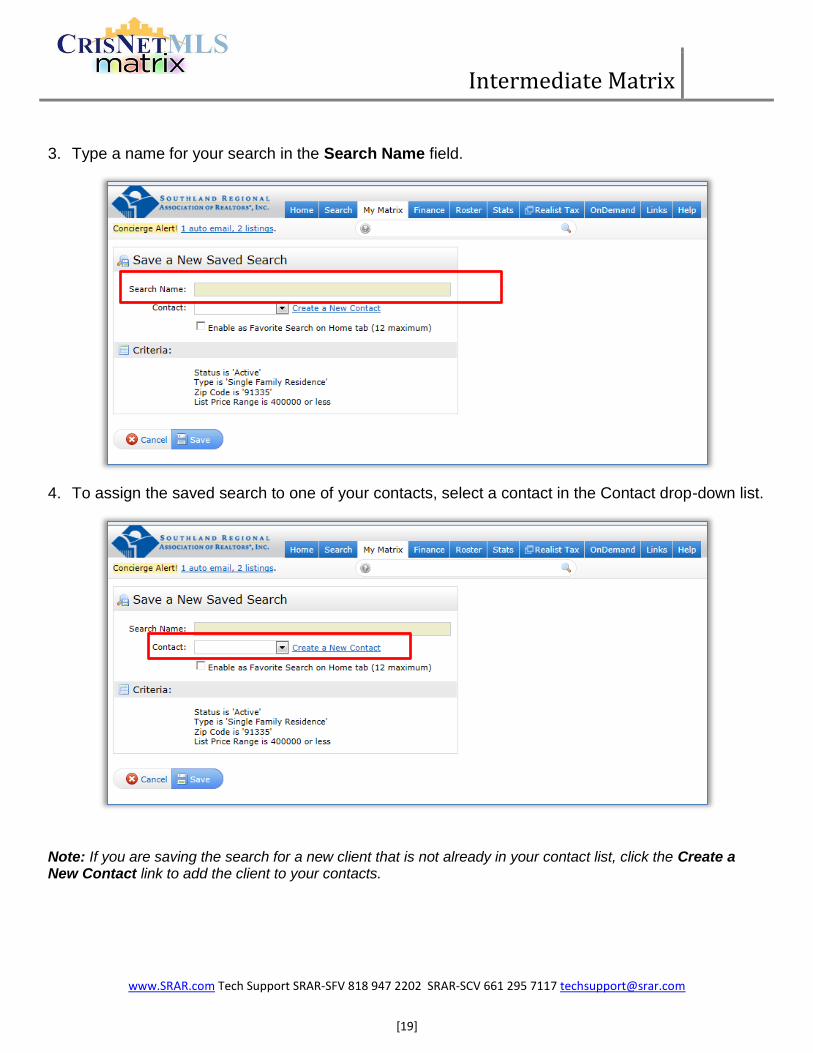
3. Type a name for your search in the Search Name field.
4. To assign the saved search to one of your contacts, select a contact in the Contact drop-down list.
Note: If you are saving the search for a new client that is not already in your contact list, click the Create a New Contact link to add the client to your contacts.
Intermediate Matrix
www.SRAR.com Tech Support SRAR-SFV 818 947 2202 SRAR-SCV 661 295 7117 [email protected]
[20]
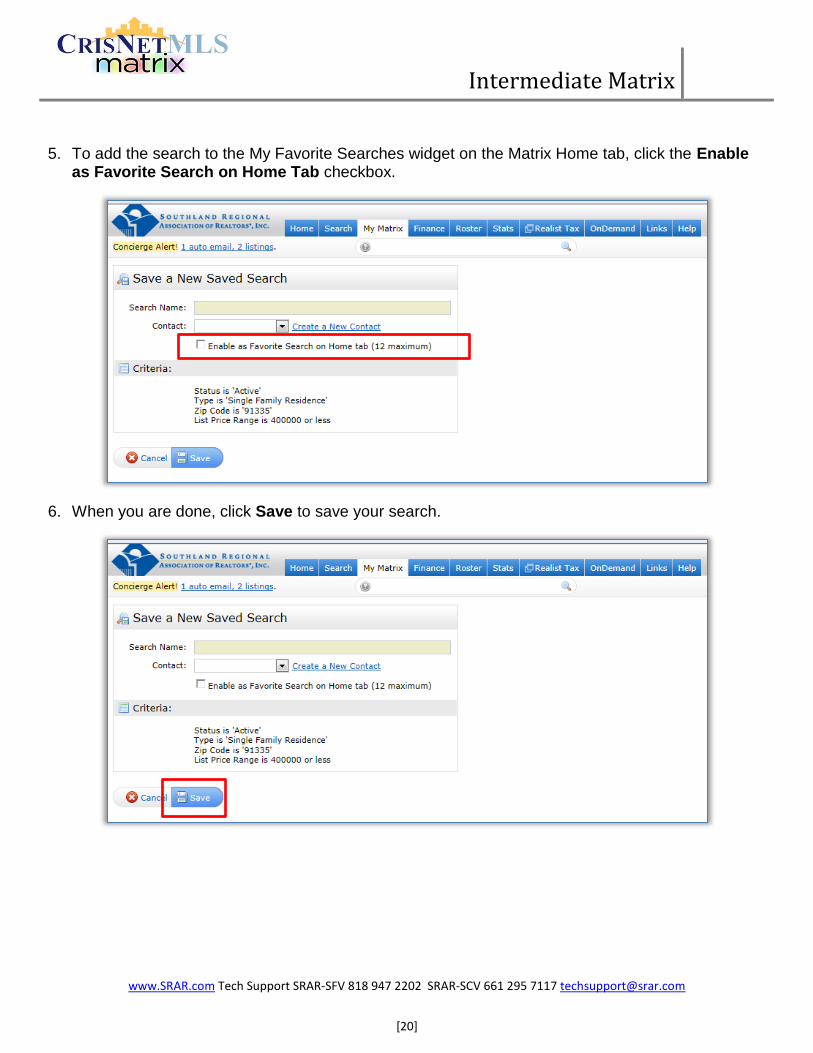
5. To add the search to the My Favorite Searches widget on the Matrix Home tab, click the Enable as Favorite Search on Home Tab checkbox.
6. When you are done, click Save to save your search.
Intermediate Matrix
www.SRAR.com Tech Support SRAR-SFV 818 947 2202 SRAR-SCV 661 295 7117 [email protected]
[21]
MANAGING SAVED SEARCHES
Follow the steps below to manage your saved searches.
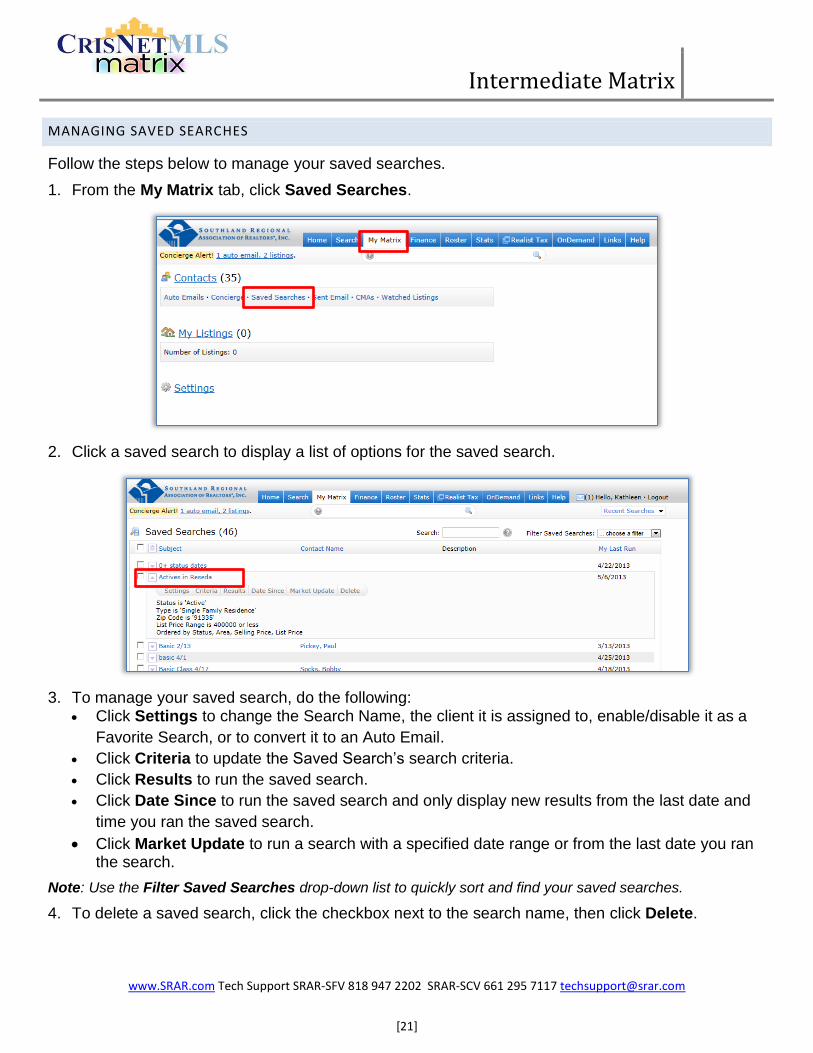
1. From the My Matrix tab, click Saved Searches.
2. Click a saved search to display a list of options for the saved search.
3. To manage your saved search, do the following: Click Settings to change the Search Name, the client it is assigned to, enable/disable it as a
Favorite Search, or to convert it to an Auto Email.
Click Criteria to update the Saved Search’s search criteria.
Click Results to run the saved search.
Click Date Since to run the saved search and only display new results from the last date and
time you ran the saved search.
Click Market Update to run a search with a specified date range or from the last date you ran the search.
Note: Use the Filter Saved Searches drop-down list to quickly sort and find your saved searches.
4. To delete a saved search, click the checkbox next to the search name, then click Delete.
Intermediate Matrix
www.SRAR.com Tech Support SRAR-SFV 818 947 2202 SRAR-SCV 661 295 7117 [email protected]
[22]
MY FAVORITE SEARCHES
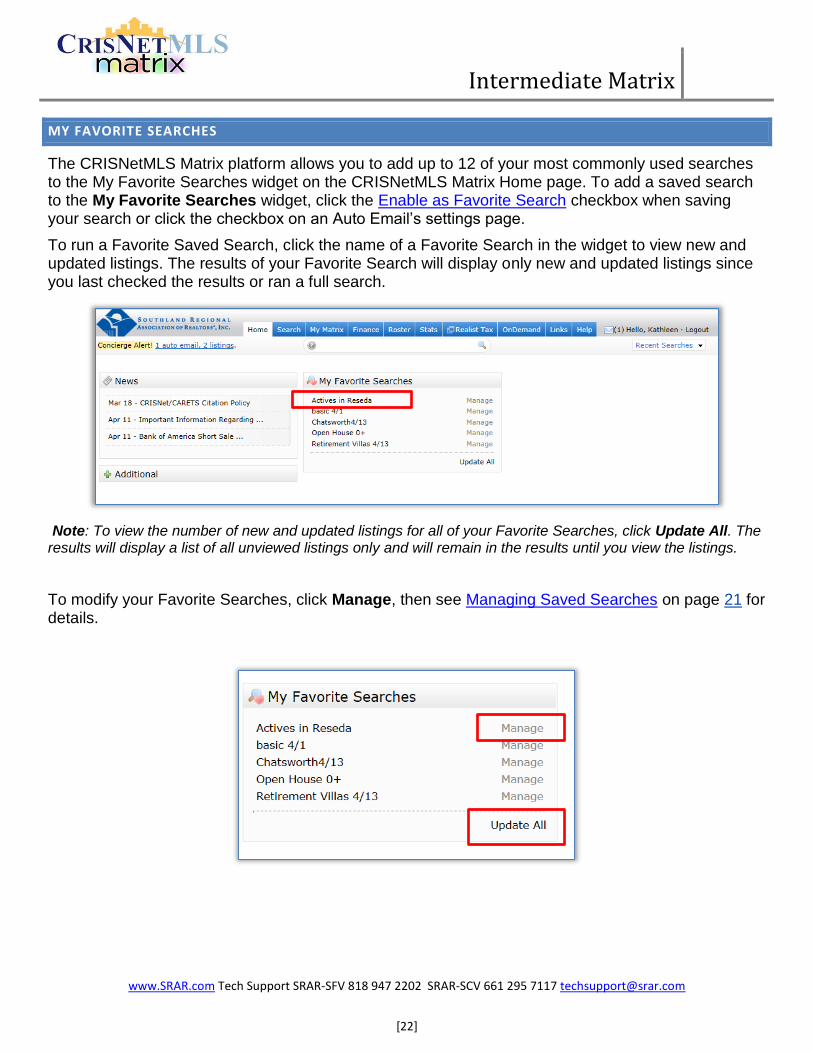
The CRISNetMLS Matrix platform allows you to add up to 12 of your most commonly used searches to the My Favorite Searches widget on the CRISNetMLS Matrix Home page. To add a saved search to the My Favorite Searches widget, click the Enable as Favorite Search checkbox when saving your search or click the checkbox on an Auto Email’s settings page.
To run a Favorite Saved Search, click the name of a Favorite Search in the widget to view new and updated listings. The results of your Favorite Search will display only new and updated listings since you last checked the results or ran a full search.
Note: To view the number of new and updated listings for all of your Favorite Searches, click Update All. The results will display a list of all unviewed listings only and will remain in the results until you view the listings.
To modify your Favorite Searches, click Manage, then see Managing Saved Searches on page 21 for details.
Intermediate Matrix
www.SRAR.com Tech Support SRAR-SFV 818 947 2202 SRAR-SCV 661 295 7117 [email protected]
[23]
SEARCHING WITH SPEED BAR
The CRISNetMLS Matrix platform’s Speed Bar allows you to use specific keywords to search for listings, open houses, and agents in a single search field. Follow the steps in these sections to search using the Speed Bar and to save and manage your Speed Bar shortcuts.
“Using Speed Bar Shortcuts” on page 23
“Saving Speed Bar Shortcuts” on page 24
“Using Saved Speed Bar Shortcuts” on page 25
“Modifying or Deleting Speed Bar Shortcuts” on page 25
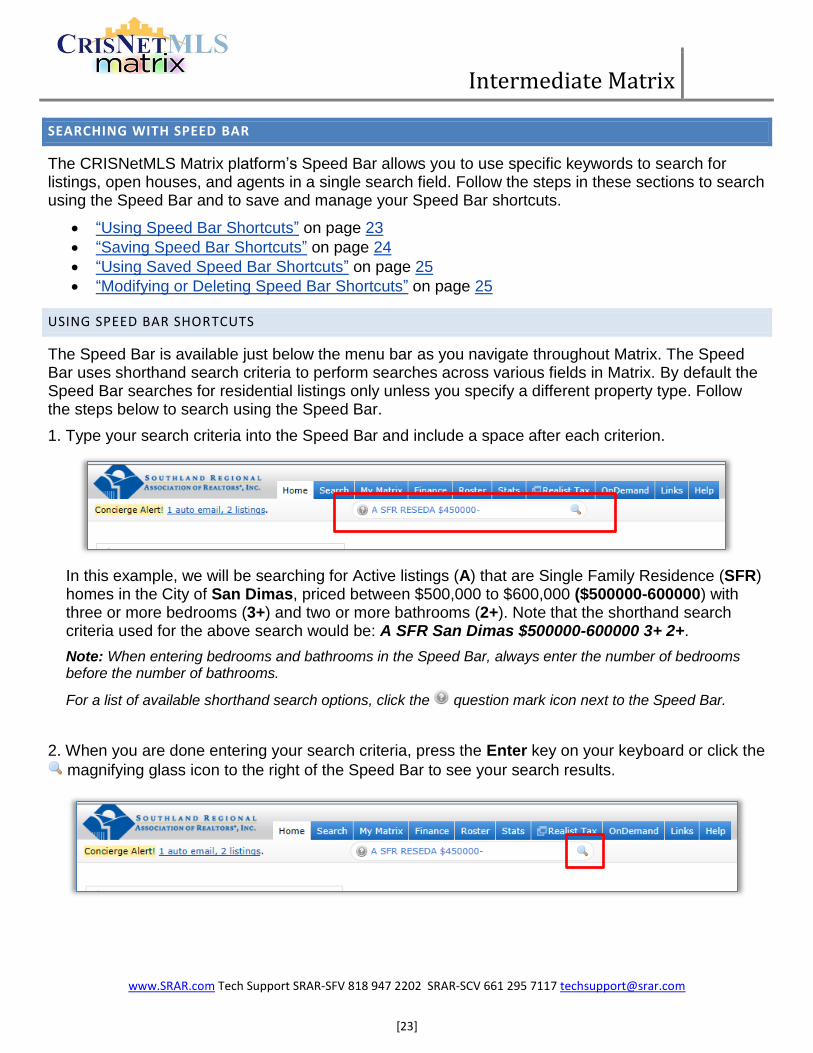
USING SPEED BAR SHORTCUTS
The Speed Bar is available just below the menu bar as you navigate throughout Matrix. The Speed Bar uses shorthand search criteria to perform searches across various fields in Matrix. By default the Speed Bar searches for residential listings only unless you specify a different property type. Follow the steps below to search using the Speed Bar.
1. Type your search criteria into the Speed Bar and include a space after each criterion.
In this example, we will be searching for Active listings (A) that are Single Family Residence (SFR) homes in the City of San Dimas, priced between $500,000 to $600,000 ($500000-600000) with three or more bedrooms (3+) and two or more bathrooms (2+). Note that the shorthand search criteria used for the above search would be: A SFR San Dimas $500000-600000 3+ 2+.
Note: When entering bedrooms and bathrooms in the Speed Bar, always enter the number of bedrooms before the number of bathrooms.
For a list of available shorthand search options, click the question mark icon next to the Speed Bar.
2. When you are done entering your search criteria, press the Enter key on your keyboard or click the
magnifying glass icon to the right of the Speed Bar to see your search results.
Intermediate Matrix
www.SRAR.com Tech Support SRAR-SFV 818 947 2202 SRAR-SCV 661 295 7117 [email protected]
[24]
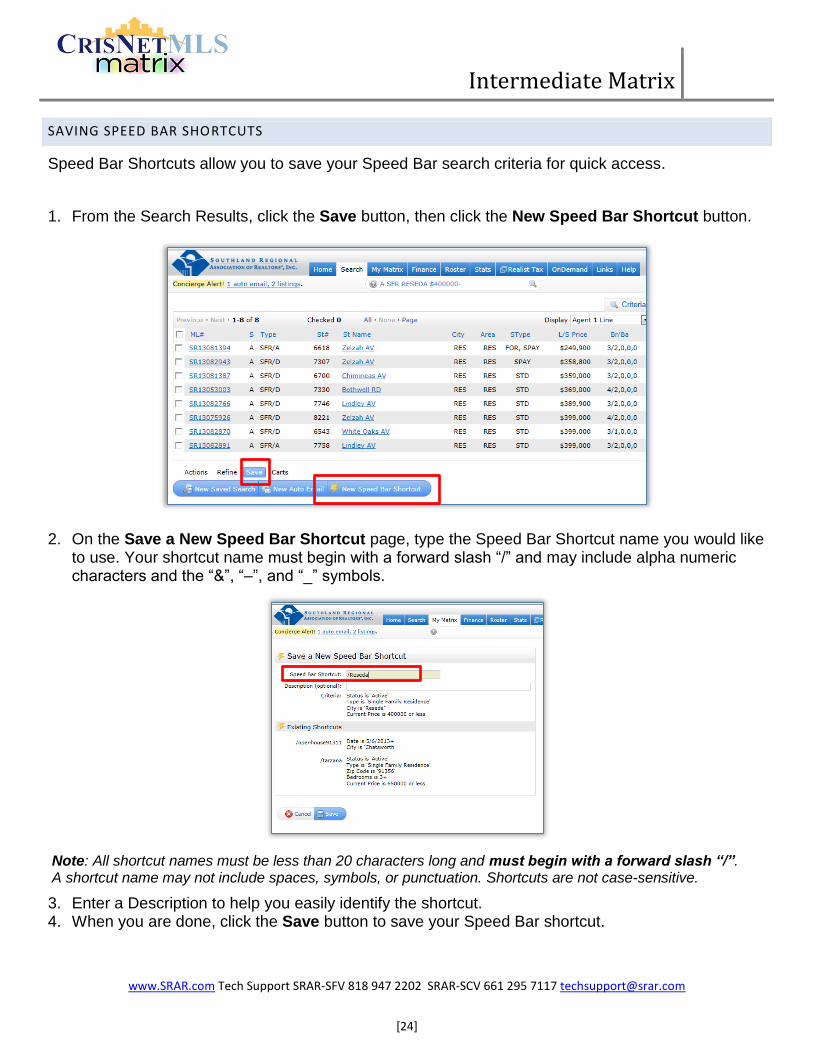
SAVING SPEED BAR SHORTCUTS
Speed Bar Shortcuts allow you to save your Speed Bar search criteria for quick access.
1. From the Search Results, click the Save button, then click the New Speed Bar Shortcut button.
2. On the Save a New Speed Bar Shortcut page, type the Speed Bar Shortcut name you would like to use. Your shortcut name must begin with a forward slash “/” and may include alpha numeric characters and the “&”, “–”, and “_” symbols.
Note: All shortcut names must be less than 20 characters long and must begin with a forward slash “/”. A shortcut name may not include spaces, symbols, or punctuation. Shortcuts are not case-sensitive.
3. Enter a Description to help you easily identify the shortcut. 4. When you are done, click the Save button to save your Speed Bar shortcut.
Intermediate Matrix
www.SRAR.com Tech Support SRAR-SFV 818 947 2202 SRAR-SCV 661 295 7117 [email protected]
[25]
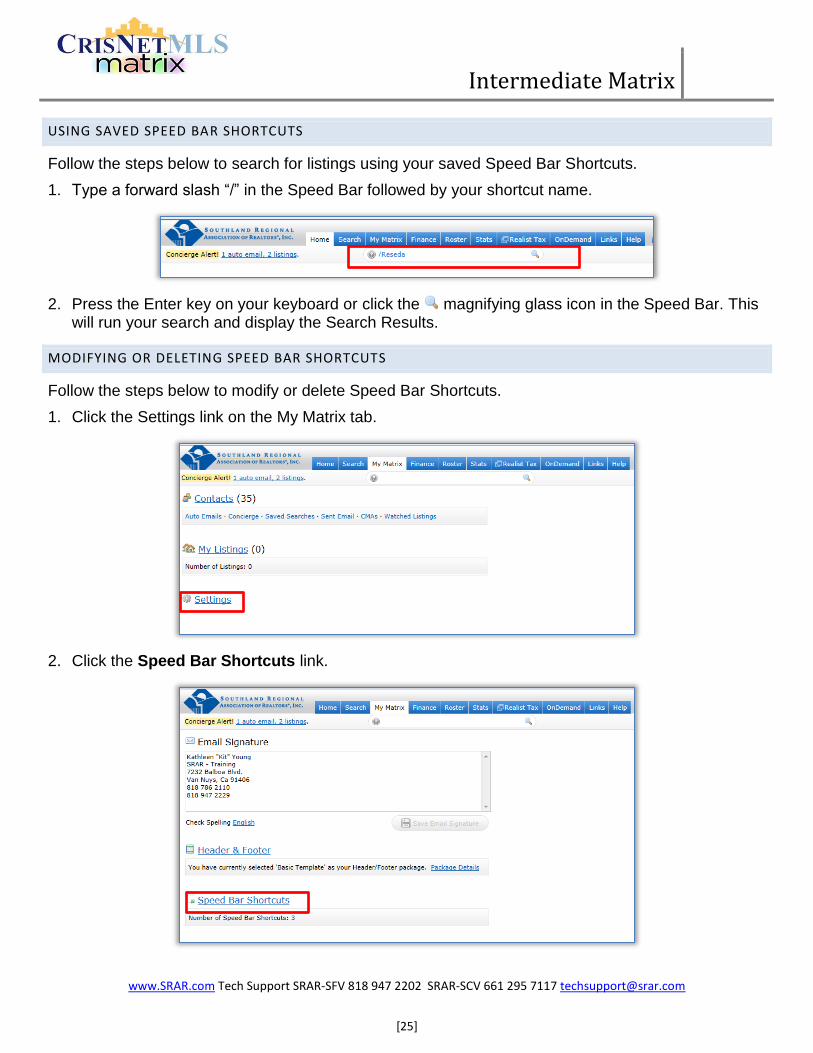
USING SAVED SPEED BAR SHORTCUTS
Follow the steps below to search for listings using your saved Speed Bar Shortcuts.
1. Type a forward slash “/” in the Speed Bar followed by your shortcut name.
2. Press the Enter key on your keyboard or click the magnifying glass icon in the Speed Bar. This will run your search and display the Search Results.
MODIFYING OR DELETING SPEED BAR SHORTCUTS
Follow the steps below to modify or delete Speed Bar Shortcuts.
1. Click the Settings link on the My Matrix tab.
2. Click the Speed Bar Shortcuts link.
Intermediate Matrix
www.SRAR.com Tech Support SRAR-SFV 818 947 2202 SRAR-SCV 661 295 7117 [email protected]
[26]
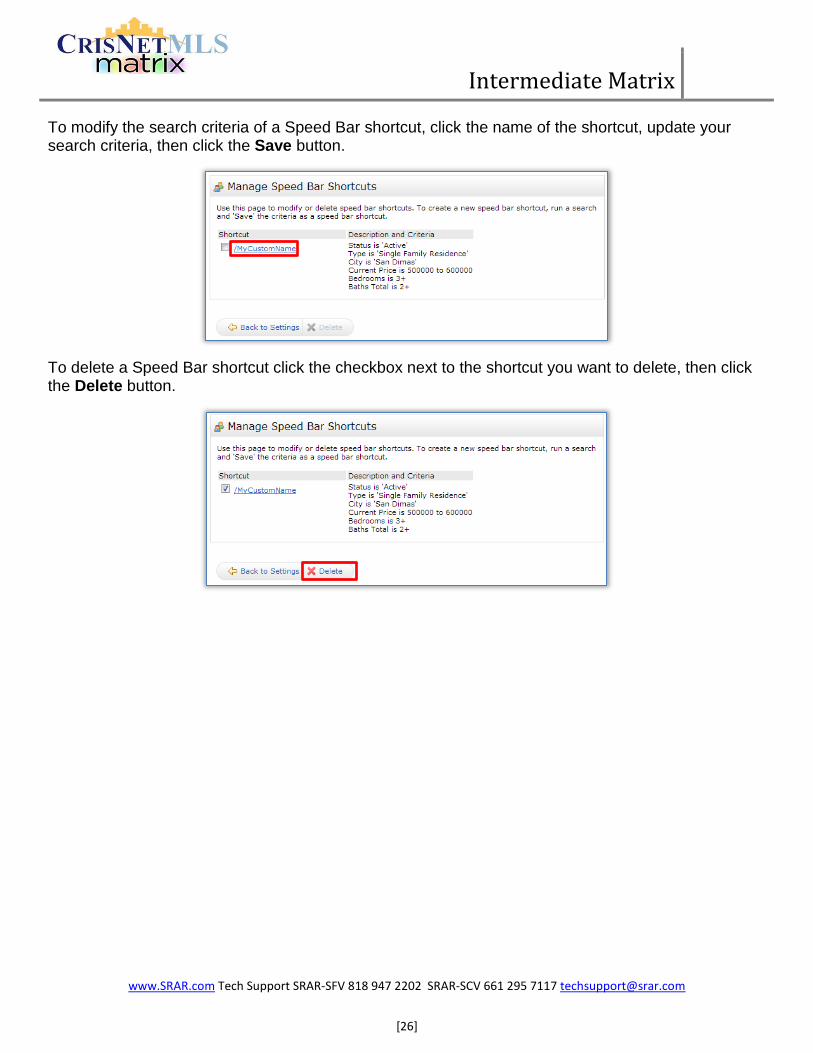
To modify the search criteria of a Speed Bar shortcut, click the name of the shortcut, update your search criteria, then click the Save button.
To delete a Speed Bar shortcut click the checkbox next to the shortcut you want to delete, then click the Delete button.
Intermediate Matrix
www.SRAR.com Tech Support SRAR-SFV 818 947 2202 SRAR-SCV 661 295 7117 [email protected]
[27]
MANAGING CONTACTS
Follow the steps in these sections to add and manage contacts in the Matrix platform.
“Adding Contacts” on page 27
“Importing Multiple Contacts” on page 28
“Viewing Contacts” on page 30
“Managing Contacts” on page 31
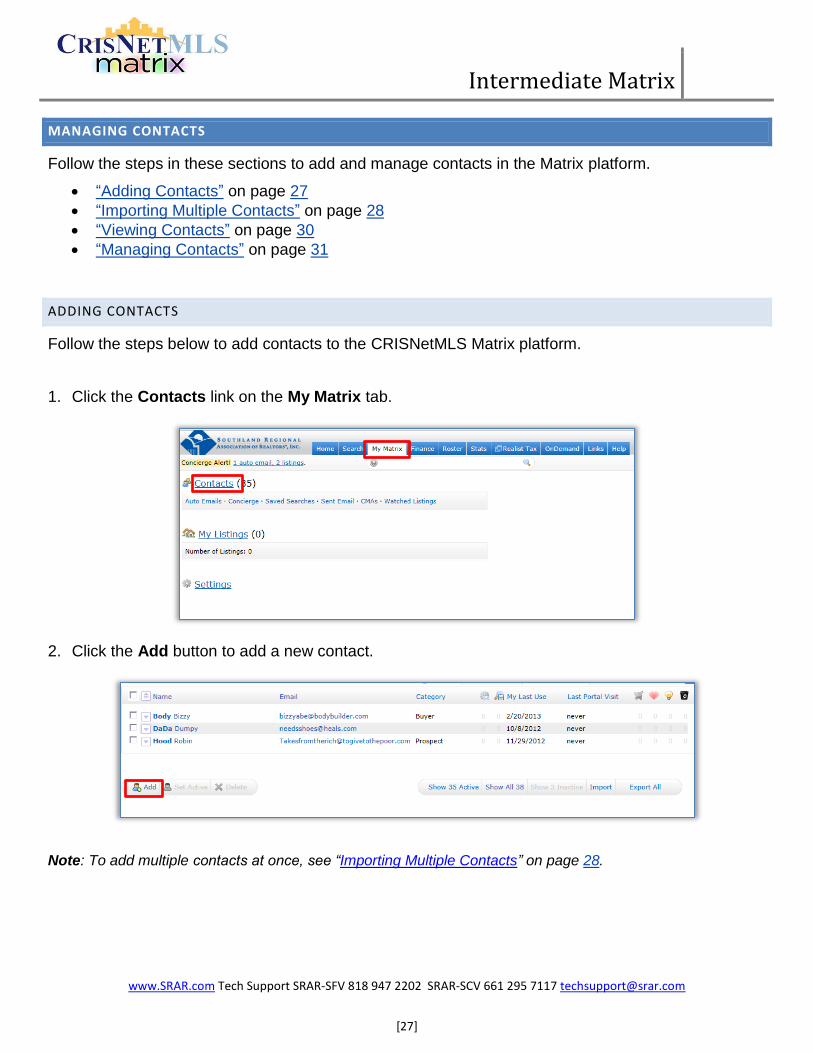
ADDING CONTACTS
Follow the steps below to add contacts to the CRISNetMLS Matrix platform.
1. Click the Contacts link on the My Matrix tab.
2. Click the Add button to add a new contact.
Note: To add multiple contacts at once, see “Importing Multiple Contacts” on page 28.
Intermediate Matrix
www.SRAR.com Tech Support SRAR-SFV 818 947 2202 SRAR-SCV 661 295 7117 [email protected]
[28]
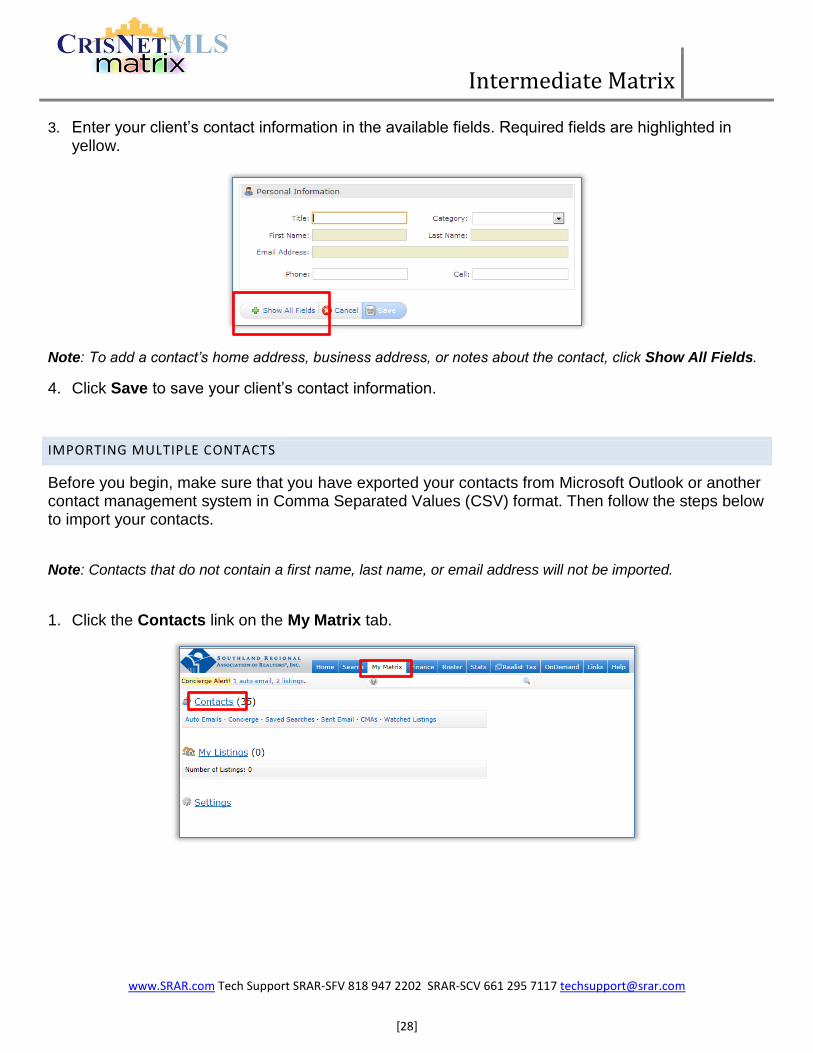
3. Enter your client’s contact information in the available fields. Required fields are highlighted in yellow.
Note: To add a contact’s home address, business address, or notes about the contact, click Show All Fields.
4. Click Save to save your client’s contact information.
IMPORTING MULTIPLE CONTACTS
Before you begin, make sure that you have exported your contacts from Microsoft Outlook or another contact management system in Comma Separated Values (CSV) format. Then follow the steps below to import your contacts.
Note: Contacts that do not contain a first name, last name, or email address will not be imported.
1. Click the Contacts link on the My Matrix tab.
Intermediate Matrix
www.SRAR.com Tech Support SRAR-SFV 818 947 2202 SRAR-SCV 661 295 7117 [email protected]
[29]
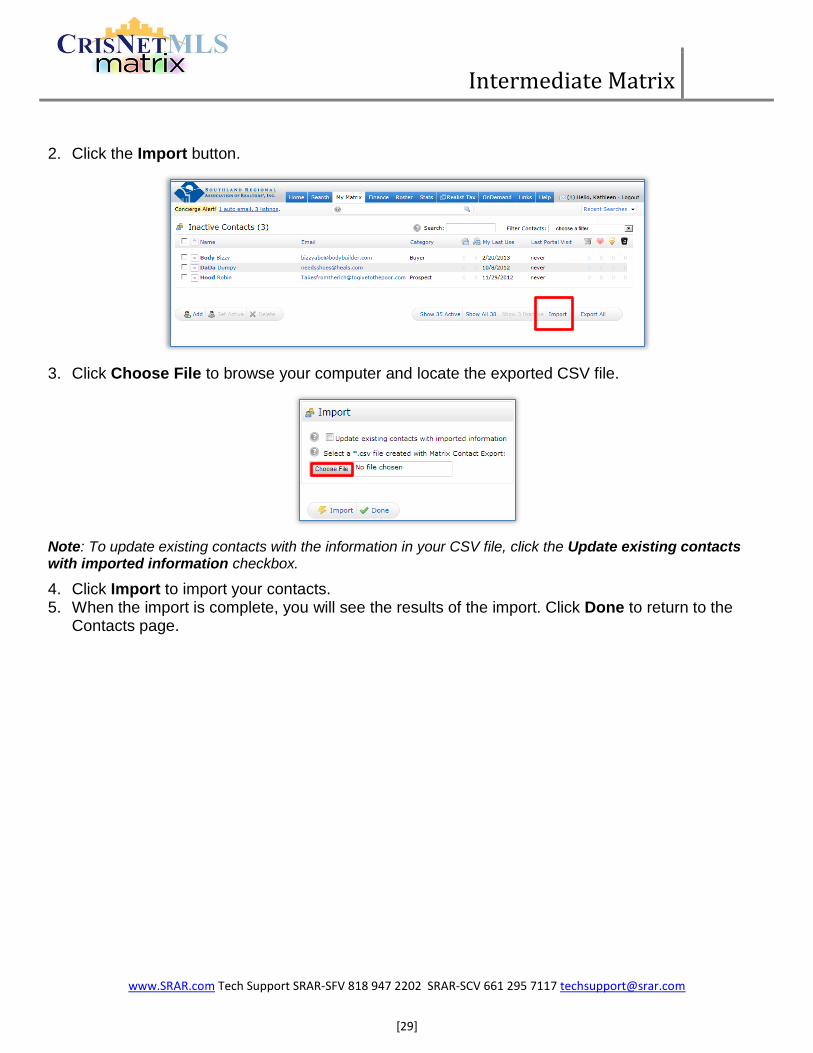
2. Click the Import button.
3. Click Choose File to browse your computer and locate the exported CSV file.
Note: To update existing contacts with the information in your CSV file, click the Update existing contacts with imported information checkbox.
4. Click Import to import your contacts. 5. When the import is complete, you will see the results of the import. Click Done to return to the
Contacts page.
Intermediate Matrix
www.SRAR.com Tech Support SRAR-SFV 818 947 2202 SRAR-SCV 661 295 7117 [email protected]
[30]
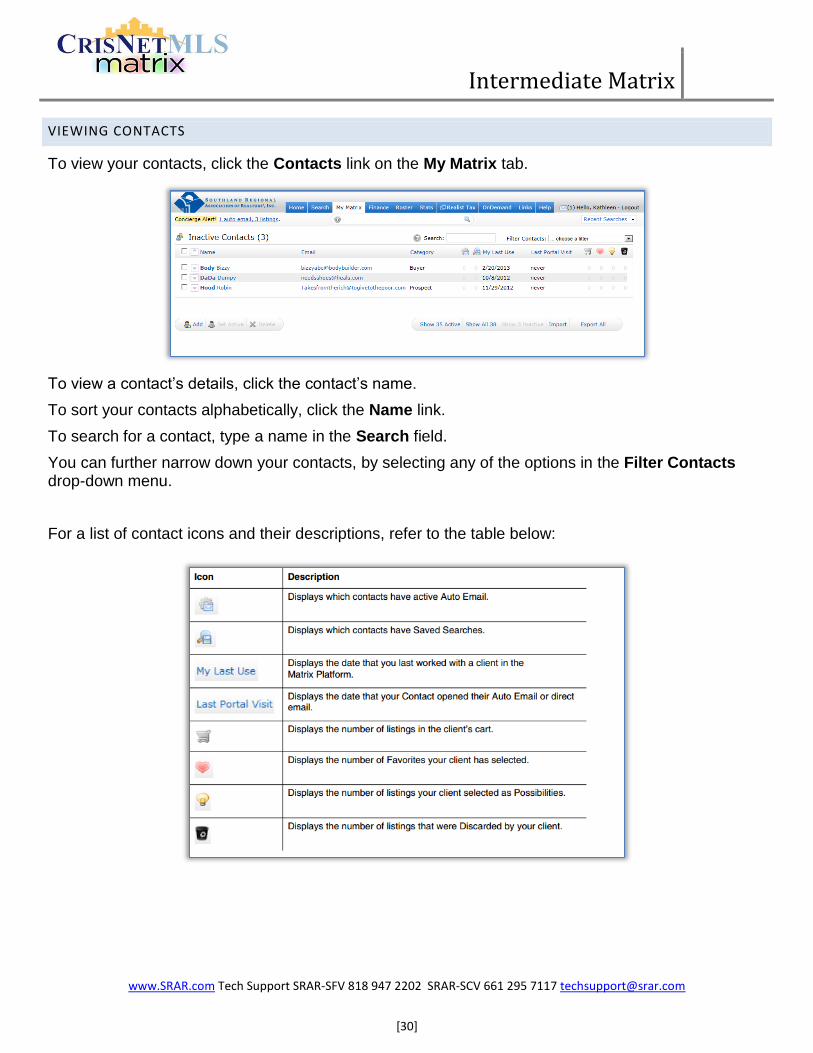
VIEWING CONTACTS
To view your contacts, click the Contacts link on the My Matrix tab.
To view a contact’s details, click the contact’s name.
To sort your contacts alphabetically, click the Name link.
To search for a contact, type a name in the Search field.
You can further narrow down your contacts, by selecting any of the options in the Filter Contacts drop-down menu.
For a list of contact icons and their descriptions, refer to the table below:
Intermediate Matrix
www.SRAR.com Tech Support SRAR-SFV 818 947 2202 SRAR-SCV 661 295 7117 [email protected]
[31]
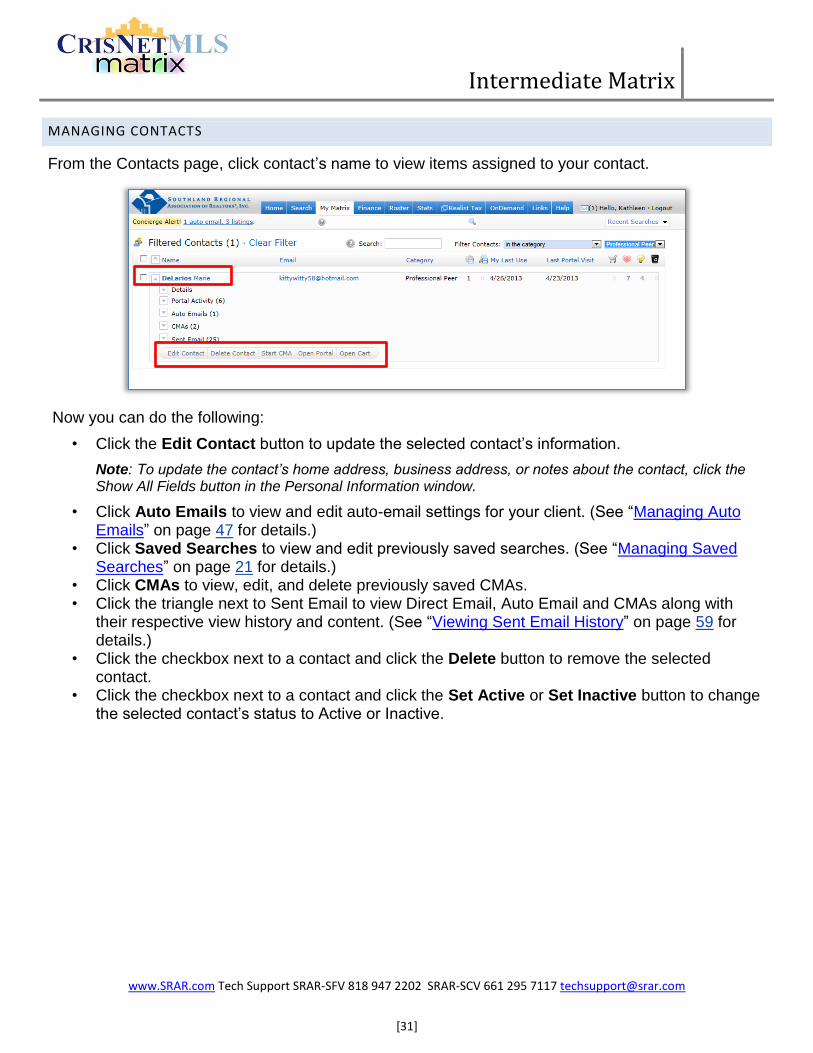
MANAGING CONTACTS
From the Contacts page, click contact’s name to view items assigned to your contact.
Now you can do the following:
• Click the Edit Contact button to update the selected contact’s information.
Note: To update the contact’s home address, business address, or notes about the contact, click the Show All Fields button in the Personal Information window.
• Click Auto Emails to view and edit auto-email settings for your client. (See “Managing Auto Emails” on page 47 for details.)
• Click Saved Searches to view and edit previously saved searches. (See “Managing Saved Searches” on page 21 for details.)
• Click CMAs to view, edit, and delete previously saved CMAs. • Click the triangle next to Sent Email to view Direct Email, Auto Email and CMAs along with
their respective view history and content. (See “Viewing Sent Email History” on page 59 for details.)
• Click the checkbox next to a contact and click the Delete button to remove the selected contact.
• Click the checkbox next to a contact and click the Set Active or Set Inactive button to change the selected contact’s status to Active or Inactive.
Intermediate Matrix
www.SRAR.com Tech Support SRAR-SFV 818 947 2202 SRAR-SCV 661 295 7117 [email protected]
[32]
CUSTOMIZING EMAIL SETTINGS
Before you send emails to your clients, you should create an email signature and customize your header/footer for the Client Portal and printed reports. Follow the steps in these sections to get started.
“Creating an Email Signature” on page 32
“Customizing Your Header/Footer” on page 33
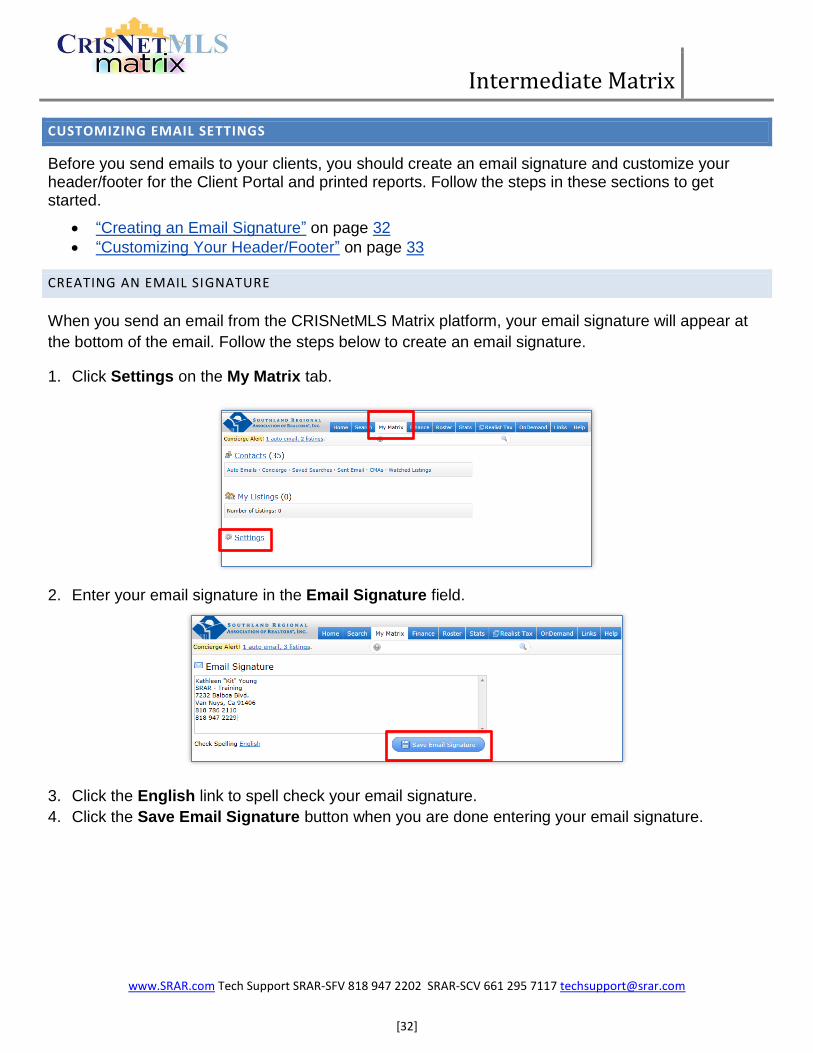
CREATING AN EMAIL SIGNATURE
When you send an email from the CRISNetMLS Matrix platform, your email signature will appear at
the bottom of the email. Follow the steps below to create an email signature.
1. Click Settings on the My Matrix tab.
2. Enter your email signature in the Email Signature field.
3. Click the English link to spell check your email signature.
4. Click the Save Email Signature button when you are done entering your email signature.
Intermediate Matrix
www.SRAR.com Tech Support SRAR-SFV 818 947 2202 SRAR-SCV 661 295 7117 [email protected]
[33]
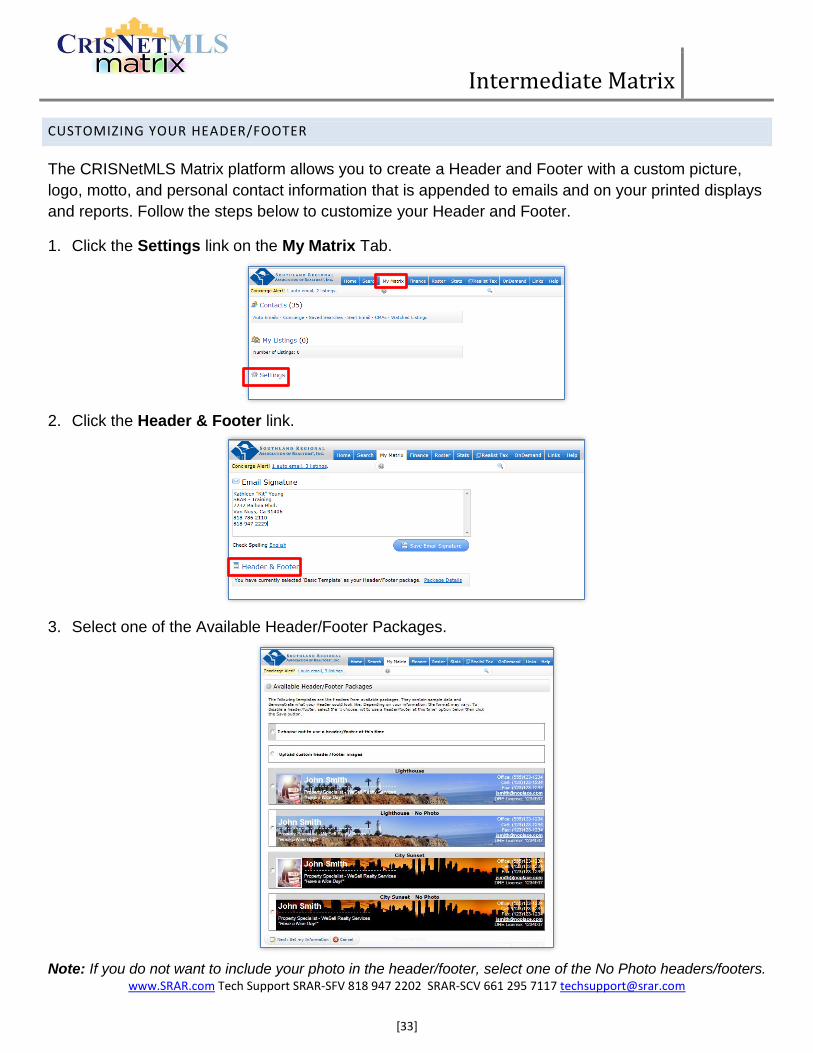
CUSTOMIZING YOUR HEADER/FOOTER
The CRISNetMLS Matrix platform allows you to create a Header and Footer with a custom picture,
logo, motto, and personal contact information that is appended to emails and on your printed displays
and reports. Follow the steps below to customize your Header and Footer.
1. Click the Settings link on the My Matrix Tab.
2. Click the Header & Footer link.
3. Select one of the Available Header/Footer Packages.
Note: If you do not want to include your photo in the header/footer, select one of the No Photo headers/footers.
Intermediate Matrix
www.SRAR.com Tech Support SRAR-SFV 818 947 2202 SRAR-SCV 661 295 7117 [email protected]
[34]
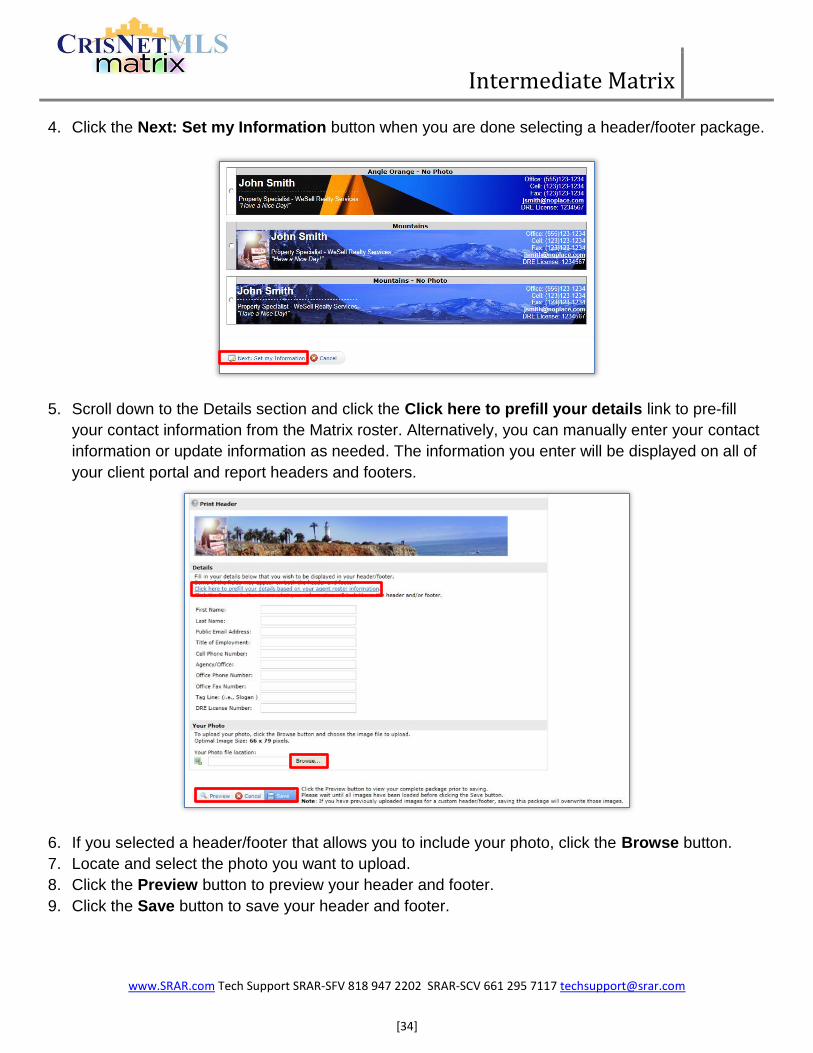
4. Click the Next: Set my Information button when you are done selecting a header/footer package.
5. Scroll down to the Details section and click the Click here to prefill your details link to pre-fill
your contact information from the Matrix roster. Alternatively, you can manually enter your contact
information or update information as needed. The information you enter will be displayed on all of
your client portal and report headers and footers.
6. If you selected a header/footer that allows you to include your photo, click the Browse button.
7. Locate and select the photo you want to upload.
8. Click the Preview button to preview your header and footer.
9. Click the Save button to save your header and footer.
Intermediate Matrix
www.SRAR.com Tech Support SRAR-SFV 818 947 2202 SRAR-SCV 661 295 7117 [email protected]
[35]
EMAILING LISTINGS
The CRISNetMLS Matrix platform allows you to email listings as reports in PDF format. Listings can
also be emailed as links to a client portal so that your clients will receive the most up to date
information for the listings you have emailed.
“Emailing Listings as Reports” on page 35
“Emailing Listings as Links” on page 38
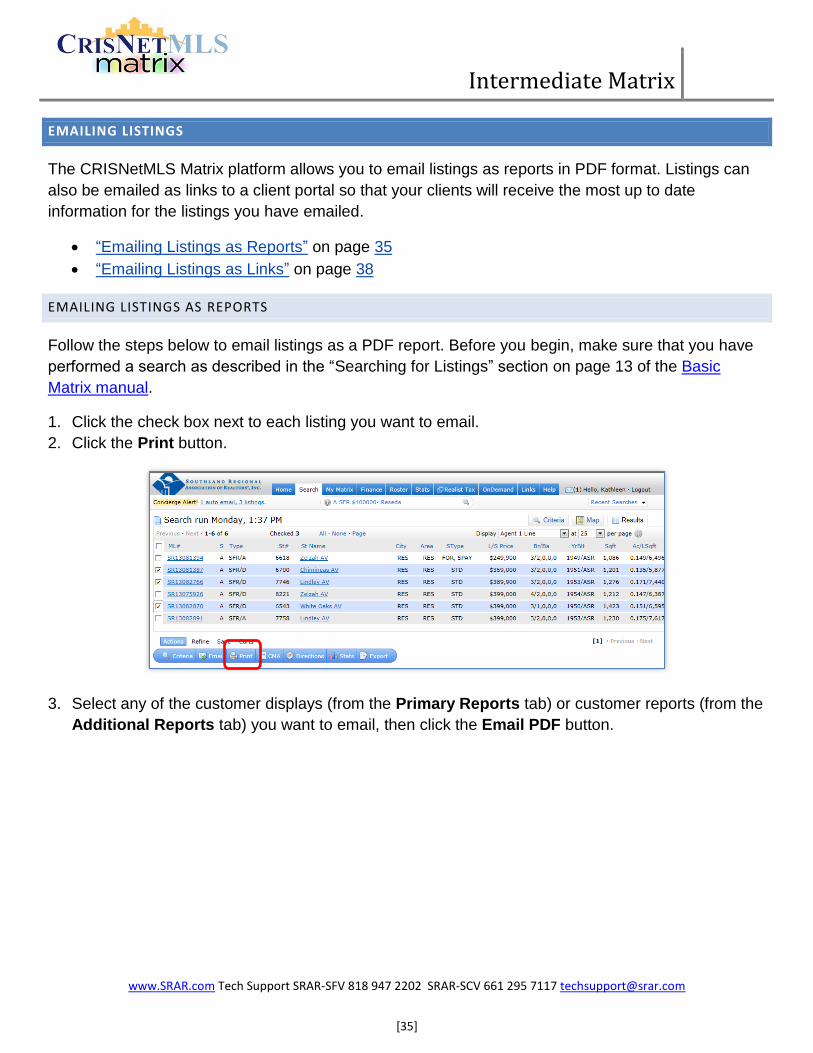
EMAILING LISTINGS AS REPORTS
Follow the steps below to email listings as a PDF report. Before you begin, make sure that you have
performed a search as described in the “Searching for Listings” section on page 13 of the Basic
Matrix manual.
1. Click the check box next to each listing you want to email.
2. Click the Print button.
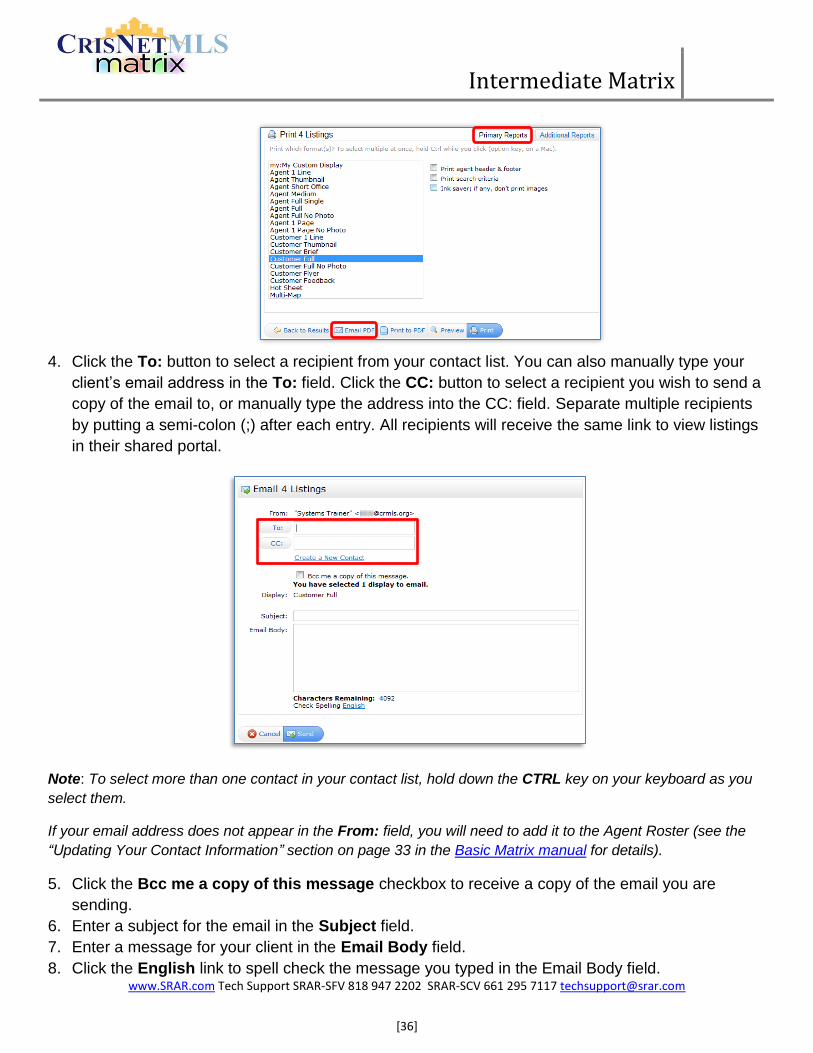
3. Select any of the customer displays (from the Primary Reports tab) or customer reports (from the
Additional Reports tab) you want to email, then click the Email PDF button.
Intermediate Matrix
www.SRAR.com Tech Support SRAR-SFV 818 947 2202 SRAR-SCV 661 295 7117 [email protected]
[36]
4. Click the To: button to select a recipient from your contact list. You can also manually type your
client’s email address in the To: field. Click the CC: button to select a recipient you wish to send a
copy of the email to, or manually type the address into the CC: field. Separate multiple recipients
by putting a semi-colon (;) after each entry. All recipients will receive the same link to view listings
in their shared portal.
Note: To select more than one contact in your contact list, hold down the CTRL key on your keyboard as you
select them.
If your email address does not appear in the From: field, you will need to add it to the Agent Roster (see the
“Updating Your Contact Information” section on page 33 in the Basic Matrix manual for details).
5. Click the Bcc me a copy of this message checkbox to receive a copy of the email you are
sending.
6. Enter a subject for the email in the Subject field.
7. Enter a message for your client in the Email Body field.
8. Click the English link to spell check the message you typed in the Email Body field.
Intermediate Matrix
www.SRAR.com Tech Support SRAR-SFV 818 947 2202 SRAR-SCV 661 295 7117 [email protected]
[37]
9. Click the Send button to email the selected display or report to your client in PDF format.
NOTE: For the best printing results, print from the Additional Reports tab. Print to PDF and then print
from your browser.
Intermediate Matrix
www.SRAR.com Tech Support SRAR-SFV 818 947 2202 SRAR-SCV 661 295 7117 [email protected]
[38]
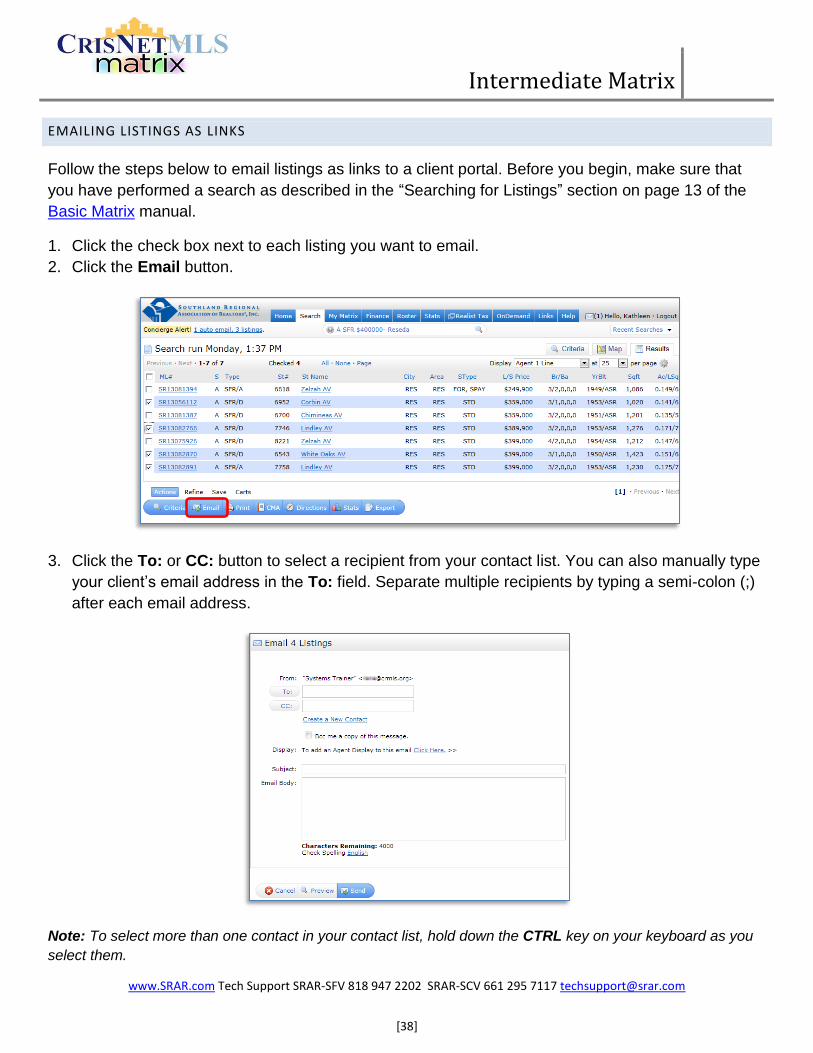
EMAILING LISTINGS AS LINKS
Follow the steps below to email listings as links to a client portal. Before you begin, make sure that
you have performed a search as described in the “Searching for Listings” section on page 13 of the
Basic Matrix manual.
1. Click the check box next to each listing you want to email.
2. Click the Email button.
3. Click the To: or CC: button to select a recipient from your contact list. You can also manually type
your client’s email address in the To: field. Separate multiple recipients by typing a semi-colon (;)
after each email address.
Note: To select more than one contact in your contact list, hold down the CTRL key on your keyboard as you
select them.
Intermediate Matrix
www.SRAR.com Tech Support SRAR-SFV 818 947 2202 SRAR-SCV 661 295 7117 [email protected]
[39]
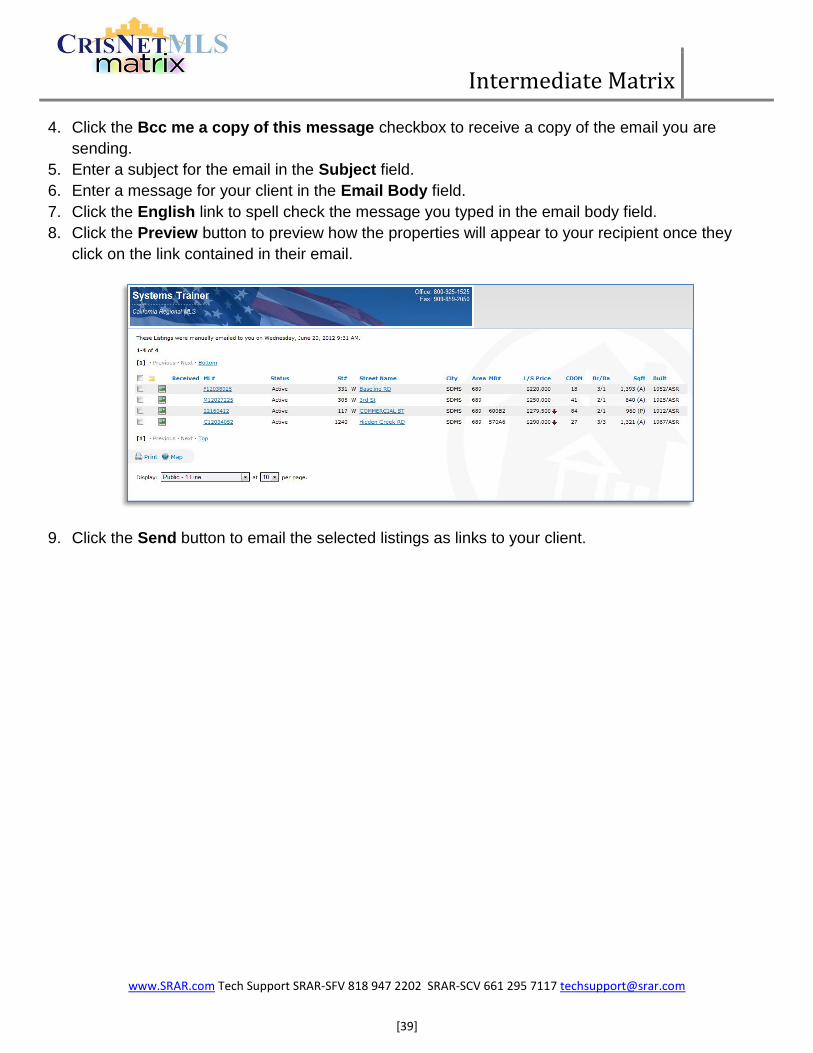
4. Click the Bcc me a copy of this message checkbox to receive a copy of the email you are
sending.
5. Enter a subject for the email in the Subject field.
6. Enter a message for your client in the Email Body field.
7. Click the English link to spell check the message you typed in the email body field.
8. Click the Preview button to preview how the properties will appear to your recipient once they
click on the link contained in their email.
9. Click the Send button to email the selected listings as links to your client.
Intermediate Matrix
www.SRAR.com Tech Support SRAR-SFV 818 947 2202 SRAR-SCV 661 295 7117 [email protected]
[40]
EMAILING LISTINGS AUTOMATICALLY (AUTO EMAILS)
Auto Emails allow you to quickly and easily turn search results and saved searches into automatic email updates that instantly notify your clients of new and changed listings. Before you begin, make sure that you have created an email signature and set up your header/footer information as described in “Customizing Email Settings” on page 32. Then follow the steps in these sections to get started.
Note: For complete control over the listings that are sent to your clients, enable concierge mode for your auto emails to approve or reject listings before sending them to your client. See “Auto Email Concierge” on page 49 for details.
“Creating Auto Emails from Search Results” on page 40
“Creating Auto Emails from Saved Searches” on page 43
“Managing Auto Emails” on page 47
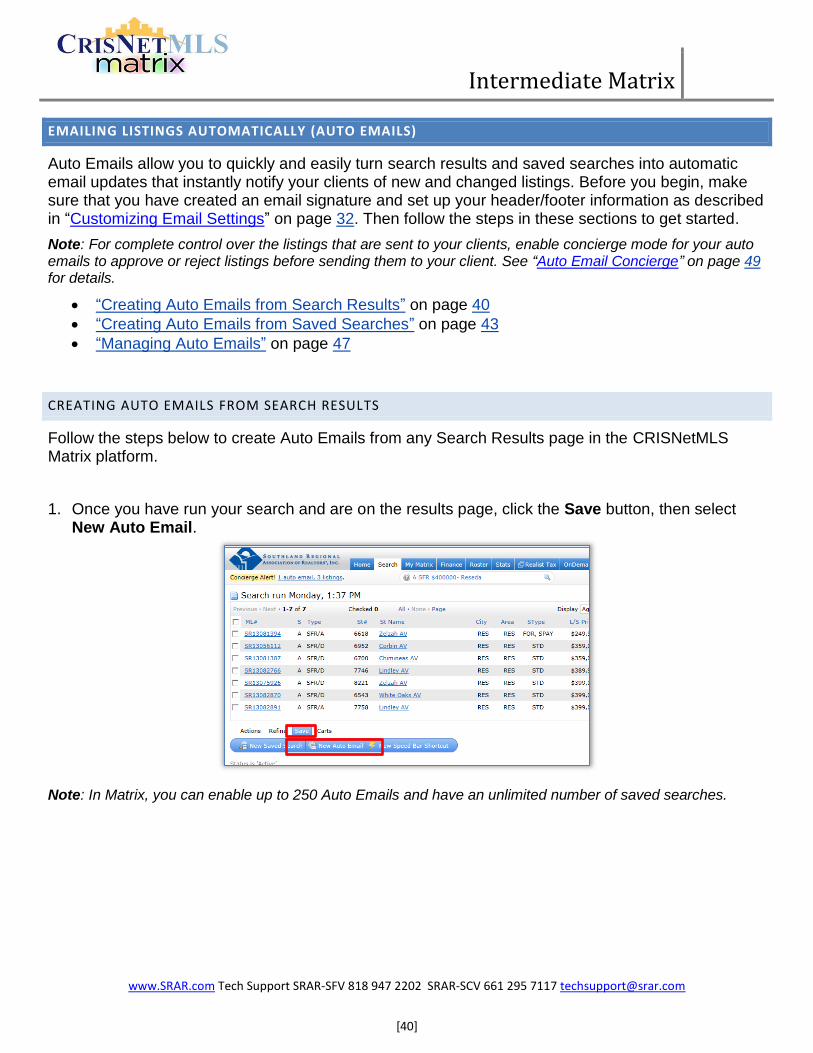
CREATING AUTO EMAILS FROM SEARCH RESULTS
Follow the steps below to create Auto Emails from any Search Results page in the CRISNetMLS Matrix platform.
1. Once you have run your search and are on the results page, click the Save button, then select New Auto Email.
Note: In Matrix, you can enable up to 250 Auto Emails and have an unlimited number of saved searches.
Intermediate Matrix
www.SRAR.com Tech Support SRAR-SFV 818 947 2202 SRAR-SCV 661 295 7117 [email protected]
[41]
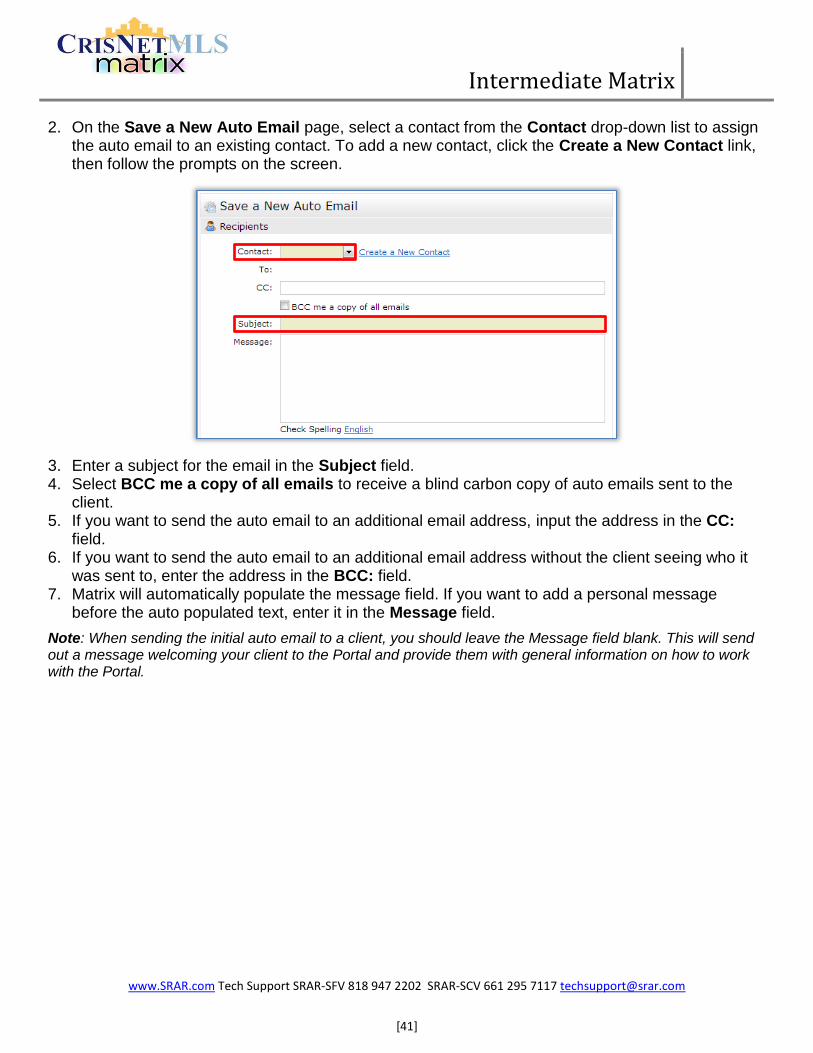
2. On the Save a New Auto Email page, select a contact from the Contact drop-down list to assign the auto email to an existing contact. To add a new contact, click the Create a New Contact link, then follow the prompts on the screen.
3. Enter a subject for the email in the Subject field. 4. Select BCC me a copy of all emails to receive a blind carbon copy of auto emails sent to the
client. 5. If you want to send the auto email to an additional email address, input the address in the CC:
field. 6. If you want to send the auto email to an additional email address without the client seeing who it
was sent to, enter the address in the BCC: field. 7. Matrix will automatically populate the message field. If you want to add a personal message
before the auto populated text, enter it in the Message field.
Note: When sending the initial auto email to a client, you should leave the Message field blank. This will send out a message welcoming your client to the Portal and provide them with general information on how to work with the Portal.
Intermediate Matrix
www.SRAR.com Tech Support SRAR-SFV 818 947 2202 SRAR-SCV 661 295 7117 [email protected]
[42]
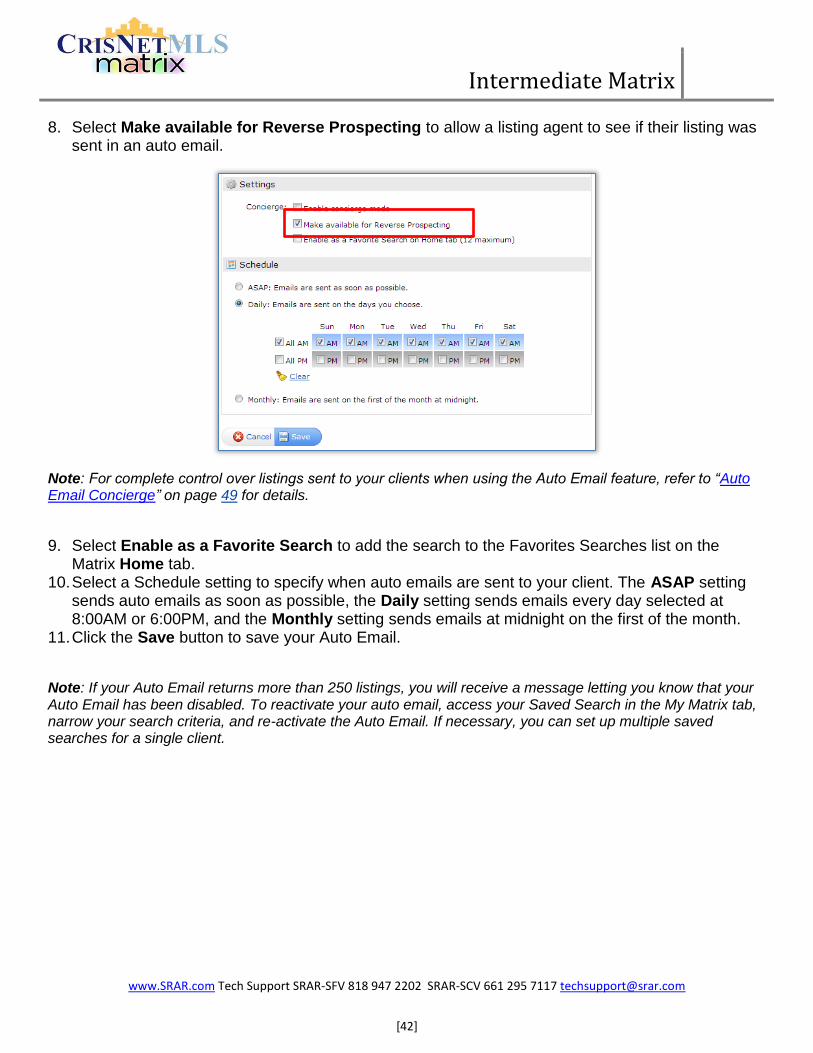
8. Select Make available for Reverse Prospecting to allow a listing agent to see if their listing was sent in an auto email.
Note: For complete control over listings sent to your clients when using the Auto Email feature, refer to “Auto Email Concierge” on page 49 for details.
9. Select Enable as a Favorite Search to add the search to the Favorites Searches list on the Matrix Home tab.
10. Select a Schedule setting to specify when auto emails are sent to your client. The ASAP setting sends auto emails as soon as possible, the Daily setting sends emails every day selected at 8:00AM or 6:00PM, and the Monthly setting sends emails at midnight on the first of the month.
11. Click the Save button to save your Auto Email.
Note: If your Auto Email returns more than 250 listings, you will receive a message letting you know that your Auto Email has been disabled. To reactivate your auto email, access your Saved Search in the My Matrix tab, narrow your search criteria, and re-activate the Auto Email. If necessary, you can set up multiple saved searches for a single client.
Intermediate Matrix
www.SRAR.com Tech Support SRAR-SFV 818 947 2202 SRAR-SCV 661 295 7117 [email protected]
[43]
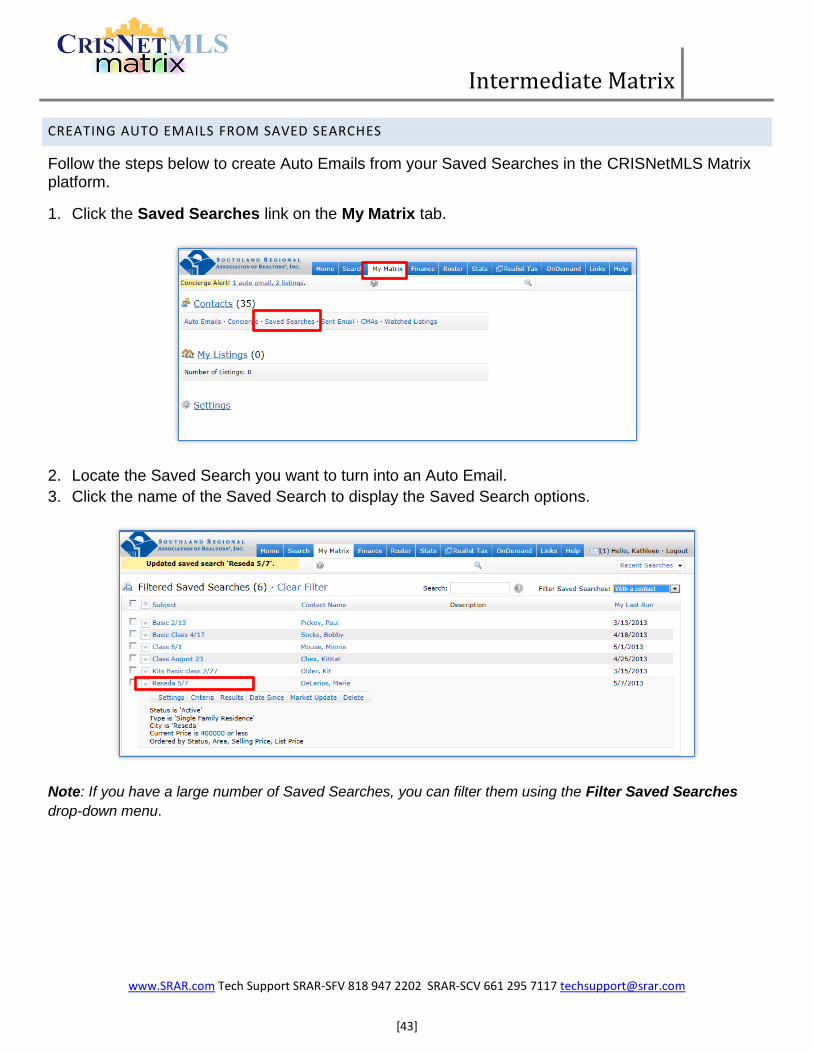
CREATING AUTO EMAILS FROM SAVED SEARCHES
Follow the steps below to create Auto Emails from your Saved Searches in the CRISNetMLS Matrix platform.
1. Click the Saved Searches link on the My Matrix tab.
2. Locate the Saved Search you want to turn into an Auto Email.
3. Click the name of the Saved Search to display the Saved Search options.
Note: If you have a large number of Saved Searches, you can filter them using the Filter Saved Searches
drop-down menu.
Intermediate Matrix
www.SRAR.com Tech Support SRAR-SFV 818 947 2202 SRAR-SCV 661 295 7117 [email protected]
[44]
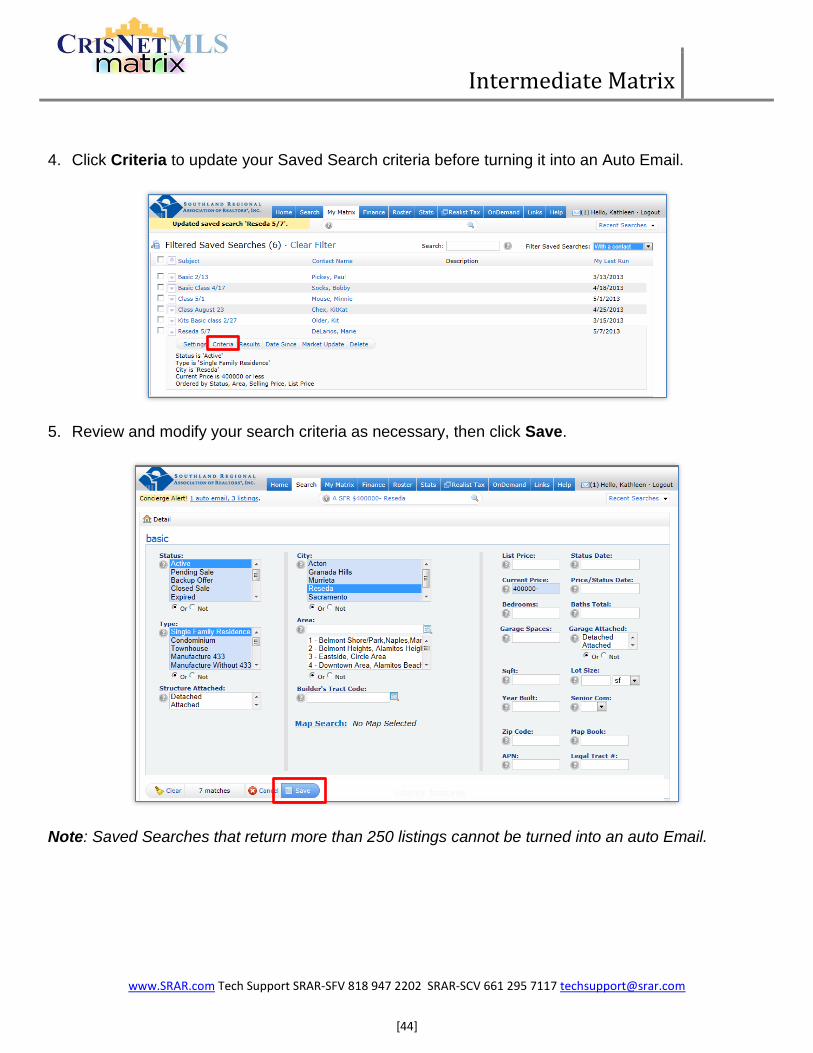
4. Click Criteria to update your Saved Search criteria before turning it into an Auto Email.
5. Review and modify your search criteria as necessary, then click Save.
Note: Saved Searches that return more than 250 listings cannot be turned into an auto Email.

Intermediate Matrix
www.SRAR.com Tech Support SRAR-SFV 818 947 2202 SRAR-SCV 661 295 7117 [email protected]
[45]
6. Click the Turn this Saved Search into an Auto Email link.
7. Verify that the correct client is selected in the Contact drop-down list.
8. If you want to send the auto email to an additional email address associated with the selected
contact, enter the address in the CC: field.
9. Select BCC me a copy of all emails to receive a blind carbon copy of auto emails sent to the
client.
10. Enter a subject for the email in the Subject field.
11. The CRISNetMLS Matrix platform automatically populates the Message field. If you want to add a
personal message before the auto populated text, enter it in the Message field.
Note: When sending the initial auto email to a client, you should leave the Message field blank. This will send
out a message welcoming your client to the Portal and provide them with general information on how to work
with the Portal.
Intermediate Matrix
www.SRAR.com Tech Support SRAR-SFV 818 947 2202 SRAR-SCV 661 295 7117 [email protected]
[46]
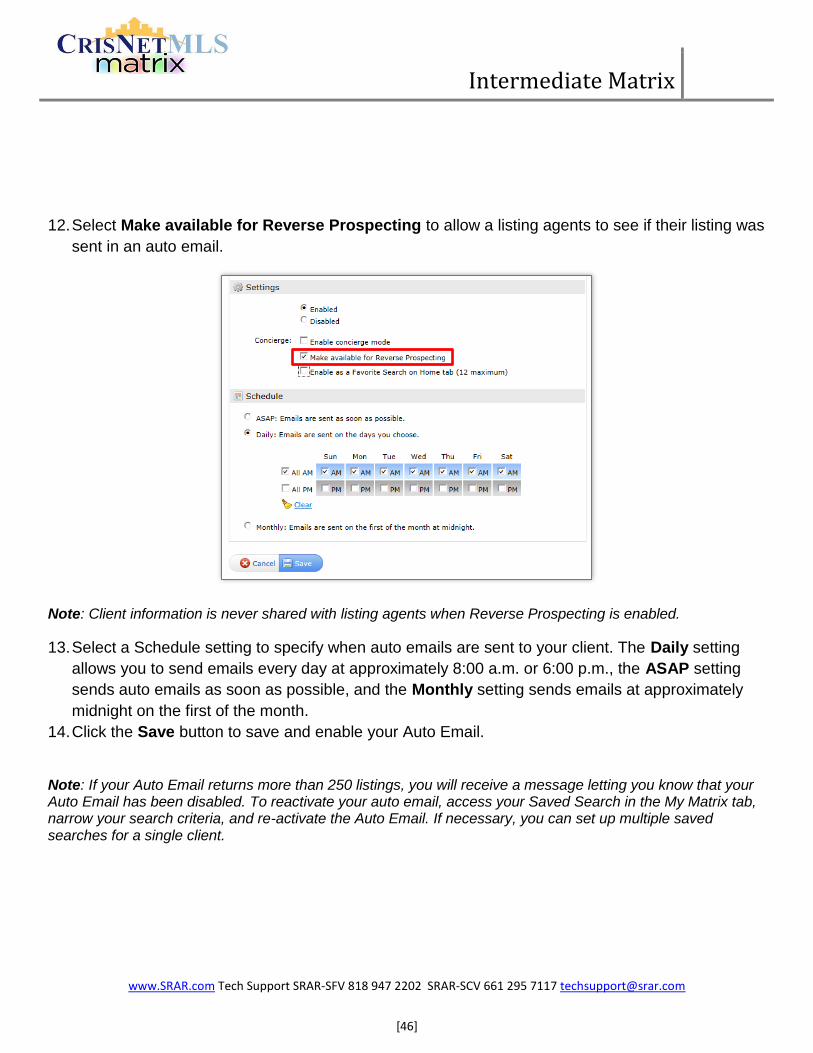
12. Select Make available for Reverse Prospecting to allow a listing agents to see if their listing was
sent in an auto email.
Note: Client information is never shared with listing agents when Reverse Prospecting is enabled.
13. Select a Schedule setting to specify when auto emails are sent to your client. The Daily setting
allows you to send emails every day at approximately 8:00 a.m. or 6:00 p.m., the ASAP setting
sends auto emails as soon as possible, and the Monthly setting sends emails at approximately
midnight on the first of the month.
14. Click the Save button to save and enable your Auto Email.
Note: If your Auto Email returns more than 250 listings, you will receive a message letting you know that your Auto Email has been disabled. To reactivate your auto email, access your Saved Search in the My Matrix tab, narrow your search criteria, and re-activate the Auto Email. If necessary, you can set up multiple saved searches for a single client.
Intermediate Matrix
www.SRAR.com Tech Support SRAR-SFV 818 947 2202 SRAR-SCV 661 295 7117 [email protected]
[47]
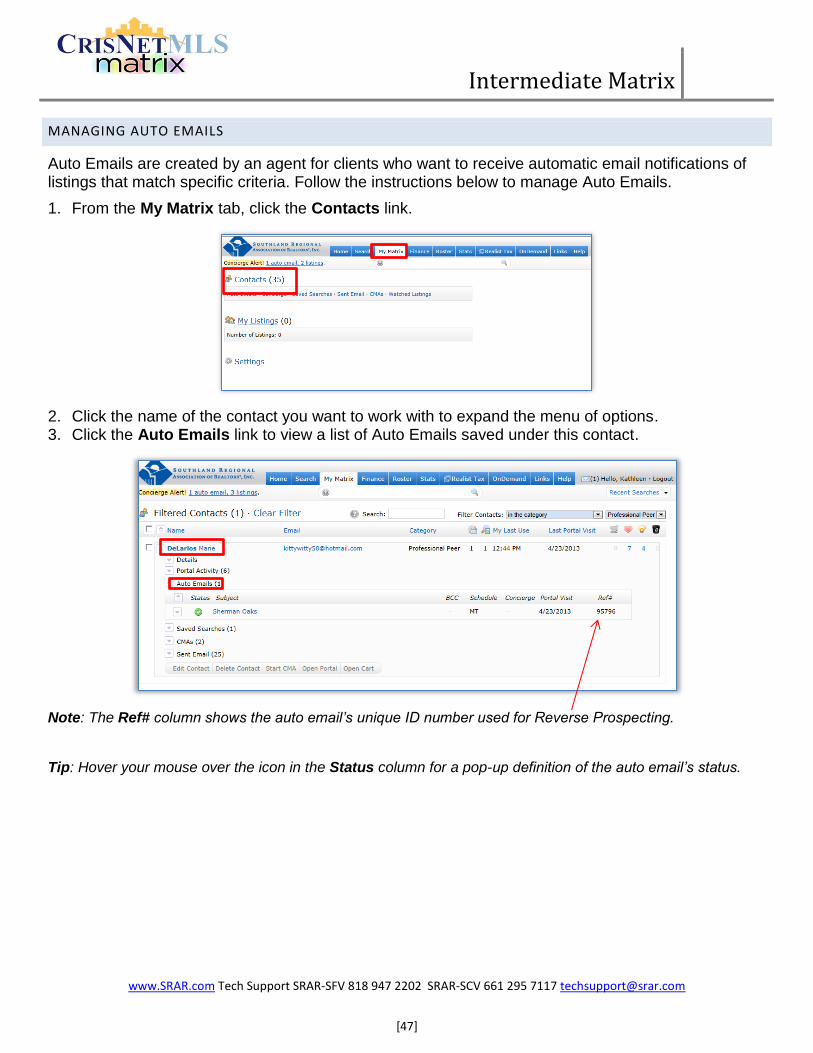
MANAGING AUTO EMAILS
Auto Emails are created by an agent for clients who want to receive automatic email notifications of listings that match specific criteria. Follow the instructions below to manage Auto Emails.
1. From the My Matrix tab, click the Contacts link.
2. Click the name of the contact you want to work with to expand the menu of options. 3. Click the Auto Emails link to view a list of Auto Emails saved under this contact.
Note: The Ref# column shows the auto email’s unique ID number used for Reverse Prospecting.
Tip: Hover your mouse over the icon in the Status column for a pop-up definition of the auto email’s status.
Intermediate Matrix
www.SRAR.com Tech Support SRAR-SFV 818 947 2202 SRAR-SCV 661 295 7117 [email protected]
[48]
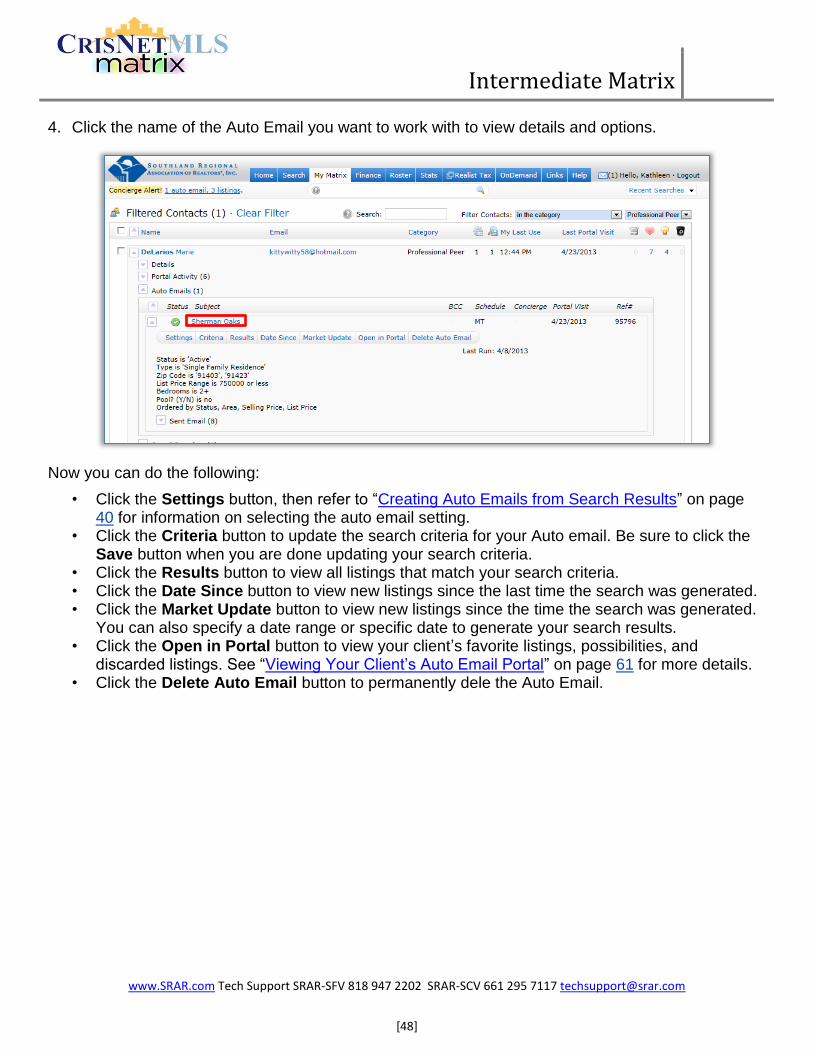
4. Click the name of the Auto Email you want to work with to view details and options.
Now you can do the following:
• Click the Settings button, then refer to “Creating Auto Emails from Search Results” on page 40 for information on selecting the auto email setting.
• Click the Criteria button to update the search criteria for your Auto email. Be sure to click the Save button when you are done updating your search criteria.
• Click the Results button to view all listings that match your search criteria. • Click the Date Since button to view new listings since the last time the search was generated. • Click the Market Update button to view new listings since the time the search was generated.
You can also specify a date range or specific date to generate your search results. • Click the Open in Portal button to view your client’s favorite listings, possibilities, and
discarded listings. See “Viewing Your Client’s Auto Email Portal” on page 61 for more details. • Click the Delete Auto Email button to permanently dele the Auto Email.
Intermediate Matrix
www.SRAR.com Tech Support SRAR-SFV 818 947 2202 SRAR-SCV 661 295 7117 [email protected]
[49]
AUTO EMAIL CONCIERGE
The Auto Email Concierge gives you complete control over listings sent to your clients when using the Auto Email feature. When matching listings are found by your client’s Auto Email, they will appear in the Concierge. The Concierge will allow you to approve and reject listings, and only listings that you approve will be emailed and made available in your client’s portal. The Concierge is especially helpful when you require close management of listings sent to your clients. Follow the steps in these sections to create a new Concierge Auto Email, approve or reject listings, and manage Auto Emails with Concierge enabled.
“Creating a Concierge Auto Email” on page 49
“Managing Listings in Concierge Mode” on page 52
“Enabling Concierge Mode for Existing Auto Emails” on page 54
“Disabling Concierge Mode for an Auto Email” on page 56
“Auto Email Displays for Concierge Mode” on page 58
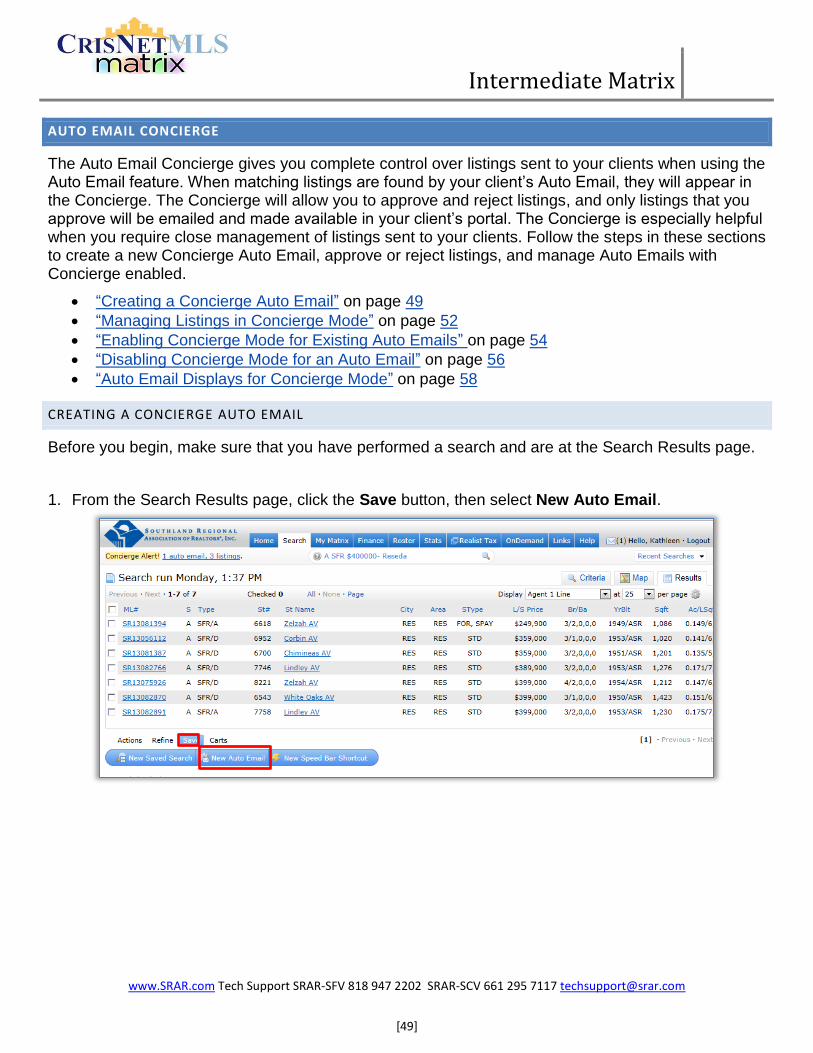
CREATING A CONCIERGE AUTO EMAIL
Before you begin, make sure that you have performed a search and are at the Search Results page.
1. From the Search Results page, click the Save button, then select New Auto Email.
Intermediate Matrix
www.SRAR.com Tech Support SRAR-SFV 818 947 2202 SRAR-SCV 661 295 7117 [email protected]
[50]
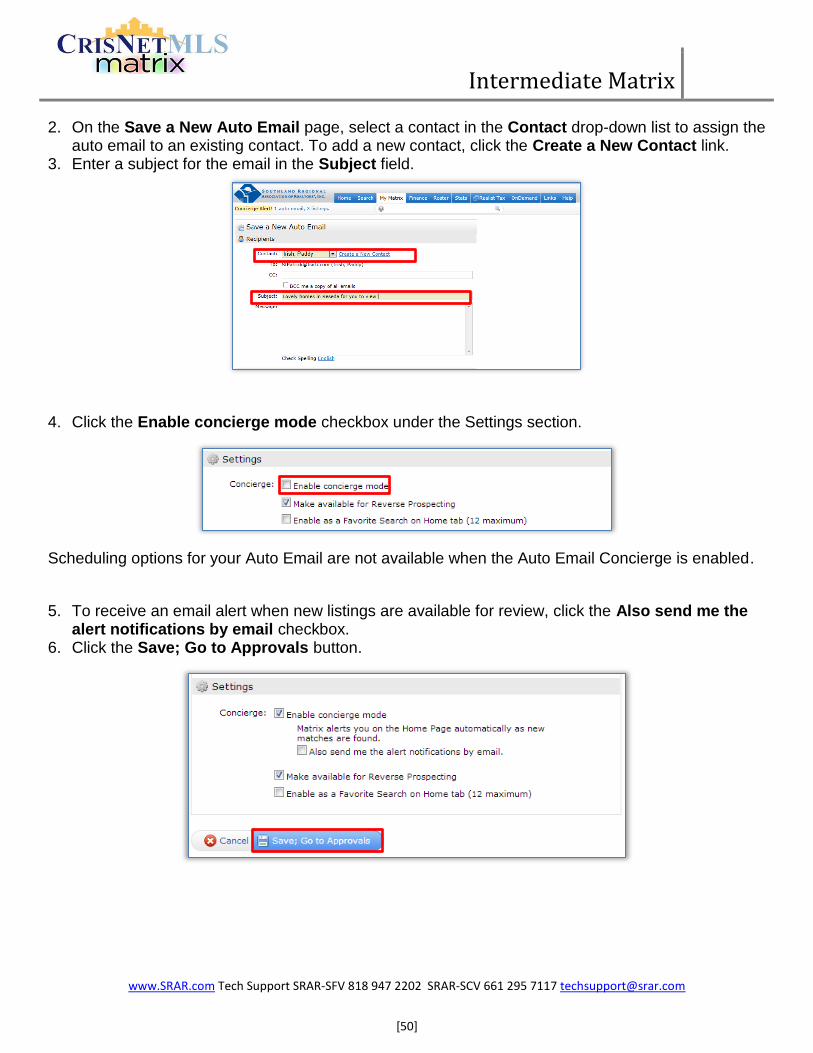
2. On the Save a New Auto Email page, select a contact in the Contact drop-down list to assign the auto email to an existing contact. To add a new contact, click the Create a New Contact link.
3. Enter a subject for the email in the Subject field.
4. Click the Enable concierge mode checkbox under the Settings section.
Scheduling options for your Auto Email are not available when the Auto Email Concierge is enabled.
5. To receive an email alert when new listings are available for review, click the Also send me the alert notifications by email checkbox.
6. Click the Save; Go to Approvals button.
Intermediate Matrix
www.SRAR.com Tech Support SRAR-SFV 818 947 2202 SRAR-SCV 661 295 7117 [email protected]
[51]
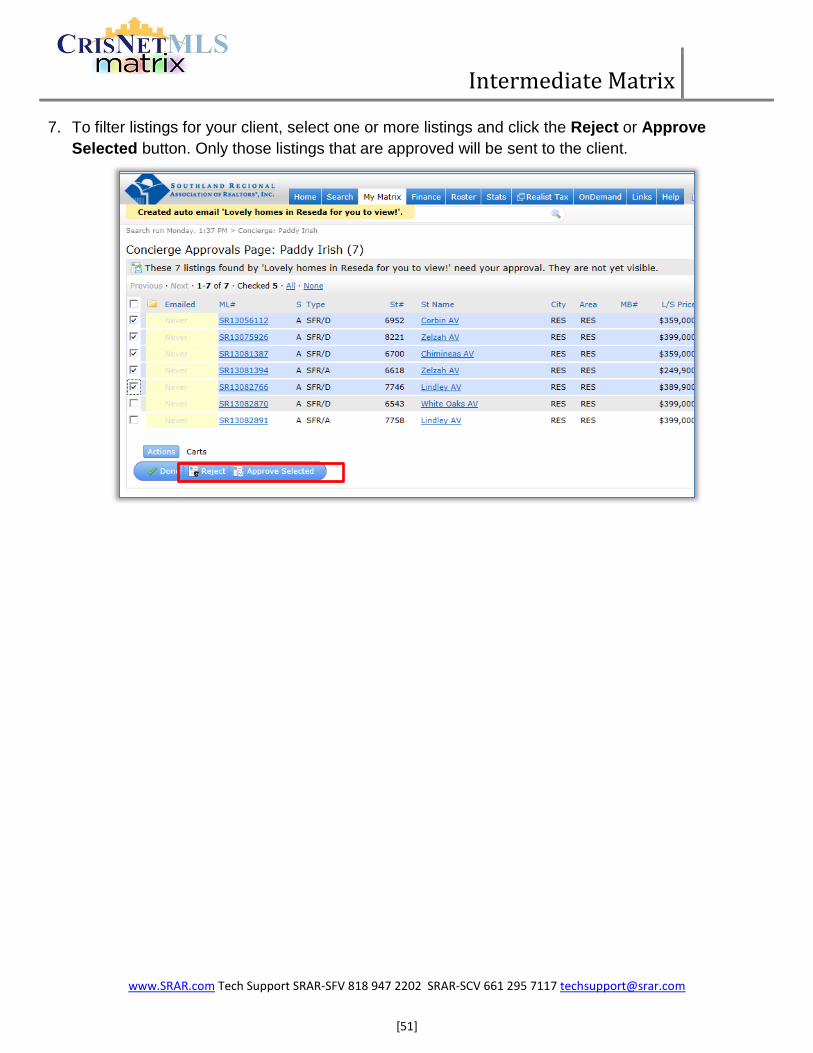
7. To filter listings for your client, select one or more listings and click the Reject or Approve
Selected button. Only those listings that are approved will be sent to the client.
Intermediate Matrix
www.SRAR.com Tech Support SRAR-SFV 818 947 2202 SRAR-SCV 661 295 7117 [email protected]
[52]
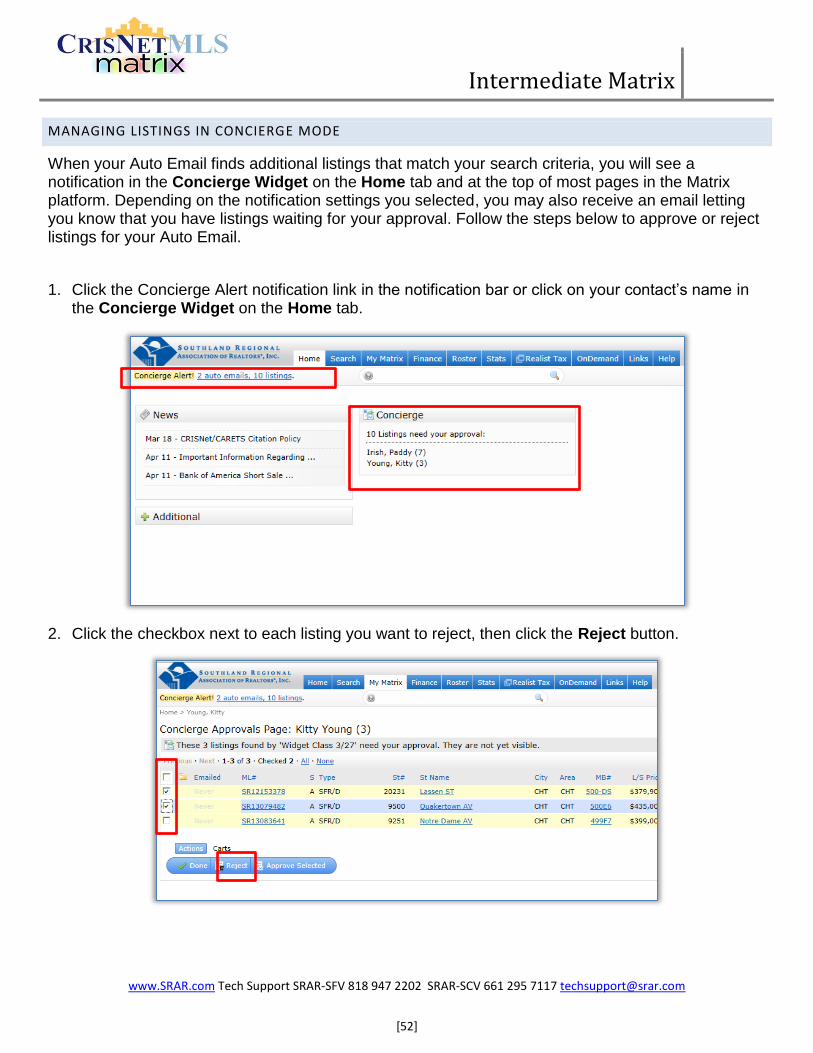
MANAGING LISTINGS IN CONCIERGE MODE
When your Auto Email finds additional listings that match your search criteria, you will see a notification in the Concierge Widget on the Home tab and at the top of most pages in the Matrix platform. Depending on the notification settings you selected, you may also receive an email letting you know that you have listings waiting for your approval. Follow the steps below to approve or reject listings for your Auto Email.
1. Click the Concierge Alert notification link in the notification bar or click on your contact’s name in the Concierge Widget on the Home tab.
2. Click the checkbox next to each listing you want to reject, then click the Reject button.
Intermediate Matrix
www.SRAR.com Tech Support SRAR-SFV 818 947 2202 SRAR-SCV 661 295 7117 [email protected]
[53]
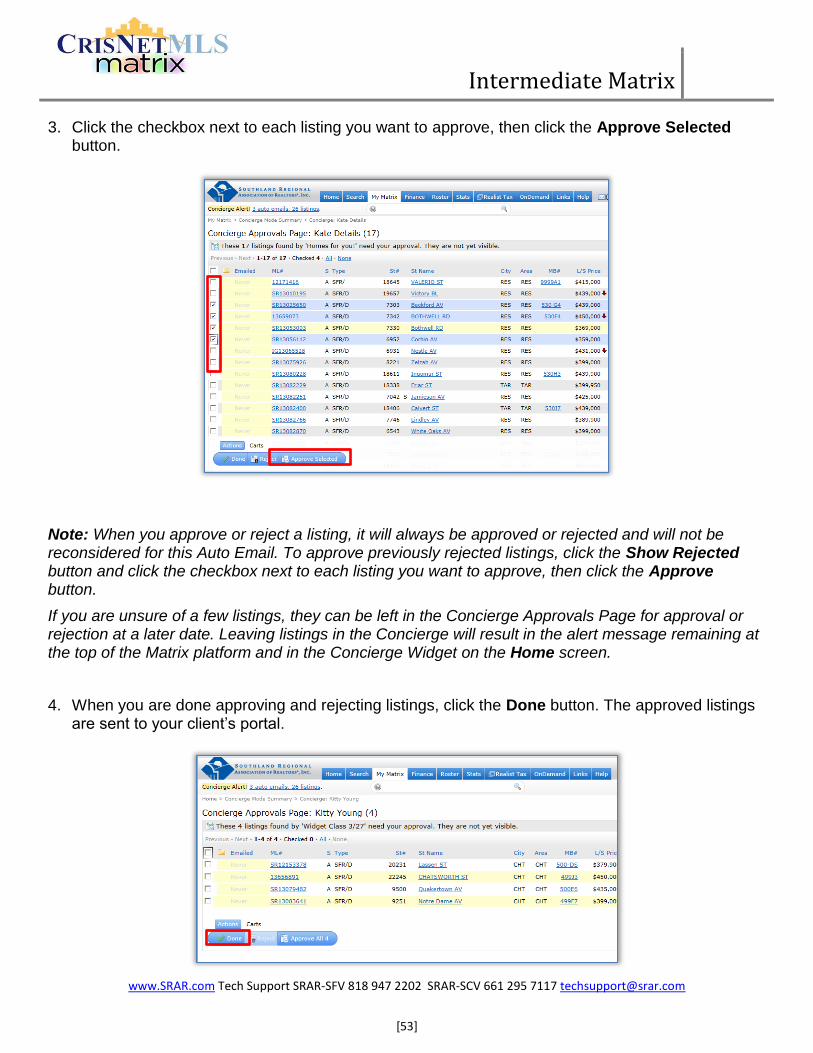
3. Click the checkbox next to each listing you want to approve, then click the Approve Selected button.
Note: When you approve or reject a listing, it will always be approved or rejected and will not be reconsidered for this Auto Email. To approve previously rejected listings, click the Show Rejected button and click the checkbox next to each listing you want to approve, then click the Approve button.
If you are unsure of a few listings, they can be left in the Concierge Approvals Page for approval or rejection at a later date. Leaving listings in the Concierge will result in the alert message remaining at the top of the Matrix platform and in the Concierge Widget on the Home screen.
4. When you are done approving and rejecting listings, click the Done button. The approved listings are sent to your client’s portal.
Intermediate Matrix
www.SRAR.com Tech Support SRAR-SFV 818 947 2202 SRAR-SCV 661 295 7117 [email protected]
[54]
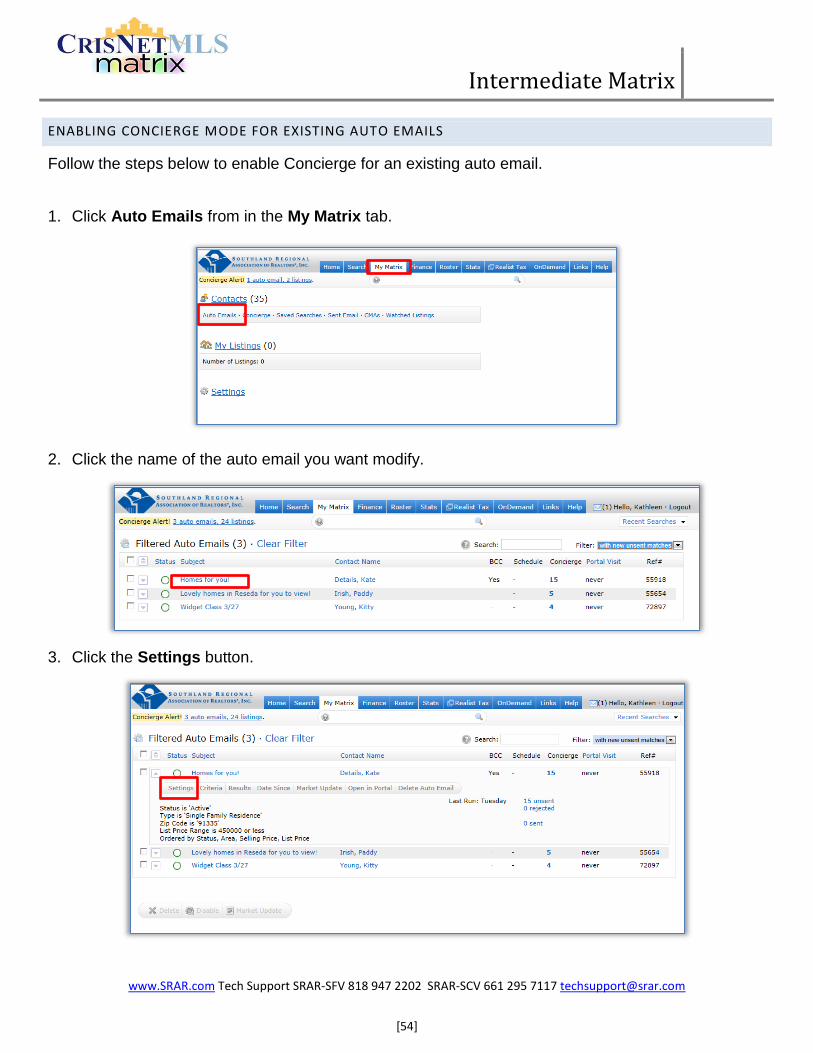
ENABLING CONCIERGE MODE FOR EXISTING AUTO EMAILS
Follow the steps below to enable Concierge for an existing auto email.
1. Click Auto Emails from in the My Matrix tab.
2. Click the name of the auto email you want modify.
3. Click the Settings button.
Intermediate Matrix
www.SRAR.com Tech Support SRAR-SFV 818 947 2202 SRAR-SCV 661 295 7117 [email protected]
[55]
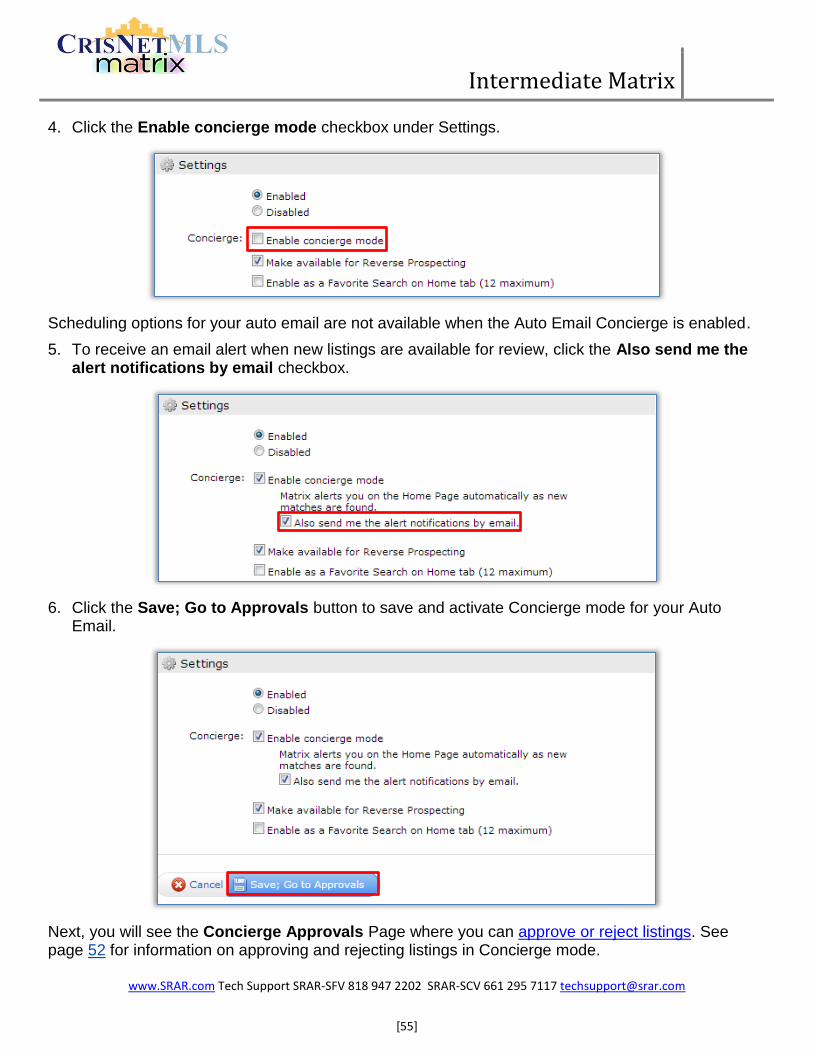
4. Click the Enable concierge mode checkbox under Settings.
Scheduling options for your auto email are not available when the Auto Email Concierge is enabled.
5. To receive an email alert when new listings are available for review, click the Also send me the alert notifications by email checkbox.
6. Click the Save; Go to Approvals button to save and activate Concierge mode for your Auto Email.
Next, you will see the Concierge Approvals Page where you can approve or reject listings. See page 52 for information on approving and rejecting listings in Concierge mode.
Intermediate Matrix
www.SRAR.com Tech Support SRAR-SFV 818 947 2202 SRAR-SCV 661 295 7117 [email protected]
[56]
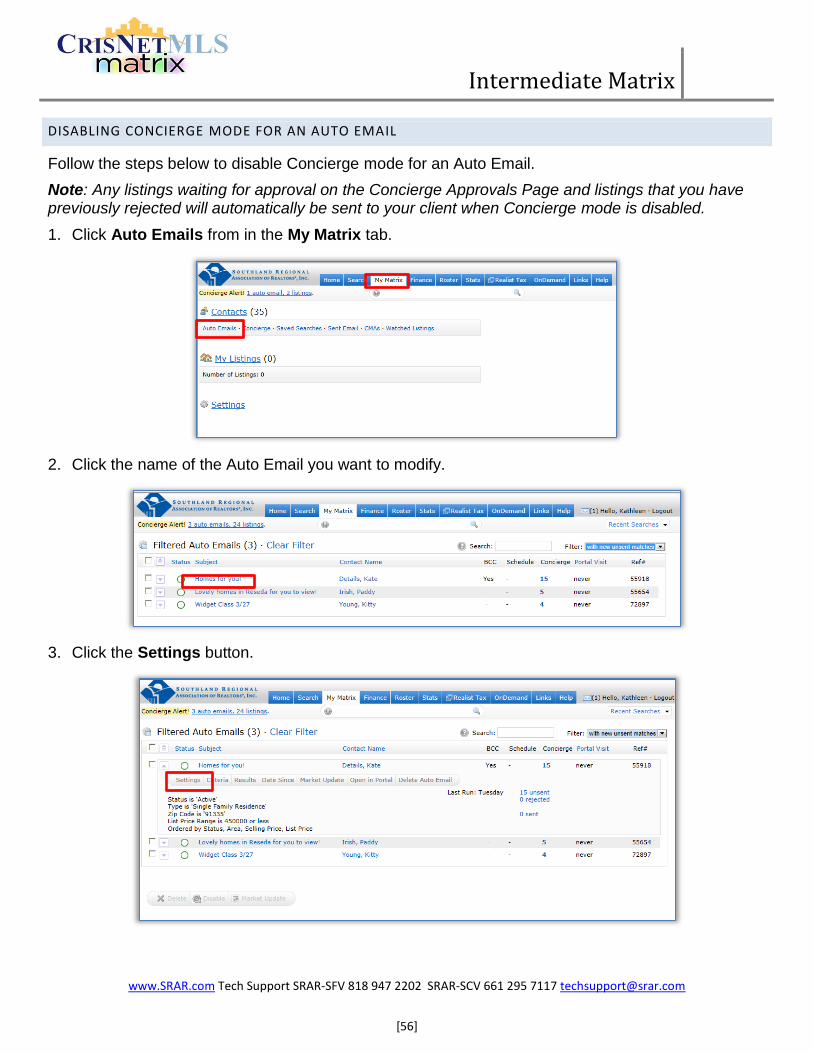
DISABLING CONCIERGE MODE FOR AN AUTO EMAIL
Follow the steps below to disable Concierge mode for an Auto Email.
Note: Any listings waiting for approval on the Concierge Approvals Page and listings that you have previously rejected will automatically be sent to your client when Concierge mode is disabled.
1. Click Auto Emails from in the My Matrix tab.
2. Click the name of the Auto Email you want to modify.
3. Click the Settings button.
Intermediate Matrix
www.SRAR.com Tech Support SRAR-SFV 818 947 2202 SRAR-SCV 661 295 7117 [email protected]
[57]
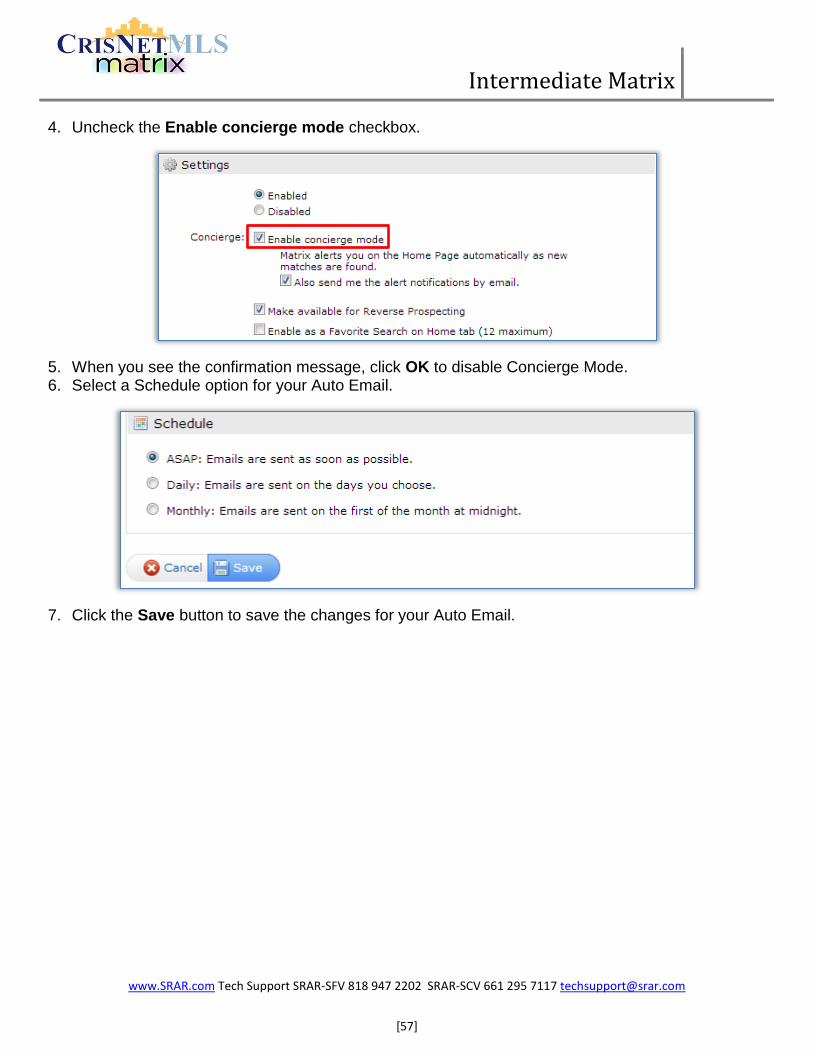
4. Uncheck the Enable concierge mode checkbox.
5. When you see the confirmation message, click OK to disable Concierge Mode. 6. Select a Schedule option for your Auto Email.
7. Click the Save button to save the changes for your Auto Email.
Intermediate Matrix
www.SRAR.com Tech Support SRAR-SFV 818 947 2202 SRAR-SCV 661 295 7117 [email protected]
[58]
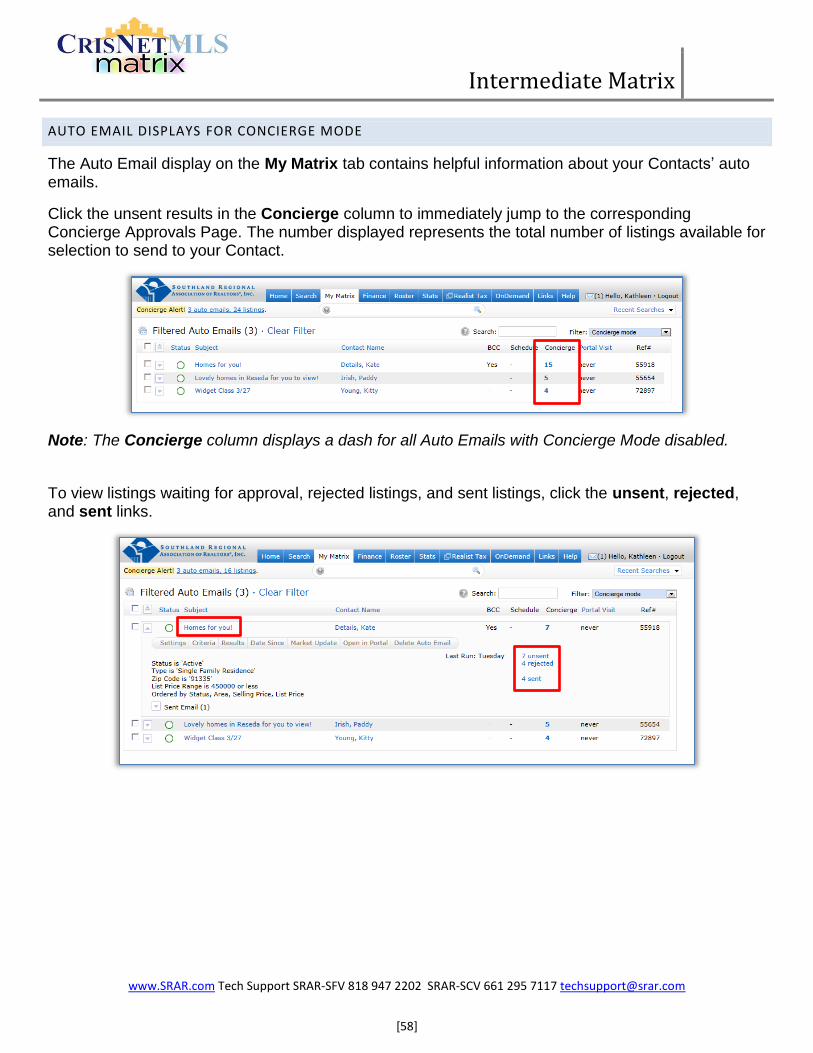
AUTO EMAIL DISPLAYS FOR CONCIERGE MODE
The Auto Email display on the My Matrix tab contains helpful information about your Contacts’ auto emails.
Click the unsent results in the Concierge column to immediately jump to the corresponding Concierge Approvals Page. The number displayed represents the total number of listings available for selection to send to your Contact.
Note: The Concierge column displays a dash for all Auto Emails with Concierge Mode disabled.
To view listings waiting for approval, rejected listings, and sent listings, click the unsent, rejected, and sent links.
Intermediate Matrix
www.SRAR.com Tech Support SRAR-SFV 818 947 2202 SRAR-SCV 661 295 7117 [email protected]
[59]
VIEWING SENT EMAIL HISTORY
Follow the steps in these sections to view emails that were sent to your client and to view your client’s activity in the Client Portal.
“Viewing Email History” on page 59
“Viewing Your Client’s Auto Email Portal” on page 61
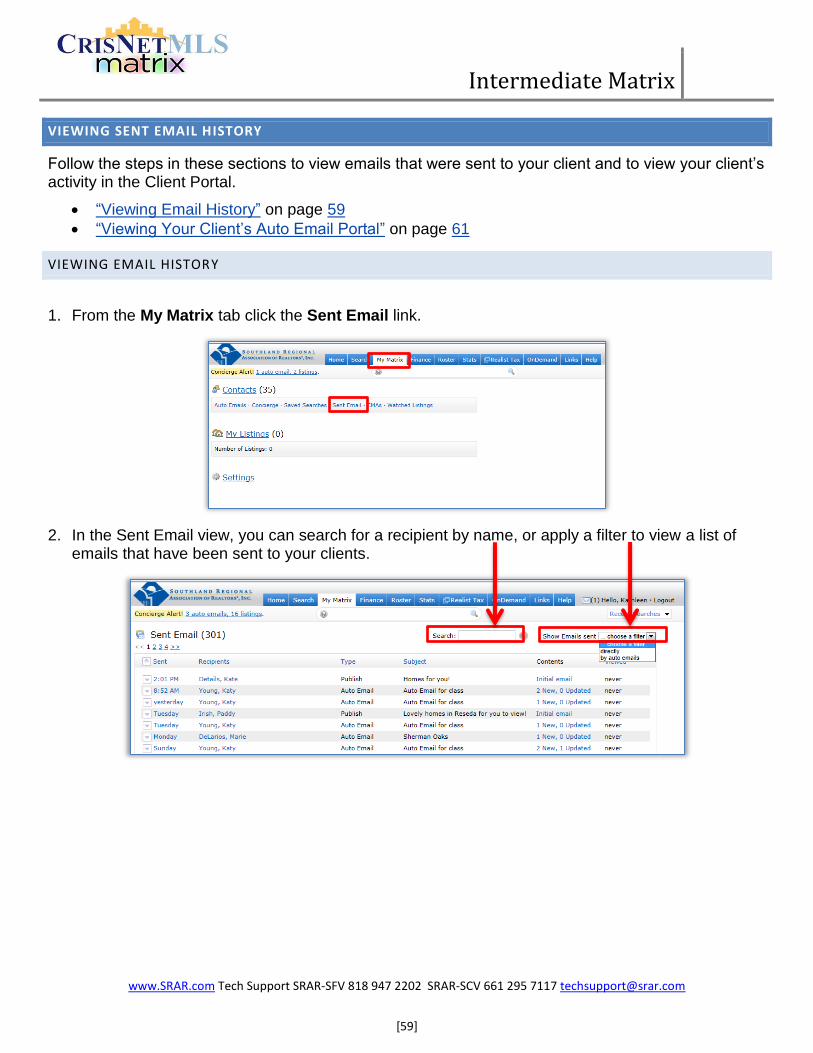
VIEWING EMAIL HISTORY
1. From the My Matrix tab click the Sent Email link.
2. In the Sent Email view, you can search for a recipient by name, or apply a filter to view a list of emails that have been sent to your clients.
Intermediate Matrix
www.SRAR.com Tech Support SRAR-SFV 818 947 2202 SRAR-SCV 661 295 7117 [email protected]
[60]
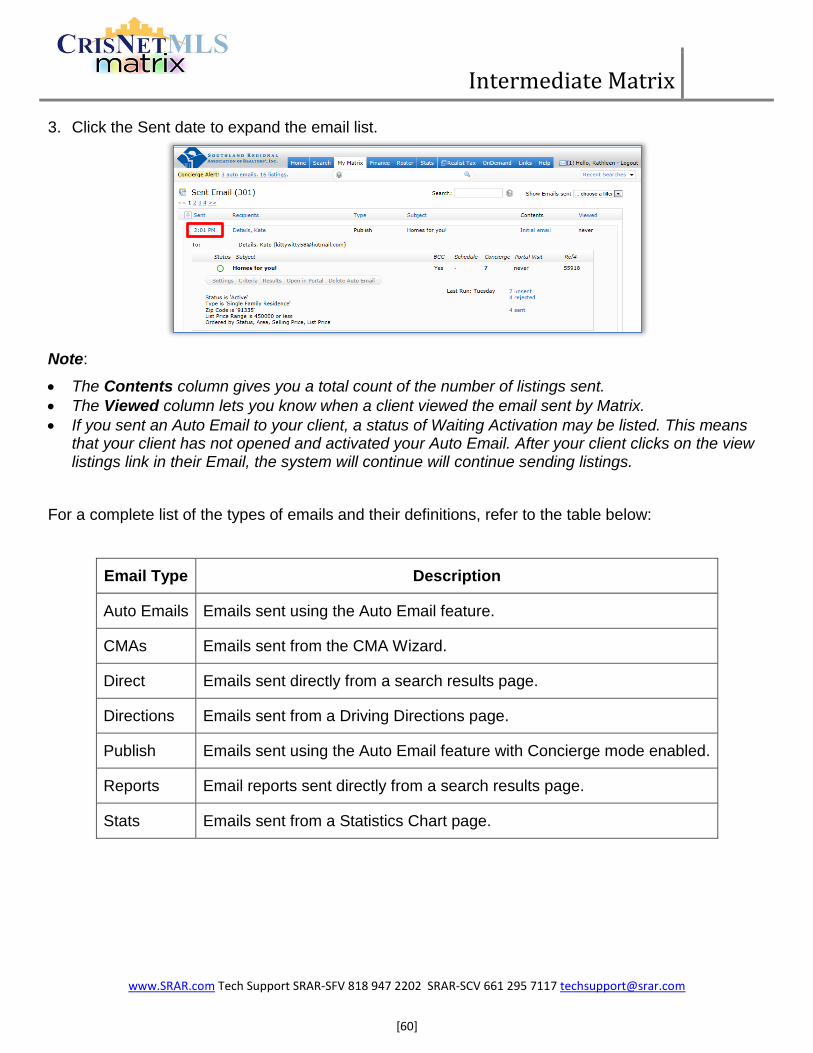
3. Click the Sent date to expand the email list.
Note:
The Contents column gives you a total count of the number of listings sent.
The Viewed column lets you know when a client viewed the email sent by Matrix.
If you sent an Auto Email to your client, a status of Waiting Activation may be listed. This means that your client has not opened and activated your Auto Email. After your client clicks on the view listings link in their Email, the system will continue will continue sending listings.
For a complete list of the types of emails and their definitions, refer to the table below:
Email Type Description
Auto Emails Emails sent using the Auto Email feature.
CMAs Emails sent from the CMA Wizard.
Direct Emails sent directly from a search results page.
Directions Emails sent from a Driving Directions page.
Publish Emails sent using the Auto Email feature with Concierge mode enabled.
Reports Email reports sent directly from a search results page.
Stats Emails sent from a Statistics Chart page.
Intermediate Matrix
www.SRAR.com Tech Support SRAR-SFV 818 947 2202 SRAR-SCV 661 295 7117 [email protected]
[61]
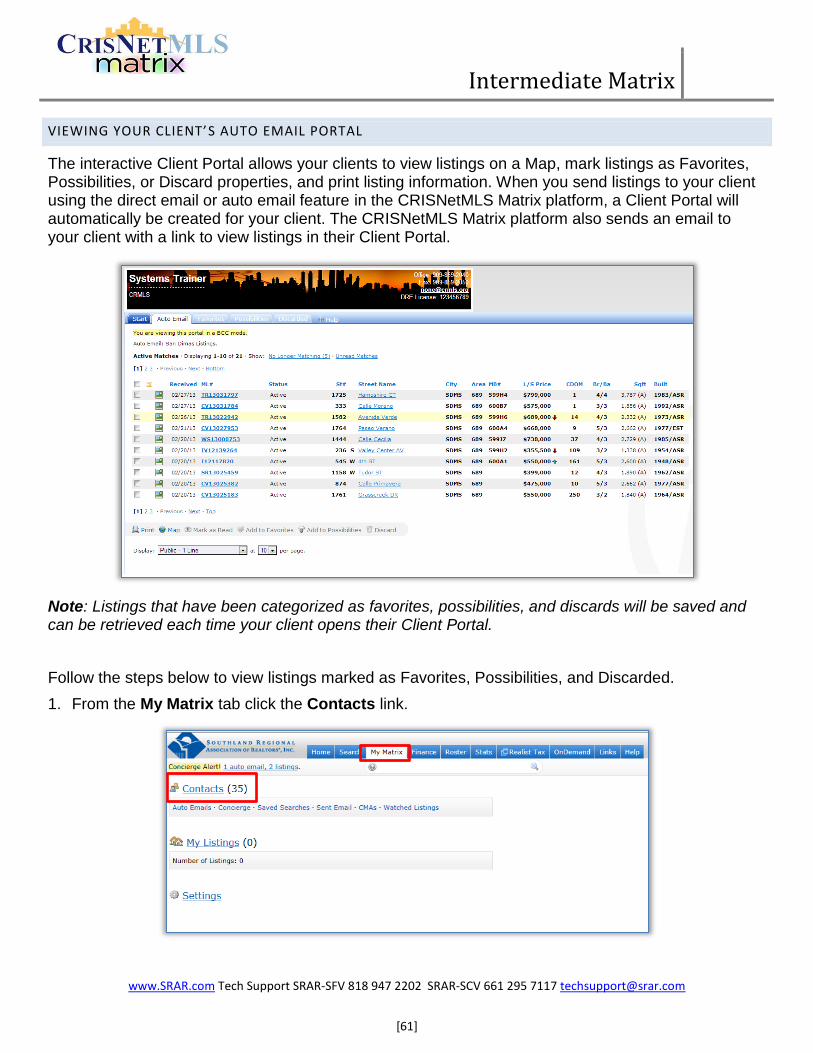
VIEWING YOUR CLIENT’S AUTO EMAIL PORTAL
The interactive Client Portal allows your clients to view listings on a Map, mark listings as Favorites, Possibilities, or Discard properties, and print listing information. When you send listings to your client using the direct email or auto email feature in the CRISNetMLS Matrix platform, a Client Portal will automatically be created for your client. The CRISNetMLS Matrix platform also sends an email to your client with a link to view listings in their Client Portal.
Note: Listings that have been categorized as favorites, possibilities, and discards will be saved and can be retrieved each time your client opens their Client Portal.
Follow the steps below to view listings marked as Favorites, Possibilities, and Discarded.
1. From the My Matrix tab click the Contacts link.
Intermediate Matrix
www.SRAR.com Tech Support SRAR-SFV 818 947 2202 SRAR-SCV 661 295 7117 [email protected]
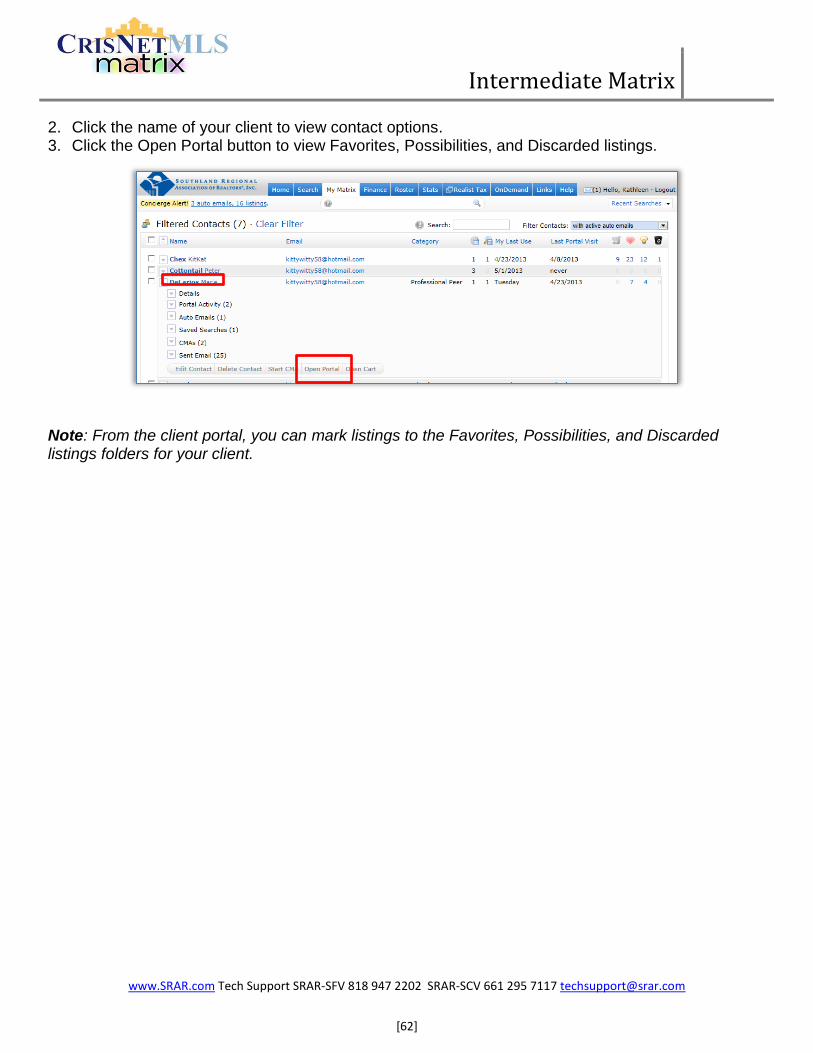
[62]
2. Click the name of your client to view contact options. 3. Click the Open Portal button to view Favorites, Possibilities, and Discarded listings.
Note: From the client portal, you can mark listings to the Favorites, Possibilities, and Discarded listings folders for your client.
Intermediate Matrix
www.SRAR.com Tech Support SRAR-SFV 818 947 2202 SRAR-SCV 661 295 7117 [email protected]
[63]
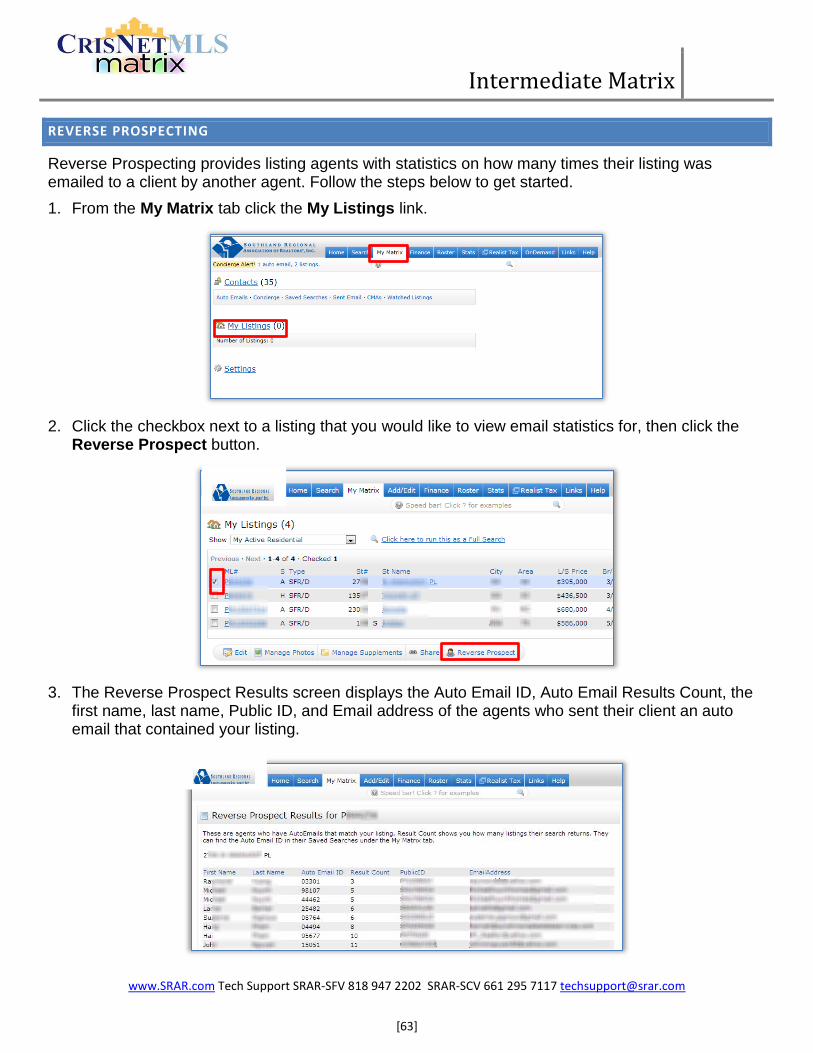
REVERSE PROSPECTING
Reverse Prospecting provides listing agents with statistics on how many times their listing was emailed to a client by another agent. Follow the steps below to get started.
1. From the My Matrix tab click the My Listings link.
2. Click the checkbox next to a listing that you would like to view email statistics for, then click the Reverse Prospect button.
3. The Reverse Prospect Results screen displays the Auto Email ID, Auto Email Results Count, the first name, last name, Public ID, and Email address of the agents who sent their client an auto email that contained your listing.
Intermediate Matrix
www.SRAR.com Tech Support SRAR-SFV 818 947 2202 SRAR-SCV 661 295 7117 [email protected]
[64]
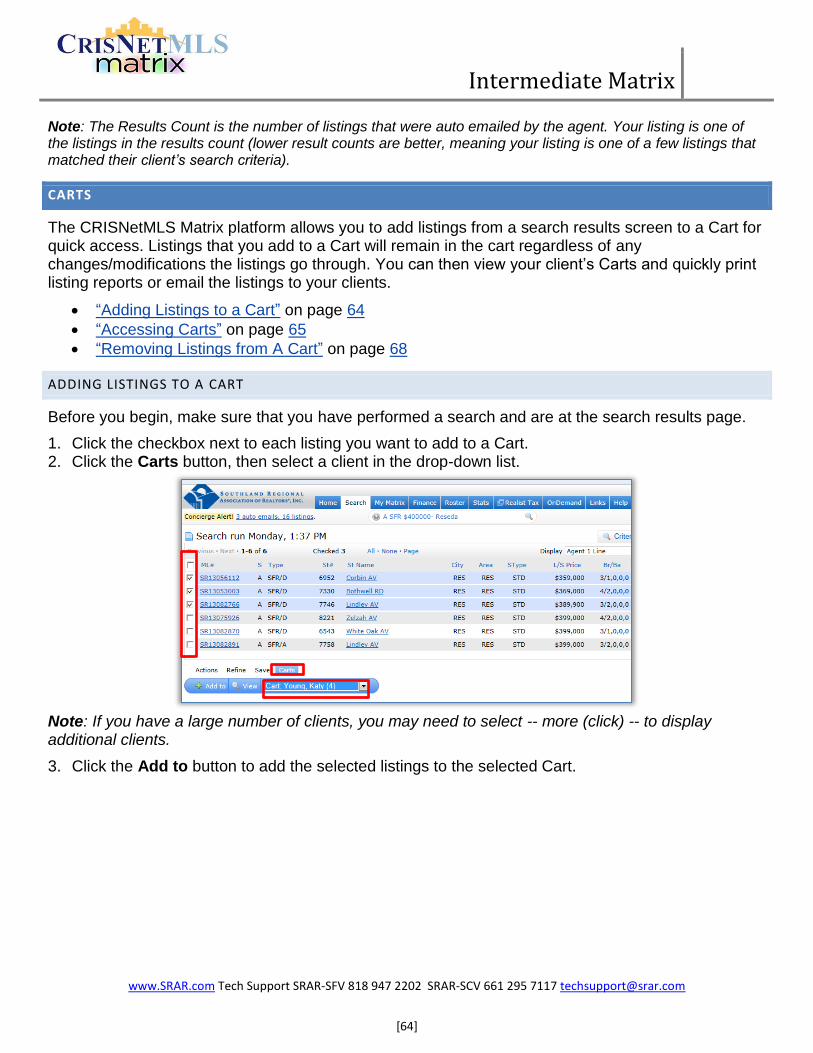
Note: The Results Count is the number of listings that were auto emailed by the agent. Your listing is one of the listings in the results count (lower result counts are better, meaning your listing is one of a few listings that matched their client’s search criteria).
CARTS
The CRISNetMLS Matrix platform allows you to add listings from a search results screen to a Cart for quick access. Listings that you add to a Cart will remain in the cart regardless of any changes/modifications the listings go through. You can then view your client’s Carts and quickly print listing reports or email the listings to your clients.
“Adding Listings to a Cart” on page 64
“Accessing Carts” on page 65
“Removing Listings from A Cart” on page 68
ADDING LISTINGS TO A CART
Before you begin, make sure that you have performed a search and are at the search results page.
1. Click the checkbox next to each listing you want to add to a Cart. 2. Click the Carts button, then select a client in the drop-down list.
Note: If you have a large number of clients, you may need to select -- more (click) -- to display additional clients.
3. Click the Add to button to add the selected listings to the selected Cart.
Intermediate Matrix
www.SRAR.com Tech Support SRAR-SFV 818 947 2202 SRAR-SCV 661 295 7117 [email protected]
[65]
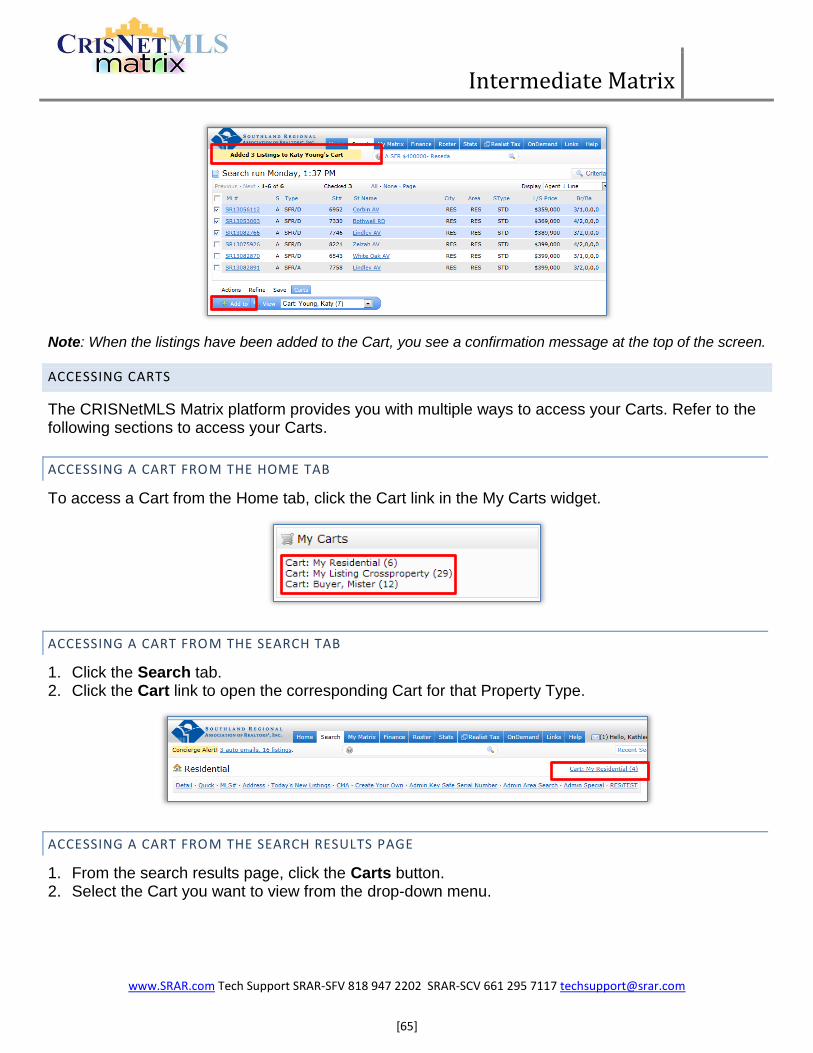
Note: When the listings have been added to the Cart, you see a confirmation message at the top of the screen.
ACCESSING CARTS
The CRISNetMLS Matrix platform provides you with multiple ways to access your Carts. Refer to the following sections to access your Carts.
ACCESSING A CART FROM THE HOME TAB
To access a Cart from the Home tab, click the Cart link in the My Carts widget.
ACCESSING A CART FROM THE SEARCH TAB
1. Click the Search tab. 2. Click the Cart link to open the corresponding Cart for that Property Type.
ACCESSING A CART FROM THE SEARCH RESULTS PAGE
1. From the search results page, click the Carts button. 2. Select the Cart you want to view from the drop-down menu.
Intermediate Matrix
www.SRAR.com Tech Support SRAR-SFV 818 947 2202 SRAR-SCV 661 295 7117 [email protected]
[66]
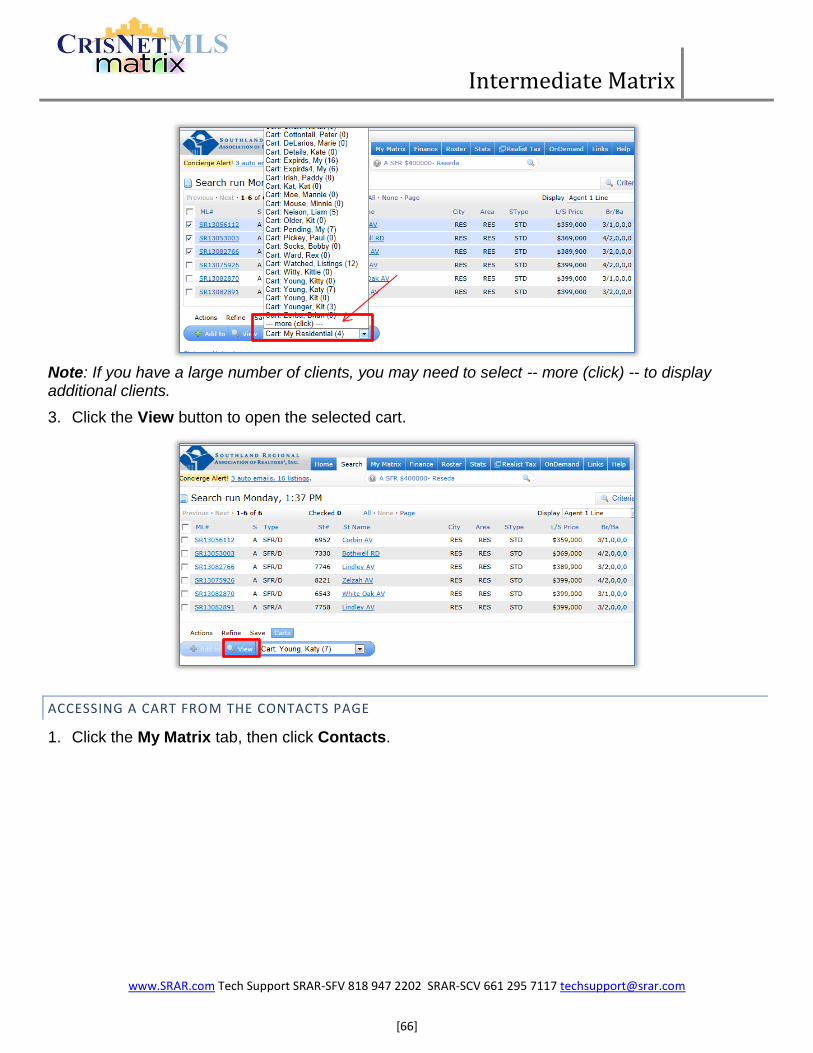
Note: If you have a large number of clients, you may need to select -- more (click) -- to display additional clients.
3. Click the View button to open the selected cart.
ACCESSING A CART FROM THE CONTACTS PAGE
1. Click the My Matrix tab, then click Contacts.
Intermediate Matrix
www.SRAR.com Tech Support SRAR-SFV 818 947 2202 SRAR-SCV 661 295 7117 [email protected]
[67]
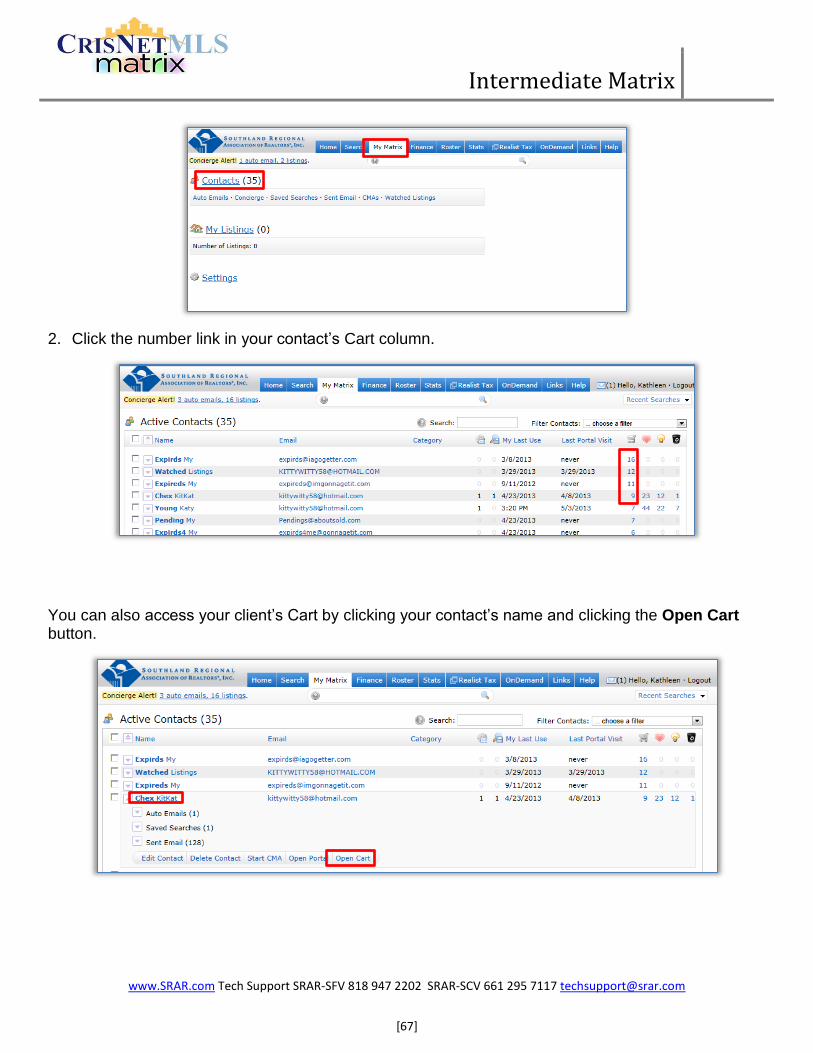
2. Click the number link in your contact’s Cart column.
You can also access your client’s Cart by clicking your contact’s name and clicking the Open Cart button.
Intermediate Matrix
www.SRAR.com Tech Support SRAR-SFV 818 947 2202 SRAR-SCV 661 295 7117 [email protected]
[68]
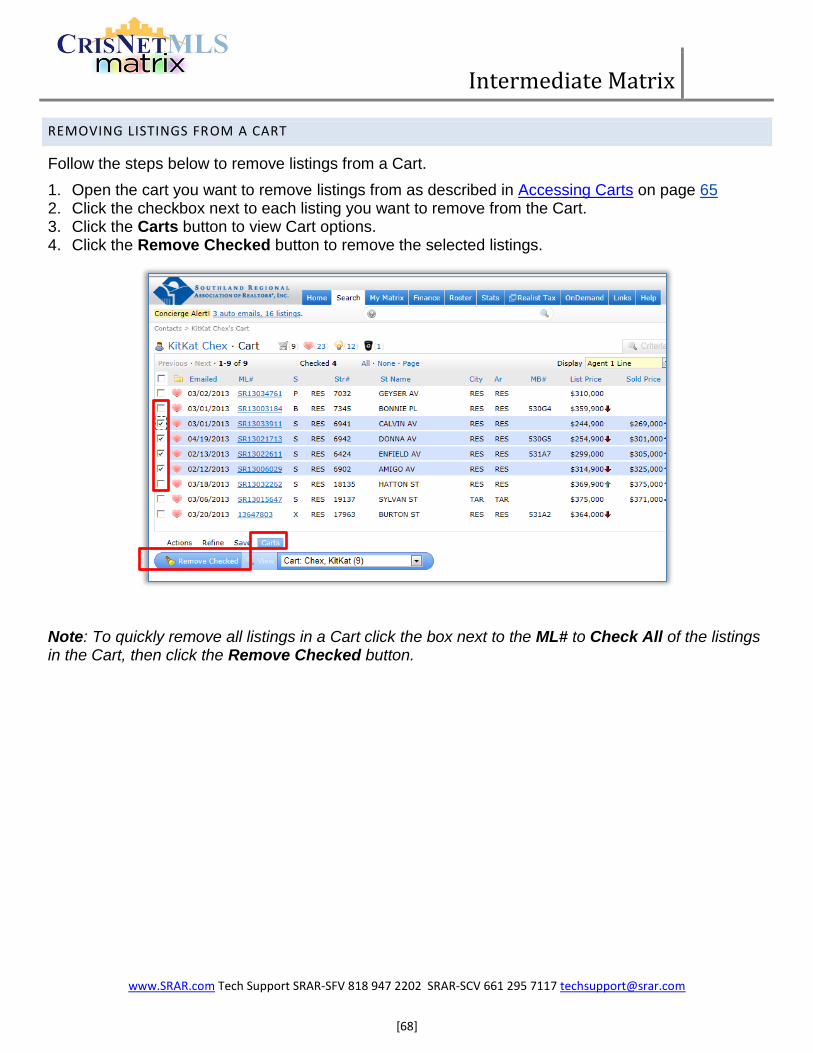
REMOVING LISTINGS FROM A CART
Follow the steps below to remove listings from a Cart.
1. Open the cart you want to remove listings from as described in Accessing Carts on page 65 2. Click the checkbox next to each listing you want to remove from the Cart. 3. Click the Carts button to view Cart options. 4. Click the Remove Checked button to remove the selected listings.
Note: To quickly remove all listings in a Cart click the box next to the ML# to Check All of the listings in the Cart, then click the Remove Checked button.
Intermediate Matrix
www.SRAR.com Tech Support SRAR-SFV 818 947 2202 SRAR-SCV 661 295 7117 [email protected]
[69]
CRISNETMLS SUPPORT RESOURCES
CRISNet MLS takes pride in providing the highest quality technical support and training for all
CRISNetMLS products and services. Please refer to the following sections for information on all of the
support resources that CRISNetMLS has to offer.
SRAR Van Nuys Helpline 818 947 2202
SRAR Santa Clarita Helpline 661 295 7117
EMAIL Technical Support [email protected]
CRISNETMLS WEBSITE
The CRISNetMLS website located at http://SRAR.com contains the following tools and resources.
MLS Tab
o Data Integrity Standards
o Free IDX Links
o Matrix Information – Training Tips and Manuals
o MLS Forms
o MLS Rules
o MLS Rules: CARETS Citation Policy
o Neighborhoods/Areas/Tract Codes – CARETS Areas
o Point2
o Santa Clarita Area Letter
o Santa Clarita Caravan Schedule
o Statistics
Membership Tab
o Applications and Forms
o Committee Descriptions
o Farming Materials
o Good Samaritan Nomination
o Member Benefits
o Membership Resources
o Risk Management
Events/Education Tab
o Calendar
o Commercial Data Exchange
o Online Ed
o Sponsorship Opportunities
o Webinars
Helpline Phone hours:
Monday – Friday 8:00am – 6:00pm
Saturday 8:00am – 5:00pm
Intermediate Matrix
www.SRAR.com Tech Support SRAR-SFV 818 947 2202 SRAR-SCV 661 295 7117 [email protected]
[70]
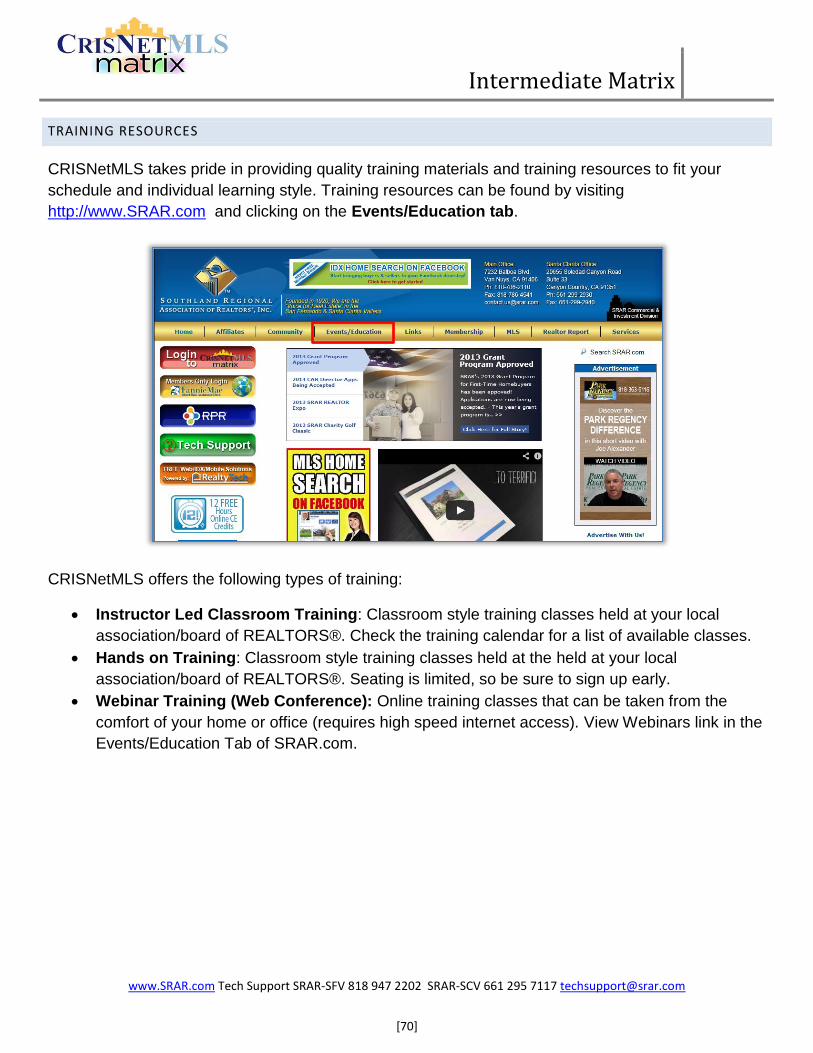
TRAINING RESOURCES
CRISNetMLS takes pride in providing quality training materials and training resources to fit your
schedule and individual learning style. Training resources can be found by visiting
http://www.SRAR.com and clicking on the Events/Education tab.
CRISNetMLS offers the following types of training:
Instructor Led Classroom Training: Classroom style training classes held at your local
association/board of REALTORS®. Check the training calendar for a list of available classes.
Hands on Training: Classroom style training classes held at the held at your local
association/board of REALTORS®. Seating is limited, so be sure to sign up early.
Webinar Training (Web Conference): Online training classes that can be taken from the
comfort of your home or office (requires high speed internet access). View Webinars link in the
Events/Education Tab of SRAR.com.
Intermediate Matrix
www.SRAR.com Tech Support SRAR-SFV 818 947 2202 SRAR-SCV 661 295 7117 [email protected]
[71]
CUSTOMER CARE
CRISNetMLS Takes pride in providing the highest quality technical support for all CRISNetMLS
products and services.
If you need immediate assistance, our Customer Care technicians are available to answer your
questions Monday through Friday from 8:00 a.m. to 6:00 p.m. and on Saturday from 8:00 a.m. to 5:00
p.m.
SRAR Van Nuys help number 818 947 2202
SRAR Santa Clarita help number 661 295 7117
Email [email protected]
.
Intermediate Matrix
www.SRAR.com Tech Support SRAR-SFV 818 947 2202 SRAR-SCV 661 295 7117 [email protected]
[72]
APPENDIX
“Searching for Listings on Your Mobile Devices” on page 72
“Adding a Public Search Link to Your Website” on page 73
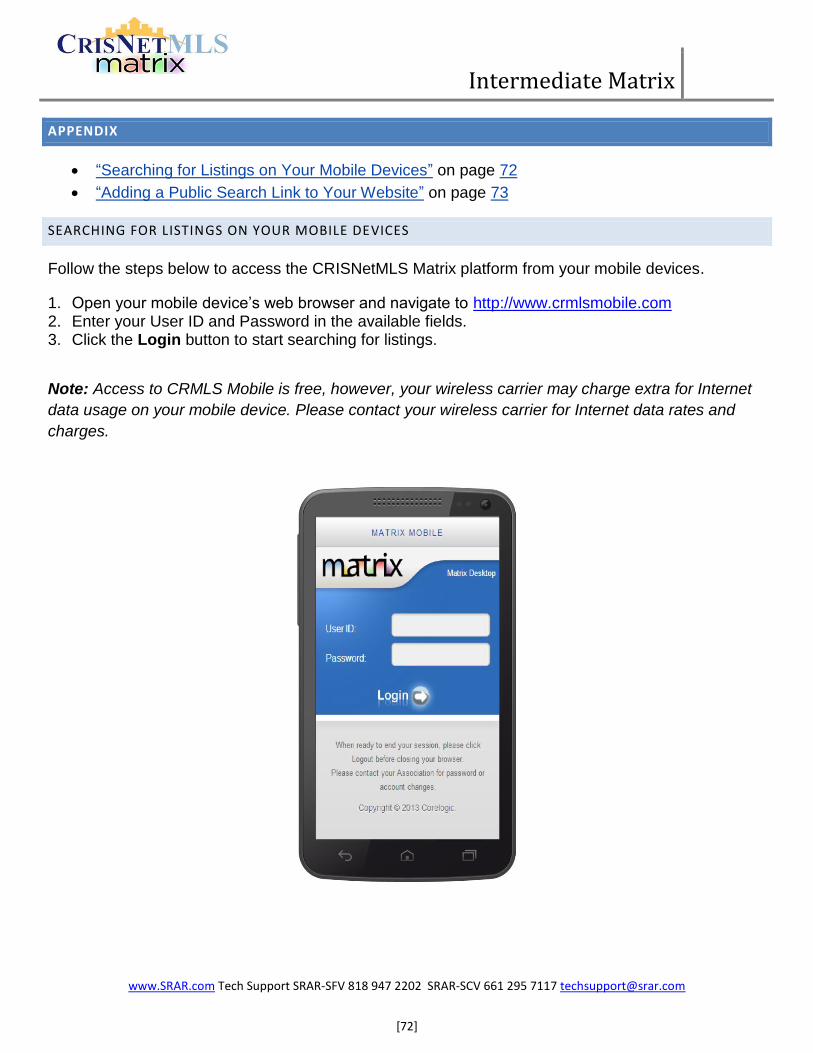
SEARCHING FOR LISTINGS ON YOUR MOBILE DEVICES
Follow the steps below to access the CRISNetMLS Matrix platform from your mobile devices.
1. Open your mobile device’s web browser and navigate to http://www.crmlsmobile.com 2. Enter your User ID and Password in the available fields. 3. Click the Login button to start searching for listings.
Note: Access to CRMLS Mobile is free, however, your wireless carrier may charge extra for Internet
data usage on your mobile device. Please contact your wireless carrier for Internet data rates and
charges.
Intermediate Matrix
www.SRAR.com Tech Support SRAR-SFV 818 947 2202 SRAR-SCV 661 295 7117 [email protected]
[73]
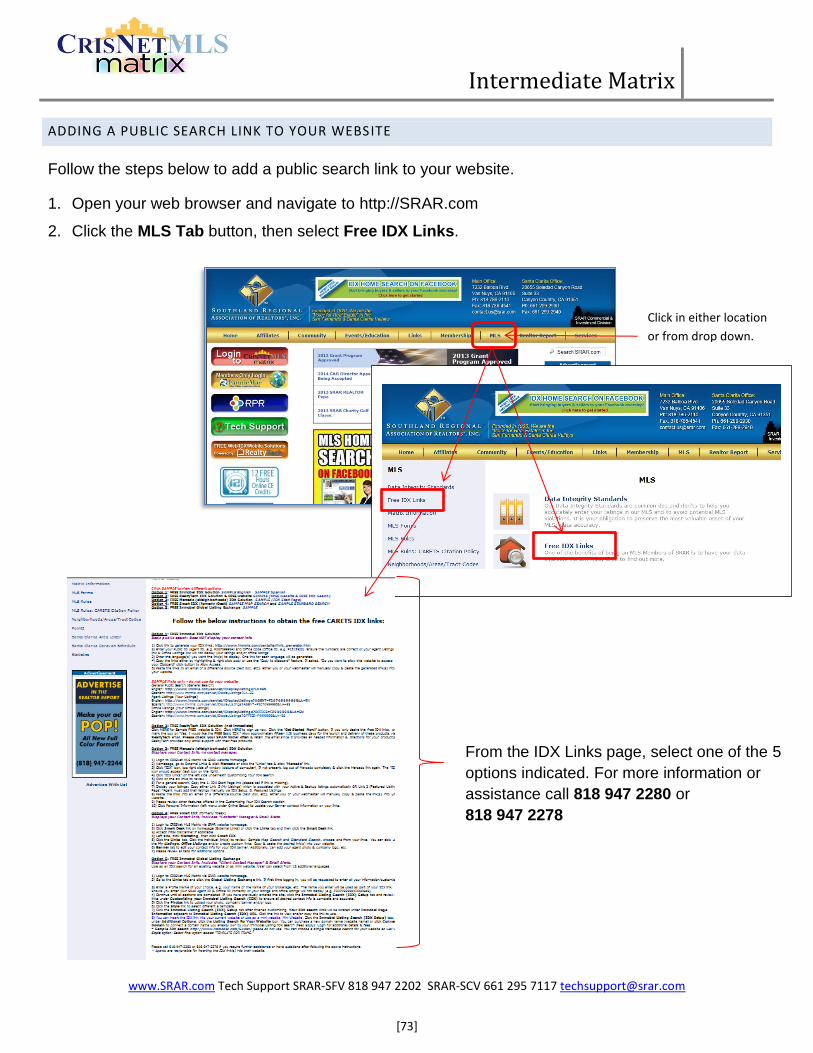
ADDING A PUBLIC SEARCH LINK TO YOUR WEBSITE
Follow the steps below to add a public search link to your website.
1. Open your web browser and navigate to http://SRAR.com
2. Click the MLS Tab button, then select Free IDX Links.
Click in either location
or from drop down.
From the IDX Links page, select one of the 5
options indicated. For more information or
assistance call 818 947 2280 or
818 947 2278
Intermediate Matrix
www.SRAR.com Tech Support SRAR-SFV 818 947 2202 SRAR-SCV 661 295 7117 [email protected]
[74]
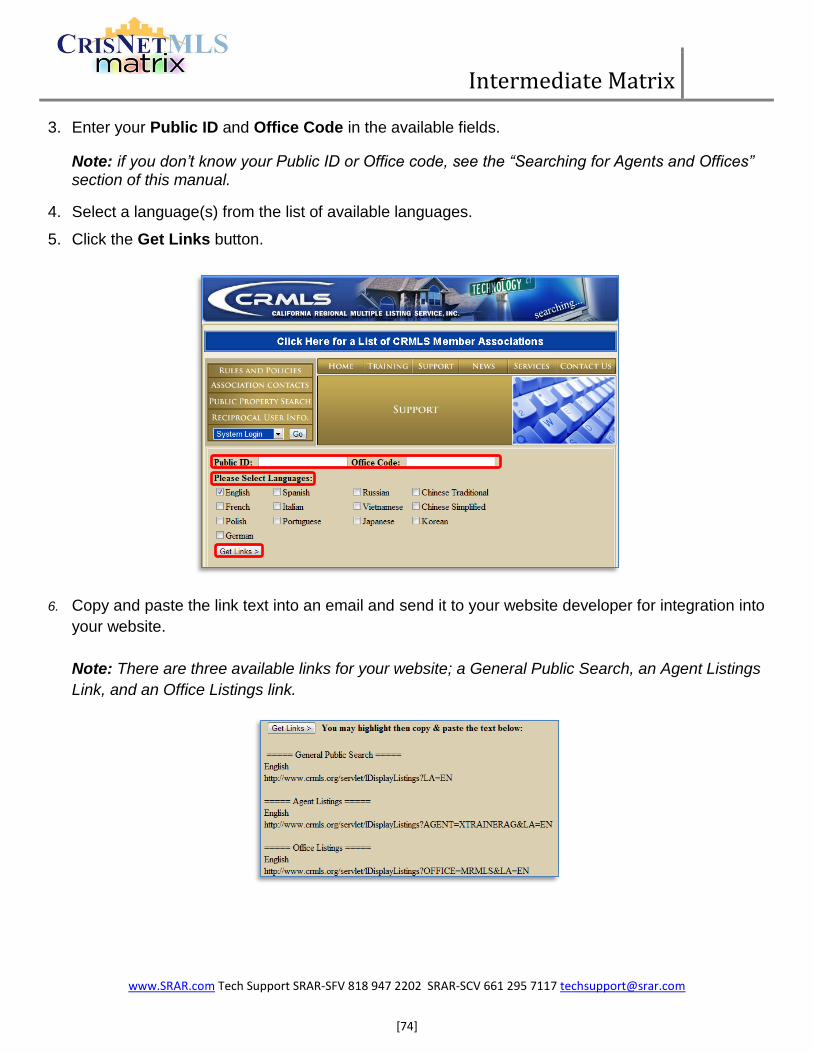
3. Enter your Public ID and Office Code in the available fields.
Note: if you don’t know your Public ID or Office code, see the “Searching for Agents and Offices” section of this manual.
4. Select a language(s) from the list of available languages.
5. Click the Get Links button.
6. Copy and paste the link text into an email and send it to your website developer for integration into
your website.
Note: There are three available links for your website; a General Public Search, an Agent Listings
Link, and an Office Listings link.