Embed Size (px)
Citation preview
Introduction
Whether you are a horse enthusiast, owner, or professional in the equine industry;
understanding the significance of equine conformation is essential. A desirable build does not
ensure a horse will be a champion, and at the same time, we all can name at least one horse
with train-wreck conformation that became a shining star. Most serviceably sound horses can
work comfortably if the workload does not overtax structure and the training/conditioning
program is realistic and fair. Conformation deficits may or may not lead to performance issues
in a particular sport or discipline, but they must be taken into account when considering the
goals for a horse and rider especially at the higher levels of competition.
When I was a beginning rider, one of my trainers told me my horse would never “make it” as
an upper level dressage horse. I set out to prove that trainer wrong and learned the hard way
that conformation IS critical to performance! There was nothing overtly wrong with the horse;
but his very long back, shorter legs and low set neck made it a longer path for training. While
this little horse was not a fancy mover, he could get the job done as a lower level event horse
and he ended up teaching loads of riders in his lifetime. Lovely man. He built my confidence,
taught me many lessons, and we had a good time. However, eventually we reached a plateau
in terms of performance.
Even though I had an artist’s eye, at the time I did not understand what I was supposed to
looking for when considering the horse’s body. After this experience, I realized it was time to
start learning about conformation, symmetry of structure and movement, gait abnormalities… it
was only the beginning!
So, this excerpt from the text we use for the Equinology Equine Body Worker Certification
Course is my gift to you! Anatomy of Equine Bodywork; The Equinology® Approach is a
collaboration between many talented and experienced equine professionals such as Dr. Barb
Crabbe, Dr. Peter Flood, Dr. Kalyani Premkumar, Dr. Nicole Rombach, Dr. Carrie Schlachter, Dr.
Kerry Ridgway, Dr. Joanna Robson, Ruth Mitchell Golladay and myself. It represents the
culmination of over 20 years of work and experience in the field of equine studies.
If you have already been studying conformation, most of what you will read in this
conformation introduction section will not be new to you, but the complete text goes into great
detail, providing you with most everything you need to know if you are going to work as a
professional.
Conformation is also discussed in our 4-day EQ300-600 onsite: Equine Biomechanics, Gait
Abnormalities and Lameness Course presented by either Dr. Carrie Schlachter or Dr. Barb
Crabbe: https://equinology.com/product/eq300-600-equine-biomechanics-gait-abnormalities-and-lameness/
I hope you enjoy!
Debranne Pattillo
Equinology INC, CEO
KNOW WHAT IS NORMAL FOR YOUR HORSE
Before we start discussing conformation, it is important that you know what is “normal” for
your horse in regards to movement, habits, vital signs, posture, behavior and how their bodies
“feel”. Then you need to be aware of the external surface anatomy to continue your
assessment. While you are on this path you should consider recording your horse’s movement
as part of your assessment.
Let’s concentrate on what constitutes “normal” so you can compare your findings in subsequent
sessions. There are many reasons that can cause your horse discomfort or change his posture.
Even with the best care, your horse can still run into problems. Add our weight to the ridden
horse and an existing issue is compounded. We all agree that horses ridden correctly may have
fewer issues than those pounding the surface or traveling upside down. However, with these
many variables, many of which we have no control; can stem from emotional, biomechanical or
chemical origin. Some horses don’t have the best conformation (the way they are structurally
put together), others have tack that doesn’t quite fit, some housing limits normal activity in
addition to problems associated with feed imbalances, shoeing or trimming, worming,
vaccination, medications as well as vices, emotion, hormones, disease, injury, poor use of
training devices, footing, and spinal issues. The variables which contribute to body sensitivity
and dysfunction involve a long list and all the “correct riding” in the world cannot undo many of
the burdens our companions may have to endure.
RULING OUT COMMON ISSUES and EXPLORING YOUR HORSE
This is a start to a list that can take up an entire chapter. However, these are simple things that
you as an owner can do. First you need to be mindful of what is normal for your horse.
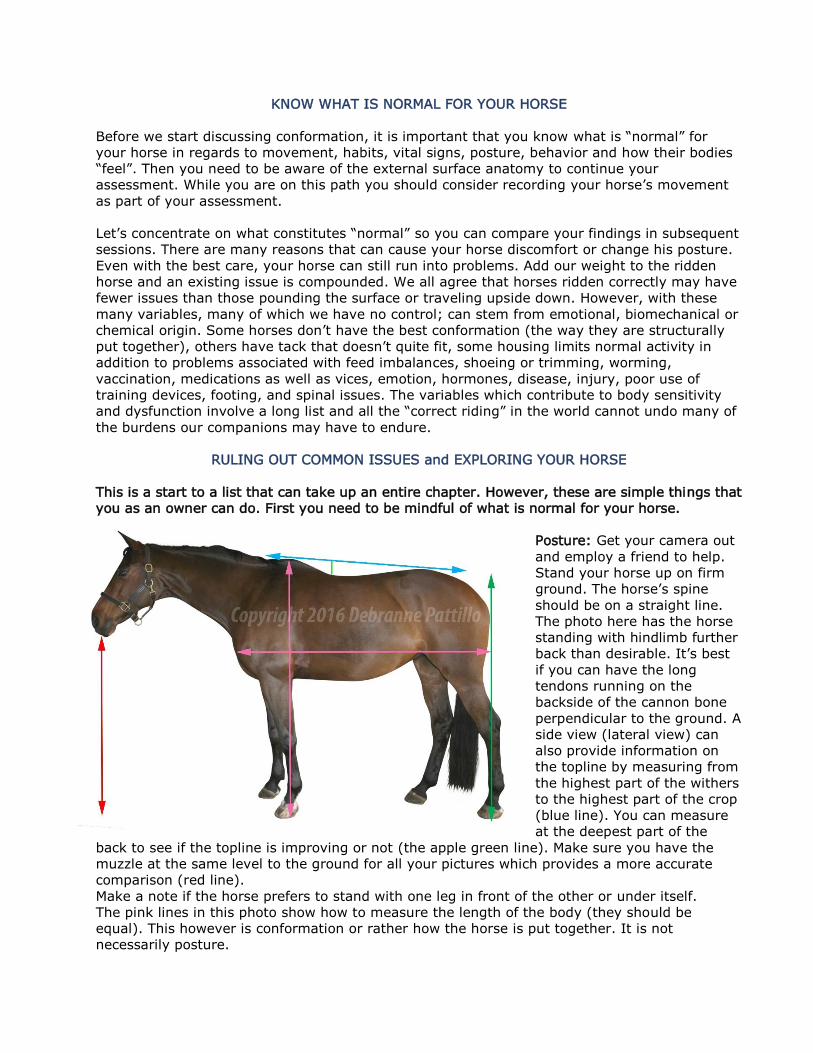
Posture: Get your camera out
and employ a friend to help.
Stand your horse up on firm
ground. The horse’s spine
should be on a straight line.
The photo here has the horse
standing with hindlimb further
back than desirable. It’s best
if you can have the long
tendons running on the
backside of the cannon bone
perpendicular to the ground. A
side view (lateral view) can
also provide information on
the topline by measuring from
the highest part of the withers
to the highest part of the crop
(blue line). You can measure
at the deepest part of the
back to see if the topline is improving or not (the apple green line). Make sure you have the
muzzle at the same level to the ground for all your pictures which provides a more accurate
comparison (red line).
Make a note if the horse prefers to stand with one leg in front of the other or under itself.
The pink lines in this photo show how to measure the length of the body (they should be
equal). This however is conformation or rather how the horse is put together. It is not
necessarily posture.
Look for areas those hollow areas that don’t have enough muscle coverage. Remember to
compare these areas to the other side to see if they are symmetrical.
By taking control photos, you have something to compare to from previous shots. Take a
picture from the other side, from behind, from the front and over the top (dorsal view). While
we are not discussion conformation here, if you do wish to learn more about conformation, here
are some links.
http://extension.uga.edu/publications/detail.cfm?number=B1400
http://www.thehorse.com/articles/10115/conformation-in-horses
Record your horse in hand and under saddle: Even if your eye is not educated to see
asymmetry in movement, you can your horse you establish a baseline for your review and to
share with your health care professionals for assessment. Professionals appreciate clips of the
following patterns in soft ground and hard ground if possible. Safety of the horse is paramount.
Record your horse moving in straight lines (filmed from about 15-20+ feet away), moving away
from you (rear view), and moving towards you (front view) at the walk and trot. If you have
access to a round pen or your horse is good on the lunge line (and sound enough), film your
horse in both directions on the circle and include clear with transitions in all three gaits; walk
trot and canter. Make notes of haunches in or out, balance on the circle, placement of the neck
and shoulders and determine which direction seems easier at the particular gait. Include film of
your horses backing up, turning on the forehand, crossing over behind and walking downhill.
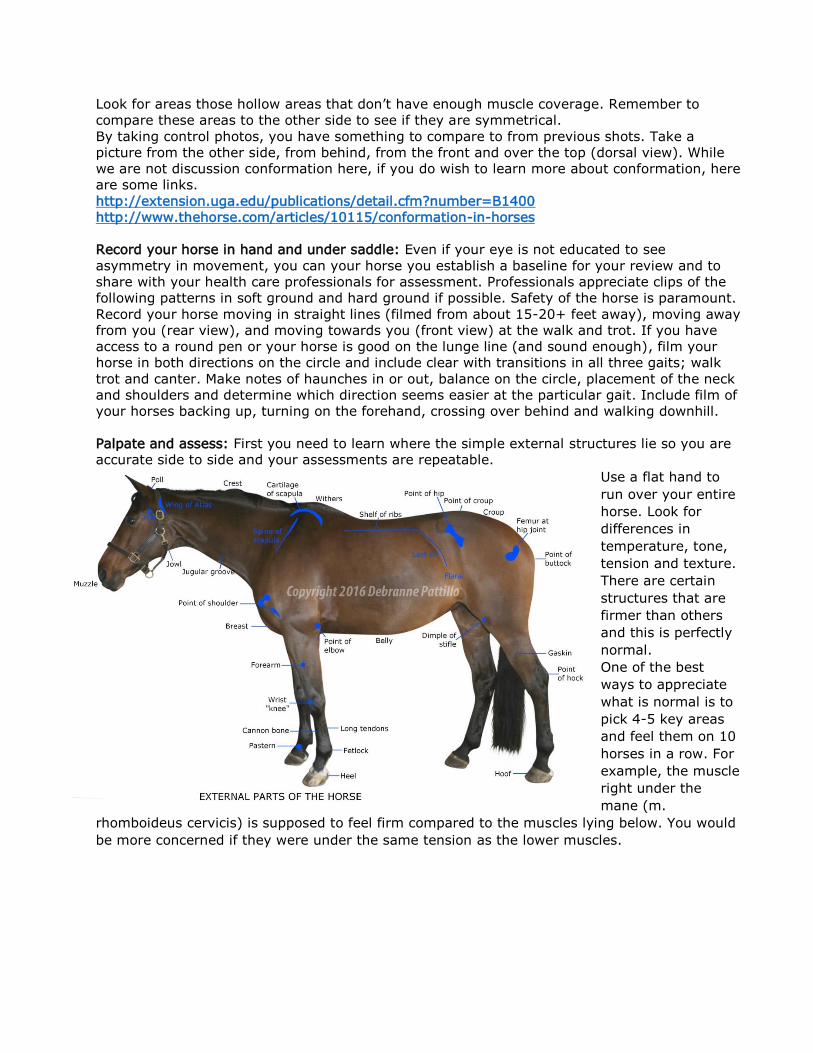
Palpate and assess: First you need to learn where the simple external structures lie so you are
accurate side to side and your assessments are repeatable.
Use a flat hand to
run over your entire
horse. Look for
differences in
temperature, tone,
tension and texture.
There are certain
structures that are
firmer than others
and this is perfectly
normal.
One of the best
ways to appreciate
what is normal is to
pick 4-5 key areas
and feel them on 10
horses in a row. For
example, the muscle
right under the
mane (m.
rhomboideus cervicis) is supposed to feel firm compared to the muscles lying below. You would
be more concerned if they were under the same tension as the lower muscles.
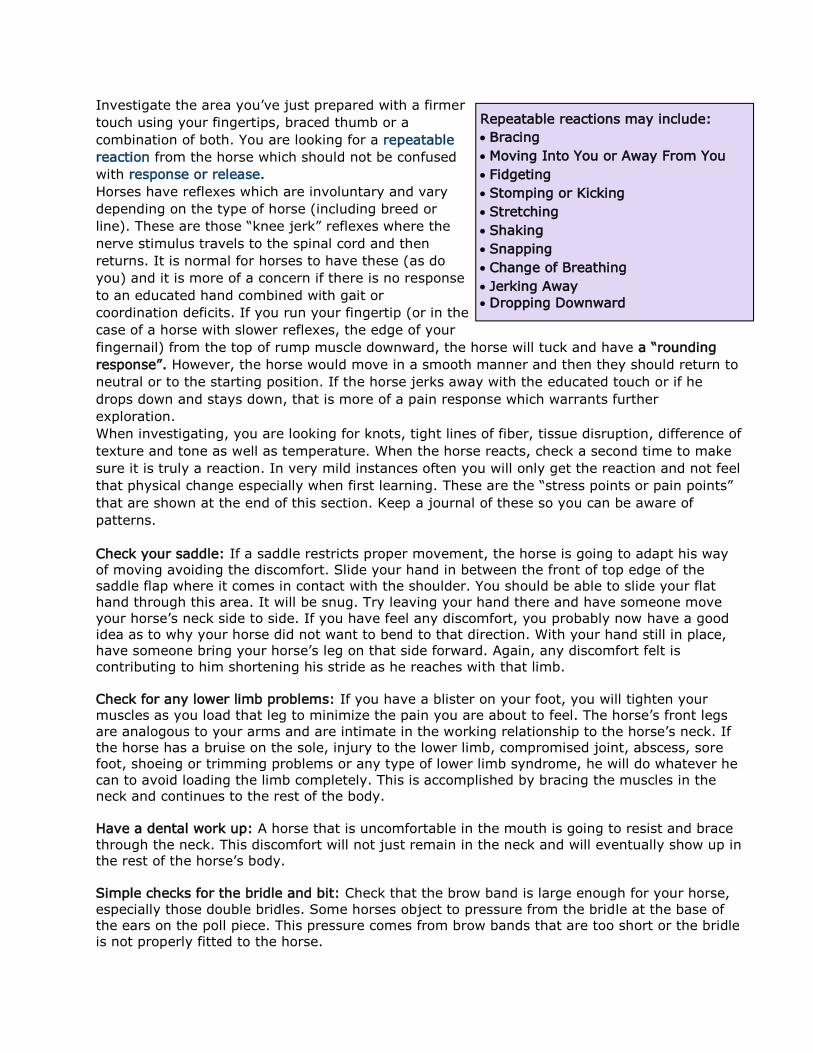
Investigate the area you’ve just prepared with a firmer
touch using your fingertips, braced thumb or a
combination of both. You are looking for a repeatable
reaction from the horse which should not be confused
with response or release.
Horses have reflexes which are involuntary and vary
depending on the type of horse (including breed or
line). These are those “knee jerk” reflexes where the
nerve stimulus travels to the spinal cord and then
returns. It is normal for horses to have these (as do
you) and it is more of a concern if there is no response
to an educated hand combined with gait or
coordination deficits. If you run your fingertip (or in the
case of a horse with slower reflexes, the edge of your
fingernail) from the top of rump muscle downward, the horse will tuck and have a “rounding
response”. However, the horse would move in a smooth manner and then they should return to
neutral or to the starting position. If the horse jerks away with the educated touch or if he
drops down and stays down, that is more of a pain response which warrants further
exploration.
When investigating, you are looking for knots, tight lines of fiber, tissue disruption, difference of
texture and tone as well as temperature. When the horse reacts, check a second time to make
sure it is truly a reaction. In very mild instances often you will only get the reaction and not feel
that physical change especially when first learning. These are the “stress points or pain points”
that are shown at the end of this section. Keep a journal of these so you can be aware of
patterns.
Check your saddle: If a saddle restricts proper movement, the horse is going to adapt his way
of moving avoiding the discomfort. Slide your hand in between the front of top edge of the
saddle flap where it comes in contact with the shoulder. You should be able to slide your flat
hand through this area. It will be snug. Try leaving your hand there and have someone move
your horse’s neck side to side. If you have feel any discomfort, you probably now have a good
idea as to why your horse did not want to bend to that direction. With your hand still in place,
have someone bring your horse’s leg on that side forward. Again, any discomfort felt is
contributing to him shortening his stride as he reaches with that limb.
Check for any lower limb problems: If you have a blister on your foot, you will tighten your
muscles as you load that leg to minimize the pain you are about to feel. The horse’s front legs
are analogous to your arms and are intimate in the working relationship to the horse’s neck. If
the horse has a bruise on the sole, injury to the lower limb, compromised joint, abscess, sore
foot, shoeing or trimming problems or any type of lower limb syndrome, he will do whatever he
can to avoid loading the limb completely. This is accomplished by bracing the muscles in the
neck and continues to the rest of the body.
Have a dental work up: A horse that is uncomfortable in the mouth is going to resist and brace
through the neck. This discomfort will not just remain in the neck and will eventually show up in
the rest of the horse’s body.
Simple checks for the bridle and bit: Check that the brow band is large enough for your horse,
especially those double bridles. Some horses object to pressure from the bridle at the base of
the ears on the poll piece. This pressure comes from brow bands that are too short or the bridle
is not properly fitted to the horse.
Repeatable reactions may include:
Bracing
Moving Into You or Away From You
Fidgeting
Stomping or Kicking
Stretching
Shaking
Snapping
Change of Breathing
Jerking Away
Dropping Downward
Not all horses carry the bit in the same place. Some horses carry it close to the cheek teeth
while other like it lower depending on the structure of their mouth. Remember to check the
length of the bit and the thickness. A thicker bit in a mouth without a lot of space in-between
the skull and lower jaw is actually more uncomfortable than a thinner bit.
IT’S ALL GREEK (LATIN) TO ME
(Muscles Charts)
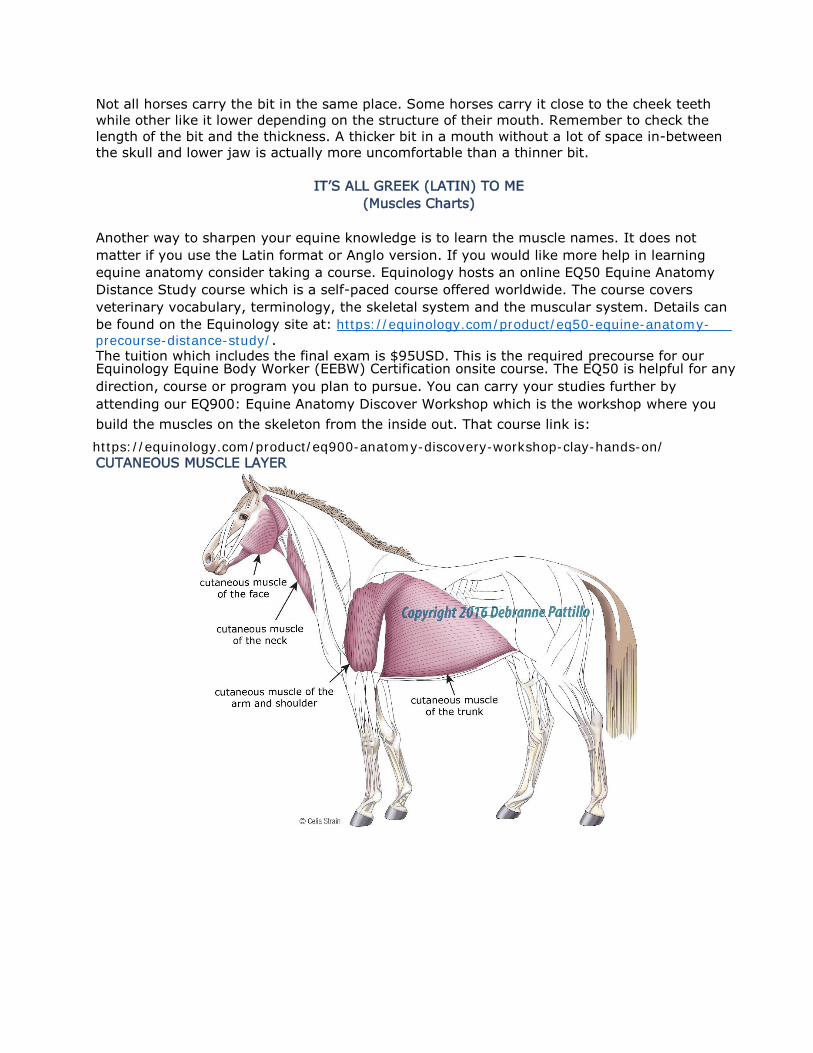
Another way to sharpen your equine knowledge is to learn the muscle names. It does not
matter if you use the Latin format or Anglo version. If you would like more help in learning
equine anatomy consider taking a course. Equinology hosts an online EQ50 Equine Anatomy
Distance Study course which is a self-paced course offered worldwide. The course covers
veterinary vocabulary, terminology, the skeletal system and the muscular system. Details can
be found on the Equinology site at: https://equinology.com/product/eq50-equine-anatomy-precourse-distance-study/. The tuition which includes the final exam is $95USD. This is the required precourse for our Equinology Equine Body Worker (EEBW) Certification onsite course. The EQ50 is helpful for any direction, course or program you plan to pursue. You can carry your studies further by attending our EQ900: Equine Anatomy Discover Workshop which is the workshop where you build the muscles on the skeleton from the inside out. That course link is: https://equinology.com/product/eq900-anatomy-discovery-workshop-clay-hands-on/ CUTANEOUS MUSCLE LAYER
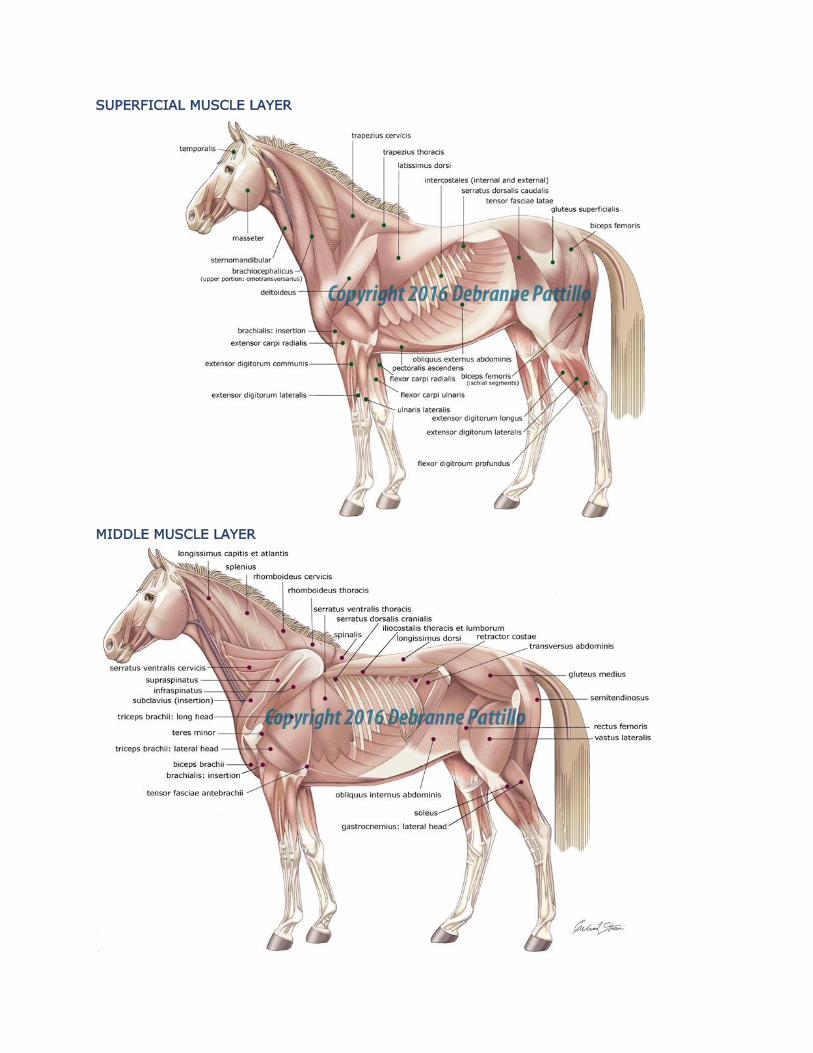
SUPERFICIAL MUSCLE LAYER
MIDDLE MUSCLE LAYER
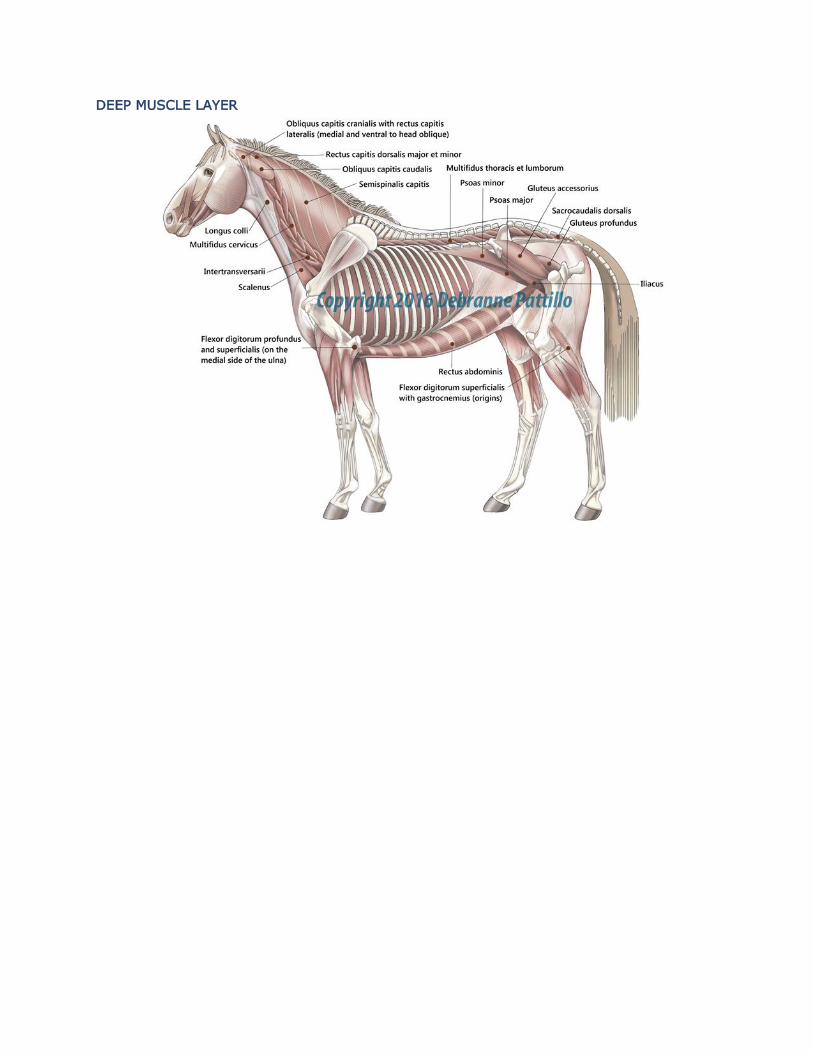
DEEP MUSCLE LAYER
Evaluation of Conformation by Dr. Barb Crabbe, DVM
Conformation defined
The term conformation is defined as the “structural arrangement” of the body. When we look at
a horse, the study of conformation is the evaluation of the proportion of the parts of his body,
and how they relate to one another. This evaluation may include factors as simple as the width
between his eyes, to a more complicated examination of the relationships between all of the
key bones and joints of his hindquarters.
In this chapter, we’re going to examine why conformation is important, will outline methods
you should use when evaluating conformation, and will give you a thorough guide to specific
ideals and faults you’ll commonly encounter in your equine patients.
Why we look at conformation
Why is conformation so important? Horses play many roles in our society, from objects of
beauty to high level athlete to valued friend. In each of these roles, various attributes may be
more desirable, and different conformation factors can come into play. In general, how the
horse is put together affects his ability to do his job (function), the strength and durability of
his body (soundness) and his appearance (beauty).
Function
From jumping to trail riding, horses are required to perform a variety of athletic functions. Just
like human athletes, their body structure has a huge impact on their aptitude for different
events. For example, a low-to-the-ground, heavily muscled Quarter Horse is perfectly designed
to hunker down and make the quick turns required for working cows, yet he’d likely fail
miserably on a 100 mile endurance ride. On the other hand, the lightly built Arabian is
designed to efficiently travel long distances excels at endurance, but isn’t likely to be
competitive in a thoroughbred race.
When evaluating conformation, it’s common to forget that many horses are bred to do a certain
job. We all have a type or discipline we may prefer, but as horsemen we should appreciate
these differences. Remember to celebrate a horse that’s beautifully conformed to perform the
job he’s bred to do—even if he’s not your style.
Soundness
Correct conformation is a key component of musculoskeletal soundness. A horse with straight
legs, well conformed feet and natural symmetry is more likely to stay sound in almost every
discipline. When we evaluate any horse’s conformation, it’s especially important to look at
factors that may contribute to uneven stresses across joints and soft tissue structures—as
these even stresses can often lead to injury.
Beauty
Although appearance may not matter when it comes to performing in many athletic disciplines,
we all appreciate a beautiful horse. In some instances, features we see as beautiful do
contribute to function and soundness. For example, expressive wide set eyes may allow the
horse to have a wider visual field or long, well set neck can help him balance. Finally, for some
horse endeavors such as breed show halter competition, beauty in and of itself is the ultimate
goal.
Preparation for evaluation
When performing conformation evaluation, it’s best to follow a consistent protocol. Ideally, the
horse should be reasonably clean, with hair clipped from around the legs and face if necessary
to allow good visualization of underlying bone structure. He should be outfitted in a bridle or
halter, with a handler who can position him properly at your request ideally on firm level
ground.
Positioning for evaluation
You’ll be examining the horse’s conformation from several vantage points—both sides, the
front, the rear and, when possible, from above (the dorsal view). In some situations, you may
also approach the horse to palpate certain areas.
When viewing from the side, the horse should be positioned loading all four limbs equally, with
his legs straight underneath his body. In order to make the most accurate assessment of joint
angles, you can standardize his position by asking him to stand with his cannon bones vertical
to the ground on the side you are evaluating. Note that this may not be a natural position for
some horses—for example a horse with overly angled stifles and hocks behind will often tend to
stand with his hind legs further underneath his body. However, by putting him in this standard
position with his cannon bones in a vertical position you’ll be able to make more accurate
comparisons between horses.
From both the front and the rear, the horse should be standing with his feet square and his
head and neck straight. You may wish to have a chair or stool available in order to look down
on his neck, back and hindquarters for your dorsal view.
Safety
Safety should always come first when working around horses—and evaluating conformation is
no exception. Remember that your safety zone is around the shoulder area, and if you must
approach the horse to stay within that zone. For conformation evaluation from the front and
rear, you’re best to stand a distance away, completely out of kicking or striking range. This is
particularly important if you intend to stand on a chair or stool for examining from above.
A Few Key Points
As you prepare to begin your evaluation, there are a few things you should keep in mind about
the different attributes or faults you are likely to identify. First, it can be difficult to separate
true conformation factors arising from posture (how the horse holds his body) and symmetry
(uneven development between corresponding sides). In the same vein, keep in mind that while
most true conformation issues are inherent to the horse’s structure, other physical attributes
may be acquired secondary to an injury or chronic unsoundness. In general, it’s most
important that you simply make note of what you see. As you become more sophisticated in
your ability to evaluate a horse’s structure you’ll learn to recognize situations where underlying
issues may exist.
Finally, bear in mind that there is no “perfect horse,” and that even a horse with gross
conformation faults can excel at his job with the right set of circumstances. In addition, most of
the conclusions you will make are based on subjective evaluation of the horse’s traits. Be
careful, and avoid forming opinions about the quality or abilities of the horses you see.
Analysis of Conformation
With the clean horse standing in a correct
position, you’ll begin a systematic
evaluation of the horse’s conformation. In
this first section, we’ll outline a step-by-
step approach you can follow to analyze
basic characteristics of the horse’s
structure. Next, we’ll identify common
conformation faults you’re likely to
encounter.
From the side
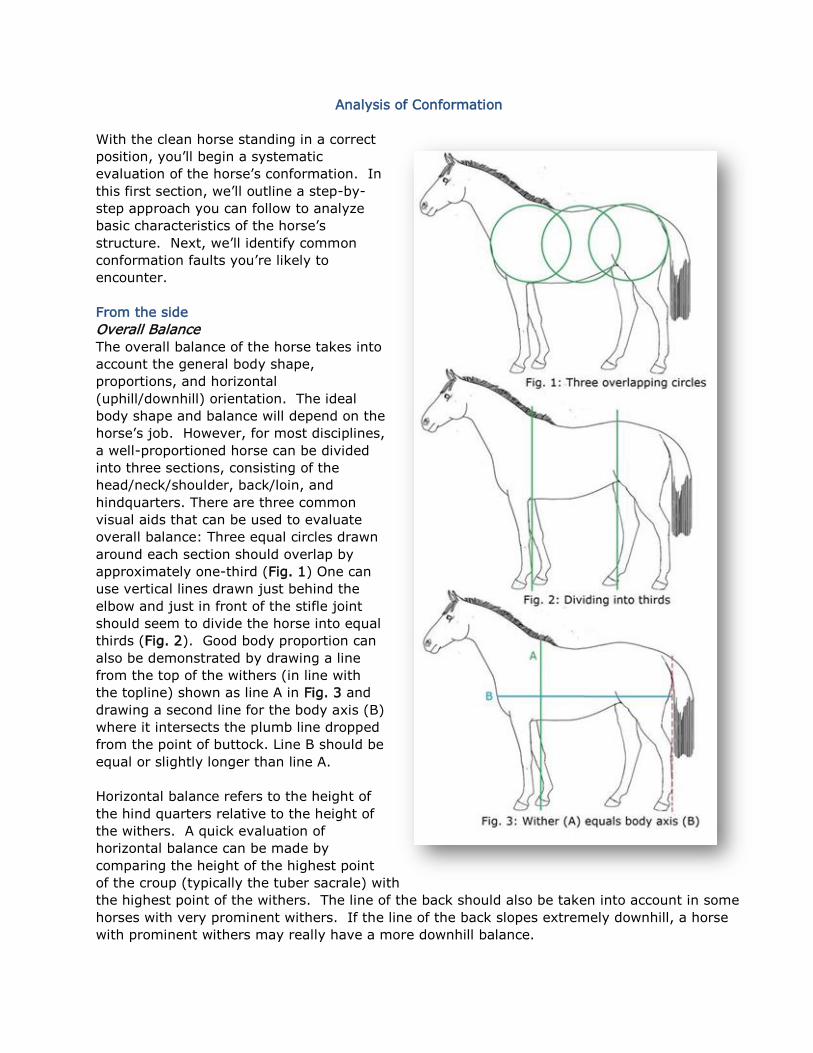
Overall Balance
The overall balance of the horse takes into
account the general body shape,
proportions, and horizontal
(uphill/downhill) orientation. The ideal
body shape and balance will depend on the
horse’s job. However, for most disciplines,
a well-proportioned horse can be divided
into three sections, consisting of the
head/neck/shoulder, back/loin, and
hindquarters. There are three common
visual aids that can be used to evaluate
overall balance: Three equal circles drawn
around each section should overlap by
approximately one-third (Fig. 1) One can
use vertical lines drawn just behind the
elbow and just in front of the stifle joint
should seem to divide the horse into equal
thirds (Fig. 2). Good body proportion can
also be demonstrated by drawing a line
from the top of the withers (in line with
the topline) shown as line A in Fig. 3 and
drawing a second line for the body axis (B)
where it intersects the plumb line dropped
from the point of buttock. Line B should be
equal or slightly longer than line A.
Horizontal balance refers to the height of
the hind quarters relative to the height of
the withers. A quick evaluation of
horizontal balance can be made by
comparing the height of the highest point
of the croup (typically the tuber sacrale) with
the highest point of the withers. The line of the back should also be taken into account in some
horses with very prominent withers. If the line of the back slopes extremely downhill, a horse
with prominent withers may really have a more downhill balance.
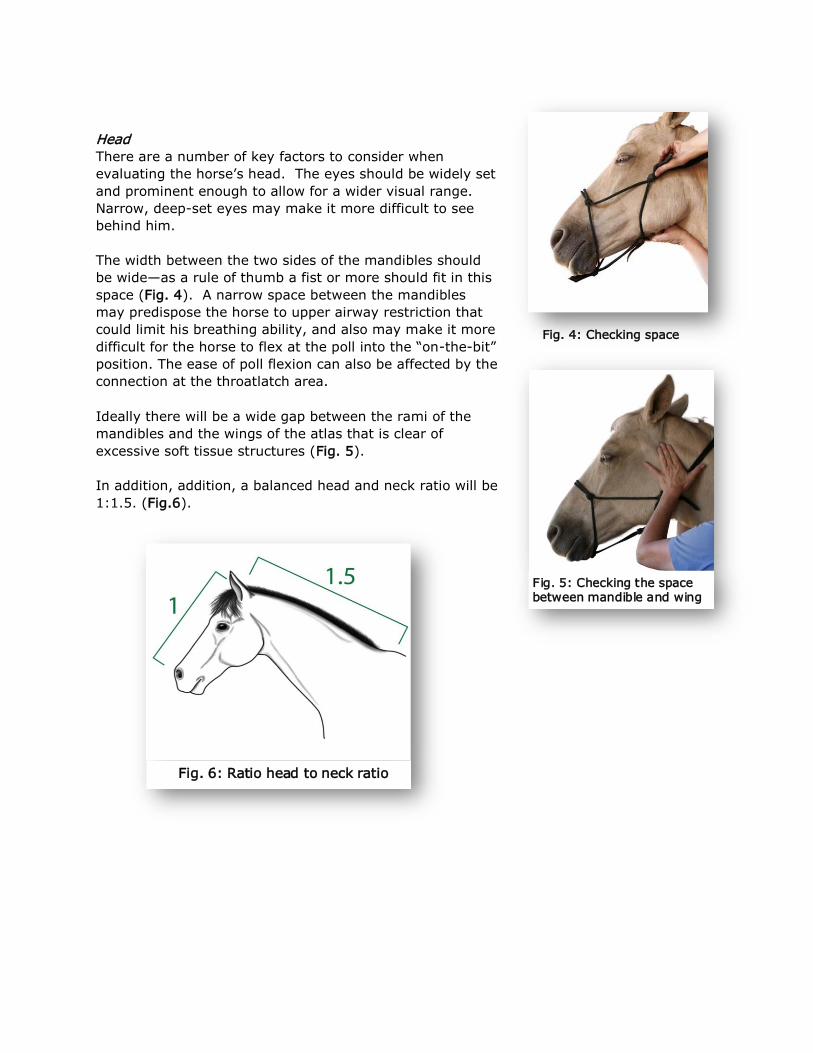
Head
There are a number of key factors to consider when
evaluating the horse’s head. The eyes should be widely set
and prominent enough to allow for a wider visual range.
Narrow, deep-set eyes may make it more difficult to see
behind him.
The width between the two sides of the mandibles should
be wide—as a rule of thumb a fist or more should fit in this
space (Fig. 4). A narrow space between the mandibles
may predispose the horse to upper airway restriction that
could limit his breathing ability, and also may make it more
difficult for the horse to flex at the poll into the “on-the-bit”
position. The ease of poll flexion can also be affected by the
connection at the throatlatch area.
Ideally there will be a wide gap between the rami of the
mandibles and the wings of the atlas that is clear of
excessive soft tissue structures (Fig. 5).
In addition, addition, a balanced head and neck ratio will be
1:1.5. (Fig.6).
Fig. 5: Checking the space between mandible and wing
Fig. 6: Ratio head to neck ratio
Fig. 4: Checking the space Fig. 4: Checking space
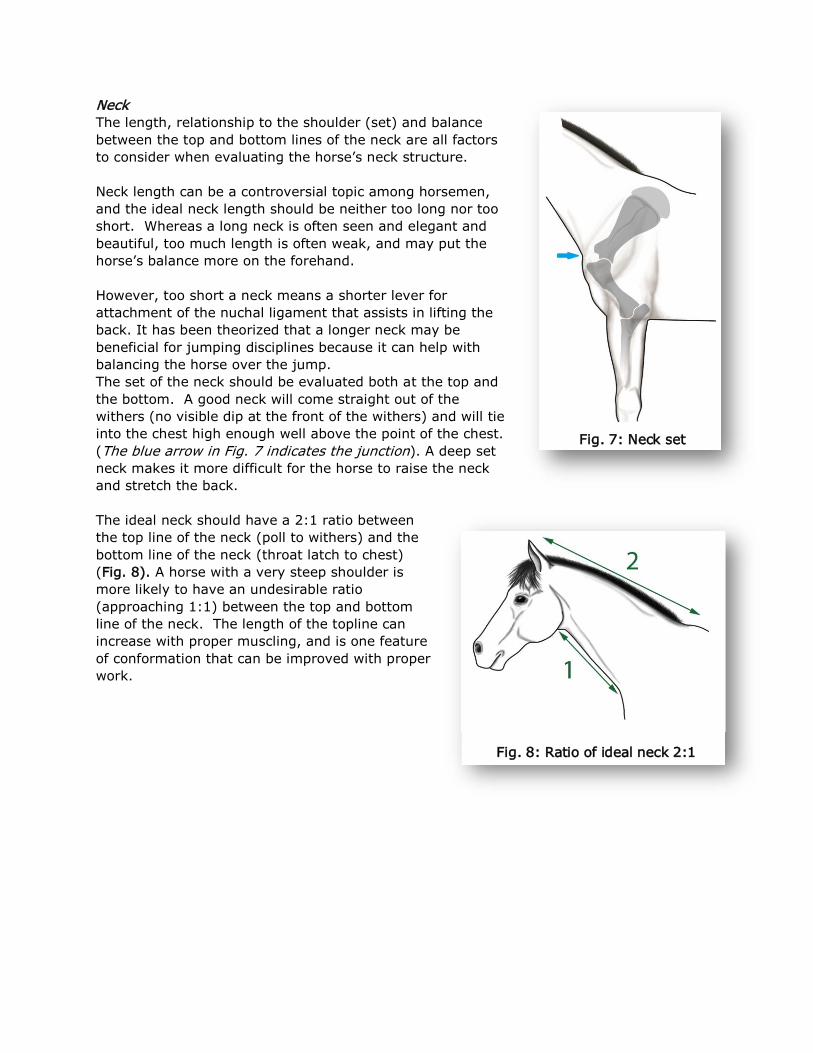
Neck
The length, relationship to the shoulder (set) and balance
between the top and bottom lines of the neck are all factors
to consider when evaluating the horse’s neck structure.
Neck length can be a controversial topic among horsemen,
and the ideal neck length should be neither too long nor too
short. Whereas a long neck is often seen and elegant and
beautiful, too much length is often weak, and may put the
horse’s balance more on the forehand.
However, too short a neck means a shorter lever for
attachment of the nuchal ligament that assists in lifting the
back. It has been theorized that a longer neck may be
beneficial for jumping disciplines because it can help with
balancing the horse over the jump.
The set of the neck should be evaluated both at the top and
the bottom. A good neck will come straight out of the
withers (no visible dip at the front of the withers) and will tie
into the chest high enough well above the point of the chest.
(The blue arrow in Fig. 7 indicates the junction). A deep set
neck makes it more difficult for the horse to raise the neck
and stretch the back.
The ideal neck should have a 2:1 ratio between
the top line of the neck (poll to withers) and the
bottom line of the neck (throat latch to chest)
(Fig. 8). A horse with a very steep shoulder is
more likely to have an undesirable ratio
(approaching 1:1) between the top and bottom
line of the neck. The length of the topline can
increase with proper muscling, and is one feature
of conformation that can be improved with proper
work.
Fig. 7: Neck set
Fig. 8: Ratio of ideal neck 2:1
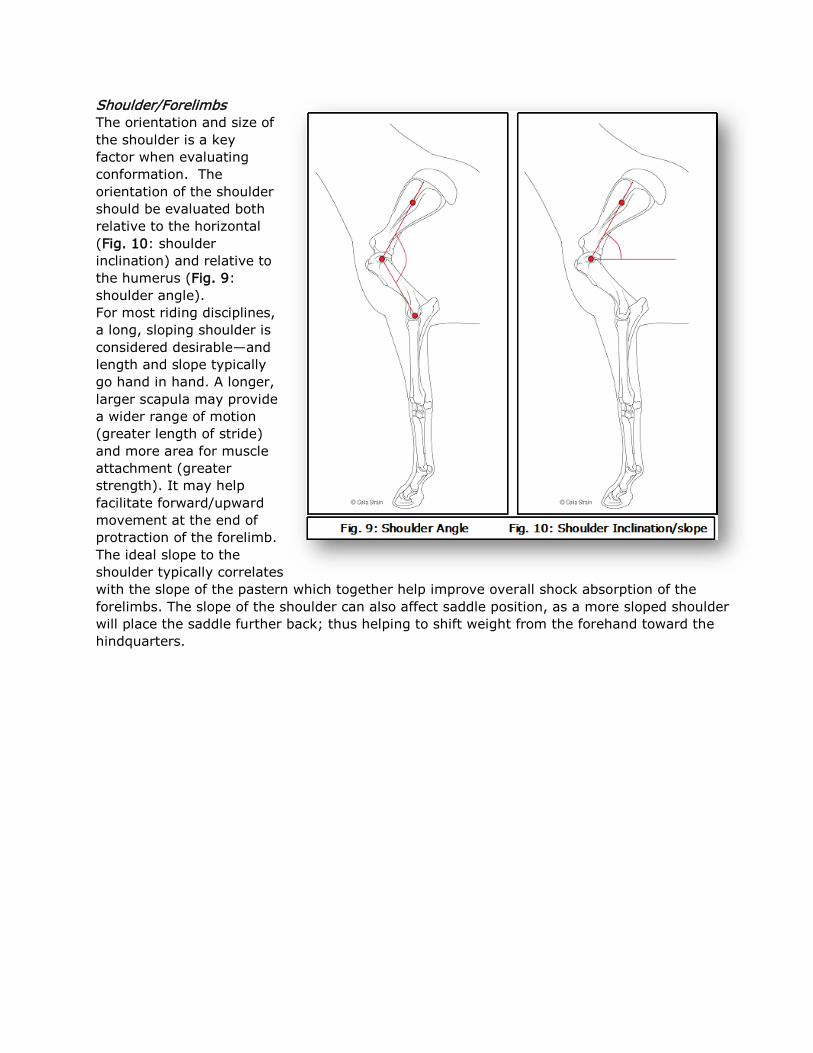
Shoulder/Forelimbs
The orientation and size of
the shoulder is a key
factor when evaluating
conformation. The
orientation of the shoulder
should be evaluated both
relative to the horizontal
(Fig. 10: shoulder
inclination) and relative to
the humerus (Fig. 9:
shoulder angle).
For most riding disciplines,
a long, sloping shoulder is
considered desirable—and
length and slope typically
go hand in hand. A longer,
larger scapula may provide
a wider range of motion
(greater length of stride)
and more area for muscle
attachment (greater
strength). It may help
facilitate forward/upward
movement at the end of
protraction of the forelimb.
The ideal slope to the
shoulder typically correlates
with the slope of the pastern which together help improve overall shock absorption of the
forelimbs. The slope of the shoulder can also affect saddle position, as a more sloped shoulder
will place the saddle further back; thus helping to shift weight from the forehand toward the
hindquarters.
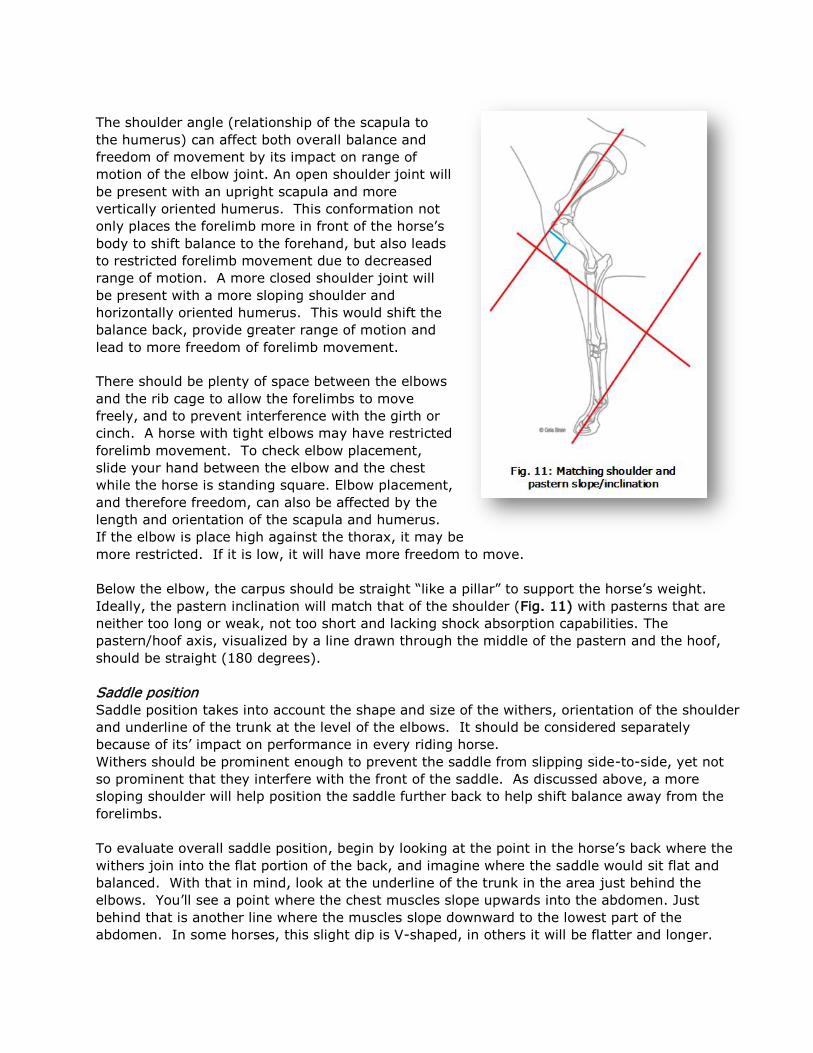
The shoulder angle (relationship of the scapula to
the humerus) can affect both overall balance and
freedom of movement by its impact on range of
motion of the elbow joint. An open shoulder joint will
be present with an upright scapula and more
vertically oriented humerus. This conformation not
only places the forelimb more in front of the horse’s
body to shift balance to the forehand, but also leads
to restricted forelimb movement due to decreased
range of motion. A more closed shoulder joint will
be present with a more sloping shoulder and
horizontally oriented humerus. This would shift the
balance back, provide greater range of motion and
lead to more freedom of forelimb movement.
There should be plenty of space between the elbows
and the rib cage to allow the forelimbs to move
freely, and to prevent interference with the girth or
cinch. A horse with tight elbows may have restricted
forelimb movement. To check elbow placement,
slide your hand between the elbow and the chest
while the horse is standing square. Elbow placement,
and therefore freedom, can also be affected by the
length and orientation of the scapula and humerus.
If the elbow is place high against the thorax, it may be
more restricted. If it is low, it will have more freedom to move.
Below the elbow, the carpus should be straight “like a pillar” to support the horse’s weight.
Ideally, the pastern inclination will match that of the shoulder (Fig. 11) with pasterns that are
neither too long or weak, not too short and lacking shock absorption capabilities. The
pastern/hoof axis, visualized by a line drawn through the middle of the pastern and the hoof,
should be straight (180 degrees).
Saddle position
Saddle position takes into account the shape and size of the withers, orientation of the shoulder
and underline of the trunk at the level of the elbows. It should be considered separately
because of its’ impact on performance in every riding horse.
Withers should be prominent enough to prevent the saddle from slipping side-to-side, yet not
so prominent that they interfere with the front of the saddle. As discussed above, a more
sloping shoulder will help position the saddle further back to help shift balance away from the
forelimbs.
To evaluate overall saddle position, begin by looking at the point in the horse’s back where the
withers join into the flat portion of the back, and imagine where the saddle would sit flat and
balanced. With that in mind, look at the underline of the trunk in the area just behind the
elbows. You’ll see a point where the chest muscles slope upwards into the abdomen. Just
behind that is another line where the muscles slope downward to the lowest part of the
abdomen. In some horses, this slight dip is V-shaped, in others it will be flatter and longer.
This marks the natural girth line, and is the point where the girth or cinch will naturally want to
come to rest.
In an ideal situation, the saddle should sit flat, with the girth naturally placed in a vertical
position well behind her elbows. If the natural girth line is very close to the elbows, comes to a
very sharp “V”, or sits in a position where it causes the girth to slip forward relative to the
natural position of the saddle, it can make saddle fitting challenging, and chronic girth sores
can occur.
Back/Loin
The length of the back is a very subjective evaluation that is as much a function of overall
balance (the mid-section of the horse appears longer than the front and rear) as an actual
measure of the back, which extends from behind the withers to the top of the croup (tuber
ischii). Ideally the back should be moderate in length, and strong—with flat muscles that run
on either side of the spine. A poorly conditioned long back will predispose the horse to back
pain. A short back is strong, but may predispose to interference problems such as forging. It is
also theorized that a horse with a short back may be more likely to develop interference
between the dorsal processes of the vertebrae (a condition known as “kissing spines”).
The loin is the section of the back between the last rib and the sacrum, along the lumbar
vertebrae. The length of the loin is usually fairly consistent among horses. When it
subjectively appears “long” it is likely to be more a function of strength. The muscling along
the top of the loin area should be flat, rather than dipped (weak) or bulging (tight). Whereas a
tight or overly muscled loin connection is strong, it may have a lack of flexibility. A horse with a
weak loin may be predisposed to back pain. The loin connection is referred to as “coupling” in
horsemen’s terms.
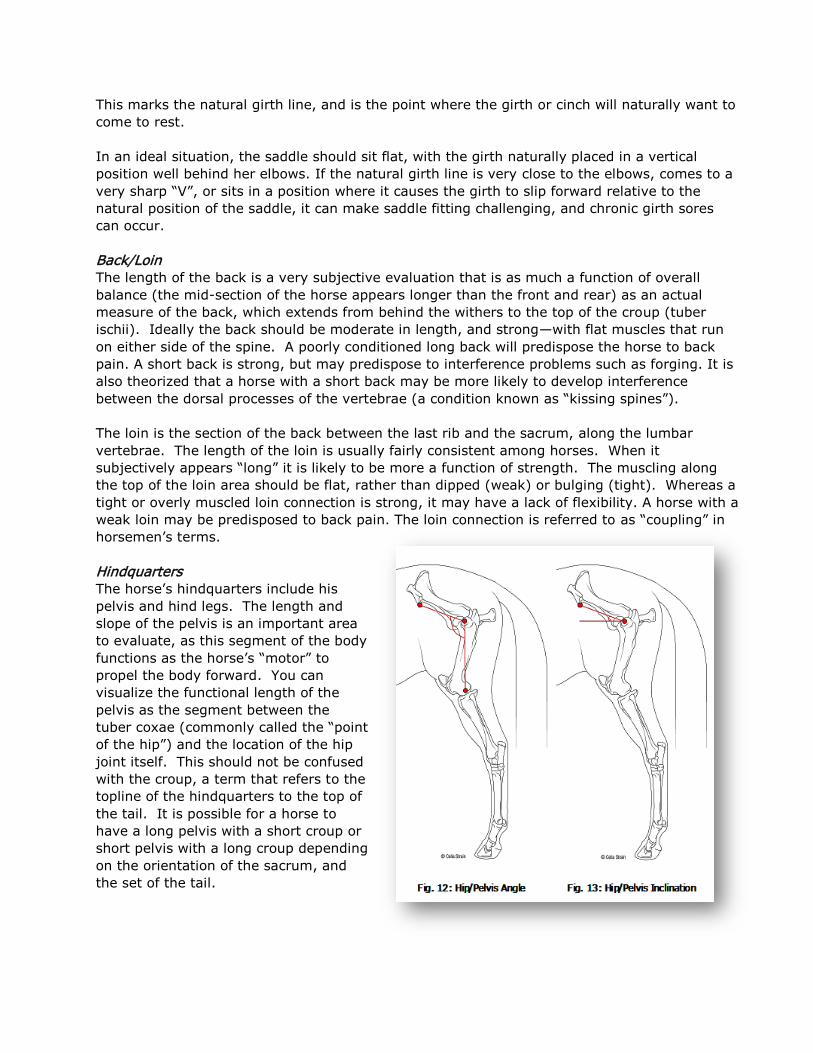
Hindquarters
The horse’s hindquarters include his
pelvis and hind legs. The length and
slope of the pelvis is an important area
to evaluate, as this segment of the body
functions as the horse’s “motor” to
propel the body forward. You can
visualize the functional length of the
pelvis as the segment between the
tuber coxae (commonly called the “point
of the hip”) and the location of the hip
joint itself. This should not be confused
with the croup, a term that refers to the
topline of the hindquarters to the top of
the tail. It is possible for a horse to
have a long pelvis with a short croup or
short pelvis with a long croup depending
on the orientation of the sacrum, and
the set of the tail.

For most riding disciplines, a long, flat pelvis is considered optimal. This type of conformation
provides a large area for muscle attachment as well as a wide range of motion to provide
maximum power to the hindquarters. Measurement of the pelvis angle is also considered and
compared for left to right symmetry (Fig. 12). The angle will influence performance and can be
altered by different bone segment lengths and inclination, orientation, injury and the hooves.
The length and orientation of the femur (extending from the hip joint to the stifle joint) is
another factor in the hindquarters that may play an important role in determining how the
horse moves. A longer, more forward sloping femur will give the horse maximum power, while
placing the hindlimb more underneath the horse’s center of gravity for balance and optimal
efficiency. A shorter femur means less power because of a smaller area for muscular
attachment. It also results in the hindlimb being placed further back towards the horse’s
hindquarters. An upright femur may predispose the horse to recurrent back problems. In a
well-placed hindlimb the hock will lie directly below the point of the buttock (tuber ischii) and
the stifle will lie directly below the point of the hip (tuber coxae).
The stifle and hock angles are generally considered together, and a slightly more open angle is
generally preferred because it provides more resistance during stance and therefore greater
strength. If the stifle angle is too large (straight) however, the horse may experience upward
fixation of the patella or “locking stifles.” Small hock angles may predispose the horse to
soundness problems including arthritis of the hocks and injuries to the ligaments at the back of
the hock (curb).
Finally, the hind pastern should be sloping, but not overly so. Too straight a pastern will lack
shock absorption, whereas too sloping a pastern may predispose the horse to hind limb
lameness. As in front, the pastern/hoof angle should be closely matched.
From the front
When viewing the horse from the front, he should be standing square with the front feet equally
loaded. Ideally, his head and neck will be held straight out in front of his body.
Chest
The width of the chest should correspond to the size of the
horse and width of his body (Fig.14). A very narrow chest may
be seen in a horse with tight elbows and can correspond to
restricted forelimb movement. An inverted “V” shape to the
chest is generally thought to be ideal and corresponds not only
to muscling through the pectoral area, but also to the
placement of the horse’s thorax relative to the shoulders. If the
thorax is relatively high (a more pronounced “V”), there will be
better freedom of the elbows, allowing for a larger range of
motion and better forelimb freedom.
Fig.14: Ideal Chest Width
Forelimbs
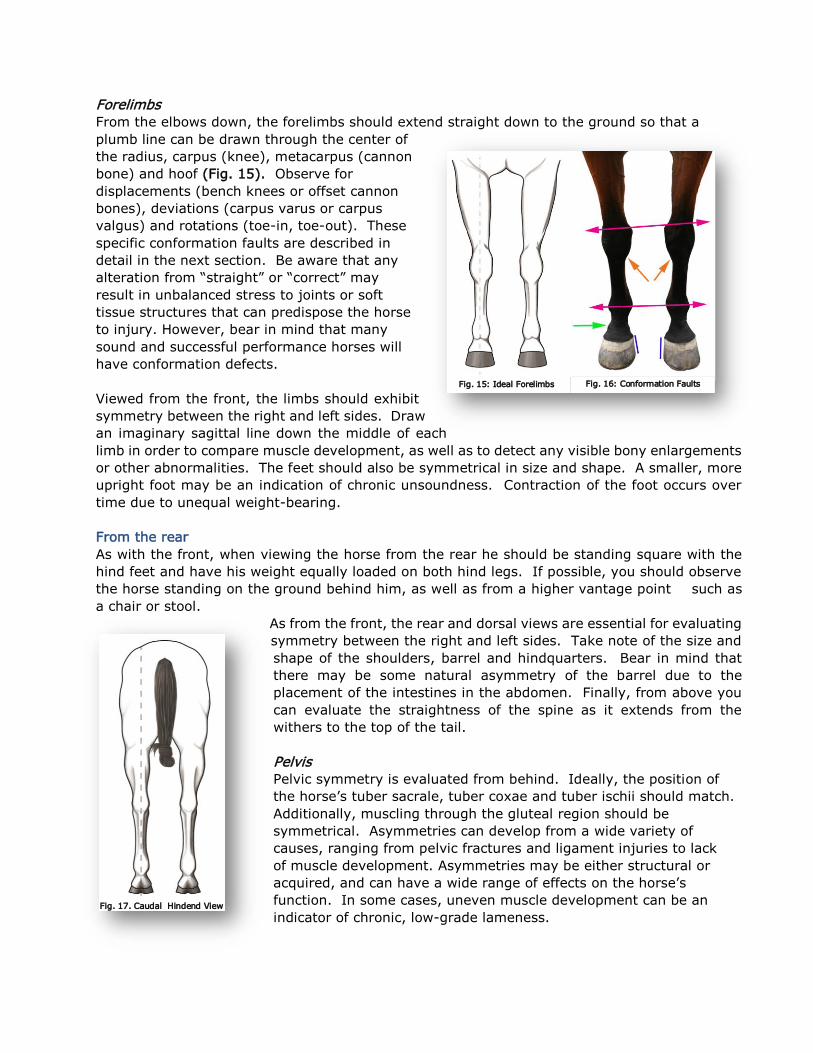
From the elbows down, the forelimbs should extend straight down to the ground so that a
plumb line can be drawn through the center of
the radius, carpus (knee), metacarpus (cannon
bone) and hoof (Fig. 15). Observe for
displacements (bench knees or offset cannon
bones), deviations (carpus varus or carpus
valgus) and rotations (toe-in, toe-out). These
specific conformation faults are described in
detail in the next section. Be aware that any
alteration from “straight” or “correct” may
result in unbalanced stress to joints or soft
tissue structures that can predispose the horse
to injury. However, bear in mind that many
sound and successful performance horses will
have conformation defects.
Viewed from the front, the limbs should exhibit
symmetry between the right and left sides. Draw
an imaginary sagittal line down the middle of each
limb in order to compare muscle development, as well as to detect any visible bony enlargements
or other abnormalities. The feet should also be symmetrical in size and shape. A smaller, more
upright foot may be an indication of chronic unsoundness. Contraction of the foot occurs over
time due to unequal weight-bearing.
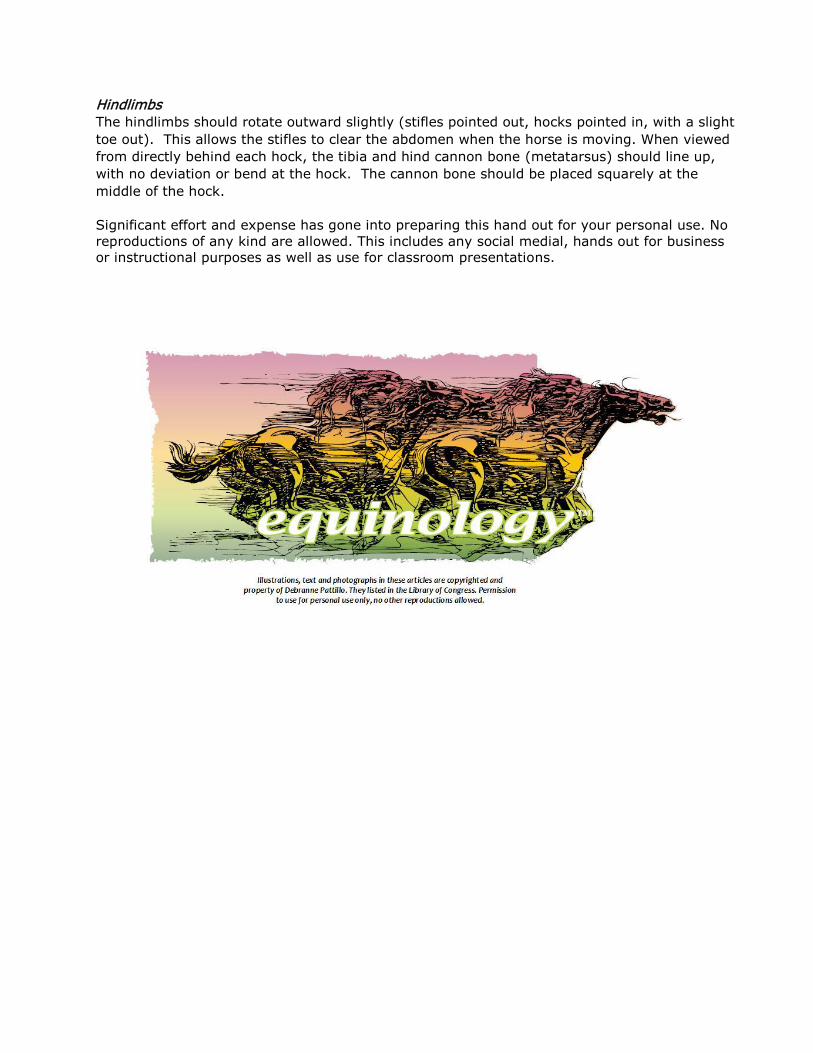
From the rear
As with the front, when viewing the horse from the rear he should be standing square with the
hind feet and have his weight equally loaded on both hind legs. If possible, you should observe
the horse standing on the ground behind him, as well as from a higher vantage point such as
a chair or stool.
As from the front, the rear and dorsal views are essential for evaluating
symmetry between the right and left sides. Take note of the size and
shape of the shoulders, barrel and hindquarters. Bear in mind that
there may be some natural asymmetry of the barrel due to the
placement of the intestines in the abdomen. Finally, from above you
can evaluate the straightness of the spine as it extends from the
withers to the top of the tail.
Pelvis
Pelvic symmetry is evaluated from behind. Ideally, the position of
the horse’s tuber sacrale, tuber coxae and tuber ischii should match.
Additionally, muscling through the gluteal region should be
symmetrical. Asymmetries can develop from a wide variety of
causes, ranging from pelvic fractures and ligament injuries to lack
of muscle development. Asymmetries may be either structural or
acquired, and can have a wide range of effects on the horse’s
function. In some cases, uneven muscle development can be an
indicator of chronic, low-grade lameness.
Fig. 15: Ideal Forelimbs Fig. 16: Conformation Faults
Fig. 17. Caudal Hindend View
Hindlimbs
The hindlimbs should rotate outward slightly (stifles pointed out, hocks pointed in, with a slight
toe out). This allows the stifles to clear the abdomen when the horse is moving. When viewed
from directly behind each hock, the tibia and hind cannon bone (metatarsus) should line up,
with no deviation or bend at the hock. The cannon bone should be placed squarely at the
middle of the hock.
Significant effort and expense has gone into preparing this hand out for your personal use. No
reproductions of any kind are allowed. This includes any social medial, hands out for business
or instructional purposes as well as use for classroom presentations.