Embed Size (px)
Citation preview
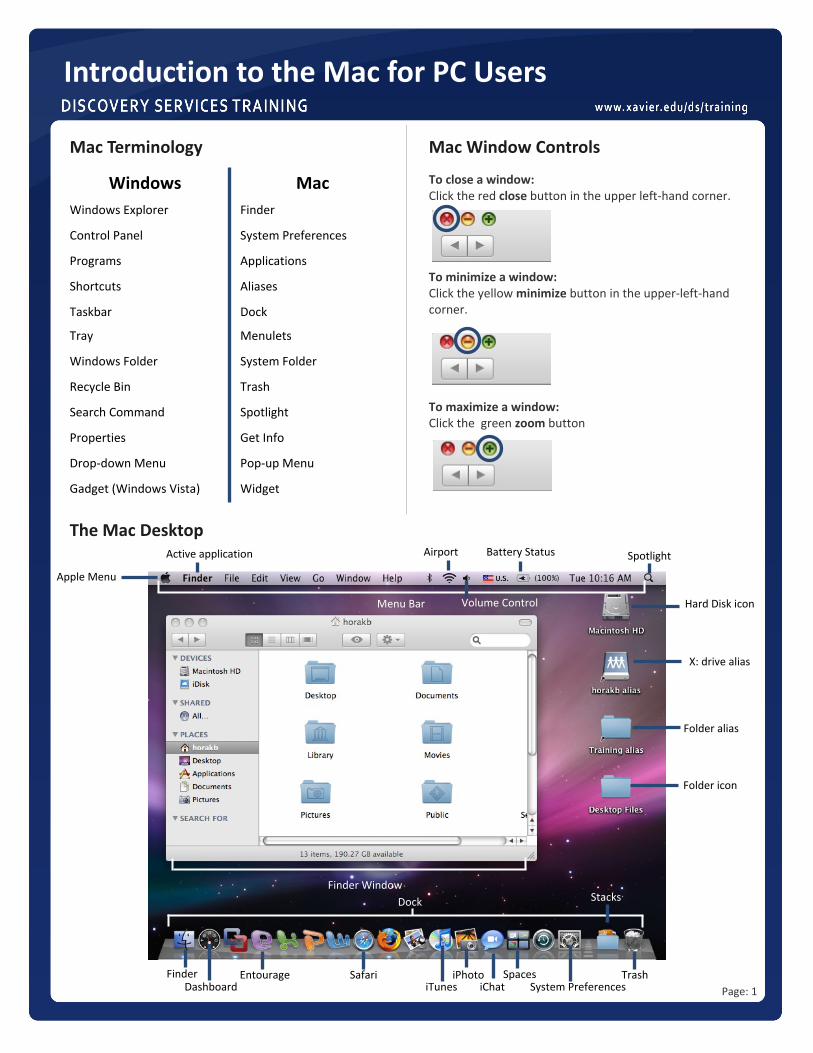
Mac Window Controls
Introduction to the Mac for PC Users
Mac Terminology
To close a window: Click the red close button in the upper left-hand corner.
To minimize a window: Click the yellow minimize button in the upper-left-hand corner.
To maximize a window: Click the green zoom button
Windows Mac
Windows Explorer Finder
Control Panel System Preferences
Programs Applications
Shortcuts Aliases
Taskbar Dock
Tray Menulets
Windows Folder System Folder
Recycle Bin Trash
Search Command Spotlight
Properties Get Info
Drop-down Menu Pop-up Menu
Gadget (Windows Vista) Widget
The Mac Desktop
Page: 1
Dock
Finder Dashboard
Entourage Safari iTunes
iPhoto iChat
Spaces System Preferences
Stacks
Trash
Menu Bar
Active application Spotlight Airport Battery Status
Finder Window
Hard Disk icon
X: drive alias
Folder alias
Folder icon
Apple Menu
Volume Control
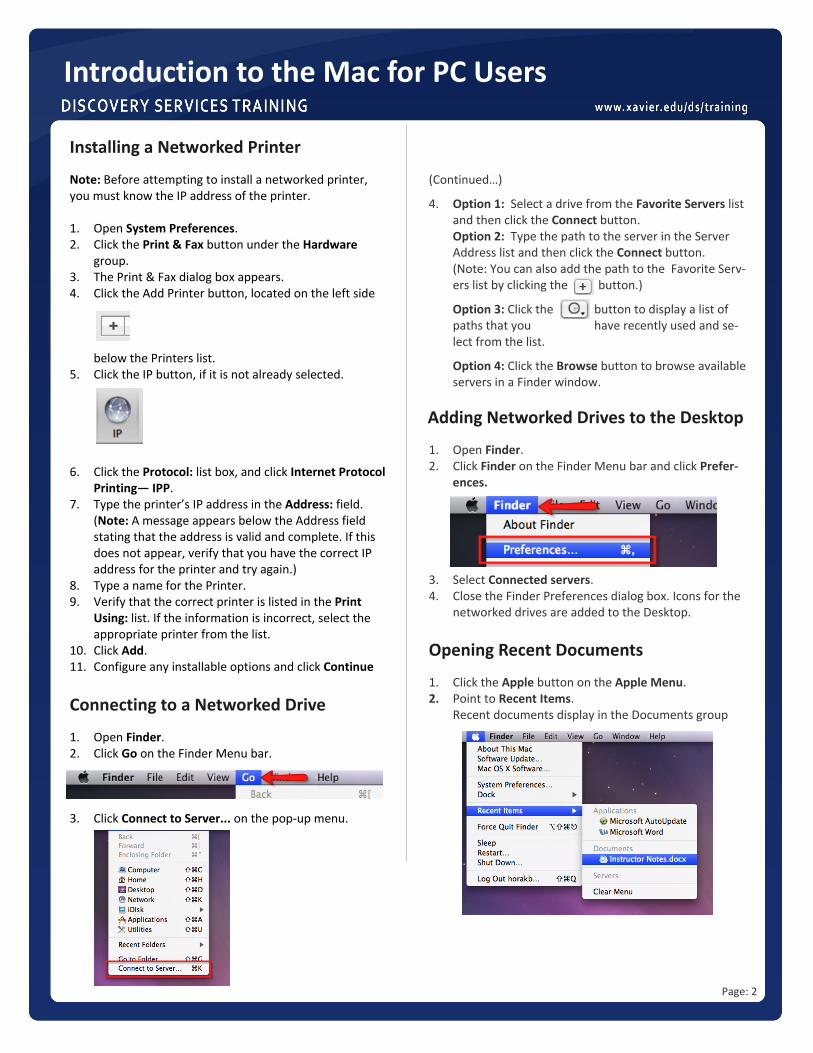
(Continued…)
4. Option 1: Select a drive from the Favorite Servers list and then click the Connect button. Option 2: Type the path to the server in the Server Address list and then click the Connect button. (Note: You can also add the path to the Favorite Serv-ers list by clicking the button.)
Option 3: Click the button to display a list of paths that you have recently used and se-lect from the list.
Option 4: Click the Browse button to browse available servers in a Finder window.
Page: 2
Installing a Networked Printer
Note: Before attempting to install a networked printer, you must know the IP address of the printer. 1. Open System Preferences. 2. Click the Print & Fax button under the Hardware
group. 3. The Print & Fax dialog box appears. 4. Click the Add Printer button, located on the left side
below the Printers list. 5. Click the IP button, if it is not already selected.
6. Click the Protocol: list box, and click Internet Protocol Printing— IPP.
7. Type the printer’s IP address in the Address: field. (Note: A message appears below the Address field stating that the address is valid and complete. If this does not appear, verify that you have the correct IP address for the printer and try again.)
8. Type a name for the Printer. 9. Verify that the correct printer is listed in the Print
Using: list. If the information is incorrect, select the appropriate printer from the list.
10. Click Add. 11. Configure any installable options and click Continue
Introduction to the Mac for PC Users
Connecting to a Networked Drive
1. Open Finder. 2. Click Go on the Finder Menu bar.
3. Click Connect to Server... on the pop-up menu.
Adding Networked Drives to the Desktop
1. Open Finder. 2. Click Finder on the Finder Menu bar and click Prefer-
ences.
3. Select Connected servers. 4. Close the Finder Preferences dialog box. Icons for the
networked drives are added to the Desktop.
Opening Recent Documents
1. Click the Apple button on the Apple Menu. 2. Point to Recent Items.
Recent documents display in the Documents group
Page: 3
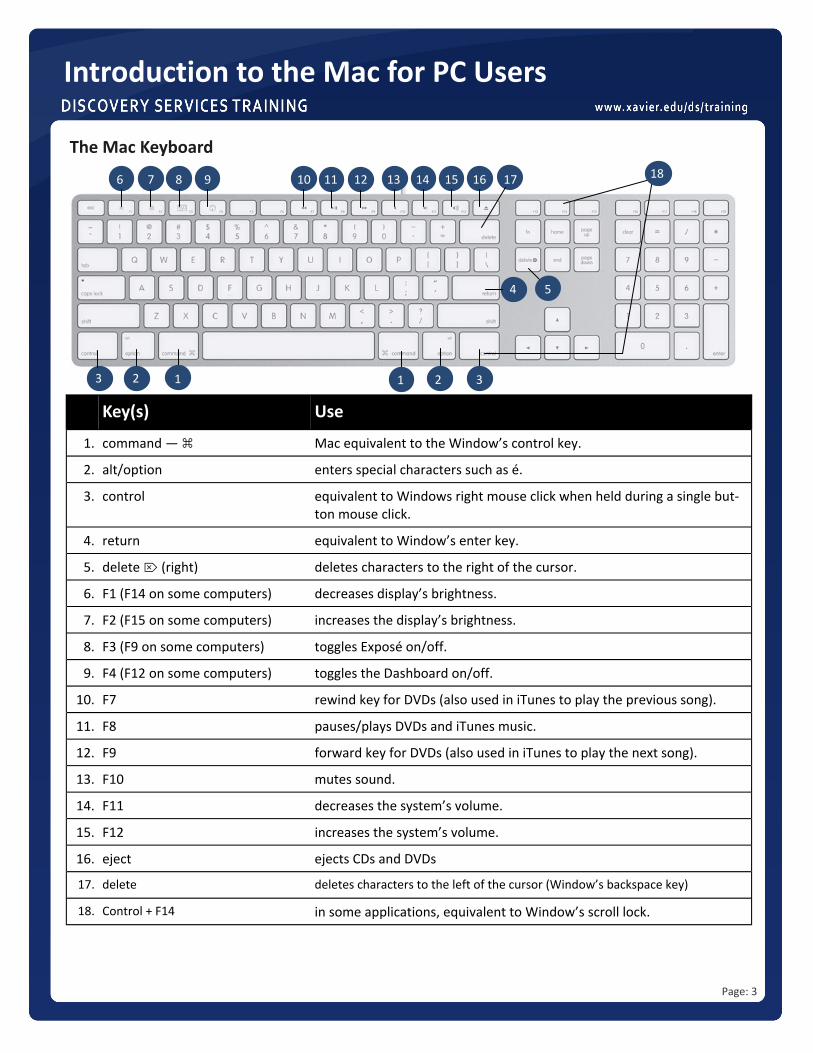
The Mac Keyboard
Introduction to the Mac for PC Users
Key(s) Use
1. command — ⌘ Mac equivalent to the Window’s control key.
2. alt/option enters special characters such as é.
3. control equivalent to Windows right mouse click when held during a single but-ton mouse click.
4. return equivalent to Window’s enter key.
5. delete ⌦ (right) deletes characters to the right of the cursor.
6. F1 (F14 on some computers) decreases display’s brightness.
7. F2 (F15 on some computers) increases the display’s brightness.
8. F3 (F9 on some computers) toggles Exposé on/off.
9. F4 (F12 on some computers) toggles the Dashboard on/off.
10. F7 rewind key for DVDs (also used in iTunes to play the previous song).
11. F8 pauses/plays DVDs and iTunes music.
12. F9 forward key for DVDs (also used in iTunes to play the next song).
13. F10 mutes sound.
14. F11 decreases the system’s volume.
15. F12 increases the system’s volume.
16. eject ejects CDs and DVDs
17. delete deletes characters to the left of the cursor (Window’s backspace key)
18. Control + F14 in some applications, equivalent to Window’s scroll lock.
1 1 2 3 2 3
4 5
18 6 7 8 9 10 11 12 13 14 15 16 17