Embed Size (px)
Citation preview
Introduction to Linux
Introduction to Unix and Linux
Workshop 1: Directories and Files
Genomics Core Lab
TEXAS A&M UNIVERSITY – CORPUS CHRISTI
Anvesh Paidipala, Evan Krell, Kelly Pennoyer, Chris Bird
Genomics Core Lab Informatics Series 1
Introduction to Linux Table of Contents
SECTION I ............................................................................................................................................... 3 Introduction to UNIX ........................................................................................................................ 3 Preparing The Virtual Machine to Run Ubuntu Linux ......................................................................... 3 Intro to Unix/Linux GUI ..................................................................................................................... 3
SECTION II .............................................................................................................................................. 5 Directory/Folder Navigation in Unix/Linux ........................................................................................ 5 Directory/Folder Manipulation in Unix/Linux .................................................................................... 7 Independent Exercise ...................................................................................................................... 10
SECTION III ............................................................................................................................................ 11 Viewing Files and their Properties .................................................................................................... 11 Manipulating and Creating Files ....................................................................................................... 14 Independent Exercise ...................................................................................................................... 18
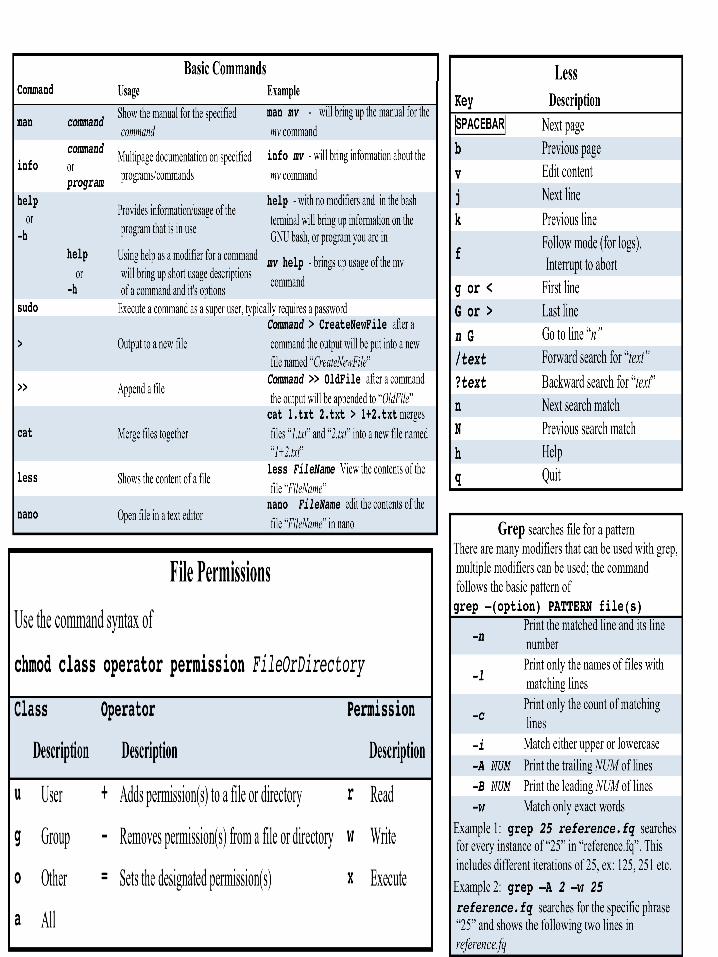
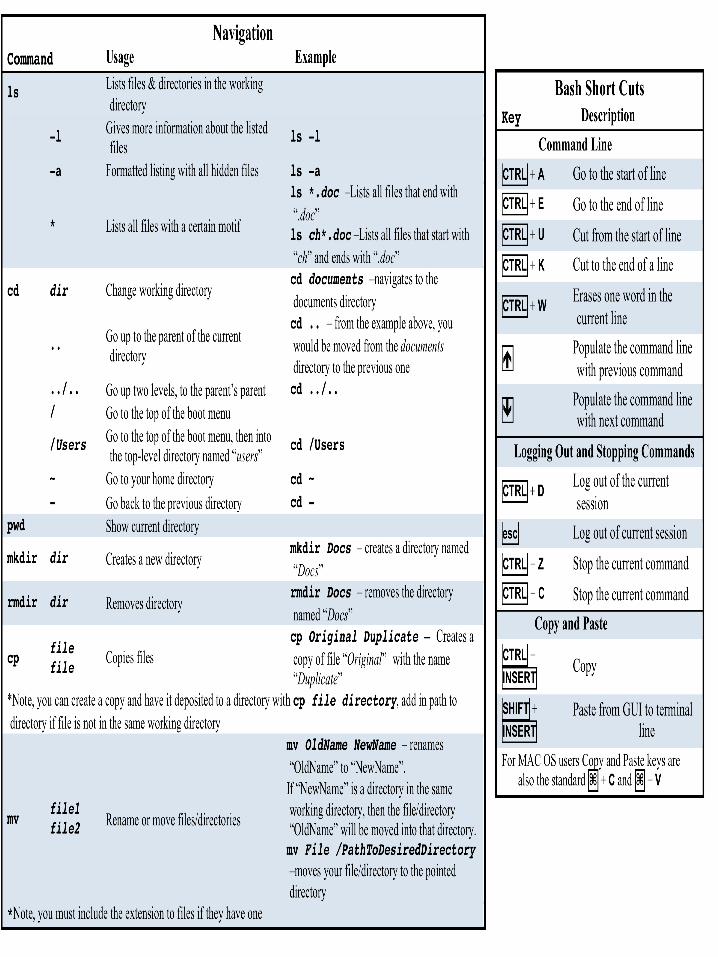
Quick Reference ....................................................................................................................... Appendix
Genomics Core Lab Informatics Series 2
Introduction to Linux
SECTION I Introduction to UNIX
Preparing The Virtual Machine to Run Ubuntu Linux
1. Turn on computer and Login to Windows
First turn your computer on and login with credentials provided.
2. Open the Oracle VM VirtualBox app
Navigate to c:/virtualbox using the Windows Explorer and double click the file named “Ubuntu_ManillaWorkshop_final.ova”
We are going to run an Ubuntu virtual machine on these Windows computers.VirtualBox allows you to run any OS on any other OS. It is free to download online from Oracle. It will take 5 minutes for VirtualBox to import the Ubuntu Virtual Machine (VM).
3. Launch the Ubuntu VM within VirtualBox
Double click the “Ubuntu_ManilaWorkshop_1” VM highlighted in blue.
It will take about a minute for Ubuntu Linux to boot within the VirtualBox window. Bye, bye Bill Gates.
Intro to Unix/Linux GUI
4. Log into Ubuntu
When prompted, type “password” and hit enter to login
The Ubuntu graphical user interface is very similar to Mac and Windows.
5. Take a Look Around the Ubuntu GUI
Genomics Core Lab Informatics Series 3
Introduction to Linux
The Ubuntu graphical user interface is very similar to MAC and Windows.
6. Launch the Terminal App
Double click the following icon
You have just launched a bash shell. Bash stands for Bourne Again Shell and it allows you to control your computer strictly by using the keyboard for input through a command line.
It is also possible to start up Unix/Linux to the command line prompt, without the GUI.
7. Using the bash shell, launch the FireFox app by typing firefox in the Terminal window and hitting the ENTER key
$ firefox
Note: only type “firefox”, the $ denotes the command prompt. Also realize that the command line is CaSe SenSitiVe and very particular about the use of spaces.
We just gave Ubuntu a terminal command, an instruction to do something – typically run a program. From the command line, you can launch any program on the computer, from graphical applications like Firefox to command-line utilities and programs. Other commands you would run in the terminal function just like Firefox, except many run only in the terminal and don’t open any sort of graphical application window.
8. Go back to the Terminal and navigate to your TAMUCC webmail using the Firefox command.
$ firefox webmail.tamucc.edu
We just used the command firefox and the argument webmail.tamucc.edu to control the computer. A terminal command argument (or option, preference) is a setting or information that customizes the command. Each program has different arguments to customize commands. Depending on the command or program, an option can be added using a dash and letter or number codes. We will explore the ways that different commands can be modified later.
9. Go back to the Terminal and you may need to exit the firefox command
Press ctrl+c on your keyboard
Sometimes you will want to stop a non-responsive program in the terminal. ctrl+c, ctrl+q, and ctrl+z are common keystroke combinations to stop commands and programs that are taking too long. Your command prompt should look like this:
Genomics Core Lab Informatics Series 4
Introduction to Linux SECTION II Directory/Folder Navigation in Unix/Linux
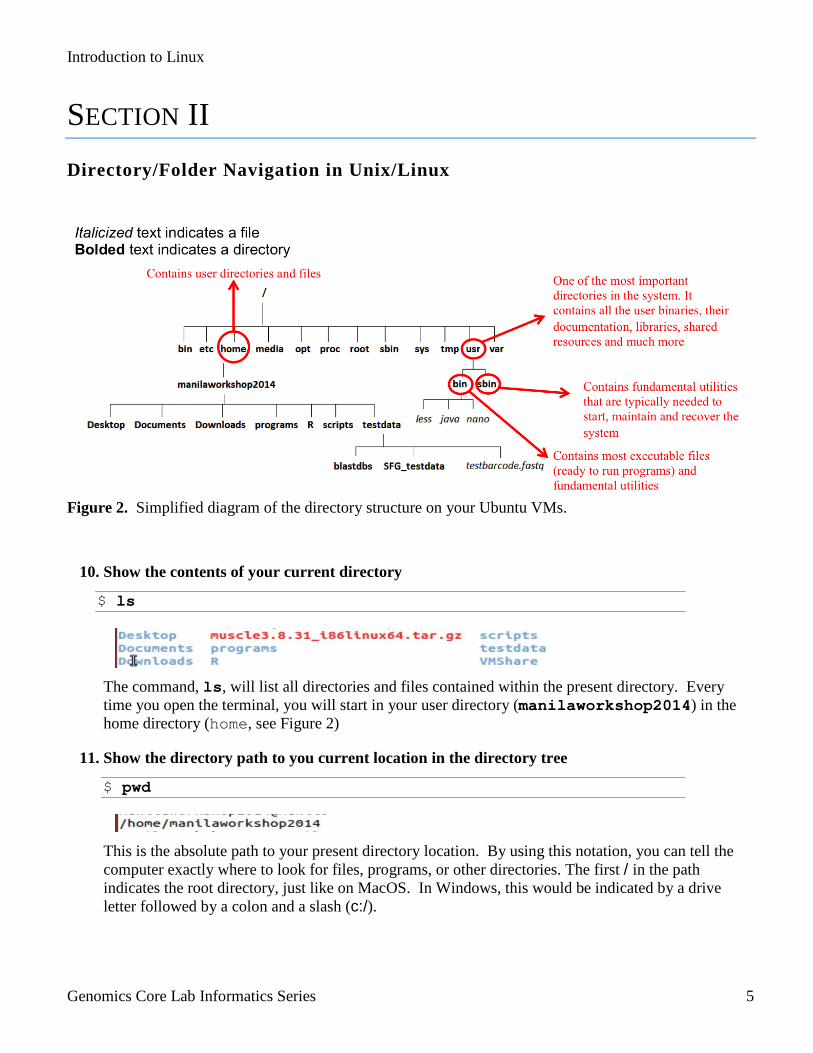
Figure 2. Simplified diagram of the directory structure on your Ubuntu VMs.
10. Show the contents of your current directory
$ ls
The command, ls, will list all directories and files contained within the present directory. Every time you open the terminal, you will start in your user directory (manilaworkshop2014) in the home directory (home, see Figure 2)
11. Show the directory path to you current location in the directory tree
$ pwd
This is the absolute path to your present directory location. By using this notation, you can tell the computer exactly where to look for files, programs, or other directories. The first / in the path indicates the root directory, just like on MacOS. In Windows, this would be indicated by a drive letter followed by a colon and a slash (c:/).
Genomics Core Lab Informatics Series 5
Introduction to Linux
12. Display the directory tree of your computer
$ tree
If tree is not installed, follow the onscreen instructions to install tree, then type tree in to the command line again. Once installed, the total directory tree of your computer, including files will start racing by on the screen. The directory tree of your computer is very large, but see Figure 2 for simplified directory structure.
13. Stop the present operation
Press ctrl+c on your keyboard
Once again, ctrl+c, ctrl+q, or ctrl+z are the most common keystrokes to stop a program from running in the shell.
14. Display the portion of the directory tree that resides within the testdata folder
$ tree testdata
The tree command combined with the testdata argument displays an image depicting the directories and files contained within testdata.
15. Open the testdata folder and view it’s contents
$ cd testdata
cd stands for change directory. You can use the cd command to navigate your computer’s directory tree. The only difference that you see on screen is the location of your command prompt has changed to ~/testdata$. The ~ stands for the user’s home directory. Thus, you can determine where you are in the directory tree by looking at the command prompt. You can use the ls command to show the contents of testdata.
16. Go back to the parent directory of testdata
$ cd ..
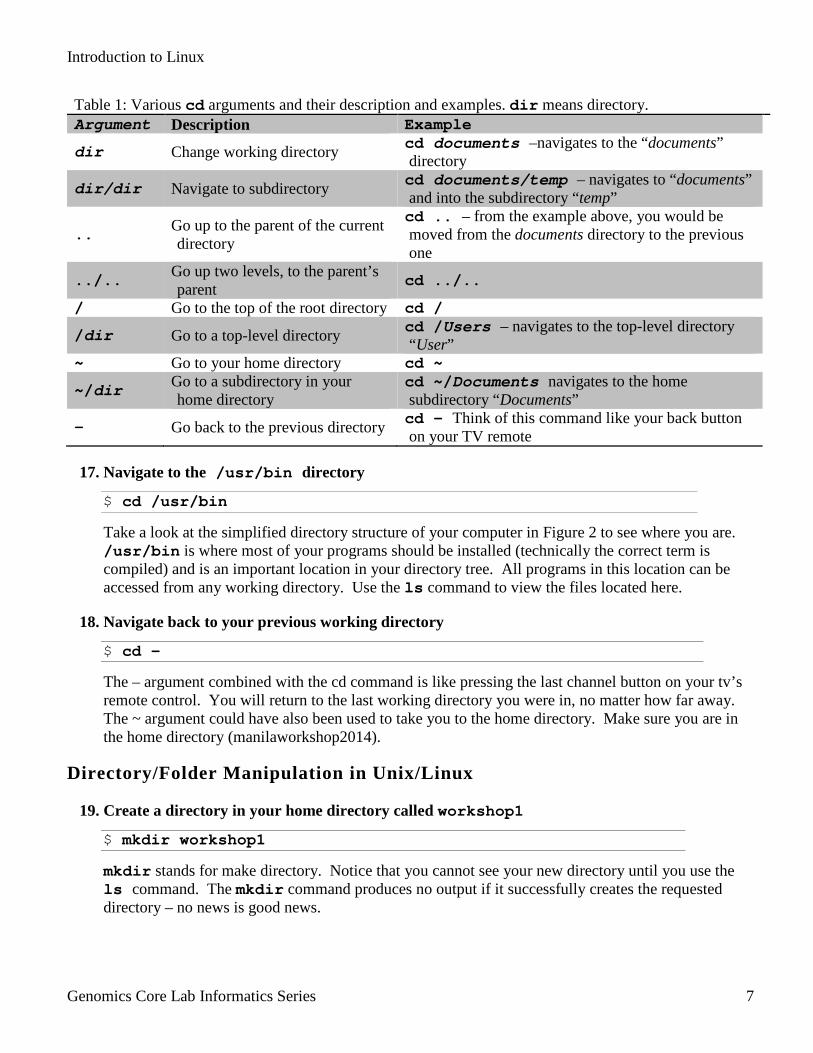
cd combined with the .. argument will always take you to the parent folder of the present working directory. Using the directory name and .. arguments you can navigate any directory tree. There are several addition arguments that can be used in combination with cd in Table 1.
Genomics Core Lab Informatics Series 6
Introduction to Linux
17. Navigate to the /usr/bin directory
$ cd /usr/bin
Take a look at the simplified directory structure of your computer in Figure 2 to see where you are. /usr/bin is where most of your programs should be installed (technically the correct term is compiled) and is an important location in your directory tree. All programs in this location can be accessed from any working directory. Use the ls command to view the files located here.
18. Navigate back to your previous working directory
$ cd -
The – argument combined with the cd command is like pressing the last channel button on your tv’s remote control. You will return to the last working directory you were in, no matter how far away. The ~ argument could have also been used to take you to the home directory. Make sure you are in the home directory (manilaworkshop2014).
Directory/Folder Manipulation in Unix/Linux
19. Create a directory in your home directory called workshop1
$ mkdir workshop1
mkdir stands for make directory. Notice that you cannot see your new directory until you use the ls command. The mkdir command produces no output if it successfully creates the requested directory – no news is good news.
Table 1: Various cd arguments and their description and examples. dir means directory. Argument Description Example
dir Change working directory cd documents –navigates to the “documents” directory
dir/dir Navigate to subdirectory cd documents/temp – navigates to “documents” and into the subdirectory “temp”
.. Go up to the parent of the current directory
cd .. – from the example above, you would be moved from the documents directory to the previous one
../.. Go up two levels, to the parent’s parent cd ../..
/ Go to the top of the root directory cd /
/dir Go to a top-level directory cd /Users – navigates to the top-level directory “User”
~ Go to your home directory cd ~
~/dir Go to a subdirectory in your home directory
cd ~/Documents navigates to the home subdirectory “Documents”
- Go back to the previous directory cd – Think of this command like your back button on your TV remote
Genomics Core Lab Informatics Series 7
Introduction to Linux
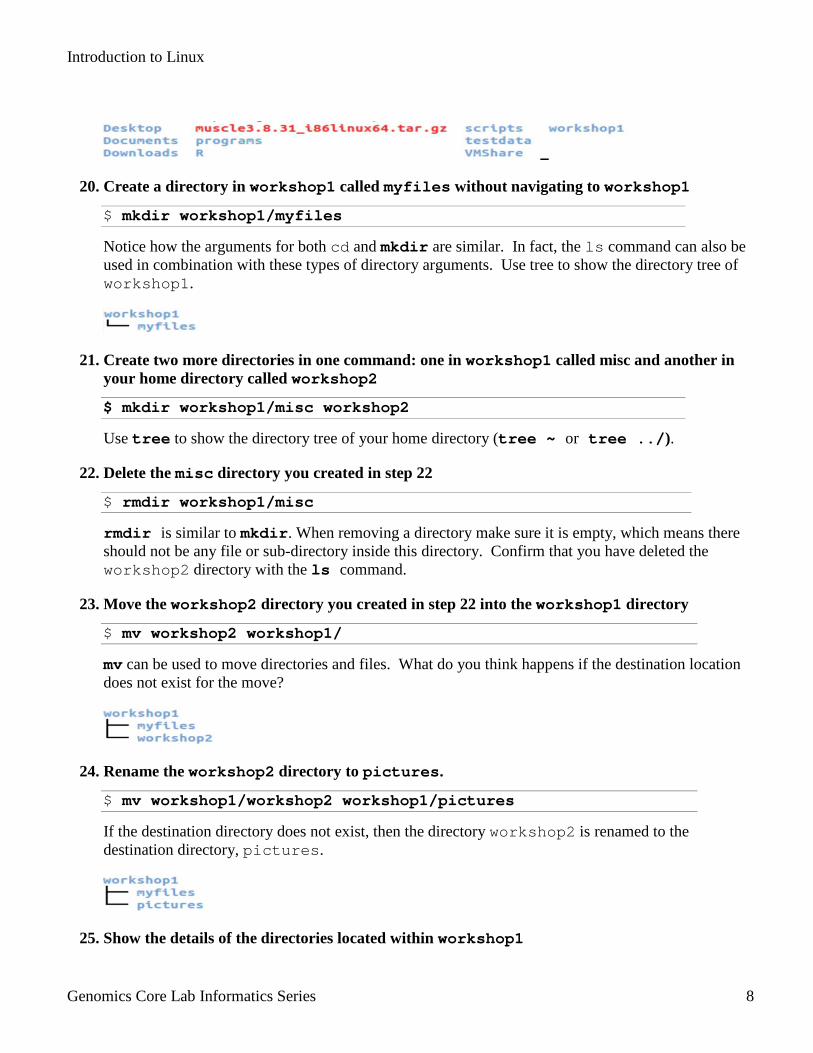
20. Create a directory in workshop1 called myfiles without navigating to workshop1
$ mkdir workshop1/myfiles
Notice how the arguments for both cd and mkdir are similar. In fact, the ls command can also be used in combination with these types of directory arguments. Use tree to show the directory tree of workshop1.
21. Create two more directories in one command: one in workshop1 called misc and another in your home directory called workshop2
$ mkdir workshop1/misc workshop2
Use tree to show the directory tree of your home directory (tree ~ or tree ../).
22. Delete the misc directory you created in step 22
$ rmdir workshop1/misc
rmdir is similar to mkdir. When removing a directory make sure it is empty, which means there should not be any file or sub-directory inside this directory. Confirm that you have deleted the workshop2 directory with the ls command.
23. Move the workshop2 directory you created in step 22 into the workshop1 directory
$ mv workshop2 workshop1/
mv can be used to move directories and files. What do you think happens if the destination location does not exist for the move?
24. Rename the workshop2 directory to pictures.
$ mv workshop1/workshop2 workshop1/pictures
If the destination directory does not exist, then the directory workshop2 is renamed to the destination directory, pictures.
25. Show the details of the directories located within workshop1
Genomics Core Lab Informatics Series 8
Introduction to Linux
$ ls –l workshop1
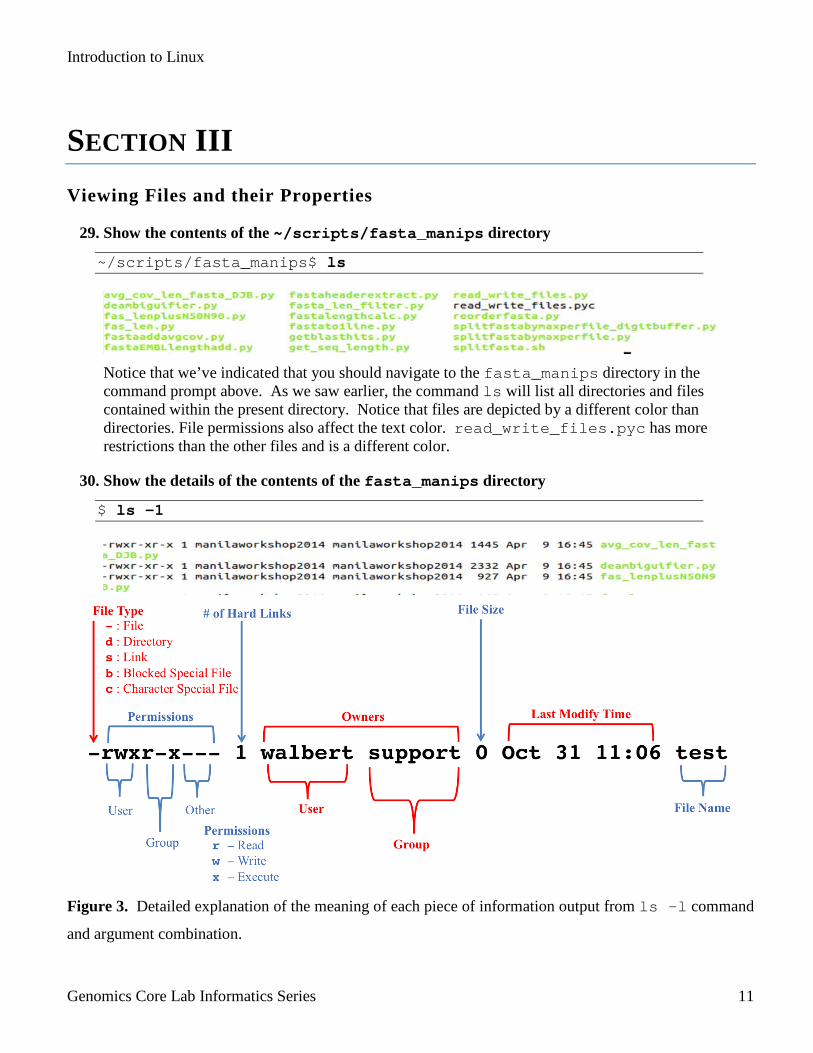
ls combined with the argument –l and a folder name will return several pieces of information about a directory or file. At this point, we are only going to be concerned with the rwxrwxr-x portion:
The first rwx indicates that you, the owner of the directory has read, write and execute privileges and the last r-x indicates that others have the ability to read and execute, but not write to that directory. We will come back to this in the next section of the workshop.
26. Restrict the ability of others to view the contents of your pictures directory.
$ chmod 700 workshop1/pictures
$ ls -l
chmod allows you to change the access permissions for a directory (see Figure 3). The arguments are the directory name and your permission level. In this case 7 is your permission level; the groups’ permission level is 0; and everybody else’s permission level is 0. The number 7 comes from the sum of the read (4), write (2), and execute (1) values. Read always equals 4 or 0. Write always equals 2 or 0. Execute always equals 1 or 0. Zero indicates no permission.
27. Using the up arrow key shortcut, edit your chmod statement to restrict others’ permissions to read, write and execute in your myfiles directory
$ chmod 700 workshop1/myfiles
The up arrow key can be used to recall your command line entries in reverse chronological order. The arrow keys allow you to scroll through your commands and choose the one you want to modify or use again. Notice that you cannot use the mouse to move the cursor position in the command line.
28. Change directories by going to the Ubuntu GUI file navigator and dragging a folder to the terminal
$ cd drag a folder here from the gui
Dragging and dropping directory paths from the GUI is often a useful feature that makes the transition to the command line a little bit easier. Copy and paste will also work.
Copy : Ctrl + Shift + C, Cut – Ctrl + Shift + X, Paste – Ctrl + Shift + P
Genomics Core Lab Informatics Series 9
Introduction to Linux Independent Exercise
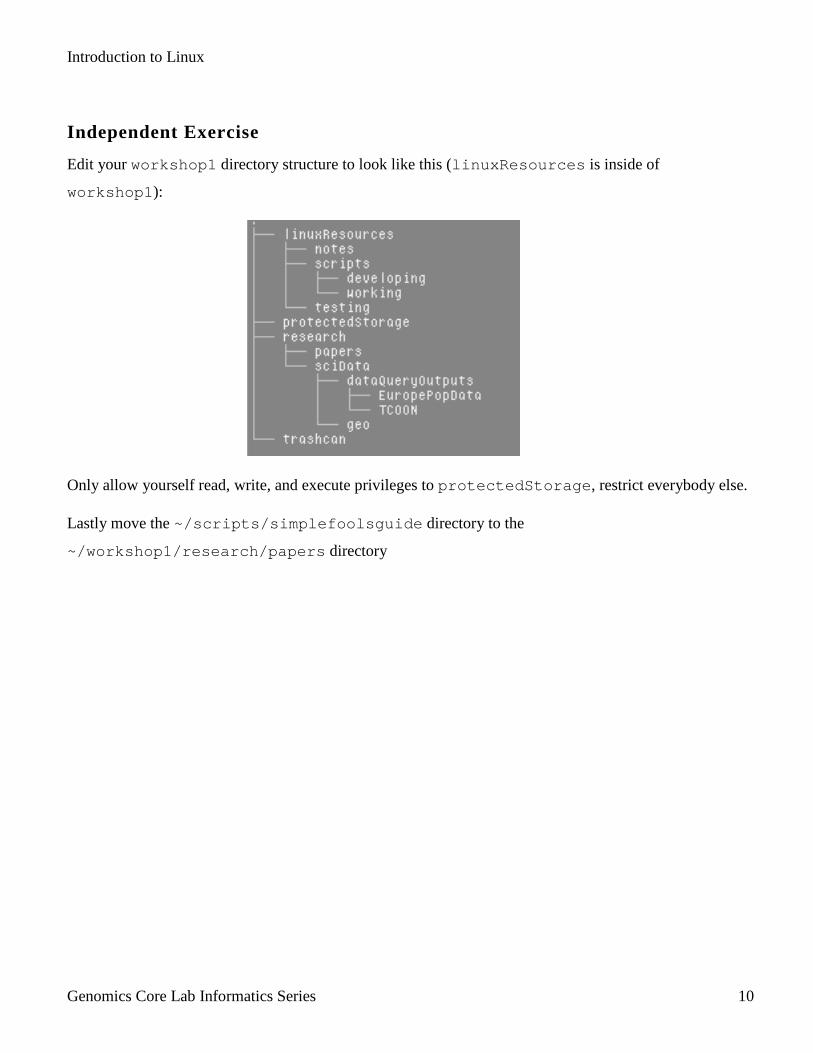
Edit your workshop1 directory structure to look like this (linuxResources is inside of
workshop1):
Only allow yourself read, write, and execute privileges to protectedStorage, restrict everybody else.
Lastly move the ~/scripts/simplefoolsguide directory to the
~/workshop1/research/papers directory
Genomics Core Lab Informatics Series 10
Introduction to Linux
SECTION III Viewing Files and their Properties
29. Show the contents of the ~/scripts/fasta_manips directory
~/scripts/fasta_manips$ ls
Notice that we’ve indicated that you should navigate to the fasta_manips directory in the command prompt above. As we saw earlier, the command ls will list all directories and files contained within the present directory. Notice that files are depicted by a different color than directories. File permissions also affect the text color. read_write_files.pyc has more restrictions than the other files and is a different color.
30. Show the details of the contents of the fasta_manips directory
$ ls -1
Figure 3. Detailed explanation of the meaning of each piece of information output from ls –l command
and argument combination.
Genomics Core Lab Informatics Series 11
Introduction to Linux 31. Give all users and groups full permissions on the file named deambiguifier.py
$ chmod 777 deambiguifier.py
chmod works the same way for files as for directories (see Figure 3). For chmod octal arguments that use numbers to represent permissions r=4, w=2, and x=1 such that chmod 777 filename gives full rwx permissions to everybody (rwxrwxrwx). In other words, for each of the three user types you add up the permission values to get three number between 0 and 7 that represent the permissions for all user types. chmod 743 = rwxr---wx.
32. Show the visible and hidden files in the “fasta_manips” directory
$ ls -a
An invisible file is one whose first character is the dot or period character (.). UNIX programs (including the shell) use most of these files to store configuration information. Notice that in the fasta_manips directory there are only 2 hidden files. The hidden files are . (the path to the fasta_manips directory) and .. (the path to the parent directory of fasta_manips). Some common examples of hidden files include the files: .profile, the Bourne shell ( sh) initialization script; .kshrc, the Korn shell ( ksh) initialization script; .cshrc, the C shell ( csh) initialization script; and .rhosts, the remote shell configuration file. You will likely encounter a situation where you need to view or edit a hidden file to change settings.
33. Show the contents of the file named deambiguifier.py by typing de then hitting the TAB key.
$ less deambiguifier.py
The TAB key can be used to autocomplete a file or directory name when typing at the command line and is a feature that is very handy to know.
less is a terminal pager program on Unix, Windows, and Unix-like systems used to view (but not change) the contents of a text file one screen at a time. Unlike most UNIX text editors/viewers, less does not need to read the entire file before starting, resulting in faster load times with large files. This particular file is a Python script. The arrow keys and page up/down keys have intuitive function. The q key can be used to exit less.
Genomics Core Lab Informatics Series 12
Introduction to Linux
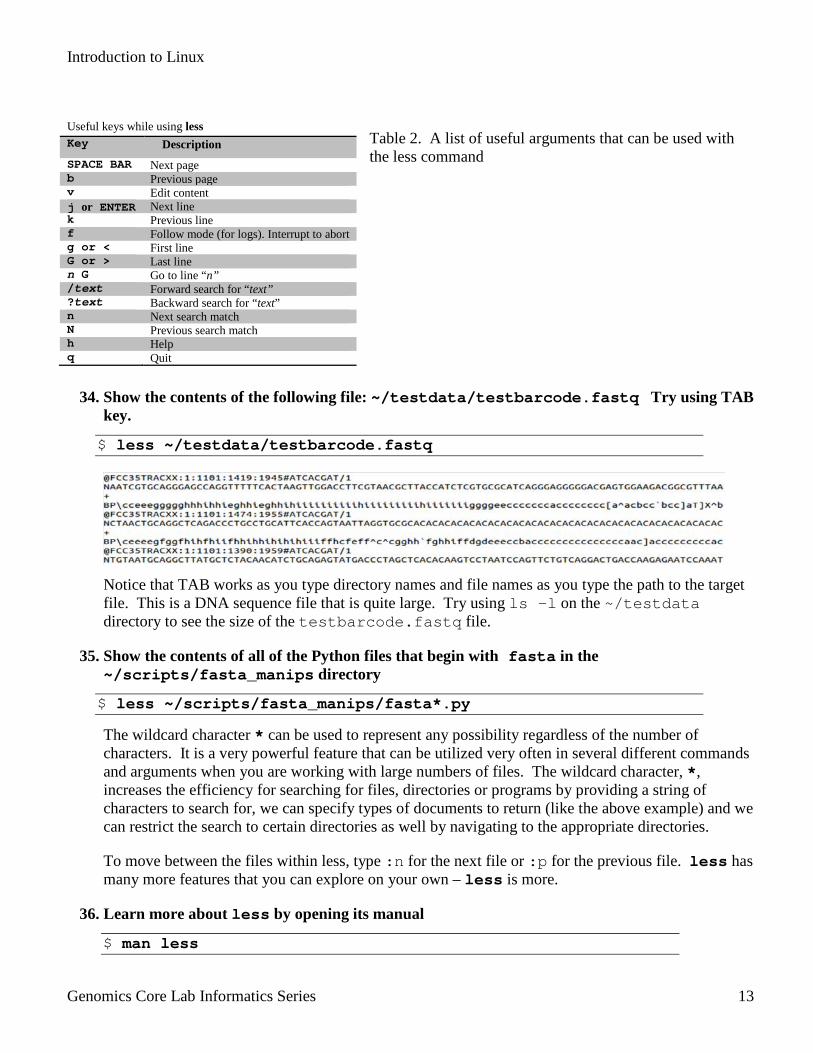
Table 2. A list of useful arguments that can be used with the less command
34. Show the contents of the following file: ~/testdata/testbarcode.fastq Try using TAB key.
$ less ~/testdata/testbarcode.fastq
Notice that TAB works as you type directory names and file names as you type the path to the target file. This is a DNA sequence file that is quite large. Try using ls –l on the ~/testdata directory to see the size of the testbarcode.fastq file.
35. Show the contents of all of the Python files that begin with fasta in the ~/scripts/fasta_manips directory
$ less ~/scripts/fasta_manips/fasta*.py
The wildcard character * can be used to represent any possibility regardless of the number of characters. It is a very powerful feature that can be utilized very often in several different commands and arguments when you are working with large numbers of files. The wildcard character, *, increases the efficiency for searching for files, directories or programs by providing a string of characters to search for, we can specify types of documents to return (like the above example) and we can restrict the search to certain directories as well by navigating to the appropriate directories.
To move between the files within less, type :n for the next file or :p for the previous file. less has many more features that you can explore on your own – less is more.
36. Learn more about less by opening its manual
$ man less
Useful keys while using less Key Description SPACE BAR Next page b Previous page v Edit content j or ENTER Next line k Previous line f Follow mode (for logs). Interrupt to abort g or < First line G or > Last line n G Go to line “n” /text Forward search for “text” ?text Backward search for “text” n Next search match N Previous search match h Help q Quit
Genomics Core Lab Informatics Series 13
Introduction to Linux
The man command can be used with several different commands and programs. When you want more info, just type man followed by the command or program. Sometimes help can be used in place of man. You can also search google, which usually results in several helpful examples.
Manipulating and Creating Files
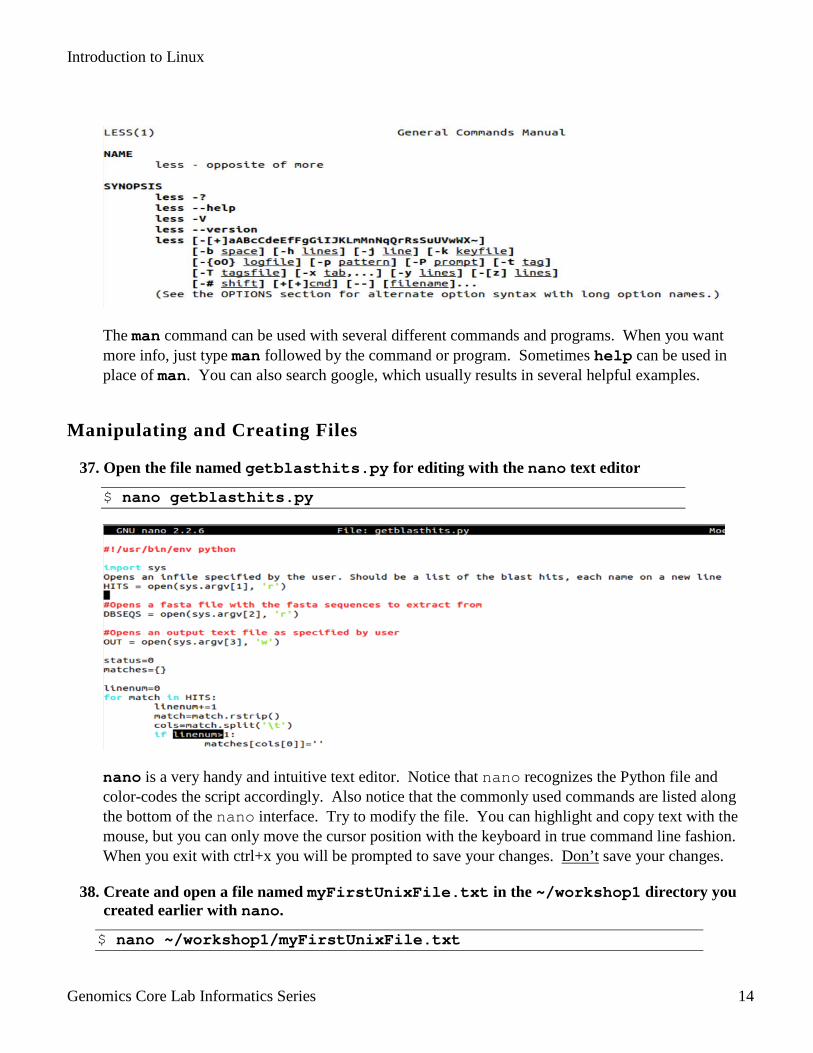
37. Open the file named getblasthits.py for editing with the nano text editor
$ nano getblasthits.py
nano is a very handy and intuitive text editor. Notice that nano recognizes the Python file and color-codes the script accordingly. Also notice that the commonly used commands are listed along the bottom of the nano interface. Try to modify the file. You can highlight and copy text with the mouse, but you can only move the cursor position with the keyboard in true command line fashion. When you exit with ctrl+x you will be prompted to save your changes. Don’t save your changes.
38. Create and open a file named myFirstUnixFile.txt in the ~/workshop1 directory you created earlier with nano.
$ nano ~/workshop1/myFirstUnixFile.txt
Genomics Core Lab Informatics Series 14
Introduction to Linux
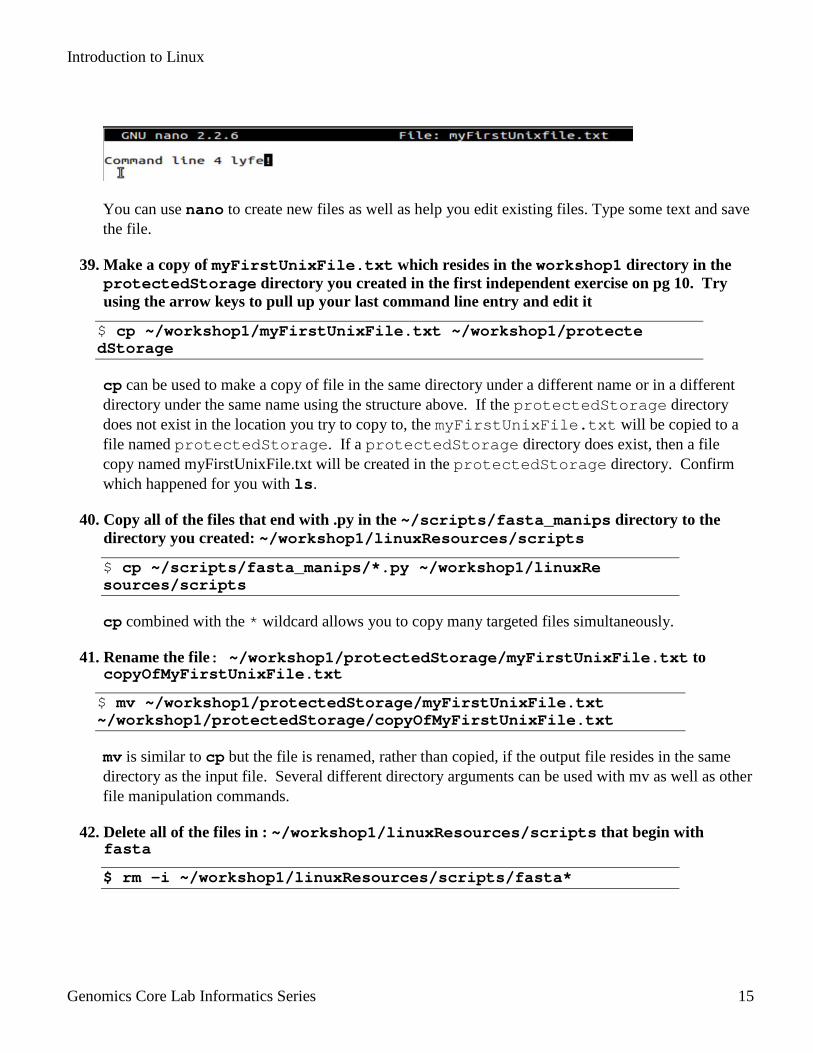
You can use nano to create new files as well as help you edit existing files. Type some text and save the file.
39. Make a copy of myFirstUnixFile.txt which resides in the workshop1 directory in the protectedStorage directory you created in the first independent exercise on pg 10. Try using the arrow keys to pull up your last command line entry and edit it
$ cp ~/workshop1/myFirstUnixFile.txt ~/workshop1/protecte dStorage
cp can be used to make a copy of file in the same directory under a different name or in a different directory under the same name using the structure above. If the protectedStorage directory does not exist in the location you try to copy to, the myFirstUnixFile.txt will be copied to a file named protectedStorage. If a protectedStorage directory does exist, then a file copy named myFirstUnixFile.txt will be created in the protectedStorage directory. Confirm which happened for you with ls.
40. Copy all of the files that end with .py in the ~/scripts/fasta_manips directory to the directory you created: ~/workshop1/linuxResources/scripts
$ cp ~/scripts/fasta_manips/*.py ~/workshop1/linuxRe sources/scripts
cp combined with the * wildcard allows you to copy many targeted files simultaneously.
41. Rename the file: ~/workshop1/protectedStorage/myFirstUnixFile.txt to copyOfMyFirstUnixFile.txt
$ mv ~/workshop1/protectedStorage/myFirstUnixFile.txt ~/workshop1/protectedStorage/copyOfMyFirstUnixFile.txt
mv is similar to cp but the file is renamed, rather than copied, if the output file resides in the same directory as the input file. Several different directory arguments can be used with mv as well as other file manipulation commands.
42. Delete all of the files in : ~/workshop1/linuxResources/scripts that begin with fasta
$ rm –i ~/workshop1/linuxResources/scripts/fasta*
Genomics Core Lab Informatics Series 15
Introduction to Linux
rm is used to delete both files and directories. The argument –i causes you to confirm the deletion to prevent mistakes. Caution: It may be dangerous to delete a file because it may contain useful information. So be careful while using this command. It is recommended to use -i option along with rm command. Try looking at the manual for rm and identify the argument used to delete a directory and all files and directories it contains. What is it?
43. Navigate to the following directory: ~/testdata/blastdbs Once there, show the contents of the directory and unzip the testdbs.tar.gz file and show the directory contents again.
$ cd ~/testdata/blastdbs
$ ls
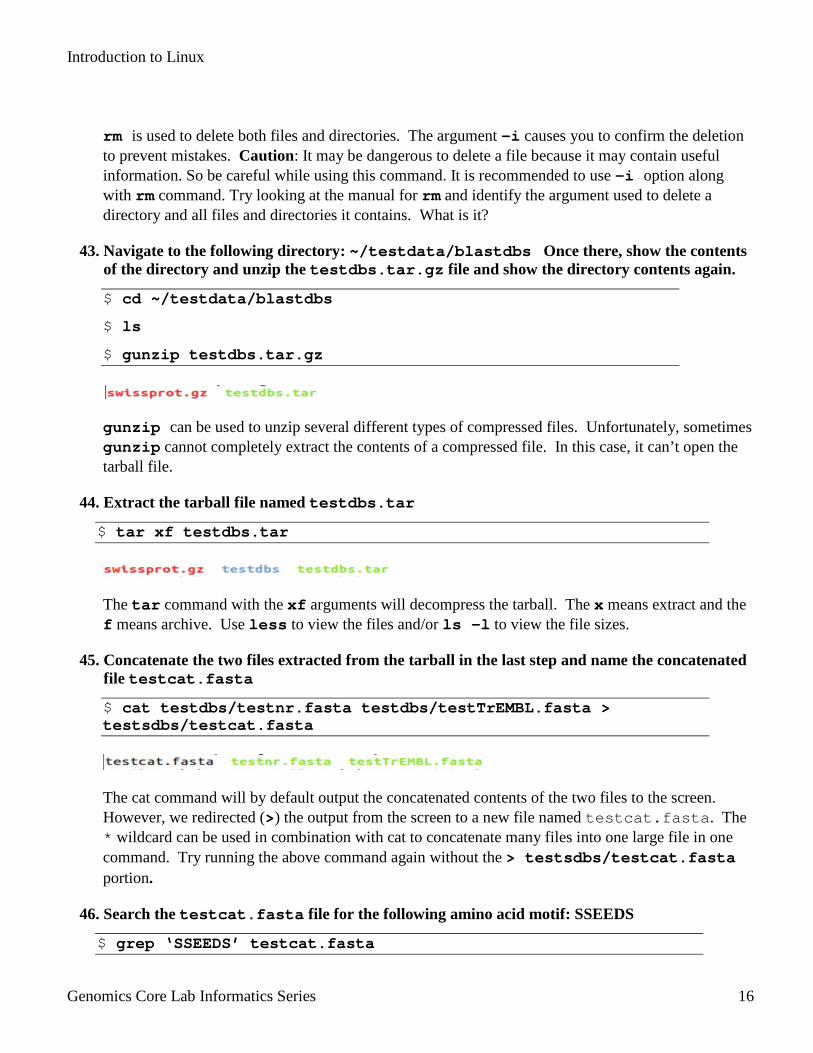
$ gunzip testdbs.tar.gz
gunzip can be used to unzip several different types of compressed files. Unfortunately, sometimes gunzip cannot completely extract the contents of a compressed file. In this case, it can’t open the tarball file.
44. Extract the tarball file named testdbs.tar
$ tar xf testdbs.tar
The tar command with the xf arguments will decompress the tarball. The x means extract and the f means archive. Use less to view the files and/or ls –l to view the file sizes.
45. Concatenate the two files extracted from the tarball in the last step and name the concatenated file testcat.fasta
$ cat testdbs/testnr.fasta testdbs/testTrEMBL.fasta > testsdbs/testcat.fasta
The cat command will by default output the concatenated contents of the two files to the screen. However, we redirected (>) the output from the screen to a new file named testcat.fasta. The * wildcard can be used in combination with cat to concatenate many files into one large file in one command. Try running the above command again without the > testsdbs/testcat.fasta portion.
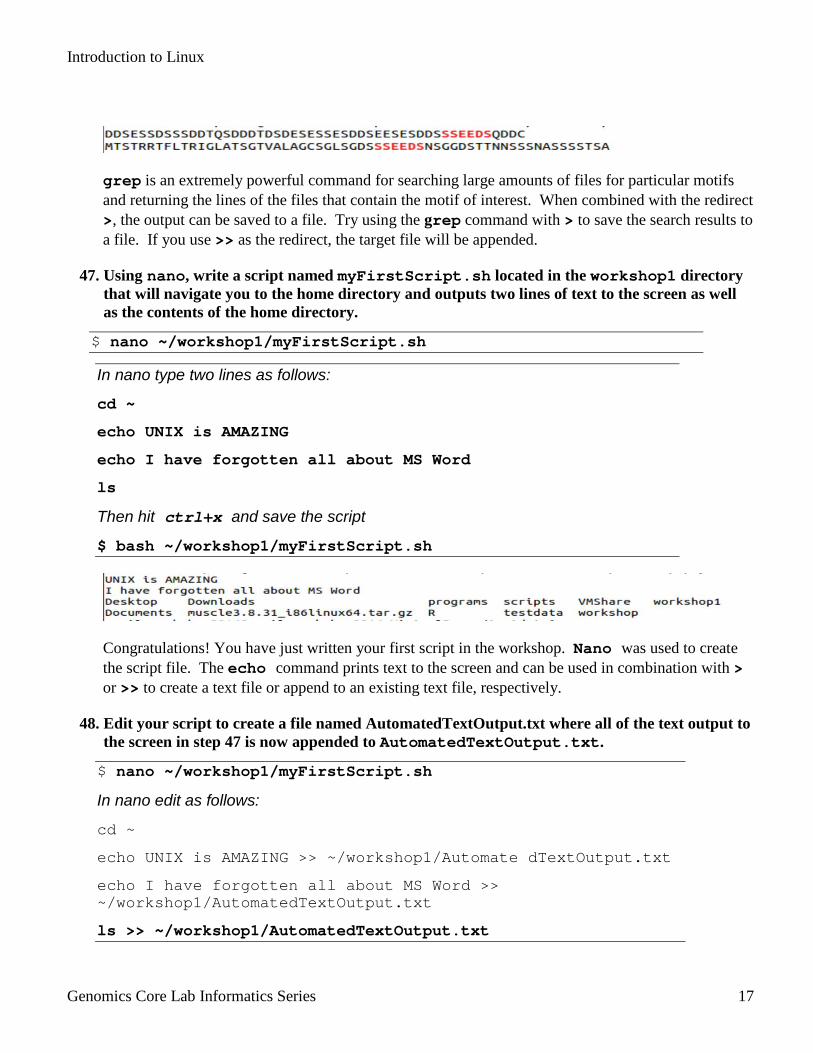
46. Search the testcat.fasta file for the following amino acid motif: SSEEDS
$ grep ‘SSEEDS’ testcat.fasta
Genomics Core Lab Informatics Series 16
Introduction to Linux
grep is an extremely powerful command for searching large amounts of files for particular motifs and returning the lines of the files that contain the motif of interest. When combined with the redirect >, the output can be saved to a file. Try using the grep command with > to save the search results to a file. If you use >> as the redirect, the target file will be appended.
47. Using nano, write a script named myFirstScript.sh located in the workshop1 directory that will navigate you to the home directory and outputs two lines of text to the screen as well as the contents of the home directory.
$ nano ~/workshop1/myFirstScript.sh
In nano type two lines as follows:
cd ~
echo UNIX is AMAZING
echo I have forgotten all about MS Word
ls
Then hit ctrl+x and save the script
$ bash ~/workshop1/myFirstScript.sh
Congratulations! You have just written your first script in the workshop. Nano was used to create the script file. The echo command prints text to the screen and can be used in combination with > or >> to create a text file or append to an existing text file, respectively.
48. Edit your script to create a file named AutomatedTextOutput.txt where all of the text output to the screen in step 47 is now appended to AutomatedTextOutput.txt.
$ nano ~/workshop1/myFirstScript.sh
In nano edit as follows:
cd ~
echo UNIX is AMAZING >> ~/workshop1/Automate dTextOutput.txt
echo I have forgotten all about MS Word >> ~/workshop1/AutomatedTextOutput.txt
ls >> ~/workshop1/AutomatedTextOutput.txt
Genomics Core Lab Informatics Series 17

Introduction to Linux
Then hit ctrl+x and save the script
$ bash ~/workshop1/myFirstScript.sh
Now your script creates a file and appends new information to it.
49. Save all of the commands you’ve used today into a file named AllCommandsUsedToday.sh in the workshop1 directory.
$ history > ~/workshop1/AllCommandsUsedToday.sh
You have just created a script that will execute every command that you have issued to your computer today. I don’t recommend running this script because you have changed the directory structure. However, you could run this on a fresh copy of the Ubuntu VM and it would execute everything you did today in a fraction of the time. Use nano to view the output
Indpendent Exercise:
Create a script that copies the file swissprot.gz from the blastdbs directory in the testdata
directory in the home directory to the research directory located within the workshop1 directory
created earlier. Unzip the file. Search the file for the amino acid motif MAYTT and redirect the
output into a file named grepswisprotdbforMAYTT. Try to incorporate other commands that
you have learned into this script to execute othe operations.
Genomics Core Lab Informatics Series 18