Embed Size (px)
Citation preview
IP Addressing: DHCP Configuration Guide,Cisco IOS Release 12.4T
Americas HeadquartersCisco Systems, Inc.170 West Tasman DriveSan Jose, CA 95134-1706USAhttp://www.cisco.comTel: 408 526-4000 800 553-NETS (6387)Fax: 408 527-0883

THE SPECIFICATIONS AND INFORMATION REGARDING THE PRODUCTS IN THIS MANUAL ARE SUBJECT TO CHANGE WITHOUT NOTICE. ALL STATEMENTS,INFORMATION, AND RECOMMENDATIONS IN THIS MANUAL ARE BELIEVED TO BE ACCURATE BUT ARE PRESENTED WITHOUT WARRANTY OF ANY KIND,EXPRESS OR IMPLIED. USERS MUST TAKE FULL RESPONSIBILITY FOR THEIR APPLICATION OF ANY PRODUCTS.
THE SOFTWARE LICENSE AND LIMITED WARRANTY FOR THE ACCOMPANYING PRODUCT ARE SET FORTH IN THE INFORMATION PACKET THAT SHIPPEDWITH THE PRODUCT AND ARE INCORPORATED HEREIN BY THIS REFERENCE. IF YOU ARE UNABLE TO LOCATE THE SOFTWARE LICENSE OR LIMITEDWARRANTY, CONTACT YOUR CISCO REPRESENTATIVE FOR A COPY.
The Cisco implementation of TCP header compression is an adaptation of a program developed by the University of California, Berkeley (UCB) as part of UCB’s public domain versionof the UNIX operating system. All rights reserved. Copyright © 1981, Regents of the University of California.
NOTWITHSTANDING ANY OTHER WARRANTY HEREIN, ALL DOCUMENT FILES AND SOFTWARE OF THESE SUPPLIERS ARE PROVIDED “AS IS” WITH ALLFAULTS. CISCO AND THE ABOVE-NAMED SUPPLIERS DISCLAIM ALL WARRANTIES, EXPRESSED OR IMPLIED, INCLUDING, WITHOUT LIMITATION, THOSE OFMERCHANTABILITY, FITNESS FOR A PARTICULAR PURPOSE AND NONINFRINGEMENT OR ARISING FROM A COURSE OF DEALING, USAGE, OR TRADEPRACTICE.
IN NO EVENT SHALL CISCO OR ITS SUPPLIERS BE LIABLE FOR ANY INDIRECT, SPECIAL, CONSEQUENTIAL, OR INCIDENTAL DAMAGES, INCLUDING,WITHOUT LIMITATION, LOST PROFITS OR LOSS OR DAMAGE TO DATA ARISING OUT OF THE USE OR INABILITY TO USE THIS MANUAL, EVEN IF CISCO ORITS SUPPLIERS HAVE BEEN ADVISED OF THE POSSIBILITY OF SUCH DAMAGES.
Cisco and the Cisco logo are trademarks or registered trademarks of Cisco and/or its affiliates in the U.S. and other countries. To view a list of Cisco trademarks, go to this URL: www.cisco.com/go/trademarks. Third-party trademarks mentioned are the property of their respective owners. The use of the word partner does not imply a partnership relationshipbetween Cisco and any other company. (1110R)
Any Internet Protocol (IP) addresses and phone numbers used in this document are not intended to be actual addresses and phone numbers. Any examples, command display output,network topology diagrams, and other figures included in the document are shown for illustrative purposes only. Any use of actual IP addresses or phone numbers in illustrative contentis unintentional and coincidental.
© 2012 Cisco Systems, Inc. All rights reserved.
C O N T E N T S
DHCP Overview 1
Information About DHCP 1
DHCP Overview 1
Benefits of Using Cisco IOS DHCP 2
DHCP Server Relay Agent and Client Operation 2
DHCP Database 3
DHCP Attribute Inheritance 3
DHCP Options and Suboptions 4
DHCP Server On-Demand Address Pool Management Overview 6
DHCP Services for Accounting and Security Overview 6
Additional References 7
Glossary 8
Configuring the Cisco IOS DHCP Server 11
Finding Feature Information 11
Prerequisites for Configuring the DHCP Server 11
Information About the Cisco IOS DHCP Server 12
Overview of the DHCP Server 12
DHCP Attribute Inheritance 12
DHCP Server Address Allocation Using Option 82 12
How to Configure the Cisco IOS DHCP Server 12
Configuring a DHCP Database Agent or Disabling Conflict Logging 13
Excluding IP Addresses 14
Configuring DHCP Address Pools 15
Configuring a DHCP Address Pool 15
Configuring a DHCP Address Pool with Secondary Subnets 20
Troubleshooting Tips 25
Verifying the DHCP Address Pool Configuration 25
Configuring Manual Bindings 27
Troubleshooting Tips 29
IP Addressing: DHCP Configuration Guide, Cisco IOS Release 12.4T iii
Configuring DHCP Static Mapping 29
Configuring the DHCP Server to Read a Static Mapping Text File 31
Customizing DHCP Server Operation 34
Configuring a Remote Router to Import DHCP Server Options from a Central DHCP Server 35
Configuring the Central DHCP Server to Update DHCP Options 35
Configuring the Remote Router to Import DHCP Options 36
Configuring DHCP Address Allocation Using Option 82 38
DHCP Address Allocation Using Option 82 Feature Design 38
Enabling Option 82 for DHCP Address Allocation 39
Troubleshooting Tips 40
Defining the DHCP Class and Relay Agent Information Patterns 40
Troubleshooting Tips 41
Defining the DHCP Address Pool 41
Configuring a Static Route with the Next Hop Dynamically Obtained Through DHCP 43
Clearing DHCP Server Variables 44
Configuration Examples for the Cisco IOS DHCP Server 45
Configuring the DHCP Database Agent Example 46
Excluding IP Addresses Example 46
Configuring DHCP Address Pools Example 46
Configuring a DHCP Address Pool with Multiple Disjoint Subnets Example 47
Configuring Manual Bindings Example 48
Configuring Static Mapping Example 49
Configuring the Option to Ignore all BOOTP Requests Example 49
Importing DHCP Options Example 50
Configuring DHCP Address Allocation Using Option 82 Example 51
Configuring a Static Route with the Next-Hop Dynamically Obtained Through DHCP
Example 52
Additional References 52
Feature Information for the Cisco IOS DHCP Server 54
Configuring the DHCP Server On-Demand Address Pool Manager 57
Finding Feature Information 57
Prerequisites for Configuring the DHCP Server On-Demand Address Pool Manager 57
Restrictions for Configuring the DHCP Server On-Demand Address Pool Manager 58
Information About the DHCP Server On-Demand Address Pool Manager 58
ODAP Manager Operation 58
Contents
IP Addressing: DHCP Configuration Guide, Cisco IOS Release 12.4Tiv
Subnet Allocation Server Operation 60
Benefits of Using ODAPs 61
How to Configure the DHCP Server On-Demand Address Pool Manager 61
Specifying DHCP ODAPs as the Global Default Mechanism 61
Defining DHCP ODAPs on an Interface 62
Configuring the DHCP Pool as an ODAP 63
Configuring ODAPs to Obtain Subnets Through IPCP Negotiation 65
Configuring AAA 67
Configuring RADIUS 69
ODAP AAA Profile 69
Disabling ODAPs 71
Verifying ODAP Operation 72
Troubleshooting Tips 74
Monitoring and Maintaining the ODAP 74
Configuring DHCP ODAP Subnet Allocation Server Support 76
Configuring a Global Subnet Pool on a Subnet Allocation Server 77
Global Subnet Pools 77
Configuring a VRF Subnet Pool on a Subnet Allocation Server 78
VRF Subnet Pools 78
Using a VPN ID to Configure a VRF Subnet Pool on a Subnet Allocation Server 79
VRF Pools and VPN IDs 80
Verifying Subnet Allocation and DHCP Bindings 82
Troubleshooting the DHCP ODAP Subnet Allocation Server 83
Configuration Examples for DHCP Server On-Demand Address Pool Manager 84
Specifying DHCP ODAPs as the Global Default Mechanism Example 84
Defining DHCP ODAPs on an Interface Example 85
Configuring the DHCP Pool as an ODAP Example 85
Configuring the DHCP Pool as an ODAP for Non-MPLS VPNs Example 87
IPCP Subnet Mask Delivery Example 88
Configuring AAA and RADIUS Example 89
Configuring a Global Pool on a Subnet Allocation Server Example 89
Configuring a VRF Pool on a Subnet Allocation Server Example 90
Using a VPN ID to Configure a VRF Pool on a Subnet Allocation Server Example 90
Verifying Local Configuration on a Subnet Allocation Server Example 90
Verifying Address Pool Allocation Information Example 91
Contents
IP Addressing: DHCP Configuration Guide, Cisco IOS Release 12.4T v
Verifying Subnet Allocation and DHCP Bindings Example 91
Additional References 91
Feature Information for the DHCP Server On-Demand Address Pool Manager 93
Glossary 94
Configuring the Cisco IOS DHCP Relay Agent 97
Finding Feature Information 97
Prerequisites for Configuring the Cisco IOS DHCP Relay Agent 97
Information About the DHCP Relay Agent 98
DHCP Relay Agent Overview 98
How to Configure the DHCP Relay Agent 98
Specifying the Packet Forwarding Address 98
Configuring Support for the Relay Agent Information Option 100
Configuring Per-Interface Support for the Relay Agent Information Option 104
Configuring the Subscriber Identifier Suboption of the Relay Agent Information Option 106
Configuring DHCP Relay Class Support for Client Identification 107
Configuring DHCP Relay Agent Support for MPLS VPNs 110
Configuring Support for Relay Agent Information Option Encapsulation 114
Setting the Gateway Address of the DHCP Broadcast to a Secondary Address Using Smart
Relay Agent Forwarding 117
Configuring Support for Private and Standard Suboption Numbers 118
Troubleshooting the DHCP Relay Agent 119
Configuration Examples for the Cisco IOS DHCP Relay Agent 120
Example: Configuring Support for the Relay Agent Information Option 120
Example: Configuring Per-Interface Support for the Relay Agent Information Option 120
Example: Configuring the Subscriber Identifier Suboption of the Relay Agent Information
Option 121
Example: Configuring DHCP Relay Class Support for Client Identification 121
Example: Configuring DHCP Relay Agent Support for MPLS VPNs 122
Example: Configuring Support for Relay Agent Information Option Encapsulation 122
Example: Setting the Gateway Address of the DHCP Broadcast to a Secondary Address
Using Smart Relay Agent Forwarding 122
Additional References 123
Feature Information for the Cisco IOS DHCP Relay Agent 124
Glossary 127
Configuring the Cisco IOS DHCP Client 129
Finding Feature Information 129
Contents
IP Addressing: DHCP Configuration Guide, Cisco IOS Release 12.4Tvi
Restrictions for Configuring the DHCP Client 129
Information About the DHCP Client 130
DHCP Client Operation 130
DHCP Client Overview 130
DHCP Client on WAN Interfaces 131
DHCP FORCERENEW 131
How to Configure the DHCP Client 132
Configuring the DHCP Client 132
DHCP Client Default Behavior 132
Troubleshooting Tips 134
Forcing a Release or Renewal of a DHCP Lease for a DHCP Client 134
DHCP Release and Renew CLI Operation 135
Release a DHCP Lease 135
Renew a DHCP Lease 135
Enabling FORCERENEW-Message Handling 136
Configuration Examples for the DHCP Client 138
Example Configuring the DHCP Client 139
Example Customizing the DHCP Client Configuration 139
Example Configuring an ATM Primary Interface (Multipoint) Using aal5snap Encapsulation
and Inverse ARP 139
Example Configuring an ATM Point-to-Point Subinterface Using aa15snap Encapsulation 140
Example Configuring an ATM Point-to-Point Subinterface Using aa15nlpid Encapsulation 140
Example Configuring an ATM Point-to-Point Subinterface Using aa15mux PPP Encapsulation 140
Example Releasing a DHCP Lease 140
Example Renewing a DHCP Lease 141
Additional References 141
Feature Information for the DHCP Client 143
Configuring DHCP Services for Accounting and Security 145
Finding Feature Information 145
Prerequisites for Configuring DHCP Services for Accounting and Security 145
Information About DHCP Services for Accounting and Security 146
DHCP Operation in Public Wireless LANs 146
Security Vulnerabilities in Public Wireless LANs 146
DHCP Services for Security and Accounting Overview 146
DHCP Lease Limits 147
Contents
IP Addressing: DHCP Configuration Guide, Cisco IOS Release 12.4T vii
How to Configure DHCP Services for Accounting and Security 147
Configuring AAA and RADIUS for DHCP Accounting 147
RADIUS Accounting Attributes 148
Troubleshooting Tips 150
Configuring DHCP Accounting 150
Verifying DHCP Accounting 152
Securing ARP Table Entries to DHCP Leases 153
Troubleshooting Tips 154
Configuring DHCP Authorized ARP 155
Configuring a DHCP Lease Limit to Globally Control the Number of Subscribers 157
Troubleshooting Tips 159
Configuring a DHCP Lease Limit to Control the Number of Subscribers on an Interface 159
Troubleshooting Tips 161
Configuration Examples for DHCP Services for Accounting and Security 161
Example Configuring AAA and RADIUS for DHCP Accounting 161
Example Configuring DHCP Accounting 162
Example Verifying DHCP Accounting 162
Example Configuring DHCP Authorized ARP 163
Example Verifying DHCP Authorized ARP 164
Example Configuring a DHCP Lease Limit 164
Additional References 164
Technical Assistance 166
Feature Information for DHCP Services for Accounting and Security 166
Configuring DHCP Enhancements for Edge-Session Management 171
Finding Feature Information 171
Information About DHCP Enhancements for Edge-Session Management 171
DHCP Servers and Relay Agents 172
On-Demand Address Pool Management 172
Design of the DHCP Enhancements for Edge-Session Management Feature 172
DHCP Server Co-Resident with the SG 172
DHCP Relay Agent Co-Resident with the SG 173
Benefits of the DHCP Enhancements for Edge-Session Management 173
How to Configure DHCP Enhancements for Edge-Session Management 174
Configuring the DHCP Address Pool and a Class Name 174
Configuring a Relay Pool with a Relay Source and Destination 176
Contents
IP Addressing: DHCP Configuration Guide, Cisco IOS Release 12.4Tviii
Configuring a Relay Pool for a Remote DHCP Server 178
Configuring Other Types of Relay Pools 181
Configuring Relay Information for an Address Pool 181
Configuring Multiple Relay Sources for a Relay Pool 183
Configuration Examples for DHCP Enhancements for Edge Session Management 185
DHCP Address Range and Class Name Configuration Example 186
DHCP Server Co-Resident with SG Configuration Example 186
DHCP Relay Agent Co-Resident with SG Configuration Example 186
Multiple DHCP Pools and Different ISPs Configuration Example 187
Multiple Relay Sources and Destinations Configuration Example 187
SG-Supplied Class Name Configuration Example 188
Additional References 188
Feature Information for DHCP Enhancements for Edge-Session Management 190
Contents
IP Addressing: DHCP Configuration Guide, Cisco IOS Release 12.4T ix

Contents
IP Addressing: DHCP Configuration Guide, Cisco IOS Release 12.4Tx
DHCP Overview
The Dynamic Host Configuration Protocol (DHCP) is based on the Bootstrap Protocol (BOOTP), whichprovides the framework for passing configuration information to hosts on a TCP/IP network. DHCP addsthe capability to automatically allocate reusable network addresses and configuration options to Internethosts. DHCP consists of two components: a protocol for delivering host-specific configuration parametersfrom a DHCP server to a host and a mechanism for allocating network addresses to hosts. DHCP is builton a client/server model, where designated DHCP server hosts allocate network addresses and deliverconfiguration parameters to dynamically configured hosts.
This module describes the concepts needed to understand Cisco IOS DHCP.
• Information About DHCP, page 1• Additional References, page 7• Glossary, page 8
Information About DHCP• DHCP Overview, page 1• Benefits of Using Cisco IOS DHCP, page 2• DHCP Server Relay Agent and Client Operation, page 2• DHCP Database, page 3• DHCP Attribute Inheritance, page 3• DHCP Options and Suboptions, page 4• DHCP Server On-Demand Address Pool Management Overview, page 6• DHCP Services for Accounting and Security Overview, page 6
DHCP OverviewCisco routers running Cisco IOS software include DHCP server and relay agent software. The Cisco IOSDHCP server is a full DHCP server implementation that assigns and manages IP addresses from specifiedaddress pools within the router to DHCP clients. These address pools can also be configured to supplyadditional information to the requesting client such as the IP address of the DNS server, the default router,and other configuration parameters. If the Cisco IOS DHCP server cannot satisfy a DHCP request from itsown database, it can forward the request to one or more secondary DHCP servers defined by the networkadministrator.
DHCP supports three mechanisms for IP address allocation:
• Automatic allocation--DHCP assigns a permanent IP address to a client.• Dynamic allocation--DHCP assigns an IP address to a client for a limited period of time, which is
called a lease (or until the client explicitly relinquishes the address). DHCP also supports on-demand
IP Addressing: DHCP Configuration Guide, Cisco IOS Release 12.4T 1
address pools (ODAPs), which is a feature in which pools of IP addresses can be dynamicallyincreased or reduced in size depending on the address utilization level. ODAPs support addressassignment for customers using private addresses.
• Manual allocation--The network administrator assigns an IP address to a client and DHCP is usedsimply to convey the assigned address to the client.
The format of DHCP messages is based on the format of BOOTP messages, which ensures support forBOOTP relay agent functionality and interoperability between BOOTP clients and DHCP servers. BOOTPrelay agents eliminate the need for deploying a DHCP server on each physical network segment. BOOTP isexplained in RFC 951, Bootstrap Protocol (BOOTP), and RFC 1542, Clarifications and Extensions for theBootstrap Protocol.
The main advantage of DHCP compared to BOOTP is that DHCP does not require that the DHCP server beconfigured with all MAC addresses of all clients. DHCP defines a process by which the DHCP serverknows the IP subnet in which the DHCP client resides, and it can assign an IP address from a pool of validIP addresses in that subnet. Most of the other information that DHCP might supply, such as the defaultrouter IP address, is the same for all hosts in the subnet, so DHCP servers can usually configureinformation per subnet rather than per host. This functionality reduces network administration taskscompared to BOOTP.
Benefits of Using Cisco IOS DHCPThe Cisco IOS DHCP implementation offers the following benefits:
• Reduced Internet access costs
Using automatic IP address assignment at each remote site substantially reduces Internet access costs.Static IP addresses are considerably more expensive to purchase than are automatically allocated IPaddresses.
• Reduced client configuration tasks and costs
Because DHCP is easy to configure, it minimizes operational overhead and costs associated with deviceconfiguration tasks and eases deployment by nontechnical users.
• Centralized management
Because the DHCP server maintains configurations for several subnets, an administrator only needs toupdate a single, central server when configuration parameters change.
DHCP Server Relay Agent and Client OperationDHCP provides a framework for passing configuration information dynamically to hosts on a TCP/IPnetwork. A DHCP client is an Internet host that uses DHCP to obtain configuration parameters such as anIP address.
A DHCP relay agent is any host that forwards DHCP packets between clients and servers. Relay agents areused to forward requests and replies between clients and servers when they are not on the same physicalsubnet. Relay agent forwarding is distinct from the normal forwarding of an IP router, where IP datagramsare switched between networks, somewhat transparently. In contrast, relay agents receive DHCP messagesand then generate a new DHCP message to send on another interface.
The figure below shows the basic steps that occur when a DHCP client requests an IP address from aDHCP server. The client, Host A, sends a DHCPDISCOVER broadcast message to locate a DHCP server.A relay agent forwards the packets between the DHCP client and server. A DHCP server offers
Benefits of Using Cisco IOS DHCP Information About DHCP
IP Addressing: DHCP Configuration Guide, Cisco IOS Release 12.4T2
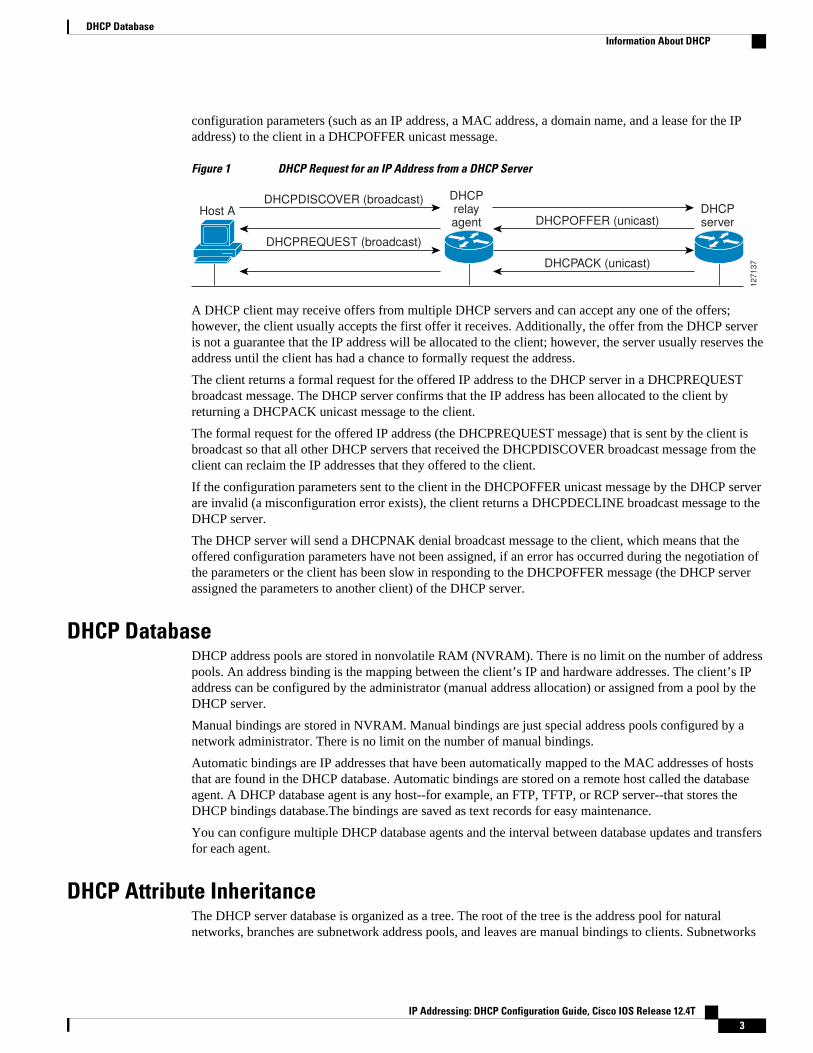
configuration parameters (such as an IP address, a MAC address, a domain name, and a lease for the IPaddress) to the client in a DHCPOFFER unicast message.
Figure 1 DHCP Request for an IP Address from a DHCP Server
Host A
DHCP relay agent
DHCP server
DHCPREQUEST (broadcast)
DHCPDISCOVER (broadcast)
DHCPACK (unicast)
DHCPOFFER (unicast)
127137
A DHCP client may receive offers from multiple DHCP servers and can accept any one of the offers;however, the client usually accepts the first offer it receives. Additionally, the offer from the DHCP serveris not a guarantee that the IP address will be allocated to the client; however, the server usually reserves theaddress until the client has had a chance to formally request the address.
The client returns a formal request for the offered IP address to the DHCP server in a DHCPREQUESTbroadcast message. The DHCP server confirms that the IP address has been allocated to the client byreturning a DHCPACK unicast message to the client.
The formal request for the offered IP address (the DHCPREQUEST message) that is sent by the client isbroadcast so that all other DHCP servers that received the DHCPDISCOVER broadcast message from theclient can reclaim the IP addresses that they offered to the client.
If the configuration parameters sent to the client in the DHCPOFFER unicast message by the DHCP serverare invalid (a misconfiguration error exists), the client returns a DHCPDECLINE broadcast message to theDHCP server.
The DHCP server will send a DHCPNAK denial broadcast message to the client, which means that theoffered configuration parameters have not been assigned, if an error has occurred during the negotiation ofthe parameters or the client has been slow in responding to the DHCPOFFER message (the DHCP serverassigned the parameters to another client) of the DHCP server.
DHCP DatabaseDHCP address pools are stored in nonvolatile RAM (NVRAM). There is no limit on the number of addresspools. An address binding is the mapping between the client’s IP and hardware addresses. The client’s IPaddress can be configured by the administrator (manual address allocation) or assigned from a pool by theDHCP server.
Manual bindings are stored in NVRAM. Manual bindings are just special address pools configured by anetwork administrator. There is no limit on the number of manual bindings.
Automatic bindings are IP addresses that have been automatically mapped to the MAC addresses of hoststhat are found in the DHCP database. Automatic bindings are stored on a remote host called the databaseagent. A DHCP database agent is any host--for example, an FTP, TFTP, or RCP server--that stores theDHCP bindings database.The bindings are saved as text records for easy maintenance.
You can configure multiple DHCP database agents and the interval between database updates and transfersfor each agent.
DHCP Attribute InheritanceThe DHCP server database is organized as a tree. The root of the tree is the address pool for naturalnetworks, branches are subnetwork address pools, and leaves are manual bindings to clients. Subnetworks
DHCP DatabaseInformation About DHCP
IP Addressing: DHCP Configuration Guide, Cisco IOS Release 12.4T 3
inherit network parameters and clients inherit subnetwork parameters. Therefore, common parameters, forexample the domain name, should be configured at the highest (network or subnetwork) level of the tree.
Inherited parameters can be overridden. For example, if a parameter is defined in both the natural networkand a subnetwork, the definition of the subnetwork is used.
Address leases are not inherited. If a lease is not specified for an IP address, by default, the DHCP serverassigns a one-day lease for the address.
DHCP Options and SuboptionsConfiguration parameters and other control information are carried in tagged data items that are stored inthe options field of the DHCP message. Options provide a method of appending additional information.Vendors that want to provide additional information to their client not designed into the protocol can useoptions.
The Cisco IOS DHCP implementation also allows most DHCP server options to be customized. Forexample, the TFTP server, which stores the Cisco IOS image, can be customized with option 150 tosupport intelligent IP phones.
VPNs allow the possibility that two pools in separate networks can have the same address space, withprivate network addresses, served by the same DHCP server. Cisco IOS software supports VPN-relatedoptions and suboptions such as the relay agent information option and VPN identification suboption. Arelay agent can recognize these VPN-related options and suboptions and forward the client-originatedDHCP packets to a DHCP server. The DHCP server can use this information to assign IP addresses andother parameters, distinguished by a VPN identifier, to help select the VPN to which the client belongs.
For more information on DHCP options and suboptions, see the “DHCP Options” appendix in the NetworkRegistrar User’s Guide , Release 6.2.
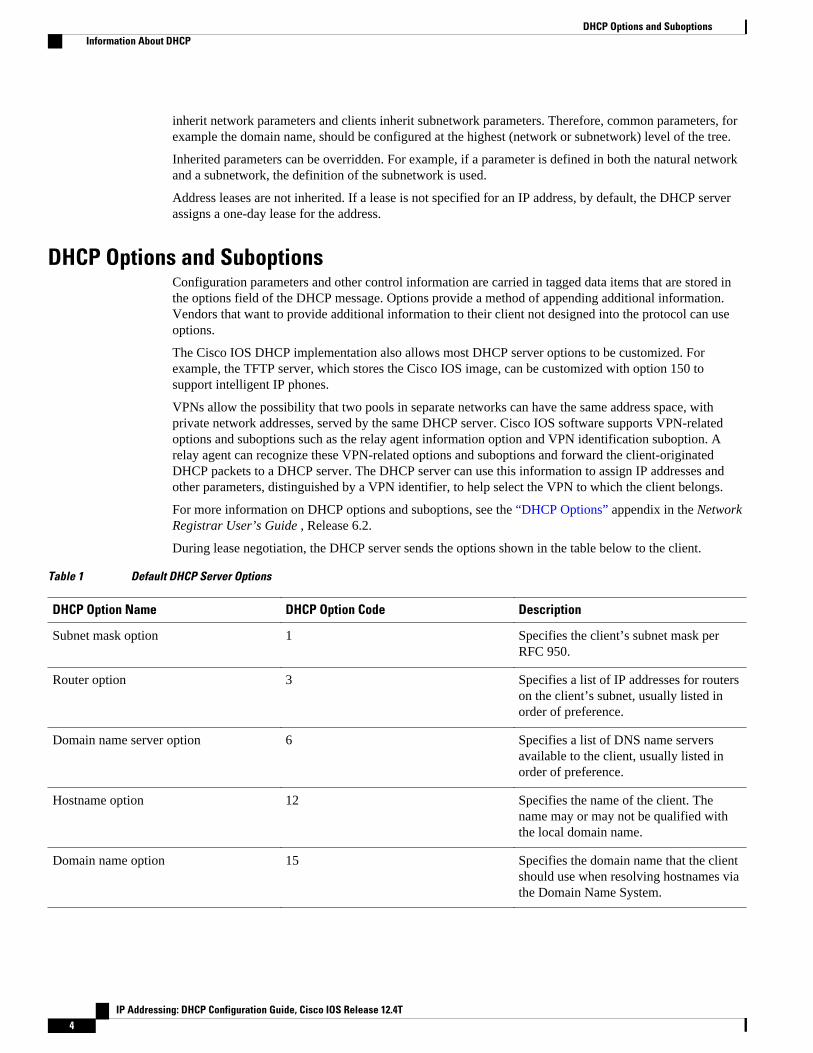
During lease negotiation, the DHCP server sends the options shown in the table below to the client.
Table 1 Default DHCP Server Options
DHCP Option Name DHCP Option Code Description
Subnet mask option 1 Specifies the client’s subnet mask perRFC 950.
Router option 3 Specifies a list of IP addresses for routerson the client’s subnet, usually listed inorder of preference.
Domain name server option 6 Specifies a list of DNS name serversavailable to the client, usually listed inorder of preference.
Hostname option 12 Specifies the name of the client. Thename may or may not be qualified withthe local domain name.
Domain name option 15 Specifies the domain name that the clientshould use when resolving hostnames viathe Domain Name System.
DHCP Options and Suboptions Information About DHCP
IP Addressing: DHCP Configuration Guide, Cisco IOS Release 12.4T4
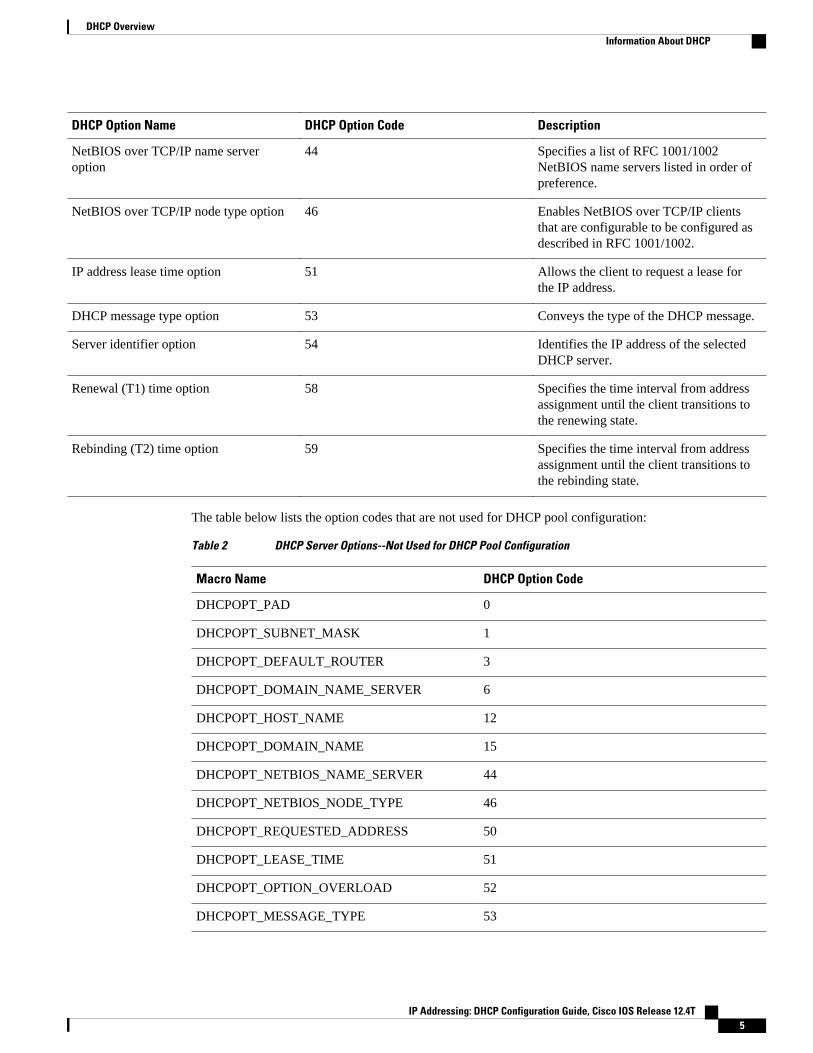
DHCP Option Name DHCP Option Code Description
NetBIOS over TCP/IP name serveroption
44 Specifies a list of RFC 1001/1002NetBIOS name servers listed in order ofpreference.
NetBIOS over TCP/IP node type option 46 Enables NetBIOS over TCP/IP clientsthat are configurable to be configured asdescribed in RFC 1001/1002.
IP address lease time option 51 Allows the client to request a lease forthe IP address.
DHCP message type option 53 Conveys the type of the DHCP message.
Server identifier option 54 Identifies the IP address of the selectedDHCP server.
Renewal (T1) time option 58 Specifies the time interval from addressassignment until the client transitions tothe renewing state.
Rebinding (T2) time option 59 Specifies the time interval from addressassignment until the client transitions tothe rebinding state.
The table below lists the option codes that are not used for DHCP pool configuration:
Table 2 DHCP Server Options--Not Used for DHCP Pool Configuration
Macro Name DHCP Option Code
DHCPOPT_PAD 0
DHCPOPT_SUBNET_MASK 1
DHCPOPT_DEFAULT_ROUTER 3
DHCPOPT_DOMAIN_NAME_SERVER 6
DHCPOPT_HOST_NAME 12
DHCPOPT_DOMAIN_NAME 15
DHCPOPT_NETBIOS_NAME_SERVER 44
DHCPOPT_NETBIOS_NODE_TYPE 46
DHCPOPT_REQUESTED_ADDRESS 50
DHCPOPT_LEASE_TIME 51
DHCPOPT_OPTION_OVERLOAD 52
DHCPOPT_MESSAGE_TYPE 53
DHCP OverviewInformation About DHCP
IP Addressing: DHCP Configuration Guide, Cisco IOS Release 12.4T 5

Macro Name DHCP Option Code
DHCPOPT_SERVER_IDENTIFIER 54
DHCPOPT_RENEWAL_TIME 58
DHCPOPT_REBINDING_TIME 59
DHCPOPT_CLIENT_IDENTIFIER 61
DHCPOPT_RELAY_INFORMATION 82
DHCPOPT_END 255
DHCP Server On-Demand Address Pool Management OverviewThe Cisco IOS DHCP server on-demand address pool (ODAP) manager is used to centralize themanagement of large pools of addresses and simplify the configuration of large networks. ODAP providesa central management point for the allocation and assignment of IP addresses. When a Cisco IOS router isconfigured as an ODAP manager, pools of IP addresses are dynamically increased or reduced in sizedepending on the address utilization level.
ODAPs support address assignment using DHCP for customers using private addresses. Each ODAP isconfigured and associated with a particular Multiprotocol Label Switching (MPLS) VPN. Cisco IOSsoftware also provides ODAP support for non-MPLS VPN address pools by adding pool name support tothe peer default ip address dhcp-pool pool namecommand.
DHCP server subnet allocation is a way of offering entire subnets (ranges of addresses) to relay agents sothat remote access devices can provision IP addresses to DHCP clients. This functionality can occur alongwith or instead of managing individual client addresses. Subnet allocation can improve IP addressprovisioning, aggregation, characterization, and distribution by relying on the DHCP infrastructure todynamically manage subnets.
This capability allows the DHCP server to be configured with a pool of subnets for lease to ODAP clients.Subnet pools can be configured for global ODAP clients or MPLS VPN ODAP clients on a per-client basis.The DHCP subnet allocation server creates bindings for the subnet leases and stores these leases in theDHCP database.
DHCP Services for Accounting and Security OverviewCisco IOS software supports several new capabilities that enhance DHCP accounting, reliability, andsecurity in Public Wireless LANs (PWLANs). This functionality can also be used in other networkimplementations.
DHCP accounting provides authentication, authorization, and accounting (AAA) and RemoteAuthentication Dial-In User Service (RADIUS) support for DHCP. The AAA and RADIUS supportimproves security by sending secure START and STOP accounting messages. The configuration of DHCPaccounting adds a layer of security that allows DHCP lease assignment and termination to be triggered forthe appropriate RADIUS START and STOP accounting records so that the session state is properlymaintained by upstream devices such as a Service Selection Gateway (SSG). This additional security canhelp to prevent unauthorized clients or hackers from gaining illegal entry to the network by spoofingauthorized DHCP leases.
Three other features have been designed and implemented to address the security concerns in PWLANs.The first feature secures ARP table entries to DHCP leases in the DHCP database. The secure ARP
DHCP Server On-Demand Address Pool Management Overview Information About DHCP
IP Addressing: DHCP Configuration Guide, Cisco IOS Release 12.4T6
functionality prevents IP spoofing by synchronizing the database of the DHCP server with the ARP table toavoid address hijacking. Secure ARP adds an entry to the ARP table for a client when an address isallocated that can be deleted by the DHCP server only when a binding expires.
The second feature is DHCP authorized ARP. This functionality provides a complete solution byaddressing the need for DHCP to explicitly know when a user logs out. Before the introduction of DHCPauthorized ARP, there was no mechanism to inform the DHCP server if a user had left the systemungracefully, which could result in excessive billing for a customer that had logged out but the system hadnot detected the log out. To prevent this problem, DHCP authorized ARP sends periodic ARP messages ona per-minute basis to determine if a user is still logged in. Only authorized users can respond to the ARPrequest. ARP responses from unauthorized users are blocked at the DHCP server providing an extra levelof security.
In addition, DHCP authorized ARP disables dynamic ARP learning on an interface. The address mappingcan be installed only by the authorized component specified by the arp authorized interface configurationcommand. DHCP is the only authorized component currently allowed to install ARP entries.
The third feature is ARP autologoff, which adds finer control for probing when authorized users log out.The arp probe interval command specifies when to start a probe (the timeout), how frequent a peer isprobed (the interval), and the maximum number of retries (the count).
Additional ReferencesRelated Documents
Related Topic Document Title
Cisco IOS commands Cisco IOS Master Commands List, All Releases
DHCP commands: complete command syntax,command mode, command history, defaults, usageguidelines, and examples
Cisco IOS IP Addressing Services CommandReference
DHCP server configuration “Configuring the Cisco IOS DHCP Server” module
DHCP relay agent configuration “Configuring the Cisco IOS DHCP Relay Agent”module
DHCP client configuration “Configuring the Cisco IOS DHCP Client” module
DHCP server on-demand address pools “Configuring the DHCP Server On-DemandAddress Pool Manager” module
DHCP advanced features “Configuring DHCP Services for Accounting andSecurity” module
DHCP enhancements for edge-session management “Configuring DHCP Enhancements for Edge-Session Management” module
DHCP options “DHCP Options” appendix in the NetworkRegistrar User’s Guide , Release 6.1.1
DHCP OverviewAdditional References
IP Addressing: DHCP Configuration Guide, Cisco IOS Release 12.4T 7
Standards
Standard Title
No new or modified standards are supported. --
MIBs
MIB MIBs Link
No new or modified MIBs are supported. To locate and download MIBs for selectedplatforms, Cisco software releases, and feature sets,use Cisco MIB Locator found at the followingURL:
http://www.cisco.com/go/mibs
RFCs
RFC Title
RFC 951 Bootstrap Protocol (BOOTP)
RFC 1542 Clarifications and Extensions for the BootstrapProtocol
RFC 2131 Dynamic Host Configuration Protocol
RFC 2132 DHCP Options and BOOTP Vendor Extensions
Technical Assistance
Description Link
The Cisco Support and Documentation websiteprovides online resources to downloaddocumentation, software, and tools. Use theseresources to install and configure the software andto troubleshoot and resolve technical issues withCisco products and technologies. Access to mosttools on the Cisco Support and Documentationwebsite requires a Cisco.com user ID andpassword.
http://www.cisco.com/cisco/web/support/index.html
Glossaryaddress binding --A mapping between the client’s IP and hardware (MAC) addresses. The client’s IPaddress may be configured by the administrator (manual address allocation) or assigned from a pool by theDHCP server (automatic address allocation). The binding also contains a lease expiration date. The defaultfor the lease expiration date is one day.
DHCP Overview Glossary
IP Addressing: DHCP Configuration Guide, Cisco IOS Release 12.4T8
address conflict --A duplication of use of the same IP address by two hosts. During address assignment,DHCP checks for conflicts using ping and gratuitous (ARP). If a conflict is detected, the address isremoved from the pool. The address will not be assigned until the administrator resolves the conflict.
address pool --The range of IP addresses assigned by the DHCP server. Address pools are indexed bysubnet number.
automatic address allocation --An address assignment method where a network administrator obtains anIP address for a client for a finite period of time or until the client explicitly relinquishes the address.Automatic allocation is particularly useful for assigning an address to a client that will be connected to thenetwork only temporarily or for sharing a limited pool of IP addresses among a group of clients that do notneed permanent IP addresses. Automatic allocation may also be a good choice for assigning an IP addressto a new client being permanently connected to a network where IP addresses are sufficiently scarce that itis important to reclaim them when old clients are retired.
BOOTP --Bootstrap Protocol. A protocol that provides a method for a booting computer to find out its IPaddress and the location of the boot file with the rest of its parameters.
client --Any host requesting configuration parameters.
database--A collection of address pools and bindings.
database agent --Any host storing the DHCP bindings database, for example, a Trivial File TransferProtocol (TFTP) server.
DHCP --Dynamic Host Configuration Protocol. A protocol that provides a mechanism for allocating IPaddresses dynamically so that addresses can be reused when hosts no longer need them.
DNS --Domain Name System. A system used in the Internet for translating names of network nodes intoaddresses.
manual address allocation --An address assignment method that allocates an administratively assigned IPaddress to a host. Manual allocation allows DHCP to be used to eliminate the error-prone process ofmanually configuring hosts with IP addresses.
PWLAN --Public Wireless Local Area Network. A type of wireless LAN, often referred to as a hotspot,that anyone having a properly configured computer device can access.
relay agent --A router that forwards DHCP and BOOTP messages between a server and a client ondifferent subnets.
server --Any host providing configuration parameters.
SSG --Service Selection Gateway. The Cisco IOS feature set that provides on-demand service enforcementwithin the Cisco network.
Cisco and the Cisco logo are trademarks or registered trademarks of Cisco and/or its affiliates in the U.S.and other countries. To view a list of Cisco trademarks, go to this URL: www.cisco.com/go/trademarks.Third-party trademarks mentioned are the property of their respective owners. The use of the word partnerdoes not imply a partnership relationship between Cisco and any other company. (1110R)
Any Internet Protocol (IP) addresses and phone numbers used in this document are not intended to beactual addresses and phone numbers. Any examples, command display output, network topology diagrams,and other figures included in the document are shown for illustrative purposes only. Any use of actual IPaddresses or phone numbers in illustrative content is unintentional and coincidental.
DHCP Overview
IP Addressing: DHCP Configuration Guide, Cisco IOS Release 12.4T 9

DHCP Services for Accounting and Security Overview
IP Addressing: DHCP Configuration Guide, Cisco IOS Release 12.4T10
Configuring the Cisco IOS DHCP Server
Cisco routers running Cisco IOS software include Dynamic Host Configuration Protocol (DHCP) serverand relay agent software. The Cisco IOS DHCP server is a full DHCP server implementation that assignsand manages IP addresses from specified address pools within the router to DHCP clients. The DHCPserver can be configured to assign additional parameters such as the IP address of the Domain NameSystem (DNS) server and the default router.
This module describes the concepts and the tasks needed to configure the Cisco IOS DHCP server.
• Finding Feature Information, page 11• Prerequisites for Configuring the DHCP Server, page 11• Information About the Cisco IOS DHCP Server, page 12• How to Configure the Cisco IOS DHCP Server, page 12• Configuration Examples for the Cisco IOS DHCP Server, page 45• Additional References, page 52• Feature Information for the Cisco IOS DHCP Server, page 54
Finding Feature InformationYour software release may not support all the features documented in this module. For the latest featureinformation and caveats, see the release notes for your platform and software release. To find informationabout the features documented in this module, and to see a list of the releases in which each feature issupported, see the Feature Information Table at the end of this document.
Use Cisco Feature Navigator to find information about platform support and Cisco software image support.To access Cisco Feature Navigator, go to www.cisco.com/go/cfn. An account on Cisco.com is not required.
Prerequisites for Configuring the DHCP ServerBefore you configure the Cisco IOS DHCP server, you should understand the concepts documented in the“DHCP Overview” module.
The Cisco IOS DHCP server and relay agent are enabled by default. You can verify if they have beendisabled by checking your configuration file. If they have been disabled, the no service dhcp commandwill appear in the configuration file. Use the service dhcp command to reenable the functionality ifnecessary.
Port 67 (the server port) is closed in the Cisco IOS DHCP/BOOTP default configuration. There are twological parts to the service dhcp command: service enabled and service running. The DHCP service isenabled by default, but port 67 is not opened until the DHCP service is running. If the service is running,the show ip sockets details or show sockets detail command displays port 67 as open.
IP Addressing: DHCP Configuration Guide, Cisco IOS Release 12.4T 11
The Cisco IOS DHCP relay agent will be enabled on an interface only when the ip helper-address isconfigured. This command enables the DHCP broadcast to be forwarded to the configured DHCP server.
Information About the Cisco IOS DHCP Server• Overview of the DHCP Server, page 12
• DHCP Attribute Inheritance, page 12
• DHCP Server Address Allocation Using Option 82, page 12
Overview of the DHCP ServerTheCisco IOS DHCP server accepts address assignment requests and renewals and assigns the addressesfrom predefined groups of addresses contained within DHCP address pools. These address pools can alsobe configured to supply additional information to the requesting client such as the IP address of the DNSserver, the default router, and other configuration parameters. The Cisco IOS DHCP server can acceptbroadcasts from locally attached LAN segments or from DHCP requests that have been forwarded by otherDHCP relay agents within the network.
DHCP Attribute InheritanceThe DHCP server database is organized as a tree. The root of the tree is the address pool for naturalnetworks, branches are subnetwork address pools, and leaves are manual bindings to clients. Subnetworksinherit network parameters and clients inherit subnetwork parameters. Therefore, common parameters (forexample, the domain name) should be configured at the highest (network or subnetwork) level of the tree.
Inherited parameters can be overridden. For example, if a parameter is defined in both the natural networkand a subnetwork, the definition of the subnetwork is used.
Address leases are not inherited. If a lease is not specified for an IP address, by default, the DHCP serverassigns a one-day lease for the address.
DHCP Server Address Allocation Using Option 82The Cisco IOS DHCP server can allocate dynamic IP addresses based on the relay information option(option 82) information sent by the relay agent.
Automatic DHCP address allocation is typically based on an IP address, whether it be the gateway address(giaddr field of the DHCP packet) or the incoming interface IP address. In some networks, it is necessary touse additional information to further determine which IP addresses to allocate. By using option 82, theCisco IOS relay agent has long been able to include additional information about itself when forwardingclient-originated DHCP packets to a DHCP server. The Cisco IOS DHCP server can also use option 82 as ameans to provide additional information to properly allocate IP addresses to DHCP clients.
How to Configure the Cisco IOS DHCP Server• Configuring a DHCP Database Agent or Disabling Conflict Logging, page 13
• Excluding IP Addresses, page 14
• Configuring DHCP Address Pools, page 15
Overview of the DHCP Server Information About the Cisco IOS DHCP Server
IP Addressing: DHCP Configuration Guide, Cisco IOS Release 12.4T12
• Configuring Manual Bindings, page 27
• Configuring DHCP Static Mapping, page 29
• Customizing DHCP Server Operation, page 34
• Configuring a Remote Router to Import DHCP Server Options from a Central DHCP Server, page35
• Configuring DHCP Address Allocation Using Option 82, page 38
• Configuring a Static Route with the Next Hop Dynamically Obtained Through DHCP, page 43
• Clearing DHCP Server Variables, page 44
Configuring a DHCP Database Agent or Disabling Conflict LoggingPerform this task to configure a DHCP database agent.
A DHCP database agent is any host (for example, an FTP, TFTP, or rcp server) or storage media on theDHCP server (for example, disk0) that stores the DHCP bindings database. You can configure multipleDHCP database agents, and you can configure the interval between database updates and transfers for eachagent.
Automatic bindings are IP addresses that have been automatically mapped to the MAC addresses of hoststhat are found in the DHCP database. Automatic binding information (such as lease expiration date andtime, interface index, and VPN routing and forwarding [VRF] name) is stored on a database agent. Thebindings are saved as text records for easy maintenance.
An address conflict occurs when two hosts use the same IP address. During address assignment, DHCPchecks for conflicts using ping and gratuitous Address Resolution Protocol (ARP). If a conflict is detected,the address is removed from the pool. The address will not be assigned until the administrator resolves theconflict.
Note We strongly recommend using database agents. However, the Cisco IOS server can run without them. Ifyou choose not to configure a DHCP database agent, disable the recording of DHCP address conflicts onthe DHCP server by using the no ip dhcp conflict logging command in global configuration mode. If thereis conflict logging but no database agent configured, bindings are lost across router reboots. Possible falseconflicts can occur causing the address to be removed from the address pool until the network administratorintervenes.
>
SUMMARY STEPS
1. enable
2. configure terminal
3. Do one of the following:
• ip dhcp database url [timeout seconds | write-delay seconds]• or• no ip dhcp conflict logging
Configuring a DHCP Database Agent or Disabling Conflict LoggingHow to Configure the Cisco IOS DHCP Server
IP Addressing: DHCP Configuration Guide, Cisco IOS Release 12.4T 13
DETAILED STEPS
Command or Action Purpose
Step 1 enable
Example:
Router> enable
Enables privileged EXEC mode.
• Enter your password if prompted.
Step 2 configure terminal
Example:
Router# configure terminal
Enters global configuration mode.
Step 3 Do one of the following:
• ip dhcp database url [timeout seconds | write-delay seconds]• or• no ip dhcp conflict logging
Example:
Router(config)# ip dhcp database ftp://user:[email protected]/router-dhcp timeout 80
Example:
Example:
Router(config)# no ip dhcp conflict logging
Configures a DHCP server to saveautomatic bindings on a remote host calleda database agent.
or
Disables DHCP address conflict logging.
Excluding IP AddressesPerform this task to specify IP addresses (excluded addresses) that the DHCP server should not assign toclients.
The IP address configured on the router interface is automatically excluded from the DHCP address pool.The DHCP server assumes that all other IP addresses in a DHCP address pool subnet are available forassigning to DHCP clients.
You need to exclude addresses from the pool if the DHCP server should not allocate those IP addresses. Anexample usage scenario is when two DHCP servers are set up to service the same network segment (subnet)for redundancy. If the two DHCP servers do not coordinate their services with each other using a protocolsuch as DHCP failover, then each DHCP server must be configured to allocate from a nonoverlapping setof addresses in the shared subnet. See the "Configuring Manual Bindings Example" section for aconfiguration example.
Excluding IP Addresses How to Configure the Cisco IOS DHCP Server
IP Addressing: DHCP Configuration Guide, Cisco IOS Release 12.4T14
SUMMARY STEPS
1. enable
2. configure terminal
3. ip dhcp excluded-address low-address [high-address]
DETAILED STEPS
Command or Action Purpose
Step 1 enable
Example:
Router> enable
Enables privileged EXEC mode.
• Enter your password if prompted.
Step 2 configure terminal
Example:
Router# configure terminal
Enters global configuration mode.
Step 3 ip dhcp excluded-address low-address [high-address]
Example:
Router(config)# ip dhcp excluded-address 172.16.1.100 172.16.1.103
Specifies the IP addresses that the DHCP servershould not assign to DHCP clients.
Configuring DHCP Address Pools• Configuring a DHCP Address Pool, page 15
• Configuring a DHCP Address Pool with Secondary Subnets, page 20
• Troubleshooting Tips, page 25
• Verifying the DHCP Address Pool Configuration, page 25
Configuring a DHCP Address PoolPerform this task to configure a DHCP address pool. On a per-address pool basis, specify DHCP optionsfor the client as necessary.
You can configure a DHCP address pool with a name that is a symbolic string (such as “engineering”) oran integer (such as 0). Configuring a DHCP address pool also puts the router into DHCP pool configurationmode--identified by the (dhcp-config)# prompt--from which you can configure pool parameters (forexample, the IP subnet number and default router list).
DHCP defines a process by which the DHCP server knows the IP subnet in which the DHCP client resides,and it can assign an IP address from a pool of valid IP addresses in that subnet. The process by which the
Configuring DHCP Address PoolsConfiguring a DHCP Address Pool
IP Addressing: DHCP Configuration Guide, Cisco IOS Release 12.4T 15
DHCP server identifies which DHCP address pool to use to service a client request is described in the"Configuring Manual Bindings" task.
The DHCP server identifies which DHCP address pool to use to service a client request as follows:
• If the client is not directly connected (the giaddr field of the DHCPDISCOVER broadcast message isnonzero), the DHCP server matches the DHCPDISCOVER with a DHCP pool that has the subnet thatcontains the IP address in the giaddr field.
• If the client is directly connected (the giaddr field is zero), the DHCP server matches theDHCPDISCOVER with DHCP pools that contain the subnets configured on the receiving interface. Ifthe interface has secondary IP addresses, the subnets associated with the secondary IP addresses areexamined for possible allocation only after the subnet associated with the primary IP address (on theinterface) is exhausted.
Cisco IOS DHCP server software supports advanced capabilities for IP address allocation. See the"Configuring DHCP Address Allocation Using Option" section for more information.
Before you configure the DHCP address pool, you need to:
• Identify DHCP options for devices where necessary, including the following:
◦ Default boot image name◦ Default routers◦ DNS servers◦ NetBIOS name server◦ Primary subnet◦ Secondary subnets and subnet-specific default router lists (see "Configuring a DHCP Address
Pool with Secondary Subnets" for information on secondary subnets).• Decide on a NetBIOS node type (b, p, m, or h).• Decide on a DNS domain name.
Note You cannot configure manual bindings within the same pool that is configured with the network DHCPpool configuration command. To configure manual bindings, see "Configuring Manual Bindings".
Configuring the Cisco IOS DHCP Server Configuring a DHCP Address Pool
IP Addressing: DHCP Configuration Guide, Cisco IOS Release 12.4T16
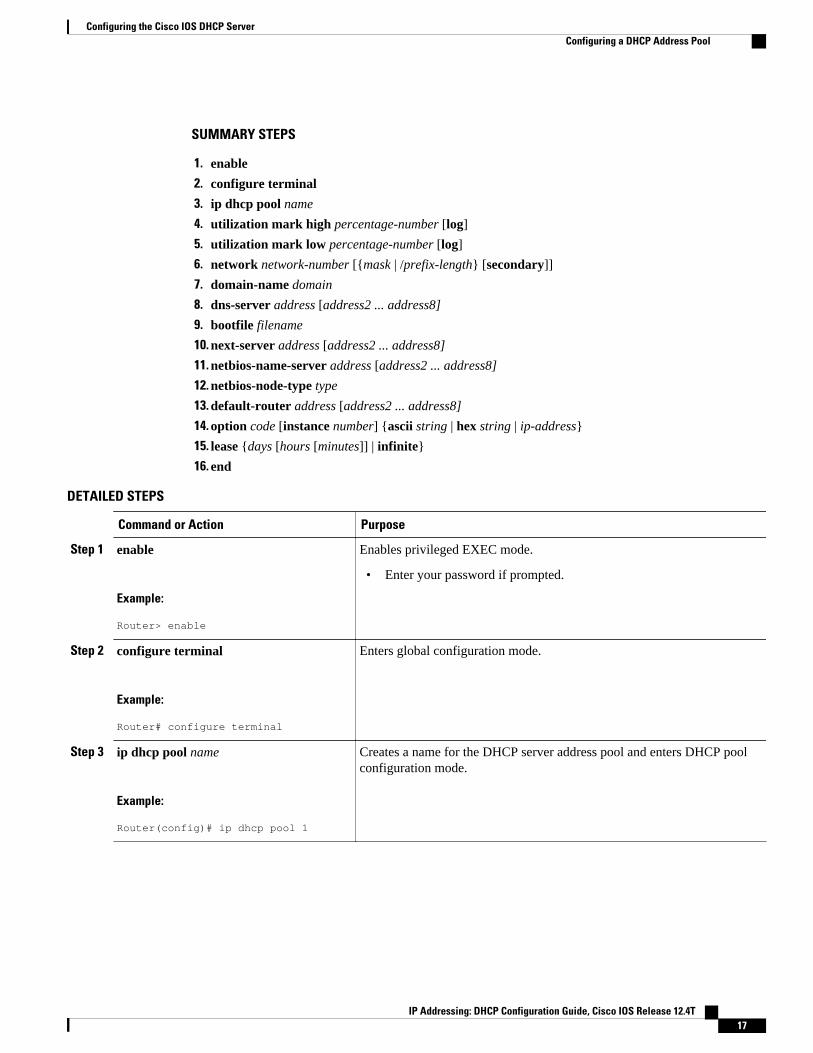
SUMMARY STEPS
1. enable
2. configure terminal
3. ip dhcp pool name
4. utilization mark high percentage-number [log]
5. utilization mark low percentage-number [log]
6. network network-number [{mask | /prefix-length} [secondary]]
7. domain-name domain
8. dns-server address [address2 ... address8]
9. bootfile filename
10. next-server address [address2 ... address8]
11. netbios-name-server address [address2 ... address8]
12. netbios-node-type type
13. default-router address [address2 ... address8]
14. option code [instance number] {ascii string | hex string | ip-address}
15. lease {days [hours [minutes]] | infinite}
16. end
DETAILED STEPS
Command or Action Purpose
Step 1 enable
Example:
Router> enable
Enables privileged EXEC mode.
• Enter your password if prompted.
Step 2 configure terminal
Example:
Router# configure terminal
Enters global configuration mode.
Step 3 ip dhcp pool name
Example:
Router(config)# ip dhcp pool 1
Creates a name for the DHCP server address pool and enters DHCP poolconfiguration mode.
Configuring the Cisco IOS DHCP ServerConfiguring a DHCP Address Pool
IP Addressing: DHCP Configuration Guide, Cisco IOS Release 12.4T 17
Command or Action Purpose
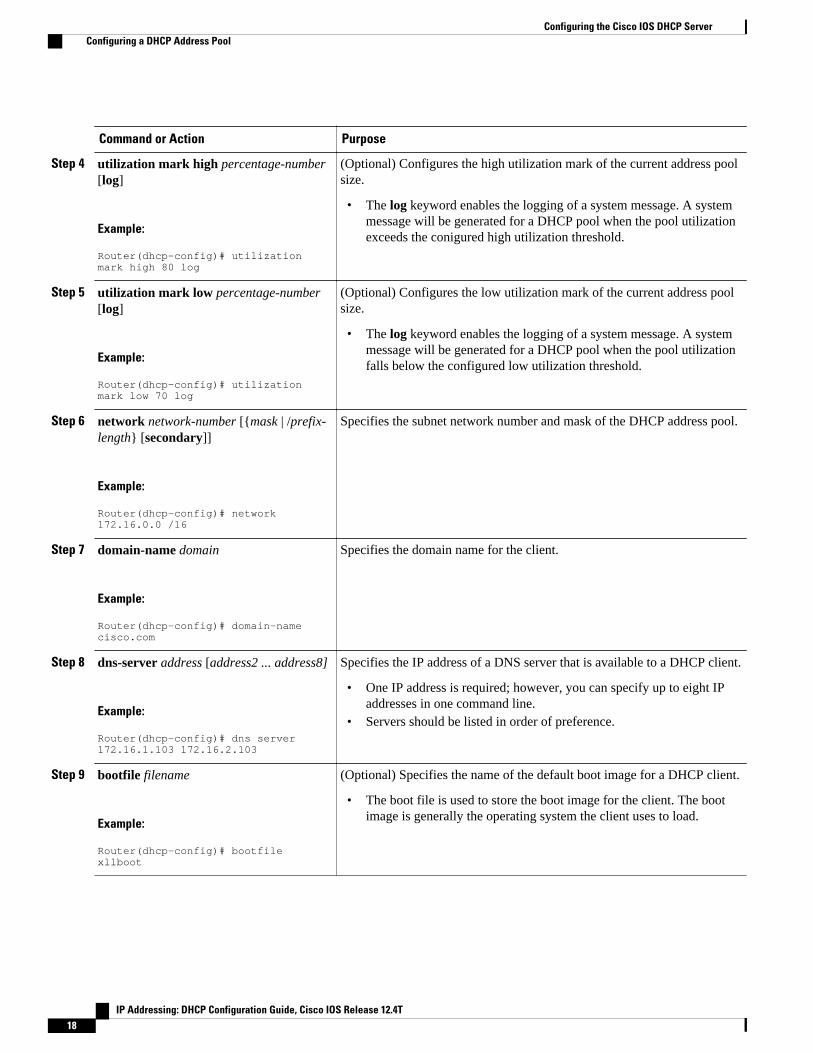
Step 4 utilization mark high percentage-number[log]
Example:
Router(dhcp-config)# utilization mark high 80 log
(Optional) Configures the high utilization mark of the current address poolsize.
• The log keyword enables the logging of a system message. A systemmessage will be generated for a DHCP pool when the pool utilizationexceeds the conigured high utilization threshold.
Step 5 utilization mark low percentage-number[log]
Example:
Router(dhcp-config)# utilization mark low 70 log
(Optional) Configures the low utilization mark of the current address poolsize.
• The log keyword enables the logging of a system message. A systemmessage will be generated for a DHCP pool when the pool utilizationfalls below the configured low utilization threshold.
Step 6 network network-number [{mask | /prefix-length} [secondary]]
Example:
Router(dhcp-config)# network 172.16.0.0 /16
Specifies the subnet network number and mask of the DHCP address pool.
Step 7 domain-name domain
Example:
Router(dhcp-config)# domain-name cisco.com
Specifies the domain name for the client.
Step 8 dns-server address [address2 ... address8]
Example:
Router(dhcp-config)# dns server 172.16.1.103 172.16.2.103
Specifies the IP address of a DNS server that is available to a DHCP client.
• One IP address is required; however, you can specify up to eight IPaddresses in one command line.
• Servers should be listed in order of preference.
Step 9 bootfile filename
Example:
Router(dhcp-config)# bootfile xllboot
(Optional) Specifies the name of the default boot image for a DHCP client.
• The boot file is used to store the boot image for the client. The bootimage is generally the operating system the client uses to load.
Configuring the Cisco IOS DHCP Server Configuring a DHCP Address Pool
IP Addressing: DHCP Configuration Guide, Cisco IOS Release 12.4T18
Command or Action Purpose
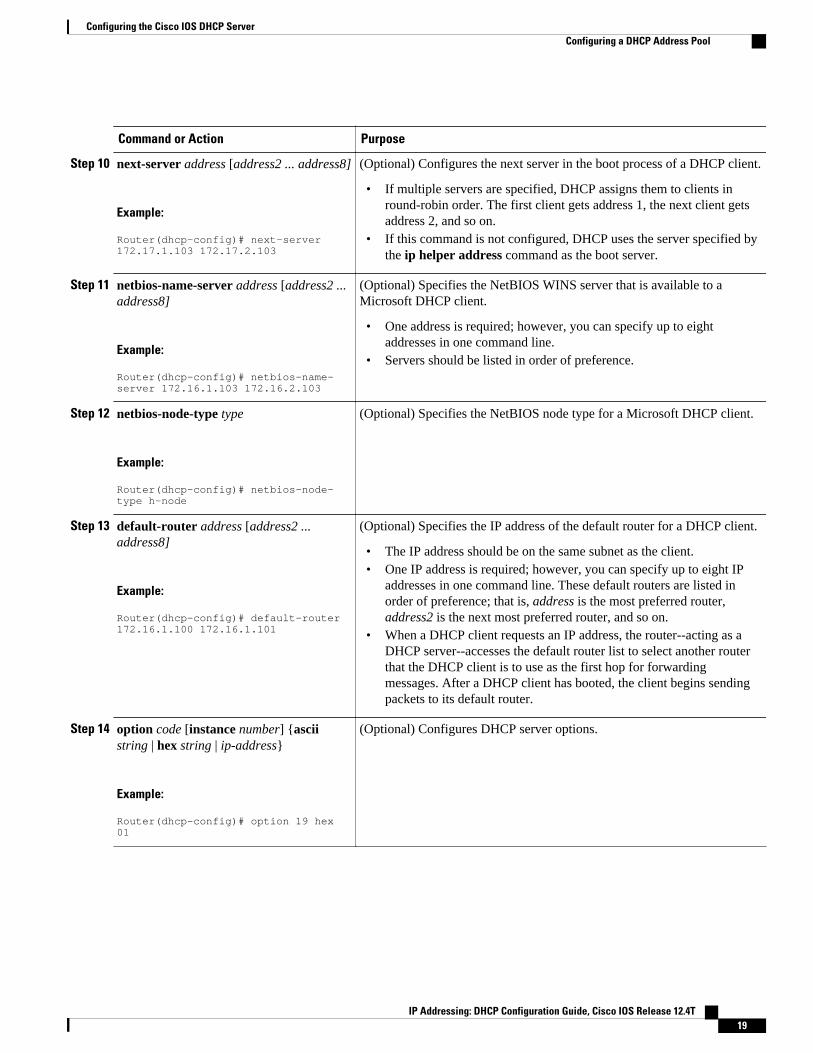
Step 10 next-server address [address2 ... address8]
Example:
Router(dhcp-config)# next-server 172.17.1.103 172.17.2.103
(Optional) Configures the next server in the boot process of a DHCP client.
• If multiple servers are specified, DHCP assigns them to clients inround-robin order. The first client gets address 1, the next client getsaddress 2, and so on.
• If this command is not configured, DHCP uses the server specified bythe ip helper address command as the boot server.
Step 11 netbios-name-server address [address2 ...address8]
Example:
Router(dhcp-config)# netbios-name-server 172.16.1.103 172.16.2.103
(Optional) Specifies the NetBIOS WINS server that is available to aMicrosoft DHCP client.
• One address is required; however, you can specify up to eightaddresses in one command line.
• Servers should be listed in order of preference.
Step 12 netbios-node-type type
Example:
Router(dhcp-config)# netbios-node-type h-node
(Optional) Specifies the NetBIOS node type for a Microsoft DHCP client.
Step 13 default-router address [address2 ...address8]
Example:
Router(dhcp-config)# default-router 172.16.1.100 172.16.1.101
(Optional) Specifies the IP address of the default router for a DHCP client.
• The IP address should be on the same subnet as the client.• One IP address is required; however, you can specify up to eight IP
addresses in one command line. These default routers are listed inorder of preference; that is, address is the most preferred router,address2 is the next most preferred router, and so on.
• When a DHCP client requests an IP address, the router--acting as aDHCP server--accesses the default router list to select another routerthat the DHCP client is to use as the first hop for forwardingmessages. After a DHCP client has booted, the client begins sendingpackets to its default router.
Step 14 option code [instance number] {asciistring | hex string | ip-address}
Example:
Router(dhcp-config)# option 19 hex 01
(Optional) Configures DHCP server options.
Configuring the Cisco IOS DHCP ServerConfiguring a DHCP Address Pool
IP Addressing: DHCP Configuration Guide, Cisco IOS Release 12.4T 19

Command or Action Purpose
Step 15 lease {days [hours [minutes]] | infinite}
Example:
Router(dhcp-config)# lease 30
(Optional) Specifies the duration of the lease.
• The default is a one-day lease.• The infinite keyword specifies that the duration of the lease is
unlimited.
Step 16 end
Example:
Router(dhcp-config)# end
Returns to global configuration mode.
Configuring a DHCP Address Pool with Secondary SubnetsPerform this task to configure a DHCP address pool with secondary subnets.
For any DHCP pool, you can configure a primary subnet and any number of secondary subnets. Eachsubnet is a range of IP addresses that the router uses to allocate an IP address to a DHCP client. The DHCPserver multiple subnet functionality enables a Cisco IOS DHCP server address pool to manage additionalIP addresses by adding the addresses to a secondary subnet of an existing DHCP address pool (instead ofusing a separate address pool).
Configuring a secondary DHCP subnetwork places the router in DHCP pool secondary subnetconfiguration mode--identified by the (config-dhcp-subnet-secondary)# prompt--from which you canconfigure a default address list that is specific to the secondary subnet. You can also specify the utilizationrate of the secondary subnet, which allows pools of IP addresses to dynamically increase or reduce in sizedepending on the address utilization level. This setting overrides the global utilization rate.
If the DHCP server selects an address pool that contains multiple subnets, the DHCP server allocates an IPaddress from the subnets as follows:
• When the DHCP server receives an address assignment request, it looks for a free address in theprimary subnet.
• When the primary subnet is exhausted, the DHCP server automatically looks for a free address in anysecondary subnets maintained by the DHCP server (even though the giaddr does not necessarily matchthe secondary subnet). The server inspects the subnets for address availability in the order in which thesubnets were added to the pool.
• If the giaddr matches a secondary subnet in the pool, the DHCP server allocates an IP address fromthat secondary subnet (even if IP addresses are available in the primary subnet and irrespective of theorder in which secondary subnets where added).
Configuring the Cisco IOS DHCP Server Configuring a DHCP Address Pool with Secondary Subnets
IP Addressing: DHCP Configuration Guide, Cisco IOS Release 12.4T20
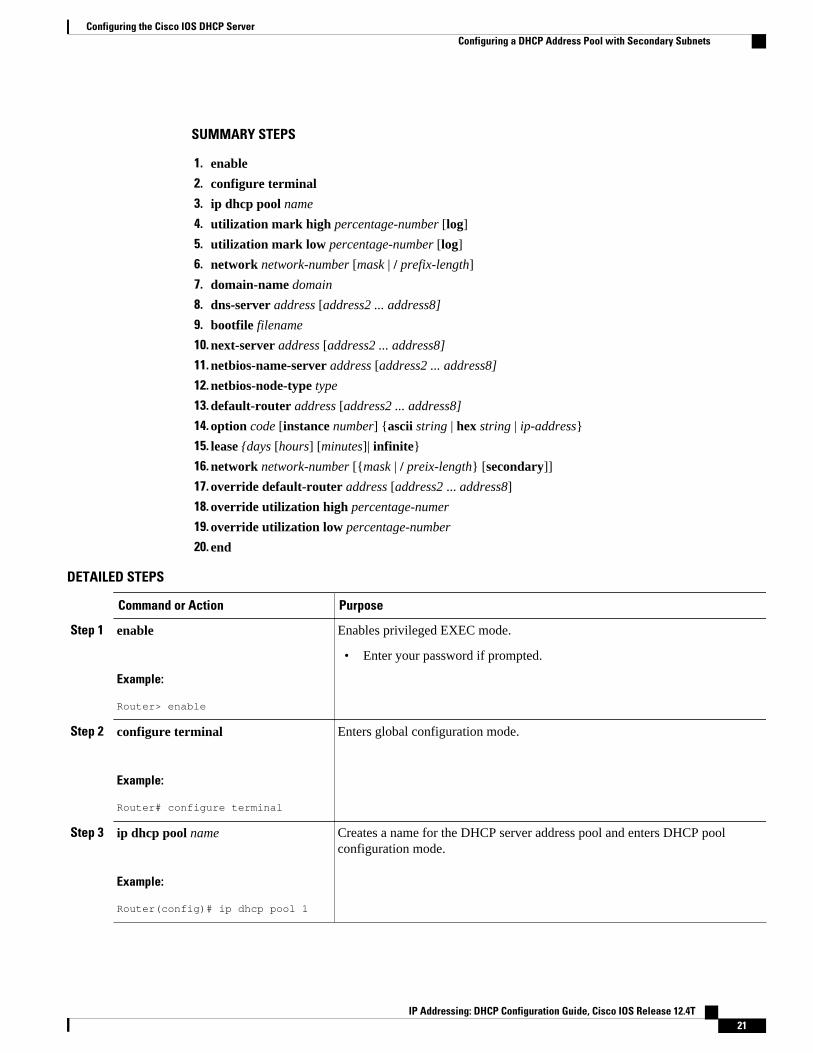
SUMMARY STEPS
1. enable
2. configure terminal
3. ip dhcp pool name
4. utilization mark high percentage-number [log]
5. utilization mark low percentage-number [log]
6. network network-number [mask | / prefix-length]
7. domain-name domain
8. dns-server address [address2 ... address8]
9. bootfile filename
10. next-server address [address2 ... address8]
11. netbios-name-server address [address2 ... address8]
12. netbios-node-type type
13. default-router address [address2 ... address8]
14. option code [instance number] {ascii string | hex string | ip-address}
15. lease {days [hours] [minutes]| infinite}
16. network network-number [{mask | / preix-length} [secondary]]
17. override default-router address [address2 ... address8]
18. override utilization high percentage-numer
19. override utilization low percentage-number
20. end
DETAILED STEPS
Command or Action Purpose
Step 1 enable
Example:
Router> enable
Enables privileged EXEC mode.
• Enter your password if prompted.
Step 2 configure terminal
Example:
Router# configure terminal
Enters global configuration mode.
Step 3 ip dhcp pool name
Example:
Router(config)# ip dhcp pool 1
Creates a name for the DHCP server address pool and enters DHCP poolconfiguration mode.
Configuring the Cisco IOS DHCP ServerConfiguring a DHCP Address Pool with Secondary Subnets
IP Addressing: DHCP Configuration Guide, Cisco IOS Release 12.4T 21
Command or Action Purpose
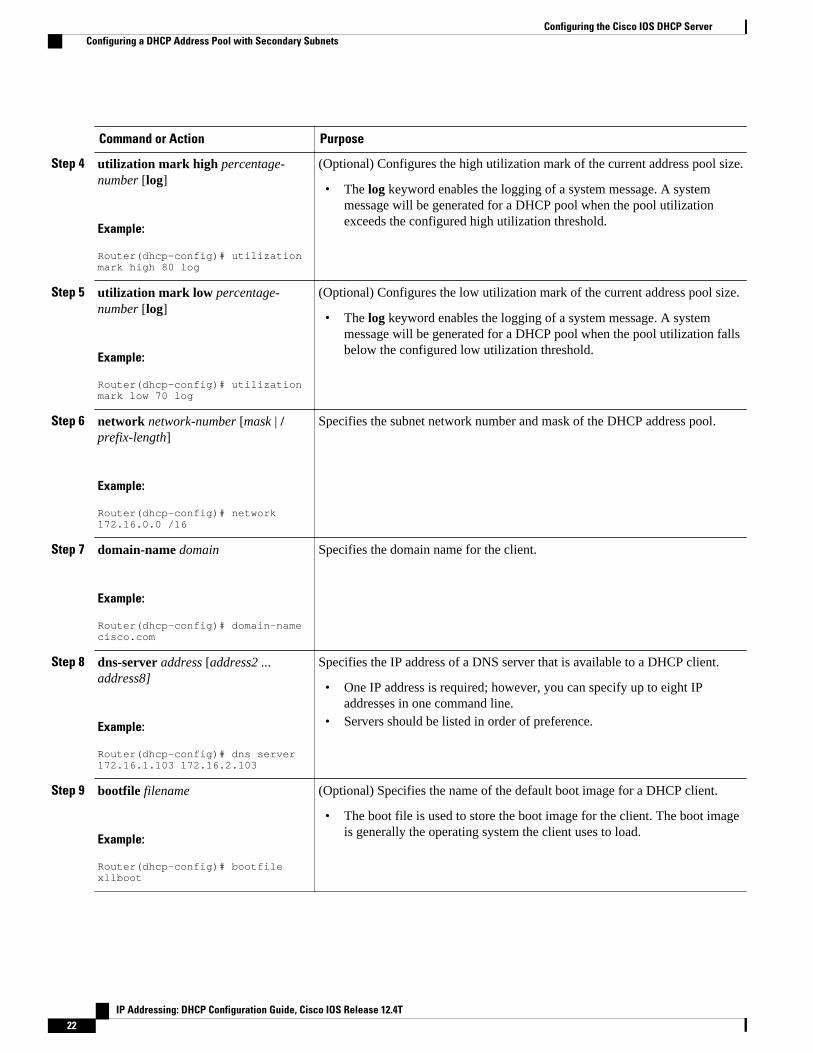
Step 4 utilization mark high percentage-number [log]
Example:
Router(dhcp-config)# utilization mark high 80 log
(Optional) Configures the high utilization mark of the current address pool size.
• The log keyword enables the logging of a system message. A systemmessage will be generated for a DHCP pool when the pool utilizationexceeds the configured high utilization threshold.
Step 5 utilization mark low percentage-number [log]
Example:
Router(dhcp-config)# utilization mark low 70 log
(Optional) Configures the low utilization mark of the current address pool size.
• The log keyword enables the logging of a system message. A systemmessage will be generated for a DHCP pool when the pool utilization fallsbelow the configured low utilization threshold.
Step 6 network network-number [mask | /prefix-length]
Example:
Router(dhcp-config)# network 172.16.0.0 /16
Specifies the subnet network number and mask of the DHCP address pool.
Step 7 domain-name domain
Example:
Router(dhcp-config)# domain-name cisco.com
Specifies the domain name for the client.
Step 8 dns-server address [address2 ...address8]
Example:
Router(dhcp-config)# dns server 172.16.1.103 172.16.2.103
Specifies the IP address of a DNS server that is available to a DHCP client.
• One IP address is required; however, you can specify up to eight IPaddresses in one command line.
• Servers should be listed in order of preference.
Step 9 bootfile filename
Example:
Router(dhcp-config)# bootfile xllboot
(Optional) Specifies the name of the default boot image for a DHCP client.
• The boot file is used to store the boot image for the client. The boot imageis generally the operating system the client uses to load.
Configuring the Cisco IOS DHCP Server Configuring a DHCP Address Pool with Secondary Subnets
IP Addressing: DHCP Configuration Guide, Cisco IOS Release 12.4T22
Command or Action Purpose
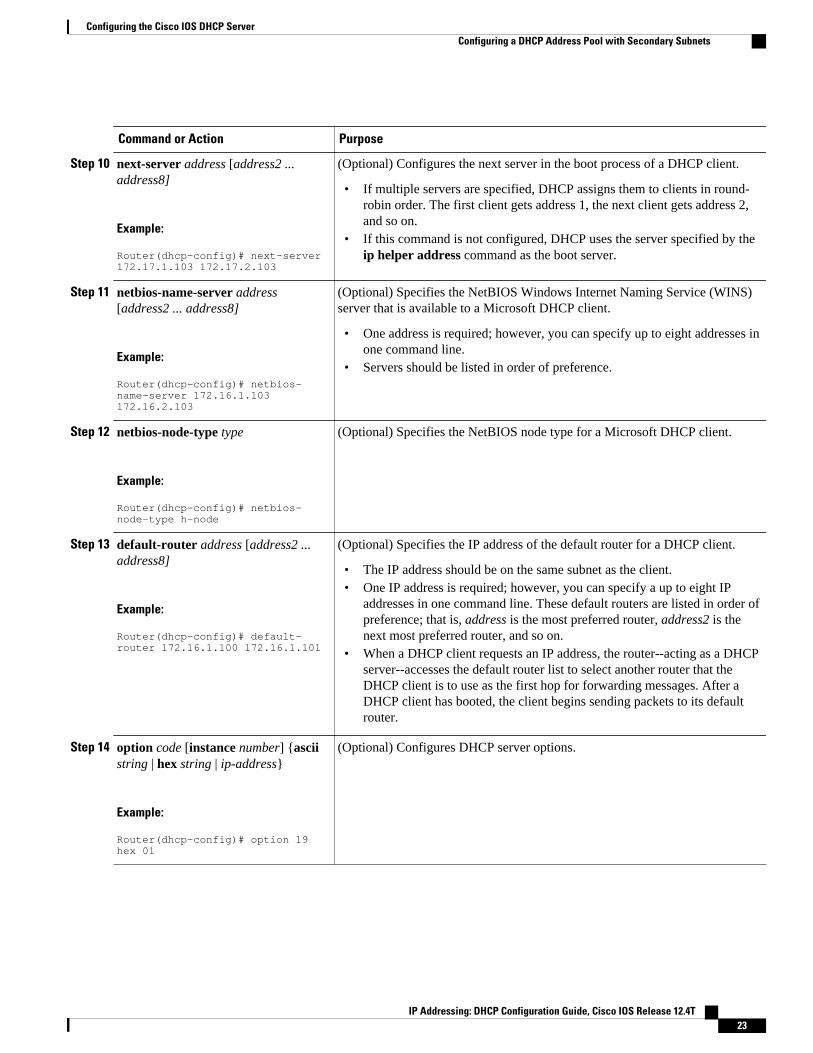
Step 10 next-server address [address2 ...address8]
Example:
Router(dhcp-config)# next-server 172.17.1.103 172.17.2.103
(Optional) Configures the next server in the boot process of a DHCP client.
• If multiple servers are specified, DHCP assigns them to clients in round-robin order. The first client gets address 1, the next client gets address 2,and so on.
• If this command is not configured, DHCP uses the server specified by theip helper address command as the boot server.
Step 11 netbios-name-server address[address2 ... address8]
Example:
Router(dhcp-config)# netbios-name-server 172.16.1.103 172.16.2.103
(Optional) Specifies the NetBIOS Windows Internet Naming Service (WINS)server that is available to a Microsoft DHCP client.
• One address is required; however, you can specify up to eight addresses inone command line.
• Servers should be listed in order of preference.
Step 12 netbios-node-type type
Example:
Router(dhcp-config)# netbios-node-type h-node
(Optional) Specifies the NetBIOS node type for a Microsoft DHCP client.
Step 13 default-router address [address2 ...address8]
Example:
Router(dhcp-config)# default-router 172.16.1.100 172.16.1.101
(Optional) Specifies the IP address of the default router for a DHCP client.
• The IP address should be on the same subnet as the client.• One IP address is required; however, you can specify a up to eight IP
addresses in one command line. These default routers are listed in order ofpreference; that is, address is the most preferred router, address2 is thenext most preferred router, and so on.
• When a DHCP client requests an IP address, the router--acting as a DHCPserver--accesses the default router list to select another router that theDHCP client is to use as the first hop for forwarding messages. After aDHCP client has booted, the client begins sending packets to its defaultrouter.
Step 14 option code [instance number] {asciistring | hex string | ip-address}
Example:
Router(dhcp-config)# option 19 hex 01
(Optional) Configures DHCP server options.
Configuring the Cisco IOS DHCP ServerConfiguring a DHCP Address Pool with Secondary Subnets
IP Addressing: DHCP Configuration Guide, Cisco IOS Release 12.4T 23
Command or Action Purpose
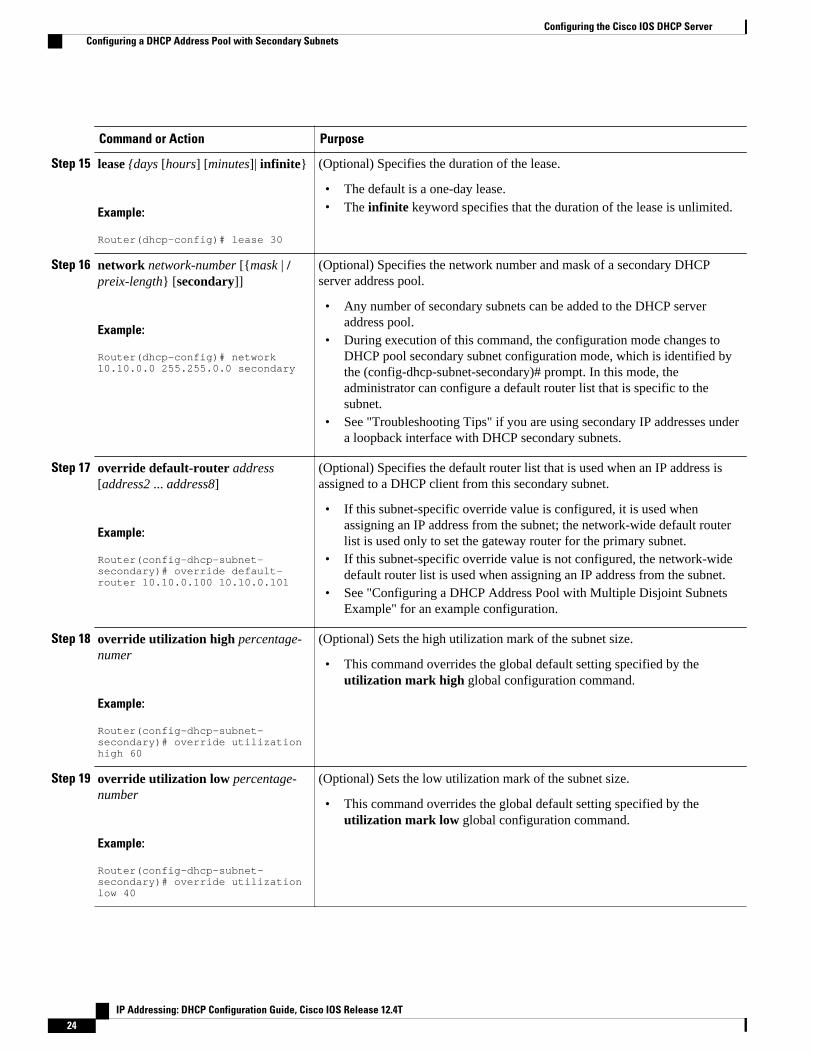
Step 15 lease {days [hours] [minutes]| infinite}
Example:
Router(dhcp-config)# lease 30
(Optional) Specifies the duration of the lease.
• The default is a one-day lease.• The infinite keyword specifies that the duration of the lease is unlimited.
Step 16 network network-number [{mask | /preix-length} [secondary]]
Example:
Router(dhcp-config)# network 10.10.0.0 255.255.0.0 secondary
(Optional) Specifies the network number and mask of a secondary DHCPserver address pool.
• Any number of secondary subnets can be added to the DHCP serveraddress pool.
• During execution of this command, the configuration mode changes toDHCP pool secondary subnet configuration mode, which is identified bythe (config-dhcp-subnet-secondary)# prompt. In this mode, theadministrator can configure a default router list that is specific to thesubnet.
• See "Troubleshooting Tips" if you are using secondary IP addresses undera loopback interface with DHCP secondary subnets.
Step 17 override default-router address[address2 ... address8]
Example:
Router(config-dhcp-subnet-secondary)# override default-router 10.10.0.100 10.10.0.101
(Optional) Specifies the default router list that is used when an IP address isassigned to a DHCP client from this secondary subnet.
• If this subnet-specific override value is configured, it is used whenassigning an IP address from the subnet; the network-wide default routerlist is used only to set the gateway router for the primary subnet.
• If this subnet-specific override value is not configured, the network-widedefault router list is used when assigning an IP address from the subnet.
• See "Configuring a DHCP Address Pool with Multiple Disjoint SubnetsExample" for an example configuration.
Step 18 override utilization high percentage-numer
Example:
Router(config-dhcp-subnet-secondary)# override utilization high 60
(Optional) Sets the high utilization mark of the subnet size.
• This command overrides the global default setting specified by theutilization mark high global configuration command.
Step 19 override utilization low percentage-number
Example:
Router(config-dhcp-subnet-secondary)# override utilization low 40
(Optional) Sets the low utilization mark of the subnet size.
• This command overrides the global default setting specified by theutilization mark low global configuration command.
Configuring the Cisco IOS DHCP Server Configuring a DHCP Address Pool with Secondary Subnets
IP Addressing: DHCP Configuration Guide, Cisco IOS Release 12.4T24
Command or Action Purpose
Step 20 end
Example:
Router(config-dhcp-subnet-secondary)# end
Returns to privileged EXEC mode.
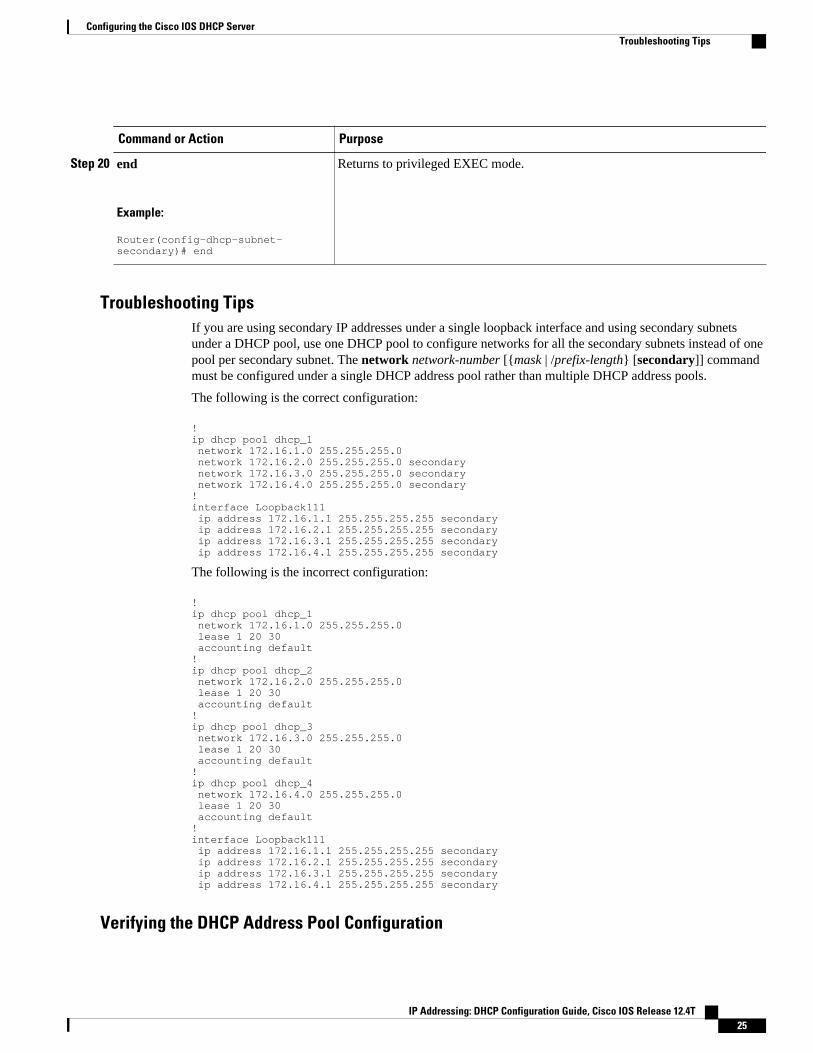
Troubleshooting TipsIf you are using secondary IP addresses under a single loopback interface and using secondary subnetsunder a DHCP pool, use one DHCP pool to configure networks for all the secondary subnets instead of onepool per secondary subnet. The network network-number [{mask | /prefix-length} [secondary]] commandmust be configured under a single DHCP address pool rather than multiple DHCP address pools.
The following is the correct configuration:
!ip dhcp pool dhcp_1 network 172.16.1.0 255.255.255.0 network 172.16.2.0 255.255.255.0 secondary network 172.16.3.0 255.255.255.0 secondary network 172.16.4.0 255.255.255.0 secondary!interface Loopback111 ip address 172.16.1.1 255.255.255.255 secondary ip address 172.16.2.1 255.255.255.255 secondary ip address 172.16.3.1 255.255.255.255 secondary ip address 172.16.4.1 255.255.255.255 secondary
The following is the incorrect configuration:
! ip dhcp pool dhcp_1 network 172.16.1.0 255.255.255.0 lease 1 20 30 accounting default!ip dhcp pool dhcp_2 network 172.16.2.0 255.255.255.0 lease 1 20 30 accounting default!ip dhcp pool dhcp_3 network 172.16.3.0 255.255.255.0 lease 1 20 30 accounting default!ip dhcp pool dhcp_4 network 172.16.4.0 255.255.255.0 lease 1 20 30 accounting default!interface Loopback111 ip address 172.16.1.1 255.255.255.255 secondary ip address 172.16.2.1 255.255.255.255 secondary ip address 172.16.3.1 255.255.255.255 secondary ip address 172.16.4.1 255.255.255.255 secondary
Verifying the DHCP Address Pool Configuration
Configuring the Cisco IOS DHCP ServerTroubleshooting Tips
IP Addressing: DHCP Configuration Guide, Cisco IOS Release 12.4T 25
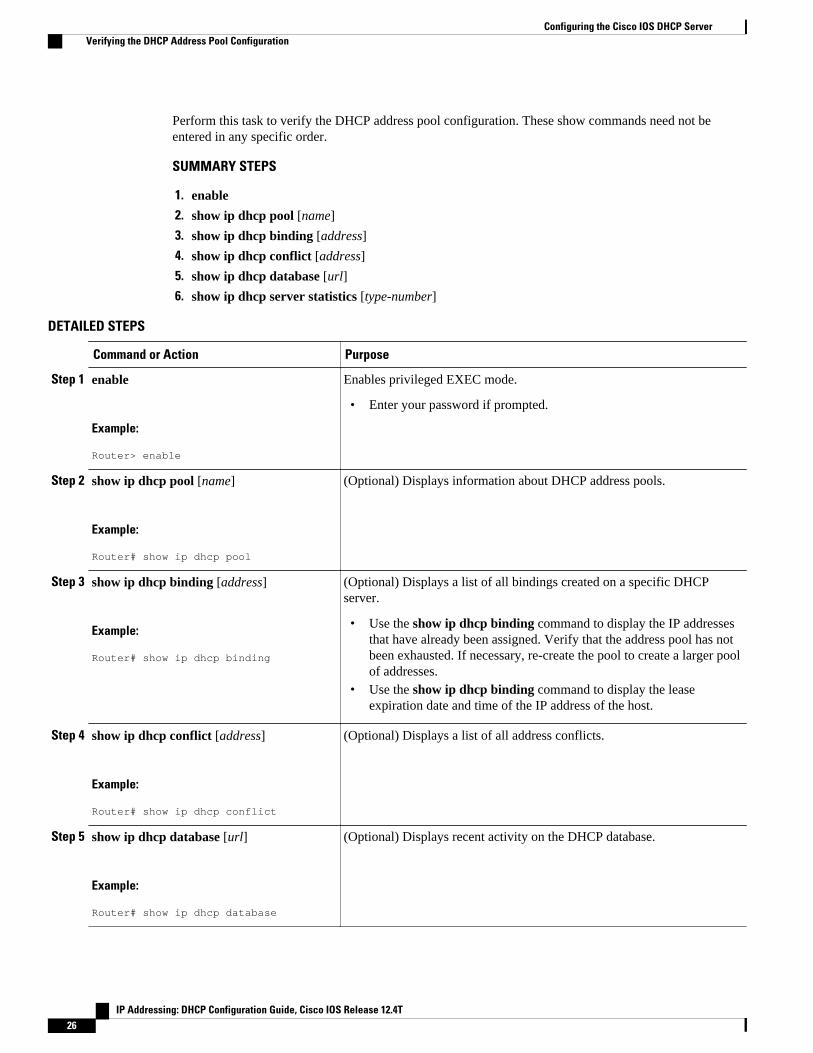
Perform this task to verify the DHCP address pool configuration. These show commands need not beentered in any specific order.
SUMMARY STEPS
1. enable
2. show ip dhcp pool [name]
3. show ip dhcp binding [address]
4. show ip dhcp conflict [address]
5. show ip dhcp database [url]
6. show ip dhcp server statistics [type-number]
DETAILED STEPS
Command or Action Purpose
Step 1 enable
Example:
Router> enable
Enables privileged EXEC mode.
• Enter your password if prompted.
Step 2 show ip dhcp pool [name]
Example:
Router# show ip dhcp pool
(Optional) Displays information about DHCP address pools.
Step 3 show ip dhcp binding [address]
Example:
Router# show ip dhcp binding
(Optional) Displays a list of all bindings created on a specific DHCPserver.
• Use the show ip dhcp binding command to display the IP addressesthat have already been assigned. Verify that the address pool has notbeen exhausted. If necessary, re-create the pool to create a larger poolof addresses.
• Use the show ip dhcp binding command to display the leaseexpiration date and time of the IP address of the host.
Step 4 show ip dhcp conflict [address]
Example:
Router# show ip dhcp conflict
(Optional) Displays a list of all address conflicts.
Step 5 show ip dhcp database [url]
Example:
Router# show ip dhcp database
(Optional) Displays recent activity on the DHCP database.
Configuring the Cisco IOS DHCP Server Verifying the DHCP Address Pool Configuration
IP Addressing: DHCP Configuration Guide, Cisco IOS Release 12.4T26
Command or Action Purpose
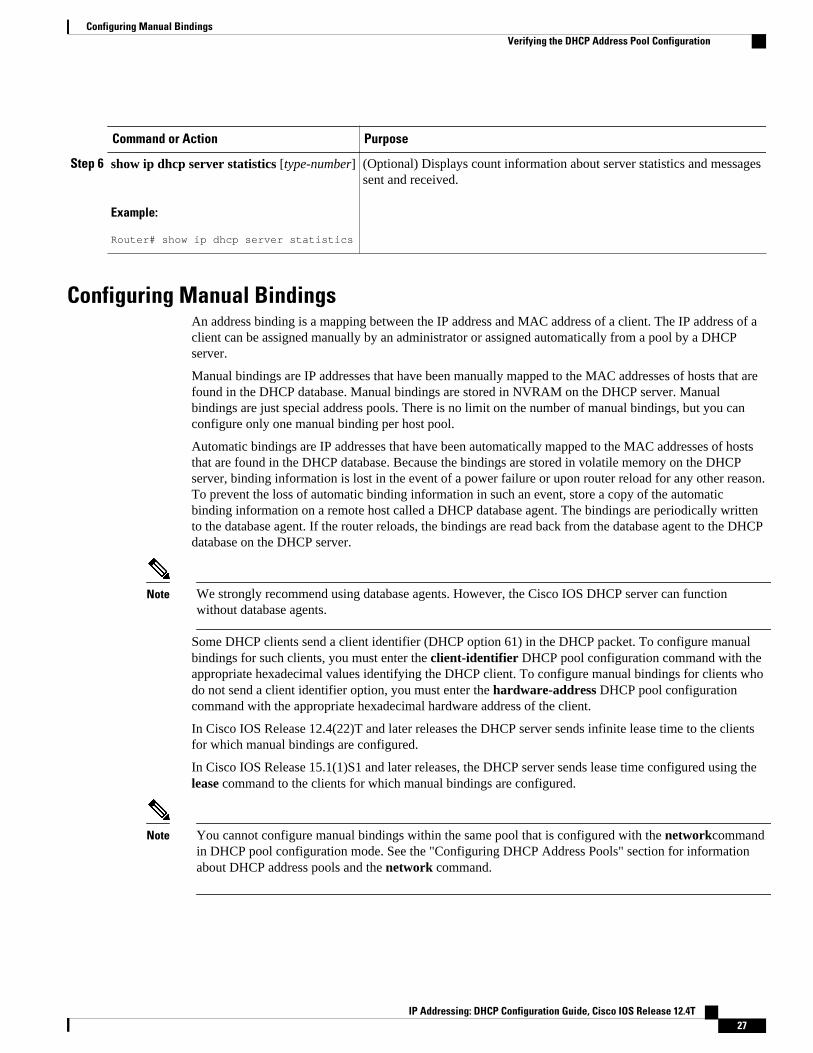
Step 6 show ip dhcp server statistics [type-number]
Example:
Router# show ip dhcp server statistics
(Optional) Displays count information about server statistics and messagessent and received.
Configuring Manual BindingsAn address binding is a mapping between the IP address and MAC address of a client. The IP address of aclient can be assigned manually by an administrator or assigned automatically from a pool by a DHCPserver.
Manual bindings are IP addresses that have been manually mapped to the MAC addresses of hosts that arefound in the DHCP database. Manual bindings are stored in NVRAM on the DHCP server. Manualbindings are just special address pools. There is no limit on the number of manual bindings, but you canconfigure only one manual binding per host pool.
Automatic bindings are IP addresses that have been automatically mapped to the MAC addresses of hoststhat are found in the DHCP database. Because the bindings are stored in volatile memory on the DHCPserver, binding information is lost in the event of a power failure or upon router reload for any other reason.To prevent the loss of automatic binding information in such an event, store a copy of the automaticbinding information on a remote host called a DHCP database agent. The bindings are periodically writtento the database agent. If the router reloads, the bindings are read back from the database agent to the DHCPdatabase on the DHCP server.
Note We strongly recommend using database agents. However, the Cisco IOS DHCP server can functionwithout database agents.
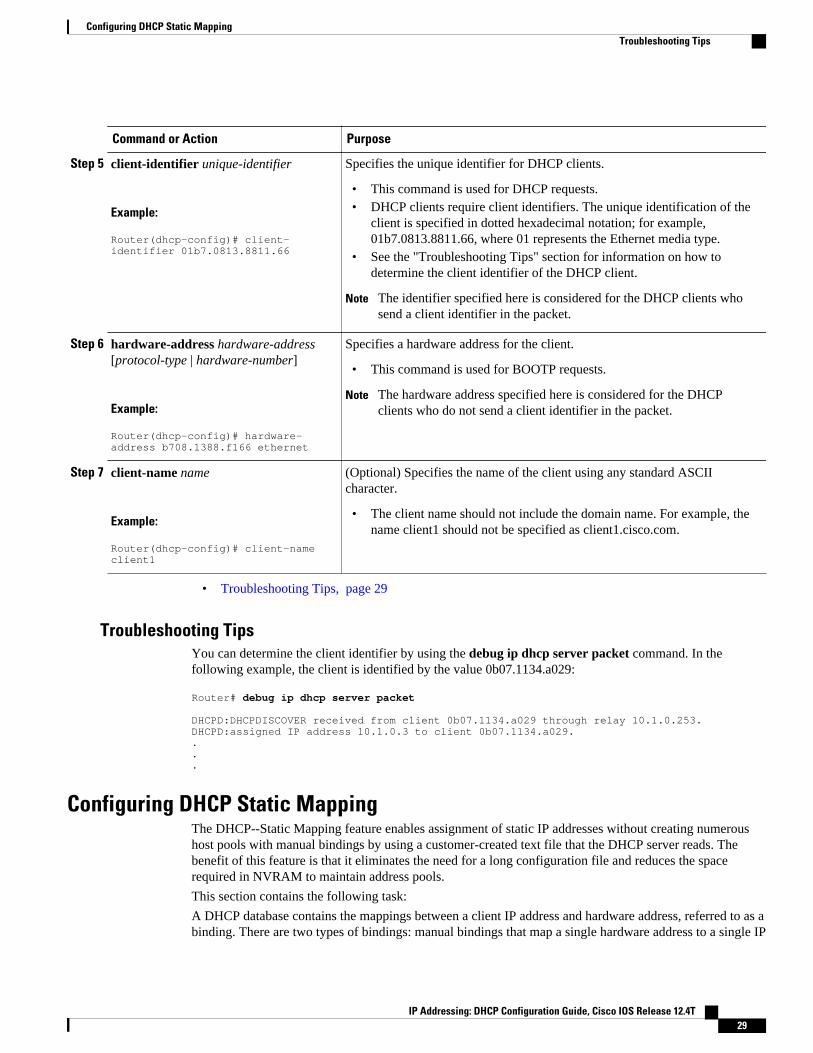
Some DHCP clients send a client identifier (DHCP option 61) in the DHCP packet. To configure manualbindings for such clients, you must enter the client-identifier DHCP pool configuration command with theappropriate hexadecimal values identifying the DHCP client. To configure manual bindings for clients whodo not send a client identifier option, you must enter the hardware-address DHCP pool configurationcommand with the appropriate hexadecimal hardware address of the client.
In Cisco IOS Release 12.4(22)T and later releases the DHCP server sends infinite lease time to the clientsfor which manual bindings are configured.
In Cisco IOS Release 15.1(1)S1 and later releases, the DHCP server sends lease time configured using thelease command to the clients for which manual bindings are configured.
Note You cannot configure manual bindings within the same pool that is configured with the networkcommandin DHCP pool configuration mode. See the "Configuring DHCP Address Pools" section for informationabout DHCP address pools and the network command.
Configuring Manual BindingsVerifying the DHCP Address Pool Configuration
IP Addressing: DHCP Configuration Guide, Cisco IOS Release 12.4T 27
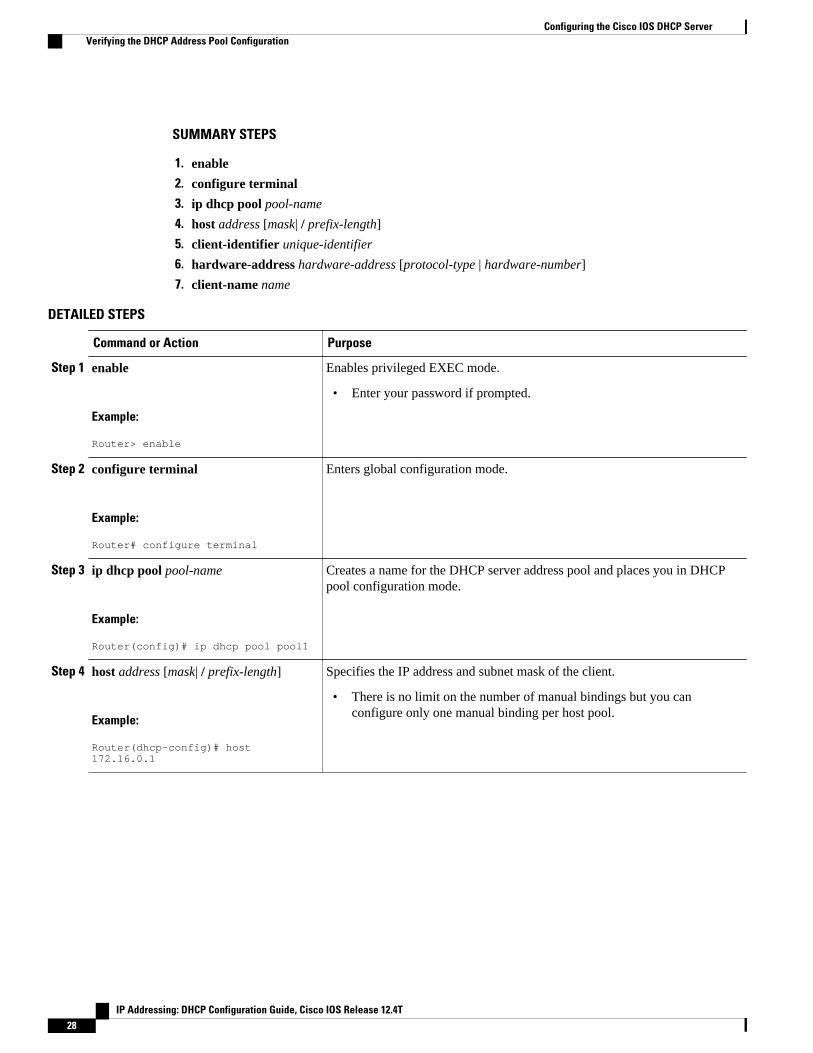
SUMMARY STEPS
1. enable
2. configure terminal
3. ip dhcp pool pool-name
4. host address [mask| / prefix-length]
5. client-identifier unique-identifier
6. hardware-address hardware-address [protocol-type | hardware-number]
7. client-name name
DETAILED STEPS
Command or Action Purpose
Step 1 enable
Example:
Router> enable
Enables privileged EXEC mode.
• Enter your password if prompted.
Step 2 configure terminal
Example:
Router# configure terminal
Enters global configuration mode.
Step 3 ip dhcp pool pool-name
Example:
Router(config)# ip dhcp pool pool1
Creates a name for the DHCP server address pool and places you in DHCPpool configuration mode.
Step 4 host address [mask| / prefix-length]
Example:
Router(dhcp-config)# host 172.16.0.1
Specifies the IP address and subnet mask of the client.
• There is no limit on the number of manual bindings but you canconfigure only one manual binding per host pool.
Configuring the Cisco IOS DHCP Server Verifying the DHCP Address Pool Configuration
IP Addressing: DHCP Configuration Guide, Cisco IOS Release 12.4T28
Command or Action Purpose
Step 5 client-identifier unique-identifier
Example:
Router(dhcp-config)# client-identifier 01b7.0813.8811.66
Specifies the unique identifier for DHCP clients.
• This command is used for DHCP requests.• DHCP clients require client identifiers. The unique identification of the
client is specified in dotted hexadecimal notation; for example,01b7.0813.8811.66, where 01 represents the Ethernet media type.
• See the "Troubleshooting Tips" section for information on how todetermine the client identifier of the DHCP client.
Note The identifier specified here is considered for the DHCP clients whosend a client identifier in the packet.
Step 6 hardware-address hardware-address[protocol-type | hardware-number]
Example:
Router(dhcp-config)# hardware-address b708.1388.f166 ethernet
Specifies a hardware address for the client.
• This command is used for BOOTP requests.
Note The hardware address specified here is considered for the DHCPclients who do not send a client identifier in the packet.
Step 7 client-name name
Example:
Router(dhcp-config)# client-name client1
(Optional) Specifies the name of the client using any standard ASCIIcharacter.
• The client name should not include the domain name. For example, thename client1 should not be specified as client1.cisco.com.
• Troubleshooting Tips, page 29
Troubleshooting TipsYou can determine the client identifier by using the debug ip dhcp server packet command. In thefollowing example, the client is identified by the value 0b07.1134.a029:
Router# debug ip dhcp server packet DHCPD:DHCPDISCOVER received from client 0b07.1134.a029 through relay 10.1.0.253.DHCPD:assigned IP address 10.1.0.3 to client 0b07.1134.a029....
Configuring DHCP Static MappingThe DHCP--Static Mapping feature enables assignment of static IP addresses without creating numeroushost pools with manual bindings by using a customer-created text file that the DHCP server reads. Thebenefit of this feature is that it eliminates the need for a long configuration file and reduces the spacerequired in NVRAM to maintain address pools.
This section contains the following task:
A DHCP database contains the mappings between a client IP address and hardware address, referred to as abinding. There are two types of bindings: manual bindings that map a single hardware address to a single IP
Configuring DHCP Static MappingTroubleshooting Tips
IP Addressing: DHCP Configuration Guide, Cisco IOS Release 12.4T 29
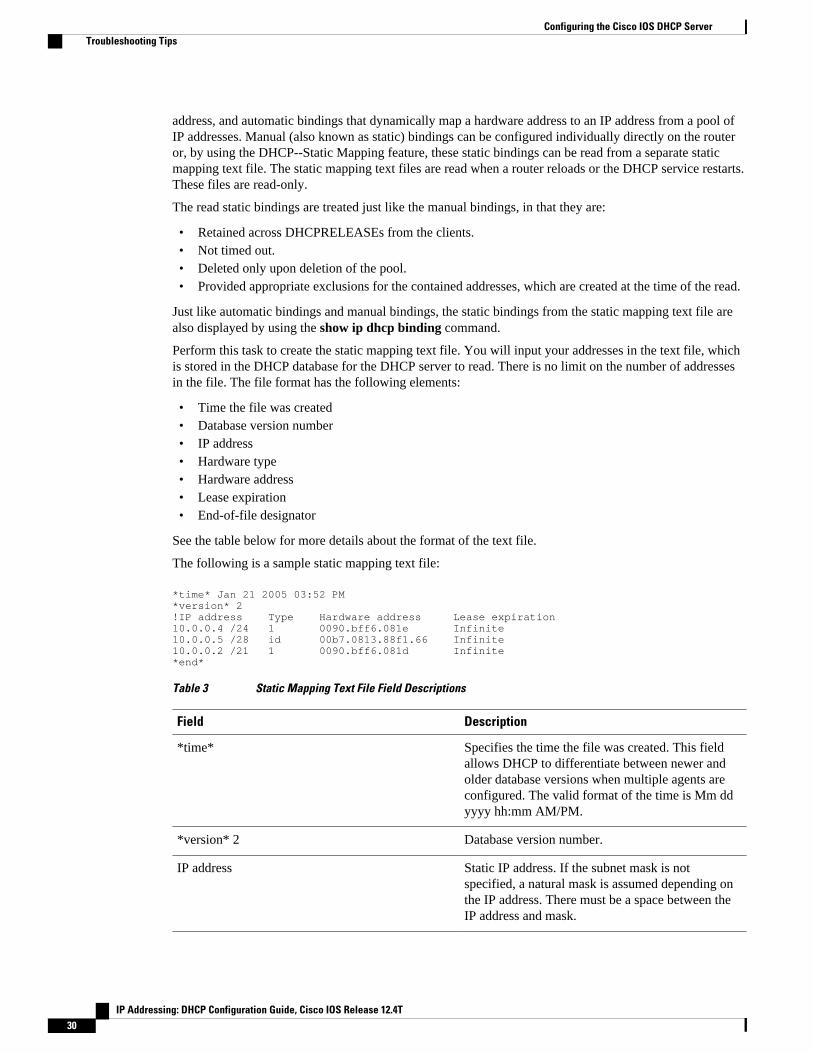
address, and automatic bindings that dynamically map a hardware address to an IP address from a pool ofIP addresses. Manual (also known as static) bindings can be configured individually directly on the routeror, by using the DHCP--Static Mapping feature, these static bindings can be read from a separate staticmapping text file. The static mapping text files are read when a router reloads or the DHCP service restarts.These files are read-only.
The read static bindings are treated just like the manual bindings, in that they are:
• Retained across DHCPRELEASEs from the clients.• Not timed out.• Deleted only upon deletion of the pool.• Provided appropriate exclusions for the contained addresses, which are created at the time of the read.
Just like automatic bindings and manual bindings, the static bindings from the static mapping text file arealso displayed by using the show ip dhcp binding command.
Perform this task to create the static mapping text file. You will input your addresses in the text file, whichis stored in the DHCP database for the DHCP server to read. There is no limit on the number of addressesin the file. The file format has the following elements:
• Time the file was created• Database version number• IP address• Hardware type• Hardware address• Lease expiration• End-of-file designator
See the table below for more details about the format of the text file.
The following is a sample static mapping text file:
*time* Jan 21 2005 03:52 PM*version* 2!IP address Type Hardware address Lease expiration10.0.0.4 /24 1 0090.bff6.081e Infinite10.0.0.5 /28 id 00b7.0813.88f1.66 Infinite10.0.0.2 /21 1 0090.bff6.081d Infinite*end*
Table 3 Static Mapping Text File Field Descriptions
Field Description
*time* Specifies the time the file was created. This fieldallows DHCP to differentiate between newer andolder database versions when multiple agents areconfigured. The valid format of the time is Mm ddyyyy hh:mm AM/PM.
*version* 2 Database version number.
IP address Static IP address. If the subnet mask is notspecified, a natural mask is assumed depending onthe IP address. There must be a space between theIP address and mask.
Configuring the Cisco IOS DHCP Server Troubleshooting Tips
IP Addressing: DHCP Configuration Guide, Cisco IOS Release 12.4T30
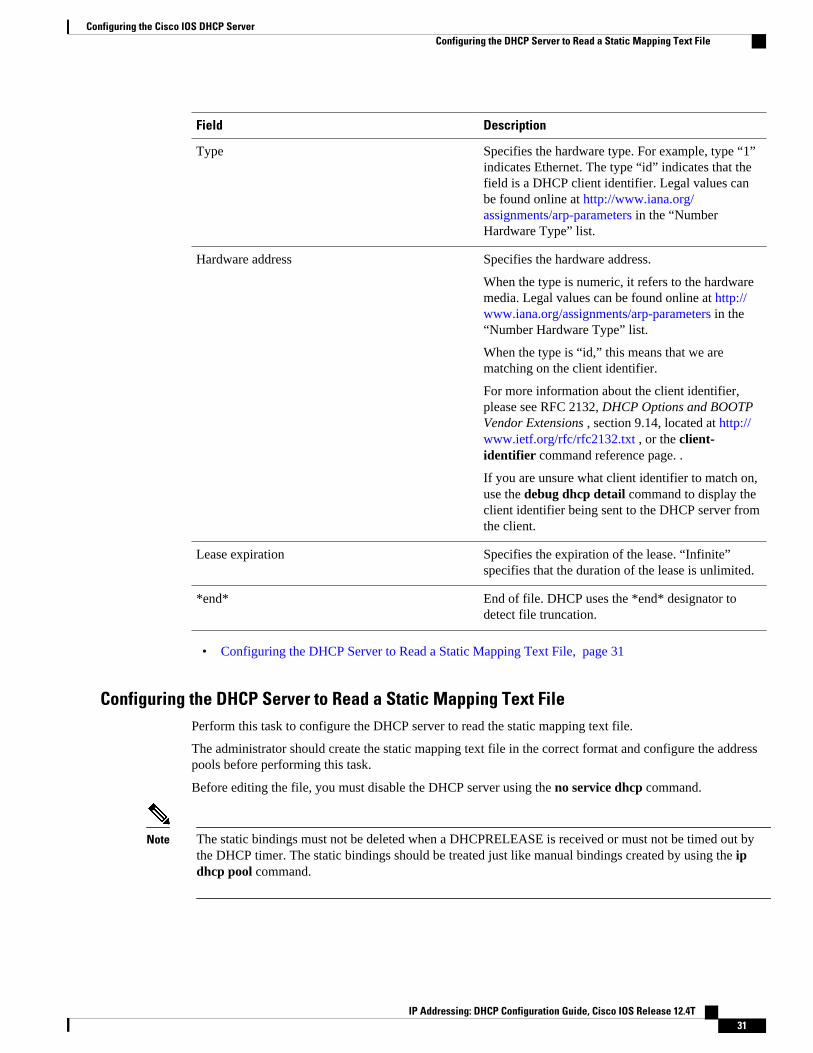
Field Description
Type Specifies the hardware type. For example, type “1”indicates Ethernet. The type “id” indicates that thefield is a DHCP client identifier. Legal values canbe found online at http://www.iana.org/assignments/arp-parameters in the “NumberHardware Type” list.
Hardware address Specifies the hardware address.
When the type is numeric, it refers to the hardwaremedia. Legal values can be found online at http://www.iana.org/assignments/arp-parameters in the“Number Hardware Type” list.
When the type is “id,” this means that we arematching on the client identifier.
For more information about the client identifier,please see RFC 2132, DHCP Options and BOOTPVendor Extensions , section 9.14, located at http://www.ietf.org/rfc/rfc2132.txt , or the client-identifier command reference page. .
If you are unsure what client identifier to match on,use the debug dhcp detail command to display theclient identifier being sent to the DHCP server fromthe client.
Lease expiration Specifies the expiration of the lease. “Infinite”specifies that the duration of the lease is unlimited.
*end* End of file. DHCP uses the *end* designator todetect file truncation.
• Configuring the DHCP Server to Read a Static Mapping Text File, page 31
Configuring the DHCP Server to Read a Static Mapping Text FilePerform this task to configure the DHCP server to read the static mapping text file.
The administrator should create the static mapping text file in the correct format and configure the addresspools before performing this task.
Before editing the file, you must disable the DHCP server using the no service dhcp command.
Note The static bindings must not be deleted when a DHCPRELEASE is received or must not be timed out bythe DHCP timer. The static bindings should be treated just like manual bindings created by using the ipdhcp pool command.
Configuring the Cisco IOS DHCP ServerConfiguring the DHCP Server to Read a Static Mapping Text File
IP Addressing: DHCP Configuration Guide, Cisco IOS Release 12.4T 31
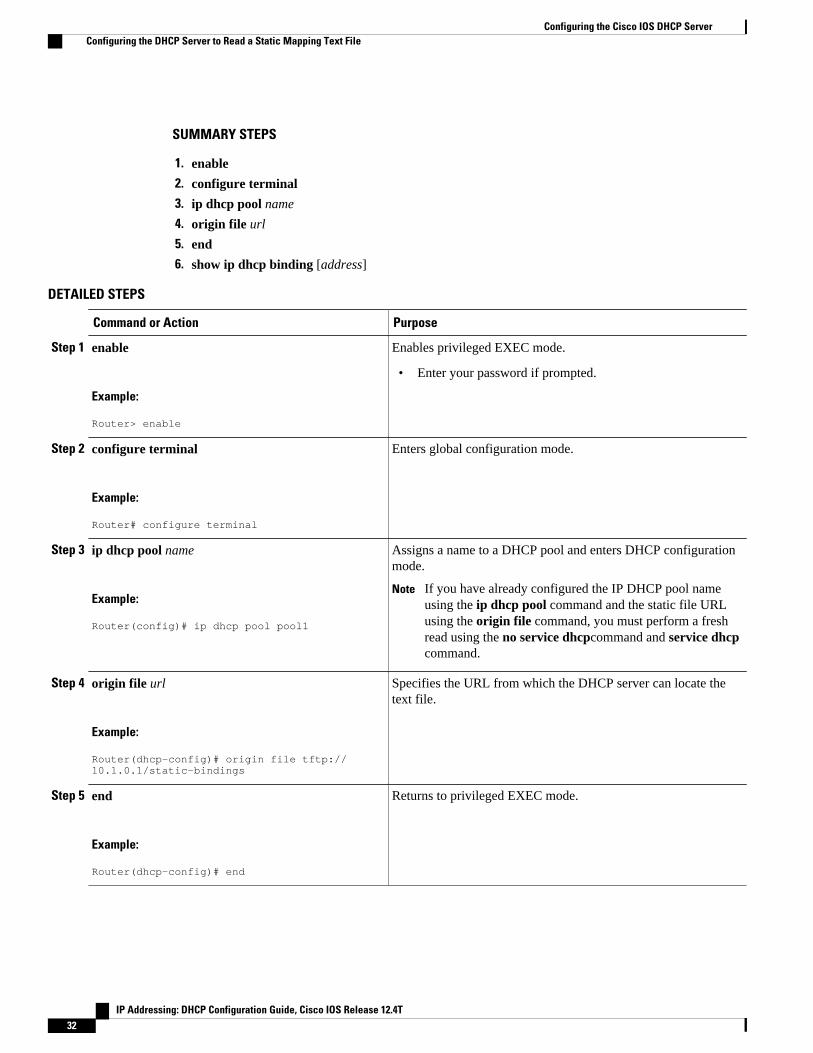
SUMMARY STEPS
1. enable
2. configure terminal
3. ip dhcp pool name
4. origin file url
5. end
6. show ip dhcp binding [address]
DETAILED STEPS
Command or Action Purpose
Step 1 enable
Example:
Router> enable
Enables privileged EXEC mode.
• Enter your password if prompted.
Step 2 configure terminal
Example:
Router# configure terminal
Enters global configuration mode.
Step 3 ip dhcp pool name
Example:
Router(config)# ip dhcp pool pool1
Assigns a name to a DHCP pool and enters DHCP configurationmode.
Note If you have already configured the IP DHCP pool nameusing the ip dhcp pool command and the static file URLusing the origin file command, you must perform a freshread using the no service dhcpcommand and service dhcpcommand.
Step 4 origin file url
Example:
Router(dhcp-config)# origin file tftp://10.1.0.1/static-bindings
Specifies the URL from which the DHCP server can locate thetext file.
Step 5 end
Example:
Router(dhcp-config)# end
Returns to privileged EXEC mode.
Configuring the Cisco IOS DHCP Server Configuring the DHCP Server to Read a Static Mapping Text File
IP Addressing: DHCP Configuration Guide, Cisco IOS Release 12.4T32
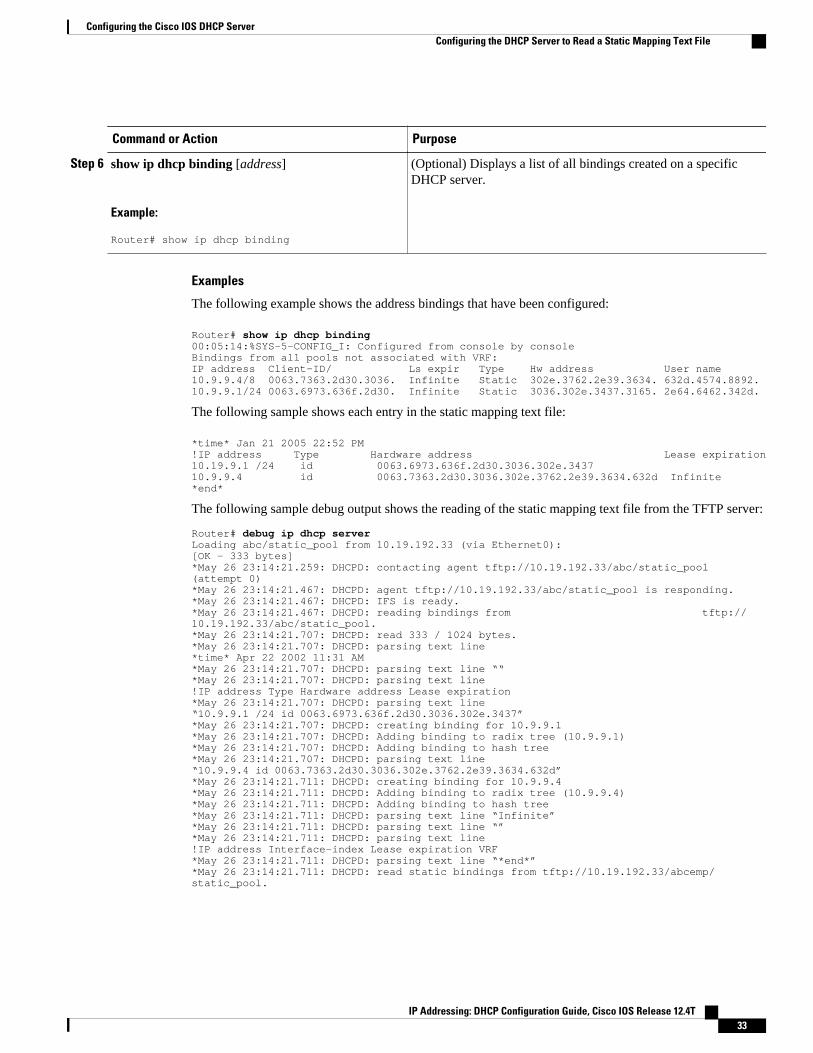
Command or Action Purpose
Step 6 show ip dhcp binding [address]
Example:
Router# show ip dhcp binding
(Optional) Displays a list of all bindings created on a specificDHCP server.
Examples
The following example shows the address bindings that have been configured:
Router# show ip dhcp binding00:05:14:%SYS-5-CONFIG_I: Configured from console by consoleBindings from all pools not associated with VRF:IP address Client-ID/ Ls expir Type Hw address User name10.9.9.4/8 0063.7363.2d30.3036. Infinite Static 302e.3762.2e39.3634. 632d.4574.8892.10.9.9.1/24 0063.6973.636f.2d30. Infinite Static 3036.302e.3437.3165. 2e64.6462.342d.
The following sample shows each entry in the static mapping text file:
*time* Jan 21 2005 22:52 PM!IP address Type Hardware address Lease expiration10.19.9.1 /24 id 0063.6973.636f.2d30.3036.302e.343710.9.9.4 id 0063.7363.2d30.3036.302e.3762.2e39.3634.632d Infinite*end*
The following sample debug output shows the reading of the static mapping text file from the TFTP server:
Router# debug ip dhcp serverLoading abc/static_pool from 10.19.192.33 (via Ethernet0):[OK - 333 bytes]*May 26 23:14:21.259: DHCPD: contacting agent tftp://10.19.192.33/abc/static_pool (attempt 0)*May 26 23:14:21.467: DHCPD: agent tftp://10.19.192.33/abc/static_pool is responding.*May 26 23:14:21.467: DHCPD: IFS is ready.*May 26 23:14:21.467: DHCPD: reading bindings from tftp://10.19.192.33/abc/static_pool.*May 26 23:14:21.707: DHCPD: read 333 / 1024 bytes.*May 26 23:14:21.707: DHCPD: parsing text line *time* Apr 22 2002 11:31 AM*May 26 23:14:21.707: DHCPD: parsing text line ““*May 26 23:14:21.707: DHCPD: parsing text line!IP address Type Hardware address Lease expiration*May 26 23:14:21.707: DHCPD: parsing text line“10.9.9.1 /24 id 0063.6973.636f.2d30.3036.302e.3437”*May 26 23:14:21.707: DHCPD: creating binding for 10.9.9.1*May 26 23:14:21.707: DHCPD: Adding binding to radix tree (10.9.9.1)*May 26 23:14:21.707: DHCPD: Adding binding to hash tree*May 26 23:14:21.707: DHCPD: parsing text line“10.9.9.4 id 0063.7363.2d30.3036.302e.3762.2e39.3634.632d”*May 26 23:14:21.711: DHCPD: creating binding for 10.9.9.4*May 26 23:14:21.711: DHCPD: Adding binding to radix tree (10.9.9.4)*May 26 23:14:21.711: DHCPD: Adding binding to hash tree*May 26 23:14:21.711: DHCPD: parsing text line “Infinite”*May 26 23:14:21.711: DHCPD: parsing text line “”*May 26 23:14:21.711: DHCPD: parsing text line!IP address Interface-index Lease expiration VRF*May 26 23:14:21.711: DHCPD: parsing text line “*end*”*May 26 23:14:21.711: DHCPD: read static bindings from tftp://10.19.192.33/abcemp/static_pool.
Configuring the Cisco IOS DHCP ServerConfiguring the DHCP Server to Read a Static Mapping Text File
IP Addressing: DHCP Configuration Guide, Cisco IOS Release 12.4T 33
Customizing DHCP Server OperationBy default, the DHCP server pings a pool address twice before assigning a particular address to arequesting client. If the ping is unanswered, the DHCP server assumes (with a high probability) that theaddress is not in use and assigns the address to the requesting client.
By default, the DHCP server waits 2 seconds before timing out a ping packet.
You can configure the DHCP server to ignore and not reply to received Bootstrap Protocol (BOOTP)requests. This functionality is beneficial when there is a mix of BOOTP and DHCP clients in a networksegment and there is a BOOTP server and a Cisco IOS DHCP server servicing the network segment. TheBOOTP server is configured with static bindings for the BOOTP clients and the BOOTP clients areintended to obtain their addresses from the BOOTP server. However, because a DHCP server can alsorespond to a BOOTP request, an address offer may be made by the DHCP server causing the BOOTPclients to boot with the address from the DHCP server, instead of the address from the BOOTP server.Configuring the DHCP server to ignore BOOTP requests means that the BOOTP clients will receiveaddress information from the BOOTP server and will not inadvertently accept an address from a DHCPserver.
The Cisco IOS software can forward these ignored BOOTP request packets to another DHCP server if theip helper-address interface configuration command is configured on the incoming interface.
SUMMARY STEPS
1. enable
2. configure terminal
3. ip dhcp ping packets number
4. ip dhcp ping timeout milliseconds
5. ip dhcp bootp ignore
DETAILED STEPS
Command or Action Purpose
Step 1 enable
Example:
Router> enable
Enables privileged EXEC mode.
• Enter your password if prompted.
Step 2 configure terminal
Example:
Router# configure terminal
Enters global configuration mode.
Customizing DHCP Server Operation Configuring the DHCP Server to Read a Static Mapping Text File
IP Addressing: DHCP Configuration Guide, Cisco IOS Release 12.4T34
Command or Action Purpose
Step 3 ip dhcp ping packets number
Example:
Router(config)# ip dhcp ping packets 5
(Optional) Specifies the number of ping packets the DHCP server sends toa pool address before assigning the address to a requesting client.
• The default is two packets. Setting the numberargument to a value of 0disables the DHCP server ping operation completely.
Step 4 ip dhcp ping timeout milliseconds
Example:
Router(config)# ip dhcp ping timeout 850
(Optional) Specifies the amount of time the DHCP server waits for a pingreply from an address pool.
Step 5 ip dhcp bootp ignore
Example:
Router(config)# ip dhcp bootp ignore
(Optional) Allows the DHCP server to selectively ignore and not reply toreceived BOOTP requests.
• The ip dhcp bootp ignore command applies to all DHCP poolsconfigured on the router. BOOTP requests cannot be selectivelyignored on a per-DHCP pool basis.
Configuring a Remote Router to Import DHCP Server Options from a CentralDHCP Server
The Cisco IOS DHCP server can dynamically configure options such as the DNS and WINS addresses torespond to DHCP requests from local clients behind the customer premises equipment (CPE). Previously,network administrators needed to manually configure the Cisco IOS DHCP server on each device. TheCisco IOS DHCP server was enhanced to allow configuration information to be updated automatically.Network administrators can configure one or more centralized DHCP servers to update specific DHCPoptions within the DHCP pools. The remote servers can request or “import” these option parameters fromthe centralized servers.
This section contains the following tasks:
• Configuring the Central DHCP Server to Update DHCP Options, page 35
• Configuring the Remote Router to Import DHCP Options, page 36
Configuring the Central DHCP Server to Update DHCP OptionsPerform this task to configure the central DHCP server to update DHCP options.
Configuring a Remote Router to Import DHCP Server Options from a Central DHCP ServerConfiguring the Central DHCP Server to Update DHCP Options
IP Addressing: DHCP Configuration Guide, Cisco IOS Release 12.4T 35
SUMMARY STEPS
1. enable
2. configure terminal
3. ip dhcp pool name
4. network network-number [mask | / prefix-length]
5. dns-server address [address2 ... address8]
DETAILED STEPS
Command or Action Purpose
Step 1 enable
Example:
Router> enable
Enables privileged EXEC mode.
• Enter your password if prompted.
Step 2 configure terminal
Example:
Router# configure terminal
Enters global configuration mode.
Step 3 ip dhcp pool name
Example:
Router(config)# ip dhcp pool 1
Creates a name for the DHCP server address pool and entersDHCP pool configuration mode.
Step 4 network network-number [mask | / prefix-length]
Example:
Router(dhcp-config)# network 172.16.0.0 /16
Specifies the subnet network number and mask of the DHCPaddress pool.
Step 5 dns-server address [address2 ... address8]
Example:
Router(dhcp-config)# dns server 172.16.1.103 172.16.2.103
(Optional) Specifies the IP address of a DNS server that isavailable to a DHCP client.
• One IP address is required; however, you can specify up toeight IP addresses in one command line.
• Servers should be listed in order of preference.
Configuring the Remote Router to Import DHCP OptionsPerform this task to configure the remote router to import DHCP options from a central DHCP server.
Configuring the Cisco IOS DHCP Server Configuring the Remote Router to Import DHCP Options
IP Addressing: DHCP Configuration Guide, Cisco IOS Release 12.4T36
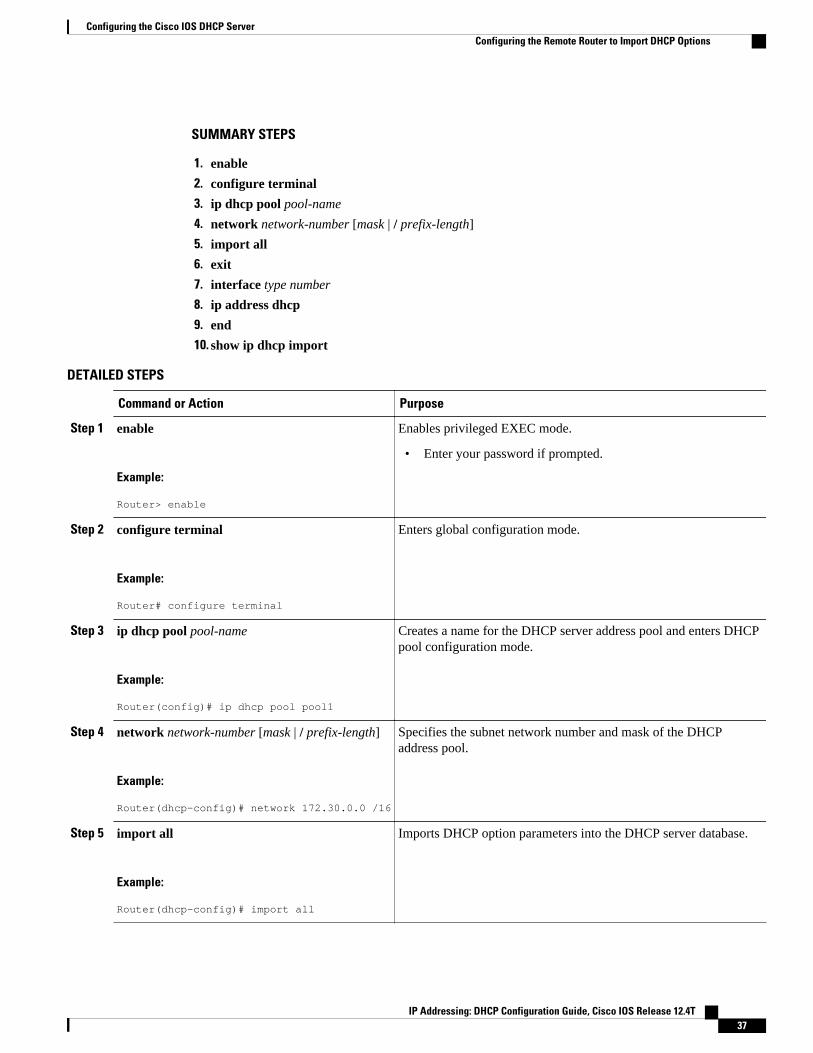
SUMMARY STEPS
1. enable
2. configure terminal
3. ip dhcp pool pool-name
4. network network-number [mask | / prefix-length]
5. import all
6. exit
7. interface type number
8. ip address dhcp
9. end
10. show ip dhcp import
DETAILED STEPS
Command or Action Purpose
Step 1 enable
Example:
Router> enable
Enables privileged EXEC mode.
• Enter your password if prompted.
Step 2 configure terminal
Example:
Router# configure terminal
Enters global configuration mode.
Step 3 ip dhcp pool pool-name
Example:
Router(config)# ip dhcp pool pool1
Creates a name for the DHCP server address pool and enters DHCPpool configuration mode.
Step 4 network network-number [mask | / prefix-length]
Example:
Router(dhcp-config)# network 172.30.0.0 /16
Specifies the subnet network number and mask of the DHCPaddress pool.
Step 5 import all
Example:
Router(dhcp-config)# import all
Imports DHCP option parameters into the DHCP server database.
Configuring the Cisco IOS DHCP ServerConfiguring the Remote Router to Import DHCP Options
IP Addressing: DHCP Configuration Guide, Cisco IOS Release 12.4T 37
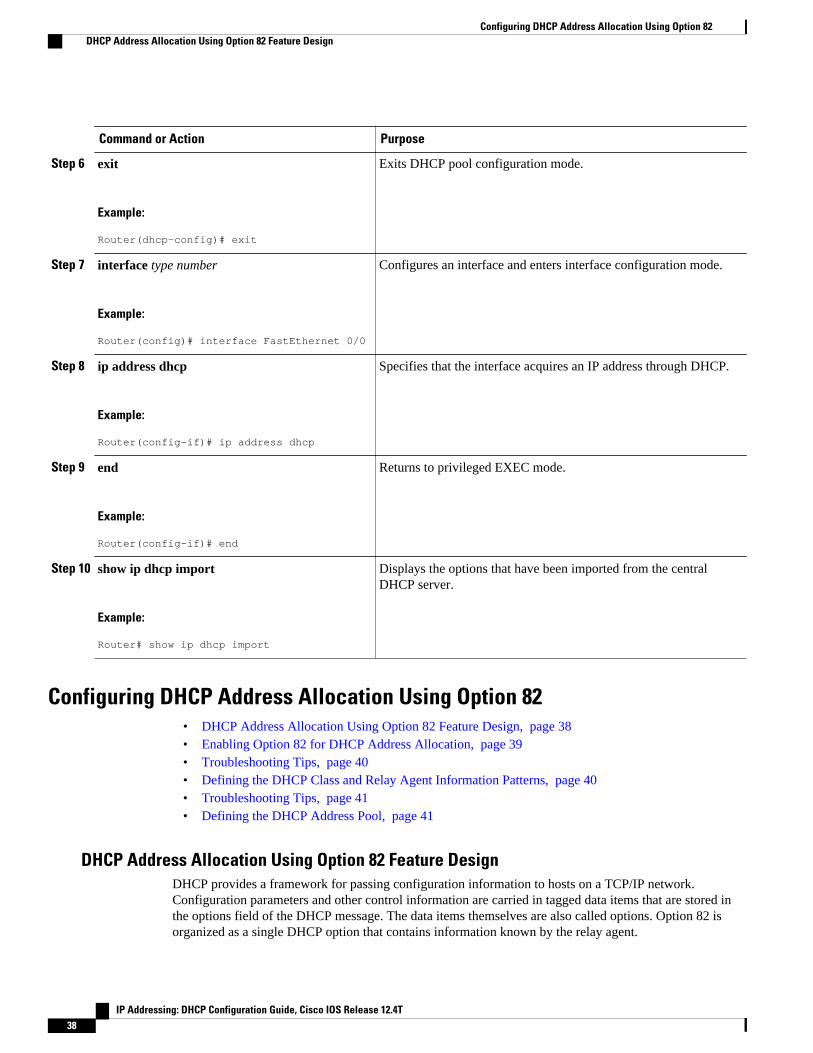
Command or Action Purpose
Step 6 exit
Example:
Router(dhcp-config)# exit
Exits DHCP pool configuration mode.
Step 7 interface type number
Example:
Router(config)# interface FastEthernet 0/0
Configures an interface and enters interface configuration mode.
Step 8 ip address dhcp
Example:
Router(config-if)# ip address dhcp
Specifies that the interface acquires an IP address through DHCP.
Step 9 end
Example:
Router(config-if)# end
Returns to privileged EXEC mode.
Step 10 show ip dhcp import
Example:
Router# show ip dhcp import
Displays the options that have been imported from the centralDHCP server.
Configuring DHCP Address Allocation Using Option 82• DHCP Address Allocation Using Option 82 Feature Design, page 38• Enabling Option 82 for DHCP Address Allocation, page 39• Troubleshooting Tips, page 40• Defining the DHCP Class and Relay Agent Information Patterns, page 40• Troubleshooting Tips, page 41• Defining the DHCP Address Pool, page 41
DHCP Address Allocation Using Option 82 Feature DesignDHCP provides a framework for passing configuration information to hosts on a TCP/IP network.Configuration parameters and other control information are carried in tagged data items that are stored inthe options field of the DHCP message. The data items themselves are also called options. Option 82 isorganized as a single DHCP option that contains information known by the relay agent.
Configuring DHCP Address Allocation Using Option 82 DHCP Address Allocation Using Option 82 Feature Design
IP Addressing: DHCP Configuration Guide, Cisco IOS Release 12.4T38
This feature is designed to allow the Cisco IOS DHCP server to use option 82 information to helpdetermine which IP addresses to allocate to clients. The information sent via option 82 will be used toidentify which port the DHCP request came in on. This feature does not parse out the individual suboptionscontained within option 82. Rather, the address allocation is done by matching a configured pattern byte bybyte.
The feature introduces a new DHCP class capability, which is a method to group DHCP clients based onsome shared characteristics other than the subnet in which the clients reside.
In an example application, DHCP clients are connected to two ports of a single switch. Each port can beconfigured to be part of two VLANs: VLAN1 and VLAN2. DHCP clients belong to either VLAN1 orVLAN2 and it is assumed that the switch can differentiate the VLAN that a particular DHCP Discovermessage belongs to (possibly through Layer 2 encapsulation). Each VLAN has its own subnet and allDHCP messages from the same VLAN (same switch) will have the giaddr field set to the same valueindicating the subnet of the VLAN.
The problem is that for a DHCP client connecting to port 1 of VLAN1, it must be allocated an IP addressfrom one range within the VLAN’s subnet, whereas a DHCP client connecting to port 2 of VLAN1 must beallocated an IP address from another range. Both these two IP address ranges are part of the same subnet(and have the same subnet mask). In the normal DHCP address allocation, the DHCP server will look onlyat the giaddr field and thus will not be able to differentiate between the two ranges.
To solve this problem, a relay agent residing at the switch inserts the relay information option (option 82),which carries information specific to the port, and the DHCP server must inspect both the giaddr field andthe inserted option 82 during the address selection process.
The Cisco IOS software will look up a pool based on IP address (giaddr or incoming interface IP address)and then match the request to a class or classes configured in the pool in the order the classes are specifiedin the DHCP pool configuration.
When a DHCP address pool has been configured with one or more DHCP classes, the pool becomes arestricted access pool, which means that no addresses will be allocated from the pool unless one or more ofthe classes in the pool is matched. This design allows DHCP classes to be used for either access control (nodefault class is configured on the pool) or to provide further address range partitions with the subnet of thepool.
Multiple pools can be configured with the same class, eliminating the need to configure the same pattern inmultiple pools.
The following capabilities are supported for DHCP class-based address allocation:
• Specifying the full relay agent information option value as a raw hexadecimal string by using therelay-information hex command in the new relay agent information configuration mode.
• Support for bitmasking the raw relay information hexadecimal value.• Support for a wildcard at the end of the hexadecimal string specified by the relay-information hex
command.
If the relay agent inserts option 82 but does not set the giaddr field in the DHCP packet, the DHCP serverinterface must be configured as a trusted interface by using the ip dhcp relay information trusted globalconfiguration command. This configuration prevents the server from dropping the DHCP message.
Enabling Option 82 for DHCP Address AllocationBy default, the Cisco IOS DHCP server can use information provided by option 82 to allocate IP addresses.To reenable this capability if it has been disabled, perform the task described in this section.
Configuring the Cisco IOS DHCP ServerEnabling Option 82 for DHCP Address Allocation
IP Addressing: DHCP Configuration Guide, Cisco IOS Release 12.4T 39
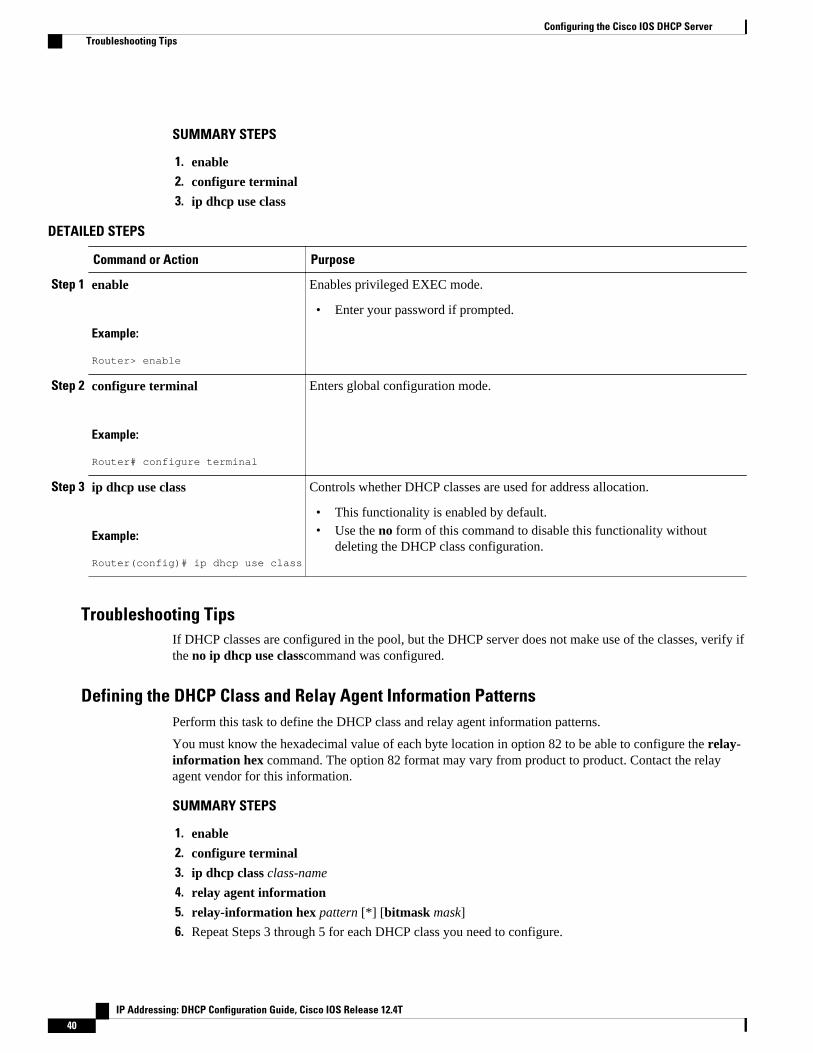
SUMMARY STEPS
1. enable
2. configure terminal
3. ip dhcp use class
DETAILED STEPS
Command or Action Purpose
Step 1 enable
Example:
Router> enable
Enables privileged EXEC mode.
• Enter your password if prompted.
Step 2 configure terminal
Example:
Router# configure terminal
Enters global configuration mode.
Step 3 ip dhcp use class
Example:
Router(config)# ip dhcp use class
Controls whether DHCP classes are used for address allocation.
• This functionality is enabled by default.• Use the no form of this command to disable this functionality without
deleting the DHCP class configuration.
Troubleshooting TipsIf DHCP classes are configured in the pool, but the DHCP server does not make use of the classes, verify ifthe no ip dhcp use classcommand was configured.
Defining the DHCP Class and Relay Agent Information PatternsPerform this task to define the DHCP class and relay agent information patterns.
You must know the hexadecimal value of each byte location in option 82 to be able to configure the relay-information hex command. The option 82 format may vary from product to product. Contact the relayagent vendor for this information.
SUMMARY STEPS
1. enable
2. configure terminal
3. ip dhcp class class-name
4. relay agent information
5. relay-information hex pattern [*] [bitmask mask]
6. Repeat Steps 3 through 5 for each DHCP class you need to configure.
Configuring the Cisco IOS DHCP Server Troubleshooting Tips
IP Addressing: DHCP Configuration Guide, Cisco IOS Release 12.4T40
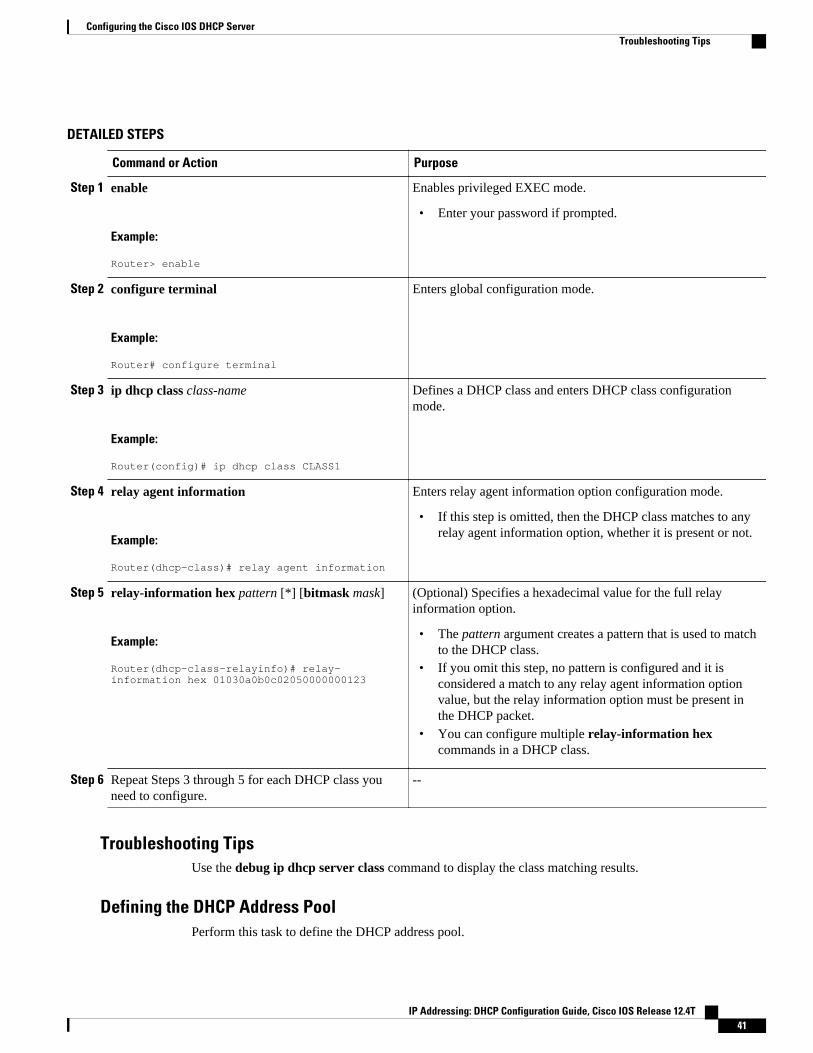
DETAILED STEPS
Command or Action Purpose
Step 1 enable
Example:
Router> enable
Enables privileged EXEC mode.
• Enter your password if prompted.
Step 2 configure terminal
Example:
Router# configure terminal
Enters global configuration mode.
Step 3 ip dhcp class class-name
Example:
Router(config)# ip dhcp class CLASS1
Defines a DHCP class and enters DHCP class configurationmode.
Step 4 relay agent information
Example:
Router(dhcp-class)# relay agent information
Enters relay agent information option configuration mode.
• If this step is omitted, then the DHCP class matches to anyrelay agent information option, whether it is present or not.
Step 5 relay-information hex pattern [*] [bitmask mask]
Example:
Router(dhcp-class-relayinfo)# relay-information hex 01030a0b0c02050000000123
(Optional) Specifies a hexadecimal value for the full relayinformation option.
• The pattern argument creates a pattern that is used to matchto the DHCP class.
• If you omit this step, no pattern is configured and it isconsidered a match to any relay agent information optionvalue, but the relay information option must be present inthe DHCP packet.
• You can configure multiple relay-information hexcommands in a DHCP class.
Step 6 Repeat Steps 3 through 5 for each DHCP class youneed to configure.
--
Troubleshooting TipsUse the debug ip dhcp server class command to display the class matching results.
Defining the DHCP Address PoolPerform this task to define the DHCP address pool.
Configuring the Cisco IOS DHCP ServerTroubleshooting Tips
IP Addressing: DHCP Configuration Guide, Cisco IOS Release 12.4T 41
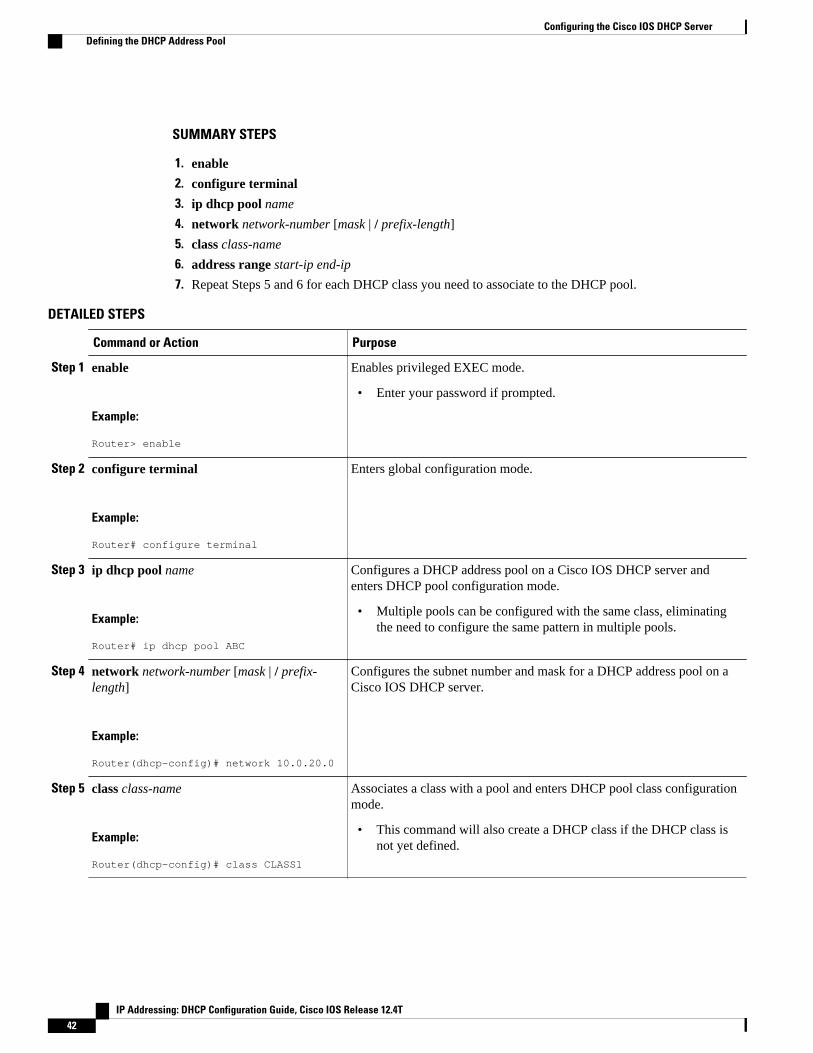
SUMMARY STEPS
1. enable
2. configure terminal
3. ip dhcp pool name
4. network network-number [mask | / prefix-length]
5. class class-name
6. address range start-ip end-ip
7. Repeat Steps 5 and 6 for each DHCP class you need to associate to the DHCP pool.
DETAILED STEPS
Command or Action Purpose
Step 1 enable
Example:
Router> enable
Enables privileged EXEC mode.
• Enter your password if prompted.
Step 2 configure terminal
Example:
Router# configure terminal
Enters global configuration mode.
Step 3 ip dhcp pool name
Example:
Router# ip dhcp pool ABC
Configures a DHCP address pool on a Cisco IOS DHCP server andenters DHCP pool configuration mode.
• Multiple pools can be configured with the same class, eliminatingthe need to configure the same pattern in multiple pools.
Step 4 network network-number [mask | / prefix-length]
Example:
Router(dhcp-config)# network 10.0.20.0
Configures the subnet number and mask for a DHCP address pool on aCisco IOS DHCP server.
Step 5 class class-name
Example:
Router(dhcp-config)# class CLASS1
Associates a class with a pool and enters DHCP pool class configurationmode.
• This command will also create a DHCP class if the DHCP class isnot yet defined.
Configuring the Cisco IOS DHCP Server Defining the DHCP Address Pool
IP Addressing: DHCP Configuration Guide, Cisco IOS Release 12.4T42
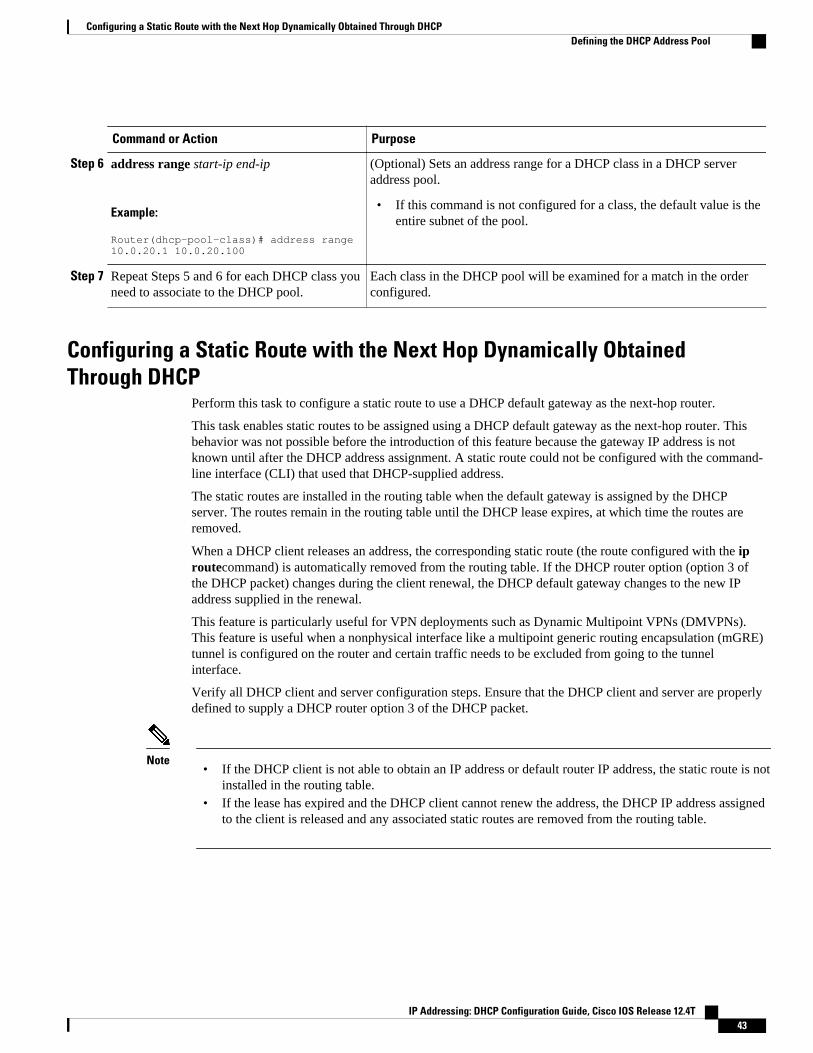
Command or Action Purpose
Step 6 address range start-ip end-ip
Example:
Router(dhcp-pool-class)# address range 10.0.20.1 10.0.20.100
(Optional) Sets an address range for a DHCP class in a DHCP serveraddress pool.
• If this command is not configured for a class, the default value is theentire subnet of the pool.
Step 7 Repeat Steps 5 and 6 for each DHCP class youneed to associate to the DHCP pool.
Each class in the DHCP pool will be examined for a match in the orderconfigured.
Configuring a Static Route with the Next Hop Dynamically ObtainedThrough DHCP
Perform this task to configure a static route to use a DHCP default gateway as the next-hop router.
This task enables static routes to be assigned using a DHCP default gateway as the next-hop router. Thisbehavior was not possible before the introduction of this feature because the gateway IP address is notknown until after the DHCP address assignment. A static route could not be configured with the command-line interface (CLI) that used that DHCP-supplied address.
The static routes are installed in the routing table when the default gateway is assigned by the DHCPserver. The routes remain in the routing table until the DHCP lease expires, at which time the routes areremoved.
When a DHCP client releases an address, the corresponding static route (the route configured with the iproutecommand) is automatically removed from the routing table. If the DHCP router option (option 3 ofthe DHCP packet) changes during the client renewal, the DHCP default gateway changes to the new IPaddress supplied in the renewal.
This feature is particularly useful for VPN deployments such as Dynamic Multipoint VPNs (DMVPNs).This feature is useful when a nonphysical interface like a multipoint generic routing encapsulation (mGRE)tunnel is configured on the router and certain traffic needs to be excluded from going to the tunnelinterface.
Verify all DHCP client and server configuration steps. Ensure that the DHCP client and server are properlydefined to supply a DHCP router option 3 of the DHCP packet.
Note• If the DHCP client is not able to obtain an IP address or default router IP address, the static route is not
installed in the routing table.• If the lease has expired and the DHCP client cannot renew the address, the DHCP IP address assigned
to the client is released and any associated static routes are removed from the routing table.
Configuring a Static Route with the Next Hop Dynamically Obtained Through DHCPDefining the DHCP Address Pool
IP Addressing: DHCP Configuration Guide, Cisco IOS Release 12.4T 43
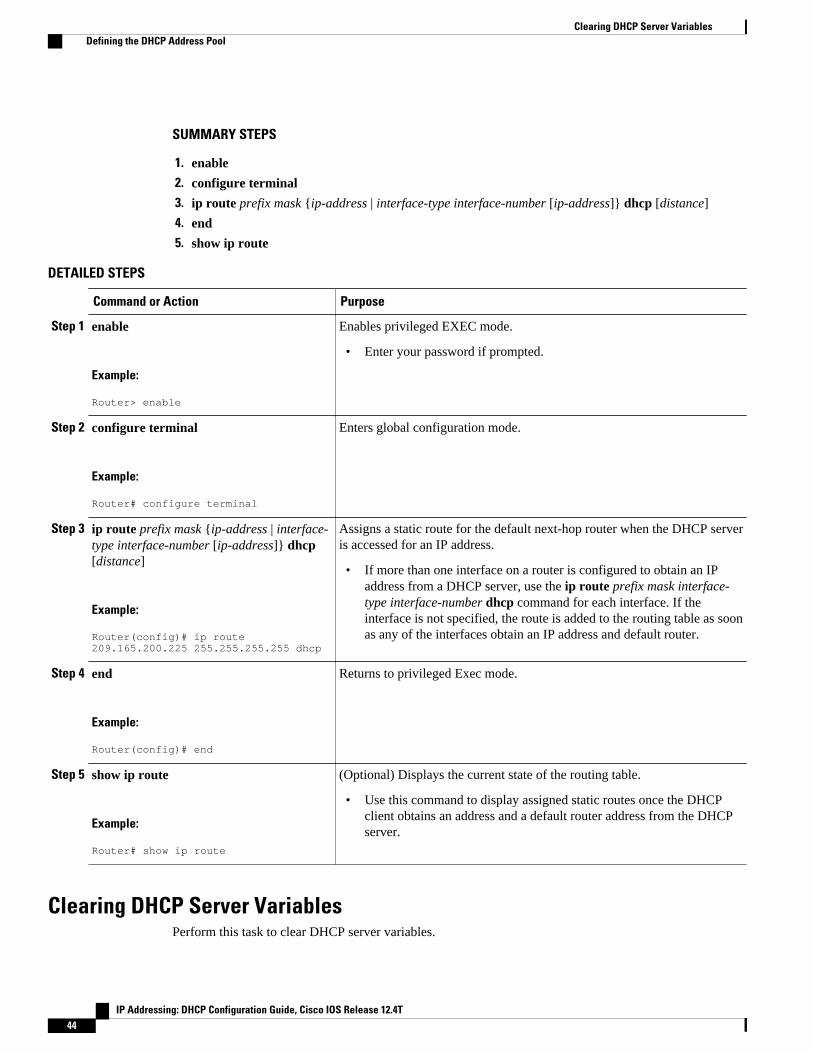
SUMMARY STEPS
1. enable
2. configure terminal
3. ip route prefix mask {ip-address | interface-type interface-number [ip-address]} dhcp [distance]
4. end
5. show ip route
DETAILED STEPS
Command or Action Purpose
Step 1 enable
Example:
Router> enable
Enables privileged EXEC mode.
• Enter your password if prompted.
Step 2 configure terminal
Example:
Router# configure terminal
Enters global configuration mode.
Step 3 ip route prefix mask {ip-address | interface-type interface-number [ip-address]} dhcp[distance]
Example:
Router(config)# ip route 209.165.200.225 255.255.255.255 dhcp
Assigns a static route for the default next-hop router when the DHCP serveris accessed for an IP address.
• If more than one interface on a router is configured to obtain an IPaddress from a DHCP server, use the ip route prefix mask interface-type interface-number dhcp command for each interface. If theinterface is not specified, the route is added to the routing table as soonas any of the interfaces obtain an IP address and default router.
Step 4 end
Example:
Router(config)# end
Returns to privileged Exec mode.
Step 5 show ip route
Example:
Router# show ip route
(Optional) Displays the current state of the routing table.
• Use this command to display assigned static routes once the DHCPclient obtains an address and a default router address from the DHCPserver.
Clearing DHCP Server VariablesPerform this task to clear DHCP server variables.
Clearing DHCP Server Variables Defining the DHCP Address Pool
IP Addressing: DHCP Configuration Guide, Cisco IOS Release 12.4T44
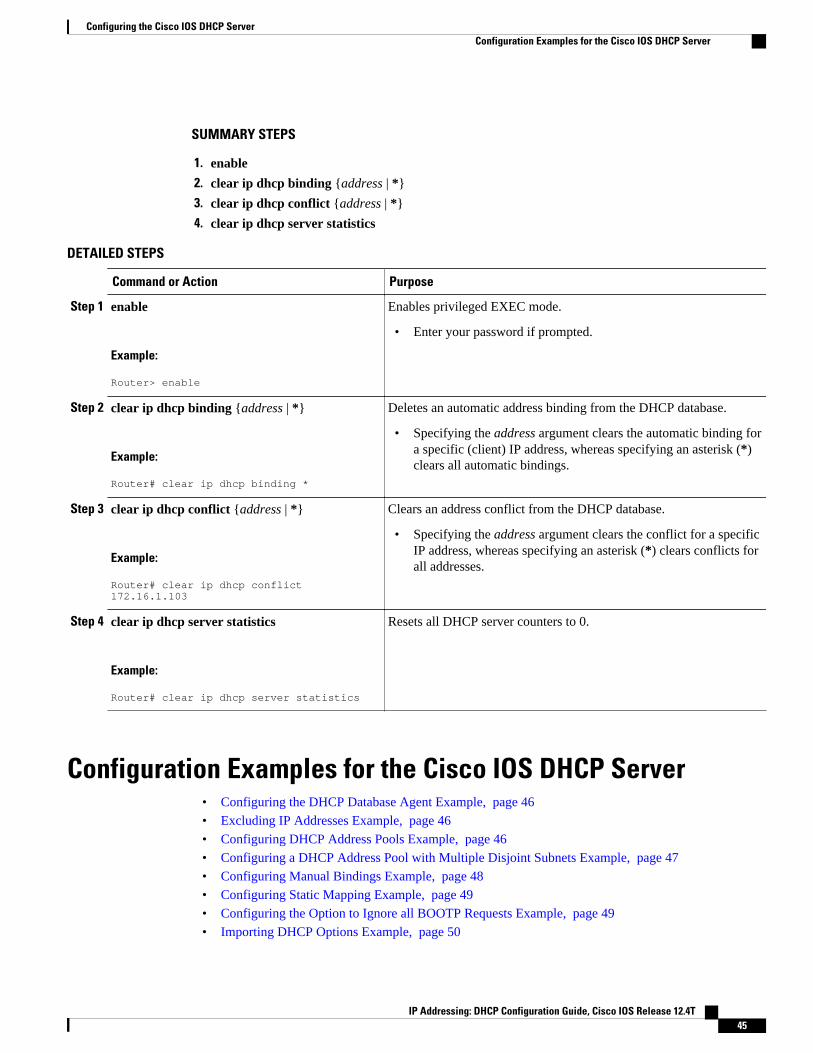
SUMMARY STEPS
1. enable
2. clear ip dhcp binding {address | *}
3. clear ip dhcp conflict {address | *}
4. clear ip dhcp server statistics
DETAILED STEPS
Command or Action Purpose
Step 1 enable
Example:
Router> enable
Enables privileged EXEC mode.
• Enter your password if prompted.
Step 2 clear ip dhcp binding {address | *}
Example:
Router# clear ip dhcp binding *
Deletes an automatic address binding from the DHCP database.
• Specifying the address argument clears the automatic binding fora specific (client) IP address, whereas specifying an asterisk (*)clears all automatic bindings.
Step 3 clear ip dhcp conflict {address | *}
Example:
Router# clear ip dhcp conflict 172.16.1.103
Clears an address conflict from the DHCP database.
• Specifying the address argument clears the conflict for a specificIP address, whereas specifying an asterisk (*) clears conflicts forall addresses.
Step 4 clear ip dhcp server statistics
Example:
Router# clear ip dhcp server statistics
Resets all DHCP server counters to 0.
Configuration Examples for the Cisco IOS DHCP Server• Configuring the DHCP Database Agent Example, page 46• Excluding IP Addresses Example, page 46• Configuring DHCP Address Pools Example, page 46• Configuring a DHCP Address Pool with Multiple Disjoint Subnets Example, page 47• Configuring Manual Bindings Example, page 48• Configuring Static Mapping Example, page 49• Configuring the Option to Ignore all BOOTP Requests Example, page 49• Importing DHCP Options Example, page 50
Configuring the Cisco IOS DHCP ServerConfiguration Examples for the Cisco IOS DHCP Server
IP Addressing: DHCP Configuration Guide, Cisco IOS Release 12.4T 45
• Configuring DHCP Address Allocation Using Option 82 Example, page 51
• Configuring a Static Route with the Next-Hop Dynamically Obtained Through DHCP Example, page52
Configuring the DHCP Database Agent ExampleThe following example shows how to store bindings on host 172.16.4.253. The file transfer protocol isFTP. The server should wait 2 minutes (120 seconds) before writing database changes.
ip dhcp database ftp://user:[email protected]/router-dhcp write-delay 120
Excluding IP Addresses ExampleIn the following example, server A and server B service the subnet 10.0.20.0/24. Splitting the subnetequally between the two servers, server A is configured to allocate IP addresses 10.0.20.1 to 10.0.20.125and server B is configured to allocate IP addresses 10.0.20.126 to 10.0.20.254.
Server A
ip dhcp excluded-address 10.0.20.126 10.0.20.255!ip dhcp pool A network 10.0.20.0 255.255.255.0
Server B
ip dhcp excluded-address 10.0.20.0 10.0.20.125!ip dhcp pool B network 10.0.20.0 255.255.255.0
Configuring DHCP Address Pools ExampleIn the following example, three DHCP address pools are created: one in network 172.16.0.0, one insubnetwork 172.16.1.0, and one in subnetwork 172.16.2.0. Attributes from network 172.16.0.0--such as thedomain name, DNS server, NetBIOS name server, and NetBIOS node type--are inherited in subnetworks172.16.1.0 and 172.16.2.0. In each pool, clients are granted 30-day leases and all addresses in eachsubnetwork, except the excluded addresses, are available to the DHCP server for assigning to clients. Thetable below lists the IP addresses for the devices in three DHCP address pools.
Table 4 DHCP Address Pool Configuration Example
Pool 0 (Network172.16.0.0)
Pool 1 (Subnetwork172.16.1.0)
Pool 2 (Subnetwork172.16.2.0)
Device IP Address Device IP Address Device IP Address
Default routers - Default routers 172.16.1.100
172.16.1.101
Default routers 172.16.2.100
172.16.2.101
Configuring the DHCP Database Agent Example Configuration Examples for the Cisco IOS DHCP Server
IP Addressing: DHCP Configuration Guide, Cisco IOS Release 12.4T46
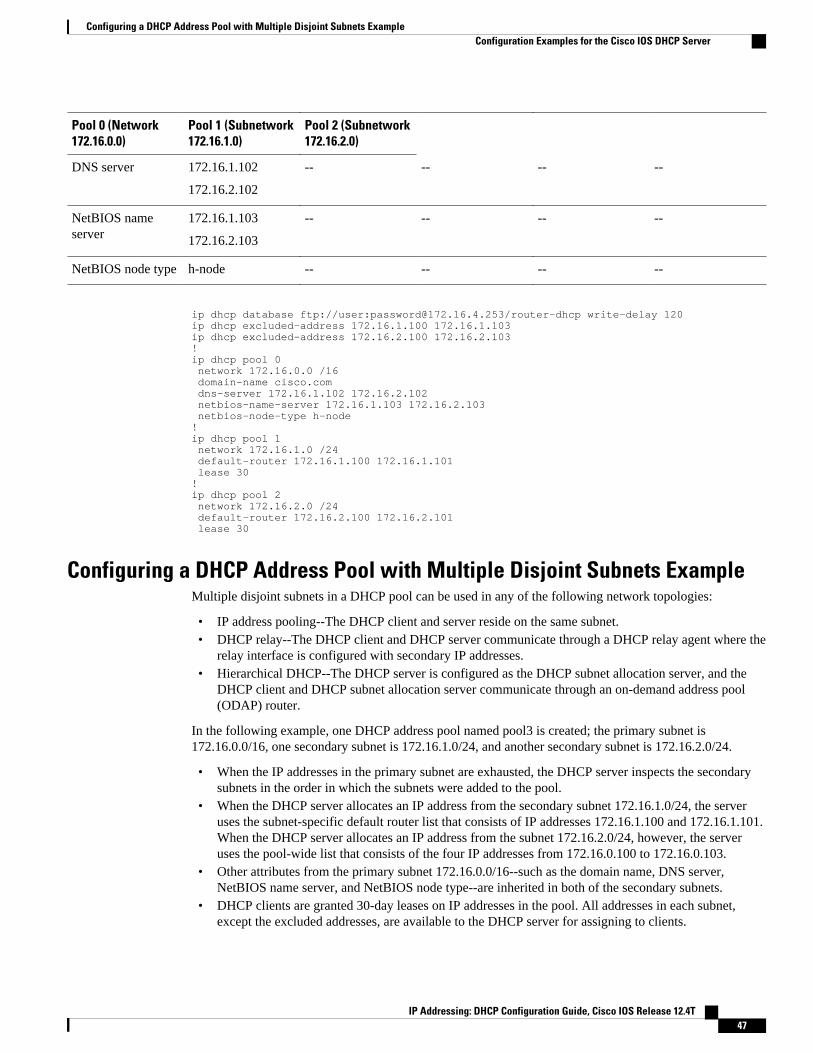
Pool 0 (Network172.16.0.0)
Pool 1 (Subnetwork172.16.1.0)
Pool 2 (Subnetwork172.16.2.0)
DNS server 172.16.1.102
172.16.2.102
-- -- -- --
NetBIOS nameserver
172.16.1.103
172.16.2.103
-- -- -- --
NetBIOS node type h-node -- -- -- --
ip dhcp database ftp://user:[email protected]/router-dhcp write-delay 120ip dhcp excluded-address 172.16.1.100 172.16.1.103 ip dhcp excluded-address 172.16.2.100 172.16.2.103!ip dhcp pool 0 network 172.16.0.0 /16 domain-name cisco.com dns-server 172.16.1.102 172.16.2.102 netbios-name-server 172.16.1.103 172.16.2.103 netbios-node-type h-node!ip dhcp pool 1 network 172.16.1.0 /24 default-router 172.16.1.100 172.16.1.101 lease 30 !ip dhcp pool 2 network 172.16.2.0 /24 default-router 172.16.2.100 172.16.2.101 lease 30
Configuring a DHCP Address Pool with Multiple Disjoint Subnets ExampleMultiple disjoint subnets in a DHCP pool can be used in any of the following network topologies:
• IP address pooling--The DHCP client and server reside on the same subnet.• DHCP relay--The DHCP client and DHCP server communicate through a DHCP relay agent where the
relay interface is configured with secondary IP addresses.• Hierarchical DHCP--The DHCP server is configured as the DHCP subnet allocation server, and the
DHCP client and DHCP subnet allocation server communicate through an on-demand address pool(ODAP) router.
In the following example, one DHCP address pool named pool3 is created; the primary subnet is172.16.0.0/16, one secondary subnet is 172.16.1.0/24, and another secondary subnet is 172.16.2.0/24.
• When the IP addresses in the primary subnet are exhausted, the DHCP server inspects the secondarysubnets in the order in which the subnets were added to the pool.
• When the DHCP server allocates an IP address from the secondary subnet 172.16.1.0/24, the serveruses the subnet-specific default router list that consists of IP addresses 172.16.1.100 and 172.16.1.101.When the DHCP server allocates an IP address from the subnet 172.16.2.0/24, however, the serveruses the pool-wide list that consists of the four IP addresses from 172.16.0.100 to 172.16.0.103.
• Other attributes from the primary subnet 172.16.0.0/16--such as the domain name, DNS server,NetBIOS name server, and NetBIOS node type--are inherited in both of the secondary subnets.
• DHCP clients are granted 30-day leases on IP addresses in the pool. All addresses in each subnet,except the excluded addresses, are available to the DHCP server for assigning to clients.
Configuring a DHCP Address Pool with Multiple Disjoint Subnets ExampleConfiguration Examples for the Cisco IOS DHCP Server
IP Addressing: DHCP Configuration Guide, Cisco IOS Release 12.4T 47
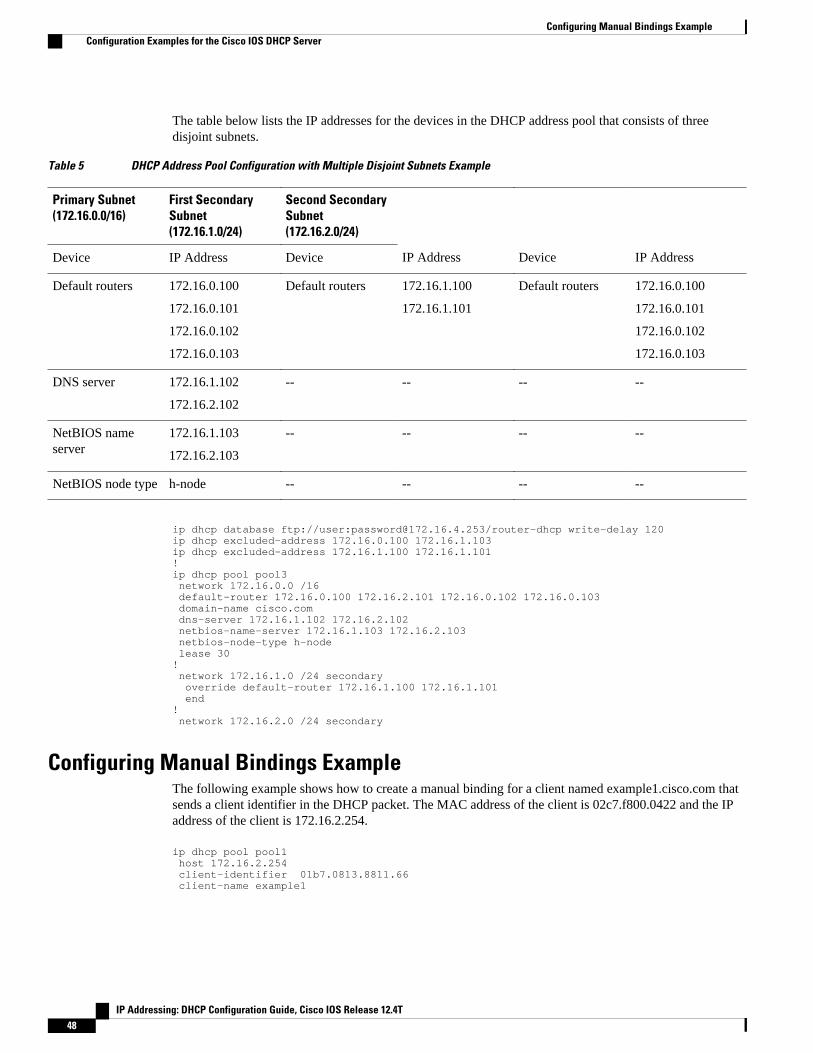
The table below lists the IP addresses for the devices in the DHCP address pool that consists of threedisjoint subnets.
Table 5 DHCP Address Pool Configuration with Multiple Disjoint Subnets Example
Primary Subnet(172.16.0.0/16)
First SecondarySubnet(172.16.1.0/24)
Second SecondarySubnet(172.16.2.0/24)
Device IP Address Device IP Address Device IP Address
Default routers 172.16.0.100
172.16.0.101
172.16.0.102
172.16.0.103
Default routers 172.16.1.100
172.16.1.101
Default routers 172.16.0.100
172.16.0.101
172.16.0.102
172.16.0.103
DNS server 172.16.1.102
172.16.2.102
-- -- -- --
NetBIOS nameserver
172.16.1.103
172.16.2.103
-- -- -- --
NetBIOS node type h-node -- -- -- --
ip dhcp database ftp://user:[email protected]/router-dhcp write-delay 120ip dhcp excluded-address 172.16.0.100 172.16.1.103 ip dhcp excluded-address 172.16.1.100 172.16.1.101 !ip dhcp pool pool3 network 172.16.0.0 /16 default-router 172.16.0.100 172.16.2.101 172.16.0.102 172.16.0.103 domain-name cisco.com dns-server 172.16.1.102 172.16.2.102 netbios-name-server 172.16.1.103 172.16.2.103 netbios-node-type h-node lease 30 ! network 172.16.1.0 /24 secondary override default-router 172.16.1.100 172.16.1.101 end ! network 172.16.2.0 /24 secondary
Configuring Manual Bindings ExampleThe following example shows how to create a manual binding for a client named example1.cisco.com thatsends a client identifier in the DHCP packet. The MAC address of the client is 02c7.f800.0422 and the IPaddress of the client is 172.16.2.254.
ip dhcp pool pool1 host 172.16.2.254 client-identifier 01b7.0813.8811.66 client-name example1
Configuring Manual Bindings Example Configuration Examples for the Cisco IOS DHCP Server
IP Addressing: DHCP Configuration Guide, Cisco IOS Release 12.4T48
The following example shows how to create a manual binding for a client named example2.cisco.com thatdo not send a client identifier in the DHCP packet. The MAC address of the client is 02c7.f800.0422 andthe IP address of the client is 172.16.2.253.
ip dhcp pool pool2 host 172.16.2.253 hardware-address 02c7.f800.0422 ethernet client-name example1
Because attributes are inherited, the two preceding configurations are equivalent to the following:
ip dhcp pool pool1 host 172.16.2.254 255.255.255.0 hardware-address 02c7.f800.0422 ieee802 client-name client1 default-router 172.16.2.100 172.16.2.101 domain-name cisco.com dns-server 172.16.1.102 172.16.2.102 netbios-name-server 172.16.1.103 172.16.2.103 netbios-node-type h-node
Configuring Static Mapping ExampleThe following example shows how to restart the DHCP server, configure the pool, and specify the URL atwhich the static mapping text file is stored:
no service dhcpservice dhcpip dhcp pool abcpool origin file tftp://10.1.0.1/staticfilename
Note The static mapping text file can be copied to flash memory on the router and served by the TFTP process ofthe router. In this case, the IP address in the origin file line must be an address owned by the router and oneadditional line of configuration is required on the router:tftp-server flash static-filename
Configuring the Option to Ignore all BOOTP Requests ExampleThe following example shows two DHCP pools that are configured on the router and that the router’sDHCP server is configured to ignore all received BOOTP requests. If a BOOTP request is received fromsubnet 10.0.18.0/24, the request will be dropped by the router (because the ip helper-address command isnot configured). If there is a BOOTP request from subnet 192.168.1.0/24, the request will be forwarded to172.16.1.1 via the ip helper-address command.
version 12.2service timestamps debug uptimeservice timestamps log uptimeno service password-encryption!hostname Router !ip subnet-zero!ip dhcp bootp ignore!ip dhcp pool ABC network 192.168.1.0 255.255.255.0 default-router 192.168.1.3 lease 2!
Configuring Static Mapping ExampleConfiguration Examples for the Cisco IOS DHCP Server
IP Addressing: DHCP Configuration Guide, Cisco IOS Release 12.4T 49
ip dhcp pool DEF network 10.0.18.0 255.255.255.0!ip cef!interface FastEthernet0/0 no ip address shutdown duplex half!interface Ethernet1/0 ip address 10.0.18.68 255.255.255.0 duplex half!interface Ethernet1/1 ip address 192.168.1.1 255.255.255.0 ip helper-address 172.16.1.1 duplex half!interface Ethernet1/2 shutdown duplex half!interface Ethernet1/3 no ip address shutdown duplex half!interface FastEthernet2/0 no ip address shutdown duplex half!ip route 172.16.1.1 255.255.255.255 e1/0 no ip http serverno ip pim bidir-enable!call rsvp-sync!mgcp profile default!dial-peer cor custom!gatekeeper shutdown!line con 0line aux 0line vty 0 4!end
Importing DHCP Options ExampleThe following example shows a remote and central server configured to support the importing of DHCPoptions. The central server is configured to automatically update DHCP options, such as DNS and WINSaddresses, within the DHCP pools. In response to a DHCP request from a local client behind CPE
Importing DHCP Options Example Configuration Examples for the Cisco IOS DHCP Server
IP Addressing: DHCP Configuration Guide, Cisco IOS Release 12.4T50
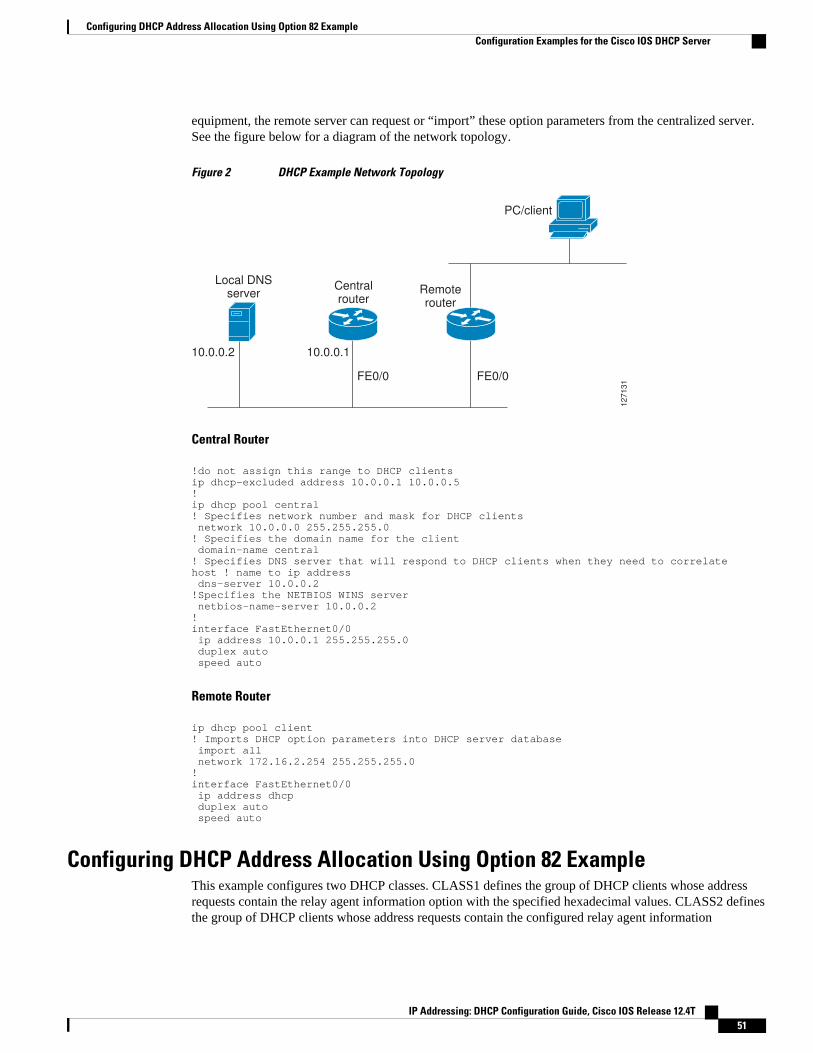
equipment, the remote server can request or “import” these option parameters from the centralized server.See the figure below for a diagram of the network topology.
Figure 2 DHCP Example Network Topology
Local DNS
serverCentral
routerRemote
router
PC/client
10.0.0.2 10.0.0.1
FE0/0 FE0/0
127131
Central Router
!do not assign this range to DHCP clientsip dhcp-excluded address 10.0.0.1 10.0.0.5!ip dhcp pool central! Specifies network number and mask for DHCP clients network 10.0.0.0 255.255.255.0! Specifies the domain name for the client domain-name central! Specifies DNS server that will respond to DHCP clients when they need to correlate host ! name to ip address dns-server 10.0.0.2!Specifies the NETBIOS WINS server netbios-name-server 10.0.0.2 !interface FastEthernet0/0 ip address 10.0.0.1 255.255.255.0 duplex auto speed auto
Remote Router
ip dhcp pool client! Imports DHCP option parameters into DHCP server database import all network 172.16.2.254 255.255.255.0!interface FastEthernet0/0 ip address dhcp duplex auto speed auto
Configuring DHCP Address Allocation Using Option 82 ExampleThis example configures two DHCP classes. CLASS1 defines the group of DHCP clients whose addressrequests contain the relay agent information option with the specified hexadecimal values. CLASS2 definesthe group of DHCP clients whose address requests contain the configured relay agent information
Configuring DHCP Address Allocation Using Option 82 ExampleConfiguration Examples for the Cisco IOS DHCP Server
IP Addressing: DHCP Configuration Guide, Cisco IOS Release 12.4T 51
suboptions. CLASS3 has no pattern configured and is treated as a “match to any” class. This type of class isuseful for specifying a “default” class.
In the following example, the subnet of pool ABC has been divided into three ranges without furthersubnetting of the 10.0.20.0/24 subnet. If there is a DHCP Discover message from the 10.0.20.0/24 subnetwith option 82 matching that of class CLASS1, an available address in the range from 10.0.20.1 to10.0.20.100 will be allocated. If there is no free address in CLASS1's address range, the DHCP Discovermessage will be matched against CLASS2, and so on.
Thus, each class in the DHCP pool will be examined for a match in the order configured by the user. Inpool ABC, the order of matching is CLASS1, CLASS2, and finally CLASS3. In pool DEF, class CLASS2does not have any address range configured. By default, the address range for a particular class is the pool'sentire subnets. Therefore, clients matching CLASS2 may be allocated addresses from 11.0.20.1 to11.0.20.254.
Multiple pools can be configured with the same class, eliminating the need to configure the same patternsin multiple pools. In the future, further classification method may be implemented. For example, there maybe a need to specify that one or more pools should be used only to service a particular class of devices (forexample, cable modems and IP phones).
! Defines the DHCP classes and relay information patternsip dhcp class CLASS1 relay agent information relay-information hex 01030a0b0c02050000000123 relay-information hex 01030a0b0c02* relay-information hex 01030a0b0c02050000000000 bitmask 0000000000000000000000FF ip dhcp class CLASS2 relay agent information relay-information hex 01040102030402020102 relay-information hex 01040101030402020102 ip dhcp class CLASS3 relay agent information ! Associates the DHCP pool with DHCP classes ip dhcp pool ABC network 10.0.20.0 255.255.255.0 class CLASS1 address range 10.0.20.1 10.0.20.100 class CLASS2 address range 10.0.20.101 10.0.20.200 class CLASS3 address range 10.0.20.201 10.0.20.254 ip dhcp pool DEF network 172.64.2.2 255.255.255.0 class CLASS1 address range 172.64.2.3 172.64.2.10 class CLASS2
Configuring a Static Route with the Next-Hop Dynamically ObtainedThrough DHCP Example
The following example shows how to configure two Ethernet interfaces to obtain the next-hop router IPaddress from the DHCP server:
ip route 10.10.10.0 255.255.255.0 dhcp 200 ip route 10.10.20.1 255.255.255.255 ethernet 1 dhcp
Additional ReferencesThe following sections provide references related to configuring the Cisco IOS DHCP server.
Configuring a Static Route with the Next-Hop Dynamically Obtained Through DHCP Example Additional References
IP Addressing: DHCP Configuration Guide, Cisco IOS Release 12.4T52
Related Documents
Related Topic Document Title
DHCP commands: complete command syntax,command mode, command history, defaults, usageguidelines, and examples
Cisco IOS IP Addressing Services CommandReference
DHCP conceptual information “DHCP Overview” module
DHCP relay agent configuration “Configuring the Cisco IOS DHCP Relay Agent”module
DHCP server on-demand address pools “Configuring the DHCP Server On-DemandAddress Pool Manager” module
DHCP client configuration “Configuring the Cisco IOS DHCP Client” module
DHCP advanced features “Configuring DHCP Services for Accounting andSecurity” module
DHCP enhancements for edge-session management “Configuring DHCP Enhancements for Edge-Session Management” module
DHCP options “DHCP Options” appendix in the NetworkRegistrar User’s Guide , Release 6.1.1
Standards
Standards Title
No new or modified standards are supported by thisfunctionality.
--
MIBs
MIBs MIBs Link
No new or modified MIBs are supported by thisfeature, and support for existing MIBs has not beenmodified by this feature.
To locate and download MIBs for selectedplatforms, Cisco IOS releases, and feature sets, useCisco MIB Locator found at the following URL:
http://www.cisco.com/go/mibs
RFCs
RFCs Title
RFC 951 Bootstrap Protocol (BOOTP)
RFC 1542 Clarifications and Extensions for the BootstrapProtocol
RFC 2131 Dynamic Host Configuration Protocol
Configuring the Cisco IOS DHCP ServerAdditional References
IP Addressing: DHCP Configuration Guide, Cisco IOS Release 12.4T 53
RFCs Title
RFC 2132 DHCP Options and BOOTP Vendor Extensions
Technical Assistance
Description Link
The Cisco Support website provides extensiveonline resources, including documentation and toolsfor troubleshooting and resolving technical issueswith Cisco products and technologies.
To receive security and technical information aboutyour products, you can subscribe to variousservices, such as the Product Alert Tool (accessedfrom Field Notices), the Cisco Technical ServicesNewsletter, and Really Simple Syndication (RSS)Feeds.
Access to most tools on the Cisco Support websiterequires a Cisco.com user ID and password.
http://www.cisco.com/cisco/web/support/index.html
Feature Information for the Cisco IOS DHCP ServerThe following table provides release information about the feature or features described in this module.This table lists only the software release that introduced support for a given feature in a given softwarerelease train. Unless noted otherwise, subsequent releases of that software release train also support thatfeature.
Use Cisco Feature Navigator to find information about platform support and Cisco software image support.To access Cisco Feature Navigator, go to www.cisco.com/go/cfn. An account on Cisco.com is not required.
Table 6 Feature Information for the Cisco IOS DHCP Server
Feature Name Releases Feature Configuration Information
DHCP Address Allocation UsingOption 82
12.3(4)T 12.2(28)SB12.2(33)SRB
The Cisco IOS DHCP server canallocate dynamic IP addressesbased on the relay informationoption (option 82) informationsent by the relay agent.
The following commands wereintroduced or modified: addressrange, class, ip dhcp class, ipdhcp use class, relay agentinformation, relay-informationhex.
Configuring the Cisco IOS DHCP Server Feature Information for the Cisco IOS DHCP Server
IP Addressing: DHCP Configuration Guide, Cisco IOS Release 12.4T54
Feature Name Releases Feature Configuration Information
DHCP Server Import AllEnhancement
12.2(15)T 12.2(33)SRC The feature is an enhancement tothe import all globalconfiguration command. Beforethis feature was introduced, theoptions imported through theimport all command wereoverwritten by those imported byanother subsystem. Through thisfeature, options imported bymultiple subsystems can coexistin the DHCP address pool. Whenthe session is terminated or thelease is released, the importedoptions are cleared.
DHCP Server Multiple Subnet 12.4(15)T 12.2(33)SRB This feature enables multiplesubnets to be configured underthe same DHCP address pool.
The following commands wereintroduced or modified:network(DHCP), overridedefault-router.
DHCP Server Option to Ignore allBOOTP Requests
12.2(8)T 12.2(28)SB This feature allows the Cisco IOSDHCP server to selectivelyignore and not reply to receivedBootstrap Protocol (BOOTP)request packets.
The following command wasintroduced or modified: ip dhcpbootp ignore.
DHCP Static Mapping 12.3(11)T 12.2(28)SB12.2(33)SRC
Configuring static mapping poolsenables the DHCP server to readthe static bindings from a separatetext file (similar in format to theDHCP database file) that is storedin these special pools.
The following command wasintroduced or modified: origin.
DHCP Statically ConfiguredRoutes Using a DHCP Gateway
12.3(8)T 12.2(28)S 12.2(33)SRC This feature enables theconfiguration of static routes thatpoint to an assigned DHCP next-hop router.
The following commands wereintroduced or modified: ip route,show ip route.
Configuring the Cisco IOS DHCP ServerFeature Information for the Cisco IOS DHCP Server
IP Addressing: DHCP Configuration Guide, Cisco IOS Release 12.4T 55
Cisco and the Cisco logo are trademarks or registered trademarks of Cisco and/or its affiliates in the U.S.and other countries. To view a list of Cisco trademarks, go to this URL: www.cisco.com/go/trademarks.Third-party trademarks mentioned are the property of their respective owners. The use of the word partnerdoes not imply a partnership relationship between Cisco and any other company. (1110R)
Any Internet Protocol (IP) addresses and phone numbers used in this document are not intended to beactual addresses and phone numbers. Any examples, command display output, network topology diagrams,and other figures included in the document are shown for illustrative purposes only. Any use of actual IPaddresses or phone numbers in illustrative content is unintentional and coincidental.
Configuring the Cisco IOS DHCP Server
IP Addressing: DHCP Configuration Guide, Cisco IOS Release 12.4T56
Configuring the DHCP Server On-DemandAddress Pool Manager
The Cisco IOS Dynamic Host Configuration Protocol (DHCP) server on-demand address pool (ODAP)manager is used to centralize the management of large pools of addresses and simplify the configurationof large networks. ODAP provides a central management point for the allocation and assignment of IPaddresses. When a Cisco IOS router is configured as an ODAP manager, pools of IP addresses aredynamically increased or reduced in size depending on the address utilization level. A DHCP poolconfigured in the router can also be used as an IP address pooling mechanism. The IP address poolingmechanism is configured in the router to specify the source of IP addresses for PPP peers.
• Finding Feature Information, page 57• Prerequisites for Configuring the DHCP Server On-Demand Address Pool Manager, page 57• Restrictions for Configuring the DHCP Server On-Demand Address Pool Manager, page 58• Information About the DHCP Server On-Demand Address Pool Manager, page 58• How to Configure the DHCP Server On-Demand Address Pool Manager, page 61• Configuration Examples for DHCP Server On-Demand Address Pool Manager, page 84• Additional References, page 91• Feature Information for the DHCP Server On-Demand Address Pool Manager, page 93• Glossary, page 94
Finding Feature InformationYour software release may not support all the features documented in this module. For the latest featureinformation and caveats, see the release notes for your platform and software release. To find informationabout the features documented in this module, and to see a list of the releases in which each feature issupported, see the Feature Information Table at the end of this document.
Use Cisco Feature Navigator to find information about platform support and Cisco software image support.To access Cisco Feature Navigator, go to www.cisco.com/go/cfn. An account on Cisco.com is not required.
Prerequisites for Configuring the DHCP Server On-DemandAddress Pool Manager
Before you configure the ODAP manager, you should understand the concepts documented in the “DHCPOverview” module.
IP Addressing: DHCP Configuration Guide, Cisco IOS Release 12.4T 57
You must configure standard Multiprotocol Label Switching (MPLS) Virtual Private Networks (VPNs)unless you intend to use non-MPLS VPNs.
In order for the IP address pooling mechanism to work correctly, the VPN routing and forwarding (VRF)instance of the PPP session must match that configured on the pool. Typically this matching is done eitherby configuring the ip vrf forwarding vrf-name command on the virtual template interface, or ifAuthentication, Authorization, and Accounting (AAA) is used to authorize the PPP user, the command canbe part of the user’s profile configuration.
Restrictions for Configuring the DHCP Server On-DemandAddress Pool Manager
• The ip dhcp excluded-address command available in global configuration mode cannot be used toexclude addresses from VRF-associated pools.
• The vrf command available in DHCP pool configuration mode is currently not supported for hostpools.
• Attribute inheritance is not supported on VRF pools.• A router can be configured as a subnet allocation server and a DHCP server at the same time with one
restriction: Separate pools must be created for subnet allocation and IP address assignment. An addresspool cannot be used by DHCP for both subnet allocation and IP address assignment.
Information About the DHCP Server On-Demand Address PoolManager
• ODAP Manager Operation, page 58
• Subnet Allocation Server Operation, page 60
• Benefits of Using ODAPs, page 61
ODAP Manager OperationODAPs enable pools of IP addresses to be dynamically increased or reduced in size depending on theaddress utilization level. Once configured, the ODAP is populated with one or more subnets leased from asource server and is ready to serve address requests from DHCP clients or from PPP sessions. The sourceserver can be a remote DHCP server or a RADIUS server (via AAA). Currently, only the Cisco AccessRegistrar RADIUS server supports ODAPs. Subnets can be added to the pool when a certain utilizationlevel (high utilization mark) is achieved. When the utilization level falls below a certain level (lowutilization mark), a subnet can be returned to the server from which it was originally leased. Summarizedroutes for each leased subnet must be inserted or removed from the related VRF with each addition orremoval of subnets into the ODAP.
ODAPs support address assignment using DHCP for customers using private addresses such as in MPLSVPNs. VPNs allow the possibility that two pools in separate networks can have the same address space,with private network addresses, served by the same DHCP server. These IP addresses can be distinguishedby a VPN identifier to help select the VPN to which the client belongs.
ODAP Manager Operation Restrictions for Configuring the DHCP Server On-Demand Address Pool Manager
IP Addressing: DHCP Configuration Guide, Cisco IOS Release 12.4T58
Each ODAP is configured and associated with a particular MPLS VPN. Cisco IOS software also supportsnon-MPLS VPN address pools by adding pool name support to the peer default ip address dhcp-poolpool-namecommand.
For MPLS VPNs, each VPN is associated with one or more VRFs. The VRF is a key element in the VPNtechnology because it maintains the routing information that defines a customer VPN site. This customersite is attached to a provider edge (PE) router. A VRF consists of an IP routing table, a derived CiscoExpress Forwarding table, a set of interfaces that use the forwarding table, and a set of rules and routingprotocol parameters that control the information that is included in the routing table.
A PPP session belonging to a specific VPN is allocated an address only from the ODAP associated withthat VPN. These PPP sessions are terminated on a Virtual Home Gateway (VHG)/PE router where theODAP is configured. The VHG/PE router maps the remote user to the corresponding MPLS VPNs.
For PPP sessions, individual address allocation from an ODAP follows a First Leased subnet First (FLF)policy. FLF searches for a free address beginning on the first leased subnet, followed by a search on thesecond leased subnet if no free address is available in the first subnet, and so on. This policy provides thebenefit of grouping the leased addresses over time to a set of subnets, which allows an efficient subnetrelease and route summarization.
However, the FLF policy differs from the normal DHCP address selection policy. Normal DHCP addressselection considers the IP address of the receiving interface or the gateway address if it is nonzero. Tosupport both policies, the DHCP server needs to be able to distinguish between a normal DHCP addressrequest and an address request for a PPP client. The ODAP manager uses an IP address pooling mechanismfor PPP that allows the DHCP server to distinguish between a normal DHCP address request and a requestfrom a PPP client.
Subnet release from an ODAP follows a Last Leased subnet First (LLF) policy, which prefers the lastleased subnet to be released first. This LLF policy searches for a releasable subnet (a subnet with noaddresses currently being leased) starting with the last leased subnet. If a releasable subnet is found(candidate subnet), it is released, and the summarized route for that subnet is removed. If more than onereleasable subnet exists at that time, only the most recently allocated is released. If there are no releasablesubnets, no action is taken. If by releasing the candidate subnet, the high utilization mark is reached, thesubnet is not released. The first leased subnet is never released (regardless of the instantaneous utilizationlevel) until the ODAP is disabled.
When a DHCP pool receives multiple subnets from an upstream DHCP server, an address from each subnetis automatically configured on the client connected interface so that the addresses within the subnets can berequested by DHCP clients.
The first address in the first subnet is automatically assigned to the primary address on the interface. Thefirst address of each subsequent subnet is assigned to secondary addresses on the interface. In addition, asclient addresses are reclaimed, the count of lease addresses for that subnet is decremented. Once a leasecounter for a subnet reaches zero (that is, lease expiry), the subnet is returned to the pool. The previousaddress on the interface is removed and the first secondary address on the interface is promoted as theprimary address of the interface.
The figure below shows an ODAP manager configured on the Cisco IOS DHCP server. The ODAPrequests an initial pool from the AAA server. Clients make DHCP requests and the DHCP server fulfillsrequests from the pool. When the utilization rate meets 90 percent, the ODAP manager requests an
Configuring the DHCP Server On-Demand Address Pool ManagerInformation About the DHCP Server On-Demand Address Pool Manager
IP Addressing: DHCP Configuration Guide, Cisco IOS Release 12.4T 59
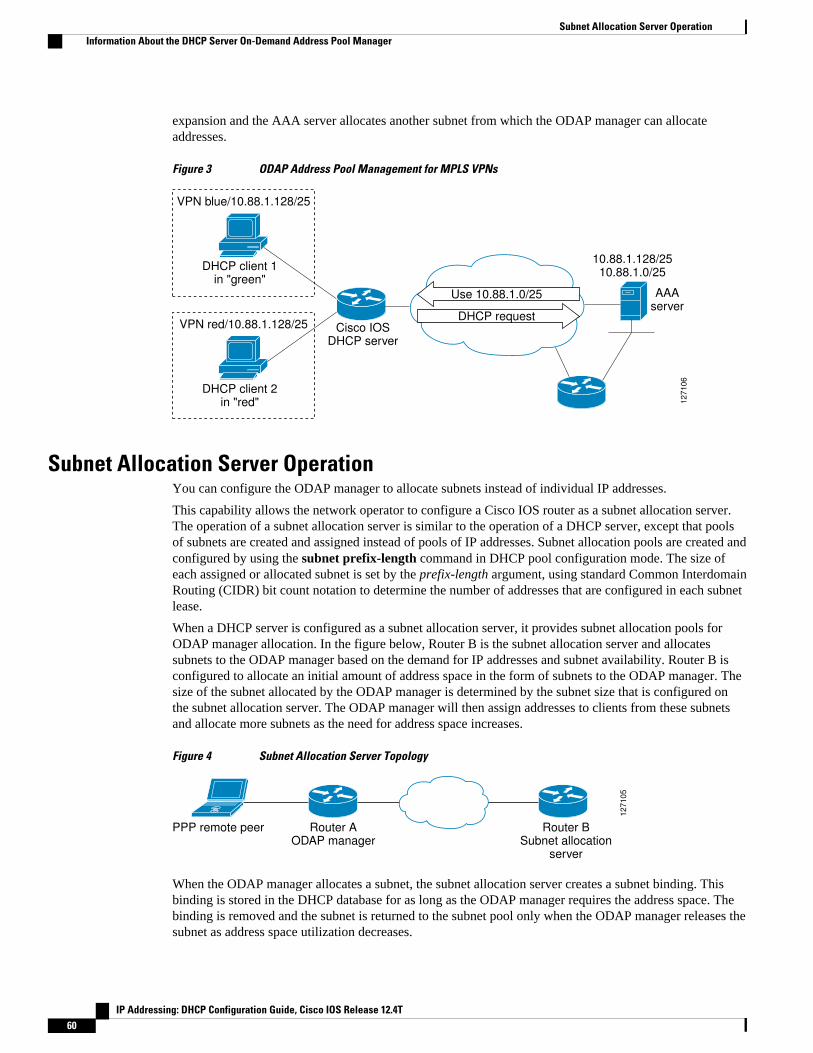
expansion and the AAA server allocates another subnet from which the ODAP manager can allocateaddresses.
Figure 3 ODAP Address Pool Management for MPLS VPNs
127106
DHCP client 1 in "green"
VPN blue/10.88.1.128/25
10.88.1.128/25 10.88.1.0/25
AAA server
DHCP client 2 in "red"
VPN blue/192.168.1.0/24VPN red/10.88.1.128/25 Cisco IOS DHCP server
Use 10.88.1.0/25
DHCP request
Subnet Allocation Server OperationYou can configure the ODAP manager to allocate subnets instead of individual IP addresses.
This capability allows the network operator to configure a Cisco IOS router as a subnet allocation server.The operation of a subnet allocation server is similar to the operation of a DHCP server, except that poolsof subnets are created and assigned instead of pools of IP addresses. Subnet allocation pools are created andconfigured by using the subnet prefix-length command in DHCP pool configuration mode. The size ofeach assigned or allocated subnet is set by the prefix-length argument, using standard Common InterdomainRouting (CIDR) bit count notation to determine the number of addresses that are configured in each subnetlease.
When a DHCP server is configured as a subnet allocation server, it provides subnet allocation pools forODAP manager allocation. In the figure below, Router B is the subnet allocation server and allocatessubnets to the ODAP manager based on the demand for IP addresses and subnet availability. Router B isconfigured to allocate an initial amount of address space in the form of subnets to the ODAP manager. Thesize of the subnet allocated by the ODAP manager is determined by the subnet size that is configured onthe subnet allocation server. The ODAP manager will then assign addresses to clients from these subnetsand allocate more subnets as the need for address space increases.
Figure 4 Subnet Allocation Server Topology
12
71
05
PPP remote peer Router A ODAP manager
Router B Subnet allocation
server
When the ODAP manager allocates a subnet, the subnet allocation server creates a subnet binding. Thisbinding is stored in the DHCP database for as long as the ODAP manager requires the address space. Thebinding is removed and the subnet is returned to the subnet pool only when the ODAP manager releases thesubnet as address space utilization decreases.
Subnet Allocation Server Operation Information About the DHCP Server On-Demand Address Pool Manager
IP Addressing: DHCP Configuration Guide, Cisco IOS Release 12.4T60
The subnet allocation server can also be associated with a VRF. A VRF consists of an IP routing table, aderived Cisco Express Forwarding table, a set of interfaces that use the forwarding table, and a set of rulesand routing protocol parameters that control the information that is included in the routing table.
Benefits of Using ODAPs
Efficient Address Management
The ODAP manager allows customers to optimize their use of IP addresses, thus conserving address space.
Efficient Route Summarization and Update
The ODAP manager inserts a summarized route when a subnet is added to the ODAP.
Multiple VRF and Independent Private Addressing Support
The ODAP manager automatically injects subnet routing information into the appropriate VRF.
How to Configure the DHCP Server On-Demand Address PoolManager
• Specifying DHCP ODAPs as the Global Default Mechanism, page 61
• Defining DHCP ODAPs on an Interface, page 62
• Configuring the DHCP Pool as an ODAP, page 63
• Configuring ODAPs to Obtain Subnets Through IPCP Negotiation, page 65
• Configuring AAA, page 67
• Configuring RADIUS, page 69
• Disabling ODAPs, page 71
• Verifying ODAP Operation, page 72
• Monitoring and Maintaining the ODAP, page 74
• Configuring DHCP ODAP Subnet Allocation Server Support, page 76
Specifying DHCP ODAPs as the Global Default MechanismPerform this task to specify that the global default mechanism to use is on-demand address pooling.
IP addressing allows configuration of a global default address pooling mechanism. The DHCP server needsto be able to distinguish between a normal DHCP address request and an address request for a PPP client.
SUMMARY STEPS
1. enable
2. configure terminal
3. ip address-pool dhcp-pool
Benefits of Using ODAPsHow to Configure the DHCP Server On-Demand Address Pool Manager
IP Addressing: DHCP Configuration Guide, Cisco IOS Release 12.4T 61
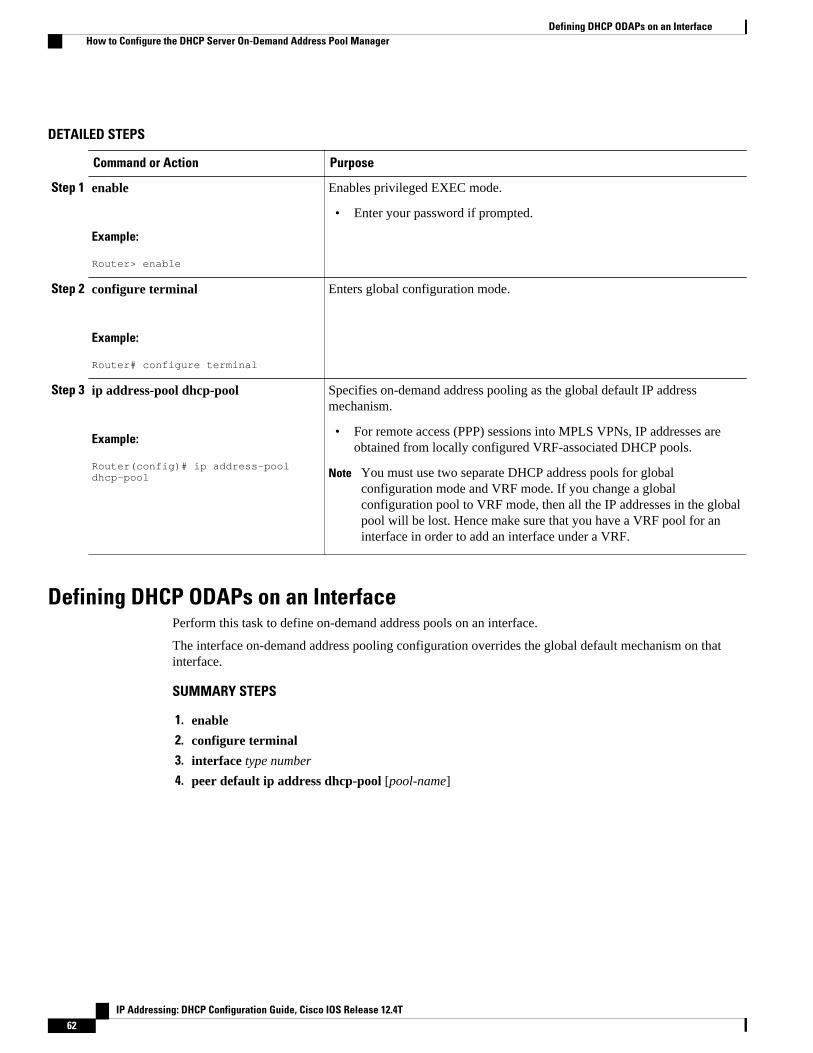
DETAILED STEPS
Command or Action Purpose
Step 1 enable
Example:
Router> enable
Enables privileged EXEC mode.
• Enter your password if prompted.
Step 2 configure terminal
Example:
Router# configure terminal
Enters global configuration mode.
Step 3 ip address-pool dhcp-pool
Example:
Router(config)# ip address-pool dhcp-pool
Specifies on-demand address pooling as the global default IP addressmechanism.
• For remote access (PPP) sessions into MPLS VPNs, IP addresses areobtained from locally configured VRF-associated DHCP pools.
Note You must use two separate DHCP address pools for globalconfiguration mode and VRF mode. If you change a globalconfiguration pool to VRF mode, then all the IP addresses in the globalpool will be lost. Hence make sure that you have a VRF pool for aninterface in order to add an interface under a VRF.
Defining DHCP ODAPs on an InterfacePerform this task to define on-demand address pools on an interface.
The interface on-demand address pooling configuration overrides the global default mechanism on thatinterface.
SUMMARY STEPS
1. enable
2. configure terminal
3. interface type number
4. peer default ip address dhcp-pool [pool-name]
Defining DHCP ODAPs on an Interface How to Configure the DHCP Server On-Demand Address Pool Manager
IP Addressing: DHCP Configuration Guide, Cisco IOS Release 12.4T62
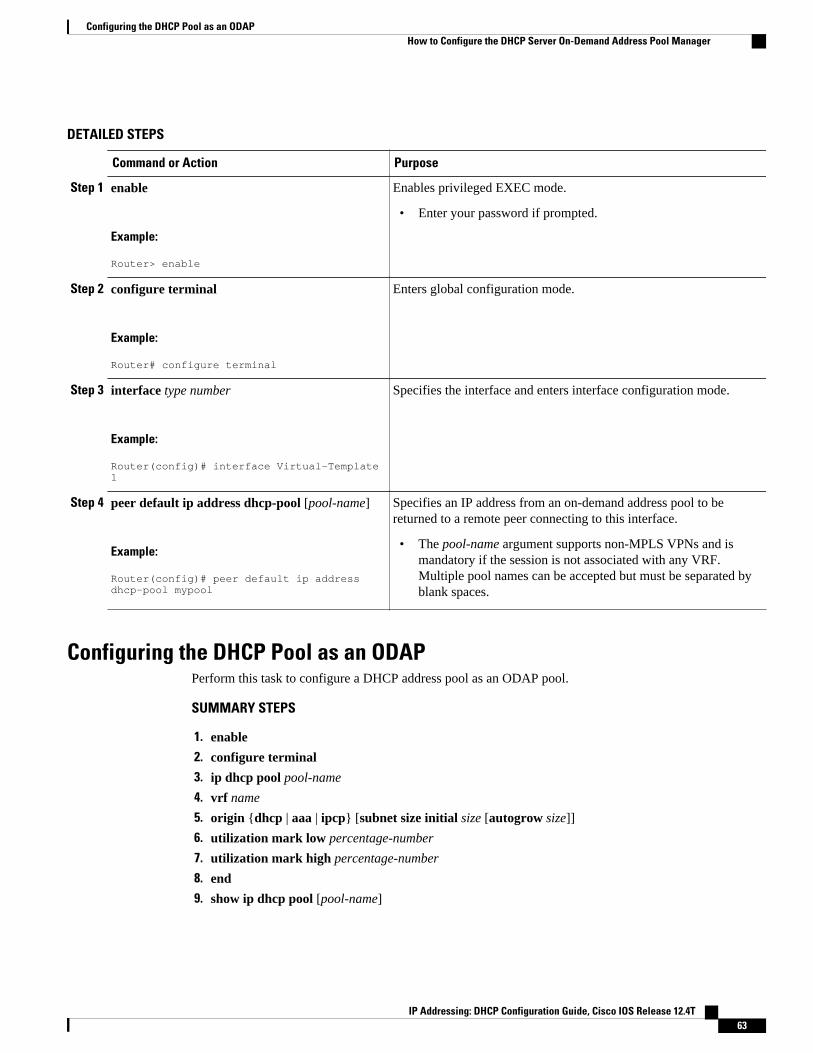
DETAILED STEPS
Command or Action Purpose
Step 1 enable
Example:
Router> enable
Enables privileged EXEC mode.
• Enter your password if prompted.
Step 2 configure terminal
Example:
Router# configure terminal
Enters global configuration mode.
Step 3 interface type number
Example:
Router(config)# interface Virtual-Template 1
Specifies the interface and enters interface configuration mode.
Step 4 peer default ip address dhcp-pool [pool-name]
Example:
Router(config)# peer default ip address dhcp-pool mypool
Specifies an IP address from an on-demand address pool to bereturned to a remote peer connecting to this interface.
• The pool-name argument supports non-MPLS VPNs and ismandatory if the session is not associated with any VRF.Multiple pool names can be accepted but must be separated byblank spaces.
Configuring the DHCP Pool as an ODAPPerform this task to configure a DHCP address pool as an ODAP pool.
SUMMARY STEPS
1. enable
2. configure terminal
3. ip dhcp pool pool-name
4. vrf name
5. origin {dhcp | aaa | ipcp} [subnet size initial size [autogrow size]]
6. utilization mark low percentage-number
7. utilization mark high percentage-number
8. end
9. show ip dhcp pool [pool-name]
Configuring the DHCP Pool as an ODAPHow to Configure the DHCP Server On-Demand Address Pool Manager
IP Addressing: DHCP Configuration Guide, Cisco IOS Release 12.4T 63
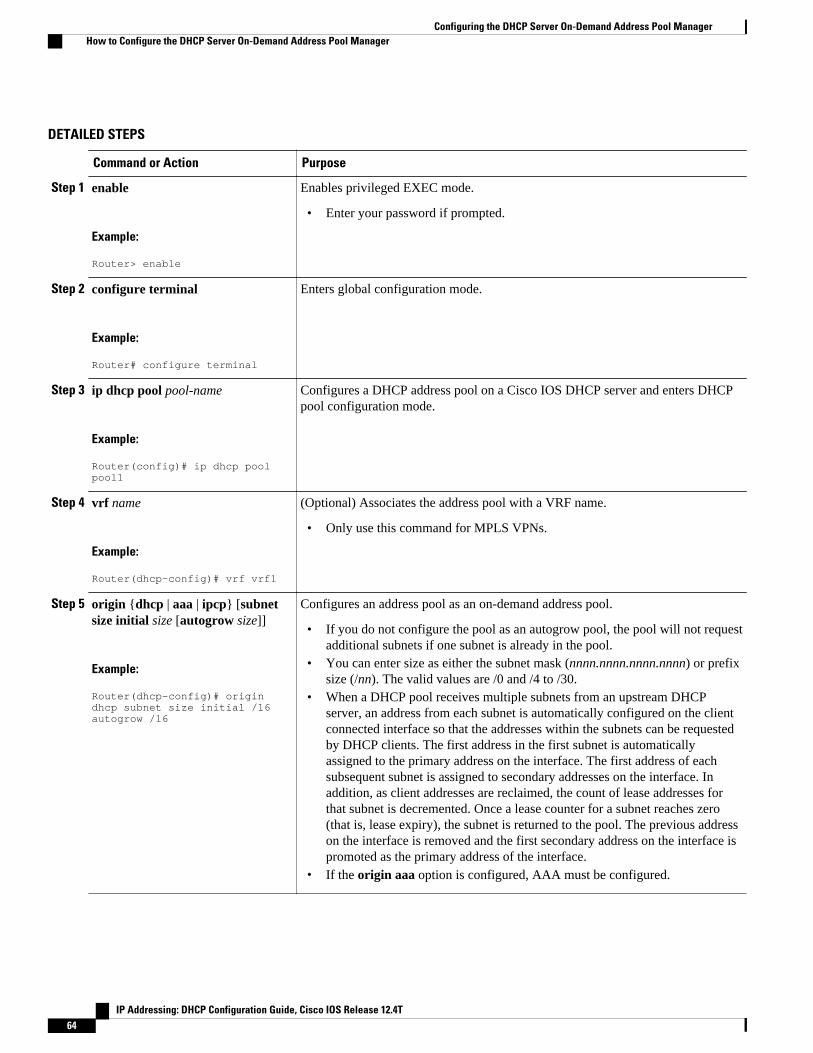
DETAILED STEPS
Command or Action Purpose
Step 1 enable
Example:
Router> enable
Enables privileged EXEC mode.
• Enter your password if prompted.
Step 2 configure terminal
Example:
Router# configure terminal
Enters global configuration mode.
Step 3 ip dhcp pool pool-name
Example:
Router(config)# ip dhcp pool pool1
Configures a DHCP address pool on a Cisco IOS DHCP server and enters DHCPpool configuration mode.
Step 4 vrf name
Example:
Router(dhcp-config)# vrf vrf1
(Optional) Associates the address pool with a VRF name.
• Only use this command for MPLS VPNs.
Step 5 origin {dhcp | aaa | ipcp} [subnetsize initial size [autogrow size]]
Example:
Router(dhcp-config)# origin dhcp subnet size initial /16 autogrow /16
Configures an address pool as an on-demand address pool.
• If you do not configure the pool as an autogrow pool, the pool will not requestadditional subnets if one subnet is already in the pool.
• You can enter size as either the subnet mask (nnnn.nnnn.nnnn.nnnn) or prefixsize (/nn). The valid values are /0 and /4 to /30.
• When a DHCP pool receives multiple subnets from an upstream DHCPserver, an address from each subnet is automatically configured on the clientconnected interface so that the addresses within the subnets can be requestedby DHCP clients. The first address in the first subnet is automaticallyassigned to the primary address on the interface. The first address of eachsubsequent subnet is assigned to secondary addresses on the interface. Inaddition, as client addresses are reclaimed, the count of lease addresses forthat subnet is decremented. Once a lease counter for a subnet reaches zero(that is, lease expiry), the subnet is returned to the pool. The previous addresson the interface is removed and the first secondary address on the interface ispromoted as the primary address of the interface.
• If the origin aaa option is configured, AAA must be configured.
Configuring the DHCP Server On-Demand Address Pool Manager How to Configure the DHCP Server On-Demand Address Pool Manager
IP Addressing: DHCP Configuration Guide, Cisco IOS Release 12.4T64
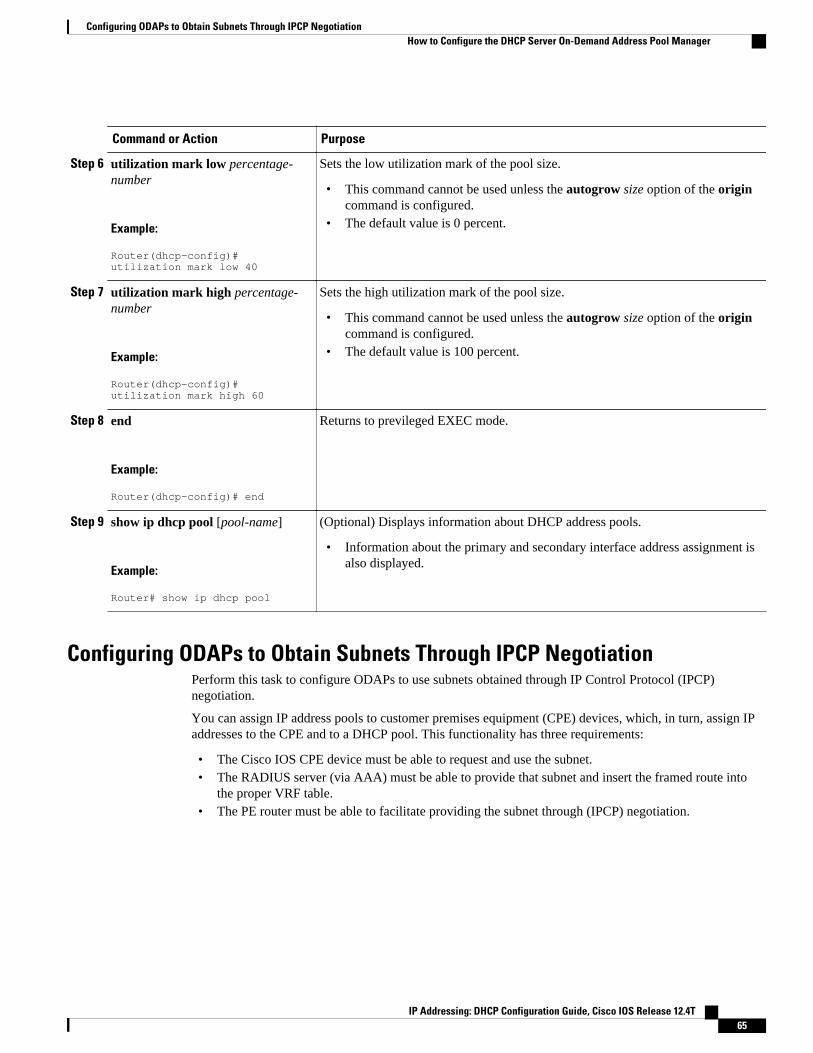
Command or Action Purpose
Step 6 utilization mark low percentage-number
Example:
Router(dhcp-config)# utilization mark low 40
Sets the low utilization mark of the pool size.
• This command cannot be used unless the autogrow size option of the origincommand is configured.
• The default value is 0 percent.
Step 7 utilization mark high percentage-number
Example:
Router(dhcp-config)# utilization mark high 60
Sets the high utilization mark of the pool size.
• This command cannot be used unless the autogrow size option of the origincommand is configured.
• The default value is 100 percent.
Step 8 end
Example:
Router(dhcp-config)# end
Returns to previleged EXEC mode.
Step 9 show ip dhcp pool [pool-name]
Example:
Router# show ip dhcp pool
(Optional) Displays information about DHCP address pools.
• Information about the primary and secondary interface address assignment isalso displayed.
Configuring ODAPs to Obtain Subnets Through IPCP NegotiationPerform this task to configure ODAPs to use subnets obtained through IP Control Protocol (IPCP)negotiation.
You can assign IP address pools to customer premises equipment (CPE) devices, which, in turn, assign IPaddresses to the CPE and to a DHCP pool. This functionality has three requirements:
• The Cisco IOS CPE device must be able to request and use the subnet.• The RADIUS server (via AAA) must be able to provide that subnet and insert the framed route into
the proper VRF table.• The PE router must be able to facilitate providing the subnet through (IPCP) negotiation.
Configuring ODAPs to Obtain Subnets Through IPCP NegotiationHow to Configure the DHCP Server On-Demand Address Pool Manager
IP Addressing: DHCP Configuration Guide, Cisco IOS Release 12.4T 65
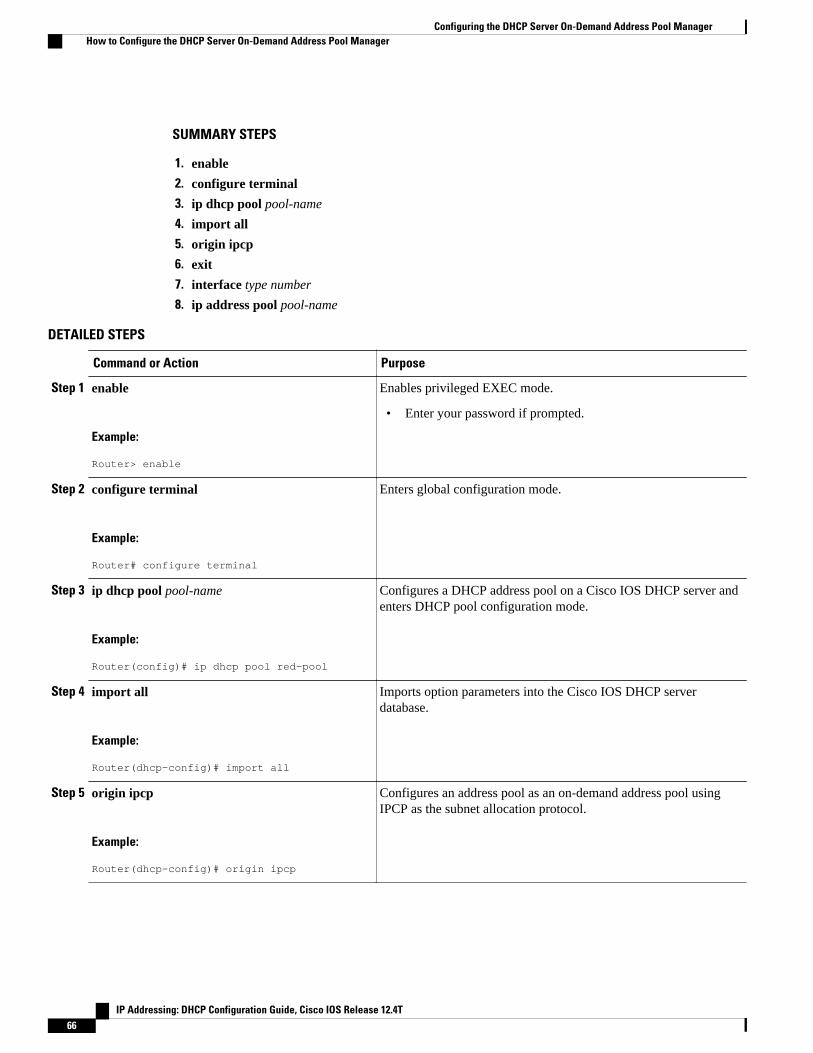
SUMMARY STEPS
1. enable
2. configure terminal
3. ip dhcp pool pool-name
4. import all
5. origin ipcp
6. exit
7. interface type number
8. ip address pool pool-name
DETAILED STEPS
Command or Action Purpose
Step 1 enable
Example:
Router> enable
Enables privileged EXEC mode.
• Enter your password if prompted.
Step 2 configure terminal
Example:
Router# configure terminal
Enters global configuration mode.
Step 3 ip dhcp pool pool-name
Example:
Router(config)# ip dhcp pool red-pool
Configures a DHCP address pool on a Cisco IOS DHCP server andenters DHCP pool configuration mode.
Step 4 import all
Example:
Router(dhcp-config)# import all
Imports option parameters into the Cisco IOS DHCP serverdatabase.
Step 5 origin ipcp
Example:
Router(dhcp-config)# origin ipcp
Configures an address pool as an on-demand address pool usingIPCP as the subnet allocation protocol.
Configuring the DHCP Server On-Demand Address Pool Manager How to Configure the DHCP Server On-Demand Address Pool Manager
IP Addressing: DHCP Configuration Guide, Cisco IOS Release 12.4T66
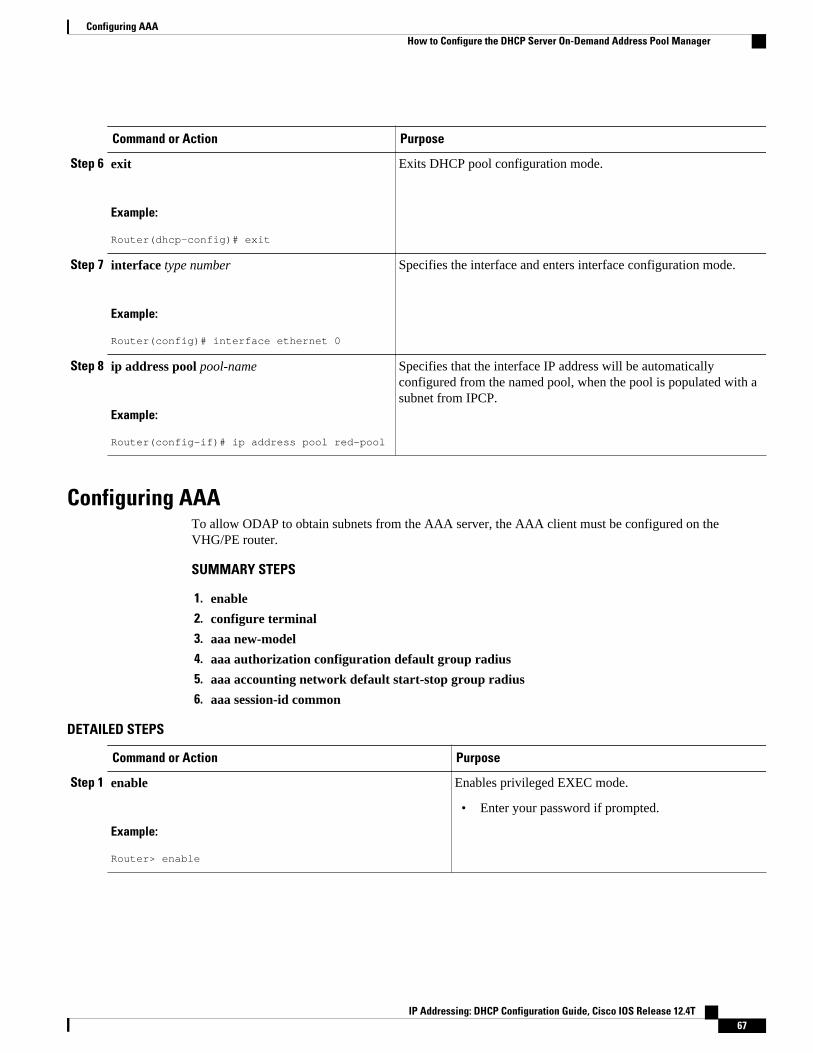
Command or Action Purpose
Step 6 exit
Example:
Router(dhcp-config)# exit
Exits DHCP pool configuration mode.
Step 7 interface type number
Example:
Router(config)# interface ethernet 0
Specifies the interface and enters interface configuration mode.
Step 8 ip address pool pool-name
Example:
Router(config-if)# ip address pool red-pool
Specifies that the interface IP address will be automaticallyconfigured from the named pool, when the pool is populated with asubnet from IPCP.
Configuring AAATo allow ODAP to obtain subnets from the AAA server, the AAA client must be configured on theVHG/PE router.
SUMMARY STEPS
1. enable
2. configure terminal
3. aaa new-model
4. aaa authorization configuration default group radius
5. aaa accounting network default start-stop group radius
6. aaa session-id common
DETAILED STEPS
Command or Action Purpose
Step 1 enable
Example:
Router> enable
Enables privileged EXEC mode.
• Enter your password if prompted.
Configuring AAAHow to Configure the DHCP Server On-Demand Address Pool Manager
IP Addressing: DHCP Configuration Guide, Cisco IOS Release 12.4T 67
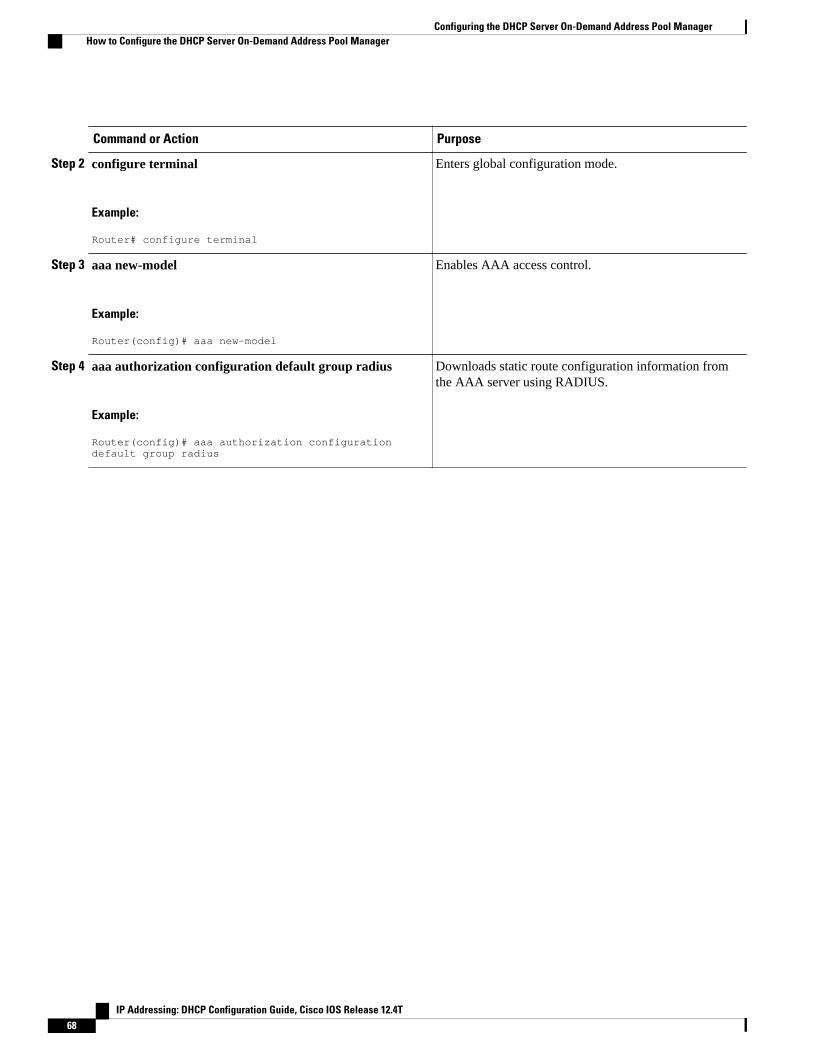
Command or Action Purpose
Step 2 configure terminal
Example:
Router# configure terminal
Enters global configuration mode.
Step 3 aaa new-model
Example:
Router(config)# aaa new-model
Enables AAA access control.
Step 4 aaa authorization configuration default group radius
Example:
Router(config)# aaa authorization configuration default group radius
Downloads static route configuration information fromthe AAA server using RADIUS.
Configuring the DHCP Server On-Demand Address Pool Manager How to Configure the DHCP Server On-Demand Address Pool Manager
IP Addressing: DHCP Configuration Guide, Cisco IOS Release 12.4T68
Command or Action Purpose
Step 5 aaa accounting network default start-stop group radius
Example:
or
Example:
aaa accounting network default stop-only group radius
Example:
Router(config)# aaa accounting network default start-stop group radius
Example:
or
Example:
Example:
Router(config)# aaa accounting network default stop-only group radius
Enables AAA accounting of requested services for billingor security purposes when you use RADIUS, and sends a“start” accounting notice at the beginning of a process.
or
Enables AAA accounting of requested services for billingor security purposes when you use RADIUS, and sends a“stop” accounting notice at the end of the requested userprocess.
Step 6 aaa session-id common
Example:
Router(config)# aaa session-id common
Ensures that the same session ID will be used for eachAAA accounting service type within a call.
Configuring RADIUS• ODAP AAA Profile, page 69
ODAP AAA ProfileThe AAA server sends the RADIUS Cisco attribute value (AV) pair attributes “pool-addr” and “pool-mask” to the Cisco IOS DHCP server in the access request and access accept. The pool-addr attribute is the
Configuring RADIUSODAP AAA Profile
IP Addressing: DHCP Configuration Guide, Cisco IOS Release 12.4T 69
IP address and the pool-mask attribute is the network mask (for example,pool-addr=192.168.1.0 and pool-mask=255.255.0.0). Together, these attributes comprise a network address (address/mask) that is allocatedby the AAA server to the Cisco IOS DHCP server.
SUMMARY STEPS
1. enable
2. configure terminal
3. ip radius source-interface subinterface-name
4. radius-server host ip-address auth-port port-number acct-port port-number
5. radius server attribute 32 include-in-access-req
6. radius server attribute 44 include-in-access-req
7. radius-server vsa send accounting
8. radius-server vsa send authentication
DETAILED STEPS
Command or Action Purpose
Step 1 enable
Example:
Router> enable
Enables privileged EXEC mode.
• Enter your password if prompted.
Step 2 configure terminal
Example:
Router# configure terminal
Enters global configuration mode.
Step 3 ip radius source-interface subinterface-name
Example:
Router(config)# ip radius source-interface Ethernet1/1
Forces RADIUS to use the IP address of a specifiedinterface for all outgoing RADIUS packets.
Step 4 radius-server host ip-address auth-port port-number acct-portport-number
Example:
Router(config)# radius-server host 172.16.1.1 auth-port 1645 acct-port 1646
Specifies a RADIUS server host.
• The ip-address argument specifies the IP addressof the RADIUS server host.
Configuring the DHCP Server On-Demand Address Pool Manager ODAP AAA Profile
IP Addressing: DHCP Configuration Guide, Cisco IOS Release 12.4T70
Command or Action Purpose
Step 5 radius server attribute 32 include-in-access-req
Example:
Router(config)# radius server attribute 32 include-in-access-req
Sends RADIUS attribute 32 (NAS-Identifier) in anaccess request or accounting request.
Step 6 radius server attribute 44 include-in-access-req
Example:
Router(config)# radius server attribute 44 include-in-access-req
Sends RADIUS attribute 44 (Accounting Session ID)in an access request or accounting request.
Step 7 radius-server vsa send accounting
Example:
Router(config)# radius-server vsa send accounting
Configures the network access server (NAS) torecognize and use vendor-specific accountingattributes.
Step 8 radius-server vsa send authentication
Example:
Router(config)# radius-server vsa send authentication
Configures the NAS to recognize and use vendor-specific authentication attributes.
Disabling ODAPsThis task shows how to disable an ODAP from a DHCP pool.
When an ODAP is disabled, all leased subnets are released. If active PPP sessions are using addresses fromthe released subnets, those sessions will be reset. DHCP clients leasing addresses from the released subnetswill not be able to renew their leases.
SUMMARY STEPS
1. enable
2. configure terminal
3. ip dhcp pool pool-name
4. no origin {dhcp | aaa | ipcp}
Disabling ODAPsODAP AAA Profile
IP Addressing: DHCP Configuration Guide, Cisco IOS Release 12.4T 71
DETAILED STEPS
Command or Action Purpose
Step 1 enable
Example:
Router> enable
Enables privileged EXEC mode.
• Enter your password if prompted.
Step 2 configure terminal
Example:
Router# configure terminal
Enters global configuration mode.
Step 3 ip dhcp pool pool-name
Example:
Router(config)# ip dhcp pool pool1
Configures a DHCP address pool on a Cisco IOS DHCP server and entersDHCP pool configuration mode.
Step 4 no origin {dhcp | aaa | ipcp}
Example:
Router(dhcp-config)# no origin dhcp
Disables the ODAP.
Verifying ODAP Operation
SUMMARY STEPS
1. enable
2. show ip dhcp binding The following output shows the bindings from pool Green. The Type fieldshows On-demand, which indicates that the address binding was created for a PPP session. The Leaseexpiration field shows Infinite, which means that the binding is valid as long as the session is up. If asubnet must be released back to the leasing server while the session is still up, the session is reset so thatit will be forced to obtain a new IP address. The Hardware address column for an On-demand entryshows the identifier for the session as detected by PPP. No bindings are shown under the Bindings fromall pools not associated with VRF field because the Global pool has not allocated any addresses.
DETAILED STEPS
Step 1 enableEnables privileged EXEC mode. Enter your password if prompted.
Verifying ODAP Operation ODAP AAA Profile
IP Addressing: DHCP Configuration Guide, Cisco IOS Release 12.4T72
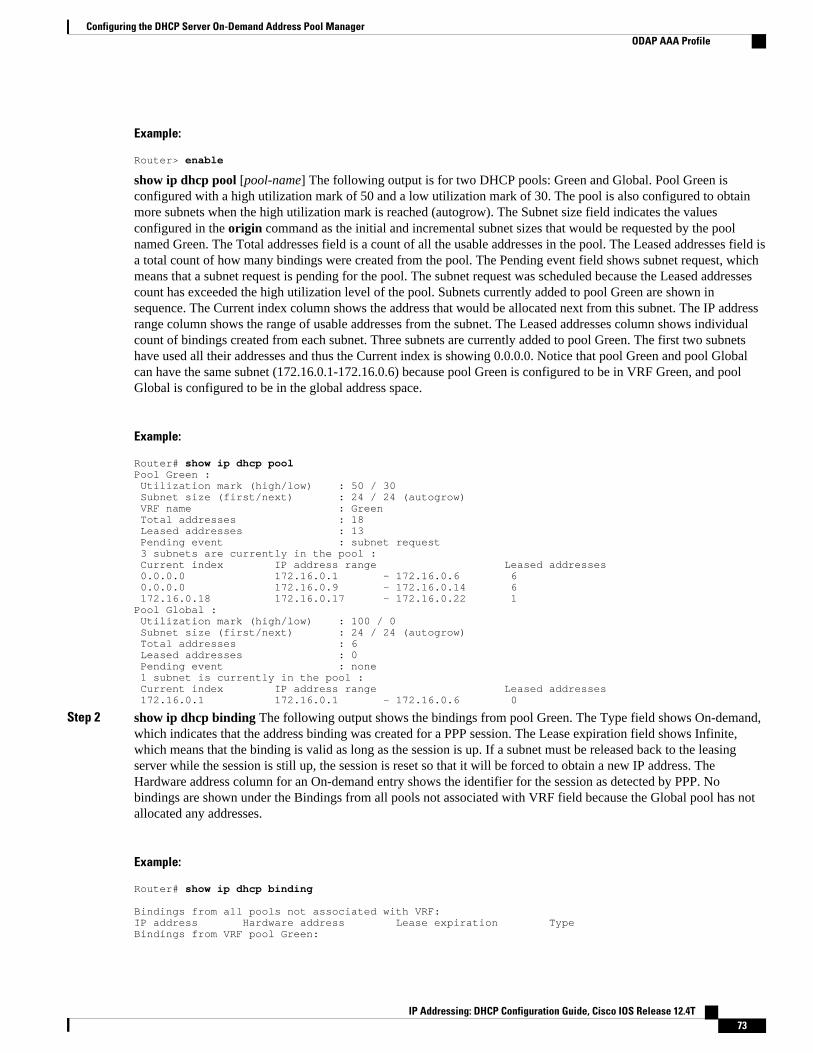
Example:
Router> enable
show ip dhcp pool [pool-name] The following output is for two DHCP pools: Green and Global. Pool Green isconfigured with a high utilization mark of 50 and a low utilization mark of 30. The pool is also configured to obtainmore subnets when the high utilization mark is reached (autogrow). The Subnet size field indicates the valuesconfigured in the origin command as the initial and incremental subnet sizes that would be requested by the poolnamed Green. The Total addresses field is a count of all the usable addresses in the pool. The Leased addresses field isa total count of how many bindings were created from the pool. The Pending event field shows subnet request, whichmeans that a subnet request is pending for the pool. The subnet request was scheduled because the Leased addressescount has exceeded the high utilization level of the pool. Subnets currently added to pool Green are shown insequence. The Current index column shows the address that would be allocated next from this subnet. The IP addressrange column shows the range of usable addresses from the subnet. The Leased addresses column shows individualcount of bindings created from each subnet. Three subnets are currently added to pool Green. The first two subnetshave used all their addresses and thus the Current index is showing 0.0.0.0. Notice that pool Green and pool Globalcan have the same subnet (172.16.0.1-172.16.0.6) because pool Green is configured to be in VRF Green, and poolGlobal is configured to be in the global address space.
Example:
Router# show ip dhcp pool Pool Green : Utilization mark (high/low) : 50 / 30 Subnet size (first/next) : 24 / 24 (autogrow) VRF name : Green Total addresses : 18 Leased addresses : 13 Pending event : subnet request 3 subnets are currently in the pool : Current index IP address range Leased addresses 0.0.0.0 172.16.0.1 - 172.16.0.6 6 0.0.0.0 172.16.0.9 - 172.16.0.14 6 172.16.0.18 172.16.0.17 - 172.16.0.22 1Pool Global : Utilization mark (high/low) : 100 / 0 Subnet size (first/next) : 24 / 24 (autogrow) Total addresses : 6 Leased addresses : 0 Pending event : none 1 subnet is currently in the pool : Current index IP address range Leased addresses 172.16.0.1 172.16.0.1 - 172.16.0.6 0
Step 2 show ip dhcp binding The following output shows the bindings from pool Green. The Type field shows On-demand,which indicates that the address binding was created for a PPP session. The Lease expiration field shows Infinite,which means that the binding is valid as long as the session is up. If a subnet must be released back to the leasingserver while the session is still up, the session is reset so that it will be forced to obtain a new IP address. TheHardware address column for an On-demand entry shows the identifier for the session as detected by PPP. Nobindings are shown under the Bindings from all pools not associated with VRF field because the Global pool has notallocated any addresses.
Example:
Router# show ip dhcp binding
Bindings from all pools not associated with VRF:IP address Hardware address Lease expiration TypeBindings from VRF pool Green:
Configuring the DHCP Server On-Demand Address Pool ManagerODAP AAA Profile
IP Addressing: DHCP Configuration Guide, Cisco IOS Release 12.4T 73
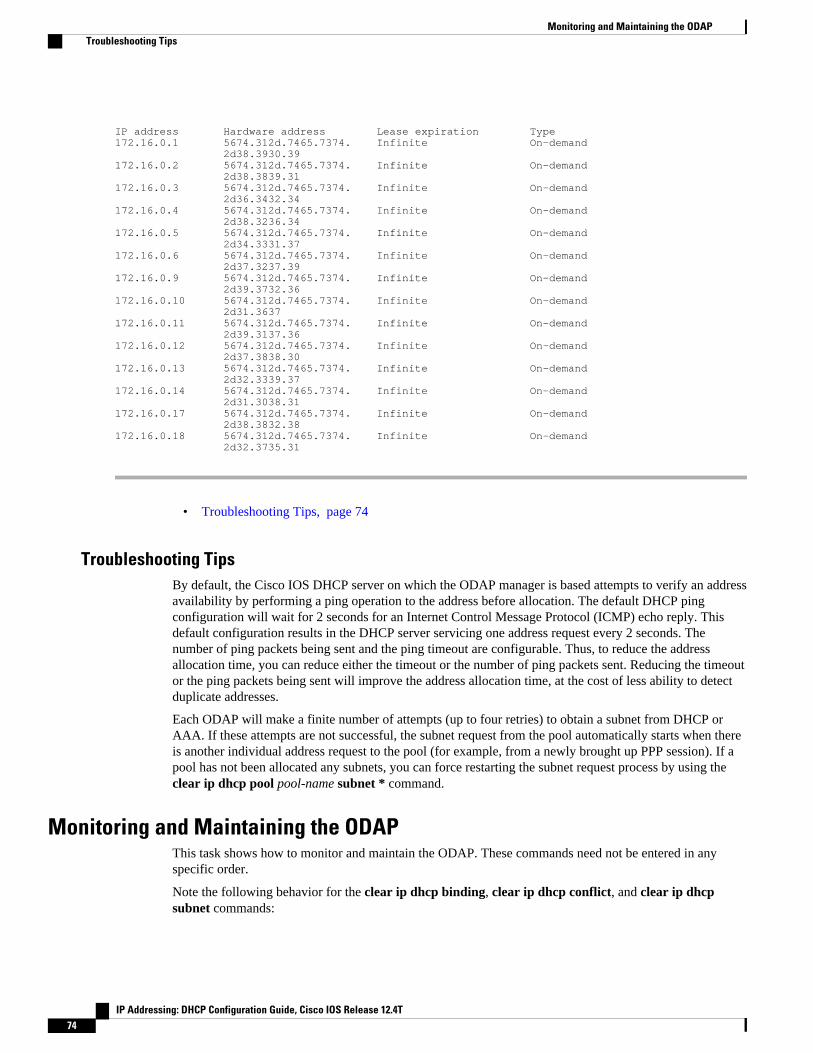
IP address Hardware address Lease expiration Type172.16.0.1 5674.312d.7465.7374. Infinite On-demand 2d38.3930.39172.16.0.2 5674.312d.7465.7374. Infinite On-demand 2d38.3839.31172.16.0.3 5674.312d.7465.7374. Infinite On-demand 2d36.3432.34172.16.0.4 5674.312d.7465.7374. Infinite On-demand 2d38.3236.34172.16.0.5 5674.312d.7465.7374. Infinite On-demand 2d34.3331.37172.16.0.6 5674.312d.7465.7374. Infinite On-demand 2d37.3237.39172.16.0.9 5674.312d.7465.7374. Infinite On-demand 2d39.3732.36172.16.0.10 5674.312d.7465.7374. Infinite On-demand 2d31.3637172.16.0.11 5674.312d.7465.7374. Infinite On-demand 2d39.3137.36172.16.0.12 5674.312d.7465.7374. Infinite On-demand 2d37.3838.30172.16.0.13 5674.312d.7465.7374. Infinite On-demand 2d32.3339.37172.16.0.14 5674.312d.7465.7374. Infinite On-demand 2d31.3038.31172.16.0.17 5674.312d.7465.7374. Infinite On-demand 2d38.3832.38172.16.0.18 5674.312d.7465.7374. Infinite On-demand 2d32.3735.31
• Troubleshooting Tips, page 74
Troubleshooting TipsBy default, the Cisco IOS DHCP server on which the ODAP manager is based attempts to verify an addressavailability by performing a ping operation to the address before allocation. The default DHCP pingconfiguration will wait for 2 seconds for an Internet Control Message Protocol (ICMP) echo reply. Thisdefault configuration results in the DHCP server servicing one address request every 2 seconds. Thenumber of ping packets being sent and the ping timeout are configurable. Thus, to reduce the addressallocation time, you can reduce either the timeout or the number of ping packets sent. Reducing the timeoutor the ping packets being sent will improve the address allocation time, at the cost of less ability to detectduplicate addresses.
Each ODAP will make a finite number of attempts (up to four retries) to obtain a subnet from DHCP orAAA. If these attempts are not successful, the subnet request from the pool automatically starts when thereis another individual address request to the pool (for example, from a newly brought up PPP session). If apool has not been allocated any subnets, you can force restarting the subnet request process by using theclear ip dhcp pool pool-name subnet * command.
Monitoring and Maintaining the ODAPThis task shows how to monitor and maintain the ODAP. These commands need not be entered in anyspecific order.
Note the following behavior for the clear ip dhcp binding, clear ip dhcp conflict, and clear ip dhcpsubnet commands:
Monitoring and Maintaining the ODAP Troubleshooting Tips
IP Addressing: DHCP Configuration Guide, Cisco IOS Release 12.4T74
• If you do not specify the pool pool-name option and an IP address is specified, it is assumed that theIP address is an address in the global address space and will look among all the non-VRF DHCP poolsfor the specified binding/conflict/subnet.
• If you do not specify the pool pool-name option and the * option is specified, it is assumed that allautomatic/ or on-demand bindings/conflicts/subnets in all VRF and non-VRF pools are to be deleted.
• If you specify both the pool pool-name option and the * option, all automatic or on-demand bindings/conflicts/subnets in the specified pool only will be cleared.
• If you specify the pool pool-name option and an IP address, the specified binding/conflict or thesubnet containing the specified IP address will be deleted from the specified pool.
SUMMARY STEPS
1. enable
2. clear ip dhcp [pool pool-name] binding {* | address}
3. clear ip dhcp [pool pool-name] conflict {* | address}
4. clear ip dhcp [pool pool-name] subnet {* | address}
5. debug dhcp details
6. debug ip dhcp server events
7. show ip dhcp import
8. show ip interface [type number]
9. show ip dhcp pool pool-name
DETAILED STEPS
Command or Action Purpose
Step 1 enable
Example:
Router> enable
Enables privileged EXEC mode.
• Enter your password if prompted.
Step 2 clear ip dhcp [pool pool-name] binding {* | address}
Example:
Router# clear ip dhcp binding *
Clears an automatic address binding or objects from a specificpool from the DHCP server database.
Step 3 clear ip dhcp [pool pool-name] conflict {* | address}
Example:
Router# clear ip dhcp conflict *
Clears an address conflict or conflicts from a specific pool fromthe DHCP server database.
Configuring the DHCP Server On-Demand Address Pool ManagerTroubleshooting Tips
IP Addressing: DHCP Configuration Guide, Cisco IOS Release 12.4T 75
Command or Action Purpose
Step 4 clear ip dhcp [pool pool-name] subnet {* | address}
Example:
Router# clear ip dhcp subnet *
Clears all currently leased subnets in the named DHCP pool or allDHCP pools if pool-name is not specified.
Step 5 debug dhcp details
Example:
Router# debug dhcp details
Monitors the subnet allocation/releasing in the on-demand addresspools.
Step 6 debug ip dhcp server events
Example:
Router# debug ip dhcp server events
Reports DHCP server events, such as address assignments anddatabase updates.
Step 7 show ip dhcp import
Example:
Router# show ip dhcp import
Displays the option parameters that were imported into the DHCPserver database.
Step 8 show ip interface [type number]
Example:
Router# show ip interface
Displays the usability status of interfaces configured for IP.
Step 9 show ip dhcp pool pool-name
Example:
Router# show ip dhcp pool green
Displays DHCP address pool information.
Configuring DHCP ODAP Subnet Allocation Server Support• Configuring a Global Subnet Pool on a Subnet Allocation Server, page 77
• Configuring a VRF Subnet Pool on a Subnet Allocation Server, page 78
• Using a VPN ID to Configure a VRF Subnet Pool on a Subnet Allocation Server, page 79
• Verifying Subnet Allocation and DHCP Bindings, page 82
• Troubleshooting the DHCP ODAP Subnet Allocation Server, page 83
Configuring DHCP ODAP Subnet Allocation Server Support Troubleshooting Tips
IP Addressing: DHCP Configuration Guide, Cisco IOS Release 12.4T76
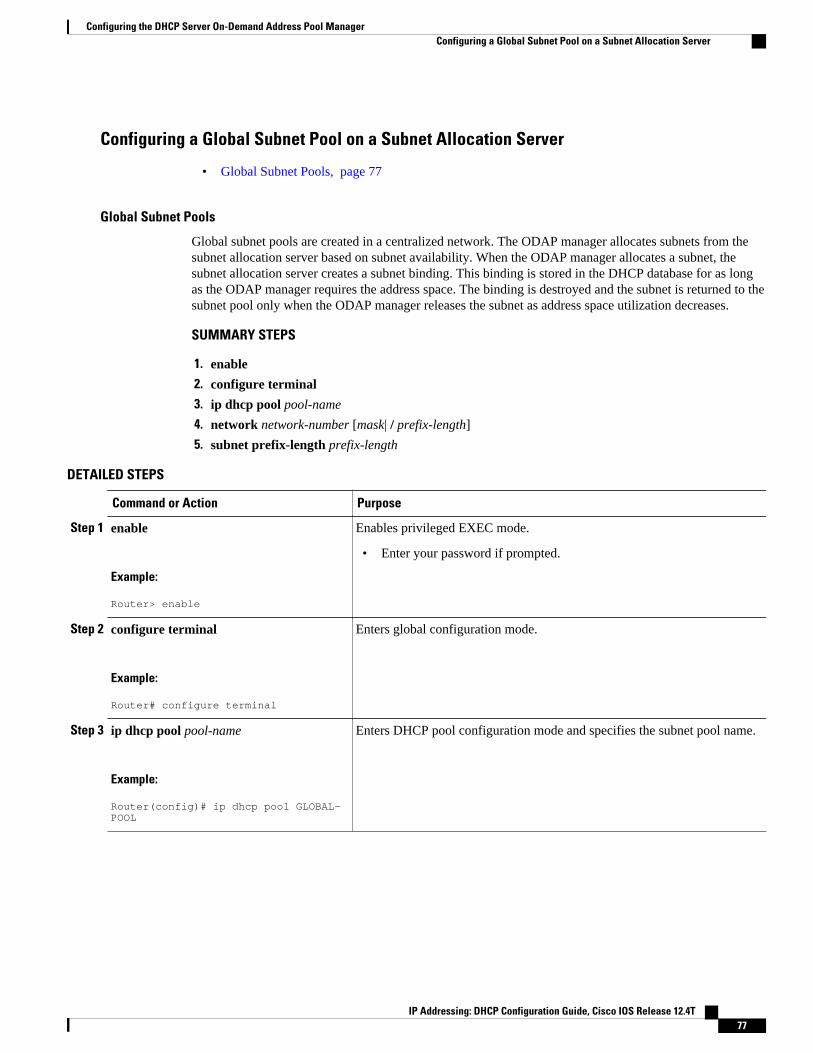
Configuring a Global Subnet Pool on a Subnet Allocation Server
• Global Subnet Pools, page 77
Global Subnet Pools
Global subnet pools are created in a centralized network. The ODAP manager allocates subnets from thesubnet allocation server based on subnet availability. When the ODAP manager allocates a subnet, thesubnet allocation server creates a subnet binding. This binding is stored in the DHCP database for as longas the ODAP manager requires the address space. The binding is destroyed and the subnet is returned to thesubnet pool only when the ODAP manager releases the subnet as address space utilization decreases.
SUMMARY STEPS
1. enable
2. configure terminal
3. ip dhcp pool pool-name
4. network network-number [mask| / prefix-length]
5. subnet prefix-length prefix-length
DETAILED STEPS
Command or Action Purpose
Step 1 enable
Example:
Router> enable
Enables privileged EXEC mode.
• Enter your password if prompted.
Step 2 configure terminal
Example:
Router# configure terminal
Enters global configuration mode.
Step 3 ip dhcp pool pool-name
Example:
Router(config)# ip dhcp pool GLOBAL-POOL
Enters DHCP pool configuration mode and specifies the subnet pool name.
Configuring the DHCP Server On-Demand Address Pool ManagerConfiguring a Global Subnet Pool on a Subnet Allocation Server
IP Addressing: DHCP Configuration Guide, Cisco IOS Release 12.4T 77
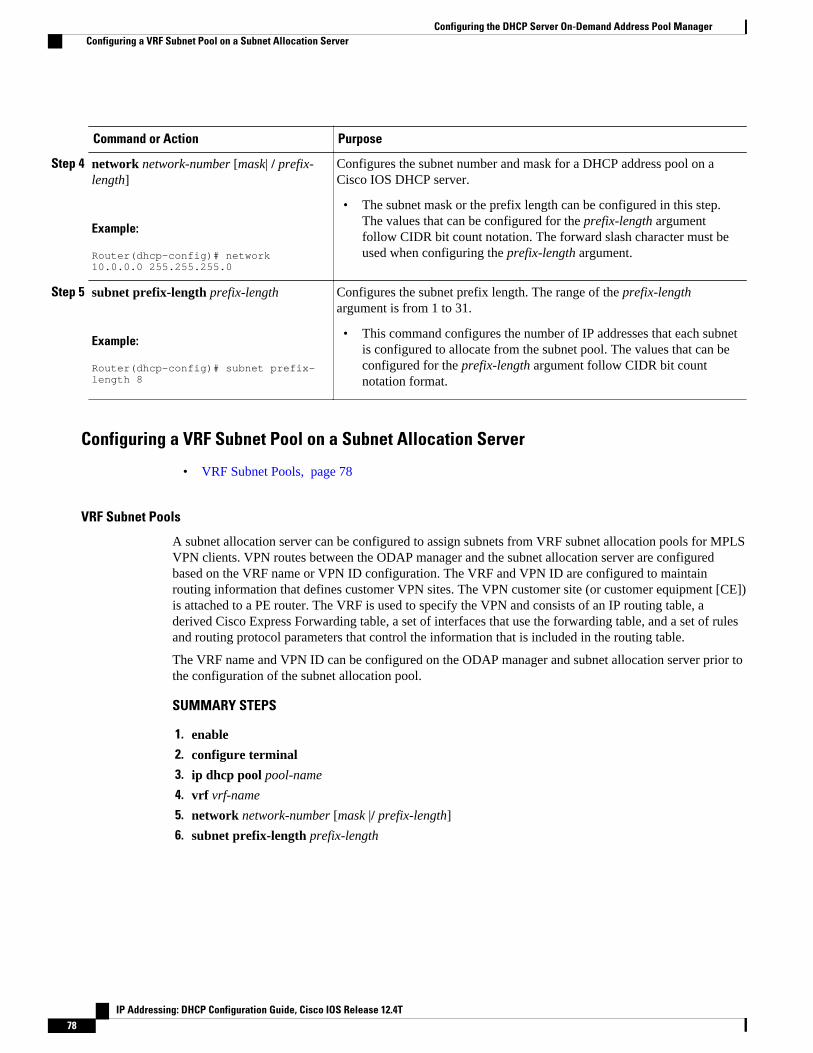
Command or Action Purpose
Step 4 network network-number [mask| / prefix-length]
Example:
Router(dhcp-config)# network 10.0.0.0 255.255.255.0
Configures the subnet number and mask for a DHCP address pool on aCisco IOS DHCP server.
• The subnet mask or the prefix length can be configured in this step.The values that can be configured for the prefix-length argumentfollow CIDR bit count notation. The forward slash character must beused when configuring the prefix-length argument.
Step 5 subnet prefix-length prefix-length
Example:
Router(dhcp-config)# subnet prefix-length 8
Configures the subnet prefix length. The range of the prefix-lengthargument is from 1 to 31.
• This command configures the number of IP addresses that each subnetis configured to allocate from the subnet pool. The values that can beconfigured for the prefix-length argument follow CIDR bit countnotation format.
Configuring a VRF Subnet Pool on a Subnet Allocation Server
• VRF Subnet Pools, page 78
VRF Subnet Pools
A subnet allocation server can be configured to assign subnets from VRF subnet allocation pools for MPLSVPN clients. VPN routes between the ODAP manager and the subnet allocation server are configuredbased on the VRF name or VPN ID configuration. The VRF and VPN ID are configured to maintainrouting information that defines customer VPN sites. The VPN customer site (or customer equipment [CE])is attached to a PE router. The VRF is used to specify the VPN and consists of an IP routing table, aderived Cisco Express Forwarding table, a set of interfaces that use the forwarding table, and a set of rulesand routing protocol parameters that control the information that is included in the routing table.
The VRF name and VPN ID can be configured on the ODAP manager and subnet allocation server prior tothe configuration of the subnet allocation pool.
SUMMARY STEPS
1. enable
2. configure terminal
3. ip dhcp pool pool-name
4. vrf vrf-name
5. network network-number [mask |/ prefix-length]
6. subnet prefix-length prefix-length
Configuring the DHCP Server On-Demand Address Pool Manager Configuring a VRF Subnet Pool on a Subnet Allocation Server
IP Addressing: DHCP Configuration Guide, Cisco IOS Release 12.4T78
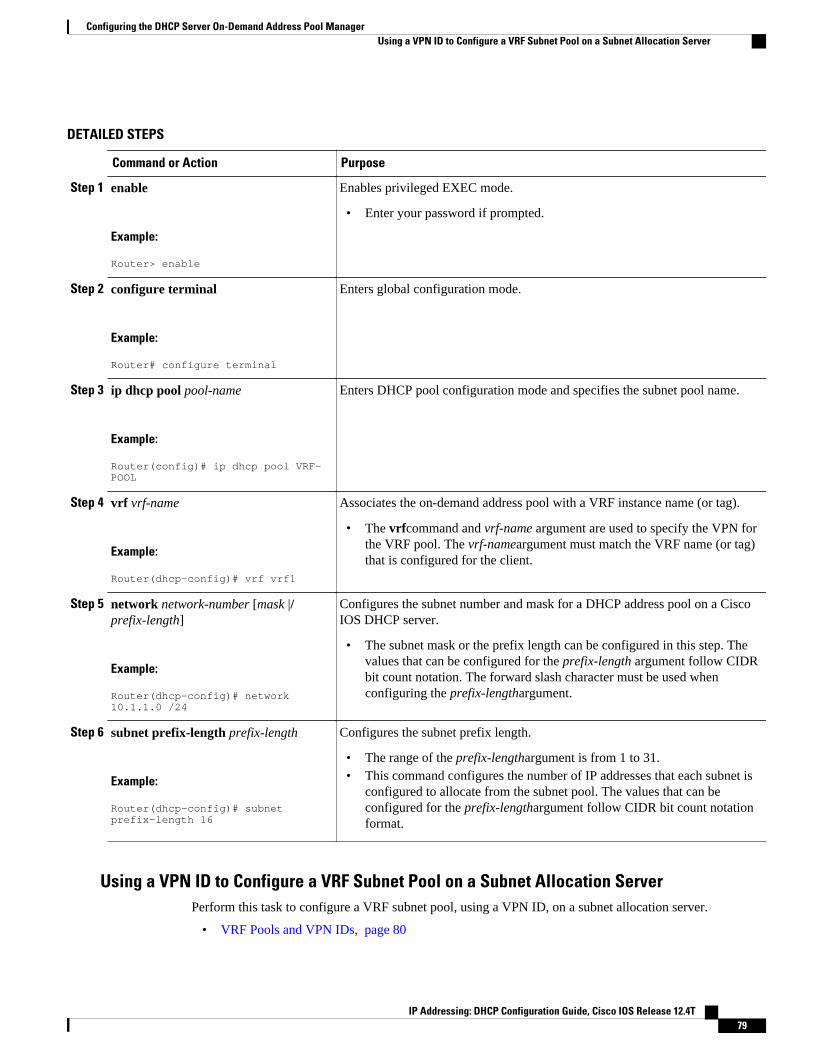
DETAILED STEPS
Command or Action Purpose
Step 1 enable
Example:
Router> enable
Enables privileged EXEC mode.
• Enter your password if prompted.
Step 2 configure terminal
Example:
Router# configure terminal
Enters global configuration mode.
Step 3 ip dhcp pool pool-name
Example:
Router(config)# ip dhcp pool VRF-POOL
Enters DHCP pool configuration mode and specifies the subnet pool name.
Step 4 vrf vrf-name
Example:
Router(dhcp-config)# vrf vrf1
Associates the on-demand address pool with a VRF instance name (or tag).
• The vrfcommand and vrf-name argument are used to specify the VPN forthe VRF pool. The vrf-nameargument must match the VRF name (or tag)that is configured for the client.
Step 5 network network-number [mask |/prefix-length]
Example:
Router(dhcp-config)# network 10.1.1.0 /24
Configures the subnet number and mask for a DHCP address pool on a CiscoIOS DHCP server.
• The subnet mask or the prefix length can be configured in this step. Thevalues that can be configured for the prefix-length argument follow CIDRbit count notation. The forward slash character must be used whenconfiguring the prefix-lengthargument.
Step 6 subnet prefix-length prefix-length
Example:
Router(dhcp-config)# subnet prefix-length 16
Configures the subnet prefix length.
• The range of the prefix-lengthargument is from 1 to 31.• This command configures the number of IP addresses that each subnet is
configured to allocate from the subnet pool. The values that can beconfigured for the prefix-lengthargument follow CIDR bit count notationformat.
Using a VPN ID to Configure a VRF Subnet Pool on a Subnet Allocation ServerPerform this task to configure a VRF subnet pool, using a VPN ID, on a subnet allocation server.
• VRF Pools and VPN IDs, page 80
Configuring the DHCP Server On-Demand Address Pool ManagerUsing a VPN ID to Configure a VRF Subnet Pool on a Subnet Allocation Server
IP Addressing: DHCP Configuration Guide, Cisco IOS Release 12.4T 79
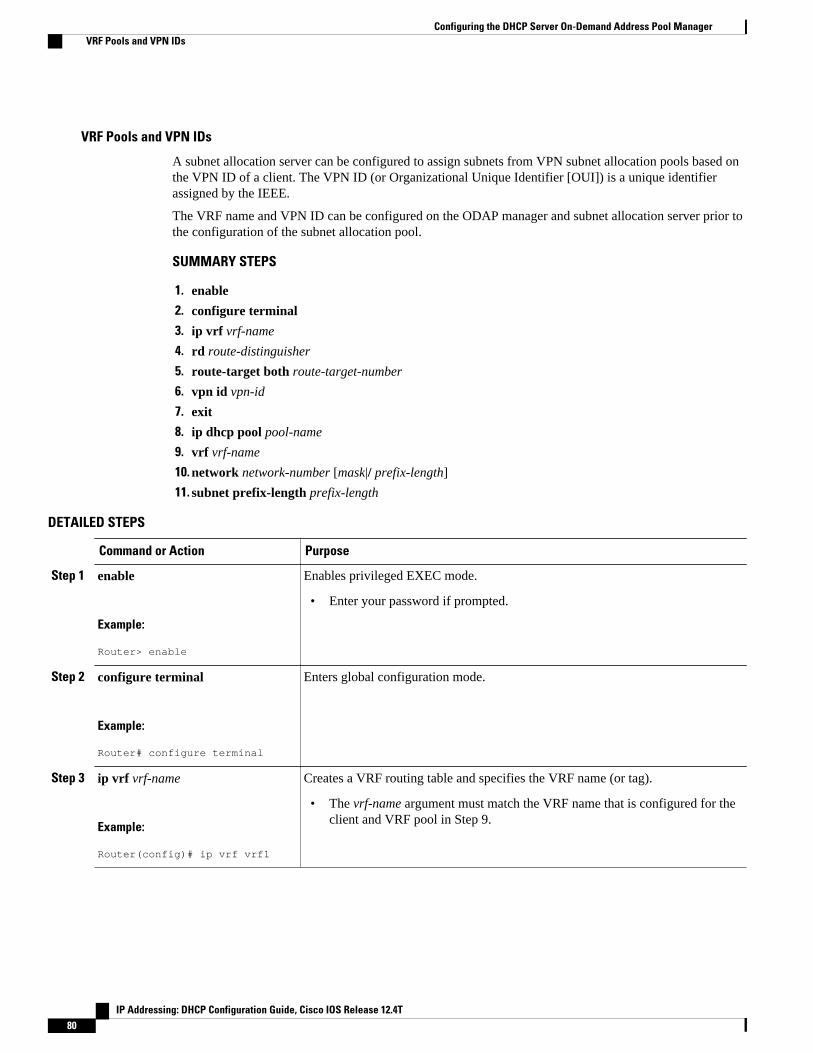
VRF Pools and VPN IDs
A subnet allocation server can be configured to assign subnets from VPN subnet allocation pools based onthe VPN ID of a client. The VPN ID (or Organizational Unique Identifier [OUI]) is a unique identifierassigned by the IEEE.
The VRF name and VPN ID can be configured on the ODAP manager and subnet allocation server prior tothe configuration of the subnet allocation pool.
SUMMARY STEPS
1. enable
2. configure terminal
3. ip vrf vrf-name
4. rd route-distinguisher
5. route-target both route-target-number
6. vpn id vpn-id
7. exit
8. ip dhcp pool pool-name
9. vrf vrf-name
10. network network-number [mask|/ prefix-length]
11. subnet prefix-length prefix-length
DETAILED STEPS
Command or Action Purpose
Step 1 enable
Example:
Router> enable
Enables privileged EXEC mode.
• Enter your password if prompted.
Step 2 configure terminal
Example:
Router# configure terminal
Enters global configuration mode.
Step 3 ip vrf vrf-name
Example:
Router(config)# ip vrf vrf1
Creates a VRF routing table and specifies the VRF name (or tag).
• The vrf-name argument must match the VRF name that is configured for theclient and VRF pool in Step 9.
Configuring the DHCP Server On-Demand Address Pool Manager VRF Pools and VPN IDs
IP Addressing: DHCP Configuration Guide, Cisco IOS Release 12.4T80
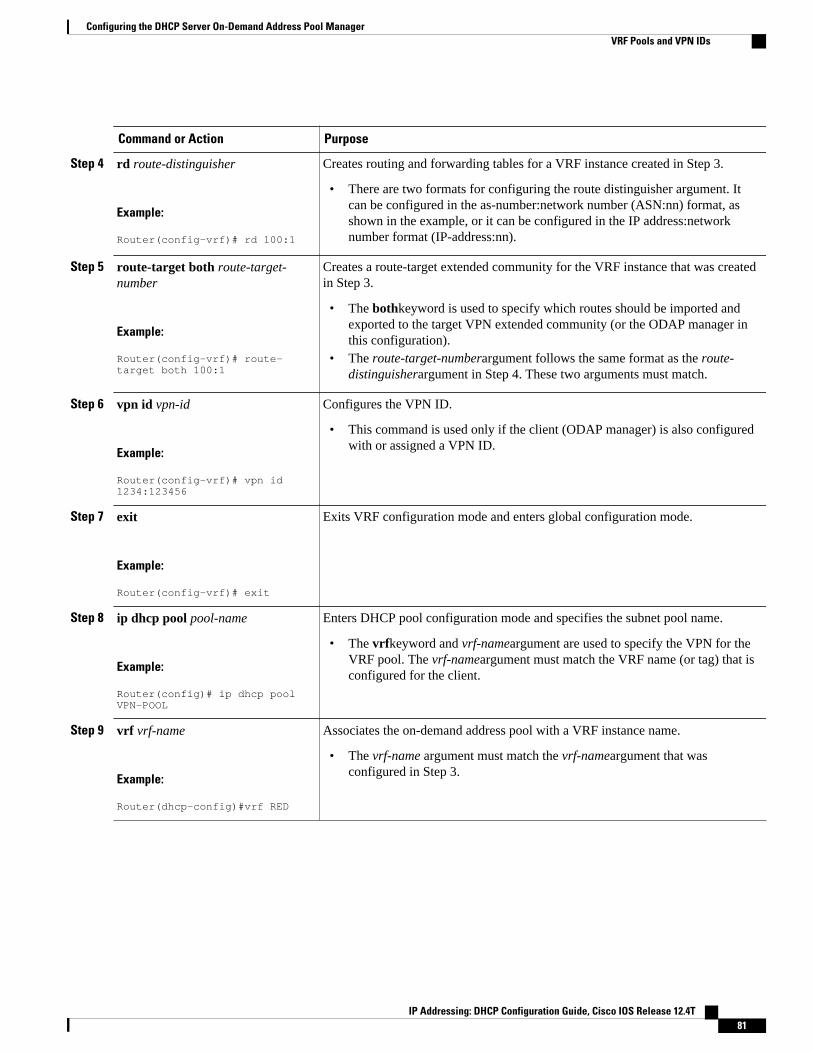
Command or Action Purpose
Step 4 rd route-distinguisher
Example:
Router(config-vrf)# rd 100:1
Creates routing and forwarding tables for a VRF instance created in Step 3.
• There are two formats for configuring the route distinguisher argument. Itcan be configured in the as-number:network number (ASN:nn) format, asshown in the example, or it can be configured in the IP address:networknumber format (IP-address:nn).
Step 5 route-target both route-target-number
Example:
Router(config-vrf)# route-target both 100:1
Creates a route-target extended community for the VRF instance that was createdin Step 3.
• The bothkeyword is used to specify which routes should be imported andexported to the target VPN extended community (or the ODAP manager inthis configuration).
• The route-target-numberargument follows the same format as the route-distinguisherargument in Step 4. These two arguments must match.
Step 6 vpn id vpn-id
Example:
Router(config-vrf)# vpn id 1234:123456
Configures the VPN ID.
• This command is used only if the client (ODAP manager) is also configuredwith or assigned a VPN ID.
Step 7 exit
Example:
Router(config-vrf)# exit
Exits VRF configuration mode and enters global configuration mode.
Step 8 ip dhcp pool pool-name
Example:
Router(config)# ip dhcp pool VPN-POOL
Enters DHCP pool configuration mode and specifies the subnet pool name.
• The vrfkeyword and vrf-nameargument are used to specify the VPN for theVRF pool. The vrf-nameargument must match the VRF name (or tag) that isconfigured for the client.
Step 9 vrf vrf-name
Example:
Router(dhcp-config)#vrf RED
Associates the on-demand address pool with a VRF instance name.
• The vrf-name argument must match the vrf-nameargument that wasconfigured in Step 3.
Configuring the DHCP Server On-Demand Address Pool ManagerVRF Pools and VPN IDs
IP Addressing: DHCP Configuration Guide, Cisco IOS Release 12.4T 81
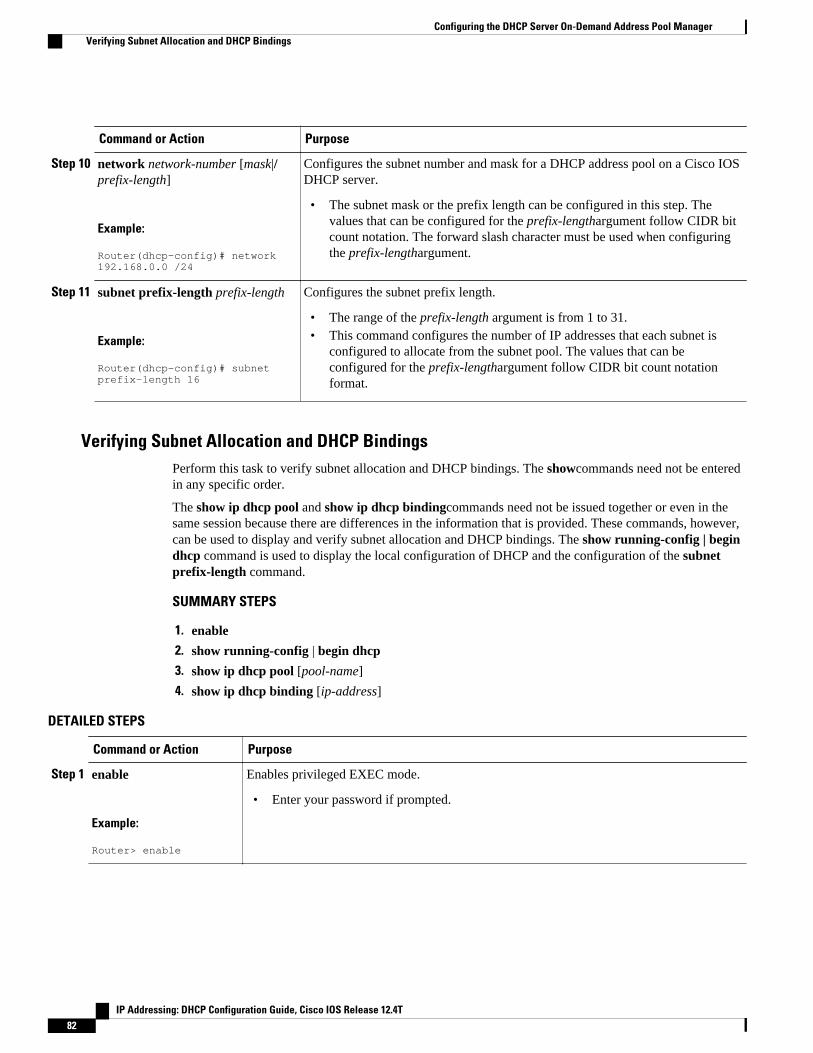
Command or Action Purpose
Step 10 network network-number [mask|/prefix-length]
Example:
Router(dhcp-config)# network 192.168.0.0 /24
Configures the subnet number and mask for a DHCP address pool on a Cisco IOSDHCP server.
• The subnet mask or the prefix length can be configured in this step. Thevalues that can be configured for the prefix-lengthargument follow CIDR bitcount notation. The forward slash character must be used when configuringthe prefix-lengthargument.
Step 11 subnet prefix-length prefix-length
Example:
Router(dhcp-config)# subnet prefix-length 16
Configures the subnet prefix length.
• The range of the prefix-length argument is from 1 to 31.• This command configures the number of IP addresses that each subnet is
configured to allocate from the subnet pool. The values that can beconfigured for the prefix-lengthargument follow CIDR bit count notationformat.
Verifying Subnet Allocation and DHCP BindingsPerform this task to verify subnet allocation and DHCP bindings. The showcommands need not be enteredin any specific order.
The show ip dhcp pool and show ip dhcp bindingcommands need not be issued together or even in thesame session because there are differences in the information that is provided. These commands, however,can be used to display and verify subnet allocation and DHCP bindings. The show running-config | begindhcp command is used to display the local configuration of DHCP and the configuration of the subnetprefix-length command.
SUMMARY STEPS
1. enable
2. show running-config | begin dhcp
3. show ip dhcp pool [pool-name]
4. show ip dhcp binding [ip-address]
DETAILED STEPS
Command or Action Purpose
Step 1 enable
Example:
Router> enable
Enables privileged EXEC mode.
• Enter your password if prompted.
Configuring the DHCP Server On-Demand Address Pool Manager Verifying Subnet Allocation and DHCP Bindings
IP Addressing: DHCP Configuration Guide, Cisco IOS Release 12.4T82
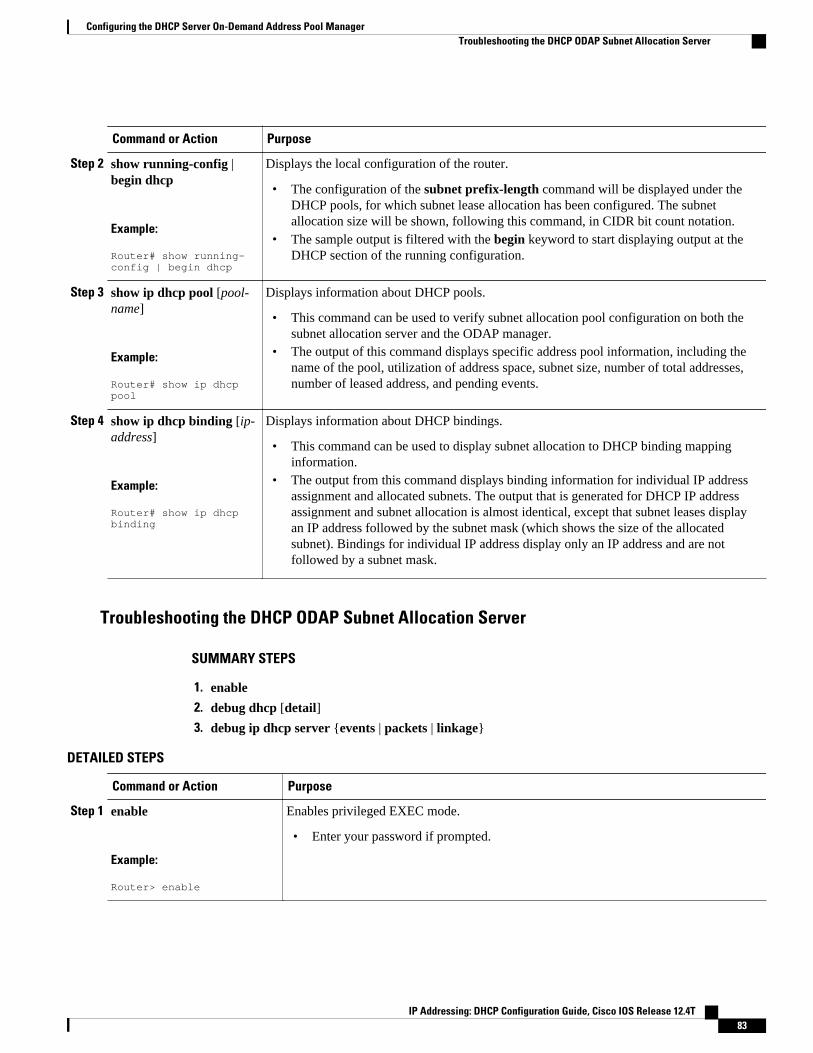
Command or Action Purpose
Step 2 show running-config |begin dhcp
Example:
Router# show running-config | begin dhcp
Displays the local configuration of the router.
• The configuration of the subnet prefix-length command will be displayed under theDHCP pools, for which subnet lease allocation has been configured. The subnetallocation size will be shown, following this command, in CIDR bit count notation.
• The sample output is filtered with the begin keyword to start displaying output at theDHCP section of the running configuration.
Step 3 show ip dhcp pool [pool-name]
Example:
Router# show ip dhcp pool
Displays information about DHCP pools.
• This command can be used to verify subnet allocation pool configuration on both thesubnet allocation server and the ODAP manager.
• The output of this command displays specific address pool information, including thename of the pool, utilization of address space, subnet size, number of total addresses,number of leased address, and pending events.
Step 4 show ip dhcp binding [ip-address]
Example:
Router# show ip dhcp binding
Displays information about DHCP bindings.
• This command can be used to display subnet allocation to DHCP binding mappinginformation.
• The output from this command displays binding information for individual IP addressassignment and allocated subnets. The output that is generated for DHCP IP addressassignment and subnet allocation is almost identical, except that subnet leases displayan IP address followed by the subnet mask (which shows the size of the allocatedsubnet). Bindings for individual IP address display only an IP address and are notfollowed by a subnet mask.
Troubleshooting the DHCP ODAP Subnet Allocation Server
SUMMARY STEPS
1. enable
2. debug dhcp [detail]
3. debug ip dhcp server {events | packets | linkage}
DETAILED STEPS
Command or Action Purpose
Step 1 enable
Example:
Router> enable
Enables privileged EXEC mode.
• Enter your password if prompted.
Configuring the DHCP Server On-Demand Address Pool ManagerTroubleshooting the DHCP ODAP Subnet Allocation Server
IP Addressing: DHCP Configuration Guide, Cisco IOS Release 12.4T 83
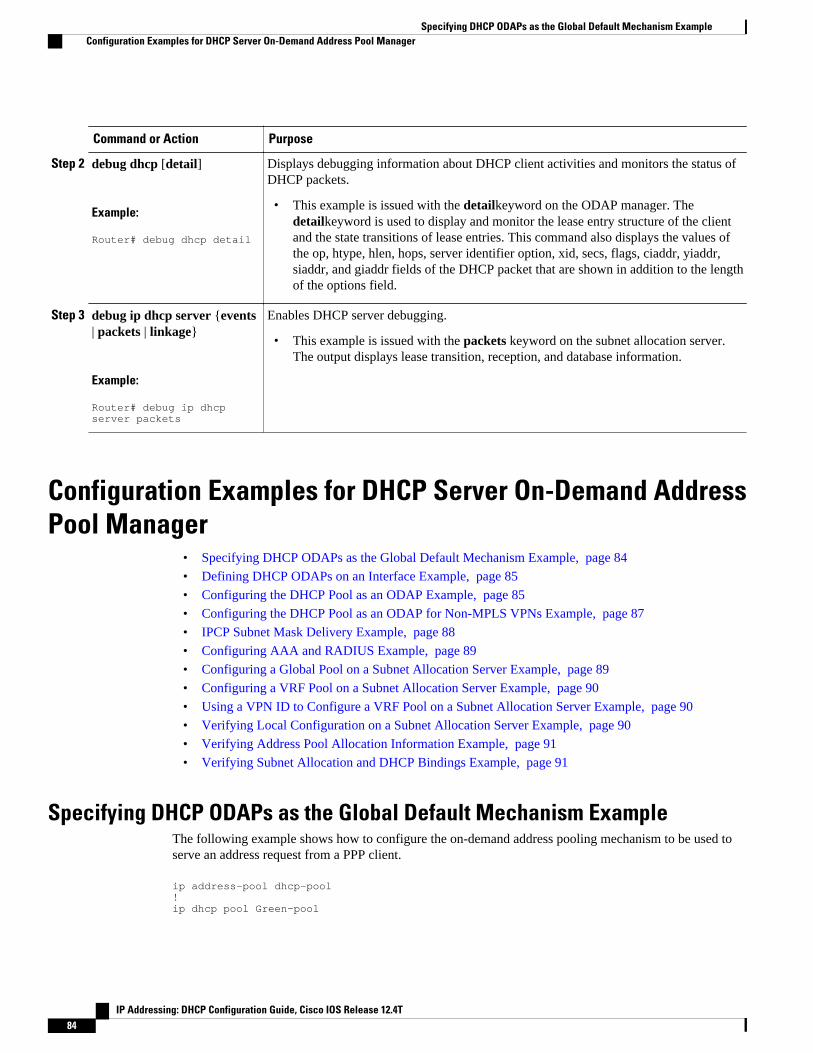
Command or Action Purpose
Step 2 debug dhcp [detail]
Example:
Router# debug dhcp detail
Displays debugging information about DHCP client activities and monitors the status ofDHCP packets.
• This example is issued with the detailkeyword on the ODAP manager. Thedetailkeyword is used to display and monitor the lease entry structure of the clientand the state transitions of lease entries. This command also displays the values ofthe op, htype, hlen, hops, server identifier option, xid, secs, flags, ciaddr, yiaddr,siaddr, and giaddr fields of the DHCP packet that are shown in addition to the lengthof the options field.
Step 3 debug ip dhcp server {events| packets | linkage}
Example:
Router# debug ip dhcp server packets
Enables DHCP server debugging.
• This example is issued with the packets keyword on the subnet allocation server.The output displays lease transition, reception, and database information.
Configuration Examples for DHCP Server On-Demand AddressPool Manager
• Specifying DHCP ODAPs as the Global Default Mechanism Example, page 84
• Defining DHCP ODAPs on an Interface Example, page 85
• Configuring the DHCP Pool as an ODAP Example, page 85
• Configuring the DHCP Pool as an ODAP for Non-MPLS VPNs Example, page 87
• IPCP Subnet Mask Delivery Example, page 88
• Configuring AAA and RADIUS Example, page 89
• Configuring a Global Pool on a Subnet Allocation Server Example, page 89
• Configuring a VRF Pool on a Subnet Allocation Server Example, page 90
• Using a VPN ID to Configure a VRF Pool on a Subnet Allocation Server Example, page 90
• Verifying Local Configuration on a Subnet Allocation Server Example, page 90
• Verifying Address Pool Allocation Information Example, page 91
• Verifying Subnet Allocation and DHCP Bindings Example, page 91
Specifying DHCP ODAPs as the Global Default Mechanism ExampleThe following example shows how to configure the on-demand address pooling mechanism to be used toserve an address request from a PPP client.
ip address-pool dhcp-pool!ip dhcp pool Green-pool
Specifying DHCP ODAPs as the Global Default Mechanism Example Configuration Examples for DHCP Server On-Demand Address Pool Manager
IP Addressing: DHCP Configuration Guide, Cisco IOS Release 12.4T84
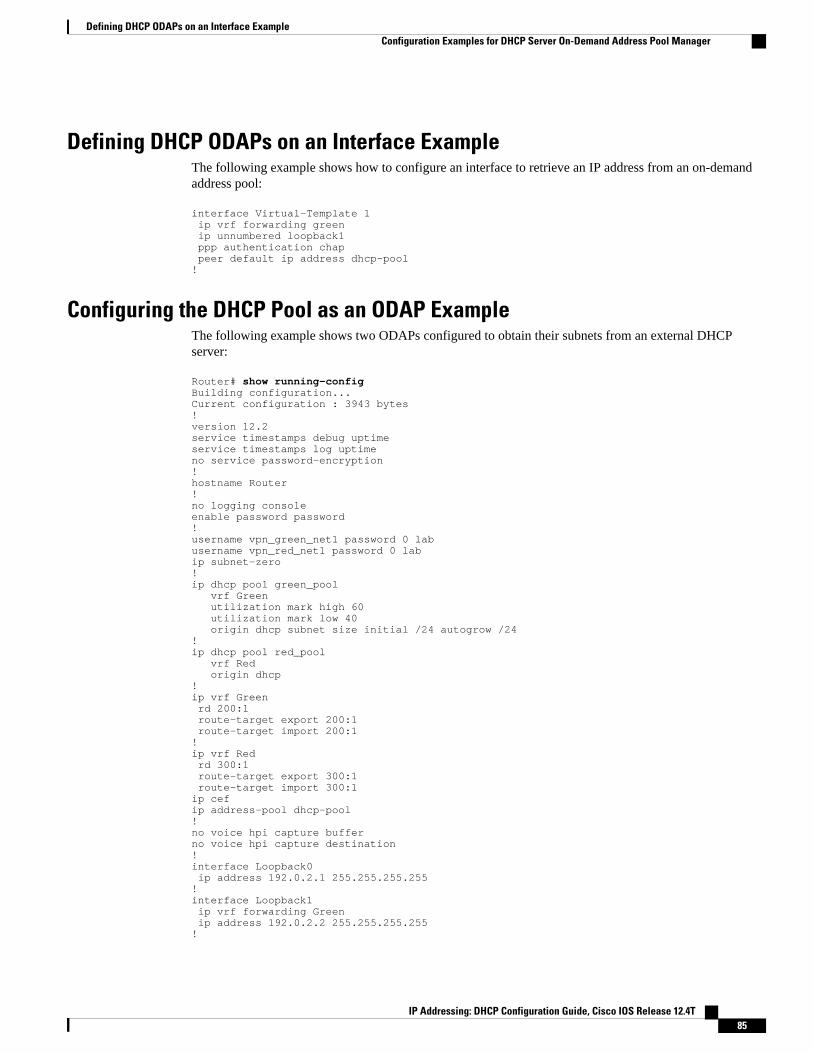
Defining DHCP ODAPs on an Interface ExampleThe following example shows how to configure an interface to retrieve an IP address from an on-demandaddress pool:
interface Virtual-Template 1 ip vrf forwarding green ip unnumbered loopback1 ppp authentication chap peer default ip address dhcp-pool!
Configuring the DHCP Pool as an ODAP ExampleThe following example shows two ODAPs configured to obtain their subnets from an external DHCPserver:
Router# show running-configBuilding configuration...Current configuration : 3943 bytes!version 12.2service timestamps debug uptimeservice timestamps log uptimeno service password-encryption!hostname Router!no logging consoleenable password password!username vpn_green_net1 password 0 labusername vpn_red_net1 password 0 labip subnet-zero!ip dhcp pool green_pool vrf Green utilization mark high 60 utilization mark low 40 origin dhcp subnet size initial /24 autogrow /24!ip dhcp pool red_pool vrf Red origin dhcp!ip vrf Green rd 200:1 route-target export 200:1 route-target import 200:1!ip vrf Red rd 300:1 route-target export 300:1 route-target import 300:1ip cefip address-pool dhcp-pool!no voice hpi capture bufferno voice hpi capture destination !interface Loopback0 ip address 192.0.2.1 255.255.255.255!interface Loopback1 ip vrf forwarding Green ip address 192.0.2.2 255.255.255.255!
Defining DHCP ODAPs on an Interface ExampleConfiguration Examples for DHCP Server On-Demand Address Pool Manager
IP Addressing: DHCP Configuration Guide, Cisco IOS Release 12.4T 85
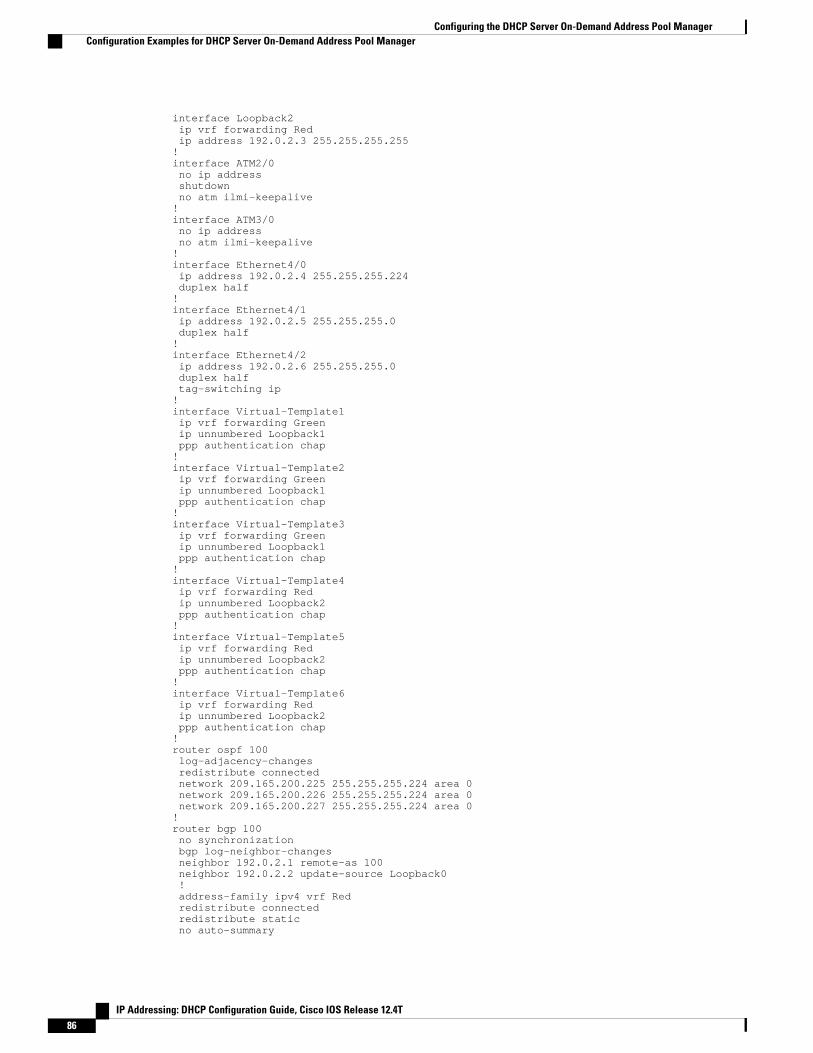
interface Loopback2 ip vrf forwarding Red ip address 192.0.2.3 255.255.255.255!interface ATM2/0 no ip address shutdown no atm ilmi-keepalive!interface ATM3/0 no ip address no atm ilmi-keepalive!interface Ethernet4/0 ip address 192.0.2.4 255.255.255.224 duplex half!interface Ethernet4/1 ip address 192.0.2.5 255.255.255.0 duplex half!interface Ethernet4/2 ip address 192.0.2.6 255.255.255.0 duplex half tag-switching ip!interface Virtual-Template1 ip vrf forwarding Green ip unnumbered Loopback1 ppp authentication chap!interface Virtual-Template2 ip vrf forwarding Green ip unnumbered Loopback1 ppp authentication chap!interface Virtual-Template3 ip vrf forwarding Green ip unnumbered Loopback1 ppp authentication chap!interface Virtual-Template4 ip vrf forwarding Red ip unnumbered Loopback2 ppp authentication chap!interface Virtual-Template5 ip vrf forwarding Red ip unnumbered Loopback2 ppp authentication chap!interface Virtual-Template6 ip vrf forwarding Red ip unnumbered Loopback2 ppp authentication chap!router ospf 100 log-adjacency-changes redistribute connected network 209.165.200.225 255.255.255.224 area 0 network 209.165.200.226 255.255.255.224 area 0 network 209.165.200.227 255.255.255.224 area 0!router bgp 100 no synchronization bgp log-neighbor-changes neighbor 192.0.2.1 remote-as 100 neighbor 192.0.2.2 update-source Loopback0 ! address-family ipv4 vrf Red redistribute connected redistribute static no auto-summary
Configuring the DHCP Server On-Demand Address Pool Manager Configuration Examples for DHCP Server On-Demand Address Pool Manager
IP Addressing: DHCP Configuration Guide, Cisco IOS Release 12.4T86
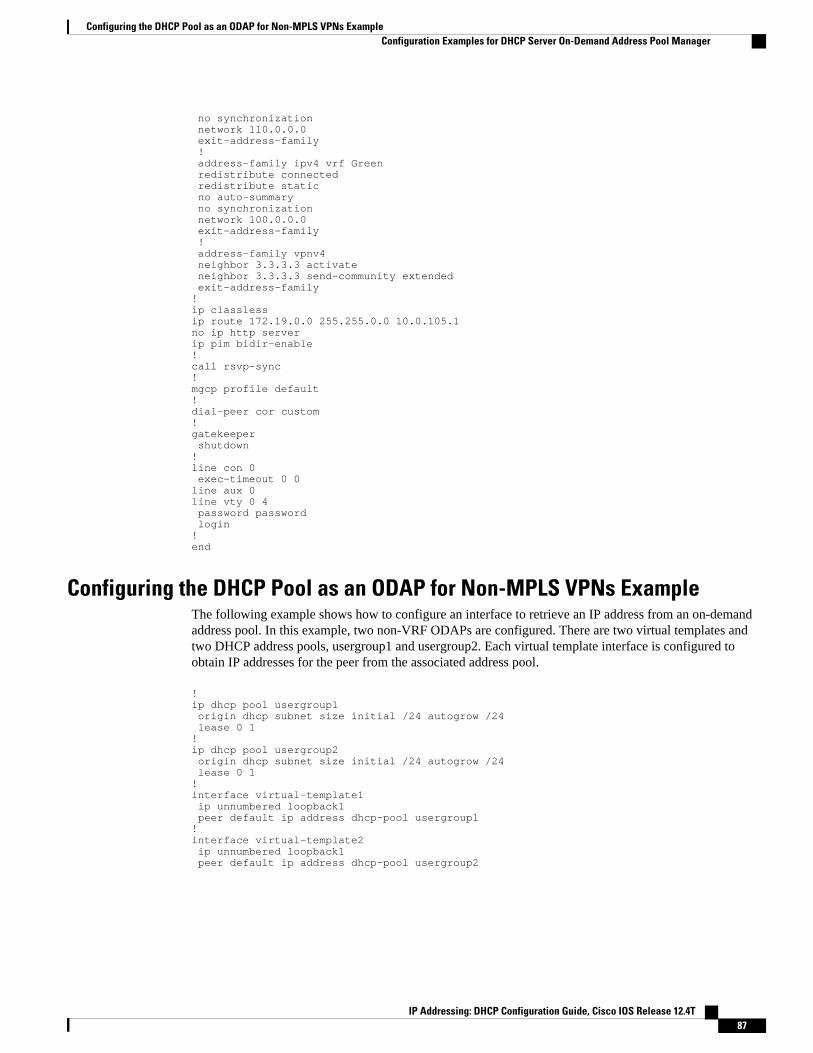
no synchronization network 110.0.0.0 exit-address-family ! address-family ipv4 vrf Green redistribute connected redistribute static no auto-summary no synchronization network 100.0.0.0 exit-address-family ! address-family vpnv4 neighbor 3.3.3.3 activate neighbor 3.3.3.3 send-community extended exit-address-family!ip classlessip route 172.19.0.0 255.255.0.0 10.0.105.1no ip http serverip pim bidir-enable!call rsvp-sync!mgcp profile default!dial-peer cor custom!gatekeeper shutdown!line con 0 exec-timeout 0 0line aux 0line vty 0 4 password password login!end
Configuring the DHCP Pool as an ODAP for Non-MPLS VPNs ExampleThe following example shows how to configure an interface to retrieve an IP address from an on-demandaddress pool. In this example, two non-VRF ODAPs are configured. There are two virtual templates andtwo DHCP address pools, usergroup1 and usergroup2. Each virtual template interface is configured toobtain IP addresses for the peer from the associated address pool.
!ip dhcp pool usergroup1 origin dhcp subnet size initial /24 autogrow /24 lease 0 1!ip dhcp pool usergroup2 origin dhcp subnet size initial /24 autogrow /24 lease 0 1!interface virtual-template1 ip unnumbered loopback1 peer default ip address dhcp-pool usergroup1!interface virtual-template2 ip unnumbered loopback1 peer default ip address dhcp-pool usergroup2
Configuring the DHCP Pool as an ODAP for Non-MPLS VPNs ExampleConfiguration Examples for DHCP Server On-Demand Address Pool Manager
IP Addressing: DHCP Configuration Guide, Cisco IOS Release 12.4T 87
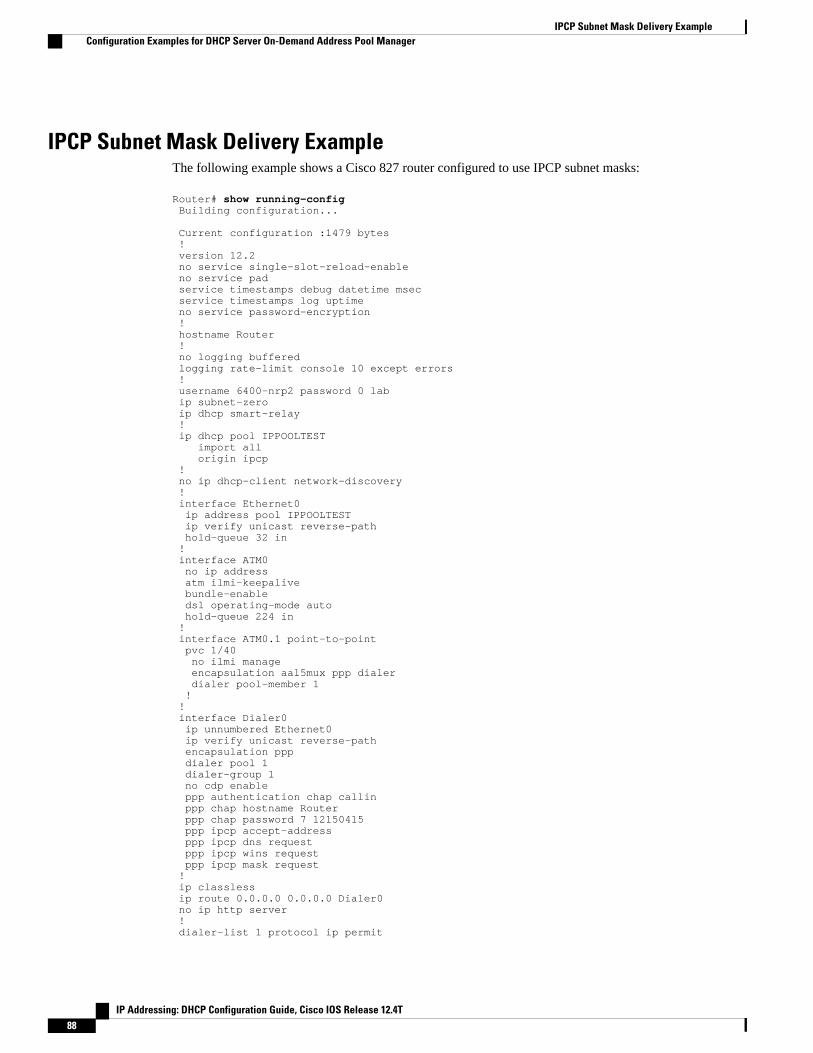
IPCP Subnet Mask Delivery ExampleThe following example shows a Cisco 827 router configured to use IPCP subnet masks:
Router# show running-config Building configuration... Current configuration :1479 bytes ! version 12.2 no service single-slot-reload-enable no service pad service timestamps debug datetime msec service timestamps log uptime no service password-encryption ! hostname Router ! no logging buffered logging rate-limit console 10 except errors ! username 6400-nrp2 password 0 lab ip subnet-zero ip dhcp smart-relay ! ip dhcp pool IPPOOLTEST import all origin ipcp ! no ip dhcp-client network-discovery ! interface Ethernet0 ip address pool IPPOOLTEST ip verify unicast reverse-path hold-queue 32 in ! interface ATM0 no ip address atm ilmi-keepalive bundle-enable dsl operating-mode auto hold-queue 224 in ! interface ATM0.1 point-to-point pvc 1/40 no ilmi manage encapsulation aal5mux ppp dialer dialer pool-member 1 ! ! interface Dialer0 ip unnumbered Ethernet0 ip verify unicast reverse-path encapsulation ppp dialer pool 1 dialer-group 1 no cdp enable ppp authentication chap callin ppp chap hostname Router ppp chap password 7 12150415 ppp ipcp accept-address ppp ipcp dns request ppp ipcp wins request ppp ipcp mask request ! ip classless ip route 0.0.0.0 0.0.0.0 Dialer0 no ip http server ! dialer-list 1 protocol ip permit
IPCP Subnet Mask Delivery Example Configuration Examples for DHCP Server On-Demand Address Pool Manager
IP Addressing: DHCP Configuration Guide, Cisco IOS Release 12.4T88
line con 0 exec-timeout 0 0 transport input none stopbits 1 line vty 0 4 login ! scheduler max-task-time 5000 end
Configuring AAA and RADIUS ExampleThe following example shows one pool “Green” configured to obtain its subnets from the AAA (RADIUS)server located at IP address 172.16.1.1:
!aaa new-model!aaa authorization configuration default group radius aaa accounting network default start-stop group radiusaaa session-id common!ip subnet-zero!ip dhcp ping packets 0!ip dhcp pool Green vrf Green utilization mark high 50 utilization mark low 30 origin aaa subnet size initial /28 autogrow /28!ip vrf Green rd 300:1 route-target export 300:1 route-target import 300:1!interface Ethernet1/1 ip address 172.16.1.12 255.255.255.0 duplex half!interface Virtual-Template1 ip vrf forwarding Green no ip address!ip radius source-interface Ethernet1/1!!IP address of the RADIUS server hostradius-server host 172.16.1.1 auth-port 1645 acct-port 1646radius-server retransmit 3radius-server attribute 32 include-in-access-req radius-server attribute 44 include-in-access-reqradius-server key ciscoradius-server vsa send accountingradius-server vsa send authentication
Configuring a Global Pool on a Subnet Allocation Server ExampleThe following example shows how to configure a router to be a subnet allocation server and create a globalsubnet allocation pool named “GLOBAL-POOL” that allocates subnets from the 10.0.0.0/24 network. Theuse of the subnet prefix-length command in this example configures the size of each subnet that isallocated from the subnet pool to support 254 host IP addresses.
ip dhcp pool GLOBAL-POOL network 10.0.0.0 255.255.255.0
Configuring AAA and RADIUS ExampleConfiguration Examples for DHCP Server On-Demand Address Pool Manager
IP Addressing: DHCP Configuration Guide, Cisco IOS Release 12.4T 89
subnet prefix-length 24!
Configuring a VRF Pool on a Subnet Allocation Server ExampleThe following example shows how to configure a router to be a subnet allocation server and create a VRFsubnet allocation pool named “VRF-POOL” that allocates subnets from the 172.16.0.0/16 network andconfigures the VPN to match the VRF named “RED.” The use of the subnet prefix-length command inthis example configures the size of each subnet that is allocated from the subnet pool to support 62 host IPaddresses.
ip dhcp pool VRF-POOL vrf RED network 172.16.0.0 /16 subnet prefix-length 26!
Using a VPN ID to Configure a VRF Pool on a Subnet Allocation ServerExample
The following example shows how to configure a router to be a subnet allocation server and create a VRFsubnet allocation pool named “VRF-POOL” that allocates subnets from the 192.168.0.0/24 network andconfigures the VRF named “RED.” The VPN ID must match the unique identifier that is assigned to theclient site. The route target and route distinguisher are configured in the as-number:network-numberformat. The route target and route distinguisher must match. The configuration of the subnet prefix-lengthcommand in this example configures the size of each subnet that is allocated from the subnet pool tosupport 30 host IP addresses.
ip vrf RED rd 100:1 route-target both 100:1 vpn id 1234:123456 exit ip dhcp pool VPN-POOL vrf RED network 192.168.0.0 /24 subnet prefix-length /27 exit
Verifying Local Configuration on a Subnet Allocation Server ExampleThe following example is output from the show running-configcommand. This command can be used toverify the local configuration on a subnet allocation server. The output from this command displays theconfiguration of the subnet prefix-length command under the DHCP pool named “GLOBAL-POOL.” Thetotal size of the subnet allocation pool is set to 254 addresses with the network command. The use of thesubnet prefix-length command configures this pool to allocate a subnet that will support 254 host IPaddresses. Because the total pool size supports only 254 addresses, only one subnet can be allocated fromthis pool.
Router# show running-config | begin dhcpip dhcp pool GLOBAL-POOL network 10.0.0.0 255.255.255.0 subnet prefix-length 24!
Configuring a VRF Pool on a Subnet Allocation Server Example Configuration Examples for DHCP Server On-Demand Address Pool Manager
IP Addressing: DHCP Configuration Guide, Cisco IOS Release 12.4T90
Verifying Address Pool Allocation Information ExampleThe following examples are output from the show ip dhcp poolcommand. This command can be used toverify subnet allocation pool configuration on the subnet allocation server and the ODAP manager. Theoutput from this command displays information about the address pool name, utilization level, configuredsubnet size, total number of addresses (from subnet), pending events, and specific subnet lease information.
The following sample output shows that the configured subnet allocation size is /24 (254 IP addresses), thatthere is a pending subnet allocation request, and that no subnets are in the pool:
Router# show ip dhcp pool ISP-1Pool ISP-1 : Utilization mark (high/low) :100 / 0 Subnet size (first/next) :24 / 24 (autogrow) Total addresses :0 Leased addresses :0 Pending event :subnet request 0 subnet is currently in the pool
The next example shows that the configured subnet allocation size is /24 (254 IP address), the configuredVRF name is “RED” and a subnet containing 254 IP addresses has been allocated but no IP addresses havebeen leased from the subnet:
Router# show ip dhcp pool SUBNET-ALLOCPool SUBNET-ALLOC : Utilization mark (high/low) :100 / 0 Subnet size (first/next) :24 / 24 (autogrow) VRF name :RED Total addresses :254 Leased addresses :0 Pending event :none 1 subnet is currently in the pool : Current index IP address range Leased addresses 10.0.0.1 10.0.0.1 - 10.0.0.254 0
Verifying Subnet Allocation and DHCP Bindings ExampleThe following example is from the show ip dhcp binding command. This command can be used to displaysubnet allocation to DHCP binding mapping information. The output of this command shows the subnetlease to MAC address mapping, the lease expiration, and the lease type (subnet lease bindings areconfigured to be automatically created and released by default). The output that is generated for DHCP IPaddress assignment and subnet allocation is almost identical, except that subnet leases display an IP addressfollowed by the subnet mask (which shows the size of the allocated subnet) in CIDR bit count notation.Bindings for individual IP address display only an IP address and are not followed by a subnet mask.
Router# show ip dhcp bindingBindings from all pools not associated with VRF:IP address Client-ID/ Lease expiration Type Hardware address/ User name10.0.0.0/26 0063.6973.636f.2d64. Mar 29 2003 04:36 AM Automatic 656d.6574.6572.2d47. 4c4f.4241.4c
Additional ReferencesThe following sections provide references related to configuring the DHCP ODAP manager.
Verifying Address Pool Allocation Information ExampleAdditional References
IP Addressing: DHCP Configuration Guide, Cisco IOS Release 12.4T 91
Related Documents
Related Topic Document Title
DHCP commands: complete command syntax,command modes, command history, defaults, usageguidelines, and examples
Cisco IOS IP Addressing Services CommandReference
DHCP conceptual information “DHCP Overview” module
DHCP server configuration “Configuring the Cisco IOS DHCP Server” module
DHCP client configuration “Configuring the Cisco IOS DHCP Client” module
DHCP relay agent configuration “Configuring the Cisco IOS DHCP Relay Agent”module
DHCP advanced features “Configuring DHCP Services for Accounting andSecurity” module
DHCP enhancements for edge-session managementconfiguration
“Configuring DHCP Enhancements for Edge-Session Management” module
DHCP options “DHCP Options” appendix in the NetworkRegistrar User’s Guide , Release 6.1.1
Standards
Standards Title
No new or modified standards are supported by thisfunctionality.
--
MIBs
MIBs MIBs Link
No new or modified MIBs are supported by thisfeature.
To locate and download MIBs for selectedplatforms, Cisco software releases, and feature sets,use Cisco MIB Locator found at the followingURL:
http://www.cisco.com/go/mibs
RFCs
RFCs Title
RFC 951 Bootstrap Protocol (BOOTP)
RFC 1542 Clarifications and Extensions for the BootstrapProtocol
RFC 2131 Dynamic Host Configuration Protocol
Configuring the DHCP Server On-Demand Address Pool Manager Additional References
IP Addressing: DHCP Configuration Guide, Cisco IOS Release 12.4T92
RFCs Title
RFC 2685 Virtual Private Networks Identifier
RFC 3046 DHCP Relay Information Option
Technical Assistance
Description Link
The Cisco Support website provides extensiveonline resources, including documentation and toolsfor troubleshooting and resolving technical issueswith Cisco products and technologies.
To receive security and technical information aboutyour products, you can subscribe to variousservices, such as the Product Alert Tool (accessedfrom Field Notices), the Cisco Technical ServicesNewsletter, and Really Simple Syndication (RSS)Feeds.
Access to most tools on the Cisco Support websiterequires a Cisco.com user ID and password.
http://www.cisco.com/cisco/web/support/index.html
Feature Information for the DHCP Server On-Demand AddressPool Manager
The following table provides release information about the feature or features described in this module.This table lists only the software release that introduced support for a given feature in a given softwarerelease train. Unless noted otherwise, subsequent releases of that software release train also support thatfeature.
Use Cisco Feature Navigator to find information about platform support and Cisco software image support.To access Cisco Feature Navigator, go to www.cisco.com/go/cfn. An account on Cisco.com is not required.
Table 7 Feature Information for the DHCP On-Demand Address Pool Manager
Feature Name Releases Feature Configuration Information
DHCP Server On-DemandAddress Pool Manager for Non-MPLS VPNs
12.2(15)T 12.2(28)SB12.2(33)SRC
This feature was enhanced toprovide ODAP support for non-MPLS VPNs.
The following command wasmodified by this feature: peerdefault ip address.
Configuring the DHCP Server On-Demand Address Pool ManagerFeature Information for the DHCP Server On-Demand Address Pool Manager
IP Addressing: DHCP Configuration Guide, Cisco IOS Release 12.4T 93

Feature Name Releases Feature Configuration Information
DHCP ODAP Server Support 12.2(15)T 12.2(28)SB12.2(33)SRC
This feature introduces thecapability to configure a DHCPserver (or router) as a subnetallocation server. This capabilityallows the Cisco IOS DHCPserver to be configured with apool of subnets for lease toODAP clients.
The following commands wereintroduced or modified by thisfeature: show ip dhcp binding,subnet prefix-length.
DHCP Server On-DemandAddress Pool Manager
12.2(8)T 12.28(SB) 12.2(33)SRC The ODAP manager is used tocentralize the management oflarge pools of addresses andsimplify the configuration oflarge networks. ODAP provides acentral management point for theallocation and assignment of IPaddresses. When a Cisco IOSrouter is configured as an ODAPmanager, pools of IP addressesare dynamically increased orreduced in size depending on theaddress utilization level.
The following commands wereintroduced or modified: aaasession-id, clear ip dhcpbinding, clear ip dhcp conflict,clear ip dhcp subnet, ipaddress-pool, ip address pool,ip dhcp aaa default username,origin, peer default ip address,show ip dhcp pool, utilizationmark high, utilization marklow, vrf.
GlossaryAAA --authentication, authorization, and accounting. Suite of network security services that provide theprimary framework through which access control can be set up on your Cisco router or access server.
Cisco Access Registrar --A RADIUS server that supports service provider deployment of access servicesby centralizing AAA information and simplifying provisioning and management.
client --A host trying to configure its interface (obtain an IP address) using DHCP or BOOTP protocols.
DHCP --Dynamic Host Configuration Protocol.
Configuring the DHCP Server On-Demand Address Pool Manager Glossary
IP Addressing: DHCP Configuration Guide, Cisco IOS Release 12.4T94
incremental subnet size --The desired size of the second and subsequent subnets requested for an on-demand pool.
initial subnet size --The desired size of the first subnet requested for an on-demand pool.
IPCP --IP Control Protocol. Protocol that establishes and configures IP over PPP.
MPLS --Multiprotocol Label Switching. Emerging industry standard upon which tag switching is based.
ODAP --on-demand address pool.
PE router --provider edge router.
PPP --Point-to-Point Protocol.
RADIUS -- Remote Authentication Dial-In User Service. Database for authenticating modem and ISDNconnections and for tracking connection time.
relay agent --A router that forwards DHCP and BOOTP messages between a server and a client ondifferent subnets.
releasable subnet --A leased subnet that has no address leased from it.
server --DHCP or BOOTP server.
VHG --Virtual Home Gateway. A Cisco IOS software component that terminates PPP sessions. It is ownedand managed by the service provider on behalf of its customer to provide access to remote users of thatcustomer’s network. A single service provider device (router) can host multiple VHGs of differentcustomers. A VHG can be dynamically brought up and down based on the access pattern of the remoteusers. Note that no single Cisco IOS feature is called the VHG; it is a collection of function and features.
VHG/PE router --A device that terminates PPP sessions and maps the remote users to the correspondingMPLS VPNs.
VPN --Virtual Private Network. Enables IP traffic to use tunneling to travel securely over a public TCP/IPnetwork.
VRF --VPN routing and forwarding instance. A VRF consists of an IP routing table, a derived forwardingtable, a set of interfaces that use the forwarding table, and a set of rules and routing protocols thatdetermine what goes into the forwarding table. In general, a VRF includes the routing information thatdefines a customer VPN site that is attached to a PE router. Each VPN instantiated on the PE router has itsown VRF.
Cisco and the Cisco logo are trademarks or registered trademarks of Cisco and/or its affiliates in the U.S.and other countries. To view a list of Cisco trademarks, go to this URL: www.cisco.com/go/trademarks.Third-party trademarks mentioned are the property of their respective owners. The use of the word partnerdoes not imply a partnership relationship between Cisco and any other company. (1110R)
Any Internet Protocol (IP) addresses and phone numbers used in this document are not intended to beactual addresses and phone numbers. Any examples, command display output, network topology diagrams,and other figures included in the document are shown for illustrative purposes only. Any use of actual IPaddresses or phone numbers in illustrative content is unintentional and coincidental.
Configuring the DHCP Server On-Demand Address Pool Manager
IP Addressing: DHCP Configuration Guide, Cisco IOS Release 12.4T 95

Verifying Subnet Allocation and DHCP Bindings Example
IP Addressing: DHCP Configuration Guide, Cisco IOS Release 12.4T96
Configuring the Cisco IOS DHCP Relay Agent
All Cisco routers that run Cisco software include a DHCP server and the relay agent software. A DHCPrelay agent is any host or IP router that forwards DHCP packets between clients and servers. This moduledescribes the concepts and tasks needed to configure the Cisco IOS DHCP relay agent.
• Finding Feature Information, page 97• Prerequisites for Configuring the Cisco IOS DHCP Relay Agent, page 97• Information About the DHCP Relay Agent, page 98• How to Configure the DHCP Relay Agent, page 98• Configuration Examples for the Cisco IOS DHCP Relay Agent, page 120• Additional References, page 123• Feature Information for the Cisco IOS DHCP Relay Agent, page 124• Glossary, page 127
Finding Feature InformationYour software release may not support all the features documented in this module. For the latest featureinformation and caveats, see the release notes for your platform and software release. To find informationabout the features documented in this module, and to see a list of the releases in which each feature issupported, see the Feature Information Table at the end of this document.
Use Cisco Feature Navigator to find information about platform support and Cisco software image support.To access Cisco Feature Navigator, go to www.cisco.com/go/cfn. An account on Cisco.com is not required.
Prerequisites for Configuring the Cisco IOS DHCP RelayAgent
• Before you configure the DHCP relay agent, you should understand the concepts documented in the“DHCP Overview” module.
• The Cisco IOS DHCP server and relay agent are enabled by default. You can verify whether they havebeen disabled by checking your configuration file. If they have been disabled, the no service dhcpcommand will appear in the configuration file. Use the service dhcp command to reenable thefunctionality if necessary.
• The Cisco IOS DHCP relay agent will be enabled on an interface only when the ip helper-addresscommand is configured. This command enables the DHCP broadcast to be forwarded to theconfigured DHCP server.
IP Addressing: DHCP Configuration Guide, Cisco IOS Release 12.4T 97
Information About the DHCP Relay Agent• DHCP Relay Agent Overview, page 98
DHCP Relay Agent OverviewA DHCP relay agent is any host that forwards DHCP packets between clients and servers. Relay agentsforward requests and replies between clients and servers when they are not on the same physical subnet.Relay agent forwarding is distinct from the normal forwarding of an IP router, where IP datagrams areswitched between networks somewhat transparently. In contrast, when relay agents receive DHCPmessages, the agents generate a new DHCP message to send out through another interface. The relay agentsets the gateway IP address (the giaddr field of the DHCP packet) and, if configured, adds the relay agentinformation option (option 82) to the packet and forwards the packet to the DHCP server. The reply fromthe server is forwarded back to the client after removing option 82.
The Cisco IOS DHCP relay agent supports the use of unnumbered interfaces, including the use of smartrelay agent forwarding. For DHCP clients that are connected though unnumbered interfaces, the DHCPrelay agent automatically adds a static host route after the DHCP client obtains an address, specifying theunnumbered interface as the outbound interface. The route is automatically removed once the lease timeexpires or when the client releases the address.
How to Configure the DHCP Relay Agent• Specifying the Packet Forwarding Address, page 98• Configuring Support for the Relay Agent Information Option, page 100• Configuring Per-Interface Support for the Relay Agent Information Option, page 104• Configuring the Subscriber Identifier Suboption of the Relay Agent Information Option, page 106• Configuring DHCP Relay Class Support for Client Identification, page 107• Configuring DHCP Relay Agent Support for MPLS VPNs, page 110• Configuring Support for Relay Agent Information Option Encapsulation, page 114• Setting the Gateway Address of the DHCP Broadcast to a Secondary Address Using Smart RelayAgent Forwarding, page 117• Configuring Support for Private and Standard Suboption Numbers, page 118• Troubleshooting the DHCP Relay Agent, page 119
Specifying the Packet Forwarding AddressDHCP clients need to use UDP broadcasts to send their initial DHCPDISCOVER messages because theclients do not have information about the network to which they are attached. If the client is on a networksegment that does not include a server, UDP broadcasts are not usually forwarded because most routers areconfigured to not forward broadcast traffic. When the DHCP client broadcasts a DHCPDISCOVERmessage, the relay agent sends the broadcast message toward the server, which may create AddressResolution Protocol (ARP) entries due to unnecessary ARP checks performed by the client after receivingthe ACK message. If there are two entries in the ARP table, one times out after the ARP timeout. You canremedy this situation by configuring the interface of your router that is receiving the broadcasts to forwardcertain classes of broadcasts to a helper address. You can use more than one helper address per interface.
DHCP Relay Agent Overview Information About the DHCP Relay Agent
IP Addressing: DHCP Configuration Guide, Cisco IOS Release 12.4T98
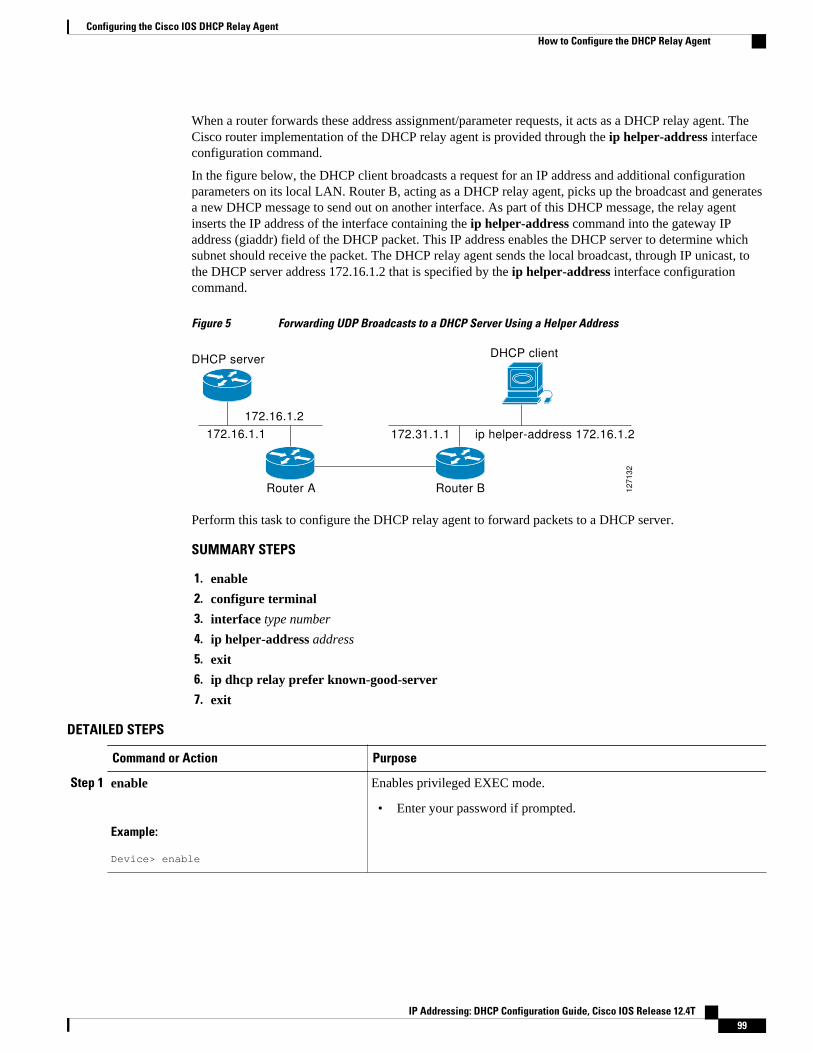
When a router forwards these address assignment/parameter requests, it acts as a DHCP relay agent. TheCisco router implementation of the DHCP relay agent is provided through the ip helper-address interfaceconfiguration command.
In the figure below, the DHCP client broadcasts a request for an IP address and additional configurationparameters on its local LAN. Router B, acting as a DHCP relay agent, picks up the broadcast and generatesa new DHCP message to send out on another interface. As part of this DHCP message, the relay agentinserts the IP address of the interface containing the ip helper-address command into the gateway IPaddress (giaddr) field of the DHCP packet. This IP address enables the DHCP server to determine whichsubnet should receive the packet. The DHCP relay agent sends the local broadcast, through IP unicast, tothe DHCP server address 172.16.1.2 that is specified by the ip helper-address interface configurationcommand.
Figure 5 Forwarding UDP Broadcasts to a DHCP Server Using a Helper Address
172.16.1.2
172.16.1.1 172.31.1.1 ip helper-address 172.16.1.2
Router B
DHCP client
Router A
DHCP server
12
71
32
Perform this task to configure the DHCP relay agent to forward packets to a DHCP server.
SUMMARY STEPS
1. enable
2. configure terminal
3. interface type number
4. ip helper-address address
5. exit
6. ip dhcp relay prefer known-good-server
7. exit
DETAILED STEPS
Command or Action Purpose
Step 1 enable
Example:
Device> enable
Enables privileged EXEC mode.
• Enter your password if prompted.
Configuring the Cisco IOS DHCP Relay AgentHow to Configure the DHCP Relay Agent
IP Addressing: DHCP Configuration Guide, Cisco IOS Release 12.4T 99
Command or Action Purpose
Step 2 configure terminal
Example:
Device# configure terminal
Enters global configuration mode.
Step 3 interface type number
Example:
Device(config)# interface FastEthernet0/0
Configures an interface and enters interface configuration mode.
Step 4 ip helper-address address
Example:
Device(config-if)# ip helper-address 172.16.1.2
Forwards UDP broadcasts, including BOOTP and DHCP.
• The address argument can be a specific DHCP server address, or itcan be the network address if other DHCP servers are on thedestination network segment. The network address enables otherservers to respond to DHCP requests.
• If you have multiple servers, you can configure one helper addressfor each server.
Step 5 exit
Example:
Device(config-if)# exit
Exits interface configuration mode and returns to global configurationmode.
Step 6 ip dhcp relay prefer known-good-server
Example:
Device(config)# ip dhcp relay prefer known-good-server
(Optional) Reduces the frequency with which the DHCP clients changetheir addresses and forwards client requests to the server that handled theprevious request.
• The DHCP relay agent deletes the ARP entries for addresses offeredto the DHCP client on unnumbered interfaces.
Step 7 exit
Example:
Device(config)# exit
Returns to privileged EXEC mode.
Configuring Support for the Relay Agent Information OptionAutomatic DHCP address allocation is typically based on an IP address, which may be either the gatewayIP address (giaddr field of the DHCP packet) or the incoming interface IP address. In some networks,additional information may be required to further determine the IP addresses that need to be allocated. Byusing the relay agent information option (option 82), the Cisco IOS relay agent can include additional
Configuring Support for the Relay Agent Information Option How to Configure the DHCP Relay Agent
IP Addressing: DHCP Configuration Guide, Cisco IOS Release 12.4T100
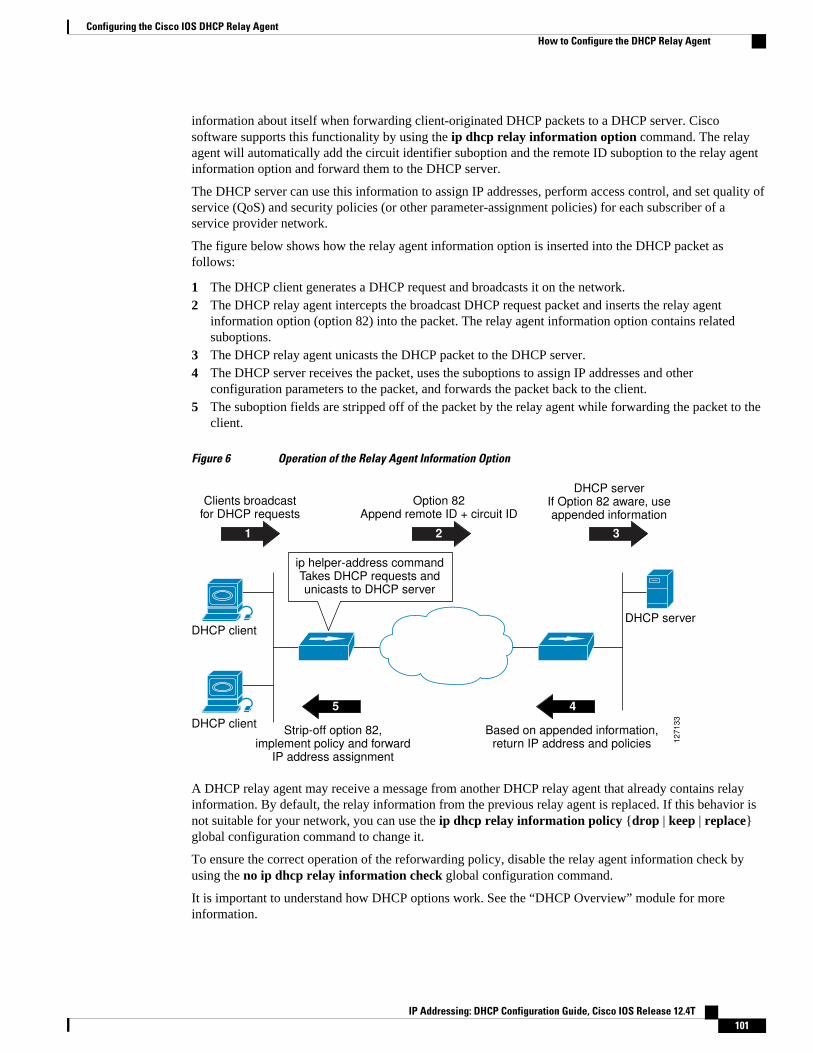
information about itself when forwarding client-originated DHCP packets to a DHCP server. Ciscosoftware supports this functionality by using the ip dhcp relay information option command. The relayagent will automatically add the circuit identifier suboption and the remote ID suboption to the relay agentinformation option and forward them to the DHCP server.
The DHCP server can use this information to assign IP addresses, perform access control, and set quality ofservice (QoS) and security policies (or other parameter-assignment policies) for each subscriber of aservice provider network.
The figure below shows how the relay agent information option is inserted into the DHCP packet asfollows:
1 The DHCP client generates a DHCP request and broadcasts it on the network.2 The DHCP relay agent intercepts the broadcast DHCP request packet and inserts the relay agent
information option (option 82) into the packet. The relay agent information option contains relatedsuboptions.
3 The DHCP relay agent unicasts the DHCP packet to the DHCP server.4 The DHCP server receives the packet, uses the suboptions to assign IP addresses and other
configuration parameters to the packet, and forwards the packet back to the client.5 The suboption fields are stripped off of the packet by the relay agent while forwarding the packet to the
client.
Figure 6 Operation of the Relay Agent Information Option
127133
Clients broadcast for DHCP requests
Strip-off option 82, implement policy and forward
IP address assignment
Based on appended information, return IP address and policies
ip helper-address command Takes DHCP requests and unicasts to DHCP server
Option 82 Append remote ID + circuit ID
DHCP server If Option 82 aware, use appended information
DHCP serverDHCP client
DHCP client
21 3
45
A DHCP relay agent may receive a message from another DHCP relay agent that already contains relayinformation. By default, the relay information from the previous relay agent is replaced. If this behavior isnot suitable for your network, you can use the ip dhcp relay information policy {drop | keep | replace}global configuration command to change it.
To ensure the correct operation of the reforwarding policy, disable the relay agent information check byusing the no ip dhcp relay information check global configuration command.
It is important to understand how DHCP options work. See the “DHCP Overview” module for moreinformation.
Configuring the Cisco IOS DHCP Relay AgentHow to Configure the DHCP Relay Agent
IP Addressing: DHCP Configuration Guide, Cisco IOS Release 12.4T 101
Note• If the ip dhcp relay information command is configured in global configuration mode but not
configured in interface configuration mode, the global configuration is applied to all interfaces.• If the ip dhcp relay information command is configured in both global configuration mode and
interface configuration mode, the interface configuration command takes precedence over the globalconfiguration command. However, the global configuration is applied to interfaces without theinterface configuration.
• If the ip dhcp relay information command is not configured in global configuration mode but isconfigured in interface configuration mode, only the interface with the configuration option applied isaffected. All other interfaces are not impacted by the configuration.
See the “Configuring Relay Agent Information Option Support per Interface” section for more informationon per-interface support for the relay agent information option.
SUMMARY STEPS
1. enable
2. configure terminal
3. ip dhcp relay information option
4. ip dhcp relay information check
5. ip dhcp relay information policy {drop | keep | replace}
6. ip dhcp relay information trust-all
7. end
8. show ip dhcp relay information trusted-sources
DETAILED STEPS
Command or Action Purpose
Step 1 enable
Example:
Device> enable
Enables privileged EXEC mode.
• Enter your password if prompted.
Step 2 configure terminal
Example:
Device# configure terminal
Enters global configuration mode.
Configuring the Cisco IOS DHCP Relay Agent How to Configure the DHCP Relay Agent
IP Addressing: DHCP Configuration Guide, Cisco IOS Release 12.4T102
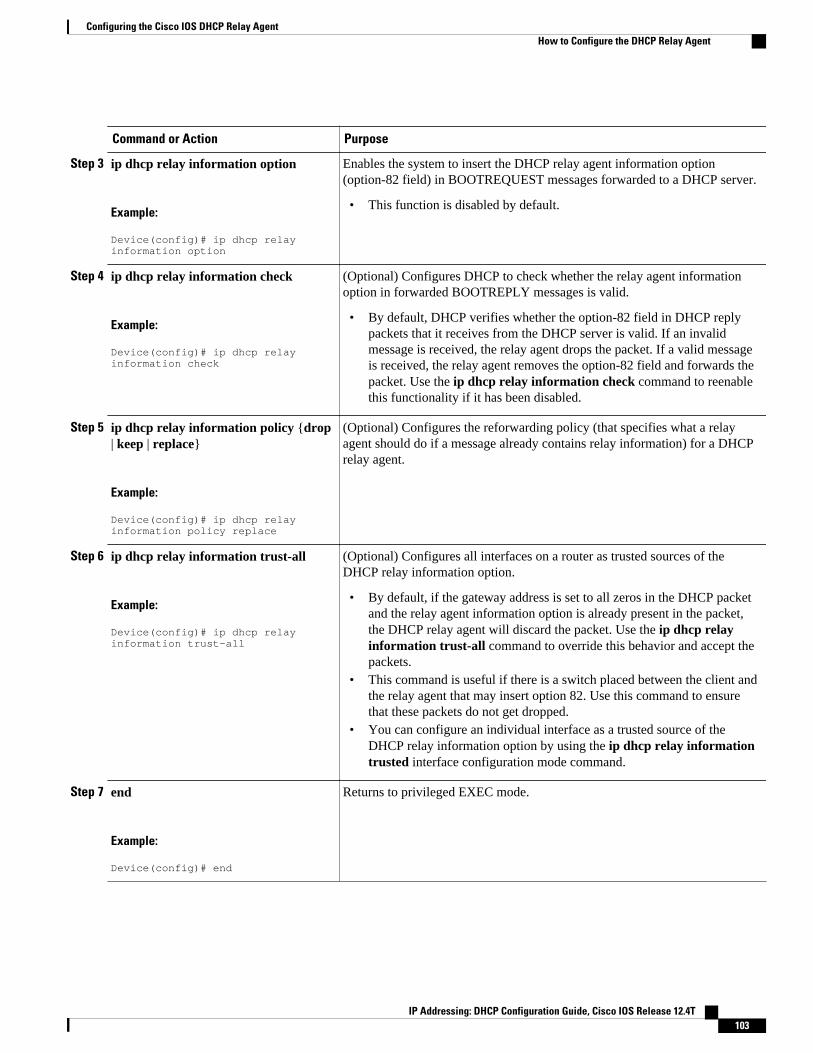
Command or Action Purpose
Step 3 ip dhcp relay information option
Example:
Device(config)# ip dhcp relay information option
Enables the system to insert the DHCP relay agent information option(option-82 field) in BOOTREQUEST messages forwarded to a DHCP server.
• This function is disabled by default.
Step 4 ip dhcp relay information check
Example:
Device(config)# ip dhcp relay information check
(Optional) Configures DHCP to check whether the relay agent informationoption in forwarded BOOTREPLY messages is valid.
• By default, DHCP verifies whether the option-82 field in DHCP replypackets that it receives from the DHCP server is valid. If an invalidmessage is received, the relay agent drops the packet. If a valid messageis received, the relay agent removes the option-82 field and forwards thepacket. Use the ip dhcp relay information check command to reenablethis functionality if it has been disabled.
Step 5 ip dhcp relay information policy {drop| keep | replace}
Example:
Device(config)# ip dhcp relay information policy replace
(Optional) Configures the reforwarding policy (that specifies what a relayagent should do if a message already contains relay information) for a DHCPrelay agent.
Step 6 ip dhcp relay information trust-all
Example:
Device(config)# ip dhcp relay information trust-all
(Optional) Configures all interfaces on a router as trusted sources of theDHCP relay information option.
• By default, if the gateway address is set to all zeros in the DHCP packetand the relay agent information option is already present in the packet,the DHCP relay agent will discard the packet. Use the ip dhcp relayinformation trust-all command to override this behavior and accept thepackets.
• This command is useful if there is a switch placed between the client andthe relay agent that may insert option 82. Use this command to ensurethat these packets do not get dropped.
• You can configure an individual interface as a trusted source of theDHCP relay information option by using the ip dhcp relay informationtrusted interface configuration mode command.
Step 7 end
Example:
Device(config)# end
Returns to privileged EXEC mode.
Configuring the Cisco IOS DHCP Relay AgentHow to Configure the DHCP Relay Agent
IP Addressing: DHCP Configuration Guide, Cisco IOS Release 12.4T 103
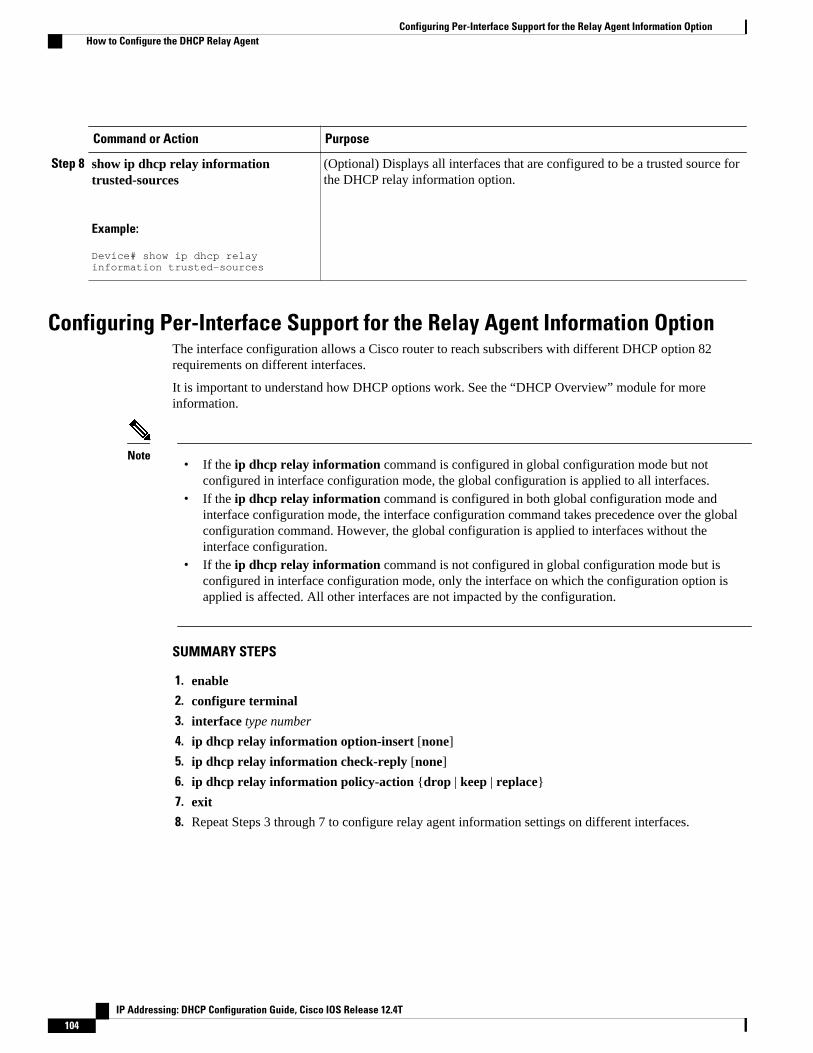
Command or Action Purpose
Step 8 show ip dhcp relay informationtrusted-sources
Example:
Device# show ip dhcp relay information trusted-sources
(Optional) Displays all interfaces that are configured to be a trusted source forthe DHCP relay information option.
Configuring Per-Interface Support for the Relay Agent Information OptionThe interface configuration allows a Cisco router to reach subscribers with different DHCP option 82requirements on different interfaces.
It is important to understand how DHCP options work. See the “DHCP Overview” module for moreinformation.
Note• If the ip dhcp relay information command is configured in global configuration mode but not
configured in interface configuration mode, the global configuration is applied to all interfaces.• If the ip dhcp relay information command is configured in both global configuration mode and
interface configuration mode, the interface configuration command takes precedence over the globalconfiguration command. However, the global configuration is applied to interfaces without theinterface configuration.
• If the ip dhcp relay information command is not configured in global configuration mode but isconfigured in interface configuration mode, only the interface on which the configuration option isapplied is affected. All other interfaces are not impacted by the configuration.
SUMMARY STEPS
1. enable
2. configure terminal
3. interface type number
4. ip dhcp relay information option-insert [none]
5. ip dhcp relay information check-reply [none]
6. ip dhcp relay information policy-action {drop | keep | replace}
7. exit
8. Repeat Steps 3 through 7 to configure relay agent information settings on different interfaces.
Configuring Per-Interface Support for the Relay Agent Information Option How to Configure the DHCP Relay Agent
IP Addressing: DHCP Configuration Guide, Cisco IOS Release 12.4T104
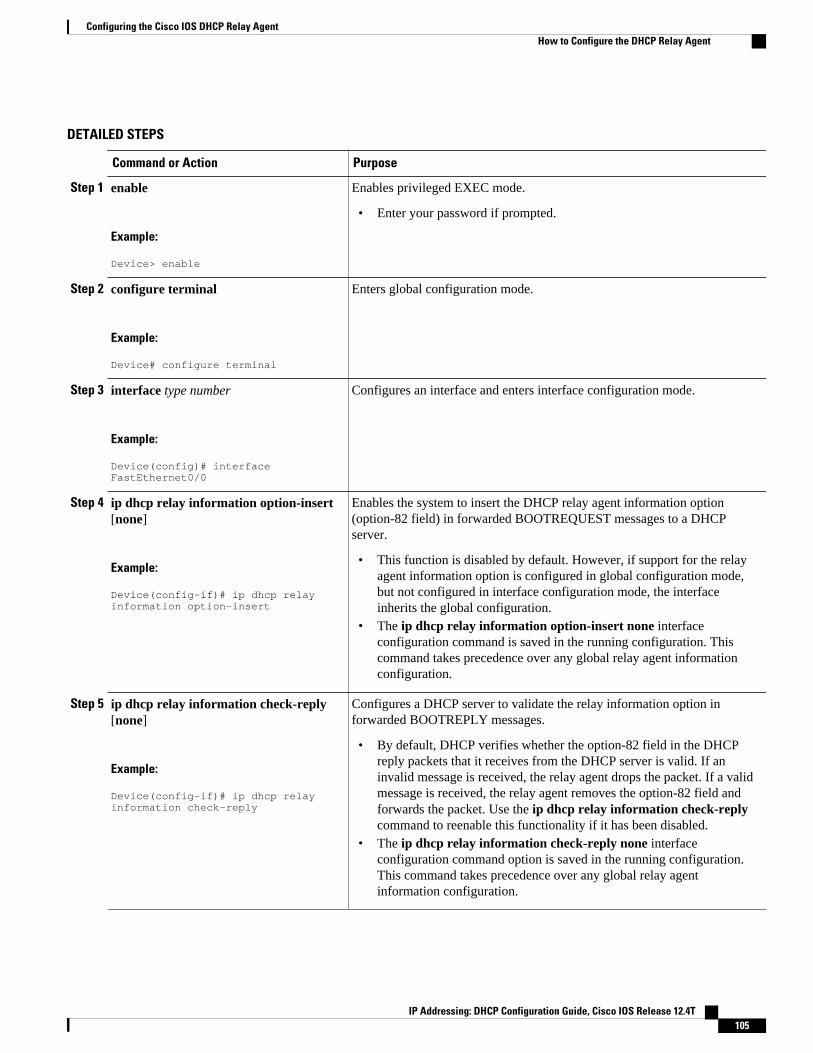
DETAILED STEPS
Command or Action Purpose
Step 1 enable
Example:
Device> enable
Enables privileged EXEC mode.
• Enter your password if prompted.
Step 2 configure terminal
Example:
Device# configure terminal
Enters global configuration mode.
Step 3 interface type number
Example:
Device(config)# interface FastEthernet0/0
Configures an interface and enters interface configuration mode.
Step 4 ip dhcp relay information option-insert[none]
Example:
Device(config-if)# ip dhcp relay information option-insert
Enables the system to insert the DHCP relay agent information option(option-82 field) in forwarded BOOTREQUEST messages to a DHCPserver.
• This function is disabled by default. However, if support for the relayagent information option is configured in global configuration mode,but not configured in interface configuration mode, the interfaceinherits the global configuration.
• The ip dhcp relay information option-insert none interfaceconfiguration command is saved in the running configuration. Thiscommand takes precedence over any global relay agent informationconfiguration.
Step 5 ip dhcp relay information check-reply[none]
Example:
Device(config-if)# ip dhcp relay information check-reply
Configures a DHCP server to validate the relay information option inforwarded BOOTREPLY messages.
• By default, DHCP verifies whether the option-82 field in the DHCPreply packets that it receives from the DHCP server is valid. If aninvalid message is received, the relay agent drops the packet. If a validmessage is received, the relay agent removes the option-82 field andforwards the packet. Use the ip dhcp relay information check-replycommand to reenable this functionality if it has been disabled.
• The ip dhcp relay information check-reply none interfaceconfiguration command option is saved in the running configuration.This command takes precedence over any global relay agentinformation configuration.
Configuring the Cisco IOS DHCP Relay AgentHow to Configure the DHCP Relay Agent
IP Addressing: DHCP Configuration Guide, Cisco IOS Release 12.4T 105
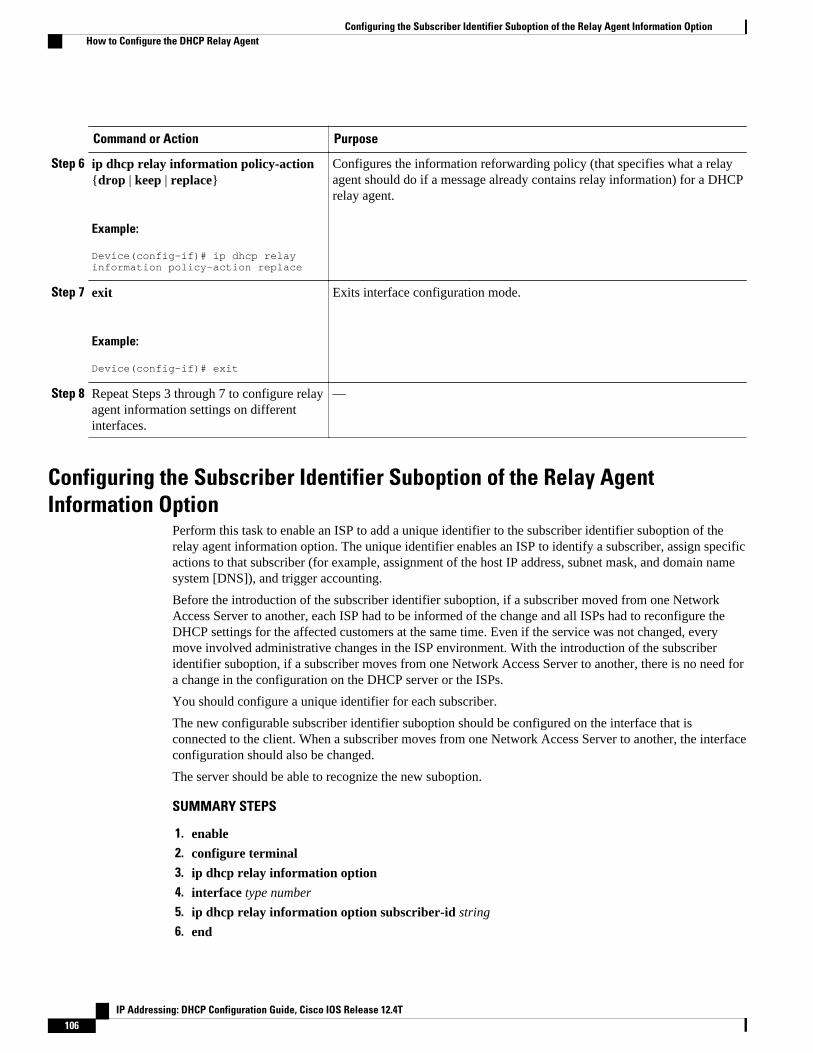
Command or Action Purpose
Step 6 ip dhcp relay information policy-action{drop | keep | replace}
Example:
Device(config-if)# ip dhcp relay information policy-action replace
Configures the information reforwarding policy (that specifies what a relayagent should do if a message already contains relay information) for a DHCPrelay agent.
Step 7 exit
Example:
Device(config-if)# exit
Exits interface configuration mode.
Step 8 Repeat Steps 3 through 7 to configure relayagent information settings on differentinterfaces.
—
Configuring the Subscriber Identifier Suboption of the Relay AgentInformation Option
Perform this task to enable an ISP to add a unique identifier to the subscriber identifier suboption of therelay agent information option. The unique identifier enables an ISP to identify a subscriber, assign specificactions to that subscriber (for example, assignment of the host IP address, subnet mask, and domain namesystem [DNS]), and trigger accounting.
Before the introduction of the subscriber identifier suboption, if a subscriber moved from one NetworkAccess Server to another, each ISP had to be informed of the change and all ISPs had to reconfigure theDHCP settings for the affected customers at the same time. Even if the service was not changed, everymove involved administrative changes in the ISP environment. With the introduction of the subscriberidentifier suboption, if a subscriber moves from one Network Access Server to another, there is no need fora change in the configuration on the DHCP server or the ISPs.
You should configure a unique identifier for each subscriber.
The new configurable subscriber identifier suboption should be configured on the interface that isconnected to the client. When a subscriber moves from one Network Access Server to another, the interfaceconfiguration should also be changed.
The server should be able to recognize the new suboption.
SUMMARY STEPS
1. enable
2. configure terminal
3. ip dhcp relay information option
4. interface type number
5. ip dhcp relay information option subscriber-id string
6. end
Configuring the Subscriber Identifier Suboption of the Relay Agent Information Option How to Configure the DHCP Relay Agent
IP Addressing: DHCP Configuration Guide, Cisco IOS Release 12.4T106
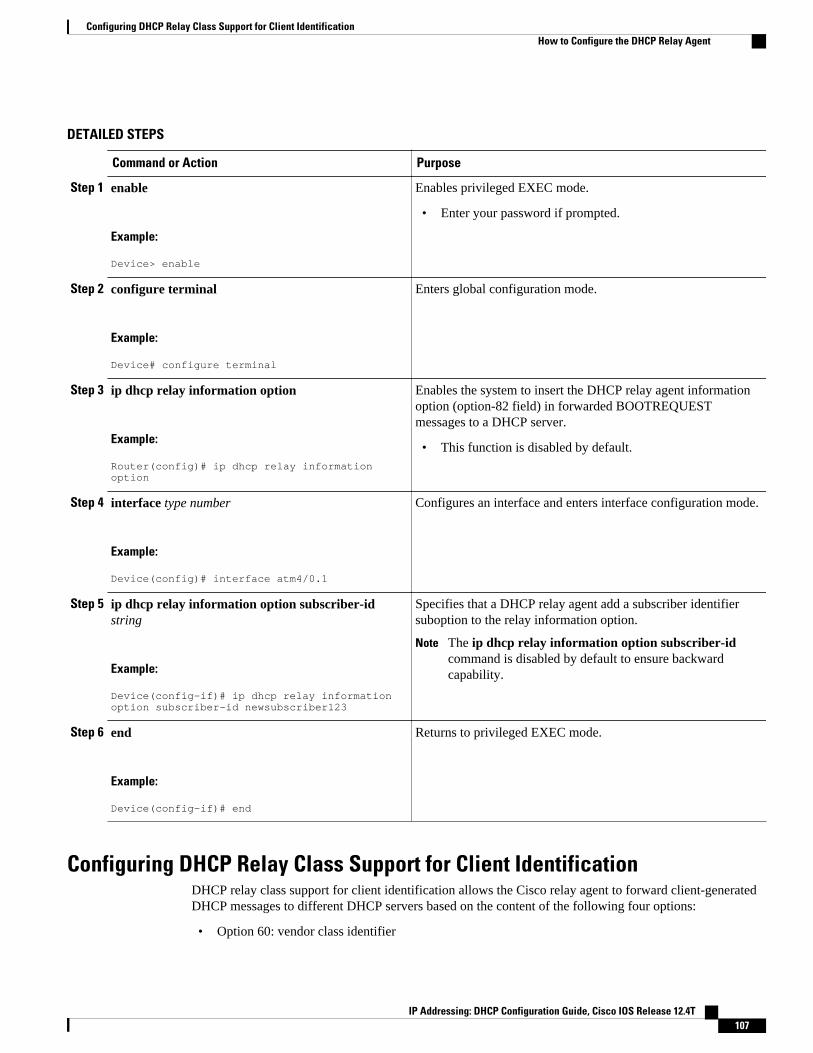
DETAILED STEPS
Command or Action Purpose
Step 1 enable
Example:
Device> enable
Enables privileged EXEC mode.
• Enter your password if prompted.
Step 2 configure terminal
Example:
Device# configure terminal
Enters global configuration mode.
Step 3 ip dhcp relay information option
Example:
Router(config)# ip dhcp relay information option
Enables the system to insert the DHCP relay agent informationoption (option-82 field) in forwarded BOOTREQUESTmessages to a DHCP server.
• This function is disabled by default.
Step 4 interface type number
Example:
Device(config)# interface atm4/0.1
Configures an interface and enters interface configuration mode.
Step 5 ip dhcp relay information option subscriber-idstring
Example:
Device(config-if)# ip dhcp relay information option subscriber-id newsubscriber123
Specifies that a DHCP relay agent add a subscriber identifiersuboption to the relay information option.
Note The ip dhcp relay information option subscriber-idcommand is disabled by default to ensure backwardcapability.
Step 6 end
Example:
Device(config-if)# end
Returns to privileged EXEC mode.
Configuring DHCP Relay Class Support for Client IdentificationDHCP relay class support for client identification allows the Cisco relay agent to forward client-generatedDHCP messages to different DHCP servers based on the content of the following four options:
• Option 60: vendor class identifier
Configuring DHCP Relay Class Support for Client IdentificationHow to Configure the DHCP Relay Agent
IP Addressing: DHCP Configuration Guide, Cisco IOS Release 12.4T 107
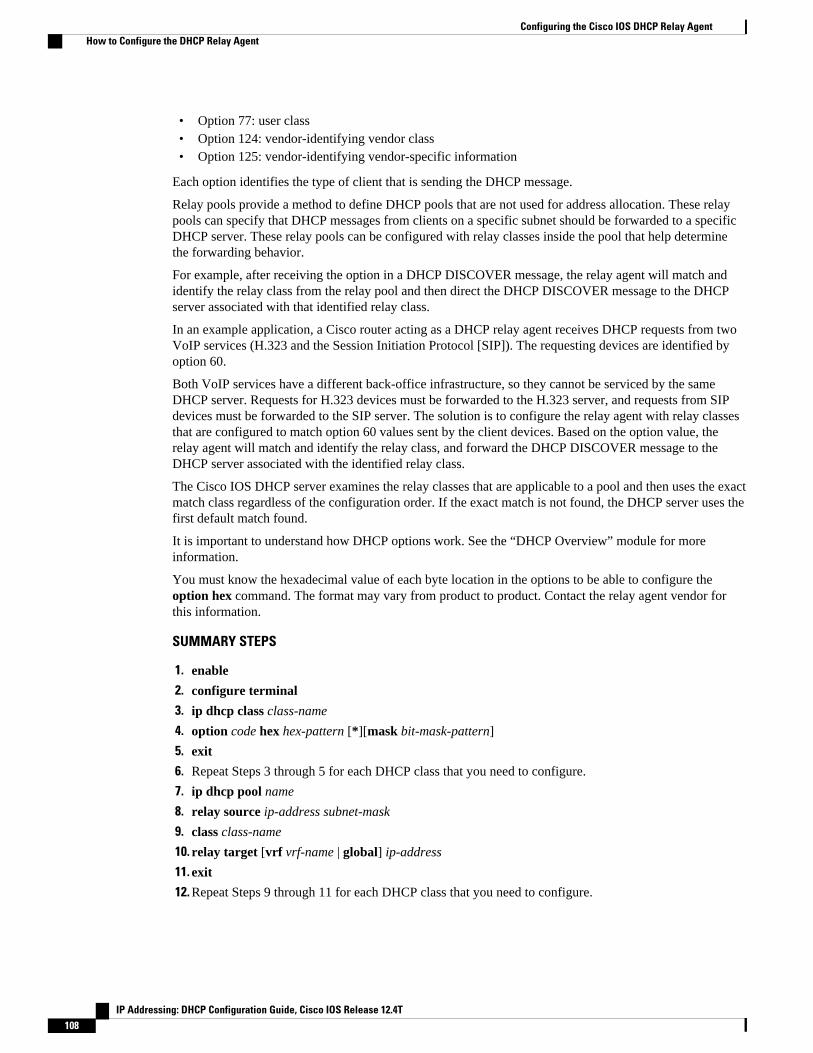
• Option 77: user class• Option 124: vendor-identifying vendor class• Option 125: vendor-identifying vendor-specific information
Each option identifies the type of client that is sending the DHCP message.
Relay pools provide a method to define DHCP pools that are not used for address allocation. These relaypools can specify that DHCP messages from clients on a specific subnet should be forwarded to a specificDHCP server. These relay pools can be configured with relay classes inside the pool that help determinethe forwarding behavior.
For example, after receiving the option in a DHCP DISCOVER message, the relay agent will match andidentify the relay class from the relay pool and then direct the DHCP DISCOVER message to the DHCPserver associated with that identified relay class.
In an example application, a Cisco router acting as a DHCP relay agent receives DHCP requests from twoVoIP services (H.323 and the Session Initiation Protocol [SIP]). The requesting devices are identified byoption 60.
Both VoIP services have a different back-office infrastructure, so they cannot be serviced by the sameDHCP server. Requests for H.323 devices must be forwarded to the H.323 server, and requests from SIPdevices must be forwarded to the SIP server. The solution is to configure the relay agent with relay classesthat are configured to match option 60 values sent by the client devices. Based on the option value, therelay agent will match and identify the relay class, and forward the DHCP DISCOVER message to theDHCP server associated with the identified relay class.
The Cisco IOS DHCP server examines the relay classes that are applicable to a pool and then uses the exactmatch class regardless of the configuration order. If the exact match is not found, the DHCP server uses thefirst default match found.
It is important to understand how DHCP options work. See the “DHCP Overview” module for moreinformation.
You must know the hexadecimal value of each byte location in the options to be able to configure theoption hex command. The format may vary from product to product. Contact the relay agent vendor forthis information.
SUMMARY STEPS
1. enable
2. configure terminal
3. ip dhcp class class-name
4. option code hex hex-pattern [*][mask bit-mask-pattern]
5. exit
6. Repeat Steps 3 through 5 for each DHCP class that you need to configure.
7. ip dhcp pool name
8. relay source ip-address subnet-mask
9. class class-name
10. relay target [vrf vrf-name | global] ip-address
11. exit
12. Repeat Steps 9 through 11 for each DHCP class that you need to configure.
Configuring the Cisco IOS DHCP Relay Agent How to Configure the DHCP Relay Agent
IP Addressing: DHCP Configuration Guide, Cisco IOS Release 12.4T108
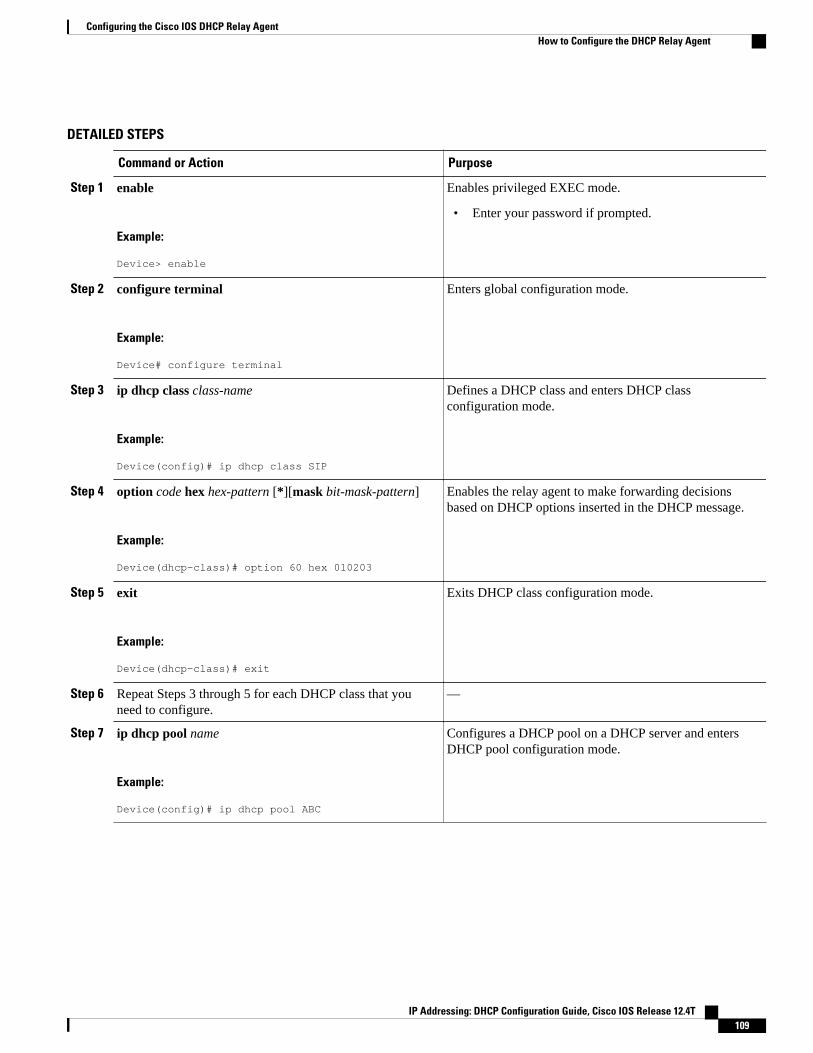
DETAILED STEPS
Command or Action Purpose
Step 1 enable
Example:
Device> enable
Enables privileged EXEC mode.
• Enter your password if prompted.
Step 2 configure terminal
Example:
Device# configure terminal
Enters global configuration mode.
Step 3 ip dhcp class class-name
Example:
Device(config)# ip dhcp class SIP
Defines a DHCP class and enters DHCP classconfiguration mode.
Step 4 option code hex hex-pattern [*][mask bit-mask-pattern]
Example:
Device(dhcp-class)# option 60 hex 010203
Enables the relay agent to make forwarding decisionsbased on DHCP options inserted in the DHCP message.
Step 5 exit
Example:
Device(dhcp-class)# exit
Exits DHCP class configuration mode.
Step 6 Repeat Steps 3 through 5 for each DHCP class that youneed to configure.
—
Step 7 ip dhcp pool name
Example:
Device(config)# ip dhcp pool ABC
Configures a DHCP pool on a DHCP server and entersDHCP pool configuration mode.
Configuring the Cisco IOS DHCP Relay AgentHow to Configure the DHCP Relay Agent
IP Addressing: DHCP Configuration Guide, Cisco IOS Release 12.4T 109
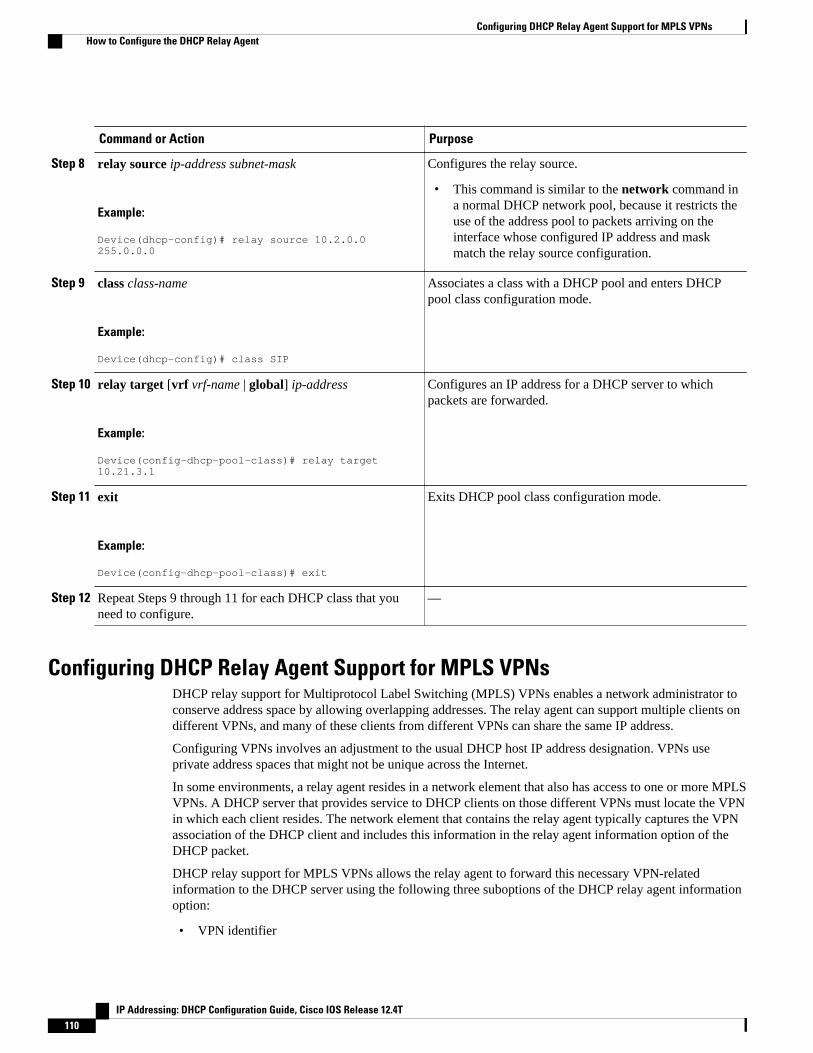
Command or Action Purpose
Step 8 relay source ip-address subnet-mask
Example:
Device(dhcp-config)# relay source 10.2.0.0 255.0.0.0
Configures the relay source.
• This command is similar to the network command ina normal DHCP network pool, because it restricts theuse of the address pool to packets arriving on theinterface whose configured IP address and maskmatch the relay source configuration.
Step 9 class class-name
Example:
Device(dhcp-config)# class SIP
Associates a class with a DHCP pool and enters DHCPpool class configuration mode.
Step 10 relay target [vrf vrf-name | global] ip-address
Example:
Device(config-dhcp-pool-class)# relay target 10.21.3.1
Configures an IP address for a DHCP server to whichpackets are forwarded.
Step 11 exit
Example:
Device(config-dhcp-pool-class)# exit
Exits DHCP pool class configuration mode.
Step 12 Repeat Steps 9 through 11 for each DHCP class that youneed to configure.
—
Configuring DHCP Relay Agent Support for MPLS VPNsDHCP relay support for Multiprotocol Label Switching (MPLS) VPNs enables a network administrator toconserve address space by allowing overlapping addresses. The relay agent can support multiple clients ondifferent VPNs, and many of these clients from different VPNs can share the same IP address.
Configuring VPNs involves an adjustment to the usual DHCP host IP address designation. VPNs useprivate address spaces that might not be unique across the Internet.
In some environments, a relay agent resides in a network element that also has access to one or more MPLSVPNs. A DHCP server that provides service to DHCP clients on those different VPNs must locate the VPNin which each client resides. The network element that contains the relay agent typically captures the VPNassociation of the DHCP client and includes this information in the relay agent information option of theDHCP packet.
DHCP relay support for MPLS VPNs allows the relay agent to forward this necessary VPN-relatedinformation to the DHCP server using the following three suboptions of the DHCP relay agent informationoption:
• VPN identifier
Configuring DHCP Relay Agent Support for MPLS VPNs How to Configure the DHCP Relay Agent
IP Addressing: DHCP Configuration Guide, Cisco IOS Release 12.4T110
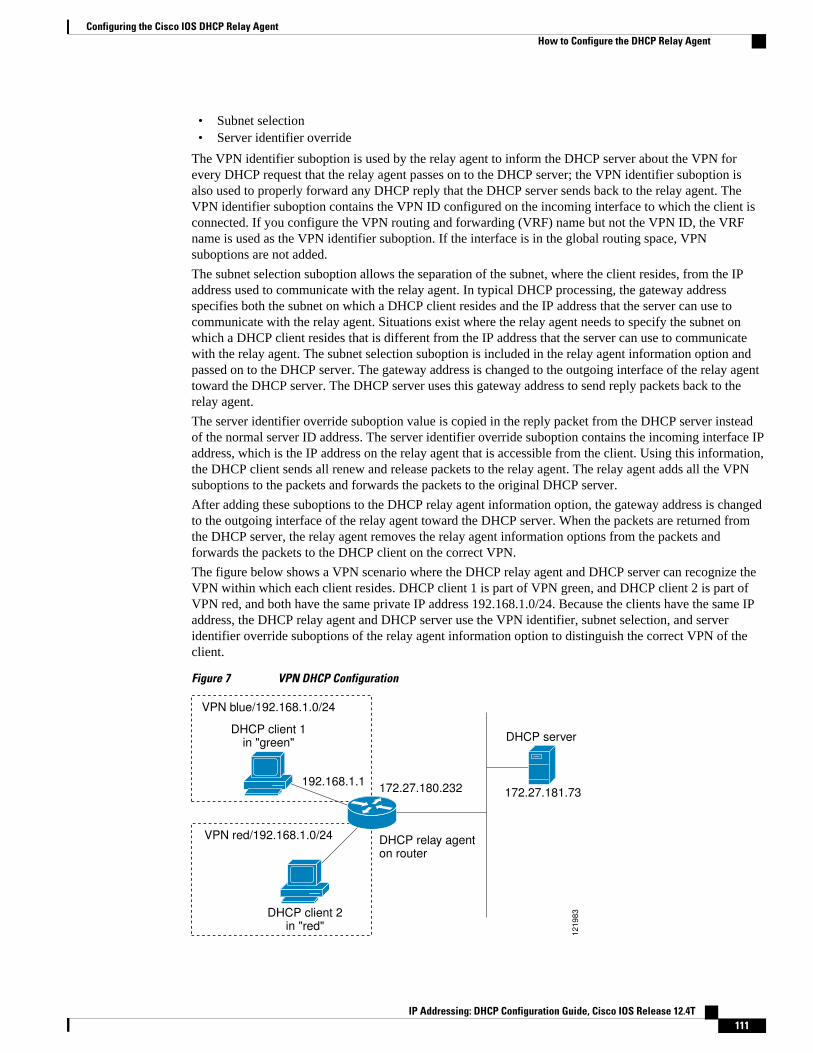
• Subnet selection• Server identifier override
The VPN identifier suboption is used by the relay agent to inform the DHCP server about the VPN forevery DHCP request that the relay agent passes on to the DHCP server; the VPN identifier suboption isalso used to properly forward any DHCP reply that the DHCP server sends back to the relay agent. TheVPN identifier suboption contains the VPN ID configured on the incoming interface to which the client isconnected. If you configure the VPN routing and forwarding (VRF) name but not the VPN ID, the VRFname is used as the VPN identifier suboption. If the interface is in the global routing space, VPNsuboptions are not added.
The subnet selection suboption allows the separation of the subnet, where the client resides, from the IPaddress used to communicate with the relay agent. In typical DHCP processing, the gateway addressspecifies both the subnet on which a DHCP client resides and the IP address that the server can use tocommunicate with the relay agent. Situations exist where the relay agent needs to specify the subnet onwhich a DHCP client resides that is different from the IP address that the server can use to communicatewith the relay agent. The subnet selection suboption is included in the relay agent information option andpassed on to the DHCP server. The gateway address is changed to the outgoing interface of the relay agenttoward the DHCP server. The DHCP server uses this gateway address to send reply packets back to therelay agent.
The server identifier override suboption value is copied in the reply packet from the DHCP server insteadof the normal server ID address. The server identifier override suboption contains the incoming interface IPaddress, which is the IP address on the relay agent that is accessible from the client. Using this information,the DHCP client sends all renew and release packets to the relay agent. The relay agent adds all the VPNsuboptions to the packets and forwards the packets to the original DHCP server.
After adding these suboptions to the DHCP relay agent information option, the gateway address is changedto the outgoing interface of the relay agent toward the DHCP server. When the packets are returned fromthe DHCP server, the relay agent removes the relay agent information options from the packets andforwards the packets to the DHCP client on the correct VPN.
The figure below shows a VPN scenario where the DHCP relay agent and DHCP server can recognize theVPN within which each client resides. DHCP client 1 is part of VPN green, and DHCP client 2 is part ofVPN red, and both have the same private IP address 192.168.1.0/24. Because the clients have the same IPaddress, the DHCP relay agent and DHCP server use the VPN identifier, subnet selection, and serveridentifier override suboptions of the relay agent information option to distinguish the correct VPN of theclient.
Figure 7 VPN DHCP Configuration
VPN red/192.168.1.0/24
12
19
83
DHCP client 1 in "green"
DHCP client 2 in "red"
VPN blue/192.168.1.0/24
DHCP relay agent on router
172.27.180.232192.168.1.1
172.27.181.73
DHCP server
Configuring the Cisco IOS DHCP Relay AgentHow to Configure the DHCP Relay Agent
IP Addressing: DHCP Configuration Guide, Cisco IOS Release 12.4T 111
Before configuring DHCP relay support for Multiprotocol Label Switching (MPLS) VPNs, you mustconfigure standard MPLS VPNs.
Note• If the ip dhcp relay information option vpn global configuration command is configured and the ip
dhcp relay information option vpn-id interface configuration command is not configured, the globalconfiguration is applied to all interfaces.
• If the ip dhcp relay information option vpn global configuration command is configured and the ipdhcp relay information option vpn-id interface configuration command is also configured, theinterface configuration command takes precedence over the global configuration command. However,the global configuration is applied to interfaces without the interface configuration.
• If the ip dhcp relay information option vpn global configuration command is not configured and theip dhcp relay information option vpn-id interface configuration command is configured, only theinterface on which the configuration option is applied is affected. All other interfaces are not impactedby the configuration.
SUMMARY STEPS
1. enable
2. configure terminal
3. ip dhcp relay information option vpn
4. interface type number
5. ip helper-address vrf name [global] address
6. ip dhcp relay information option vpn-id [none]
7. end
DETAILED STEPS
Command or Action Purpose
Step 1 enable
Example:
Device> enable
Enables privileged EXEC mode.
• Enter your password if prompted.
Step 2 configure terminal
Example:
Device# configure terminal
Enters global configuration mode.
Configuring the Cisco IOS DHCP Relay Agent How to Configure the DHCP Relay Agent
IP Addressing: DHCP Configuration Guide, Cisco IOS Release 12.4T112
Command or Action Purpose
Step 3 ip dhcp relay information option vpn
Example:
Device(config)# ip dhcp relay information option vpn
Enables the system to insert VPN suboptions into the DHCP relay agentinformation option in forwarded BOOTREQUEST messages to a DHCP serverand sets the gateway address to the outgoing interface toward the DHCP server.
• The VPN suboptions are also added to the BOOTP broadcast packetswhen the command is configured.
Step 4 interface type number
Example:
Device(config)# interface FastEthernet0/0
Configures an interface and enters interface configuration mode.
Step 5 ip helper-address vrf name [global]address
Example:
Device(config-if)# ip helper-address vrf vrf1 172.27.180.232
Forwards UDP broadcasts, including BOOTP, received on an interface.
• If the DHCP server resides in a different VRF or global space that isdifferent from the VPN, the vrf name or global options allow you tospecify the name of the VRF or the global space in which the DHCPserver resides.
Step 6 ip dhcp relay information option vpn-id [none]
Example:
Device(config-if)# ip dhcp relay information option vpn-id
(Optional) Enables the system to insert VPN suboptions into the DHCP relayagent information option in forwarded BOOTREQUEST messages to a DHCPserver and sets the gateway address to the outgoing interface toward the DHCPserver.
• The VPN suboptions are also added to the BOOTP broadcast packetswhen the command is configured.
• The ip dhcp relay information option vpn-id none command allows youto disable the VPN functionality on the interface. The only time you needto use this command is when the ip dhcp relay information option vpnglobal configuration command is configured and you want to override theglobal configuration.
• The no ip dhcp relay information option vpn-id command removes theconfiguration from the running configuration. In this case, the interfaceinherits the global configuration, which may or may not be configured toinsert VPN suboptions.
Step 7 end
Example:
Device(config-if)# end
Returns to privileged EXEC mode.
Configuring the Cisco IOS DHCP Relay AgentHow to Configure the DHCP Relay Agent
IP Addressing: DHCP Configuration Guide, Cisco IOS Release 12.4T 113
Configuring Support for Relay Agent Information Option EncapsulationWhen two relay agents are relaying messages between the DHCP client and the DHCP server, the relayagent closer to the server, by default, replaces the first option 82 information with its own option 82. Theremote ID and circuit ID information from the first relay agent is lost. In some deployment scenarios, it isnecessary to maintain the initial option 82 from the first relay agent, in addition to the option 82 from thesecond relay agent, for example, in a situation where an Intelligent Services Gateway (ISG) acting as asecond relay agent is connected to a Layer 2 device. The Layer 2 device connects to the household andidentifies the household with its own option 82.
The DHCP Relay Option 82 Encapsulation feature allows the second relay agent to encapsulate option 82information in a received message from the first relay agent if the second relay agent is configured to addits own option 82 information. This configuration allows the DHCP server to use option 82 informationfrom both relay agents. The DHCP server can use the VPN information from the second relay agent, alongwith the option 82 information from the first relay agent, to send correct address assignments and otherconfiguration parameters for the client devices based on the VRF, option 60, and encapsulated option 82.The reply message from the DHCP server to the DHCP client traverses the same path as the requestmessages through the two relay agents to the DHCP client.
The figure below shows the processing that occurs on the two relay agents and the DHCP server when thisfeature is configured:
1 The DHCP client generates a DHCP message (including option 60) and broadcasts it on the network.2 The first DHCP relay agent intercepts the broadcast DHCP request packet and inserts its own option 82
in the packet.3 The relay agent automatically adds the circuit ID suboption and the remote ID suboption to option 82
and forwards them to the second relay agent.4 The second relay agent encapsulates the first relay agent’s option 82 and inserts its own option 82.5 The gateway IP address (giaddr) is set to the incoming interface on the second relay agent and the
original giaddr from the first relay agent is encapsulated.6 The second DHCP relay agent unicasts the DHCP packet to the DHCP server.7 The DHCP server receives the packet and uses the VPN suboption information from the second relay
agent, along with the option 82 information from the first relay agent, to assign IP addresses and otherconfiguration parameters and forwards the packet back to the second relay agent.
8 When the second relay agent receives the reply message from the server, it restores the encapsulatedoption 82 and prior giaddr from the first relay agent. The reply message is then sent to the prior giaddr.
Configuring Support for Relay Agent Information Option Encapsulation How to Configure the DHCP Relay Agent
IP Addressing: DHCP Configuration Guide, Cisco IOS Release 12.4T114
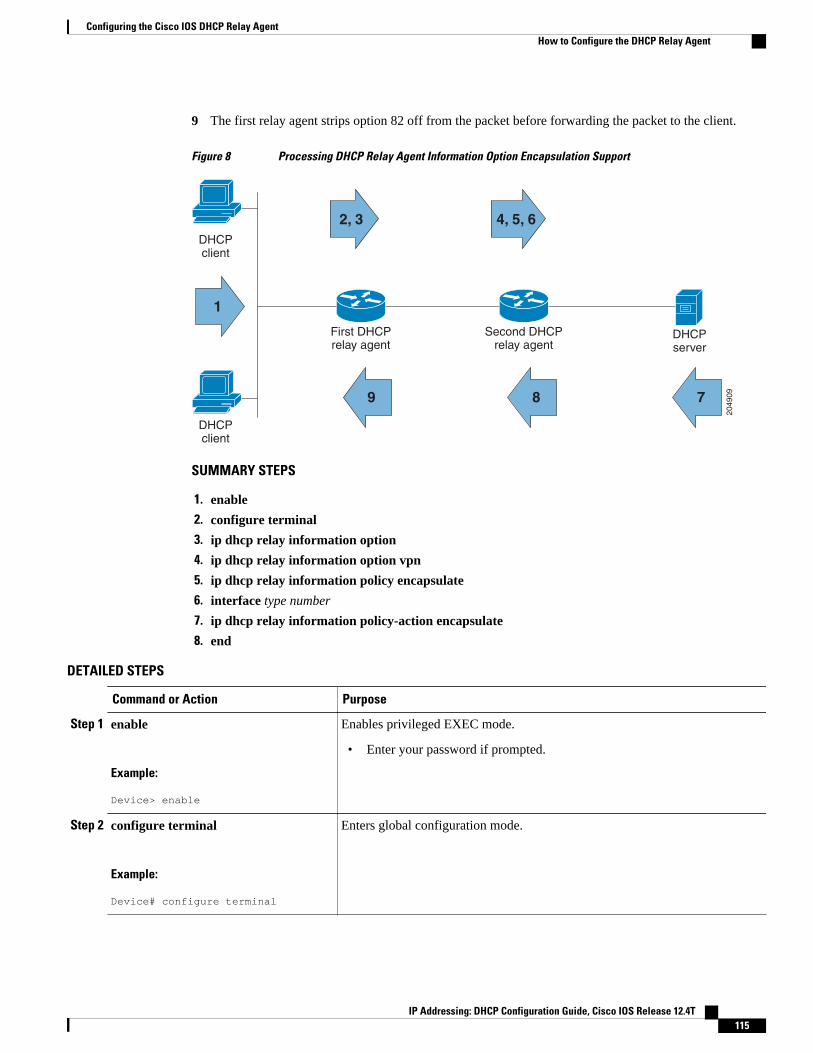
9 The first relay agent strips option 82 off from the packet before forwarding the packet to the client.
Figure 8 Processing DHCP Relay Agent Information Option Encapsulation Support
2, 3
1
9
4, 5, 6
8 7
DHCPclient
First DHCPrelay agent
Second DHCPrelay agent
DHCPserver
DHCPclient
20
49
09
SUMMARY STEPS
1. enable
2. configure terminal
3. ip dhcp relay information option
4. ip dhcp relay information option vpn
5. ip dhcp relay information policy encapsulate
6. interface type number
7. ip dhcp relay information policy-action encapsulate
8. end
DETAILED STEPS
Command or Action Purpose
Step 1 enable
Example:
Device> enable
Enables privileged EXEC mode.
• Enter your password if prompted.
Step 2 configure terminal
Example:
Device# configure terminal
Enters global configuration mode.
Configuring the Cisco IOS DHCP Relay AgentHow to Configure the DHCP Relay Agent
IP Addressing: DHCP Configuration Guide, Cisco IOS Release 12.4T 115
Command or Action Purpose
Step 3 ip dhcp relay information option
Example:
Device(config)# ip dhcp relay information option
Enables the system to insert the DHCP relay agent information option(option-82 field) in forwarded BOOTREQUEST messages to a DHCP server.
• This function is disabled by default.
Step 4 ip dhcp relay information option vpn
Example:
Device(config)# ip dhcp relay information option vpn
(Optional) Enables the system to insert VPN suboptions into the DHCP relayagent information option in forwarded BOOTREQUEST messages to a DHCPserver and sets the gateway address to the outgoing interface toward the DHCPserver.
• The VPN suboptions are also added to the BOOTP broadcast packetswhen the command is configured.
Step 5 ip dhcp relay information policyencapsulate
Example:
Device(config)# ip dhcp relay information policy encapsulate
Enables the system to encapsulate the DHCP relay agent information option(option-82 field) received from a prior relay agent in forwardedBOOTREQUEST messages to a DHCP server.
• Option 82 information from both relay agents will be forwarded to theDHCP server.
Step 6 interface type number
Example:
Device(config)# interface FastEthernet0/0
(Optional) Configures an interface and enters interface configuration mode.
• If you configure the global configuration command, there is no need toconfigure the interface configuration command unless you want to apply adifferent configuration on a specific interface.
Step 7 ip dhcp relay information policy-actionencapsulate
Example:
Device(config-if)# ip dhcp relay information policy-action encapsulate
(Optional) Enables the system to encapsulate the DHCP relay agentinformation option (option-82 field) received on an interface from a prior relayagent in forwarded BOOTREQUEST messages to a DHCP server on aninterface.
• This function is disabled by default. This command has precedence overthe global configuration command. However, if the relay agentinformation option encapsulation support is configured in globalconfiguration mode, but not in interface configuration mode, the interfaceinherits the global configuration.
Step 8 end
Example:
Device(config-if)# end
Returns to privileged EXEC mode.
Configuring the Cisco IOS DHCP Relay Agent How to Configure the DHCP Relay Agent
IP Addressing: DHCP Configuration Guide, Cisco IOS Release 12.4T116
Setting the Gateway Address of the DHCP Broadcast to a SecondaryAddress Using Smart Relay Agent Forwarding
You only need to configure helper addresses on the interface where the UDP broadcasts that you want toforward to the DHCP server are being received. You only need to configure the ip dhcp smart-relaycommand if you have secondary addresses on that interface and you want the router to step through each IPnetwork when forwarding DHCP requests. If smart relay agent forwarding is not configured, all requestsare forwarded using the primary IP address on the interface.
If the ip dhcp smart-relay command is configured, the relay agent counts the number of times that theclient retries sending a request to the DHCP server when there is no DHCPOFFER message from theDHCP server. After three retries, the relay agent sets the gateway address to the secondary address. If theDHCP server still does not respond after three more retries, then the next secondary address is used as thegateway address.
This functionality is useful when the DHCP server cannot be configured to use secondary pools.
SUMMARY STEPS
1. enable
2. configure terminal
3. ip dhcp smart-relay
4. exit
DETAILED STEPS
Command or Action Purpose
Step 1 enable
Example:
Device> enable
Enables privileged EXEC mode.
• Enter your password if prompted.
Step 2 configure terminal
Example:
Device# configure terminal
Enters global configuration mode.
Step 3 ip dhcp smart-relay
Example:
Device(config)# ip dhcp smart-relay
Allows the DHCP relay agent to switch the gateway address (giaddr field of aDHCP packet) to a secondary address when there is no DHCPOFFER messagefrom a DHCP server.
Setting the Gateway Address of the DHCP Broadcast to a Secondary Address Using Smart Relay Agent ForwardingHow to Configure the DHCP Relay Agent
IP Addressing: DHCP Configuration Guide, Cisco IOS Release 12.4T 117
Command or Action Purpose
Step 4 exit
Example:
Device(config)# exit
Returns to privileged EXEC mode.
Configuring Support for Private and Standard Suboption NumbersSome features that are not standardized will use the private Cisco relay agent suboption numbers. After thefeatures are standardized, the relay agent suboptions are assigned the Internet Assigned Numbers Authority(IANA) numbers. Cisco software supports both private and IANA numbers for these suboptions.
Perform this task to configure the DHCP client to use private or IANA standard relay agent suboptionnumbers.
SUMMARY STEPS
1. enable
2. configure terminal
3. ip dhcp compatibility suboption link-selection {cisco | standard}
4. exit
DETAILED STEPS
Command or Action Purpose
Step 1 enable
Example:
Device> enable
Enables privileged EXEC mode.
• Enter your password if prompted.
Step 2 configure terminal
Example:
Device# configure terminal
Enters global configuration mode.
Step 3 ip dhcp compatibility suboption link-selection {cisco |standard}
Example:
Device(config)# ip dhcp compatibility suboption link-selection standard
Configures the DHCP client to use private or IANAstandard relay agent suboption numbers.
Configuring Support for Private and Standard Suboption Numbers How to Configure the DHCP Relay Agent
IP Addressing: DHCP Configuration Guide, Cisco IOS Release 12.4T118
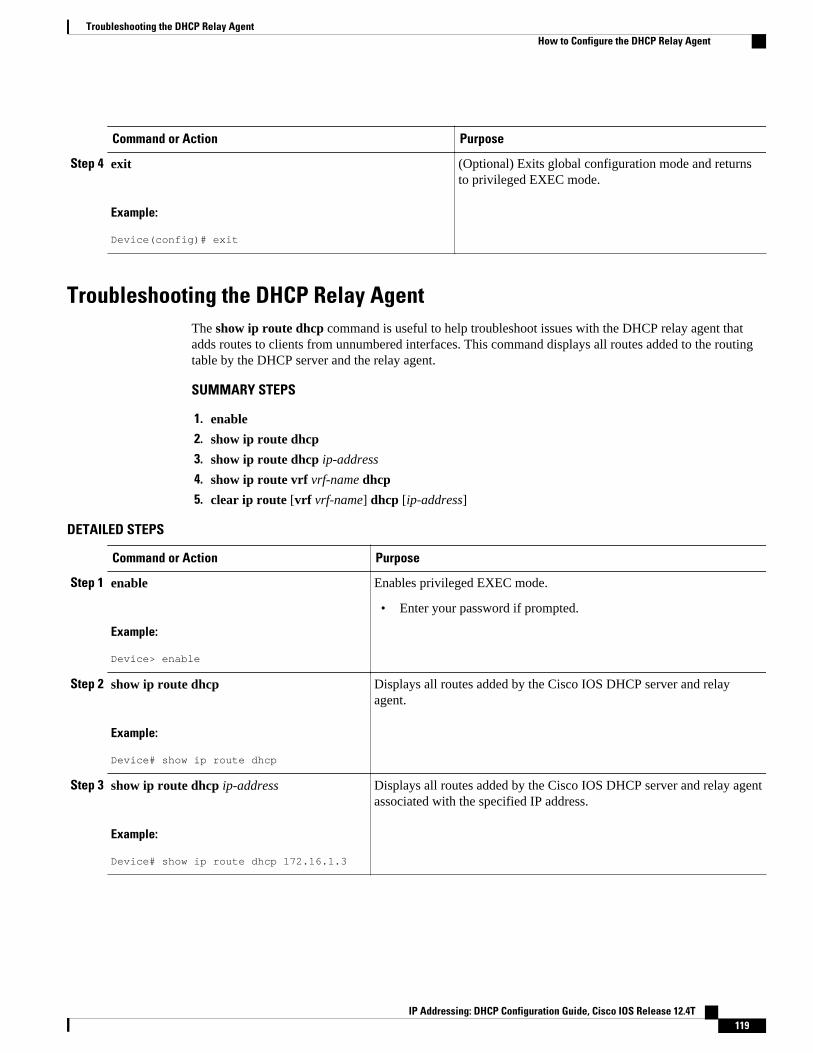
Command or Action Purpose
Step 4 exit
Example:
Device(config)# exit
(Optional) Exits global configuration mode and returnsto privileged EXEC mode.
Troubleshooting the DHCP Relay AgentThe show ip route dhcp command is useful to help troubleshoot issues with the DHCP relay agent thatadds routes to clients from unnumbered interfaces. This command displays all routes added to the routingtable by the DHCP server and the relay agent.
SUMMARY STEPS
1. enable
2. show ip route dhcp
3. show ip route dhcp ip-address
4. show ip route vrf vrf-name dhcp
5. clear ip route [vrf vrf-name] dhcp [ip-address]
DETAILED STEPS
Command or Action Purpose
Step 1 enable
Example:
Device> enable
Enables privileged EXEC mode.
• Enter your password if prompted.
Step 2 show ip route dhcp
Example:
Device# show ip route dhcp
Displays all routes added by the Cisco IOS DHCP server and relayagent.
Step 3 show ip route dhcp ip-address
Example:
Device# show ip route dhcp 172.16.1.3
Displays all routes added by the Cisco IOS DHCP server and relay agentassociated with the specified IP address.
Troubleshooting the DHCP Relay AgentHow to Configure the DHCP Relay Agent
IP Addressing: DHCP Configuration Guide, Cisco IOS Release 12.4T 119
Command or Action Purpose
Step 4 show ip route vrf vrf-name dhcp
Example:
Device# show ip route vrf vrf1 dhcp
Displays all routes added by the Cisco IOS DHCP server and relay agentassociated with the named VRF.
Step 5 clear ip route [vrf vrf-name] dhcp [ip-address]
Example:
Device# clear ip route dhcp
Removes routes from the routing table added by the DHCP server andrelay agent for DHCP clients on unnumbered interfaces.
Configuration Examples for the Cisco IOS DHCP Relay Agent• Example: Configuring Support for the Relay Agent Information Option, page 120• Example: Configuring Per-Interface Support for the Relay Agent Information Option, page 120• Example: Configuring the Subscriber Identifier Suboption of the Relay Agent Information Option, page 121• Example: Configuring DHCP Relay Class Support for Client Identification, page 121• Example: Configuring DHCP Relay Agent Support for MPLS VPNs, page 122• Example: Configuring Support for Relay Agent Information Option Encapsulation, page 122• Example: Setting the Gateway Address of the DHCP Broadcast to a Secondary Address Using SmartRelay Agent Forwarding, page 122
Example: Configuring Support for the Relay Agent Information OptionThe following example shows how to enable the DHCP server, the relay agent, and the insertion andremoval of the DHCP relay information option (option 82). Note that the Cisco IOS DHCP server isenabled by default. In this example, the DHCP server is disabled:
! Reenables the DHCP server.service dhcpip dhcp relay information option!interface ethernet0/0 ip address 192.168.100.1 255.255.255.0 ip helper-address 10.55.11.3
Example: Configuring Per-Interface Support for the Relay Agent InformationOption
The following example shows that for subscribers who are being serviced by the same aggregation router,the relay agent information option for ATM subscribers must be processed differently from that forEthernet digital subscribers. For ATM subscribers, the relay agent information option is configured to beremoved from the packet by the relay agent before forwarding the packet to the client. For Ethernet
Example: Configuring Support for the Relay Agent Information Option Configuration Examples for the Cisco IOS DHCP Relay Agent
IP Addressing: DHCP Configuration Guide, Cisco IOS Release 12.4T120
subscribers, the connected device provides the relay agent information option, and the option is configuredto remain in the packet and be forwarded to the client.
ip dhcp relay information trust-allinterface Loopback0 ip address 10.16.0.1 255.255.255.0!interface ATM3/0 no ip address!interface ATM3/0.1 ip helper-address 10.16.1.2 ip unnumbered loopback0 ip dhcp relay information option-insert!interface Loopback1 ip address 10.18.0.1 255.255.255.0!interface Ethernet4 no ip address!interface Ethernet4/0.1 encapsulation dot1q 123 ip unnumbered loopback1 ip helper-address 10.18.1.2 ip dhcp relay information policy-action keep
Example: Configuring the Subscriber Identifier Suboption of the Relay AgentInformation Option
The following example shows how to add a unique identifier to the subscriber-identifier suboption of therelay agent information option:
ip dhcp relay information option!interface Loopback0 ip address 10.1.1.129 255.255.255.192 !interface ATM4/0 no ip address !interface ATM4/0.1 point-to-point ip helper-address 10.16.1.2 ip unnumbered Loopback0 ip dhcp relay information option subscriber-id newperson123 atm route-bridged ip pvc 88/800 encapsulation aal5snap
Example: Configuring DHCP Relay Class Support for Client IdentificationIn the following example, DHCP messages are received from DHCP clients on subnet 10.2.2.0. The relayagent will match and identify the relay class from the relay pool and forward the DHCP message to theappropriate DHCP server identified by the relay target command.
!ip dhcp class H323 option 60 hex 010203!ip dhcp class SIP option 60 hex 040506! ! The following is the relay pool:ip dhcp pool pool1
Example: Configuring the Subscriber Identifier Suboption of the Relay Agent Information OptionConfiguration Examples for the Cisco IOS DHCP Relay Agent
IP Addressing: DHCP Configuration Guide, Cisco IOS Release 12.4T 121
relay source 10.2.2.0 255.255.255.0 class H323 relay target 192.168.2.1 relay target 192.168.3.1! class SIP relay target 192.168.4.1
Example: Configuring DHCP Relay Agent Support for MPLS VPNsIn the following example, the DHCP relay agent receives a DHCP request on Ethernet interface 0/1 andsends the request to the DHCP server located at IP helper address 10.44.23.7, which is associated with theVRF named vrf1:
ip dhcp relay information option vpn!interface ethernet 0/1 ip helper-address vrf vrf1 10.44.23.7!
Example: Configuring Support for Relay Agent Information OptionEncapsulation
In the following example, DHCP relay agent 1 is configured globally to insert the relay agent informationoption into the DHCP packet. DHCP relay agent 2 is configured to add its own relay agent informationoption, including the VPN information, and to encapsulate the relay agent information option received fromDHCP relay agent 1. The DHCP server receives the relay agent information options from both the relayagents, uses this information to assign IP addresses and other configuration parameters, and forwards themback to the client.
DHCP Relay Agent 1
ip dhcp relay information option
DHCP Relay Agent 2
ip dhcp relay information optionip dhcp relay information option vpnip dhcp relay information option encapsulation
Example: Setting the Gateway Address of the DHCP Broadcast to aSecondary Address Using Smart Relay Agent Forwarding
In the following example, the router will forward the DHCP broadcast received on Ethernet interface 0/0 tothe DHCP server (10.55.11.3), by inserting 192.168.100.1 in the giaddr field of the DHCP packet. If theDHCP server has a scope or pool configured for the 192.168.100.0/24 network, the server will respond;otherwise, it will not respond.
Because the ip dhcp smart-relay global configuration command is configured, if the router sends threerequests using 192.168.100.1 in the giaddr field and does not get a response, the router will move on andstart using 172.16.31.254 in the giaddr field instead. Without the smart relay functionality, the router usesonly 192.168.100.1 in the giaddr field.
ip dhcp smart-relay
Example: Configuring DHCP Relay Agent Support for MPLS VPNs Configuration Examples for the Cisco IOS DHCP Relay Agent
IP Addressing: DHCP Configuration Guide, Cisco IOS Release 12.4T122
!interface ethernet0/0 ip address 192.168.100.1 255.255.255.0 ip address 172.16.31.254 255.255.255.0 ip helper-address 10.55.11.3!
Additional ReferencesRelated Documents
Related Topic Document Title
Cisco IOS commands Cisco IOS Master Commands List, All Releases
DHCP commands: complete command syntax,command modes, command history, defaults, usageguidelines, and examples
Cisco IOS IP Addressing Services CommandReference
DHCP conceptual information “DHCP Overview” module in the IP Addressing:DHCP Configuration Guide
DHCP server configuration “Configuring the Cisco IOS DHCP Server” modulein the IP Addressing: DHCP Configuration Guide
DHCP client configuration “Configuring the Cisco IOS DHCP Client” modulein the IP Addressing: DHCP Configuration Guide
DHCP server on-demand address pool managerconfiguration
“Configuring the DHCP Server On-DemandAddress Pool Manager” module in the IPAddressing: DHCP Configuration Guide
DHCP advanced features “Configuring DHCP Services for Accounting andSecurity” module in the IP Addressing: DHCPConfiguration Guide
DHCP enhancements for edge-session managementconfiguration
“Configuring DHCP Enhancements for Edge-Session Management” module in the IPAddressing: DHCP Configuration Guide
DHCP options “DHCP Options” appendix in the NetworkRegistrar User’s Guide, Release 6.1.1
DHCP for IPv6 “Implementing DHCP for IPv6” module in the IPAddressing: DHCP Configuration Guide
Standards and RFCs
Standard/RFC Title
RFC 951 Bootstrap Protocol (BOOTP)
Configuring the Cisco IOS DHCP Relay AgentAdditional References
IP Addressing: DHCP Configuration Guide, Cisco IOS Release 12.4T 123
Standard/RFC Title
RFC 1542 Clarifications and Extensions for the BootstrapProtocol
RFC 2131 Dynamic Host Configuration Protocol
RFC 2685 Virtual Private Networks Identifier
RFC 3046 DHCP Relay Information Option
RFC 5460 DHCPv6 Bulk Leasequery
Technical Assistance
Description Link
The Cisco Support and Documentation websiteprovides online resources to downloaddocumentation, software, and tools. Use theseresources to install and configure the software andto troubleshoot and resolve technical issues withCisco products and technologies. Access to mosttools on the Cisco Support and Documentationwebsite requires a Cisco.com user ID andpassword.
http://www.cisco.com/cisco/web/support/index.html
Feature Information for the Cisco IOS DHCP Relay AgentThe following table provides release information about the feature or features described in this module.This table lists only the software release that introduced support for a given feature in a given softwarerelease train. Unless noted otherwise, subsequent releases of that software release train also support thatfeature.
Use Cisco Feature Navigator to find information about platform support and Cisco software image support.To access Cisco Feature Navigator, go to www.cisco.com/go/cfn. An account on Cisco.com is not required.
Configuring the Cisco IOS DHCP Relay Agent Feature Information for the Cisco IOS DHCP Relay Agent
IP Addressing: DHCP Configuration Guide, Cisco IOS Release 12.4T124
Table 8 Feature Information for the Cisco IOS DHCP Relay Agent
Feature Name Releases Feature Information
DHCP Class Support for ClientIdentification
12.4(11)T The DHCP Class Support forClient Identification featureenhances the DHCP classmechanism to support options 60,77, 124, and 125. These optionsidentify the type of client that issending the DHCP message. TheDHCP relay agent can makeforwarding decisions based on thecontent of the options in theDHCP message sent by the client.
The following command wasintroduced by this feature: optionhex.
DHCP Relay MPLS VPNSupport
12.2(8)
12.2(28)SB
12.2(33)SRC
DHCP relay support for MPLSVPNs enables a networkadministrator to conserve addressspace by allowing overlappingaddresses. The relay agent cansupport multiple clients ondifferent VPNs, and many ofthese clients from different VPNscan share the same IP address.
The following commands weremodified by this feature: ip dhcprelay information option, and iphelper address.
Configuring the Cisco IOS DHCP Relay AgentFeature Information for the Cisco IOS DHCP Relay Agent
IP Addressing: DHCP Configuration Guide, Cisco IOS Release 12.4T 125
Feature Name Releases Feature Information
DHCP Relay Option 82Encapsulation
12.2(33)SRD This feature allows a secondDHCP relay agent to encapsulatethe relay agent information option(option 82) from a prior relayagent, to add its own option 82,and to forward the packet to theDHCP server. The DHCP servercan use the VPN informationfrom the second relay agent,along with the option 82information from the first relayagent, to send correct addressassignments and otherconfiguration parameters for theclient devices based on the VRF,option 60, and encapsulatedoption 82.
The following commands weremodified by this feature: ip dhcprelay information policy, and ipdhcp relay information policy-action.
DHCP Relay Option 82 perInterface Support
12.2(31)SB2
12.2(33)SRC
12.4(6)T
This feature enables support forthe DHCP relay agentinformation option (option 82) ona per-interface basis. Theinterface configuration allowsdifferent DHCP servers, withdifferent DHCP option 82requirements to be reached fromone Cisco router.
The following commands wereintroduced by this feature: ipdhcp relay information check-reply, ip dhcp relay informationoption-insert, and ip dhcp relayinformation policy-action.
DHCP Subscriber IdentifierSuboption of Option 82
12.2(28)SB
12.2(33)SRB
12.3(14)T
This feature enables an ISP to adda unique identifier to thesubscriber-identifier suboption ofthe relay agent informationoption.
The following command wasintroduced by this feature: ipdhcp relay information optionsubscriber-id.
Configuring the Cisco IOS DHCP Relay Agent Feature Information for the Cisco IOS DHCP Relay Agent
IP Addressing: DHCP Configuration Guide, Cisco IOS Release 12.4T126
Feature Name Releases Feature Information
DHCPv4 Relay per InterfaceVPN ID Support
12.4(11)T The DHCPv4 Relay per InterfaceVPN ID Support feature allowsthe Cisco IOS DHCP relay agentto be configured per interface tooverride the global configurationof the ip dhcp relay informationoption vpn command. Thisfeature allows subscribers withdifferent relay information optionVPN ID requirements ondifferent interfaces to be reachedfrom one Cisco router.
The following command wasintroduced by this feature: ipdhcp relay information optionvpn-id.
DHCPv6 Bulk Lease Query 15.1(1)S The Cisco IOS DHCPv6 relayagent supports bulk lease query inaccordance with RFC 5460.
The following commands wereintroduced or modified by thisfeature: debug ipv6 dhcp relayand ipv6 dhcp-relay bulk-lease.
Glossaryclient—A host that is trying to configure its interface (obtain an IP address) using DHCP or BOOTPprotocols.
DHCP—Dynamic Host Configuration Protocol. A network protocol that automatically provides an IP hostwith an IP address and other related configuration information (for example, subnet mask and defaultgateway).
giaddr—gateway IP address. The giaddr field of the DHCP message provides the DHCP server withinformation about the IP address subnet on which the client is to reside. It also provides the DHCP serverwith an IP address where the response messages are to be sent.
MPLS—Multiprotocol Label Switching. Industry standard upon which tag switching is based.
relay agent—A router that forwards DHCP and BOOTP messages between a server and a client ondifferent subnets.
server—A DHCP or BOOTP server.
VPN—Virtual Private Network. Enables IP traffic to use tunneling to travel securely over a public TCP/IPnetwork.
VRF—VPN routing and forwarding instance. A VRF consists of an IP routing table, a derived forwardingtable, a set of interfaces that use the forwarding table, and a set of rules and routing protocols thatdetermine what goes into the forwarding table. In general, a VRF includes the routing information that
Configuring the Cisco IOS DHCP Relay AgentGlossary
IP Addressing: DHCP Configuration Guide, Cisco IOS Release 12.4T 127

defines a customer VPN site that is attached to a Provider Edge (PE) router. Each VPN that is instantiatedon the PE router has its own VRF.
Cisco and the Cisco logo are trademarks or registered trademarks of Cisco and/or its affiliates in the U.S.and other countries. To view a list of Cisco trademarks, go to this URL: www.cisco.com/go/trademarks.Third-party trademarks mentioned are the property of their respective owners. The use of the word partnerdoes not imply a partnership relationship between Cisco and any other company. (1110R)
Any Internet Protocol (IP) addresses and phone numbers used in this document are not intended to beactual addresses and phone numbers. Any examples, command display output, network topology diagrams,and other figures included in the document are shown for illustrative purposes only. Any use of actual IPaddresses or phone numbers in illustrative content is unintentional and coincidental.
Configuring the Cisco IOS DHCP Relay Agent
IP Addressing: DHCP Configuration Guide, Cisco IOS Release 12.4T128
Configuring the Cisco IOS DHCP Client
Cisco IOS Dynamic Host Configuration Protocol (DHCP) client software provides the flexibility toinclude various configuration options for the DHCP client. A DHCP client is defined as an Internet hostusing DHCP to obtain configuration parameters such as an IP address. This module describes the conceptsand tasks needed to configure the Cisco IOS DHCP client. It includes information on the Cisco DHCPFORCERENEW feature, which provides entity authentication and message authentication.
• Finding Feature Information, page 129• Restrictions for Configuring the DHCP Client, page 129• Information About the DHCP Client, page 130• How to Configure the DHCP Client, page 132• Configuration Examples for the DHCP Client, page 138• Additional References, page 141• Feature Information for the DHCP Client, page 143
Finding Feature InformationYour software release may not support all the features documented in this module. For the latest featureinformation and caveats, see the release notes for your platform and software release. To find informationabout the features documented in this module, and to see a list of the releases in which each feature issupported, see the Feature Information Table at the end of this document.
Use Cisco Feature Navigator to find information about platform support and Cisco software image support.To access Cisco Feature Navigator, go to www.cisco.com/go/cfn. An account on Cisco.com is not required.
Restrictions for Configuring the DHCP ClientThe DHCP client can be configured on Ethernet interfaces and on PPP over ATM (PPPoA) and certainATM interfaces. The DHCP client works with ATM point-to-point interfaces and will accept anyencapsulation type. For ATM multipoint interfaces, the DHCP client is supported using only the aal5snapencapsulation type combined with Inverse Address Resolution Protocol (ARP). Inverse ARP, which buildsan ATM map entry, is necessary to send unicast packets to the server (or relay agent) on the other end ofthe connection. Inverse ARP is supported only for the aal5snap encapsulation type.
For multipoint interfaces, an IP address can be acquired using other encapsulation types because broadcastpackets are used. However, unicast packets to the other end will fail because there is no ATM map entryand thus DHCP renewals and releases also fail.
IP Addressing: DHCP Configuration Guide, Cisco IOS Release 12.4T 129
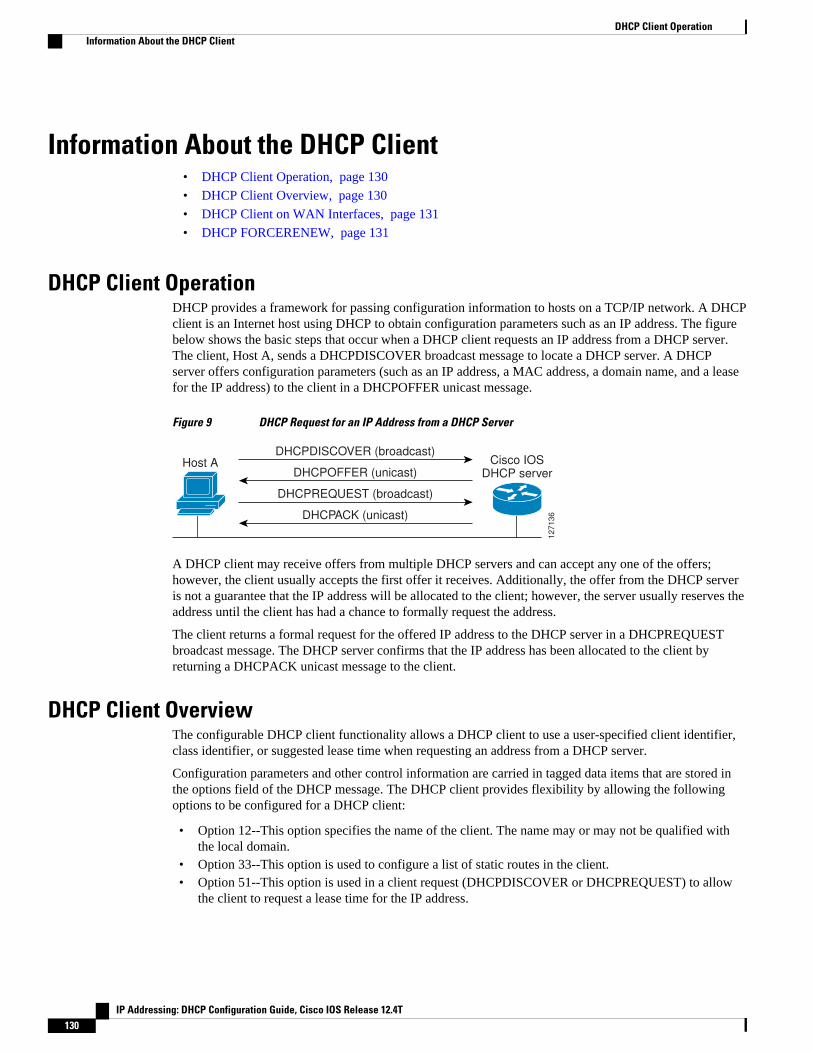
Information About the DHCP Client• DHCP Client Operation, page 130
• DHCP Client Overview, page 130
• DHCP Client on WAN Interfaces, page 131
• DHCP FORCERENEW, page 131
DHCP Client OperationDHCP provides a framework for passing configuration information to hosts on a TCP/IP network. A DHCPclient is an Internet host using DHCP to obtain configuration parameters such as an IP address. The figurebelow shows the basic steps that occur when a DHCP client requests an IP address from a DHCP server.The client, Host A, sends a DHCPDISCOVER broadcast message to locate a DHCP server. A DHCPserver offers configuration parameters (such as an IP address, a MAC address, a domain name, and a leasefor the IP address) to the client in a DHCPOFFER unicast message.
Figure 9 DHCP Request for an IP Address from a DHCP Server
Host A
DHCPACK (unicast)
DHCPREQUEST (broadcast)
DHCPOFFER (unicast)
DHCPDISCOVER (broadcast)Cisco IOS
DHCP server
12
71
36
A DHCP client may receive offers from multiple DHCP servers and can accept any one of the offers;however, the client usually accepts the first offer it receives. Additionally, the offer from the DHCP serveris not a guarantee that the IP address will be allocated to the client; however, the server usually reserves theaddress until the client has had a chance to formally request the address.
The client returns a formal request for the offered IP address to the DHCP server in a DHCPREQUESTbroadcast message. The DHCP server confirms that the IP address has been allocated to the client byreturning a DHCPACK unicast message to the client.
DHCP Client OverviewThe configurable DHCP client functionality allows a DHCP client to use a user-specified client identifier,class identifier, or suggested lease time when requesting an address from a DHCP server.
Configuration parameters and other control information are carried in tagged data items that are stored inthe options field of the DHCP message. The DHCP client provides flexibility by allowing the followingoptions to be configured for a DHCP client:
• Option 12--This option specifies the name of the client. The name may or may not be qualified withthe local domain.
• Option 33--This option is used to configure a list of static routes in the client.• Option 51--This option is used in a client request (DHCPDISCOVER or DHCPREQUEST) to allow
the client to request a lease time for the IP address.
DHCP Client Operation Information About the DHCP Client
IP Addressing: DHCP Configuration Guide, Cisco IOS Release 12.4T130
• Option 55--This option allows the DHCP client to request certain options from the DHCP server. Theip dhcp client request command allows the system administrator to turn off some of the requestedoptions, thus removing them from the request list.
• Option 60--This option allows the user to configure the vendor class identifier string to use in theDHCP interaction.
• Option 61--This option is used by DHCP clients to specify their unique identifier. DHCP servers usethis value to index their database of address bindings. This value is expected to be unique for allclients in an administrative domain.
• Option 120--This option is used to specify a 32-bit (binary) IPv4 address to be used by the SessionInitiation Protocol (SIP) client to locate a SIP server.
• Option 121--This option is used to configure classless static routes by specifying classless networkdestinations in these routes: that is, each routing table entry includes a subnet mask.
Note If a request includes both static routes and classless static routes, the client uses only the classless staticroutes. If the DHCP server returns both a classless static route option and a router option, the DHCP clientignores the router option.
• Option 125--This option is used by DHCP clients and servers to exchange vendor-specificinformation.
DHCP Client on WAN InterfacesThe DHCP client on WAN interfaces allows a DHCP client to acquire an IP address over PPPoA andcertain ATM interfaces. By using DHCP rather than the IP Control Protocol (IPCP), a DHCP client canacquire other useful information such as Domain Name System (DNS) addresses, the DNS default domainname, and the default route.
The configuration of PPPoA and Classical IP and ARP over ATM already allows for a broadcast capabilityover the interface (using the broadcast keyword on the ATM interface). Most changes in this feature aredirected at removing already existing restrictions on what types of interfaces are allowed to send out DHCPpackets (previously, dialer interfaces have not been allowed). This feature also ensures that DHCPRELEASE messages are sent out the interface before a connection is allowed to be broken.
DHCP FORCERENEWThe Cisco DHCP FORCERENEW feature provides entity authentication and message authentication, inaccordance with RFC 3118, by which DHCP clients and servers authenticate the identity of other DHCPentities and verify that the content of a DHCP message has not been changed during delivery through thenetwork.
The message authentication mechanism allows servers to determine whether a request for DHCPinformation comes from a client that is authorized to use the network. It also allows clients to verify that aDHCP server can be trusted to provide valid configuration.
The Cisco DHCP FORCERENEW feature requires authentication. All client-server exchanges must beauthenticated: The ip dhcp client authentication modeand key chain commands must be configured.
When the client gets a FORCERENEW message, it does the following:
• Authenticates the message according to the authentication mode specified in the ip dhcp clientauthentication mode command. The Cisco DHCP FORCERENEW feature supports both token-basedand Message Digest 5 (MD5)-based authentication.
DHCP Client on WAN InterfacesInformation About the DHCP Client
IP Addressing: DHCP Configuration Guide, Cisco IOS Release 12.4T 131
◦ Token-based authentication is useful only for basic protection against inadvertently instantiatedDHCP servers. Tokens are transmitted in plain text; they provide weak authentication and do notprovide message authentication.
◦ MD5-based authentication provides better message and entity authentication because it contains asingle-use value generated by the source as a message authentication code.
• Changes its state to RENEW.• Tries to renew its lease according to normal DHCP procedures.
The client discards any multicast FORCERENEW message or message that fails authentication.
How to Configure the DHCP Client• Configuring the DHCP Client, page 132
• Forcing a Release or Renewal of a DHCP Lease for a DHCP Client, page 134
• Enabling FORCERENEW-Message Handling, page 136
Configuring the DHCP Client• DHCP Client Default Behavior, page 132
• Troubleshooting Tips, page 134
DHCP Client Default BehaviorCisco routers running Cisco IOS software include DHCP server and relay agent software, which areenabled by default. Your router can act as both the DHCP client and DHCP server. Use the ip addressdhcp command to obtain IP address information for the configured interface.
You must configure the ip dhcp client commands before entering the ip address dhcp command on aninterface to ensure that the DHCPDISCOVER messages that are generated contain the correct optionvalues. The ip dhcp client commands are checked only when an IP address is acquired from DHCP. If anyof the ip dhcp client commands are entered after an IP address has been acquired from DHCP, it will nottake effect until the next time the router acquires an IP address from DHCP. This means that the newconfiguration will take effect only after either the ip address dhcp command or the release dhcp andrenew dhcpEXECcommandshave been configured.
SUMMARY STEPS
1. enable
2. configure terminal
3. interface type number
4. ip dhcp client client-id {interface-name| ascii string| hex string}
5. ip dhcp client class-id {string| hex string}
6. ip dhcp client lease days [hours][minutes]
7. ip dhcp client hostname host-name
8. [no] ip dhcp client request option-name
9. ip address dhcp
Configuring the DHCP Client How to Configure the DHCP Client
IP Addressing: DHCP Configuration Guide, Cisco IOS Release 12.4T132
DETAILED STEPS
Command or Action Purpose
Step 1 enable
Example:
Router> enable
Enables privileged EXEC mode.
• Enter your password if prompted.
Step 2 configure terminal
Example:
Router# configure terminal
Enters global configuration mode.
Step 3 interface type number
Example:
Router(config)# interface Ethernet 1
Configures an interface type and enters interface configurationmode.
Step 4 ip dhcp client client-id {interface-name| ascii string|hex string}
Example:
Router(config-if)# ip dhcp client client-id ascii mytest1
(Optional) Specifies the client identifier.
• When you specify the no form of this command, theconfiguration is removed and the system returns to using thedefault form. It is not possible to configure the system to notinclude a client identifier.
Step 5 ip dhcp client class-id {string| hex string}
Example:
Router(config-if)# ip dhcp client class-id my-class-id
(Optional) Specifies the class identifier.
Step 6 ip dhcp client lease days [hours][minutes]
Example:
Router(config-if)# ip dhcp client lease 2
(Optional) Configures the duration of the lease for an IP addressthat is requested from a DHCP client to a DHCP server.
Step 7 ip dhcp client hostname host-name
Example:
Router(config-if)# ip dhcp client hostname router1
(Optional) Specifies or modifies the hostname sent in the DHCPmessage.
Configuring the Cisco IOS DHCP ClientDHCP Client Default Behavior
IP Addressing: DHCP Configuration Guide, Cisco IOS Release 12.4T 133
Command or Action Purpose
Step 8 [no] ip dhcp client request option-name
Example:
Router(config-if)# no ip dhcp client request tftp-server-address
(Optional) Configures a DHCP client to request an option from aDHCP server.
• The option name can be tftp-server-address, netbios-nameserver, vendor-specific, static-route, domain-name,dns-nameserver, or router. By default, all these options arerequested. The no form of the command instructs the systemto not request certain options.
Step 9 ip address dhcp
Example:
Router(config-if)# ip address dhcp
Acquires an IP address on an interface from DHCP.
Troubleshooting TipsTo verify the configuration, you can use the debug dhcp detail command to display the DHCP packets thatwere sent and received. To display the server side of the DHCP interaction, use the debug ip dhcp serverpackets command.
The following are troubleshooting tips for DHCP clients on WAN interfaces:
• An ATM primary interface is always multipoint.• An ATM subinterface can be multipoint or point-to-point.• If you are using a point-to-point interface, the routing table determines when to send a packet to the
interface and ATM map entries are not needed. Consequently, Inverse ARP, which builds ATM mapentries, is not needed.
• If you are using a multipoint interface, you must use Inverse ARP to discover the IP address of theother side of the connection.
• You can specify Inverse ARP through the protocol ip inarpcommand. You must use the aal5snapencapsulation type when using Inverse ARP because it is the only encapsulation type that supportsInverse ARP.
Forcing a Release or Renewal of a DHCP Lease for a DHCP ClientPerform this task to force a release or renewal of a DHCP lease for a DHCP client.
Forcing a release or renewal of a DHCP lease for a DHCP client provides the ability to perform twoindependent operations from the command-line interface (CLI) in EXEC mode:
• Immediately release a DHCP lease for a DHCP client.• Force a DHCP renewal of a lease for a DHCP client.
This functionality provides the following benefits:
• Eliminates the need to go into the configuration mode to reconfigure the router to release or renew aDHCP lease.
• Simplifies the release and renewal of a DHCP lease.• Reduces the amount of time spent performing DHCP IP release and renewal configuration tasks.
Forcing a Release or Renewal of a DHCP Lease for a DHCP Client Troubleshooting Tips
IP Addressing: DHCP Configuration Guide, Cisco IOS Release 12.4T134
• DHCP Release and Renew CLI Operation, page 135
DHCP Release and Renew CLI Operation
• Release a DHCP Lease, page 135
• Renew a DHCP Lease, page 135
Release a DHCP Lease
The release dhcp command starts the process to immediately release a DHCP lease for the specifiedinterface. After the lease is released, the interface address is deconfigured. The release dhcp commanddoes not deconfigure the ip address dhcp command specified in the configuration file for the interface.During a write memory or show running configuration file action, or if the router is rebooted, the ipaddress dhcp command executes to acquire a DHCP address for the interface.
The original IP address for the interface must be assigned by the DHCP server. If the interface is notassigned an IP address by the DHCP server, the release dhcp command fails and displays the followingerror message:
Interface does not have a DHCP originated address
Renew a DHCP Lease
The renew dhcp command advances the DHCP lease timer to the next stage, at which point one of thefollowing occurs:
• If the lease is currently in a BOUND state, the lease is advanced to the RENEW state and a DHCPRENEW request is sent.
• If the lease is currently in a RENEW state, the timer is advanced to the REBIND state and a DHCPREBIND request is sent.
If there is no response to the RENEW request, the interface remains in the RENEW state. In this case, thelease timer will advance to the REBIND state and subsequently send a REBIND request.
If a NAK response is sent in response to the RENEW request, the interface is deconfigured.
The original IP address for the interface must be assigned by the DHCP server. If the interface is notassigned an IP address by the DHCP server, the renew dhcp command fails and displays the followingerror message:
Interface does not have a DHCP originated address
Note In Cisco IOS Release 15.0(1)M and later releases Cisco IOS DHCP clients do not accept packets with zerolease time or no lease time option.
The DHCP client must be assigned an IP address by the DHCP server.
Configuring the Cisco IOS DHCP ClientDHCP Release and Renew CLI Operation
IP Addressing: DHCP Configuration Guide, Cisco IOS Release 12.4T 135
Note If the DHCP client is not assigned an IP address by the DHCP server, the DHCP release and renew CLIcommands will fail.
>
SUMMARY STEPS
1. enable
2. release dhcp type number
3. renew dhcp type number
DETAILED STEPS
Command or Action Purpose
Step 1 enable
Example:
Router> enable
Enables privileged EXEC mode.
• Enter your password if prompted.
Step 2 release dhcp type number
Example:
Router# release dhcp ethernet 3/1
Performs an immediate release of the DHCP lease for the interface anddeconfigures the IP address for the interface.
Step 3 renew dhcp type number
Example:
Router# renew dhcp ethernet 3/1
Forces the DHCP timer to advance to the next stage, at which point a subsequentaction is taken: A DHCP REQUEST packet is sent to renew or rebind the lease.
Enabling FORCERENEW-Message HandlingPerform this task to specify the type of authentication to be used in DHCP messages on the interface,specify the key chain to be used in authenticating a request, and enable FORCERENEW-message handlingon the DHCP client when authentication is enabled.
You must configure the same authentication mode, and the same secret ID and secret value that wereconfigured in the key chain command, on both the client and the server.
Enabling FORCERENEW-Message Handling Renew a DHCP Lease
IP Addressing: DHCP Configuration Guide, Cisco IOS Release 12.4T136
SUMMARY STEPS
1. interface type number
2. ip dhcp client authentication key-chain name
3. ip dhcp client authentication mode type
4. exit
5. key chain name-of-chain
6. exit
7. ip dhcp-client forcerenew
8. end
DETAILED STEPS
Command or Action Purpose
Step 1 interface type number
Example:
Router(config)# interface Ethernet 1
Configures an interface type and enters interface-configuration mode.
Step 2 ip dhcp client authentication key-chain name
Example:
Router(config-if)# ip dhcp client authentication key-chain dhcp1
Specifies the key chain to be used in authenticating arequest.
Step 3 ip dhcp client authentication mode type
Example:
Router(config-if)# ip dhcp client authentication mode md5
Specifies the type of authentication to be used in DHCPmessages on the interface.
Step 4 exit
Example:
Router(config-if)# exit
Exits interface configuration mode.
Configuring the Cisco IOS DHCP ClientRenew a DHCP Lease
IP Addressing: DHCP Configuration Guide, Cisco IOS Release 12.4T 137
Command or Action Purpose
Step 5 key chain name-of-chain
Example:
Router(config-keychain)# key chain dhcp1
Example:
key 1234
Example:
key-string secret
Enters key-chain configuration mode and identifies theauthentication strings to be used in the named key chain.
Step 6 exit
Example:
Router(config-keychain)# exit
Exits key-chain configuration mode and enters globalconfiguration mode.
Step 7 ip dhcp-client forcerenew
Example:
Router(config)# ip dhcp-client forcerenew
Enables DHCP FORCERENEW-message handling onthe DHCP client.
Step 8 end
Example:
Router(config)# end
(Optional) Exits global configuration mode and returnsto privileged EXEC mode.
Configuration Examples for the DHCP Client• Example Configuring the DHCP Client, page 139• Example Customizing the DHCP Client Configuration, page 139• Example Configuring an ATM Primary Interface (Multipoint) Using aal5snap Encapsulation andInverse ARP, page 139• Example Configuring an ATM Point-to-Point Subinterface Using aa15snap Encapsulation, page 140• Example Configuring an ATM Point-to-Point Subinterface Using aa15nlpid Encapsulation, page 140• Example Configuring an ATM Point-to-Point Subinterface Using aa15mux PPP Encapsulation, page140• Example Releasing a DHCP Lease, page 140
Configuring the Cisco IOS DHCP Client Configuration Examples for the DHCP Client
IP Addressing: DHCP Configuration Guide, Cisco IOS Release 12.4T138
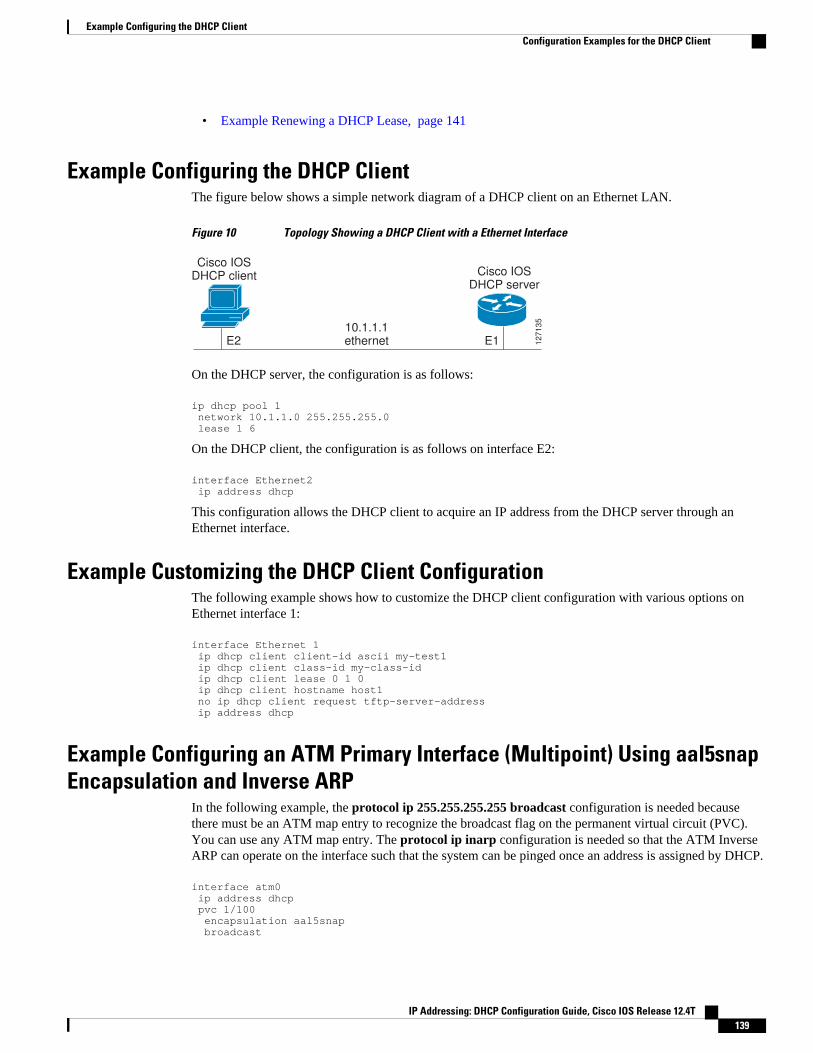
• Example Renewing a DHCP Lease, page 141
Example Configuring the DHCP ClientThe figure below shows a simple network diagram of a DHCP client on an Ethernet LAN.
Figure 10 Topology Showing a DHCP Client with a Ethernet Interface
Cisco IOS
DHCP client Cisco IOS
DHCP server
10.1.1.1
ethernetE2 E1 127135
On the DHCP server, the configuration is as follows:
ip dhcp pool 1 network 10.1.1.0 255.255.255.0 lease 1 6
On the DHCP client, the configuration is as follows on interface E2:
interface Ethernet2 ip address dhcp
This configuration allows the DHCP client to acquire an IP address from the DHCP server through anEthernet interface.
Example Customizing the DHCP Client ConfigurationThe following example shows how to customize the DHCP client configuration with various options onEthernet interface 1:
interface Ethernet 1 ip dhcp client client-id ascii my-test1 ip dhcp client class-id my-class-id ip dhcp client lease 0 1 0 ip dhcp client hostname host1 no ip dhcp client request tftp-server-address ip address dhcp
Example Configuring an ATM Primary Interface (Multipoint) Using aal5snapEncapsulation and Inverse ARP
In the following example, the protocol ip 255.255.255.255 broadcast configuration is needed becausethere must be an ATM map entry to recognize the broadcast flag on the permanent virtual circuit (PVC).You can use any ATM map entry. The protocol ip inarp configuration is needed so that the ATM InverseARP can operate on the interface such that the system can be pinged once an address is assigned by DHCP.
interface atm0 ip address dhcp pvc 1/100 encapsulation aal5snap broadcast
Example Configuring the DHCP ClientConfiguration Examples for the DHCP Client
IP Addressing: DHCP Configuration Guide, Cisco IOS Release 12.4T 139
protocol ip 255.255.255.255 broadcast protocol ip inarp
Example Configuring an ATM Point-to-Point Subinterface Using aa15snapEncapsulation
The following example shows an ATM point-to-point subinterface configuration using aa15snapencapsulation:
interface atm0.1 point-to-point ip address dhcp pvc 1/100 encapsulation aal5snap broadcast
Example Configuring an ATM Point-to-Point Subinterface Using aa15nlpidEncapsulation
The following example shows an ATM point-to-point subinterface configuration using aa15nlpidencapsulation:
interface atm0.1 point-to-point ip address dhcp pvc 1/100 encapsulation aal5nlpid broadcast
Example Configuring an ATM Point-to-Point Subinterface Using aa15muxPPP Encapsulation
The following example shows an ATM point-to-point subinterface configuration using aa15mux PPPencapsulation:
interface atm0.1 point-to-point pvc 1/100 encapsulation aal5mux ppp virtual-template1 broadcast!interface virtual-template1 ip address dhcp
Example Releasing a DHCP LeaseIn the following example, a DHCP release is performed on an interface that was originally assigned an IPaddress by the DHCP server:
Router# release dhcp ethernet 3/1
In the following example, an attempt is made to release the DHCP lease on an interface that was notoriginally assigned an IP address by the DHCP server:
Router# release dhcp ethernet 3/1
Interface does not have a DHCP originated address
Example Configuring an ATM Point-to-Point Subinterface Using aa15snap Encapsulation Configuration Examples for the DHCP Client
IP Addressing: DHCP Configuration Guide, Cisco IOS Release 12.4T140
In the following example, the release dhcp command is executed without specifying the typeandnumberarguments:
Router# release dhcp
Incomplete command.
Example Renewing a DHCP LeaseIn the following example, the DHCP lease is renewed on an interface that was originally assigned an IPaddress by the DHCP server:
Router# renew dhcp ethernet 3/1
In the following example, an attempt is made to renew the DHCP lease on an interface that was notoriginally assigned an IP address by the DHCP server:
Router# renew dhcp ethernet 3/1
Interface does not have a DHCP originated address
In the following example, the renew dhcp command is executed without specifying the typeandnumberarguments:
Router# renew dhcp
Incomplete command.
Additional ReferencesThe following sections provide references related to the DHCP client.
Related Documents
Related Topic Document Title
DHCP commands: complete command syntax,command modes, command history, defaults, usageguidelines, and examples.
Cisco IOS IP Addressing Services CommandReference
DHCP conceptual information “DHCP Overview” module
DHCP server configuration “Configuring the Cisco IOS DHCP Server” module
DHCP server on-demand address pools “Configuring the DHCP Server On-DemandAddress Pool Manager” module
DHCP relay agent configuration “Configuring the Cisco IOS DHCP Relay Agent”module
DHCP advanced features “Configuring DHCP Services for Accounting andSecurity” module
Example Renewing a DHCP LeaseAdditional References
IP Addressing: DHCP Configuration Guide, Cisco IOS Release 12.4T 141
Related Topic Document Title
DHCP enhancements for edge-session management “Configuring DHCP Enhancements for Edge-Session Management” module
Standards
Standards Title
No new or modified standards are supported by thisfeature, and support for existing standards has notbeen modified by this feature.
--
MIBs
MIBs MIBs Link
No new or modified MIBs are supported by thisfeature, and support for existing MIBs has not beenmodified by this feature.
To locate and download MIBs for selectedplatforms, Cisco software releases, and feature sets,use Cisco MIB Locator found at the followingURL:
http://www.cisco.com/go/mibs
RFCs
RFCs Title
RFC 2131 Dynamic Host Configuration Protocol
RFC 2132 DHCP Options and BOOTP Vendor Extensions
RFC 3118 Authentication for DHCP Messages
RFC 3203 DHCP reconfigure extension
RFC 3361 DHCP-for-IPv4 Option for SIP Servers
RFC 3442 Classless Static Route Option for DHCPv4
RFC 3925 Vendor-Identifying Vendor Options for DHCPv4
Configuring the Cisco IOS DHCP Client Additional References
IP Addressing: DHCP Configuration Guide, Cisco IOS Release 12.4T142
Technical Assistance
Description Link
The Cisco Support website provides extensiveonline resources, including documentation and toolsfor troubleshooting and resolving technical issueswith Cisco products and technologies.
To receive security and technical information aboutyour products, you can subscribe to variousservices, such as the Product Alert Tool (accessedfrom Field Notices), the Cisco Technical ServicesNewsletter, and Really Simple Syndication (RSS)Feeds.
Access to most tools on the Cisco Support websiterequires a Cisco.com user ID and password.
http://www.cisco.com/cisco/web/support/index.html
Feature Information for the DHCP ClientThe following table provides release information about the feature or features described in this module.This table lists only the software release that introduced support for a given feature in a given softwarerelease train. Unless noted otherwise, subsequent releases of that software release train also support thatfeature.
Use Cisco Feature Navigator to find information about platform support and Cisco software image support.To access Cisco Feature Navigator, go to www.cisco.com/go/cfn. An account on Cisco.com is not required.
Table 9 Feature Information for the Cisco IOS DHCP Client
Feature Name Releases Feature Information
Configurable DHCP Client 12.2(28)SB 12.3(8)T The Configurable DHCP Clientfeature provides the flexibility toinclude various configurationoptions for the DHCP client. ADHCP client is defined as anInternet host using DHCP toobtain configuration parameterssuch as an IP address.
The following commands wereintroduced: ip dhcp client class-id, ip dhcp client client-id, ipdhcp client hostname, ip dhcpclient lease, ip dhcp clientrequest.
Configuring the Cisco IOS DHCP ClientFeature Information for the DHCP Client
IP Addressing: DHCP Configuration Guide, Cisco IOS Release 12.4T 143
Feature Name Releases Feature Information
DHCP Release and Renew CLI inEXEC Mode
12.2(28)SB 12.2(33)SRC12.3(4)T
This feature provides the abilityto perform two independentoperations from the CLI:
• Immediately release a DHCPlease for a DHCP client
• Force a DHCP renewal of alease for a DHCP client
The following commands wereintroduced: release dhcpandrenew dhcp.
DHCP Client on WAN Interfaces 12.2(8)T 12.2(28)SB The DHCP Client on WANInterfaces feature extends theDHCP to allow a DHCP client toacquire an IP address over PPPover ATM (PPPoA) and certainATM interfaces.
No commands were introduced ormodified by this feature.
Cisco DHCP FORCERENEW 12.4(22)YB 15.0(1)M This feature enhances security byproviding entity authenticationand message authentication.
The following commands wereintroduced or modified: ip dhcpclient authentication key-chain,ip dhcp client authenticationmode, ip dhcp-clientforcerenew, ip dhcp clientrequest.
Cisco and the Cisco logo are trademarks or registered trademarks of Cisco and/or its affiliates in the U.S.and other countries. To view a list of Cisco trademarks, go to this URL: www.cisco.com/go/trademarks.Third-party trademarks mentioned are the property of their respective owners. The use of the word partnerdoes not imply a partnership relationship between Cisco and any other company. (1110R)
Any Internet Protocol (IP) addresses and phone numbers used in this document are not intended to beactual addresses and phone numbers. Any examples, command display output, network topology diagrams,and other figures included in the document are shown for illustrative purposes only. Any use of actual IPaddresses or phone numbers in illustrative content is unintentional and coincidental.
Configuring the Cisco IOS DHCP Client
IP Addressing: DHCP Configuration Guide, Cisco IOS Release 12.4T144
Configuring DHCP Services for Accounting andSecurity
Cisco IOS software supports several capabilities that enhance DHCP security, reliability, and accountingin Public Wireless LANs (PWLANs). This functionality can also be used in other networkimplementations. This module describes the concepts and tasks needed to configure DHCP services foraccounting and security.
• Finding Feature Information, page 145• Prerequisites for Configuring DHCP Services for Accounting and Security, page 145• Information About DHCP Services for Accounting and Security, page 146• How to Configure DHCP Services for Accounting and Security, page 147• Configuration Examples for DHCP Services for Accounting and Security, page 161• Additional References, page 164• Technical Assistance, page 166• Feature Information for DHCP Services for Accounting and Security, page 166
Finding Feature InformationYour software release may not support all the features documented in this module. For the latest featureinformation and caveats, see the release notes for your platform and software release. To find informationabout the features documented in this module, and to see a list of the releases in which each feature issupported, see the Feature Information Table at the end of this document.
Use Cisco Feature Navigator to find information about platform support and Cisco software image support.To access Cisco Feature Navigator, go to www.cisco.com/go/cfn. An account on Cisco.com is not required.
Prerequisites for Configuring DHCP Services for Accountingand Security
Before you configure DHCP services for accounting and security, you should understand the conceptsdocumented in the “DHCP Overview” module.
IP Addressing: DHCP Configuration Guide, Cisco IOS Release 12.4T 145
Information About DHCP Services for Accounting andSecurity
• DHCP Operation in Public Wireless LANs, page 146• Security Vulnerabilities in Public Wireless LANs, page 146• DHCP Services for Security and Accounting Overview, page 146• DHCP Lease Limits, page 147
DHCP Operation in Public Wireless LANsThe configuration of DHCP in a PWLAN simplifies the configuration of wireless clients and reduces theoverhead necessary to maintain the network. DHCP clients are leased IP addresses by the DHCP server andthen authenticated by the Service Selection Gateway (SSG), which allows the clients to access networkservices. The DHCP server and client exchange DHCP messages for IP address assignments. When aDHCP server assigns an IP address to a client, a DHCP binding is created. The IP address is leased to theclient until the client explicitly releases the IP address and disconnects from the network. If the clientdisconnects without releasing the address, the server terminates the lease after the lease time is over. Ineither case, the DHCP server removes the binding and the IP address is returned to the pool.
Security Vulnerabilities in Public Wireless LANsAs more people start using PWLANs, security becomes an important concern. Most implementations ofPWLANs rely on DHCP for users to obtain an IP address while in a hot spot (such as a coffee shop, airportterminal, hotel, and so on) and use this IP address provided by the DHCP server throughout their session.
IP spoofing is a common technique used by hackers to spoof IP addresses. For example, customer Aobtains an IP address from DHCP and has already been authenticated to use the PWLAN, but a hackerspoofs the IP address of customer A and uses this IP address to send and receive traffic. Customer A willstill be billed for the service even though he or she is not using the service.
Address Resolution Protocol (ARP) table entries are dynamic by design. Request and reply ARP packetsare sent and received by all the networking devices in a network. In a DHCP network, the DHCP serverstores the leased IP address to the MAC address or the client identifier of the client in the DHCP binding.But as ARP entries are learned dynamically, an unauthorized client can spoof the IP address given by theDHCP server and start using that IP address. The MAC address of this unauthorized client will replace theMAC address of the authorized client in the ARP table, allowing the unauthorized client to freely use thespoofed IP address.
DHCP Services for Security and Accounting OverviewDHCP security and accounting features have been designed and implemented to address the securityconcerns in PWLANs but also can be used in other network implementations.
DHCP accounting provides authentication, authorization, and accounting (AAA) and RADIUS support forDHCP. The AAA and RADIUS support improves security by sending secure START and STOPaccounting messages. The configuration of DHCP accounting adds a layer of security that allows DHCPlease assignment and termination to be triggered for the appropriate RADIUS START and STOPaccounting records so that the session state is properly maintained by upstream devices, such as an SSG.This additional security can help to prevent hackers or unauthorized clients from gaining illegal entry to thenetwork by spoofing authorized DHCP leases.
DHCP Operation in Public Wireless LANs Information About DHCP Services for Accounting and Security
IP Addressing: DHCP Configuration Guide, Cisco IOS Release 12.4T146
Three other features have been designed and implemented to address the security concerns in PWLANs.The first feature secures ARP table entries to DHCP leases in the DHCP database. The secure ARPfunctionality prevents IP spoofing by synchronizing the database of the DHCP server with the ARP table toavoid address hijacking. Secure ARP adds an entry to the ARP table for a client when an address isallocated that can be deleted by the DHCP server only when a binding expires.
The second feature is DHCP authorized ARP. This functionality provides a complete solution byaddressing the need for DHCP to explicitly know when a user logs out. Before the introduction of DHCPauthorized ARP, there was no mechanism to inform the DHCP server if a user had left the systemungracefully, which could result in excessive billing for a customer that had logged out but without thesystem detecting it. To prevent this problem, DHCP authorized ARP sends periodic ARP messages on aper-minute basis to determine if a user is still logged in. Only authorized users can respond to the ARPrequest. ARP responses from unauthorized users are blocked at the DHCP server, providing an extra levelof security.
In addition, DHCP authorized ARP disables dynamic ARP learning on an interface. The address mappingcan be installed only by the authorized component specified by the arp authorized interface configurationcommand. DHCP is the only authorized component allowed to install ARP entries.
The third feature is ARP Auto-logoff, which adds finer control for probing when authorized users log out.The arp probe interval command specifies when to start a probe (the timeout), how frequently a peer isprobed (the interval), and the maximum number of retries (the count).
DHCP Lease LimitsYou can control the number of subscribers globally or on a per-interface basis by configuring a DHCPlease limit. This functionality allows an ISP to limit the number of leases available to clients per householdor connection.
How to Configure DHCP Services for Accounting and Security• Configuring AAA and RADIUS for DHCP Accounting, page 147
• Configuring DHCP Accounting, page 150
• Verifying DHCP Accounting, page 152
• Securing ARP Table Entries to DHCP Leases, page 153
• Configuring DHCP Authorized ARP, page 155
• Configuring a DHCP Lease Limit to Globally Control the Number of Subscribers, page 157
• Configuring a DHCP Lease Limit to Control the Number of Subscribers on an Interface, page 159
Configuring AAA and RADIUS for DHCP AccountingRADIUS provides the accounting capability for the transmission of secure START and STOP messages.AAA and RADIUS are enabled prior to the configuration of DHCP accounting but can also be enabled tosecure an insecure DHCP network. The configuration steps in this section are required for configuringDHCP accounting in a new or existing network.
• RADIUS Accounting Attributes, page 148
• Troubleshooting Tips, page 150
DHCP Lease LimitsHow to Configure DHCP Services for Accounting and Security
IP Addressing: DHCP Configuration Guide, Cisco IOS Release 12.4T 147
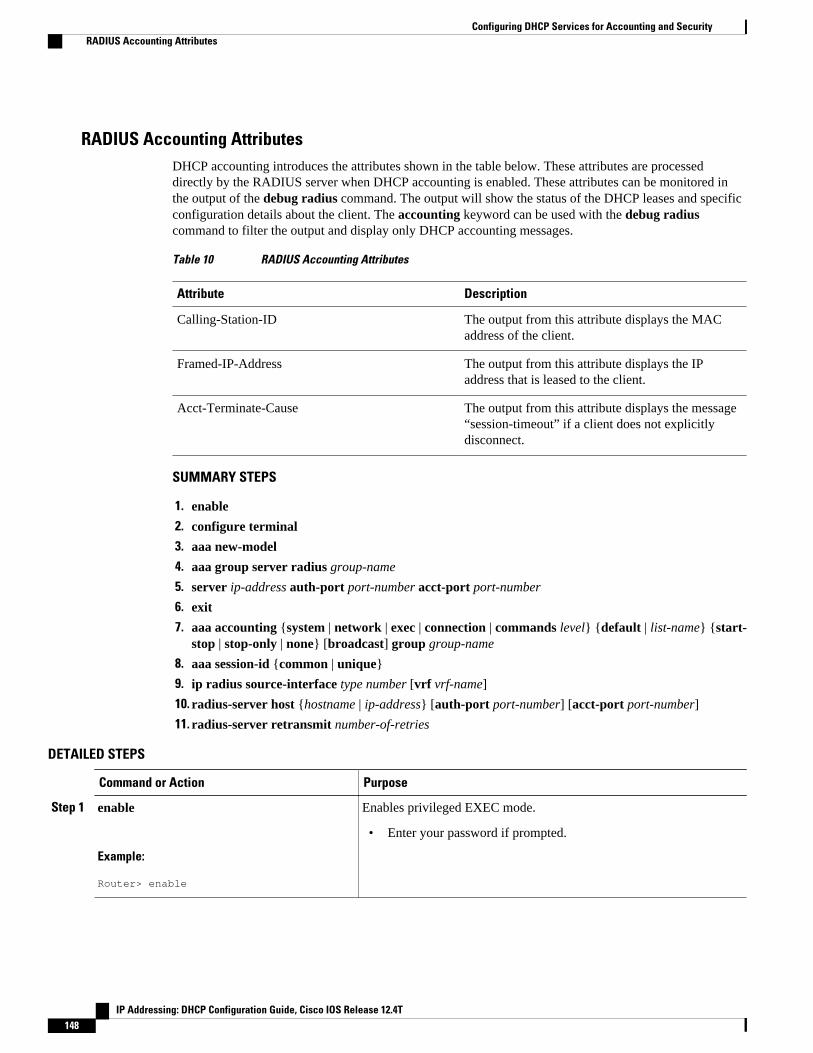
RADIUS Accounting AttributesDHCP accounting introduces the attributes shown in the table below. These attributes are processeddirectly by the RADIUS server when DHCP accounting is enabled. These attributes can be monitored inthe output of the debug radius command. The output will show the status of the DHCP leases and specificconfiguration details about the client. The accounting keyword can be used with the debug radiuscommand to filter the output and display only DHCP accounting messages.
Table 10 RADIUS Accounting Attributes
Attribute Description
Calling-Station-ID The output from this attribute displays the MACaddress of the client.
Framed-IP-Address The output from this attribute displays the IPaddress that is leased to the client.
Acct-Terminate-Cause The output from this attribute displays the message“session-timeout” if a client does not explicitlydisconnect.
SUMMARY STEPS
1. enable
2. configure terminal
3. aaa new-model
4. aaa group server radius group-name
5. server ip-address auth-port port-number acct-port port-number
6. exit
7. aaa accounting {system | network | exec | connection | commands level} {default | list-name} {start-stop | stop-only | none} [broadcast] group group-name
8. aaa session-id {common | unique}
9. ip radius source-interface type number [vrf vrf-name]
10. radius-server host {hostname | ip-address} [auth-port port-number] [acct-port port-number]
11. radius-server retransmit number-of-retries
DETAILED STEPS
Command or Action Purpose
Step 1 enable
Example:
Router> enable
Enables privileged EXEC mode.
• Enter your password if prompted.
Configuring DHCP Services for Accounting and Security RADIUS Accounting Attributes
IP Addressing: DHCP Configuration Guide, Cisco IOS Release 12.4T148
Command or Action Purpose
Step 2 configure terminal
Example:
Router# configure terminal
Enters global configuration mode.
Step 3 aaa new-model
Example:
Router(config)# aaa new-model
Enables the AAA access control model.
• DHCP accounting functions only in the access control model.
Note TACACS and extended TACACS commands are not availableafter this command is configured and are not supported byDHCP accounting.
Step 4 aaa group server radius group-name
Example:
Router(config)# aaa group server radius RGROUP-1
Creates a server group for AAA or TACACS+ services and entersserver group RADIUS configuration mode.
• The server group is created in this step so that accounting servicescan be applied.
Step 5 server ip-address auth-port port-number acct-port port-number
Example:
Router(config-sg-radius)# server 10.0.0.1 auth-port 1645 acct-port 1646
Specifies the servers that are members of the server group that wascreated in Step 4.
• You must open port numbers for authorization and accounting.1645 is the default port number for authorization, and 1646 is thedefault port number for accounting. The range of port numbersthat can be specified is from 0 to 65535.
• The values entered for the auth-port port-numberand acct-portport-number keywords and arguments must match the portnumbers that will be configured in Step 10.
Step 6 exit
Example:
Router(config-sg-radius)# exit
Exits server group RADIUS configuration mode and enters globalconfiguration mode.
Step 7 aaa accounting {system | network | exec |connection | commands level} {default | list-name} {start-stop | stop-only | none}[broadcast] group group-name
Example:
Router(config)# aaa accounting network RADIUS-GROUP1 start-stop group RGROUP-1
Configures RADIUS accounting for the specified server group.
• The RADIUS accounting server is specified in the first list-nameargument (RADIUS-GROUP1), and the target server group isspecified in the second group-nameargument (RGROUP-1).
• This command enables start and stop accounting for DHCPaccounting. The start-stop keyword enables the transmission ofboth START and STOP accounting messages. The stop-onlykeyword will enable the generation and verification of STOPaccounting messages only.
Configuring DHCP Services for Accounting and SecurityRADIUS Accounting Attributes
IP Addressing: DHCP Configuration Guide, Cisco IOS Release 12.4T 149
Command or Action Purpose
Step 8 aaa session-id {common | unique}
Example:
Router(config)# aaa session-id common
Specifies whether the same session ID will be used for each AAAaccounting service type within a call or whether a different session IDwill be assigned to each accounting service type.
Step 9 ip radius source-interface type number [vrfvrf-name]
Example:
Router(config)# ip radius source-interface Ethernet 0
Forces RADIUS to use the IP address of the specified interface for alloutgoing RADIUS packets.
Step 10 radius-server host {hostname | ip-address}[auth-port port-number] [acct-port port-number]
Example:
Router(config)# radius-server host 10.1.1.1 auth-port 1645 acct-port 1646
Specifies the RADIUS server host.
• The values entered for the auth-port port-numberand acct-portport-number keywords and arguments must match the portnumbers that were configured in Step 5.
Step 11 radius-server retransmit number-of-retries
Example:
Router(config)# radius-server retransmit 3
Specifies the number of times that Cisco IOS software will look forRADIUS server hosts.
Troubleshooting TipsTo monitor and troubleshoot the configuration of RADIUS accounting, use the following command:
debug radius accounting
Configuring DHCP AccountingPerform this task to configure DHCP accounting.
DHCP accounting is enabled with the accountingDHCP pool configuration command. This commandconfigures DHCP to operate with AAA and RADIUS to enable secure START and STOP accountingmessages. This configuration adds a layer of security that allows DHCP lease assignment and terminationto be triggered for the appropriate RADIUS START and STOP accounting records so that the session stateis properly maintained by upstream devices, such as the SSG.
DHCP accounting is configured on a per-client or per-lease basis. Separate DHCP accounting processescan be configured on a per-pool basis.
Configuring DHCP Accounting Troubleshooting Tips
IP Addressing: DHCP Configuration Guide, Cisco IOS Release 12.4T150

You must configure an SSG for client authentication. AAA and RADIUS must be enabled before DHCPaccounting will operate.
Note The following restrictions apply to DHCP accounting:
• DHCP accounting can be configured only for DHCP network pools in which bindings are createdautomatically and destroyed upon lease termination or when the client sends a DHCPRELEASEmessage.
• DHCP bindings are destroyed when the clear ip dhcp binding or no service dhcpcommand isentered, which also triggers an accounting STOP message. You should exercise caution when enteringthese commands if a pool is configured with DHCP accounting, because these commands will clearactive leases.
>
SUMMARY STEPS
1. enable
2. configure terminal
3. ip dhcp pool pool-name
4. accounting method-list-name
DETAILED STEPS
Command or Action Purpose
Step 1 enable
Example:
Router> enable
Enables privileged EXEC mode.
• Enter your password if prompted.
Step 2 configure terminal
Example:
Router# configure terminal
Enters global configuration mode.
Step 3 ip dhcp pool pool-name
Example:
Router(config)# ip dhcp pool WIRELESS-POOL
Configures a DHCP address pool and enters DHCP pool configurationmode.
Configuring DHCP Services for Accounting and SecurityTroubleshooting Tips
IP Addressing: DHCP Configuration Guide, Cisco IOS Release 12.4T 151
Command or Action Purpose
Step 4 accounting method-list-name
Example:
Router(config-dhcp)# accounting RADIUS-GROUP1
Enables DHCP accounting if the specified server group is configured to runRADIUS accounting.
• The example configures DHCP accounting START and STOPmessages to be sent if RADIUS-GROUP1 is configured as a start-stopgroup. STOP messages will be sent only if RADIUS-GROUP1 isconfigured as a stop-only group. See Step 7 in the Configuring AAAand RADIUS for DHCP Accounting, page 147 section for moredetails.
Verifying DHCP AccountingPerform this task to verify the DHCP accounting configuration.
The debug radius, debug radius accounting, debug ip dhcp server events, debug aaa accounting, anddebug aaa idcommands need not be issued together or in the same session because there are differences inthe information that is provided. These commands, however, can be used to display DHCP accounting startand stop events, AAA accounting messages, and information about AAA and DHCP hosts and clients. Seethe "RADIUS Accounting Attributes" section of this module for a list of AAA attributes that have beenintroduced by DHCP accounting. The show running-config | begin dhcp command can be used to displaythe local DHCP configuration including the configuration of DHCP accounting.
SUMMARY STEPS
1. enable
2. debug radius accounting
3. debug ip dhcp server events
4. debug aaa accounting
5. debug aaa id
6. show running-config | begin dhcp
DETAILED STEPS
Command or Action Purpose
Step 1 enable
Example:
Router> enable
Enables privileged EXEC mode.
• Enter your password if prompted.
Step 2 debug radius accounting
Example:
Router# debug radius accounting
Displays RADIUS events on the console of the router.
• These events provide information about RADIUS processes. DHCPaccounting information can be filtered with the accounting keyword.START and STOP accounting messages will be displayed in theoutput.
Verifying DHCP Accounting Troubleshooting Tips
IP Addressing: DHCP Configuration Guide, Cisco IOS Release 12.4T152
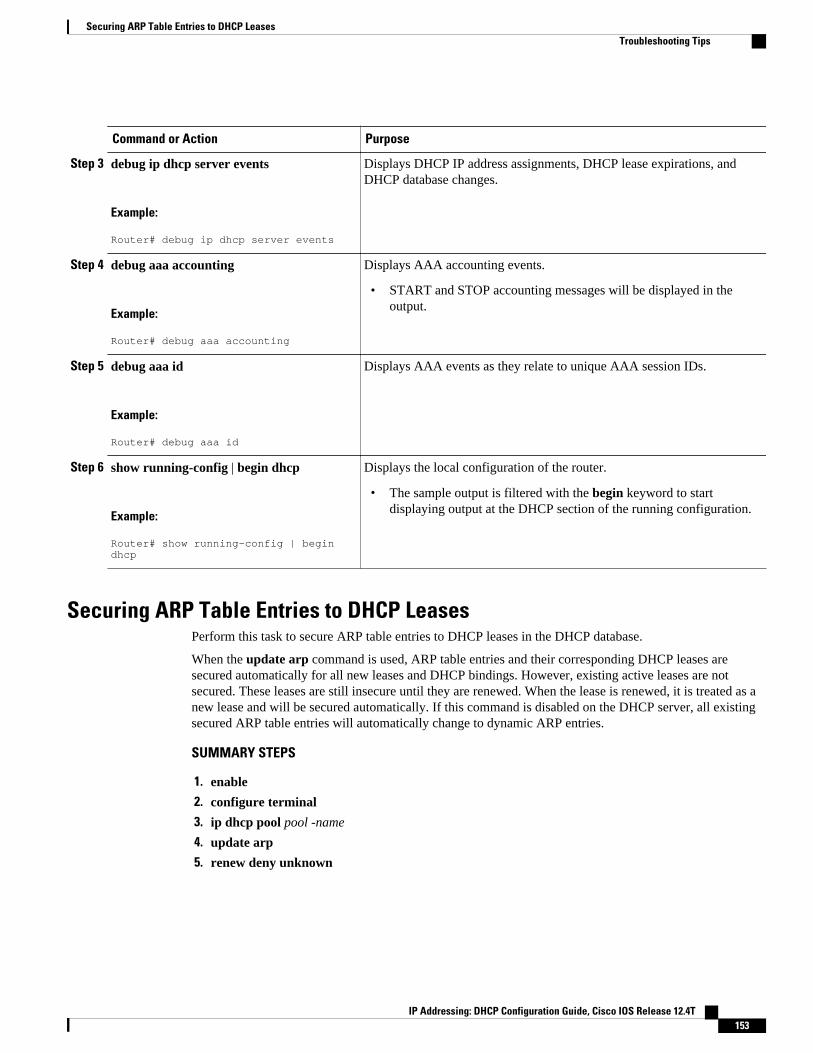
Command or Action Purpose
Step 3 debug ip dhcp server events
Example:
Router# debug ip dhcp server events
Displays DHCP IP address assignments, DHCP lease expirations, andDHCP database changes.
Step 4 debug aaa accounting
Example:
Router# debug aaa accounting
Displays AAA accounting events.
• START and STOP accounting messages will be displayed in theoutput.
Step 5 debug aaa id
Example:
Router# debug aaa id
Displays AAA events as they relate to unique AAA session IDs.
Step 6 show running-config | begin dhcp
Example:
Router# show running-config | begin dhcp
Displays the local configuration of the router.
• The sample output is filtered with the begin keyword to startdisplaying output at the DHCP section of the running configuration.
Securing ARP Table Entries to DHCP LeasesPerform this task to secure ARP table entries to DHCP leases in the DHCP database.
When the update arp command is used, ARP table entries and their corresponding DHCP leases aresecured automatically for all new leases and DHCP bindings. However, existing active leases are notsecured. These leases are still insecure until they are renewed. When the lease is renewed, it is treated as anew lease and will be secured automatically. If this command is disabled on the DHCP server, all existingsecured ARP table entries will automatically change to dynamic ARP entries.
SUMMARY STEPS
1. enable
2. configure terminal
3. ip dhcp pool pool -name
4. update arp
5. renew deny unknown
Securing ARP Table Entries to DHCP LeasesTroubleshooting Tips
IP Addressing: DHCP Configuration Guide, Cisco IOS Release 12.4T 153
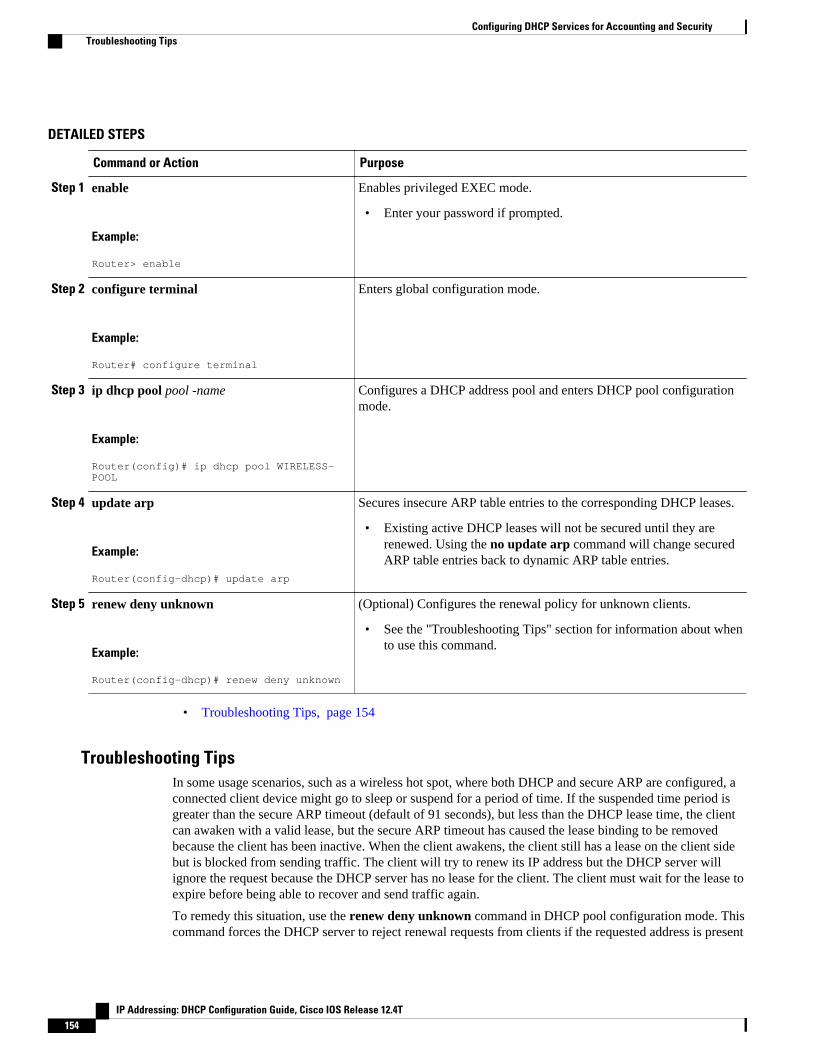
DETAILED STEPS
Command or Action Purpose
Step 1 enable
Example:
Router> enable
Enables privileged EXEC mode.
• Enter your password if prompted.
Step 2 configure terminal
Example:
Router# configure terminal
Enters global configuration mode.
Step 3 ip dhcp pool pool -name
Example:
Router(config)# ip dhcp pool WIRELESS-POOL
Configures a DHCP address pool and enters DHCP pool configurationmode.
Step 4 update arp
Example:
Router(config-dhcp)# update arp
Secures insecure ARP table entries to the corresponding DHCP leases.
• Existing active DHCP leases will not be secured until they arerenewed. Using the no update arp command will change securedARP table entries back to dynamic ARP table entries.
Step 5 renew deny unknown
Example:
Router(config-dhcp)# renew deny unknown
(Optional) Configures the renewal policy for unknown clients.
• See the "Troubleshooting Tips" section for information about whento use this command.
• Troubleshooting Tips, page 154
Troubleshooting TipsIn some usage scenarios, such as a wireless hot spot, where both DHCP and secure ARP are configured, aconnected client device might go to sleep or suspend for a period of time. If the suspended time period isgreater than the secure ARP timeout (default of 91 seconds), but less than the DHCP lease time, the clientcan awaken with a valid lease, but the secure ARP timeout has caused the lease binding to be removedbecause the client has been inactive. When the client awakens, the client still has a lease on the client sidebut is blocked from sending traffic. The client will try to renew its IP address but the DHCP server willignore the request because the DHCP server has no lease for the client. The client must wait for the lease toexpire before being able to recover and send traffic again.
To remedy this situation, use the renew deny unknown command in DHCP pool configuration mode. Thiscommand forces the DHCP server to reject renewal requests from clients if the requested address is present
Configuring DHCP Services for Accounting and Security Troubleshooting Tips
IP Addressing: DHCP Configuration Guide, Cisco IOS Release 12.4T154
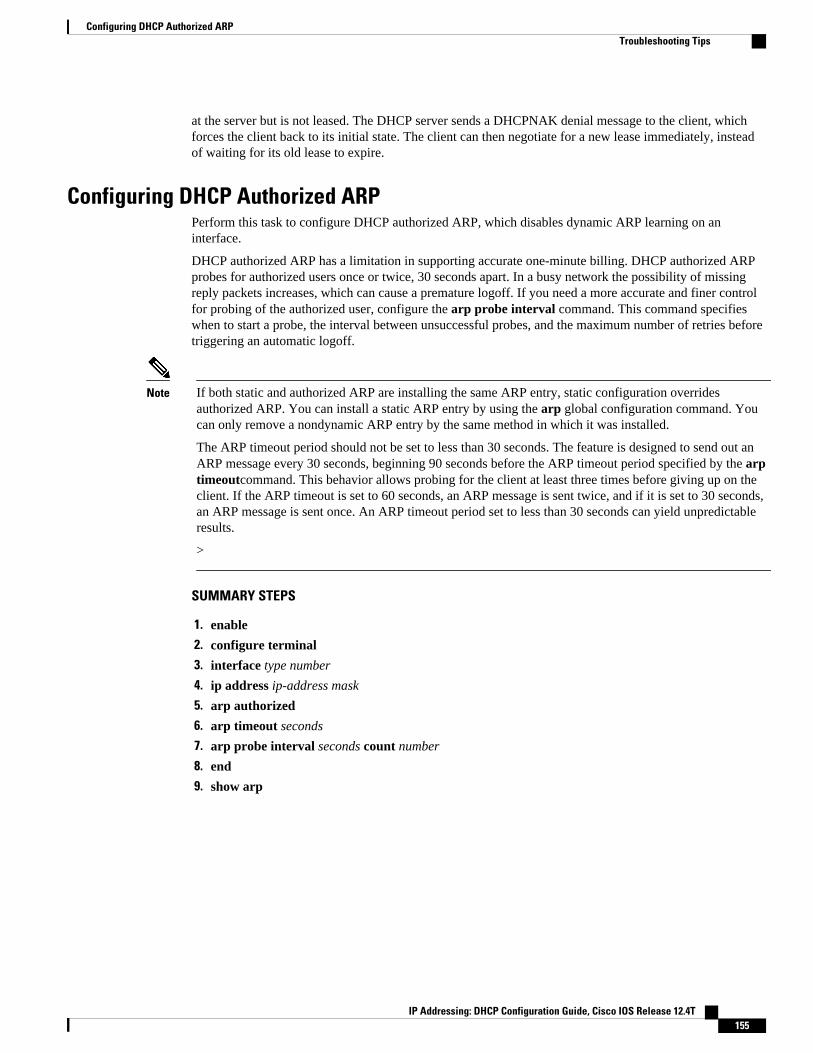
at the server but is not leased. The DHCP server sends a DHCPNAK denial message to the client, whichforces the client back to its initial state. The client can then negotiate for a new lease immediately, insteadof waiting for its old lease to expire.
Configuring DHCP Authorized ARPPerform this task to configure DHCP authorized ARP, which disables dynamic ARP learning on aninterface.
DHCP authorized ARP has a limitation in supporting accurate one-minute billing. DHCP authorized ARPprobes for authorized users once or twice, 30 seconds apart. In a busy network the possibility of missingreply packets increases, which can cause a premature logoff. If you need a more accurate and finer controlfor probing of the authorized user, configure the arp probe interval command. This command specifieswhen to start a probe, the interval between unsuccessful probes, and the maximum number of retries beforetriggering an automatic logoff.
Note If both static and authorized ARP are installing the same ARP entry, static configuration overridesauthorized ARP. You can install a static ARP entry by using the arp global configuration command. Youcan only remove a nondynamic ARP entry by the same method in which it was installed.
The ARP timeout period should not be set to less than 30 seconds. The feature is designed to send out anARP message every 30 seconds, beginning 90 seconds before the ARP timeout period specified by the arptimeoutcommand. This behavior allows probing for the client at least three times before giving up on theclient. If the ARP timeout is set to 60 seconds, an ARP message is sent twice, and if it is set to 30 seconds,an ARP message is sent once. An ARP timeout period set to less than 30 seconds can yield unpredictableresults.
>
SUMMARY STEPS
1. enable
2. configure terminal
3. interface type number
4. ip address ip-address mask
5. arp authorized
6. arp timeout seconds
7. arp probe interval seconds count number
8. end
9. show arp
Configuring DHCP Authorized ARPTroubleshooting Tips
IP Addressing: DHCP Configuration Guide, Cisco IOS Release 12.4T 155

DETAILED STEPS
Command or Action Purpose
Step 1 enable
Example:
Router> enable
Enables privileged EXEC mode.
• Enter your password if prompted.
Step 2 configure terminal
Example:
Router# configure terminal
Enters global configuration mode.
Step 3 interface type number
Example:
Router(config)# interface ethernet 1
Configures an interface type and enters interface configuration mode.
Step 4 ip address ip-address mask
Example:
Router(config-if)# ip address 209.165.200.224 209.165.200.224
Sets a primary IP address for an interface.
Step 5 arp authorized
Example:
Router(config-if)# arp authorized
Disables dynamic ARP learning on an interface.
• The IP address to MAC address mapping can be installed only bythe authorized subsystem.
Step 6 arp timeout seconds
Example:
Router(config-if)# arp timeout 60
Configures how long an entry remains in the ARP cache.
Configuring DHCP Services for Accounting and Security Troubleshooting Tips
IP Addressing: DHCP Configuration Guide, Cisco IOS Release 12.4T156
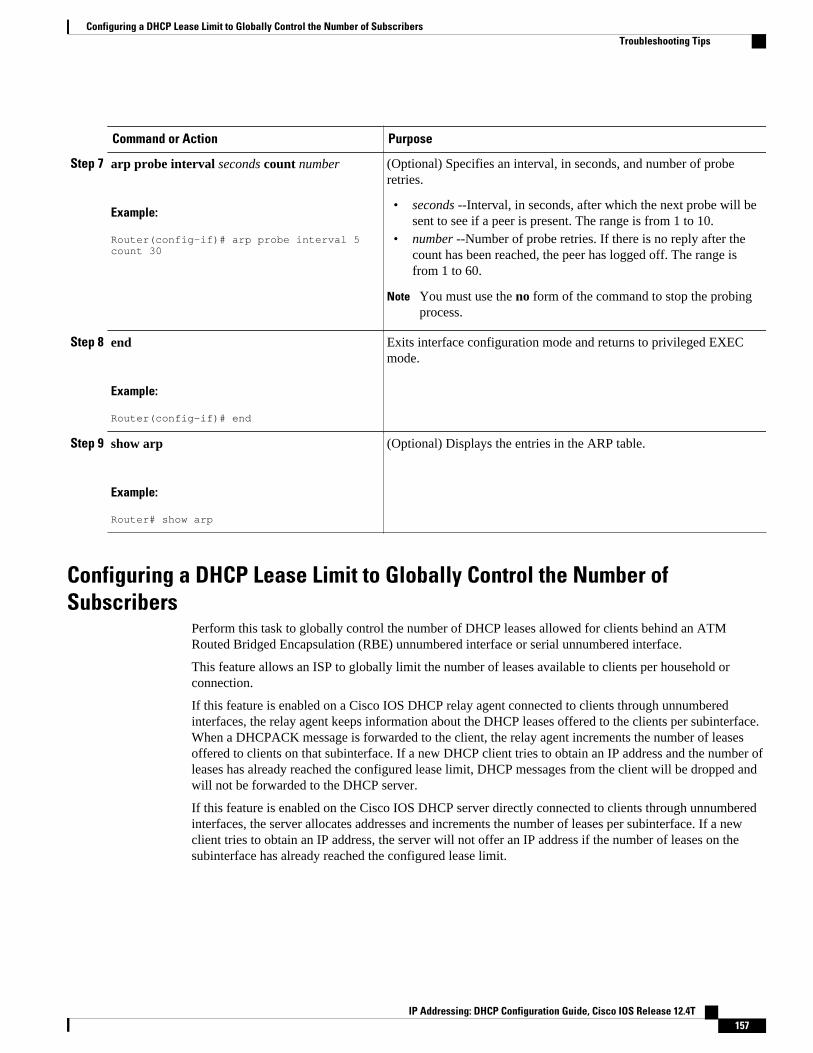
Command or Action Purpose
Step 7 arp probe interval seconds count number
Example:
Router(config-if)# arp probe interval 5 count 30
(Optional) Specifies an interval, in seconds, and number of proberetries.
• seconds --Interval, in seconds, after which the next probe will besent to see if a peer is present. The range is from 1 to 10.
• number --Number of probe retries. If there is no reply after thecount has been reached, the peer has logged off. The range isfrom 1 to 60.
Note You must use the no form of the command to stop the probingprocess.
Step 8 end
Example:
Router(config-if)# end
Exits interface configuration mode and returns to privileged EXECmode.
Step 9 show arp
Example:
Router# show arp
(Optional) Displays the entries in the ARP table.
Configuring a DHCP Lease Limit to Globally Control the Number ofSubscribers
Perform this task to globally control the number of DHCP leases allowed for clients behind an ATMRouted Bridged Encapsulation (RBE) unnumbered interface or serial unnumbered interface.
This feature allows an ISP to globally limit the number of leases available to clients per household orconnection.
If this feature is enabled on a Cisco IOS DHCP relay agent connected to clients through unnumberedinterfaces, the relay agent keeps information about the DHCP leases offered to the clients per subinterface.When a DHCPACK message is forwarded to the client, the relay agent increments the number of leasesoffered to clients on that subinterface. If a new DHCP client tries to obtain an IP address and the number ofleases has already reached the configured lease limit, DHCP messages from the client will be dropped andwill not be forwarded to the DHCP server.
If this feature is enabled on the Cisco IOS DHCP server directly connected to clients through unnumberedinterfaces, the server allocates addresses and increments the number of leases per subinterface. If a newclient tries to obtain an IP address, the server will not offer an IP address if the number of leases on thesubinterface has already reached the configured lease limit.
Configuring a DHCP Lease Limit to Globally Control the Number of SubscribersTroubleshooting Tips
IP Addressing: DHCP Configuration Guide, Cisco IOS Release 12.4T 157
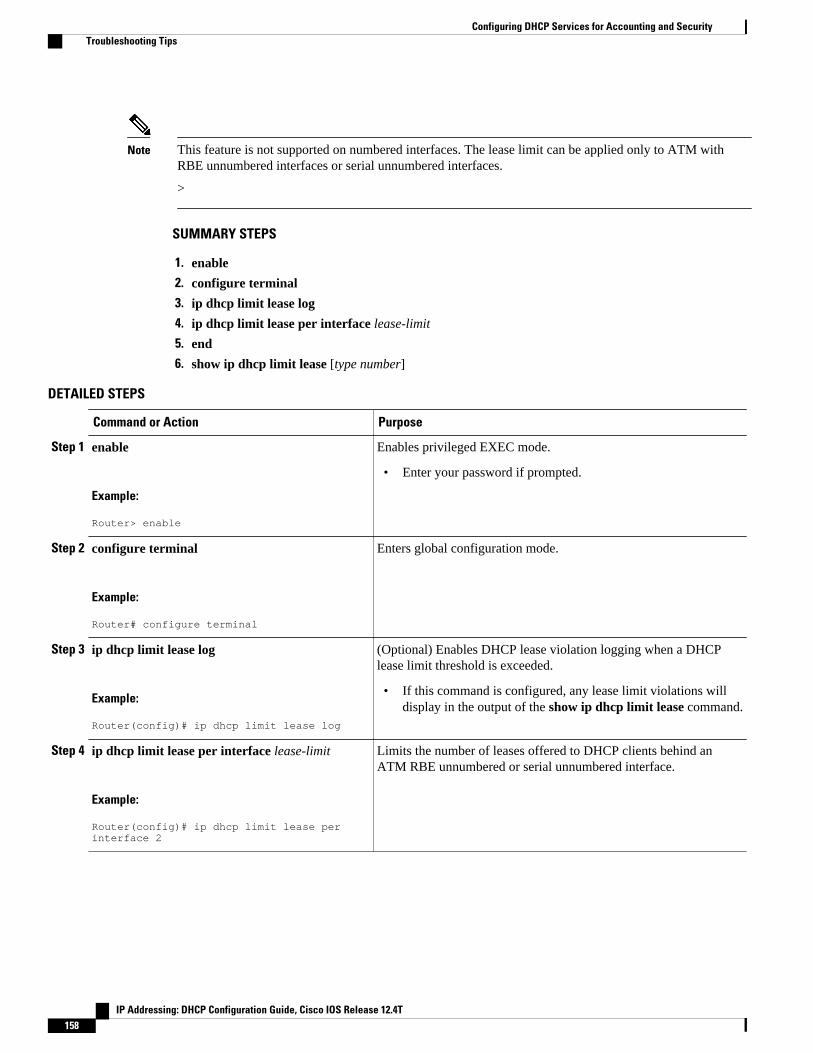
Note This feature is not supported on numbered interfaces. The lease limit can be applied only to ATM withRBE unnumbered interfaces or serial unnumbered interfaces.
>
SUMMARY STEPS
1. enable
2. configure terminal
3. ip dhcp limit lease log
4. ip dhcp limit lease per interface lease-limit
5. end
6. show ip dhcp limit lease [type number]
DETAILED STEPS
Command or Action Purpose
Step 1 enable
Example:
Router> enable
Enables privileged EXEC mode.
• Enter your password if prompted.
Step 2 configure terminal
Example:
Router# configure terminal
Enters global configuration mode.
Step 3 ip dhcp limit lease log
Example:
Router(config)# ip dhcp limit lease log
(Optional) Enables DHCP lease violation logging when a DHCPlease limit threshold is exceeded.
• If this command is configured, any lease limit violations willdisplay in the output of the show ip dhcp limit lease command.
Step 4 ip dhcp limit lease per interface lease-limit
Example:
Router(config)# ip dhcp limit lease per interface 2
Limits the number of leases offered to DHCP clients behind anATM RBE unnumbered or serial unnumbered interface.
Configuring DHCP Services for Accounting and Security Troubleshooting Tips
IP Addressing: DHCP Configuration Guide, Cisco IOS Release 12.4T158
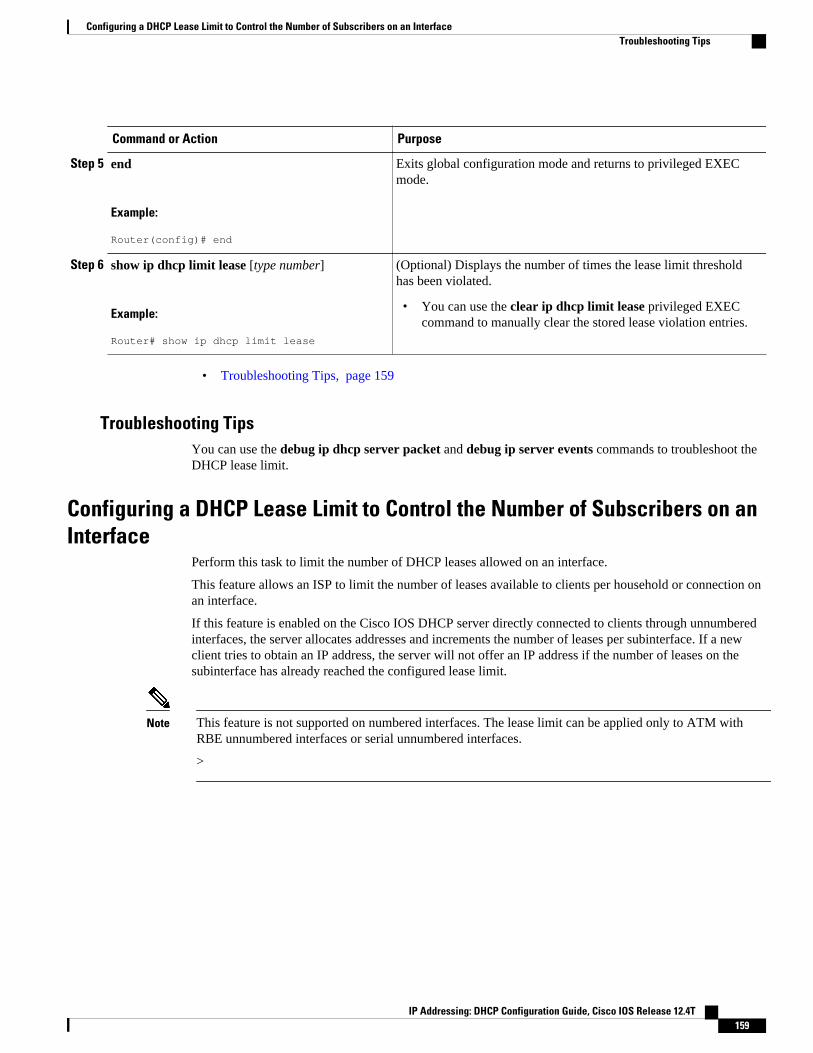
Command or Action Purpose
Step 5 end
Example:
Router(config)# end
Exits global configuration mode and returns to privileged EXECmode.
Step 6 show ip dhcp limit lease [type number]
Example:
Router# show ip dhcp limit lease
(Optional) Displays the number of times the lease limit thresholdhas been violated.
• You can use the clear ip dhcp limit lease privileged EXECcommand to manually clear the stored lease violation entries.
• Troubleshooting Tips, page 159
Troubleshooting TipsYou can use the debug ip dhcp server packet and debug ip server events commands to troubleshoot theDHCP lease limit.
Configuring a DHCP Lease Limit to Control the Number of Subscribers on anInterface
Perform this task to limit the number of DHCP leases allowed on an interface.
This feature allows an ISP to limit the number of leases available to clients per household or connection onan interface.
If this feature is enabled on the Cisco IOS DHCP server directly connected to clients through unnumberedinterfaces, the server allocates addresses and increments the number of leases per subinterface. If a newclient tries to obtain an IP address, the server will not offer an IP address if the number of leases on thesubinterface has already reached the configured lease limit.
Note This feature is not supported on numbered interfaces. The lease limit can be applied only to ATM withRBE unnumbered interfaces or serial unnumbered interfaces.
>
Configuring a DHCP Lease Limit to Control the Number of Subscribers on an InterfaceTroubleshooting Tips
IP Addressing: DHCP Configuration Guide, Cisco IOS Release 12.4T 159
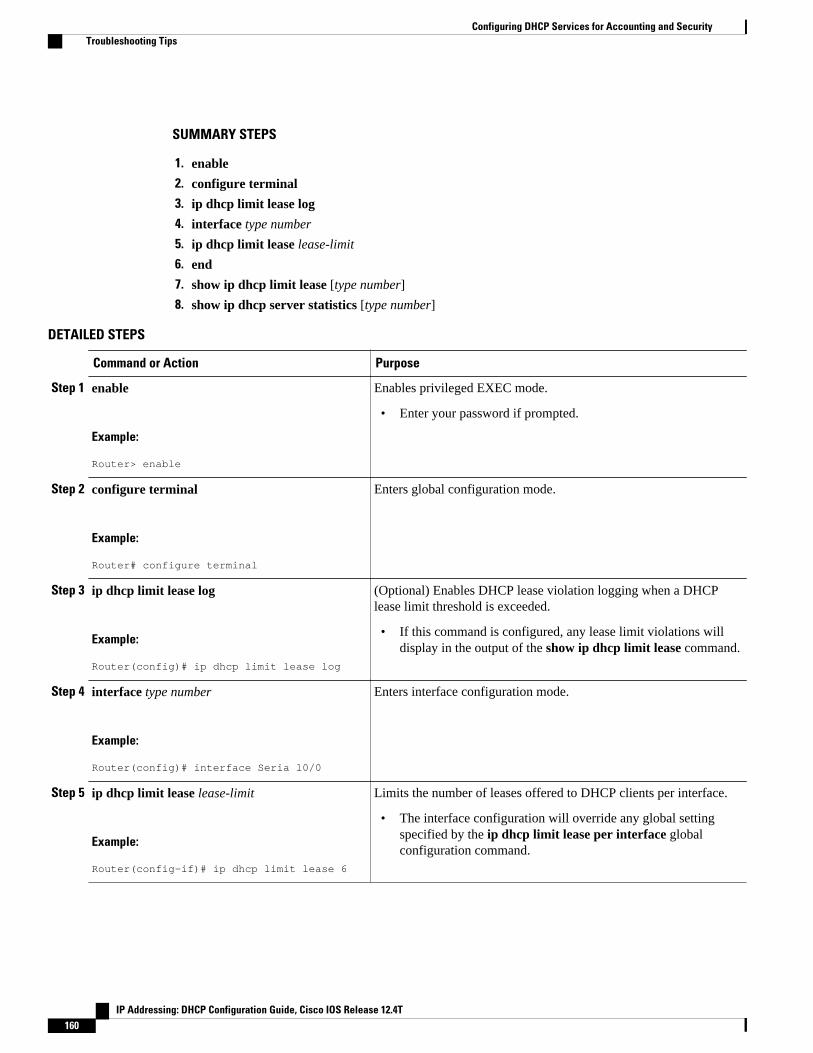
SUMMARY STEPS
1. enable
2. configure terminal
3. ip dhcp limit lease log
4. interface type number
5. ip dhcp limit lease lease-limit
6. end
7. show ip dhcp limit lease [type number]
8. show ip dhcp server statistics [type number]
DETAILED STEPS
Command or Action Purpose
Step 1 enable
Example:
Router> enable
Enables privileged EXEC mode.
• Enter your password if prompted.
Step 2 configure terminal
Example:
Router# configure terminal
Enters global configuration mode.
Step 3 ip dhcp limit lease log
Example:
Router(config)# ip dhcp limit lease log
(Optional) Enables DHCP lease violation logging when a DHCPlease limit threshold is exceeded.
• If this command is configured, any lease limit violations willdisplay in the output of the show ip dhcp limit lease command.
Step 4 interface type number
Example:
Router(config)# interface Seria l0/0
Enters interface configuration mode.
Step 5 ip dhcp limit lease lease-limit
Example:
Router(config-if)# ip dhcp limit lease 6
Limits the number of leases offered to DHCP clients per interface.
• The interface configuration will override any global settingspecified by the ip dhcp limit lease per interface globalconfiguration command.
Configuring DHCP Services for Accounting and Security Troubleshooting Tips
IP Addressing: DHCP Configuration Guide, Cisco IOS Release 12.4T160
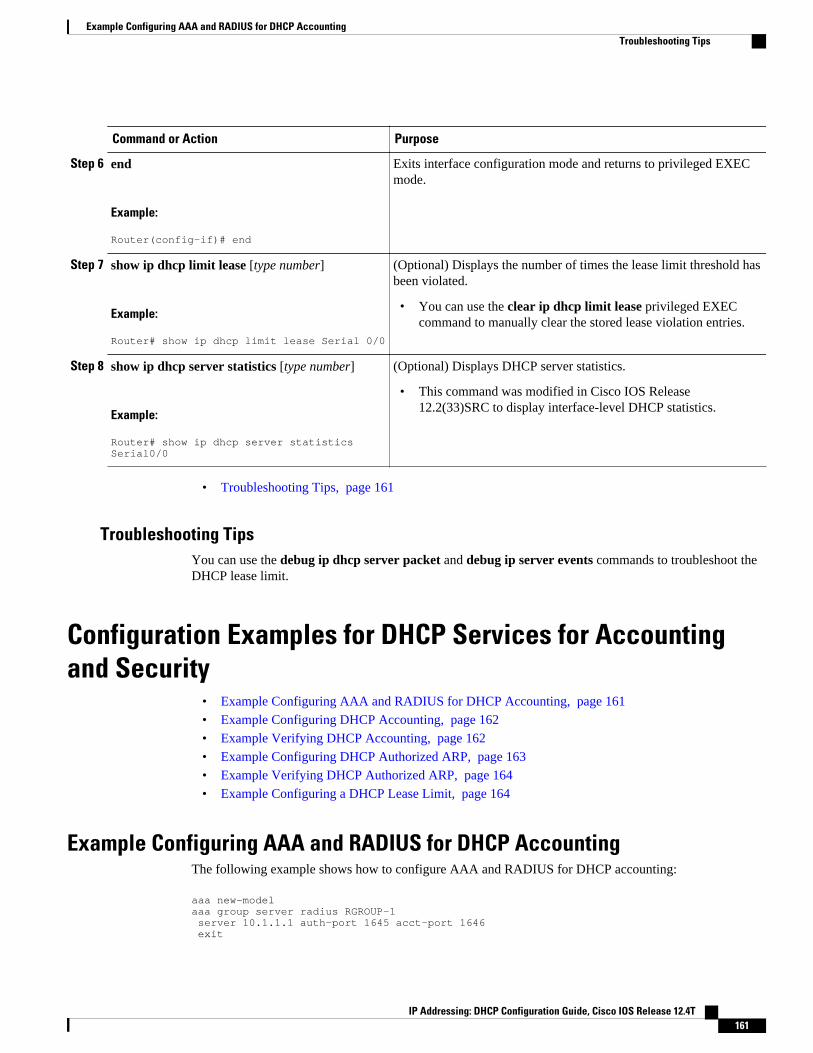
Command or Action Purpose
Step 6 end
Example:
Router(config-if)# end
Exits interface configuration mode and returns to privileged EXECmode.
Step 7 show ip dhcp limit lease [type number]
Example:
Router# show ip dhcp limit lease Serial 0/0
(Optional) Displays the number of times the lease limit threshold hasbeen violated.
• You can use the clear ip dhcp limit lease privileged EXECcommand to manually clear the stored lease violation entries.
Step 8 show ip dhcp server statistics [type number]
Example:
Router# show ip dhcp server statistics Serial0/0
(Optional) Displays DHCP server statistics.
• This command was modified in Cisco IOS Release12.2(33)SRC to display interface-level DHCP statistics.
• Troubleshooting Tips, page 161
Troubleshooting TipsYou can use the debug ip dhcp server packet and debug ip server events commands to troubleshoot theDHCP lease limit.
Configuration Examples for DHCP Services for Accountingand Security
• Example Configuring AAA and RADIUS for DHCP Accounting, page 161• Example Configuring DHCP Accounting, page 162• Example Verifying DHCP Accounting, page 162• Example Configuring DHCP Authorized ARP, page 163• Example Verifying DHCP Authorized ARP, page 164• Example Configuring a DHCP Lease Limit, page 164
Example Configuring AAA and RADIUS for DHCP AccountingThe following example shows how to configure AAA and RADIUS for DHCP accounting:
aaa new-model aaa group server radius RGROUP-1 server 10.1.1.1 auth-port 1645 acct-port 1646 exit
Example Configuring AAA and RADIUS for DHCP AccountingTroubleshooting Tips
IP Addressing: DHCP Configuration Guide, Cisco IOS Release 12.4T 161
aaa accounting network RADIUS-GROUP1 start-stop group RGROUP-1 aaa session-id common ip radius source-interface Ethernet 0 radius-server host 10.1.1.1 auth-port 1645 acct-port 1646 radius-server retransmit 3 exit
Example Configuring DHCP AccountingDHCP accounting is configured on a per-client or per-lease basis. Separate DHCP accounting processescan be configured on a per-pool basis. The following example shows how to configure DHCP accountingSTART and STOP messages to be sent if RADIUS-GROUP1 is configured as a start-stop group:
ip dhcp pool WIRELESS-POOL accounting RADIUS-GROUP1 exit
Example Verifying DHCP AccountingDHCP accounting is enabled after both RADIUS and AAA for DHCP are configured. DHCP START andSTOP accounting generation information can be monitored with the debug radius accounting and debugip dhcp server eventscommands. See the "RADIUS Accounting Attributes" task for a list of AAAattributes that have been introduced by DHCP accounting.
The following is sample output from the debug radius accountingcommand. The output shows the DHCPlease session ID, the MAC address, and the IP address of the client interface.
00:00:53: RADIUS: Pick NAS IP for uid=2 tableid=0 cfg_addr=10.0.18.3 best_addr=0.0.0.0 00:00:53: RADIUS(00000002): sending 00:00:53: RADIUS(00000002): Send to unknown id 21645/1 10.1.1.1 :1646, Accounting-Request, len 76 00:00:53: RADIUS: authenticator C6 FE EA B2 1F 9A 85 A2 - 9A 5B 09 B5 36 B5 B9 27 00:00:53: RADIUS: Acct-Session-Id [44] 10 "00000002" 00:00:53: RADIUS: Framed-IP-Address [8] 6 10.0.0.10 00:00:53: RADIUS: Calling-Station-Id [31] 16 "00000c59df76" 00:00:53: RADIUS: Acct-Status-Type [40] 6 Start [1] 00:00:53: RADIUS: Service-Type [6] 6 Framed [2] 00:00:53: RADIUS: NAS-IP-Address [4] 6 10.0.18.3 00:00:53: RADIUS: Acct-Delay-Time [41] 6 0
The following is sample output from the debug ip dhcp server eventscommand. The output was generatedon a DHCP server and shows an exchange of DHCP messages between the client and server to negotiate aDHCP lease. The acknowledgment that confirms to the DHCP server that the client has accepted theassigned IP address triggers the accounting START message. It is shown in the last line of the followingoutput:
00:45:50:DHCPD:DHCPDISCOVER received from client0063.6973.636f.2d30.3030.312e.3432.6339.2e65.6337.352d.4574.31 oninterface Ethernet0.00:45:52:DHCPD:assigned IP address 10.10.10.16 to client0063.6973.636f.2d30.3030.312e.3432.6339.2e65.6337.352d.4574.31.00:45:52:DHCPD:Sending DHCPOFFER to client0063.6973.636f.2d30.3030.312e.3432.6339.2e65.6337.352d.4574.31(10.10.10.16)00:45:52:DHCPD:broadcasting BOOTREPLY to client 0001.42c9.ec75.00:45:52:DHCPD:DHCPREQUEST received from client0063.6973.636f.2d30.3030.312e.3432.6339.2e65.6337.352d.4574.31.00:45:52:DHCPD:Sending DHCPACK to client0063.6973.636f.2d30.3030.312e.3432.6339.2e65.6337.352d.4574.31(10.10.10.16).00:45:52:DHCPD:broadcasting BOOTREPLY to client 0001.42c9.ec75.00:45:52:DHCPD:triggered Acct Start for 0001.42c9.ec75 (10.10.10.16).
The following is sample output from the debug ip dhcp server eventscommand. The output was generatedon a DHCP server and shows the receipt of an explicit release message from the DHCP client. The DHCP
Example Configuring DHCP Accounting Configuration Examples for DHCP Services for Accounting and Security
IP Addressing: DHCP Configuration Guide, Cisco IOS Release 12.4T162
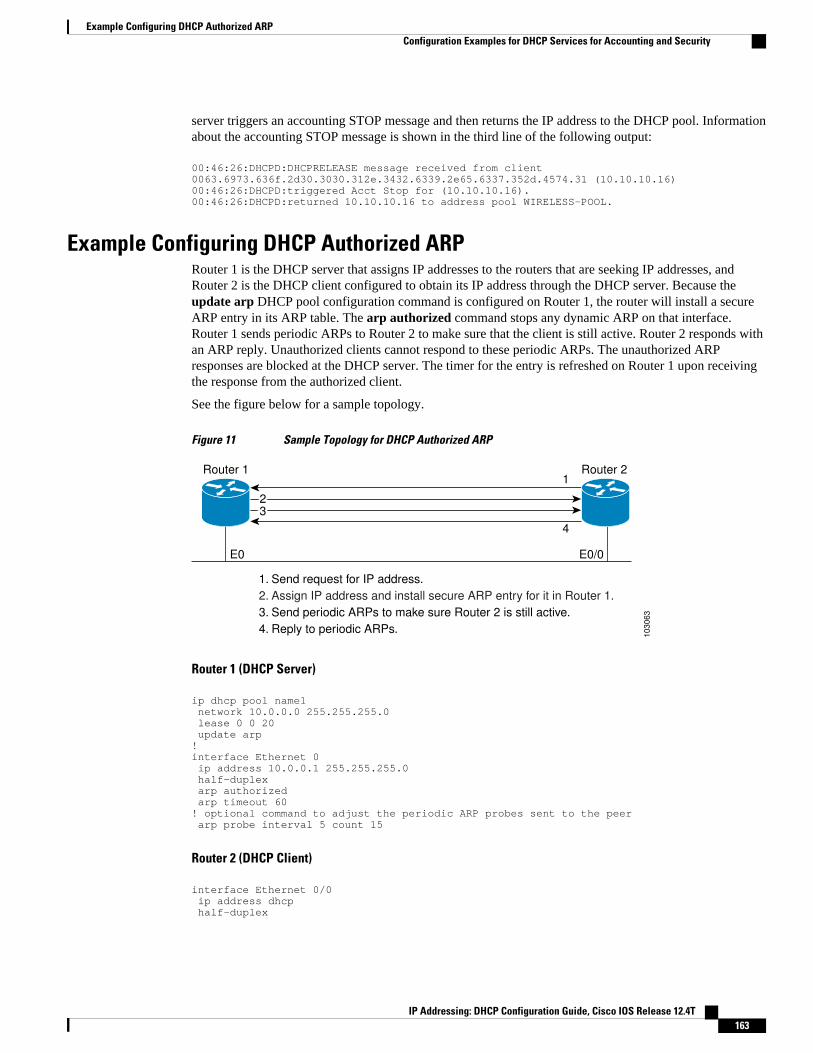
server triggers an accounting STOP message and then returns the IP address to the DHCP pool. Informationabout the accounting STOP message is shown in the third line of the following output:
00:46:26:DHCPD:DHCPRELEASE message received from client0063.6973.636f.2d30.3030.312e.3432.6339.2e65.6337.352d.4574.31 (10.10.10.16)00:46:26:DHCPD:triggered Acct Stop for (10.10.10.16).00:46:26:DHCPD:returned 10.10.10.16 to address pool WIRELESS-POOL.
Example Configuring DHCP Authorized ARPRouter 1 is the DHCP server that assigns IP addresses to the routers that are seeking IP addresses, andRouter 2 is the DHCP client configured to obtain its IP address through the DHCP server. Because theupdate arp DHCP pool configuration command is configured on Router 1, the router will install a secureARP entry in its ARP table. The arp authorized command stops any dynamic ARP on that interface.Router 1 sends periodic ARPs to Router 2 to make sure that the client is still active. Router 2 responds withan ARP reply. Unauthorized clients cannot respond to these periodic ARPs. The unauthorized ARPresponses are blocked at the DHCP server. The timer for the entry is refreshed on Router 1 upon receivingthe response from the authorized client.
See the figure below for a sample topology.
Figure 11 Sample Topology for DHCP Authorized ARP
10
30
63
1
4
Router 1 Router 2
E0
1. Send request for IP address.
2. Assign IP address and install secure ARP entry for it in Router 1.
3. Send periodic ARPs to make sure Router 2 is still active.
4. Reply to periodic ARPs.
E0/0
2323
Router 1 (DHCP Server)
ip dhcp pool name1 network 10.0.0.0 255.255.255.0 lease 0 0 20 update arp!interface Ethernet 0 ip address 10.0.0.1 255.255.255.0 half-duplex arp authorized arp timeout 60! optional command to adjust the periodic ARP probes sent to the peer arp probe interval 5 count 15
Router 2 (DHCP Client)
interface Ethernet 0/0 ip address dhcp half-duplex
Example Configuring DHCP Authorized ARPConfiguration Examples for DHCP Services for Accounting and Security
IP Addressing: DHCP Configuration Guide, Cisco IOS Release 12.4T 163
Example Verifying DHCP Authorized ARPThe following is sample output from the show arp command on Router 1 (see the figure above):
Router1# show arpProtocol Address Age (min) Hardware Addr Type InterfaceInternet 10.0.0.3 0 0004.dd0c.ffcb ARPA Ethernet01Internet 10.0.0.1 - 0004.dd0c.ff86 ARPA Ethernet0
The following is sample output from the show arp command on Router 2 (see the figure above):
Router2# show arpProtocol Address Age (min) Hardware Addr Type InterfaceInternet 10.0.0.3 - 0004.dd0c.ffcb ARPA Ethernet0/02Internet 10.0.0.1 0 0004.dd0c.ff86 ARPA Ethernet0/0
Example Configuring a DHCP Lease LimitIn the following example, if more than three clients try to obtain an IP address from ATM interface 4/0.1,the DHCPDISCOVER packets will not be forwarded to the DHCP server. If the DHCP server resides onthe same router, DHCP will not reply to more than three clients.
ip dhcp limit lease per interface 3!interface loopback 0 ip address 10.1.1.129 255.255.255.192!interface ATM 4/0.1 no ip address!interface ATM 4/0.1 point-to-point ip helper-address 172.16.1.2 ip unnumbered loopback 0 atm route-bridged ip pvc 88/800 encapsulation aal5snap
In the following example, five DHCP clients are allowed to receive IP addresses. If a sixth client tries toobtain an IP address, the DHCPDISCOVER messages will not be forwarded to the DHCP server and a trapwill be sent to the SNMP manager.
ip dhcp limit lease log ! ip dhcp pool pool1 network 10.1.1.0 255.255.255.0 !interface loopback 0 ip address 10.1.1.1 255.255.255.0 !interface serial 0/0.2 point-to-point ip dhcp limit lease 5 ip unnumbered loopback 0 exitsnmp-server enable traps dhcp interface
Additional References
Example Verifying DHCP Authorized ARP Additional References
IP Addressing: DHCP Configuration Guide, Cisco IOS Release 12.4T164
Related Documents
Related Topic Document Title
ARP commands: complete command syntax,command modes, defaults, usage guidelines, andexamples
Cisco IOS IP Addressing Services CommandReference
DHCP commands: complete command syntax,command modes, defaults, usage guidelines, andexamples
Cisco IOS IP Addressing Services CommandReference
DHCP conceptual information “DHCP Overview” module in the Cisco IOS IPAddressing Configuration Guide
DHCP server configuration “Configuring the Cisco IOS DHCP Server” modulein the Cisco IOS IP Addressing ConfigurationGuide
DHCP ODAP configuration “Configuring the DHCP Server On-DemandAddress Pool Manager” module in the Cisco IOS IPAddressing Configuration Guide
DHCP client configuration “Configuring the Cisco IOS DHCP Client” modulein the Cisco IOS IP Addressing ConfigurationGuide
DHCP relay agent configuration “Configuring the Cisco IOS DHCP Relay Agent”module in the Cisco IOS IP AddressingConfiguration Guide
DHCP enhancements for edge-session management “Configuring DHCP Enhancements for Edge-Session Management” module in the Cisco IOS IPAddressing Configuration Guide
AAA and RADIUS configuration tasks Cisco IOS Security Configuration Guide
AAA and RADIUS commands: complete commandsyntax, command mode, defaults, usage guidelines,and examples
Cisco IOS Security Command Reference
Standards
Standards Title
No new or modified standards are supported by thisfunctionality.
--
Configuring DHCP Services for Accounting and SecurityAdditional References
IP Addressing: DHCP Configuration Guide, Cisco IOS Release 12.4T 165
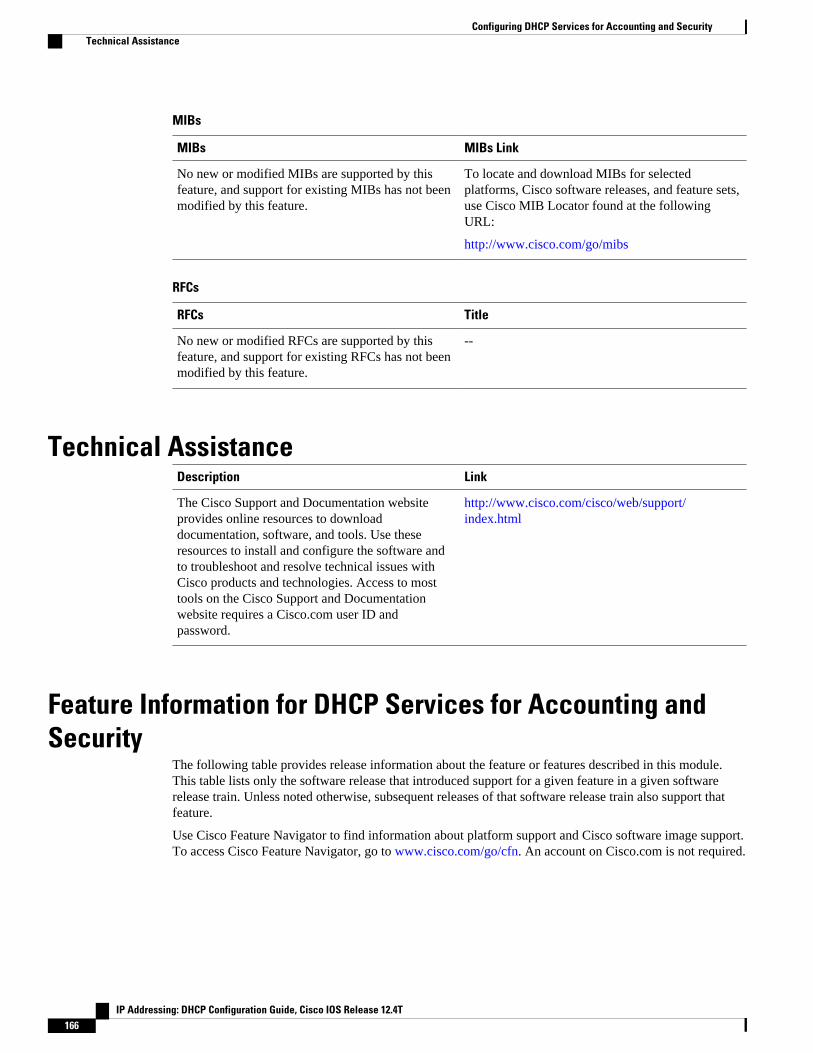
MIBs
MIBs MIBs Link
No new or modified MIBs are supported by thisfeature, and support for existing MIBs has not beenmodified by this feature.
To locate and download MIBs for selectedplatforms, Cisco software releases, and feature sets,use Cisco MIB Locator found at the followingURL:
http://www.cisco.com/go/mibs
RFCs
RFCs Title
No new or modified RFCs are supported by thisfeature, and support for existing RFCs has not beenmodified by this feature.
--
Technical AssistanceDescription Link
The Cisco Support and Documentation websiteprovides online resources to downloaddocumentation, software, and tools. Use theseresources to install and configure the software andto troubleshoot and resolve technical issues withCisco products and technologies. Access to mosttools on the Cisco Support and Documentationwebsite requires a Cisco.com user ID andpassword.
http://www.cisco.com/cisco/web/support/index.html
Feature Information for DHCP Services for Accounting andSecurity
The following table provides release information about the feature or features described in this module.This table lists only the software release that introduced support for a given feature in a given softwarerelease train. Unless noted otherwise, subsequent releases of that software release train also support thatfeature.
Use Cisco Feature Navigator to find information about platform support and Cisco software image support.To access Cisco Feature Navigator, go to www.cisco.com/go/cfn. An account on Cisco.com is not required.
Configuring DHCP Services for Accounting and Security Technical Assistance
IP Addressing: DHCP Configuration Guide, Cisco IOS Release 12.4T166
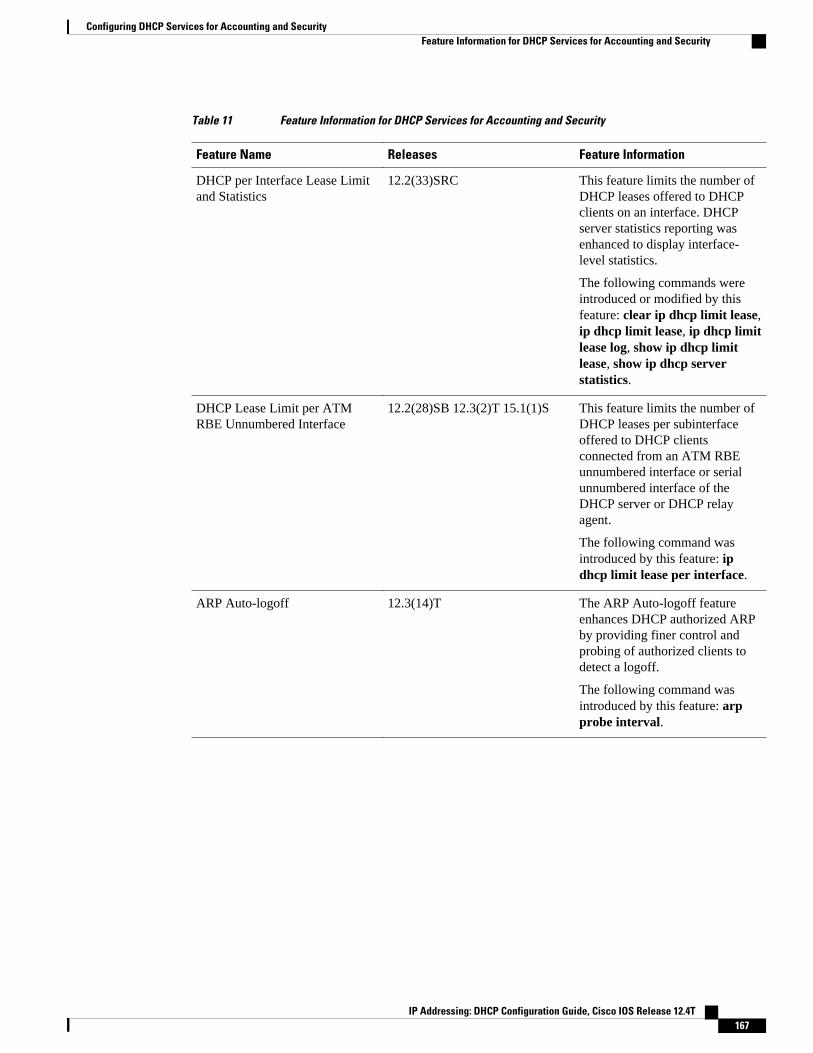
Table 11 Feature Information for DHCP Services for Accounting and Security
Feature Name Releases Feature Information
DHCP per Interface Lease Limitand Statistics
12.2(33)SRC This feature limits the number ofDHCP leases offered to DHCPclients on an interface. DHCPserver statistics reporting wasenhanced to display interface-level statistics.
The following commands wereintroduced or modified by thisfeature: clear ip dhcp limit lease,ip dhcp limit lease, ip dhcp limitlease log, show ip dhcp limitlease, show ip dhcp serverstatistics.
DHCP Lease Limit per ATMRBE Unnumbered Interface
12.2(28)SB 12.3(2)T 15.1(1)S This feature limits the number ofDHCP leases per subinterfaceoffered to DHCP clientsconnected from an ATM RBEunnumbered interface or serialunnumbered interface of theDHCP server or DHCP relayagent.
The following command wasintroduced by this feature: ipdhcp limit lease per interface.
ARP Auto-logoff 12.3(14)T The ARP Auto-logoff featureenhances DHCP authorized ARPby providing finer control andprobing of authorized clients todetect a logoff.
The following command wasintroduced by this feature: arpprobe interval.
Configuring DHCP Services for Accounting and SecurityFeature Information for DHCP Services for Accounting and Security
IP Addressing: DHCP Configuration Guide, Cisco IOS Release 12.4T 167
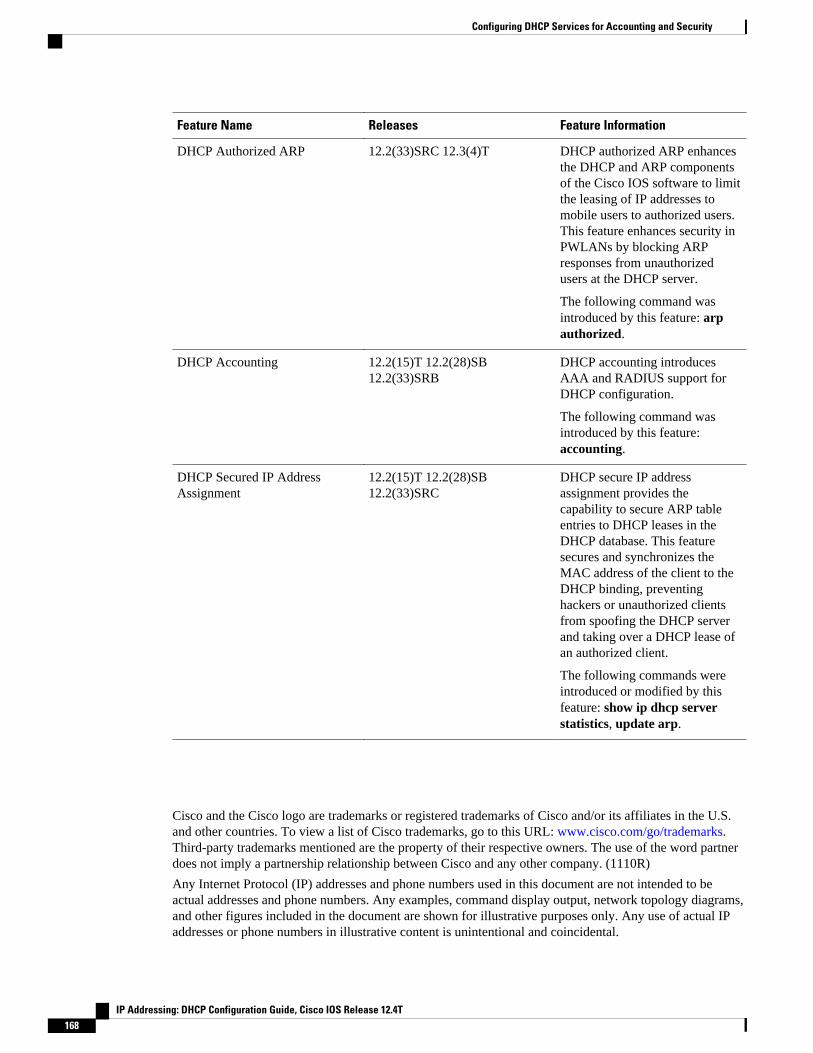
Feature Name Releases Feature Information
DHCP Authorized ARP 12.2(33)SRC 12.3(4)T DHCP authorized ARP enhancesthe DHCP and ARP componentsof the Cisco IOS software to limitthe leasing of IP addresses tomobile users to authorized users.This feature enhances security inPWLANs by blocking ARPresponses from unauthorizedusers at the DHCP server.
The following command wasintroduced by this feature: arpauthorized.
DHCP Accounting 12.2(15)T 12.2(28)SB12.2(33)SRB
DHCP accounting introducesAAA and RADIUS support forDHCP configuration.
The following command wasintroduced by this feature:accounting.
DHCP Secured IP AddressAssignment
12.2(15)T 12.2(28)SB12.2(33)SRC
DHCP secure IP addressassignment provides thecapability to secure ARP tableentries to DHCP leases in theDHCP database. This featuresecures and synchronizes theMAC address of the client to theDHCP binding, preventinghackers or unauthorized clientsfrom spoofing the DHCP serverand taking over a DHCP lease ofan authorized client.
The following commands wereintroduced or modified by thisfeature: show ip dhcp serverstatistics, update arp.
Cisco and the Cisco logo are trademarks or registered trademarks of Cisco and/or its affiliates in the U.S.and other countries. To view a list of Cisco trademarks, go to this URL: www.cisco.com/go/trademarks.Third-party trademarks mentioned are the property of their respective owners. The use of the word partnerdoes not imply a partnership relationship between Cisco and any other company. (1110R)
Any Internet Protocol (IP) addresses and phone numbers used in this document are not intended to beactual addresses and phone numbers. Any examples, command display output, network topology diagrams,and other figures included in the document are shown for illustrative purposes only. Any use of actual IPaddresses or phone numbers in illustrative content is unintentional and coincidental.
Configuring DHCP Services for Accounting and Security
IP Addressing: DHCP Configuration Guide, Cisco IOS Release 12.4T168

Configuring DHCP Services for Accounting and Security
IP Addressing: DHCP Configuration Guide, Cisco IOS Release 12.4T 169

Example Configuring a DHCP Lease Limit
IP Addressing: DHCP Configuration Guide, Cisco IOS Release 12.4T170
Configuring DHCP Enhancements for Edge-Session Management
The DHCP Enhancements for Edge-Session Management feature provides the capability of simultaneousservice by multiple Internet Service Providers (ISPs) to customers using one network infrastructure. Theend-user customer may change ISPs at any time.
The DHCP enhancements evolved out of the Service Gateways (SGs) requirement to receive informationfrom the DHCP server about when client DISCOVER packets (session initiation) are received, when anaddress has been allocated to a client, and when a client has released a DHCP lease or the lease hasexpired (session termination).
• Finding Feature Information, page 171• Information About DHCP Enhancements for Edge-Session Management, page 171• How to Configure DHCP Enhancements for Edge-Session Management, page 174• Configuration Examples for DHCP Enhancements for Edge Session Management, page 185• Additional References, page 188• Feature Information for DHCP Enhancements for Edge-Session Management, page 190
Finding Feature InformationYour software release may not support all the features documented in this module. For the latest featureinformation and caveats, see the release notes for your platform and software release. To find informationabout the features documented in this module, and to see a list of the releases in which each feature issupported, see the Feature Information Table at the end of this document.
Use Cisco Feature Navigator to find information about platform support and Cisco software image support.To access Cisco Feature Navigator, go to www.cisco.com/go/cfn. An account on Cisco.com is not required.
Information About DHCP Enhancements for Edge-SessionManagement
• DHCP Servers and Relay Agents, page 172
• On-Demand Address Pool Management, page 172
• Design of the DHCP Enhancements for Edge-Session Management Feature, page 172
• Benefits of the DHCP Enhancements for Edge-Session Management, page 173
IP Addressing: DHCP Configuration Guide, Cisco IOS Release 12.4T 171
DHCP Servers and Relay AgentsDHCP provides a framework for passing configuration information dynamically to hosts on a TCP/IPnetwork. A DHCP client is an Internet host using DHCP to obtain configuration parameters such as an IPaddress.
A DHCP relay agent is any host that forwards DHCP packets between clients and servers. Relay agents areused to forward requests and replies between clients and servers when they are not on the same physicalsubnet. Relay agent forwarding is distinct from the normal forwarding of an IP router, where IP datagramsare switched between networks somewhat transparently. By contrast, relay agents receive DHCP messagesand then generate a new DHCP message to send on another interface.
For more information, refer to the DHCP modules in the Cisco IOS IP Addressing Services ConfigurationGuide , Release 12.4.
On-Demand Address Pool ManagementAn On-Demand Address Pool (ODAP) is used to centralize the management of large pools of addressesand simplifies the configuration of large networks. ODAP provides a central management point for theallocation and assignment of IP addresses.
When a Cisco router is configured as an ODAP manager, pools of IP addresses are dynamically increasedor reduced in size depending on the address utilization level. The ODAP manager is supported bycentralized Remote Authentication Dial-In User Service (RADIUS) or DHCP servers and is configured torequest an initial pool of addresses from either the RADIUS or DHCP server.
The ODAP manager controls IP address assignment and will allocate additional IP addresses as necessary.This method of address allocation and assignment optimizes the use of available address space andsimplifies the configuration of medium and large-sized networks.
For more information, see the “Configuring the DHCP Server On-Demand Address Pool Manager”module.
Design of the DHCP Enhancements for Edge-Session Management FeatureWith the DHCP Enhancements for Edge-Session Management feature, a DHCP server and relay agent areseparate, but closely coupled. The basic design of the feature encompasses two types of configuration at theedge of an ISP network as follows:
• DHCP server and an SG that are co-resident (in the same device)• DHCP relay agent and an SG that are co-resident
• DHCP Server Co-Resident with the SG, page 172
• DHCP Relay Agent Co-Resident with the SG, page 173
DHCP Server Co-Resident with the SGWith this configuration, the DHCP server is in the same device as the SG and allocates addresses fromlocally configured address pools or acquires a subnet of addresses to allocate from some other system in thenetwork. There are no changes to the server address allocation function to support the configuration.
This configuration enables the DHCP server to notify the SG that it has received a broadcast sent by theend-user DHCP client. The SG passes the MAC address and other information to the DHCP server. The SG
DHCP Servers and Relay Agents DHCP Server Co-Resident with the SG
IP Addressing: DHCP Configuration Guide, Cisco IOS Release 12.4T172
also passes a class name (for example, the name of the ISP), which is used by the DHCP server to match apool-class definition.
Lease-state notifications are always made by the DHCP server to the SG, because the information isalready present.
Note The local configuration may also be performed by an ODAP that acquires subnets for the address poolsfrom another DHCP server or a RADIUS server.
DHCP Relay Agent Co-Resident with the SGWith this configuration, the relay agent is in the same device as the SG and intercedes in DHCP sessions toappear as the DHCP server to the DHCP client. As the server, the relay agent may obtain enoughinformation about the DHCP session to notify the SG of all events (for example, lease termination).
Appearing to be the DHCP server is performed by using the DHCP functionality that is currently in use onunnumbered interfaces. This functionality enables the relay agent to substitute its own IP address for theserver.
The packet is passed by the relay agent to the DHCP server and the SG is notified of the receipt. Followingthe notification, an inquiry is made by the relay agent to the SG about which DHCP class name to use.Then, the packet is passed by the relay agent to the selected DHCP server.
The end-user DHCP client MAC address and other pertinent information is passed to the SG. The SGreturns the DHCP class name to use when matching a DHCP pool if the SG is configured to do so. If theDHCP relay agent is not acting as a server, it relays the packet to the DHCP server.
Note An address pool may have one DHCP class defined to specify one central DHCP server to which the relayagent passes the packet, or it may have multiple DHCP classes defined to specify a different DHCP serverfor each client.
Benefits of the DHCP Enhancements for Edge-Session ManagementThe benefits of the DHCP Enhancements for Edge-Session Management feature are as follows:
• Allows the full DHCP server system to be located farther inside the network, while only running arelatively simple DHCP relay agent at the edge.
• Simplifies the DHCP configuration at the edge.• Allows all DHCP server administration to occur closer to the middle of the network on one centralized
DHCP server, or on separate DHCP servers (one for each ISP).• Allows each ISP full control over all DHCP options and lease times.• Allows both the DHCP server and client configurations to be used on the same edge system
simultaneously.
Benefits of the DHCP Enhancements for Edge-Session ManagementDHCP Relay Agent Co-Resident with the SG
IP Addressing: DHCP Configuration Guide, Cisco IOS Release 12.4T 173
How to Configure DHCP Enhancements for Edge-SessionManagement
• Configuring the DHCP Address Pool and a Class Name, page 174
• Configuring a Relay Pool with a Relay Source and Destination, page 176
• Configuring a Relay Pool for a Remote DHCP Server, page 178
• Configuring Other Types of Relay Pools, page 181
Configuring the DHCP Address Pool and a Class NamePerform this task to configure a DHCP server that assigns addresses from an address pool for a specificclass name that has been assigned by an SG that is co-resident with the DHCP server at the edge.
If a DHCP server is resident in the same device as an SG and both are at the edge, a class name and addresspool should be configured. In this case, the DHCP server notifies an SG of a DISCOVER broadcastreceived from a client and the SG returns a class name. The returned class name designates an addressrange of an address pool. The DHCP server sends the MAC address and IP address of the incominginterface or the specified relay-agent address to the SG.
Note If the DHCP server has its address pools defined locally or retrieves the subnets from ISP DHCP servers orAAA servers using ODAP, additional DHCP server configuration on behalf of the SG is not required.
If dynamic allocation of the address pool is required using ODAP, the origin command is specified.
The specification of the class name is required in the DHCP address-pool configuration and in the SGsystem itself to designate each DHCP client class name. A default class name should be configured if a userdoes not have one.
Each address pool should be associated with one or more DHCP classes (address-provider ISPs). When theDHCP client selects an ISP, the selection becomes the class name designated by the SG.
SUMMARY STEPS
1. enable
2. configure terminal
3. ip dhcp pool name
4. origin {dhcp | file url}
5. network network-number [mask | prefix-length]
6. class class-name
7. address range start-ip end-ip
8. Repeat Steps 3, 5, and 6.
9. exit
Configuring the DHCP Address Pool and a Class Name How to Configure DHCP Enhancements for Edge-Session Management
IP Addressing: DHCP Configuration Guide, Cisco IOS Release 12.4T174
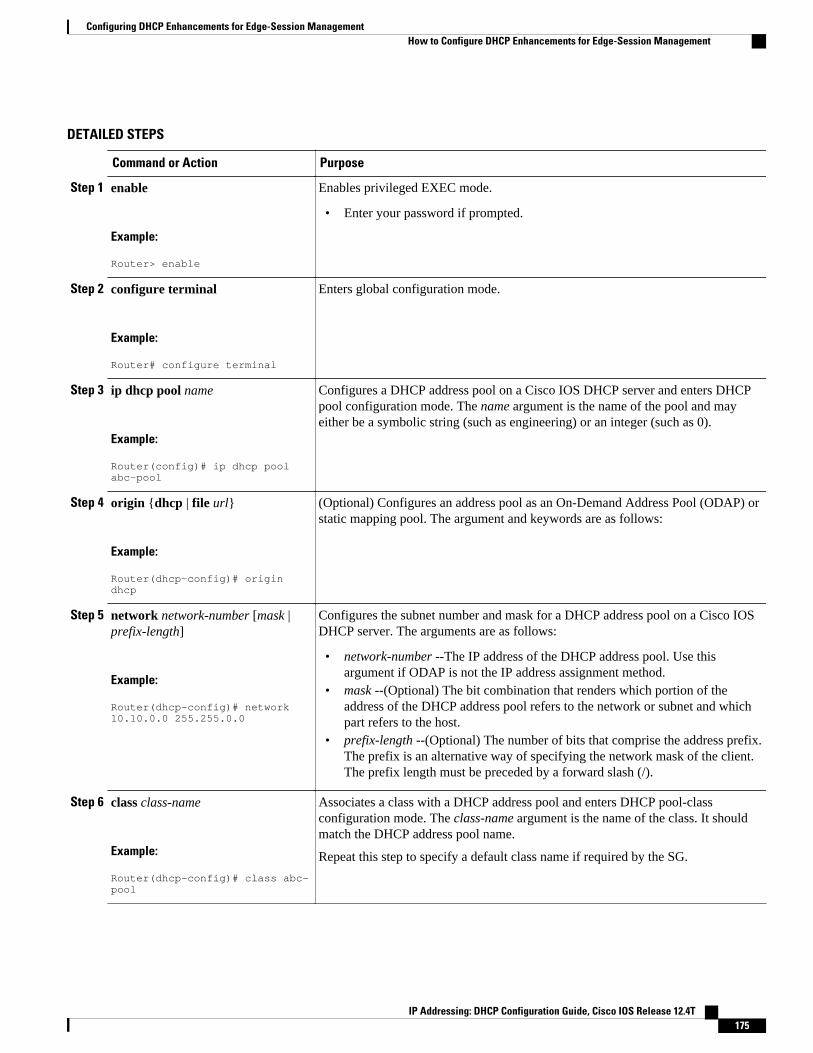
DETAILED STEPS
Command or Action Purpose
Step 1 enable
Example:
Router> enable
Enables privileged EXEC mode.
• Enter your password if prompted.
Step 2 configure terminal
Example:
Router# configure terminal
Enters global configuration mode.
Step 3 ip dhcp pool name
Example:
Router(config)# ip dhcp pool abc-pool
Configures a DHCP address pool on a Cisco IOS DHCP server and enters DHCPpool configuration mode. The name argument is the name of the pool and mayeither be a symbolic string (such as engineering) or an integer (such as 0).
Step 4 origin {dhcp | file url}
Example:
Router(dhcp-config)# origin dhcp
(Optional) Configures an address pool as an On-Demand Address Pool (ODAP) orstatic mapping pool. The argument and keywords are as follows:
Step 5 network network-number [mask |prefix-length]
Example:
Router(dhcp-config)# network 10.10.0.0 255.255.0.0
Configures the subnet number and mask for a DHCP address pool on a Cisco IOSDHCP server. The arguments are as follows:
• network-number --The IP address of the DHCP address pool. Use thisargument if ODAP is not the IP address assignment method.
• mask --(Optional) The bit combination that renders which portion of theaddress of the DHCP address pool refers to the network or subnet and whichpart refers to the host.
• prefix-length --(Optional) The number of bits that comprise the address prefix.The prefix is an alternative way of specifying the network mask of the client.The prefix length must be preceded by a forward slash (/).
Step 6 class class-name
Example:
Router(dhcp-config)# class abc-pool
Associates a class with a DHCP address pool and enters DHCP pool-classconfiguration mode. The class-name argument is the name of the class. It shouldmatch the DHCP address pool name.
Repeat this step to specify a default class name if required by the SG.
Configuring DHCP Enhancements for Edge-Session ManagementHow to Configure DHCP Enhancements for Edge-Session Management
IP Addressing: DHCP Configuration Guide, Cisco IOS Release 12.4T 175
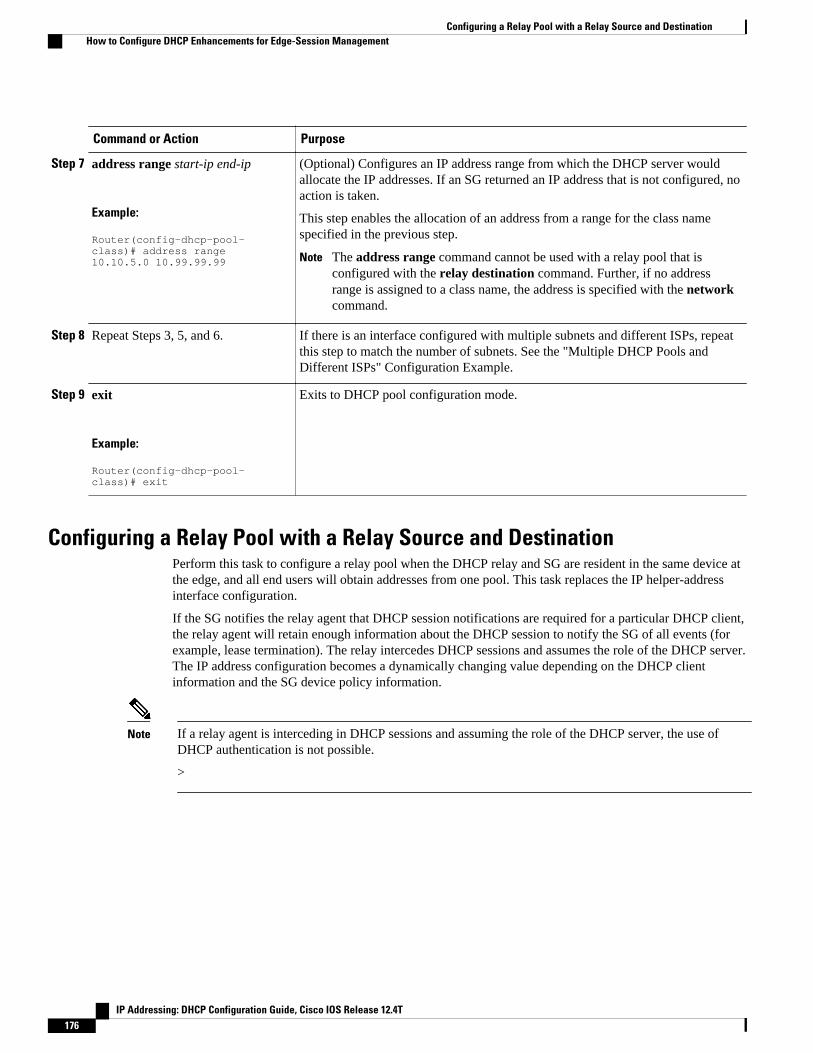
Command or Action Purpose
Step 7 address range start-ip end-ip
Example:
Router(config-dhcp-pool-class)# address range 10.10.5.0 10.99.99.99
(Optional) Configures an IP address range from which the DHCP server wouldallocate the IP addresses. If an SG returned an IP address that is not configured, noaction is taken.
This step enables the allocation of an address from a range for the class namespecified in the previous step.
Note The address range command cannot be used with a relay pool that isconfigured with the relay destination command. Further, if no addressrange is assigned to a class name, the address is specified with the networkcommand.
Step 8 Repeat Steps 3, 5, and 6. If there is an interface configured with multiple subnets and different ISPs, repeatthis step to match the number of subnets. See the "Multiple DHCP Pools andDifferent ISPs" Configuration Example.
Step 9 exit
Example:
Router(config-dhcp-pool-class)# exit
Exits to DHCP pool configuration mode.
Configuring a Relay Pool with a Relay Source and DestinationPerform this task to configure a relay pool when the DHCP relay and SG are resident in the same device atthe edge, and all end users will obtain addresses from one pool. This task replaces the IP helper-addressinterface configuration.
If the SG notifies the relay agent that DHCP session notifications are required for a particular DHCP client,the relay agent will retain enough information about the DHCP session to notify the SG of all events (forexample, lease termination). The relay intercedes DHCP sessions and assumes the role of the DHCP server.The IP address configuration becomes a dynamically changing value depending on the DHCP clientinformation and the SG device policy information.
Note If a relay agent is interceding in DHCP sessions and assuming the role of the DHCP server, the use ofDHCP authentication is not possible.
>
Configuring a Relay Pool with a Relay Source and Destination How to Configure DHCP Enhancements for Edge-Session Management
IP Addressing: DHCP Configuration Guide, Cisco IOS Release 12.4T176
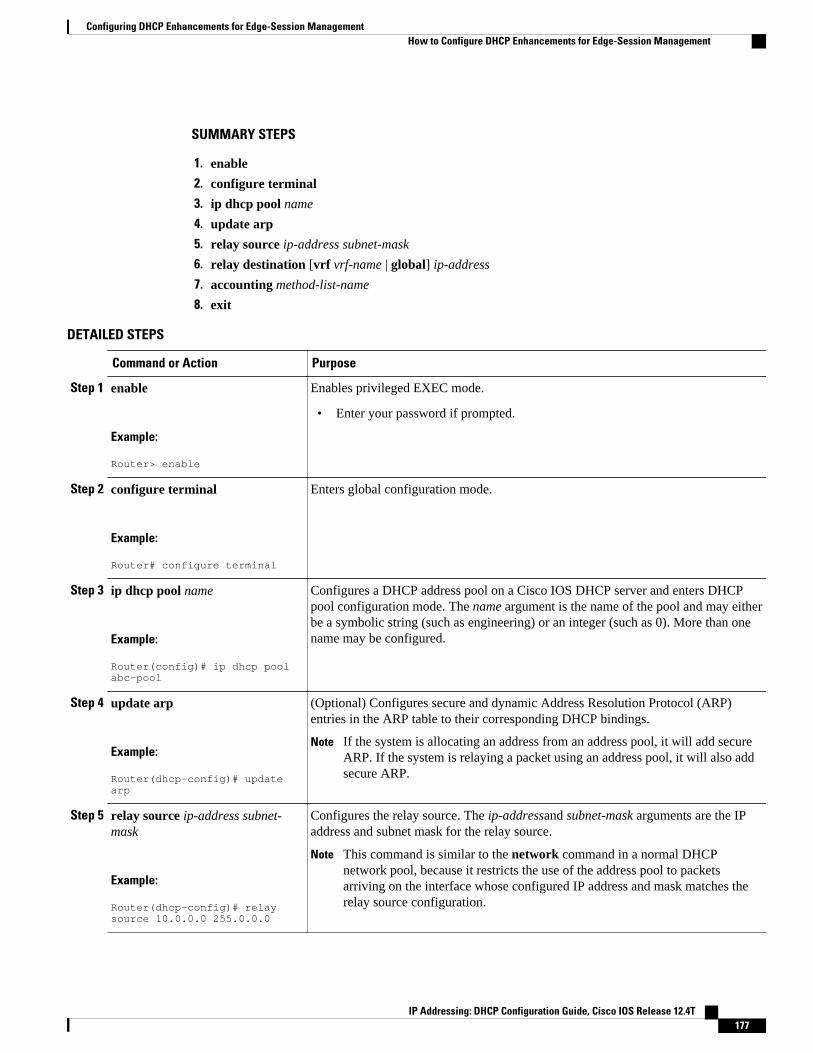
SUMMARY STEPS
1. enable
2. configure terminal
3. ip dhcp pool name
4. update arp
5. relay source ip-address subnet-mask
6. relay destination [vrf vrf-name | global] ip-address
7. accounting method-list-name
8. exit
DETAILED STEPS
Command or Action Purpose
Step 1 enable
Example:
Router> enable
Enables privileged EXEC mode.
• Enter your password if prompted.
Step 2 configure terminal
Example:
Router# configure terminal
Enters global configuration mode.
Step 3 ip dhcp pool name
Example:
Router(config)# ip dhcp pool abc-pool
Configures a DHCP address pool on a Cisco IOS DHCP server and enters DHCPpool configuration mode. The name argument is the name of the pool and may eitherbe a symbolic string (such as engineering) or an integer (such as 0). More than onename may be configured.
Step 4 update arp
Example:
Router(dhcp-config)# update arp
(Optional) Configures secure and dynamic Address Resolution Protocol (ARP)entries in the ARP table to their corresponding DHCP bindings.
Note If the system is allocating an address from an address pool, it will add secureARP. If the system is relaying a packet using an address pool, it will also addsecure ARP.
Step 5 relay source ip-address subnet-mask
Example:
Router(dhcp-config)# relay source 10.0.0.0 255.0.0.0
Configures the relay source. The ip-addressand subnet-mask arguments are the IPaddress and subnet mask for the relay source.
Note This command is similar to the network command in a normal DHCPnetwork pool, because it restricts the use of the address pool to packetsarriving on the interface whose configured IP address and mask matches therelay source configuration.
Configuring DHCP Enhancements for Edge-Session ManagementHow to Configure DHCP Enhancements for Edge-Session Management
IP Addressing: DHCP Configuration Guide, Cisco IOS Release 12.4T 177

Command or Action Purpose
Step 6 relay destination [vrf vrf-name |global] ip-address
Example:
Router(dhcp-config)# relay destination 10.5.5.0
Configures the IPv4 address of a remote DHCP server to which DHCP clientpackets are sent. The arguments and keywords are as follows:
• vrf --(Optional) Virtual routing and forwarding (VRF). The vrf-name argumentis the name of the VRF associated with the relay destination IP address.
• global --(Optional) Global IP address. Use the this keyword when the relayagent is in the global address space and the relay source is in a VRF.
• ip-address --IP address of the relay destination.
Note When using the relay destination command, the ip-address argument isassumed to be in the same VRF as the address pool under which thecommand was configured. If the relay destination IP address is in a differentVRF, or in the global address space, then the vrf vrf-name or globalkeywords need to be specified.
Step 7 accounting method-list-name
Example:
Router(dhcp-config)# accounting RADIUS-GROUP1
(Optional) Enables DHCP accounting if the specified server group is configured torun RADIUS accounting.
• AAA and RADIUS must be enabled before DHCP accounting will operate.• The example configures DHCP accounting START and STOP messages to be
sent if RADIUS-GROUP1 is configured as a start-stop group. STOP messageswill only be sent if RADIUS-GROUP1 is configured as a stop-only group. See“Configuring DHCP Services for Accounting and Security” module for moreinformation on DHCP accounting.
Step 8 exit
Example:
Router(dhcp-config)# exit
Exits to global configuration mode.
Configuring a Relay Pool for a Remote DHCP ServerPerform this task to use an SG-supplied class name when selecting the remote DHCP server in a configuredrelay pool, which is used to specify how DHCP client packets should be relayed. Multiple configurations ofrelay targets may appear in a pool-class definition in which case all addresses are used for relay purposes.
Note The relay source command cannot be used with the network command or origin command since thosecommands implicitly designate the incoming interface and are used to define a different type of pool. Itassociates the relay only with an interface in the same way that the ip helper-address command does by itspresence as an interface configuration command.
>
Configuring a Relay Pool for a Remote DHCP Server How to Configure DHCP Enhancements for Edge-Session Management
IP Addressing: DHCP Configuration Guide, Cisco IOS Release 12.4T178
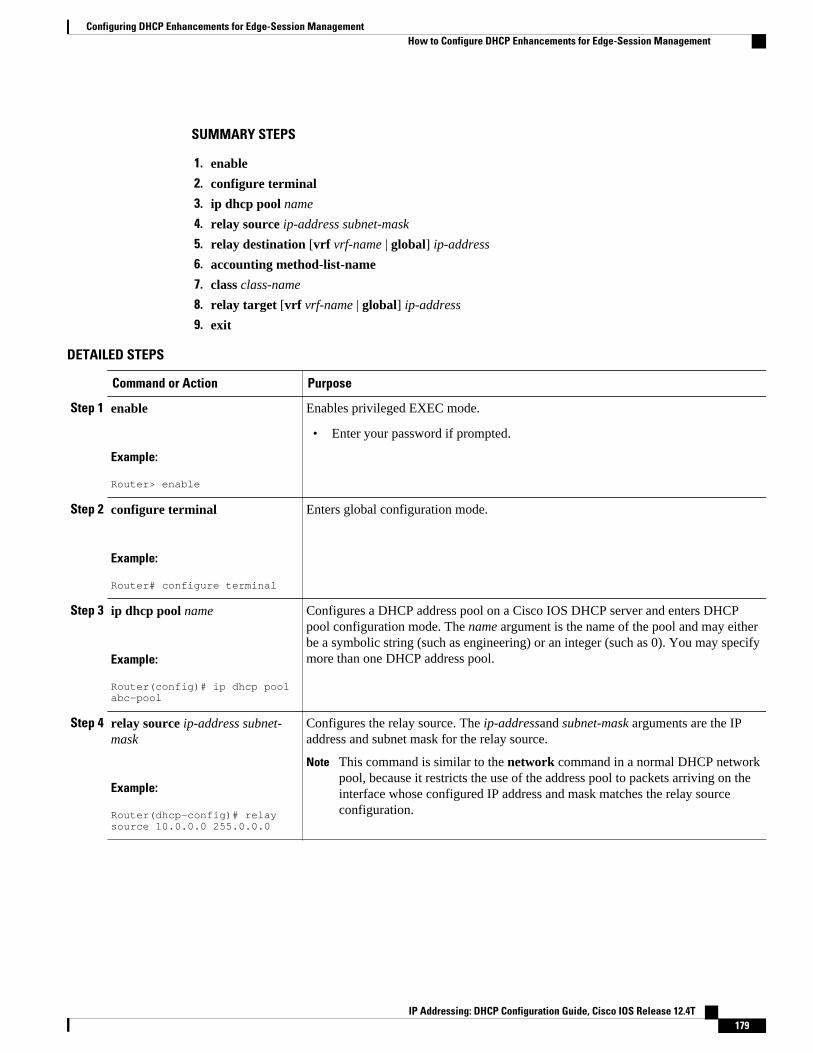
SUMMARY STEPS
1. enable
2. configure terminal
3. ip dhcp pool name
4. relay source ip-address subnet-mask
5. relay destination [vrf vrf-name | global] ip-address
6. accounting method-list-name
7. class class-name
8. relay target [vrf vrf-name | global] ip-address
9. exit
DETAILED STEPS
Command or Action Purpose
Step 1 enable
Example:
Router> enable
Enables privileged EXEC mode.
• Enter your password if prompted.
Step 2 configure terminal
Example:
Router# configure terminal
Enters global configuration mode.
Step 3 ip dhcp pool name
Example:
Router(config)# ip dhcp pool abc-pool
Configures a DHCP address pool on a Cisco IOS DHCP server and enters DHCPpool configuration mode. The name argument is the name of the pool and may eitherbe a symbolic string (such as engineering) or an integer (such as 0). You may specifymore than one DHCP address pool.
Step 4 relay source ip-address subnet-mask
Example:
Router(dhcp-config)# relay source 10.0.0.0 255.0.0.0
Configures the relay source. The ip-addressand subnet-mask arguments are the IPaddress and subnet mask for the relay source.
Note This command is similar to the network command in a normal DHCP networkpool, because it restricts the use of the address pool to packets arriving on theinterface whose configured IP address and mask matches the relay sourceconfiguration.
Configuring DHCP Enhancements for Edge-Session ManagementHow to Configure DHCP Enhancements for Edge-Session Management
IP Addressing: DHCP Configuration Guide, Cisco IOS Release 12.4T 179
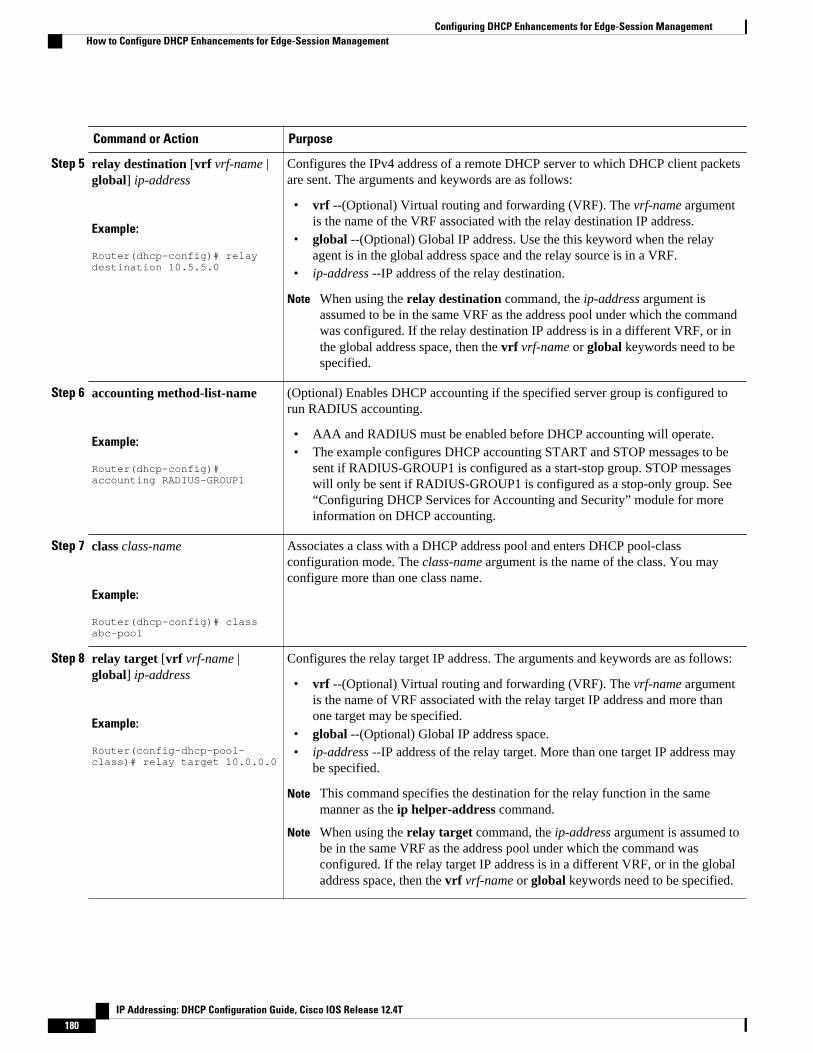
Command or Action Purpose
Step 5 relay destination [vrf vrf-name |global] ip-address
Example:
Router(dhcp-config)# relay destination 10.5.5.0
Configures the IPv4 address of a remote DHCP server to which DHCP client packetsare sent. The arguments and keywords are as follows:
• vrf --(Optional) Virtual routing and forwarding (VRF). The vrf-name argumentis the name of the VRF associated with the relay destination IP address.
• global --(Optional) Global IP address. Use the this keyword when the relayagent is in the global address space and the relay source is in a VRF.
• ip-address --IP address of the relay destination.
Note When using the relay destination command, the ip-address argument isassumed to be in the same VRF as the address pool under which the commandwas configured. If the relay destination IP address is in a different VRF, or inthe global address space, then the vrf vrf-name or global keywords need to bespecified.
Step 6 accounting method-list-name
Example:
Router(dhcp-config)# accounting RADIUS-GROUP1
(Optional) Enables DHCP accounting if the specified server group is configured torun RADIUS accounting.
• AAA and RADIUS must be enabled before DHCP accounting will operate.• The example configures DHCP accounting START and STOP messages to be
sent if RADIUS-GROUP1 is configured as a start-stop group. STOP messageswill only be sent if RADIUS-GROUP1 is configured as a stop-only group. See“Configuring DHCP Services for Accounting and Security” module for moreinformation on DHCP accounting.
Step 7 class class-name
Example:
Router(dhcp-config)# class abc-pool
Associates a class with a DHCP address pool and enters DHCP pool-classconfiguration mode. The class-name argument is the name of the class. You mayconfigure more than one class name.
Step 8 relay target [vrf vrf-name |global] ip-address
Example:
Router(config-dhcp-pool-class)# relay target 10.0.0.0
Configures the relay target IP address. The arguments and keywords are as follows:
• vrf --(Optional) Virtual routing and forwarding (VRF). The vrf-name argumentis the name of VRF associated with the relay target IP address and more thanone target may be specified.
• global --(Optional) Global IP address space.• ip-address --IP address of the relay target. More than one target IP address may
be specified.
Note This command specifies the destination for the relay function in the samemanner as the ip helper-address command.
Note When using the relay target command, the ip-address argument is assumed tobe in the same VRF as the address pool under which the command wasconfigured. If the relay target IP address is in a different VRF, or in the globaladdress space, then the vrf vrf-name or global keywords need to be specified.
Configuring DHCP Enhancements for Edge-Session Management How to Configure DHCP Enhancements for Edge-Session Management
IP Addressing: DHCP Configuration Guide, Cisco IOS Release 12.4T180
Command or Action Purpose
Step 9 exit
Example:
Router(config-dhcp-pool-class)# exit
Exits to DHCP pool configuration mode.
Configuring Other Types of Relay Pools• Configuring Relay Information for an Address Pool, page 181
• Configuring Multiple Relay Sources for a Relay Pool, page 183
Configuring Relay Information for an Address PoolPerform this task to configure relay information for an address pool. In this configuration, the SG sends oneclass name that results in the DISCOVER packet being relayed to a server at the IP address configuredusing the relay targetcommand. If the SG sends a class name that is not configured as being associatedwith the address pool, then no action is taken.
Note Specifying the address range command and relay target command in a pool-class definition is notpossible, because this would allocate an address and relay for the same packet.
>
SUMMARY STEPS
1. enable
2. configure terminal
3. ip dhcp pool name
4. network network-number [mask | prefix-length]
5. class class-name
6. relay target [vrf vrf-name | global] ip-address
7. exit
8. Repeat Steps 5 through 7 for each DHCP class you need to configure.
Configuring Other Types of Relay PoolsConfiguring Relay Information for an Address Pool
IP Addressing: DHCP Configuration Guide, Cisco IOS Release 12.4T 181
DETAILED STEPS
Command or Action Purpose
Step 1 enable
Example:
Router> enable
Enables privileged EXEC mode.
• Enter your password if prompted.
Step 2 configure terminal
Example:
Router# configure terminal
Enters global configuration mode.
Step 3 ip dhcp pool name
Example:
Router(config)# ip dhcp pool abc-pool
Configures a DHCP address pool on a Cisco IOS DHCP server and enters DHCPpool configuration mode. The name argument is the name of the pool and mayeither be a symbolic string (such as engineering) or an integer (such as 0).
Step 4 network network-number [mask |prefix-length]
Example:
Router(dhcp-config)# network 10.0.0.0 255.0.0.0
Configures the subnet number and mask for a DHCP address pool on a Cisco IOSDHCP server. The arguments are as follows:
• network-number --The IP address of the DHCP address pool.• mask --(Optional) The bit combination that renders which portion of the
address of the DHCP address pool refers to the network or subnet and whichpart refers to the host.
• prefix-length --(Optional) The number of bits that comprise the addressprefix. The prefix is an alternative way of specifying the network mask of theclient. The prefix length must be preceded by a forward slash (/).
Step 5 class class-name
Example:
Router(dhcp-config)# class abc-pool
Associates a class with a DHCP address pool and enters DHCP pool-classconfiguration mode. The class-name argument is the name of the class. More thanone class name may be configured.
Note If no relay target or address range is configured for a DHCP pool classname, the DHCP pool configuration is used as the class by default.
Configuring DHCP Enhancements for Edge-Session Management Configuring Relay Information for an Address Pool
IP Addressing: DHCP Configuration Guide, Cisco IOS Release 12.4T182
Command or Action Purpose
Step 6 relay target [vrf vrf-name | global]ip-address
Example:
Router(config-dhcp-pool-class)# relay target 10.0.0.0
Configures the relay target IP address. The arguments and keywords for the relaytarget command are as follows:
• vrf --(Optional) Virtual routing and forwarding (VRF). The vrf-nameargument is the name of VRF associated with the relay target IP address andmore than one target may be specified.
• global --(Optional) Global IP address space.• ip-address --IP address of the relay target. More than one target IP address
may be specified.
Note When using the relay target command, the ip-address argument isassumed to be in the same VRF as the address pool under which thecommand was configured. If the relay target IP address is in a differentVRF, or in the global address space, then the vrf vrf-name or globalkeywords need to be specified.
Step 7 exit
Example:
Router(config-dhcp-pool-class)# exit
Exits to DHCP pool configuration mode.
Step 8 Repeat Steps 5 through 7 for eachDHCP class you need to configure.
--
Configuring Multiple Relay Sources for a Relay PoolPerform this task to configure multiple relay sources for a relay pool. The configuration is similar toconfiguring an IP helper address on multiple interfaces. Pools are matched to the IP addresses on anincoming interface in the order in which the interfaces display when the show running-configcommand isused. Once a relay is found or an address allocation is found, the search stops.
SUMMARY STEPS
1. enable
2. configure terminal
3. interface type number
4. ip address ip-address mask [secondary]
5. exit
6. ip dhcp pool name
7. relay source ip-address subnet-mask
8. relay destination [vrf vrf-name | global] ip-address
9. accounting method-list-name
10. Repeat Steps 6 and 7 for each configured DHCP pool.
11. exit
Configuring DHCP Enhancements for Edge-Session ManagementConfiguring Multiple Relay Sources for a Relay Pool
IP Addressing: DHCP Configuration Guide, Cisco IOS Release 12.4T 183
DETAILED STEPS
Command or Action Purpose
Step 1 enable
Example:
Router> enable
Enables privileged EXEC mode.
• Enter your password if prompted.
Step 2 configure terminal
Example:
Router# configure terminal
Enters global configuration mode.
Step 3 interface type number
Example:
Router(config)# interface ethernet1
Configures an interface and enters interface configuration mode. Thearguments are as follows:
Step 4 ip address ip-address mask[secondary]
Example:
Router(config-if)# ip address 10.0.0.0 255.0.0.0
Sets a primary or secondary IP address for an interface.
Step 5 exit
Example:
Router(config-if)# exit
Exits to global configuration mode.
Step 6 ip dhcp pool name
Example:
Router(config)# ip dhcp pool abc-pool1
Configures a DHCP address pool on a DHCP server and enters DHCP poolconfiguration mode. The name argument is the name of the pool and mayeither be a symbolic string (such as engineering) or an integer (such as 0).More than one pool may be assigned.
Configuring DHCP Enhancements for Edge-Session Management Configuring Multiple Relay Sources for a Relay Pool
IP Addressing: DHCP Configuration Guide, Cisco IOS Release 12.4T184
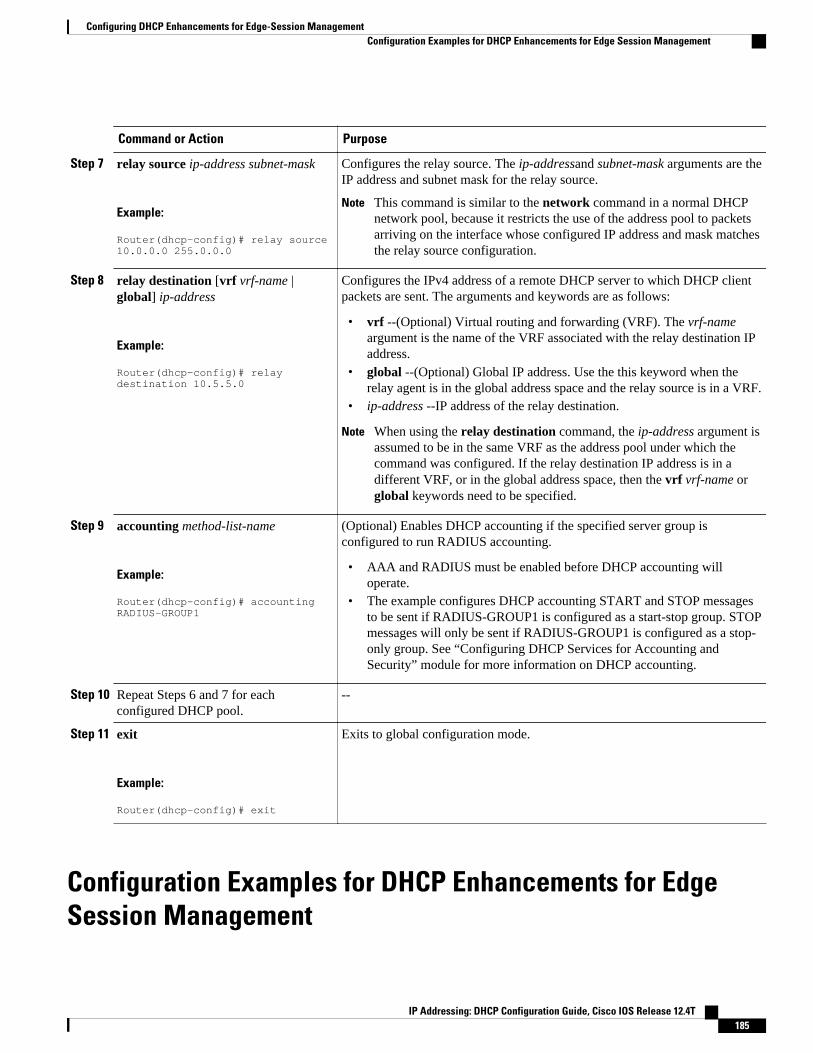
Command or Action Purpose
Step 7 relay source ip-address subnet-mask
Example:
Router(dhcp-config)# relay source 10.0.0.0 255.0.0.0
Configures the relay source. The ip-addressand subnet-mask arguments are theIP address and subnet mask for the relay source.
Note This command is similar to the network command in a normal DHCPnetwork pool, because it restricts the use of the address pool to packetsarriving on the interface whose configured IP address and mask matchesthe relay source configuration.
Step 8 relay destination [vrf vrf-name |global] ip-address
Example:
Router(dhcp-config)# relay destination 10.5.5.0
Configures the IPv4 address of a remote DHCP server to which DHCP clientpackets are sent. The arguments and keywords are as follows:
• vrf --(Optional) Virtual routing and forwarding (VRF). The vrf-nameargument is the name of the VRF associated with the relay destination IPaddress.
• global --(Optional) Global IP address. Use the this keyword when therelay agent is in the global address space and the relay source is in a VRF.
• ip-address --IP address of the relay destination.
Note When using the relay destination command, the ip-address argument isassumed to be in the same VRF as the address pool under which thecommand was configured. If the relay destination IP address is in adifferent VRF, or in the global address space, then the vrf vrf-name orglobal keywords need to be specified.
Step 9 accounting method-list-name
Example:
Router(dhcp-config)# accounting RADIUS-GROUP1
(Optional) Enables DHCP accounting if the specified server group isconfigured to run RADIUS accounting.
• AAA and RADIUS must be enabled before DHCP accounting willoperate.
• The example configures DHCP accounting START and STOP messagesto be sent if RADIUS-GROUP1 is configured as a start-stop group. STOPmessages will only be sent if RADIUS-GROUP1 is configured as a stop-only group. See “Configuring DHCP Services for Accounting andSecurity” module for more information on DHCP accounting.
Step 10 Repeat Steps 6 and 7 for eachconfigured DHCP pool.
--
Step 11 exit
Example:
Router(dhcp-config)# exit
Exits to global configuration mode.
Configuration Examples for DHCP Enhancements for EdgeSession Management
Configuring DHCP Enhancements for Edge-Session ManagementConfiguration Examples for DHCP Enhancements for Edge Session Management
IP Addressing: DHCP Configuration Guide, Cisco IOS Release 12.4T 185
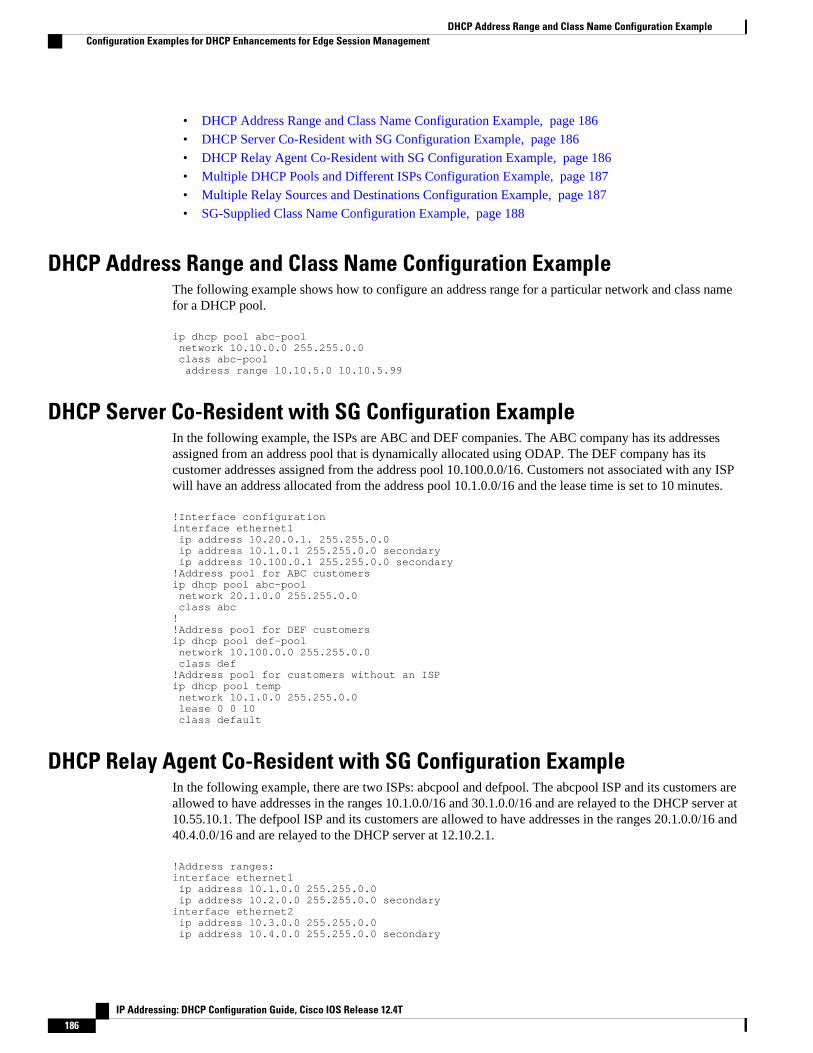
• DHCP Address Range and Class Name Configuration Example, page 186
• DHCP Server Co-Resident with SG Configuration Example, page 186
• DHCP Relay Agent Co-Resident with SG Configuration Example, page 186
• Multiple DHCP Pools and Different ISPs Configuration Example, page 187
• Multiple Relay Sources and Destinations Configuration Example, page 187
• SG-Supplied Class Name Configuration Example, page 188
DHCP Address Range and Class Name Configuration ExampleThe following example shows how to configure an address range for a particular network and class namefor a DHCP pool.
ip dhcp pool abc-pool network 10.10.0.0 255.255.0.0 class abc-pool address range 10.10.5.0 10.10.5.99
DHCP Server Co-Resident with SG Configuration ExampleIn the following example, the ISPs are ABC and DEF companies. The ABC company has its addressesassigned from an address pool that is dynamically allocated using ODAP. The DEF company has itscustomer addresses assigned from the address pool 10.100.0.0/16. Customers not associated with any ISPwill have an address allocated from the address pool 10.1.0.0/16 and the lease time is set to 10 minutes.
!Interface configurationinterface ethernet1 ip address 10.20.0.1. 255.255.0.0 ip address 10.1.0.1 255.255.0.0 secondary ip address 10.100.0.1 255.255.0.0 secondary!Address pool for ABC customersip dhcp pool abc-pool network 20.1.0.0 255.255.0.0 class abc!!Address pool for DEF customersip dhcp pool def-pool network 10.100.0.0 255.255.0.0 class def!Address pool for customers without an ISPip dhcp pool temp network 10.1.0.0 255.255.0.0 lease 0 0 10 class default
DHCP Relay Agent Co-Resident with SG Configuration ExampleIn the following example, there are two ISPs: abcpool and defpool. The abcpool ISP and its customers areallowed to have addresses in the ranges 10.1.0.0/16 and 30.1.0.0/16 and are relayed to the DHCP server at10.55.10.1. The defpool ISP and its customers are allowed to have addresses in the ranges 20.1.0.0/16 and40.4.0.0/16 and are relayed to the DHCP server at 12.10.2.1.
!Address ranges:interface ethernet1 ip address 10.1.0.0 255.255.0.0 ip address 10.2.0.0 255.255.0.0 secondaryinterface ethernet2 ip address 10.3.0.0 255.255.0.0 ip address 10.4.0.0 255.255.0.0 secondary
DHCP Address Range and Class Name Configuration Example Configuration Examples for DHCP Enhancements for Edge Session Management
IP Addressing: DHCP Configuration Guide, Cisco IOS Release 12.4T186
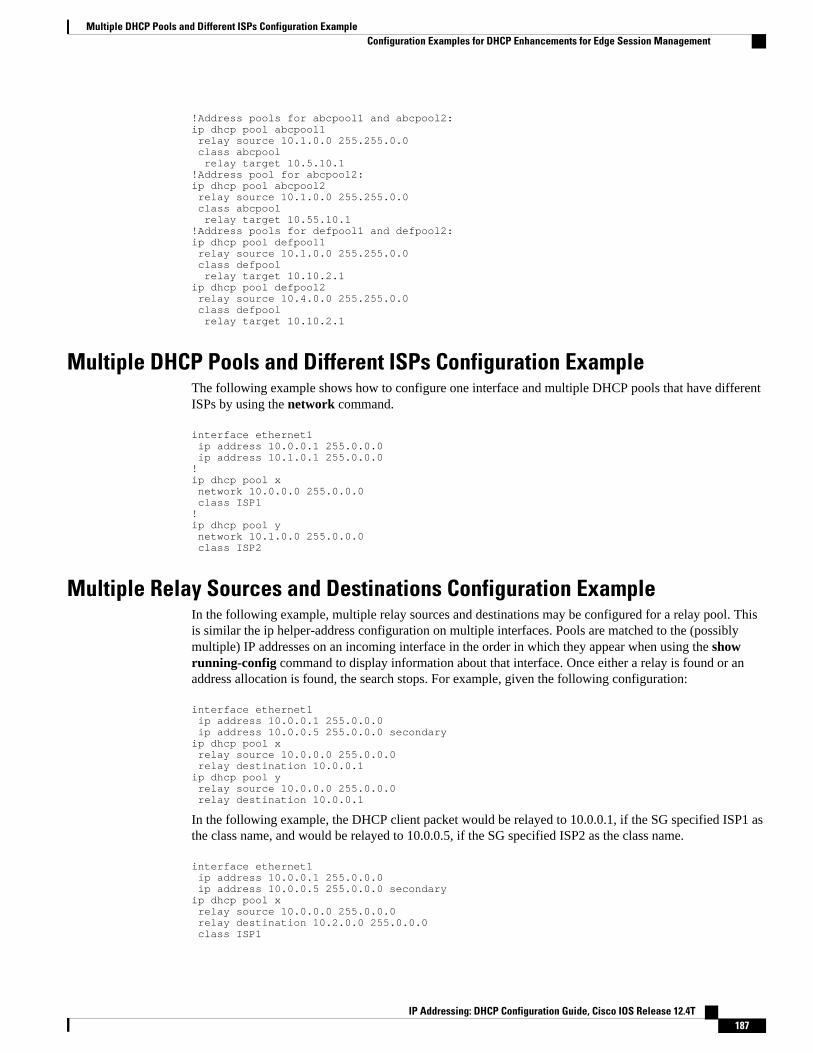
!Address pools for abcpool1 and abcpool2:ip dhcp pool abcpool1 relay source 10.1.0.0 255.255.0.0 class abcpool relay target 10.5.10.1!Address pool for abcpool2:ip dhcp pool abcpool2 relay source 10.1.0.0 255.255.0.0 class abcpool relay target 10.55.10.1!Address pools for defpool1 and defpool2:ip dhcp pool defpool1 relay source 10.1.0.0 255.255.0.0 class defpool relay target 10.10.2.1ip dhcp pool defpool2 relay source 10.4.0.0 255.255.0.0 class defpool relay target 10.10.2.1
Multiple DHCP Pools and Different ISPs Configuration ExampleThe following example shows how to configure one interface and multiple DHCP pools that have differentISPs by using the network command.
interface ethernet1 ip address 10.0.0.1 255.0.0.0 ip address 10.1.0.1 255.0.0.0!ip dhcp pool x network 10.0.0.0 255.0.0.0 class ISP1!ip dhcp pool y network 10.1.0.0 255.0.0.0 class ISP2
Multiple Relay Sources and Destinations Configuration ExampleIn the following example, multiple relay sources and destinations may be configured for a relay pool. Thisis similar the ip helper-address configuration on multiple interfaces. Pools are matched to the (possiblymultiple) IP addresses on an incoming interface in the order in which they appear when using the showrunning-config command to display information about that interface. Once either a relay is found or anaddress allocation is found, the search stops. For example, given the following configuration:
interface ethernet1 ip address 10.0.0.1 255.0.0.0 ip address 10.0.0.5 255.0.0.0 secondaryip dhcp pool x relay source 10.0.0.0 255.0.0.0 relay destination 10.0.0.1ip dhcp pool y relay source 10.0.0.0 255.0.0.0 relay destination 10.0.0.1
In the following example, the DHCP client packet would be relayed to 10.0.0.1, if the SG specified ISP1 asthe class name, and would be relayed to 10.0.0.5, if the SG specified ISP2 as the class name.
interface ethernet1 ip address 10.0.0.1 255.0.0.0 ip address 10.0.0.5 255.0.0.0 secondaryip dhcp pool x relay source 10.0.0.0 255.0.0.0 relay destination 10.2.0.0 255.0.0.0 class ISP1
Multiple DHCP Pools and Different ISPs Configuration ExampleConfiguration Examples for DHCP Enhancements for Edge Session Management
IP Addressing: DHCP Configuration Guide, Cisco IOS Release 12.4T 187
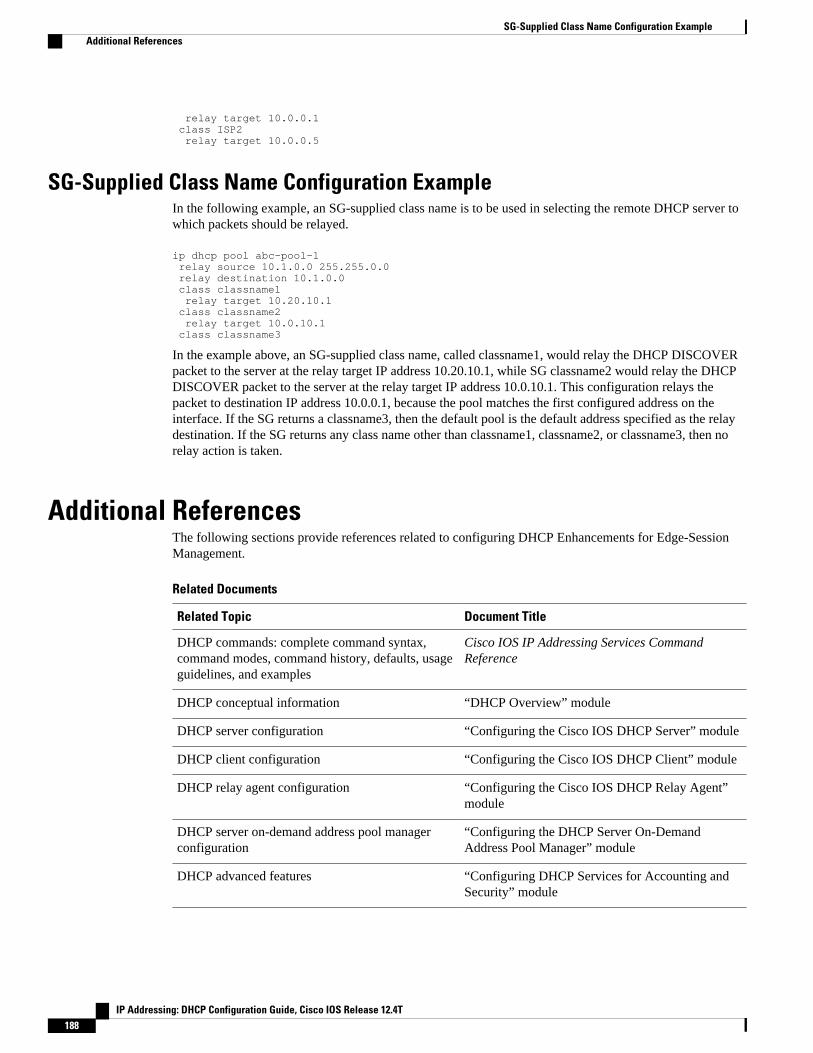
relay target 10.0.0.1 class ISP2 relay target 10.0.0.5
SG-Supplied Class Name Configuration ExampleIn the following example, an SG-supplied class name is to be used in selecting the remote DHCP server towhich packets should be relayed.
ip dhcp pool abc-pool-1 relay source 10.1.0.0 255.255.0.0 relay destination 10.1.0.0 class classname1 relay target 10.20.10.1 class classname2 relay target 10.0.10.1 class classname3
In the example above, an SG-supplied class name, called classname1, would relay the DHCP DISCOVERpacket to the server at the relay target IP address 10.20.10.1, while SG classname2 would relay the DHCPDISCOVER packet to the server at the relay target IP address 10.0.10.1. This configuration relays thepacket to destination IP address 10.0.0.1, because the pool matches the first configured address on theinterface. If the SG returns a classname3, then the default pool is the default address specified as the relaydestination. If the SG returns any class name other than classname1, classname2, or classname3, then norelay action is taken.
Additional ReferencesThe following sections provide references related to configuring DHCP Enhancements for Edge-SessionManagement.
Related Documents
Related Topic Document Title
DHCP commands: complete command syntax,command modes, command history, defaults, usageguidelines, and examples
Cisco IOS IP Addressing Services CommandReference
DHCP conceptual information “DHCP Overview” module
DHCP server configuration “Configuring the Cisco IOS DHCP Server” module
DHCP client configuration “Configuring the Cisco IOS DHCP Client” module
DHCP relay agent configuration “Configuring the Cisco IOS DHCP Relay Agent”module
DHCP server on-demand address pool managerconfiguration
“Configuring the DHCP Server On-DemandAddress Pool Manager” module
DHCP advanced features “Configuring DHCP Services for Accounting andSecurity” module
SG-Supplied Class Name Configuration Example Additional References
IP Addressing: DHCP Configuration Guide, Cisco IOS Release 12.4T188

Related Topic Document Title
DHCP options “DHCP Options” appendix in the NetworkRegistrar User’s Guide , Release 6.1.1
Standards
Standards Title
No new or modified standards are supported by thisfunctionality.
--
MIBs
MIBs MIBs Link
No new or modified MIBs are supported by thisfeature.
To locate and download MIBs for selectedplatforms, Cisco IOS releases, and feature sets, useCisco MIB Locator found at the following URL:
http://www.cisco.com/go/mibs
RFCs
RFCs Title
RFC 951 Bootstrap Protocol (BOOTP)
RFC 1542 Clarifications and Extensions for the BootstrapProtocol
RFC 2131 Dynamic Host Configuration Protocol
RFC 2685 Virtual Private Networks Identifier
RFC 3046 DHCP Relay Information Option
Configuring DHCP Enhancements for Edge-Session ManagementAdditional References
IP Addressing: DHCP Configuration Guide, Cisco IOS Release 12.4T 189
Technical Assistance
Description Link
The Cisco Support website provides extensiveonline resources, including documentation and toolsfor troubleshooting and resolving technical issueswith Cisco products and technologies.
To receive security and technical information aboutyour products, you can subscribe to variousservices, such as the Product Alert Tool (accessedfrom Field Notices), the Cisco Technical ServicesNewsletter, and Really Simple Syndication (RSS)Feeds.
Access to most tools on the Cisco Support websiterequires a Cisco.com user ID and password.
http://www.cisco.com/techsupport
Feature Information for DHCP Enhancements for Edge-Session Management
The following table provides release information about the feature or features described in this module.This table lists only the software release that introduced support for a given feature in a given softwarerelease train. Unless noted otherwise, subsequent releases of that software release train also support thatfeature.
Use Cisco Feature Navigator to find information about platform support and Cisco software image support.To access Cisco Feature Navigator, go to www.cisco.com/go/cfn. An account on Cisco.com is not required.
Table 12 Feature Information for DHCP Enhancements for Edge-Session Management
Feature Name Releases Feature Configuration Information
DHCP Relay Accounting 12.4(6)T The DHCP Relay Accountingfeature allows a Cisco IOS DHCPrelay agent to send a RADIUSaccounting start packet when anaddress is assigned to a client anda RADIUS accounting stoppacket when the address isreleased. This feature is enabledby using the accountingcommand with relay pools thatuse the relay destinationcommand in DHCP poolconfiguration mode.
No new commands wereintroduced by this feature.
Configuring DHCP Enhancements for Edge-Session Management Feature Information for DHCP Enhancements for Edge-Session Management
IP Addressing: DHCP Configuration Guide, Cisco IOS Release 12.4T190

Feature Name Releases Feature Configuration Information
DHCP Enhancements for Edge-Session Management
12.3(14)T
12.2(28)SB
12.2(33)SRC
The DHCP Enhancements forEdge-Session Managementfeature provides the capability ofsimultaneous service by multipleISPs to customers using onenetwork infrastructure. The end-user customer may change ISPs atany time.
The following commands wereintroduced by this feature: relaydestination, relay source,andrelay target.
Cisco and the Cisco logo are trademarks or registered trademarks of Cisco and/or its affiliates in the U.S.and other countries. To view a list of Cisco trademarks, go to this URL: www.cisco.com/go/trademarks.Third-party trademarks mentioned are the property of their respective owners. The use of the word partnerdoes not imply a partnership relationship between Cisco and any other company. (1110R)
Any Internet Protocol (IP) addresses and phone numbers used in this document are not intended to beactual addresses and phone numbers. Any examples, command display output, network topology diagrams,and other figures included in the document are shown for illustrative purposes only. Any use of actual IPaddresses or phone numbers in illustrative content is unintentional and coincidental.
Configuring DHCP Enhancements for Edge-Session Management
IP Addressing: DHCP Configuration Guide, Cisco IOS Release 12.4T 191

SG-Supplied Class Name Configuration Example
IP Addressing: DHCP Configuration Guide, Cisco IOS Release 12.4T192