Embed Size (px)
Citation preview
ISNC LEARNING MANAGEMENT SYSTEM
pg. 1 ISNC MOODLE Administrator
User Manual for Faculty Members
Moodle Administrator
ISNC LEARNING MANAGEMENT SYSTEM
pg. 2 ISNC MOODLE Administrator
Index
Contents Page
Introduction to Moodle 3
How to sign in Moodle 4
How to edit profile and change password 6
Moodle Home Page Structure 7
Accessing your Courses 8
Course Page in Moodle 9
Introduction of Blocks 10
Navigation Block 10
Administration Block 11
How to Add Block to Course Page 12
Blocks Types 13
Course Page Settings 14
Adding Content to Course 20
The “Add an activity or resource” menu 21
Assignment Activity 22
Chat Activity 30
Forum Activity 34
Lesson Activity 42
Quiz Activity 52
Feedback Activity 62
Introduction of Resource Files, Folders, Book, Label 68
How to add Book 69
How to add Folder 69
How to add Label 70
How to add Files 71
How to Upload PowerPoint 73
How to Import Question into Quiz 77
How to Upload Video 78
ISNC LEARNING MANAGEMENT SYSTEM
pg. 3 ISNC MOODLE Administrator
Learning Management System
Introduction to Moodle. Moodle is an online Learning Management System (LMS) enabling educators to create dynamic courses that extend learning, anytime, anywhere. The heart of LMS is courses that contain activities and resources. The main power of this activity-based model comes in combining the activities into sequences and groups, which can help you guide participants through learning paths. Thus, each activity can build on the outcomes of previous ones.
What teachers can do with Moodle... 1. Create online courses 2. upload file and Powepoint 3. open forums and survey 4. create online tests and examinations
ISNC LEARNING MANAGEMENT SYSTEM
pg. 4 ISNC MOODLE Administrator
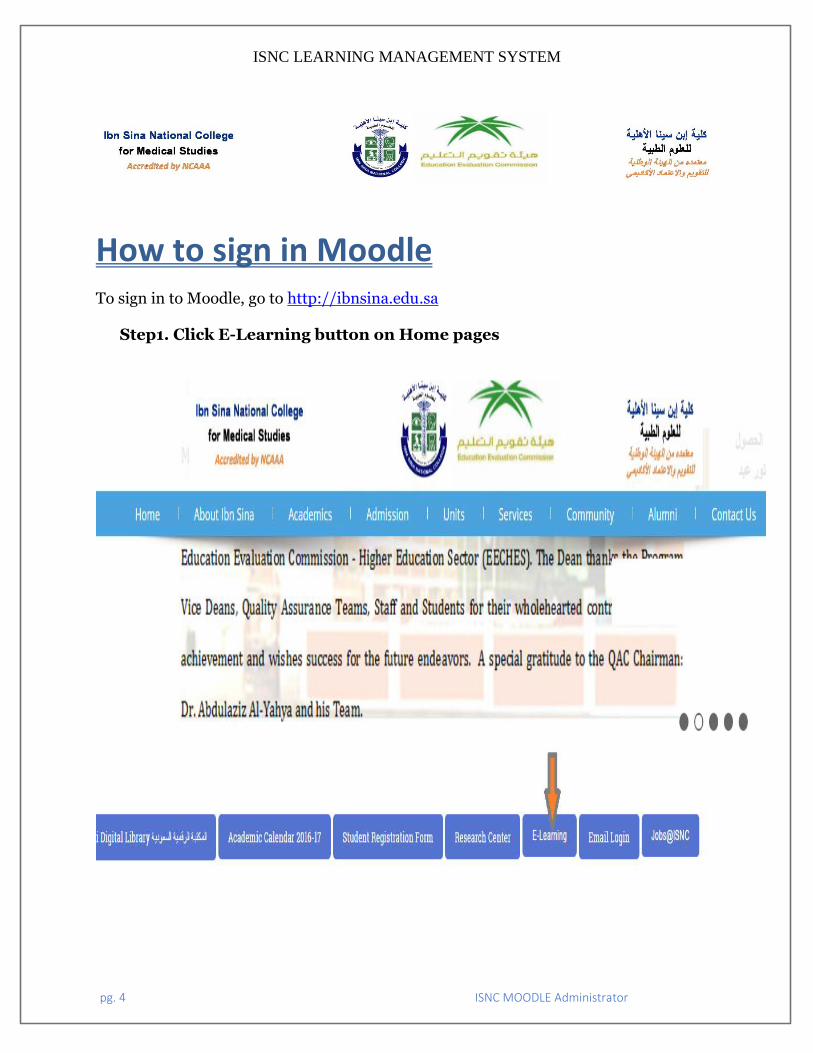
How to sign in Moodle To sign in to Moodle, go to http://ibnsina.edu.sa
Step1. Click E-Learning button on Home pages
ISNC LEARNING MANAGEMENT SYSTEM
pg. 5 ISNC MOODLE Administrator
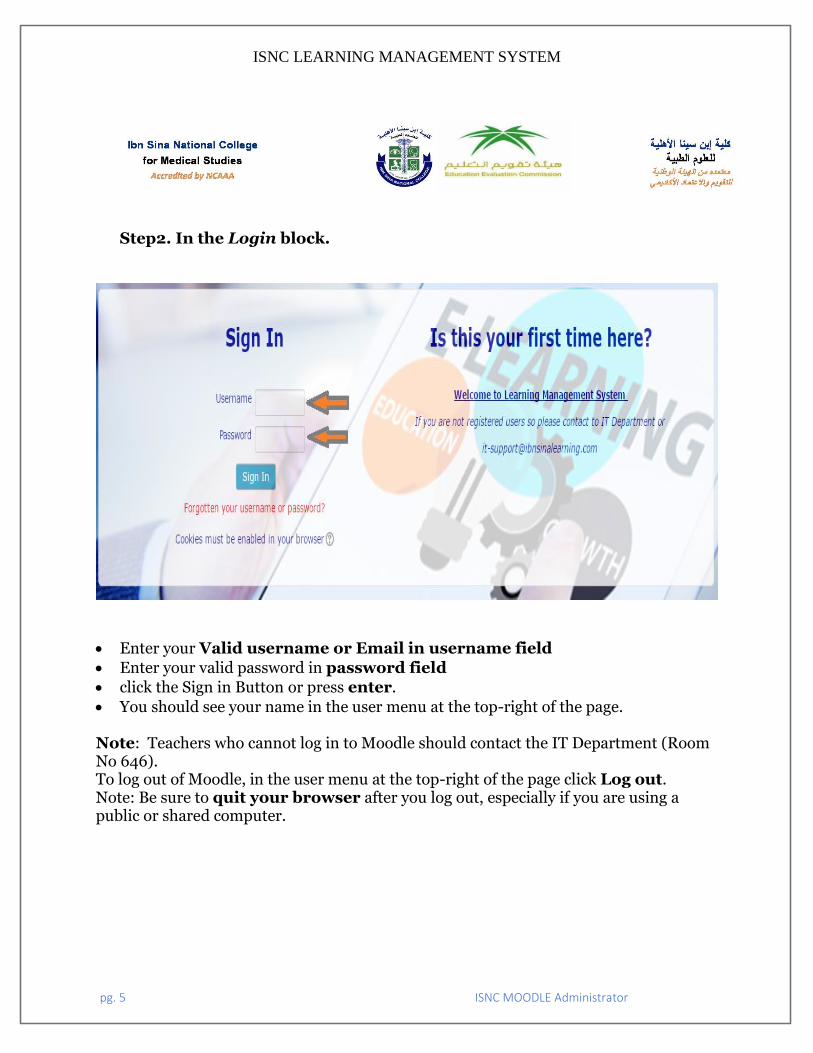
Step2. In the Login block.
Enter your Valid username or Email in username field
Enter your valid password in password field
click the Sign in Button or press enter.
You should see your name in the user menu at the top-right of the page. Note: Teachers who cannot log in to Moodle should contact the IT Department (Room No 646). To log out of Moodle, in the user menu at the top-right of the page click Log out. Note: Be sure to quit your browser after you log out, especially if you are using a public or shared computer.
ISNC LEARNING MANAGEMENT SYSTEM
pg. 6 ISNC MOODLE Administrator
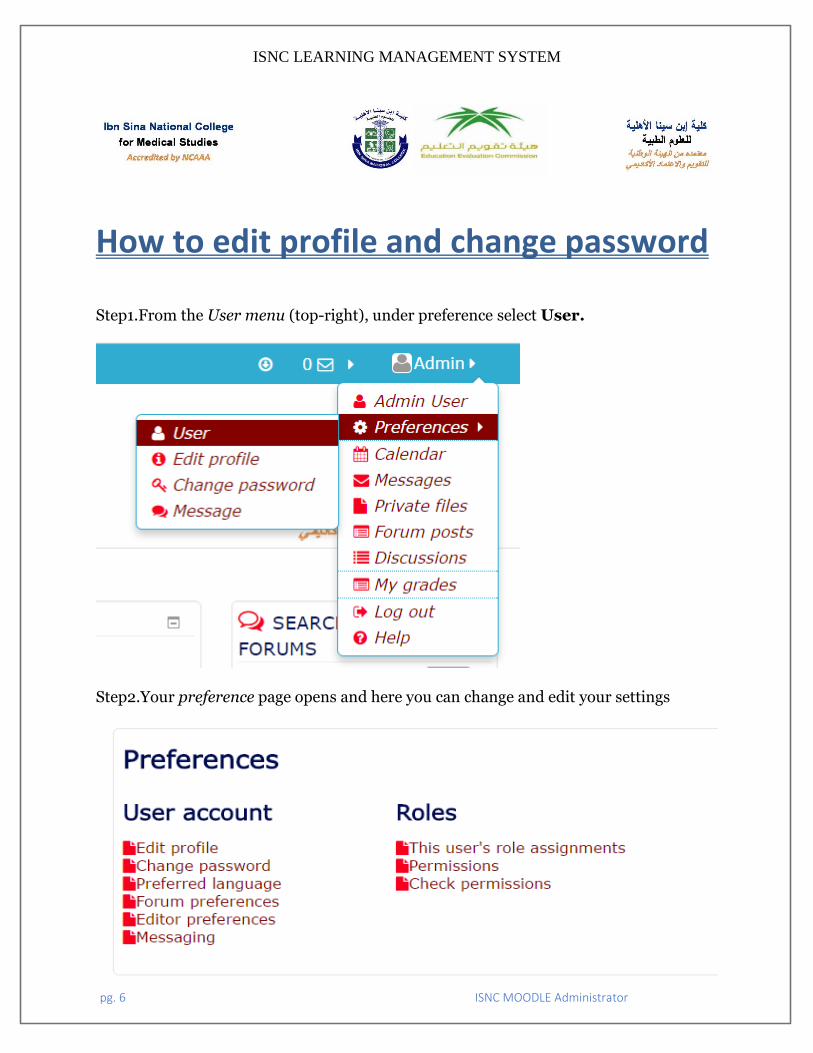
How to edit profile and change password Step1.From the User menu (top-right), under preference select User.
Step2.Your preference page opens and here you can change and edit your settings
ISNC LEARNING MANAGEMENT SYSTEM
pg. 7 ISNC MOODLE Administrator
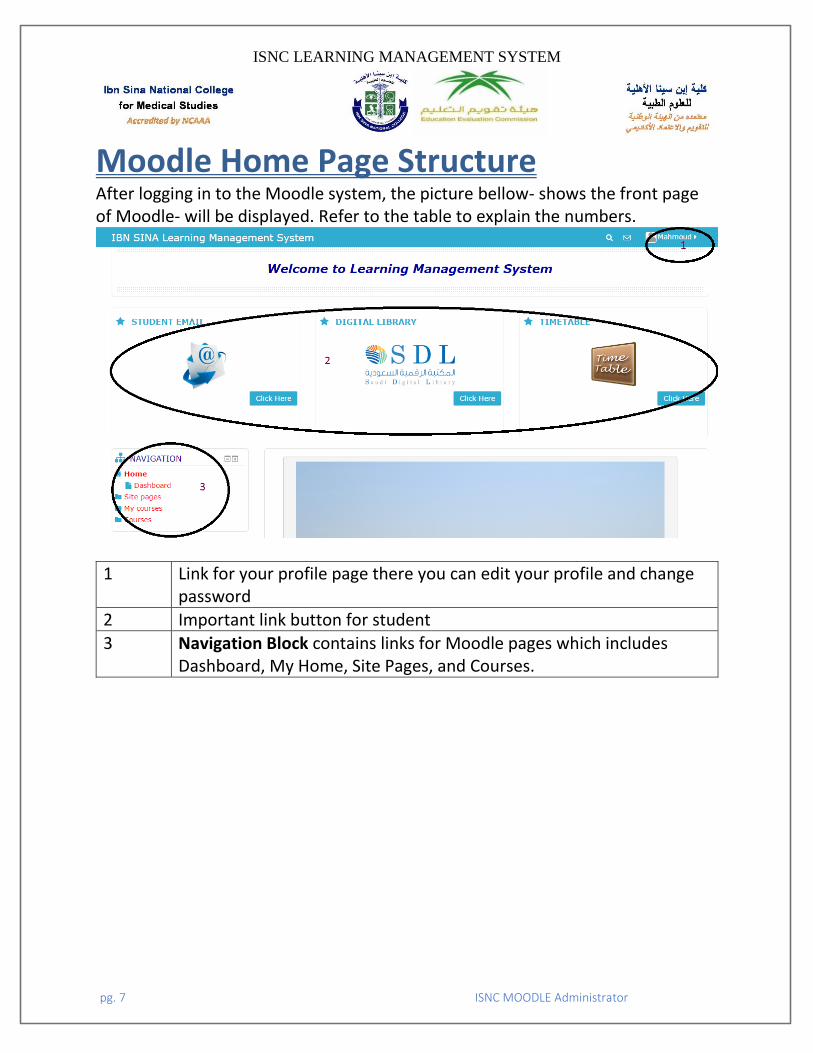
Moodle Home Page Structure After logging in to the Moodle system, the picture bellow- shows the front page of Moodle- will be displayed. Refer to the table to explain the numbers.
1 Link for your profile page there you can edit your profile and change password
2 Important link button for student
3 Navigation Block contains links for Moodle pages which includes Dashboard, My Home, Site Pages, and Courses.
ISNC LEARNING MANAGEMENT SYSTEM
pg. 8 ISNC MOODLE Administrator
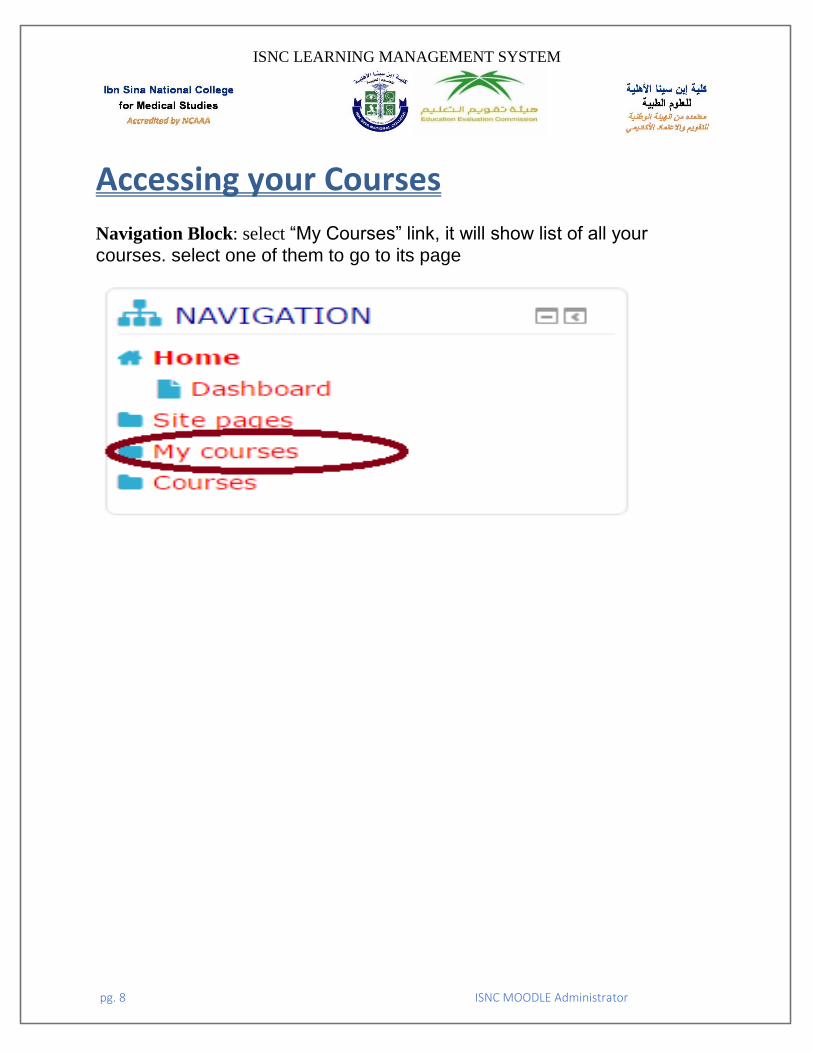
Accessing your Courses Navigation Block: select “My Courses” link, it will show list of all your courses. select one of them to go to its page
ISNC LEARNING MANAGEMENT SYSTEM
pg. 9 ISNC MOODLE Administrator
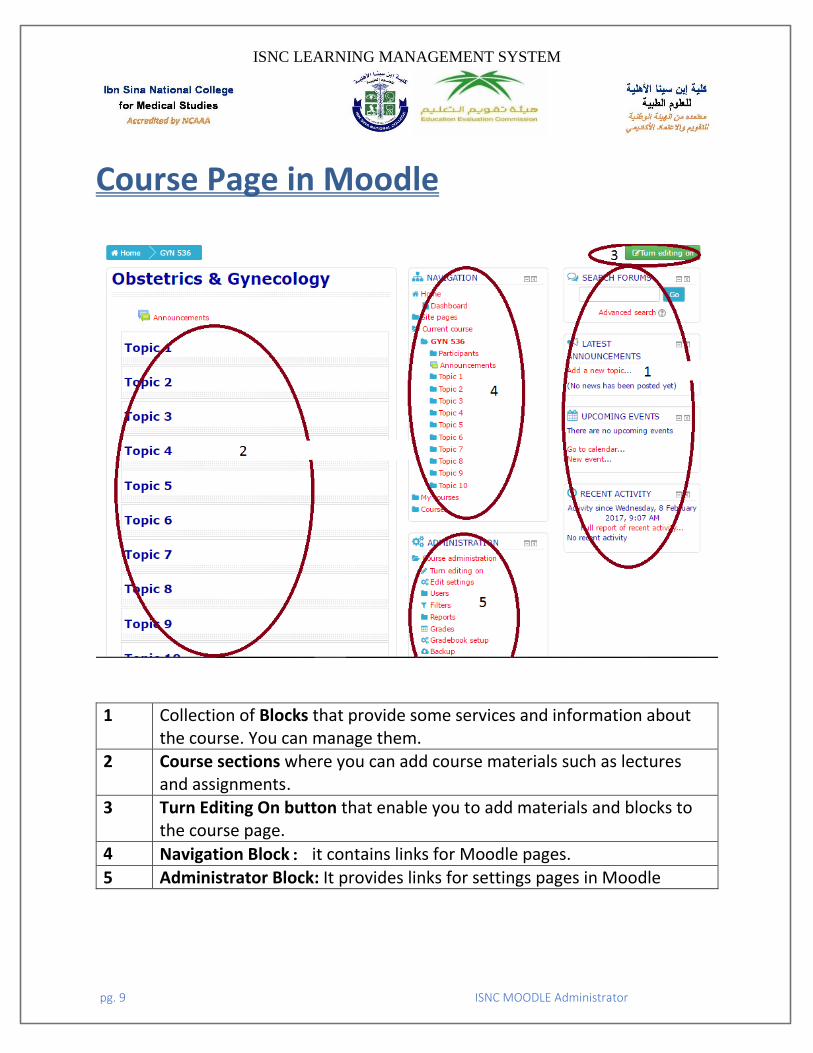
Course Page in Moodle
1 Collection of Blocks that provide some services and information about
the course. You can manage them. 2 Course sections where you can add course materials such as lectures
and assignments. 3 Turn Editing On button that enable you to add materials and blocks to
the course page. 4 Navigation Block: it contains links for Moodle pages.
5 Administrator Block: It provides links for settings pages in Moodle
ISNC LEARNING MANAGEMENT SYSTEM
pg. 10 ISNC MOODLE Administrator
Blocks Blocks are items which may be added to the left or right or center column of any page in Moodle. Usually blocks show information from course page or from external web site such as twitter. Each course page has standard blocks which you can add or delete them later. Blocks Types 1) Navigation Block
2) Administration Block
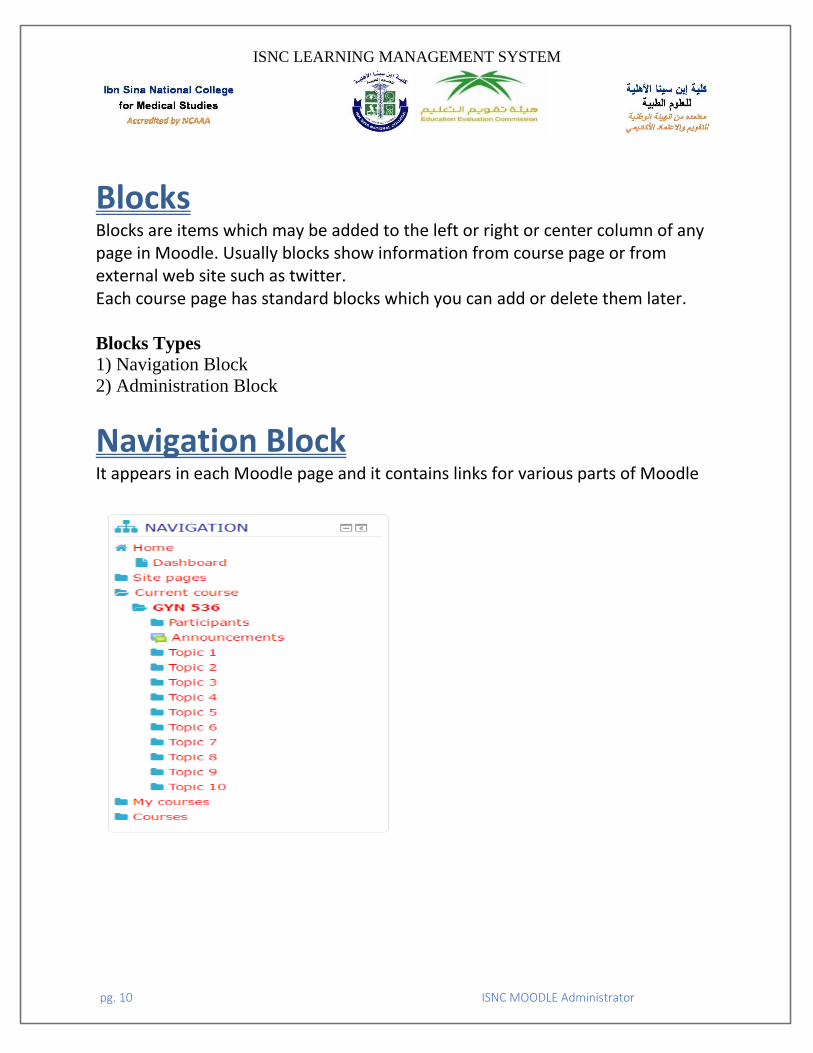
Navigation Block It appears in each Moodle page and it contains links for various parts of Moodle
ISNC LEARNING MANAGEMENT SYSTEM
pg. 11 ISNC MOODLE Administrator
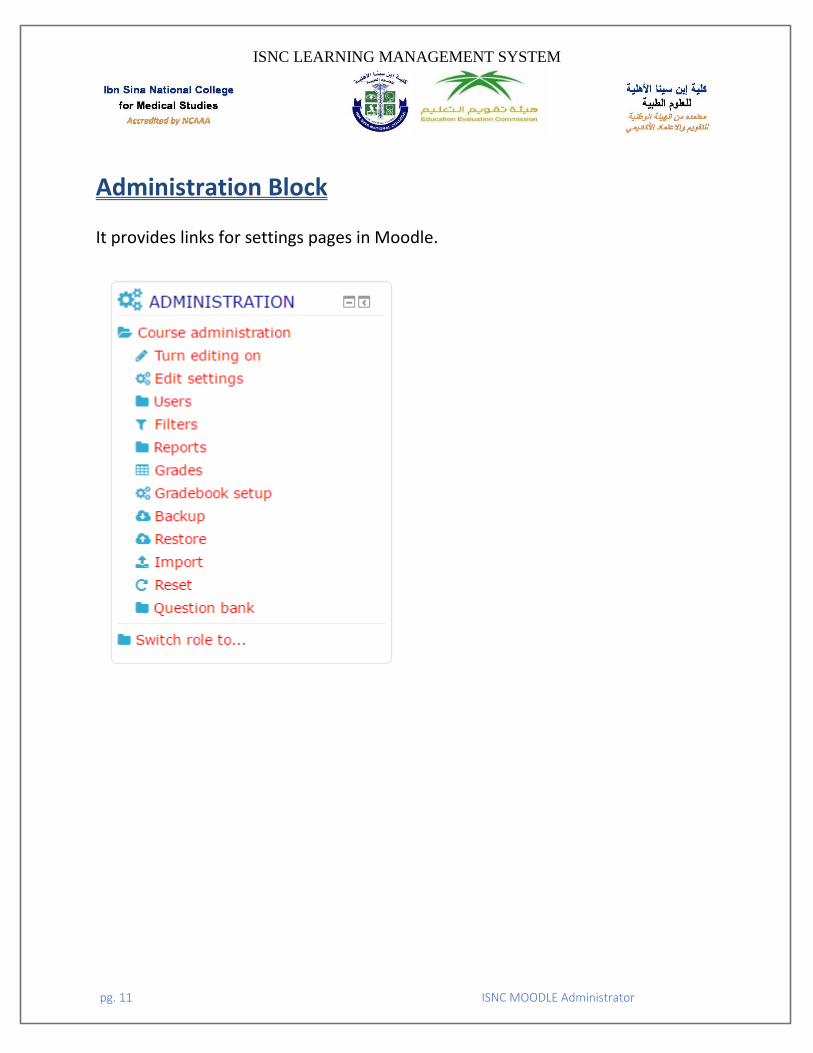
Administration Block
It provides links for settings pages in Moodle.
ISNC LEARNING MANAGEMENT SYSTEM
pg. 12 ISNC MOODLE Administrator
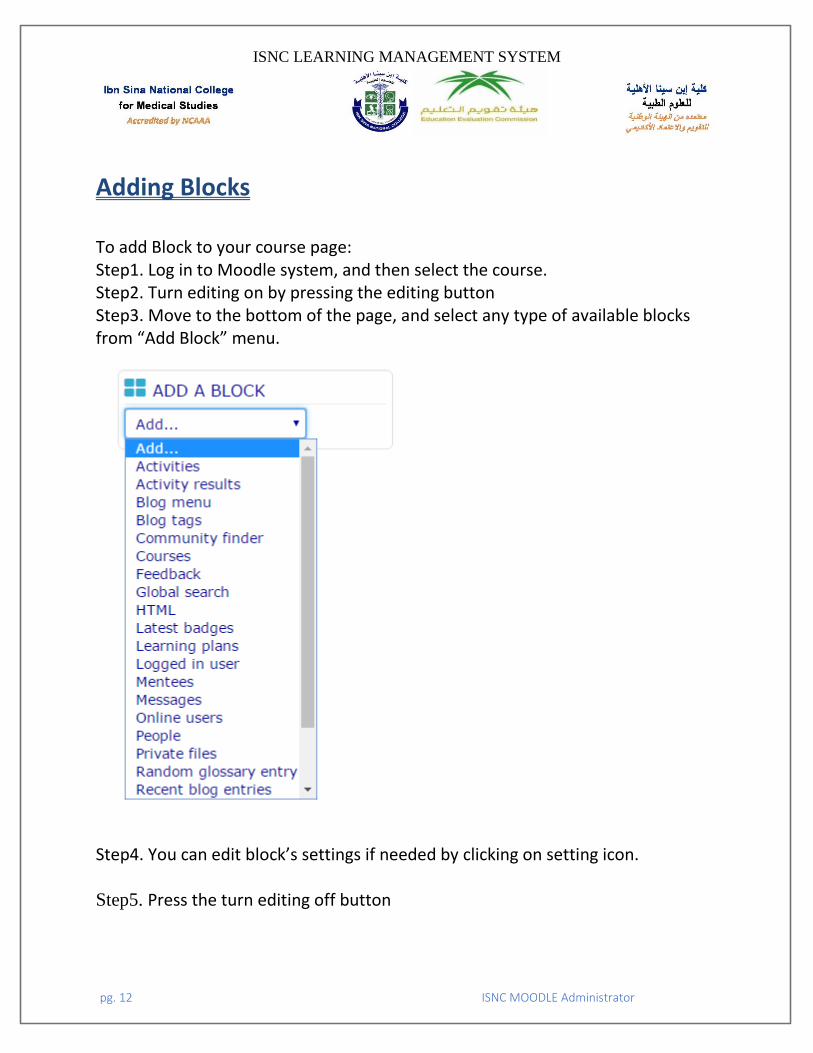
Adding Blocks To add Block to your course page: Step1. Log in to Moodle system, and then select the course. Step2. Turn editing on by pressing the editing button Step3. Move to the bottom of the page, and select any type of available blocks from “Add Block” menu.
Step4. You can edit block’s settings if needed by clicking on setting icon. Step5. Press the turn editing off button
ISNC LEARNING MANAGEMENT SYSTEM
pg. 13 ISNC MOODLE Administrator
Blocks Types Calendar Block This block displays a copy of the current calendar month and shows range of colorful events as a reminder. All course events automatically appear in the calendar, for example, when you set a day for submitting the assignment activity, this date will appear as a course event in the calendar. Upcoming Event Block The Upcoming events block displays future events in a summarized list. Events are generated directly from the calendar and/or activity deadlines, providing a link to full details or link to the activity. All event of the course such as assignments due dates, exam date and manually added events will be displayed in this block. Activities Block The Activities block lists all activities and resources of the current course and allows navigation between the different activities available in your course (Forums, Quizzes, Assignments, Lesson module and so forth). The activities list will grow as you add activities to your course. When clicking on the Resource link, the block will display a list of all resources added in your course. See the next figure.
ISNC LEARNING MANAGEMENT SYSTEM
pg. 14 ISNC MOODLE Administrator
Course Settings Instructors have the ability to change course settings if they are not satisfied with default settings that were completed in initial set up of the course. Course settings include the layout of the course page, start date of course, availability to the students etc.
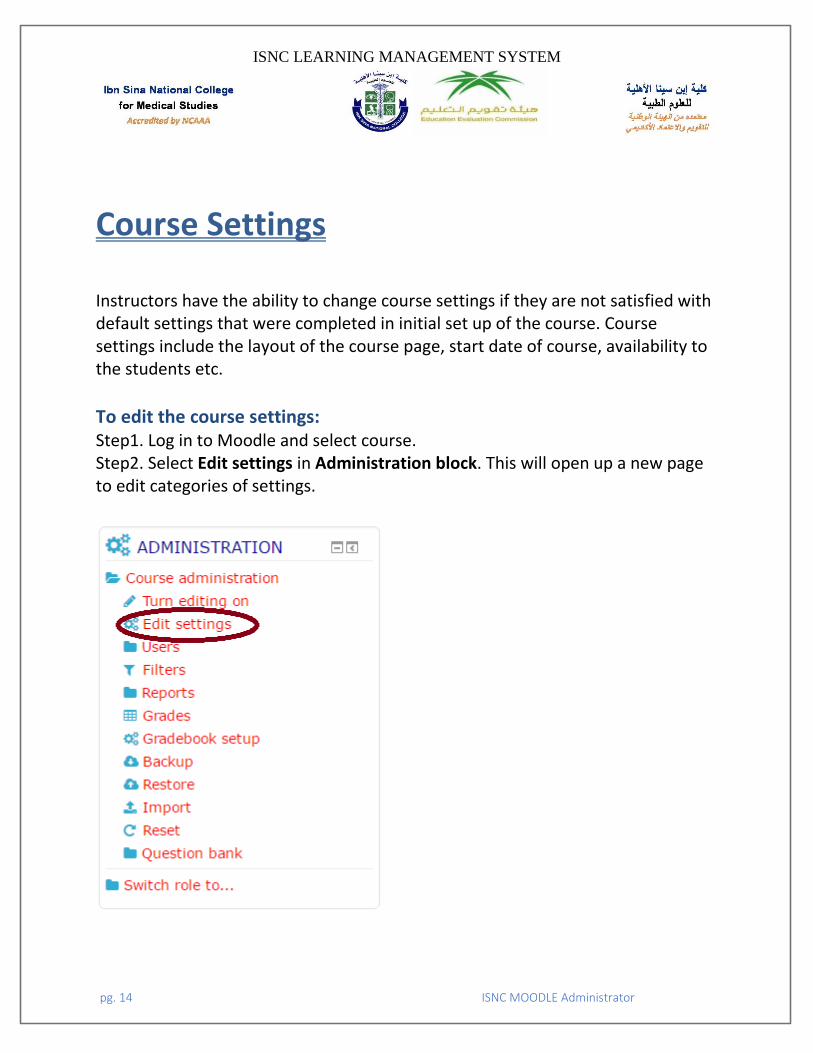
To edit the course settings: Step1. Log in to Moodle and select course. Step2. Select Edit settings in Administration block. This will open up a new page to edit categories of settings.
ISNC LEARNING MANAGEMENT SYSTEM
pg. 15 ISNC MOODLE Administrator
Categories of Course settings that teacher can edit as follows: 1. General 2. Description 3. Course format 4. Appearance 5. Files and uploads 6. Groups
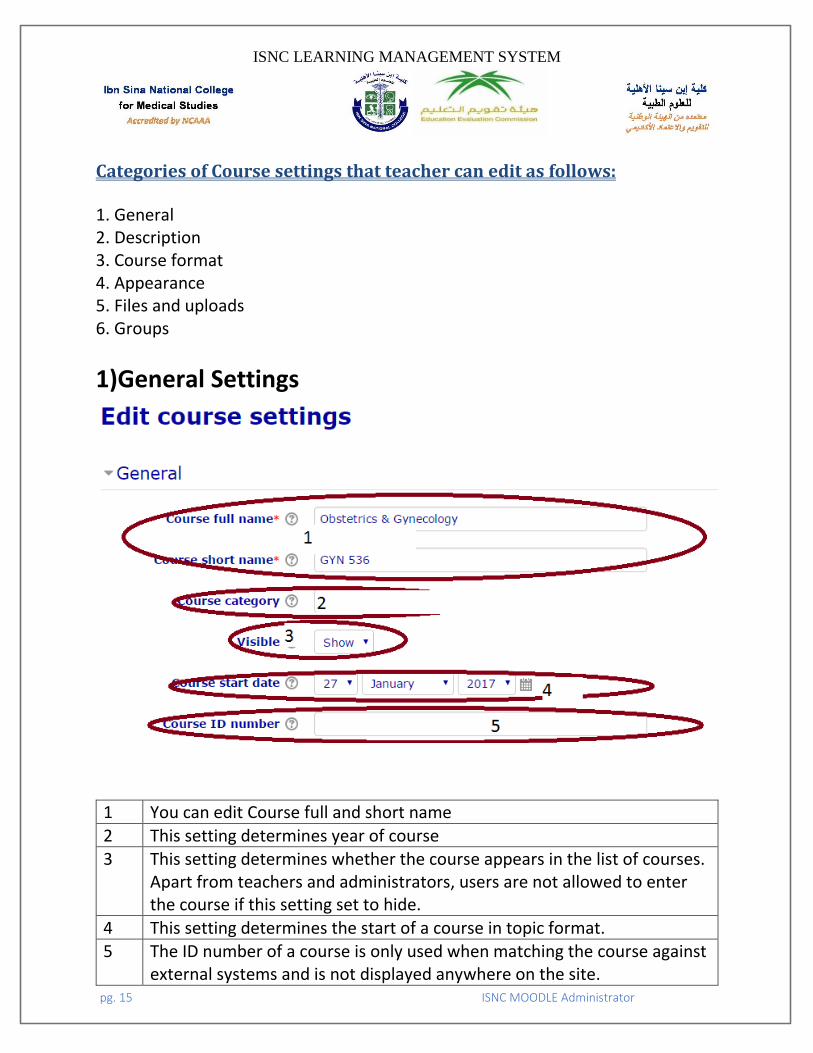
1)General Settings
1 You can edit Course full and short name 2 This setting determines year of course 3 This setting determines whether the course appears in the list of courses.
Apart from teachers and administrators, users are not allowed to enter the course if this setting set to hide.
4 This setting determines the start of a course in topic format. 5 The ID number of a course is only used when matching the course against
external systems and is not displayed anywhere on the site.
ISNC LEARNING MANAGEMENT SYSTEM
pg. 16 ISNC MOODLE Administrator
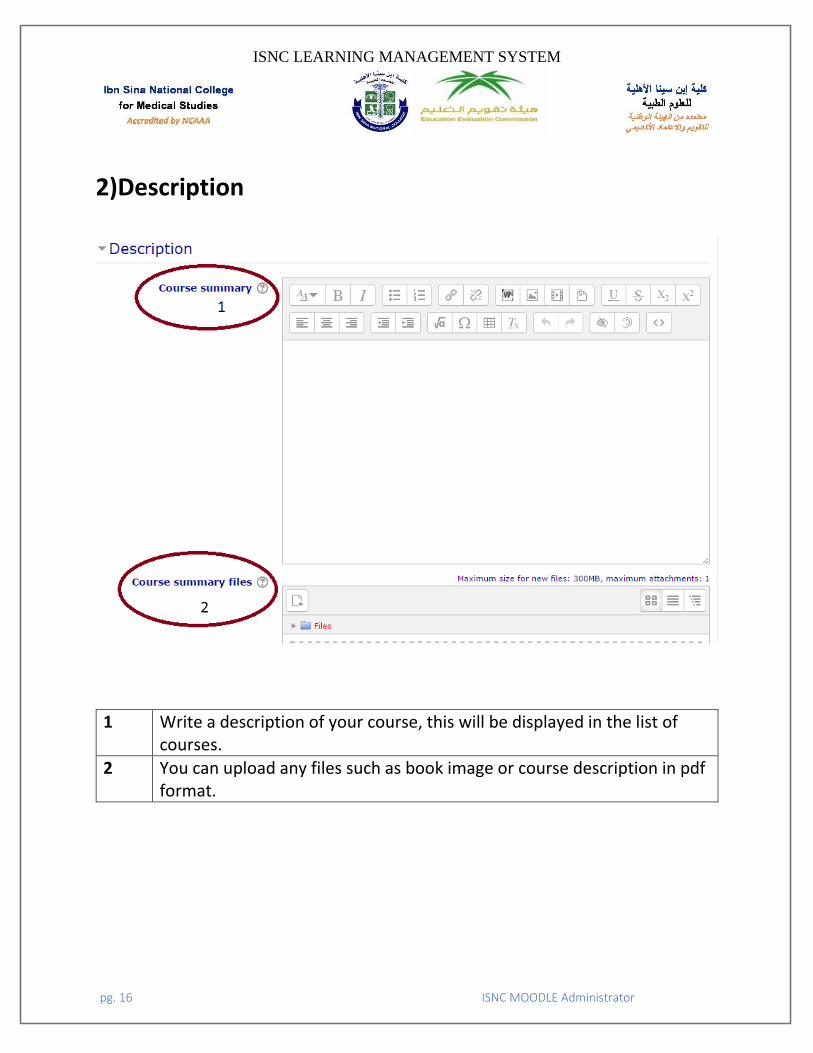
2)Description
1 Write a description of your course, this will be displayed in the list of
courses. 2 You can upload any files such as book image or course description in pdf
format.
ISNC LEARNING MANAGEMENT SYSTEM
pg. 17 ISNC MOODLE Administrator
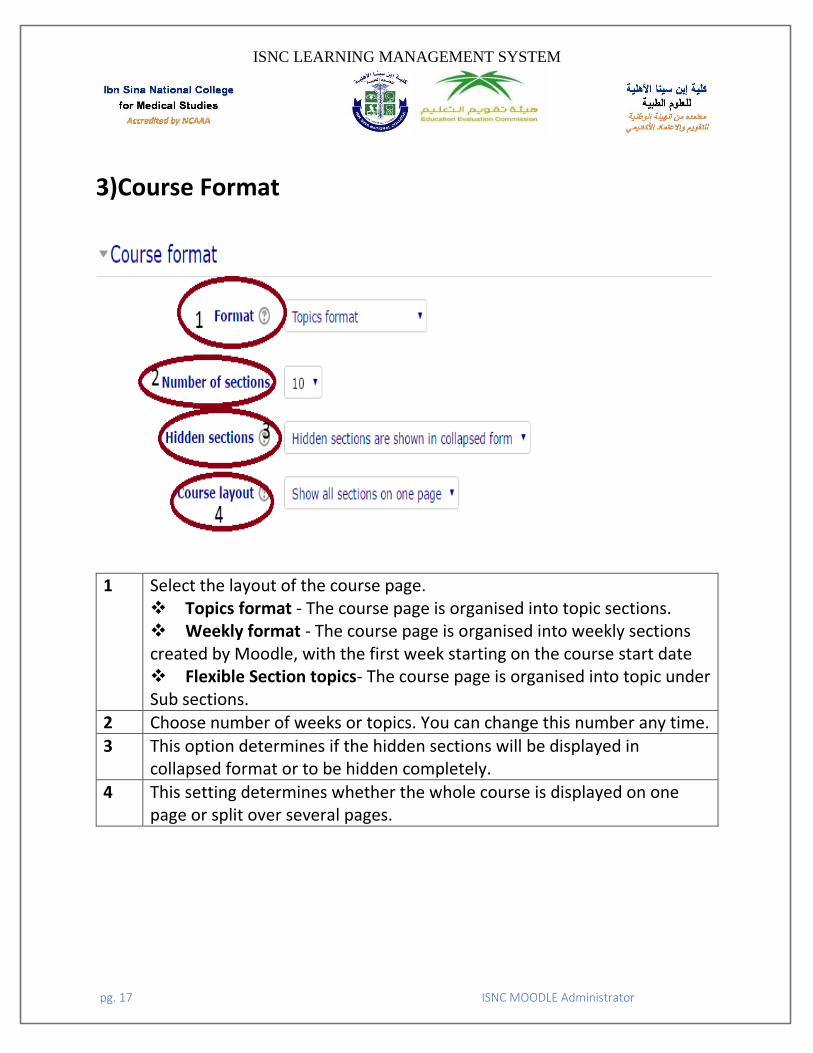
3)Course Format
1 Select the layout of the course page.
Topics format - The course page is organised into topic sections. Weekly format - The course page is organised into weekly sections created by Moodle, with the first week starting on the course start date Flexible Section topics- The course page is organised into topic under Sub sections.
2 Choose number of weeks or topics. You can change this number any time. 3 This option determines if the hidden sections will be displayed in
collapsed format or to be hidden completely. 4 This setting determines whether the whole course is displayed on one
page or split over several pages.
ISNC LEARNING MANAGEMENT SYSTEM
pg. 18 ISNC MOODLE Administrator
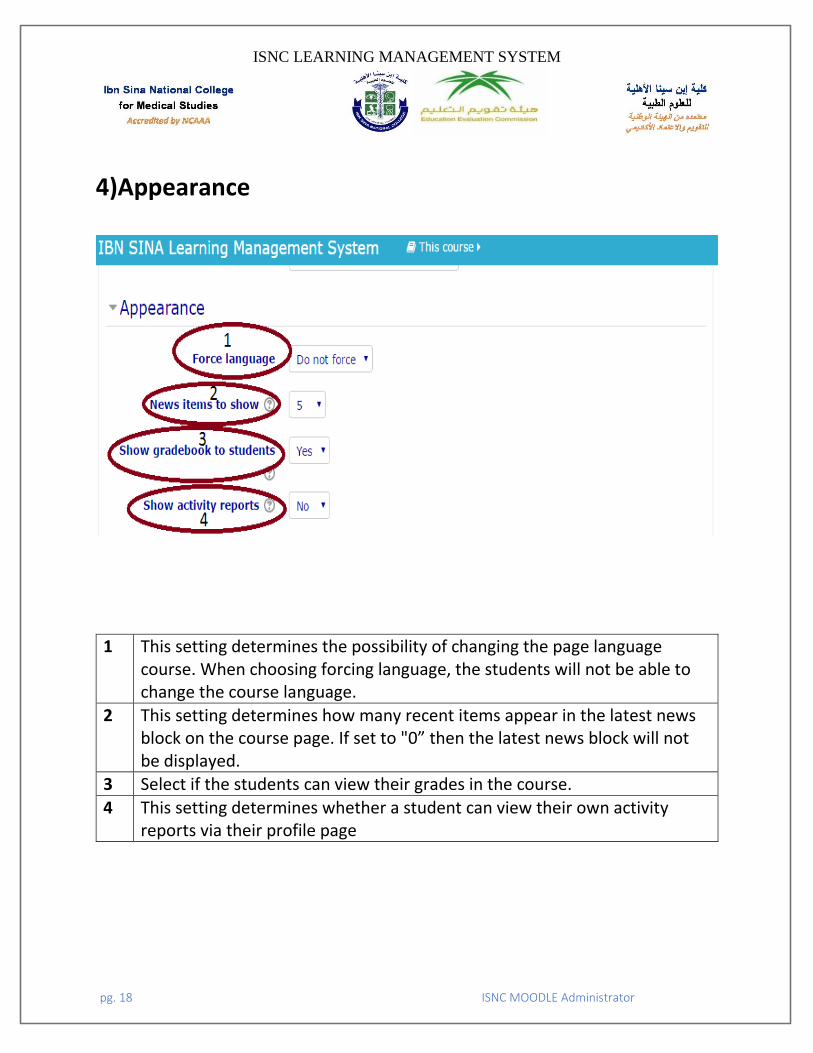
4)Appearance
1 This setting determines the possibility of changing the page language
course. When choosing forcing language, the students will not be able to change the course language.
2 This setting determines how many recent items appear in the latest news block on the course page. If set to "0” then the latest news block will not be displayed.
3 Select if the students can view their grades in the course. 4 This setting determines whether a student can view their own activity
reports via their profile page
ISNC LEARNING MANAGEMENT SYSTEM
pg. 19 ISNC MOODLE Administrator
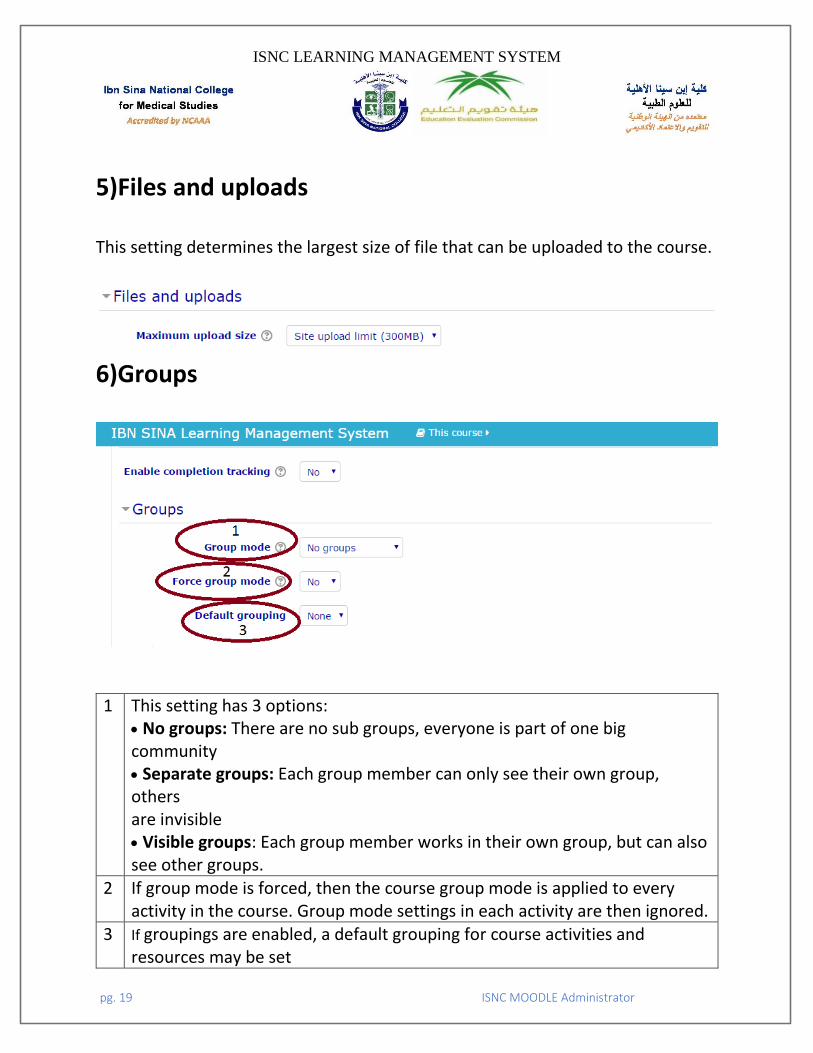
5)Files and uploads This setting determines the largest size of file that can be uploaded to the course.
6)Groups
1 This setting has 3 options: No groups: There are no sub groups, everyone is part of one big community Separate groups: Each group member can only see their own group, others are invisible Visible groups: Each group member works in their own group, but can also see other groups.
2 If group mode is forced, then the course group mode is applied to every activity in the course. Group mode settings in each activity are then ignored.
3 If groupings are enabled, a default grouping for course activities and resources may be set
ISNC LEARNING MANAGEMENT SYSTEM
pg. 20 ISNC MOODLE Administrator
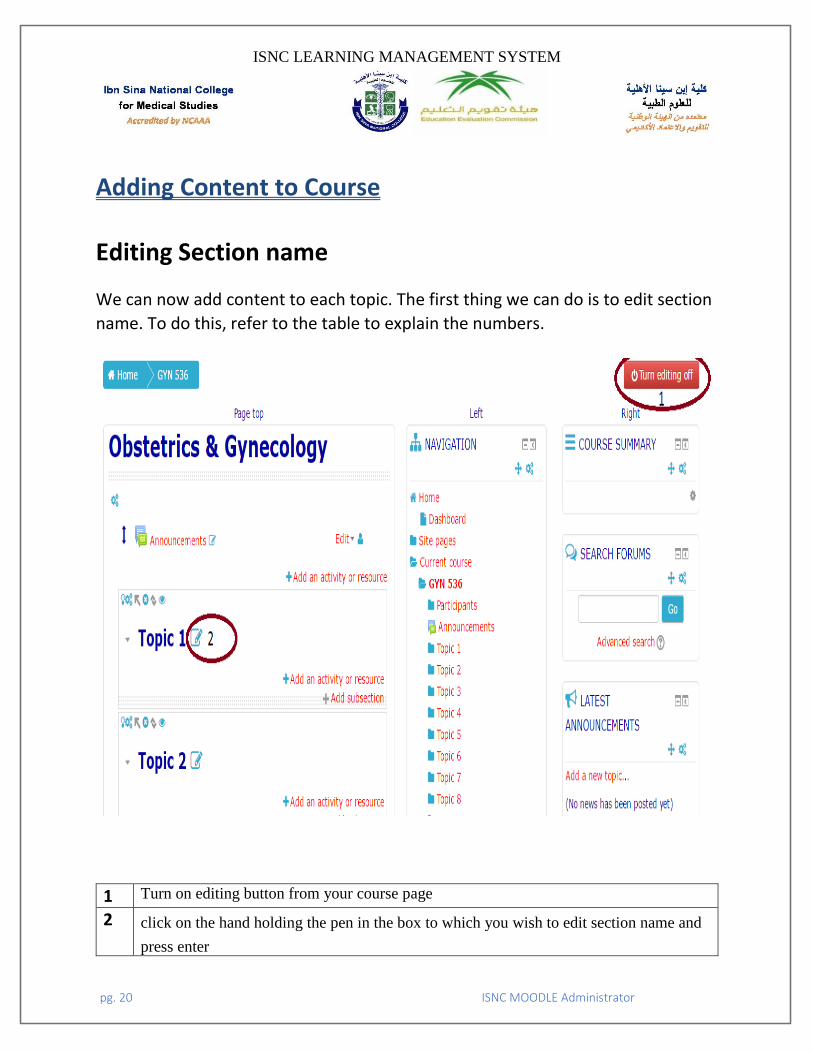
Adding Content to Course Editing Section name
We can now add content to each topic. The first thing we can do is to edit section
name. To do this, refer to the table to explain the numbers.
1 Turn on editing button from your course page
2 click on the hand holding the pen in the box to which you wish to edit section name and
press enter
ISNC LEARNING MANAGEMENT SYSTEM
pg. 21 ISNC MOODLE Administrator
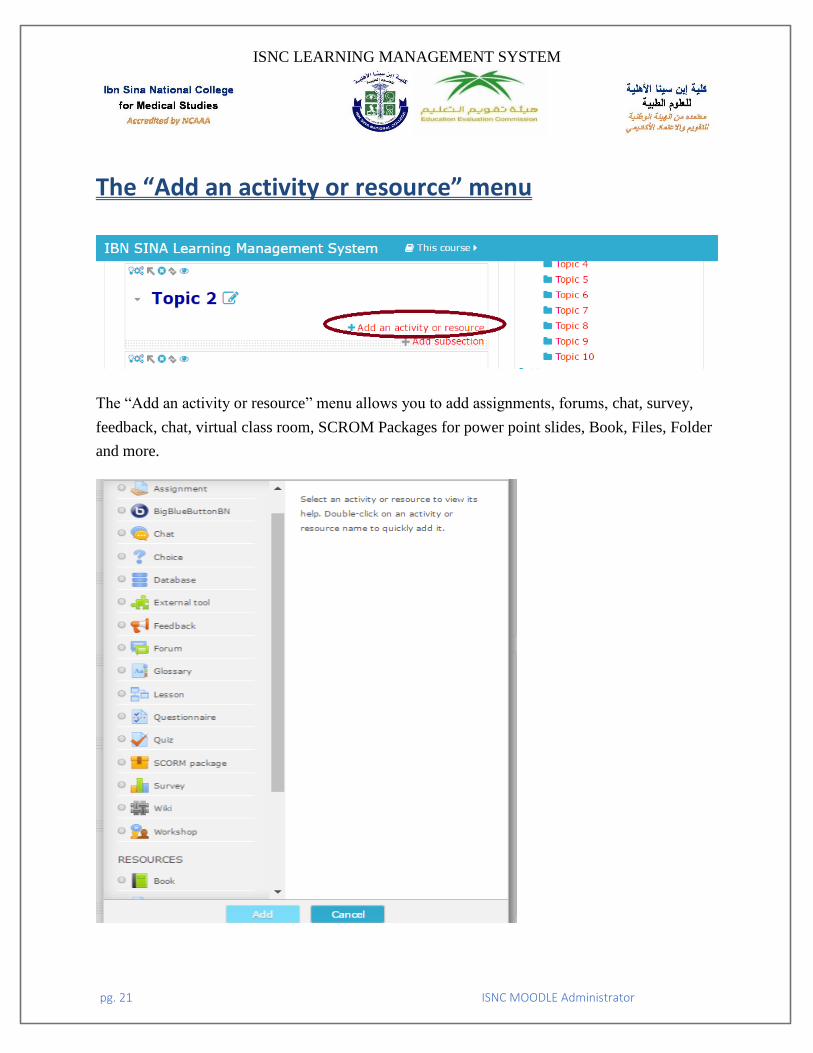
The “Add an activity or resource” menu
The “Add an activity or resource” menu allows you to add assignments, forums, chat, survey,
feedback, chat, virtual class room, SCROM Packages for power point slides, Book, Files, Folder
and more.
ISNC LEARNING MANAGEMENT SYSTEM
pg. 22 ISNC MOODLE Administrator
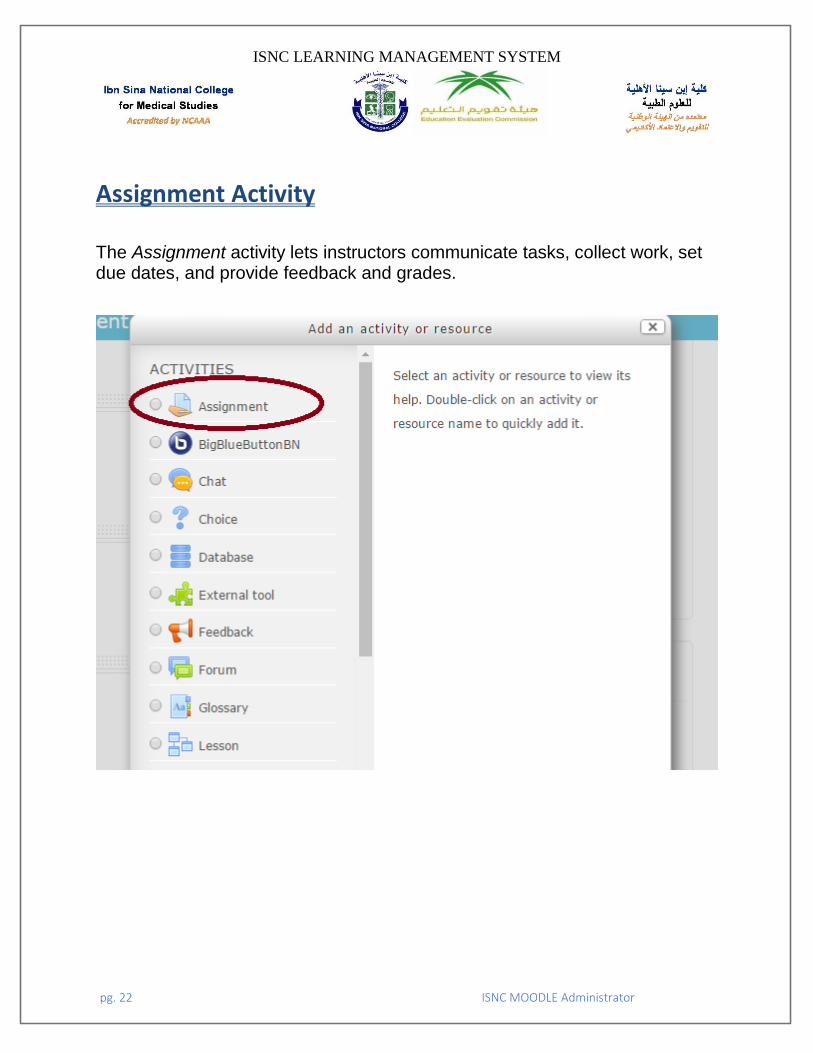
Assignment Activity The Assignment activity lets instructors communicate tasks, collect work, set due dates, and provide feedback and grades.
ISNC LEARNING MANAGEMENT SYSTEM
pg. 23 ISNC MOODLE Administrator
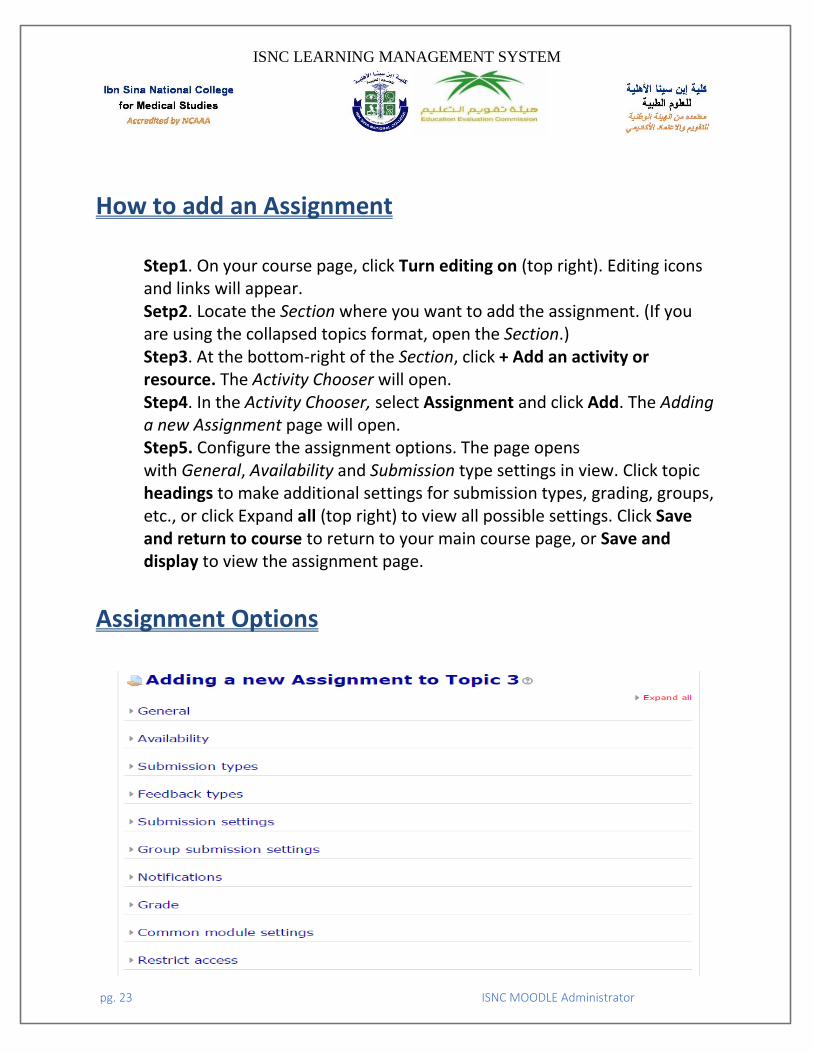
How to add an Assignment
Step1. On your course page, click Turn editing on (top right). Editing icons and links will appear. Setp2. Locate the Section where you want to add the assignment. (If you are using the collapsed topics format, open the Section.) Step3. At the bottom-right of the Section, click + Add an activity or resource. The Activity Chooser will open. Step4. In the Activity Chooser, select Assignment and click Add. The Adding a new Assignment page will open. Step5. Configure the assignment options. The page opens with General, Availability and Submission type settings in view. Click topic headings to make additional settings for submission types, grading, groups, etc., or click Expand all (top right) to view all possible settings. Click Save and return to course to return to your main course page, or Save and display to view the assignment page.
Assignment Options
ISNC LEARNING MANAGEMENT SYSTEM
pg. 24 ISNC MOODLE Administrator
1)General Settings
Assignment name (required) This name displays as a link on your course page. Use something unique that clearly identifies this assignment from other course activities. We also recommend keeping the name short.
Description (optional) Enter a summary of the assignment and instructions. You can also Display description on course page. Select this option to display the description underneath the assignment link on your course page. (This works best if the description is very concise).
Additional files Drag and drop files into the upload field to append the file to the assignment Description.
2)Availability
Select Enable checkboxes to set a date and time for:
Allow submissions from Determines when students can begin to submit to the assignment.
Due date Determines when the assignment will be due. The due date will show in the course Calendar and within the Activities Block.
Cut-off date Determine when the assignment will no longer accept submissions.
3)Submission Types
Submission types With Online text, students can enter text directly into an editor. If File submissions are enabled, students can upload one or more files. Note: To create an offline assignment where students will submit or perform work outside Moodle, leave both Online text and File submissions unchecked. You

ISNC LEARNING MANAGEMENT SYSTEM
pg. 25 ISNC MOODLE Administrator
can still provide a description, set due dates and have the activity show in the course Calendar and Gradebook.
Maximum number of uploaded files If file submissions are enabled, each student will be able to upload up to the set number of files for their submission.
Maximum submission size
If file submissions are enabled, each upload cannot exceed this file size per upload. (If a student can upload multiple files, and uploads files at different times, the total can exceed the set size.)
4)Feedback Types
Feedback comments If enabled, graders can provide written feedback for each submission. These comments are from the grader to the student.
Feedback files If enabled, graders can upload files containing feedback when marking assignments. For example, you can upload marked up student submissions, documents with comments, or spoken audio feedback.
Offline grading worksheet If enabled, graders can download a spreadsheet to enter grades without having to be logged in to Moodle. This can be useful if you anticipate grading while disconnected from the Internet.
Comment inline If enabled, the submission text will be copied into the feedback comment field during grading, making it easier to comment inline or to edit the original text.
5)Submission Settings
Require students click submit button If enabled, students will have to click a Submit button to declare their submission as final. Requiring the Submit button allows students to keep a draft version of
ISNC LEARNING MANAGEMENT SYSTEM
pg. 26 ISNC MOODLE Administrator
the submission on the system. Note: If this setting is changed from No to Yes after students have made submissions, the submissions will be regarded as final.
Require that students accept the submission statement If enabled, students will be shown a statement that declares they are submitting their own original work and they will have to accept the statement before their submission is processed.
Attempts reopened If set to Manually, the student's submission can be reopened by a teacher. If set to Automatically until pass, the student's submission is automatically reopened until the student achieves a passing grade (defined under Grade).
Maximum attempts The maximum number of submission attempts that can be made by a student. After this number of attempts has been made, the student's submission will not be able to be reopened.
6)Group Submission Settings
Students submit in groups If enabled, students submit work together in groups rather than individually. For example, a group of students can submit one file that contains the joint work of the group. See Configure & Grade Group Assignments in Moodle.
Require all group members submit If enabled, all students in a group must individually click the Submit button in order to acknowledge that they are signing off on their group's joint submission. Note: This option is available only if both Students submit in groups and Require students click submit button are enabled.
Grouping for student groups If Students submit in groups is enabled, this option shows which Grouping has been selected in the common module settings (see below).
ISNC LEARNING MANAGEMENT SYSTEM
pg. 27 ISNC MOODLE Administrator
7)Notifications
Notify graders about submissions If enabled, instructors and TAs will receive an email alert whenever a student makes a submission. (This may not be manageable in a class with a large number of students.)
Notify graders about late submissions If enabled, instructors and TAs will receive an email alert whenever a submission is made after the due date.
Default setting for "Notify students" If enabled, the default setting for notifying students when grades are released will be set in the assignment grading interface. This can be changed manually during grading. For more information.
8)Grade
Grade Select the Grade Type: None - The assignment will be ungraded and worth no points. Point - Grade out of a simple number of maximum points. Enter the maximum possible score for the assignment in the Maximum points field. Scale - Select a preset or custom Scale from the Scale drop-down.
Grading method
Choose Simple direct grading, Rubric or Grading guide to grade the assignment.
Grade category
Select a Category in your gradebook under which you would like the assignment grade to be placed.
Blind grading
If enabled, instructors and TAs will not see student names when grading submissions.
Use grading workflow
When enabled, grading an assignment goes through a series of workflow stages: Not graded, in grading, Grading completed, in review, Ready for release, and Released.
ISNC LEARNING MANAGEMENT SYSTEM
pg. 28 ISNC MOODLE Administrator
Use grading allocation
When both Use grading workflow and Use grading allocation are enabled, instructors can assign specific graders to grade specific students.
9)Common Module Settings
Visibility to students Set whether or not an assignment is visible to students. By default, new assignments are set to Show.
ID number Setting an ID number identifies the activity for grade calculation purposes.
Group mode, grouping These options let you restrict the assignment to particular groups of students you have already created in Moodle.
10)Restrict Access
Use Restrict Access settings with care and check for conflicts with other settings you may have made for the activity. Settings may prevent students from accessing restricted content, including grades and due dates.
To add restrictions on accessing the activity, click Add restriction... The Add restriction window will open, containing the following options:
Date. Prevent access until (or from) a specified date and time. Grade. Require students to achieve a specified grade. User profile. Control access based on fields within the student’s profile. Restriction set. Add a set of nested restrictions to apply complex logic.
If you have groups in your course, you will see the following additional options: Group. Allow or prevent access only students who belong to a specified group, or
all groups. Grouping. Allow or prevent access only students who belong to a group within a
specified grouping.
ISNC LEARNING MANAGEMENT SYSTEM
pg. 29 ISNC MOODLE Administrator
Edit an Assignment While it is possible to edit the content or setup options for an existing assignment, proceed with caution if the assignment has already been released to students -- especially if students have already submitted work. Changing some options, such as changing participants when working with groups, may result in student confusion and the loss of work that has already been submitted.
To change the content or options for an assignment you have already created:
1. On your course page, click Turn editing on. 2. Next to the Assignment to update, click Edit, then select Edit Settings. The
assignment's settings page will open. 3. The Updating Assignment page shows you the same options available on
the Adding a new Assignment page. Here you may change your assignment options as needed, including changing the due date, grading information, and availability of the assignment.
4. Once you have finished making the necessary changes, click Save and return to course at the bottom of the page.

ISNC LEARNING MANAGEMENT SYSTEM
pg. 30 ISNC MOODLE Administrator
Chat Activity The Chat activity allows course members to hold real-time, text-based conversations with other course members.
ISNC LEARNING MANAGEMENT SYSTEM
pg. 31 ISNC MOODLE Administrator
How to Set up a Chat Room Step1. On your course page, click Turn editing on (top right). Editing icons and links will appear. Step2. Locate the Section where you want to add the Chat activity. Step3. At the lower-right of the Section, click + Add an activity or
resource. In the Add an activity or resource window select Chat and click Add. The Adding a new Chat page will open. Step4. In the Add an activity or resource window select Chat and click Add. The Adding a new Chat page will open. Step5. On the Adding a new Chat page, enter an informative name in the Name of this chat room field. For example, "Group A Chat -- Weds. 8-9 pm.” Step6. In the Description box, enter a description that lets your students know the purpose of the chat, and your expectations for their participation. For a structured discussion, you could include a specific list of questions you would like addressed. This is also a good place to let your students know whether or not you plan to make the archive of chat logs available to the entire class. Step7. Configure other settings for the assignment. For more information on these options,
Step8. Click Save and return to course to return to your course page.
Configure Chat Options When you add a Chat activity to a Moodle course, you can choose from a
number of settings. The first two settings are required; the remaining settings
are optional. Click particular headings to view those settings, or Expand
all (top right) to view all settings.
1. In the Chat sessions section, from the Next chat time drop-down menu, select a specific date and hour for students to meet.
2. Next, from the Repeat/publish session times drop-down menu, select whether and how often the chat will repeat. You can publish repeating session times daily or weekly, or not at all.
ISNC LEARNING MANAGEMENT SYSTEM
pg. 32 ISNC MOODLE Administrator
Note: Setting a date and time is optional and will not restrict access to the chat at other times; it will add the Chat to the course Calendar block, and let your students know when they can expect to find others in the chat room.
3. From the Save past sessions drop-down menu, select how long chat logs will be preserved in the archive. By default, this is set to Never delete messages.
4. To allow students to view chat logs, select Yes from the Everyone can view past sessions drop-down menu. This will allow everyone in the course to review the text entered into the chat stream (whether or not they attended a session). When set to No (default), only instructors and TAs will have access to the logs for the chat room.
5. Under Common module settings you can assign the Chat activity to groups., 6. The Restrict access area lets you set conditions for student access to
the Chat activity, either by date or by prerequisite. Note: During periods when access is restricted, the activity is completely hidden from students, on the course page, in the gradebook, and in the course Calendar.
7. Click Save and return to course. Or, to open the chat room directly, click Save and display.
View, Delete or Download Chat Logs Instructors can view, delete, or export logs of chat room sessions. A session begins when the first person enters a chat, and ends when the last person leaves.
View a Log of a Particular Session By default, only instructors can view past sessions. For students to be able to see past sessions, an instructor must set up the chat to allow everyone to view past chat sessions.
1. On your course page, click the link of the Chat activity. The Chat page opens, showing the description and a list of links.
2. Click View past chat sessions. The Chat sessions page opens showing a list of sessions and participants with a count of how many messages each participant sent. The sessions are listed in reverse-chronological order, with
ISNC LEARNING MANAGEMENT SYSTEM
pg. 33 ISNC MOODLE Administrator
3. the most recent session at the top of the list. Note: If you see No complete sessions found, click List all Sessions.
4. To view a particular session, click See this session (at right). A log will open showing the exchange of messages between participants.
5. To return to the Chat sessions page, click Continue.
Delete a Session Log 1. On your course page, click the link of the Chat activity. The Chat page
opens, showing the description and a list of links. 2. Click View past chat sessions. The Chat sessions page opens showing a list
of sessions and participants with a count of how many messages each participant sent. The sessions are listed in reverse-chronological order, with the most recent session at the top of the list. Note: If you see No complete sessions found, click List all Sessions.
3. For a session listed on the Chat sessions page, click Delete this session. The session log will open with a confirmation box at the top of the page.
4. To confirm that you are deleting the correct session, click Continue to delete the log. You will be returned to the Chat sessions page.
Download a Session Log 1. On your course page, click the link of the Chat activity. The Chat page
opens, showing the description and a list of links. 2. Click View past chat sessions. The Chat sessions page opens showing a list
of sessions and participants with a count of how many messages each participant sent. The sessions are listed in reverse-chronological order, with the most recent session at the top of the list. Note: If you see No complete sessions found, click List all Sessions.
3. To download a session, click Export to portfolio (at lower-left). The session will download to your computer as an HTML page. Depending on your browser, you may need to confirm the download. Note: Look for the file named "Your chat name-session.html" where your
ISNC LEARNING MANAGEMENT SYSTEM
pg. 34 ISNC MOODLE Administrator
4. browser typically saves downloads. You can view the file in a browser, or open it in a word processing application such as MS Word.
5. To return to the previous page after downloading, click Return to where you were.
6. To return to the Chat sessions page, click Continue.
Download Logs of All Sessions 1. On your course page, click the link of the Chat activity. The Chat page
opens, showing the description and a list of links. 2. Click View past chat sessions. The Chat sessions page opens showing a list
of sessions and participants with a count of how many messages each participant sent. The sessions are listed in reverse-chronological order, with the most recent session at the top of the list. Note: If you see No complete sessions found, click List all Sessions.
3. Click Export all to portfolio (at lower left of the page). The sessions will be compiled in a single HTML file and downloaded to your computer. Depending on your browser, you may need to confirm the download. Note: Look for the file named "Your chat name-session.html" where your browser typically saves downloads. You can view the file in a browser, or open it in a word processing application such as MS Word.
4. To return to the previous page after downloading, click Return to where you were.
5. To return to the Chat sessions page, click Continue.
ISNC LEARNING MANAGEMENT SYSTEM
pg. 35 ISNC MOODLE Administrator
Forum Instructors and students can communicate and collaborate using Moodle Forums. Instructors can create discussion topics or, depending on the forum type, allow students to originate topics. Course members can then post replies, and subscribe if they want to receive an email copy of each post made to a particular forum.
Forum Types There are multiple forum types in Moodle. Some forum types allow only the instructor to start a new topic, and others allow students to start new topics. Choose the type of forum that makes sense for the activity you are asking your students to do:
Standard forum for general use Allow multiple topics arranged in a threaded conversation. Students may start new topics in this format.
Standard forum displayed in a blog-like format Allow multiple topics listed with the most recent topic at the top of the page and replies behind a link. Students may start new topics in this format.
Single simple discussion Only one topic, started by the instructor, is allowed. This is best suited for short-term, focused conversations.
Each person posts one discussion Each student may start one new topic. Students are not limited in the number of replies they can post within those topics.
Q and A forum An instructor posts one topic, for example, posing a question to students. Students must post their response before they can view other students’ responses.
The News Forum This unique forum is automatically created in each course for instructors to post announcements. By default, comments are not allowed, only instructors and TAs can post to the forum, and all course participants receive an email copy of each post.
ISNC LEARNING MANAGEMENT SYSTEM
pg. 36 ISNC MOODLE Administrator
Add a New Forum to Your Course 1. On your course page, click Turn editing on (top right). Editing icons and
links will appear. 2. Locate the course Section where you will add the forum. (If you are using
the Collapsed topics format, open the Section.) 3. At the bottom-right of the Section, click + Add an activity or
resource. The Activity chooser will open. 4. In the Activity chooser, select Forum and then click Add. The Adding a new
Forum page will open. 5. Configure settings for the forum 6. Click Save and return to course to return to your main course page.
Configure Forum Options When you add a Forum activity to a Moodle course, you can choose from a number of settings. The first two settings are required; the remaining settings are optional. Click particular headings to view those settings, or Expand all (top right) to view all settings. This section describes each setting.
1)General
Forum name (required) This name displays as a link to the forum on your course page. Use something unique that clearly identifies this forum from other course activities. We also recommend keeping the name short.
Description (required) Explain the purpose of the forum to your students. For example, you might describe how often students should post, how many posts and replies they should make, and/or the expectations about post content. The Description will be visible to students when they click the forum link.
Display description on course page Select this option to display the description underneath the assignment link on your course page.
ISNC LEARNING MANAGEMENT SYSTEM
pg. 37 ISNC MOODLE Administrator
Forum type Select a forum type from the drop-down menu. The default is Standard forum for general use.
Attachments and word count
Maximum attachment size Each attachment cannot exceed this file size. (If a student can attach multiple files, and attaches files at different times, the total can exceed the set size.)
Maximum number of attachments Each student will be able to upload up to the maximum number of attachments for their submission.
Display word count This setting specifies whether the word count of each post should be displayed or not. Subscription and tracking
Subscription mode Subscription mode is set to Optional subscription by default (recommended). This allows students to choose to subscribe to the forum and receive an email copy of each post made. Other choices are:
Forced subscription - Everyone is subscribed and cannot unsubscribe (not recommended in most cases).
Auto subscription - Everyone is subscribed initially but can choose to unsubscribe at any time.
Subscription disabled - Subscriptions are not allowed. Read tracking
If enabled, participants can track read and unread posts in the forum and in discussions.
ISNC LEARNING MANAGEMENT SYSTEM
pg. 38 ISNC MOODLE Administrator
2)RSS
RSS feed for this activity RSS (really simple syndication) feeds in Moodle enable people to stay up to date with forum posts. Select Discussions or Posts from the drop-down menu to choose what content will be included in the feed.
Number of RSS recent articles If RSS feed is enabled for this activity, this setting specifies the number of articles (either discussions or posts) to include in the RSS feed.
3)Post threshold for blocking
Time period for blocking This setting limits the number of posts students can make in a period of time. Choose the time period within which to block students from posting from the Time period for blocking drop-down menu.
Post threshold for blocking If a time period for blocking has been set, this setting specifies the maximum number of posts which a user can post in the given time period.
Post threshold for warning Students can be warned as they approach the maximum number of posts allowed in a given period. This setting specifies after how many posts they are warned. Grade
Grade category Select a Category in your gradebook under which you would like the assignment grade to be placed.
4)Ratings
You can grade your students' posts using Ratings. Instructors can rate each post a student makes, and the ratings are aggregated into a single grade in the gradebook.
ISNC LEARNING MANAGEMENT SYSTEM
pg. 39 ISNC MOODLE Administrator
Roles with permission to rate Once the forum activity has been saved, you will be able to see the roles Moodle users must have in order to submit ratings. The list of roles may be amended via the permissions link in the Administration block.
Aggregate type The aggregate type defines how ratings are combined to form the final grade in the gradebook. Choose from one of the following options in the Aggregate type drop-down menu: Average of ratings - The mean of all ratings. Count of ratings - The number of rated items becomes the final grade. Note that the total cannot exceed the maximum grade for the activity. Maximum - The highest rating becomes the final grade. Minimum - The smallest rating becomes the final grade. Sum - All ratings are added together. Note that the total cannot exceed the maximum grade for the activity. Note: If No ratings is selected, then the activity will not appear in the gradebook.
Scale If an aggregate type has been selected, you may select the type of grading used for this activity. If Scale is chosen, you can then choose the scale from the Scale drop-down menu. If using Point grading, you can then enter the maximum grade available for this activity.
Restrict ratings to items with dates in this range If this check box is selected, you can set a specific date range during which a post must be made in order to receive a grade.
4) Common Module Settings
Visible Set whether or not an assignment is visible to students. By default, new assignments are set to Show.
ID number Setting an ID number identifies the activity for grade calculation purposes. Group mode and Grouping
ISNC LEARNING MANAGEMENT SYSTEM
pg. 40 ISNC MOODLE Administrator
These options let you restrict the assignment to particular groups of students you have already created in Moodle.
Restrict Access
To add restrictions on accessing the activity, click Add restriction. The Add restriction window will open, containing the following options:
Date. Prevent access until (or from) a specified date and time. Grade. Require students to achieve a specified grade. User profile. Control access based on fields within the student’s profile. Restriction set. Add a set of nested restrictions to apply complex logic.
If you have groups in your course, you will see the following additional options: Group. Allow only students who belong to a specified group, or all groups. Grouping. Allow only students who belong to a group within a specified grouping.
Add a New Topic to a Forum Depending on the type of forum, students may be able to add topics as soon as the activity is available, or the instructor may need to initiate the discussion by posting a topic. For example, instructors must post a question to a Q & A forum before students can post.
To add a new topic to a forum:
1. Click the link to the forum activity (not the edit icon, but the link to open the forum). The Forum page will open, showing the description you provided when you set up the activity. If no topics or posts have been added, you see "There are no discussion topics yet in this forum."
2. If working with groups in the forum:
To post a topic that will be visible only to a particular group, the Group mode for the forum must be set to Separate (on the Settings page for the forum), and on the Forum page, from the Groups drop-down menu (at top of page), select the group name.
ISNC LEARNING MANAGEMENT SYSTEM
pg. 41 ISNC MOODLE Administrator
To post a topic that will be visible to all groups to read, but to which only a particular group can reply, the Group mode for the forum must be set to Visible (on the Settings page for the forum), and on the Forum page, from the Groups drop-down menu (at top of page), select the group name.
To post the same topic for all groups, leave the Groups menu set to All participants.
3. Click Add a new discussion topic (for a Q & A forum click Add a new question). The Your new discussion topic page will open.
4. Enter a subject and a message (both required). 5. If subscription is set to Optional in the forum's settings, select
the Discussion subscription check box to receive email copies of posts made to this forum. (This will affect you, not your students.)
6. You may choose to add an attachment. 7. Select the Mail now checkbox if you do not want the standard 30-minute
delay before subscribers receive an email. 8. Click Post to forum to post your message. 9. Click Continue to return to the Forum page. Your discussion topic will be
listed, and course members will now be able to reply. 10. Once replies have been made, click the link to the topic to view replies or
add additional replies to the thread. (If read tracking is enabled, the number of unread posts will be indicated and links highlighted.)
Close a Forum and Prevent Further Student Posts To prevent further student contributions to a forum, change the Permissions for the activity to make it "read-only." On your course page, click the link to the forum. The Forum page will open.
1. With the forum page, open, go to the Administration block and click Permissions (not Check Permissions). The Permissions in Forum screen will open.
2. In the Advanced role override drop-down menu, choose Student. 3. Under the bold heading, Activity: Forum, select Prevent for the following:
• Reply to posts • Start new discussions
ISNC LEARNING MANAGEMENT SYSTEM
pg. 42 ISNC MOODLE Administrator
Lesson Activity
The lesson module presents a series of HTML pages to the student who is usually asked to make some sort of choice underneath the content area. The choice will send them to a specific page in the Lesson. In a Lesson page's simplest form, the student can select a continue button at the bottom of the page, which will send them to the next page in the Lesson.
Lesson administration settings
This page explains the settings involved when first creating a lesson. To add a lesson to your Moodle course page:
With the editing turned on, in the section you wish to add your lesson, click
the "Add an activity or resource" link (or, if not present, the "Add an activity"
drop down menu) and choose Lesson All settings may expanded by clicking the
"Expand all" link top right.
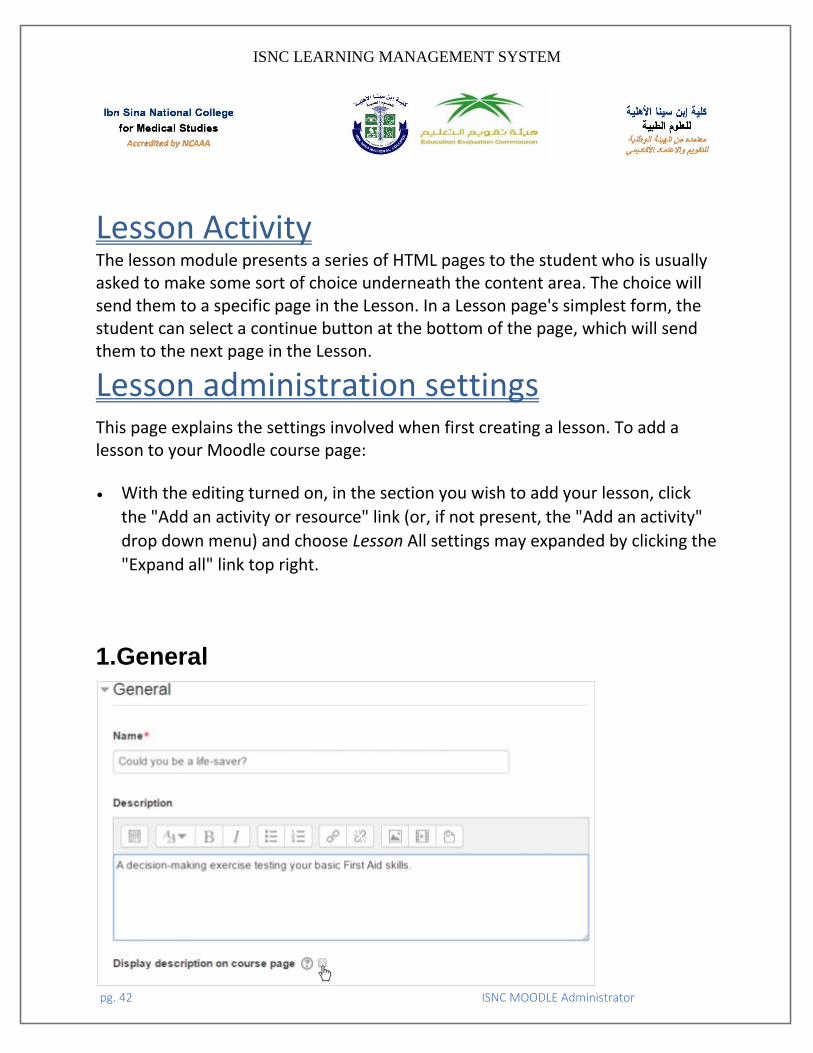
1.General
ISNC LEARNING MANAGEMENT SYSTEM
pg. 43 ISNC MOODLE Administrator
Name
Whatever you type here will form the link learners click on to view the lesson so it is helpful to give it a name that suggests its purpose.
Description
Add a description of your lesson here.
Display description on the course page
If this box is ticked, the description will appear on the course page just below the name of the lesson.
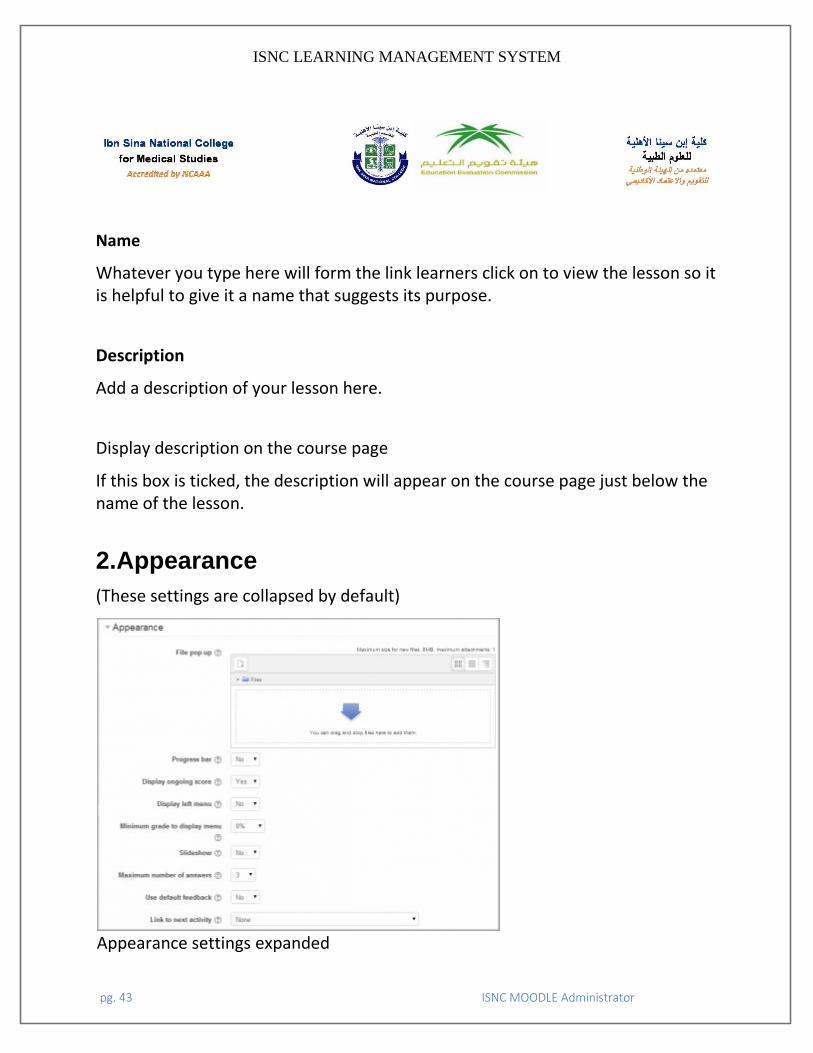
2.Appearance
(These settings are collapsed by default)
Appearance settings expanded
ISNC LEARNING MANAGEMENT SYSTEM
pg. 44 ISNC MOODLE Administrator
File pop
If you want to include a link to a file on the lesson page for students to refer to, upload it here.
Progress bar
Choose this to show a bar at the bottom of the page showing how far into the lesson the student has got.
For lessons containing only Content pages, once a lesson has been taken to
the end, if that same lesson is re-taken, the progress bar will not be "reset",
i.e. it will show a 100% progress from page 1!
For lessons containing Question pages and set to "Re-take" Yes, the progress
bar is always "reset" at 0% upon re-take.
Note that the Lesson Progress bar only works correctly for lessons with a
"straightforward" navigation, such as page 1 -> page 2 -> page n -> end of
lesson. It is not guaranteed to work with pages "jumping all over the place".
Display ongoing score
Choose this to let students see their score as they work through the lesson.
Display left menu
Choose this if you want to show a list of the pages in the Lesson so a student can see what is coming up.
Minimum grade to display menu
Choose this if you want the student to go through the lesson once and get a grade before they can (on review) see and navigate through all the different pages.
ISNC LEARNING MANAGEMENT SYSTEM
pg. 45 ISNC MOODLE Administrator
Slideshow
Slideshow height, width and background colour are set for the whole site by an administrator in Settings > Site administration > Plugins > Activity modules > Lesson.
Maximum Number of Answers
Here you can set the default number of answer boxes available when you add your question or content pages. For instance, if you are only going to use True/False, you would only need 2. You can change this at any time so it's not crucial.
Use default feedback
Choose this if you want to show a set phrase regardless of their answer. If you have set your own default feedback such as "well done; correct" or "never mind; better luck next time" etc it will appear. If you have not, then Moodle's default feedback will appear.
Link to next activity
Choose this to give students a link to another activity when they reach the end of the lesson. (Note: this can also be achieved using Conditional activities)
ISNC LEARNING MANAGEMENT SYSTEM
pg. 46 ISNC MOODLE Administrator
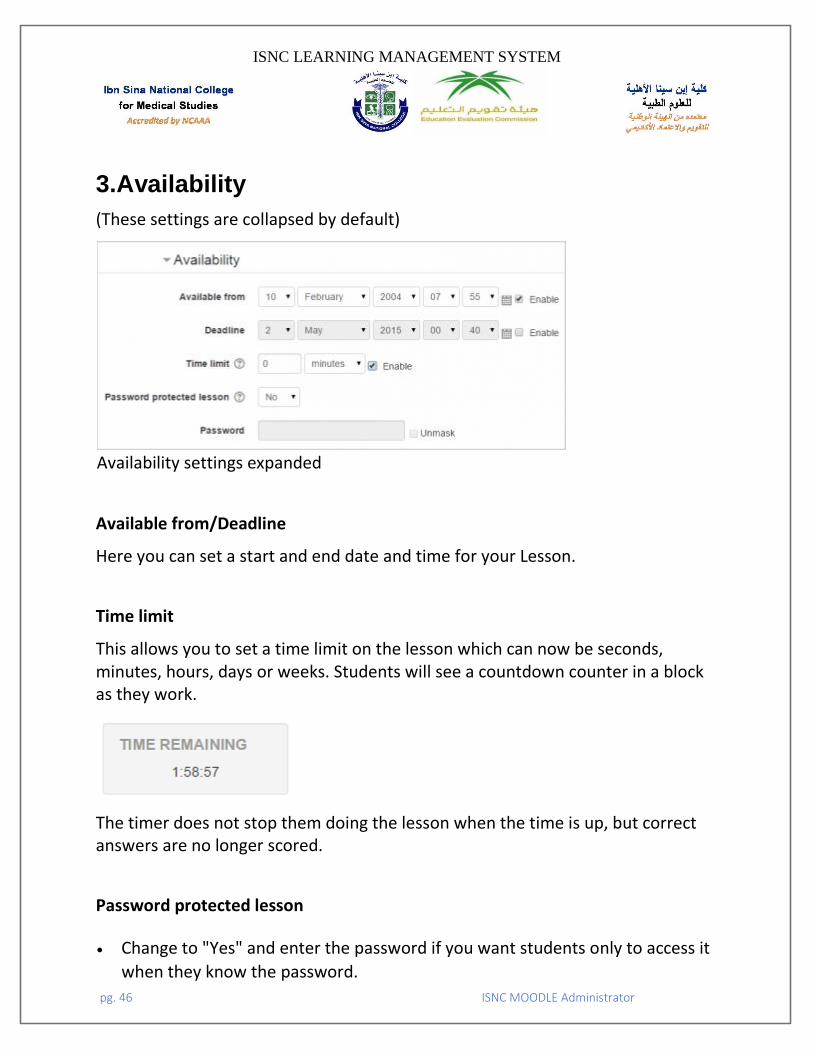
3.Availability
(These settings are collapsed by default)
Availability settings expanded
Available from/Deadline
Here you can set a start and end date and time for your Lesson.
Time limit
This allows you to set a time limit on the lesson which can now be seconds, minutes, hours, days or weeks. Students will see a countdown counter in a block as they work.
The timer does not stop them doing the lesson when the time is up, but correct answers are no longer scored.
Password protected lesson
Change to "Yes" and enter the password if you want students only to access it
when they know the password.
ISNC LEARNING MANAGEMENT SYSTEM
pg. 47 ISNC MOODLE Administrator
Prerequisite lesson
Note: You will only see this setting if you have a course with prerequisite
lessons upgraded from an earlier version of Moodle.
You will see a warning that prerequisites are due to be removed completely.
Please use access restrictions instead. See Conditional activities for more
information.
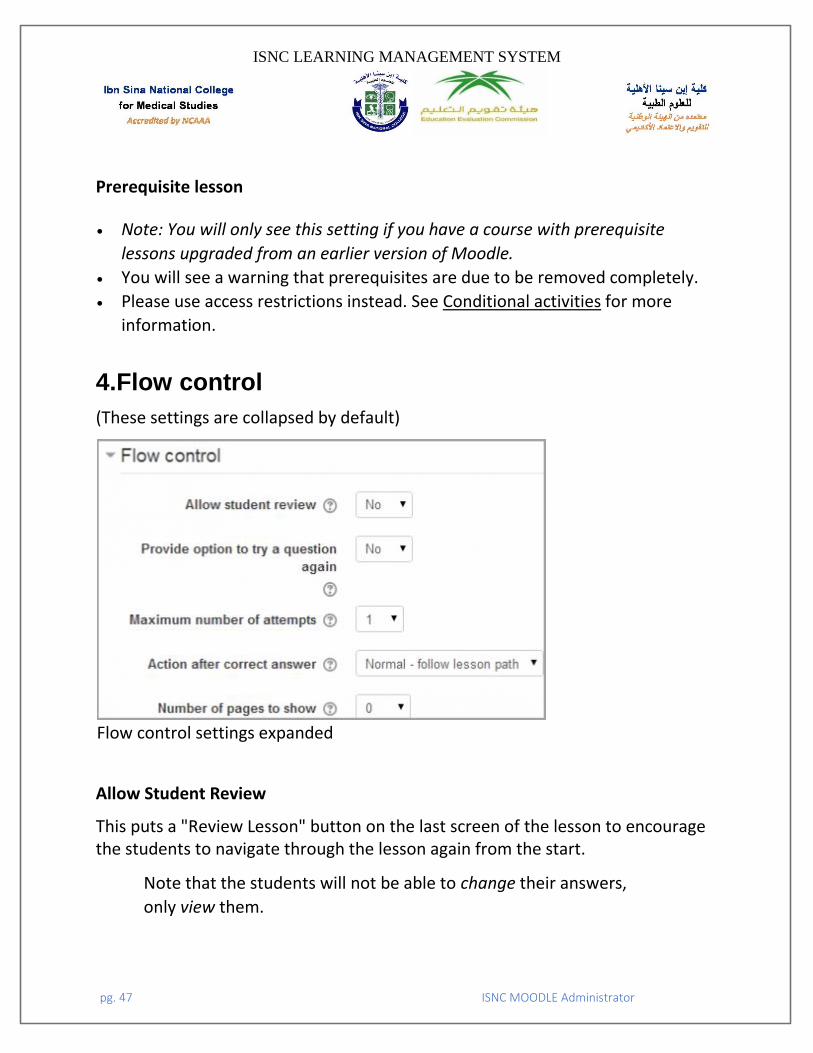
4.Flow control
(These settings are collapsed by default)
Flow control settings expanded
Allow Student Review
This puts a "Review Lesson" button on the last screen of the lesson to encourage the students to navigate through the lesson again from the start.
Note that the students will not be able to change their answers,
only view them.

ISNC LEARNING MANAGEMENT SYSTEM
pg. 48 ISNC MOODLE Administrator
Provide option to try a question again
This displays a button after an incorrectly answered question so that the
student can try again (but not get credit for it)
TIP: Leave this off if you are using essay questions.
Maximum Number of Attempts
Decide here how many times you want students to be able to attempt
each question. When they reach the maximum, they will be taken
automatically to the next page.
Note: this setting works in combination with the above setting, or independently.
When 'provide an option to try again' is set to No, students will be able
to retake the question as many times as it is set here, with a score
penalty.
When 'provide an option to try again' is set to Yes, then students will be
able to retake the question as many times as it set here without a score
penalty. In this case an extra dialogue appears.
Consequently, when the relevant jump 'this page' is used in wrong answer while the 'provide an option to try again' is set to No and 'maximum number of attempts' is set to 1, a student that will answer wrongly will be moved into the next page, since he/she has the change to try the question just once.
Tip: Ensure you check lesson using a real student account, as the teacher preview or the 'switch role to student' may not give you the exact picture.
ISNC LEARNING MANAGEMENT SYSTEM
pg. 49 ISNC MOODLE Administrator
Action after a Correct Answer
Choose here where you want a student to be sent to if they get a question right. See Using Lesson for more details on this setting. The options are:
o the next part of the Lesson (default setting)
o a random, unexpected page
o a random page which they have not yet answered.
Number of pages to show
You only need this if you have set "Action after a correct answer" to show an unseen or unanswered page. Otherwise, all pages will be seen
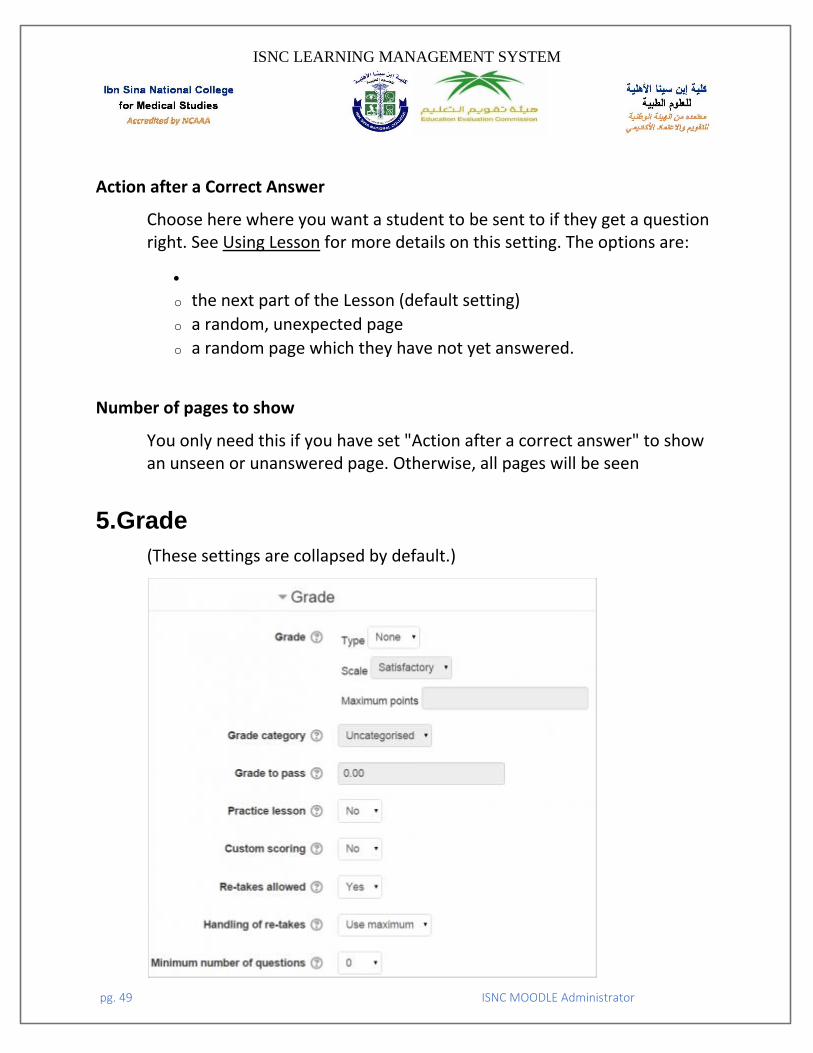
5.Grade
(These settings are collapsed by default.)
ISNC LEARNING MANAGEMENT SYSTEM
pg. 50 ISNC MOODLE Administrator
Custom Scoring
Use this to give a particular number score (negative or positive) to each answer
Re-takes allowed
Choose this if you want your students to be able to do the lesson more than once.
Note that this setting only applies to lessons containing Question pages.
Lessons consisting only of Content pages can be re-taken even if 'Re-takes
allowed' is set to No.
Handling of re-take
If you allow your students to re-take the lesson, then decide here if the grade for all lesson attempts is the mean or the maximum.
Note that the Question Analysis always uses the answers from the first tries
of the lesson. Re-takes by students are ignored.
Minimum Number of Questions
Set here the minimum number of questions that will be used to calculate a student's score. Students will be told how many they have answered and how many more they need to answer.
If you are using Content pages, then set this to 0.
If you use this setting, then add some explanatory text at the
start of the lesson so the student knows how many questions
they must answer as a minimum. (They may answer more.
ISNC LEARNING MANAGEMENT SYSTEM
pg. 51 ISNC MOODLE Administrator
6.Common module settings
(These settings are collapsed by default.)
Restrict access/Activity completion
(These settings are collapsed by default)
The Restrict access and Activity completion settings are visible
if Conditional activities and Activity completion have been
enabled in the site and the course.
Note that in addition to the standard activity completion
conditions, the Lesson also has 'Require end reached' and
7.User and group overrides
When a lesson has been created, it is possible to override certain settings for individuals and groups. The settings for this are located in the Lesson administration block:
ISNC LEARNING MANAGEMENT SYSTEM
pg. 52 ISNC MOODLE Administrator
Quiz
The Quiz activity module allows the teacher to design and build quizzes consisting
of a large variety of Question types, including multiple choice, true-false, short
answer and drag and drop images and text. These questions are kept in
the Question bank and can be re-used in different quizzes.
Quizzes may be used
As course exams
As an assignment
As exam practice
For self-assessment
How to Create Quiz Activity
Step1. Enable editing mode by pressing “turn editing on” button.
Step2. Within the required Week or Topic section, click Add an Activity or
Resource link.
Step3. Select Quiz from activity list, and click Add.
ISNC LEARNING MANAGEMENT SYSTEM
pg. 53 ISNC MOODLE Administrator
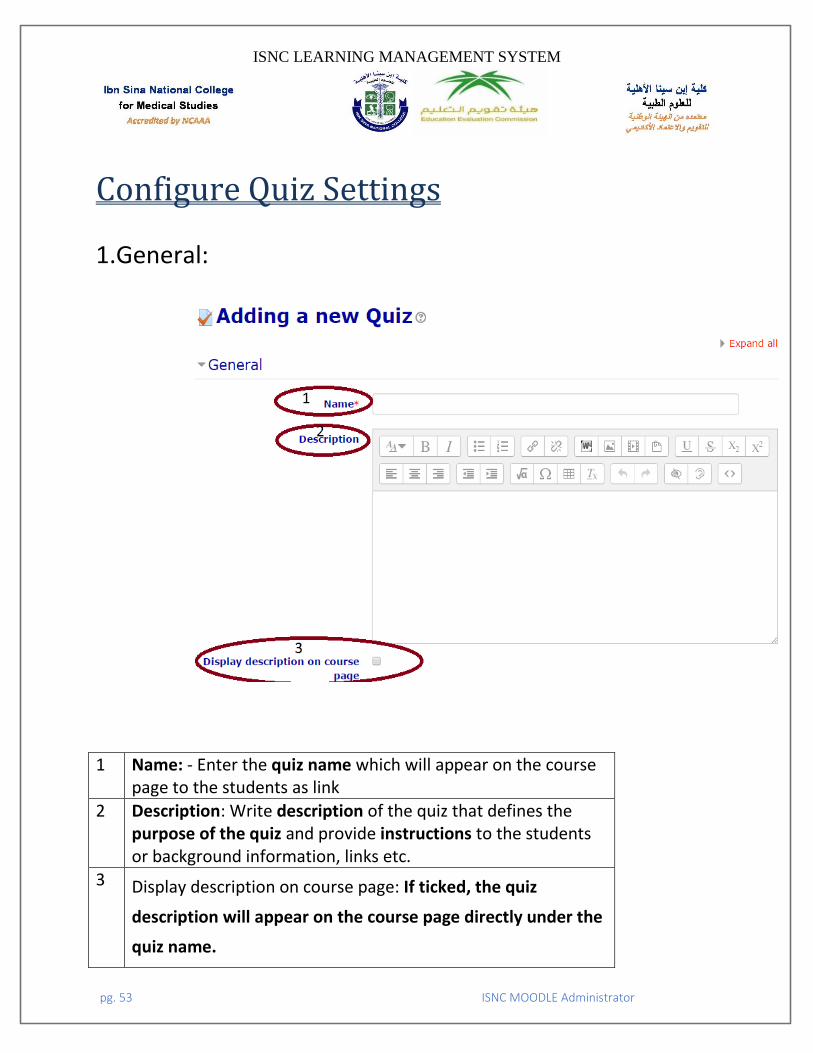
Configure Quiz Settings
1.General:
1 Name: - Enter the quiz name which will appear on the course page to the students as link
2 Description: Write description of the quiz that defines the purpose of the quiz and provide instructions to the students or background information, links etc.
3 Display description on course page: If ticked, the quiz
description will appear on the course page directly under the
quiz name.
ISNC LEARNING MANAGEMENT SYSTEM
pg. 54 ISNC MOODLE Administrator
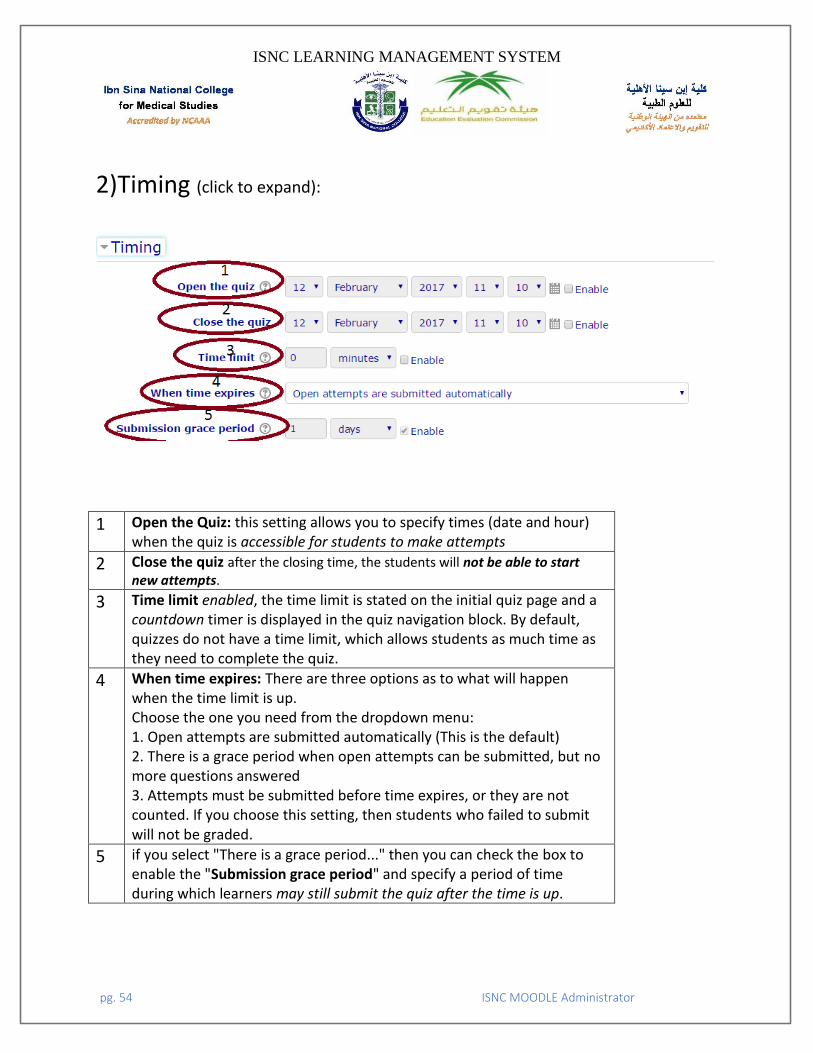
2)Timing (click to expand):
1 Open the Quiz: this setting allows you to specify times (date and hour) when the quiz is accessible for students to make attempts
2 Close the quiz after the closing time, the students will not be able to start new attempts.
3 Time limit enabled, the time limit is stated on the initial quiz page and a countdown timer is displayed in the quiz navigation block. By default, quizzes do not have a time limit, which allows students as much time as they need to complete the quiz.
4 When time expires: There are three options as to what will happen when the time limit is up. Choose the one you need from the dropdown menu: 1. Open attempts are submitted automatically (This is the default) 2. There is a grace period when open attempts can be submitted, but no more questions answered 3. Attempts must be submitted before time expires, or they are not counted. If you choose this setting, then students who failed to submit will not be graded.
5 if you select "There is a grace period..." then you can check the box to enable the "Submission grace period" and specify a period of time during which learners may still submit the quiz after the time is up.
ISNC LEARNING MANAGEMENT SYSTEM
pg. 55 ISNC MOODLE Administrator
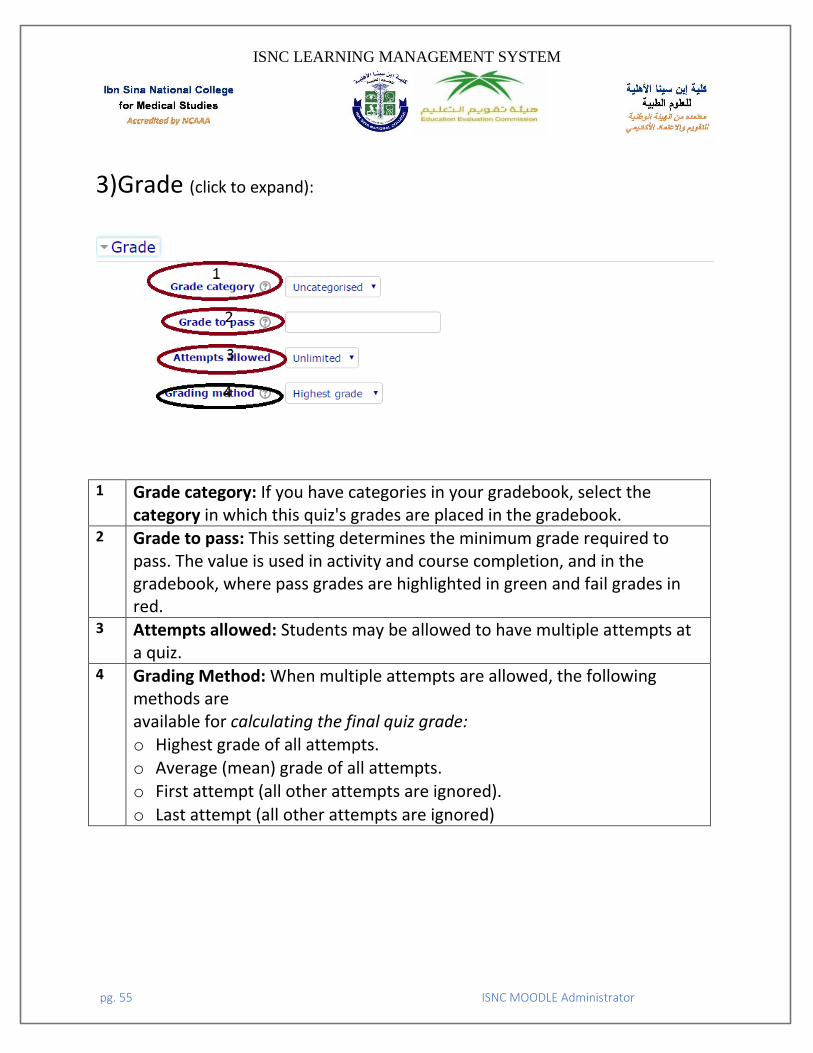
3)Grade (click to expand):
1 Grade category: If you have categories in your gradebook, select the category in which this quiz's grades are placed in the gradebook.
2 Grade to pass: This setting determines the minimum grade required to pass. The value is used in activity and course completion, and in the gradebook, where pass grades are highlighted in green and fail grades in red.
3 Attempts allowed: Students may be allowed to have multiple attempts at a quiz.
4 Grading Method: When multiple attempts are allowed, the following methods are available for calculating the final quiz grade: o Highest grade of all attempts. o Average (mean) grade of all attempts. o First attempt (all other attempts are ignored).
o Last attempt (all other attempts are ignored)
ISNC LEARNING MANAGEMENT SYSTEM
pg. 56 ISNC MOODLE Administrator
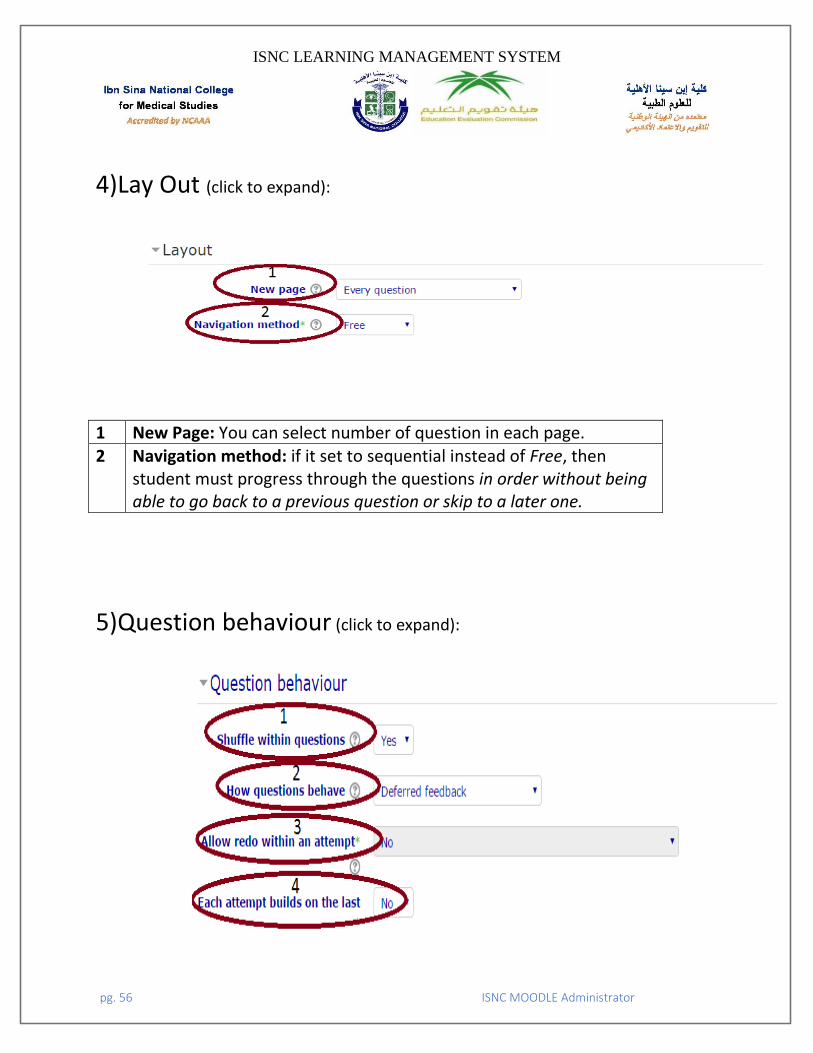
4)Lay Out (click to expand):
1 New Page: You can select number of question in each page. 2 Navigation method: if it set to sequential instead of Free, then
student must progress through the questions in order without being able to go back to a previous question or skip to a later one.
5)Question behaviour (click to expand):
ISNC LEARNING MANAGEMENT SYSTEM
pg. 57 ISNC MOODLE Administrator
1 Shuffle within questions: If set to 'yes', the parts making up each question will be randomly shuffled each time a student attempts the quiz, provided the option is also enabled in the question settings. This setting only applies to questions that have multiple parts, such as multiple choice or matching questions.
2 How questions behave: this setting determines how the students interact with the questions in quiz. o 'Deferred feedback' mode: you may wish the students to enter an answer to each question and then submit the entire quiz, before anything is graded or they get any feedback. o 'Interactive with multiple tries' mode: you may wish for students to submit each question as they go along to get immediate feedback, and if they do not get it right immediately, they will have another try for fewer marks. o Immediate feedback: Similar to interactive mode in that the student can submit their response immediately during the quiz attempt, and get it graded. However, they can only submit one response, they cannot change it later.
3 Allow redo within an attempt: if enabled, then when students have finished attempting particular question, they will see a Redo question button. This allows them to attempt another version of the same question, without having to submit the entire quiz attempt and start another one.
4 If multiple attempts are allowed and “Each attempt build on last” setting is enabled, each new quiz attempt will contain the results of the previous attempt. This allows a quiz to be completed over several attempts.
ISNC LEARNING MANAGEMENT SYSTEM
pg. 58 ISNC MOODLE Administrator
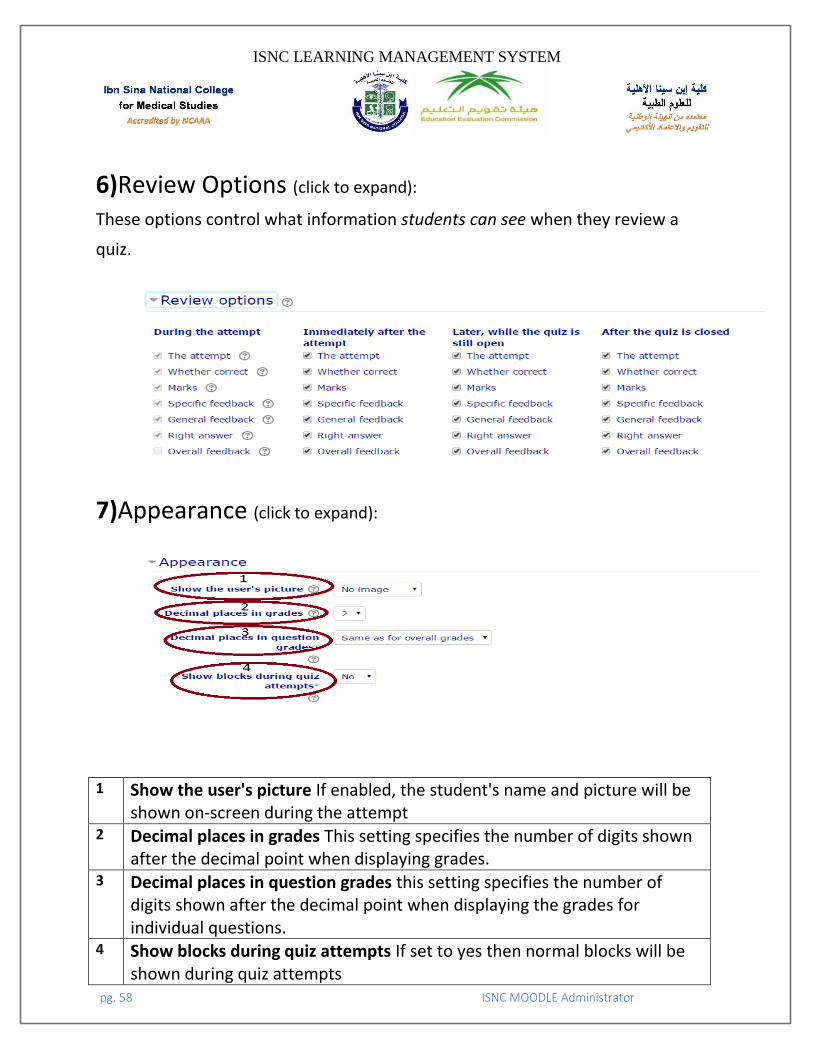
6)Review Options (click to expand):
These options control what information students can see when they review a
quiz.
7)Appearance (click to expand):
1 Show the user's picture If enabled, the student's name and picture will be shown on-screen during the attempt
2 Decimal places in grades This setting specifies the number of digits shown after the decimal point when displaying grades.
3 Decimal places in question grades this setting specifies the number of digits shown after the decimal point when displaying the grades for individual questions.
4 Show blocks during quiz attempts If set to yes then normal blocks will be shown during quiz attempts
ISNC LEARNING MANAGEMENT SYSTEM
pg. 59 ISNC MOODLE Administrator
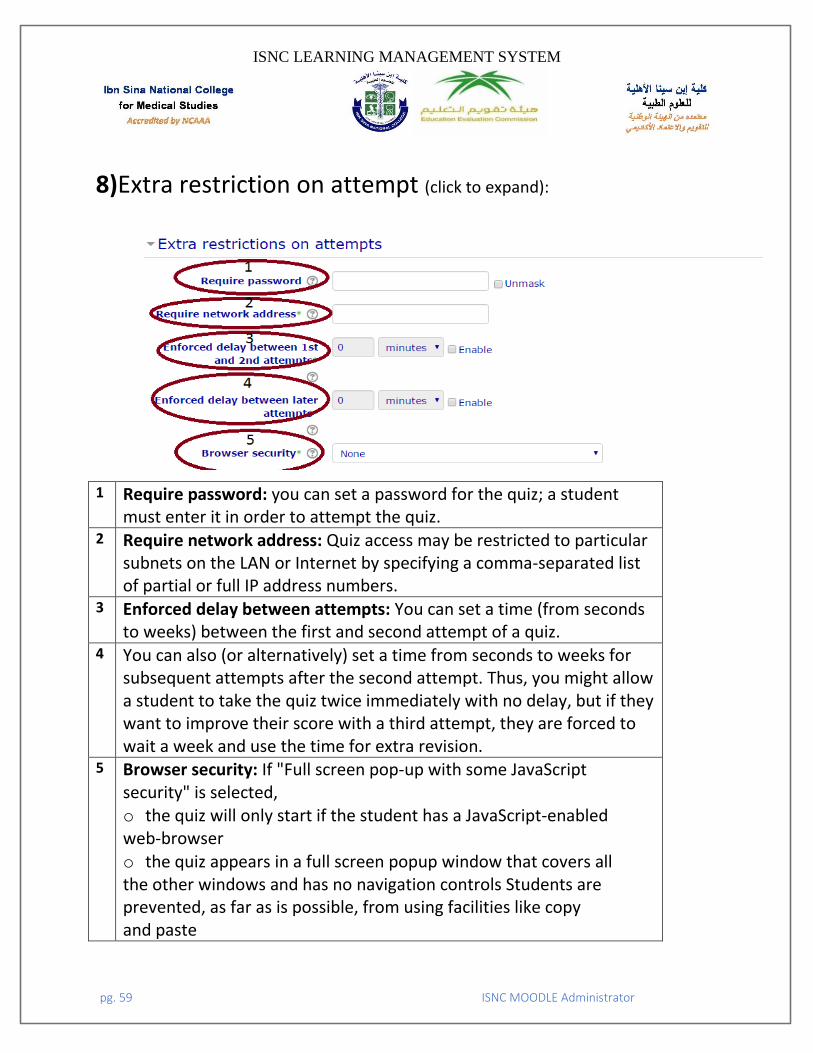
8)Extra restriction on attempt (click to expand):
1 Require password: you can set a password for the quiz; a student must enter it in order to attempt the quiz.
2 Require network address: Quiz access may be restricted to particular subnets on the LAN or Internet by specifying a comma-separated list of partial or full IP address numbers.
3 Enforced delay between attempts: You can set a time (from seconds to weeks) between the first and second attempt of a quiz.
4 You can also (or alternatively) set a time from seconds to weeks for subsequent attempts after the second attempt. Thus, you might allow a student to take the quiz twice immediately with no delay, but if they want to improve their score with a third attempt, they are forced to wait a week and use the time for extra revision.
5 Browser security: If "Full screen pop-up with some JavaScript security" is selected, o the quiz will only start if the student has a JavaScript-enabled web-browser o the quiz appears in a full screen popup window that covers all the other windows and has no navigation controls Students are prevented, as far as is possible, from using facilities like copy and paste
ISNC LEARNING MANAGEMENT SYSTEM
pg. 60 ISNC MOODLE Administrator
9)Overall Feedback: Overall feedback is text that is shown after a quiz has been attempted. By
specifying additional grade boundaries (as a percentage or as a number), the text
shown can depend on the grade obtained.
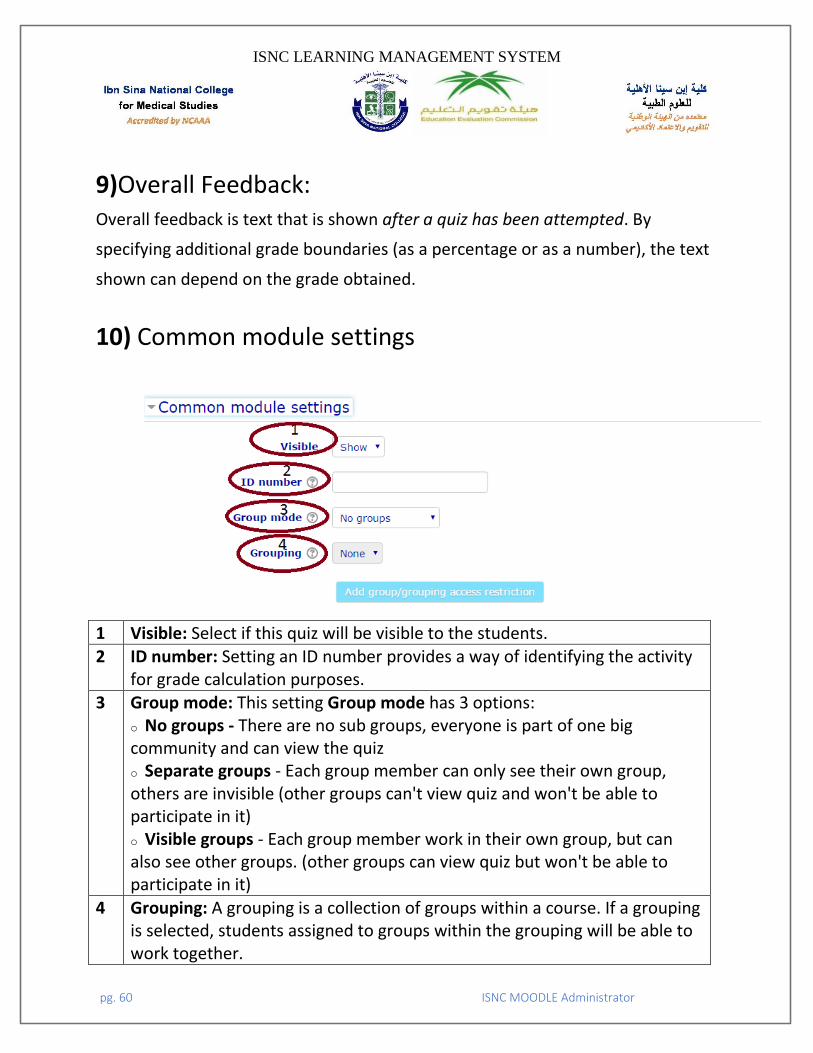
10) Common module settings
1 Visible: Select if this quiz will be visible to the students. 2 ID number: Setting an ID number provides a way of identifying the activity
for grade calculation purposes. 3 Group mode: This setting Group mode has 3 options:
o No groups - There are no sub groups, everyone is part of one big community and can view the quiz o Separate groups - Each group member can only see their own group, others are invisible (other groups can't view quiz and won't be able to participate in it) o Visible groups - Each group member work in their own group, but can also see other groups. (other groups can view quiz but won't be able to participate in it)
4 Grouping: A grouping is a collection of groups within a course. If a grouping is selected, students assigned to groups within the grouping will be able to work together.
ISNC LEARNING MANAGEMENT SYSTEM
pg. 61 ISNC MOODLE Administrator
Step 3: Add Questions to Quiz
Click on the quiz name in the course page
Click on "Edit Quiz" button
Click on add question
Moodle support many types of questions, here we will describe most
common types True and false and MCQ.
ISNC LEARNING MANAGEMENT SYSTEM
pg. 62 ISNC MOODLE Administrator
Feedback
The Feedback module allows you to create and conduct surveys to collect
feedback. The Feedback activity is ideal for the likes of course or teacher
evaluations.
Step 1: Create Feedback Activity
1. On the course home page, click Turn editing on in the
appropriate topic section click Add an activity or resource
2. Select Feedback from "Add an activity or resource"
window, then click Add
Step 2: Configure the Feedback Activity
Following is the explanation of feedback activity’s settings:
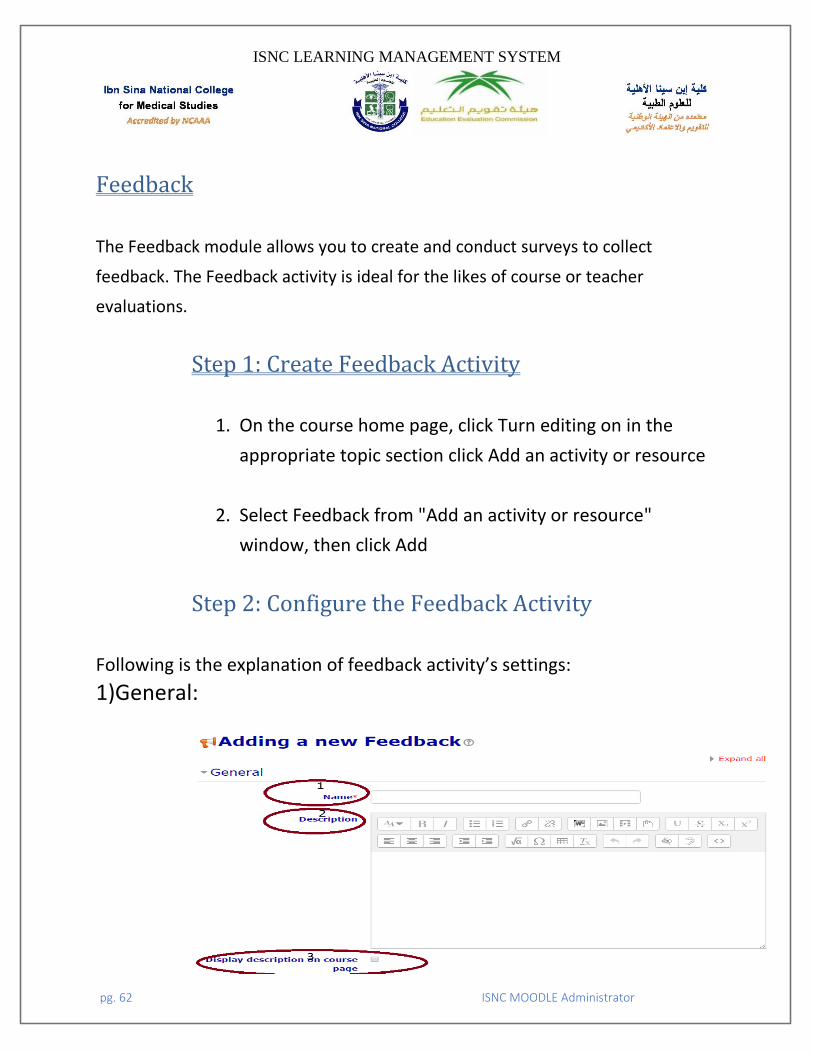
1)General:
ISNC LEARNING MANAGEMENT SYSTEM
pg. 63 ISNC MOODLE Administrator
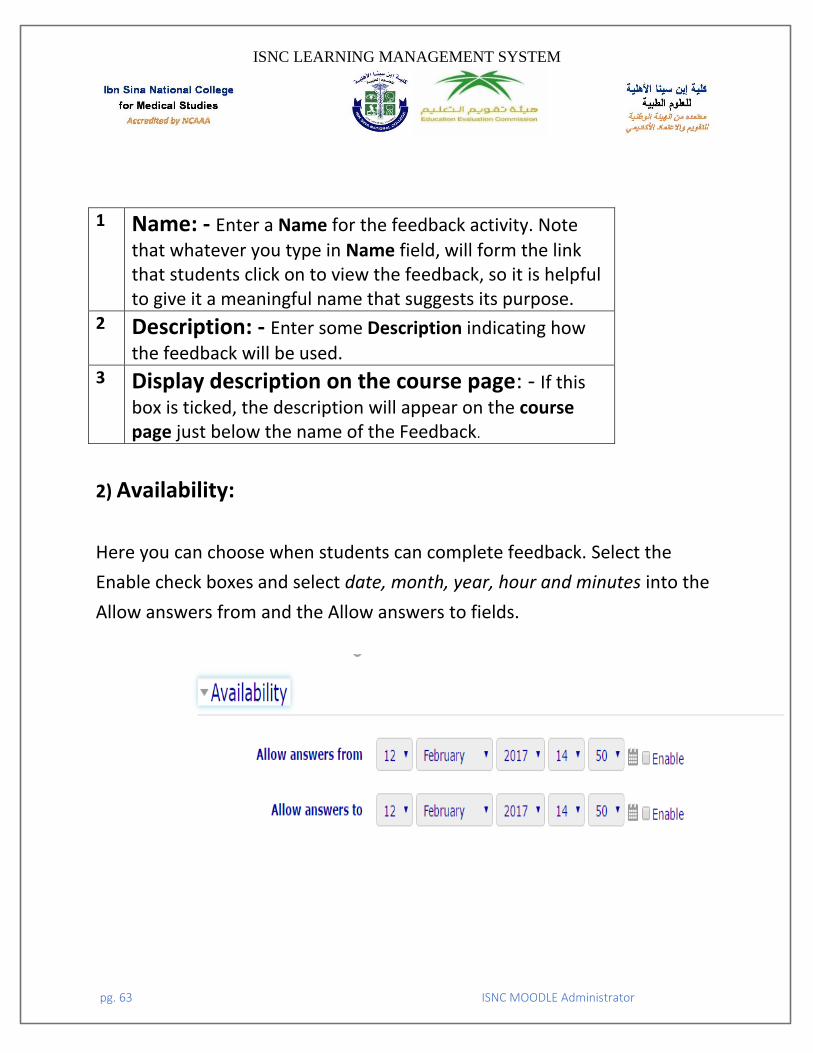
1 Name: - Enter a Name for the feedback activity. Note
that whatever you type in Name field, will form the link that students click on to view the feedback, so it is helpful to give it a meaningful name that suggests its purpose.
2 Description: - Enter some Description indicating how
the feedback will be used. 3 Display description on the course page: - If this
box is ticked, the description will appear on the course page just below the name of the Feedback.
2) Availability:
Here you can choose when students can complete feedback. Select the
Enable check boxes and select date, month, year, hour and minutes into the
Allow answers from and the Allow answers to fields.
ISNC LEARNING MANAGEMENT SYSTEM
pg. 64 ISNC MOODLE Administrator
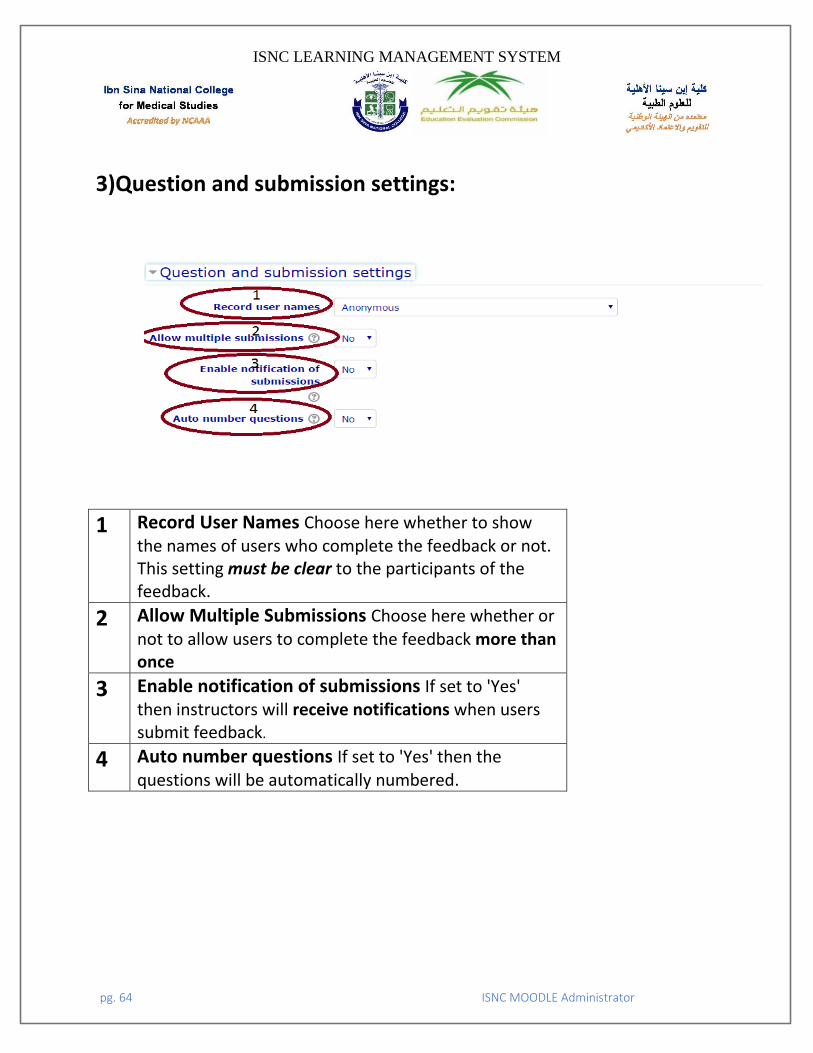
3)Question and submission settings:
1 Record User Names Choose here whether to show the names of users who complete the feedback or not. This setting must be clear to the participants of the feedback.
2 Allow Multiple Submissions Choose here whether or not to allow users to complete the feedback more than once
3 Enable notification of submissions If set to 'Yes' then instructors will receive notifications when users submit feedback.
4 Auto number questions If set to 'Yes' then the questions will be automatically numbered.
ISNC LEARNING MANAGEMENT SYSTEM
pg. 65 ISNC MOODLE Administrator
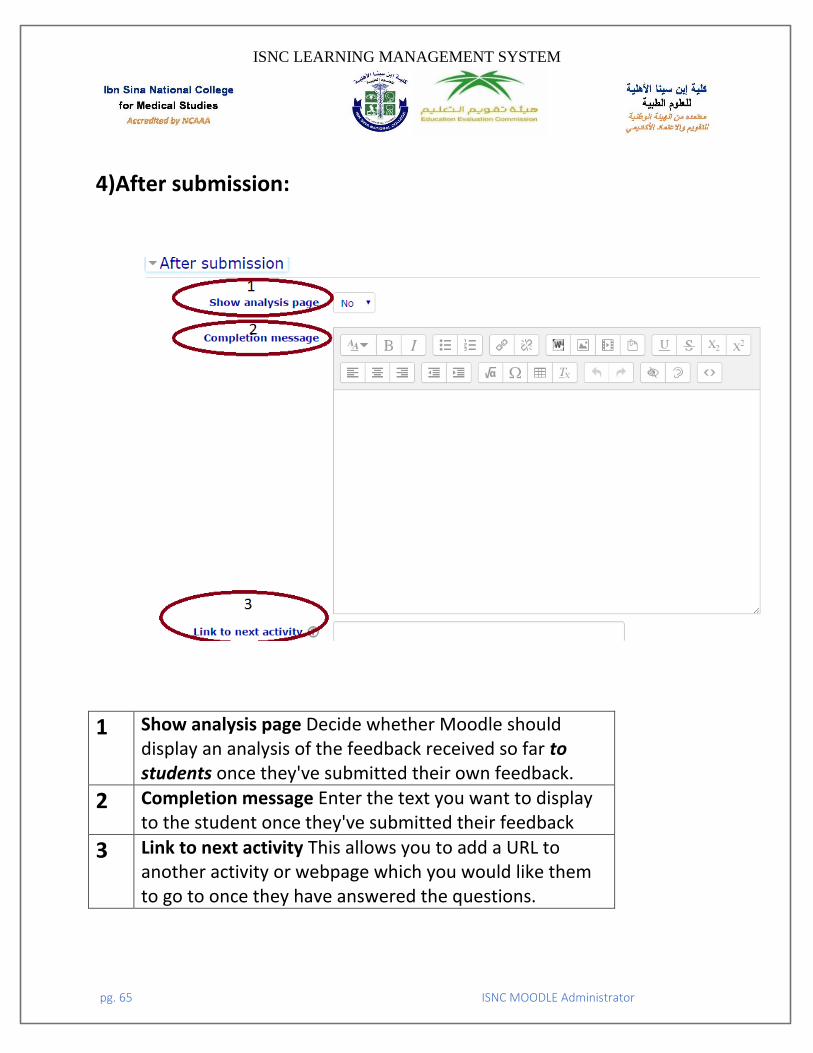
4)After submission:
1 Show analysis page Decide whether Moodle should display an analysis of the feedback received so far to students once they've submitted their own feedback.
2 Completion message Enter the text you want to display to the student once they've submitted their feedback
3 Link to next activity This allows you to add a URL to another activity or webpage which you would like them to go to once they have answered the questions.
ISNC LEARNING MANAGEMENT SYSTEM
pg. 66 ISNC MOODLE Administrator
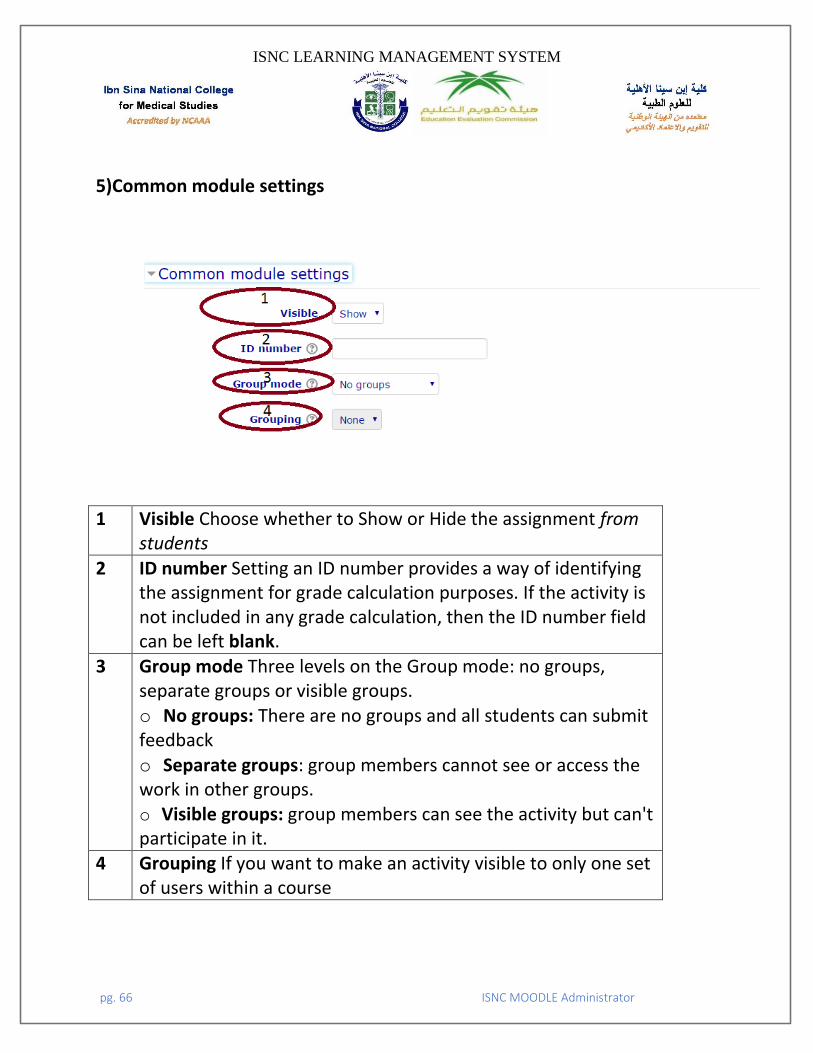
5)Common module settings
1 Visible Choose whether to Show or Hide the assignment from students
2 ID number Setting an ID number provides a way of identifying the assignment for grade calculation purposes. If the activity is not included in any grade calculation, then the ID number field can be left blank.
3 Group mode Three levels on the Group mode: no groups, separate groups or visible groups. o No groups: There are no groups and all students can submit feedback
o Separate groups: group members cannot see or access the work in other groups. o Visible groups: group members can see the activity but can't participate in it.
4 Grouping If you want to make an activity visible to only one set of users within a course
ISNC LEARNING MANAGEMENT SYSTEM
pg. 67 ISNC MOODLE Administrator
Step 3: Add Questions to Feedback
The Edit questions page is where you create questions for your Feedback
activity and decide on the layout for your survey.
Create Questions 1) Click on the newly created Feedback link
2) Select the Edit questions tab.
3) On the Edit questions page, select a question type and complete the
resulting page as appropriate
Step 4: View the Analysis
Within the Analysis tab you will be able to view a list of all responses
submitted for each of the questions within a Feedback activity. The total
number of Submitted answers and Questions are provided within this page,
and a link to export this data to Excel for detailed Analysis.
1. Click the title of the Feedback activity from the course home page.
2. If you have enabled the option of seeing each participant’s name in the
evaluation, you can click the Show responses tab to view individual
responses. Click the Analysis tab to view the aggregated percentages of each
evaluation choice.
3. To export the results to an Excel spreadsheet, click Export to Excel.
ISNC LEARNING MANAGEMENT SYSTEM
pg. 68 ISNC MOODLE Administrator
Resource
A resource is an item that a teacher can use to support learning, such as a file or link. Moodle supports a range of resource types which teachers can add to their courses. In edit mode, a teacher can add resources via a drop down menu. Resources appear as a single link with an icon in front of it that represents the type of resource.
Book - Multi-page resources with a book-like format
File - A picture, a pdf document, a spreadsheet, a sound file, a video file
Folder - For helping organize files and one folder may contain other folders
IMS content package - Add static material from other sources in the standard
IMS content package format
Label - Can be a few displayed words or an image used to separate resources
and activities in a topic section, or can be a lengthy description or instructions
Page - The student sees a single, scrollable screen that a teacher creates with
the robust HTML editor
General Steps to Add Resource to Moodle Course Page
1. Log in to Moodle, and then select the course. 2. Enable editing mode in your course page by pressing “turn editing on” button. 3. Within the required Week or Topic section click Add Activity or Resource link. 4. Select the resource from activity and resource list. 5. Enter the information needed and press save button. Next, we explain each type of resources in Moodle.
ISNC LEARNING MANAGEMENT SYSTEM
pg. 69 ISNC MOODLE Administrator
How to Add Book Book is useful when you want to create a multi-page resource in a book-like
format, with chapters and subchapters.
To add a Book, complete the following steps:
1. Log in to Moodle, then select the course you want to add book to.
2. Enable editing mode in your course page by pressing “turn editing on”
button.
3. Within the required Week or Topic section click Add Activity or Resource link.
4. In the “add an activity or resource window” scroll down to Resource option and
select book then click add.
5. In the book setting page add needed settings and click “save and display”
button to
start adding the content of the book.
How to add Folder A folder allows a teacher to display several course resources together. The
resources may be of different types and they may be uploaded in one go, as a
zipped folder which is then unzipped, or they may be added one at a time to an
empty folder on the course page.
To add a Folder, complete the following steps:
1. Login with the appropriate access rights (e.g. editing teacher).
2. Enable editing mode in your course page by pressing “turn editing on”
button.
3. Within the required Week or Topic section click Add Activity or Resource link.
4. In the “add an activity or resource window” scroll down to Resource option and
select folder then click add.
5. In the folder setting page add the following settings.
ISNC LEARNING MANAGEMENT SYSTEM
pg. 70 ISNC MOODLE Administrator
How to add Label A label serves as a spacer on a Moodle course page. It can be used to add text,
images,
multimedia or code in between other resources in the different sections.
It can help to improve the appearance of a course if used thoughtfully.
Labels may be used
To split up a long list of activities with a subheading or an image.
To display an embedded sound file or video directly on the course page.
To add a short description to a course section.
Note: - over-use of multimedia (sound, video) in labels can slow down the loading
of a course page so always add video in lesson activity.
To add a Label, complete the following steps:
1. Login with the appropriate access rights (e.g. editing teacher).
2. Press “turn editing on” button in the course page.
3. Within the required Week or Topic section click Add Activity or Resource link.
4. In the “add an activity or resource window” scroll down to Resource option and
select label then click add.
5. In the label setting page add the following settings and then click “save and
display” button.
ISNC LEARNING MANAGEMENT SYSTEM
pg. 71 ISNC MOODLE Administrator
How to Add File The file resource is used to share course material with your students. You can
share a simple file such as a Word-processed document or slideshow.
To add a File, complete the following steps:
1. Log in to Moodle and then select the course.
2. Press “turn editing on” button.
There are 2 methods to add file
First Method:
Drag the file and drop it in the required section.
Second Method:
3. Within the required Week or Topic section click Add Activity or Resource link.
4. In the “add an activity or resource window” scroll down to Resource option and
select file then click add.
5. In the file setting page add the file settings and press save button.
ISNC LEARNING MANAGEMENT SYSTEM
pg. 72 ISNC MOODLE Administrator
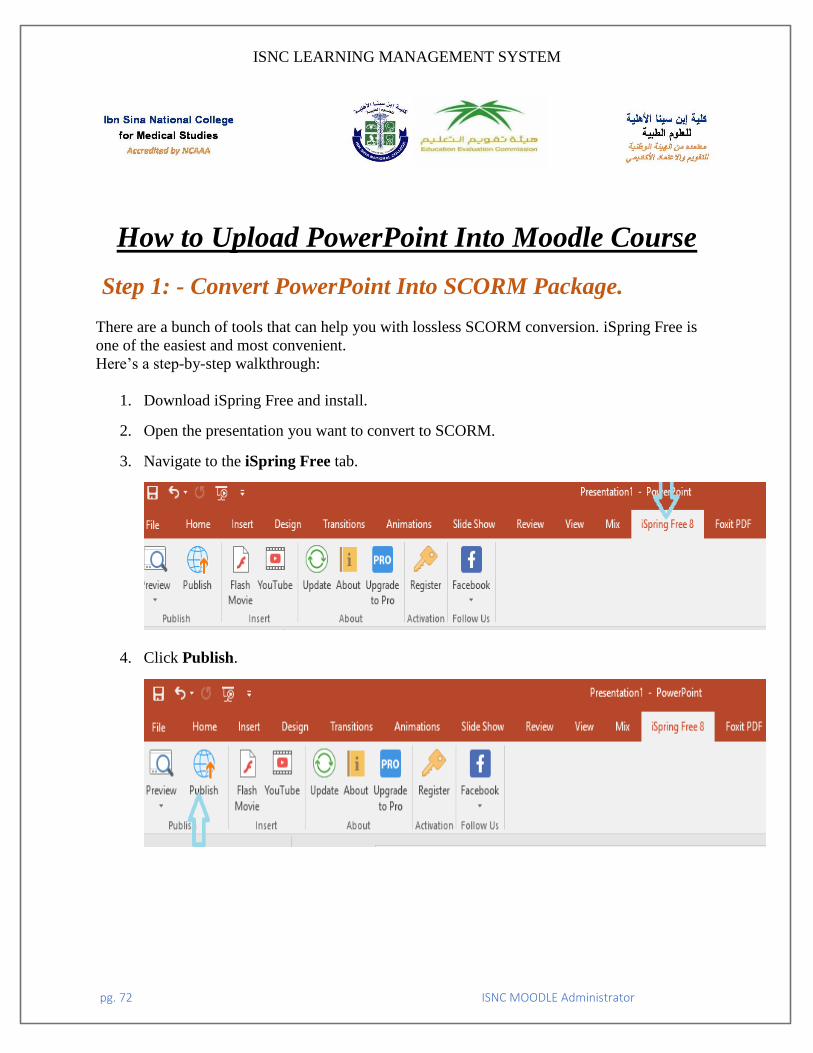
How to Upload PowerPoint Into Moodle Course
Step 1: - Convert PowerPoint Into SCORM Package.
There are a bunch of tools that can help you with lossless SCORM conversion. iSpring Free is
one of the easiest and most convenient.
Here’s a step-by-step walkthrough:
1. Download iSpring Free and install.
2. Open the presentation you want to convert to SCORM.
3. Navigate to the iSpring Free tab.
4. Click Publish.
ISNC LEARNING MANAGEMENT SYSTEM
pg. 73 ISNC MOODLE Administrator
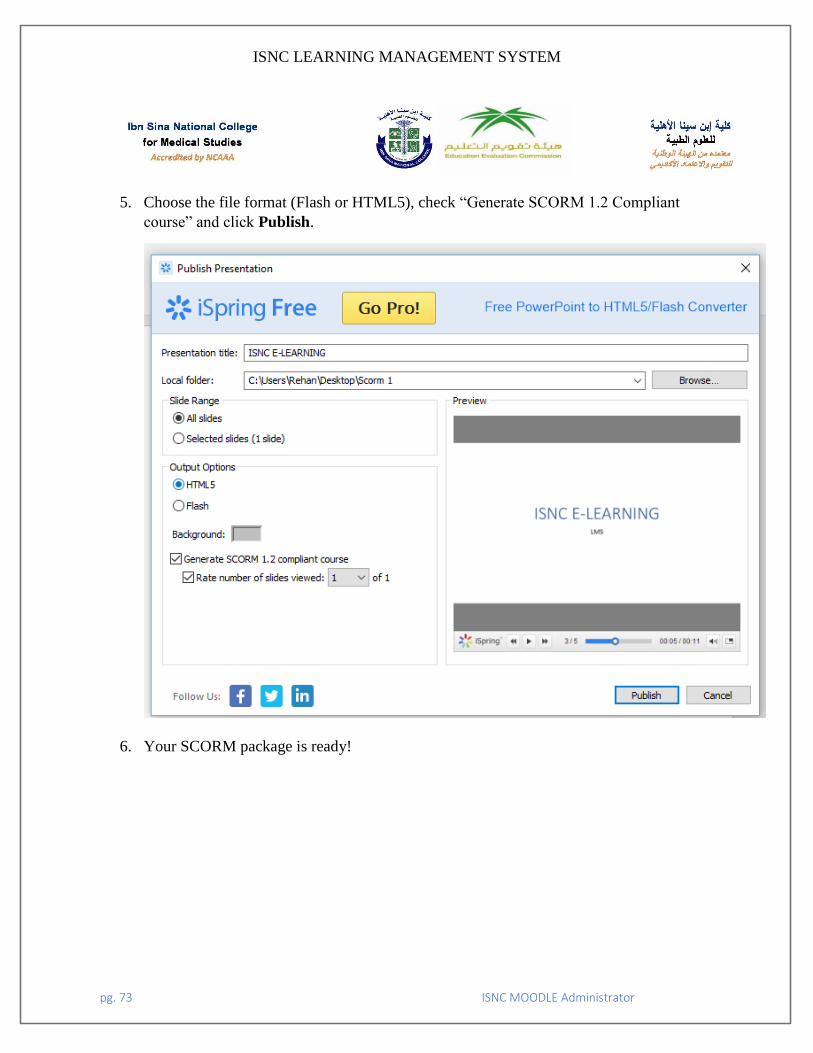
5. Choose the file format (Flash or HTML5), check “Generate SCORM 1.2 Compliant
course” and click Publish.
6. Your SCORM package is ready!
ISNC LEARNING MANAGEMENT SYSTEM
pg. 74 ISNC MOODLE Administrator
Step 2: - Upload converted SCORM package in Moodle Course
Uploading your presentation to a course site
1. Go to the course homepage and click Turn editing on.
2. Click Add an activity or resource in the section where you want to add the presentation.
3. Select SCORM Package and click Add.
4. Enter a Name and Description.
5. In the Package area, upload the SCORM package that is saved to your computer.
6. Review the rest of the settings to establish a grade, restrict number of attempts, etc.
7. Scroll down and click Save and display to verify that the presentation is working
correctly.
ISNC LEARNING MANAGEMENT SYSTEM
pg. 75 ISNC MOODLE Administrator
Import Question To Quiz in Moodle
Import Quiz Questions to Moodle Using the Aiken Format
The Aiken format lets you create multiple-choice or true-false questions using a simple, human-
readable format that you can save as a plain text file and import into a Moodle.
To bulk import paragraph, short answer, matching, or multiple response questions, or questions
that include images.
Write Questions in the Aiken Format
1. Write your questions in a word-processing application (e.g., MS Word) or a text editor
such as Notepad (Windows) or Text Edit (Mac OS X), and format as follows:
The question must be all on one line.
Each answer must start with a single uppercase letter, followed by a period "." or
a right parenthesis ")", then a space.
The answer line must immediately follow, starting with "ANSWER: " (with a
space after the colon) and then giving the letter for the correct answer.
Note: The word "ANSWER" and the answer letters (A,B,C etc.) must be
capitalized as shown, otherwise the import will fail.
2. Use Save As to save your questions as a .txt (plain text) file in UTF-8 format.
Example:
The Loch Ness Monster is a type of?
A. Homonid
B. Lizard
C. Ape
D. Plesiosauria
ANSWER: D
The Coelacanth was considered a cryptid until 1938.
A) True
B) False
ANSWER: A
ISNC LEARNING MANAGEMENT SYSTEM
pg. 76 ISNC MOODLE Administrator
Import Questions into the Moodle Question Bank
Once you have saved your text file, you can import your questions into the Moodle Question
Bank:
1. Log into Moodle and open the course where you would like to add questions.
2. In the Administration block, under Course Administration, click Question Bank, then
click Import. The Import questions from file page will open.
3. For File format, select Aiken Format.
4. Click the General heading to expand the settings and for Import category, select
a Category (or use Default for course) .
Under Import questions from file, drag and drop your .txt file onto the blue arrow in
the Import box, or alternately, click Choose a file.... to browse for the .txt file on your
computer.
5. Click Import. You will see a page with the message "importing (# of) question(s) from
file," with a list of the questions.
6. Click Continue. Your Question Bank will open. You can now further edit the questions
or include the questions in a quiz.
ISNC LEARNING MANAGEMENT SYSTEM
pg. 77 ISNC MOODLE Administrator
How to Upload Video
Uploading your presentation video to a course site
1. Go to the course homepage and click Turn editing on.
2. Click Add an activity or resource in the section where you want to add the presentation.
3. Select page and click Add.
4. Enter a Name and Description.
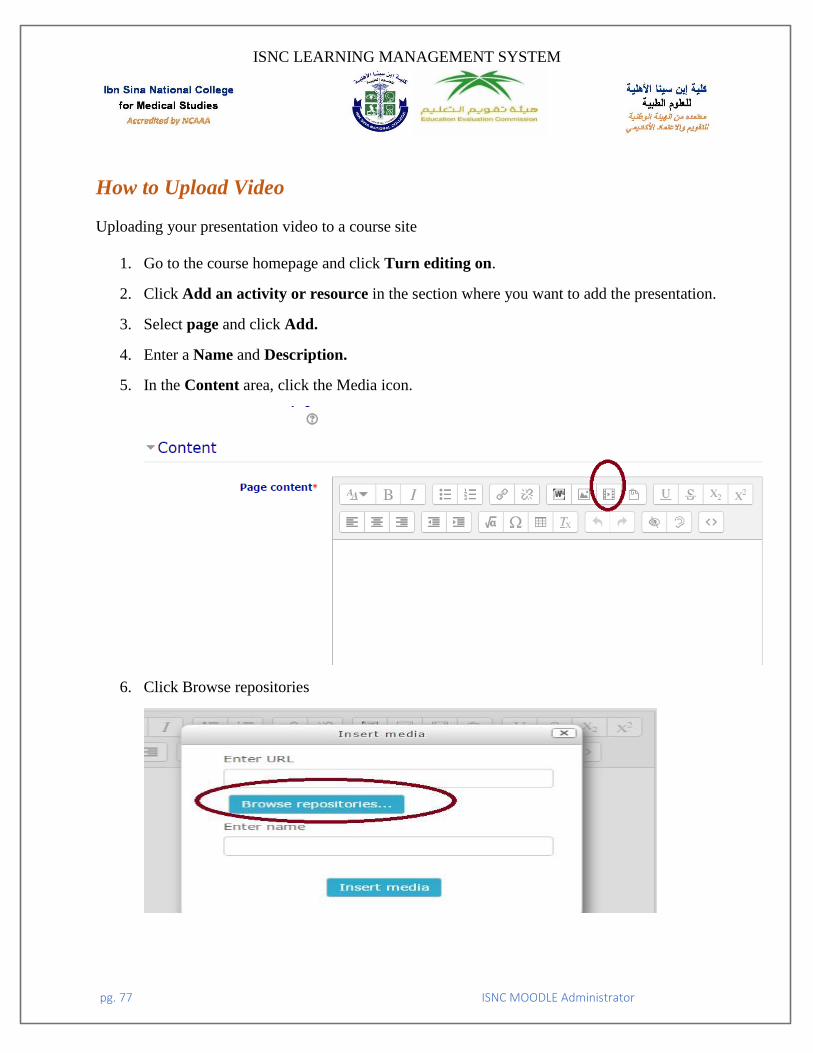
5. In the Content area, click the Media icon.
6. Click Browse repositories
ISNC LEARNING MANAGEMENT SYSTEM
pg. 78 ISNC MOODLE Administrator
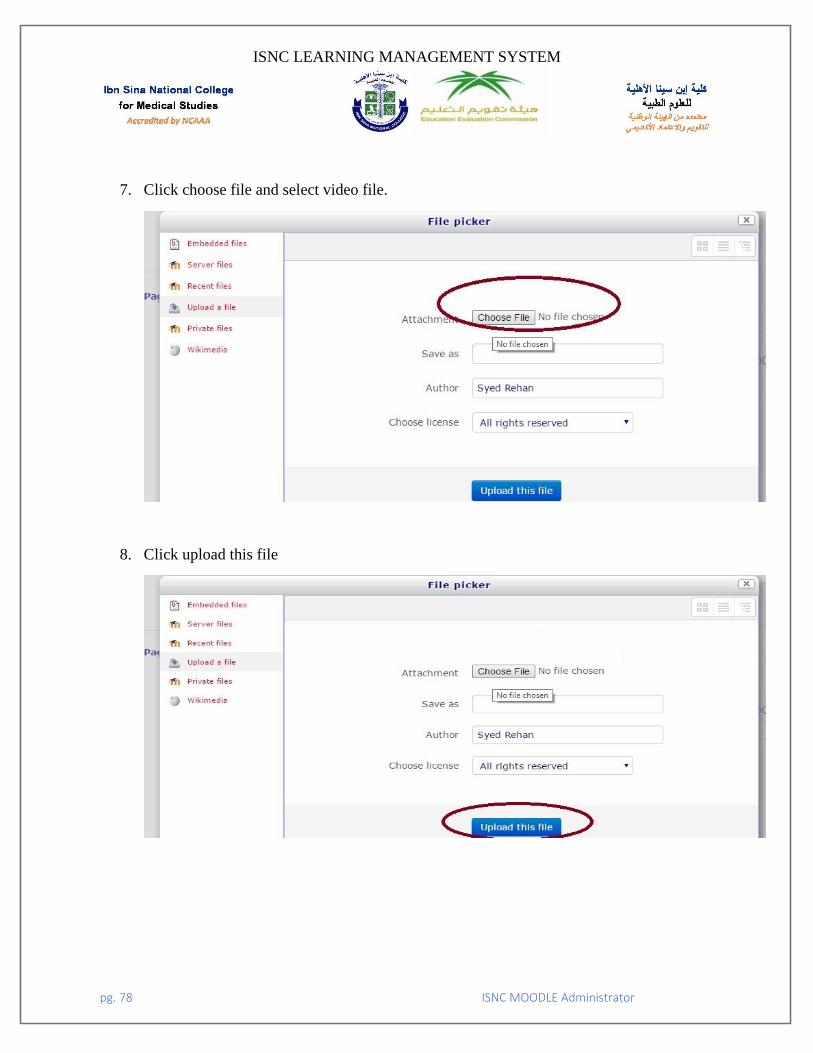
7. Click choose file and select video file.
8. Click upload this file

ISNC LEARNING MANAGEMENT SYSTEM
pg. 79 ISNC MOODLE Administrator
9. After finish uploading media click insert media.
10. Click Save button