Embed Size (px)
Citation preview
True WirelessStereo Headset
User manual
JBDK
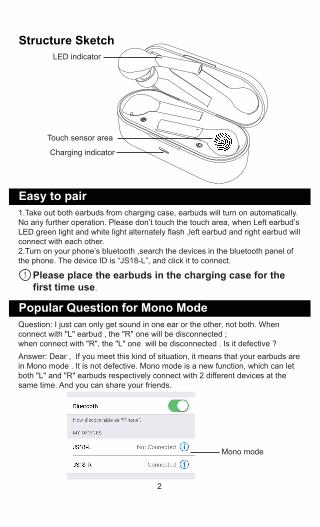
Easy to pair
Structure Sketch
1.Take out both earbuds from charging case, earbuds will turn on automatically.No any further operation. Please don’t touch the touch area, when Left earbud’s LED green light and white light alternately flash ,left earbud and right earbud will connect with each other.2.Turn on your phone’s bluetooth ,search the devices in the bluetooth panel of the phone. The device ID is “JS18-L”, and click it to connect.
Please place the earbuds in the charging case for the first time use.
Popular Question for Mono ModeQuestion: I just can only get sound in one ear or the other, not both. When connect with "L" earbud , the "R" one will be disconnected ; when connect with "R", the "L" one will be disconnected . Is it defective ?Answer: Dear , If you meet this kind of situation, it means that your earbuds are in Mono mode . It is not defective. Mono mode is a new function, which can let both "L" and "R" earbuds respectively connect with 2 different devices at the same time. And you can share your friends.
2
LED indicator
Charging indicator
Touch sensor area
Mono mode
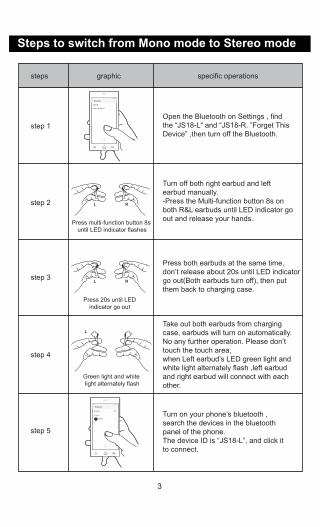
Steps to switch from Mono mode to Stereo mode
steps graphic specific operations
step 1 Open the Bluetooth on Settings , find the “JS18-L“ and “JS18-R. ”Forget This Device” ,then turn off the Bluetooth.
step 2
Turn off both right earbud and left earbud manually.-Press the Multi-function button 8s on both R&L earbuds until LED indicator go out and release your hands.
step 3
Press both earbuds at the same time, don’t release about 20s until LED indicatorgo out(Both earbuds turn off), then put them back to charging case.
step 4
Take out both earbuds from charging case, earbuds will turn on automatically.No any further operation. Please don’t touch the touch area, when Left earbud’s LED green light and white light alternately flash ,left earbud and right earbud will connect with each other.
step 5
Turn on your phone’s bluetooth ,search the devices in the bluetooth panel of the phone. The device ID is “JS18-L”, and click it to connect.
3
JS18-R
Forget This Device
Bluetooth
Press multi-function button 8s until LED indicator flashes
L R
Press 20s until LEDindicator go out
L R
Green light and white light alternately flash
L
JS18-L
Bluetooth
MY DEVICES
Bluetooth
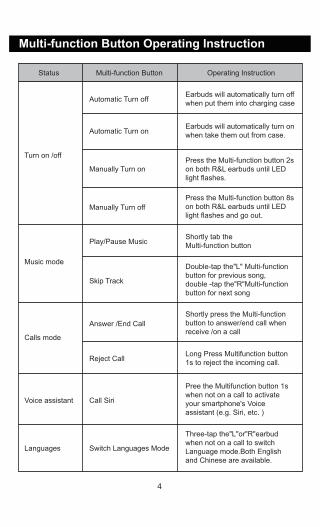
Multi-function Button Operating Instruction
Status
Turn on /off
Music mode
Calls mode
Automatic Turn off Earbuds will automatically turn off when put them into charging case
Earbuds will automatically turn on when take them out from case.
Press the Multi-function button 2s on both R&L earbuds until LED light flashes.
Press the Multi-function button 8s on both R&L earbuds until LED light flashes and go out.
Automatic Turn on
Manually Turn on
Manually Turn off
Play/Pause Music Shortly tab the Multi-function button
Double-tap the"L" Multi-function button for previous song,double -tap the"R"Multi-function button for next song
Skip Track
Answer /End CallShortly press the Multi-function button to answer/end call when receive /on a call
Long Press Multifunction button 1s to reject the incoming call.Reject Call
Voice assistant
Pree the Multifunction button 1s when not on a call to activate your smartphone's Voice assistant (e.g. Siri, etc. )
Call Siri
Languages
Three-tap the"L"or"R"earbud when not on a call to switch Language mode.Both English and Chinese are available.
Switch Languages Mode
Multi-function Button Operating Instruction
4
Charge the earbuds
1. Put the earbuds in the charging case and close the lid. The LED indicator green light is on during charging status. The LED indicator will flash white light about 1 minute when charging done.2.It takes approx 1.5 hours to fully recharge the earbuds. If the earbuds are at low battery, put them in charging case for 10 to 20 minutes , you can get about 1 hour playtime
Charge the charging case
Plug the charging case into a USB power supply or certified wall charger. Charging input: 5V/2A. It takes approx. 1.5 hours to fully charge the earbuds and the charging case.
NOTE: non-certified chargers may take longer to charge
*Auto turn off
*In order to conserve battery life , earbuds will turn off in following situation:1. Earbuds are unconnected with devices beyond 3 minutes after turn on2. Earbuds are out of the range(30ft )from your devices beyond 3 minutes
*Automatically relink
1.Take out from the charging case, when both the earbuds are turn on,they will automatically relink to your smartphone with paired record in the effective range2.After disconnected with your current connected phone, the earbuds will automatically relink to your smartphone within 3 mins in the effective range.3.You may need to connect the earbuds to your smartphone manually if automatically relink fail
5
*Trouble shooting
Reset the Earbuds
If you are unable to connect your earbuds and mobile phone, please try thefollowing
1.Earbuds Resetting will clear the list of paired devices and resets all settings2.Ensure the earbud is turned off and not in the charging case, press the Multi-function button about 10s until the LED light go out(reset successfully)3.After turn on, the earbuds will need to be re-paired to your smartphone
How to care for your earbuds
1.Always store the earbuds in the charging case and safely protected2.Avoid storage at extreme temperatures (above 65.C/149 F or below10C/14F),which can shorten battery life and may affect the earbuds’function3.Don’t store the earbuds for extended periods of time without recharging them(max. three months)4.If the earbuds or the charging case become dirty, it is recommended to clean them with a soft, lint-free cloth that has been dampened with clean Water
6
1.Ensure that your earbuds are fully charged and powered on.2.Ensure that the earbuds are in pairing mode.3.Ensure that your mobile phone’s Bluetooth feature is activated.4.Please refer to paring steps on page 2 for specific instructions.5.Ensure that headsets within a 30 ft. Range of your mobile phone and there are no obstructions,such as walls or other electronic devices ,between the two.6.If the above steps do not solve your problem , please restart your phone or reset the earbuds(please refer to reset steps) .Repeat the troubleshooting sequence.
Safety information
1.Check local laws regarding the use of mobile phones and headsets while driving.2.If you use the headset while driving,ensure that your attention and focus remains on the road and you drive in a responsible and safe manner.3.Never allow children to play with the headset, as the small parts may be a choking hazard.4.Observe all signs that require an electrical device or RF radio product to be switched off in designated areas.These could include hospitals ,airplanes,blasting areas, and potentially explosive environments.5.Never mount or store your headset over an air bag deployment area, a serious injury may result when the air bag deploys.6.Do not open or mutilate the built-in battery.
Warning and precautions
WARNING: To prevent fire or shock hazard, do not expose this unit to rain moisture.WARNING: Do not place this unit directly onto furniture surfaces with any type of soft, porous , or sensitive finish.As with any rubber compound make with oils , the feet could cause marks or staining where the feet reside.WARNING: Lithium batteries are recyclable and should be recycled or disposed of in normal household waste. Contact your local government for disposal or recycling practices in your area. They should be incinerated since they might explode.
NOTE: This device uses an internal rechargeable lithium-ion battery that should last the lifetime of the device. If you suspect your battery may be dead after several attempts to charge , please contact aftersales-service center for support.Never disassemble the unit or attempt to remove the battery as that could cause leakage of an electrolyte substance.
7
Warranty Card
To protect your rights, please read the following content:The following circumstance does not belong to the scope of free maintenance1.Failure to installation ,use ,maintenance,custody result in failure or damage2.Alter,tear up the bar code:3.Beyond this consignment, the warranty period 4.Bar code or model does not accord with the product itself 5.Do STH without authorization changes inherent in the setup and teardown repair.6.Accidents or human behavior lead to damage of product7.Damage caused by force maieure8.Manufacturing lead to the damage of the product itself
Special note
1.Buy 7 days performance problems, the outward appearance is no scratches , replacement of new products.2.Please bring your invoice and warranty card services: if cannot show proof of the above ,prodeuct free warranty since the date of production.3.Please ask for and keep maintenance certificate4.The warranty of the product will add 3 months warranty period ,postage fees shall be the responsibility of the sender5.Dealers of the company of other commitments, the company is not liable.
8


![Welcome [images-na.ssl-images-amazon.com]](https://img.pdfslide.net/doc/110x75/6203f9a89fab5114bb31a72c/welcome-images-nassl-images-.jpg)