Embed Size (px)
Citation preview
Keeping Chord Changes Fast: Tricks and Techniques for Shaking Off Chord Progression Rust (audio not included)
ARTICLE URL: https://www.guitarchalk.com/keeping-chord-changes-fast/
Written by Bobby Kittleberger JUNE 20, 2018ed
QUICK HIT: A detailed guide about how to optimize chord changes in a
functional way to increase speed, accuracy and clean up subtle
inconsistencies.
I've found that on the guitar, even the simplest movements can be
improved over long periods of time. By this I mean that certain things,
which may feel second nature after a while, can still be improved. As we
get familiar with certain chords, patterns, progressions and shapes, we
stop noticing the nuanced and hidden mistakes that we're making. We've
done it so much that we simply gloss over chords and chord changes
because, for the most part, they sound fine.
They're acceptable.
Partly, this is because many guitar and bass players tend to move on too
quickly from introductory topics. Difficult chords, tricky changes or even
particular runs of single note patterns can get glossed over and left
unrefined over years of playing.
In this article we'll look at some examples of that and go through some
methods and exercises that will help you fix it.
Full Acoustic and Electric Guitar Courses in HD Video
Want to check out the most in-depth, properly ordered repository of
guitar lessons in existence? Guitar Tricks has a library of over 11,000
professional guitar lessons shot in crystal clear HD video.
I've been a member of Guitar Tricks for over five years, and still use their
lessons regularly, as a teacher and a student. If you want to try them out,
it helps support our magazine, but also gives you access to the entire site,
completely free for two weeks.
• Cancel before the two-week trial ends. No charge. No hard feelings.
• Use for up to 60 days after the trial and cancel for a full refund if it's not
working out. No worries.
• A free trial or full membership signup at Guitar Tricks - through the button
below - helps support Guitar Chalk and keeps our free magazine going.
CHECK OUT THE COURSES FREE
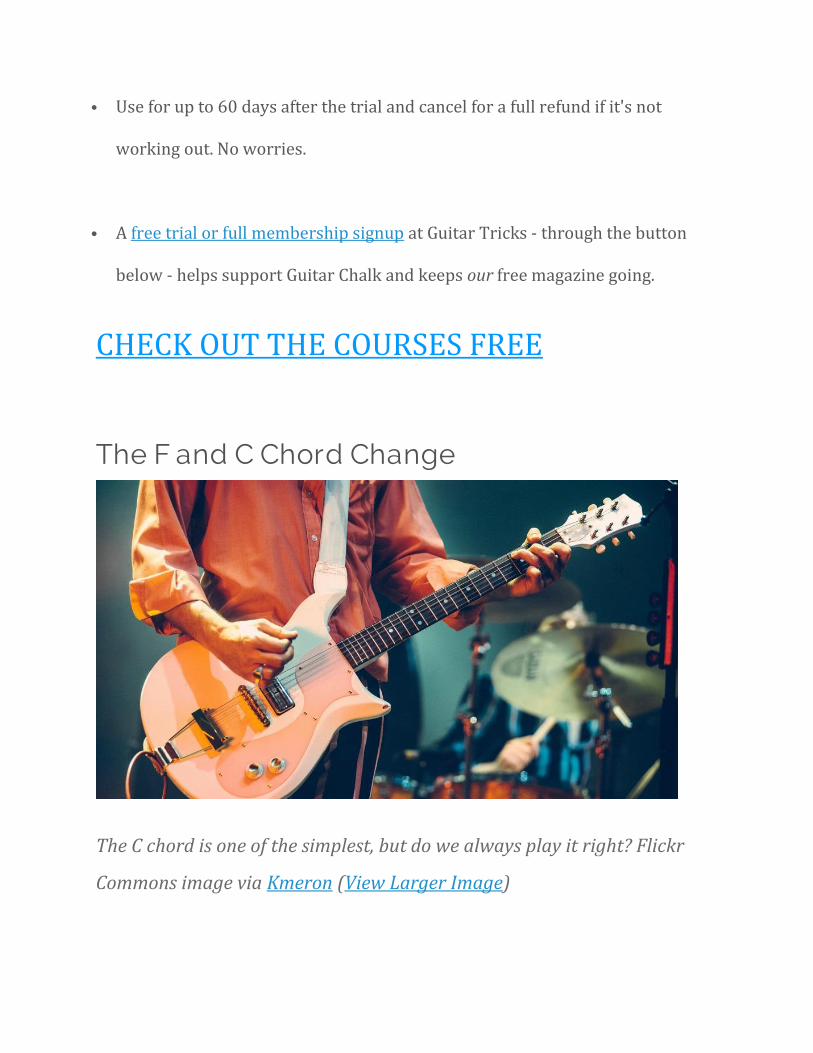
The F and C Chord Change
The C chord is one of the simplest, but do we always play it right? Flickr
Commons image via Kmeron (View Larger Image)
Let's start with something fairly easy. I'll speak from experience with a
chord change that I learned early on, but then never really perfected.
The change is simply moving from C to F and F to C.
• F Chord Guitar Diagrams
• C Chord Guitar Diagrams
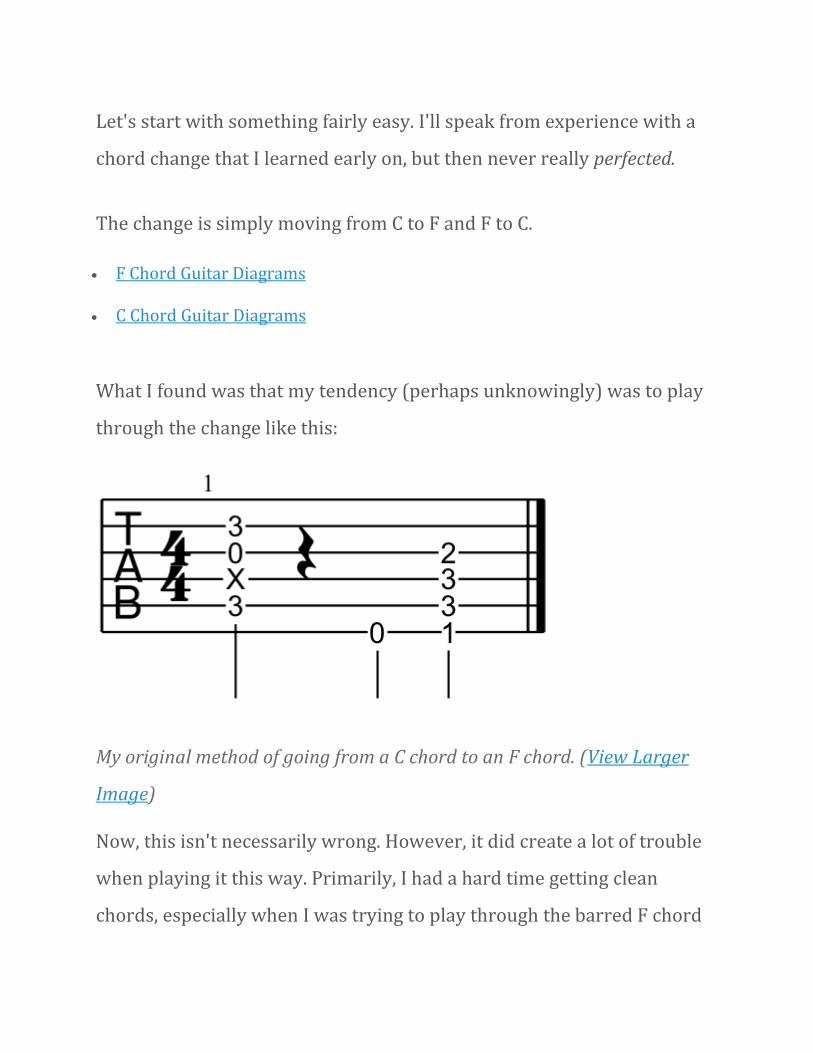
What I found was that my tendency (perhaps unknowingly) was to play
through the change like this:
My original method of going from a C chord to an F chord. (View Larger
Image)
Now, this isn't necessarily wrong. However, it did create a lot of trouble
when playing it this way. Primarily, I had a hard time getting clean
chords, especially when I was trying to play through the barred F chord
shape. Inevitably, I would fumble through those last two strings (the high
E and B) without being really sure if I should attempt the full barre or
just mute them.
Also, as indicated in the tab, I had a sloppy habit of dropping out of the C
chord and playing an open E note before moving to the F chord.
This made the change messier.
It wasn't fast, smooth or intentional. It just happened when it had to. My
C to F and F to C transitions were unsophisticated. But, what could I do to
change that? First, it took some intentionality on my part, and
recognizing that this particular change was a problem area.
Let's break it down even further.
MATCHING CHORD VOICINGS
You might have noticed that I paired a rather strange version of the C
major chord with a barred version of the F chord. This was my first
mistake because these two voicings don't work particularly well
together. A much better, more functional combination of C and F voicings
would be the following:
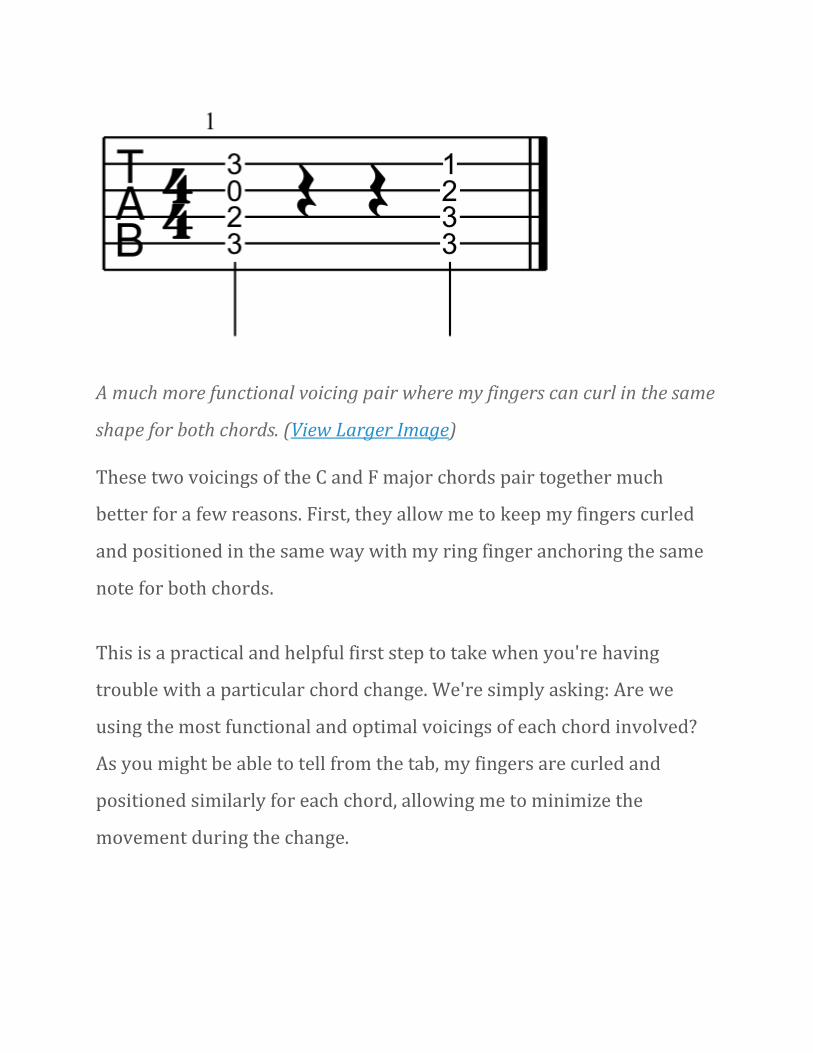
A much more functional voicing pair where my fingers can curl in the same
shape for both chords. (View Larger Image)
These two voicings of the C and F major chords pair together much
better for a few reasons. First, they allow me to keep my fingers curled
and positioned in the same way with my ring finger anchoring the same
note for both chords.
This is a practical and helpful first step to take when you're having
trouble with a particular chord change. We're simply asking: Are we
using the most functional and optimal voicings of each chord involved?
As you might be able to tell from the tab, my fingers are curled and
positioned similarly for each chord, allowing me to minimize the
movement during the change.
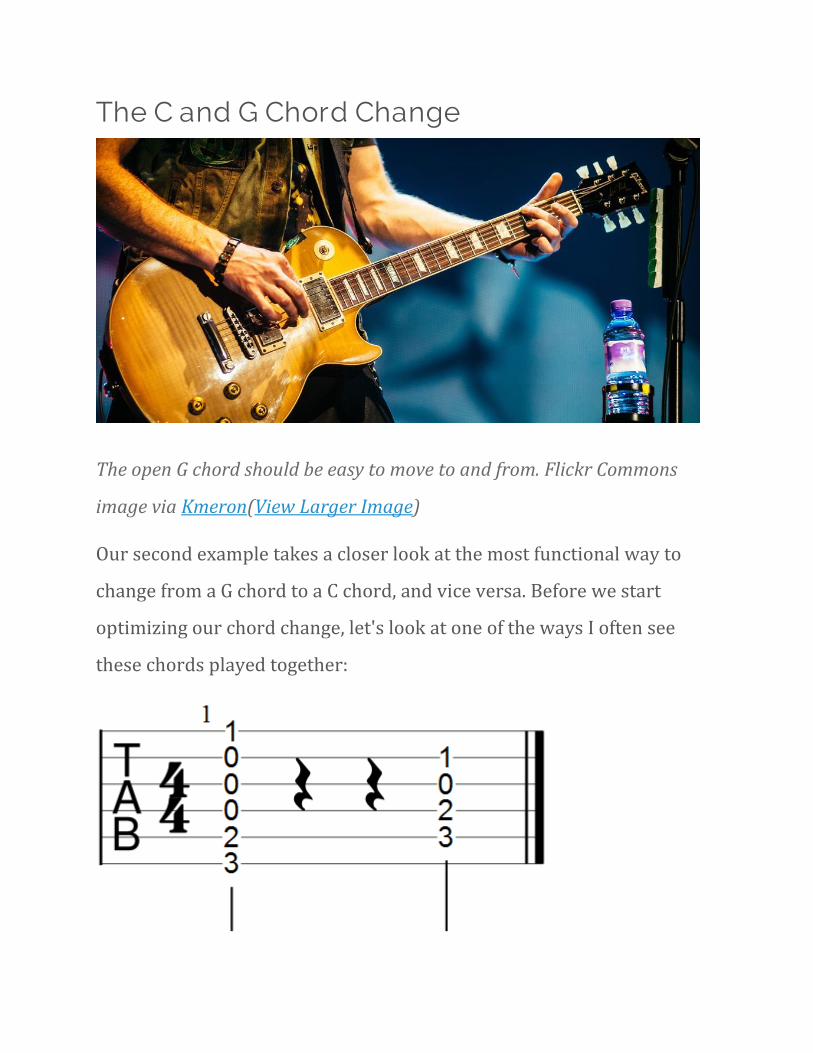
The C and G Chord Change
The open G chord should be easy to move to and from. Flickr Commons
image via Kmeron(View Larger Image)
Our second example takes a closer look at the most functional way to
change from a G chord to a C chord, and vice versa. Before we start
optimizing our chord change, let's look at one of the ways I often see
these chords played together:
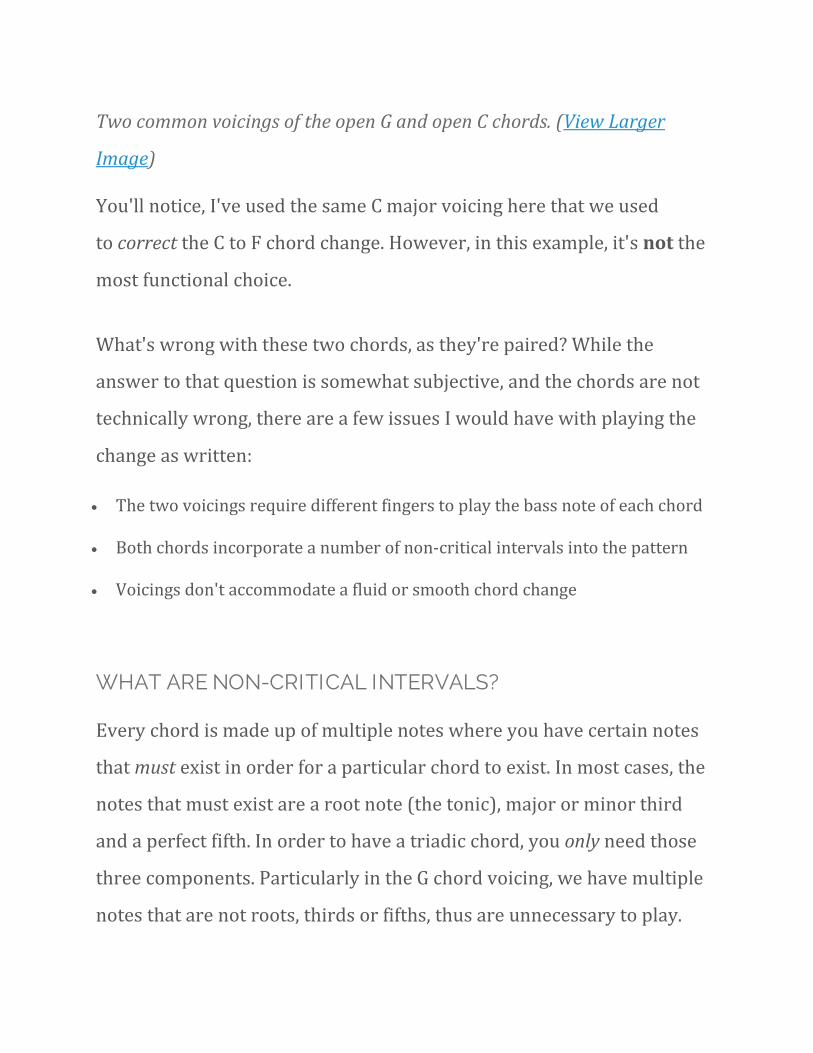
Two common voicings of the open G and open C chords. (View Larger
Image)
You'll notice, I've used the same C major voicing here that we used
to correct the C to F chord change. However, in this example, it's not the
most functional choice.
What's wrong with these two chords, as they're paired? While the
answer to that question is somewhat subjective, and the chords are not
technically wrong, there are a few issues I would have with playing the
change as written:
• The two voicings require different fingers to play the bass note of each chord
• Both chords incorporate a number of non-critical intervals into the pattern
• Voicings don't accommodate a fluid or smooth chord change
WHAT ARE NON-CRITICAL INTERVALS?
Every chord is made up of multiple notes where you have certain notes
that must exist in order for a particular chord to exist. In most cases, the
notes that must exist are a root note (the tonic), major or minor third
and a perfect fifth. In order to have a triadic chord, you only need those
three components. Particularly in the G chord voicing, we have multiple
notes that are not roots, thirds or fifths, thus are unnecessary to play.
MINIMIZING MOVEMENT AND INTERVALS BETWEEN THE CHORD CHANGE
This amounts to a bloated chord and overly-complex chord change. Our
task is to minimize the chords and the change first, then build up
complexity - adding less important intervals - as we're more comfortable
with the core shape and the chord change.
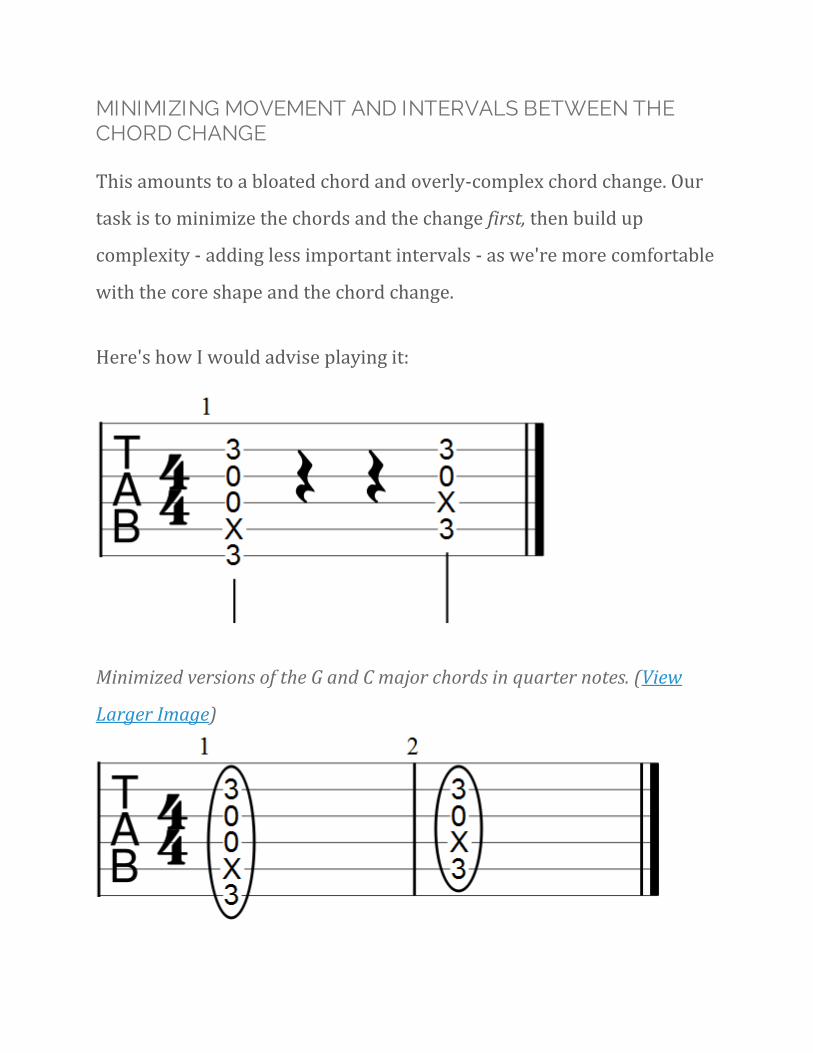
Here's how I would advise playing it:
Minimized versions of the G and C major chords in quarter notes. (View
Larger Image)
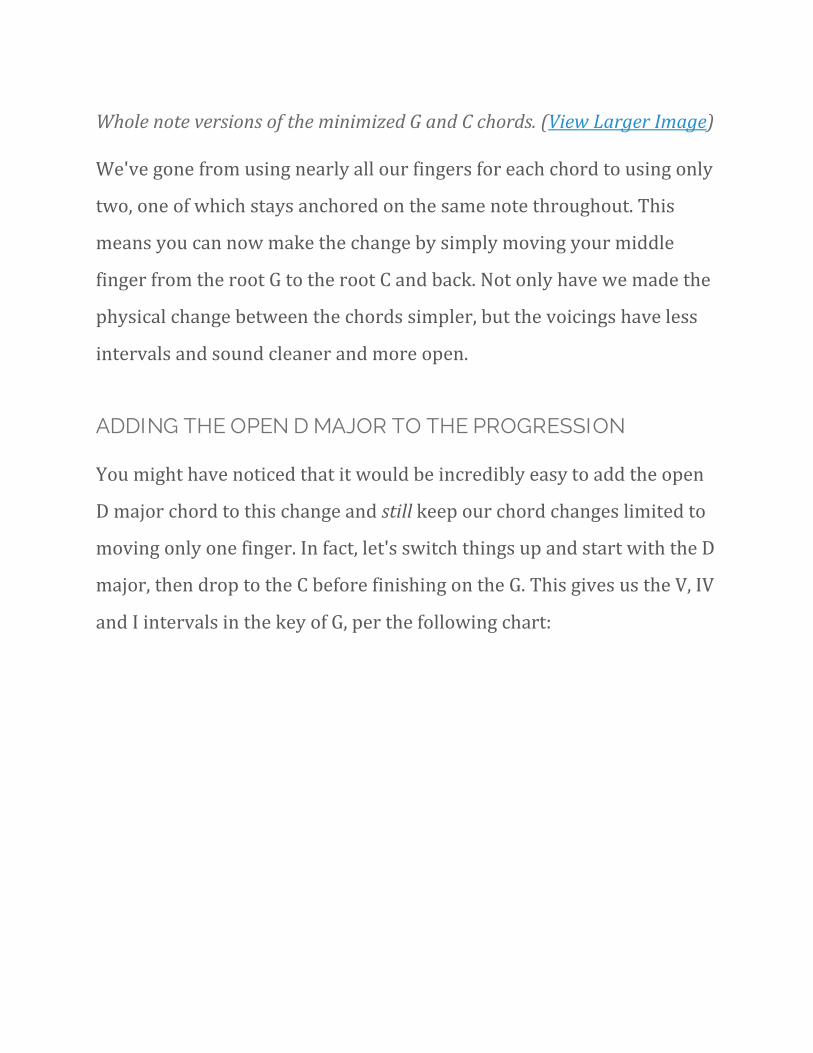
Whole note versions of the minimized G and C chords. (View Larger Image)
We've gone from using nearly all our fingers for each chord to using only
two, one of which stays anchored on the same note throughout. This
means you can now make the change by simply moving your middle
finger from the root G to the root C and back. Not only have we made the
physical change between the chords simpler, but the voicings have less
intervals and sound cleaner and more open.
ADDING THE OPEN D MAJOR TO THE PROGRESSION
You might have noticed that it would be incredibly easy to add the open
D major chord to this change and still keep our chord changes limited to
moving only one finger. In fact, let's switch things up and start with the D
major, then drop to the C before finishing on the G. This gives us the V, IV
and I intervals in the key of G, per the following chart:
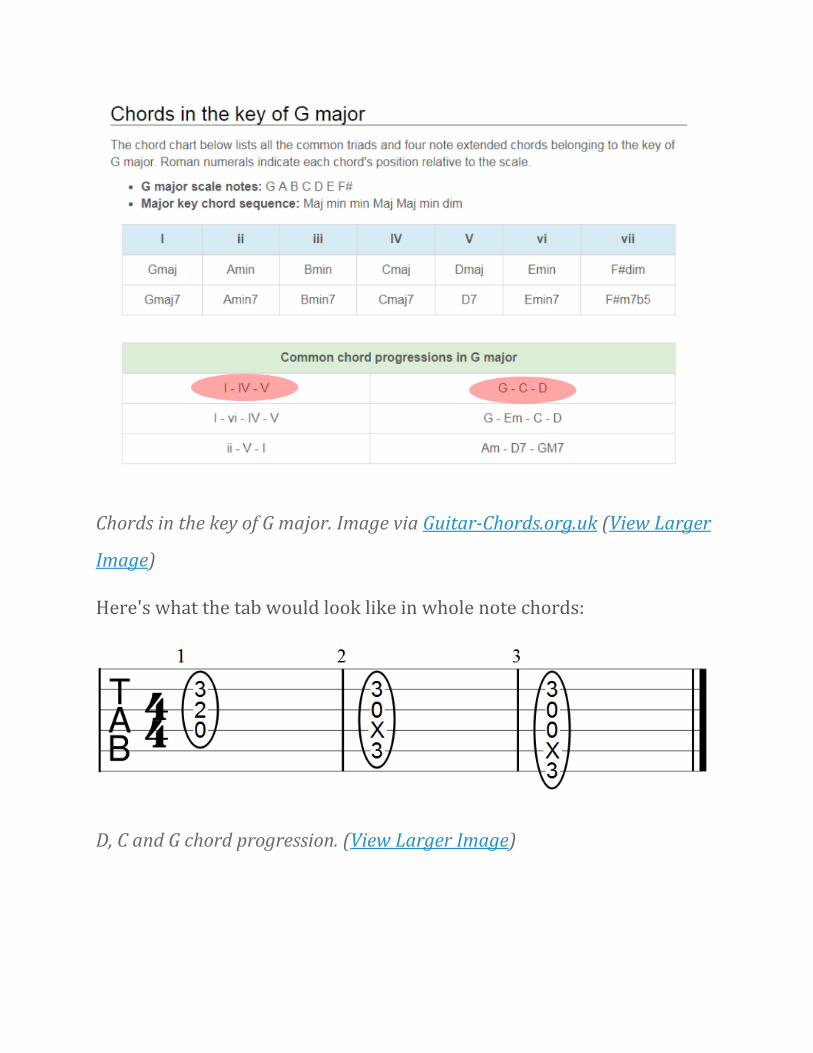
Chords in the key of G major. Image via Guitar-Chords.org.uk (View Larger
Image)
Here's what the tab would look like in whole note chords:
D, C and G chord progression. (View Larger Image)
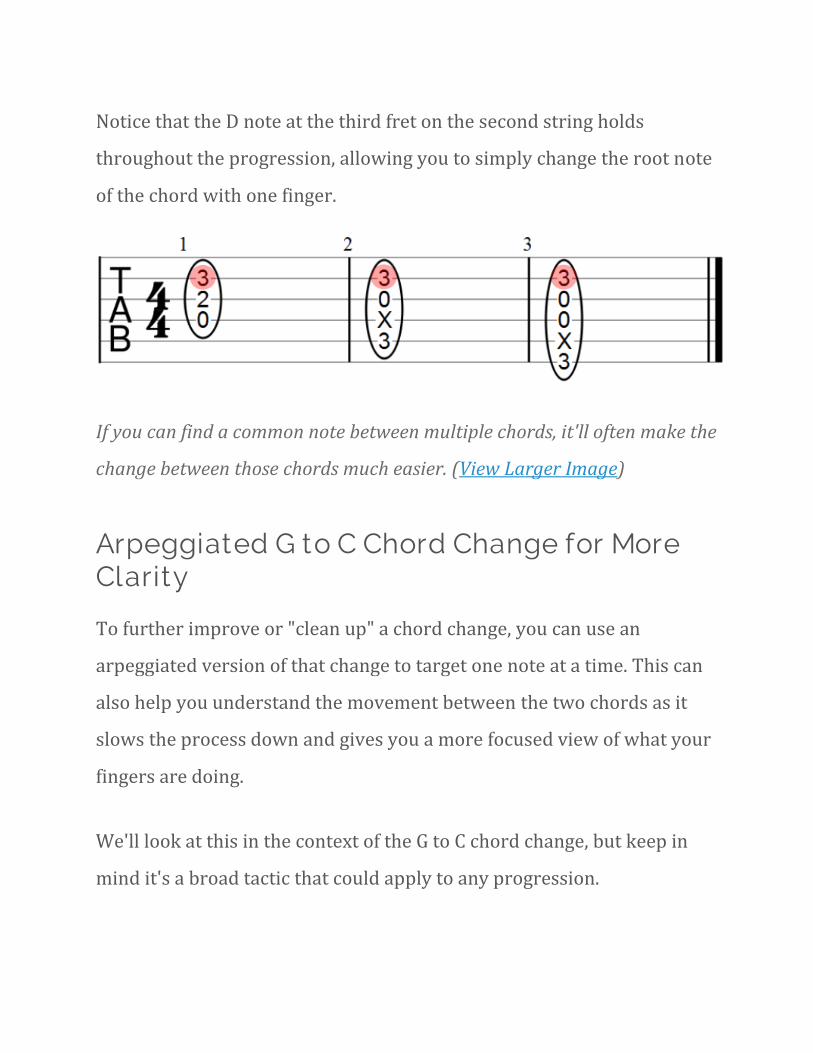
Notice that the D note at the third fret on the second string holds
throughout the progression, allowing you to simply change the root note
of the chord with one finger.
If you can find a common note between multiple chords, it'll often make the
change between those chords much easier. (View Larger Image)
Arpeggiated G to C Chord Change for More Clarity
To further improve or "clean up" a chord change, you can use an
arpeggiated version of that change to target one note at a time. This can
also help you understand the movement between the two chords as it
slows the process down and gives you a more focused view of what your
fingers are doing.
We'll look at this in the context of the G to C chord change, but keep in
mind it's a broad tactic that could apply to any progression.
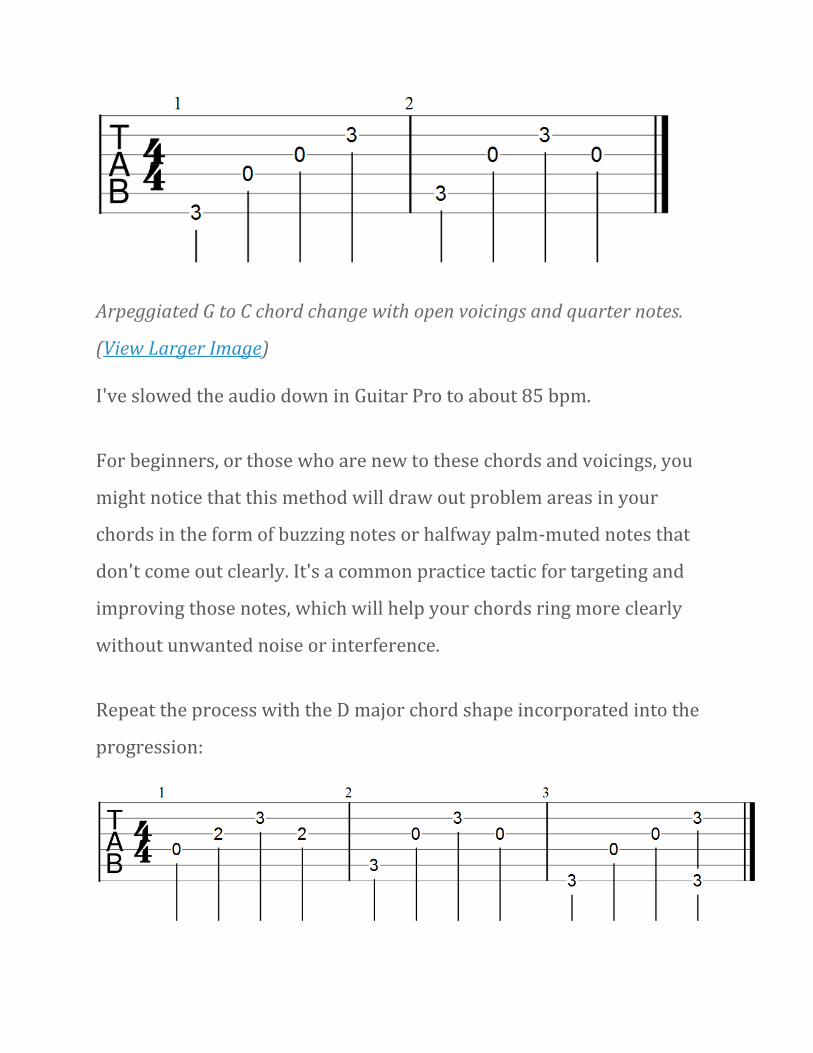
Arpeggiated G to C chord change with open voicings and quarter notes.
(View Larger Image)
I've slowed the audio down in Guitar Pro to about 85 bpm.
For beginners, or those who are new to these chords and voicings, you
might notice that this method will draw out problem areas in your
chords in the form of buzzing notes or halfway palm-muted notes that
don't come out clearly. It's a common practice tactic for targeting and
improving those notes, which will help your chords ring more clearly
without unwanted noise or interference.
Repeat the process with the D major chord shape incorporated into the
progression:
Adding the D major arpeggio for a full chord progression in the key of G
major. (View Larger Image)
For a little more context, here's the audio, again at 85 bpm:
The E, A and B Chord Progression and Changes
In the key of E major, the I, VI and V progression is E, A and B. Like D, C
and G, it's quite common. Yet again, I've found that a lot of guitarists -
regardless of skill level - have a hard time getting these changes
optimized.
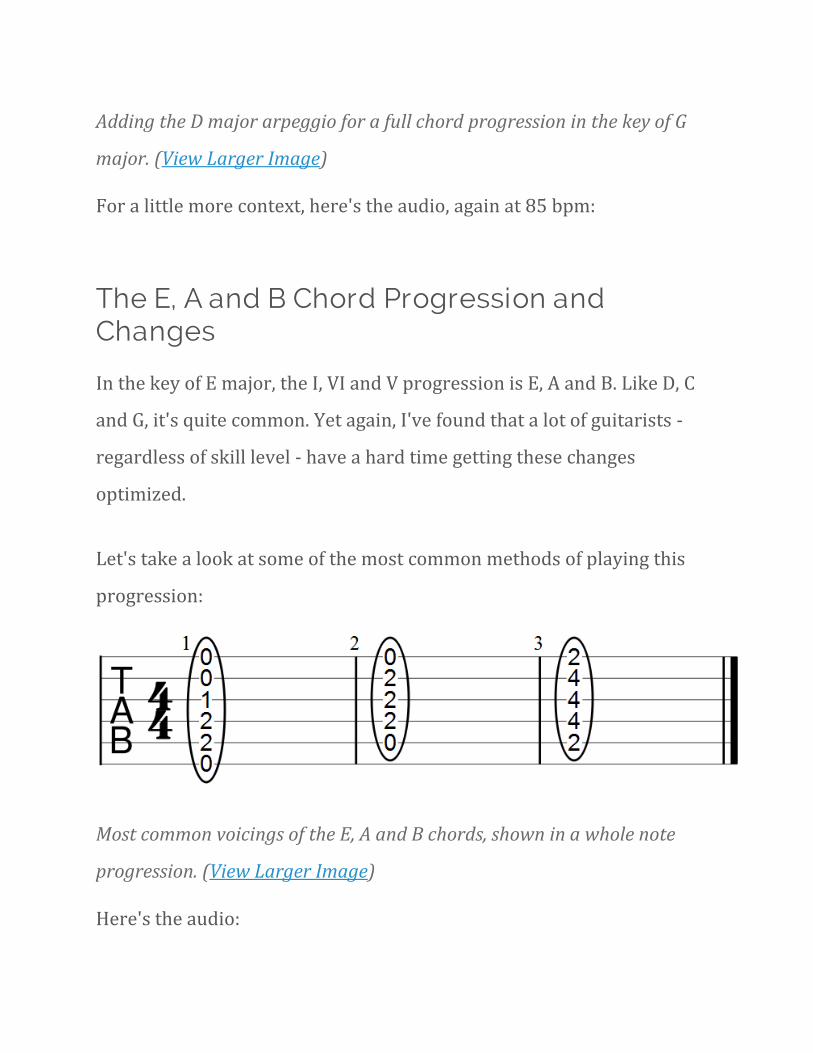
Let's take a look at some of the most common methods of playing this
progression:
Most common voicings of the E, A and B chords, shown in a whole note
progression. (View Larger Image)
Here's the audio:
Remember: In previous examples we've looked at ways to optimize the
chord changes and clean them up, primarily by making them easier to
play. Here are some of the methods we've used so far:
• Matched chords with voicings that are more functional and easier to change
between
• Reduced the amount of movement necessary between chords
• Limited our use of non-critical intervals in our chord voicings
While the E, A and B chord progression is a bit more straightforward
than the others we've looked at, we can still apply these same tactics.
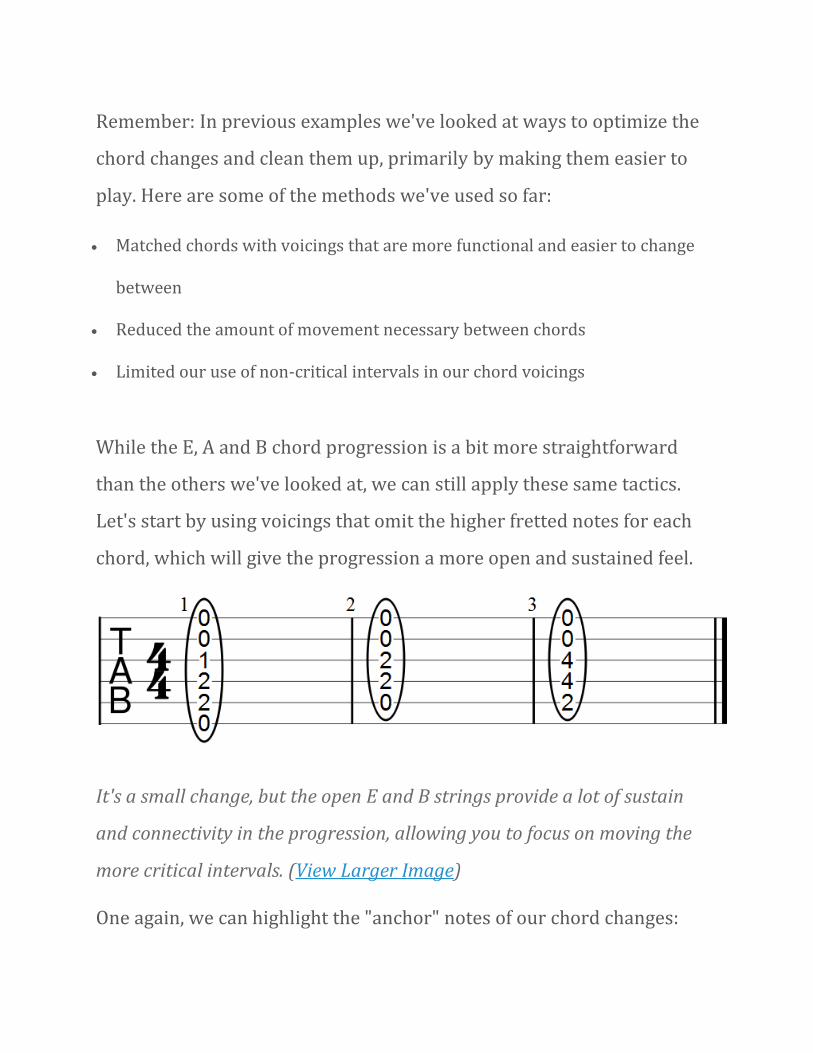
Let's start by using voicings that omit the higher fretted notes for each
chord, which will give the progression a more open and sustained feel.
It's a small change, but the open E and B strings provide a lot of sustain
and connectivity in the progression, allowing you to focus on moving the
more critical intervals. (View Larger Image)
One again, we can highlight the "anchor" notes of our chord changes:
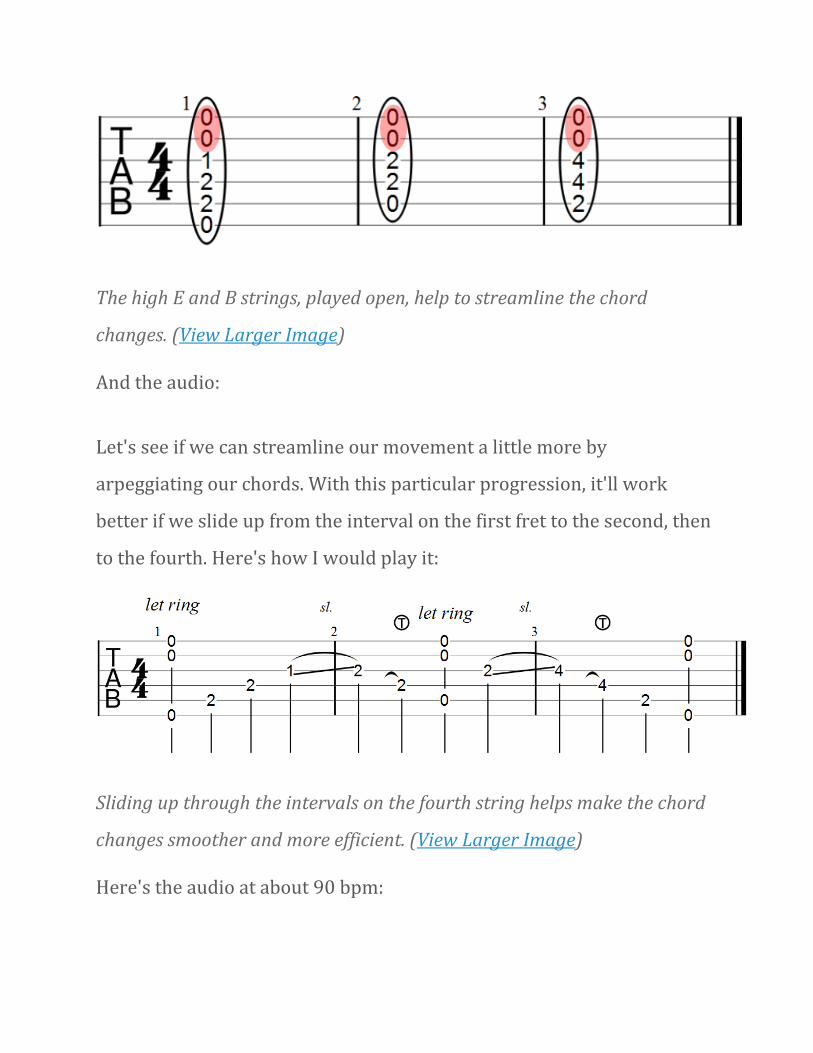
The high E and B strings, played open, help to streamline the chord
changes. (View Larger Image)
And the audio:
Let's see if we can streamline our movement a little more by
arpeggiating our chords. With this particular progression, it'll work
better if we slide up from the interval on the first fret to the second, then
to the fourth. Here's how I would play it:
Sliding up through the intervals on the fourth string helps make the chord
changes smoother and more efficient. (View Larger Image)
Here's the audio at about 90 bpm:
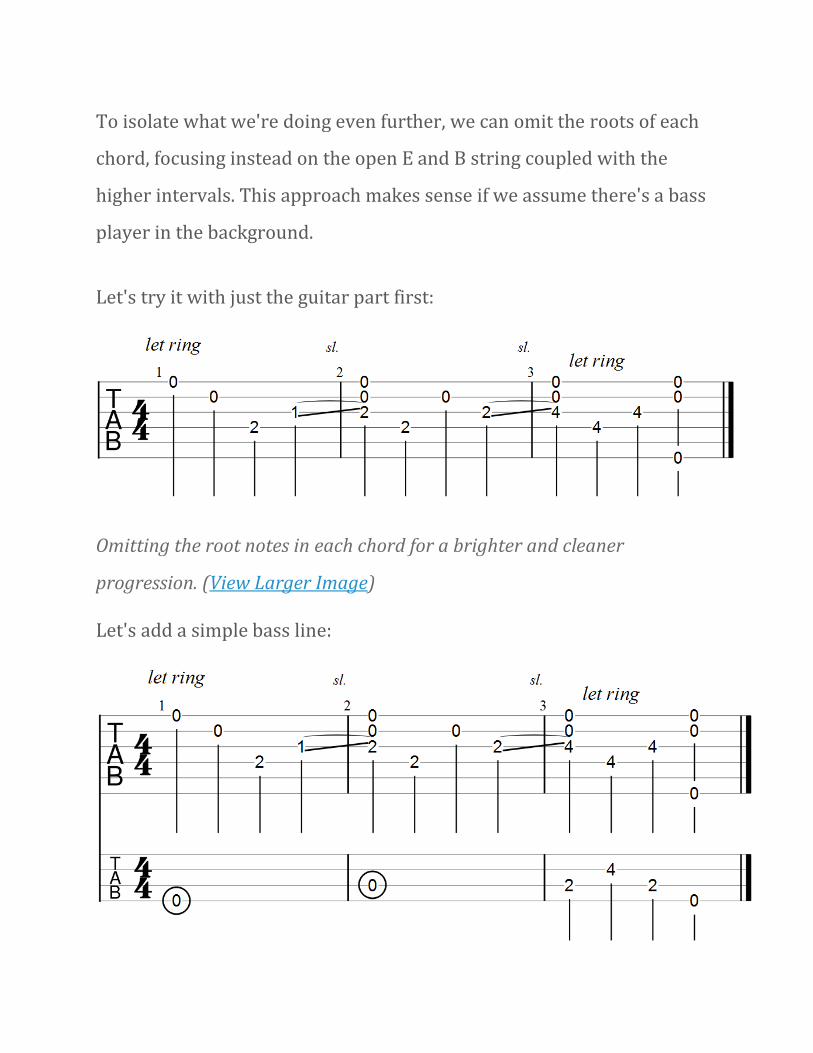
To isolate what we're doing even further, we can omit the roots of each
chord, focusing instead on the open E and B string coupled with the
higher intervals. This approach makes sense if we assume there's a bass
player in the background.
Let's try it with just the guitar part first:
Omitting the root notes in each chord for a brighter and cleaner
progression. (View Larger Image)
Let's add a simple bass line:
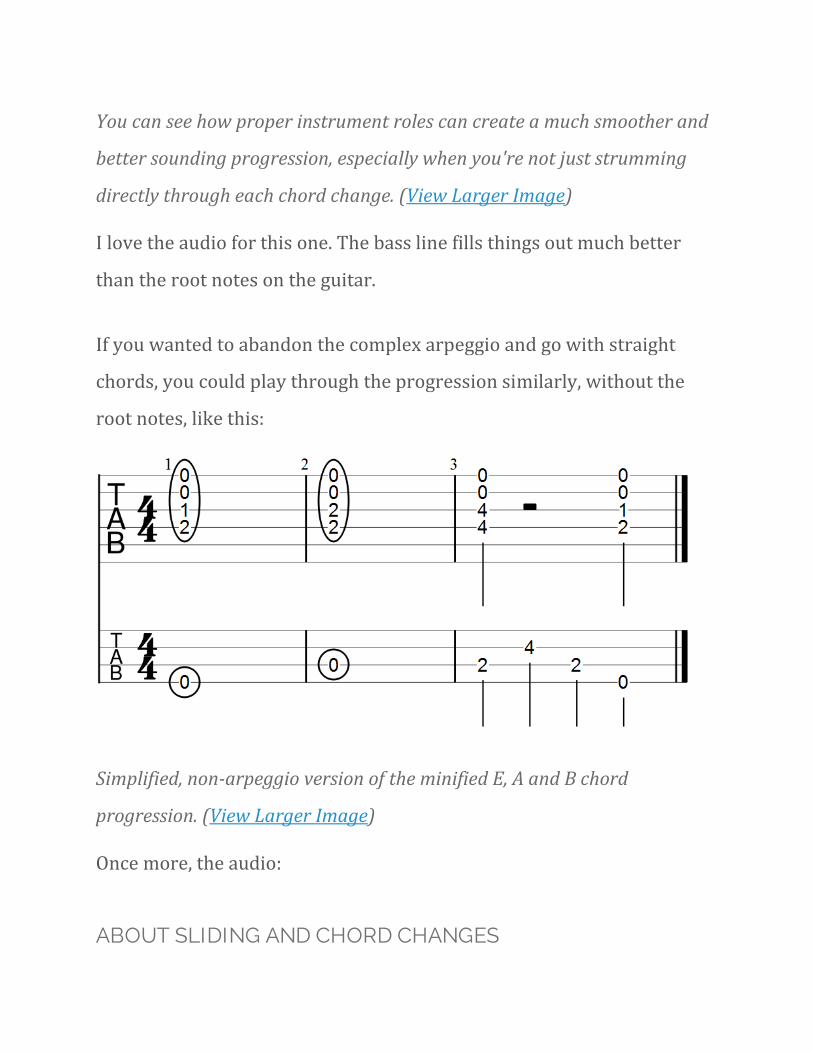
You can see how proper instrument roles can create a much smoother and
better sounding progression, especially when you're not just strumming
directly through each chord change. (View Larger Image)
I love the audio for this one. The bass line fills things out much better
than the root notes on the guitar.
If you wanted to abandon the complex arpeggio and go with straight
chords, you could play through the progression similarly, without the
root notes, like this:
Simplified, non-arpeggio version of the minified E, A and B chord
progression. (View Larger Image)
Once more, the audio:
ABOUT SLIDING AND CHORD CHANGES
Any time you have an opportunity to slide into a chord, you should take
advantage of it, since it gives you a much better chance of hitting the
correct notes and coming out with a smooth change. You can find these
by looking at opportunities for lateral fretboard movement between
your origin chord and destination chord.
• Origin Chord: First chord in a change
• Destination Chord: Second chord in a change
This works particularly well in the E, A and B progression because we're
moving up the fretboard. It allows us to change chords while leaving at
least one of our fingers on the strings.
Dealing with More Chord Complexity: F Sharp Minor Example
The F sharp minor chord is another great example of something that
I sorta learned, but never really cleaned up or perfected for a long time.
Looking back, I should have spent a lot more time with it than I initially
did. Even today, I still have trouble with changes involving this shape, if I
don't apply good technique.
First, let's look at a few different ways to play this chord shape.
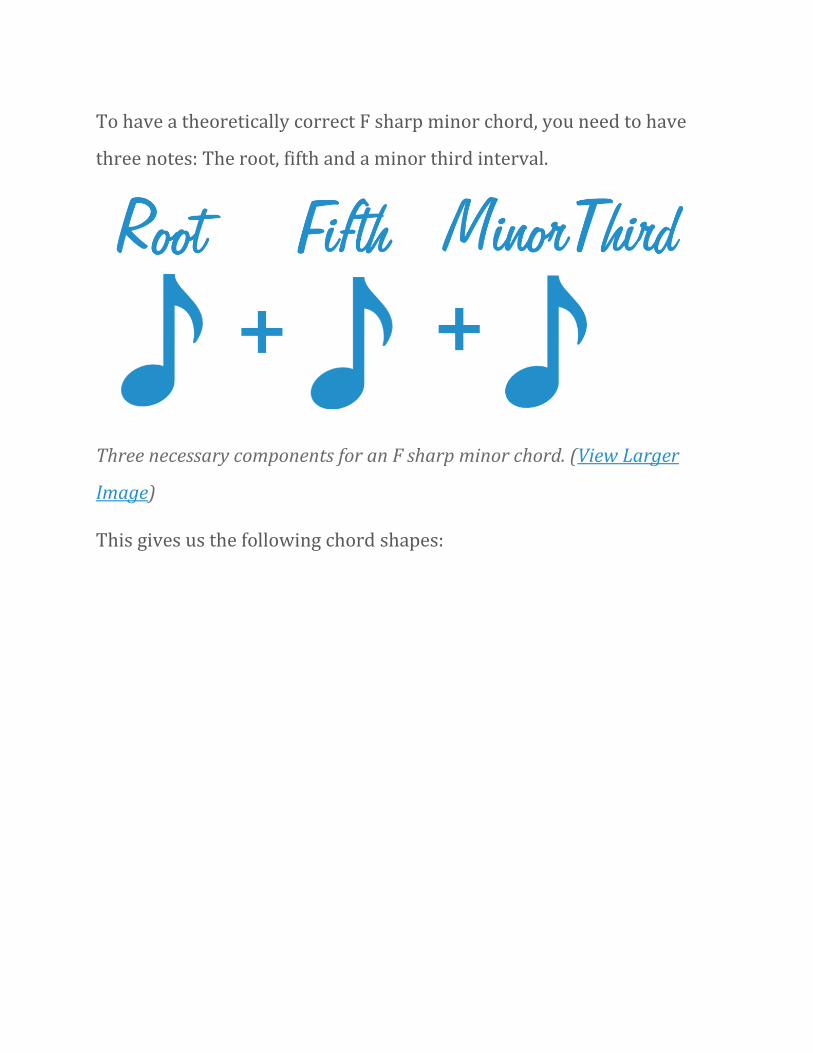
To have a theoretically correct F sharp minor chord, you need to have
three notes: The root, fifth and a minor third interval.
Three necessary components for an F sharp minor chord. (View Larger
Image)
This gives us the following chord shapes:
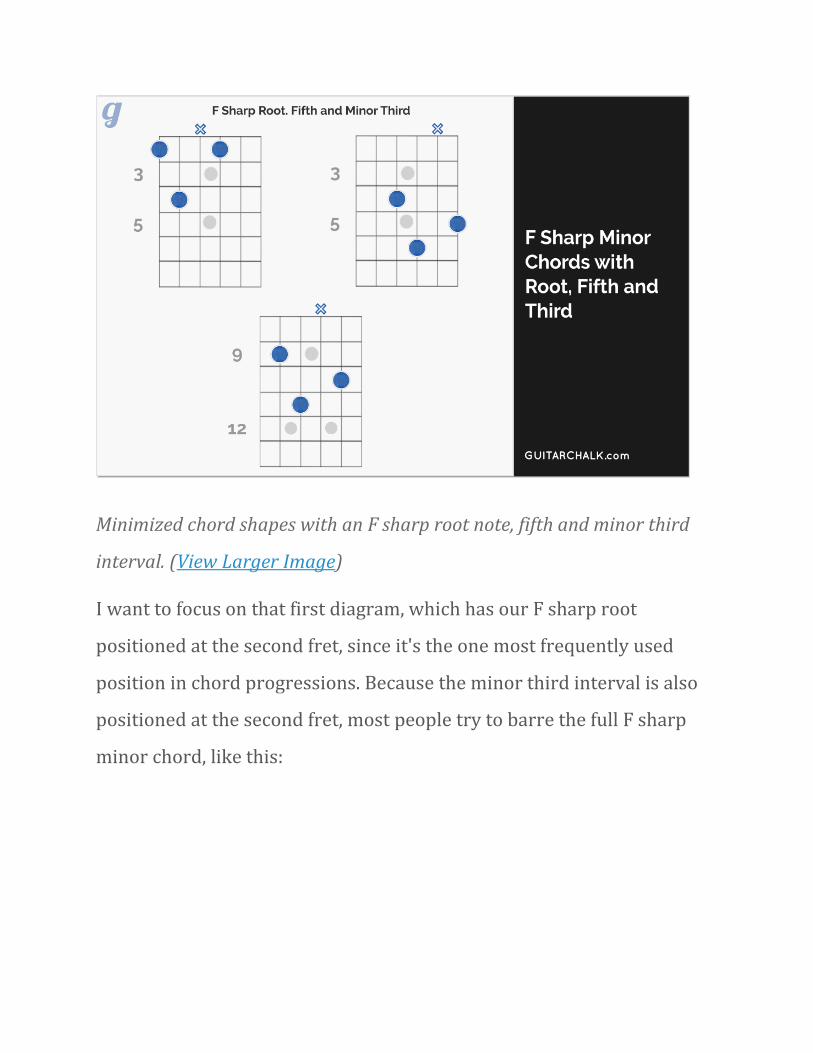
Minimized chord shapes with an F sharp root note, fifth and minor third
interval. (View Larger Image)
I want to focus on that first diagram, which has our F sharp root
positioned at the second fret, since it's the one most frequently used
position in chord progressions. Because the minor third interval is also
positioned at the second fret, most people try to barre the full F sharp
minor chord, like this:
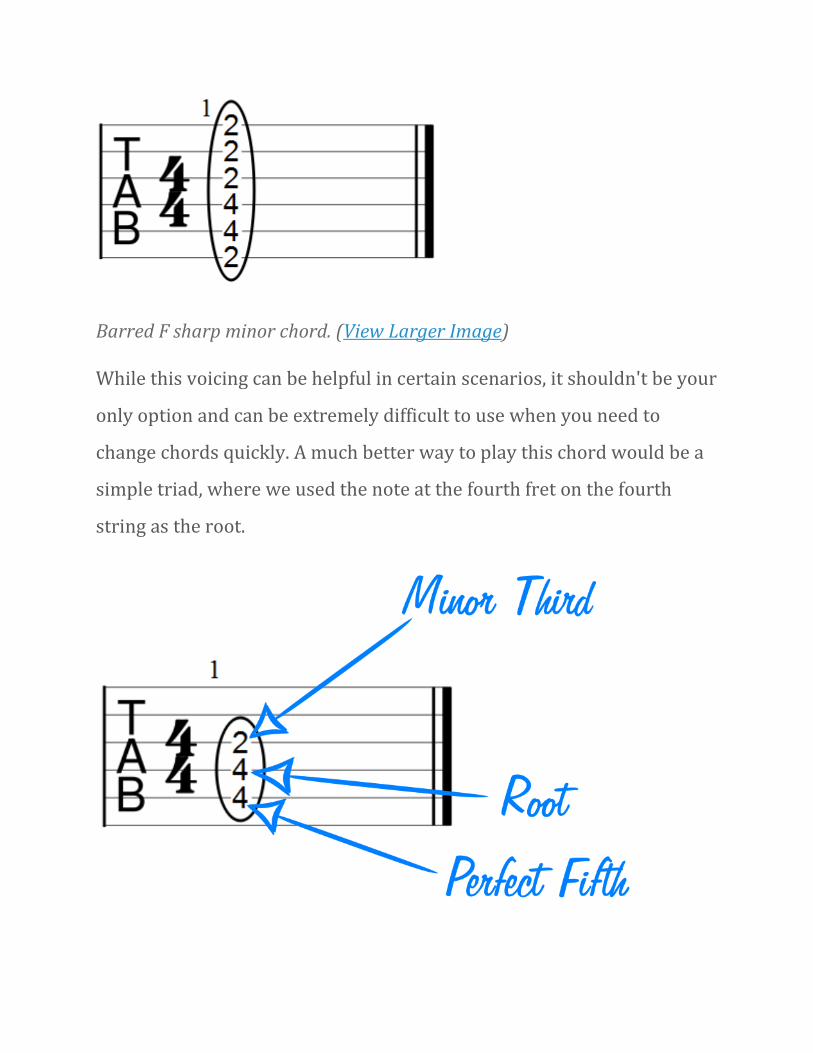
Barred F sharp minor chord. (View Larger Image)
While this voicing can be helpful in certain scenarios, it shouldn't be your
only option and can be extremely difficult to use when you need to
change chords quickly. A much better way to play this chord would be a
simple triad, where we used the note at the fourth fret on the fourth
string as the root.
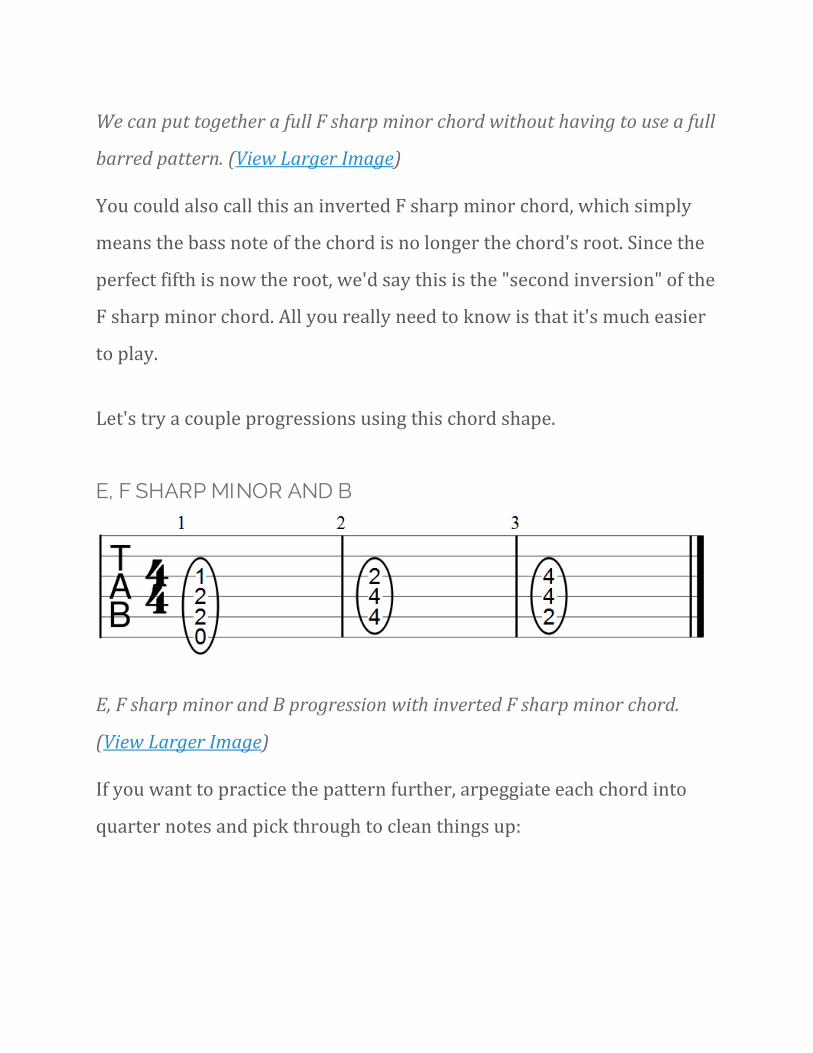
We can put together a full F sharp minor chord without having to use a full
barred pattern. (View Larger Image)
You could also call this an inverted F sharp minor chord, which simply
means the bass note of the chord is no longer the chord's root. Since the
perfect fifth is now the root, we'd say this is the "second inversion" of the
F sharp minor chord. All you really need to know is that it's much easier
to play.
Let's try a couple progressions using this chord shape.
E, F SHARP MINOR AND B
E, F sharp minor and B progression with inverted F sharp minor chord.
(View Larger Image)
If you want to practice the pattern further, arpeggiate each chord into
quarter notes and pick through to clean things up:
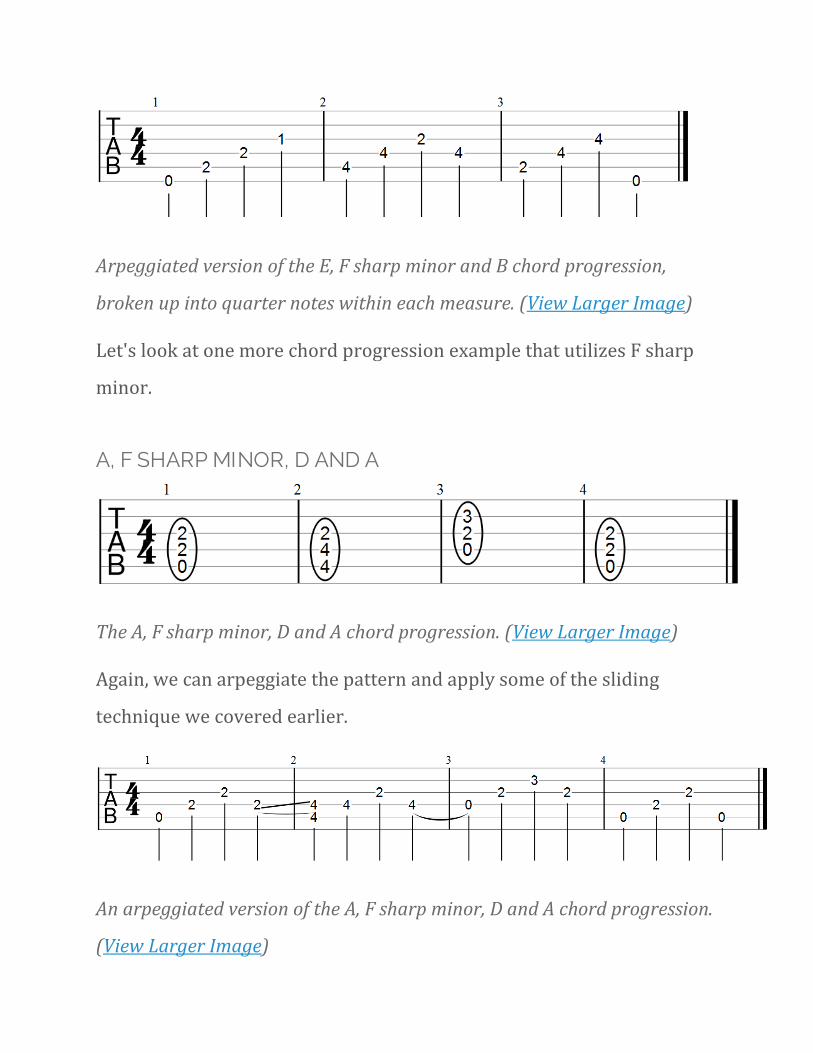
Arpeggiated version of the E, F sharp minor and B chord progression,
broken up into quarter notes within each measure. (View Larger Image)
Let's look at one more chord progression example that utilizes F sharp
minor.
A, F SHARP MINOR, D AND A
The A, F sharp minor, D and A chord progression. (View Larger Image)
Again, we can arpeggiate the pattern and apply some of the sliding
technique we covered earlier.
An arpeggiated version of the A, F sharp minor, D and A chord progression.
(View Larger Image)
We can slide into the F sharp minor chord at the fourth fret, then pull off
of the same notes to begin our D chord in the third measure. The
progression resolves by going back to the open A chord.
Common Mistakes and Easy Fixes
While I often find it easier to deal with chord progressions in some kind
of context (E, A and B, or G, C and D, etc.) it can also be helpful to identify
common problems that crop up as a result of poor form, or flawed
fretboard movement that can impact all progressions. Again, these tend
to be habits that form over time and aren't overtly obvious.
They might not cause you to play the wrong chord or completely miss
notes, but they do cause impurities in your chord changes; small
mistakes and inconsistencies that aren't major enough to make you stop
what you're doing and fix the problem.
If this goes on long enough, you get used to the mistake and -
subliminally - assume it's without flaw.
This is why guitar teachers will often tell you to slow down your
movements and arpeggiate each chord to weed out problem areas, as
we've done in the above examples. We can also identify these problems
and deal with them more specifically, by making note of what we might
might hear in a chord change that is telling us there's a mechanical
problem.
• Buzzing Notes
• "Dead" space between chords (silence)
• Dead notes that aren't being played
• Unwanted scraping or pick noise
• Unwanted muted or un-muted strings
These are all problems that stem from a lack of efficiency when moving
from one chord to another. However, having identified the problem, we
can use isolated exercises that will help us target these issues and get
them out of all our chord changes, regardless of fretboard position.
Improving Lateral Fretboard Movement
There are a number of common positions that the fretboard dictates we
use - and become familiar with - when moving laterally (fret to fret). In
these exercises we want to get used to forming those positions and
moving them between frets while staying on the same string. Let's look
at the positions first. We'll work with four of the most common.
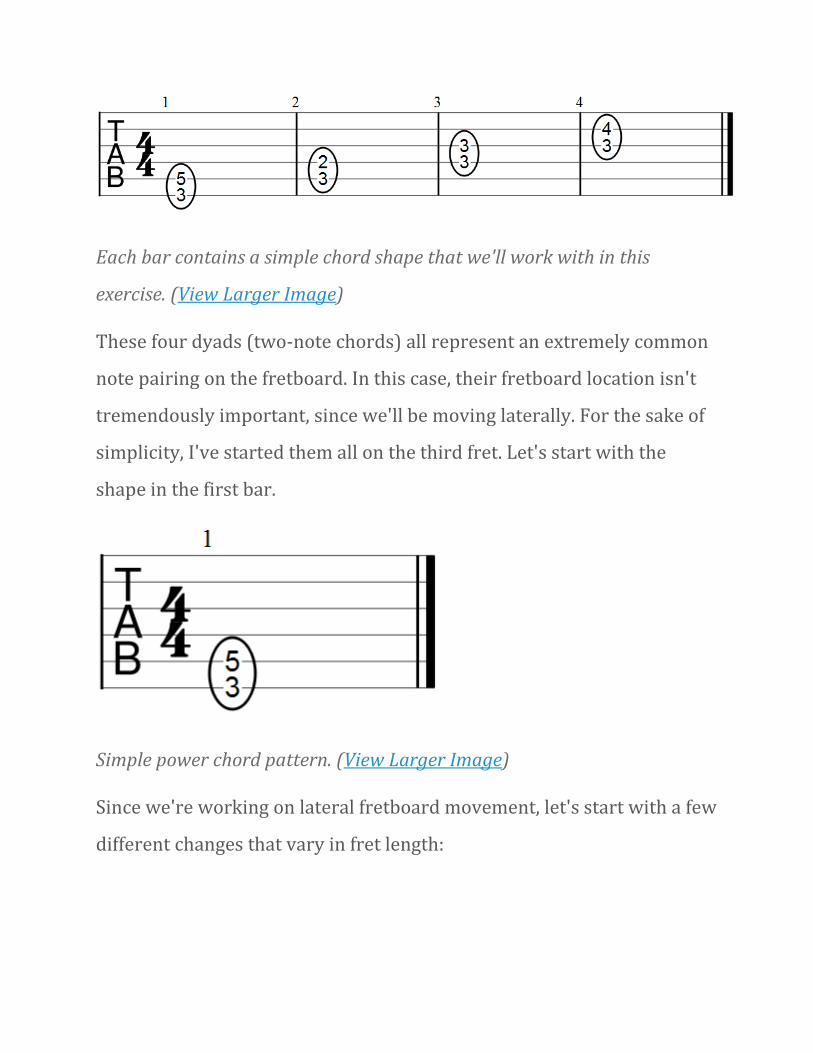
Each bar contains a simple chord shape that we'll work with in this
exercise. (View Larger Image)
These four dyads (two-note chords) all represent an extremely common
note pairing on the fretboard. In this case, their fretboard location isn't
tremendously important, since we'll be moving laterally. For the sake of
simplicity, I've started them all on the third fret. Let's start with the
shape in the first bar.
Simple power chord pattern. (View Larger Image)
Since we're working on lateral fretboard movement, let's start with a few
different changes that vary in fret length:
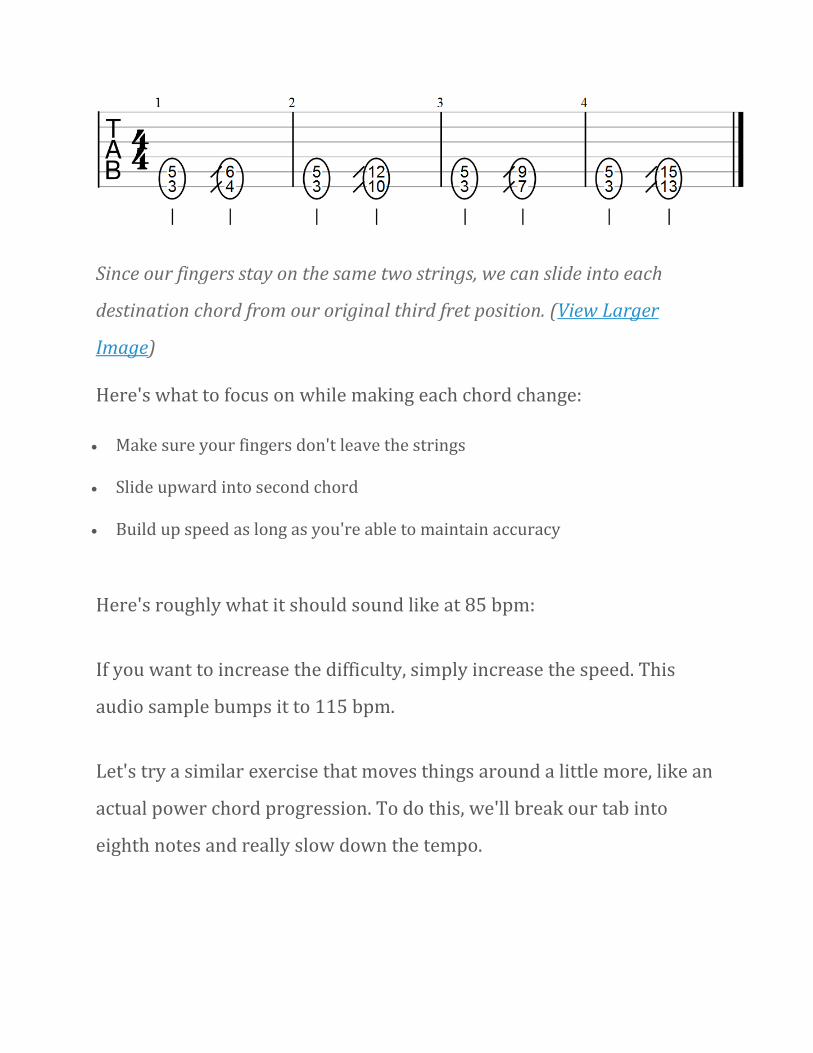
Since our fingers stay on the same two strings, we can slide into each
destination chord from our original third fret position. (View Larger
Image)
Here's what to focus on while making each chord change:
• Make sure your fingers don't leave the strings
• Slide upward into second chord
• Build up speed as long as you're able to maintain accuracy
Here's roughly what it should sound like at 85 bpm:
If you want to increase the difficulty, simply increase the speed. This
audio sample bumps it to 115 bpm.
Let's try a similar exercise that moves things around a little more, like an
actual power chord progression. To do this, we'll break our tab into
eighth notes and really slow down the tempo.
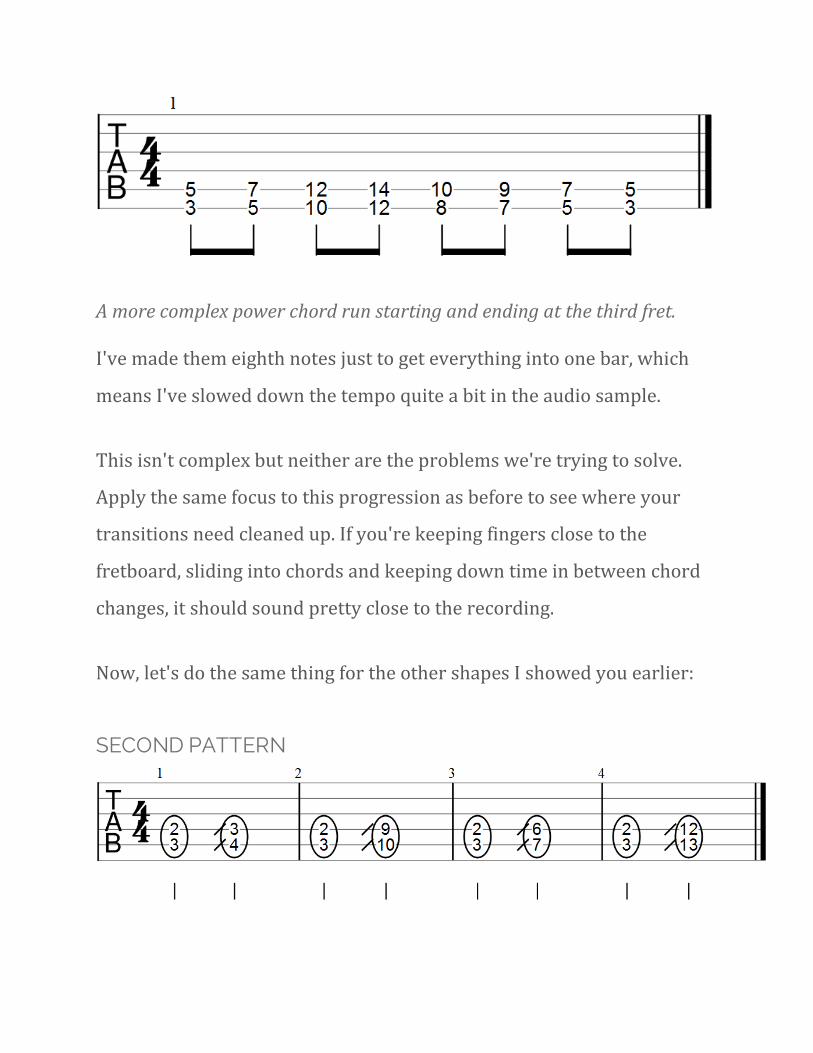
A more complex power chord run starting and ending at the third fret.
I've made them eighth notes just to get everything into one bar, which
means I've slowed down the tempo quite a bit in the audio sample.
This isn't complex but neither are the problems we're trying to solve.
Apply the same focus to this progression as before to see where your
transitions need cleaned up. If you're keeping fingers close to the
fretboard, sliding into chords and keeping down time in between chord
changes, it should sound pretty close to the recording.
Now, let's do the same thing for the other shapes I showed you earlier:
SECOND PATTERN
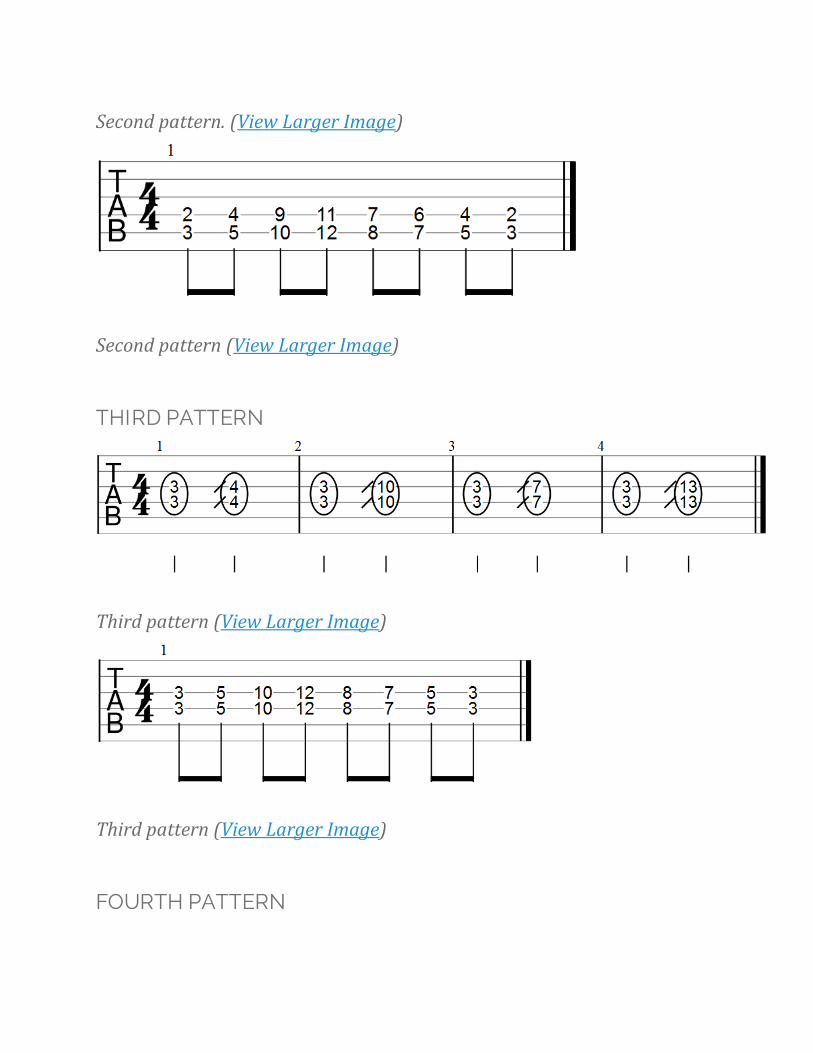
Second pattern. (View Larger Image)
Second pattern (View Larger Image)
THIRD PATTERN
Third pattern (View Larger Image)
Third pattern (View Larger Image)
FOURTH PATTERN

Fourth pattern. (View Larger Image)
Fourth pattern. (View Larger Image)
Keep in mind that there are a number of variables you can inject into
these exercises, namely the following:
• Tempo
• Starting fret
• Ending fret
• Interval spacing
Even if you just stick to the script I've outlined, you've got plenty of
opportunities to improve your accuracy and quickness while changing
common chord shapes. While the movements aren't directly applicable to
a particular progression, getting better at these lateral movements
should result in a noticeable improvement during actual "real world"
chord changes.
Improving Vertical (String-to-String) Movement
While lateral fretboard movement is fairly easy to practice, vertical
string-to-string movement can be a more nuanced discipline and is more
difficult to troubleshoot. It's also an area that's more prone to mistakes
and inaccuracies, simply because you're required to move your finger off
the fretboard and the string, then back down again. It's a seemingly small
difference, but most people have more trouble with chord changes
involving this type of movement.
That's why you often see guitar players gravitate towards uniform barre
and power chords, as it minimize the need for changing between strings.
However, it's poor practice to rely on those chord shapes all the time.
You need to tackle string-to-string movement and make sure that you're
able to handle those chord changes as well as the lateral ones. Both
methods should be accessible and usable.
ANALYZING STRING-TO-STRING CHORD CHANGES
What are some of the properties of a vertical chord change?
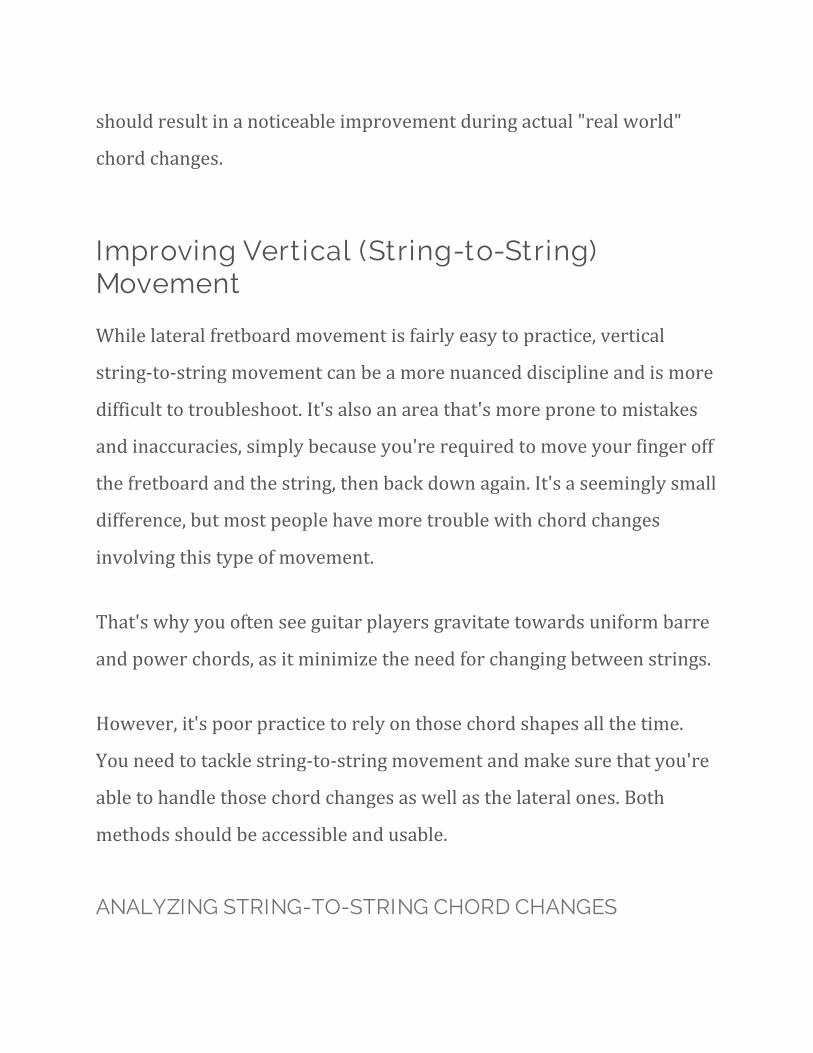
First, I should point out that with a lot of string-to-string changes, we're
incorporating short lateral shifts as well, usually between one and three
frets of space. For example, you might have two open chords with
different root positions.
The D to G chord change incorporates lateral and vertical movement.
(View Larger Image)
This chord also occur when shifting between two power or barre chords
with roots on different strings.
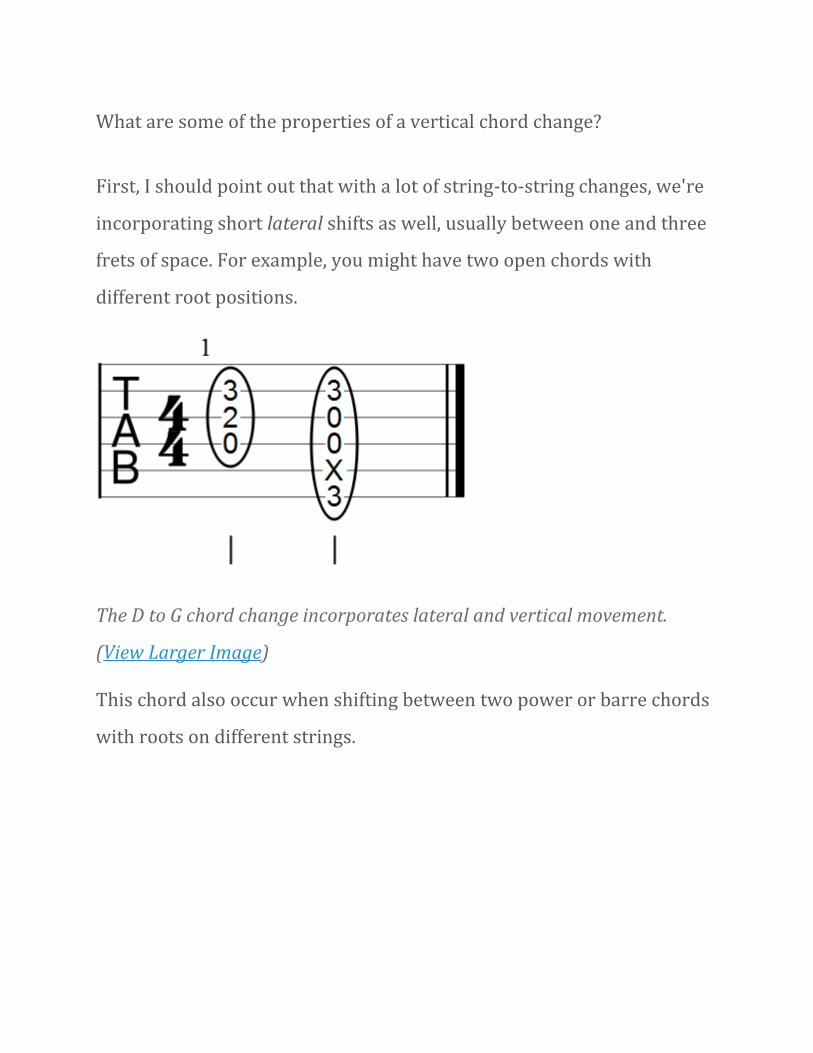
The G to D power chord change also incorporates lateral and vertical
movement. (View Larger Image)
These types of chord changes can also mean we're making a change in
the "lead finger" which is the finger playing to bass-most note of the
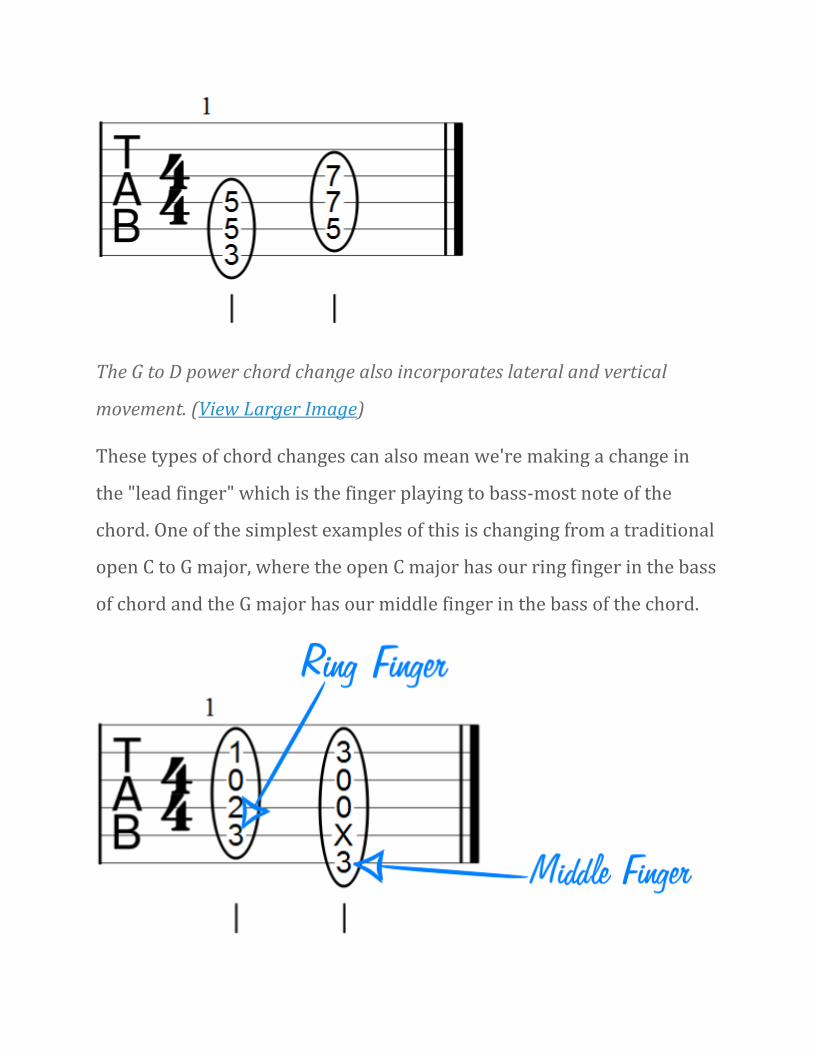
chord. One of the simplest examples of this is changing from a traditional
open C to G major, where the open C major has our ring finger in the bass
of chord and the G major has our middle finger in the bass of the chord.
In this version of the C to G chord change, your middle finger replaces your
ring finger in the bass of the chord. (View Larger Image)
Our task is to figure out how to practice this, similar to how we were
practicing the lateral movements. To start, lets take an exercise from the
C to G chord change we just looked at, which allows us to focus on a
change that is based on a common progression. We'll start on the third
fret, but apply the same movement at other fretboard positions as well.
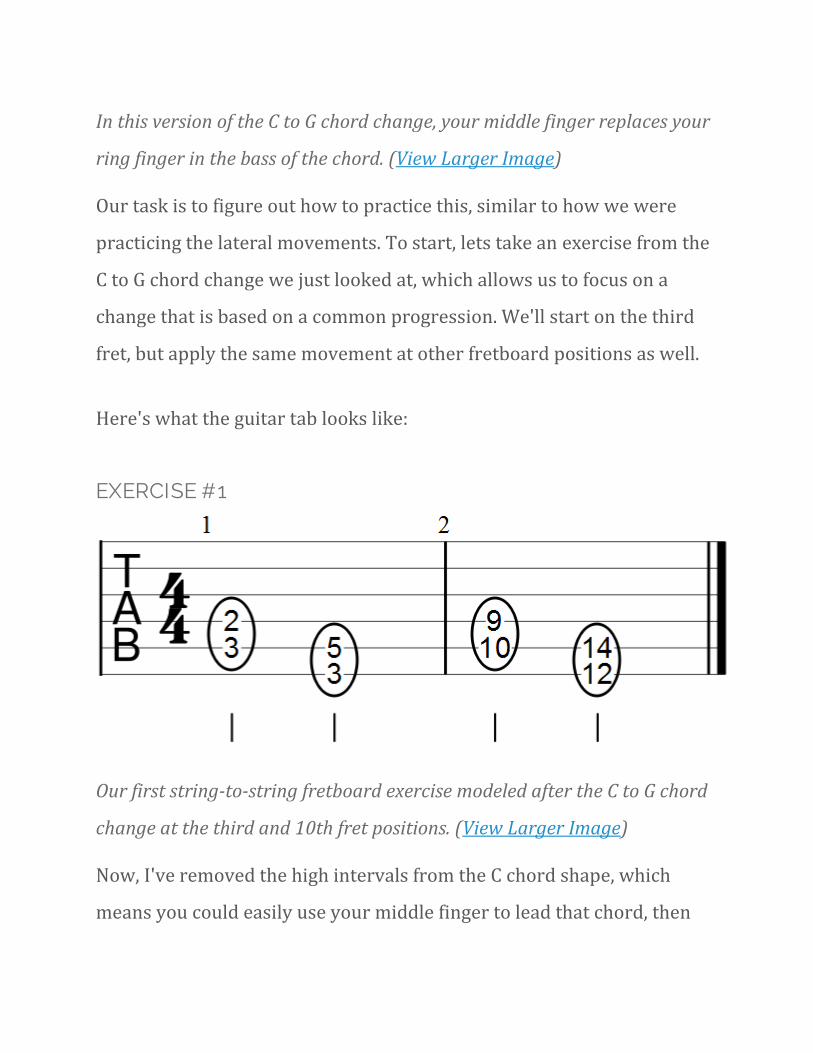
Here's what the guitar tab looks like:
EXERCISE #1
Our first string-to-string fretboard exercise modeled after the C to G chord
change at the third and 10th fret positions. (View Larger Image)
Now, I've removed the high intervals from the C chord shape, which
means you could easily use your middle finger to lead that chord, then
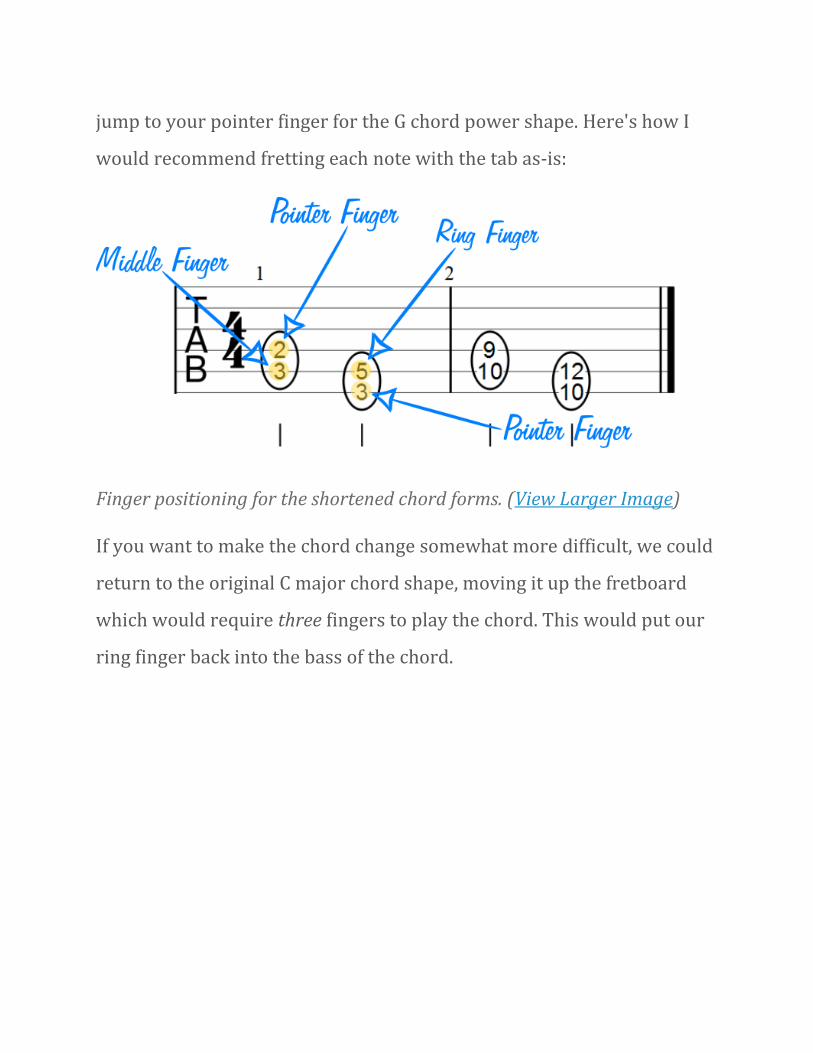
jump to your pointer finger for the G chord power shape. Here's how I
would recommend fretting each note with the tab as-is:
Finger positioning for the shortened chord forms. (View Larger Image)
If you want to make the chord change somewhat more difficult, we could
return to the original C major chord shape, moving it up the fretboard
which would require three fingers to play the chord. This would put our
ring finger back into the bass of the chord.
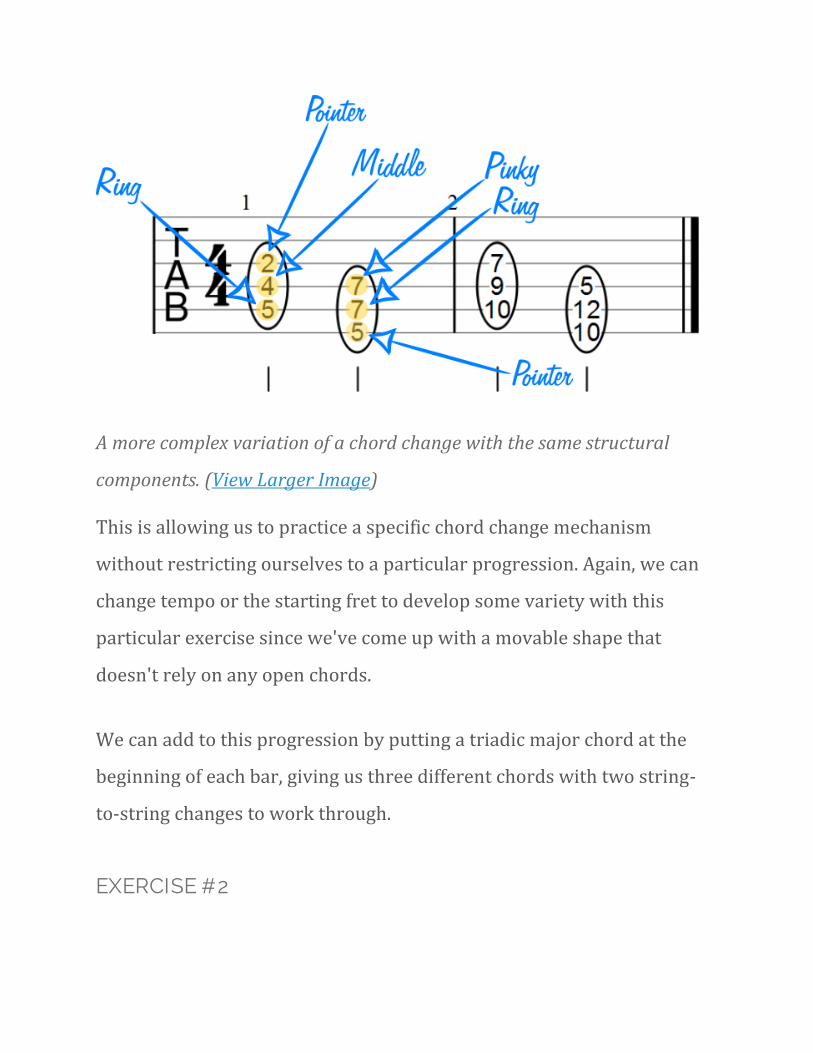
A more complex variation of a chord change with the same structural
components. (View Larger Image)
This is allowing us to practice a specific chord change mechanism
without restricting ourselves to a particular progression. Again, we can
change tempo or the starting fret to develop some variety with this
particular exercise since we've come up with a movable shape that
doesn't rely on any open chords.
We can add to this progression by putting a triadic major chord at the
beginning of each bar, giving us three different chords with two string-
to-string changes to work through.
EXERCISE #2
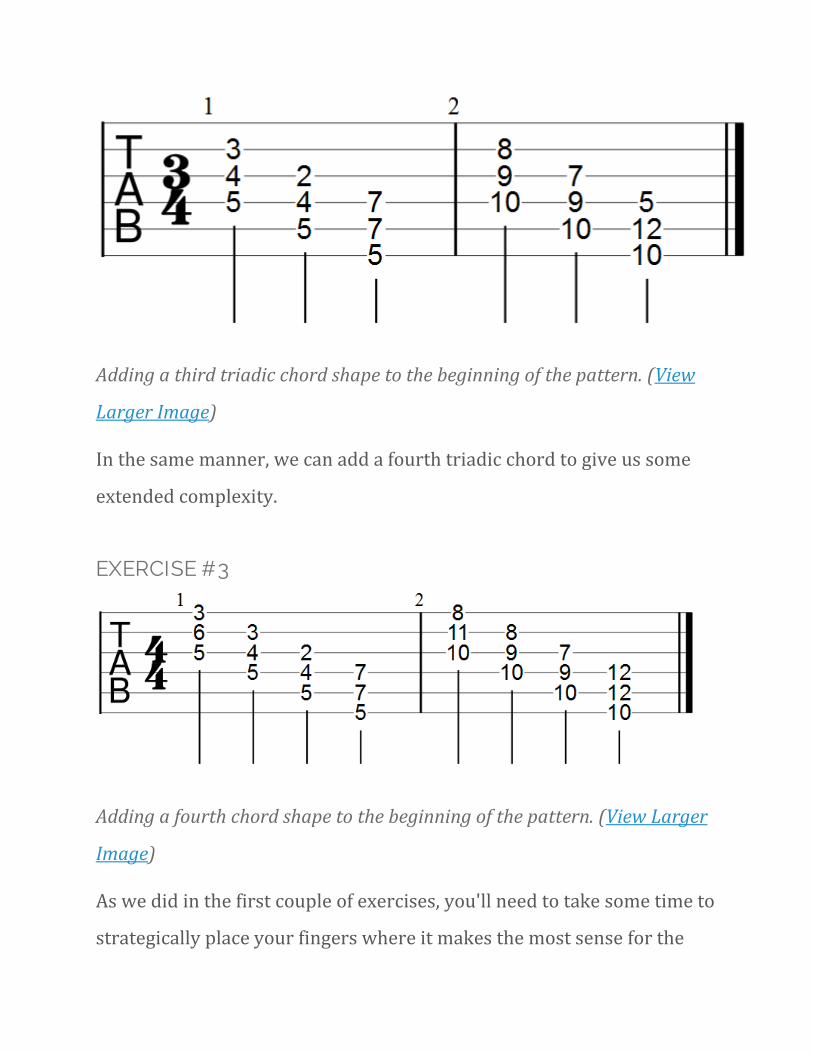
Adding a third triadic chord shape to the beginning of the pattern. (View
Larger Image)
In the same manner, we can add a fourth triadic chord to give us some
extended complexity.
EXERCISE #3
Adding a fourth chord shape to the beginning of the pattern. (View Larger
Image)
As we did in the first couple of exercises, you'll need to take some time to
strategically place your fingers where it makes the most sense for the
chord change. As I mentioned earlier in this article, you should still be
looking for opportunities to minimize movement and keep your fingers
as close to the strings as possible.
Let's build a similar pattern, but with only power/barre chord shapes,
where your pointer finger is leading each chord.
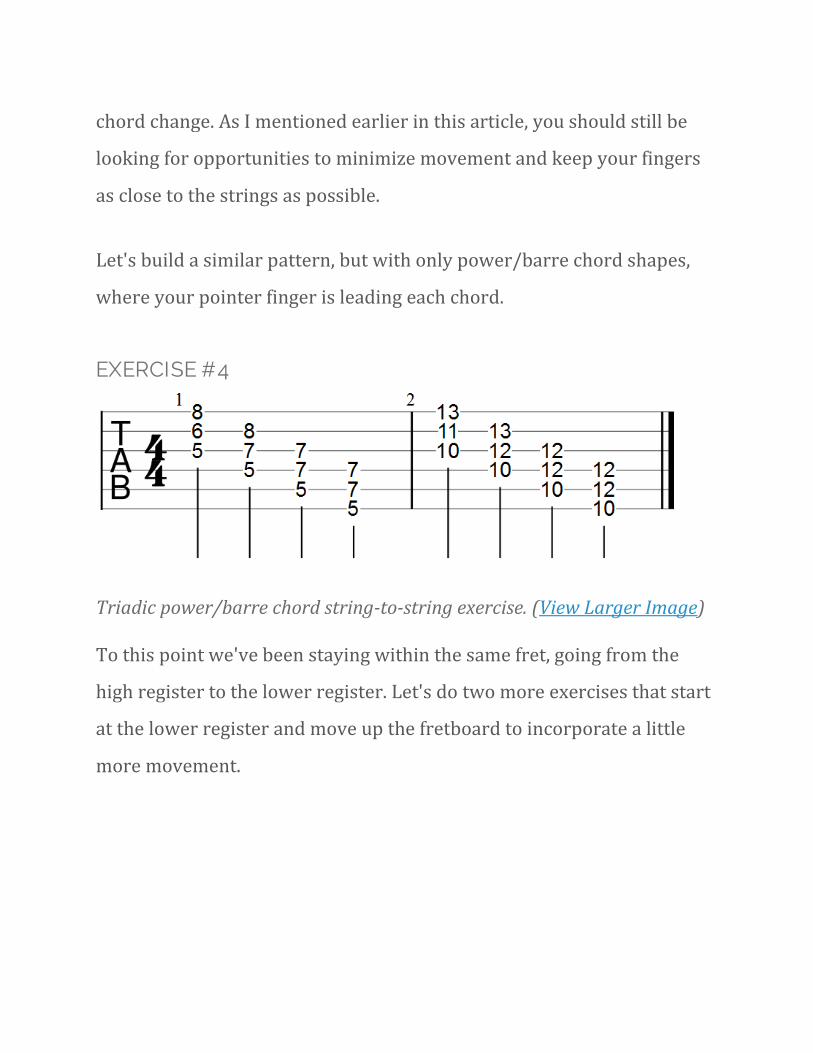
EXERCISE #4
Triadic power/barre chord string-to-string exercise. (View Larger Image)
To this point we've been staying within the same fret, going from the
high register to the lower register. Let's do two more exercises that start
at the lower register and move up the fretboard to incorporate a little
more movement.
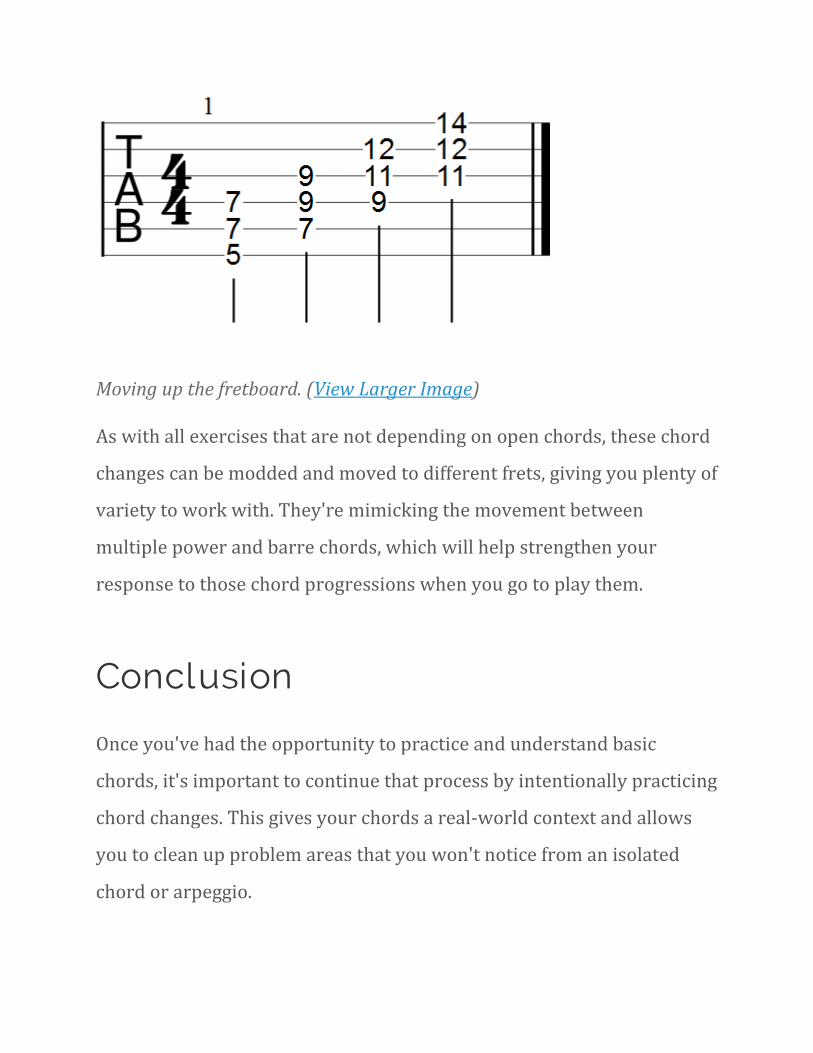
Moving up the fretboard. (View Larger Image)
As with all exercises that are not depending on open chords, these chord
changes can be modded and moved to different frets, giving you plenty of
variety to work with. They're mimicking the movement between
multiple power and barre chords, which will help strengthen your
response to those chord progressions when you go to play them.
Conclusion
Once you've had the opportunity to practice and understand basic
chords, it's important to continue that process by intentionally practicing
chord changes. This gives your chords a real-world context and allows
you to clean up problem areas that you won't notice from an isolated
chord or arpeggio.
Get creative with the exercises I've outlined here and use them to build
other patterns that can help you produce cleaner chord progressions.
Even using an actual chord progression as an exercise - similar to what
we did in the beginning of this lesson - can be extremely helpful when it
comes to making more efficient, cleaner chord changes.
If you need additional help, we have plenty of other chord-related
resources.
Here are couple you might find particularly helpful:
• Chord Charts and Diagrams Page (downloadable)
• The Most Common Guitar Chord Progressions
Questions
If you have questions about the content, I'd encourage you to leave them
in the comments section below. I have a much easier time answering
those directly, as opposed to email, which also allows us to expand and
improve pages like this one.