Embed Size (px)
Citation preview
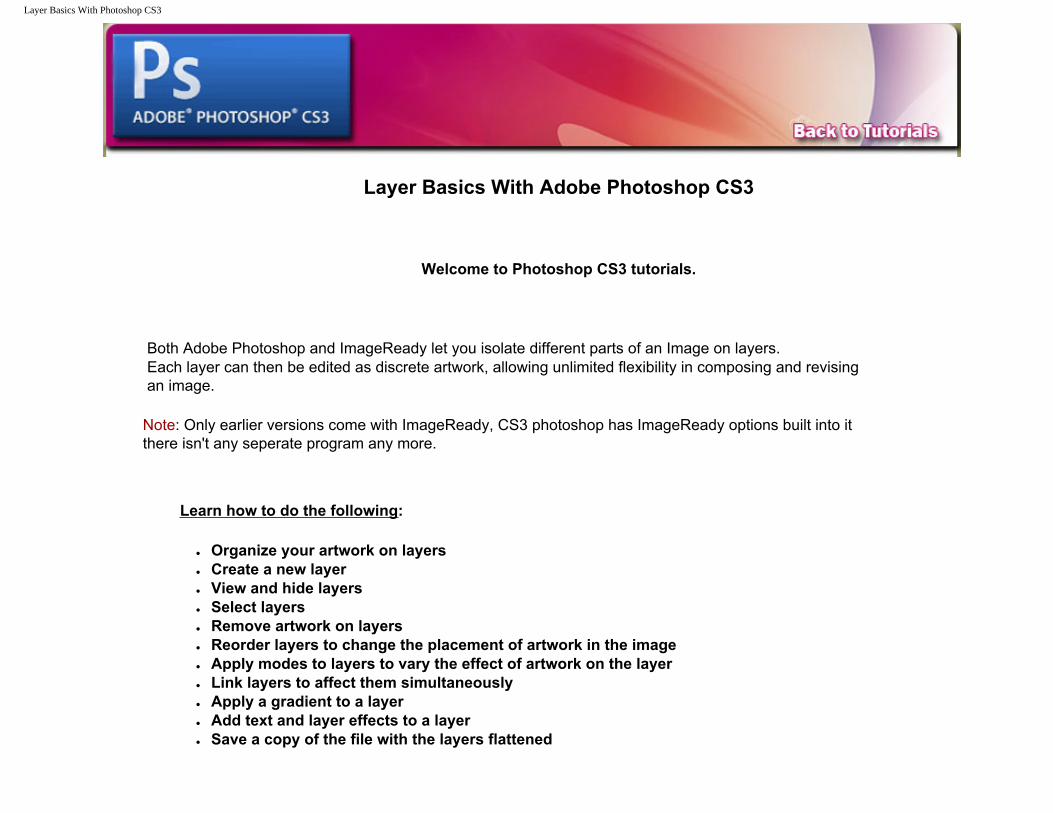
Layer Basics With Photoshop CS3
Layer Basics With Adobe Photoshop CS3
Welcome to Photoshop CS3 tutorials.
Both Adobe Photoshop and ImageReady let you isolate different parts of an Image on layers. Each layer can then be edited as discrete artwork, allowing unlimited flexibility in composing and revising an image.
Note: Only earlier versions come with ImageReady, CS3 photoshop has ImageReady options built into it there isn't any seperate program any more.
Learn how to do the following:
● Organize your artwork on layers ● Create a new layer ● View and hide layers ● Select layers ● Remove artwork on layers ● Reorder layers to change the placement of artwork in the image ● Apply modes to layers to vary the effect of artwork on the layer ● Link layers to affect them simultaneously ● Apply a gradient to a layer ● Add text and layer effects to a layer ● Save a copy of the file with the layers flattened
Layer Basics With Photoshop CS3
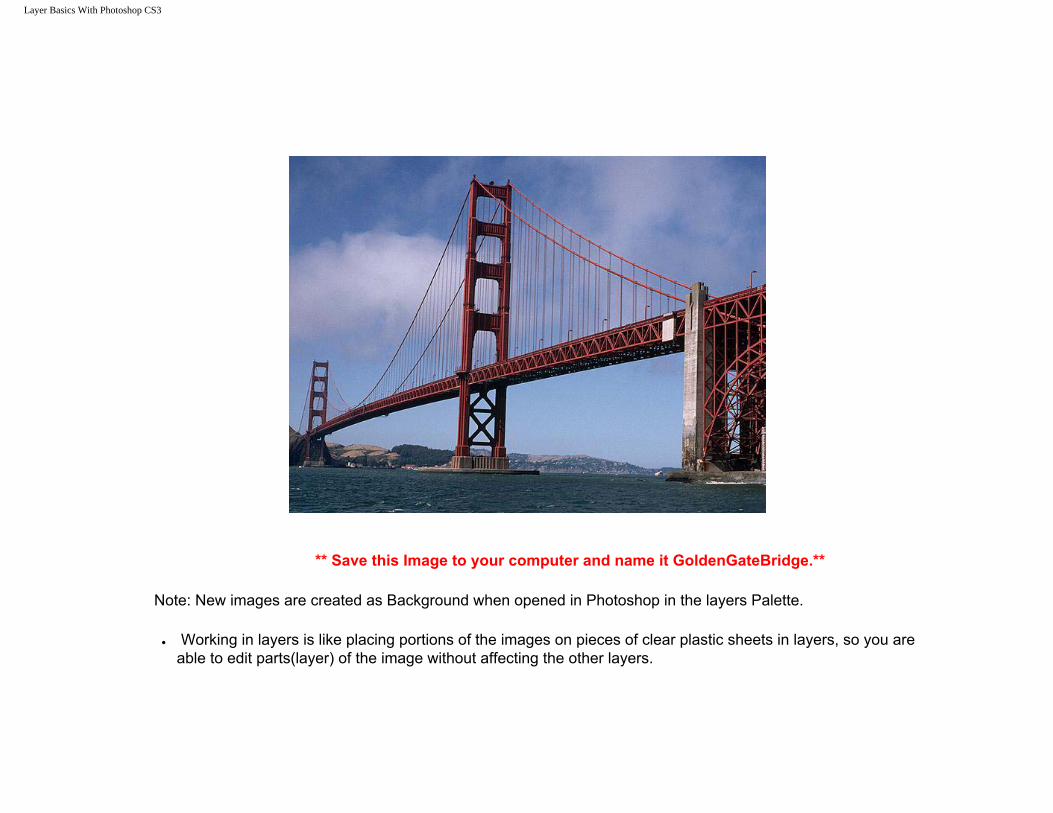
** Save this Image to your computer and name it GoldenGateBridge.**
Note: New images are created as Background when opened in Photoshop in the layers Palette.
● Working in layers is like placing portions of the images on pieces of clear plastic sheets in layers, so you are able to edit parts(layer) of the image without affecting the other layers.
Layer Basics With Photoshop CS3
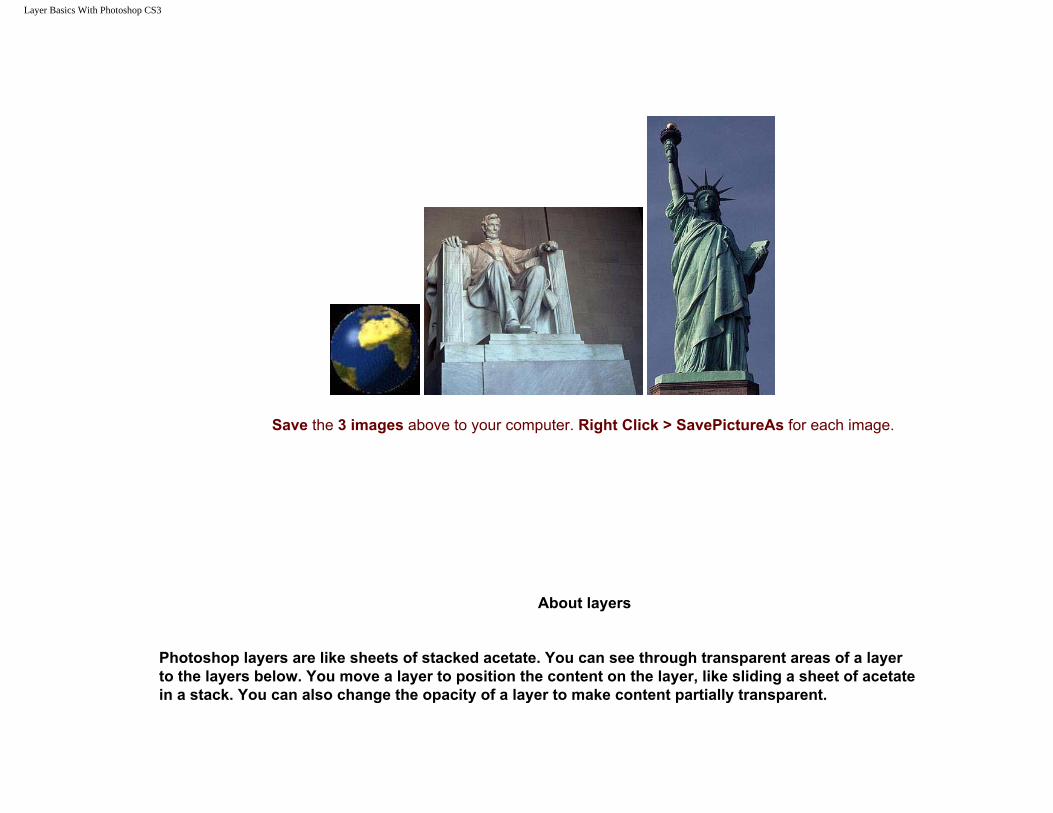
Save the 3 images above to your computer. Right Click > SavePictureAs for each image.
About layers
Photoshop layers are like sheets of stacked acetate. You can see through transparent areas of a layer to the layers below. You move a layer to position the content on the layer, like sliding a sheet of acetate in a stack. You can also change the opacity of a layer to make content partially transparent.
Layer Basics With Photoshop CS3
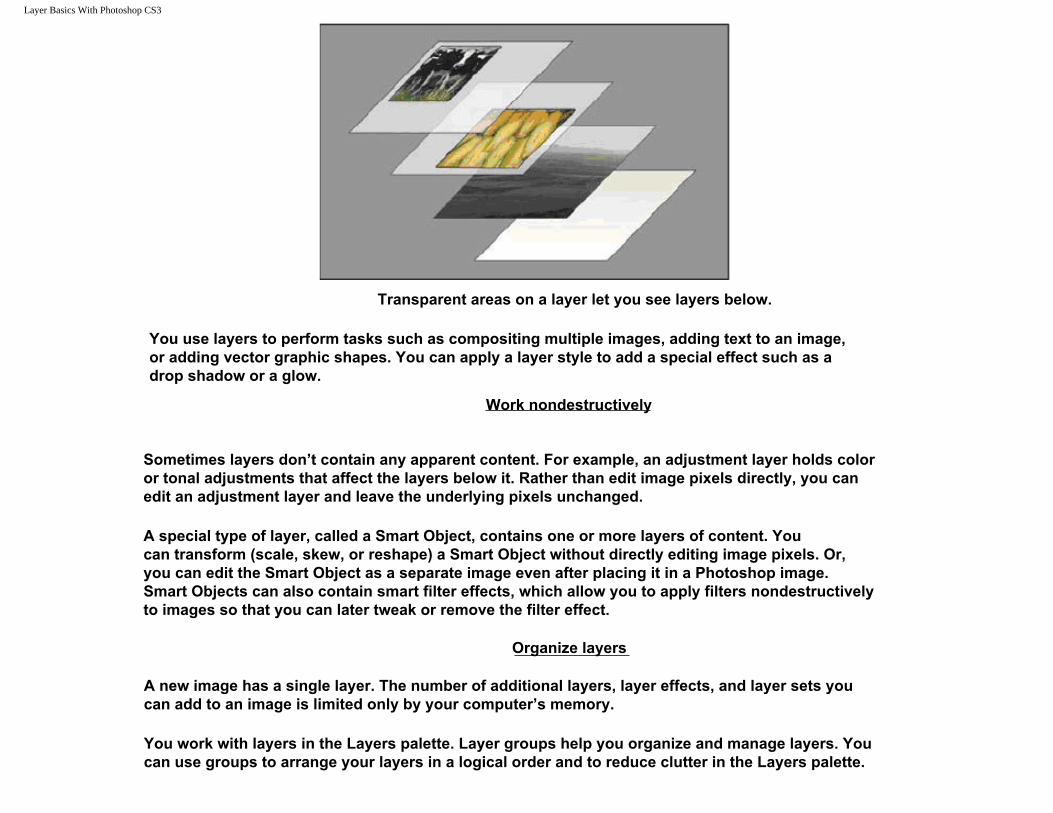
Transparent areas on a layer let you see layers below.
You use layers to perform tasks such as compositing multiple images, adding text to an image, or adding vector graphic shapes. You can apply a layer style to add a special effect such as a drop shadow or a glow.
Work nondestructively
Sometimes layers don’t contain any apparent content. For example, an adjustment layer holds color or tonal adjustments that affect the layers below it. Rather than edit image pixels directly, you can edit an adjustment layer and leave the underlying pixels unchanged.
A special type of layer, called a Smart Object, contains one or more layers of content. You can transform (scale, skew, or reshape) a Smart Object without directly editing image pixels. Or, you can edit the Smart Object as a separate image even after placing it in a Photoshop image. Smart Objects can also contain smart filter effects, which allow you to apply filters nondestructively to images so that you can later tweak or remove the filter effect.
Organize layers
A new image has a single layer. The number of additional layers, layer effects, and layer sets you can add to an image is limited only by your computer’s memory.
You work with layers in the Layers palette. Layer groups help you organize and manage layers. You can use groups to arrange your layers in a logical order and to reduce clutter in the Layers palette.
Layer Basics With Photoshop CS3
You can nest groups within other groups. You can also use groups to apply attributes and masks to multiple layers simultaneously.
From Adobe Photoshop > Help
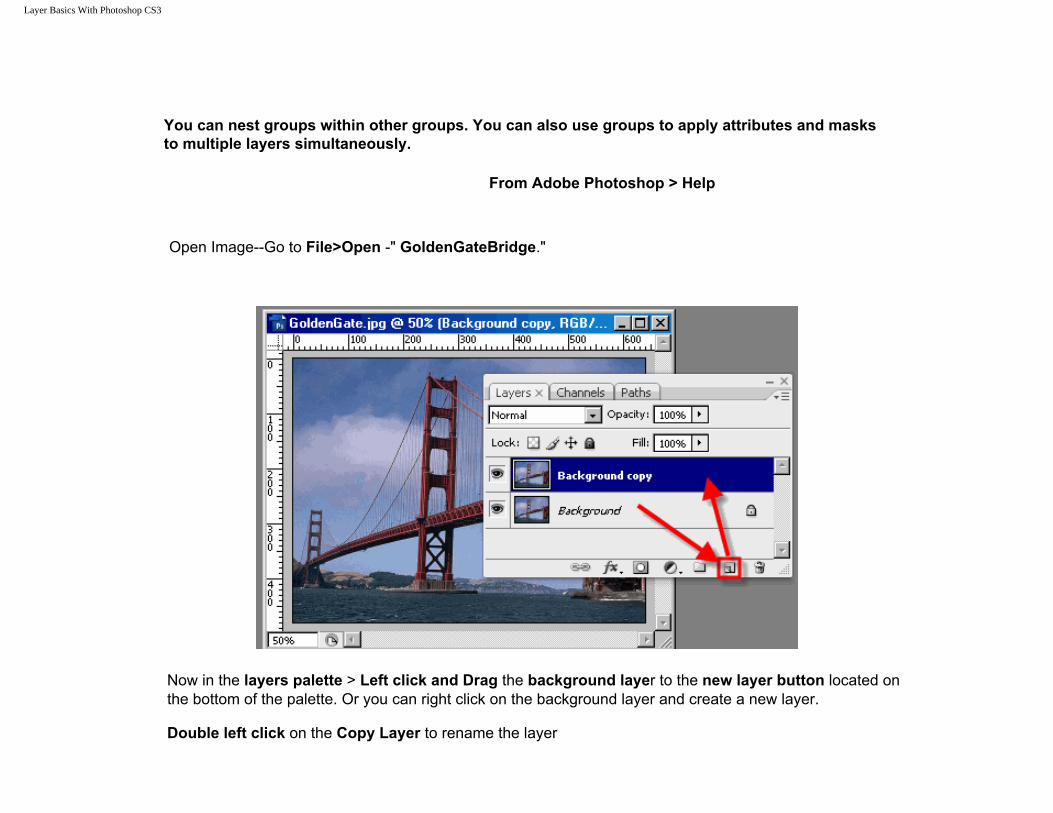
Open Image--Go to File>Open -" GoldenGateBridge."
Now in the layers palette > Left click and Drag the background layer to the new layer button located on the bottom of the palette. Or you can right click on the background layer and create a new layer. Double left click on the Copy Layer to rename the layer
Layer Basics With Photoshop CS3
.
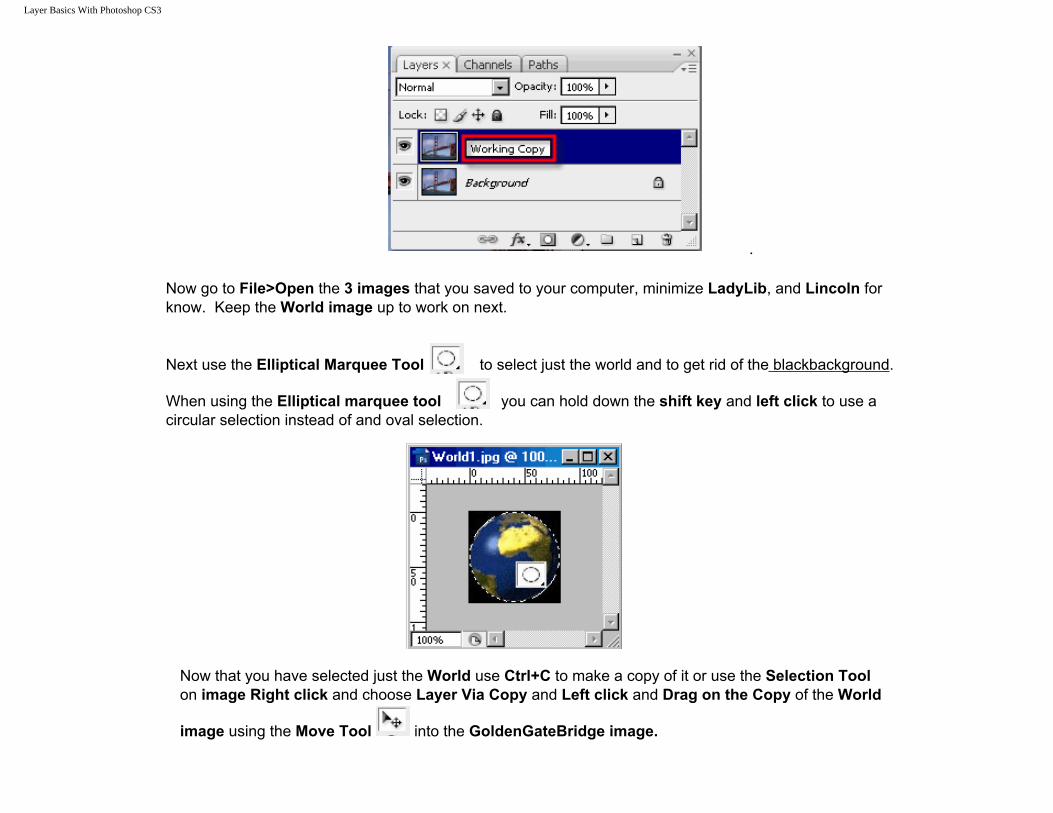
Now go to File>Open the 3 images that you saved to your computer, minimize LadyLib, and Lincoln for know. Keep the World image up to work on next.
Next use the Elliptical Marquee Tool to select just the world and to get rid of the blackbackground.
When using the Elliptical marquee tool you can hold down the shift key and left click to use a circular selection instead of and oval selection.
Now that you have selected just the World use Ctrl+C to make a copy of it or use the Selection Tool on image Right click and choose Layer Via Copy and Left click and Drag on the Copy of the World
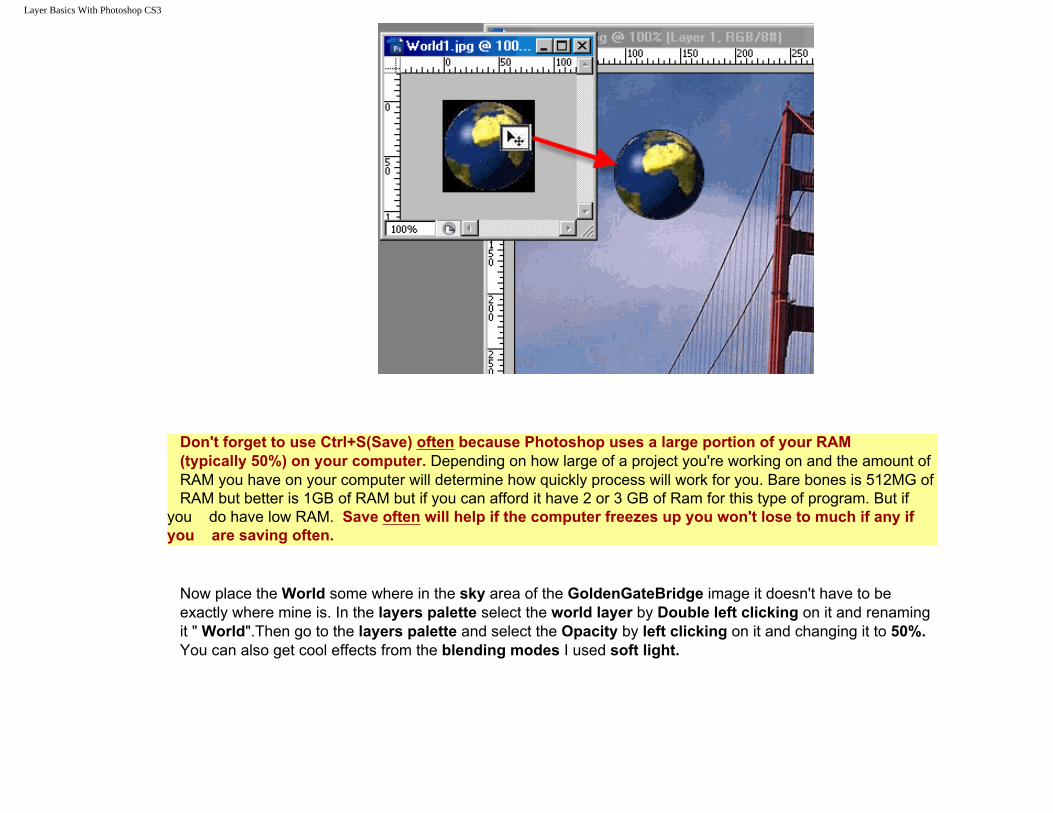
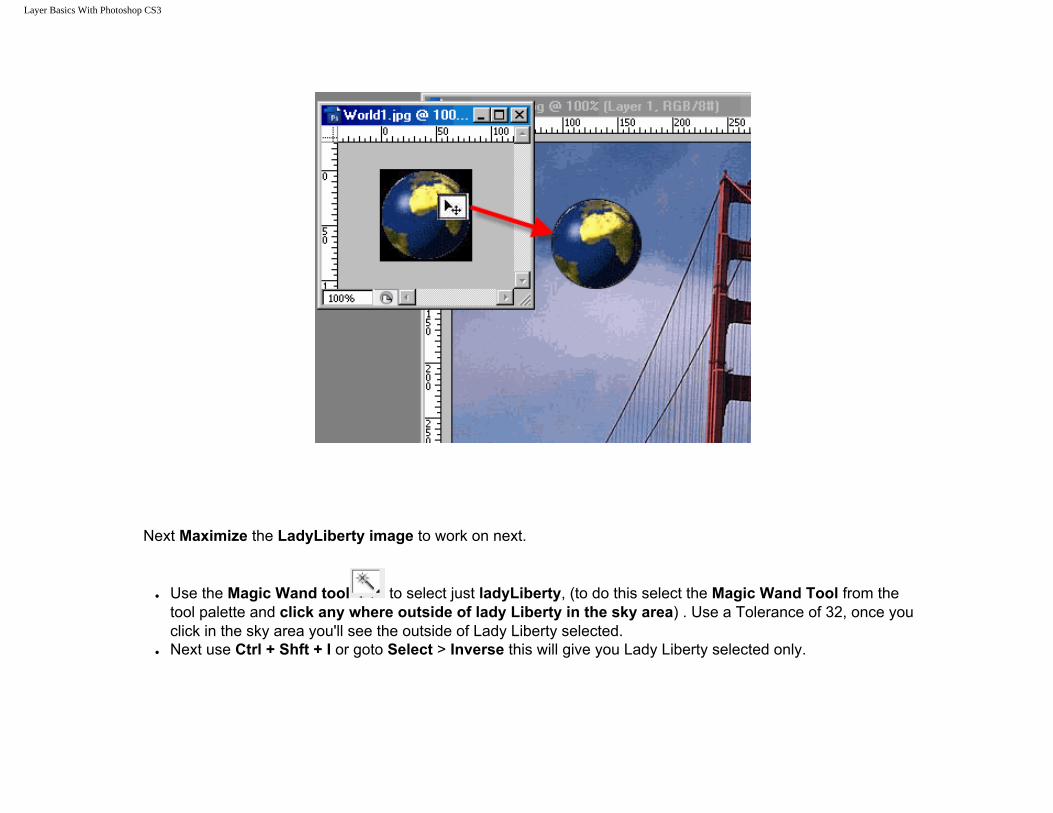
image using the Move Tool into the GoldenGateBridge image.
Layer Basics With Photoshop CS3
Don't forget to use Ctrl+S(Save) often because Photoshop uses a large portion of your RAM (typically 50%) on your computer. Depending on how large of a project you're working on and the amount of RAM you have on your computer will determine how quickly process will work for you. Bare bones is 512MG of RAM but better is 1GB of RAM but if you can afford it have 2 or 3 GB of Ram for this type of program. But if you do have low RAM. Save often will help if the computer freezes up you won't lose to much if any if you are saving often.
Now place the World some where in the sky area of the GoldenGateBridge image it doesn't have to be exactly where mine is. In the layers palette select the world layer by Double left clicking on it and renaming it " World".Then go to the layers palette and select the Opacity by left clicking on it and changing it to 50%. You can also get cool effects from the blending modes I used soft light.
Layer Basics With Photoshop CS3
Next Maximize the LadyLiberty image to work on next.
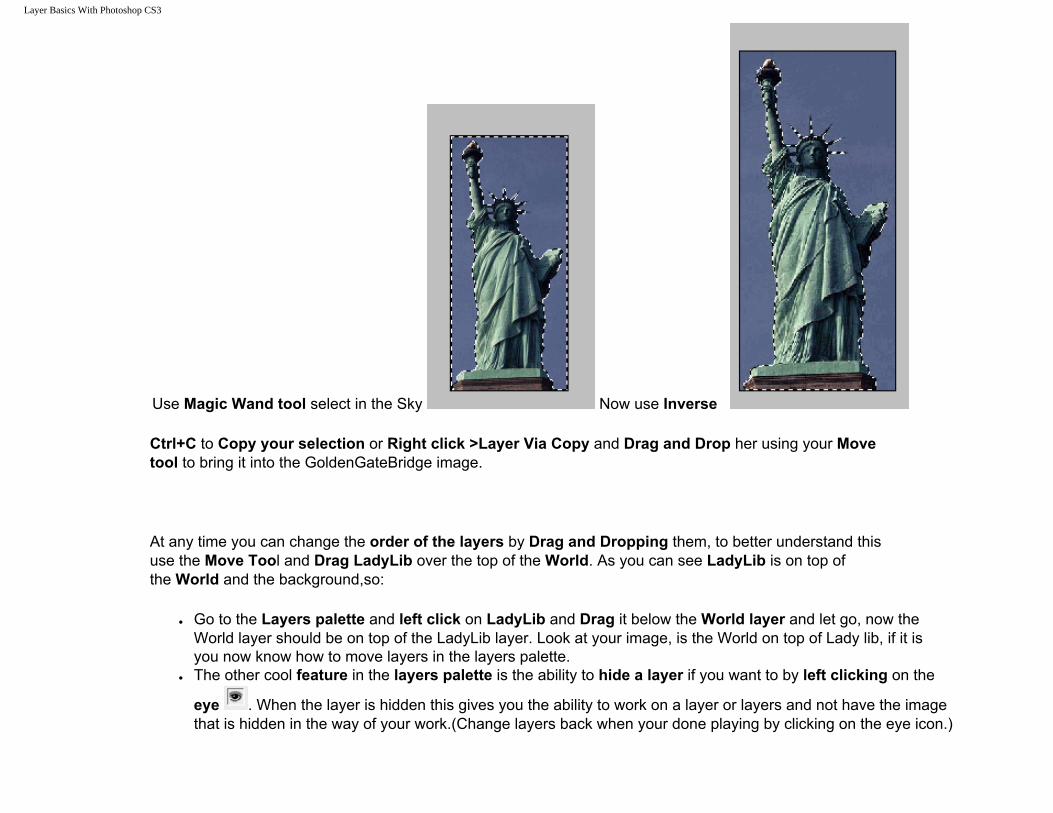
● Use the Magic Wand tool to select just ladyLiberty, (to do this select the Magic Wand Tool from the tool palette and click any where outside of lady Liberty in the sky area) . Use a Tolerance of 32, once you click in the sky area you'll see the outside of Lady Liberty selected.
● Next use Ctrl + Shft + I or goto Select > Inverse this will give you Lady Liberty selected only.
Layer Basics With Photoshop CS3
Use Magic Wand tool select in the Sky Now use Inverse
Ctrl+C to Copy your selection or Right click >Layer Via Copy and Drag and Drop her using your Move tool to bring it into the GoldenGateBridge image.
At any time you can change the order of the layers by Drag and Dropping them, to better understand this use the Move Tool and Drag LadyLib over the top of the World. As you can see LadyLib is on top of the World and the background,so:
● Go to the Layers palette and left click on LadyLib and Drag it below the World layer and let go, now the World layer should be on top of the LadyLib layer. Look at your image, is the World on top of Lady lib, if it is you now know how to move layers in the layers palette.
● The other cool feature in the layers palette is the ability to hide a layer if you want to by left clicking on the
eye . When the layer is hidden this gives you the ability to work on a layer or layers and not have the image that is hidden in the way of your work.(Change layers back when your done playing by clicking on the eye icon.)
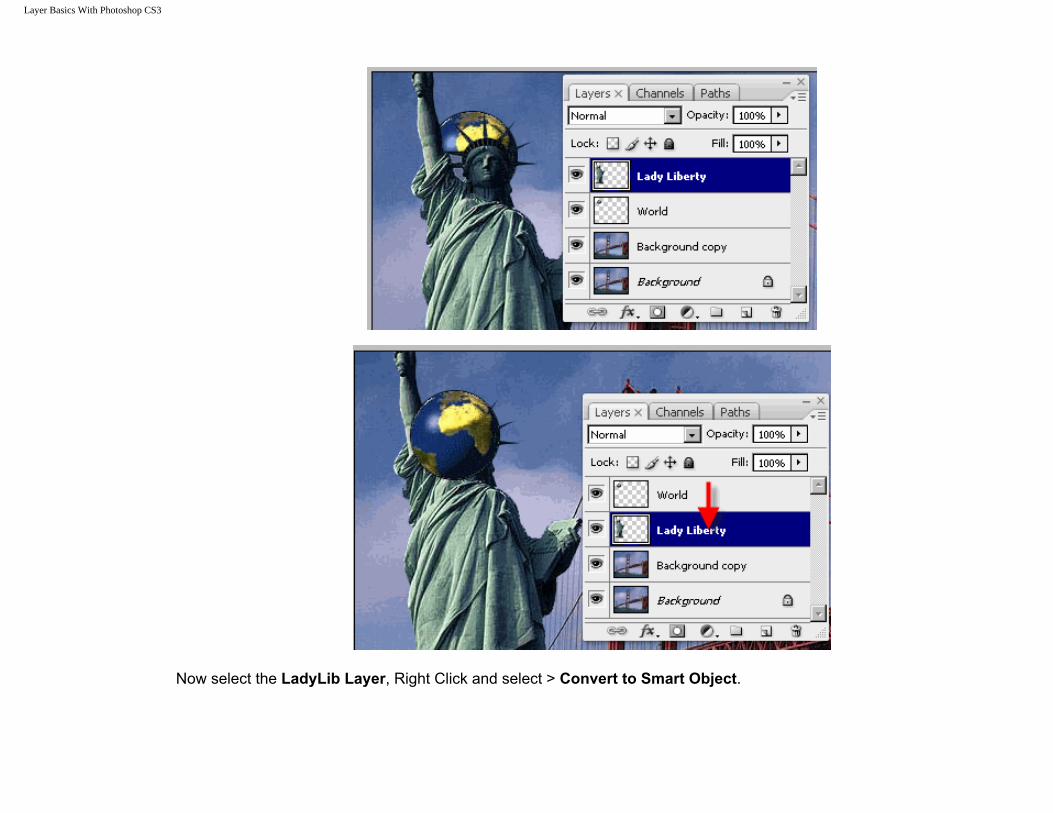
Layer Basics With Photoshop CS3
Now select the LadyLib Layer, Right Click and select > Convert to Smart Object.
Layer Basics With Photoshop CS3
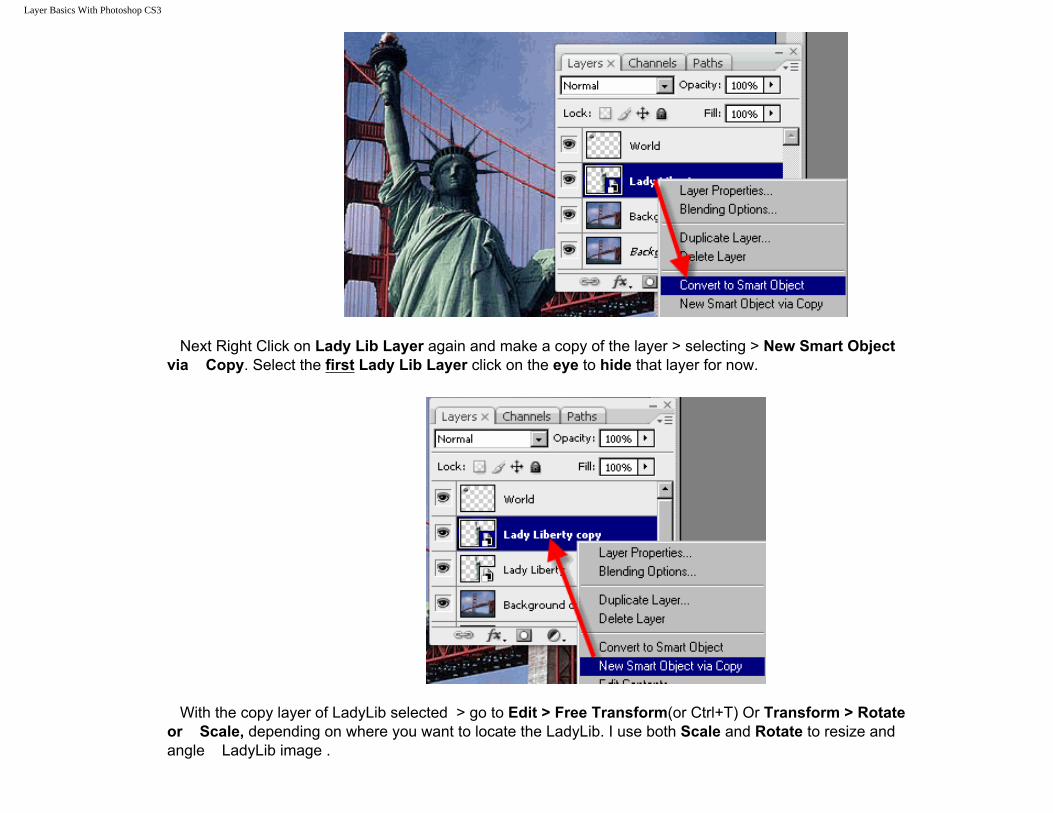
Next Right Click on Lady Lib Layer again and make a copy of the layer > selecting > New Smart Object via Copy. Select the first Lady Lib Layer click on the eye to hide that layer for now.
With the copy layer of LadyLib selected > go to Edit > Free Transform(or Ctrl+T) Or Transform > Rotate or Scale, depending on where you want to locate the LadyLib. I use both Scale and Rotate to resize and angle LadyLib image .
Layer Basics With Photoshop CS3
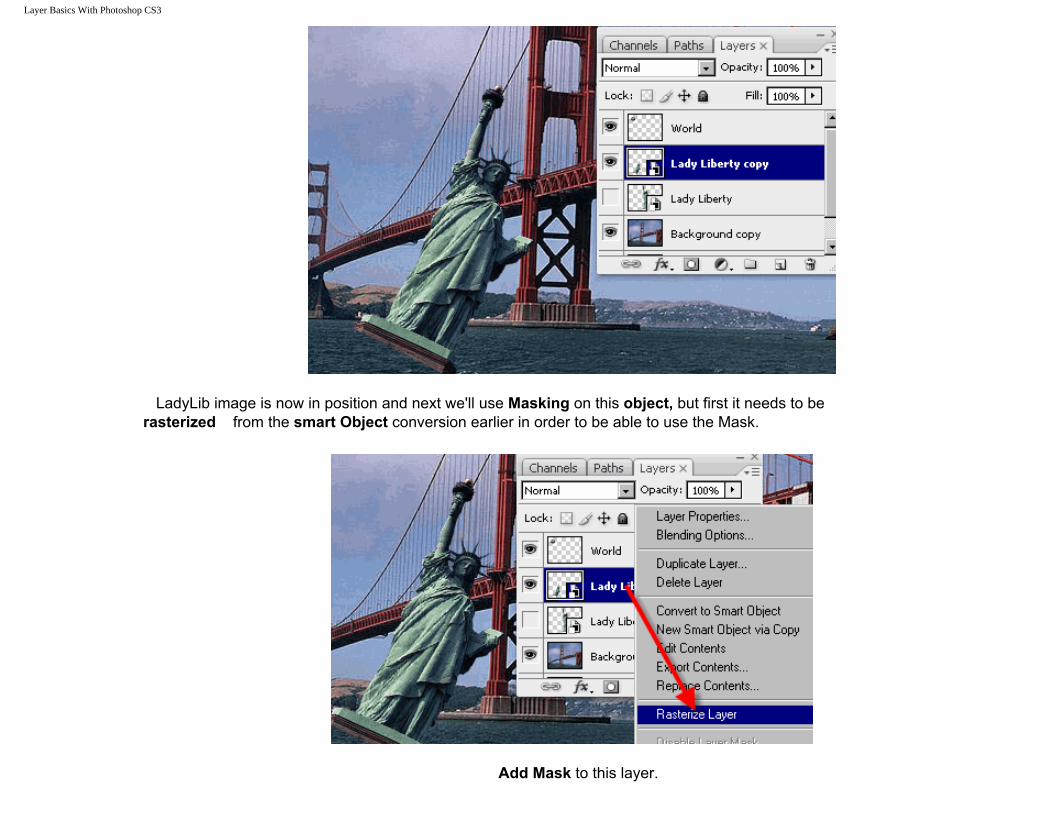
LadyLib image is now in position and next we'll use Masking on this object, but first it needs to be rasterized from the smart Object conversion earlier in order to be able to use the Mask.
Add Mask to this layer.
Layer Basics With Photoshop CS3
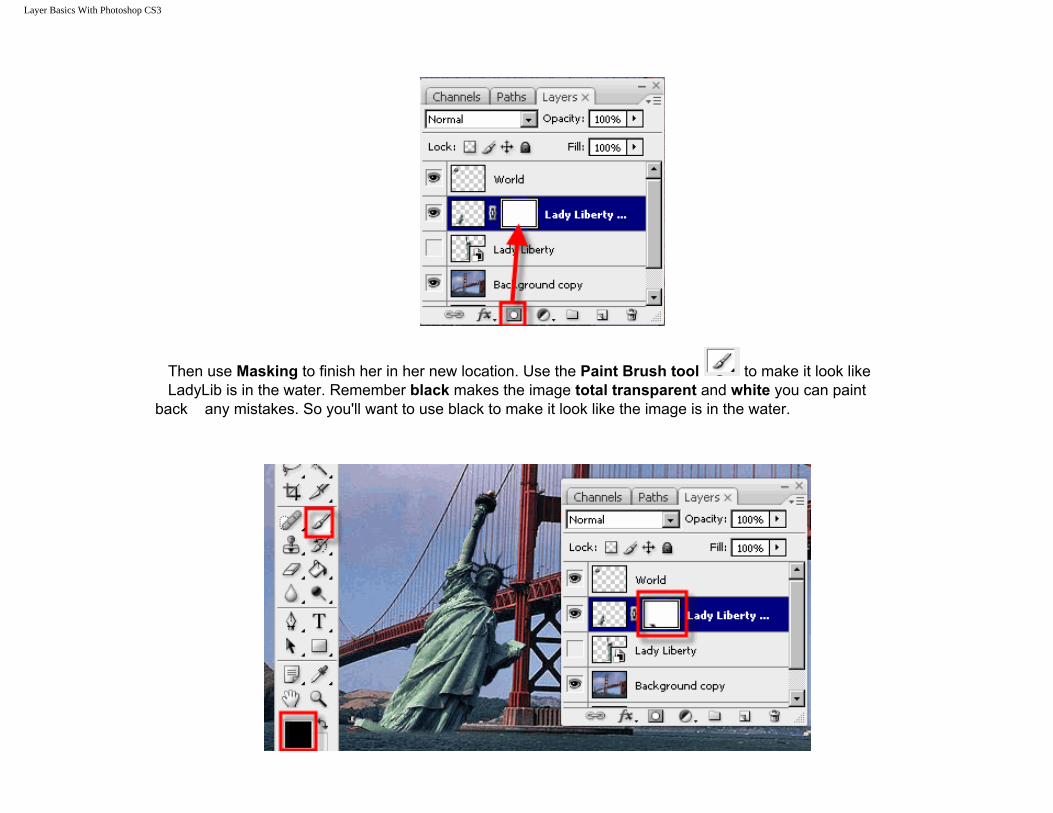
Then use Masking to finish her in her new location. Use the Paint Brush tool to make it look like LadyLib is in the water. Remember black makes the image total transparent and white you can paint back any mistakes. So you'll want to use black to make it look like the image is in the water.
Layer Basics With Photoshop CS3
S Setting Blending Layer Options The blending options in the layer Style dialog box ( Photoshop) let you change a layer's opacity and blending with the pixels underneath.
Keep in mind that a layer's opacity and blending mode interact with the opacity and mode of thetools you use to paint and edit the pixels on the layer. For example, suppose you are working on alayer that uses the Dissolve mode and an opacity of 50%. If you paint on this layer using the paintbrush tool set to Normal mode with an opacity of 100%, the paint will appear in Dissolve mode with a 50% opacity because this is the maximum the layer can display. On the other hand, suppose you are working on a layer created using Normal mode and 100% opacity. If you use the Eraser tool with an opacity of 50%, only 50% of the paint will disappear as you erase.
-From Adobe online Help-
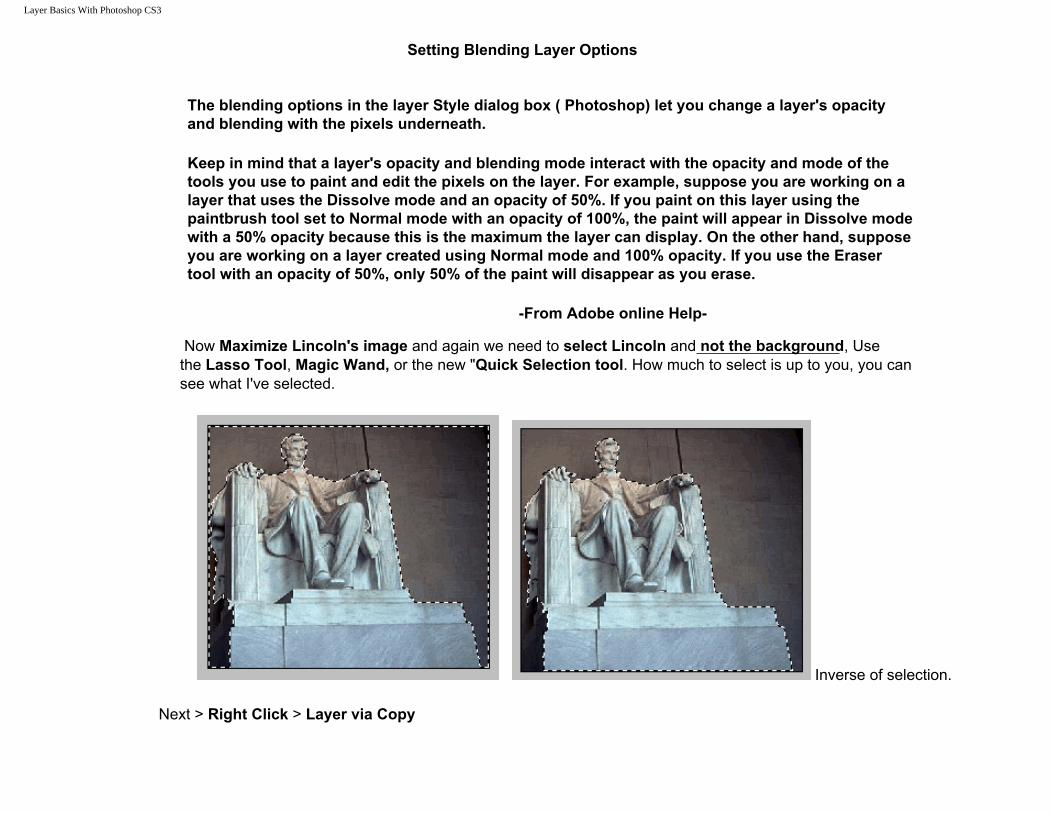
Now Maximize Lincoln's image and again we need to select Lincoln and not the background, Use the Lasso Tool, Magic Wand, or the new "Quick Selection tool. How much to select is up to you, you can see what I've selected.
Inverse of selection.
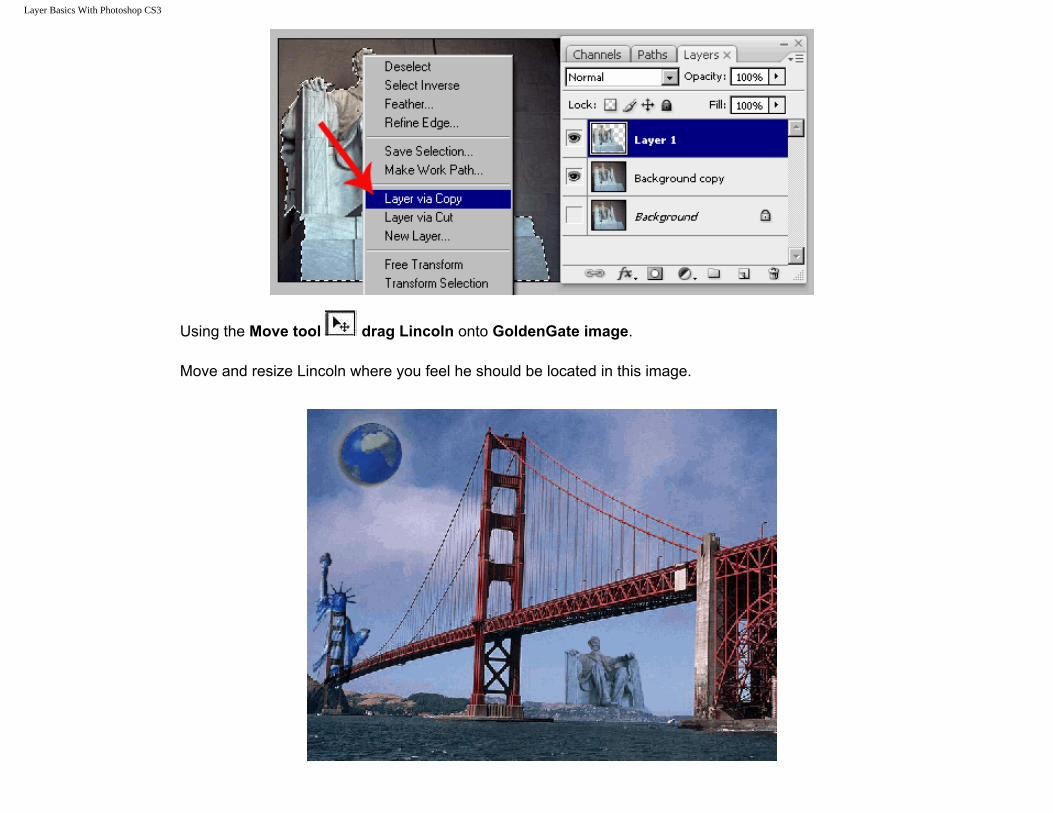
Next > Right Click > Layer via Copy
Layer Basics With Photoshop CS3
Using the Move tool drag Lincoln onto GoldenGate image.
Move and resize Lincoln where you feel he should be located in this image.
Layer Basics With Photoshop CS3
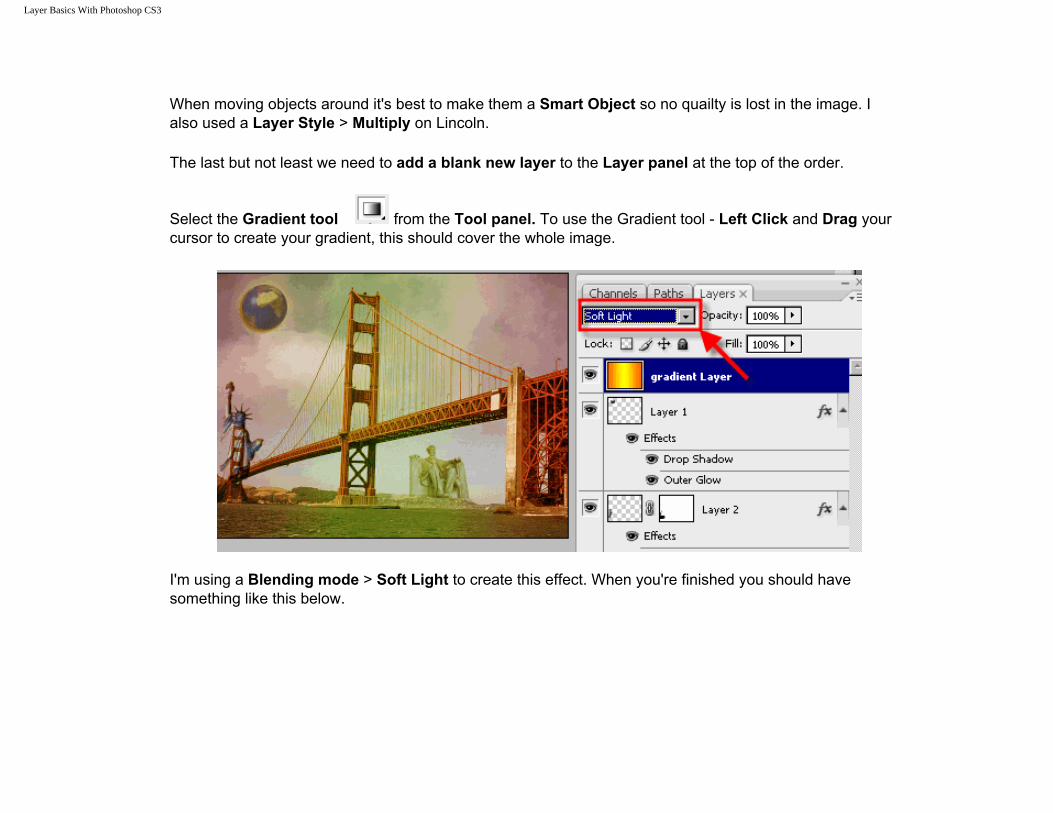
When moving objects around it's best to make them a Smart Object so no quailty is lost in the image. I also used a Layer Style > Multiply on Lincoln.
The last but not least we need to add a blank new layer to the Layer panel at the top of the order.
Select the Gradient tool from the Tool panel. To use the Gradient tool - Left Click and Drag your cursor to create your gradient, this should cover the whole image.
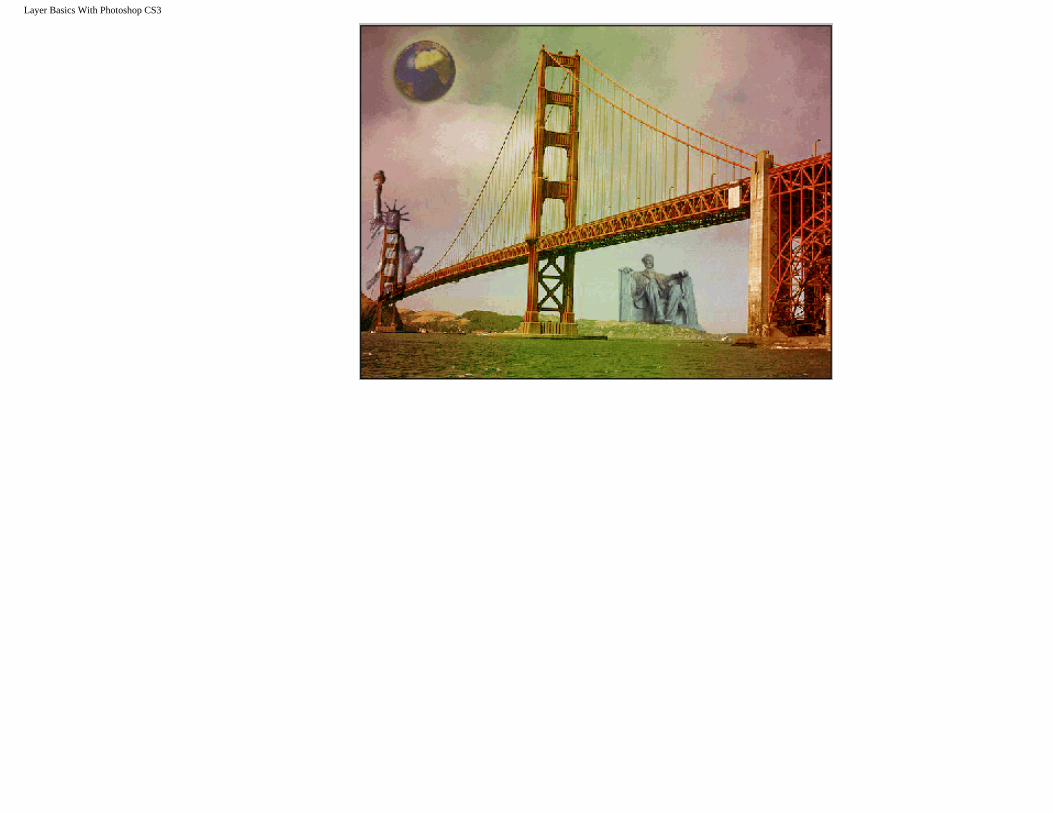
I'm using a Blending mode > Soft Light to create this effect. When you're finished you should have something like this below.
Layer Basics With Photoshop CS3