Embed Size (px)
Citation preview

LCD Keypad & LCD Proximity Keypad
(Models: RP432KP, RP432KPP)
2
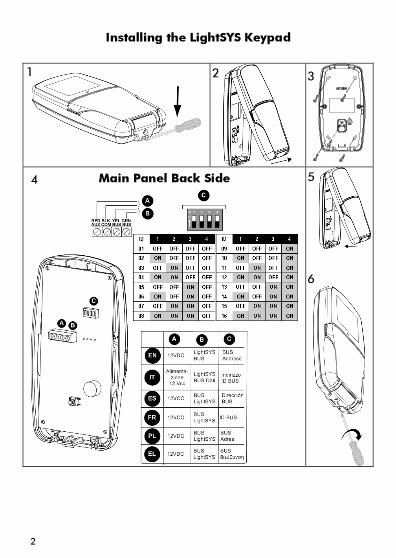
Installing the LightSYS Keypad
Main Panel Back Side
21
4 5
6
3
3
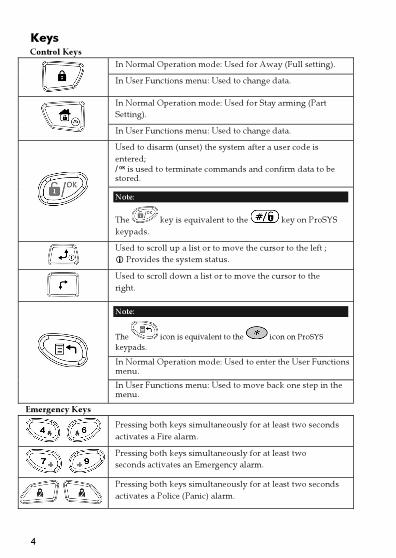
Introduction
The user-friendly LightSYS LCD/LCD Proximity keypad enables simple operation and programming of the LightSYS and ProSYS security systems. The following instructions offer a brief keypad operation overview. For detailed information on programming the system, refer to the LightSYS or ProSYS Installer and User manuals.
Indicators
Power
On
System is operating properly from AC power, its backup battery is in good condition and there are no troubles in the system.
Off No power.
Slow Flash System is in programming.
Rapid Flash System trouble (fault).
Ready
On System is ready to be armed. Off System is not ready to be armed
Slow Flash System is ready to be armed (set) while exit/entry zone is open.
Arm (Set)
On System is armed in Full Arm or Stay Arm (Part Set) mode.
Off System is disarmed (unset). Slow Flash System is in Exit Delay. Rapid Flash Alarm condition.
Stay / Bypass
(Part Set/ Omit)
On System is in Stay Arm (Part Set) or Zone Bypass (omit) mode.
Off No bypass zones in system.
Tamper
On Zone/keypad/external module has been tampered.
Off All zones are operating normally.
Fire
On Fire alarm. Off Normal operation. Flashing Fire circuit problem.
LED (Red)
Arm / Alarm Behaves in the same manner as the indicator.
4
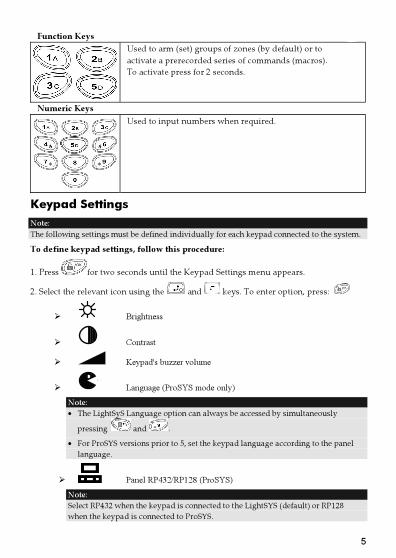
Keys Control Keys
In Normal Operation mode: Used for Away (Full setting).
In User Functions menu: Used to change data.
In Normal Operation mode: Used for Stay arming (Part Setting).
In User Functions menu: Used to change data.
Used to disarm (unset) the system after a user code is entered; / OK is used to terminate commands and confirm data to be stored.
Note:
The key is equivalent to the key on ProSYS keypads.
Used to scroll up a list or to move the cursor to the left ; � Provides the system status.
Used to scroll down a list or to move the cursor to the right.
Note:
The icon is equivalent to the icon on ProSYS
keypads.
In Normal Operation mode: Used to enter the User Functions menu.
In User Functions menu: Used to move back one step in the menu.
Emergency Keys
Pressing both keys simultaneously for at least two seconds activates a Fire alarm.
Pressing both keys simultaneously for at least two seconds activates an Emergency alarm.
Pressing both keys simultaneously for at least two seconds activates a Police (Panic) alarm.
5
Function Keys
Used to arm (set) groups of zones (by default) or to activate a prerecorded series of commands (macros). To activate press for 2 seconds.
Numeric Keys
Used to input numbers when required.
Keypad Settings
Note:
The following settings must be defined individually for each keypad connected to the system.
To define keypad settings, follow this procedure:
1. Press for two seconds until the Keypad Settings menu appears.
2. Select the relevant icon using the and keys. To enter option, press:
� Brightness
� Contrast
� Keypad's buzzer volume
� Language (ProSYS mode only)
Note:
• The LightSyS Language option can always be accessed by simultaneously
pressing and .
• For ProSYS versions prior to 5, set the keypad language according to the panel
language.
� Panel RP432/RP128 (ProSYS)
Note:
Select RP432 when the keypad is connected to the LightSYS (default) or RP128
when the keypad is connected to ProSYS.
6
3. Adjust settings with arrow keys. Confirm adjusted settings with .
4. Press to save the adjusted settings.
5. Press to exit the keypad settings menu.
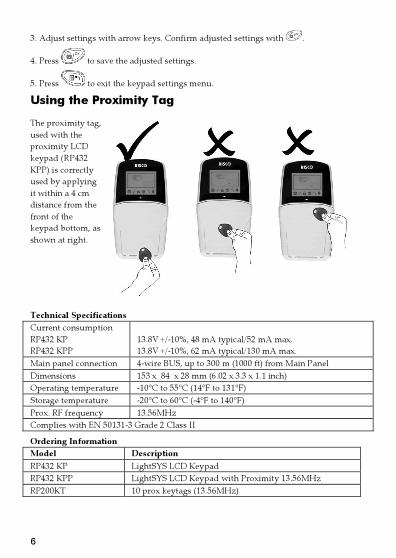
Using the Proximity Tag
The proximity tag, used with the proximity LCD keypad (RP432 KPP) is correctly used by applying it within a 4 cm distance from the front of the keypad bottom, as shown at right.
Technical Specifications
Current consumption RP432 KP RP432 KPP
13.8V +/-10%, 48 mA typical/52 mA max. 13.8V +/-10%, 62 mA typical/130 mA max.
Main panel connection 4-wire BUS, up to 300 m (1000 ft) from Main Panel Dimensions 153 x 84 x 28 mm (6.02 x 3.3 x 1.1 inch) Operating temperature -10°C to 55°C (14°F to 131°F) Storage temperature -20°C to 60°C (-4°F to 140°F)Prox. RF frequency 13.56MHz Complies with EN 50131-3 Grade 2 Class II
Ordering Information
Model Description
RP432 KP LightSYS LCD KeypadRP432 KPP LightSYS LCD Keypad with Proximity 13.56MHz RP200KT 10 prox keytags (13.56MHz)
7
Introduzione
La tastiera LightSYS LCD / LCD con circuito di Prossimità Integrato permette di compiere semplici operazioni e programmare le centrali LightSYS e ProSYS in modo facile ed intuitivo. Le seguenti istruzioni offrono una panoramica delle operazioni disponibili. Per informazioni dettagliate sulla programmazione del sistema fare riferimento ai manuali Tecnico e Utente della LightSYS o ProSYS.
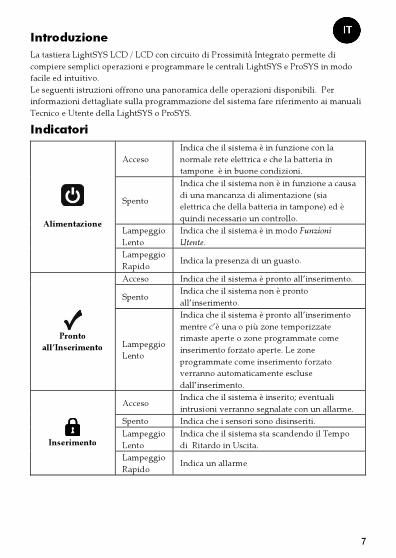
Indicatori
Alimentazione
Acceso Indica che il sistema è in funzione con la normale rete elettrica e che la batteria in tampone è in buone condizioni.
Spento
Indica che il sistema non è in funzione a causa di una mancanza di alimentazione (sia elettrica che della batteria in tampone) ed è quindi necessario un controllo.
Lampeggio Lento
Indica che il sistema è in modo Funzioni
Utente. Lampeggio Rapido
Indica la presenza di un guasto.
Pronto
all’Inserimento
Acceso Indica che il sistema è pronto all’inserimento.
Spento Indica che il sistema non è pronto all’inserimento.
Lampeggio Lento
Indica che il sistema è pronto all’inserimento mentre c’è una o più zone temporizzate rimaste aperte o zone programmate come inserimento forzato aperte. Le zone programmate come inserimento forzato verranno automaticamente escluse dall’inserimento.
Inserimento
Acceso Indica che il sistema è inserito; eventuali intrusioni verranno segnalate con un allarme.
Spento Indica che i sensori sono disinseriti. Lampeggio Lento
Indica che il sistema sta scandendo il Tempo di Ritardo in Uscita.
Lampeggio Rapido
Indica un allarme

8
Inserimento
Parziale /
Esclusione
Zona
Acceso
Indica che risulta esclusa almeno una zona, o che è stato selezionato il modo Inserimento Parziale
Nota:
L’icona è equivalente all’icona sulle altre tastier ProSYS.
Spento Indica che tutte le zone funzionano normalmente e il sistema è in modo Inserimento Totale.
Manomissione
Acceso Indica che un dispositivo collegato al sistema è stato manomesso
Spento Indica che tutte le zone funzionano normalmente.
Incendio
Acceso Indica che si sono verificati un allarme o un’emergenza incendio
Spento Indica che tutte le zone incendio funzionano correttamente.
Lampeggio Indica che è stato rilevato un problema nel circuito incendio ed è necessario un controllo.
LED (Rosso)
Inserimento Si comporta alla stessa maniera del led .
Tasti Tasti di Comando
In Modo di Funzionamento Normale: Attiva l’Inserimento Totale.
Nel Menù Funzioni Utente: Modifica i dati.
In Modo di Funzionamento Normale: Attiva l’Inserimento Parziale.
Nel Menù Funzioni Utente: Modifica i dati.
Disinserisce il sistema dopo l’inserimento del codice utente oppure termina i comandi e conferma i dati da memorizzare.
Nota:
Il tasto è equivalente al tasto sulle altre tastiere ProSYS.
9
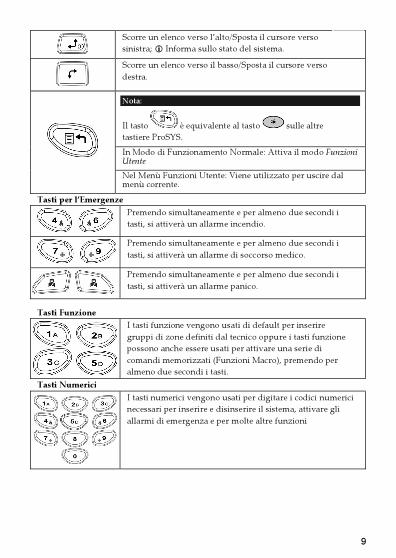
Scorre un elenco verso l’alto/Sposta il cursore verso sinistra; � Informa sullo stato del sistema.
Scorre un elenco verso il basso/Sposta il cursore verso destra.
Nota:
Il tasto è equivalente al tasto sulle altre tastiere ProSYS.
In Modo di Funzionamento Normale: Attiva il modo Funzioni
Utente
Nel Menù Funzioni Utente: Viene utilizzato per uscire dal menù corrente.
Tasti per l’Emergenze
Premendo simultaneamente e per almeno due secondi i tasti, si attiverà un allarme incendio.
Premendo simultaneamente e per almeno due secondi i tasti, si attiverà un allarme di soccorso medico.
Premendo simultaneamente e per almeno due secondi i tasti, si attiverà un allarme panico.
Tasti Funzione
I tasti funzione vengono usati di default per inserire gruppi di zone definiti dal tecnico oppure i tasti funzione possono anche essere usati per attivare una serie di comandi memorizzati (Funzioni Macro), premendo per almeno due secondi i tasti.
Tasti Numerici
I tasti numerici vengono usati per digitare i codici numerici necessari per inserire e disinserire il sistema, attivare gli allarmi di emergenza e per molte altre funzioni
10
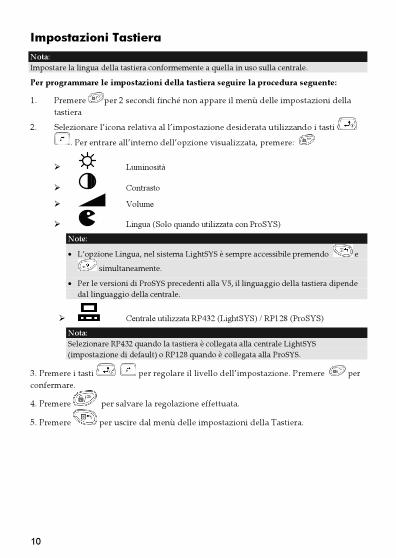
Impostazioni Tastiera
Nota:
Impostare la lingua della tastiera conformemente a quella in uso sulla centrale.
Per programmare le impostazioni della tastiera seguire la procedura seguente:
1. Premere per 2 secondi finché non appare il menù delle impostazioni della tastiera
2. Selezionare l’icona relativa al l’impostazione desiderata utilizzando i tasti
. Per entrare all’interno dell’opzione visualizzata, premere:
� Luminosità
� Contrasto
� Volume
� Lingua (Solo quando utilizzata con ProSYS)
Note:
• L’opzione Lingua, nel sistema LightSYS è sempre accessibile premendo e
simultaneamente.
• Per le versioni di ProSYS precedenti alla V5, il linguaggio della tastiera dipende
dal linguaggio della centrale.
� Centrale utilizzata RP432 (LightSYS) / RP128 (ProSYS)
Nota:
Selezionare RP432 quando la tastiera è collegata alla centrale LightSYS
(impostazione di default) o RP128 quando è collegata alla ProSYS.
3. Premere i tasti per regolare il livello dell’impostazione. Premere per confermare.
4. Premere per salvare la regolazione effettuata.
5. Premere per uscire dal menù delle impostazioni della Tastiera.
11
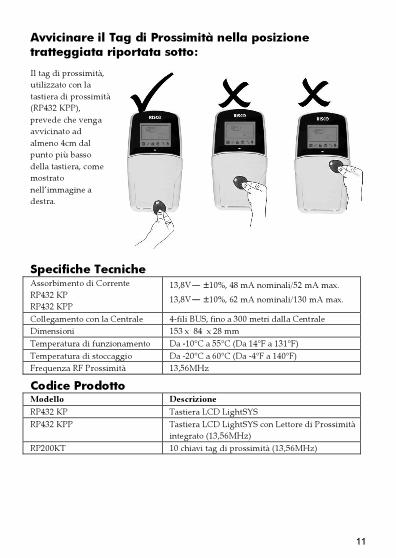
Avvicinare il Tag di Prossimità nella posizione tratteggiata riportata sotto:
Il tag di prossimità, utilizzato con la tastiera di prossimità (RP432 KPP), prevede che venga avvicinato ad almeno 4cm dal punto più basso della tastiera, come mostrato nell’immagine a destra.
Specifiche Tecniche Assorbimento di Corrente RP432 KP RP432 KPP
13,8V— ±10%, 48 mA nominali/52 mA max.
13,8V— ±10%, 62 mA nominali/130 mA max.
Collegamento con la Centrale 4-fili BUS, fino a 300 metri dalla Centrale
Dimensioni 153 x 84 x 28 mm Temperatura di funzionamento Da -10°C a 55°C (Da 14°F a 131°F) Temperatura di stoccaggio Da -20°C a 60°C (Da -4°F a 140°F) Frequenza RF Prossimità 13,56MHz
Codice Prodotto Modello Descrizione
RP432 KP Tastiera LCD LightSYS RP432 KPP Tastiera LCD LightSYS con Lettore di Prossimità
integrato (13,56MHz) RP200KT 10 chiavi tag di prossimità (13,56MHz)
12
Introducción
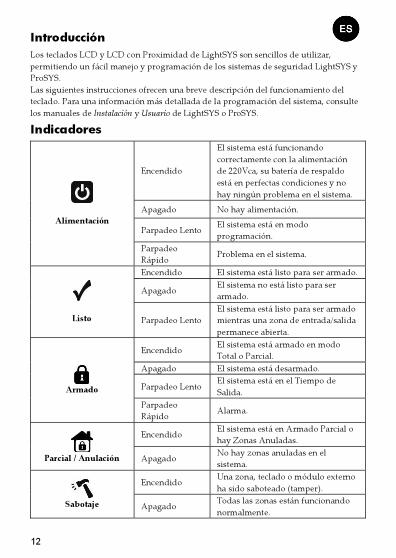
Los teclados LCD y LCD con Proximidad de LightSYS son sencillos de utilizar, permitiendo un fácil manejo y programación de los sistemas de seguridad LightSYS y ProSYS. Las siguientes instrucciones ofrecen una breve descripción del funcionamiento del teclado. Para una información más detallada de la programación del sistema, consulte los manuales de Instalación y Usuario de LightSYS o ProSYS.
Indicadores
Alimentación
Encendido
El sistema está funcionando correctamente con la alimentación de 220Vca, su batería de respaldo está en perfectas condiciones y no hay ningún problema en el sistema.
Apagado No hay alimentación.
Parpadeo Lento El sistema está en modo programación.
Parpadeo Rápido
Problema en el sistema.
Listo
Encendido El sistema está listo para ser armado.
Apagado El sistema no está listo para ser armado.
Parpadeo Lento El sistema está listo para ser armado mientras una zona de entrada/salida permanece abierta.
Armado
Encendido El sistema está armado en modo Total o Parcial.
Apagado El sistema está desarmado.
Parpadeo Lento El sistema está en el Tiempo de Salida.
Parpadeo Rápido
Alarma.
Parcial / Anulación
Encendido El sistema está en Armado Parcial o hay Zonas Anuladas.
Apagado No hay zonas anuladas en el sistema.
Sabotaje
Encendido Una zona, teclado o módulo externo ha sido saboteado (tamper).
Apagado Todas las zonas están funcionando normalmente.
13
Fuego
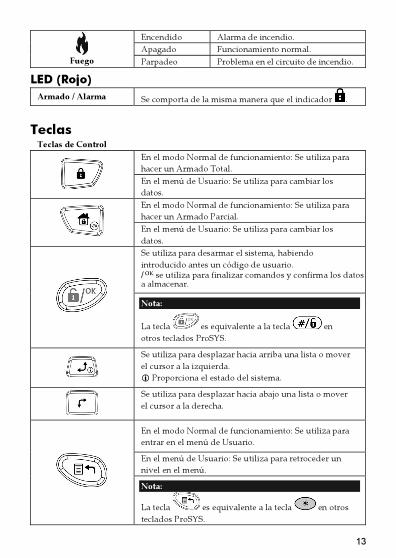
Encendido Alarma de incendio. Apagado Funcionamiento normal. Parpadeo Problema en el circuito de incendio.
LED (Rojo)
Armado / Alarma Se comporta de la misma manera que el indicador .
Teclas Teclas de Control
En el modo Normal de funcionamiento: Se utiliza para hacer un Armado Total. En el menú de Usuario: Se utiliza para cambiar los datos.
En el modo Normal de funcionamiento: Se utiliza para hacer un Armado Parcial. En el menú de Usuario: Se utiliza para cambiar los datos.
Se utiliza para desarmar el sistema, habiendo introducido antes un código de usuario. / OK se utiliza para finalizar comandos y confirma los datos a almacenar.
Nota:
La tecla es equivalente a la tecla en otros teclados ProSYS.
Se utiliza para desplazar hacia arriba una lista o mover el cursor a la izquierda. � Proporciona el estado del sistema.
Se utiliza para desplazar hacia abajo una lista o mover el cursor a la derecha.
En el modo Normal de funcionamiento: Se utiliza para entrar en el menú de Usuario.
En el menú de Usuario: Se utiliza para retroceder un nivel en el menú.
Nota:
La tecla es equivalente a la tecla en otros teclados ProSYS.
14
Teclas de Emergencia
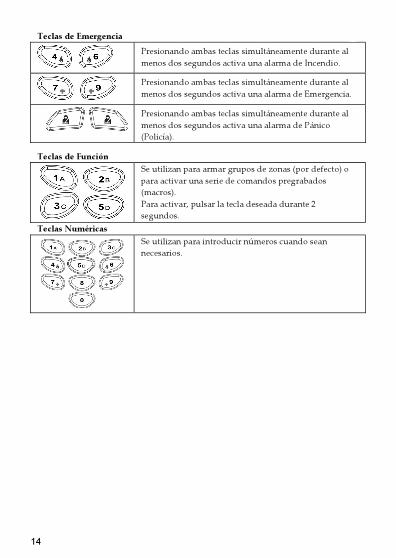
Presionando ambas teclas simultáneamente durante al menos dos segundos activa una alarma de Incendio.
Presionando ambas teclas simultáneamente durante al menos dos segundos activa una alarma de Emergencia.
Presionando ambas teclas simultáneamente durante al menos dos segundos activa una alarma de Pánico (Policía).
Teclas de Función
Se utilizan para armar grupos de zonas (por defecto) o para activar una serie de comandos pregrabados (macros). Para activar, pulsar la tecla deseada durante 2 segundos.
Teclas Numéricas
Se utilizan para introducir números cuando sean necesarios.
15
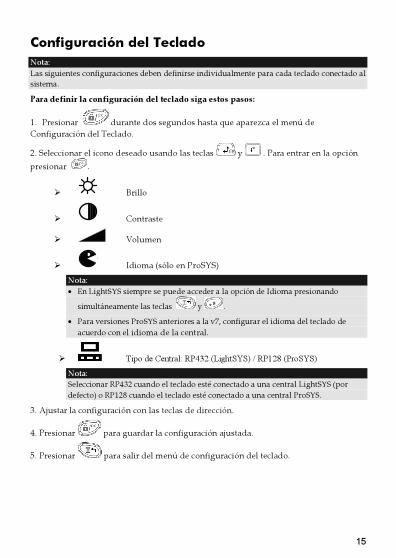
Configuración del Teclado
Nota:
Las siguientes configuraciones deben definirse individualmente para cada teclado conectado al
sistema.
Para definir la configuración del teclado siga estos pasos:
1. Presionar durante dos segundos hasta que aparezca el menú de Configuración del Teclado.
2. Seleccionar el icono deseado usando las teclas y . Para entrar en la opción presionar .
� Brillo
� Contraste
� Volumen
� Idioma (sólo en ProSYS)
Nota:
• En LightSYS siempre se puede acceder a la opción de Idioma presionando
simultáneamente las teclas y .
• Para versiones ProSYS anteriores a la v7, configurar el idioma del teclado de
acuerdo con el idioma de la central.
� Tipo de Central: RP432 (LightSYS) / RP128 (ProSYS)
Nota:
Seleccionar RP432 cuando el teclado esté conectado a una central LightSYS (por
defecto) o RP128 cuando el teclado esté conectado a una central ProSYS.
3. Ajustar la configuración con las teclas de dirección.
4. Presionar para guardar la configuración ajustada.
5. Presionar para salir del menú de configuración del teclado.
16
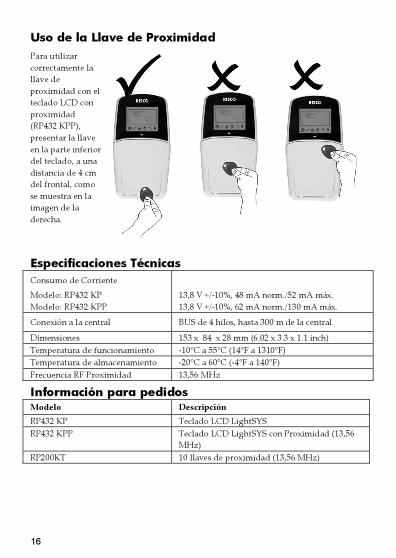
Uso de la Llave de Proximidad
Para utilizar correctamente la llave de proximidad con el teclado LCD con proximidad (RP432 KPP), presentar la llave en la parte inferior del teclado, a una distancia de 4 cm del frontal, como se muestra en la imagen de la derecha.
Especificaciones Técnicas
Consumo de Corriente
Modelo: RP432 KP Modelo: RP432 KPP
13,8 V +/-10%, 48 mA norm./52 mA máx. 13,8 V +/-10%, 62 mA norm./130 mA máx.
Conexión a la central BUS de 4 hilos, hasta 300 m de la central
Dimensiones 153 x 84 x 28 mm (6.02 x 3.3 x 1.1 inch)Temperatura de funcionamiento -10°C a 55°C (14°F a 1310°F) Temperatura de almacenamiento -20°C a 60°C (-4°F a 140°F) Frecuencia RF Proximidad 13,56 MHz
Información para pedidos
Modelo Descripción
RP432 KP Teclado LCD LightSYSRP432 KPP Teclado LCD LightSYS con Proximidad (13,56
MHz) RP200KT 10 llaves de proximidad (13,56 MHz)
17
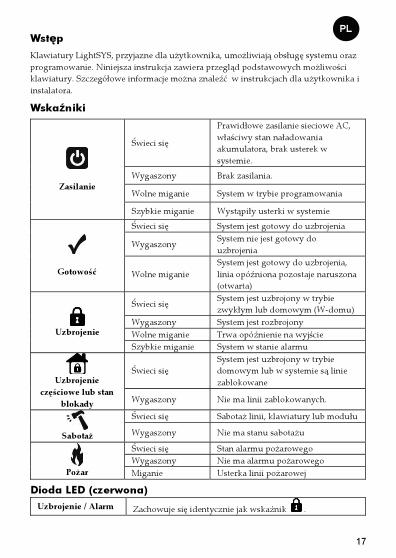
Wstęp
Klawiatury LightSYS, przyjazne dla użytkownika, umożliwiają obsługę systemu oraz programowanie. Niniejsza instrukcja zawiera przegląd podstawowych możliwości klawiatury. Szczegółowe informacje można znaleźć w instrukcjach dla użytkownika i instalatora.
Wskaźniki
Zasilanie
Świeci się
Prawidłowe zasilanie sieciowe AC, właściwy stan naładowania akumulatora, brak usterek w systemie.
Wygaszony Brak zasilania.
Wolne miganie System w trybie programowania
Szybkie miganie Wystąpiły usterki w systemie
Gotowość
Świeci się System jest gotowy do uzbrojenia
Wygaszony System nie jest gotowy do uzbrojenia
Wolne miganie System jest gotowy do uzbrojenia, linia opóźniona pozostaje naruszona (otwarta)
Uzbrojenie
Świeci się System jest uzbrojony w trybie zwykłym lub domowym (W-domu)
Wygaszony System jest rozbrojony Wolne miganie Trwa opóźnienie na wyjście Szybkie miganie System w stanie alarmu
Uzbrojenie
częściowe lub stan
blokady
Świeci się System jest uzbrojony w trybie domowym lub w systemie są linie zablokowane
Wygaszony Nie ma linii zablokowanych.
Sabotaż
Świeci się Sabotaż linii, klawiatury lub modułu
Wygaszony Nie ma stanu sabotażu
Pożar
Świeci się Stan alarmu pożarowego Wygaszony Nie ma alarmu pożarowego Miganie Usterka linii pożarowej
Dioda LED (czerwona)
Uzbrojenie / Alarm Zachowuje się identycznie jak wskaźnik .
PL
18
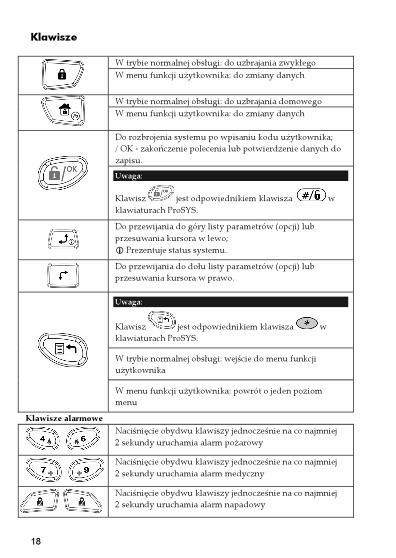
Klawisze
W trybie normalnej obsługi: do uzbrajania zwykłego W menu funkcji użytkownika: do zmiany danych
W trybie normalnej obsługi: do uzbrajania domowego W menu funkcji użytkownika: do zmiany danych
Do rozbrojenia systemu po wpisaniu kodu użytkownika; / OK - zakończenie polecenia lub potwierdzenie danych do zapisu.
Uwaga:
Klawisz jest odpowiednikiem klawisza w klawiaturach ProSYS.
Do przewijania do góry listy parametrów (opcji) lub przesuwania kursora w lewo; � Prezentuje status systemu.
Do przewijania do dołu listy parametrów (opcji) lub przesuwania kursora w prawo.
Uwaga:
Klawisz jest odpowiednikiem klawisza w klawiaturach ProSYS.
W trybie normalnej obsługi: wejście do menu funkcji użytkownika
W menu funkcji użytkownika: powrót o jeden poziom menu
Klawisze alarmowe
Naciśnięcie obydwu klawiszy jednocześnie na co najmniej 2 sekundy uruchamia alarm pożarowy
Naciśnięcie obydwu klawiszy jednocześnie na co najmniej 2 sekundy uruchamia alarm medyczny
Naciśnięcie obydwu klawiszy jednocześnie na co najmniej 2 sekundy uruchamia alarm napadowy
19
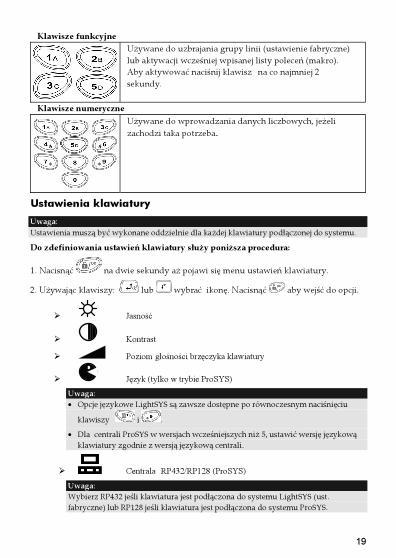
Klawisze funkcyjne
Używane do uzbrajania grupy linii (ustawienie fabryczne) lub aktywacji wcześniej wpisanej listy poleceń (makro). Aby aktywować naciśnij klawisz na co najmniej 2 sekundy.
Klawisze numeryczne
Używane do wprowadzania danych liczbowych, jeżeli zachodzi taka potrzeba.
Ustawienia klawiatury
Uwaga:
Ustawienia muszą być wykonane oddzielnie dla każdej klawiatury podłączonej do systemu.
Do zdefiniowania ustawień klawiatury służy poniższa procedura:
1. Nacisnąć na dwie sekundy aż pojawi się menu ustawień klawiatury.
2. Używając klawiszy: lub wybrać ikonę. Nacisnąć aby wejść do opcji.
� Jasność
� Kontrast
� Poziom głośności brzęczyka klawiatury
� Język (tylko w trybie ProSYS)
Uwaga:
• Opcje językowe LightSYS są zawsze dostępne po równoczesnym naciśnięciu
klawiszy i .
• Dla centrali ProSYS w wersjach wcześniejszych niż 5, ustawić wersję językową
klawiatury zgodnie z wersją językową centrali.
� Centrala RP432/RP128 (ProSYS)
Uwaga:
Wybierz RP432 jeśli klawiatura jest podłączona do systemu LightSYS (ust.
fabryczne) lub RP128 jeśli klawiatura jest podłączona do systemu ProSYS.
20
3. Używając klawiszy ze strzałkami ustalić właściwą wartość parametru. Zatwierdzić wybór klawiszem .
4. Nacisnąć aby zapisać ustalone ustawienia.
5. Nacisnąć aby wyjść z menu ustawień klawiatury.
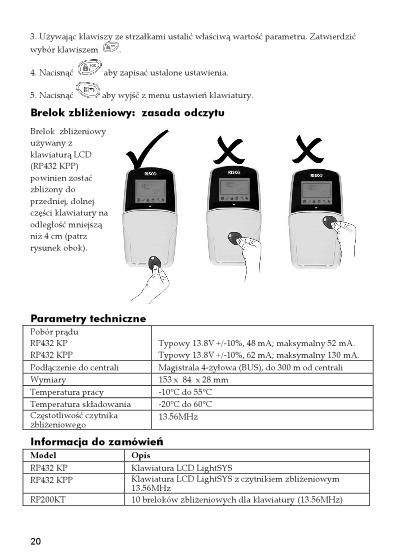
Brelok zbliżeniowy: zasada odczytu
Brelok zbliżeniowy używany z klawiaturą LCD (RP432 KPP) powinien zostać zbliżony do przedniej, dolnej części klawiatury na odległość mniejszą niż 4 cm (patrz rysunek obok).
Parametry techniczne Pobór prądu RP432 KP RP432 KPP
Typowy 13.8V +/-10%, 48 mA; maksymalny 52 mA. Typowy 13.8V +/-10%, 62 mA; maksymalny 130 mA.
Podłączenie do centrali Magistrala 4-żyłowa (BUS), do 300 m od centrali Wymiary 153 x 84 x 28 mm Temperatura pracy -10°C do 55°C Temperatura składowania -20°C do 60°C Częstotliwość czytnika zbliżeniowego
13.56MHz
Informacja do zamówień Model Opis
RP432 KP Klawiatura LCD LightSYSRP432 KPP Klawiatura LCD LightSYS z czytnikiem zbliżeniowym
13.56MHzRP200KT 10 breloków zbliżeniowych dla klawiatury (13.56MHz)
21
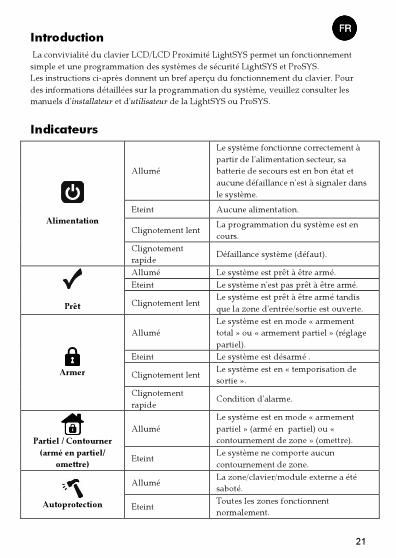
Introduction
La convivialité du clavier LCD/LCD Proximité LightSYS permet un fonctionnement simple et une programmation des systèmes de sécurité LightSYS et ProSYS. Les instructions ci-après donnent un bref aperçu du fonctionnement du clavier. Pour des informations détaillées sur la programmation du système, veuillez consulter les manuels d'installateur et d'utilisateur de la LightSYS ou ProSYS.
Indicateurs
Alimentation
Allumé
Le système fonctionne correctement à partir de l'alimentation secteur, sa batterie de secours est en bon état et aucune défaillance n'est à signaler dans le système.
Eteint Aucune alimentation.
Clignotement lent La programmation du système est en cours.
Clignotement rapide
Défaillance système (défaut).
Prêt
Allumé Le système est prêt à être armé. Eteint Le système n'est pas prêt à être armé.
Clignotement lent Le système est prêt à être armé tandis que la zone d'entrée/sortie est ouverte.
Armer
Allumé Le système est en mode « armement total » ou « armement partiel » (réglage partiel).
Eteint Le système est désarmé .
Clignotement lent Le système est en « temporisation de sortie ».
Clignotement rapide
Condition d'alarme.
Partiel / Contourner
(armé en partiel/
omettre)
Allumé Le système est en mode « armement partiel » (armé en partiel) ou « contournement de zone » (omettre).
Eteint Le système ne comporte aucun contournement de zone.
Autoprotection
Allumé La zone/clavier/module externe a été saboté.
Eteint Toutes les zones fonctionnent normalement.
22
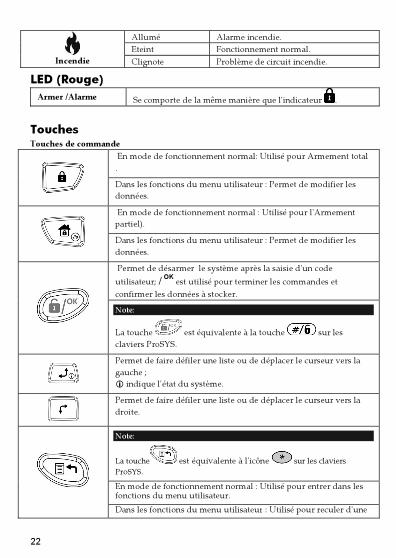
Incendie
Allumé Alarme incendie. Eteint Fonctionnement normal. Clignote Problème de circuit incendie.
LED (Rouge)
Armer /Alarme Se comporte de la même manière que l'indicateur .
Touches Touches de commande
En mode de fonctionnement normal: Utilisé pour Armement total .
Dans les fonctions du menu utilisateur : Permet de modifier les données.
En mode de fonctionnement normal : Utilisé pour l'Armement partiel).
Dans les fonctions du menu utilisateur : Permet de modifier les données.
Permet de désarmer le système après la saisie d'un code utilisateur; /
OK est utilisé pour terminer les commandes et
confirmer les données à stocker.
Note:
La touche est équivalente à la touche sur les claviers ProSYS.
Permet de faire défiler une liste ou de déplacer le curseur vers la gauche ; � indique l'état du système.
Permet de faire défiler une liste ou de déplacer le curseur vers la droite.
Note:
La touche est équivalente à l'icône sur les claviers
ProSYS.
En mode de fonctionnement normal : Utilisé pour entrer dans les fonctions du menu utilisateur.
Dans les fonctions du menu utilisateur : Utilisé pour reculer d'une
23
étape dans le menu.
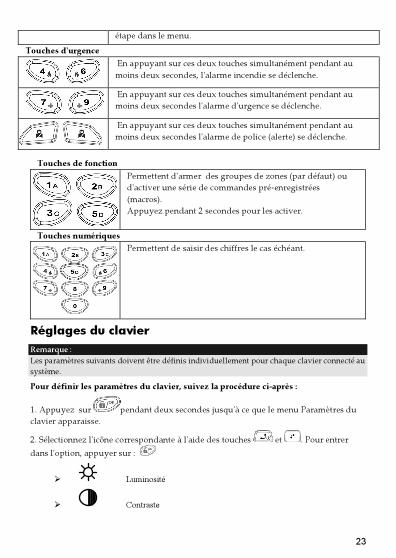
Touches d'urgence
En appuyant sur ces deux touches simultanément pendant au moins deux secondes, l'alarme incendie se déclenche.
En appuyant sur ces deux touches simultanément pendant au moins deux secondes l'alarme d'urgence se déclenche.
En appuyant sur ces deux touches simultanément pendant au moins deux secondes l'alarme de police (alerte) se déclenche.
Touches de fonction
Permettent d'armer des groupes de zones (par défaut) ou d'activer une série de commandes pré-enregistrées (macros). Appuyez pendant 2 secondes pour les activer.
Touches numériques
Permettent de saisir des chiffres le cas échéant.
Réglages du clavier
Remarque :
Les paramètres suivants doivent être définis individuellement pour chaque clavier connecté au
système.
Pour définir les paramètres du clavier, suivez la procédure ci-après :
1. Appuyez sur pendant deux secondes jusqu'à ce que le menu Paramètres du clavier apparaisse.
2. Sélectionnez l'icône correspondante à l'aide des touches et . Pour entrer dans l'option, appuyer sur :
� Luminosité
� Contraste
24
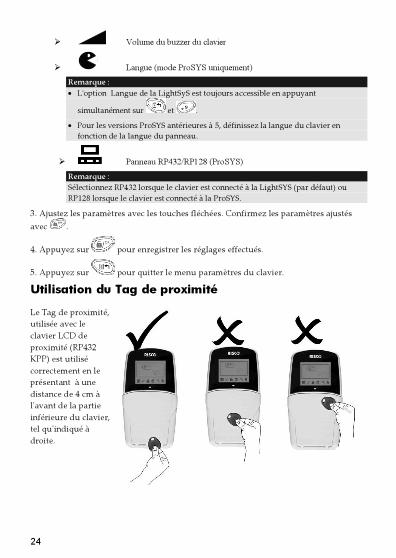
� Volume du buzzer du clavier
� Langue (mode ProSYS uniquement)
Remarque :
• L'option Langue de la LightSyS est toujours accessible en appuyant
simultanément sur et .
• Pour les versions ProSYS antérieures à 5, définissez la langue du clavier en
fonction de la langue du panneau.
� Panneau RP432/RP128 (ProSYS)
Remarque :
Sélectionnez RP432 lorsque le clavier est connecté à la LightSYS (par défaut) ou
RP128 lorsque le clavier est connecté à la ProSYS.
3. Ajustez les paramètres avec les touches fléchées. Confirmez les paramètres ajustés avec .
4. Appuyez sur pour enregistrer les réglages effectués.
5. Appuyez sur pour quitter le menu paramètres du clavier.
Utilisation du Tag de proximité
Le Tag de proximité, utilisée avec le clavier LCD de proximité (RP432 KPP) est utilisé correctement en le présentant à une distance de 4 cm à l'avant de la partie inférieure du clavier, tel qu'indiqué à droite.
25
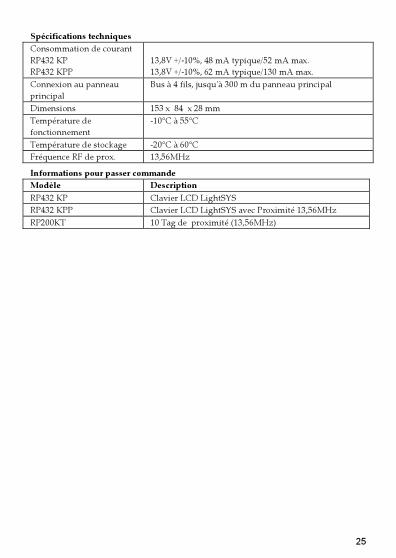
Spécifications techniques
Consommation de courant RP432 KP RP432 KPP
13,8V +/-10%, 48 mA typique/52 mA max. 13,8V +/-10%, 62 mA typique/130 mA max.
Connexion au panneau principal
Bus à 4 fils, jusqu'à 300 m du panneau principal
Dimensions 153 x 84 x 28 mm Température de fonctionnement
-10°C à 55°C
Température de stockage -20°C à 60°C Fréquence RF de prox. 13,56MHz
Informations pour passer commande
Modèle Description
RP432 KP Clavier LCD LightSYS RP432 KPP Clavier LCD LightSYS avec Proximité 13,56MHz RP200KT 10 Tag de proximité (13,56MHz)
26
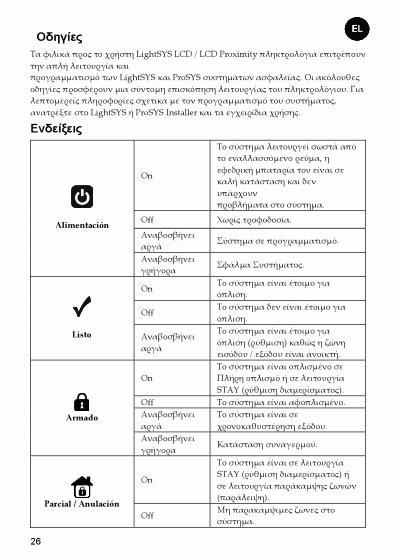
Οδηγίες
Τα φιλικά προς το χρήστη LightSYS LCD / LCD Proximity πληκτρολόγια επιτρέπουν την απλή λειτουργία και προγραμματισμό των LightSYS και ProSYS συστημάτων ασφαλείας. Οι ακόλουθες οδηγίες προσφέρουν μια σύντομη επισκόπηση λειτουργίας του πληκτρολόγιου. Για λεπτομερείς πληροφορίες σχετικά με τον προγραμματισμό του συστήματος, ανατρέξτε στο LightSYS ή ProSYS Installer και τα εγχειρίδια χρήσης.
Ενδείξεις
Alimentación
On
Το σύστημα λειτουργεί σωστά από το εναλλασσόμενο ρεύμα, η εφεδρική μπαταρία του είναι σε καλή κατάσταση και δεν υπάρχουν προβλήματα στο σύστημα.
Off Χωρίς τροφοδοσία.
Αναβοσβήνει αργά
Σύστημα σε προγραμματισμό.
Αναβοσβήνει γρήγορα
Σφάλμα Συστήματος.
Listo
On Το σύστημα είναι έτοιμο για όπλιση.
Off Το σύστημα δεν είναι έτοιμο για όπλιση.
Αναβοσβήνει αργά
Το σύστημα είναι έτοιμο για όπλιση (ρύθμιση) καθώς η ζώνη εισόδου / εξόδου είναι ανοικτή.
Armado
On Το σύστημα είναι οπλισμένο σε Πλήρη οπλισμό ή σε λειτουργία STAY (ρύθμιση διαμερίσματος).
Off Το σύστημα είναι αφοπλισμένο. Αναβοσβήνει αργά
Το σύστημα είναι σε χρονοκαθυστέρηση εξόδου.
Αναβοσβήνει γρήγορα
Κατάσταση συναγερμού.
Parcial / Anulación
On
Το σύστημα είναι σε λειτουργία STAY (ρύθμιση διαμερίσματος) ή σε λειτουργία παράκαμψης ζωνών (παράλειψη).
Off Μη παρακάμψιμες ζώνες στο σύστημα.
27
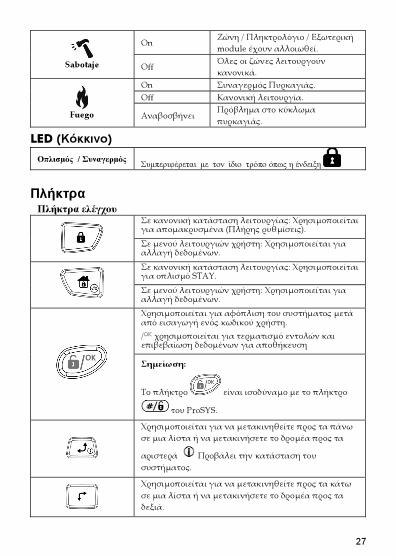
Sabotaje
On Ζώνη / Πληκτρολόγιο / Εξωτερική module έχουν αλλοιωθεί.
Off Όλες οι ζώνες λειτουργούν κανονικά.
Fuego
On Συναγερμός Πυρκαγιάς. Off Κανονική λειτουργία.
Αναβοσβήνει Πρόβλημα στο κύκλωμα πυρκαγιάς.
LED (Κόκκινο)
Οπλισμός / Συναγερμός Συμπεριφέρεται με τον ίδιο τρόπο όπως η ένδειξη
Πλήκτρα Πλήκτρα ελέγχου
Σε κανονική κατάσταση λειτουργίας: Χρησιμοποιείται για απομακρυσμένα (Πλήρης ρυθμίσεις).
Σε μενού λειτουργιών χρήστη: Χρησιμοποιείται για αλλαγή δεδομένων.
Σε κανονική κατάσταση λειτουργίας: Χρησιμοποιείται για οπλισμό STAY.
Σε μενού λειτουργιών χρήστη: Χρησιμοποιείται για αλλαγή δεδομένων.
Χρησιμοποιείται για αφόπλιση του συστήματος μετά από εισαγωγή ενός κωδικού χρήστη. /ΟΚ χρησιμοποιείται για τερματισμό εντολών και επιβεβαίωση δεδομένων για αποθήκευση
Σημείωση:
Το πλήκτρο είναι ισοδύναμο με το πλήκτρο
του ProSYS.
Χρησιμοποιείται για να μετακινηθείτε προς τα πάνω σε μια λίστα ή να μετακινήσετε το δρομέα προς τα
αριστερά Προβάλει την κατάσταση του συστήματος.
Χρησιμοποιείται για να μετακινηθείτε προς τα κάτω σε μια λίστα ή να μετακινήσετε το δρομέα προς τα δεξιά.
28
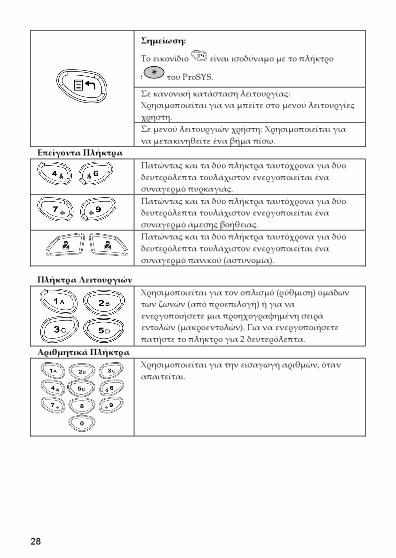
Σημείωση:
Το εικονίδιο είναι ισοδύναμο με το πλήκτρο
του ProSYS.
Σε κανονική κατάσταση λειτουργίας: Χρησιμοποιείται για να μπείτε στο μενού λειτουργίες χρήστη. Σε μενού λειτουργιών χρήστη: Χρησιμοποιείται για να μετακινηθείτε ένα βήμα πίσω.
Επείγοντα Πλήκτρα
Πατώντας και τα δύο πλήκτρα ταυτόχρονα για δύο δευτερόλεπτα τουλάχιστον ενεργοποιείται ένα συναγερμό πυρκαγιάς.
Πατώντας και τα δύο πλήκτρα ταυτόχρονα για δύο δευτερόλεπτα τουλάχιστον ενεργοποιείται ένα συναγερμό άμεσης βοήθειας.
Πατώντας και τα δύο πλήκτρα ταυτόχρονα για δύο δευτερόλεπτα τουλάχιστον ενεργοποιείται ένα συναγερμό πανικού (αστυνομία).
Πλήκτρα Λειτουργιών
Χρησιμοποιείται για τον οπλισμό (ρύθμιση) ομάδων των ζωνών (από προεπιλογή) ή για να ενεργοποιήσετε μια προηχογραφημένη σειρά εντολών (μακροεντολών). Για να ενεργοποιήσετε πατήστε το πλήκτρο για 2 δευτερόλεπτα.
Αριθμητικά Πλήκτρα
Χρησιμοποιείται για την εισαγωγή αριθμών, όταν απαιτείται.
29
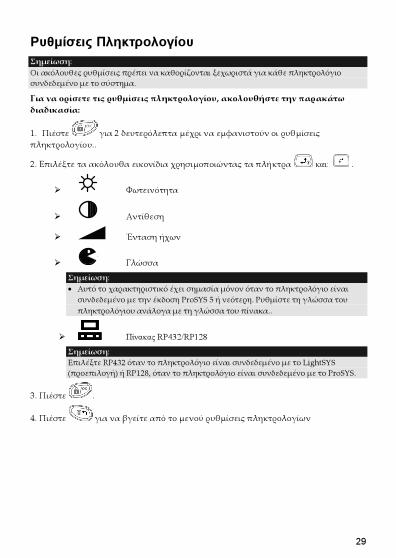
Ρυθμίσεις Πληκτρολογίου
Σημείωση:
Οι ακόλουθες ρυθμίσεις πρέπει να καθορίζονται ξεχωριστά για κάθε πληκτρολόγιο
συνδεδεμένο με το σύστημα.
Για να ορίσετε τις ρυθμίσεις πληκτρολογίου, ακολουθήστε την παρακάτω
διαδικασία:
1. Πιέστε για 2 δευτερόλεπτα μέχρι να εμφανιστούν οι ρυθμίσεις πληκτρολογίου..
2. Επιλέξτε τα ακόλουθα εικονίδια χρησιμοποιώντας τα πλήκτρα και: .
� Φωτεινότητα
� Αντίθεση
� Ένταση ήχων
� Γλώσσα
Σημείωση:
• Αυτό το χαρακτηριστικό έχει σημασία μόνον όταν το πληκτρολόγιο είναι
συνδεδεμένο με την έκδοση ProSYS 5 ή νεότερη. Ρυθμίστε τη γλώσσα του
πληκτρολόγιου ανάλογα με τη γλώσσα του πίνακα..
� Πίνακας RP432/RP128
Σημείωση:
Επιλέξτε RP432 όταν το πληκτρολόγιο είναι συνδεδεμένο με το LightSYS
(προεπιλογή) ή RP128, όταν το πληκτρολόγιο είναι συνδεδεμένο με το ProSYS.
3. Πιέστε .
4. Πιέστε για να βγείτε από το μενού ρυθμίσεις πληκτρολογίων
30
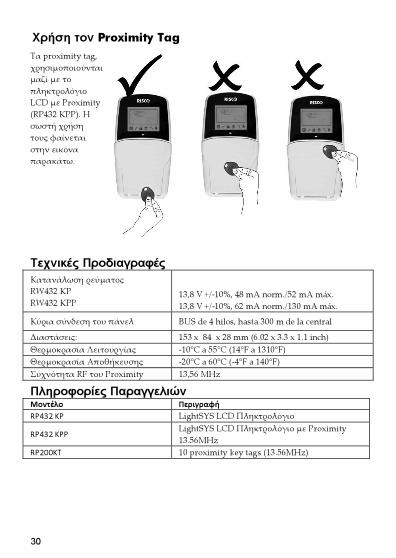
Χρήση τον Proximity Tag
Τα proximity tag, χρησιμοποιούνται μαζί με το πληκτρολόγιο LCD με Proximity (RP432 KPP). Η σωστή χρήση τους φαίνεται στην εικόνα παρακάτω.
Τεχνικές Προδιαγραφές
Κατανάλωση ρεύματος RW432 KP RW432 KPP
13,8 V +/-10%, 48 mA norm./52 mA máx. 13,8 V +/-10%, 62 mA norm./130 mA máx.
Κύρια σύνδεση του πάνελ BUS de 4 hilos, hasta 300 m de la central
Διαστάσεις: 153 x 84 x 28 mm (6.02 x 3.3 x 1.1 inch) Θερμοκρασία Λειτουργίας -10°C a 55°C (14°F a 1310°F) Θερμοκρασία Αποθήκευσης -20°C a 60°C (-4°F a 140°F) Συχνότητα RF του Proximity 13,56 MHz
Πληροφορίες Παραγγελιών
Μοντέλο Περιγραφή
RP432 KP LightSYS LCD Πληκτρολόγιο
RP432 KPP LightSYS LCD Πληκτρολόγιο με Proximity 13.56MHz
RP200KT 10 proximity key tags (13.56MHz)
31
FCC Note
This device complies with Part 15 of the FCC Rules. Operation is subject to the following two conditions:
1. This device may not cause harmful interference and
2. This device must accept any interference received, including interference that may cause undesired operation.
FCC ID: JE4RP432KPP
This equipment has been tested and found to comply with the limits for a Class B digital device, pursuant to Part15 of the FCC
rules. These limits are designed to provide reasonable protection against harmful interference in a residential installation.
This equipment generates uses and can radiate radio frequency energy and, if not installed and used in accordance with the
instructions, may cause harmful interference to radio communications.
However, there is no guarantee that interference will not occur in a particular installation. If this equipment does cause harmful
interference to radio or television reception, which can be determined by turning the equipment off and on, the user is encouraged
to try to correct the interference by one or more of the following measures:
a. Reorient or relocate the receiving antenna.
b. Increase the separation between the equipment and receiver.
c. Connect the equipment to an outlet on a circuit different from that to which the receiver is connected.
d. Consult the dealer or an experienced radio/TV technician.
FCC Warning
The manufacturer is not responsible for any radio or TV interference caused by unauthorized modifications to this equipment.
Such modifications could void the user's authority to operate the equipment.
RTTE Compliance Statement Hereby, RISCO Group declares that this equipment is in compliance with the essential requirements and
other relevant provisions of Directive 1999/5/EC. For the EC Declaration of Conformity please refer to our
website: www.riscogroup.com.
RISCO Group Limited Warranty RISCO Group and its subsidiaries and affiliates ("Seller") warrants its products to be free from defects in materials and
workmanship under normal use for 24 months from the date of production. Because Seller does not install or connect the product
and because the product may be used in conjunction with products not manufactured by the Seller, Seller cannot guarantee the
performance of the security system which uses this product. Seller's obligation and liability under this warranty is expressly
limited to repairing and replacing, at Seller's option, within a reasonable time after the date of delivery, any product not meeting
the specifications. Seller makes no other warranty, expressed or implied, and makes no warranty of merchantability or of fitness
for any particular purpose.
In no case shall seller be liable for any consequential or incidental damages for breach of this or any other warranty, expressed or
implied, or upon any other basis of liability whatsoever.
Seller's obligation under this warranty shall not include any transportation charges or costs of installation or any liability for direct,
indirect, or consequential damages or delay.
Seller does not represent that its product may not be compromised or circumvented; that the product will prevent any personal
injury or property loss by burglary, robbery, fire or otherwise; or that the product will in all cases provide adequate warning or
protection.
Seller, in no event shall be liable for any direct or indirect damages or any other losses occurred due to any type of tampering,
whether intentional or unintentional such as masking, painting or spraying on the lenses, mirrors or any other part of the detector.
Buyer understands that a properly installed and maintained alarm may only reduce the risk of burglary, robbery or fire without
warning, but is not insurance or a guaranty that such event will not occur or that there will be no personal injury or property loss
as a result thereof.
Consequently seller shall have no liability for any personal injury, property damage or loss based on a claim that the product fails
to give warning. However, if seller is held liable, whether directly or indirectly, for any loss or damage arising under this limited
warranty or otherwise, regardless of cause or origin, seller's maximum liability shall not exceed the purchase price of the product,
which shall be complete and exclusive remedy against seller.
No employee or representative of Seller is authorized to change this warranty in any way or grant any other warranty.
WARNING: This product should be tested at least once a week.

32
Contacting RISCO Group
RISCO Group is committed to customer service and product support. You can contact us through our website www.riscogroup.com or as follows:
United Kingdom
Tel: +44-(0)-161-655-5500
E-mail: [email protected]
Brazil
Tel: +55-11-3661-8767 E-mail: [email protected]
Italy Tel: +39-02-66590054
E-mail: [email protected]
China (Shanghai)
Tel: +86-21-52-39-0066 E-mail: [email protected]
Spain Tel: +34-91-490-2133
E-mail: [email protected]
China (Shenzhen)
Tel: +86-755-82789285 E-mail: [email protected]
France Tel: +33-164-73-28-50
E-mail: [email protected]
Poland
Tel: +48-22-500-28-40 E-mail: [email protected]
Belgium (Benelux)
Tel: +32-2522-7622
E-mail: [email protected]
Israel
Tel: +972-3-963-7777
E-mail: [email protected]
USA Tel: +1-631-719-4400 E-mail: [email protected]
RISCO product was purchased from All rights reserved. No part of this document may be reproduced in any form without prior written permission from the publisher.
© RISCO Group 05/12 5IN1425 E