Embed Size (px)
Citation preview

Table of Contents
Learning Administration: Home Page Overview ............................................................................................................1
Learning Administration: Users Page Overview ............................................................................................................3
Learning Administration: Learning Page Overview ........................................................................................................4
Learning Administration: Content Page Overview..........................................................................................................7
Learning Administration: System Admin Overview ........................................................................................................8
Searching and Viewing Employee Records ..................................................................................................................9
Create an Assignment Profile .................................................................................................................................... 12
Utilizing the Users-Tools Menu .................................................................................................................................. 19
Create a Group......................................................................................................................................................... 25
Import Content: Add New Content .............................................................................................................................. 28
Import Content: Add Content for an Existing Item........................................................................................................ 31
Import Content: Replace Content for an Existing Item ................................................................................................. 34
Content: Printed Exam Templates.............................................................................................................................. 37
Adding Learning Documents...................................................................................................................................... 38
Create an Item.......................................................................................................................................................... 41
Create an Online Course........................................................................................................................................... 48
Create a New Scheduled Offering .............................................................................................................................. 54
Create a Blended Course .......................................................................................................................................... 61
Create an ‘Other Item’ ............................................................................................................................................... 68
Adding Assessments ................................................................................................................................................ 71
Create a Class.......................................................................................................................................................... 77
Create a Group Instance ........................................................................................................................................... 80
Create a Catalog ...................................................................................................................................................... 82
Create a Program ..................................................................................................................................................... 87
Create a Curricula..................................................................................................................................................... 91
Create Requirements ................................................................................................................................................ 96
Create Questionnaire Surveys ................................................................................................................................. 100
Adding External Links ............................................................................................................................................. 104
Adding Collections .................................................................................................................................................. 107
Create Tasks .......................................................................................................................................................... 110
Learning Tools Menu .............................................................................................................................................. 113
Reports Overview ................................................................................................................................................... 117
LEARNING MANAGEMENT SYSTEM (LMS) AGENCY ADMINISTRATOR USER GUIDE
Learning Management System: Learning Administrator User Guide
Department of Management Services 1
Learning Administration: Home Page Overview
Introduction
This user guide contains information about key features of the People First Learning Management System (LMS), Learning Administration. The below section provides an introduction and overview on the key functionality within the Home Page of the Learning
Administration page.
Getting Started
Follow the path to access the Learning Administration Home Page.
Your path is…
People First Login page > Manager or Employee Landing page > Talent Management tile >Talent Management Home page > Primary navigation dropdown menu> Learning
Administration
Home Page
Overview
Home icon appears in the header of each page and, if
selected, returns you to the Talent Management Home page.
Account navigation dropdown menu appears in the header of each page and displays the logged in user’s
name and People First Login ID. Selecting the dropdown menu, allows you to log out.
Home button appears in the top menu section of each page. If selected, returns you to the Learning Administration
home page, where you can access your administrator Quick
Links for administrator tools you use f requently.
Learning Management System: Learning Administrator User Guide
Department of Management Services 2
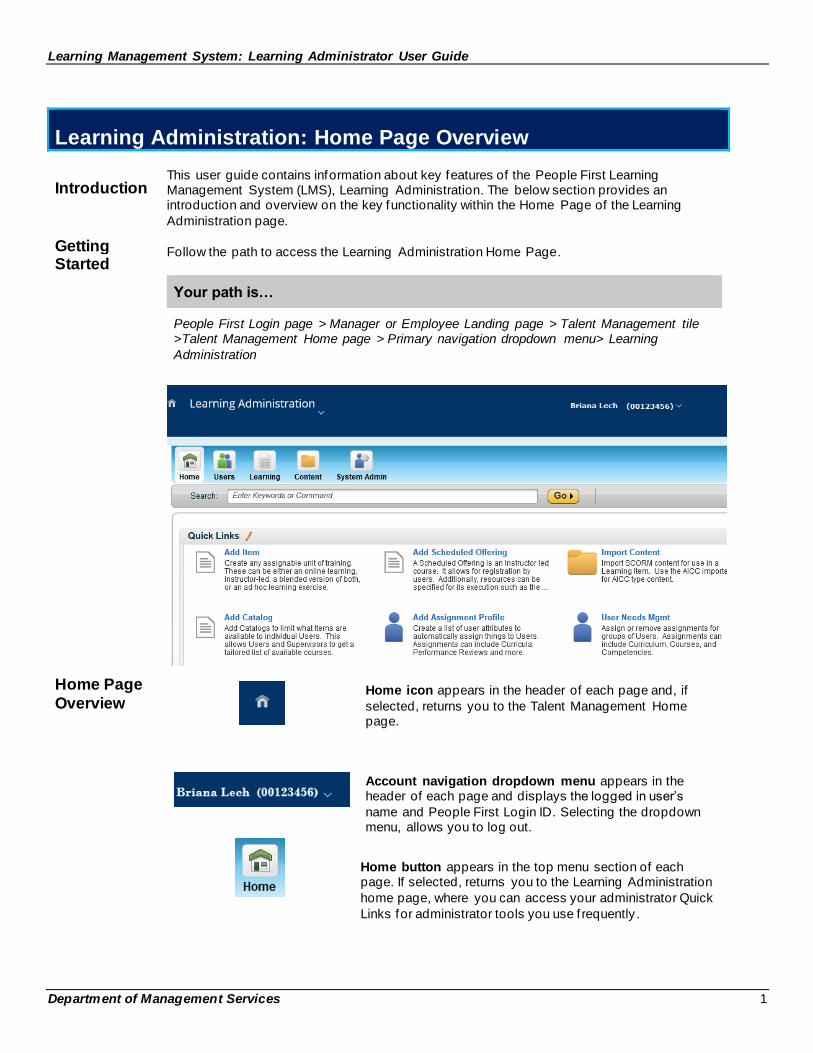
Users button appears in the top menu section of each page. Selecting this link takes you to the Users page where you can perform search for and edit learner’s information, create and search for assignment prof iles and create and
search for groups (slots).
Learning button appears in the top menu section of each page. Selecting this link takes you to the Learning page where you can create and search for learning items
(courses), curricula and programs.
Content button appears in the top menu section of each page. Selecting this link takes you to the Content page where you can perform load content and create
assessments.
System Admin button appears in the top menu section of each page. Selecting this link takes you to the System
Admin page where you can conf igure certif icate templates
and review any scheduled background jobs.
References button appears in the top menu section of each page. Selecting this link allows you to search for global
references that will be displayed to learners and administrators and allows you to create physical resource
for Facilities and Locations.
Reports button appears in the top menu section of each
page. Selecting this link allows you to process administrator
reports.
Search bar appears in the top menu section of each page. You can enter keywords or commands into the search bar.
Note: This feature will be removed in January 2020.
Preferences icon appears in the top menu section of each page. Selecting this link allows you to modify your time zone
(default time zone is Eastern).
Choose a different layout icon allows you to select the
layout for your Learning Administration home page. Changing this selection will only impact your default view
and will not impact other administrators in your agency.
Help icon is presented throughout the administrator pages and takes you to SuccessFactors content that includes information on what each learning function is and general
information on how to use them. This should be your f irst
stop for help as an administrator!
Quick Links section appears in the bottom section of the home page. In this section, you can create your own quick
Learning Management System: Learning Administrator User Guide
Department of Management Services 3
links for actions you f requently use. Changing this selection will only impact your default quick links and will not impact
other administrators in your agency.
Learning Administration: Users Page Overview
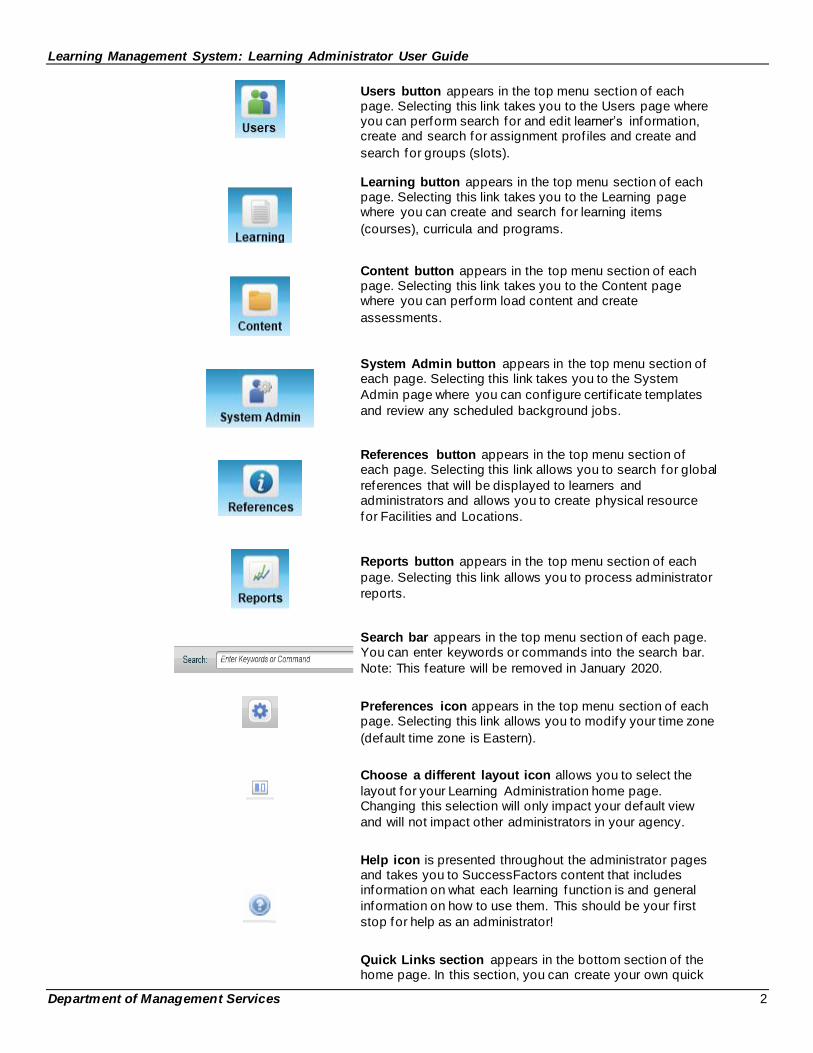
Introduction When it's time to perform user-related tasks such as searching for user, creating and search for
assignment prof iles, creating and searching for groups and running user-related tools you will select the Users tab in Learning Administration. The below section provides an introduction and overview of the key functionality within the Users Page of the LMS. Details on each functionality are
covered later.
Getting
Started
Follow the below path to access the Users Page:
Your path is…
People First Login page > Manager or Employee Landing page > Talent Management tile >Talent Management Home page > Primary navigation dropdown menu> Learning
Administration > Users button
Users Page Overview
Below is an overview of the Users Page:
Users tab appears in the tab menu on the Users page and allows you to search for employees within your agency.
After selecting an employee, you can view the employee’s details, view the employee’s related learning items and perform learning related actions (assign learning, change
due dates, etc.) on the employee.
Assignment Profiles tab appears in the tab menu on the Users page. An assignment prof ile is a set of rules used to
assign learning items based on employee attributes. Use this tab to create and search for existing assignment
prof iles.
Tools tab appears in the tab menu on the Users page. Selecting this tab displays user-related tools that allow you
to administer learning.
Learning Management System: Learning Administrator User Guide
Department of Management Services 4
Groups tab appears in the tab menu on the Users page.
You can reserve slots in training for specif ic employees with learning groups. Use this tab to create new groups and
search for existing groups.
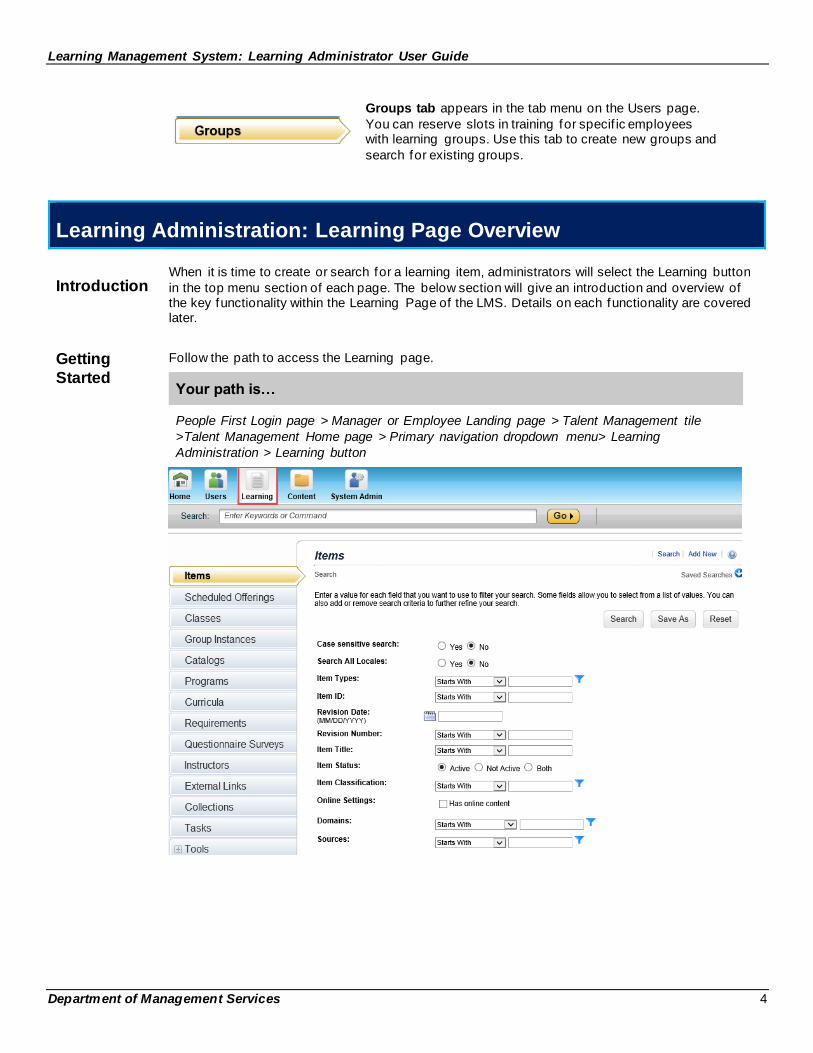
Learning Administration: Learning Page Overview
Introduction
When it is time to create or search for a learning item, administrators will select the Learning button
in the top menu section of each page. The below section will give an introduction and overview of the key functionality within the Learning Page of the LMS. Details on each functionality are covered later.
Getting
Started
Follow the path to access the Learning page.
Your path is…
People First Login page > Manager or Employee Landing page > Talent Management tile
>Talent Management Home page > Primary navigation dropdown menu> Learning
Administration > Learning button
Learning Management System: Learning Administrator User Guide
Department of Management Services 5
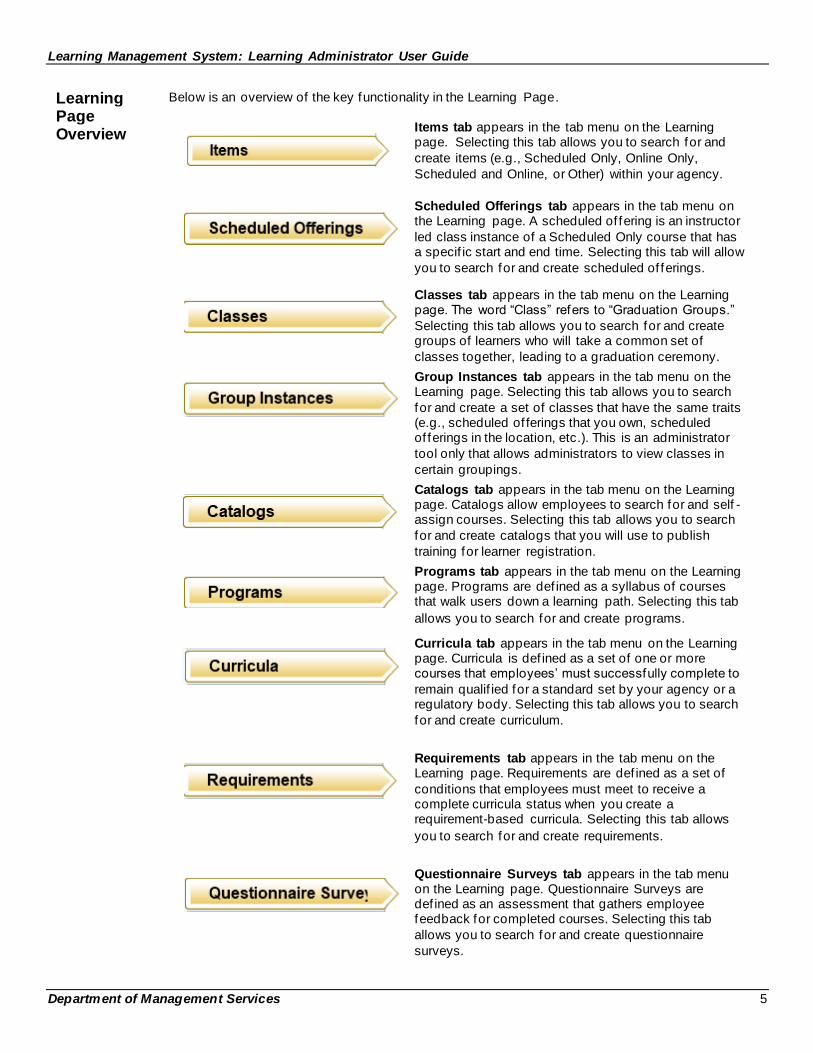
Learning Page Overview
Below is an overview of the key functionality in the Learning Page.
Items tab appears in the tab menu on the Learning page. Selecting this tab allows you to search for and
create items (e.g., Scheduled Only, Online Only,
Scheduled and Online, or Other) within your agency.
Scheduled Offerings tab appears in the tab menu on the Learning page. A scheduled of fering is an instructor
led class instance of a Scheduled Only course that has a specif ic start and end time. Selecting this tab will allow
you to search for and create scheduled of ferings.
Classes tab appears in the tab menu on the Learning page. The word “Class” refers to “Graduation Groups.”
Selecting this tab allows you to search for and create groups of learners who will take a common set of
classes together, leading to a graduation ceremony.
Group Instances tab appears in the tab menu on the Learning page. Selecting this tab allows you to search
for and create a set of classes that have the same traits (e.g., scheduled of ferings that you own, scheduled of ferings in the location, etc.). This is an administrator
tool only that allows administrators to view classes in
certain groupings.
Catalogs tab appears in the tab menu on the Learning page. Catalogs allow employees to search for and self -assign courses. Selecting this tab allows you to search
for and create catalogs that you will use to publish
training for learner registration.
Programs tab appears in the tab menu on the Learning page. Programs are def ined as a syllabus of courses that walk users down a learning path. Selecting this tab
allows you to search for and create programs.
Curricula tab appears in the tab menu on the Learning page. Curricula is def ined as a set of one or more courses that employees’ must successfully complete to
remain qualif ied for a standard set by your agency or a regulatory body. Selecting this tab allows you to search
for and create curriculum.
Requirements tab appears in the tab menu on the Learning page. Requirements are def ined as a set of
conditions that employees must meet to receive a complete curricula status when you create a requirement-based curricula. Selecting this tab allows
you to search for and create requirements.
Questionnaire Surveys tab appears in the tab menu on the Learning page. Questionnaire Surveys are def ined as an assessment that gathers employee feedback for completed courses. Selecting this tab
allows you to search for and create questionnaire
surveys.
Learning Management System: Learning Administrator User Guide
Department of Management Services 6
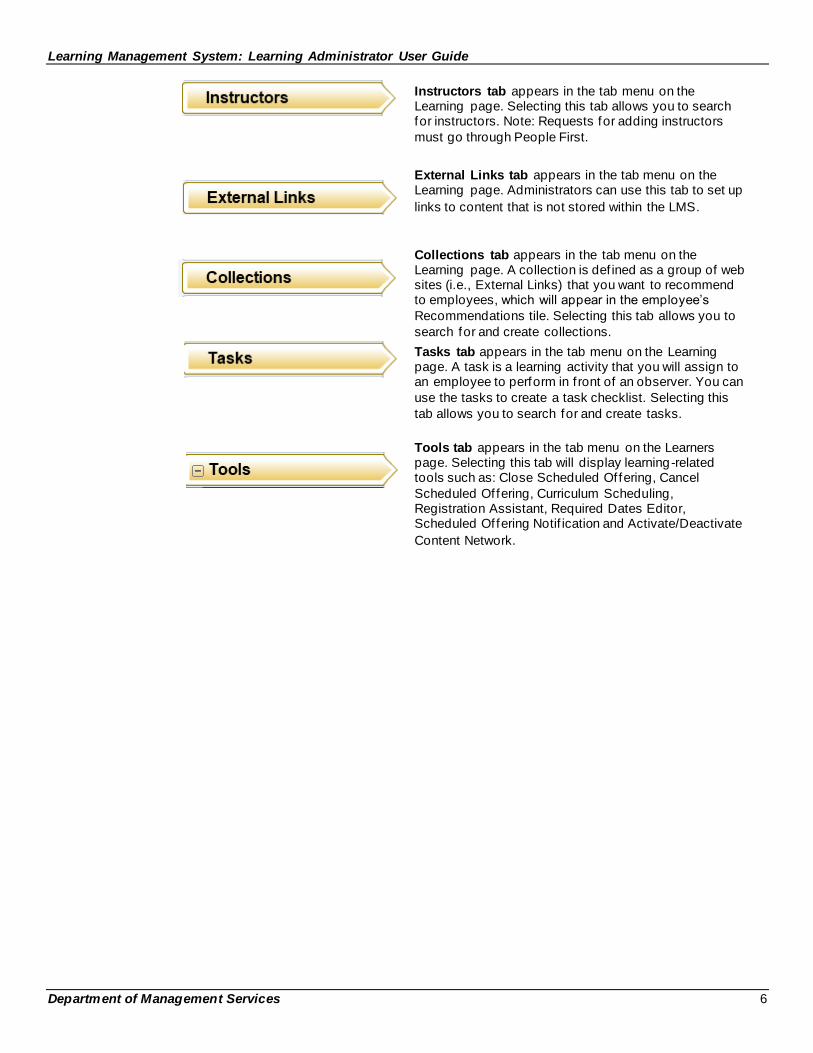
Instructors tab appears in the tab menu on the Learning page. Selecting this tab allows you to search for instructors. Note: Requests for adding instructors
must go through People First.
External Links tab appears in the tab menu on the Learning page. Administrators can use this tab to set up
links to content that is not stored within the LMS.
Collections tab appears in the tab menu on the Learning page. A collection is def ined as a group of web sites (i.e., External Links) that you want to recommend to employees, which will appear in the employee’s
Recommendations tile. Selecting this tab allows you to
search for and create collections.
Tasks tab appears in the tab menu on the Learning page. A task is a learning activity that you will assign to an employee to perform in f ront of an observer. You can
use the tasks to create a task checklist. Selecting this
tab allows you to search for and create tasks.
Tools tab appears in the tab menu on the Learners page. Selecting this tab will display learning-related tools such as: Close Scheduled Offering, Cancel
Scheduled Offering, Curriculum Scheduling, Registration Assistant, Required Dates Editor, Scheduled Offering Notif ication and Activate/Deactivate
Content Network.
Learning Management System: Learning Administrator User Guide
Department of Management Services 7
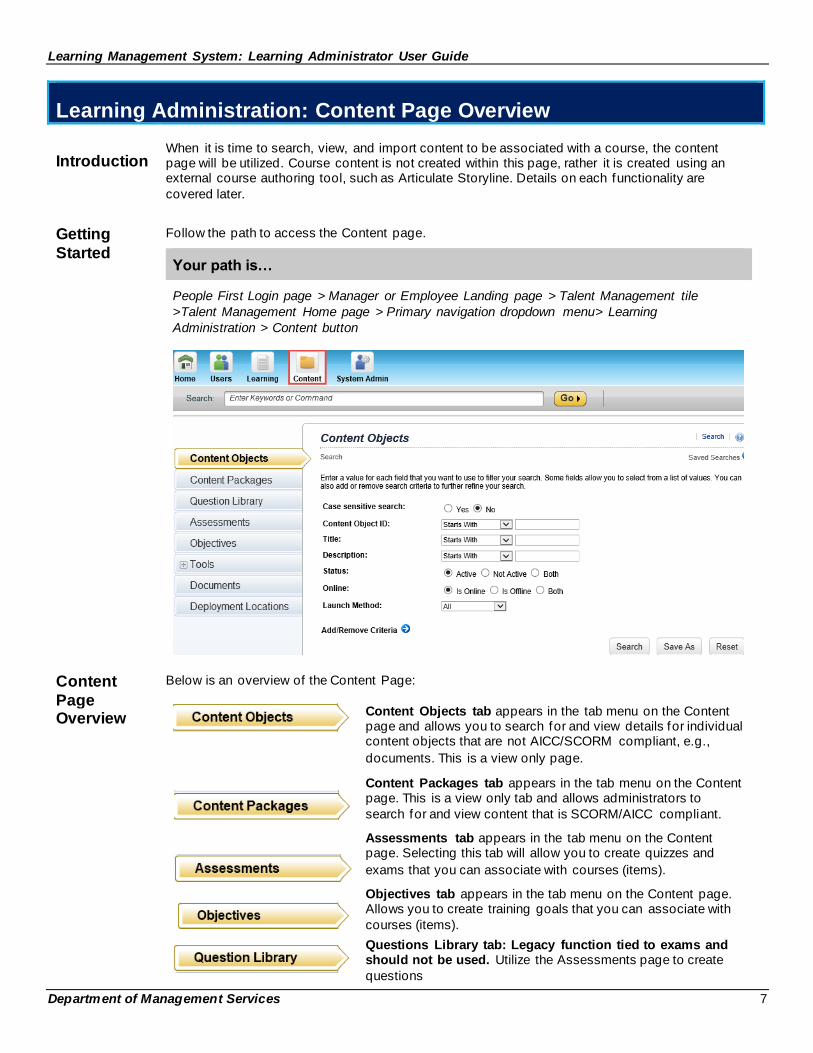
Learning Administration: Content Page Overview
Introduction
When it is time to search, view, and import content to be associated with a course, the content page will be utilized. Course content is not created within this page, rather it is created using an external course authoring tool, such as Articulate Storyline. Details on each functionality are
covered later.
Getting
Started
Follow the path to access the Content page.
Your path is…
People First Login page > Manager or Employee Landing page > Talent Management tile
>Talent Management Home page > Primary navigation dropdown menu> Learning
Administration > Content button
Content
Page Overview
Below is an overview of the Content Page:
Content Objects tab appears in the tab menu on the Content page and allows you to search for and view details for individual content objects that are not AICC/SCORM compliant, e.g.,
documents. This is a view only page.
Content Packages tab appears in the tab menu on the Content page. This is a view only tab and allows administrators to
search for and view content that is SCORM/AICC compliant.
Assessments tab appears in the tab menu on the Content page. Selecting this tab will allow you to create quizzes and
exams that you can associate with courses (items).
Objectives tab appears in the tab menu on the Content page. Allows you to create training goals that you can associate with
courses (items).
Questions Library tab: Legacy function tied to exams and should not be used. Utilize the Assessments page to create
questions
Learning Management System: Learning Administrator User Guide
Department of Management Services 8
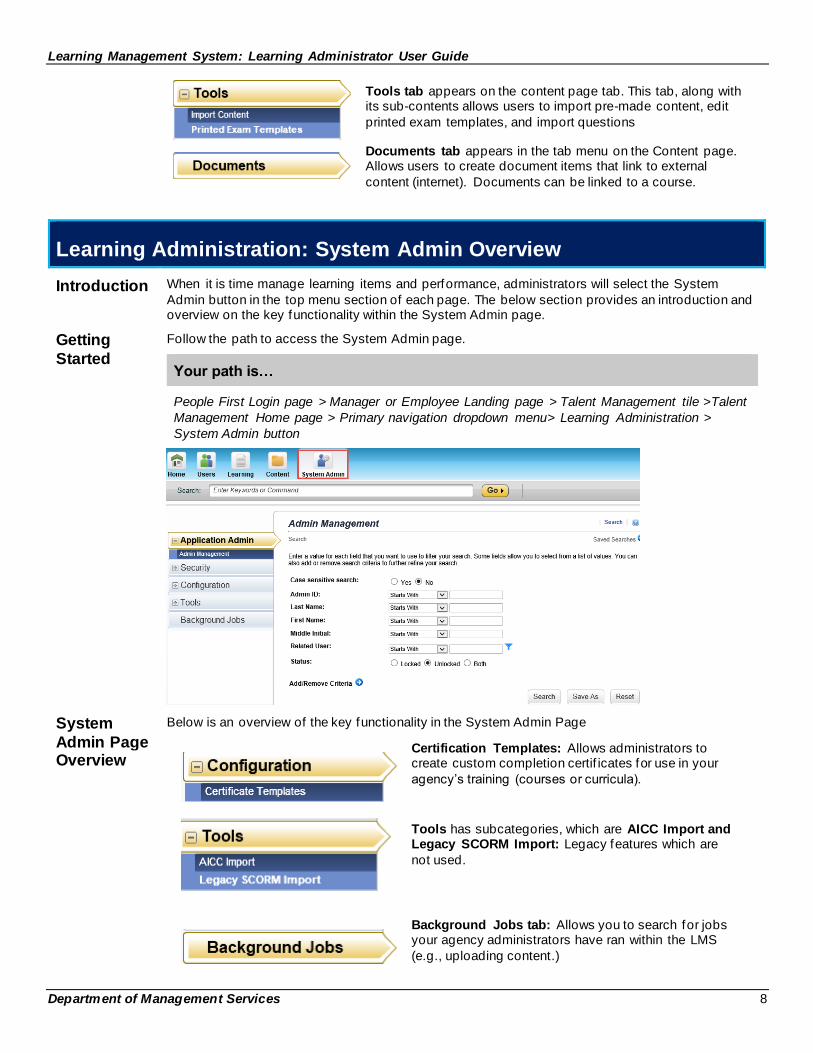
Tools tab appears on the content page tab. This tab, along with its sub-contents allows users to import pre-made content, edit
printed exam templates, and import questions
Documents tab appears in the tab menu on the Content page. Allows users to create document items that link to external
content (internet). Documents can be linked to a course.
Learning Administration: System Admin Overview
Introduction When it is time manage learning items and performance, administrators will select the System
Admin button in the top menu section of each page. The below section provides an introduction and overview on the key functionality within the System Admin page.
Getting
Started
Follow the path to access the System Admin page.
Your path is…
People First Login page > Manager or Employee Landing page > Talent Management tile >Talent
Management Home page > Primary navigation dropdown menu> Learning Administration >
System Admin button
System
Admin Page Overview
Below is an overview of the key functionality in the System Admin Page
Certification Templates: Allows administrators to create custom completion certif icates for use in your
agency’s training (courses or curricula).
Tools has subcategories, which are AICC Import and Legacy SCORM Import: Legacy features which are
not used.
Background Jobs tab: Allows you to search for jobs your agency administrators have ran within the LMS
(e.g., uploading content.)

Learning Management System: Learning Administrator User Guide
Department of Management Services 9
Now, this guide will transition into specific functionality and step-by-step processes that you will most likely
perform in your role as a Learning Administrator.
Searching and Viewing Employee Records
Introduction One of the functions within the Users Page is the ability to search for learners) within your agency
and view their training history and additional functionality. The below sections outline how to search and view a learner’s record.
Getting Started
Your path is…
People First Login page > Manager or Employee Landing page > Talent Management tile
>Talent Management Home page > Primary navigation dropdown menu> Learning
Administration > Users button> Users tab > Search
Process Overview
Follow the steps below to search for and view an employee record:
Steps:
1. Select the Users button.
2. Once you select the Users button, the system will default to the Users tab.
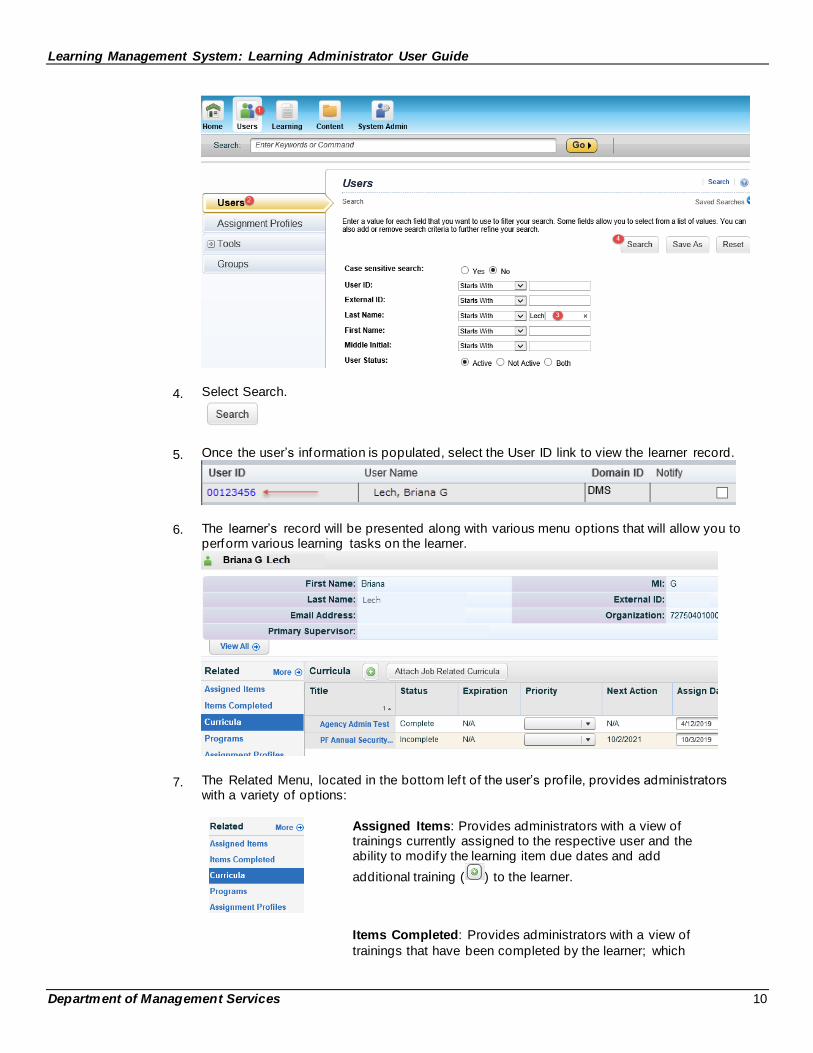
3. Enter in employee’s information in one of the search f ields . Administrators can Add/Remove search criteria or set additional f ilters for applicable f ields.
Tips for successful searches:
• When using the User ID to search for an employee, the employee’s 8-digit People
First Login ID must be used, including the leading zero(s). For example, if the employee’s People First Login ID is 123456, then you would enter 00123456.
• When searching for an external user, utilize the External ID f ield.
Learning Management System: Learning Administrator User Guide
Department of Management Services 10
4. Select Search.
5. Once the user’s information is populated, select the User ID link to view the learner record.
6. The learner’s record will be presented along with various menu options that will allow you to perform various learning tasks on the learner.
7. The Related Menu, located in the bottom lef t of the user’s prof ile, provides administrators with a variety of options:
Assigned Items: Provides administrators with a view of trainings currently assigned to the respective user and the ability to modify the learning item due dates and add
additional training ( ) to the learner.
Items Completed: Provides administrators with a view of
trainings that have been completed by the learner; which
Learning Management System: Learning Administrator User Guide
Department of Management Services 11
includes training that was mass loaded into the system at go-live.
Curricula: View curricula that are currently assigned to the
user as well as add a curricula for the specif ic use (use the
green plus to add training ( ).
Programs: View programs that are currently assigned to the
learner. Programs must be added in the program, they cannot be added to a learner here.
Assignment Profiles: View the assignment prof iles the learner is assigned to.
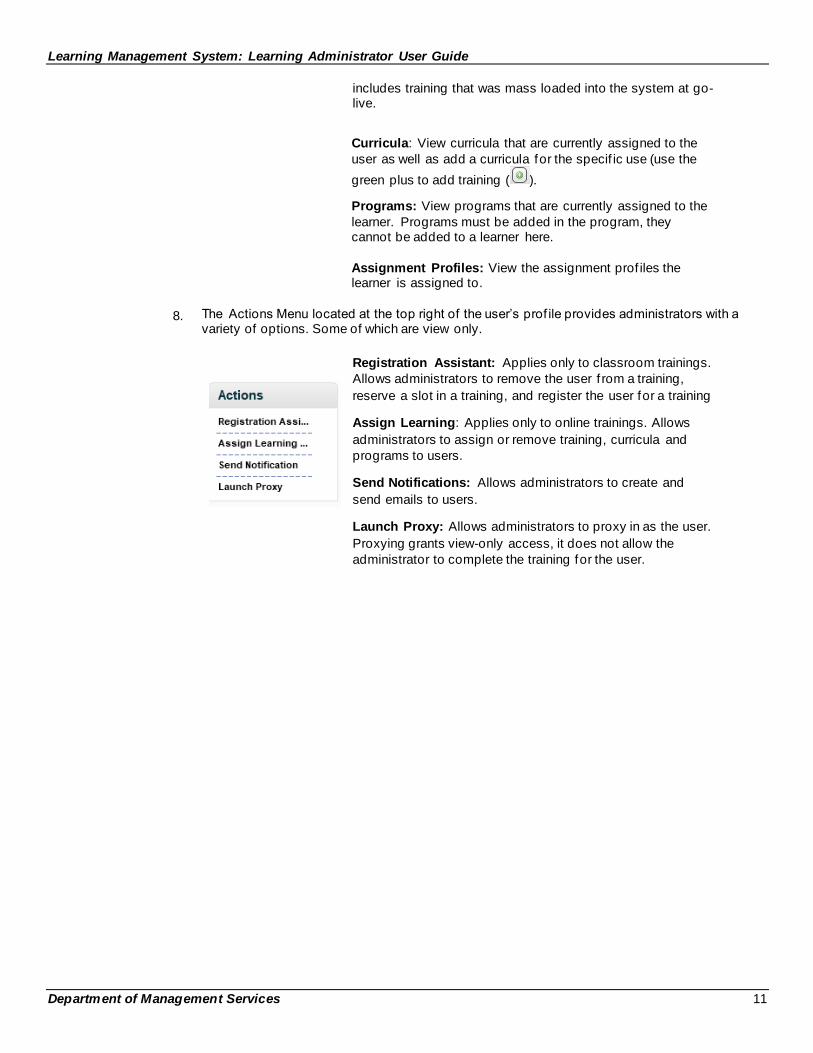
8. The Actions Menu located at the top right of the user’s prof ile provides administrators with a variety of options. Some of which are view only.
Registration Assistant: Applies only to classroom trainings.
Allows administrators to remove the user f rom a training,
reserve a slot in a training, and register the user for a training
Assign Learning: Applies only to online trainings. Allows
administrators to assign or remove training, curricula and
programs to users.
Send Notifications: Allows administrators to create and
send emails to users.
Launch Proxy: Allows administrators to proxy in as the user.
Proxying grants view-only access, it does not allow the
administrator to complete the training for the user.
Learning Management System: Learning Administrator User Guide
Department of Management Services 12
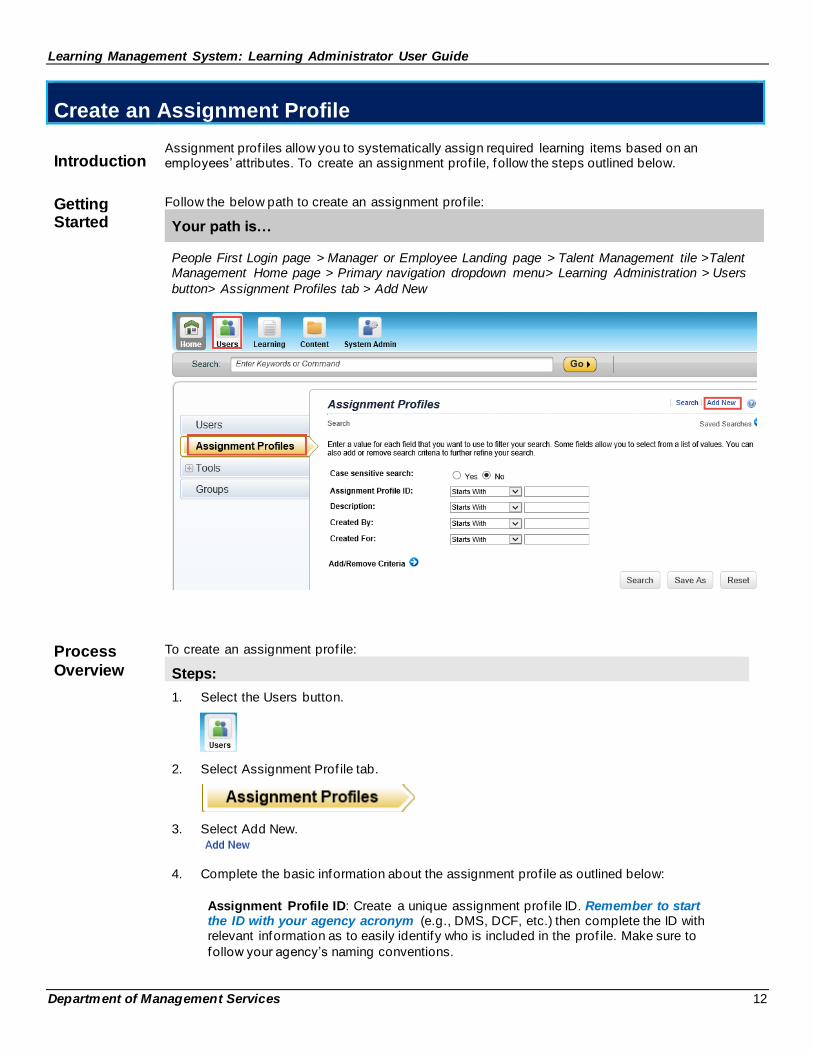
Create an Assignment Profile
Introduction
Assignment prof iles allow you to systematically assign required learning items based on an employees’ attributes. To create an assignment prof ile, follow the steps outlined below.
Getting Started
Follow the below path to create an assignment prof ile:
Your path is…
People First Login page > Manager or Employee Landing page > Talent Management tile >Talent Management Home page > Primary navigation dropdown menu> Learning Administration > Users
button> Assignment Profiles tab > Add New
Process
Overview
To create an assignment prof ile:
Steps:
1. Select the Users button.
2. Select Assignment Prof ile tab.
3. Select Add New.
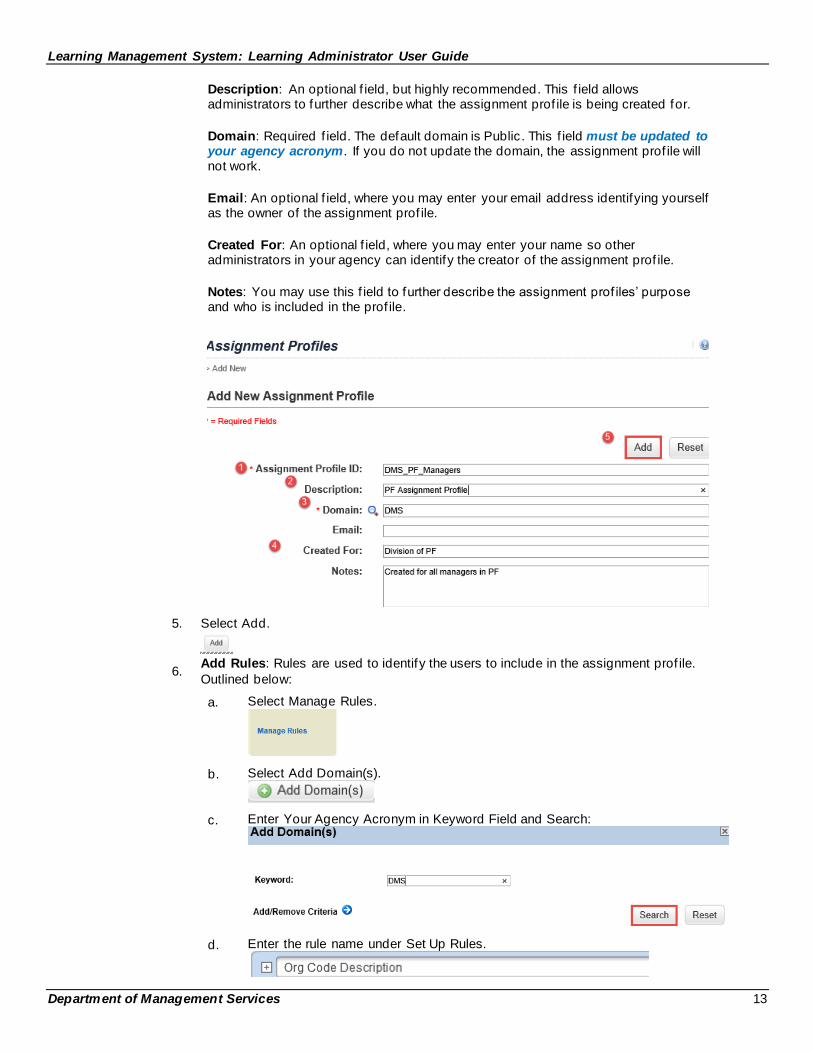
4. Complete the basic information about the assignment prof ile as outlined below:
• Assignment Profile ID: Create a unique assignment prof ile ID. Remember to start the ID with your agency acronym (e.g., DMS, DCF, etc.) then complete the ID with relevant information as to easily identify who is included in the prof ile. Make sure to
follow your agency’s naming conventions.
Learning Management System: Learning Administrator User Guide
Department of Management Services 13
• Description: An optional f ield, but highly recommended. This f ield allows administrators to further describe what the assignment prof ile is being created for.
• Domain: Required f ield. The default domain is Public. This f ield must be updated to your agency acronym. If you do not update the domain, the assignment prof ile will not work.
• Email: An optional f ield, where you may enter your email address identifying yourself as the owner of the assignment prof ile.
• Created For: An optional f ield, where you may enter your name so other administrators in your agency can identify the creator of the assignment prof ile.
• Notes: You may use this f ield to further describe the assignment prof iles’ purpose and who is included in the prof ile.
•
5. Select Add.
6. Add Rules: Rules are used to identify the users to include in the assignment prof ile.
Outlined below:
a. Select Manage Rules.
b. Select Add Domain(s).
c. Enter Your Agency Acronym in Keyword Field and Search:
d. Enter the rule name under Set Up Rules.

Learning Management System: Learning Administrator User Guide
Department of Management Services 14
e. Select an Attribute (Note: Some attributes are not valid for use. Specif ically, Alternate Job Code ID, f ields labeled CustomColumnRow* and f ields labeled For Federal User Connector Use Only should not be used.):
f. Select an Operator:
Note: Select the desired operation to further drill down your population. Not all operators
are applicable for each attribute. For example:
Matches Not for Hire Date/Month, Item Completion, and Is Full-Time
Between For Hire Date Only.
Contains Used for text-based f ields, not for Hire Date/Month, Item
Completion, or Is Full-Time.
Is Empty Not for Hire Month, Item Completion, and Is Full Time.
Equals Not for Hire Month, Item Completion, and Is Full Time.
Includes Sub
Records of
For Domain and Org only.
Starts with Not for Hire Month, Item Completion, and Is Full Time.
Does not
Match Not for Hire Month, Item Completion, and Is Full Time.
Does not
Contain Not for Hire Month, Item Completion, and Is Full Time.
Is Not
Empty
Not for Hire Month, Item Completion, and Is Full Time.
Does not
Equal For Hire Date and Item Completion only.
Does not
Start With Not for Hire Month, Item Completion, and Is Full Time.
On or After For Hire Date only.
On or
Before For Hire Date only.
Learning Management System: Learning Administrator User Guide
Department of Management Services 15
Include Indirect
Reports of
For Supervisor only.
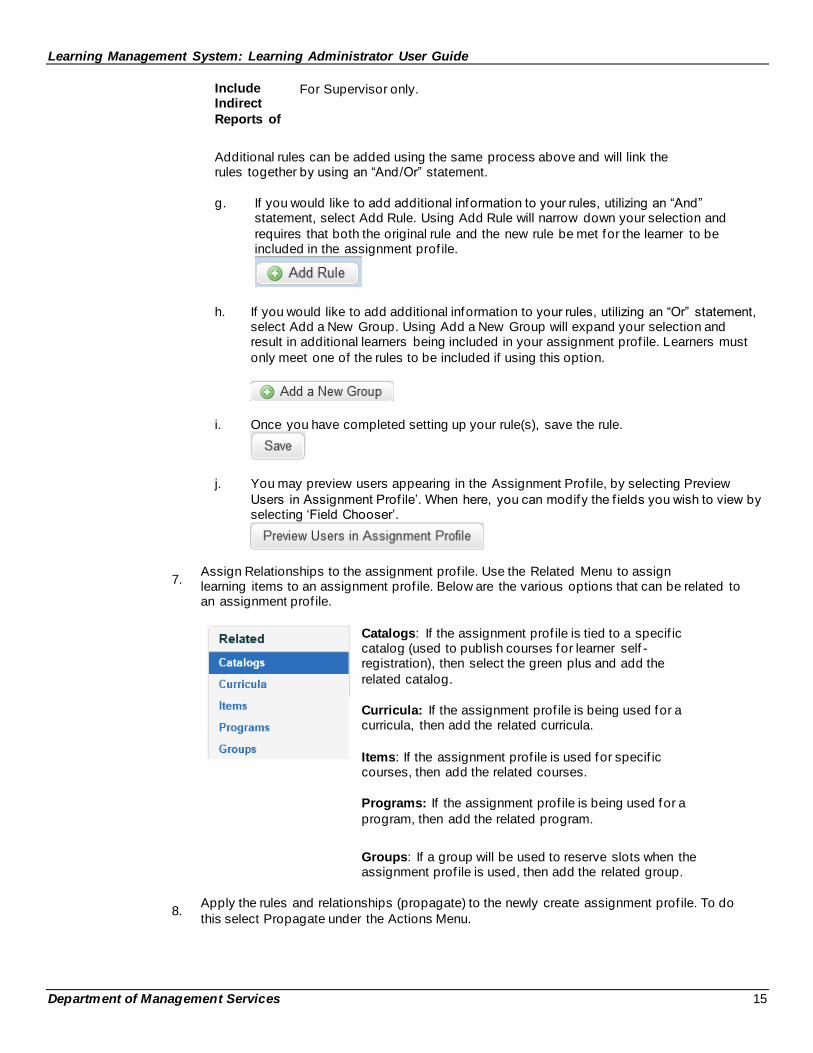
Additional rules can be added using the same process above and will link the rules together by using an “And/Or” statement.
g. If you would like to add additional information to your rules, utilizing an “And”
statement, select Add Rule. Using Add Rule will narrow down your selection and
requires that both the original rule and the new rule be met for the learner to be included in the assignment prof ile.
h.
If you would like to add additional information to your rules, utilizing an “Or” statement, select Add a New Group. Using Add a New Group will expand your selection and result in additional learners being included in your assignment prof ile. Learners must
only meet one of the rules to be included if using this option.
i. Once you have completed setting up your rule(s), save the rule.
j. You may preview users appearing in the Assignment Prof ile, by selecting Preview
Users in Assignment Prof ile’. When here, you can modify the f ields you wish to view by selecting ‘Field Chooser’.
7. Assign Relationships to the assignment prof ile. Use the Related Menu to assign learning items to an assignment prof ile. Below are the various options that can be related to an assignment prof ile.
Catalogs: If the assignment prof ile is tied to a specif ic catalog (used to publish courses for learner self -registration), then select the green plus and add the
related catalog.
Curricula: If the assignment prof ile is being used for a curricula, then add the related curricula.
Items: If the assignment prof ile is used for specif ic courses, then add the related courses.
Programs: If the assignment prof ile is being used for a
program, then add the related program.
Groups: If a group will be used to reserve slots when the assignment prof ile is used, then add the related group.
8. Apply the rules and relationships (propagate) to the newly create assignment prof ile. To do
this select Propagate under the Actions Menu.
Learning Management System: Learning Administrator User Guide
Department of Management Services 16
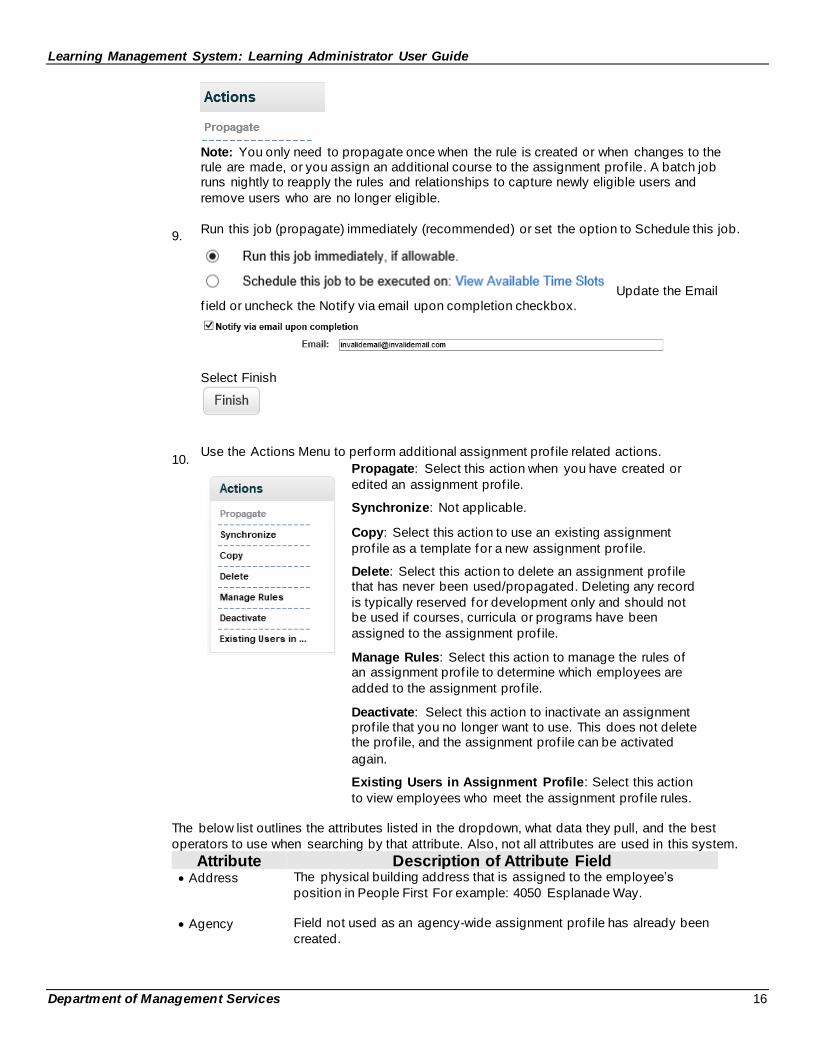
Note: You only need to propagate once when the rule is created or when changes to the rule are made, or you assign an additional course to the assignment prof ile. A batch job runs nightly to reapply the rules and relationships to capture newly eligible users and
remove users who are no longer eligible.
9. Run this job (propagate) immediately (recommended) or set the option to Schedule this job.
Update the Email f ield or uncheck the Notify via email upon completion checkbox.
Select Finish
10. Use the Actions Menu to perform additional assignment prof ile related actions.
• Propagate: Select this action when you have created or
edited an assignment prof ile.
• Synchronize: Not applicable.
• Copy: Select this action to use an existing assignment
prof ile as a template for a new assignment prof ile.
• Delete: Select this action to delete an assignment prof ile that has never been used/propagated. Deleting any record
is typically reserved for development only and should not be used if courses, curricula or programs have been
assigned to the assignment prof ile.
• Manage Rules: Select this action to manage the rules of an assignment prof ile to determine which employees are
added to the assignment prof ile.
• Deactivate: Select this action to inactivate an assignment prof ile that you no longer want to use. This does not delete the prof ile, and the assignment prof ile can be activated
again.
• Existing Users in Assignment Profile: Select this action
to view employees who meet the assignment prof ile rules.
The below list outlines the attributes listed in the dropdown, what data they pull, and the best
operators to use when searching by that attribute. Also, not all attributes are used in this system.
Attribute Description of Attribute Field • Address The physical building address that is assigned to the emp loyee’s
position in People First For example: 4050 Esplanade Way.
• Agency Field not used as an agency-wide assignment prof ile has already been
created.
Learning Management System: Learning Administrator User Guide
Department of Management Services 17
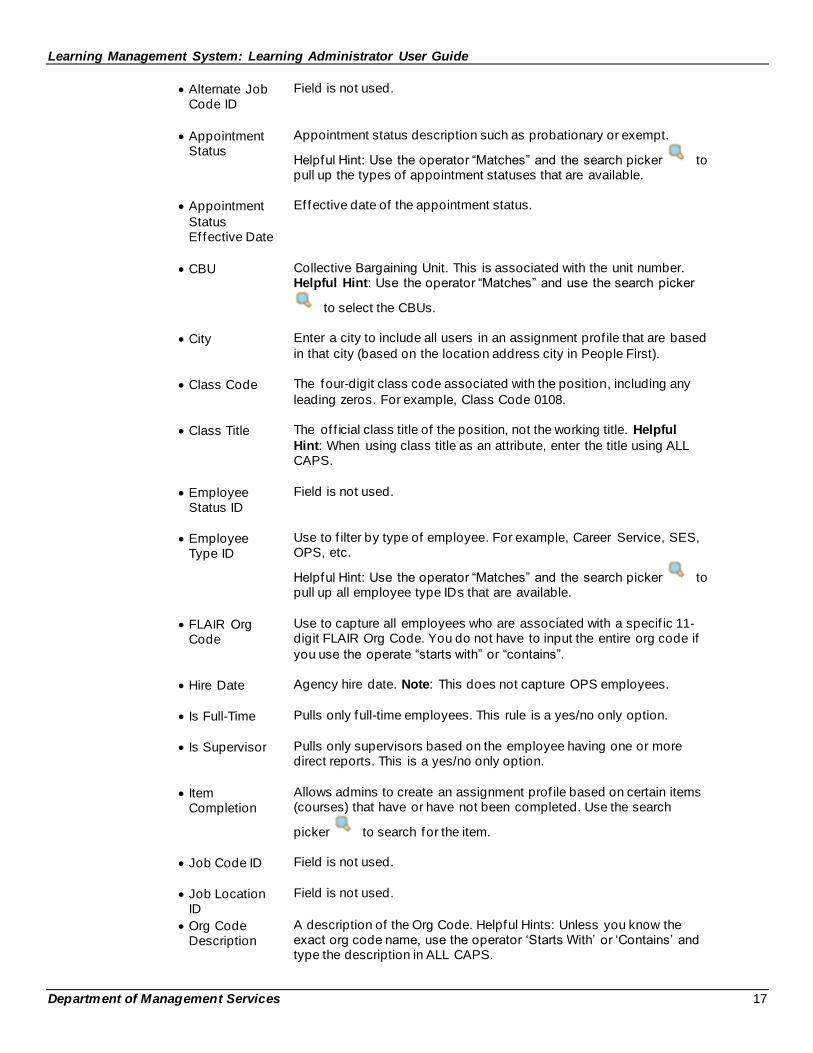
• Alternate Job Code ID
Field is not used.
• Appointment Status
Appointment status description such as probationary or exempt.
Helpful Hint: Use the operator “Matches” and the search picker to pull up the types of appointment statuses that are available.
• Appointment
Status Ef fective Date
Ef fective date of the appointment status.
• CBU Collective Bargaining Unit. This is associated with the unit number. Helpful Hint: Use the operator “Matches” and use the search picker
to select the CBUs.
• City Enter a city to include all users in an assignment prof ile that are based
in that city (based on the location address city in People First).
• Class Code The four-digit class code associated with the position, including any
leading zeros. For example, Class Code 0108.
• Class Title The of f icial class title of the position, not the working title. Helpful
Hint: When using class title as an attribute, enter the title using ALL CAPS.
• Employee Status ID
Field is not used.
• Employee Type ID
Use to f ilter by type of employee. For example, Career Service, SES, OPS, etc.
Helpful Hint: Use the operator “Matches” and the search picker to pull up all employee type IDs that are available.
• FLAIR Org Code
Use to capture all employees who are associated with a specif ic 11-digit FLAIR Org Code. You do not have to input the entire org code if
you use the operate “starts with” or “contains”.
• Hire Date Agency hire date. Note: This does not capture OPS employees.
• Is Full-Time Pulls only full-time employees. This rule is a yes/no only option.
• Is Supervisor Pulls only supervisors based on the employee having one or more direct reports. This is a yes/no only option.
• Item Completion
Allows admins to create an assignment prof ile based on certain items (courses) that have or have not been completed. Use the search
picker to search for the item.
• Job Code ID Field is not used.
• Job Location ID
Field is not used.
• Org Code Description
A description of the Org Code. Helpful Hints: Unless you know the exact org code name, use the operator ‘Starts With’ or ‘Contains’ and type the description in ALL CAPS.
Learning Management System: Learning Administrator User Guide
Department of Management Services 18
• Organization ID Use to capture all employees who are associated with a specif ic 24-digit Org Code. You do not have to input the entire org code if you use the operate “starts with” or “contains”.
• Position Number Enter the position numbers of the user you want to include in the
assignment prof ile. You must enter the exact 8-digit number or use the operator ‘Starts With’.
• Postal Code Enter a Zip Code to include all users in an assignment prof ile that are based in that Zip Code (based on the location address Zip Code in People First).
• Region ID Field is not used.
• Regular or Temp Field is not used.
• State Enter a state abbreviation to include all users in an assignment prof ile
that are based in that state (based on the location address city in People First). Must input using the two-letter state abbr., for example, FL.
• Supervisor ID Create an assignment prof ile by looking up certain supervisors. Use
the operator “Matches” and the search picker to search for the supervisor.
• User ID Create an assignment prof ile by looking up specific users in the
system. Use the operator “Matches” and the search picker to search for the users you wish to target.
Learning Management System: Learning Administrator User Guide
Department of Management Services 19
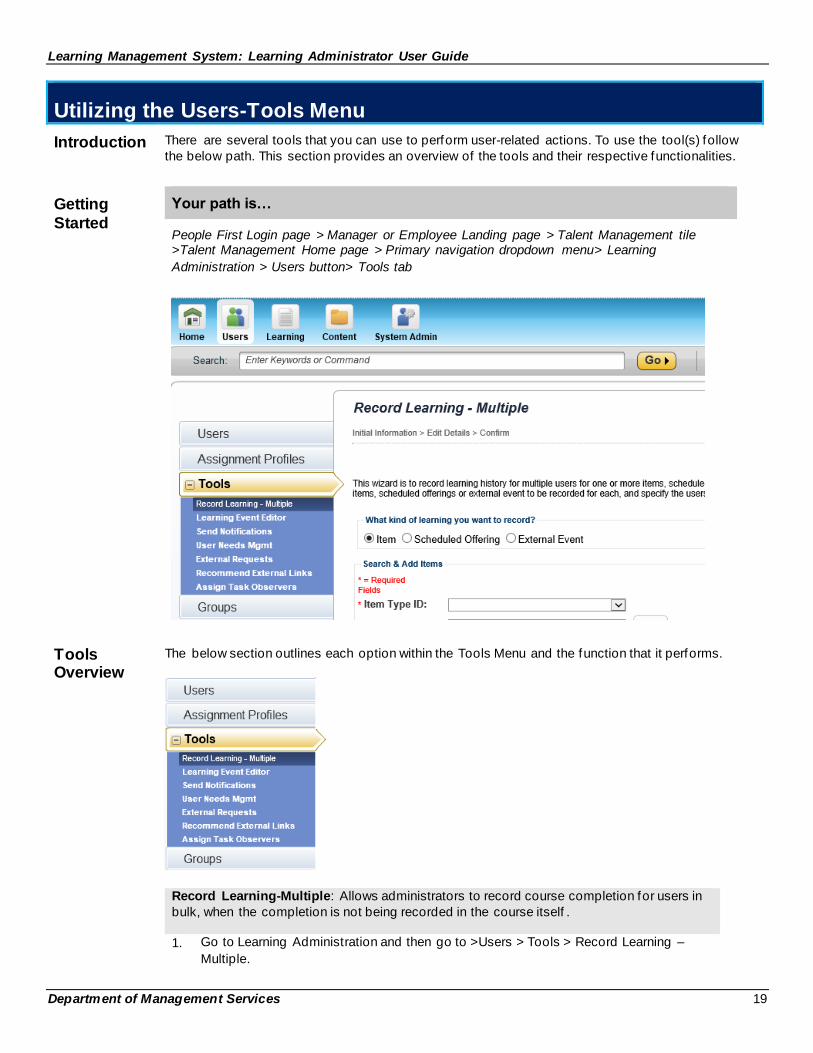
Utilizing the Users-Tools Menu
Introduction There are several tools that you can use to perform user-related actions. To use the tool(s) follow
the below path. This section provides an overview of the tools and their respective functionalities.
Getting
Started
Your path is…
People First Login page > Manager or Employee Landing page > Talent Management tile >Talent Management Home page > Primary navigation dropdown menu> Learning
Administration > Users button> Tools tab
Tools Overview
The below section outlines each option within the Tools Menu and the function that it performs.
Record Learning-Multiple: Allows administrators to record course completion for users in
bulk, when the completion is not being recorded in the course itself .
1. Go to Learning Administration and then go to >Users > Tools > Record Learning –
Multiple.
Learning Management System: Learning Administrator User Guide
Department of Management Services 20
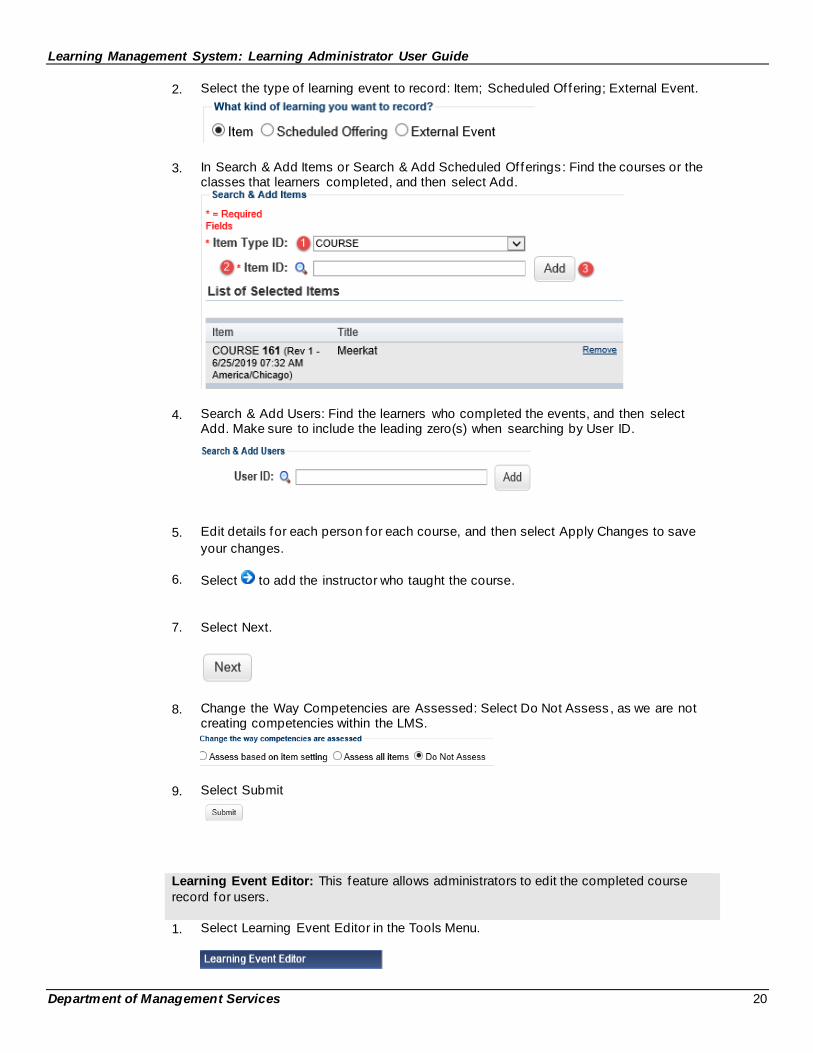
2. Select the type of learning event to record: Item; Scheduled Offering; External Event.
3. In Search & Add Items or Search & Add Scheduled Offerings: Find the courses or the classes that learners completed, and then select Add.
4. Search & Add Users: Find the learners who completed the events, and then select Add. Make sure to include the leading zero(s) when searching by User ID.
5. Edit details for each person for each course, and then select Apply Changes to save
your changes.
6. Select to add the instructor who taught the course.
7. Select Next.
8. Change the Way Competencies are Assessed: Select Do Not Assess , as we are not creating competencies within the LMS.
9. Select Submit
Learning Event Editor: This feature allows administrators to edit the completed course
record for users.
1. Select Learning Event Editor in the Tools Menu.
Learning Management System: Learning Administrator User Guide
Department of Management Services 21
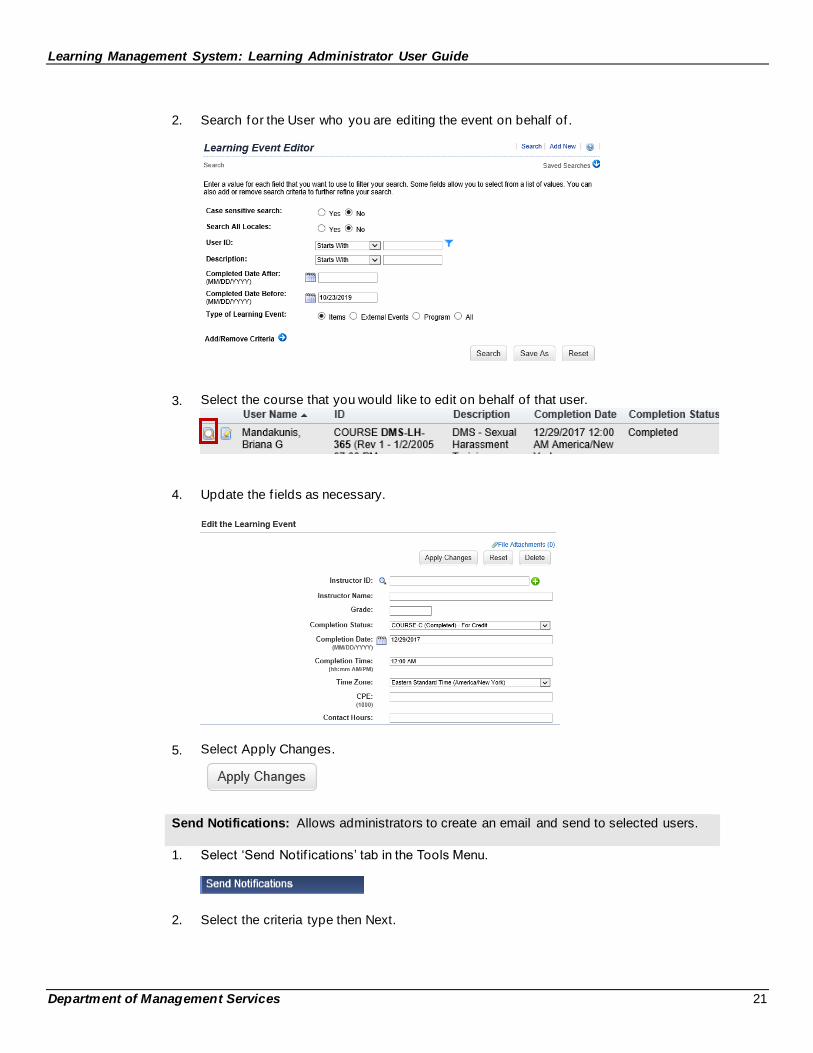
2. Search for the User who you are editing the event on behalf of .
3. Select the course that you would like to edit on behalf of that user.
4. Update the f ields as necessary.
5. Select Apply Changes.
Send Notifications: Allows administrators to create an email and send to selected users.
1. Select ‘Send Notif ications’ tab in the Tools Menu.
2. Select the criteria type then Next.
Learning Management System: Learning Administrator User Guide
Department of Management Services 22
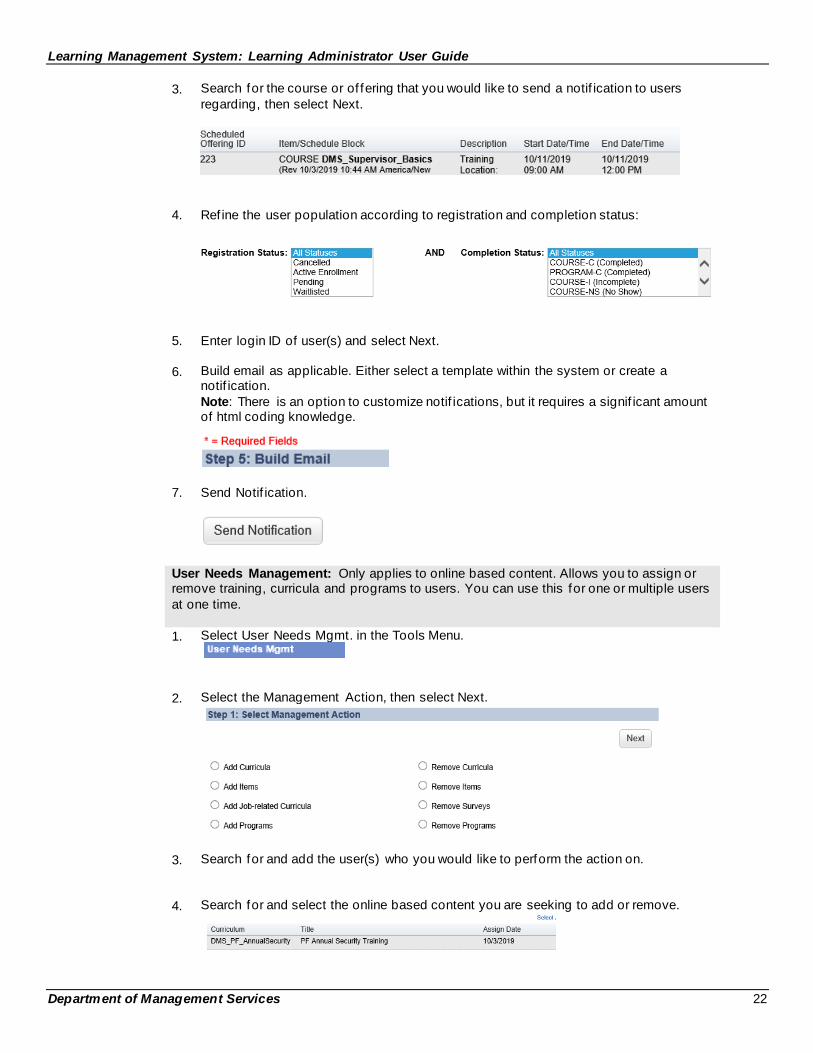
3. Search for the course or of fering that you would like to send a notif ication to users
regarding, then select Next.
4. Ref ine the user population according to registration and completion status:
5. Enter login ID of user(s) and select Next.
6. Build email as applicable. Either select a template within the system or create a notif ication.
Note: There is an option to customize notif ications, but it requires a signif icant amount of html coding knowledge.
7. Send Notif ication.
User Needs Management: Only applies to online based content. Allows you to assign or remove training, curricula and programs to users. You can use this for one or multiple users
at one time.
1. Select User Needs Mgmt. in the Tools Menu.
2. Select the Management Action, then select Next.
3. Search for and add the user(s) who you would like to perform the action on.
4. Search for and select the online based content you are seeking to add or remove.
Learning Management System: Learning Administrator User Guide
Department of Management Services 23
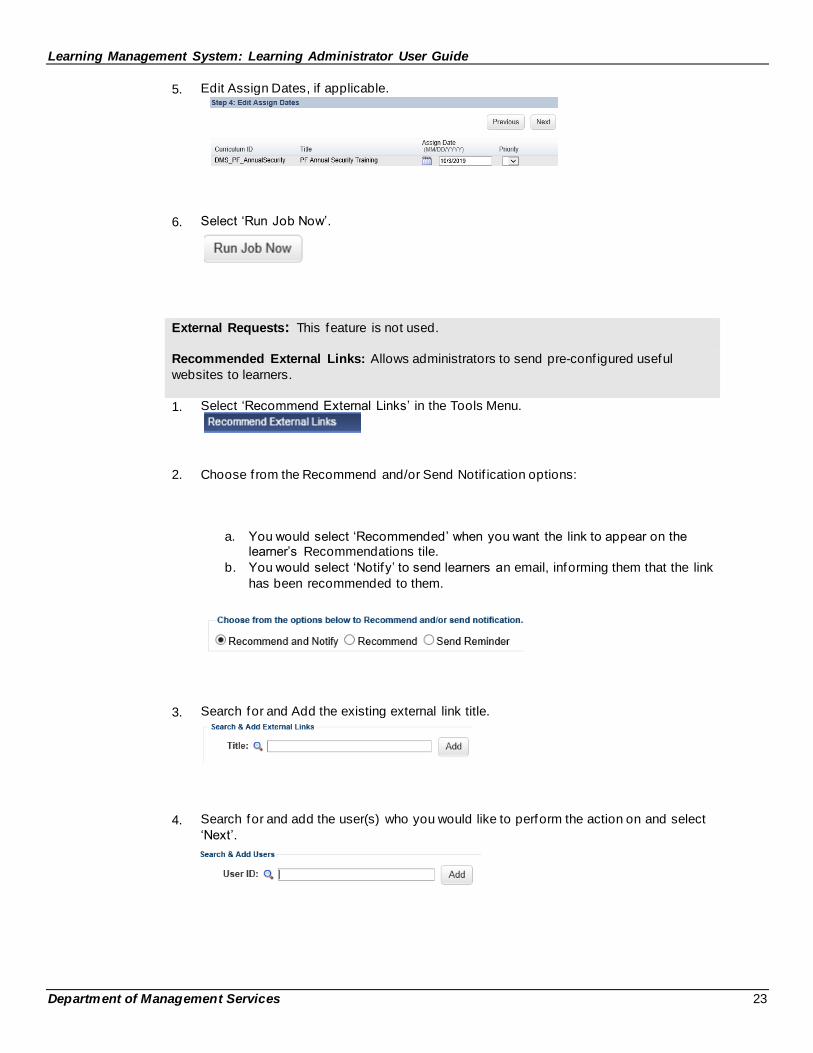
5. Edit Assign Dates, if applicable.
6. Select ‘Run Job Now’.
External Requests: This feature is not used.
Recommended External Links: Allows administrators to send pre-conf igured useful
websites to learners.
1. Select ‘Recommend External Links’ in the Tools Menu.
2. Choose f rom the Recommend and/or Send Notif ication options:
a. You would select ‘Recommended’ when you want the link to appear on the learner’s Recommendations tile.
b. You would select ‘Notify’ to send learners an email, informing them that the link
has been recommended to them.
3. Search for and Add the existing external link title.
4. Search for and add the user(s) who you would like to perform the action on and select
‘Next’.
Learning Management System: Learning Administrator User Guide
Department of Management Services 24
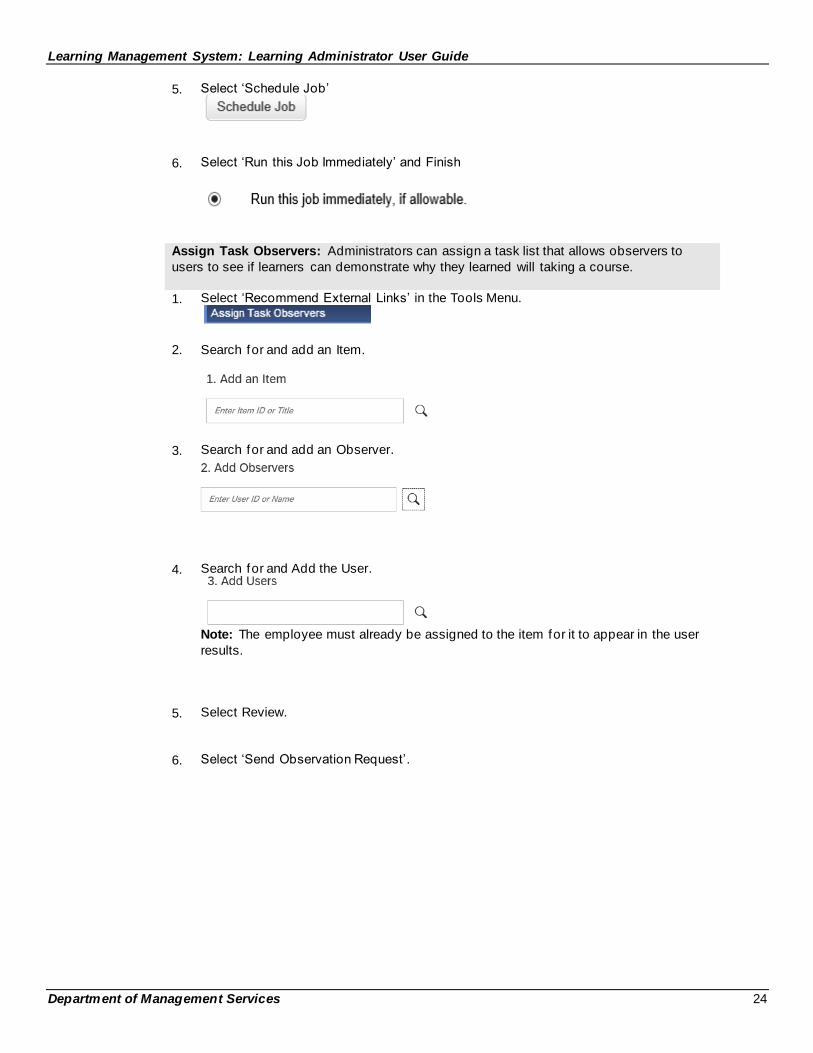
5. Select ‘Schedule Job’
6. Select ‘Run this Job Immediately’ and Finish
Assign Task Observers: Administrators can assign a task list that allows observers to
users to see if learners can demonstrate why they learned will taking a course.
1. Select ‘Recommend External Links’ in the Tools Menu.
2. Search for and add an Item.
3. Search for and add an Observer.
4. Search for and Add the User.
Note: The employee must already be assigned to the item for it to appear in the user
results.
5. Select Review.
6. Select ‘Send Observation Request’.
Learning Management System: Learning Administrator User Guide
Department of Management Services 25
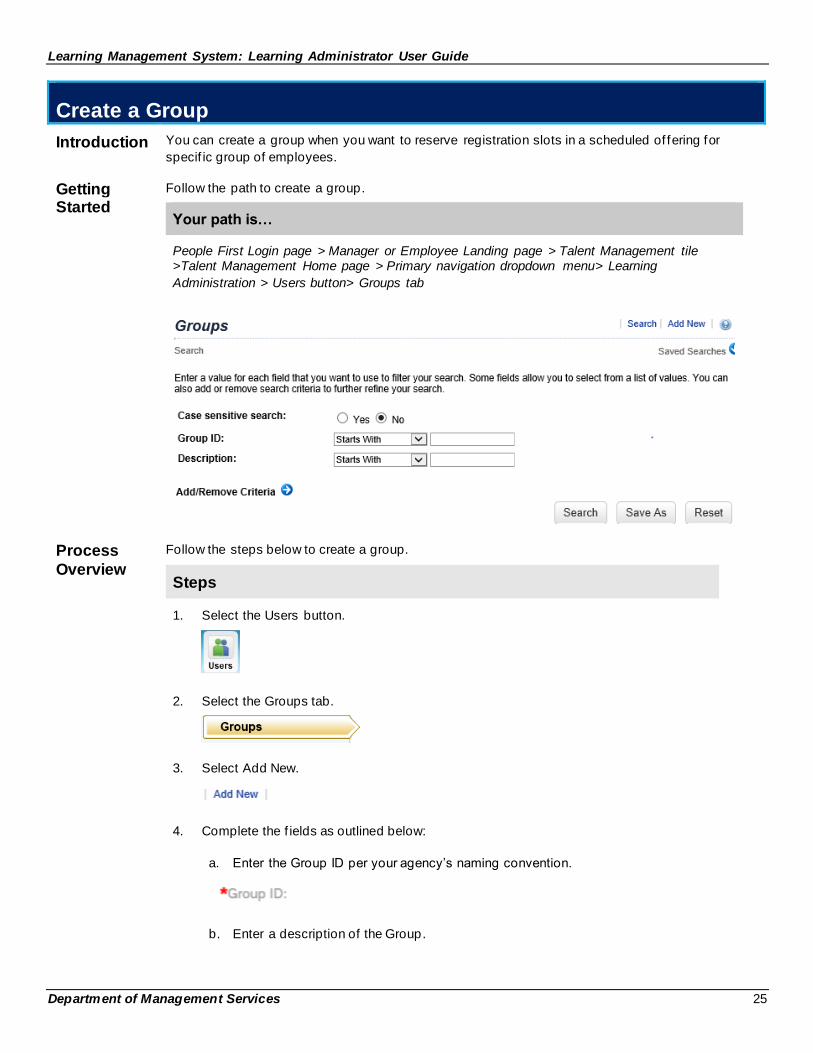
Create a Group
Introduction You can create a group when you want to reserve registration slots in a scheduled of fering for
specif ic group of employees.
Getting Started
Follow the path to create a group.
Your path is…
People First Login page > Manager or Employee Landing page > Talent Management tile >Talent Management Home page > Primary navigation dropdown menu> Learning
Administration > Users button> Groups tab
Process
Overview
Follow the steps below to create a group.
Steps
1. Select the Users button.
2. Select the Groups tab.
3. Select Add New.
4. Complete the f ields as outlined below:
a. Enter the Group ID per your agency’s naming convention.
b. Enter a description of the Group.

Learning Management System: Learning Administrator User Guide
Department of Management Services 26
c. Enter or search for the Domain ID (select your agency, do not leave as
public).
d. Select Save.
5. Associate the newly created group with an assignment prof ile.
a. Create an assignment prof ile for the group, if not previously created.
b. Once the Assignment Prof ile has been created and/or selected, select “Groups’ within the Related menu.
c. Select the green plus icon to add the previously created group.
d. Enter the Group ID that was created (Step 4) or select Search to view all the groups within your agency’s domain.
e. Select the applicable group to add to the Assignment Prof ile.
Reserve the space in the scheduled offering: Once the assignment prof ile has been
associated with a group, the next step is to reserve space within a scheduled of fering. To
reserve space in a scheduled of fering, follow the below steps.
6. Select the Learning button.
7. Select the Scheduled Offerings tab.
8. Enter the Scheduled Offering ID and select search.
9. Select the Scheduled Offering ID link.
Learning Management System: Learning Administrator User Guide
Department of Management Services 27
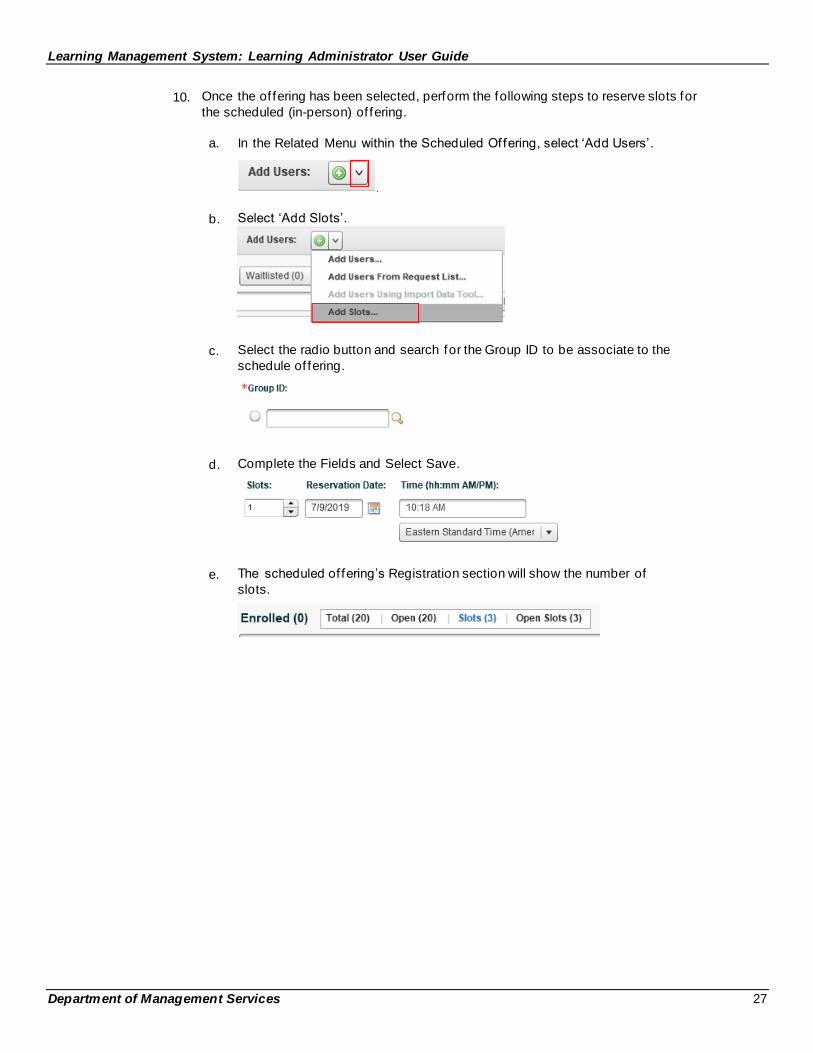
10. Once the of fering has been selected, perform the following steps to reserve slots for
the scheduled (in-person) of fering.
a. In the Related Menu within the Scheduled Offering, select ‘Add Users’.
b. Select ‘Add Slots’.
c. Select the radio button and search for the Group ID to be associate to the
schedule of fering.
d. Complete the Fields and Select Save.
e. The scheduled of fering’s Registration section will show the number of
slots.
Learning Management System: Learning Administrator User Guide
Department of Management Services 28
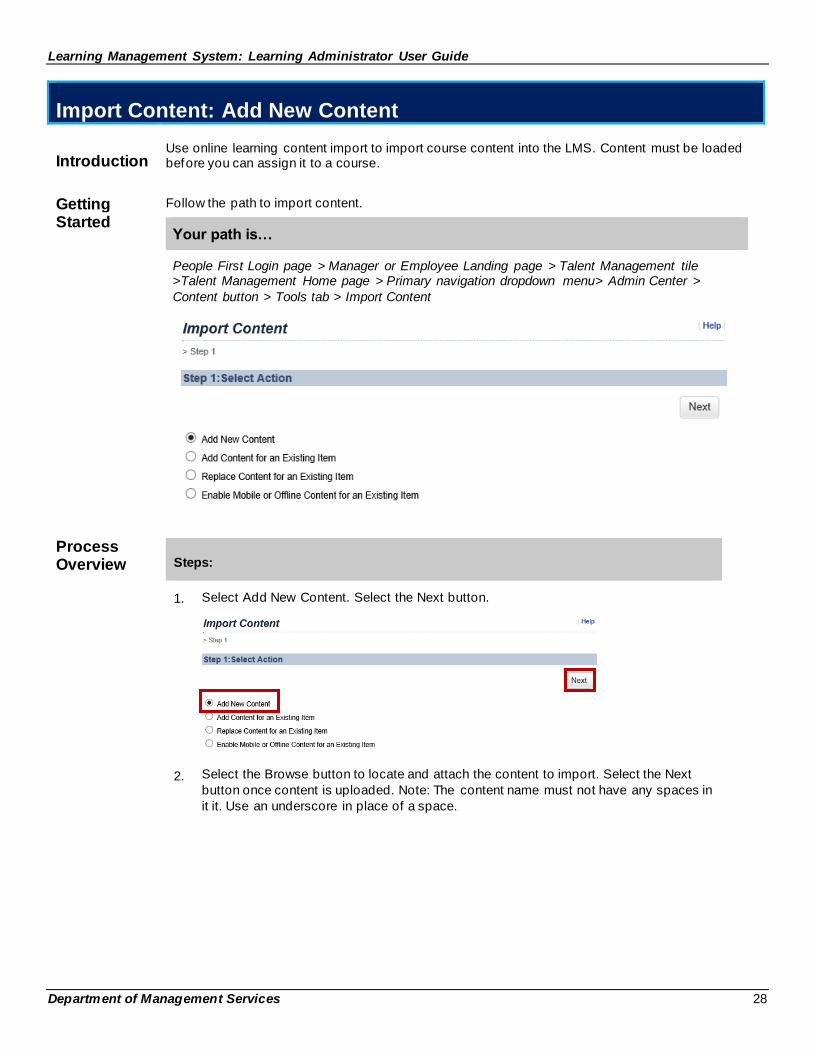
Import Content: Add New Content
Introduction
Use online learning content import to import course content into the LMS. Content must be loaded before you can assign it to a course.
Getting Started
Follow the path to import content.
Your path is…
People First Login page > Manager or Employee Landing page > Talent Management tile >Talent Management Home page > Primary navigation dropdown menu> Admin Center >
Content button > Tools tab > Import Content
Process Overview Steps:
1. Select Add New Content. Select the Next button.
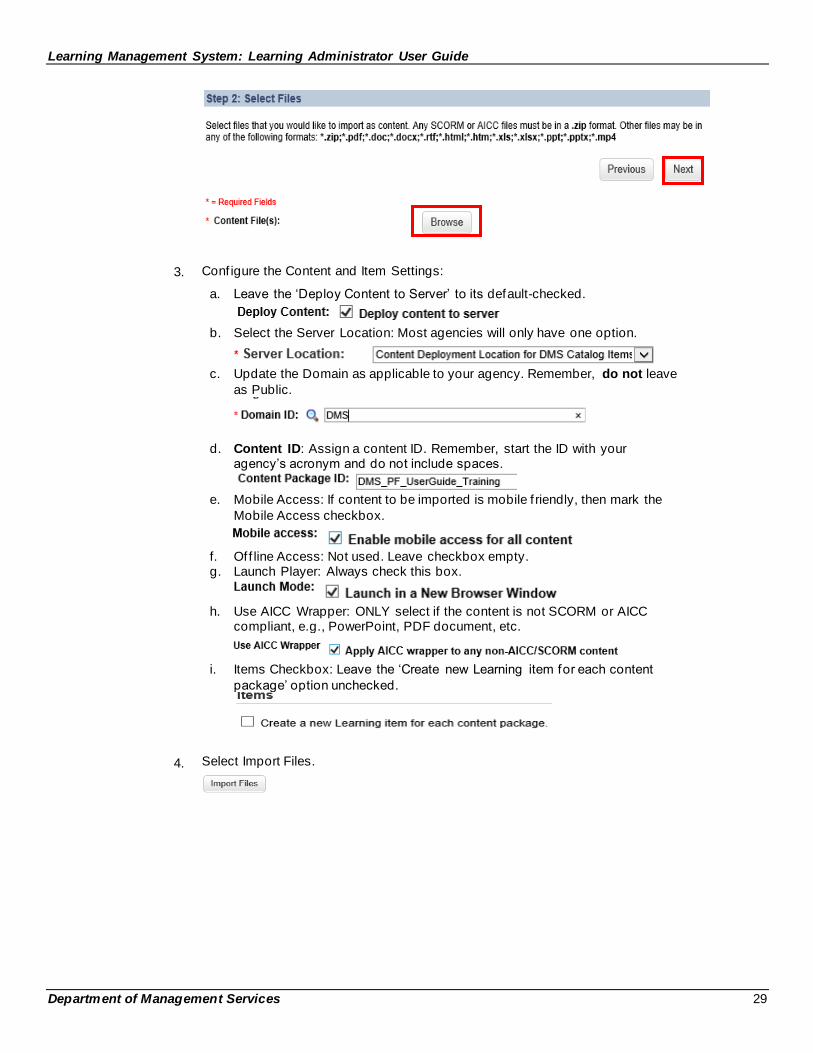
2. Select the Browse button to locate and attach the content to import. Select the Next
button once content is uploaded. Note: The content name must not have any spaces in
it it. Use an underscore in place of a space.
Learning Management System: Learning Administrator User Guide
Department of Management Services 29
3. Conf igure the Content and Item Settings:
a. Leave the ‘Deploy Content to Server’ to its default-checked.
b. Select the Server Location: Most agencies will only have one option.
c. Update the Domain as applicable to your agency. Remember, do not leave
as Public.
d. Content ID: Assign a content ID. Remember, start the ID with your agency’s acronym and do not include spaces.
e. Mobile Access: If content to be imported is mobile f riendly, then mark the
Mobile Access checkbox.
f. Of f line Access: Not used. Leave checkbox empty. g. Launch Player: Always check this box.
h. Use AICC Wrapper: ONLY select if the content is not SCORM or AICC
compliant, e.g., PowerPoint, PDF document, etc.
i. Items Checkbox: Leave the ‘Create new Learning item for each content
package’ option unchecked.
4. Select Import Files.
Learning Management System: Learning Administrator User Guide
Department of Management Services 30
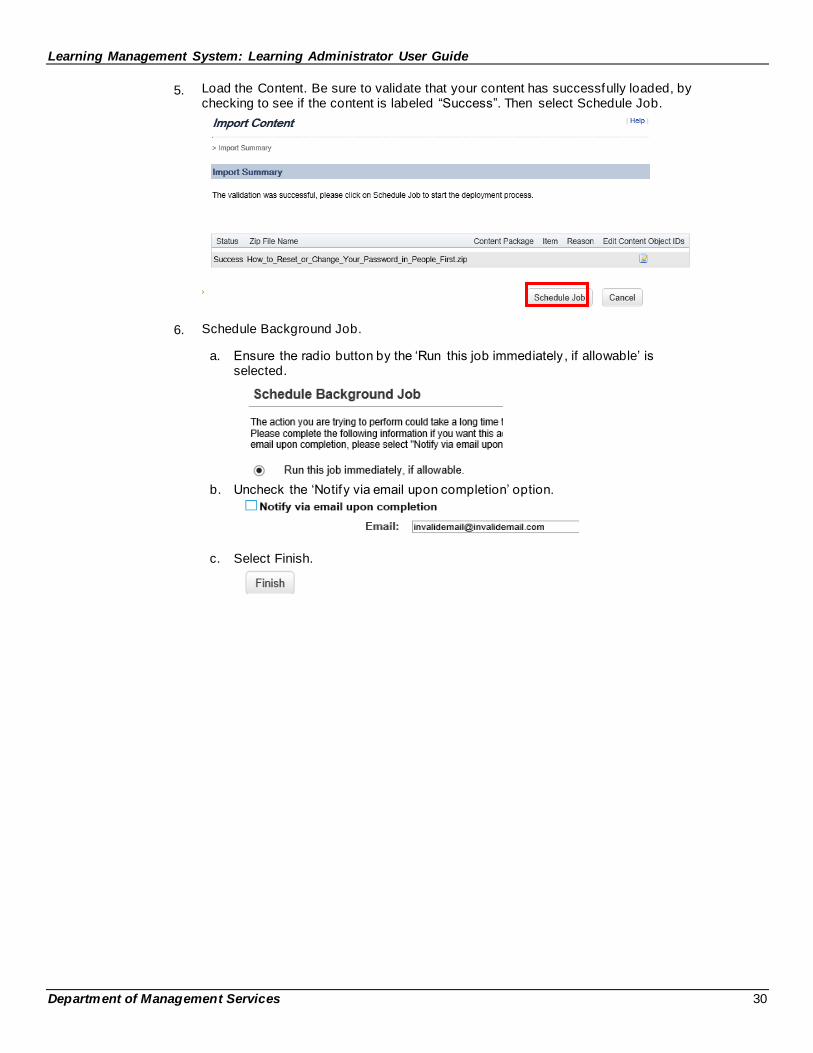
5. Load the Content. Be sure to validate that your content has successfully loaded, by checking to see if the content is labeled “Success”. Then select Schedule Job.
6. Schedule Background Job.
a. Ensure the radio button by the ‘Run this job immediately , if allowable’ is selected.
b. Uncheck the ‘Notify via email upon completion’ option.
c. Select Finish.
Learning Management System: Learning Administrator User Guide
Department of Management Services 31
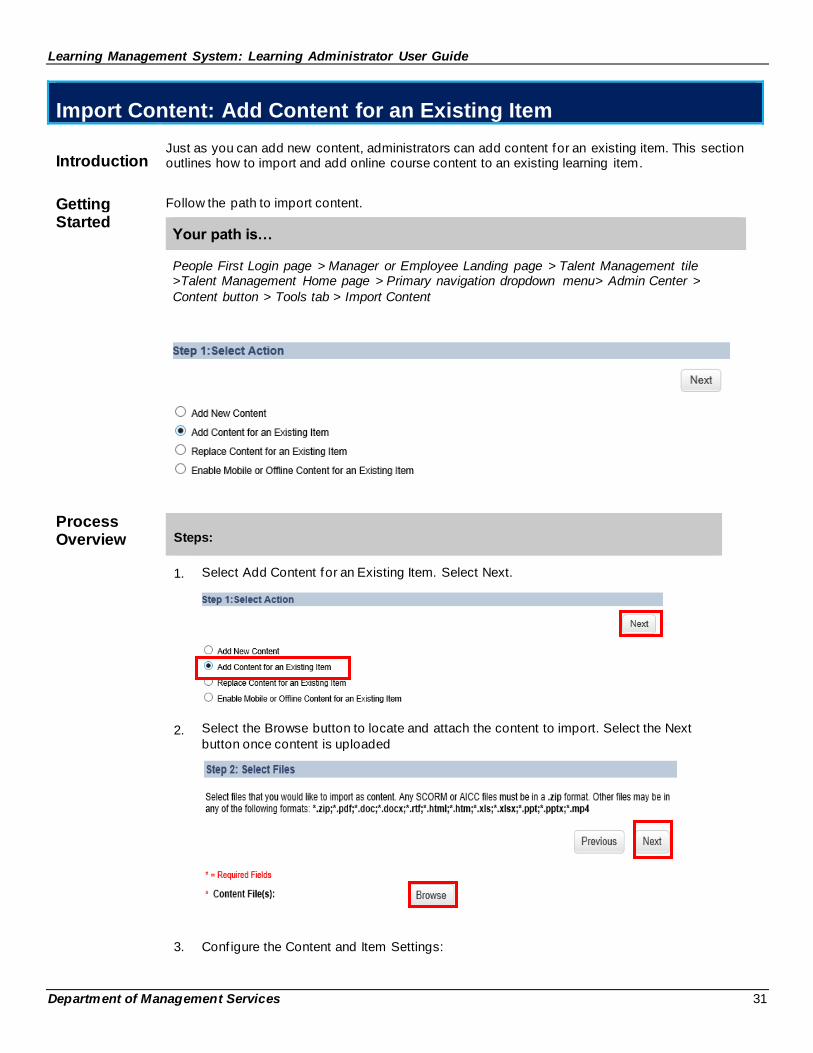
Import Content: Add Content for an Existing Item
Introduction
Just as you can add new content, administrators can add content for an existing item. This section outlines how to import and add online course content to an existing learning item.
Getting Started
Follow the path to import content.
Your path is…
People First Login page > Manager or Employee Landing page > Talent Management tile >Talent Management Home page > Primary navigation dropdown menu> Admin Center >
Content button > Tools tab > Import Content
Process Overview Steps:
1. Select Add Content for an Existing Item. Select Next.
2. Select the Browse button to locate and attach the content to import. Select the Next
button once content is uploaded
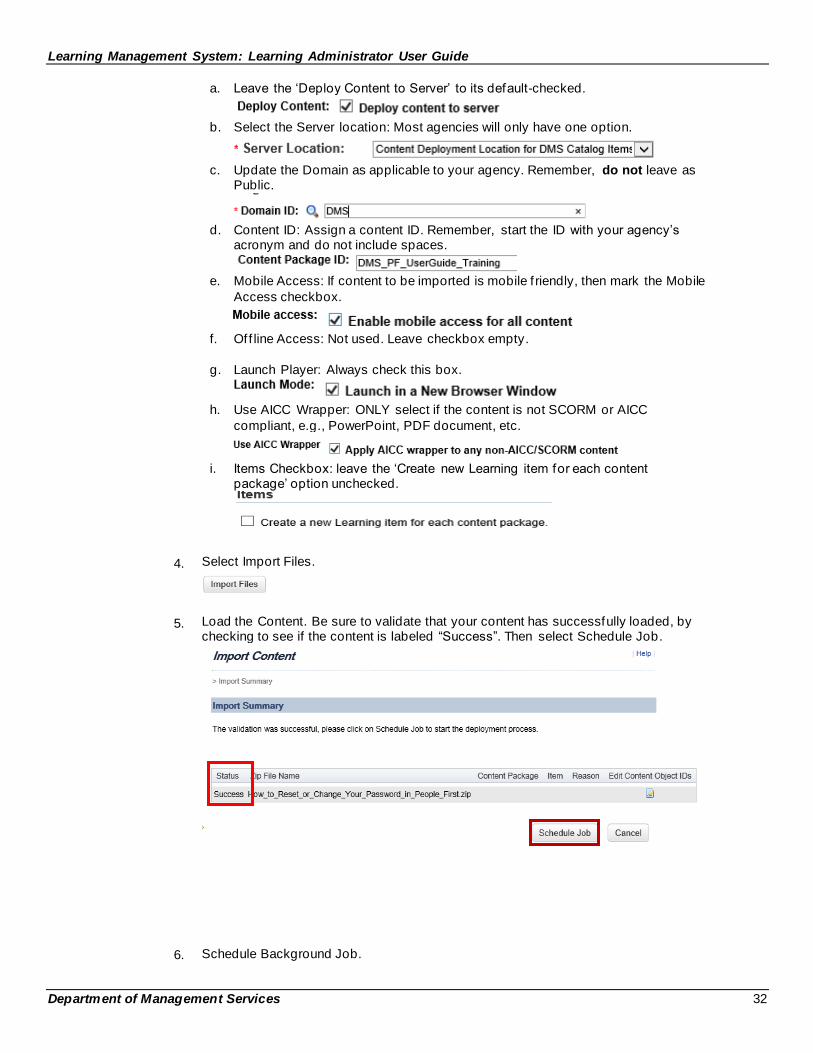
3. Conf igure the Content and Item Settings:
Learning Management System: Learning Administrator User Guide
Department of Management Services 32
a. Leave the ‘Deploy Content to Server’ to its default-checked.
b. Select the Server location: Most agencies will only have one option.
c. Update the Domain as applicable to your agency. Remember, do not leave as
Public.
d. Content ID: Assign a content ID. Remember, start the ID with your agency’s
acronym and do not include spaces.
e. Mobile Access: If content to be imported is mobile f riendly, then mark the Mobile
Access checkbox.
f. Of f line Access: Not used. Leave checkbox empty.
g. Launch Player: Always check this box.
h. Use AICC Wrapper: ONLY select if the content is not SCORM or AICC
compliant, e.g., PowerPoint, PDF document, etc.
i. Items Checkbox: leave the ‘Create new Learning item for each content
package’ option unchecked.
4. Select Import Files.
5. Load the Content. Be sure to validate that your content has successfully loaded, by checking to see if the content is labeled “Success”. Then select Schedule Job.
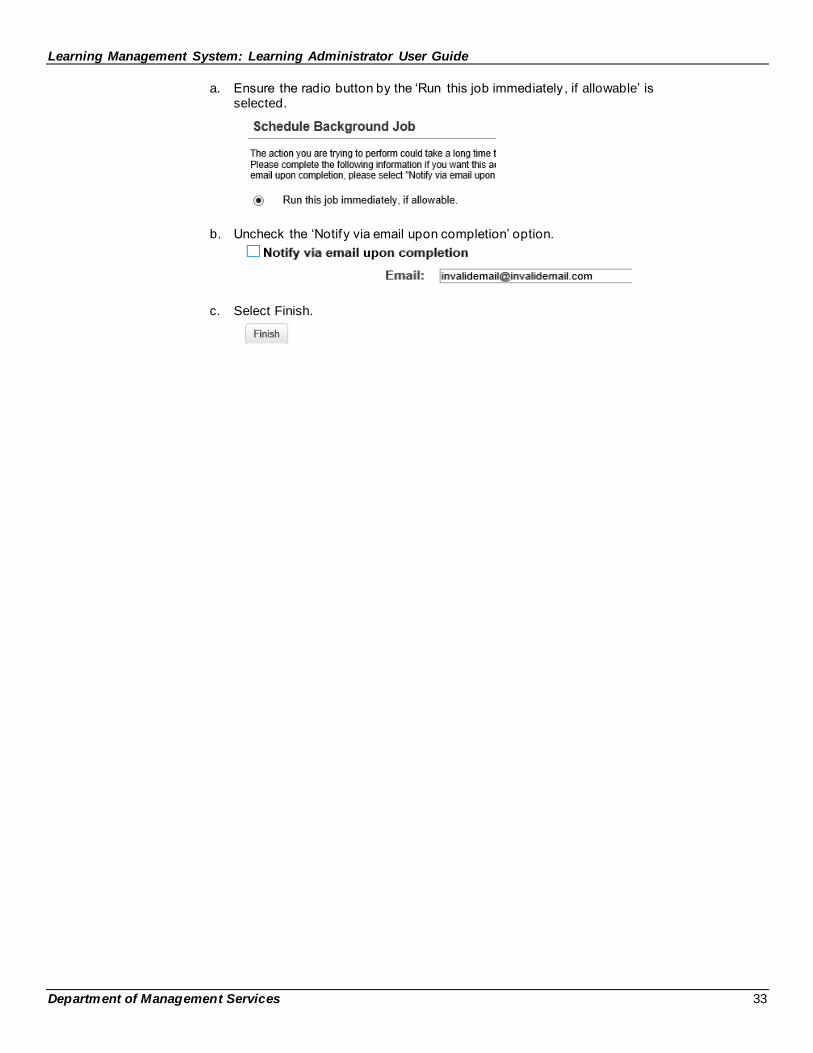
6. Schedule Background Job.
Learning Management System: Learning Administrator User Guide
Department of Management Services 33
a. Ensure the radio button by the ‘Run this job immediately , if allowable’ is selected.
b. Uncheck the ‘Notify via email upon completion’ option.
c. Select Finish.
Learning Management System: Learning Administrator User Guide
Department of Management Services 34
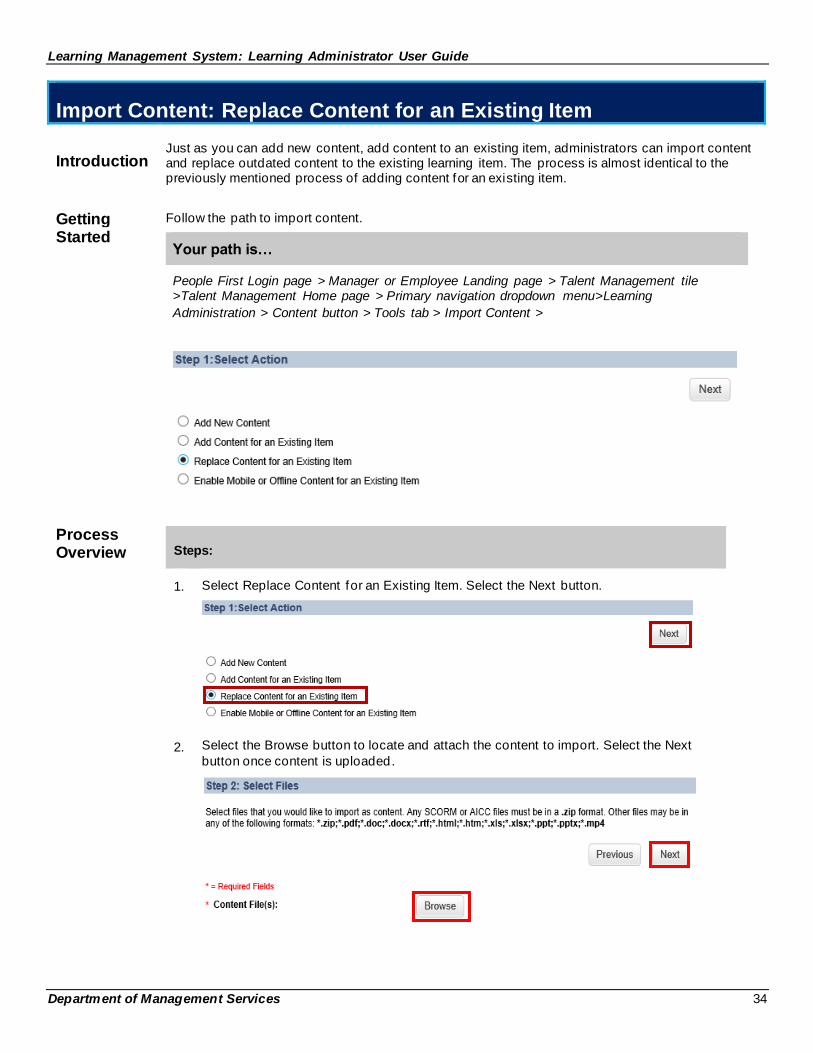
Import Content: Replace Content for an Existing Item
Introduction
Just as you can add new content, add content to an existing item, administrators can import content and replace outdated content to the existing learning item. The process is almost identical to the previously mentioned process of adding content for an existing item.
Getting Started
Follow the path to import content.
Your path is…
People First Login page > Manager or Employee Landing page > Talent Management tile >Talent Management Home page > Primary navigation dropdown menu>Learning
Administration > Content button > Tools tab > Import Content >
Process Overview Steps:
1. Select Replace Content for an Existing Item. Select the Next button.
2. Select the Browse button to locate and attach the content to import. Select the Next
button once content is uploaded.
Learning Management System: Learning Administrator User Guide
Department of Management Services 35
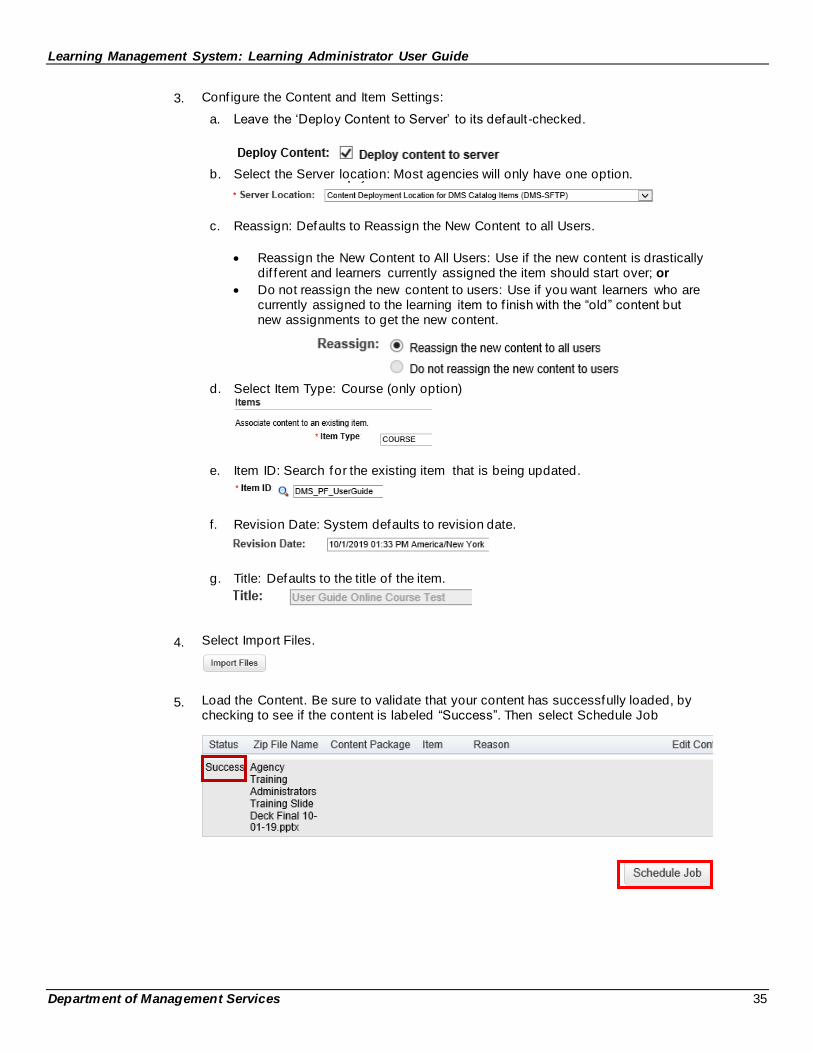
3. Conf igure the Content and Item Settings:
a. Leave the ‘Deploy Content to Server’ to its default-checked.
b. Select the Server location: Most agencies will only have one option.
c. Reassign: Defaults to Reassign the New Content to all Users.
• Reassign the New Content to All Users: Use if the new content is drastically dif ferent and learners currently assigned the item should start over; or
• Do not reassign the new content to users: Use if you want learners who are currently assigned to the learning item to f inish with the “old” content but new assignments to get the new content.
d. Select Item Type: Course (only option)
e. Item ID: Search for the existing item that is being updated.
f. Revision Date: System defaults to revision date.
g. Title: Defaults to the title of the item.
4. Select Import Files.
5. Load the Content. Be sure to validate that your content has successfully loaded, by checking to see if the content is labeled “Success”. Then select Schedule Job
Learning Management System: Learning Administrator User Guide
Department of Management Services 36
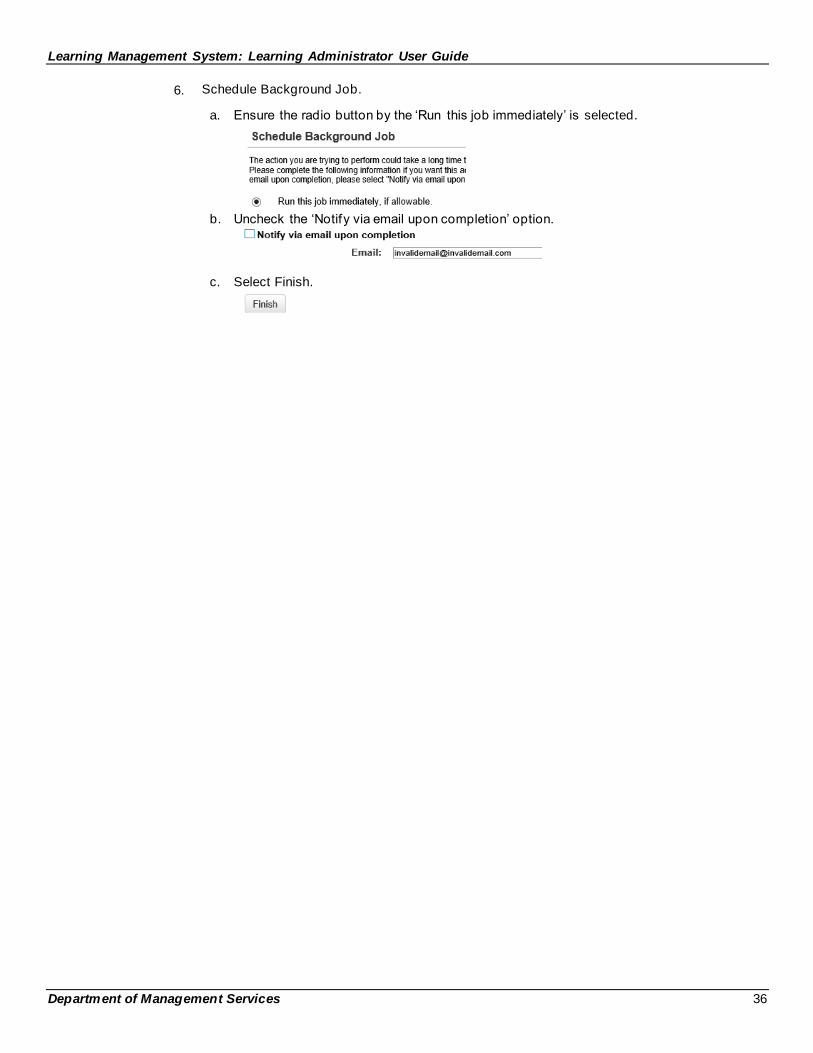
6. Schedule Background Job.
a. Ensure the radio button by the ‘Run this job immediately’ is selected.
b. Uncheck the ‘Notify via email upon completion’ option.
c. Select Finish.
Learning Management System: Learning Administrator User Guide
Department of Management Services 37
Content: Printed Exam Templates
Introduction
This option within the tools menu on the Content page allows administrators to create printed exam templates learners can take outside of the learning management system Printed exam templates are HTML structure.
Getting Started
Follow the path to import printed exam templates.
Your path is…
People First Login page > Manager or Employee Landing page > Talent Management tile >Talent Management Home page > Primary navigation dropdown menu> Learning
Administration > Content button > Tools tab > Printed Exam templates
Process
Overview
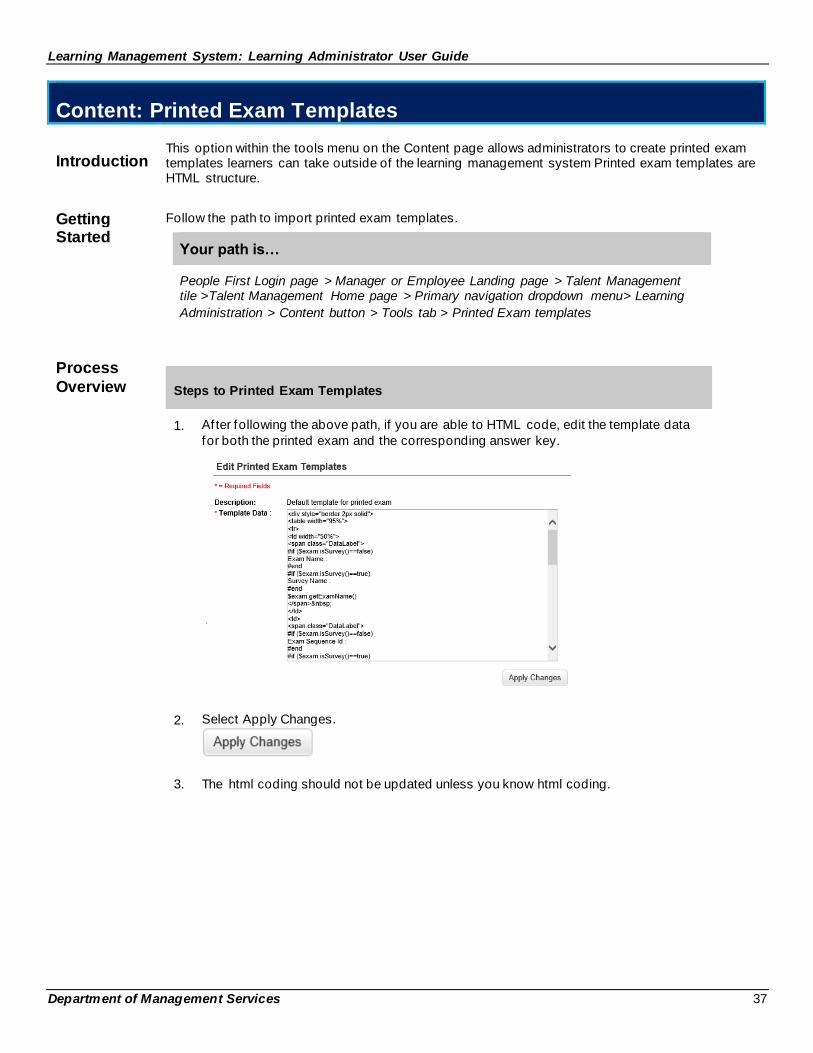
Steps to Printed Exam Templates
1. Af ter following the above path, if you are able to HTML code, edit the template data
for both the printed exam and the corresponding answer key.
2. Select Apply Changes.
3. The html coding should not be updated unless you know html coding.
Learning Management System: Learning Administrator User Guide
Department of Management Services 38
Adding Learning Documents
Introduction
You can add documents (books, videos, standard operating procedures, and so on) to support instructional design and delivery. You can add documents to attach them to courses, curricula, programs, and to tasks for the purpose of instructional design or delivery. Documents are another
form of external links and can be used to publish additional learning materials for scheduled of ferings.
Getting Started
Follow the path to create documents.
Your path is…
People First Login page > Manager or Employee Landing page > Talent Management tile >Talent Management Home page > Primary navigation dropdown menu> Learning
Administration > Content button> Documents tab
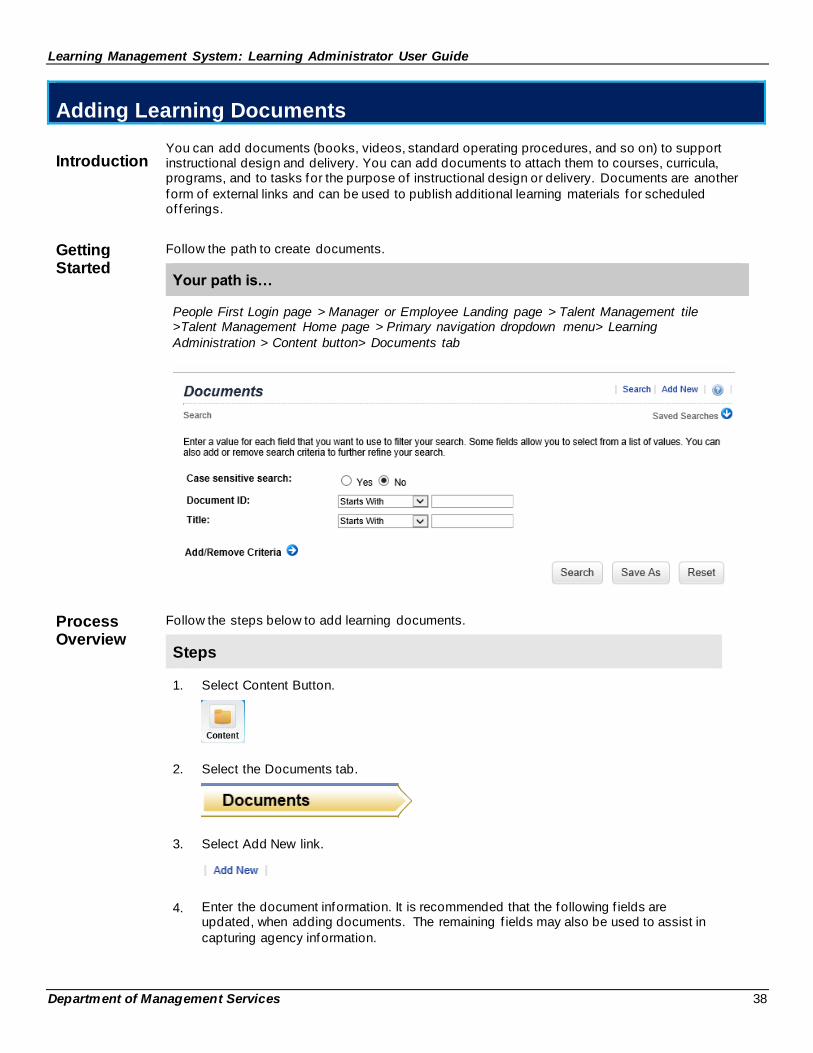
Process Overview
Follow the steps below to add learning documents.
Steps
1. Select Content Button.
2. Select the Documents tab.
3. Select Add New link.
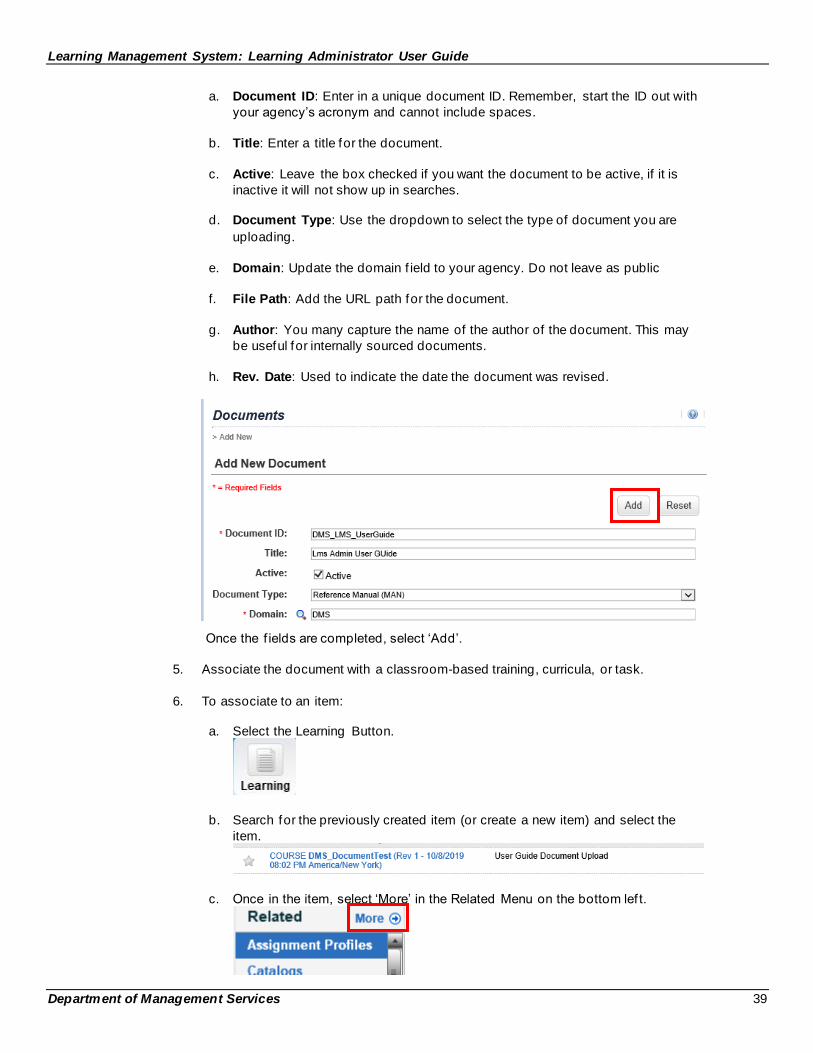
4. Enter the document information. It is recommended that the following f ields are updated, when adding documents. The remaining f ields may also be used to assist in
capturing agency information.
Learning Management System: Learning Administrator User Guide
Department of Management Services 39
a. Document ID: Enter in a unique document ID. Remember, start the ID out with
your agency’s acronym and cannot include spaces.
b. Title: Enter a title for the document.
c. Active: Leave the box checked if you want the document to be active, if it is
inactive it will not show up in searches.
d. Document Type: Use the dropdown to select the type of document you are
uploading.
e. Domain: Update the domain f ield to your agency. Do not leave as public
f. File Path: Add the URL path for the document.
g. Author: You many capture the name of the author of the document. This may
be useful for internally sourced documents.
h. Rev. Date: Used to indicate the date the document was revised.
Once the f ields are completed, select ‘Add’.
5. Associate the document with a classroom-based training, curricula, or task.
6. To associate to an item:
a. Select the Learning Button.
b. Search for the previously created item (or create a new item) and select the
item.
c. Once in the item, select ‘More’ in the Related Menu on the bottom lef t.
Learning Management System: Learning Administrator User Guide
Department of Management Services 40
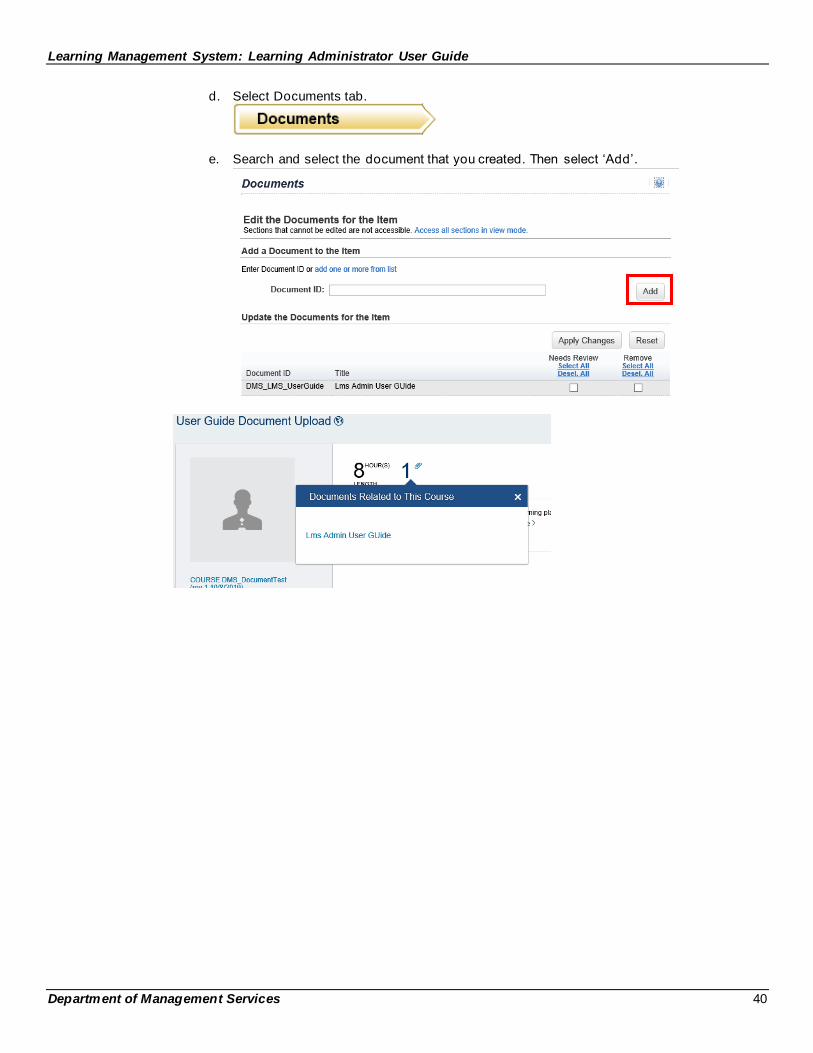
d. Select Documents tab.
e. Search and select the document that you created. Then select ‘Add’.
Learning Management System: Learning Administrator User Guide
Department of Management Services 41
Create an Item
Introduction
An item is the foundation in which all courses are created upon. Administrators can use items to create an online course, classroom courses, or to create a task. The below process overview explains how to create an item for each of the four item types.
Getting Started
Follow the path to create an item for a course.
Your path is…
People First Login page > Manager or Employee Landing page > Talent Management tile >Talent Management Home page > Primary navigation dropdown menu>Learning
Administration > Learning button > Items tab > Add New
Process Overview
Follow the steps below to create an item.
Steps
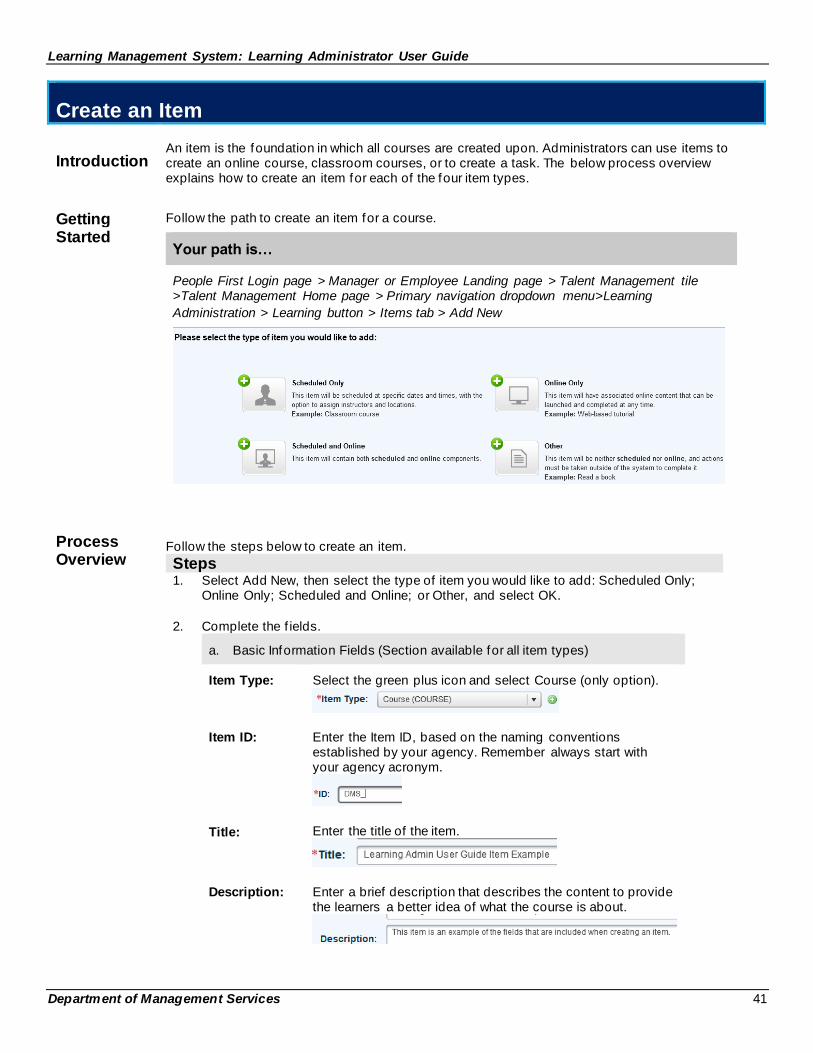
1. Select Add New, then select the type of item you would like to add: Scheduled Only; Online Only; Scheduled and Online; or Other, and select OK.
2. Complete the f ields.
a. Basic Information Fields (Section available for all item types)
Item Type:
Select the green plus icon and select Course (only option).
Item ID:
Enter the Item ID, based on the naming conventions established by your agency. Remember always start with your agency acronym.
Title: Enter the title of the item.
Description:
Enter a brief description that describes the content to provide the learners a better idea of what the course is about.
Learning Management System: Learning Administrator User Guide
Department of Management Services 42
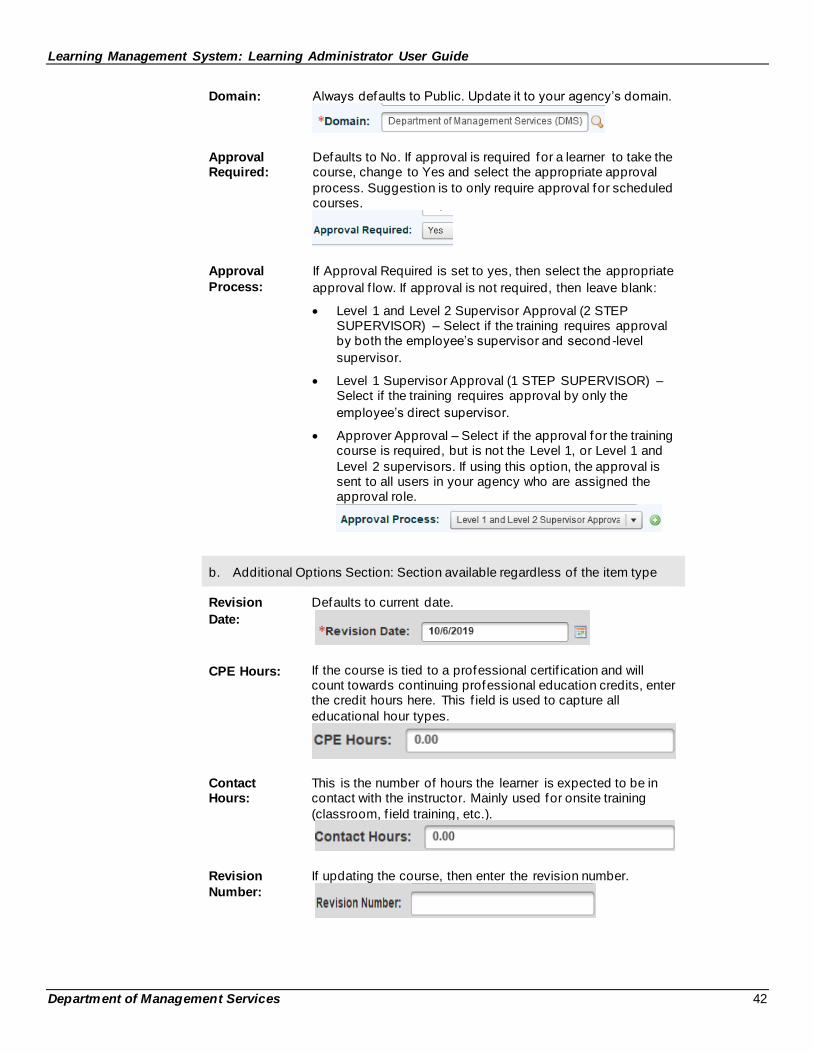
Domain:
Always defaults to Public. Update it to your agency’s domain.
Approval Required:
Defaults to No. If approval is required for a learner to take the course, change to Yes and select the appropriate approval
process. Suggestion is to only require approval for scheduled courses.
Approval
Process:
If Approval Required is set to yes, then select the appropriate
approval f low. If approval is not required, then leave blank:
• Level 1 and Level 2 Supervisor Approval (2 STEP SUPERVISOR) – Select if the training requires approval by both the employee’s supervisor and second -level
supervisor.
• Level 1 Supervisor Approval (1 STEP SUPERVISOR) – Select if the training requires approval by only the
employee’s direct supervisor.
• Approver Approval – Select if the approval for the training course is required, but is not the Level 1, or Level 1 and
Level 2 supervisors. If using this option, the approval is sent to all users in your agency who are assigned the approval role.
b. Additional Options Section: Section available regardless of the item type
Revision
Date:
Defaults to current date.
CPE Hours: If the course is tied to a professional certif ication and will count towards continuing professional education credits, enter the credit hours here. This f ield is used to capture all
educational hour types.
Contact Hours:
This is the number of hours the learner is expected to be in contact with the instructor. Mainly used for onsite training
(classroom, f ield training, etc.).
Revision
Number:
If updating the course, then enter the revision number.
Learning Management System: Learning Administrator User Guide
Department of Management Services 43
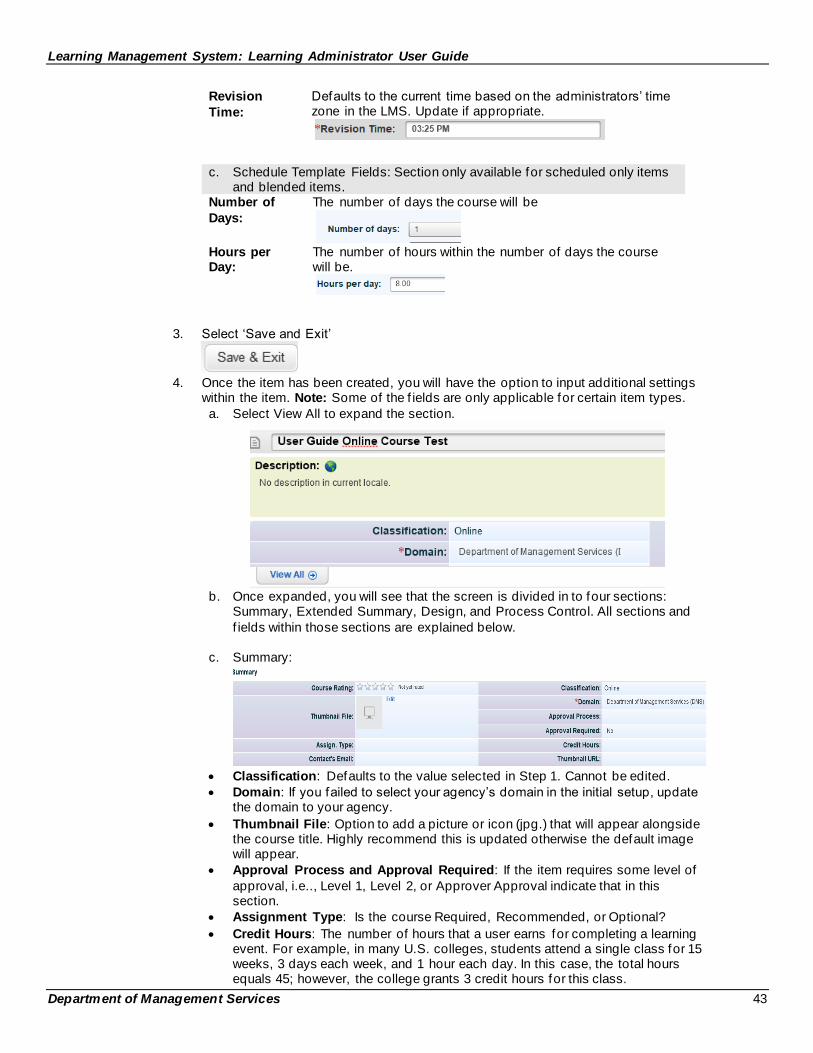
Revision
Time:
Defaults to the current time based on the administrators’ time zone in the LMS. Update if appropriate.
c. Schedule Template Fields: Section only available for scheduled only items and blended items.
Number of
Days:
The number of days the course will be
Hours per Day:
The number of hours within the number of days the course will be.
3. Select ‘Save and Exit’
4. Once the item has been created, you will have the option to input additional settings
within the item. Note: Some of the f ields are only applicable for certain item types.
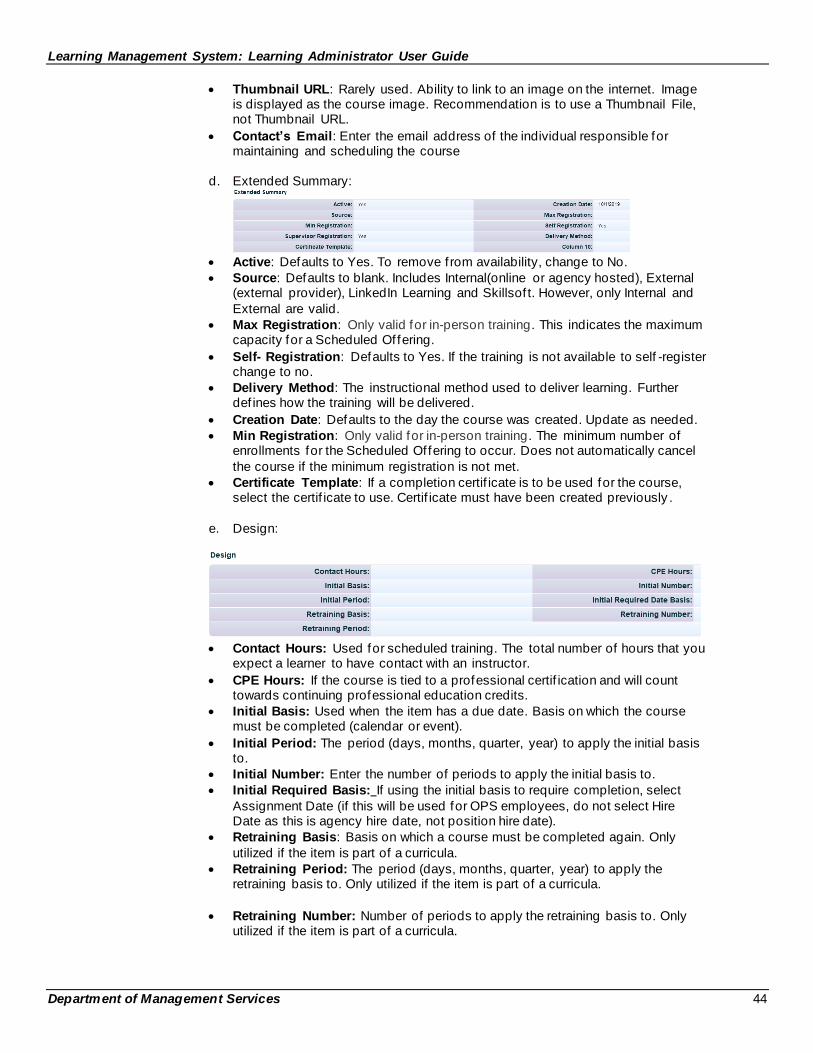
a. Select View All to expand the section.
b. Once expanded, you will see that the screen is divided in to four sections:
Summary, Extended Summary, Design, and Process Control. All sections and
f ields within those sections are explained below.
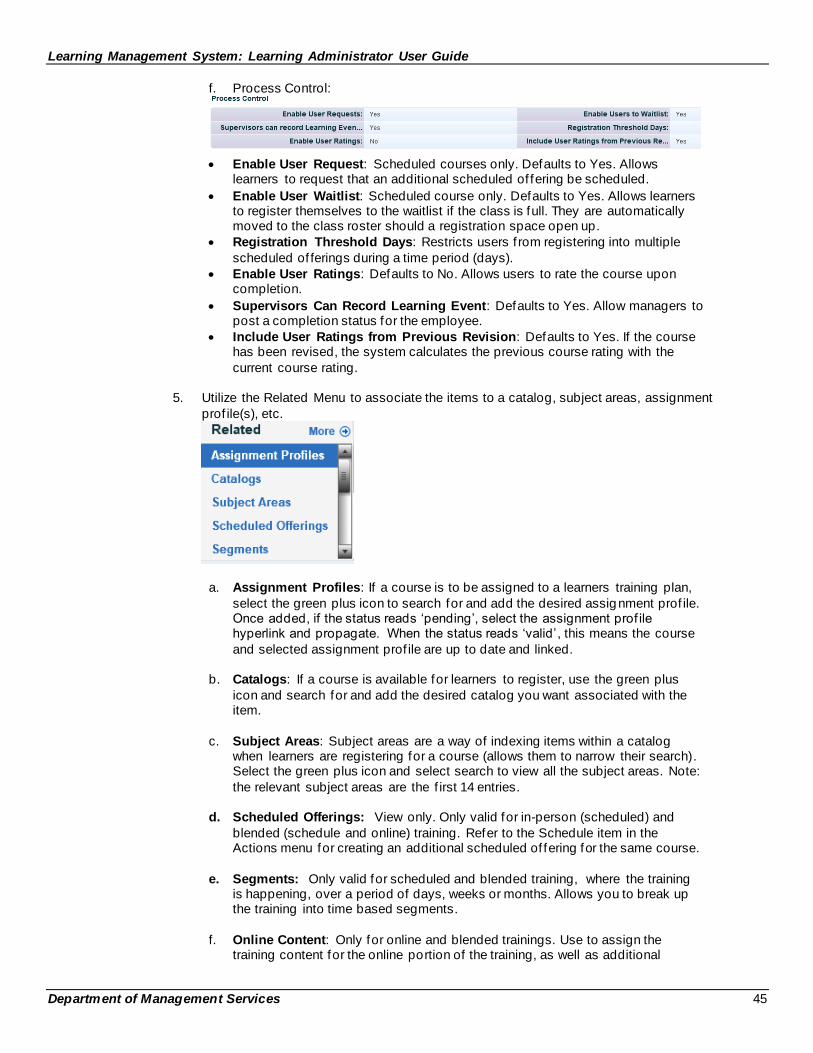
c. Summary:
• Classification: Defaults to the value selected in Step 1. Cannot be edited.
• Domain: If you failed to select your agency’s domain in the initial setup, update the domain to your agency.
• Thumbnail File: Option to add a picture or icon (jpg.) that will appear alongside the course title. Highly recommend this is updated otherwise the default image will appear.
• Approval Process and Approval Required: If the item requires some level of
approval, i.e.., Level 1, Level 2, or Approver Approval indicate that in this section.
• Assignment Type: Is the course Required, Recommended, or Optional?
• Credit Hours: The number of hours that a user earns for completing a learning event. For example, in many U.S. colleges, students attend a single class for 15 weeks, 3 days each week, and 1 hour each day. In this case, the total hours equals 45; however, the college grants 3 credit hours for this class.
Learning Management System: Learning Administrator User Guide
Department of Management Services 44
• Thumbnail URL: Rarely used. Ability to link to an image on the internet. Image is displayed as the course image. Recommendation is to use a Thumbnail File, not Thumbnail URL.
• Contact’s Email: Enter the email address of the individual responsible for maintaining and scheduling the course
d. Extended Summary:
• Active: Defaults to Yes. To remove f rom availability, change to No.
• Source: Defaults to blank. Includes Internal(online or agency hosted), External (external provider), LinkedIn Learning and Skillsof t. However, only Internal and
External are valid.
• Max Registration: Only valid for in-person training. This indicates the maximum capacity for a Scheduled Offering.
• Self- Registration: Defaults to Yes. If the training is not available to self -register change to no.
• Delivery Method: The instructional method used to deliver learning. Further def ines how the training will be delivered.
• Creation Date: Defaults to the day the course was created. Update as needed.
• Min Registration: Only valid for in-person training. The minimum number of enrollments for the Scheduled Offering to occur. Does not automatically cancel
the course if the minimum registration is not met.
• Certificate Template: If a completion certif icate is to be used for the course, select the certif icate to use. Certif icate must have been created previously .
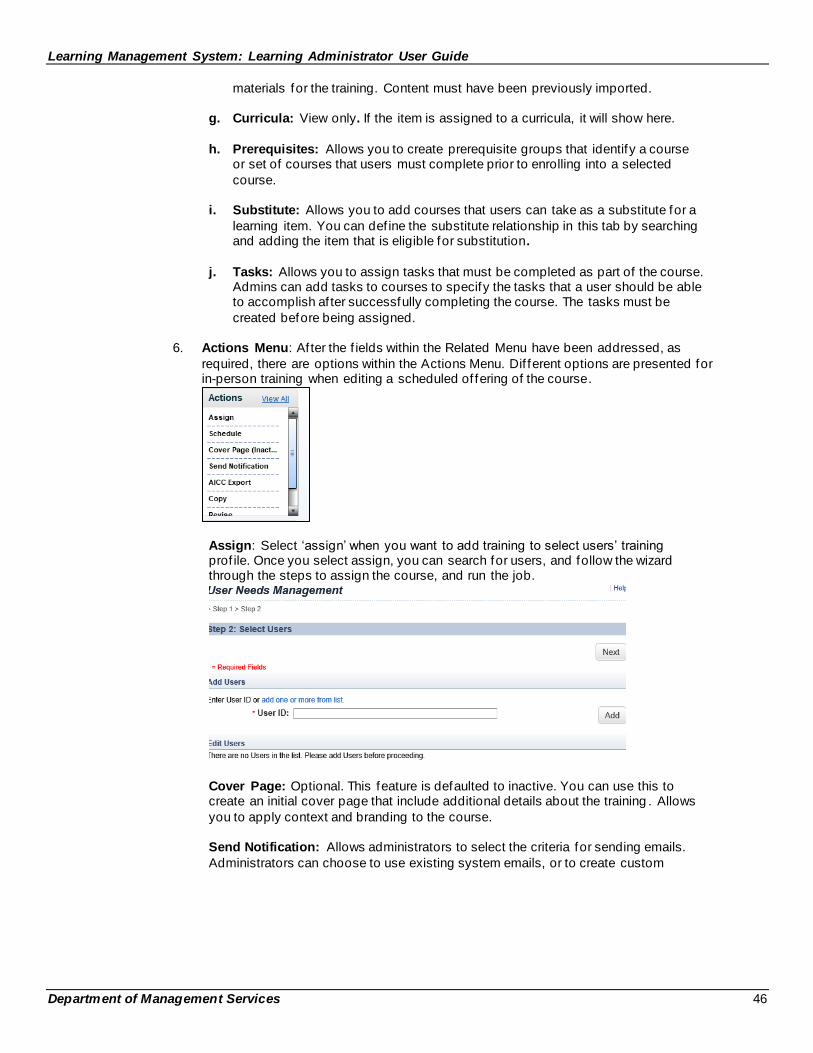
e. Design:
• Contact Hours: Used for scheduled training. The total number of hours that you
expect a learner to have contact with an instructor.
• CPE Hours: If the course is tied to a professional certif ication and will count towards continuing professional education credits.
• Initial Basis: Used when the item has a due date. Basis on which the course must be completed (calendar or event).
• Initial Period: The period (days, months, quarter, year) to apply the initial basis to.
• Initial Number: Enter the number of periods to apply the initial basis to.
• Initial Required Basis: If using the initial basis to require completion, select
Assignment Date (if this will be used for OPS employees, do not select Hire Date as this is agency hire date, not position hire date).
• Retraining Basis: Basis on which a course must be completed again. Only
utilized if the item is part of a curricula.
• Retraining Period: The period (days, months, quarter, year) to apply the retraining basis to. Only utilized if the item is part of a curricula.
• Retraining Number: Number of periods to apply the retraining basis to. Only utilized if the item is part of a curricula.
Learning Management System: Learning Administrator User Guide
Department of Management Services 45
f. Process Control:
• Enable User Request: Scheduled courses only. Defaults to Yes. Allows
learners to request that an additional scheduled of fering be scheduled.
• Enable User Waitlist: Scheduled course only. Defaults to Yes. Allows learners to register themselves to the waitlist if the class is full. They are automatically moved to the class roster should a registration space open up.
• Registration Threshold Days: Restricts users f rom registering into multiple
scheduled of ferings during a time period (days).
• Enable User Ratings: Defaults to No. Allows users to rate the course upon completion.
• Supervisors Can Record Learning Event: Defaults to Yes. Allow managers to post a completion status for the employee.
• Include User Ratings from Previous Revision: Defaults to Yes. If the course has been revised, the system calculates the previous course rating with the
current course rating.
5. Utilize the Related Menu to associate the items to a catalog, subject areas, assignment
prof ile(s), etc.
a. Assignment Profiles: If a course is to be assigned to a learners training plan,
select the green plus icon to search for and add the desired assignment prof ile. Once added, if the status reads ‘pending’, select the assignment prof ile hyperlink and propagate. When the status reads ‘valid’, this means the course
and selected assignment prof ile are up to date and linked.
b. Catalogs: If a course is available for learners to register, use the green plus
icon and search for and add the desired catalog you want associated with the item.
c. Subject Areas: Subject areas are a way of indexing items within a catalog when learners are registering for a course (allows them to narrow their search). Select the green plus icon and select search to view all the subject areas. Note:
the relevant subject areas are the f irst 14 entries.
d. Scheduled Offerings: View only. Only valid for in-person (scheduled) and
blended (schedule and online) training. Refer to the Schedule item in the Actions menu for creating an additional scheduled of fering for the same course.
e. Segments: Only valid for scheduled and blended training, where the training is happening, over a period of days, weeks or months. Allows you to break up the training into time based segments.
f. Online Content: Only for online and blended trainings. Use to assign the
training content for the online portion of the training, as well as additional
Learning Management System: Learning Administrator User Guide
Department of Management Services 46
materials for the training. Content must have been previously imported.
g. Curricula: View only. If the item is assigned to a curricula, it will show here.
h. Prerequisites: Allows you to create prerequisite groups that identify a course
or set of courses that users must complete prior to enrolling into a selected
course.
i. Substitute: Allows you to add courses that users can take as a substitute for a
learning item. You can def ine the substitute relationship in this tab by searching and adding the item that is eligible for substitution.
j. Tasks: Allows you to assign tasks that must be completed as part of the course. Admins can add tasks to courses to specify the tasks that a user should be able to accomplish af ter successfully completing the course. The tasks must be
created before being assigned.
6. Actions Menu: Af ter the f ields within the Related Menu have been addressed, as
required, there are options within the Actions Menu. Dif ferent options are presented for in-person training when editing a scheduled of fering of the course.
Assign: Select ‘assign’ when you want to add training to select users’ training prof ile. Once you select assign, you can search for users, and follow the wizard through the steps to assign the course, and run the job.
Cover Page: Optional. This feature is defaulted to inactive. You can use this to create an initial cover page that include additional details about the training . Allows
you to apply context and branding to the course. Send Notification: Allows administrators to select the criteria for sending emails.
Administrators can choose to use existing system emails, or to create custom
Learning Management System: Learning Administrator User Guide
Department of Management Services 47
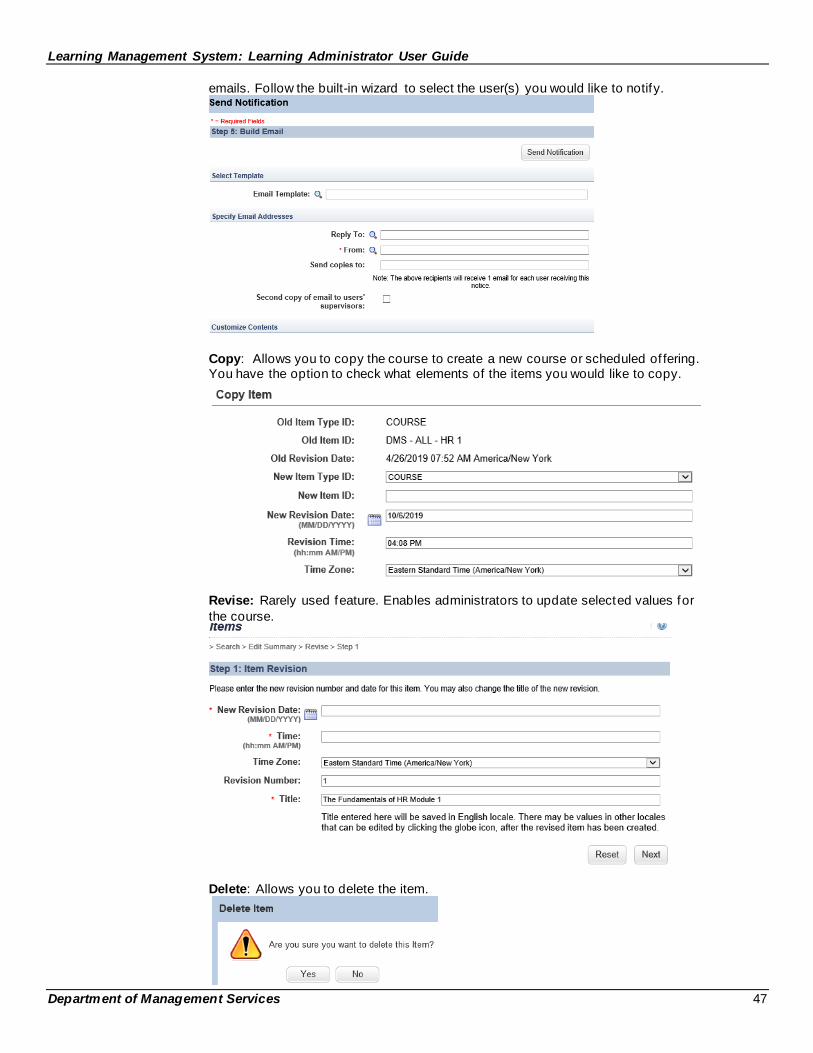
emails. Follow the built-in wizard to select the user(s) you would like to notify.
Copy: Allows you to copy the course to create a new course or scheduled of fering. You have the option to check what elements of the items you would like to copy.
Revise: Rarely used feature. Enables administrators to update selected values for
the course.
Delete: Allows you to delete the item.
Learning Management System: Learning Administrator User Guide
Department of Management Services 48
AICC Export: Legacy feature and is not used.
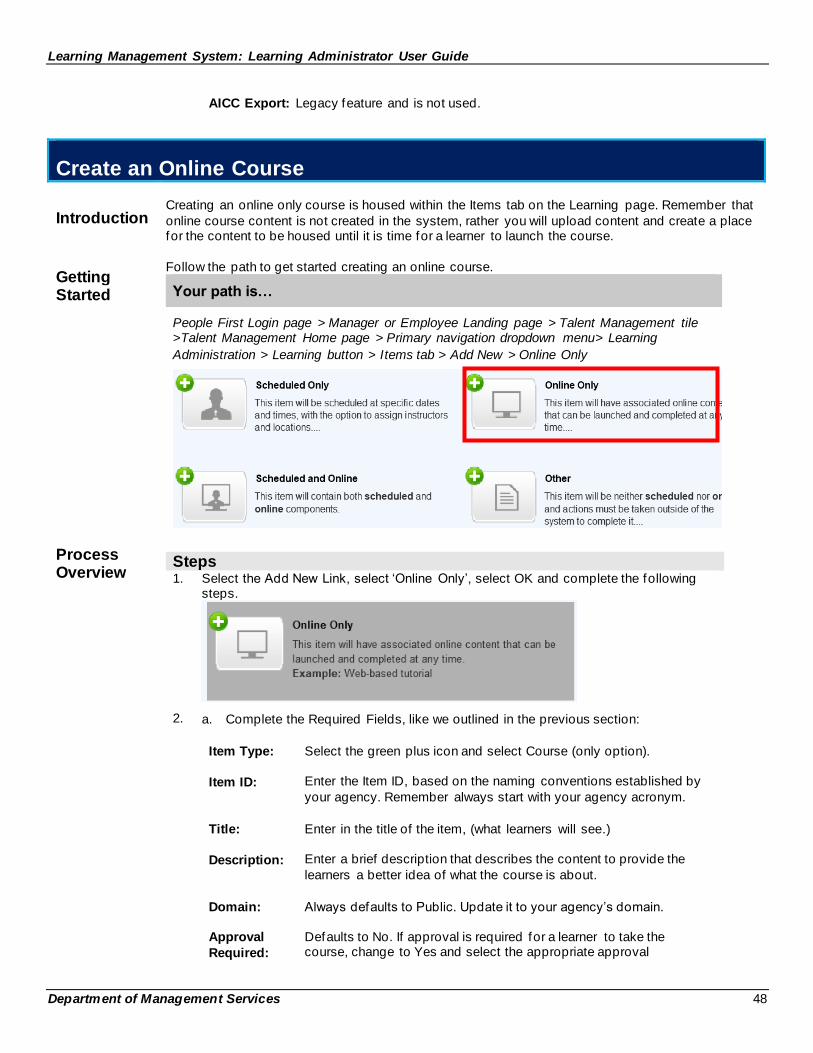
Create an Online Course
Introduction
Creating an online only course is housed within the Items tab on the Learning page. Remember that
online course content is not created in the system, rather you will upload content and create a place for the content to be housed until it is time for a learner to launch the course.
Getting Started
Follow the path to get started creating an online course.
Your path is…
People First Login page > Manager or Employee Landing page > Talent Management tile >Talent Management Home page > Primary navigation dropdown menu> Learning
Administration > Learning button > Items tab > Add New > Online Only
Process Overview
Steps
1. Select the Add New Link, select ‘Online Only’, select OK and complete the following steps.
2. a. Complete the Required Fields, like we outlined in the previous section:
Item Type: Select the green plus icon and select Course (only option).
Item ID: Enter the Item ID, based on the naming conventions established by
your agency. Remember always start with your agency acronym.
Title: Enter in the title of the item, (what learners will see.)
Description: Enter a brief description that describes the content to provide the
learners a better idea of what the course is about.
Domain: Always defaults to Public. Update it to your agency’s domain.
Approval
Required:
Defaults to No. If approval is required for a learner to take the course, change to Yes and select the appropriate approval
Learning Management System: Learning Administrator User Guide
Department of Management Services 49
process. Suggestion is to only require approval for scheduled courses.
Approval
Process:
If Approval Required is set to yes, then select the appropriate
approval f low. If approval is not required, then leave blank:
• Level 1 and Level 2 Supervisor Approval (2 STEP
SUPERVISOR) – Select if the training requires approval by
both the employee’s supervisor and second -level supervisor.
• Level 1 Supervisor Approval (1 STEP SUPERVISOR) – Select if the training requires approval by only the employee’s direct
supervisor.
• Approver Approval – Select if the approval for the training course is required, but is not the Level 1, or Level 1 and Level
2 supervisors. If using this option, the approval is sent to all
users in your agency who are assigned the approval role.
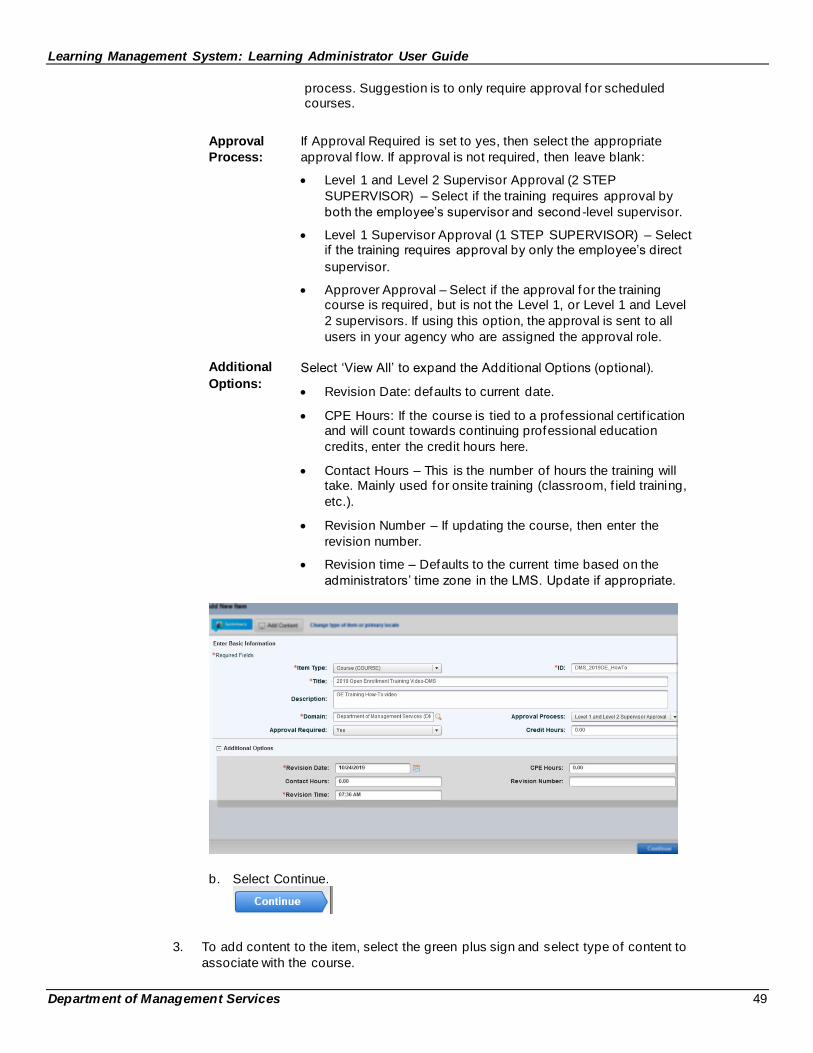
Additional
Options:
Select ‘View All’ to expand the Additional Options (optional).
• Revision Date: defaults to current date.
• CPE Hours: If the course is tied to a professional certif ication and will count towards continuing professional education
credits, enter the credit hours here.
• Contact Hours – This is the number of hours the training will take. Mainly used for onsite training (classroom, f ield training,
etc.).
• Revision Number – If updating the course, then enter the
revision number.
• Revision time – Defaults to the current time based on the
administrators’ time zone in the LMS. Update if appropriate.
b. Select Continue.
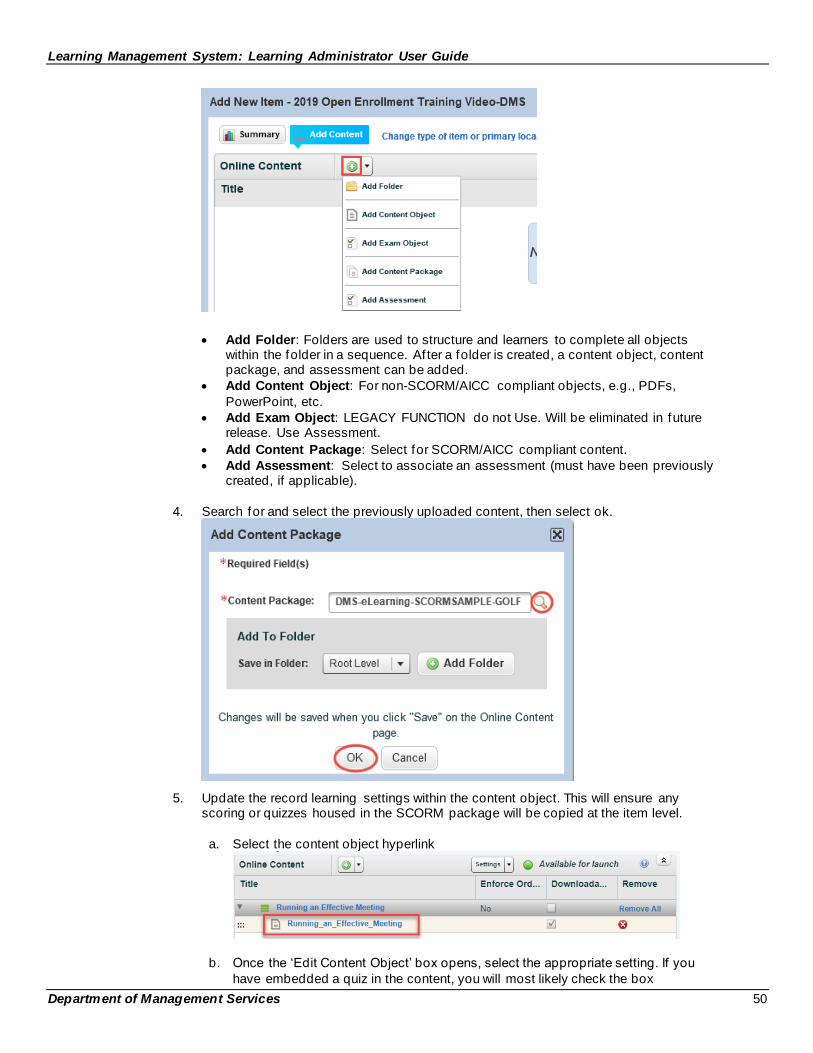
3. To add content to the item, select the green plus sign and select type of content to
associate with the course.
Learning Management System: Learning Administrator User Guide
Department of Management Services 50
• Add Folder: Folders are used to structure and learners to complete all objects within the folder in a sequence. Af ter a folder is created, a content object, content package, and assessment can be added.
• Add Content Object: For non-SCORM/AICC compliant objects, e.g., PDFs,
PowerPoint, etc.
• Add Exam Object: LEGACY FUNCTION do not Use. Will be eliminated in future release. Use Assessment.
• Add Content Package: Select for SCORM/AICC compliant content.
• Add Assessment: Select to associate an assessment (must have been previously created, if applicable).
4. Search for and select the previously uploaded content, then select ok.
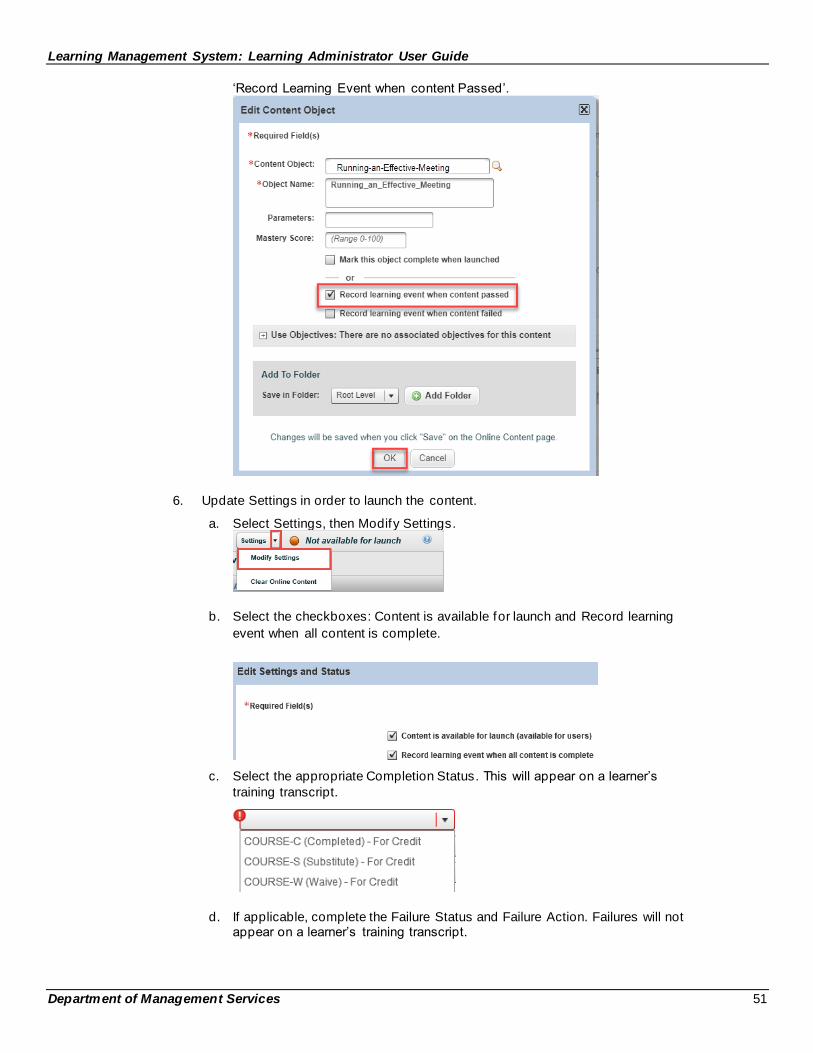
5. Update the record learning settings within the content object. This will ensure any scoring or quizzes housed in the SCORM package will be copied at the item level.
a. Select the content object hyperlink
b. Once the ‘Edit Content Object’ box opens, select the appropriate setting. If you
have embedded a quiz in the content, you will most likely check the box
Learning Management System: Learning Administrator User Guide
Department of Management Services 51
‘Record Learning Event when content Passed’.
6. Update Settings in order to launch the content.
a. Select Settings, then Modify Settings.
b. Select the checkboxes: Content is available for launch and Record learning
event when all content is complete.
c. Select the appropriate Completion Status . This will appear on a learner’s
training transcript.
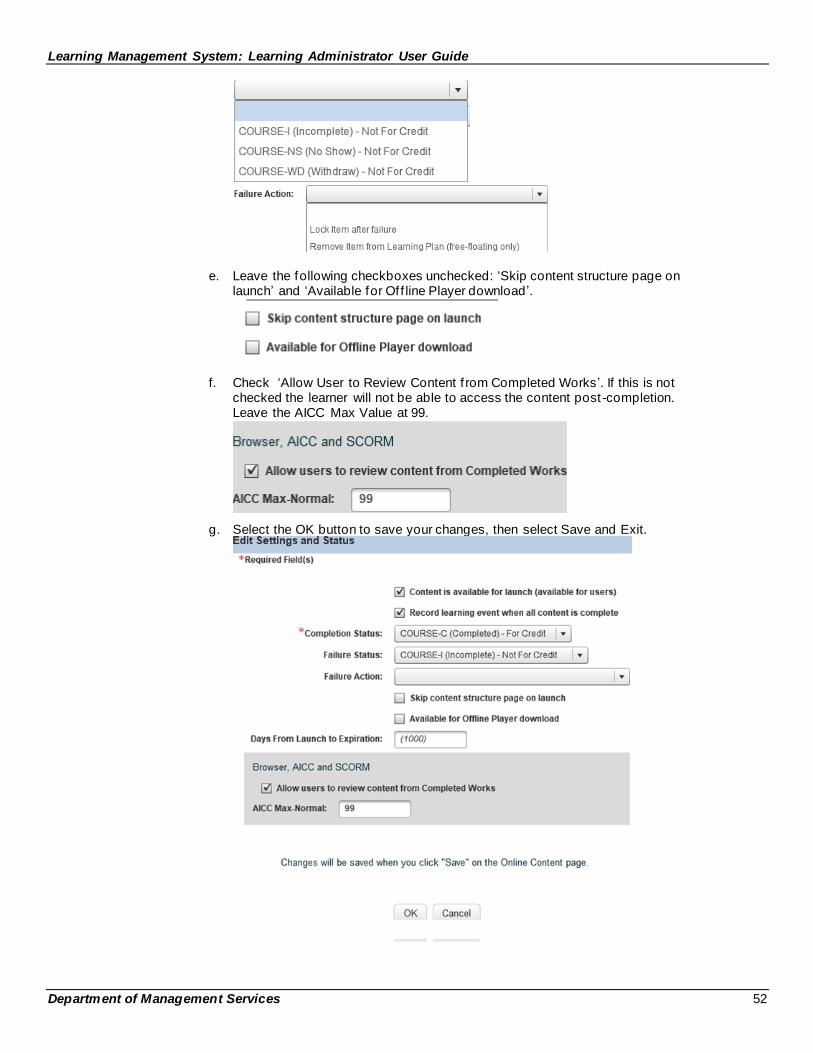
d. If applicable, complete the Failure Status and Failure Action. Failures will not appear on a learner’s training transcript.
Learning Management System: Learning Administrator User Guide
Department of Management Services 52
e. Leave the following checkboxes unchecked: ‘Skip content structure page on launch’ and ‘Available for Of f line Player download ’.
f. Check ‘Allow User to Review Content f rom Completed Works ’. If this is not checked the learner will not be able to access the content post-completion. Leave the AICC Max Value at 99.
g. Select the OK button to save your changes, then select Save and Exit.
Learning Management System: Learning Administrator User Guide
Department of Management Services 53
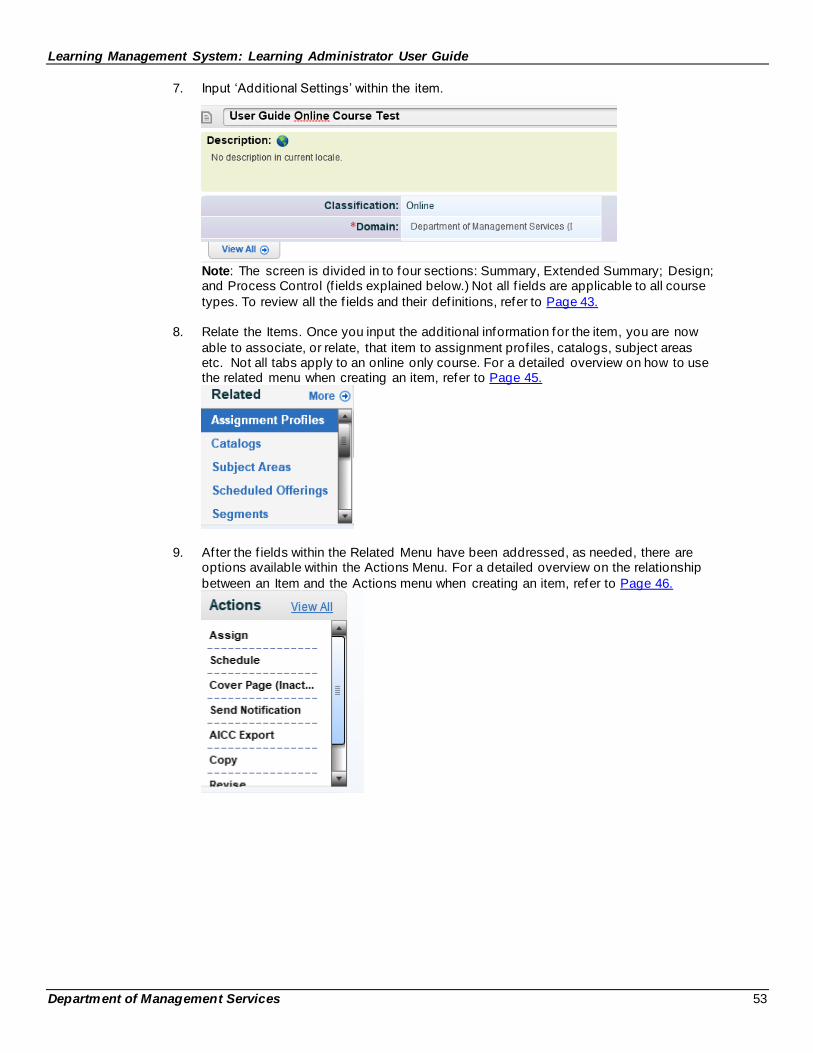
7. Input ‘Additional Settings’ within the item.
Note: The screen is divided in to four sections: Summary, Extended Summary; Design; and Process Control (f ields explained below.) Not all f ields are applicable to all course
types. To review all the f ields and their def initions, refer to Page 43.
8. Relate the Items. Once you input the additional information for the item, you are now
able to associate, or relate, that item to assignment prof iles, catalogs, subject areas etc. Not all tabs apply to an online only course. For a detailed overview on how to use the related menu when creating an item, refer to Page 45.
9. Af ter the f ields within the Related Menu have been addressed, as needed, there are options available within the Actions Menu. For a detailed overview on the relationship
between an Item and the Actions menu when creating an item, refer to Page 46.
Learning Management System: Learning Administrator User Guide
Department of Management Services 54
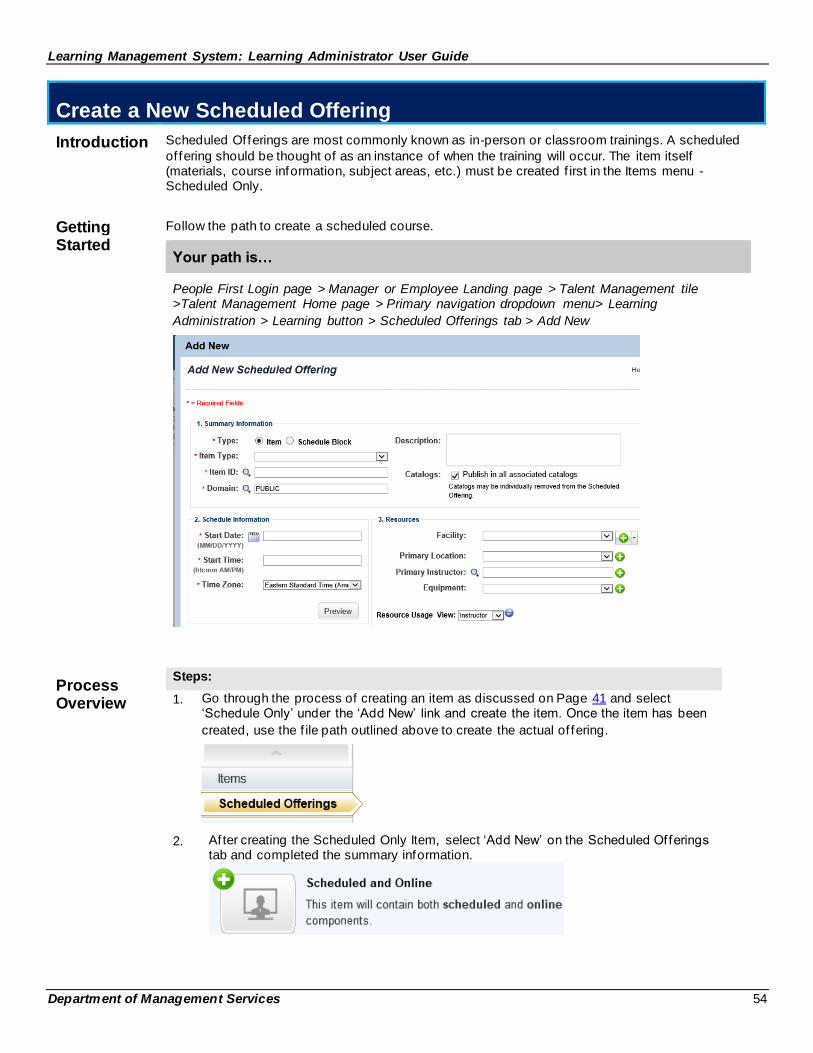
Create a New Scheduled Offering
Introduction Scheduled Offerings are most commonly known as in-person or classroom trainings. A scheduled
of fering should be thought of as an instance of when the training will occur. The item itself (materials, course information, subject areas, etc.) must be created f irst in the Items menu -Scheduled Only.
Getting Started
Follow the path to create a scheduled course.
Your path is…
People First Login page > Manager or Employee Landing page > Talent Management tile >Talent Management Home page > Primary navigation dropdown menu> Learning
Administration > Learning button > Scheduled Offerings tab > Add New
Process Overview
Steps:
1. Go through the process of creating an item as discussed on Page 41 and select ‘Schedule Only’ under the ‘Add New’ link and create the item. Once the item has been
created, use the f ile path outlined above to create the actual of fering.
2. Af ter creating the Scheduled Only Item, select ‘Add New’ on the Scheduled Offerings tab and completed the summary information.
Learning Management System: Learning Administrator User Guide
Department of Management Services 55
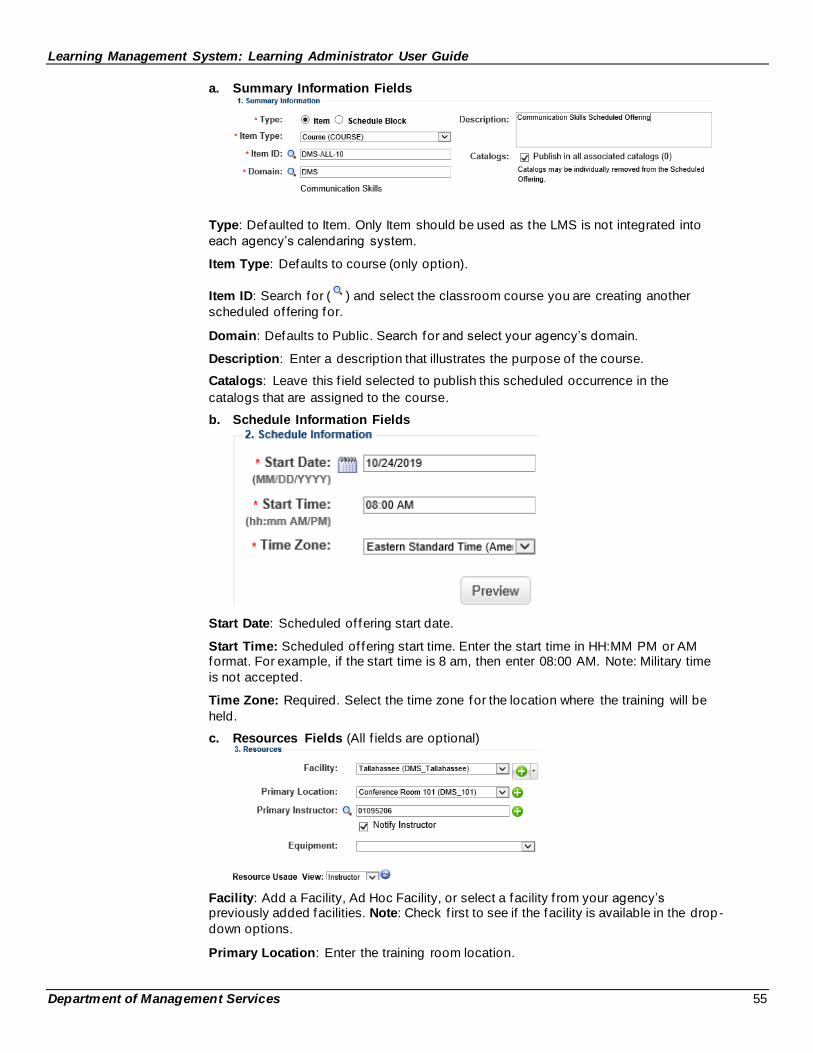
a. Summary Information Fields
Type: Defaulted to Item. Only Item should be used as the LMS is not integrated into
each agency’s calendaring system.
Item Type: Defaults to course (only option).
Item ID: Search for ( ) and select the classroom course you are creating another
scheduled of fering for.
Domain: Defaults to Public. Search for and select your agency’s domain.
Description: Enter a description that illustrates the purpose of the course.
Catalogs: Leave this f ield selected to publish this scheduled occurrence in the
catalogs that are assigned to the course.
b. Schedule Information Fields
Start Date: Scheduled of fering start date.
Start Time: Scheduled of fering start time. Enter the start time in HH:MM PM or AM format. For example, if the start time is 8 am, then enter 08:00 AM. Note: Military time
is not accepted.
Time Zone: Required. Select the time zone for the location where the training will be
held.
c. Resources Fields (All f ields are optional)
Facility: Add a Facility, Ad Hoc Facility, or select a facility f rom your agency’s previously added facilities. Note: Check f irst to see if the facility is available in the drop-
down options.
Primary Location: Enter the training room location.
Learning Management System: Learning Administrator User Guide
Department of Management Services 56
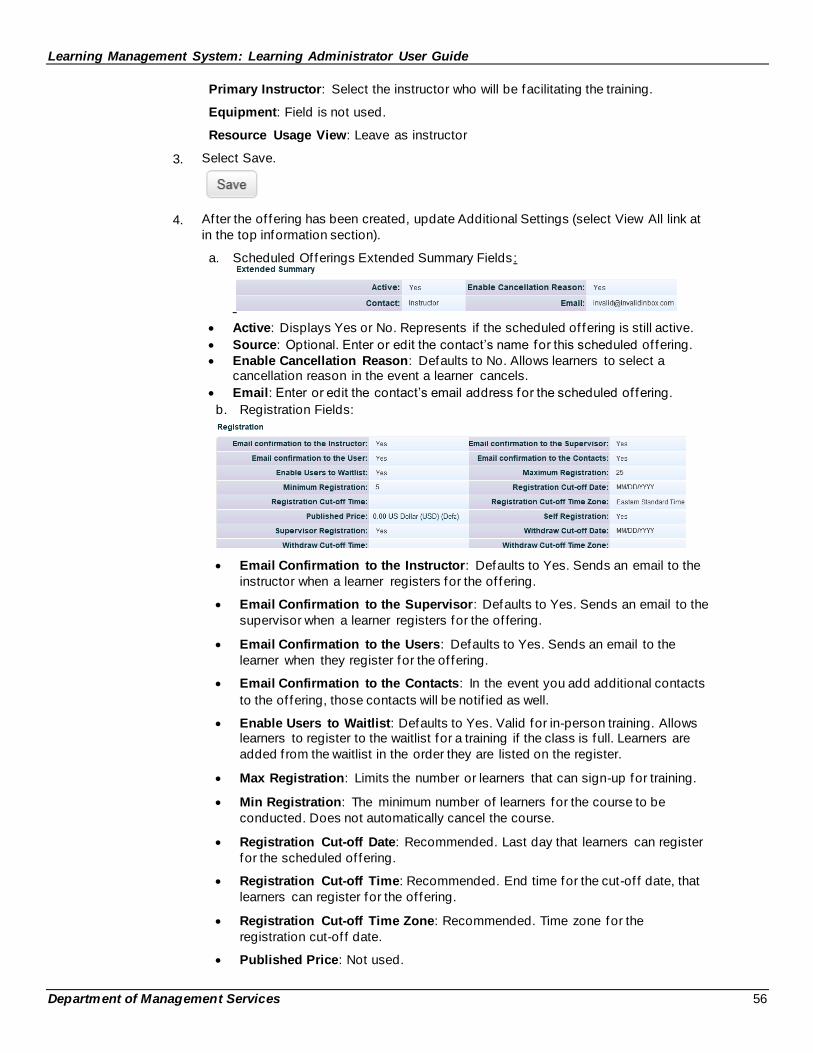
Primary Instructor: Select the instructor who will be facilitating the training.
Equipment: Field is not used.
Resource Usage View: Leave as instructor
3. Select Save.
4. Af ter the of fering has been created, update Additional Settings (select View All link at
in the top information section).
a. Scheduled Offerings Extended Summary Fields:
• Active: Displays Yes or No. Represents if the scheduled of fering is still active.
• Source: Optional. Enter or edit the contact’s name for this scheduled of fering.
• Enable Cancellation Reason: Defaults to No. Allows learners to select a cancellation reason in the event a learner cancels.
• Email: Enter or edit the contact’s email address for the scheduled of fering.
b. Registration Fields:
• Email Confirmation to the Instructor: Defaults to Yes. Sends an email to the
instructor when a learner registers for the of fering.
• Email Confirmation to the Supervisor: Defaults to Yes. Sends an email to the
supervisor when a learner registers for the of fering.
• Email Confirmation to the Users: Defaults to Yes. Sends an email to the
learner when they register for the of fering.
• Email Confirmation to the Contacts: In the event you add additional contacts
to the of fering, those contacts will be notif ied as well.
• Enable Users to Waitlist: Defaults to Yes. Valid for in-person training. Allows learners to register to the waitlist for a training if the class is full. Learners are
added f rom the waitlist in the order they are listed on the register.
• Max Registration: Limits the number or learners that can sign-up for training.
• Min Registration: The minimum number of learners for the course to be
conducted. Does not automatically cancel the course.
• Registration Cut-off Date: Recommended. Last day that learners can register
for the scheduled of fering.
• Registration Cut-off Time: Recommended. End time for the cut-of f date, that
learners can register for the of fering.
• Registration Cut-off Time Zone: Recommended. Time zone for the
registration cut-of f date.
• Published Price: Not used.
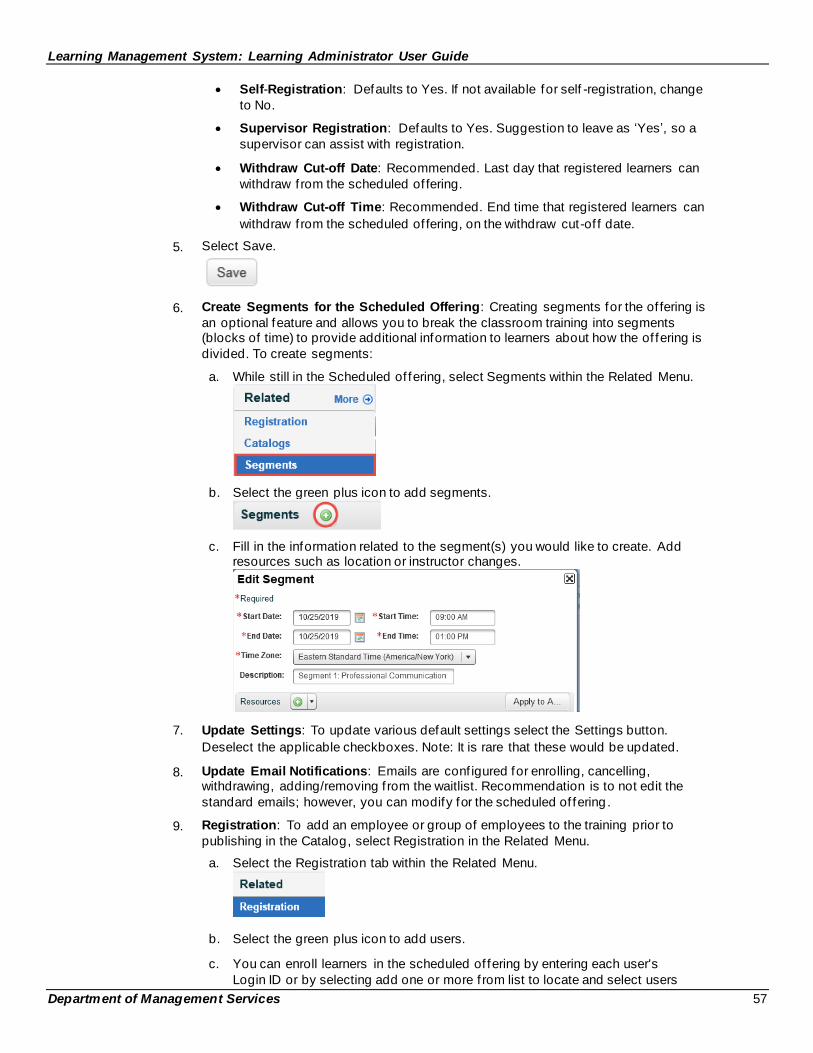
Learning Management System: Learning Administrator User Guide
Department of Management Services 57
• Self-Registration: Defaults to Yes. If not available for self -registration, change
to No.
• Supervisor Registration: Defaults to Yes. Suggestion to leave as ‘Yes’, so a
supervisor can assist with registration.
• Withdraw Cut-off Date: Recommended. Last day that registered learners can
withdraw f rom the scheduled of fering.
• Withdraw Cut-off Time: Recommended. End time that registered learners can
withdraw f rom the scheduled of fering, on the withdraw cut-of f date. •
5. Select Save.
6. Create Segments for the Scheduled Offering: Creating segments for the of fering is
an optional feature and allows you to break the classroom training into segments (blocks of time) to provide additional information to learners about how the of fering is
divided. To create segments:
a. While still in the Scheduled of fering, select Segments within the Related Menu.
b. Select the green plus icon to add segments.
c. Fill in the information related to the segment(s) you would like to create. Add resources such as location or instructor changes.
7. Update Settings: To update various default settings select the Settings button.
Deselect the applicable checkboxes. Note: It is rare that these would be updated.
8. Update Email Notifications: Emails are conf igured for enrolling, cancelling, withdrawing, adding/removing f rom the waitlist. Recommendation is to not edit the
standard emails; however, you can modify for the scheduled of fering .
9. Registration: To add an employee or group of employees to the training prior to
publishing in the Catalog, select Registration in the Related Menu.
a. Select the Registration tab within the Related Menu.
b. Select the green plus icon to add users.
c. You can enroll learners in the scheduled of fering by entering each user's
Login ID or by selecting add one or more f rom list to locate and select users
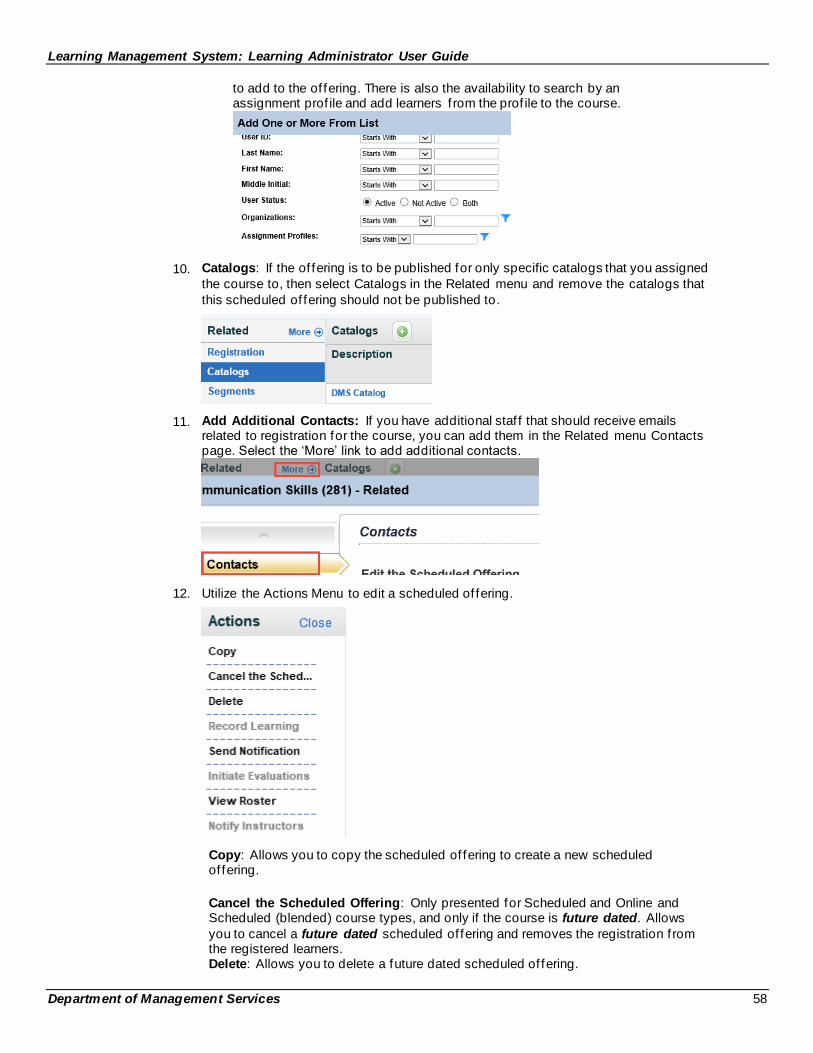
Learning Management System: Learning Administrator User Guide
Department of Management Services 58
to add to the of fering. There is also the availability to search by an assignment prof ile and add learners f rom the prof ile to the course.
10. Catalogs: If the of fering is to be published for only specific catalogs that you assigned
the course to, then select Catalogs in the Related menu and remove the catalogs that
this scheduled of fering should not be published to.
11. Add Additional Contacts: If you have additional staf f that should receive emails related to registration for the course, you can add them in the Related menu Contacts page. Select the ‘More’ link to add additional contacts.
12. Utilize the Actions Menu to edit a scheduled of fering.
Copy: Allows you to copy the scheduled of fering to create a new scheduled of fering.
Cancel the Scheduled Offering: Only presented for Scheduled and Online and Scheduled (blended) course types, and only if the course is future dated. Allows
you to cancel a future dated scheduled of fering and removes the registration f rom the registered learners. Delete: Allows you to delete a future dated scheduled of fering.
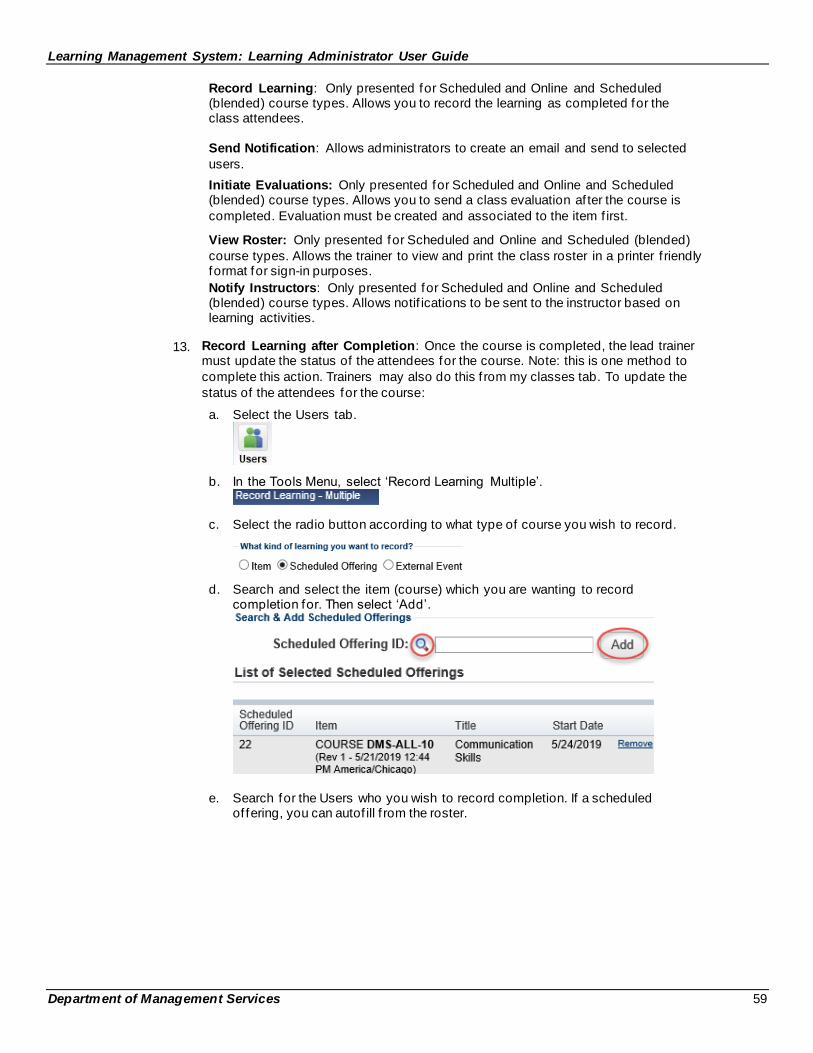
Learning Management System: Learning Administrator User Guide
Department of Management Services 59
Record Learning: Only presented for Scheduled and Online and Scheduled (blended) course types. Allows you to record the learning as completed for the class attendees.
Send Notification: Allows administrators to create an email and send to selected
users.
Initiate Evaluations: Only presented for Scheduled and Online and Scheduled (blended) course types. Allows you to send a class evaluation af ter the course is
completed. Evaluation must be created and associated to the item f irst.
View Roster: Only presented for Scheduled and Online and Scheduled (blended)
course types. Allows the trainer to view and print the class roster in a printer f riendly format for sign-in purposes.
Notify Instructors: Only presented for Scheduled and Online and Scheduled (blended) course types. Allows notif ications to be sent to the instructor based on learning activities.
13. Record Learning after Completion: Once the course is completed, the lead trainer must update the status of the attendees for the course. Note: this is one method to
complete this action. Trainers may also do this f rom my classes tab. To update the
status of the attendees for the course:
a. Select the Users tab.
b. In the Tools Menu, select ‘Record Learning Multiple’.
c. Select the radio button according to what type of course you wish to record.
d. Search and select the item (course) which you are wanting to record completion for. Then select ‘Add’.
e. Search for the Users who you wish to record completion. If a scheduled of fering, you can autof ill f rom the roster.
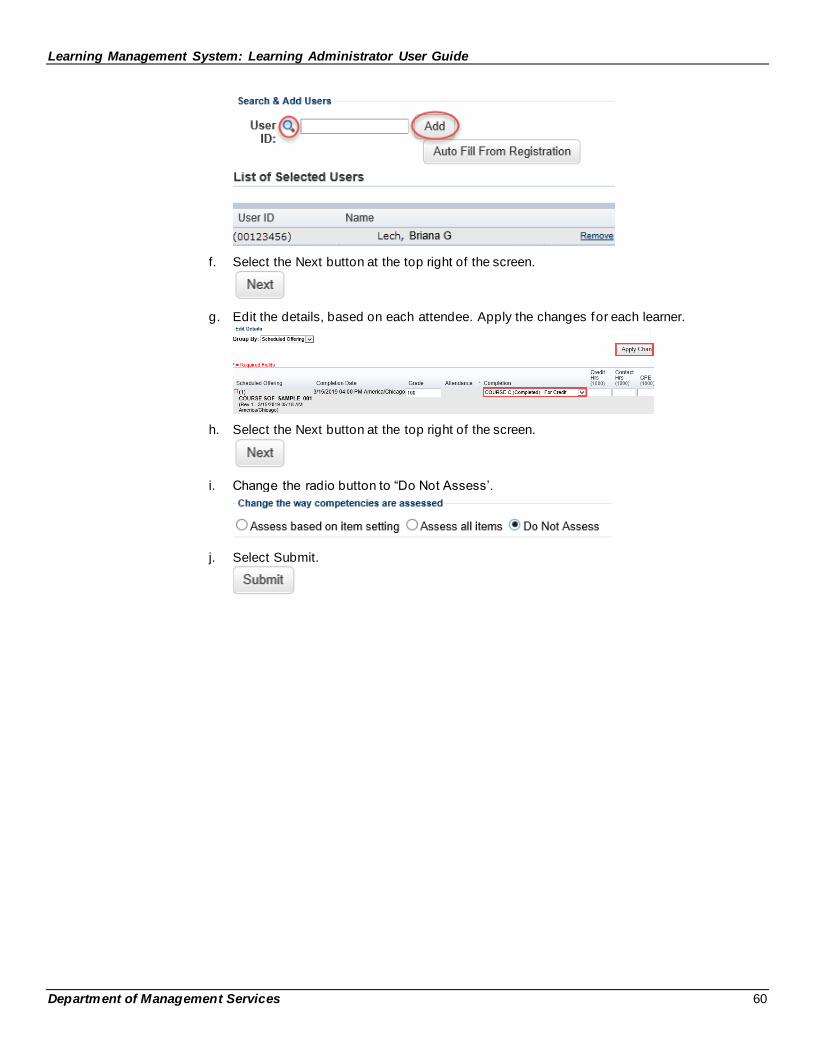
Learning Management System: Learning Administrator User Guide
Department of Management Services 60
f. Select the Next button at the top right of the screen.
g. Edit the details, based on each attendee. Apply the changes for each learner.
h. Select the Next button at the top right of the screen.
i. Change the radio button to “Do Not Assess’.
j. Select Submit.
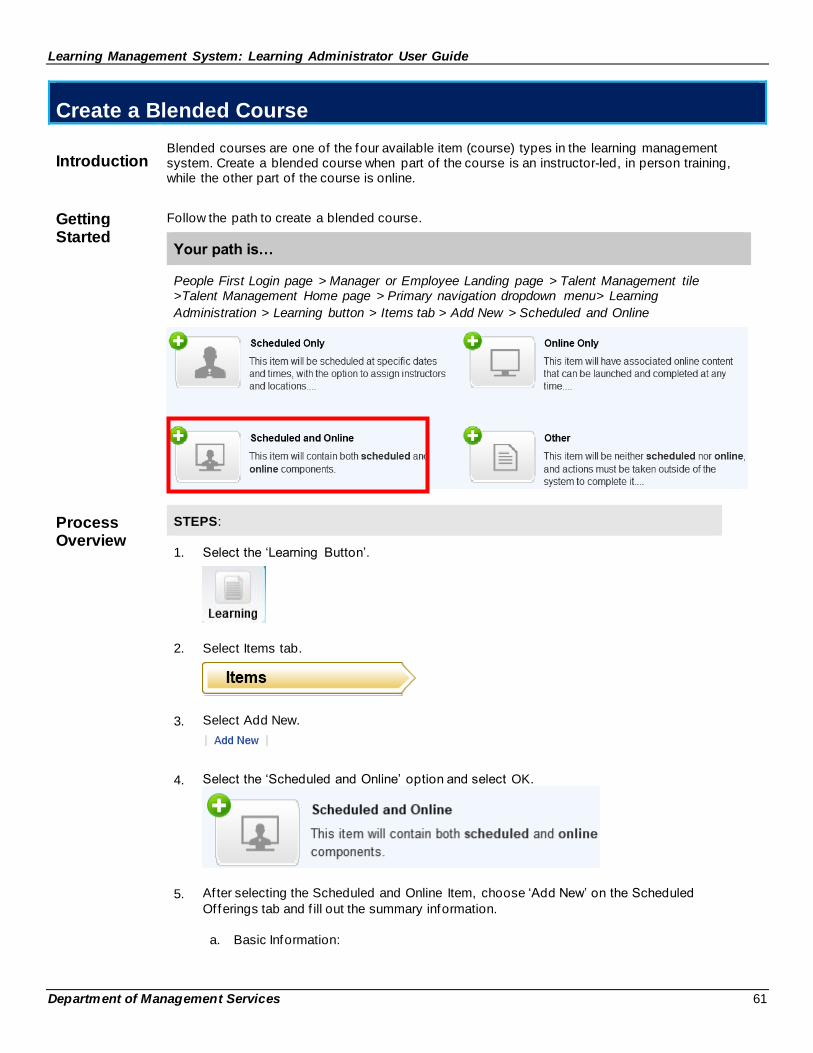
Learning Management System: Learning Administrator User Guide
Department of Management Services 61
Create a Blended Course
Introduction
Blended courses are one of the four available item (course) types in the learning management system. Create a blended course when part of the course is an instructor-led, in person training, while the other part of the course is online.
Getting Started
Follow the path to create a blended course.
Your path is…
People First Login page > Manager or Employee Landing page > Talent Management tile >Talent Management Home page > Primary navigation dropdown menu> Learning
Administration > Learning button > Items tab > Add New > Scheduled and Online
Process Overview
STEPS:
1. Select the ‘Learning Button’.
2. Select Items tab.
3. Select Add New.
4. Select the ‘Scheduled and Online’ option and select OK.
5. Af ter selecting the Scheduled and Online Item, choose ‘Add New’ on the Scheduled
Offerings tab and f ill out the summary information.
a. Basic Information:
Learning Management System: Learning Administrator User Guide
Department of Management Services 62
Item Type:
Select the green plus icon and select Course (only option)
Item ID:
Enter the Item ID, based on the naming conventions established by
your agency. Remember always start with your agency acronym.
Title: Enter in the title of the item (what learners will see).
Description:
Enter a brief description that describes the content to provide the
learners a better idea of what the course is about.
Domain:
Always defaults to Public. Update it to your agency’s domain.
Approval Required:
Defaults to No. If approval is required for a learner to take the course, change to Yes and select the appropriate approval process. Suggestion is to only require approval for scheduled
courses.
Approval Process:
If Approval Required is set to yes, then select the appropriate
approval f low. If approval is not required, then leave blank:
• Level 1 and Level 2 Supervisor Approval (2 STEP SUPERVISOR) – Select if the training requires approval by
both the employee’s supervisor and second -level supervisor.
• Level 1 Supervisor Approval (1 STEP SUPERVISOR) – Select if the training requires approval by only the employee’s direct
supervisor.
• Approver Approval – Select if the approval for the training
course is required, but is not the Level 1, or Level 1 and Level 2 supervisors. If using this option, the approval is sent to all
users in your agency who are assigned the approval role
b. Schedule Template:
Number of
Days:
Enter the number of days the course occur over.
Hours per Day:
Enter the number of hours the course will be conducted each day.
c. Additional Options:
Revision
Date: Defaults to current date.
CPE Hours: If the course is tied to a professional certif ication and will count
towards continuing professional education credits, enter the credit hours here. This f ield is used to capture all educational
hour types.
Contact Hours:
This is the number of hours the learner is expected to be in contact with the instructor. Mainly used for onsite training
(classroom, f ield training, etc.).
Revision
Number: If updating the course, then enter the revision number.
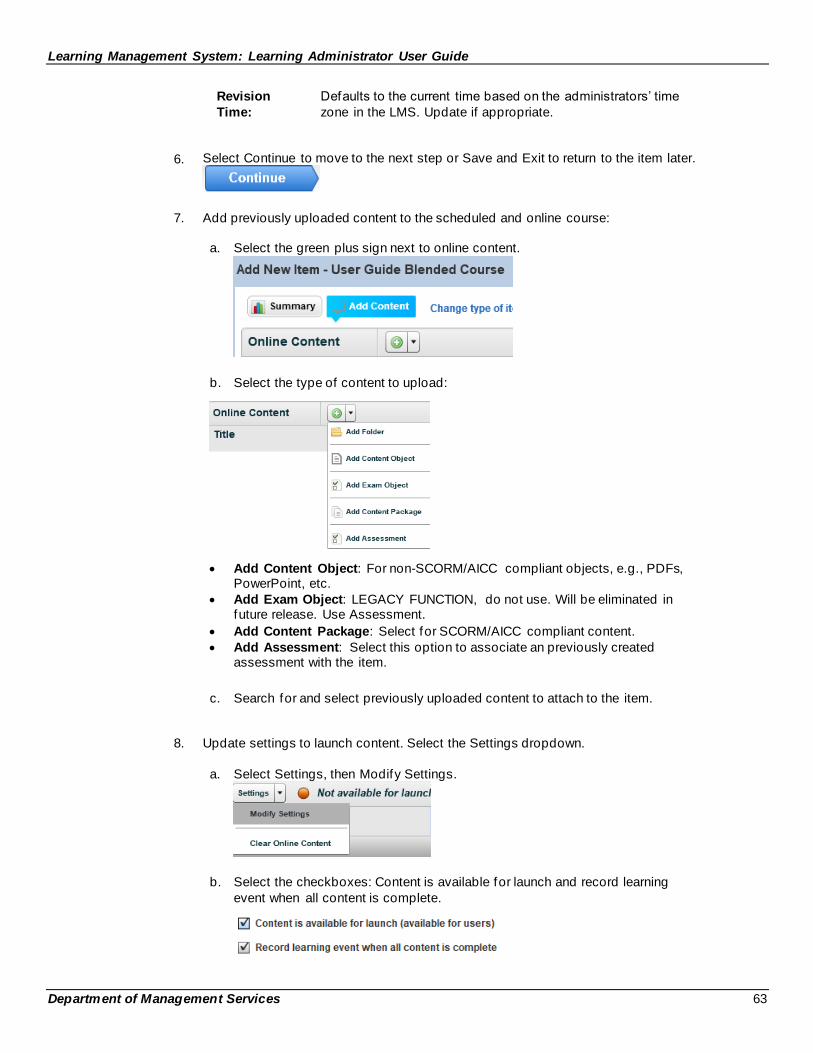
Learning Management System: Learning Administrator User Guide
Department of Management Services 63
Revision
Time:
Defaults to the current time based on the administrators’ time
zone in the LMS. Update if appropriate.
6. Select Continue to move to the next step or Save and Exit to return to the item later.
7. Add previously uploaded content to the scheduled and online course:
a. Select the green plus sign next to online content.
b. Select the type of content to upload:
• Add Content Object: For non-SCORM/AICC compliant objects, e.g., PDFs, PowerPoint, etc.
• Add Exam Object: LEGACY FUNCTION, do not use. Will be eliminated in future release. Use Assessment.
• Add Content Package: Select for SCORM/AICC compliant content.
• Add Assessment: Select this option to associate an previously created assessment with the item.
c. Search for and select previously uploaded content to attach to the item.
8. Update settings to launch content. Select the Settings dropdown.
a. Select Settings, then Modify Settings.
b. Select the checkboxes: Content is available for launch and record learning
event when all content is complete.
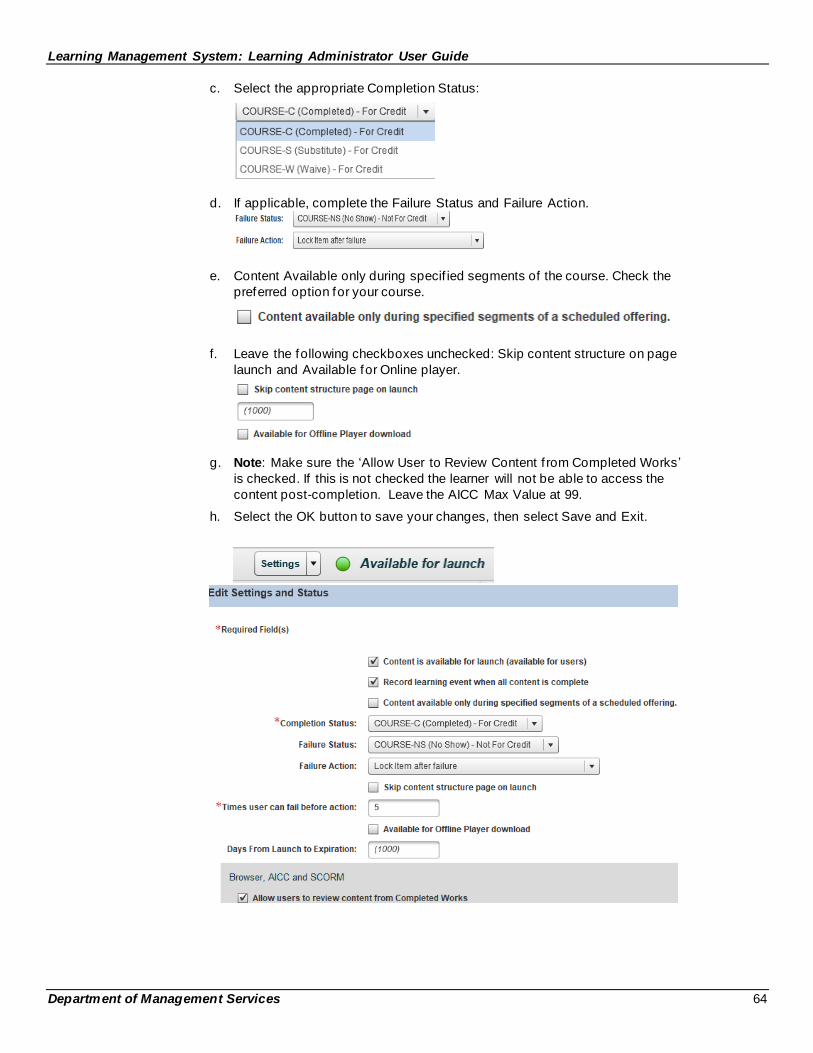
Learning Management System: Learning Administrator User Guide
Department of Management Services 64
c. Select the appropriate Completion Status:
d. If applicable, complete the Failure Status and Failure Action.
e. Content Available only during specif ied segments of the course. Check the
preferred option for your course.
f. Leave the following checkboxes unchecked: Skip content structure on page
launch and Available for Online player.
g. Note: Make sure the ‘Allow User to Review Content f rom Completed Works ’
is checked. If this is not checked the learner will not be able to access the
content post-completion. Leave the AICC Max Value at 99.
h. Select the OK button to save your changes, then select Save and Exit.
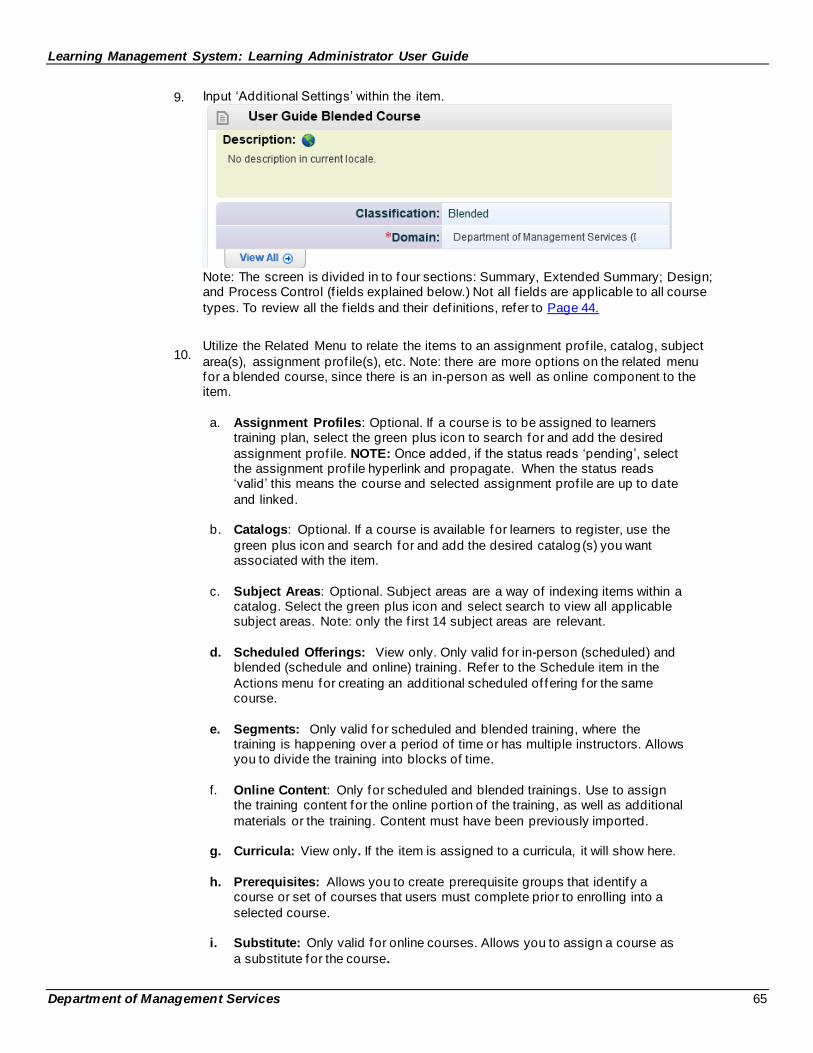
Learning Management System: Learning Administrator User Guide
Department of Management Services 65
9. Input ‘Additional Settings’ within the item.
Note: The screen is divided in to four sections: Summary, Extended Summary; Design; and Process Control (f ields explained below.) Not all f ields are applicable to all course
types. To review all the f ields and their def initions, refer to Page 44.
10. Utilize the Related Menu to relate the items to an assignment prof ile, catalog, subject
area(s), assignment prof ile(s), etc. Note: there are more options on the related menu for a blended course, since there is an in-person as well as online component to the item.
a. Assignment Profiles: Optional. If a course is to be assigned to learners
training plan, select the green plus icon to search for and add the desired
assignment prof ile. NOTE: Once added, if the status reads ‘pending’, select the assignment prof ile hyperlink and propagate. When the status reads ‘valid’ this means the course and selected assignment prof ile are up to date
and linked.
b. Catalogs: Optional. If a course is available for learners to register, use the
green plus icon and search for and add the desired catalog (s) you want associated with the item.
c. Subject Areas: Optional. Subject areas are a way of indexing items within a catalog. Select the green plus icon and select search to view all applicable subject areas. Note: only the f irst 14 subject areas are relevant.
d. Scheduled Offerings: View only. Only valid for in-person (scheduled) and
blended (schedule and online) training. Refer to the Schedule item in the
Actions menu for creating an additional scheduled of fering for the same course.
e. Segments: Only valid for scheduled and blended training, where the training is happening over a period of time or has multiple instructors. Allows you to divide the training into blocks of time.
f. Online Content: Only for scheduled and blended trainings. Use to assign
the training content for the online portion of the training, as well as additional
materials or the training. Content must have been previously imported.
g. Curricula: View only. If the item is assigned to a curricula, it will show here.
h. Prerequisites: Allows you to create prerequisite groups that identify a
course or set of courses that users must complete prior to enrolling into a
selected course.
i. Substitute: Only valid for online courses. Allows you to assign a course as
a substitute for the course.
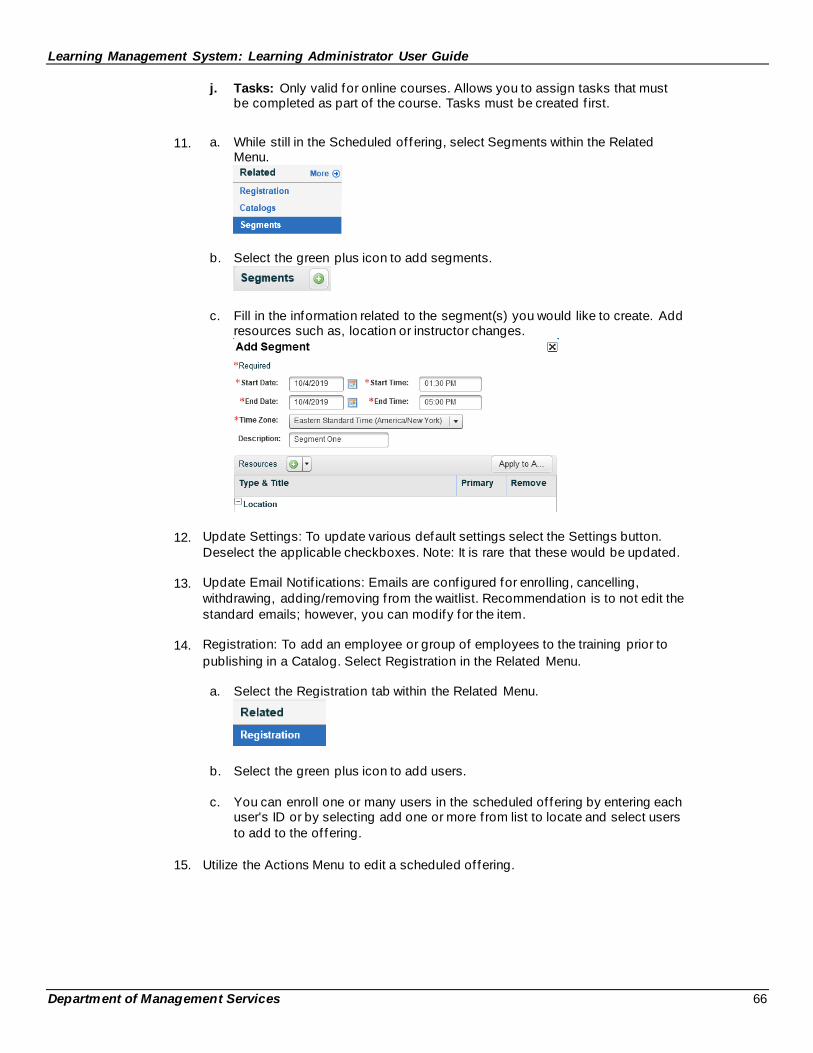
Learning Management System: Learning Administrator User Guide
Department of Management Services 66
j. Tasks: Only valid for online courses. Allows you to assign tasks that must be completed as part of the course. Tasks must be created f irst.
11. a. While still in the Scheduled of fering, select Segments within the Related Menu.
b. Select the green plus icon to add segments.
c. Fill in the information related to the segment(s) you would like to create. Add resources such as, location or instructor changes.
12. Update Settings: To update various default settings select the Settings button.
Deselect the applicable checkboxes. Note: It is rare that these would be updated.
13. Update Email Notif ications: Emails are conf igured for enrolling, cancelling,
withdrawing, adding/removing f rom the waitlist. Recommendation is to not edit the
standard emails; however, you can modify for the item.
14. Registration: To add an employee or group of employees to the training prior to
publishing in a Catalog. Select Registration in the Related Menu.
a. Select the Registration tab within the Related Menu.
b. Select the green plus icon to add users.
c. You can enroll one or many users in the scheduled of fering by entering each user's ID or by selecting add one or more f rom list to locate and select users
to add to the of fering.
15. Utilize the Actions Menu to edit a scheduled of fering.
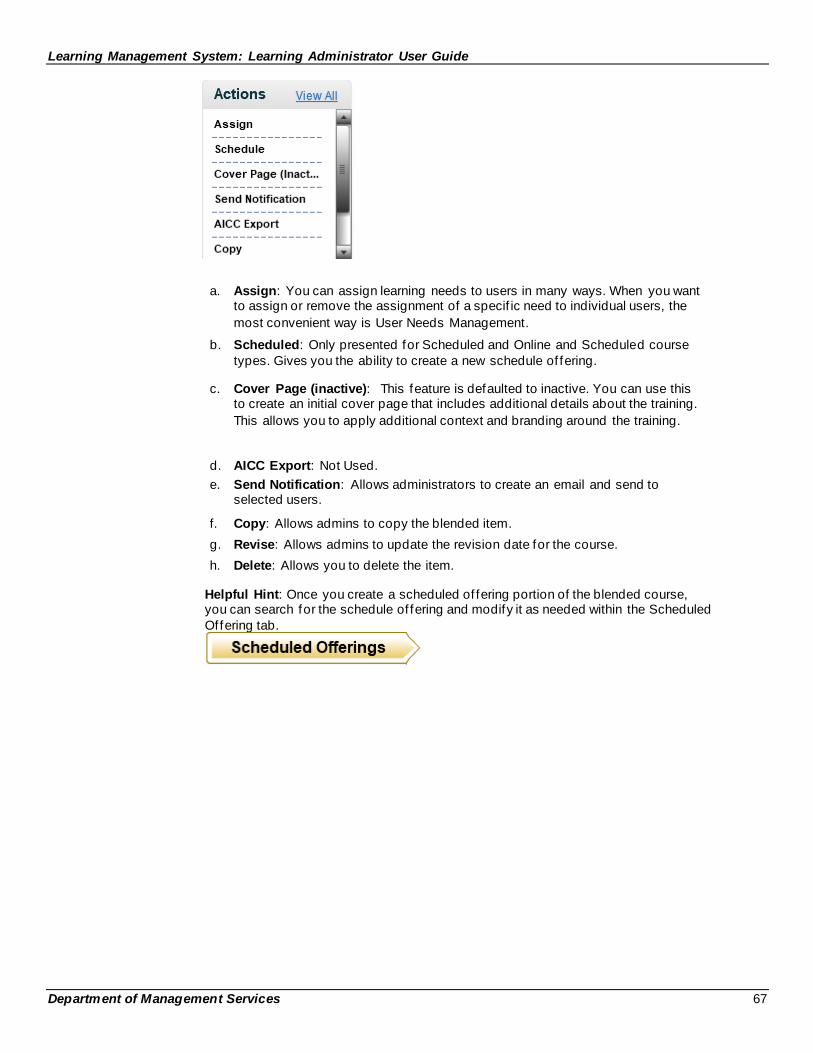
Learning Management System: Learning Administrator User Guide
Department of Management Services 67
a. Assign: You can assign learning needs to users in many ways. When you want to assign or remove the assignment of a specif ic need to individual users, the
most convenient way is User Needs Management.
b. Scheduled: Only presented for Scheduled and Online and Scheduled course
types. Gives you the ability to create a new schedule of fering.
c. Cover Page (inactive): This feature is defaulted to inactive. You can use this to create an initial cover page that includes additional details about the training.
This allows you to apply additional context and branding around the training.
d. AICC Export: Not Used.
e. Send Notification: Allows administrators to create an email and send to selected users.
f. Copy: Allows admins to copy the blended item.
g. Revise: Allows admins to update the revision date for the course.
h. Delete: Allows you to delete the item.
Helpful Hint: Once you create a scheduled of fering portion of the blended course, you can search for the schedule of fering and modify it as needed within the Scheduled
Offering tab.
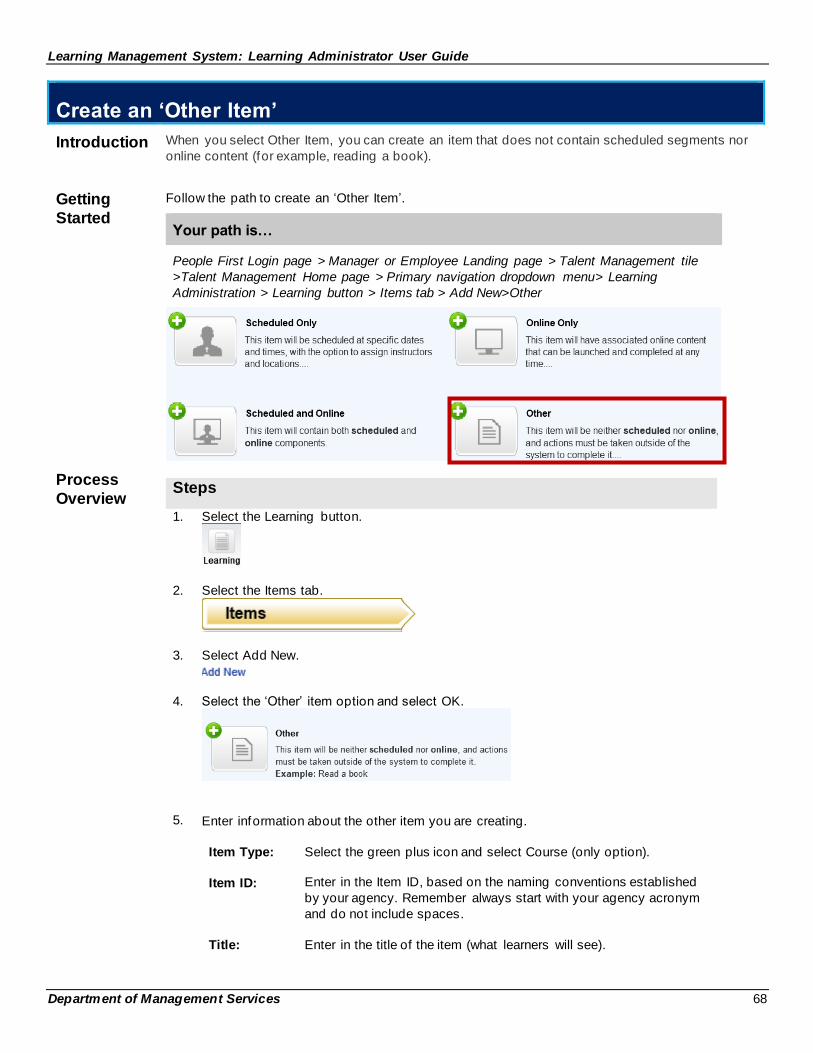
Learning Management System: Learning Administrator User Guide
Department of Management Services 68
Create an ‘Other Item’
Introduction When you select Other Item, you can create an item that does not contain scheduled segments nor
online content (for example, reading a book).
Getting
Started
Follow the path to create an ‘Other Item’.
Your path is…
People First Login page > Manager or Employee Landing page > Talent Management tile
>Talent Management Home page > Primary navigation dropdown menu> Learning
Administration > Learning button > Items tab > Add New>Other
Process
Overview
Steps
1. Select the Learning button.
2. Select the Items tab.
3. Select Add New.
4. Select the ‘Other’ item option and select OK.
5. Enter information about the other item you are creating.
Item Type: Select the green plus icon and select Course (only option).
Item ID: Enter in the Item ID, based on the naming conventions established
by your agency. Remember always start with your agency acronym
and do not include spaces.
Title: Enter in the title of the item (what learners will see).
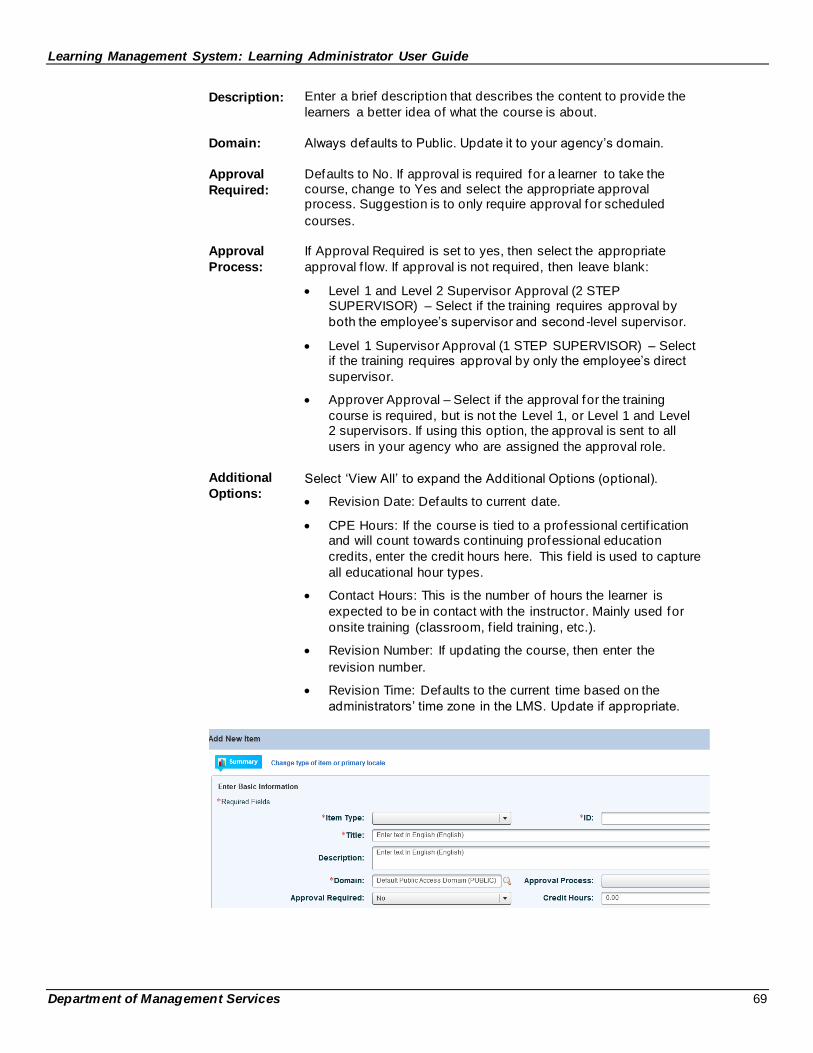
Learning Management System: Learning Administrator User Guide
Department of Management Services 69
Description: Enter a brief description that describes the content to provide the
learners a better idea of what the course is about.
Domain: Always defaults to Public. Update it to your agency’s domain.
Approval
Required:
Defaults to No. If approval is required for a learner to take the course, change to Yes and select the appropriate approval process. Suggestion is to only require approval for scheduled
courses.
Approval
Process:
If Approval Required is set to yes, then select the appropriate
approval f low. If approval is not required, then leave blank:
• Level 1 and Level 2 Supervisor Approval (2 STEP SUPERVISOR) – Select if the training requires approval by
both the employee’s supervisor and second -level supervisor.
• Level 1 Supervisor Approval (1 STEP SUPERVISOR) – Select if the training requires approval by only the employee’s direct
supervisor.
• Approver Approval – Select if the approval for the training
course is required, but is not the Level 1, or Level 1 and Level 2 supervisors. If using this option, the approval is sent to all
users in your agency who are assigned the approval role.
Additional
Options: Select ‘View All’ to expand the Additional Options (optional).
• Revision Date: Defaults to current date.
• CPE Hours: If the course is tied to a professional certif ication and will count towards continuing professional education
credits, enter the credit hours here. This f ield is used to capture
all educational hour types.
• Contact Hours: This is the number of hours the learner is
expected to be in contact with the instructor. Mainly used for
onsite training (classroom, f ield training, etc.).
• Revision Number: If updating the course, then enter the
revision number.
• Revision Time: Defaults to the current time based on the
administrators’ time zone in the LMS. Update if appropriate.
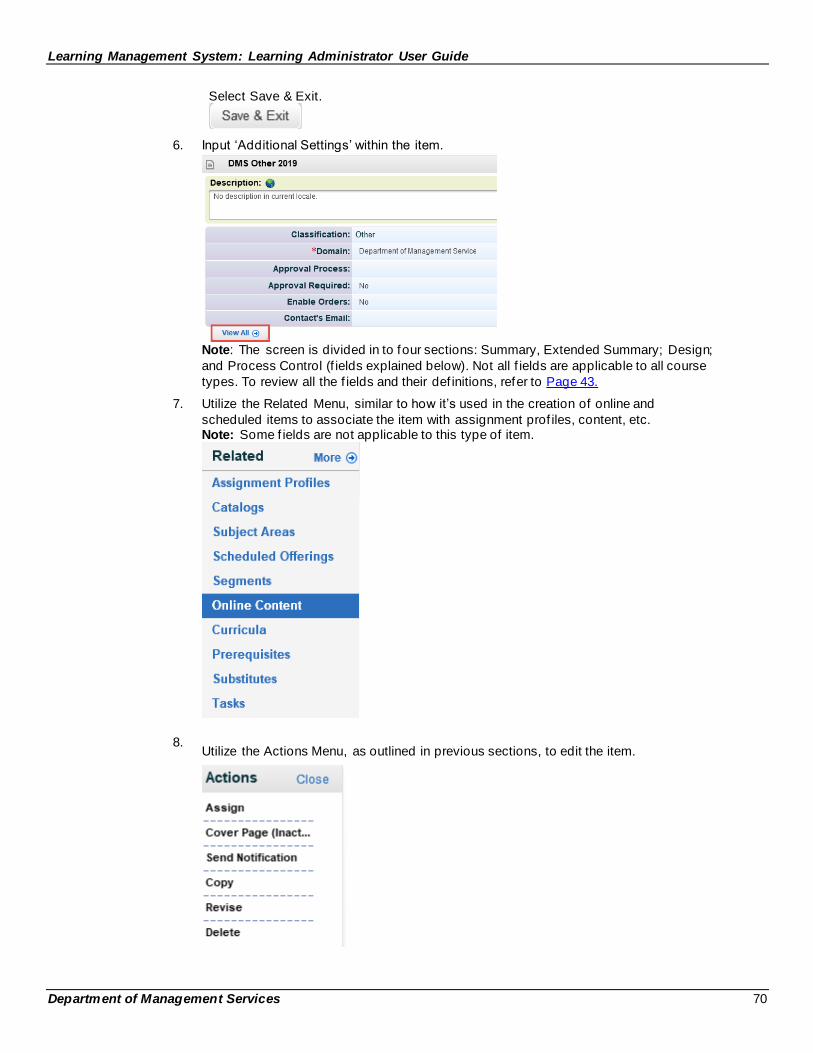
Learning Management System: Learning Administrator User Guide
Department of Management Services 70
Select Save & Exit.
6. Input ‘Additional Settings’ within the item.
Note: The screen is divided in to four sections: Summary, Extended Summary; Design;
and Process Control (f ields explained below). Not all f ields are applicable to all course
types. To review all the f ields and their def initions, refer to Page 43.
7. Utilize the Related Menu, similar to how it’s used in the creation of online and
scheduled items to associate the item with assignment prof iles, content, etc. Note: Some f ields are not applicable to this type of item.
8. Utilize the Actions Menu, as outlined in previous sections, to edit the item.
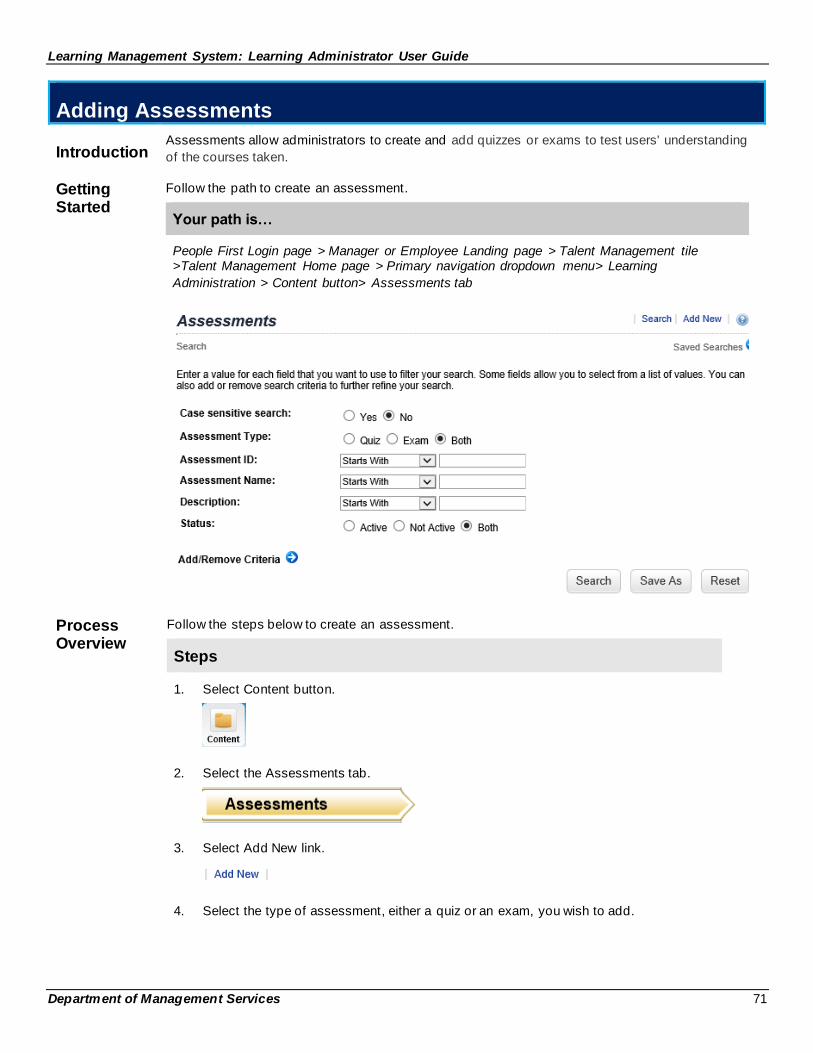
Learning Management System: Learning Administrator User Guide
Department of Management Services 71
Adding Assessments
Introduction Assessments allow administrators to create and add quizzes or exams to test users' understanding
of the courses taken.
Getting Started
Follow the path to create an assessment.
Your path is…
People First Login page > Manager or Employee Landing page > Talent Management tile >Talent Management Home page > Primary navigation dropdown menu> Learning
Administration > Content button> Assessments tab
Process Overview
Follow the steps below to create an assessment.
Steps
1. Select Content button.
2. Select the Assessments tab.
3. Select Add New link.
4. Select the type of assessment, either a quiz or an exam, you wish to add.
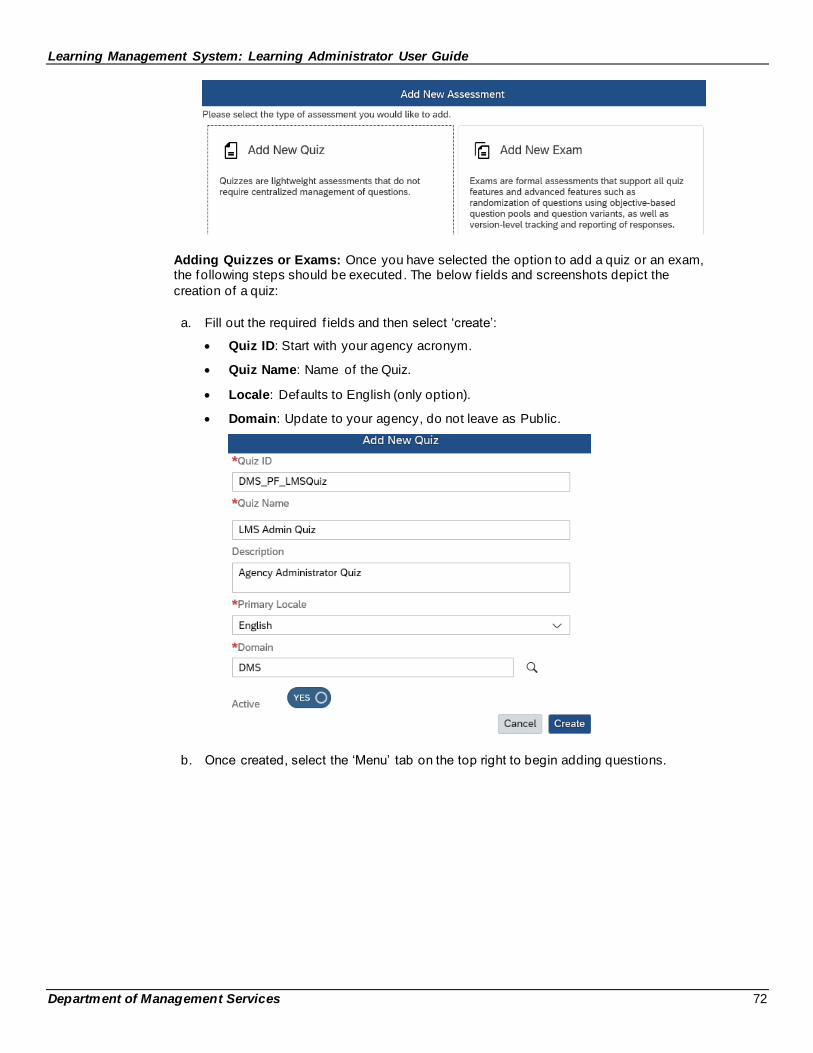
Learning Management System: Learning Administrator User Guide
Department of Management Services 72
Adding Quizzes or Exams: Once you have selected the option to add a quiz or an exam, the following steps should be executed. The below f ields and screenshots depict the
creation of a quiz:
a. Fill out the required f ields and then select ‘create’:
• Quiz ID: Start with your agency acronym.
• Quiz Name: Name of the Quiz.
• Locale: Defaults to English (only option).
• Domain: Update to your agency, do not leave as Public.
b. Once created, select the ‘Menu’ tab on the top right to begin adding questions.
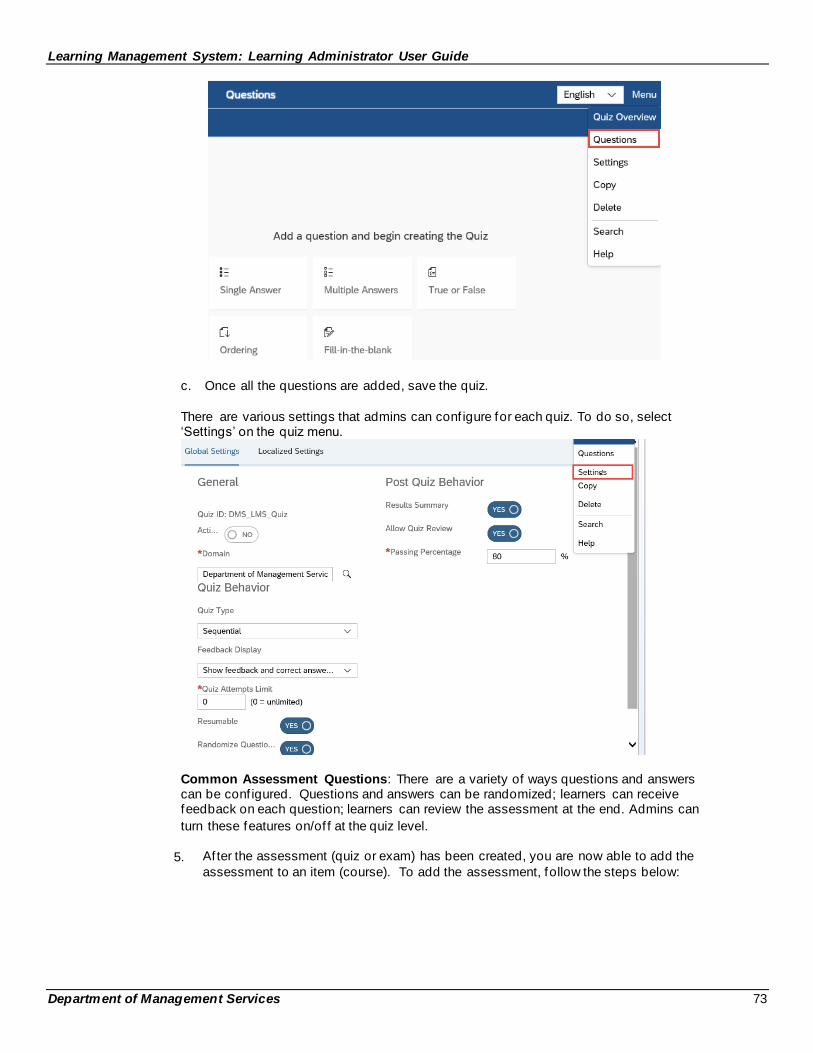
Learning Management System: Learning Administrator User Guide
Department of Management Services 73
c. Once all the questions are added, save the quiz.
There are various settings that admins can conf igure for each quiz. To do so, select ‘Settings’ on the quiz menu.
Common Assessment Questions: There are a variety of ways questions and answers can be conf igured. Questions and answers can be randomized; learners can receive feedback on each question; learners can review the assessment at the end. Admins can
turn these features on/of f at the quiz level.
5. Af ter the assessment (quiz or exam) has been created, you are now able to add the
assessment to an item (course). To add the assessment, follow the steps below:
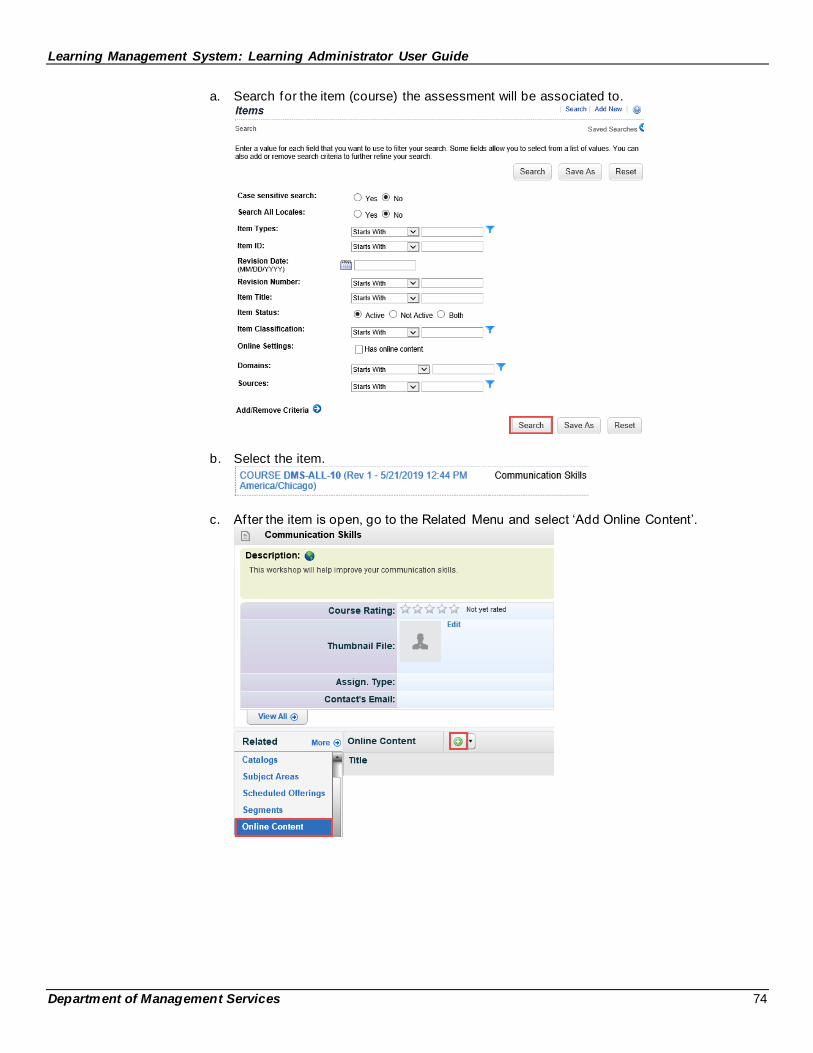
Learning Management System: Learning Administrator User Guide
Department of Management Services 74
a. Search for the item (course) the assessment will be associated to.
b. Select the item.
c. After the item is open, go to the Related Menu and select ‘Add Online Content’.
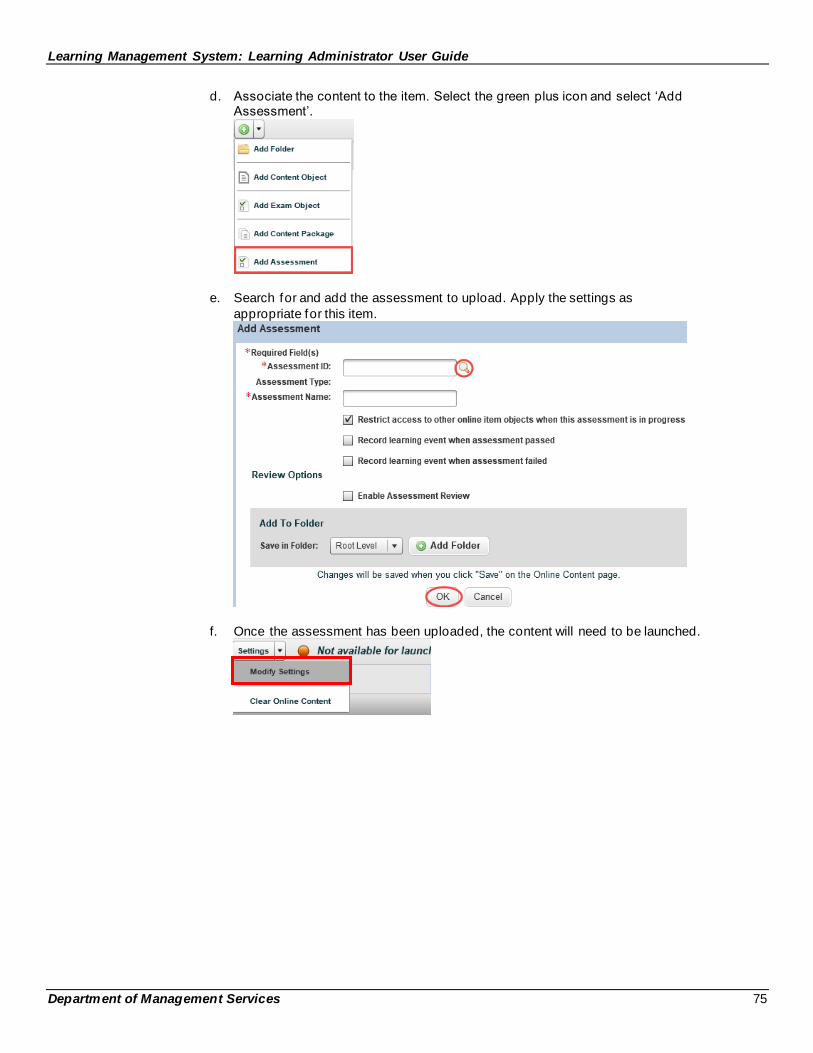
Learning Management System: Learning Administrator User Guide
Department of Management Services 75
d. Associate the content to the item. Select the green plus icon and select ‘Add Assessment’.
e. Search for and add the assessment to upload. Apply the settings as
appropriate for this item.
f. Once the assessment has been uploaded, the content will need to be launched.
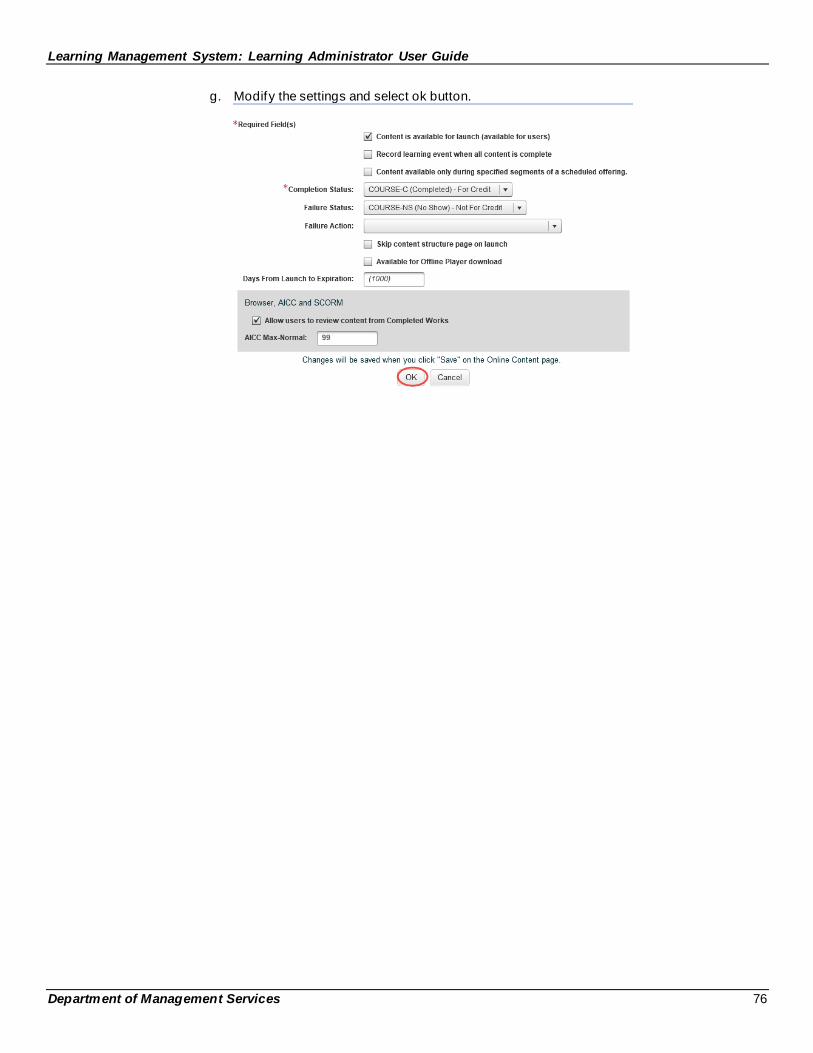
Learning Management System: Learning Administrator User Guide
Department of Management Services 76
g. Modify the settings and select ok button.
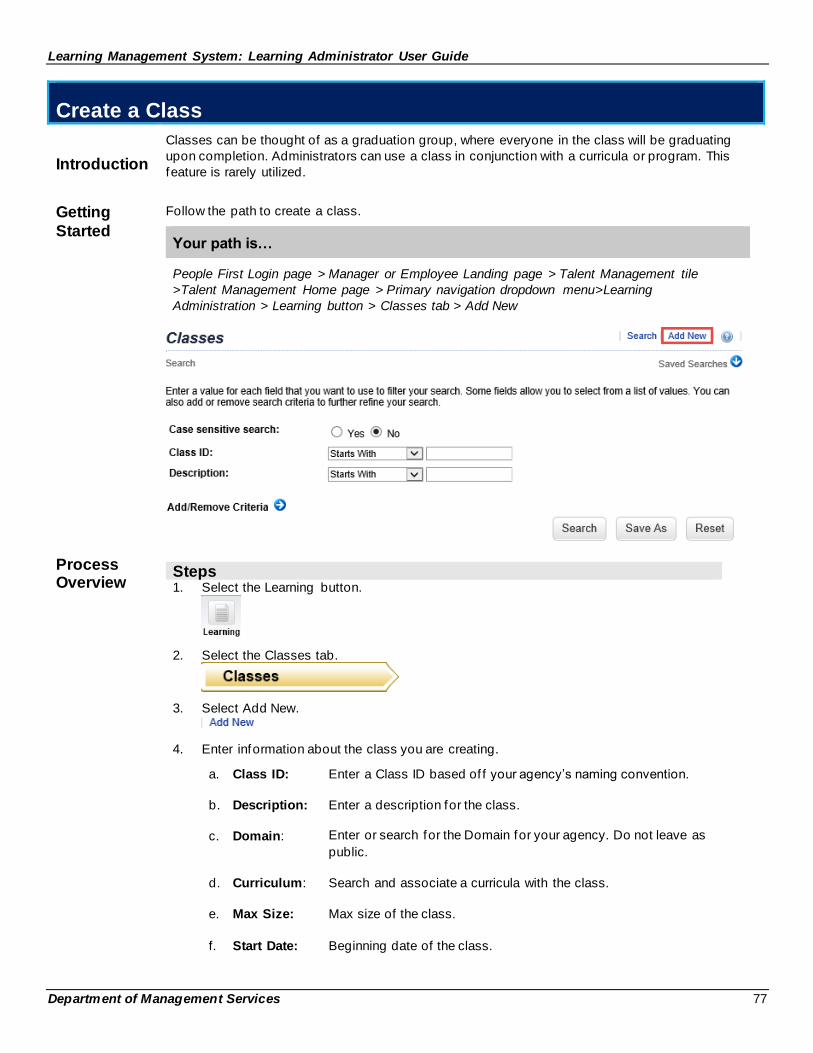
Learning Management System: Learning Administrator User Guide
Department of Management Services 77
Create a Class
Introduction
Classes can be thought of as a graduation group, where everyone in the class will be graduating
upon completion. Administrators can use a class in conjunction with a curricula or program. This
feature is rarely utilized.
Getting
Started
Follow the path to create a class.
Your path is…
People First Login page > Manager or Employee Landing page > Talent Management tile
>Talent Management Home page > Primary navigation dropdown menu>Learning
Administration > Learning button > Classes tab > Add New
Process Overview
Steps 1. Select the Learning button.
2. Select the Classes tab.
3. Select Add New.
4. Enter information about the class you are creating.
a. Class ID: Enter a Class ID based of f your agency’s naming convention.
b. Description: Enter a description for the class.
c. Domain: Enter or search for the Domain for your agency. Do not leave as
public.
d. Curriculum: Search and associate a curricula with the class.
e. Max Size: Max size of the class.
f. Start Date: Beginning date of the class.

Learning Management System: Learning Administrator User Guide
Department of Management Services 78
g. End Date: End date of the class.
5. Select Add.
6. To add scheduled of ferings to the class, perform the following steps:
Adding a Scheduled Offering a. Select the Offerings tab on the Classes page.
b. Search for and add the scheduled of fering you wish to add to the Class and select Auto Register to register the learners automatically.
7. Use the Registration Rules tab to conf igure the registration, withdrawal, and
notif ication settings for the classes in a graduation group.
Configuring Registration Rules a. Select the Registration Rules tab on the classes page.
b. Conf igure the settings within the page as desired. Registration Status: Defaults to Active enrollment. The remaining registration
status is Waitlisted (Waitlisted). Admins have the option to reserves slots in the of fering.
Scheduled Offering Charge Back Setting: Not applicable. Withdraw Rules: Removes the associated items with the class f rom the Users’
learning plan.
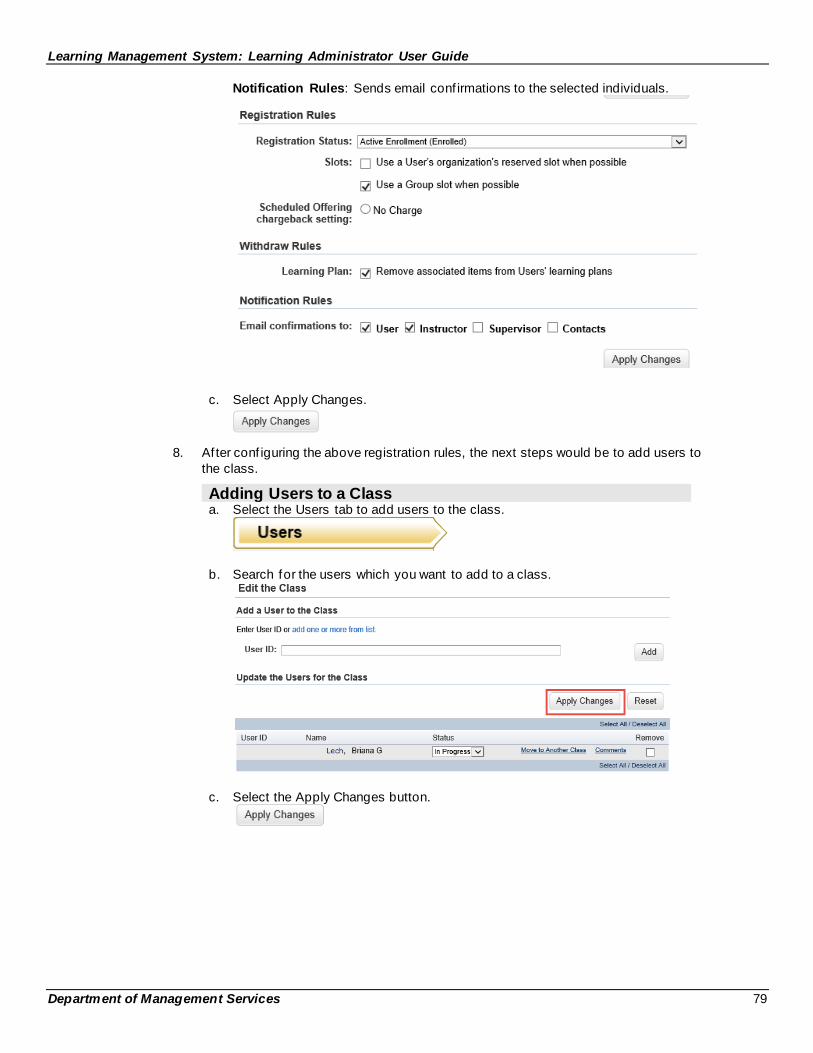
Learning Management System: Learning Administrator User Guide
Department of Management Services 79
Notification Rules: Sends email conf irmations to the selected individuals.
c. Select Apply Changes.
8. Af ter conf iguring the above registration rules, the next steps would be to add users to
the class.
Adding Users to a Class a. Select the Users tab to add users to the class.
b. Search for the users which you want to add to a class.
c. Select the Apply Changes button.
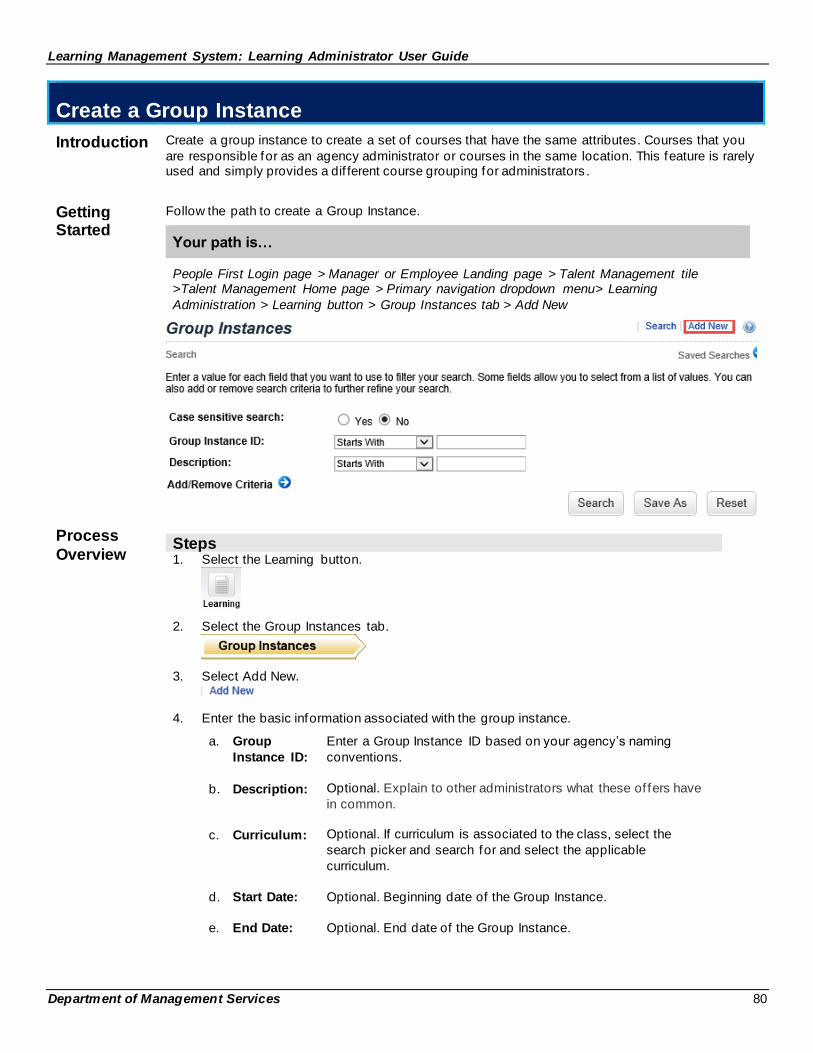
Learning Management System: Learning Administrator User Guide
Department of Management Services 80
Create a Group Instance
Introduction Create a group instance to create a set of courses that have the same attributes. Courses that you
are responsible for as an agency administrator or courses in the same location. This feature is rarely used and simply provides a dif ferent course grouping for administrators .
Getting Started
Follow the path to create a Group Instance.
Your path is…
People First Login page > Manager or Employee Landing page > Talent Management tile >Talent Management Home page > Primary navigation dropdown menu> Learning
Administration > Learning button > Group Instances tab > Add New
Process
Overview
Steps 1. Select the Learning button.
2. Select the Group Instances tab.
3. Select Add New.
4. Enter the basic information associated with the group instance.
a. Group
Instance ID:
Enter a Group Instance ID based on your agency’s naming
conventions.
b. Description: Optional. Explain to other administrators what these of fers have
in common.
c. Curriculum: Optional. If curriculum is associated to the class, select the
search picker and search for and select the applicable
curriculum.
d. Start Date: Optional. Beginning date of the Group Instance.
e. End Date: Optional. End date of the Group Instance.
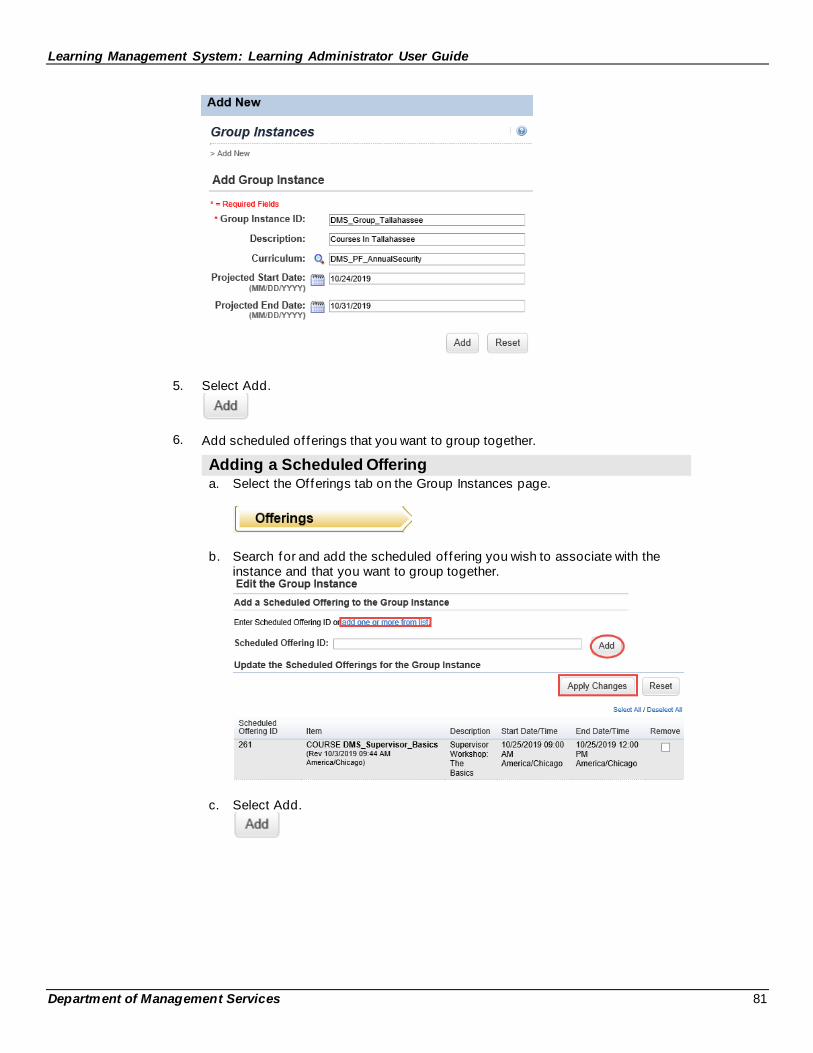
Learning Management System: Learning Administrator User Guide
Department of Management Services 81
5. Select Add.
6. Add scheduled of ferings that you want to group together.
Adding a Scheduled Offering a. Select the Offerings tab on the Group Instances page.
b. Search for and add the scheduled of fering you wish to associate with the instance and that you want to group together.
c. Select Add.
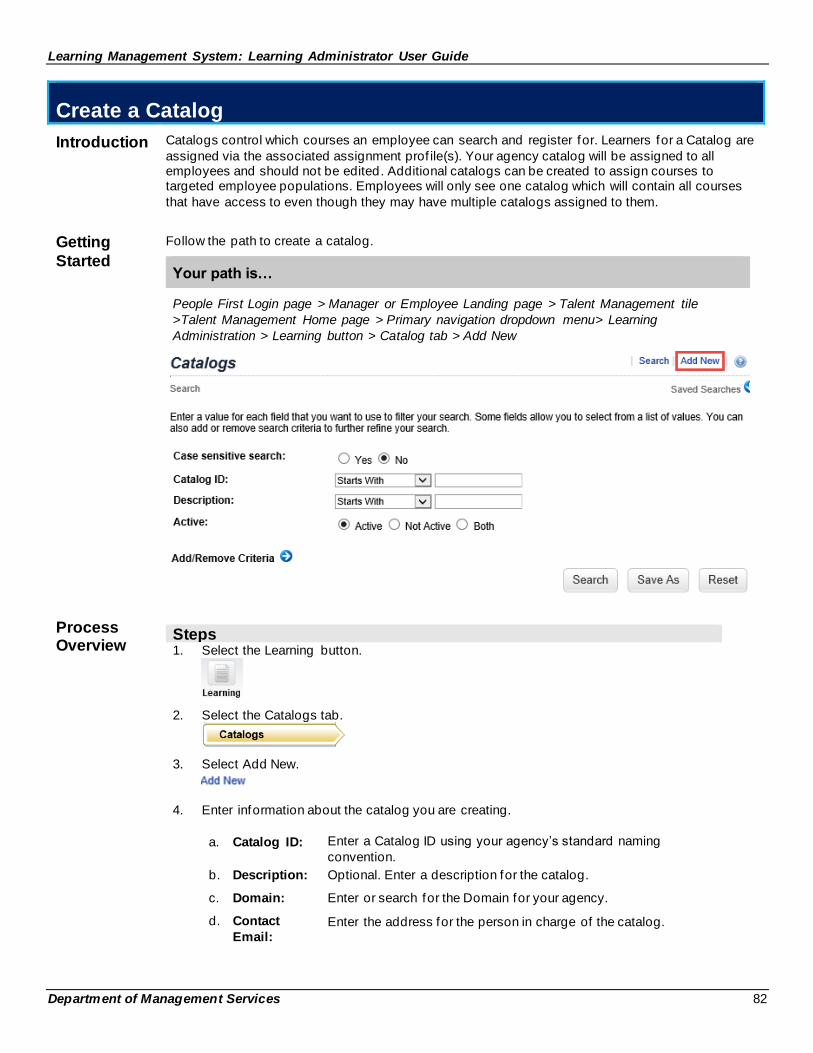
Learning Management System: Learning Administrator User Guide
Department of Management Services 82
Create a Catalog
Introduction Catalogs control which courses an employee can search and register for. Learners for a Catalog are
assigned via the associated assignment prof ile(s). Your agency catalog will be assigned to all employees and should not be edited. Additional catalogs can be created to assign courses to targeted employee populations. Employees will only see one catalog which will contain all courses
that have access to even though they may have multiple catalogs assigned to them.
Getting
Started
Follow the path to create a catalog.
Your path is…
People First Login page > Manager or Employee Landing page > Talent Management tile
>Talent Management Home page > Primary navigation dropdown menu> Learning
Administration > Learning button > Catalog tab > Add New
Process Overview
Steps 1. Select the Learning button.
2. Select the Catalogs tab.
3. Select Add New.
4. Enter information about the catalog you are creating.
a. Catalog ID: Enter a Catalog ID using your agency’s standard naming
convention.
b. Description: Optional. Enter a description for the catalog.
c. Domain: Enter or search for the Domain for your agency.
d. Contact
Email: Enter the address for the person in charge of the catalog.
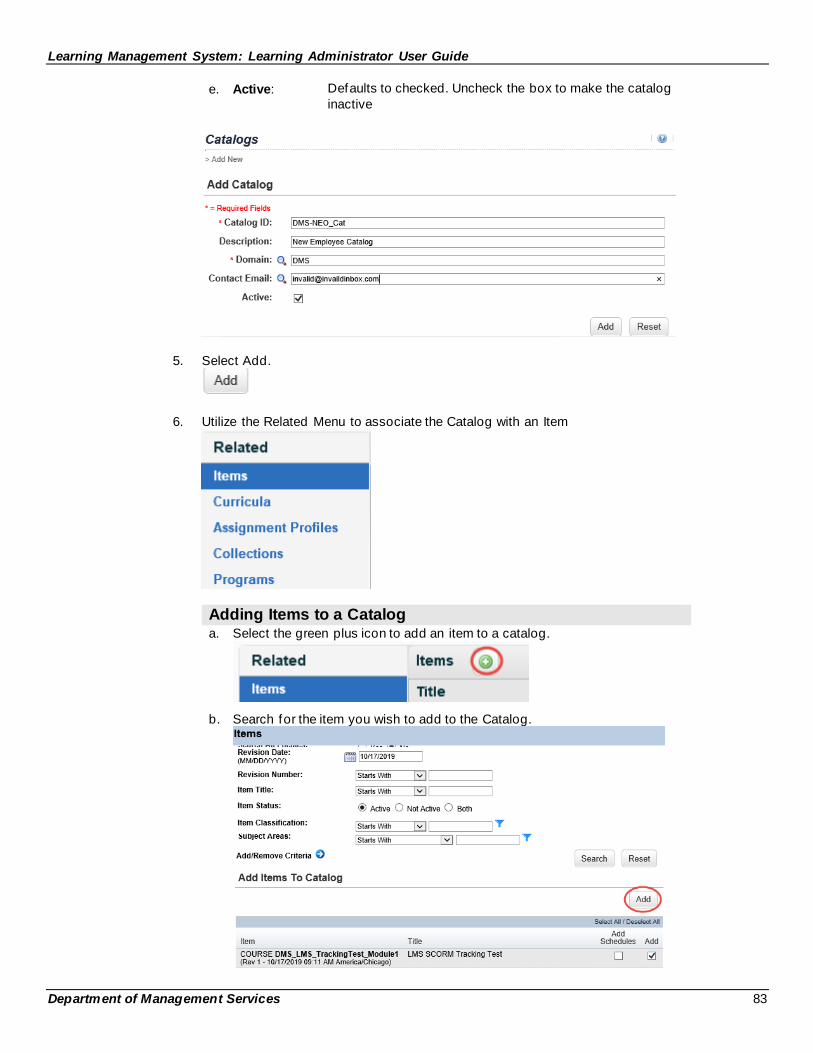
Learning Management System: Learning Administrator User Guide
Department of Management Services 83
e. Active: Defaults to checked. Uncheck the box to make the catalog
inactive
5. Select Add.
6. Utilize the Related Menu to associate the Catalog with an Item
Adding Items to a Catalog a. Select the green plus icon to add an item to a catalog.
b. Search for the item you wish to add to the Catalog.
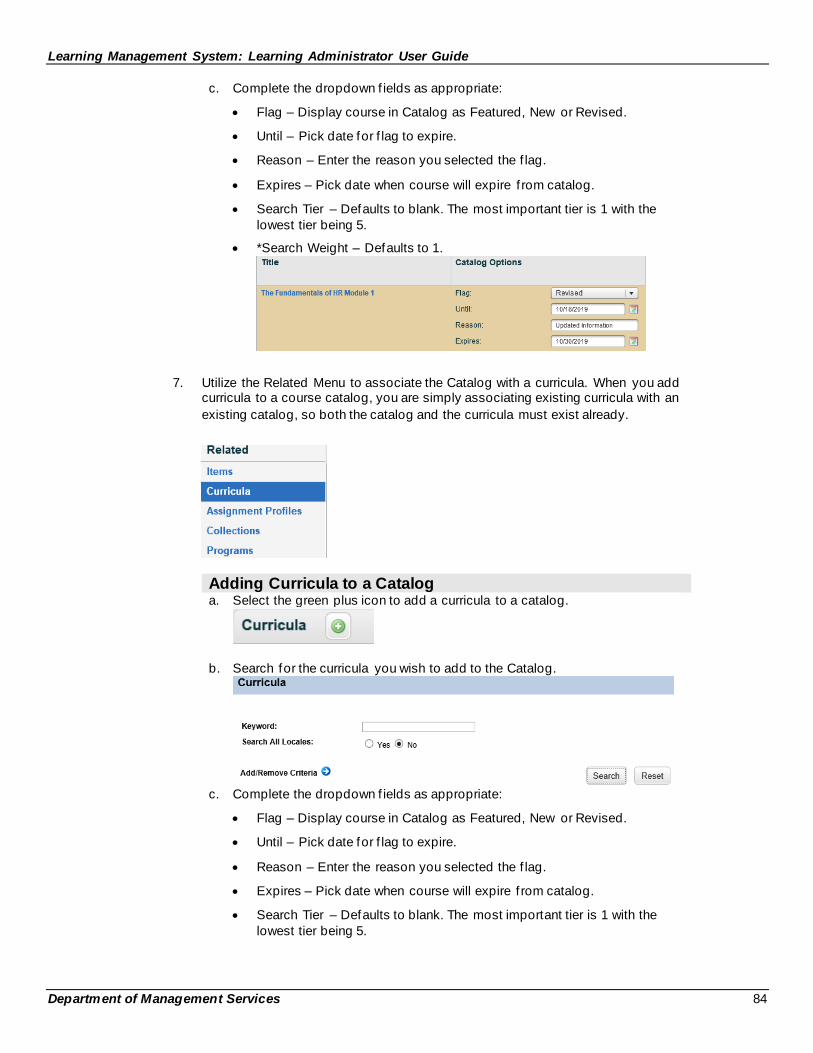
Learning Management System: Learning Administrator User Guide
Department of Management Services 84
c. Complete the dropdown f ields as appropriate:
• Flag – Display course in Catalog as Featured, New or Revised.
• Until – Pick date for f lag to expire.
• Reason – Enter the reason you selected the f lag.
• Expires – Pick date when course will expire f rom catalog.
• Search Tier – Defaults to blank. The most important tier is 1 with the
lowest tier being 5.
• *Search Weight – Defaults to 1.
7. Utilize the Related Menu to associate the Catalog with a curricula. When you add curricula to a course catalog, you are simply associating existing curricula with an
existing catalog, so both the catalog and the curricula must exist already.
Adding Curricula to a Catalog a. Select the green plus icon to add a curricula to a catalog.
b. Search for the curricula you wish to add to the Catalog.
c. Complete the dropdown f ields as appropriate:
• Flag – Display course in Catalog as Featured, New or Revised.
• Until – Pick date for f lag to expire.
• Reason – Enter the reason you selected the f lag.
• Expires – Pick date when course will expire f rom catalog.
• Search Tier – Defaults to blank. The most important tier is 1 with the
lowest tier being 5.
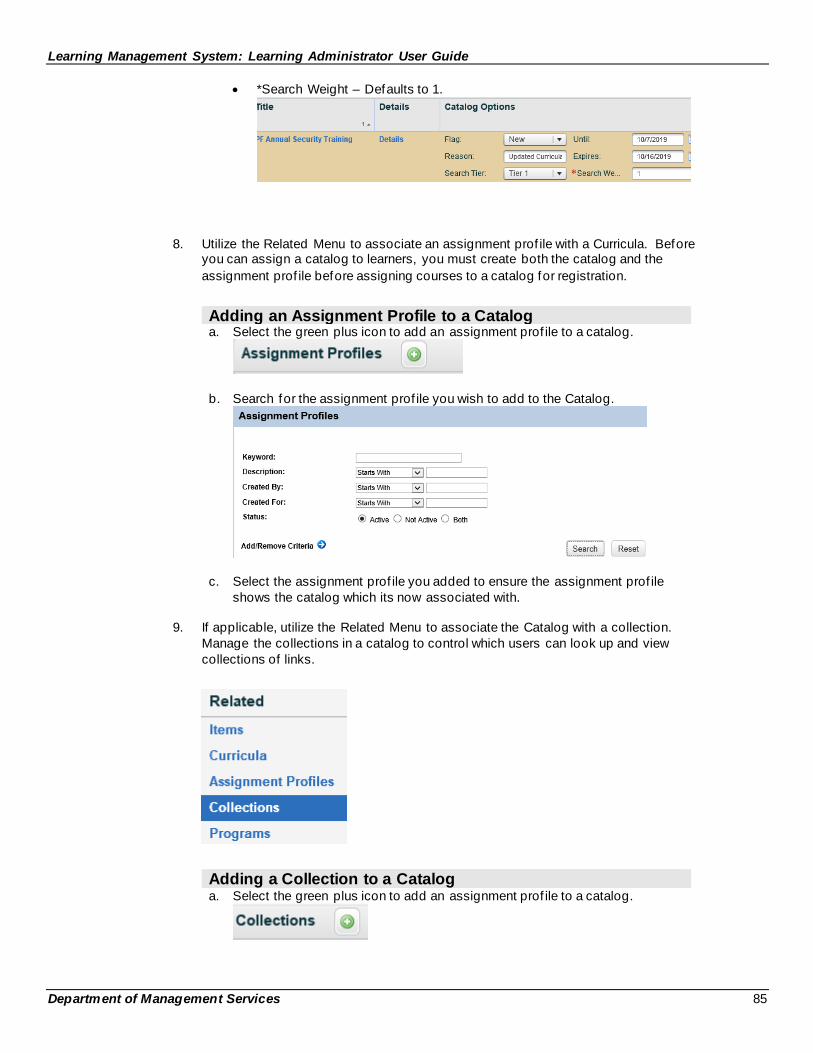
Learning Management System: Learning Administrator User Guide
Department of Management Services 85
• *Search Weight – Defaults to 1.
8. Utilize the Related Menu to associate an assignment prof ile with a Curricula. Before you can assign a catalog to learners, you must create both the catalog and the
assignment prof ile before assigning courses to a catalog for registration.
Adding an Assignment Profile to a Catalog a. Select the green plus icon to add an assignment prof ile to a catalog.
b. Search for the assignment prof ile you wish to add to the Catalog.
c. Select the assignment prof ile you added to ensure the assignment prof ile
shows the catalog which its now associated with.
9. If applicable, utilize the Related Menu to associate the Catalog with a collection.
Manage the collections in a catalog to control which users can look up and view
collections of links.
Adding a Collection to a Catalog a. Select the green plus icon to add an assignment prof ile to a catalog.
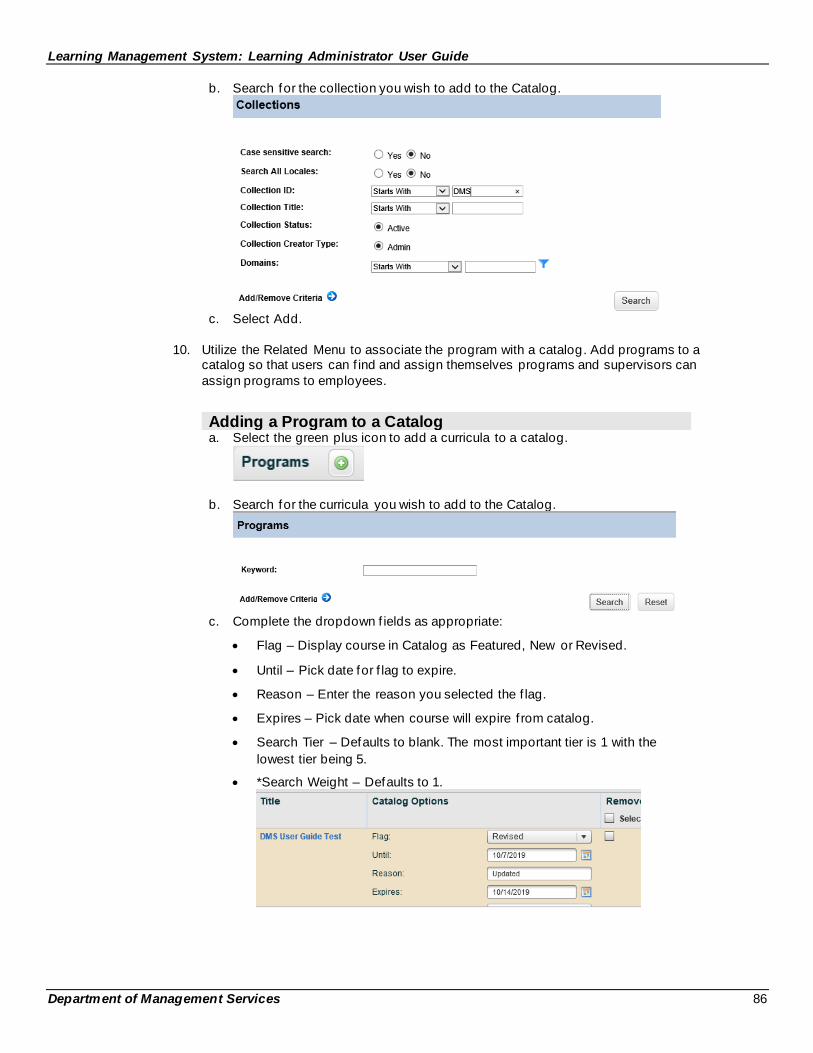
Learning Management System: Learning Administrator User Guide
Department of Management Services 86
b. Search for the collection you wish to add to the Catalog.
c. Select Add.
10. Utilize the Related Menu to associate the program with a catalog. Add programs to a catalog so that users can f ind and assign themselves programs and supervisors can
assign programs to employees.
Adding a Program to a Catalog a. Select the green plus icon to add a curricula to a catalog.
b. Search for the curricula you wish to add to the Catalog.
c. Complete the dropdown f ields as appropriate:
• Flag – Display course in Catalog as Featured, New or Revised.
• Until – Pick date for f lag to expire.
• Reason – Enter the reason you selected the f lag.
• Expires – Pick date when course will expire f rom catalog.
• Search Tier – Defaults to blank. The most important tier is 1 with the
lowest tier being 5.
• *Search Weight – Defaults to 1.
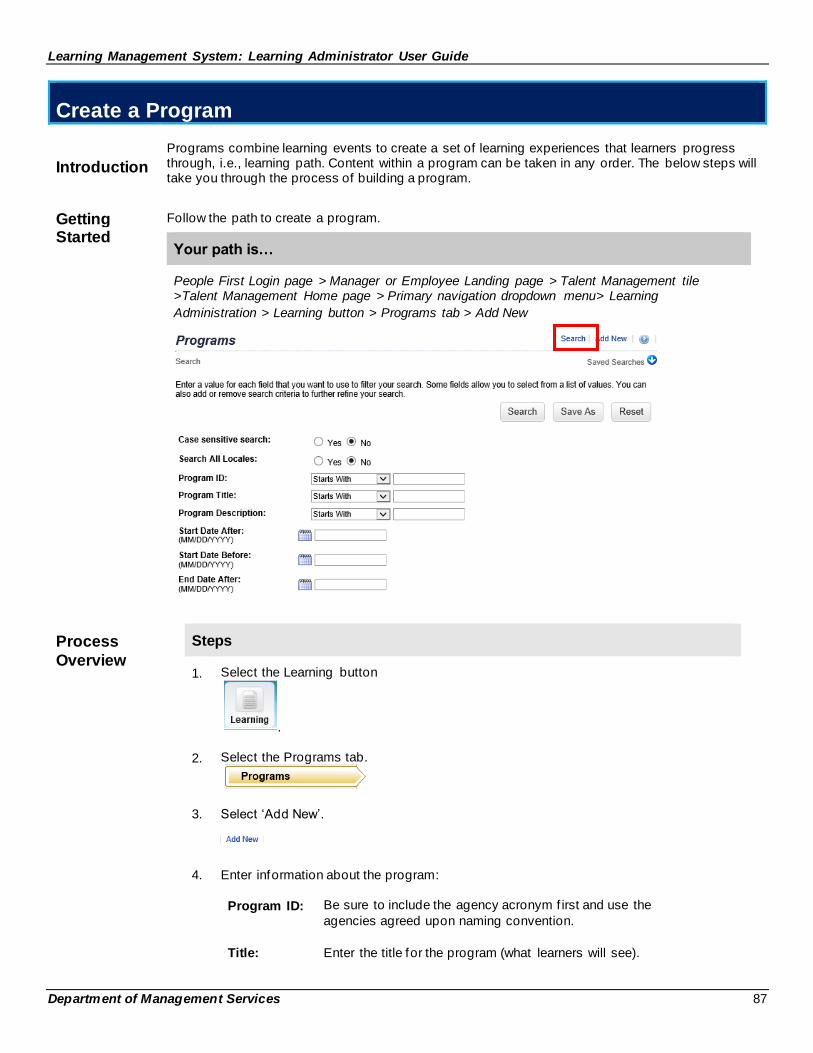
Learning Management System: Learning Administrator User Guide
Department of Management Services 87
Create a Program
Introduction
Programs combine learning events to create a set of learning experiences that learners progress through, i.e., learning path. Content within a program can be taken in any order. The below steps will take you through the process of building a program.
Getting Started
Follow the path to create a program.
Your path is…
People First Login page > Manager or Employee Landing page > Talent Management tile >Talent Management Home page > Primary navigation dropdown menu> Learning
Administration > Learning button > Programs tab > Add New
Process
Overview
Steps
1. Select the Learning button
.
2. Select the Programs tab.
3. Select ‘Add New’.
4. Enter information about the program:
Program ID: Be sure to include the agency acronym f irst and use the
agencies agreed upon naming convention.
Title: Enter the title for the program (what learners will see).
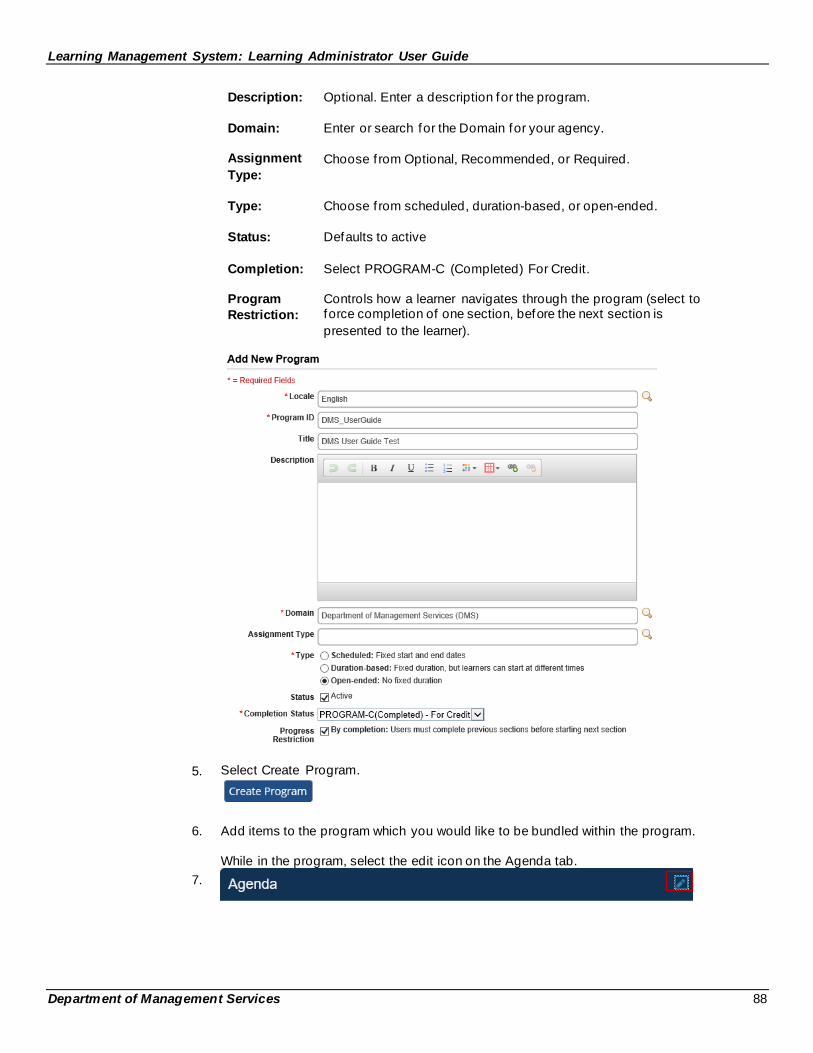
Learning Management System: Learning Administrator User Guide
Department of Management Services 88
Description: Optional. Enter a description for the program.
Domain: Enter or search for the Domain for your agency.
Assignment
Type:
Choose f rom Optional, Recommended, or Required.
Type: Choose f rom scheduled, duration-based, or open-ended.
Status: Defaults to active
Completion: Select PROGRAM-C (Completed) For Credit.
Program
Restriction:
Controls how a learner navigates through the program (select to force completion of one section, before the next section is
presented to the learner).
5. Select Create Program.
6. Add items to the program which you would like to be bundled within the program.
7.
While in the program, select the edit icon on the Agenda tab.
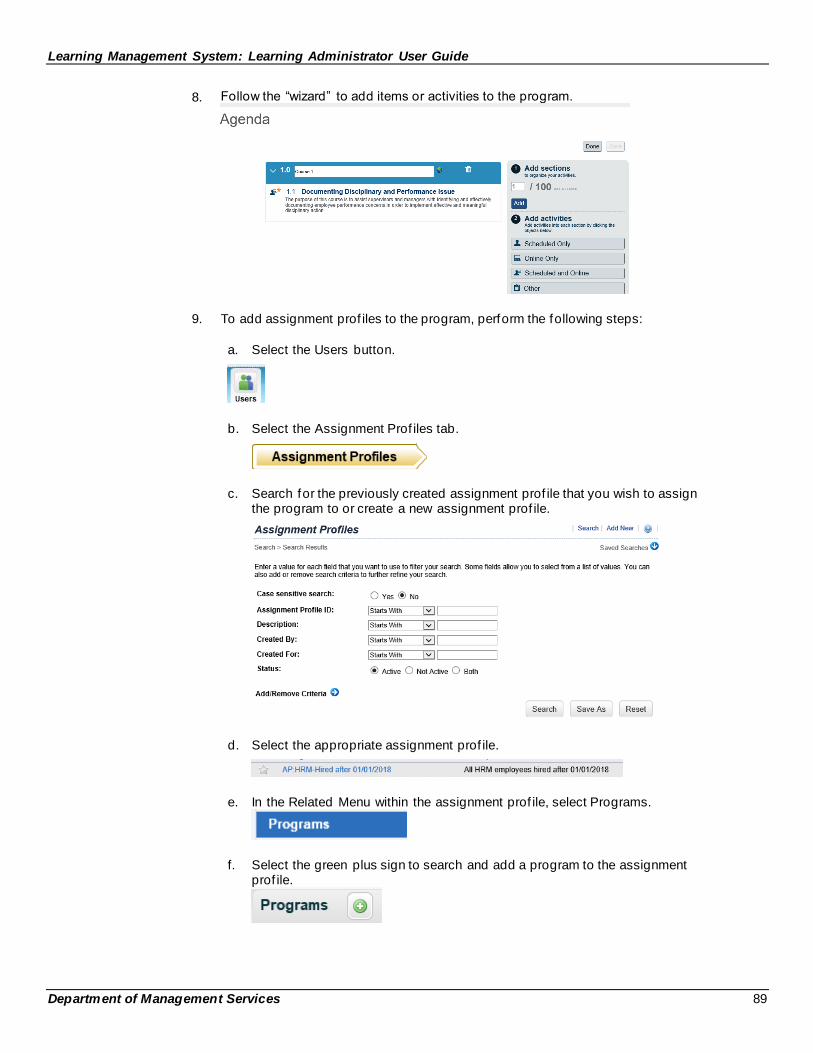
Learning Management System: Learning Administrator User Guide
Department of Management Services 89
8. Follow the “wizard” to add items or activities to the program.
9. To add assignment prof iles to the program, perform the following steps:
a. Select the Users button.
b. Select the Assignment Prof iles tab.
c. Search for the previously created assignment prof ile that you wish to assign the program to or create a new assignment prof ile.
d. Select the appropriate assignment prof ile.
e. In the Related Menu within the assignment prof ile, select Programs.
f. Select the green plus sign to search and add a program to the assignment prof ile.
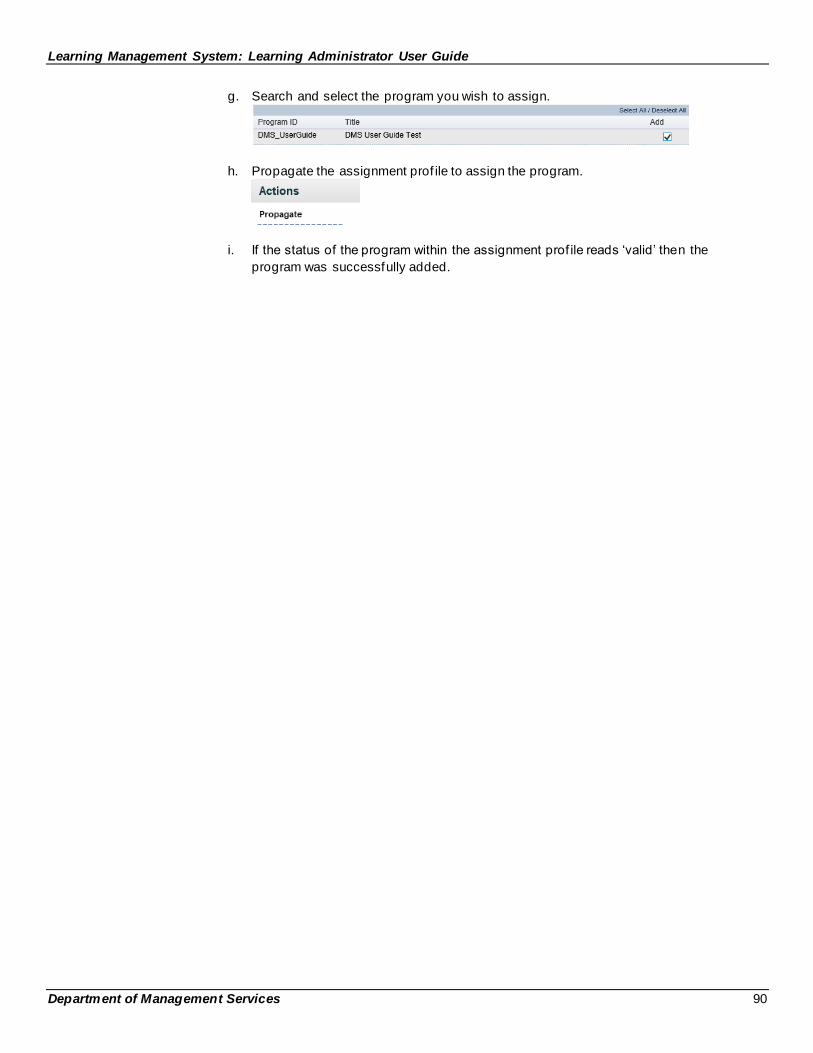
Learning Management System: Learning Administrator User Guide
Department of Management Services 90
g. Search and select the program you wish to assign.
h. Propagate the assignment prof ile to assign the program.
i. If the status of the program within the assignment prof ile reads ‘valid’ then the
program was successfully added.
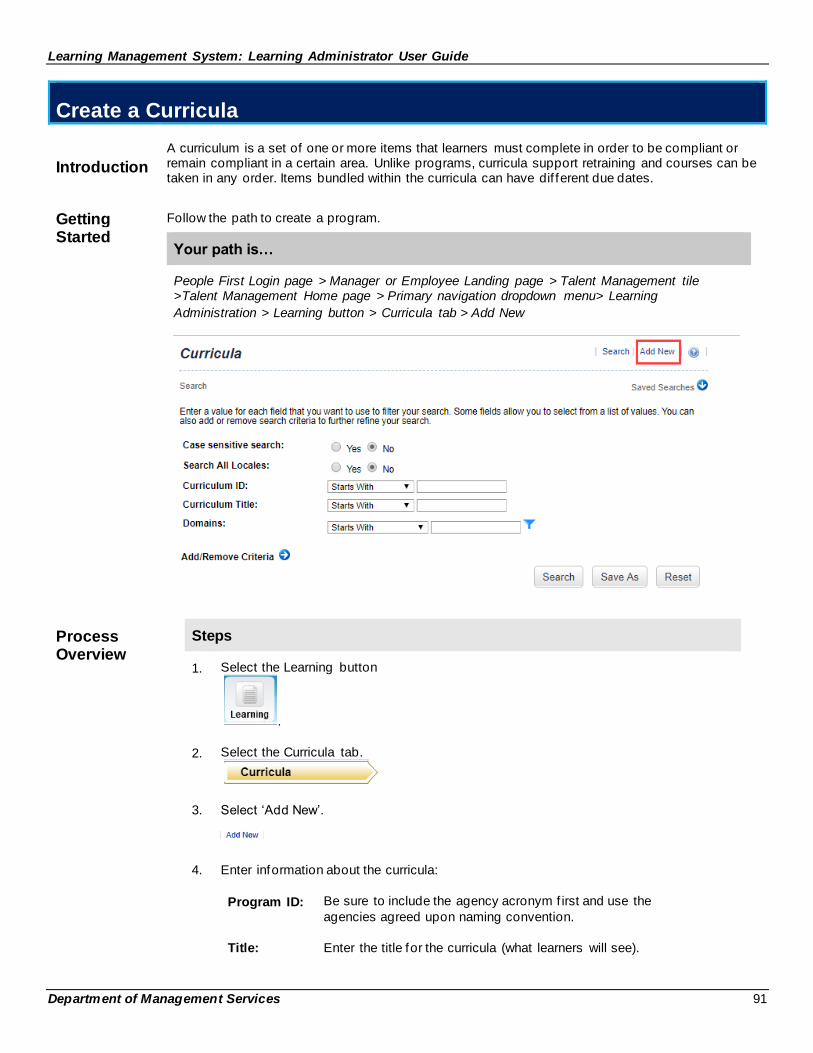
Learning Management System: Learning Administrator User Guide
Department of Management Services 91
Create a Curricula
Introduction
A curriculum is a set of one or more items that learners must complete in order to be compliant or remain compliant in a certain area. Unlike programs, curricula support retraining and courses can be taken in any order. Items bundled within the curricula can have dif ferent due dates.
Getting Started
Follow the path to create a program.
Your path is…
People First Login page > Manager or Employee Landing page > Talent Management tile >Talent Management Home page > Primary navigation dropdown menu> Learning
Administration > Learning button > Curricula tab > Add New
Process Overview
Steps
1. Select the Learning button
.
2. Select the Curricula tab.
3. Select ‘Add New’.
4. Enter information about the curricula:
Program ID: Be sure to include the agency acronym f irst and use the
agencies agreed upon naming convention.
Title: Enter the title for the curricula (what learners will see).
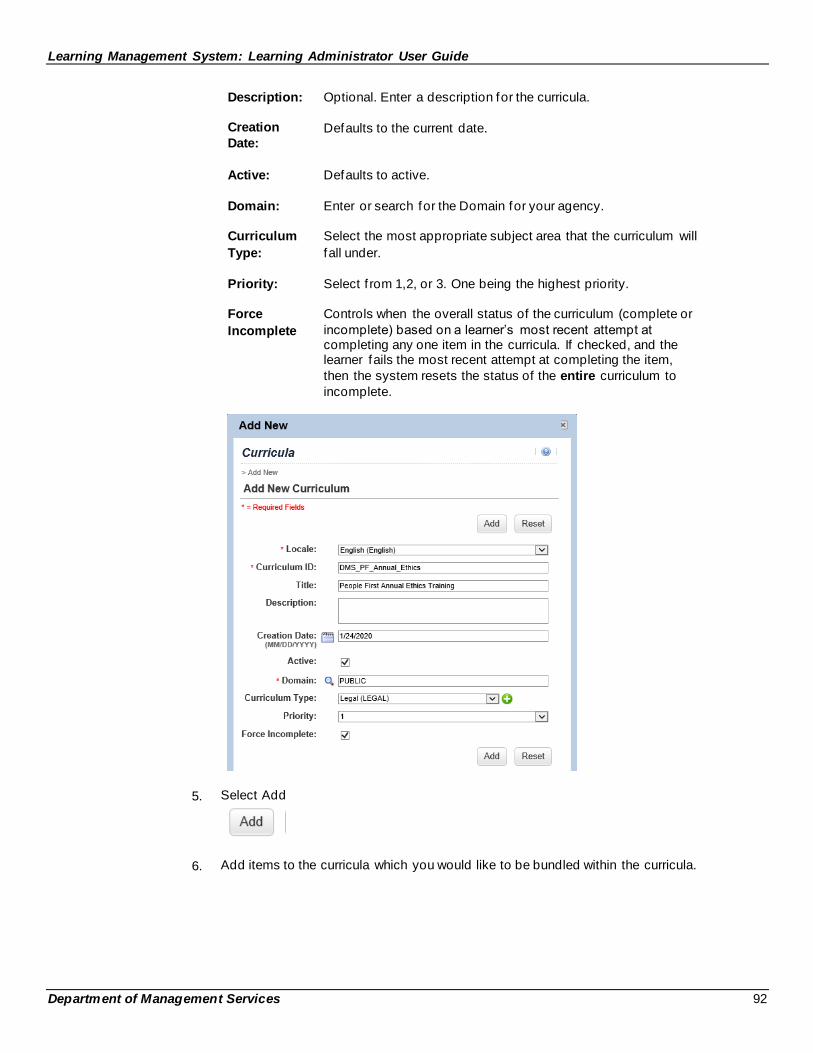
Learning Management System: Learning Administrator User Guide
Department of Management Services 92
Description: Optional. Enter a description for the curricula.
Creation
Date: Defaults to the current date.
Active: Defaults to active.
Domain: Enter or search for the Domain for your agency.
Curriculum
Type:
Select the most appropriate subject area that the curriculum will
fall under.
Priority: Select f rom 1,2, or 3. One being the highest priority.
Force
Incomplete
Controls when the overall status of the curriculum (complete or
incomplete) based on a learner’s most recent attempt at completing any one item in the curricula. If checked, and the learner fails the most recent attempt at completing the item,
then the system resets the status of the entire curriculum to
incomplete.
5. Select Add
6. Add items to the curricula which you would like to be bundled within the curricula.
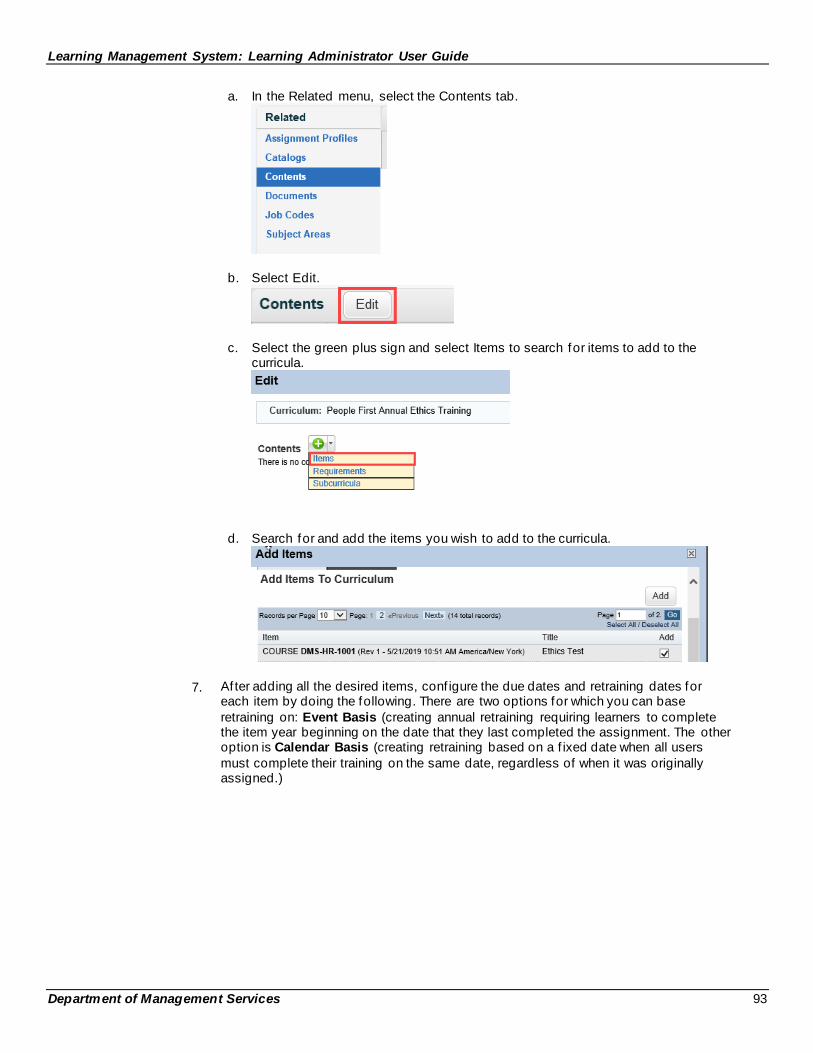
Learning Management System: Learning Administrator User Guide
Department of Management Services 93
a. In the Related menu, select the Contents tab.
b. Select Edit.
c. Select the green plus sign and select Items to search for items to add to the curricula.
d. Search for and add the items you wish to add to the curricula.
7. Af ter adding all the desired items, conf igure the due dates and retraining dates for each item by doing the following. There are two options for which you can base
retraining on: Event Basis (creating annual retraining requiring learners to complete the item year beginning on the date that they last completed the assignment. The other option is Calendar Basis (creating retraining based on a f ixed date when all users
must complete their training on the same date, regardless of when it was originally assigned.)
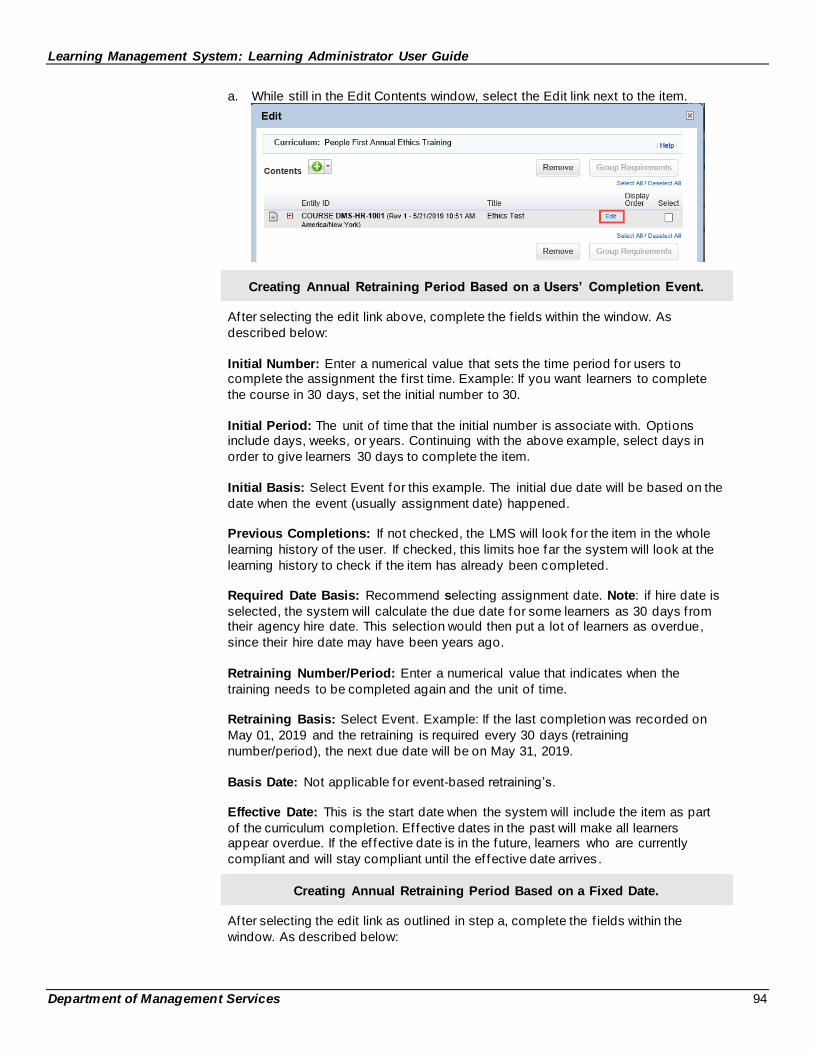
Learning Management System: Learning Administrator User Guide
Department of Management Services 94
a. While still in the Edit Contents window, select the Edit link next to the item.
Creating Annual Retraining Period Based on a Users’ Completion Event.
After selecting the edit link above, complete the f ields within the window. As
described below:
Initial Number: Enter a numerical value that sets the time period for users to complete the assignment the f irst time. Example: If you want learners to complete
the course in 30 days, set the initial number to 30.
Initial Period: The unit of time that the initial number is associate with. Options include days, weeks, or years. Continuing with the above example, select days in
order to give learners 30 days to complete the item.
Initial Basis: Select Event for this example. The initial due date will be based on the
date when the event (usually assignment date) happened.
Previous Completions: If not checked, the LMS will look for the item in the whole
learning history of the user. If checked, this limits hoe far the system will look at the
learning history to check if the item has already been completed.
Required Date Basis: Recommend selecting assignment date. Note: if hire date is
selected, the system will calculate the due date for some learners as 30 days f rom their agency hire date. This selection would then put a lot of learners as overdue,
since their hire date may have been years ago.
Retraining Number/Period: Enter a numerical value that indicates when the
training needs to be completed again and the unit of time.
Retraining Basis: Select Event. Example: If the last completion was recorded on
May 01, 2019 and the retraining is required every 30 days (retraining
number/period), the next due date will be on May 31, 2019.
Basis Date: Not applicable for event-based retraining’s.
Effective Date: This is the start date when the system will include the item as part
of the curriculum completion. Ef fective dates in the past will make all learners appear overdue. If the ef fective date is in the future, learners who are currently
compliant and will stay compliant until the ef fective date arrives .
Creating Annual Retraining Period Based on a Fixed Date.
After selecting the edit link as outlined in step a, complete the f ields within the
window. As described below:

Learning Management System: Learning Administrator User Guide
Department of Management Services 95
Initial Number: Enter a numerical value that sets the time period for users to complete the assignment the f irst time. Example: If you want learners to complete
the course in 30 days, set the initial number to 30.
Initial Period: The unit of time that the initial number is associate with. Options include days, weeks, or years. Continuing with the above example, select days in
order to give learners 30 days to complete the item.
Initial Basis: Select Calendar.
Threshold: Only applicable for calendar-based curricula. Controls a “grace period” for an item’s due date. Threshold is a number of days before the end of the initial
period. If users receive this assignment before the threshold, they must complete it within the current initial period. If they receive this assignment af ter the threshold,
they must complete it in the next initial period.
Previous Completions: If not checked, the LMS will look for the item in the whole learning history of the user. If checked, this limits hoe far the system will look at the
learning history to check if the item has already been completed.
Required Date Basis: Ignore this setting.
Retraining Number/Period: Enter a numerical value that indicates when the
training needs to be completed again and the unit of time.
Retraining Basis: Select Event. Example: If the last completion was recorded on May 01, 2019 and the retraining is required every 30 days (retraining
number/period), the next due date will be on May 31, 2019.
Basis Date: select the day before (because calculations are based on midnight) the f ixed calendar date in the year that you want initial and retraining periods to begin. The system will create intervals starting with the specif ied Basis Date using the
def ined period. If the basis date is 01-Feb-2019 and the retraining is required every 30 days, the next due dates would be 3-Mar-19, 2-Apr-19, and so on, for all users independent of
their last retraining completion.
Effective Date: This is the start date when the system will include the item as part of the curriculum completion. Ef fective dates in the past will make all learners
appear overdue. If the ef fective date is in the future, learners who are currently
compliant and will stay compliant until the ef fective date arrives.
8. Select ‘Apply Changes' to f inalize the above settings.
9. A curricula can be added to catalogs by selecting the green plus sign and searching for the catalog.
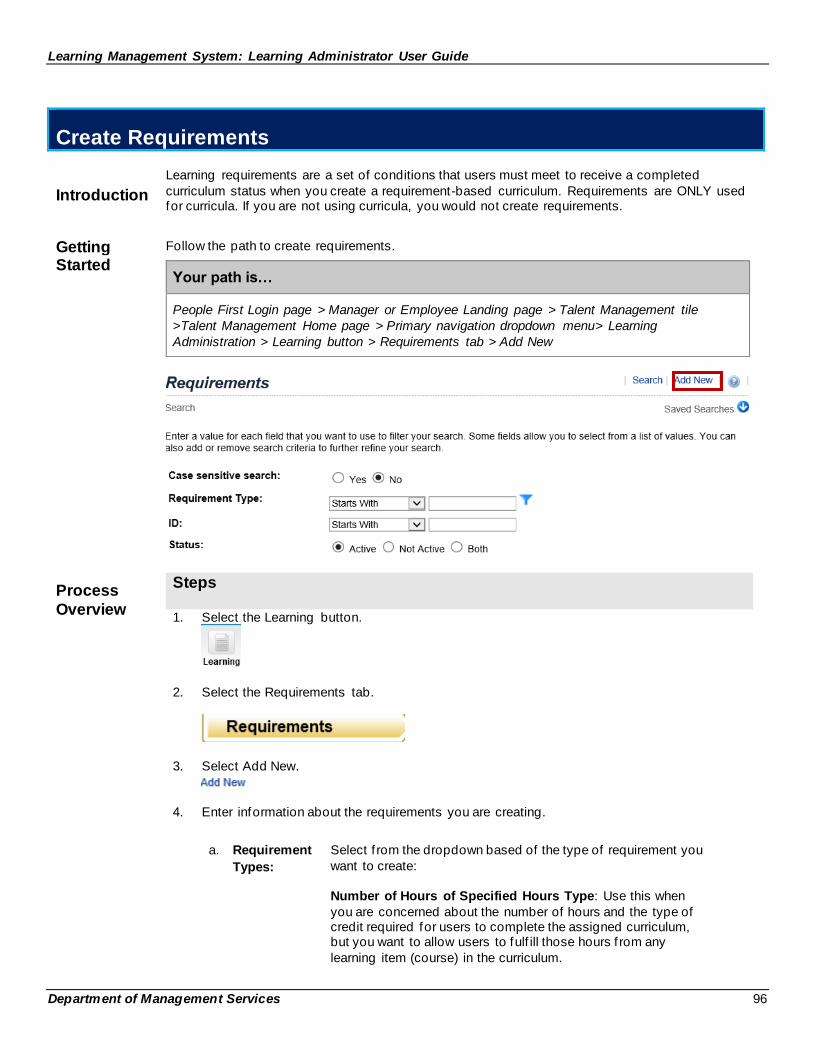
Learning Management System: Learning Administrator User Guide
Department of Management Services 96
Create Requirements
Introduction
Learning requirements are a set of conditions that users must meet to receive a completed
curriculum status when you create a requirement-based curriculum. Requirements are ONLY used for curricula. If you are not using curricula, you would not create requirements.
Getting Started
Follow the path to create requirements.
Your path is…
People First Login page > Manager or Employee Landing page > Talent Management tile
>Talent Management Home page > Primary navigation dropdown menu> Learning
Administration > Learning button > Requirements tab > Add New
Process
Overview
Steps
1. Select the Learning button.
2. Select the Requirements tab.
3. Select Add New.
4. Enter information about the requirements you are creating.
a. Requirement
Types:
Select f rom the dropdown based of the type of requirement you
want to create: Number of Hours of Specified Hours Type: Use this when
you are concerned about the number of hours and the type of credit required for users to complete the assigned curriculum, but you want to allow users to fulf ill those hours f rom any
learning item (course) in the curriculum.
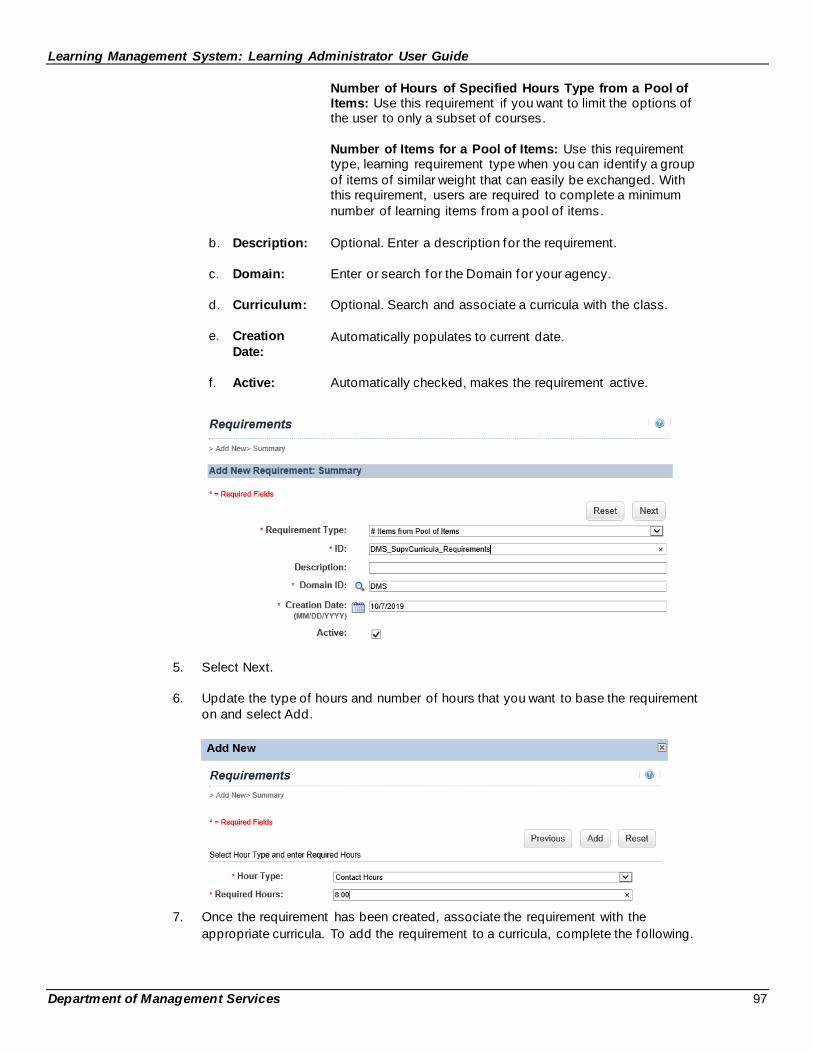
Learning Management System: Learning Administrator User Guide
Department of Management Services 97
Number of Hours of Specified Hours Type from a Pool of Items: Use this requirement if you want to limit the options of the user to only a subset of courses.
Number of Items for a Pool of Items: Use this requirement type, learning requirement type when you can identify a group
of items of similar weight that can easily be exchanged. With this requirement, users are required to complete a minimum
number of learning items f rom a pool of items.
b. Description: Optional. Enter a description for the requirement.
c. Domain: Enter or search for the Domain for your agency.
d. Curriculum: Optional. Search and associate a curricula with the class.
e. Creation
Date: Automatically populates to current date.
f. Active: Automatically checked, makes the requirement active.
5. Select Next.
6. Update the type of hours and number of hours that you want to base the requirement
on and select Add.
7. Once the requirement has been created, associate the requirement with the
appropriate curricula. To add the requirement to a curricula, complete the following.
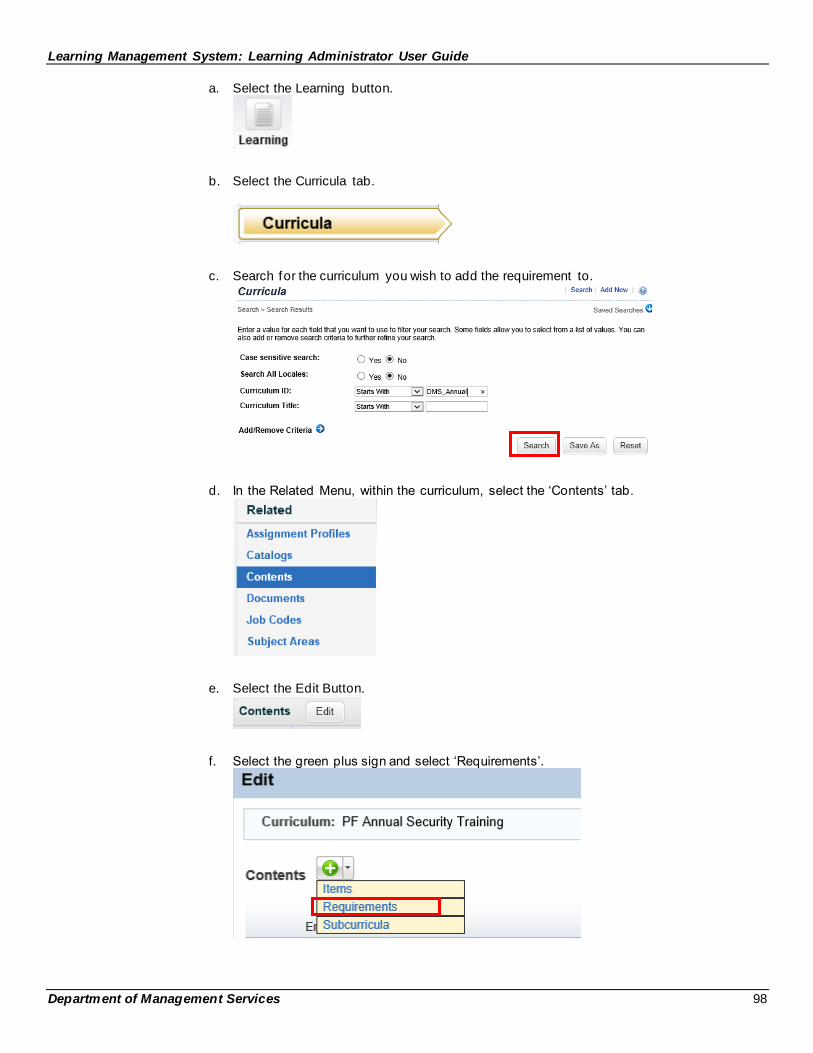
Learning Management System: Learning Administrator User Guide
Department of Management Services 98
a. Select the Learning button.
b. Select the Curricula tab.
c. Search for the curriculum you wish to add the requirement to.
d. In the Related Menu, within the curriculum, select the ‘Contents’ tab.
e. Select the Edit Button.
f. Select the green plus sign and select ‘Requirements’.
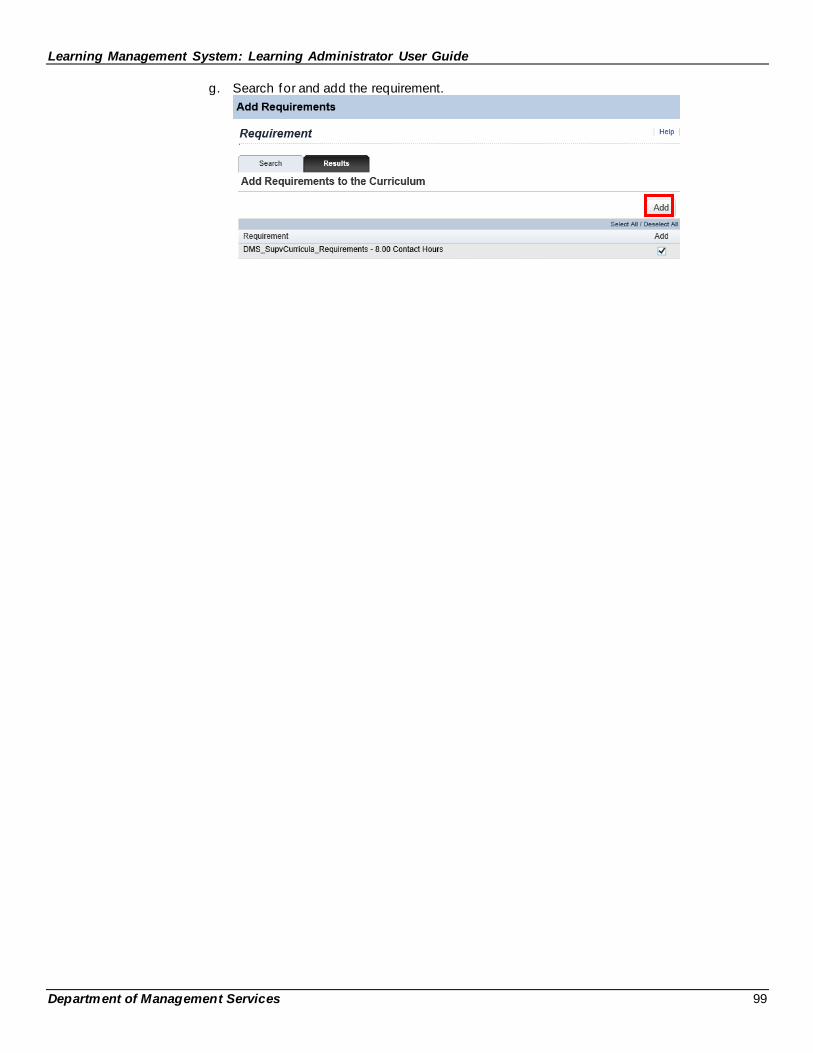
Learning Management System: Learning Administrator User Guide
Department of Management Services 99
g. Search for and add the requirement.
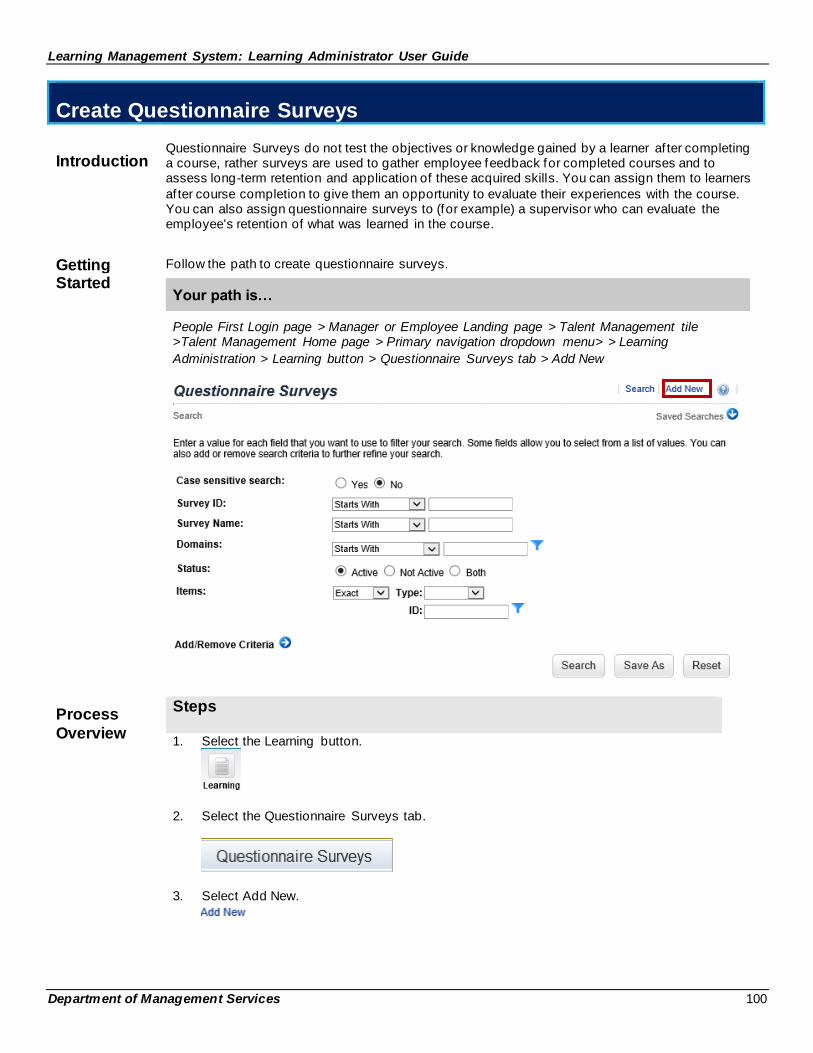
Learning Management System: Learning Administrator User Guide
Department of Management Services 100
Create Questionnaire Surveys
Introduction
Questionnaire Surveys do not test the objectives or knowledge gained by a learner af ter completing a course, rather surveys are used to gather employee feedback for completed courses and to assess long-term retention and application of these acquired skills. You can assign them to learners
af ter course completion to give them an opportunity to evaluate their experiences with the course. You can also assign questionnaire surveys to (for example) a supervisor who can evaluate the employee's retention of what was learned in the course.
Getting Started
Follow the path to create questionnaire surveys.
Your path is…
People First Login page > Manager or Employee Landing page > Talent Management tile >Talent Management Home page > Primary navigation dropdown menu> > Learning
Administration > Learning button > Questionnaire Surveys tab > Add New
Process
Overview
Steps
1. Select the Learning button.
2. Select the Questionnaire Surveys tab.
3. Select Add New.
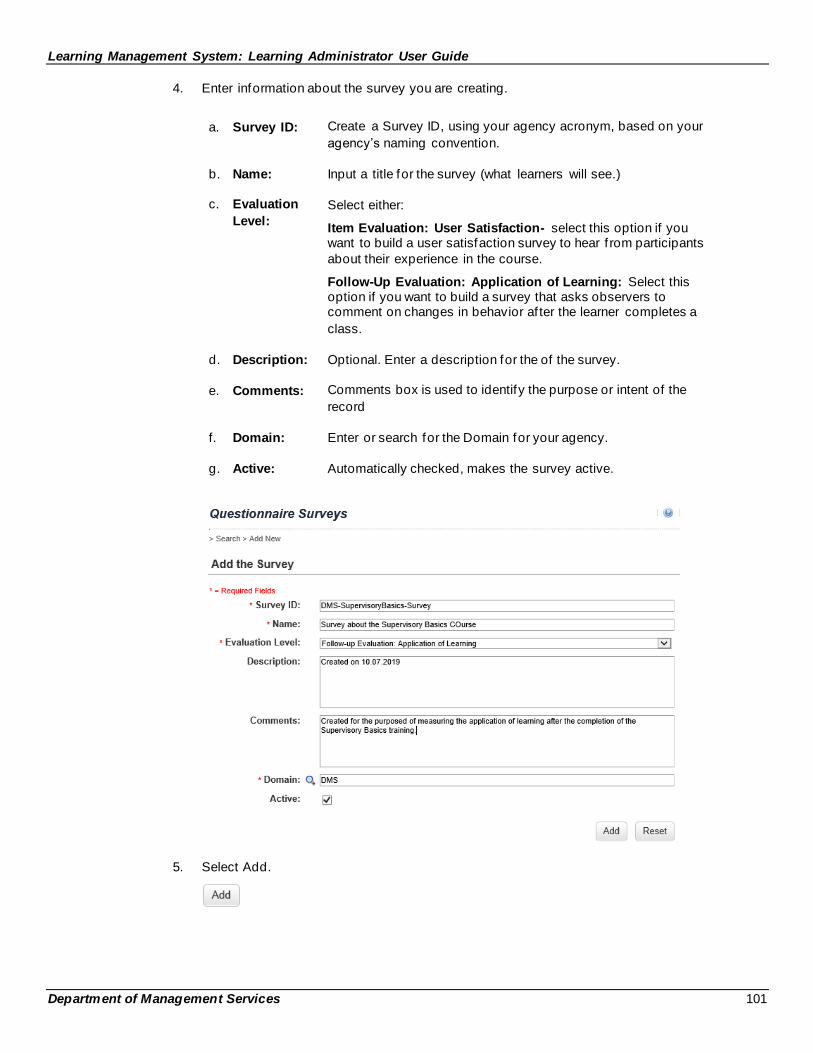
Learning Management System: Learning Administrator User Guide
Department of Management Services 101
4. Enter information about the survey you are creating.
a. Survey ID: Create a Survey ID, using your agency acronym, based on your
agency’s naming convention.
b. Name: Input a title for the survey (what learners will see.)
c. Evaluation
Level:
Select either:
Item Evaluation: User Satisfaction- select this option if you want to build a user satisfaction survey to hear f rom participants
about their experience in the course.
Follow-Up Evaluation: Application of Learning: Select this option if you want to build a survey that asks observers to comment on changes in behavior af ter the learner completes a
class.
d. Description: Optional. Enter a description for the of the survey.
e. Comments: Comments box is used to identify the purpose or intent of the
record
f. Domain: Enter or search for the Domain for your agency.
g. Active: Automatically checked, makes the survey active.
5. Select Add.
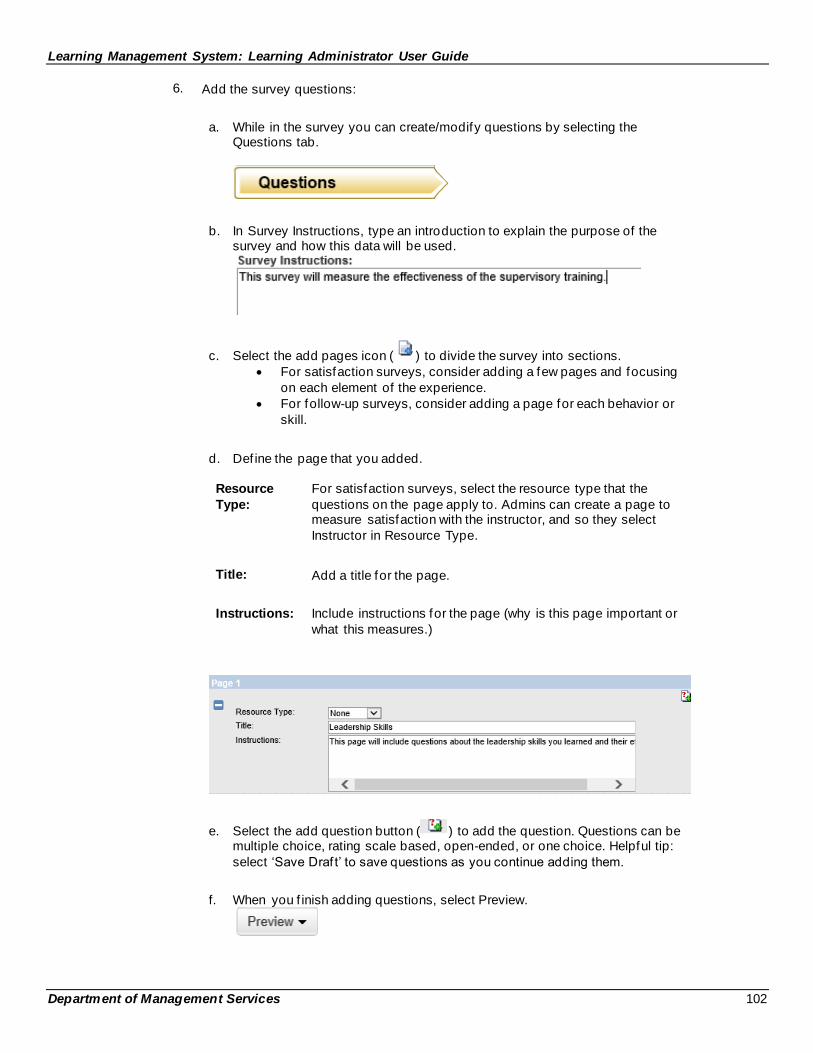
Learning Management System: Learning Administrator User Guide
Department of Management Services 102
6. Add the survey questions:
a. While in the survey you can create/modify questions by selecting the Questions tab.
b. In Survey Instructions, type an introduction to explain the purpose of the survey and how this data will be used.
c. Select the add pages icon ( ) to divide the survey into sections.
• For satisfaction surveys, consider adding a few pages and focusing
on each element of the experience.
• For follow-up surveys, consider adding a page for each behavior or
skill.
d. Def ine the page that you added.
Resource
Type:
For satisfaction surveys, select the resource type that the
questions on the page apply to. Admins can create a page to measure satisfaction with the instructor, and so they select
Instructor in Resource Type.
Title: Add a title for the page.
Instructions: Include instructions for the page (why is this page important or
what this measures.)
e. Select the add question button ( ) to add the question. Questions can be multiple choice, rating scale based, open-ended, or one choice. Helpful tip:
select ‘Save Draf t’ to save questions as you continue adding them.
f. When you f inish adding questions, select Preview.
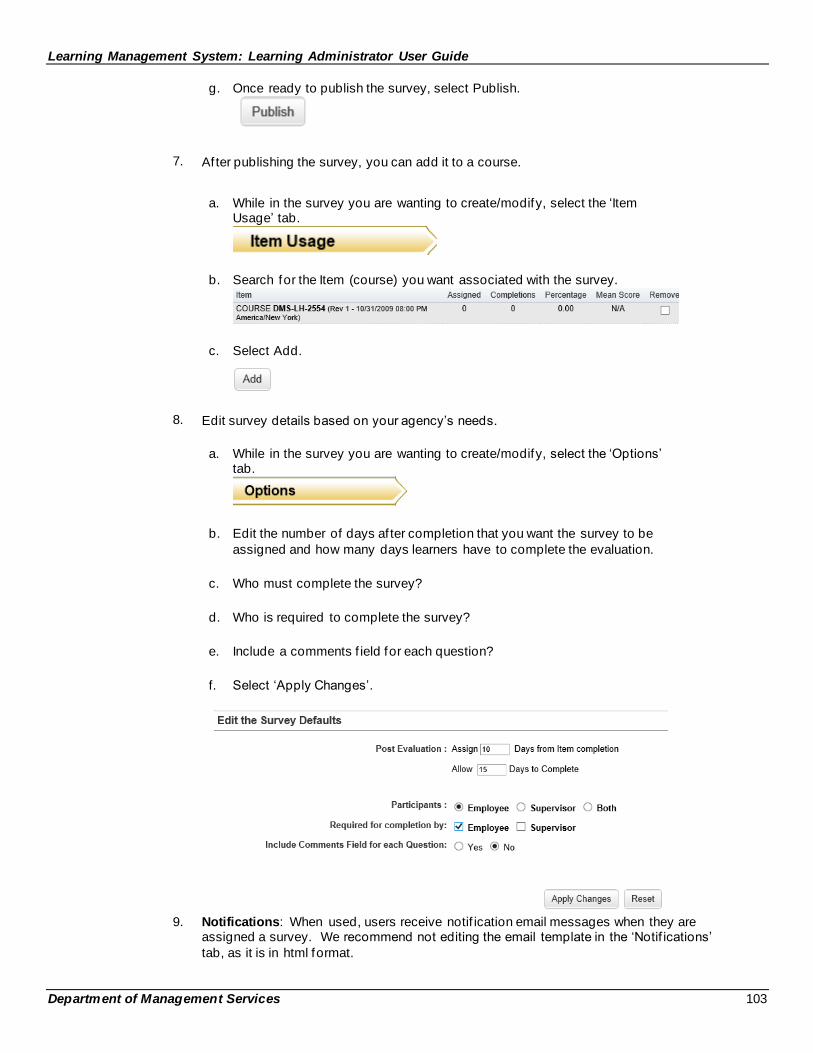
Learning Management System: Learning Administrator User Guide
Department of Management Services 103
g. Once ready to publish the survey, select Publish.
7. Af ter publishing the survey, you can add it to a course.
a. While in the survey you are wanting to create/modify, select the ‘Item Usage’ tab.
b. Search for the Item (course) you want associated with the survey.
c. Select Add.
8. Edit survey details based on your agency’s needs.
a. While in the survey you are wanting to create/modify, select the ‘Options’ tab.
b. Edit the number of days af ter completion that you want the survey to be
assigned and how many days learners have to complete the evaluation.
c. Who must complete the survey?
d. Who is required to complete the survey?
e. Include a comments f ield for each question?
f. Select ‘Apply Changes’.
9. Notifications: When used, users receive notif ication email messages when they are assigned a survey. We recommend not editing the email template in the ‘Notif ications’
tab, as it is in html format.
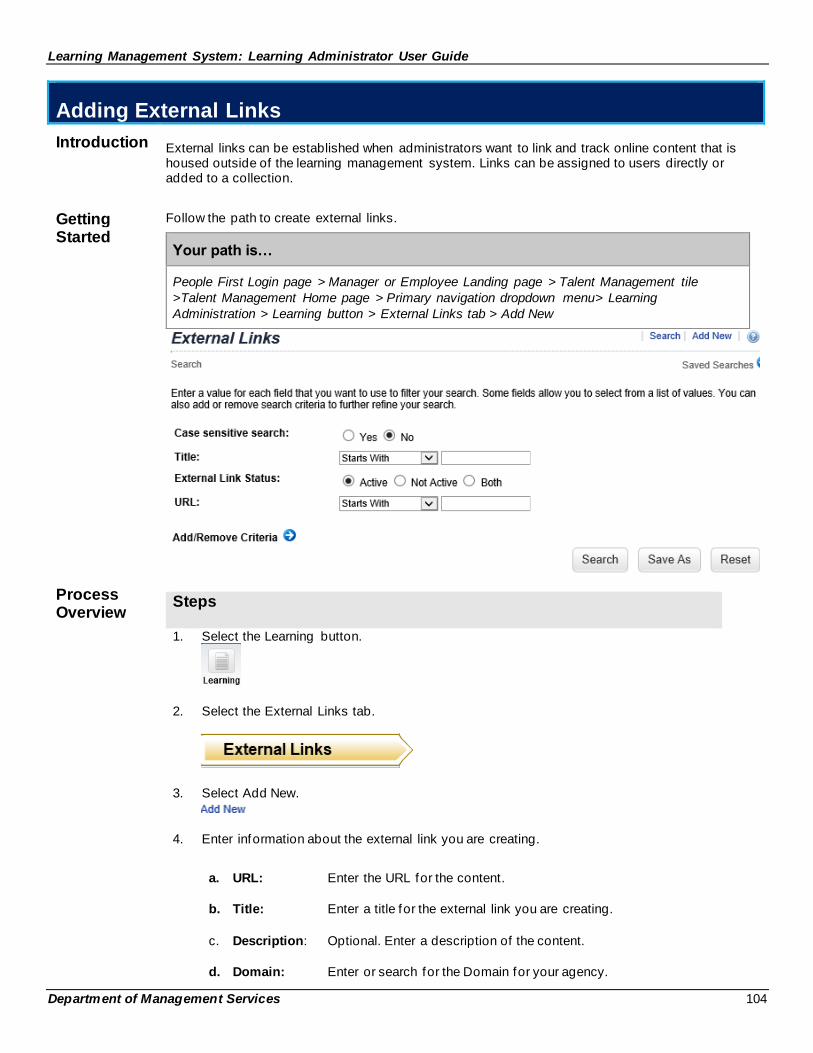
Learning Management System: Learning Administrator User Guide
Department of Management Services 104
Adding External Links
Introduction
External links can be established when administrators want to link and track online content that is housed outside of the learning management system. Links can be assigned to users directly or added to a collection.
Getting Started
Follow the path to create external links.
Your path is…
People First Login page > Manager or Employee Landing page > Talent Management tile
>Talent Management Home page > Primary navigation dropdown menu> Learning
Administration > Learning button > External Links tab > Add New
Process Overview
Steps 1. Select the Learning button.
2. Select the External Links tab.
3. Select Add New.
4. Enter information about the external link you are creating.
a. URL: Enter the URL for the content.
b. Title: Enter a title for the external link you are creating.
c. Description: Optional. Enter a description of the content.
d. Domain: Enter or search for the Domain for your agency.
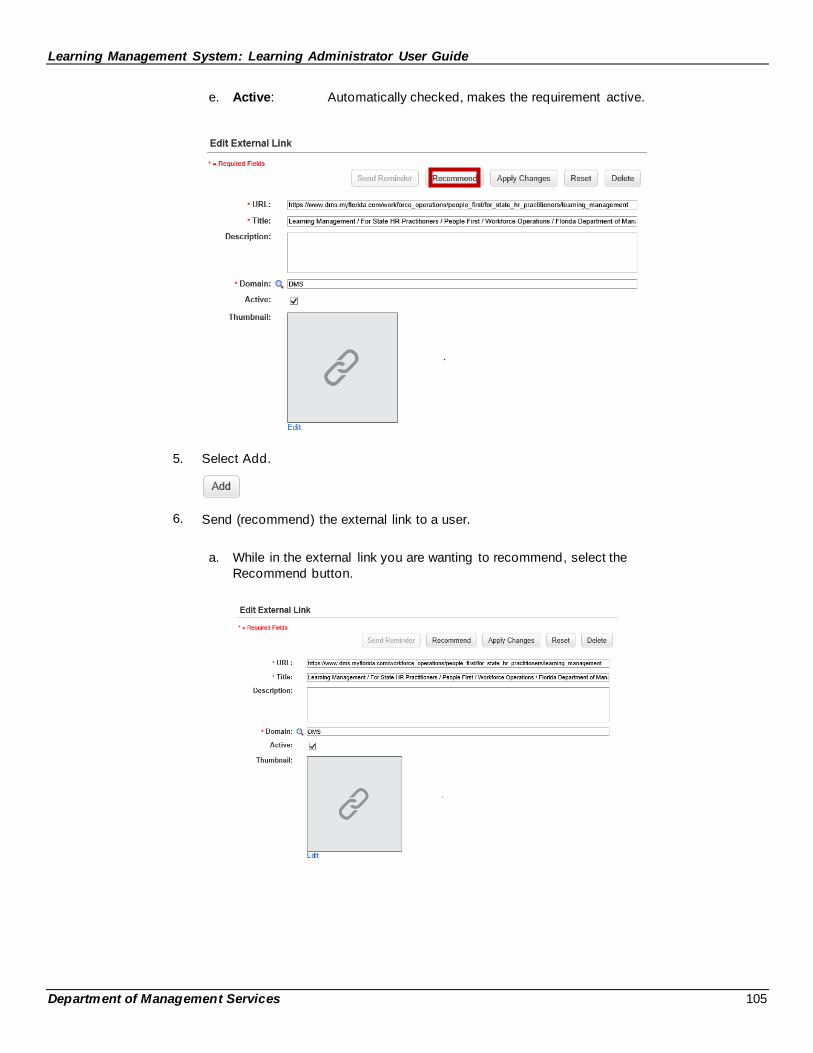
Learning Management System: Learning Administrator User Guide
Department of Management Services 105
e. Active: Automatically checked, makes the requirement active.
5. Select Add.
6. Send (recommend) the external link to a user.
a. While in the external link you are wanting to recommend, select the
Recommend button.
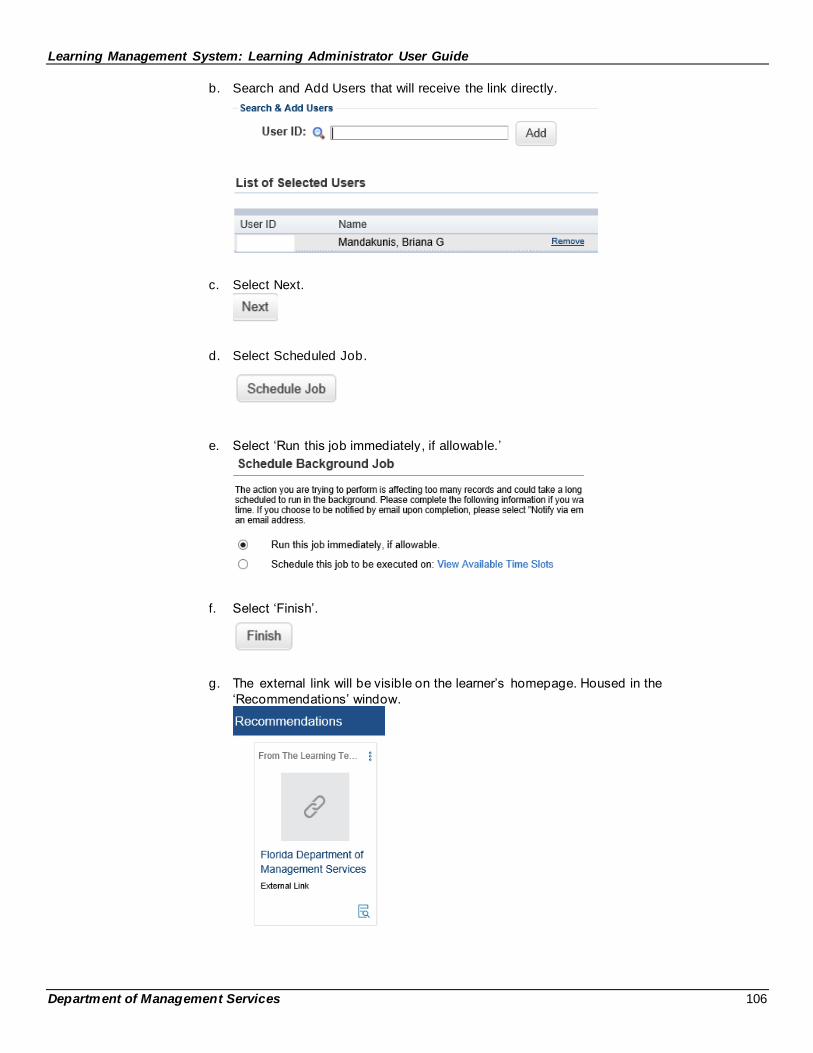
Learning Management System: Learning Administrator User Guide
Department of Management Services 106
b. Search and Add Users that will receive the link directly.
c. Select Next.
d. Select Scheduled Job.
e. Select ‘Run this job immediately, if allowable.’
f. Select ‘Finish’.
g. The external link will be visible on the learner’s homepage. Housed in the
‘Recommendations’ window.
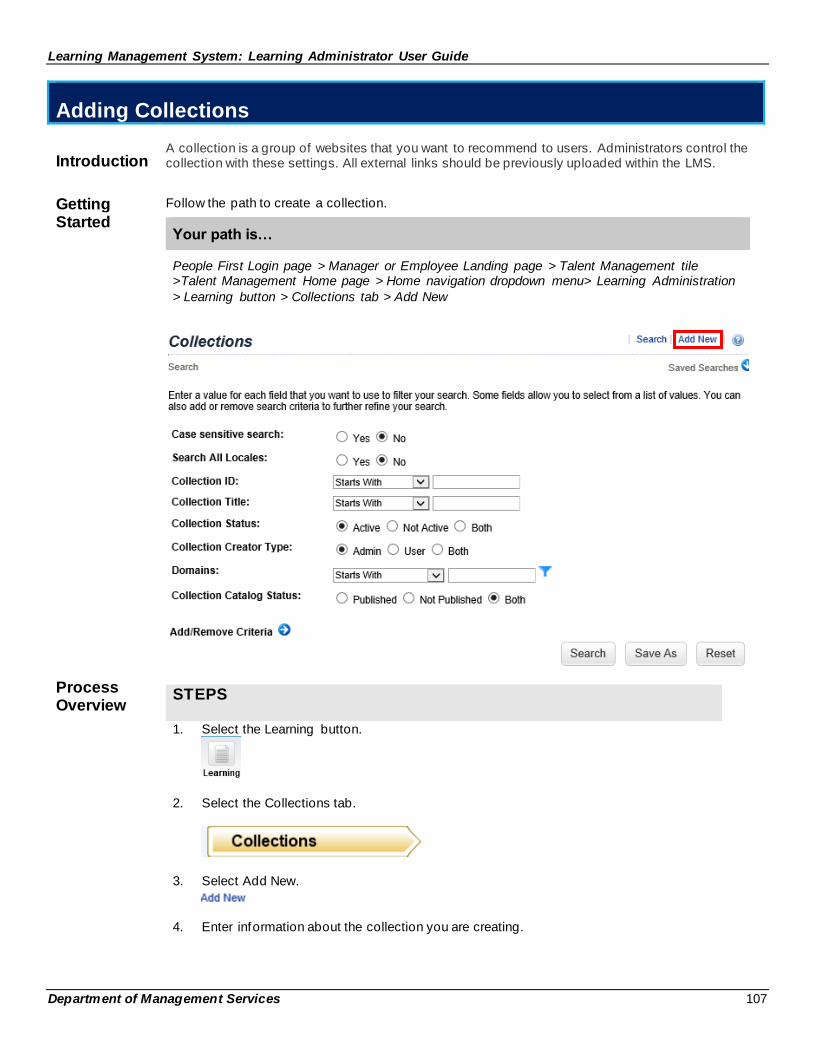
Learning Management System: Learning Administrator User Guide
Department of Management Services 107
Adding Collections
Introduction
A collection is a group of websites that you want to recommend to users. Administrators control the collection with these settings. All external links should be previously uploaded within the LMS.
Getting Started
Follow the path to create a collection.
Your path is…
People First Login page > Manager or Employee Landing page > Talent Management tile >Talent Management Home page > Home navigation dropdown menu> Learning Administration
> Learning button > Collections tab > Add New
Process Overview
STEPS 1. Select the Learning button.
2. Select the Collections tab.
3. Select Add New.
4. Enter information about the collection you are creating.
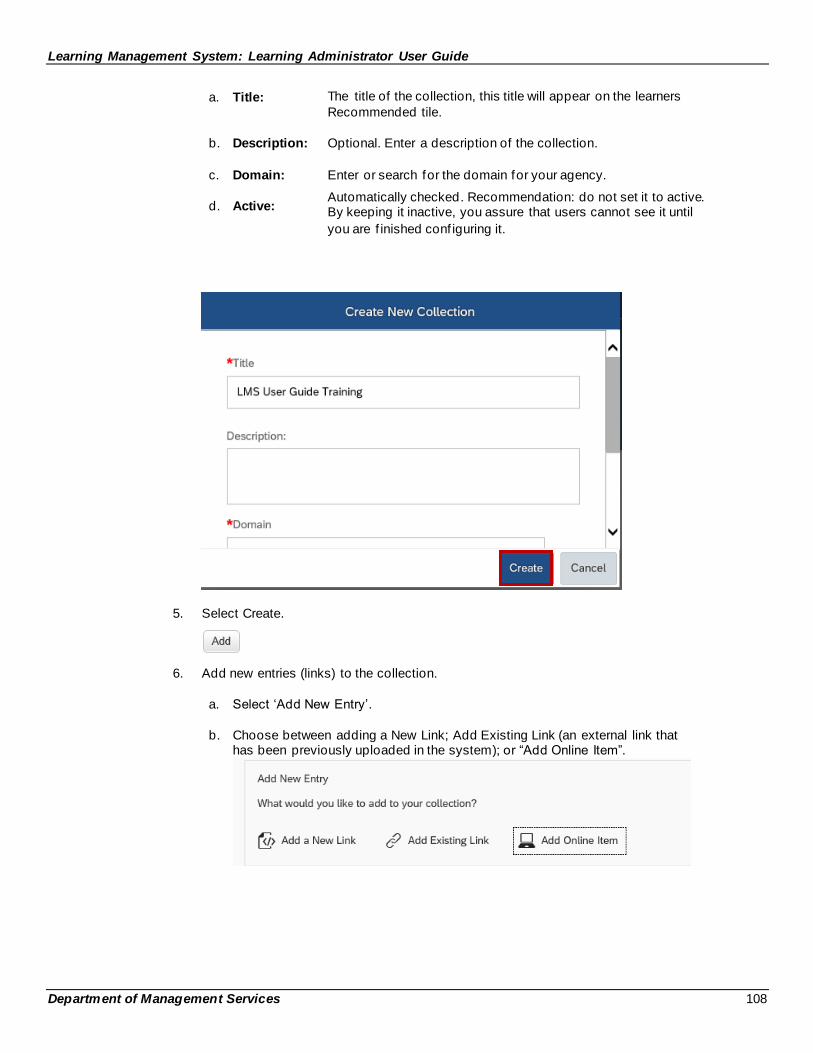
Learning Management System: Learning Administrator User Guide
Department of Management Services 108
a. Title: The title of the collection, this title will appear on the learners
Recommended tile.
b. Description: Optional. Enter a description of the collection.
c. Domain: Enter or search for the domain for your agency.
d. Active: Automatically checked. Recommendation: do not set it to active. By keeping it inactive, you assure that users cannot see it until
you are f inished conf iguring it.
5. Select Create.
6. Add new entries (links) to the collection.
a. Select ‘Add New Entry’.
b. Choose between adding a New Link; Add Existing Link (an external link that has been previously uploaded in the system); or “Add Online Item”.
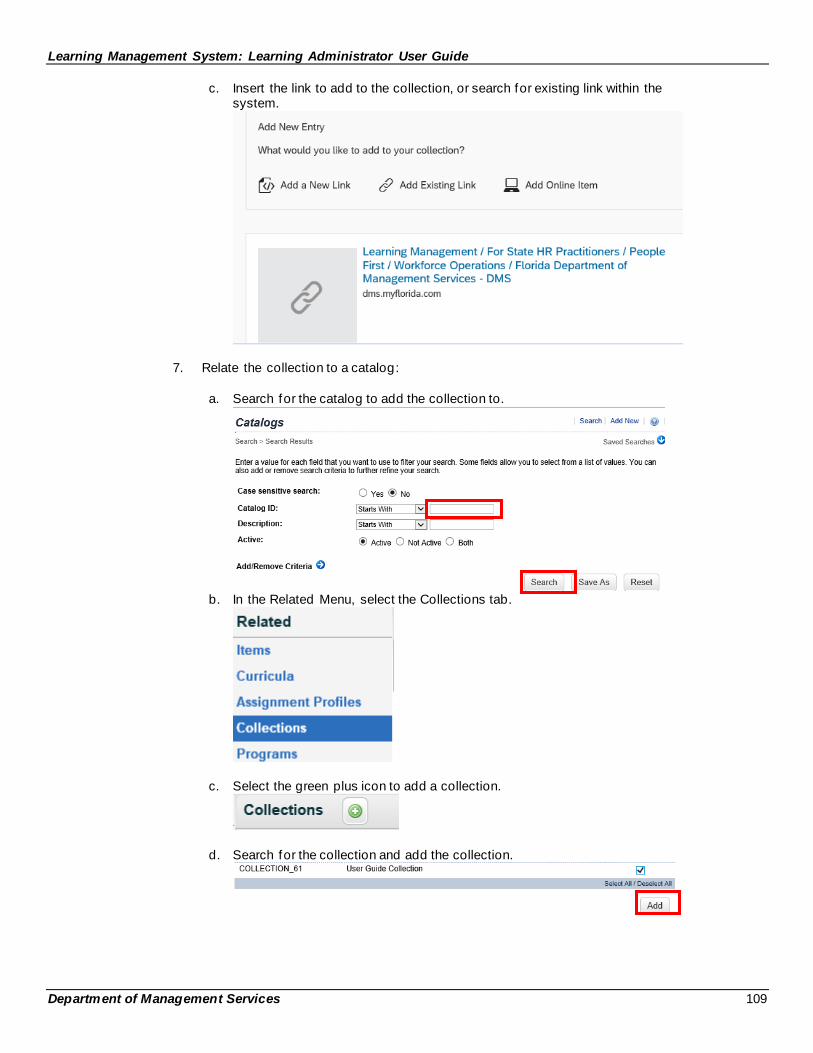
Learning Management System: Learning Administrator User Guide
Department of Management Services 109
c. Insert the link to add to the collection, or search for existing link within the system.
7. Relate the collection to a catalog:
a. Search for the catalog to add the collection to.
b. In the Related Menu, select the Collections tab.
c. Select the green plus icon to add a collection.
d. Search for the collection and add the collection.
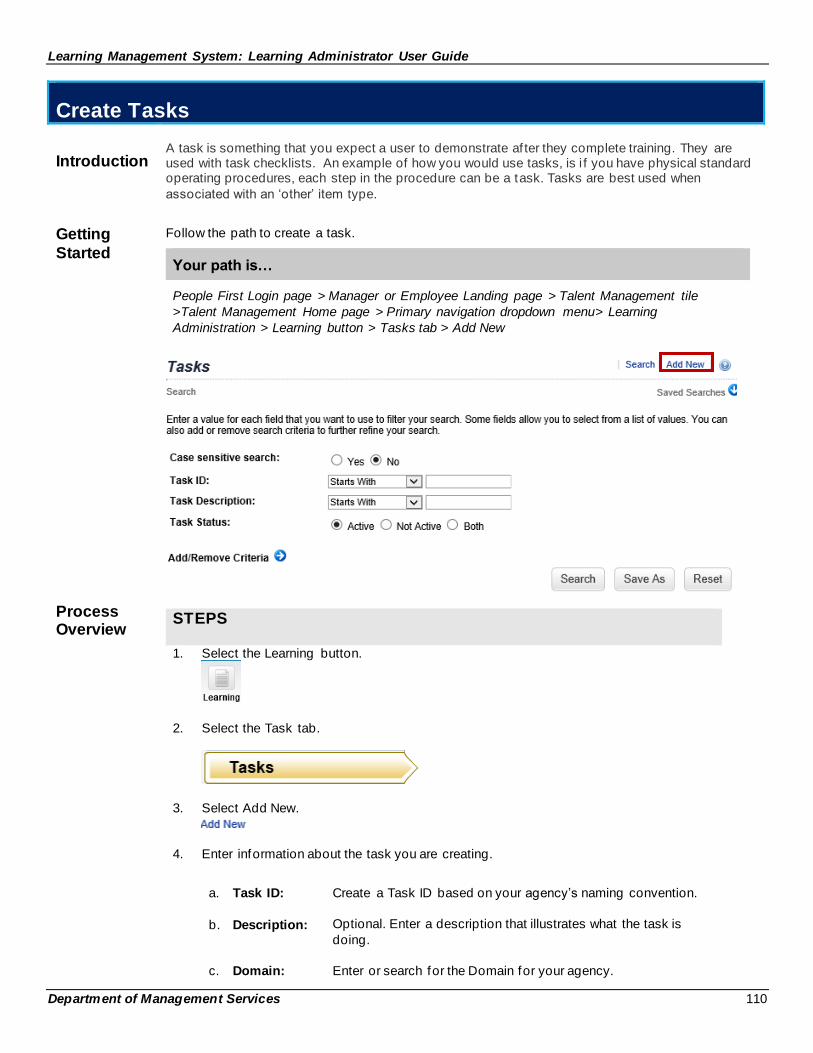
Learning Management System: Learning Administrator User Guide
Department of Management Services 110
Create Tasks
Introduction
A task is something that you expect a user to demonstrate af ter they complete training. They are used with task checklists. An example of how you would use tasks, is i f you have physical standard operating procedures, each step in the procedure can be a task. Tasks are best used when
associated with an ‘other’ item type.
Getting
Started
Follow the path to create a task.
Your path is…
People First Login page > Manager or Employee Landing page > Talent Management tile
>Talent Management Home page > Primary navigation dropdown menu> Learning
Administration > Learning button > Tasks tab > Add New
Process Overview
STEPS
1. Select the Learning button.
2. Select the Task tab.
3. Select Add New.
4. Enter information about the task you are creating.
a. Task ID: Create a Task ID based on your agency’s naming convention.
b. Description: Optional. Enter a description that illustrates what the task is
doing.
c. Domain: Enter or search for the Domain for your agency.
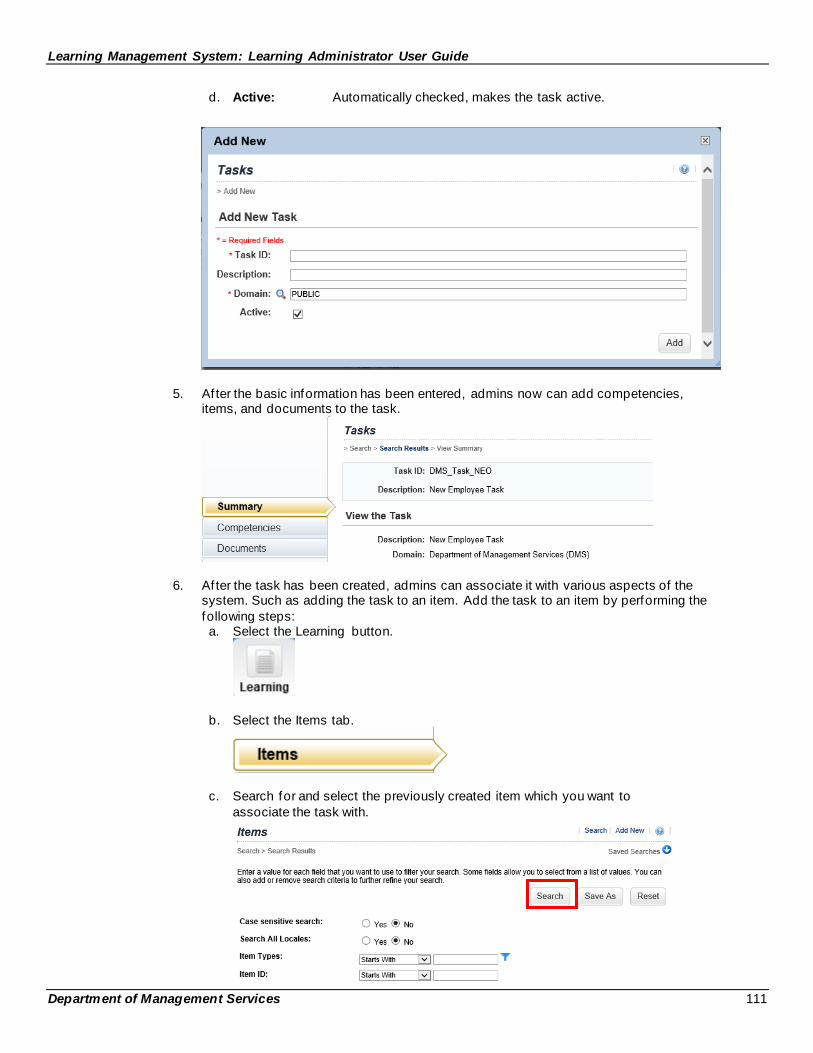
Learning Management System: Learning Administrator User Guide
Department of Management Services 111
d. Active: Automatically checked, makes the task active.
5. Af ter the basic information has been entered, admins now can add competencies, items, and documents to the task.
6. Af ter the task has been created, admins can associate it with various aspects of the system. Such as adding the task to an item. Add the task to an item by performing the
following steps: a. Select the Learning button.
b. Select the Items tab.
c. Search for and select the previously created item which you want to
associate the task with.
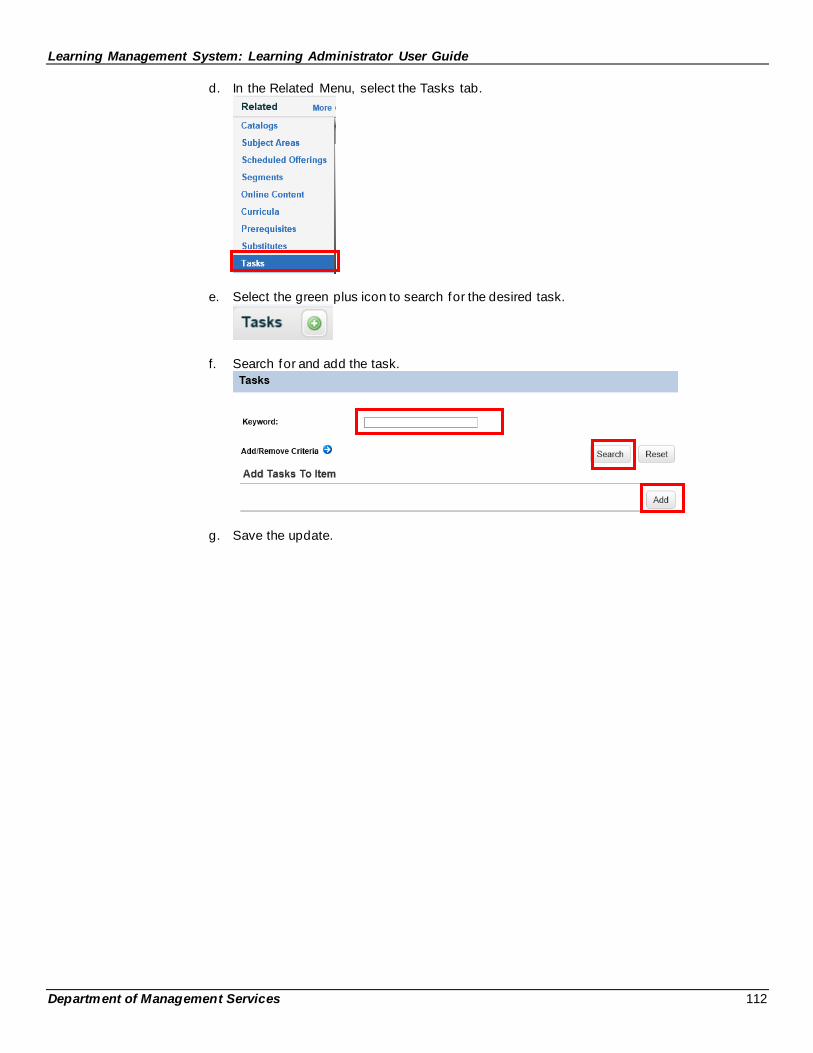
Learning Management System: Learning Administrator User Guide
Department of Management Services 112
d. In the Related Menu, select the Tasks tab.
e. Select the green plus icon to search for the desired task.
f. Search for and add the task.
g. Save the update.
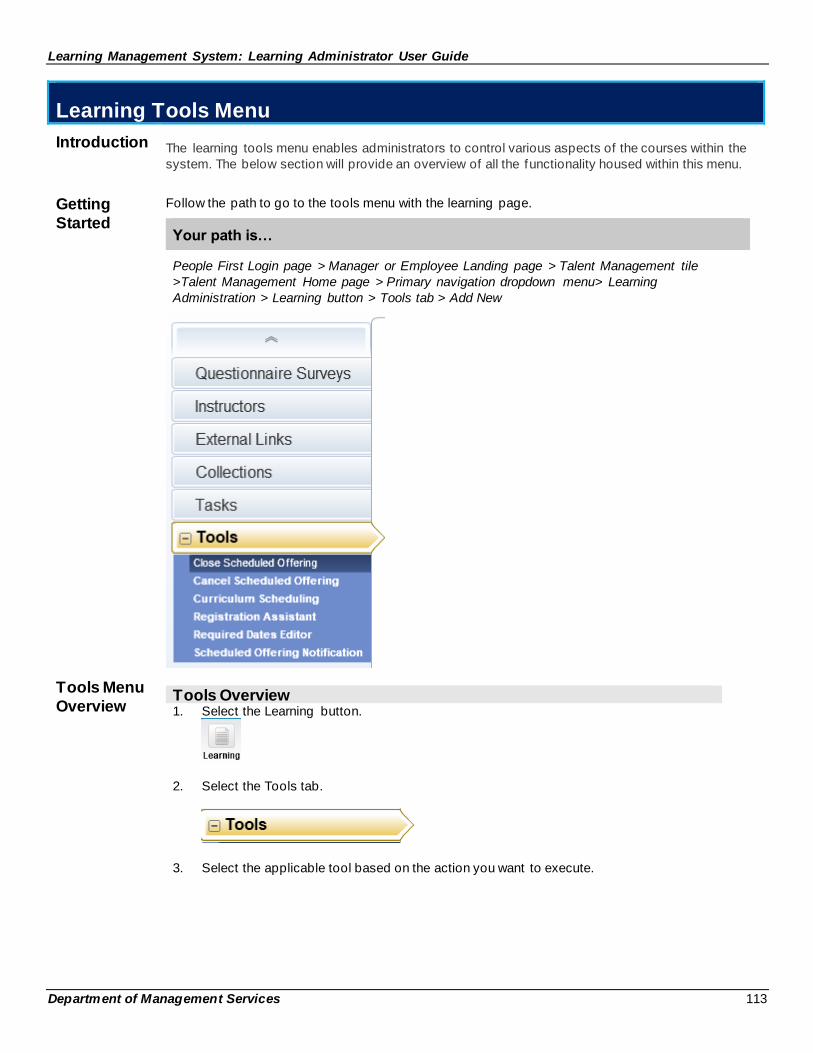
Learning Management System: Learning Administrator User Guide
Department of Management Services 113
Learning Tools Menu
Introduction The learning tools menu enables administrators to control various aspects of the courses within the
system. The below section will provide an overview of all the functionality housed within this menu.
Getting
Started
Follow the path to go to the tools menu with the learning page.
Your path is…
People First Login page > Manager or Employee Landing page > Talent Management tile
>Talent Management Home page > Primary navigation dropdown menu> Learning
Administration > Learning button > Tools tab > Add New
Tools Menu
Overview
Tools Overview 1. Select the Learning button.
2. Select the Tools tab.
3. Select the applicable tool based on the action you want to execute.
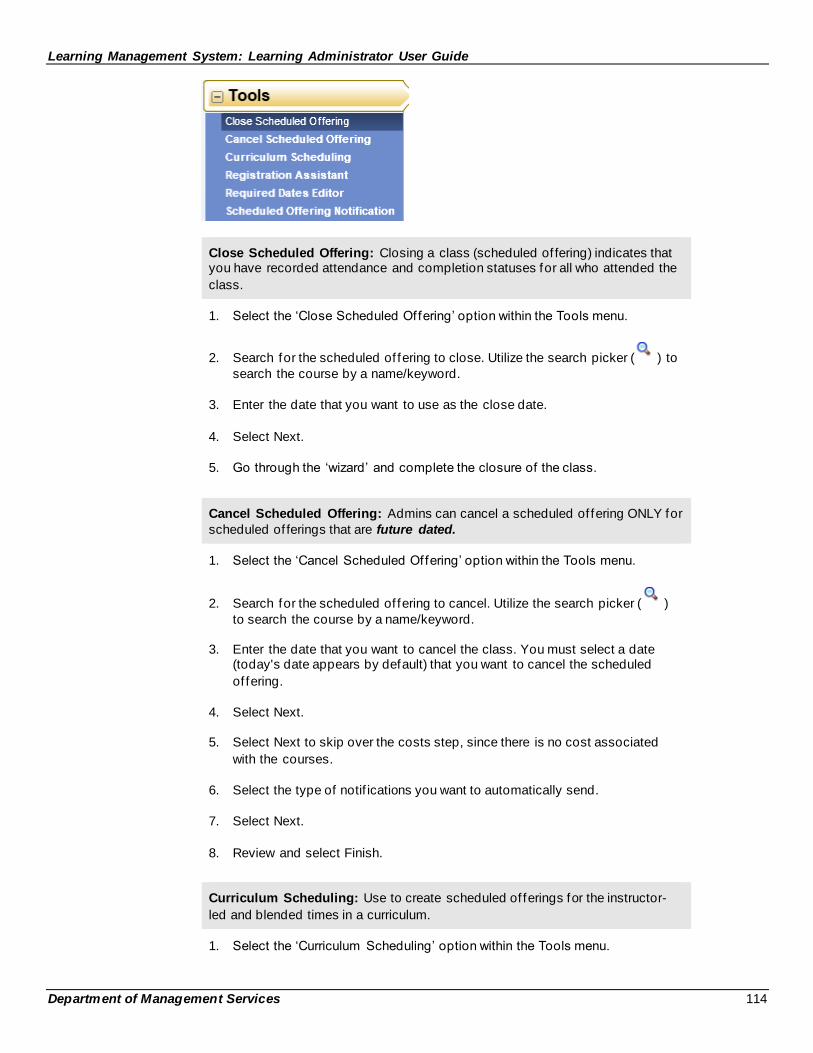
Learning Management System: Learning Administrator User Guide
Department of Management Services 114
Close Scheduled Offering: Closing a class (scheduled of fering) indicates that you have recorded attendance and completion statuses for all who attended the
class.
1. Select the ‘Close Scheduled Offering’ option within the Tools menu.
2. Search for the scheduled of fering to close. Utilize the search picker ( ) to
search the course by a name/keyword.
3. Enter the date that you want to use as the close date.
4. Select Next.
5. Go through the ‘wizard’ and complete the closure of the class.
Cancel Scheduled Offering: Admins can cancel a scheduled of fering ONLY for
scheduled of ferings that are future dated.
1. Select the ‘Cancel Scheduled Offering’ option within the Tools menu.
2. Search for the scheduled of fering to cancel. Utilize the search picker ( )
to search the course by a name/keyword.
3. Enter the date that you want to cancel the class. You must select a date (today's date appears by default) that you want to cancel the scheduled
of fering.
4. Select Next.
5. Select Next to skip over the costs step, since there is no cost associated
with the courses.
6. Select the type of notif ications you want to automatically send.
7. Select Next.
8. Review and select Finish.
Curriculum Scheduling: Use to create scheduled of ferings for the instructor-
led and blended times in a curriculum.
1. Select the ‘Curriculum Scheduling’ option within the Tools menu.
Learning Management System: Learning Administrator User Guide
Department of Management Services 115
2. Search for the curriculum to cancel. Utilize the search picker ( ) to search
the curricula by a name/keyword.
3. Enter scheduling information (including the start date and time, time zone, and domain ID) that the system uses to create scheduled of ferings in the
curriculum.
4. Select Next.
5. If a class is associated with the curriculum, select next.
6. Select ‘Finish’.
Registration Assistant: Use this to register users in, withdraw users f rom, and
reserve registration slots in a scheduled of fering .
1. Select the ‘Registration Assistant’ option within the Tools menu.
2. Select the radio button of the action you want to execute: ‘Withdraw Users,
Reserve Slots, or Register Users’.
3. Search for the scheduled of fering. Utilize the search picker ( ) to search
the course by a name/keyword.
4. Select Next.
5. Search for the users to Add/ Withdraw/Slots to reserve etc.
6. Select ‘Finish’.
Required Dates Editor: Use this to set new required dates by which users must
complete all f ree-f loating items or curriculum items.
1. Select the ‘Required Dates Editor’ option within the Tools menu.
2. Search and select via ‘Add Users’.
3. Search for the curriculum. Utilize the search picker ( ) to search the
curriculum by a name/keyword.
4. Select Next.
5. You can add one or more “f ree-f loating” items by selecting an item type and
entering an item ID or by selecting add one or more f rom list.
6. Select Next.
7. Input the required date(s).
8. Select ‘Finish’.
Learning Management System: Learning Administrator User Guide
Department of Management Services 116
Scheduled Offering Notification: Notif ies users, supervisors, instructors, and other contacts that you scheduled an of fering. Users, supervisors, instructors, and other contacts receive dif ferent notif ications depending on each user's
current registration status (Registered, Pending, Waitlisted, Withdrawn, or
Canceled) for the scheduled of fering.
1. Select the ‘Scheduled Offering Notif ication’ option within the Tools menu.
2. Search and select via ‘Add Users’.
3. Search for the scheduled of fering ID. Utilize the search picker ( ) to
search the Scheduled Offering ID by a name/keyword .
4. Select Next.
5. Select the types of people (users, instructors, supervisors) you would like to
notify.
6. Select ‘Finish’.
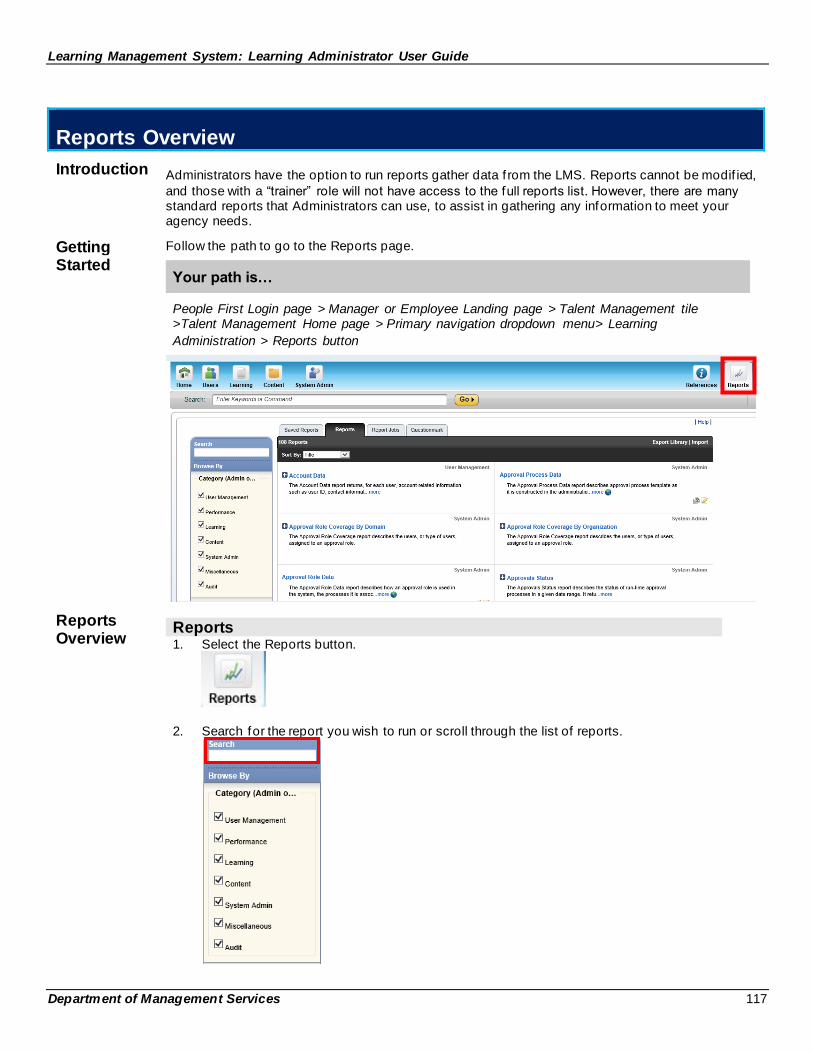
Learning Management System: Learning Administrator User Guide
Department of Management Services 117
Reports Overview
Introduction Administrators have the option to run reports gather data f rom the LMS. Reports cannot be modif ied,
and those with a “trainer” role will not have access to the full reports list. However, there are many standard reports that Administrators can use, to assist in gathering any information to meet your agency needs.
Getting Started
Follow the path to go to the Reports page.
Your path is…
People First Login page > Manager or Employee Landing page > Talent Management tile >Talent Management Home page > Primary navigation dropdown menu> Learning
Administration > Reports button
Reports Overview
Reports 1. Select the Reports button.
2. Search for the report you wish to run or scroll through the list of reports.
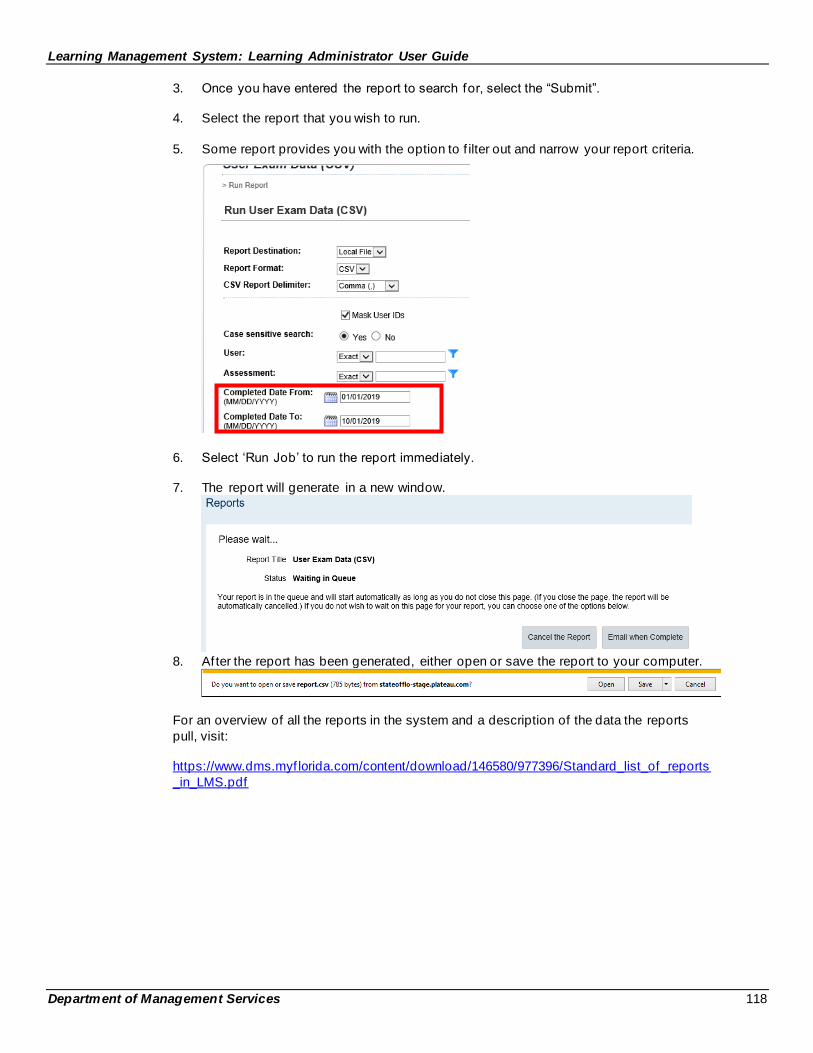
Learning Management System: Learning Administrator User Guide
Department of Management Services 118
3. Once you have entered the report to search for, select the “Submit”.
4. Select the report that you wish to run.
5. Some report provides you with the option to f ilter out and narrow your report criteria.
6. Select ‘Run Job’ to run the report immediately.
7. The report will generate in a new window.
8. Af ter the report has been generated, either open or save the report to your computer.
For an overview of all the reports in the system and a description of the data the reports
pull, visit: https://www.dms.myf lorida.com/content/download/146580/977396/Standard_list_of_reports
_in_LMS.pdf