Embed Size (px)
Citation preview
UNITED STATES MARINE CORPS THE BASIC SCHOOL
MARINE CORPS TRAINING COMMAND CAMP BARRETT, VIRGINIA 22134-5019
LENSATIC COMPASS B182056
STUDENT HANDOUT
Basic Officer Course
B182056 Lensatic Compass
2 Basic Officer Course
Lensatic Compass
Introduction Land navigation requires the use of many tools; the more
experienced the navigators, the more tools they will use. Obvious examples of the simpler tools available are the protractor, map, compass, and pace count. Less obvious examples, that will take experience to appreciate, are the terrain, sun, stars, the direction water flows, wildlife, etc. As with any skill, proficiency in land navigation is based upon a firm knowledge of basic tools.
Importance Land navigation is a skill-set which takes time and practice
in order to become proficient and confident. Basic mastery of the tools of land navigation -- map, compass, and protractor -- is absolutely necessary in order to ensure our success.
In This Lesson This lesson is devoted to two of the most basic tools: the
lensatic compass and your pace count (you have already been exposed to the protractor and map). The intent of this lesson is to ensure students are prepared for follow on classroom and field instruction in land navigation.
This lesson covers the following topics:
Topic Page
Lensatic Compass 4 Maintenance and Care 6 Compass Techniques 8 Pace Count 10 Basic Navigation Techniques 11 Review Questions 16 Review Questions Answers 21 Summary 23 References 23 Glossary of Terms and Acronyms 23 Notes 23
Learning Objectives Terminal Learning Objectives
TBS-PAT-1002 Given a military topographic map, protractor, lensatic compass, and objective, navigate with a map and compass, to arrive within 100 meters of the objective.
B182056 Lensatic Compass
3 Basic Officer Course
Lensatic Compass
Learning Objectives (Continued)
Enabling Learning Objectives TBS-PAT-1002k Given a lensatic compass, a surveyed point with a level platform, an azimuth marker, and a surveyed known direction, inspect the lensatic compass, to determine serviceability. TBS-PAT-1002m Given a military topographic map, a compass, an obstacle, perform deliberate offset as required, to arrive within 50 meters of the objective.
B182056 Lensatic Compass
4 Basic Officer Course
Lensatic Compass
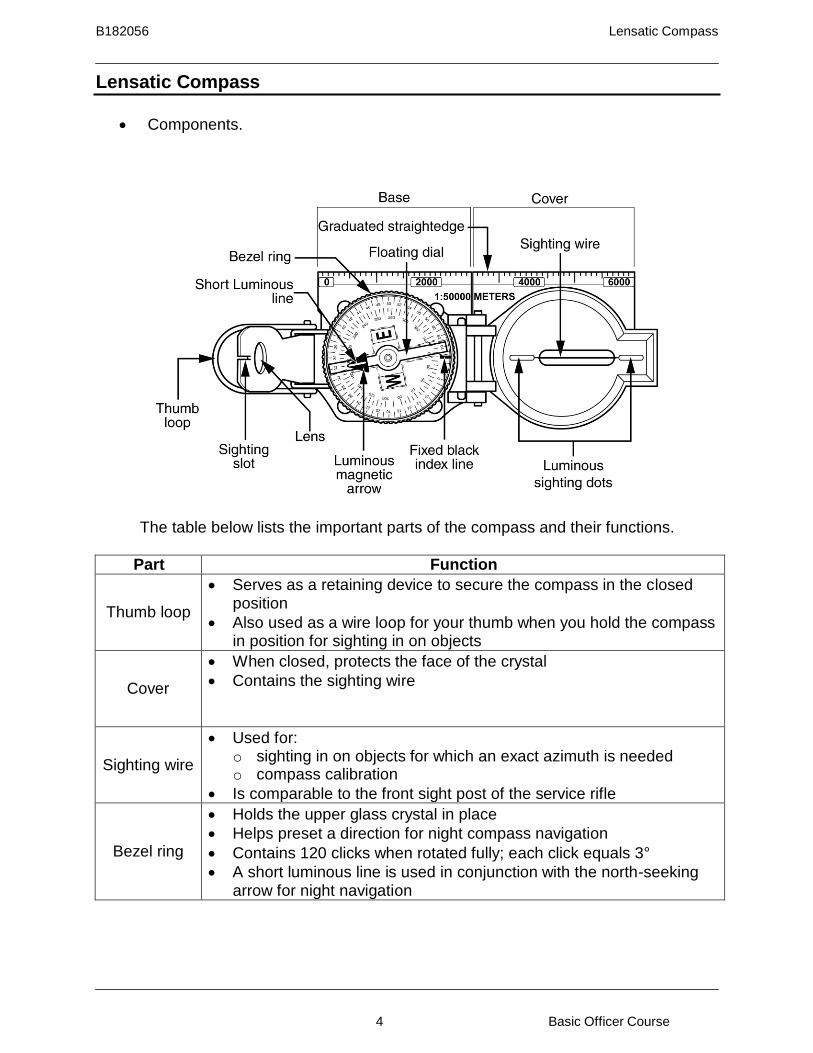
• Components.
The table below lists the important parts of the compass and their functions.
Part Function
Thumb loop
• Serves as a retaining device to secure the compass in the closed position
• Also used as a wire loop for your thumb when you hold the compass in position for sighting in on objects
Cover
• When closed, protects the face of the crystal • Contains the sighting wire
Sighting wire
• Used for: o sighting in on objects for which an exact azimuth is needed o compass calibration
• Is comparable to the front sight post of the service rifle
Bezel ring
• Holds the upper glass crystal in place • Helps preset a direction for night compass navigation • Contains 120 clicks when rotated fully; each click equals 3° • A short luminous line is used in conjunction with the north-seeking
arrow for night navigation
B182056 Lensatic Compass
5 Basic Officer Course
Lensatic Compass (Continued)
• Components. (Continued)
Important parts of the compass and their functions (Continued)
Black index line
• Stationary line used as a reference line for determining direction • When the compass is held properly, the azimuth found directly
under the black index line identifies the direction that the compass is pointing
Compass dial
• Is delicately balanced and free floating when in use • Can be locked in place by closing the eyepiece • Contains two complete circular scales, one in
o Degrees (red scale) o Mils (black scale)
Lanyard (Dummy
cord)
• Helps prevent loss of the compass • Periodically, the brass clamp and the cord itself need to be checked
for serviceability
• General Inspection. Compasses are delicate instruments and should be cared for accordingly. A detailed inspection is required when first obtaining and using a compass. Important serviceability checks are outlined below.
o Visual Inspection. Open your compass to see that the:
− Cover glass is not broken, clouded, or cracked. − Compass dial does not stick and is free floating.
o Inspect the front cover to see if the cover sighting wire is missing or bent o Inspect the lens holder to be sure:
− It is placed flat against the cover glass. − The index line on the cover glass bisects the sight slot. − With the compass closed, the sighting wire also bisects the sight slot − The lens holder is not bent.
• Inspection for night clarity. Check the bezel ring around the face of the
compass; it should make a distinct click as it is rotated. Proper functioning of the bezel ring is essential for accurate night navigation. When inspecting your compass under conditions of darkness, the following parts should appear luminous. If these parts are not luminous, the compass should be surveyed. Do not place the compass under a light source prior to use; may give you a false reading on the serviceability of your compass.
B182056 Lensatic Compass
6 Basic Officer Course
Lensatic Compass (Continued)
• Inspection for night clarity (Continued).
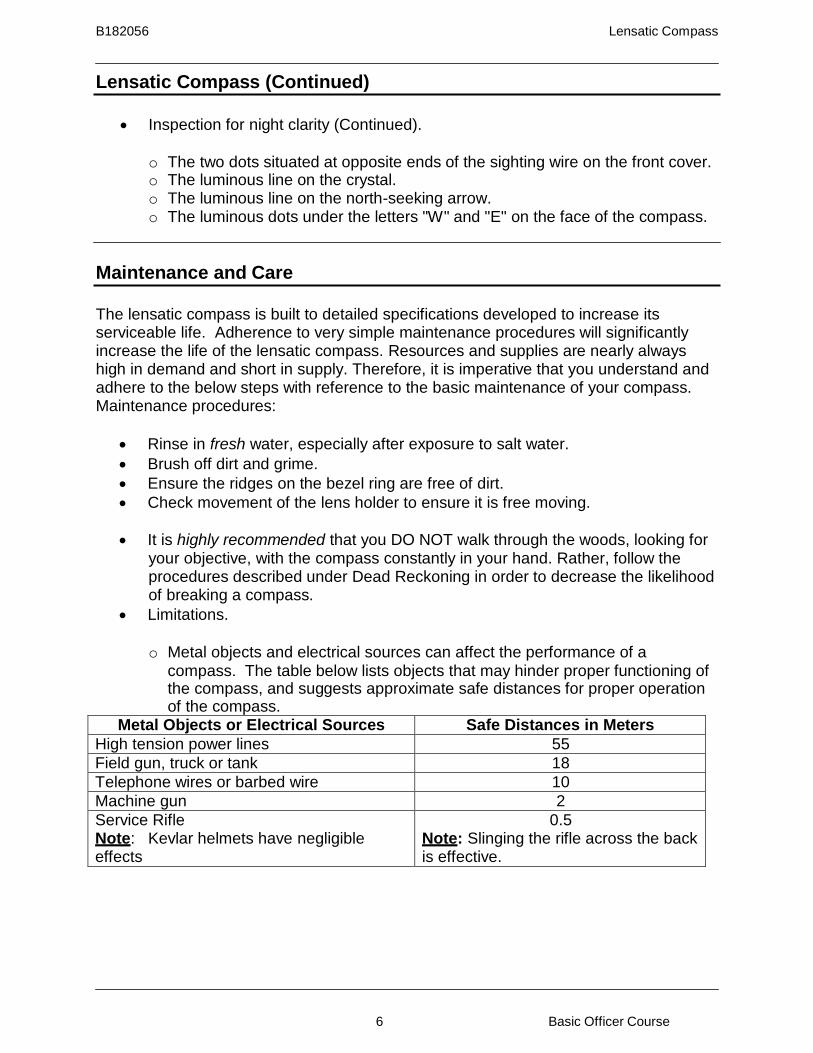
o The two dots situated at opposite ends of the sighting wire on the front cover. o The luminous line on the crystal. o The luminous line on the north-seeking arrow. o The luminous dots under the letters "W" and "E" on the face of the compass.
Maintenance and Care
The lensatic compass is built to detailed specifications developed to increase its serviceable life. Adherence to very simple maintenance procedures will significantly increase the life of the lensatic compass. Resources and supplies are nearly always high in demand and short in supply. Therefore, it is imperative that you understand and adhere to the below steps with reference to the basic maintenance of your compass. Maintenance procedures:
• Rinse in fresh water, especially after exposure to salt water. • Brush off dirt and grime. • Ensure the ridges on the bezel ring are free of dirt. • Check movement of the lens holder to ensure it is free moving.
• It is highly recommended that you DO NOT walk through the woods, looking for
your objective, with the compass constantly in your hand. Rather, follow the procedures described under Dead Reckoning in order to decrease the likelihood of breaking a compass.
• Limitations.
o Metal objects and electrical sources can affect the performance of a compass. The table below lists objects that may hinder proper functioning of the compass, and suggests approximate safe distances for proper operation of the compass.
Metal Objects or Electrical Sources Safe Distances in Meters High tension power lines 55 Field gun, truck or tank 18 Telephone wires or barbed wire 10 Machine gun 2 Service Rifle Note: Kevlar helmets have negligible effects
0.5 Note: Slinging the rifle across the back is effective.
B182056 Lensatic Compass
7 Basic Officer Course
Maintenance and Care (Continued)
• Calibration. A compass in good working condition is very accurate, but it needs to be checked periodically on a known line of direction. This process, called compass calibration, is described in the table below.
Step Action 1 Note the calibration point azimuth: the known magnetic azimuth from the
calibration point to a designated point. 2 Shoot an azimuth from the calibration point to the designated point using the
compass-to-cheek technique (described in detail in this handout). Check for effects on your compass from your eyeglasses, watches, rings, etc. If you wear these items in the field, be sure to wear them when calibrating your compass.
3 Compare azimuths. If your compass shot an azimuth: • Greater than the calibration point azimuth, then you must add the
difference between the two azimuths (the calibration point value) to your computed magnetic azimuth.
• Less than the calibration point azimuth, then you must subtract the difference between the two azimuths (the calibration point value) from your computed magnetic azimuth.
B182056 Lensatic Compass
8 Basic Officer Course
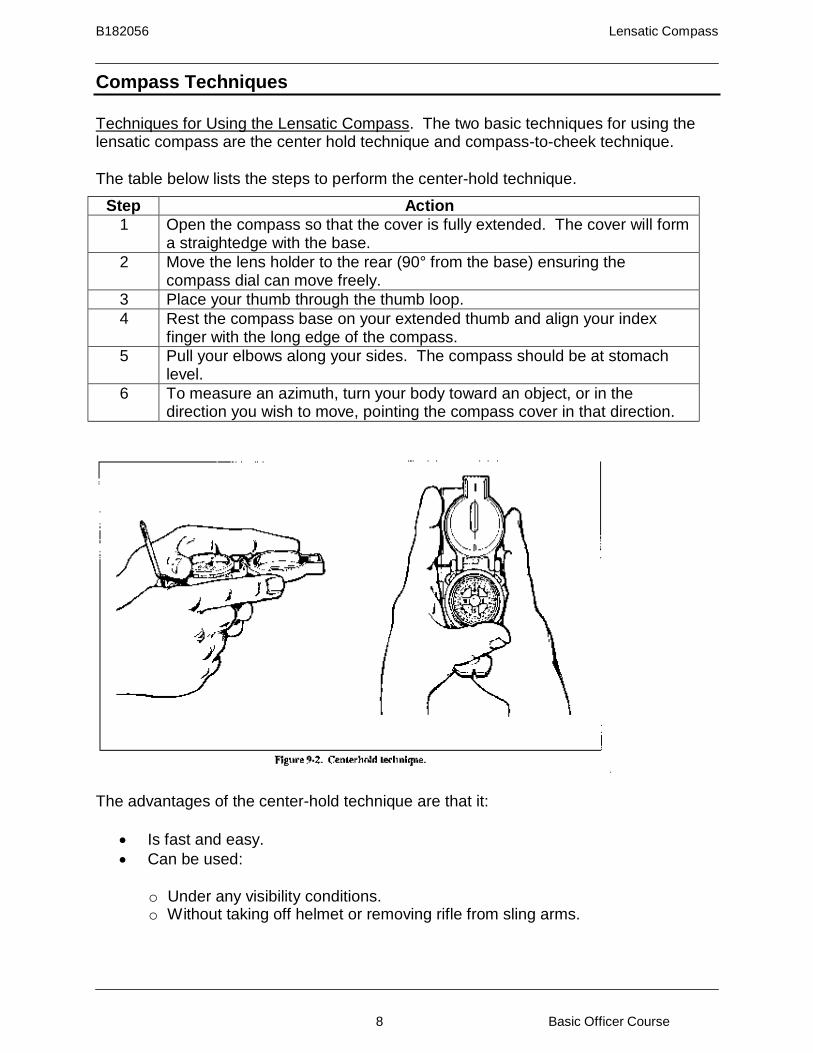
Compass Techniques
Techniques for Using the Lensatic Compass. The two basic techniques for using the lensatic compass are the center hold technique and compass-to-cheek technique.
The table below lists the steps to perform the center-hold technique.
Step Action 1 Open the compass so that the cover is fully extended. The cover will form
a straightedge with the base. 2 Move the lens holder to the rear (90° from the base) ensuring the
compass dial can move freely. 3 Place your thumb through the thumb loop. 4 Rest the compass base on your extended thumb and align your index
finger with the long edge of the compass. 5 Pull your elbows along your sides. The compass should be at stomach
level. 6 To measure an azimuth, turn your body toward an object, or in the
direction you wish to move, pointing the compass cover in that direction.
The advantages of the center-hold technique are that it:
• Is fast and easy. • Can be used:
o Under any visibility conditions. o Without taking off helmet or removing rifle from sling arms.
B182056 Lensatic Compass
9 Basic Officer Course
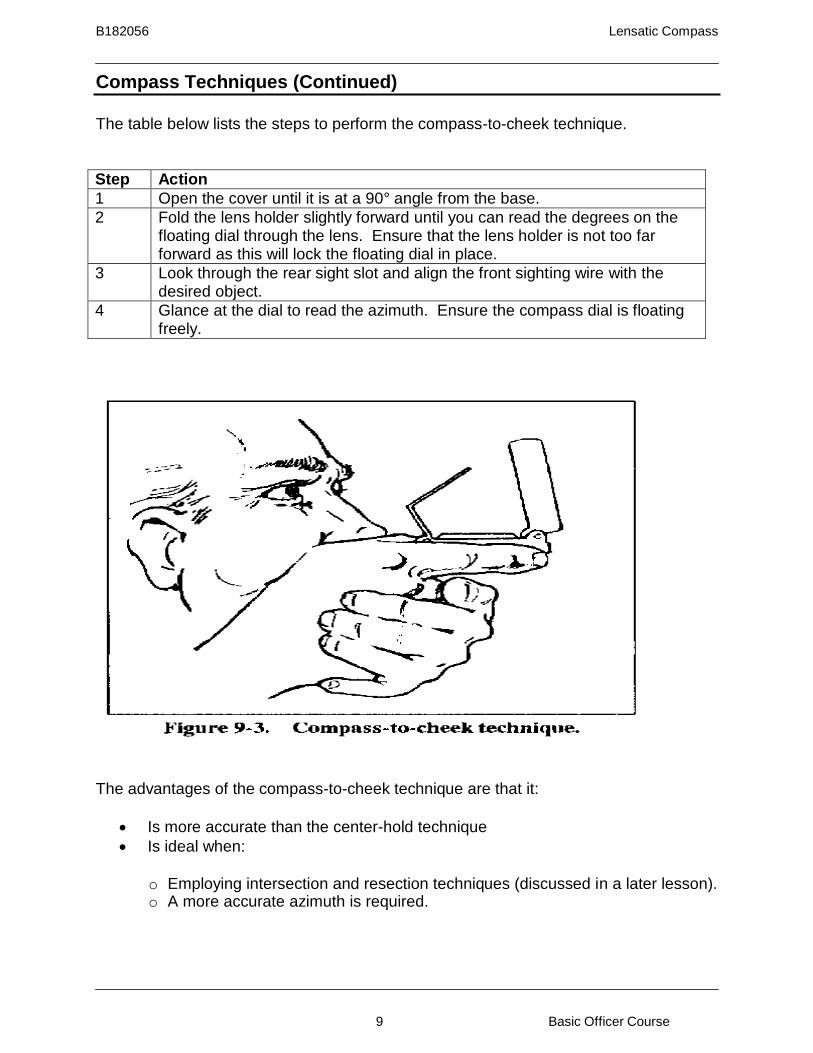
Compass Techniques (Continued)
The table below lists the steps to perform the compass-to-cheek technique.
Step Action 1 Open the cover until it is at a 90° angle from the base. 2 Fold the lens holder slightly forward until you can read the degrees on the
floating dial through the lens. Ensure that the lens holder is not too far forward as this will lock the floating dial in place.
3 Look through the rear sight slot and align the front sighting wire with the desired object.
4 Glance at the dial to read the azimuth. Ensure the compass dial is floating freely.
The advantages of the compass-to-cheek technique are that it:
• Is more accurate than the center-hold technique • Is ideal when:
o Employing intersection and resection techniques (discussed in a later lesson). o A more accurate azimuth is required.
B182056 Lensatic Compass
10 Basic Officer Course
Pace Count
• Average Pace Count. Another basic tool required for successful land navigation is the pace count. Although not an exact science, knowing your pace count can provide you with a major portion of the information necessary to determine your location on the map and ground at any time. To determine your average pace count, you must:
o Walk a straight-line distance on representative terrain of the area where your
navigation will take place. o Count each time your left foot strikes the ground. o Convert your pace to a specific number of paces per 100 meters. For
example, 310 paces = 62 paces per 100 meters 500 meters
o Although pace varies for many reasons, 60-75 paces per 100 meters is
average. Technically no average pace exists; however, use 60 paces per 100 meters until your specific pace can be determined.
• Pace Count between Objectives. To determine a pace count between
objectives once your average pace count per 100m is determined, simply multiply the distance between the objectives by your average pace count per 100m. The table below shows practical application of this information.
Step Action Example 1 Determine your
pace count. For this example, assume an average pace count of 60 paces per 100m.
2 Determine the distance to be traveled.
For this example, use 370m.
3 Set up the problem: X = distance to be traveled multiplied by the average pace count.
X = 370 meters x 60 paces 100 meters
4 Solve. X = 222 paces

B182056 Lensatic Compass
11 Basic Officer Course
Pace Count (Continued)
• Factors Effecting Pace:
o Slope - pace lengthens on a downgrade and shortens on an upgrade. o Winds - tailwinds lengthen pace while headwinds shorten pace. o Surface - loose surfaces tend to shorten pace. o Elements - snow, rain, and ice tend to shorten pace. o Clothing and equipment - heavier burdens may shorten pace. o Stamina - fatigue will shorten the pace. o Limited visibility/night - unsure footing or the presence of unseen obstacles
makes people wary; pace will tend to shorten. Basic Navigation Techniques
Along with the tools discussed above, basic and specialized techniques will be used to navigate from point to point, in any clime and place. We will first discuss the basic navigational techniques and then the special situational techniques that will save time and ensure successful navigation despite obstacles, weather, or terrain.
An understanding of the terms below will help to clarify the techniques mentioned in this section:
• Attack point - an easily recognizable feature positively identified on the map and
on the ground, preferably 400 meters or less from your objective. The key aspect is being sure you can find this feature on the ground and on the map. The optimal attack point is a readily identifiable, man made feature within 400m of your objective. Remember, this is the optimal attack point. DO NOT discard an excellent, readily identifiable attack point simply because it is greater than 400m from your objective.
Navigators with little experience will feel more comfortable using manmade features as attack points. Novice navigators are initially discouraged from using terrain (hills, draws, etc.) as attack points due to their lack of experience in identifying specific pieces of terrain. As they become more experienced, they should try to use terrain features as attack points. However, if you are not sure -- don't use it.
• Manmade attack points - road junctions, a bridge, stream/road junctions, etc. • Terrain features used as attack points - hilltops, stream junctions, or any unique
feature that stands out both on the map and in the real world.
B182056 Lensatic Compass
12 Basic Officer Course
Basic Navigation Techniques (Continued)
• Collecting features - features that you plan to cross enroute to your objective. These features will serve as checkpoints and will allow you to be confident of your location every step of the way. Identify potential collecting features when you are planning your route and look for them as you move towards your objective. Collecting features aid in building your confidence that you are where you believe you are.
• Limiting/catching feature - a predetermined feature, preferably linear (such as a stream, finger, or road), beyond your objective. If you reach this feature when navigating, you will know that you have traveled past your objective without finding it. Your pace count is a built-in catching feature. Utilize 150% of your pace count when no physical catching feature is available. For example, if your plan calls for 500 paces to your objective, a built in catching feature would be a pace count of 750.
The three basic techniques used for land navigation are dead reckoning, terrain association, and the combination method (dead reckoning and terrain association).
• Dead Reckoning. The process of simply following an established azimuth for a
specific distance without regard to terrain. The table below lists the steps for dead reckoning navigation.
Step Action 1 Locate your starting point and objective on the map. 2 Determine the grid azimuth between the two points and
convert it to a magnetic azimuth (remember to figure in your compass calibration point value).
3 Determine the distance to your objective and convert it to a pace count.
4 Set the magnetic azimuth on your compass by
• Rotating the compass until the desired azimuth falls
under the fixed black index line. • Holding the compass in hand and turning the bezel
ring until the luminous line is aligned with the north- seeking arrow.
Note: During conditions of limited visibility, an azimuth may be set on the compass by the click method. Remember, the bezel ring contains one click per three degrees.
5 Pick an object (tree, building, sign, etc.) in the distance along your azimuth. Put the compass away and walk to that object. Once arriving at this point, remove the compass, check the azimuth and pick another object. Repeat until you reach your final objective.
B182056 Lensatic Compass
13 Basic Officer Course
Basic Navigation Techniques (Continued)
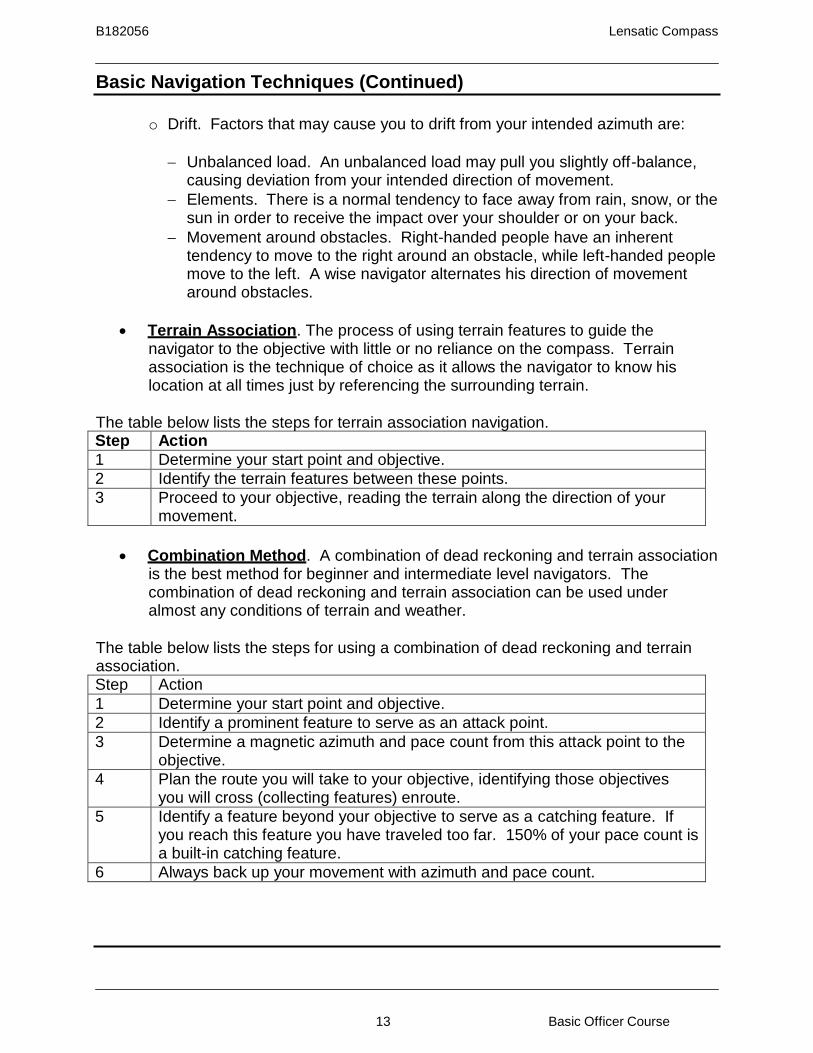
o Drift. Factors that may cause you to drift from your intended azimuth are:
− Unbalanced load. An unbalanced load may pull you slightly off-balance,
causing deviation from your intended direction of movement. − Elements. There is a normal tendency to face away from rain, snow, or the
sun in order to receive the impact over your shoulder or on your back. − Movement around obstacles. Right-handed people have an inherent
tendency to move to the right around an obstacle, while left-handed people move to the left. A wise navigator alternates his direction of movement around obstacles.
• Terrain Association. The process of using terrain features to guide the
navigator to the objective with little or no reliance on the compass. Terrain association is the technique of choice as it allows the navigator to know his location at all times just by referencing the surrounding terrain.
The table below lists the steps for terrain association navigation. Step Action 1 Determine your start point and objective. 2 Identify the terrain features between these points. 3 Proceed to your objective, reading the terrain along the direction of your
movement.
• Combination Method. A combination of dead reckoning and terrain association is the best method for beginner and intermediate level navigators. The combination of dead reckoning and terrain association can be used under almost any conditions of terrain and weather.
The table below lists the steps for using a combination of dead reckoning and terrain association. Step Action 1 Determine your start point and objective. 2 Identify a prominent feature to serve as an attack point. 3 Determine a magnetic azimuth and pace count from this attack point to the
objective. 4 Plan the route you will take to your objective, identifying those objectives
you will cross (collecting features) enroute. 5 Identify a feature beyond your objective to serve as a catching feature. If
you reach this feature you have traveled too far. 150% of your pace count is a built-in catching feature.
6 Always back up your movement with azimuth and pace count.
B182056 Lensatic Compass
14 Basic Officer Course
Basic Navigation Techniques (Continued)
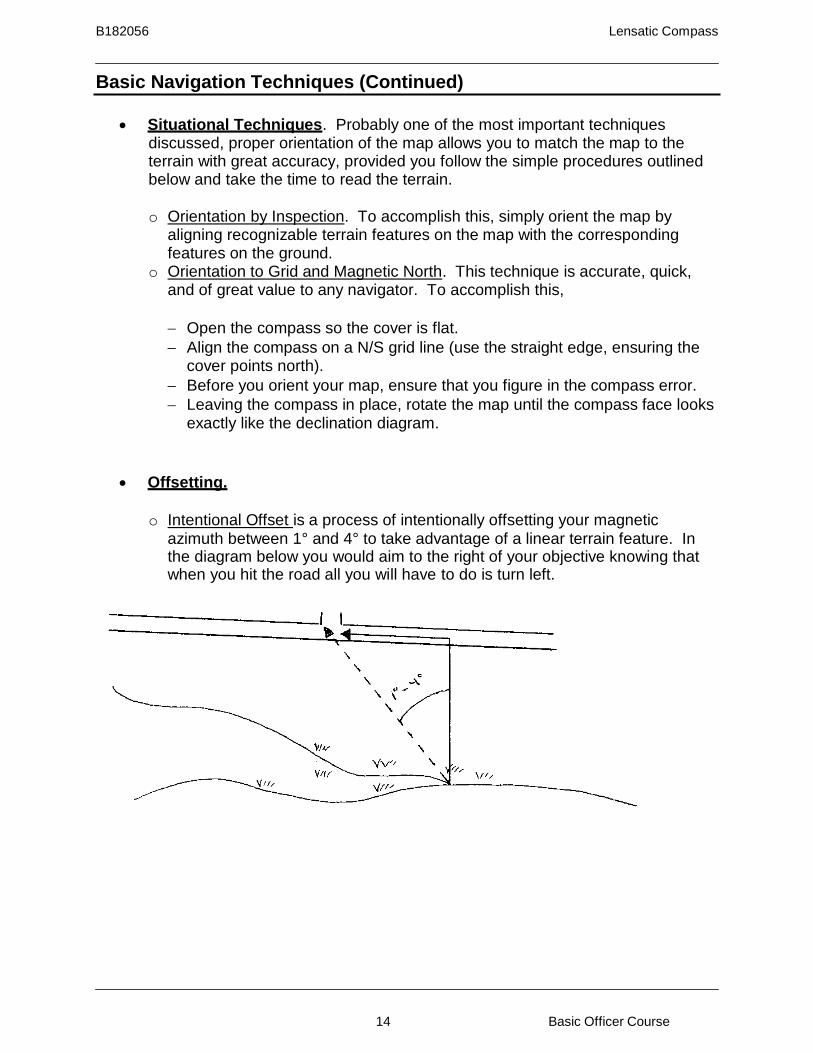
• Situational Techniques. Probably one of the most important techniques discussed, proper orientation of the map allows you to match the map to the terrain with great accuracy, provided you follow the simple procedures outlined below and take the time to read the terrain.
o Orientation by Inspection. To accomplish this, simply orient the map by
aligning recognizable terrain features on the map with the corresponding features on the ground.
o Orientation to Grid and Magnetic North. This technique is accurate, quick, and of great value to any navigator. To accomplish this,
− Open the compass so the cover is flat. − Align the compass on a N/S grid line (use the straight edge, ensuring the
cover points north). − Before you orient your map, ensure that you figure in the compass error. − Leaving the compass in place, rotate the map until the compass face looks
exactly like the declination diagram.
• Offsetting.
o Intentional Offset is a process of intentionally offsetting your magnetic azimuth between 1° and 4° to take advantage of a linear terrain feature. In the diagram below you would aim to the right of your objective knowing that when you hit the road all you will have to do is turn left.

B182056 Lensatic Compass
15 Basic Officer Course
Basic Navigation Techniques (Continued)
• Offsetting (Continued).
o 90° Offset Rule. This technique is used when you are not able to cross a sizable obstacle. To execute this technique, you simply create a "box" around the obstacle by adding and subtracting 90° to your azimuth in the manner indicated by the diagram below. You must keep track of your pace count during the evolution.
B182056 Lensatic Compass
16 Basic Officer Course
Review Questions
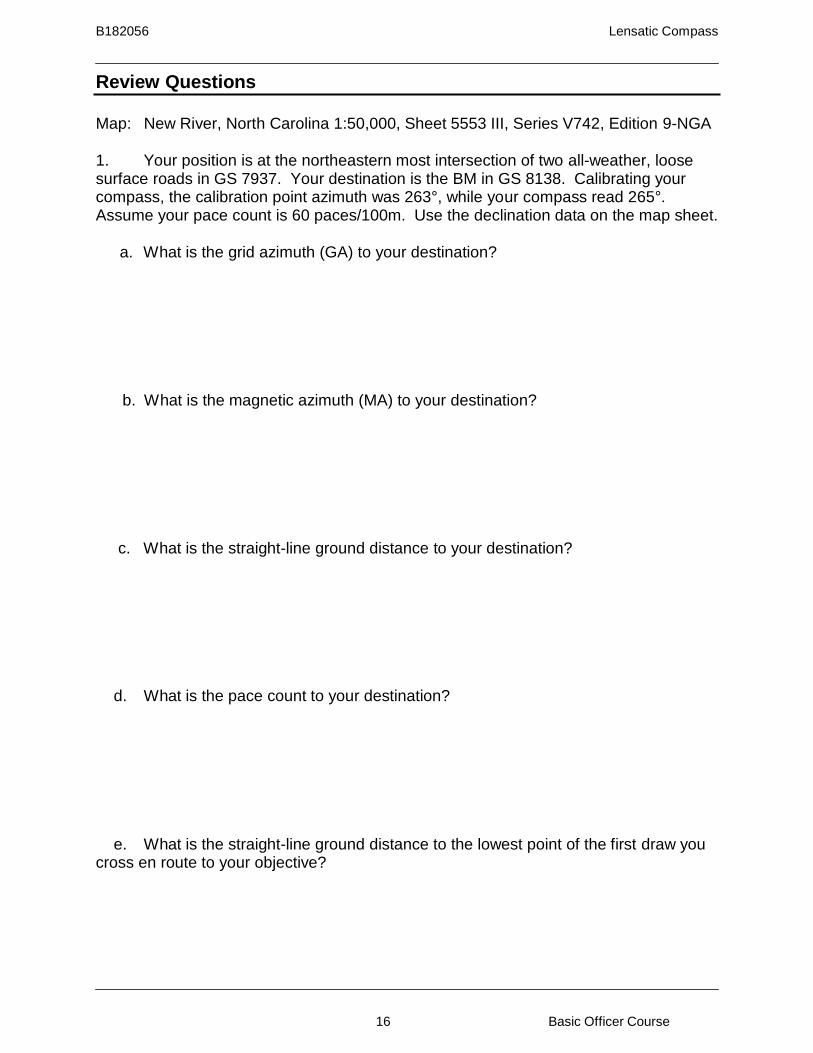
Map: New River, North Carolina 1:50,000, Sheet 5553 III, Series V742, Edition 9-NGA
1. Your position is at the northeastern most intersection of two all-weather, loose surface roads in GS 7937. Your destination is the BM in GS 8138. Calibrating your compass, the calibration point azimuth was 263°, while your compass read 265°. Assume your pace count is 60 paces/100m. Use the declination data on the map sheet.
a. What is the grid azimuth (GA) to your destination?
b. What is the magnetic azimuth (MA) to your destination?
c. What is the straight-line ground distance to your destination?
d. What is the pace count to your destination?
e. What is the straight-line ground distance to the lowest point of the first draw you cross en route to your objective?
B182056 Lensatic Compass
17 Basic Officer Course
Review Questions (Continued)
Question 1 (Continued)
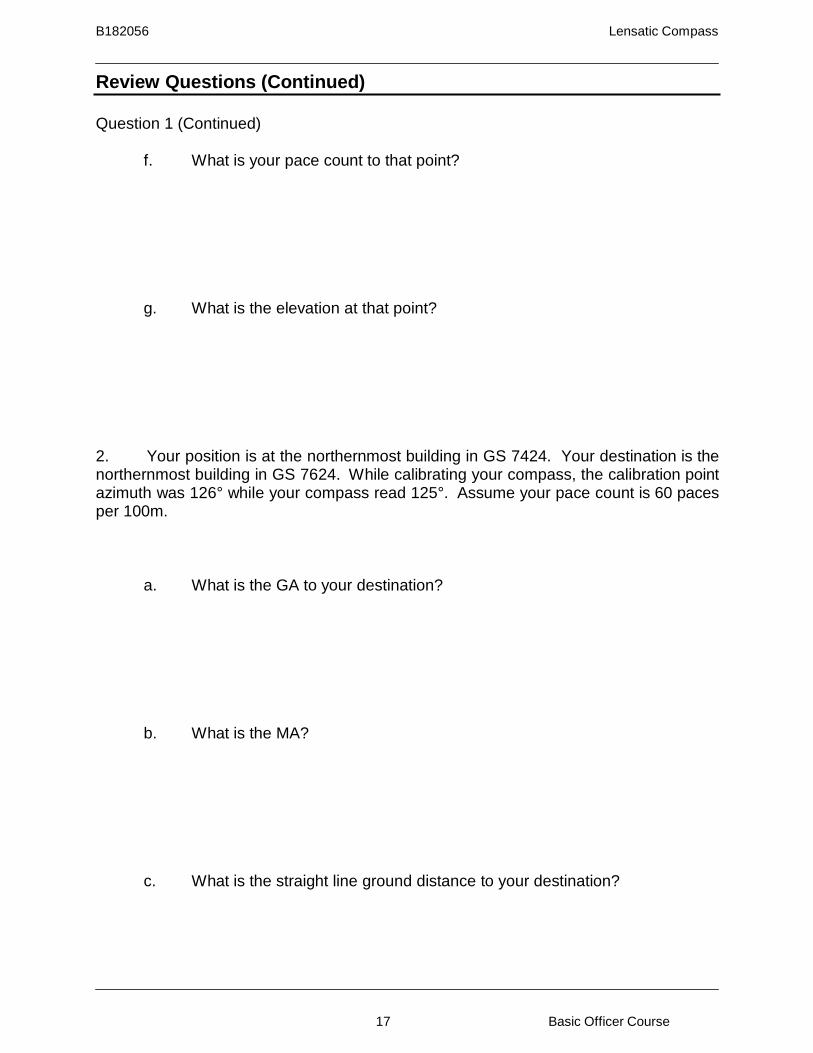
f. What is your pace count to that point?
g. What is the elevation at that point? 2. Your position is at the northernmost building in GS 7424. Your destination is the northernmost building in GS 7624. While calibrating your compass, the calibration point azimuth was 126° while your compass read 125°. Assume your pace count is 60 paces per 100m.
a. What is the GA to your destination?
b. What is the MA?
c. What is the straight line ground distance to your destination?
B182056 Lensatic Compass
18 Basic Officer Course
Review Questions (Continued)
Question 2 (Continued)
d. What is the pace count to your destination?
e. What are three possible collecting features along your route?
B182056 Lensatic Compass
19 Basic Officer Course
Review Questions (Continued)
3. The following questions deal with the lensatic compass and distances from specific objectives. Will your compass function properly in the following situations? Yes or no and why or why not?
a. 50m from a power line?
Answer:
b. 20m from barbed wire?
Answer:
c. 55m from telephone lines?
Answer:
d. 5m from a truck?
Answer:
e. 20m from a tank?
Answer:
f. 3m from a helmet?
Answer:
g. 2m from a machine gun?
Answer:
h. 0.5m from a Kevlar helmet?
Answer:
B182056 Lensatic Compass
20 Basic Officer Course
Review Questions (Continued)
Question 3 (Continued)
i. 1m from an M-16A2 service rifle?
Answer:
j. 5m from a rifle?
Answer:
B182056 Lensatic Compass
21 Basic Officer Course
Review Questions Answers
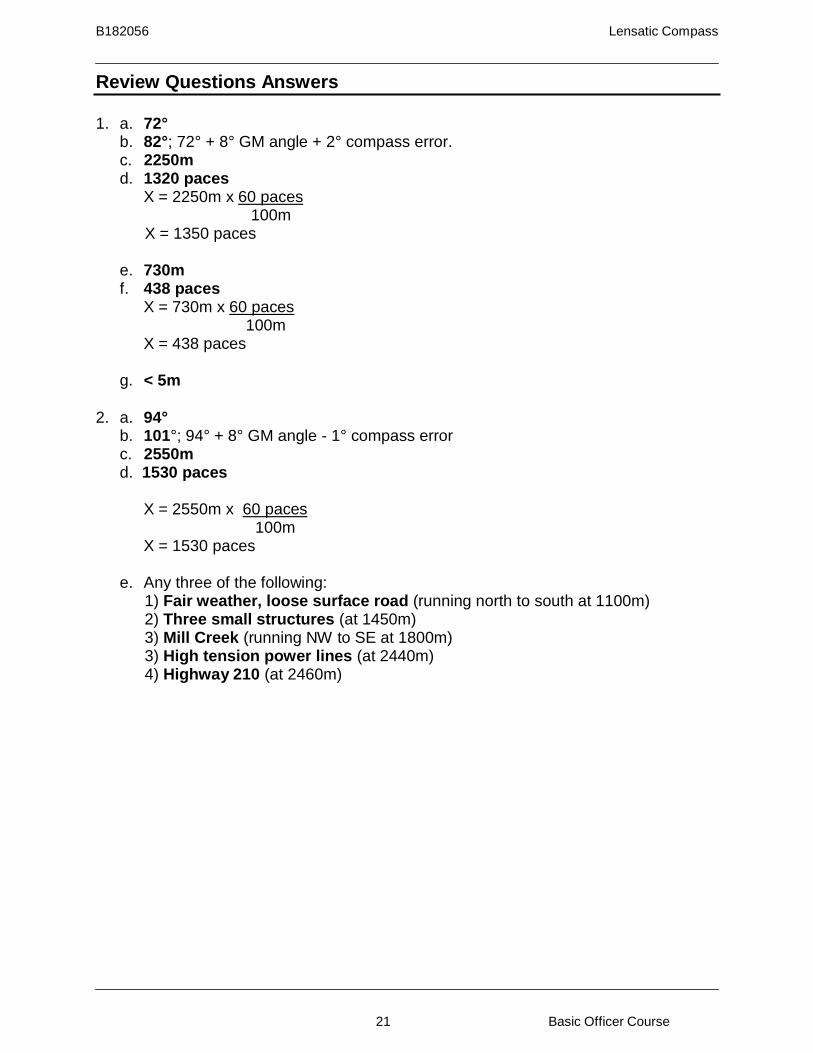
1. a. 72°
b. 82°; 72° + 8° GM angle + 2° compass error. c. 2250m d. 1320 paces
X = 2250m x 60 paces 100m
X = 1350 paces
e. 730m f. 438 paces
X = 730m x 60 paces 100m
X = 438 paces
g. < 5m
2. a. 94° b. 101°; 94° + 8° GM angle - 1° compass error c. 2550m d. 1530 paces
X = 2550m x 60 paces
100m X = 1530 paces
e. Any three of the following:
1) Fair weather, loose surface road (running north to south at 1100m) 2) Three small structures (at 1450m) 3) Mill Creek (running NW to SE at 1800m) 3) High tension power lines (at 2440m) 4) Highway 210 (at 2460m)
B182056 Lensatic Compass
22 Basic Officer Course
Review Questions Answers
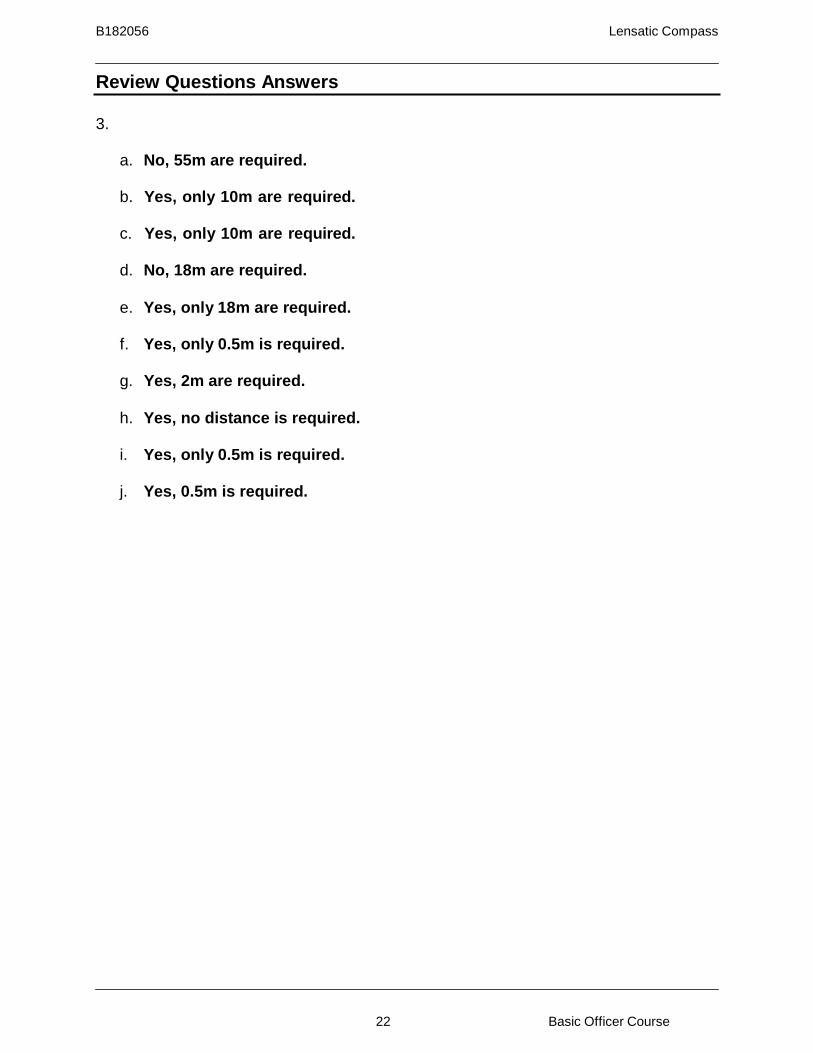
3.
a. No, 55m are required.
b. Yes, only 10m are required.
c. Yes, only 10m are required.
d. No, 18m are required.
e. Yes, only 18m are required.
f. Yes, only 0.5m is required.
g. Yes, 2m are required.
h. Yes, no distance is required.
i. Yes, only 0.5m is required.
j. Yes, 0.5m is required.
B182056 Lensatic Compass
23 Basic Officer Course
Summary
The lensatic compass is an important tool in land navigation. You should now know how to use and care for your lensatic compass.
References
Reference Number or
Author Reference Title
FM 3-25.26 Map Reading and Land Navigation Glossary of Terms and Acronyms
Term or Acronym Definition or Identification
GA Grid azimuth MA Magnetic azimuth
Notes