Embed Size (px)
Citation preview
Lionbridge App for Marketo
Setup Guide
Version 1.0.2
January 23, 2017
Copyright© Copyright 2017 Lionbridge Technologies, Inc. All rights reserved. Published in the USA. March, 2016.
Lionbridge and the Lionbridge logotype are registered trademarks or trademarks of Lionbridge Technologies, Inc. in the United States and other countries. All other trademarks used herein are the property of their respective owners. The opinions of third-party contributors remain theirs alone and do not necessarily represent the views of Lionbridge Technologies.
Lionbridge App for Marketo Setup Guide Page 2
Version 1.0.2 January 23, 2017
Contents
1 Welcome to the Lionbridge App for Marketo 5
1.1 Terminology 5
1.2 About the Clay Tablet Translation Platform 6
1.3 How the Lionbridge App Works with Marketo 7
1.4 Using this Guide 7
1.5 How to Contact Clay Tablet Support 8
2 Before You Set Up the Lionbridge App for Marketo 11
3 Adding the Lionbridge App in Marketo 12
3.1 Sending LaunchPoint Service Information to the Implementations Team 14
4 Getting Started with CloudBroker 15
4.1 CloudBroker at a Glance 16
5 Configuring the Lionbridge App in CloudBroker 17
5.1 Configuring Clay Tablet Languages 17
5.2 Configuring Language Segmentation 19
5.3 Configuring Global Translation Settings 22
5.4 Configuring Lionbridge Freeway Authentication 25
5.5 Configuring SDL TMS Entries 26
5.6 Configuring Marketo Authentication Settings 28
5.7 Configuring Other Marketo Settings 30
5.8 Configuring Translation Providers 32
6 Configuring User Access 36
6.1 Managing Teams 36
6.1.1 Adding or Editing a Team 37
6.1.2 Deleting a Team 39
6.2 Managing Users 41
6.2.1 Adding a User 42
6.2.2 Editing a User 44
6.2.3 Deleting a User 46
7 Administrative Tasks 48
7.1 Viewing Lionbridge App Information and Usage Data 48
7.2 Viewing Job Data 50
Lionbridge App for Marketo Setup Guide Page 3
Version 1.0.2 January 23, 2017

8 Appendix: Language Codes 53
Lionbridge App for Marketo Setup Guide Page 4
Version 1.0.2 January 23, 2017
1 Welcome to the Lionbridge App for MarketoWelcome to the Lionbridge App for Marketo (Lionbridge App). This application is a Marketo plug-in. It enables you to automate sending and retrieving assets in Marketo for translation, which dramatically reduces the effort required to create, maintain, and publish assets in multiple languages.
1.1 Terminology
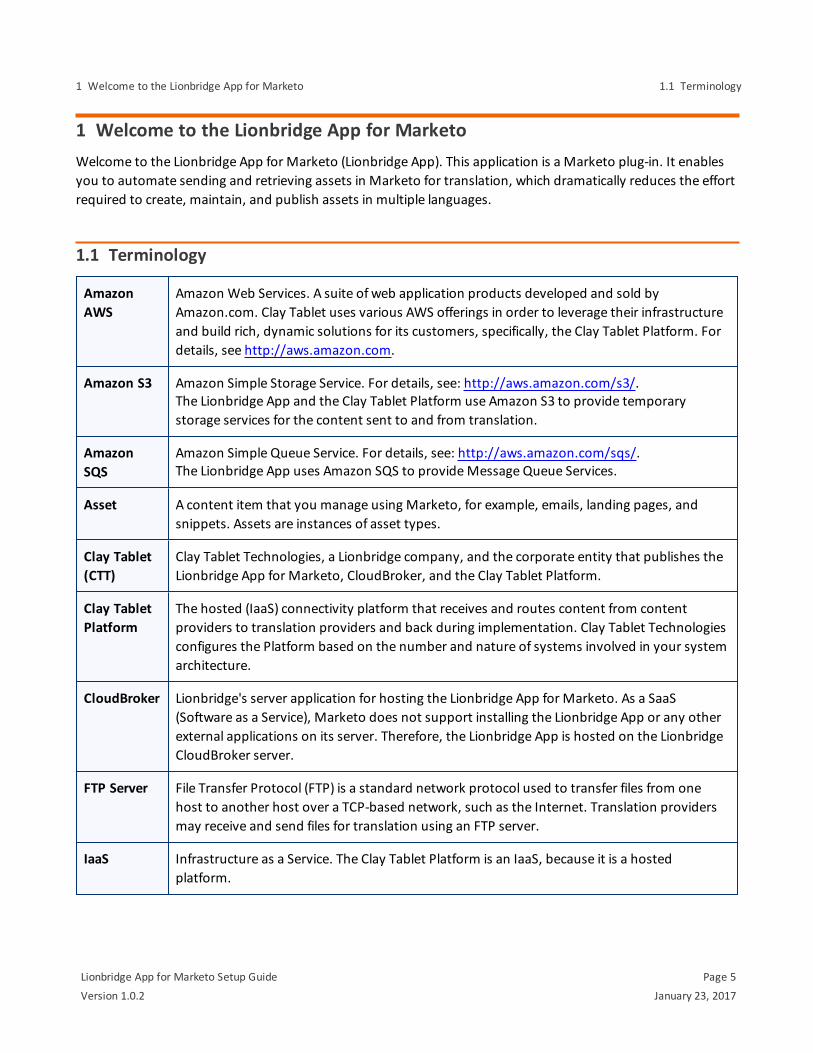
Amazon AWS
Amazon Web Services. A suite of web application products developed and sold by Amazon.com. Clay Tablet uses various AWS offerings in order to leverage their infrastructure and build rich, dynamic solutions for its customers, specifically, the Clay Tablet Platform. For details, see http://aws.amazon.com.
Amazon S3 Amazon Simple Storage Service. For details, see: http://aws.amazon.com/s3/. The Lionbridge App and the Clay Tablet Platform use Amazon S3 to provide temporary storage services for the content sent to and from translation.
Amazon SQS
Amazon Simple Queue Service. For details, see: http://aws.amazon.com/sqs/. The Lionbridge App uses Amazon SQS to provide Message Queue Services.
Asset A content item that you manage using Marketo, for example, emails, landing pages, and snippets. Assets are instances of asset types.
Clay Tablet (CTT)
Clay Tablet Technologies, a Lionbridge company, and the corporate entity that publishes the Lionbridge App for Marketo, CloudBroker, and the Clay Tablet Platform.
Clay Tablet Platform
The hosted (IaaS) connectivity platform that receives and routes content from content providers to translation providers and back during implementation. Clay Tablet Technologies configures the Platform based on the number and nature of systems involved in your system architecture.
CloudBroker Lionbridge's server application for hosting the Lionbridge App for Marketo. As a SaaS (Software as a Service), Marketo does not support installing the Lionbridge App or any other external applications on its server. Therefore, the Lionbridge App is hosted on the Lionbridge CloudBroker server.
FTP Server File Transfer Protocol (FTP) is a standard network protocol used to transfer files from one host to another host over a TCP-based network, such as the Internet. Translation providers may receive and send files for translation using an FTP server.
IaaS Infrastructure as a Service. The Clay Tablet Platform is an IaaS, because it is a hosted platform.
Lionbridge App for Marketo Setup Guide Page 5
Version 1.0.2 January 23, 2017
1 Welcome to the Lionbridge App for Marketo 1.1 Terminology
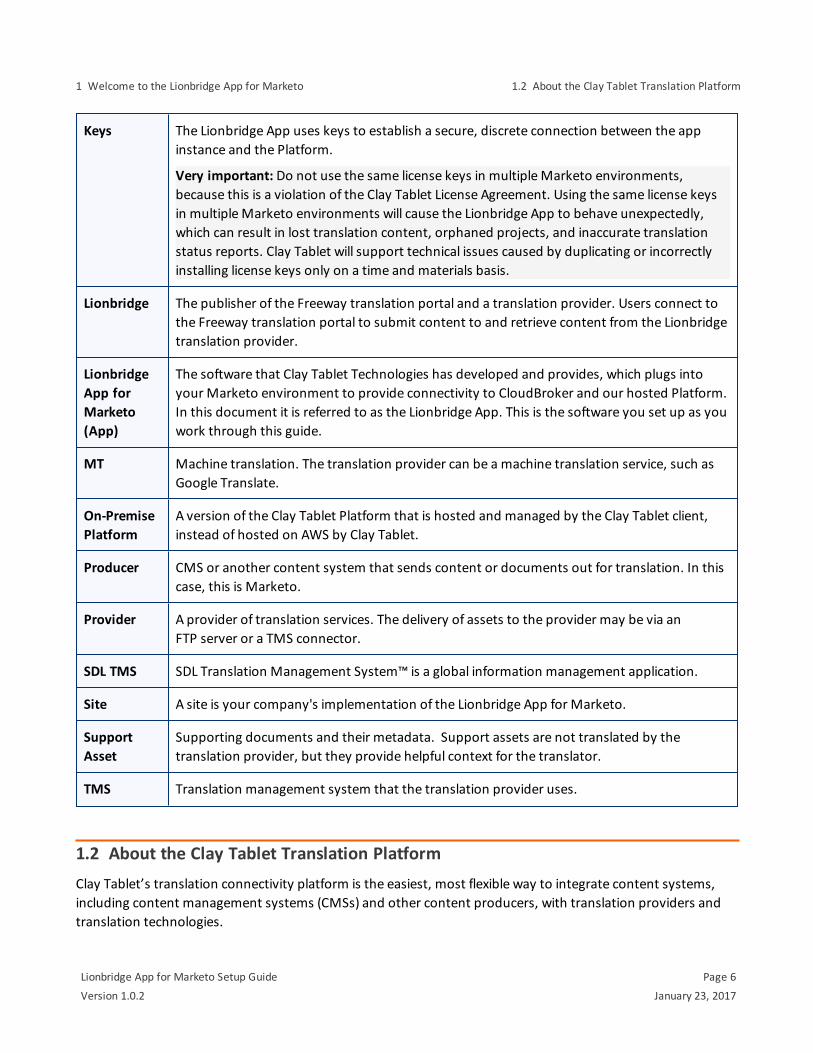
Keys The Lionbridge App uses keys to establish a secure, discrete connection between the app instance and the Platform.
Very important: Do not use the same license keys in multiple Marketo environments, because this is a violation of the Clay Tablet License Agreement. Using the same license keys in multiple Marketo environments will cause the Lionbridge App to behave unexpectedly, which can result in lost translation content, orphaned projects, and inaccurate translation status reports. Clay Tablet will support technical issues caused by duplicating or incorrectly installing license keys only on a time and materials basis.
Lionbridge The publisher of the Freeway translation portal and a translation provider. Users connect to the Freeway translation portal to submit content to and retrieve content from the Lionbridge translation provider.
Lionbridge App for Marketo (App)
The software that Clay Tablet Technologies has developed and provides, which plugs into your Marketo environment to provide connectivity to CloudBroker and our hosted Platform. In this document it is referred to as the Lionbridge App. This is the software you set up as you work through this guide.
MT Machine translation. The translation provider can be a machine translation service, such as Google Translate.
On-Premise Platform
A version of the Clay Tablet Platform that is hosted and managed by the Clay Tablet client, instead of hosted on AWS by Clay Tablet.
Producer CMS or another content system that sends content or documents out for translation. In this case, this is Marketo.
Provider A provider of translation services. The delivery of assets to the provider may be via an FTP server or a TMS connector.
SDL TMS SDL Translation Management System™ is a global information management application.
Site A site is your company's implementation of the Lionbridge App for Marketo.
Support Asset
Supporting documents and their metadata. Support assets are not translated by the translation provider, but they provide helpful context for the translator.
TMS Translation management system that the translation provider uses.
1.2 About the Clay Tablet Translation PlatformClay Tablet’s translation connectivity platform is the easiest, most flexible way to integrate content systems, including content management systems (CMSs) and other content producers, with translation providers and translation technologies.
Lionbridge App for Marketo Setup Guide Page 6
Version 1.0.2 January 23, 2017
1 Welcome to the Lionbridge App for Marketo 1.2 About the Clay Tablet Translation Platform
Clay Tablet Platform is the hosted (IaaS) connectivity platform that receives and routes content from content management systems to translation providers and back. It is hosted on Amazon Web Services (AWS). During implementation, Clay Tablet Technologies configures the Platform for your translation solution, based on the translation providers or systems you use. The Clay Tablet Platform uses the following services on AWS:
S3 (Amazon Simple Storage Service), which provides storage services for the content sent to and from translation.
SQS (Amazon Simple Queue Service), which provides message queue services.
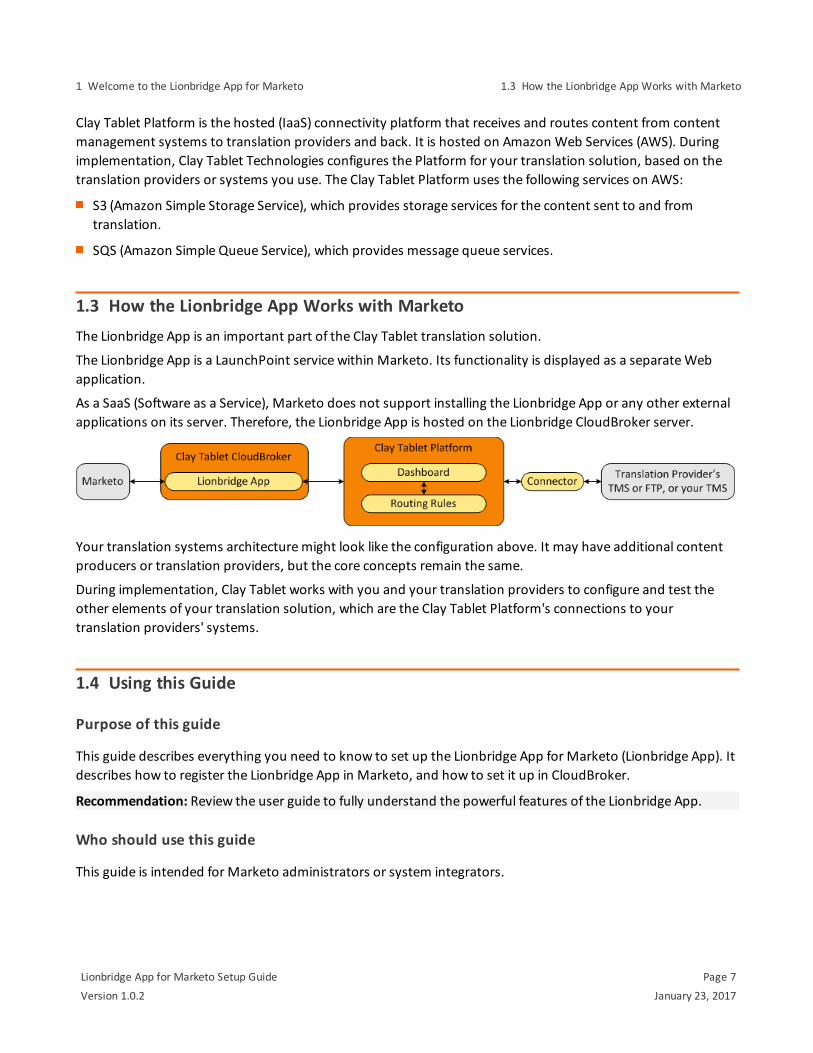
1.3 How the Lionbridge App Works with MarketoThe Lionbridge App is an important part of the Clay Tablet translation solution.
The Lionbridge App is a LaunchPoint service within Marketo. Its functionality is displayed as a separate Web application.
As a SaaS (Software as a Service), Marketo does not support installing the Lionbridge App or any other external applications on its server. Therefore, the Lionbridge App is hosted on the Lionbridge CloudBroker server.
Your translation systems architecture might look like the configuration above. It may have additional content producers or translation providers, but the core concepts remain the same.
During implementation, Clay Tablet works with you and your translation providers to configure and test the other elements of your translation solution, which are the Clay Tablet Platform's connections to your translation providers' systems.
1.4 Using this Guide
Purpose of this guide
This guide describes everything you need to know to set up the Lionbridge App for Marketo (Lionbridge App). It describes how to register the Lionbridge App in Marketo, and how to set it up in CloudBroker.
Recommendation: Review the user guide to fully understand the powerful features of the Lionbridge App.
Who should use this guide
This guide is intended for Marketo administrators or system integrators.
Lionbridge App for Marketo Setup Guide Page 7
Version 1.0.2 January 23, 2017
1 Welcome to the Lionbridge App for Marketo 1.3 How the Lionbridge App Works with Marketo
What your company setup should be
This document assumes that:
Your company is already using Marketo.
Clay Tablet Technologies has set up CloudBroker for your company to use the Lionbridge App to send out content for translation from Marketo.
Clay Tablet Technologies has set up the Clay Tablet Platform to send content to your translation providers.
What you should already know
This document assumes that:
You have a strong working knowledge of Marketo and its features.
You are familiar with your company's translation process and requirements.
You have valid user credentials to log into Marketo as an administrator.
You have valid user credentials to log into CloudBroker as a site administrator.
How to find out more about the Lionbridge App for Marketo
For information on using the Lionbridge App for Marketo to send and receive content for translation, read the Lionbridge App for Marketo User Guide.
Documentation conventions
This guide uses the following conventions:
Convention Description
Bold Highlights screen elements such as buttons, menu items, and fields.
Courier Highlights input, file names, and paths.
Italics Highlights terms for emphasis, variables, or document titles.
> Indicates a menu choice. For example, "Select New > New Campaign Folder."
1.5 How to Contact Clay Tablet SupportEmail @: [email protected]
Telephone: +1-416-363-0888
You can submit a support ticket either:
Lionbridge App for Marketo Setup Guide Page 8
Version 1.0.2 January 23, 2017
1 Welcome to the Lionbridge App for Marketo 1.5 How to Contact Clay Tablet Support
by email
from the Clay Tablet Zendesk page, using your web browser
To submit a support ticket:
1. Do one of the following:
Email [email protected], and cc (carbon copy) anyone to include in the ticket correspondence.
Important: Include the information and attachments in your email that are listed in the sub-sections below.
Create a ticket in Zendesk:
a. Open the Clay Tablet Zendesk page in your browser: https://claytablet.zendesk.com. b. Sign in to Zendesk. If you do not have sign-in credentials, see "To view and update your support ticket
in Zendesk:" below.
Important: Include the information and attachments that are listed in the sub-sections below.
c. Click Submit a request. d. In the CCs field, add anyone to include in the ticket correspondence.
Zendesk automatically creates a ticket and responds to everyone included in the cc field.
2. Everyone in the original cc receives updates unless they request to be removed from the ticket.
Important: Check your email spam folder (especially first-time Zendesk users) as sometimes email notifications from Zendesk are marked as spam.
When the issue is resolved, Clay Tablet closes the ticket.
Information to include in the support ticket:
client name
CMS or content system name and version
Connector or App version installed
name of job for which the issue occurs
date of job submission
detailed description of the issue
any error text–copy and paste, if applicable
Files to attach to the support ticket:
CMS log files for the date the issue occurred
Clay Tablet log files for the date the issue occurred
Lionbridge App for Marketo Setup Guide Page 9
Version 1.0.2 January 23, 2017
1 Welcome to the Lionbridge App for Marketo 1.5 How to Contact Clay Tablet Support
screen capture of the issue
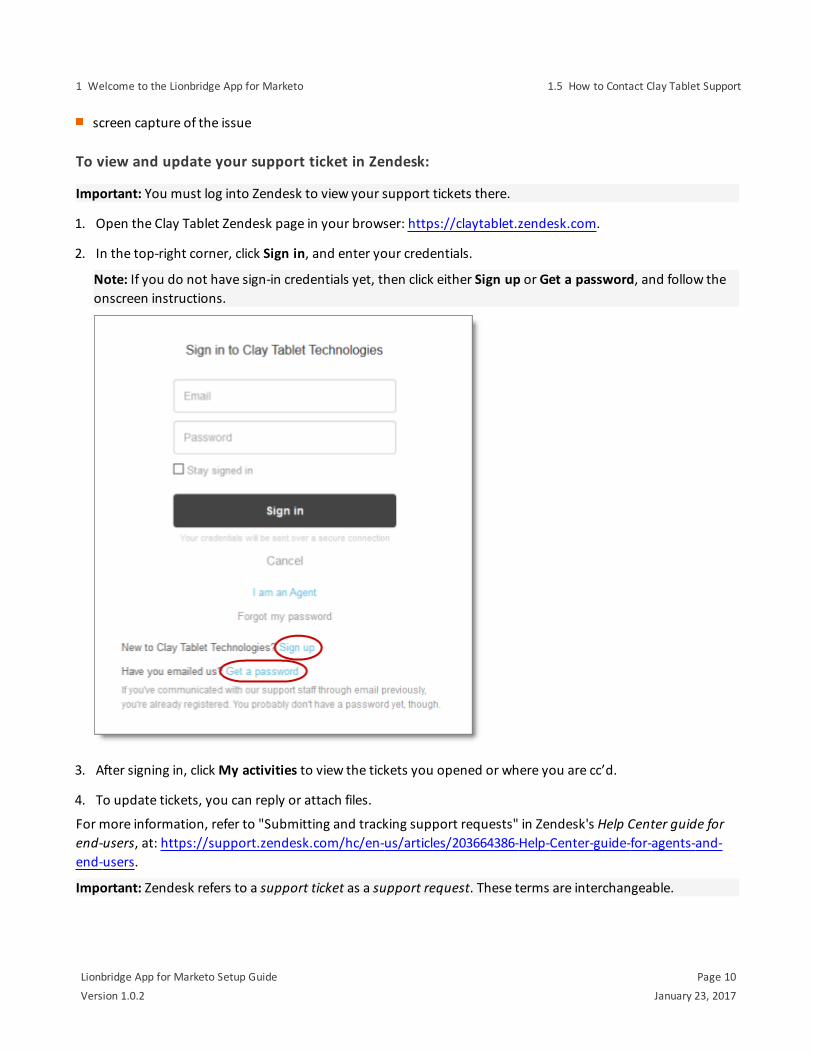
To view and update your support ticket in Zendesk:
Important: You must log into Zendesk to view your support tickets there.
1. Open the Clay Tablet Zendesk page in your browser: https://claytablet.zendesk.com.
2. In the top-right corner, click Sign in, and enter your credentials.
Note: If you do not have sign-in credentials yet, then click either Sign up or Get a password, and follow the onscreen instructions.
3. After signing in, click My activities to view the tickets you opened or where you are cc’d.
4. To update tickets, you can reply or attach files.
For more information, refer to "Submitting and tracking support requests" in Zendesk's Help Center guide for end-users, at: https://support.zendesk.com/hc/en-us/articles/203664386-Help-Center-guide-for-agents-and-end-users.
Important: Zendesk refers to a support ticket as a support request. These terms are interchangeable.
Lionbridge App for Marketo Setup Guide Page 10
Version 1.0.2 January 23, 2017
1 Welcome to the Lionbridge App for Marketo 1.5 How to Contact Clay Tablet Support
2 Before You Set Up the Lionbridge App for MarketoSince Marketo is a SaaS (software as a service) application, you do not install the Lionbridge App for Marketo (Lionbridge App). The Lionbridge App is a plug-in on the Marketo server.
Instead, to enable the Lionbridge App within Marketo, you create a corresponding LaunchPoint service within Marketo. Then you configure the application in CloudBroker, which is a SaaS for configuring and hosting apps that are plug-ins to SaaS content systems.
There are four main steps in setting up the Lionbridge App:
1. As a Marketo administrator, you add the Lionbridge App as a LaunchPoint Service in Marketo. For detailed instructions, see "Adding the Lionbridge App in Marketo" on page 12.
2. You send some information from the previous step to the Clay Tablet Implementations Team, at [email protected]. For detailed instructions, see "Sending LaunchPoint Service Information to the Implementations Team" on page 14.
The Clay Tablet Implementations Team creates your Marketo site in CloudBroker.
3. As a Lionbridge CloudBroker site administrator, you configure your Marketo site. For detailed instructions, see "Getting Started with CloudBroker" on page 15 and "Configuring the Lionbridge App in CloudBroker" on page 17.
4. As a Lionbridge CloudBroker site administrator, you configure user access, including setting up teams and users. For detailed instructions, see "Configuring User Access" on page 36.
Once the setup is complete, Marketo users can start using the Lionbridge App to manage translations.
Lionbridge App for Marketo Setup Guide Page 11
Version 1.0.2 January 23, 2017
2 Before You Set Up the Lionbridge App for Marketo
3 Adding the Lionbridge App in MarketoTo enable Clay Tablet integration, you add the Lionbridge App as a LaunchPoint Service in Marketo.
For information about LaunchPoint services, refer to the Marketo Product Docs, available at https://docs.marketo.com.
To add the Lionbridge App as a LaunchPoint Service in Marketo:
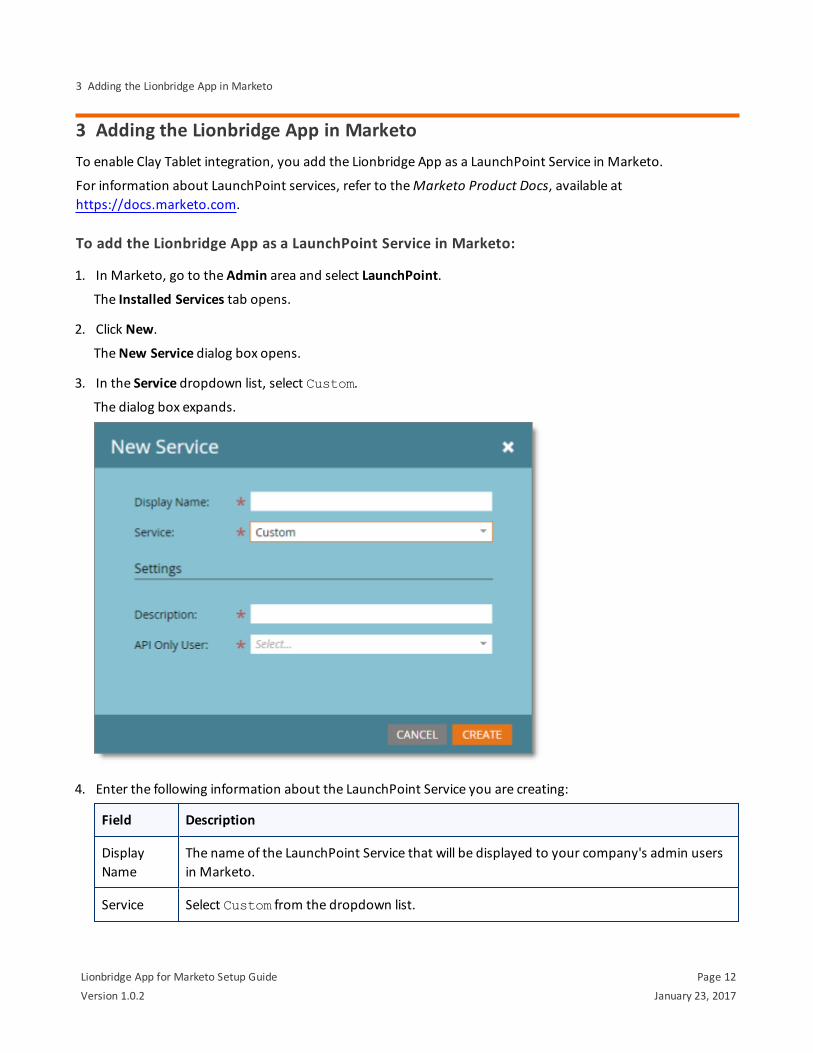
1. In Marketo, go to the Admin area and select LaunchPoint.
The Installed Services tab opens.
2. Click New.
The New Service dialog box opens.
3. In the Service dropdown list, select Custom.
The dialog box expands.
4. Enter the following information about the LaunchPoint Service you are creating:
Field Description
Display Name
The name of the LaunchPoint Service that will be displayed to your company's admin users in Marketo.
Service Select Custom from the dropdown list.
Lionbridge App for Marketo Setup Guide Page 12
Version 1.0.2 January 23, 2017
3 Adding the Lionbridge App in Marketo
Field Description
Description A description of the API Only User, described below.Note: Displayed only when Custom is selected in the Service dropdown list, described above.
API Only User
In the dropdown list, select the email address of a Marketo user that has permission to access all assets in Marketo. Note: Displayed only when Custom is selected in the Service dropdown list, described above.
5. Click Create.
The Installed Services tab refreshes.
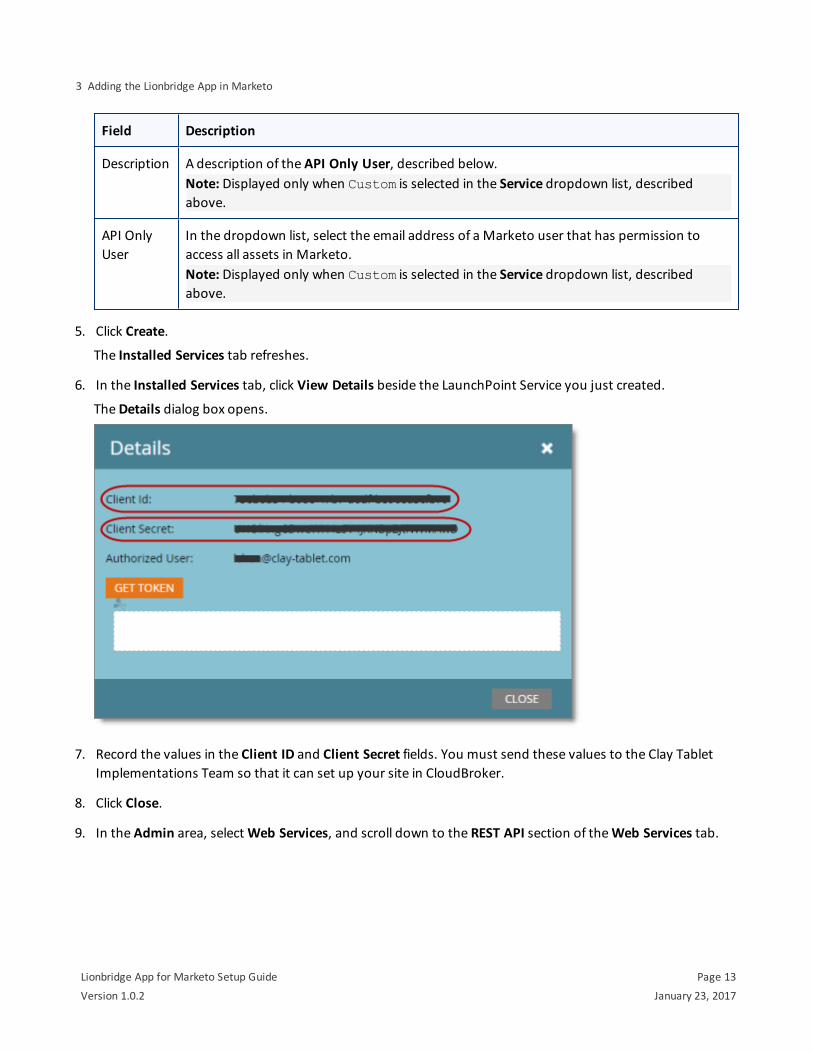
6. In the Installed Services tab, click View Details beside the LaunchPoint Service you just created.
The Details dialog box opens.
7. Record the values in the Client ID and Client Secret fields. You must send these values to the Clay Tablet Implementations Team so that it can set up your site in CloudBroker.
8. Click Close.
9. In the Admin area, select Web Services, and scroll down to the REST API section of the Web Services tab.
Lionbridge App for Marketo Setup Guide Page 13
Version 1.0.2 January 23, 2017
3 Adding the Lionbridge App in Marketo
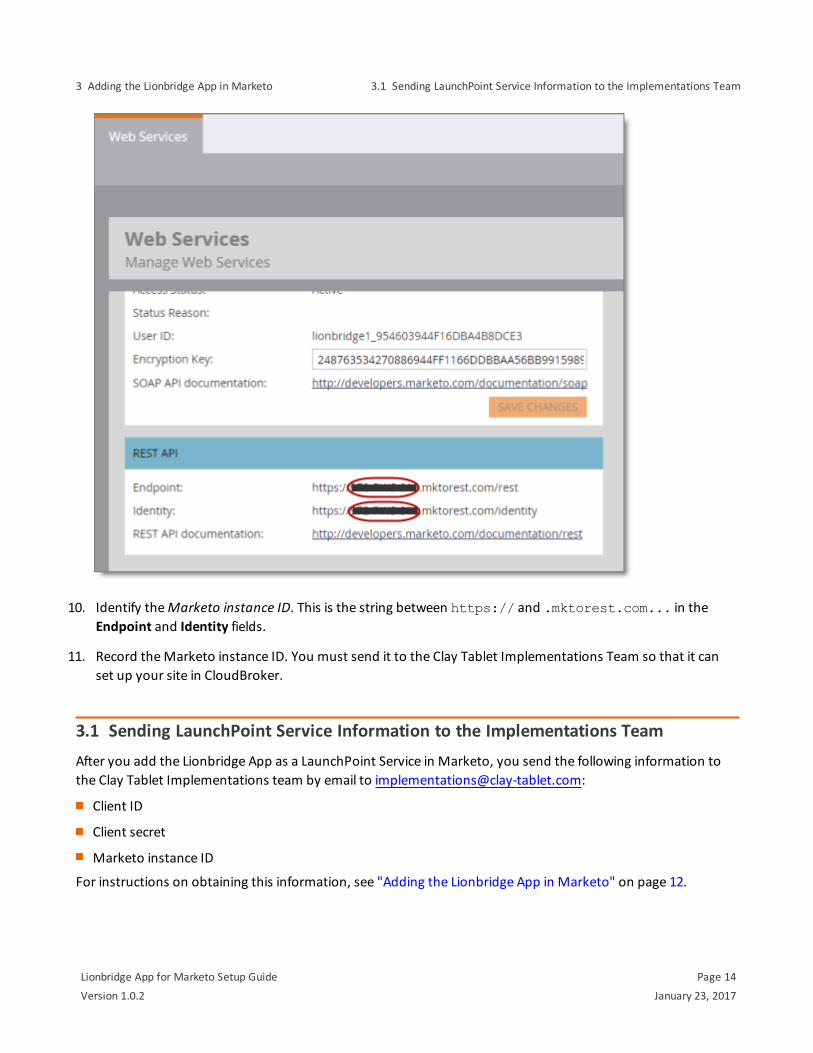
10. Identify the Marketo instance ID. This is the string between https:// and .mktorest.com... in the Endpoint and Identity fields.
11. Record the Marketo instance ID. You must send it to the Clay Tablet Implementations Team so that it can set up your site in CloudBroker.
3.1 Sending LaunchPoint Service Information to the Implementations TeamAfter you add the Lionbridge App as a LaunchPoint Service in Marketo, you send the following information to the Clay Tablet Implementations team by email to [email protected]:
Client ID
Client secret
Marketo instance ID
For instructions on obtaining this information, see "Adding the Lionbridge App in Marketo" on page 12.
Lionbridge App for Marketo Setup Guide Page 14
Version 1.0.2 January 23, 2017
3 Adding the Lionbridge App in Marketo 3.1 Sending LaunchPoint Service Information to the Implementations Team
4 Getting Started with CloudBrokerAfter Clay Tablet personnel create your Marketo site in CloudBroker, you log into CloudBroker so that you can configure it.
CloudBroker supports all browsers.
To access CloudBroker:
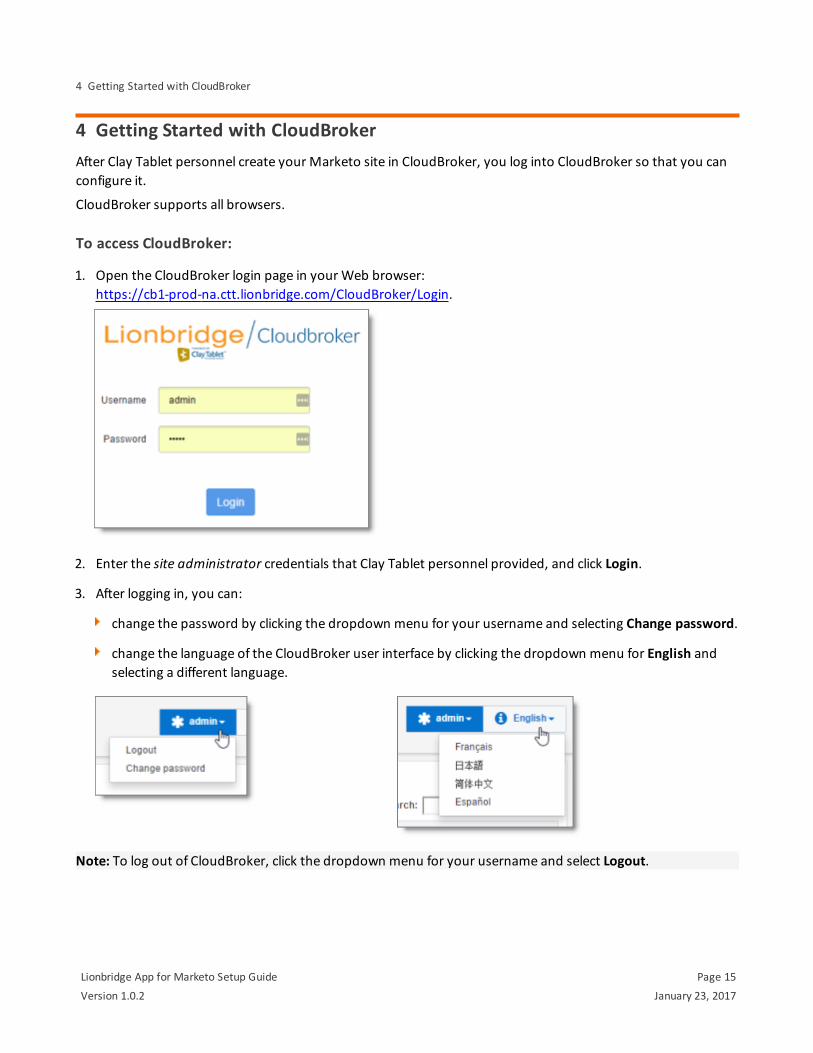
1. Open the CloudBroker login page in your Web browser:https://cb1-prod-na.ctt.lionbridge.com/CloudBroker/Login.
2. Enter the site administrator credentials that Clay Tablet personnel provided, and click Login.
3. After logging in, you can:
change the password by clicking the dropdown menu for your username and selecting Change password.
change the language of the CloudBroker user interface by clicking the dropdown menu for English and selecting a different language.
Note: To log out of CloudBroker, click the dropdown menu for your username and select Logout.
Lionbridge App for Marketo Setup Guide Page 15
Version 1.0.2 January 23, 2017
4 Getting Started with CloudBroker
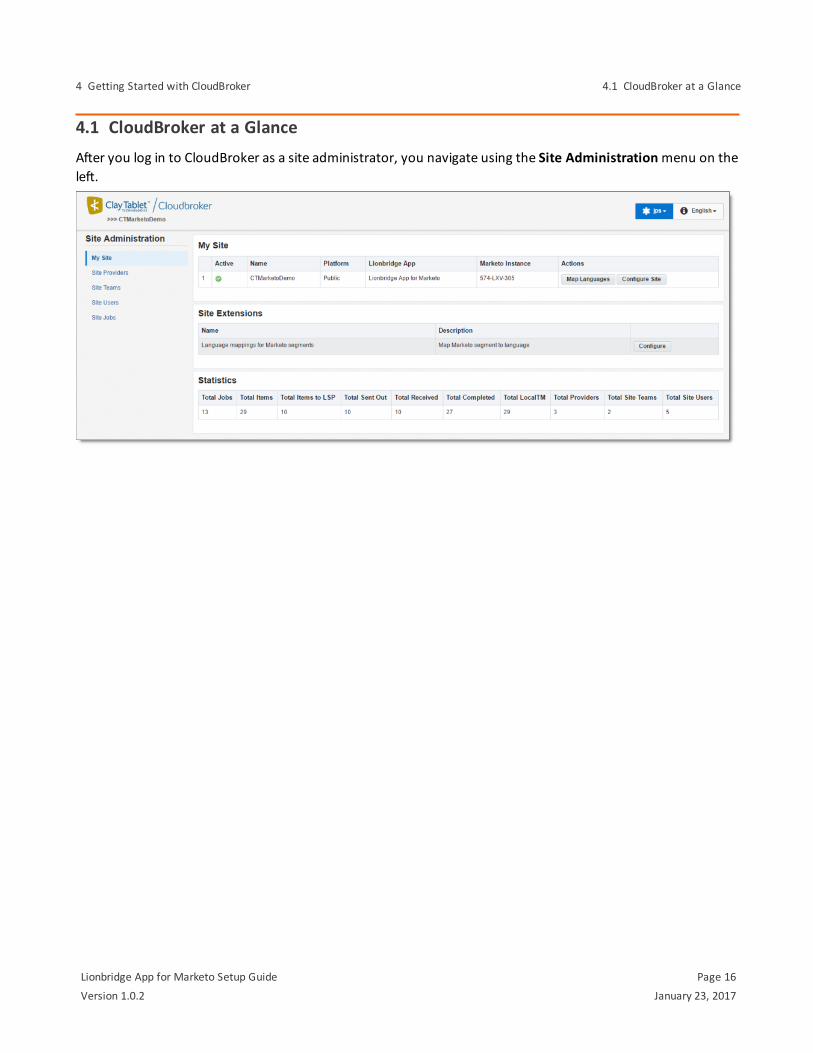
4.1 CloudBroker at a GlanceAfter you log in to CloudBroker as a site administrator, you navigate using the Site Administration menu on the left.
Lionbridge App for Marketo Setup Guide Page 16
Version 1.0.2 January 23, 2017
4 Getting Started with CloudBroker 4.1 CloudBroker at a Glance
5 Configuring the Lionbridge App in CloudBrokerA site administrator configures and manages the Lionbridge App's configuration in CloudBroker, which is a Clay Tablet SaaS for configuring apps that are plug-ins to SaaS content systems. The Lionbridge App for Marketo (Lionbridge App) is your site.
To configure the Lionbridge App in CloudBroker:
1. Log in to CloudBroker as a site administrator. For details, see "Getting Started with CloudBroker" on page 15.
2. Perform the following language-mapping tasks:
"Configuring Clay Tablet Languages" on page 17
"Configuring Language Segmentation" on page 19
3. Perform the following configuration tasks:
"Configuring Global Translation Settings" on page 22
"Configuring Lionbridge Freeway Authentication" on page 25
"Configuring SDL TMS Entries" on page 26
"Configuring Marketo Authentication Settings" on page 28
"Configuring Other Marketo Settings" on page 30
"Configuring Translation Providers" on page 32
4. Configure users, teams, and access, as described in "Configuring User Access" on page 36.
5.1 Configuring Clay Tablet LanguagesYou configure the Clay Tablet languages so that:
CloudBroker correctly maps these languages to those in the Lionbridge App.
The Lionbridge App uniquely identifies each language.
The Lionbridge App correctly identifies the source and target languages of your content.
The Lionbridge App displays languages in the optimal order for your end users.
Important: After you configure Clay Tablet languages, you create a Marketo segmentation so that you can map Marketo segments to Clay Tablet languages and language codes. For detailed instructions, see "Configuring Language Segmentation" on page 19.
To configure Clay Tablet languages:
1. In the Site Administration menu on the left, ensure that My Site is selected, so that the My Site page is open. This is the default selection when you log into CloudBroker as a site administrator. For detailed
Lionbridge App for Marketo Setup Guide Page 17
Version 1.0.2 January 23, 2017
5 Configuring the Lionbridge App in CloudBroker 5.1 Configuring Clay Tablet Languages
information about this page, see "Viewing Lionbridge App Information and Usage Data" on page 48.
2. Click Map Languages.
The Language Mapping dialog box opens. The top-left corner of the dialog box displays the number of mappings between Marketo languages and Clay Tablet languages.The top-right corner of the dialog box displays the name that Clay Tablet personnel assigned to your company's site.
By default, CloudBroker includes predefined mappings between language names and codes, and Clay Tablet language codes.
You can modify or delete the current mappings and add new mappings. The following information is displayed about each language mapping:
Column Description
Language Name
The name for the language.
Code The language's code.
Lionbridge App for Marketo Setup Guide Page 18
Version 1.0.2 January 23, 2017
5 Configuring the Lionbridge App in CloudBroker 5.1 Configuring Clay Tablet Languages

Column Description
CT Language
The Clay Tablet language code for the language. For a list and description of Clay Tablet language codes, see "Appendix: Language Codes" on page 53.
Form Locale
The form locale specified for the language in Marketo in the Marketing Activities area, under Form Settings > Settings. For more information refer to the Marketo Product Docs, available at http://docs.marketo.com/.
3. You can modify the following aspects of a language mapping:
To map a language to a different Clay Tablet language code, select a language from the dropdown list in the CT Language column.
To change the order in which a language is displayed to your users when they send out content for
translation, use the up and down buttons.
To remove a language mapping, click the corresponding delete button .
Note: Remove a language mapping does not affect any translation jobs in progress that use that mapping.
4. Optional. To add a new language mapping, click Add. The Lionbridge App adds a blank line at the bottom of the list. Enter the language name and ISO code, and select the corresponding Clay Tablet language code from the list.
5. When you are done, click Save to save your changes.
Next, you configure language segmentation to map language segments to these languages and language codes. For details, see "Configuring Language Segmentation" on page 19.
5.2 Configuring Language SegmentationYou create a Marketo segmentation so that you can map individual Marketo segments to the Clay Tablet languages and language codes you configured, as described in "Configuring Clay Tablet Languages" on page 17. For detailed information on Marketo segmentation and segments, see the Marketo Product Docs at https://docs.marketo.com/display/public/DOCS/Segmentation+and+Snippets.
To configure language segmentation:
1. In Marketo, create a segmentation for mapping languages for translation, and add a segment for each Clay Tablet language you want to map. In general, you want to create a segment for each source language from which you will translated assets, and for each target language into which you will translate assets. For detailed instructions, see "Create a Segmentation" in the Marketo Product Docs at https://docs.marketo.com/display/public/DOCS/Create+a+Segmentation.
Lionbridge App for Marketo Setup Guide Page 19
Version 1.0.2 January 23, 2017
5 Configuring the Lionbridge App in CloudBroker 5.2 Configuring Language Segmentation
2. In the Site Administration menu on the left, ensure that My Site is selected, so that the My Site page is open. This is the default selection when you log into CloudBroker as a site administrator. For detailed information about this page, see "Viewing Lionbridge App Information and Usage Data" on page 48.
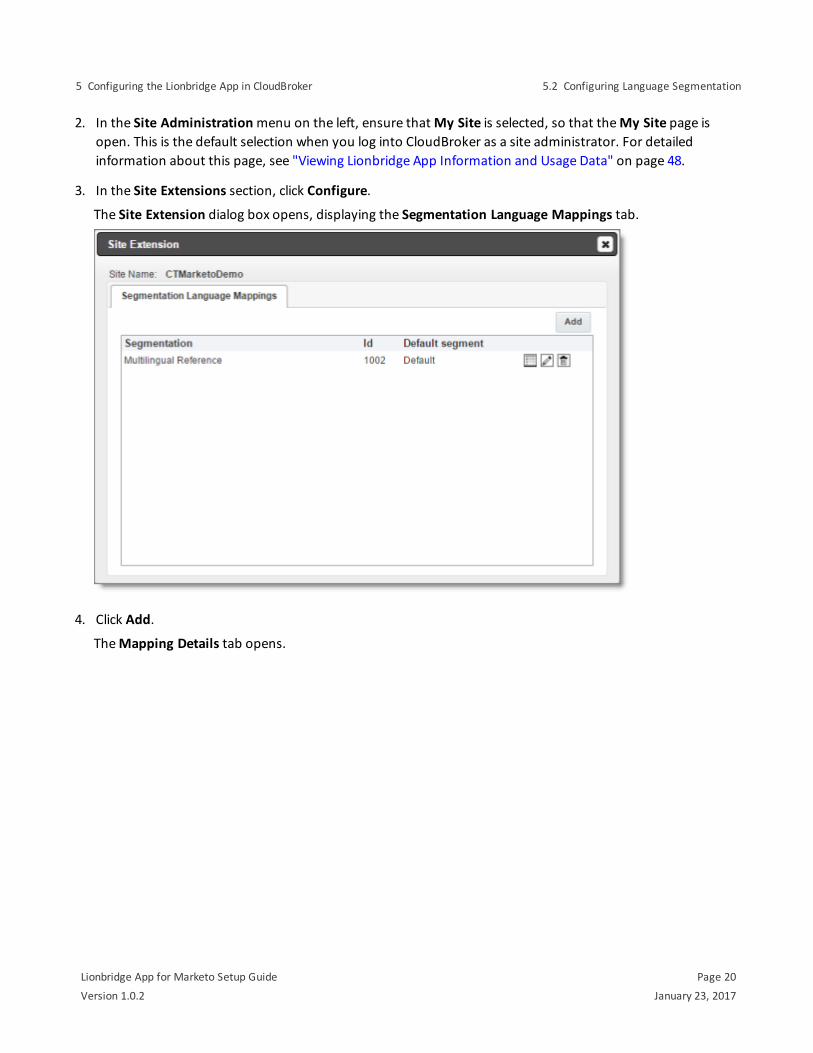
3. In the Site Extensions section, click Configure.
The Site Extension dialog box opens, displaying the Segmentation Language Mappings tab.
4. Click Add.
The Mapping Details tab opens.
Lionbridge App for Marketo Setup Guide Page 20
Version 1.0.2 January 23, 2017
5 Configuring the Lionbridge App in CloudBroker 5.2 Configuring Language Segmentation
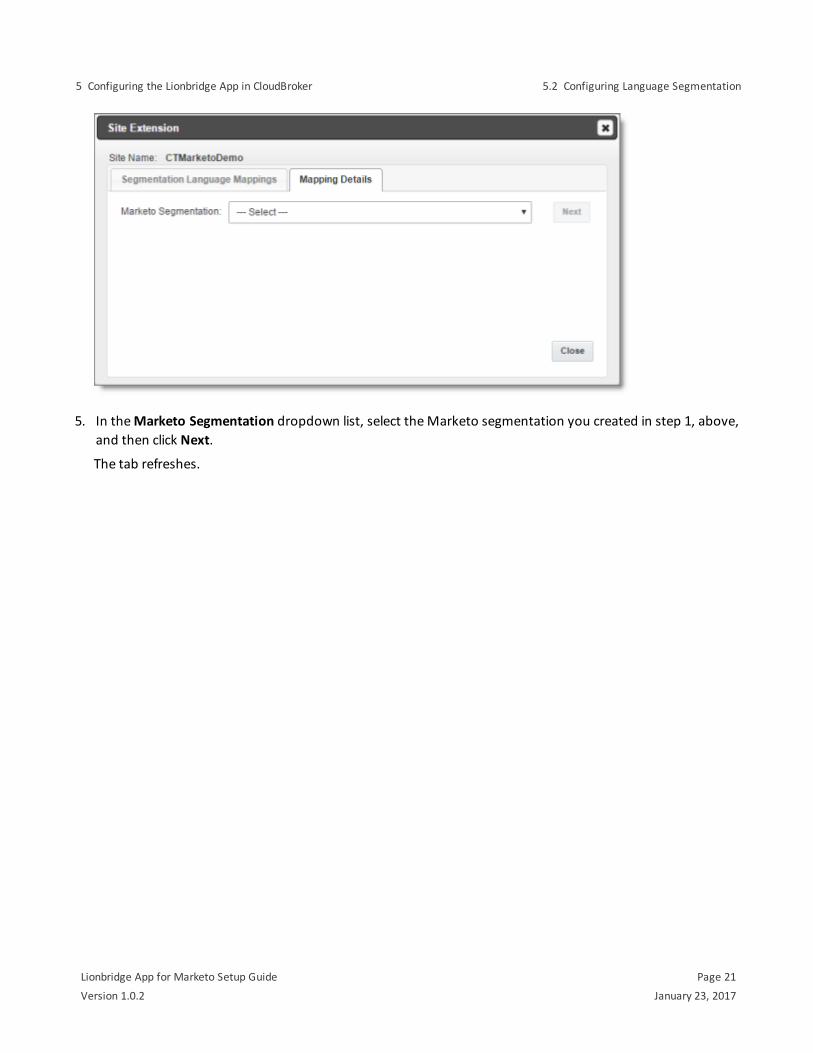
5. In the Marketo Segmentation dropdown list, select the Marketo segmentation you created in step 1, above, and then click Next.
The tab refreshes.
Lionbridge App for Marketo Setup Guide Page 21
Version 1.0.2 January 23, 2017
5 Configuring the Lionbridge App in CloudBroker 5.2 Configuring Language Segmentation
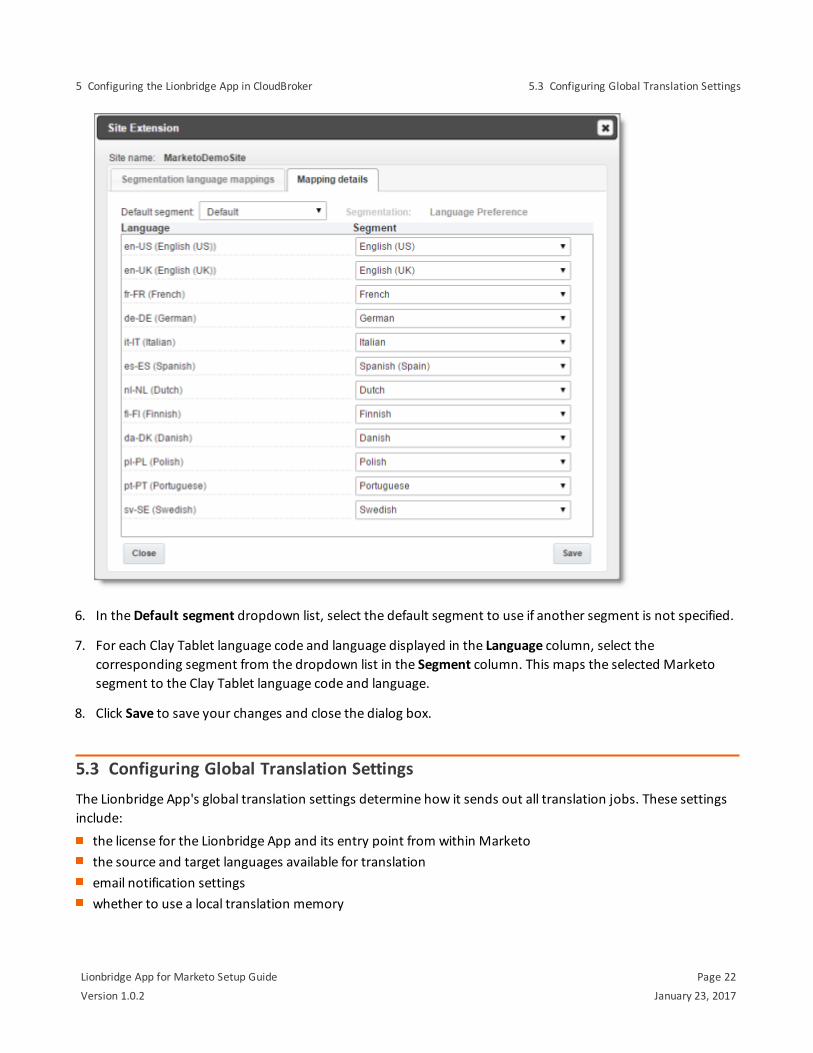
6. In the Default segment dropdown list, select the default segment to use if another segment is not specified.
7. For each Clay Tablet language code and language displayed in the Language column, select the corresponding segment from the dropdown list in the Segment column. This maps the selected Marketo segment to the Clay Tablet language code and language.
8. Click Save to save your changes and close the dialog box.
5.3 Configuring Global Translation SettingsThe Lionbridge App's global translation settings determine how it sends out all translation jobs. These settings include:
the license for the Lionbridge App and its entry point from within Marketothe source and target languages available for translationemail notification settingswhether to use a local translation memory
Lionbridge App for Marketo Setup Guide Page 22
Version 1.0.2 January 23, 2017
5 Configuring the Lionbridge App in CloudBroker 5.3 Configuring Global Translation Settings
To set the global translation settings:
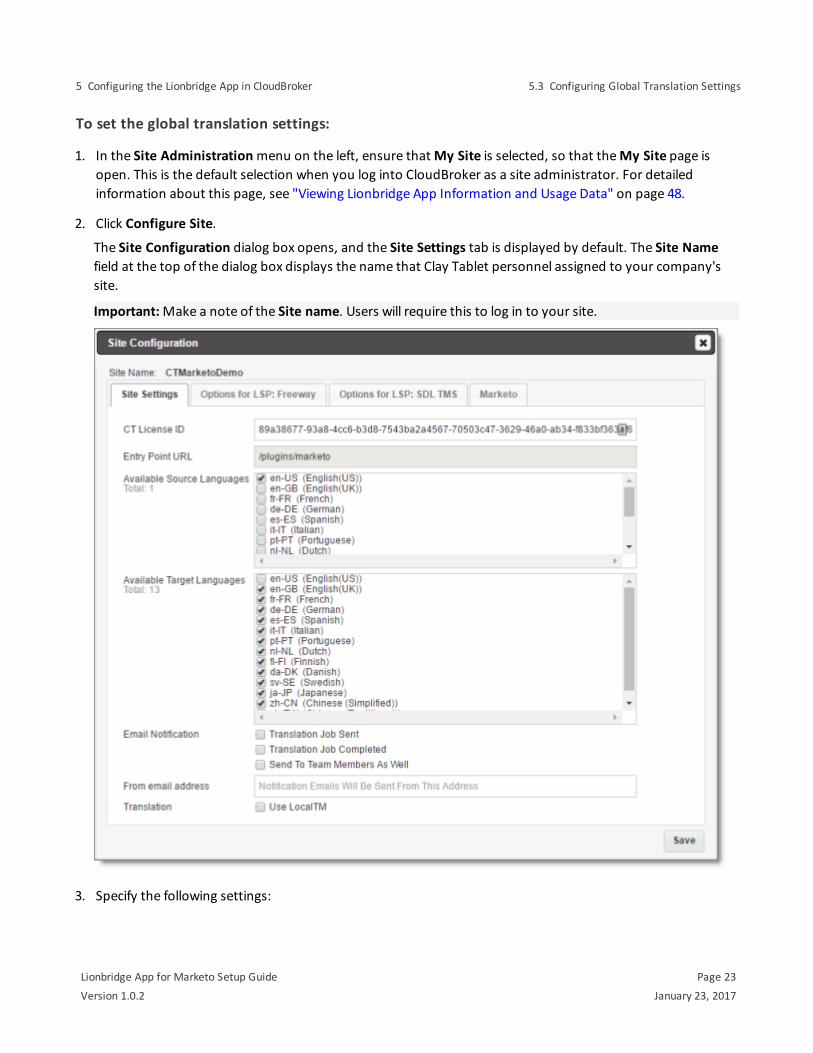
1. In the Site Administration menu on the left, ensure that My Site is selected, so that the My Site page is open. This is the default selection when you log into CloudBroker as a site administrator. For detailed information about this page, see "Viewing Lionbridge App Information and Usage Data" on page 48.
2. Click Configure Site.
The Site Configuration dialog box opens, and the Site Settings tab is displayed by default. The Site Name field at the top of the dialog box displays the name that Clay Tablet personnel assigned to your company's site.
Important: Make a note of the Site name. Users will require this to log in to your site.
3. Specify the following settings:
Lionbridge App for Marketo Setup Guide Page 23
Version 1.0.2 January 23, 2017
5 Configuring the Lionbridge App in CloudBroker 5.3 Configuring Global Translation Settings
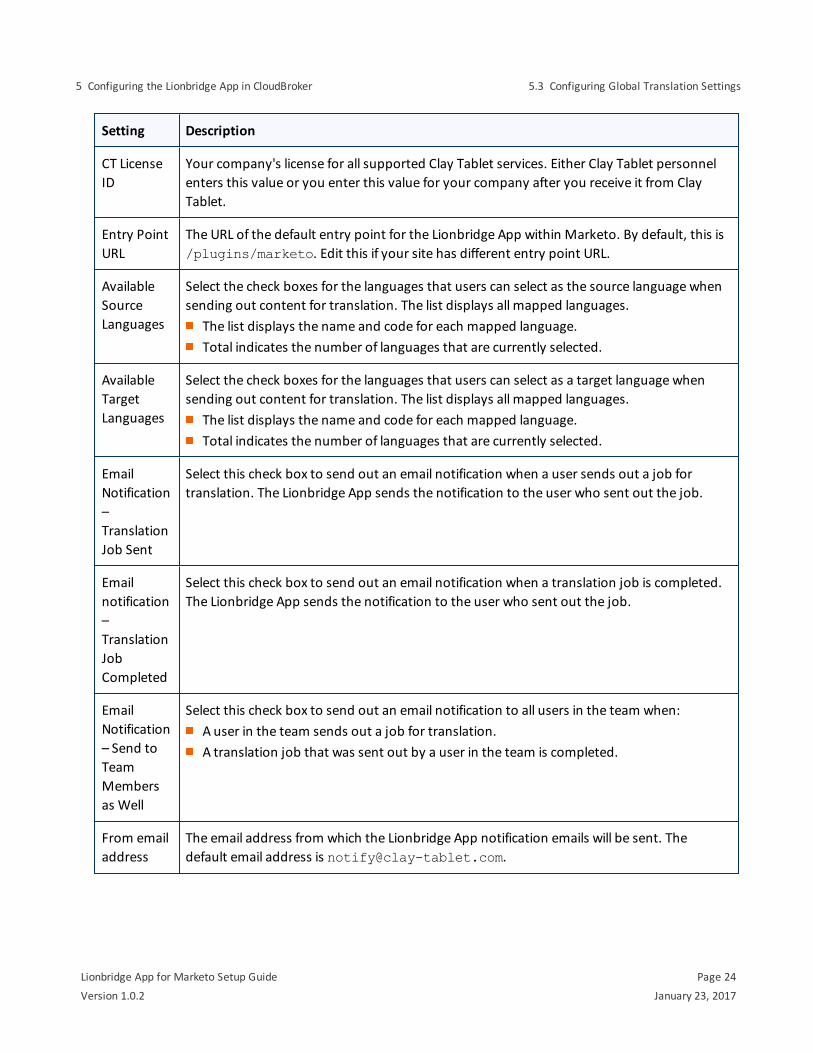
Setting Description
CT License ID
Your company's license for all supported Clay Tablet services. Either Clay Tablet personnel enters this value or you enter this value for your company after you receive it from Clay Tablet.
Entry Point URL
The URL of the default entry point for the Lionbridge App within Marketo. By default, this is /plugins/marketo. Edit this if your site has different entry point URL.
Available Source Languages
Select the check boxes for the languages that users can select as the source language when sending out content for translation. The list displays all mapped languages.
The list displays the name and code for each mapped language. Total indicates the number of languages that are currently selected.
Available Target Languages
Select the check boxes for the languages that users can select as a target language when sending out content for translation. The list displays all mapped languages.
The list displays the name and code for each mapped language. Total indicates the number of languages that are currently selected.
Email Notification – Translation Job Sent
Select this check box to send out an email notification when a user sends out a job for translation. The Lionbridge App sends the notification to the user who sent out the job.
Email notification – Translation Job Completed
Select this check box to send out an email notification when a translation job is completed. The Lionbridge App sends the notification to the user who sent out the job.
Email Notification – Send to Team Members as Well
Select this check box to send out an email notification to all users in the team when:A user in the team sends out a job for translation.A translation job that was sent out by a user in the team is completed.
From email address
The email address from which the Lionbridge App notification emails will be sent. The default email address is [email protected].
Lionbridge App for Marketo Setup Guide Page 24
Version 1.0.2 January 23, 2017
5 Configuring the Lionbridge App in CloudBroker 5.3 Configuring Global Translation Settings
Setting Description
Translation – Use local TM
Translated content is stored in a local translation memory (TM). This setting determines whether to check previously translated content in the local TM for any content changes, and send only changed content out for translation. If content was previously translated and it has not changed, then the Lionbridge App does not send it for translation again: Instead, it uses the stored translation. This feature reduces the quantity of content that the Lionbridge App sends to translation providers, which reduces your cost. However, it increases the processing time before sending out the items for translation.
4. Click Save.
5.4 Configuring Lionbridge Freeway AuthenticationNote: This section is relevant only if Lionbridge Freeway is your translation provider.
If Lionbridge Freeway is your translation provider, you can configure authentication to Lionbridge Freeway from the Lionbridge App. This facilitates delivering your content from the Lionbridge App, via the Clay Tablet Platform, to Lionbridge Freeway.
To configure Lionbridge Freeway authentication:
1. In the Site Administration menu on the left, ensure that My Site is selected, so that the My Site page is open. This is the default selection when you log into CloudBroker as a site administrator. For detailed information about this page, see "Viewing Lionbridge App Information and Usage Data" on page 48.
2. Click Configure Site.
The Site Configuration dialog box opens. The Site Name field at the top of the dialog box displays the name that Clay Tablet personnel assigned to your company's site.
3. Click the Options for LSP: Freeway tab.
Lionbridge App for Marketo Setup Guide Page 25
Version 1.0.2 January 23, 2017
5 Configuring the Lionbridge App in CloudBroker 5.4 Configuring Lionbridge Freeway Authentication
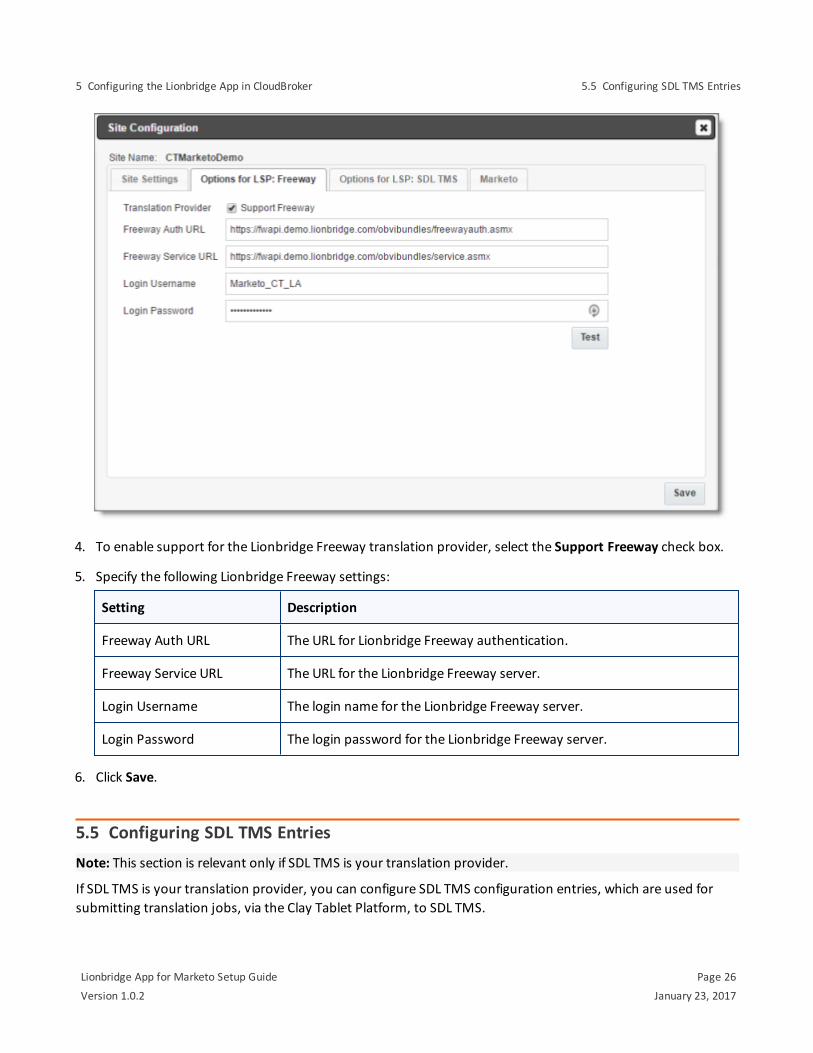
4. To enable support for the Lionbridge Freeway translation provider, select the Support Freeway check box.
5. Specify the following Lionbridge Freeway settings:
Setting Description
Freeway Auth URL The URL for Lionbridge Freeway authentication.
Freeway Service URL The URL for the Lionbridge Freeway server.
Login Username The login name for the Lionbridge Freeway server.
Login Password The login password for the Lionbridge Freeway server.
6. Click Save.
5.5 Configuring SDL TMS EntriesNote: This section is relevant only if SDL TMS is your translation provider.
If SDL TMS is your translation provider, you can configure SDL TMS configuration entries, which are used for submitting translation jobs, via the Clay Tablet Platform, to SDL TMS.
Lionbridge App for Marketo Setup Guide Page 26
Version 1.0.2 January 23, 2017
5 Configuring the Lionbridge App in CloudBroker 5.5 Configuring SDL TMS Entries
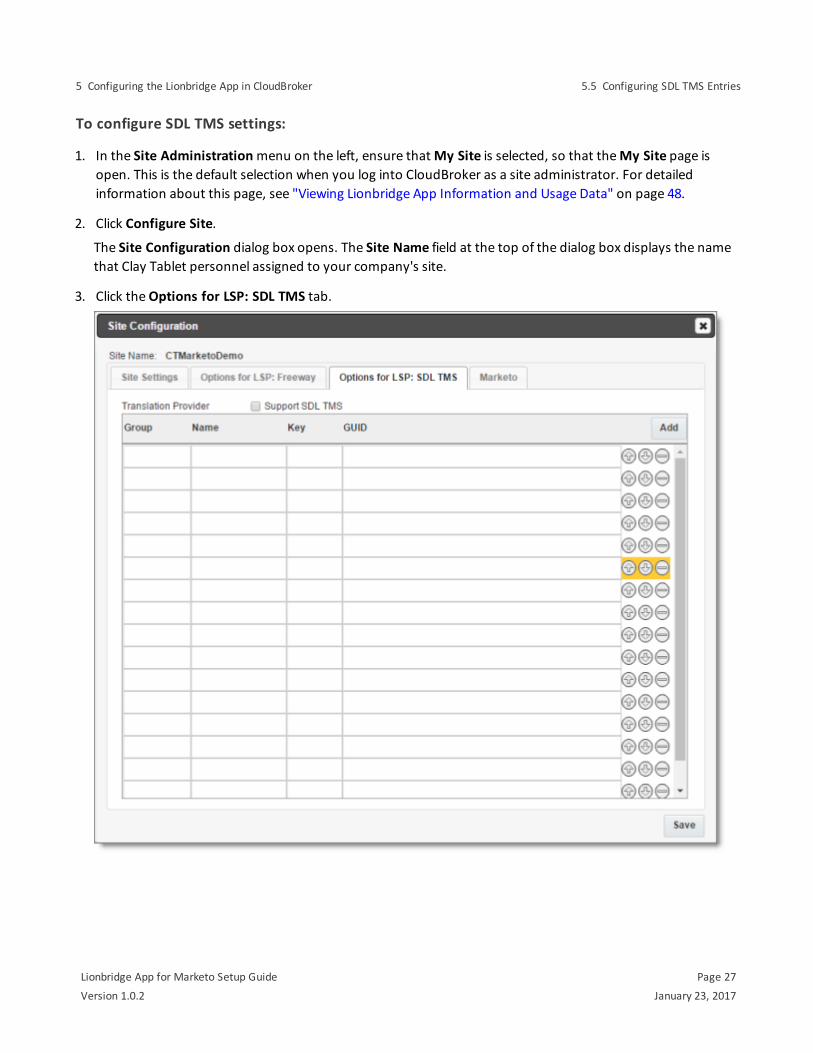
To configure SDL TMS settings:
1. In the Site Administration menu on the left, ensure that My Site is selected, so that the My Site page is open. This is the default selection when you log into CloudBroker as a site administrator. For detailed information about this page, see "Viewing Lionbridge App Information and Usage Data" on page 48.
2. Click Configure Site.
The Site Configuration dialog box opens. The Site Name field at the top of the dialog box displays the name that Clay Tablet personnel assigned to your company's site.
3. Click the Options for LSP: SDL TMS tab.
Lionbridge App for Marketo Setup Guide Page 27
Version 1.0.2 January 23, 2017
5 Configuring the Lionbridge App in CloudBroker 5.5 Configuring SDL TMS Entries
4. To enable support for the SDL TMS translation provider, select the Support SDL TMS check box.
5. Enter the following information about an SDL TMS configuration entry, which is used for submitting translation jobs to SDL TMS:
Column Description
Group The Dropbox selection group.
Name The name to display in the Dropbox selection box.
Key The key for submitting a job to SDL TMS.
GUID The key from the Dropbox selection box links to a GUID in SDL TMS. Each GUID is related to a different TM (translation memory), TermBase, and Workflow.
6. Optional. Modify the order of a configuration entry. To change the order in which an entry is displayed to
your users when they send out content for translation, use the up and down buttons.
7. Optional. To remove a configuration entry, click the corresponding delete button .
8. Click Save.
5.6 Configuring Marketo Authentication SettingsThe Lionbridge App must authenticate with Marketo. You manage the authentication settings in the Marketo tab of the Configure Site dialog box.
To configure these settings:
1. In the Site Administration menu on the left, ensure that My Site is selected, so that the My Site page is open. This is the default selection when you log into CloudBroker as a site administrator. For detailed information about this page, see "Viewing Lionbridge App Information and Usage Data" on page 48.
2. Click Configure Site.
The Configure Site dialog box opens. The Site Name field at the top of the dialog box displays the name that Clay Tablet personnel assigned to your company's site.
3. Click the Marketo tab.
Lionbridge App for Marketo Setup Guide Page 28
Version 1.0.2 January 23, 2017
5 Configuring the Lionbridge App in CloudBroker 5.6 Configuring Marketo Authentication Settings
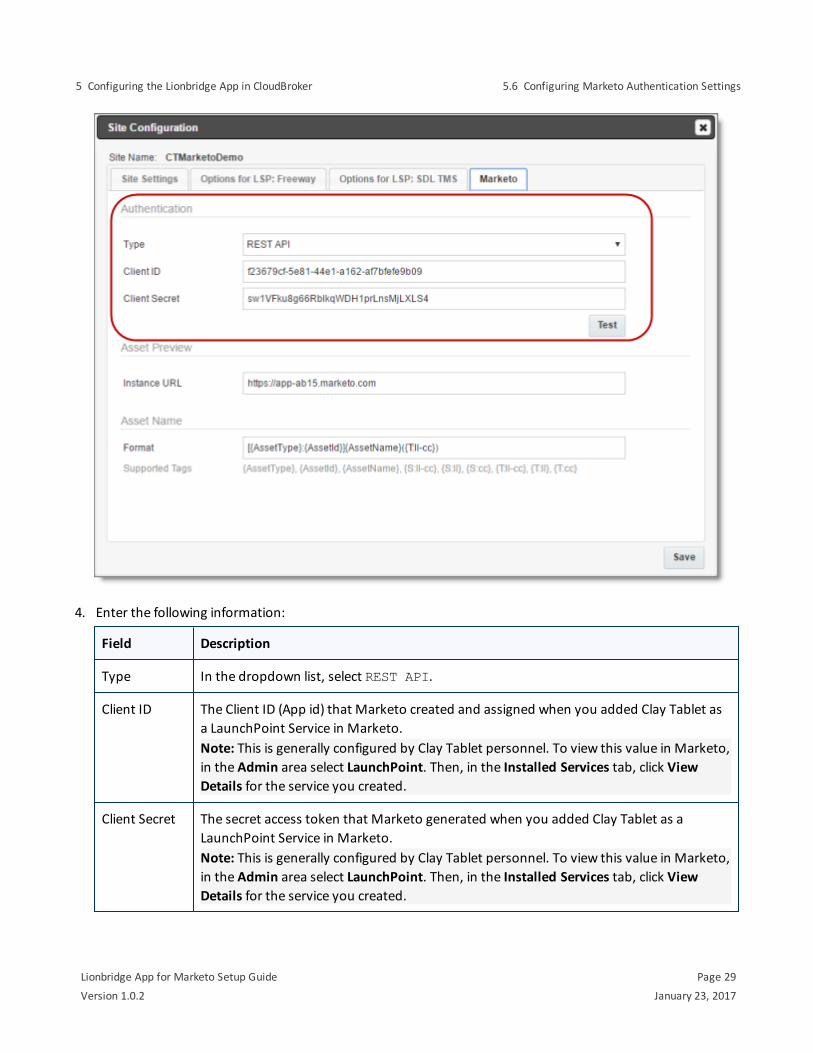
4. Enter the following information:
Field Description
Type In the dropdown list, select REST API.
Client ID The Client ID (App id) that Marketo created and assigned when you added Clay Tablet as a LaunchPoint Service in Marketo.Note: This is generally configured by Clay Tablet personnel. To view this value in Marketo, in the Admin area select LaunchPoint. Then, in the Installed Services tab, click View Details for the service you created.
Client Secret The secret access token that Marketo generated when you added Clay Tablet as a LaunchPoint Service in Marketo.Note: This is generally configured by Clay Tablet personnel. To view this value in Marketo, in the Admin area select LaunchPoint. Then, in the Installed Services tab, click View Details for the service you created.
Lionbridge App for Marketo Setup Guide Page 29
Version 1.0.2 January 23, 2017
5 Configuring the Lionbridge App in CloudBroker 5.6 Configuring Marketo Authentication Settings
For a detailed description of the other fields in this tab, see "Configuring Other Marketo Settings" on page 30.
5. Optional. Click the Test button to test the authentication settings. A message box indicates that the test was successful. Click OK to close the message box.
6. Click Save.
5.7 Configuring Other Marketo SettingsYou can configure the following Marketo-specific settings:
the filename format of translated assets
the URL of the Marketo instance with the source and target assets
Note: The Lionbridge App requires this to generate the preview links from the Job Details tab to the source and target assets.
To configure these settings:
1. In the Site Administration menu on the left, ensure that My Site is selected, so that the My Site page is open. This is the default selection when you log into CloudBroker as a site administrator. For detailed information about this page, see "Viewing Lionbridge App Information and Usage Data" on page 48.
2. Click Configure Site.
The Configure Site dialog box opens. The Site Name field at the top of the dialog box displays the name that Clay Tablet personnel assigned to your company's site.
3. Click the Marketo tab.
Lionbridge App for Marketo Setup Guide Page 30
Version 1.0.2 January 23, 2017
5 Configuring the Lionbridge App in CloudBroker 5.7 Configuring Other Marketo Settings
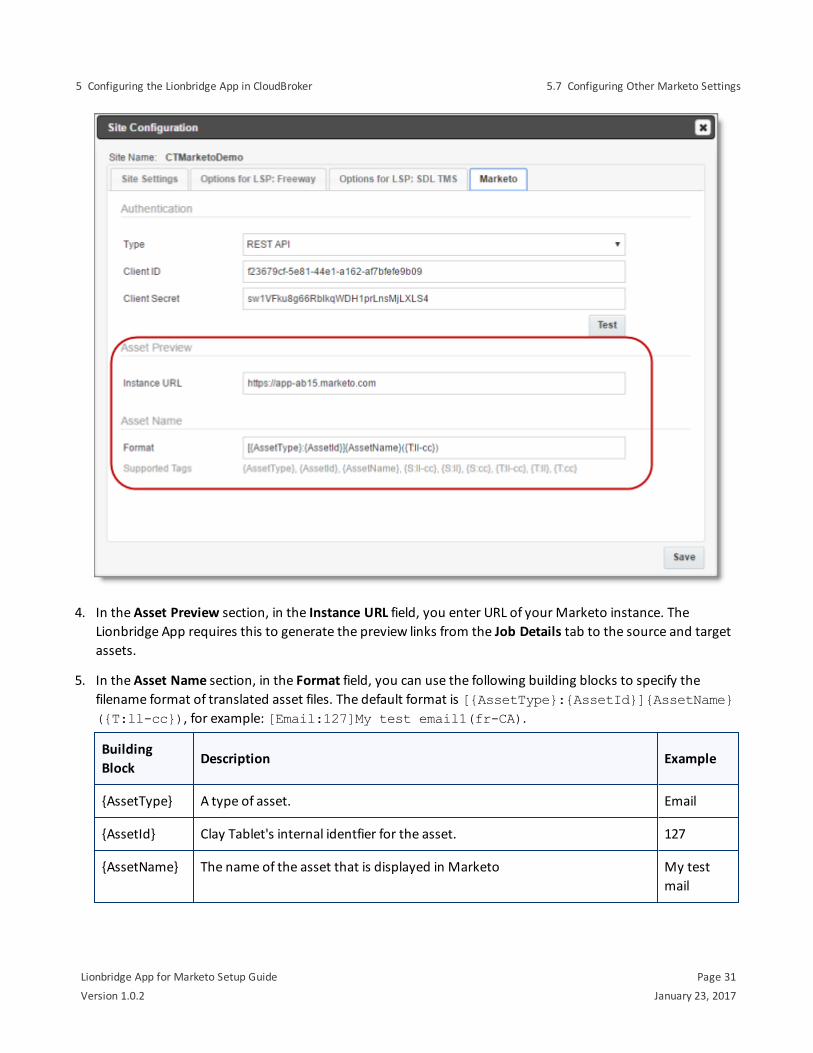
4. In the Asset Preview section, in the Instance URL field, you enter URL of your Marketo instance. The Lionbridge App requires this to generate the preview links from the Job Details tab to the source and target assets.
5. In the Asset Name section, in the Format field, you can use the following building blocks to specify the filename format of translated asset files. The default format is [{AssetType}:{AssetId}]{AssetName}({T:ll-cc}), for example: [Email:127]My test email1(fr-CA).
Building Block
Description Example
{AssetType} A type of asset. Email
{AssetId} Clay Tablet's internal identfier for the asset. 127
{AssetName} The name of the asset that is displayed in Marketo My test mail
Lionbridge App for Marketo Setup Guide Page 31
Version 1.0.2 January 23, 2017
5 Configuring the Lionbridge App in CloudBroker 5.7 Configuring Other Marketo Settings
Building Block
Description Example
{S:ll-cc} The language code and the country code of the source language, separated by a hyphen.
en-CA
{S:ll} The language code only of the source language. en
{S:cc} The country code only of the source language. CA
{T:ll-cc} The language code and the country code of the target language, separated by a hyphen.
fr-CA
{T:ll} The language code only of the target language. fr
{T:cc} The country code only of the target language. CA
For a detailed description of the other fields in this tab, see "Configuring Marketo Authentication Settings" on page 28.
6. Optional. Click the Test button to test the authentication settings. A message box indicates that the test was successful. Click OK to close the message box.
7. Click Save.
5.8 Configuring Translation ProvidersVery important: Do not use the same license keys in multiple Marketo environments, because this is a violation of the Clay Tablet License Agreement. Using the same license keys in multiple Marketo environments will cause the Lionbridge App to behave unexpectedly, which can result in lost translation content, orphaned projects, and inaccurate translation status reports. Clay Tablet will support technical issues caused by duplicating or incorrectly installing license keys only on a time and materials basis.
The Lionbridge App uses the CMS address key, which is in source.xml, to move your items for translation from the Lionbridge App to the Clay Tablet Platform. The Platform then forwards the items to translate to your translation provider. If you are using multiple translation providers, there must be one key (file) for each provider.
Note: The Lionbridge App always initiates calls to the Clay Tablet Platform. However, the CMS address keys enable establishing a secure, discrete connection between the Lionbridge App instance and the Platform. They also support the return of files from translation.
Your company's platform key is in target.xml. This is your company's license for the Clay Tablet Platform.
Before you can send assets for translation, you must set up your Clay Tablet license key and your translation providers.
Lionbridge App for Marketo Setup Guide Page 32
Version 1.0.2 January 23, 2017
5 Configuring the Lionbridge App in CloudBroker 5.8 Configuring Translation Providers
Important: Before starting, ensure you obtain your license key from Clay Tablet. Verify that Clay Tablet has set up your account license keys for each of your translation providers.
To configure translation providers:
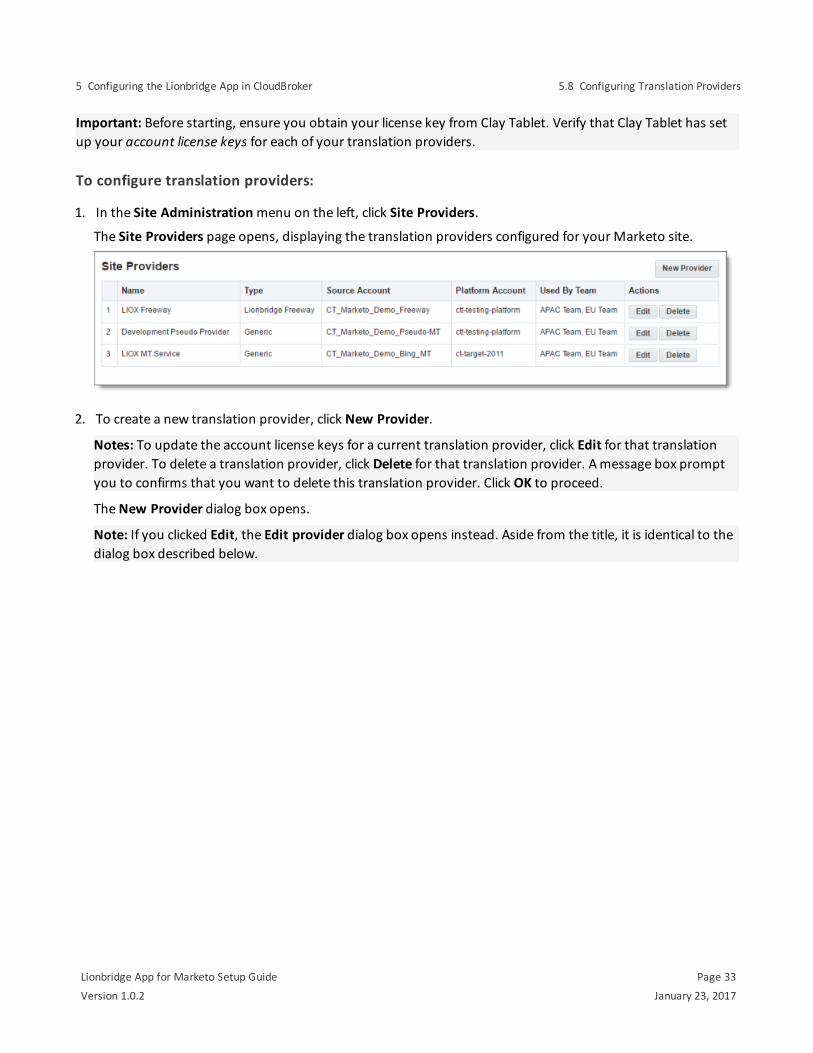
1. In the Site Administration menu on the left, click Site Providers.
The Site Providers page opens, displaying the translation providers configured for your Marketo site.
2. To create a new translation provider, click New Provider.
Notes: To update the account license keys for a current translation provider, click Edit for that translation provider. To delete a translation provider, click Delete for that translation provider. A message box prompt you to confirms that you want to delete this translation provider. Click OK to proceed.
The New Provider dialog box opens.
Note: If you clicked Edit, the Edit provider dialog box opens instead. Aside from the title, it is identical to the dialog box described below.
Lionbridge App for Marketo Setup Guide Page 33
Version 1.0.2 January 23, 2017
5 Configuring the Lionbridge App in CloudBroker 5.8 Configuring Translation Providers
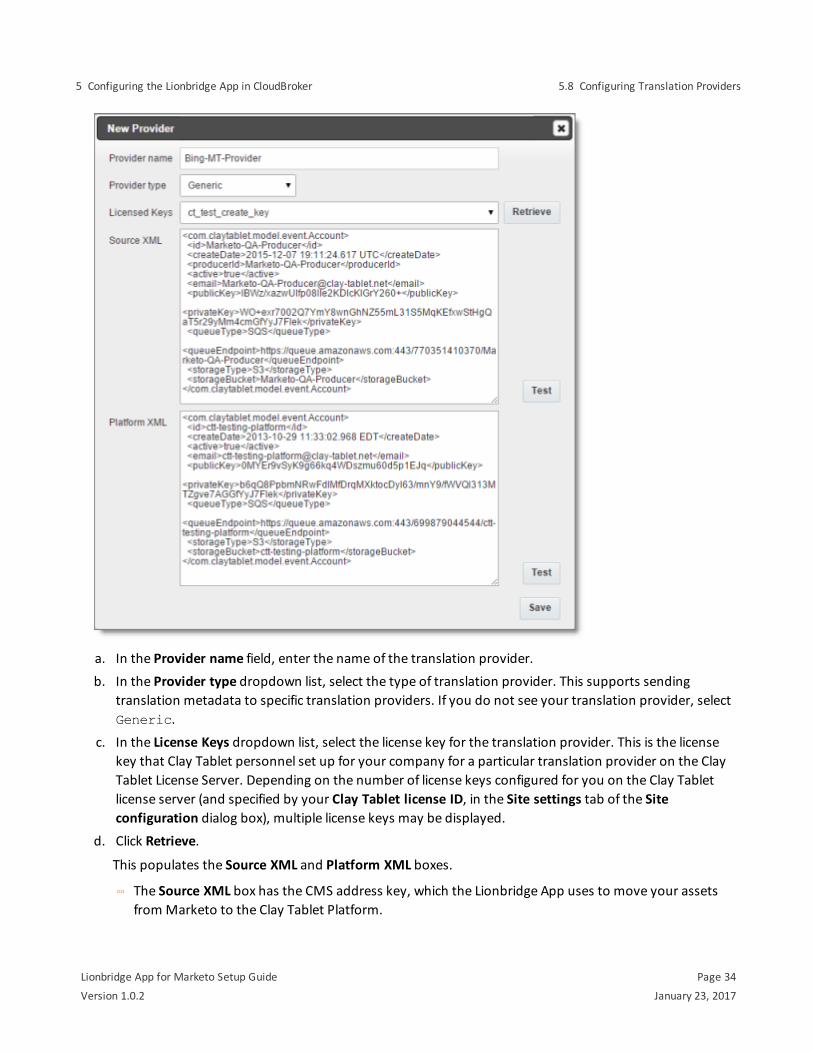
a. In the Provider name field, enter the name of the translation provider. b. In the Provider type dropdown list, select the type of translation provider. This supports sending
translation metadata to specific translation providers. If you do not see your translation provider, select Generic.
c. In the License Keys dropdown list, select the license key for the translation provider. This is the license key that Clay Tablet personnel set up for your company for a particular translation provider on the Clay Tablet License Server. Depending on the number of license keys configured for you on the Clay Tablet license server (and specified by your Clay Tablet license ID, in the Site settings tab of the Site configuration dialog box), multiple license keys may be displayed.
d. Click Retrieve.
This populates the Source XML and Platform XML boxes.
The Source XML box has the CMS address key, which the Lionbridge App uses to move your assets from Marketo to the Clay Tablet Platform.
Lionbridge App for Marketo Setup Guide Page 34
Version 1.0.2 January 23, 2017
5 Configuring the Lionbridge App in CloudBroker 5.8 Configuring Translation Providers
The Platform XML box has the platform key, for accessing the Clay Tablet Platform. e. Click Test beside the Source XML box. A message box indicates whether this key passed the test. f. Click Test beside the Platform XML box. A message box indicates whether this key passed the test.
3. Click Save.
Lionbridge App for Marketo Setup Guide Page 35
Version 1.0.2 January 23, 2017
5 Configuring the Lionbridge App in CloudBroker 5.8 Configuring Translation Providers
6 Configuring User AccessTo enable Marketo users to send out content for translation from the Lionbridge App, you must add them as users in CloudBroker and add them to one or more teams. A user's team determines:
the source languages of the assets that a user can send out for translation
the target languages into which a user can request translation of the assets
the translation providers to whom a user can send the assets for translation
Important: Only users who are part of a team can send out content for translation from the Lionbridge App.
To configure user access, perform the following general steps:
1. Create one or more teams. For details, see "Adding or Editing a Team" on page 37.
2. Create users and add them to teams. For details, see "Adding a User" on page 42.
6.1 Managing TeamsA team is a collection of users for a specific site. All users on a team can send out content for translation from the source languages to the translation providers into the target languages configured for the team.
This section describes how to view information about existing teams, add a new team, and edit an existing team.
To manage teams:
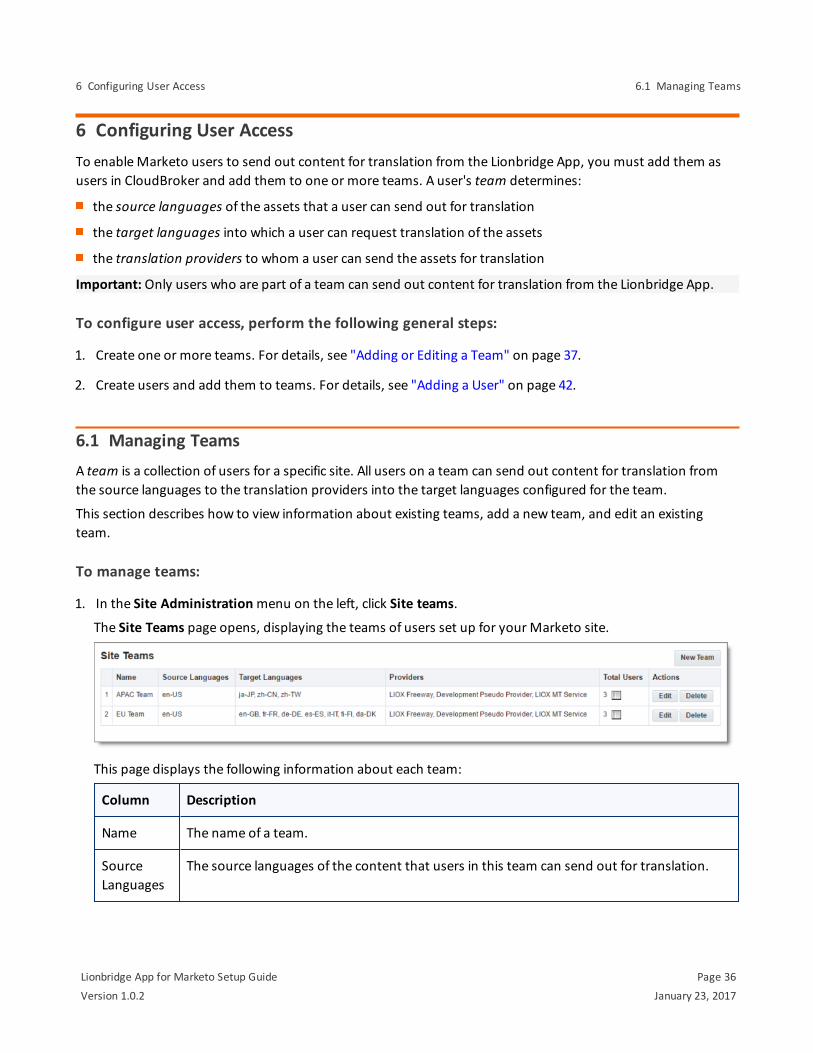
1. In the Site Administration menu on the left, click Site teams.
The Site Teams page opens, displaying the teams of users set up for your Marketo site.
This page displays the following information about each team:
Column Description
Name The name of a team.
Source Languages
The source languages of the content that users in this team can send out for translation.
Lionbridge App for Marketo Setup Guide Page 36
Version 1.0.2 January 23, 2017
6 Configuring User Access 6.1 Managing Teams
Column Description
Target Languages
The target languages of the content to which users in this team can send out content for translation.
Providers The translation providers to which users in this team can send out content for translation.
Total Users The total number of users in this team. Tip: To view the users in this team, click the icon. The Team users box displays all the users on the team and their email addresses.
2. Do one of the following:
To create a new team, click New Team. For detailed instructions, see "Adding or Editing a Team" on page 37.
To edit a team, in the Actions column, click Edit in the corresponding row. For detailed instructions, see "Adding or Editing a Team" on page 37.
To delete a team, in the Actions column, click Delete in the corresponding row. For detailed instructions, see "Deleting a Team" on page 39.
6.1.1 Adding or Editing a Team
You can create a new team or edit a team that was created previously.
To add or edit a team:
1. In the Site Administration menu on the left, click Site Teams.
The Site Teams page opens, displaying the teams set up for your Marketo site. For detailed information about this page, see "Managing Teams" on page 36.
2. Do one of the following:
To create a new team, click New Team.
To edit an existing team, click Edit for that team.
Either the New Site Geam or the Edit Site Team dialog box opens, displaying the Source Languages tab. Aside from the title, these dialog boxes are nearly identical.
Lionbridge App for Marketo Setup Guide Page 37
Version 1.0.2 January 23, 2017
6 Configuring User Access 6.1 Managing Teams
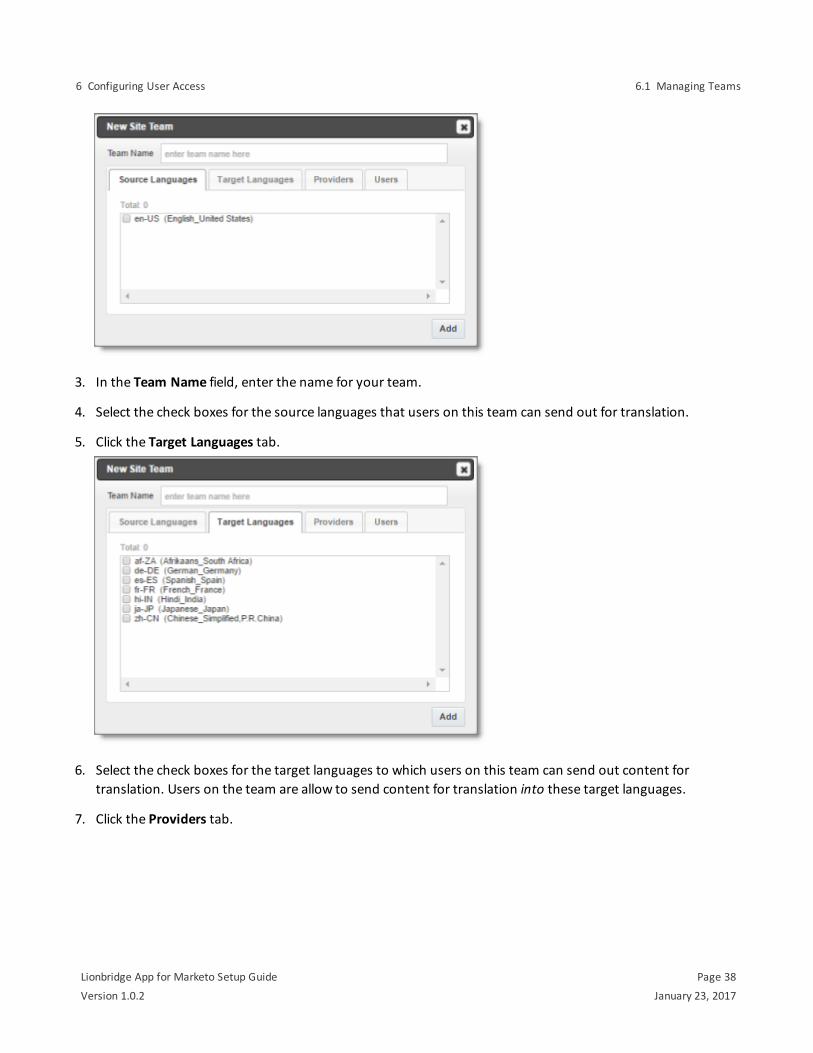
3. In the Team Name field, enter the name for your team.
4. Select the check boxes for the source languages that users on this team can send out for translation.
5. Click the Target Languages tab.
6. Select the check boxes for the target languages to which users on this team can send out content for translation. Users on the team are allow to send content for translation into these target languages.
7. Click the Providers tab.
Lionbridge App for Marketo Setup Guide Page 38
Version 1.0.2 January 23, 2017
6 Configuring User Access 6.1 Managing Teams

8. Select the check boxes for the translation providers to which the users on this team can send out content for translation.
9. Click the Users tab.
10. Select the check boxes for the users who are on this team.
11. Do one of the following to save your changes:
In the New Site Team dialog box, click Add.
In the Edit Site Team dialog box, click Save.
6.1.2 Deleting a Team
You can delete a team from the Lionbridge App so that it will no longer be a collection of users with the same permissions for sending out assets for translation from specified source languages, to specified target
Lionbridge App for Marketo Setup Guide Page 39
Version 1.0.2 January 23, 2017
6 Configuring User Access 6.1 Managing Teams
languages, to specified translation providers.
Important: Deleting a team from the Lionbridge App also deletes all the jobs and items sent by users from the Lionbridge App as part of this team. Deleting a team from the Lionbridge App does not delete the users in the team from either CloudBroker or Marketo.
Notes about users that are in multiple teams: Deleting a team does not delete jobs or items that users sent as part of a different team. If users are in multiple teams, deleting a team from the Lionbridge App does not change user permissions from the non-deleted team.
To delete a team from the Lionbridge App:
1. In the Site Administration menu on the left, click Site Teams.
The Site Teams page opens, displaying the teams set up for your Marketo site. For detailed information about this page, see "Managing Teams" on page 36.
2. In the Actions column, click Delete for the team to delete.
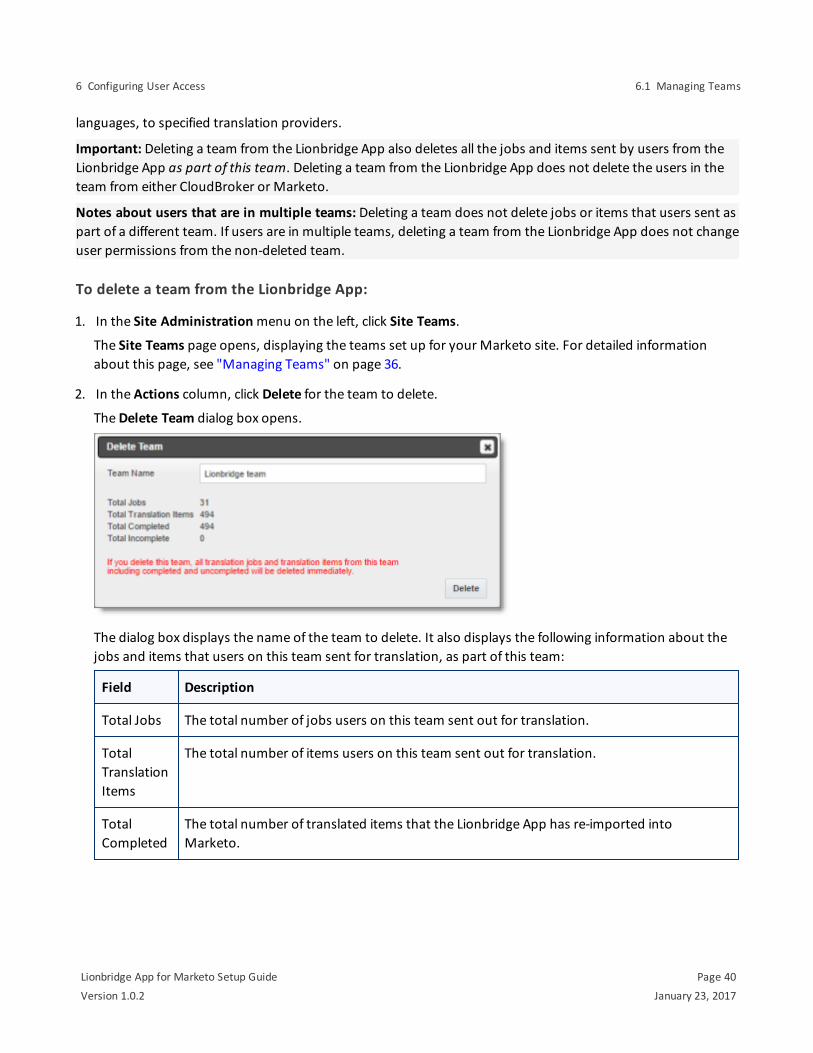
The Delete Team dialog box opens.
The dialog box displays the name of the team to delete. It also displays the following information about the jobs and items that users on this team sent for translation, as part of this team:
Field Description
Total Jobs The total number of jobs users on this team sent out for translation.
Total Translation Items
The total number of items users on this team sent out for translation.
Total Completed
The total number of translated items that the Lionbridge App has re-imported into Marketo.
Lionbridge App for Marketo Setup Guide Page 40
Version 1.0.2 January 23, 2017
6 Configuring User Access 6.1 Managing Teams
Field Description
Total Incomplete
The total number of assets that the Lionbridge App has not yet re-imported into Marketo. Usually these are assets that are currently in translation, or were just recently received back from translation and that the Lionbridge App is trying to re-import into Marketo.Warning: If you delete this team, these items will be deleted. They will not be re-imported into Marketo.
3. Click Delete to remove the team and all the jobs and items sent out for translation by users as part of this team from the Lionbridge App.
6.2 Managing UsersMarketo users can access the Lionbridge App to send, monitor, and review translation jobs.
To manage users:
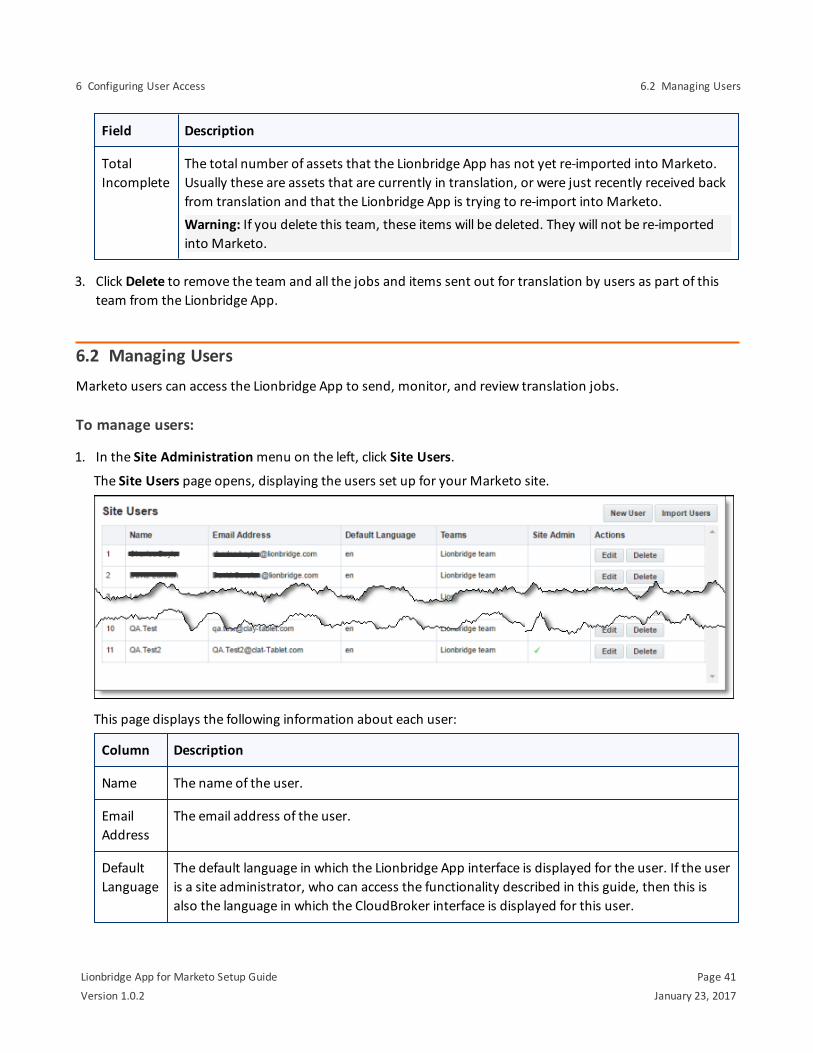
1. In the Site Administration menu on the left, click Site Users.
The Site Users page opens, displaying the users set up for your Marketo site.
This page displays the following information about each user:
Column Description
Name The name of the user.
Email Address
The email address of the user.
Default Language
The default language in which the Lionbridge App interface is displayed for the user. If the user is a site administrator, who can access the functionality described in this guide, then this is also the language in which the CloudBroker interface is displayed for this user.
Lionbridge App for Marketo Setup Guide Page 41
Version 1.0.2 January 23, 2017
6 Configuring User Access 6.2 Managing Users
Column Description
Teams The teams to which this user belongs. A team determines which source and target languages the user can send out for translation and the translation providers to which the user can send the content.
Site Admin
A check mark indicates whether this user is a site administrator. Site administrators can access CloudBroker to set up the Lionbridge App, as described in this guide.
2. Do one of the following:
To create a new user, click New User. For detailed instructions, see "Adding a User" on page 42.
To edit a user, in the Actions column, click Edit in the corresponding row. For detailed instructions, see "Editing a User" on page 44.
To delete a user, in the Actions column, click Delete in the corresponding row. For detailed instructions, see "Deleting a User" on page 46.
6.2.1 Adding a User
You can add a user to the Lionbridge App so that you can add the user to one or more teams. This enables the user to send assets for translation from and to specified languages and to specified translation providers.
To add a user:
1. In the Site Administration menu on the left, click Site Users.
The Site Users page opens, displaying the users set up for your Marketo site. For detailed information about this page, see "Managing Users" on page 41.
2. Click New User.
The New User dialog box opens.
Lionbridge App for Marketo Setup Guide Page 42
Version 1.0.2 January 23, 2017
6 Configuring User Access 6.2 Managing Users
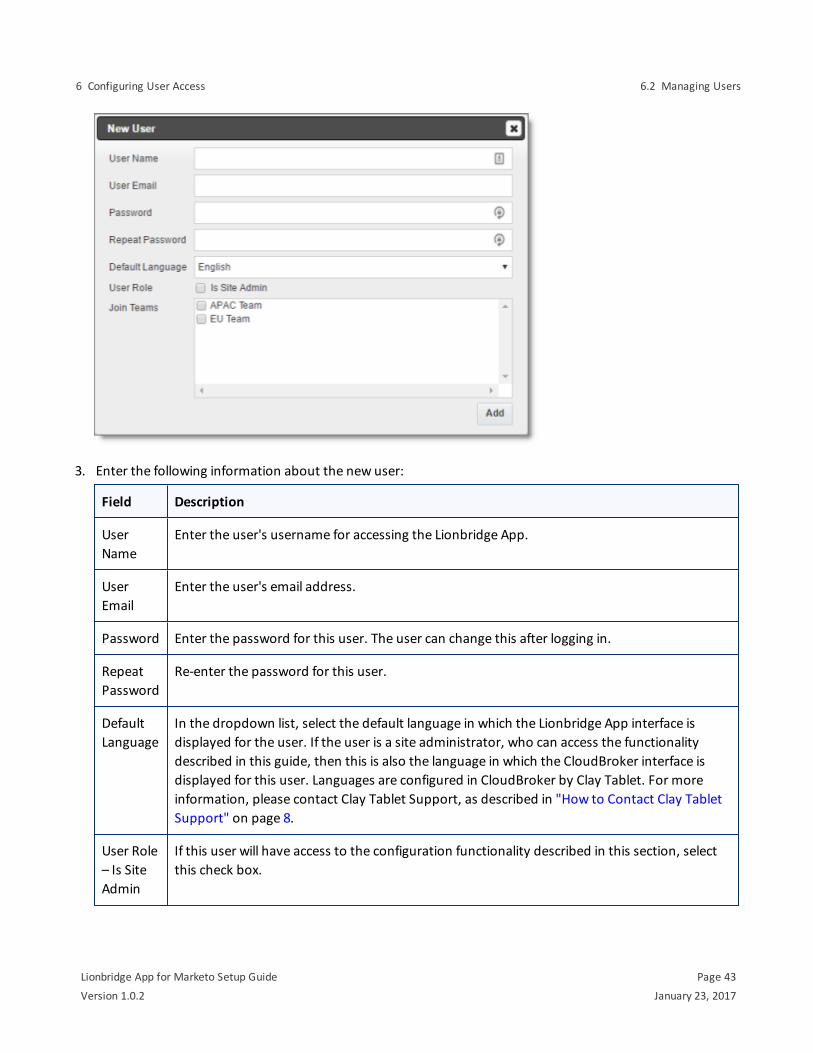
3. Enter the following information about the new user:
Field Description
User Name
Enter the user's username for accessing the Lionbridge App.
User Email
Enter the user's email address.
Password Enter the password for this user. The user can change this after logging in.
Repeat Password
Re-enter the password for this user.
Default Language
In the dropdown list, select the default language in which the Lionbridge App interface is displayed for the user. If the user is a site administrator, who can access the functionality described in this guide, then this is also the language in which the CloudBroker interface is displayed for this user. Languages are configured in CloudBroker by Clay Tablet. For more information, please contact Clay Tablet Support, as described in "How to Contact Clay Tablet Support" on page 8.
User Role – Is Site Admin
If this user will have access to the configuration functionality described in this section, select this check box.
Lionbridge App for Marketo Setup Guide Page 43
Version 1.0.2 January 23, 2017
6 Configuring User Access 6.2 Managing Users
Field Description
Join Teams
Select the check boxes of the teams the user is joining. A user must belong to at least one team to be able to send out content for translation. The team determines which source and target languages the user can send out for translation and the translation providers to which the user can send the content. You can view the settings for all teams on the Site Teams page. For details, see "Managing Teams" on page 36.
4. Click Add.
6.2.2 Editing a User
In general you edit a user that you previously added, either by importing or automatically, to specify the following information:
the default language for displaying the Lionbridge App for the userwhether the user is a site administrator, who can access CloudBroker to set up the Lionbridge App, as described in this guidethe teams that the user joins
You can also change a user's username or email address.
To edit a user:
1. In the Site Administration menu on the left, click Site Users.
The Site Users page opens, displaying the users set up for your Marketo site. For detailed information about this page, see "Managing Users" on page 41.
2. Click Edit for the user to edit.
The Edit User dialog box opens.
Lionbridge App for Marketo Setup Guide Page 44
Version 1.0.2 January 23, 2017
6 Configuring User Access 6.2 Managing Users
3. You can modify the following information:
Field Description
User Name
The user's username.
User Email
The user's email address.
Change Password
Select this check box to change this user's password.
New Password
Enter the new password for this user. The user can change this after logging in. Available only if the Change password check box, above, is selected.
Repeat Password
Re-enter the new password for this user. Available only if the Change password check box, above, is selected.
Lionbridge App for Marketo Setup Guide Page 45
Version 1.0.2 January 23, 2017
6 Configuring User Access 6.2 Managing Users
Field Description
Default Language
In the dropdown list, select the default language in which the Lionbridge App interface is displayed for the user. If the user is a site administrator, who can access the functionality described in this guide, then this is also the language in which the CloudBroker interface is displayed for this user. Languages are configured in CloudBroker by Clay Tablet. For more information, please contact Clay Tablet Support, as described in "How to Contact Clay Tablet Support" on page 8.
User Role Indicates whether this user is a site administrator, who can access CloudBroker to set up the Lionbridge App, as described in this guide.
If the user is a site administrator, select the Is site admin check box.If the user is not a site administrator, clear the Is site admin check box.
Join Teams
The teams to which this user belongs. A user must belong to at least one team to be able to send out content for translation. The team determines which source and target languages the user can send out for translation and the translation providers to which the user can send the content. You can view the settings for all teams on the Site Teams page. For details, see "Managing Teams" on page 36.
To join a team, select the corresponding check box.To leave a team, clear the corresponding check box.
4. Click Save to save your changes.
6.2.3 Deleting a User
You can delete a user from the Lionbridge App so that the user will no longer have access. Deleting a user from the Lionbridge App also deletes all the jobs and items sent by this user from the Lionbridge App.
Important: Deleting a user from the Lionbridge App does not delete the user in Marketo.
To delete a user from the Lionbridge App:
1. In the Site Administration menu on the left, click Site Users.
The Site Users page opens, displaying the users set up for your Marketo site. For detailed information about this page, see "Managing Users" on page 41.
2. In the Actions column, click Delete for the user to delete.
The Delete User dialog box opens.
Lionbridge App for Marketo Setup Guide Page 46
Version 1.0.2 January 23, 2017
6 Configuring User Access 6.2 Managing Users
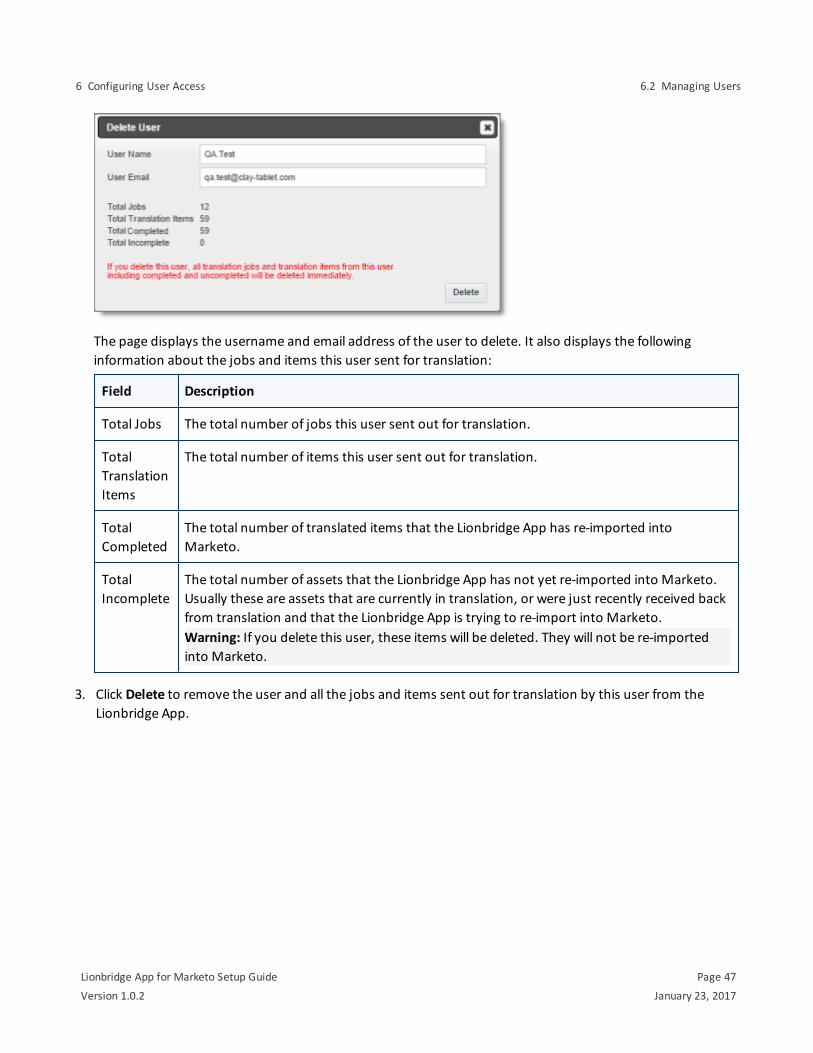
The page displays the username and email address of the user to delete. It also displays the following information about the jobs and items this user sent for translation:
Field Description
Total Jobs The total number of jobs this user sent out for translation.
Total Translation Items
The total number of items this user sent out for translation.
Total Completed
The total number of translated items that the Lionbridge App has re-imported into Marketo.
Total Incomplete
The total number of assets that the Lionbridge App has not yet re-imported into Marketo. Usually these are assets that are currently in translation, or were just recently received back from translation and that the Lionbridge App is trying to re-import into Marketo.Warning: If you delete this user, these items will be deleted. They will not be re-imported into Marketo.
3. Click Delete to remove the user and all the jobs and items sent out for translation by this user from the Lionbridge App.
Lionbridge App for Marketo Setup Guide Page 47
Version 1.0.2 January 23, 2017
6 Configuring User Access 6.2 Managing Users
7 Administrative TasksAs a site administrator, you can perform the following administrative tasks:
"Viewing Lionbridge App Information and Usage Data" on page 48
"Viewing Job Data" on page 50
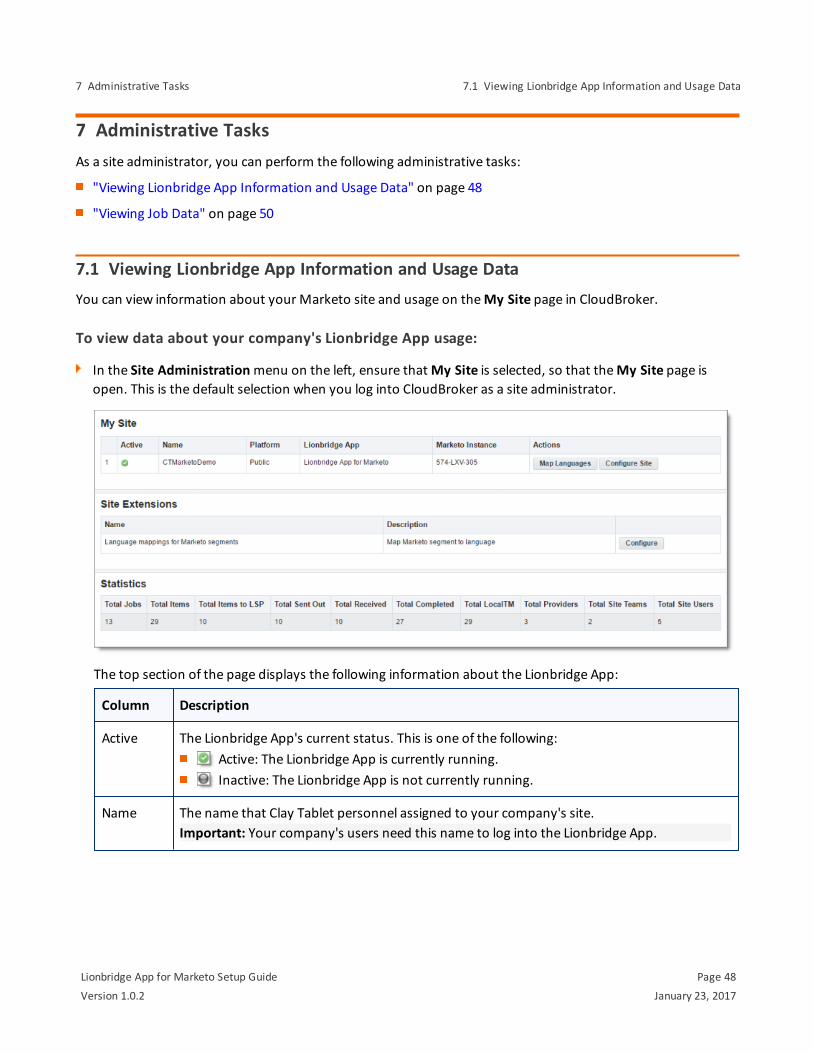
7.1 Viewing Lionbridge App Information and Usage DataYou can view information about your Marketo site and usage on the My Site page in CloudBroker.
To view data about your company's Lionbridge App usage:
In the Site Administration menu on the left, ensure that My Site is selected, so that the My Site page is open. This is the default selection when you log into CloudBroker as a site administrator.
The top section of the page displays the following information about the Lionbridge App:
Column Description
Active The Lionbridge App's current status. This is one of the following: Active: The Lionbridge App is currently running. Inactive: The Lionbridge App is not currently running.
Name The name that Clay Tablet personnel assigned to your company's site.Important: Your company's users need this name to log into the Lionbridge App.
Lionbridge App for Marketo Setup Guide Page 48
Version 1.0.2 January 23, 2017
7 Administrative Tasks 7.1 Viewing Lionbridge App Information and Usage Data
Column Description
Platform The type of Clay Tablet Platform (Platform) that your company site uses. The Platform is the connectivity platform that receives and routes content from content systems to translation providers and back during implementation. There are two types:
Public: This IaaS (Infrastructure as a Service) solution is hosted on AWS. Clay Tablet configures the Platform based on the number and nature of systems involved in your system architecture.On-Premise: Your company either hosts the Platform or it determines the cloud location that hosts it.
Lionbridge App
The Clay Tablet plug-in that connects the Marketo content system to the Clay Tablet Platform. This is the Lionbridge App for Marketo, which is identified here as the Lionbridge App for Marketo.
Marketo Instance
This is the Marketo instance ID that you retrieved from Marketo after creating the LaunchPoint Service, and sent to to the Clay Tablet Implementations Team so that they could set up your site in CloudBroker.
For information about the Map Languages and Configure Site buttons, see "Configuring the Lionbridge App in CloudBroker" on page 17.
The Statistics section of the page displays the following information about items processed by the Lionbridge App:
Column Description
Total Jobs The total number of translation jobs that the Lionbridge App sent out for translation.
Total Items The total number of translation requests (each source and target language pair is a separate item) from Lionbridge App users. This includes items the Lionbridge App sent out to a translation provider, items translated by localTM (translation memory) , and items that did not require translation.
Total Items to LSP
The total number of items (each source and target language pair is a separate item) that the Lionbridge App sent out for translation to a translation provider.
Total Sent Out
The total number of files that the Lionbridge App sent out for translation.
Total Received
The total number of files that the Lionbridge App received back from translation.
Total Completed
The total number of items (each source and target language pair is a separate item) for which the translation is complete.
Lionbridge App for Marketo Setup Guide Page 49
Version 1.0.2 January 23, 2017
7 Administrative Tasks 7.1 Viewing Lionbridge App Information and Usage Data
Column Description
Total LocalTM
The total number of items in the local translation memory's database.
Total Providers
The total number of translation providers configured in the Lionbridge App.
Total Site Teams
The total number of teams set up in the Lionbridge App.
Total Site Users
The total number of users set up in the Lionbridge App.
7.2 Viewing Job DataYou can view data about jobs that the Lionbridge App sends out for translation.
To view job data:
1. In the Site Administration menu on the left, click Site Jobs.
The Site Jobs page opens, displaying all the jobs that the Lionbridge App sent out for translation.
This page displays the following information about each job, in reverse chronological order by creation date:
Lionbridge App for Marketo Setup Guide Page 50
Version 1.0.2 January 23, 2017
7 Administrative Tasks 7.2 Viewing Job Data
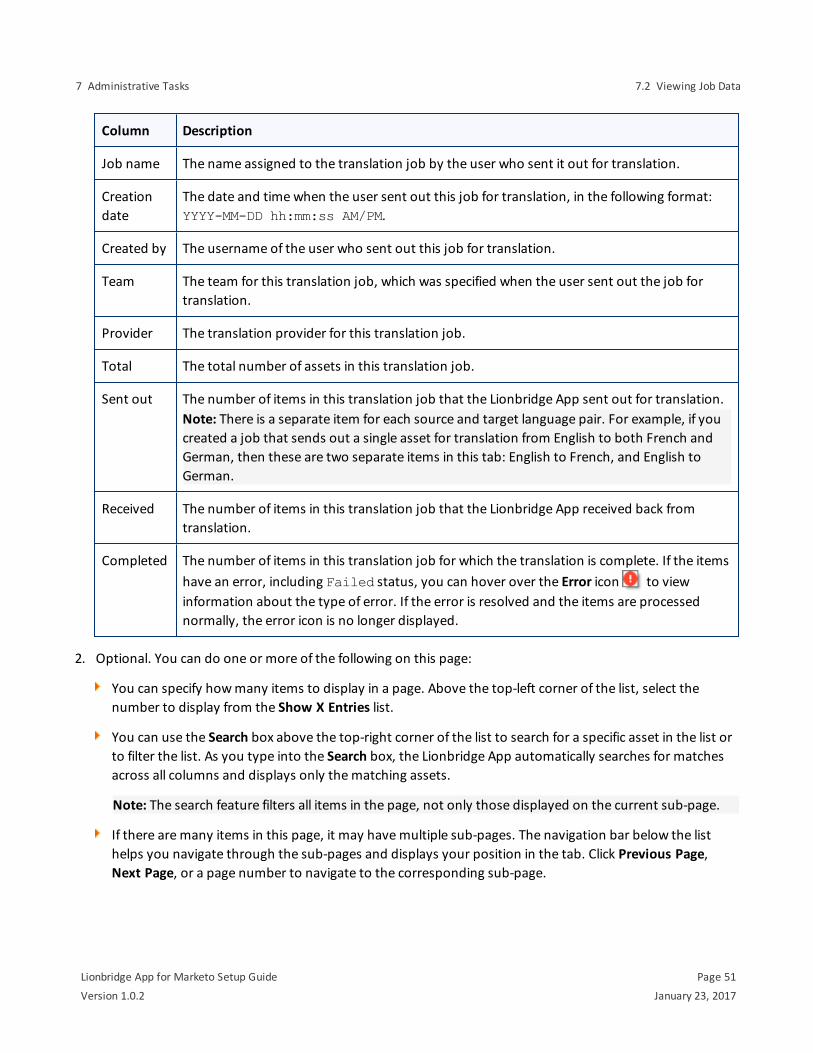
Column Description
Job name The name assigned to the translation job by the user who sent it out for translation.
Creation date
The date and time when the user sent out this job for translation, in the following format: YYYY-MM-DD hh:mm:ss AM/PM.
Created by The username of the user who sent out this job for translation.
Team The team for this translation job, which was specified when the user sent out the job for translation.
Provider The translation provider for this translation job.
Total The total number of assets in this translation job.
Sent out The number of items in this translation job that the Lionbridge App sent out for translation. Note: There is a separate item for each source and target language pair. For example, if you created a job that sends out a single asset for translation from English to both French and German, then these are two separate items in this tab: English to French, and English to German.
Received The number of items in this translation job that the Lionbridge App received back from translation.
Completed The number of items in this translation job for which the translation is complete. If the items have an error, including Failed status, you can hover over the Error icon to view information about the type of error. If the error is resolved and the items are processed normally, the error icon is no longer displayed.
2. Optional. You can do one or more of the following on this page:
You can specify how many items to display in a page. Above the top-left corner of the list, select the number to display from the Show X Entries list.
You can use the Search box above the top-right corner of the list to search for a specific asset in the list or to filter the list. As you type into the Search box, the Lionbridge App automatically searches for matches across all columns and displays only the matching assets.
Note: The search feature filters all items in the page, not only those displayed on the current sub-page.
If there are many items in this page, it may have multiple sub-pages. The navigation bar below the list helps you navigate through the sub-pages and displays your position in the tab. Click Previous Page, Next Page, or a page number to navigate to the corresponding sub-page.
Lionbridge App for Marketo Setup Guide Page 51
Version 1.0.2 January 23, 2017
7 Administrative Tasks 7.2 Viewing Job Data

To sort the items in the tab by a different column, click the corresponding column header.
To reverse the sort order of a column, click the column header.
Lionbridge App for Marketo Setup Guide Page 52
Version 1.0.2 January 23, 2017
7 Administrative Tasks 7.2 Viewing Job Data

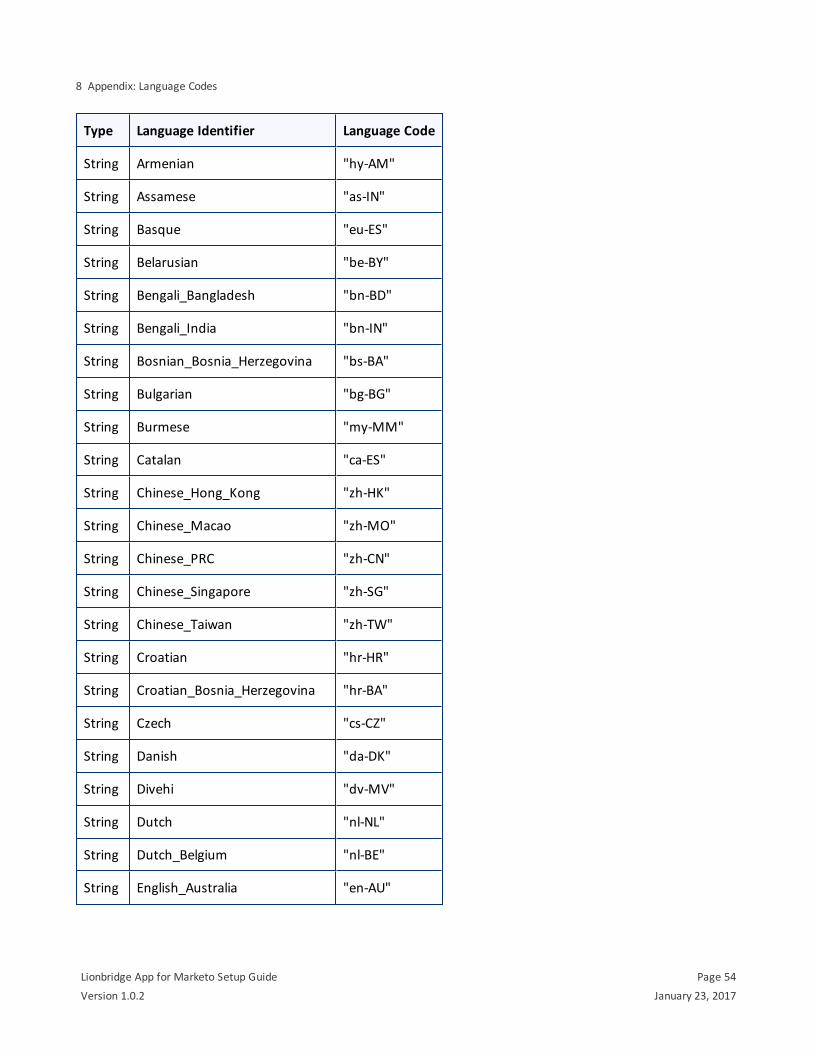
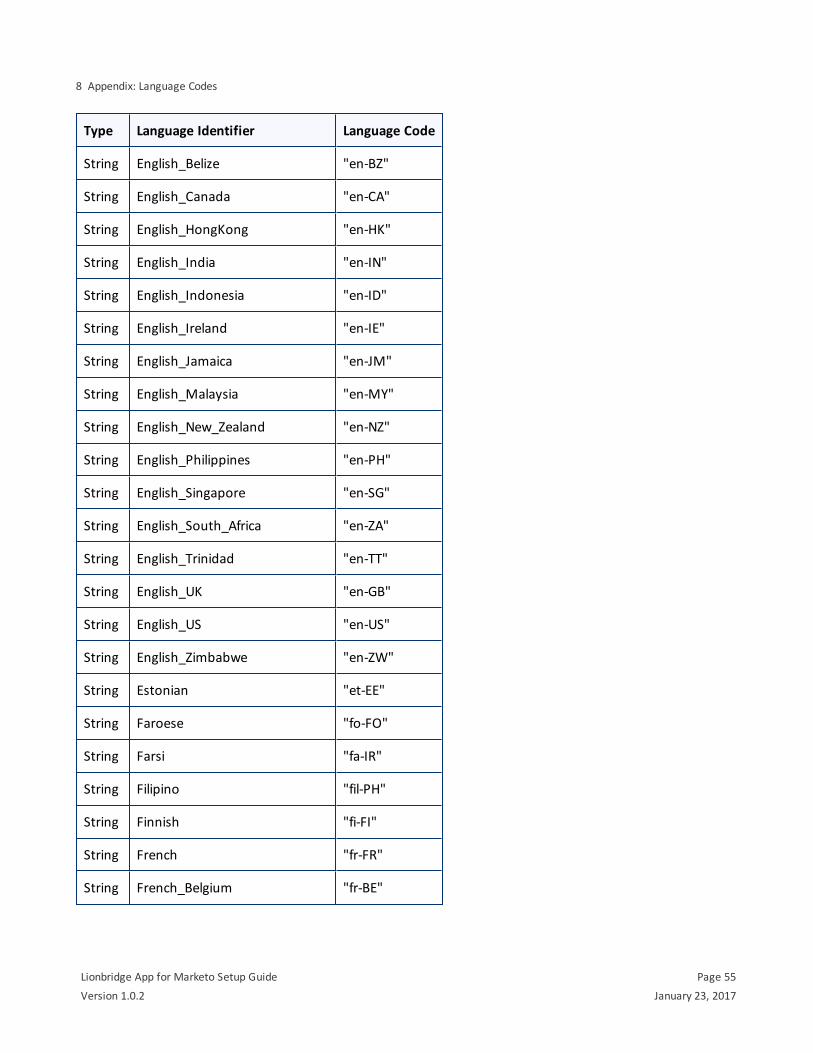
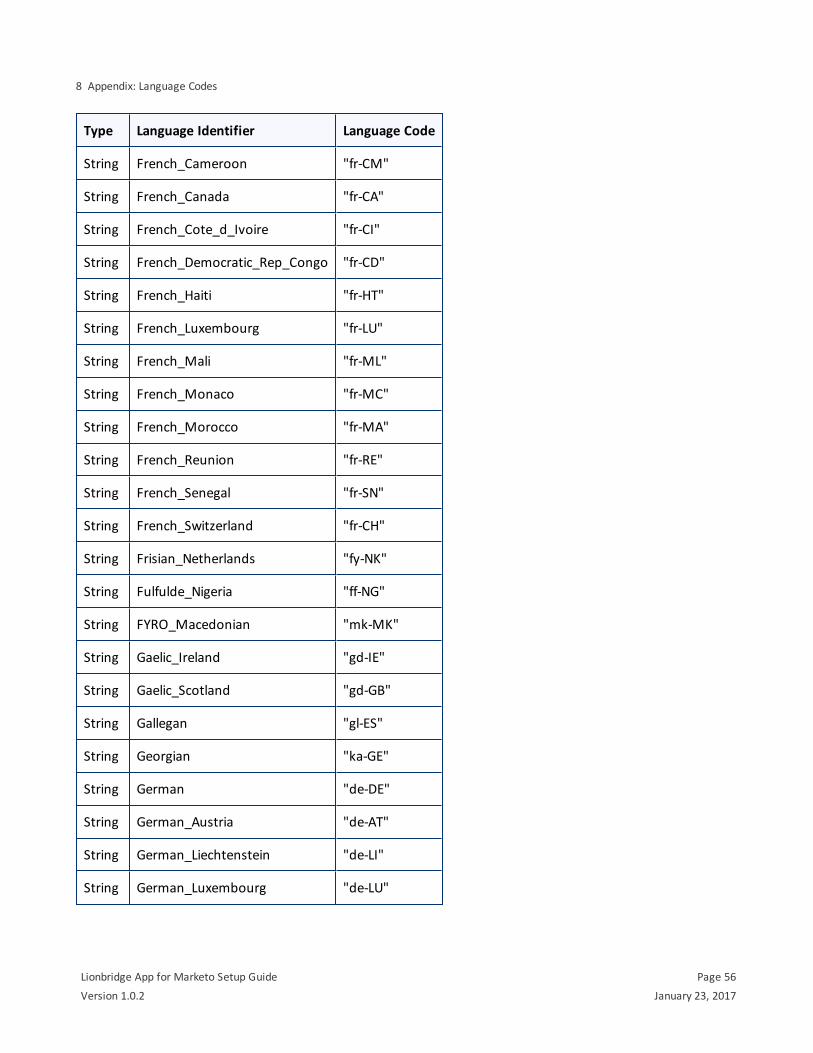
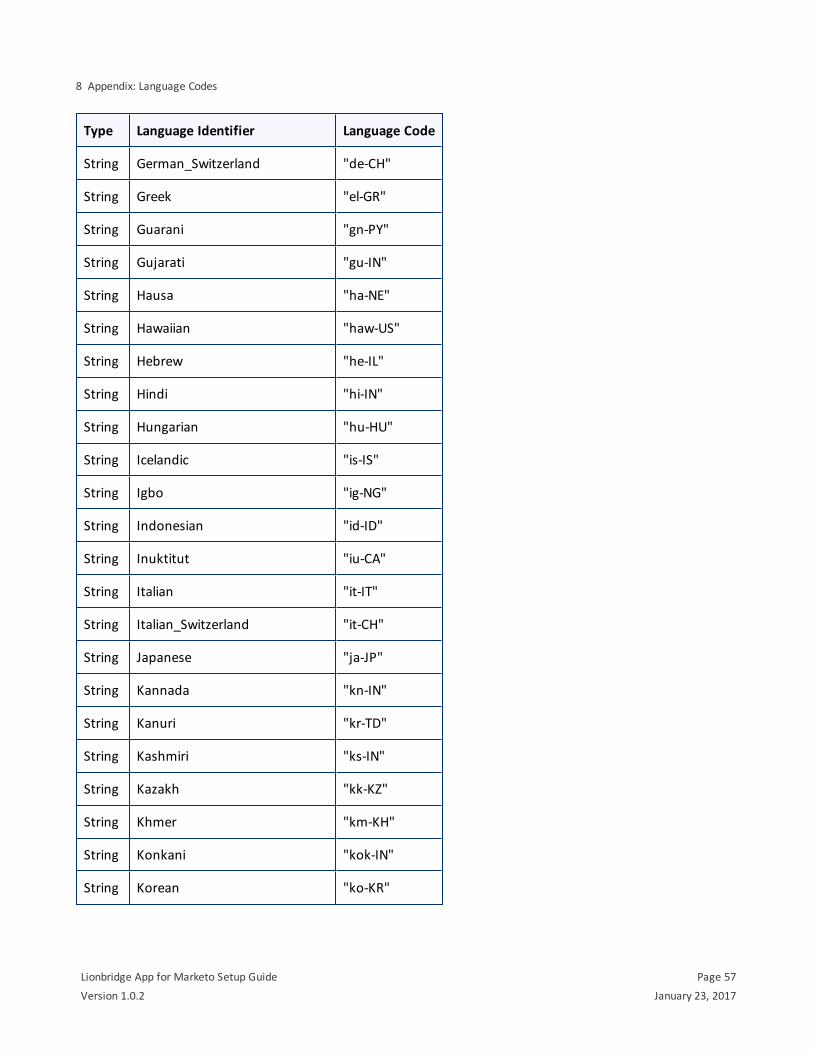
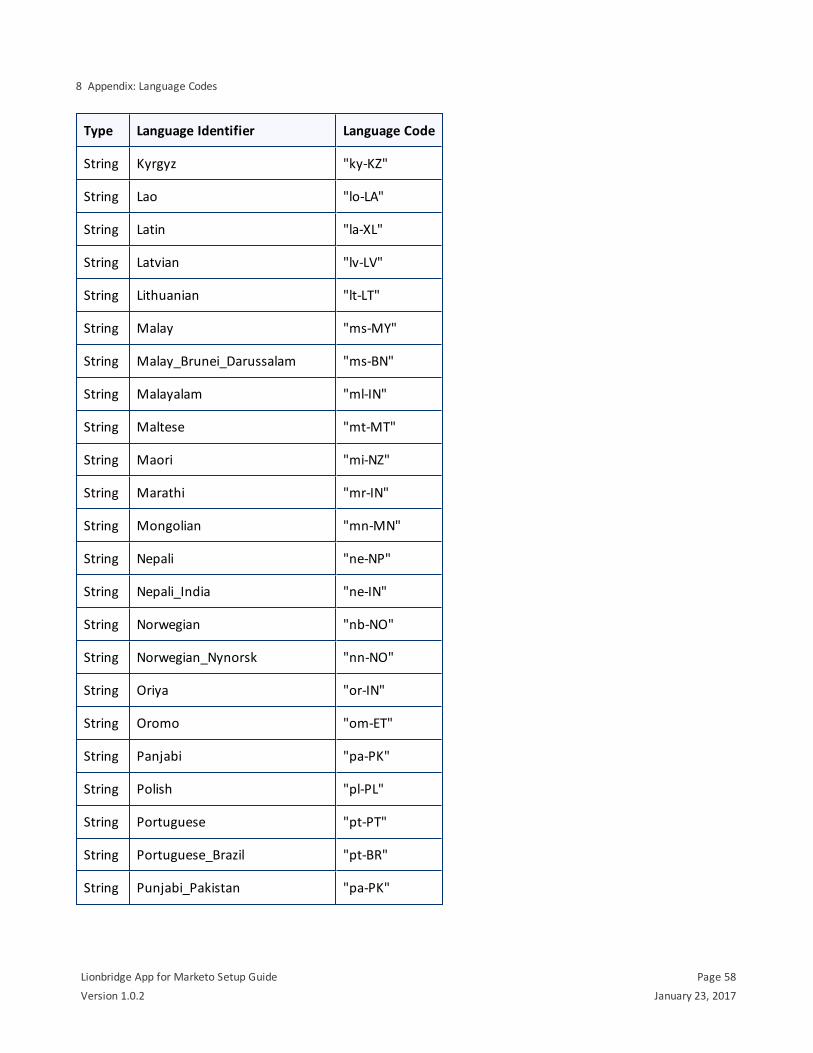
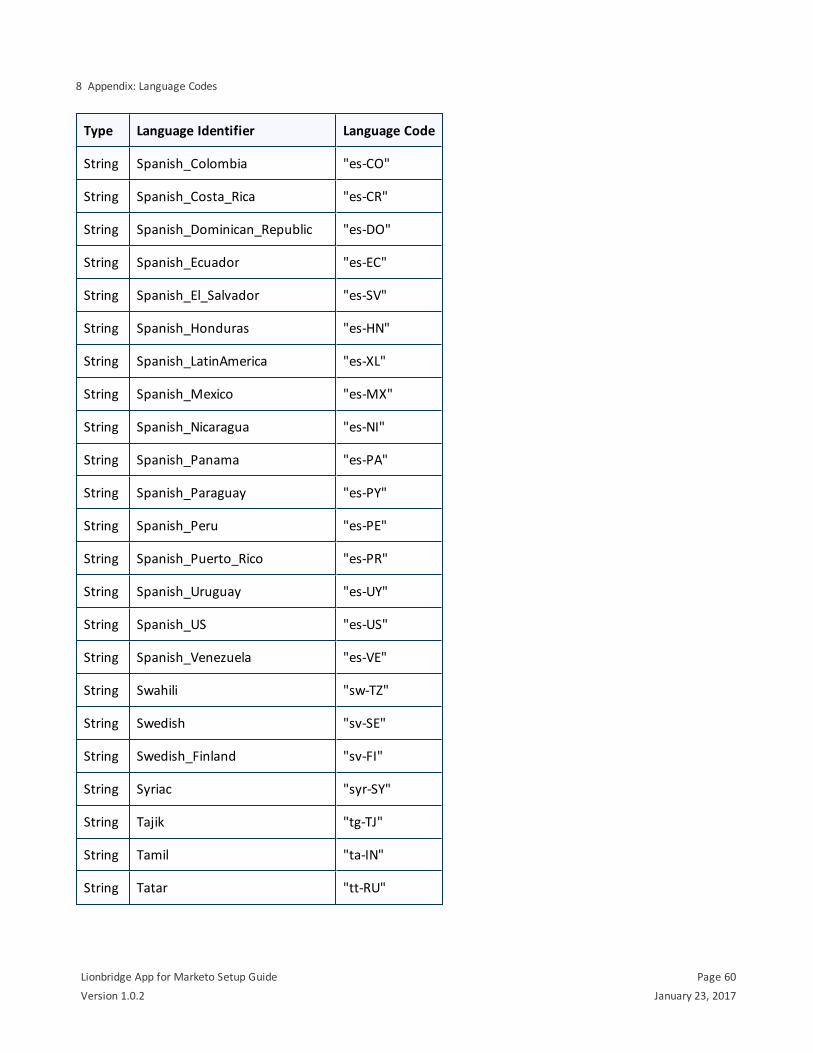
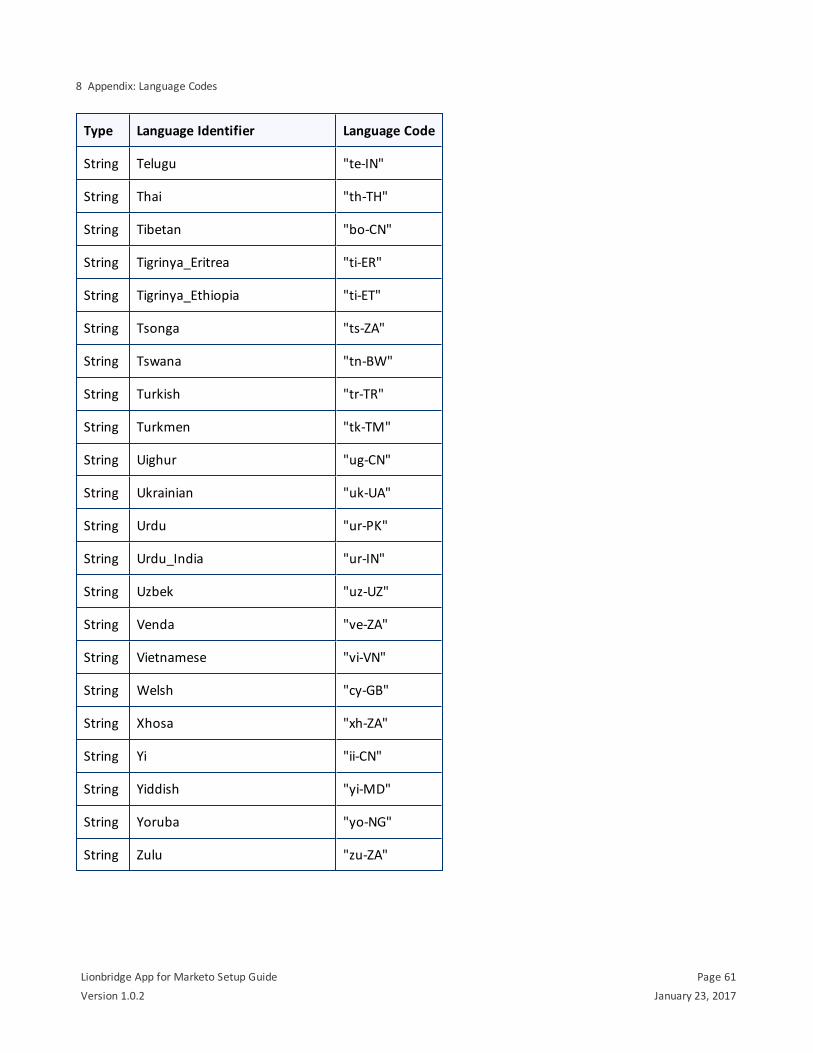
8 Appendix: Language CodesFor detailed instructions on configuring languages for the Lionbridge App, see "Configuring Clay Tablet Languages" on page 17.
The Lionbridge App has the following language codes:
Type Language Identifier Language Code
String Afrikaans "af-ZA"
String Albanian "sq-AL"
String Amharic "am-ET"
String Arabic_Algeria "ar-DZ"
String Arabic_Bahrain "ar-BH"
String Arabic_Egypt "ar-EG"
String Arabic_Iraq "ar-IQ"
String Arabic_Jordan "ar-JO"
String Arabic_Kuwait "ar-KW"
String Arabic_Lebanon "ar-LB"
String Arabic_Libya "ar-LY"
String Arabic_MiddleEast "ar-XR"
String Arabic_Morocco "ar-MA"
String Arabic_Oman "ar-OM"
String Arabic_Qatar "ar-QA"
String Arabic_Saudi_Arabia "ar-SA"
String Arabic_Syria "ar-SY"
String Arabic_Tunisia "ar-TM"
String Arabic_UAE "ar-AE"
String Arabic_Yemen "ar-YE"
Lionbridge App for Marketo Setup Guide Page 53
Version 1.0.2 January 23, 2017
8 Appendix: Language Codes
Type Language Identifier Language Code
String Armenian "hy-AM"
String Assamese "as-IN"
String Basque "eu-ES"
String Belarusian "be-BY"
String Bengali_Bangladesh "bn-BD"
String Bengali_India "bn-IN"
String Bosnian_Bosnia_Herzegovina "bs-BA"
String Bulgarian "bg-BG"
String Burmese "my-MM"
String Catalan "ca-ES"
String Chinese_Hong_Kong "zh-HK"
String Chinese_Macao "zh-MO"
String Chinese_PRC "zh-CN"
String Chinese_Singapore "zh-SG"
String Chinese_Taiwan "zh-TW"
String Croatian "hr-HR"
String Croatian_Bosnia_Herzegovina "hr-BA"
String Czech "cs-CZ"
String Danish "da-DK"
String Divehi "dv-MV"
String Dutch "nl-NL"
String Dutch_Belgium "nl-BE"
String English_Australia "en-AU"
Lionbridge App for Marketo Setup Guide Page 54
Version 1.0.2 January 23, 2017
8 Appendix: Language Codes
Type Language Identifier Language Code
String English_Belize "en-BZ"
String English_Canada "en-CA"
String English_HongKong "en-HK"
String English_India "en-IN"
String English_Indonesia "en-ID"
String English_Ireland "en-IE"
String English_Jamaica "en-JM"
String English_Malaysia "en-MY"
String English_New_Zealand "en-NZ"
String English_Philippines "en-PH"
String English_Singapore "en-SG"
String English_South_Africa "en-ZA"
String English_Trinidad "en-TT"
String English_UK "en-GB"
String English_US "en-US"
String English_Zimbabwe "en-ZW"
String Estonian "et-EE"
String Faroese "fo-FO"
String Farsi "fa-IR"
String Filipino "fil-PH"
String Finnish "fi-FI"
String French "fr-FR"
String French_Belgium "fr-BE"
Lionbridge App for Marketo Setup Guide Page 55
Version 1.0.2 January 23, 2017
8 Appendix: Language Codes
Type Language Identifier Language Code
String French_Cameroon "fr-CM"
String French_Canada "fr-CA"
String French_Cote_d_Ivoire "fr-CI"
String French_Democratic_Rep_Congo "fr-CD"
String French_Haiti "fr-HT"
String French_Luxembourg "fr-LU"
String French_Mali "fr-ML"
String French_Monaco "fr-MC"
String French_Morocco "fr-MA"
String French_Reunion "fr-RE"
String French_Senegal "fr-SN"
String French_Switzerland "fr-CH"
String Frisian_Netherlands "fy-NK"
String Fulfulde_Nigeria "ff-NG"
String FYRO_Macedonian "mk-MK"
String Gaelic_Ireland "gd-IE"
String Gaelic_Scotland "gd-GB"
String Gallegan "gl-ES"
String Georgian "ka-GE"
String German "de-DE"
String German_Austria "de-AT"
String German_Liechtenstein "de-LI"
String German_Luxembourg "de-LU"
Lionbridge App for Marketo Setup Guide Page 56
Version 1.0.2 January 23, 2017
8 Appendix: Language Codes
Type Language Identifier Language Code
String German_Switzerland "de-CH"
String Greek "el-GR"
String Guarani "gn-PY"
String Gujarati "gu-IN"
String Hausa "ha-NE"
String Hawaiian "haw-US"
String Hebrew "he-IL"
String Hindi "hi-IN"
String Hungarian "hu-HU"
String Icelandic "is-IS"
String Igbo "ig-NG"
String Indonesian "id-ID"
String Inuktitut "iu-CA"
String Italian "it-IT"
String Italian_Switzerland "it-CH"
String Japanese "ja-JP"
String Kannada "kn-IN"
String Kanuri "kr-TD"
String Kashmiri "ks-IN"
String Kazakh "kk-KZ"
String Khmer "km-KH"
String Konkani "kok-IN"
String Korean "ko-KR"
Lionbridge App for Marketo Setup Guide Page 57
Version 1.0.2 January 23, 2017
8 Appendix: Language Codes
Type Language Identifier Language Code
String Kyrgyz "ky-KZ"
String Lao "lo-LA"
String Latin "la-XL"
String Latvian "lv-LV"
String Lithuanian "lt-LT"
String Malay "ms-MY"
String Malay_Brunei_Darussalam "ms-BN"
String Malayalam "ml-IN"
String Maltese "mt-MT"
String Maori "mi-NZ"
String Marathi "mr-IN"
String Mongolian "mn-MN"
String Nepali "ne-NP"
String Nepali_India "ne-IN"
String Norwegian "nb-NO"
String Norwegian_Nynorsk "nn-NO"
String Oriya "or-IN"
String Oromo "om-ET"
String Panjabi "pa-PK"
String Polish "pl-PL"
String Portuguese "pt-PT"
String Portuguese_Brazil "pt-BR"
String Punjabi_Pakistan "pa-PK"
Lionbridge App for Marketo Setup Guide Page 58
Version 1.0.2 January 23, 2017
8 Appendix: Language Codes

Type Language Identifier Language Code
String Pushto "ps-AF"
String Quechua_Ecuador "qu-EC"
String Quechua_Peru "qu-PE"
String Rhaeto_Romance "rm-IT"
String Romanian "ro-RO"
String Romanian_Moldova "ro-MD"
String Russian "ru-RU"
String Russian_Moldava "ru-MD"
String Sami "se-NO"
String Sanskrit "sa-IN"
String Serbian_Cyrillic "sr-RS"
String Serbian_Latin "sr-SP"
String Sindhi_India "sd-IN"
String Sindhi_Pakistan "sd-PK"
String Sinhala "si-LK"
String Slovak "sk-SK"
String Slovenian "sl-SI"
String Somali "so-ET"
String Sorbian "wen-DE"
String Spanish "es-ES"
String Spanish_Argentina "es-AR"
String Spanish_Bolivia "es-BO"
String Spanish_Chile "es-CL"
Lionbridge App for Marketo Setup Guide Page 59
Version 1.0.2 January 23, 2017
8 Appendix: Language Codes
Type Language Identifier Language Code
String Spanish_Colombia "es-CO"
String Spanish_Costa_Rica "es-CR"
String Spanish_Dominican_Republic "es-DO"
String Spanish_Ecuador "es-EC"
String Spanish_El_Salvador "es-SV"
String Spanish_Honduras "es-HN"
String Spanish_LatinAmerica "es-XL"
String Spanish_Mexico "es-MX"
String Spanish_Nicaragua "es-NI"
String Spanish_Panama "es-PA"
String Spanish_Paraguay "es-PY"
String Spanish_Peru "es-PE"
String Spanish_Puerto_Rico "es-PR"
String Spanish_Uruguay "es-UY"
String Spanish_US "es-US"
String Spanish_Venezuela "es-VE"
String Swahili "sw-TZ"
String Swedish "sv-SE"
String Swedish_Finland "sv-FI"
String Syriac "syr-SY"
String Tajik "tg-TJ"
String Tamil "ta-IN"
String Tatar "tt-RU"
Lionbridge App for Marketo Setup Guide Page 60
Version 1.0.2 January 23, 2017
8 Appendix: Language Codes
Type Language Identifier Language Code
String Telugu "te-IN"
String Thai "th-TH"
String Tibetan "bo-CN"
String Tigrinya_Eritrea "ti-ER"
String Tigrinya_Ethiopia "ti-ET"
String Tsonga "ts-ZA"
String Tswana "tn-BW"
String Turkish "tr-TR"
String Turkmen "tk-TM"
String Uighur "ug-CN"
String Ukrainian "uk-UA"
String Urdu "ur-PK"
String Urdu_India "ur-IN"
String Uzbek "uz-UZ"
String Venda "ve-ZA"
String Vietnamese "vi-VN"
String Welsh "cy-GB"
String Xhosa "xh-ZA"
String Yi "ii-CN"
String Yiddish "yi-MD"
String Yoruba "yo-NG"
String Zulu "zu-ZA"
Lionbridge App for Marketo Setup Guide Page 61
Version 1.0.2 January 23, 2017
8 Appendix: Language Codes