Embed Size (px)
DESCRIPTION
Logo, Brand, Mark, Design
Citation preview
Logo Design: Simple and Solid Brand Marks George Bokhua Intro
1. Familiarize yourself with helpful core texts. 2. These books provide an excellent foundation in clean, strong, minimalist design. I found these very useful in my
early days. 3. Consider ordering new or used copies, browsing online previews, or borrowing them from your local library.
○ Grid Systems in Graphic Design (Josef MullerBrockmann) ○ Principles of TwoDimensional Design (Wucius Wong) ○ The Book Of Symbols (Archive for Research in Archetypal Symbolism)
Animal Mark: Making a Moodboard
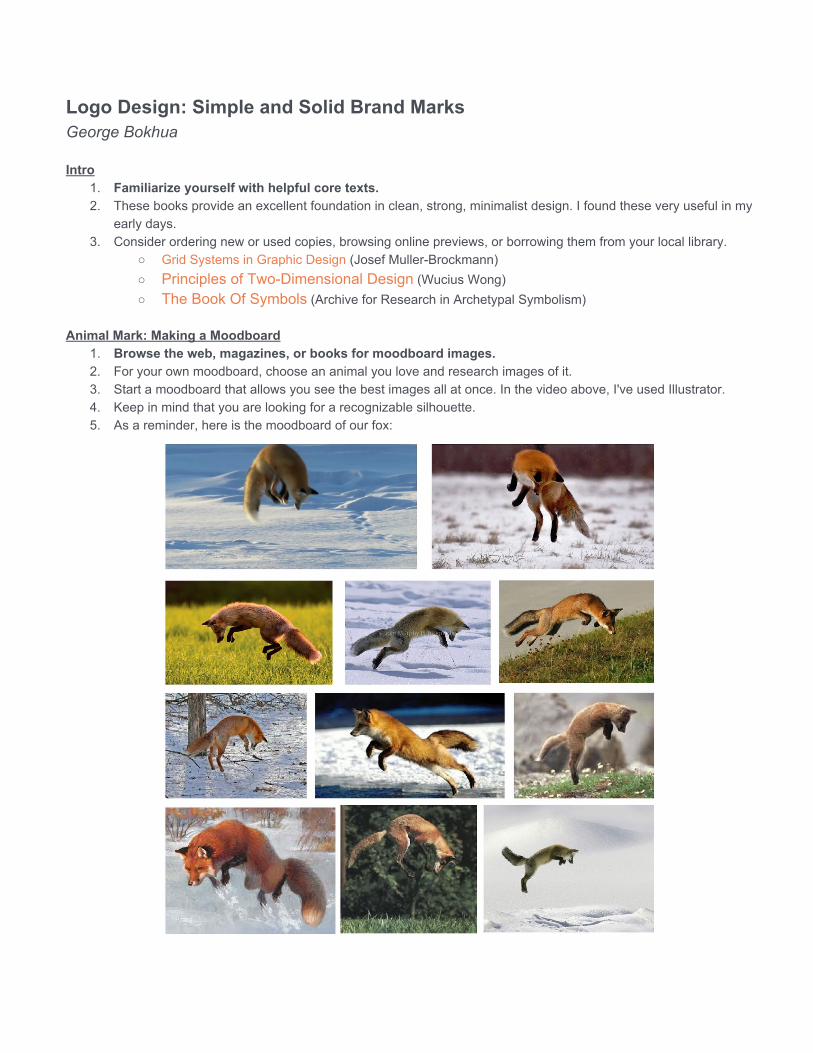
1. Browse the web, magazines, or books for moodboard images. 2. For your own moodboard, choose an animal you love and research images of it. 3. Start a moodboard that allows you see the best images all at once. In the video above, I've used Illustrator. 4. Keep in mind that you are looking for a recognizable silhouette. 5. As a reminder, here is the moodboard of our fox:
6. Choose your reference image. 7. Select your reference image from your moodboard. Always try to select the image with most recognizable
silhouette. 8. Add color. 9. Finalize your mark by adding color that fits the style, energy, and spirit of your chosen animal.
Animal Mark: Sketching
1. Print your image. 2. You will need a hardcopy image to trace. 3. Trace your image. 4. Using semitransparent paper (I've used 80% transparency), try to make 3050 outline sketches of the animal in
your reference image. 5. Get to know your subject! 6. Bear in mind: As a logo designer, you are a master of simplification. Try to outline the shape with as few strokes
as you can. 7. Digitize your sketch. 8. Scan or take a photo of your sketch and import it into Illustrator.
Animal Mark: Execution
1. Import your sketch. 2. If you haven't already done so, important your digitized sketch into Illustrator. 3. Refine your sketch. 4. Try to outline a silhouette of your sketch in a clean, geometrically sound manner. Use the minimum amount of
anchor points. 5. If you have any doubts about a curve, try to spend as much time as you can to fix it. In the end, the finer the
curves, the more powerful, beautiful, and empowering the mark. 6. It can take some time to arrive at the perfect image. 7. My advice: When you feel that the mark is done, spend several more hours on making in "perfect." At that point,
again spend a few more hours to make it even more perfect. Afterwards, take it in and enjoy the results of your hard work and strong eye.
8. Finalize your sketch. 9. Finalize your sketch in Illustrator, add grids, etc. 10. Review the postproject advice in the third video for helpful hints and review.
Letter Mark: Concept and Sketching
1. Select your letter and concept. 2. Choose your favorite letter from the alphabet, and then decide a concept to incorporate in your letter mark. 3. Subjects like architecture, science, and technology are often a good fit for such projects because the forms
associated with those subjects are wellsuited to the shapes of alphabetical characters. 4. Sketch 3050 possibilities. 5. Keeping your concept in mind, complete 3050 sketches for your lettermark. Get to know your letter. Push
your creative vision. 6. Digitize your sketch. 7. Scan or take a photo of your sketch and import it into Illustrator. The form of a sketched mark should be 80%
complete.
Letter Mark: Execution 1. Outline your letter. 2. Begin executing your letter mark in Illustrator. Start with a rough outline. 3. Adjust and enhance the mark. 4. Once you have your outline figure, begin perfecting and refining the mark. 5. Pay attention to the element of negative space and the overall balance. 6. In the end, when you look at the result, you should not have a feeling that something needs to be changed.
Keep revising, tweaking, refining, and working on your image until you feel satisfied that the image fulfills your creative vision.
Negative Space Mark: Intro and Sketching
1. Find a subject that could be made into a negative space mark 2. There are certain subjects that can be made into a negative space mark. In principle any idea will work that has
a background (positive shaped space) overlapped by foreground (negative space shape). In my case things like hands holding something or animals heads overlaping their bodyes work the best.
Negative Space Mark: Execution
1. Execute the mark patiently 2. Try not to settle with the result that you are not happy with. If you are not happy with the result, do not expect
others to like it. Bystanders opinions are very important, ask them nicely to criticize your work and do not get upset at their opinion. Remember best marks have a universal appeal – so think of extraterrestrials as clients.


