Embed Size (px)
Citation preview
���
Lotus® Notes and Domino
Version 8.5
Installing Domino Servers and Notes Clients
GC27-2404-00
First Edition - Revised (November 21, 2008) This edition applies to IBM® Lotus® Notes® 8.5 and IBM Lotus Domino® 8.5, and to all subsequent releases and modifications until otherwise indicated in new editions. © Copyright International Business Machines Corporation 1994, 2008. All rights reserved. US Government Users Restricted Rights - Use, duplication or disclosure restricted by GSA ADP Schedule Contract with IBM Corp.

Contents
Chapter 1. Deploying Domino . . . . . 1
Domino server installation . . . . . . . . . . 1
Guidepost for deploying Domino . . . . . . 1
Building the Domino environment . . . . . . 11
Chapter 2. Setting up the Domino
Network . . . . . . . . . . . . . . 13
Network Configuration . . . . . . . . . . 13
Lotus Domino and networks . . . . . . . 13
Network security . . . . . . . . . . . 17
Planning the TCP/IP network . . . . . . . 20
Planning the NetBIOS network . . . . . . . 38
Setting up Domino servers on the network . . . 40
Setting up Notes named networks . . . . . . 41
Fine-tuning network port setup on a server . . . 41
Server setup tasks specific to TCP/IP . . . . . 48
Server setup tasks specific to NetBIOS . . . . 57
Chapter 3. Installing and Setting Up
Domino Servers . . . . . . . . . . . 59
Installing and setting up Domino servers . . . . 59
Domino server evaluation software license . . . 59
To install and set up a server . . . . . . . 59
Entering system commands . . . . . . . . 60
Using the Domino server with a trial evaluation
license . . . . . . . . . . . . . . . 60
Domino server installation . . . . . . . . 61
Disabling concurrent I/O and direct I/O on
Domino servers on AIX . . . . . . . . . 71
Domino server setup program . . . . . . . 72
Domino’s On-Disk Structure . . . . . . . . 74
Setting up DOLS on a server . . . . . . . 74
Using the Domino server setup program . . . 76
Certification log . . . . . . . . . . . . 89
Domino server registration . . . . . . . . 89
Optional tasks to perform after server setup . . 92
Starting and shutting down the Domino server 102
Starting Domino as an application or a
Windows service . . . . . . . . . . . 103
Using instant messaging in the Domino
Directory . . . . . . . . . . . . . . 104
Running the Domino-Portal integration wizard 104
Chapter 4. Setting Up and Using
Domino Administration Tools . . . . 107
The Domino Administrator . . . . . . . . . 107
Installing the Domino Administrator . . . . 107
Setting up the Domino Administrator . . . . 107
Starting the Domino Administrator . . . . . 107
Navigating Domino Administrator . . . . . 108
Selecting a server to administer in the Domino
Administrator . . . . . . . . . . . . 108
Setting Domino Administration preferences . . 109
Tools and preferences for debugging in the
Domino Administrator . . . . . . . . . 116
Domino Administrator tabs . . . . . . . . 117
Domino Administrator tools . . . . . . . 119
Web Administrator . . . . . . . . . . . 120
Setting up the Web Administrator . . . . . 120
Starting the Web Administrator . . . . . . 123
Using the Web Administrator . . . . . . . 124
Configuring Domino and Portal Server
federated administration . . . . . . . . 127
Setting up and using Web Administration Server
Bookmarks . . . . . . . . . . . . . 130
The Server Controller and the Domino Console . . 131
Starting and stopping the Server Controller . . 131
Starting and stopping the Domino Console . . 132
Chapter 5. Installing and Setting Up
Notes Clients . . . . . . . . . . . 135
Planning for Notes client installation and upgrade 135
Products to install and order of installation . . 135
Considerations before installing Notes on
Windows . . . . . . . . . . . . . . 141
Considerations before installing Notes on Linux 147
Considerations before installing Notes on Mac
OS X . . . . . . . . . . . . . . . 148
Considerations before installing Notes on Citrix 149
Setting up and customizing Notes installation . . 149
Customizing the Notes install kit to add or
remove Eclipse features . . . . . . . . . 150
Installing and subscribing to preset feeds . . . 162
Customizing Notes install using the tuner . . . 163
Customizing Notes using the
plugin_customization.ini file . . . . . . . 168
Using the Multilingual User Interface (MUI)
pack on Windows . . . . . . . . . . . 169
Using the Native Language (NL) packs . . . . 173
Instant messaging and client installation and
setup . . . . . . . . . . . . . . . 174
Installing Notes in a single user environment . . . 175
Installing and upgrading Notes for a single user 176
Installing Notes in a multi-user environment . . . 177
Installing and upgrading Notes on Windows for
multi-user . . . . . . . . . . . . . 178
Installing and upgrading Notes on Linux . . . 179
Installing and upgrading Notes on Mac OS X 184
Installing and upgrading Notes on Citrix . . . 184
Adding or removing installed Notes features
within a release . . . . . . . . . . . . 186
Upgrading a Notes single user install to multi-user 186
Automating Notes installation using a silent install 187
Running a Notes silent install . . . . . . . 188
Using the install manifest ″default″ setting for
silent feature specification . . . . . . . . 188
Performing a Notes silent install on Windows 189
Performing a Notes multi-user silent install . . 190
iii

Calling a transform file during Notes silent
install . . . . . . . . . . . . . . . 191
Performing a Notes silent install on Linux . . . 192
Providing a batch file for Notes client silent
install . . . . . . . . . . . . . . . 192
Providing command line utilities for Notes
install . . . . . . . . . . . . . . . 193
Setting up Notes with a scriptable setup . . . 193
Installing and running Notes on a USB drive . . . 197
Installing Notes basic configuration on a USB
drive . . . . . . . . . . . . . . . 197
Enabling the autorun process to start at Notes
login . . . . . . . . . . . . . . . 199
Running Notes basic configuration from a USB
drive . . . . . . . . . . . . . . . 200
Installing Notes in a shared network directory . . 200
To set up the shared network installation . . . 201
Managing client plug-in deployment . . . . . 201
Client feature deployment . . . . . . . . 202
Installing a new feature using the Notes install
kit . . . . . . . . . . . . . . . . 203
Deploying client plug-ins with widgets and the
widget catalog . . . . . . . . . . . . 203
Creating a new feature . . . . . . . . . 210
Signing custom or third-party features and
plug-ins for install and update . . . . . . 210
Creating and using an NSF-based update site 214
Controlling feature install and update with
update sites . . . . . . . . . . . . . 217
Configuring component update for composite
applications . . . . . . . . . . . . . 223
Enabling user-initiated update with EUM . . . 228
Creating and using a traditional third-party
installer . . . . . . . . . . . . . . 229
Chapter 6. Upgrading Notes Clients 233
Upgrading Notes clients . . . . . . . . . . 233
Before you upgrade the Notes client . . . . . 234
Using Upgrade-by-mail . . . . . . . . . . 235
Before you use Upgrade-by-mail . . . . . . 235
Backing up Notes client files . . . . . . . 236
Creating the upgrade notification for
Upgrade-by-mail . . . . . . . . . . . 236
Installing Lotus Notes with Upgrade-by-mail 237
Upgrading the mail file template with
Upgrade-by-mail . . . . . . . . . . . 237
Using Notes Smart Upgrade . . . . . . . . 238
Prerequisites . . . . . . . . . . . . . 238
To use Lotus Notes Smart Upgrade, follow this
procedure: . . . . . . . . . . . . . 238
How Smart Upgrade performs an upgrade . . 239
Smart Upgrade server failover to another
clustered server . . . . . . . . . . . 239
Creating a Smart Upgrade application . . . . 240
Smart Upgrade Tracking Reports application 240
Controlling the number of concurrent Smart
Upgrade downloads . . . . . . . . . . 241
Creating a link to the Smart Upgrade Database 242
Adding update kits to the Smart Upgrade
application . . . . . . . . . . . . . 242
Running a silent upgrade using optional
arguments . . . . . . . . . . . . . 247
Creating a Lotus Notes Smart Upgrade desktop
policy settings document . . . . . . . . 249
Using Smart Upgrade to run a series of client
upgrades . . . . . . . . . . . . . . 250
Notes users and Lotus Notes Smart Upgrade 250
Maintaining Lotus Notes Smart Upgrade . . . 251
Using the Smart Upgrade Run-As wizard . . . 251
Chapter 7. Uninstalling the Notes
Client . . . . . . . . . . . . . . . 255
Uninstalling Notes . . . . . . . . . . . 255
Uninstalling Notes from a Windows client . . . 255
Uninstalling Notes from a Linux client . . . . 255
Uninstalling Notes from a Mac OS X client . . 257
Uninstalling Notes from a Citrix client . . . . 257
Uninstalling Notes silently . . . . . . . . 258
Cleaning a previous or partial Notes installation
from your client . . . . . . . . . . . 258
Index . . . . . . . . . . . . . . . 261
iv Installing Domino Servers and Notes Clients
Chapter 1. Deploying Domino
This chapter outlines the steps required to deploy IBM® Lotus® Domino(TM)
successfully and introduces important concepts that you need to know before you
install Domino servers.
Domino server installation
The first step in deploying an IBM(R) Lotus(R) Domino(R) server is installation, or
copying the program files to the system’s hard drive.
To install Domino, see the following procedures:
v Installing Domino on Microsoft(R) Windows(R) systems
v Installing Domino on UNIX(R) systems
v Installing Domino on IBM i
v Using silent server installation to install Domino on Windows or UNIX systems
v Installing Domino on Linux on IBM(R) System z systems
v Using silent server install on Linux on System z systems
Guidepost for deploying Domino
Whether you’re setting up IBM(R) Lotus(R) Domino(R) and IBM(R) Lotus(R)
Notes(R) for the first time or adding to an established Domino environment,
planning is vital. Along with determining your company’s needs, you need to plan
how to integrate Domino into your existing network. After planning is complete,
you can begin to install and set up Domino servers and the Domino Administrator
and build the Domino environment. The following list describes, in order, the
process to use to deploy Domino.
1. Determine your company’s server needs. Decide where to locate each server
physically, taking into consideration local and wide-area networks and the
function of each server.
2. Develop a hierarchical name scheme that includes organization and
organizational unit names.
3. Decide whether you need more than one Domino domain.
4. Understand how server name format affects network name-to-address
resolution for servers. Ensure that the DNS records for your company are the
correct type for the server names.
5. Determine which server services to enable.
6. Determine which certificate authority to use.
7. Install and set up the first Domino server.
8. Install and set up the Domino Administrator client on the administrator’s
machine.
9. Complete network-related server setup.
10. If the Domino server is offering Internet services, set up Internet site
documents. There are some instances where Internet Site documents are
required.
11. Specify administration preferences.
12. Create additional certifier IDs to support the hierarchical name scheme.
1
13. Set up recovery information for the certifier IDs.
14. Add the administrator’s ID to the recovery information for the certifier IDs
and then distribute the certifier IDs, as necessary, to other administrators.
15. Register additional servers.
16. If you did not choose to do so during first server setup, Create a group in the
Domino Directory for all administrators, and give this group Manager access
to all databases on the first server.
17. Install and set up additional servers.
18. Complete network-related server setup for each additional server.
19. Build the Domino environment.
For more information on certificate authorities, administration preferences,
administrator access, groups, and database access, see Domino Administrator Help
at http://www.ibm.com/developerworks/lotus/documentation/domino
Getting started with Domino for IBM i
For information about getting started with IBM(R) Lotus(R) Domino(R) for IBM(R)
i and other sources of information, see Techdoc number 7013148 - Domino for IBM
i (i5/OS): Getting started with Lotus Domino.
http://www.ibm.com/support/docview.wss?rs=463&uid=swg27013148
Functions of Domino servers
Before you install and set up the first IBM(R) Lotus(R) Domino(R) server, consider
the function and physical location of the servers that your company needs and
determine how to connect the servers to each other. The current configuration of
local and wide-area networks affects many of these decisions.
Consider your company’s need for:
v Servers that provide IBM(R) Lotus(R) Notes(R) or browser users with access to
applications
v Hub servers that handle communication between servers that are geographically
distant
v Web servers that provide browser users with access to Web applications
v Servers that manage messaging services
v Directory servers that provide users and servers with information about how to
communicate with other users and servers
v Passthru servers that provide users and servers with access to a single server
that provides access to other servers
v Domain Search servers that provide users with the ability to perform searches
across all servers in a Domino domain
v Clustered servers that provide users with constant access to data and provide
load-balancing and failover
v Partitioned servers that run multiple instances of the Domino server on a single
computer
v Firewall servers that provide Notes users with access to internal Domino
services and protect internal servers from outside users
v xSP servers that provide users with Internet access to a specific set of Domino
applications
Your decisions help determine which types of Domino servers your require. When
you install each server, you must select one of the following installation options:
2 Installing Domino Servers and Notes Clients
v Domino Utility Server -- Installs a Domino server that provides application
services only, with support for Domino clusters. The Domino Utility Server is an
installation type for Lotus Domino that removes client access license
requirements. Note that it does NOT include support for messaging services. See
full licensing text for details.
v Domino Messaging Server -- Installs a Domino server that provides messaging
services. Note that it does NOT include support for application services or
Domino clusters.
v Domino Enterprise Server -- Installs a Domino server that provides both
messaging and application services, with support for Domino clusters.
Note: All three types of installations support Domino partitioned servers. Only
the Domino Enterprise Server supports a service provider (xSP) environment.
Hierarchical naming for servers and users
Hierarchical naming is the cornerstone of IBM(R) Lotus(R) Domino(R) security;
therefore planning it is a critical task. Hierarchical names provide unique
identifiers for servers and users in a company. When you register new servers and
users, the hierarchical names drive their certification, or their level of access to the
system, and control whether users and servers in different organizations and
organizational units can communicate with each another.
Before you install Domino servers, create a diagram of your company and use the
diagram to plan a meaningful name scheme. Then create certifier IDs to implement
the name scheme and ensure a secure system.
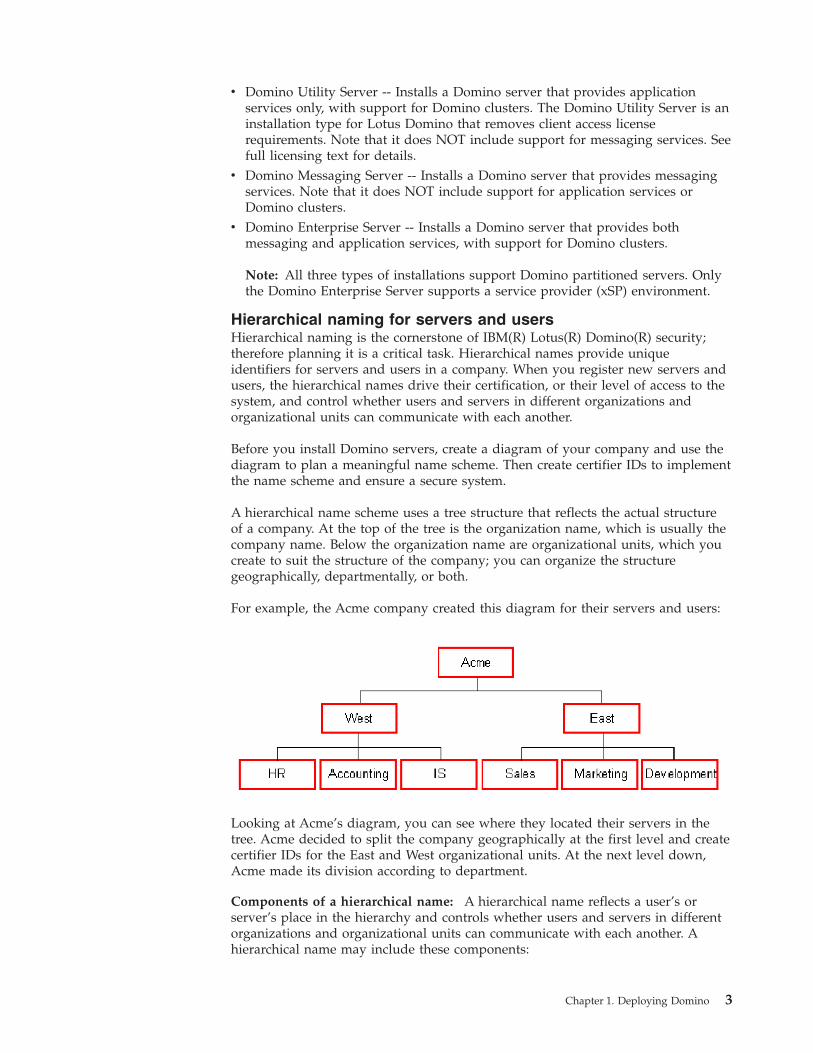
A hierarchical name scheme uses a tree structure that reflects the actual structure
of a company. At the top of the tree is the organization name, which is usually the
company name. Below the organization name are organizational units, which you
create to suit the structure of the company; you can organize the structure
geographically, departmentally, or both.
For example, the Acme company created this diagram for their servers and users:
Looking at Acme’s diagram, you can see where they located their servers in the
tree. Acme decided to split the company geographically at the first level and create
certifier IDs for the East and West organizational units. At the next level down,
Acme made its division according to department.
Components of a hierarchical name: A hierarchical name reflects a user’s or
server’s place in the hierarchy and controls whether users and servers in different
organizations and organizational units can communicate with each another. A
hierarchical name may include these components:
Chapter 1. Deploying Domino 3
v Common name (CN) -- Corresponds to a user’s name or a server’s name. All
names must include a common name component.
v Organizational unit (OU) -- Identifies the location of the user or server in the
organization. Domino allows for a maximum of four organizational units in a
hierarchical name. Organizational units are optional.
v Organization (O) -- Identifies the organization to which a user or server belongs.
Every name must include an organization component.
v Country (C) --Identifies the country in which the organization exists. The
country is optional.
An example of a hierarchical name that uses all of the components is:
Julia Herlihy/Sales/East/Acme/US
Typically a name is entered and displayed in this abbreviated format, but it is
stored internally in canonical format, which contains the name and its associated
components, as shown below:
CN=Julia Herlihy/OU=Sales/OU=East/O=Acme/C=US.
Note: You can use hierarchical naming with wildcards as a way to isolate a group
of servers that need to connect to a given Domino server in order to route mail.
Domino domains
A Domino domain is a group of IBM(R) Lotus(R) Domino(R) servers that share the
same Domino Directory. As the control and administration center for Domino
servers in a domain, the Domino Directory contains, among other documents, a
Server document for each server and a Person document for each Notes user.
Planning for Domino domains: There are four basic scenarios for setting up
Domino domains. The first scenario, which many small- and medium-size
companies use, involves creating only one Domino domain and registering all
servers and users in one Domino Directory. This scenario is the most common and
the easiest to manage.
The second scenario is common when a large company has multiple independent
business units. In this case, one organization spread across multiple domains may
be the best scenario. Then all servers and users are members of the same
organization, and each business unit administers its own Domino Directory.
For more information on administering multiple Domino directories, see the
chapter ″Planning Directory Services.″
A third scenario is common when multiple companies work closely together yet
want to retain individual corporate identities. Then one domain and multiple
organizations may work best.
Finally, the fourth scenario involves maintaining multiple domains and multiple
organizations. This scenario often occurs when one company acquires another.
Sometimes the decision to create multiple Domino domains is not based on
organizational structure at all. For example, you may want to create multiple
Domino domains if you have slow or unreliable network connections that prohibit
4 Installing Domino Servers and Notes Clients
frequent replication of a single, large directory. Keep in mind that working with
multiple domains requires additional administrative work and requires you to set
up a system for managing them.
Domains can be used as a broad security measure. For example, you can grant or
deny a user access to servers and databases, based on the domain in which the
user is registered. Using an extended ACL is an alternative to creating multiple
domains, because you can use the extended ACL to specify different levels of
access to a single Domino Directory, based on organization name hierarchy.
For more information on extended ACLs, see the chapter ″Setting Up Extended
ACLs.″
Partitioned servers
Using IBM(R) Lotus(R) Domino(R) server partitioning, you can run multiple
instances of the Domino server on a single computer. By doing so, you reduce
hardware expenses and minimize the number of computers to administer because,
instead of purchasing multiple small computers to run Domino servers that might
not take advantage of the resources available to them, you can purchase a single,
more powerful computer and run multiple instances of the Domino server on that
single machine.
On a Domino partitioned server, all partitions share the same Domino program
directory, and thus share one set of Domino executable files. However, each
partition has its own Domino data directory and NOTES.INI file; thus each has its
own copy of the Domino Directory and other administrative databases.
If one partition shuts down, the others continue to run. If a partition encounters a
fatal error, Domino’s fault recovery feature restarts only that partition, not the
entire computer.
For information on setting up fault recovery, see the chapter ″Transaction Logging
and Recovery.″
Partitioned servers can provide the scalability you need while also providing
security. As your system grows, you can migrate users from a partition to a
separate server. A partitioned server can also be a member of a cluster if you
require high availability of databases. Security for a partitioned server is the same
as for a single server.
When you set up a partitioned server, you must run the same version of Domino
on each partition. However, if the server runs on UNIX(R), there is an alternative
means to run multiple instances of Domino on the server: on UNIX, you can run
different versions of Domino on a single computer, each version with its own
program directory. You can even run multiple instances of each version by
installing it as a Domino partitioned server.
If the server runs on IBM i, you can use multi-versioning support to install and
run multiple Domino servers at different release levels. For more information about
setting up partitioned or multi-version servers on IBM i, see the documentation at
http://www-128.ibm.com/developerworks/lotus/documentation/domino/#systemi
Deciding whether to use partitioned servers: Whether or not to use partitioned
servers depends, in part, on how you set up Domino domains. A partitioned server
is most useful when the partitions are in different Domino domains. For example,
Chapter 1. Deploying Domino 5
using a partitioned server, you can dedicate different Domino domains to different
customers or set up multiple Web sites. A partitioned server with partitions all in
the same Domino domain often uses more computer resources and disk space than
a single server that runs multiple services.
When making the decision to use partitioned servers, remember that it is easier to
administer a single server than it is to administer multiple partitions. However, if
your goal is to isolate certain server functions on the network -- for example, to
isolate the messaging hub from the replication hub or isolate work groups for
resource and activity logging -- you might be willing to take on the additional
administrative work. In addition, running a partitioned server on a multiprocessor
computer may improve performance, even when the partitions are in the same
domain, because the computer simultaneously runs certain processes.
To give Notes users access to a Domino server where they can create and run
Domino applications, use a partitioned server. However, to provide customers with
Internet access to a specific set of Domino applications, set up an xSP server
environment.
Note: xSP is not supported on system IBM i.
For more information about using Domino in an xSP environment, see the chapter
″Planning the Service Provider Environment.″
Deciding how many partitions to have: How many partitions you can install
without noticeably diminishing performance depends on the power of the
computer and the operating system the computer uses. For optimal performance,
partition multiprocessor computers that have at least one, and preferably two,
processors for each partition that you install on the computer.
Certifier IDs and certificates
Certifier IDs and certificates form the basis of IBM(R) Lotus(R) Domino(R) security.
To place servers and users correctly within your organization’s hierarchical name
scheme, you create a certifier ID for each branch on the name tree. You use the
certifiers during server and user registration to ″stamp″ each server ID and user ID
with a certificate that defines where each belongs in the organization. Servers and
users who belong to the same name tree can communicate with each other; servers
and users who belong to different name trees need a cross-certificate to
communicate with each other.
Note: You can register servers and users without stamping each server ID and
user ID if you have migrated the certifier to a Domino server-based certification
authority (CA).
For more information about server-based CAs, see the chapter ″Setting Up a
Domino server-based certification authority.″
Each time you create a certifier ID, Domino creates a certifier ID file and a Certifier
document. The ID file contains the ID that you use to register servers and users.
The Certifier document serves as a record of the certifier ID and stores, among
other things, its hierarchical name, the name of the certifier ID that issued it, and
the names of certificates associated with it.
Note: During server setup, you can use an existing certifier ID instead of creating
a new one. The certifier ID that you specify cannot have multiple passwords
6 Installing Domino Servers and Notes Clients
assigned to it. Attempting to user a certifier ID with multiple passwords generates
an error message and causes server setup to halt.
There are two types of certifier IDs: organization and organizational unit.
Organization certifier ID: The organization certifier appears at the top of the
name tree and is usually the name of the company -- for example, Acme. During
first server setup, the Server Setup program creates the organization certifier and
stores the organization certifier ID file in the Domino data directory, giving it the
name CERT.ID. During first server setup, this organization certifier ID
automatically certifies the first Domino server ID and the administrator’s user ID.
If your company is large and decentralized, you might want to use the Domino
Administrator after server setup to create a second organization certifier ID to
allow for further name differentiation -- for example, to differentiate between
company subsidiaries.
For more information on working with multiple organizations, see the topic
″Domino domains″ earlier in this chapter.
Organizational unit certifier IDs: The organizational unit certifiers are at all the
branches of the tree and usually represent geographical or departmental names --
for example, East/Acme or Sales/East/Acme. If you choose to, you can create a
first-level organizational unit certifier ID during server setup, with the result that
the server ID and administrator’s user ID are stamped with the organizational unit
certifier rather than with the organization certifier. If you choose not to create this
organizational unit certifier during server setup, you can always use the Domino
Administrator to do it later -- just remember to recertify the server ID and
administrator’s user ID.
For information on recertifying user IDs, see the chapter ″Setting Up and
Managing Notes Users.″ For information on recertifying server IDs, see the chapter
″Maintaining Domino Servers.″
You can create up to four levels of organizational unit certifiers. To create first-level
organizational unit certifier IDs, you use the organization certifier ID. To create
second-level organizational unit certifier IDs, you use the first-level organizational
unit certifier IDs, and so on.
Using organizational unit certifier IDs, you can decentralize certification by
distributing individual certifier IDs to administrators who manage users and
servers in specific branches of the company. For example, the Acme company has
two administrators. One administers servers and users in West/Acme and has
access to only the West/Acme certifier ID, and the other administers servers and
users in East/Acme and has access to only the East/Acme certifier ID.
Certifier security: By default, the Server Setup program stores the certifier ID file
in the directory you specify as the Domino data directory. When you use the
Domino Administrator to create an additional organization certifier ID or
organizational unit certifier ID, you specify where you want the ID stored. To
ensure security, store certifiers in a secure location -- such as a disk locked in a
secure area.
User ID recovery: To provide ID and password recovery for Notes users, you
need to set up recovery information for each certifier ID. Before you can recover
Chapter 1. Deploying Domino 7

user ID files, you need access to the certifier ID file to specify the recovery
information, and the user ID files themselves must be made recoverable. There are
three ways to do this:
v At user registration, create the ID file with a certifier ID that contains recovery
information.
v Export recovery information from the certifier ID file and have the user accept it.
v (Only for servers using the server-based certification authority) Add recovery
information to the certifier. Then, when existing users authenticate to their home
server, their IDs are automatically updated.
For more information, see the chapter ″Protecting and Managing Notes IDs.″
Example of how certifier IDs mirror the hierarchical name scheme: To
implement their hierarchical name scheme, the Acme company created a certifier
ID at each branch of the hierarchical name tree:
To register each server and user, Acme does the following:
v Creates /Acme as the organization certifier ID during first server setup.
v Uses the /Acme certifier ID to create the /East/Acme and /West/Acme certifier
IDs.
v Uses the /East/Acme certifier ID to register servers and users in the East coast
offices and uses the /West/Acme certifier ID to register servers and users in the
West coast offices.
v Uses the /East/Acme certifier ID to create the /Sales/East/Acme,
/Marketing/East/Acme, and /Development/East/Acme certifier IDs.
v Uses the /West/Acme certifier ID to create the /HR/West/Acme,
/Accounting/West/Acme, and IS/West/Acme certifier IDs.
v Uses the /Sales/East/Acme, /Sales/Marketing/Acme, and Development/East/Acme certifier IDs to register users and servers in the East coast division.
8 Installing Domino Servers and Notes Clients
v Uses the /HR/West/Acme, /Accounting/West/Acme, and IS/West/Acme
certifier IDs to register users and servers in the West coast division.
Domino server services
Before you start the Server Setup program, decide which services and tasks to set
up on the server. If you don’t select the services during the setup program, you
can later enable them by editing the ServerTasks setting in the NOTES.INI file or
by starting the server task from the server console.
Internet services: The IBM(R) Lotus(R) Domino(R) Server Setup program presents
these selections for Internet services:
v Web Browsers (HTTP Web services)
v Internet Mail Clients (SMTP, POP3, and IMAP mail services)
v Directory services (LDAP)
Advanced Domino services: These Domino services, which are necessary for the
proper operation of the Domino infrastructure, are enabled by default when you
set up a Domino server:
v Database Replicator
v Mail Router
v Agent Manager
v Administration Process
v Calendar Connector
v Schedule Manager
v DOLS (Domino Off-Line Services)
These are optional advanced Domino server services that you can enable:
v DIIOP CORBA Services
v DECS (Domino Enterprise Connection Services)
v Billing
v HTTP Server
v IMAP Server
v ISpy
v LDAP Server
v POP3 Server
v Remote Debug Server
v SMTP Server
v Stats
v Statistic Collector
v Web Retriever
Note: It is best to use activity logging instead of the billing service.
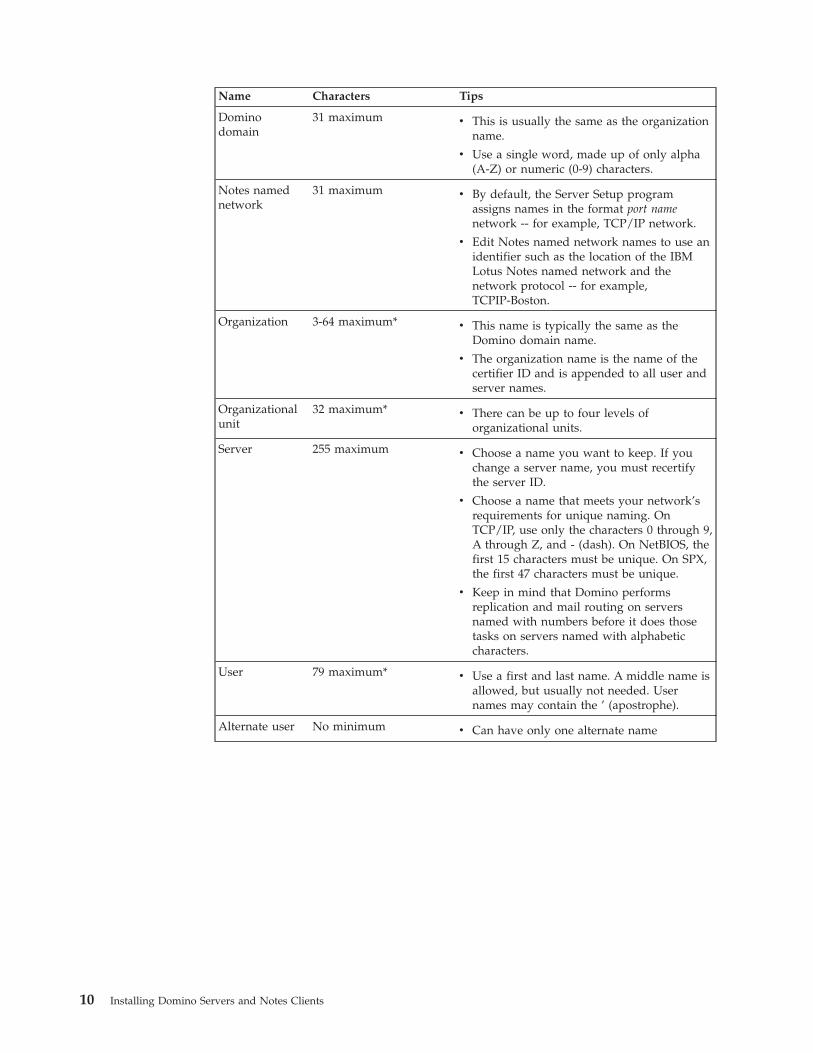
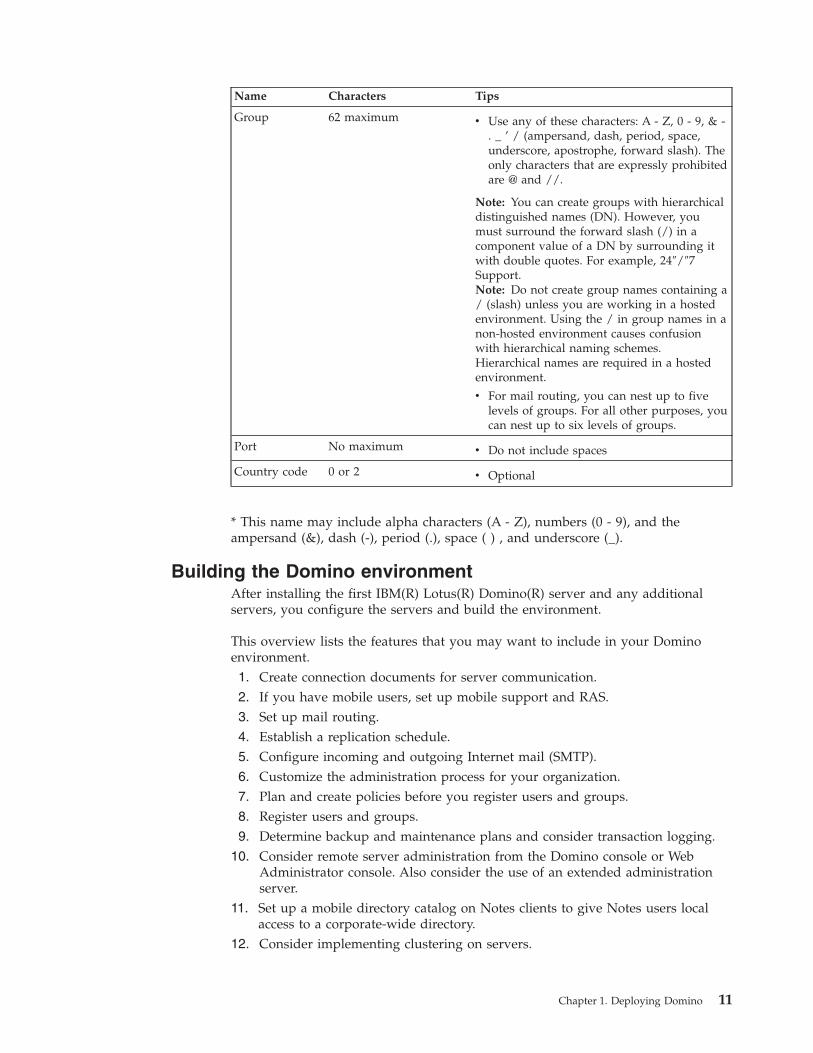
Table of Domino naming requirements
Consider these guidelines when naming parts of the IBM(R) Lotus(R) Domino(R)
system.
Chapter 1. Deploying Domino 9
Name Characters Tips
Domino
domain
31 maximum v This is usually the same as the organization
name.
v Use a single word, made up of only alpha
(A-Z) or numeric (0-9) characters.
Notes named
network
31 maximum v By default, the Server Setup program
assigns names in the format port name
network -- for example, TCP/IP network.
v Edit Notes named network names to use an
identifier such as the location of the IBM
Lotus Notes named network and the
network protocol -- for example,
TCPIP-Boston.
Organization 3-64 maximum* v This name is typically the same as the
Domino domain name.
v The organization name is the name of the
certifier ID and is appended to all user and
server names.
Organizational
unit
32 maximum* v There can be up to four levels of
organizational units.
Server 255 maximum v Choose a name you want to keep. If you
change a server name, you must recertify
the server ID.
v Choose a name that meets your network’s
requirements for unique naming. On
TCP/IP, use only the characters 0 through 9,
A through Z, and - (dash). On NetBIOS, the
first 15 characters must be unique. On SPX,
the first 47 characters must be unique.
v Keep in mind that Domino performs
replication and mail routing on servers
named with numbers before it does those
tasks on servers named with alphabetic
characters.
User 79 maximum* v Use a first and last name. A middle name is
allowed, but usually not needed. User
names may contain the ’ (apostrophe).
Alternate user No minimum v Can have only one alternate name
10 Installing Domino Servers and Notes Clients
Name Characters Tips
Group 62 maximum v Use any of these characters: A - Z, 0 - 9, & -
. _ ’ / (ampersand, dash, period, space,
underscore, apostrophe, forward slash). The
only characters that are expressly prohibited
are @ and //.
Note: You can create groups with hierarchical
distinguished names (DN). However, you
must surround the forward slash (/) in a
component value of a DN by surrounding it
with double quotes. For example, 24″/″7
Support.
Note: Do not create group names containing a
/ (slash) unless you are working in a hosted
environment. Using the / in group names in a
non-hosted environment causes confusion
with hierarchical naming schemes.
Hierarchical names are required in a hosted
environment.
v For mail routing, you can nest up to five
levels of groups. For all other purposes, you
can nest up to six levels of groups.
Port No maximum v Do not include spaces
Country code 0 or 2 v Optional
* This name may include alpha characters (A - Z), numbers (0 - 9), and the
ampersand (&), dash (-), period (.), space ( ) , and underscore (_).
Building the Domino environment
After installing the first IBM(R) Lotus(R) Domino(R) server and any additional
servers, you configure the servers and build the environment.
This overview lists the features that you may want to include in your Domino
environment.
1. Create connection documents for server communication.
2. If you have mobile users, set up mobile support and RAS.
3. Set up mail routing.
4. Establish a replication schedule.
5. Configure incoming and outgoing Internet mail (SMTP).
6. Customize the administration process for your organization.
7. Plan and create policies before you register users and groups.
8. Register users and groups.
9. Determine backup and maintenance plans and consider transaction logging.
10. Consider remote server administration from the Domino console or Web
Administrator console. Also consider the use of an extended administration
server.
11. Set up a mobile directory catalog on Notes clients to give Notes users local
access to a corporate-wide directory.
12. Consider implementing clustering on servers.
Chapter 1. Deploying Domino 11

12 Installing Domino Servers and Notes Clients
Chapter 2. Setting up the Domino Network
This chapter describes planning concepts and presents protocol-specific procedures
required to run IBM(R) Lotus(R) Domino(TM) on a network. The chapter describes
using network protocols from a Domino perspective and does not provide general
network information.
Network Configuration
This section presents the planning concepts and setup procedures necessary for a
successful IBM(R) Lotus(R) Domino(TM) deployment over a network. It provides
information on network protocols from a Domino perspective but does not attempt
to provide general network information.
v Lotus Domino and networks
v Network security
v Planning the TCP/IP network
v Planning the NetBIOS network
v Setting up Domino servers on the network
Lotus Domino and networks
A variety of client systems can use wireless technology or modems to communicate
with IBM(R) Lotus(R) Domino(R) servers over local area networks (LANs), wide
area networks (WANs), and metropolitan area networks (MANs). Computers use
one or more protocols to govern how they share information over a network. For
example, IBM(R) Lotus(R) Notes(R) workstations and Domino servers use the
Notes remote procedure call (NRPC) protocol running over the LAN’s network
protocol to communicate with other Domino servers. Other client systems, such as
Web browsers, Internet mail clients, wireless application protocol (WAP) devices,
and personal information management (PIM) devices, can also communicate with
Domino servers.
Note: Support for dialup modem (X.PC) connections is available only in releases
of Domino(R) earlier than release 8.5. You may continue to use Domino
Administrator 8.5 to configure and maintain modem support, but only on servers
running pre-8.5 releases.
Isolated LANs can be connected by WANs. A WAN is either a continuous
connection -- such as a frame-relay, leased telephone line, or digital subscriber line
(DSL) -- or a dialup connection over a modem or Integrated Services Digital
Network (ISDN) line. Dialup connections are either to an individual server or to a
LAN (through a provider network or your company’s own communications
server).
Buildings or sites that are geographically close to each other can use a MAN,
which is a continuous, high-speed connection that can connect corporate LANs or
connect a LAN to the WAN. Like a WAN, a MAN is usually shared by multiple
organizations.
Wireless technology that works with Domino ranges from localized transmission
systems (802.11a or 802.11b) to national or international satellite transmission
systems that are geostationary, mid-orbit, or tracked orbit.
13
If you are planning a network for geographically dispersed locations, consider how
to achieve a cost-effective infrastructure. Placing servers in one location requires
that users in other locations access the Domino server across WAN connections,
which can be slow and expensive. Placing servers in every location and replicating
databases to make the same information available on several LANs requires
attention to administration at each location. One effective way to set up a network
is to use a hub server at each location to handle communication with hub servers
in other locations. Then, only the hub servers, not every server in the network, use
WAN connections.
The functionality of Notes workstations and Domino servers depends on the
effectiveness and capacity of networks. To plan a Domino network with sufficient
capacity, you must consider not only the traffic to and from Domino servers but
also any other traffic on the network.
Avoiding port conflicts on IBM i
IBM(R) i and IBM(R) Lotus(R) Domino(R) both provide some of the same Internet
protocols; therefore, if your configuration is not correct it is possible to have port
conflicts. Services such as SMTP, POP3, HTTP and LDAP need to be configured so
that they do not conflict.
For information about configuring services to avoid port conflicts, see the
following chapters of Installing and Managing Domino 8 for System i at
http://www.ibm.com/developerworks/lotus/documentation/domino/
v Chapter 15 - Using Domino as a mail server
v Chapter 16 - Domino as a Web server
v Chapter 17 - About Directory services and Domino, section title Using
Lightweight Directory Access Protocol
NRPC communication
IBM(R) Lotus(R) Domino(R) servers offer many different services. The foundation
for communication between IBM(R) Lotus(R) Notes(R) workstations and Domino
servers or between two Domino servers is the Notes remote procedure call (NRPC)
service.
Network protocols for NRPC communication: To communicate, two computers
must run the same network protocol and software driver.
Notes and Domino support PPP using either Microsoft Dialup Networking (DUN)
or Remote Access Service (RAS) for network dialup. In addition, you can use any
IETF-compliant PPP communications server to dial into the network on which the
Domino server resides or though which the server can be accessed.
On LANs, Lotus Domino is compatible with the TCP/IP and NetBIOS over the
lower transport IP For NetBIOS connections to work, both Notes workstations and
Domino servers must use the same lower transport.
For detailed information on which protocols are compatible with Lotus Domino for
each supported operating system, see the Release Notes.
Notes network ports: During the Server Setup program, Domino provides a list
of Notes network ports based on the current operating system configuration. If
these ports are not the ones you want to enable for use with the Domino server,
you can edit the list during setup.
14 Installing Domino Servers and Notes Clients
Because each network protocol consumes memory and processing resources, you
might want to exclude one or more ports and later remove the associated protocol
software from the system.
In TCP/IP and NetBIOS, you can install multiple network interface cards (NICs)
and enable additional Notes network ports for each protocol, using the NOTES.INI
file to bind each port to a separate IP address or NetBIOS LANA number.
Notes named networks: Consider Notes named networks in your planning. A
Notes named network (NNN) is a group of servers that can connect to each other
directly through a common LAN protocol and network pathway -- for example,
servers running on TCP/IP in one location. Servers on the same NNN route mail
to each another automatically, whereas you need a Connection document to route
mail between servers on different NNNs.
When you set up Server documents, be sure to assign each server to the correct
NNN. Lotus Domino expects a continuous connection between servers that are in
the same NNN, and serious delays in routing can occur if a server must dial up a
remote LAN because the remote server is inadvertently placed within the NNN.
Also bear in mind that the Notes Network field for each port can contain only one
NNN name, and no two NNN names can be the same.
NNNs affect Notes users when they use the Open Application dialog box. When a
user selects Other to display a list of servers, the servers displayed are those on the
NNN of the user’s home server for the port on which the Notes workstation
communicates with the home server. Also, when users click on a database link or
document link, if a server in their home server’s NNN has a replica of that
database, they can connect to the replica.
Note: If a server is assigned to two NNNs in the same protocol, as in the case
where the server has two Notes network ports for TCP/IP, a Notes workstation or
Domino server connecting to that server uses the NNN for the port listed first in
the Server document.
Resolving server names to network addresses in NRPC
Communications between IBM(R) Lotus(R) Notes(R) and IBM(R) Lotus(R)
Domino(R) run over the NRPC protocol on top of each supported LAN protocol.
When a Notes workstation or Domino server attempts to connect to a Domino
server over a LAN, it uses a combination of the built-in Notes Name Service and
the network protocol’s name-resolver service to convert the name of the Domino
server to a physical address on the network.
The Notes Name Service resolves Domino common names to their respective
protocol-specific names. Because the Notes Name Service resolves common names
by making calls to the Domino Directory, the service becomes available to the
Notes workstation only after the workstation has successfully connected to its
home (messaging) server for the first time. (The protocol name-resolver service
normally makes the first connection possible.) When the Notes workstation makes
a subsequent attempt to connect to a Domino server, the Notes Name Service
supplies it with the Domino server’s protocol-specific name -- that is, the name
that the server is known by in the protocol’s name service -- which is stored in the
protocol’s Net Address field in the Server document. The protocol’s name-resolver
service then resolves the protocol-specific name to its protocol-specific address, and
the workstation is able to connect to the server.
Chapter 2. Setting up the Domino Network 15
Note: When resolving names of Domino servers that offer Internet services, Lotus
Notes uses the protocol’s name-resolver service directly.
How name resolution works in NRPC: A Notes workstation or Domino server
follows these steps to resolve the name of the Domino server to which it is trying
to connect over NRPC.
Note: If the Net Address field in the Server document contains a physical address
-- a practice that is not recommended in a production environment-- the Notes
Name Service performs the resolve directly, thus placing the burden of maintaining
physical address changes on the Domino administrator.
1. If the workstation/server has a Connection document for the destination server
that contains the protocol-specific name, the workstation/server passes the
protocol-specific name to the protocol’s name-resolver service. If the Connection
document contains a physical address, the Notes Name Service performs the
resolve directly. Normal-priority Connection documents are checked first, and
then low-priority Connection documents.
Note: Unlike in Server documents, adding physical addresses in Connection
documents is not discouraged, since only the local workstation/server uses the
Connection document.
2. To determine if the destination server’s protocol-specific name is cached, the
workstation checks the Location document and the server checks its own Server
document. If the name is cached, the workstation/server uses the last-used
Notes network port to determine the protocol and passes this value to the
protocol’s name-resolver service.
3. If the protocol-specific name is not cached, one of the following occurs, based
on the list order of enabled Notes network ports:
v For a Notes workstation connected to the home (messaging) server, Notes
gives the common name of the destination Domino server to the home
server, which looks in the Domino Directory for the Server document of the
destination server. The home server locates the contents of the Net Address
field for the Notes named network that the Notes workstation has in
common with the destination server and passes this name to the protocol’s
name-resolver service. If the workstation and the destination server are in the
same Domino domain but not in the same Notes named network, the home
server locates the names of each protocol that the workstation has in
common with the destination server and passes each to the appropriate
protocol until a resolve is made. If the Notes workstation can’t access its
home server, it connects to its secondary Notes name server, which carries
out the same actions as the home server.
v For a Domino server, Domino checks the Server document for the destination
server, locates the contents of the Net Address field for the Notes named
network that the Domino server has in common with the destination server,
and passes this name to the protocol’s name-resolver service. If the
destination server is in the same Domino domain as the Domino server, but
not in the same Notes named network, the Domino server locates the
protocol name of each protocol that it has in common with the destination
server and passes each to the appropriate protocol until a resolve is made.4. If Steps 1 through 3 do not produce the server’s network address, the
workstation/server offers the Domino common name of the destination server
to the name-resolver service of each protocol, based on the order of the enabled
network ports in the Server document.
16 Installing Domino Servers and Notes Clients
Network security
Physical network security is beyond the scope of this book, but you must set it up
before you set up connection security. Physical network security prevents
unauthorized users from breaking through the network and using one of the
operating system’s native services -- for example, file sharing -- to access the
server. Physical network security also comes into play when any data is exposed,
as the potential exists for malicious or unauthorized users to eavesdrop both on
the network where the IBM(R) Lotus(R) Domino(R) system resides and on the
system you are using to set up the server.
Network access is typically controlled using network hardware -- such as filtering
routers, firewalls, and proxy servers. Be sure to enable rules and connection
pathways for the services that you and others will access.
Newer firewall systems offer virtual-private-network (VPN) services, which
encapsulate the TCP/IP packet into another IP wrapper where the inner TCP/IP
packet and its data are encrypted. This is a popular way to create virtual tunnels
through the Internet between remote sites. If you want to have the Domino server
access both a private VPN and the Internet for SMTP mail, make sure your
solution is able to handle full TCP data packets and that it allows dual
connections. If not, the Domino server system may require a second NIC to work
around limitations of the VPN solution.
NRPC and Internet connection security
To control connection access, you typically use a network hardware configuration,
such as a firewall, reverse proxy, or IBM(R) Lotus(R) Domino(R) passthru server, to
which you can authorize connections and define access to network resources.
In addition, you can encrypt all connections by service type. Encrypting
connections protects data from access by malicious or unauthorized users. To
prevent data from being compromised, encrypt all Domino and IBM(R) Lotus(R)
Notes(R) services that connect to public networks or to networks over which you
have no direct control. Encrypting the connection channel prevents unauthorized
users from using a network protocol analyzer to read data.
To encrypt NRPC network traffic, use the Notes port encryption feature. For traffic
over Internet protocols, use SSL. For both NRPC and Internet protocols, you can
enforce encryption at the server for all inbound and outbound connections. In the
case of the Notes client, you can also enforce encryption on all outbound
connections, even if the server to which you are connecting allows unencrypted
connections.
Because encryption adds additional load to the server, you may want to limit the
services for which the server uses encryption. Other ways to minimize the load
that encryption puts on the system include:
v Using an additional Domino server acting as a passthru server for NRPC
connections
v Using a reverse proxy to manage authentication and encryption outside of
Domino servers when using SSL
v Removing unnecessary or unused protocols or services on the server system as
well as Domino server services
Using a Domino passthru server as a proxy
A proxy is a system that understands the type of information transmitted -- for
example, NRPC or HTTP-format information -- and controls the information flow
Chapter 2. Setting up the Domino Network 17
between trusted and untrusted clients and servers. A proxy communicates on
behalf of the requester and also communicates information back to the requester. A
proxy can provide detailed logging information about the client requesting the
information and the information that was transmitted. It can also cache
information so requesters can quickly retrieve information again.
A proxy stops direct access from an untrusted network to services on a trusted
network. If an application proxy is in use, then application-specific heuristics can
be applied to look at the connections from the untrusted networks and determine
if what is being requested is legal or safe.
An application proxy resides in the actual server application and acts as an
intermediary that communicates on behalf of the requester. An application proxy
works the same as a packet filter, except the application proxy delivers the packet
to the destination. An application proxy can be used with any protocol, but it is
designed to work with one application. For example, an SMTP proxy understands
only SMTP.
A circuit-level proxy is similar to an application proxy, except that it does not need
to understand the type of information being transmitted. For example, a SOCKS
server can act as a circuit-level proxy. You can use a circuit-level proxy to
communicate using Internet protocols with TCP/IP -- that is, IMAP, LDAP, POP3,
SMTP, IIOP, and HTTP, as well as Internet protocols secured with SSL.
HTTP is a special case. In IBM(R) Lotus(R) Domino(R), when the HTTP Connect
method is used by an HTTP proxy, applications using other protocols can also use
the HTTP proxy, but they use it as a circuit-level proxy, not as an application
proxy. SSL uses the HTTP Connect method to get through an application proxy
because the data is encrypted and the application proxy cannot read the data.
HTTPS (HTTP and SSL) use both the HTTP proxy and the Connect method, which
implies that the HTTP proxy is a circuit-level proxy for HTTPS. The same method
is used to get NRPC, IMAP, and other protocols through the HTTP proxy.
You can set up a Domino passthru server as an application proxy for NRPC. A
passthru server provides all levels of IBM(R) Lotus(R) Notes(R) and Domino
security while allowing clients who use dissimilar protocols to communicate
through a single Domino server. The application proxy does not allow Internet
protocols -- for example, HTTP, IMAP, and LDAP -- to use a Domino passthru
server to communicate, however. For Internet protocols, you can use an HTTP
proxy with the HTTP Connect method to act as a circuit-level proxy.
A Notes client or Domino server can also be a proxy client and interoperate with
either passthru (NRPC protocol only) or as a SOCKS or HTTP tunnel client (for
NRPC, POP3, LDAP, IMAP, and SMTP protocols). You set this up in the Proxy
setting in the client Location document.
To set up a Domino passthru server as an application proxy: When you set up
an application proxy, make sure the following Domain Name System (DNS)
services are correctly configured:
v The databases db.DOMAIN and db.ADDR, which DNS uses to map host names
to IP addresses, must contain the correct host names and addresses.
v Hosts files must contain the fully qualified domain name of the servers.
If you are using the Network Information Service (NIS), you must use the fully
qualified domain name and make sure NIS can coexist with DNS.
18 Installing Domino Servers and Notes Clients
For information on configuring these settings, see the documentation for your
network operating system.
You must first connect the server to the untrusted network -- for example, the
Internet -- and then set up Notes workstations and Domino servers to use the
passthru server as a proxy when accessing services outside the trusted network.
To set up a workstation or server to use the passthru server, you must specify the
passthru server in the Location document for a workstation and in the Server
document for a server.
TCP/IP security considerations
In a TCP/IP network, configure all IBM(R) Lotus(R) Domino(R) servers to reject
Telnet and FTP connections. Furthermore, do not allow file system access to the
Domino server or the operating system on which it runs, unless you are sure you
can properly maintain user access lists and passwords and you can guarantee a
secure environment.
If you use the Network File System (NFS) without maintaining the password file,
users can breach security by accessing files through NFS instead of through the
Domino server. If this ″back door″ access method is needed, isolate the network
pathway on a LAN NIC and segment, and make sure that the ability to access files
through NFS is exclusive to this isolated secure network.
Mapped directory links and Domino data security
To ensure data security, do not create a mapped directory link to a file server or
shared Network Attached Storage (NAS) server for an IBM(R) Lotus(R) Domino(R)
server. These links can cause both database corruption and security problems.
Database corruption: If the network connection fails while the Domino server is
writing to a database on the file server or shared NAS server, the database can
become corrupted. In addition, the interdependence of the file sharing protocols --
Server Message Block (SMB), Common Internet File System (CIFS), and Network
File System (NFS) -- and the remote file system can affect the Domino server’s
performance. Domino sometimes needs to open large numbers of remote files, and
low latency for read/write operations to these files is desirable.
To avoid these problems on Domino servers, consider doing one or more of the
following:
v Create an isolated network and use cut-through (non-buffering) layer-2 switches
to interconnect the Domino server to the NAS system.
v Limit access to the NAS system to the Domino server.
v Reduce the number of hops and the distance between hops in the connection
pathways between the Domino server and the storage system.
v Use a block protocol instead of a file protocol.
v Use a private storage area network (SAN) instead of a shared NAS system.
v Avoid creating any file-access contention between Domino and other
applications.
To avoid problems with IBM(R) Lotus(R) Notes(R) workstations, consider doing
the following:
v Locate Notes workstations so that they are not accessing a remote file server or
NAS system over a WAN.
Chapter 2. Setting up the Domino Network 19
v To minimize the risk of database corruption because of server failure when a
Notes client’s Domino data directory is on a file server or NAS server, evaluate
the reliability of the entire network pathway as well as the remote system’s
ability to maintain uninterrupted sessions to the Notes client over the file
sharing protocols it is using (SMB, CIFS, NFS, NetWare Core Protocol, or
AppleShare).
v If a Notes client’s Domino data directory is on a file server or NAS server,
remember that only one user (user session) can have the user data directory files
open a time. Lotus Notes does not support concurrent access to the same ″local″
database by two clients.
Security problems: When ″Encrypt network data″ is enabled, all Domino server
and Notes workstation traffic is encrypted. However, the file I/O between the
Domino server and the file server or shared NAS server is not encrypted, leaving it
vulnerable to access by unauthorized users.
Planning the TCP/IP network
The default TCP/IP configuration for an IBM(R) Lotus(R) Domino(R) server is one
IP address that is globally bound, meaning that the server listens for connections at
the IP addresses of all NICs on the computer. Global binding works as long as the
computer does not have more than one IP address offering a service over the same
assigned TCP port.
For operating system requirements, see the Release Notes.
The default configuration
Use these topics to plan how to integrate Lotus Domino with the TCP/IP network
when the Domino server has one IP address and is not partitioned:
v NRPC name-to-address resolution over TCP/IP
v Ensuring DNS resolves in TCP protocols
Advanced configurations
Use these topics to plan how to integrate Lotus Domino with the TCP/IP network
when the Domino server has more than one IP address or is partitioned:
v Advanced Domino TCP/IP configurations
v Partitioned servers and IP addresses
v Ensuring DNS resolves in advanced TCP/IP configurations
Changing a server’s IP address
Use this topic to change a server’s IP address:
v Changing a server’s IP address
Moving to IPv6
This topic provides the information you need if your company is migrating to the
IPv6 standard:
v IPv6 and Lotus Domino
Using Domino i with TCP/IP
The IBM(R) Lotus(R) Domino(R) server on IBM(R) i uses TCP/IP to communicate
with Notes workstations and other external resources such as the Internet. For the
Domino server to work properly, TCP/IP must be set up and active on your
system.
20 Installing Domino Servers and Notes Clients
For more information about setting up a TCP/IP environment, see the document
System i, Networking TCP/IP Setup at the IBM i Information Center at
http://publib.boulder.ibm.com/infocenter/systems/scope/i5os/topic/rzai2/rzai2.pdf
NRPC name-to-address resolution over TCP/IP
In the TCP/IP protocol, the method most commonly used to resolve server names
to network addresses is the Domain Name System (DNS), an Internet directory
service developed both to allow local administrators to create and manage the
records that resolve server names to IP addresses and to make those records
available globally. While the POP3, IMAP, LDAP, and HTTP services use DNS
directly, the NRPC service uses a combination of the Notes Name Service and DNS
to resolve server names to network addresses.
For background information on how the Notes Name Service works with
name-resolver services such DNS, see the topic ″Resolving server names to
network addresses in NRPC″ earlier in this chapter.
When you set up an IBM(R) Lotus(R) Notes(R) workstation on the TCP/IP
network, you normally rely on DNS to resolve the name of the workstation’s
IBM(R) Lotus(R) Domino(R) home server the first time the workstation tries to
connect to it. As long as the Notes workstation and Domino home server are in the
same DNS domain level, DNS can accomplish the resolve.
When to edit the Net Address field in the Server document: The default format
for a server’s TCP/IP network address in Lotus Domino is its fully qualified
domain name (FQDN) -- for example, app01.acme.com -- based on the DNS record
and the IP address references in the system’s TCP/IP stack. When a Notes
workstation or Domino server requests this name, the TCP/IP resolver passes it to
DNS, and DNS resolves the name directly to the IP address of the destination
server, regardless of the DNS domain level of the requesting system.
If you do not want to enter the FQDN in the Net Address field, you can change it
to the simple IP host name -- for example, app01 -- either during server setup or
later by editing the Server document. For example, you might use the simple IP
host name if you are setting up multiple TCP ports for NRPC, a configuration in
which using the FQDN for each network address can cause connection failures if
the Notes Name Service returns the FQDN for the wrong TCP port. In this case,
using the simple IP host name ensures that DNS does a lookup in all domain levels
within the scope of the domains defined in the requesting system’s TCP/IP stack
settings.
CAUTION:
In a production environment, do not use IP addresses in Net Address fields.
Doing so can result in serious administrative complications if IP addresses
change or if Network Address Translation (NAT) connections are used, as the
values returned by the Notes Name Service will not be correct.
Secondary name servers: To ensure that the Notes Name Service is always
available over TCP/IP, when you set up a Notes user, you can designate a Domino
secondary name server that stands in for the home server in these situations:
v The user’s home server is down.
v The user’s home server is not running TCP/IP.
v The user’s home server cannot be resolved over TCP/IP.
Chapter 2. Setting up the Domino Network 21
Note: In companies using multiple DNS domains, a Domino secondary name
server ensures that a Notes workstation can connect with its home server even
when the home server is in a different DNS domain. You can use policies to
automate the setup of secondary name servers.
For more information, see the following topics:
v Ensuring DNS resolves in NRPC Best practices...
v Policies
Special case: The passthru server: By connecting to a passthru server, Notes users
can access servers that do not share a network protocol with their systems. If both
the Notes workstation and destination server are in a different Domino domain
from the passthru server, it may not be possible for the passthru server to resolve
the name of the destination server. In this case, do one of the following:
v On the Notes workstation, create a Connection document that includes the IP
address of the destination server.
v On the passthru server, create a Connection document to the destination server.
Internal alternatives to DNS: If you don’t use DNS at your site or if a Domino
server is not registered with DNS (as is sometimes the case if the server offers
Internet services), use one of these methods to enable each Notes workstation and
Domino server to perform name resolution locally. Keep in mind that the upkeep
required for both of these approaches is considerable.
v Place a hosts file, which is a table that pairs each system name with its IP
address, on every system that needs private access. Set up each system so that it
accesses the hosts file before accessing DNS.
v Create a Connection document that contains the destination server’s IP address
on every Notes workstation and Domino server that needs to access that server.
Alternative IP name services: Microsoft networking services offers four
additional methods of IP address resolution. These methods are not as reliable as
traditional DNS and hosts files and can cause name and address confusion. For
best results, do not use these methods when also using the Notes network port for
TCP/IP.
v Direct NetBIOS broadcast -- The system sends out a name broadcast message so
that all of the systems on the local network segment can register the name and
IP address in their name cache. If you must use NetBIOS over IP and use
Domino with both the NetBIOS and TCP/IP port drivers, avoid name-resolution
problems by giving the Domino server and the system different names.
Master Browser cache (for NT domains or SAMBA servers) -- Collects broadcasted
names and IP addresses and publishes them across the NT domain to other Master
Browser systems for Microsoft(R) Windows(R) systems to access in their name
lookups.
v Windows Internet Name Service (WINS) -- Uses NetBIOS broadcasts. Unlike
DNS, which is static in nature, WINS is dynamic. Note that the TCP/IP stacks of
Macintosh and UNIX(R) client systems may not be able to access the WINS
server.
v LAN Manager Hosts (LMHosts) -- A static hosts file method.
CAUTION:
On a Windows system, the combination of the system’s native NetBIOS over IP
name-resolver service and DNS can cause name resolution failure for the
Domino server name.
22 Installing Domino Servers and Notes Clients
Ensuring DNS resolves in TCP protocols
When you register a new IBM(R) Lotus(R) Domino(R) server, you specify a
common name for it. Within a Domino hierarchical name, the common name is the
portion before the leftmost slash. For example, in the name App01/East/Acme, the
common name is App01. The common name, not the hierarchical name, is the
name that the Domino server is known by in DNS.
Note: When you choose a common name for a Domino server that uses DNS, use
only the characters 0 through 9, A through Z, and the dash (-). Do not use spaces
or underscores.
Note: The DNS names held in IBM(R) Lotus(R) Notes(R) and IBM Lotus Domino
are not case sensitive; Notes workstations and Domino servers always pass DNS
names to DNS in lowercase.
You can avoid problems and extra work if you consider the DNS configuration, as
well as the effect of other protocol name-resolver services, when you choose the
format for the common name of the Domino server.
For procedures to help you avoid DNS problems in NRPC, see the referenced
’Ensuring DNS...″ topics.
Note that these procedures apply only to servers handling communications
between Lotus Notes and Lotus Domino (NRPC services). If you administer
servers that provide Internet services such as HTTP, SMTP, POP3, or LDAP, you
can skip these topics, as these services use DNS directly.
Ensuring DNS resolves on Windows systems -- All TCP protocols: If an IBM(R)
Lotus(R) Domino(R) server is a Microsoft(R) Windows(R) system, often two name
services exist on the system -- NetBIOS over IP and DNS. If you assign the same
name to both the Domino server and the system, client applications that use either
the Notes Name Service or DNS can encounter name-space ghosting between the
two names. In other words, because the NetBIOS record for a system’s host name
has already been found, the name resolving process ends and the DNS record for
the Domino server on that system is never found.
Note: For a Domino server on Windows 2000, problems occur only if you enable
name services for NetBIOS over IP in order to join an NT domain using Server
Message Blocks (SMB).
To prevent this problem:
1. Add a preface such as W2K- to the system name, using the Network
Identification tab on the System Properties dialog box.
2. Create an A record (or, for IPv6, AAAA record) in DNS for the system name.
The IP address is the same as the one for the Domino server.
3. Create a CNAME record in DNS for the Domino server’s name, linking it to the
system name.
For example, for the Domino server BosMail02/Acme, the common name is
BosMail02. You name the system NT-BosMail02. You create an A record in DNS for
NT-BosMail02.acme.com and a CNAME record for BosMail02.acme.com, linking it
with NT-BosMail02.acme.com.
Ensuring DNS resolves in NRPC -- Best practices: The following procedures
provide the best name-resolution practices for an IBM(R) Lotus(R) Domino(R)
Chapter 2. Setting up the Domino Network 23
server using the default NRPC configuration on a TCP/IP network (one IBM(R)
Lotus(R) Notes(R) network port for TCP/IP). These procedures address the
following DNS configurations:
v One DNS domain
v Multiple DNS domain levels
When you have one DNS domain: If your company uses only one DNS domain,
doing the following eliminates the need for CNAME records in DNS:
1. Assign the same name as both the Domino server common name and the
simple IP host name registered with DNS.
2. Make sure the Net Address field on the Server document contains the server’s
FQDN.
3. Create an A record (or, for IPv6, AAAA record) in DNS.
For example, you set up the Domino server App01/Engr/Acme. Thus, you register
the server with DNS as app01, the server’s common name. The Net Address field
in the Server document contains app01.acme.com (the server’s FQDN), and the A
record is: app01.acme.com IN A 192.168.10.17.
When you have multiple DNS domain levels: If your company uses multiple DNS
domain levels -- for example, when each country in which a multinational
company has offices is a subdomain in DNS -- doing the following eliminates the
need for multiple CNAME records in DNS and ensures that DNS lookups always
work, regardless of the DNS domain level of the user’s system:
1. Assign the same name as both the Domino server common name and the
simple IP host name.
2. Make sure the Net Address field on the Server document contains the server’s
FQDN.
3. Create an A record (or, for IPv6, AAAA record) in DNS.
4. If users’ systems are in a different DNS domain than that of their home server
or in a DNS subdomain of their home server’s domain, set up a secondary
name server. Place this secondary name server on the same physical network as
the users’ systems or on a network that the users can access.
Note: Register the secondary name server in the root of the company’s DNS
domain.
5. Set up all Notes users or a subset of users affected by Step 4, or set up an
individual Notes user.
For example, you register the Domino server ParisMail01/Sales/Acme with DNS
as parismail01.france.acme.com. Parismail01 is the home server for some users in
the DNS subdomain spain.acme.com. You set up a secondary name server,
Nameserver/Acme, register it with DNS as nameserver.acme.com, and ensure that
the Location documents of users who need a secondary name server point to this
server.
When a user in spain.acme.com attempts a first connection with the home server
(parismail01.france.acme.com), the connection fails because the DNS subdomain for
spain.acme.com has no records for the subdomain france.acme.com. Notes then
connects successfully with the secondary name server (nameserver.acme.com),
since the DNS subdomain for spain.acme.com does include the records for
acme.com. When the secondary name server supplies the Notes workstation with
the FQDN from the Net Address field in the Server document for ParisMail01,
DNS resolves the FQDN to an IP address, and the user can access mail.
24 Installing Domino Servers and Notes Clients
As long as all Server documents in the Domino domain have the TCP/IP network
address in FQDN format, this approach allows any Notes workstation or Domino
server to locate any Domino server, regardless of its DNS domain level.
Ensuring DNS resolves in NRPC -- Alternative practices: The following
procedures provide alternative name-resolution practices for an IBM(R) Lotus(R)
Domino(R) server using the default NRPC configuration on a TCP/IP network
(one Notes network port for TCP/IP).
Domino server names that differ from their DNS names: When your name scheme for
Domino servers is different than that for DNS, use one of the following methods to
translate the Domino server’s name to the host name:
v Create a local Connection document on each IBM(R) Lotus(R) Notes(R) client
and Domino server that needs to connect to the Domino server, and enter the
FQDN for the system that hosts the Domino server in the Net Address field. For
example, for the Domino server named App01/Sales/Acme on the system
registered with DNS as redflier, enter redflier.acme.com in the Net Address fields
of the Connection documents.
v Use an alias (CNAME) record in DNS to link the Domino server common name
to the simple IP host name. For example, for the Domino server
App01/Sales/Acme on the system registered with DNS as redflier, use a
CNAME record to link the name App01 to the name redflier. When a Notes
workstation first accesses this server, it obtains the host name from the Net
Address field of the Server document and caches it, thereby making future
connections faster.
IP addresses in Connection documents: In situations in which you don’t want to use
any name-resolver service -- such as bringing up a new server system that you
don’t want known yet, or having a server on the Internet that you want accessible
but for which you can’t use DNS -- create Connection documents that directly tell
Notes workstations or Domino servers how to access this Domino server by using
the server’s IP address in the documents’ Net Address fields.
Network Address Translation (NAT): NAT is a method of translating an IP address
between two address spaces: a public space and a private space.
Public addresses are assigned to companies by the Internet Corporation of
Assigned Names and Numbers (ICANN) or leased from the company’s ISP/NSP.
Public addresses are accessible through the Internet (routable) unless firewalls and
isolated networks make them inaccessible.
Private addresses are IP address spaces that have been reserved for internal use.
These addresses are not accessible over the Internet (non-routable) because
network routers within the Internet will not allow access to them.
The following address spaces have been reserved for internal use. It is best to use
these IP addresses and not make up your own.
v Class A: 10.0.0.0 to 10.255.255.255
v Class B: 127.16.0.0 to 172.31.255.255
v Class C: 192.168.0.0 to 192.168.255.255
For example, users inside a company access the Domino server based on its
assigned IP address, which is a private address (192.168.1.1). Internet users must
access the Domino server through a NAT router, which converts the private
Chapter 2. Setting up the Domino Network 25
address to one of its static public addresses (130.20.2.2). Therefore, a Notes client
accessing the server from the Internet uses the public address.
Ensuring DNS resolves in NRPC -- A practice to use with caution: The
following practice, if followed precisely, should ensure good DNS resolves in
NRPC for companies with multiple DNS domain levels, but might result in extra
work if the infrastructure changes. Using this practice has the following
disadvantages:
v You can never assign more than one IP address in DNS to the IBM(R) Lotus(R)
Domino(R) server.
v If the FQDN changes, the Domino server name will not match the FQDN, thus
invalidating the DNS resolve. You will then need to create a new server and
migrate users to it.
v If you use network address translation (NAT), the server’s FQDN must be
identical in both instances of DNS (internal and external shadow DNS).
v You cannot use other network protocols, as many of them use flat network name
services, and those that use hierarchical name systems will not function unless
the name hierarchy is exactly the same.
v Diagnosing connectivity issues can be much harder.
When you have multiple DNS domain levels: If your company uses multiple DNS
domain levels -- for example, when each country in which a multinational
company has offices is a subdomain in DNS -- do the following:
1. Use the server’s FQDN as the Domino server common name.
2. Create an A record (or, for IPv6, AAAA record) in DNS.
For example, if you register a server with DNS as app01.germany.acme.com, you
can also assign the Domino server’s common name as app01.germany.acme.com. In
this case, the server’s Domino hierarchical name might be
app01.germany.acme.com/Sales/Acme.
Changing a server’s IP address
Before changing a server’s IP address, consider the following potential problems:
v Problem 1: If the server’s previous IP address is stored in any Server Connection
documents or Server documents, when that server’s IP address is changed in
DNS and on the server itself, these old Server Connection documents or Server
documents will cause connection failures.
Solution: Use the DNS fully-qualified domain name, not the IP address, as the
network address stored in the Server Connection documents and Server
documents. You can then change the server’s IP address in DNS without having
to change the Server Connection documents or Server documents. Changing the
network address from the IP address to the DNS name can be done at any time.
To modify the Server Connection document, open the Server Connection
document. On the Basics tab, if Local Area Network is chosen in the Connection
Type field, click the Advanced tab and check the entry in the Destination server
address field. If the field contains the server’s IP address, delete the IP address
and enter the fully-qualified domain name. Remember, both the server-based
Domino Directory and the client-based Address Book can have this problem.
To modify the Server document, click the Ports tab for the Net Address for TCP
ports. If the field contains the IP address, change the entry to the proper
fully-qualified domain name.
v Problem 2: The algorithm that all IBM(R) Lotus(R) Notes(R) clients and IBM(R)
Lotus(R) Domino(R) servers use to connect to a Domino server can cache the IP
26 Installing Domino Servers and Notes Clients
address that was used to successfully connect to a server. If this cache entry
exists, when the server’s IP address is changed, the old cached address may be
used causing the connection to fail.
It is important to understand why this caching is performed. Notes supports a
wide range of networking technologies implemented as Notes ports. If Notes
attempts to connect to a server that is down, and tries every possible technology
(Notes port) using every possible Name to Address resolution tool until each
one fails, the connection attempt takes a long time. To prevent the long delay
that would occur in reporting the error when the server goes down, Notes has
implemented two server connection algorithms. One algorithm is fast, using
cached addresses, and the other is slower, using the complete algorithm which
bypasses the cache when it fails.
The following solutions can resolve this problem. Solutions are listed in the
order in which they should be used.
Solution 1: The fast connection algorithm is only used if the client or server had
successfully connected to the same server earlier in the day. If a successful
connection has not yet occurred today, the slower algorithm is used and the
cache is bypassed. To avoid this problem, change a server’s IP address late in the
evening, but before midnight. This is the easiest solution because it is
transparent to the user and involves no help desk calls or any action on the
user’s part.
Solution 2: The cache is rewritten following successful connection to the server.
The cached address is the address entered by the user, not the resolved IP
address. Therefore, if users have the habit of connecting to servera/acme by
entering servera.acme.com, the cached address will be servera.acme.com, not
1.2.3.4 and the problem will not occur.
Solution 3: The cache is rewritten following any successful connection to the
server. If a user tries to connect to the server by its Notes name, for example,
servera/acme, the stale cache entry is used. If the user tries to connect using the
server’s fully-qualified domain name, for example, servera.acme.com, then the
cache will not be used, the new address will be fetched from DNS and the
correct new address entered in the cache. To make this successful connection
using the fully-qualified domain name of the server, use the File - Application -
Open menu command or the File - Preferences - User Preferences - Ports - Trace
menu selections.
Solution 4: The cache is stored in the following Notes fields in the Location
documents for the client and in the Server document for the server:
– $Saved Addresses
– $SavedDate
– $SavedPorts
– $SavedServers
– $SavedTriedDate
If these fields are deleted from the Location or Server document, for example,
using a formula agent, the old IP addresses in the cache cannot be used. This
method can be confusing because the Notes items are rewritten when the client
or server exists from an in-memory copy. Therefore, to use this method to clear
the cache for the client, create the agent in the Local Address Book, and then
switch to the Island Location document and exit the client. Restart the client,
and then run the agent to clear the cache for all other locations. Switch to your
normal location.
Sample agent formula language code to clear the cache:
– FIELD $SavedAddresses:=@DeleteField;
Chapter 2. Setting up the Domino Network 27
– FIELD $SavedDate:=@DeleteField;
– FIELD $SavedPorts:=@DeleteField;
– FIELD $SavedTriedDate:=@DeleteField;
– FIELD $SavedServers:=@DeleteField;
– SELECT @All
Solution 5: Disable the use of the cached addresses by using the following
NOTES.INI setting:
DONT_USE_REMEMBERED_ADDRESSES=1
If the client uses multiple or slow port technologies, we discourage the use of
this technique because it can cause a long delay in reporting that a server is
down.
IPv6 and Lotus Domino
Because support for IPv6 by hardware and operating system suppliers and the
Internet is still in the early stages, moving to the IPv6 standard will be a gradual
process for most organizations. In IBM(R) Lotus(R) Domino(R), you can enable
IPv6 support for SMTP, POP3, IMAP, LDAP, and HTTP services on IBM(R) AIX®,
IBM(R) i, Solaris®, and Linux(R) systems.
Domino supports both IPv6 and IPv4. Thus, if an IPv6-enabled Domino server
encounters an IP address in IPv4 format, the Domino server can still make the
connection to that address. When attempting to connect to a server, Domino tries
to resolve all IP addresses for a server until one works. This allows a server to
have both an IPv4 address and an IPv6 address. Domino caches the last successful
address for a server and uses only the cached address to quickly search for a
server. If you do not want to use only the cached address, enter the NOTES.INI
setting DONT_USE_REMEMBERED_ADDRESSES=1.
For information about the NOTES.INI variable
DONT_USE_REMEMBERED_ADDRESSES, see the Lotus developerWorks Web site
at http://www-128.ibm.com/developerworks/lotus/documentation/notes-ini/.
In DNS, records that store IPv6 addresses are called AAAA records. After you
enable IPv6 on a Domino server and add the server’s AAAA record to DNS,
another IPv6-enabled Domino server can connect to it only over IPv6. Servers that
don’t support IPv6 can run Domino with IPv6 support disabled, which is the
default. These servers can successfully connect to IPv6-enabled Domino servers
only if the DNS for the IPv6 servers contain A records.
Using IPv6 in a Domino network: For best results when using IPv6 with Domino
servers, set up network devices in the network pathway to connect directly with
native IPv6, rather than tunnel through the IPv4 network.
Enabling IPv6 on Notes and Domino, post release 6: To enable IPv6 on IBM(R)
Lotus(R) Notes(R) and Domino, add the setting TCP_ENABLEIPV6=1 to the
NOTES.INI file on both the Notes client and the Domino server.
How Lotus Domino decides whether to connect over IPv6 or IPv4: A Domino
server evaluates the address format and then, based on that information, makes an
IPv4 or an IPv6 connection.
Address format Server response
IPv4 Makes an IPv4 connection.
28 Installing Domino Servers and Notes Clients
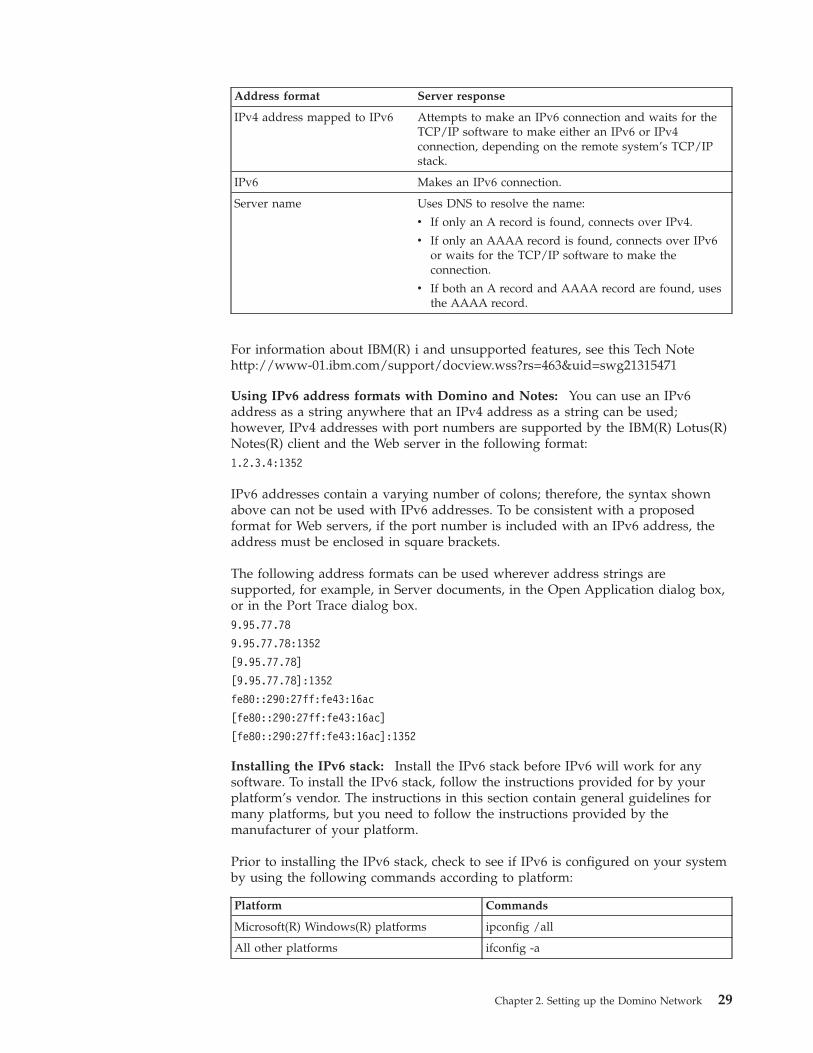
Address format Server response
IPv4 address mapped to IPv6 Attempts to make an IPv6 connection and waits for the
TCP/IP software to make either an IPv6 or IPv4
connection, depending on the remote system’s TCP/IP
stack.
IPv6 Makes an IPv6 connection.
Server name Uses DNS to resolve the name:
v If only an A record is found, connects over IPv4.
v If only an AAAA record is found, connects over IPv6
or waits for the TCP/IP software to make the
connection.
v If both an A record and AAAA record are found, uses
the AAAA record.
For information about IBM(R) i and unsupported features, see this Tech Note
http://www-01.ibm.com/support/docview.wss?rs=463&uid=swg21315471
Using IPv6 address formats with Domino and Notes: You can use an IPv6
address as a string anywhere that an IPv4 address as a string can be used;
however, IPv4 addresses with port numbers are supported by the IBM(R) Lotus(R)
Notes(R) client and the Web server in the following format:
1.2.3.4:1352
IPv6 addresses contain a varying number of colons; therefore, the syntax shown
above can not be used with IPv6 addresses. To be consistent with a proposed
format for Web servers, if the port number is included with an IPv6 address, the
address must be enclosed in square brackets.
The following address formats can be used wherever address strings are
supported, for example, in Server documents, in the Open Application dialog box,
or in the Port Trace dialog box.
9.95.77.78
9.95.77.78:1352
[9.95.77.78]
[9.95.77.78]:1352
fe80::290:27ff:fe43:16ac
[fe80::290:27ff:fe43:16ac]
[fe80::290:27ff:fe43:16ac]:1352
Installing the IPv6 stack: Install the IPv6 stack before IPv6 will work for any
software. To install the IPv6 stack, follow the instructions provided for by your
platform’s vendor. The instructions in this section contain general guidelines for
many platforms, but you need to follow the instructions provided by the
manufacturer of your platform.
Prior to installing the IPv6 stack, check to see if IPv6 is configured on your system
by using the following commands according to platform:
Platform Commands
Microsoft(R) Windows(R) platforms ipconfig /all
All other platforms ifconfig -a
Chapter 2. Setting up the Domino Network 29
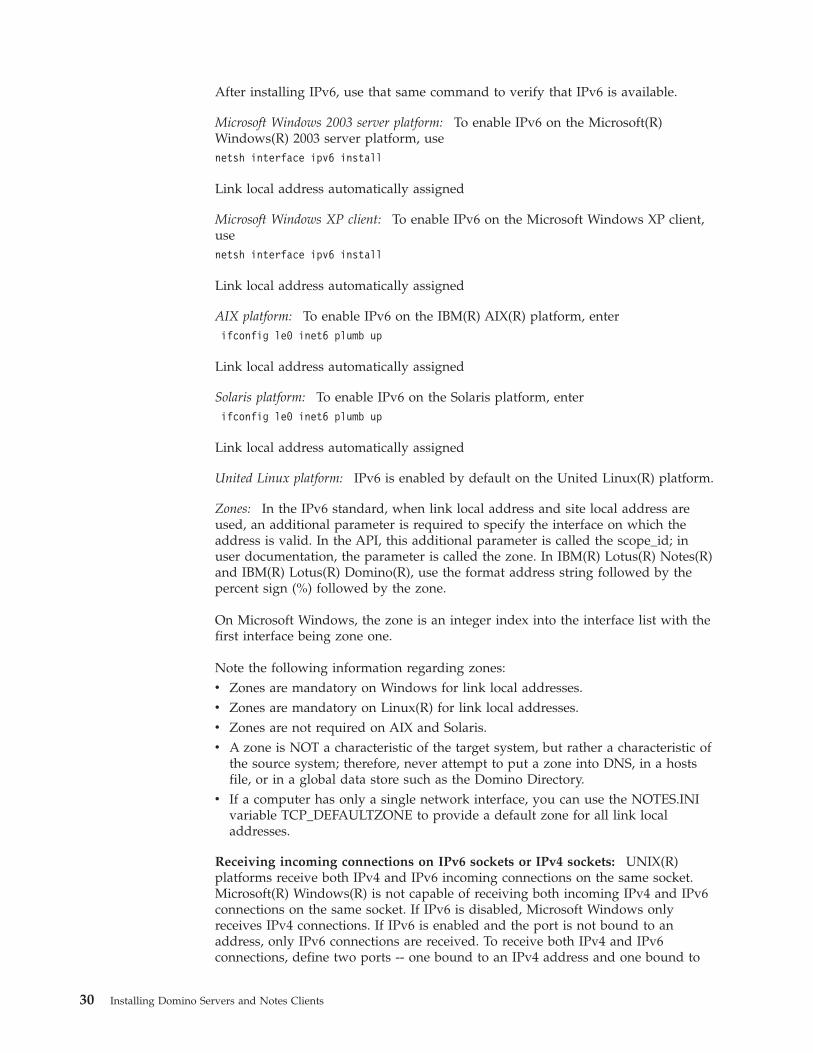
After installing IPv6, use that same command to verify that IPv6 is available.
Microsoft Windows 2003 server platform: To enable IPv6 on the Microsoft(R)
Windows(R) 2003 server platform, use
netsh interface ipv6 install
Link local address automatically assigned
Microsoft Windows XP client: To enable IPv6 on the Microsoft Windows XP client,
use
netsh interface ipv6 install
Link local address automatically assigned
AIX platform: To enable IPv6 on the IBM(R) AIX(R) platform, enter
ifconfig le0 inet6 plumb up
Link local address automatically assigned
Solaris platform: To enable IPv6 on the Solaris platform, enter
ifconfig le0 inet6 plumb up
Link local address automatically assigned
United Linux platform: IPv6 is enabled by default on the United Linux(R) platform.
Zones: In the IPv6 standard, when link local address and site local address are
used, an additional parameter is required to specify the interface on which the
address is valid. In the API, this additional parameter is called the scope_id; in
user documentation, the parameter is called the zone. In IBM(R) Lotus(R) Notes(R)
and IBM(R) Lotus(R) Domino(R), use the format address string followed by the
percent sign (%) followed by the zone.
On Microsoft Windows, the zone is an integer index into the interface list with the
first interface being zone one.
Note the following information regarding zones:
v Zones are mandatory on Windows for link local addresses.
v Zones are mandatory on Linux(R) for link local addresses.
v Zones are not required on AIX and Solaris.
v A zone is NOT a characteristic of the target system, but rather a characteristic of
the source system; therefore, never attempt to put a zone into DNS, in a hosts
file, or in a global data store such as the Domino Directory.
v If a computer has only a single network interface, you can use the NOTES.INI
variable TCP_DEFAULTZONE to provide a default zone for all link local
addresses.
Receiving incoming connections on IPv6 sockets or IPv4 sockets: UNIX(R)
platforms receive both IPv4 and IPv6 incoming connections on the same socket.
Microsoft(R) Windows(R) is not capable of receiving both incoming IPv4 and IPv6
connections on the same socket. If IPv6 is disabled, Microsoft Windows only
receives IPv4 connections. If IPv6 is enabled and the port is not bound to an
address, only IPv6 connections are received. To receive both IPv4 and IPv6
connections, define two ports -- one bound to an IPv4 address and one bound to
30 Installing Domino Servers and Notes Clients
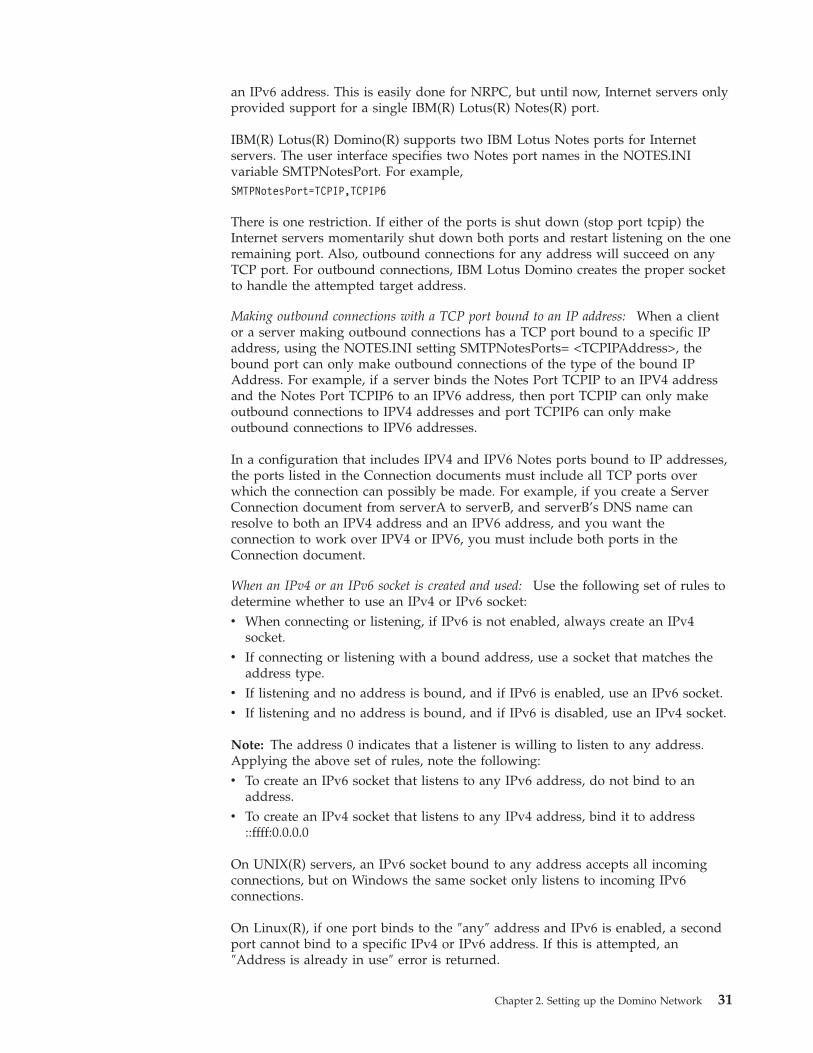
an IPv6 address. This is easily done for NRPC, but until now, Internet servers only
provided support for a single IBM(R) Lotus(R) Notes(R) port.
IBM(R) Lotus(R) Domino(R) supports two IBM Lotus Notes ports for Internet
servers. The user interface specifies two Notes port names in the NOTES.INI
variable SMTPNotesPort. For example,
SMTPNotesPort=TCPIP,TCPIP6
There is one restriction. If either of the ports is shut down (stop port tcpip) the
Internet servers momentarily shut down both ports and restart listening on the one
remaining port. Also, outbound connections for any address will succeed on any
TCP port. For outbound connections, IBM Lotus Domino creates the proper socket
to handle the attempted target address.
Making outbound connections with a TCP port bound to an IP address: When a client
or a server making outbound connections has a TCP port bound to a specific IP
address, using the NOTES.INI setting SMTPNotesPorts= <TCPIPAddress>, the
bound port can only make outbound connections of the type of the bound IP
Address. For example, if a server binds the Notes Port TCPIP to an IPV4 address
and the Notes Port TCPIP6 to an IPV6 address, then port TCPIP can only make
outbound connections to IPV4 addresses and port TCPIP6 can only make
outbound connections to IPV6 addresses.
In a configuration that includes IPV4 and IPV6 Notes ports bound to IP addresses,
the ports listed in the Connection documents must include all TCP ports over
which the connection can possibly be made. For example, if you create a Server
Connection document from serverA to serverB, and serverB’s DNS name can
resolve to both an IPV4 address and an IPV6 address, and you want the
connection to work over IPV4 or IPV6, you must include both ports in the
Connection document.
When an IPv4 or an IPv6 socket is created and used: Use the following set of rules to
determine whether to use an IPv4 or IPv6 socket:
v When connecting or listening, if IPv6 is not enabled, always create an IPv4
socket.
v If connecting or listening with a bound address, use a socket that matches the
address type.
v If listening and no address is bound, and if IPv6 is enabled, use an IPv6 socket.
v If listening and no address is bound, and if IPv6 is disabled, use an IPv4 socket.
Note: The address 0 indicates that a listener is willing to listen to any address.
Applying the above set of rules, note the following:
v To create an IPv6 socket that listens to any IPv6 address, do not bind to an
address.
v To create an IPv4 socket that listens to any IPv4 address, bind it to address
::ffff:0.0.0.0
On UNIX(R) servers, an IPv6 socket bound to any address accepts all incoming
connections, but on Windows the same socket only listens to incoming IPv6
connections.
On Linux(R), if one port binds to the ″any″ address and IPv6 is enabled, a second
port cannot bind to a specific IPv4 or IPv6 address. If this is attempted, an
″Address is already in use″ error is returned.
Chapter 2. Setting up the Domino Network 31
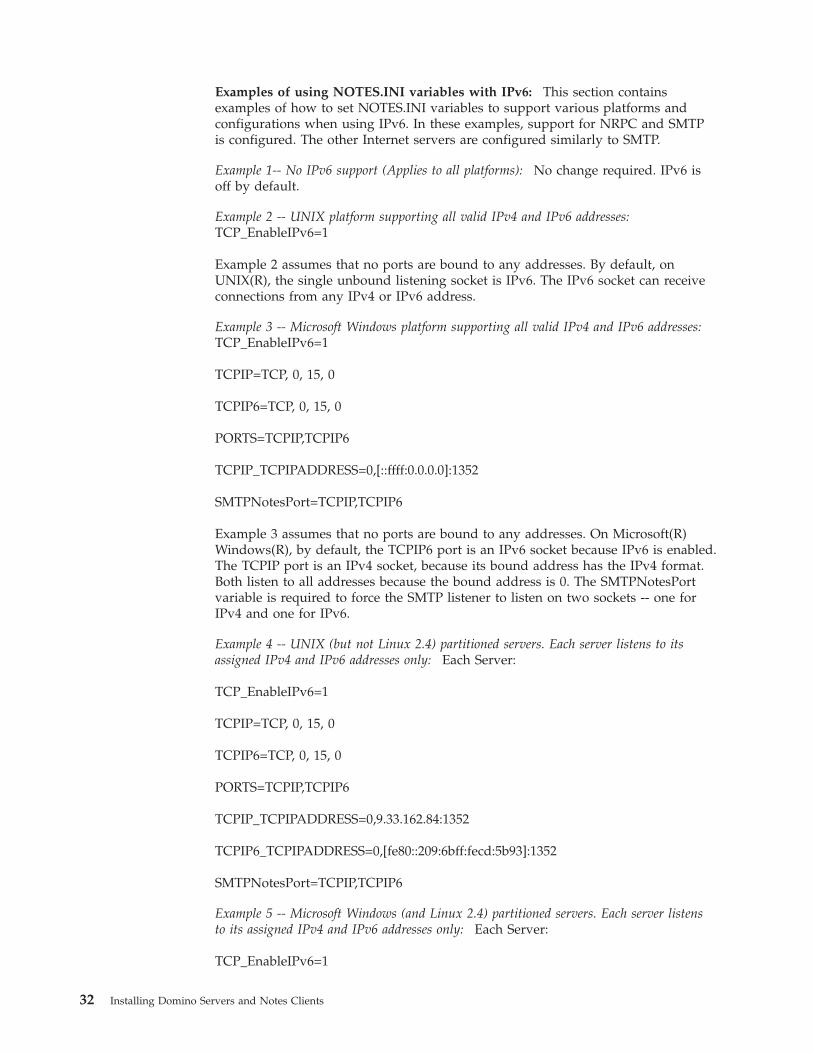
Examples of using NOTES.INI variables with IPv6: This section contains
examples of how to set NOTES.INI variables to support various platforms and
configurations when using IPv6. In these examples, support for NRPC and SMTP
is configured. The other Internet servers are configured similarly to SMTP.
Example 1-- No IPv6 support (Applies to all platforms): No change required. IPv6 is
off by default.
Example 2 -- UNIX platform supporting all valid IPv4 and IPv6 addresses:
TCP_EnableIPv6=1
Example 2 assumes that no ports are bound to any addresses. By default, on
UNIX(R), the single unbound listening socket is IPv6. The IPv6 socket can receive
connections from any IPv4 or IPv6 address.
Example 3 -- Microsoft Windows platform supporting all valid IPv4 and IPv6 addresses:
TCP_EnableIPv6=1
TCPIP=TCP, 0, 15, 0
TCPIP6=TCP, 0, 15, 0
PORTS=TCPIP,TCPIP6
TCPIP_TCPIPADDRESS=0,[::ffff:0.0.0.0]:1352
SMTPNotesPort=TCPIP,TCPIP6
Example 3 assumes that no ports are bound to any addresses. On Microsoft(R)
Windows(R), by default, the TCPIP6 port is an IPv6 socket because IPv6 is enabled.
The TCPIP port is an IPv4 socket, because its bound address has the IPv4 format.
Both listen to all addresses because the bound address is 0. The SMTPNotesPort
variable is required to force the SMTP listener to listen on two sockets -- one for
IPv4 and one for IPv6.
Example 4 -- UNIX (but not Linux 2.4) partitioned servers. Each server listens to its
assigned IPv4 and IPv6 addresses only: Each Server:
TCP_EnableIPv6=1
TCPIP=TCP, 0, 15, 0
TCPIP6=TCP, 0, 15, 0
PORTS=TCPIP,TCPIP6
TCPIP_TCPIPADDRESS=0,9.33.162.84:1352
TCPIP6_TCPIPADDRESS=0,[fe80::209:6bff:fecd:5b93]:1352
SMTPNotesPort=TCPIP,TCPIP6
Example 5 -- Microsoft Windows (and Linux 2.4) partitioned servers. Each server listens
to its assigned IPv4 and IPv6 addresses only: Each Server:
TCP_EnableIPv6=1
32 Installing Domino Servers and Notes Clients
TCPIP=TCP, 0, 15, 0
TCPIP6=TCP, 0, 15, 0
PORTS=TCPIP,TCPIP6
TCPIP_TCPIPADDRESS=0,9.33.162.84:1352
TCPIP6_TCPIPADDRESS=0,[fe80::209:6bff:fecd:5b93%4]:1352
SMTPNotesPort=TCPIP,TCPIP6
The difference here is that Microsoft Windows and Linux(R) 2.4 require the use of
the zone in the address even for addresses bound to listeners if the address is a
link local address. The same effect can also be achieved as shown in Example 5A.
Examle 5A -- Microsoft Windows and Linux 2.4 partitioned servers. Each server listens to
its assigned IPv4 and IPv6 addresses only: For each server:
TCP_EnableIPv6=1
TCP_DefaultZone=4
TCPIP=TCP, 0, 15, 0
TCPIP6=TCP, 0, 15, 0
PORTS=TCPIP,TCPIP6
TCPIP_TCPIPADDRESS=0,9.33.162.84:1352
TCPIP6_TCPIPADDRESS=0,[fe80::209:6bff:fecd:5b93]:1352
SMTPNotesPort=TCPIP,TCPIP6
Example 6 -- Any client wants to make outbound IPv4 connections: No change
required
Example 6A -- A UNIX client (not Linux 2.4) wants to make an outbound IPv6
connection: TCP_EnableIPv6=1
Connect to an IPv6 address, or to a DNS or hosts file resident name that resolves
to an IPv6 address.
Example 7 -- Microsoft Windows/Linux 2.4 client wants to make outbound connection via
IPv6: TCP_EnableIPv6=1
Connect to an IPv6 address, or to a DNS or hosts file resident name that resolves
to an IPv6 address. If the address is a link local address, it must include the zone,
such as fe80::209:6bff:fecd:5b93%4, or the local NOTES.INI file must contain a
default zone, or the zone must be included in the local bound address. Such
addresses must NEVER be stored in DNS, in Server documents, or Connection
documents. If an IPv6-capable computer running Windows XP enables IPv6 and it
is DHCP, it will automatically have its QUAD A record stored in DNS and it is
stored without a zone, because the zone is a local construct. Therefore, the ONLY
way to use such a DNS entry is to have a default zone in NOTES.INI.
Chapter 2. Setting up the Domino Network 33
Example 7A -- Microsoft Windows / Linux 2.4 client wants to make outbound connection
via IPv6: TCP_EnableIPv6=1
TCP_DefaultZone=4
Connect to an IPv6 address, or to a DNS or hosts file resident name that resolves
to an IPv6 address. If the address is a link local address, it need not include the
zone, such as fe80::209:6bff:fecd:5b93 because the zone is defaulted by the
NOTES.INI variable.
Example 7B -- Microsoft Windows / Linux 2.4 client wants to make outbound connection
via IPv6: TCP_EnableIPV6=1
TCPIP=TCP, 0, 15, 0
PORTS=TCPIP
TCPIP_TCPIPADDRESS=0,[fe80::209:6bff:fecd:5b93%4]:1352
Connect to an IPv6 address, or to a DNS or hosts file resident name that resolves
to an IPv6 address. If the address is a link local address, it need not include the
zone, such as fe80::209:6bff:fecd:5b93 because it is defaulted by the bound address’s
zone.
Enabling Internet protocols on both TCP/IP and TCP/IPV6 ports: Add the following
settings to the file, NOTES.INI:
v ldapnotesport=tcpip,tcpipv6
v imapnotesport=tcpip,tcpipv6
v smtpnotesport=tcpip,tcpipv6
v pop3notesport=tcpip,tcpipv6
Connecting a Notes client to a Domino server via IPv6:
1. Install the IBM(R) Lotus(R) Domino(R) server and IBM(R) Lotus(R) Notes(R)
client.
2. Enable IPv6 on both the client and the server by adding the NOTES.INI setting,
TCP_ENABLEIP6=1, to the NOTES.INI files on the Notes client and Domino
server:
3. Configure a zone on both the Notes client and the Domino server.
4. On the Domino server, configure the port for IPv4 and the port for IPv6.
5. Launch the Notes client.
6. Connect from the Notes client using IPv6 address-NRPC. Optionally, you can
enter the zone if you want to.
7. A low priority Connection document is added to the local Domino Directory
(NAMES.NSF). This Connection document and IPv6 are used during future
connection attempts initiated with File -- Application -- Open.
Connecting from a Notes client using IPv6 address-NRPC: Use this procedure to
connect from the Notes client to a server using an IPv6 address.
1. Choose File -- Application -- Open.
2. In the Server field, enter the IPv6 address. Optionally, you can enter a server
name that resolves to an IPv6 address instead of entering the IPv6 address in
the Server field.
34 Installing Domino Servers and Notes Clients
A low-priority Connection document is added to your local Domino Directory
(NAMES.NSF).
Advanced Domino TCP/IP configurations
A single IBM(R) Lotus(R) Domino(R) server can have multiple IP addresses if you
use multiple NICs, each offering an address, or if one NIC offers multiple
addresses. Having multiple IP addresses allows the server to listen for connections
at more than one instance of the TCP port assigned to NRPC (1352) or at TCP
ports that are assigned to other services such as LDAP or HTTP. Both individual
Domino servers and partitioned Domino servers can have multiple NICs, each
with its own IP address.
Multiple IP addresses and NICs on a Domino server: Set up a Domino server
with multiple IP addresses, each with its own NIC, if you want to:
v Split the client load for better performance
v Split client-to-server access from server-to-server communication
v Set up mail routing, replication, or cluster replication on an alternate path
(private network)
v Partition a Domino server so that more than one partition offers the same
Internet service (SMTP, POP3, IMAP, LDAP, or HTTP).
v Allow access to the Domino server via a TCP/IP firewall system over a different
network segment, a configuration known as a demilitarized zone (DMZ)
v Use a Domino passthru server as an application proxy
v Provide network/server failover, used in mission-critical resource access
v Set up alternate window and/or maximum transmission unit (MTU) settings for
satellite uplink and downlink connections isolated from local access connections
For a configuration with multiple IP addresses, you must bind each listening port
to the appropriate IP address to ensure that each TCP service receives the network
connections intended for it.
Note: A configuration with multiple NICs does not increase the number of
Domino sessions you can have on a server. In TCP/IP, machine capacity depends
on processors and memory.
Multiple IP addresses with one NIC: Reasons to use one NIC to serve multiple
IP addresses include:
v Isolating local versus WAN IBM(R) Lotus(R) Notes(R) named networks so local
users can see only local Domino servers
v When setting up redundant WAN path connections for server to server access
v When the use of a different TCP/IP port map is needed for firewall connections
v When offering HTTP services to a different group than NRPC connections
v As a service provider when offering Domino server access for either Notes or
Web clients to different groups/companies
For a configuration with multiple addresses and one NIC, you must configure the
TCP/IP stack and bind each listening port to an IP address.
Partitioned servers and IP addresses: When you set up an IBM(R) Lotus(R)
Domino(R) partitioned server, it is usually best to assign a separate IP address to
each partition and use a separate NIC for each. Using a separate NIC for each
address can make the computer’s I/O much faster.
Chapter 2. Setting up the Domino Network 35
Lotus Domino is designed to listen for TCP/IP connections on all NICs in a
computer system. If more than one partition is hosting the same service (NRPC,
SMTP, POP3, IMAP, LDAP, or HTTP), fine-tune which partitions listen for which
connections by associating each service’s TCP port with a specific IP address.
As an alternative to using a separate NIC for each IP address, you can use a single
NIC and still assign a separate IP address to each partition.
If you are unable to assign a separate IP address to each partition, you can use
port mapping.
Note: As an alternative to port mapping, you can use port address translation
(PAT), in which a firewall redirects the TCP port connection to a different TCP
port. Both port mapping and PAT require advanced skills to implement correctly.
Ensuring DNS resolves in advanced TCP/IP configurations: When you have
IBM(R) Lotus(R) Domino(R) servers with multiple IBM(R) Lotus(R) Notes(R)
network ports for TCP/IP, follow these procedures to ensure server
name-to-address resolution by DNS. This topic covers the following configurations:
v Users in different DNS subdomains accessing one Domino server
v User-to-server access and server-to-server access via different DNS subdomains
Users in different DNS subdomains accessing one Domino server: If users are on two
isolated networks and the Domino server has a NIC for each network, use DNS to
direct the users to the NIC the server shares with them.
1. Assign an IP address to each NIC by creating A records (or, for IPv6, AAAA
records) in DNS. Use the ping command and the IP address to test the
responsiveness of the NIC.
Note: If the Domino server is running Microsoft(R) Windows(R) and there is a
route between the two networks, prevent the NetBIOS broadcasts from exiting
from both adapters by using the Windows Control Panel to disable one
instance of the WINS client. Use the Bindings tab of the Network dialog box,
select All Adapters, and select the name of the NIC for which you want to
disable WINS.
2. Create two CNAME records in DNS for the Domino server, linking the server’s
common name to each NIC name in the A records. (Using CNAME records for
the Domino server provides diagnostic fidelity to test the network pathway
independently of the server’s name resolve.)
3. Add a second Notes network port for TCP/IP in Domino.
4. Bind each TCP/IP port to the IP address the appropriate NIC. On the server
console, verify that both TCP/IP ports are active and linked to the correct IP
address.
5. In the Server document’s Net Address field for each TCP/IP port, use the
server’s common name only, not its FQDN.
6. On each Notes workstation, set the user’s DNS name lookup scope to the
correct DNS subdomain.
Example: At the Acme company, some users connect to the Domino server
Chicago/Sales/Acme over an Ethernet network, others over a Token Ring network.
Register the Domino server with DNS as chicago.east.acme.com for the users on
the Ethernet network and as chicago.west.acme.com for users on the Token Ring
network.
36 Installing Domino Servers and Notes Clients
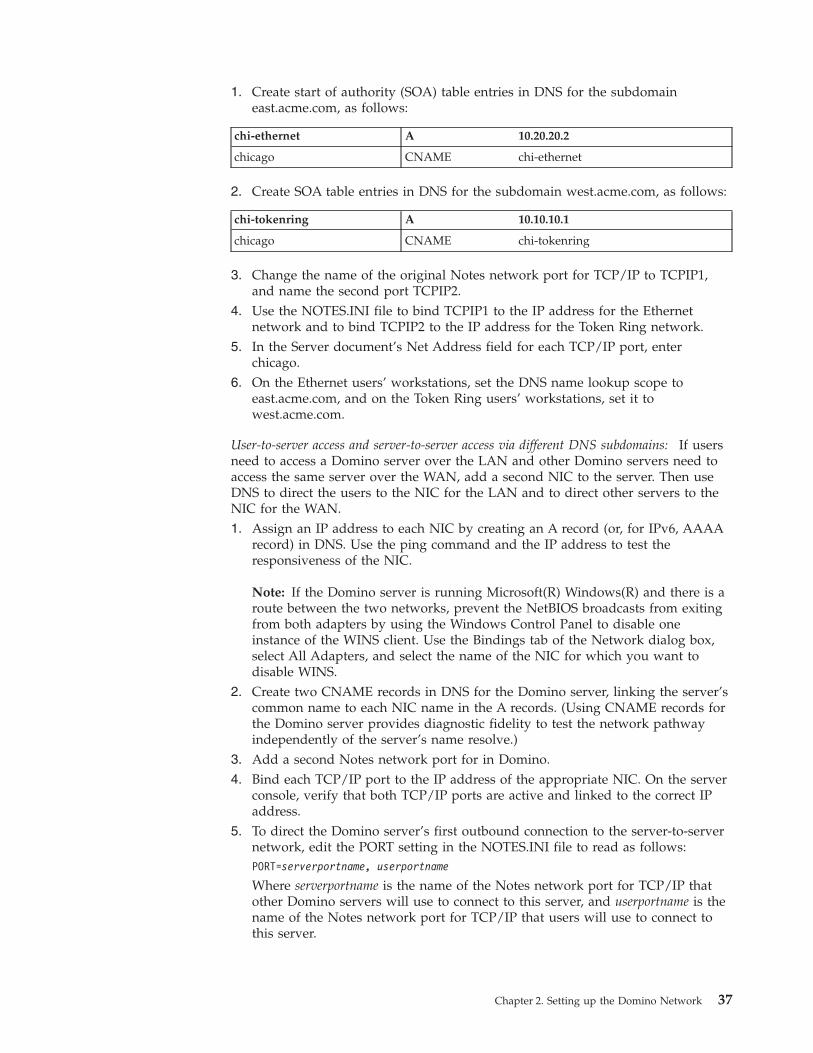
1. Create start of authority (SOA) table entries in DNS for the subdomain
east.acme.com, as follows:
chi-ethernet A 10.20.20.2
chicago CNAME chi-ethernet
2. Create SOA table entries in DNS for the subdomain west.acme.com, as follows:
chi-tokenring A 10.10.10.1
chicago CNAME chi-tokenring
3. Change the name of the original Notes network port for TCP/IP to TCPIP1,
and name the second port TCPIP2.
4. Use the NOTES.INI file to bind TCPIP1 to the IP address for the Ethernet
network and to bind TCPIP2 to the IP address for the Token Ring network.
5. In the Server document’s Net Address field for each TCP/IP port, enter
chicago.
6. On the Ethernet users’ workstations, set the DNS name lookup scope to
east.acme.com, and on the Token Ring users’ workstations, set it to
west.acme.com.
User-to-server access and server-to-server access via different DNS subdomains: If users
need to access a Domino server over the LAN and other Domino servers need to
access the same server over the WAN, add a second NIC to the server. Then use
DNS to direct the users to the NIC for the LAN and to direct other servers to the
NIC for the WAN.
1. Assign an IP address to each NIC by creating an A record (or, for IPv6, AAAA
record) in DNS. Use the ping command and the IP address to test the
responsiveness of the NIC.
Note: If the Domino server is running Microsoft(R) Windows(R) and there is a
route between the two networks, prevent the NetBIOS broadcasts from exiting
from both adapters by using the Windows Control Panel to disable one
instance of the WINS client. Use the Bindings tab of the Network dialog box,
select All Adapters, and select the name of the NIC for which you want to
disable WINS.
2. Create two CNAME records in DNS for the Domino server, linking the server’s
common name to each NIC name in the A records. (Using CNAME records for
the Domino server provides diagnostic fidelity to test the network pathway
independently of the server’s name resolve.)
3. Add a second Notes network port for in Domino.
4. Bind each TCP/IP port to the IP address of the appropriate NIC. On the server
console, verify that both TCP/IP ports are active and linked to the correct IP
address.
5. To direct the Domino server’s first outbound connection to the server-to-server
network, edit the PORT setting in the NOTES.INI file to read as follows:
PORT=serverportname, userportname
Where serverportname is the name of the Notes network port for TCP/IP that
other Domino servers will use to connect to this server, and userportname is the
name of the Notes network port for TCP/IP that users will use to connect to
this server.
Chapter 2. Setting up the Domino Network 37
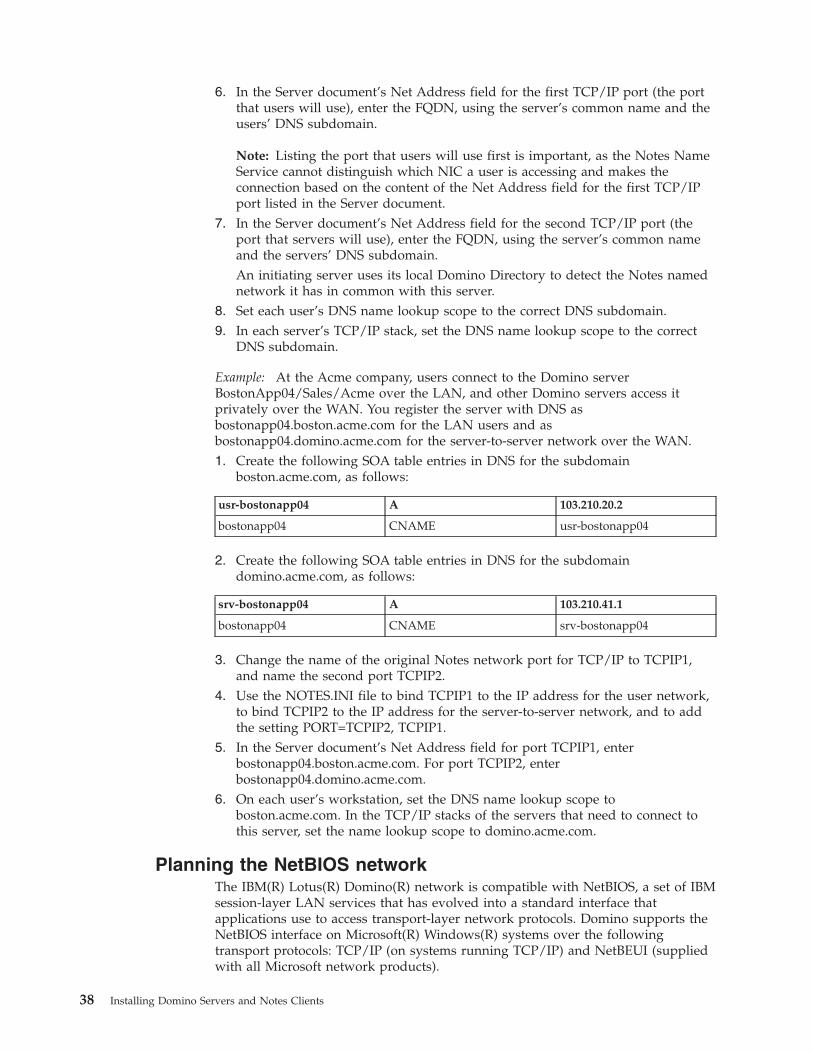
6. In the Server document’s Net Address field for the first TCP/IP port (the port
that users will use), enter the FQDN, using the server’s common name and the
users’ DNS subdomain.
Note: Listing the port that users will use first is important, as the Notes Name
Service cannot distinguish which NIC a user is accessing and makes the
connection based on the content of the Net Address field for the first TCP/IP
port listed in the Server document.
7. In the Server document’s Net Address field for the second TCP/IP port (the
port that servers will use), enter the FQDN, using the server’s common name
and the servers’ DNS subdomain.
An initiating server uses its local Domino Directory to detect the Notes named
network it has in common with this server.
8. Set each user’s DNS name lookup scope to the correct DNS subdomain.
9. In each server’s TCP/IP stack, set the DNS name lookup scope to the correct
DNS subdomain.
Example: At the Acme company, users connect to the Domino server
BostonApp04/Sales/Acme over the LAN, and other Domino servers access it
privately over the WAN. You register the server with DNS as
bostonapp04.boston.acme.com for the LAN users and as
bostonapp04.domino.acme.com for the server-to-server network over the WAN.
1. Create the following SOA table entries in DNS for the subdomain
boston.acme.com, as follows:
usr-bostonapp04 A 103.210.20.2
bostonapp04 CNAME usr-bostonapp04
2. Create the following SOA table entries in DNS for the subdomain
domino.acme.com, as follows:
srv-bostonapp04 A 103.210.41.1
bostonapp04 CNAME srv-bostonapp04
3. Change the name of the original Notes network port for TCP/IP to TCPIP1,
and name the second port TCPIP2.
4. Use the NOTES.INI file to bind TCPIP1 to the IP address for the user network,
to bind TCPIP2 to the IP address for the server-to-server network, and to add
the setting PORT=TCPIP2, TCPIP1.
5. In the Server document’s Net Address field for port TCPIP1, enter
bostonapp04.boston.acme.com. For port TCPIP2, enter
bostonapp04.domino.acme.com.
6. On each user’s workstation, set the DNS name lookup scope to
boston.acme.com. In the TCP/IP stacks of the servers that need to connect to
this server, set the name lookup scope to domino.acme.com.
Planning the NetBIOS network
The IBM(R) Lotus(R) Domino(R) network is compatible with NetBIOS, a set of IBM
session-layer LAN services that has evolved into a standard interface that
applications use to access transport-layer network protocols. Domino supports the
NetBIOS interface on Microsoft(R) Windows(R) systems over the following
transport protocols: TCP/IP (on systems running TCP/IP) and NetBEUI (supplied
with all Microsoft network products).
38 Installing Domino Servers and Notes Clients
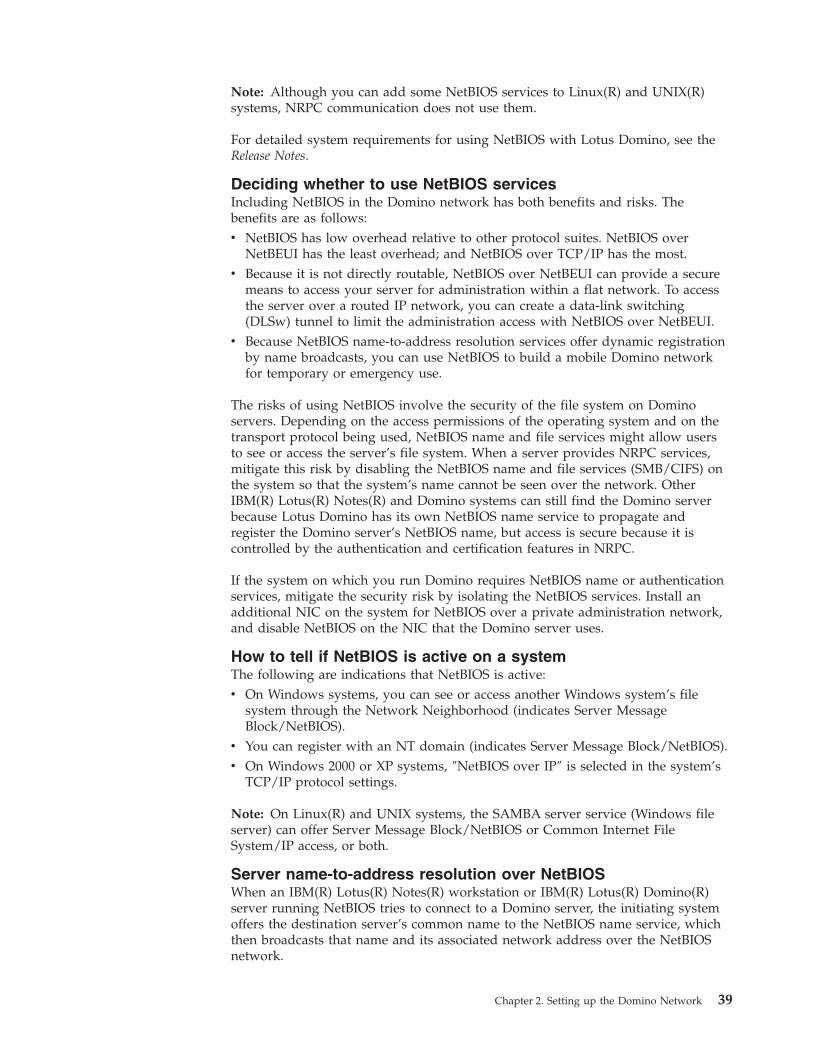
Note: Although you can add some NetBIOS services to Linux(R) and UNIX(R)
systems, NRPC communication does not use them.
For detailed system requirements for using NetBIOS with Lotus Domino, see the
Release Notes.
Deciding whether to use NetBIOS services
Including NetBIOS in the Domino network has both benefits and risks. The
benefits are as follows:
v NetBIOS has low overhead relative to other protocol suites. NetBIOS over
NetBEUI has the least overhead; and NetBIOS over TCP/IP has the most.
v Because it is not directly routable, NetBIOS over NetBEUI can provide a secure
means to access your server for administration within a flat network. To access
the server over a routed IP network, you can create a data-link switching
(DLSw) tunnel to limit the administration access with NetBIOS over NetBEUI.
v Because NetBIOS name-to-address resolution services offer dynamic registration
by name broadcasts, you can use NetBIOS to build a mobile Domino network
for temporary or emergency use.
The risks of using NetBIOS involve the security of the file system on Domino
servers. Depending on the access permissions of the operating system and on the
transport protocol being used, NetBIOS name and file services might allow users
to see or access the server’s file system. When a server provides NRPC services,
mitigate this risk by disabling the NetBIOS name and file services (SMB/CIFS) on
the system so that the system’s name cannot be seen over the network. Other
IBM(R) Lotus(R) Notes(R) and Domino systems can still find the Domino server
because Lotus Domino has its own NetBIOS name service to propagate and
register the Domino server’s NetBIOS name, but access is secure because it is
controlled by the authentication and certification features in NRPC.
If the system on which you run Domino requires NetBIOS name or authentication
services, mitigate the security risk by isolating the NetBIOS services. Install an
additional NIC on the system for NetBIOS over a private administration network,
and disable NetBIOS on the NIC that the Domino server uses.
How to tell if NetBIOS is active on a system
The following are indications that NetBIOS is active:
v On Windows systems, you can see or access another Windows system’s file
system through the Network Neighborhood (indicates Server Message
Block/NetBIOS).
v You can register with an NT domain (indicates Server Message Block/NetBIOS).
v On Windows 2000 or XP systems, ″NetBIOS over IP″ is selected in the system’s
TCP/IP protocol settings.
Note: On Linux(R) and UNIX systems, the SAMBA server service (Windows file
server) can offer Server Message Block/NetBIOS or Common Internet File
System/IP access, or both.
Server name-to-address resolution over NetBIOS
When an IBM(R) Lotus(R) Notes(R) workstation or IBM(R) Lotus(R) Domino(R)
server running NetBIOS tries to connect to a Domino server, the initiating system
offers the destination server’s common name to the NetBIOS name service, which
then broadcasts that name and its associated network address over the NetBIOS
network.
Chapter 2. Setting up the Domino Network 39
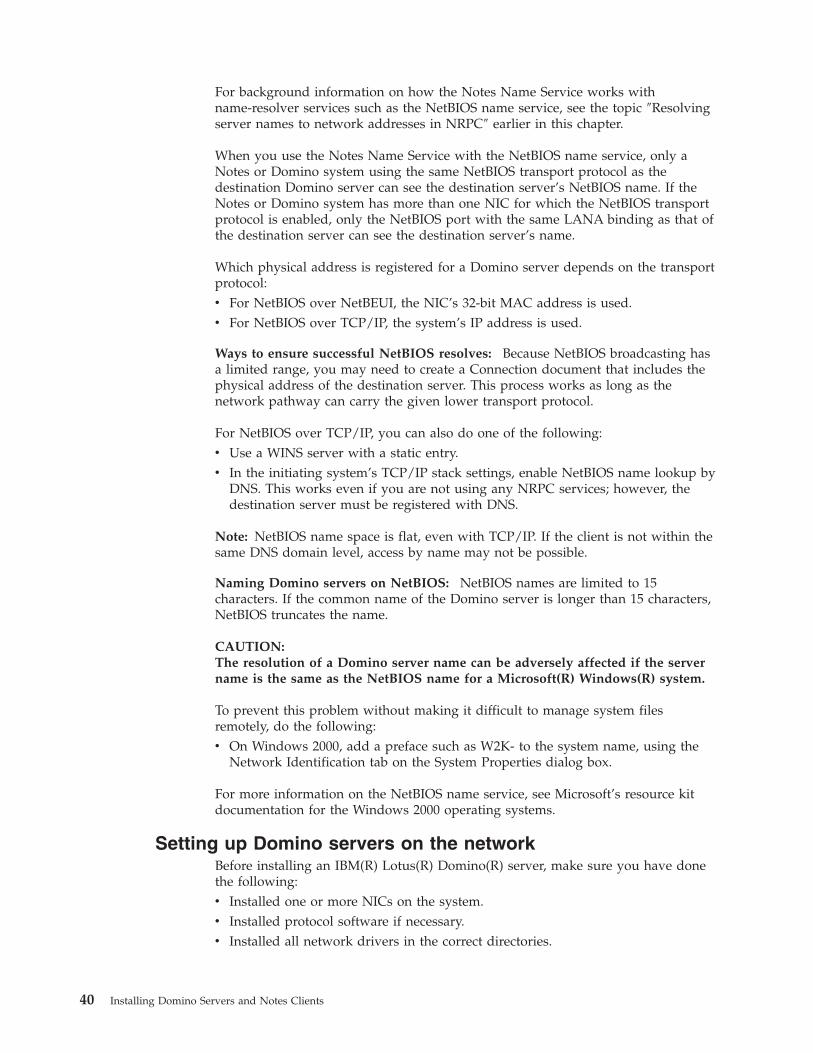
For background information on how the Notes Name Service works with
name-resolver services such as the NetBIOS name service, see the topic ″Resolving
server names to network addresses in NRPC″ earlier in this chapter.
When you use the Notes Name Service with the NetBIOS name service, only a
Notes or Domino system using the same NetBIOS transport protocol as the
destination Domino server can see the destination server’s NetBIOS name. If the
Notes or Domino system has more than one NIC for which the NetBIOS transport
protocol is enabled, only the NetBIOS port with the same LANA binding as that of
the destination server can see the destination server’s name.
Which physical address is registered for a Domino server depends on the transport
protocol:
v For NetBIOS over NetBEUI, the NIC’s 32-bit MAC address is used.
v For NetBIOS over TCP/IP, the system’s IP address is used.
Ways to ensure successful NetBIOS resolves: Because NetBIOS broadcasting has
a limited range, you may need to create a Connection document that includes the
physical address of the destination server. This process works as long as the
network pathway can carry the given lower transport protocol.
For NetBIOS over TCP/IP, you can also do one of the following:
v Use a WINS server with a static entry.
v In the initiating system’s TCP/IP stack settings, enable NetBIOS name lookup by
DNS. This works even if you are not using any NRPC services; however, the
destination server must be registered with DNS.
Note: NetBIOS name space is flat, even with TCP/IP. If the client is not within the
same DNS domain level, access by name may not be possible.
Naming Domino servers on NetBIOS: NetBIOS names are limited to 15
characters. If the common name of the Domino server is longer than 15 characters,
NetBIOS truncates the name.
CAUTION:
The resolution of a Domino server name can be adversely affected if the server
name is the same as the NetBIOS name for a Microsoft(R) Windows(R) system.
To prevent this problem without making it difficult to manage system files
remotely, do the following:
v On Windows 2000, add a preface such as W2K- to the system name, using the
Network Identification tab on the System Properties dialog box.
For more information on the NetBIOS name service, see Microsoft’s resource kit
documentation for the Windows 2000 operating systems.
Setting up Domino servers on the network
Before installing an IBM(R) Lotus(R) Domino(R) server, make sure you have done
the following:
v Installed one or more NICs on the system.
v Installed protocol software if necessary.
v Installed all network drivers in the correct directories.
40 Installing Domino Servers and Notes Clients
v Installed any network software required for the protocols. For more information,
see the vendor’s documentation.
After you install the server, you use the Domino Server Setup program to accept
network defaults or customize network settings.
After you run the setup program, you may need to complete one or more of these
tasks to finish setting up Lotus Domino on the network:
v Change the default names assigned to Notes named networks make them
consistent with actual network topography.
v Fine-tune network port setup by adding, enabling, renaming, reordering,
disabling, or deleting ports or by enabling network encryption or compression
on a port.
v Complete tasks TCP/IP or NETBIOS protocol.
Setting up Notes named networks
The IBM(R) Lotus(R) Domino(R) Server Setup program automatically places all
servers that are in a Domino domain and that run the same network protocol in
the same IBM(R) Lotus(R) Notes(R) named network (NNN). In the Server
document, the setup program assigns each NNN a default name in the format
portname network.
After you complete the Server Setup program, rename the NNN for each network
port in the Server document. It is useful if the name reflects both the location of
the network and its protocol. For example, if your company has a TCP/IP network
and has LANs in Boston and San Francisco, change the name of the NNN in
Boston to ″TCPIP Boston network,″ and change the name of the NNN in San
Francisco to ″TCPIP SF network.″
CAUTION:
Domino assumes that all servers in a NNN have a continuous LAN or WAN
connection. If this is not the case, serious delays in mail routing between servers
can occur.
To change the name of a Notes named network
1. From the Domino Administrator, select the server you just set up.
2. Click the Configuration tab.
3. Expand the Server section in the view pane.
4. Click Current Server Document.
5. Click Edit Server, and then click the Ports - Notes Network Ports tab.
6. In the Notes Network field for each port, enter a new name for the server’s
Notes named network. The name can include space characters.
7. Click Save and Close.
Fine-tuning network port setup on a server
After you install and set up an IBM(R) Lotus(R) Domino(R) server, review the list
of network ports that were enabled by the Server Setup program. Unless you
customize network settings during setup, Domino enables ports based on the
current operating system configuration. To conserve system resources, disable the
ports for protocols that you don’t need.
Use Domino Administrator to make these changes to a server’s network port
setup:
Chapter 2. Setting up the Domino Network 41
v Disable a network port
v Enable a network port
v Add a network port
v Rename a network port
v Reorder network ports
v Delete a network port
v Encrypt network data on a port
v Compress network data on a port
Note: On an IBM(R) Lotus(R) Notes(R) workstation, you use the User Preferences
dialog box to change port setup.
Enabling a network port on a server
If the server port you want to enable will be the IBM(R) Lotus(R) Notes(R)
workstation’s only means of connecting with the server, do not use this procedure.
Instead, use the Ports setting in the server’s NOTES.INI file.
If the Notes workstation already has a port in common with the server and you
still cannot connect to it, create a Connection document in Notes.
To enable a network port:
1. From the IBM(R) Lotus(R) Domino(R) Administrator or Web Administrator,
click the server on which you want to enable a port.
2. Click the Configuration tab.
3. Do one of these:
v From the Domino Administrator’s Tools pane, choose Server - Setup Ports.
v From the Web Administrator’s Port tool, choose Setup. 4. Select the port you want to enable, and then select ″Port enabled.″
5. Click TCP/IP Options, Options, or COMx Options, and specify information as
appropriate.
6. Click OK.
7. Click the Server - Status tab.
8. Do one of these so that the change takes effect:
v From the Domino Administrator’s Tools pane, choose Restart Port. (If you
can’t see the Tools pane, make sure you are in the Server Tasks view.)
v From the Web Administrator’s Ports tool, choose Restart. 9. In the Server document, click the Ports - Notes Network Ports tab, and edit
these fields as necessary:
Field Action
Port Enter the port name. Lotus Domino assigns a default port name to each
network protocol detected on the system.
Notes Network Enter the name of the Notes named network for the group of Domino
servers that are in this location and run on a particular protocol -- for
example, Boston TCPIP. Space characters are allowed in a Notes network
name.
Net Address Enter the protocol-specific name of the server -- for example,
sales.acme.com. The name you use depends on the convention of the
network protocol. This field is used to determine the address that other
servers use to access this server.
42 Installing Domino Servers and Notes Clients
Field Action
Disabled/Enabled
Choose Enabled so that other servers will know the port is enabled.
10. Save the Server document.
11. Make sure that this server is set up to replicate its Domino Directory to other
servers, or enter the preceding changes into the Server document on a server
that is set up to do the replication, or other servers will not know that they
can connect to this server over the newly enabled port.
Adding a network port on a server
If the server port you want to add will be the IBM(R) Lotus(R) Notes(R)
workstation’s only means of connecting with the server, do not use this procedure.
Instead, use the Ports setting in the server’s NOTES.INI file.
If the Notes workstation already has a port in common with the server and you
still cannot connect to it, create a Connection document in Notes.
To add a network port:
1. From the IBM(R) Lotus(R) Domino(R) Administrator or Web Administrator,
click the server on which you want to add a port.
2. Click the Configuration tab.
3. Do one of these:
v From the Domino Administrator’s Tools pane, choose Server - Setup Ports.
v From the Web Administrator’s Port tool, choose Setup. 4. Click New.
5. Specify the port name and driver, and click OK.
6. Click TCP/IP Options, LANx Options, or COMx Options, and specify
information as appropriate.
7. Click OK.
8. Click the Server - Status tab.
9. Do one of these so that the change takes effect:
v From the Domino Administrator’s Tools pane, choose Restart Port. (If you
can’t see the Tools pane, make sure you are in the Server Tasks view.)
v From the Web Administrator’s Ports tool, choose Restart.10. In the Server document, click the Ports - Notes Network Ports tab, and edit
these fields as necessary:
Field Action
Port Enter the port name. Lotus Domino assigns a default port name to each
network protocol detected on the system.
Notes Network Enter the name of the Notes named network for the group of Domino
servers that are in this location and run on a particular protocol -- for
example, Boston TCPIP. Space characters are allowed in a Notes network
name.
Net Address Enter the protocol-specific name of the server -- for example,
sales.acme.com. The name you use depends on the convention of the
network protocol. This field is used to determine the address that other
servers use to access this server.
Disabled/Enabled
Choose Enabled so that other servers will know the port is enabled.
Chapter 2. Setting up the Domino Network 43
11. Save the Server document.
12. Make sure that this server is set up to replicate its Domino Directory to other
servers, or enter the preceding changes to the Server document on a server
that is set up to do the replication, or other servers will not know that they
can connect to this server over the newly enabled port.
13. If you are adding an additional TCP/IP port on a computer with multiple
NICs, see the Binding topics:
14. If you are adding an additional NetBIOS port on a computer with multiple
NICs, see the ″Creating additional network ports for NetBIOS″ topic.
Disabling a network port on a server
Even after you disable a port, it still appears in the list of available ports so that
you can later enable it.
1. From the IBM(R) Lotus(R) Domino(R) Administrator or Web Administrator,
click the server on which you want to disable a port.
2. Click the Configuration tab.
3. Do one of these:
v From the Domino Administrator’s Tools pane, choose Server - Setup Ports.
v From the Web Administrator’s Port tool, choose Setup.4. Select the port you want to disable, and then deselect ″Port enabled.″
5. Click OK.
6. Click the Server - Status tab.
7. Do one of these so that the change takes effect:
v From the Domino Administrator’s Tools pane, choose Restart Port. (If you
can’t see the Tools pane, make sure you are in the Server Tasks view.)
v From the Web Administrator’s Ports tool, choose Restart.8. In the Server document, on the Ports - Notes Network Ports tab, specify
Disabled next to the name of the port you are disabling.
9. Save the Server document.
Renaming a network port on a server
You might want to rename a port to reflect its function. For example, suppose you
add a second TCP/IP port named SRV-TCP so that clustered servers can
communicate over a private network. Then you might want to might want to
rename the original TCP/IP port through which users will communicate with the
server USR-TCP.
1. From the IBM(R) Lotus(R) Domino(R) Administrator or Web Administrator,
click the server on which you want to rename a port.
2. Click the Configuration tab.
3. Do one of these:
v From the Domino Administrator’s Tools pane, choose Server - Setup Ports.
v From the Web Administrator’s Port tool, choose Setup. 4. Select the port you want to rename.
5. Click Rename, and then enter the new name. Do not use spaces in the port
name.
6. Click OK.
7. Click the Server - Status tab.
8. Do one of these so that the change takes effect:
44 Installing Domino Servers and Notes Clients
v From the Domino Administrator’s Tools pane, choose Restart Port. (If you
can’t see the Tools pane, make sure you are in the Server Tasks view.)
v From the Web Administrator’s Ports tool, choose Restart. 9. In the server document, on the Ports - Notes Network Ports tab, change the
name of the port to the new name and save the document.
10. If this server is the source server for any Connection documents in the
Domino Directory, click Server - Connections.
11. Select a Connection document and click Edit Connection.
12. On the Basics tab, enter the new port name in the ″Use the port(s)″ field.
13. Save and close the Connection document.
14. Repeat steps 10 to 13 for each Connection document for which this server is
the source.
Reordering network ports on a server
Changing the order in which ports are listed in the Setup Ports dialog box also
changes the Ports setting in the NOTES.INI file. List the ports in the order in
which you want them to be used -- for example, list nearest or fastest connections
first. Then when a server uses a Notes named network or a Connection document
to locate another server, the port with a close or fast connection will be used as the
preferred path.
To reorder network ports:
1. From the Domino Administrator or Web Administrator, click the server on
which you want to reorder ports.
2. Click the Configuration tab.
3. Do one of these:
v From the Domino Administrator’s Tools pane, choose Server - Setup Ports.
v From the Web Administrator’s Port tool, choose Setup. 4. Select the port that you want to relocate in the list.
5. Click the up and down arrows, as necessary to relocate the port.
6. Click OK.
7. Click the Server - Status tab.
8. Do one of these so that the change takes effect:
v From the Domino Administrator’s Tools pane, choose Restart Port. (If you
can’t see the Tools pane, make sure you are in the Server Tasks view.)
v From the Web Administrator’s Ports tool, choose Restart. 9. In the Server document, on the Ports - Notes Network Ports tab, change the
port order to the new order by cutting and pasting all the necessary fields.
10. Save the Server document.
Note: When you create a Connection document on a server, the Connection
document takes the port order from the order in the Setup Ports dialog box. Then,
whenever the server connects with the destination server, the server obtains the
port order directly from the Connection document. If you change the port order
after you create Connection documents, you must save each Connection document
again. To have different Connection documents reflect different port orders, change
the port order, save a Connection document, change the port order again, save
another Connection document, and so on.
Chapter 2. Setting up the Domino Network 45
Deleting a network port on a server
If you delete a port, it no longer appears in the list of available ports in the Setup
Ports dialog box.
1. From the IBM(R) Lotus(R) Domino(R) Administrator or Web Administrator,
click the server on which you want to delete a port.
2. Click the Configuration tab.
3. Do one of these:
v From the Domino Administrator’s Tools pane, choose Server - Setup Ports.
v From the Web Administrator’s Port tool, choose Setup. 4. Select the port you want to delete.
5. Click Delete.
6. Click OK.
7. Click the Server - Status tab.
8. Do one of these so that the change takes effect:
v From the Domino Administrator’s Tools pane, choose Restart Port. (If you
can’t see the Tools pane, make sure you are in the Server Tasks view.)
v From the Web Administrator’s Ports tool, choose Restart. 9. In the Server document, on the Ports - Notes Network Ports tab, delete the
contents of all the fields next to the name of the port you are deleting.
10. Save the Server document.
Encrypting NRPC communication on a server port
You can encrypt network data on a server’s Notes network ports to prevent the
network eavesdropping that’s possible with a network protocol analyzer. Network
encryption occurs at the application layer of a given protocol and is independent
of other forms of encryption. Network data is encrypted only while it is in transit.
After the data is received and stored, network encryption is no longer in effect.
Network data encryption occurs if you enable network data encryption on either
side of a network connection. For example, if you enable encryption on a server’s
IBM(R) Lotus(R) Notes(R) network port for TCP/IP, you don’t need to enable
encryption on the TCP/IP ports of workstations or servers that connect to the
server.
If you want the server to have one TCP/IP port for Notes traffic over the Internet
and another TCP/IP port for internal traffic over NRPC, you can encrypt the port
for Internet traffic and leave the port for internal traffic unencrypted.
Be aware that multiple high-speed encrypted connections to a server can affect
server performance adversely. Encrypting network data has little effect on client
performance. For protocols other than NRPC, you use SSL for encryption.
To encrypt NRPC communication:
1. From the IBM(R) Lotus(R) Domino(R) Administrator or Web Administrator,
choose the server for which you want to encrypt network data.
2. Click the Configuration tab.
3. Do one of these:
v From the Domino Administrator’s Tools pane, choose Server - Setup Ports.
v From the Web Administrator’s Port tool, choose Setup.4. Select the port you want to encrypt.
5. Select ″Encrypt network data.″
46 Installing Domino Servers and Notes Clients
6. Click OK.
7. Click the Server - Status tab.
8. Do one of these so that the change takes effect:
v From the Domino Administrator’s Tools pane, choose Restart Port. (If you
can’t see the Tools pane, make sure you are in the Server Tasks view.)
v From the Web Administrator’s Ports tool, choose Restart.
Compressing network data on a server port
To reduce the amount of data transmitted between an IBM(R) Lotus(R) Notes(R)
workstation and IBM(R) Lotus(R) Domino(R) server or between two Domino
servers, enable network compression for each enabled network port. Whether you
should enable compression on a network port depends on the type of network
connection and the type of data being transmitted.
For compression to work, enable it on both sides of a network connection. To
enable compression for a network port on a server, use the Server tab in the
Domino Administrator. To enable compression on network ports on Notes
workstations, from the Domino Administrator, use a setup or desktop policy
settings document or from a workstation, use the User Preferences dialog box.
WAN connections: You benefit from using network compression only if the data
being transmitted is not already compressed. In the case of a network dialup
service such as Microsoft’s Remote Access Service (RAS) which includes built-in
compression, enabling compression on Notes network ports does not provide any
additional benefit. The same is true of tasks involving data that was compressed
using the Lempel-Ziv algorithm (LZ1 compression) -- such as replicating a mail file
with a large number of compressed attachments.
LAN connections: While compression decreases bandwidth use on a LAN, you
must weigh this gain against increased memory and processor use, since network
compression works by buffering data before compressing it. The cost of
compression might be worth it only for a heavily loaded network.
To compress data on a server port:
1. From the Domino Administrator or Web Administrator, click the server for
which you want to turn on network compression.
2. Click the Configuration tab.
3. Do one of these:
v From the Domino Administrator’s Tools pane, choose Server - Setup Ports.
v From the Web Administrator’s Port tool, choose Setup.4. Select the port for which you want to turn on compression.
Note: Make sure ″Port enabled″ is selected for that port.
5. Select ″Compress network data.″
6. Click OK.
7. Click the Server - Status tab.
8. Do one of these so that the change takes effect:
v From the Domino Administrator’s Tools pane, choose Restart Port. (If you
can’t see the Tools pane, make sure you are in the Server Tasks view.)
v From the Web Administrator’s Ports tool, choose Restart.
Chapter 2. Setting up the Domino Network 47
Server setup tasks specific to TCP/IP
After you run the IBM(R) Lotus(R) Domino(R) Server Setup program, complete
these procedures:
1. Set up a secondary name server for IBM(R) Lotus(R) Notes(R) clients.
2. Change the server’s connection-time-out interval.
3. For servers that provide services to Internet clients, enable Domino support for
IPv6.
4. For configurations involving multiple NICs on a server or partitioned server:
v Reorder multiple Notes network ports for TCP/IP.
v Bind an NRPC port to an IP address.
v Bind an Internet service to an IP address.5. For a partitioned server with a single NIC for the entire computer, assign an IP
address to each server partition.
6. Change a default TCP or SSL port number.
7. Confirm that TCP/IP is configured properly.
Setting up a secondary name server
To ensure that the Notes Name Service is always available to IBM(R) Lotus(R)
Notes(R) workstations, assign a secondary name server in users’ Location
documents. You can specify a different secondary name server for each LAN
location defined. The secondary name server is used when:
v The user’s home server is down.
v The user’s home server is not running TCP/IP.
v The name of the user’s home server cannot be resolved over TCP/IP.
For examples of situations in which the name of a home server cannot be
resolved, see the topic ″Ensuring DNS resolves in advanced TCP/IP
configurations″ earlier in this chapter.
Note: You can use setup or desktop policy settings to assign secondary name
servers to groups of users.
For more information, see the Creating policies″ topic.
To set up a secondary name server:
1. On the Notes workstation, choose File - Mobile - Locations, and open the
location for which you want to designate a secondary name server.
2. Click ″Edit Location.″
3. Click the Advanced - Secondary Servers tab. (The Advanced tab appears only if
you have a location defined as ″Local Area Network″ or ″Both Dialup and
Local Area Network.″)
4. In the ″Secondary TCP/IP Notes server name″ field, enter one of the following:
v The common name of the IBM(R) Lotus(R) Domino(R) server -- for example,
Notesserver1
v The hierarchical name of the Domino server -- for example,
Notesserver1/Acme5. In the ″Secondary TCP/IP host name or address″ field, enter one of the
following:
v IP address -- for example, 197.114.33.22
v The fully qualified domain name -- for example, notesserver1.acme.com
v The simple host name -- for example, notesserver1
48 Installing Domino Servers and Notes Clients
If you specify only the host name in this field, the workstation must use the
Domain Name System (DNS) or local hosts file to locate the secondary name
server. When you specify the IP address in this field, Lotus Domino resolves
the host’s IP address without having to perform a DNS or hosts file lookup.6. Click ″Save and Close.″
Changing the TCP/IP connection-time-out interval
You might want to increase the number of seconds that IBM(R) Lotus(R)
Domino(R) waits before terminating a connection attempt. For example, increasing
the time-out interval is often necessary on a server that dials up other Domino
servers. The default time-out interval is 5 seconds.
1. From the Domino Administrator or Web Administrator, click the server for
which you want to change the time-out interval.
2. Click the Configuration tab.
3. Do one of these:
v From the Domino Administrator’s Tools pane, choose Server - Setup Ports.
v From the Web Administrator’s Port tool, choose Setup.4. Select the TCP/IP port.
5. Click ″TCPIP Options,″ and enter a number.
Note: Unless the connection is over a dial-on-demand ISDN modem, remote
bridge, or router, it is best to enter a number no greater than 10, as the IBM(R)
Lotus(R) Notes(R) client or Domino server won’t retry the connection until the
timer has expired.
6. Click OK.
Enabling support for IPv6 on a Domino server
You can enable support for IPv6 on an IBM(R) Lotus(R) Domino(R) server that
runs the IMAP, POP3, SMTP, LDAP, or HTTP service.
To enable IPv6, add this NOTES.INI setting to the server’s NOTES.INI file:
TCP_EnableIPV6=1
Reordering multiple server ports for TCP/IP
If an IBM(R) Lotus(R) Domino(R) server has multiple IBM(R) Lotus(R) Notes(R)
network ports for TCP/IP, the order in which these ports are listed in the
NOTES.INI file and the Server document affects how other servers and
workstations connect to this server. The Ports setting in the NOTES.INI file
determines which port a workstation or server tries first. In the absence of other
settings that bind an NRPC, POP3, IMAP, SMTP, or LDAP service to an IP address,
all of these services will try to use the port listed first in the NOTES.INI file.
Server-to-server communication: If you add a second Notes network port for
TCP/IP in order to isolate server-to-server communication -- for example, a private
network for cluster replication -- list this port first in the NOTES.INI file so that
server-to-server traffic will tend to occur over this connection, thus decreasing the
data flow on the port for the user network. To change the port order in the
NOTES.INI file, use the Port Setup dialog box.
Note: If you are setting up a private cluster network and do not list the server
port first, you must add the setting Server_Cluster_Default_Port to the NOTES.INI
file. The disadvantage of adding this setting is that if the server encounters a
problem connecting over this port, it will not try another port, and replication will
not occur.
Chapter 2. Setting up the Domino Network 49
Workstation-to-server communication: If a Domino server has a port for
workstations to connect on -- for example, over a LAN -- and another port for
servers to connect on -- for example, over a WAN -- list the workstation port first
in the Server document so that users see only servers on the LAN when they
choose File - Application - Open.
To reorder the ports in the Server document, click the Ports - Notes Network Ports
tab, and edit the fields in the table.
Binding an Internet service to an IP address
If the IBM(R) Lotus(R) Domino(R) server has multiple Notes network ports for
TCP/IP (NRPC ports) and the server is also hosting the SMTP, POP3, IMAP, LDAP,
Domino IIOP (DIIOP) or Internet Cluster Manager (ICM) service, you must specify
the NRPC port that you want the service to use in the NOTES.INI file. If you do
not specify an NRPC port for an Internet service, by default the service will use
the port listed first in the Ports setting in the NOTES.INI file. You can specify the
same NRPC port for multiple Internet services.
For the Domino Web server (HTTP service), you use the Server document to bind
HTTP to a host name IP address.
To bind the SMTP, POP3, IMAP, LDAP, DIIOP, or ICM service:
1. Bind each NRPC port to an IP address.
2. In the NOTES.INI file, specify the appropriate NRPC port for each Internet
service as follows:
Note: If you don’t know the port name to enter for an NRPC port, open the
Server document, click the Ports - Notes Network Ports tab, and look at the
ports associated with the TCP protocol.
Service Action
POP3 Enter POP3NotesPort=port namewhere port name is the name of the NRPC
port that you want to link the service to.
IMAP Enter IMAPNotesPort=port namewhere port name is the name of the
NRPC port that you want to link the service to.
SMTP Enter SMTPNotesPort=port namewhere port name is the name of the
NRPC port that you want to link the service to.
LDAP Enter LDAPNotesPort=port namewhere port name is the name of the
NRPC port that you want to link the service to.
DIIOP Enter DIIOPNotesPort=port namewhere port name is the name of the
NRPC port that you want to link the service to.
ICM Enter ICMNotesPort=port namewhere port name is the name of the NRPC
port that you want to link the service to.
Note: For more information on DIIOPNotesPort, visit www.bm.com/support and
search for Technical Note # 1236597, ″Using the DIIOPNotesPort notes.ini variable.″
Example: The following example shows the lines (in bold) to add to the Ports
section of the NOTES.INI file to bind two NRPC ports to their IP addresses and to
specify the second NRPC port for the SMTP service.
Ports=TCPIP, TCP1P2
TCPIP=TCP, 0, 15, 0
TCPIP_TCPIPAddress=0,10.33.52.1
50 Installing Domino Servers and Notes Clients
TCPIP2=TCP, 0, 15, 0
TCPIP2_TCPIPAddress=0, 209.98.76.10
SMTPNotesPort=TCPIP2
Note: Domino adds the lines that are not bold when you use either the Domino
Server Setup program or the Domino Administrator’s Setup Ports dialog box to
enable a port.
To bind the HTTP service:
1. On the Internet Protocols - HTTP tab of the Server document, enter one or
more IP addresses or FQDNs for the server in the ″Host name(s)″ field.
2. Select Enabled in the ″Bind to host name″ field.
Note: If the server is a partitioned server and has Web sites configured with
separate IP addresses, or has virtual servers (Domino 5) configured for one or
more partitions, enter the partition’s IP address, and each Web site or virtual
server’s IP address in the ″Host name(s)″ field, separated by semicolons.
Alternatively, you can use FQDNs in this field. Do not list additional Web sites and
virtual hosts that have IP addresses that are already listed in this field.
Example 1 -- Server partition with Web sites: The partition’s host name is app01
and there are two Web sites configured for it: sales.acme.com and
accounting.acme.com. The Web site sales.acme.com uses the same IP address as the
partition, and the Web site accounting.acme.com has its own IP address. Enter the
following in the ″Host name(s)″ field:
9.88.43.113;9.88.46.110
where 9.88.43.113 is the IP address for both the partition and the Web site
sales.acme.com and 9.88.46.110 is the IP address for the Web site
accounting.acme.com.
Example 2 -- Server partition with virtual servers: The partition’s host name is
app01 and there are two virtual servers (9.88.46.114 and 9.88.46.115) and one
virtual host configured for it. Enter the following in the ″Host name(s)″ field:
9.88.43.113;9.88.46.114;9.88.46.115
where 9.88.43.113 is the IP address for both the partition and the virtual host
sales.acme.com, 9.88.46.114 is the IP address for virtual server 1
(accounting.acme.com), and 9.88.46.115 is the IP address for virtual server 2
(northeastsales.acme.com).
Binding an NRPC port to an IP address
By default, all TCP/IP-based services on an IBM(R) Lotus(R) Domino(R) server
listen for network connections on all NICs and on all configured IP addresses on
the server. If you have enabled more than one Notes network port for TCP/IP
(TCP port for NRPC) on either a single Domino server or a Domino partitioned
server, you must associate the NRPC ports and IP addresses by binding each port
to an address.
To bind an NRPC port to an IP address: When setting the NOTES.INI variables
for port mapping, do not include a zone in a port mapped address. The zone is
only valid locally.
1. For each IP address, make sure you have added a Notes port TCP/IP. Also
make sure that each port has a unique name.
Chapter 2. Setting up the Domino Network 51
2. In the NOTES.INI file, confirm that these lines appear for each port that you
added:
Ports=TCPIPportname
TCPIPportname=TCP, 0, 15, 0
Where TCPIPportname is the port name you defined.
3. For each port that you want to bind to an IP address, add this line to the
NOTES.INI file:
TCPIPportname_TCPIPAddress=0,IPaddress
Where IPaddress is the IP address of the specific NIC.
For example:
TCPIP_TCPIPAddress=0,130.123.45.1
Note: For IPv6, enclose the address in square brackets, as it contains colons.
For example:
TCPIP_TCPIPAddress=0,[fe80::290:27ff:fe43:16ac]
4. (Optional) To help you later remember the function of each port, add the
default TCP port number for NRPC to the end of the line you entered in Step
3, as follows:
:1352
CAUTION:
Do not change the assigned TCP port number unless you have a way to
redirect the inbound connection with Domino port mapping or a firewall
that has port address translation (PAT).
Assigning separate IP addresses to partitions on a system with a
single NIC
If you use a single NIC with multiple IP addresses, you must complete additional
configuration instructions, which are based on your operating system, for each
server partition.
Note: Using separate IP addresses with a single NIC can have a negative impact
on the computer’s I/O performance.
IBM AIX or Linux: You must be logged on as root.
To enable an IP address in IBM AIX:
1. Add one entry in the local host names file /etc/hosts for each server partition.
The entry for the partition that uses the computer host name should already
exist.
2. To enable an IP address, enter this command under the heading ″Part 2
-Traditional Configuration″ in the startup file (etc/rc.net). Do not enter this
command for the partition that uses the computer host name.
/usr/sbin/ifconfig interface alias server_name
where interface is the name of the network interface, and server_name is the
name of the partitioned server -- for example:
/usr/sbin/ifconfig en0 alias server2
3. Restart the system if necessary, and test the configuration. From another
computer, use the ping command with the server names. To show the network
status, use the netstat command.
To disable an IP address in IBM AIX or Linux: Do not remove the IP address of
a server partition that uses the computer host name as its server name.
52 Installing Domino Servers and Notes Clients
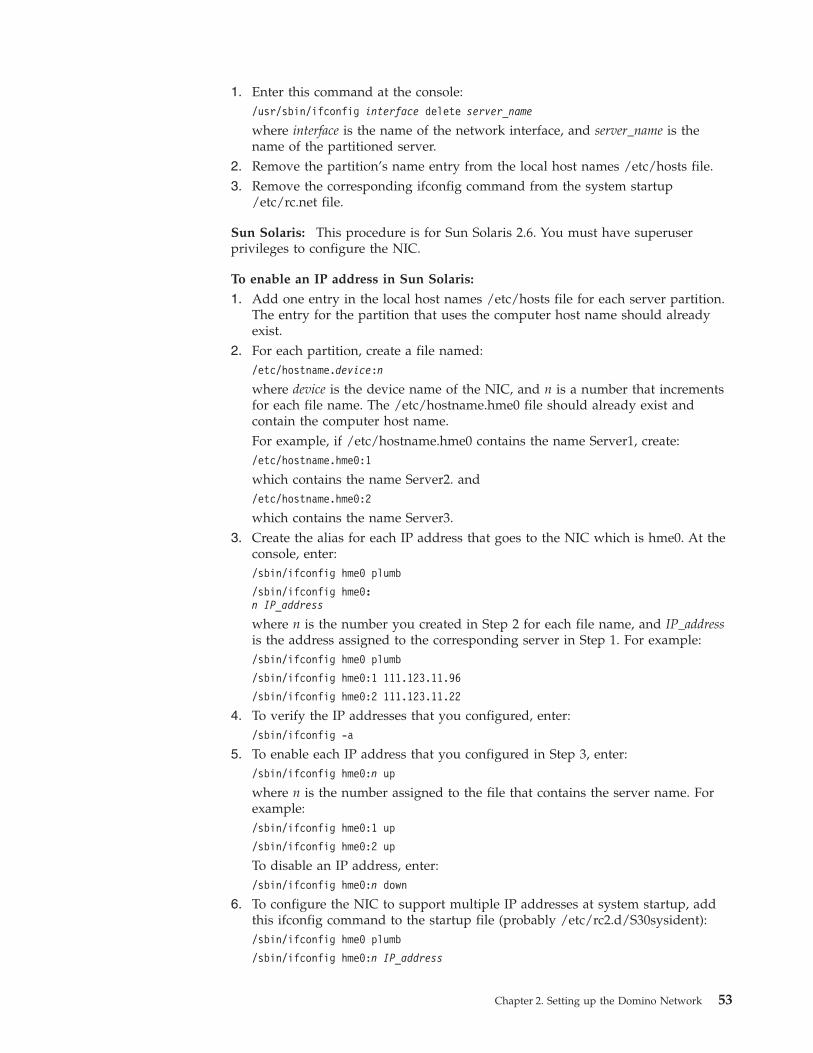
1. Enter this command at the console:
/usr/sbin/ifconfig interface delete server_name
where interface is the name of the network interface, and server_name is the
name of the partitioned server.
2. Remove the partition’s name entry from the local host names /etc/hosts file.
3. Remove the corresponding ifconfig command from the system startup
/etc/rc.net file.
Sun Solaris: This procedure is for Sun Solaris 2.6. You must have superuser
privileges to configure the NIC.
To enable an IP address in Sun Solaris:
1. Add one entry in the local host names /etc/hosts file for each server partition.
The entry for the partition that uses the computer host name should already
exist.
2. For each partition, create a file named:
/etc/hostname.device:n
where device is the device name of the NIC, and n is a number that increments
for each file name. The /etc/hostname.hme0 file should already exist and
contain the computer host name.
For example, if /etc/hostname.hme0 contains the name Server1, create:
/etc/hostname.hme0:1
which contains the name Server2. and
/etc/hostname.hme0:2
which contains the name Server3.
3. Create the alias for each IP address that goes to the NIC which is hme0. At the
console, enter:
/sbin/ifconfig hme0 plumb
/sbin/ifconfig hme0:
n IP_address
where n is the number you created in Step 2 for each file name, and IP_address
is the address assigned to the corresponding server in Step 1. For example:
/sbin/ifconfig hme0 plumb
/sbin/ifconfig hme0:1 111.123.11.96
/sbin/ifconfig hme0:2 111.123.11.22
4. To verify the IP addresses that you configured, enter:
/sbin/ifconfig -a
5. To enable each IP address that you configured in Step 3, enter:
/sbin/ifconfig hme0:n up
where n is the number assigned to the file that contains the server name. For
example:
/sbin/ifconfig hme0:1 up
/sbin/ifconfig hme0:2 up
To disable an IP address, enter:
/sbin/ifconfig hme0:n down
6. To configure the NIC to support multiple IP addresses at system startup, add
this ifconfig command to the startup file (probably /etc/rc2.d/S30sysident):
/sbin/ifconfig hme0 plumb
/sbin/ifconfig hme0:n IP_address
Chapter 2. Setting up the Domino Network 53

/sbin/ifconfig hme0:n up
where n corresponds to the number you created in Step 2 for each file name,
and IP_address is the address assigned to the corresponding server in Step 1.
7. Test the configuration. From another computer, use the ping command with the
server names. To show the network status, use the netstat command.
To disable an IP address in Sun Solaris: Do not remove the IP address of the
server partition that uses the computer host name as its server name.
1. To disable the IP address, type:
/sbin/ifconfig hme0:n down
where n is the number assigned to the file that contains the server name. For
example:
/sbin/ifconfig hme0:1 down
2. Remove the corresponding /etc/hostname.hme0:n file. For example, to remove
Server2, remove the /etc/hostname.hme0:1 file, which contains the name
Server2.
3. Remove the partition’s server name entry from the local host names /etc/hosts
file.
Windows: To configure a single NIC for multiple IP addresses on Microsoft(R)
Windows(R) systems, do the following:
v For Windows 2000, use the Network and Dial-up Connections icon on the
Control Panel, and then the Local Area Connection icon. Click the Properties
button. For more information, see the Windows 2000 documentation.
Configuring a partitioned server for one IP address and port
mapping
To configure server partitions to share the same IP address and the same NIC, you
use port mapping. With port mapping, you assign a unique TCP port number to
each server partition and designate one partition to perform port mapping. The
port-mapping partition listens on port 1352 and redirects IBM(R) Lotus(R) Notes(R)
and IBM(R) Lotus(R) Domino(R) connection requests to the other partitions.
If the port-mapping partition fails, existing sessions on the other partitions remain
connected. In most cases, Notes clients will not be able to open new sessions on
any of the partitions. However, because each Notes client maintains information in
memory about recent connections, including those redirected by the port-mapping
partition, a client may be able to connect to a partition even when the
port-mapping partition is not running. A client or remote server that has a
Connection document containing both the IP address and the assigned port can
always access the port-mapping partition.
Because the port-mapping partition requires extra system resources, consider
dedicating the partition to this task only. To do this, remove all other server tasks,
such as mail routing and replication, from the partition’s NOTES.INI file.
Port mapping works for NRPC communication only. However, you can use the
Server document in the Domino Directory to configure IMAP, LDAP, and POP3
services and Domino Web servers to use unique ports for communication. When
you do, you must make the port number available to users when they try to
connect to the servers.
54 Installing Domino Servers and Notes Clients
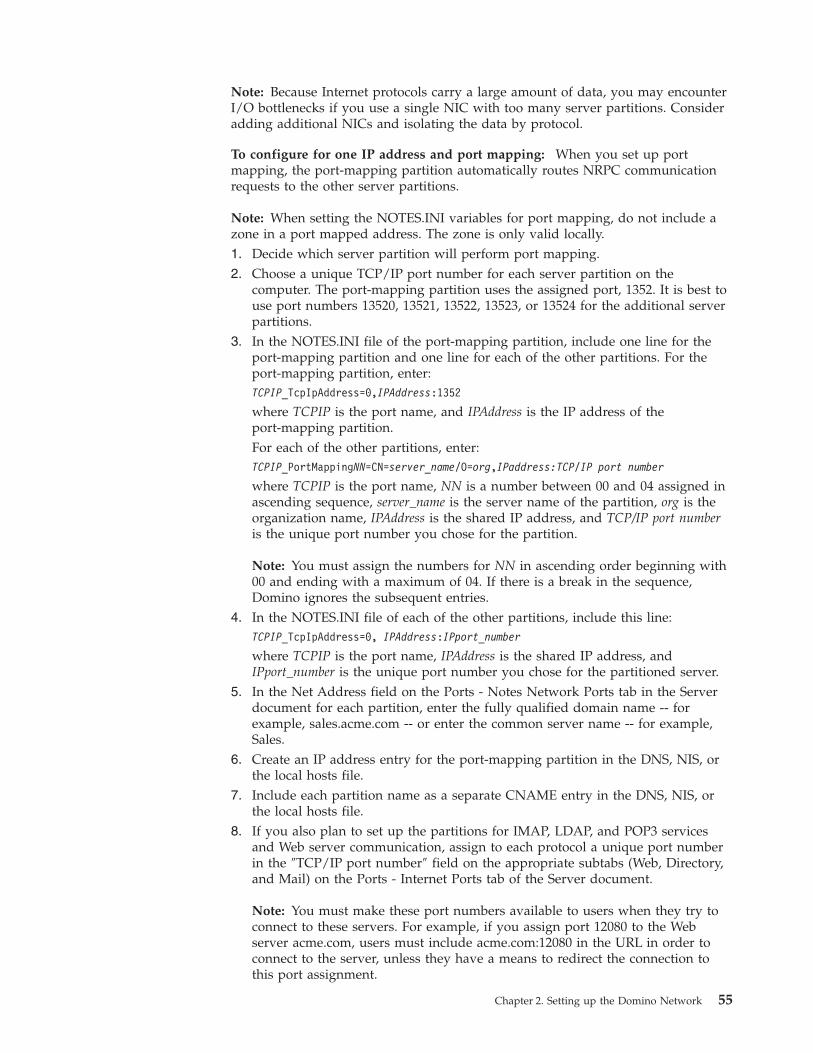
Note: Because Internet protocols carry a large amount of data, you may encounter
I/O bottlenecks if you use a single NIC with too many server partitions. Consider
adding additional NICs and isolating the data by protocol.
To configure for one IP address and port mapping: When you set up port
mapping, the port-mapping partition automatically routes NRPC communication
requests to the other server partitions.
Note: When setting the NOTES.INI variables for port mapping, do not include a
zone in a port mapped address. The zone is only valid locally.
1. Decide which server partition will perform port mapping.
2. Choose a unique TCP/IP port number for each server partition on the
computer. The port-mapping partition uses the assigned port, 1352. It is best to
use port numbers 13520, 13521, 13522, 13523, or 13524 for the additional server
partitions.
3. In the NOTES.INI file of the port-mapping partition, include one line for the
port-mapping partition and one line for each of the other partitions. For the
port-mapping partition, enter:
TCPIP_TcpIpAddress=0,IPAddress:1352
where TCPIP is the port name, and IPAddress is the IP address of the
port-mapping partition.
For each of the other partitions, enter:
TCPIP_PortMappingNN=CN=server_name/O=org,IPaddress:TCP/IP port number
where TCPIP is the port name, NN is a number between 00 and 04 assigned in
ascending sequence, server_name is the server name of the partition, org is the
organization name, IPAddress is the shared IP address, and TCP/IP port number
is the unique port number you chose for the partition.
Note: You must assign the numbers for NN in ascending order beginning with
00 and ending with a maximum of 04. If there is a break in the sequence,
Domino ignores the subsequent entries.
4. In the NOTES.INI file of each of the other partitions, include this line:
TCPIP_TcpIpAddress=0, IPAddress:IPport_number
where TCPIP is the port name, IPAddress is the shared IP address, and
IPport_number is the unique port number you chose for the partitioned server.
5. In the Net Address field on the Ports - Notes Network Ports tab in the Server
document for each partition, enter the fully qualified domain name -- for
example, sales.acme.com -- or enter the common server name -- for example,
Sales.
6. Create an IP address entry for the port-mapping partition in the DNS, NIS, or
the local hosts file.
7. Include each partition name as a separate CNAME entry in the DNS, NIS, or
the local hosts file.
8. If you also plan to set up the partitions for IMAP, LDAP, and POP3 services
and Web server communication, assign to each protocol a unique port number
in the ″TCP/IP port number″ field on the appropriate subtabs (Web, Directory,
and Mail) on the Ports - Internet Ports tab of the Server document.
Note: You must make these port numbers available to users when they try to
connect to these servers. For example, if you assign port 12080 to the Web
server acme.com, users must include acme.com:12080 in the URL in order to
connect to the server, unless they have a means to redirect the connection to
this port assignment.
Chapter 2. Setting up the Domino Network 55
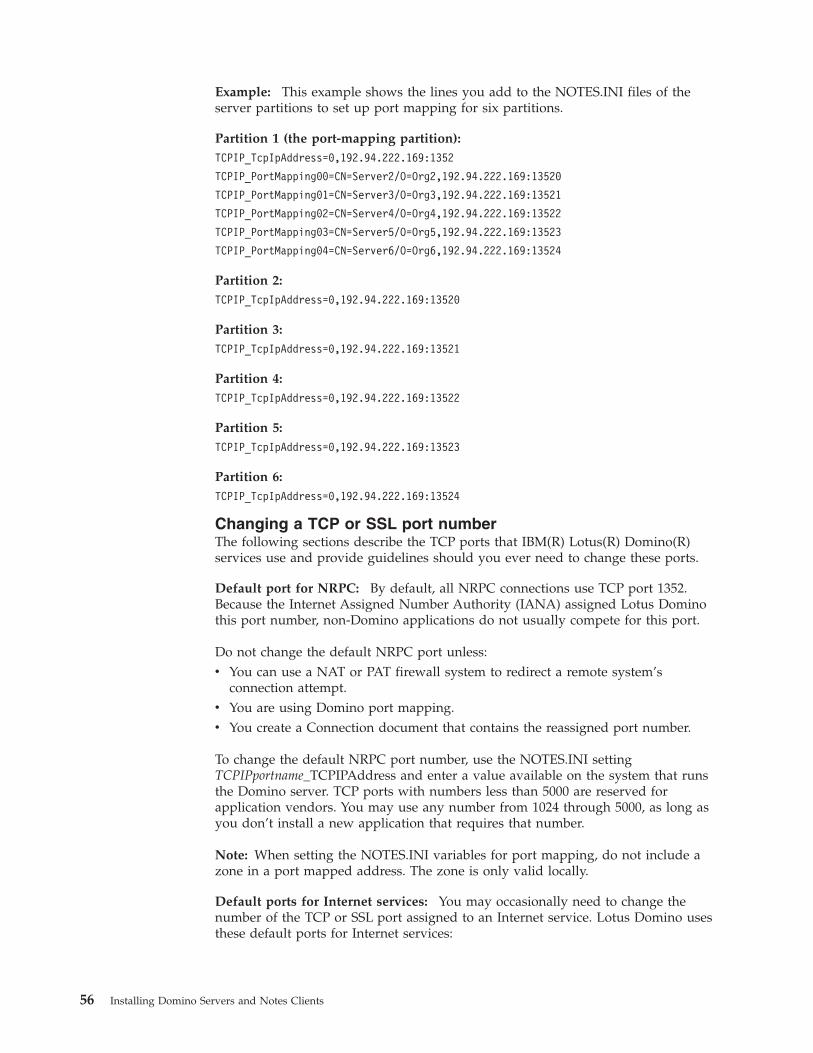
Example: This example shows the lines you add to the NOTES.INI files of the
server partitions to set up port mapping for six partitions.
Partition 1 (the port-mapping partition):
TCPIP_TcpIpAddress=0,192.94.222.169:1352
TCPIP_PortMapping00=CN=Server2/O=Org2,192.94.222.169:13520
TCPIP_PortMapping01=CN=Server3/O=Org3,192.94.222.169:13521
TCPIP_PortMapping02=CN=Server4/O=Org4,192.94.222.169:13522
TCPIP_PortMapping03=CN=Server5/O=Org5,192.94.222.169:13523
TCPIP_PortMapping04=CN=Server6/O=Org6,192.94.222.169:13524
Partition 2:
TCPIP_TcpIpAddress=0,192.94.222.169:13520
Partition 3:
TCPIP_TcpIpAddress=0,192.94.222.169:13521
Partition 4:
TCPIP_TcpIpAddress=0,192.94.222.169:13522
Partition 5:
TCPIP_TcpIpAddress=0,192.94.222.169:13523
Partition 6:
TCPIP_TcpIpAddress=0,192.94.222.169:13524
Changing a TCP or SSL port number
The following sections describe the TCP ports that IBM(R) Lotus(R) Domino(R)
services use and provide guidelines should you ever need to change these ports.
Default port for NRPC: By default, all NRPC connections use TCP port 1352.
Because the Internet Assigned Number Authority (IANA) assigned Lotus Domino
this port number, non-Domino applications do not usually compete for this port.
Do not change the default NRPC port unless:
v You can use a NAT or PAT firewall system to redirect a remote system’s
connection attempt.
v You are using Domino port mapping.
v You create a Connection document that contains the reassigned port number.
To change the default NRPC port number, use the NOTES.INI setting
TCPIPportname_TCPIPAddress and enter a value available on the system that runs
the Domino server. TCP ports with numbers less than 5000 are reserved for
application vendors. You may use any number from 1024 through 5000, as long as
you don’t install a new application that requires that number.
Note: When setting the NOTES.INI variables for port mapping, do not include a
zone in a port mapped address. The zone is only valid locally.
Default ports for Internet services: You may occasionally need to change the
number of the TCP or SSL port assigned to an Internet service. Lotus Domino uses
these default ports for Internet services:
56 Installing Domino Servers and Notes Clients

Service Default TCP port Default SSL port
POP3 110 995
IMAP 143 993
LDAP 389 636
SMTP inbound 25 465
SMTP outbound 25 465
HTTP 80 443
IIOP 63148 63149
Server Controller N/A 2050
Server setup tasks specific to NetBIOS
After you run the IBM(R) Lotus(R) Domino(R) Server Setup program, complete
these procedures:
1. Use the Domino Administrator to define a NetBIOS LANA number for the
NetBIOS port.
2. If you want the server to connect to different segments of a NetBIOS network,
create one or more additional Notes network ports for NetBIOS.
Defining a NetBIOS LANA number for a Notes network port
To run NetBIOS on a server, after you complete the Server Setup program, you
must determine the NetBIOS LANA number to which the Notes network port will
be bound. The NetBIOS LANA number is a logical number that represents a
NetBIOS transport protocol stack on a NIC. You must know which transport
protocol IBM(R) Lotus(R) Notes(R) workstations and other IBM(R) Lotus(R)
Domino(R) servers are using for NetBIOS within your workgroup or company.
If the computer running the Domino server has more than one NIC running the
same protocol stack, you must define a different NetBIOS LANA number for each
Notes network port for NetBIOS.
NetBIOS systems using the same transport protocol should be in the same Notes
named network. If you create Connection documents on the server, the LAN port
you select must also be for the same transport protocol.
To define a LANA number in Lotus Domino:
1. From the Domino Administrator or Web Administrator, click the server for
which you want to define a LANA number.
2. Click the Configuration tab.
3. Do one of these:
v From the Domino Administrator’s Tools pane, choose Server - Setup Ports.
v From the Web Administrator’s Port tool, choose Setup.4. Select the Portname port, where Portname is the name of the NetBIOS port for
which you are defining a LANA number.
5. Click ″Portname Options,″ and choose Manual.
6. Enter the correct LANA number.
7. Click OK.
Chapter 2. Setting up the Domino Network 57
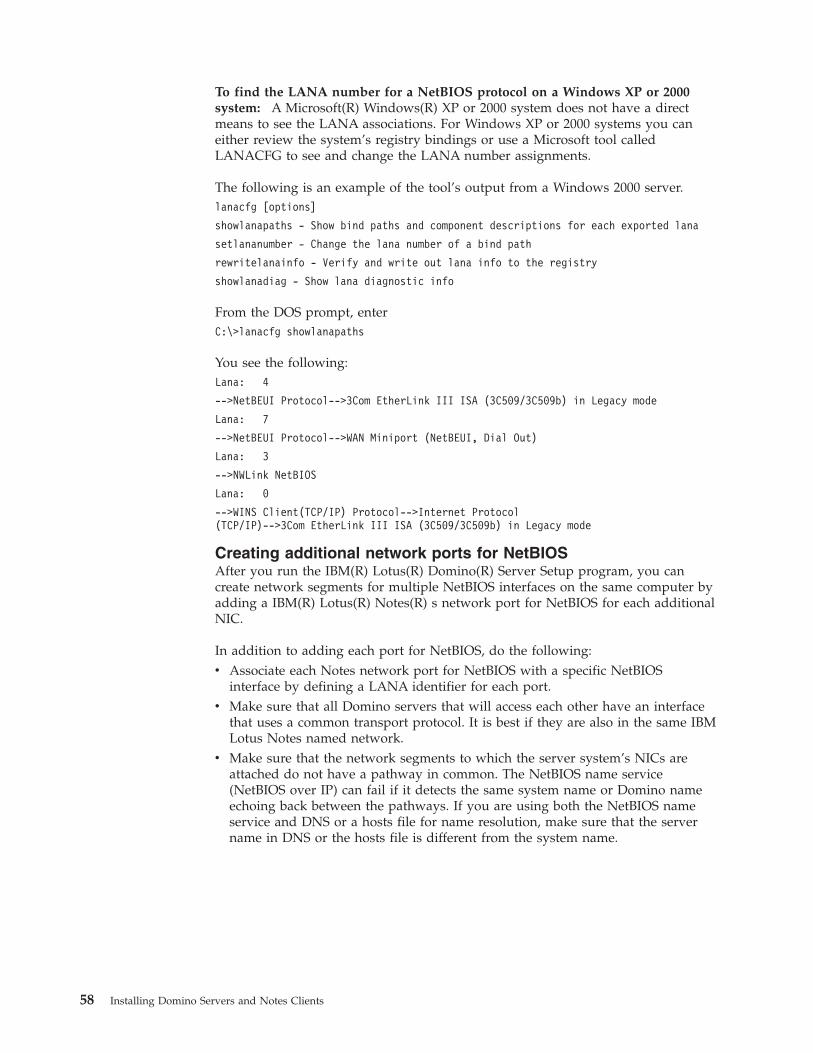
To find the LANA number for a NetBIOS protocol on a Windows XP or 2000
system: A Microsoft(R) Windows(R) XP or 2000 system does not have a direct
means to see the LANA associations. For Windows XP or 2000 systems you can
either review the system’s registry bindings or use a Microsoft tool called
LANACFG to see and change the LANA number assignments.
The following is an example of the tool’s output from a Windows 2000 server.
lanacfg [options]
showlanapaths - Show bind paths and component descriptions for each exported lana
setlananumber - Change the lana number of a bind path
rewritelanainfo - Verify and write out lana info to the registry
showlanadiag - Show lana diagnostic info
From the DOS prompt, enter
C:\>lanacfg showlanapaths
You see the following:
Lana: 4
-->NetBEUI Protocol-->3Com EtherLink III ISA (3C509/3C509b) in Legacy mode
Lana: 7
-->NetBEUI Protocol-->WAN Miniport (NetBEUI, Dial Out)
Lana: 3
-->NWLink NetBIOS
Lana: 0
-->WINS Client(TCP/IP) Protocol-->Internet Protocol
(TCP/IP)-->3Com EtherLink III ISA (3C509/3C509b) in Legacy mode
Creating additional network ports for NetBIOS
After you run the IBM(R) Lotus(R) Domino(R) Server Setup program, you can
create network segments for multiple NetBIOS interfaces on the same computer by
adding a IBM(R) Lotus(R) Notes(R) s network port for NetBIOS for each additional
NIC.
In addition to adding each port for NetBIOS, do the following:
v Associate each Notes network port for NetBIOS with a specific NetBIOS
interface by defining a LANA identifier for each port.
v Make sure that all Domino servers that will access each other have an interface
that uses a common transport protocol. It is best if they are also in the same IBM
Lotus Notes named network.
v Make sure that the network segments to which the server system’s NICs are
attached do not have a pathway in common. The NetBIOS name service
(NetBIOS over IP) can fail if it detects the same system name or Domino name
echoing back between the pathways. If you are using both the NetBIOS name
service and DNS or a hosts file for name resolution, make sure that the server
name in DNS or the hosts file is different from the system name.
58 Installing Domino Servers and Notes Clients
Chapter 3. Installing and Setting Up Domino Servers
This chapter describes how to plan a hierarchical name tree and how to install, set
up, and register IBM(R) Lotus(R) Domino(TM) servers.
Installing and setting up Domino servers
Before you install and set up the first IBM(R) Lotus(R) Domino(R) server, you must
plan server and organizational naming and security. In addition, you must
understand your existing network configuration and know how Domino will fit
into the network. If you are adding an additional server to an existing Domino
infrastructure, you must have already registered the server and its server ID and
password must be available.
Note: If you plan to run multiple language versions of Domino with Web
browsers, install the International English version of the Domino server as the base
Domino installation. Next, install other language packs. Installing the Domino
server in English first prevents error messages from displaying in other languages,
even when you have selected English as the language preference in your Browser
options.
For information on system requirements, see the Release Notes.
Domino server evaluation software license
You also have the option of installing an evaluation copy of the Domino server
instead of the traditional production copy. The evaluation copy can be used for a
limited number of days.
To install and set up a server
Installing a Domino server -- that is, copying the server program files onto the
designated machine -- is the first part of deploying a server. The second part is
using the Domino server setup program to configure the server.
Note: Do not unpack installation kit files to the same directory to which you
install the installation files. Specify a unique directory path for each set of
installation files.
1. Choose a name for the server. Refer to the name that you created based on
your company’s structure.
2. Identify the function of the server -- for example, will it be a mail server or an
application server? The function of the server determines which tasks to enable
during configuration.
3. Decide where to locate the server physically and decide who administers it.
4. Decide whether the server is part of an existing Domino domain or is the first
server in a new Domino domain.
5. If this is the first server in a Domino domain, do the following:
a. Install the server program files.
b. Use the Domino server setup program to set up the server.
c. Complete network-related setup.
59
d. Create organization certifier IDs and organizational unit certifier IDs as
required by the hierarchical name scheme.
e. Distribute certifier IDs to administrators.
f. Implement Domino security.6. If this server is part of an existing Domino domain, do the following:
a. Use the Domino Administrator to register the server.
b. Install the server program files on each additional server.
c. Use the Domino server setup program to set up each additional server.7. Perform additional configuration procedures, based on the type of services,
tasks, and programs that you want to run on this server.
Entering system commands
Some of the procedures that follow include instructions for entering commands at
the system command prompt. The instructions tell you to enter the command from
the ″Domino program directory″ or ″Notes program directory,″ depending on
whether you are performing the procedure on an IBM(R) Lotus(R) Domino(R)
server or an IBM(R) Lotus(R) Notes(R) client. Before entering commands, make
sure you understand the following definitions of these terms as they apply to your
operating system.
Note: See the Release Notes for specifics on default and recommended installation
directories.
Windows operating systems
On a Domino server on Microsoft(R) Windows(R), the Domino program directory
is C:\Program Files\IBM\Lotus\Domino, unless you installed the program files to
a different location. On a Notes client, the Notes program directory is C:\Program
Files\IBM\Lotus\Notes, unless you installed the program files to a different
location.
UNIX operating systems
On a Domino server on UNIX(R), the location of the server program files is
different from the directory you use for entering commands. Always use the
following path for entering commands:
lotus/bin/server
The ″server’″ portion of the path is a script that initializes a UNIX shell so that
Domino programs can run on UNIX.
The default location of the lotus directory is /opt/ibm/lotus, but you can change it
to any location, for example, /local/lotus or /usr/lotus.
Using the Domino server with a trial evaluation license
You can install IBM(R) Lotus(R) Domino(R) with a trial evaluation license or with
the traditional production license. There is a production certificate and an
evaluation certificate and each has its own install kit. The first time the server is
brought up without a production license, a trial license is automatically assigned.
The server console displays a message indicating that Domino does not have a
production license, and a temporary evaluation license has been created for you to
use for 60 days.
During Domino server startup, Domino checks whether you are using a trial
version or the production version. If it is a production server install, the server
60 Installing Domino Servers and Notes Clients
startup process continues as usual. If it is an evaluation version, Domino checks
whether the evaluation period has expired. If the evaluation process has not
expired, the console displays this message:
W A R N I N G
You are using a temporary license.
You need to enroll IBM Lotus Domino within <number> days.
If the evaluation process has expired, the server startup is terminated and the
console displays this message:
Your license is expired.
You should now install a production version of the product.
You can now install the production Domino server.
Domino server installation
The first step in deploying an IBM(R) Lotus(R) Domino(R) server is installation, or
copying the program files to the system’s hard drive.
To install Domino, see the following procedures:
v Installing Domino on Microsoft(R) Windows(R) systems
v Installing Domino on UNIX(R) systems
v Installing Domino on IBM i
v Using silent server installation to install Domino on Windows or UNIX systems
v Installing Domino on Linux on IBM(R) System z systems
v Using silent server install on Linux on System z systems
Installing Domino on Windows systems
You can install IBM(R) Lotus(R) Domino(R) on a Microsoft(R) Windows(R) system
by following this procedure, or you can perform a silent installation of a local
server.
1. Before you install the Domino server program files on a Windows system, do
the following:
v Make sure that the required hardware and software components are in
place and working.
v Read the Release Notes for operating system and network protocol
requirements and for any last-minute changes or additions to the
documentation.
v Temporarily disable any screen savers and turn off any virus-detection
software.
v Before running any Domino setup command, be sure to complete any
pending reboot actions you may have from installing other applications.
v Make sure that all other applications are closed. Otherwise, you may
corrupt any shared files, and the Install program may not run properly.
v If you are upgrading to Domino from a previous release, see the upgrade
information available in IBM(R) Redbooks(R) at http://www.redbooks.ibm.com and in the Domino Administrator help at
http://www.ibm.com/developerworks/lotus/documentation/domino, as
well as the Release Notes. 2. Run the install program (SETUP.EXE), which is on the installation CD.
3. Read the Welcome screen, and click Next. Then read the License Agreement
and click I accept the terms in the license agreement, and then click Next.
Chapter 3. Installing and Setting Up Domino Servers 61
4. Choose the program directory, and choose whether you are installing
partitioned servers. Click Next.
5. Specify the data directory in which to copy the software. If you are installing
a partitioned server, specify a data directory for each partition.
Note: For partitions, use the Add button to add each of the data directories to
the list. If they are not added to the list they will not be installed.
6. Select the server type you acquired:
v Domino Utility Server -- Installs a Domino server that provides application
services only, with support for Domino clusters. The Domino Utility Server
removes client access license requirements. Note that it does NOT include
support for messaging services. See full licensing text for details.
v Domino Messaging Server -- Installs a Domino server that provides
messaging services. Note that it does NOT include support for application
services or Domino clusters.
v Domino Enterprise Server -- Installs a Domino server that provides both
messaging and application services, with support for Domino clusters.
v Customize - Allows you to select the features you want to install.
Note: All installation types support Domino partitioned servers. Only the
Domino Enterprise Server supports a service provider (xSP) environment. 7. If you are installing partitioned servers, specify a data directory for each
partition.
8. Review the summary information, and then select Next to begin installing
files.
9. Click Finish to complete the install program.
10. Choose Start - Programs - Lotus Applications - Lotus Domino Server, or use
the icons on your Desktop to start the server setup program.
Installing Domino on UNIX systems
You can install IBM(R) Lotus(R) Domino(R) on a UNIX(R) system by following this
procedure, or you can perform a silent installation of a local server.
1. Before you install the Domino server program files on a UNIX system, do the
following:
v Make sure that the required hardware and software components are in
place and working.
v Read the Release Notes for operating system and network protocol
requirements and for any last-minute changes or additions to the
documentation.
v Temporarily disable any screen savers and turn off any virus-detection
software.
v Before running any Domino setup command, be sure to complete any
pending reboot actions you may have from installing other applications.
v Make sure that all other applications are closed.
v If you are upgrading to Domino from a previous release, see the upgrade
information available in IBM(R) Redbooks(R) at http://www.redbooks.ibm.com and the Domino Administrator help at
http://www.ibm.com/developerworks/lotus/documentation/domino. 2. As the root user, run the install program ./install which is on the installation
CD.
62 Installing Domino Servers and Notes Clients
Note: If you want to run the install in graphical mode, the root user’s
DISPLAY needs to configured correctly. You also have the option to run the
install in console mode.
3. Read the Welcome screen, and click Next. Then read the License Agreement
and click I accept the terms in the license agreement, and then click Next.
4. (Optional) Choose Install Data Directories Only.
Note: Choose the Data Directories Only option when migrating a single
server install to a multiple server install. If you are adding multiple partitions,
select the option to install partitioned servers when specifying the
corresponding program files directory name. Or, choose this option when you
are upgrading only one partition on a multiple-partitioned server.
5. Choose the program directory, and choose whether you are installing
partitioned servers. Click Next.
6. Specify the data directory in which to copy the software. If you are installing
a partitioned server, specify a data directory for each partition.
Note: For partitions, use the Add button to add each of the data directories to
the list. If they are not added to the list they will not be installed.
7. Specify a UNIX user name and UNIX group name.
8. (Optional)If you are installing to a directory other than /opt/ibm/lotus, you
can create the /opt/ibm/lotus soft link.
9. Choose a server setup option.
Note: The server setup options are not available for servers with multiple
partitions.
10. Select the server type you acquired:
v Domino Utility Server -- Installs a Domino server that provides application
services only, with support for Domino clusters. The Domino Utility Server
removes client access license requirements. Note that it does NOT include
support for messaging services. See full licensing text for details.
v Domino Messaging Server -- Installs a Domino server that provides
messaging services. Note that it does NOT include support for application
services or Domino clusters.
v Domino Enterprise Server -- Installs a Domino server that provides both
messaging and application services, with support for Domino clusters.
v Customize - Allows you to select the features you want to install.
Note: All installation types support Domino partitioned servers. Only the
Domino Enterprise Server supports a service provider (xSP) environment.11. Review the summary information, and then select Next to begin installing
files.
12. Click Finish to complete the install program.
Prerequisites for installing Domino on IBM i
This section highlights some of the decisions you should make before you install
IBM(R) Lotus(R) Domino(R) on IBM(R) i. Before you install and set up your first
Domino server, you must plan server and organizational naming and security. In
addition, you must understand your existing network configuration and how
Domino will fit into the network.
Before installing the Domino on IBM i, verify the following:
Chapter 3. Installing and Setting Up Domino Servers 63
v You have a user profile with the required authorities to install and configure
Domino.
v You have installed the required hardware and software.
v Any Domino servers configured with previous beta or pre-release software have
been removed and the beta or pre-release versions of Domino software have
been removed.
v TCP/IP is set up and active on your system.
When you install Domino, licensed program objects such as programs (*PGM) and
service programs (*SRVPGM) are placed in a release-specific library such as
QDOMINO850.
Miscellaneous objects are placed in the QUSRNOTES library. For example, the
following objects would be stored in the QUSRNOTES library:
v All Domino subsystem descriptions
v All data queues and job queues for the servers
v Status of the servers
Basic Domino files, such as .NSFs and .NTFs, as well as files that contain symbolic
links to programs, service programs, and other objects in the release-specific
QNOTES library are created in the release-specific NOTES directory in the iSeries
integrated file system. These symbolic links provide access to the objects in the
release-specific library from the integrated file system. The iSeries integrated file
system provides a directory structure similar to the Domino installation on a
Microsoft(R) Windows(R) or UNIX operating system. The /QIBM/USERDATA/LOTUS/NOTES directory is created in the integrated file system. Users who create
programs accessed by Domino must add symbolic links to their programs in this
directory.
The QNOTES user profile is created for use by Domino and Notes application
programs that run on the system iSeries. This user profile is intended for system
functions and for integration with the underlying IBM i security mechanisms;
therefore, it does not have a password. Individual users cannot use the QNOTES
user profile to sign on to the system server.
CAUTION:
Do not delete the QNOTES user profile.
Domino servers and subsystems must be stopped while installing software. If you
already have Domino servers configured on the system, make sure you stop these
servers and their subsystems before installing the Domino for IBM i software.
Note: If all configured servers are multi-version capable servers, you can install a
new version of Domino software while they are still running.
The server data directory should not reside in the QIBM directory. When setting
up a Domino server, do not specify the Domino product directory,
/QIBM/ProdData/..., or the Domino user directory, /QIBM/UserData/..., as the
location of the server data directory. Putting the server data directory within the
product directory could cause problems when operating the server, especially if
you run more than one Domino server on your system.
A commonly used location for the server data directory is:
64 Installing Domino Servers and Notes Clients
/lotus/domino/data
If you have more than one Domino server on your system, you could specify a
location such as:
/lotus/domino/servername/data
where servername is the name you specify for each server.
IBM i QNOTES user profile requirements: In order to function correctly,
Domino for IBM i requires *RWX (read, write and execute) access to the root
integrated file system directory. For example, when creating new Domino servers,
a new directory needs to be created at the root directory for the associated new
Domino data directory. By default, IBM i sets the public access to the root
integrated file system directory to *RWX. However, for security reasons, you may
decide to restrict public access. For example, public access may be set to *X
(execute). In this case, the QNOTES user profile should be given *RWX access to
the root integrated file system directory.
IBM i network communications error: If network communications are not set up
correctly, you will receive an error message during installation using InstallShield
or server setup using the setup wizard.
Make sure you satisfy all the requirements in this message before attempting the
installation again.
Installing Domino on IBM i systems: If you are installing an IBM(R) Lotus(R)
Domino(R) server on system IBM(R) i, read the information pertaining to installing
a Domino server as well as the sections of the install documentation that pertain
only to IBM(R) i as well.
Authorities required to install and configure Domino: The IBM i operating system has
extensive security to prevent unauthorized access to system functions and data. To
install and configure Domino, you must sign on to the system with a user profile
that has the required authorities. To install the Domino software, your user profile
must have the following special authorities:
v All object access (*ALLOBJ)
v Security administration (*SECADM)
To configure a Domino server, your user profile must have the following special
authorities:
v All object access (*ALLOBJ)
v System configuration (*IOSYSCFG)
v Job control (*JOBCTL)
v Security administration (*SECADM)
Checking your user profile using commands: The system security officer has the
required authorities to install and configure Domino. If you are not the security
officer, use the Display User Profile (DSPUSRPRF) command to determine if your
user profile has the required authorities. To check your user profile, follow these
steps:
1. At any command prompt, type the following command and then press Enter:
DSPUSRPRF user-id
where user-id is the name of your user profile.
Chapter 3. Installing and Setting Up Domino Servers 65
2. Press the PAGE DOWN key and locate the special authority field to display the
special authorities for the user profile.
If your user profile does not have the required authorities, ask the security officer
to either do the installation and configuration or to add the required authorities to
your user profile.
Starting the Domino software install process on IBM i: There are several ways you
can begin the installation of the Domino software. Each way provides a slightly
different experience, but all accomplish the same tasks. You can install the Domino
software using any of the following methods:
v Launch the Domino Server Installation and Setup wizard through the System i
Navigator. This method uses the InstallShield interface and allows the product
CD-ROM to be in either the workstation or IBM i optical drive.
v Use the InstallShield interface by running the SETUP.EXE file from the product
CD-ROM. This method allows the product CD-ROM to be in either the
workstation or i optical drive.
v Use the LODRUN command from the command interface. This method requires
that the product CD-ROM be in the optical drive of IBM i system.
Using InstallShield from the product CD-ROM: You can launch the InstallShield
wizard by running the SETUP.EXE file from the Domino product CD-ROM using a
workstation that has Microsoft(R) Windows(R) installed. The SETUP.EXE file is in
the root directory of CD ROM 1. For example,
d:\setup.exe
where d is the letter assigned to your workstation CD-ROM drive.
You are prompted to insert CD ROM 2 during the installation.
After you complete the installation, you can launch the Domino Server Setup
wizard.
Using silent server installation to install Domino on Windows or
UNIX systems
Use IBM(R) Lotus(R) Domino(TM) silent server installation to install servers
without any intervention during the installation process. The silent server
installation suppresses the wizard and the user interface. There is no need to
monitor the installation or to provide additional input through the typical
installation dialog boxes.
Before running Domino’s silent server install, do the following:
v Make sure that the required hardware and software components are in place and
working.
v Read the Lotus Domino Release Notes for operating system and network
protocol requirements. Check the Release Notes for last-minute changes or
additions that may impact the silent server install.
v Temporarily disable screen savers and turn off virus-detection software.
v Before running any Domino setup command, complete any pending reboot
actions you may have from installing other applications.
v If you are upgrading from a previous Domino release, see the upgrade
information available at http://www.redbooks.ibm.com
v Make sure that all other applications are closed.
66 Installing Domino Servers and Notes Clients
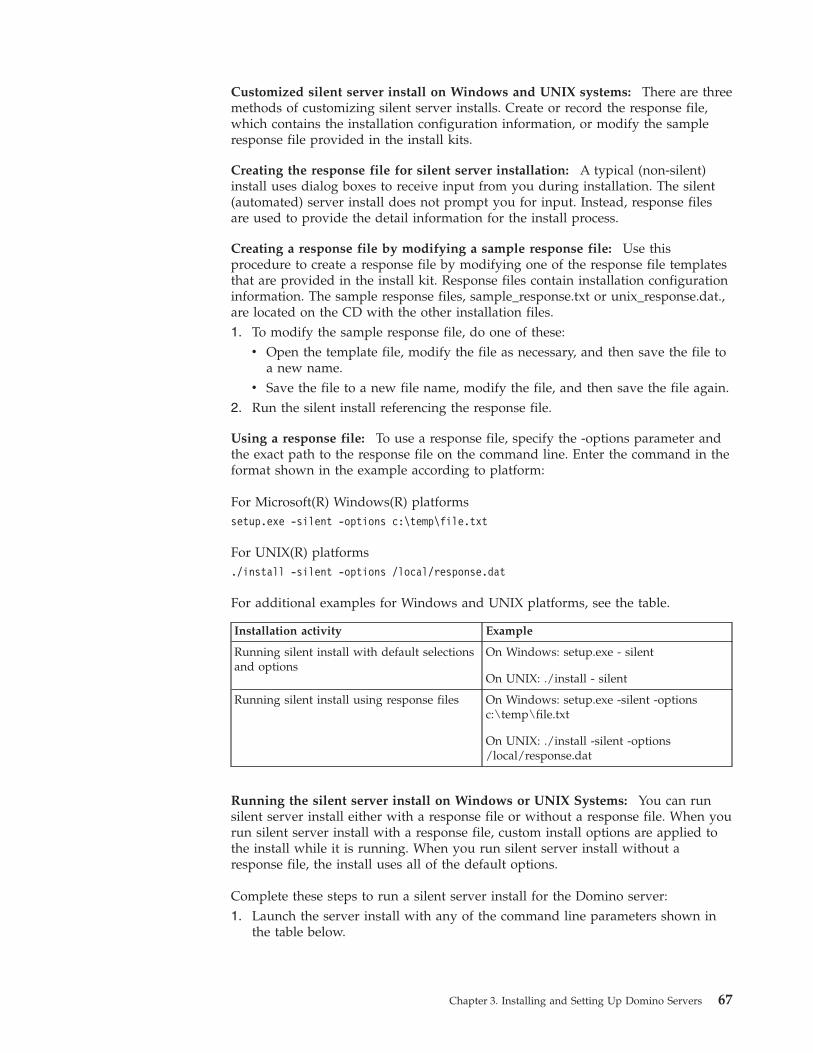
Customized silent server install on Windows and UNIX systems: There are three
methods of customizing silent server installs. Create or record the response file,
which contains the installation configuration information, or modify the sample
response file provided in the install kits.
Creating the response file for silent server installation: A typical (non-silent)
install uses dialog boxes to receive input from you during installation. The silent
(automated) server install does not prompt you for input. Instead, response files
are used to provide the detail information for the install process.
Creating a response file by modifying a sample response file: Use this
procedure to create a response file by modifying one of the response file templates
that are provided in the install kit. Response files contain installation configuration
information. The sample response files, sample_response.txt or unix_response.dat.,
are located on the CD with the other installation files.
1. To modify the sample response file, do one of these:
v Open the template file, modify the file as necessary, and then save the file to
a new name.
v Save the file to a new file name, modify the file, and then save the file again.2. Run the silent install referencing the response file.
Using a response file: To use a response file, specify the -options parameter and
the exact path to the response file on the command line. Enter the command in the
format shown in the example according to platform:
For Microsoft(R) Windows(R) platforms
setup.exe -silent -options c:\temp\file.txt
For UNIX(R) platforms
./install -silent -options /local/response.dat
For additional examples for Windows and UNIX platforms, see the table.
Installation activity Example
Running silent install with default selections
and options
On Windows: setup.exe - silent
On UNIX: ./install - silent
Running silent install using response files On Windows: setup.exe -silent -options
c:\temp\file.txt
On UNIX: ./install -silent -options
/local/response.dat
Running the silent server install on Windows or UNIX Systems: You can run
silent server install either with a response file or without a response file. When you
run silent server install with a response file, custom install options are applied to
the install while it is running. When you run silent server install without a
response file, the install uses all of the default options.
Complete these steps to run a silent server install for the Domino server:
1. Launch the server install with any of the command line parameters shown in
the table below.
Chapter 3. Installing and Setting Up Domino Servers 67
Parameter Description and example
-silent Runs the basic silent server install using the default options.
v On Microsoft(R) Windows(R), setup.exe -silent
v On UNIX(R), ./install -silent
Runs the silent server install with customized options.
v On Windows, setup -silent -option C:\temp\file.txt
v On UNIX, ./install -silent -option /local/response.dat
Installing Domino on Linux on System z systems
Before you install the IBM(R) Lotus(R) Domino(R) program files on a Linux(R) on
IBM(R) System z system, do the following:
v Make sure that the required hardware and software components are in place and
working.
v Read the Release Notes for operating system and network protocol requirements
and for any last-minute changes or additions to the documentation.
v Temporarily disable any screen savers and turn off any virus-detection software.
v Make sure that all other applications are closed.
v If you are upgrading to Domino from a previous release, see the upgrade
information available at http://www.redbooks.ibm.com and the Domino
Administrator help at http://www.ibm.com/developerworks/lotus/documentation/domino.
v For Domino for Linux, you must install the sysstat package containing iostat in
order to obtain platform statistics.
v If you are using Linux on System z, do the following:1. Copy the Domino installation tar file, ZLINUX.TAR.GZ, from the CD ROM at
your workstation to a Linux(R) on System z file system where it can be
expanded and utilized for the installation steps. Be sure to transfer the file
using a binary method. For example, for FTP, set the transfer mode to ″binary″.
Neither the tar file nor its contents are required after installation has completed.
2. Expand the tar file by issuing the following shell command on Linux for
System z:
tar -xzvf ZLINUX.TAR.GZ
Note: It could take a minute or two for this process to complete. Once
complete, the subdirectories ″zlinux/domino″ should exist.
3. (Optional) Delete the tar file to save disk space.
4. Change to the directory containing the Domino install script:
cd zlinux/domino
When the installation is complete (interactive mode or script mode), both the tar
file and the ″zlinux″ subdirectory created by its expansion can be deleted.
You can install multiple instances of the Domino server on a single system. The
instances can be the same release of Domino or different releases. If you install
different releases, only one instance can be earlier than the current Domino release.
If you want all instances to be the same release, it is best to install a Domino
partitioned server because all Domino partitions then share one program directory
and, by doing so, conserve system resources. If you install a single Domino server
and later want to make it a partitioned server, you can do so without removing the
68 Installing Domino Servers and Notes Clients
initial installation. When you have multiple instances of the Domino server, each
with a separate program directory, one or more of the instances may be a
partitioned server.
To install the Domino program files on a Linux on System z system, you can use
either interactive mode or script mode.
To use interactive mode: You use interactive mode to install the Domino program
and data files on the local machine or to use a Telnet connection to install the
Domino program and data files on specified remote systems.
During the interactive mode installation, you can use these keys at the UNIX(R)
command prompt:
v Type h for help
v Type e to exit the Install program
v Press ESC to return to the previous screen
v Press the spacebar to change the setting until you get the one you want
v Press TAB to accept a setting and continue to the next screen1. Make sure the Domino server kit is available from your network or CD ROM
drive.
Note: If you are using Linux on System z, be sure the Install files are located in
your local file system. For information on transferring the files to your local file
system, see the procedure at the beginning of this topic.
2. Log in to the root account for Domino Server installation.
3. Change to the directory containing the ″install″ script.
4. Enter the following at the root command prompt to run the script:
./install
5. Follow the on-screen instructions and specify these options:
Option Action
Add data directories only Choose one:
v Yes to change a single Domino server into a partitioned
server or add data directories to an existing partitioned
server
v No to keep a single Domino server
Domino Server installation
type
Choose the server type that you acquired. For an xSP
server, you must have the Domino Enterprise Server.
Install template files Choose one:
v Yes to install new templates
v No to retain templates from a previous release
Install xSP server (for Domino
Enterprise Server only)
Choose one:
v Yes if this is an xSP server
v No if this is not an xSP server
Program directory Specify the directory in which Domino will store program
files.
Chapter 3. Installing and Setting Up Domino Servers 69
Option Action
Create /opt/ibm/lotus soft
link
Choose one:
v Yes if this system will have only one Domino installation
(program directory)
v No if this system will have multiple Domino
installations (multiple program directories)
Data directory Specify the directory in which Domino will store data files.
If you are installing a partitioned server, indicate that and
specify multiple data directories.
UNIX User name Specify the person who will own the server configuration
data. If you are installing a partitioned server, you may
specify a different person for each data directory.
UNIX Group name Specify the group to which the UNIX User belongs. If you
are installing a partitioned server, you may specify a
different group for each data directory.
To use script mode: Script mode installation provides silent install functionality
for UNIX platforms and allows you to install saved installation settings to a local
server or remote servers.
SCRIPT.DAT, the default sample script file, contains information you need to install
the Domino server program files, including descriptions of each parameter and
instructions for using the -script option to install partitioned servers.
Note: Existing SCRIPT.DAT files from previous Domino versions cannot be used
with the new ISMP installer. Modify a local copy of the file sample
unix_response.dat provided with the install kits. More options are now available
than in the previous installation’s script.dat file.
1. Change the directory to the kit’s install directory on either the CD-ROM or
network drive.
2. Copy SCRIPT.DAT from the kit’s install directory to your local system as
filename.dat
Where filename is the name you want to give to the local script file that will
contain the installation settings.
3. Open the local script file, filename.dat, and set the parameters as needed. It is
usually best to use the default settings, as follows:
v Install target host name -- parameter = target_hosts
v Domino server installation type -- Choose the server type that you acquired.
v Install template files -- template_install_option = 1
v Add data directories only -- add_data_directories_only = 0
v Install xSP server -- asp_install_option = 0
v Program directory -- Use the directory where Domino stores program files.
v Create /opt/ibm/lotus soft link -- opt_lotus_softlink = 0
v Data directory -- Use the directory where Domino stores data files.
v UNIX User name -- Person who will own the server configuration data
v UNIX Group name -- The group to which the UNIX User belongs4. Save the local file, filename.dat.
5. Log in to the root account from your local system.
6. Switch back to the kit’s install directory (CD-ROM or network).
70 Installing Domino Servers and Notes Clients
7. To install using the local script file, enter this command at the UNIX console
prompt:
install -script filename.dat
Using silent server install on Linux on System z systems
These instructions apply to Linux(R) on IBM(R) System z systems. Before running
a silent server install, read all of the installation information in this chapter.
Running a silent server install on Linux on System z:
1. Make a local copy of the file SCRIPT.DAT. The SCRIPT.DAT file is located in
the install directory.
2. Edit the new copy of SCRIPT.DAT. The step-by-step instructions for editing the
file are in the SCRIPT.DAT file.
3. Run the install program by entering this command:
./install -script /tmp/script.dat
Note: The command shown above uses the directory name ″tmp″ but you may
name this directory according to your own naming conventions.
Using the express install
Express install is similar to a regular server install except that you have the
additional option of launching the server from the last window displayed during
express install.
During the express install, you are presented with various dialog boxes and
informational messages, as you would be during the standard Domino server
install; however, during express install, many of the options presented on the
dialog boxes are selected for you, resulting in a faster install process.
Note: Before running any IBM(R) Lotus(R) Domino(R) setup command, be sure to
complete any pending reboot actions you may have from installing other
applications.
To run Domino’s Express Install, from the Installer command line, enter the
following command:
setup -express
Note: Run Domino express server install from the full installation kit. It is not
available for installation from a Web kit.
Disabling concurrent I/O and direct I/O on Domino servers on
AIX
Concurrent I/O (CIO) and Direct I/O (DIO) are not supported with IBM(R)
Lotus(R) Domino(R) servers. CIO is a file system feature introduced in IBM(R)
AIX(R) 5.2.0.10, also known as maintenance level 01, in the Enhanced Journaling
File system (JFS2). This feature improves performance for many environments,
particularly for relational databases.
See the Release Notes for version-specific information.
Because the CIO feature is not supported for use with Domino servers, do not
enable this option on file systems that Domino accesses. If this option is enabled,
Domino data might become corrupted, which can cause server crashes or
performance issues.
Chapter 3. Installing and Setting Up Domino Servers 71
Certain core file system items, such as file buffer cache, per-file lock or inode lock,
and sync daemon, are managed differently by the operating system with the CIO
option enabled. Domino is not coded to address these changes in behavior.
The CIO option is typically enabled as a flag when a file system is mounted. Use
these steps to disable the mount option:
1. Run this command for each file system mounted with CIO:
chfs -a options=rw /FS_NAME
Where /FS_NAME is the name of the mount point.
2. Unmount and remount each file system, or reboot, which has the same effect
when done after running the chfs commands.
3. To verify that the change was applied, run ’mount’ and verify that you do not
see ″cio″ in the mount options column, as shown in the examples.
Example of output with CIO disabled
/dev/test05lv /test05 jfs2 Oct 04 23:13 rw,log=INLINE
Example of output with CIO enabled:
/dev/test03lv /test03 jfs2 Sep 19 19:25 rw,cio,log=INLINE
For more information on the CIO feature, see the AIX whitepaper ″Improving
Database Performance With AIX Concurrent I/O″ at http://www-1.ibm.com/servers/aix/whitepapers/db_perf_aix.pdf.
Domino server setup program
The IBM(R) Lotus(R) Domino(R) server setup program guides you through the
choices you make to configure a Domino server. Setting up the first Domino server
in a domain establishes a framework that consists of the Domino Directory, ID
files, and documents. When you set up additional servers, you build upon this
framework.
Note: Domino first server setup creates IDs with a default public key width of
1024 bits. If a different key width is required, run SETUP.EXE to install the Domino
files but before starting the server, open the server’s NOTES.INI file, and then set
SETUP_FIRST_SERVER_PUBLIC_KEY_WIDTH to the desired key width. For
example, for Domino R5-compatible keys, install the files for the Domino server by
running SETUP.EXE, but before starting the server, open the NOTES.INI file and
then set SETUP_FIRST_SERVER_PUBLIC_KEY_WIDTH=630. The public key width
can be set to either 630 or 1024 when using the NOTES.INI variable.
Setting up the first Domino server does the following:
v Creates a Domino domain.
v Creates the certification log file, names it CERTLOG.NSF, and saves it in the
Domino data directory.
v Uses the PUBNAMES.NTF template to create the Domino Directory for the
domain, names the directory NAMES.NSF, and places it in the Domino data
directory.
v Creates an organization certifier ID, names it CERT.ID, and saves it in the
Domino data directory.
v Optionally creates an organizational unit certifier ID, names it OUCERT.ID, and
stores it in the Domino Directory.
v Creates a Certifier document, which describes the organization certifier ID, in
the Domino Directory.
72 Installing Domino Servers and Notes Clients
v Creates a server ID, names it SERVER.ID, and saves it in the Domino data
directory.
v Uses the organization certifier ID to certify the server ID.
v Creates a Server document in the Domino Directory and includes in it
information that you specified during the setup program.
v Creates a Person document in the Domino Directory for the Domino
Administrator that you specified during the setup program.
v Creates a user ID and password for the Domino Administrator and attaches it as
a file named USER.ID to the administrator’s Person document in the Domino
Directory.
v Uses the organization certifier ID to certify the administrator’s user ID.
v Gives the administrator and the server Manager access in the ACL of the
Domino Directory.
v Adds the server name to the LocalDomainServers group in the Domino
Directory.
v Creates the log file, names it LOG.NSF, and saves it in the Domino data
directory.
v Enables the appropriate network and serial ports.
v Creates a mail directory in the Domino data directory and creates a mail file in
that directory for the Domino Administrator.
v Creates the Reports file, names it REPORTS.NSF, and saves it in the Domino
data directory.
v Updates network settings in the Server document of the Domino Directory.
v Configures SMTP, if selected during the setup program.
v If ″DOLS Domino Off Line Services″ was selected during the setup program,
creates the Off-Line Services file, names it DOLADMIN.NSF, and saves it in the
Domino data directory,.
v Updates the Access Control List in all databases and templates in the Domino
data directory tree to remove Anonymous access and/or add
LocalDomainAdmin access, depending on the selections made during the setup
program.
v Configures xSP Service Provider information, if selected during the install
program.
Setting up an additional Domino server does the following:
v Copies the Domino Directory, if a file location was specified during the setup
program, names it NAMES.NSF, and saves it in the Domino data directory.
v Copies the server’s ID from the location specified during the setup program,
either from a file, a copy of the directory, or the existing Domino server’s
directory; names it SERVER.ID; and saves it in the Domino data directory.
v Retrieves the Domain name and Administrator name from the Server document
in the Domino Directory.
v Creates the log file, names it LOG.NSF, and saves it in the Domino data
directory.
v Copies or replicates the Administration Requests file, names it ADMIN4.NSF,
and saves it in the Domino data directory.
v Copies or replicates the Monitoring Configuration file, names it EVENTS4.NSF,
and saves it in the Domino data directory.
v Replicates the Domino Directory, if it doesn’t already exist, names it
NAMES.NSF, and saves it in the Domino data directory.
Chapter 3. Installing and Setting Up Domino Servers 73
v Creates a Connection document to the existing Domino server in the Domino
Directory.
v Creates the Reports file, names it REPORTS.NSF, and saves it in the Domino
data directory.
v Updates network settings in the Server document of the Domino Directory.
v Configures SMTP, if selected during the setup program.
v If ″DOLS Domino Off-Line Services″ was selected during the setup program,
creates the Off-Line Services file, names it DOLADMIN.NSF, and saves it in the
Domino data directory.
v Updates the Access Control List in all databases and templates in the Domino
data directory tree to remove Anonymous access and/or add
LocalDomainAdmin access, depending on the selections made during the setup
program.
v Configures xSP Service Provider information, if selected during the install
program.
v Replicates changes made to the Server document with the existing server, if any.
v Removes the SERVER.ID attachment from the Domino Directory, if applicable.
Domino’s On-Disk Structure
IBM(R) Lotus(R) Domino(R) supports file format, on-disk structure (ODS) 51.
See the Release Notes for version-specific information.
Upgrading from an earlier level of ODS to the current level
To upgrade from an earlier ODS to a current-level ODS format database in
Domino, set the following file parameter in the NOTES.INI file on the Domino
server or the IBM(R) Lotus(R) Notes(R) client:
Create_R8_Databases=1
When you set the NOTES.INI parameter for ODS, new databases are created using
the current level. Use copy-style compacting to upgrade existing ODS databases to
the current level of ODS. Use this command to run copy-style compacting:
compact -c <database name>
Note: In-place compacting has been changed. When a database with an earlier
level of ODS is detected, Domino does not automatically convert to copy-style
compact to upgrade your databases.
The current level of ODS provides potential improvement for I/O, folder
optimization, compression, and attachment consolidation.
Reverting back one ODS level
To revert back one ODS level, use the compact -r command as shown here:
compact -r <database name>
Setting up DOLS on a server
IBM(R) Lotus(R) Domino(R) Off-Line Services (DOLS) must be configured on the
Domino server for users to be able to take applications off-line and use only a
browser to work with them. You can enable any application for DOLS. The
following templates are enabled for DOLS by default:
v IBM(R) Lotus(R) Domino(R) Web Access (MAIL8.NTF, DWA7.NTF, and
iNOTES6.NTF)
74 Installing Domino Servers and Notes Clients
v Discussion - IBM(R) Lotus(R) Notes(R) and Web (R7) database (DISCSW7.NTF)
See the Release Notes for version-specific information.
To configure DOLS during Domino server setup
1. Under ″Setup Internet services for,″ select ″Web Browsers (HTTP services),″ and
then click Customize.
2. In the ″Domino tasks″ list, select ″DOLS Domino Off-Line Services.″
3. At the end of setup, when you have the option to create an access control list
entry, add the group LocalDomainAdmins to all databases and templates.
4. Accept the default option ″Prohibit Anonymous access to all databases and
templates.″ If you deselect this option, you must open the ACL for each DOLS
application and assign No Access to Anonymous.
5. Make sure the following names are identical:
v The TCP/IP DNS host name -- In Microsoft(R) Windows(R), choose Start -
Programs - Windows Explorer. Then choose Network Neighborhood
properties - TCP/IP properties. On the DNS Configuration tab, look at the
Host field.
v The server name -- Open the Server document and look at the Server name
field.
v The Internet host name -- Open the Server document and look at the ″Fully
qualified Internet host name″ field.
Note: DOLS runs on Domino servers configured to work through a Microsoft(R)
IIS server.
To configure DOLS manually
If you do not configure DOLS during Domino server setup, you can configure
DOLS manually by editing the Server document.
1. Open the Server document.
2. Click Internet Protocols - HTTP.
3. In the ″DSAPI filter file names″ field, enter the DSAPI filter file name that
corresponds to the operating system that the server is running, and then restart
the server:
v Windows - ndolextn
v Linux(R) - libdolextn
v IBM(R) AIX(R) - libdolextn
v Solaris - libdolextn
v IBM(R) System z(R) - libdolextn
v IBM(R) i - libdolextn
Note: On the IBM(R) i platform, the server document is updated when a
new server is configured or an existing server is modified using the
CFGDOMSVR or CHGDOMSVR CL command with DOLS(*YES) specified.4. Create a DOLADMIN.NSF database from the template DOLADMIN.NTF.
5. After the database is created, restart the Domino administrator and click the
Configuration tab. The name of the DOLADMIN.NSF is an option in the
Navigation pane.
To set up DOLS on clustered servers
Before using DOLS on a clustered Domino server, make sure that:
Chapter 3. Installing and Setting Up Domino Servers 75

v The Domino server is either a Domino Utility Server or Domino Enterprise
Server.
v All servers in the cluster run the same release of Domino with DOLS
v Clustered server management is running to handle both failover of replication
and HTTP
v Internet Cluster Manager is running
v Subscription directories must have the same name on every clustered server. For
example, if a subscription is under \data\Webmail user\7CD5957CB669AE2285256BDF00567AD8\, this name cannot be different on a
different server in the cluster.
To configure DOLS on a server that uses Web Site documents
If you create a Web Site Document (a type of Internet site document) on the
Domino server, you must add the appropriate DOLS DSAPI filter filename to the
DSAPI field in the Web Site document for DOLS to be enabled. If there are several
Web Site documents, you must add the DSAPI filter filename to each one. To add
the DOLS DSAPI filter filename to a Web Site document:
1. Open the Web Site document.
2. Click the Configuration tab.
3. In the ″DSAPI filter″ field, enter the DSAPI filter file name that corresponds to
the operating system that the server is running, and then restart the server:
v Windows - ndolextn
v Linux - libdolextn
v AIX - libdolextn
v Solaris - libdolextn
v System z - libdolextn
v IBM(R) i - libdolextn
Using Domino Off-Line Services (DOLS) and Lotus iNotes
To provide IBM(R) Lotus(R) iNotes(TM) users with the ability to work off line, you
must enable IBM Lotus Domino Off-Line Services (DOLS) when you set up the
server. DOLS enables users to work off line, disconnected from the network, and
provides many replication features that IBM(R) Lotus(R) Notes(R) users expect
when working in the Notes client.
Users require a Notes ID so that DOLS can synchronize the offline mail file with
the server. The default DOLS configuration will prompt the user for a Notes ID the
first time they go offline with Lotus iNotes.
If you rename a user, the user must reinstall the DOLS offline subscription in order
for the offline mail file to synchronize with the server. After a name change, the
user must wait for the old Notes ID and password to stop working, accept the
name change using a Notes client, then log on to Lotus iNotes with the new Notes
ID and password.
Using the Domino server setup program
The following procedures describe the ways you can use the server setup program.
v Use the server setup program on the server you are setting up.
v Use the server setup program from a client system or from another server.
v Create a setup profile by recording your choices during the server setup
program.
76 Installing Domino Servers and Notes Clients
v Use a setup profile to set up multiple servers with the same requirements.
v Use a setup profile without viewing the setup screens (″silent″ setup).
v Using automatic server setup on Linux on System z and on UNIX.
Indic language support in the Domino server setup program
You can change both the font and the alphabet that displays when you enter text
in a field on a server setup program screen. Normally, the alphabet that displays is
that of the default language.
The IBM(R) Lotus(R) Domino(R) server setup program supports the following
alphabets:
v Bengali
v Devanagari
v Gujarati
v Gurmukhi
v Kannada
v Malayalam
v Oriya
v Tamil
v Telugu
To change the font: Changing the font is required for the Devanagari alphabet, as
the default font does not work with it.
1. Start the setup program by starting the Domino server.
2. On the Welcome screen, click Font.
3. Select a font that will work with the alphabet you plan to use.
4. To select an alphabet different from that of the default language, see the
following procedure.
To change the alphabet: Changing the alphabet is supported for the Microsoft(R)
Windows(R), IBM(R) AIX(R), and Linux(R) operating systems only.
1. Start the setup program by starting the Domino server.
2. Right-mouse click on the title bar of the screen in which you want to enter text
that uses an alphabet different than that of the default language.
3. Select ″Select Input Method.″
4. Select the alphabet that you want to use.
5. Enter text in one or more fields on the screen.
Note: Clicking Next to go to the next screen restores the alphabet to that of the
default language. Repeat the preceding procedure for each screen on which you
want to use a different alphabet.
Using automatic server setup on Linux on System z and on UNIX
Automatic server setup is a UNIX(R) and Linux(R) on System z feature for single
local IBM(R) Lotus(R) Domino(R) servers. When automatic server setup is used for
new server installations, server setup runs automatically after the server
installation is complete. For server upgrades, the server is restarted automatically
after the installation is complete.
Automatic server setup does not apply to partitioned servers or to remote servers.
Chapter 3. Installing and Setting Up Domino Servers 77

By default, server setup is set to manual so that the server setup does not
automatically run for new server installs, and server restart does not automatically
run for server upgrades.
You can enable this feature from the script file containing all of the user
configuration parameters for UNIX script installation. In the UNIX kit directory,
the sample script file is SCRIPT.DAT.
Note: Before running any IBM(R) Lotus(R) Domino(R) setup command, be sure to
complete any pending reboot actions you may have from installing other
applications.
Enabling automatic server setup from the script file: To enable the automatic
server setup feature from the script file, complete the following steps.
1. Open your script file.
2. Locate the variable, start_server_setup =
Note: The default is start_server_setup = 0, which is the manual setting. When
the manual setting (0) is active, you must manually initiate the server setup or
server restart.
3. Enter one of these values according to when you want automatic setup to run:
v 0 -- To disable automatic server setup and enable manual setup. You have to
manually start the server after a new server installation or restart the server
after an upgrade when you use this setting.
v 1 -- To automatically launch server setup after installation or to automatically
restart the server after a server upgrade.
Note: For Linux(R) on System z and z/OS, set the DISPLAY environment
variable so that the setup program is directed to a workstation supporting
X-Window.When the Install program starts, it asks for the password of the ID that owns
the Notes data directory.
v 2 -- To automatically launch server setup in listen mode after installing a new
server. You can then connect to the server using the Remote server setup
tool. To automatically restart the server after installing a server upgrade.
Note: When the Install program starts on a Linux on System z system, the
program asks for the password of the ID that owns the Notes data directory.
Enabling automatic server setup from the user interface: To enable the automatic
server setup feature from the UNIX or Linux on System z user interface, complete
the following steps.
1. Locate the option ″Select server setup method.″
Note: The default is Manual server setup. When the manual setting (0) is
active, you must manually initiate the server setup or server restart.
2. Press the Spacebar until you see the setting you want to use. You can use one
of the following settings:
v Local server setup -- To automatically launch server setup after installation or
to automatically restart the server after a server upgrade.
Note: For Linux on System z and z/OS, set the DISPLAY environment
variable so that the setup program is directed to a workstation supporting
X-Window.
78 Installing Domino Servers and Notes Clients
When the Install program starts, it asks for the password of the ID that owns
the IBM Lotus Notes data directory.
v Remote server setup -- To automatically launch server setup in listen mode
after installing a new server. You can then connect to the server using the
Remote server setup tool. To automatically restart the server after a server
upgrade.
Note: When the Install program starts on a Linux on System z system, the
program asks for the password of the ID that owns the Notes data directory.
v Manual server setup -- To disable automatic server setup and enable manual
setup. You have to manually start the server after a new server installation or
restart the server after an upgrade when you use this setting.3. Press Tab to accept the setting.
Using the Domino server setup program locally
After installing the IBM(R) Lotus(R) Domino(R) server program files on a server,
you can run the Domino server setup program locally by starting the server. The
server setup program asks a series of questions and guides you through the setup
process. Online Help is available during the process.
Note: During server setup, you can use an existing certifier ID instead of creating
a new one. The certifier ID that you specify cannot have multiple passwords
assigned to it. Attempting to use a certifier ID with multiple passwords generates
an error message and causes server setup to halt.
If you are using Linux(R) on System z, you cannot use the Domino server setup
program locally. You must use the Domino server setup program remotely, as
described in the next section.
Note: Before running any Domino setup command, be sure to complete any
pending reboot actions you may have from installing other applications.
Using the Domino server setup program remotely
After you install the program files for an IBM(R) Lotus(R) Domino(R) server on a
system, you can use either a Microsoft(R) Windows(R) client system or another
Domino server to run the server setup program remotely. Running the server setup
program from a Windows client is easier if the client has Domino Administrator
installed -- to run the program from a client without Domino Administrator, you
need the Java(TM) runtime environment plus some files from the program
directory of an installed Domino server.
Note: During server setup, you can use an existing certifier ID instead of creating
a new one. The certifier ID that you specify cannot have multiple passwords
assigned to it. Attempting to user a certifier ID with multiple passwords generates
an error message and causes server setup to halt.
To run the server setup program from a Windows client with Domino
Administrator:
Note: Before running any Domino setup command, be sure to complete any
pending reboot actions you may have from installing other applications.
1. Make sure that you:
v Selected ″Remote server setup″ when you installed Domino Administrator on
the client system (on the Windows desktop, choose Start - Programs - Lotus
Applications and see if Remote server setup appears in the list)
Chapter 3. Installing and Setting Up Domino Servers 79
v Know the host name or network address of the remote system2. Install the Domino server program files on a server system, but do not run the
Domino server setup program.
3. At the command prompt on the server system, from the Domino program
directory, do one of the following:
v On a Microsoft(R) Windows(R) server, enter
nserver -listen
v On a UNIX(R) server, enter
server -listen
4. On the client system, choose Start - Programs - Lotus Applications - Remote
server setup.
5. In the Connect to Remote Domino Server dialog box, click Ping to ensure that
you can connect to the remote server.
6. Enter the host name or network address of the remote server.
7. Click OK to start the Domino server setup program.
To run the server setup program from a Windows client without Domino
Administrator, or from a UNIX workstation:
Note: Before running any Domino setup command, be sure to complete any
pending reboot actions you may have from installing other applications.
1. Make sure that you know the host name or network address of the remote
system.
2. Install the Domino server program files on a server system, but do not run the
Domino server setup program.
3. At the command prompt on the server, from the Domino program directory,
do one of the following:
v On a UNIX server, enter
/lotus/bin/server -listen
v On a Windows server, enter
nserver -listen
4. On the client system, install the Java(TM) runtime environment.
5. Create a temporary directory on the client system. For example, enter the
following at the command prompt:
v On a Windows client:
mkdir c:\temp
v On a UNIX workstation:
mkdir /temp
6. Do one of the following:
v From a Windows client, copy the remote setup files CFGDOMSERVER.JAR,
JHALL.JAR, and REMOTESETUP.CMD from the server to the directory you
created on the client system. These files are in C:\Domino program directory
on the server.
v From a UNIX workstation, copy the remote setup files
CFGDOMSERVER.JAR, JHALL.JAR, and REMOTESETUP from the server to
the directory you created on the workstation. These files are in /Domino
program directory/lotus/notes/latest/ibmpow/ on an IBM(R) AIX(R) server,
/Domino program directory/lotus/notes/latest/zlinux/ on a Linux(R) on System z
80 Installing Domino Servers and Notes Clients
server, /Domino program directory/lotus/notes/latest/linux/ on a Linux
server, and /Domino program directory/lotus/notes/latest/sunspa/ on a
Solaris server.
Note: Linux on System z and z/OS ship tar files on the cd which contain
all the files needed for remote server setup.
v On Linux on System z -- ZLINUX_CLIENT.TAR
v On z/OS -- ZOS_CLIENT.TAR 7. At the command prompt on the client system, from the directory you created,
do one of the following:
v On a Windows client, enter remotesetup.cmd
v On a UNIX workstation, enter remotesetup 8. In the Connect to Remote Domino Server dialog box, click Ping to ensure that
you can connect to the remote server.
9. Enter the host name or network address of the remote server.
10. Click OK to start the Domino server setup program.
To run the server setup program from another server system:
1. Install the IBM(R) Lotus(R) Domino(R) server program files on both server
systems, but do not run the Domino server setup program.
2. Make sure that you know the host name or network address of the remote
system.
3. At the command prompt on the local server system, from the Domino program
directory, do one of the following:
v On a Microsoft(R) Windows(R) server, enter
nserver -listen
v On a UNIX(R) server, enter
server -listen
4. Do one of the following:
v On a Windows server, enter
nserver -remote
v On a UNIX server, enter
server -remote
Note: For Linux on System z and z/OS, set the DISPLAY environment
variable so that the setup program is directed to a workstation supporting
X-Window.
Tip: Entering nserver -help or server -help displays all parameters available
for working with remote server setups.5. In the Connect to Remote Domino Server dialog box, click Ping to ensure that
you can connect to the remote server.
6. Enter the host name or network address of the remote server.
7. Click OK to start the Domino server setup program.
Creating a server setup profile
A server setup profile is a file that you use to quickly configure servers. To create a
server setup profile, you run the server setup program in record mode, either at
the server you are setting up or from a Microsoft(R) Windows(R) client. Creating a
server setup profile from a Windows client is easier if the client has the IBM(R)
Lotus(R) Domino(R) Administrator installed -- to create a profile from a client
Chapter 3. Installing and Setting Up Domino Servers 81
without Domino Administrator, you need the Java(R) runtime environment plus
some files from the program directory of an installed Domino server.
When the following procedures include instructions for entering system
commands, make sure you understand the terms ″Domino program directory″ and
″Notes program directory″ as they apply to your operating system.
To create a setup profile at a server:
1. Install the Domino server program files on the server system, but do not run
the Domino server setup program.
2. At the command prompt on the server, from the Domino program directory, do
one of the following:
v On a Microsoft Windows(R) server, enter
nserver -record
v On a UNIX(R) server, enter
server -record
Note: For Linux(R) on System z and z/OS, set the DISPLAY environment
variable so that the setup program is directed to a workstation supporting
X-Window.
Tip: Entering nserver -help or server -help displays the parameters available
for working with server setup profiles.3. Enter a name and description for the profile.
4. Continue through the setup program.
Domino saves your selections in a file with the name you specified in Step 3.
By default this file is created in the Domino program directory.
To create a setup profile from a Windows client with Domino Administrator:
1. Make sure that you selected ″Remote server setup″ when you installed Domino
Administrator on the client system.
2. Install the Domino server program files on the server system, but do not run
the Domino server setup program.
3. At the command prompt on the client system, from the IBM(R) Lotus(R)
Notes(R) program directory, enter
serversetup -record
4. Enter a name and description for the profile.
5. Continue through the setup program.
Domino saves your selections in a file with the name you specified in Step 4
and stores the file in the Notes program directory on the client system.
To create a setup profile from a Windows client without Domino Administrator
or from a UNIX workstation:
1. Install the Domino server program files on the server system, but do not run
the Domino server setup program.
2. On the client system, install the Java(TM) runtime environment.
3. Create a temporary directory on the client system. For example, enter the
following at the command prompt:
v On a Microsoft(R) Windows(R) client:
mkdir c:\temp
v On a UNIX(R) workstation:
82 Installing Domino Servers and Notes Clients
mkdir /temp
4. Do one of the following:
v From a Windows client, copy the remote setup files CFGDOMSERVER.JAR,
JHALL.JAR, and REMOTESETUP.CMD from the server to the directory you
created on the client system. These files are in C:\Domino program directory on
the server.
v From a UNIX workstation, copy the remote setup files
CFGDOMSERVER.JAR, JHALL.JAR, and REMOTESETUP from the server to
the directory you created on the workstation. These files are located as
below:
/<Domino program directory>/lotus/notes/latest/ibmpow/ on an IBM(R)
AIX(R) server
/<Domino program directory>/lotus/notes/latest/zlinux/ on a Linux on System z
server
/<Domino program directory>/lotus/notes/latest/linux/ on a Linux server
/<Domino program directory>/lotus/notes/latest/sunspa/ on a Solaris server
Note: Linux on System z and z/OS ship tar files on the CD that contains the
files needed for remote server setup.
v On Linux on System z -- ZLINUX_CLIENT.TAR
v On z/OS -- ZOS_CLIENT.TAR5. At the command prompt on the client system, from the directory you created,
enter:
remotesetup -record
Note: For Linux on System z and z/OS, Set the DISPLAY environment variable
so that the setup program is directed to a workstation supporting X-Window.
6. Enter a name and description for the profile.
7. Continue through the setup program.
Domino saves your selections in a file with the name you specified in Step 6
and stores the file in the client-system directory that you created in Step 3.
Using a server setup profile
You can use a server setup profile at the server you are setting up or from a client
system.
Using a server setup profile from a Microsoft(R) Windows(R) client is easier if the
client has the IBM(R) Lotus(R) Domino(R) Administrator installed -- to use a
profile from a Windows or UNIX(R) client without Domino Administrator, you
need the Java(TM) runtime environment plus some files from the program
directory of an installed Domino server.
When you use a setup profile, you choose whether or not to view the setup
screens as you run the profile. Running a profile without viewing the screens is
sometimes referred to as a ″silent″ setup.
When the following procedures include instructions for entering system
commands, make sure you understand the terms ″Domino program directory″ and
″Notes program directory″ as they apply to your operating system.
To use a setup profile at the server:
1. Install the Domino server program files on a server system, but do not run the
Domino server setup program.
Chapter 3. Installing and Setting Up Domino Servers 83
2. At the command prompt on the server, from the Domino program directory, do
one of the following:
v On a Microsoft(R) Windows(R) server, enter
nserver -playback
v On a UNIX(R) server, enter
server -playback
Tip: Entering nserver -help or server -help displays the parameters available
for working with server setup profiles.3. Choose the profile to use. If you don’t see the profile you want in the list, click
Browse to locate the directory that contains the profile.
4. To change the existing profile, select ″Modify selected profile.″ Click OK to start
the server setup.
To use a setup profile from a Windows client with Domino Administrator:
1. Make sure that you selected ″Remote server setup″ when you installed
Domino Administrator on the client system.
2. Install the Domino server program files on a server system, but do not run the
Domino server setup program.
3. At the command prompt on the server system, from the Domino program
directory, do one of the following:
v On a Microsoft(R) Windows(R) server, enter
nserver -listen
v On a UNIX(R) server, enter
server -listen
4. At the command prompt on the Windows client, from the Notes program
directory, enter:
serversetup -playback
5. In the Connect to Remote Domino Server dialog box, click Ping to ensure that
you can connect to the server.
6. Enter the host name or network address of the server.
7. Click OK.
8. Choose the profile to use. If you don’t see the profile you want in the list,
click Browse to locate the directory that contains the profile.
9. To change the existing profile instead of running it to set up a new server,
click Modify selected profile.
10. Click OK to start the server setup.
To use a setup profile from a Windows client without Domino Administrator or
from a UNIX workstation:
1. Install the Domino server program files on a server system, but do not run the
Domino server setup program.
2. At the command prompt on the server system, from the Domino program
directory, do one of the following:
v On a Windows server, enter
nserver -listen
v On a UNIX(R) server, enter
server -listen
3. On the client system, install the Java runtime environment.
84 Installing Domino Servers and Notes Clients

4. Create a temporary directory on the client system. For example, enter the
following at the command prompt:
v On a Windows client:
mkdir c:\temp
v On a UNIX workstation:
mkdir /temp
5. Do one of the following:
v From a Windows client, copy the remote setup files CFGDOMSERVER.JAR,
JHALL.JAR, and REMOTESETUP.CMD from the server to the directory you
created on the client system. These files are in C:\<Domino program
directory> on the server.
v From a UNIX workstation, copy the remote setup files
CFGDOMSERVER.JAR, JHALL.JAR, and REMOTESETUP from the server to
the directory you created on the workstation. These files located as below:
v /<Domino program directory>/lotus/notes/latest/ibmpow/ on an IBM(R)
AIX(R) server
v /<Domino program directory>/lotus/notes/latest/zlinux/ for Linux(R) on an
IBM(R) System z server
v /<Domino program directory>/lotus/notes/latest/linux/ on a Linux server
v /<Domino program directory>/lotus/notes/latest/sunspa/ on a Sun
Microsystems Solaris(R) server
Note: Linux on System z and z/OS ship tar files on the CD that contain the
files needed for remote server setup.
v On Linux on System z -- ZLINUX_CLIENT.TAR
v On z/OS -- ZOS_CLIENT.TAR 6. At the command prompt on the client system, from the directory you created,
enter:
remotesetup -playback
Note: For Linux on System z and z/OS, set the DISPLAY environment
variable so that the setup program is directed to a workstation supporting
X-Window.
7. In the Connect to Remote Domino Server dialog box, click Ping to ensure that
you can connect to the server.
8. Enter the host name or network address of the server.
9. Click OK.
10. Choose the profile to use. If you don’t see the profile you want in the list,
click Browse to locate the directory that contains the profile. To change the
existing profile, click Modify selected profile.
11. Click OK to start the server setup.
Using silent server setup
A ″silent″ setup is one in which you do not view the setup screens as you run the
server setup profile. You can do a silent setup at the server you are setting up or
from a client system. Doing a silent setup from a Microsoft(R) Windows(R) client is
easier if the client has the IBM(R) Lotus(R) Domino(R) Administrator installed -- to
do a silent setup from a Windows(R) or UNIX(R) client without Domino
Administrator, you need the Java(TM) runtime environment plus some files from
the program directory of an installed Domino server.
Chapter 3. Installing and Setting Up Domino Servers 85

Tip: When doing a silent setup, display a progress bar (Windows) or have
percent-complete written to the command line (UNIX) by adding the -pb
parameter to the end of the command.
When the following procedures include instructions for entering system
commands, make sure you understand the terms ″Domino program directory″ and
″Notes program directory as they apply to your operating system.
To do a silent setup at the server:
Note: Before running any Domino setup command, be sure to complete any
pending reboot actions you may have from installing other applications.
1. Install the Domino server program files on a server system, but do not run the
Domino server setup program.
2. At the command prompt on the server, from the Domino program directory, do
one of the following:
v On a Windows server, enter
nserver -silent c:\myprofile.pds
v On a UNIX server, enter
server -silent /myprofile.pds
where myprofile is the name you gave to the profile file.
Note: If the profile file is not in the root directory, use the profile’s full path
in the command.
Tip: Entering nserver -help or server -help displays the parameters available
for working with server setup profiles.3. If the profile uses existing server, certifier, or administrator IDs that require
passwords, do the following:
a. Create a text file that contains the passwords for the existing IDs. The
keywords in this are:
Server=
AddServer=
Certifier=
OUCertifier=
Administrator=
b. Add a parameter in the command line for the name of the password file.
For example, on Windows enter:
nserver -silent c:\myprofile.pds c:\passwd.txt
4. If this is a partitioned server setup, add the = parameter to the command line
to specify the NOTES.INI file in this partition’s Domino data directory. For
example, on Windows enter:
nserver -silent c:\myprofile.pds =c:\lotus\domino\data2\notes.ini
5. Check the ERRORLOG.TXT file in the Domino data directory to confirm that
the setup is complete, or to view any error messages that were generated
during setup.
To do a silent setup from a Windows client with Domino Administrator:
1. Make sure that you selected ″Remote server setup″ when you installed Domino
Administrator on the client system.
86 Installing Domino Servers and Notes Clients
2. Install the Domino server program files on a server system, but do not run the
Domino server setup program.
3. At the command prompt on the server system, from the Domino program
directory, do one of the following:
v On a Windows server, enter
nserver -listen
v On a UNIX server, enter
server -listen
4. At the command prompt on the client system, from the IBM Lotus Notes
program directory, enter:
serversetup -silent c:\myprofile.pds -remote serveraddress
Where myprofile is the name you gave the setup profile and serveraddress is the
host name or network address of the server you are setting up.
Note: If the profile file is not in the root directory, use the profile’s full path in
the command.
5. If the profile uses existing server, certifier, or administrator IDs that require
passwords, do the following:
a. Create a text file that contains the passwords for the existing IDs. The
keywords in this are:
Server=
AddServer=
Certifier=
OUCertifier=
Administrator=
b. Add a parameter in the command line for the name of the password file.
For example, on Windows enter:
serversetup -silent c:\myprofile.pds c:\passwd.txt -remote serveraddress
6. If this is a partitioned server setup, add the = parameter to the command line
to specify the NOTES.INI file in this partition’s Domino data directory. For
example, on Windows enter:
serversetup -silent c:\myprofile.pds -remote serveraddress =c:\lotus\domino\data2\notes.ini
7. Check the ERRORLOG.TXT file in the Notes data directory to confirm that the
setup is complete, or to view any error messages that were generated during
setup.
To do a silent setup from a Windows client without Domino Administrator or
from a UNIX workstation:
1. Install the IBM(R) Lotus(R) Domino(R) server program files on a server system,
but do not run the Domino server setup program.
2. At the command prompt on the server system, from the Domino program
directory, do one of the following:
v On a Windows server, enter
nserver -listen
v On a UNIX server, enter
server -listen
Note: For Linux on System z and z/OS, set the DISPLAY environment
variable so that the setup program is directed to a workstation supporting
X-Window.
Chapter 3. Installing and Setting Up Domino Servers 87
3. On the client system, install the Java runtime environment.
4. Create a temporary directory on the client system. For example, enter the
following at the command prompt:
v On a Windows client:
mkdir c:\temp
v On a UNIX workstation:
mkdir /temp
5. Do one of the following:
v From a Windows client, copy the remote setup files CFGDOMSERVER.JAR,
JHALL.JAR, and REMOTESETUP.CMD from the server to the directory you
created on the client system. These files are in C:\Domino program directory on
the server.
v From a UNIX workstation, copy the remote setup files
CFGDOMSERVER.JAR, JHALL.JAR, and REMOTESETUP from the server to
the directory you created on the workstation. These files located as below:
/<Domino program directory>/lotus/notes/latest/ibmpow/ on an IBM(R)
AIX(R) server
/<Domino program directory>/lotus/notes/latest/zlinux/ for Linux(R) on an
IBM(R) System z server
/<Domino program directory>/lotus/notes/latest/linux/ on a Linux server
/<Domino program directory>/lotus/notes/latest/sunspa/ on a Sun
Microsystems Solaris(R) server
Note: Linux on System z and z/OS ship tar files on the CD that contains the
files needed for remote server setup.
v On Linux on System z -- ZLINUX_CLIENT.TAR
v On z/OS -- ZOS_CLIENT.TAR6. At the command prompt on the client system, from the IBM Lotus Notes
program directory, enter:
remotesetup -silent c:\myprofile.pds -remote
serveraddress
Note: For Linux on System z and z/OS, set the DISPLAY environment variable
so that the setup program is directed to a workstation supporting X-Window.
Where myprofile is the name you gave the setup profile and serveraddress is the
host name or network address of the server you are setting up.
Note: If the profile file is not in the root directory, use the profile’s full path in
the command.
7. If the profile uses existing server, certifier, or administrator IDs that require
passwords, do the following:
a. Create a text file that contains the passwords for the existing IDs. The
keywords in this are:
Server=
AddServer=
Certifier=
OUCertifier=
Administrator=
b. Add a parameter in the command line for the name of the password file.
For example, on Windows enter:
88 Installing Domino Servers and Notes Clients
remotesetup -silent c:\myprofile.pds c:\passwd.txt -remote serveraddress
8. If this is a partitioned server setup, add the = parameter to the command line
to specify the NOTES.INI file in this partition’s Domino data directory. For
example, on Windows enter:
remotesetup -silent c:\myprofile.pds -remote serveraddress =c:\lotus\domino\data2\notes.ini
9. Check the ERRORLOG.TXT file to confirm that the setup is complete, or to
view any error messages that were generated during setup.
Certification log
When you set up the first IBM(R) Lotus(R) Domino(R) server in a domain, the
server setup program creates the Certification Log. If you delete the log, you can
recreate it, but be aware that the new log will not contain the information it
previously stored.
The Certification log records information related to recertification and name
changes. When you add servers and users to Domino, the Certification Log
maintains a record of how you registered them. For each registered server and
user, the Certification Log stores a document containing the following information:
v Name and license type
v Date of certification and expiration
v Name, license type, and ID number of the certifier ID used to create or recertify
the ID
Create a replica of the Certification Log on every server that is a registration server
and on every server that stores a Domino Directory that is used for user
management -- for example, renaming and recertifying users. If the server whose
Domino Directory replica you are using does not have a Certification Log,
user-management actions will fail.
Domino server registration
Before you install and set up additional servers, you must register them. In effect,
registering a server adds the server to the system. The server registration process
creates a Server document for the server in the IBM(R) Lotus(R) Domino(R)
Directory and creates a server ID. After registering and installing a server, you use
the server setup program to obtain a copy of the Domino Directory for the new
server and to set up the server to run particular services and tasks -- for example,
the HTTP service, the Mail Router, and so on.
The server registration user interface automatically removes leading spaces and
trailing spaces from passwords. Passwords cannot begin or end with a space. This
also applies to certifier registration and user registration.
Before you register servers, plan and understand your company’s hierarchical
name scheme. The name scheme defines which certifier ID to use when you
register each new server. In addition, make sure that you have access to each
certifier ID, know its password, and have created ID recovery information for it.
If you have decided to use the IBM(R) Lotus(R) Domino(R) server-based
certification authority (CA), you can register servers without access to the certifier
ID file and its password.
The registration server, which is the server that initially stores changes to
documents in the Domino Directory until the Domino Directory replicates with
other servers, must be up and running on the network. To register servers from
Chapter 3. Installing and Setting Up Domino Servers 89
your workstation, you must have access to the registration server and have at least
Author access with the Server Creator and Group Modifier roles in the ACL of the
Domino Directory.
When you register a server, Domino does the following:
v Creates a server ID for the new server and certifies it with the certifier ID
v Creates a Server document for the new server in the Domino Directory
v Encrypts and attaches the server ID to the Server document and saves the ID on
a disk or in a file on the server
v Adds the server name to the LocalDomainServers group in the Domino
Directory
v Creates an entry for the new server in the Certification Log (CERTLOG.NSF)
If you have a Domino server-based CA for issuing Internet certificates, you can
choose to configure the new server to support SSL connections by providing a
server key ring password and the server’s host name. Then, Domino does the
following:
v The registration process creates a certificate request in the Administration
Requests database (ADMIN4.NSF) to be processed by the server’s Internet CA
v The registration process creates a ″create SSL key ring″ request in ADMIN4.NSF
v Once you set up and start the new server and the ″create SSL keying″ request
has replicated to it, the ″create SSL key ring″ request creates the server key ring
file and an ″enable SSL ports″ request for the administration server of the
Domino Directory
v The ″enable SSL ports″ request enables all the SSL ports on the new server and
creates a ″monitor SSL status″ request for the new server
v The ″monitor SSL status″ request restarts all of the Internet tasks currently
running on the new server so that the tasks will accept SSL connections
Note: You must use the Domino Administrator if you want to use this server
registration process to configure a new server for SSL.
Registering a server
Use this procedure to register a server.
Note: If you have not specified a registration server in Administration Preferences,
this server is by default:
v The server specified in the NewUserServer setting in the NOTES.INI file
v The Administration server 1. If you are supplying the certifier ID, make sure that you have access to it and
that you know its password.
2. If you are using the IBM(R) Lotus(R) Domino(R) Administrator and would
like the new server to support SSL, make sure that you have an Internet CA
configured.
3. From the Domino Administrator or Web Administrator, click the
Configuration tab.
4. From the Tools pane, click Registration - Server.
5. If you are using the Domino Administrator, do the following:
a. If you are using the CA process, click Server and select a server that
includes the Domino Directory that contains the Certificate Authority
records, and the copy of the Administration Requests database
90 Installing Domino Servers and Notes Clients
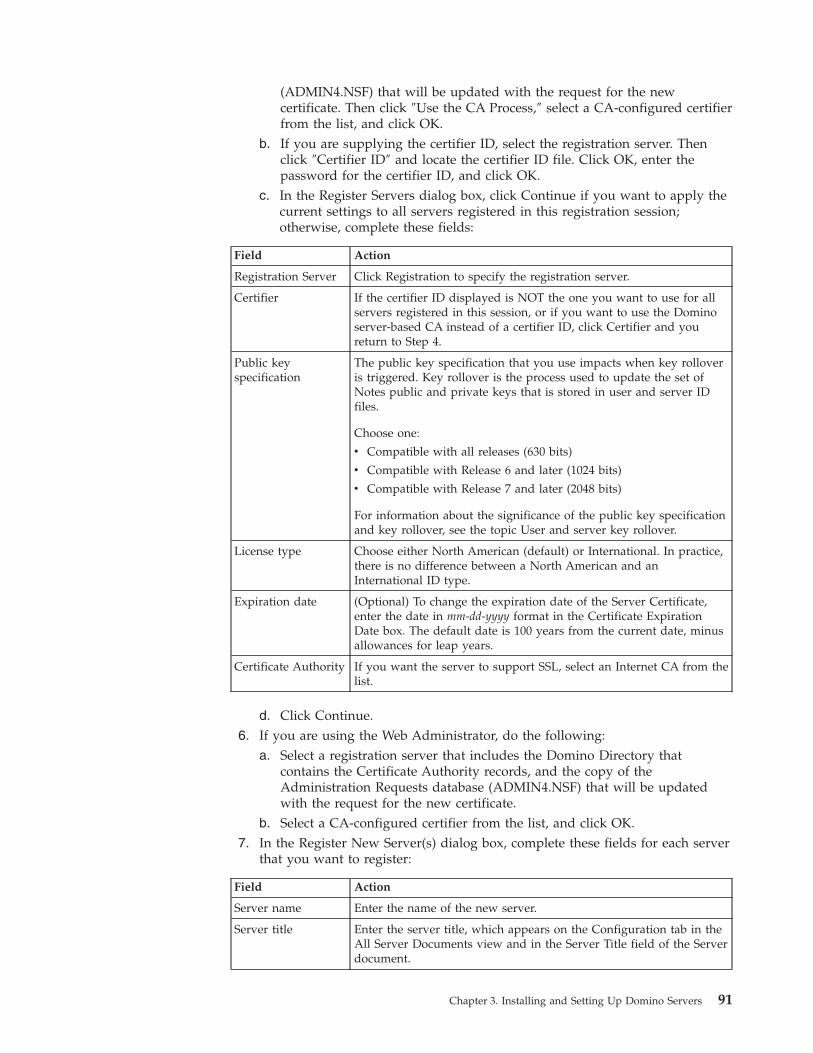
(ADMIN4.NSF) that will be updated with the request for the new
certificate. Then click ″Use the CA Process,″ select a CA-configured certifier
from the list, and click OK.
b. If you are supplying the certifier ID, select the registration server. Then
click ″Certifier ID″ and locate the certifier ID file. Click OK, enter the
password for the certifier ID, and click OK.
c. In the Register Servers dialog box, click Continue if you want to apply the
current settings to all servers registered in this registration session;
otherwise, complete these fields:
Field Action
Registration Server Click Registration to specify the registration server.
Certifier If the certifier ID displayed is NOT the one you want to use for all
servers registered in this session, or if you want to use the Domino
server-based CA instead of a certifier ID, click Certifier and you
return to Step 4.
Public key
specification
The public key specification that you use impacts when key rollover
is triggered. Key rollover is the process used to update the set of
Notes public and private keys that is stored in user and server ID
files.
Choose one:
v Compatible with all releases (630 bits)
v Compatible with Release 6 and later (1024 bits)
v Compatible with Release 7 and later (2048 bits)
For information about the significance of the public key specification
and key rollover, see the topic User and server key rollover.
License type Choose either North American (default) or International. In practice,
there is no difference between a North American and an
International ID type.
Expiration date (Optional) To change the expiration date of the Server Certificate,
enter the date in mm-dd-yyyy format in the Certificate Expiration
Date box. The default date is 100 years from the current date, minus
allowances for leap years.
Certificate Authority If you want the server to support SSL, select an Internet CA from the
list.
d. Click Continue. 6. If you are using the Web Administrator, do the following:
a. Select a registration server that includes the Domino Directory that
contains the Certificate Authority records, and the copy of the
Administration Requests database (ADMIN4.NSF) that will be updated
with the request for the new certificate.
b. Select a CA-configured certifier from the list, and click OK. 7. In the Register New Server(s) dialog box, complete these fields for each server
that you want to register:
Field Action
Server name Enter the name of the new server.
Server title Enter the server title, which appears on the Configuration tab in the
All Server Documents view and in the Server Title field of the Server
document.
Chapter 3. Installing and Setting Up Domino Servers 91
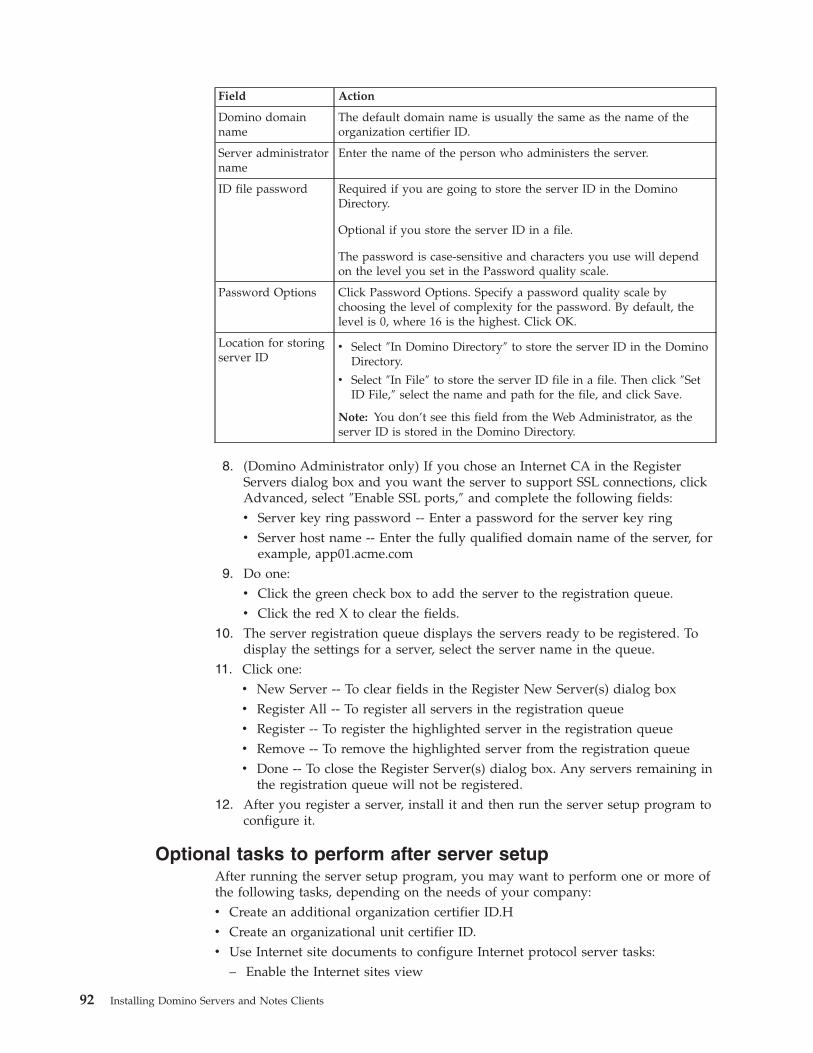
Field Action
Domino domain
name
The default domain name is usually the same as the name of the
organization certifier ID.
Server administrator
name
Enter the name of the person who administers the server.
ID file password Required if you are going to store the server ID in the Domino
Directory.
Optional if you store the server ID in a file.
The password is case-sensitive and characters you use will depend
on the level you set in the Password quality scale.
Password Options Click Password Options. Specify a password quality scale by
choosing the level of complexity for the password. By default, the
level is 0, where 16 is the highest. Click OK.
Location for storing
server ID
v Select ″In Domino Directory″ to store the server ID in the Domino
Directory.
v Select ″In File″ to store the server ID file in a file. Then click ″Set
ID File,″ select the name and path for the file, and click Save.
Note: You don’t see this field from the Web Administrator, as the
server ID is stored in the Domino Directory.
8. (Domino Administrator only) If you chose an Internet CA in the Register
Servers dialog box and you want the server to support SSL connections, click
Advanced, select ″Enable SSL ports,″ and complete the following fields:
v Server key ring password -- Enter a password for the server key ring
v Server host name -- Enter the fully qualified domain name of the server, for
example, app01.acme.com 9. Do one:
v Click the green check box to add the server to the registration queue.
v Click the red X to clear the fields.10. The server registration queue displays the servers ready to be registered. To
display the settings for a server, select the server name in the queue.
11. Click one:
v New Server -- To clear fields in the Register New Server(s) dialog box
v Register All -- To register all servers in the registration queue
v Register -- To register the highlighted server in the registration queue
v Remove -- To remove the highlighted server from the registration queue
v Done -- To close the Register Server(s) dialog box. Any servers remaining in
the registration queue will not be registered.12. After you register a server, install it and then run the server setup program to
configure it.
Optional tasks to perform after server setup
After running the server setup program, you may want to perform one or more of
the following tasks, depending on the needs of your company:
v Create an additional organization certifier ID.H
v Create an organizational unit certifier ID.
v Use Internet site documents to configure Internet protocol server tasks:
– Enable the Internet sites view
92 Installing Domino Servers and Notes Clients
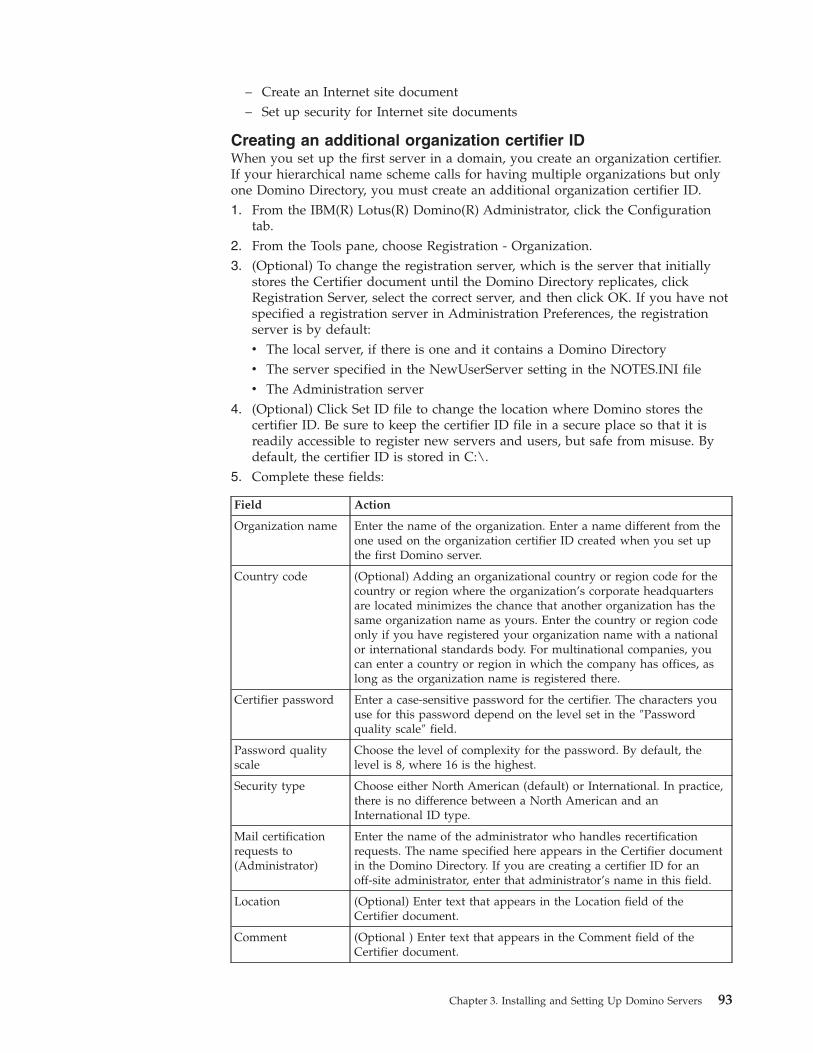
– Create an Internet site document
– Set up security for Internet site documents
Creating an additional organization certifier ID
When you set up the first server in a domain, you create an organization certifier.
If your hierarchical name scheme calls for having multiple organizations but only
one Domino Directory, you must create an additional organization certifier ID.
1. From the IBM(R) Lotus(R) Domino(R) Administrator, click the Configuration
tab.
2. From the Tools pane, choose Registration - Organization.
3. (Optional) To change the registration server, which is the server that initially
stores the Certifier document until the Domino Directory replicates, click
Registration Server, select the correct server, and then click OK. If you have not
specified a registration server in Administration Preferences, the registration
server is by default:
v The local server, if there is one and it contains a Domino Directory
v The server specified in the NewUserServer setting in the NOTES.INI file
v The Administration server4. (Optional) Click Set ID file to change the location where Domino stores the
certifier ID. Be sure to keep the certifier ID file in a secure place so that it is
readily accessible to register new servers and users, but safe from misuse. By
default, the certifier ID is stored in C:\.
5. Complete these fields:
Field Action
Organization name Enter the name of the organization. Enter a name different from the
one used on the organization certifier ID created when you set up
the first Domino server.
Country code (Optional) Adding an organizational country or region code for the
country or region where the organization’s corporate headquarters
are located minimizes the chance that another organization has the
same organization name as yours. Enter the country or region code
only if you have registered your organization name with a national
or international standards body. For multinational companies, you
can enter a country or region in which the company has offices, as
long as the organization name is registered there.
Certifier password Enter a case-sensitive password for the certifier. The characters you
use for this password depend on the level set in the ″Password
quality scale″ field.
Password quality
scale
Choose the level of complexity for the password. By default, the
level is 8, where 16 is the highest.
Security type Choose either North American (default) or International. In practice,
there is no difference between a North American and an
International ID type.
Mail certification
requests to
(Administrator)
Enter the name of the administrator who handles recertification
requests. The name specified here appears in the Certifier document
in the Domino Directory. If you are creating a certifier ID for an
off-site administrator, enter that administrator’s name in this field.
Location (Optional) Enter text that appears in the Location field of the
Certifier document.
Comment (Optional ) Enter text that appears in the Comment field of the
Certifier document.
Chapter 3. Installing and Setting Up Domino Servers 93
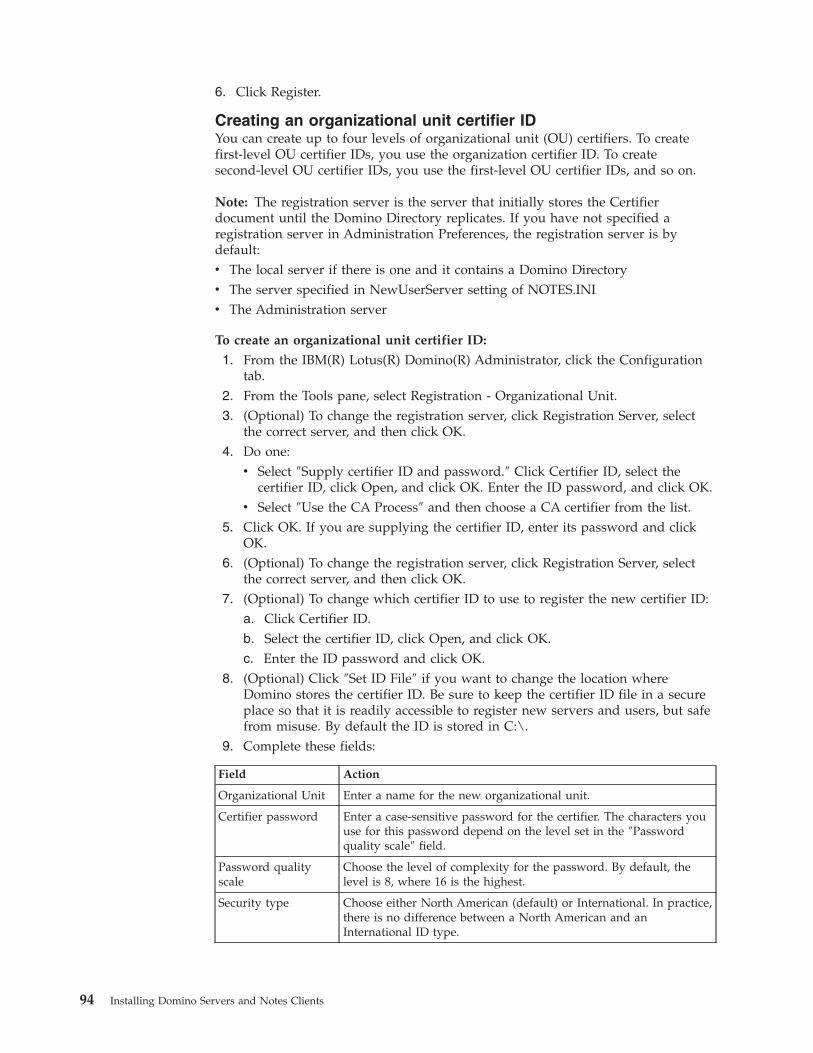
6. Click Register.
Creating an organizational unit certifier ID
You can create up to four levels of organizational unit (OU) certifiers. To create
first-level OU certifier IDs, you use the organization certifier ID. To create
second-level OU certifier IDs, you use the first-level OU certifier IDs, and so on.
Note: The registration server is the server that initially stores the Certifier
document until the Domino Directory replicates. If you have not specified a
registration server in Administration Preferences, the registration server is by
default:
v The local server if there is one and it contains a Domino Directory
v The server specified in NewUserServer setting of NOTES.INI
v The Administration server
To create an organizational unit certifier ID:
1. From the IBM(R) Lotus(R) Domino(R) Administrator, click the Configuration
tab.
2. From the Tools pane, select Registration - Organizational Unit.
3. (Optional) To change the registration server, click Registration Server, select
the correct server, and then click OK.
4. Do one:
v Select ″Supply certifier ID and password.″ Click Certifier ID, select the
certifier ID, click Open, and click OK. Enter the ID password, and click OK.
v Select ″Use the CA Process″ and then choose a CA certifier from the list. 5. Click OK. If you are supplying the certifier ID, enter its password and click
OK.
6. (Optional) To change the registration server, click Registration Server, select
the correct server, and then click OK.
7. (Optional) To change which certifier ID to use to register the new certifier ID:
a. Click Certifier ID.
b. Select the certifier ID, click Open, and click OK.
c. Enter the ID password and click OK. 8. (Optional) Click ″Set ID File″ if you want to change the location where
Domino stores the certifier ID. Be sure to keep the certifier ID file in a secure
place so that it is readily accessible to register new servers and users, but safe
from misuse. By default the ID is stored in C:\.
9. Complete these fields:
Field Action
Organizational Unit Enter a name for the new organizational unit.
Certifier password Enter a case-sensitive password for the certifier. The characters you
use for this password depend on the level set in the ″Password
quality scale″ field.
Password quality
scale
Choose the level of complexity for the password. By default, the
level is 8, where 16 is the highest.
Security type Choose either North American (default) or International. In practice,
there is no difference between a North American and an
International ID type.
94 Installing Domino Servers and Notes Clients
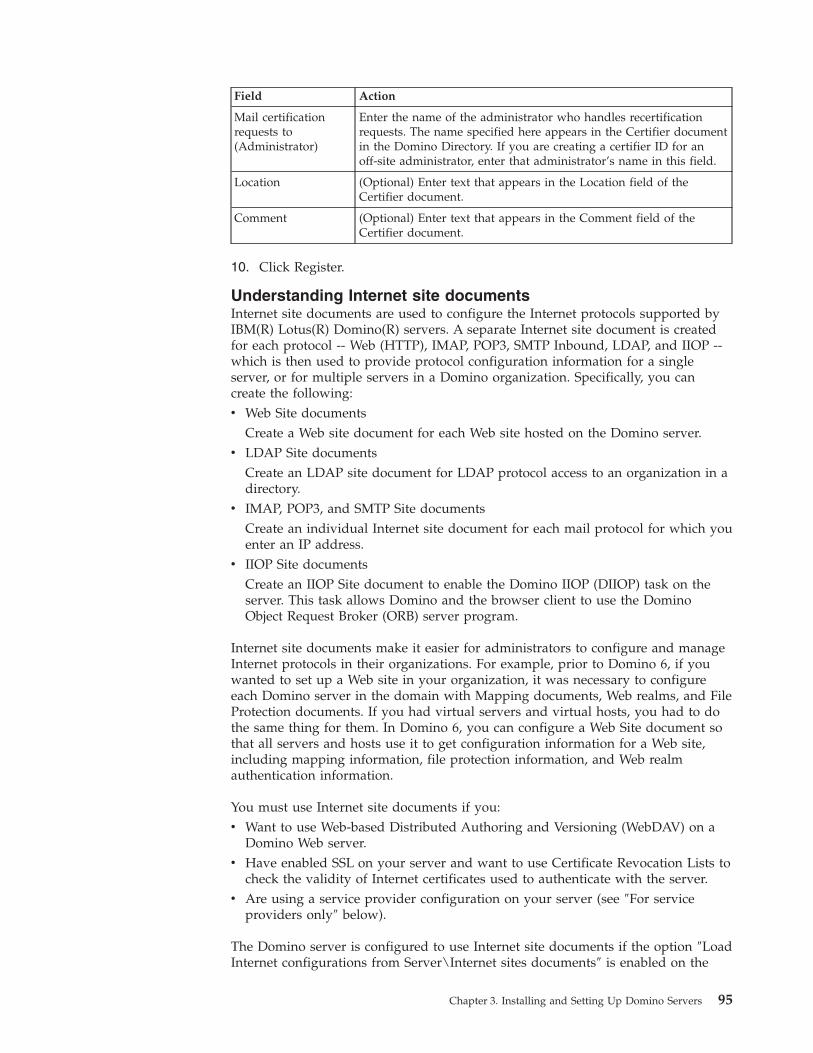
Field Action
Mail certification
requests to
(Administrator)
Enter the name of the administrator who handles recertification
requests. The name specified here appears in the Certifier document
in the Domino Directory. If you are creating a certifier ID for an
off-site administrator, enter that administrator’s name in this field.
Location (Optional) Enter text that appears in the Location field of the
Certifier document.
Comment (Optional) Enter text that appears in the Comment field of the
Certifier document.
10. Click Register.
Understanding Internet site documents
Internet site documents are used to configure the Internet protocols supported by
IBM(R) Lotus(R) Domino(R) servers. A separate Internet site document is created
for each protocol -- Web (HTTP), IMAP, POP3, SMTP Inbound, LDAP, and IIOP --
which is then used to provide protocol configuration information for a single
server, or for multiple servers in a Domino organization. Specifically, you can
create the following:
v Web Site documents
Create a Web site document for each Web site hosted on the Domino server.
v LDAP Site documents
Create an LDAP site document for LDAP protocol access to an organization in a
directory.
v IMAP, POP3, and SMTP Site documents
Create an individual Internet site document for each mail protocol for which you
enter an IP address.
v IIOP Site documents
Create an IIOP Site document to enable the Domino IIOP (DIIOP) task on the
server. This task allows Domino and the browser client to use the Domino
Object Request Broker (ORB) server program.
Internet site documents make it easier for administrators to configure and manage
Internet protocols in their organizations. For example, prior to Domino 6, if you
wanted to set up a Web site in your organization, it was necessary to configure
each Domino server in the domain with Mapping documents, Web realms, and File
Protection documents. If you had virtual servers and virtual hosts, you had to do
the same thing for them. In Domino 6, you can configure a Web Site document so
that all servers and hosts use it to get configuration information for a Web site,
including mapping information, file protection information, and Web realm
authentication information.
You must use Internet site documents if you:
v Want to use Web-based Distributed Authoring and Versioning (WebDAV) on a
Domino Web server.
v Have enabled SSL on your server and want to use Certificate Revocation Lists to
check the validity of Internet certificates used to authenticate with the server.
v Are using a service provider configuration on your server (see ″For service
providers only″ below).
The Domino server is configured to use Internet site documents if the option ″Load
Internet configurations from Server\Internet sites documents″ is enabled on the
Chapter 3. Installing and Setting Up Domino Servers 95
Basics tab on Server document. If the option is not enabled, the server defaults to
Server document settings to obtain configuration information for Internet protocols.
Internet site documents are designed to be used as follows:
v For any incoming connection, Internet site documents, Certifier documents and
Global Domain documents are used to determine which organization (certifier)
is associated with the target IP address. In a Domino configuration, all incoming
IP addresses usually map to the top level certifier.
v For a specific organization and a specific protocol and a specific server, the
Internet site document is used to determine which authentication controls are to
be applied.
When you enter a Host name or IP address in an Internet site document, you do
not gain control over which authentication controls are applied according to the IP
address the user connects to. Instead, the first Internet site document located for
the server and the organization is used. As a result, except for Web Site documents,
you should have only one Internet site document for each organization, protocol,
and server combination.
For example, do not do the following:
Server A has two IP addresses and you create the following two Internet site
documents for POP3:
v One Internet site document for one IP address with no SSL allowed
v One Internet site document for another IP address, with SSL allowed.
The IP address is used to determine the organization and both Internet site
documents apply to the same organization. The first Internet site document that
matches the server and the organization is used, in this case, the Internet site
document that does not allow SSL.
Modifications to Internet site documents (including the creation of new Site
documents) are dynamic. The server or protocol does not need to be restarted after
you create a new Site document, or after you modify or delete an existing one.
Changes generally take effect minutes after the change is made.
Internet site documents are created in the Internet sites view, which is used to help
manage Internet protocol configuration information by listing the configured
Internet site documents for each organization in the domain.
CAUTION:
If you use an Internet site document to configure one Internet protocol on a
server, you must also use Internet site documents for all Internet protocols on
that server. For example, you cannot set up an LDAP Internet site document and,
on the same server, use the Server document to configure HTTP.
While most protocol settings are configured in Internet site documents, there are
some settings that need to be configured in the Server document to support
Internet protocol configurations. These include settings for:
v Enabling and configuring the TCP/IP port.
v Enabling and configuring the SSL port (including redirecting TCP to SSL).
v Accessing the server -- such as who can access the server and how.
96 Installing Domino Servers and Notes Clients
Setting up Internet site documents on a Domino server: Do the following to set
up basic Internet site functionality on a Domino server.
1. Create Internet sites document for the Internet protocols you want to use.
2. Set up security for each Internet site document.
3. Enable Internet site documents on the server.
For service providers only: Internet site documents are required for hosted
organizations. These documents control each hosted organization’s use of Internet
protocols. A hosted organization can only use an Internet protocol if the hosted
organization has an Internet site document for that protocol. A shared IP address
may be used for all hosted organizations, or unique IP addresses may be set up for
each hosted organization. Internet site documents link IP addresses to the
individual hosted organizations for each Internet protocol.
When registering hosted organizations, you have the option to create Internet site
documents during hosted organization registration, or you can choose to create
them later.
Service providers need to consider the following when using Internet site
documents:
v Each hosted organization has one Web Site document that can be created during
hosted organization registration. You must create this initial Web Site document
to activate the HTTP protocol. If you have multiple Web sites, you need one
individual Web Site document for each additional Web site for each
organization. If the hosted organization supports DOLS, the Web Site document
must contain the name of the DSAPI filter file name.
v You must create one mail protocol Site document (IMAP, POP3, or SMTP) for
each protocol used by each organization.
v In a hosted environment, Domino IIOP (DIIOP) can use the information in the
IIOP Internet site document to define the scope of the Domino Directory used to
validate users. With DIIOP, you can use any Java(TM) code running on any
server on the network.
v If your configuration has one IP address that is shared by multiple hosted
organizations, HTTP, IMAP, LDAP, POP3, and SMTP are the available protocols.
For IMAP, LDAP, POP3, and SMTP users, the name provided during
authentication must be the user’s Internet e-mail address, so that the server
knows the organization of which each user is a member. Anonymous access to
LDAP is not supported in this configuration.
v To enable SSL for a hosted organization, you must enter the server IP address in
the field ″Host names or addresses mapped to this site″ on the Basics tab of the
Internet site document.
Creating an Internet site document: You can create Internet site documents for
Web, IMAP, POP3, LDAP, SMTP Inbound, and IIOP Internet protocols. You create
one document at a time.
To create an Internet site document:
1. From the IBM(R) Lotus(R) Domino(R) Administrator, click Configuration - Web
- Internet sites.
2. Click Add Internet site, and select the type of Internet site document to create.
Chapter 3. Installing and Setting Up Domino Servers 97
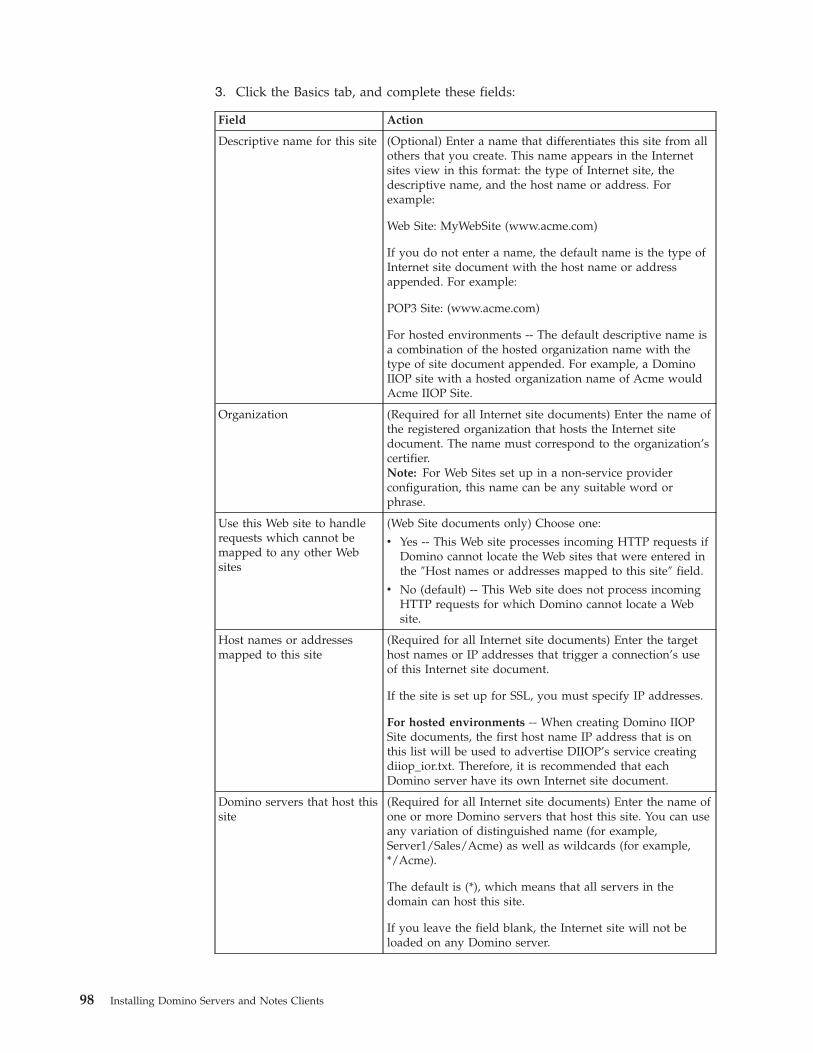
3. Click the Basics tab, and complete these fields:
Field Action
Descriptive name for this site (Optional) Enter a name that differentiates this site from all
others that you create. This name appears in the Internet
sites view in this format: the type of Internet site, the
descriptive name, and the host name or address. For
example:
Web Site: MyWebSite (www.acme.com)
If you do not enter a name, the default name is the type of
Internet site document with the host name or address
appended. For example:
POP3 Site: (www.acme.com)
For hosted environments -- The default descriptive name is
a combination of the hosted organization name with the
type of site document appended. For example, a Domino
IIOP site with a hosted organization name of Acme would
Acme IIOP Site.
Organization (Required for all Internet site documents) Enter the name of
the registered organization that hosts the Internet site
document. The name must correspond to the organization’s
certifier.
Note: For Web Sites set up in a non-service provider
configuration, this name can be any suitable word or
phrase.
Use this Web site to handle
requests which cannot be
mapped to any other Web
sites
(Web Site documents only) Choose one:
v Yes -- This Web site processes incoming HTTP requests if
Domino cannot locate the Web sites that were entered in
the ″Host names or addresses mapped to this site″ field.
v No (default) -- This Web site does not process incoming
HTTP requests for which Domino cannot locate a Web
site.
Host names or addresses
mapped to this site
(Required for all Internet site documents) Enter the target
host names or IP addresses that trigger a connection’s use
of this Internet site document.
If the site is set up for SSL, you must specify IP addresses.
For hosted environments -- When creating Domino IIOP
Site documents, the first host name IP address that is on
this list will be used to advertise DIIOP’s service creating
diiop_ior.txt. Therefore, it is recommended that each
Domino server have its own Internet site document.
Domino servers that host this
site
(Required for all Internet site documents) Enter the name of
one or more Domino servers that host this site. You can use
any variation of distinguished name (for example,
Server1/Sales/Acme) as well as wildcards (for example,
*/Acme).
The default is (*), which means that all servers in the
domain can host this site.
If you leave the field blank, the Internet site will not be
loaded on any Domino server.
98 Installing Domino Servers and Notes Clients
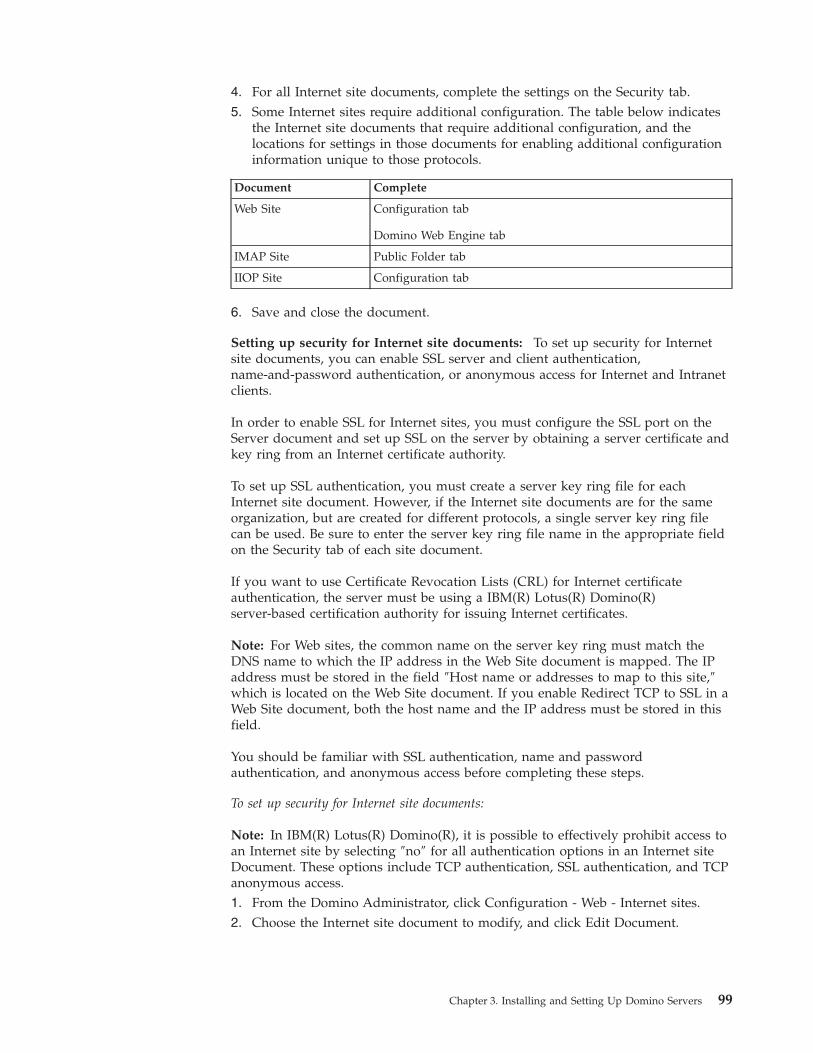
4. For all Internet site documents, complete the settings on the Security tab.
5. Some Internet sites require additional configuration. The table below indicates
the Internet site documents that require additional configuration, and the
locations for settings in those documents for enabling additional configuration
information unique to those protocols.
Document Complete
Web Site Configuration tab
Domino Web Engine tab
IMAP Site Public Folder tab
IIOP Site Configuration tab
6. Save and close the document.
Setting up security for Internet site documents: To set up security for Internet
site documents, you can enable SSL server and client authentication,
name-and-password authentication, or anonymous access for Internet and Intranet
clients.
In order to enable SSL for Internet sites, you must configure the SSL port on the
Server document and set up SSL on the server by obtaining a server certificate and
key ring from an Internet certificate authority.
To set up SSL authentication, you must create a server key ring file for each
Internet site document. However, if the Internet site documents are for the same
organization, but are created for different protocols, a single server key ring file
can be used. Be sure to enter the server key ring file name in the appropriate field
on the Security tab of each site document.
If you want to use Certificate Revocation Lists (CRL) for Internet certificate
authentication, the server must be using a IBM(R) Lotus(R) Domino(R)
server-based certification authority for issuing Internet certificates.
Note: For Web sites, the common name on the server key ring must match the
DNS name to which the IP address in the Web Site document is mapped. The IP
address must be stored in the field ″Host name or addresses to map to this site,″
which is located on the Web Site document. If you enable Redirect TCP to SSL in a
Web Site document, both the host name and the IP address must be stored in this
field.
You should be familiar with SSL authentication, name and password
authentication, and anonymous access before completing these steps.
To set up security for Internet site documents:
Note: In IBM(R) Lotus(R) Domino(R), it is possible to effectively prohibit access to
an Internet site by selecting ″no″ for all authentication options in an Internet site
Document. These options include TCP authentication, SSL authentication, and TCP
anonymous access.
1. From the Domino Administrator, click Configuration - Web - Internet sites.
2. Choose the Internet site document to modify, and click Edit Document.
Chapter 3. Installing and Setting Up Domino Servers 99
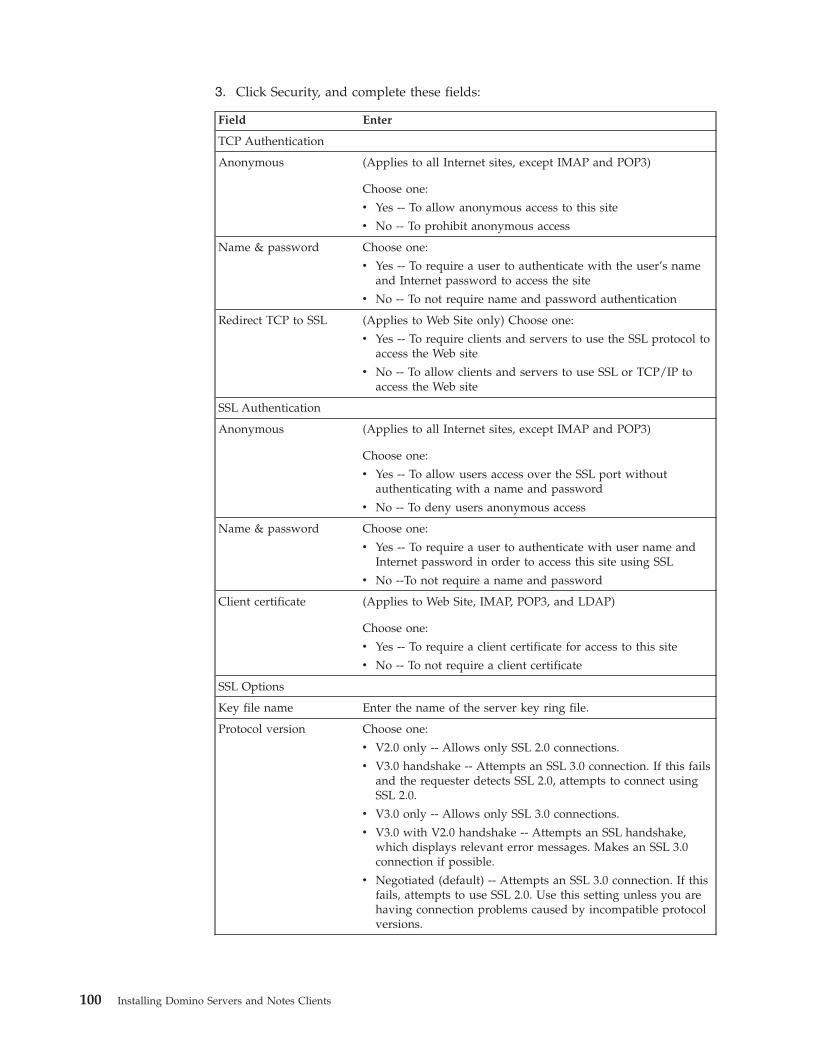
3. Click Security, and complete these fields:
Field Enter
TCP Authentication
Anonymous (Applies to all Internet sites, except IMAP and POP3)
Choose one:
v Yes -- To allow anonymous access to this site
v No -- To prohibit anonymous access
Name & password Choose one:
v Yes -- To require a user to authenticate with the user’s name
and Internet password to access the site
v No -- To not require name and password authentication
Redirect TCP to SSL (Applies to Web Site only) Choose one:
v Yes -- To require clients and servers to use the SSL protocol to
access the Web site
v No -- To allow clients and servers to use SSL or TCP/IP to
access the Web site
SSL Authentication
Anonymous (Applies to all Internet sites, except IMAP and POP3)
Choose one:
v Yes -- To allow users access over the SSL port without
authenticating with a name and password
v No -- To deny users anonymous access
Name & password Choose one:
v Yes -- To require a user to authenticate with user name and
Internet password in order to access this site using SSL
v No --To not require a name and password
Client certificate (Applies to Web Site, IMAP, POP3, and LDAP)
Choose one:
v Yes -- To require a client certificate for access to this site
v No -- To not require a client certificate
SSL Options
Key file name Enter the name of the server key ring file.
Protocol version Choose one:
v V2.0 only -- Allows only SSL 2.0 connections.
v V3.0 handshake -- Attempts an SSL 3.0 connection. If this fails
and the requester detects SSL 2.0, attempts to connect using
SSL 2.0.
v V3.0 only -- Allows only SSL 3.0 connections.
v V3.0 with V2.0 handshake -- Attempts an SSL handshake,
which displays relevant error messages. Makes an SSL 3.0
connection if possible.
v Negotiated (default) -- Attempts an SSL 3.0 connection. If this
fails, attempts to use SSL 2.0. Use this setting unless you are
having connection problems caused by incompatible protocol
versions.
100 Installing Domino Servers and Notes Clients
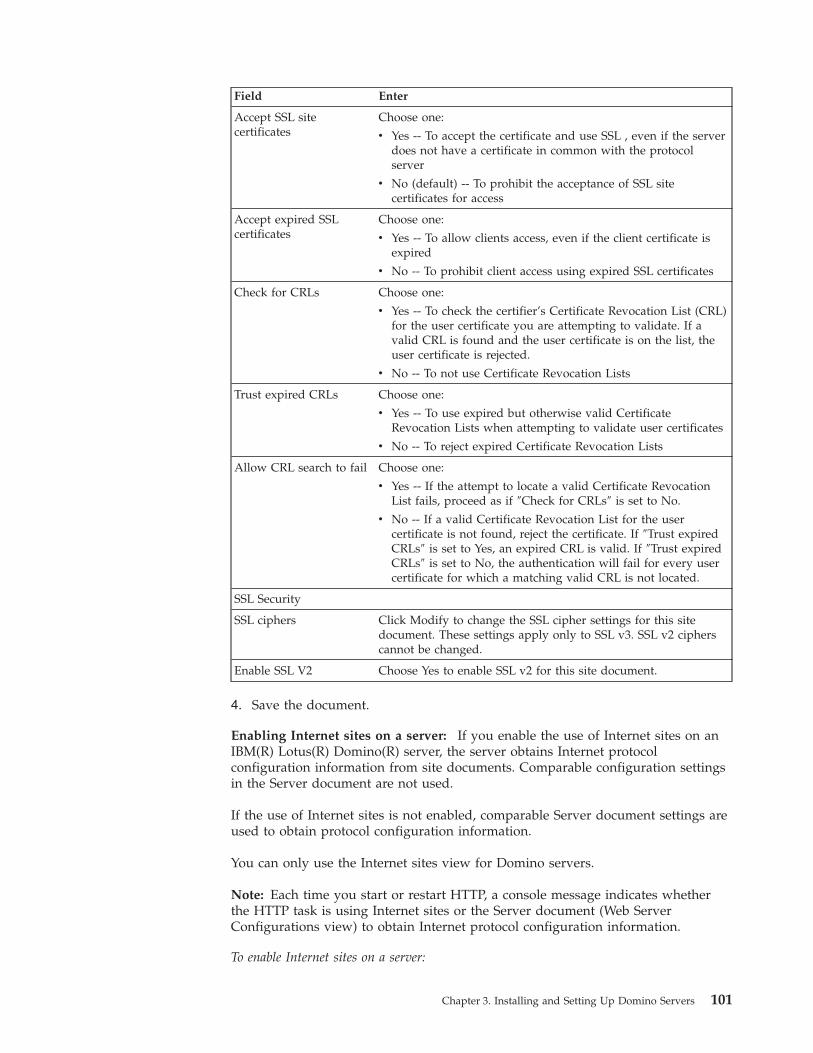
Field Enter
Accept SSL site
certificates
Choose one:
v Yes -- To accept the certificate and use SSL , even if the server
does not have a certificate in common with the protocol
server
v No (default) -- To prohibit the acceptance of SSL site
certificates for access
Accept expired SSL
certificates
Choose one:
v Yes -- To allow clients access, even if the client certificate is
expired
v No -- To prohibit client access using expired SSL certificates
Check for CRLs Choose one:
v Yes -- To check the certifier’s Certificate Revocation List (CRL)
for the user certificate you are attempting to validate. If a
valid CRL is found and the user certificate is on the list, the
user certificate is rejected.
v No -- To not use Certificate Revocation Lists
Trust expired CRLs Choose one:
v Yes -- To use expired but otherwise valid Certificate
Revocation Lists when attempting to validate user certificates
v No -- To reject expired Certificate Revocation Lists
Allow CRL search to fail Choose one:
v Yes -- If the attempt to locate a valid Certificate Revocation
List fails, proceed as if ″Check for CRLs″ is set to No.
v No -- If a valid Certificate Revocation List for the user
certificate is not found, reject the certificate. If ″Trust expired
CRLs″ is set to Yes, an expired CRL is valid. If ″Trust expired
CRLs″ is set to No, the authentication will fail for every user
certificate for which a matching valid CRL is not located.
SSL Security
SSL ciphers Click Modify to change the SSL cipher settings for this site
document. These settings apply only to SSL v3. SSL v2 ciphers
cannot be changed.
Enable SSL V2 Choose Yes to enable SSL v2 for this site document.
4. Save the document.
Enabling Internet sites on a server: If you enable the use of Internet sites on an
IBM(R) Lotus(R) Domino(R) server, the server obtains Internet protocol
configuration information from site documents. Comparable configuration settings
in the Server document are not used.
If the use of Internet sites is not enabled, comparable Server document settings are
used to obtain protocol configuration information.
You can only use the Internet sites view for Domino servers.
Note: Each time you start or restart HTTP, a console message indicates whether
the HTTP task is using Internet sites or the Server document (Web Server
Configurations view) to obtain Internet protocol configuration information.
To enable Internet sites on a server:
Chapter 3. Installing and Setting Up Domino Servers 101

1. Open the Server document you want to edit, and click Edit Server.
2. Click the Basics tab.
3. In the Basics section, enable ″Loads Internet configurations from
Server/Internet sites documents.″
4. Save the document.
5. Restart the server.
Note: The HTTP task is backward-compatible with the Web Server Configurations
view.
Starting and shutting down the Domino server
Start the IBM(R) Lotus(R) Domino(R) server so users can access shared databases
and obtain other server services. Do not enter keystrokes or click the mouse while
the Domino server is starting or shutting down.
Note: If the server program is running, do not use CTRL+S to stop scrolling the
console, because no server services take place until you press a key to continue.
To start the server
Operating system Action
Microsoft(R) Windows(R) Choose Start - Programs - Lotus Applications - Lotus
Domino Server.
UNIX(R) Enter the path for the Domino program directory. For
example, if you installed Domino in the /opt
directory, enter:
/opt/ibm/lotus/bin/server
IBM i Use the following IBM i command:
STRDOMSVR SERVER(servername)
Where servername is the name of you Domino server
To shut down the server
Type either of the following commands at the console:
exit
or
quit
It may take ten seconds or more for the server to shut down.
IBM i
For IBM i, in addition to Quit and Stop, you can also use the following IBM i
command:
ENDDOMSVR SERVER<servername>
Where servername is the name of you Domino server
102 Installing Domino Servers and Notes Clients
Starting Domino as an application or a Windows service
If you have installed IBM(R) Lotus(R) Domino(R) as a Microsoft(R) Windows(R)
service, when you start the Domino server, a dialog box appears prompting you to
specify whether to start Domino as an application or a Windows service.
1. On the Lotus Domino Server dialog box, choose one:
v Start Domino as a Windows service -- Starts the Domino server as a
Windows service. Domino then runs like any Windows service.
– If you choose this option without selecting either of the check boxes, the
next time you start Domino, this message displays ″Lotus Domino is
installed as a Windows service.″ The dialog box does not display again.
– If you choose this option and you select the ″Always start Domino as a
service at system startup,″ Domino always starts as a Windows service
and this dialog box no longer appears at start up.
The ″Don’t ask me again″ check box does not apply to the ″Start Domino
as a Windows service″ due to the way that Windows services work.v Start Domino as a regular application -- Starts the Domino server as any
application would be started. This is the traditional method for starting and
running the Domino server.
– If you choose this option without selecting either of the check boxes on
the dialog box, the next time Domino starts, you are prompted with this
dialog box again.
– If you choose this option and you select the ″Don’t ask me again″ check
box, you are not prompted with this dialog box again and Domino always
starts as an application.
– If you choose this option and select the check box ″Always start Domino
as a service at system startup″ Domino runs as an application during the
current session. The next time you start the server, Domino runs as a
Windows service.2. Optionally, you can also choose neither of the following, one of the following,
or both:
v Always start Domino as a service at system startup -- Select this check box if
you want Domino to always start as a Windows service. Once you select this
option and click OK, you can not change your selection using this dialog
box.
v Don’t ask me again -- Select this check box if you do not want to be
prompted again when the Domino server starts. After you select this check
box and click OK, you will not be able to reset your selections using this
dialog box.3. Click OK.
When run as a Windows service, Domino runs as any other Windows services
runs. Some of the benefits associated with running Domino as a Windows service
are listed below.
v If you select ″Automatic″ for starting services, Windows services are started
when the system starts.
v Windows services can be controlled via the Windows service manager. The
Windows service manager can be used remotely.
v Services continue to run even when you log off the system.
Chapter 3. Installing and Setting Up Domino Servers 103
Using instant messaging in the Domino Directory
The IBM(R) Lotus(R) Domino(R) Directory is now enabled for instant messaging,
meaning that you can conduct an online chat directly from the Domino Directory.
The instant messaging Chat feature is available only if you have a Sametime
server, and only for Microsoft(R) Windows(R) versions of IBM(R) Lotus(R)
Domino(R)/Notes.
Chats are interactive, real-time text conversations.
From the People document, Group document, and from the Domino Directory
itself there is a Chat option in the menu bar. You can perform these instant
messaging activities:
v Click Chat and you can choose from the following options:
v Chat with -- Open a chat with the person whose name is currently selected in
the open document or directory.
v Add to Instant Contact List -- Add the selected person’s name to an instant
messaging contact list that you choose.
v Show/Hide Contact List -- Toggles between displaying the names in the contact
list and hiding the list.
Running the Domino-Portal integration wizard
Use the Domino-Portal integration (DPI) wizard to configure an IBM(R)
WebSphere(R) Portal server to work with your Domino-based infrastructure. You
can use the DPI wizard with the IBM(R) Lotus(R) Domino(R) server. The DPI
wizard eliminates many of the manual Domino and WebSphere Portal
configuration steps required to run the Domino and Extended Products Portlets,
Common Mail and Common Calendar.
Prerequisites
The DPI wizard requires that both the Domino server and WebSphere Portal server
be installed and set up.
v WebSphere Portal server 6.0 with security enabled, configured with Domino
LDAP, not clustered, and with no support for IBM(R) Access Manager for
e-business or Computer Associates eTrust(R) SiteMinder(R).
v Domino LDAP server, configured as the LDAP server for WebSphere Portal 6.0,
running Domino release 7.0 or more recent, with the LDAP and HTTP/HTTPS
services enabled. The wizard communicates over HTTP, but specifying an
HTTPS port as well allows for a secure transmission of the DTPA token that the
wizard copies.
v If security is enabled manually on the WebSphere Portal server 6.0, instead of
enabling security with the Advanced Configuration wizard on the WebSphere
Portal server, you will need to restart the WebSphere Portal Administration
server before you run the DPI wizard. To prevent having to manually restart the
WebSphere Portal Administration server, be sure to enable security in the
Advanced Configuration wizard prior to running the DPI wizard.
v All servers must be behind the same Internet security firewall, in the same
Internet domain, and if they are Domino servers, in the same Domino domain.
v To run the DPI wizard, you must be listed as an Administrator in the Server
document in the Domino Directory (NAMES.NSF) on the Lotus Domino LDAP
server.
104 Installing Domino Servers and Notes Clients
CAUTION:
If you already have a Web SSO configuration on your Domino servers, be sure
to read the ″Consideration for existing SSO environments″ section prior to
running the wizard.
Considerations for existing Web SSO environments
The wizard creates a fresh Web SSO environment for all of the Domino servers in
your Domino domain that you choose to configure. If your installation of Domino
is new, or if your existing Domino and IBM(R) Lotus(R) Sametime(R) servers have
no Web SSO documents in their Domino Directory applications (NAMES.NSF
files), no further action is needed and you are ready to run the wizard.
Running the Domino-Portal integration wizard
Complete these steps to run the Domino-Portal integration wizard.
1. To start the wizard, from the portal server, directory <PortalServerHome>/config/wizard.
2. Do one of the following:
v For UNIX(R), type the following command:
./dpiwiz.sh
v For Microsoft(R) Windows(R) platforms, type the following command:
dpiwiz.bat
You can review the log file dpitasks.log generated during the configuration. The
Dpitasks.log file contains the wizard history. If the DPI wizard fails, use the View
Log button to review the content of the log file. Log files are stored on the Portal
server at <PortalServerHome>/log.
When the wizard completes, the log files are zipped into a file with this naming
convention: DPIDebug_yyyymmdd_hhmm.zip, which can be found at
<PortalServerHome>/config/wizard.
Chapter 3. Installing and Setting Up Domino Servers 105

106 Installing Domino Servers and Notes Clients
Chapter 4. Setting Up and Using Domino Administration Tools
This chapter explains how to install and navigate the IBM(R) Lotus(R)
Domino(TM) Administrator. It also includes information on setting up and using
the IBM(R) Lotus(R) Domino(TM) Web Administrator, which allows you to
administer a Domino server using a browser.
The Domino Administrator
The IBM(R) Lotus(R) Domino(R) Administrator is the administration client for
IBM(R) Lotus(R) Notes(R) and Domino. You can use the Domino Administrator to
perform most administration tasks. You can administer the Domino system using
the local Domino Administrator or using the IBM(R) Lotus(R) Domino(R) Web
Administrator.
Information about the Domino Administrator in this section includes:
v Domino Administrator installation
v Setting up the Domino Administrator
v Selecting a server to administer in the Domino Administrator
v Setting Domino Administrator preferences
v Navigating the Domino Administrator
v Organizing tasks using the Domino Administrator tabs
Note: The Domino Administrator client also offers Domino domain monitoring
(DDM) which you can use to view the overall status of multiple servers across one
or more domains, and then use the information provided by DDM to quickly
resolve problems.
Installing the Domino Administrator
When you install and set up an IBM(R) Lotus(R) Domino(R) server, the Server
Setup program does not install the Domino Administrator, which is the
administration client. You must run the Domino Administrator client setup to
install the Domino Administrator client. There are many ways to set up your
Administrator client installation.
Do not install the Domino Administrator on the same system on which you
installed the Domino server. Doing so compromises Domino’s security and impairs
server performance.
Setting up the Domino Administrator
1. Make sure the IBM(R) Lotus(R) Domino(R) server is running.
2. Start the Domino Administrator.
3. The first time you start the Domino Administrator, a setup wizard starts. After
you answer the questions displayed by the setup wizard, the Domino
Administrator client opens automatically.
Starting the Domino Administrator
There are several ways to start the IBM(R) Lotus(R) Domino(R) Administrator.
1. Make sure the Domino server is running.
107
2. Do one:
v From the Microsoft(R) Windows(R) control panel, click Start - Programs -
Lotus Applications - Lotus Domino Administrator.
v Click the Domino Administrator icon on the desktop.
v From the IBM(R) Lotus(R) Notes(R) client, click the Domino Administrator
bookmark button or choose File - Tools - Server Administration.
Navigating Domino Administrator
The user interface for the IBM(R) Lotus(R) Domino(R) Administrator is divided
into four panes. Clicking in one pane dynamically updates information in other
panes.
Server pane
The server pane displays the servers in the domain, grouped in different views.
For example, you can view all servers in the domain or view them by clusters or
networks. To ″pin″ the server pane open, click the pin icon at the top of the server
pane.
Task pane
The tasks pane provides a logical grouping of administration tasks organized by
tabs. Each tab includes all the tasks associated with a specific area of
administration. For example, to manage the files located on a particular server,
select a server and click the Files tab.
Results pane
The appearance of the results pane changes, based on the task you are performing.
For example, the results pane may display a list of files, as on the Files tab, or an
active display of real-time processes and statistics, as on the Server - Monitoring
tab.
Tools pane
The tools pane provides additional functions associated with a selected tab. For
example, from the Files tab you can check disk space and perform tasks associated
with files.
Window tabs
Use window tabs to switch from one open window to another in the Domino
Administrator. Every time you open a database or a document, a new window tab
appears beneath the main menu bar.
Domains
You can access the servers in each domain that you administer. Click a domain to
open the server pane.
Bookmark bar
The Bookmark bar organizes bookmarks. Each icon on the Bookmark bar (running
down the left edge of the Domino Administrator window) opens a bookmark or a
list of bookmarks, which can include Web browser bookmarks.
Selecting a server to administer in the Domino Administrator
To administer a server, you select the server from a server list. You can have
multiple server lists, each of which is represented by a button. After you select a
server, information about that server appears in all the tabs.
108 Installing Domino Servers and Notes Clients
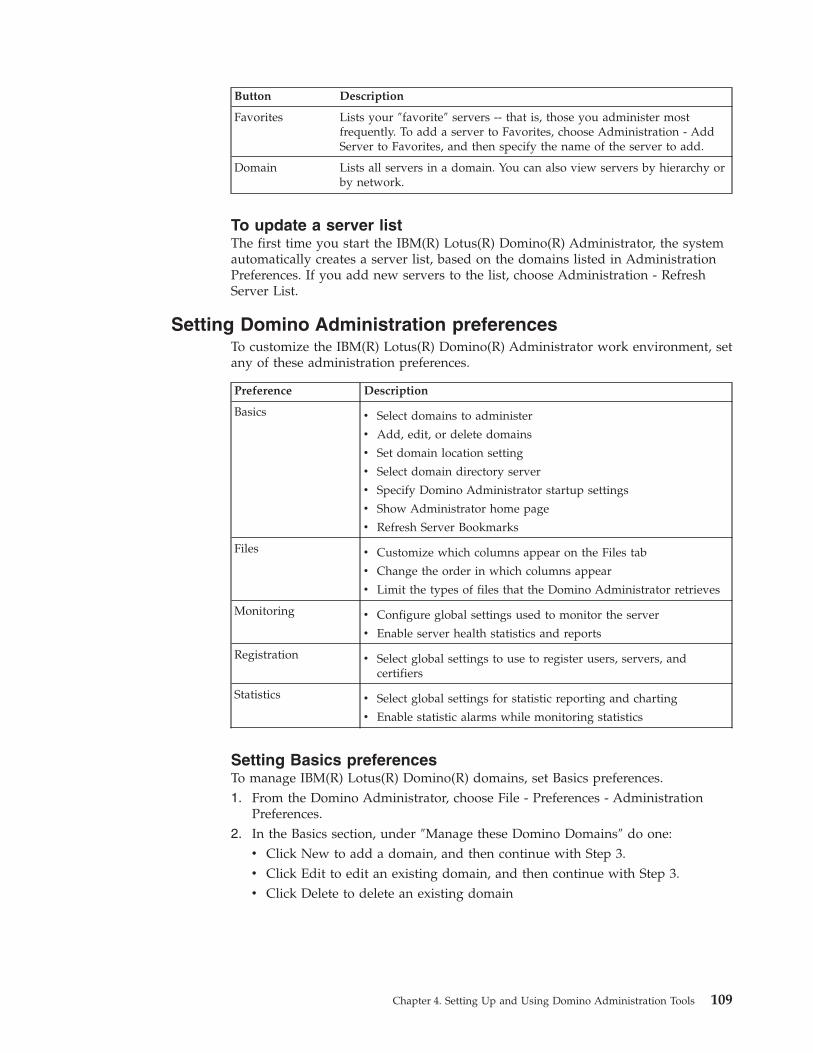
Button Description
Favorites Lists your ″favorite″ servers -- that is, those you administer most
frequently. To add a server to Favorites, choose Administration - Add
Server to Favorites, and then specify the name of the server to add.
Domain Lists all servers in a domain. You can also view servers by hierarchy or
by network.
To update a server list
The first time you start the IBM(R) Lotus(R) Domino(R) Administrator, the system
automatically creates a server list, based on the domains listed in Administration
Preferences. If you add new servers to the list, choose Administration - Refresh
Server List.
Setting Domino Administration preferences
To customize the IBM(R) Lotus(R) Domino(R) Administrator work environment, set
any of these administration preferences.
Preference Description
Basics v Select domains to administer
v Add, edit, or delete domains
v Set domain location setting
v Select domain directory server
v Specify Domino Administrator startup settings
v Show Administrator home page
v Refresh Server Bookmarks
Files v Customize which columns appear on the Files tab
v Change the order in which columns appear
v Limit the types of files that the Domino Administrator retrieves
Monitoring v Configure global settings used to monitor the server
v Enable server health statistics and reports
Registration v Select global settings to use to register users, servers, and
certifiers
Statistics v Select global settings for statistic reporting and charting
v Enable statistic alarms while monitoring statistics
Setting Basics preferences
To manage IBM(R) Lotus(R) Domino(R) domains, set Basics preferences.
1. From the Domino Administrator, choose File - Preferences - Administration
Preferences.
2. In the Basics section, under ″Manage these Domino Domains″ do one:
v Click New to add a domain, and then continue with Step 3.
v Click Edit to edit an existing domain, and then continue with Step 3.
v Click Delete to delete an existing domain
Chapter 4. Setting Up and Using Domino Administration Tools 109
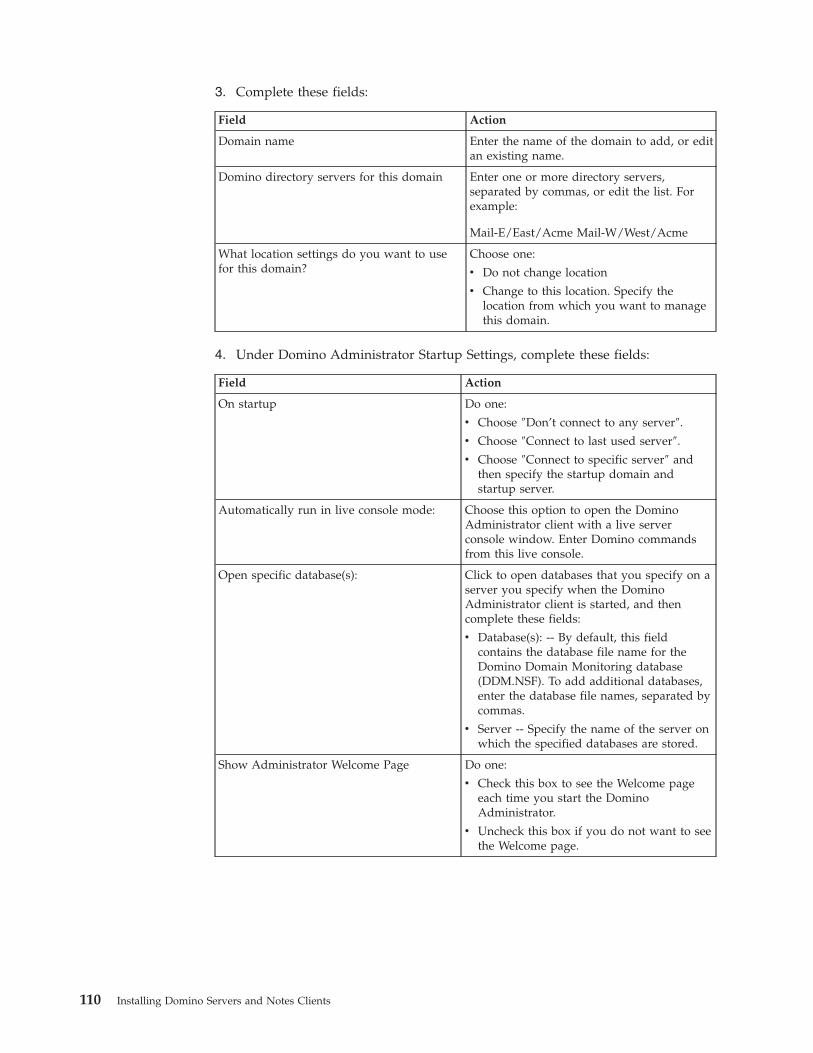
3. Complete these fields:
Field Action
Domain name Enter the name of the domain to add, or edit
an existing name.
Domino directory servers for this domain Enter one or more directory servers,
separated by commas, or edit the list. For
example:
Mail-E/East/Acme Mail-W/West/Acme
What location settings do you want to use
for this domain?
Choose one:
v Do not change location
v Change to this location. Specify the
location from which you want to manage
this domain.
4. Under Domino Administrator Startup Settings, complete these fields:
Field Action
On startup Do one:
v Choose ″Don’t connect to any server″.
v Choose ″Connect to last used server″.
v Choose ″Connect to specific server″ and
then specify the startup domain and
startup server.
Automatically run in live console mode: Choose this option to open the Domino
Administrator client with a live server
console window. Enter Domino commands
from this live console.
Open specific database(s): Click to open databases that you specify on a
server you specify when the Domino
Administrator client is started, and then
complete these fields:
v Database(s): -- By default, this field
contains the database file name for the
Domino Domain Monitoring database
(DDM.NSF). To add additional databases,
enter the database file names, separated by
commas.
v Server -- Specify the name of the server on
which the specified databases are stored.
Show Administrator Welcome Page Do one:
v Check this box to see the Welcome page
each time you start the Domino
Administrator.
v Uncheck this box if you do not want to see
the Welcome page.
110 Installing Domino Servers and Notes Clients

Field Action
Refresh Server Bookmarks on Startup Do one:
v Check this box to update the server’s
bookmarks each time you start the Domino
Administrator. If you are using Domino
and IBM(R) DB2 Universal Database(TM)
Enterprise Server Edition, you check this
box because server bookmarks must be
up-to-date to allow all of the Domino and
DB2 features to work correctly.
v Uncheck this box if you do not want to
refresh the server’s bookmarks each time
you start the Domino Administrator.
5. Click OK, or click Files to continue setting Administration Preferences.
Setting Files preferences
By setting Files preferences, you can customize which columns appear on the Files
tab, change the order in which columns display, and limit the types of files the
IBM(R) Lotus(R) Domino(R) Administrator retrieves.
By default, the Files tab displays columns in this order:
v Title
v Filename
v Physical Path
v File Format
v Logical Size
v Physical Size
v Max Size
v Quota
v Warning
v Created
v Last Fixup
v Is Logged
v Template
v Space Used
v Out of Office
v DAOS State
v DAOS Count
v DAOS Size
v Design Compression
v Data Compression
v LZ1 Compression
v Response Threads
To set Files preferences:
1. From the Domino Administrator, choose File - Preferences - Administration
Preferences.
2. Click the Files section.
3. Do one:
Chapter 4. Setting Up and Using Domino Administration Tools 111
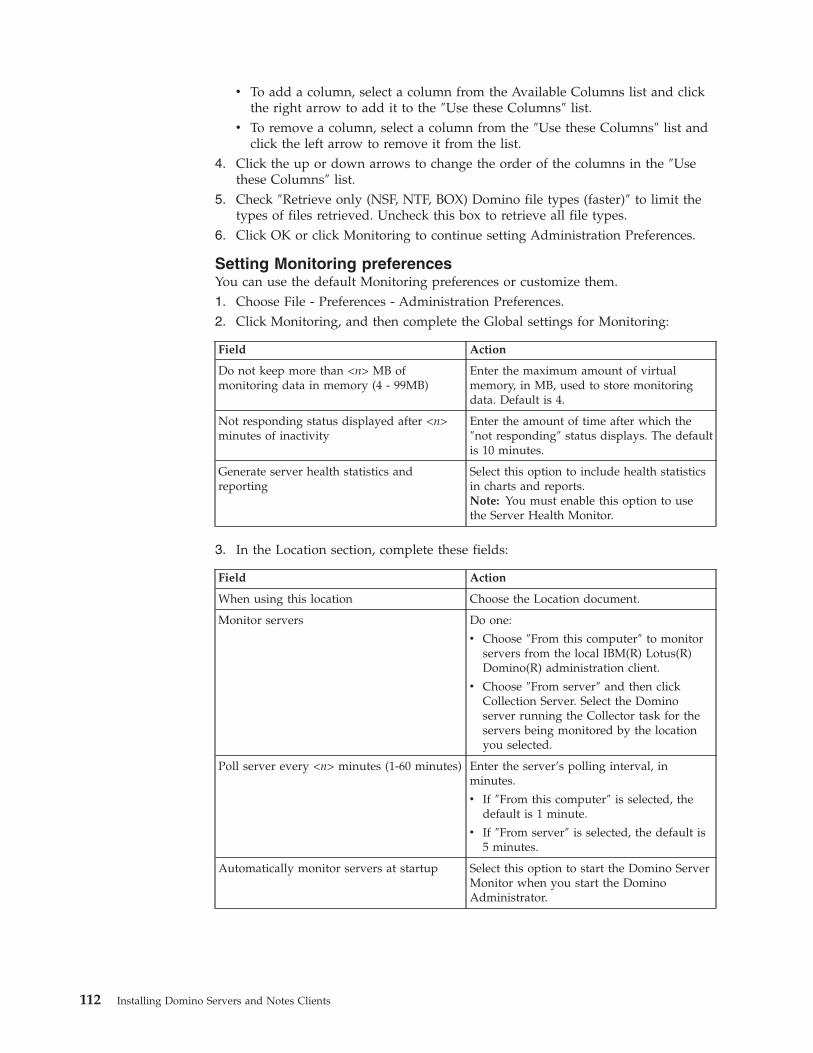
v To add a column, select a column from the Available Columns list and click
the right arrow to add it to the ″Use these Columns″ list.
v To remove a column, select a column from the ″Use these Columns″ list and
click the left arrow to remove it from the list.4. Click the up or down arrows to change the order of the columns in the ″Use
these Columns″ list.
5. Check ″Retrieve only (NSF, NTF, BOX) Domino file types (faster)″ to limit the
types of files retrieved. Uncheck this box to retrieve all file types.
6. Click OK or click Monitoring to continue setting Administration Preferences.
Setting Monitoring preferences
You can use the default Monitoring preferences or customize them.
1. Choose File - Preferences - Administration Preferences.
2. Click Monitoring, and then complete the Global settings for Monitoring:
Field Action
Do not keep more than <n> MB of
monitoring data in memory (4 - 99MB)
Enter the maximum amount of virtual
memory, in MB, used to store monitoring
data. Default is 4.
Not responding status displayed after <n>
minutes of inactivity
Enter the amount of time after which the
″not responding″ status displays. The default
is 10 minutes.
Generate server health statistics and
reporting
Select this option to include health statistics
in charts and reports.
Note: You must enable this option to use
the Server Health Monitor.
3. In the Location section, complete these fields:
Field Action
When using this location Choose the Location document.
Monitor servers Do one:
v Choose ″From this computer″ to monitor
servers from the local IBM(R) Lotus(R)
Domino(R) administration client.
v Choose ″From server″ and then click
Collection Server. Select the Domino
server running the Collector task for the
servers being monitored by the location
you selected.
Poll server every <n> minutes (1-60 minutes) Enter the server’s polling interval, in
minutes.
v If ″From this computer″ is selected, the
default is 1 minute.
v If ″From server″ is selected, the default is
5 minutes.
Automatically monitor servers at startup Select this option to start the Domino Server
Monitor when you start the Domino
Administrator.
112 Installing Domino Servers and Notes Clients
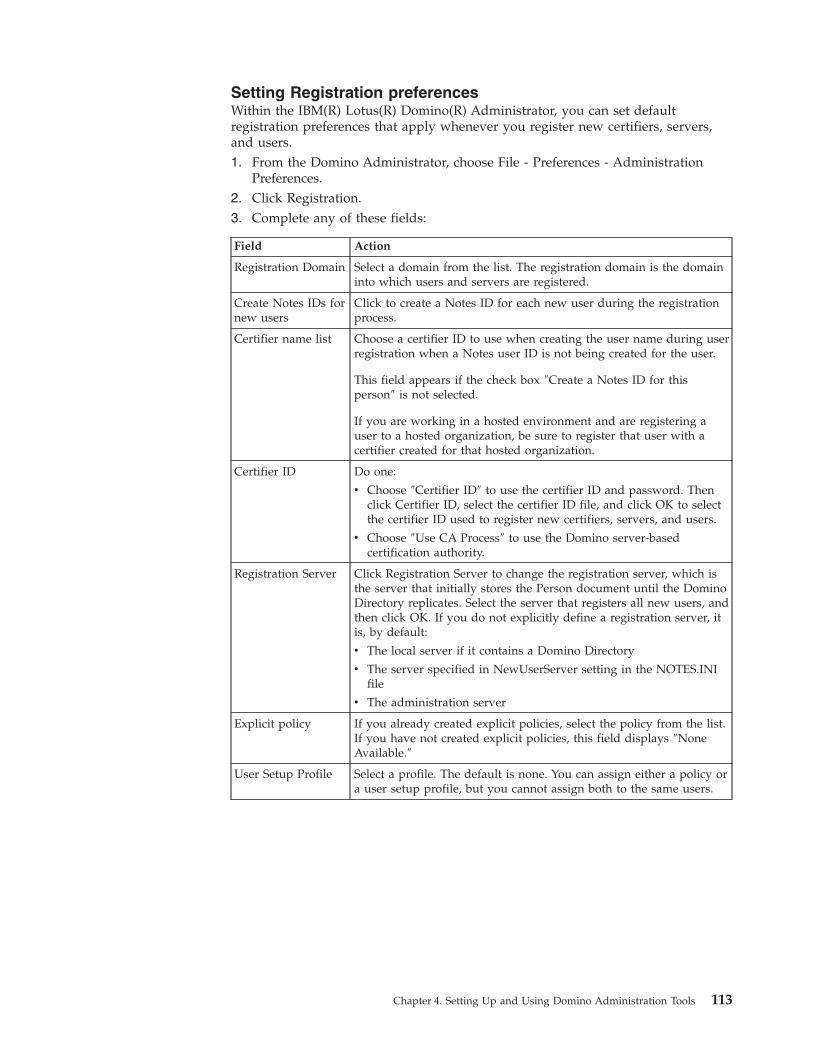
Setting Registration preferences
Within the IBM(R) Lotus(R) Domino(R) Administrator, you can set default
registration preferences that apply whenever you register new certifiers, servers,
and users.
1. From the Domino Administrator, choose File - Preferences - Administration
Preferences.
2. Click Registration.
3. Complete any of these fields:
Field Action
Registration Domain Select a domain from the list. The registration domain is the domain
into which users and servers are registered.
Create Notes IDs for
new users
Click to create a Notes ID for each new user during the registration
process.
Certifier name list Choose a certifier ID to use when creating the user name during user
registration when a Notes user ID is not being created for the user.
This field appears if the check box ″Create a Notes ID for this
person″ is not selected.
If you are working in a hosted environment and are registering a
user to a hosted organization, be sure to register that user with a
certifier created for that hosted organization.
Certifier ID Do one:
v Choose ″Certifier ID″ to use the certifier ID and password. Then
click Certifier ID, select the certifier ID file, and click OK to select
the certifier ID used to register new certifiers, servers, and users.
v Choose ″Use CA Process″ to use the Domino server-based
certification authority.
Registration Server Click Registration Server to change the registration server, which is
the server that initially stores the Person document until the Domino
Directory replicates. Select the server that registers all new users, and
then click OK. If you do not explicitly define a registration server, it
is, by default:
v The local server if it contains a Domino Directory
v The server specified in NewUserServer setting in the NOTES.INI
file
v The administration server
Explicit policy If you already created explicit policies, select the policy from the list.
If you have not created explicit policies, this field displays ″None
Available.″
User Setup Profile Select a profile. The default is none. You can assign either a policy or
a user setup profile, but you cannot assign both to the same users.
Chapter 4. Setting Up and Using Domino Administration Tools 113
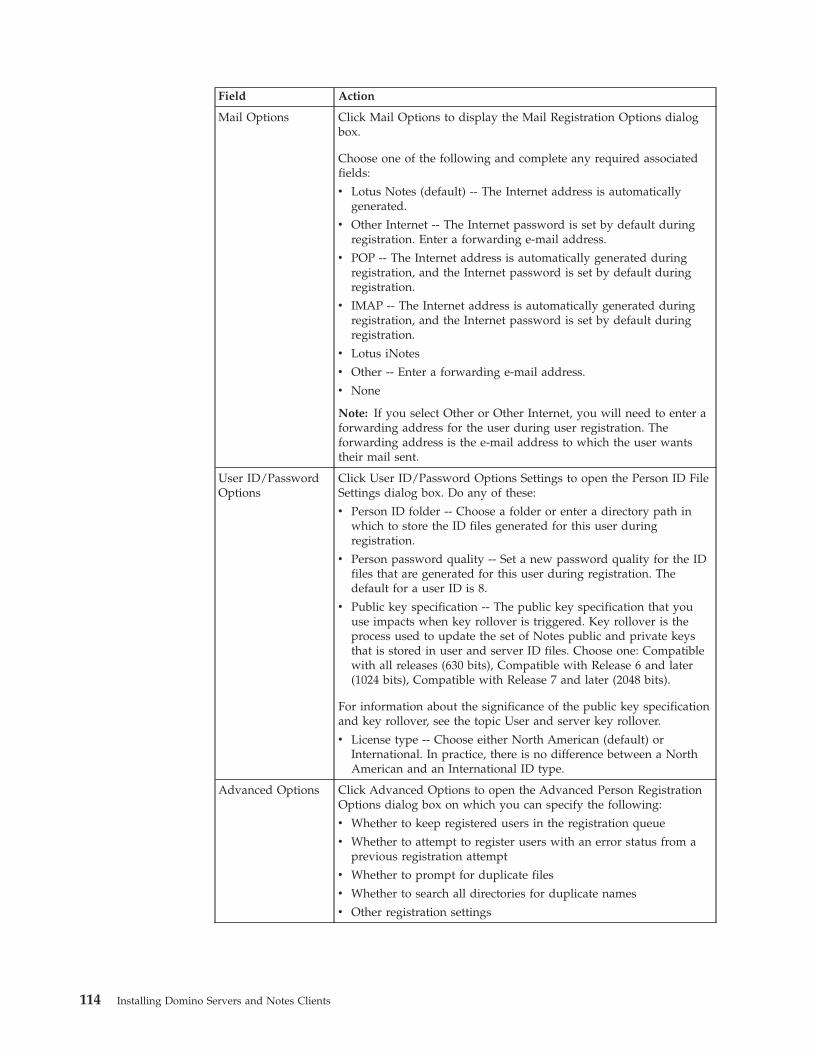
Field Action
Mail Options Click Mail Options to display the Mail Registration Options dialog
box.
Choose one of the following and complete any required associated
fields:
v Lotus Notes (default) -- The Internet address is automatically
generated.
v Other Internet -- The Internet password is set by default during
registration. Enter a forwarding e-mail address.
v POP -- The Internet address is automatically generated during
registration, and the Internet password is set by default during
registration.
v IMAP -- The Internet address is automatically generated during
registration, and the Internet password is set by default during
registration.
v Lotus iNotes
v Other -- Enter a forwarding e-mail address.
v None
Note: If you select Other or Other Internet, you will need to enter a
forwarding address for the user during user registration. The
forwarding address is the e-mail address to which the user wants
their mail sent.
User ID/Password
Options
Click User ID/Password Options Settings to open the Person ID File
Settings dialog box. Do any of these:
v Person ID folder -- Choose a folder or enter a directory path in
which to store the ID files generated for this user during
registration.
v Person password quality -- Set a new password quality for the ID
files that are generated for this user during registration. The
default for a user ID is 8.
v Public key specification -- The public key specification that you
use impacts when key rollover is triggered. Key rollover is the
process used to update the set of Notes public and private keys
that is stored in user and server ID files. Choose one: Compatible
with all releases (630 bits), Compatible with Release 6 and later
(1024 bits), Compatible with Release 7 and later (2048 bits).
For information about the significance of the public key specification
and key rollover, see the topic User and server key rollover.
v License type -- Choose either North American (default) or
International. In practice, there is no difference between a North
American and an International ID type.
Advanced Options Click Advanced Options to open the Advanced Person Registration
Options dialog box on which you can specify the following:
v Whether to keep registered users in the registration queue
v Whether to attempt to register users with an error status from a
previous registration attempt
v Whether to prompt for duplicate files
v Whether to search all directories for duplicate names
v Other registration settings
114 Installing Domino Servers and Notes Clients
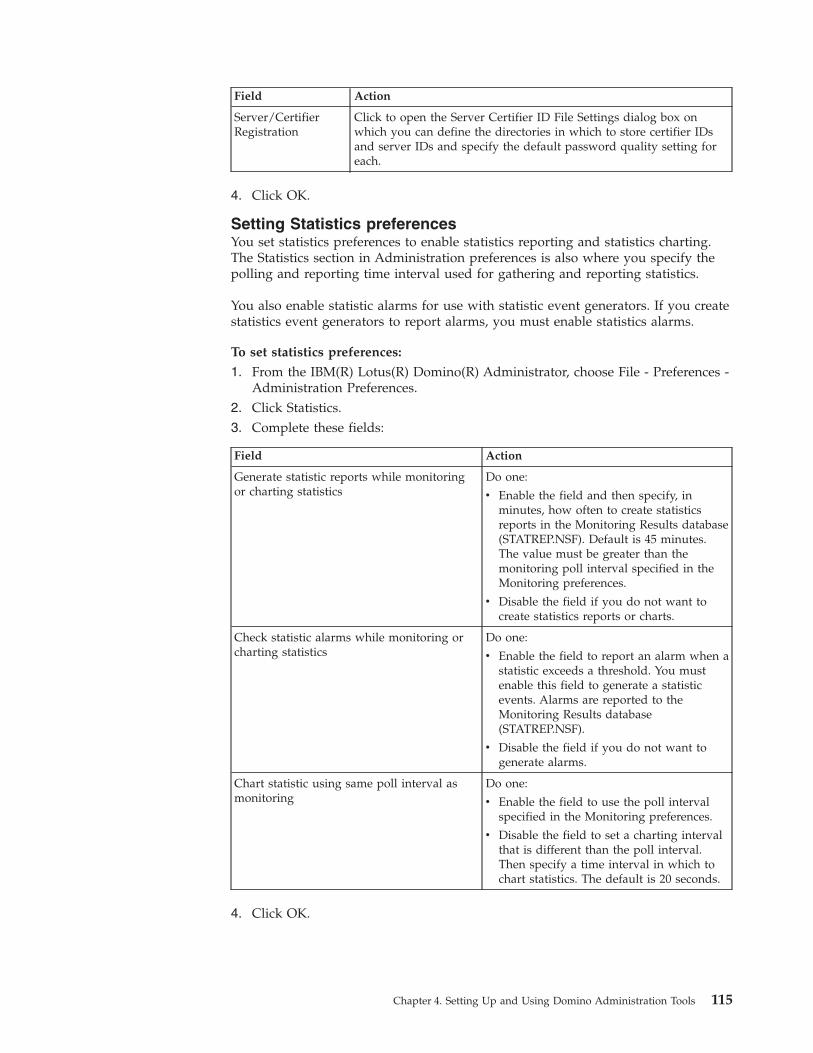
Field Action
Server/Certifier
Registration
Click to open the Server Certifier ID File Settings dialog box on
which you can define the directories in which to store certifier IDs
and server IDs and specify the default password quality setting for
each.
4. Click OK.
Setting Statistics preferences
You set statistics preferences to enable statistics reporting and statistics charting.
The Statistics section in Administration preferences is also where you specify the
polling and reporting time interval used for gathering and reporting statistics.
You also enable statistic alarms for use with statistic event generators. If you create
statistics event generators to report alarms, you must enable statistics alarms.
To set statistics preferences:
1. From the IBM(R) Lotus(R) Domino(R) Administrator, choose File - Preferences -
Administration Preferences.
2. Click Statistics.
3. Complete these fields:
Field Action
Generate statistic reports while monitoring
or charting statistics
Do one:
v Enable the field and then specify, in
minutes, how often to create statistics
reports in the Monitoring Results database
(STATREP.NSF). Default is 45 minutes.
The value must be greater than the
monitoring poll interval specified in the
Monitoring preferences.
v Disable the field if you do not want to
create statistics reports or charts.
Check statistic alarms while monitoring or
charting statistics
Do one:
v Enable the field to report an alarm when a
statistic exceeds a threshold. You must
enable this field to generate a statistic
events. Alarms are reported to the
Monitoring Results database
(STATREP.NSF).
v Disable the field if you do not want to
generate alarms.
Chart statistic using same poll interval as
monitoring
Do one:
v Enable the field to use the poll interval
specified in the Monitoring preferences.
v Disable the field to set a charting interval
that is different than the poll interval.
Then specify a time interval in which to
chart statistics. The default is 20 seconds.
4. Click OK.
Chapter 4. Setting Up and Using Domino Administration Tools 115
Tools and preferences for debugging in the Domino
Administrator
The IBM(R) Lotus(R) Domino(R) Administrator client offers several tools and one
set of preferences for debugging errors.
From the Domino Administrator, choose Files - Tools and then choose one of these:
v Debug LotusScript -- Enables LotusScript(R) debugging. When a check mark
appears to the left of the Debug LotusScript option, LotusScript debugging is
enabled. For more information about LotusScript debugging, see the IBM(R)
Lotus(R) Domino(R) Designer documentation, topic Using the LotusScript
Debugger.
v Remote LotusScript Debugger -- Opens the Domino Debugger. The remote
debugger allows debugging of LotusScript agents running on remote servers.
For more information about remote debugging, see the Domino Designer
documentation, topic Using the Remote Debugger.
v Show Java Debug Console -- Opens the Java(TM) Debug Console window. For
information about the Java Debug Console, see the Domino Designer
documentation, topics Writing Java in an agent, Running a Java program, and
other related topics.
v Java Debugging Preferences -- Opens the Java Debugging Preferences dialog box.
For information, see the topic Enabling Java Debugging.
Enabling Java Debugging
The Domino Administrator supports Java debugging in the following contexts.
Each context has its own JVM. Only one user can debug at a time in each context.
v Foreground -- Java code that runs in the Domino Administrator client
interactively, for example, an agent triggered from the Actions menu.
v Background -- Java code that runs in the Domino Administrator client under
control of the task loader, for example, a locally scheduled agent.
v Web preview -- Java code being previewed in a browser through Domino
Designer, for example, an applet on a form.
Java code from a script library runs in the context of the calling code.
To enable and disable Java debugging on the Domino
Administrator
Java debugging is disabled by default.
1. From the Domino Administrator, choose Files - Tools - Java Debugging
Preferences. The Java Debugging Preferences dialog box appears.
2. Do one or more of these:
v To enable foreground debugging, click Client Agents/Applets, and then
specify a port number to connect the IBM(R) Lotus(R) Notes(R) and
debugger computers. Deselect to disable.
v To enable background debugging, click Locally Scheduled Agents, and then
specify a port number to connect the Notes and debugger computers.
Deselect to disable.
v To enable Web preview debugging, click HTTP Preview, and then specify a
port number to connect the Domino Administrator client and debugger
computers. Deselect to disable.
Note: Specifying a port number may require several attempts before you
locate a free port.
116 Installing Domino Servers and Notes Clients
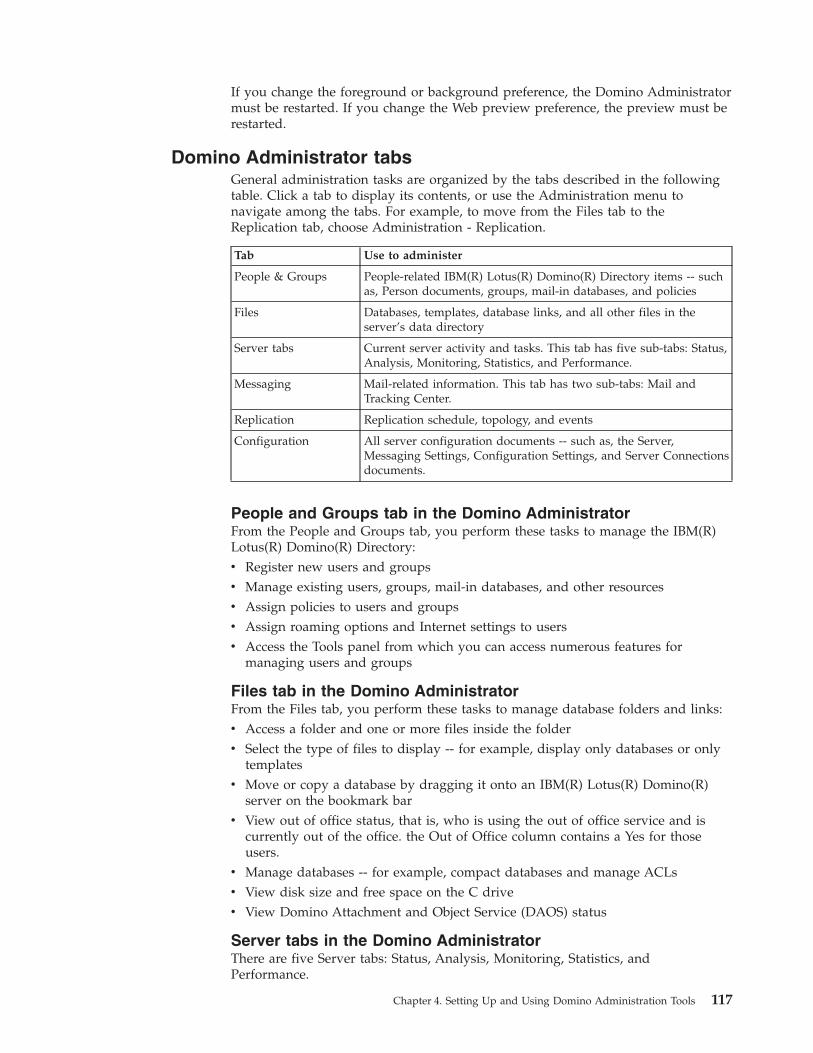
If you change the foreground or background preference, the Domino Administrator
must be restarted. If you change the Web preview preference, the preview must be
restarted.
Domino Administrator tabs
General administration tasks are organized by the tabs described in the following
table. Click a tab to display its contents, or use the Administration menu to
navigate among the tabs. For example, to move from the Files tab to the
Replication tab, choose Administration - Replication.
Tab Use to administer
People & Groups People-related IBM(R) Lotus(R) Domino(R) Directory items -- such
as, Person documents, groups, mail-in databases, and policies
Files Databases, templates, database links, and all other files in the
server’s data directory
Server tabs Current server activity and tasks. This tab has five sub-tabs: Status,
Analysis, Monitoring, Statistics, and Performance.
Messaging Mail-related information. This tab has two sub-tabs: Mail and
Tracking Center.
Replication Replication schedule, topology, and events
Configuration All server configuration documents -- such as, the Server,
Messaging Settings, Configuration Settings, and Server Connections
documents.
People and Groups tab in the Domino Administrator
From the People and Groups tab, you perform these tasks to manage the IBM(R)
Lotus(R) Domino(R) Directory:
v Register new users and groups
v Manage existing users, groups, mail-in databases, and other resources
v Assign policies to users and groups
v Assign roaming options and Internet settings to users
v Access the Tools panel from which you can access numerous features for
managing users and groups
Files tab in the Domino Administrator
From the Files tab, you perform these tasks to manage database folders and links:
v Access a folder and one or more files inside the folder
v Select the type of files to display -- for example, display only databases or only
templates
v Move or copy a database by dragging it onto an IBM(R) Lotus(R) Domino(R)
server on the bookmark bar
v View out of office status, that is, who is using the out of office service and is
currently out of the office. the Out of Office column contains a Yes for those
users.
v Manage databases -- for example, compact databases and manage ACLs
v View disk size and free space on the C drive
v View Domino Attachment and Object Service (DAOS) status
Server tabs in the Domino Administrator
There are five Server tabs: Status, Analysis, Monitoring, Statistics, and
Performance.
Chapter 4. Setting Up and Using Domino Administration Tools 117
Status: From the Status tab, you can:
v See which server tasks are running, stop or restart them, or start new tasks
v See who is connected to the server, including IBM(R) Lotus(R) Notes(R) users,
browser and e-mail clients
v See which Notes databases are currently in use
v Access the live remote console of the server
v Monitor the schedule of programs, agents, mail routing and replication
v Access the Tools panel from which you can access server status related tools.
Analysis: From the Analysis tab, you can:
v View, search, and analyze the log file (LOG.NSF)
v Access the database catalog on the server
v Access the Monitoring Results database (STATREP.NSF)
v Manage Administration Process requests
v Access the Tools panel from which you can find a specific server, review activity
data and access other server analysis related tools.
Monitoring: From the Monitoring tab, you can:
v Check the status of IBM(R) Lotus(R) Domino(R) servers
v Check server availability and sort servers by state or timeline
v View the current status of tasks running on each server and view selected
statistics
v Monitor server health status and access server health reports
Statistics: From the Statistics tab, you can see the real-time statistics for the
current status of the Domino system.
Performance: From the Performance tab, you can:
v View statistic charts for server performance in real time
v Chart historical server performance over a selected period of time
v Manage server activity trends
v Perform resource load-balancing among servers
Messaging tabs in the Domino Administrator
There are two messaging tabs.
Mail: From the Mail tab, you can:
v Manage the mailboxes on the server
v Check mail
v View mail routing status
v Monitor the log file for routing-related events
v Run reports on messaging use
v Access the Tools panel from which you can access additional Messaging features
such as stopping and starting the router
Tracking Center: From the Tracking Center tab, you can issue tracking requests to
track messages. You must enable the Tracking Center tab in the IBM(R) Lotus(R)
Domino(R) Web Administrator.
118 Installing Domino Servers and Notes Clients
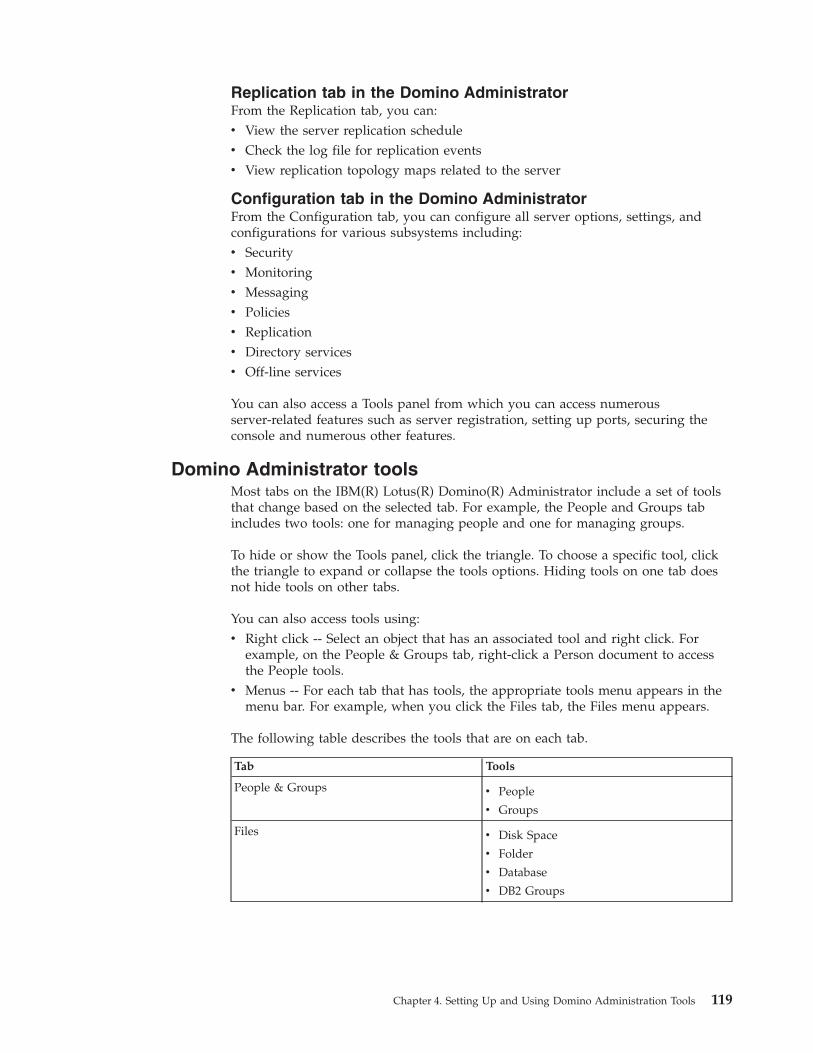
Replication tab in the Domino Administrator
From the Replication tab, you can:
v View the server replication schedule
v Check the log file for replication events
v View replication topology maps related to the server
Configuration tab in the Domino Administrator
From the Configuration tab, you can configure all server options, settings, and
configurations for various subsystems including:
v Security
v Monitoring
v Messaging
v Policies
v Replication
v Directory services
v Off-line services
You can also access a Tools panel from which you can access numerous
server-related features such as server registration, setting up ports, securing the
console and numerous other features.
Domino Administrator tools
Most tabs on the IBM(R) Lotus(R) Domino(R) Administrator include a set of tools
that change based on the selected tab. For example, the People and Groups tab
includes two tools: one for managing people and one for managing groups.
To hide or show the Tools panel, click the triangle. To choose a specific tool, click
the triangle to expand or collapse the tools options. Hiding tools on one tab does
not hide tools on other tabs.
You can also access tools using:
v Right click -- Select an object that has an associated tool and right click. For
example, on the People & Groups tab, right-click a Person document to access
the People tools.
v Menus -- For each tab that has tools, the appropriate tools menu appears in the
menu bar. For example, when you click the Files tab, the Files menu appears.
The following table describes the tools that are on each tab.
Tab Tools
People & Groups v People
v Groups
Files v Disk Space
v Folder
v Database
v DB2 Groups
Chapter 4. Setting Up and Using Domino Administration Tools 119
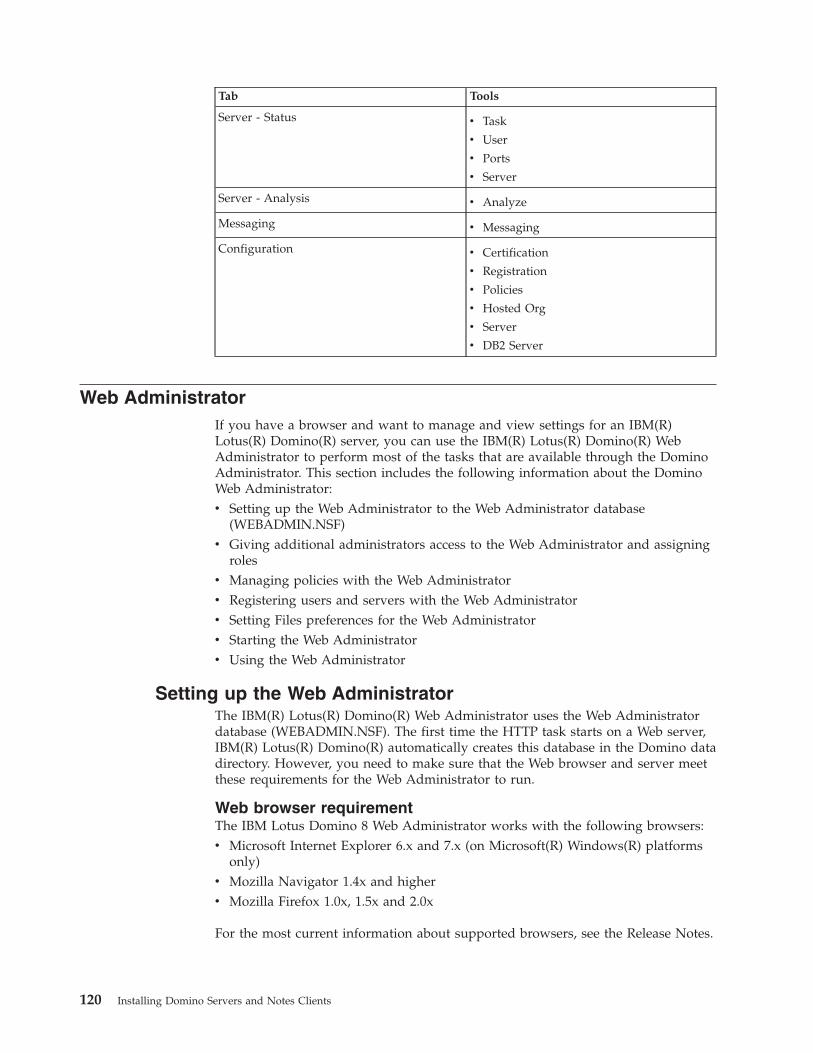
Tab Tools
Server - Status v Task
v User
v Ports
v Server
Server - Analysis v Analyze
Messaging v Messaging
Configuration v Certification
v Registration
v Policies
v Hosted Org
v Server
v DB2 Server
Web Administrator
If you have a browser and want to manage and view settings for an IBM(R)
Lotus(R) Domino(R) server, you can use the IBM(R) Lotus(R) Domino(R) Web
Administrator to perform most of the tasks that are available through the Domino
Administrator. This section includes the following information about the Domino
Web Administrator:
v Setting up the Web Administrator to the Web Administrator database
(WEBADMIN.NSF)
v Giving additional administrators access to the Web Administrator and assigning
roles
v Managing policies with the Web Administrator
v Registering users and servers with the Web Administrator
v Setting Files preferences for the Web Administrator
v Starting the Web Administrator
v Using the Web Administrator
Setting up the Web Administrator
The IBM(R) Lotus(R) Domino(R) Web Administrator uses the Web Administrator
database (WEBADMIN.NSF). The first time the HTTP task starts on a Web server,
IBM(R) Lotus(R) Domino(R) automatically creates this database in the Domino data
directory. However, you need to make sure that the Web browser and server meet
these requirements for the Web Administrator to run.
Web browser requirement
The IBM Lotus Domino 8 Web Administrator works with the following browsers:
v Microsoft Internet Explorer 6.x and 7.x (on Microsoft(R) Windows(R) platforms
only)
v Mozilla Navigator 1.4x and higher
v Mozilla Firefox 1.0x, 1.5x and 2.0x
For the most current information about supported browsers, see the Release Notes.
120 Installing Domino Servers and Notes Clients
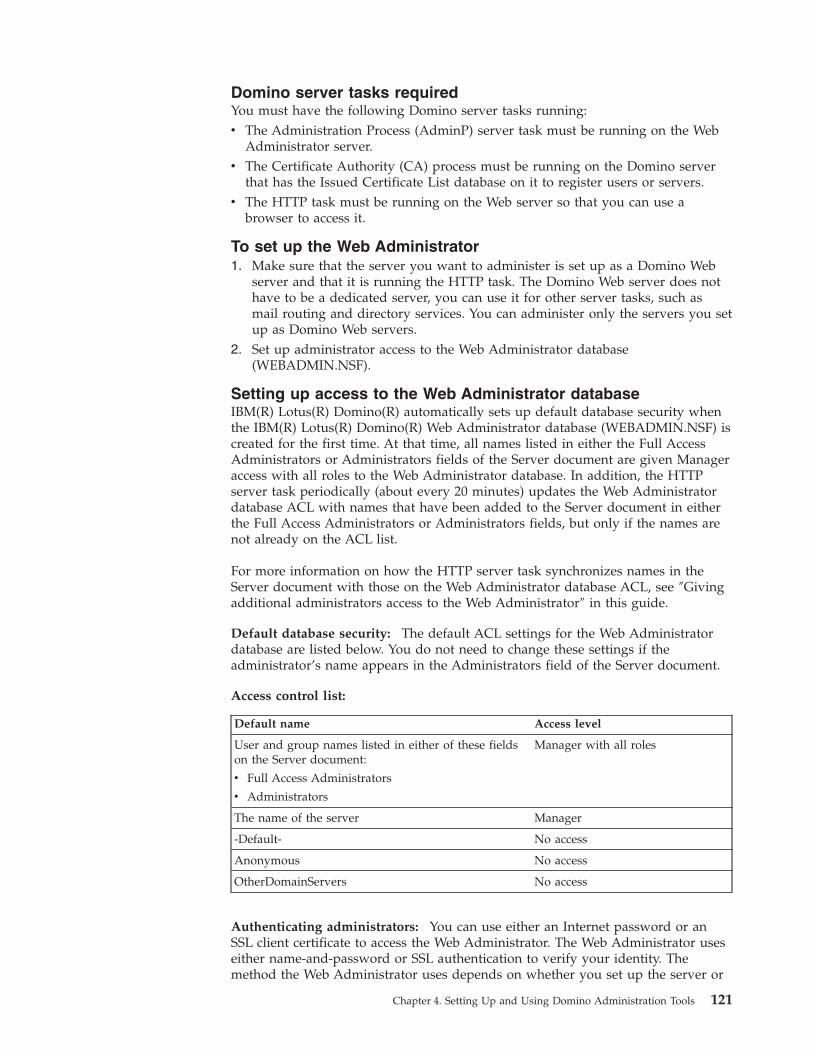
Domino server tasks required
You must have the following Domino server tasks running:
v The Administration Process (AdminP) server task must be running on the Web
Administrator server.
v The Certificate Authority (CA) process must be running on the Domino server
that has the Issued Certificate List database on it to register users or servers.
v The HTTP task must be running on the Web server so that you can use a
browser to access it.
To set up the Web Administrator
1. Make sure that the server you want to administer is set up as a Domino Web
server and that it is running the HTTP task. The Domino Web server does not
have to be a dedicated server, you can use it for other server tasks, such as
mail routing and directory services. You can administer only the servers you set
up as Domino Web servers.
2. Set up administrator access to the Web Administrator database
(WEBADMIN.NSF).
Setting up access to the Web Administrator database
IBM(R) Lotus(R) Domino(R) automatically sets up default database security when
the IBM(R) Lotus(R) Domino(R) Web Administrator database (WEBADMIN.NSF) is
created for the first time. At that time, all names listed in either the Full Access
Administrators or Administrators fields of the Server document are given Manager
access with all roles to the Web Administrator database. In addition, the HTTP
server task periodically (about every 20 minutes) updates the Web Administrator
database ACL with names that have been added to the Server document in either
the Full Access Administrators or Administrators fields, but only if the names are
not already on the ACL list.
For more information on how the HTTP server task synchronizes names in the
Server document with those on the Web Administrator database ACL, see ″Giving
additional administrators access to the Web Administrator″ in this guide.
Default database security: The default ACL settings for the Web Administrator
database are listed below. You do not need to change these settings if the
administrator’s name appears in the Administrators field of the Server document.
Access control list:
Default name Access level
User and group names listed in either of these fields
on the Server document:
v Full Access Administrators
v Administrators
Manager with all roles
The name of the server Manager
-Default- No access
Anonymous No access
OtherDomainServers No access
Authenticating administrators: You can use either an Internet password or an
SSL client certificate to access the Web Administrator. The Web Administrator uses
either name-and-password or SSL authentication to verify your identity. The
method the Web Administrator uses depends on whether you set up the server or
Chapter 4. Setting Up and Using Domino Administration Tools 121
the Domino Web Administrator database (WEBADMIN.NSF), or both to require
name-and-password or SSL authentication.
To access the Web Administrator database, you must have name-and-password
authentication or SSL client authentication set up on the server.
Name-and-password authentication is enabled for the HTTP protocol by default.
To use name-and-password authentication, you must have an Internet password in
your Person document. To use SSL client authentication, you must have a client
certificate, and SSL must be set up on the server.
Giving additional administrators access to the Web Administrator
You can use the Server document as a convenient way to give additional
administrators access to the IBM(R) Lotus(R) Domino(R) Web Administrator. To
add an administrator to the Web Administrator database (WEBADMIN.NSF) ACL,
simply add the name to either the ″Full Access Administrators″ or
″Administrators″ field of the Server document. The HTTP server task routinely
synchronizes the names listed in those fields of the Web Server document with
those listed on the Web Administration database ACL. Names that are not already
listed in the ACL are added with Manager access and all roles. Names that are
already listed in the ACL, keep the access granted to them in the ACL. This
preserves custom ACL settings, such as limiting the ACL roles of a particular
administrator, from being overwritten. It also allows you to restrict administrators
from using the Web Administrator, even though they are listed as administrator in
the server document. If you delete an administrator’s name from the Server
document, the name is also deleted from the Web Administrator database ACL
automatically at the next synchronization.
You can also give administrators access to the Web Administrator manually by
adding them directly to the Domino Web Administrator database ACL. You can
give an administrator full or partial access by restricting the roles assigned. The
role assigned to an administrator determines which commands are available to the
administrator, and which tabs appear in the Web Administrator client. You cannot
restrict roles when you add administrator access to the Web Administrator using
the Server document. If you add a name using the server document, you must
manually restrict access to the web Administrator through the Domino Web
Administrator database ACL. To prevent an administrator from access, assign No
access in the ACL.
To update access to the Web Administrator database automatically:
1. From the IBM(R) Lotus(R) Domino(R) Administrator, click the Configuration
tab.
2. Select the Server view, and open the Current Server Document for the Web
Administration server.
3. Select the Security tab.
4. In one of these fields, enter the name of the administrator to whom you want
to give access to the Web Administrator:
v Full Access Administrators
v Administrators5. Click Save & Close
To update the Web Administrator database ACL list manually: You can
manually add an administrator to the Web Administrator database ACL list.
1. From the browser using the Web Administrator, click the Files tab.
122 Installing Domino Servers and Notes Clients
2. Select the Web Administrator database (WEBADMIN.NSF).
3. From the Tools menu, select Database - Manage ACL.
4. Click Add and add the administrator or group name to the ACL of the Web
Administrator database.
5. In the Access field, select Manager.
6. Assign the roles. Assigned roles determine which commands and tabs appear
in the Web Administrator.
Tip: To select more than one role, hold down the Shift or Control key while
selecting roles. Selected roles appear highlighted.
7. Do one of the following:
v If the server requires name-and-password authentication, edit each
administrator’s Person document and enter an Internet password.
v If the server requires SSL client authentication, set up the browser for SSL.
Administrator roles in the Web Administrator
By default, the ACL gives Manager access and all roles to users named in the
Administrators and Full Access Administrators fields on the Server document.
However, you can restrict a Web administrator’s access to parts of the IBM(R)
Lotus(R) Domino(R) Administrator by limiting the assigned roles. Each role has a
corresponding tab and associated commands. When you restrict access, you also
restrict which tabs appear in the IBM(R) Lotus(R) Domino(R) Web Administrator.
For example, if you assign only the People&Groups role to a Web Administrator,
the People & Groups tab is the only tab that appears when that administrator uses
the Web Administrator. The following table shows the roles that have been
predefined for the Domino Web Administrator.
Role Tab
Files Files
People&Groups People & Groups
Replication Replication
Configuration Configuration
Mail Messaging - Mail
MsgTracking Messaging - Tracking Center
ServerStatus Server - Status
ServerAnalysis Server - Analysis
ServerStatistic Server - Statistic
To restrict a Web administrator’s access, use the Manage ACL tool on the Files tab.
Starting the Web Administrator
When you start the IBM(R) Lotus(R) Domino(R) Web Administrator, it displays the
server’s administration homepage (information about the server and the
administrator using the server). It does not automatically open to a tab, you must
choose a tab to begin using the Web Administrator. To return to the server
administration homepage at any time, click the top left server icon in the Web
Administrator bookmark bar.
Chapter 4. Setting Up and Using Domino Administration Tools 123
To start the Web Administrator
1. Start the HTTP task on the server if it is not already running by entering
load http
2. From the browser, enter the URL for the Web Administrator database on the
server you want to administer. For example, enter:
http://yourserver.domain.com/webadmin.nsf
Or for SSL, enter:
https://yourserver.domain.com/webadmin.nsf
3. Enter your hierarchical, common name, or short name and your Internet
password.
4. Click one of the tabs to begin using the Web Administrator.
Using the Web Administrator
The IBM(R) Lotus(R) Domino(R) Web Administrator is almost identical to the
IBM(R) Lotus(R) Domino(R) Administrator with very few exceptions. The user
interface looks the same, and most menu options, dialog and information boxes are
identical, although the Web Administrator may occasionally display additional
information. For example, the Mail tab in the Web Administrator offers additional
mail specific statistics -- for example, Mail Routing Schedule, Mail Routing
Statistics, and Mail Retrieval Statistics. This information is available in the Domino
Administrator; however, it is not displayed the same way.
In addition, there is a new Task tool on the Replication and Mail - Messaging tabs.
You can use this tool to issue Tell commands, and to stop, start, and restart
replication, router, and messaging tasks.
The Web Administrator includes most of the Domino Administrator functionality.
However, the Domino Server Monitor and performance charting are not available
in the Web Administrator. And you can restrict further which commands and tabs
are available by restricting the roles assigned to an administrator. Information on
the availability of specific Web Administrator features and minor changes to how
you access a feature are documented throughout the Domino Administrator help
documentation at http://www.ibm.com/developerworks/lotus/documentation/domino/.
Accessing online help
To access online documentation, use the Help button.
Additional buttons
The Domino Web Administrator includes these buttons that appear at to the right
of the tabs. These do not appear in the Domino Administrator:
v Sign out -- Use this to log out when you cannot or do not want to close the
browser.
v Preferences -- Use this to set Administration preferences.
v Help -- Use this to access on-line help documents for the Domino Administrator.
The mail bookmark displays in the bookmark area only if you have browsed to
your home mail server.
Setting Files preferences for the Web Administrator
You can use the IBM(R) Lotus(R) Domino(R) Web Administrator to set Files
preferences.
124 Installing Domino Servers and Notes Clients
Files preferences: By default, the Files tab in the IBM(R) Lotus(R) Domino(R)
Administrator displays information about database files in the following order;
however, you can customize which columns display in the Web Administrator. The
fewer columns you display, the faster the Files panel performs.
v Title
v File Name
v Physical Path
v File Format
v Size
v Space Used
v Max Size
v Quota
v Warning
v Created
v Last Fixup
v Is Logged
v Template Name
v Inherit From
v Type
v Replica ID
v Out of Office
v DAOS State
v DAOS Count
v DAOS Size
v Design Compression
v Data Compression
v LZ1 Compression
v Response Threads
To set Files preferences: By default, the Web Administrator displays all columns.
You can add or delete columns from the display. Select a column name from the
″Use these Columns″ list and then click Add or Remove.
Registering users and servers with the Web Administrator
To use the IBM(R) Lotus(R) Domino(R) Web Administrator to register new IBM(R)
Lotus(R) Notes(R) users, you must use the IBM(R) Lotus(R) Domino(R)
server-based certification authority. Any request or task that requires a certifier ID
file -- for example, migrate or modify ID -- is not available.
To use the Web Administrator to register users or servers, you must have
Registration Authority (RA) access in the server-based certification authority (CA).
The server that is running the Web Administrator should also be listed as an RA
but that role is not required for the server. If, however, the server is not listed as an
RA, the administrator that is an RA must open the Administration Requests
database and approve the administration request to register the user. You must
assign the RA role in the Domino Administrator, not in the Web Administrator. To
assign the RA role, use the Modify Certifier tool on the Configuration panel.
You cannot set registration preferences in the Web Administrator. You must use the
registration settings in the CA and in the Registration policy settings document.
Chapter 4. Setting Up and Using Domino Administration Tools 125
In the Web Administrator, you cannot configure a server for SSL during the server
registration process.
For more information, see the following topics in this guide:
v Modifying a server-based CA
v Registering users with the Web Administrator
v Creating and modifying groups
v Registering a server
Managing policies with the Web Administrator
The Policy tools on the Configuration and People & Groups tabs in the IBM(R)
Lotus(R) Domino(R) Administrator are not available in the IBM(R) Lotus(R)
Domino(R) Web Administrator. Therefore, from the Web Administrator, you cannot
use the Policy Assign tool or the Policy Synopsis tool.
If you create policies before you register users, you can assign them to users and
groups during user registration. You can also edit a IBM(R) Lotus(R) Notes(R)
user’s Person document and manually assign an explicit policy by specifying the
name of the policy.
Working with policy documents: From the Web Administrator, you can use the
Policies view in either the People & Groups or the Configuration tab to add, edit,
or delete policy documents. To add or delete policy documents, use the buttons
that display in the Results pane. In this view, the names of policy documents are
links. To edit one of these documents, click the link for the document you want to
edit.
Using the Web Administrator to delete policy documents is not recommended
because doing so does not initiate the Administration Process requests required to
remove all references to the deleted document from other policy documents.
If you use the Web Administrator to create a desktop policy settings document,
you cannot add the database links used to set up bookmarks or custom Welcome
pages.
Using the Web Administrator consoles
The IBM(R) Lotus(R) Domino(R) Web Administrator includes two consoles, the
Quick Console and the Live Console, which you access from the Server - Status
tab. These consoles mirror the server console on the Server Status tab of the
IBM(R) Lotus(R) Domino(R) Administrator.
Use the Live Console to send commands to a Web server running under a Server
Controller. You can send Controller and shell commands, as well as Domino server
commands. To use the Live Console, you must install Java(TM) Plug-in 1.4 or
higher and enable it in your Web browser.
Use the Quick Console to send commands to a Web server that does not run under
a Server Controller. Or use it if you are unable to install or use the Java(TM)
Plug-in in your browser.
Using the Web Administrator with service providers
Service providers may allow administrators at hosted organizations to manage
users and groups by allowing remote access through the IBM(R) Lotus(R)
126 Installing Domino Servers and Notes Clients
Domino(R) Web Administrator, with restricted roles. In some cases, the
administrator at the service provider site will assume all responsibilities for
managing users and groups.
Message tracking in the Web Administrator
To use the IBM(R) Lotus(R) Domino(R) Web Administrator to trace messages, you
must first enable message tracking.
To enable message tracking:
1. From the Web Administrator, click the Configuration tab.
2. Open the Messaging view, and select Settings.
3. Click Edit Message Settings.
4. Select the Message Tracking tab.
5. Under Basics, in the Message tracking field, select Enabled. The default is
Disabled.
6. Under Access Settings, complete these fields:
Field Action
Allowed to track messages Select both of these:
v Your name
v LocalDomainServers
Allowed to track subjects Select your name from the list
7. Click Save & Close.
Editing the NOTES.INI file and cleanup script in the Web
Administrator
You must be a Full Access Administrator to edit the NOTES.INI file. You must
have Administrator access or higher to view the NOTES.INI file, or to edit or view
the cleanup script.
Signing out of the Web Administrator
When you finish using the IBM(R) Lotus(R) Domino(R) Web Administrator, close
the browser to end the session or click Sign out to end the session and clear your
user name and password credentials so that unauthorized users cannot access the
browser while the Web Administrator is still running.
Configuring Domino and Portal Server federated
administration
You can administer an IBM(R) Lotus(R) Domino(R) 8.0 server and an IBM(R)
WebSphere(R) Portal Server 6.0 or 6.0.0.1 from the Portal Server administration
user interface (UI) on the same Portal Server. In this configuration, the Domino
Web Administrator UI is embedded in the Portal administration UI. To administer
both server types from one Portal administration user interface, link the Domino
Web Administrator client UI to the Portal administration UI. The Domino Web
Administrator UI then displays with other portal-specific user interfaces.
To implement this configuration, you must complete these procedures:
1. If you have not already done so, download the Portal 6 Update Installer (PUI)
tool.
2. Patch your Portal Server 6.0 or 6.0.0.1 with the iFix. Apply this patch only once.
If you are using Portal Server 6.0.1, you do not need to do this.
Chapter 4. Setting Up and Using Domino Administration Tools 127
3. After patching the Portal Server 6.0 or 6.0.0.1, run the access scripts to add
Domino servers to the Portal administration user interface. You must run one
access script for each server.
4. Be sure to complete the procedure Enabling the Portal server for federated
administration in this guide.
5. Clear your browser’s cache file.
The iFix consists of a .ZIP file which includes a .jar file and a readme.txt file. The
.ZIP file is contained within the database WEBADMIN.NSF.
There are two XML Access scripts. One XML Access script adds a Domino server
into the Portal administration UI; one XML Access script removes a Domino server
from the Portal administration UI. Each XML Access script is a single XML-based
configuration file used as input for the Portal XML configuration interface tool.
Run the XML Access script once for each Domino Web administration server to be
integrated into or removed from the Portal administration UI. For example, if two
servers (ServerA and ServerB) should be integrated into the Portal Administration
UI, point the browser to each of the two servers, obtain the addfederation.xml file
from each server, and then run each file against the Portal Server. The Portal
Administrator UI would then be configured to include the two Domino servers.
Prerequisite
A successful SSO configuration must exist between the Portal 6.0 or 6.0.0.1 Server
and the Domino 8 server.
Preparing the portal server
You need to perform this procedure only one time for the Portal Server 6 or 6.0.0.1.
1. If you have not already done so, download the Portal 6 Update Installer (PUI)
tool. You can download the PUI from
http://www.ibm.com/software/genservers/portal/support
2. Download the file iFix.zip from any Domino 8 server by pointing to this URL
which triggers the download
http://<dominoserver>/webadmin.nsf/iFix.zip
3. Save the file, iFix.ZIP, locally on the Portal server.
4. Unzip the file, and then install it. For information about installing the file, see
the Portal Information Center at http://publib.boulder.ibm.com/infocenter/wpdoc/v510/index.jsp?topic=/com.ibm.wp.ent.doc/wpf/portalupdateinstaller.html
5. Access the directory <PortalServerRootDirectory>\config\ subdirectory, and
then run this command:
WPSconfig.bat init deploy-transformation-federation
-DPortalAdminId=<wpsadminid> -DPortalAdminPwd=<wpsadminpwd>
On UNIX(R) systems, use WPSConfig.sh instead of WPSConfig.bat.
Setting up Domino and Portal server federated administration
1. From the Portal Server, download the configuration script from this URL
http://<dominoserver>/webadmin.nsf/addfederation.xml
2. Save the file locally on the Portal server.
3. Access the directory <PortalServerRootDirectory>\bin subdirectory, and then
run this command:
128 Installing Domino Servers and Notes Clients
xmlaccess.bat -in c:\addfederation.xml -user <wpsadminid> -password
<wpsadminpwd> -url localhost:10038/wps/config
Port 10038 is the default port. If you configured the portal server to use a
different port, specify the port number that you used when you configured the
Portal Server.
Note: On UNIX(R) systems, use xmlaccess.sh instead of xmlaccess.bat.
1. Log out and then log in.
Enabling the Portal server for federated administration
Perform these steps from the IBM(R) WebSphere(R) Administration console.
1. Select Resources.
2. Select Resource Environment Providers.
3. Click the link for WP ConfigService from the list of available resource
environment providers.
4. Select Custom Properties, and then click New.
5. In the Name field, specify federation enabled.
6. In the value field, specify true.
7. Click Apply.
8. Save the changes.
9. From Resource environment providers -- WP ConfigService -- Custom
properties, select Custom Properties, and then click New.
10. In the Name field, specify federation.useAbsoluteURLs.
11. In the Value field, specify true.
12. Click Apply.
13. Save the changes.
14. Restart the Portal server.
Removing Domino and Portal server federated administration
1. From the IBM(R) WebSphere(R) Portal Server, download the configuration
script from the URL
http://<dominoserver>/webadmin.nsf/removefederation.xml
2. Save the XML file locally on the Portal Server.
3. Access the directory <PortalServerRootDirectory>\bin subdirectory, and then
run the following command:
xmlaccess.bat -in c:\removefederation.xml -user <wpsadminid> -password
<wpsadminpwd> -url localhost:10038/wps/config
Note: Port 10038 is the default port. If you configured the portal server to use a
different port, specify the port number that you used when you configured the
Portal Server.
Note: On UNIX(R) systems, use xmlaccess.sh instead of xmlaccess.bat.
1. Log out and then log in to see the changes.
The ″My Domino Servers″ tab is not removed by default. To remove the entire
Domino integration, complete these steps:
1. Remove all added servers.
2. Log on to Portal.
Chapter 4. Setting Up and Using Domino Administration Tools 129
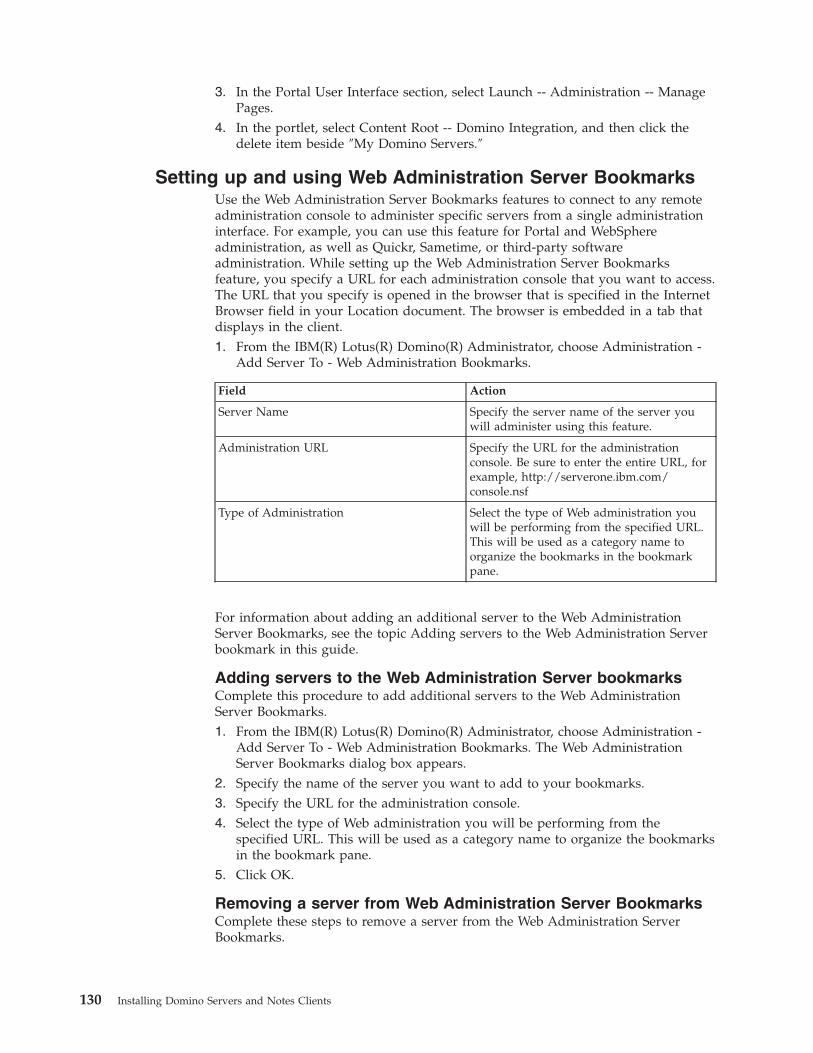
3. In the Portal User Interface section, select Launch -- Administration -- Manage
Pages.
4. In the portlet, select Content Root -- Domino Integration, and then click the
delete item beside ″My Domino Servers.″
Setting up and using Web Administration Server Bookmarks
Use the Web Administration Server Bookmarks features to connect to any remote
administration console to administer specific servers from a single administration
interface. For example, you can use this feature for Portal and WebSphere
administration, as well as Quickr, Sametime, or third-party software
administration. While setting up the Web Administration Server Bookmarks
feature, you specify a URL for each administration console that you want to access.
The URL that you specify is opened in the browser that is specified in the Internet
Browser field in your Location document. The browser is embedded in a tab that
displays in the client.
1. From the IBM(R) Lotus(R) Domino(R) Administrator, choose Administration -
Add Server To - Web Administration Bookmarks.
Field Action
Server Name Specify the server name of the server you
will administer using this feature.
Administration URL Specify the URL for the administration
console. Be sure to enter the entire URL, for
example, http://serverone.ibm.com/console.nsf
Type of Administration Select the type of Web administration you
will be performing from the specified URL.
This will be used as a category name to
organize the bookmarks in the bookmark
pane.
For information about adding an additional server to the Web Administration
Server Bookmarks, see the topic Adding servers to the Web Administration Server
bookmark in this guide.
Adding servers to the Web Administration Server bookmarks
Complete this procedure to add additional servers to the Web Administration
Server Bookmarks.
1. From the IBM(R) Lotus(R) Domino(R) Administrator, choose Administration -
Add Server To - Web Administration Bookmarks. The Web Administration
Server Bookmarks dialog box appears.
2. Specify the name of the server you want to add to your bookmarks.
3. Specify the URL for the administration console.
4. Select the type of Web administration you will be performing from the
specified URL. This will be used as a category name to organize the bookmarks
in the bookmark pane.
5. Click OK.
Removing a server from Web Administration Server Bookmarks
Complete these steps to remove a server from the Web Administration Server
Bookmarks.
130 Installing Domino Servers and Notes Clients
1. From the IBM(R) Lotus(R) Domino(R) Administrator, choose Administration -
Remove Server From - Web Administration Bookmarks. The Remove Server
From Bookmarks dialog box appears.
2. Specify the name of the server you want to remove from your bookmarks, and
then click OK.
Modifying server properties for a server in the Web
Administration Server Properties Bookmarks
Complete this procedure to modify the properties assigned to a server in the Web
Administration Server Properties Bookmarks.
1. From the IBM(R) Lotus(R) Domino(R) Administrator, right click on the Web
Administration Server Bookmark.
2. Click Web Administration Server Properties. The Web Administration Server
Bookmarks dialog box appears.
3. Modify the server name, administration URL, or specify a new type of
administration.
4. Click OK.
The Server Controller and the Domino Console
The Server Controller is a Java(TM) based program that controls an IBM(R)
Lotus(R) Domino(R) server. Starting the Server Controller starts the Domino server
it controls. When a server runs under a Server Controller, you can send operating
system commands (shell commands), Controller commands, and Domino server
commands to the Server Controller. For example, from a remote console, you can
use Controller commands to kill Domino processes on a server that is hung or to
start a Domino server that is down.
You can use the Domino Console, a Java-based console, to communicate with a
Server Controller. You can run the Domino Console on any platform except Apple
Macintosh. Using the Domino Console, you can send commands to multiple
servers. The Domino Console doesn’t require a Notes ID, only a Domino Internet
name and password, so you can connect to servers certified by different certifiers
without having multiple Notes IDs or cross-certificates. You can customize output
to the Domino Console -- for example, use local event filters to specify the types of
events the Console displays. You can also log server output to log files and
customize the appearance of the Console.
The Domino Console functions strictly as a server console. Consequently, the
Domino Console doesn’t include the full set of Domino administration features
that are available through the Domino Administrator and the IBM(R) Lotus(R)
Domino(R) Web Administrator, and you can’t use it to open and manage IBM(R)
Lotus(R) Notes(R) databases.
The files needed to run the Server Controller and to run the Domino Console are
provided with Domino and Notes.
You can also use remote consoles in the Domino Administrator and Web
Administrator to communicate with a Server Controller.
Starting and stopping the Server Controller
Do the following to start the Server Controller, the IBM(R) Lotus(R) Domino(R)
server, and the Domino Console:
1. Shut down the Domino server, if it is running.
Chapter 4. Setting Up and Using Domino Administration Tools 131
2. Start the Server Controller using the same command you normally use to start
the Domino server but append the argument -jc. For example, if you run a
server on Microsoft(R) Windows(R) XP from the directory c:\lotus\domino
using a shortcut icon on the Desktop, use the following target for the shortcut:
c:\lotus\domin\nserver.exe -jc
The Server Controller runs in its own window. You can minimize a Server
Controller window, but do not close or kill the window to stop the Server
Controller. Instead, use the Controller Quit command from a console to stop a
Server Controller and the server it controls.
When you run a Server Controller, you no longer have access to the traditional
console at the server. You can communicate only through the Domino Console or a
console in the Domino Administrator or Web Administrator.
Optional arguments to use when running the Server Controller
Starting the Server Controller using only the argument -jc starts the Domino Server
and the Domino Console along with the Server Controller. There are two optional
arguments you can specify to change this default behavior: -c and -s.
Use -c to prevent the Domino Console from running when you start the Server
Controller. You might prevent the Console from running on a slow machine or a
machine that is low on memory. If you use this argument and the Domino server
ID requires a password, the Domino server starts without running its server tasks.
To run the server tasks, you must connect to the Server Controller from a console
and specify the server password when prompted.
Use -s to prevent the server from running when you start the Server Controller.
Use this argument along with -c so that someone who is directly at the server can
start only the Server Controller, and then a remote administrator can start the
server and specify a required server password remotely from a console.
Example Result
nserver -jc Runs the Server Controller, the server, and the Domino
Console
nserver -jc -c Runs the Server Controller and the server
nserver -jc -s Runs the Server Controller and the Domino Console
nserver -jc -c -s Runs only the Server Controller
Starting and stopping the Domino Console
You can run the IBM(R) Lotus(R) Domino(R) Console from any machine on which
a Domino server or the Domino Administrator is installed. To use the Domino
Console to communicate with a Domino server, the server must be running under
a Server Controller.
To start the Domino Console
1. Make sure that the Domino server or the Domino Administrator is installed on
the machine.
2. Run the following command directly from the program directory, or from a
directory path that points to the program directory:
jconsole
132 Installing Domino Servers and Notes Clients
Note: The Domino Console also starts by default when you start a Server
Controller.
For information on using the Domino Console, choose Help - Help Topics from the
Domino Console menu.
To stop the Domino Console
1. From the Domino Console, choose File - Exit.
2. If the Console is currently connected to a Server Controller, when you see the
prompt ″Exiting the Console by disconnecting all active connections. Do you
want to continue?″ do the following:
a. (Optional) To also stop a Domino server and Domino Server Controller
running locally, select the option ″Also, bring down Domino (if running)
and quit the local Server Controller - local server name.
b. Click Yes.
Chapter 4. Setting Up and Using Domino Administration Tools 133

134 Installing Domino Servers and Notes Clients
Chapter 5. Installing and Setting Up Notes Clients
This section describes how to plan for, install, and configure the IBM(R) Lotus(R)
Notes(R) client, including the Lotus Notes pre-installation checklist and installation
documentation roadmap.
Planning for Notes client installation and upgrade
This section describes how to plan for, install, upgrade to, and configure the
IBM(R) Lotus(R) Notes(R) client.
Products to install and order of installation
The following information lists the servers and products you need to install to use
IBM(R) Lotus(R) Notes(R).
Servers to install
1. IBM(R) Lotus(R) Domino(R) server.
2. (Optional) IBM(R) DB2(R) running with a Domino server. Required if you want
to create and use DB2 enabled Notes databases.
3. (Optional) IBM(R) Lotus(R) Sametime(R) server. Required if you want
awareness and chat in the Notes client.
4. (Optional) Lotus Connections server. Required if you want to use Activities
from within the Notes client. For information, see the Lotus Connections
documentation.
5. (Optional) IBM(R) WebSphere(R) Portal server. Required if you want to use
composite applications that contain portlets.
(Optional configuration) To use the Portal administrative user interface on the
Portal server to administer both Domino and WebSphere Portal, configure
Domino and Portal server federated administration. For information, see the
topics ″Running the Domino-Portal integration wizard″ and ″Configuring
Domino and Portal Server federated administration.″
Note: (Optional) Install WebSphere Portal composite application support for Notes,
previously named ″Notes server client installer″ on the WebSphere Portal server.
This is required in order to work with composite applications that contain portlets
or to edit portlets using the Composite Application Editor.
Clients to install
1. Notes. This provides Mail, Calendar, Contacts, and options including IBM(R)
Lotus(R) Symphony(TM), Composite Application Editor, Activities, and IBM(R)
Lotus(R) Sametime(R) (integrated).
Note: For Microsoft(R) Windows(R) users, if Notes version 6.5.x, 7.x, and 8.x is
detected on the client, the installation program will upgrade it to this Notes
release.
Note: For Linux(R) users, upgrade from Notes version 7.x and 8.x is not
supported.
2. (Optional) Domino Administrator and Domino Designer.
135

For Windows single user installation, the IBM(R) Lotus(R) Domino(R)
Administrator client and Domino Designer client can optionally be installed or
upgraded during Notes install.
Notes install on the Linux and Mac OS X platforms support multi-user
installation only, which currently does not support install or upgrade of the
Domino Designer or Domino Administrator clients.
Notes pre-installation checklist
This IBM(R) Lotus(R) Notes(R) release includes both new and familiar functionality
for mail, calendar, and contacts, with a new user interface capable of operating
within a combination IBM(R) Lotus(R) Domino(R) server and IBM(R)
WebSphere(R) Portal server deployment. It includes the optional installation of the
Composite Applications Editor, IBM(R) Lotus(R) Symphony(TM), Activities, IBM(R)
Lotus(R) Sametime(R) (integrated), and any custom or third-party Eclipse(TM)
features that you choose to add.
This checklist lists the main steps you need to complete, or at least consider, before
installing or upgrading to this Notes release.
1. Read the release notes or system requirements tech note for software and
hardware specifications for the systems on which you or your users will be
installing. See the hardware and software requirements section of the release
notes for details, including the Notes installation matrix release note.
2. Read the Products to install and order of installation topic in this guide.
3. Read the platform-specific Considerations topics in this guide.
4. Determine how you want to install. For example, will users install the client
themselves using an installation kit or a Smart Upgrade procedure, will you
install a multi-user or single user environment, and if installing on
Microsoft(R) Windows(R), will you use the Notes-only installer or the Allclient
(Notes, Domino Administrator and Domino Designer clients) installer.
5. Familiarize yourself with installation and upgrade basics as presented in the
″Notes client installation and Smart Upgrade″ section of this guide.
6. Install or upgrade your Lotus Domino server.
7. (Optional) If you are installing IBM(R) DB2, see the release notes ″Domino
and DB2 supported platforms and hardware and software requirements,″
″Installing Domino and DB2 on Microsoft Windows platforms″ and ″Installing
Domino and DB2 on IBM(R) AIX(R) and Linux(R) platforms.″
8. Set Domino administrator settings for your users.
9. (Optional) Install or upgrade your Activities server if you will be enabling
users to create, edit, or view activity documents from Notes. For Activities
server setup, see the IBM(R) Lotus(R) Connections documentation.
10. (Optional) Install or upgrade your IBM WebSphere Portal server if you will be
enabling users to create, edit, or view composite applications that contain
portlets. See the WebSphere Portal information center http://publib.boulder.ibm.com/infocenter/wpdoc/v6r0/index.jsp.
11. (Optional) Create a Home Portal account for your Notes users that specifies
information such as their default WebSphere Portal server name, port, and
authentication information. Read the Home Portal account topics in this guide.
12. (Optional) Install the WebSphere Portal composite application support for
Notes on the WebSphere Portal server if you will be enabling users to create,
edit, or view composite applications that contain portlets.
13. (Optional) Use policy settings, NOTES.INI file settings, and the Notes tuner to
specify available user settings.
136 Installing Domino Servers and Notes Clients

14. (Optional) Modify the Notes install kit’s install manifest (deploy\install.xml)
and zipped update site (deploy\updateSite.zip, including the site index file
SITE.XML) to specify which Notes features users can install and optionally
how and if those features will appear on the Notes feature installation panel.
15. (Optional) If you have custom or third-party Eclipse components to install
with Notes, modify the Notes install kit’s install manifest (deploy\install.xml)
and zipped update site (deploy\updateSite.zip, including the site index file
SITE.XML) to add these features to the install kit.
16. Determine how you will make HTTP (Eclipse, non-Domino) and NRPC
(Domino server-based) component and application updates available to Notes
client systems.
17. Place the Notes installation kit in an accessible location.
18. Uninstall any Notes 8x beta instances.
19. Shut down all applications before installing or upgrading to this release of
Notes.
20. Install Notes on the user client systems or communicate to users how they are
to install (or upgrade) Notes.
Locating Lotus Notes administrative documentation
You can find information and instructions for IBM(R) Lotus(R) Notes(R)
administration, installation, and configuration using the following pointers.
v For system requirements, including supported platforms, see Lotus Tech Notes
at http://www.ibm.com/software/lotus/support/notes/support.html.
v For IBM(R) Lotus(R) Domino(R) server installation and setup, see this Domino
Administrator help.
Note: This Domino Administrator documentation contains information
regarding setting up and using Domino and IBM(R) DB2(R). Information about
the DB2 server is located in the DB2 Information Center at http://publib.boulder.ibm.com/infocenter/db2luw/v8/index.jsp.
v For IBM(R) Lotus(R) Notes(R) client installation and setup, see this Domino
Administrator help.
– For information about installing and upgrading Notes clients, see the ″Notes
pre-installation checklist″ topic in this guide.
– For information about installing or upgrading to Notes, see the ″Setting up
and customizing Notes installation″ topic in this guide.
– For information about uninstalling Notes, see the ″Uninstalling Notes″ topic
in this guide.
– For enabling and using third-party features, including customizing the
installation, see the ″Enabling and using third-party feature installation and
update in Note″ topic in this guide.v For IBM(R) Lotus(R) Domino(R) Designer and LotusScript requirements,
especially relative to composite applications, see the Lotus Domino Designer
help at http://www.ibm.com/developerworks/lotus/documentation/dominodesigner. In addition, see the following information on developing
application components on supported platforms:
– Notes component and application development -- See the ″Application
Design″ section of the Domino Designer help.
– Eclipse(TM) component and application development -- See the Eclipse
Integrated Developer Environment (IDE) help system as well as
documentation supplied with IBM(R) WebSphere(R) Portal and the IBM(R)
Lotus(R) Expeditor toolkit.
Chapter 5. Installing and Setting Up Notes Clients 137
– Composite applications developed and used with WebSphere Portal -- See the
″Composite applications″ section of the documentation supplied with
WebSphere Portal.
– Composite applications developed with IBM Lotus Component Designer --
See the ″Composite applications″ section in the Lotus Component Designer
User Guide, available in the product help.
– Composite Application Editor -- See the help supplied with the Composite
Application Editor. The Composite Applications Editor can be installed
during Notes installation.
– Portal Application Template Editor -- See the documentation supplied with
WebSphere Portal.
– Wiring Properties Editor -- This composite applications wiring properties
editor is installed with Domino Designer and is documented in the Domino
Designer help. It is also available in IBM(R) Lotus(R) Component Designer
help.v For information about the Expeditor runtime environment, see the information
center at http://publib.boulder.ibm.com/infocenter/ledoc/v6r11/index.jsp?topic=/com.ibm.help.ic.doc/welcome.html.
Look for updates to this content at http://www.ibm.com/developerworks/lotus/documentation/expeditor/.
v For WebSphere Portal server and WebSphere Application server installation and
setup, see the information center at http://publib.boulder.ibm.com/infocenter/wpdoc/v6r0/topic/com.ibm.wp.ent.doc/wpf/welcome.html.
v For Sametime(R) server setup, see the Sametime server installation
documentation.
v For information about installing the WebSphere Portal composite application
support for Notes in support of composite applications that contain portlets, and
other Portal-based elements, see topic ″Installing the WebSphere Portal
composite application support for Notes″ topic in this guide. Also see the
″Specifying the home portal account using preferences″ and ″Specifying the
home portal account using policy″ topics.
Installing the WebSphere Portal composite application support
for Notes
You can install IBM(R) WebSphere(R) Portal composite application support for
IBM(R) Lotus(R) Notes(R) on an IBM WebSphere server. This is required for Notes
users who will be using composite applications that contain portlets. It is available
in the Notes install kit and as a Web download.
The WebSphere Portal composite application support for Notes is required to
install portlets on the server and for Notes client communication with the
WebSphere Portal server. For example, if you want users to be able to edit a
portal-based composite application using the Composite Application Editor, you
must first run the WebSphere Portal composite application support for Notes
installation program on the WebSphere Portal server. This installation program also
installs the .war files that are required by the Composite Applications Editor when
it works with the WebSphere Portal server.
If your users create composite applications that include portlets, you must install
the WebSphere Portal server. To use some of the functions enabled by WebSphere
Portal in Lotus Notes, you must also install the WebSphere Portal composite
application support for Notes on the portal server. You can then create a Home
Portal Account for Notes users allowing them to create, edit, and view composite
138 Installing Domino Servers and Notes Clients
applications that contain portlets. Users can obtain help about creating or
modifying a Home Portal Account using the preferences panel in their Notes
online Help system.
Perform the following steps to install WebSphere Portal composite application
support for Lotus Notes on your WebSphere Portal server.
Note: As an alternative to steps 1 - 4 below, Windows users can install
″WebSphere Portal composite application support for Lotus Notes″ by locating and
running ca8_SCI.exe in the APPS subdirectory of the Notes installation kit or on
the WebSphere Portal composite application support for Lotus Notes CD. Linux
users must first copy the ca8_SCI.tar file to their local machine and ″untar″ it using
the tar -xvf ca8_SCI.tar command.
Note: Upgrade from a previously installed version of WebSphere Portal composite
application support for Lotus Notes is supported.
1. Obtain the WebSphere Portal composite application support for Lotus Notes
installer kit and place it in a temporary folder such as /temp.
2. Navigate to and unzip the installer kit.
3. Open the unzipped folder and note its contents, which include the setup
installation executable file and a portal folder in which various portlets and
scripts reside.
4. Run the setup executable file (for example, setupwin32.exe) or binary.
5. If a language selection panel appears, make your selection then click OK.
6. Read the Welcome screen. If you want to read related information, click
Information Center. Click Next to continue.
7. Read and accept the license agreement terms. Click Next to continue.
8. Accept the default installation directory or specify a new one. Click Next to
continue.
9. Accept the default WebSphere Portal server or specify a new one. Enter your
WebSphere user name and password. Click Next to continue.
For details about specifying the WebSphere Portal server value, see the
WebSphere Portal Information Center.
10. Read the preview screen for the installation directory path and size, and click
Install. The installation process takes several minutes.
11. Read the installation summary screen, and click Finish to exit the installation
wizard.
Additional step if Web server or Portal server use Secure Sockets Layer (SSL): If
you have configured your Web server or Portal server to use Secure Sockets Layer
(SSL) and are using a self-signed test certificate, you must perform additional steps
before running the WebSphere Portal composite application support for Notes to
ensure that SSL communications occur properly between the WebSphere Portal
composite application support for Notes program and the Web server or Portal
server. These instructions are detailed in the ″Installing the Network Client
Installer when using SSL with a self-signed test certificate″ in the IBM(R) Lotus(R)
Expeditor Information Center at http://publib.boulder.ibm.com/infocenter/ledoc/v6r11/topic/com.ibm.rcp.tools.doc.admin/networkclientinstallSSL.html.
See future Expeditor information center help as it becomes available at
http://www.ibm.com/developerworks/lotus/documentation/expeditor.
Chapter 5. Installing and Setting Up Notes Clients 139
Note: You do not need to additionally install the Expeditor Network Client
Installer (NCI).
Installing the WebSphere Portal composite application support for Notes using
command line parameters: You can also install WebSphere Portal composite
application support for Notes on the portal server using the silent or console install
methods.
Silent mode: Use the following command line to install WebSphere Portal
composite application support for Notes in silent mode:
<setup launcher> -silent -V licenseAccepted=true -P installLocation="C:\Program Files\IBM\
Lotus\Notes\Server" -V NCI_PORTAL_HOME="C:\Program Files\IBM\WebSphere\PortalServer"
-V NCI_PORTAL_USERID=<your portal admin id> -V NCI_PORTAL_PASSWORD=
<your portal admin password>
The <setup launcher> values are as below:
v setupwin32.exe for Windows
v setupLinux.sh for Linux
The silent install parameters are as below:
-silent
Set the variable to accept the license agreement panel:
-V LicenseAccepted=true
Set the Product bean in the installer to install the client in the entered location:
-P installLocation="<install_location>"
Provide the Portal install location:
-V NCI_PORTAL_HOME="C:\Program Files\IBM\WebSphere\PortalServer"
Provide the Portal administrator’s ID:
-V NCI_PORTAL_USERID=<your portal admin id>
Provide the Portal administrator’s password:
-V NCI_PORTAL_PASSWORD=<your portal admin password>
Note: Replace <your portal admin id> and <your portal admin password> with your
own specific Portal administrator ID and password.
Note: If you have configured your Web server or Portal server to use Secure
Sockets Layer (SSL) and are using a self-signed test certificate, see the ″Additional
step if Web server or Portal server use Secure Sockets Layer (SSL)″ information
above.
Considerations for uninstalling and reinstalling WebSphere Portal composite
application support for Notes: When you install WebSphere Portal composite
application support for Notes, it installs several portlets on the WebSphere Portal
server. Notes-based composite applications that contains portlets use these portlets.
If you uninstall the server client installer, you also remove these needed portlets,
which removes them from any composite applications that use them. This
adversely affects those composite applications. Do not uninstall the server client
installer from a server that is used by composite applications.
140 Installing Domino Servers and Notes Clients

If you uninstall and reinstall WebSphere Portal composite application support for
Notes from your WebSphere Portal server, you must recreate the composite
application elements that contain portlets using the newly installed portlets.
Specifying the home portal account
To use features that require an IBM(R) WebSphere(R) Portal server, such as
composite applications that contain portlets, IBM(R) Lotus(R) Notes(R) users need
a Home Portal account. The Home Portal account is a unique account that specifies
which WebSphere Portal server to connect to for features and composite
applications that require a WebSphere Portal server. You can set up a Home Portal
account for users using policy, and Notes users can create and edit the account
using a preference panel.
After Notes is installed and prior to using composite applications that contain
portlets, or other features that require a WebSphere Portal server, users need a
Home Portal account. Home Portal account information is stored in the Contacts
database.
Note: The standard portal URL format is http://host:port/wps/myportal, where
/wps is a standard portal context and /myportal is a standard personalized Home.
To specify a WebSphere Portal server as the Home Portal account server for a
Notes user, you can set the following values using the IBM(R) Lotus(R) Domino(R)
Administrator client. These settings affect fields on the Notes Home Portal Account
preference page.
Administrators can use the Domino Administrator client to complete the following
fields on the Portal Server Basics tab for users who may, for example, need to
access and use composite applications that contain portlets:
v Home Portal Server -- Type the name of the Portal server that hosts Notes user
accounts.
v Authentication URL -- Type the URL that Notes users need to access in order to
authenticate with the Portal server.
v Authentication type -- Choose either J2EE-Form or HTTP for Web-based
authentication.
These Domino policy settings override Notes account preferences and will create
the account if it does not already exist.
Customizing the location of Notes install directories
Use this procedure to specify a location other than the default location in which to
store the installation directories. When specifying directory names, use names that
contain eight or fewer characters.
1. From Application Configuration, select Setup Properties.
2. Click Add/Remove Program Settings.
3. Change the PROGDIR property to the location in which you are storing the
program files.
4. Change the DATADIR property to the location in which you are storing the
data files. This is the new default data directory.
Considerations before installing Notes on Windows
Before installing IBM(R) Lotus(R) Notes(R) on a Microsoft(R) Windows(R) client,
you should be familiar with the following information.
Chapter 5. Installing and Setting Up Notes Clients 141
Mail, calendar, and contact features are installed with Notes, including traditional
Notes functionality. Additional features such as IBM Lotus Symphony(TM),
Activities, Sametime (integrated), and the Composite Application Editor can also
be installed.
You can install Notes as single user or multi-user. Single user installation also
allows you to install or upgrade IBM(R) Lotus(R) Domino(R) Designer and IBM(R)
Lotus(R) Domino(R) Administrator clients.
Notes is available as an install kit. You can install Notes in graphical mode, silent
mode, and by using Smart Upgrade.
The install kit for Notes install on a Windows client consists of the following items:
v Installation program executable file (SETUP.EXE)
v Zipped update site directory UPDATESITE.ZIP (contains features folder, plugins
folder and SITE.XML file)
v Deploy directory (contains the install manifest (INSTALL.XML) and
PLUGIN_CUSTOMIZATION.INI)
v SETUP.INI
v Lotus Notes 8.x.msi
If a Notes release 6.5.x, 7.x, or 8.x is detected on the client, the installation program
will upgrade it to the current Notes release. If you are running a version of Notes
that was released prior to Notes 6.5, upgrade to at least Notes 6.5 before installing
and upgrading to this Notes release.
If an existing version of Domino Designer or Domino Administrator is resident,
you can choose to upgrade them using the Allclient installation kit. Note that
multi-user does not support the Allclient installation program.
Windows Vista(TM) users: If you are installing or upgrading Notes on the
Windows Vista platform, see the topic ″Windows Vista: Considerations for Notes
install and upgrade″ for information about enabling and using the UAC ON
setting.
The following information is useful when installing or upgrading to Notes on a
Windows client.
v For system requirements, including supported platforms, see Lotus Tech Notes
at http://www.ibm.com/software/lotus/support/notes/support.html.
v When installing Notes you must be logged in as an administrative user or as a
non-administrative user with elevated privileges. To install as a
non-administrative user, an administrator should first run the Group Policy
Editor (gpedit.msc) and set install privileges to ″Always Install Elevated″ as
below. Once these settings have been made, non-administrative users can then
install, open, and use Notes.
From the Policy Group Editor [gpedit.msc] policy setting:
1. Click Computer Configuration - Administrative Templates - Windows
Components - Windows Installer > Always Install Elevated.
2. Click User Configuration - Administrative Templates - Windows Components
- Windows Installer - Always Install Elevated.v Notes installation on Windows(R) supports Windows XP and Windows Vista.
For Windows Vista, the User Account Control (UAC) setting should be ON.
v You can install Notes on Windows in a single user or multi-user environment.
142 Installing Domino Servers and Notes Clients
v If you plan to use Notes shared login, do not select ″Client Single Logon
Feature″ during installation.
v When installing Notes using the Windows Allclient kit, feature panel installation
options are available for installing or upgrading the Domino Designer and
Domino Administrator clients.
v For recommended memory, see the ″Software requirements″ section of the
release notes or tech notes.
v A summary panel displays the disk space footprint for what is being installed.
Install also needs additional temporary disk space. The temporary disk space
required is almost as large as the footprint. If you do not have enough space for
the footprint and temporary space, the installer will stop you from continuing.
v Shut down all applications before installing Notes.
v If you have installed a Notes Beta version, uninstall it before installing this
Notes version.
v On Windows Vista, you cannot upgrade a Notes 8.0 installation that was
installed with UAC turned OFF to a Notes installation that has UAC turned ON.
You must first uninstall, set UAC ON, then run the current Notes installer.
v Shared network installation is not supported for Notes standard configuration.
v Installation and use of Notes on a USB drive is not supported for Notes
standard configuration.
v At initial release, Notes is available in US English only. Additional language kits
are made available for Notes shortly after initial release. See the language kit
topics in this guide.
v The installation path cannot contain special characters such as # or $.
v Only one instance of Notes should be installed on a client workstation at any
given time.
v If installation does not complete successfully, uninstall Notes and reinstall. If
uninstall is not successful, see ″Cleaning a previous or partial Notes installation
from your client.″
v The Notes installer does not support upgrade from single user to multi-user,
however it is possible to perform such an upgrade using a manual technique.
For information about upgrading from a single user to a multi-user Notes
installation, see the ″Upgrading from a single user to a multi-user Notes
installation″ topic in this guide.
v The installation path cannot contain special characters such as # or $.
v Only one instance of Notes should be installed on a client workstation at any
given time.
v Once you click ″Install″ on the Notes installation panel, allow the installation to
complete. Ending the Notes installation process prematurely can leave files in an
unstable state, and may also leave empty folders and miscellaneous files on your
system. If you experience problems installing Notes after exiting out of Notes
installation prior to its completion, see the release note and help topic entitled
″Cleaning a previous or partial Notes installation from the client″.
Notes installation directories for Windows
The recommended and default IBM(R) Lotus(R) Notes(R) installation directories
are as below.
Note: If a Notes version is currently installed, the default path is the current Notes
installation path. When you install Notes single user on a system on which Notes
6.5 or 7.x is already installed, the traditional Notes portion of the product is
upgraded and installed to the same directory in which the existing Notes install
Chapter 5. Installing and Setting Up Notes Clients 143
binaries currently reside, for example C:\Lotus\Notes. The Notes data directory is
assumed to be the directory where the existing Notes install data files exist, for
example C:\Lotus\Notes\data. Additional IBM(R) Lotus(R) Expeditor framework
files are installed to a \framework subdirectory, for example C:\Lotus\Notes\framework.
The default and suggested Windows Vista(TM) and Windows XP single user
directories for Notes install are as below:
v C:\Program Files\IBM\Lotus\Notes -- Notes product and binary files
installation directory
v C:\Program Files\IBM\Lotus\Notes\data -- Notes single user data files
installation directory
v C:\Program Files\IBM\Lotus\Notes\data\workspace -- Notes single user
workspace directory
v C:\Program Files\IBM\Lotus\Note\framework -- Recommended Notes Java
code installation directory
The default and suggested Windows XP multi-user directories for Notes install for
are as below:
v C:\Program Files\IBM\Lotus\Notes -- Notes multi-user default binary files
installation directory
v C:\Documents and Settings\<user>\Local Settings\Application
Data\Lotus\Notes\data -- Notes data files installation directory for each user
v C:\Documents and Settings\<user>\Local Settings\Application
Data\Lotus\Notes\Data\workspace -- Notes workspace directory for each user
v C:\Program Files\IBM\Lotus\Notes\framework -- Notes Java(TM) code
installation directory
v C:\Documents and Settings\All Users\Local Settings\Application
Data\Lotus\Notes\Data -- Shared data directory
The default and suggested Windows Vista multi-user directories for Notes install
are as below:
v C:\Program Files\IBM\Lotus\Notes -- Notes multi-user default binary files
installation directory
v C:\ProgramData\Lotus\Notes\data -- Notes multi-user shared resources and
templates installation directory
v C:\Users\<user name>\AppData\Local\Lotus\Notes\data -- Notes multi-user
default data installation directory
v C:\Users\<user name>\AppData\Local\Lotus\Notes\data\workspace -- Notes
multi-user workspace directory for each user
v C:\Program Files\IBM\Lotus\Notes\framework -- Notes Java code installation
directory
Note: On a Windows system in which an existing Notes installation is detected
(6.5.x, 7x, or 8.x), default installation directories are as below:
v Notes product and binary files installation directory -- Directory where the
existing Notes install binaries exist, for example C:\Lotus\Notes
v Notes data files installation directory -- Directory where the existing Notes data
files exist, for example C:\Lotus\Notes\data
v Notes Java code installation directory -- Subdirectory \framework of the Notes
installation directory, for example C:\Lotus\Notes\framework
144 Installing Domino Servers and Notes Clients
v /{$HOME}/lotus/notes/data/workspace -- Notes workspace directory for each
user
Windows Vista considerations for Notes install, upgrade, and
uninstall
When you install and use IBM(R) Lotus(R) Notes(R) on a Microsoft(R) Windows
Vista(TM) platform with UAC ON, all users run with standard user privileges,
including users in the Administrators group. If a process needs to perform an
administrative task, as is the case with a Notes install, the access must switch to
administrator. When this happens the user is either prompted to continue (if they
are already logged in an administrator) or is asked to enter administrator
credentials (if they are logged in as a standard user). The program, in this case the
Notes installation program, runs based on the user having administrative rights.
Note that when installing or uninstalling Notes with UAC ON, you must be
working as an administrative user.
Installing Notes with UAC ON: When installing or upgrading Notes on a
Windows Vista client, the UAC setting should be enabled (UAC ON) in the
following situations:
v Notes single or multi-user install on Windows Vista on which no Notes
installation exists currently
v Notes upgrade from an existing Notes install on Windows XP
Listed below are two options for enabling the UAC setting on the Windows Vista
client. You can also reference http://www.netsquirrel.com/msconfig/msconfig_vista.html.
Note: On Windows Vista, you cannot upgrade a Notes installation on Windows
Vista that was installed with UAC turned OFF to a installation that has UAC
turned ON. You must first uninstall your Notes 8.0 installation, set UAC ON, then
run the current Notes installation program.
Note: See the ″Notes and Domino platforms and system requirements″ release
note for related and additional system requirements.
Setting UAC On -- Option 1: You can enable the UAC ON security setting using
the following procedure.
1. Click Start - Run and type MSCONFIG in the Run field to start the
Microsoft(R) Configuration Utility.
The Run menu may not visible by default. The Run command is in Programs
Accessories. You can also find it by placing your cursor on the task bar,
right-click, and choose Properties - Start Menu - Classic Start menu.
Alternatively you can click on the Windows Vista Start icon in the bottom left
corner of your screen then type MSCONFIG in the search box to locate and
start the utility.
2. If prompted for your administrator user name and password, or if so logged in,
if prompted to continue respond as needed to continue.
3. Click the Tools tab.
4. Scroll down and click Enable UAC.
Note: The Tools tab is a new addition to MSCONFIG in Windows Vista. The
Enable UAC and Disable UAC options modify the Registry so that UAC will be
either enabled or disabled upon your next client startup. Note that MSCONFIG
Chapter 5. Installing and Setting Up Notes Clients 145

requires that you have UAC authorization to run it and that Registry changes
cannot be made without elevated privileges.
5. Click the OK or Launch button.
6. A command window will appear. When the command is finished running,
close the window.
7. Close MSCONFIG and restart the computer to enable new the UAC setting.
Setting UAC On -- Option 2: You can enable the UAC ON security setting using
the following procedure.
1. Click Start - Control panel to open the Windows Vista Control Panel.
2. Click User Accounts.
3. Click Turn User Account Control on or off.
4. Check the box next to Use User Account Control (UAC) to help protect your
computer.
5. Click OK and restart the computer to enable the UAC setting.
Upgrading from Notes 8.0 with UAC ON: You cannot upgrade a Notes 8.0
installation that was installed with UAC turned OFF to a Notes installation that
has UAC turned ON. You must first uninstall your Notes 8.0 installation, set UAC
ON, then run the current Notes installer.
Upgrading from single user to multi-user: The Notes installation program does
not support automatic Notes upgrade from single user to multi-user within the
same release or from one release to another, although it is possible. To upgrade
from single user to multi-user, see the Upgrading a Notes single user install to
multi-user topic in this guide.
Considerations for enabling GB18030 support on Windows XP
Simplified Chinese (GB18030) characters may not display properly in IBM(R)
Lotus(R) Notes(R) running on Windows XP. To enable GB18030 support on a
Microsoft(R) Windows XP client, do the following:
1. Install the language support for Simplified Chinese on any non-Simplified
Chinese version of Windows.
2. Click Start -- Control Panel -- Regional and Language Options.
3. On the Languages tab, check Install files for East Asian languages.
4. Install the GB18030 support package from http://go.microsoft.com/fwlink/?LinkId=26235.
To enable GB18030 font linking, do the following:
1. Click Start -- Run.
2. In the Run text box, type regedt32 to open the registry.
3. Navigate to [HKEY_LOCAL_MACHINE\SOFTWARE\Microsoft\Windows
NT\CurrentVersion\FontLink\SystemLink].
4. Double-click Tahoma.
5. Add ″SimSun18030.ttc,SimSun-18030″, in a new line, in the edit box.
6. Double-click Arial.
7. Add ″SimSun18030.ttc,SimSun-18030″, in a new line, in the edit box.
8. Click OK to restart the computer.
146 Installing Domino Servers and Notes Clients

Font linking provides the ability to render non-Latin characters when the font set
by the application does not support those particular characters. It is suitable when
an application cannot use a single font to render all the required characters.
Note: If you use the Registry Editor incorrectly, you can cause serious problems
that may require you to reinstall your operating system. Use the Registry Editor at
your own risk.
To enable the GB18030 dialog font, do the following:
1. Right click in the desktop and click Properties.
2. Click the Appearance tab on the Display Properties dialog.
3. Click Advanced.
4. On the Advance Appearance dialog, click Item then SimSun-18030 font.
5. Click OK on the Advanced Appearance dialog.
6. Click OK on the Display Properties dialog.
Changing the CSS user interface font in the notes_plugin_customization.ini
file: A Notes user can override the CSS user interface font by adding the
following statement to the com.ibm.notes.branding/notes_plugin_customization.ini
file.
com.ibm.rcp.ui/UI_FONT_FACE
For example, to set the Notes user interface font to ″SimSun-18030″ instead of
using the CSS font, add the following line to the com.ibm.notes.branding/notes_plugin_customization.ini file.
com.ibm.rcp.ui/UI_FONT_FACE=SimSun-1803
Considerations before installing Notes on Linux
Before installing IBM(R) Lotus(R) Notes(R) on a Linux(R) client, you should be
familiar with the following information.
Mail, calendar, and contact features are installed with Notes, including traditional
Notes functionality. Additional features such as the IBM(R) Lotus(R)
Symphony(TM), Activities, IBM(R) Lotus(R) Sametime(R) (integrated), and the
Composite Application Editor can also be installed.
The Notes RPM package install kit consists of the following items:
v Notes rpm package (ibm_lotus_notes-8.5.i586.rpm)
v Activities rpm package (ibm_lotus_activities-8.5.i586.rpm)
v Composite Application Editor rpm package (ibm_lotus_cae-8.5.i586.rpm)
v Sametime rpm package (ibm_lotus_sametime-8.5.i586.rpm)
v Symphony rpm package (ibm_lotus_symphony-8.5.i586.rpm)
The Notes DEB package install kit consists of the following items:
v Notes deb package (ibm_lotus_notes-8.5.i586.deb)
v Activities deb package (ibm_lotus_activities-8.5.i586.deb)
v Composite Application Editor deb package (ibm_lotus_cae-8.5.i586.deb)
v Sametime deb package (ibm_lotus_sametime-8.5.i586.deb)
v Symphony deb package (ibm_lotus_symphony-8.5.i586.deb)
v For system requirements, including supported platforms, see Lotus Tech Notes
at http://www.ibm.com/software/lotus/support/notes/support.html.
Chapter 5. Installing and Setting Up Notes Clients 147
v You must be logged in as a root user or switch user to root before installing
Notes. After Notes is installed, non-root users can open and use Notes.
v When installing Notes from CD onto an RHEL 5 Linux client, mount the CD
drive using exec as a gconf mount option. You can then insert the Notes
installation CD and run the installer by typing ./setup.sh. By default, RHEL 5
does not allow execute permission on a mounted CD drive.
To properly mount the RHEL 5 client drive, use the following command:
gconftool-2 /system/storage/default_options/iso9660/mount_options
-s "[exec]" -t list --list-type=string
Optionally, you can mount the drive using your UID settings:
gconftool-2 /system/storage/default_options/iso9660/mount_options
-s "[exec,uid=]" -t list --list-type=string
After installation is complete, change back to the default permissions as below.
gconftool-2 /system/storage/default_options/iso9660/mount_options
-s "[]" -t list --list-type=string
v You can install Notes in a multi-user environment. Single user install is not
supported.
v If you have installed a Beta version, uninstall it before installing the release
version.
v Shared network installation is not supported for Notes standard configuration.
v Installation and use of Notes on a USB drive is not supported for Notes
standard configuration.
v The installation path cannot contain special characters such as # or $.
v Only one instance of Notes should be installed on a client workstation at any
given time.
v If installation does not complete successfully, uninstall Notes and reinstall. If
uninstall is not successful, see ″Cleaning a previous or partial Notes installation
from your client.″
Notes installation directories for Linux
On a Linux(R) system, default directories for IBM(R) Lotus(R) Notes(R) install and
upgrade are as below:
v /opt/ibm/lotus/notes -- Notes product and binary files installation directory
v /root/lotus/notes/data -- Notes data files installation directory
v /root/lotus/notes/data/workspace -- Notes workspace directory
v /opt/ibm/lotus/notes/framework -- Notes Java code installation directory
v /etc/lotus/notes/data -- Shared data directory
v /{$HOME}/lotus/notes/data -- Notes data files directory for each user
The following data and workspace directories are only used during Notes install
and upgrade. Notes cannot be run as the root user, so these directories are not
used at runtime. The install and provisioning log files are located in this
workspace directory.
v /root/lotus/notes/data -- Notes data files installation directory
v /root/lotus/notes/data/workspace -- Notes workspace directory
Considerations before installing Notes on Mac OS X
Before installing IBM(R) Lotus(R) Notes(R) on an Apple(R) Mac OS X(R) client, you
should be familiar with the following information.
v For system requirements, including supported platforms, see Lotus Tech Notes
at http://www.ibm.com/software/lotus/support/notes/support.html.
148 Installing Domino Servers and Notes Clients
The install kit for Notes install on a Mac OS X client consists of the following
items:
v Notes installation Meta-package (.mpkg)
v Uninstaller application
The following information is helpful when installing Notes on a Mac OS X client:
v For recommended memory, see the ″Software requirements″ section of the
release notes or tech notes.
v The installation program will detect and upgrade an existing Notes installation
to the current Notes installation.
v If you are upgrading Notes, turn off all options in the Application Sharing tab of
the Shared System Preferences panel.
v You can install Notes in a multi-user environment. Single user install is not
supported.
v Users must have administrator-level privileges to install.
v Installation and use of Notes on a USB drive is not supported for Notes
standard configuration.
Notes installation directories for Mac OS X
On an Apple(R) Mac OS X(R) system, the default installation directories are as
below:
v /Applications/Notes.app -- Notes product and binary files installation directory
v /Applications/Notes.app/Contents/MacOS/ -- Notes Java(TM) code installation
directory
v ~/Library/Application Support/Lotus Notes Data/Expeditor -- Notes
workspace directory
v /Applications/Notes.app/Contents/Resources/.lproj/Data -- Shared data
directory
v ~/Library/Application Support/Lotus Notes Data -- Data files directory for each
user
Considerations before installing Notes on Citrix
IBM(R) Lotus(R) Notes(R) installation is supported on Citrix(R).
For system requirements, including supported platforms, see Lotus Tech Notes at
http://www.ibm.com/software/lotus/support/notes/support.html.
Related information about Notes client installation in the Citrix platform is
available in the following Tech Note:
http://www.ibm.com/support/docview.wss?rs=475&uid=swg21292162
Setting up and customizing Notes installation
Depending on your organization, you may need to provide an installation method
for only a few users or for thousands of users. You may want to allow users to
install or upgrade IBM(R) Lotus(R) Notes(R) themselves or you may want to install
or upgrade Notes for your users. You may also want to customize the installation
so that users only have the features they need.
After you register users, and determine various policy settings for users, decide
how to deploy client installations for users.
Chapter 5. Installing and Setting Up Notes Clients 149
On Microsoft(R) Windows(R), single users can use the Allclient install kit to install
all three clients -- the Notes client, IBM(R) Lotus(R) Domino(R) Administrator
client, and IBM(R) Lotus(R) Domino(R) Designer.
Multi-user install is available on Windows, Linux(R), Citrix(R), and Apple(R) Mac
OS X(R). Multi-user install does not support installation of the Domino Designer or
Domino Administrator clients.
As an administrator, you can customize the installation process for your users so
that they install the features that they need. You can customize installation using
tuner capabilities, for example if you want to install Notes multi-user using a silent
installation method. You can also customize installation of Eclipse(TM)-based
features using the install manifest resident in the Notes install kit, for example if
you want to remove the Composite Application Editor from the installer.
Before you begin installing Notes, make sure that you or your users do the
following:
v Read the release notes for information about software and hardware
requirements.
v Read the considerations section of the installation topics in this guide.
v Assign appropriate access rights to installation directories.
To successfully install, upgrade, and use Notes, users must be allowed both
Write and Modify permissions to the program directory, data directory, and all
associated subdirectories. Assign appropriate access rights to your Notes client
users.
v Log in as an administrative user or user with elevated privileges.
You must be logged in as an administrative or root user with administrative
privileges.
For related information about login prior to install, see the software
requirements topic in the current release notes.
Note: Windows users should log onto their client with administrative rights to
install or upgrade Notes. For cases in which administrative rights are not
available, enable the setting ″Always install with elevated privileges.″ The
setting ″Always install with elevated privileges″ is a Microsoft Windows setting
that is part of Window’s User Policies. Refer to your Microsoft Windows
documentation for details.
Note: Options for installing the Notes on Restricted or Standard/Power user
computers are described in the Windows Installer documentation.
Customizing the Notes install kit to add or remove Eclipse
features
You can customize the IBM(R) Lotus(R) Notes(R) install kit to add new or
third-party features at install or upgrade or to remove certain supplied features
from the kit prior to install or upgrade using the procedure outlined here.
For an overview of the files and directories in the Notes install kit, see the topic
″Eclipse files and folders in the install kit.″
1. Customize the Notes install manifest (deploy\install.xml) to add new or
third-party features or remove certain supplied features.
150 Installing Domino Servers and Notes Clients
You can customize the Notes install kit to, for example, add a third-party
feature to the installer or remove one of the optional installation panel choices,
such as IBM Lotus Symphony(TM), from the installer.
If you are adding a new or third-party feature, see the topic ″Customizing the
Notes install manifest for new or third-party Eclipse features.″
If you are removing a supplied feature from the Notes install kit, see the
following topics in this guide:
v Customizing the Notes install manifest for supplied Eclipse features
v Reducing the Notes install kit size
v Removing features from the Notes install kit using a supplied tool
Note: Only the Composite Applications Editor, Lotus Symphony, and the
embedded Sametime(R) features are available for removal from the install
kit; all other supplied feature should remain as supplied and not be removed
from the Notes install kit.2. If you are adding a new or third-party feature, sign the feature and plug-in JAR
files and optionally establish signing preferences in the deploy\plugin_customization.ini file).
See the topic ″Signing custom or third-party features and plug-ins for install
and update.″
3. Optionally add features to or remove features from the supplied Notes install
kit.
v If you are adding a new or third-party feature, add the feature and plug-in
JAR files to the correct features and plugins subdirectories in the Notes
install kit’s updateSite.zip and ensure that the update site manifest
(SITE.XML) correctly lists the contents of those subdirectories.
Optionally use the supplied AddToKit tool to copy the contents of a
customized update site (features subdirectory, plugins subdirectory and
SITE.XML file) to the update site in the Notes install kit structure
(UPDATESITE.ZIP).
See the topic ″Adding new features to the Notes install kit using a supplied
tool.″
v If you are removing a supplied feature , remove the feature and plug-in JAR
files from the correct features and plugins subdirectories in the Notes install
kit’s updateSite.zip and ensure that the update site manifest (SITE.XML)
correctly lists the contents of those subdirectories.
Optionally use the supplied trimUpdateSite tool to remove the contents of a
customized update site (features subdirectory, plugins subdirectory and
SITE.XML file) from the update site in the Notes install kit structure
(UPDATESITE.ZIP).
See the topic ″Removing features from the Notes install kit using a supplied
tool.″4. Test the customized Notes install kit before distributing it to your users.
5. Distribute the customized Notes install kit for Notes install or upgrade.
Eclipse files and folders in the install kit
You can customize in the IBM(R) Lotus(R) Notes(R) install kit relative to supplied
Eclipse features. The procedure for customizing the Notes install kit is described in
the ″Customizing the Notes install kit to add or remove Eclipse features.″
Chapter 5. Installing and Setting Up Notes Clients 151
While you continue to have the ability to customize Notes install using tuner
capabilities, the addition of Eclipse(TM) features and plug-ins have broadened
your Notes install capabilities.
When customizing Notes installation, you work primarily in two directories,
deploy and updateSite, in the supplied Notes install kit. The updateSite directory
is supplied in zipped form.
During Notes install, and in addition to the IBM(R) Lotus(R) Domino(R) Designer
and IBM(R) Lotus(R) Domino(R) Administrator features which appear on the
feature installation panel if you are using an Allclient installation kit, the following
features appear on the feature installation panel -- Lotus Symphony(TM),
Activities, Composite Applications Editor, and Sametime(R).
You can optionally edit the install manifest (INSTALL.XML) to specify how
features, such as IBM Lotus Symphony, will appear on the Notes feature
installation panel. For example, a feature can appear selected for install by default
or not. You can also edit the install manifest to remove features from the
installation panel, either to force installation or prevent that feature from being
selected during install. You can also optionally remove a feature from the
installation kit itself. Finally, you can customize installation to add custom or
third-party features by editing the install manifest to add features for Notes install,
adding related feature and plug-in JAR files to the correct features and plugins
subdirectories in a customized update site, and updating the site manifest to
correctly list the features in a customized update site.
v deploy directory
The Notes install kit’s deploy directory includes the following:
– INSTALL.XML (deploy\install.xml) -- install manifest that lists the Eclipse
features to install
You can customize the install manifest to specify which features to install. You
can use the install manifest to allow the user to choose installation of a given
feature. You can also specify features to install, update, or remove after the
initial Notes installation.
The install manifest uses Eclipse standards, but it is a file unique to Notes
install. An ″installfeature″ attribute reflects the feature name users see on the
Notes feature installation panel. Lower level ″feature″ statements are grouped
together as a feature subordinate to a top level ″install feature.″
– PLUGIN_CUSTOMIZATION.INI (deploy\plugin_customization.ini) -- Eclipse
preferences filev UPDATESITE.ZIP -- Eclipse updateSite directory zip file
The zipped updateSite directory includes the following:
– SITE.XML -- registry of the features that you want to expose for install.
This standard IBM(R) Lotus(R) Expeditor site registry lists the Eclipse features
available for install. It uses a unique Document Type Definition (DTD) or set
of XML file conventions, which are documented in the Expeditor help.
General information about the SITE.XML registry is also available at the
eclipse.org Web site.
– features subdirectory -- contains the (signed) feature JAR files. Features are
used to organize plug-ins.
– plugins subdirectory -- contains the (signed) plug-in JAR files. Plug-ins hold
runtime code.
152 Installing Domino Servers and Notes Clients
Eclipse features are specified for installation in the supplied install manifest. The
install manifest, in conjunction with the UPDATESITE.ZIP contents, determine
which features are available in the Notes installer.
By default, the following features are included on the Notes features installation
panel. You can suppress their display, and establish installation program defaults,
using the install manifest.
v Composite Applications Editor
v Lotus Symphony
v Activities
v Sametime (integrated)
Note: In the install manifest supplied in the Notes install kit, do not modify
features whose ″required″ attribute is set to ″true.″
Understanding the Eclipse update site
An Eclipse(TM) update site is a repository for features and plug-ins and it follows
a standard format. The IBM(R) Lotus(R) Notes(R) installer uses the update site
directory zip file UPDATESITE.ZIP, which contains a features subdirectory and
plugins subdirectory, as well as a SITE.XML registry. The SITE.XML registry lists
all features that are published from the update site.
For Notes install, Eclipse update site content must adhere to these conventions:
v All features must be packaged in JAR files (one per feature) and placed in the
″features″ subdirectory (updateSite.zip\features).
v All plug-ins must be packaged in JAR files (one per plug-in) and placed in the
″plugins″ subdirectory (updateSite.zip\plugins).
v Published feature IDs must reside in the SITE.XML registry
(updateSite.zip\site.xml).
Customizing the Notes install manifest for supplied Eclipse
features
You can optionally edit the supplied IBM(R) Lotus(R) Notes(R) install manifest
(INSTALL.XML) to control which features are available for installation and what
the user sees on the feature installation panel.
For Notes installation of supplied Eclipse(TM) features, you can do any of the
following:
v Display a feature name and enable the user to select or deselect the option. The
feature name appears on the feature installation panel as selected, and the user
can select or deselect it.
v Display a feature name and force its installation. The feature name appears on
the feature installation panel and user cannot deselect it.
v Prevent a feature name from appearing on the features installation panel.
Depending on how attributes are set in the install manifest this can either force
the feature to be installed or prevent the feature from being installed.
v Remove a supplied feature from install consideration. You can comment or even
delete an ″installfeature″ block.
Note: Only certain supplied features should be removed from the install kit,
namely IBM Lotus Symphony(TM), the Composite Applications Editor, and the
embedded Sametime(R) feature. No other supplied features should be removed
from the Notes install kit.
Chapter 5. Installing and Setting Up Notes Clients 153
When customizing the INSTALL.XML file for supplied features, focus only on the
″installfeature″ element, not the sub-level ″feature″ element.
When you open the Notes INSTALL.XML file in a Web browser or XML editor, it
opens in expanded form and the hierarchy is apparent. To simplify display,
collapse the feature hierarchy so that only the ″installfeature″ elements are visible.
Each ″installfeature″ element represents an installable feature.
You can edit the install manifest using an XML editor or text editor but be sure to
validate the XML before moving to the next step in the customization process.
A sample of INSTALL.XML text (specifically an ″installfeature″ block) is shown
below. For supplied features such as the Composite Application Editor and Lotus
Symphony, the attributes you can edit are ″default,″ ″required,″ and ″show″ which
are seen in the ″installfeature″ element snippet below:
+ <installfeature default="false" description="%Editors.description"
id="Editors" name="%Editors.name" required="false" show="true"
version="8.0.0.20071115.0230">
Note: Do not edit any ″installfeature″ element whose ″required″ attribute is set to
″true.″
v default -- Specifies whether the ″installfeature″ name is shown selected for
installation. If set to true, the ″installfeature″ name is selected on the feature
installation panel. If set to false, the ″installfeature″ name is not selected on the
feature installation panel.
Note: The ″default″ attribute is ignored when re-running the installer and is
ignored on upgrade unless the ″installfeature″ did not exist in the previously
installed offering. This allows the installer to display the state (installed or not
installed) of the ″installfeature″ that was available in the previous installer
offering.
v required -- Specifies whether the ″installfeature″ must be installed. If set to true,
the ″installfeature″ is installed. If set to false, and show is set to true, the
″installfeature″ name appears on the Notes feature installation panel and the
user can select the option.
The ″required″ attribute overrides the ″default″ attribute.
v show -- Specifies whether the ″installfeature″ appears on the Notes feature
installation panel. If set to true, the ″installfeature″ name is visible. If set to false,
the ″installfeature″ name is not visible.
For other information about the install manifest, see the ″Install manifest″ section
of ″Customizing provisioned components″ in IBM(R) Lotus(R) Expeditor help at
http://publib.boulder.ibm.com/infocenter/ledoc/v6r11/topic/com.ibm.help.ic.doc/welcome.html.
See future Expeditor release help as it becomes available.
Example: Display a feature on the features installation panel and enable the user
to select or deselect the feature: To display an ″installfeature″ name and enable
the user to select or deselect it during Notes install, set the following values:
v default -- false
v required -- false
v show -- true
154 Installing Domino Servers and Notes Clients
Example: Display a feature on the features installation panel and force its
installation: To display an ″installfeature″ name and force its installation, set the
following values:
v default -- true
v required -- true
v show -- true
Example: Prevent a feature from appearing on the features installation panel and
install: To prevent an ″installfeature″ name from appearing on the features
installation panel and force its installation, set the following values:
v default -- true
v required -- true
v show -- false
Example: Prevent a feature from appearing on the features installation panel and
do not install: To prevent an ″installfeature″ name from appearing on the features
installation panel and prevent its installation, either delete that feature block,
comment its ″installfeature″ element in the INSTALL.XML file, or set the following
values:
v default -- false
v required -- false
v show -- false
You can remove an ″installfeature″ by deleting it from the install manifest. This can
minimize the size of the Notes install as well as mask features that users do not
need.
Reducing the Notes install kit size
IBM(R) Lotus(R)Notes(R) contains features which increase the size of the install
kits when compared to the Notes basic configuration install kits and previous
releases. Some customer’s infrastructures are not capable of efficiently handling
distribution of the larger install kits and require a method by which they can
reduce the size of the kit and still leverage the increased capabilities of the Notes
standard configuration client. You can optionally reduce the size of the install kit
by removing any of the three features listed here.
If you are not using IBM Lotus Symphony(TM), IBM Lotus Sametime(R) or the
Composite Application Editor in your user population, you can reduce the size of
your Notes install kit using the procedure described here. Reductions to the size of
the Notes install kit are listed in the table below.
Feature Name Size reduction (approximate)
Lotus Symphony 78MB
Sametime 4MB
Composite Application Editor 4MB
You can remove the following supplied features from the Notes install kit:
v Lotus Symphony (represented as <installfeature default=″false″
description=″%Editors.description″ id=″Editors″...)
v Sametime (represented as <installfeature default=″true″ description=″%Sametime.description″ id=″SametimeUI″ ...)
Chapter 5. Installing and Setting Up Notes Clients 155
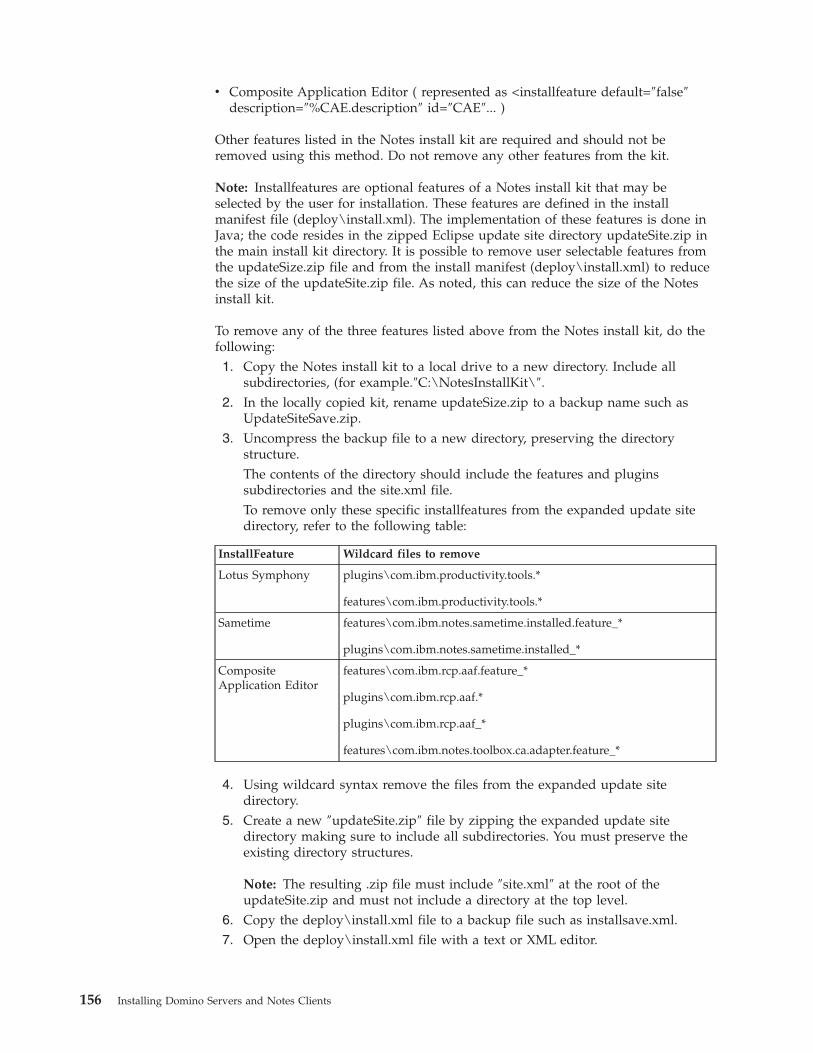
v Composite Application Editor ( represented as <installfeature default=″false″
description=″%CAE.description″ id=″CAE″... )
Other features listed in the Notes install kit are required and should not be
removed using this method. Do not remove any other features from the kit.
Note: Installfeatures are optional features of a Notes install kit that may be
selected by the user for installation. These features are defined in the install
manifest file (deploy\install.xml). The implementation of these features is done in
Java; the code resides in the zipped Eclipse update site directory updateSite.zip in
the main install kit directory. It is possible to remove user selectable features from
the updateSize.zip file and from the install manifest (deploy\install.xml) to reduce
the size of the updateSite.zip file. As noted, this can reduce the size of the Notes
install kit.
To remove any of the three features listed above from the Notes install kit, do the
following:
1. Copy the Notes install kit to a local drive to a new directory. Include all
subdirectories, (for example.″C:\NotesInstallKit\″.
2. In the locally copied kit, rename updateSize.zip to a backup name such as
UpdateSiteSave.zip.
3. Uncompress the backup file to a new directory, preserving the directory
structure.
The contents of the directory should include the features and plugins
subdirectories and the site.xml file.
To remove only these specific installfeatures from the expanded update site
directory, refer to the following table:
InstallFeature Wildcard files to remove
Lotus Symphony plugins\com.ibm.productivity.tools.*
features\com.ibm.productivity.tools.*
Sametime features\com.ibm.notes.sametime.installed.feature_*
plugins\com.ibm.notes.sametime.installed_*
Composite
Application Editor
features\com.ibm.rcp.aaf.feature_*
plugins\com.ibm.rcp.aaf.*
plugins\com.ibm.rcp.aaf_*
features\com.ibm.notes.toolbox.ca.adapter.feature_*
4. Using wildcard syntax remove the files from the expanded update site
directory.
5. Create a new ″updateSite.zip″ file by zipping the expanded update site
directory making sure to include all subdirectories. You must preserve the
existing directory structures.
Note: The resulting .zip file must include ″site.xml″ at the root of the
updateSite.zip and must not include a directory at the top level.
6. Copy the deploy\install.xml file to a backup file such as installsave.xml.
7. Open the deploy\install.xml file with a text or XML editor.
156 Installing Domino Servers and Notes Clients
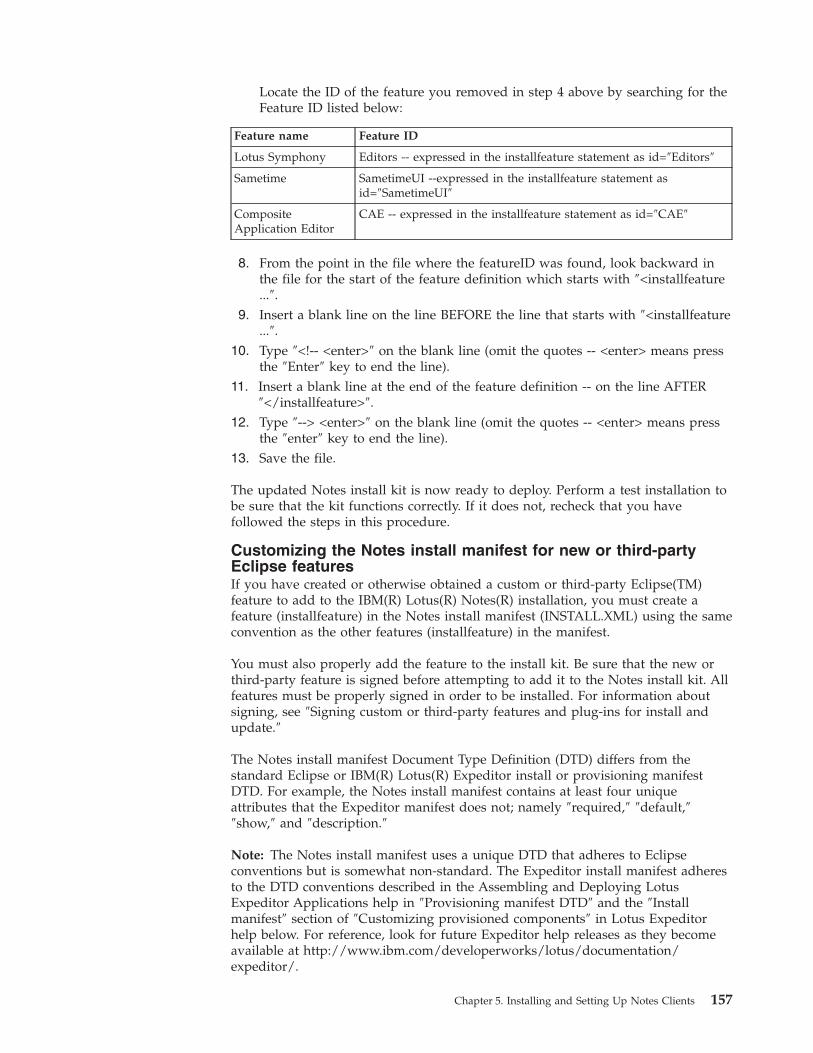
Locate the ID of the feature you removed in step 4 above by searching for the
Feature ID listed below:
Feature name Feature ID
Lotus Symphony Editors -- expressed in the installfeature statement as id=″Editors″
Sametime SametimeUI --expressed in the installfeature statement as
id=″SametimeUI″
Composite
Application Editor
CAE -- expressed in the installfeature statement as id=″CAE″
8. From the point in the file where the featureID was found, look backward in
the file for the start of the feature definition which starts with ″<installfeature
...″.
9. Insert a blank line on the line BEFORE the line that starts with ″<installfeature
...″.
10. Type ″<!-- <enter>″ on the blank line (omit the quotes -- <enter> means press
the ″Enter″ key to end the line).
11. Insert a blank line at the end of the feature definition -- on the line AFTER
″</installfeature>″.
12. Type ″--> <enter>″ on the blank line (omit the quotes -- <enter> means press
the ″enter″ key to end the line).
13. Save the file.
The updated Notes install kit is now ready to deploy. Perform a test installation to
be sure that the kit functions correctly. If it does not, recheck that you have
followed the steps in this procedure.
Customizing the Notes install manifest for new or third-party
Eclipse features
If you have created or otherwise obtained a custom or third-party Eclipse(TM)
feature to add to the IBM(R) Lotus(R) Notes(R) installation, you must create a
feature (installfeature) in the Notes install manifest (INSTALL.XML) using the same
convention as the other features (installfeature) in the manifest.
You must also properly add the feature to the install kit. Be sure that the new or
third-party feature is signed before attempting to add it to the Notes install kit. All
features must be properly signed in order to be installed. For information about
signing, see ″Signing custom or third-party features and plug-ins for install and
update.″
The Notes install manifest Document Type Definition (DTD) differs from the
standard Eclipse or IBM(R) Lotus(R) Expeditor install or provisioning manifest
DTD. For example, the Notes install manifest contains at least four unique
attributes that the Expeditor manifest does not; namely ″required,″ ″default,″
″show,″ and ″description.″
Note: The Notes install manifest uses a unique DTD that adheres to Eclipse
conventions but is somewhat non-standard. The Expeditor install manifest adheres
to the DTD conventions described in the Assembling and Deploying Lotus
Expeditor Applications help in ″Provisioning manifest DTD″ and the ″Install
manifest″ section of ″Customizing provisioned components″ in Lotus Expeditor
help below. For reference, look for future Expeditor help releases as they become
available at http://www.ibm.com/developerworks/lotus/documentation/expeditor/.
Chapter 5. Installing and Setting Up Notes Clients 157
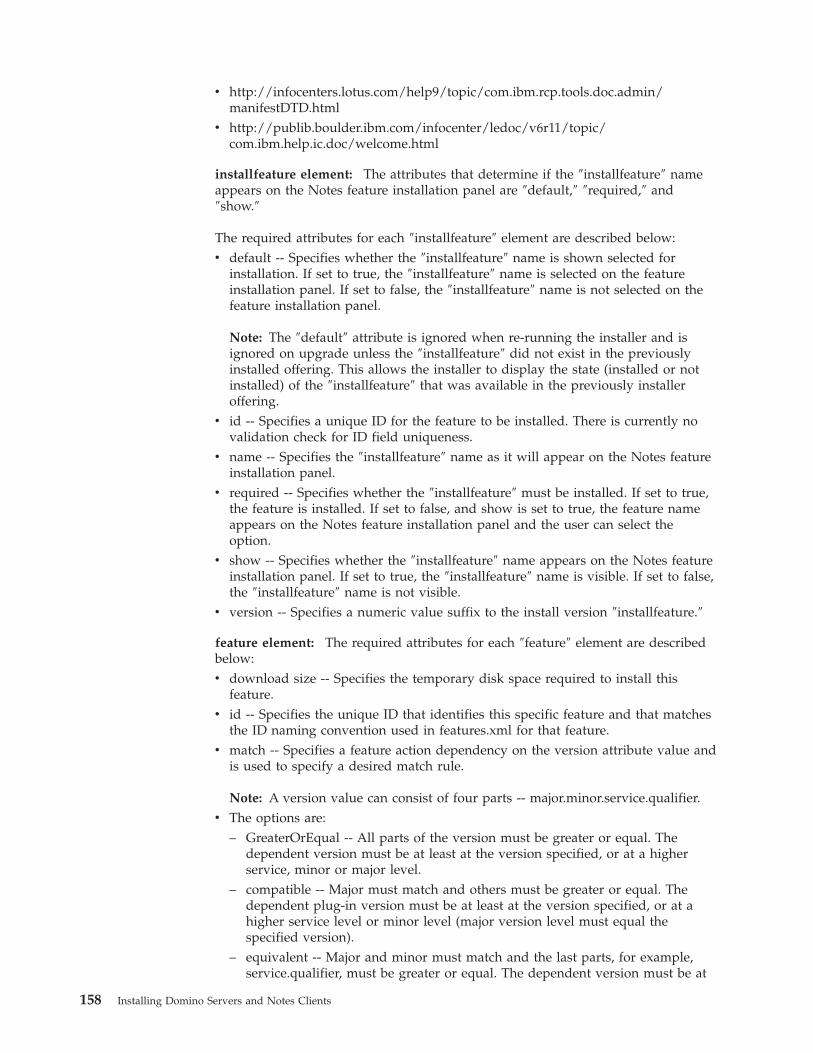
v http://infocenters.lotus.com/help9/topic/com.ibm.rcp.tools.doc.admin/manifestDTD.html
v http://publib.boulder.ibm.com/infocenter/ledoc/v6r11/topic/com.ibm.help.ic.doc/welcome.html
installfeature element: The attributes that determine if the ″installfeature″ name
appears on the Notes feature installation panel are ″default,″ ″required,″ and
″show.″
The required attributes for each ″installfeature″ element are described below:
v default -- Specifies whether the ″installfeature″ name is shown selected for
installation. If set to true, the ″installfeature″ name is selected on the feature
installation panel. If set to false, the ″installfeature″ name is not selected on the
feature installation panel.
Note: The ″default″ attribute is ignored when re-running the installer and is
ignored on upgrade unless the ″installfeature″ did not exist in the previously
installed offering. This allows the installer to display the state (installed or not
installed) of the ″installfeature″ that was available in the previously installer
offering.
v id -- Specifies a unique ID for the feature to be installed. There is currently no
validation check for ID field uniqueness.
v name -- Specifies the ″installfeature″ name as it will appear on the Notes feature
installation panel.
v required -- Specifies whether the ″installfeature″ must be installed. If set to true,
the feature is installed. If set to false, and show is set to true, the feature name
appears on the Notes feature installation panel and the user can select the
option.
v show -- Specifies whether the ″installfeature″ name appears on the Notes feature
installation panel. If set to true, the ″installfeature″ name is visible. If set to false,
the ″installfeature″ name is not visible.
v version -- Specifies a numeric value suffix to the install version ″installfeature.″
feature element: The required attributes for each ″feature″ element are described
below:
v download size -- Specifies the temporary disk space required to install this
feature.
v id -- Specifies the unique ID that identifies this specific feature and that matches
the ID naming convention used in features.xml for that feature.
v match -- Specifies a feature action dependency on the version attribute value and
is used to specify a desired match rule.
Note: A version value can consist of four parts -- major.minor.service.qualifier.
v The options are:
– GreaterOrEqual -- All parts of the version must be greater or equal. The
dependent version must be at least at the version specified, or at a higher
service, minor or major level.
– compatible -- Major must match and others must be greater or equal. The
dependent plug-in version must be at least at the version specified, or at a
higher service level or minor level (major version level must equal the
specified version).
– equivalent -- Major and minor must match and the last parts, for example,
service.qualifier, must be greater or equal. The dependent version must be at
158 Installing Domino Servers and Notes Clients
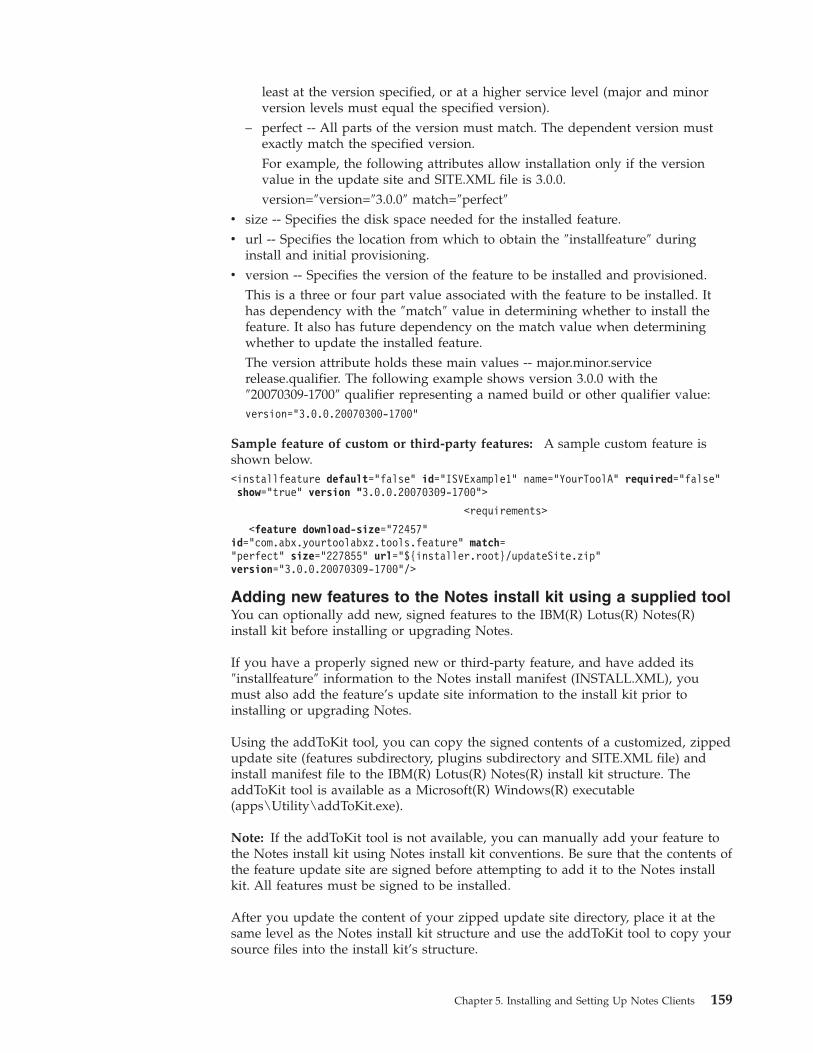
least at the version specified, or at a higher service level (major and minor
version levels must equal the specified version).
– perfect -- All parts of the version must match. The dependent version must
exactly match the specified version.
For example, the following attributes allow installation only if the version
value in the update site and SITE.XML file is 3.0.0.
version=″version=″3.0.0″ match=″perfect″v size -- Specifies the disk space needed for the installed feature.
v url -- Specifies the location from which to obtain the ″installfeature″ during
install and initial provisioning.
v version -- Specifies the version of the feature to be installed and provisioned.
This is a three or four part value associated with the feature to be installed. It
has dependency with the ″match″ value in determining whether to install the
feature. It also has future dependency on the match value when determining
whether to update the installed feature.
The version attribute holds these main values -- major.minor.service
release.qualifier. The following example shows version 3.0.0 with the
″20070309-1700″ qualifier representing a named build or other qualifier value:
version="3.0.0.20070300-1700"
Sample feature of custom or third-party features: A sample custom feature is
shown below.
<installfeature default="false" id="ISVExample1" name="YourToolA" required="false"
show="true" version "3.0.0.20070309-1700">
<requirements>
<feature download-size="72457"
id="com.abx.yourtoolabxz.tools.feature" match=
"perfect" size="227855" url="${installer.root}/updateSite.zip"
version="3.0.0.20070309-1700"/>
Adding new features to the Notes install kit using a supplied tool
You can optionally add new, signed features to the IBM(R) Lotus(R) Notes(R)
install kit before installing or upgrading Notes.
If you have a properly signed new or third-party feature, and have added its
″installfeature″ information to the Notes install manifest (INSTALL.XML), you
must also add the feature’s update site information to the install kit prior to
installing or upgrading Notes.
Using the addToKit tool, you can copy the signed contents of a customized, zipped
update site (features subdirectory, plugins subdirectory and SITE.XML file) and
install manifest file to the IBM(R) Lotus(R) Notes(R) install kit structure. The
addToKit tool is available as a Microsoft(R) Windows(R) executable
(apps\Utility\addToKit.exe).
Note: If the addToKit tool is not available, you can manually add your feature to
the Notes install kit using Notes install kit conventions. Be sure that the contents of
the feature update site are signed before attempting to add it to the Notes install
kit. All features must be signed to be installed.
After you update the content of your zipped update site directory, place it at the
same level as the Notes install kit structure and use the addToKit tool to copy your
source files into the install kit’s structure.
Chapter 5. Installing and Setting Up Notes Clients 159
Before using the addToKit tool, perform the following tasks:
v Create and sign any new Eclipse(TM) features that you want to add to the Notes
install kit.
v Place the new features and plug-ins JAR files in the features and plugins update
site subdirectories (updateSite.zip\features and updateSite.zip\plugins).
v Create and validate the new SITE.XML site manifest file (updateSite.zip\site.xml).
v Create and validate the new INSTALL.XML install manifest in the deploy
directory (deploy\install.xml).
Considerations: The following information is helpful when using the addToKit
tool:
v There is no validation capability with the addToKit tool so be sure that your
XML is validated and your ″installfeature″ ID attribute values are unique.
v You can run the addToKit tool with or without arguments.
v The <addTokitPath> must contain a deploy directory and zipped updateSite
directory that matches the format of the Lotus Notes install kit.
v The updatesSite.zip\site.xml and deploy\install.xml information is merged from
the <addTokitPath> to the <destKit> path and the plug-ins and features are copied
over. The files in <addTokitPath> are added to the existing kit; they are appended
to the destination SITE.XML and INSTALL.XML files.
v Running the tool with no arguments copies files to a temporary directory. If you
do not specify a source path <.\addTokitPath> in the command line, the default
source path is .\addToKit. If you do not specify a destination path <destKit>, the
default destination path is the current working directory. The .\addToKit value
should be the default source path.
v Before running this tool, place your signed features and plug-ins correctly in the
update site directory and update the SITE.XML and INSTALL.XML files in their
correct directories. Zip the update site directory.
Command line options: Command line arguments are available. For example,
when you run the following command, information from <kitPath> is merged into
the kit that is in the same directory as the ADDTOKIT.EXE file.
addToKit.exe [-dhnV] <kitPath>
In the following example, the contents of C:\addToKit are copied into the
temp\notes8abx.w32 directory.
addToKit.exe c:\addToKit c:\temp\notes8abx.w32
When using addToKit.exe -h, tool usage is displayed as below:
<kitPath> defaults to addToKit/.
-d Turn debugging on.
-h Print command line option usage.
-n Run the utility as a dry run.
-V Print version information.
Procedure: The procedure for using the ADDTOKIT tool is as below.
160 Installing Domino Servers and Notes Clients
1. Extract ADDTOKIT.ZIP into the temporary directory in which your files reside,
for example, c:\temp\notes8abx.w32. This zip file contains the directory
addToKit, which contains your zipped update site directory
(UPDATESITE.ZIP), and your deploy (deploy) directory.
2. Copy the ADDTOKIT.EXE into the same temporary directory.
3. Open a command window, change to the directory in which the addToKit tool
resides, and run the tool, preferably with the source path and target path
arguments, using the following format:
addToKit.exe [<addTokitPath>] [<destkit>]
In this format, <addTokitPath> is the source path containing the source
UPDATESITE.ZIP file and deploy directory and <destkit> is the target directory
in which your Notes installation resides.
The source update site is an update site directory containing the features
subdirectory, plugins subdirectory, and SITE.XML file. The deploy directory
contains the updated INSTALL.XML file. The format of the source update site
directory zip file and deploy directory must match the format of the target
update site directory zip file and deploy directory.
Removing features from the Notes install kit using a supplied
tool
You can optionally remove certain features from the IBM(R) Lotus(R) Notes(R)
install kit prior to installing or upgrading Notes.
Note: Of the supplied features, the Composite Applications Editor, Lotus
Symphony, Activities, and the SametimeUI features are available for removal from
the install kit; all other features must remain as supplied and not be removed from
the install kit.
Using the trimUpdateSite tool, you can remove optional features from the install
kit prior to installing or upgrading Notes. The trimUpdateSite tool is available as a
Microsoft(R) Windows(R) executable (apps\utility\trimUpdateSite.exe).
Note: If the trimUpdateSite tool is not available, you can manually remove the
feature, plug-in, and SITE.XML content from the updateSite.zip and the correlating
<installfeature> from the install manifest, using Notes install kit conventions.
Note: You will need the externally-available zip232xN.zip and unz552xN.exe from
ftp://tug.ctan.org/tex-archive/tools/zip/info-zip/WIN32/ to run the tool.
1. Make a backup copy of your Notes install kit.
2. Create a working directory by copying the updateSite.zip and
deploy\install.xml to a new directory. Ensure that you have write access to
the working directory.
3. Ensure that you have adequate space for unzipping and re-zipping
updateSite.zip on your %TEMP% drive.
4. Change to the working directory in which the updatesite.zip and the
deploy\install.xml install manifest reside.
5. Move a copy of the supplied trimUpdateSite.exe (apps\utility\trimUpdateSite.exe) and its readme.txt file to your working directory.
6. Open the readme file associated with the trimUpdateSite.exe and obtain the
zip232xN.zip and unz552xN.exe from ftp://tug.ctan.org/tex-archive/tools/zip/info-zip/WIN32. Place them in the working directory.
The working directory contents should now include the following:
v updateSite.zip
Chapter 5. Installing and Setting Up Notes Clients 161
v deploy\install.xml
v trimUpdateSite.exe
v zip.exe (
v unzip.exe
v readme.txt
Note: The trimUpdateSite utility requires that the zip.exe and unzip.exe
utilities be resident in the same directory as the trimUpdateSite.exe tool. 7. Navigate to your working directory and double click trimUpdateSite.exe using
Windows Explorer, or start the program using a Command Prompt.
8. Click the ″...″ browse button next to the ″Select Location of updateSite.zip:″
option.
9. Select the directory as instructed.
The utility reads the deploy\install.xml file and displays a list of optional
features that you are allowed to remove.
10. Select the feature(s) to remove and click Process Selection(s).″
Note: Use the CTRL key to select more than one feature in the list.
11. When prompted, click OK to remove the selected feature(s) from the
updateSite.zip (update site folder) and the deploy\install.xml file (Notes
install manifest).
12. When informed that processing is complete, click Exit.
13. Copy the modified updateSite.zip and deploy\install.xml from your working
directory to overwrite the supplied updateSite.zip and deploy\install.xml in
your Notes install kit.
If you have not created a backup copy as instructed in step 1, do so now
before overwriting the original versions.
14. Run a test install, before deploying Notes to users, to ensure that the feature(s)
you specified has been properly installed and the Notes install kit installs as
you expect it to.
The trimUpdateSite tool creates a copy of the files it modifies, for example ″copy of
updateSite.zip″ and ″copy of install.xml.″ You can undo the trimUpdateSite tool
work by deleting its output updateSize.zip and install.xml and renaming the ″copy
of″ originals back to updateSite.zip and install.xml.
Installing and subscribing to preset feeds
The deploy\extras folder in the IBM(R) Lotus(R) Notes(R) install kit contains a
PRESETFEEDS.OPML XML file in which preset feed subscriptions are supplied.
You can edit this file. Check the install kit’s PRESETFEEDS.OPML file for the latest
default preset feed subscriptions.
Controlling preset feeds prior to Notes install
To control which preset feeds are available to Notes users, you can modify the
supplied deploy\extras\presetfeeds.opml file prior to installing Notes. You can
also export feeds from an existing feed reader into PRESETFEEDS.OPML.
Adding preset feeds
You can add preset feeds to the PRESETFEEDS.OPML file by either exporting from
another reader to an .OPML file and copying that content into
162 Installing Domino Servers and Notes Clients
PRESETFEEDS.OPML or by editing PRESETFEEDS.OPML using a text or XML
editor. Alternatively, you can overwrite PRESETFEEDS.OPML content with the
OUTPUT.OPML file from another reader.
Removing preset feeds
You can remove or comment out any supplied preset feeds from the
PRESETFEEDS.OPML file.
If you do not want any preset feeds, you can remove or rename the
PRESETFEEDS.OPML file.
Subscribing to preset feeds after Notes install
The ″Subscribe to preset feeds icon″ is available in Notes from the Feeds user
interface. After subscribing, or after toggling the icon off using the File -
Preferences user interface sequence, you can redisplay the ″Subscribe to preset
feeds″ icon using the following procedure:
1. Click File - Preferences.
2. Click Feeds.
3. Enable Show ″Subscribe to preset feeds″ button on the toolbar and click OK.
4. Click the Feeds icon in the Notes sidebar to open the Feeds user interface. The
″Subscribe to preset feeds″ icon contains the round feeds graphic.
5. Click the ″Subscribe to preset feeds″ icon to subscribe to the feeds obtained
from the Notes installer’s deploy\extras\presetfeeds.opml file.
Note: The ″Subscribe to preset feeds″ icon is removed when the ″Subscribe to
preset feeds″ process is complete.
Note: If a feed cannot be read, a log file entry is created during the ″Subscribe
to preset feeds″ process.
Changing feed subscription after subscribing to preset feeds
You can subscribe to new feeds or unsubscribe from existing feeds by using the
Feeds user interface as described in Notes help.
Customizing Notes install using the tuner
Some aspects of client installation can be customized to allow you to control the
options that are installed and/or available to users. You can use the
Installshield(TM) Tuner to customize IBM(R) Lotus(R) Notes(R) client installation
on a Microsoft(R) Windows client, by customizing the MSI (Microsoft Software
Installer) file. The tuner supports customization of MSI kits using transforms that
support adding resources, registry settings, shortcuts, folders, changing installer
defaults, hiding features, and enabling other custom installer transforms. The tuner
provides for customization using pre-selected choices for the installer. Transform
files are simply added to the original media kit in the form of a
<TRANSFORM>.MST file. A tuned install media kit can be distributed using
standard media kit distribution methods.
To control installation of the features listed in the Notes install kit’s install manifest
(INSTALL.XML), you must customize the install manifest itself.
You can use transform files to deselect options that you don’t want to install by
default. You also use transform files to hide the options that you do not want users
Chapter 5. Installing and Setting Up Notes Clients 163
to change, regardless of whether you choose to install a particular option. Modify
the Visible and Initial State settings for each installation option that you want to
designate as hidden or not hidden.
After you customize installation of traditional Notes features using the tuner and
transform capabilities, you can customize specific feature installation using the
install manifest (INSTALL.XML) and Eclipse(TM) update site contents
(UPDATESITE.ZIP), resident in the Notes install kit.
Obtaining a tuner and creating a transform file
You can use a tuner program to customize some aspects of IBM(R) Lotus(R)
Notes(R) end-user installation. Creating a transform file requires a third-party tool
such as the InstallShield(TM) Tuner OEM Edition. IBM(R) Lotus(R) Domino(R)
contains an InstallShield Tuner for Notes, that you can use to create a transform
file for customizing certain aspects of the Notes installation process, such as
adding resources or changing defaults. You can also use transform files to set up
shared and customized installations.
Note: The tuner that is included with Domino works only with Domino, not with
other products.
To install the tuner, run the setup file, Apps/InstallShield Tuner for
LotusNotes/SETUP.EXE, from the Domino installation CD.
Tuner information is available at the following:
http://www.macrovision.com/products/installation/installshield.htm
The tuner is also available from IBM Passport Advantage, as described at the
following Web sites:
http://www.ibm.com/software/howtobuy/passportadvantage/index.html
http://www-1.ibm.com/support/docview.wss?rs=475&context
=SSKTWP&context=SSKTMJ&q1=1226984&uid=swg21226984&loc=en_US&cs=
utf-8&lang=en
Additional information about the tuner is available by searching on the term
combination ″Installshield Tuner″ + ″Notes″ at the following:
http://www.ibm.com/support/us/en/
http://www.google.com
Use this procedure to create a transform file using the supplied tuner. Users can
then apply the transform file when installing Notes.
Create a transform file:
1. Invoke the InstallShield Tuner program and browse to the .ITW configuration
file.
Note: The .ITW configuration file is located in the Notes install kit directory
structure in the same location as the Notes install SETUP.EXE file. Use the .ITW file
with the Notes installation executable that you want to configure.
1. Click Create a new transform file.
2. In the Select an MSI file field for the Microsoft(R) Windows(R) Installer Package
option, select the .MSI file (for example, Lotus Notes 8.0.MSI).
3. In the New project name and location field for the Microsoft Windows Installer
Transform option, enter the custom transform name. Save the file to the same
path on which the install kit resides.
164 Installing Domino Servers and Notes Clients
4. Click Create.
5. Make any other desired modifications to the default settings provided.
6. Click Save.
After creating the transform file, you apply the transform file to the installation
process. The installation process then uses the values that you set in the transform
file in place of default values.
Add custom files to a transform: To add custom files to a client installation,
create a transform file.
1. Copy the custom files to the install directory or place them in a directory
within the install directory -- for example, <PathToInstallKit>\AllClient\CopyFiles\custom.nsf.
2. Click Target System Configuration - Files.
3. In the top pane, click Browse and locate the source directory, which is the
directory from which you are copying the custom files.
4. In the bottom pane, select the destination directory, for example,
ProgramFiles\Lotus\notes\Data.
5. Drag and drop the custom file from the source directory to the destination
directory.
Applying NOTES.INI settings during silent install:
1. Open the InstallShield Tuner for IBM(R) Lotus(R) Notes(R).
2. From the System Configuration section, click the IniFiles item in the System
Configuration section.
3. In the center pane, right click Destination Computer and then choose Show
Folder - Program Files Folder.
4. Expand the Program Files Folder directory to access the Lotus\Notes folder
5. Right click the Notes folder and then choose the option, New Inifile.
6. Locate the default Notes .INI file, INIFILE1.INI, that was created in the Notes
folder. Rename this file with the name NOTES.INI.
7. Locate the default section, NewSection1, that was created for the NOTES.INI
file. Rename the default section with the name Notes.
8. Select the Notes section and then modify these values that are located in the
right-most pane of the tuner:
v In the column titled Key, locate New Key and modify the name using an
appropriate value such as ConfigFile.
v In the column titled Value, locate New Value and modify the name using an
appropriate value such as n:\config\setup.txt.
v Verify that the Action value is set to the default value, Add Line. 9. Locate the Additional Tools section, and then click the Direct Editor item in
the Additional Tools section.
10. In the center pane, select the Component table, and then scroll down the
component list until you locate CST_COMPONENT.
11. Change the value in the Directory_ column from NOTES to the new value
VDIR_INI.
12. In the center pane, select the table, IniFile, and then scroll down the
component list until you locate CST_INIFILE.
13. Change the value in the DirProperty column from NOTES to the new value
VDIR_INI.
Chapter 5. Installing and Setting Up Notes Clients 165
14. Make other modifications if necessary.
15. Click Save.
Using transform files for Notes user install
After creating a Microsoft Transform file (MST), you can use that file for end-user
client installations.
Note: You must use a transform (MST) file when performing a Notes multi-user
silent install.
This section contains two sets of instructions. The first set explains how to apply a
transform file for a user interface (UI) installation -- that is, an installation that
presents a user interface. The second set explains how to apply a transform file for
a silent install -- that is, an installation that does not present a user interface and
therefore does not require any user interaction. There is also a section on using a
batch file to launch the command.
For installations using the transform file (and for silent installations) using the
msiexec commands, the network installation should not be the first installation of
IBM(R) Lotus(R) Notes(R) that you perform unless you are certain that all of the
client workstations contain the Microsoft(R) Windows(R) Installer Service.
Note: The command line path is the default installation path or the path for the
transform file.
User interface (UI) installation: In this example, the ″progdir″ parameter and the
″datadir″ parameter are used to overwrite the default settings designated by the
transform file.
1. Change to the Notes install directory that contains the install media kit. For
example, this is the directory in which the Notes .MSI file, SETUP.EXE file, and
transform, *.MST file reside.
2. Run the silent install as below:
v For a single user install on Windows, do one of the following:
– To install to the default program and data directories, and install the
default features as specified in the install manifest, enter the following
command:
msiexec /i ″Lotus Notes 8.0.2.msi″ TRANSFORMS=″custom.mst″
– To install to non-default program and data directories, enter the following
command to explicitly state the target program and data directory:
msiexec /i ″Lotus Notes 8.0.2.msi″ PROGDIR=C:\Test
DATADIR=C:\Test\Data TRANSFORMS=″custom.mst″v For a multi-user install on Windows, you can either use the
″SETMULTIUSER=1″ command line statement or use a transform (MST) file
when performing the Notes silent multi-user install.
msiexec /i "Lotus Notes 8.0.2.msi" SETMULTIUSER=1 /qb"
See the topic ″Performing a Notes multi-user silent install″ for details.
Applying a transform to a silent installation:
1. Change directory to the install directory that contains both the Lotus Notes
.MSI file and the transform .MST files.
2. Do one of the following:
v To install to the default directories, enter this command line:
msiexec /i "Lotus Notes 8.0.2.msi" /qn TRANSFORMS="custom.mst"
166 Installing Domino Servers and Notes Clients
v To overwrite the default directories, enter this command line:
msiexec /i "Lotus Notes 8.0.2.msi" /qn PROGDIR=C:\Test DATADIR=C:\
Test\Data TRANSFORMS="custom.mst"
Using a batch file to deploy command line options when applying a transform
file: You can also create a batch file that the user launches to start the command.
A sample batch file is below:
Sample batch file
msiexec /i "Lotus Notes 8.0.2.msi" TRANSFORMS="custom.mst"
Using the SETUP.INI file setting to apply one transform file to all client
installs: Use a setting in the SETUP.INI file to apply one transform file to all
installs. This prevents users from having to enter a command line or use a batch
file.
Modify the command line in the SETUP.INI to read as below:
CmdLine+/l*v %TEMP%\notes8.log TRANSFORMS=custom.mst
The transform file is applied when you start the Notes installer.
Examples -- Applying scriptable setup using a transform file
during Notes install
You can apply NOTES.INI settings during client install by using a transform file.
Use this example when setting up a transform file that applies NOTES.INI settings
during IBM(R) Lotus(R) Notes(R) client installations.
Example 1 -- Including instant messaging parameters in a scriptable setup: You
can include instant messaging information during a scriptable setup of Notes
client. The scriptable setup includes a setting that provides information to the
Notes client setup wizard. In this example, add the NOTES.INI setting,
CONFIGFILE=, to point to a text file that contains the parameters for the Notes
client setup wizard.
The SETUP.TXT file can be placed on shared network resource or distributed to
individual workstations.
Note: If you decide that you want to distribute new or modified NOTES.INI
settings using a transform file, use the same method and steps that are explained
in this example.
In this example, you need to complete these procedures:
1. Create a SETUP.TXT file.
2. To allow the new SETUP.TXT file to be referenced, open the file, NOTES.INI,
and add this setting:
ConfigFile=\\PathToFile\Setup.txt
3. Use the InstallShield Tuner for Lotus Notes to set up a transform file to
distribute the new ConfigFile= setting in the NOTES.INI file.
4. After completing Steps 1, 2 and 3 above, see the steps in the topic ″Using
transform files for end-user installations″ in this guide.
Creating the SETUP.TXT file: Create a SETUP.TXT file using the parameters
shown below. Save your file using the filename SETUP.TXT.
v IM.server=ServerName1.domain.com
Chapter 5. Installing and Setting Up Notes Clients 167
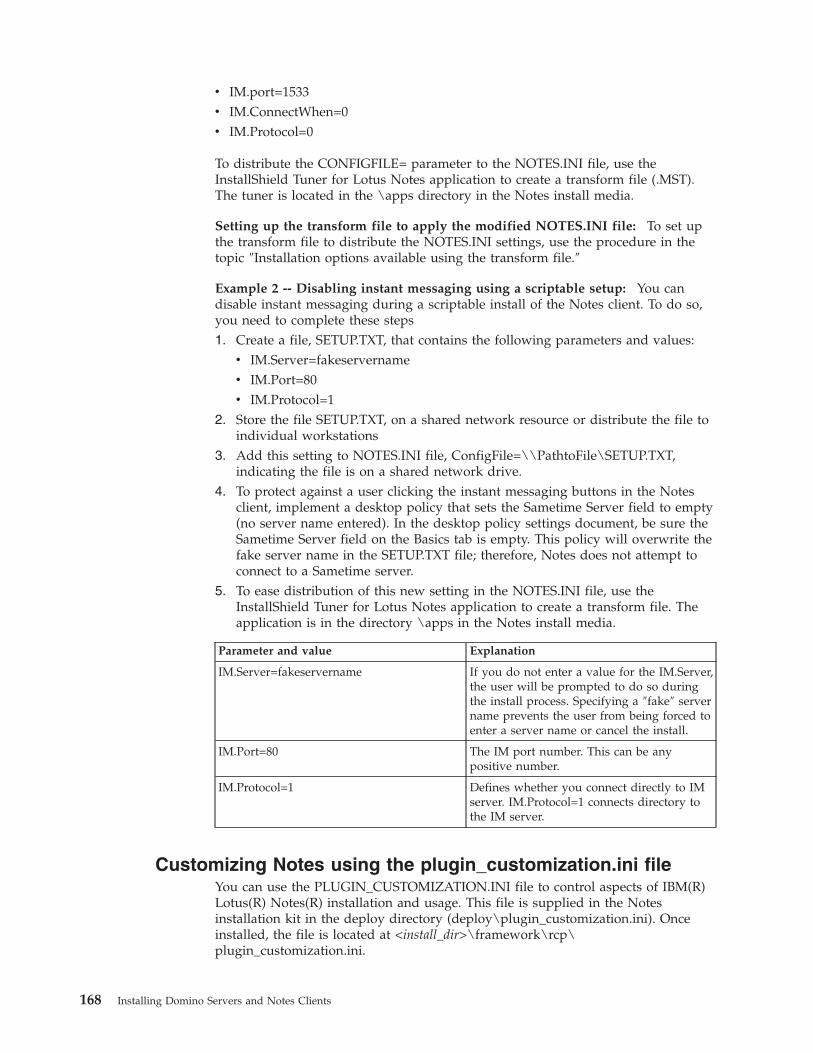
v IM.port=1533
v IM.ConnectWhen=0
v IM.Protocol=0
To distribute the CONFIGFILE= parameter to the NOTES.INI file, use the
InstallShield Tuner for Lotus Notes application to create a transform file (.MST).
The tuner is located in the \apps directory in the Notes install media.
Setting up the transform file to apply the modified NOTES.INI file: To set up
the transform file to distribute the NOTES.INI settings, use the procedure in the
topic ″Installation options available using the transform file.″
Example 2 -- Disabling instant messaging using a scriptable setup: You can
disable instant messaging during a scriptable install of the Notes client. To do so,
you need to complete these steps
1. Create a file, SETUP.TXT, that contains the following parameters and values:
v IM.Server=fakeservername
v IM.Port=80
v IM.Protocol=12. Store the file SETUP.TXT, on a shared network resource or distribute the file to
individual workstations
3. Add this setting to NOTES.INI file, ConfigFile=\\PathtoFile\SETUP.TXT,
indicating the file is on a shared network drive.
4. To protect against a user clicking the instant messaging buttons in the Notes
client, implement a desktop policy that sets the Sametime Server field to empty
(no server name entered). In the desktop policy settings document, be sure the
Sametime Server field on the Basics tab is empty. This policy will overwrite the
fake server name in the SETUP.TXT file; therefore, Notes does not attempt to
connect to a Sametime server.
5. To ease distribution of this new setting in the NOTES.INI file, use the
InstallShield Tuner for Lotus Notes application to create a transform file. The
application is in the directory \apps in the Notes install media.
Parameter and value Explanation
IM.Server=fakeservername If you do not enter a value for the IM.Server,
the user will be prompted to do so during
the install process. Specifying a ″fake″ server
name prevents the user from being forced to
enter a server name or cancel the install.
IM.Port=80 The IM port number. This can be any
positive number.
IM.Protocol=1 Defines whether you connect directly to IM
server. IM.Protocol=1 connects directory to
the IM server.
Customizing Notes using the plugin_customization.ini file
You can use the PLUGIN_CUSTOMIZATION.INI file to control aspects of IBM(R)
Lotus(R) Notes(R) installation and usage. This file is supplied in the Notes
installation kit in the deploy directory (deploy\plugin_customization.ini). Once
installed, the file is located at <install_dir>\framework\rcp\plugin_customization.ini.
168 Installing Domino Servers and Notes Clients
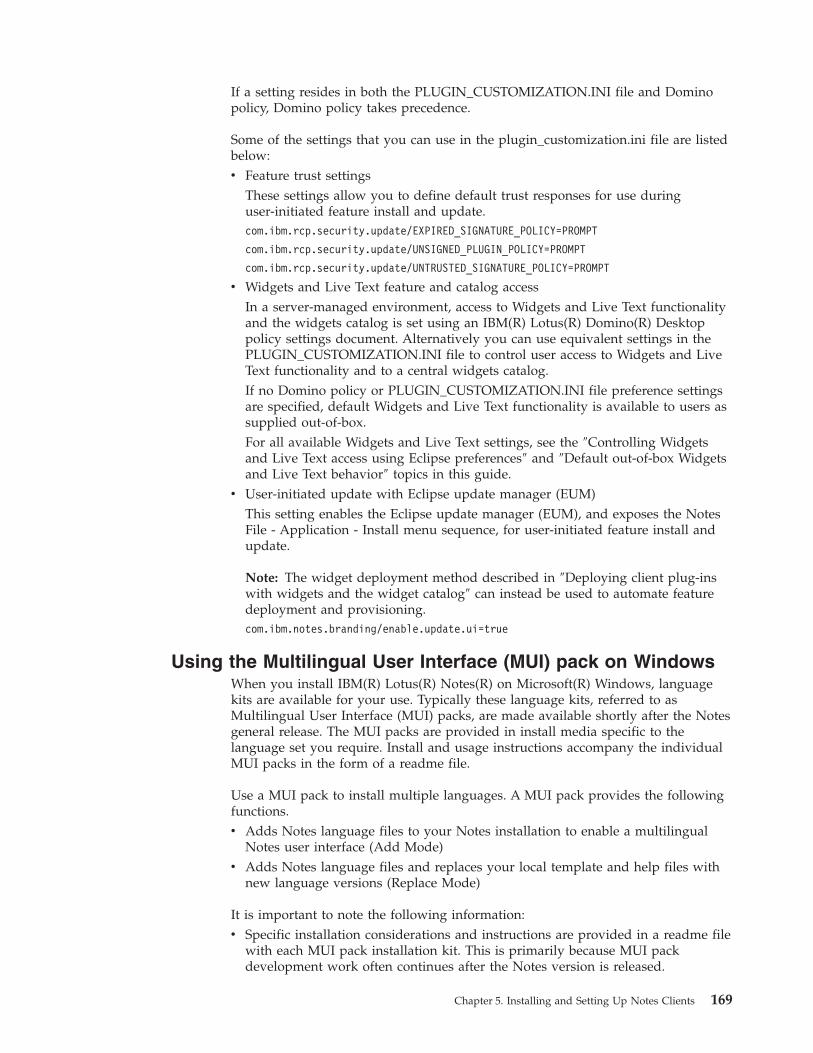
If a setting resides in both the PLUGIN_CUSTOMIZATION.INI file and Domino
policy, Domino policy takes precedence.
Some of the settings that you can use in the plugin_customization.ini file are listed
below:
v Feature trust settings
These settings allow you to define default trust responses for use during
user-initiated feature install and update.
com.ibm.rcp.security.update/EXPIRED_SIGNATURE_POLICY=PROMPT
com.ibm.rcp.security.update/UNSIGNED_PLUGIN_POLICY=PROMPT
com.ibm.rcp.security.update/UNTRUSTED_SIGNATURE_POLICY=PROMPT
v Widgets and Live Text feature and catalog access
In a server-managed environment, access to Widgets and Live Text functionality
and the widgets catalog is set using an IBM(R) Lotus(R) Domino(R) Desktop
policy settings document. Alternatively you can use equivalent settings in the
PLUGIN_CUSTOMIZATION.INI file to control user access to Widgets and Live
Text functionality and to a central widgets catalog.
If no Domino policy or PLUGIN_CUSTOMIZATION.INI file preference settings
are specified, default Widgets and Live Text functionality is available to users as
supplied out-of-box.
For all available Widgets and Live Text settings, see the ″Controlling Widgets
and Live Text access using Eclipse preferences″ and ″Default out-of-box Widgets
and Live Text behavior″ topics in this guide.
v User-initiated update with Eclipse update manager (EUM)
This setting enables the Eclipse update manager (EUM), and exposes the Notes
File - Application - Install menu sequence, for user-initiated feature install and
update.
Note: The widget deployment method described in ″Deploying client plug-ins
with widgets and the widget catalog″ can instead be used to automate feature
deployment and provisioning.
com.ibm.notes.branding/enable.update.ui=true
Using the Multilingual User Interface (MUI) pack on Windows
When you install IBM(R) Lotus(R) Notes(R) on Microsoft(R) Windows, language
kits are available for your use. Typically these language kits, referred to as
Multilingual User Interface (MUI) packs, are made available shortly after the Notes
general release. The MUI packs are provided in install media specific to the
language set you require. Install and usage instructions accompany the individual
MUI packs in the form of a readme file.
Use a MUI pack to install multiple languages. A MUI pack provides the following
functions.
v Adds Notes language files to your Notes installation to enable a multilingual
Notes user interface (Add Mode)
v Adds Notes language files and replaces your local template and help files with
new language versions (Replace Mode)
It is important to note the following information:
v Specific installation considerations and instructions are provided in a readme file
with each MUI pack installation kit. This is primarily because MUI pack
development work often continues after the Notes version is released.
Chapter 5. Installing and Setting Up Notes Clients 169
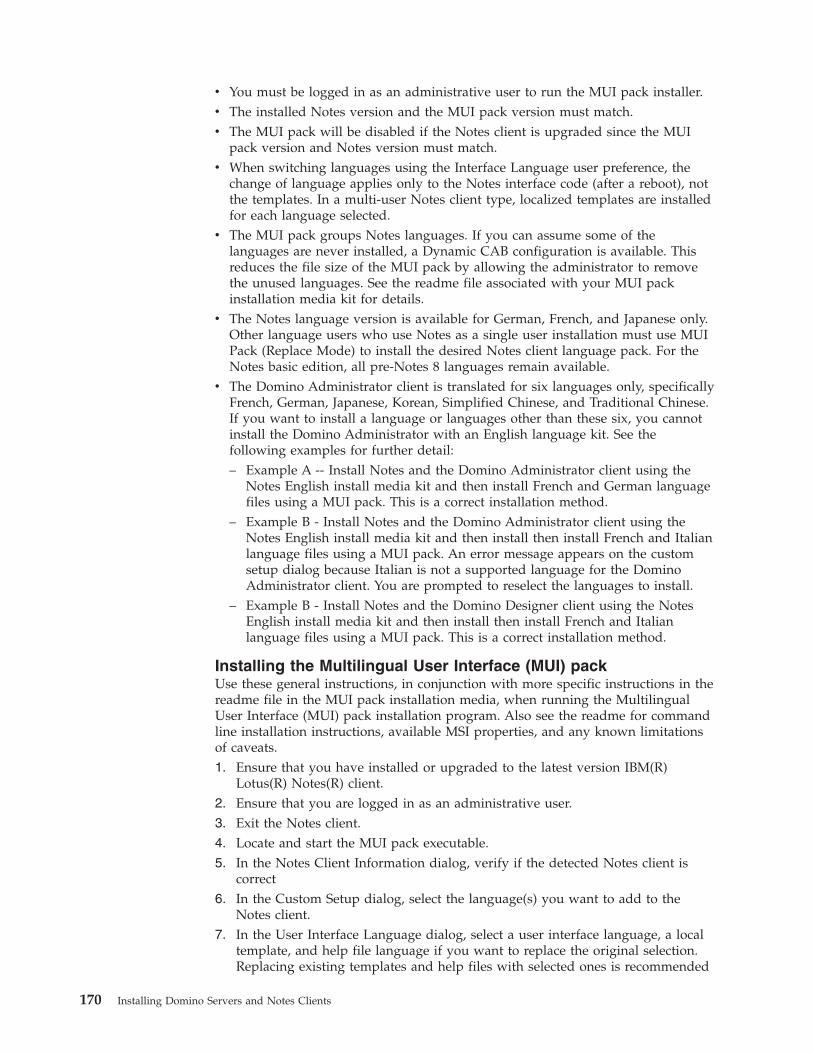
v You must be logged in as an administrative user to run the MUI pack installer.
v The installed Notes version and the MUI pack version must match.
v The MUI pack will be disabled if the Notes client is upgraded since the MUI
pack version and Notes version must match.
v When switching languages using the Interface Language user preference, the
change of language applies only to the Notes interface code (after a reboot), not
the templates. In a multi-user Notes client type, localized templates are installed
for each language selected.
v The MUI pack groups Notes languages. If you can assume some of the
languages are never installed, a Dynamic CAB configuration is available. This
reduces the file size of the MUI pack by allowing the administrator to remove
the unused languages. See the readme file associated with your MUI pack
installation media kit for details.
v The Notes language version is available for German, French, and Japanese only.
Other language users who use Notes as a single user installation must use MUI
Pack (Replace Mode) to install the desired Notes client language pack. For the
Notes basic edition, all pre-Notes 8 languages remain available.
v The Domino Administrator client is translated for six languages only, specifically
French, German, Japanese, Korean, Simplified Chinese, and Traditional Chinese.
If you want to install a language or languages other than these six, you cannot
install the Domino Administrator with an English language kit. See the
following examples for further detail:
– Example A -- Install Notes and the Domino Administrator client using the
Notes English install media kit and then install French and German language
files using a MUI pack. This is a correct installation method.
– Example B - Install Notes and the Domino Administrator client using the
Notes English install media kit and then install then install French and Italian
language files using a MUI pack. An error message appears on the custom
setup dialog because Italian is not a supported language for the Domino
Administrator client. You are prompted to reselect the languages to install.
– Example B - Install Notes and the Domino Designer client using the Notes
English install media kit and then install then install French and Italian
language files using a MUI pack. This is a correct installation method.
Installing the Multilingual User Interface (MUI) pack
Use these general instructions, in conjunction with more specific instructions in the
readme file in the MUI pack installation media, when running the Multilingual
User Interface (MUI) pack installation program. Also see the readme for command
line installation instructions, available MSI properties, and any known limitations
of caveats.
1. Ensure that you have installed or upgraded to the latest version IBM(R)
Lotus(R) Notes(R) client.
2. Ensure that you are logged in as an administrative user.
3. Exit the Notes client.
4. Locate and start the MUI pack executable.
5. In the Notes Client Information dialog, verify if the detected Notes client is
correct
6. In the Custom Setup dialog, select the language(s) you want to add to the
Notes client.
7. In the User Interface Language dialog, select a user interface language, a local
template, and help file language if you want to replace the original selection.
Replacing existing templates and help files with selected ones is recommended
170 Installing Domino Servers and Notes Clients
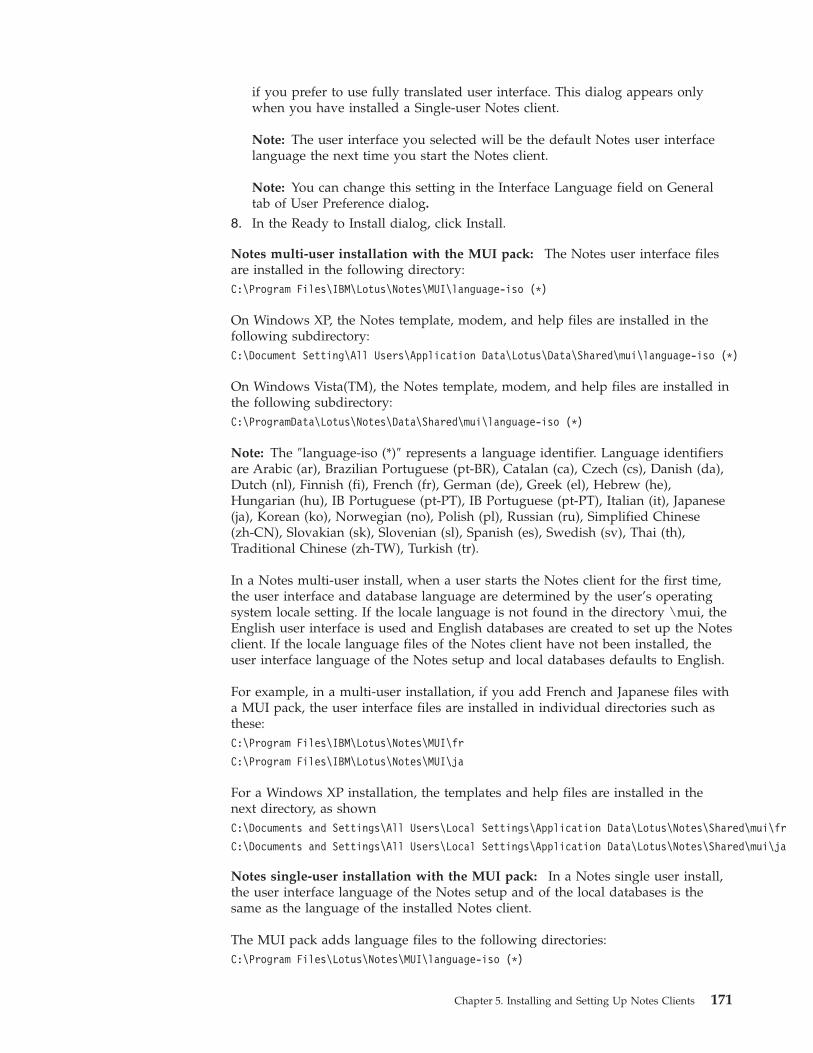
if you prefer to use fully translated user interface. This dialog appears only
when you have installed a Single-user Notes client.
Note: The user interface you selected will be the default Notes user interface
language the next time you start the Notes client.
Note: You can change this setting in the Interface Language field on General
tab of User Preference dialog.
8. In the Ready to Install dialog, click Install.
Notes multi-user installation with the MUI pack: The Notes user interface files
are installed in the following directory:
C:\Program Files\IBM\Lotus\Notes\MUI\language-iso (*)
On Windows XP, the Notes template, modem, and help files are installed in the
following subdirectory:
C:\Document Setting\All Users\Application Data\Lotus\Data\Shared\mui\language-iso (*)
On Windows Vista(TM), the Notes template, modem, and help files are installed in
the following subdirectory:
C:\ProgramData\Lotus\Notes\Data\Shared\mui\language-iso (*)
Note: The ″language-iso (*)″ represents a language identifier. Language identifiers
are Arabic (ar), Brazilian Portuguese (pt-BR), Catalan (ca), Czech (cs), Danish (da),
Dutch (nl), Finnish (fi), French (fr), German (de), Greek (el), Hebrew (he),
Hungarian (hu), IB Portuguese (pt-PT), IB Portuguese (pt-PT), Italian (it), Japanese
(ja), Korean (ko), Norwegian (no), Polish (pl), Russian (ru), Simplified Chinese
(zh-CN), Slovakian (sk), Slovenian (sl), Spanish (es), Swedish (sv), Thai (th),
Traditional Chinese (zh-TW), Turkish (tr).
In a Notes multi-user install, when a user starts the Notes client for the first time,
the user interface and database language are determined by the user’s operating
system locale setting. If the locale language is not found in the directory \mui, the
English user interface is used and English databases are created to set up the Notes
client. If the locale language files of the Notes client have not been installed, the
user interface language of the Notes setup and local databases defaults to English.
For example, in a multi-user installation, if you add French and Japanese files with
a MUI pack, the user interface files are installed in individual directories such as
these:
C:\Program Files\IBM\Lotus\Notes\MUI\fr
C:\Program Files\IBM\Lotus\Notes\MUI\ja
For a Windows XP installation, the templates and help files are installed in the
next directory, as shown
C:\Documents and Settings\All Users\Local Settings\Application Data\Lotus\Notes\Shared\mui\fr
C:\Documents and Settings\All Users\Local Settings\Application Data\Lotus\Notes\Shared\mui\ja
Notes single-user installation with the MUI pack: In a Notes single user install,
the user interface language of the Notes setup and of the local databases is the
same as the language of the installed Notes client.
The MUI pack adds language files to the following directories:
C:\Program Files\Lotus\Notes\MUI\language-iso (*)
Chapter 5. Installing and Setting Up Notes Clients 171
Note: The ″language-iso (*)″ represents a language identifier. Language identifiers
are Arabic (ar), Brazilian Portuguese (pt-BR), Catalan (ca), Czech (cs), Danish (da),
Dutch (nl), Finnish (fi), French (fr), German (de), Greek (el), Hebrew (he),
Hungarian (hu), IB Portuguese (pt-PT), IB Portuguese (pt-PT), Italian (it), Japanese
(ja), Korean (ko), Norwegian (no), Polish (pl), Russian (ru), Simplified Chinese
(zh-CN), Slovakian (sk), Slovenian (sl), Spanish (es), Swedish (sv), Thai (th),
Traditional Chinese (zh-TW), Turkish (tr).
In the install wizard dialog, you can select two options -- ″User Interface
Language″ and ″Replace Local template/Help files.″ For specific installation
considerations and instructions, see the readme in the MUI pack distribution kit.
Using Language Pack Installer with Domino
If you plan to install Language Pack Installer (LPI) to run with IBM(R) Lotus(R)
Domino(R), be aware of the following information before installing and setting up
Domino and LPI. You should also read the Language Pack Installer README.TXT
file supplied with the LPI software.
To present a non-English language email interface to Domino users, the Domino
environment is required, as well as the following:
v The appropriate non-English version of Microsoft(R) Windows(R) for the end
user so that users can open file attachments that contain non-English
(multiple-byte) characters in the file name. Providing the non-English version of
Windows, also ensures that non-English fonts are present on the system. Users
can then read email subject lines and body text that are comprised of
non-English characters.
v The appropriate non-English mail template that enables folder names, button
labels, field labels and column headers to display in the non-English language.
This is not required for users running a POP or IMAP client.
v A non-English IBM(R) Lotus(R) Notes(R) client to enable menu options and
dialog boxes to display in the non-English language. This is not required for
users running a POP, IMAP, or browser client.
v Non-English fonts for Lotus Notes to allow a user’s workstation to display text
encoded in the non-English character set in case the user does not have the
non-English version of Windows.
To allow users to work in some languages other than English, enable the setting
″Enable Unicode display″ in Notes. Complete these steps:
1. From the Notes client, click File - Preferences - User Preferences.
2. On the Basics panel, in the Additional Options list, check the option, Enable
Unicode display.
3. Click OK.
Install the non-English Notes client and the non-English fonts for Lotus Notes on
each workstation. You can download both from the Passport Advantage site or the
Business Partner Zone.
Note: The non-English mail template is installed when you the install the
Language Pack Installer. You can also obtain the non-English mail template from
Passport Advantage site or the Business Partner Zone.
Prior to installing and setting up LPI in your Domino environment, review the
following information:
v Review the LPI file, README.TXT, to be aware of limitations and restrictions.
172 Installing Domino Servers and Notes Clients
v Extract the language pack on a workstation and then run the appropriate
SETUP.EXE file. Running the file, SETUP.EXE, initiates a Java(TM) wizard on the
workstation which pushes the language pack to the server.
v While installing Language Pack Installer, choose the templates to which you are
adding the non-English design element. (Use IBM(R) Lotus(R) Domino(R)
Designer to view the language of each design element.) After installing the
language pack, the selected templates have English and non-English design
elements. If you manually replace a mail file’s design using File - Application -
Replace Design, you can specify English, or a non-English language for the mail
file when prompted to do so in the dialog box.
v Before replacing the design of any mail files that contain custom folders, assign
Manager access to the mail file to LocalDomainAdmins (or to a comparable
group of which you are a member).
v After assigning Manager access to the appropriate group, manually run the
agent, Update Folder Design, from the Actions menu in each mail file. When
that is complete, run Fixup, Updall, and Compact -c on each mail file and then
replace the mail file’s design. Replacing the design before upgrading the folders
causes the design replace to fail and results in errors stating ’unable to find
referenced note.’
v Do not remove the flag, Prohibit design replace, from folder design elements.
Deleting the flag causes the causes the folders to be deleted.
v If you modify the selected Multilingual options in the database properties’
design tab, the database will open extremely slowly. Always leave the
Multilingual database property unchecked. (Access the database properties
design tab in the Domino Administrator client by clicking the Files tab, selecting
a database, then choosing File - Application - Properties. Click the tab that has
an icon of a hammer.)
v Add non-English languages to the IBM(R) Lotus(R) Domino(R) Web Access
template. Other templates are optional.
Using the Native Language (NL) packs
When you install IBM(R) Lotus(R) Notes(R) on Linux(R) or Apple Mac OS X(R)
platforms, language kits are available for your use. Typically these language kits,
referred to as native language (NL) packs, are available shortly after the Notes
general release.
The NL packs are provided in install kits specific to the language set you require.
Install and usage instructions accompany the individual NL packs in the form of a
readme file.
Use an NL pack to install one or multiple non-English languages. An NL pack
provides the following functions.
Each language pack kit is self-contained and complete. You do not need to first
install Notes using an English-based install kit and then install an additional
language pack. Instead, simply run the installation executable from the desired
language kit to install Notes in your language of choice. For example, when you
install from the nl1a language kit, the program installs all the specified Notes client
resources available in the install kit, including the requested language resources.
1. Obtain the NL kit and run the Notes installation executable in that kit.
2. Respond to all prompts.
Chapter 5. Installing and Setting Up Notes Clients 173
The NL pack installation program uses a locale panel on which you are
prompted to select which language(s) to install from the group. When you run
the installer using this language pack, you are prompted to select one or more
languages.
You cannot install one language pack and then install another. For example,
you cannot install nl1a and then install nl1b. If you want to install nl1b, you
must first uninstall nl1a.
3. Click Finish when installation is complete.
Languages available in each NL kit
The table below displays the language groupings for each NL kit.
Mac OS X Linux
G1/G2a/Catalan nl1a: Simplified Chinese,
Traditional Chinese
nl1b: Japanese, Korean
nl1c: Brazilian Portuguese, French,
Spanish
nl1d: Italian, German, Catalan
nl2a1: Danish, Dutch
nl2a2: Finnish, Norwegian,
Swedish
nl1a: Simplified Chinese,
Traditional Chinese
nl1b: Japanese, Korean
nl1c: Brazilian Portuguese, French,
Spanish
nl1d: Italian, German, Catalan
nl2a1: Danish, Dutch
nl2a2: Finnish, Norwegian,
Swedish
G2b/G3 nl2b1: Czech
nl2b2: Polish, Russian
nl2b3: Greek, Hungarian
nl2b4: Iberian Portuguese, Turkish
nl3a: Slovenian, Slovak
nl3b: Thai
nl2b1: Czech
nl2b2: Polish, Russian
nl2b3: Greek, Hungarian
nl2b4: Iberian Portuguese, Turkish
Nl2b5: Arabic, Hebrew
nl3a: Slovenian, Slovak
nl3b: Thai
Instant messaging and client installation and setup
Instant messaging (IM) allows users to see others online and to send them instant
messages. Users can also start instant online meetings among three or more
co-workers.
Instant messaging is included in the IBM(R) Lotus(R) Notes(R) client installation,
and is installed when you install the Notes client. During the Notes client
configuration, the Lotus Notes Client Configuration dialog box displays the check
box ″Setup Instant Messaging″ that allows you to specify whether to set up IM
during Notes client setup. By default, the check box is selected to enable the setup
of IM. You can deselect that check box to prevent IM from being set up for users.
Enabling Single Sign-On for instant messaging
As an administrator, you can include IM in single sign-on with Lotus Notes and
push this feature down to users through dynamic configuration. To enable IM with
single sign-on for users, use the NOTES.INI variable, IM_ENABLE_SSO=1. If this
variable is set to 1, IM with single sign-on is enabled; if this variable is set to 0
174 Installing Domino Servers and Notes Clients
(zero), IM with single sign-on is disabled and the user must enter their instant
messaging password. There is also a setting on the User Preferences dialog box
that users can set to designate whether they want to use the single sign-on feature,
allowing then to log on once and still connect to multiple applications and servers.
For more information on the NOTES.INI variable, see http://www.ibm.com/developerworks/lotus/documentation/notes-ini.
Scriptable setup and instant messaging
If you are using scriptable setup to configure newly installed clients, IM can be
included in the scriptable setup. There are several variables that you use to define
the IM settings for users.
Name awareness in view columns and names fields
When Notes displays the online status for a name, it passes that name as
displayed, to the IBM(R) Lotus(R) Sametime(R) server for lookup in the Sametime
server’s directory. Usually this is the Notes abbreviated format (for example, John
Smith/Austin/Acme), although exceptions can be found in email because email
names can be received from the Internet. In order for the name to be found in the
directory that the Sametime server uses, the directory needs to support a lookup of
a Notes abbreviated name. If the directory that the Sametime server uses is an
IBM(R) Lotus(R) Domino(R) directory, this occurs by default. However, if the
directory that the Sametime server uses is an LDAP directory, you may need to
configure how the server performs a name lookup with the LDAP server. You may
also need to ensure that the LDAP directory has a Notes abbreviated name
attribute for each of its entries.
For information about using LDAP with a Sametime server, see the Lotus Sametime
Administrator’s Guide at http://www.ibm.com/developerworks/lotus/documentation/sametime/. Reference the chapter ″Using LDAP with the Sametime
Server.″ In particular, reference the ″Configuring the LDAP Searching Setting″
portion of the chapter.
Instant messaging and policies
Use the desktop policy settings document to specify a Sametime server for users.
Enter the server name in the Sametime server field. When pushed down to the
users, this setting populates the field ″Sametime server″ in the users’ Location
documents. The user can, however, enter a different server name in that field on
the Location document to override the setting from the policy document. The
server specified in the Sametime server field is the server that the user will access
for instant messaging. If no server name is entered in this field, the user is unable
to log on to IM. The user would then have to review the settings on the Instant
Messaging tab of their Location document, and make the necessary corrections.
Installing Notes in a single user environment
You can install IBM(R) Lotus(R) Notes(R) on Microsoft(R) Windows(R) in a single
user environment.
You can optionally use the Lotus Notes Allclient installer to install Lotus Notes,
IBM(R) Lotus(R) Domino(R) Designer and IBM(R) Lotus(R) Domino(R)
Administrator clients.
Chapter 5. Installing and Setting Up Notes Clients 175

Before you install Notes, read the release notes for software and hardware
requirements and known issues or caveats. Also read the considerations section of
this guide and any referenced information.
Installing and upgrading Notes for a single user
Notes installation on Microsoft(R) Windows(R) is supported for single user or
multi-user. When installing Notes in a single user environment using the Allclient
installation kit, you can install or upgrade the IBM(R) Lotus(R) Domino(R)
Designer and IBM(R) Lotus(R) Domino(R) Administrator clients.
Note: Notes installation on Linux(R) and Mac OS X(R) is supported for multi-user
install only.
Note: Notes installation on Citrix(R) is supported for single user install and
multi-user install.
IBM(R) Lotus(R) Notes(R) is available as an install kit. Notes can be installed in
graphical mode, silent mode, and by using Smart Upgrade.
See the ″Considerations before installing Notes on Windows″ topic in this guide
before installing Notes on your Windows platform.
1. Shut down all applications.
2. Obtain the Notes installation kit.
For example, obtain the installation kit CD or open a browser and navigate to
the Web site at which the installation kit resides.
3. Uninstall any Notes 8x Beta installations.
Note: If you are installing or upgrading Notes on Windows Vista, see the
″Windows Vista: Considerations for Notes install and upgrade″ topic in this
guide before proceeding.
4. Save the installation kit to a local folder, for example to your C:\temp folder.
5. Navigate to the folder in which you saved the installation kit.
6. Locate and run the SETUP.EXE installation executable.
Note: If a user has the environment variables USERPROFILE, HOMEDRIVE,
or HOMEPATH set to a network share, you must use special command line
parameters to ensure that all data directories are installed locally, thus
eliminating issues with network shares. You can check for these environment
variables by typing ″SET″ at a command prompt. If HOMEDRIVE is not set to
C:, review this instruction carefully. For example, if HOMEDRIVE=H: (where
″H″ may be a mapped network drive).
7. Read the Welcome screen and click Next.
8. Read and accept the license agreement terms and click Next.
9. Enter your user name and organization, choose the ″Single-user Install″ setting
and click Next.
10. Accept the default install directory or specify a different installation directory
and click Next.
11. Select the features and sub-features to install and click Next.
These options include the following:
Notes client -- The Notes client is installed automatically.
v Domino Administrator -- Select this to install or upgrade the Domino
Administrator client.
176 Installing Domino Servers and Notes Clients
v Domino Designer -- Select this to install or upgrade the Domino Designer
client. Note that the Property Broker Editor is installed automatically with
Domino Designer.
v Activities --Select this to install the Activities feature. An activities server is
required to use this feature.
v Composite Applications Editor -- Select this to install the Composite
Applications Editor for use with composite applications.
v Lotus Symphony -- Select this to install IBM(R) Lotus(R) Symphony(TM)
including Lotus Symphony Documents, Lotus Symphony Presentations, and
Lotus Symphony Spreadsheets.
v Sametime (integrated) -- Select this to install basic IBM(R) Lotus(R)
Sametime(R) capabilities such as chat and live names. A Sametime server is
required to use this feature.12. Accept Notes as the default email, calendar, and contacts programs, read the
preview screen, and click Install.
13. When installation is complete, read the summary screen and click Finish to
exit the installation wizard and start Notes.
The installation program creates new shortcut icons on your desktop.
If this is a new install, respond to the configuration wizard prompts. Your
administrator can supply the Domino server and configuration information to
you.
Installing Notes in a multi-user environment
Installing IBM(R) Lotus(R) Notes(R) in a multi-user user environment enables
multiple users to sequentially log in to the same machine and use the same Notes
install directory with their own Notes data directory.
Note: Multi-user install is supported for Notes client-only install; it is not available
for the IBM(R) Lotus(R) Domino(R) Administrator or IBM(R) Lotus(R) Domino(R)
Designer clients. The Notes Allclient kit is available for single user installation only.
The Allclient kit allows for Notes, Domino Designer, and Domino Administrator
install.
Perform a multi-user install if your organization has multiple users who share a
single workstation. When users first log in, they access the Notes client setup and
their personal data files, such as BOOKMARK.NSF, NAMES.NSF, and other files,
are created. The installer installs the Notes program files to a central location on
the local system. Each user has their own data directory. Each user’s data files are
created and subsequently accessed when they log in and start Notes.
Notes installation on the supported Linux(R) or Apple(R) Mac OS X(R) platforms is
only available as a multi-user install. Notes installation on the supported Windows
and Citrix(R) platforms is available for single user and multi-user install.
Note: Notes multi-user install differs from a Notes shared install in that program
files are located on the local system in a multi-user install. This allows users to
access Notes regardless of which network drives are available. In a shared install,
users are dependent on the availability of shared network drives.
Chapter 5. Installing and Setting Up Notes Clients 177
Installing and upgrading Notes on Windows for multi-user
IBM(R) Lotus(R) Notes(R)installation on Microsoft(R) Windows(R) supports single
user install and multi-user install. Multi-user install does not support install or
upgrade of the IBM(R) Lotus(R) Domino(R) Designer of IBM(R) Lotus(R)
Domino(R) Administrator client.
The IBM(R) Lotus(R) Notes(R) is available as an install kit. Notes can be installed
in graphical mode, silent mode, and by using Smart Upgrade.
See the ″Considerations before installing Notes on Windows″ topic in this guide
before proceeding.
1. Shut down all applications.
2. Obtain the Notes installation kit.
For example, obtain the installation kit CD or open a browser and navigate to
the Web site at which the installation kit resides.
3. Uninstall any Notes Beta installations.
Note: If you are installing or upgrading Notes on Windows Vista(TM), see the
Windows Vista: Considerations for Notes install and upgrade topic in this
guide before proceeding.
4. Save the installation kit to a local folder, for example to your C:\temp folder.
5. Navigate to the folder in which you saved the installation kit.
6. Locate and run the SETUP.EXE installation executable.
Note: If a user has the environment variables USERPROFILE, HOMEDRIVE,
or HOMEPATH set to a network share, you must use special command line
parameters to ensure that all data directories are installed locally, thus
eliminating issues with network shares. You can check for these environment
variables by typing ″SET″ at a command prompt. If HOMEDRIVE is not set to
C:, review this instruction carefully. For example, if HOMEDRIVE=H: (where
″H″ may be a mapped network drive).
7. Read the Welcome screen and click Next.
8. Read and accept the license agreement terms and click Next.
9. Enter your user name and organization, choose the ″Multi-user Install″ setting,
and click Next.
10. Accept the default install directory or specify a different directory installation
directory and click Next.
Note: Install to a directory that is readable but not writeable by all users.
11. Select the features and subfeatures to install and click Next. These options
include the following:
v Activities -- Select this to install the Activities feature. An activities server is
required to use this feature.
v Sametime (integrated) -- Select this to install basic IBM(R) Lotus(R)
Sametime(R) capabilities such as chat and live names. A Sametime server is
required to use this feature.
v IBM Lotus Symphony -- Select this to install IBM(R) Lotus(R)
Symphony(TM) including Lotus Symphony Documents, Lotus Symphony
Presentations, and Lotus Symphony Spreadsheets.
v Composite Application Editor -- Select this to install the Composite
Application Editor for use with composite applications.
178 Installing Domino Servers and Notes Clients
12. Accept Notes as the default email, calendar, and contacts programs, read the
preview screen, and click Install.
13. When installation is complete, read the summary screen and click Finish to
exit the installation wizard and start Notes.
You can see application icons on the desktop or by clicking Start - All
Programs - Lotus Applications. If you installed the IBM Lotus Symphony, you
can see application icons on the desktop and by clicking Start - All Programs.
Running the Notes client on Windows as a user after
administrative install
After you install the Notes client, users can log in and run Notes.
1. Log in as a non-administrative user.
2. Start Notes using the new desktop shortcut or click Start - Lotus Applications -
Lotus Notes.
3. Respond to Notes setup prompts as they appear.
Installing and upgrading Notes on Linux
IBM(R) Lotus(R) Notes(R)installation on Linux(R) supports multi-user install.
If you are upgrading to the current Notes release using an RPM or DEB install kit,
and installed the earlier release with an ISMP installer uninstall the earlier release
before installing the current release. This uninstall step is only required if you will
be installing the current release using an RPM or DEB install kit.
DEB kit install instructions:
Notes is available as a deb install kit for installing on the Ubuntu platform. If you
are upgrading from a pre-Notes 8.5 release, uninstall Notes using the uninstall
utility provided with that release.
Note: See the ″Considerations before installing Notes on Linux″ topic in this guide
before proceeding.
1. Shut down all applications.
Make sure that all processes are terminated, including eclipse/javaw,
eclipse/notes2w, sametime, notes, taskldr, and nsdexec.
To be sure there are no Notes processes running, change to the Notes data
directory and type the following command:
/opt/ibm/lotus/notes/nsd.sh -kill
2. Uninstall any Notes Beta installations.
3. As the root user, open a terminal window or file browser.
4. If you are obtaining the deb install kit from a Web downloads page, open your
browser and navigate to the Web page from which to obtain the download.
5. Locate the Notes deb install kit and save it to your /root folder.
For example, obtain the deb install kit CD or open a browser and navigate to
the Web site at which the deb install kit resides.
6. Navigate to the folder in which you saved the deb install kit and unpack the
tar file.
7. Navigate to the directory that contains the unpacked deb files.
Note: To install, you must switch to the root user or be logged in as a root
user.
Note: Install to a directory that is readable, but not writeable, by all users.
Chapter 5. Installing and Setting Up Notes Clients 179
8. Specify the deb packages to install. Use either a command line or GUI install
method.
Notes deb packages provide one required component (Notes) and four optional
components (Activities, Composite Application Editor, Sametime, and Lotus
Symphony). Optional components are dependent on the required component.
The required component must be installed before installing optional
components. Likewise, optional components must be uninstalled before the
required component can be uninstalled.
These options include the following:
v Notes - Select to install Notes (ibm_lotus_notes-8.5.i586.deb).
v Activities -- Select to install Activities. An activities server is required to use
this feature (ibm_lotus_activities-8.5.i586.deb).
v Sametime (integrated) -- Select to install basic Lotus Sametime capabilities
such as chat and live names. A Sametime server is required to use this
feature (ibm_lotus_sametime-8.5.i586.deb).
v IBM Lotus Symphony -- Select to install Lotus Symphony
(ibm_lotus_sametime-8.5.i586.deb).
v Composite Application Editor -- Select to install the Composite Applications
Editor for use with composite applications (ibm_lotus_cae-8.5.i586.deb),
You can use the following command to check if you have already installed one
or more of the deb packages:
$dpkg -l "ibm-lotus*"
Command line install instructions for DEB
Sample instructions for command line deb install are shown below.
v To install Notes
$sudo dpkg -i ibm_lotus_notes-8.5.i586.deb
v To install Activities
$sudo dpkg -i ibm_lotus_activities-8.5.i586.deb
v To install Composite Application Editor
$sudo dpkg -i ibm_lotus_cae-8.5.i586.deb
v To install Sametime
$sudo dpkg -i ibm_lotus_sametime-8.5.i586.deb
v To install IBM Lotus Symphony
$sudo dpkg -i ibm_lotus_symphony-8.5.i586.deb
Note: You can combine these to install with a paired command, as below:
Install the Notes deb first.
$sudo dpkg -i ibm_lotus_notes-8.5.i586.deb
You can then install the other deb packages.
$sudo dpkg -i ibm_lotus_activities-8.5.i586.deb ibm_lotus_cae-8.5.i586.deb
ibm_lotus_sametime-8.5.i586.deb ibm_lotus_symphony-8.5.i586.deb
GUI install instructions for DEB
Sample instructions to install the deb packages through the operating system
GUI installer are as below.
The GUI package installer can include a directory in which the required
packages reside. In this example, the following packages reside in the
/root/notesdebs directory.
a. Place the required deb packages in a target directory, for example
/root/notesdebs.
180 Installing Domino Servers and Notes Clients

The GUI package installer can include a directory in which the required
packages reside. In this example, the following packages reside in the
/root/notesdebs directory.
v ibm_lotus_activites-8.5.i586.deb
v ibm_lotus_cae-8.5.i586.deb
v ibm_lotus_notes-8.5.i586.deb
v ibm_lotus_symphony-8.5.i586.debb. Navigate to the directory from a GUI environment on your system and
right click on the deb to install. The resultant menu options are as below:
Open with GDeb Package installer
Open with Archive Manager
Open with Other Application
Cut
Copy
Make link
For example, if you select Open with GDebi Package installer, the Ubuntu
GUI opens to install that package.
c. Install ibm_lotus_notes-8.5.i586.deb first and then repeat for each of the
other deb packages to install.
Note: If installation is unsuccessful, review the log file at
<install_dir>/framework/rcp/installer_logs/framework_install.log.
Note: After install, application icons are visible by clicking Computer -
More Application - Office - Lotus Notes and reside in /usr/share/applications.
9. On initial startup, the license agreement appears. Read and accept the license
agreement terms and continue with Notes setup.
RPM kit install instructions:
Notes is available as an rpm install kit for installing on the SuSE or Red Hat
platforms. If you are upgrading from a pre-Notes 8.5 release, uninstall Notes using
the uninstall utility provided with that release.
Note: See the ″Considerations before installing Notes on Linux″ topic in this guide
before proceeding.
1. Shut down all applications.
Make sure that all processes are terminated, including eclipse/javaw,
eclipse/notes2w, sametime, notes, taskldr, and nsdexec.
To be sure there are no Notes processes running, change to the Notes data
directory and type the following command:
/opt/ibm/lotus/notes/nsd.sh -kill
2. Uninstall any Notes Beta installations.
3. As the root user, open a terminal window or file browser.
4. If you are obtaining the rpm install kit from a Web downloads page, open your
browser and navigate to the Web page from which to obtain the download.
5. Locate the Notes rpm install kit and save it to your /root folder.
For example, obtain the rpm install kit CD or open a browser and navigate to
the Web site at which the rpm install kit resides.
Chapter 5. Installing and Setting Up Notes Clients 181
6. Navigate to the folder in which you saved the rpm install kit and unpack the
tar file.
7. Navigate to the directory that contains the unpacked rpm files.
Note: To install, you must switch to the root user or be logged in as a root
user.
Note: Install to a directory that is readable, but not writeable, by all users.
8. Select the features to install by installing the additional rpms that have been
included in the rpm install kit. Notes 8.5 rpm packages provide one required
component (Notes) and four optional components (Activities, Composite
Application Editor, Sametime, and Lotus Symphony). Optional components are
dependent on the required component. The required component must be
installed before installing optional components. Likewise, optional components
must be uninstalled before the required component can be uninstalled.
These options include the following:
v Notes - Select to install Notes (ibm_lotus_notes-8.5.i586.rpm).
v Activities -- Select to install Activities. An activities server is required to use
this feature (ibm_lotus_activities-8.5.i586.rpm).
v Sametime (integrated) -- Select to install basic Lotus Sametime capabilities
such as chat and live names. A Sametime server is required to use this
feature (ibm_lotus_sametime-8.5.i586.rpm).
v IBM Lotus Symphony -- Select to install Lotus Symphony
(ibm_lotus_sametime-8.5.i586.rpm).
v Composite Application Editor -- Select to install the Composite Applications
Editor for use with composite applications (ibm_lotus_cae-8.5.i586.rpm)
You can use the following command to check if you have already installed one
or more of the rpm packages.
rpm -qa | grep ibm_lotus
Command line instructions
Sample instructions for command line rpm install are shown below.
v To install Notes
#rpm -i ibm_lotus_notes-8.5.i586.rpm
v To install Activities
#rpm -i ibm_lotus_activities-8.5.i586.rpm
v To install Composite Application Editor
#rpm -i ibm_lotus_cae-8.5.i586.rpm
v To install Sametime
#rpm -i ibm_lotus_sametime-8.5.i586.rpm
v To install IBM Lotus Symphony
#rpm -i ibm_lotus_symphony-8.5.i586.rpm
Note: You can combine these into a single install as shown below.
#rpm -i ibm_lotus_notes-8.5.i586.rpm ibm_lotus_activities-8.5.i586.
rpm ibm_lotus_cae-8.5.i586.rpm ibm_lotus_sametime-8.5.
i586.rpm ibm_lotus_symphony-8.5.i586.rpm
GUI install instructions for RPM
Sample instructions to install the rpm packages through the operating system
GUI installer are as below.
182 Installing Domino Servers and Notes Clients
The GUI package installer can include a directory in which the required
packages reside. In this example, the following packages reside in the
/root/notesrpms directory.
a. Place the required deb packages in a target directory, for example
./root/notesrpms.
The GUI package installer can include a directory in which the required
packages reside. In this example, the following packages reside in the
/root/notesrpms directory.
v ibm_lotus_activites-8.5.i586.rpm
v ibm_lotus_cae-8.5.i586.rpm
v ibm_lotus_notes-8.5.i586.rpm
v ibm_lotus_sametime-8.5.i586.rpm
v ibm_lotus_symphony-8.5.i586.rpmb. Navigate to this folder from a GUI environment on your system and right
click on the rpm to install.
-- If you are installing on a SUSE platform, menu options appear as below.
Open with ″Install Software″
Open with ″File Roller″
Open with Other Application
Cut
Copy
For example, select Open with ″Install Software″ to install the rpm.
-- If you are installing on a Red Hat platform, menu options appear as
below
Open with ″Software Installer″
Open with ″Archive Manager″
Open with Other Application
Cut
Copy
For example, select Open with ″Software Installer″ to install the rpm.
c. Install ibm_lotus_notes-8.5.i586.rpm first and repeat for each package to
install.
Note: If installation is unsuccessful, you can open the install log file at
<install_dir>/framework/rcp/installer_logs/framework_install.log.
Note: After install, application icons are visible by clicking Computer -
More Application - Office - Lotus Notes and reside in /usr/share/applications.
9. On initial startup, the license agreement appears. Read and accept the license
agreement terms and continue with the Notes setup.
Running the Notes client on Linux as a user after root user
install
After you install the Notes client, users can log in and run Notes.
1. Log in as a non-root user.
2. Start Notes by clicking the Computer option - More Applications... - New
Applications - Lotus Notes.
3. Respond to Notes setup prompts as they appear.
Chapter 5. Installing and Setting Up Notes Clients 183
Note: If you upgraded Notes, you may need to update your mail template.
Your contacts should be automatically updated.
Installing and upgrading Notes on Mac OS X
IBM(R) Lotus(R) Notes(R)installation on Apple(R) Mac OS X(R) supports
multi-user install.
See the ″Considerations before installing Notes on Mac OS X″ topic in this guide
before proceeding.
1. Obtain the Notes installation kit.
2. Locate and run the installation executable.
3. Read the Welcome screen and click Continue.
4. Read and accept the license agreement terms and click Continue.
5. Accept the default install directory and click Continue.
6. Select the features to install and click Continue.
7. Accept Notes as the default email, calendar, and contacts programs, read the
preview screen, and click Continue.
8. Read the installation type screen and click Install
9. If prompted, enter your administrative user name and password and click
OK.
10. Read the installation summary screen and click Finish to exit the installation
wizard.
11. Start Notes by double clicking the new Notes.app icon in the /Applications
directory.
12. Respond to any Notes setup prompts as they appear.
Installing Notes basic configuration on Mac OS X
Instructions for the Notes basic configuration are as below:
1. Obtain the Notes installation kit.
2. Locate and run the installation executable.
3. Read the Welcome screen and click Continue.
4. Read and accept the license agreement terms and click Continue.
5. Accept the default install directory and click Continue.
6. Read the preview screen and click Install.
7. If prompted, enter your administrative user name and password and click OK.
The installation process may take several minutes.
8. Click Finish to exit the installation wizard.
9. Start Notes by double clicking the new Notes.app icon in /Applications
directory.
Installing and upgrading Notes on Citrix
IBM(R) Lotus(R) Notes(R) installation on Citrix(R) supports single user install and
multi-user install. These instructions are for Notes multi-user install on Citrix
Presentation Server version 4.5.
Related information about Notes client installation in the Citrix platform is
available in the following Tech Note:
http://www.ibm.com/support/docview.wss?rs=475&uid=swg21292162
184 Installing Domino Servers and Notes Clients
Install Notes multi-user
To install Notes on Citrix Presentation Server version 4.5, use the following
procedure:
1. Obtain the ″Notes Client Only″ standard client install kit. This kit allows you
to install Notes multi-user.
2. Log directly onto the Citrix server (not remotely) as the Administrator.
3. From the Microsoft(R) Windows Control Panel, select Add/Remove Programs.
4. Click Add New Programs and select the Notes install kit from step 1.
Note: This step puts the Citrix/Terminal server out of ″Application mode″
and into ″Install Mode.″
5. Locate and run the SETUP.EXE installation executable.
6. Read the Welcome screen and click Next.
7. Read and accept the license agreement terms and click Next.
8. Enter your user name and organization, choose the ″Multi-user Install″ setting,
and click Next.
9. Accept the default install directory or specify a different directory installation
directory and click Next.
For a new install, the default directory is C:\Program Files\IBM\Lotus\Notes.
10. Read the preview screen, accept Notes as the default email, calendar, and
contacts programs, and click Install.
Delete and modify various NOTES.INI settings
The Notes installation program creates a NOTES.INI file in the following two
locations.
v %SYSTEMROOT%
v Documents and Settings\AllUsers\Applications\Lotus\Notes\Data
Note: Notes multi-user only uses the NOTES.INI file in Documents and Settings.
1. Delete the NOTES.INI file in the %SYSTEMROOT% directory.
2. Open the NOTES.INI file in Documents and Settings\AllUsers\Application
Data\Lotus\Notes\Data and add the following parameters:
[Notes]
KitType=1
SharedDataDirectory=C:\Documents and Settings\All Users\Application
Data\Lotus\Notes\Data\Shared
InstallMode=1
InstallType=6
Note: InstallMode is the NOTES.INI parameter that represents the Notes
standard configuration.
3. Save and close the file.
Modify registry key settings
Because Notes is not Terminal Services-aware, the installer does not properly
update the registry keys to reflect the multi-user installation.
Note: The information below is presented as a guideline for making relevant
changes within the Microsoft Windows Registry. The Windows Registry is central
to the operation of Windows, so any changes should be performed with great care.
Chapter 5. Installing and Setting Up Notes Clients 185
Back up your system before attempting the following procedure, in order to allow
recovery from system file corruption or other failures.
1. Click Start Menu - Run, and in the ″Open″ field type ″regedit″ (without the
quotation marks).
2. Go to the [HKEY_LOCAL_MACHINE\SOFTWARE\Lotus\Notes] registry
key.
3. Double-click the MultiUser DWORD.
4. Change the ″Value Data″ field to 00000001. Click OK to save the changes.
5. Double-click the DataPath DWORD.
6. Change the ″Value Data″ field to ″″. Click OK to save the changes.
7. Go to the [HKEY_LOCAL_MACHINE\SOFTWARE\Lotus\Notes\8.0] registry
key.
8. Double-click the MultiUser DWORD.
9. Change the ″Value Data″ field to 00000001. Click OK to save the changes.
10. Double-click the DataPath DWORD.
11. Change the ″Value Data″ field to ″″. Click OK to save the changes.
12. Start Notes and complete the install configuration process as prompted.
Adding or removing installed Notes features within a release
Within the same IBM(R) Lotus(R) Notes(R) release, you can add features to or
remove features from your current Notes installation by re-running the Notes
installer. Deselect features you want to remove or select features you want to add.
You can also customize the process using the install manifest.
1. Start the Notes installer.
2. Respond to prompts.
3. Select the features you want to add or remove and click Next.
v Add/Install -- Any available feature that was not previously installed is
shown selected. You can leave these features as selected in order to install
them.
v Update -- Any feature that was installed previously is shown selected. You
can leave these features as selected in order to upgrade them.
Note: For multi-user, the features being updated are not removed from disk;
they remain but are not used. For single user, the features being updated are
removed from disk.
v Remove -- Any feature that was installed previously is shown selected. You
can deselect these features in order to remove them.
Note: For Linux(R), features that are selected for removal are disabled, not
actually removed from disk.4. Optionally specify Notes as your default e-mail and calendar program and click
Install.
5. Respond to any prompts and click Finish when installation is complete.
Upgrading a Notes single user install to multi-user
The IBM(R) Lotus(R) Notes(R) installation program cannot upgrade an existing
Notes single user installation to Notes multi-user installation. However, you can
use a manual process to accomplish this goal.
186 Installing Domino Servers and Notes Clients
Use this procedure to upgrade a single user install to a higher version multi-user
install and also move the user’s data directory and other content to new install
directories.
1. Log in as an administrative user or user with elevated privileges.
2. Back up the user’s data directory (by default located below the Notes install
directory, for example C:\Program Files\IBM\Lotus\Notes\data).
3. Back up the user’s NOTES.INI file (by default located in the Notes install
directory, for example C:\Program Files\IBM\Lotus\Notes).
4. Back up any third-party binaries installed in the Notes binary directory. This
step is optional if there are no binaries or if it would be easier to reinstall
them.
5. Uninstall Notes using the Notes uninstall procedure.
6. Install Notes and when prompted choose a multi-user install.
Note: The Notes-only install kit supports multi-user install; the Allclient
install kit does not.
Note: The multi-user install creates a shared data directory under, by default,
C:\ProgramData, which contains database templates and other shared data
files. This directory is read-only for non-administrative users.
7. Start Notes as the current (administrative) user and respond to all setup
prompts.
8. Merge the old NOTES.INI from the backup with the newly installed
NOTES.INI to preserve preferences and activate any third-party code.
9. Merge the old data directory from the backup with the newly installed data
directory. The merge will depend on the versions of the Notes single-user
install and multi-user install.
10. Exit Notes and log in as a non-administrative user.
11. Start Notes.
Automating Notes installation using a silent install
Automated client installation, otherwise referred to as ″silent install,″ is available
for installing IBM(R) Lotus(R) Notes(R). For single user installs on a Windows
client, silent install also supports the three IBM(R) Lotus(R) Domino(R) clients --
IBM(R) Lotus(R) Notes, IBM(R) Lotus(R) Domino(R) Designer, and IBM(R)
Lotus(R) Domino(R) Administrator -- Allclient installation kit. Silent install
simplifies user installation because it presents few or no installation options.
To install Notes using silent installation, you must be logged in as an
administrative user or a non-administrative user with elevated privileges
(Windows) or root user (Linux).
Notes silent install uses a tuner program to create a transform file based on
installation options that you specify when you run the tuner. When you or a user
subsequently runs the silent install, the specified installation options are applied
automatically. To perform a silent Notes multi-user install, see the topic
″Performing a Notes multi-user silent install.″
You can also specify features from the Notes install manifest (install.xml file) as
command line arguments. All features in the install manifest that have their
″required″ attribute set to ″true″ are automatically installed.
Chapter 5. Installing and Setting Up Notes Clients 187
Running a Notes silent install
Silent install is useful for installing without user intervention. The user can execute
a script or batch file to perform a complete installation without having to answer
any questions or prompts. Command line options are available and are described
below.
Running a silent install provides users with default install options. To customize
the silent install, you can use, individually or in combination, install manifest
customization and a tuner transform file.
IBM(R) Lotus(R) Notes(R) installation uses an install manifest file (INSTALL.XML),
supplied in the Notes installation kit as deploy\install.xml. This file and its
contents can be customized to control which features are installed automatically,
which features appear in the feature installation panel for user selection, and
whether features are presented as enabled or disabled by default. Using a silent
install, you can define which features in the install manifest are installed
automatically, by setting the ″required″ attribute to ″true″ for each ″installfeature″
ID you want installed. Features in the install manifest that have their ″required″
attribute set to ″true″ are automatically installed.
Note: Silent install uses the settings in the Notes MSI file. The settings in the MSI
file override the settings in the Notes install manifest file (deploy\install.xml). To
install IBM(R) Lotus(R) Domino(R) Designer or IBM(R) Lotus(R) Domino(R)
Administrator, you must either select them for install using the feature installation
panel or specify them for silent install using the tuner. They will not be installed,
even if specified in the SELECTINSTALLFEATURES property, if they are not
selected for install as part of the MSI installation.
Before you begin the silent installation, perform the following tasks:
v For single user install, optionally use the tuner to create a transform file. For
multi-user silent install, you must use the tuner to create a transform file that
specifies multi-user install.
v Determine which features you want installed, open the install manifest
INSTALL.XML, locate the ″installfeature″ ID, and set the ″required″ attribute to
″true″. Alternatively, you can specify features for install using command line
arguments.
v Determine the desired installation directory and Notes data directory.
v For Notes installation on a Microsoft(R) Windows(R) client, determine if the
install will be for single user or multi-user.
v Read the release notes for disk-space requirements and for last-minute changes
or additions to the documentation.
Using the install manifest ″default″ setting for silent feature
specification
During a silent install, specify the features to install using the following
information as a guide.
Clean install
Considerations when installing IBM(R) Lotus(R) Notes(R) on a system on which a
Notes installation does not currently exist:
v If the ″SELECTINSTALLFEATURES″ property is specified on the command line,
use that property to determine which installfeatures (in the install.xml file)
should be installed.
188 Installing Domino Servers and Notes Clients
v If ″SELECTINSTALLFEATURES″ is not specified on command line, use the
″default″ setting of each installfeature (in the install manifest) to determine if a
feature should be installed.
In this situation, the only installfeatures that will be installed if ″default″ is set to
″true″ are those where the ″show″ attribute is also set to ″true″ -- these are the
installfeatures that would have appeared in the Notes feature installation panel.
Upgrade install
Considerations when installing Notes on a system in which an upgradable version
of Notes currently exists:
v If the ″SELECTINSTALLFEATURES″ property is specified on the command line,
use that property to determine which installfeatures should be installed or
upgraded. If an installfeature is already installed and is not specified in
″SELECTINSTALLFEATURES″, remove the feature.
v If ″SELECTINSTALLFEATURES″ is not specified on the command line,
″installfeature″s that are already installed and are not specified on the command
line will be uninstalled.
Performing a Notes silent install on Windows
You can use various command line arguments, as detailed here, during a IBM(R)
Lotus(R) Notes(R) silent install on a Microsoft(R) Windows(R) client. You must be
logged in as an administrative user or user with elevated privileges to perform the
install.
To run a Notes multi-user install (or upgrade) silent install, see the topic
″Performing a Notes multi-user silent install.″
Note: Notes installation and upgrade on a Linux(R) and Apple(R) Mac OS X(R)
client is only available in multi-user mode. However, Notes installation and
upgrade on a Windows client allows for either single user or multi-user install. The
Allclient installation method, which enables installation of Lotus Notes, IBM(R)
Lotus(R) Domino(R) Designer, and IBM(R) Lotus(R) Domino(R) Administrator, is
not available for multi-user install; it is only available for single user install.
1. Open a command window.
2. Change to the directory in which the Notes install kit’s SETUP.EXE installation
executable is resident.
3. Type the silent installation command.
Example commands are provided below. Note that these examples do not
illustrate use of a transform file.
v Use the following format to run the install in silent mode, using default
values, without a progress bar:
setup.exe /s /v"/qn"
Note: For example, this command installs Notes to the single user default
C:\Program Files\IBM\Lotus\Notes directory and Notes data folders and
files to the C:\Program Files\IBM\Lotus\Notes\data directory.
When installation is complete, the shortcut icon(s) appears on the desktop.
v Use this format to display a message when the installation is complete or it
has failed. Use the + parameter as follows:
setup.exe /s /v"/qn+"
Chapter 5. Installing and Setting Up Notes Clients 189
v Use this format to display a progress bar during the installation, in addition
to displaying the message indicating that the installation is complete or it has
failed:
setup.exe /s /v"/qb+"
v To specify a non-default destination directory, for example
C:\IBM\Lotus\Notes, use the following command line syntax:
setup /S /V"SELECTINSTALLFEATURES=Activities,Editors PROGDIR=C:\IBM\Lotus\Notes
DATADIR=C:\IBM\Lotus\Notes\Data /qn"
v Use this format to specify named install manifest features to install using the
command line. Obtain the ″installfeature″ ID syntax from the Notes install
manifest (install.xml). To install any of these features, include the feature ID
value in the ″SELECTINSTALLFEATURES″ property on the command line a
shown below. Specify comma-separated features names in quotes as follows.
Note the placement of the quote, equals sign, and space characters.
setup /s /v"SELECTINSTALLFEATURES=Activities,Sametime,Editors,CAE /qn"
Note: Each feature in the Lotus Notes install manifest whose ″required’
attribute is set to ″true″ will be installed, regardless of whether it is specified
in the command line in the SELECTINSTALLFEATURES statement.
To pass a parameter that contains intervening spaces, such as a directory
path, enclose the parameter in quotes using a backslash quote sequence as
follows:
setup /s /V"SELECTINSTALLFEATURES=Activities,Editors PROGDIR=\"C:\Program Files\
Lotus\Notes\" DATADIR=\"C:\Program Files\Lotus\Notes\Data\" /qn"
Specify as few or as many feature IDs on the command line as desired.
Note: All features in the supplied install manifest whose ″required’ attribute
is set to ″true″ will be installed.
Note: To pass a parameter that contains intervening spaces, such as a
directory path, quote the parameter using a backslash quote sequence as
follows:
setup /s /V"SELECTINSTALLFEATURES=Activities,Editors PROGDIR=\"C:\Program Files\
Lotus\Notes\" DATADIR=\"C:\Program Files\Lotus\Notes\Data\" /qn"
Performing a Notes multi-user silent install
To perform an IBM(R) Lotus(R) Notes(R) silent multi-user install or upgrade on
Microsoft(R) Windows(R) you can either use a transform file or a command line
statement.
Note: Prior to Notes 8.0.2 a transform was required for silently installing or
upgrading a multi-user Notes install on Windows. A new command line option
has since been added to remove that requirement.
Note: You must have administrator rights or elevated privileges to perform a
multi-user install or upgrade. Use the Notes client-only installer. Multi-user
installation does not support the Notes Allclient installer.
Use a command line to set silent multi-user statement
To perform a Notes silent multi-user install or upgrade on Windows, use the
″SETMULTIUSER=1″ command line statement. An example is shown below:
setup /v"SETMULTIUSER=1/qb"
190 Installing Domino Servers and Notes Clients
Use a transform file to set silent multi-user statement
The steps to create the transform file for silent multi-user install and upgrade are
as below:
1. Open the ″InstallShield Tuner for Lotus Notes″ program and locate the
supplied configuration file ″LotusNotes.itw.″
2. Click Create a new transform file.
3. In the Select an MSI file field for the Microsoft(R) Windows(R) Installer
Package option, select the supplied .MSI file (for example, Lotus Notes
8.0.2.MSI).
4. In the New project name and location field for the Microsoft Windows
Installer Transform option, enter the customized transform filename, for
example MU.MST
5. Save the customized transform file, for example MU.MST, to the same location
at which the Notes install media kit resides, specifically the directory in which
the Notes multi-user SETUP.EXE file resides.
6. Click Create.
7. Click Application Configuration.
8. Open the customized transform file name, for example MU.MST
9. Click Setup Properties.
10. Change the value in the ApplicationUsers property from ″OnlyCurrentUser″
to ″AllUsers.″
By default the installation is now a multi-user installation for the customized
transform file, for example MU.MST
11. Click Save.
12. Open a Command Prompt window.
13. Navigate to the Notes install media kit on your local drive. Note that this is
the same directory in which the supplied Notes .MSI file resides and that you
just created the multi-user transform file, named, for example MU.MST
14. Type the following and respond to any prompts:
setup /s /v"TRANSFORMS=mu.mst /qn"
Calling a transform file during Notes silent install
You can call a configured transform file in the IBM(R) Lotus(R) Notes(R) silent
install command line.
In the following command line example, a transform is called and the Activities,
Composite Applications Editor, Lotus Symphony(TM), and integrated Sametime(R)
features (SELECTINSTALLFEATURES=Activities,SametimeUI,Editors,CAE) are
explicitly requested for install.
setup.exe /s /v"TRANSFORMS=LotusNotes.smt SELECTINSTALLFEATURES=
Activities,SametimeUI,Editors,CAE /qb+"
Alternatively, you could do the following.
1. Add the following statement to the transform file
SELECTINSTALLFEATURES=Activities,SametimeUI,Editors,CAE
2. Run the following command:
setup.exe /s /v"TRANSFORMS=LotusNotes.smt /qb+"
Chapter 5. Installing and Setting Up Notes Clients 191
Performing a Notes silent install on Linux
You can specify these command line options when running an IBM(R) Lotus(R)
Notes(R) silent install on Linux(R). You must be logged in as a root user.
1. Open a command window or shell.
2. Change to the directory in which the Lotus Notes install kit’s setup.sh
installation binary is resident.
3. Type the silent installation command.
Example syntax and an example command are provided below.
- silent
This specifies that the command will run in silent mode.
-V licenseAccepted="true|false"
This sets the variable to accept the license agreement panel.
-P installLocation="<location>"
This sets the install location for Notes client. The value must not contain an ending
slash symbol (\).
-V selectInstallFeatures="<list of comma separated install feature ids>"
This sets the list of optional install features that can be installed.
This argument overrides all install feature ″default″ attributes in the install
manifest. If you use this argument, only the install features listed in the argument
and the ″required″ install features are installed/selected.
-V removeInstallFeatures="<list of comma separated install feature ids>"
This sets the list of optional install features that can be removed on upgrade.
This argument is only supported for Domino Administrator and Domino Designer
install features when you are updating Notes. If Notes is already installed, and the
Administrator client and/or Designer client are also already installed, and you are
upgrading Notes with the current installer, you can use this argument to
remove/deselect the Administrator client and/or Designer client from the upgrade.
In this example, the Notes installer is run silently such that all features in the
install manifest whose required attribute is set to true are installed and the license
agreement is accepted without prompting. You must minimally use these
command line parameters to run Notes silent install on Linux.
setup.exe -silent -V licenseAccepted="true"
Providing a batch file for Notes client silent install
Creating and then providing a batch file that executes the command to perform a
silent install is convenient for users. Users can easily install the IBM(R) Lotus(R)
Notes(R) client by running the batch file.
Create a batch file
To create a batch file, perform the following steps:
1. Open a text editor.
2. Type the desired silent install command syntax in the edit window: An
example is shown below.
setup /S /V"/qn"
192 Installing Domino Servers and Notes Clients
3. Save the file using a .bat file extension in the name, for example
BATCHINSTALL.BAT. Save the file in the same directory that contains the
installation image (the directory in which the Notes install setup.exe or setup.sh
resides).
Run the Notes silent install using a batch file
To run a Notes silent install using the batch file, perform the following steps.
1. Navigate to the installation image directory (the directory in which the Notes
setup.exe or setup.sh resides).
2. Locate the batch file, for example BATCHINSTALL.BAT.
3. Run the batch file by double-clicking on the .bat file name, for example
BATCHINSTALL.BAT.
Sample batch file content containing a transform file
A command line sample that includes a transform file call is shown below:
msiexec /i "Lotus Notes 8.0.2.msi" TRANSFORMS="custom.mst"
Providing command line utilities for Notes install
Provide command line utilities so that users can install one or more clients on their
workstations. This table presents sample command line utilities that you can
modify to suit your needs.
Note: The MSI file name will reflect that of the current IBM(R) Lotus(R) Notes(R)
release.
Type of install Sample command line utility
Transform install msiexec /i ″Lotus Notes 8.0.2.msi″
TRANSFORMS=″custom.mst″
Transform silent install msiexec /i ″Lotus Notes 8.0.2.msi″ /qn
TRANSFORMS=″custom.mst″
Silent install with fail/success prompt msiexec /i ″Lotus Notes 8.0.2.msi″ /qn+
Silent install setup.exe /s /v″/qn″
Verbose logging setup.exe /v″/L*v c:\temp\install.log
Setting up Notes with a scriptable setup
The scriptable setup option uses a setting in the NOTES.INI file to provide
information to the client setup wizard. During installation, the wizard displays
only those panels that users need. The NOTES.INI setting ConfigFile= points to a
text file that contains the required parameters. The wizard reads this text file and
completes the setup. The user is able to bypass the wizard screens for which
parameters have been provided.
Note: Support for direct dialup modem (X.PC) connections is available only in
releases of Domino(R) earlier than release 8.5. You may continue to use Domino
Administrator 8.5 to configure and maintain direct dialup modem support, but
only on servers running pre-8.5 releases.
The settings and parameters that you can use in the text file are listed below:
Setting Description
Username User’s hierarchical name -- for example, John
Smith/Acme
Chapter 5. Installing and Setting Up Notes Clients 193
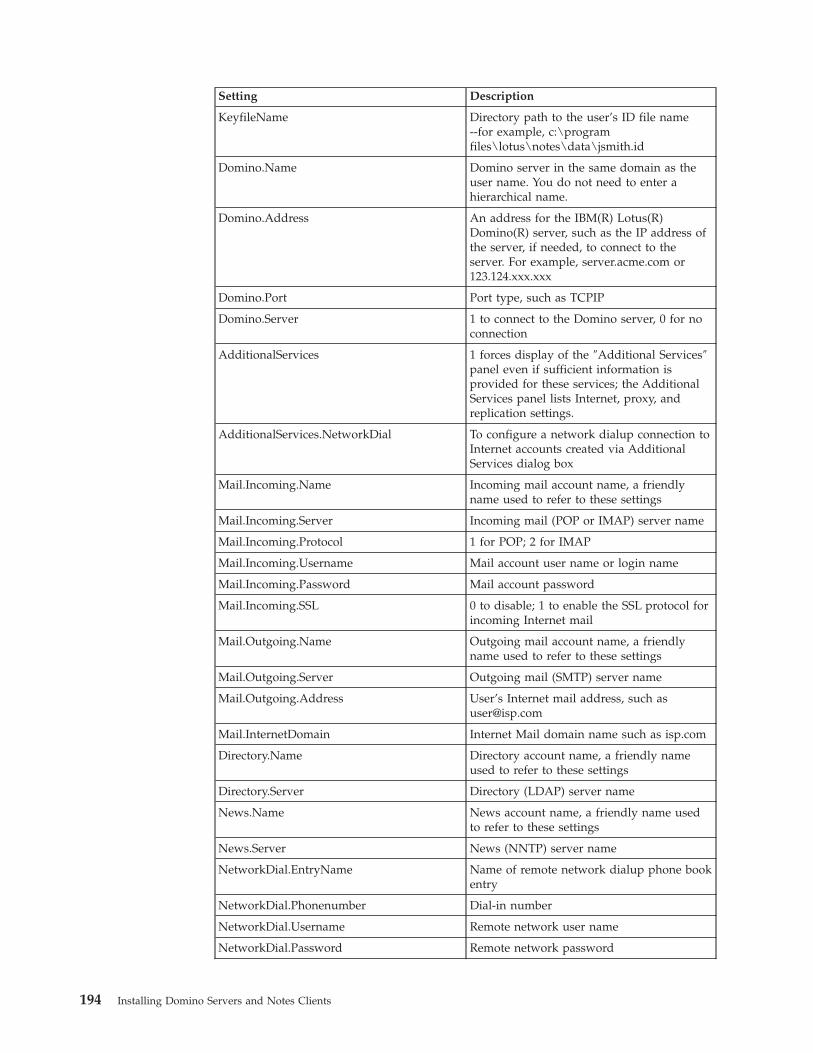
Setting Description
KeyfileName Directory path to the user’s ID file name
--for example, c:\program
files\lotus\notes\data\jsmith.id
Domino.Name Domino server in the same domain as the
user name. You do not need to enter a
hierarchical name.
Domino.Address An address for the IBM(R) Lotus(R)
Domino(R) server, such as the IP address of
the server, if needed, to connect to the
server. For example, server.acme.com or
123.124.xxx.xxx
Domino.Port Port type, such as TCPIP
Domino.Server 1 to connect to the Domino server, 0 for no
connection
AdditionalServices 1 forces display of the ″Additional Services″
panel even if sufficient information is
provided for these services; the Additional
Services panel lists Internet, proxy, and
replication settings.
AdditionalServices.NetworkDial To configure a network dialup connection to
Internet accounts created via Additional
Services dialog box
Mail.Incoming.Name Incoming mail account name, a friendly
name used to refer to these settings
Mail.Incoming.Server Incoming mail (POP or IMAP) server name
Mail.Incoming.Protocol 1 for POP; 2 for IMAP
Mail.Incoming.Username Mail account user name or login name
Mail.Incoming.Password Mail account password
Mail.Incoming.SSL 0 to disable; 1 to enable the SSL protocol for
incoming Internet mail
Mail.Outgoing.Name Outgoing mail account name, a friendly
name used to refer to these settings
Mail.Outgoing.Server Outgoing mail (SMTP) server name
Mail.Outgoing.Address User’s Internet mail address, such as
Mail.InternetDomain Internet Mail domain name such as isp.com
Directory.Name Directory account name, a friendly name
used to refer to these settings
Directory.Server Directory (LDAP) server name
News.Name News account name, a friendly name used
to refer to these settings
News.Server News (NNTP) server name
NetworkDial.EntryName Name of remote network dialup phone book
entry
NetworkDial.Phonenumber Dial-in number
NetworkDial.Username Remote network user name
NetworkDial.Password Remote network password
194 Installing Domino Servers and Notes Clients
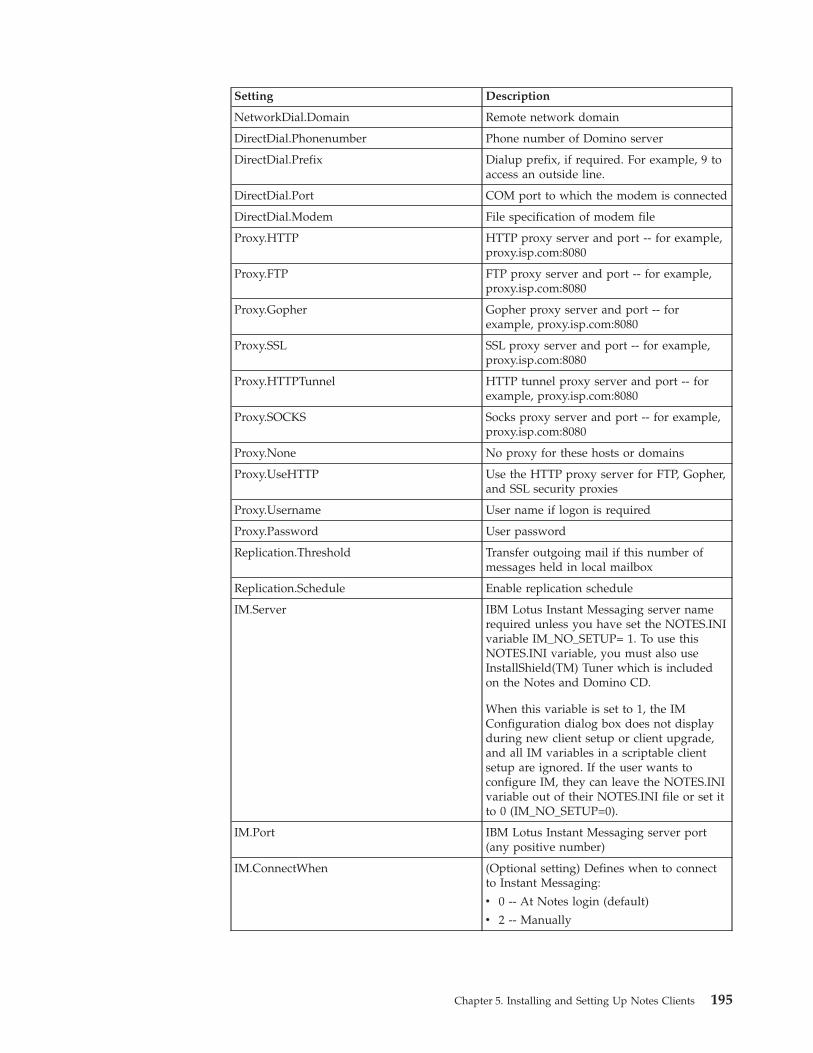
Setting Description
NetworkDial.Domain Remote network domain
DirectDial.Phonenumber Phone number of Domino server
DirectDial.Prefix Dialup prefix, if required. For example, 9 to
access an outside line.
DirectDial.Port COM port to which the modem is connected
DirectDial.Modem File specification of modem file
Proxy.HTTP HTTP proxy server and port -- for example,
proxy.isp.com:8080
Proxy.FTP FTP proxy server and port -- for example,
proxy.isp.com:8080
Proxy.Gopher Gopher proxy server and port -- for
example, proxy.isp.com:8080
Proxy.SSL SSL proxy server and port -- for example,
proxy.isp.com:8080
Proxy.HTTPTunnel HTTP tunnel proxy server and port -- for
example, proxy.isp.com:8080
Proxy.SOCKS Socks proxy server and port -- for example,
proxy.isp.com:8080
Proxy.None No proxy for these hosts or domains
Proxy.UseHTTP Use the HTTP proxy server for FTP, Gopher,
and SSL security proxies
Proxy.Username User name if logon is required
Proxy.Password User password
Replication.Threshold Transfer outgoing mail if this number of
messages held in local mailbox
Replication.Schedule Enable replication schedule
IM.Server IBM Lotus Instant Messaging server name
required unless you have set the NOTES.INI
variable IM_NO_SETUP= 1. To use this
NOTES.INI variable, you must also use
InstallShield(TM) Tuner which is included
on the Notes and Domino CD.
When this variable is set to 1, the IM
Configuration dialog box does not display
during new client setup or client upgrade,
and all IM variables in a scriptable client
setup are ignored. If the user wants to
configure IM, they can leave the NOTES.INI
variable out of their NOTES.INI file or set it
to 0 (IM_NO_SETUP=0).
IM.Port IBM Lotus Instant Messaging server port
(any positive number)
IM.ConnectWhen (Optional setting) Defines when to connect
to Instant Messaging:
v 0 -- At Notes login (default)
v 2 -- Manually
Chapter 5. Installing and Setting Up Notes Clients 195
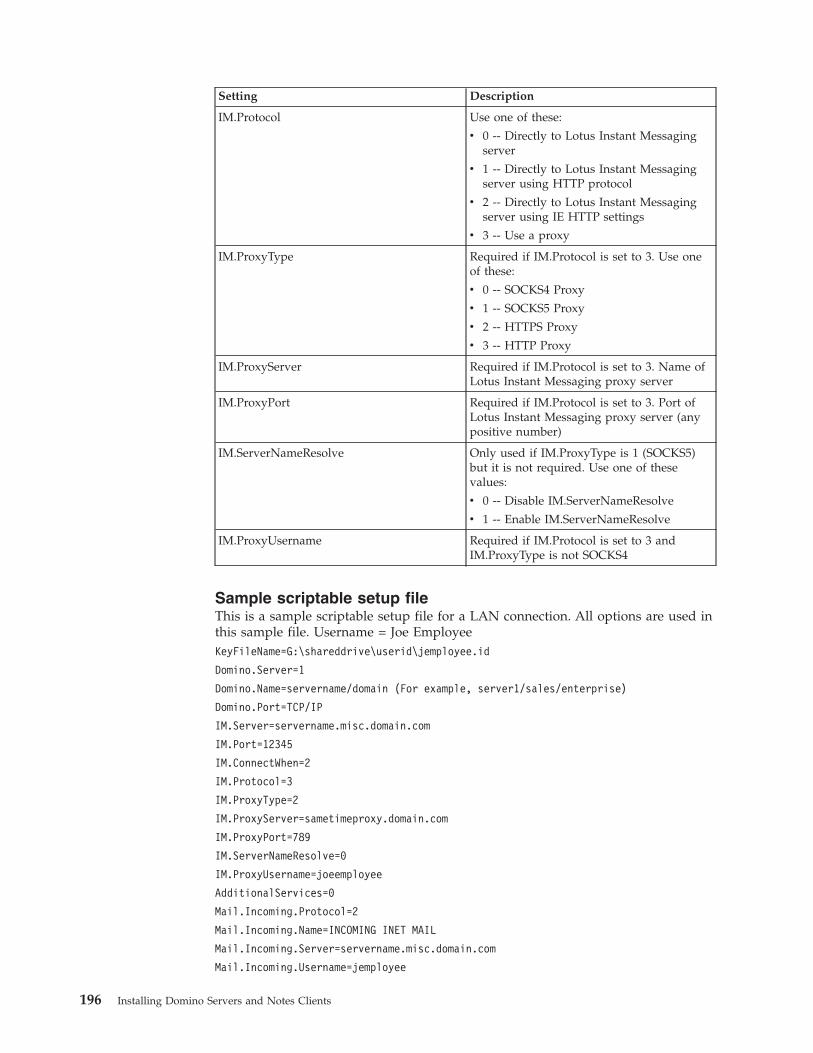
Setting Description
IM.Protocol Use one of these:
v 0 -- Directly to Lotus Instant Messaging
server
v 1 -- Directly to Lotus Instant Messaging
server using HTTP protocol
v 2 -- Directly to Lotus Instant Messaging
server using IE HTTP settings
v 3 -- Use a proxy
IM.ProxyType Required if IM.Protocol is set to 3. Use one
of these:
v 0 -- SOCKS4 Proxy
v 1 -- SOCKS5 Proxy
v 2 -- HTTPS Proxy
v 3 -- HTTP Proxy
IM.ProxyServer Required if IM.Protocol is set to 3. Name of
Lotus Instant Messaging proxy server
IM.ProxyPort Required if IM.Protocol is set to 3. Port of
Lotus Instant Messaging proxy server (any
positive number)
IM.ServerNameResolve Only used if IM.ProxyType is 1 (SOCKS5)
but it is not required. Use one of these
values:
v 0 -- Disable IM.ServerNameResolve
v 1 -- Enable IM.ServerNameResolve
IM.ProxyUsername Required if IM.Protocol is set to 3 and
IM.ProxyType is not SOCKS4
Sample scriptable setup file
This is a sample scriptable setup file for a LAN connection. All options are used in
this sample file. Username = Joe Employee
KeyFileName=G:\shareddrive\userid\jemployee.id
Domino.Server=1
Domino.Name=servername/domain (For example, server1/sales/enterprise)
Domino.Port=TCP/IP
IM.Server=servername.misc.domain.com
IM.Port=12345
IM.ConnectWhen=2
IM.Protocol=3
IM.ProxyType=2
IM.ProxyServer=sametimeproxy.domain.com
IM.ProxyPort=789
IM.ServerNameResolve=0
IM.ProxyUsername=joeemployee
AdditionalServices=0
Mail.Incoming.Protocol=2
Mail.Incoming.Name=INCOMING INET MAIL
Mail.Incoming.Server=servername.misc.domain.com
Mail.Incoming.Username=jemployee
196 Installing Domino Servers and Notes Clients
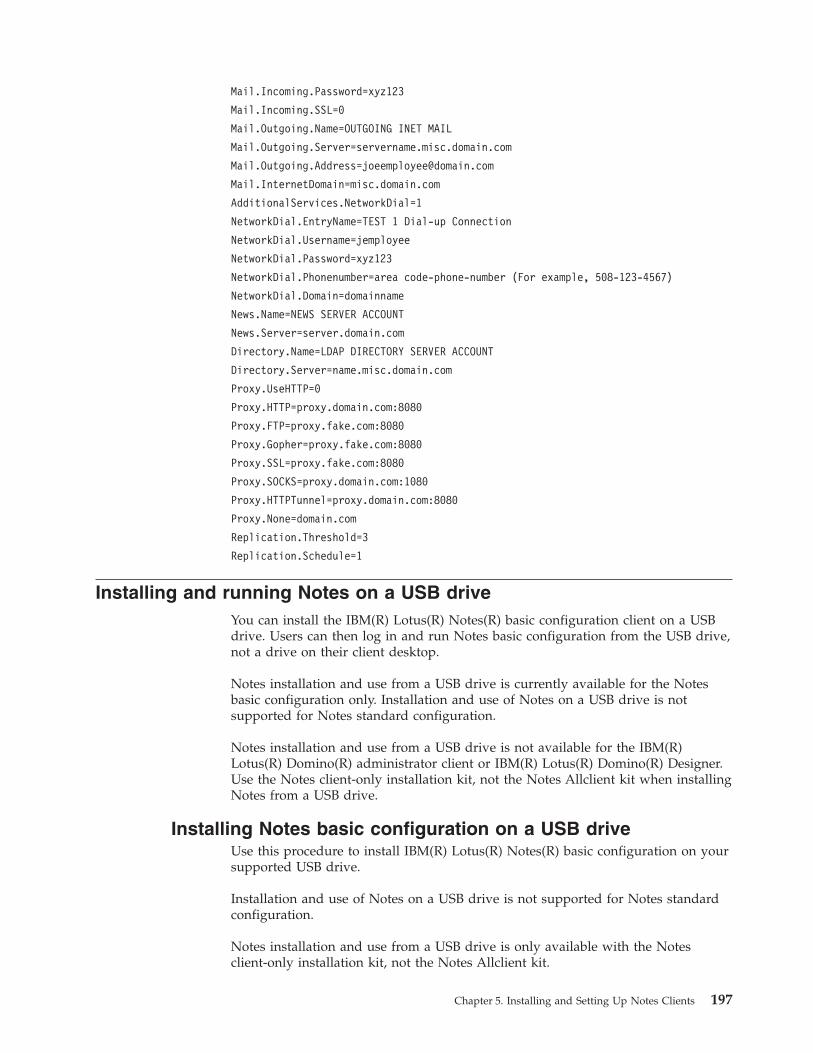
Mail.Incoming.Password=xyz123
Mail.Incoming.SSL=0
Mail.Outgoing.Name=OUTGOING INET MAIL
Mail.Outgoing.Server=servername.misc.domain.com
Mail.InternetDomain=misc.domain.com
AdditionalServices.NetworkDial=1
NetworkDial.EntryName=TEST 1 Dial-up Connection
NetworkDial.Username=jemployee
NetworkDial.Password=xyz123
NetworkDial.Phonenumber=area code-phone-number (For example, 508-123-4567)
NetworkDial.Domain=domainname
News.Name=NEWS SERVER ACCOUNT
News.Server=server.domain.com
Directory.Name=LDAP DIRECTORY SERVER ACCOUNT
Directory.Server=name.misc.domain.com
Proxy.UseHTTP=0
Proxy.HTTP=proxy.domain.com:8080
Proxy.FTP=proxy.fake.com:8080
Proxy.Gopher=proxy.fake.com:8080
Proxy.SSL=proxy.fake.com:8080
Proxy.SOCKS=proxy.domain.com:1080
Proxy.HTTPTunnel=proxy.domain.com:8080
Proxy.None=domain.com
Replication.Threshold=3
Replication.Schedule=1
Installing and running Notes on a USB drive
You can install the IBM(R) Lotus(R) Notes(R) basic configuration client on a USB
drive. Users can then log in and run Notes basic configuration from the USB drive,
not a drive on their client desktop.
Notes installation and use from a USB drive is currently available for the Notes
basic configuration only. Installation and use of Notes on a USB drive is not
supported for Notes standard configuration.
Notes installation and use from a USB drive is not available for the IBM(R)
Lotus(R) Domino(R) administrator client or IBM(R) Lotus(R) Domino(R) Designer.
Use the Notes client-only installation kit, not the Notes Allclient kit when installing
Notes from a USB drive.
Installing Notes basic configuration on a USB drive
Use this procedure to install IBM(R) Lotus(R) Notes(R) basic configuration on your
supported USB drive.
Installation and use of Notes on a USB drive is not supported for Notes standard
configuration.
Notes installation and use from a USB drive is only available with the Notes
client-only installation kit, not the Notes Allclient kit.
Chapter 5. Installing and Setting Up Notes Clients 197

The following considerations are helpful as you install Notes on a USB drive:
v You can use Notes on USB with roaming users. When a roaming user activates
this feature, the roaming user’s roaming files are replicated to the USB drive that
the roaming user is using.
v When you run the setup process (Step 2 below), program and data files are
installed and an initialization file, AUTORUN.INI, is created. An executable file,
AUTORUN.EXE, is also created and stored in the root directory of the install
area on the USB drive.
v When you use the AUTORUN.EXE command (Step 4 below) to install the Notes
client, a streamlined install process is performed. During the streamlined install
process, the USB drive letter is determined, AUTORUN.INI is read, standard
Notes registry keys are set and a desktop shortcut is created. During the install
process, a temporary directory is also created and the Notes client files are
stored in the temporary directory.
v Microsoft(R) Windows(R) does not natively support autoplay for USB drives; the
autorun process installs and launches Notes each time you plug the USB drive
into the USB port.
v When you remove the USB drive, Notes is uninstalled and all registry entries
and files that were added to the computer are removed. The desktop shortcut,
temporary directory and any attachments that you used are also removed. No
changes are made to the USB drive.
Complete these steps to install Notes client on your supported USB drive:
1. Obtain the Notes client-only install kit and expand the files into a folder on
your hard drive, or place the expanded kit onto a shared drive for others to
access.
2. Insert the USB drive into the USB port on your computer.
3. Note the assigned USB drive letter; this drive letter assignment is dynamic and
will change when you use that USB port in the future.
4. Open a command prompt window and navigate to the folder or directory you
created in step 1.
5. In a command prompt window, enter the following command to install Notes
on the USB drive; in this example ″F″ is the USB drive:
setup /a /v"NOMAD=1 TARGETDIR=F:\ /qb+"
Note: The parameters, /qb+ allow for the display of the basic user interface
and a message box at the end of the install.
6. When the install process is complete, run the command AUTORUN.EXE from
the root USB drive by double-clicking on the filename or by typing the
command on the command line.
7. The Notes client is installed and will automatically launch. Complete the Notes
setup process as usual.
The AUTORUN.INI file
The AUTORUN.INI file that is created will be similar to this sample file.
[Autorun]
MSI_LOCATION=Z:\Lotus Notes 8.0.2.msi
MSI_COMMANDLINE=/qb PROGDIR=″Z:\program files\Lotus\notes\″
DATADIR=″Z:\program files\Lotus\notes\Data\″
198 Installing Domino Servers and Notes Clients
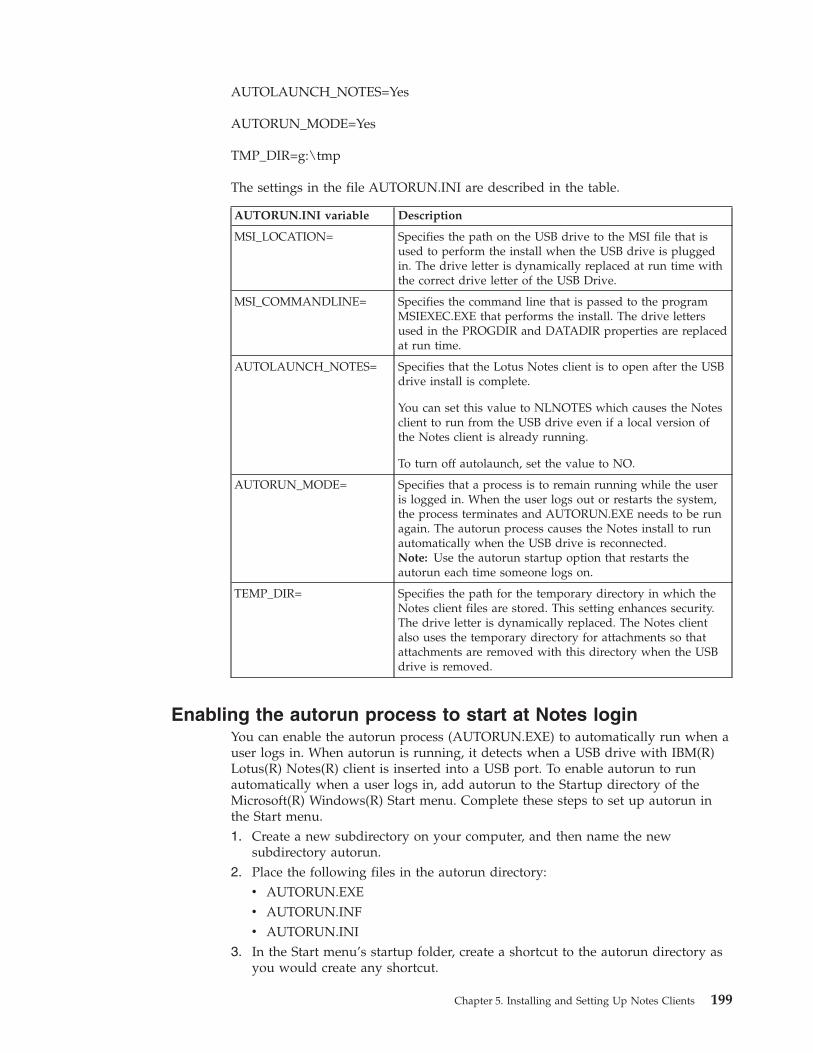
AUTOLAUNCH_NOTES=Yes
AUTORUN_MODE=Yes
TMP_DIR=g:\tmp
The settings in the file AUTORUN.INI are described in the table.
AUTORUN.INI variable Description
MSI_LOCATION= Specifies the path on the USB drive to the MSI file that is
used to perform the install when the USB drive is plugged
in. The drive letter is dynamically replaced at run time with
the correct drive letter of the USB Drive.
MSI_COMMANDLINE= Specifies the command line that is passed to the program
MSIEXEC.EXE that performs the install. The drive letters
used in the PROGDIR and DATADIR properties are replaced
at run time.
AUTOLAUNCH_NOTES= Specifies that the Lotus Notes client is to open after the USB
drive install is complete.
You can set this value to NLNOTES which causes the Notes
client to run from the USB drive even if a local version of
the Notes client is already running.
To turn off autolaunch, set the value to NO.
AUTORUN_MODE= Specifies that a process is to remain running while the user
is logged in. When the user logs out or restarts the system,
the process terminates and AUTORUN.EXE needs to be run
again. The autorun process causes the Notes install to run
automatically when the USB drive is reconnected.
Note: Use the autorun startup option that restarts the
autorun each time someone logs on.
TEMP_DIR= Specifies the path for the temporary directory in which the
Notes client files are stored. This setting enhances security.
The drive letter is dynamically replaced. The Notes client
also uses the temporary directory for attachments so that
attachments are removed with this directory when the USB
drive is removed.
Enabling the autorun process to start at Notes login
You can enable the autorun process (AUTORUN.EXE) to automatically run when a
user logs in. When autorun is running, it detects when a USB drive with IBM(R)
Lotus(R) Notes(R) client is inserted into a USB port. To enable autorun to run
automatically when a user logs in, add autorun to the Startup directory of the
Microsoft(R) Windows(R) Start menu. Complete these steps to set up autorun in
the Start menu.
1. Create a new subdirectory on your computer, and then name the new
subdirectory autorun.
2. Place the following files in the autorun directory:
v AUTORUN.EXE
v AUTORUN.INF
v AUTORUN.INI3. In the Start menu’s startup folder, create a shortcut to the autorun directory as
you would create any shortcut.
Chapter 5. Installing and Setting Up Notes Clients 199
4. From Windows Explorer, right click the autorun shortcut, and then click
Properties.
5. Click the Shortcut tab, and then enter the following string in the Target field:
path to autorun directory\autorun.exe /startup
where path to autorun directory is the actual directory path.
6. Click OK.
Running Notes basic configuration from a USB drive
IBM(R) Lotus(R) Notes(R) users can run from a USB drive plugged into a USB port
on a Notes client supported platform. The Lotus Notes client must already be
installed on the USB drive. The USB drive letter assignment is dynamic.
Notes installation and use from a USB drive is currently available for the Notes
basic configuration only.
Installation and use of Notes on a USB drive is not supported for Notes standard
configuration.
Notes installation and use from a USB drive is only available with the Notes
client-only installation kit, not the Notes Allclient kit.
Note: Notes on USB is designed to run on locked-down Microsoft(R) Windows(R)
desktops because the registry value it writes to is HKEY_CURRENT_USER\Software\Lotus\Notes. This registry key is typically not locked down in these
environments.
Installing Notes in a shared network directory
As an administrator, you can offer a shared network installation to your users. In a
shared network installation, all program files are installed on a file server and the
users’ data files reside on their local workstations.
When installing the Notes Allclient kit on your Microsoft(R) Windows(R) client, all
program files for IBM(R) Lotus(R) Notes(R), IBM(R) Lotus(R) Domino(R)
Administrator, and IBM(R) Lotus(R) Domino(R) Designer are installed. To run
Lotus Notes, Domino Administrator and Domino Designer client installs from one
set of program files on a file server, create multiple transform files.
Note: To perform a shared installation and run the transform file, users must have
the Microsoft(R) Windows(R) Installer service on their workstations.
After you install the program files to a directory on a server, users can run a
shared version of the software, thereby saving on disk space usage. However, if the
server is unavailable, users cannot run Notes. When users install Notes from this
directory, only the data files (DESKTOP.DSK, BOOKMARK.NTF, and all local
databases) are copied to their workstations. The program files remain on the
server, where they are shared among all users. As users run Notes, the program
files are read into memory on their workstations.
Assign to those users who install Notes client software from the file server ″Read″
access to the directory containing the files.
Note: Read Access is the only supported access level on the administrator image;
set the access to the administrator image.
200 Installing Domino Servers and Notes Clients
Note: Do not attempt to upgrade existing network image files. To upgrade an
existing network image, delete all files in the existing network image and install
the new network image files to the same location.
To set up the shared network installation
1. Before you begin this installation process, do the following:
v Make sure that the required hardware and software components are in place
and working.
v Read the Release Notes for disk-space requirements and for any last-minute
changes or additions to the documentation.
v Temporarily disable any screen savers and turn off any virus-detection
software.
v Make sure that all other applications are closed. Otherwise, you may corrupt
shared files, and the Install program may not run properly.2. Log on as administrator on the drive on which you are installing the program
files.
3. From the command line, use this syntax to run setup and create the
administrator image on the network:
E:\path to install kit\setup /A
In this example, drive E represents the drive on which the client installation
files are located. The /A creates the administrator image on the network.
4. Enter the name of the directory that will store the installed files. By default, this
directory is the first network drive accessible from your workstation. To specify
a network drive and directory other than the default, click Change.
5. Click Install. Every client option is installed. A directory structure that is
useable and understandable by the operating system is created. Users can run
the install program directly from this directory structure that you provide using
the Notes .MSI file created in the root of the directory structure. For example,
the MSI file for Notes 8.0.2 is Lotus Notes 8.0.2.MSI.
6. Create a transform file for installing the user’s local data files.
After successfully installing all client files to a shared directory on the network,
you can instruct users to use the transform file to install the client on their own
workstations.
Managing client plug-in deployment
While you can customize your client installer to add new or remove supplied
features and plug-ins when you install or upgrade your clients, you can also
provision (install and automatically update) stand-alone or third party features and
plug-ins to your existing IBM(R) Lotus(R) Notes(R) or IBM(R) Lotus(R) Expeditor
run-time using a combination of IBM(R) Lotus(R) Domino(R) policy or Eclipse(TM)
preferences, a widget resident in a widgets catalog on an HTTP or Domino server,
and a Eclipse update site (with signed features and plugin JAR files) optionally
resident in a centrally managed NSF-based update site.
This section contains the following topics:
v Creating custom or third-party features
v Signing custom or third-party features and plug-ins for install and update
v Installing a new feature using the Notes install manifest during Notes install or
upgrade
v Deploying client plug-ins with widgets and the widget catalog
Chapter 5. Installing and Setting Up Notes Clients 201

v Creating and using an NSF-based update site
v Configuring component update for composite applications
v Creating and using a traditional third-party installer
Client feature deployment
After you have created or obtained a new third-party or custom Eclipse-based
feature and set of plug-ins, there are several ways to install it for your IBM(R)
Lotus(R) Notes(R) users.
v Using the install manifest and update site during Notes installation and update
You can customize the supplied Notes install kit to add your own features and
plug-ins to the install manifest and update site folder. This is ideal if the new
feature is available when you are ready to install a Notes release and you want
to install it when you install or upgrade to Notes.
For information, see the topic ″Customizing Notes installation using the install
manifest topic.″
v Using widgets and the widgets catalog to deploy features and plug-ins to an
existing Notes or IBM(R) Lotus(R) Expeditor client
This is the feature and plug-in deployment method of choice and should be
used in place of the traditional Eclipse update manager method mentioned in
earlier Notes and Domino release documentation and still referenced in this
guide.
This method is available for deploying new features and plug-ins to an existing
Notes install and also to an Expeditor client that may not be running Notes,
such as a client on which a stand-alone IBM(R) Lotus(R) Symphony(TM)
deployment exists.
This method is not available for updating Notes features that were installed as
part of the Notes installation program, specifically the install kit’s install
manifest or update site.
For information, see the topic ″Deploying and managing client plug-ins with
widgets and the widget catalog.″
v Creating and using an NSF-based update site for feature install or update into
the Notes runtime
You can create an NSF-based update site using the supplied UPDATESITE.NTF
template.
For information, see the topic ″Creating and using an NSF-based update site.″
v Using a composite application and/or Notes update site database for composite
application update
You can use composite applications alone or with an NSF-based update site to
install or update custom or third-party features.
For information, see the topic ″Configuring component update for composite
applications.″
v Enabling user-initiated update and exposing the Eclipse(TM) update manager
This method has been superseded by the widgets and the widget catalog
method mentioned above.
For information, see the topic ″Enabling user-initiated update.″
v Using a traditional third-party installer for install into the Notes runtime
You create an install manifest and update site folder containing the feature and
plug-in JAR files for the new feature and SITE.XML. You can distribute the
installer to deployers or users to perform their own installation, or you can
install the new features for users who already have Notes installed.
202 Installing Domino Servers and Notes Clients
For information, see the topic ″Creating a traditional third-party installer.″
Controlling feature install and update and composite application
update using update site controls
You can determine which update sites a user can obtain features from using a
variety of options including a server managed update site list, which can
optionally be specified as the only site list from which the user can obtain updates.
For information, see the topics ″Controlling feature install and update″ and
″Specifying available update sites.″
Creating features and plug-ins
Regardless of how you make third-party or custom features and plug-ins available
for IBM(R) Lotus(R) Notes(R) installation or update, you must first create or obtain
the feature, create an install manifest to describe what is to be installed and place
the new features and plug-in JAR files correctly in an update site directory along
with a site index. Tools such as the IBM(R) Lotus(R) Expeditor integrated
development environment (IDE) help automate the Eclipse(TM) feature
development process for you.
You should also specify feature and plug-in security settings for signing, and can
specify additional information such as a list of valid sites from which to obtain
install and update information, and some security settings, using a
PLUGIN_CUSTOMIZATION.INI file.
For information, see the topic ″Creating custom or third-party features.″
Signing features and plug-ins
Prior to making a new third-party or custom Eclipse-based feature available for
Notes installation or update, you must correctly sign the feature. Once signed, you
must also include signing information in the PLUGIN_CUSTOMIZATION.INI file
that accompanies the install manifest.
For information, see the topic ″Signing custom or third-party features and
plug-ins.″
Installing a new feature using the Notes install kit
For information about installing a new or third-party feature when you install or
upgrade to a new Notes release, see the topic ″Customizing the Notes install kit to
add or remove Eclipse features.″
Deploying client plug-ins with widgets and the widget catalog
You can use a widget to deploy a new feature and corresponding plug-in to an
existing IBM(R) Lotus(R) Notes(R) client using a combination of the widgets
catalog, an NSF-based update site in which the feature resides, an XML file
attached to the widget that calls the feature’s update site, and Domino policy or
Eclipse preferences.
This process is written as an ordered procedure and assumes you have a valid
Eclipse update site containing a features folder, plugins folder, and site.xml file and
that all JAR files in the update site folders are properly signed. It also assumes you
want to deploy this plug-in to an existing user such that it be installed, and that
any updates to it be automatically provisioned, for that user.
Chapter 5. Installing and Setting Up Notes Clients 203
Note: Once you have performed these steps, users will be automatically
provisioned with the feature called by the widget’s extension.xml. The feature
called by the widget you are about to create will be installed when the user’s local
widgets catalog is updated. As well, any updates you make to the feature will be
provisioned to the user by way of the widget. The client checks the widget catalog
for updates periodically and upon user request.
Note: This procedure parallels one documented for an earlier release in Lotus Tech
Note 1305829 at http://www.ibm.com/support/docview.wss?rs=899&uid=swg21305829.
You will use these items to complete the process:
v Widgets catalog on named Domino server
v Correctly configured Widgets section of Domino Desktop policy settings
document
v Correctly formed and signed Eclipse update site containing the feature(s) to
deploy
v NSF-based update site containing your Eclipse update site
v Widget resident in the widgets catalog and of the same category as the user’s
policy or preference
v Correctly formed widget XML file attachment that calls the update site
Note: Two sample extension.xml files are attached to Lotus Tech Note 1305829.
Process steps
The main steps for deploying a new feature using a widget are as below:
v Place the feature’s valid Eclipse update site, containing the signed features and
plug-ins, in a central location
v Install or upgrade the server and client, create the widgets catalog, and set
widgets policy or preferences
v Create an NSF-based update site and import the Eclipse update site
v Create the extension.xml that the widget will use to call the feature’s update site
v Display the Widgets sidebar and verify or set catalog access
v Create the widget in the widgets catalog and attach its extension.xml file to call
the update site
v Test the widget by dragging it from the catalog view to your My Widgets
sidebar
v Communicate to users how to obtain the widget or inform them that they will
be automatically provisioned with the widget and its feature
Note: In addition to the topic references in the procedure steps, the following
topics provide additional information.
v Notes My Widgets overview
v Catalog options and access
v Format of the Eclipse update site
v Specifying available update sites
v Controlling feature install and update with update sites
v Controlling My Widgets access with Eclipse preferences
You may also find useful background and related information in the Notes and
Domino wiki at http://www.lotus.com/ldd/dominowiki.nsf.
204 Installing Domino Servers and Notes Clients
Place the feature’s valid Eclipse update site, containing the
signed features and plugins, in a central location
Perform these steps to place the feature’s valid Eclipse update site, containing the
signed features and plugins, in a central location.
1. Place the feature’s signed Eclipse update site, including the features and
plugins directories and the valid site.xml file, on your local client system.
This process assume that you already have a valid Eclipse update site,
containing the signed features and plugins. For information about signing the
contents of an update site, see ″Signing custom or third-party features and
plug-ins for install and update.″
The update site can reside on either an HTTP server or in an NSF-based update
site, for example updatesite.nsf, on a Domino server. In this example, you’ll import
the Eclipse update site into an NSF-based updates site on a central Domino server
in the ″Create an NSF-based update site and Import the Eclipse update site.″
Install or upgrade the Domino server and Notes client, create the
widgets catalog, and set widgets policy or preferences
Perform these steps to install or upgrade your IBM(R) Lotus(R) Domino(R) server
and IBM(R) Lotus(R) Notes(R) client, create the widgets catalog, and specify
widgets policy or preference settings for users.
1. Install or upgrade a Domino server to 8.0.2 or greater.
This server will house the widget catalog application and NSF-based update
site, and optionally be used to configure the user’s desktop policy settings with
new Widgets policy settings.
In this example, the Domino server name is WidgetCatalogServer.abx.com.
2. Install or upgrade a Notes client to 8.0.2 or greater.
3. Create the widgets catalog on the server using the widgets catalog template as
described in the ″Creating the widget catalog″ topic.
4. Configure Domino policy to specify the catalog server name, catalog name, and
catalog categories to install using the Widgets tab on the Domino desktop
policy settings document as described in the ″Controlling Widgets and Live
Text access with Domino policy″ topic.
Note: Alternatively, establish these settings with either the user’s My Widgets
preference panel or Eclipse preferences in the plugin_customization.ini file on
the client.
For this example, specify values for the first two settings for both your own
policy and your users; specify the third setting for users only. Leave all other
settings as is. These values are for this example only:
Widget catalog server -- WidgetCatalogServer.abx.com
Widget catalog application name -- toolbox.nsf
Widget catalog categories to install -- widgetsforyou
Note: The ″widgetsforyou″ category is for your target Notes users; you do not
need it for your own policy setting as you create and test the widget.
5. If you have used the ″Enable provider IDs for widget addition″ or ″Restrict
provider IDs for installation/execution″ settings on the Widgets tab in the
desktop policy settings document to control which widget types your users can
install and use, note that a fifth type, prov.provider.ToolboxProvisioning, has
been added which allows a widget to be used to deploy a client plug-in, which
you should enable. An equivalent setting in the plugin_customization.ini file is
Chapter 5. Installing and Setting Up Notes Clients 205
also now available. For more information, see the ″Controlling Widgets and
Live Text access with Domino policy″ topic.
Create an NSF-based update site and import the Eclipse update
site
The update site can reside on any HTTP or IBM(R) Lotus(R) Domino(R) Domino
server that can be reached using HTTP or Notes NRCP protocols. Importing the
update site into the NSF-based update site is the recommended method for
deploying features and plug-ins using widgets. The NSF-based update site
provides a central location for housing features for user deployment and
provisioning. In this example, the NSF-based update site will reside on
WidgetCatalogServer.abx.com.
You can import an Eclipse update site into an NSF-based update site (for example
updatesite.nsf) as described in the ″Creating and using an NSF-based update site″
topic in this guide and the general steps below.
To import an Eclipse update site into an NSF-based update site do the following:
1. Create the NSF-based update site as below:
a. Click File - Application - New.
b. Click Show Advanced Templates and specify the Eclipse Update Site (8x)
template (updatesite.ntf) as the template.
The NSF-based update site template (updatesite.ntf) is installed as part of
the Domino server install or upgrade.
c. Specify a title and NSF file name (for example, updatesite.nsf) for the new
application and click OK.2. Import the Eclipse update site into the new and open NSF-based update site as
below.
a. Click Features in the left pane navigator and then click the Import Local
Update Site button.
b. As prompted, browse to the update site, select its site.xml file, and click OK.
Create the extension.xml that the widget will use to call the
feature’s update site
Perform these steps to create the widget’s extension.xml file that you will use to
call the update site and provision the feature to users.
The widget’s extension.xml file will contain an install manifest <installfeature>
snippet with a pointer to the update site and specifications on how to install or
update the feature.
1. Create the extension.xml file. Use the sample XML below as a guide.
Information about the contents of an install manifest and specifically the
<installfeature> section is available in the ″Provisioning manifest DTD″ topic in
the Expeditor Client for Desktop and Devices, Version guide in the Expeditor
information center at
http://publib.boulder.ibm.com/infocenter/ledoc/v6r11/index.jsp?topic=/com.ibm.rcp.tools.doc.admin/manifestDTD.html
Sample XML
The items in bold are the fields you need to customize for your own feature.
206 Installing Domino Servers and Notes Clients
Note: You can obtain the sample extension.xml file used in this example from
Lotus Tech Note 130582 at http://www-01.ibm.com/support/docview.wss?rs=899&uid=swg21305829<?xml version="1.0" encoding="UTF-8"?>
<webcontextConfiguration version="1.1">
<palleteItem id="com.mycompany.xyz.extensions.featureABX" imageUrl=""
providerId="com.ibm.rcp.toolbox.prov.provider.ToolboxProvisioning"
title="Comp XYZ Custom Plugin"
url="nrpc://WidgetCatalogServer.abx.com/updatesite.nsf/site.xml">
<preferences>
</preferences>
<data>
<installManifest>
<![CDATA[
<install>
<installfeature description="Comp XYZ Custom Plugin"
id="Test_Feature_ABX" name="Test Feature ABX">
<requirements>
<feature download-size="10" id="Test_Feature_ABX" match="perfect" size="10" version="1.0"/>
</requirements>
</installfeature>
</install>
]]>
</installManifest>
</data>
</palleteItem>
</webcontextConfiguration>
Sample XML definitions:: Items in the top section of an extension.xml file are
described below:
v xml version = internal setting, use exactly as specified in the sample
v encoding = internal setting, use exactly as specified in the sample
v webcontextConfiguration version = internal setting, use exactly as specified in
the sample
v palleteItem id = internal ID setting, this must adhere to the namespace/ID
format as specified in the sample - this value must be unique for each pallette
item
v imageURL = URL at which the widget graphic that appears in the My Widgets
sidebar resides, if no value is specified a default graphic is used
v providerID = states the widget’s intent, for widgets that deploy features you
must use exactly as specified in the sample
v title = widget name that appears in the My Widgets sidebar panel
v url = pointer by which the update site and site.xml are located. You can specify
a URL value using NRCP protocol if the update site resides in an NSF-based
update site (for example, updateSite.nsf) on a Domino server or using an HTTP
protocol if the update site exists on an HTTP server.
Note: This example points to the site.xml file in an NSF-based update site.
Chapter 5. Installing and Setting Up Notes Clients 207
Note: By default, only public update sites that do not require authentication are
available for feature deployment using widgets. However, you can use accounts to
configure access to update sites that require user authentication.
Items in the <installManifest> section of the sample XML file are described in the
″Provisioning Manifest DTD″ link at the top of this section.
Display the Widgets sidebar and verify or set catalog access
Perform these steps to start the Notes client, display the My Widgets sidebar panel,
and ensure that the catalog server and catalog name preferences are correct.
1. Start Notes and open the Widgets preference panel by clicking File -
Preferences - Widgets.
2. Enable the Show Widgets Toolbar and the My Widgets sidebar panel option
(this option is typically disabled by default when not using policies).
If you specified policy settings for the catalog earlier, they will be visible on
this preference panel. In this example, those values should be as below:
Catalog server -- WidgetCatalogServer.abx.com
Catalog name -- toolbox.nsf
Catalog categories to install -- (leave this setting as is for now)
3. Click OK to display the My Widgets sidebar panel and toolbar and connect to
the widgets catalog.
Create a catalog deployment widget in the catalog and attach its
extension.xml file
Perform these steps to open the widgets catalog, create the widget, and attach the
extension.xml file that you created earlier.
1. Open the widgets catalog from the My Widgets sidebar panel by clicking
Catalog > Browse in the My Widgets options menu.
The next few steps will be done in the widget catalog as you create the widget
that you’ll use to provision your feature to users.
2. Create the widget as below:
a. In the widget catalog, click the All Widgets view option.
b. Click Add Widget to Catalog.
c. Enter a widget title, for example ″FeatureABX″ in the Title field.
d. Click Category and select a existing or type a new category name, for
example widgetsforyou. For this example scenario, type the new catalog
category ″testFeatureABX″ name.
e. Optional: Click Platform and select all that apply.
f. Optional: For view sorting purposes, click Plugin and Features.
g. In the Description field, enter a brief descriptor, such as ″Provision
FeatureABX to users.″
h. Click Attach and select the extension.xml file that you created earlier.
i. Click Save and Close.
Test the widget by dragging it from the catalog view to your My
Widgets sidebar
Always test a feature deployment widget before making it available to your users.
1. Drag the new widget from the widgets catalog view to your My Widgets
sidebar panel.
2. Respond to any feature install prompts that appear.
When you install a new feature you are prompted to restart the client.
208 Installing Domino Servers and Notes Clients
3. Upon restart, note the addition of the FeatureABX widget in the My Widgets
sidebar panel.
4. Test the functionality that you expected to be installed by the widget.
5. Once you are satisfied with the widget behavior, change the widget’s category
name to make it available to users whose Widgets categories to install policy or
preference matches the widget’s category. In this example, reopen the widget in
the catalog and change its widget category from ″testFeatureABX″ to
″widgetsforyou″ as used in this example as specified in their Widget catalog
categories to install policy setting.
Communicate to users how to obtain the widget or inform them
that they will be automatically provisioned with the widget and
its feature
Once you have tested and reassigned the widget’s category name as above, users
can either obtain the widget manually or let the client automatically provision the
widget, and the feature that the widget is designed to install, to them.
Tell users how to obtain the widget or inform them they will be automatically
provisioned with the widget, and the feature it is designed to deploy, upon their
next catalog update.
1. Install the widget from the catalog.
If using policies:
v Click Catalog - Update Widgets from your My Widgets sidebar panel options
menu.
v Allow the local catalog to be updated/replicated on its regular schedule and
be aware that the new widget will be added and the feature it is designed to
deploy will be installed, when the local catalog is updated.
If not using policies:
v Click Catalog - Update Widgets from your My Widgets sidebar panel options
menu. Click Catalog - Preferences, select the category in which the widget
resides, and click Apply.
v Open the catalog (Catalog - Browse), highlight the widget, and drag it to
your My Widgets sidebar panel.2. Respond to any feature installation prompts that appear.
Note: When you install a new feature, you are prompted to restart the client.
3. Upon restart, note the addition of the FeatureABX widget in the My Widgets
sidebar panel and the feature called by that widget.
The widget catalog is checked for updates based on a replication schedule. Adding
or removing a category in the Widgets preference panel adds or removes widgets
on the client in or from that category.
Any features called by a widget in a category to which a user is subscribed are
installed on that user’s client system.
Feature updates are provisioned to the user automatically provided that you have
properly updated and signed the contents of your feature update site, properly
updated the widget’s extension.xml file by incrementing the ″version=″ setting in
the requirements section of the extension.xml, and updated the version number in
the feature’s Eclipse update site site.xml file to match the widget’s extension.xml
file’s feature ″version=″ setting.
Chapter 5. Installing and Setting Up Notes Clients 209
Creating a new feature
You can learn to create custom or third-party features for use with IBM(R) Lotus(R)
Notes(R) using these and other resources.
New features and plug-ins must be signed prior to their install and deployment.
For information about using the IBM(R) Lotus(R) Expeditor to create applications
and start Notes from the Expeditor integrated development environment (IDE), see
the following resources at http://infocenters.lotus.com/help9/index.jsp
v ″Welcome to Developing Applications for Lotus Expeditor″ at http
http://publib.boulder.ibm.com/infocenter/ledoc/v6r11/index.jsp
v ″Using the Lotus Expeditor Toolkit environment with Lotus Notes 8″ at
http://publib.boulder.ibm.com/infocenter/ledoc/v6r11/index.jsp
v Customizing Notes installation
v Managing client plug-in deployment
v Deploying client plug-ins with widgets and the widget catalog
v Enabling and using third-party feature installation and update in Notes
For additional information and examples, see the IBM developerWorks site at
http://www.ibm.com/developerworks/lotus/community/.
For general information about Eclipse(TM) features and plugin-ins, see
http://www.eclipse.org.
Signing custom or third-party features and plug-ins for install
and update
Eclipse(TM) plug-ins can be created and used to extend IBM(R) Lotus(R) Notes(R)
client functionality. Plug-ins are provisioned with the client software. They are
ordinarily signed with a certificate that is trusted by Notes clients and which
verifies that they contain secure data.
Plug-ins are typically signed by the developer. JAR signing is a standard process
and many tools exist. You can sign features and plug-ins either using the JarSigner
tool included in the Java(TM) Development Kit (JDK) or a third-party tool, such as
the Plugin Development Environment (PDE) in Eclipse. Certificates which can be
obtained from many of the well known certificate authorities (CA).
When you install new custom or third-party features and plug-ins for Notes
installation, you can add your own certificates to a keystore so that the signed
features are trusted during install and update from the install kit.
Note: Features being installed as part of Notes install must be signed.
Features are checked for trust during initial and update provisioning. If Notes is
already installed, features are checked during runtime provisioning.
v Install time provisioning
The Notes installer installs and initially provisions new or updated features from
the install kit’s update site UPDATESITE.ZIP. During this initial provisioning,
trust is based on the Java keystore file in the Notes install kit’s ″deploy″
directory. This keystore contains the IBM code signing certificate. By default,
only features and plug-ins that are signed with this certificate will be installed.
v Runtime provisioning
210 Installing Domino Servers and Notes Clients
If Notes is running, provisioning can be initiated manually by the end user or
programmatically based on a scheduled criteria or other provisioning
mechanism (such as that used by the widget provisioning process). During
runtime provisioning, the Notes keystore determines trust for the features being
downloaded. This keystore contains the IBM code signing certificate, and by
default only plug-ins that are signed with this certificate are installed.
The items in the Notes install kit’s update site zip file (updateSite.zip) must be
signed, including custom or third-party feature and plug-in JAR files. The
provisioning process seeks to verify the signature. This allows administrators and
users to control and validate the signed code being downloaded to the client.
If you have digitally signed the features to install or update, the provisioning
system does the following:
v Displays errors about untrusted content as a post-install summary
v Provides a consistent user interface for handling trusted and untrusted content
during runtime provisioning based on policy settings
Note: There is no user interface for trust prompting during initial Notes install.
v Makes trust decisions based on managed policy settings so that you can override
default settings and manage policy settings from a server
Signing and adding new features to the install kit
If you create new features, you can sign them in preparation for install and update
using a code signing certificate obtained from a certification authority. When
signed and properly resident in the install kit, the features can be installed if the
code signing certificate is included in the kit keystore. If the code signing certificate
is not a trusted file, you can modify the install signature verification policy to
allow for installing signed but untrusted content.
Signing your custom or third-party features accomplishes the following:
v Allows you to dictate the policy settings to determine what kind of
signed/unsigned content can be downloaded from an allowed Eclipse update
site
v Allows you to modify the default policy used by the signature verification code
at install and update time by using IBM(R) Lotus(R) Domino(R) policy or by
setting preferences in the PLUGIN_CUSTOMIZATION.INI file in the install kit
v Based on administrator settings, allows users to make trust decisions based on
the certificate details that were used to sign a feature on the update site
v Prevents corrupted signed content from being installed and provisioned
After you have created and signed new Eclipse features and plug-ins, you can
control the response to untrusted content during feature install and update.
To add new features to the Notes installer do the following:
1. Build and create JAR files for new custom or third-party features and plug-ins
for use in an Eclipse update site. Use the JRE’s JarSigner tool, Eclipse, or other
third-party tool.
2. Sign the new custom or third-party feature and plug-in JAR files.
3. Add the certificate to the Notes install kit’s deploy\.keystore.JCEKS.IBM_J9_VM.install file using the KeyTool program included
with the JVM or other third-party tool.
Chapter 5. Installing and Setting Up Notes Clients 211

Note: Add the certificate(s) used to sign the JAR files to the file(s) beginning
with ″.KEYSTORE″ in the deploy directory of the Notes install kit.
Note: The Notes Keystore, which is used for manual update, does not currently
include a cross certificate for the IBM code signing certificate. Only the
.KEYSTORE file contains this certificate, and it is only used for install and
upgrade.
4. Add the signed features and plug-ins JAR files to the Notes install kit’s update
site (updateSite.zip\features and updateSite.zip\plugins).
5. Modify the Notes install kit install manifest (deploy\install.xml) and the update
site registry (updateSite.zip\site.xml) to include the new feature(s).
6. Use the Domino Administrator to set the default signature verification policies
to be used by the Notes client using the Security Settings - Signed Plugin page.
Note: If you are updating using the install kit, Domino policy takes precedent
over settings that reside in the Notes install kit deploy\plugincustomization.ini
file. Domino policy does not affect the initial install.
7. Test the installer by running the Notes installer setup.exe (Microsoft(R)
Windows(R)) or setup.sh (Linux(R)).
8. Deploy or make available to users, the install kit, including the keystore that
you updated in the install kit’s deploy directory.
Note: If you are adding the new features to an update site, place the update
site content and the deploy folder content wherever the update is to be made
available. When performing a runtime update, the Notes keystore is used for
determining trust. This requires an Internet cross-certificate for the code signing
certificate to exist in the personal address book. Based on the policy settings set
by the administrator, the user can be prompted if the code signing certificate is
not trusted by the Notes trust store.
Look for updates to this content as future Expeditor releases become available at
http://www.ibm.com/developerworks/lotus/documentation/expeditor/.
Using the plugin_customization.ini file to verify trust
You can use the IBM(R) Lotus(R) Notes(R) install kit’s deploy\plugin_customization.ini file to call a named keystore and instruct the installer
how to respond to features and plug-ins that are expired or not yet valid,
unsigned, or signed by an unrecognized certificate authority. You can modify the
following settings in the Notes install kit deploy\plugincustomization.ini file to
establish responses during install and update:
com.ibm.rcp.security.update/EXPIRED_SIGNATURE_POLICY=PROMPT
com.ibm.rcp.security.update/UNSIGNED_PLUGIN_POLICY=PROMPT
com.ibm.rcp.security.update/UNTRUSTED_SIGNATURE_POLICY=PROMPT
Note: If you are updating using the install kit, IBM(R) Lotus(R) Domino(R) policy
takes precedent over settings that reside in the Notes install kit
deploy\plugincustomization.ini file. Domino policy does not affect the initial
install.
Note: Features being installed as part of Notes install must be signed.
By default the Notes installer uses only the keystore in the deploy directory to
make trust decisions. If you want to trust any certificate issued by a well known
212 Installing Domino Servers and Notes Clients
certification authority, add the following statement to the install kit’s
deploy\plugin_customization.ini file as below.
Note: This instructs the kit installer to verify trust in code signing certificates using
the JRE CACERTS file, which contains the certificates for all well known roots.
Using this setting will compromise the security of the installer, since anyone with a
valid certificate can modify the code.com.ibm.rcp.security.update/TRUST_CERTIFICATE_AUTHORITIES=true
#(default is false)
The three settings that govern how the result of signature verification is interpreted
are as below:
v ALLOW -- Install the feature.
v PROMPT -- Prompt the user and let them decide what to do.
In the case of untrusted, the user can choose to start trusting the certificate by
adding it to the keystore. Note that during Notes installation, PROMPT =
DENY, because e installation program does not prompt the user for this
information.
v DENY -- Don’t prompt the user and don’t install the feature.
EXPIRED_SIGNATURE_POLICY: The EXPIRED_SIGNATURE_POLICY setting
defines the default behavior when provisioning encounters a JAR file that is signed
but the certificate used to sign the jar file has expired. The available values are
PROMPT, ALLOW, and DENY. For the initial install, PROMPT=DENY because
there is no user interface for this function. The PROMPT function is recognized by
Notes upgrade.
Note: For any install or upgrade performed using an install kit, PROMPT=DENY.
The following example allows JAR files with expired signatures to be installed or
updated:
com.ibm.rcp.security.update/EXPIRED_SIGNATURE_POLICY=ALLOW
UNSIGNED_PLUGIN_POLICY: The UNSIGNED_PLUGIN_POLICY setting
defines the default behavior when provisioning encounters an unsigned JAR file.
The available values are PROMPT, ALLOW, and DENY. For the initial install,
PROMPT=DENY because there is no user interface for this function. The PROMPT
function is recognized by Notes install and upgrade.
The following example allows unsigned JAR files to be installed or updated:
com.ibm.rcp.security.update/UNSIGNED_PLUGIN_POLICY=ALLOW
UNTRUSTED_SIGNATURE_POLICY: The UNTRUSTED_SIGNATURE_POLICY
setting defines default behavior when provisioning encounters a JAR file that has
been properly signed, but no matching certificate exists in the keystore.
The available values are PROMPT, ALLOW, and DENY. For kit install and
upgrade, PROMPT=DENY because there is no user interface for this function.
The following example does not allow untrusted JAR files to be installed or
updated. If the Notes installer encounters an untrusted signature during initial
Notes install, it exits the install with an error.
com.ibm.rcp.security.update/UNTRUSTED_SIGNATURE_POLICY=DENY
Chapter 5. Installing and Setting Up Notes Clients 213

Using Domino policy to verify trust
Occasionally, during IBM(R) Lotus(R) Notes(R) install or update, a security
problem is encountered for a feature or plug-in. Either a JAR file is unsigned, not
signed with a trusted certificate, or the certificate has either expired or is not yet
valid. You can establish a policy for never installing these plug-ins, always
installing them, or asking users to decide at the time the plug-in is installed.
Note: If you are updating using the install kit, IBM(R) Lotus(R) Domino(R) policy
takes precedence over settings that reside in the Notes install kit
deploy\plugincustomization.ini file. Domino policy does not affect the initial
install.
Note: Features being installed as part of Notes install must be signed.
To configure a policy for signed Eclipse(TM) plug-ins, complete the following
fields on the Domino Administrator client Signed Plugins tab. The options for each
of the following fields are to ask the user, never install, or always install.
v Installation of plug-ins that are expired or not yet valid
v Installation of unsigned plug-ins
v Installation of plug-ins signed by an unrecognized entity
Creating and using an NSF-based update site
You can use the Eclipse Update Site template to create an NSF-based update site
application and then import some or all of the features from an Eclipse(TM)
update site into the NSF-based update site.
The Eclipse Update Site (8x) template (UPDATESITE.NTF) is installed during
IBM(R) Lotus(R) Domino(R) and IBM(R) Lotus(R) Notes(R) install.
Use this template to create an NSF-based update site to act as an Eclipse(TM)
update site hosted in a Notes application. The NSF-based update site dynamically
provides the SITE.XML, features, and plug-ins.
You can use the UPDATESITE.NTF template as the basis for your own NSF-based
update site by creating an update site application, as below:
1. Click File - Application - New.
2. Specify the server on which to create the NSF-based update site application.
3. Specify a new application title and file name, for example updatesite and
UPDATESITE.NSF respectively.
4. In the template server field, use the local server or specify a different server
from which to obtain the template you’ll use to create the application.
5. Click Show Advanced Templates.
6. Select Eclipse Update Site (8x) template (UPDATESITE.NTF) as the template.
7. Click OK.
Note: You can name the NSF-based update site any name you choose; however,
you must use Eclipse Update Site (8x) (UPDATESITE.NTF) as the template.
When you first open the NSF-based update site, there are three action buttons
available. These import actions are not mutually exclusive. For example, you might
initially import an entire Eclipse update site and later choose to import specific
additional or updated features. You may later choose to import an additional
NSF-based update site. Note that once the NSF-based update site contains content,
214 Installing Domino Servers and Notes Clients
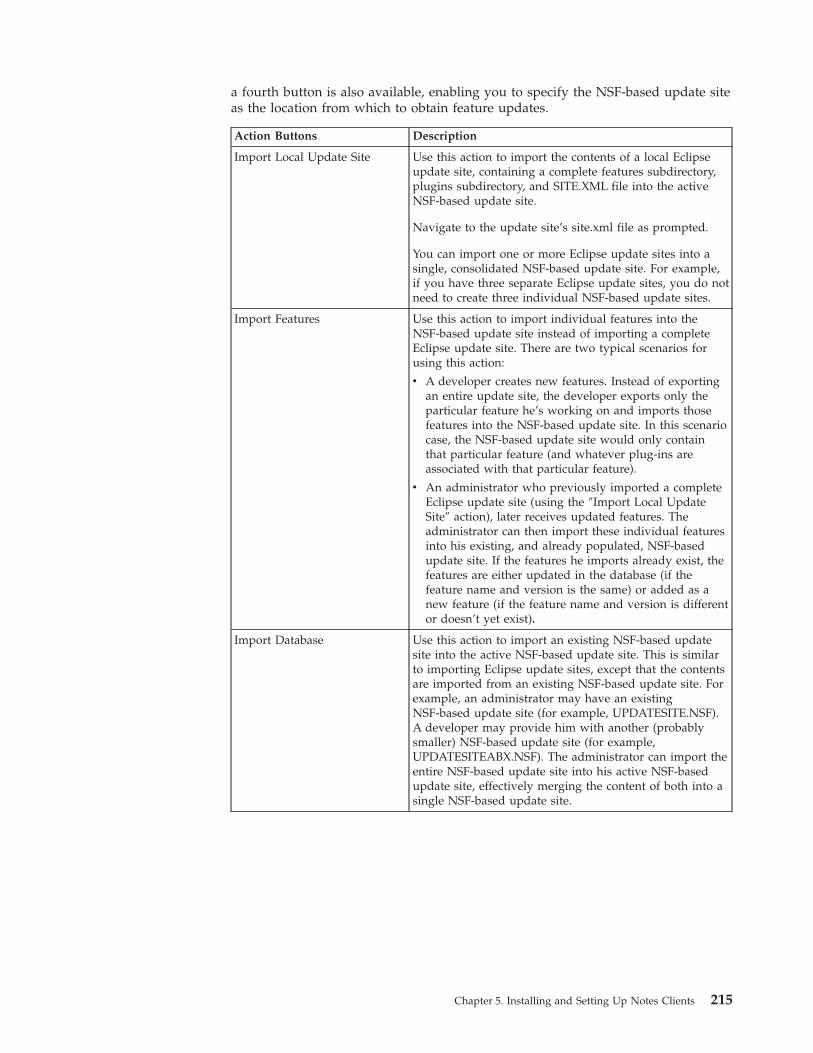
a fourth button is also available, enabling you to specify the NSF-based update site
as the location from which to obtain feature updates.
Action Buttons Description
Import Local Update Site Use this action to import the contents of a local Eclipse
update site, containing a complete features subdirectory,
plugins subdirectory, and SITE.XML file into the active
NSF-based update site.
Navigate to the update site’s site.xml file as prompted.
You can import one or more Eclipse update sites into a
single, consolidated NSF-based update site. For example,
if you have three separate Eclipse update sites, you do not
need to create three individual NSF-based update sites.
Import Features Use this action to import individual features into the
NSF-based update site instead of importing a complete
Eclipse update site. There are two typical scenarios for
using this action:
v A developer creates new features. Instead of exporting
an entire update site, the developer exports only the
particular feature he’s working on and imports those
features into the NSF-based update site. In this scenario
case, the NSF-based update site would only contain
that particular feature (and whatever plug-ins are
associated with that particular feature).
v An administrator who previously imported a complete
Eclipse update site (using the ″Import Local Update
Site″ action), later receives updated features. The
administrator can then import these individual features
into his existing, and already populated, NSF-based
update site. If the features he imports already exist, the
features are either updated in the database (if the
feature name and version is the same) or added as a
new feature (if the feature name and version is different
or doesn’t yet exist).
Import Database Use this action to import an existing NSF-based update
site into the active NSF-based update site. This is similar
to importing Eclipse update sites, except that the contents
are imported from an existing NSF-based update site. For
example, an administrator may have an existing
NSF-based update site (for example, UPDATESITE.NSF).
A developer may provide him with another (probably
smaller) NSF-based update site (for example,
UPDATESITEABX.NSF). The administrator can import the
entire NSF-based update site into his active NSF-based
update site, effectively merging the content of both into a
single NSF-based update site.
Chapter 5. Installing and Setting Up Notes Clients 215
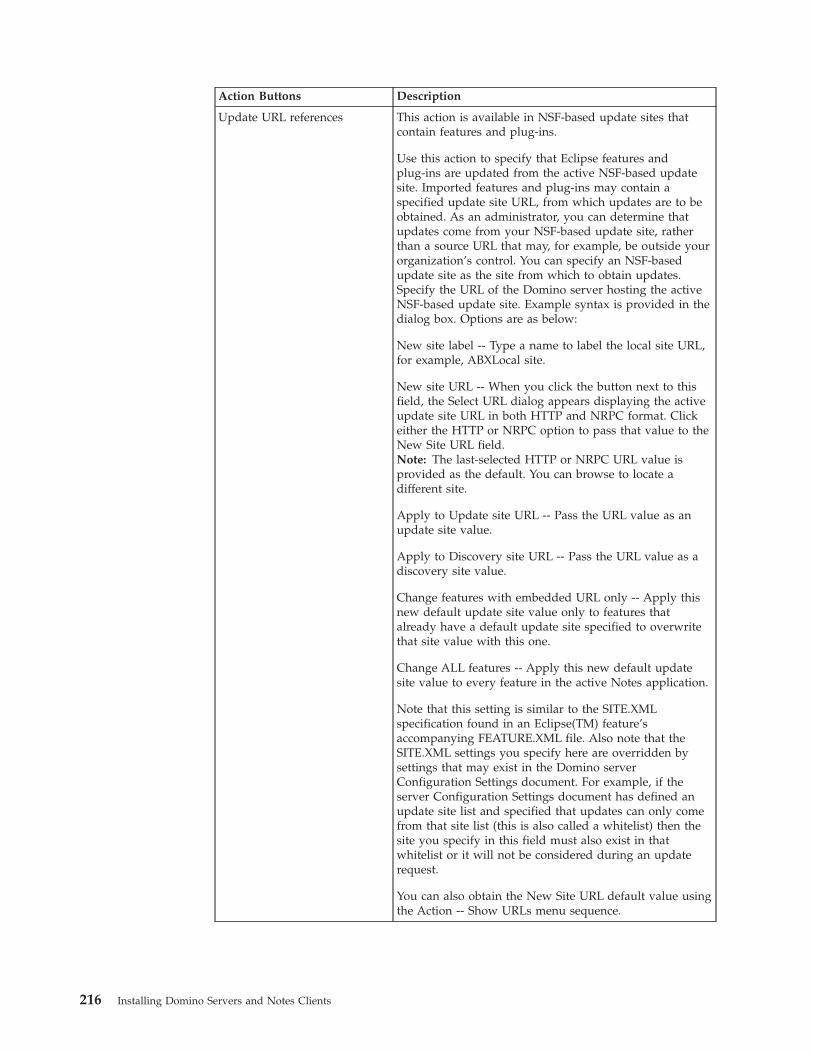
Action Buttons Description
Update URL references This action is available in NSF-based update sites that
contain features and plug-ins.
Use this action to specify that Eclipse features and
plug-ins are updated from the active NSF-based update
site. Imported features and plug-ins may contain a
specified update site URL, from which updates are to be
obtained. As an administrator, you can determine that
updates come from your NSF-based update site, rather
than a source URL that may, for example, be outside your
organization’s control. You can specify an NSF-based
update site as the site from which to obtain updates.
Specify the URL of the Domino server hosting the active
NSF-based update site. Example syntax is provided in the
dialog box. Options are as below:
New site label -- Type a name to label the local site URL,
for example, ABXLocal site.
New site URL -- When you click the button next to this
field, the Select URL dialog appears displaying the active
update site URL in both HTTP and NRPC format. Click
either the HTTP or NRPC option to pass that value to the
New Site URL field.
Note: The last-selected HTTP or NRPC URL value is
provided as the default. You can browse to locate a
different site.
Apply to Update site URL -- Pass the URL value as an
update site value.
Apply to Discovery site URL -- Pass the URL value as a
discovery site value.
Change features with embedded URL only -- Apply this
new default update site value only to features that
already have a default update site specified to overwrite
that site value with this one.
Change ALL features -- Apply this new default update
site value to every feature in the active Notes application.
Note that this setting is similar to the SITE.XML
specification found in an Eclipse(TM) feature’s
accompanying FEATURE.XML file. Also note that the
SITE.XML settings you specify here are overridden by
settings that may exist in the Domino server
Configuration Settings document. For example, if the
server Configuration Settings document has defined an
update site list and specified that updates can only come
from that site list (this is also called a whitelist) then the
site you specify in this field must also exist in that
whitelist or it will not be considered during an update
request.
You can also obtain the New Site URL default value using
the Action -- Show URLs menu sequence.
216 Installing Domino Servers and Notes Clients
Display activity logs
The NSF-based update site records the various update actions that it performs in
an activity log. You can display that log by clicking Activity Logs in the Update
Site left pane navigator. Logged information includes the following:
v Activity type, such as importing a feature or changing an imported feature’s
default update site URL
v Name of the person initiating the activity
v Date and time when the activity was initiated
v Activity details such as which feature was imported or updated
Display the active update site URL
You can display the active update site URL in HTTP or NRPC form using the
Actions -- Show URLs menu sequence. You can then paste this value into a site list,
for example a site list specified in a server Configuration Settings document, using
the Copy button in the dialog. Note that the Update URL References dialog has
also been updated to display the active update site URL.
Example URL for a server-hosted NSF-based update site:
http://teamabx.notesdev.xyz.com/__ccc570f2006677cf.nsf/site.xml
nrpc://teamabx.notesdev.xyz.com/__ccc570f2006677cf/site.xml
Example URL for a local NSF-based update site:
http://localhost/__ccc570f2006677cf.nsf/site.xml
nrcp://localhost/__ccc570f2006677cf/site.xml
Resources for learning more about NSF-based update sites
For information about how to create the NSF-based update site, see the ″Creating
and preparing the updatesite.nsf″ topic in this guide.
For information about using an NSF-based update site with composite
applications, see the topic Configuring component update for composite
applications in this guide.
For additional information about NSF-based update sites in conjunction with
composite applications, see the IBM developerWorks posting at:
http://www-03.ibm.com/developerworks/blogs/page/CompApps?entry=
nsf_based_update_sites and the site index at http://www.ibm.com/
developerworks/blogs/page/CompApps?entry=blog_sitemap
Also see the ″NSF based update sites and composite applications″ posting at:
http://www-03.ibm.com/developerworks/blogs/resources/CompApps/
NSF_Based_Eclipse_Update_Sites_and_Composite_Applications.pdf
Controlling feature install and update with update sites
Provisioning settings are available on the Client Upgrade tab in the IBM(R)
Lotus(R) Domino(R) Administrator server Configuration Settings document. For
information about using the server Configuration Settings document to manage
feature install and update, see ″Specifying available update sites.″
Note: Features installed or upgraded using the IBM(R) Lotus(R) Notes(R) installer
are only available for upgrade using the Notes installer.
v An update site can be either a traditional Eclipse update site or a Notes
NSF-based update site, which is based on the supplied UPDATESITE.NTF
template.
Chapter 5. Installing and Setting Up Notes Clients 217
v Feature update can occur if the feature version at the update site is higher than
the installed feature version.
v Using the Provisioning tab options on the server Configuration Settings
document, you can create and allow use of a default list of update sites, allow
update from the default update site embedded in the feature (FEATURE.XML)
or composite application definition (CA XML), or constrain feature update to a
specific update site list, referred to as a whitelist.
One way of installing and updating standalone or third-party features is the
Eclipse update manager (EUM), which is a user-initiated tool that can install and
update features and plug-ins. Alternatively, widgets can be used to automatically
install and update standalone or third-party features. For information about
deploying and provisioning features to an existing client, see ″Deploying client
plug-ins with widgets and the widget catalog.″
Specifying available update sites
IBM(R) Lotus(R) Domino(R) server-based update of features and plug-ins enables
you to control which update sites the user can obtain features from. Using new
fields on the server Configuration Settings document in the Domino Administrator
client, you can control where (and if) users can obtain features for install and
update. If the administrator allows, users can initiate feature install and update.
The update process searches an update site or site list for feature updates, as well
as updates to composite applications. Update sites can be Eclipse(TM) update sites
or NSF-based update sites.
Note: You can control feature update using a list of available update sites, called a
default update site list. This list can optionally be treated as a whitelist (approved
site list), to control exactly which update sites can be used for feature install and
update.
Domino administrators can control feature update, using the server Configuration
Settings document and the provisioning setting in the Domino Desktop policy
settings document, to restrict the places a user can obtain new or updated features.
Administrator control to remotely manage feature install and update site
capabilities and settings, such that changes are reflected on the client, are as below:
v Disable feature update completely
v Enable feature install and update such that users can specify any update site.
v You can install or update features from a user-specified site with the sites stored
in the BOOKMARKS.XML file or from a default site list specified in the
PLUGIN_CUSTOMIZATION.INI file or the Domino server Configuration
Settings document.
Note: If you use the File - Application - Install menu option, your selections are
stored in a BOOKMARKS.XML file on your client system for possible use during
feature install and update. The BOOKMARKS.XML file is not used for composite
applications, only feature install and update. You may also find update site
settings in the PLUGIN_CUSTOMIZATION.INI file on your client system, which
can be edited manually either before or after Notes install. Settings on the server
Configuration Settings document override update site settings in both of these
files.
-- You can also update existing features from the default site specified in the
feature’s FEATURE.XML file, provided that the FEATURE.XML is physically
resident on your client system.
218 Installing Domino Servers and Notes Clients
Note: The FEATURE.XML file is not used for initial feature install; only feature
update.
– When a default list or whitelist is not specified, feature install occurs from
either the Eclipse update manager or the composite application XML (CA
XML) update site settings. Feature update can occur from the FEATURE.XML
update site provided that you have enabled the ″Use update site specified in
Feature″ option in the server Configuration Settings document.
– When a default list or whitelist is specified, feature install and/or update can
be constrained to a site list. The default list becomes the whitelist if you
enable the ″Allow client updates only from these sites″ option in the server
Configuration Document.
A whitelist is ideal for preventing users from obtaining updates from
unauthorized or untrusted sites. For example, the BOOKMARKS.XML,
FEATURE.XML, or CA XML may reference unauthorized sites that are not in the
whitelist. If a Notes user attempts to update from one of these sites, update will
fail if the site is not in the whitelist.
Features can be updated over NRPC or HTTP protocol. You can use either an
HTTP (Web-style) or NRPC (Domino style) protocol to specify an available update
site or sites.
Note: Although Expeditor allows for automatic feature and component update,
Notes does not. All feature and composite application update in Notes must be
user-initiated. If referencing Expeditor documentation, make note of this difference
in behavior.
Note: If a composite application definition (CA XML) has been updated it can
trigger a feature update if that CA XML requests a new feature version.
Server Configuration Settings document options: The server Configuration
Settings document contains a Client Upgrade tab, on which you can use the
Provisioning tab to add, remove, edit, and disable or enable update sites, as well as
determine update site availability.
Provisioning settings are enabled: The ″Provisioning settings are enabled″ option
is an overall Enable/Disable field, which is disabled by default.
v Disabling the ″Provisioning settings are enabled″ option, prevents the server
Configuration Settings document (with it’s initial default values or current
administrator-specified values) from inadvertently overriding any existing
update site settings on the server’s client systems. This allows you to work with
this Configuration Settings document settings but prevents your settings from
being pushed to the client systems until you specifically choose to enable them
for the client.
Note that settings on the Configuration Settings document will override settings
that may exist in the PLUGIN_CUSTOMIZATION.INI file or
BOOKMARKS.XML file on the user’s client system, or that may have been
pushed to the client previously from this or another server Configuration
Settings document.
v Enabling this option pushes the settings on this Configuration Settings document
to the client, thus overriding any of the present update site settings specified on
the client. The client will retrieve the new provisioning settings when you
connect to the home mail server.
If you enable this option with the all provisioning choices for the document
disabled, then you can install from a composite application (CA XML) or the
Chapter 5. Installing and Setting Up Notes Clients 219
Update Manager user interface but you will be prevented from performing any
feature updates. If you later disable the overall provisioning option, then you
can install from a composite application (CA XML) or the Update Manager user
interface and you can also do feature update from FEATURE.XML. This is the
initial default configuration.
Sites to include in search: You can check the sites that you want to include in the
install or update operations. All sites specified in the default site list are available
for your selection.
New, Edit, and Delete: You can add new sites to the default site list, edit the
server name or URL of a site already present in the site list, or delete a site from
the default site list.
Allow client updates only from these sites and Use update site specified in
feature: The two options at the bottom of the page work as described below. A
definition of each is provided below, however the meaning of both options can
change when they are used in combination with one another, as is described
immediately following the definitions below.
v Enabling the ″Allow client updates only from these sites″ field, forces the update
site list to act as a whitelist. Update can only occur from the update site list only.
Note: If you are using the Eclipse update manager (EUM) and enable the
whitelist setting, some options on the ″Update sites to visit″ page will be
masked, such as New Remote Site, New Local Site, and New Archived Site.
v Disabling the ″Allow client updates only from these sites″ field allows the user
to update features from any update site, including but not limited to those in the
update site list. The update site list is treated as a default list and features can be
updated from elsewhere.
v Enabling the ″Use update site specified in Feature″ field updates from the
default update site value specified in the feature’s FEATURE.XML file.
Note: All features contain an embedded update site URL in their .JAR file
(FEATURE.XML). This value is typically the location from which the feature was
initially installed and it acts as a default update site.
v Disabling the ″Use update site specified in Feature″ field prevents the use of
FEATURE.XML, for updates.
These two options work in combination with one another, as described below.
v Enabling the ″Allow client updates only from these sites″ field and disabling the
″Use update site specified in Feature″ field forces the update site list to act as a
whitelist. Update can only occur from the listed updates sites.
v Enabling the ″Use update site specified in Feature″ field and disabling the
″Allow client updates only from these sites″ field allows the FEATURE.XML, to
be used for update and the Eclipse update manager and CA XML to be used for
install or the default update site list to be used for either install or update.
v Enabling both ″Allow client updates only from these sites″ field and ″Use
update site specified in Feature″ field specifies that only the update sites present
in the whitelist can be used. The update manager will try the update site
specified in the FEATURE.XML file first. If this fails, and a list of updates sites is
present, it will try the update site list next.
Note: The ″Allow client updates only from these sites″ setting takes precedent
over the ″Use update site specified in Feature″ setting. If ″Allow client updates
220 Installing Domino Servers and Notes Clients
only from these sites″ is enabled, the update site in the FEATURE.XML file must
be resident in the default update site list to be used for update.
v Disabling the ″Use update site specified in Feature″ option and having no
default sites enabled prevents all updates.
v Disabling both the ″Allow client updates only from these sites″ and the ″Use
update site specified in Feature″ options, and having default sites enabled,
allows updates from the default update site list.
Add an update site to the update site list: You can add an update site to the
update site list in the server Configuration Settings document.
1. From the IBM(R) Lotus(R) Domino(R) Administrator, select the Configuration
tab and click Server - Configuration.
2. Click Add Configuration or open the existing server document.
3. Click Client Upgrade - Provisioning.
4. Select the checkbox next to the Provisioning settings are enabled option.
5. Click New.
6. Type a descriptive server name of your choice.
7. Specify an existing update site location, for example http://abx20.zxc.com:80 or
https://abx20.zxc.com:443.
Note: If you are using Web-based HTTP protocol then specify the update site
value using HTTP or HTTPS format, for example http://<server>/updatesite.nsf/site.xml or https://abx20.zxc.com:443. The last part of the Web
address is inferred to be ″site.xml″, thus its specification in the path statement
is optional.
Note: If you are using a Domino NRPC protocol then specify the update site
value using NRPC format, for example NRPC://<server>/__<replicationID>/site.xml. You must specify ″site.xml″ as the last part of the NRPC address. You
can specify an Eclipse update site or an NSF-based update site.
8. Click OK.
9. Select the checkbox next to the server listed in the Sites to include in search
option.
Edit an existing update site in the update site list: You can change the server
name or URL of a site in the update site list using the server Configuration
Settings document.
1. From the IBM(R) Lotus(R) Domino(R) Administrator, click Server -
Configurations.
2. Select the Server Configuration document you want to edit, and click Edit
Configuration.
3. Click Client Upgrade - Provisioning.
4. From the ″Sites to include in search″, select the site to edit.
5. Click Edit.
6. Optionally change the descriptive server name to a new name.
7. Optionally change the server URL to a different server URL.
8. Click OK.
Delete an existing update site from the update site list: You can delete a site
from the update site list using the server Configuration Settings document.
Chapter 5. Installing and Setting Up Notes Clients 221
1. From the IBM(R) Lotus(R) Domino(R) Administrator, click Server -
Configurations.
2. Select the Server Configuration document you want, and click Edit
Configuration.
3. Click Client Upgrade - Provisioning.
4. From the ″Sites to include in search″, select the site(s) to delete.
5. Click Delete and OK.
Alternatively, you could simply disable the site by unchecking it in the update site
list user interface.
Specify that feature update be performed from the feature’s update site
(default): You can specify that feature update only be allowed from the update
site specified for that feature.
1. From the IBM(R) Lotus(R) Domino(R) Administrator, click Server -
Configurations.
2. Select the Server Configuration document you want, and click Edit
Configuration.
3. Click Client Upgrade - Provisioning.
4. Enable the ″Use update site specified in Feature″ option to update features
based on their FEATURE.XML update site. Ensure that the whitelist option is
disabled.
5. Disable the default update sites that are currently specified in the server
Configuration Settings document.
Specify that feature install can occur from a default update site, CA XML or
Update Manager: You can specify that feature install occur from a default update
site, CA XML, or a site specified using the Update Manager user interface.
1. From the IBM(R) Lotus(R) Domino(R) Administrator, click Server -
Configurations.
2. Select the Server Configuration document you want, and click Edit
Configuration.
3. Click Client Upgrade - Provisioning.
4. Disable ″Allow client updates only from these sites.″
5. Enable the default update sites that are currently specified in the server
Configuration Settings document.
Specify that feature update can occur from a default update site or
FEATURE.XML: You can specify that feature update occur from a default update
site, FEATURE.XML, or a site specified using the Update Manager user interface.
1. From the IBM(R) Lotus(R) Domino(R) Administrator, click Server -
Configurations.
2. Select the Server Configuration document you want, and click Edit
Configuration.
3. Click Client Upgrade - Provisioning.
4. Disable ″Allow client updates only from these sites.″
5. Enable ″Use update site specified in Feature.″
6. Enable the default update sites that are currently specified in the server
Configuration Settings document.
222 Installing Domino Servers and Notes Clients
Specify that feature install or update can occur from the whitelist only: You can
specify that feature install or update occur only from the whitelist. This method
enables you to tightly control where install and update can occur from using a list
of approved update sites. This provides the strongest security controls. Use the
server Configuration Settings document to accomplish this task.
1. From the IBM(R) Lotus(R) Domino(R) Administrator, click Server -
Configurations.
2. Select the Server Configuration document you want, and click Edit
Configuration.
3. Click Client Upgrade - Provisioning.
4. Enable ″Allow client updates only from these sites″.
Note: In this situation, ″Use update site specified in Feature″ has no effect
because ″Allow client updates only from these sites″ takes precedent.
Specify different site controls for feature install and update: You can specify
that feature update can only be performed from a site list but that feature install be
allowed from other sites as specified in the Update Manager user interface or CA
XML. This method is applicable when you want to allow feature install from
various sites but only permit feature update from an approved site. For example,
third-party features maintain their original update site location in their
FEATURE.XML. You may choose to move that feature to an authorized update site
and install from that site. However, if the ″Use update site specified in Feature″
option is enabled, the update could retrieve from that external update site, which
is not desirable. This method enables you to prevent update from occurring from
that site.
1. From the IBM(R) Lotus(R) Domino(R) Administrator, click Server -
Configurations.
2. Select the Server Configuration document you want, and click Edit
Configuration.
3. Click Client Upgrade - Provisioning.
4. Disable ″Use update site specified in Feature.″
5. Disable ″Allow client updates only from these sites″
6. Enable the default update sites that are currently specified in the server
Configuration Settings document.
Configuring component update for composite applications
Composite application update, supported by IBM(R) Lotus(R) Notes(R), IBM(R)
Lotus(R) Domino(R) and IBM(R) WebSphere(R) Portal, is available in this Notes
release. Composite applications and associated Eclipse-based features can be
updated when a user opens an application. Composite applications can update
composite application definitions. Certain Eclipse(TM) features can also be
updated.
A composite application definition can reference one or more Eclipse features as
application requirements. Each requirement can specify a particular update site
from which it will be provisioned.
You can use composite applications to install or update custom or third-party
features in Notes, as described here. You can also use the Eclipse update manager,
if exposed in Notes, to install or update custom or third-party features in Notes.
Chapter 5. Installing and Setting Up Notes Clients 223
For information about installing new features as part of Notes install or with a
third-party installer, see the topic Installing custom and third-party features and
plug-ins in this guide.
When a user opens a composite application or when a composite application
update operation occurs, if the application definition has changed, an update
operation is run to provision both newly specified features as well as existing
features that have newer available versions.
The feature requirement update site setting can specify a Domino server (or local
NSF replica) or a Portal server (or any HTTP server). Update site URL examples
for each server are as follows:
v The Domino server supports feature provisioning over the NRPC protocol.
– Domino server
NRPC://<server-hint-or-host>/<replica-id>/site.xml -> NRPC://updates.ibm.com/__85257258006000A1/site.xml
– Local replica ID
NRPC:///__85257258006000A1/site.xml
Note: Note the use of the double underscore and replica ID in the NRPC
protocol.v The Domino server optionally supports feature update over the HTTP/HTTPS
protocols.
HTTP://updates.ibm.com/updatesite.nsf/site.xml
Eclipse update sites in conjunction with Domino NSFs allow for such usage
scenarios as the following:
– Host the NSF-based update site, for example UPDATESITE.NSF, on a Domino
Web server.
– Supply an NSF-based update site, for example UPDATESITE.NSF, to others,
in which others can merge this NSF-based update site into their own.
– Supply individual features and plug-ins to others for their own use in their
own composite applications.
– Create custom features and plug-ins with the additional capability to create a
new NSF-based update site, for example UPDATESITE.NSF, and import these
features and plug-ins.v The Eclipse update site server (HTTP server) supports feature update over the
HTTP/HTTPS protocols.
http://updates.ibm.com/updatesite/site.xml
Domino NSF-based update sites
Domino provides the capability to put an Eclipse(TM) update site inside an NSF
database. An NSF-based update site is typically a separate database that doesn’t
contain composite applications. However, since any Notes application NSF can
contain a composite application, an update site NSF may contain a composite
application. For example, a third-party could deliver a composite application and
an update site, with the former pointing to the latter. Or an administrator could
put the composite application in an NSF-based update site and make it available to
users that way.
For more information about NSF-based update sites, see the topic Creating and
using an NSF-based update site in this guide.
224 Installing Domino Servers and Notes Clients
You can import Eclipse update sites into an NF-based update site application as
described below.
Creating and preparing the NSF-based update site
1. Create an NSF-based update site, for example UPDATESITE.NSF, using the File
- Application - New menu sequence and the Eclipse Update Site (8) template
(UPDATESITE.NTF) installed with the Domino server (and also with Notes 8x).
The UPDATESITE.NTF template is installed with the Domino server and also
during Notes client install. An update site application (for example
UPDATESITE.NSF) acts as an Eclipse-based update site hosted in an NSF Notes
application on a Domino server. It dynamically provides the site.xml, features,
and plug-ins.
Note: To see the Eclipse Update Site (8) template (UPDATESITE.NTF), click
Show Advanced Properties in the new Application dialog box.
The NSF-based update site acts as an Eclipse update site hosted in a Notes
application on a Domino server. It dynamically provides the SITE.XML,
features, and plug-ins.
2. Open the NSF-based update site.
3. Click the Import Local Update Site... action button.
4. From the resultant explanatory panel, use the Browse button to navigate to the
Eclipse update site.
5. Select the SITE.XML file.
6. Click Open.
An ″Importing update site″ progress bar appears.
Editing a Composite Application’s feature requirements update
site URL
There are two methods you can use to edit a composite application’s feature
requirements update site URL:
A. Recommended method: Using the Composite Applications Editor to specify an
update site for feature requirements
The preferred way to edit the update site URL for a feature requirement is through
the use of the Composite Application Editor (CAE) as described in the following
steps:
1. In Notes, open the composite application.
2. Click Actions - Edit Application... .
The Composite Applications Editor (CAE) opens in a new window.
3. From the resultant component list, right-click the desired component and select
Edit Component Properties.
4. Click Advanced.
A list of properties appears.
5. Select the property for the desired feature, for example url.Feature_NN, and
click Edit.
Alternatively, click Add and enter the name and the value.
6. Click OK to exit Advanced.
7. Click OK to exit the Properties pane.
8. Click Done to close and save the changes.
9. The modified CA XML is re-read and processed.
Chapter 5. Installing and Setting Up Notes Clients 225
B. Alternate method: Configuring a composite application to specify an update site
Use this process to define update sites for the contents of a particular composite
application NSF.
1. The administrator obtains a composite application NSF, for example
MyCompAppabx.nsf.
2. Accompanying the composite application NSF, the administrator obtains an
update site folder, which contains a \features and \plugins subdirectory, as
well as a SITE.XML file. The SITE.XML file lists features contained within the
update site folder.
3. The administrator modifies the composite application’s XML to point to a
specific Domino update site.
a. Open a composite application, for example MyCompAppabx.nsf, in Domino
Designer on the Domino server.
As the application is opening, do not click Cancel.
Accept any security screen prompts.
b. Click Composite Application - Application in the left pane navigator.
c. Click the composite application name in the list then click the Export tab.
This action outputs to an xml file of the same name, for example
MyCompAppabx.xml.
Leave the composite application open.
d. Open the XML file created in the previous step.
e. Modify each ″url.feature″ value to point to the needed Domino update site.
For example, for each <preference name=″url.feature″> entry, where
url.feature is the placeholder for the update site URL and the specific
feature name, point to the needed Domino update site.
The following format uses an NRPC protocol:
NRPC://<server>/__<replicationID>/site.xml
The following format uses an HTTP protocol:
HTTP://<server>/updatesite.nsf/site.xml4. Save and close the XML file.
5. In Domino Designer and within the open composite application, click the
composite application name in the list, click the Refresh tab, and select the
modified composite application XML file.
6. Open the NSF-based update site application, for example UPDATESITE.NSF,
and import the SITE.XML file from the local update site folder that
accompanies this composite application.
Note: A user can open the composite application using a Notes database link,
bookmark, or File - Application - Open on the server to initiate update.
For information about deploying and provisioning features to an existing client
runtime, see the topic ″Deploying and managing client plug-ins with widgets and
the widget catalog.″
Retrieving composite application definitions (CA XML) from
Domino
The NRPC URL format for retrieving composite application updates is as below:
NRPC://<Server-hint-or-host>/<replica-id>/composite.xml?<param>=<value>
Where:
226 Installing Domino Servers and Notes Clients
Server-hint-or-host = DNS host name, IP address, or server name
replica-id of the database on the target server
param -- <name|unid>
Name -- String to be used to lookup CA design element in view -- Look up first as
a name and if not found, then as an alias.
UNID -- UNID of the composite application design note
For example:
NRPC://abx_tc.upcdev.ibm.com/__8525634000734621/composite.xml?name=Hannover
WebSphere Portal and Composite Applications
WebSphere Portal composite application update is made available to the Notes
user through the Home Portal Account setting in Notes, as determined by the
Domino administrator. In addition, the administrator must also have installed the
WebSphere Portal composite application support for Notes on the same WebSphere
Portal server to which the user’s Home Portal Account points. WebSphere Portal
composite application update pertains typically to the Notes user who is working
with composite applications that contain Web projections.
v Installing the WebSphere Portal composite application support for Lotus Notes
v Specifying the home portal account using policy
v Specifying the home portal account using preferences
Resources for learning more about composite applications
The following reference information is available for learning more about
configuring and using composite applications.
v For information and examples describing how to create and deploy composite
applications in the Notes context, such as composite applications tutorials, see
IBM developerWorks at http://www.ibm.com/developerworks/lotus/composite-apps.
v See the composite applications blog at http://www.ibm.com/developerworks/blogs/page/CompApps and http://www.ibm.com/developerworks/blogs/page/CompApps?entry=blog_sitemap.
v For related information about developing and deploying NSF-based composite
applications, see Domino Designer Help at http://publib.boulder.ibm.com/infocenter/domhelp/v8r0/index.jsp and the IBM developerWorks composite
applications blog at http://www.ibm.com/developerworks/blogs/page/CompApps .
v For information about creating a composite application to run in the IBM(R)
Websphere(R) Portal environment, see the IBM WebSphere Portal Information
Center at http://www.ibm.com/developerworks/websphere/zones/portal/proddoc.html.
v For information about NSF-based update sites, see the ″Creating and using an
NSF-based update site″ topic in this guide and the ″NSF based Update Sites″
blog entry at http://www-03.ibm.com/developerworks/blogs/page/CompApps?entry=nsf_based_update_sites.
v For additional information about NSF-based update sites in conjunction with
composite applications, see the composite applications blog at IBM
developerWorks, for example, the NSF-based update site posting at
Chapter 5. Installing and Setting Up Notes Clients 227
http://www-03.ibm.com/developerworks/blogs/page/CompApps?entry=nsf_based_update_sites and the site index at
http://www.ibm.com/developerworks/blogs/page/CompApps?entry=blog_sitemap.
Also see the ″NSF-based update sites and composite applications″ posting at:
http://www-03.ibm.com/developerworks/blogs/resources/CompApps/
NSF_Based_Eclipse_Update_Sites_and_Composite_Applications.pdf
v For information about using composite applications, see the Notes help for these
Help categories:
– Portal Applications Catalog
– Composite Applications Editor
– Portal Template Library
– Domino Designer Property Broker
Enabling user-initiated update with EUM
To allow users to install or update custom or third-party Eclipse(TM) features and
plug-ins into an existing IBM(R) Lotus(R) Notes(R) installation, you can enable
display of the Eclipse update manager user interface. By default, the Eclipse
update manager (EUM) is not displayed. You can enable the EUM using either
IBM(R) Lotus(R) Domino(R) desktop policy or an Eclipse preference.
Note: This Eclipse update manager (EUM) method, which requires user-initiated
install and update for deploying plug-ins to an existing client installation, has been
superseded by the client management process available with widgets and the
centrally managed widget catalog. That process is described in the topic
″Deploying and managing client plug-ins with widgets and the widget catalog.″ It
is not suggested that you use EUM to deploy and manage plug-ins. Instead,
deploy plug-ins to clients using a centrally managed widget catalog method.
Policy
Set the following policy to enable EUM.
1. Using the IBM(R) Lotus(R) Domino(R) Administrator client, open the Desktop
policy settings document.
2. On the Basics tab, locate the Provisioning section at the bottom of the
document.
3. In the Allow user to do user initiated updates field, click Enable to allow
user-initiated updates or Disable to prevent user-initiated updates.
Preference
Add the following line to the user’s PLUGIN_CUSTOMIZATION.INI file
(<install_dir>/framework/rcp/plugin_customization.ini after install or
deploy\plugin_customization.ini before install) to enable EUM.
com.ibm.notes.branding/enable.update.ui=true
Additional step to access and use the feature
In a multi-user Notes install, after the user has used EUM she must open the
Application Management panel in Notes and enable the feature, as below.
1. Click File - Application - Application Management.
2. For each feature to be enabled, select the feature, then click Enable.
Enable multiple features one at a time.
Despite being prompted to restart after every action, you can enable multiple
features before restarting.
228 Installing Domino Servers and Notes Clients
3. Allow the client to restart when you are prompted.
Once restarted, you can use the feature.
Application management is documented in the ″Using Expeditor Client″ help in
the Expeditor information center at http://www.ibm.com/developerworks/lotus/documentation/expeditor.
Specifying a default multi-user install directory with EUM
In a multi-user installation, installing a feature using EUM places that feature in
the (install_dir)\framework\shared\eclipse directory. For example, if you log in as
a non-administrative user, and install a feature using EUM, that feature is installed
to (install_dir)\framework\shared\eclipse directory and available to all users in
that multi-user installation.
Note: Using the EUM method you need administrator privileges to update
features in the Notes\framework directory. However, you do not need
administrator privileges if you are installing or updating features to the
workspace\applications directory. Note that the applications directory is located in
the user’s workspace directory.
All features, when installed by a non-administrative user in a Notes multi-user
install, are installed to the <install_dir>\framework\shared\eclipse directory by
default. You can override this default for a particular feature by having the
feature’s application developer specify a colocation-affinity attribute. To limit a
user’s ability to install a feature, the deployer can specify a colocation-affinity
attribute with the ID ″com.ibm.rcp.site.anchor.shared.feature″. The resultant site for
a deployer would still be the shared site, chosen because the colocation-affinity
selects that site. A user attempting to install the feature would have the feature
installation fail, since the site specified by the colocation-affinity is not accessible.
Information about setting a colocation-affinity value is found in the ″Expeditor
System Administrators Guide″ at http://www.ibm.com/developerworks/lotus/documentation/expeditor.
Creating and using a traditional third-party installer
Using the underlying Lotus(R) Expeditor platform, developers and deployers can
create, assemble, and deploy custom and third-party features to the IBM(R)
Lotus(R) Notes(R) runtime to add new features after Notes has been installed.
For information about customizing the supplied Notes install kit to add new
custom or third-party features during Notes install, see the topic Customizing
Notes installation using the install manifest in this guide. While this process
describes how to customize the install manifest and update site to prepare to
install Notes, the information can be useful as you create the third-party installer
and install custom or third-party features into an existing Notes runtime.
For information about signing new features and configuring responses to
provisioning trust prompts during install and update, see the topic Signing custom
or third-party features and plug-ins for install and update in this guide.
Assumptions and prerequisites
Assumptions and prerequisites are as follows:
Chapter 5. Installing and Setting Up Notes Clients 229
v A team consisting of a developer, assembler, and deployer has created a new
Eclipse(TM) feature or feature set. The team is preparing to create a third-party
installer that will deploy that feature or feature set into an existing Notes
runtime.
v You have a working knowledge of Eclipse feature development and deployment
practices, including file and format conventions.
v You have a general knowledge of IBM(R) Lotus(R) Expeditor development and
deployment practices.
v Notes is already installed on the platform-supported clients to be provisioned.
v The feature or feature set to be installed adheres to the standard Eclipse file and
directory structures for the deploy directory which contains the install manifest
INSTALL.XML and PLUGIN_CUSTOMIZATION.INI files.
v The feature or feature set to be installed adheres to the standard Eclipse file and
directory structures for the update site directory containing the features and
plugins subdirectories and the site index SITE.XML file.
v You have signed all JAR files in the Eclipse update site.
v The choice of single user or multi-user install has been decided.
Process overview
This procedure uses a combination of existing Expeditor and Notes documentation
to describe the process for creating a third-party installer. Each step may contain
one or more links to topics in which you will find information about how to
complete the step.
The overview steps for creating and deploying a traditional third-party installer
within the context of Expeditor and Notes are:
1. Create the new feature using the Expeditor integrate development environment
(IDE).
This tool creates the Eclipse update site, including the updateSite\features
subdirectory contents, updateSite\plugins subdirectory contents, and
updateSite\site.xml index file. Although you can create the feature or feature
set using any Eclipse tools, the Expeditor IDE helps prepare the update site for
you.
2. Sign the JAR files in the update site.
3. Create the install manifest file in the deploy directory, deploy\install.xml.
4. Determine where the Notes <install_dir> \framework is located on the target
system. For example, the Notes <install_dir>framework directory may be
Programs and Files\IBM\Lotus\Notes\data\framework.
5. Create a new PLUGIN_CUSTOMIZATION.INI file in the deploy directory,
deploy\plugin_customization.ini.
Read the existing PLUGIN_CUSTOMIZATION.INI on the target system to help
determine what preferences to add to your new installer’s
PLUGIN_CUSTOMIZATION.INI file.
6. Merge your new PLUGIN_CUSTOMIZATION.INI file with the installed
PLUGIN_CUSTOMIZATION.INI on the target client.
7. Start Notes.
8. Process your install manifest, deploy\install.xml, to install the new feature or
feature set to the existing Notes runtime on the target system. You can do this
using the rcplauncher tool or you can bundle the new installer in a kit.
The steps above are explained below and, where possible, contain links to
explanatory help.
230 Installing Domino Servers and Notes Clients

1. Create the feature, for example, using the Expeditor integrated development
environment (IDE). For more information, see the following resources:
Note: See the Expeditor technical library for new release documentation
postings at http://www.ibm.com/developerworks/lotus/documentation/expeditor.
v Developing applications:
http://publib.boulder.ibm.com/infocenter/ledoc/v6r11/topic/com.ibm.rcp.tools.doc.appdev/designingapps_main.html
v Using the Lotus Expeditor Toolkit environment with Notes:
http://publib.boulder.ibm.com/infocenter/ledoc/v6r11/topic/com.ibm.rcp.tools.doc.appdev/intro_xpdtkenvlotusnotes.html
v Packaging applications for deployment:
http://publib.boulder.ibm.com/infocenter/ledoc/v6r11/topic/com.ibm.rcp.tools.doc.admin/Deployingapplications.html
2. Create or confirm the features and plug-ins content in the update site. If you
used the Expeditor IDE, the features and plugins subdirectories and their JAR
file contents should already exist.
3. Create or confirm the SITE.XML index in the update site. If you used the
Expeditor IDE, the SITE.XML index should already exist.
4. Sign the feature and plug-in JAR files in the update site.
5. Create a PLUGIN_CUSTOMIZATION.INI file and add any additional settings
that you need. For example, you might specify the name of a default update
server. Ensure that this file resides in your deploy directory,
deploy\plugin_customization.ini.
Note: Your third-party installer should merge its
PLUGIN_CUSTOMIZATION.INI file with the
PLUGIN_CUSTOMIZATION.INI file resident on the target client
(<install_dir\framework\plugin_customization.ini). You can use the site
registry to determine where Notes is installed on the target client. To do so,
click Start - Run - regedit and then click Software - Lotus - Notes - 8.x. The
DataPath value states where Notes is installed.
6. Create and validate the install manifest INSTALL.XML to be used during
third-party install. Ensure that this file resides in your deploy directory,
deploy\install.xml. The install manifest describes what to install, update, or
remove. For more information, see the following resources:
v Assembling and Deploying Lotus Expeditor Applications:
http://publib.boulder.ibm.com/infocenter/ledoc/v6r11/topic/com.ibm.rcp.tools.doc.admin/cutlassassemblinganddeploying.html
v Using the provisioning manifest:
http://publib.boulder.ibm.com/infocenter/ledoc/v6r11/topic/com.ibm.rcp.tools.doc.admin/provisioningmanifest_using.html
v Provisioning manifest DTD:
http://publib.boulder.ibm.com/infocenter/ledoc/v6r11/topic/com.ibm.rcp.tools.doc.admin/manifestDTD.html
7. Perform a Merge Manifest operation. For more information, see the following
resources:
v Deploying features to the platform:
http://publib.boulder.ibm.com/infocenter/ledoc/v6r11/topic/com.ibm.rcp.tools.doc.admin/Deployingfeaturestotheplatform.html
Chapter 5. Installing and Setting Up Notes Clients 231
v Understanding the merge processing for the provisioning manifest:
http://publib.boulder.ibm.com/infocenter/ledoc/v6r11/topic/com.ibm.rcp.tools.doc.admin/provisioningmanifest_understandingmerging.html
Note: Scenario 5 and 6 are the most applicable for Notes. 8. Determine where the Notes runtime is located on the target system and start
Notes.
Note: Before you can install, you must know where the Notes platform
resides on the target system. Use the site registry to determine where Notes is
installed on the target client. Click Start - Run - regedit and then click
Software - Lotus - Notes - 8.x. The DataPath value states where Notes is
installed.
9. Deploy the new features to the Notes runtime and launch provisioning.
You can use the rcplauncher command to process the install manifest and
initiate install. You can also optionally package the third-party installer in an
installation kit and initiate installation from that kit. For more information, see
the following topics in the Lotus Expeditor Information Center at
http://publib.boulder.ibm.com/infocenter/ledoc/v6r11/index.jsp
v Using the Provisioning application:
Note: Expeditor does not currently display a progress bar during install.
v Managing using another management system:
v Using the Provisioning application when the platform is already running:10. Test and distribute the third-party installer as needed.
Lotus Expeditor documentation references
You may find the following Expeditor topics helpful as you begin to create
third-party installers. See the Lotus Expeditor Information Center at
http://publib.boulder.ibm.com/infocenter/ledoc/v6r11/index.jsp
v Using the provisioning manifest -- This describes how to find the Expeditor
installation in the registry/etc directory or home directory property files.
v Understanding the merge process for the provisioning manifest and provisioning
manifest DTD -- These describe how to create the appropriate manifests to
install/remove/update features.
v Using the provisioning application -- This describes how to install and uninstall
features in Expeditor.
v Using the provisioning application with Dcommands -- This describes how to
launch the platform provisioning application using Dcommands regardless of
whether the platform is currently running.
232 Installing Domino Servers and Notes Clients
Chapter 6. Upgrading Notes Clients
This chapter explains how to upgrade the IBM(R) Lotus(R) Notes(R) client.
Upgrading Notes clients
IBM(R) Lotus(R) Notes(R) supports the following options for upgrading Notes
clients:
v Upgrade-by-mail
v Lotus Notes Smart Upgrade Run-As Wizard
v Lotus Notes Smart Upgrade
v Administrative installation
For system requirements for this release, see Lotus Tech Notes at
http://www.ibm.com/software/lotus/support/notes/support.html.
See the platform-specific considerations and install topics in this guide for
information about running the Notes installer to upgrade your existing Notes
client systems to this release. Also see the topics describing how to customize the
Notes install kit prior to upgrade.
Upgrade-by-mail is an e-mail notification system that notifies users to upgrade
their Notes clients and mail file templates to the Notes and Domino design.
Upgrade-by-mail requires that you copy all installation files to a network file
server or a shared directory that users can access. In the upgrade notification, you
specify the path to SETUP.EXE. The notification message includes buttons that
users click to launch the Lotus Notes installation program and to replace the
design of their Notes mail file.
For Microsoft(R) Windows(R) users, you can also upgrade an Notes 6.5.x and
greater installation to the current Notes release using the Notes installer in the
Notes install kit. If the IBM(R) Lotus(R) Domino(R) Administrator client and/or
IBM(R) Lotus(R) Domino(R) Designer client are resident, they can also be
upgraded using the Notes Allclient install kit.
Note: Upgrade-by-mail is not available for IBM(R) Lotus(R) Domino(R) Web
Access (iNotes Web Access) users. Upgrade-by-mail applies only to Notes client
users.
The Smart Upgrade Run-As wizard (SUSETRUNASWIZARD.EXE) creates an
executable file (SURUNAS.EXE) that Notes client users can then run to upgrade
their Notes clients. Notes client users can use the Smart Upgrade Run-As
(SURunas) feature to upgrade to a newer Notes client release. Smart Upgrade
Run-As is designed for Notes client users who do not have administrator
privileges but who still need to periodically update their Notes client software.
Notes client users with administrator privileges on their local computer can still
use Smart Upgrade.
Like Upgrade-by-mail, Lotus Notes Smart Upgrade sends a notification to users to
upgrade their Notes clients. Lotus Notes Smart Upgrade lets you set a grace period
during which users must upgrade their clients.
233
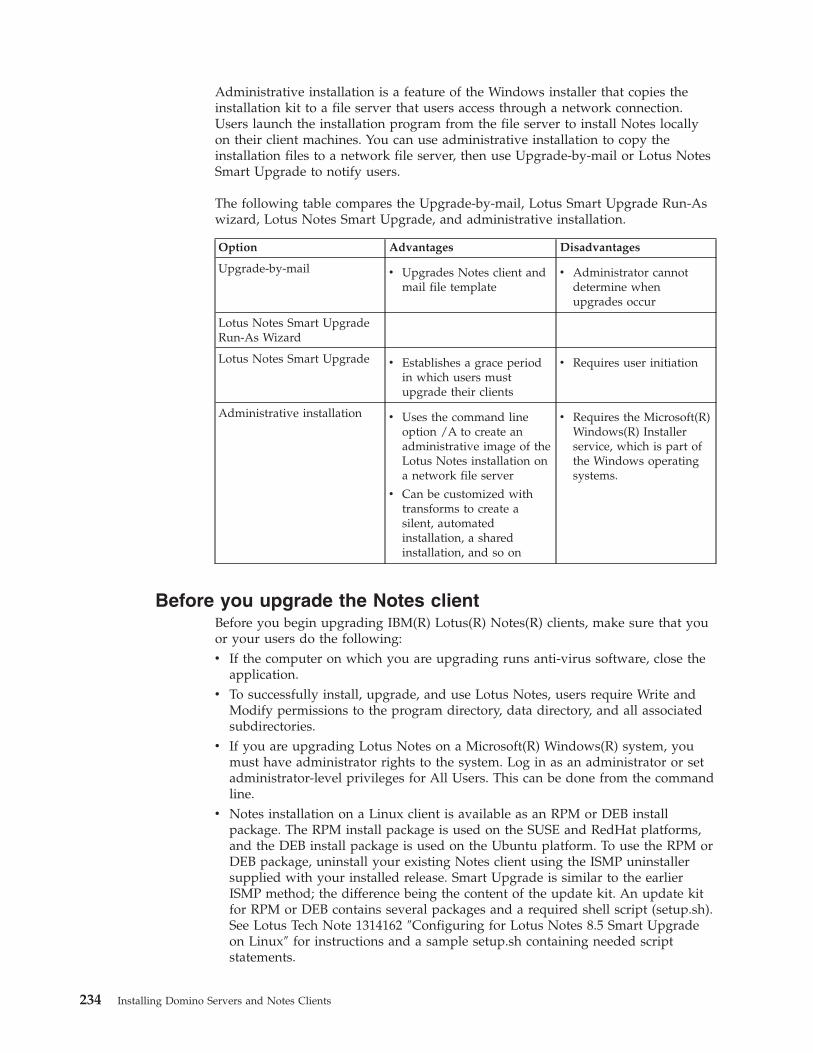
Administrative installation is a feature of the Windows installer that copies the
installation kit to a file server that users access through a network connection.
Users launch the installation program from the file server to install Notes locally
on their client machines. You can use administrative installation to copy the
installation files to a network file server, then use Upgrade-by-mail or Lotus Notes
Smart Upgrade to notify users.
The following table compares the Upgrade-by-mail, Lotus Smart Upgrade Run-As
wizard, Lotus Notes Smart Upgrade, and administrative installation.
Option Advantages Disadvantages
Upgrade-by-mail v Upgrades Notes client and
mail file template
v Administrator cannot
determine when
upgrades occur
Lotus Notes Smart Upgrade
Run-As Wizard
Lotus Notes Smart Upgrade v Establishes a grace period
in which users must
upgrade their clients
v Requires user initiation
Administrative installation v Uses the command line
option /A to create an
administrative image of the
Lotus Notes installation on
a network file server
v Can be customized with
transforms to create a
silent, automated
installation, a shared
installation, and so on
v Requires the Microsoft(R)
Windows(R) Installer
service, which is part of
the Windows operating
systems.
Before you upgrade the Notes client
Before you begin upgrading IBM(R) Lotus(R) Notes(R) clients, make sure that you
or your users do the following:
v If the computer on which you are upgrading runs anti-virus software, close the
application.
v To successfully install, upgrade, and use Lotus Notes, users require Write and
Modify permissions to the program directory, data directory, and all associated
subdirectories.
v If you are upgrading Lotus Notes on a Microsoft(R) Windows(R) system, you
must have administrator rights to the system. Log in as an administrator or set
administrator-level privileges for All Users. This can be done from the command
line.
v Notes installation on a Linux client is available as an RPM or DEB install
package. The RPM install package is used on the SUSE and RedHat platforms,
and the DEB install package is used on the Ubuntu platform. To use the RPM or
DEB package, uninstall your existing Notes client using the ISMP uninstaller
supplied with your installed release. Smart Upgrade is similar to the earlier
ISMP method; the difference being the content of the update kit. An update kit
for RPM or DEB contains several packages and a required shell script (setup.sh).
See Lotus Tech Note 1314162 ″Configuring for Lotus Notes 8.5 Smart Upgrade
on Linux″ for instructions and a sample setup.sh containing needed script
statements.
234 Installing Domino Servers and Notes Clients
The Tech Notes repository is at http://www.ibm.com/software/lotus/support/notes/support.html. The upgrade kit contains both RPM and DEB packages. An
example of script for both RPM and DEB is attached to this Tech Note.
v You need administrative or root access rights to install Lotus Notes.
For cases in which administrative rights are not available, enable the setting
″Always install with elevated privileges.″ The setting ″Always install with
elevated privileges″ is a Windows setting that is part of Window’s User Policies.
Refer to your Microsoft Windows documentation for details. Refer to the Release
Notes for the most current information on permissions required when installing
as a non-administrator.
v Options for installing the Lotus Notes client on Restricted or Standard/Power
User computers are described in the Microsoft Windows Installer
documentation.
v Review options for customizing the Notes client installation and set up.
v (Optional) Use the People - by Client Version view in the Domino Directory to
quickly determine the Notes client version in use in your domains.
Using Upgrade-by-mail
Upgrade-by-mail is a feature that sends an e-mail notification to specified users to
upgrade their IBM(R) Lotus(R) Notes(R) clients and optionally, their mail file
templates. You can also use Upgrade-by-mail to notify users that their mail files
have been migrated to Notes mail.
Note: Upgrade-by-mail is not available for IBM(R) Lotus(R) Domino(R) Web
Access (iNotes Web Access) users. Upgrade-by-mail applies only to Notes client
users.
The upgrade notification contains two buttons that users click to upgrade their
clients and mail files. The Install Notes button launches a Notes client installation
program from a directory on a network drive to which users have access. The
Upgrade Mail File button replaces the user’s current mail template with a locally
stored Notes/Domino mail template or another specified template, such as a
customized mail template. Users must upgrade their Notes clients to install the
Notes/Domino mail file template locally, before they upgrade their mail files.
Using the Upgrade Mail File button is optional. You must complete the Mail
Template Information section in the upgrade-by-mail notification to enable the
Upgrade Mail File button. If you do not complete this section, Upgrade-by-mail
does not display the button on the e-mail notification.
Before you use Upgrade-by-mail
Before you begin, complete the following tasks:
v Back up the IBM(R) Lotus(R) Notes(R) client.
v Create an installation directory on an IBM(R) Lotus(R) Domino(R) server or a
file server to which all users have network access, then copy all Notes
installation directories and files to this folder.
Note: To use Upgrade-by-mail to upgrade mail file templates, users must have at
least Designer access to their mail application. If users do not have this level of
access, use the mail conversion utility to update mail file templates.
Chapter 6. Upgrading Notes Clients 235
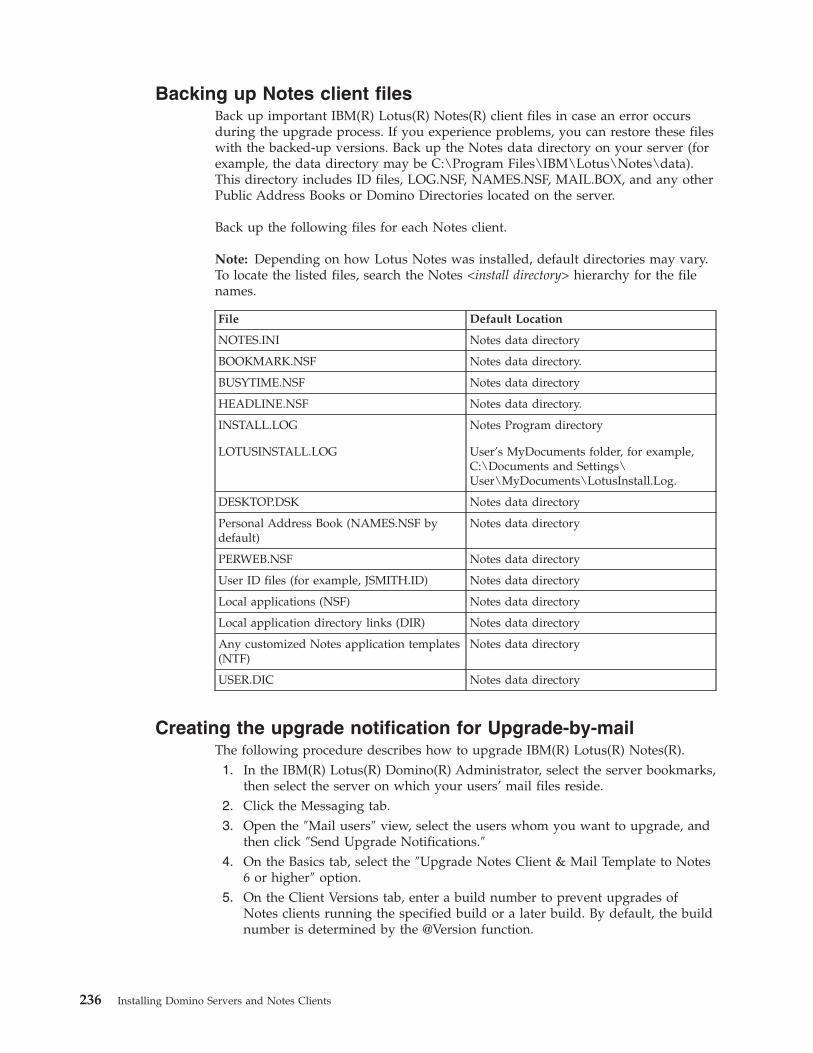
Backing up Notes client files
Back up important IBM(R) Lotus(R) Notes(R) client files in case an error occurs
during the upgrade process. If you experience problems, you can restore these files
with the backed-up versions. Back up the Notes data directory on your server (for
example, the data directory may be C:\Program Files\IBM\Lotus\Notes\data).
This directory includes ID files, LOG.NSF, NAMES.NSF, MAIL.BOX, and any other
Public Address Books or Domino Directories located on the server.
Back up the following files for each Notes client.
Note: Depending on how Lotus Notes was installed, default directories may vary.
To locate the listed files, search the Notes <install directory> hierarchy for the file
names.
File Default Location
NOTES.INI Notes data directory
BOOKMARK.NSF Notes data directory.
BUSYTIME.NSF Notes data directory
HEADLINE.NSF Notes data directory.
INSTALL.LOG
LOTUSINSTALL.LOG
Notes Program directory
User’s MyDocuments folder, for example,
C:\Documents and Settings\
User\MyDocuments\LotusInstall.Log.
DESKTOP.DSK Notes data directory
Personal Address Book (NAMES.NSF by
default)
Notes data directory
PERWEB.NSF Notes data directory
User ID files (for example, JSMITH.ID) Notes data directory
Local applications (NSF) Notes data directory
Local application directory links (DIR) Notes data directory
Any customized Notes application templates
(NTF)
Notes data directory
USER.DIC Notes data directory
Creating the upgrade notification for Upgrade-by-mail
The following procedure describes how to upgrade IBM(R) Lotus(R) Notes(R).
1. In the IBM(R) Lotus(R) Domino(R) Administrator, select the server bookmarks,
then select the server on which your users’ mail files reside.
2. Click the Messaging tab.
3. Open the ″Mail users″ view, select the users whom you want to upgrade, and
then click ″Send Upgrade Notifications.″
4. On the Basics tab, select the ″Upgrade Notes Client & Mail Template to Notes
6 or higher″ option.
5. On the Client Versions tab, enter a build number to prevent upgrades of
Notes clients running the specified build or a later build. By default, the build
number is determined by the @Version function.
236 Installing Domino Servers and Notes Clients
6. On the Software Distributions tab, in the Notes Install Kit Paths section, enter
the directory path in the ″Root path for Install kits″ field using the following
format:
\\server_name\shared_drive_name\installation_folder_name
7. In the ″Path for <platform>″ fields, enter the file path to the installation file
following the format above, and include the installation executable, for
example SETUP.EXE, in the path.
8. If you want users to upgrade their mail file templates, complete the Mail
Template Information section. Enter the template name of the existing mail
files. The default field value is a wild card character (*).
Note: Complete the Mail Template Information section to include an Upgrade
Mail button in the upgrade notification sent to users.
9. The new mail template name appears in the New Mail template file name
field. If you renamed the template or used a custom mail template, enter the
new name. The new template must exist in your users’ Notes data directory.
10. The ″Ignore 200 category limit″ check box is selected. If you want no more
than 200 folders created, deselect the check box.
11. If you are upgrading IMAP clients, select the ″Mail file to be used by IMAP
mail clients″ check box.
12. (Optional) To automatically upgrade custom folders to the Inbox design, select
the ″Upgrade custom folders″ check box.
13. (Optional) Select the ″Prompt before upgrading custom folders″ check box.
14. (Optional) Complete the Additional Information field.
15. (Optional) Select whether to be notified after users have upgraded their mail
file templates.
16. Click Send.
Installing Lotus Notes with Upgrade-by-mail
The upgrade notification includes two buttons. The Install Notes button runs the
IBM(R) Lotus(R) Notes(R) client installation program. The following procedure is
intended for Notes client users.
1. Click the Install Notes button.
2. Follow the prompts on the Setup screens to properly install the software.
3. Start Notes.
Notes sets up and upgrades the software automatically if you install Lotus Notes
in the same directory as the previous release of Lotus Notes. If you install the
Lotus Notes software in a different directory, Lotus Notes prompts you to complete
the configuration process. If you install Lotus Notes in a different directory, be
aware that the Setup installation program places the NOTES.INI file in the Notes
program directory.
Upgrading the mail file template with Upgrade-by-mail
After users install IBM(R) Lotus(R) Notes(R), they must return to the upgrade
notification to upgrade the mail file template.
1. Click Upgrade Mail File.
2. When prompted for a password, enter your Notes password.
3. Lotus Notes upgrades the template automatically.
Chapter 6. Upgrading Notes Clients 237
Using Notes Smart Upgrade
IBM(R) Lotus(R) Notes(R) Smart Upgrade notifies users to update their Notes
client to a later release. You have the option of using Lotus Notes Smart Upgrade
with a policy document and policy settings documents to help manage updates. If
you choose not to use policies, use the settings in the Smart Upgrade kit document
to manage updates.
Note: Policies are not required to use Smart Upgrade.
You cannot upgrade a pre-Notes 8 client on the Linux or Apple Mac OS X platform
to this release.
Prerequisites
To use Smart Upgrade as a means of upgrading Notes clients, you must meet the
following prerequisites:
v Notes client already installed
v Connectivity to a Domino server
v Smart Upgrade application created, configured, deployed, and enabled
v User’s Location documents specify the correct home server on the Servers tab of
the document
Note: If you are using Smart Upgrade on a Linux system, see the ″Before you
upgrade the Notes client″ topic in this guide and Lotus Tech Note 1314162
″Configuring for Lotus Notes 8.5 Smart Upgrade on Linux″ for instructions.
To use Lotus Notes Smart Upgrade, follow this procedure:
1. Create an application using the Smart Upgrade kits to host Notes client update
kits.
2. Update the Configuration Settings document in the Domino Directory with a
link to the Smart Upgrade application. Domino uses its replica ID in the link
and does the following in this order 1.) Looks for a local replica of that
application, and if found, uses it. 2.) Looks for a replica of that application on
any cluster mates if the server is in a cluster, and if found, uses it. 3) Uses the
application on the server specified in the Server Configuration document.
3. Download an update kit, also known as an incremental installer, from the Lotus
developerWorks site:
http://www.lotus.com/ldd/smartupgrade
4. Create a an upgrade kit document in the Smart Upgrade application and attach
a Notes client kit or an All Client kit to the kit document, or designate a shared
network drive in the kit document.
Note: If you are preparing a Smart Upgrade kit for use on the Linux platform,
note that the kit for RPM contains several RPM packages and requires a shell
script (setup.sh). See Lotus Tech Note 1314162 ″Configuring for Lotus Notes 8.5
Smart Upgrade on Linux″ for instructions.
5. If you are using policies, create or modify a desktop policy settings document
to specify the updated release to deploy and the date on which the grace
period for updating a Notes client ends.
6. If you are using policies, create or modify a policy document to assign users or
groups to the desktop policy settings document.
238 Installing Domino Servers and Notes Clients
7. If you are using policies, use the policy document to assign users and groups to
the policy. See the topic ″Planning and assigning policies.″
Note: The Smart Upgrade kits are available in English and other languages (for
language packs).
How Smart Upgrade performs an upgrade
If the Smart Upgrade Timer on the IBM(R) Lotus(R) Notes(R) client expires, the
next time that users log in to their IBM(R) Lotus(R) Domino(R) home server or its
cluster mate, Smart Upgrade does the following:
1. Compares the release number of the user’s Notes client to the release number
specified in the Source version field of the kit document in the Smart Upgrade
application. The Notes client sends a match pattern to the server including the
Notes client’s current version, the platform and the localization. The Install type
is also sent. The server then looks for a matching kit.
2. If the server finds a match, it sends a flag back to the Notes client indicating an
upgrade kit may exist.
3. The Notes client searches the Smart Upgrade application for a match for its
current Notes client version, platform and localization. The Notes client also
checks the install type.
Note: Smart Upgrade kits utilize a Readers field; therefore, the Notes client
only sees kits for the user specified in the Allowed Users and Servers field of
the Smart Upgrade Kit document.
4. If the user’s Deploy version field on the desktop policy settings document is
populated with a version number, Notes compares that version number to the
version number specified in the Destination version field of the kit document.
Note: Specifying the upgrade kit release number in the Deploy version field of
the desktop policy settings document is optional. If that field is blank, but an
update kit is available, Lotus Notes Smart Upgrade skips Step 4 and uses the
release number of the update kit to continue the upgrade process.
5. If a match is found, and users are specified or are members of a specified
group, Lotus Notes Smart Upgrade displays a Smart Upgrade dialog box that
prompts the users to upgrade their Notes client.
6. Users can update their clients when prompted or delay the upgrade for a
specified period of time. If the user has a policy that specifies an Upgrade
deadline and that date has expired, the Smart Upgrade dialog box displays an
″Update Now″ button that forces users to update their Notes client with no
options for further delay. If the setting ″Remind me every hour after upgrade
deadline has passed″ is set in the policy settings document, users can delay the
Smart Upgrade in one hour increments before being prompted again.
Smart Upgrade server failover to another clustered server
Smart Upgrade server failover is available with clustered servers. To use this
feature, paste the link for the Smart Upgrade application into a Configuration
Settings document on a clustered server. When the IBM(R) Lotus(R) Notes(R) client
user logs on, the user’s home server’s Configuration Settings document is checked
to access the link to the Smart Upgrade application. Smart Upgrade then checks
that server for the link to the application. If the server containing the application is
available, it uses it. If the server containing the application is not available, Smart
Upgrade searches, by replica ID and name, for a replica server within the cluster
and tries to open it on a replica server.
Chapter 6. Upgrading Notes Clients 239
When a Notes client user receives the Smart Upgrade prompt and clicks OK to
initiate the upgrade, the name of the server containing the Smart Upgrade
application and its replica ID are written to the NOTES.INI settings
SmartUpgradeDBpath={server name}!!{database file name} and
SmartUpgradeReplicID=xxxxxxx. Smart Upgrade looks for the user’s home mail
server. If the user’s home mail server is not accessible, Smart Upgrade uses the
previously-saved NOTES.INI variable SmartUpgradeReplicID= and path to search
for the replicated Smart Upgrade application within the clustered servers. If the
user’s home mail server is accessible, the Smart Upgrade application on that server
is used.
If all attempts to run the Smart Upgrade fail, the user receives a message
indicating that no Smart Upgrade application is available.
Creating a Smart Upgrade application
Use the Smart Upgrade kits template (SMUPGRADE.NTF) to create the IBM(R)
Lotus(R) Notes(R) Smart Upgrade application that will store the upgrade kits. The
application must reside on at least one server in the domain. After the Smart
Upgrade application is added to the application catalog, other servers can locate
the application. If you replicate the Smart Upgrade application to other servers in
the domain, users will have more choices in the application catalog and possibly
fewer network problems accessing the update kits.
1. In the IBM(R) Lotus(R) Domino(R) Administrator client, choose File -
Application - New.
2. In the New Application dialog box, enter the server name and application title.
3. Enter a file name in the File Name field.
4. Click Template Server, and then choose the server on which the application will
reside.
5. Select the ″Show advanced templates″ check box.
6. Select ″Smart Upgrade kits″ from the box of template names, then click OK.
7. After you create the Smart Upgrade application, create an application link in
your Configuration Settings document in the Domino Directory.
Smart Upgrade Tracking Reports application
The Smart Upgrade Tracking Reports application is a repository for storing Smart
Upgrade Tracking Reports that contain detail information about the status of all
attempts to run Smart Upgrade on IBM(R) Lotus(R) Notes(R) clients in a domain.
Use it to determine whether the Notes clients are upgrading successfully when
using Smart Upgrade, or to determine which users are experiencing problems. If
there are instances where Smart Upgrade fails, use the information in the report to
assist in determining the problem without having to visit the user’s desktop. You
can also use the reports to determine whether there is a repeating problem on
multiple clients which could be related to the configuration of the Smart Upgrade
application containing the kit information.
During the server setup of a domain’s first server, IBM(R) Lotus(R) Domino(R)
creates a mail-in application named Lotus Notes/Domino Smart Upgrade Tracking
Reports application (LNDSUTR.NSF) using the template LNDSUTR.NTF. Domino
also creates the corresponding mail-in document. Notes automatically creates
Smart Upgrade Tracking reports each time Smart Upgrade runs on a client in your
domain. Reports of successful upgrades are sent to the Smart Upgrade Tracking
240 Installing Domino Servers and Notes Clients
Reports application the first time the Notes client is started after the successful
upgrade. Reports of unsuccessful upgrades are sent immediately after the upgrade
fails or cancels.
If you prefer, you can manually set up the application by using LNDSUTR.NTF,
and you can then create the corresponding mail-in document.
If you are using policies, enable Smart Upgrade Tracking on the desktop policy
settings document’s Smart Upgrade tab. The Notes client then uses the information
that you enter there to mail a Smart Upgrade Tracking Report each time Smart
Upgrade is run on Notes clients in your domain.
You can view reported information by Status, that is, sorted according to whether
the Smart Upgrade succeeded, failed, or was canceled. You can also view reports
by date, by Notes/Domino version, by operating system version, or by user.
Using Smart Upgrade tracking after upgrading
If you upgrade to this Domino release and you have not set up or used Smart
Upgrade Tracking in the past, you need to manually create the Smart Upgrade
Tracking Reports application and the mail-in document. You then need to modify
the desktop policy settings document to enable Smart Upgrade Tracking for the
users whose upgrades you want to track.
Creating a Smart Upgrade Tracking Reports application
Use this procedure to manually create the Smart Upgrade Tracking Reports
application.
1. From the IBM(R) Lotus(R) Domino(R) Administrator client, choose File -
Application - New.
2. In the New Application dialog box, specify the server name and application
title.
3. Enter a file name in the File Name field.
4. Click Template Server, and then choose the server on which the application will
reside.
5. Select the Show advanced templates check box.
6. Select Lotus Notes/Domino Smart Upgrade Tracking Reports (LNDSUTR.NTF)
from the list of template names, and then click OK.
Controlling the number of concurrent Smart Upgrade
downloads
Use this procedure to enable or disable the Smart Upgrade Governor and to
control the number of concurrent Smart Upgrade attempts, that is, to control the
number of times Smart Upgrade can be run while the Smart Upgrade Governor is
enabled. When Smart Upgrade Governor is enabled, specify the maximum number
of Smart Upgrade attempts by specifying a value in the field ″Maximum
Concurrent Downloads″ on the Server Configuration document.
1. From the IBM(R) Lotus(RM) Domino(R) Administrator, click Configuration -
Server - Configurations.
2. Select the Server Configuration document you want to open, and then click
Edit Configuration.
3. Click the Smart Upgrade tab. In the field ″Limit Concurrent Smart Upgrade,″
enable the Smart Upgrade Governor.
Chapter 6. Upgrading Notes Clients 241
4. In the field ″Maximum Concurrent Downloads,″ enter a value for the
maximum concurrent number of Smart Upgrade attempts that can be made
while the Smart Upgrade Governor is enabled. The default is 100.
5. Save and close the Configuration Settings document.
Creating a link to the Smart Upgrade Database
In the IBM(R) Lotus(R) Domino(R) Directory, the Configuration Settings document
contains a Smart Upgrade Database Link field in which you paste the link to the
Smart Upgrade application. The Domino intelligent locator uses the replica ID of
the Smart Upgrade application in the link and does the following in this order: 1)
Looks for a local replica, and if found, uses it. 2) Looks for a replica on any cluster
mates if the server is in a cluster, and if found, uses it. 3) Uses the application on
the server specified in the link in the Server Configuration document.
During this procedure, you enable the Smart Upgrade Governor feature that allows
you to limit the number of concurrent Smart Upgrade attempts.
1. In the Domino Administrator, open the Smart Upgrade application that you
created.
2. Choose Edit - Copy as link - Application link.
3. From the Domino Administrator, click Configuration - Server - Configurations.
4. Select the server, and then click ″Edit Configuration″ to edit an existing
Configuration Settings document.
5. Click the Smart Upgrade tab.
Note: Lotus Notes Smart Upgrade first checks for the Smart Upgrade link in
the Configuration Settings document of the home server specified in the
IBM(R) Lotus(R) Notes(R) client Location document. If that Configuration
Settings document does not contain a Smart Upgrade link, Smart Upgrade
next checks the * - [All Servers] Configuration Settings document for the link.
6. On the Smart Upgrade tab of the document, paste the link in the ″Smart
Upgrade Database link″ field.
7. (Optional) In the field ″Limit Concurrent Smart Upgrade,″ enable the Smart
Upgrade Governor. When Smart Upgrade Governor is enabled, you can limit
the number of times that Smart Upgrade attempts are made by specifying a
value in the field ″Maximum Concurrent Downloads.″
Note: Use this feature to prevent an excessive load on the server if Smart
Upgrade is invoked numerous times on the same server.
8. In the field ″Maximum Concurrent Downloads,″ enter a value for the
maximum concurrent number of Smart Upgrade attempts that can be made
while the Smart Upgrade Governor is enabled.
9. Save and close the Configuration Settings document.
10. You can now begin adding update kits to the Smart Upgrade application.
Adding update kits to the Smart Upgrade application
After downloading a kit, make the kit available to users by creating a kit document
in the Smart Upgrade application and then either attaching the kit to the kit
document or storing the kit in a directory on a shared network drive that users can
access.
You specify the location of the kit in the Smart Upgrade kit document when setting
up Smart Upgrade for users. You can provide upgrade kits for upgrading just the
242 Installing Domino Servers and Notes Clients
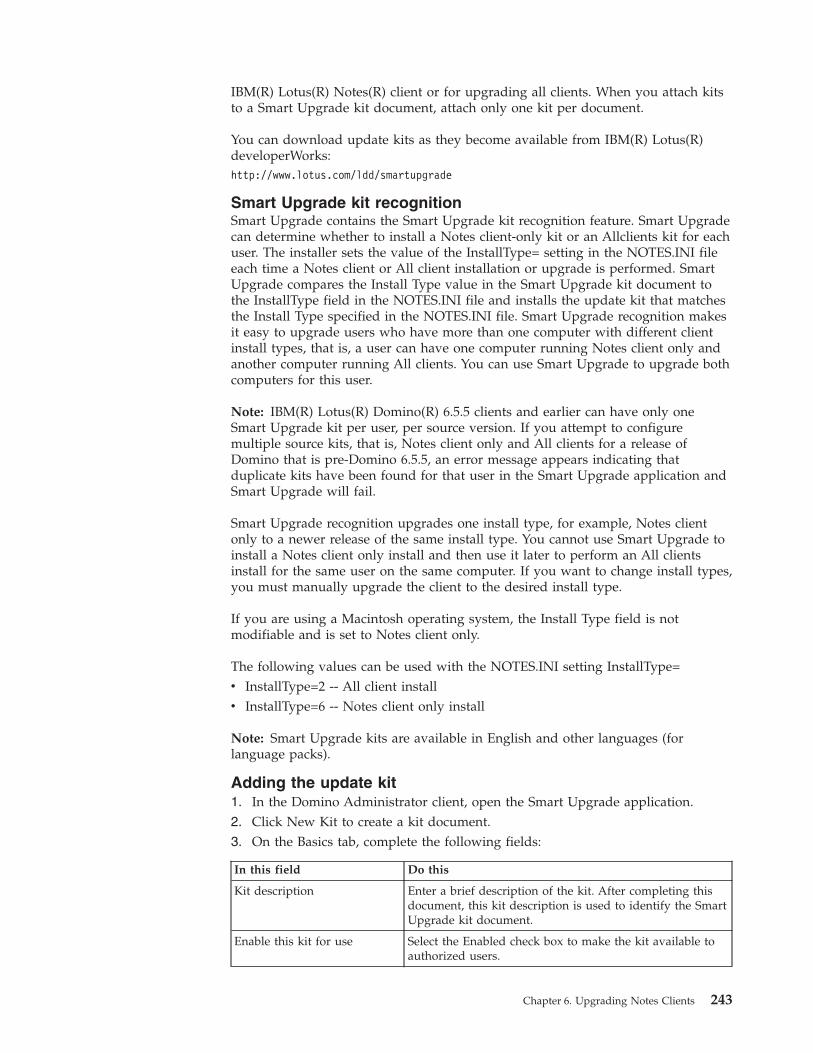
IBM(R) Lotus(R) Notes(R) client or for upgrading all clients. When you attach kits
to a Smart Upgrade kit document, attach only one kit per document.
You can download update kits as they become available from IBM(R) Lotus(R)
developerWorks:
http://www.lotus.com/ldd/smartupgrade
Smart Upgrade kit recognition
Smart Upgrade contains the Smart Upgrade kit recognition feature. Smart Upgrade
can determine whether to install a Notes client-only kit or an Allclients kit for each
user. The installer sets the value of the InstallType= setting in the NOTES.INI file
each time a Notes client or All client installation or upgrade is performed. Smart
Upgrade compares the Install Type value in the Smart Upgrade kit document to
the InstallType field in the NOTES.INI file and installs the update kit that matches
the Install Type specified in the NOTES.INI file. Smart Upgrade recognition makes
it easy to upgrade users who have more than one computer with different client
install types, that is, a user can have one computer running Notes client only and
another computer running All clients. You can use Smart Upgrade to upgrade both
computers for this user.
Note: IBM(R) Lotus(R) Domino(R) 6.5.5 clients and earlier can have only one
Smart Upgrade kit per user, per source version. If you attempt to configure
multiple source kits, that is, Notes client only and All clients for a release of
Domino that is pre-Domino 6.5.5, an error message appears indicating that
duplicate kits have been found for that user in the Smart Upgrade application and
Smart Upgrade will fail.
Smart Upgrade recognition upgrades one install type, for example, Notes client
only to a newer release of the same install type. You cannot use Smart Upgrade to
install a Notes client only install and then use it later to perform an All clients
install for the same user on the same computer. If you want to change install types,
you must manually upgrade the client to the desired install type.
If you are using a Macintosh operating system, the Install Type field is not
modifiable and is set to Notes client only.
The following values can be used with the NOTES.INI setting InstallType=
v InstallType=2 -- All client install
v InstallType=6 -- Notes client only install
Note: Smart Upgrade kits are available in English and other languages (for
language packs).
Adding the update kit
1. In the Domino Administrator client, open the Smart Upgrade application.
2. Click New Kit to create a kit document.
3. On the Basics tab, complete the following fields:
In this field Do this
Kit description Enter a brief description of the kit. After completing this
document, this kit description is used to identify the Smart
Upgrade kit document.
Enable this kit for use Select the Enabled check box to make the kit available to
authorized users.
Chapter 6. Upgrading Notes Clients 243
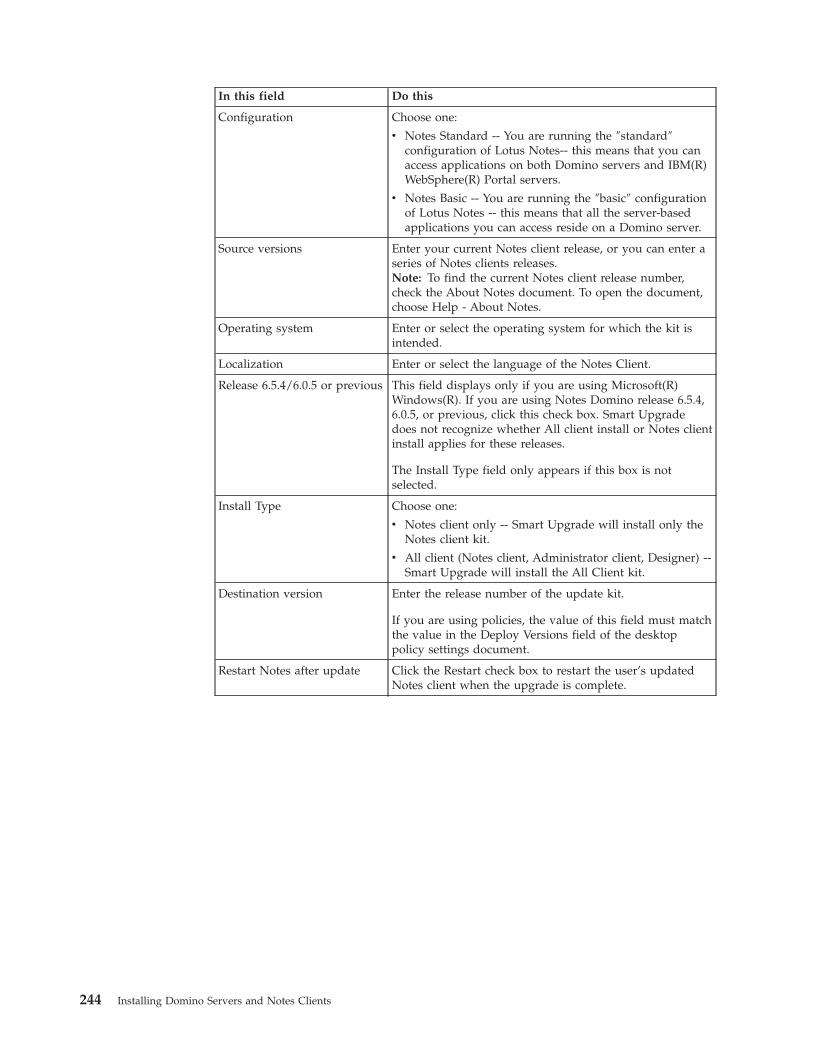
In this field Do this
Configuration Choose one:
v Notes Standard -- You are running the ″standard″
configuration of Lotus Notes-- this means that you can
access applications on both Domino servers and IBM(R)
WebSphere(R) Portal servers.
v Notes Basic -- You are running the ″basic″ configuration
of Lotus Notes -- this means that all the server-based
applications you can access reside on a Domino server.
Source versions Enter your current Notes client release, or you can enter a
series of Notes clients releases.
Note: To find the current Notes client release number,
check the About Notes document. To open the document,
choose Help - About Notes.
Operating system Enter or select the operating system for which the kit is
intended.
Localization Enter or select the language of the Notes Client.
Release 6.5.4/6.0.5 or previous This field displays only if you are using Microsoft(R)
Windows(R). If you are using Notes Domino release 6.5.4,
6.0.5, or previous, click this check box. Smart Upgrade
does not recognize whether All client install or Notes client
install applies for these releases.
The Install Type field only appears if this box is not
selected.
Install Type Choose one:
v Notes client only -- Smart Upgrade will install only the
Notes client kit.
v All client (Notes client, Administrator client, Designer) --
Smart Upgrade will install the All Client kit.
Destination version Enter the release number of the update kit.
If you are using policies, the value of this field must match
the value in the Deploy Versions field of the desktop
policy settings document.
Restart Notes after update Click the Restart check box to restart the user’s updated
Notes client when the upgrade is complete.
244 Installing Domino Servers and Notes Clients
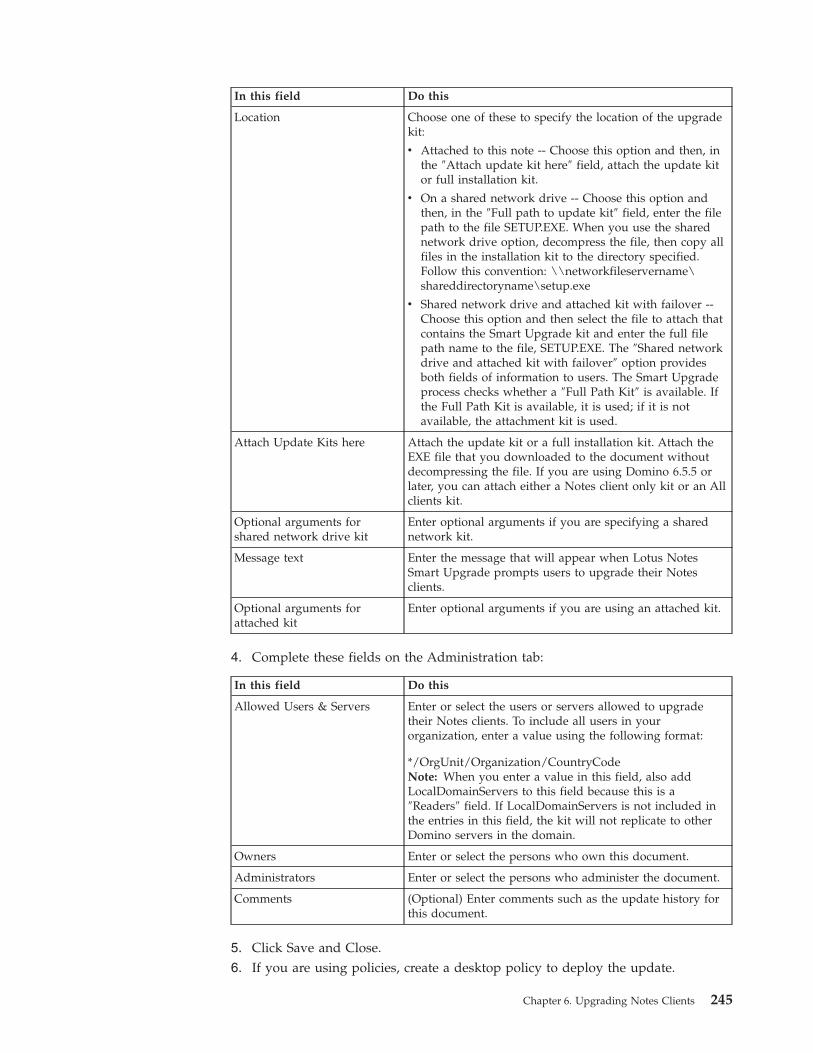
In this field Do this
Location Choose one of these to specify the location of the upgrade
kit:
v Attached to this note -- Choose this option and then, in
the ″Attach update kit here″ field, attach the update kit
or full installation kit.
v On a shared network drive -- Choose this option and
then, in the ″Full path to update kit″ field, enter the file
path to the file SETUP.EXE. When you use the shared
network drive option, decompress the file, then copy all
files in the installation kit to the directory specified.
Follow this convention: \\networkfileservername\shareddirectoryname\setup.exe
v Shared network drive and attached kit with failover --
Choose this option and then select the file to attach that
contains the Smart Upgrade kit and enter the full file
path name to the file, SETUP.EXE. The ″Shared network
drive and attached kit with failover″ option provides
both fields of information to users. The Smart Upgrade
process checks whether a ″Full Path Kit″ is available. If
the Full Path Kit is available, it is used; if it is not
available, the attachment kit is used.
Attach Update Kits here Attach the update kit or a full installation kit. Attach the
EXE file that you downloaded to the document without
decompressing the file. If you are using Domino 6.5.5 or
later, you can attach either a Notes client only kit or an All
clients kit.
Optional arguments for
shared network drive kit
Enter optional arguments if you are specifying a shared
network kit.
Message text Enter the message that will appear when Lotus Notes
Smart Upgrade prompts users to upgrade their Notes
clients.
Optional arguments for
attached kit
Enter optional arguments if you are using an attached kit.
4. Complete these fields on the Administration tab:
In this field Do this
Allowed Users & Servers Enter or select the users or servers allowed to upgrade
their Notes clients. To include all users in your
organization, enter a value using the following format:
*/OrgUnit/Organization/CountryCode
Note: When you enter a value in this field, also add
LocalDomainServers to this field because this is a
″Readers″ field. If LocalDomainServers is not included in
the entries in this field, the kit will not replicate to other
Domino servers in the domain.
Owners Enter or select the persons who own this document.
Administrators Enter or select the persons who administer the document.
Comments (Optional) Enter comments such as the update history for
this document.
5. Click Save and Close.
6. If you are using policies, create a desktop policy to deploy the update.
Chapter 6. Upgrading Notes Clients 245
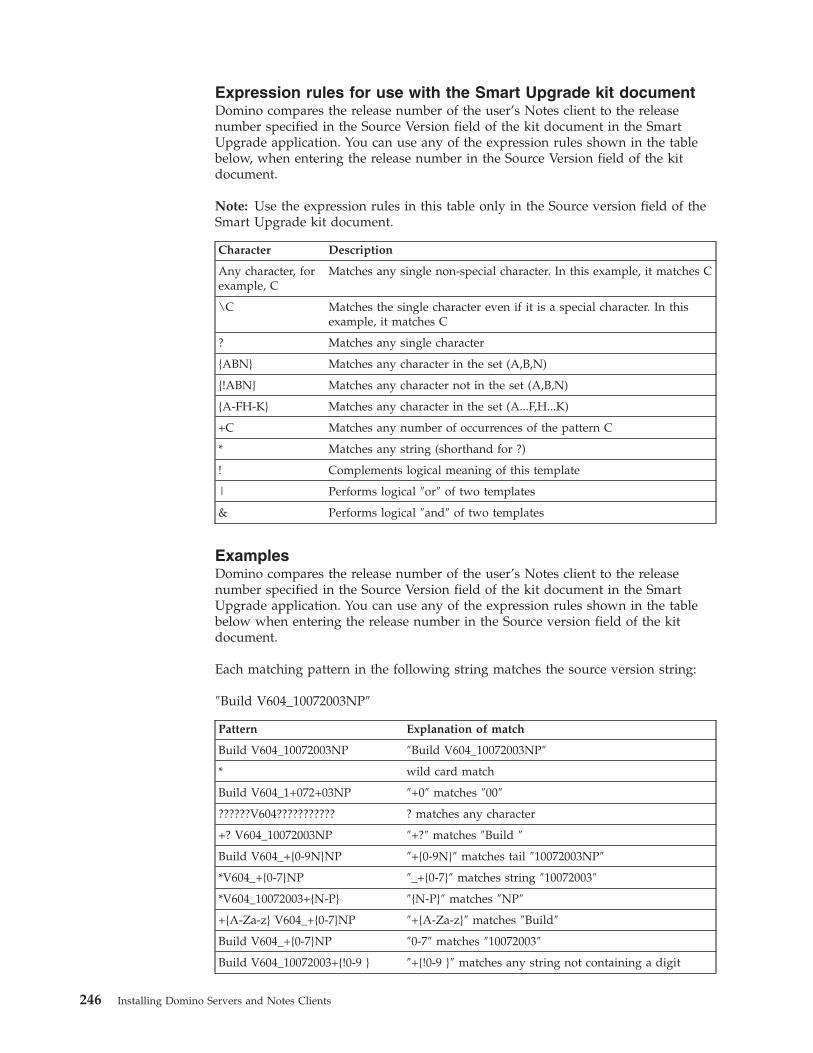
Expression rules for use with the Smart Upgrade kit document
Domino compares the release number of the user’s Notes client to the release
number specified in the Source Version field of the kit document in the Smart
Upgrade application. You can use any of the expression rules shown in the table
below, when entering the release number in the Source Version field of the kit
document.
Note: Use the expression rules in this table only in the Source version field of the
Smart Upgrade kit document.
Character Description
Any character, for
example, C
Matches any single non-special character. In this example, it matches C
\C Matches the single character even if it is a special character. In this
example, it matches C
? Matches any single character
{ABN} Matches any character in the set (A,B,N)
{!ABN} Matches any character not in the set (A,B,N)
{A-FH-K} Matches any character in the set (A...F,H...K)
+C Matches any number of occurrences of the pattern C
* Matches any string (shorthand for ?)
! Complements logical meaning of this template
| Performs logical ″or″ of two templates
& Performs logical ″and″ of two templates
Examples
Domino compares the release number of the user’s Notes client to the release
number specified in the Source Version field of the kit document in the Smart
Upgrade application. You can use any of the expression rules shown in the table
below when entering the release number in the Source version field of the kit
document.
Each matching pattern in the following string matches the source version string:
″Build V604_10072003NP″
Pattern Explanation of match
Build V604_10072003NP ″Build V604_10072003NP″
* wild card match
Build V604_1+072+03NP ″+0″ matches ″00″
??????V604??????????? ? matches any character
+? V604_10072003NP ″+?″ matches ″Build ″
Build V604_+{0-9N}NP ″+{0-9N}″ matches tail ″10072003NP″
*V604_+{0-7}NP ″_+{0-7}″ matches string ″10072003″
*V604_10072003+{N-P} ″{N-P}″ matches ″NP″
+{A-Za-z} V604_+{0-7}NP ″+{A-Za-z}″ matches ″Build″
Build V604_+{0-7}NP ″0-7″ matches ″10072003″
Build V604_10072003+{!0-9 } ″+{!0-9 }″ matches any string not containing a digit
246 Installing Domino Servers and Notes Clients
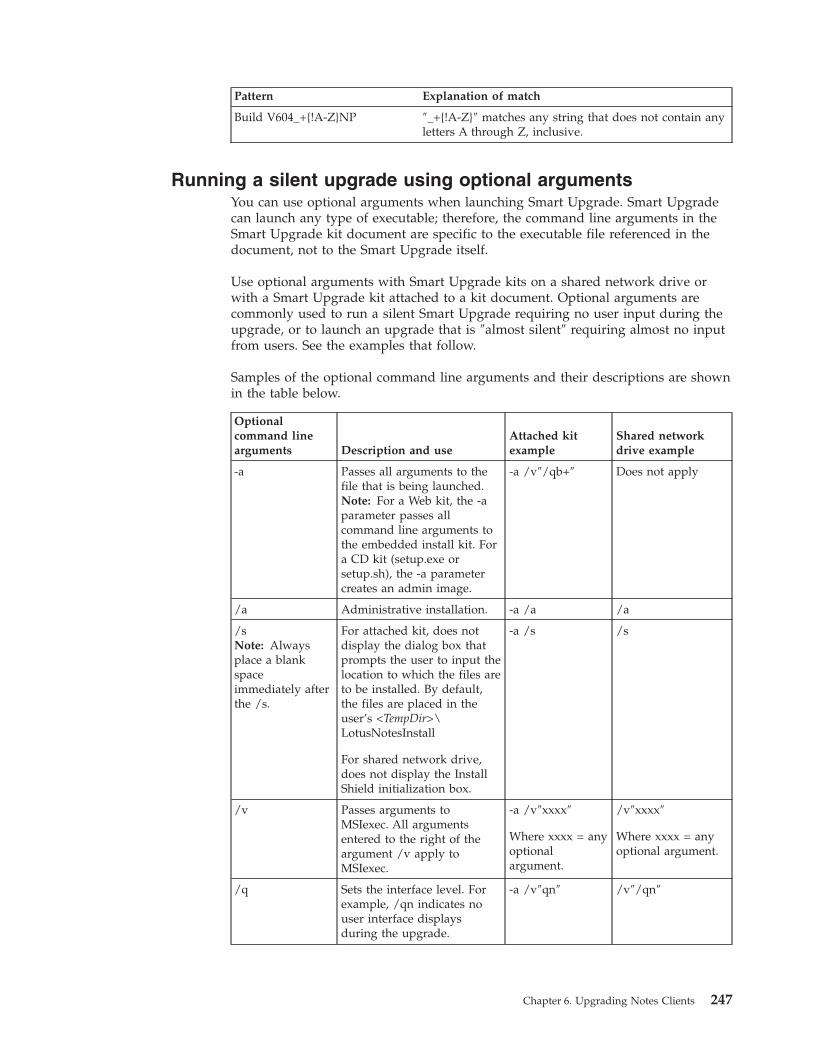
Pattern Explanation of match
Build V604_+{!A-Z}NP ″_+{!A-Z}″ matches any string that does not contain any
letters A through Z, inclusive.
Running a silent upgrade using optional arguments
You can use optional arguments when launching Smart Upgrade. Smart Upgrade
can launch any type of executable; therefore, the command line arguments in the
Smart Upgrade kit document are specific to the executable file referenced in the
document, not to the Smart Upgrade itself.
Use optional arguments with Smart Upgrade kits on a shared network drive or
with a Smart Upgrade kit attached to a kit document. Optional arguments are
commonly used to run a silent Smart Upgrade requiring no user input during the
upgrade, or to launch an upgrade that is ″almost silent″ requiring almost no input
from users. See the examples that follow.
Samples of the optional command line arguments and their descriptions are shown
in the table below.
Optional
command line
arguments Description and use
Attached kit
example
Shared network
drive example
-a Passes all arguments to the
file that is being launched.
Note: For a Web kit, the -a
parameter passes all
command line arguments to
the embedded install kit. For
a CD kit (setup.exe or
setup.sh), the -a parameter
creates an admin image.
-a /v″/qb+″ Does not apply
/a Administrative installation. -a /a /a
/s
Note: Always
place a blank
space
immediately after
the /s.
For attached kit, does not
display the dialog box that
prompts the user to input the
location to which the files are
to be installed. By default,
the files are placed in the
user’s <TempDir>\LotusNotesInstall
For shared network drive,
does not display the Install
Shield initialization box.
-a /s /s
/v Passes arguments to
MSIexec. All arguments
entered to the right of the
argument /v apply to
MSIexec.
-a /v″xxxx″
Where xxxx = any
optional
argument.
/v″xxxx″
Where xxxx = any
optional argument.
/q Sets the interface level. For
example, /qn indicates no
user interface displays
during the upgrade.
-a /v″qn″ /v″/qn″
Chapter 6. Upgrading Notes Clients 247
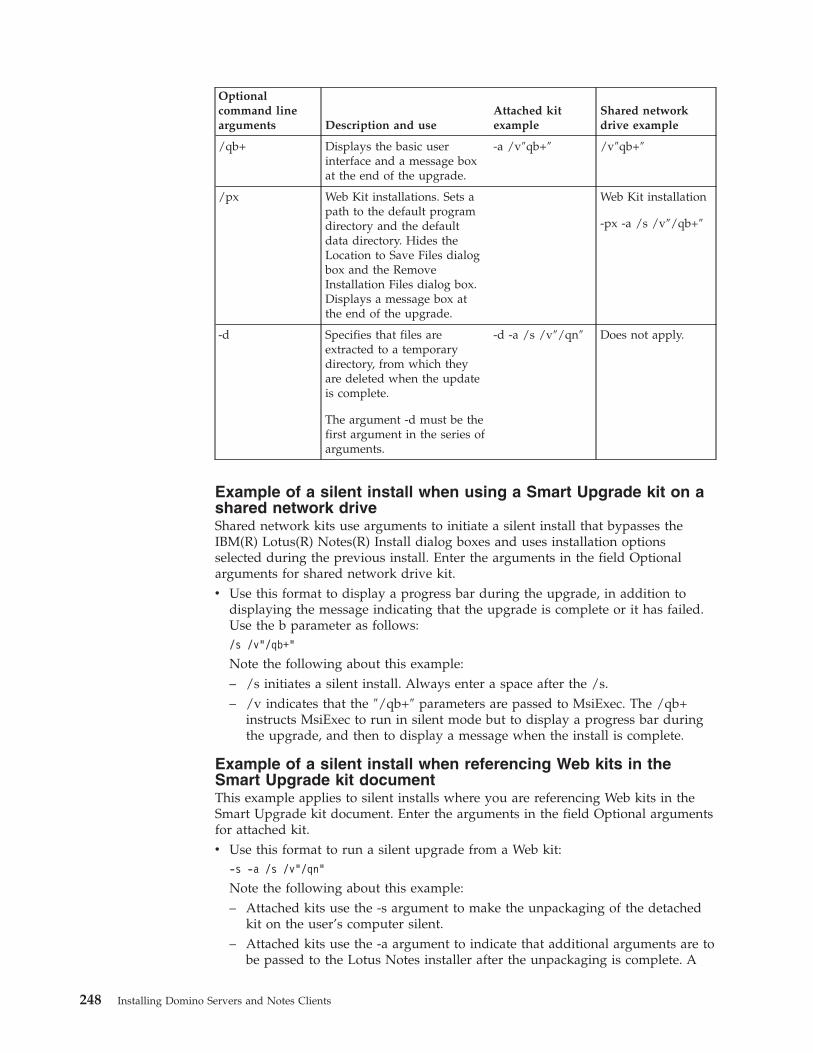
Optional
command line
arguments Description and use
Attached kit
example
Shared network
drive example
/qb+ Displays the basic user
interface and a message box
at the end of the upgrade.
-a /v″qb+″ /v″qb+″
/px Web Kit installations. Sets a
path to the default program
directory and the default
data directory. Hides the
Location to Save Files dialog
box and the Remove
Installation Files dialog box.
Displays a message box at
the end of the upgrade.
Web Kit installation
-px -a /s /v″/qb+″
-d Specifies that files are
extracted to a temporary
directory, from which they
are deleted when the update
is complete.
The argument -d must be the
first argument in the series of
arguments.
-d -a /s /v″/qn″ Does not apply.
Example of a silent install when using a Smart Upgrade kit on a
shared network drive
Shared network kits use arguments to initiate a silent install that bypasses the
IBM(R) Lotus(R) Notes(R) Install dialog boxes and uses installation options
selected during the previous install. Enter the arguments in the field Optional
arguments for shared network drive kit.
v Use this format to display a progress bar during the upgrade, in addition to
displaying the message indicating that the upgrade is complete or it has failed.
Use the b parameter as follows:
/s /v"/qb+"
Note the following about this example:
– /s initiates a silent install. Always enter a space after the /s.
– /v indicates that the ″/qb+″ parameters are passed to MsiExec. The /qb+
instructs MsiExec to run in silent mode but to display a progress bar during
the upgrade, and then to display a message when the install is complete.
Example of a silent install when referencing Web kits in the
Smart Upgrade kit document
This example applies to silent installs where you are referencing Web kits in the
Smart Upgrade kit document. Enter the arguments in the field Optional arguments
for attached kit.
v Use this format to run a silent upgrade from a Web kit:
-s -a /s /v"/qn"
Note the following about this example:
– Attached kits use the -s argument to make the unpackaging of the detached
kit on the user’s computer silent.
– Attached kits use the -a argument to indicate that additional arguments are to
be passed to the Lotus Notes installer after the unpackaging is complete. A
248 Installing Domino Servers and Notes Clients
silent install requires no user input because it bypasses the Lotus Notes Install
windows. Silent install use installation options selected during the previous
install.
– Always enter a space after the /s.
Creating a Lotus Notes Smart Upgrade desktop policy
settings document
You have the option of using a desktop policy settings document to enable IBM(R)
Lotus(R) Notes(R) Smart Upgrade to function automatically, to deploy different
releases of the Notes client to different groups of users, to upgrade Notes clients
through several updates at one time, to automatically create and use a Smart
Upgrade Tracking Reports application, and to control when updates occur in order
to preserve server performance. The desktop policy settings document is applied
continually during authentication and is enforced by dynamic configuration. The
policy settings document is applied to the users’ client configuration whenever a
change to the document occurs.
If you have not already done so, create a policy document.
Note: Policies are not required to use Smart Upgrade.
Creating a policy document for Lotus Notes Smart Upgrade
You create or modify a policy document to determine which users and groups will
be assigned the IBM(R) Lotus(R) Notes(R) Smart Upgrade desktop policy settings
document. There are two types of policy documents: organizational and explicit.
Organizational policies are based on your organizational hierarchy and are
assigned automatically to the users within an organization. If you want all users in
your organization to upgrade their Notes clients, create an organizational policy.
Explicit policies are assigned to specific users and groups. If you want only specific
users and groups to upgrade their Notes clients, create an explicit policy.
A user who is not assigned to the Lotus Notes Smart Upgrade desktop policy
settings document may still update the Notes client because Smart Upgrade works
as described here. When the Notes client Smart Upgrade timer expires, the next
time the user’s Notes client authenticates with their home server or cluster mate of
their home server, the server compares the Notes client release information with
the available update kit release information it has cached. If the server finds a
match, it signals to the Notes client that a possible match exists.
The Notes Client then directly checks the Smart Upgrade application for an
available kit. If a user is assigned a policy where a specific Notes client version is
specified, the Notes client only proceeds with Smart Upgrade if a kit exists that
will upgrade this particular Notes client to the version specified in the policy
document. If no policy document exists and the Notes client finds a matching
upgrade kit(s) for their current version of Notes, Smart Upgrade also proceeds.
Note: You can limit which kits specific users can see by populating the Allowed
Users and Servers field on the Smart Upgrade kit document. A server can signal to
a Notes client that a kit is potentially available, but the Notes client may not locate
an available kit because the user’s name has not been entered in the Allowed Users
and Servers field. In this scenario, the Smart Upgrade timer on the Notes client is
incremented by one day.
1. For more information about policies, see the ″Using Policies″ topic.
Chapter 6. Upgrading Notes Clients 249
2. On the People and Groups tab of the IBM(R) Lotus(R) Domino(R) Directory,
open the Policies view.
3. If you are creating a policy, click Add Policy. If you are modifying an existing
policy, select the policy to modify, and then click Edit Policy.
4. If you are modifying an existing policy, modify as many of the following fields
as necessary. If you are creating a policy, do the following:
v On the Basics tab, enter the policy name, then choose either Explicit or
Organizational as the policy type.
v Provide a description for the policy.5. In the Desktop field, select the desktop policy settings document to associate
with the policy you are creating or modifying.
6. Click Save and Close.
7. If you created an explicit policy, you can assign the policy to users and groups.
If you created an organizational policy, then the process is complete.
Assigning the Lotus Notes Smart Upgrade policy to users and
groups
If you created an explicit policy, then you must assign the policy to users and/or
groups. See the topic ″Planning and assigning policies″ as well as the related
subtopics.
Using Smart Upgrade to run a series of client upgrades
You can use Smart Upgrade to ″chain″ upgrade kits, that is, to install them in a
series from the earliest release in the kit document to the most recent IBM(R)
Lotus(R) Notes(R) and IBM(R) Lotus(R) Domino(R) release listed in a kit
document. For example, you can create a kit document to upgrade the Notes 7.5
client to Notes 8.0. You can also create a second kit document to upgrade the
Notes 8.0 client to Notes 8.5. When Smart Upgrade runs, it will recognize the
sequence and upgrade the Notes clients sequentially. When all of the upgrades are
complete, the Notes client is restarted. This sequence is followed regardless of
whether Smart Upgrade is deployed manually or by a policy.
When you ″chain″ upgrade kits, be sure to use one method of installation, for
example, install all kits from a shared network drive, or perform all upgrades
using attached kits. If you attempt to combine upgrade methods, your upgrade
may contain errors or fail completely.
Notes users and Lotus Notes Smart Upgrade
The following is general information about IBM(R) Lotus(R) Notes(R) users and
Smart Upgrade.
v Location documents must specify the correct home server on the Servers tab of
the Location document. If the wrong home server is specified, Smart Upgrade
will not begin the upgrade process.
v The Microsoft(R) Windows(R) Installer allows you to specify administrator-level
privileges for Lotus Notes. This allows single Windows users to install Lotus
Notes without administrator access.
v At any time during the grace period, users can choose File - Tools - Notes Smart
Upgrade to begin the upgrade process.
250 Installing Domino Servers and Notes Clients
Maintaining Lotus Notes Smart Upgrade
After you have completed the procedure for setting up the IBM(R) Lotus(R)
Notes(R) Smart Upgrade application and Smart Upgrade policies, perform the
following tasks to maintain Smart Upgrade:
v Download new update kits as they become available at IBM(R) developerWorks
(http://www.lotus.com/ldd/smartupgrade) and add the new kits to the Smart
Upgrade application.
v Disable the previous update kits and enable the latest update kit. To disable a
kit, clear the Enable check box on the Basics tab of the Smart Upgrade
document.
v If you are using policies, edit the Smart Upgrade desktop policy settings
document with the new release number and grace period.
Using the Smart Upgrade Run-As wizard
Run the Smart Upgrade Run-As wizard (SUSETRUNASWIZARD.EXE) to create an
executable file (SURUNAS.EXE) that Notes client users can then run to upgrade
their IBM(R) Lotus(R) Notes(R) clients.
Lotus Notes users can use the Smart Upgrade Run-As (SURunas) feature to
upgrade to a newer Notes client release. Smart Upgrade Run-As is designed for
Notes client users who do not have administrator privileges but who still need to
periodically update their Notes client software. Notes client users with
administrator privileges on their local computer can still use Smart Upgrade.
As previously mentioned, you run SUSETRUNASWIZARD.EXE to create an
executable file, SURUNAS.EXE, that Notes client users can run to upgrade their
Notes clients. This new executable file runs within the standard Smart Upgrade
program on the local workstation, as a user with administrator privileges. You
specify the administrator user name and password while completing the Smart
Upgrade Run-As wizard. While the wizard is running, you specify the file, usually
a SETUP.EXE or similar file, that is to be run when the user runs SURUNAS.EXE.
The SETUP.EXE file that you specify is either stored in SURUNAS.EXE or you can
specify a Universal Naming Convention (UNC) path to a shared network drive
from which that setup file can be accessed. In addition to specifying the setup file
to be used, you also specify any other files to be included in the install kit. The
Smart Upgrade Run-As wizard creates the install kit that the Notes client end
users run to upgrade their Notes clients.
Note: If you have multiple domains, and if you do not have a user name and
password that can be used across multiple domains, run the Smart Upgrade
Run-As wizard for each individual domain.
Running the Smart Upgrade Run-As wizard
While running the wizard, you have the option to store the new executable in a
self-contained package in the SURUNAS.EXE file or as a file reference to a network
share. Instructions for both procedures are included here.
Running SUSETRUNASWIZARD.EXE and storing the executable in a
self-contained package in the SURunAs executable file
1. Run the file, SUSETRUNASWIZARD.EXE.
2. Choose to save the new executable in a self-contained package in the SURunAs
executable file, and then click Next.
Chapter 6. Upgrading Notes Clients 251
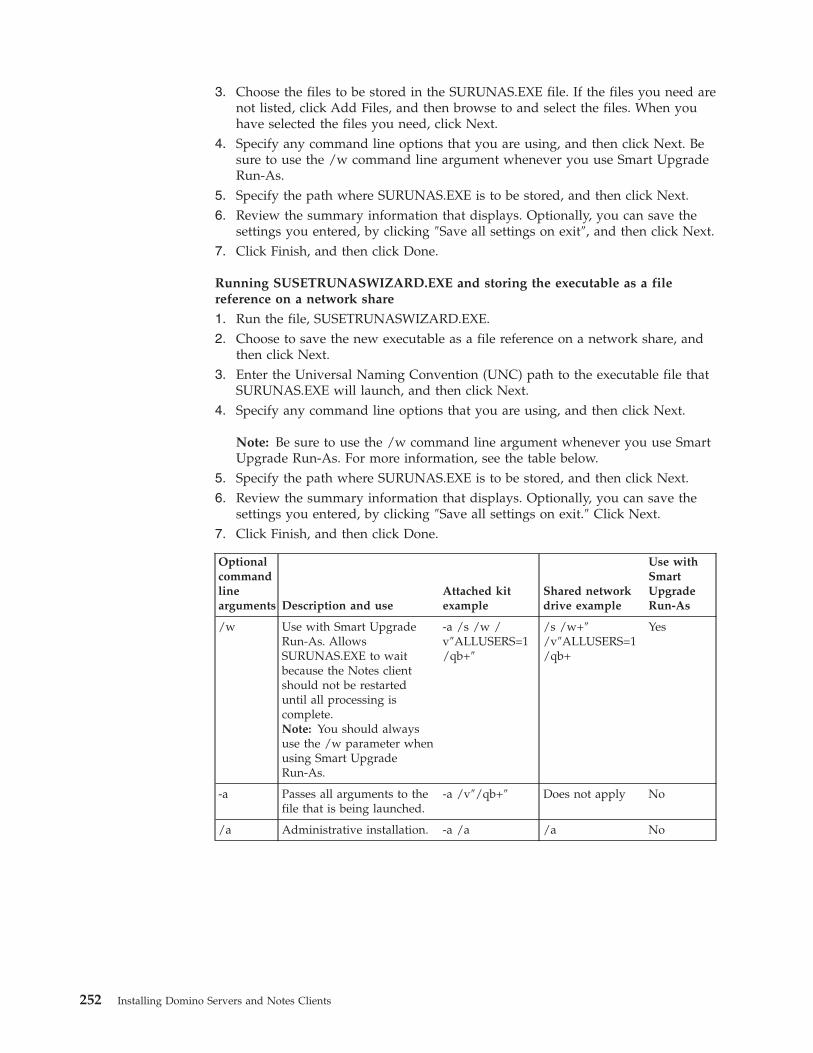
3. Choose the files to be stored in the SURUNAS.EXE file. If the files you need are
not listed, click Add Files, and then browse to and select the files. When you
have selected the files you need, click Next.
4. Specify any command line options that you are using, and then click Next. Be
sure to use the /w command line argument whenever you use Smart Upgrade
Run-As.
5. Specify the path where SURUNAS.EXE is to be stored, and then click Next.
6. Review the summary information that displays. Optionally, you can save the
settings you entered, by clicking ″Save all settings on exit″, and then click Next.
7. Click Finish, and then click Done.
Running SUSETRUNASWIZARD.EXE and storing the executable as a file
reference on a network share
1. Run the file, SUSETRUNASWIZARD.EXE.
2. Choose to save the new executable as a file reference on a network share, and
then click Next.
3. Enter the Universal Naming Convention (UNC) path to the executable file that
SURUNAS.EXE will launch, and then click Next.
4. Specify any command line options that you are using, and then click Next.
Note: Be sure to use the /w command line argument whenever you use Smart
Upgrade Run-As. For more information, see the table below.
5. Specify the path where SURUNAS.EXE is to be stored, and then click Next.
6. Review the summary information that displays. Optionally, you can save the
settings you entered, by clicking ″Save all settings on exit.″ Click Next.
7. Click Finish, and then click Done.
Optional
command
line
arguments Description and use
Attached kit
example
Shared network
drive example
Use with
Smart
Upgrade
Run-As
/w Use with Smart Upgrade
Run-As. Allows
SURUNAS.EXE to wait
because the Notes client
should not be restarted
until all processing is
complete.
Note: You should always
use the /w parameter when
using Smart Upgrade
Run-As.
-a /s /w /
v″ALLUSERS=1
/qb+″
/s /w+″
/v″ALLUSERS=1
/qb+
Yes
-a Passes all arguments to the
file that is being launched.
-a /v″/qb+″ Does not apply No
/a Administrative installation. -a /a /a No
252 Installing Domino Servers and Notes Clients
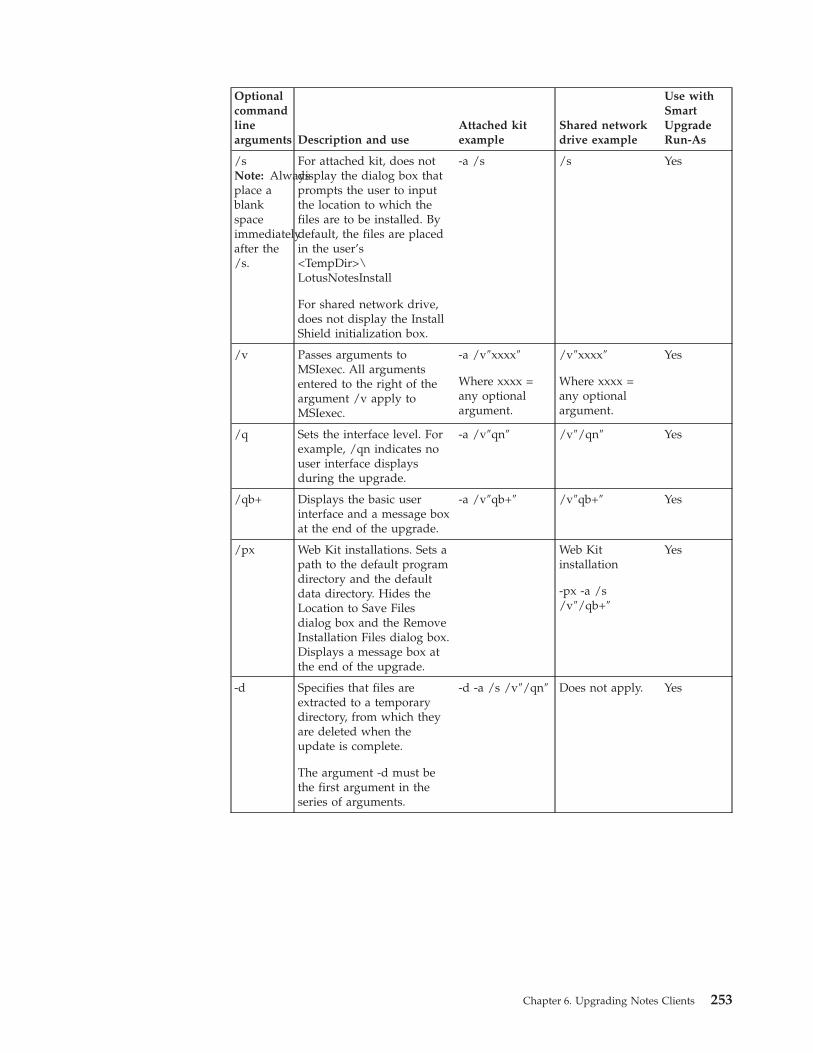
Optional
command
line
arguments Description and use
Attached kit
example
Shared network
drive example
Use with
Smart
Upgrade
Run-As
/s
Note: Always
place a
blank
space
immediately
after the
/s.
For attached kit, does not
display the dialog box that
prompts the user to input
the location to which the
files are to be installed. By
default, the files are placed
in the user’s
<TempDir>\LotusNotesInstall
For shared network drive,
does not display the Install
Shield initialization box.
-a /s /s Yes
/v Passes arguments to
MSIexec. All arguments
entered to the right of the
argument /v apply to
MSIexec.
-a /v″xxxx″
Where xxxx =
any optional
argument.
/v″xxxx″
Where xxxx =
any optional
argument.
Yes
/q Sets the interface level. For
example, /qn indicates no
user interface displays
during the upgrade.
-a /v″qn″ /v″/qn″ Yes
/qb+ Displays the basic user
interface and a message box
at the end of the upgrade.
-a /v″qb+″ /v″qb+″ Yes
/px Web Kit installations. Sets a
path to the default program
directory and the default
data directory. Hides the
Location to Save Files
dialog box and the Remove
Installation Files dialog box.
Displays a message box at
the end of the upgrade.
Web Kit
installation
-px -a /s
/v″/qb+″
Yes
-d Specifies that files are
extracted to a temporary
directory, from which they
are deleted when the
update is complete.
The argument -d must be
the first argument in the
series of arguments.
-d -a /s /v″/qn″ Does not apply. Yes
Chapter 6. Upgrading Notes Clients 253

254 Installing Domino Servers and Notes Clients
Chapter 7. Uninstalling the Notes Client
To uninstall IBM(R) Lotus(R) Notes(R), use any of the following procedures:
v Uninstall from Windows using Add Remove
v Uninstall from Linux using command line
v Cleaning a previous Notes 8 Beta from your client
v Uninstalling Notes silently
Uninstalling Notes
While it is not necessary to uninstall Notes to upgrade to a new release, you
should uninstall a Beta release before upgrading to the released version.
For information on uninstalling Notes, see the platform-specific instructions in this
guide.
Uninstalling Notes from a Windows client
Use the following procedure to uninstall IBM(R) Lotus(R) Notes(R) from the
Microsoft(R) Windows(R) client.
Note: If you installed Notes using multi-user, you must log in as an administrative
user to uninstall. When uninstalling a multi-user install, each user’s Notes data
directory and workspace are left intact to preserve data.
1. Exit Notes before uninstalling the product.
2. Click Add/Remove Programs from the Windows Control Panel.
3. Locate and select IBM Lotus Notes in the application list.
4. Click Remove.
5. Respond to all prompts.
Uninstall may take several minutes to complete.
Uninstalling Notes from a Linux client
Uninstall may take several minutes to complete. Each user’s data directory and
workspace are left intact to preserve data.
1. Exit Notes before uninstalling the product.
2. Log in as a root user.
3. Navigate to <install path>/uninstaller.bin using File Browser or a shell terminal.
4. Run the uninstaller.bin file by either double-clicking on the icon in File Browser
or executing ./uninstaller.bin in a shell.
If you installed IBM(R) Lotus(R) Notes(R) using an rpm kit (SUSE or Red Hat
platform), use the following procedure to uninstall Notes.
1. Exit Notes before uninstalling the product.
2. Log in as an root user.
3. Uninstall the rpm packages using either a command line or using GUI method
as below.
GUI uninstall method for rpm packages
255
v On SUSE, use the Remove Software application. Click Computer - System
applications - Remove Software. Search for and select the Notes rpm
packages. Click Remove.
v On Red Hat, use the Add/Remove Software application on the Applications
menu. Search for and select the Notes rpm packages. Click Apply.
Command line uninstall method for rpm packages
v Check which Notes-related rpm packages are installed using the following
command.
rpm -qa | grep ibm_lotus
v Uninstall all Notes rpm packages in a single command line as in the example
below.
#rpm -e ibm_lotus_notes ibm_lotus_activities ibm_lotus_cae ibm_lotus_sametime
ibm_lotus_symphony
v Optionally, uninstall packages individually, being sure to uninstall Notes last,
as below.
#rpm -e ibm_lotus_activities
#rpm -e ibm_lotus_cae
#rpm -e ibm_lotus_sametime
#rpm -e ibm_lotus_symphony
#rpm -e ibm_lotus_notes
If you installed IBM(R) Lotus(R) Notes(R) using a deb kit (Ubuntu platform), use
the following procedure to uninstall Notes.
1. Exit Notes before uninstalling the product.
2. Log in as an root user.
3. Uninstall the deb packages using either a command line or using GUI method
as below.
GUI uninstall method for deb packages
Use the Synaptic Package Manager application.
a. Click System - Administration.
b. Click Synaptic Package Manager.
c. Search for and a Notes deb package.
d. Click Mark for Removal.
e. Click Apply.
f. Repeat for the remaining Notes deb packages.
Command line uninstall method for deb packages
v Check which Notes-related rpm packages are installed using the following
command.
$dpkg -l "ibm-lotus*"
v Uninstall all Notes deb packages in a single command line as in the example
below.
#sudo dpkg -P ibm_lotus_notes ibm_lotus_activities ibm_lotus_cae ibm_lotus_sametime
ibm_lotus_symphony
v Optionally, uninstall packages individually, being sure to uninstall Notes last,
as below.
$sudo dpkg -P ibm_lotus_activities
$sudo dpkg -P ibm_lotus_cae
$sudo dpkg -P ibm_lotus_sametime
$sudo dpkg -P ibm_lotus_symphony
256 Installing Domino Servers and Notes Clients
$sudo dpkg -P ibm_lotus_notes
Uninstalling Notes from a Mac OS X client
You can uninstall IBM(R) Lotus(R) Notes(R) by dragging Notes.app from
/Applications to the trash. This preserves user data. You can also uninstall Notes
using the uninstaller application supplied with the Notes install media. This
preserves user data. As well, you can also uninstall Notes by dragging the
following items to the Apple(R) Mac OS X(R) trash bin:
v Notes.app
v ~/Library/Application Support/Lotus Notes Data folder (″~″ = user’s home
directory)
v ~/Library/Preferences/Notes Preferences
Note: To reinstall after uninstalling, you may also need to delete the following
items prior to reinstalling Notes:
– /Library/Receipts/Lotus Notes Installer.pkg
– /Library/Receipts/xpdcoreinstaller.pkg
Note: If you installed the Notes basic configuration, rather than the standard
configuration, you can uninstall the Notes basic configuration by dragging
Notes.app from /Applications to the trash. This preserves user data. You can also
uninstall Notes by dragging the following items to the Mac OS X trash bin:
v /Applications/Notes.app
v ~/Library/Application Support/Lotus Notes Data folder (″~″ = user’s home
directory)
v ~/Library/Preferences/Notes Preferences
v /Library/Receipts/Lotus Notes Installer.pkg
Uninstalling Notes from a Citrix client
Use the following procedure to uninstall IBM(R) Lotus(R) Notes(R) from the
Citrix(R) client.
See the release notes for the latest information about platform and system
requirements.
Related information about Notes client installation in the Citrix platform is
available in the following Tech Note and its related links:
http://www.ibm.com/support/docview.wss?rs=475&uid=swg21292162
Note: If you installed Notes using multi-user, you must log in as an administrative
user to uninstall. When uninstalling a multi-user install, each user’s Notes data
directory and workspace are left intact to preserve data.
1. Exit Notes before uninstalling the product.
2. Click Add/Remove Programs from the Windows Control Panel.
3. Locate and select IBM Lotus Notes in the application list.
4. Click Remove.
5. Respond to all prompts.
Uninstall may take several minutes to complete.
Chapter 7. Uninstalling the Notes Client 257
Uninstalling Notes silently
You can uninstall IBM(R) Lotus(R) Notes(R) silently. Each user’s data directory and
workspace will be left to preserve data.
If you are uninstalling a multi-user install, log in as an administrator or root user.
Note: Shut down the Notes application before starting the uninstall procedure.
Windows
You can uninstall Notes silently from a Microsoft(R) Windows(R) client.
1. Ensure that Notes is not running.
2. Open a command prompt window.
3. Change to the directory in which the installation package uninstaller resides or
specify the full path to the MSI file.
4. Run the uninstall command. A sample syntax is shown below:
msiexec /x "Lotus Notes 8.0.2.msi" /qn
Linux
You can uninstall Notes silently from a Linux(R) client.
1. Ensure that Notes is not running.
2. Open a Linux shell.
3. Change to the directory in which the uninstaller resides or specify the full path
to the uninstaller.
4. As the root user, run the following command to silently uninstall Notes.
<install_dir>/uninstaller.bin -silent
Cleaning a previous or partial Notes installation from your
client
If you experience a problem installing IBM(R) Lotus(R) Notes(R) or if you exited
out of the installation process prior to its completion, review the suggestions
below.
Uninstall instructions are provided in this guide. If, after uninstalling a previous or
partial release, you continue to experience install or uninstall problems, use the
cleanup instructions below.
Cleanup instructions for Windows
To clean a Notes or partial Notes install from your Microsoft(R) Windows(R) client,
complete the following procedure:
1. Delete all folders in the Notes <install path>\ except the \data folder.
2. Back up the Notes <install path>\data folder and then delete all subdirectories
in <install path>\data. Do not delete any root-level files from the Notes <install
path>\data folder.
3. If Notes appears in your Add/Remove Program panel, run the Windows
installer cleanup utility located at Microsoft Help and Support.
Cleanup instructions for Linux
To clean a Notes or partial Notes install from your Linux(R) client, complete the
following procedure:
258 Installing Domino Servers and Notes Clients
As root user:
1. Remove <install path>/install.log (and any other log files left over in that
directory).
2. Remove <install path>/framework.
3. Remove /root/InstallShield (unless you have installed other programs on your
system with InstallShield).
4. Remove /root/lotus.
5. Remove /root/install.log if present.
6. Remove /root/install.xml if present.
7. Remove /etc/lotus/notes if present.
As non-root user:
1. Remove /home/<user name>/lotus.
2. Remove /home/<user name>/InternalProvisioning.log.
3. Remove the contents of /tmp owned by <user name>.
Chapter 7. Uninstalling the Notes Client 259

260 Installing Domino Servers and Notes Clients
Index
AACL
Web administrator and 122
Activities 135, 151
addToKit 159
Administration preferencessetting 109, 111, 112, 113, 115, 124
Administration Processsetting up 136
Administratorsallowing access to Web
Administrator 122
AIXconfiguring partitioned servers 52
Aliasesin DNS 25
Anonymous accessvirtual servers 99
Automatic server setup 77
Autorun process for Notes on USBstarting 199
AUTORUN.ININotes on a USB drive 197
BBacking up
files on Notes client before
upgrading 236
Bindingport-to-IP address 50, 51
Browsersusing for administration 120
CCA XML 218, 223
Certificate Authoritycreating 210
Certificatescertifier IDs and 6
Certification Logdescribed 89
Certifier IDsorganization 93
organizational unit 94
overview 6
Client installation 149
setting up for users 149, 150, 151,
153, 157, 159
single user 175
Client Upgrade 218, 221, 222, 223
Client Upgrade tab 217
ClustersDomino Off-Line Services on 74
colocation-affinity 228
Command line installation 193
Common namesserver IP name and 23, 36
composite application definition 218
Composite Application Editor 135, 137,
151, 223
Composite applications 137, 223
Home Portal Account 136, 141
Notes server client installer 136, 138,
178
references 223
update 202, 223
update site 223
WebSphere Portal composite
application support for Lotus
Notes 138, 178
Composite Applications Editor 223
Compressingnetwork data 47
Configuration Settings document 214,
217, 218, 223
Connection documentsport order and 45
Controllerdescribed 131
starting and stopping 131
DData directory
certifier IDs and 6
DB2 server enablement 137
DDM.NSFOpen at Domino Administrator client
startup 109
Debug LotusScriptDomino Administrator client 116
Debugging Preferencesfor Java in Domino Administrator
client 116
Default database securityWeb Administrator 121
Deploymentcertifier IDs 6
Domino domains 4
Domino environment 11
guidepost 1
naming conventions 9
server functions 2
server names 3
server services 9
DesignerWiring Properties Editor 137
Designer access 137
Desktop policy settings document 228
DIIOP server task 50
DirectoriesDomino server 60
Directory linksdatabase corruption and 19
network security and 19
DNSdefined 21
domains 21
multiple domains 23, 26, 36
DNS (continued)name resolution in NRPC and 21, 23,
25, 26, 36
DOLS. See Domino Off-Line Services 74
DomainsDNS 21
multiple DNS 23, 26, 36
planning 4
Domino AdministratorConfiguration tab 119
Domino Console, Domino Controller
and 131
Files tab 117
installing 107, 141, 175, 200
Messaging tabs 118
overview 107
People and Groups tab 117
Replication tab 119
running Server Setup program
with 79
server list 108
Server tabs 117
setting preferences 109, 111, 112, 113,
115
setting up 107
starting 107
tabs 117
tools 119
user interface 108, 117
Web Administrator and 124
Domino and Portal serversadministration 127
Domino Consolestarting and stopping 132
Web Administrator and 131
Domino Controllerdefault TCP port 56
Domino Designer 137, 223
installing 141, 175, 200
Domino Directoryserver registration and 89
Domino domainsplanning 4
Domino environmentbuilding 11
Domino Off-Line Servicessetting up the server for 74
Domino serverevaluation software 60
Indic language support 77
installing 1, 59, 61
planning services and tasks 9
Setup program 72, 76, 79, 92
starting and shutting down 102
Domino server setupexpress 71
Domino update site 223
Domino-Portal Integration wizard 104
DPI wizard 104
261
EEclipse
features and plug-ins 136, 137, 150,
151, 153, 157, 159, 202, 210, 212, 214,
229
update manager 228
update site 136, 150, 151, 153, 159,
202, 210, 214, 229
Eclipse update manager 228
Eclipse update site 217, 223
Eclipse Update Site (8) template 223
Eclipse update sites 218
Encryptionnetwork data 17, 46
End-user installationsNotes customized install
manifest 136, 150, 151, 153, 157,
159, 186
with Transform files 150, 166
Evaluation licensefor Domino server 60
Expeditorcustom and third-party features 137,
202, 210, 229
Network client installer 138
Expeditor Information Center 223
Express server setup 71
Ffeature install and update 217
FEATURE.XML 218, 222, 223
Federated administrationDomino and Portal servers 127
removing 129
Feedspreset feeds at install 162
File - Application - Install 218
File format 74
Filesbacking up on Notes client before
upgrading 236
preferences 111
FQDNas server’s common name 26
specifying in Connection
document 25
specifying in Server document 23, 36
HHierarchical names
creating scheme for 3
server registration and 89
Home pagesfor virtual servers 99
Home Portal Account 136, 141, 223
Host namesspecifying in Server document 23, 36
Hosts filessystem settings for 21
HTTP service 136, 223
binding to an IP address 50
IIBM Lotus Notes Smart Upgrade
See Smart Upgrade 238
IBM Lotus Productivity Tools 135, 151
IDs, certifier 6, 93, 94
IMAP servicebinding to an IP address 50
Indic languagessupport for 77
InstalladdToKit 159
Domino Administrator client 135,
136, 141, 175, 176, 200, 233
Domino Designer client 135, 136,
141, 175, 176, 200, 233
Eclipse update site 141, 150, 151, 159,
202, 210, 214
install.xml 141, 150, 151, 153, 157,
159, 188, 202, 210, 214, 229
media kit 136, 141, 148, 150, 151, 153,
157, 159, 168, 176, 178, 188, 233
Notes client 135, 136, 141, 175, 176,
200, 233
Notes server client installer 138
plugin_customization.ini 141, 150,
151, 168, 202, 210, 212, 214, 228, 229
preset feeds 162
presetfeeds.opml 162
server 135, 136
setup.sh 179
site index site.xml 141, 150, 151, 153,
159, 202, 210, 214, 229
update site 151, 153, 159, 202, 229
WebSphere Portal composite
application support for Lotus
Notes 138
Install directories 229, 255, 257, 258
Install manifest 136, 141, 150, 151, 153,
157, 159, 202, 210, 214, 229
atributes 153
attributes 151, 153, 157, 159, 188
default attribute 153, 157
installfeature 151, 153, 157, 188
installfeature sample 153, 157
required attribute 151, 153, 157
show attribute 153, 157
Install typefor Smart Upgrade 242
Installationby scriptable setup 193
client 135, 136, 149, 150, 151, 153,
159, 176
command line 193
End-user with install manifest 136,
150, 151, 153, 157, 163, 188, 210
End-user with Transform files 136,
150, 157, 163, 164, 166, 167, 187, 192
interactive mode 68
multi-user 136, 141, 178, 189, 192
on Linuz on zSeries 68
on UNIX systems 62, 68
on Windows systems 61
script mode 68
setting up 135, 136, 153, 188, 192
silent 68, 141, 176, 188, 189, 192
single user 136, 141, 175, 176, 189
Installation options 136, 162
Installation options (continued)using a third-party installer 202, 229
using install manifest 136, 150, 151,
153, 157, 159, 188, 202, 229
using Transform files 136, 150, 163,
164, 166, 167, 187, 188, 192, 200
InstallShield Tuner for Lotus Notes 136,
163, 164, 166, 167, 187, 192, 200
Instant Messagingand LDAP 174
and policies 174
enabling with single sign-on 174
setting up with client installation 174
Intelligent locator 238, 242
Internet passwordsWeb Administrator 121
Internet servicesbinding to IP addresses 50
default TCP ports 56
proxies for 17
Internet Site documentscreating 97
overview 95
IP addresschanging 26
IP addressesbinding ports to 50, 51
for partitioned servers 35
multiple 35, 36
partitioned servers and 52
using in Connection documents 25
using in Server documents 21
IP namesspecifying in Server document 23, 36
IPv6 standarddescribed 28
enabling support for 49
IPX/SPXNotes port for 42, 43, 44, 45, 46, 47
JJava Debug Console
Domino Administrator client 116
Java debuggingDomino Administrator client 116
Java Debugging PreferencesDomino Administrator client 116
KKeys 210
LLANA numbers
NetBIOS ports and 57
LANsintegrating Domino with 13
network compression and 47
setting up servers on 40
LDAPusing with Instant Messaging 174
using with Sametime 174
LDAP servicebinding to an IP address 50
262 Installing Domino Servers and Notes Clients
Licenseevaluation 60
Linuxconfiguring partitioned servers 52
Linux for zSeriesinstalling Domino on 68
Linux on zSeriesautomatic server setup 77, 79
server setup 79, 81, 83
Live consoleWeb Administrator and 126
Location documentsSmart Upgrade and 250
Locatorintelligent 238, 242
LotusScript debuggingDomino Administrator client 116
MMessage tracking
in Web Administrator 127
Monitoringsetting preferences 112
MSI file 197
Multi-user installation 141, 178
Notes client 141
with Multi-user Interface Pack 172
Multi-user Interface Pack 172
NName resolution in NRPC
described 15
ensuring DNS resolves 23, 25, 26, 36
over NetBIOS 39
over TCP/IP 21, 23, 48
Name servicesMicrosoft 21
Notes 15
Name-and-password authenticationvirtual servers 99
Namesfor servers 23, 25, 26, 36
Naming conventionsDomino system 9
hierarchical 3
Notes named networks 41
ports 44
servers 23, 39
NATusing 25
NetBIOSintegrating Domino with 38
name resolution in 39
Notes port for 42, 43, 44, 45, 46, 47,
57, 58
setting up servers for 40, 57
Network Address Translation. See
NAT 25
Network portsadding 43, 58
binding to IP addresses 50, 51
compressing data on 47
configuring 42, 57
deleting 46
Network ports (continued)disabling 44
encrypting 46
fine-tuning 41
renaming 44
reordering 45, 49
Server Setup program and 14
TCP/IP 21, 36
Network protocolscompatible with Domino 14
defined 13
Networksintegrating Domino with 13, 20, 38
name resolution 15, 21
security 17
Notes clientbacking up files 236
backing up files before
upgrading 236
installing 135, 237
upgrading 234
Notes Name Servicedescribed 15
Notes named networksdefined 14
setting up 41
Notes network ports. See Network
ports 41
Notes on a USB driverunning 200
Notes Remote Procedure Call service. See
NRPC service 14
Notes RPC. See NRPC service 14
NOTES.INI file 136
editing 127
NRPC 221
NRPC service 136, 223
binding to an IP address 51
default TCP port 56
described 14
encrypting 46
name resolution in 15, 21, 23, 25, 26,
36, 39
NRPC URL format 223
NSF-based update 223
NSF-based update site 201, 214, 217, 223
NSF-based update sites 218
OODS.
See On-Disk Structure 74
On-Disk StructureUpgrading from earlier level 74
Organization certifier IDs 6
creating 93
Organizational unit certifier IDs 6
creating 94
PPartitioned servers
described 5
IP addresses and 35, 52, 54
multiple Web sites and 50
port mapping 54
Passthru connectionstroubleshooting 21
Passthru serversas application proxies for NRPC 17
Performancenetworks 47
PLUGIN_CUSTOMIZATION.INI 168,
218
Policiesand Instant Messaging 174
and Sametime 174
deploying client settings 136
Policy settingsin Web Administrator 126
security 212, 214
POP3 servicebinding to an IP address 50
Port mappingon partitioned servers 54
Portal serverenabling for federated
administration 129
Portal server and Domino serveradministration 127
Portsadding 43, 58
binding to IP addresses 50, 51
compressing data on 47
configuring 42, 57
deleting 46
disabling 44
encrypting 46
names 44
renaming 44
reordering 45, 49
Server Setup program and 14
SSL 56
TCP 56
PreferencesDomino Administrator 109, 111, 112,
113, 115
Web Administrator 124
Provisioning 157, 218, 222, 223, 228
Proxiesdefined 17
Domino passthru servers as 17
HTTP 17
QQuick console
Web Administrator and 126
RRegistration
setting preferences 113
registry key 184, 200
Remote consoleWeb Administrator and 126
Remote LotusScript DebuggerDomino Administrator client 116
Response filecreated with sample response 66
using 66
Index 263
RolesWeb Administrator and 122, 123
SSametime
and LDAP 174
and policies 174
and scriptable setup 174
enabling with single sign-on 174
setting up with client installation 174
Sametime (integrated) 135, 151
Script fileautomatic server setup 77
SCRIPT.DAT fileUNIX installation 68
Scriptable setupand Instant Messaging 174
and Sametime 174
setting up Notes with 193
Secondary name serversadding in Notes 48
Securitycertificates 210
certifier IDs and 6
encryption 17
network 17, 19
planning 17
signatures and 229
virtual Web servers 99
Web Administrator 121
Security policy settings 210
ServerActivities 135
Domino evaluation license 60
Notes client installer 135
Sametime 135
WebSphere Portal 178
WebSphere Portal composite
application support for Lotus
Notes 135
Server Certificatechanging expiration date 90
Server Configuration Settings
document 218, 221, 222, 223
Server documentsDNS resolves in NRPC and 21
network settings in 42
Server install 135
express 71
Server installationsilent 66
Server monitorchanging default settings 112
Server namesIP names and 23, 36
Server propertiesWeb Administration Server
Bookmarks 131
Server setupautomatic 77
express 71
Server setup profilescreating 81
silent 85
using 83
Server topologyplanning 2
ServersActivities 178
administering 108
configuring for LANs 35, 40, 48, 57
functions 2
naming 3, 23, 25, 26, 39
partitioned 5, 35, 52, 54
passthru 17
proxy 17
registering 89
secondary name 48
Setup profilescreating 81
silent 85
using 83
Setup program. See Domino server 72
Shared installationupgrading 200
Windows Installer and 200
Shared network directoryinstalling clients 200
Signingdatabases and templates 210
Silent installUNIX 68
Silent server installon UNIX systems 71
Silent server installationon Windows and UNIX systems 66
Single sign-onwith Instant Messaging 174
with Sametime 174
Single-user installation 141
Sizeclient installation requirements 137,
141, 147, 148, 149, 233
Smart Upgrade 136
assigning policies to users and
groups 250
concurrent attemtps to run 241
desktop policy settings
document 249
explicit policy 249
kit recognition 242
linking to Configuration Settings
document 242
location documents and 250
Lotus Notes Smart Upgrade Kits
template 240
maintaining 251
organizational policy 249
overview 176, 238
Smart Upgrade database 240
update kits 242
Windows Installer and 250
Smart Upgrade Governorenabling and disabling 241
Smart Upgrade Run As wizard 251
SMTPbinding to an IP address 50
Solarisconfiguring partitioned servers 52
SSLvirtual servers and 99
Statisticssetting preferences 115
SUSETRUNASWIZARD.EXESmart Upgrade Run As wizard 251
Systemclient requirements 136, 137, 141,
147, 148, 149, 233
TTCP/IP
Domino Internet services and 50
importance of Notes port order 49
IPv6 standard 28, 49
multiple IP addresses for servers 21,
35, 36
name resolution in 23
name resolution in NRPC 21, 23, 25,
26, 36
Notes port for 42, 43, 44, 45, 46, 47,
51
partitioned servers and 35
planning server configurations 20
port mapping 54
port numbers 56
Secondary name servers 48
security 19
setting up servers on 35, 40, 48
time-out setting 49
Telnetand UNIX installation 68
TemplatesDomino Off-Line Services 74
NSF-based update site 214
Terminal Services 184
Time-out settingsTCP/IP 49
Toolsadministration 119, 120
Transform filecreating 164
Transform filesapplying 166
for end-user installations 166
Troubleshootingclient install or uninstall 258
UUninstall
Notes client 255, 257, 258
Unit numbersNetBIOS ports and 57
UNIXinstallation on 62, 68
silent server install 71
Update kitsand Smart Upgrade 242
Update Manager 222, 223
update site 218
Update siteEclipse 136, 150, 151, 153, 159, 202,
210, 214, 223
NSF-based 136, 202, 214, 223
updatesite.ntf 136, 214
user-initiated update 228
264 Installing Domino Servers and Notes Clients
UPDATESITE.NSF 223
updatesite.ntf 136, 202, 214, 223
UPDATESITE.NTF 214, 217, 223
Upgradeclients 141
Upgrade-by-mailinstalling the Lotus Notes client 237
overview 235
preparation for using 235
upgrade notification 236
upgrading mail file template 237
Upgradingfrom earlier Notes/Domino
releases 135
Notes client 135
preparing for 234
USB drive 197, 200
User-initiated update 168
Usersconfiguring for TCP/IP 48
registering 125
VVirtual Web servers
partitioned servers and 50
security 99
WWANs
integrating Domino with 13
WANs (continued)network compression and 47
Web Administration Server BookmarksAdding servers to 130
Modifying server properties 131
Removing a server from 130
Setting up 130
Web Administratoraccess 121, 122
configuring 120
Domino Console, Domino Controller
and 131
managing policies 126
message tracking 127
registering users 125
remote console 126
roles 122, 123
setting preferences 124
signing out 127
starting 123
using 120, 124
Web Site documentsDOLS and 74
Web sitesmultiple, on a server partition 50
WEBADMIN.NSFconfiguring 120
securing 121
WebSphere Portal 141, 178
Home Portal Account 136
portal application template
editor 137
WebSphere portal composite application
support for Lotus Notes 138
WebSphere Portal composite application
support for Lotus Notes 141
using with SSL 138
WebSphere Portal composite application
support for Notes 223
whitelist 217, 218
Wide-area networks. See WANs 13
widgets 217
Windowsdirectory for entering commands 60
installation on 61
running Server Setup program on 79
Windows 2000configuring partitioned servers 52
ensuring name resolves on 39
name resolution 23, 36
Windows InstallerSmart Upgrade and 250
Windows NTconfiguring partitioned servers 52
ensuring name resolves on 39
name resolution 23, 36
Wiring properties editor 137
XX.PC network
compression and 47
Index 265