Embed Size (px)
Citation preview

Page 1
Lotus Evora Door Latch Kit Fitting Instructions LSL 594
The instructions contained within this fitting guide are tailored to be used when renewing the door latch assem-blies and ancillary components as provided in the Evora door latch fitting kit, (part number A132B0235S).
This fitting kit comprises of the specific parts required to carry out Technical Service Bulletin 2011/26. Please compare the contents of your fitting kit with the list below and ensure you have a full set of parts/correct quan-tity before continuing.
Part number Description Qty required A132B0235S Door latch fitting kit 1/vehicle
Parts includedDescription Part number Qty/kit/vehicleLatch mechanism, LH C132B4151F 1Latch mechanism, RH C132B4152F 1 Door curtain, LH A132B4157F 1Door curtain, RH A132B4158F 1Cable interior release C132B0123F 2Starlock fastener A124W6797F 2Linkage clips A082U6267F 2Rod, sill button to latch LH F132B4053F 1Rod, sill button to latch RH F132B4054F 1Door trim fasteners A100W6481F 10Release handle setting tool T000T1529F 1Sill Button A132U0455F 2Fitting guide LSL594 1
Additional sundries required but not included in the kit
PTFE spray grease A132B6038V As required
OvErvIEw OF mAIn LAtch cOmPOnEntS
Sill button Security shieldLH lock barrel Exterior handle Control rods
Latch assembly Interior release cable
b383
Door lockrelease lever
Actuatorbase plate
CDL actuator
CDLlever
Leverbase plate
Latchmicroswitchharness
Exterior releasehandle control rod
Actuator harness terminal
Page 2
Lotus Evora Door Latch Kit Fitting Instructions LSL 594
LAtch ASSEmbLy
To remove the latch mechanism assembly from door:
Ensure door window is in the fully raised to allow access 1. the door latch mechanism, linkages and electrical con-nectors.
Unscrew and remove the door sill button. (The button may 2. have been secured with adhesive so it may require cover-ing to protect it whilst using grips or a strap to remove it).
Release all fixings securing the door trim panel door and 3. pull trim away from the door shell (see section VE.2 of Evora Service notes).
From the rear side of the door trim:4.
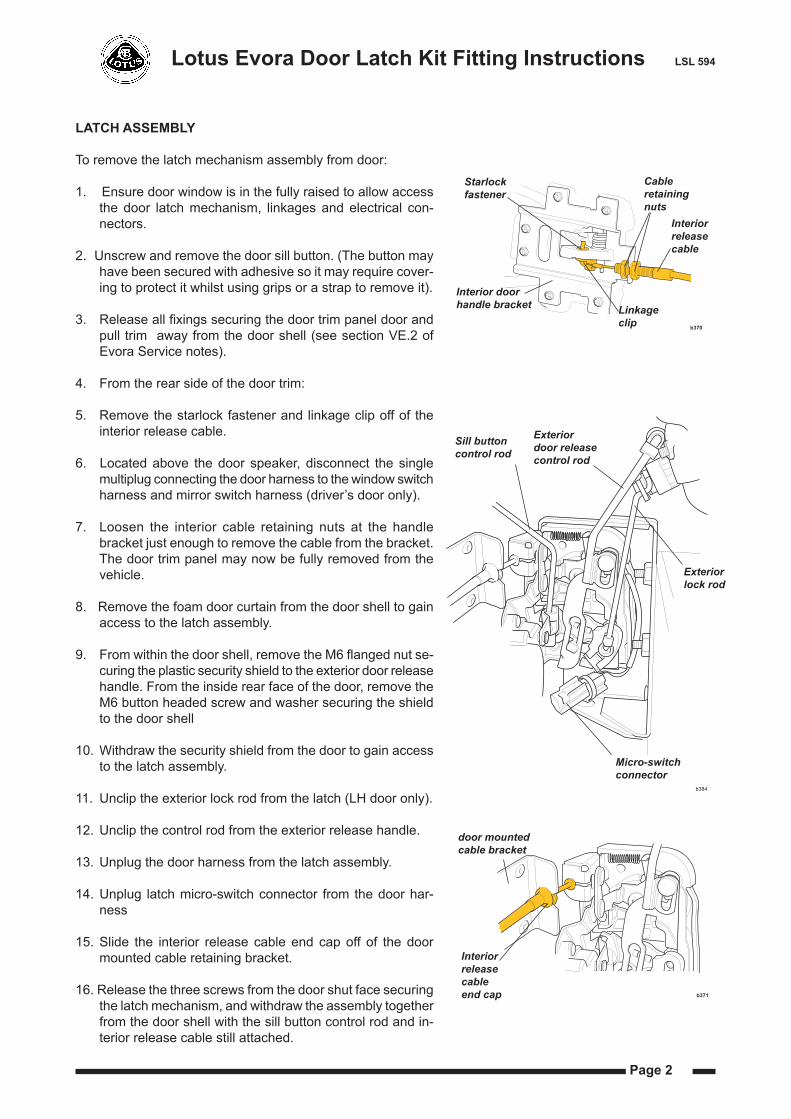
Remove the starlock fastener and linkage clip off of the 5. interior release cable.
Located above the door speaker, disconnect the single 6. multiplug connecting the door harness to the window switch harness and mirror switch harness (driver’s door only).
Loosen the interior cable retaining nuts at the handle 7. bracket just enough to remove the cable from the bracket. The door trim panel may now be fully removed from the vehicle.
Remove the foam door curtain from the door shell to gain 8. access to the latch assembly.
From within the door shell, remove the M6 flanged nut se-9. curing the plastic security shield to the exterior door release handle. From the inside rear face of the door, remove the M6 button headed screw and washer securing the shield to the door shell
Withdraw the security shield from the door to gain access 10. to the latch assembly.
Unclip the exterior lock rod from the latch (LH door only).11.
Unclip the control rod from the exterior release handle.12.
Unplug the door harness from the latch assembly.13.
Unplug latch micro-switch connector from the door har-14. ness
Slide the interior release cable end cap off of the door 15. mounted cable retaining bracket.
Release the three screws from the door shut face securing 16. the latch mechanism, and withdraw the assembly together from the door shell with the sill button control rod and in-terior release cable still attached.
Starlock fastener
b370
Linkageclip
Cable retaining nuts
Interior door handle bracket
Interior release cable
b371
Interior release cableend cap
door mounted cable bracket
Exterior lock rod
Exterior door release control rod
Micro-switch connector
b384
Sill buttoncontrol rod
Page 3
Lotus Evora Door Latch Kit Fitting Instructions LSL 594
cAbLE FItmEnt
Before fitting new cable supplied in kit:
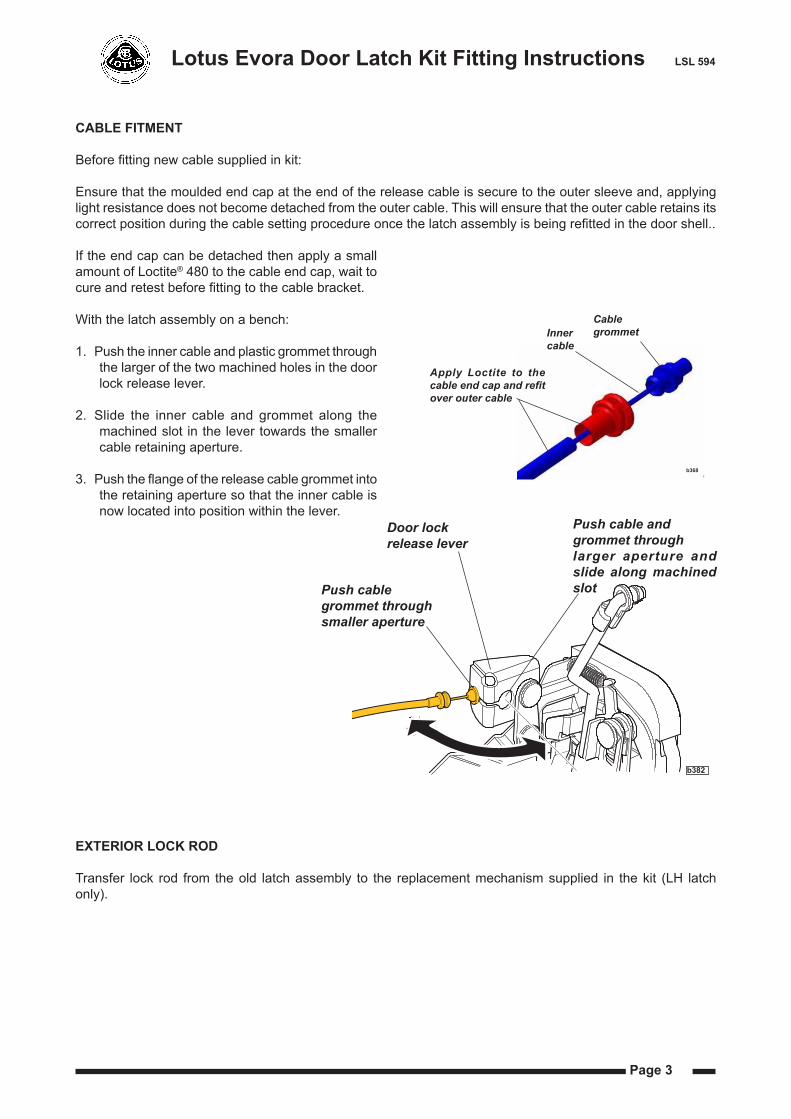
Ensure that the moulded end cap at the end of the release cable is secure to the outer sleeve and, applying light resistance does not become detached from the outer cable. This will ensure that the outer cable retains its correct position during the cable setting procedure once the latch assembly is being refitted in the door shell..
If the end cap can be detached then apply a small amount of Loctite® 480 to the cable end cap, wait to cure and retest before fitting to the cable bracket.
With the latch assembly on a bench:
Push the inner cable and plastic grommet through 1. the larger of the two machined holes in the door lock release lever.
Slide the inner cable and grommet along the 2. machined slot in the lever towards the smaller cable retaining aperture.
Push the flange of the release cable grommet into 3. the retaining aperture so that the inner cable is now located into position within the lever.
EXtErIOr LOcK rOD
Transfer lock rod from the old latch assembly to the replacement mechanism supplied in the kit (LH latch only).
b368
Apply Loctite to the cable end cap and refit over outer cable
CablegrommetInner
cable
b382
Push cablegrommet through smaller aperture
Door lockrelease lever
Push cable and grommet through larger aperture and slide along machined slot
Page 4
Lotus Evora Door Latch Kit Fitting Instructions LSL 594
trAnSFErrIng cDL DOOr LAtch LEvEr ASSEmbLy
The new latch assembly has not been supplied with latch lever CDL assembly and it will also be necessary to:
Remove and discard the 2 existing screws on the new latch mechanism that secure the plastic actuator •housing to its metal base plate to accommodate the latch lever CDL baseplate screws.
Remove CDL door latch assembly from original door latches and transfer them to the latches supplied in •this kit.
note: the cDL door latch lever assembly should be considered a safety critical item and must be in-stalled to the new latch assembly.
Removal from old door latch assembly
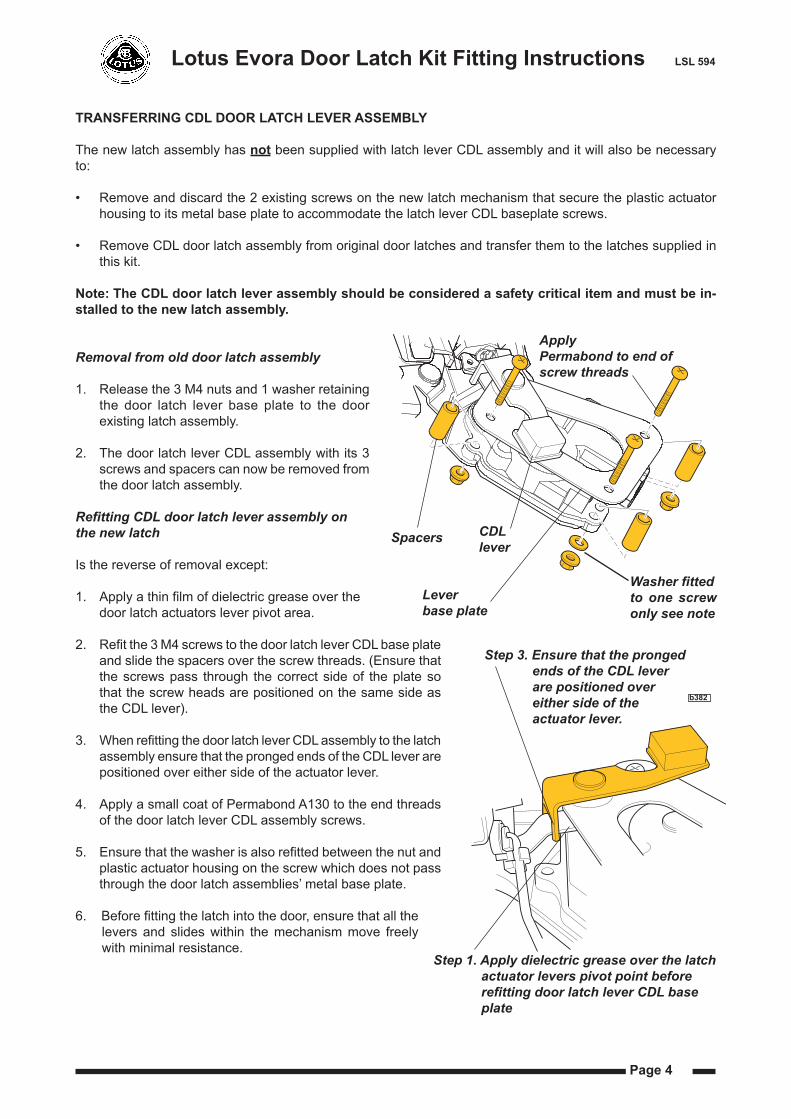
Release the 3 M4 nuts and 1 washer retaining 1. the door latch lever base plate to the door existing latch assembly.
The door latch lever CDL assembly with its 3 2. screws and spacers can now be removed from the door latch assembly.
Refitting CDL door latch lever assembly on the new latch
Is the reverse of removal except:
Apply a thin film of dielectric grease over the 1. door latch actuators lever pivot area.
Refit the 3 M4 screws to the door latch lever CDL base plate 2. and slide the spacers over the screw threads. (Ensure that the screws pass through the correct side of the plate so that the screw heads are positioned on the same side as the CDL lever).
When refitting the door latch lever CDL assembly to the latch 3. assembly ensure that the pronged ends of the CDL lever are positioned over either side of the actuator lever.
Apply a small coat of Permabond A130 to the end threads 4. of the door latch lever CDL assembly screws.
Ensure that the washer is also refitted between the nut and 5. plastic actuator housing on the screw which does not pass through the door latch assemblies’ metal base plate.
Before fitting the latch into the door, ensure that all the 6. levers and slides within the mechanism move freely with minimal resistance.
b382
Spacers
Leverbase plate
CDLlever
Apply Permabond to end of screw threads
Washer fittedto one screw only see note
Step 1. Apply dielectric grease over the latch actuator levers pivot point before refitting door latch lever CDL base plate
Step 3. Ensure that the pronged ends of the CDL lever are positioned over either side of the actuator lever.

Page 5
Lotus Evora Door Latch Kit Fitting Instructions LSL 594
SILL buttOn cOntrOL rOD tO LAtch
Fit the supplied sill button control rod to the new latch assembly
Note: Rods are handed and could possibly be supplied without part number identification. Please compare shape and profile of rods supplied in the fitting kit with existing rods attached to old latch to confirm identification.
The latch is now a complete assembly which is ready to fit into the door shell.
FIttIng LAtch ASSEmbLy
Fit the latch assembly in place, reconnecting the main CDL and micro-switch harness connectors to the 1. latch assembly.
Ensure that the sill control rod is positioned through its aperture in the door shell. 2.
Apply Loctite3. ® 130 to the three screws securing the latch mechanism to the door shut face and tighten to 4 Nm.
Connect the exterior door lock rod to the lock (LH door only) Do not fit exterior handle release rod at this 4. time.
Slide the end cap of the interior release cable back onto the door mounted cable retaining bracket.5.
Before refitting the security shield ensure that the latch is lu-6. bricated using a small amount of a suitable clear PTFE spray grease (such as Lotus part number A132B6038V). Direct at the latches specific slide and pivot points illustrated.
tESt mEchAnIcAL OPErAtIOn OF LAtch ASSEmbLy
It is vitally important to ensure that the new latch assembly operates smoothly, has no tight spots or sticking points.
Procedure:
Push the sill control rod downwards to set the latch in the locked position.1.
Hold the interior release cable at the outer sleeve, gently pull the inner cable and check the operation and 2. movement of the latch mechanism and cable is smooth and progressive, (this will replicate the same action as using the interior door handle).
The latch mechanism should also fully return as the inner cable is released. 3.
Carry out this testing procedure again with the sill control rod raised (unlocked position), the resistance in 4. the cable and latch will increase, but, again it should be smooth and progressive.
Refit the exterior door handle rod once you are satisfied that the interior handle latch mechanism is operat-5. ing smoothly.
b364
Latch lever pivot and slide lubrica-tion points
Page 6
Lotus Evora Door Latch Kit Fitting Instructions LSL 594
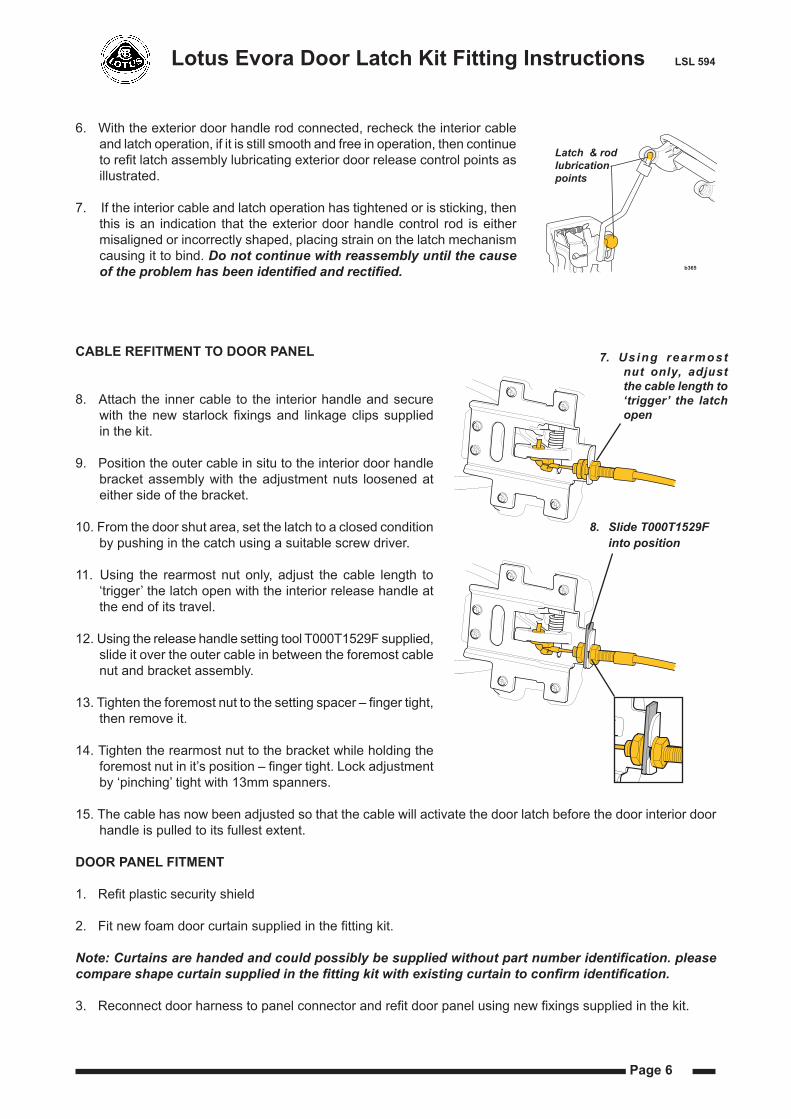
With the exterior door handle rod connected, recheck the interior cable 6. and latch operation, if it is still smooth and free in operation, then continue to refit latch assembly lubricating exterior door release control points as illustrated.
If the interior cable and latch operation has tightened or is sticking, then 7. this is an indication that the exterior door handle control rod is either misaligned or incorrectly shaped, placing strain on the latch mechanism causing it to bind. Do not continue with reassembly until the cause of the problem has been identified and rectified.
cAbLE rEFItmEnt tO DOOr PAnEL
Attach the inner cable to the interior handle and secure 8. with the new starlock fixings and linkage clips supplied in the kit.
Position the outer cable in situ to the interior door handle 9. bracket assembly with the adjustment nuts loosened at either side of the bracket.
From the door shut area, set the latch to a closed condition 10. by pushing in the catch using a suitable screw driver.
Using the rearmost nut only, adjust the cable length to 11. ‘trigger’ the latch open with the interior release handle at the end of its travel.
Using the release handle setting tool T000T1529F supplied, 12. slide it over the outer cable in between the foremost cable nut and bracket assembly.
Tighten the foremost nut to the setting spacer – finger tight, 13. then remove it.
Tighten the rearmost nut to the bracket while holding the 14. foremost nut in it’s position – finger tight. Lock adjustment by ‘pinching’ tight with 13mm spanners.
The cable has now been adjusted so that the cable will activate the door latch before the door interior door 15. handle is pulled to its fullest extent.
DOOr PAnEL FItmEnt
Refit plastic security shield1.
Fit new foam door curtain supplied in the fitting kit. 2.
Note: Curtains are handed and could possibly be supplied without part number identification. please compare shape curtain supplied in the fitting kit with existing curtain to confirm identification.
Reconnect door harness to panel connector and refit door panel using new fixings supplied in the kit.3.
Using rearmost 7. nut only, adjust the cable length to ‘trigger’ the latch open
Slide T000T1529F 8. into position
b365
Latch & rodlubrication points
Page 7
Lotus Evora Door Latch Kit Fitting Instructions LSL 594
SEttIng DOOr SILL buttOn hEIght
Once satisfactorily refitted, apply a small amount of Loctite• ® 130 to the thread of the sill control rod before fitting the new sill button supplied. Screw the button onto the rod; setting the height so that in the rods downwards position only the contoured radii and domed section of the button is visible.
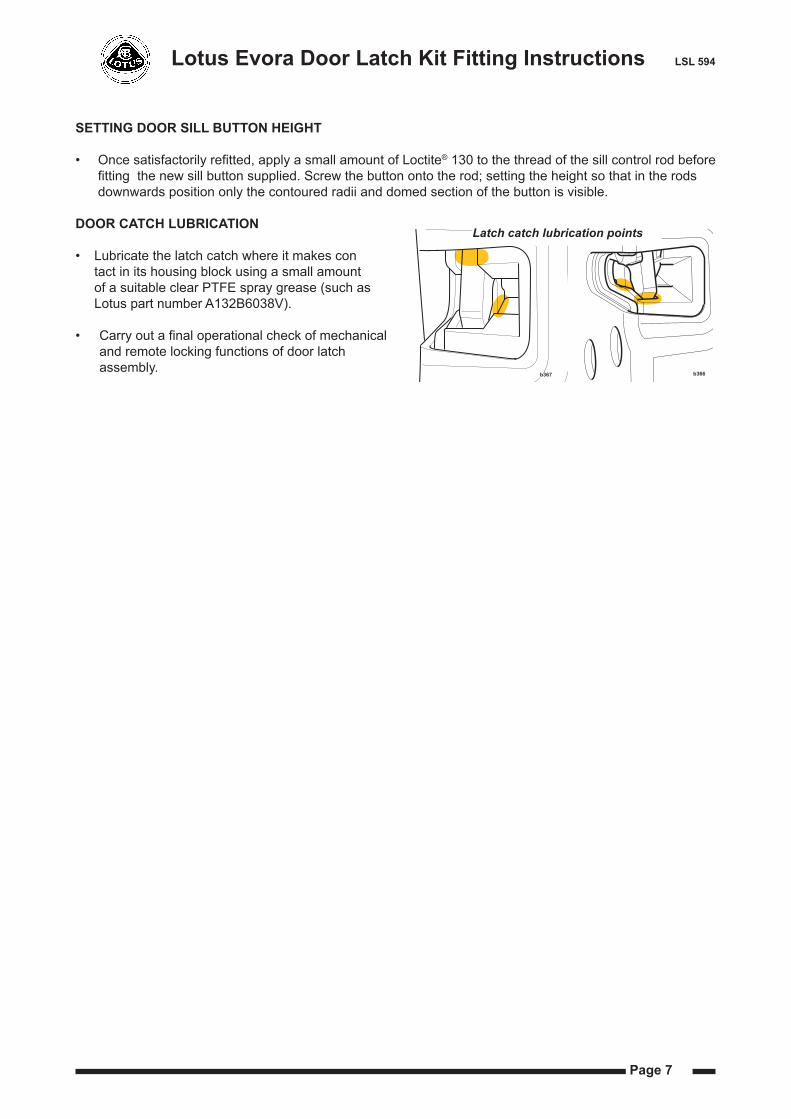
DOOr cAtch LubrIcAtIOn
Lubricate the latch catch where it makes con • tact in its housing block using a small amount of a suitable clear PTFE spray grease (such as Lotus part number A132B6038V).
Carry out a final operational check of mechanical •and remote locking functions of door latch assembly.
b367 b366
Latch catch lubrication points