Embed Size (px)
Citation preview
LSO Administrator Training
Participant Guide
LSO Administrator Training: Participant Guide Human Resource Development | 717.787.3813

2
3
LSO Administrator Training Participant Guide
Table of Contents
Module 1: Introduction ............................................................................ 4
Module 2: LSO Overview Page ................................................................. 8 Module 3: Creating Agency Course Groups ............................................ 11
Module 4: Creating/Changing Course Types .......................................... 14
Module 5: Creating/Canceling Courses .................................................. 23 Module 6: Managing Participation for Learners...................................... 29
Module 7: Viewing/Printing Course Rosters .......................................... 34
Module 8: Following Up Courses ............................................................ 36
Module 9: Creating Curriculums and Programs ...................................... 39
Module 10: Creating After-the-Facts (ATFs) .......................................... 47
Module 11: Creating/Managing Locations and Rooms ........................... 50
Summary ............................................................................................... 53
4
Module 1: Introduction
Welcome to LSO Administrator training. This course is intended for agency administrators assigned one of the following roles:
Training Administrator Course Administrator
For purposes of this training, all participants have been assigned the Training
Administrator role, which provides additional access and functionality in LSO.
We will highlight the differences between the two roles throughout the training when appropriate. Please consult with your agency training officer to
confirm the role you have been assigned for the actual “live” LSO, scheduled to launch in January 2013.
Course Objectives
After completing this course, you will be able to:
create Course Groups
create Course Types
create/cancel courses
manage participation for learners
view/print course rosters
follow up courses
create curriculums and programs
create after-the-facts (ATFs)
create/manage locations and rooms
5
Accessing the Administrator Portal
To access the Administrator Portal in the LSO test environment:
1. Log in to the network using the training login/password provided to
you with your participant guide. Ex. pmotrain01/train$01
PLEASE DO NOT USE YOUR CWOPA ID TO LOG IN. 2. Open Internet Explorer.
3. Click the Favorites link at the top of the window. 4. Select “SAP NetWeaver Portal” from the Favorites list.
Logon page appears. 5. Enter your personnel number in the User field.
Ex. P00647000 Note: You must include P and two zeroes as the prefix.
6. Enter “Imagine#1” in the Password field.
Note: The password is case sensitive. 7. Click the “Log On” button.
ESS Home page appears. 8. Click the “LSO” tab at the top of the page.
LSO Overview page appears.
To access the Administrator Portal in the “live” LSO:
1. Go to www.myWorkplace.state.pa.us ESS Home page appears.
2. Click the “LSO” tab at the top of the page. LSO Overview page appears.
Notes
___________________________________________________
___________________________________________________
___________________________________________________
___________________________________________________
___________________________________________________
6
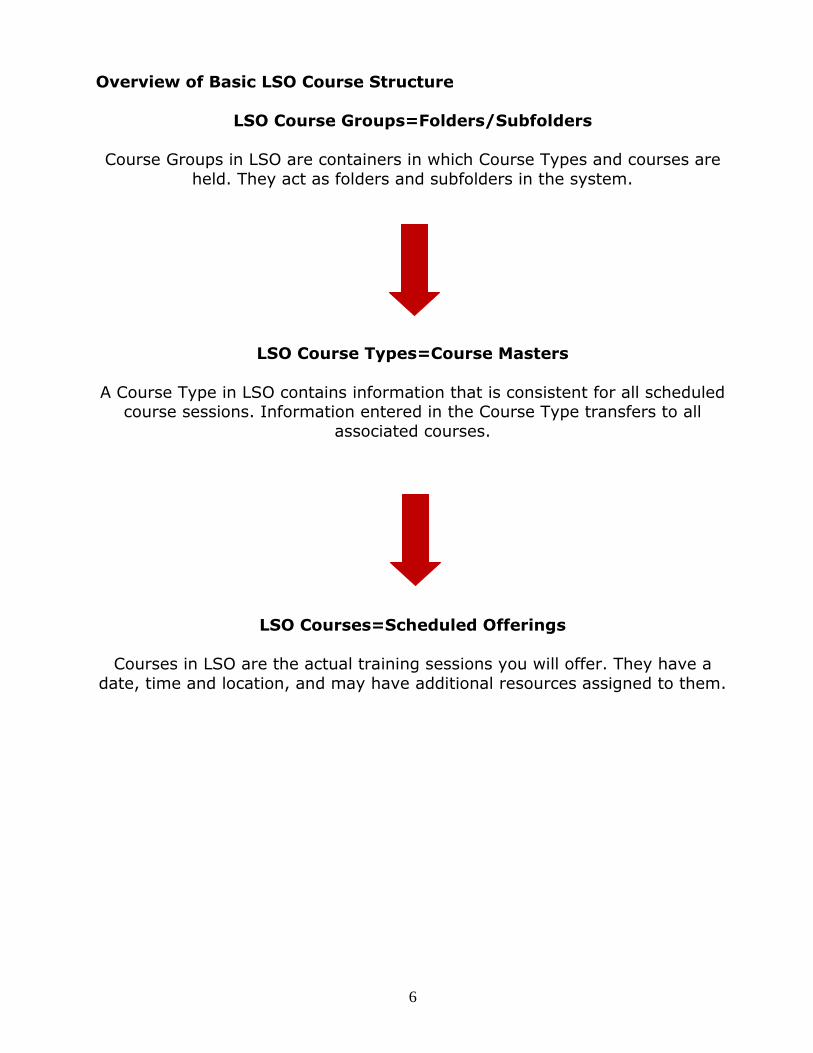
Overview of Basic LSO Course Structure
LSO Course Groups=Folders/Subfolders
Course Groups in LSO are containers in which Course Types and courses are
held. They act as folders and subfolders in the system.
LSO Course Types=Course Masters
A Course Type in LSO contains information that is consistent for all scheduled course sessions. Information entered in the Course Type transfers to all
associated courses.
LSO Courses=Scheduled Offerings
Courses in LSO are the actual training sessions you will offer. They have a
date, time and location, and may have additional resources assigned to them.
7
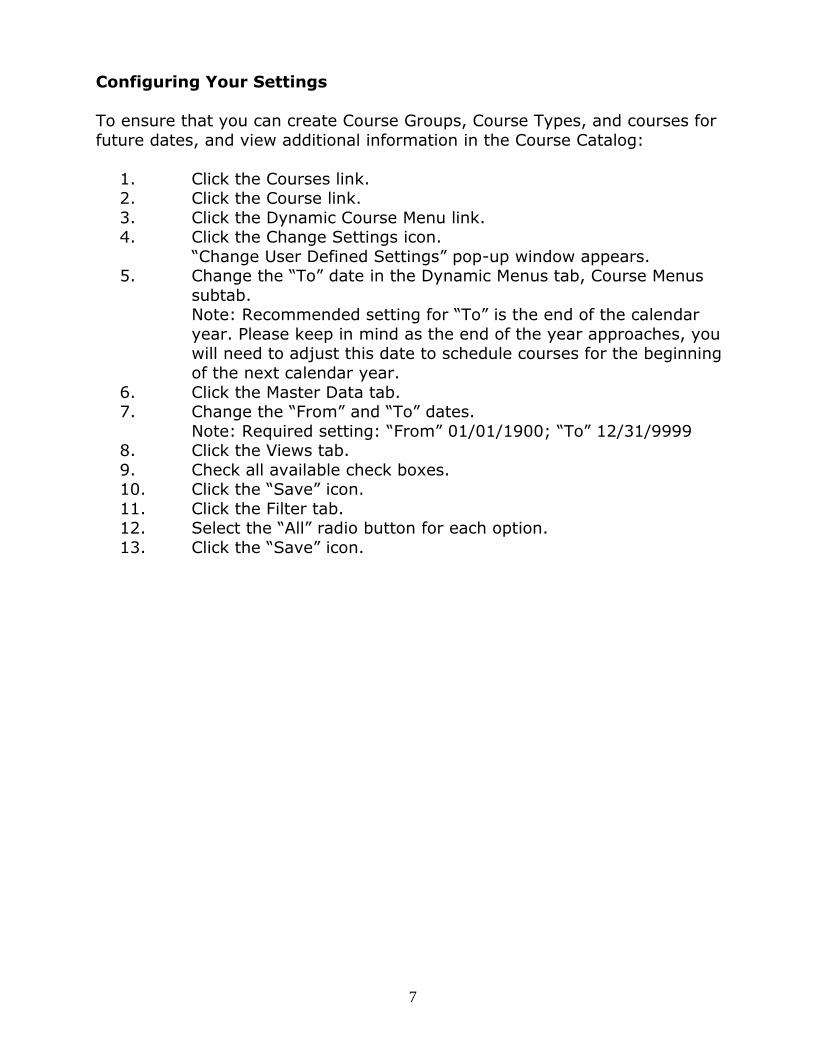
Configuring Your Settings
To ensure that you can create Course Groups, Course Types, and courses for
future dates, and view additional information in the Course Catalog:
1. Click the Courses link. 2. Click the Course link.
3. Click the Dynamic Course Menu link. 4. Click the Change Settings icon.
“Change User Defined Settings” pop-up window appears. 5. Change the “To” date in the Dynamic Menus tab, Course Menus
subtab. Note: Recommended setting for “To” is the end of the calendar
year. Please keep in mind as the end of the year approaches, you will need to adjust this date to schedule courses for the beginning
of the next calendar year.
6. Click the Master Data tab. 7. Change the “From” and “To” dates.
Note: Required setting: “From” 01/01/1900; “To” 12/31/9999 8. Click the Views tab.
9. Check all available check boxes. 10. Click the “Save” icon.
11. Click the Filter tab. 12. Select the “All” radio button for each option.
13. Click the “Save” icon.
8
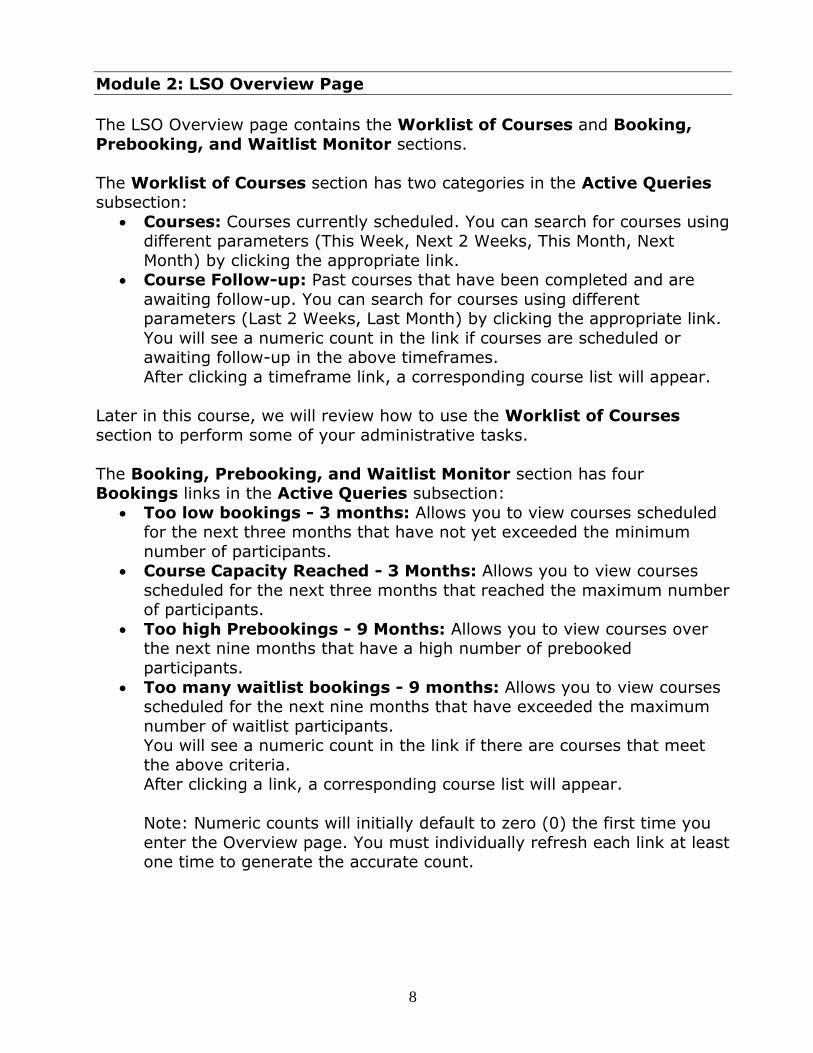
Module 2: LSO Overview Page
The LSO Overview page contains the Worklist of Courses and Booking,
Prebooking, and Waitlist Monitor sections.
The Worklist of Courses section has two categories in the Active Queries subsection:
Courses: Courses currently scheduled. You can search for courses using different parameters (This Week, Next 2 Weeks, This Month, Next
Month) by clicking the appropriate link. Course Follow-up: Past courses that have been completed and are
awaiting follow-up. You can search for courses using different parameters (Last 2 Weeks, Last Month) by clicking the appropriate link.
You will see a numeric count in the link if courses are scheduled or awaiting follow-up in the above timeframes.
After clicking a timeframe link, a corresponding course list will appear.
Later in this course, we will review how to use the Worklist of Courses
section to perform some of your administrative tasks.
The Booking, Prebooking, and Waitlist Monitor section has four Bookings links in the Active Queries subsection:
Too low bookings - 3 months: Allows you to view courses scheduled for the next three months that have not yet exceeded the minimum
number of participants. Course Capacity Reached - 3 Months: Allows you to view courses
scheduled for the next three months that reached the maximum number of participants.
Too high Prebookings - 9 Months: Allows you to view courses over the next nine months that have a high number of prebooked
participants.
Too many waitlist bookings - 9 months: Allows you to view courses scheduled for the next nine months that have exceeded the maximum
number of waitlist participants. You will see a numeric count in the link if there are courses that meet
the above criteria. After clicking a link, a corresponding course list will appear.
Note: Numeric counts will initially default to zero (0) the first time you
enter the Overview page. You must individually refresh each link at least one time to generate the accurate count.

9
From the Booking, Prebooking, and Waitlist Monitor section, you can
export a list of courses to Excel format, or view/print a sign-in roster for a specific course.
To export a list of courses to Excel format:
1. Click the appropriate booking link.
A list of courses appears. 2. Click the Export button.
3. Click Export to Microsoft Excel.
To view/print a sign-in roster for a specific course: 1. Select a course from the list by clicking the box left of the
course title. The course row is highlighted and the “Print Sign-In Roster”
button is activated. 2. Click the “Print Sign-In Roster” button.
The course roster appears in a separate window. 3. Hover your cursor over the course roster.
An Adobe task bar appears. 4. Click the “Print file” icon.
2.1 LSO Overview Screen
10
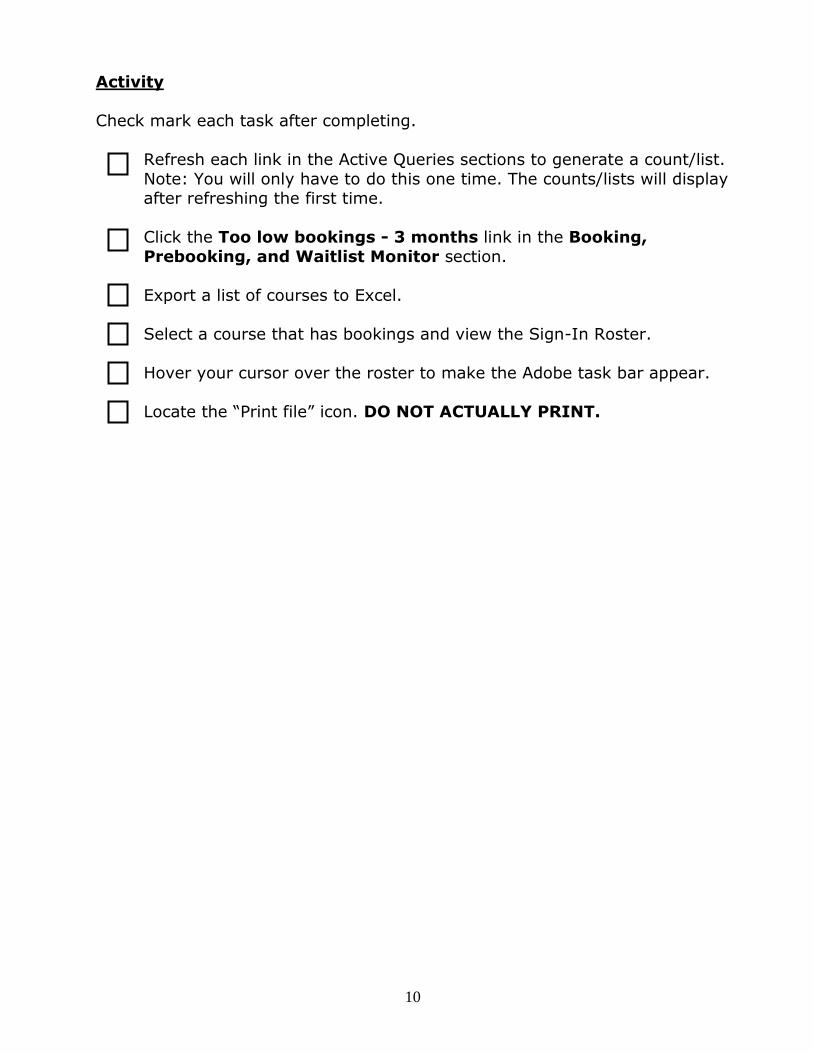
Activity
Check mark each task after completing.
Refresh each link in the Active Queries sections to generate a count/list.
Note: You will only have to do this one time. The counts/lists will display after refreshing the first time.
Click the Too low bookings - 3 months link in the Booking,
Prebooking, and Waitlist Monitor section.
Export a list of courses to Excel.
Select a course that has bookings and view the Sign-In Roster.
Hover your cursor over the roster to make the Adobe task bar appear.
Locate the “Print file” icon. DO NOT ACTUALLY PRINT.
11
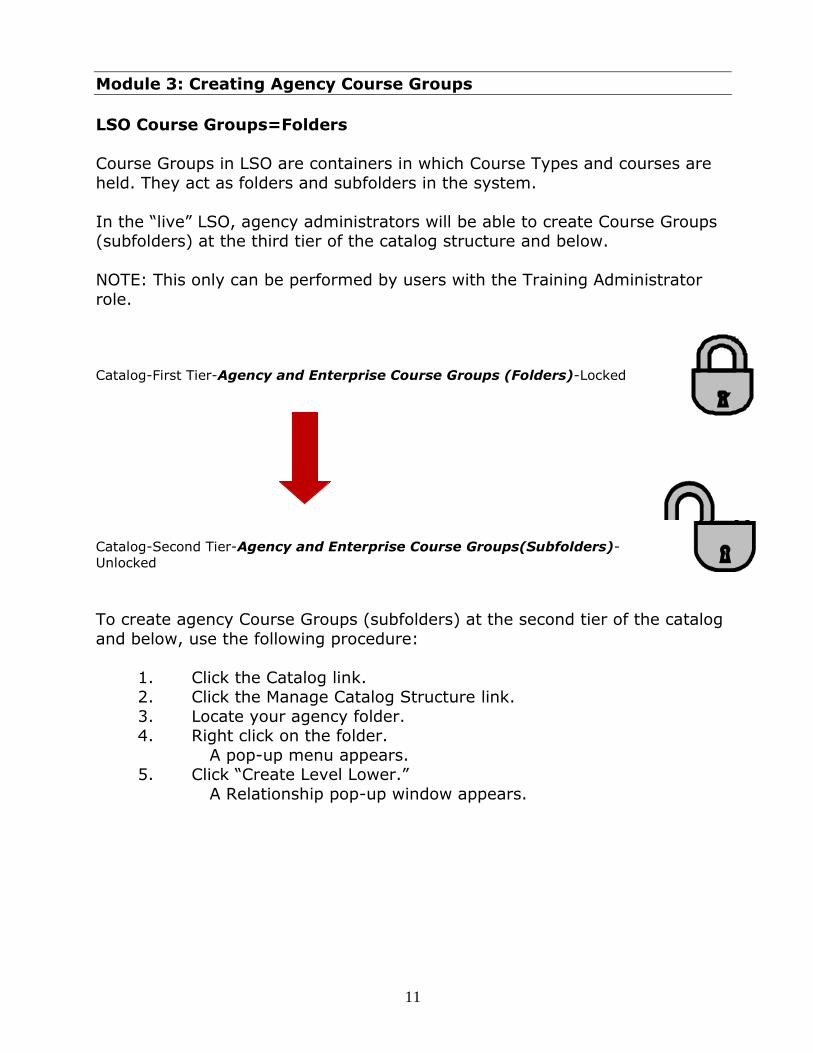
Module 3: Creating Agency Course Groups
LSO Course Groups=Folders
Course Groups in LSO are containers in which Course Types and courses are
held. They act as folders and subfolders in the system.
In the “live” LSO, agency administrators will be able to create Course Groups (subfolders) at the third tier of the catalog structure and below.
NOTE: This only can be performed by users with the Training Administrator
role.
Catalog-First Tier-Agency and Enterprise Course Groups (Folders)-Locked
Catalog-Second Tier-Agency and Enterprise Course Groups(Subfolders)-
Unlocked
To create agency Course Groups (subfolders) at the second tier of the catalog
and below, use the following procedure:
1. Click the Catalog link. 2. Click the Manage Catalog Structure link.
3. Locate your agency folder. 4. Right click on the folder.
A pop-up menu appears. 5. Click “Create Level Lower.”
A Relationship pop-up window appears.
12
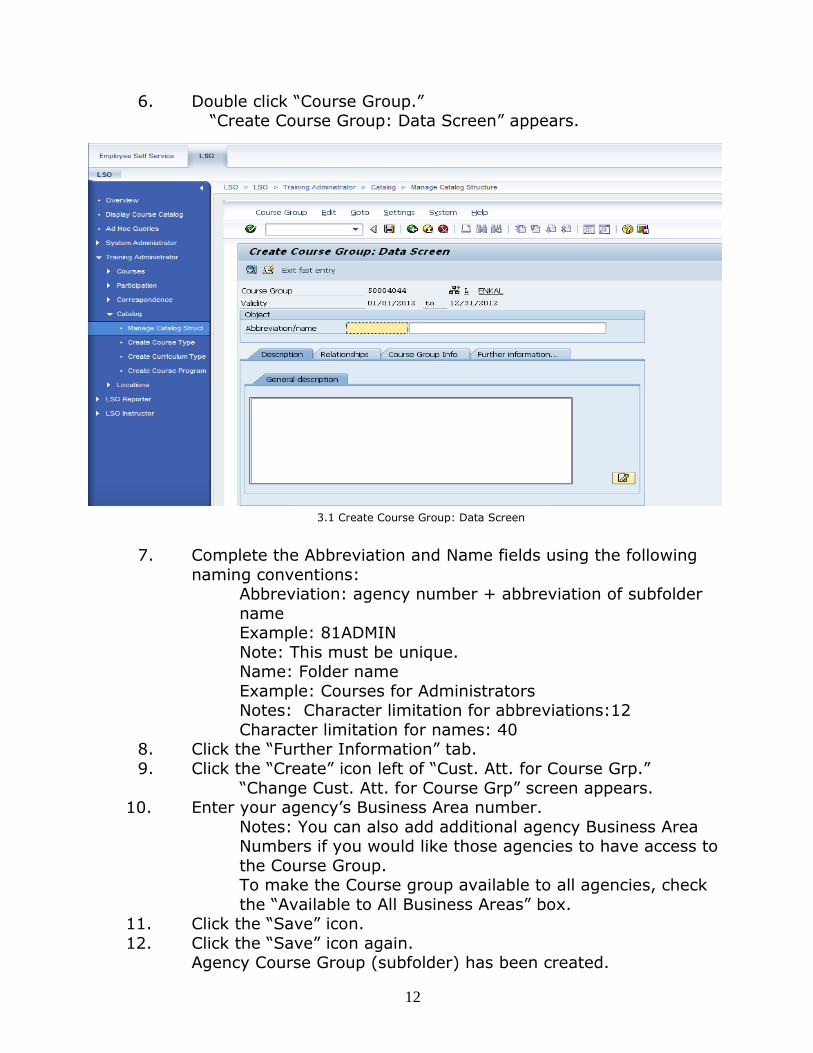
6. Double click “Course Group.” “Create Course Group: Data Screen” appears.
7. Complete the Abbreviation and Name fields using the following
naming conventions: Abbreviation: agency number + abbreviation of subfolder
name Example: 81ADMIN
Note: This must be unique. Name: Folder name
Example: Courses for Administrators Notes: Character limitation for abbreviations:12
Character limitation for names: 40 8. Click the “Further Information” tab.
9. Click the “Create” icon left of “Cust. Att. for Course Grp.”
“Change Cust. Att. for Course Grp” screen appears. 10. Enter your agency’s Business Area number.
Notes: You can also add additional agency Business Area Numbers if you would like those agencies to have access to
the Course Group. To make the Course group available to all agencies, check
the “Available to All Business Areas” box. 11. Click the “Save” icon.
12. Click the “Save” icon again. Agency Course Group (subfolder) has been created.
3.1 Create Course Group: Data Screen
13
Activity
Check mark each task after completing.
Locate your agency Course Group (folder).
Create an agency Course Group (subfolder) within your agency folder. Use your agency name, initials and “T3” to name the subfolder.
Example: Health AY T3
Write down the abbreviation/name of the subfolder you just created. You will be using this subfolder throughout the training.
14
Module 4: Creating/Changing Course Types
LSO Course Types=Course Masters
A Course Type in LSO should contain information that is consistent for all
scheduled course sessions. Information entered in the Course Type transfers to all associated courses.
NOTE: This only can be performed by users with the Training Administrator
role.
We’ll cover how to create Course Types for the two most common delivery methods:
Classroom Web-based training
Classroom
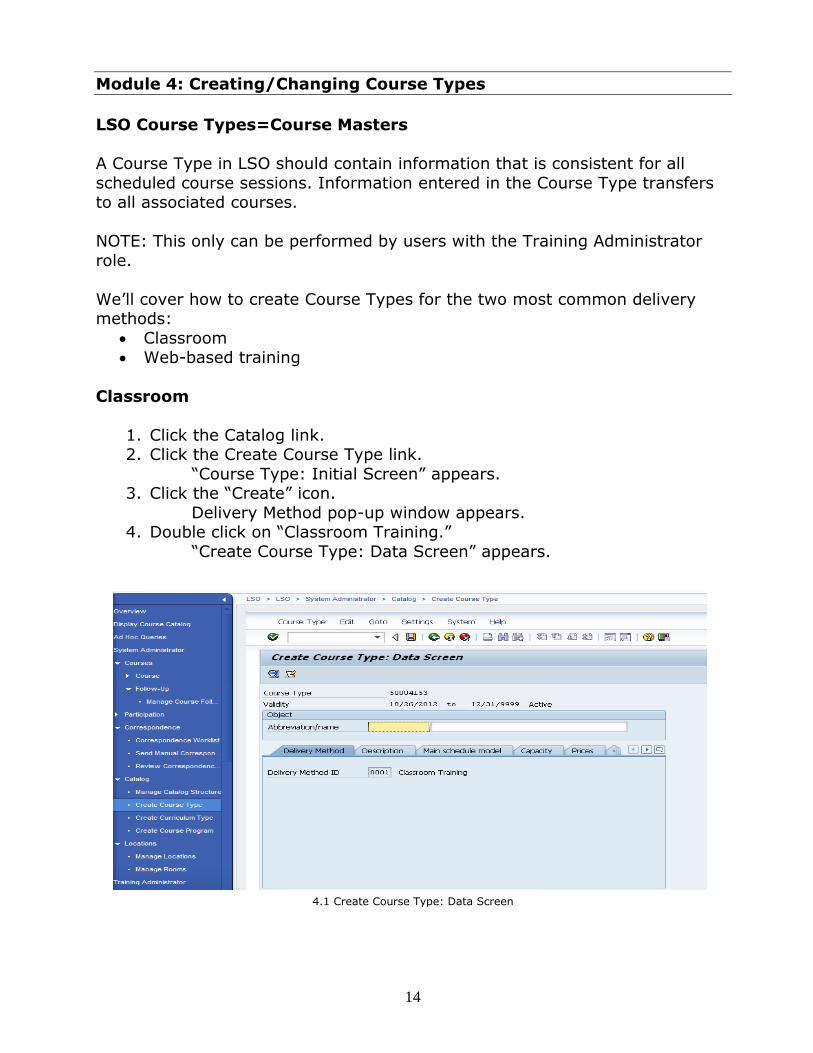
1. Click the Catalog link. 2. Click the Create Course Type link.
“Course Type: Initial Screen” appears. 3. Click the “Create” icon.
Delivery Method pop-up window appears. 4. Double click on “Classroom Training.”
“Create Course Type: Data Screen” appears.
4.1 Create Course Type: Data Screen
15
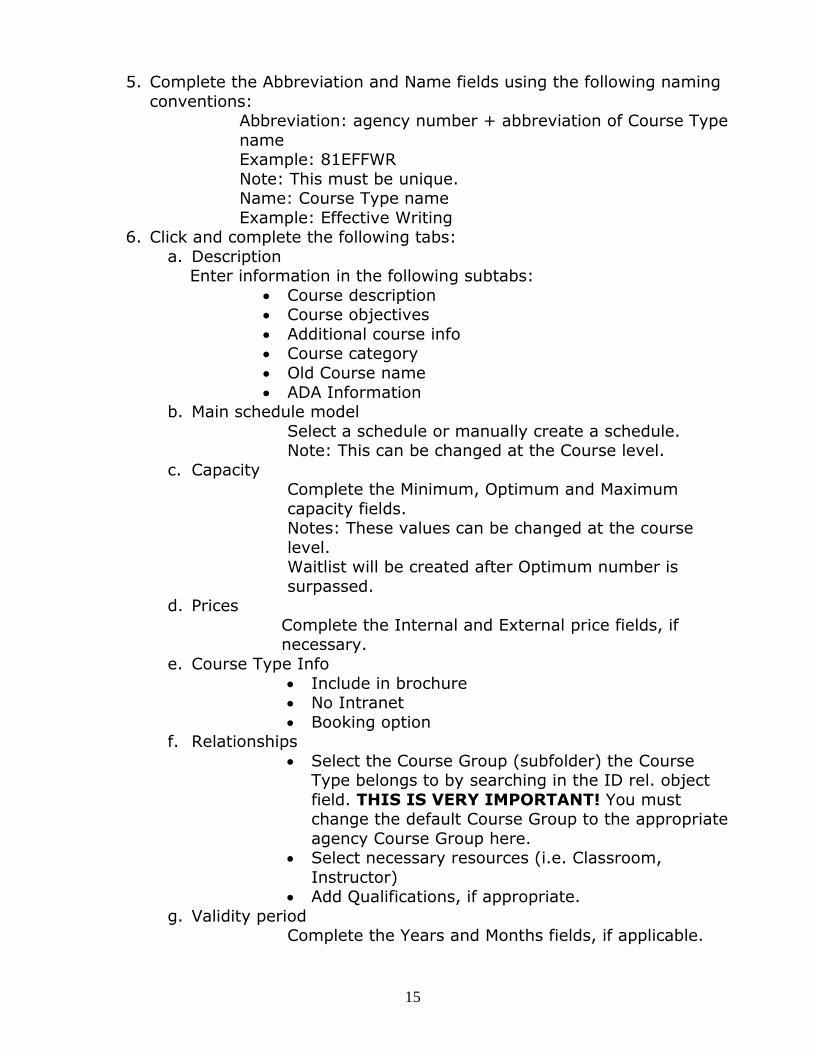
5. Complete the Abbreviation and Name fields using the following naming
conventions: Abbreviation: agency number + abbreviation of Course Type
name Example: 81EFFWR
Note: This must be unique. Name: Course Type name
Example: Effective Writing 6. Click and complete the following tabs:
a. Description Enter information in the following subtabs:
Course description Course objectives
Additional course info Course category
Old Course name
ADA Information b. Main schedule model
Select a schedule or manually create a schedule. Note: This can be changed at the Course level.
c. Capacity Complete the Minimum, Optimum and Maximum
capacity fields. Notes: These values can be changed at the course
level. Waitlist will be created after Optimum number is
surpassed. d. Prices
Complete the Internal and External price fields, if necessary.
e. Course Type Info
Include in brochure No Intranet
Booking option f. Relationships
Select the Course Group (subfolder) the Course Type belongs to by searching in the ID rel. object
field. THIS IS VERY IMPORTANT! You must change the default Course Group to the appropriate
agency Course Group here. Select necessary resources (i.e. Classroom,
Instructor) Add Qualifications, if appropriate.
g. Validity period Complete the Years and Months fields, if applicable.
16
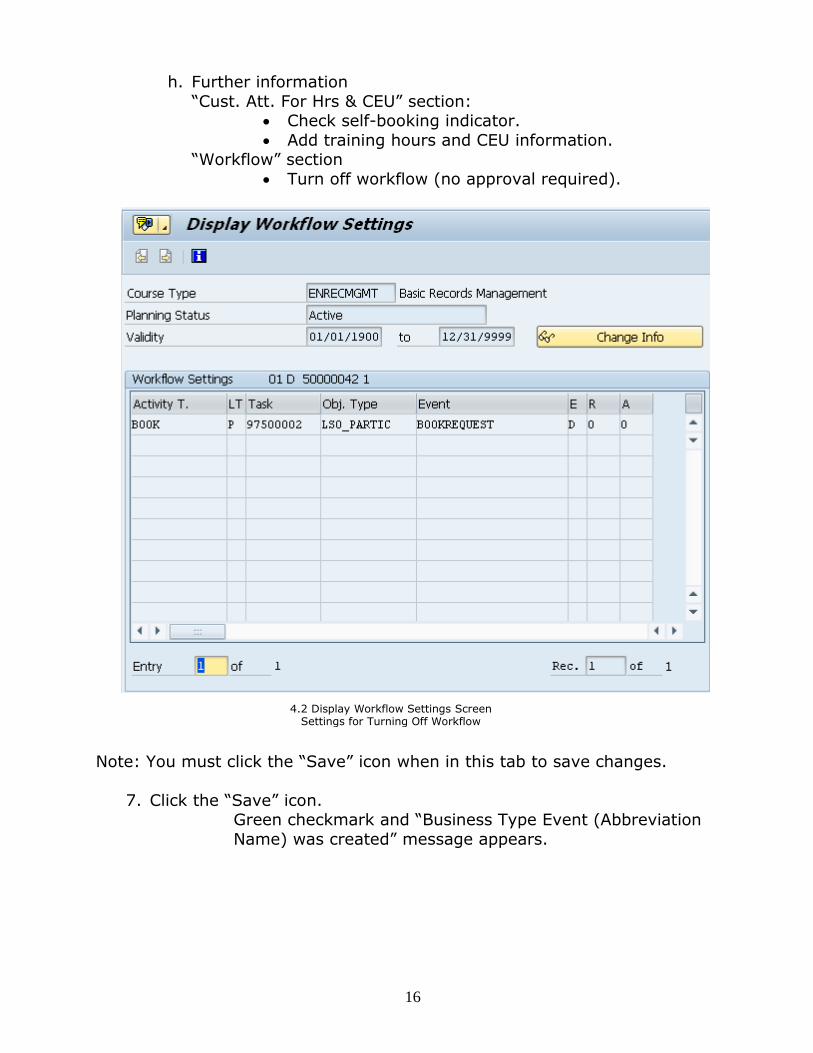
h. Further information
“Cust. Att. For Hrs & CEU” section: Check self-booking indicator.
Add training hours and CEU information. “Workflow” section
Turn off workflow (no approval required).
Note: You must click the “Save” icon when in this tab to save changes.
7. Click the “Save” icon. Green checkmark and “Business Type Event (Abbreviation
Name) was created” message appears.
4.2 Display Workflow Settings Screen Settings for Turning Off Workflow
17
Web-Based Training
1. Click the Catalog link.
2. Click the Create Course link.
“Course Type: Initial Screen” appears.
3. Click the “Create” icon. Delivery Method pop-up window appears.
4. Double click on “Web-Based Training.”
“Create Course Type: Data Screen” appears.
5. Complete the Abbreviation and Name fields using the following naming conventions:
Abbreviation: agency number + abbreviation of Course Type
name Example: 81ETHICS
Note: This must be unique. Name: Course Type name
Example: Ethics for Employees
6. Click and complete the following tabs: a. Course Type Content
This is where you create a relationship to your web-based content, which has already been imported through the LSO
Authoring Environment, with the Course Type. I. Click the “Search” icon in the Content Type field.
Course Content Type pop-up window appears. II. Click the green checkmark.
Course Content Type window appears.
III. Double click the web-based content you want associated with this course.
18
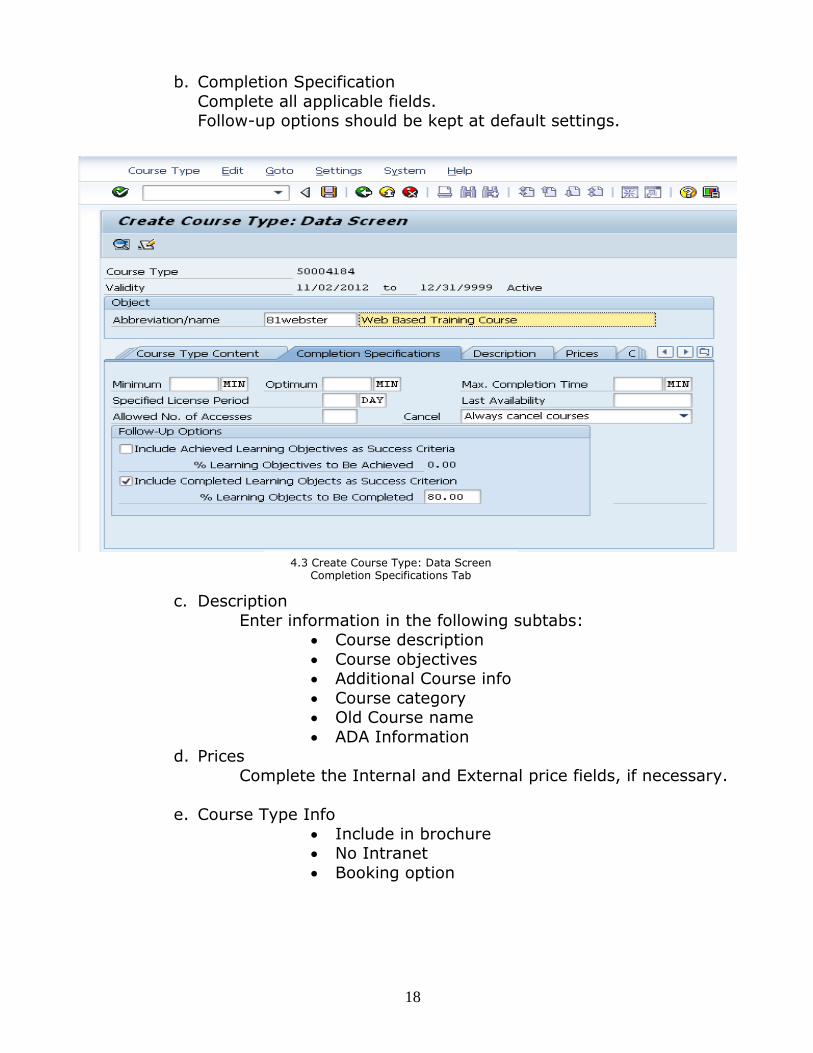
b. Completion Specification
Complete all applicable fields. Follow-up options should be kept at default settings.
c. Description
Enter information in the following subtabs: Course description
Course objectives Additional Course info
Course category Old Course name
ADA Information d. Prices
Complete the Internal and External price fields, if necessary.
e. Course Type Info
Include in brochure No Intranet
Booking option
4.3 Create Course Type: Data Screen Completion Specifications Tab
19
f. Relationships
Select the Course Group (subfolder) the Course Type belongs to by searching in the ID rel. object
field. THIS IS VERY IMPORTANT! You must change the default Course Group to the appropriate
agency Course Group here. Add Qualifications, if appropriate.
g. Validity period
Complete the Years and Months fields, if applicable.
h. Further information Check self-booking indicator.
Add training hours and CEU information. Add link to accessible version of WBT.
Note: You must click the “Save” icon when in this field to
save changes.
7. Click the “Save” icon. Green checkmark and “Business Type Event (Abbreviation
Name) was created” message appears.
Notes
___________________________________________________
___________________________________________________
___________________________________________________
___________________________________________________
___________________________________________________
20
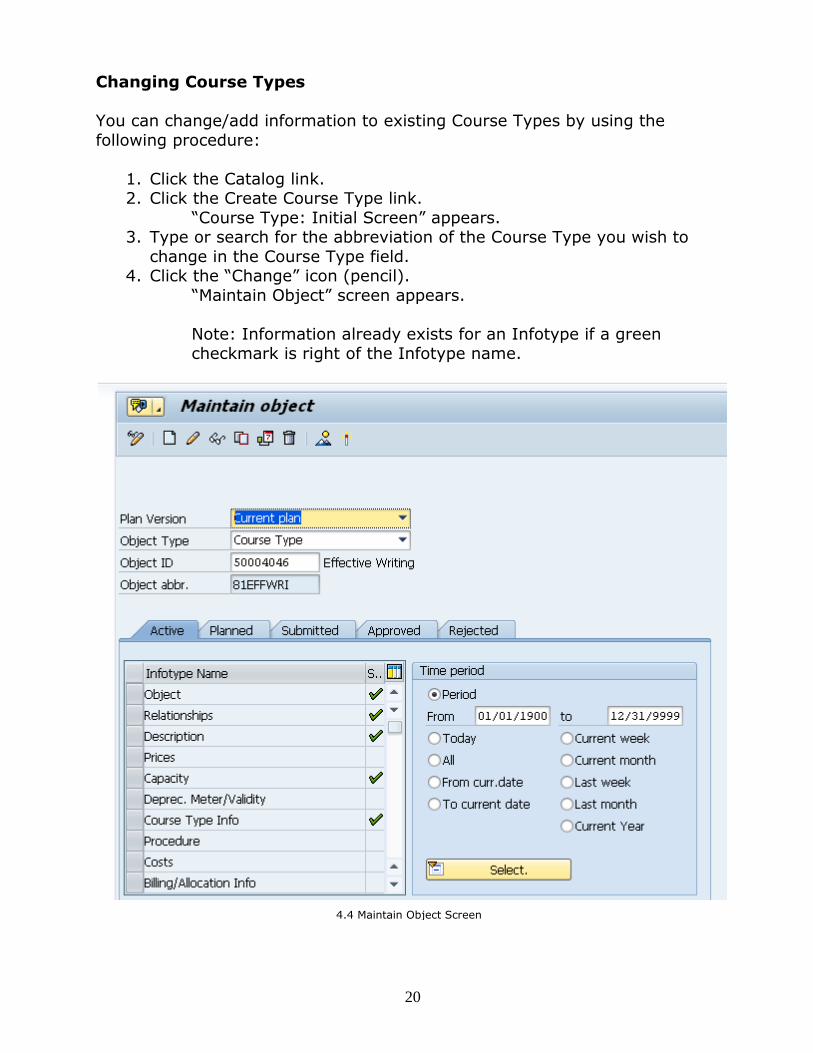
Changing Course Types
You can change/add information to existing Course Types by using the
following procedure:
1. Click the Catalog link. 2. Click the Create Course Type link.
“Course Type: Initial Screen” appears. 3. Type or search for the abbreviation of the Course Type you wish to
change in the Course Type field. 4. Click the “Change” icon (pencil).
“Maintain Object” screen appears.
Note: Information already exists for an Infotype if a green checkmark is right of the Infotype name.
4.4 Maintain Object Screen
21
To change existing information:
1. Click the box left of the Infotype you wish to change. The Infotype row is highlighted.
2. Click the “Change Infotype” icon (pencil). “Change” screen appears.
3. Change information. 4. Click the “Save” icon.
To add information:
1. Click the box left of the Infotype you wish to add. The Infotype row is highlighted.
2. Click the “Create Infotype” icon (paper). “Create” screen appears.
3. Add information. 4. Click the “Save” icon.
Delimiting Course Types
Before delimiting, review the Course Type in the Dynamic Course menu to
ensure there are no future courses scheduled.
To delimit, or make a Course Type inactive:
1. Click the Catalog link. 2. Click the Manage Catalog Structure link.
3. Locate the Course Type in the catalog. 4. Right click on the Course Type.
A pop-up menu appears. 5. Click “Delimit.”
“Delimit Object” pop-up window appears.
6. Enter a date in the “Delimitation Date” field. Note: DO NOT CHECK THE HISTORICAL RECORD BOX.
7. Click the “Delimit (Enter)” icon. Warning pop-up appears.
8. Click “Yes.”
If you would simply like to hide the course from learners without losing any information, you can use the “Change Existing Information” procedure listed
above and check the “No Intranet” box in the “Course Type Info” tab.
22
Activity
Check mark each task after completing.
Create a Course Type named “LSO T3 Test Course (Initials)”
Example: LSO T3 Test Course AY Make sure you set the relationship to the subfolder you created during
the last activity.
Locate the Course Type you just created and make changes to the Description field.
Save your changes.
23
Module 5: Creating/Canceling Courses
LSO Courses=Scheduled Offerings
Courses in LSO are the actual training sessions you will offer. They have a
date, time and location, and may have additional resources assigned to them.
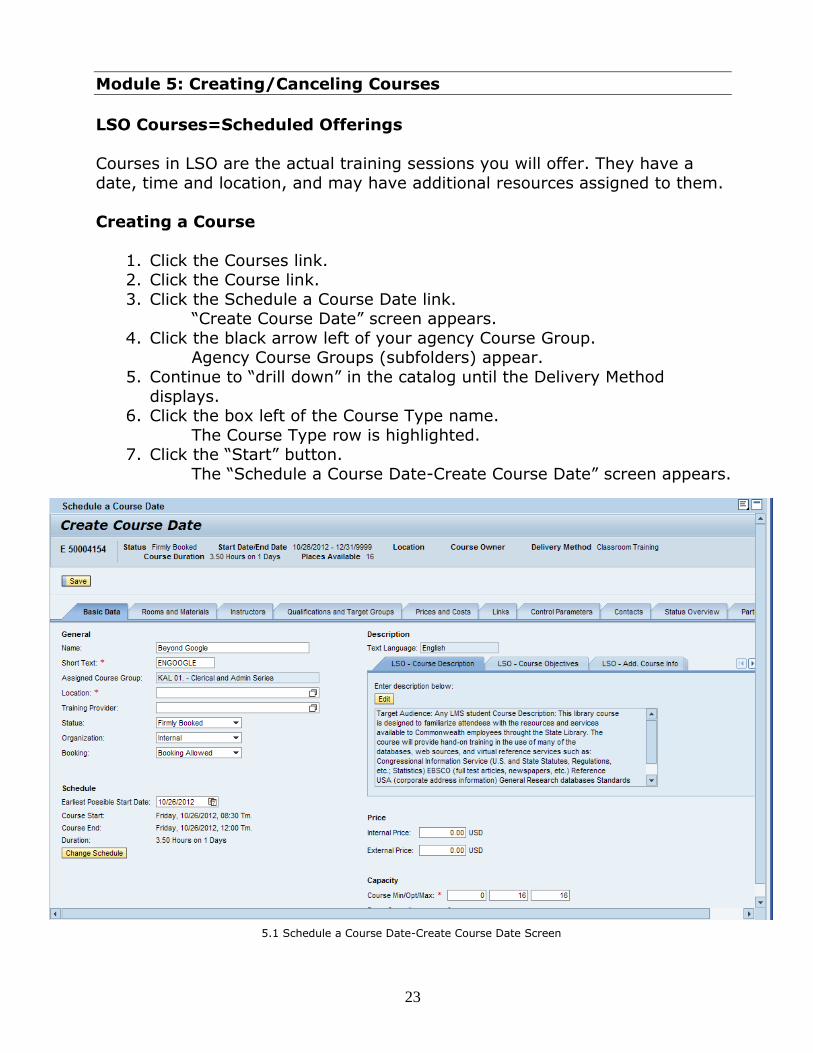
Creating a Course
1. Click the Courses link. 2. Click the Course link.
3. Click the Schedule a Course Date link. “Create Course Date” screen appears.
4. Click the black arrow left of your agency Course Group. Agency Course Groups (subfolders) appear.
5. Continue to “drill down” in the catalog until the Delivery Method
displays. 6. Click the box left of the Course Type name.
The Course Type row is highlighted. 7. Click the “Start” button.
The “Schedule a Course Date-Create Course Date” screen appears.
5.1 Schedule a Course Date-Create Course Date Screen
24
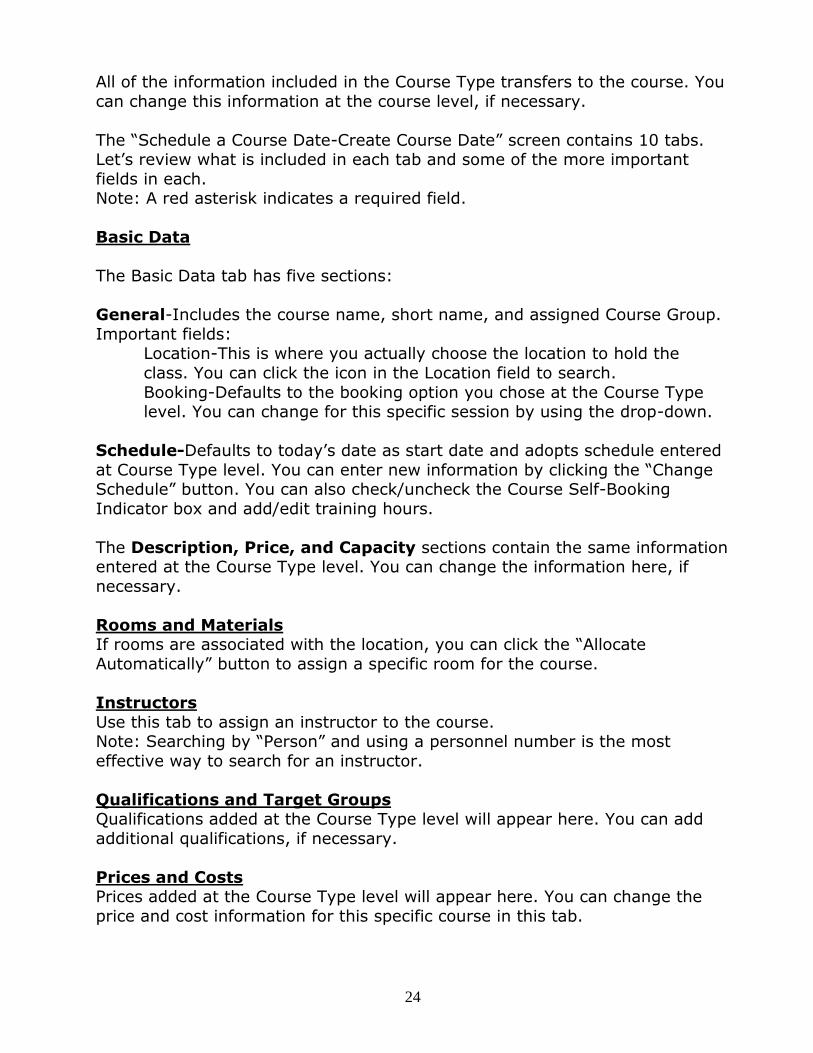
All of the information included in the Course Type transfers to the course. You
can change this information at the course level, if necessary.
The “Schedule a Course Date-Create Course Date” screen contains 10 tabs. Let’s review what is included in each tab and some of the more important
fields in each. Note: A red asterisk indicates a required field.
Basic Data
The Basic Data tab has five sections:
General-Includes the course name, short name, and assigned Course Group.
Important fields: Location-This is where you actually choose the location to hold the
class. You can click the icon in the Location field to search.
Booking-Defaults to the booking option you chose at the Course Type level. You can change for this specific session by using the drop-down.
Schedule-Defaults to today’s date as start date and adopts schedule entered
at Course Type level. You can enter new information by clicking the “Change Schedule” button. You can also check/uncheck the Course Self-Booking
Indicator box and add/edit training hours.
The Description, Price, and Capacity sections contain the same information entered at the Course Type level. You can change the information here, if
necessary.
Rooms and Materials If rooms are associated with the location, you can click the “Allocate
Automatically” button to assign a specific room for the course.
Instructors
Use this tab to assign an instructor to the course. Note: Searching by “Person” and using a personnel number is the most
effective way to search for an instructor.
Qualifications and Target Groups Qualifications added at the Course Type level will appear here. You can add
additional qualifications, if necessary.
Prices and Costs Prices added at the Course Type level will appear here. You can change the
price and cost information for this specific course in this tab.
25
Links
Any associated links added at the Course Type level will appear here. You can add additional links in this tab.
Control Parameters
Contains a list of notifications that will be sent based on actions taken in this course.
Contacts
Contacts added at the Course Type level will appear here. You can add additional contacts for this specific course in this tab.
Status Overview
Shows the overall status of the course.
Participants
This tab is updated when participants begin to book into the course.
After you have updated the information in the tabs, click the “Save” button. You will receive a confirmation message, “Course Created.”
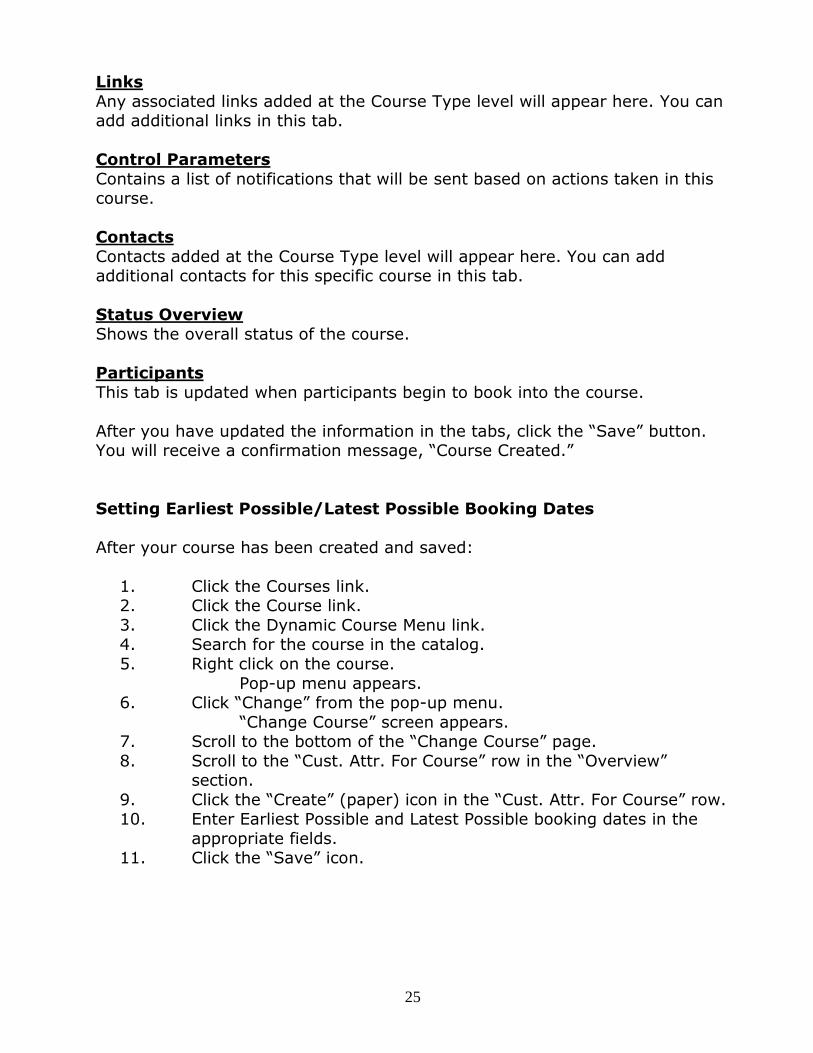
Setting Earliest Possible/Latest Possible Booking Dates
After your course has been created and saved:
1. Click the Courses link. 2. Click the Course link.
3. Click the Dynamic Course Menu link. 4. Search for the course in the catalog.
5. Right click on the course.
Pop-up menu appears. 6. Click “Change” from the pop-up menu.
“Change Course” screen appears. 7. Scroll to the bottom of the “Change Course” page.
8. Scroll to the “Cust. Attr. For Course” row in the “Overview” section.
9. Click the “Create” (paper) icon in the “Cust. Attr. For Course” row. 10. Enter Earliest Possible and Latest Possible booking dates in the
appropriate fields. 11. Click the “Save” icon.
26
Changing Courses
You can change/add information to existing courses by using the following
procedure:
1. Click the Courses link. 2. Click the Course link.
3. Click the Change Course link. “Change Course Date” screen appears.
4. Search the course catalog to find the course. 5. Click the course title link.
6. Click the Start button. 7. Make necessary changes to the course.
8. Click the Save button.
Canceling Courses
NOTE: Please cancel individual participation before canceling the course.
1. Click the Courses link. 2. Click the Course link.
3. Click the Dynamic Course Menu link. “Dynamic Course Menu” screen appears.
4. Click through the course catalog to find the course. 5. Right click on the course you wish to cancel.
A pop-up menu appears.
6. Click “Firmly Book/Cancel”.
27
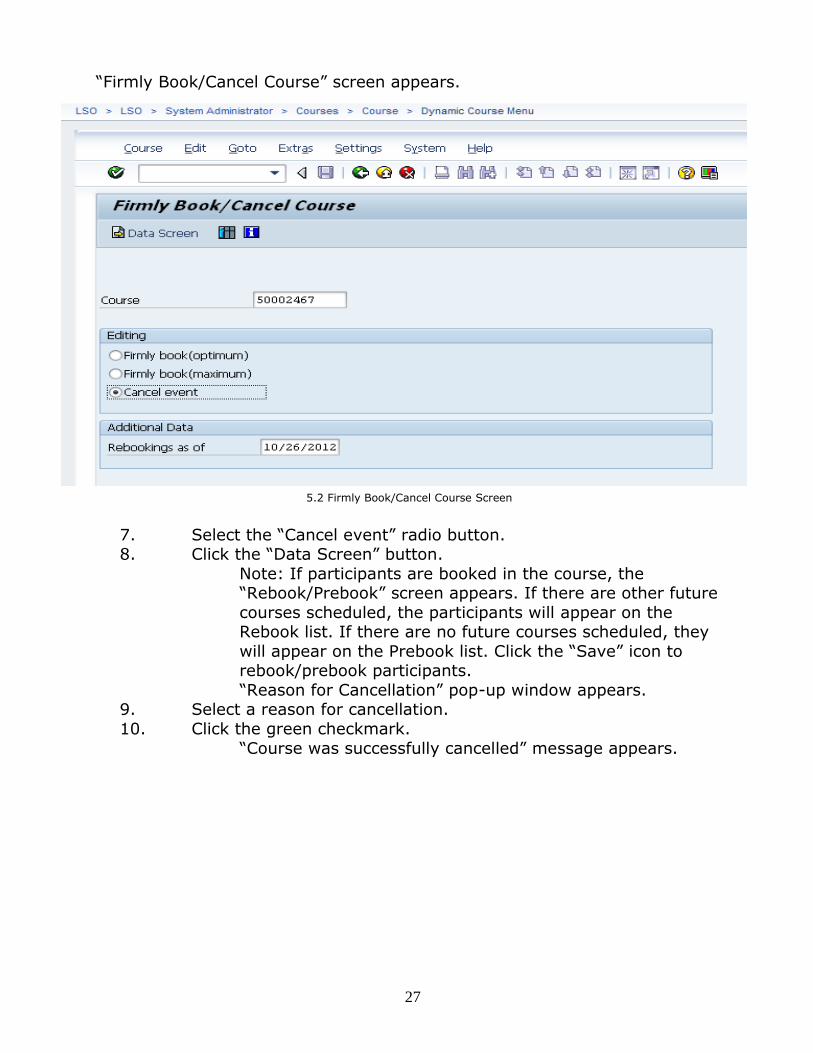
“Firmly Book/Cancel Course” screen appears.
7. Select the “Cancel event” radio button. 8. Click the “Data Screen” button.
Note: If participants are booked in the course, the “Rebook/Prebook” screen appears. If there are other future
courses scheduled, the participants will appear on the Rebook list. If there are no future courses scheduled, they
will appear on the Prebook list. Click the “Save” icon to rebook/prebook participants.
“Reason for Cancellation” pop-up window appears. 9. Select a reason for cancellation.
10. Click the green checkmark.
“Course was successfully cancelled” message appears.
5.2 Firmly Book/Cancel Course Screen
28
Activity
Check mark each task after completing.
Create a course using the Course Type you created during the last
activity.
Cancel the course you just created.
Create a new course associated with the same Course Type.
29
Module 6: Managing Participation for Learners
You can book, prebook , and cancel course participation for learners.
To initially book learners into a course:
1. Click the Participation link.
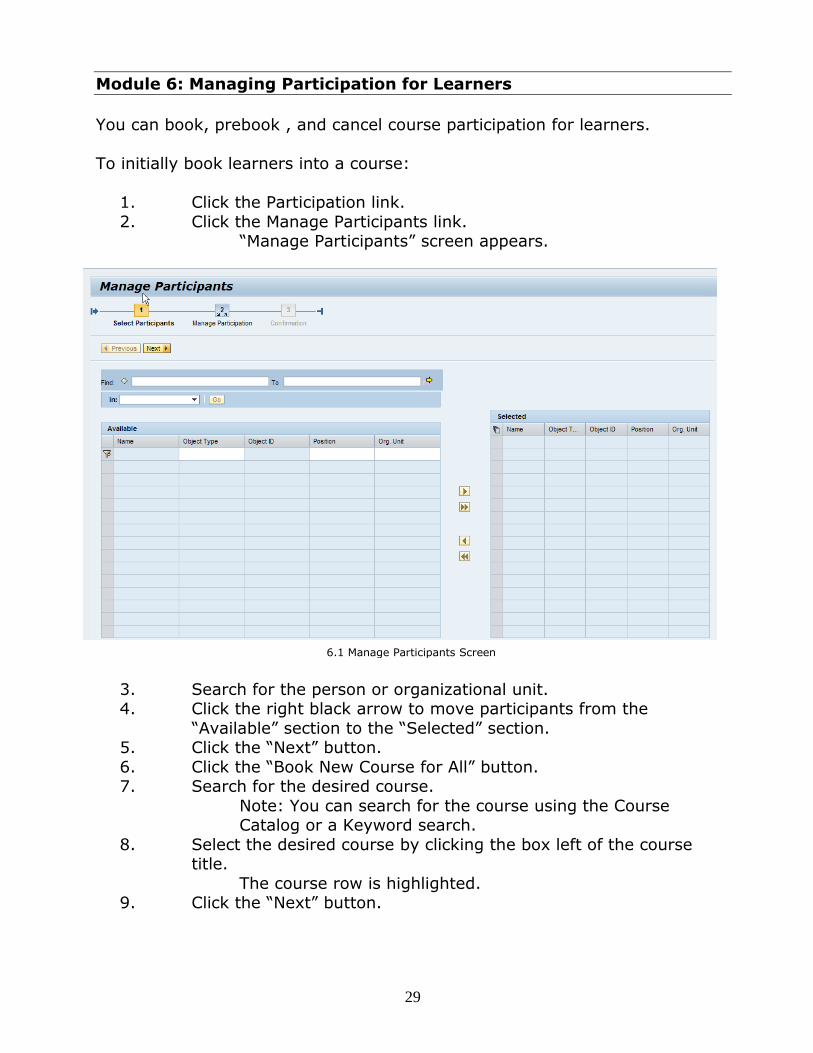
2. Click the Manage Participants link. “Manage Participants” screen appears.
3. Search for the person or organizational unit. 4. Click the right black arrow to move participants from the
“Available” section to the “Selected” section. 5. Click the “Next” button.
6. Click the “Book New Course for All” button. 7. Search for the desired course.
Note: You can search for the course using the Course Catalog or a Keyword search.
8. Select the desired course by clicking the box left of the course title.
The course row is highlighted. 9. Click the “Next” button.
6.1 Manage Participants Screen
30
10. Click the “Book” button. “Participation was successfully booked” message appears.
Note: You can book additional courses for the same group of participants by clicking the “Book New Course for All”
button. 11. Click the “Next” button to confirm.
You can also manage courses that already have booking activity by using the
Manage Course Participations link . Another way to do this is through the LSO Overview screen, which we reviewed at the beginning of this course.
From the LSO Overview, Worklist of Courses section, Active Queries
subsection:
1. Click the appropriate timeframe link.
2. Scroll to find the course that you would like to manage. 3. Click the box left of the course name.
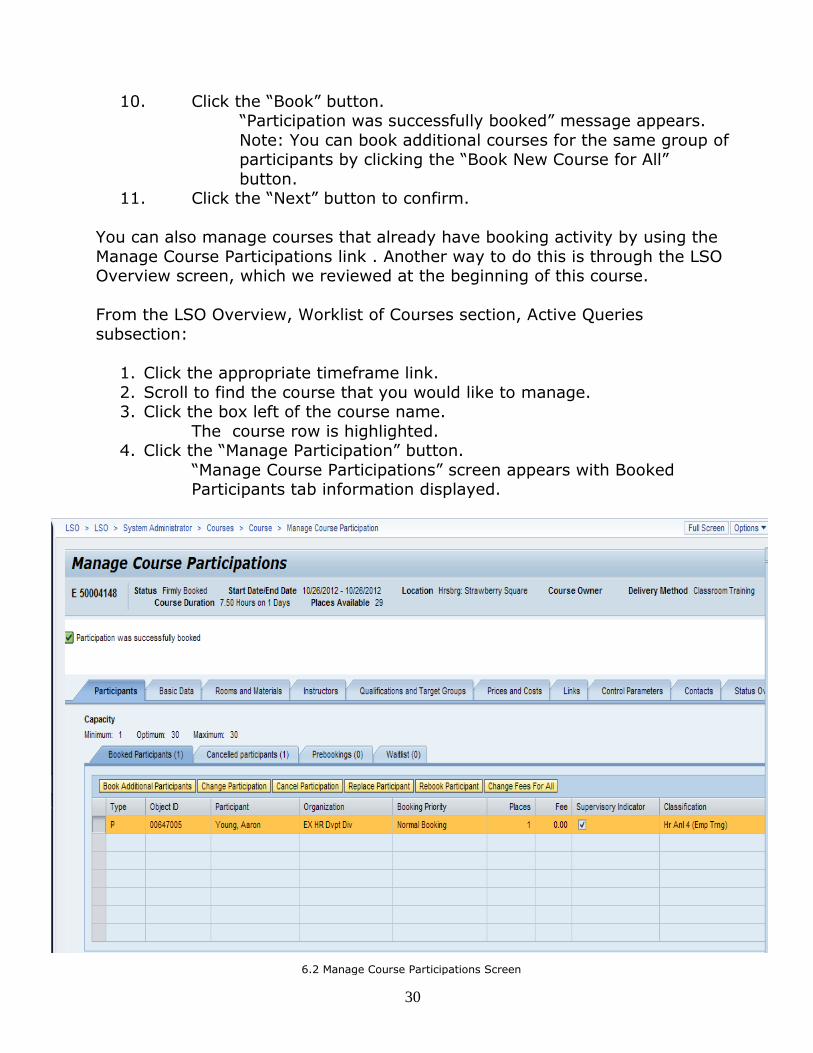
The course row is highlighted. 4. Click the “Manage Participation” button.
“Manage Course Participations” screen appears with Booked Participants tab information displayed.
6.2 Manage Course Participations Screen
31
There are four tabs available:
Booked Participants-Allows you to book participants or change participant
statuses for learners. Cancelled Participants-Allows you to change the participant statuses of
learners who have previously canceled participation. Prebookings-Allows you prebook additional learners and change the
participant statuses of learners who have previously prebooked. Waitlist-Allows you to add learners to the waitlist or change the participant
statuses of learners who are already on the waitlist.
What is an Essential Booking? An Essential Booking is similar to what we refer to as a “Forced Enroll.”
Administrators have the option to perform an Essential Booking when the course has reached the optimum number of participants.
What is a Mandatory Assignment? A Mandatory Assignment is course assigned to an employee by a supervisor
or training administrator. Please do not confuse these with “mandatory” trainings issued by the Office of Administration. You can assign these courses
with a “To be taken by” date. Once assigned, these courses will appear in the employee’s Messages and Notes section of the My Training Homepage. The
employee is then responsible for actually booking the course.
To assign a mandatory course:
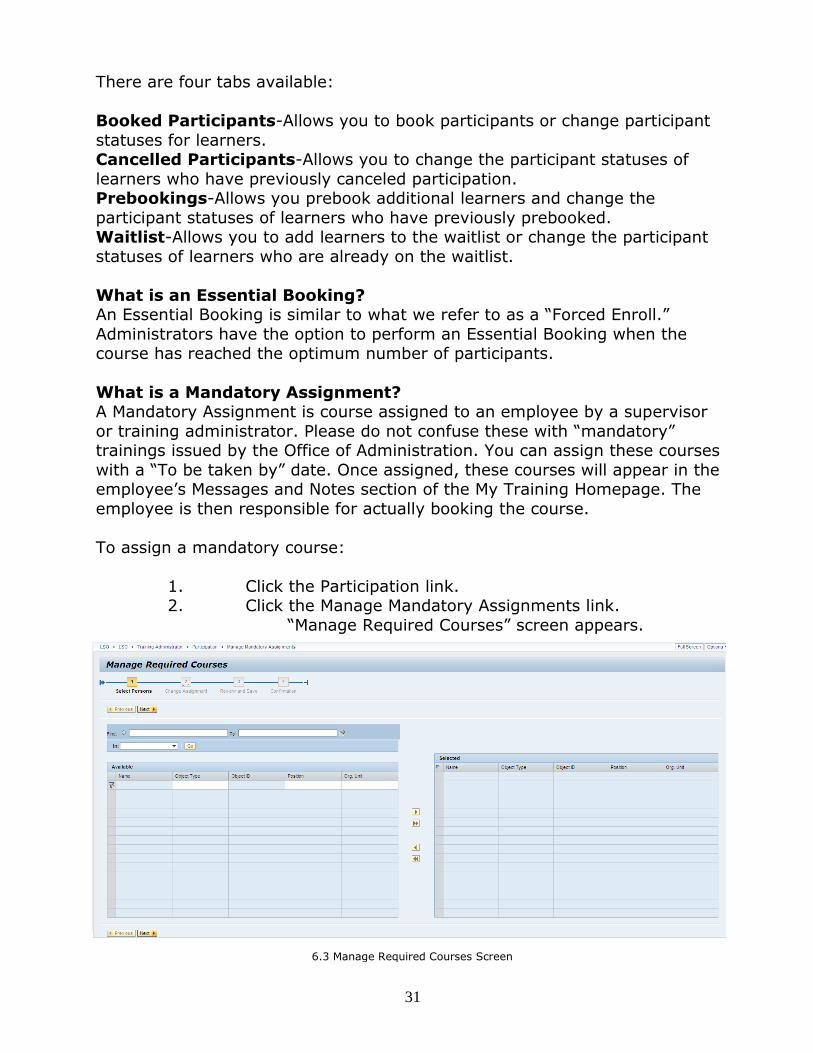
1. Click the Participation link. 2. Click the Manage Mandatory Assignments link.
“Manage Required Courses” screen appears.
6.3 Manage Required Courses Screen
32
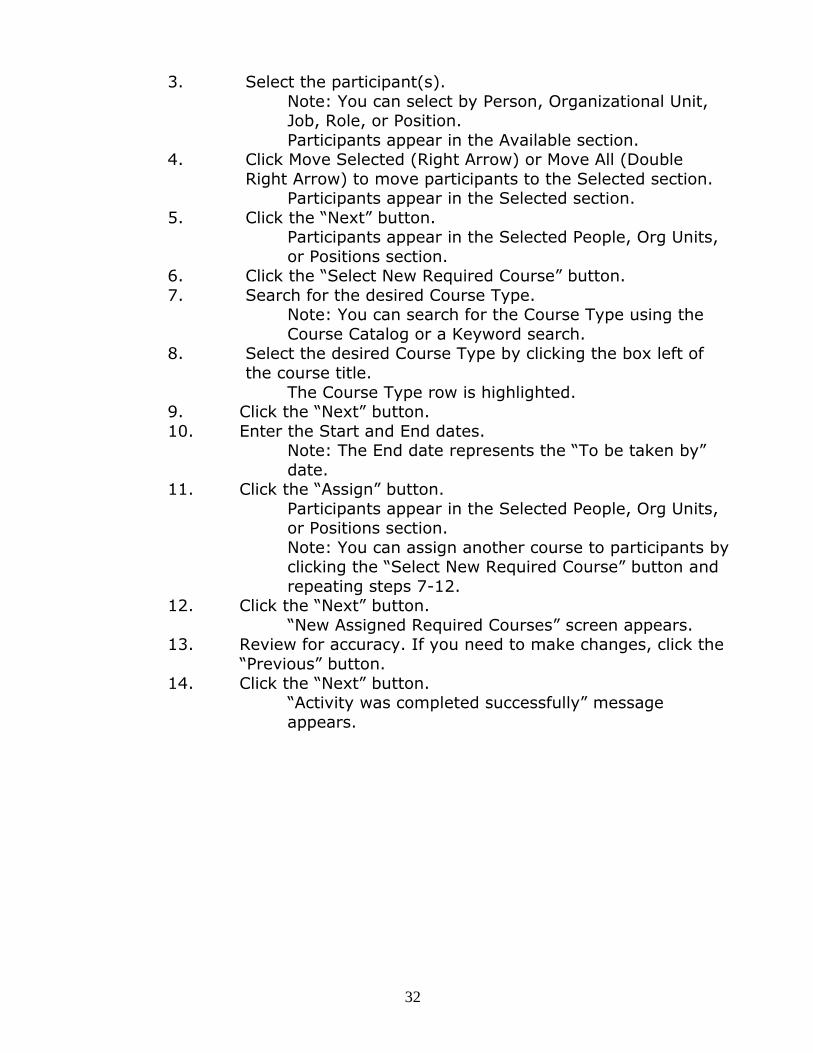
3. Select the participant(s).
Note: You can select by Person, Organizational Unit, Job, Role, or Position.
Participants appear in the Available section. 4. Click Move Selected (Right Arrow) or Move All (Double
Right Arrow) to move participants to the Selected section. Participants appear in the Selected section.
5. Click the “Next” button. Participants appear in the Selected People, Org Units,
or Positions section. 6. Click the “Select New Required Course” button.
7. Search for the desired Course Type. Note: You can search for the Course Type using the
Course Catalog or a Keyword search. 8. Select the desired Course Type by clicking the box left of
the course title.
The Course Type row is highlighted. 9. Click the “Next” button.
10. Enter the Start and End dates. Note: The End date represents the “To be taken by”
date. 11. Click the “Assign” button.
Participants appear in the Selected People, Org Units, or Positions section.
Note: You can assign another course to participants by clicking the “Select New Required Course” button and
repeating steps 7-12. 12. Click the “Next” button.
“New Assigned Required Courses” screen appears. 13. Review for accuracy. If you need to make changes, click the
“Previous” button.
14. Click the “Next” button. “Activity was completed successfully” message
appears.
33
Activity
Check mark each task after completing.
Book participants into the course you created in the earlier activity.
Example: LSO T3 Test Course AY
Cancel participation for learners in the same course.
Prebook participants into the same course.
Locate your assigned training course and add participants to the waitlist.
Assign a mandatory course to a learner.
34
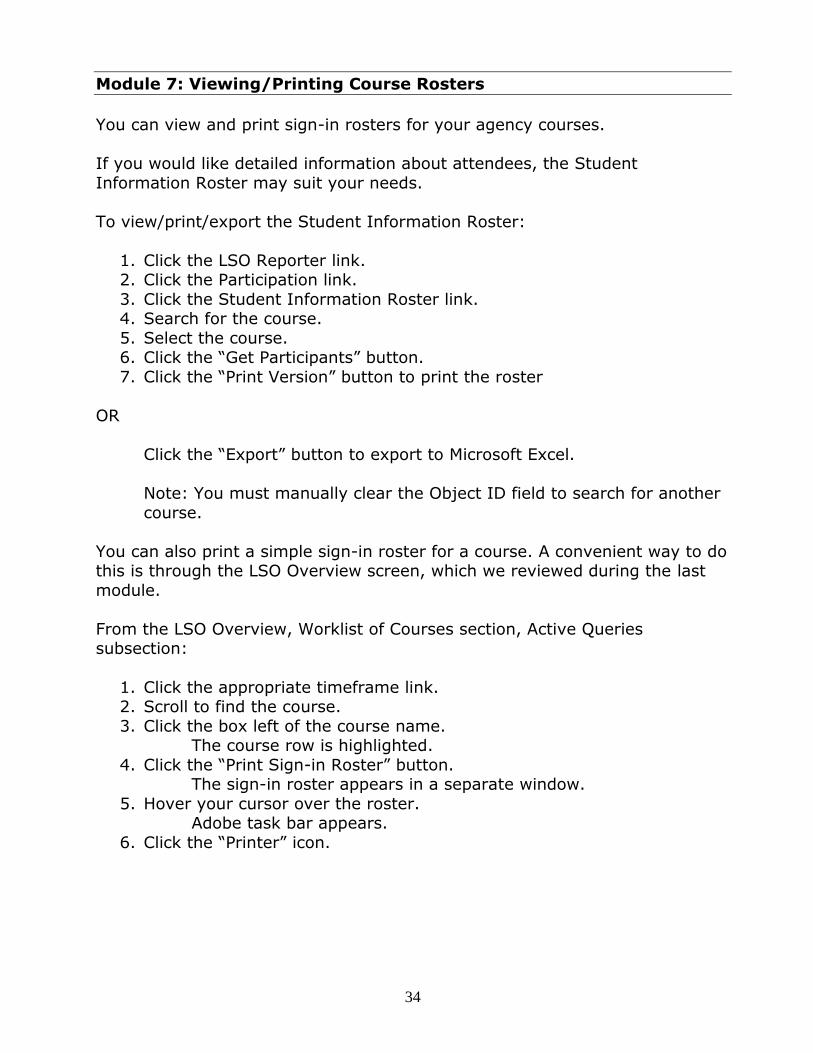
Module 7: Viewing/Printing Course Rosters
You can view and print sign-in rosters for your agency courses.
If you would like detailed information about attendees, the Student
Information Roster may suit your needs.
To view/print/export the Student Information Roster:
1. Click the LSO Reporter link. 2. Click the Participation link.
3. Click the Student Information Roster link. 4. Search for the course.
5. Select the course. 6. Click the “Get Participants” button.
7. Click the “Print Version” button to print the roster
OR
Click the “Export” button to export to Microsoft Excel.
Note: You must manually clear the Object ID field to search for another
course.
You can also print a simple sign-in roster for a course. A convenient way to do this is through the LSO Overview screen, which we reviewed during the last
module.
From the LSO Overview, Worklist of Courses section, Active Queries subsection:
1. Click the appropriate timeframe link. 2. Scroll to find the course.
3. Click the box left of the course name. The course row is highlighted.
4. Click the “Print Sign-in Roster” button. The sign-in roster appears in a separate window.
5. Hover your cursor over the roster. Adobe task bar appears.
6. Click the “Printer” icon.
35
Activity
Check mark each task after completing.
Locate the course you created earlier.
Example: LSO T3 Test Course AY
View the Student Information Roster for your course.
Locate the “Print Version” button. DO NOT ACTUALLY PRINT.
Export the roster to Excel.
36
Module 8: Following Up Courses
Administrators can give credit for completing courses, also known as course
follow up.
Use the following procedure to follow up courses using the Worklist of Courses. You can also go directly to the Manage Course Follow Up link to
search for and follow up courses.
From the LSO Overview, Worklist of Courses section, Active Queries subsection:
1. Click the appropriate timeframe link in the Course Follow Up
section. 2. Scroll to find the course that you would like to manage.
3. Click the box left of the course name.
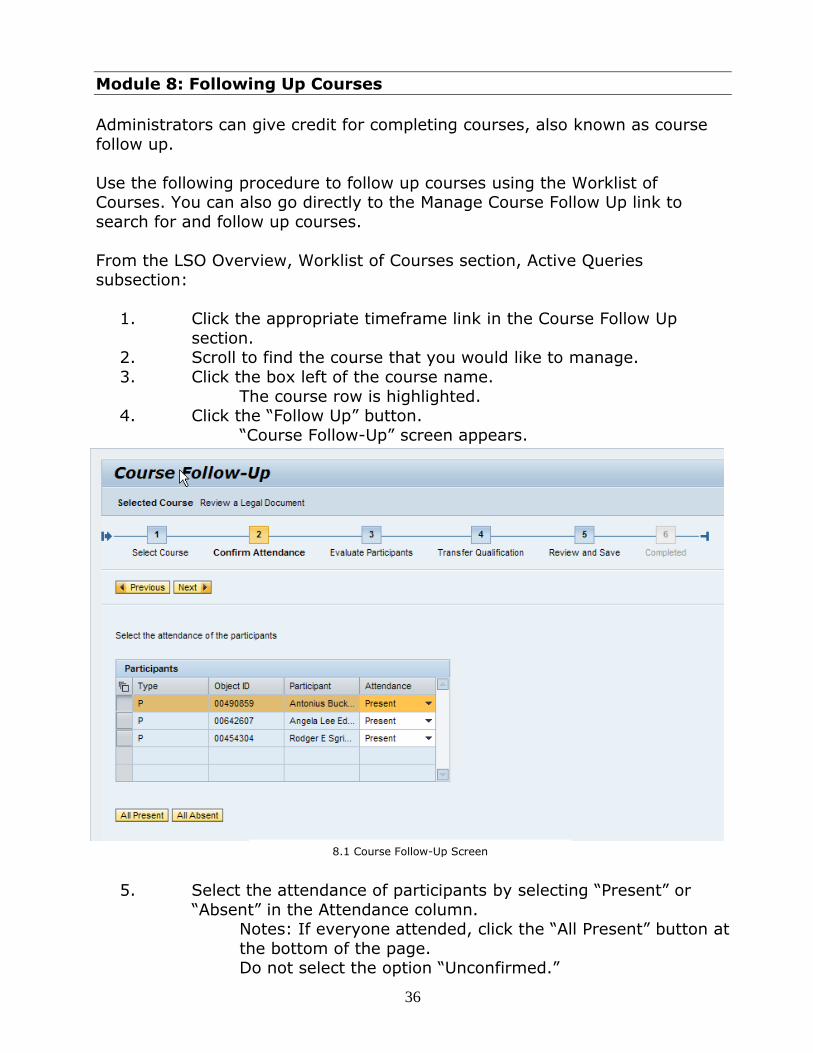
The course row is highlighted. 4. Click the “Follow Up” button.
“Course Follow-Up” screen appears.
5. Select the attendance of participants by selecting “Present” or
“Absent” in the Attendance column. Notes: If everyone attended, click the “All Present” button at
the bottom of the page. Do not select the option “Unconfirmed.”
8.1 Course Follow-Up Screen
37
6. Click the “Next” button.
7. Evaluate participants by selecting “Course Passed” or “Course Failed” in the Participant Assessment column.
Notes: If everyone passed, click the “All Passed” button at the bottom of the screen.
Do not select the option “Not Rated.” If “Course Failed” is selected, select a Reason For Not
Passing. If appropriate, you can manually enter a numeric grade in
the Grade column. 8. Click the “Next” button.
9. Assign a proficiency level to assigned qualifications, if necessary. 10. Click the “Next” button.
11. Check the “Flag course as followed-up when saving data” box. 12. Review information.
If the information is inaccurate, click the “Previous” button
to make necessary corrections. 13. Click the “Next” button.
“Your course follow-up was saved” message appears. Note: If you would like to confirm that the course was
actually followed up, click the Refresh link in the lower right corner of the Worklist of Courses and scroll to the far right.
A checkmark should appear in the Course Followed Up column.
Notes
___________________________________________________
___________________________________________________
___________________________________________________
___________________________________________________
___________________________________________________

38
Activity
Check mark each task after completing.
Locate your assigned training course.
Follow up the course using different attendance and evaluation options.
39
Module 9: Creating Curriculums and Programs
If you would like participants to complete a series of courses related to a
specific topic or job, you should consider creating curriculums or programs in LSO.
Programs and curriculums are very similar. Both allow you to assign a series
of courses that must be completed by the participant; however, programs are more flexible than curriculums in terms of how and when the courses are
booked and completed.
Curriculums are set up to book participants directly into specific courses associated with the curriculum in a specific sequence. A good example of
when a curriculum could be used is the Leadership Development Institute (LDI) managed by the Office of Administration. There is a set group of
participants; there is one training session per month for a year. The
participants are finished with the curriculum at the end of the year.
Programs are usually set up with more flexibility in terms of when participants book and complete the associated courses. Programs can be used to
encourage participants to take a variety of related courses over an extended period of time.
Participants book curriculums. They subscribe to programs. Once booked into
a curriculum, the participant is automatically booked into all courses associated with the curriculum. Depending on how the program is set up, the
participant will be able to reference the program course list after subscribing, and will have the opportunity to self-book the associated courses.
To create a Curriculum Type:
NOTE: This only can be performed by users with the Training Administrator role.
1. Click the Catalog link.
2. Click the Create Curriculum Type link. 3. Click the “Create” icon.
4. Complete the Abbreviation/Name fields using your agency naming convention.
5. Enter information in the tabs. Note: This is similar to the information you added when creating a
Course Type. 6. Click the “Save” icon.
“Processing Type” pop-up window appears.
40
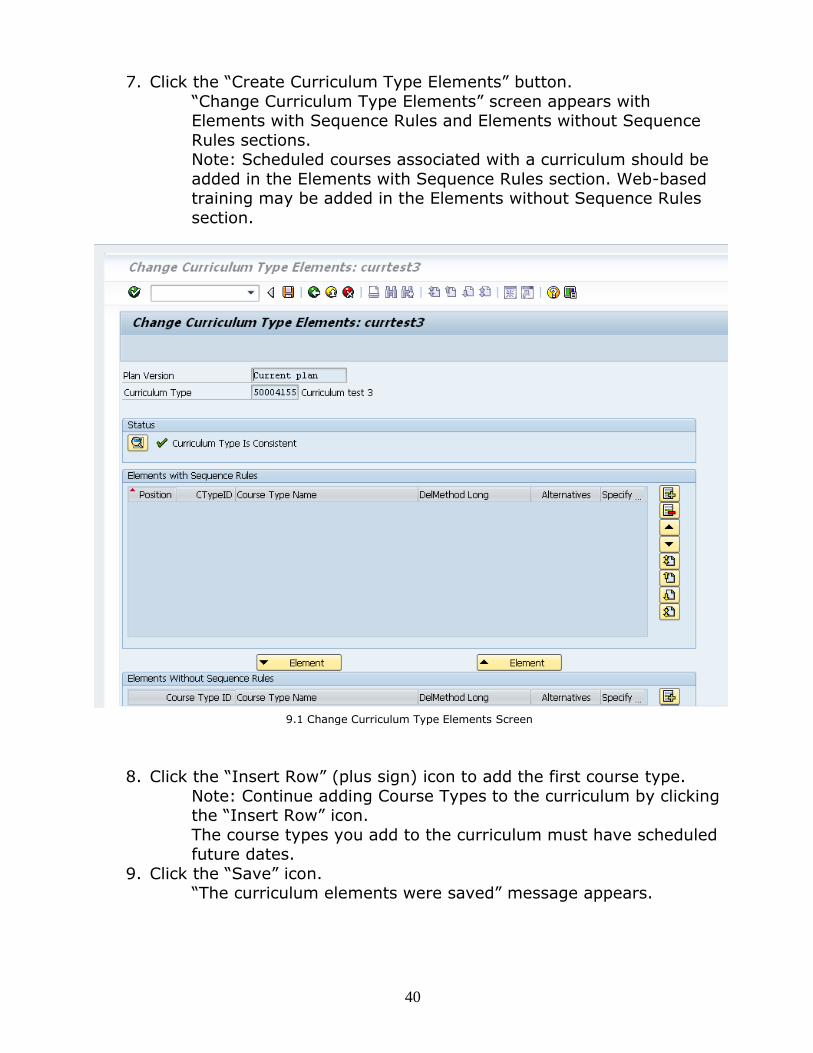
7. Click the “Create Curriculum Type Elements” button.
“Change Curriculum Type Elements” screen appears with Elements with Sequence Rules and Elements without Sequence
Rules sections. Note: Scheduled courses associated with a curriculum should be
added in the Elements with Sequence Rules section. Web-based training may be added in the Elements without Sequence Rules
section.
8. Click the “Insert Row” (plus sign) icon to add the first course type.
Note: Continue adding Course Types to the curriculum by clicking the “Insert Row” icon.
The course types you add to the curriculum must have scheduled future dates.
9. Click the “Save” icon. “The curriculum elements were saved” message appears.
9.1 Change Curriculum Type Elements Screen
41
The next thing you’ll do is schedule the curriculum to make it available for
booking:
1. Click the Courses link. 2. Click the Course link.
3. Click the Schedule Curriculum link. “Curriculum Maintenance” screen appears.
4. Enter the Curriculum Type. 5. Click the “Create” icon.
6. Click the box left of the course in the Course section. The course row is highlighted.
7. Click the “Next” button. Note: Continue to do this for all courses associated with the
curriculum. 8. Click the “Save” icon.
“Curriculum was saved message” appears.
To book learners in a curriculum:
1. Click the Participation link.
2. Click the Dynamic Participation Menu link. 3. Search for the Curriculum.
4. Drill down to the level where you see the scheduled dates. 5. Right click on the curriculum dates
Pop-up menu appears. 6. Click “Book.”
Book Participation: Data pop-up window appears. 7. Search for the person.
8. Click the “Book” button. Select Curriculum Elements pop-up window appears.
9. Click the “Save” icon.
“Curriculum was booked” message appears.
42
To follow up a Curriculum:
1. Click the Courses link 2. Click the Course link
3. Click the Dynamic Course Menu link. 4. Find the Curriculum
5. Right click on the Curriculum A pop-up menu appears.
6. Click “Follow Up” “Follow Up Participation” screen appears
7. Complete the following fields for each participant: Confirmed
Pass Follow Up
8. Click the “Save” icon. 9. Click the “Continue” icon.
Qualifications will be transferred, if applicable.
10. Click the “Continue” icon. 11. Click “To Save” icon.
12. Click the “Save” icon.
43
To create a Course Program:
NOTE: This only can be performed by users with the Training Administrator
role.
1. Click the Catalog link. 2. Click the Create Course Program link.
“Course Program: Initial Screen” appears. 3. Click the “Create” icon.
4. Complete the Abbreviation/Name fields using your agency naming convention.
5. Enter information in the tabs. Note: This is similar to the information you added
when creating a Course Type. VERY IMPORTANT: You must manually select
“English” as the language in the “Further Information”
tab, “Course Info” section. Then, you must click the “Save” icon in this section before proceeding.
6. Click the “Save” icon. “Processing Type” pop-up window appears.
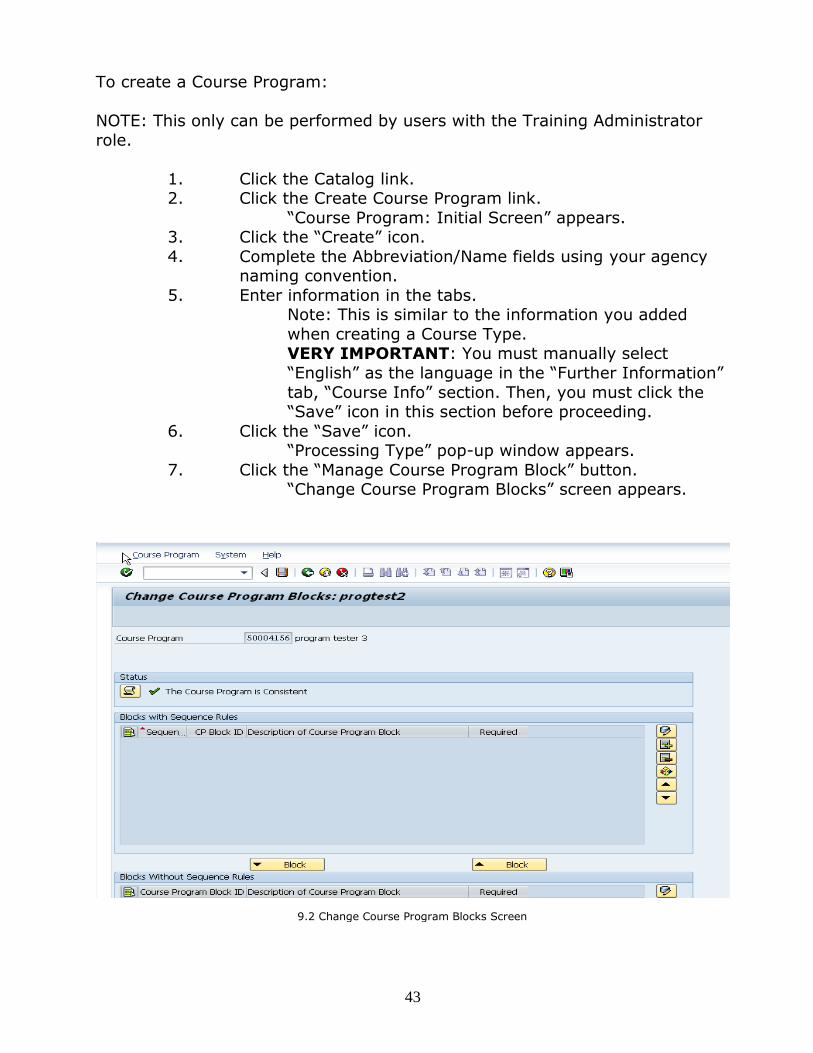
7. Click the “Manage Course Program Block” button. “Change Course Program Blocks” screen appears.
9.2 Change Course Program Blocks Screen
44
8. Click the “Insert Block” icon.
“Change Course Program Blocks” pop-up window appears.
9. Enter the object abbreviation and name in the appropriate fields.
10. Click the green checkmark. 11. Click the “Save” icon.
12. Click the box left of the block name. The block row is highlighted.
13. Click the “Edit Block” icon. “Change Course Program Block Elements” screen
appears. 14. Click the “Insert Element” (plus sign) icon to add Course
Types or curriculums. Note: Continue adding Course Types or curriculums by
clicking the “Insert Element” icon.
15. Click the “Save” icon. “Course Program Block Elements were saved”
message appears.
To subscribe learners to Course Programs:
1. Click the Participation link.
2. Click the Dynamic Participation Menu link. 3. Search for the Course Program.
4. Right click on the Course Program Pop-up menu appears.
5. Click “Subscribe.” “Subscribe to Course Program” screen appears.
6. Select the language as “English.”
7. Search for the person. 8. Click the “Subscribe” button.
“Course program was subscribed” message appears.
45
To follow up a Course Program:
1. Follow up each individual course in the Course Program
using the standard follow up procedure. 2. Click the Courses link
3. Click the Course link 4. Click the Dynamic Course Menu link.
5. Find the Course Program 6. Right click on the Course Program
A pop-up menu appears. 7. Click “Follow Up”
“Follow Up Participation” screen appears 8. Complete the following fields for each participant:
Confirmed Pass
Follow Up
9. Click the “Save” icon. 10. Click the “Continue” icon.
Qualifications will be transferred, if applicable. 11. Click the “Continue” icon.
12. Click “To Save” icon. 13. Click the “Save” icon.
46
Activity
Check mark each task after completing.
Create a Curriculum Type.
Make sure to set the relationship to the agency subfolder you created.
Schedule the Curriculum.
Book a person into the Curriculum you just created.
Create a Course Program. Make sure to set the relationship to the agency subfolder you created.
Subscribe a person to the Course Program you just created.

47
Module 10: Creating After-the-Facts (ATFs)
After-the-Facts should be created when learners complete courses that are
not listed in your LSO agency training catalog. Out Service Training and training certifications verified by your agency administrators are examples of
these types of records. ATFs will appear on learners’ commonwealth training transcripts.
The ATF creation process is actually three steps rolled into one(create the
course, book learners, and follow up the course).
ATF courses must be processed for a past date to allow the follow up process to work properly.
Before creating your first ATF, you must have at least one Course Type
associated with your agency catalog for both Out Service Training and
Administrator Confirmed Record.
Note: Start Date must be backdated in the “Course Type: Initial Screen” when creating Course Types for ATFs.
To create an ATF:
1. Click the Courses link.
2. Click the Course link. 3. Click the Create ATF link.
“LSO After Fact Processing” screen appears.
10.1 LSO After Fact Processing Screen
48
4. Select the “Out Service Training” or “Admin Confirmed Record”
radio button. 5. Select a Course Type.
6. Enter the training location. 7. Enter the course name.
8. Enter the training dates. 9. Enter the course fee, if applicable.
10. Add qualifications, if applicable. 11. Add attendees.
12. Enter the following information for each attendee: Grade(if applicable)
Pass/Fail Reason for Fail (if applicable)
Education Unit Type Unit Value
Credit Hours
Actual Hours 13. Click the “Save” icon.
“Course was successfully followed up” pop-up window appears.
14. Click the green checkmark.
Notes
___________________________________________________
___________________________________________________
___________________________________________________
___________________________________________________
___________________________________________________
49
Activity
Check mark each task after completing.
Create Out Service Training and Administrator Confirmed Record Course
Types in the agency subfolder (ex. Health AY T3) you created earlier.
Create ATFs for both Out Service Training and Administrator Confirmed Record.

50
Module 11: Creating/Managing Locations and Rooms
NOTE: This only can be performed by users with the Training Administrator
role.
To create a new location:
1. Click the Locations link. 2. Click Manage Locations link.
3. Click the “Create” icon. “Create Location: Data Screen” appears.
4. Complete the Abbreviation/Name fields using the standard naming convention.
Example: 333MKTST/HRSBRG: 333 Market St. 5. Complete the Description, Address and Further Information tabs.
6. Click the “Save” icon.
“Business event location was created” message appears.
11.1 Create Location: Data Screen
51
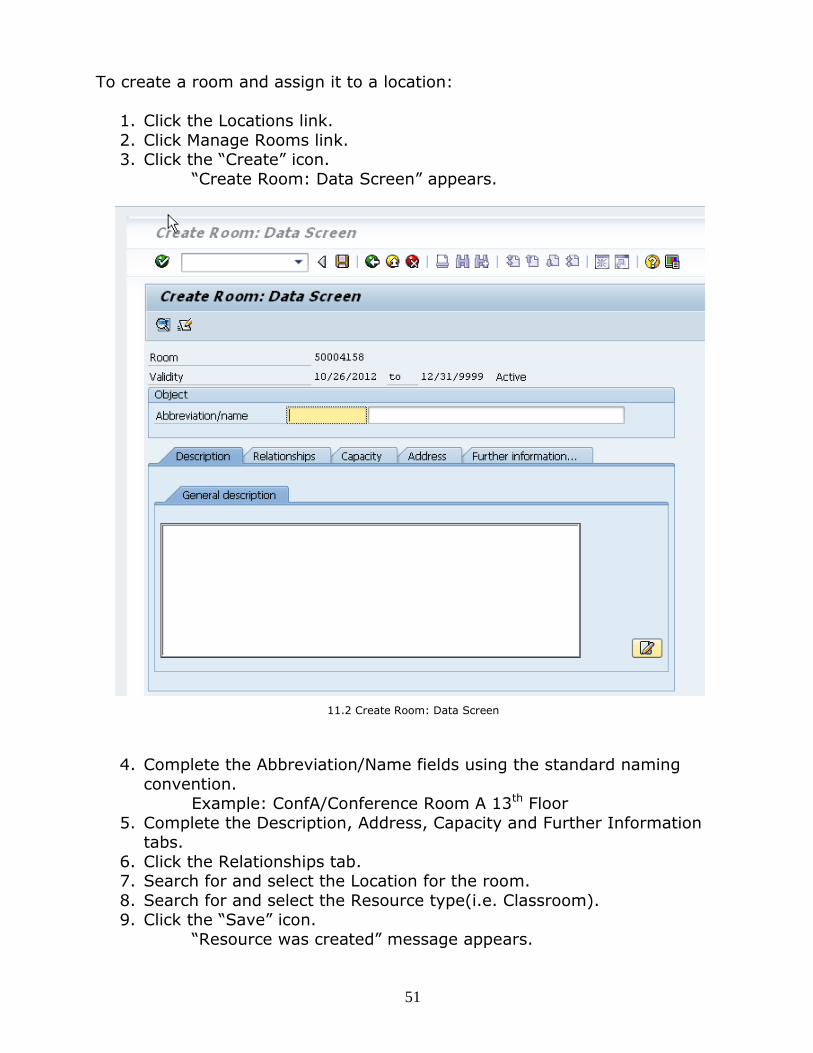
To create a room and assign it to a location:
1. Click the Locations link.
2. Click Manage Rooms link. 3. Click the “Create” icon.
“Create Room: Data Screen” appears.
4. Complete the Abbreviation/Name fields using the standard naming
convention. Example: ConfA/Conference Room A 13th Floor
5. Complete the Description, Address, Capacity and Further Information tabs.
6. Click the Relationships tab. 7. Search for and select the Location for the room.
8. Search for and select the Resource type(i.e. Classroom). 9. Click the “Save” icon.
“Resource was created” message appears.
11.2 Create Room: Data Screen
52
Activity
Check mark each task after completing.
Create a new location.
Use the naming convention “Building T3 Initials.” Example: Building T3 AY
Create a new room associated with the location you just created.
Use the naming convention “Room T3 Initials.” Example: Room T3 AY
53
Summary
Congratulations! You successfully completed the LSO Administrator training.
You are now able to:
create Course Groups
create Course Types
create/cancel courses
manage participation for learners
view/print course rosters
follow up courses
create curriculums and programs
create after-the-facts (ATFs)
create/manage locations and rooms
If you have any questions about LSO, or this training, please contact your
agency training officer.