Embed Size (px)
Citation preview
MacStitch/WinStitch Manual
by Ursa Software
Revision: January 2017
- �1
IntroductionThis document explains all the main functions of the application, plus the bundled Thread Editor utility, and Symbol Editor. We hope you enjoy many hours using the program! If you can't find the answer to a query you have within this document, please send us an email using the contact form on our website, or in the help menu of your program.
Jeff & Deb Tullin
Ursa Software
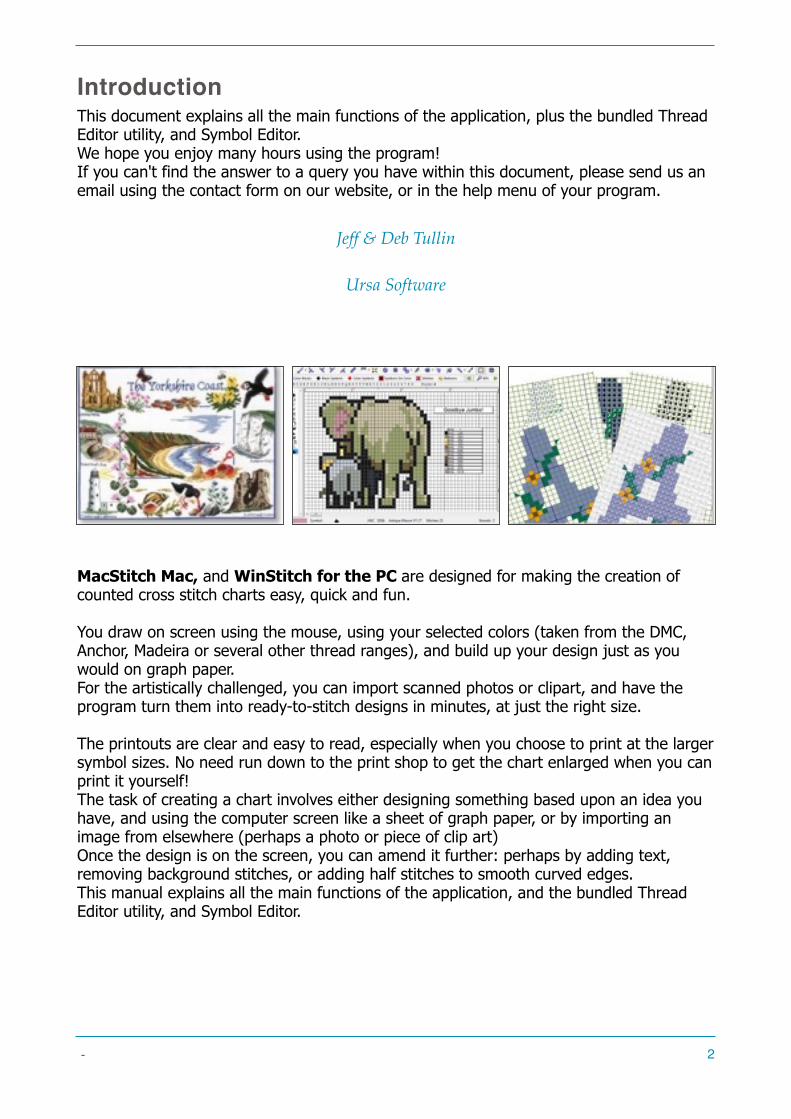
MacStitch Mac, and WinStitch for the PC are designed for making the creation of counted cross stitch charts easy, quick and fun.
You draw on screen using the mouse, using your selected colors (taken from the DMC, Anchor, Madeira or several other thread ranges), and build up your design just as you would on graph paper. For the artistically challenged, you can import scanned photos or clipart, and have the program turn them into ready-to-stitch designs in minutes, at just the right size.
The printouts are clear and easy to read, especially when you choose to print at the larger symbol sizes. No need run down to the print shop to get the chart enlarged when you can print it yourself! The task of creating a chart involves either designing something based upon an idea you have, and using the computer screen like a sheet of graph paper, or by importing an image from elsewhere (perhaps a photo or piece of clip art) Once the design is on the screen, you can amend it further: perhaps by adding text, removing background stitches, or adding half stitches to smooth curved edges. This manual explains all the main functions of the application, and the bundled Thread Editor utility, and Symbol Editor.
- �2
Table of ContentsContextual Help 4
The Launch Window 4
The Main Window 8
Getting Started 10
The Palette. 17
Motifs, Alphabets, and Special Stitches. 19
Layers 23
The Status Bar 25
The File Menu: Load and Save Charts 27
The File Menu: Print/Print Selection 31
The Edit Menu: Copy, Paste and Area Functions 36
The Insert Menu 38
The View Menu 39
The Palette Menu 43
The Import/Export Menu 47
Preferences (General) 48
Preferences (Estimated Length) 51
Preferences (Thread Sets) 51
Export to PDF 53
PDF Options 54
Importing Images: The Import Wizard 59
Importing Images: Advanced Import 62
Working with Plastic Canvas 67
Symbol Editor 68
Adding Totally New Threads 69
How Do I? 70
We like to hear from you! 72
Recommend a friend 72
- �3
Contextual Help
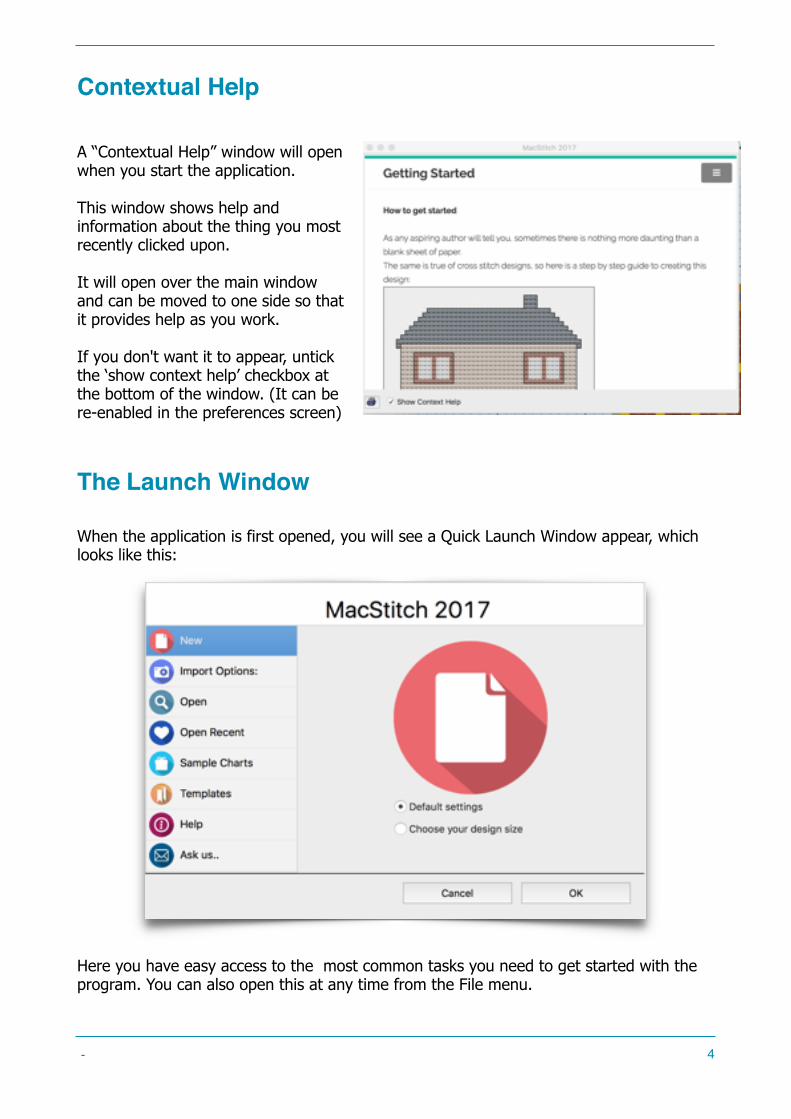
A “Contextual Help” window will open when you start the application.
This window shows help and information about the thing you most recently clicked upon.
It will open over the main window and can be moved to one side so that it provides help as you work.
If you don't want it to appear, untick the ‘show context help’ checkbox at the bottom of the window. (It can be re-enabled in the preferences screen)
The Launch Window
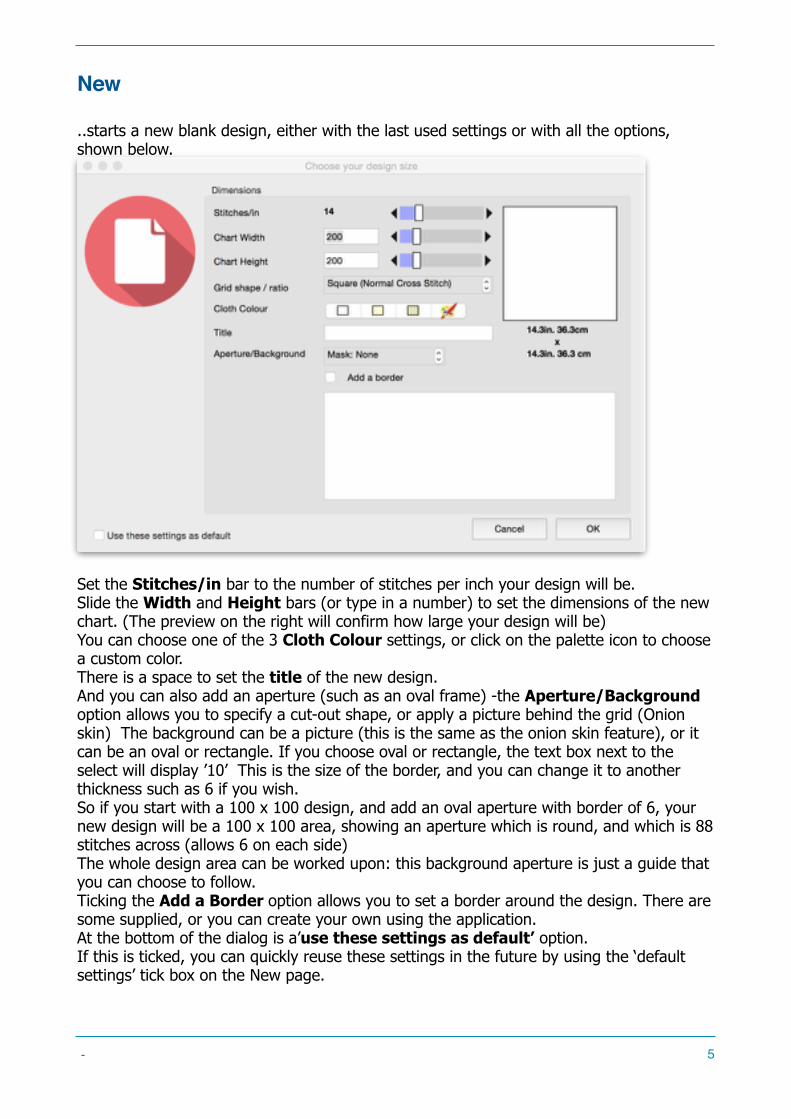
When the application is first opened, you will see a Quick Launch Window appear, which looks like this:
Here you have easy access to the most common tasks you need to get started with the program. You can also open this at any time from the File menu.
- �4
New
..starts a new blank design, either with the last used settings or with all the options, shown below.
!
Set the Stitches/in bar to the number of stitches per inch your design will be. Slide the Width and Height bars (or type in a number) to set the dimensions of the new chart. (The preview on the right will confirm how large your design will be) You can choose one of the 3 Cloth Colour settings, or click on the palette icon to choose a custom color. There is a space to set the title of the new design. And you can also add an aperture (such as an oval frame) -the Aperture/Background option allows you to specify a cut-out shape, or apply a picture behind the grid (Onion skin) The background can be a picture (this is the same as the onion skin feature), or it can be an oval or rectangle. If you choose oval or rectangle, the text box next to the select will display ’10’ This is the size of the border, and you can change it to another thickness such as 6 if you wish.So if you start with a 100 x 100 design, and add an oval aperture with border of 6, your new design will be a 100 x 100 area, showing an aperture which is round, and which is 88 stitches across (allows 6 on each side)The whole design area can be worked upon: this background aperture is just a guide that you can choose to follow. Ticking the Add a Border option allows you to set a border around the design. There are some supplied, or you can create your own using the application. At the bottom of the dialog is a’use these settings as default’ option. If this is ticked, you can quickly reuse these settings in the future by using the ‘default settings’ tick box on the New page.
- �5

Import
allows you to open a photo or clip art and convert to a chart, using either the Import Wizard or Advanced Importer if you have the Premium edition (see importing)
Open
is used to browse for a CHART file previously saved.
Open Recent
Shows the recent files menu showing up to 10 recent files.. select and open one to re-open the chart, or double click on a row.
- �6
Sample Charts
..opens the selection of samples in the same way as Open Recent
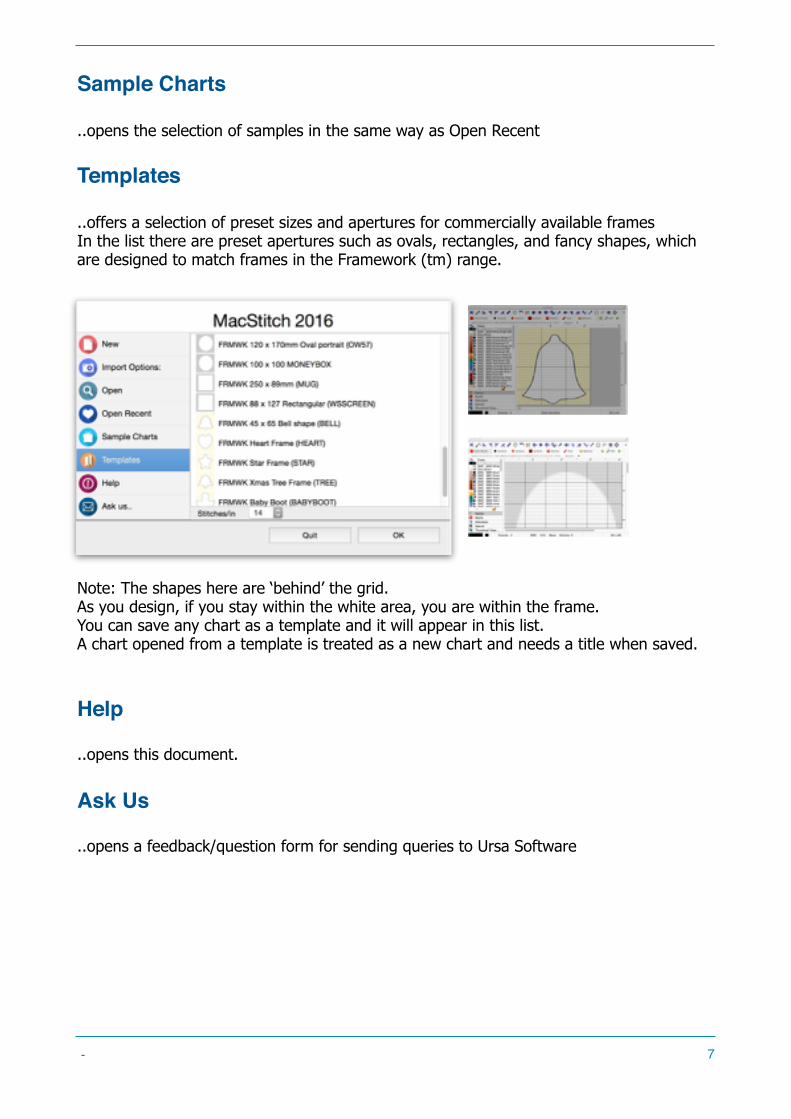
Templates
..offers a selection of preset sizes and apertures for commercially available frames In the list there are preset apertures such as ovals, rectangles, and fancy shapes, which are designed to match frames in the Framework (tm) range.
!
!
Note: The shapes here are ‘behind’ the grid. As you design, if you stay within the white area, you are within the frame. You can save any chart as a template and it will appear in this list. A chart opened from a template is treated as a new chart and needs a title when saved.
Help
..opens this document.
Ask Us
..opens a feedback/question form for sending queries to Ursa Software
- �7
The Main Window
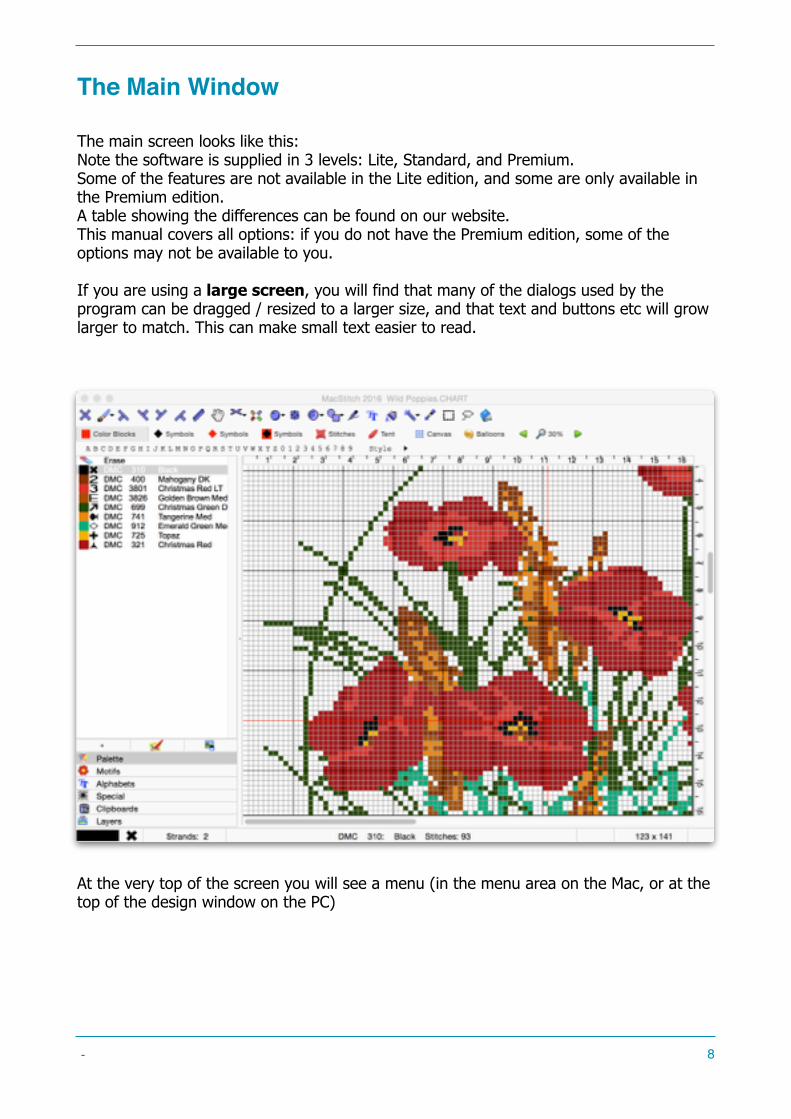
The main screen looks like this: Note the software is supplied in 3 levels: Lite, Standard, and Premium.Some of the features are not available in the Lite edition, and some are only available in the Premium edition. A table showing the differences can be found on our website. This manual covers all options: if you do not have the Premium edition, some of the options may not be available to you.
If you are using a large screen, you will find that many of the dialogs used by the program can be dragged / resized to a larger size, and that text and buttons etc will grow larger to match. This can make small text easier to read.
At the very top of the screen you will see a menu (in the menu area on the Mac, or at the top of the design window on the PC)
- �8
Toolbars
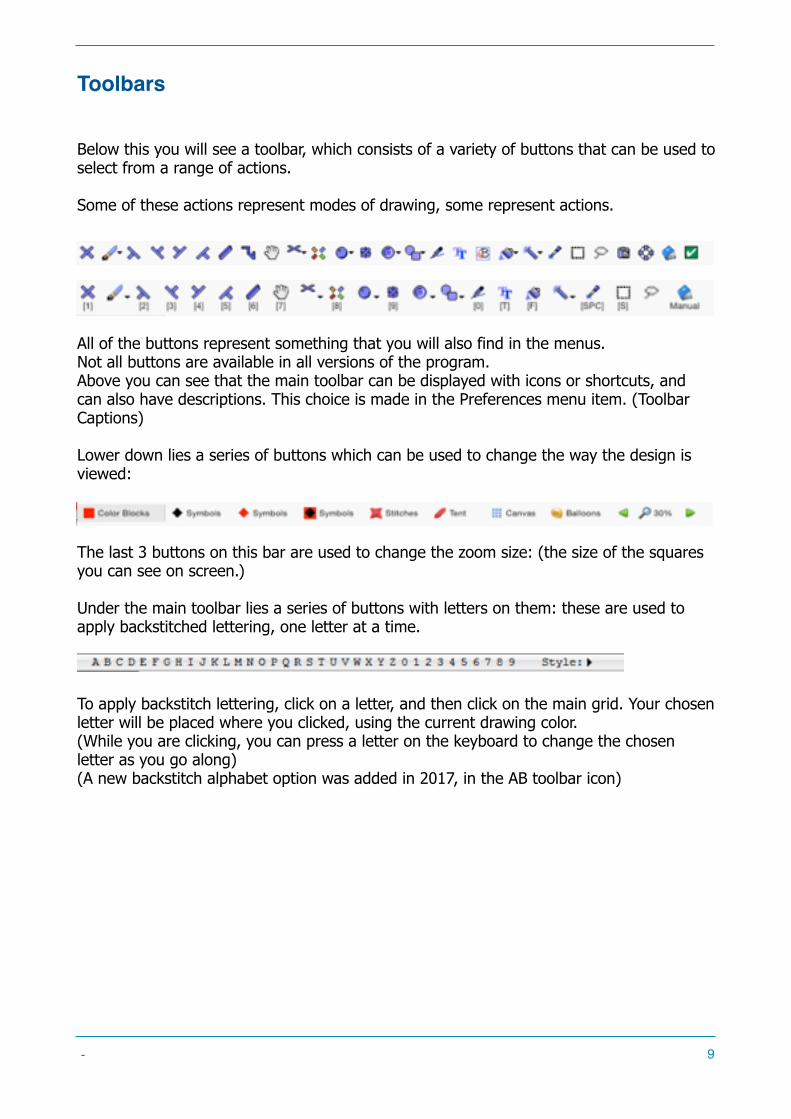
Below this you will see a toolbar, which consists of a variety of buttons that can be used to select from a range of actions.
Some of these actions represent modes of drawing, some represent actions.
All of the buttons represent something that you will also find in the menus. Not all buttons are available in all versions of the program. Above you can see that the main toolbar can be displayed with icons or shortcuts, and can also have descriptions. This choice is made in the Preferences menu item. (Toolbar Captions)Lower down lies a series of buttons which can be used to change the way the design is viewed:
The last 3 buttons on this bar are used to change the zoom size: (the size of the squares you can see on screen.) Under the main toolbar lies a series of buttons with letters on them: these are used to apply backstitched lettering, one letter at a time.! To apply backstitch lettering, click on a letter, and then click on the main grid. Your chosen letter will be placed where you clicked, using the current drawing color.(While you are clicking, you can press a letter on the keyboard to change the chosen letter as you go along) (A new backstitch alphabet option was added in 2017, in the AB toolbar icon)
- �9
Getting Started
Drawing
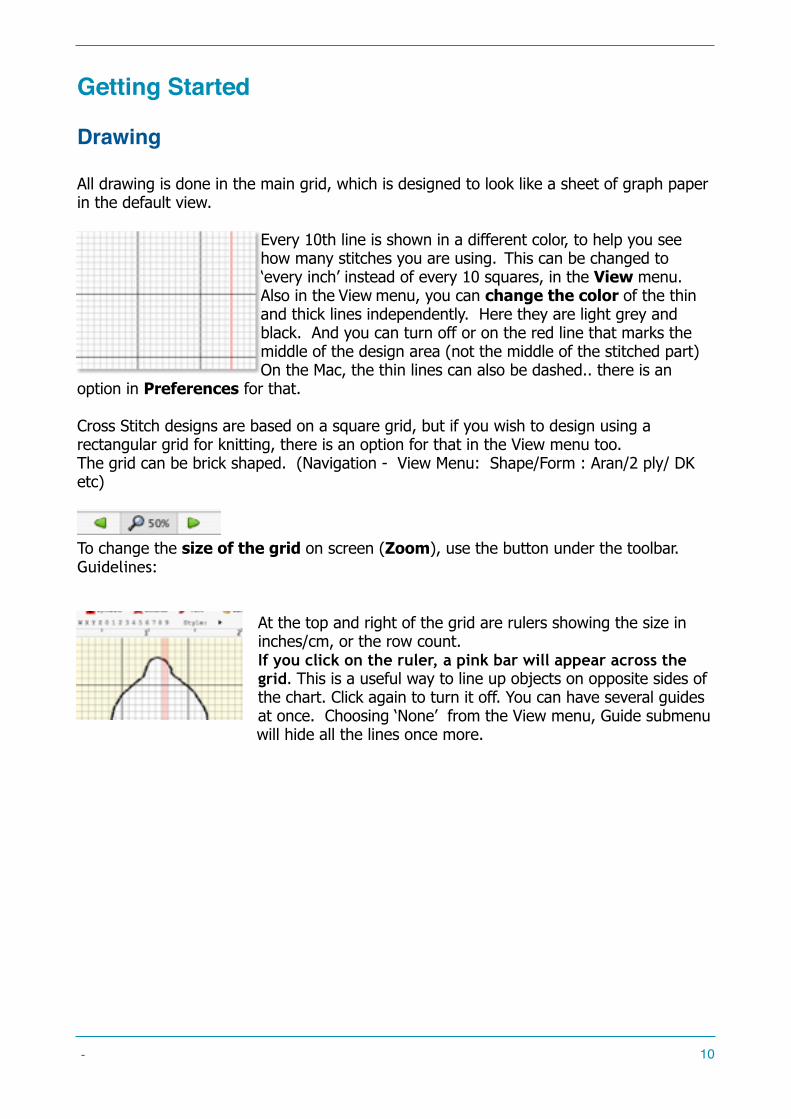
All drawing is done in the main grid, which is designed to look like a sheet of graph paper in the default view.
Every 10th line is shown in a different color, to help you see how many stitches you are using. This can be changed to ‘every inch’ instead of every 10 squares, in the View menu.Also in the View menu, you can change the color of the thin and thick lines independently. Here they are light grey and black. And you can turn off or on the red line that marks the middle of the design area (not the middle of the stitched part) On the Mac, the thin lines can also be dashed.. there is an
option in Preferences for that. Cross Stitch designs are based on a square grid, but if you wish to design using a rectangular grid for knitting, there is an option for that in the View menu too. The grid can be brick shaped. (Navigation - View Menu: Shape/Form : Aran/2 ply/ DK etc)
To change the size of the grid on screen (Zoom), use the button under the toolbar. Guidelines:
At the top and right of the grid are rulers showing the size in inches/cm, or the row count. If you click on the ruler, a pink bar will appear across the grid. This is a useful way to line up objects on opposite sides of the chart. Click again to turn it off. You can have several guides at once. Choosing ‘None’ from the View menu, Guide submenu will hide all the lines once more.
- �10

Stitch Types
Normal full crosses are created using the full cross icon, and erased using the right mouse button (or CTRL-left mouse button) But there are many other types of stitch you can add to the design.
These icons draw 3/4 stitches (sometimes called half stitches) in the current color.
These icons allow you to add beads of various sizes, French Knots, and buttons.
Backstitch or outline buttons. To add backstitch, click this icon, then click and hold the mouse at one end of the backstitch line in the grid. While holding the mouse down, move the mouse to a different spot and let go. A line will be drawn in the current color.
The multi-line icon is ‘continuous backstitch’: click and hold the mouse, and move the ouse around. Backstitch will be drawn in a series of continuous lines following the mouse
until you let go.
This icon lets you add 1/4 stitches to the design.
These icons add several stitches at once. The pencil draws a line of full stitches in much the same way as backstitch is added.
The Paint Can lets you fill an area with the current color: select a color from the palette, click on any solid area of color, and the program will change all the touching stitches of the clicked color to the current color.
You can also fill an area with a motif , or a copied selection from the screen (pattern).
This can be useful for filling an area with a chequerboard pattern, or small flower motifs.
Just select and copy an area, then choose ‘Flood fill with Motif’ from this toolbar icon, and click in an area of solid color, or a blank area of grid that is surrounded by stitches or outlining.
The TT icon allows you to convert letters made from true type fonts into stitches.
- �11
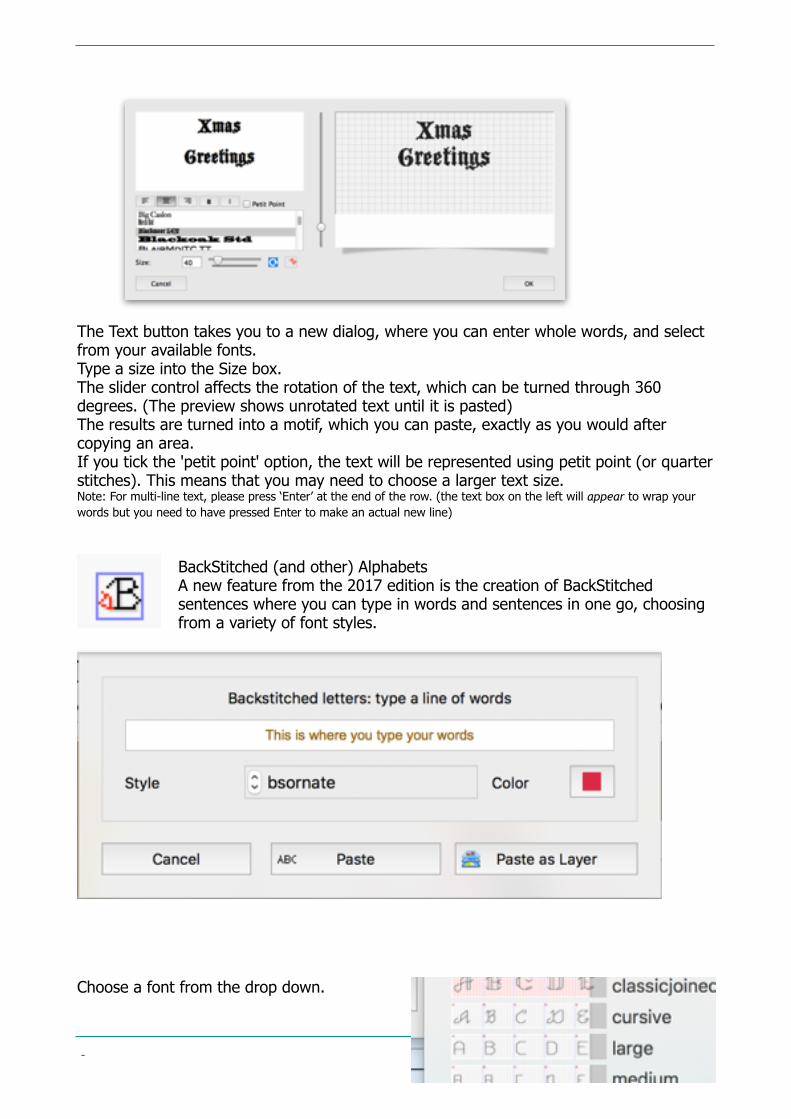
The Text button takes you to a new dialog, where you can enter whole words, and select from your available fonts. Type a size into the Size box. The slider control affects the rotation of the text, which can be turned through 360 degrees. (The preview shows unrotated text until it is pasted)The results are turned into a motif, which you can paste, exactly as you would after copying an area.If you tick the 'petit point' option, the text will be represented using petit point (or quarter stitches). This means that you may need to choose a larger text size. Note: For multi-line text, please press ‘Enter’ at the end of the row. (the text box on the left will appear to wrap your words but you need to have pressed Enter to make an actual new line)
BackStitched (and other) Alphabets A new feature from the 2017 edition is the creation of BackStitched sentences where you can type in words and sentences in one go, choosing from a variety of font styles.
�
Choose a font from the drop down.
- �12
Type your words in the text box. Choose a color if you want to change it Then click either ‘Paste’ or ‘Paste as Layer’
If you choose Paste, then the screen disappears, and you can paste your words where you like in the design.
If you choose Paste as Layer, the pasted words are not ‘fixed’ in place, but can be moved around as a layer object, for finer placement.
This paintbrush lets you choose a bigger brush to work with. You can draw with 2x2, 3x3, 5x5 and a round brush to fill bigger areas at a time, instead of single crosses.
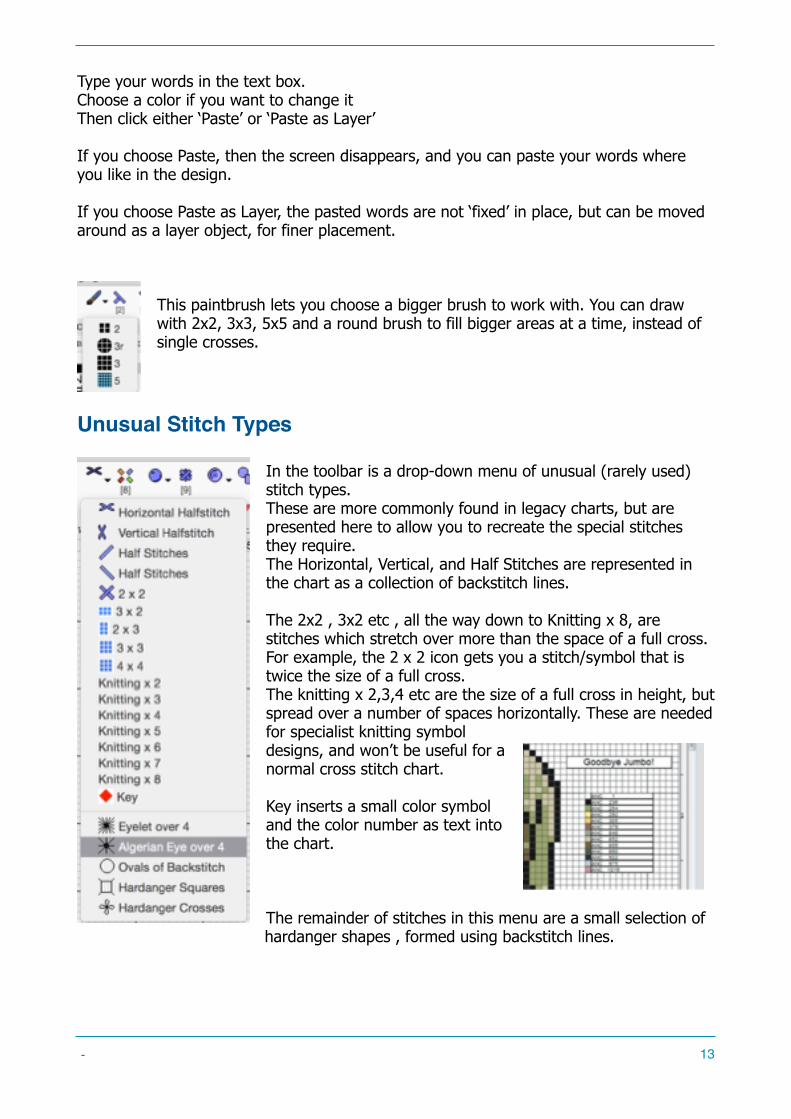
Unusual Stitch Types
In the toolbar is a drop-down menu of unusual (rarely used) stitch types. These are more commonly found in legacy charts, but are presented here to allow you to recreate the special stitches they require. The Horizontal, Vertical, and Half Stitches are represented in the chart as a collection of backstitch lines.
The 2x2 , 3x2 etc , all the way down to Knitting x 8, are stitches which stretch over more than the space of a full cross. For example, the 2 x 2 icon gets you a stitch/symbol that is twice the size of a full cross. The knitting x 2,3,4 etc are the size of a full cross in height, but spread over a number of spaces horizontally. These are needed for specialist knitting symbol designs, and won’t be useful for a normal cross stitch chart.
Key inserts a small color symbol and the color number as text into the chart.
The remainder of stitches in this menu are a small selection of hardanger shapes , formed using backstitch lines.
- �13
Other Toolbar Items
Automatic Outlining
! Use this icon to automatically surround a block of color by backstitch. Select your outline color from the palette. Click this icon. Click in a block of color on the design area. The outside edge of the shape will be outlined in the new color.
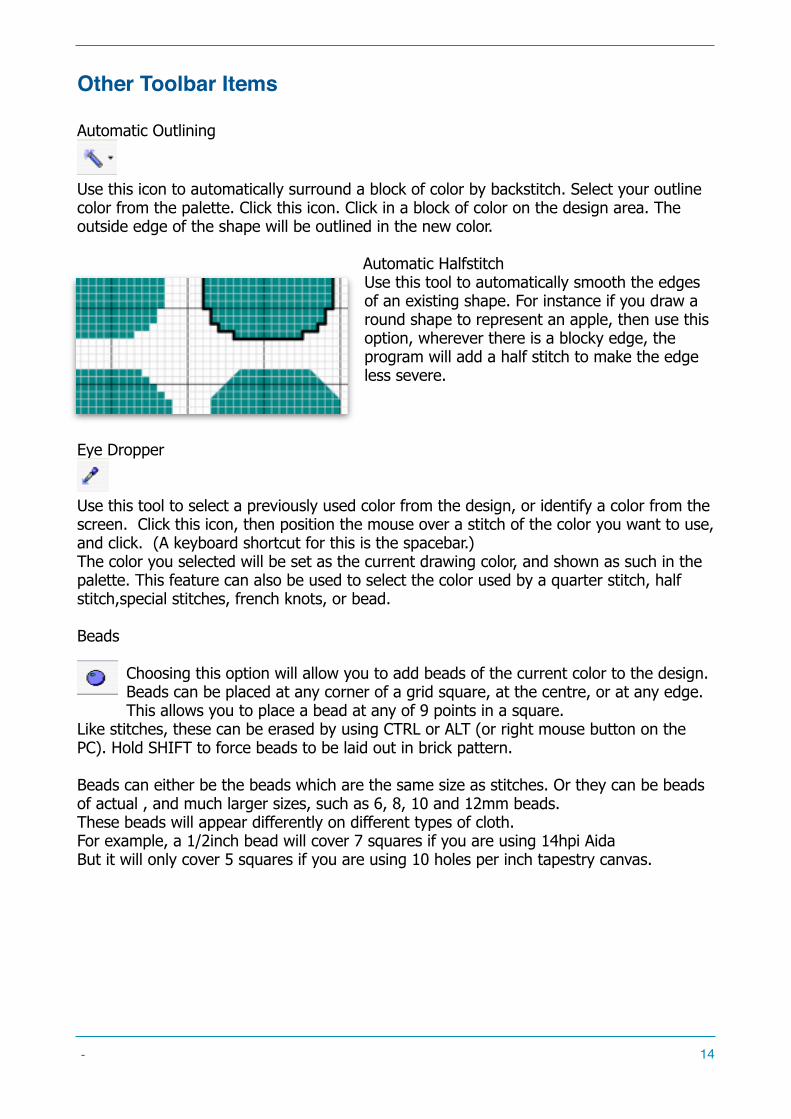
Automatic HalfstitchUse this tool to automatically smooth the edges of an existing shape. For instance if you draw a round shape to represent an apple, then use this option, wherever there is a blocky edge, the program will add a half stitch to make the edge less severe.
Eye Dropper
! Use this tool to select a previously used color from the design, or identify a color from the screen. Click this icon, then position the mouse over a stitch of the color you want to use, and click. (A keyboard shortcut for this is the spacebar.)The color you selected will be set as the current drawing color, and shown as such in the palette. This feature can also be used to select the color used by a quarter stitch, half stitch,special stitches, french knots, or bead.
Beads
Choosing this option will allow you to add beads of the current color to the design.Beads can be placed at any corner of a grid square, at the centre, or at any edge.This allows you to place a bead at any of 9 points in a square.
Like stitches, these can be erased by using CTRL or ALT (or right mouse button on the PC). Hold SHIFT to force beads to be laid out in brick pattern.Beads can either be the beads which are the same size as stitches. Or they can be beads of actual , and much larger sizes, such as 6, 8, 10 and 12mm beads. These beads will appear differently on different types of cloth.For example, a 1/2inch bead will cover 7 squares if you are using 14hpi Aida But it will only cover 5 squares if you are using 10 holes per inch tapestry canvas.
- �14
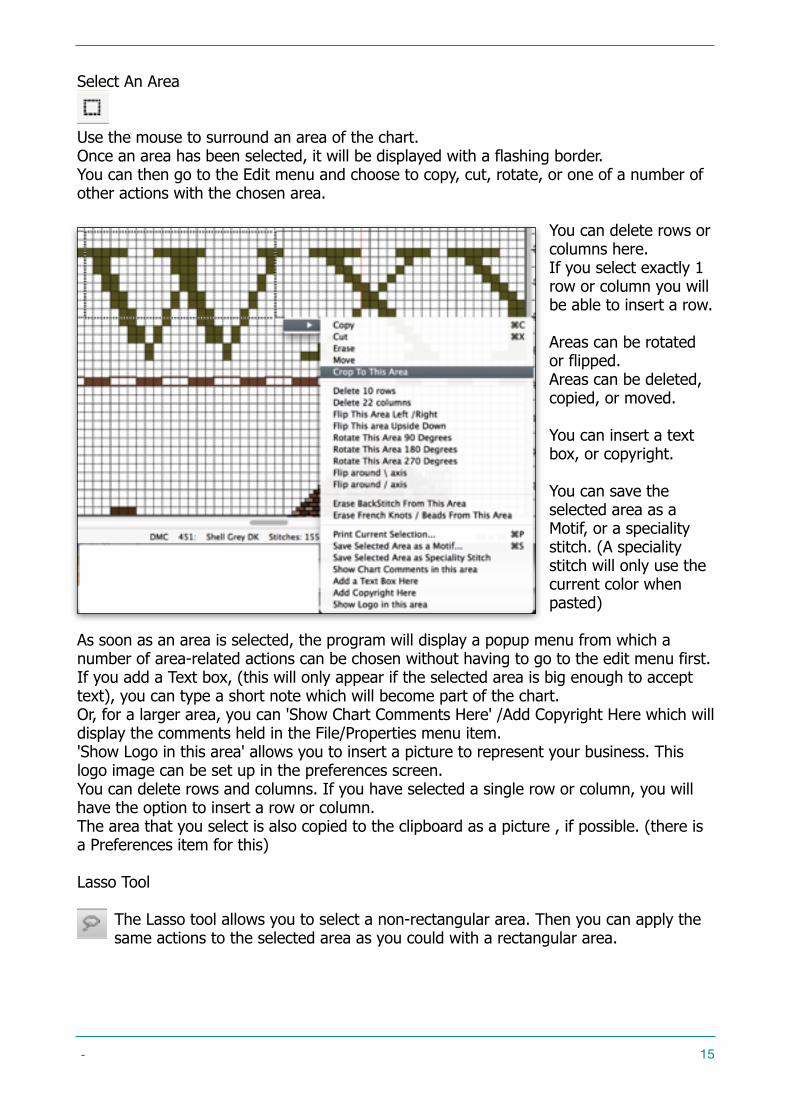
Select An Area
! Use the mouse to surround an area of the chart.Once an area has been selected, it will be displayed with a flashing border.You can then go to the Edit menu and choose to copy, cut, rotate, or one of a number of other actions with the chosen area.
You can delete rows or columns here. If you select exactly 1 row or column you will be able to insert a row.
Areas can be rotated or flipped. Areas can be deleted, copied, or moved.
You can insert a text box, or copyright.
You can save the selected area as a Motif, or a speciality stitch. (A speciality stitch will only use the current color when pasted)
As soon as an area is selected, the program will display a popup menu from which a number of area-related actions can be chosen without having to go to the edit menu first.If you add a Text box, (this will only appear if the selected area is big enough to accept text), you can type a short note which will become part of the chart.Or, for a larger area, you can 'Show Chart Comments Here' /Add Copyright Here which will display the comments held in the File/Properties menu item.'Show Logo in this area' allows you to insert a picture to represent your business. This logo image can be set up in the preferences screen.You can delete rows and columns. If you have selected a single row or column, you will have the option to insert a row or column. The area that you select is also copied to the clipboard as a picture , if possible. (there is a Preferences item for this) Lasso Tool
The Lasso tool allows you to select a non-rectangular area. Then you can apply the same actions to the selected area as you could with a rectangular area.
- �15
Shapes This option has a popup menu that allows you choose between ovals, and rectangles, which may be hollow or solid, or made up of beads.To add one of these shapes, select your option, click the main grid, hold the mouse button down, drag the mouse to the opposite corner of the shape, and let go.The shape will be drawn in the area you selected. There are also triangles and diamond filled shapes available here.
Drag the Design Area
If you select this icon, then instead of drawing when you drag the mouse around on the grid, you will move the design around.(This is equivalent to moving both of the scrollbars around the grid , at the same time. Click on the grid, hold the mouse, then drag the design in your chosen direction and release the mouse.
Backstitch Letters.
For backstitch letters, there is a row of small buttons under the toolbar.! These produce single letters or numbers of backstitch when clicked upon -the chosen letter appears as a motif under the control of the mouse.When you click the mouse, your chosen letter is pasted in the current drawing color.To change the style of letters, click the style button, and you can choose from 4 built-in alphabet styles, and between upper and lower case.One useful feature allows to you select the letter from the keyboard. If you want to enter the word APPLE, choose A from the toolbar, and click to place it.Then press P on the keyboard : the motif will change to a letter P, and you can place this twice. Now press L on the keyboard, and so on. Markup
If you don’t want to print reams of paper or a PDF, and are using a laptop or tablet machine, you might choose to stitch ‘from the screen’If so, you can use the Markup option to ‘tick off’ each stitched square.Click on this icon and click or drag the mouse over the design.
Ticks will be added where you click, to indicate which parts you have stitched. Note: the markup isn’t part of the design, and won’t appear on printouts etc.
- �16
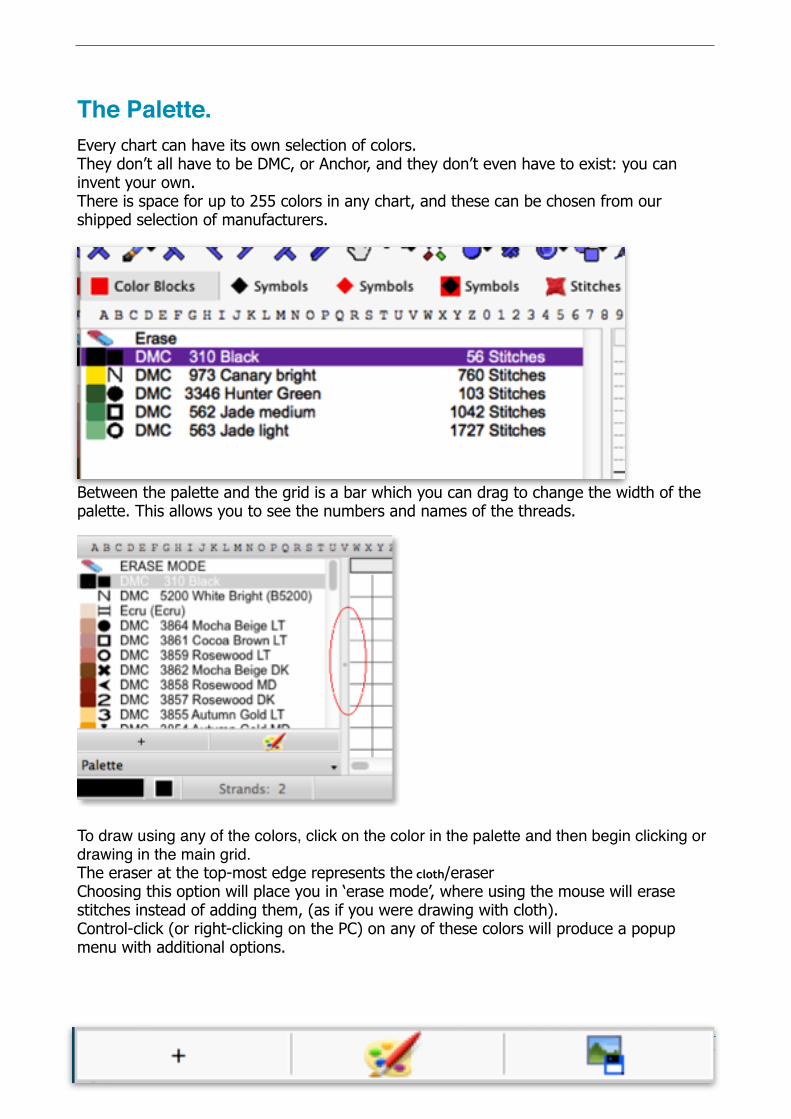
The Palette.Every chart can have its own selection of colors. They don’t all have to be DMC, or Anchor, and they don’t even have to exist: you can invent your own. There is space for up to 255 colors in any chart, and these can be chosen from our shipped selection of manufacturers.
�Between the palette and the grid is a bar which you can drag to change the width of the palette. This allows you to see the numbers and names of the threads.
To draw using any of the colors, click on the color in the palette and then begin clicking or drawing in the main grid.The eraser at the top-most edge represents the cloth/eraser Choosing this option will place you in ‘erase mode’, where using the mouse will erase stitches instead of adding them, (as if you were drawing with cloth).Control-click (or right-clicking on the PC) on any of these colors will produce a popup menu with additional options.
- �17
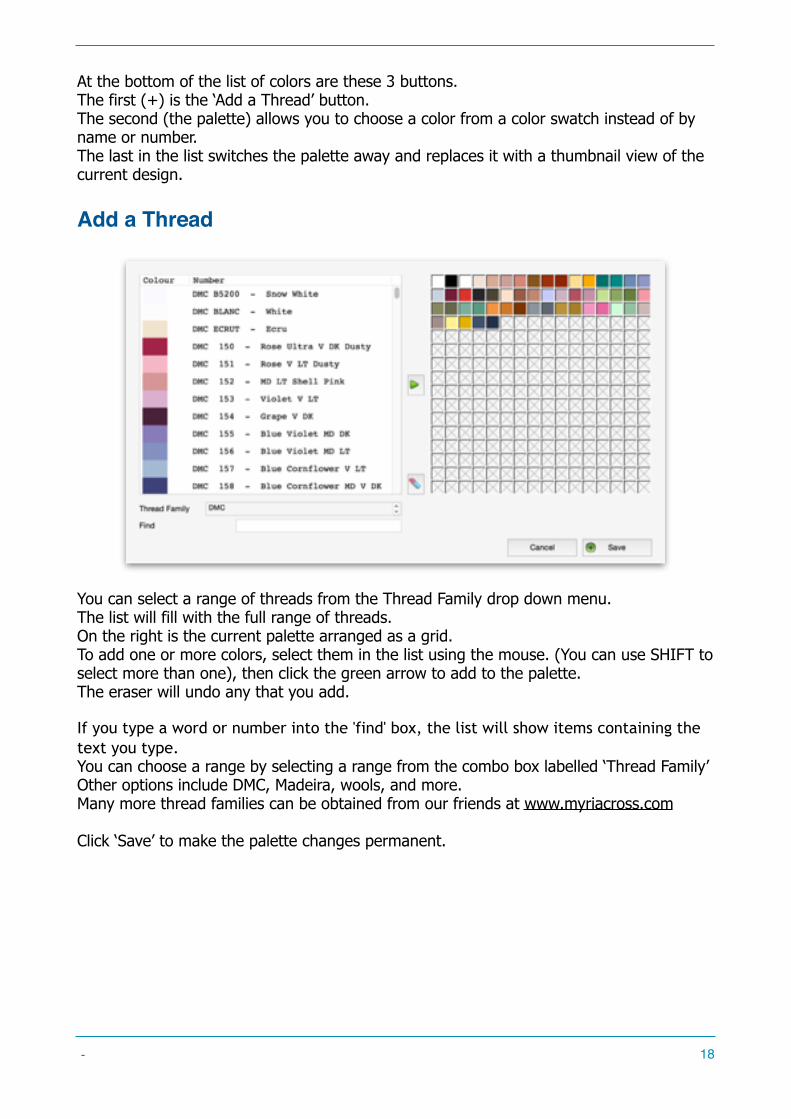
At the bottom of the list of colors are these 3 buttons. The first (+) is the ‘Add a Thread’ button. The second (the palette) allows you to choose a color from a color swatch instead of by name or number. The last in the list switches the palette away and replaces it with a thumbnail view of the current design.
Add a Thread
You can select a range of threads from the Thread Family drop down menu. The list will fill with the full range of threads. On the right is the current palette arranged as a grid. To add one or more colors, select them in the list using the mouse. (You can use SHIFT to select more than one), then click the green arrow to add to the palette. The eraser will undo any that you add.
If you type a word or number into the 'find' box, the list will show items containing the text you type. You can choose a range by selecting a range from the combo box labelled ‘Thread Family’ Other options include DMC, Madeira, wools, and more.Many more thread families can be obtained from our friends at www.myriacross.com
Click ‘Save’ to make the palette changes permanent.
- �18
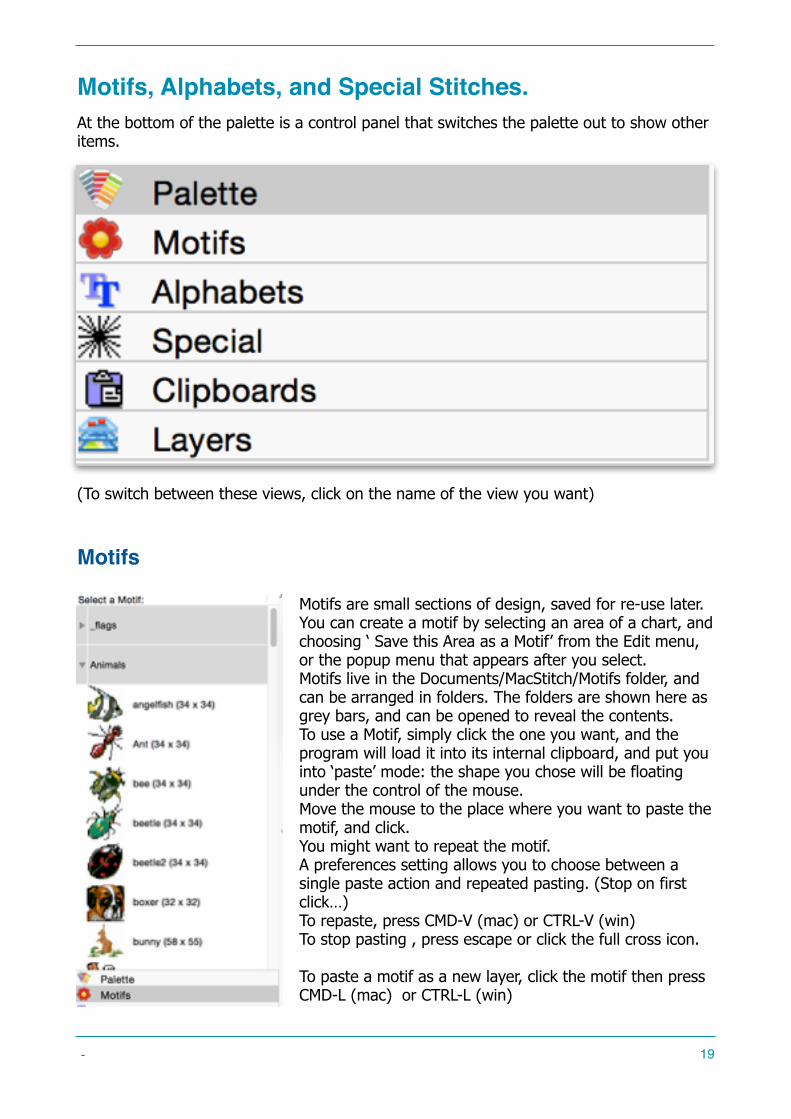
Motifs, Alphabets, and Special Stitches.At the bottom of the palette is a control panel that switches the palette out to show other items.
(To switch between these views, click on the name of the view you want)
Motifs
Motifs are small sections of design, saved for re-use later. You can create a motif by selecting an area of a chart, and choosing ‘ Save this Area as a Motif’ from the Edit menu, or the popup menu that appears after you select. Motifs live in the Documents/MacStitch/Motifs folder, and can be arranged in folders. The folders are shown here as grey bars, and can be opened to reveal the contents. To use a Motif, simply click the one you want, and the program will load it into its internal clipboard, and put you into ‘paste’ mode: the shape you chose will be floating under the control of the mouse. Move the mouse to the place where you want to paste the motif, and click. You might want to repeat the motif. A preferences setting allows you to choose between a single paste action and repeated pasting. (Stop on first click…) To repaste, press CMD-V (mac) or CTRL-V (win) To stop pasting , press escape or click the full cross icon.
To paste a motif as a new layer, click the motif then press CMD-L (mac) or CTRL-L (win)
- �19
Alphabets
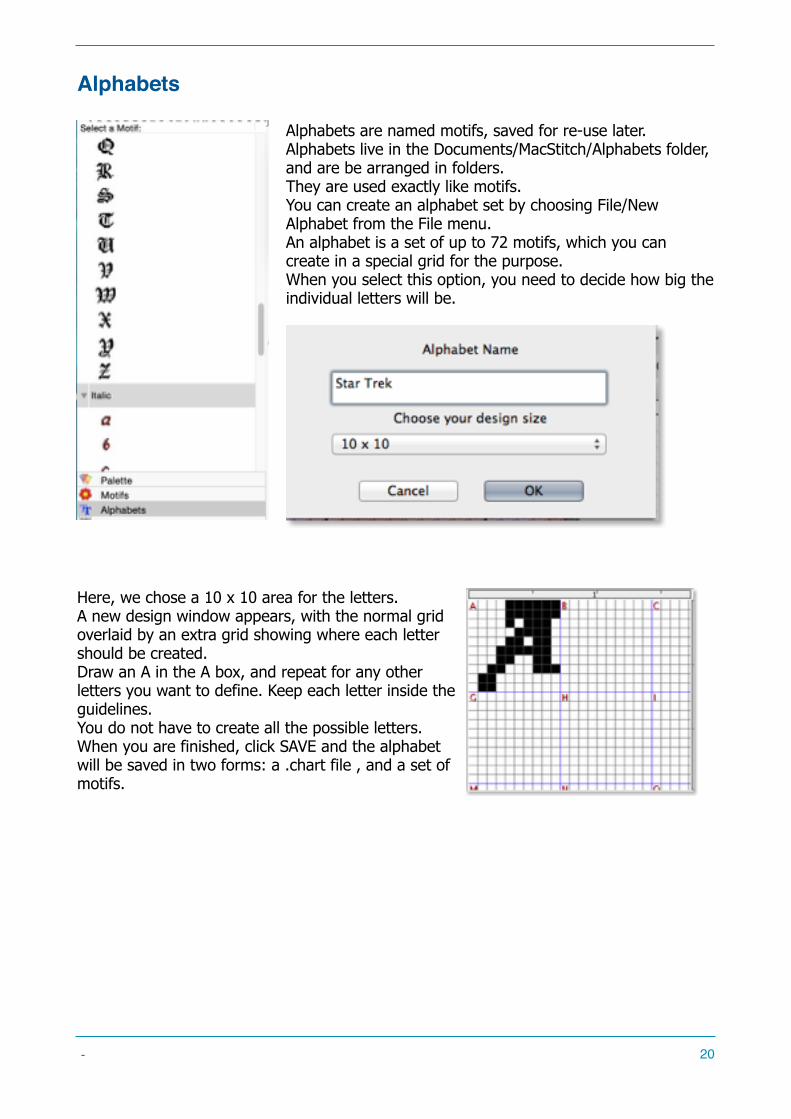
Alphabets are named motifs, saved for re-use later. Alphabets live in the Documents/MacStitch/Alphabets folder, and are be arranged in folders. They are used exactly like motifs. You can create an alphabet set by choosing File/New Alphabet from the File menu. An alphabet is a set of up to 72 motifs, which you can create in a special grid for the purpose.When you select this option, you need to decide how big the individual letters will be.
!
Here, we chose a 10 x 10 area for the letters.A new design window appears, with the normal grid overlaid by an extra grid showing where each letter should be created. Draw an A in the A box, and repeat for any other letters you want to define. Keep each letter inside the guidelines.You do not have to create all the possible letters.When you are finished, click SAVE and the alphabet will be saved in two forms: a .chart file , and a set of motifs.
- �20
Backstitched Alphabets
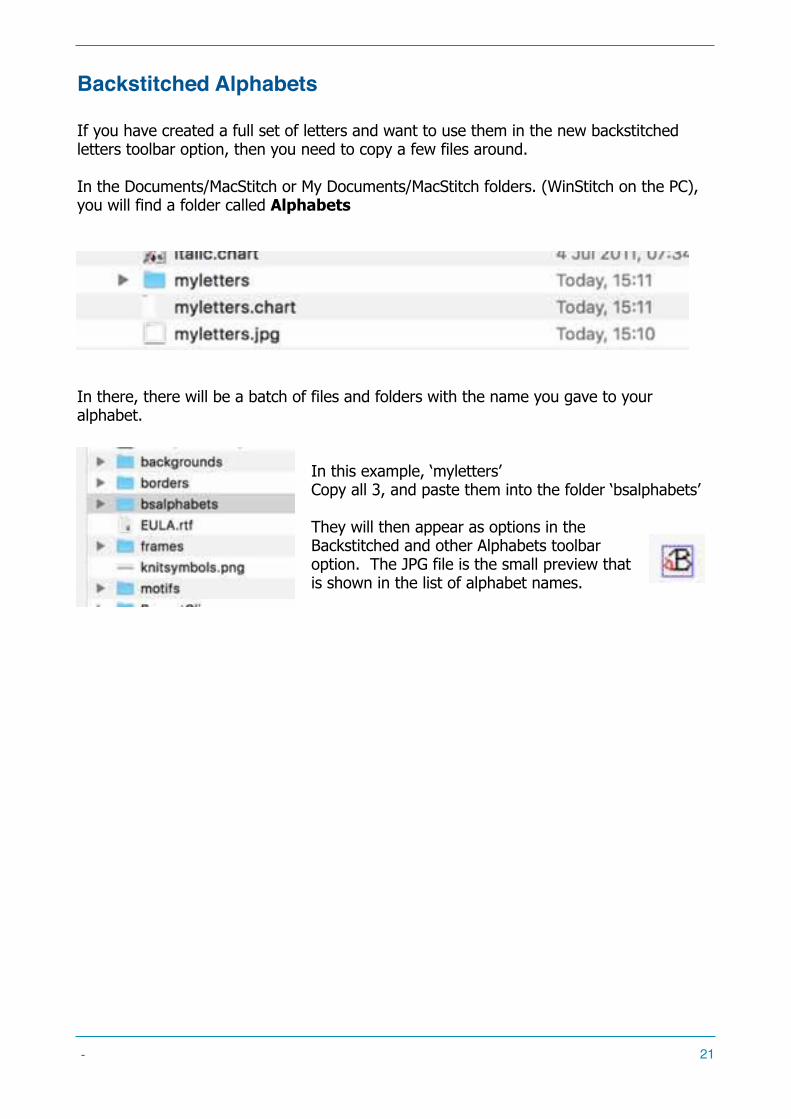
If you have created a full set of letters and want to use them in the new backstitched letters toolbar option, then you need to copy a few files around.
In the Documents/MacStitch or My Documents/MacStitch folders. (WinStitch on the PC), you will find a folder called Alphabets
In there, there will be a batch of files and folders with the name you gave to your alphabet.
In this example, ‘myletters’ Copy all 3, and paste them into the folder ‘bsalphabets’ They will then appear as options in the Backstitched and other Alphabets toolbar option. The JPG file is the small preview that is shown in the list of alphabet names.
- �21
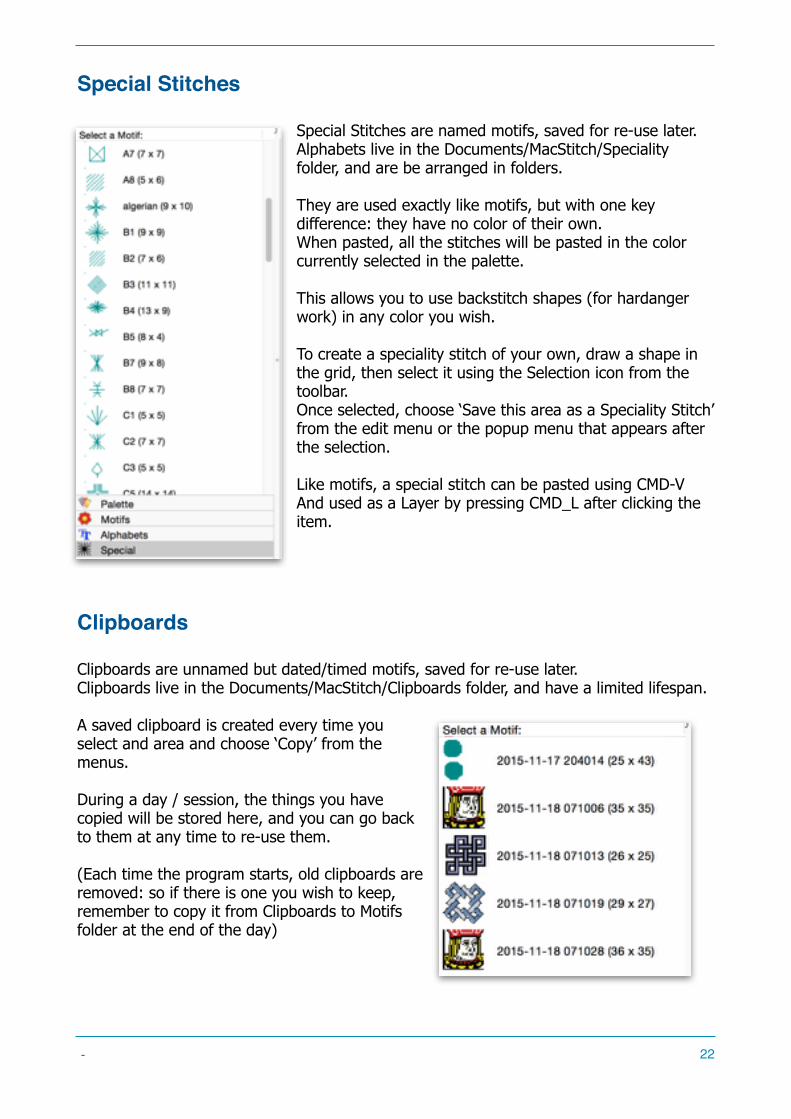
Special Stitches
Special Stitches are named motifs, saved for re-use later. Alphabets live in the Documents/MacStitch/Speciality folder, and are be arranged in folders.
They are used exactly like motifs, but with one key difference: they have no color of their own. When pasted, all the stitches will be pasted in the color currently selected in the palette.
This allows you to use backstitch shapes (for hardanger work) in any color you wish.
To create a speciality stitch of your own, draw a shape in the grid, then select it using the Selection icon from the toolbar. Once selected, choose ‘Save this area as a Speciality Stitch’ from the edit menu or the popup menu that appears after the selection.
Like motifs, a special stitch can be pasted using CMD-V And used as a Layer by pressing CMD_L after clicking the item.
Clipboards
Clipboards are unnamed but dated/timed motifs, saved for re-use later. Clipboards live in the Documents/MacStitch/Clipboards folder, and have a limited lifespan.
A saved clipboard is created every time you select and area and choose ‘Copy’ from the menus.
During a day / session, the things you have copied will be stored here, and you can go back to them at any time to re-use them.
(Each time the program starts, old clipboards are removed: so if there is one you wish to keep, remember to copy it from Clipboards to Motifs folder at the end of the day)
- �22
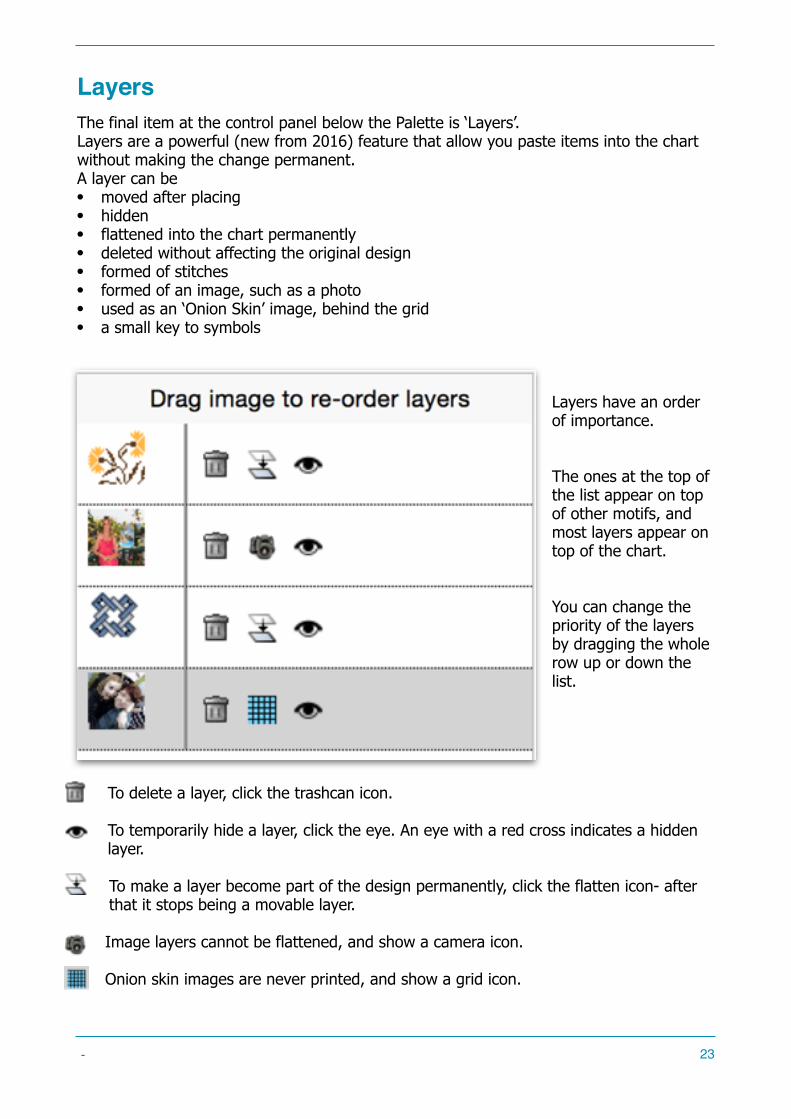
LayersThe final item at the control panel below the Palette is ‘Layers’. Layers are a powerful (new from 2016) feature that allow you paste items into the chart without making the change permanent. A layer can be • moved after placing • hidden • flattened into the chart permanently • deleted without affecting the original design • formed of stitches • formed of an image, such as a photo • used as an ‘Onion Skin’ image, behind the grid • a small key to symbols
Layers have an order of importance.
The ones at the top of the list appear on top of other motifs, and most layers appear on top of the chart.
You can change the priority of the layers by dragging the whole row up or down the list.
To delete a layer, click the trashcan icon.
To temporarily hide a layer, click the eye. An eye with a red cross indicates a hidden layer.
To make a layer become part of the design permanently, click the flatten icon- after that it stops being a movable layer.
Image layers cannot be flattened, and show a camera icon.
Onion skin images are never printed, and show a grid icon.
- �23
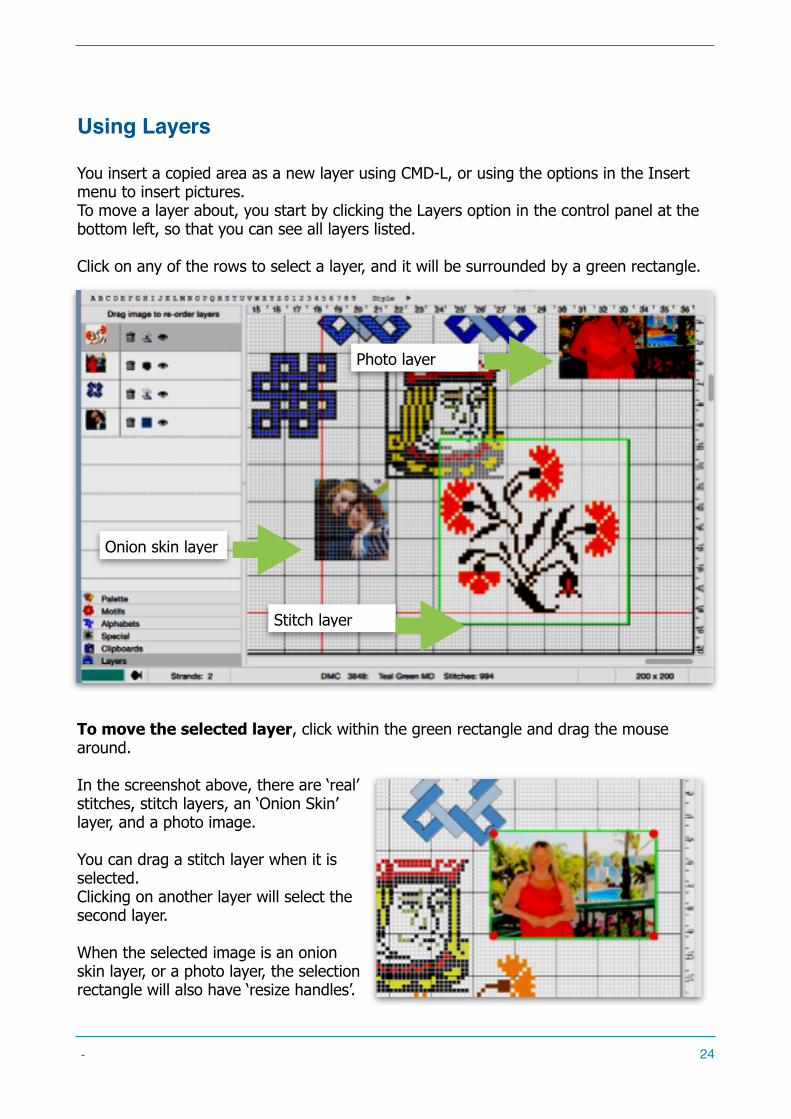
Using Layers
You insert a copied area as a new layer using CMD-L, or using the options in the Insert menu to insert pictures. To move a layer about, you start by clicking the Layers option in the control panel at the bottom left, so that you can see all layers listed.
Click on any of the rows to select a layer, and it will be surrounded by a green rectangle.
To move the selected layer, click within the green rectangle and drag the mouse around.
In the screenshot above, there are ‘real’ stitches, stitch layers, an ‘Onion Skin’ layer, and a photo image.
You can drag a stitch layer when it is selected. Clicking on another layer will select the second layer.
When the selected image is an onion skin layer, or a photo layer, the selection rectangle will also have ‘resize handles’.
- �24
Onion skin layer
Stitch layer
Photo layer
Dragging the red resize handles will resize the image on screen.
Unless a layer is hidden, it will be printed or exported into a PDF as if it were part of the chart. Stitches used by the layer are not ‘counted’ as part of the chart until merged, or printed.
During printing, the layers are temporarily merged in order of priority. The lower layers are merged first, then the upper layers. If layers overlap, this means that some stitches from lower layers will be replaced by stitches from the upper layers.
If your chart includes layers, they will be preserved when you save and load the chart. (However, this new functionality means that charts with layers are no longer readable by older versions of MacStitch and WinStitch)
The Status BarAlong the bottom of the main window is a status bar, showing information about the chart and selected thread.
The panel at the left shows the current color. If you click on it, it also has the effect of turning the palette from a detailed list showing names, into a smaller list which lets you see more colors at once. Click again to restore the original palette view.
Next to that is the symbol used by the current thread. you can click on that to change the symbol. At the far right hand side, the chart size (shown here as 200 x 200) If you click on that, it will open the ‘change design size’ dialog , so that you can change the chart.. perhaps to add extra space for more stitches.
In the centre of this bar is the current thread name. Click here to edit the thread.
- �25
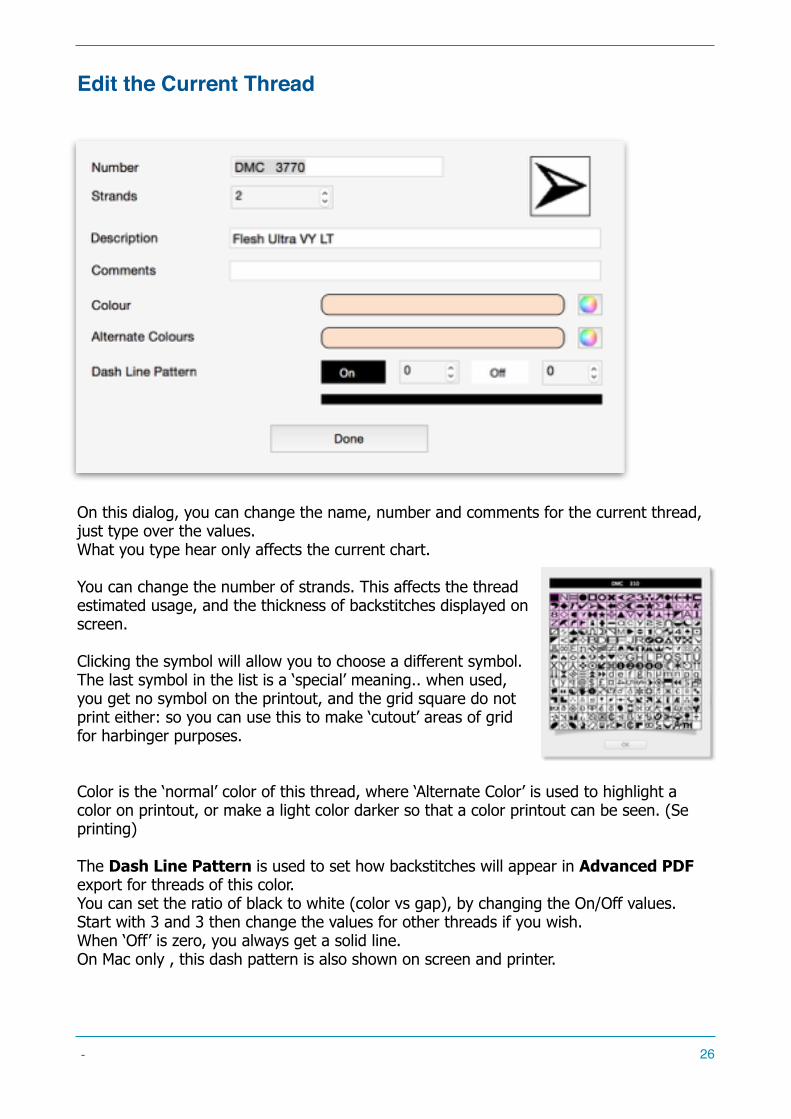
Edit the Current Thread
On this dialog, you can change the name, number and comments for the current thread, just type over the values. What you type hear only affects the current chart.
You can change the number of strands. This affects the thread estimated usage, and the thickness of backstitches displayed on screen.
Clicking the symbol will allow you to choose a different symbol. The last symbol in the list is a ‘special’ meaning.. when used, you get no symbol on the printout, and the grid square do not print either: so you can use this to make ‘cutout’ areas of grid for harbinger purposes.
Color is the ‘normal’ color of this thread, where ‘Alternate Color’ is used to highlight a color on printout, or make a light color darker so that a color printout can be seen. (Se printing)
The Dash Line Pattern is used to set how backstitches will appear in Advanced PDF export for threads of this color. You can set the ratio of black to white (color vs gap), by changing the On/Off values. Start with 3 and 3 then change the values for other threads if you wish. When ‘Off’ is zero, you always get a solid line. On Mac only , this dash pattern is also shown on screen and printer.
- �26
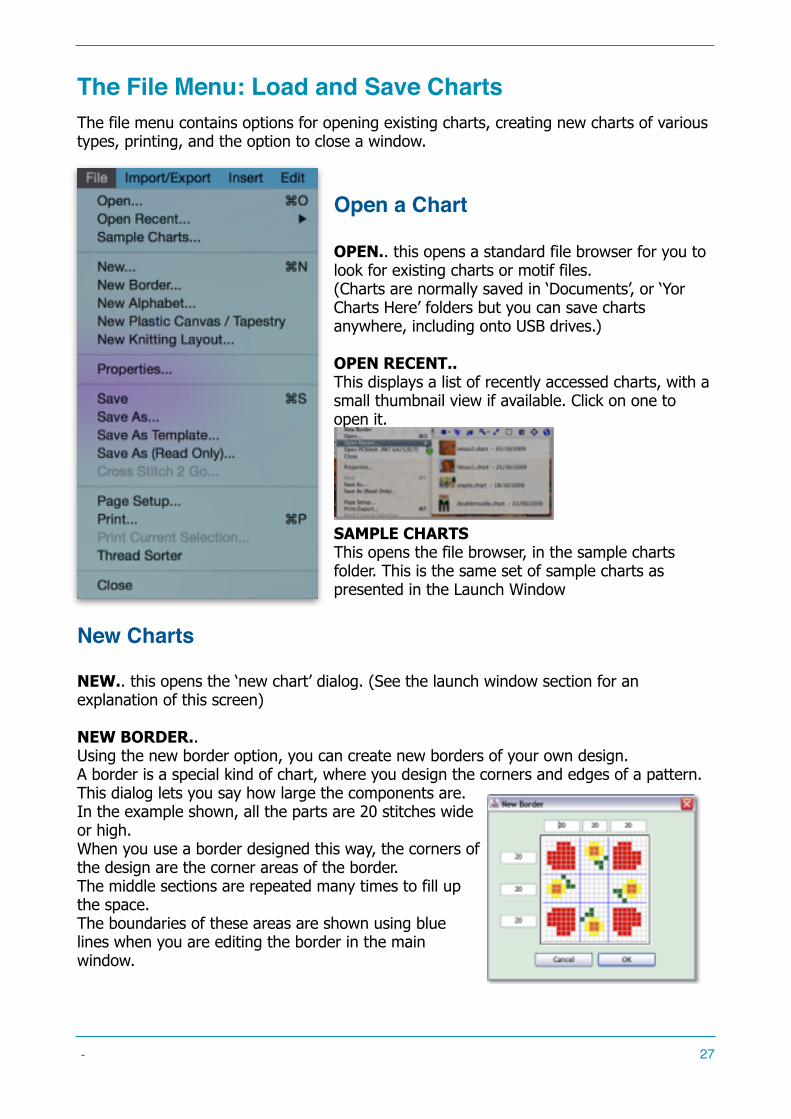
The File Menu: Load and Save ChartsThe file menu contains options for opening existing charts, creating new charts of various types, printing, and the option to close a window.
Open a Chart
OPEN.. this opens a standard file browser for you to look for existing charts or motif files. (Charts are normally saved in ‘Documents’, or ‘Yor Charts Here’ folders but you can save charts anywhere, including onto USB drives.)
OPEN RECENT.. This displays a list of recently accessed charts, with a small thumbnail view if available. Click on one to open it.
! SAMPLE CHARTS This opens the file browser, in the sample charts folder. This is the same set of sample charts as presented in the Launch Window
New Charts
NEW.. this opens the ‘new chart’ dialog. (See the launch window section for an explanation of this screen)
NEW BORDER.. Using the new border option, you can create new borders of your own design.A border is a special kind of chart, where you design the corners and edges of a pattern.This dialog lets you say how large the components are.In the example shown, all the parts are 20 stitches wide or high.When you use a border designed this way, the corners of the design are the corner areas of the border.The middle sections are repeated many times to fill up the space.The boundaries of these areas are shown using blue lines when you are editing the border in the main window.
- �27
New Knitting Layout
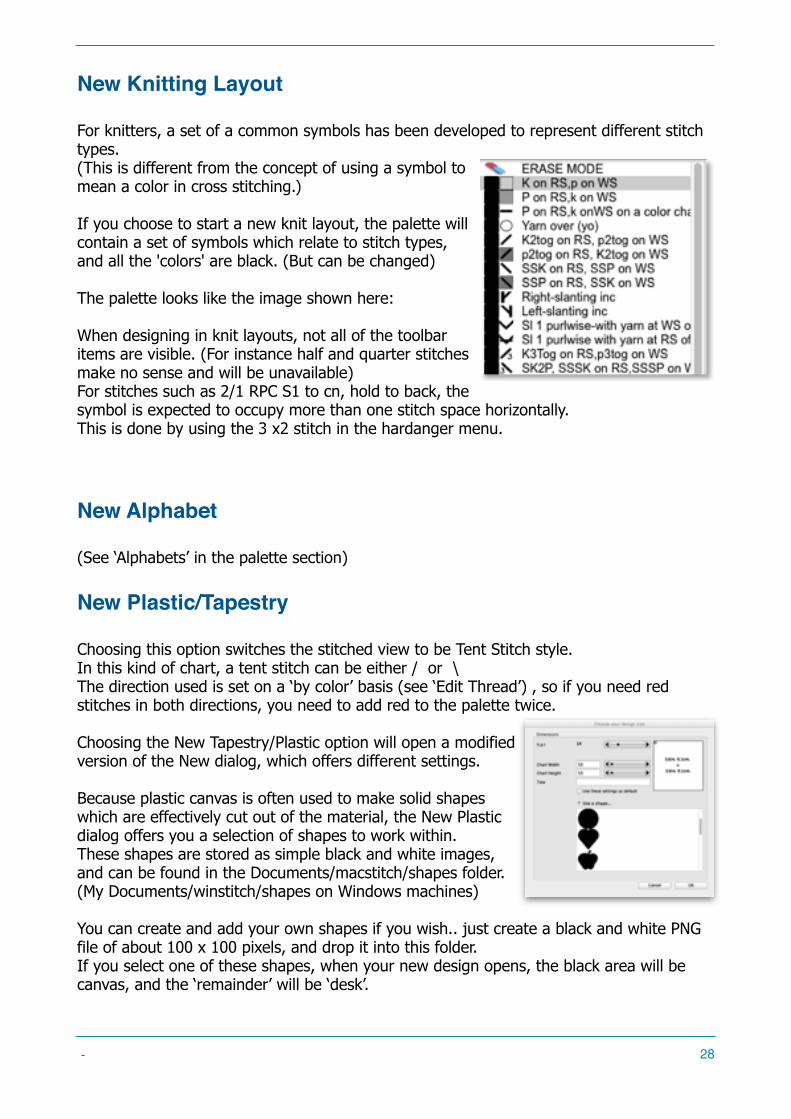
For knitters, a set of a common symbols has been developed to represent different stitch types. (This is different from the concept of using a symbol to mean a color in cross stitching.) If you choose to start a new knit layout, the palette will contain a set of symbols which relate to stitch types, and all the 'colors' are black. (But can be changed) The palette looks like the image shown here:When designing in knit layouts, not all of the toolbar items are visible. (For instance half and quarter stitches make no sense and will be unavailable)For stitches such as 2/1 RPC S1 to cn, hold to back, the symbol is expected to occupy more than one stitch space horizontally. This is done by using the 3 x2 stitch in the hardanger menu.
New Alphabet
(See ‘Alphabets’ in the palette section)
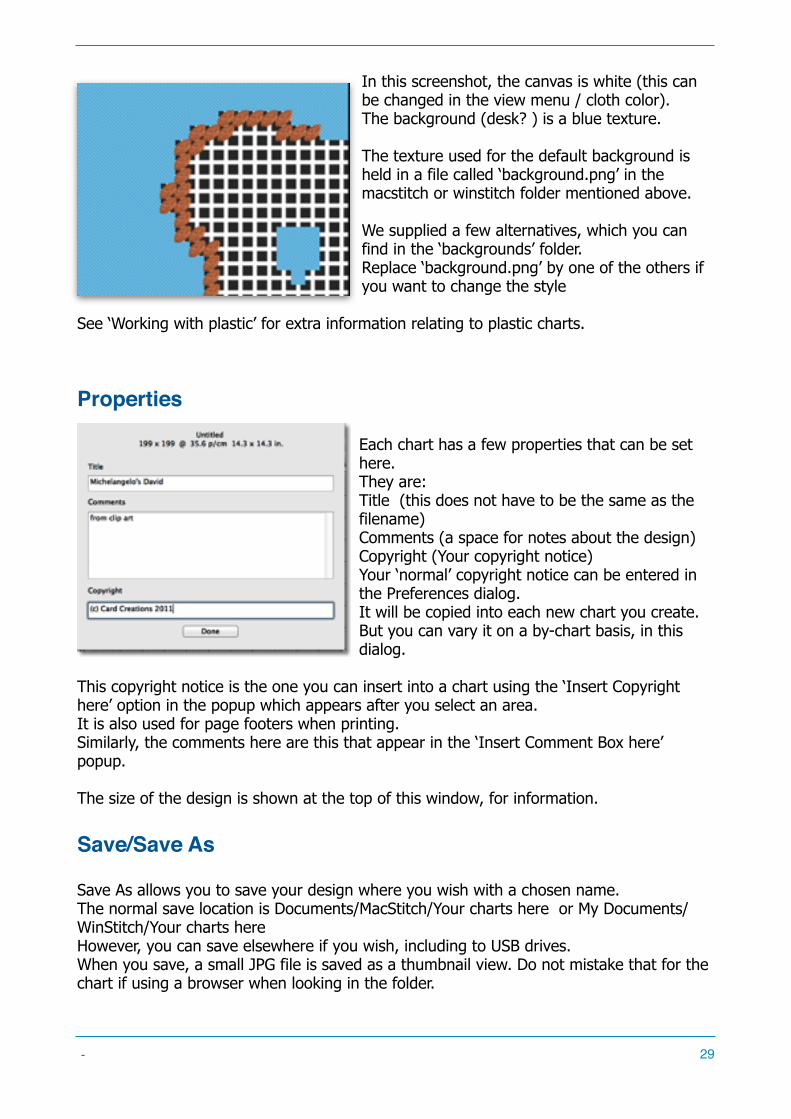
New Plastic/Tapestry
Choosing this option switches the stitched view to be Tent Stitch style. In this kind of chart, a tent stitch can be either / or \ The direction used is set on a ‘by color’ basis (see ‘Edit Thread’) , so if you need red stitches in both directions, you need to add red to the palette twice.
Choosing the New Tapestry/Plastic option will open a modified version of the New dialog, which offers different settings. Because plastic canvas is often used to make solid shapes which are effectively cut out of the material, the New Plastic dialog offers you a selection of shapes to work within.These shapes are stored as simple black and white images, and can be found in the Documents/macstitch/shapes folder.(My Documents/winstitch/shapes on Windows machines)You can create and add your own shapes if you wish.. just create a black and white PNG file of about 100 x 100 pixels, and drop it into this folder.If you select one of these shapes, when your new design opens, the black area will be canvas, and the ‘remainder’ will be ‘desk’.
- �28
In this screenshot, the canvas is white (this can be changed in the view menu / cloth color). The background (desk? ) is a blue texture.
The texture used for the default background is held in a file called ‘background.png’ in the macstitch or winstitch folder mentioned above. We supplied a few alternatives, which you can find in the ‘backgrounds’ folder. Replace ‘background.png’ by one of the others if you want to change the style
See ‘Working with plastic’ for extra information relating to plastic charts.
Properties
Each chart has a few properties that can be set here. They are: Title (this does not have to be the same as the filename) Comments (a space for notes about the design) Copyright (Your copyright notice) Your ‘normal’ copyright notice can be entered in the Preferences dialog. It will be copied into each new chart you create. But you can vary it on a by-chart basis, in this dialog.
This copyright notice is the one you can insert into a chart using the ‘Insert Copyright here’ option in the popup which appears after you select an area. It is also used for page footers when printing. Similarly, the comments here are this that appear in the ‘Insert Comment Box here’ popup.
The size of the design is shown at the top of this window, for information.
Save/Save As
Save As allows you to save your design where you wish with a chosen name. The normal save location is Documents/MacStitch/Your charts here or My Documents/WinStitch/Your charts here However, you can save elsewhere if you wish, including to USB drives. When you save, a small JPG file is saved as a thumbnail view. Do not mistake that for the chart if using a browser when looking in the folder.
- �29
Your file name should end with .CHART If the name you enter does not end with.CHART, the program will attempt to add .chart to the end.. (without the extension your computer may not know what to do with the file if you just double click it later.)
The file format used by our software has changed little over the years, but the introduction of Layers in 2016 has meant we needed to create a new way to save files. The software will save in ‘the old format’ if you don't have layers, and in the ‘new’ if you do have layers. You should see no difference in loading or saving, but new format files cannot be opened by older versions of the software than the 2016 edition.
Every time you save a design, we also zip up a copy of it into a file in your Documents or My Documents folder. If you make a drastic mistake after a week or two of work, or forget where you saved, older versions of the chart are still recoverable later unless these zip files are deleted. (To access old versions, use the ‘recover file from Archive’ menu item)
Cross Stitch 2 Go
Cross Stitch 2 Go is our iPad app. It’s very much simpler than the desktop program, but is a handy way to create motifs and small designs on the move, and is also a neat way to stitch your work, using the iPad screen instead of sheets of paper.If you want to save your work for Cross Stitch 2 Go, it must be 200 x 200 stitches or smaller with no more than 40 colors.Also, because the backstitch method is simpler, you won’t keep point to point backstitch, beads, buttons or knots.Like saving an ordinary chart, you will be presented with a standard File Save dialog, with which you can save the design. Cross Stitch 2 Go designs have names which end with .cht So save your design with a name ending in .CHT and the program will know you intend to export to Cross Stitch 2 Go.
Page Setup
This option displays the program’s print settings dialog, and the printer’s page setup dialog. Here you can set the properties of your chosen printer.
- �30
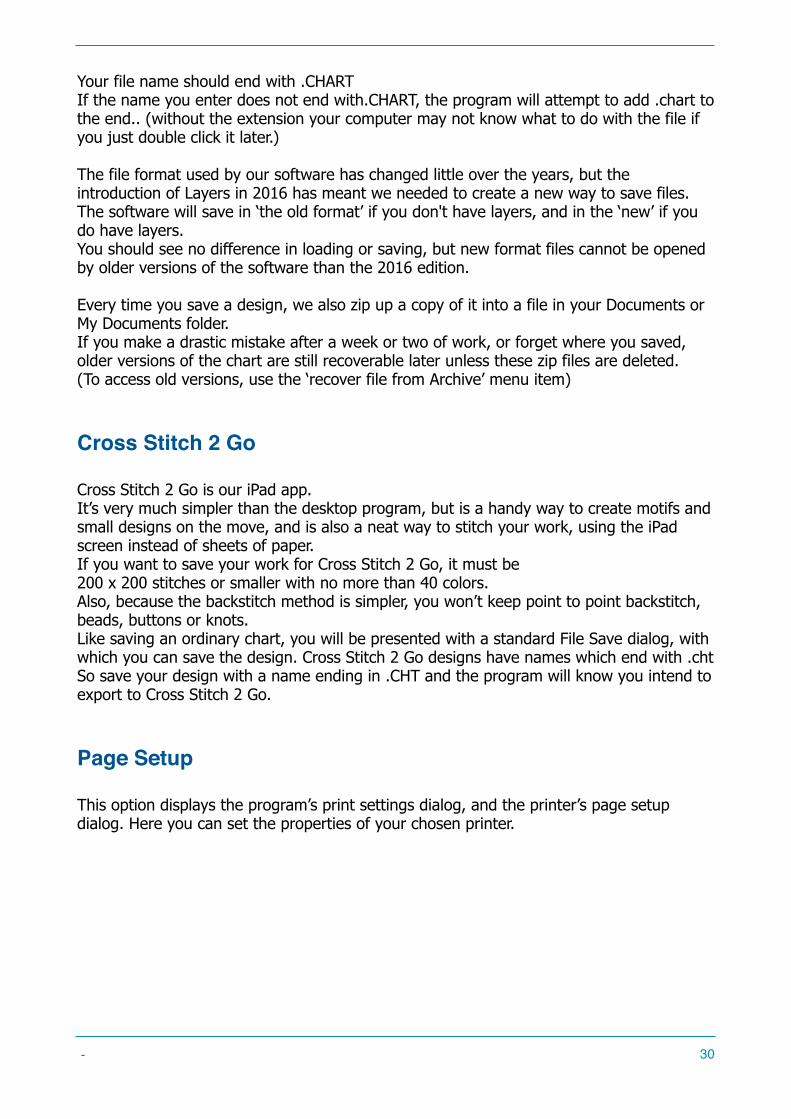
Thread Sorter
The thread sorter option creates a series of pages listing the colors from your current chart.Print this to sheets of cardboard, and punch holes next to the thread names, for use as a thread sorter.
The output looks like this:
Close
This option will close the design. If there are unsaved changes, you will be prompted to save these before the window closes.On Windows, if this is the last window, the whole program will be closed.On the Mac, the menu bars will remain visible.
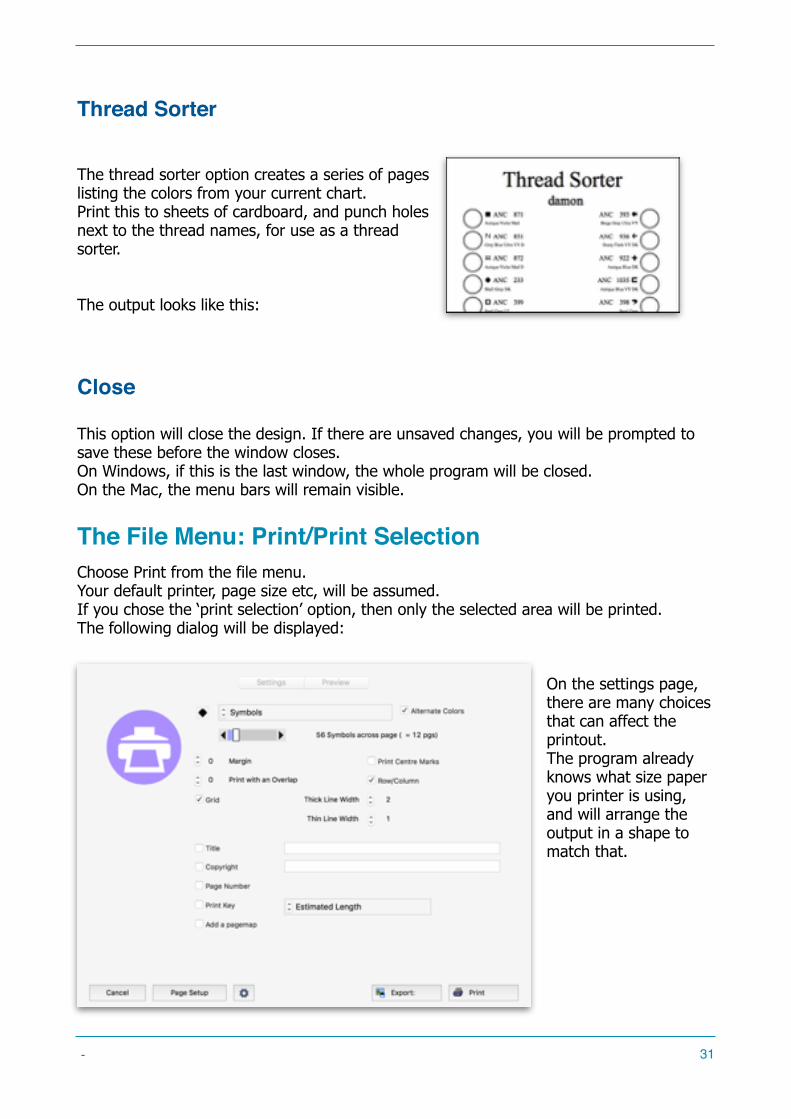
The File Menu: Print/Print SelectionChoose Print from the file menu. Your default printer, page size etc, will be assumed.If you chose the ‘print selection’ option, then only the selected area will be printed.The following dialog will be displayed:
On the settings page, there are many choices that can affect the printout. The program already knows what size paper you printer is using, and will arrange the output in a shape to match that.
- �31
Style:
You can print your design in the same styles as you can view it while editing: Black Symbol, Color Symbol, Symbol on color, etc. Choose the printing style from the drop down menu at the top.
Alternate Colors
Each thread in the palette has a ‘real’ color and an alternate color. You can change these by clicking the thread name at the bottom of the design grid. The alternate color can be used to assign a darker shade to light colors so that they print clearer in color symbol view. Or you might set all the alternates to grey or white, apart from one, and so get a chart that shows one color strongly in isolation. Ticking this box makes the printout use the alternate color instead of the ‘real’ color.
Symbol Size:
The bigger the symbols / color blocks on the paper, the less of your design will fit on one page. A magazine typically prints designs at around 55..70 symbols/squares across a page of A4 in portrait mode. In the screenshot above, the setting is 40 across the page, and you can see that for this design it will need to chop the chart up into 2 pages to show all the stitches. Less per page = more pages. Higher number = less pages but harder to read.
Margin
The space on the page is affected by the margin setting. The higher the number, the bigger the gap between the edge of the page and the start of the grid.
Print with an overlap
If your chart occupies more than one page, you can make the pages repeat up to 5 of the stitches from adjoining pages using this setting. Duplicated stitches will appear under a shade area in the printout.
- �32
Print centre marks
This option marks the horizontal and vertical centres of the design with an arrow on the printout.
Row/Column
When this is ticked, the rows and columns will be numbered. (If Bottom to Top is ticked, the numbers start at the bottom and work upwards: handy for knitting and crochet)
Grid
When ticked, there will be a grid. Unticked, none.
Thick/Thin Line Width
These options set the relative thickness of the thick and thin lines of grid.
Title
This will contain the chart title if you have set one. If ticked, it will appear at the top of each page.
Copyright
This will contain the copyright if you have set one. If ticked, the copyright will appear at the bottom of each page.
Page No
If ticked, each page will have a number at the bottom.
Print Key
If ticked, a key to the colors and symbols will be added as the last page/s. The estimated length column of the key can be either a length in cm/inches, or a stitch count, or an estimate of the number of 8mtr skeins.
- �33
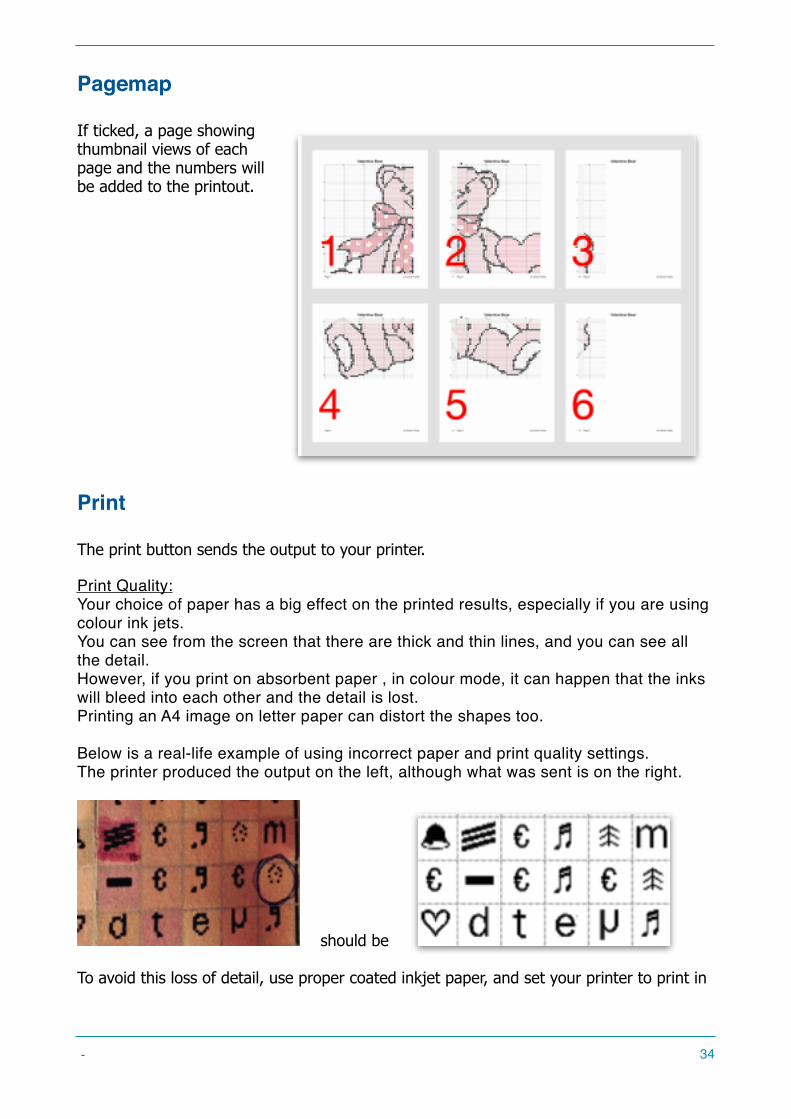
Pagemap
If ticked, a page showing thumbnail views of each page and the numbers will be added to the printout.
The print button sends the output to your printer.
Print Quality: Your choice of paper has a big effect on the printed results, especially if you are using colour ink jets. You can see from the screen that there are thick and thin lines, and you can see all the detail. However, if you print on absorbent paper , in colour mode, it can happen that the inks will bleed into each other and the detail is lost. Printing an A4 image on letter paper can distort the shapes too. Below is a real-life example of using incorrect paper and print quality settings. The printer produced the output on the left, although what was sent is on the right.
! should be ! To avoid this loss of detail, use proper coated inkjet paper, and set your printer to print in
- �34
photographic mode, (where it uses several light passes of ink which it allows to dry a little before over spraying).
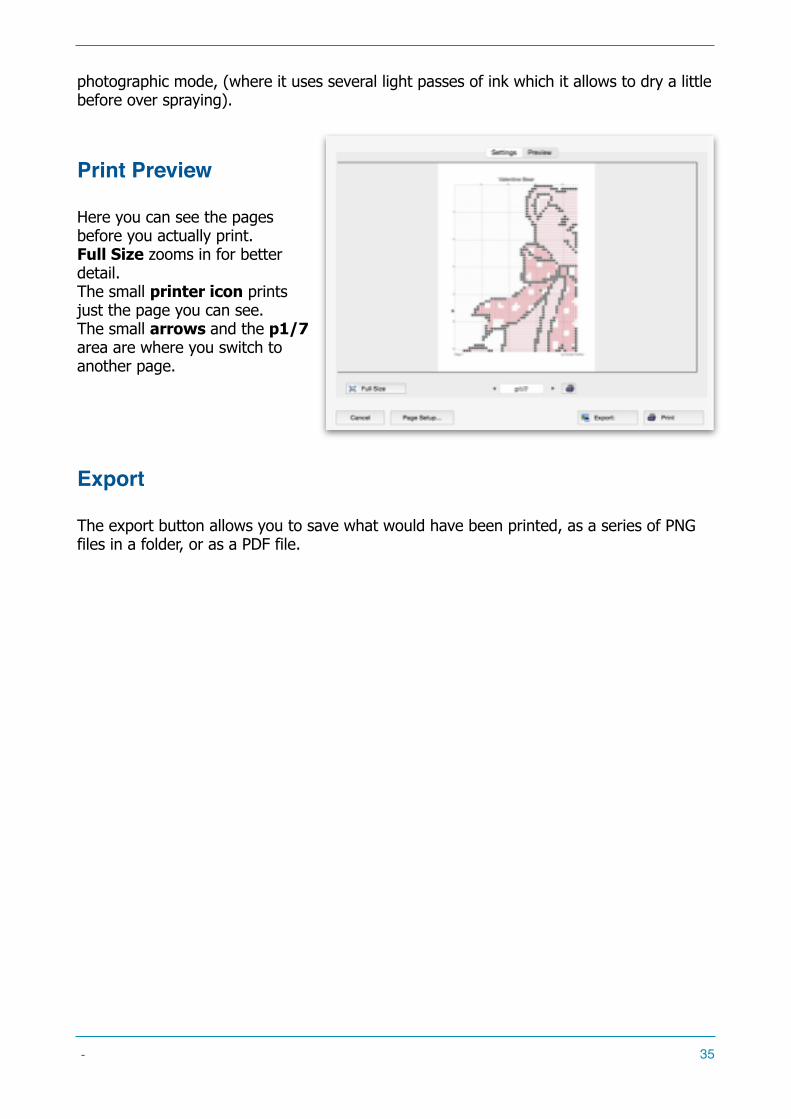
Print Preview
Here you can see the pages before you actually print. Full Size zooms in for better detail. The small printer icon prints just the page you can see. The small arrows and the p1/7 area are where you switch to another page.
Export
The export button allows you to save what would have been printed, as a series of PNG files in a folder, or as a PDF file.
- �35
The Edit Menu: Copy, Paste and Area FunctionsThe edit menu, as in most applications, offers Cut / Paste / Copy / Erase / Select All and these work as you would expect them to, on areas of chart that you select using the select tool.
(tip: Most of the Edit menu functions are also available in the popup menu that appears immediately after you select an area) Paste Use this option to paste a previously copied or cut area into the design window as part of the chart. Once this has been clicked, an outline of the item to be pasted a motif will move around under the control of the mouse. Click when the motif is positioned where you want it.There is an option in the preferences dialog to determine whether the pasting should continue, or whether the pasting should stop and revert to full stitches mode.It is possible to place the pasted motif half-way between stitches, so that quarter stitches in the left corner can be pasted in the right corner.To make this possible, press the SHIFT button while you move the shape around with the mouse. “Normal” stitches will be converted to special stitches if required when you paste. you may also Paste as New Layer (See ‘layers’ for more detail) using CMD-L or CTRL-L
A selected area can also be flipped or rotated using one of the Flip or Rotate menu items. After flipping or rotating, you will be able to paste the selection in the normal way, or paste it as a new layer by pressing CMD-L or CTRL-L
You can select an area and erase all backstitch or French Knots/Beads/Special stitches using the Erase… option here.
With an area selected, you can Crop to this Area.. almost the opposite of ‘erase’, this option discards everything apart from the area you selected, leaving the selected area as the entire chart. Save Selected Area as Motif , and Save Selected Area as a Speciality Stitch. (see.. ‘Motifs, Alphabets, and Special Stitches’) Motifs are small pieces of design saved in color, in the Motifs folder, while Speciality Stitches are small pieces of design saved in a way that will take on the current color when pasted, and they are saved in the ‘Speciality Stitches’ sub folder.
Change Design AreaThis option allows you to change the size of the cloth on which you are designing. You can increase or decrease the size using the same selector as you use when starting a new design.When resizing, you will be asked if you want to resize the design also.If you answer yes, then the design will gain or lose stitches to make it suit the new cloth size: so reducing the area and resizing will make the number of stitches and the finished work smaller.If you answer ‘No’ then the cloth size will be changed, but the design will be left alone.
- �36
This may mean that parts of a large design are lost when you reduce the cloth size, if the new size is smaller than the stitched area.
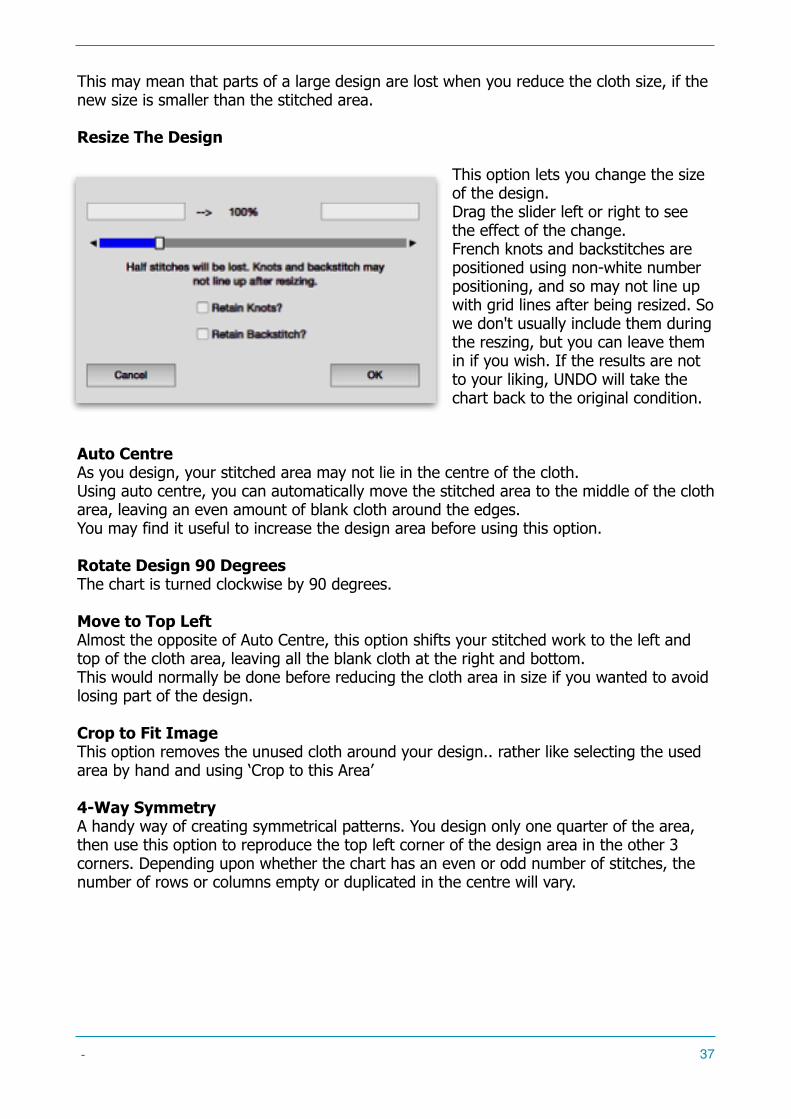
Resize The Design This option lets you change the size of the design. Drag the slider left or right to see the effect of the change. French knots and backstitches are positioned using non-white number positioning, and so may not line up with grid lines after being resized. So we don't usually include them during the reszing, but you can leave them in if you wish. If the results are not to your liking, UNDO will take the chart back to the original condition.
Auto CentreAs you design, your stitched area may not lie in the centre of the cloth.Using auto centre, you can automatically move the stitched area to the middle of the cloth area, leaving an even amount of blank cloth around the edges.You may find it useful to increase the design area before using this option.
Rotate Design 90 Degrees The chart is turned clockwise by 90 degrees.
Move to Top LeftAlmost the opposite of Auto Centre, this option shifts your stitched work to the left and top of the cloth area, leaving all the blank cloth at the right and bottom.This would normally be done before reducing the cloth area in size if you wanted to avoid losing part of the design.
Crop to Fit ImageThis option removes the unused cloth around your design.. rather like selecting the used area by hand and using ‘Crop to this Area’ 4-Way SymmetryA handy way of creating symmetrical patterns. You design only one quarter of the area, then use this option to reproduce the top left corner of the design area in the other 3 corners. Depending upon whether the chart has an even or odd number of stitches, the number of rows or columns empty or duplicated in the centre will vary.
- �37
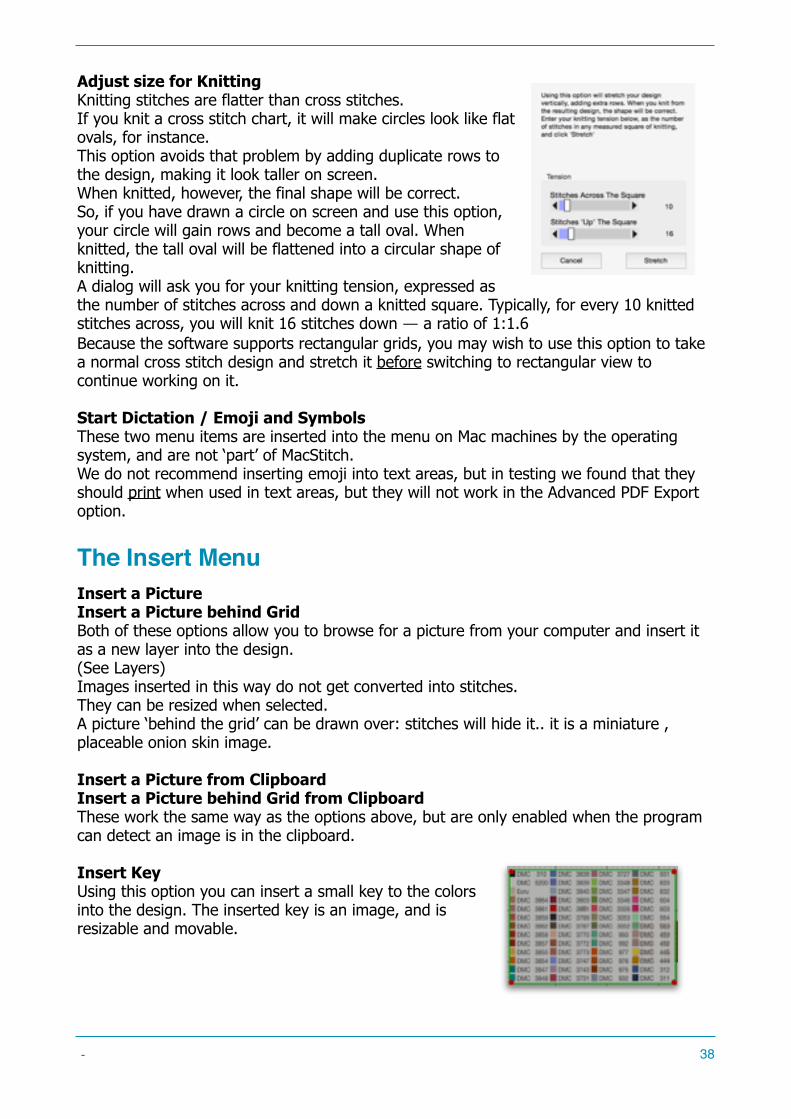
Adjust size for Knitting Knitting stitches are flatter than cross stitches.If you knit a cross stitch chart, it will make circles look like flat ovals, for instance.This option avoids that problem by adding duplicate rows to the design, making it look taller on screen.When knitted, however, the final shape will be correct.So, if you have drawn a circle on screen and use this option, your circle will gain rows and become a tall oval. When knitted, the tall oval will be flattened into a circular shape of knitting.A dialog will ask you for your knitting tension, expressed as the number of stitches across and down a knitted square. Typically, for every 10 knitted stitches across, you will knit 16 stitches down ― a ratio of 1:1.6Because the software supports rectangular grids, you may wish to use this option to take a normal cross stitch design and stretch it before switching to rectangular view to continue working on it.Start Dictation / Emoji and Symbols These two menu items are inserted into the menu on Mac machines by the operating system, and are not ‘part’ of MacStitch. We do not recommend inserting emoji into text areas, but in testing we found that they should print when used in text areas, but they will not work in the Advanced PDF Export option.
The Insert MenuInsert a Picture Insert a Picture behind Grid Both of these options allow you to browse for a picture from your computer and insert it as a new layer into the design. (See Layers) Images inserted in this way do not get converted into stitches. They can be resized when selected. A picture ‘behind the grid’ can be drawn over: stitches will hide it.. it is a miniature , placeable onion skin image.
Insert a Picture from Clipboard Insert a Picture behind Grid from Clipboard These work the same way as the options above, but are only enabled when the program can detect an image is in the clipboard.
Insert Key Using this option you can insert a small key to the colors into the design. The inserted key is an image, and is resizable and movable.
- �38
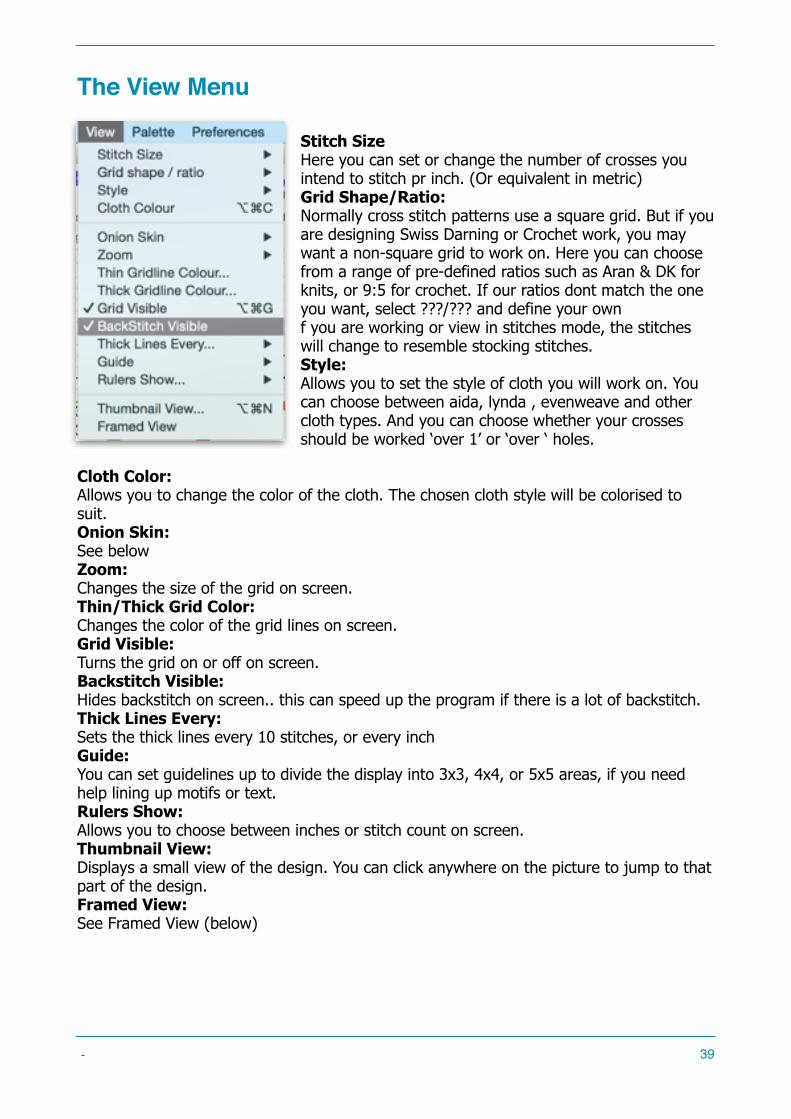
The View MenuStitch Size Here you can set or change the number of crosses you intend to stitch pr inch. (Or equivalent in metric) Grid Shape/Ratio: Normally cross stitch patterns use a square grid. But if you are designing Swiss Darning or Crochet work, you may want a non-square grid to work on. Here you can choose from a range of pre-defined ratios such as Aran & DK for knits, or 9:5 for crochet. If our ratios dont match the one you want, select ???/??? and define your own f you are working or view in stitches mode, the stitches will change to resemble stocking stitches. Style: Allows you to set the style of cloth you will work on. You can choose between aida, lynda , evenweave and other cloth types. And you can choose whether your crosses should be worked ‘over 1’ or ‘over ‘ holes.
Cloth Color: Allows you to change the color of the cloth. The chosen cloth style will be colorised to suit. Onion Skin: See below Zoom: Changes the size of the grid on screen. Thin/Thick Grid Color: Changes the color of the grid lines on screen. Grid Visible: Turns the grid on or off on screen. Backstitch Visible: Hides backstitch on screen.. this can speed up the program if there is a lot of backstitch. Thick Lines Every: Sets the thick lines every 10 stitches, or every inch Guide: You can set guidelines up to divide the display into 3x3, 4x4, or 5x5 areas, if you need help lining up motifs or text. Rulers Show: Allows you to choose between inches or stitch count on screen. Thumbnail View: Displays a small view of the design. You can click anywhere on the picture to jump to that part of the design. Framed View: See Framed View (below)
- �39
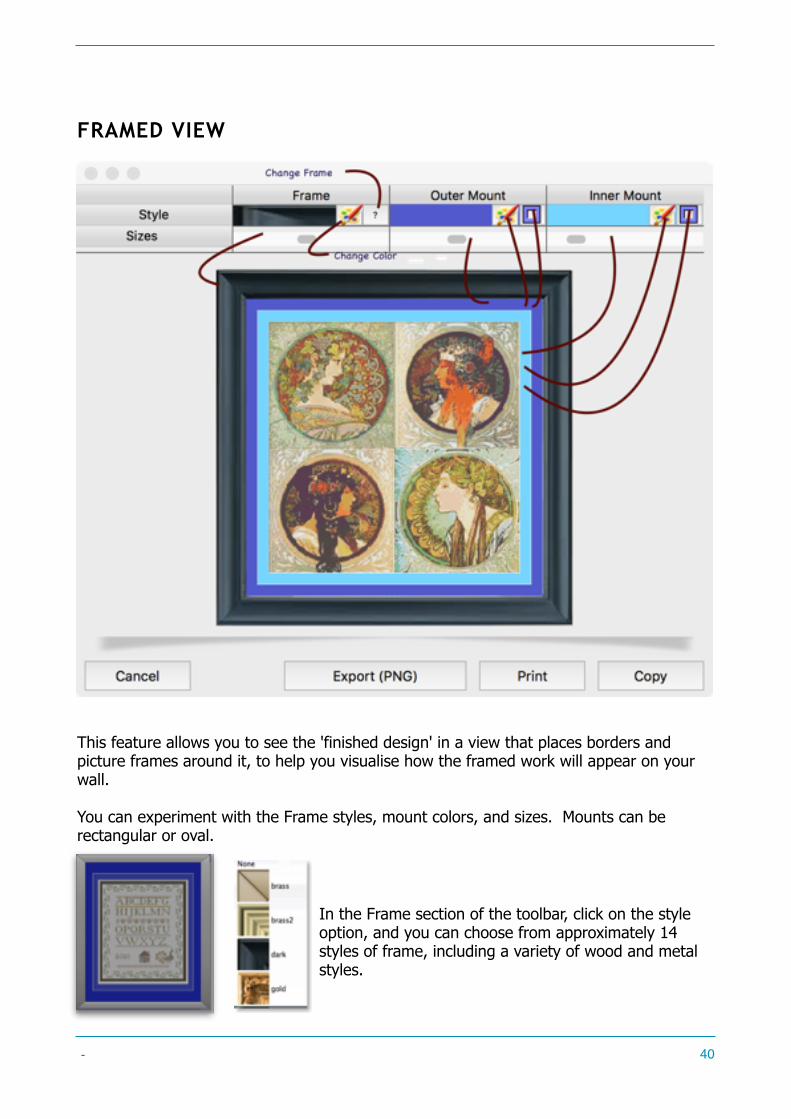
FRAMED VIEW
This feature allows you to see the 'finished design' in a view that places borders and picture frames around it, to help you visualise how the framed work will appear on your wall.You can experiment with the Frame styles, mount colors, and sizes. Mounts can be rectangular or oval.
In the Frame section of the toolbar, click on the style option, and you can choose from approximately 14 styles of frame, including a variety of wood and metal styles.
- �40

The scrollbar below that lets you change the frame width. ! Switches between rectangular and oval mounts. ! This button allows you to tint the frame by adding or removing red, green or blue from it, if you wish to tweak the shading. When used with mounts, it lets you choose the mount color.You can have up to 2 borders within the frame. Click on the color in the style section to change the border colors, and use the scroll bar to change the widths.The buttons at the bottom let you copy the result , export to a PNG file, or print it. It is possible to create your own frames: Look in the Documents/MacStitch/Frames folder on your machine. (My Documents/Winstitch/Frames for windows machines)Each frame has its own folder.Inside the folder is either a set of PNG files names tl, top, tr, left, right etc. (these form rectangular frames) or a file called whole.png plus a partner one called whole_mask.pngThe ‘whole’ files are used to provide round or shaped frames.The whole.png file has the main picture. The whole_mask.png is a black and white image, where the black area matches parts of the original that you want to see, and the white area matches parts which should be transparent.Example shown on the right..
- �41
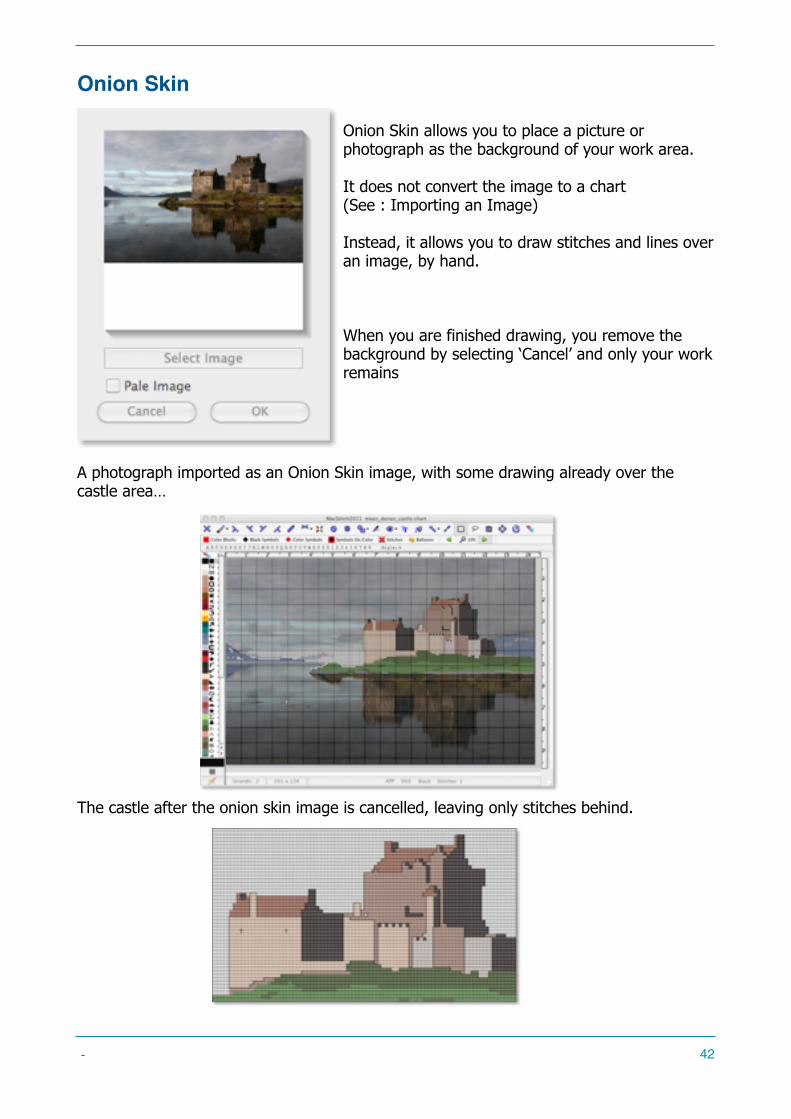
Onion Skin
Onion Skin allows you to place a picture or photograph as the background of your work area. It does not convert the image to a chart (See : Importing an Image) Instead, it allows you to draw stitches and lines over an image, by hand.
When you are finished drawing, you remove the background by selecting ‘Cancel’ and only your work remains
A photograph imported as an Onion Skin image, with some drawing already over the castle area…
The castle after the onion skin image is cancelled, leaving only stitches behind.
- �42
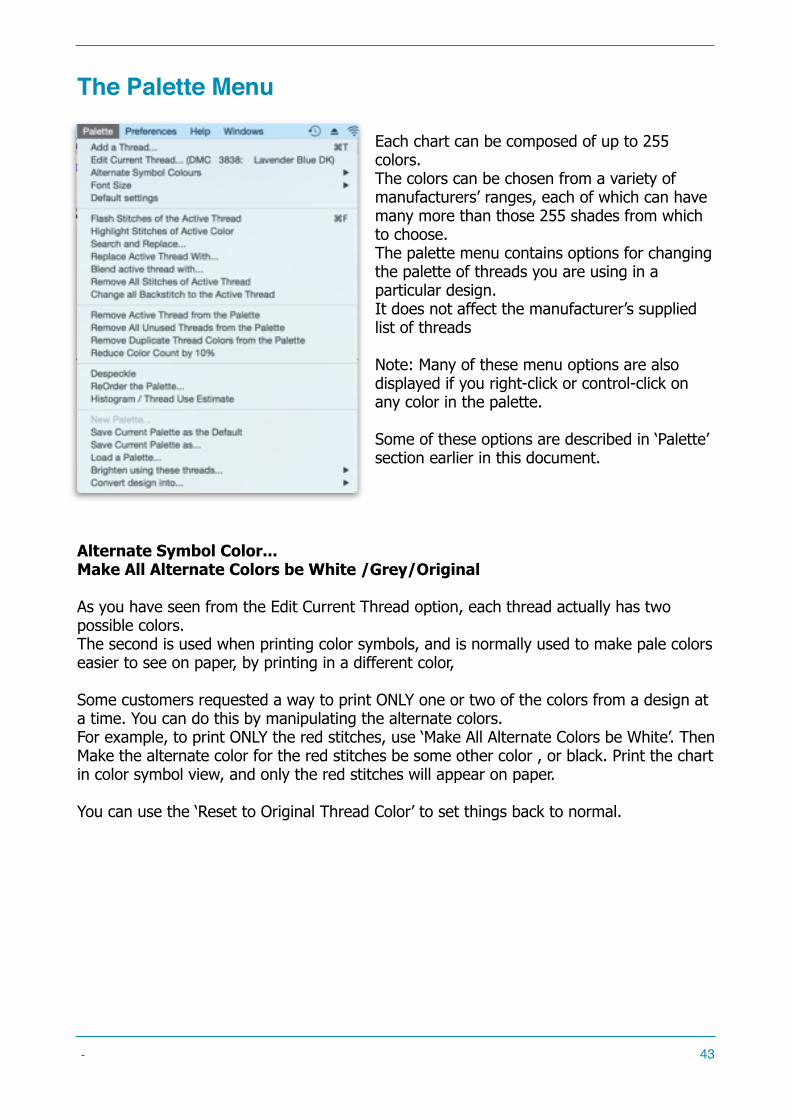
The Palette Menu
Each chart can be composed of up to 255 colors. The colors can be chosen from a variety of manufacturers’ ranges, each of which can have many more than those 255 shades from which to choose. The palette menu contains options for changing the palette of threads you are using in a particular design. It does not affect the manufacturer’s supplied list of threads Note: Many of these menu options are also displayed if you right-click or control-click on any color in the palette.Some of these options are described in ‘Palette’ section earlier in this document.
Alternate Symbol Color...Make All Alternate Colors be White /Grey/OriginalAs you have seen from the Edit Current Thread option, each thread actually has two possible colors. The second is used when printing color symbols, and is normally used to make pale colors easier to see on paper, by printing in a different color,
Some customers requested a way to print ONLY one or two of the colors from a design at a time. You can do this by manipulating the alternate colors. For example, to print ONLY the red stitches, use ‘Make All Alternate Colors be White’. Then Make the alternate color for the red stitches be some other color , or black. Print the chart in color symbol view, and only the red stitches will appear on paper. You can use the ‘Reset to Original Thread Color’ to set things back to normal.
- �43
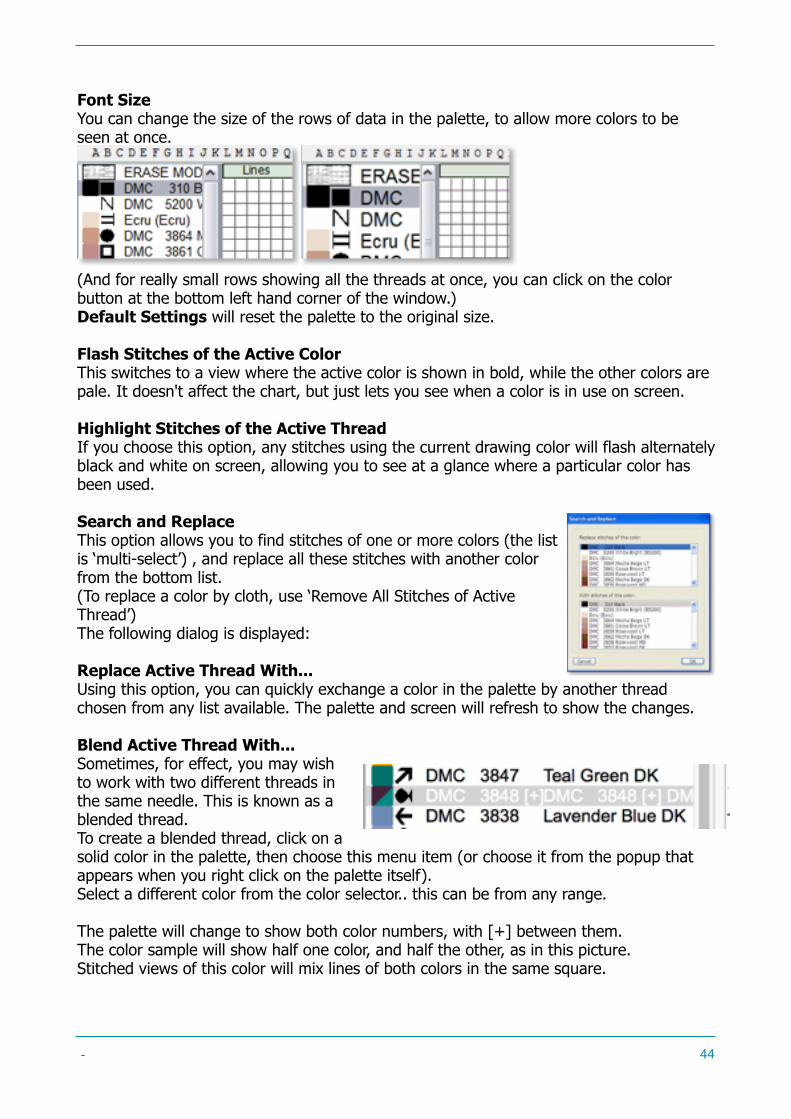
Font SizeYou can change the size of the rows of data in the palette, to allow more colors to be seen at once.
! ! (And for really small rows showing all the threads at once, you can click on the color button at the bottom left hand corner of the window.) Default Settings will reset the palette to the original size.
Flash Stitches of the Active ColorThis switches to a view where the active color is shown in bold, while the other colors are pale. It doesn't affect the chart, but just lets you see when a color is in use on screen.
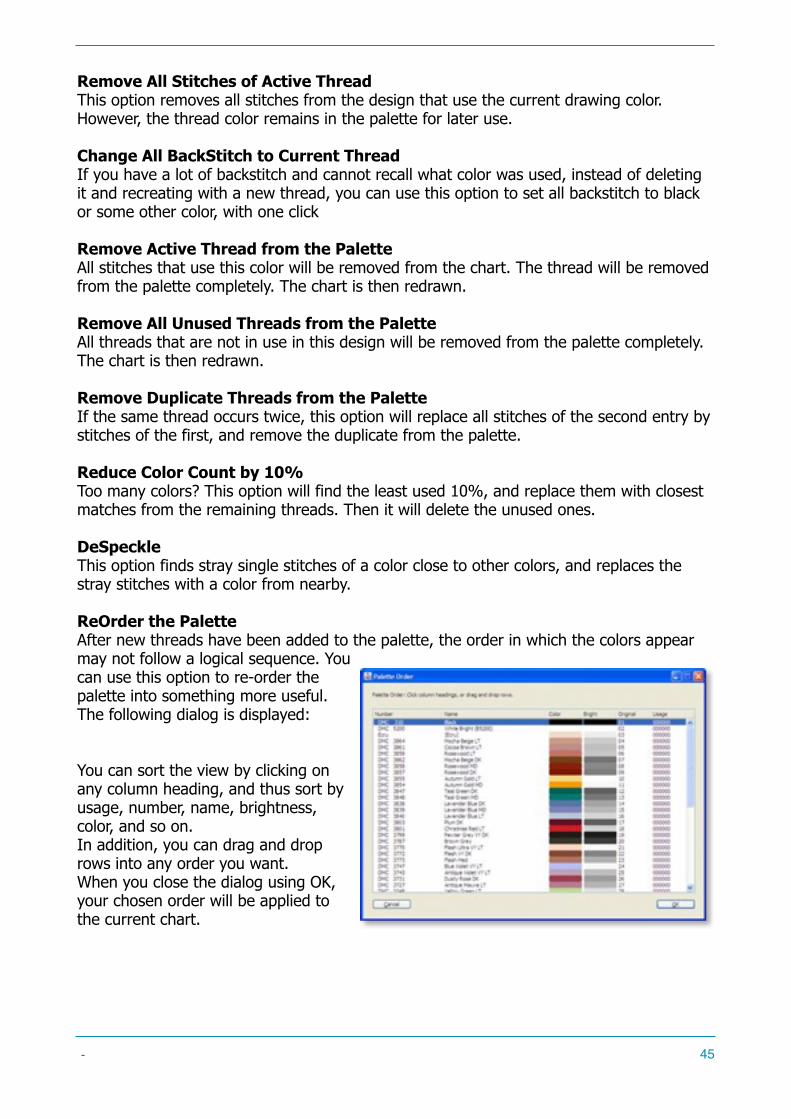
Highlight Stitches of the Active Thread If you choose this option, any stitches using the current drawing color will flash alternately black and white on screen, allowing you to see at a glance where a particular color has been used. Search and ReplaceThis option allows you to find stitches of one or more colors (the list is ‘multi-select’) , and replace all these stitches with another color from the bottom list.(To replace a color by cloth, use ‘Remove All Stitches of Active Thread’)The following dialog is displayed:
Replace Active Thread With...Using this option, you can quickly exchange a color in the palette by another thread chosen from any list available. The palette and screen will refresh to show the changes. Blend Active Thread With...Sometimes, for effect, you may wish to work with two different threads in the same needle. This is known as a blended thread. To create a blended thread, click on a solid color in the palette, then choose this menu item (or choose it from the popup that appears when you right click on the palette itself). Select a different color from the color selector.. this can be from any range.
The palette will change to show both color numbers, with [+] between them. The color sample will show half one color, and half the other, as in this picture. Stitched views of this color will mix lines of both colors in the same square.
- �44
Remove All Stitches of Active Thread This option removes all stitches from the design that use the current drawing color. However, the thread color remains in the palette for later use.
Change All BackStitch to Current Thread If you have a lot of backstitch and cannot recall what color was used, instead of deleting it and recreating with a new thread, you can use this option to set all backstitch to black or some other color, with one click
Remove Active Thread from the Palette All stitches that use this color will be removed from the chart. The thread will be removed from the palette completely. The chart is then redrawn.Remove All Unused Threads from the Palette All threads that are not in use in this design will be removed from the palette completely.The chart is then redrawn.
Remove Duplicate Threads from the Palette If the same thread occurs twice, this option will replace all stitches of the second entry by stitches of the first, and remove the duplicate from the palette.
Reduce Color Count by 10%Too many colors? This option will find the least used 10%, and replace them with closest matches from the remaining threads. Then it will delete the unused ones.
DeSpeckle This option finds stray single stitches of a color close to other colors, and replaces the stray stitches with a color from nearby.
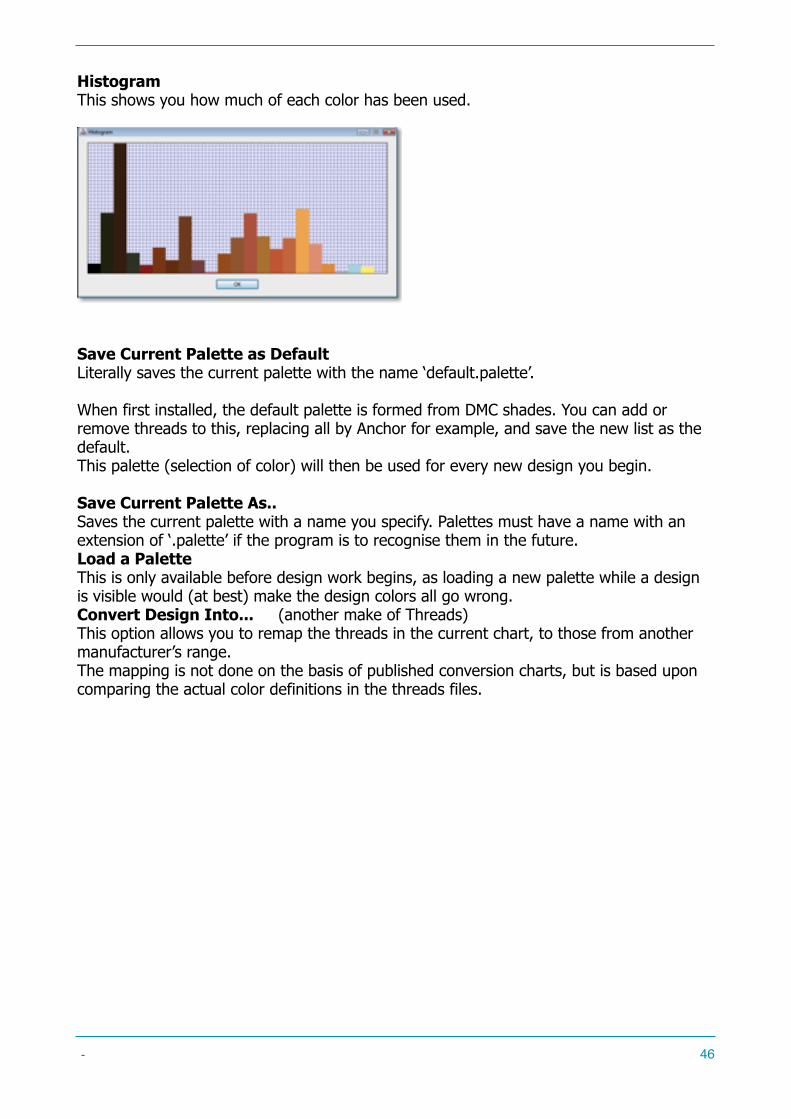
ReOrder the PaletteAfter new threads have been added to the palette, the order in which the colors appear may not follow a logical sequence. You can use this option to re-order the palette into something more useful. The following dialog is displayed:You can sort the view by clicking on any column heading, and thus sort by usage, number, name, brightness, color, and so on. In addition, you can drag and drop rows into any order you want. When you close the dialog using OK, your chosen order will be applied to the current chart.
- �45
Histogram This shows you how much of each color has been used.
!
Save Current Palette as DefaultLiterally saves the current palette with the name ‘default.palette’.
When first installed, the default palette is formed from DMC shades. You can add or remove threads to this, replacing all by Anchor for example, and save the new list as the default. This palette (selection of color) will then be used for every new design you begin. Save Current Palette As..Saves the current palette with a name you specify. Palettes must have a name with an extension of ‘.palette’ if the program is to recognise them in the future.Load a PaletteThis is only available before design work begins, as loading a new palette while a design is visible would (at best) make the design colors all go wrong.Convert Design Into... (another make of Threads)This option allows you to remap the threads in the current chart, to those from another manufacturer’s range.The mapping is not done on the basis of published conversion charts, but is based upon comparing the actual color definitions in the threads files.
- �46
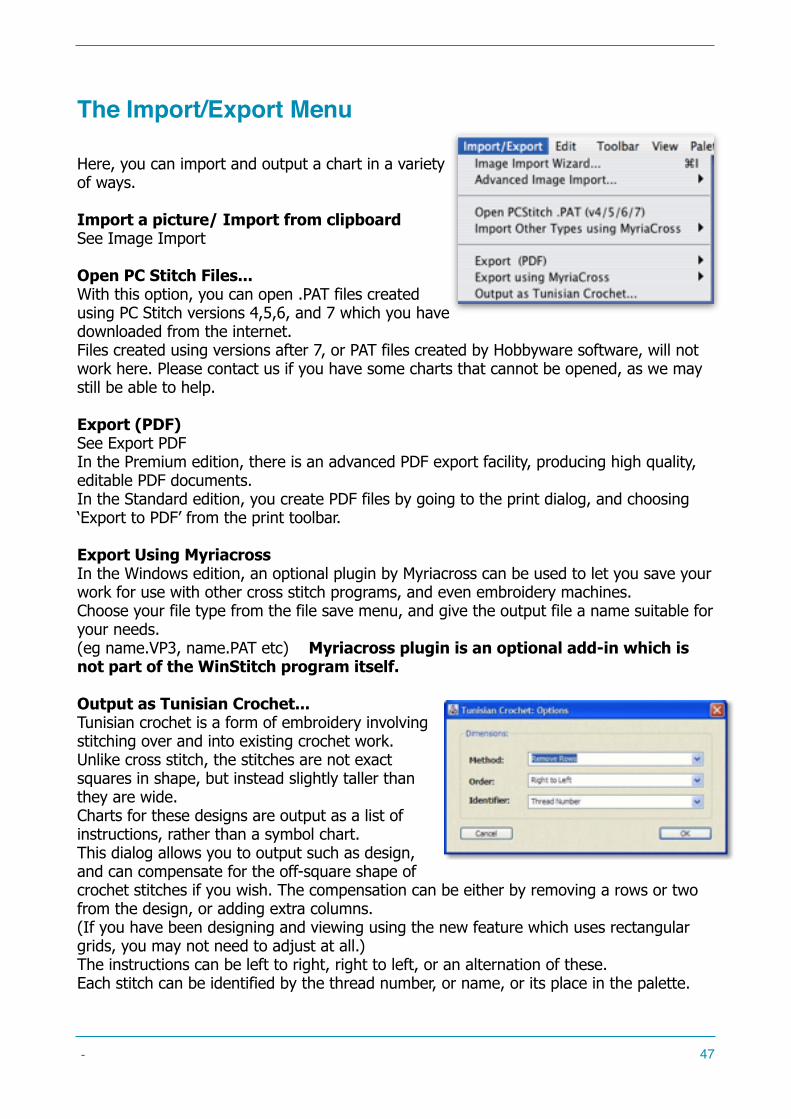
The Import/Export MenuHere, you can import and output a chart in a variety of ways.Import a picture/ Import from clipboard See Image Import Open PC Stitch Files...With this option, you can open .PAT files created using PC Stitch versions 4,5,6, and 7 which you have downloaded from the internet. Files created using versions after 7, or PAT files created by Hobbyware software, will not work here. Please contact us if you have some charts that cannot be opened, as we may still be able to help.
Export (PDF) See Export PDF In the Premium edition, there is an advanced PDF export facility, producing high quality, editable PDF documents.In the Standard edition, you create PDF files by going to the print dialog, and choosing ‘Export to PDF’ from the print toolbar.Export Using MyriacrossIn the Windows edition, an optional plugin by Myriacross can be used to let you save your work for use with other cross stitch programs, and even embroidery machines.Choose your file type from the file save menu, and give the output file a name suitable for your needs.(eg name.VP3, name.PAT etc) Myriacross plugin is an optional add-in which is not part of the WinStitch program itself.Output as Tunisian Crochet...Tunisian crochet is a form of embroidery involving stitching over and into existing crochet work.Unlike cross stitch, the stitches are not exact squares in shape, but instead slightly taller than they are wide.Charts for these designs are output as a list of instructions, rather than a symbol chart.This dialog allows you to output such as design, and can compensate for the off-square shape of crochet stitches if you wish. The compensation can be either by removing a rows or two from the design, or adding extra columns.(If you have been designing and viewing using the new feature which uses rectangular grids, you may not need to adjust at all.)The instructions can be left to right, right to left, or an alternation of these.Each stitch can be identified by the thread number, or name, or its place in the palette.
- �47
Key to CSV...This option saves the key/legend as a CSV file, with the numbers, names, stitch count, and estimated length.You can insert the symbols into a document either by copying them from screen , or using the symbols.png file in the support folder. A CSV file is a purely text file, and does not contain the symbols or actual colors in color.Export as Stitched ViewThis option saves the whole chart in one image as a PNG file An image of this kind can only be detailed if the chart is smaller than 250 x 250 stitches.Above this size (for instance 500 x 500 or larger), we would need to create a picture that used more than 4Gb of memory.Our program cannot access that amount of memory, and most other programs would not be able to open such a picture.So for larger images, we reduce the size of the stitches smaller and smaller to keep the file size down.It is better to use PDF for large charts.
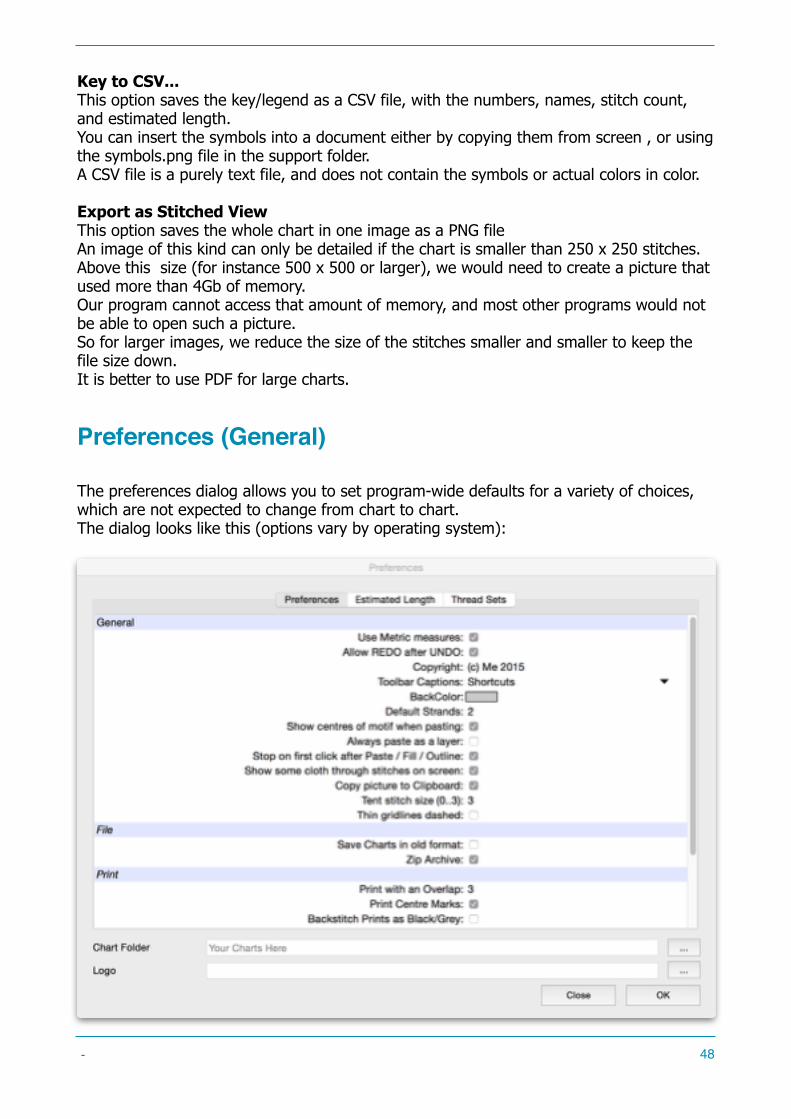
Preferences (General)The preferences dialog allows you to set program-wide defaults for a variety of choices, which are not expected to change from chart to chart.The dialog looks like this (options vary by operating system):
- �48
Use Metric MeasuresWhen ticked, the rulers, thread estimates, and page sizes displayed by the program, will appear in Centimetres (SI units) rather than inches. Allow REDO after UNDO If this is ticked, then the program will store away a file called REDO.chart when UNDO is chosen. This allows an UNDO operation to be reversed. If unticked, the REDO menu option will be unavailable. Copyright You can type a copyright notice here and it will be added to each new chart you create. However, it can then be changed for each chart later. Toolbar Captions The main toolbar can be captionless, or it can show short descriptions, or the keyboard shortcuts used to activate each button. You can choose which using the drop down here. BackColorThis is the color shown in the unused space around the grid on screen. Default Strands This is the number of strands assumed for any new thread you add to the palette. Show Centres of Motif when pasting When this option is ticked, the centre of a motif will be shown with cross–hair lines , to allow you to line the motif up with specific places on the chart. Always Paste as a Layer If available, when this option is ticked, then pasting a motif will promote it to a movable layer instead of pasting immediately into a chart. To make a layer permanent, click the flatten icon next to the layer in the layer organiser. Stop on First Click After Paste...If this is ticked, then when you PASTE an item (not a layer), or FILL an area, the program reverts to full stitches mode. If this is unticked, the program will continue to paste until you click another toolbar button. Copy picture to clipboard If this is ticked, then when you select an area of chart and choose ‘copy’, a picture eof the visible grid will also be copied to the clipboard for pasting into another application if you choose. Show Some Cloth Through Stitches This option governs whether there is a little cloth cold shown behind each stitch when in stitch view. If unticked, crosses will be shown as solid - no cloth is visible behind. If ticked, you can see cloth color behind black stitches.Example of the difference:
! !
Tent Size Tent Stitches can be tick or thin. Thicker lines make the design look more colored, where thinner ones make it easier to distinguish individual stitches when printing in color. Thin gridlines dashed On the mac, the thin gridlines on screen may be dashed or solid.
- �49
Save charts in old formatThis option will rarely be used: it forces the program to save charts which are backward compatible with X-Stitch Studio or early MacStitch versions. The old format takes up more space than the current one, and can not include beads, text fields, buttons , layers and other recent features. This is only of use for sending a .CHART file to someone with a really old version of our software. Zip ArchiveIf this is ticked, then when you save a chart, we make a zipped copy in the documents folder as a safety net. If you ever lose a chart, or need to revert to an old version from weeks ago, this is a way to do it. See ‘recover file from archive’ to get the files back. It has a small impact on the time taken to save, but we feel it is worthwhile Print with an overlap This option lets you choose how much overlap (if any) is used when printing a multi-page design. Overlapped areas contain repeated items from previous page, under a greyed area.Print Centre MarksIf this option is ticked, small marks will appear around the design when printed, on the lines that represent the exact centre of the design.Backstitch prints as black/grey By default, backstitch will print in the thread color, if you have a color printer.Obviously, it will print in shades of grey on a black and white printer.If this option is ticked, then backstitch will also print as black/grey on a color printer.Backstitch Thickness This allows you to set the comparative thickness of the backstitch lines when printed. If the lines are too thin, reduce the number shown.(PDF) Outline special stitchesThe ‘special stitches’ (3 x 2, 3 x 3, petit point) will normally be shown on the PDF output with a thin border because they could be placed over an existing normal stitch, and the outline will show them more clearly.Untick this box if you want no special outline.Chart Icon (Mac) Each individual chart can have a unique icon on the Mac. This option lets you choose what that icon will be: either the whole chart, only the visible part at the time you save, or a standard MacStitch file icon. Chart FolderNormally, you should save your charts in Documents/Macstitch or similar If you select another folder here, the program will open in your chosen folder when you go to save.Logo If you want to have a logo (a picture representing your business) embedded on the chart, set the path to the picture here.You can select an area and ‘Insert Logo’ when creating your chart. This option is largely obsolete now that Layers allow you to insert an image anywhere on the chart.
- �50
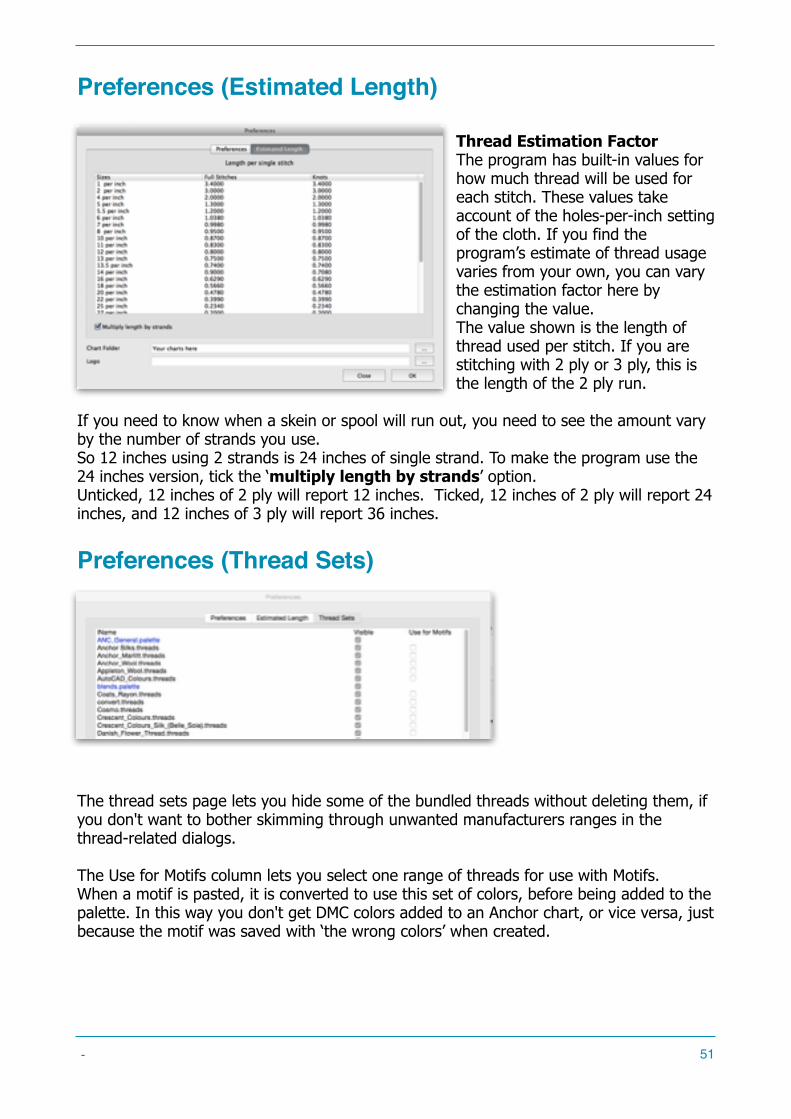
Preferences (Estimated Length)
Thread Estimation FactorThe program has built-in values for how much thread will be used for each stitch. These values take account of the holes-per-inch setting of the cloth. If you find the program’s estimate of thread usage varies from your own, you can vary the estimation factor here by changing the value. The value shown is the length of thread used per stitch. If you are stitching with 2 ply or 3 ply, this is the length of the 2 ply run.
If you need to know when a skein or spool will run out, you need to see the amount vary by the number of strands you use.So 12 inches using 2 strands is 24 inches of single strand. To make the program use the 24 inches version, tick the ‘multiply length by strands’ option.Unticked, 12 inches of 2 ply will report 12 inches. Ticked, 12 inches of 2 ply will report 24 inches, and 12 inches of 3 ply will report 36 inches.
Preferences (Thread Sets)
The thread sets page lets you hide some of the bundled threads without deleting them, if you don't want to bother skimming through unwanted manufacturers ranges in the thread-related dialogs.
The Use for Motifs column lets you select one range of threads for use with Motifs. When a motif is pasted, it is converted to use this set of colors, before being added to the palette. In this way you don't get DMC colors added to an Anchor chart, or vice versa, just because the motif was saved with ‘the wrong colors’ when created.
- �51
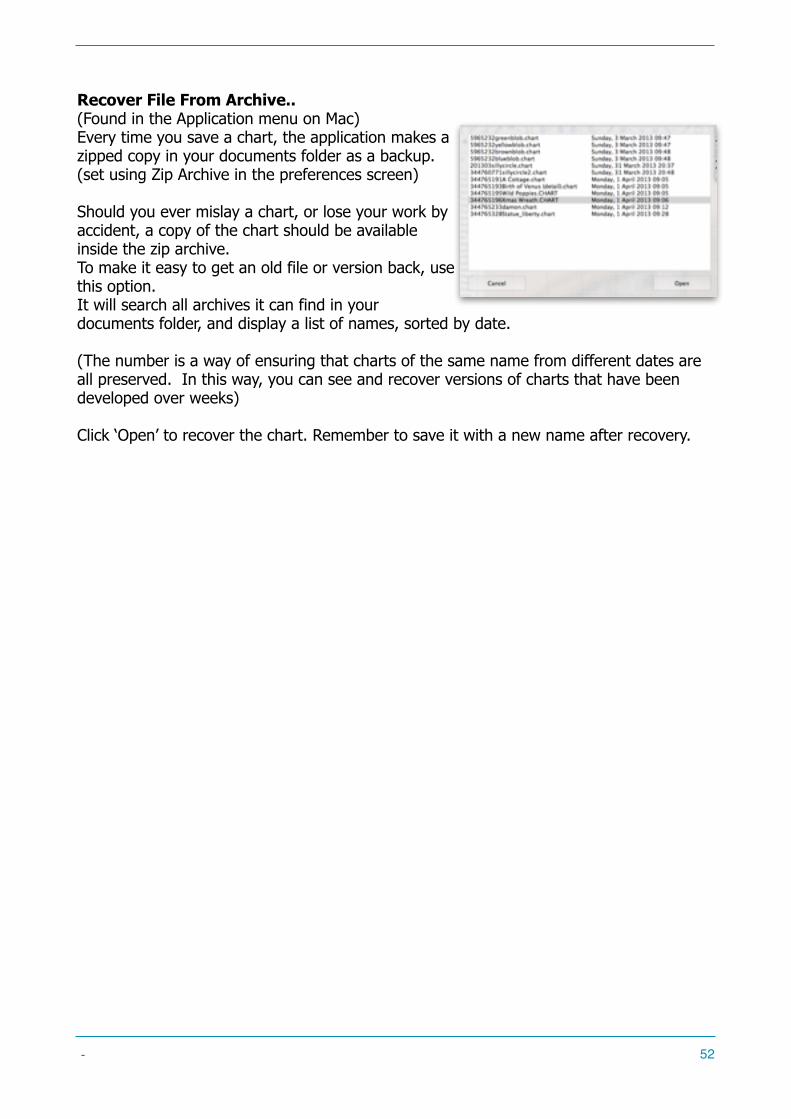
Recover File From Archive..(Found in the Application menu on Mac) Every time you save a chart, the application makes a zipped copy in your documents folder as a backup. (set using Zip Archive in the preferences screen) Should you ever mislay a chart, or lose your work by accident, a copy of the chart should be available inside the zip archive.To make it easy to get an old file or version back, use this option.It will search all archives it can find in your documents folder, and display a list of names, sorted by date. (The number is a way of ensuring that charts of the same name from different dates are all preserved. In this way, you can see and recover versions of charts that have been developed over weeks)Click ‘Open’ to recover the chart. Remember to save it with a new name after recovery.
- �52
Export to PDFIf you need to get the best possible output quality, to send or sell charts via the internet, or to send designs to a Printer, you are likely to need a PDF version of the design. There are 2 ways to obtain PDF files : the Import/Export option is the highest quality, and contains editable content. But it is only available in the Premium Edition. (Standard edition has a PDF option in the print settings screen.)
A chart exported in this way has up to 5 sections, accessed using the list on the left.The order that the sections appear in the PDF file are:
• Cover (and Footer) Page (optional) • Preview Page (optional) • One or more Chart pages (with optional key-per-page) • Page Map (optional) • Symbol Key Page/s (optional)
But because the optional parts are less important than the chart itself, the PDF export screen is in a slightly different order.
Cover Page/Footer Page
The first section allows for a cover and/or footer page: This allows you to have a first page like a book cover: perhaps this contains your logo, or any other information you want to add.You create the cover page in any tool you like, and save it as an image file (JPG/PNG/GIF/TIFF…) or as a single page PDF file. Using the … button you can browse for that image. As long as the program can extract an image from the file you choose, it can be used as the cover page. The same goes for the footer page, except that it forms the LAST page of the export, and might be used to add stitch diagrams and extra design info.
Preview
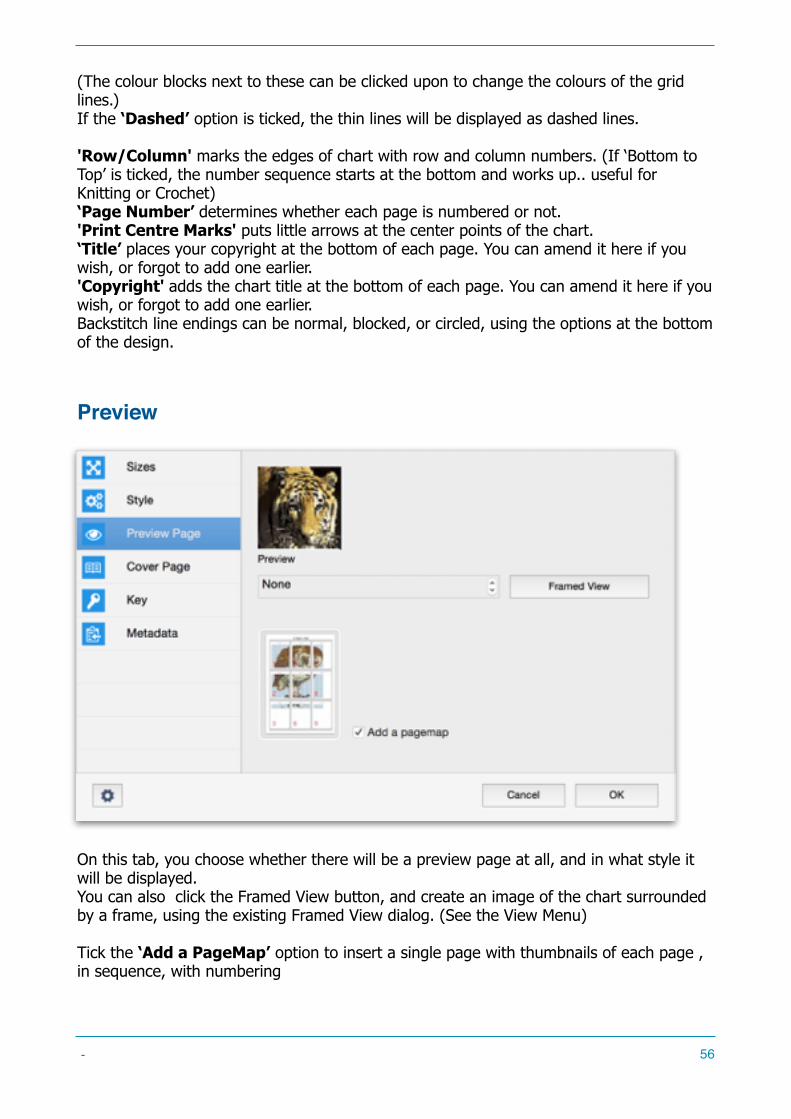
The next section is a Preview: This allows you to have a first or second page which shows the whole design on a single page. The default view mode here is 'Stitches' because this is designed to look like the final stitched work.If you choose 'None' from the selection box, no preview will appear in the PDF file.Framed view calls up the framed view window, and here you can create a preview that also has a framed surround.
Here, you can also tick the ‘Page Map’ option if you want an extra page showing how the pages should be arranged.
- �53
Chart
The next section is the chart itself. You can choose from all available view styles for the output.
Key
The last section is the key to symbols.You can choose to have one or not, by checking the 'Key' option.The other options allow you to choose how the key is built up: for instance you can choose to have the program display an estimated length, or a count of the stitches, using the checkboxes available.
PDF Options
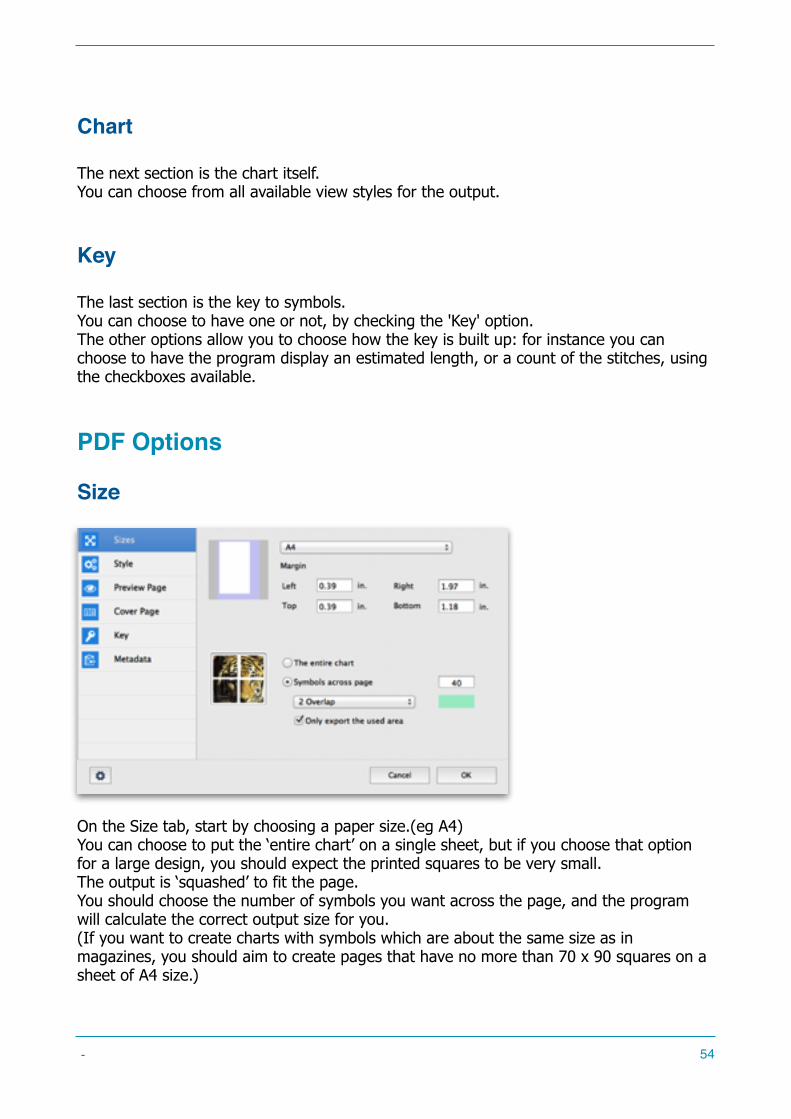
Size
! On the Size tab, start by choosing a paper size.(eg A4)You can choose to put the ‘entire chart’ on a single sheet, but if you choose that option for a large design, you should expect the printed squares to be very small.The output is ‘squashed’ to fit the page.You should choose the number of symbols you want across the page, and the program will calculate the correct output size for you.(If you want to create charts with symbols which are about the same size as in magazines, you should aim to create pages that have no more than 70 x 90 squares on a sheet of A4 size.)
- �54

The margins boxes allow you to set white space around the exported design.‘Only export the used area’ omits the white area of unused design.
The Overlap option determines how much of the previous page is repeated on the next page, and clicking on the colour block next to that determines what colour the overlapped area will be shown as.
Style
!
On the STYLE tab, you choose how the main chart area will appear.You can select to have the chart as black and white symbols, colour symbols, stitches etc , using the drop down list at the top. Each thread has both a normal colour and an alternate color.. (e.g. you can have a pale yellow print as a dark orange) by ticking the ‘Alternate Colors’ option. (the alternate colour is chosen for each thread using the ‘Edit This Thread’ options)Symbol % sets how large the symbols will be inside the grid.
! ! Example of changing the % to have more ‘white space’ around each symbol.The Grid option allows you to decide if there is a grid or not.And the thick/thin line width options allow you to set how different the thick and thin lines are.
- �55
(The colour blocks next to these can be clicked upon to change the colours of the grid lines.)If the ‘Dashed’ option is ticked, the thin lines will be displayed as dashed lines.'Row/Column' marks the edges of chart with row and column numbers. (If ‘Bottom to Top’ is ticked, the number sequence starts at the bottom and works up.. useful for Knitting or Crochet)‘Page Number’ determines whether each page is numbered or not.'Print Centre Marks' puts little arrows at the center points of the chart.‘Title’ places your copyright at the bottom of each page. You can amend it here if you wish, or forgot to add one earlier.'Copyright' adds the chart title at the bottom of each page. You can amend it here if you wish, or forgot to add one earlier.Backstitch line endings can be normal, blocked, or circled, using the options at the bottom of the design.
Preview
On this tab, you choose whether there will be a preview page at all, and in what style it will be displayed. You can also click the Framed View button, and create an image of the chart surrounded by a frame, using the existing Framed View dialog. (See the View Menu)
Tick the ‘Add a PageMap’ option to insert a single page with thumbnails of each page , in sequence, with numbering
- �56
Cover Page
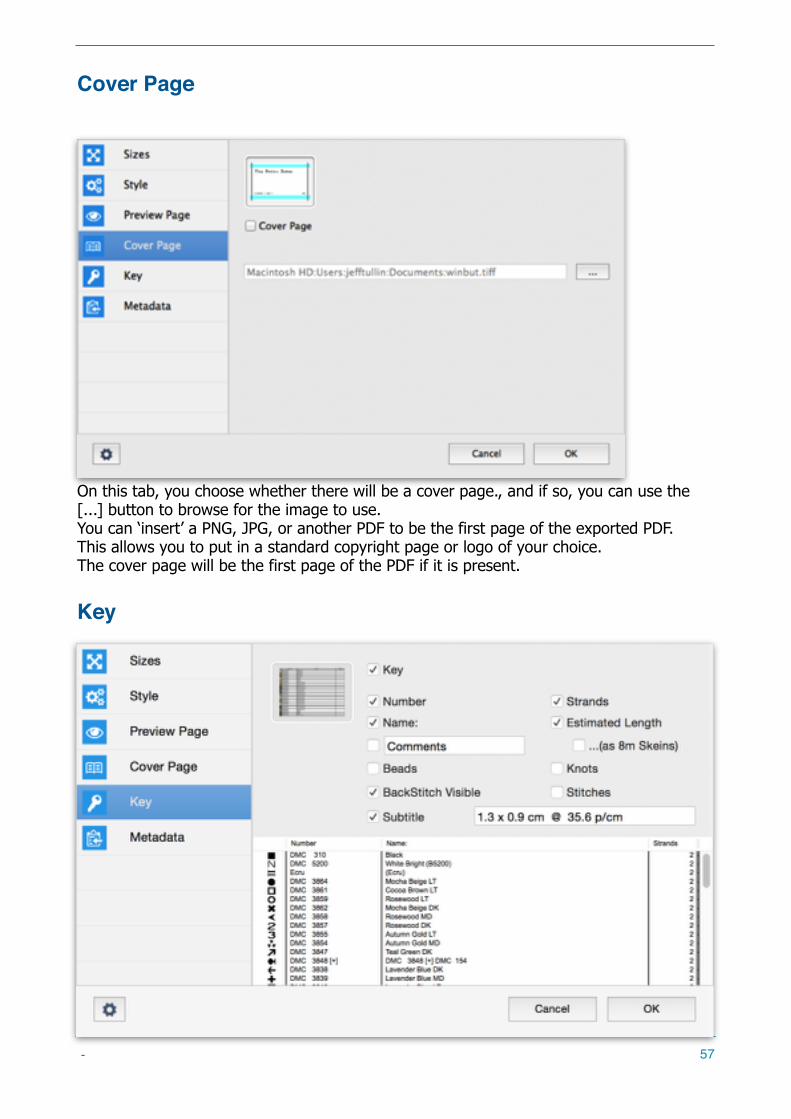
! On this tab, you choose whether there will be a cover page., and if so, you can use the [...] button to browse for the image to use.You can ‘insert’ a PNG, JPG, or another PDF to be the first page of the exported PDF. This allows you to put in a standard copyright page or logo of your choice.The cover page will be the first page of the PDF if it is present.
Key
- �57
You can choose to have one or not, by checking the 'Key' option.If the design has less than 40 colours, you will also have the option to have a small key on every page instead of the fuller key at the end, using the ‘on every page’ option.The other options allow you to choose how the key is built up.Tick the options that you want to appear in the key.As you select items, you will see the key build up in the list at the bottom of the screen.The title of the comments column (which will display the extra description used for the threads if one is present) can be amended.(Some people want a simple ‘add your own notes’ column. By changing the title here you can set what is printed at the top of the column.)You can amend the text in any of these rows: just click in any cell and start typing. In this way you could change the estimated length to a number of skeins, add notes to suggest blended threads, or other tips.The respective widths of the columns can be adjusted by dragging the column headings. The Subtitle option is pre-filled with the size of the design, and your choice of stitches-per-inch. but you can overtype this with anything you wish. These words appear under ,(or instead of) a title on the key page.
In the exported key, if a colour has had a backstitch dash pattern defined for any colour, it will appear under the colour sample in the first column instead of the normal colour sample. e.g DMC 524 in this example uses backstitch defined with a pattern of 1:1
Metadata
On this tab, you can amend the embedded data that is saved within the PDF itself. This data is not printed, but will appear as ‘information’ when interrogated by a PDF viewing application.The PDF & ZIP option can be ticked.. If it is ticked then after the export occurs, the program will also zip up the resulting PDF file to compress it , ready for emailing if you wish.
- �58
Importing Images: The Import WizardMacStitch and Winstitch offer two methods of importing images:The first is a simple 'wizard' method, which asks a series of questions and generates a new chart at the end. This is available in the Lite and Standard editions.The second is a more advanced dialog which offers greater control over the import process. (Premium edition only)The Wizard is a simple step-by-step process, and will choose a range of colors from one of the manufacturer's ranges up to a maximum number you specify. The Advanced option also allows you to fine tune the process, and can additionally force the import to be performed using a palette of threads you have previously saved. (This is the best method for importing clip art images which have a small number of colors). It also allows you to preview the effects of your choices before you commit to import the image. It also contains an image editor which gives you control over a variety of image enhancements before import.
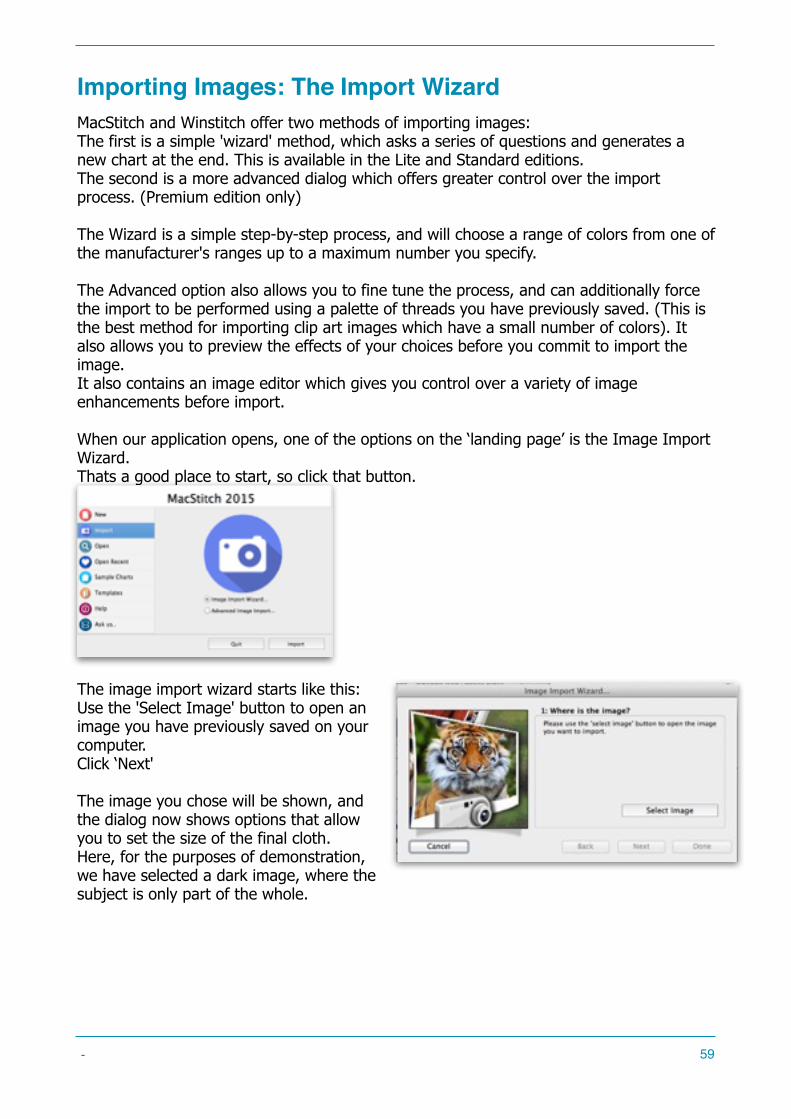
When our application opens, one of the options on the ‘landing page’ is the Image Import Wizard.Thats a good place to start, so click that button.
! The image import wizard starts like this:Use the 'Select Image' button to open an image you have previously saved on your computer.Click ‘Next' The image you chose will be shown, and the dialog now shows options that allow you to set the size of the final cloth.Here, for the purposes of demonstration, we have selected a dark image, where the subject is only part of the whole.
- �59
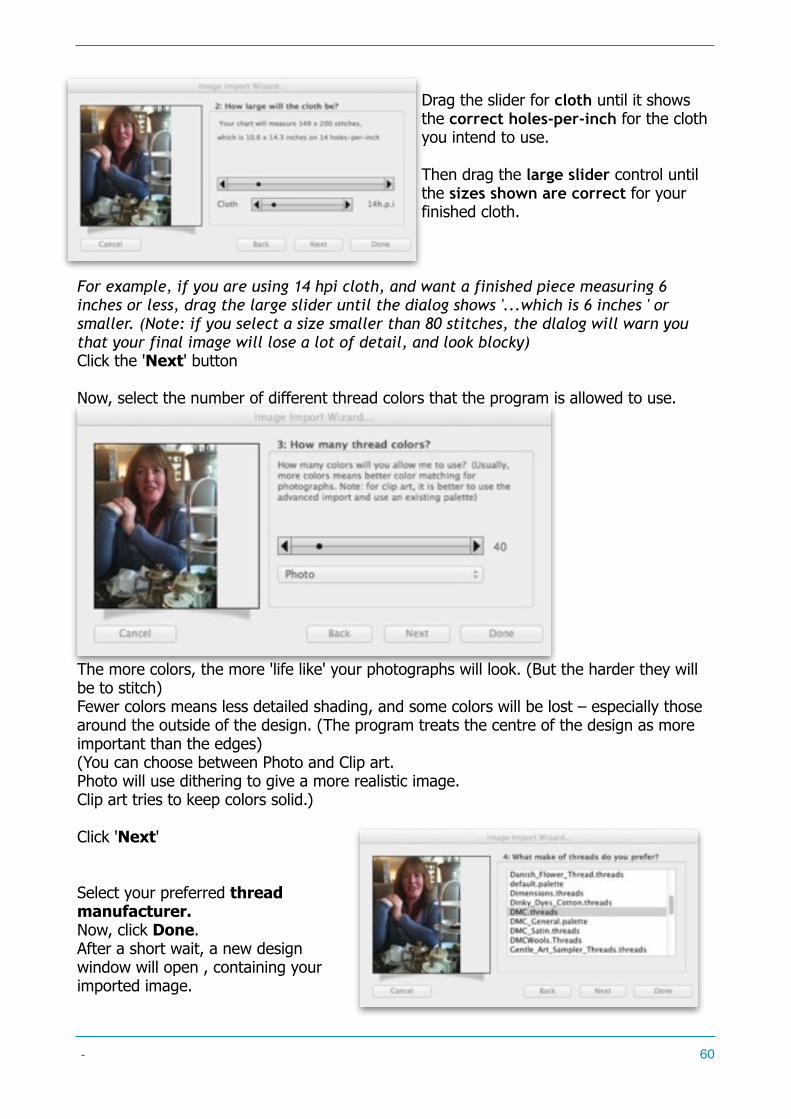
Drag the slider for cloth until it shows the correct holes-per-inch for the cloth you intend to use. Then drag the large slider control until the sizes shown are correct for your finished cloth.
For example, if you are using 14 hpi cloth, and want a finished piece measuring 6 inches or less, drag the large slider until the dialog shows '...which is 6 inches ' or smaller. (Note: if you select a size smaller than 80 stitches, the dlalog will warn you that your final image will lose a lot of detail, and look blocky) Click the 'Next' button Now, select the number of different thread colors that the program is allowed to use.
! The more colors, the more 'life like' your photographs will look. (But the harder they will be to stitch) Fewer colors means less detailed shading, and some colors will be lost – especially those around the outside of the design. (The program treats the centre of the design as more important than the edges) (You can choose between Photo and Clip art. Photo will use dithering to give a more realistic image. Clip art tries to keep colors solid.)Click 'Next'
Select your preferred thread manufacturer.Now, click Done.After a short wait, a new design window will open , containing your imported image.
- �60
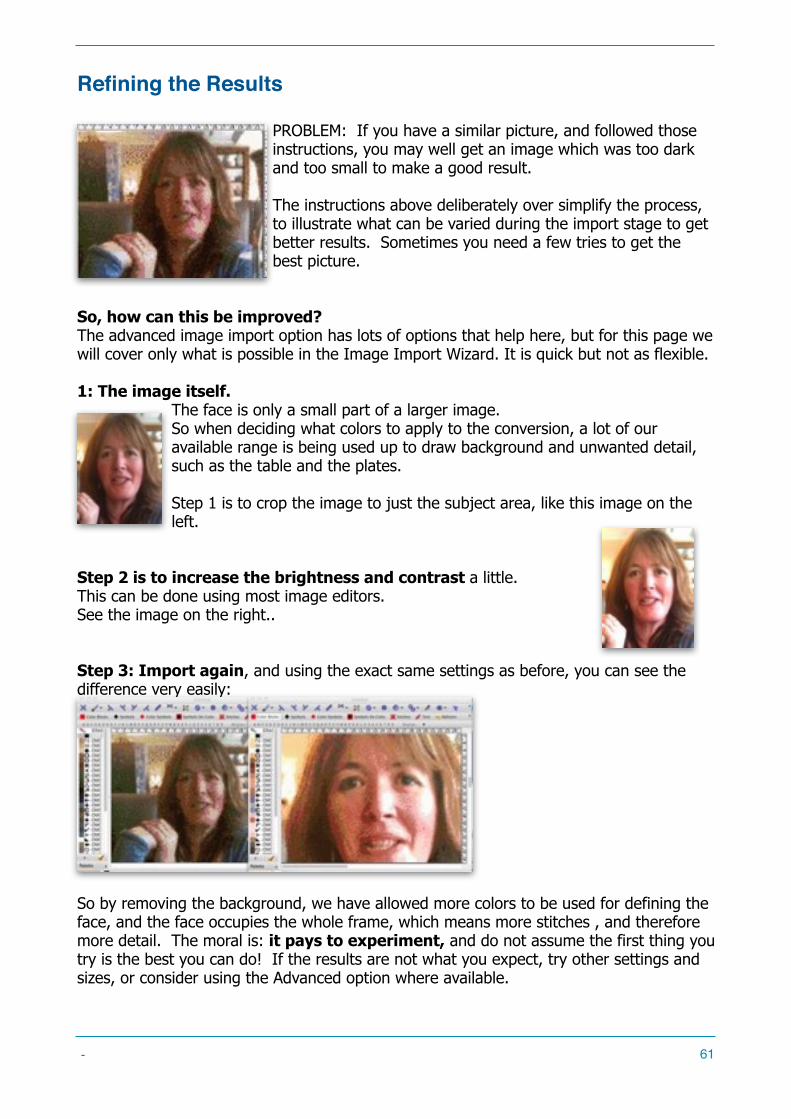
Refining the Results
PROBLEM: If you have a similar picture, and followed those instructions, you may well get an image which was too dark and too small to make a good result.
The instructions above deliberately over simplify the process, to illustrate what can be varied during the import stage to get better results. Sometimes you need a few tries to get the best picture.
So, how can this be improved? The advanced image import option has lots of options that help here, but for this page we will cover only what is possible in the Image Import Wizard. It is quick but not as flexible.1: The image itself.
The face is only a small part of a larger image. So when deciding what colors to apply to the conversion, a lot of our available range is being used up to draw background and unwanted detail, such as the table and the plates. Step 1 is to crop the image to just the subject area, like this image on the left.
Step 2 is to increase the brightness and contrast a little.This can be done using most image editors. See the image on the right..
Step 3: Import again, and using the exact same settings as before, you can see the difference very easily:
!
So by removing the background, we have allowed more colors to be used for defining the face, and the face occupies the whole frame, which means more stitches , and therefore more detail. The moral is: it pays to experiment, and do not assume the first thing you try is the best you can do! If the results are not what you expect, try other settings and sizes, or consider using the Advanced option where available.
- �61
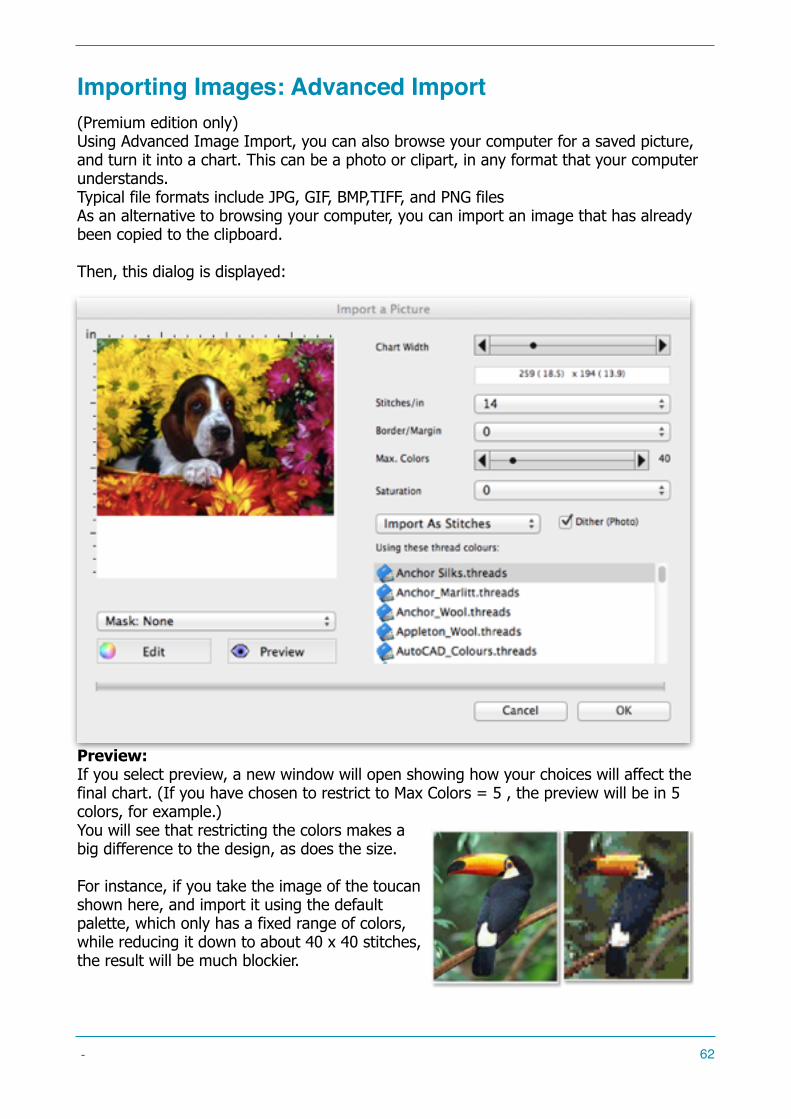
Importing Images: Advanced Import(Premium edition only) Using Advanced Image Import, you can also browse your computer for a saved picture, and turn it into a chart. This can be a photo or clipart, in any format that your computer understands. Typical file formats include JPG, GIF, BMP,TIFF, and PNG files As an alternative to browsing your computer, you can import an image that has already been copied to the clipboard. Then, this dialog is displayed:
! Preview: If you select preview, a new window will open showing how your choices will affect the final chart. (If you have chosen to restrict to Max Colors = 5 , the preview will be in 5 colors, for example.) You will see that restricting the colors makes a big difference to the design, as does the size.
For instance, if you take the image of the toucan shown here, and import it using the default palette, which only has a fixed range of colors, while reducing it down to about 40 x 40 stitches, the result will be much blockier.
- �62
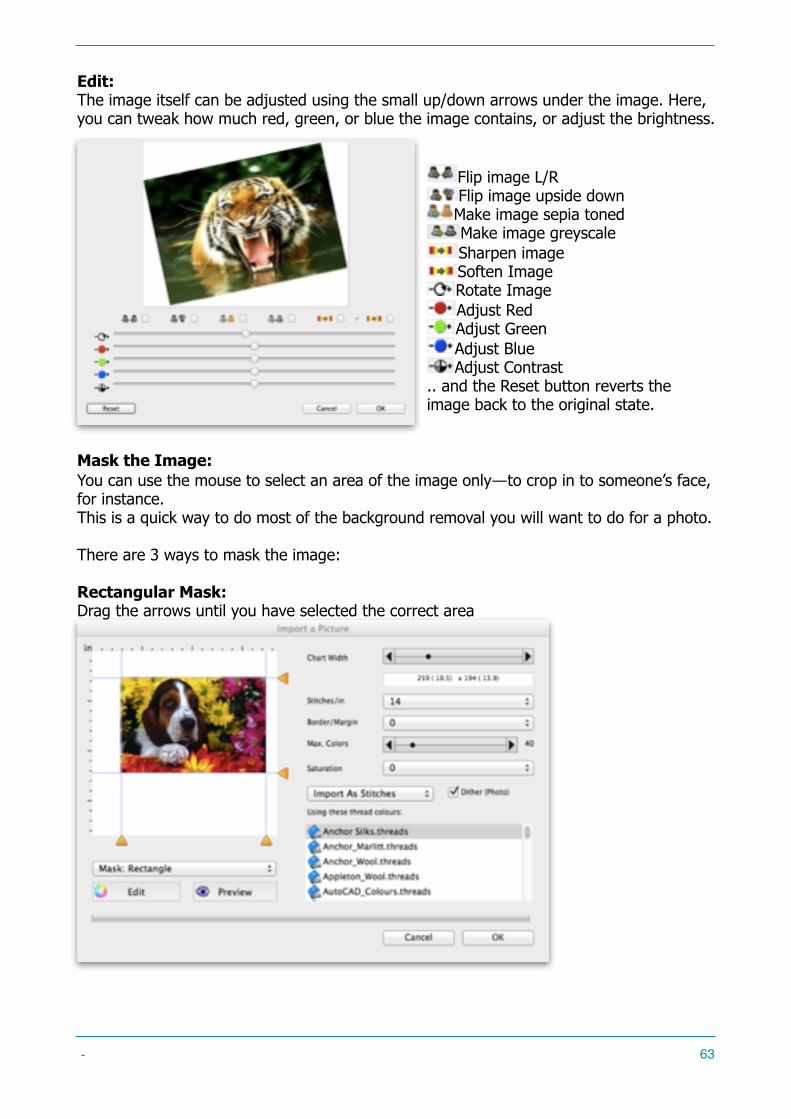
Edit: The image itself can be adjusted using the small up/down arrows under the image. Here,you can tweak how much red, green, or blue the image contains, or adjust the brightness.
! Flip image L/R ! Flip image upside down! Make image sepia toned! Make image greyscale ! Sharpen image ! Soften Image ! Rotate Image ! Adjust Red! Adjust Green! Adjust Blue! Adjust Contrast .. and the Reset button reverts the image back to the original state.
Mask the Image: You can use the mouse to select an area of the image only―to crop in to someone’s face, for instance. This is a quick way to do most of the background removal you will want to do for a photo. There are 3 ways to mask the image: Rectangular Mask: Drag the arrows until you have selected the correct area
!
- �63

Oval Mask: Drag the arrows until you have selected the correct area
!
Freehand Mask: Use the mouse to draw all around the area you want to keep. When you release the mouse, your selected area will be shown selected in red.If you make a mistake, just click and start drawing again.
!
- �64
Settings
Import Size: At the top right of the dialog, you can set the final stitched size of the imported image. Slide the controls for width until you have the cloth size you want. The values are affected by the holes-per-inch setting below.Border: If you choose a value here, the imported image will appear on a chart that has a blank border around it, of the size you choose.
Using These Thread Colors: The program is shipped with several ranges of manufacturer’s threads. Choose the one you prefer from the list. The program will choose threads from this range, up to the maximum number you select. Importing can also be done using a palette you have previously saved. If you choose this option, the image will be mapped to the closest colors that can be found in the palette.(This is a useful technique for clip art images: if you have a palette made up of only 4 colors, your final design will only have the exact colors you specify.) Max Colors: This governs how many different threads the program is allowed to use to represent your image. It is usually best to allow many colors initially, and reduce them manually afterwards, as too few colors here will result in a blotchy image.If you import using a .THREADS file, this slider governs how many threads the program is allowed to ‘buy’ to complete your chart.The slider has no effect if you import against a .PALETTE file, since in this instance, you are effectively saying ‘I only have these threads―what can you do with them?’ Dither (Photo): Tick this box if you are importing a photograph, as it will make a more lifelike image.For clipart and other sold color pictures, leave the box unticked. Saturation: Importing an image tends to make the colors slightly duller. The saturation option makes the image colors deeper and more vibrant. Any value greater than zero makes the colors stronger. Negative numbers make the image paler.Import as Stitches/beads: By request, this feature allows you to import the image and turn each pixel into a bead of some color, instead of a full stitch.
- �65

Tips for getting the best image:
Photographs contain millions of dots of color to give you the best possible printout or view on screen. Even one which is 6 inches across can be expected to have thousands of pixels in each direction.
Cross stitching is a much coarser medium, that does not strictly lend itself to representing photographs. Each inch of cloth has perhaps 10 to 20 stitches to use, and it is obvious that for every 1000 pixels in your original image, you may be able to stitch one single stitch. Lots of detail will be lost. Similarly, your photo has millions of different colors, but you need to stitch the picture using perhaps 45 different thread colors. So lots of shading will be lost.
To compensate for this: • Your image needs to be bright and punchy. • Don’t waste thread colors on a busy background. • Crop your image so that what you can see is mostly what you want to stitch. • Keep the contrast high. Removing Background: We usually find that if you can replace the background area with a good solid color before you import, it is much easier to remove the background after it has been imported. (You can simply remove stitches of the background color) If the background is ‘busy’ then it will need to be erased. Use a mask to eliminate most of the background.Then after importing, remove the last edges. Using the freehand mask tool will remove a lot of unwanted background, but if you find there is still a lot to remove, the best way to do this is to switch to erase mode, and draw rectangles around the image. When most of the background has been removed, switch to ‘single stitches’ mode, and remove individual stitches to finish the job.
- �66
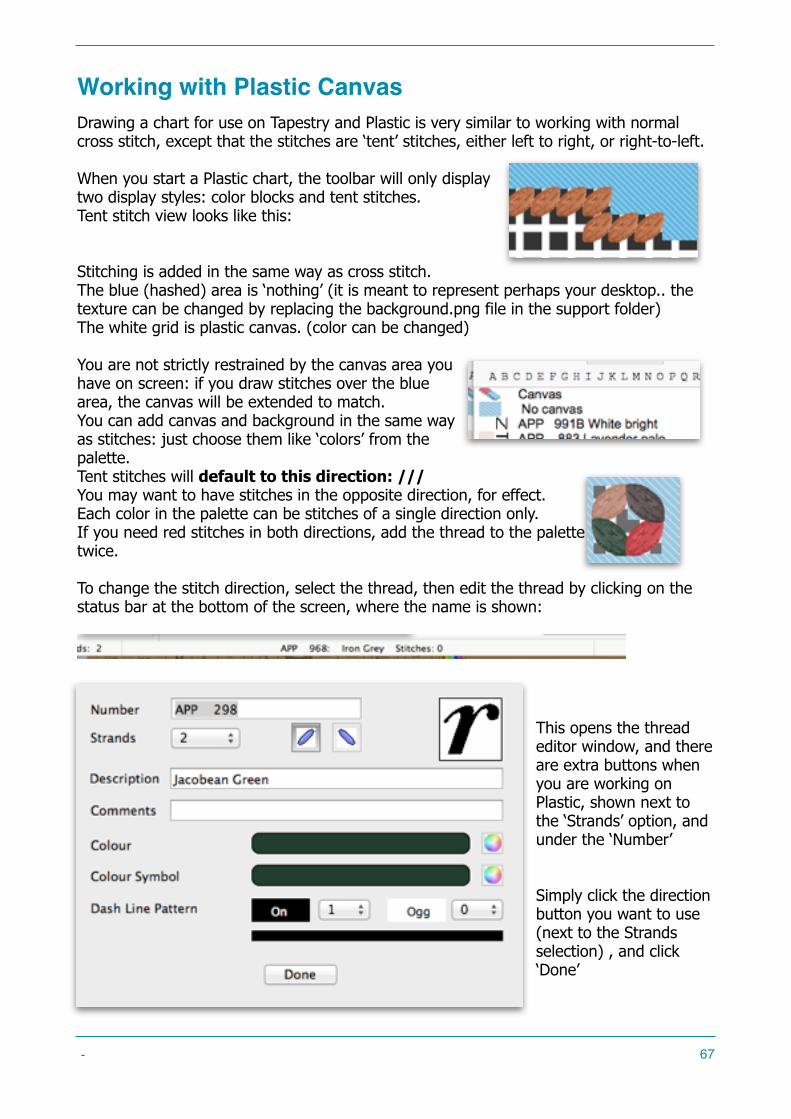
Working with Plastic CanvasDrawing a chart for use on Tapestry and Plastic is very similar to working with normal cross stitch, except that the stitches are ‘tent’ stitches, either left to right, or right-to-left.When you start a Plastic chart, the toolbar will only display two display styles: color blocks and tent stitches. Tent stitch view looks like this:
Stitching is added in the same way as cross stitch. The blue (hashed) area is ‘nothing’ (it is meant to represent perhaps your desktop.. the texture can be changed by replacing the background.png file in the support folder) The white grid is plastic canvas. (color can be changed)You are not strictly restrained by the canvas area you have on screen: if you draw stitches over the blue area, the canvas will be extended to match.You can add canvas and background in the same way as stitches: just choose them like ‘colors’ from the palette. Tent stitches will default to this direction: /// You may want to have stitches in the opposite direction, for effect. Each color in the palette can be stitches of a single direction only.If you need red stitches in both directions, add the thread to the palette twice.To change the stitch direction, select the thread, then edit the thread by clicking on the status bar at the bottom of the screen, where the name is shown:
!
This opens the thread editor window, and there are extra buttons when you are working on Plastic, shown next to the ‘Strands’ option, and under the ‘Number’
Simply click the direction button you want to use (next to the Strands selection) , and click ‘Done’
- �67
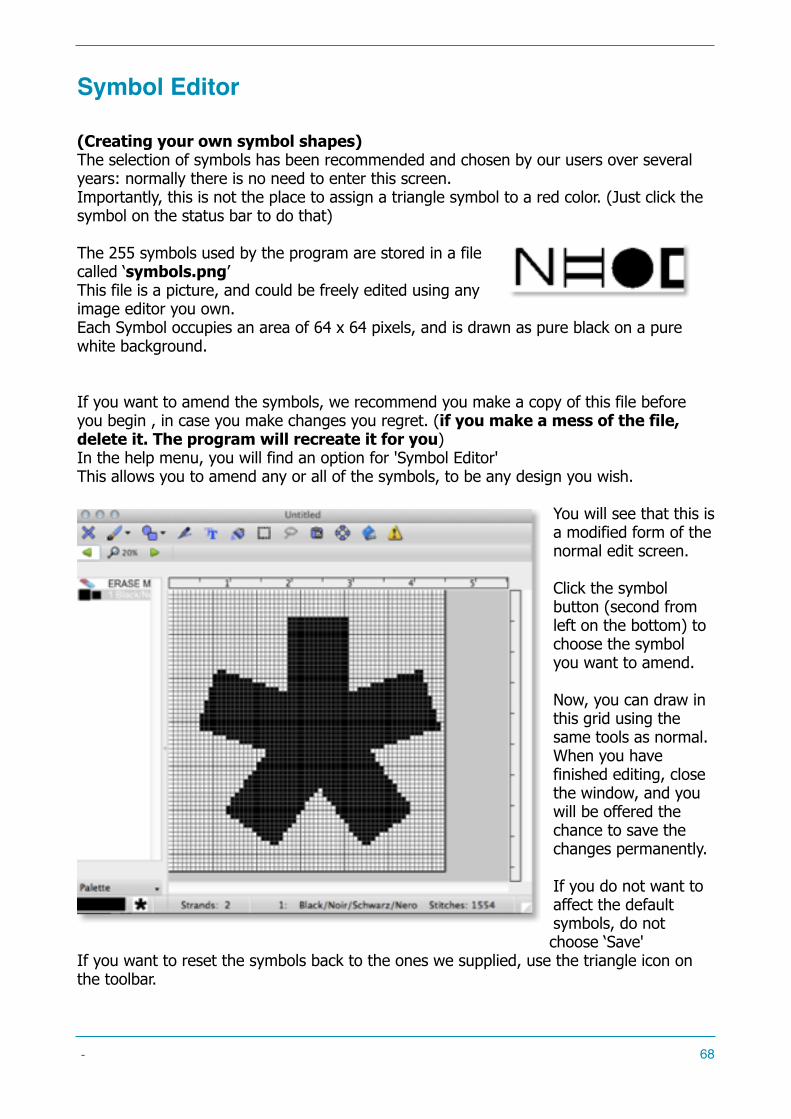
Symbol Editor
(Creating your own symbol shapes) The selection of symbols has been recommended and chosen by our users over several years: normally there is no need to enter this screen.Importantly, this is not the place to assign a triangle symbol to a red color. (Just click the symbol on the status bar to do that)The 255 symbols used by the program are stored in a file called ‘symbols.png’ This file is a picture, and could be freely edited using any image editor you own.Each Symbol occupies an area of 64 x 64 pixels, and is drawn as pure black on a pure white background.If you want to amend the symbols, we recommend you make a copy of this file before you begin , in case you make changes you regret. (if you make a mess of the file, delete it. The program will recreate it for you)In the help menu, you will find an option for 'Symbol Editor' This allows you to amend any or all of the symbols, to be any design you wish.
You will see that this is a modified form of the normal edit screen. Click the symbol button (second from left on the bottom) to choose the symbol you want to amend.Now, you can draw in this grid using the same tools as normal.When you have finished editing, close the window, and you will be offered the chance to save the changes permanently. If you do not want to affect the default symbols, do not choose ‘Save'
If you want to reset the symbols back to the ones we supplied, use the triangle icon on the toolbar.
- �68
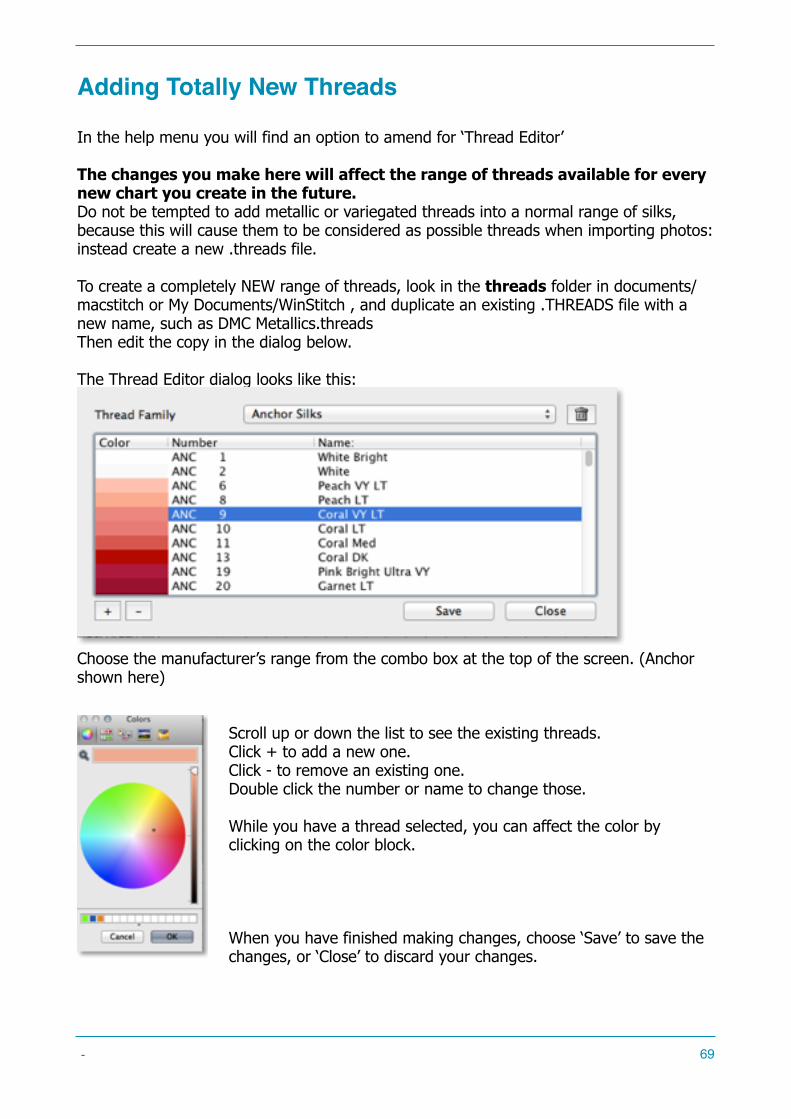
Adding Totally New Threads
In the help menu you will find an option to amend for ‘Thread Editor’The changes you make here will affect the range of threads available for every new chart you create in the future. Do not be tempted to add metallic or variegated threads into a normal range of silks, because this will cause them to be considered as possible threads when importing photos: instead create a new .threads file. To create a completely NEW range of threads, look in the threads folder in documents/macstitch or My Documents/WinStitch , and duplicate an existing .THREADS file with a new name, such as DMC Metallics.threadsThen edit the copy in the dialog below.The Thread Editor dialog looks like this:
! Choose the manufacturer’s range from the combo box at the top of the screen. (Anchor shown here)
Scroll up or down the list to see the existing threads. Click + to add a new one.Click - to remove an existing one. Double click the number or name to change those.While you have a thread selected, you can affect the color by clicking on the color block.
When you have finished making changes, choose ‘Save’ to save the changes, or ‘Close’ to discard your changes.
- �69
How Do I?We have found it is impossible to guess all the things that people might want to do with our software. You are an inventive crowd! But here are some commonly asked ‘How Do I? questions, and there are more on our website, which we add to whenever possible. There are also some videos on the website, and an FAQ page. If you have a question we don’t cover, please send us an email and we can help!
How Do I Stop pasting a motif when I’m finished? Start doing something different: e.g. click on the full stitches icon.How Do I Insert a row in the middle? Select an area about 10 stitches wide and 1 stitch high. Choose ‘Insert a row’ from the popup menu.How Do I reduce the colors after an import? Choose ‘reduce colours by 10%’ in the palette menu.How Do I identify a colour I have already used? Click on the eyedropper tool on the toolbar, and wave the mouse around over the grid. The name of the colour will be shown at the bottom, and click ing on the stitch will change to that color. Pressing the spacebar is a shortcut for this action.How Do I make the symbols on the printout bigger? Choose fewer symbols ‘across the page’ when you go to print. Less symbols, bigger symbols.How Do I delete a background? Use the lasso tool to select a randomly shaped background area, then choose Delete or press CMD-X or CTRL-XHow Do I add a new thread colour to the .threads ? Use Thread Editor in the help menu. Select your range. Click the + button. Change the name and number. Select a colour from the popup. Save.
How do I change all the red stitches to green in a small area only? Select the area with the select tool, and choose ‘search and replace’ from the palette menu.
How do I use this chart to drive my Embroidery Machine? Thats not possible.
How do I print onto cloth? The only way we know is to export as PDF in color blocks mode, and take the PDF to a specialist printer who can apply inks to cloth. Don't try putting cloth in your printer! There is also transfer paper available: you print in color on transfer paper, and iron it to cloth.
- �70
How do I get blended colors? Right click on a color in the palette, and choose ‘Blend’ from the popup menu. The color you choose there will appear as a blend , and the number of the thread will be amended. How do I delete unwanted charts? There is no ‘delete’ option for charts in the program, but when you use file/open, the file open dialog will usually allow you to right click on a file, and choose ‘delete’ or ‘move to trash. You can also use Finder or File Explorer to look in the Documents folder, for win stitch or macstitch, and in there a folder called Your Charts Here. Select unwanted files and drag them to the trash.
How do I get more space to design on? Use the edit menu, choose ‘change design area’, and enter a bigger design size than you are currently using. Answer ‘no’ to ‘resize the design’. Then use the edit menu / Auto centre to make the design occupy the middle of the new area.
Can I scan in an existing chart and turn it into a new design? Sadly no. You can however use a scanned chart as an onion skin image, and draw over it in color. See our ‘How To’
I have a Mac and a PC, can I have the program on both? Yes.. you can get the software for your other machine just for the price of the recent upgrade. (usually less than £10). Your serial number will work for both machines. If you have a desktop and a laptop which are both Mac or both PC, you are allowed to install your software on both.
Can I save charts in PAT or other format? Not from within the software itself, but we do offer a solution using some third party software , as a service. Please drop us an email for more information.
Can I get the printout to be bigger/smaller? The print dialog has a ‘symbols per page’ option. The more symbols across the page, the smaller they will be. For bigger symbols, use less per page. This WILL generate more pages.. you need to balance symbol size against number of pages.
Is there an upgrade? The software should tell you when updates are available, and when chargeable upgrades are available (the major number changes), you can buy upgrades on our website. We also offer a lifetime upgrade deal where you pay once and qualify for all future versions forever, without any future fee.
- �71
We like to hear from you!
Each year, we try to add new features that people have asked for. Obviously, that depends upon people asking for new features!
So, starting from 2017, we have started a new scheme.. If you think of a new feature we don’t have in our software, and we implement it in a future release, we’ll send you the new version free of charge , plus half your original purchase price back. (In the event that two people come up with the same idea, we’ll work on ‘first come, first served’, but we will notify you if your idea is chosen for the scheme)
Recommend a friendLove your program? Know someone else who would, too?
Tell them where they can buy, and send us an email with ‘Recommend’ in the title, to tell us who they are.
We promise we won’t SPAM your friend with emails, but we’ll make a note, and if they buy a copy, we’ll send you £5 as a ‘Thank You’.
- �72

![Lookbook - backstitch Collateral/[backstitch] Mercer... · 2017 Total Rewards In Review Your Total Investment: $91,535 $23,425 $11,610 EAP DOWNLOAD Employee Assistance program $2,224](https://img.pdfslide.net/doc/110x75/5f0a325c7e708231d42a7aa6/lookbook-backstitch-collateralbackstitch-mercer-2017-total-rewards-in.jpg)