Embed Size (px)
Citation preview
Manual Nero BackItUp
Nero BackItUp 2
Copyright and Trademark Information This document and all its contents herein are subject to and protected by international copyright and other intellectual property rights and are the property of Nero AG and its subsidiaries, affiliates or licensors. All rights reserved. No part of this document may be reproduced, transmitted or transcribed without the express written permission of Nero AG. All trade names and trademarks and/or service marks are the property of their respective owners. The trademarks mentioned are expressly named for information purposes only. Nero AG rejects any claims that transcend the clauses of the guarantee rights to the fullest extent. Nero AG does not undertake any liability for the correctness of the content of this document. The contents of the software supplied, as well as of this document, may be changed without prior warning. Some applications of the Nero Suites require technologies developed by third-party manufacturers. Some of these are included as a trial version in this suite. These technologies need to be activated online (free of charge) or by sending an activation fax to have unlimited use of the version. Nero will then undertake to release the data necessary to activate technologies licensed by third-party manufacturers for unlimited use with Nero 12 or Nero 12 Platinum. It is therefore necessary to have an Internet connection or a fax machine. Unless you own the copyright or have permission from the copyright owner, you may be violating national or international copyright laws and be subject to payment of damages and other remedies, if you duplicate, reproduce, modify, or distribute copyrighted material. If you are unsure of your rights you should contact your legal advisor. Copyright © 2012 Nero AG and its licensors. All rights reserved. Nero, Nero BackItUp, Nero Burn, Nero Burning ROM, Nero CoverDesigner, Nero Digital, Nero Express, Nero Kwik Media, Nero Kwik Backup, Nero Kwik Blu-ray, Nero Kwik Burn, Nero Kwik DVD, Nero Kwik Faces, Nero Kwik MobileSync, Nero Kwik Move it, Nero Kwik Play, Nero Kwik Photobook, Nero Kwik Places, Nero Kwik Sync, Nero Kwik Themes, Nero Kwik Tuner, Nero MediaStreaming, Nero Recode, Nero RescueAgent, Nero SmartDetect, Nero Simply Enjoy, Nero SmoothPlay, Nero StartSmart, Nero SoundTrax, Nero Surround, Nero Video, Nero Video Express, Nero WaveEditor Burn-At-Once, LayerMagic, Liquid Media, SecurDisc, the SecurDisc logo, Superresolution and UltraBuffer are common law trademarks or registered trademarks of Nero AG. Gracenote, CDDB, MusicID, MediaVOCS, the Gracenote logo and logotype, and the "Powered by Gracenote" logo are either registered trademarks or trademarks of Gracenote in the United States and/or other countries. Manufactured under license from Dolby Laboratories. Dolby, Pro Logic, and the double-D symbol are registered trademarks of Dolby Laboratories, Inc. Confidential unpublished works. Copyright 2011 Dolby Laboratories. All rights reserved. Manufactured under license under U.S. Patent Nos: 5,956,674; 5,974,380; 6,487,535 & other U.S. and worldwide patents issued & pending. DTS, the Symbol, & DTS and the Symbol together are registered trademarks & DTS Digital Surround, DTS 2.0+Digital Out and the DTS logos are trademarks of DTS, Inc. Product includes software. © DTS, Inc. All Rights Reserved. Adobe, Acrobat, Reader, Premiere, AIR, and Flash are trademarks or registered trademarks of Adobe Systems, Incorporated. Apple, Apple TV, iTunes, iTunes Store, iPad, iPod, iPod touch, iPhone, Mac and QuickTime are trademarks of Apple Inc. registered in the U.S and other countries. AMD App Acceleration, AMD Athlon, AMD Opteron, AMD Sempron, AMD Turion, ATI Catalyst, ATI Radeon, ATI, Remote Wonder, and TV Wonder are trademarks or registered trademarks of Advanced Micro Devices, Inc. Bluetooth is a trademark owned by Bluetooth SIG, Inc. Blu-ray Disc, Blu-ray, Blu-ray 3D, BD-Live, BONUSVIEW, BDXL, AVCREC and the logos are trademarks of the Blu-ray Disc Association. Check Point is a registered trademark of Check Point Software Technologies Ltd. FaceVACS and Cognitec are either registered trademarks or trademarks of Cognitec Systems GmbH. DivX and DivX Certified are registered trademarks of DivX, Inc. DVB is a registered trademark of the DVB Project. 3GPP is a trademark of European Telecommunications Standards Institute (ETSI). Facebook is a registered trademark of Facebook, Inc. Google, Android and YouTube are trademarks of Google, Inc. LightScribe is a registered trademark of the Hewlett-Packard Development Company, L.P. Ask and Ask.com are registered trademarks of IAC Search & Media. IEEE is a registered trademark of The Institute of Electrical and Electronics Engineers, Inc. Intel, Intel Core, Intel Quick Sync Video, Intel XScale and Pentium are trademarks or registered trademarks of Intel Corporation in the U.S. and/or other countries. Philips is a registered trademark of Koninklijke Philips Electronics.N.V. Linux is a registered trademark of Linus Torvalds. InstallShield is a registered trademark of Macrovision Corporation. ActiveX, ActiveSync, Aero, Authenticode, DirectX, DirectShow, Internet Explorer, Microsoft, MSN, Outlook, Windows, Windows Mail, Windows Media, Windows Media Player, Windows Mobile, Windows.NET, Windows Server, Windows Vista, Windows XP, Windows 7, Windows 8, Xbox, Xbox 360, PowerPoint, Visual C++, Silverlight, the Silverlight Logo, the Windows Vista start button, and the Windows logo are trademarks or registered trademarks of Microsoft Corporation in the United States and other countries. My Space is a trademark of MySpace, Inc. NVIDIA, GeForce, ForceWare, and CUDA are trademarks or registered trademarks of NVIDIA. This program includes software developed by the OpenSSL Project for use in the OpenSSL Toolkit. (http://www.openssl.org/)\Open SSL is copyright © 1998-2005 The OpenSSL Project. All rights reserved. This program includes cryptographic software written by Eric Young ([email protected]). This program includes software written by Tim Hudson ([email protected]). Cryptographic software inside Open SSL is copyright © 1995-1998 Eric Young ([email protected]). All rights reserved. CompactFlash is a registered trademark of SanDisk Corporation. Sony, Memory Stick, PlayStation, and PSP are trademarks or registered trademarks of Sony Corporation. AVCHD, AVCHD Lite and AVCHD Progressive are trademarks of Sony Corporation and Panasonic Corporation. HDV is a trademark of Sony Corporation and Victor Company of Japan, Limited (JVC). MP3 SURROUND, MP3PRO and their logos are trademarks of Thomson S.A. Unicode is a registered trademark of Unicode, Inc. The USB logo is a trademark of Universal Serial Bus Implementers Corporation. UPnP is a registered trademark of UPnP Implementers Corporation. Vimeo is a trademark of Vimeo, LLC. Yahoo! and Flickr are registered trademarks of Yahoo! Inc. Labelflash is a trademark of Yamaha Corporation Other product and brand names may be trademarks of their respective owners and do not imply affiliation with, sponsorship, or endorsement by owners. Nero AG reserves the right to change specifications without notice. Use of this product is subject to the acceptance of the End User License Agreement upon installation of the software. www.nero.com Nero AG, Im Stoeckmaedle 18, 76307 Karlsbad, Germany
Table of Contents
Nero BackItUp 3
Table of Contents
1 Start Successfully 5 1.1 About the Manual 5 1.2 About Nero BackItUp 5 1.3 Versions of Nero BackItUp 6 1.4 System Requirements 7 1.5 Working With Nero BackItUp 7 1.6 Starting the Program 7
2 User Interface 9
3 About Nero LIVEBackup 11 3.1 Nero LIVEBackup Area 11 3.2 Activating Nero LIVEBackup 12
4 Backup With Nero BackItUp 15
5 Storing Online With Autobackup 17
6 Backing Up Files 20
7 Back Up Media Library 23
8 Backing Up Drives 25
9 Backup Settings Screen 28 9.1 About Backup Types 30 9.2 About the Time Schedule 33
10 Syncing With Nero BackItUp 34 10.1 Syncing Folders 34 10.2 About Sync Types 36
11 Restore With Nero BackItUp 40 11.1 Restore Files and Folders 40 11.2 Restore Drive Backup 44
12 Backup and Restore Expert Options Overview 46 12.1 E-mail Notification 47 12.2 Miscellaneous 48
13 Manage Your Backup and Sync Job Screen 50
14 Tools 53
Table of Contents
Nero BackItUp 4
14.1 Creating Standalone Nero BackItUp SyncTool 53 14.2 Erase Rewritable Disc Window 54
15 Nero BackItUp Options Overview 56 15.1 Setting Up FTP Server Connection 56 15.2 Remote Proxy 58 15.3 Setting Up E-Mail Account 58 15.4 Creating Filter 60
16 Nero BackItUp ImageTool 64 16.1 Creating Bootable Nero BackItUp ImageTool 64 16.2 Starting Nero BackItUp ImageTool 65 16.3 User Interface 66 16.3.1 Extended Area 67 16.4 Drive Backup 68 16.4.1 Burning a Backup to Disc 68 16.4.2 Saving the Backup to a Hard Drive 70 16.5 Restoring a Drive Backup 70 16.6 Options Window 71 16.7 Exiting Nero BackItUp ImageTool 72
17 Nero BackItUp SyncTool 73
18 Glossary 74
19 Index 75
20 Contact 77
Start Successfully
Nero BackItUp 5
1 Start Successfully
1.1 About the Manual This manual is intended for all users who want to learn how to use Nero BackItUp. It is process-based and explains how to achieve a specific objective on a step-by-step basis.
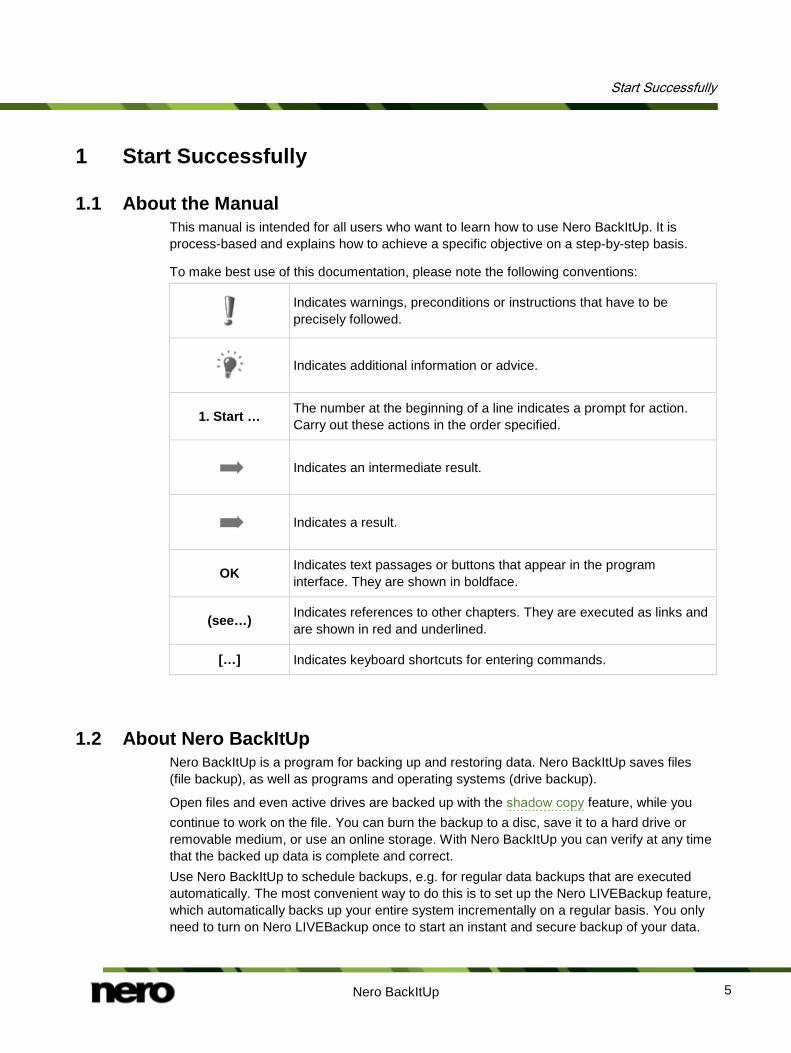
To make best use of this documentation, please note the following conventions:
Indicates warnings, preconditions or instructions that have to be precisely followed.
Indicates additional information or advice.
1. Start … The number at the beginning of a line indicates a prompt for action. Carry out these actions in the order specified.
Indicates an intermediate result.
Indicates a result.
OK Indicates text passages or buttons that appear in the program interface. They are shown in boldface.
(see…) Indicates references to other chapters. They are executed as links and are shown in red and underlined.
[…] Indicates keyboard shortcuts for entering commands.
1.2 About Nero BackItUp Nero BackItUp is a program for backing up and restoring data. Nero BackItUp saves files (file backup), as well as programs and operating systems (drive backup).
Open files and even active drives are backed up with the shadow copy feature, while you continue to work on the file. You can burn the backup to a disc, save it to a hard drive or removable medium, or use an online storage. With Nero BackItUp you can verify at any time that the backed up data is complete and correct. Use Nero BackItUp to schedule backups, e.g. for regular data backups that are executed automatically. The most convenient way to do this is to set up the Nero LIVEBackup feature, which automatically backs up your entire system incrementally on a regular basis. You only need to turn on Nero LIVEBackup once to start an instant and secure backup of your data.

Start Successfully
Nero BackItUp 6
The backup source is per default the whole system, but you can exclude any internal partition, if you want to. The backup target is found and suggested automatically. The default schedule is every two hours, but you can also change that of course. Nero BackItUp ImageTool is another tool for backing up files and drives. It is included on the bootable disc that you can create beginning with Nero BackItUp. With the Nero BackItUp ImageTool, you can back up and restore drives. This particularly lends itself to backing up on otherwise active drives, since such drives are inactive when booting the Nero BackItUp ImageTool. Nero BackItUp SyncTool is a tool for syncing folders. It is created with Nero BackItUp and stored either on hard drive, removable medium or optical disc. Nero BackItUp SyncTool can be started from these media on any computer; Nero BackItUp does not have to be installed to start Nero BackItUp SyncTool.
1.3 Versions of Nero BackItUp Nero BackItUp is available as part of Nero 12, Nero 12 Platinum, and as a standalone product (Nero BackItUp 12). The application is available in different versions: Nero BackItUp and Nero BackItUp Essentials. Nero BackItUp offers the full range of features. Nero BackItUp Essential may not offer the following features:
Backup and restore expert options Multiple targets for backups Advanced encryption Extract files from drive backup Create file filter Backup with Nero BackItUp ImageTool Syncing In addition, the Nero BackItUp desktop icon may be missing. However, the application can always be started through the start menu of your computer as well.
Features that are not available in Nero BackItUp Essentials are indicated by the icon. The icon offers you upgrade possibilities, and gives information about it. If you have a limited version of Nero BackItUp without the features mentioned here, you can upgrade your Nero product at www.nero.com to get the full version of Nero BackItUp with all features. Nero BackItUp as standalone product does not offer access to Nero MediaBrowser unless Nero Kwik Media is installed. You can always upgrade your standalone version to Nero 12 or Nero 12 Platinum at www.nero.com.
Start Successfully
Nero BackItUp 7
1.4 System Requirements Nero BackItUp is part of the Nero product you have installed. Its system requirements are the same. Detailed system requirements of this and all other Nero products can be found in the Support section on our Web site www.nero.com.
1.5 Working With Nero BackItUp With Nero BackItUp you can generally backup, restore and sync. Just open the Additional Tasks area, choose a task and start it. You then complete the task by navigating through the different steps where a separate screen is displayed for each individual step. You will find a description in this manual for each screen and each task. The most convenient way to back up your whole system is to turn on the Nero LIVEBackup feature. Simply move the slider to On. The backup source is per default the whole system and the backup target is found and suggested automatically. The backup default schedule is every two hours. You can change these settings with the Configure button.
1.6 Starting the Program There are several ways to open Nero BackItUp, depending on various factors such as the product you have installed and the operating system you are using.
On Windows 7 and earlier versions of Windows, you can start Nero BackItUp via:
Start (the start icon) > (All) Programs > Nero > Nero 12 > Nero BackItUp
the Nero BackItUp 12 desktop icon
the Nero 12 Welcome Application if you use Nero 12
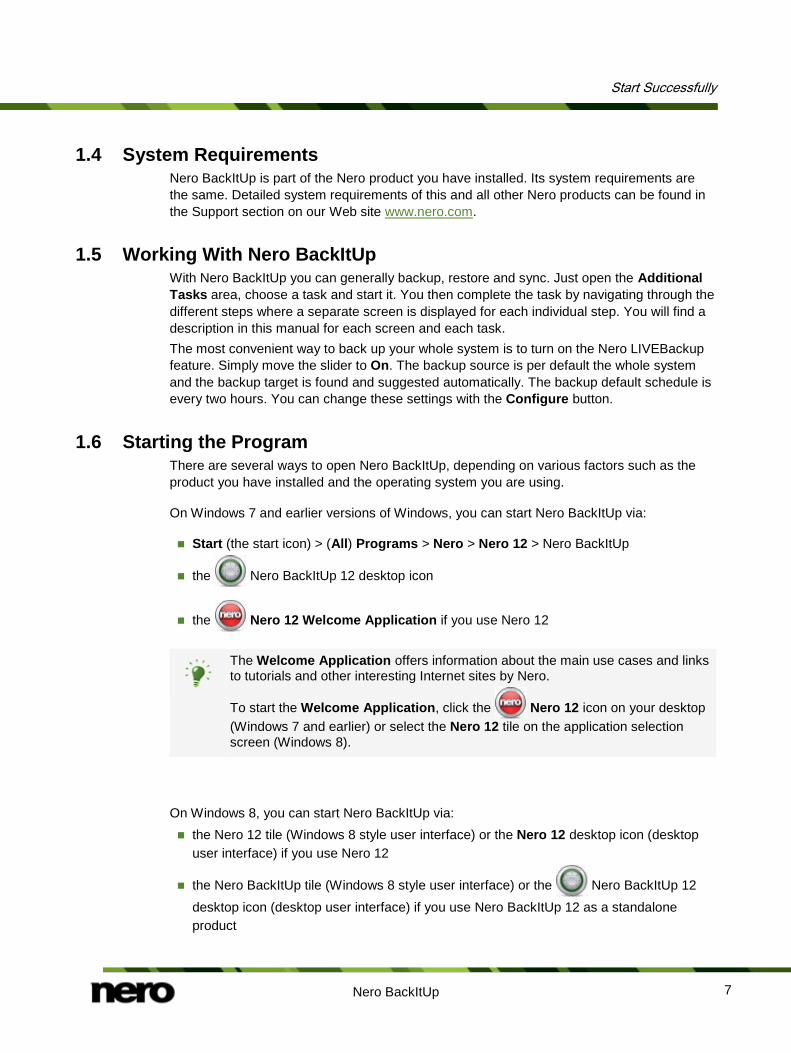
The Welcome Application offers information about the main use cases and links to tutorials and other interesting Internet sites by Nero.
To start the Welcome Application, click the Nero 12 icon on your desktop (Windows 7 and earlier) or select the Nero 12 tile on the application selection screen (Windows 8).
On Windows 8, you can start Nero BackItUp via: the Nero 12 tile (Windows 8 style user interface) or the Nero 12 desktop icon (desktop
user interface) if you use Nero 12
the Nero BackItUp tile (Windows 8 style user interface) or the Nero BackItUp 12 desktop icon (desktop user interface) if you use Nero BackItUp 12 as a standalone product
Start Successfully
Nero BackItUp 8
It is also possible to start tasks with Nero BackItUp from the context menu of a file or folder.
At first startup and if not disabled, the Welcome to Nero BackItUp window is displayed. Here you will find information about the main use cases with Nero BackItUp and links to tutorials and other interesting Internet sites by Nero. The window can be started at any time within Nero BackItUp by clicking the Get Started button.
User Interface
Nero BackItUp 9
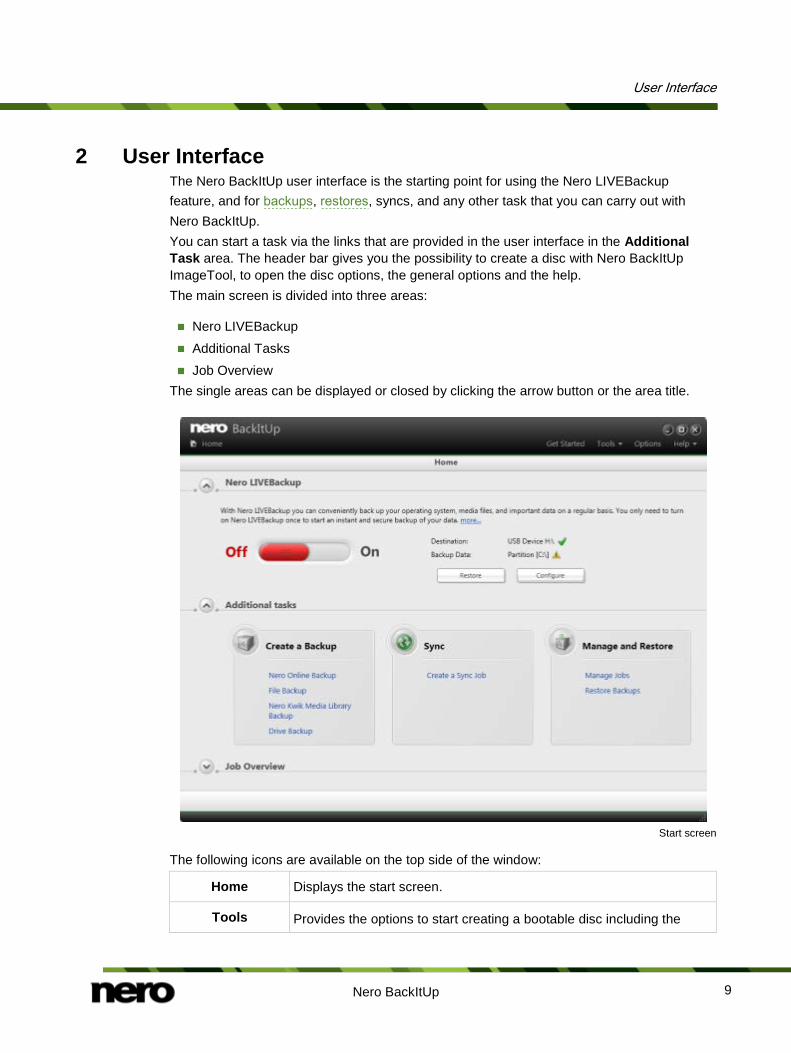
2 User Interface The Nero BackItUp user interface is the starting point for using the Nero LIVEBackup feature, and for backups, restores, syncs, and any other task that you can carry out with Nero BackItUp. You can start a task via the links that are provided in the user interface in the Additional Task area. The header bar gives you the possibility to create a disc with Nero BackItUp ImageTool, to open the disc options, the general options and the help. The main screen is divided into three areas:
Nero LIVEBackup Additional Tasks Job Overview The single areas can be displayed or closed by clicking the arrow button or the area title.
Start screen
The following icons are available on the top side of the window:
Home Displays the start screen.
Tools Provides the options to start creating a bootable disc including the
User Interface
Nero BackItUp 10
Nero BackItUp ImageTool and to create the standalone tool Nero BackItUp SyncTool. You can also erase a rewritable disc and display disc information.
Options Opens the Options window.
Help Displays help options and the About window, where you can find the version number of the application.
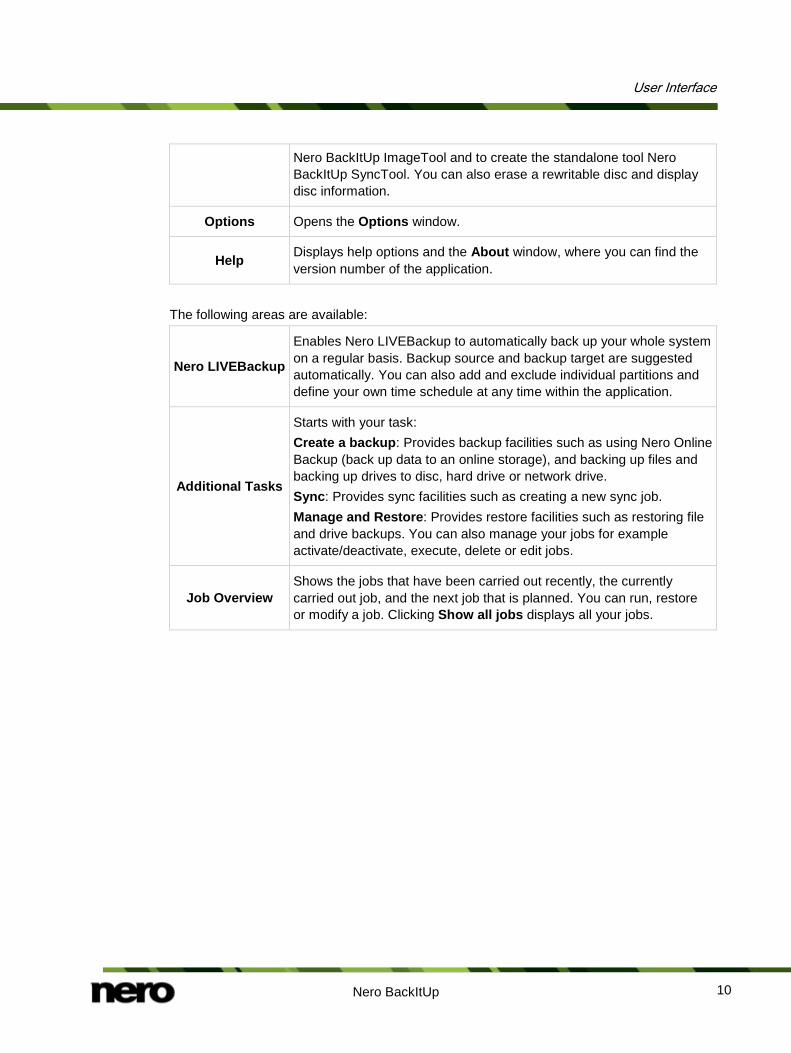
The following areas are available:
Nero LIVEBackup
Enables Nero LIVEBackup to automatically back up your whole system on a regular basis. Backup source and backup target are suggested automatically. You can also add and exclude individual partitions and define your own time schedule at any time within the application.
Additional Tasks
Starts with your task: Create a backup: Provides backup facilities such as using Nero Online Backup (back up data to an online storage), and backing up files and backing up drives to disc, hard drive or network drive. Sync: Provides sync facilities such as creating a new sync job. Manage and Restore: Provides restore facilities such as restoring file and drive backups. You can also manage your jobs for example activate/deactivate, execute, delete or edit jobs.
Job Overview Shows the jobs that have been carried out recently, the currently carried out job, and the next job that is planned. You can run, restore or modify a job. Clicking Show all jobs displays all your jobs.
About Nero LIVEBackup
Nero BackItUp 11
3 About Nero LIVEBackup The most convenient way to backup your whole system is to turn on the Nero LIVEBackup feature once. This feature can be found on the Nero BackItUp start screen in the upper area. Simply move the slider to On to turn it on. The backup source is per default the whole system and the backup target is found and suggested automatically. The backup default schedule is every two hours. You can change these settings with the Configure button. A backup with Nero LIVEBackup is always an incremental drive backup, meaning that the first backup is a full backup and with the next backup runs only the changes are backed up. This makes the backup runs very less time consuming. But Nero LIVEBackup offers another advantage compared to other incremental drive backups: The single backup runs are merged together after a while. This decreases the restore time and also the backup space. The exact time span for merging depends on the backup data size, the total target space and free space on the target and is calculated individually for you. With Nero LIVEBackup you have an automated, convenient way to back up your whole system that offers the least back up time and, at the same time, lowest backup space and least restore time possible.
See also Activating Nero LIVEBackup →12
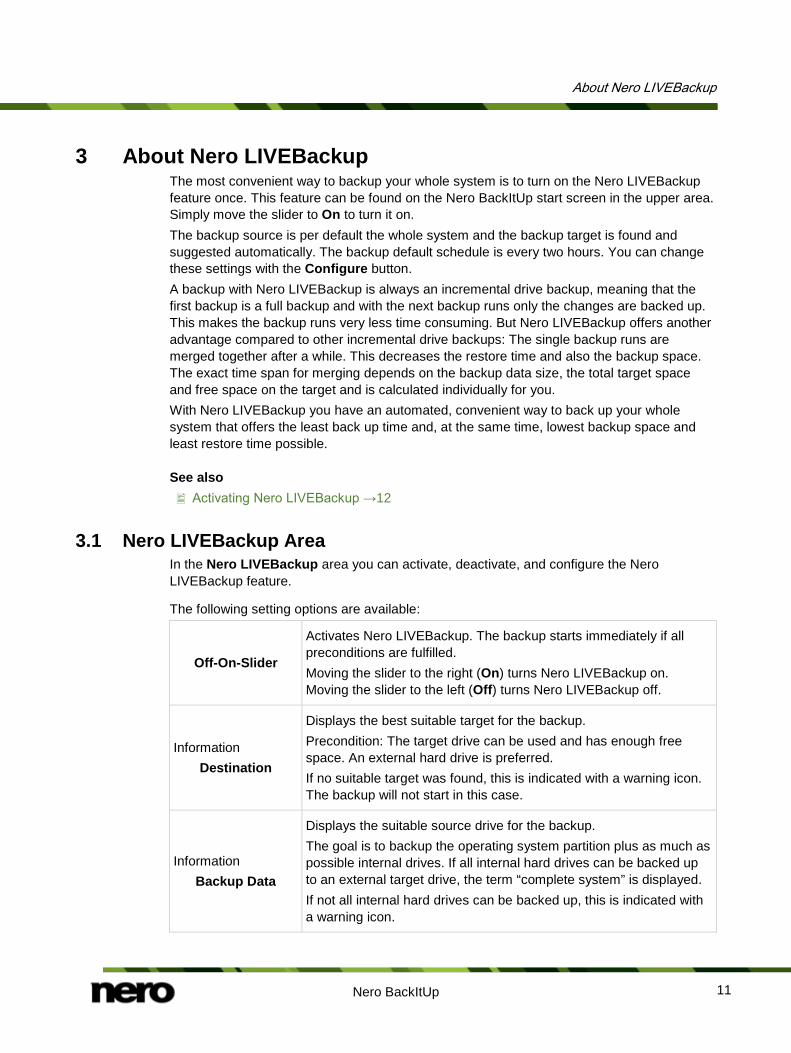
3.1 Nero LIVEBackup Area In the Nero LIVEBackup area you can activate, deactivate, and configure the Nero LIVEBackup feature.
The following setting options are available:
Off-On-Slider
Activates Nero LIVEBackup. The backup starts immediately if all preconditions are fulfilled. Moving the slider to the right (On) turns Nero LIVEBackup on. Moving the slider to the left (Off) turns Nero LIVEBackup off.
Information Destination
Displays the best suitable target for the backup. Precondition: The target drive can be used and has enough free space. An external hard drive is preferred. If no suitable target was found, this is indicated with a warning icon. The backup will not start in this case.
Information Backup Data
Displays the suitable source drive for the backup. The goal is to backup the operating system partition plus as much as possible internal drives. If all internal hard drives can be backed up to an external target drive, the term “complete system” is displayed. If not all internal hard drives can be backed up, this is indicated with a warning icon.
About Nero LIVEBackup
Nero BackItUp 12
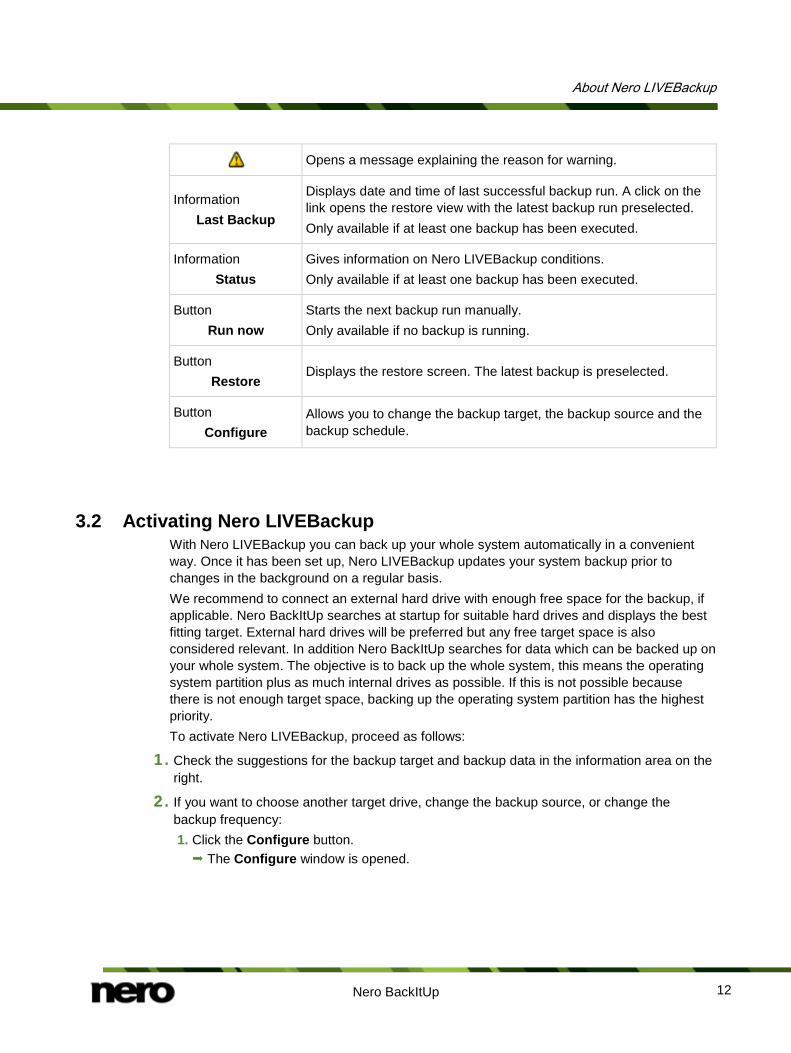
Opens a message explaining the reason for warning.
Information Last Backup
Displays date and time of last successful backup run. A click on the link opens the restore view with the latest backup run preselected. Only available if at least one backup has been executed.
Information Status
Gives information on Nero LIVEBackup conditions. Only available if at least one backup has been executed.
Button Run now
Starts the next backup run manually. Only available if no backup is running.
Button Restore
Displays the restore screen. The latest backup is preselected.
Button Configure
Allows you to change the backup target, the backup source and the backup schedule.
3.2 Activating Nero LIVEBackup With Nero LIVEBackup you can back up your whole system automatically in a convenient way. Once it has been set up, Nero LIVEBackup updates your system backup prior to changes in the background on a regular basis. We recommend to connect an external hard drive with enough free space for the backup, if applicable. Nero BackItUp searches at startup for suitable hard drives and displays the best fitting target. External hard drives will be preferred but any free target space is also considered relevant. In addition Nero BackItUp searches for data which can be backed up on your whole system. The objective is to back up the whole system, this means the operating system partition plus as much internal drives as possible. If this is not possible because there is not enough target space, backing up the operating system partition has the highest priority. To activate Nero LIVEBackup, proceed as follows:
1. Check the suggestions for the backup target and backup data in the information area on the right.
2. If you want to choose another target drive, change the backup source, or change the backup frequency:
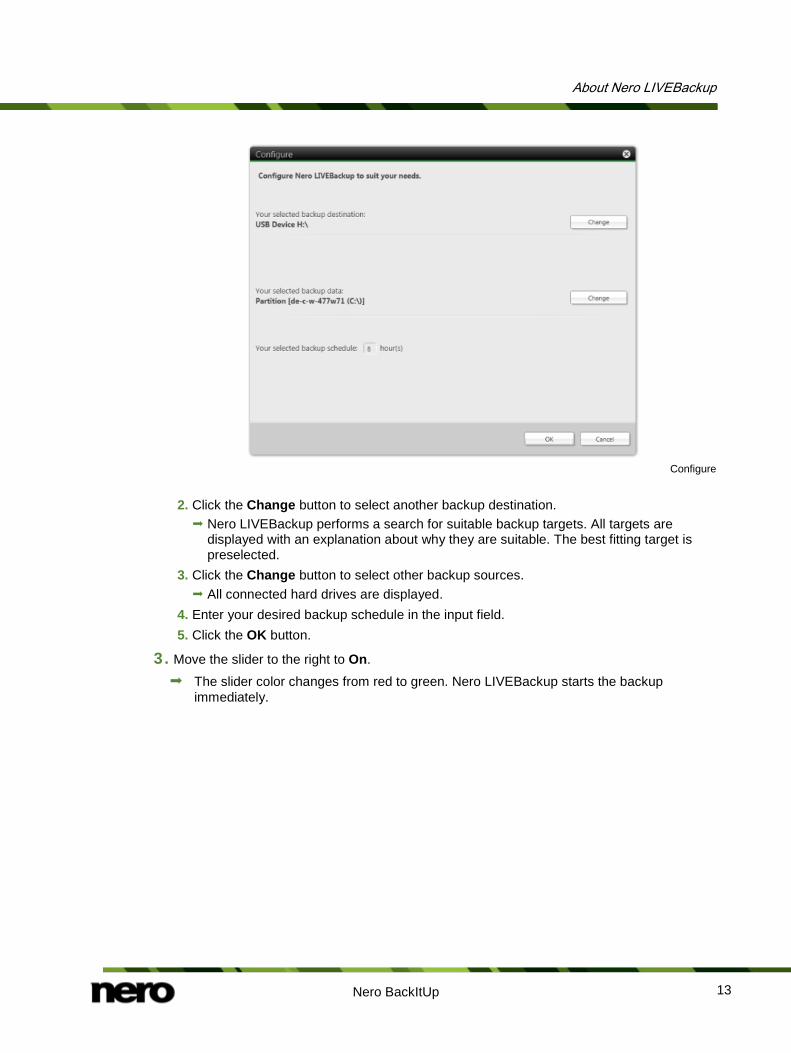
1. Click the Configure button. The Configure window is opened.
About Nero LIVEBackup
Nero BackItUp 13
Configure
2. Click the Change button to select another backup destination. Nero LIVEBackup performs a search for suitable backup targets. All targets are
displayed with an explanation about why they are suitable. The best fitting target is preselected.
3. Click the Change button to select other backup sources. All connected hard drives are displayed.
4. Enter your desired backup schedule in the input field. 5. Click the OK button.
3. Move the slider to the right to On.
The slider color changes from red to green. Nero LIVEBackup starts the backup immediately.
About Nero LIVEBackup
Nero BackItUp 14
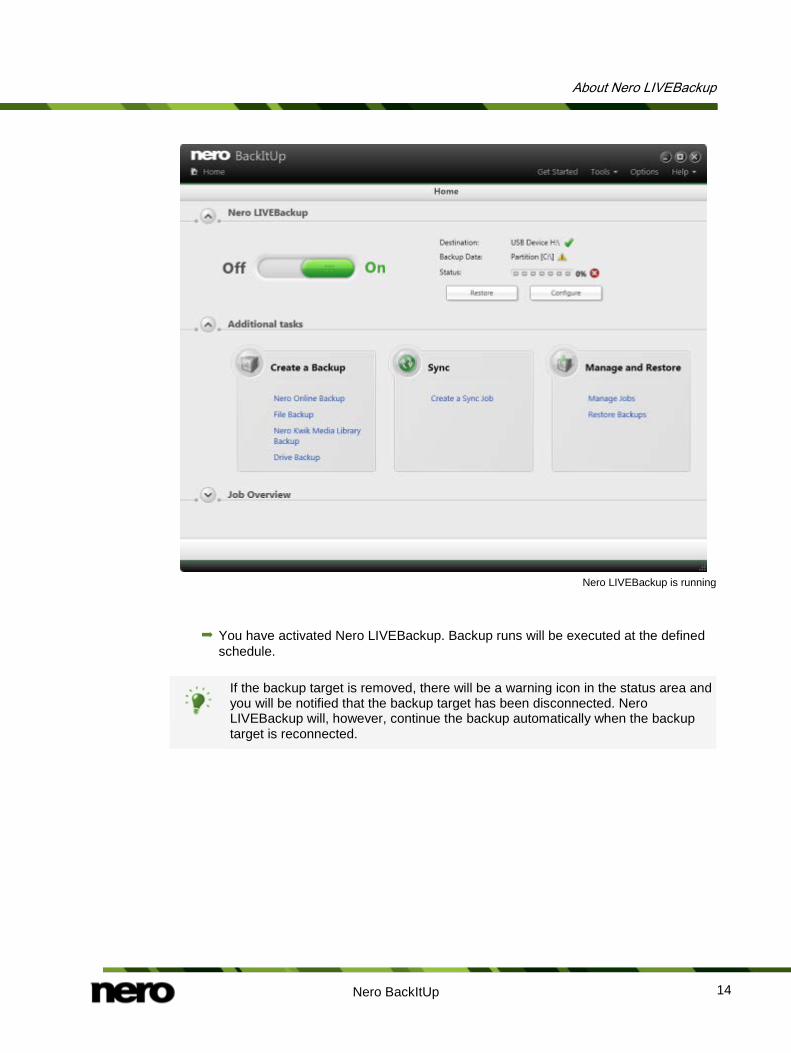
Nero LIVEBackup is running
You have activated Nero LIVEBackup. Backup runs will be executed at the defined schedule.
If the backup target is removed, there will be a warning icon in the status area and you will be notified that the backup target has been disconnected. Nero LIVEBackup will, however, continue the backup automatically when the backup target is reconnected.
Backup With Nero BackItUp
Nero BackItUp 15
4 Backup With Nero BackItUp With Nero BackItUp you can back up data. The Create a backup area in the Additional Tasks area is your starting point for choosing a type of backup outside Nero LIVEBackup. Click within the Create a backup area to get an overview about the backup possibilites. The following backup tasks are available: Manage Nero Online Backup With Nero BackItUp, you can set up and configure Autobackup, the automatic online backup feature. Once it has been set up, Autobackup is available on your computer's notification area and backs up specified folders in the background, using the Internet service Nero Online Backup as a backup location. Setting up Autobackup is particularly useful when you want to carry out regular backups for the same files and want to have a computer-independent access to your data. The advantages are, e.g. that all the settings for the backup have already been configured and that there is no risk of forgetting a backup date or of not carrying out a backup as scheduled (as long as the computer is on). In addition, the safety of your data does not depend on the physical status of your hard drive. File backup If you choose a file backup, the individual files and folders that you select are backed up. If you want to back up the same files again later, a backup update makes it easier and saves resources and other things. A file backup is useful to protect against data loss that can occur due to hardware damage or force majeure (fire, etc.). As a result, we recommend frequent backups so that you can restore data that is as current as possible in case of loss. Nero Kwik Media Library Backup If you choose a Nero Kwik Media library backup, the folders that were indexed by Nero Kwik Media are backed up. You can select single folders as well as complete categories (Photo, Video, Music). Nero BackItUp only backs up the content, meaning the files itself, not the media library database. Created playlists, tags or any other information you can carry out within Nero Kwik Media (stored in the media library database) are not part of the backup.
Media Library The media library is a database which contains all your media files that were indexed by Nero Kwik Media. It is designed to be accessed in several Nero applications via Nero MediaBrowser Nero MediaBrowser and the media library come with Nero Kwik Media and are installed together. You will find further information in the Nero Kwik Media manual.
Backup With Nero BackItUp
Nero BackItUp 16
Drive backup If you choose drive backup, entire drives (hard drives and/or partitions) are backed up, including programs and the operating system. When restoring a drive backup, programs and operating systems are restored, in contrast to file backup restoring. So, a drive backup is useful to restore the whole operating system plus programs in case of hardware damage.
See also Backing Up Files →20 Backing Up Drives →25 Restore With Nero BackItUp →40
Storing Online With Autobackup
Nero BackItUp 17
5 Storing Online With Autobackup With Nero BackItUp you can set up and configure Autobackup to automatically back up files and folders online, using the Internet service Nero Online Backup as a backup location. Once it has been set up, Autobackup is available in the Windows notification area and backs up the folders that you specify in the background in the defined sequence. Setting up Autobackup is particularly useful when you want to carry out regular backups for the same files and want to have a computer-independent access to your data. In order for Autobackup to be able to carry out the automatic backup process according to your preferences, configure which file types should be automatically backed up in which folders and define the backup target.
Nero Online Backup offers you an online data storage (which is subject to charge). We recommend a broadband Internet connection (e.g. DSL-1000 or faster) for uploading the files to be backed up. The costs for the Internet connection and the costs for using the Internet service Nero Online Backup are the user's responsibility.
The update backup method is used for automatic online backups. In this process, the data from the previous backup is overwritten with the modified data. This means that there are no backup versions, i.e. accessing older backup versions is not possible. Files that are deleted from a monitored folder are kept in the backup. If you want to delete these files from the backup as well, then use the delete feature, which can be accessed in the Nero Online Backup status screen.
To set up Autobackup, proceed as follows:
1. Click the Additional Tasks button.
The Additional Tasks area is displayed.
2. Click the Manage Nero Online Backup entry link in the Create a backup area.
The Step 1 of 3 – Please select your source screen is displayed.
Storing Online With Autobackup
Nero BackItUp 18
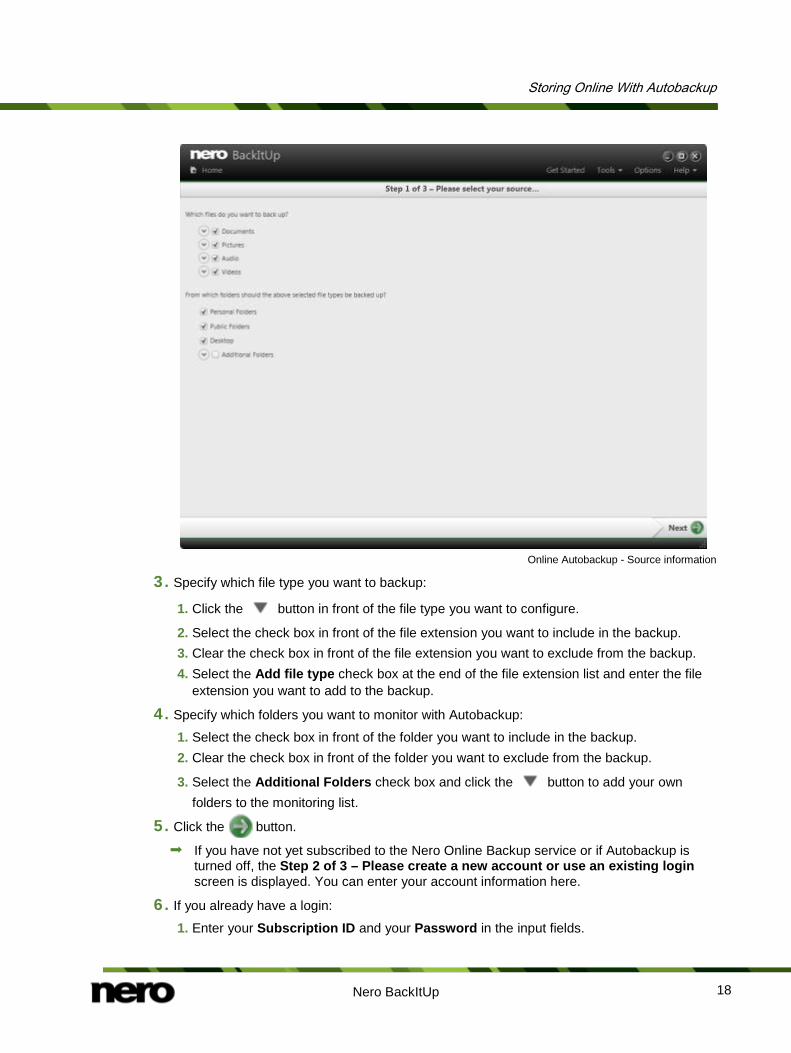
Online Autobackup - Source information
3. Specify which file type you want to backup:
1. Click the button in front of the file type you want to configure.
2. Select the check box in front of the file extension you want to include in the backup. 3. Clear the check box in front of the file extension you want to exclude from the backup. 4. Select the Add file type check box at the end of the file extension list and enter the file
extension you want to add to the backup.
4. Specify which folders you want to monitor with Autobackup:
1. Select the check box in front of the folder you want to include in the backup. 2. Clear the check box in front of the folder you want to exclude from the backup.
3. Select the Additional Folders check box and click the button to add your own folders to the monitoring list.
5. Click the button.
If you have not yet subscribed to the Nero Online Backup service or if Autobackup is turned off, the Step 2 of 3 – Please create a new account or use an existing login screen is displayed. You can enter your account information here.
6. If you already have a login:
1. Enter your Subscription ID and your Password in the input fields.
Storing Online With Autobackup
Nero BackItUp 19
2. To keep the login information, select the Remember my password check box.
7. If you have not yet subscribed to the Nero Online Backup service:
1. Select the I do not have a Nero Online Backup account and want to subscribe now option button.
2. Click the button.
The Nero Online Backup - Create new account screen is displayed. 3. Choose a backup storage and subscription duration. 4. Choose a password for your account. 5. Enter an e-mail address. 6. Please read the terms and conditions agreement carefully by clicking the Terms &
Conditions link. If you agree to the terms of the agreement, select the I have read the Terms & Conditions check box. A subscription is not possible without your consent to this agreement.
8. Click the button.
The Step 3 of 3 - Autobackup status screen is displayed. You can view your backup status and your subscription information here and also delete files and folders from your storage at Nero Online Backup.
9. Click the button.
The first full backup of the folders that you have specified is carried out. You can monitor the progress with the status information in the taskbar. The final screen is displayed. Autobackup has been set up and carries out the backup updates automatically due to the specified settings.
Turn off Nero Online Backup
If you want to turn off the online backup, just click the button in the Nero Online Backup status screen.
Change settings If you want to change the settings, just click the Nero Online Backup entry link in the start screen area. Click the Edit button to change your subscription. Click the Source information link to change the backup settings.
Backing Up Files
Nero BackItUp 20
6 Backing Up Files With Nero BackItUp you can carry out file backups. This means that individual files can be backed up and then restored at a later point in time. In comparison to drive backups, it is not possible to restore operating systems or programs with this option. The first step is selecting files and folders to back up. The next step is to select a target where to save the backup. You can save the backup on your hard drive or removable data media, burn the backup to a disc or use an online storage. At last you can make settings according to your preferences. To backup files, proceed as follows:
1. Click the Additional Tasks button.
The Additional Tasks area is displayed.
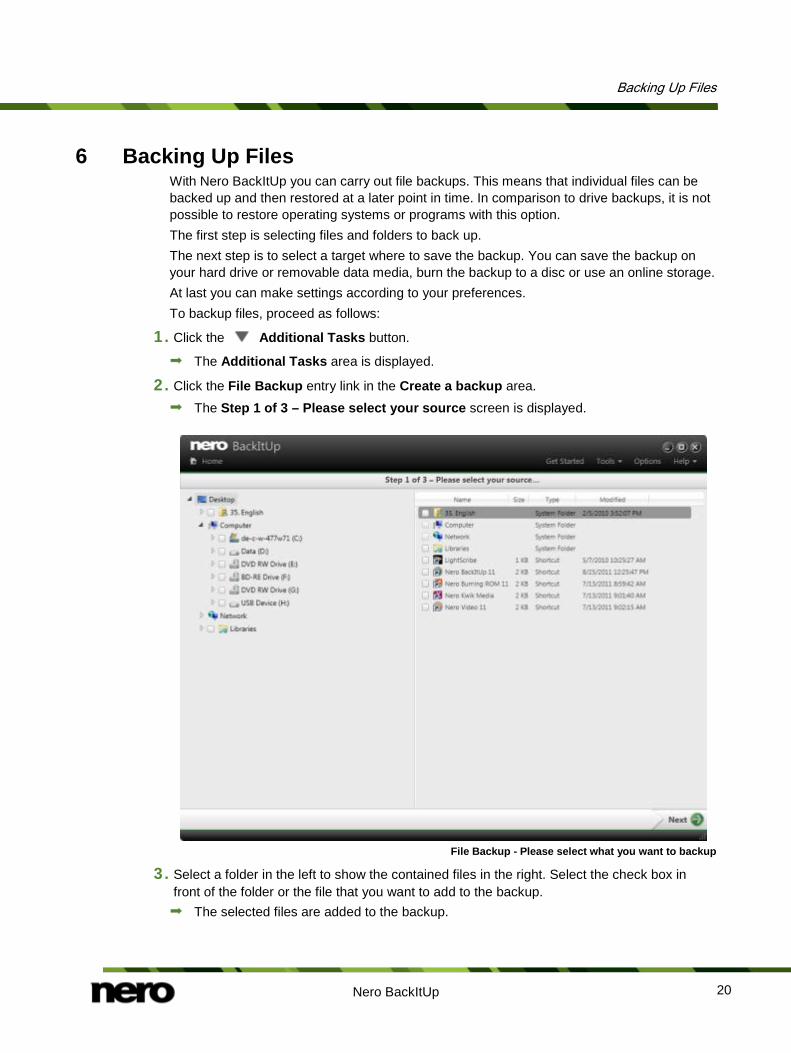
2. Click the File Backup entry link in the Create a backup area. The Step 1 of 3 – Please select your source screen is displayed.
File Backup - Please select what you want to backup
3. Select a folder in the left to show the contained files in the right. Select the check box in front of the folder or the file that you want to add to the backup. The selected files are added to the backup.
Backing Up Files
Nero BackItUp 21
4. Click the button.
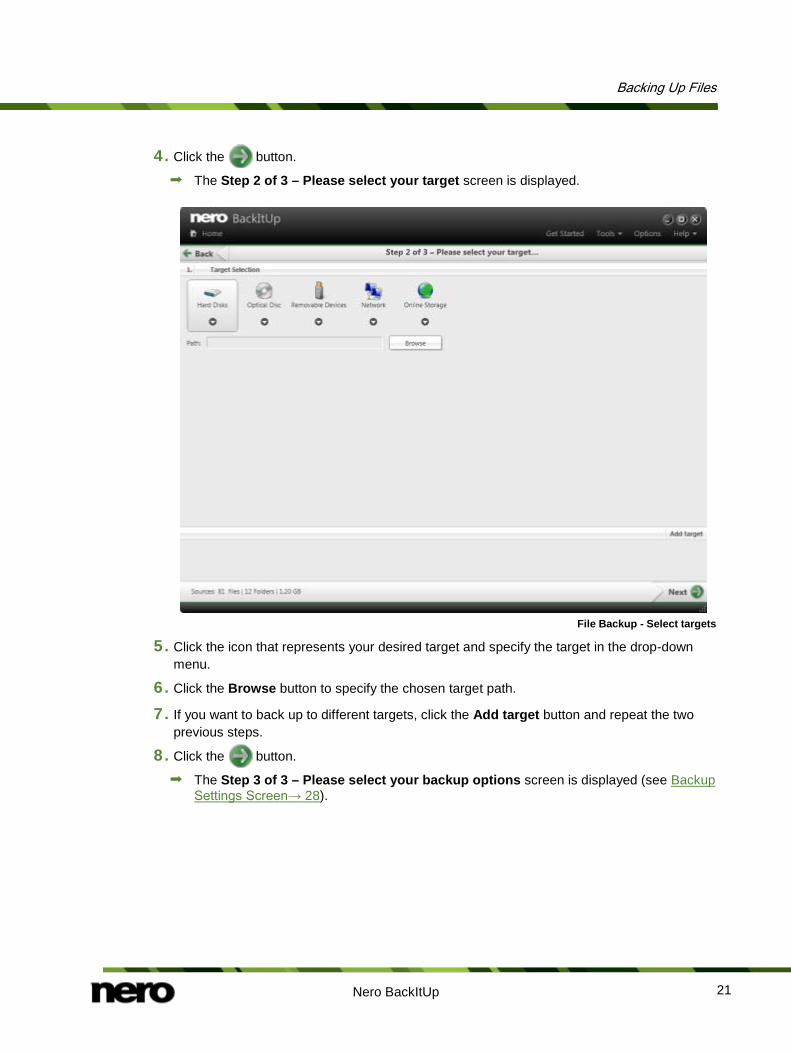
The Step 2 of 3 – Please select your target screen is displayed.
File Backup - Select targets
5. Click the icon that represents your desired target and specify the target in the drop-down menu.
6. Click the Browse button to specify the chosen target path.
7. If you want to back up to different targets, click the Add target button and repeat the two previous steps.
8. Click the button.
The Step 3 of 3 – Please select your backup options screen is displayed (see Backup Settings Screen→ 28).
Backing Up Files
Nero BackItUp 22
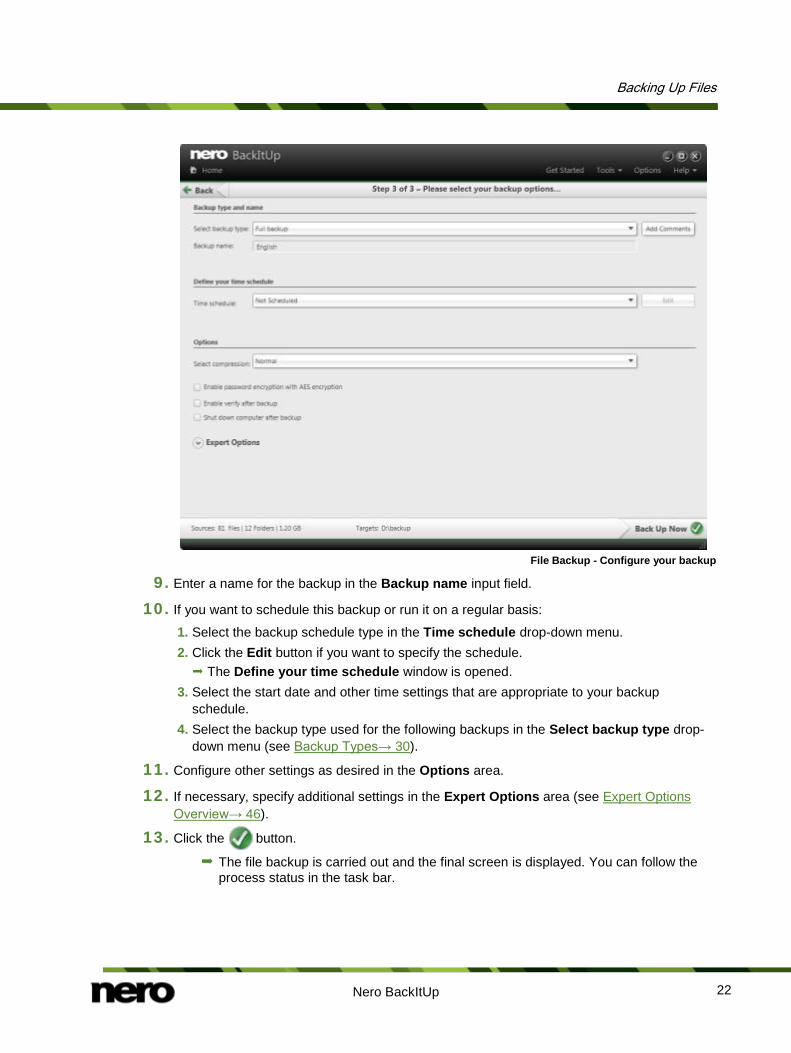
File Backup - Configure your backup
9. Enter a name for the backup in the Backup name input field.
10. If you want to schedule this backup or run it on a regular basis:
1. Select the backup schedule type in the Time schedule drop-down menu. 2. Click the Edit button if you want to specify the schedule.
The Define your time schedule window is opened. 3. Select the start date and other time settings that are appropriate to your backup
schedule. 4. Select the backup type used for the following backups in the Select backup type drop-
down menu (see Backup Types→ 30).
11. Configure other settings as desired in the Options area.
12. If necessary, specify additional settings in the Expert Options area (see Expert Options Overview→ 46).
13. Click the button.
The file backup is carried out and the final screen is displayed. You can follow the process status in the task bar.
Back Up Media Library
Nero BackItUp 23
7 Back Up Media Library With Nero BackItUp you can back up the content of the media library. With this backup type the folders that were indexed by Nero Kwik Media are backed up. You can select single folders as well as complete categories (Photo, Video, Music). Nero BackItUp only backs up the content, meaning the files itself, not the media library database. Created playlists, tags or any other information you can carry out within Nero Kwik Media (stored in media library database) are not part of the backup. The backup process is similar to a normal file backup: The first step is selecting categories and folders to back up. The next step is to select a target where to save the backup. You can save the backup on your hard drive or removable data media, burn them to a disc or use an online storage. At last you can make settings according to your preferences. To backup Nero Media Library content, proceed as follows:
1. Click the Additional Tasks button.
The Additional Tasks area is displayed.
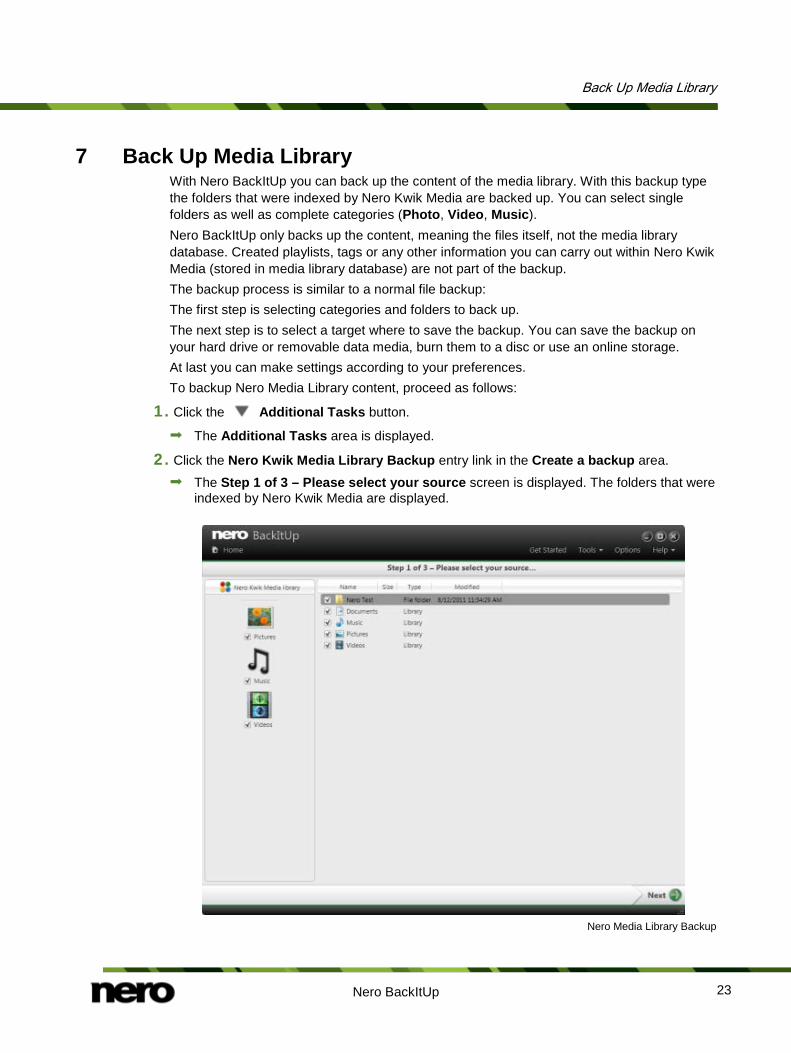
2. Click the Nero Kwik Media Library Backup entry link in the Create a backup area.
The Step 1 of 3 – Please select your source screen is displayed. The folders that were indexed by Nero Kwik Media are displayed.
Nero Media Library Backup
Back Up Media Library
Nero BackItUp 24
3. Select the check box in front of the file category that you want to add to the backup, or select the check box in front the folder that you want to add to the backup.
4. Click the button.
The Step 2 of 3 – Please select your target screen is displayed.
5. Click the icon that represents your desired target and specify the target in the drop-down menu.
6. Click the Browse button to specify the chosen target path.
7. If you want to back up to different targets, click the Add target button and repeat the two previous steps.
8. Click the button.
The Step 3 of 3 – Please select your backup options screen is displayed (see Backup Settings Screen→ 28).
9. Enter a name for the backup in the Backup name input field.
10. If you want to schedule this backup or run it on a regular basis:
1. Select the backup schedule type in the Time schedule drop-down menu. 2. Click the Edit button if you want to specify the schedule.
The Define your time schedule window is opened. 3. Select the start date and other time settings that are appropriate to your backup
schedule. 4. Select the backup type used for the following backups in the Select backup type drop-
down menu (see Backup Types→ 30).
11. Configure other settings as desired in the Options area.
12. If necessary, specify additional settings in the Expert Options area (see Expert Options Overview→ 46).
13. Click the button.
The Nero Kwik Media Library backup is carried out and the final screen is displayed. You can follow the process status in the task bar.
Media Library The media library is a database which contains all your media files that were indexed by Nero Kwik Media. It is designed to be accessed in several Nero applications via Nero MediaBrowser Nero MediaBrowser and the media library come with Nero Kwik Media and are installed together. You will find further information in the Nero Kwik Media manual.
Backing Up Drives
Nero BackItUp 25
8 Backing Up Drives With Nero BackItUp you can carry out drive backups. When restoring a drive backup, programs and operating systems are restored, in contrast to file backup restoring. The drive backup can be updated. The update type Incremental backup is available for this purpose. The first step is selecting a drive to back up. The next step is to select a target where to save the backup. You can save the backup on your hard drive or removable data media, burn the backup to a disc or use an online storage. When you back up a drive, the backup file is usually quite large. If you burn the backup to disc, you will usually require multiple discs. The first backup disc is always a bootable disc. If you do not burn the backup to disc, it is still quite useful to create a bootable disc so that you can start the computer (and the drive restore) from CD/DVD in the event of an emergency. At last you can make settings according to your preferences.
Administrator rights You must have administrator rights in order to back up and restore hard drives and partitions.
To backup drives, proceed as follows:
1. Click the Additional Tasks button.
The Additional Tasks area is displayed.
2. Click the Drive Backup entry link in the Create a backup area. The Step 1 of 3 – Please select your source drive screen is displayed.
Backing Up Drives
Nero BackItUp 26
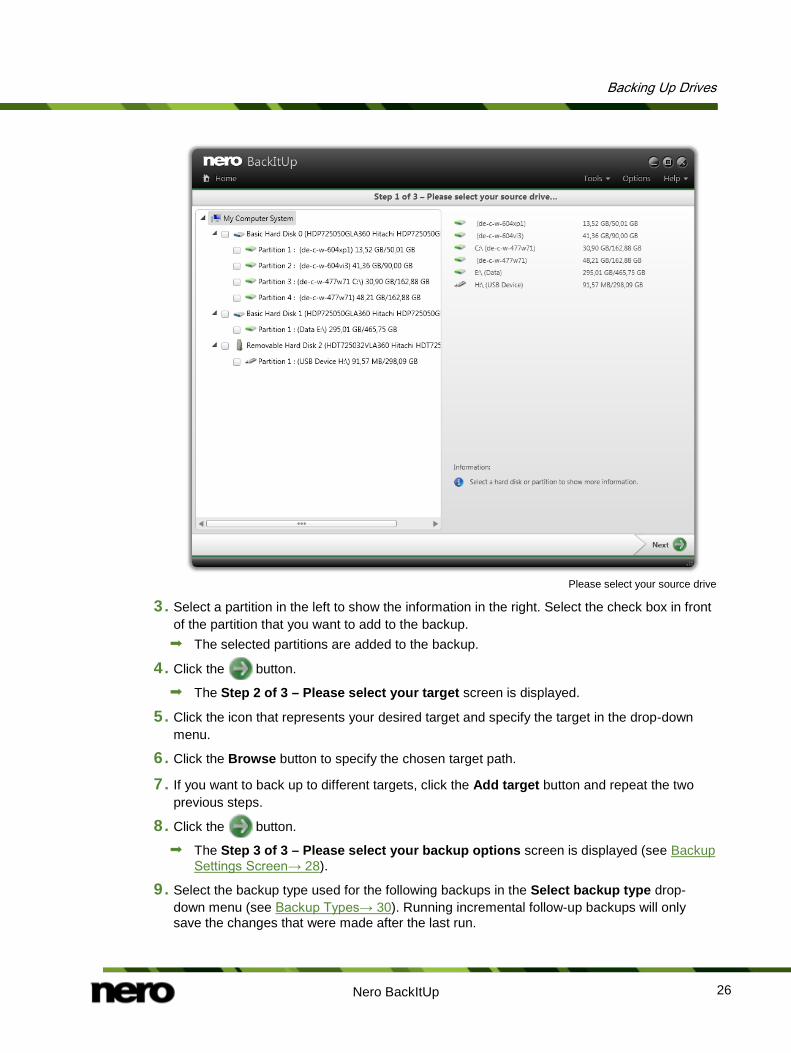
Please select your source drive
3. Select a partition in the left to show the information in the right. Select the check box in front of the partition that you want to add to the backup. The selected partitions are added to the backup.
4. Click the button.
The Step 2 of 3 – Please select your target screen is displayed.
5. Click the icon that represents your desired target and specify the target in the drop-down menu.
6. Click the Browse button to specify the chosen target path.
7. If you want to back up to different targets, click the Add target button and repeat the two previous steps.
8. Click the button.
The Step 3 of 3 – Please select your backup options screen is displayed (see Backup Settings Screen→ 28).
9. Select the backup type used for the following backups in the Select backup type drop-down menu (see Backup Types→ 30). Running incremental follow-up backups will only save the changes that were made after the last run.
Backing Up Drives
Nero BackItUp 27
10. Enter a backup name in the Backup name field.
11. If you want to schedule this backup or run it on a regular basis:
1. Select the backup schedule type in the Time schedule drop-down menu. 2. Click the Edit button.
The Define your time schedule window is opened. 3. Select the start date and other time settings adequate to your backup schedule.
12. Configure other settings as desired in the Options area.
13. If necessary specify additional settings in the Expert Options area (see Expert Options Overview→ 46).
14. Click the button.
The drive backup is carried out and the final screen is displayed. You can follow the process status in the status bar.
Backup Settings Screen
Nero BackItUp 28
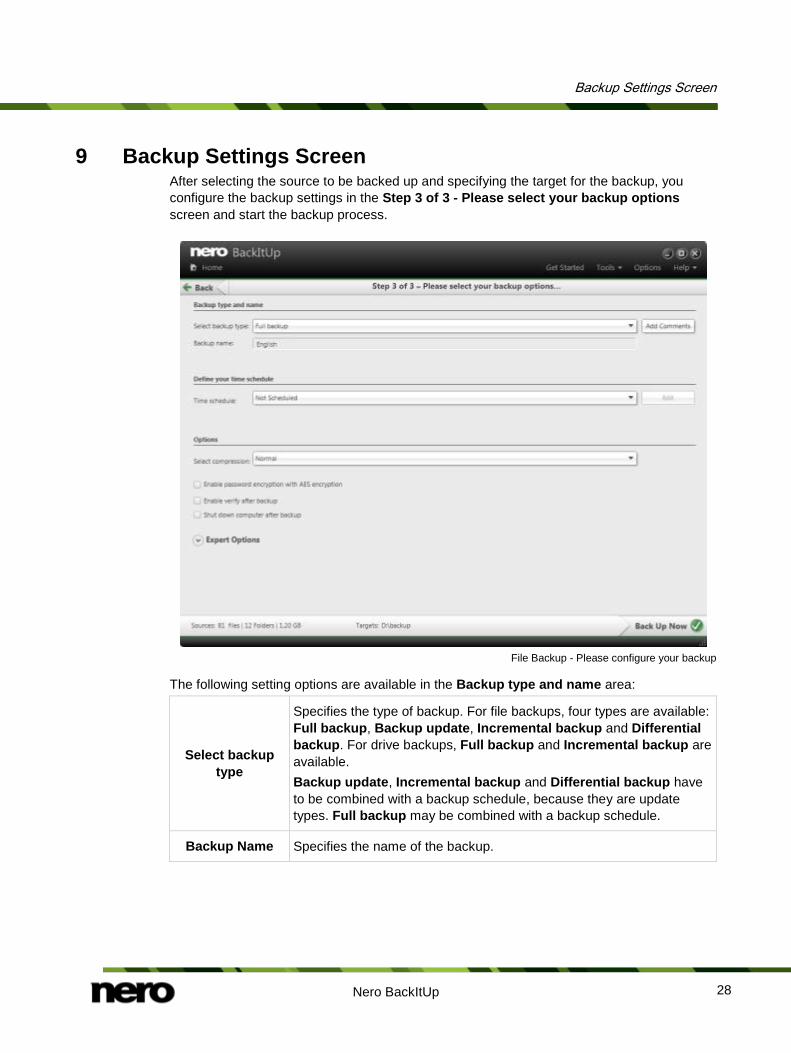
9 Backup Settings Screen After selecting the source to be backed up and specifying the target for the backup, you configure the backup settings in the Step 3 of 3 - Please select your backup options screen and start the backup process.
File Backup - Please configure your backup
The following setting options are available in the Backup type and name area:
Select backup type
Specifies the type of backup. For file backups, four types are available: Full backup, Backup update, Incremental backup and Differential backup. For drive backups, Full backup and Incremental backup are available. Backup update, Incremental backup and Differential backup have to be combined with a backup schedule, because they are update types. Full backup may be combined with a backup schedule.
Backup Name Specifies the name of the backup.
Backup Settings Screen
Nero BackItUp 29
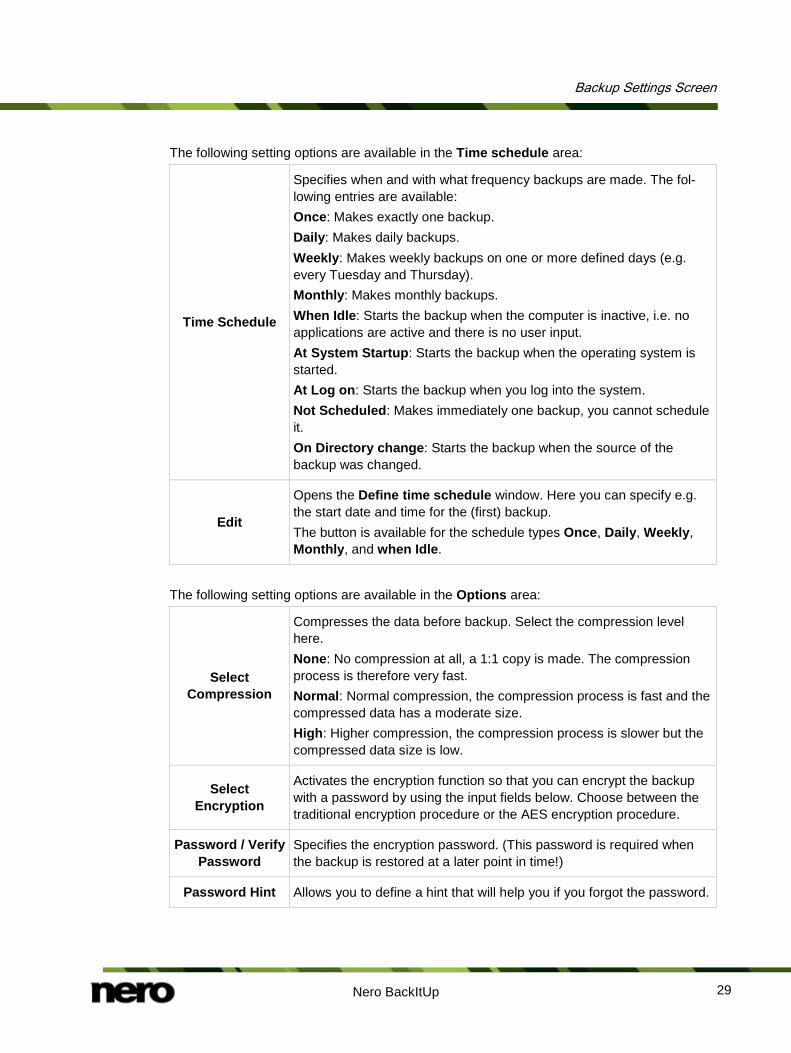
The following setting options are available in the Time schedule area:
Time Schedule
Specifies when and with what frequency backups are made. The fol-lowing entries are available: Once: Makes exactly one backup. Daily: Makes daily backups. Weekly: Makes weekly backups on one or more defined days (e.g. every Tuesday and Thursday). Monthly: Makes monthly backups. When Idle: Starts the backup when the computer is inactive, i.e. no applications are active and there is no user input. At System Startup: Starts the backup when the operating system is started. At Log on: Starts the backup when you log into the system. Not Scheduled: Makes immediately one backup, you cannot schedule it. On Directory change: Starts the backup when the source of the backup was changed.
Edit
Opens the Define time schedule window. Here you can specify e.g. the start date and time for the (first) backup. The button is available for the schedule types Once, Daily, Weekly, Monthly, and when Idle.
The following setting options are available in the Options area:
Select Compression
Compresses the data before backup. Select the compression level here. None: No compression at all, a 1:1 copy is made. The compression process is therefore very fast. Normal: Normal compression, the compression process is fast and the compressed data has a moderate size. High: Higher compression, the compression process is slower but the compressed data size is low.
Select Encryption
Activates the encryption function so that you can encrypt the backup with a password by using the input fields below. Choose between the traditional encryption procedure or the AES encryption procedure.
Password / Verify Password
Specifies the encryption password. (This password is required when the backup is restored at a later point in time!)
Password Hint Allows you to define a hint that will help you if you forgot the password.
Backup Settings Screen
Nero BackItUp 30
Enable verify after backup Verifies that the data is complete and correct after backup.
Shutdown PC after backup Automatically shuts down the PC after the backup process has ended.
See also Backup and Restore Expert Options Overview →46
9.1 About Backup Types There are four backup types in Nero BackItUp: Full Backup Differential Backup Incremental Backup Update Backup For file backups, all four backup types are available. For drive backups, only Full Backup and Incremental Backup are available. With the Full backup type, all files and folders that you have selected will be backed up. A first backup is always a full backup. With the Incremental backup type, all files that have changed in comparison to the last backup will be saved. With the Differential backup type, all files that have changed in comparison to the first backup will be saved. With the Update backup type, the actual backup procedure depends on the media on which the backup is made: If you are backing up to a hard drive with the Update backup type, then the data of the
previous backup will be overwritten with the changed data. This means that older versions will be erased; access to older backup states will no longer be possible.
If you are backing up to the disc on which the previous backup was burned with the Update backup type, then the procedure is the same as described for the Incremental backup. In this case a folder will be generated in a new session.
With the three Full, Incremental and Differential backup types, it does not matter which medium you save the backup to. You can, for example, use the disc that you used for any of the older backups (Nero BackItUp automatically started a multisession disc) as long as there is still space on the disc. You can also back up to a new medium.
Backup Settings Screen
Nero BackItUp 31
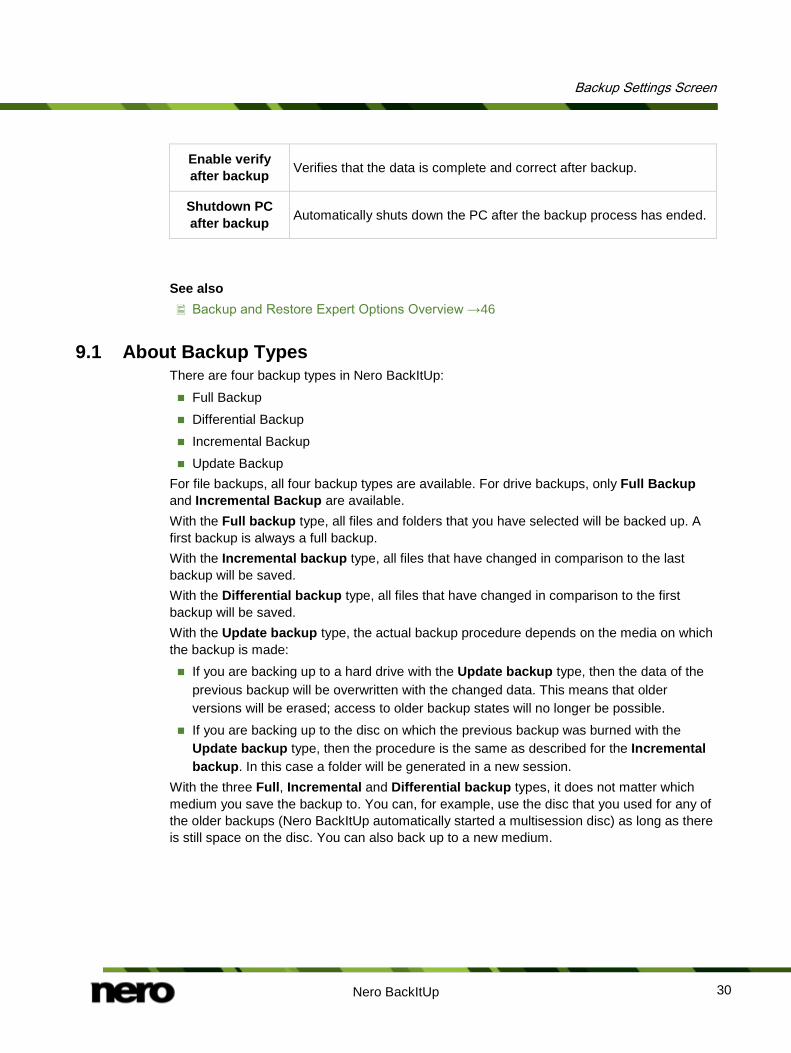
Incremental Backup (Above) and Differential Backup (Below)
The picture above shows the difference between incremental and differential backups (which are represented as curved lines):
With the incremental backup type, the changes that were made compared to the last backup are saved: The second backup run (2.) is compared to the first (1.), and the third backup run (3.) is compared to the second (2.).
With the differential backup type, the changes that were made compared to the first backup are saved: The second backup run (2.) is compared to the first (1.) and the third backup run (3.) is compared to the first (1.) as well.
An example is provided below to illustrate the difference between incremental and differential backups with file backup: Let's assume that you have 100 photos and are backing them up. The first (full) backup contains the 100 photos. Then you change 25 of the photos and want to back up again. You select an incremental or differential backup (it does not matter which you select for the second backup). The 25 changed photos are backed up. Then you change another 10 photos and want to back up again: If you select the Incremental backup, 10 photos are backed up, specifically those that have changed since the last backup. (Nero BackItUp compares the current status with the last backup.) If you select the Differential backup, 35 photos are backed up, specifically those that have changed since the first backup. (Nero BackItUp compares the current status with the first backup.) This means that incremental backups require less storage space, however usually more backup versions will have been created. The result is that the restore takes longer since many small versions must be restored (and made ready) one after the other. The opposite is true of the differential backup: It requires more storage space, however only two backup versions (the first and the last) are needed. Consequently, for the restore only two versions are restored (and made ready) because the last version contains all changes made since the first backup.
Backup Settings Screen
Nero BackItUp 32
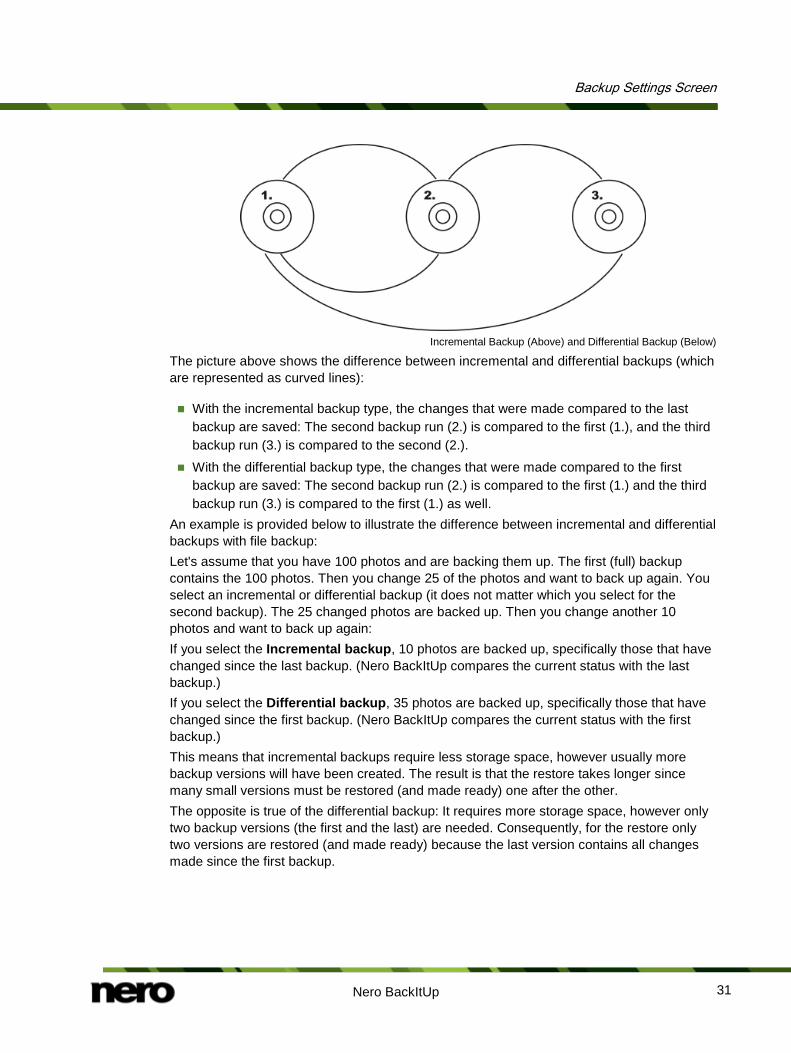
Data backup distinction between differential and incremental backup
1 1st backup
2 2nd backup
3 3rd backup
4 Data on the computer White: Original data Black: Changed data
5 Incremental backup Data that has been modified since the previous backup is backed up
6 Differential backup Data that has been modified since the first backup is backed up
Backup Settings Screen
Nero BackItUp 33
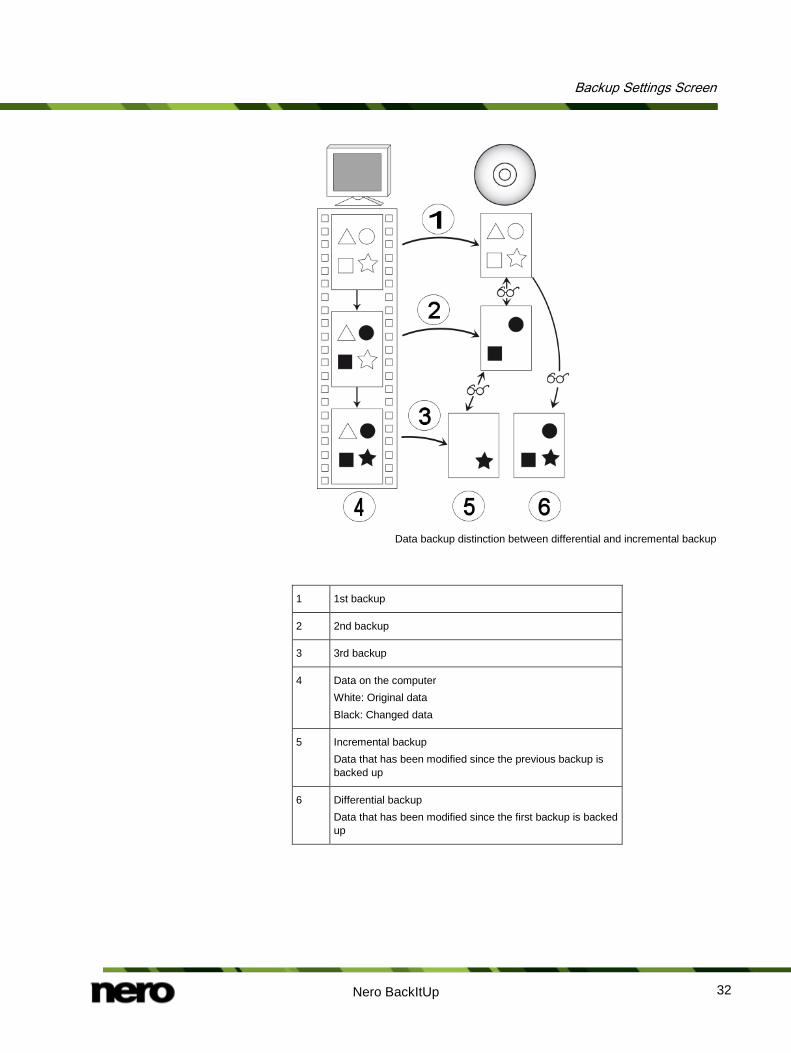
The following table provides information to help you determine the correct update type for your file backup:
Backup type Storage space requirement for the backup set
Effort involved in restoring
Can older versions be accessed?
Full backup Extremely high Extremely low (only the current version is required) Yes
Differential backup Mid Low (current and first version must be kept) Yes
Incremental backup Low High (all versions must be kept) Yes
Backup update to hard drive (old versions will be erased)
Extremely low Extremely low (only the current version is required) No
9.2 About the Time Schedule If you have definied a time schedule, the backup process will be carried out automatically at the defined time. The system time is used for this purpose. The computer must be switched on and an operating system must be running for this to happen. Nero BackItUp does not have to be running in order to carry out the scheduled backup, since it can work in the background. Depending on which setting you have selected, the backup can either be executed without the user being logged on or a user must be logged on. In order for the backup to be carried out as scheduled, provide the chosen target media: If the backup is to be burned to disc, ensure that an appropriate blank disc is inserted in
the burner. If you are backing up to an FTP server, ensure that the computer is connected to the
Internet. If you are backing up to a removable medium or to an external hard drive, ensure that
the appropriate device is connected or installed. After the backup has been successfully completed, a corresponding message appears in the system tray. If you set notifications in the Expert Options area, you will be sent an e-mail (if a network or Internet connection exists).
Syncing With Nero BackItUp
Nero BackItUp 34
10 Syncing With Nero BackItUp With Nero BackItUp you can synchronize (“sync”) files between two folders. You can use the sync function within the application or you can use the standalone sync tool that comes with Nero BackItUp. Synchronizing exchanges files between two folders. The folders can be located on the same computer or on different computers and devices. For example, you can synchronize your desktop computer with your laptop to make sure that relevant directories contain the same contents.
See also Creating Standalone Nero BackItUp SyncTool →53 Syncing Folders →34
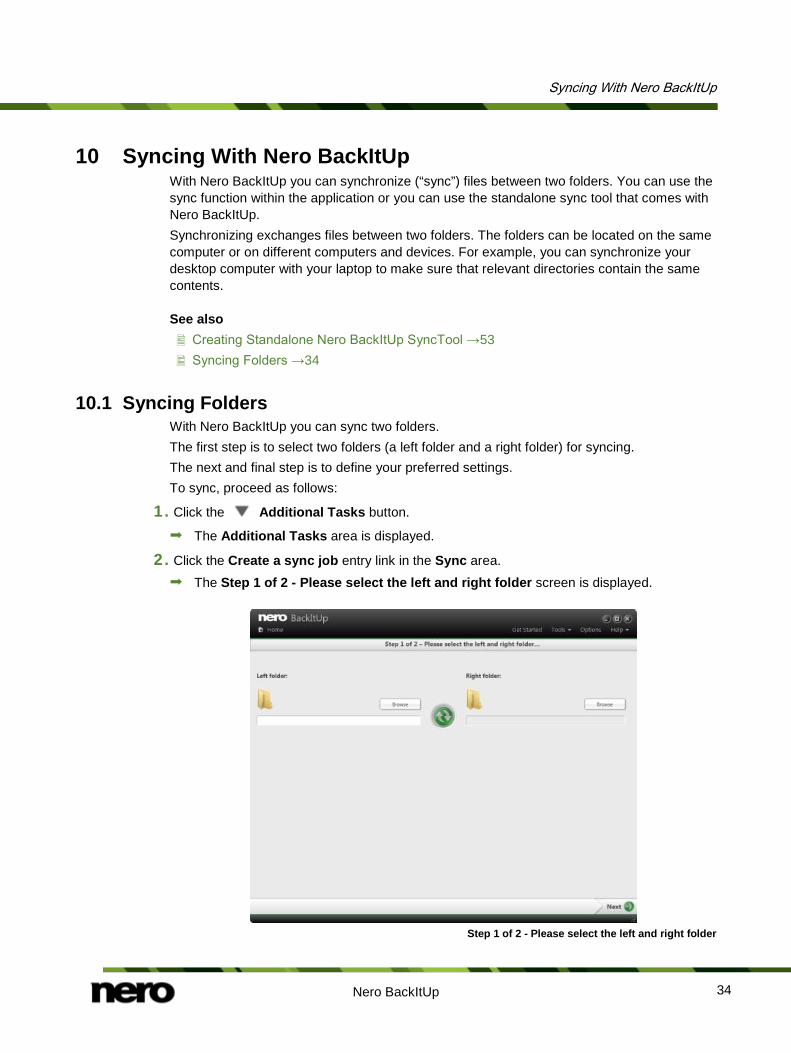
10.1 Syncing Folders With Nero BackItUp you can sync two folders. The first step is to select two folders (a left folder and a right folder) for syncing. The next and final step is to define your preferred settings. To sync, proceed as follows:
1. Click the Additional Tasks button.
The Additional Tasks area is displayed.
2. Click the Create a sync job entry link in the Sync area. The Step 1 of 2 - Please select the left and right folder screen is displayed.
Step 1 of 2 - Please select the left and right folder

Syncing With Nero BackItUp
Nero BackItUp 35
3. Click the Left folder Browse button to choose the left folder.
4. Click the Right folder Browse button to choose the right folder.
One folder can only participate in exact one sync job! Do not use the same folder in more than one sync job in order to avoid unpleasant side effects.
5. Click the button.
The Step 2 of 2 – Please select your synchronization options screen is displayed.
New Data Synchronization - Finalize Settings
6. Select a sync type in the Select a type drop-down menu (see About Sync Types→ 36).
7. Enter a name for the sync job in the Type a name input field.
8. If you want to schedule the sync job or to run it on a regular basis:
1. Select the sync schedule type in the Time schedule drop-down menu. 2. Click the Edit button if you want to specify the schedule.
The Define your time schedule window is opened.
Syncing With Nero BackItUp
Nero BackItUp 36
3. Select the start date and other time settings that are appropriate to your backup schedule.
9. Choose your preferred conflict-handling option in the Conflict handling area.
10. Click the button.
The sync job is started and the final screen is displayed.
10.2 About Sync Types Nero BackItUp has five sync types:
Mirror Copy Update Partial mirror Partial synchronization The following pictures show examplary sync cycles for each of the sync types illustrating the differences between the sync types. As a precondition, you have executed a first syncing run. This way, each of the two folders contains four identical files. This is shown in the first step. In the next step you change the files in the left or the right folder, as illustrated by the hand symbol (Depending on the sync type, you make changes only in the folder where changes make sense). In the third step Nero BackItUp is executing the syncing process, as illustrated by the Nero BackItUp syncing icon. Finally, the result of the syncing process is shown. These symbols apply for the changes: = updated file, = deleted file, = new file
Syncing With Nero BackItUp
Nero BackItUp 37
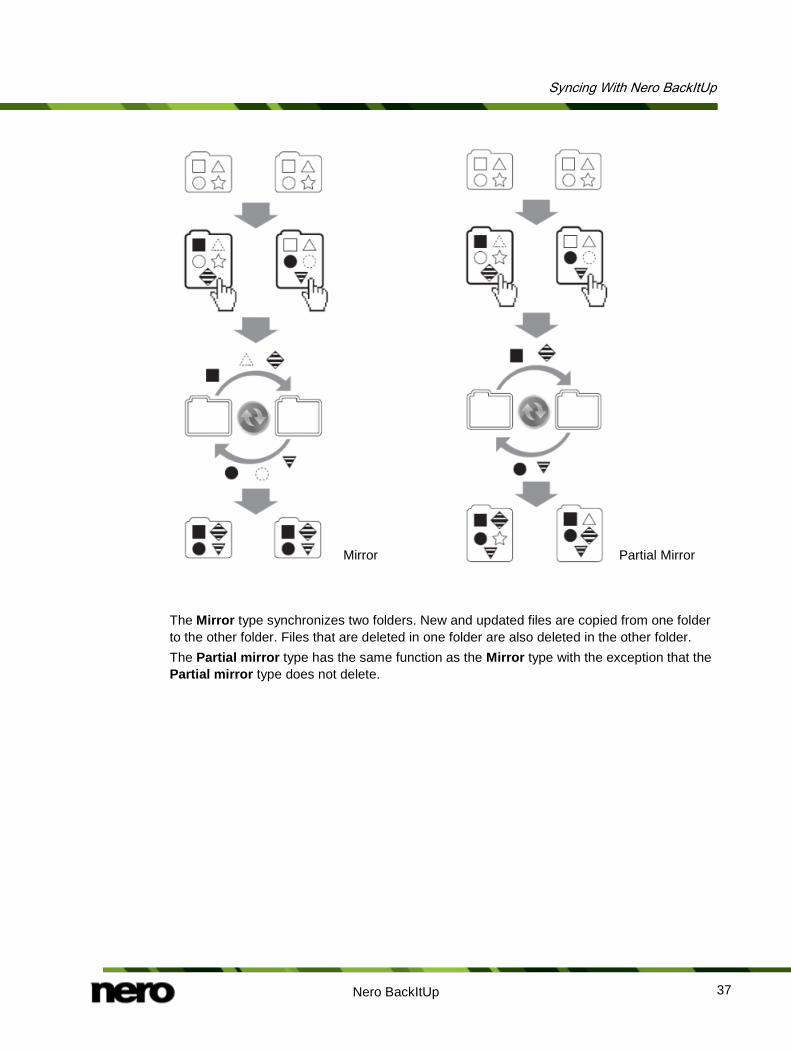
Mirror Partial Mirror
The Mirror type synchronizes two folders. New and updated files are copied from one folder to the other folder. Files that are deleted in one folder are also deleted in the other folder. The Partial mirror type has the same function as the Mirror type with the exception that the Partial mirror type does not delete.
Syncing With Nero BackItUp
Nero BackItUp 38
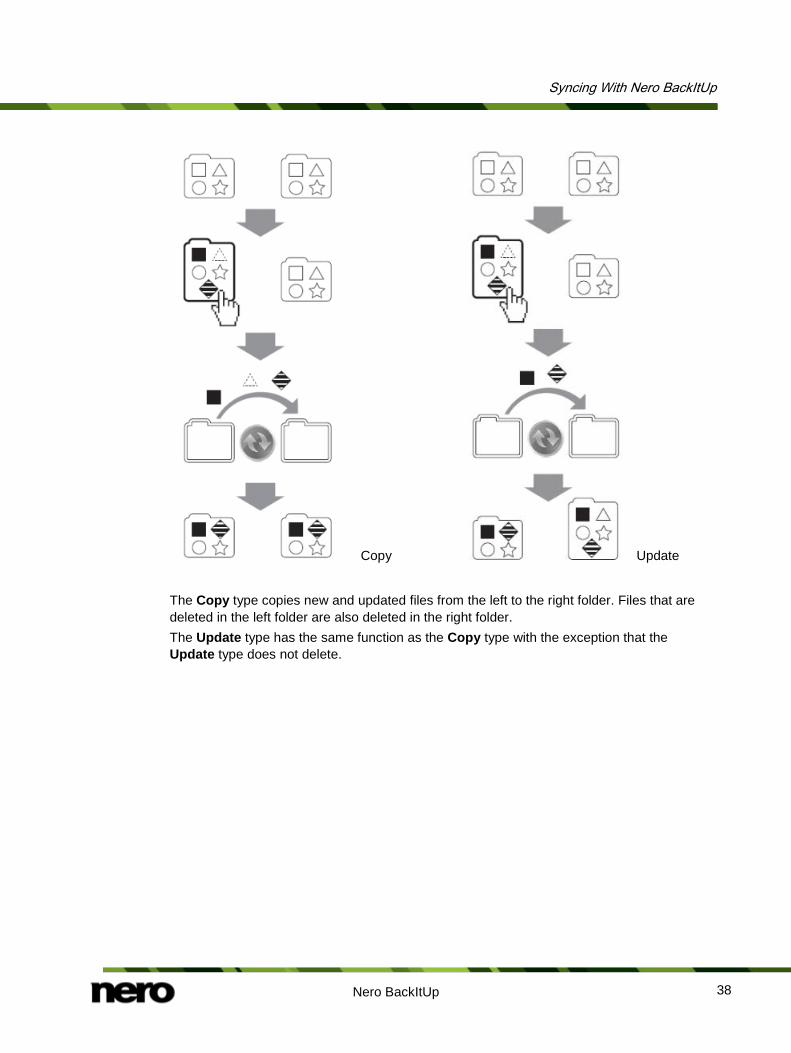
Copy Update
The Copy type copies new and updated files from the left to the right folder. Files that are deleted in the left folder are also deleted in the right folder. The Update type has the same function as the Copy type with the exception that the Update type does not delete.
Syncing With Nero BackItUp
Nero BackItUp 39
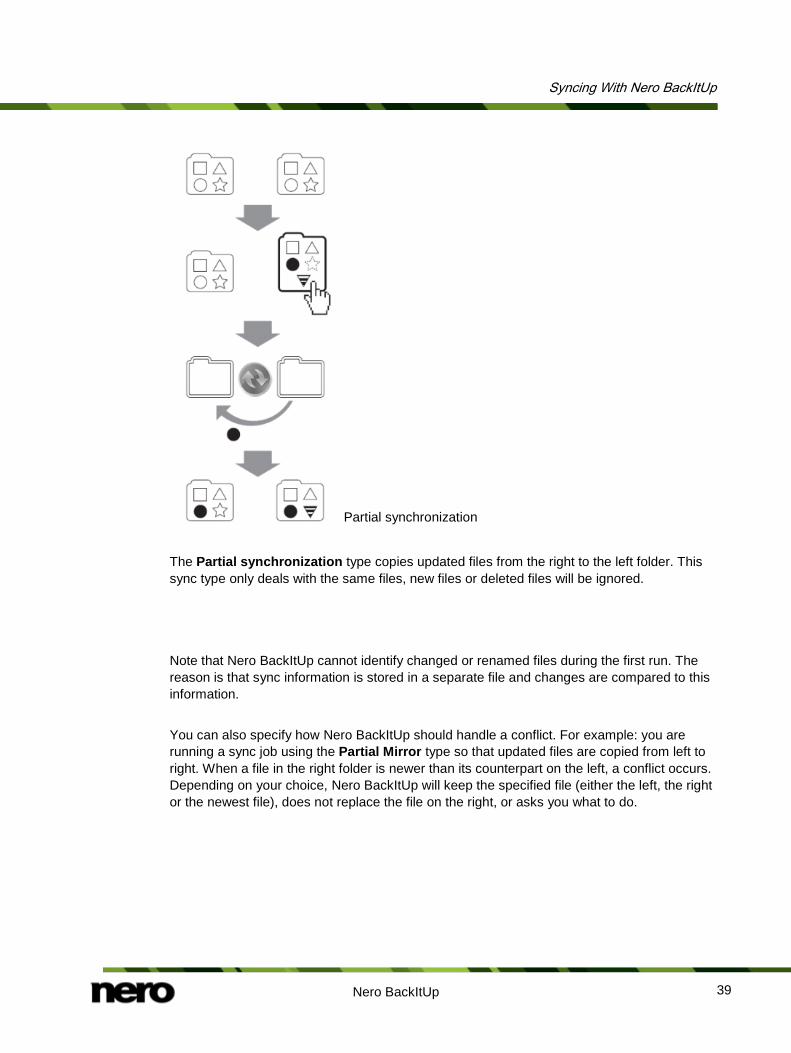
Partial synchronization
The Partial synchronization type copies updated files from the right to the left folder. This sync type only deals with the same files, new files or deleted files will be ignored. Note that Nero BackItUp cannot identify changed or renamed files during the first run. The reason is that sync information is stored in a separate file and changes are compared to this information. You can also specify how Nero BackItUp should handle a conflict. For example: you are running a sync job using the Partial Mirror type so that updated files are copied from left to right. When a file in the right folder is newer than its counterpart on the left, a conflict occurs. Depending on your choice, Nero BackItUp will keep the specified file (either the left, the right or the newest file), does not replace the file on the right, or asks you what to do.

Restore With Nero BackItUp
Nero BackItUp 40
11 Restore With Nero BackItUp
11.1 Restore Files and Folders With Nero BackItUp you can restore file backups. The content of the file backup is restored during this process. You can exclude individual files from the restore process or select specific files to be restored. It is even possible to choose a drive backup to restore individual files. In contrast to a drive backup restore process, a file backup does not allow the restore of programs or operating systems The first step is to select the backup and the backup run. The next step is then to select files and folders for restore. The next step is to select a path where to restore the backup and to make settings according to your preferences.
Restoring files and folders is possible from the following backups:
▲ Nero LIVEBackup ▲ File Backup. ▲ Nero Kwik Media library backup ▲ Drive Backup To restore a file backup, proceed as follows:
1. Click the Additional Tasks button.
The Additional Tasks area is displayed.
2. Click the Restore backups entry link in the Manage and Restore area. The Step 1 of 2 – Please select your backup to be restored screen is displayed. The
executed backups are displayed in the general job navigation slider.
Restore With Nero BackItUp
Nero BackItUp 41
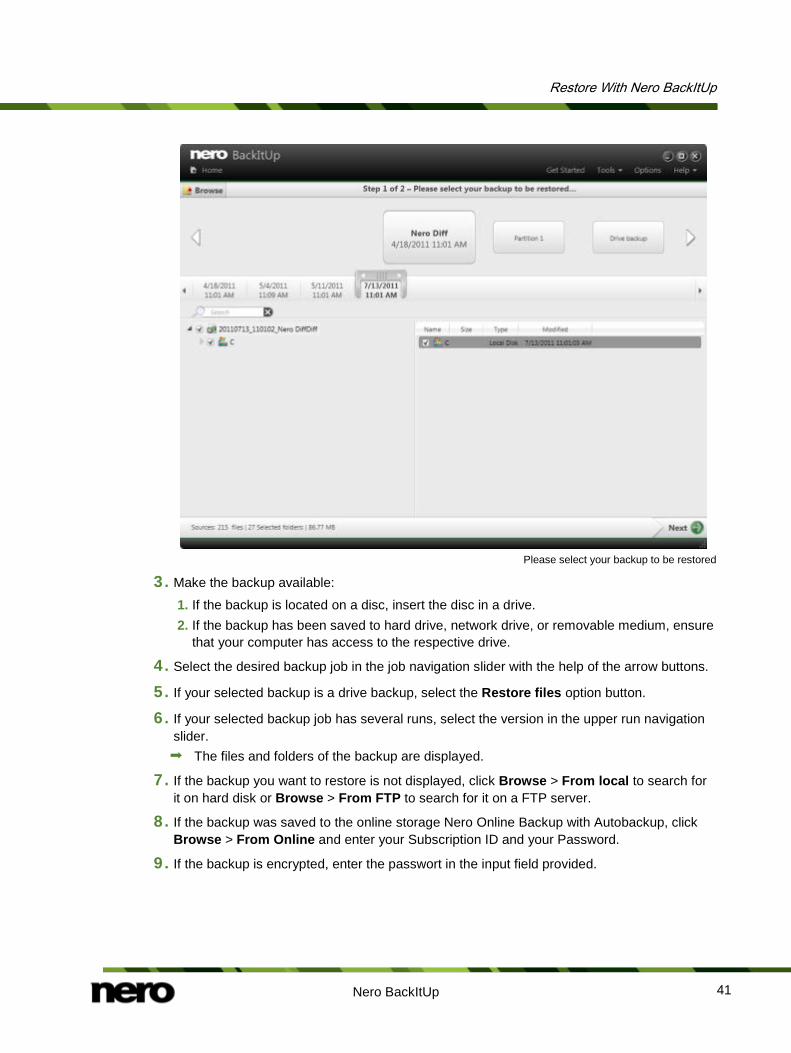
Please select your backup to be restored
3. Make the backup available:
1. If the backup is located on a disc, insert the disc in a drive. 2. If the backup has been saved to hard drive, network drive, or removable medium, ensure
that your computer has access to the respective drive.
4. Select the desired backup job in the job navigation slider with the help of the arrow buttons.
5. If your selected backup is a drive backup, select the Restore files option button.
6. If your selected backup job has several runs, select the version in the upper run navigation slider. The files and folders of the backup are displayed.
7. If the backup you want to restore is not displayed, click Browse > From local to search for it on hard disk or Browse > From FTP to search for it on a FTP server.
8. If the backup was saved to the online storage Nero Online Backup with Autobackup, click Browse > From Online and enter your Subscription ID and your Password.
9. If the backup is encrypted, enter the passwort in the input field provided.
Restore With Nero BackItUp
Nero BackItUp 42
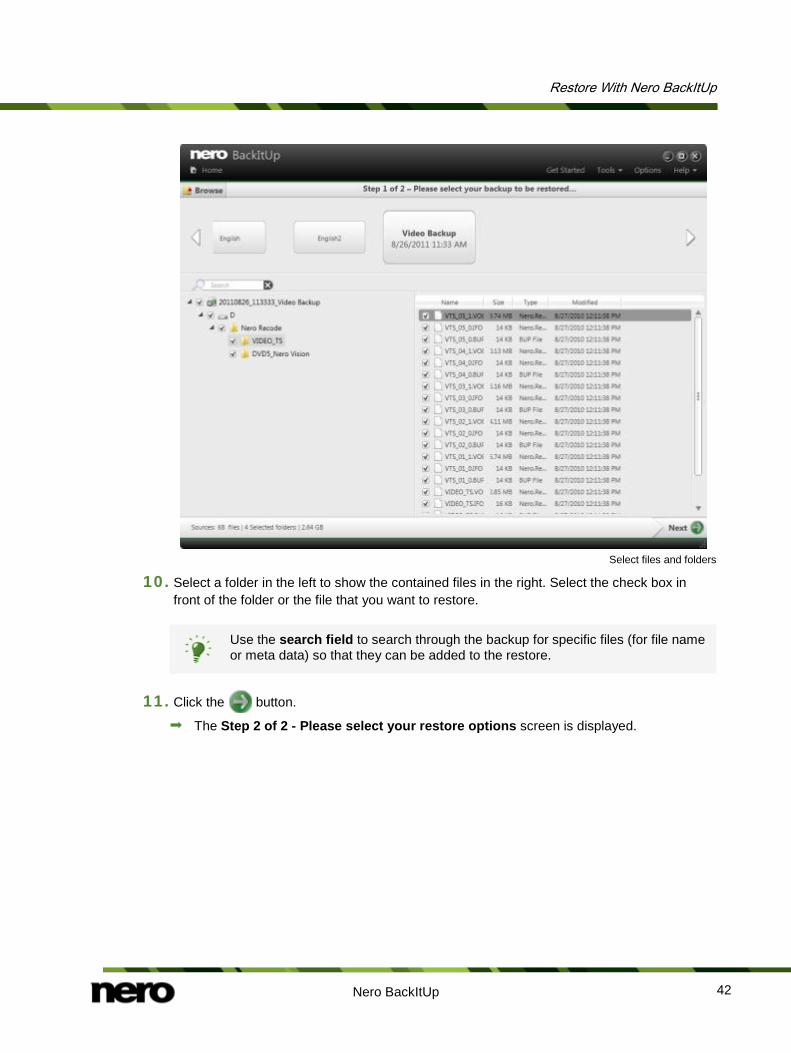
Select files and folders
10. Select a folder in the left to show the contained files in the right. Select the check box in front of the folder or the file that you want to restore.
Use the search field to search through the backup for specific files (for file name or meta data) so that they can be added to the restore.
11. Click the button.
The Step 2 of 2 - Please select your restore options screen is displayed.
Restore With Nero BackItUp
Nero BackItUp 43
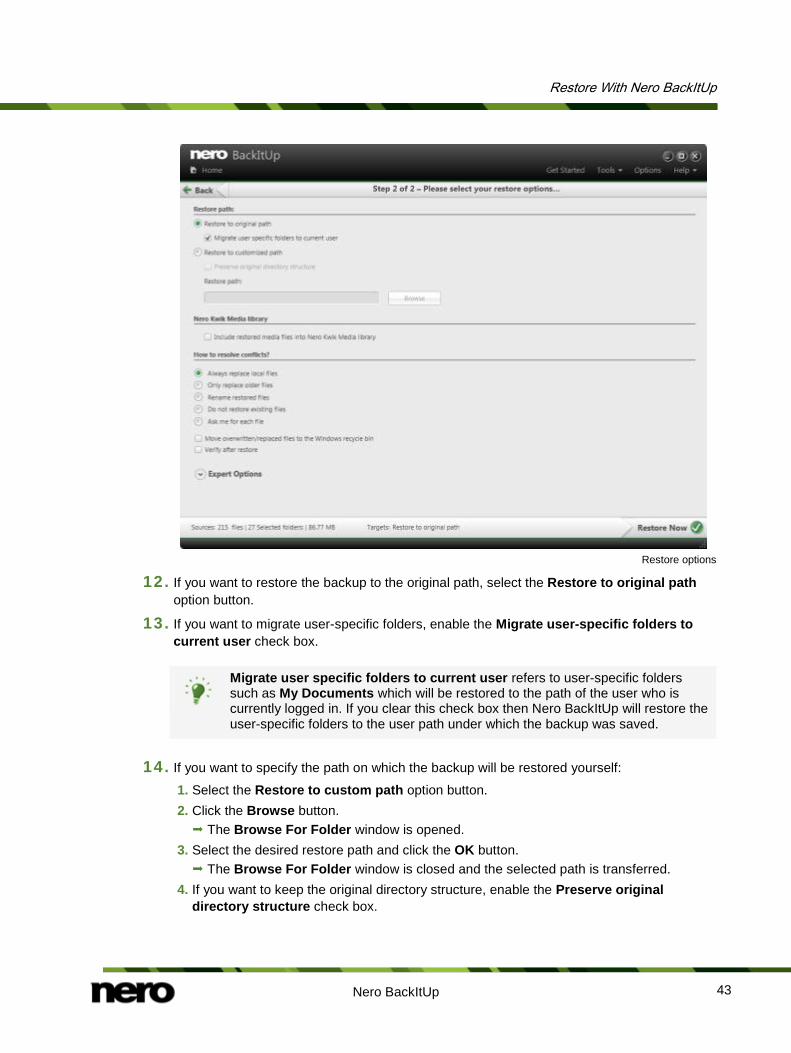
Restore options
12. If you want to restore the backup to the original path, select the Restore to original path option button.
13. If you want to migrate user-specific folders, enable the Migrate user-specific folders to current user check box.
Migrate user specific folders to current user refers to user-specific folders such as My Documents which will be restored to the path of the user who is currently logged in. If you clear this check box then Nero BackItUp will restore the user-specific folders to the user path under which the backup was saved.
14. If you want to specify the path on which the backup will be restored yourself:
1. Select the Restore to custom path option button. 2. Click the Browse button.
The Browse For Folder window is opened. 3. Select the desired restore path and click the OK button.
The Browse For Folder window is closed and the selected path is transferred. 4. If you want to keep the original directory structure, enable the Preserve original
directory structure check box.
Restore With Nero BackItUp
Nero BackItUp 44
Checkbox Include restored Media files into Nero Media Library Allows to automatically add the target folder you had chosen for backup to the list of the be indexed folders. When media files are added to an indexed folder, you are gained instantly access to it from Nero MediaBrowser or Nero Kwik Media. Only available if Nero Kwik Media is installed.
15. Use the How to resolve conflicts option buttons to choose the action to take when a file to be restored is already (or is still) on the computer.
16. If necessary specify additional settings in the Expert Options area (see Expert Options Overview→ 46).
17. Click the button.
The restore is carried out and the final screen is displayed. You can follow the process status in the task bar.
See also Backup and Restore Expert Options Overview →46
11.2 Restore Drive Backup With Nero BackItUp you can restore drive backups. During this process, the drive backup content is restored. Programs and operating systems are restored. Problems usually occur if you want to restore an active hard drive or partition, e.g. locking an active hard drive or partition for the restore process is usually not possible. In this case, we recommend carrying out the restore process with Nero BackItUp ImageTool, which you create with Nero BackItUp.
Restoring drives and programs is possible from the following backups:
▲ Nero LIVEBackup ▲ Drive Backup
Administrator rights You must have administrator rights in order to back up and restore hard drives and partitions.
For technical reasons, only one single partition or one hard drive with all partitions can be restored during one restore process.
To restore a drive backup, proceed as follows:
1. Click the Additional Tasks button.
The Additional Tasks area is displayed.
2. Click the Restore backups entry link in the Manage and Restore area.
Restore With Nero BackItUp
Nero BackItUp 45
The Step 1 of 2 – Please select your backup to be restored screen is displayed. The executed backups are displayed in the general job navigation slider.
3. Make the backup available:
1. If the backup is located on a disc, insert the disc in a drive. 2. If the backup has been saved to hard drive, network drive, or removable medium, ensure
that your computer has access to the respective drive.
4. Select the desired backup job in the job navigation slider with the help of the arrow buttons.
5. If your selected backup job has several runs, select the version in the upper run navigation slider. The partitions of the backup are displayed in the left area. Partitions that were not part of
the drive backup are grayed out.
6. If the backup you want to restore is not displayed, click Browse > From local to search for it on hard drive or Browse > From FTP to search for it on a FTP server.
7. Select the option button preceding the partition that you want to restore. Information about the backed up partition, like Backup date, Partition size and Data size, is displayed in the right area.
8. Click the button.
The Step 2 of 2 – Please select the target for the restore screen is displayed. The partition to be restored and a target for restore are shown. The default restore target will be the original location.
9. If you want to restore the backup to another location:
1. Click the arrow icon. 2. Specify the target in the drop-down menu.
You can choose any partition as target as long as the partition size is greater than or equal to the used space (data size) of the source partition to be restored.
The target partition will be overwritten during the restore process. All existing data of the target partition will be lost!
10. If necessary specify additional settings in the Expert Options area (see Expert options→ 46).
11. Click the button.
The restore is carried out and the final screen is displayed. You can follow the process status in the task bar.
Backup and Restore Expert Options Overview
Nero BackItUp 46
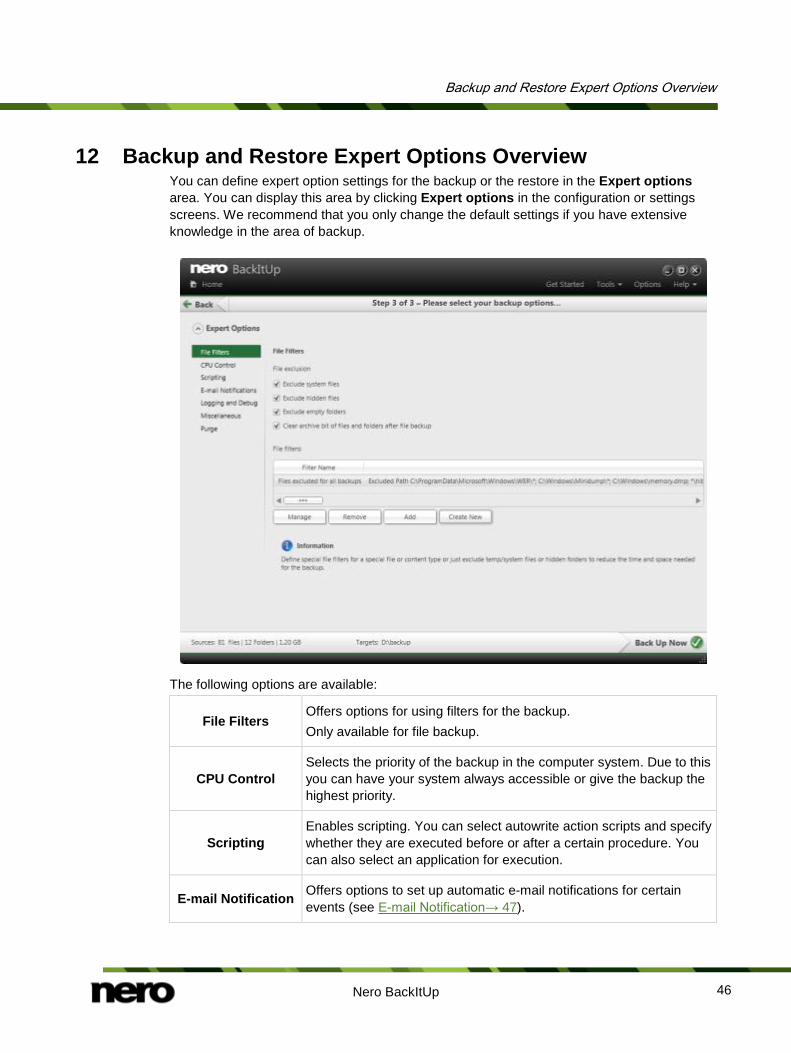
12 Backup and Restore Expert Options Overview You can define expert option settings for the backup or the restore in the Expert options area. You can display this area by clicking Expert options in the configuration or settings screens. We recommend that you only change the default settings if you have extensive knowledge in the area of backup.
The following options are available:
File Filters Offers options for using filters for the backup. Only available for file backup.
CPU Control Selects the priority of the backup in the computer system. Due to this you can have your system always accessible or give the backup the highest priority.
Scripting Enables scripting. You can select autowrite action scripts and specify whether they are executed before or after a certain procedure. You can also select an application for execution.
E-mail Notification Offers options to set up automatic e-mail notifications for certain events (see E-mail Notification→ 47).
Backup and Restore Expert Options Overview
Nero BackItUp 47
Logging and Debug
Selects the detail level of the log file. You can include the log file in the backup or store it elsewhere.
Miscellaneous Offers several specific options (see Miscellaneous→ 48).
Burning Offers several burn options such as choosing the write speed and automatically erasing rewritable discs. Only available for backups.
Purge Offers options to delete backups automatically. Only available for backups.
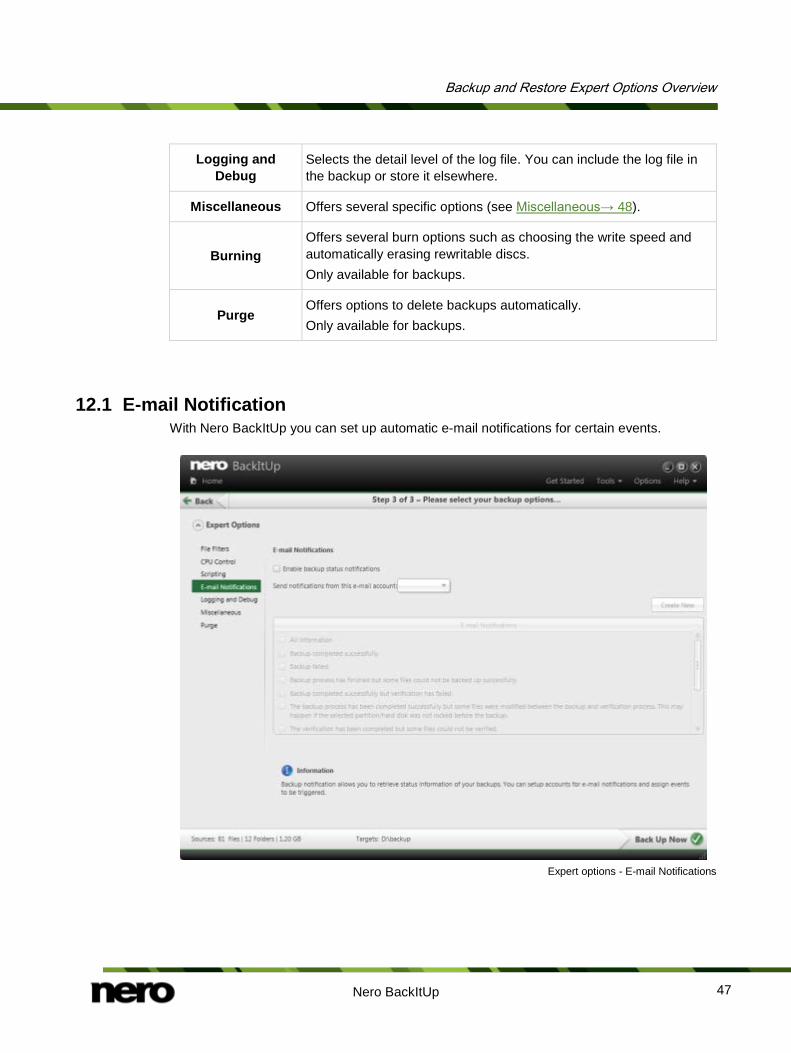
12.1 E-mail Notification With Nero BackItUp you can set up automatic e-mail notifications for certain events.
Expert options - E-mail Notifications
Backup and Restore Expert Options Overview
Nero BackItUp 48
The following setting options are available:
Check box Enable backup/restore
status notifications Enables sending of e-mail notifications.
Drop-down menu Send notifications from this
e-mail account
Chooses the account used for sending the e-mail notifications.
Button Create New
Opens the E-mail accounts window, where you can create a new e-mail account.
List E-mail Notifications
Opens the E-mail events window, where you can enter the e-mail address to which the notification will be sent. Click All information to select all events as a trigger for e-mail notifications.
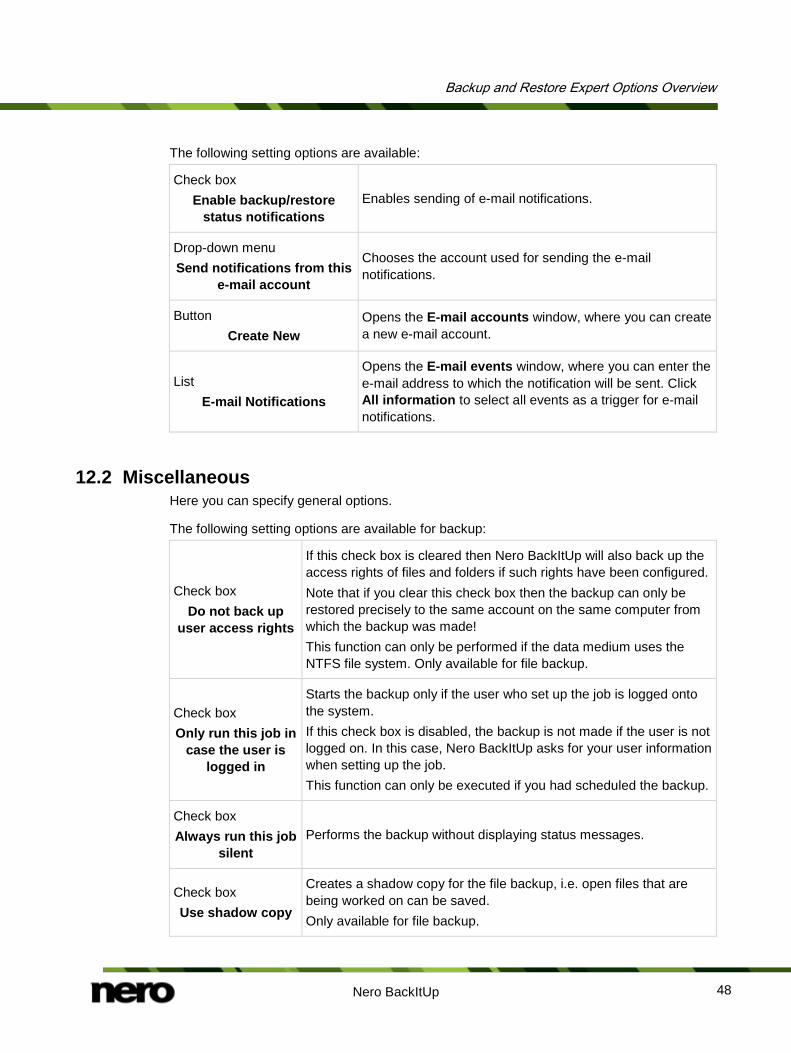
12.2 Miscellaneous Here you can specify general options.
The following setting options are available for backup:
Check box Do not back up
user access rights
If this check box is cleared then Nero BackItUp will also back up the access rights of files and folders if such rights have been configured. Note that if you clear this check box then the backup can only be restored precisely to the same account on the same computer from which the backup was made! This function can only be performed if the data medium uses the NTFS file system. Only available for file backup.
Check box Only run this job in
case the user is logged in
Starts the backup only if the user who set up the job is logged onto the system. If this check box is disabled, the backup is not made if the user is not logged on. In this case, Nero BackItUp asks for your user information when setting up the job. This function can only be executed if you had scheduled the backup.
Check box Always run this job
silent Performs the backup without displaying status messages.
Check box Use shadow copy
Creates a shadow copy for the file backup, i.e. open files that are being worked on can be saved. Only available for file backup.
Backup and Restore Expert Options Overview
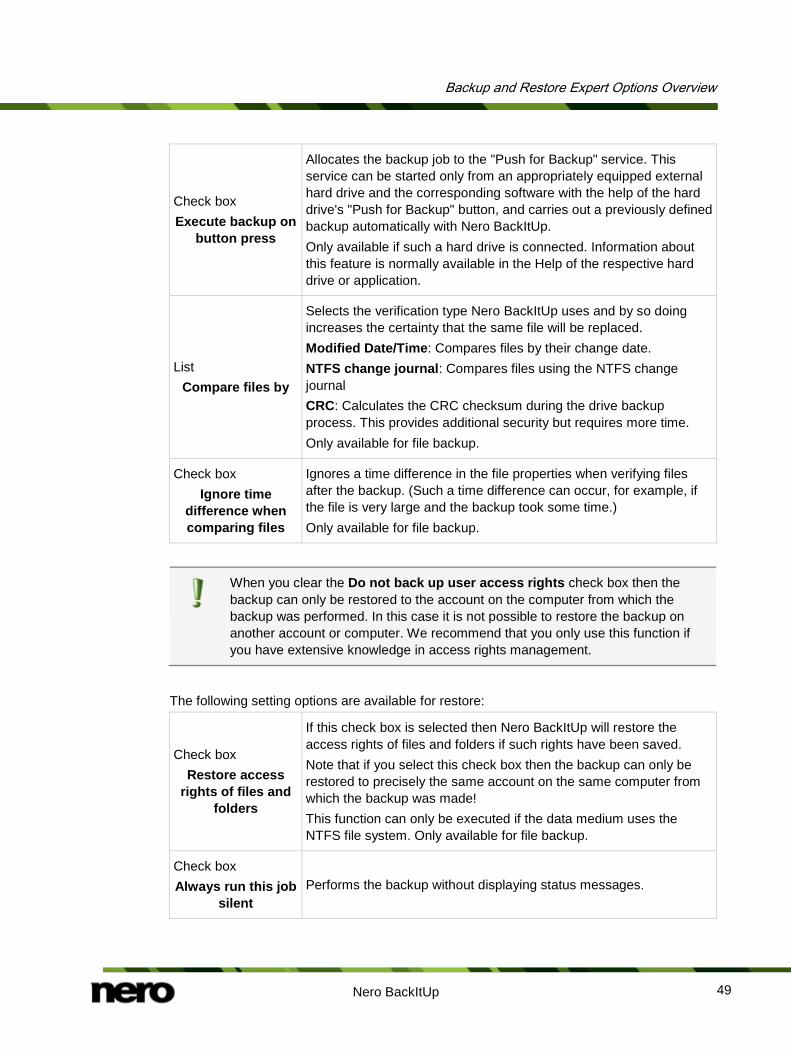
Nero BackItUp 49
Check box Execute backup on
button press
Allocates the backup job to the "Push for Backup" service. This service can be started only from an appropriately equipped external hard drive and the corresponding software with the help of the hard drive's "Push for Backup" button, and carries out a previously defined backup automatically with Nero BackItUp. Only available if such a hard drive is connected. Information about this feature is normally available in the Help of the respective hard drive or application.
List Compare files by
Selects the verification type Nero BackItUp uses and by so doing increases the certainty that the same file will be replaced. Modified Date/Time: Compares files by their change date. NTFS change journal: Compares files using the NTFS change journal CRC: Calculates the CRC checksum during the drive backup process. This provides additional security but requires more time. Only available for file backup.
Check box Ignore time
difference when comparing files
Ignores a time difference in the file properties when verifying files after the backup. (Such a time difference can occur, for example, if the file is very large and the backup took some time.) Only available for file backup.
When you clear the Do not back up user access rights check box then the backup can only be restored to the account on the computer from which the backup was performed. In this case it is not possible to restore the backup on another account or computer. We recommend that you only use this function if you have extensive knowledge in access rights management.
The following setting options are available for restore:
Check box Restore access
rights of files and folders
If this check box is selected then Nero BackItUp will restore the access rights of files and folders if such rights have been saved. Note that if you select this check box then the backup can only be restored to precisely the same account on the same computer from which the backup was made! This function can only be executed if the data medium uses the NTFS file system. Only available for file backup.
Check box Always run this job
silent Performs the backup without displaying status messages.
Manage Your Backup and Sync Job Screen
Nero BackItUp 50
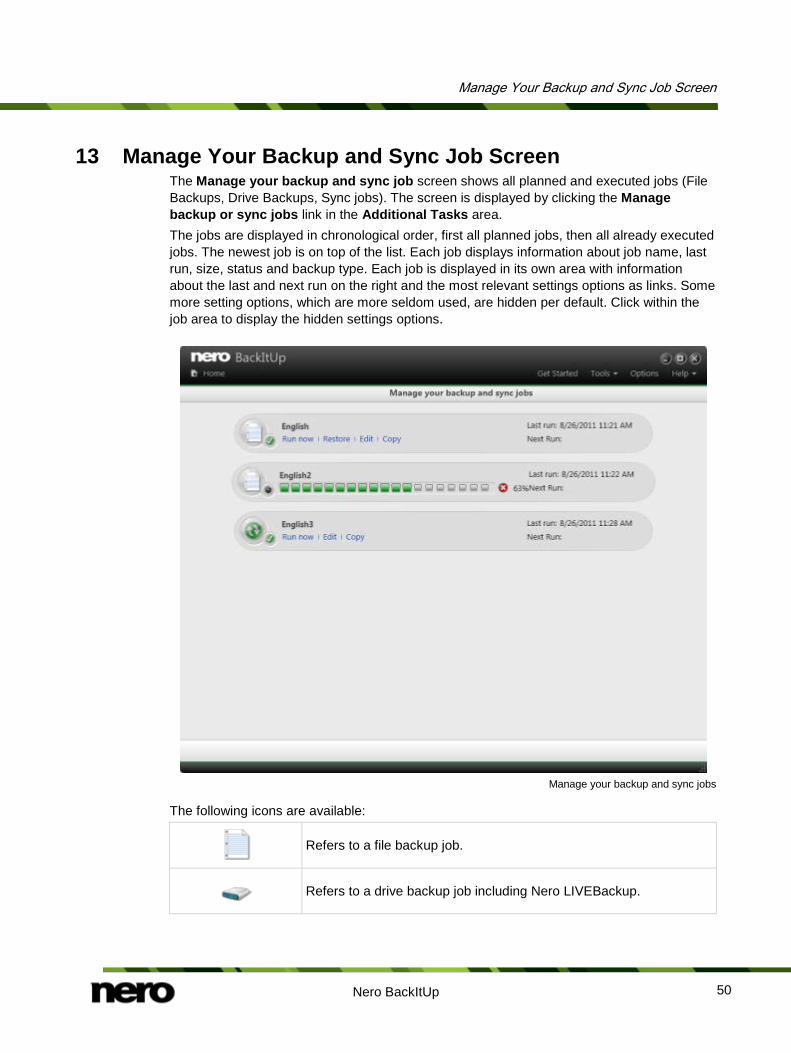
13 Manage Your Backup and Sync Job Screen The Manage your backup and sync job screen shows all planned and executed jobs (File Backups, Drive Backups, Sync jobs). The screen is displayed by clicking the Manage backup or sync jobs link in the Additional Tasks area. The jobs are displayed in chronological order, first all planned jobs, then all already executed jobs. The newest job is on top of the list. Each job displays information about job name, last run, size, status and backup type. Each job is displayed in its own area with information about the last and next run on the right and the most relevant settings options as links. Some more setting options, which are more seldom used, are hidden per default. Click within the job area to display the hidden settings options.
Manage your backup and sync jobs
The following icons are available:
Refers to a file backup job.
Refers to a drive backup job including Nero LIVEBackup.
Manage Your Backup and Sync Job Screen
Nero BackItUp 51
Refers to a sync job.
The following setting options are available for a job:
Run now Executes the job immediately.
Restore Displays the restore view. The latest backup of the selected job is preselected. Only available for a backup job.
Edit Displays the job’s configuration allowing you to change them.
Copy Saves a copy of the selected job under a new name allowing you to change the settings.
The following setting options are available in the hidden area:
Show Backups Displays the list of backups which belong to that job. The button then changes to the Hide Backups button. Only available for a backup job.
Backup list
Shows the backup runs belonging to the selected job in a chronological order. Information like backup name, execution date, data size, status and backup type are given. If a backup has failed to be executed, you are able to view, save and print the log file from here. Only available for a backup job.
Button Delete Selected
Deletes the selected backup run.That means, that the references in Nero BackItUp to the backup run are removed. Note, that the backup file itself will not be deleted! Note that deleting single backup runs here may cause problems when restoring in case the information is needed to complete the whole restore! In general, it may be safe to delete the latest incremental backup (as incremental backup runs are compared to the last run). It may also be safe to delete any middle differential backup (as differential backup runs are compared to the first full backup). Only available for a backup job.
Button Activate /
Deactivate
Activates/Deactivates the job. The option to deactivate the job rather than to delete them has the benefit that all information is kept and that you are able to activate the job at any time again.
Manage Your Backup and Sync Job Screen
Nero BackItUp 52
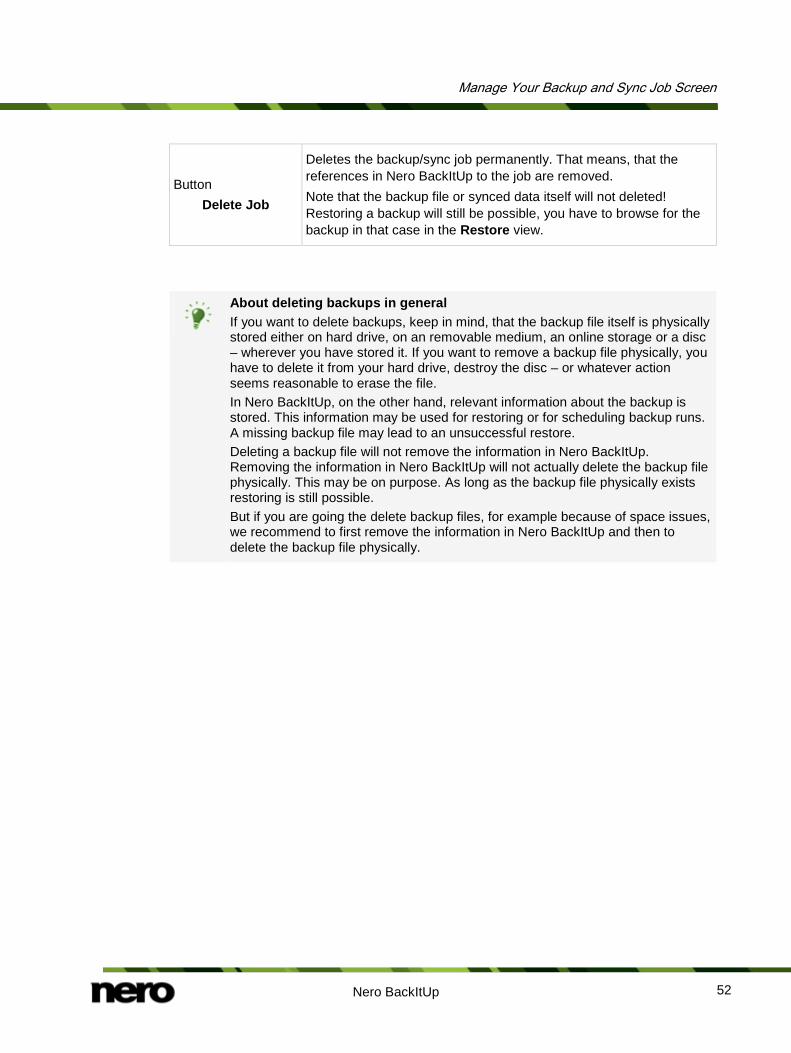
Button Delete Job
Deletes the backup/sync job permanently. That means, that the references in Nero BackItUp to the job are removed. Note that the backup file or synced data itself will not deleted! Restoring a backup will still be possible, you have to browse for the backup in that case in the Restore view.
About deleting backups in general If you want to delete backups, keep in mind, that the backup file itself is physically stored either on hard drive, on an removable medium, an online storage or a disc – wherever you have stored it. If you want to remove a backup file physically, you have to delete it from your hard drive, destroy the disc – or whatever action seems reasonable to erase the file. In Nero BackItUp, on the other hand, relevant information about the backup is stored. This information may be used for restoring or for scheduling backup runs. A missing backup file may lead to an unsuccessful restore. Deleting a backup file will not remove the information in Nero BackItUp. Removing the information in Nero BackItUp will not actually delete the backup file physically. This may be on purpose. As long as the backup file physically exists restoring is still possible. But if you are going the delete backup files, for example because of space issues, we recommend to first remove the information in Nero BackItUp and then to delete the backup file physically.
Tools
Nero BackItUp 53
14 Tools
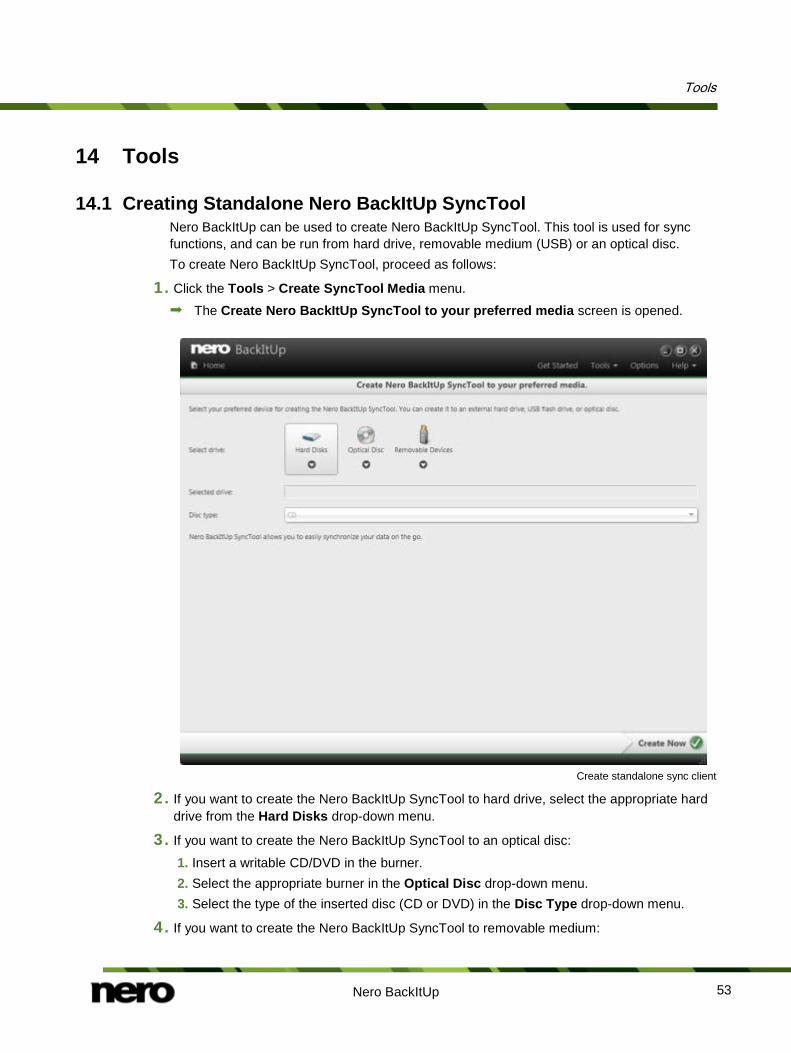
14.1 Creating Standalone Nero BackItUp SyncTool Nero BackItUp can be used to create Nero BackItUp SyncTool. This tool is used for sync functions, and can be run from hard drive, removable medium (USB) or an optical disc. To create Nero BackItUp SyncTool, proceed as follows:
1. Click the Tools > Create SyncTool Media menu.
The Create Nero BackItUp SyncTool to your preferred media screen is opened.
Create standalone sync client
2. If you want to create the Nero BackItUp SyncTool to hard drive, select the appropriate hard drive from the Hard Disks drop-down menu.
3. If you want to create the Nero BackItUp SyncTool to an optical disc:
1. Insert a writable CD/DVD in the burner. 2. Select the appropriate burner in the Optical Disc drop-down menu. 3. Select the type of the inserted disc (CD or DVD) in the Disc Type drop-down menu.
4. If you want to create the Nero BackItUp SyncTool to removable medium:
Tools
Nero BackItUp 54
1. Connect the removable medium to your computer. 2. Select the removable medium from the Removable Media drop-down menu.
5. Click the button.
The creation process begins; you can track the process via the messages in the task bar. After the creation process is completed, the disc is ejected. You have created the standalone Nero BackItUp SyncTool and can now start it.
See also Nero BackItUp SyncTool →73
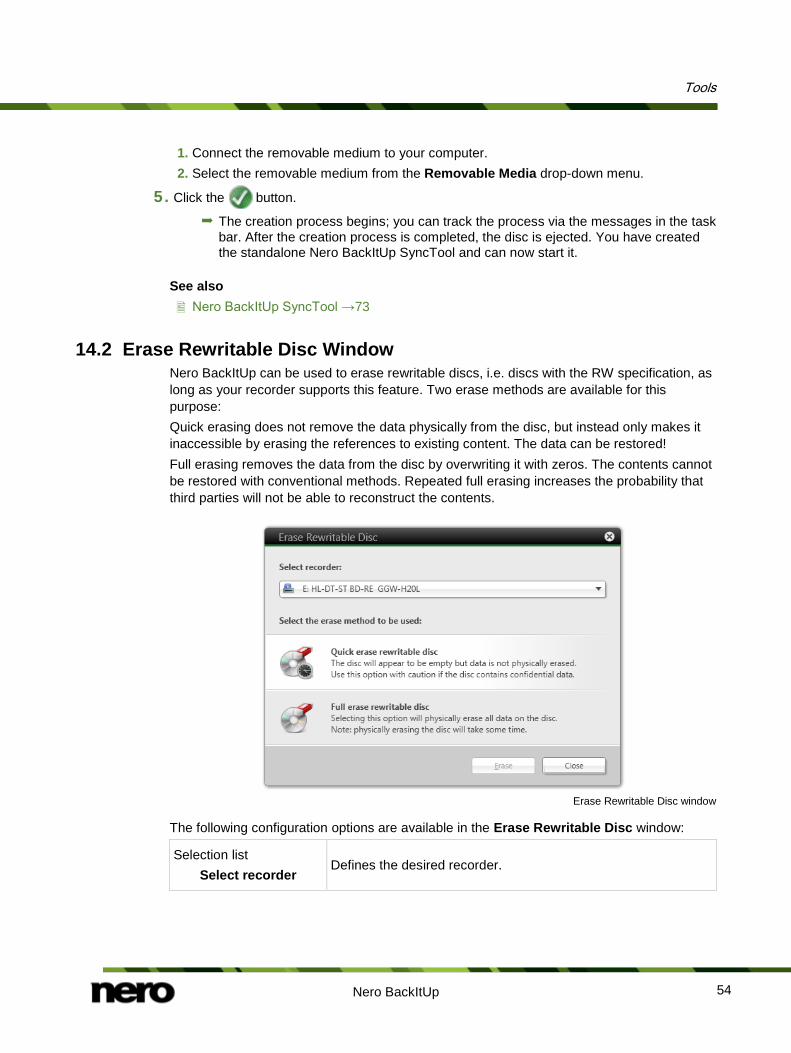
14.2 Erase Rewritable Disc Window Nero BackItUp can be used to erase rewritable discs, i.e. discs with the RW specification, as long as your recorder supports this feature. Two erase methods are available for this purpose: Quick erasing does not remove the data physically from the disc, but instead only makes it inaccessible by erasing the references to existing content. The data can be restored! Full erasing removes the data from the disc by overwriting it with zeros. The contents cannot be restored with conventional methods. Repeated full erasing increases the probability that third parties will not be able to reconstruct the contents.
Erase Rewritable Disc window
The following configuration options are available in the Erase Rewritable Disc window:
Selection list Select recorder
Defines the desired recorder.
Tools
Nero BackItUp 55
Selection list Select the erase
method to be used
Defines the erase method. Two options are available: The Quick-erase rewritable disc method does not physically erase all data from the disc, but only the references to the contents. The disc will appear to be empty even though the data is still physically available. Erasing a disc using this method takes between one and two minutes. The Full-erase rewritable disc method physically erases all data from the disc. The contents cannot be restored with conventional methods. Repeated full erasing increases the probability that third parties will not be able to reconstruct the contents. Erasing the disc using this method takes longer than the other method, depending on the type of disc involved.
Button Erase
Starts the erase process.
Button Cancel
Cancels the action and closes the window.

Nero BackItUp Options Overview
Nero BackItUp 56
15 Nero BackItUp Options Overview You can define options for working with Nero BackItUp in the Options window. You can open the window via the Options button.
The following options are available:
General
Backs up files and folders starting from the shell context menu. The shell context menu offers various pertinent information and is opened by clicking a file or folder with the right mouse button in the Windows Explorer.
Help Enables tooltips. You can also re-enable all windows that you had disabled with the "Never show me this message again" check box.
Remote Sets up remote targets. You can add, change, or remove FTP server. In addition you can enable and configure proxy settings.
E-mail accounts Sets up e-mail account information.
File Filters Defines file filters which can be used for backups and restores. Depending on the definition, the filter includes or excludes certain type of files. The filters can also be combined.
See also Setting Up FTP Server Connection →56 Remote Proxy →58 Setting Up E-Mail Account →58 Creating Filter →60
15.1 Setting Up FTP Server Connection With Nero BackItUp you can enter the connection information for your FTP server so that you can choose it as a backup target. The FTP server itself is not provided by Nero BackItUp. You usually gain access to it through an FTP server provider such as a webspace provider. To set up a new FTP server connection, proceed as follows:
1. Click the Options button. The Options window is opened.
2. Click the Remote entry in the selection list. The Remote screen is displayed with the FTP tab on top.
3. Click the New button. The Remote Host Settings window is opened.
Nero BackItUp Options Overview
Nero BackItUp 57
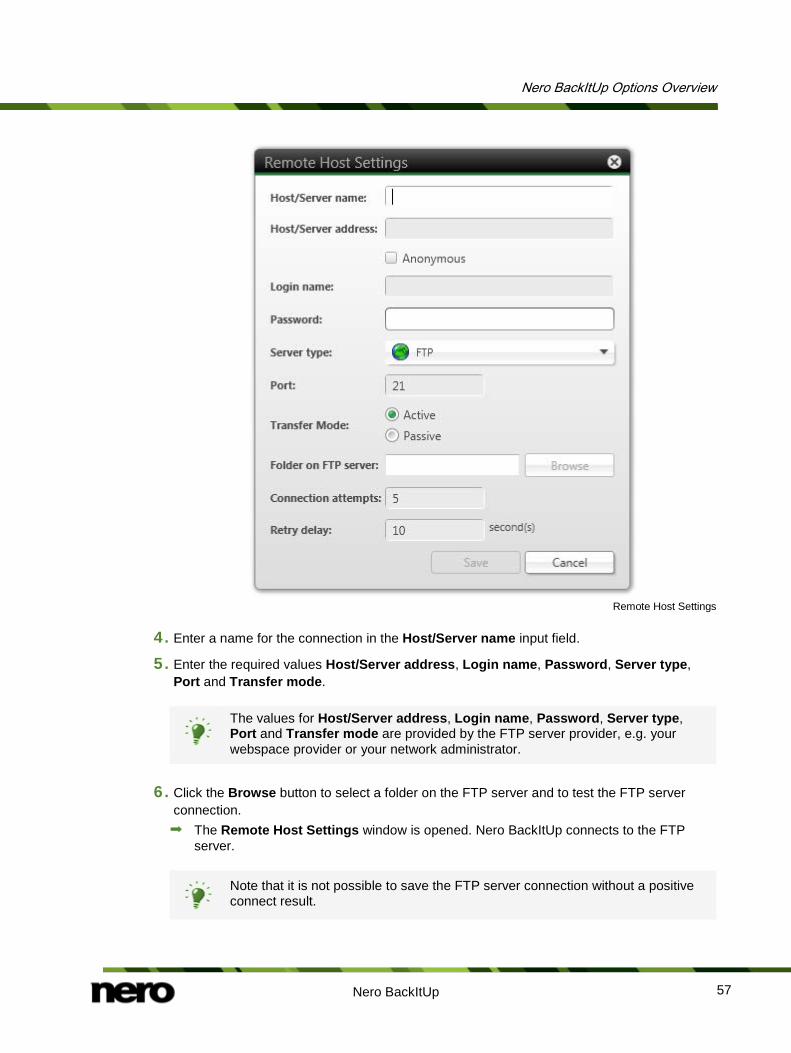
Remote Host Settings
4. Enter a name for the connection in the Host/Server name input field.
5. Enter the required values Host/Server address, Login name, Password, Server type, Port and Transfer mode.
The values for Host/Server address, Login name, Password, Server type, Port and Transfer mode are provided by the FTP server provider, e.g. your webspace provider or your network administrator.
6. Click the Browse button to select a folder on the FTP server and to test the FTP server connection. The Remote Host Settings window is opened. Nero BackItUp connects to the FTP
server.
Note that it is not possible to save the FTP server connection without a positive connect result.
Nero BackItUp Options Overview
Nero BackItUp 58
7. Select a folder or create a new folder on the FTP server where Nero BackItUp should store the backup.
8. Click the OK button.
9. Click the Save button.
The FTP server is saved and displayed in the list of FTP servers. You can now store other FTP server information or close the window and use the FTP server for backups and restores.
15.2 Remote Proxy You can enable and configure proxy server on the Remote > Proxy tab in the Options window. You only need to configure the proxy if you need to use it for accessing the Internet or any other network. In this case, the proxy settings are relevant for all network task you can do with Nero BackItUp such as using online storage, FTP server, network connections, and e-mail notifications.
The following setting options are available:
Check box Enable proxy
server
Activates the proxy server connection information which are now used by Nero BackItUp.
Option button Use system
settings
Uses the proxy settings. This is only possible if you have configured and stored proxy settings on your system.
Option button Use local settings
Uses the local proxy settings and allows you to enter them in the input fields below.
The correct settings for the proxy connection need to be provided by your system administrator or internet provider.
The created proxy connection is saved when creating a bootable CD/DVD and applied to the respective Nero BackItUp ImageTool options.
15.3 Setting Up E-Mail Account In Nero BackItUp you can add your e-mail account information. Thus can be used to send status information about backup and restore processes via e-mail. The receiver is later on added in the same screen where you set up options regarding your backup or restore (see Backup And Restore Expert Options→ 46).
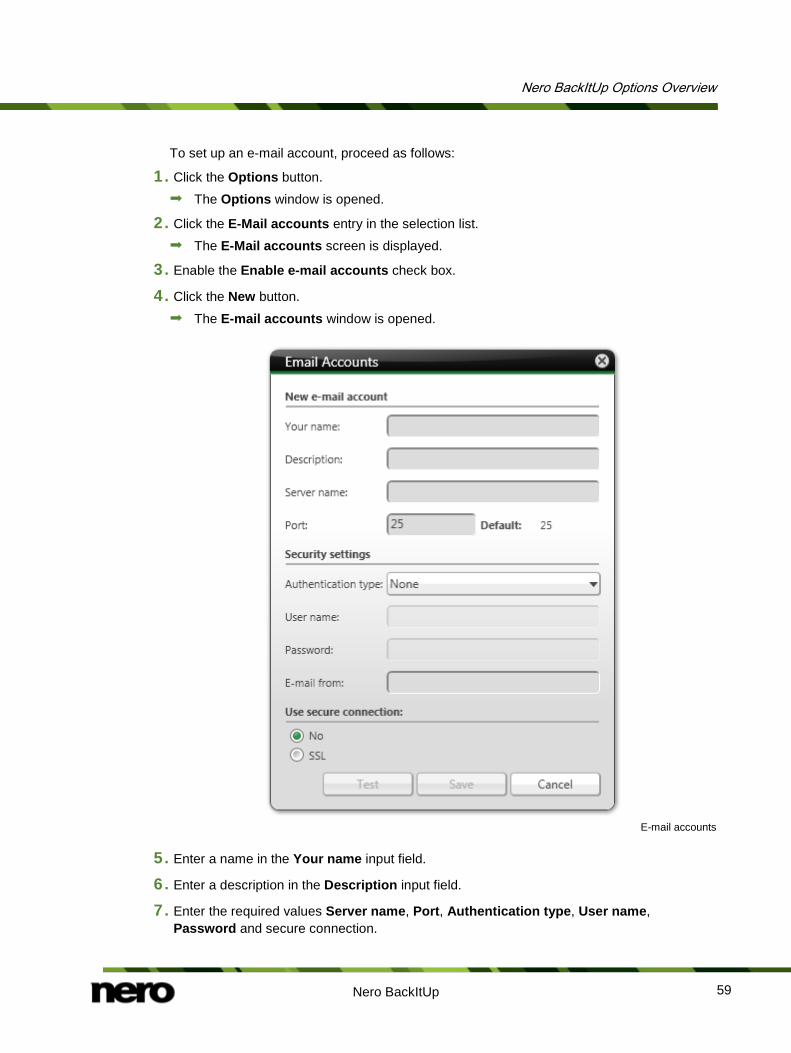
Nero BackItUp Options Overview
Nero BackItUp 59
To set up an e-mail account, proceed as follows:
1. Click the Options button. The Options window is opened.
2. Click the E-Mail accounts entry in the selection list. The E-Mail accounts screen is displayed.
3. Enable the Enable e-mail accounts check box.
4. Click the New button.
The E-mail accounts window is opened.
E-mail accounts
5. Enter a name in the Your name input field.
6. Enter a description in the Description input field.
7. Enter the required values Server name, Port, Authentication type, User name, Password and secure connection.
Nero BackItUp Options Overview
Nero BackItUp 60
Note, that the Server name input field requires an SMTP server, because Nero BackItUp uses the account information only to send e-mails (not to receive). You need to enter your complete e-mail address ([email protected]) in the User name input field. The values for Server name, Port, Authentication type and the secure connection are provided by your e-mail provider or your network administrator.
8. Enter your e-mail address in the E-Mail from input field.
9. Click the Test button to test the connection. A message window is displayed.
Note that it is not possible to save the e-mail account without a connection to the Internet.
10. Click the Save button. The e-mail account is saved and displayed in the list. You can now store other e-
mail account information or close the window and use the e-mail account for e-mail notifications during backups and restores.
15.4 Creating Filter You can create filters to filter certain files for backup or restore. You can either create filters for a particular backup or restore, or you can create them for all backups and restores. One filter does always have one specific filter criteria! First, you select one filter criteria in the respective area, followed by adding the specifics to the filter, and then the filter is saved. To create a filter that will subsequently be available for every backup and every restore, proceed as follows:
1. Click the Options button. The Options window is opened.
2. Click the File Filters button.
If you want to create filters for a special backup/restore, click the Create New button in the Expert options area in the File Backup/Restore configure screen.
3. Click the New button. The Create a New Filter window is opened.
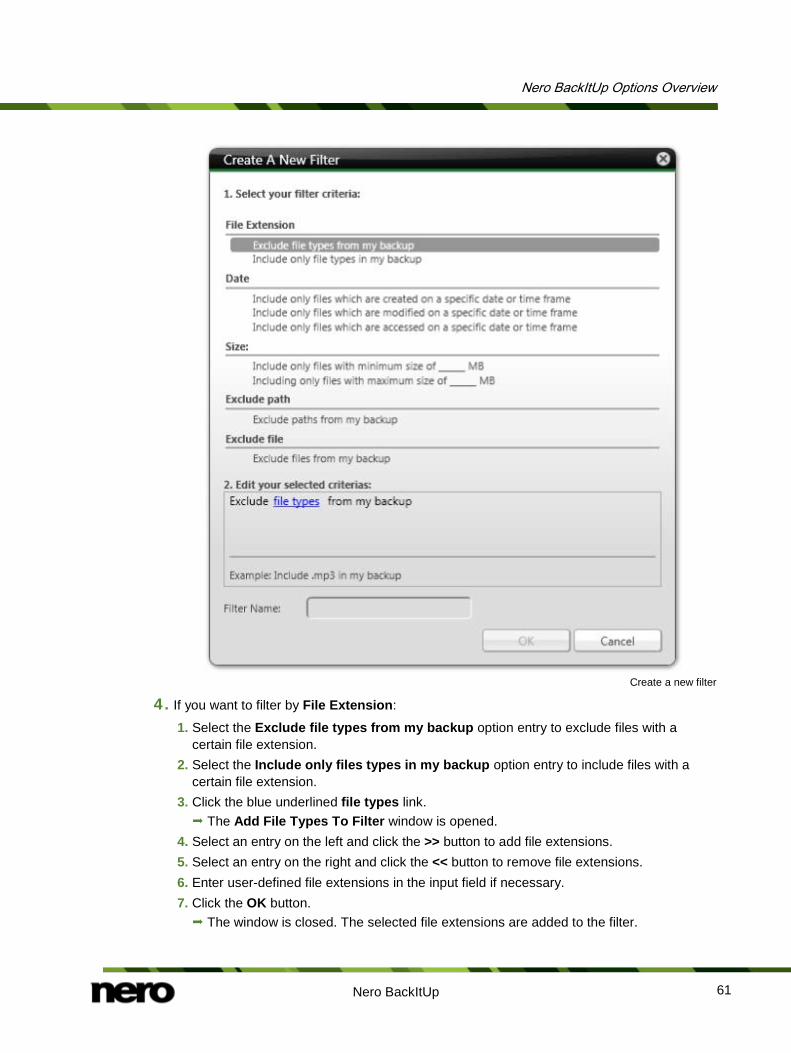
Nero BackItUp Options Overview
Nero BackItUp 61
Create a new filter
4. If you want to filter by File Extension:
1. Select the Exclude file types from my backup option entry to exclude files with a certain file extension.
2. Select the Include only files types in my backup option entry to include files with a certain file extension.
3. Click the blue underlined file types link. The Add File Types To Filter window is opened.
4. Select an entry on the left and click the >> button to add file extensions. 5. Select an entry on the right and click the << button to remove file extensions. 6. Enter user-defined file extensions in the input field if necessary. 7. Click the OK button.
The window is closed. The selected file extensions are added to the filter.
Nero BackItUp Options Overview
Nero BackItUp 62
5. If you want to filter by Date:
1. Select the option entry to include only files which are created, modified or accessed on a specific date or time frame.
2. Click the blue underlined date or time frame link. The Select Date or Time Frame window is opened.
3. Select a specific date using the calendar or a time frame using the calendar or the input fields.
4. Click the OK button. The window is closed. The selected date or period of time is added to the filter.
6. If you want to filter by Size:
1. Select with the option entries whether the desired files must have a certain minimum or maximum size.
2. Specify the size in MB in the input field.
7. If you want to exclude a specific path:
1. Select the Exclude path from my backup option entry. 2. Click the blue underlined path link.
The Exclude Path window is opened. 3. Click the Add button.
A browser window is opened. 4. Select the folder you want to exclude and click the OK button.
The window is closed. The path to the selected folder is added to the The following paths are excluded list. The folder and all of its subfolders are excluded in the filtering process.
5. Add additional paths as desired. 6. If you want to select a path again, click the Remove button. 7. Click the OK button.
The window is closed. The selected path is added to the filter.
8. If you want to exclude a specific file:
1. Select the Exclude files from my backup option entry. 2. Click the blue underlined files link.
The Exclude Files window is opened. 3. Click the Add button.
A browser window is opened. 4. Select the file you want to exclude and click the OK button.
The window is closed. The selected file is added to the The following files are excluded list.
5. Add additional files as desired. 6. If you want to select a file again, click the Remove button. 7. Click the OK button.
The window is closed. The selected file is added to the filter.
Nero BackItUp Options Overview
Nero BackItUp 63
9. Enter a name for the filter in the Filter name input field.
10. If you have opened the Create a New Filter window via the File Backup or Restore screen but want the filter to be available in the future for each backup or restore, select the Save this filter check box.
11. Click the OK button. The window is closed and the created filter is applied and saved.
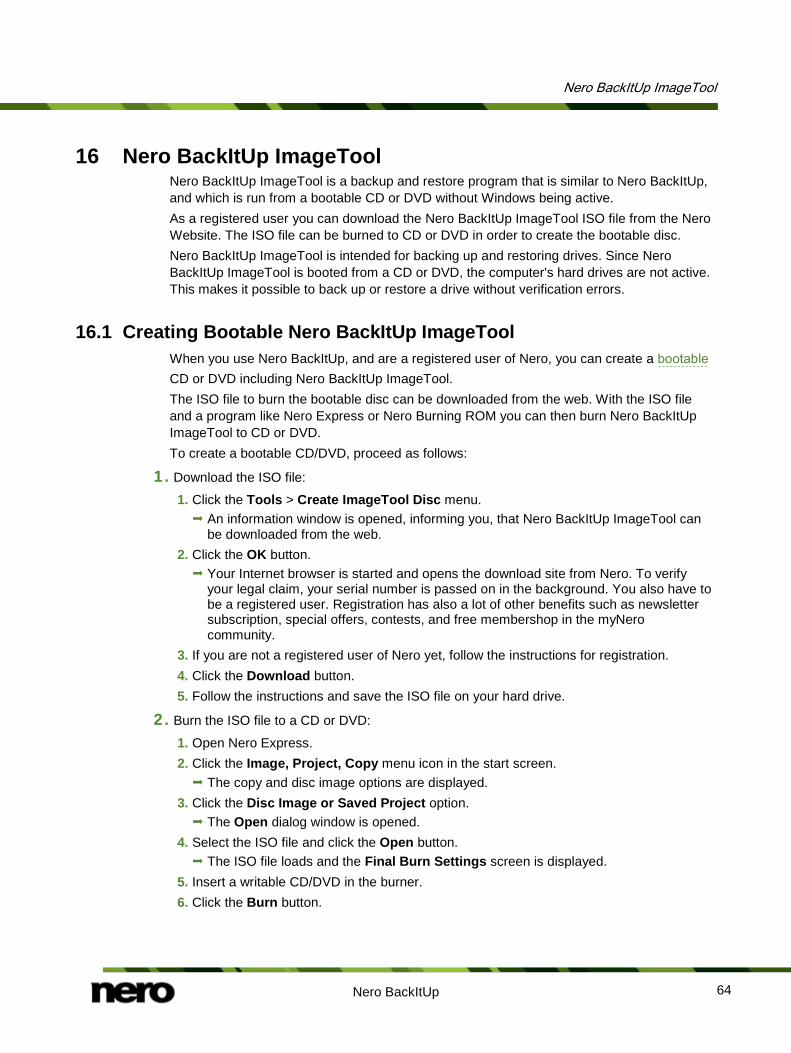
Nero BackItUp ImageTool
Nero BackItUp 64
16 Nero BackItUp ImageTool Nero BackItUp ImageTool is a backup and restore program that is similar to Nero BackItUp, and which is run from a bootable CD or DVD without Windows being active. As a registered user you can download the Nero BackItUp ImageTool ISO file from the Nero Website. The ISO file can be burned to CD or DVD in order to create the bootable disc. Nero BackItUp ImageTool is intended for backing up and restoring drives. Since Nero BackItUp ImageTool is booted from a CD or DVD, the computer's hard drives are not active. This makes it possible to back up or restore a drive without verification errors.
16.1 Creating Bootable Nero BackItUp ImageTool When you use Nero BackItUp, and are a registered user of Nero, you can create a bootable CD or DVD including Nero BackItUp ImageTool. The ISO file to burn the bootable disc can be downloaded from the web. With the ISO file and a program like Nero Express or Nero Burning ROM you can then burn Nero BackItUp ImageTool to CD or DVD. To create a bootable CD/DVD, proceed as follows:
1. Download the ISO file:
1. Click the Tools > Create ImageTool Disc menu. An information window is opened, informing you, that Nero BackItUp ImageTool can
be downloaded from the web. 2. Click the OK button.
Your Internet browser is started and opens the download site from Nero. To verify your legal claim, your serial number is passed on in the background. You also have to be a registered user. Registration has also a lot of other benefits such as newsletter subscription, special offers, contests, and free membershop in the myNero community.
3. If you are not a registered user of Nero yet, follow the instructions for registration. 4. Click the Download button. 5. Follow the instructions and save the ISO file on your hard drive.
2. Burn the ISO file to a CD or DVD:
1. Open Nero Express. 2. Click the Image, Project, Copy menu icon in the start screen.
The copy and disc image options are displayed. 3. Click the Disc Image or Saved Project option.
The Open dialog window is opened. 4. Select the ISO file and click the Open button.
The ISO file loads and the Final Burn Settings screen is displayed. 5. Insert a writable CD/DVD in the burner. 6. Click the Burn button.
Nero BackItUp ImageTool
Nero BackItUp 65
The Burn Process screen is displayed and the burn process starts. You can follow the process status in the status bar. After the creation process is completed, the disc is ejected.
The ISO file can also be burned to CD/DVD with Nero Burning ROM. Further instruction on how to burn with Nero Burning ROM and more detailled information on burning with Nero Express can be found in the respective help files. Manuals can be downloaded for free from the support section at www.nero.com, and the online helps can be accessed from within the applications. Both Nero Express and Nero Burning ROM are part of Nero 12 and Nero 12 Platinum and Nero Express is part of Nero BurnExpress 2. If you are a user of Nero BackItUp 12 and do not have Nero Express / Nero Burning ROM, you can always upgrade to the full suite version with all the features, or use any other burn application that is capable of burning ISO files.
You have created a bootable disc that can be used to start Nero BackItUp ImageTool.
16.2 Starting Nero BackItUp ImageTool Nero BackItUp ImageTool is started from the bootable CD/DVD that you created beginning with Nero BackItUp. If booting from the CD/DVD, the computer is started without having to access the hard drive. Since the hard drive is disabled, backup or restore without verification errors is possible.
The following prerequisites must be fulfilled for the computer to be able to boot from the disc:
▲ The start sequence must be set in the BIOS of the computer in such a way that the drive is addressed first as the boot drive (start sequence CD-ROM, C, A for instance).
▲ In the case of an SCSI CD-ROM drive, this drive must be connected to an SCSI adapter with a separate BIOS in which settings can be modified accordingly. (This will only work if there are no IDE hard drives present, as these come before the SCSI adapter in the boot sequence.)
▲ The bootable CD/DVD that you created beginning with Nero BackItUp is placed in the drive.
To boot the computer from the disc and to start Nero BackItUp ImageTool, proceed as follows:
1. Start the computer. The computer starts and boots from the CD/DVD.
Nero BackItUp ImageTool is loaded. You can track the process with the messages on the screen. The Nero BackItUp ImageTool start screen is displayed. A language selection list is displayed.
Nero BackItUp ImageTool
Nero BackItUp 66
Booting from the CD/DVD It is important for the CD/DVD to already be in the drive when the computer is started, since this is the only way that the CD/DVD will be booted and Nero BackItUp ImageTool run. Because it is not possible to insert a CD/DVD when the computer is switched off, first start the computer as usual, insert the CD/DVD, and then shut down the computer.
2. Select the language for Nero BackItUp ImageTool from the Please choose your language selection list.
3. Click the OK button. The Nero BackItUp ImageTool window is opened. A window with a license agreement is opened.
4. Please read the license agreement carefully and select the appropriate check box if you agree to the terms of the agreement. Using Nero BackItUp ImageTool is not possible without your consent to this agreement.
5. Click the Next button.
The window with the license agreement is closed. You can now start using Nero BackItUp ImageTool. You have booted Nero BackItUp ImageTool from the disc.
The CD/DVD is no longer needed after Nero BackItUp ImageTool has started. You can remove the CD/DVD if you need the drive for a backup or restore disc.
16.3 User Interface The user interface in Nero BackItUp ImageTool is the starting point for backups, restores, and any other task that you can carry out with Nero BackItUp ImageTool. Click here on the relevant menu icons to go to desired screen where you can start the task.
Click the button in the left margin of the window to display an extended area with additional options and features.
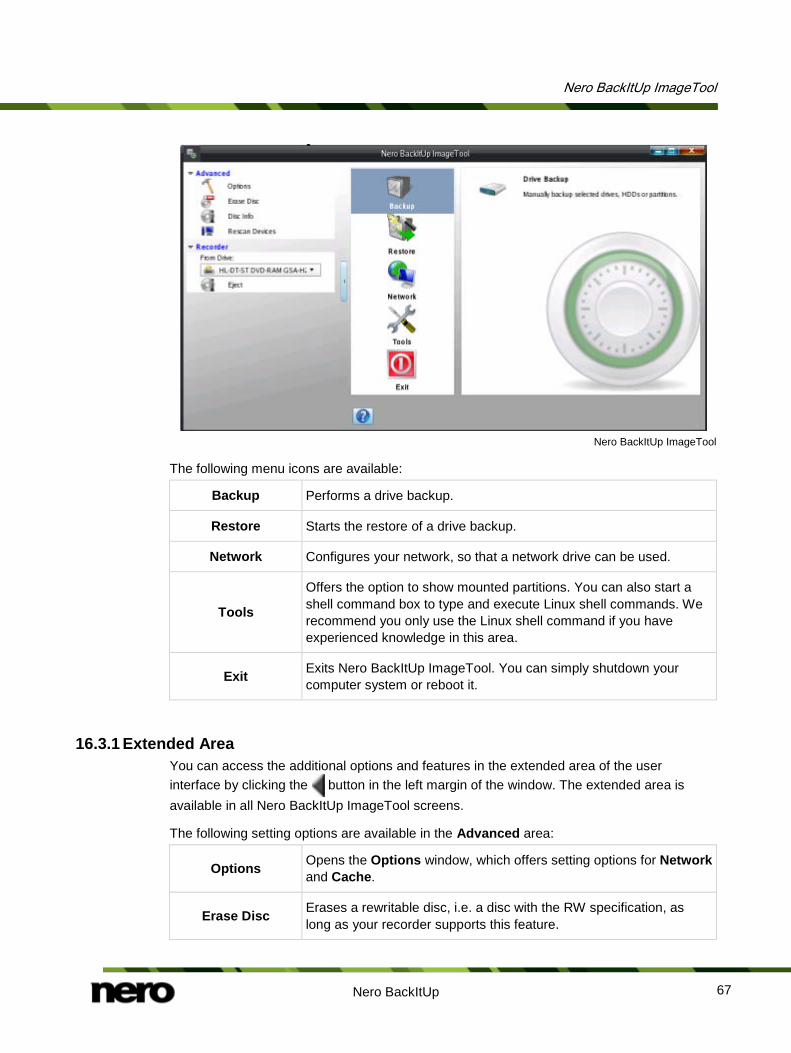
Nero BackItUp ImageTool
Nero BackItUp 67
Nero BackItUp ImageTool
The following menu icons are available:
Backup Performs a drive backup.
Restore Starts the restore of a drive backup.
Network Configures your network, so that a network drive can be used.
Tools
Offers the option to show mounted partitions. You can also start a shell command box to type and execute Linux shell commands. We recommend you only use the Linux shell command if you have experienced knowledge in this area.
Exit Exits Nero BackItUp ImageTool. You can simply shutdown your computer system or reboot it.
16.3.1 Extended Area You can access the additional options and features in the extended area of the user interface by clicking the button in the left margin of the window. The extended area is available in all Nero BackItUp ImageTool screens.
The following setting options are available in the Advanced area:
Options Opens the Options window, which offers setting options for Network and Cache.
Erase Disc Erases a rewritable disc, i.e. a disc with the RW specification, as long as your recorder supports this feature.
Nero BackItUp ImageTool
Nero BackItUp 68
Disc Info Displays information about the inserted disc (e.g. content if applicable or available capacity).
Rescan Devices Searches for new devices.
The following setting options are available in the Recorder area:
From Drive Defines the desired recorder.
Eject Disc Ejects the disc.
16.4 Drive Backup With Nero BackItUp ImageTool you can back up a hard drive or partition. The advantage in comparison to drive backups made with Nero BackItUp is that the drive is not active, since Nero BackItUp ImageTool is booted from the disc. This way, no verification errors occur during the backup process - active hard drives can be backed up. To back up a drive with Nero BackItUp ImageTool, you must first select the backup source. You can then write the backup to a disc or save it to a hard drive. If you connect a device, you may need to click the Rescan Devices button in the extended area so that Nero BackItUp ImageTool recognizes the devices.
16.4.1 Burning a Backup to Disc With Nero BackItUp ImageTool you can make a drive backup and write it to a disc. The following assumes that the backup is written to several discs. In order to write a drive backup to a disc, proceed as follows:
1. Click the Backup > Drive Backup button.
The Step 1 of 3 – Select sources screen is displayed.
2. Select the appropriate check box to select the desired hard drive or partition.
The hard drive or partition is selected.
You can select several partitions in a hard drive for a backup. However, only one hard drive can be selected per pass.
3. Click the Next button. The Step 2 of 3 - Select target and options screen is displayed.
4. Select a burner in the Target drop-down menu.
5. Make additional settings as desired.

Nero BackItUp ImageTool
Nero BackItUp 69
6. Click the Next button. The Step 3 of 3 - Finalize screen is displayed.
7. Verify the settings in this screen.
8. Click the Backup button. The Backup Process screen is displayed and the backup process starts. You can track
the process with the progress bar. The Waiting for Disc window is opened, and the selected drive is ejected.
9. Insert a suitable recordable disc. The Waiting for Disc window is closed and the backup process continues. (Nero
BackItUp ImageTool starts a multisession disc automatically or continues with it.) If the disc's storage capacity is exhausted, the Waiting for Disc window is opened again
and the disc is ejected.
10. Remove the recorded disc and insert a new blank disc. The backup process resumes and the newly inserted blank disc is burned.
11. Repeat the previous step until the backup has been completely burned to disc.
Once the backup is complete, the disc is ejected and the Backup Process window is opened. After the backup has been written completely, Nero BackItUp ImageTool will want to verify the data by default. For this purpose, it will require the discs in the sequence that they were written.
If the backup was written to one single disc, the verification process is started automatically.
12. Remove the disc.
13. Click on the Disc drives button in the Backup Process window.
14. Insert the first disc of the backup in order to have it verified.
15. Double-click the drive containing the disc.
The verification process is started and the first disc verified. The disc is then ejected and the Backup Process window is opened again.
16. Repeat the two previous steps for each disc of the backup in chronological order. When the backup is completed, a window with an appropriate message is opened.
17. Click the OK button.
You have written the drive backup to a disc. Now you can save the log or click the Next button to start other actions.
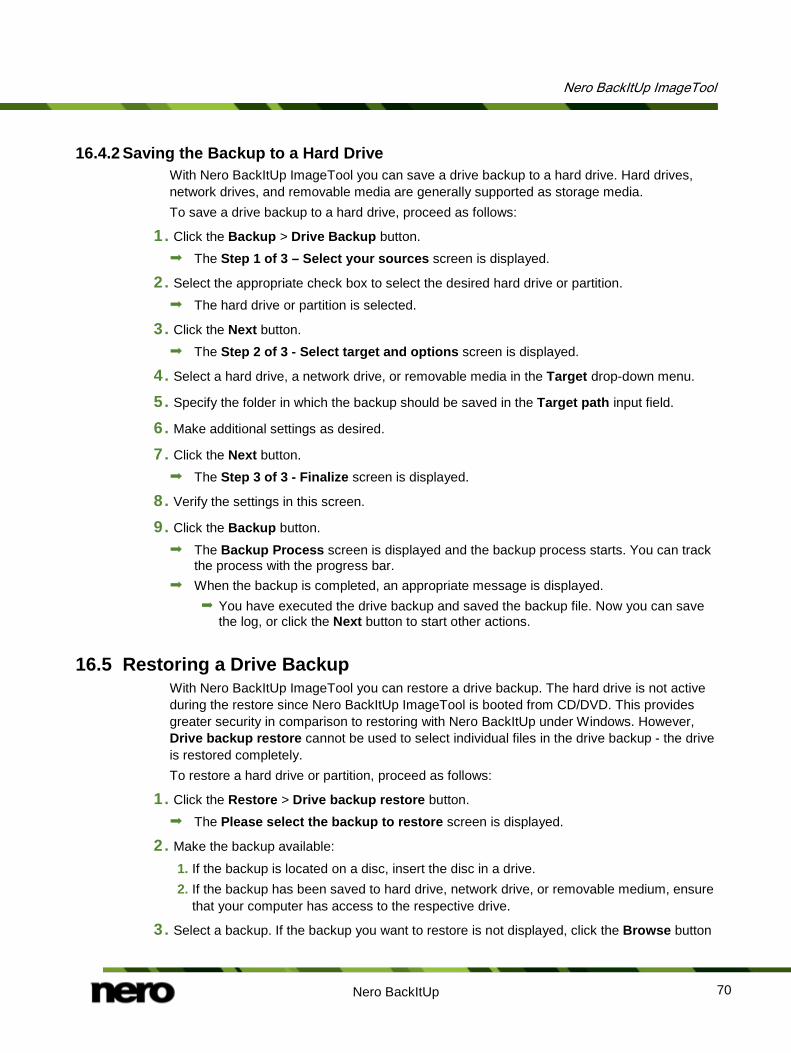
Nero BackItUp ImageTool
Nero BackItUp 70
16.4.2 Saving the Backup to a Hard Drive With Nero BackItUp ImageTool you can save a drive backup to a hard drive. Hard drives, network drives, and removable media are generally supported as storage media. To save a drive backup to a hard drive, proceed as follows:
1. Click the Backup > Drive Backup button. The Step 1 of 3 – Select your sources screen is displayed.
2. Select the appropriate check box to select the desired hard drive or partition. The hard drive or partition is selected.
3. Click the Next button. The Step 2 of 3 - Select target and options screen is displayed.
4. Select a hard drive, a network drive, or removable media in the Target drop-down menu.
5. Specify the folder in which the backup should be saved in the Target path input field.
6. Make additional settings as desired.
7. Click the Next button. The Step 3 of 3 - Finalize screen is displayed.
8. Verify the settings in this screen.
9. Click the Backup button.
The Backup Process screen is displayed and the backup process starts. You can track the process with the progress bar.
When the backup is completed, an appropriate message is displayed. You have executed the drive backup and saved the backup file. Now you can save
the log, or click the Next button to start other actions.
16.5 Restoring a Drive Backup With Nero BackItUp ImageTool you can restore a drive backup. The hard drive is not active during the restore since Nero BackItUp ImageTool is booted from CD/DVD. This provides greater security in comparison to restoring with Nero BackItUp under Windows. However, Drive backup restore cannot be used to select individual files in the drive backup - the drive is restored completely. To restore a hard drive or partition, proceed as follows:
1. Click the Restore > Drive backup restore button. The Please select the backup to restore screen is displayed.
2. Make the backup available:
1. If the backup is located on a disc, insert the disc in a drive. 2. If the backup has been saved to hard drive, network drive, or removable medium, ensure
that your computer has access to the respective drive.
3. Select a backup. If the backup you want to restore is not displayed, click the Browse button
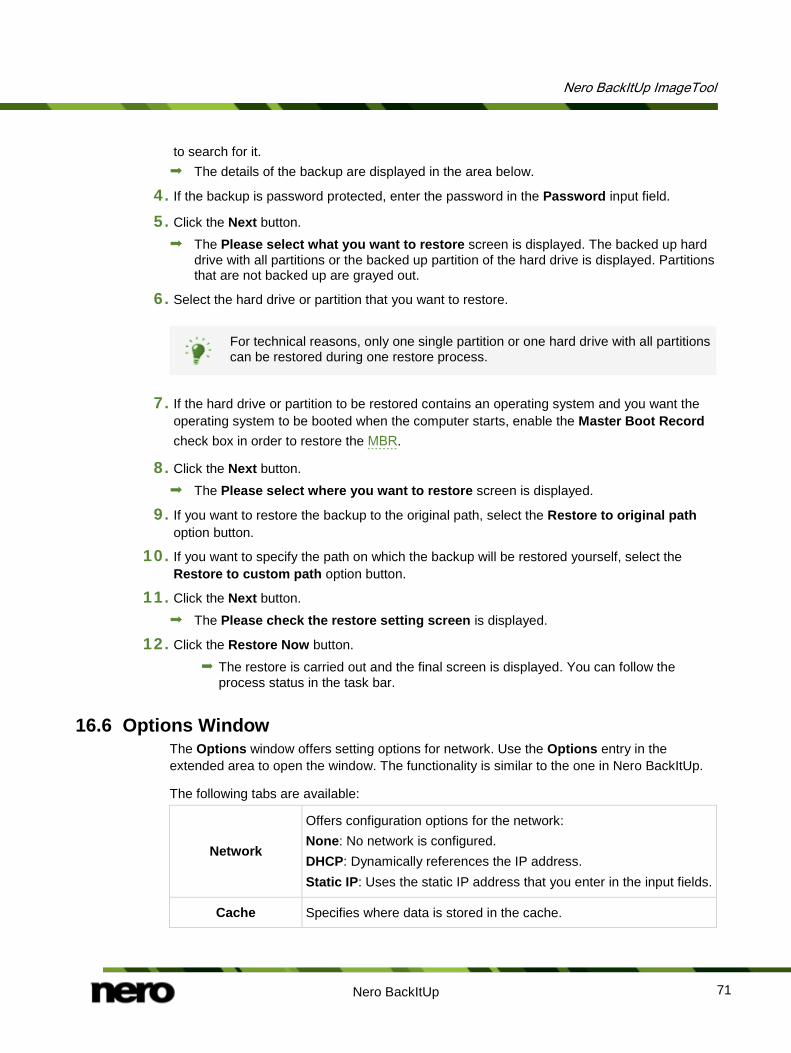
Nero BackItUp ImageTool
Nero BackItUp 71
to search for it. The details of the backup are displayed in the area below.
4. If the backup is password protected, enter the password in the Password input field.
5. Click the Next button. The Please select what you want to restore screen is displayed. The backed up hard
drive with all partitions or the backed up partition of the hard drive is displayed. Partitions that are not backed up are grayed out.
6. Select the hard drive or partition that you want to restore.
For technical reasons, only one single partition or one hard drive with all partitions can be restored during one restore process.
7. If the hard drive or partition to be restored contains an operating system and you want the operating system to be booted when the computer starts, enable the Master Boot Record check box in order to restore the MBR.
8. Click the Next button. The Please select where you want to restore screen is displayed.
9. If you want to restore the backup to the original path, select the Restore to original path option button.
10. If you want to specify the path on which the backup will be restored yourself, select the Restore to custom path option button.
11. Click the Next button.
The Please check the restore setting screen is displayed.
12. Click the Restore Now button.
The restore is carried out and the final screen is displayed. You can follow the process status in the task bar.
16.6 Options Window The Options window offers setting options for network. Use the Options entry in the extended area to open the window. The functionality is similar to the one in Nero BackItUp.
The following tabs are available:
Network
Offers configuration options for the network: None: No network is configured. DHCP: Dynamically references the IP address. Static IP: Uses the static IP address that you enter in the input fields.
Cache Specifies where data is stored in the cache.
Nero BackItUp ImageTool
Nero BackItUp 72
16.7 Exiting Nero BackItUp ImageTool To exit Nero BackItUp ImageTool, proceed as follows:
1. Remove the bootable CD/DVD from the drive.
2. If the drive is locked, open the extended area and click the Eject Disc button.
3. Click the Exit button.
4. If you want to reboot your computer system, click the Reboot button. If you want to shutdown your computer system, click the Shutdown button.
Nero BackItUp ImageTool is exited and the computer shuts down.
Nero BackItUp SyncTool
Nero BackItUp 73
17 Nero BackItUp SyncTool Nero BackItUp SyncTool is a program that is used for sync functions. It is run from hard drive, removable medium (USB) or an optical disc. Nero BackItUp SyncTool is created with Nero BackItUp. It offers the same features as the sync feature integrated in Nero BackItUp. Nero BackItUp SyncTool is particularly useful when you want to automatically sync the same folders. It can be used to sync two folders on the same computers or two folders located on a computer and a removable medium.
See also Syncing Folders →34 Creating Standalone Nero BackItUp SyncTool →53
Glossary
Nero BackItUp 74
18 Glossary Backup Copying data from the computer to an alternative storage medium. Backups are created in a special format with the help of a backup program.
Bootable CD Booting refers to loading the operating system when a computer is started. This is normally done from the hard drive. However, if you do not want to boot or cannot boot your computer from your hard drive for whatever reason, you can load an operating environment from the drive with a boot CD.
Master Boot Record MBR The Master Boot Record (MBR) is located in the hard drive's first sector. It contains a boot file that starts the operating system. It also defines the drive's partitioning.
Restore Restore stands for restoring data to a previous condition or to copying data by using a backup copy that was created previously and a backup program, e.g. Nero BackItUp.
Shadow Copy A shadow copy is a snapshot of a file at a certain point in time. The advantage is that you can keep working with this file while the backup program, e.g. Nero BackItUp, backs up the file in the background. This feature is particularly relevant when you want to save system files, which are modified continuously by the system.
Index
Nero BackItUp 75
19 Index Access rights
Back up ......................................................... 48 Restore ......................................................... 49
Autobackup Change settings ............................................ 17 Setting up ...................................................... 17 Storing online ................................................ 17 Using Nero Online Backup ............................ 17
Backup
Deleting a backup ......................................... 52 Drive ............................................................. 25 Encrypt ......................................................... 29 File ................................................................ 20 Folder ........................................................... 20 Job ................................................................ 10 Modify job ..................................................... 10 Overview ....................................................... 15 Partition ........................................................ 25 Schedule ....................................................... 33 Select compression level ............................... 29 Set up expert options .................................... 46 Settings ......................................................... 28 Shutdown computer after backup .................. 30 Tasks ............................................................ 15
Backup type Choose a backup type .................................. 33 Differential backup ........................................ 30 Full backup ................................................... 30 Incremental backup ....................................... 30 Overview ....................................................... 30 Select ................................................. 22, 24, 26 Update backup .............................................. 30
Bootable disc .................................. 64, 65 Burn options ......................................... 47
Compression ........................................ 29 Computer
Shell context menu........................................ 56 Shutdown after backup ................................. 30
Conflict handling Restore file backup ....................................... 44 Sync .............................................................. 36
Conventions, manual ............................. 5 CPU Control ......................................... 46
Disc information ................................... 10
Drive Backing up .................................................... 26 Backing up with Nero BackItUp ImageTool.... 68
Drive backup ........................................ 25 About drive backup ....................................... 16 Enable verification ......................................... 30 Restore ......................................................... 44 Restore files .................................................. 40 Schedule ....................................................... 27 Select source ................................................ 25 Select target .................................................. 26 Settings ......................................................... 28 Without verification errors .............................. 65
E-mail account
Account values .............................................. 59 Set up ........................................................... 58
E-mail notification ................................. 46 Enabling ........................................................ 48 Trigger events ............................................... 48
Encryption ............................................ 29 Expert options ...................................... 46
File backup ........................................... 20
About File backup ......................................... 15 Enable verification ......................................... 30 Filter .............................................................. 46 Restore files .................................................. 40 Schedule ............................................22, 24, 29 Select backup type ....................... 22, 24, 26, 28 Select source ................................................ 20 Select target ............................................ 21, 24 Settings ......................................................... 28
Filter Create ........................................................... 60 Date .............................................................. 62 Exclude file.................................................... 62 Exclude path ................................................. 62 File extension ................................................ 61 Size ............................................................... 62
FTP server Set up ........................................................... 56
Log file .................................................. 47
Manual, conventions .............................. 5
Index
Nero BackItUp 76
Nero BackItUp ImageTool
Backing up to hard drive................................ 70 Create ........................................................... 64 Drive backup ................................................. 68 Erase disc ..................................................... 67 Execute Linux shell commands ..................... 67 Exit...........................................................67, 72 Explanation ............................................... 6, 64 Main screen .................................................. 66 Restore drive backup .................................... 70 Starting ......................................................... 65 User interface................................................ 66
Nero BackItUp SyncTool Create ........................................................... 53 Create to disc ................................................ 53 Create to hard drive ...................................... 53 Create to removable medium ........................ 53 Explanation ............................................... 6, 73
Nero Kwik Media library backup About Nero Kwik Media library backup .......... 15 Executing the backup .................................... 23 Restore the backup ....................................... 40
Nero LIVEBackup About Nero LIVEBackup ............................... 11 Activating Nero LIVEBackup ......................... 12 Explanation ..................................................... 6 External backup target .................................. 14 Restore files .................................................. 40 Restore programs and files ........................... 44 Setting options .............................................. 11
Nero Online Backup ............................. 17 About Nero Online Backup ............................ 15 Turn off ......................................................... 19
Program
Starting the program ....................................... 7
Proxy Enable .......................................................... 58 Settings ......................................................... 58
Purge options ....................................... 47
Remote settings ................................... 56 Restore
Drive backup ................................................. 44 File backup ................................................... 40 Migrate user specific folders .......................... 43 Own path ...................................................... 43 Resolve conflicts ........................................... 44 Set up expert options .................................... 46 To another hard drive .................................... 45 To original hard drive .................................... 45 To original path ............................................. 43
Rewritable disc Erase ............................................................ 54 Erase method ................................................ 55 Erase with Nero BackItUp ............................. 10 Erase with Nero BackItUp ImageTool ............ 67
Schedule .............................................. 33 Scripting ............................................... 46 Shadow copy ........................................ 48 Start
From context menu ......................................... 8 From shell context menu ............................... 56 Via Welcome Application ................................. 7 Welcome to screen ......................................... 8
Start screen ............................................ 9 Status messages .................................. 48 Sync ............................................... 34, 34
Choose sync type .......................................... 35 Conflict handling...................................... 36, 39 Schedule ....................................................... 35 Select folder .................................................. 35
Sync type Copy ............................................................. 36 Mirror ............................................................ 36 Overview ....................................................... 36 Partial mirror ................................................. 36 Partial synchronization .................................. 36 Update .......................................................... 36
System requirements ............................. 7
Tooltips ................................................. 56
User interface ......................................... 9
Verification
Ignoring time difference ................................. 49
Version ................................................... 6
Window
Erase Rewritable Disc ................................... 54
Work overview ........................................ 5
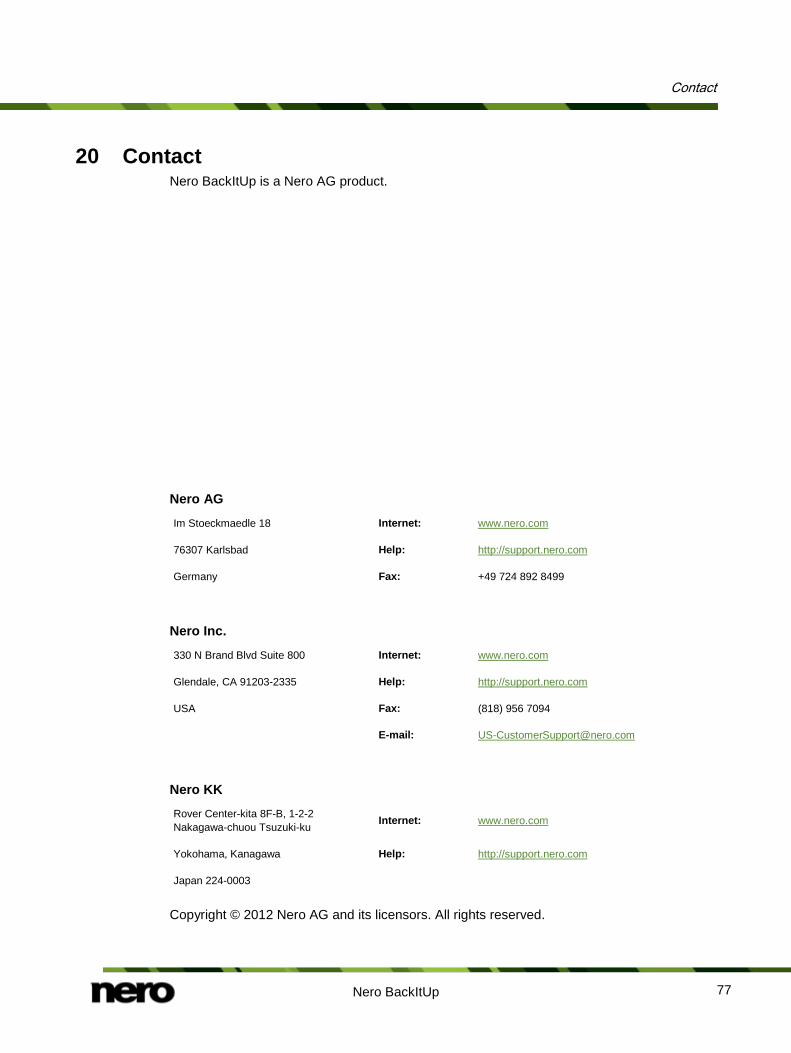
Contact
Nero BackItUp 77
20 Contact Nero BackItUp is a Nero AG product.
Nero AG
Im Stoeckmaedle 18 Internet: www.nero.com
76307 Karlsbad Help: http://support.nero.com
Germany Fax: +49 724 892 8499
Nero Inc.
330 N Brand Blvd Suite 800 Internet: www.nero.com
Glendale, CA 91203-2335 Help: http://support.nero.com
USA Fax: (818) 956 7094
E-mail: [email protected]
Nero KK
Rover Center-kita 8F-B, 1-2-2 Nakagawa-chuou Tsuzuki-ku Internet: www.nero.com
Yokohama, Kanagawa Help: http://support.nero.com
Japan 224-0003
Copyright © 2012 Nero AG and its licensors. All rights reserved.