Embed Size (px)
Citation preview

AmpliTubefor iPad
UserManual

IntroThank you for purchasing AmpliTube for iPad. This manual will cover all the product featuresin detail. Please read it carefully to get maximum results.You can also have a quick tour by tapping the Help (?) button on the top-left of AmpliTubeinterface and immediately start rockin'.
AmpliTube® and iRig™ are trademarks or registered trademarks property of IK Multimedia. All other product names andtrademarks are property of their respective owners, which are in no way associated or affiliated with IK Multimedia.Product names are used solely for the purpose of identifying the specific products that were studied during IKMultimedia’s sound model development and for describing certain types of tones produced with IK Multimedia’s digitalmodeling technology. Use of these names do not imply any cooperation or endorsement.
iRig Connections and PrecautionsThe iRig interface adapter is the easiest way to get your guitar/bass signal into your mobiledevice.You can also use the iRig with line level signal sources such as synthesizers, keyboards ormixers. Plus you can connect a microphone by adding a suitable Mic Preamp. The iRig is theideal companion not only for the AmpliTube for iPad apps, but also works with any otherrecording, processing or tuning app.Read the instructions below carefully to correctly set up and operate AmpliTube iRig.
Quick Start
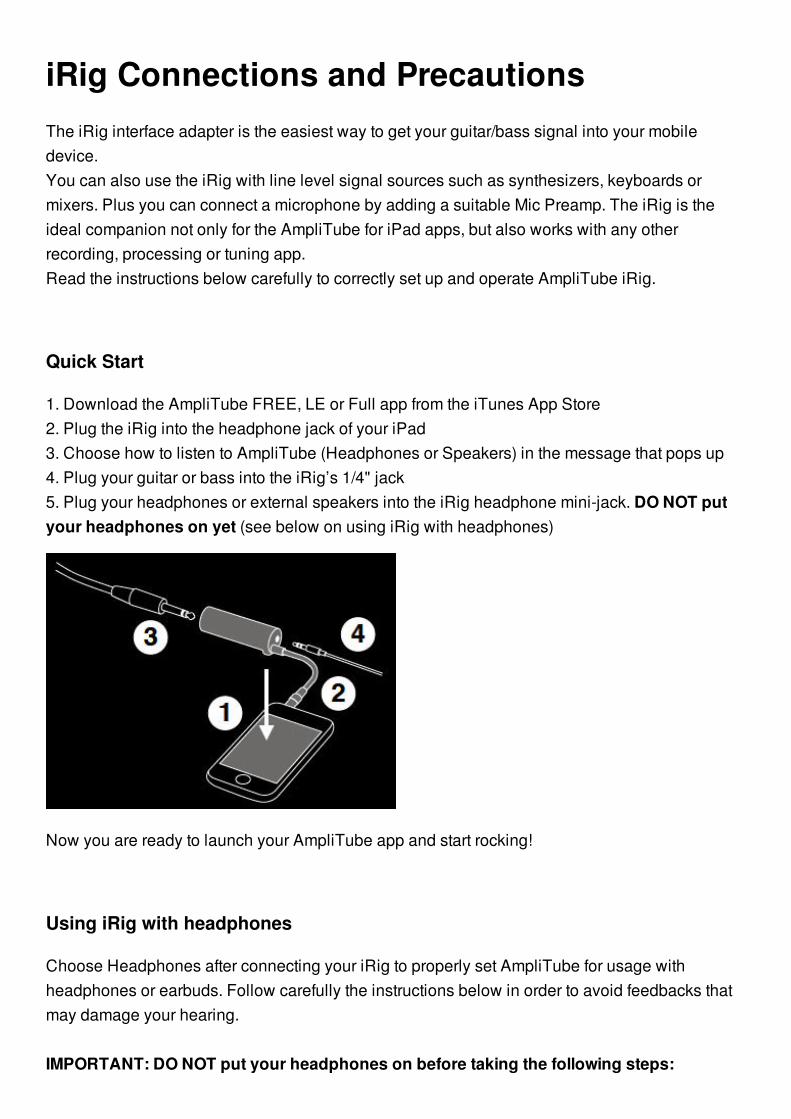
1. Download the AmpliTube FREE, LE or Full app from the iTunes App Store2. Plug the iRig into the headphone jack of your iPad3. Choose how to listen to AmpliTube (Headphones or Speakers) in the message that pops up4. Plug your guitar or bass into the iRig’s 1/4" jack5. Plug your headphones or external speakers into the iRig headphone mini-jack. DO NOT putyour headphones on yet (see below on using iRig with headphones)
Now you are ready to launch your AmpliTube app and start rocking!
Using iRig with headphones
Choose Headphones after connecting your iRig to properly set AmpliTube for usage withheadphones or earbuds. Follow carefully the instructions below in order to avoid feedbacks thatmay damage your hearing.
IMPORTANT: DO NOT put your headphones on before taking the following steps:
1. Plug your iRig to your iPad2. Plug your headphones or earbuds to iRig3. Launch AmpliTube4. Lower the volume of your device by using the side volume buttons5. Put your headphones on
NEVER turn "NO FEEDBACK" option OFF in the AmpliTube app SETUP page when usingheadphones or earbuds, to avoid possible feedback.
If you are listening to AmpliTube using earphones that include a microphone, please lower thevolume to avoid possible feedback.
NEVER plug or unplug your headphones when AmpliTube is open and running.
WARNING: Permanent hearing loss may occur if earbuds or headphones are usedat high volume. You can adapt over time to a higher volume of sound, which maysound normal but can be damaging to your hearing. Set your device volume to a safelevel before that happens.
If you experience ringing in your ears, reduce the volume or discontinue use of earbuds orheadphones with your device.
Using iRig with mixers, speakers or amplifiers
Choose Speakers from the message that pops up after connecting your iRig to set AmpliTube forlistening with mixers, speakers or amplifiers.
Don’t be mislead by the iRig 1/8" phones jack output! You can connect iRig not only toheadphones or earbuds, but also to your speakers or to a mixer.iRig allows you to play without amps and cabinets, but if you prefer using the real ones you cando that easily as well: plug the iRig output directly into your amplifier input and bypass theAmpliTube amp+cab module. Now you can use your iPad as your effects pedalboard!
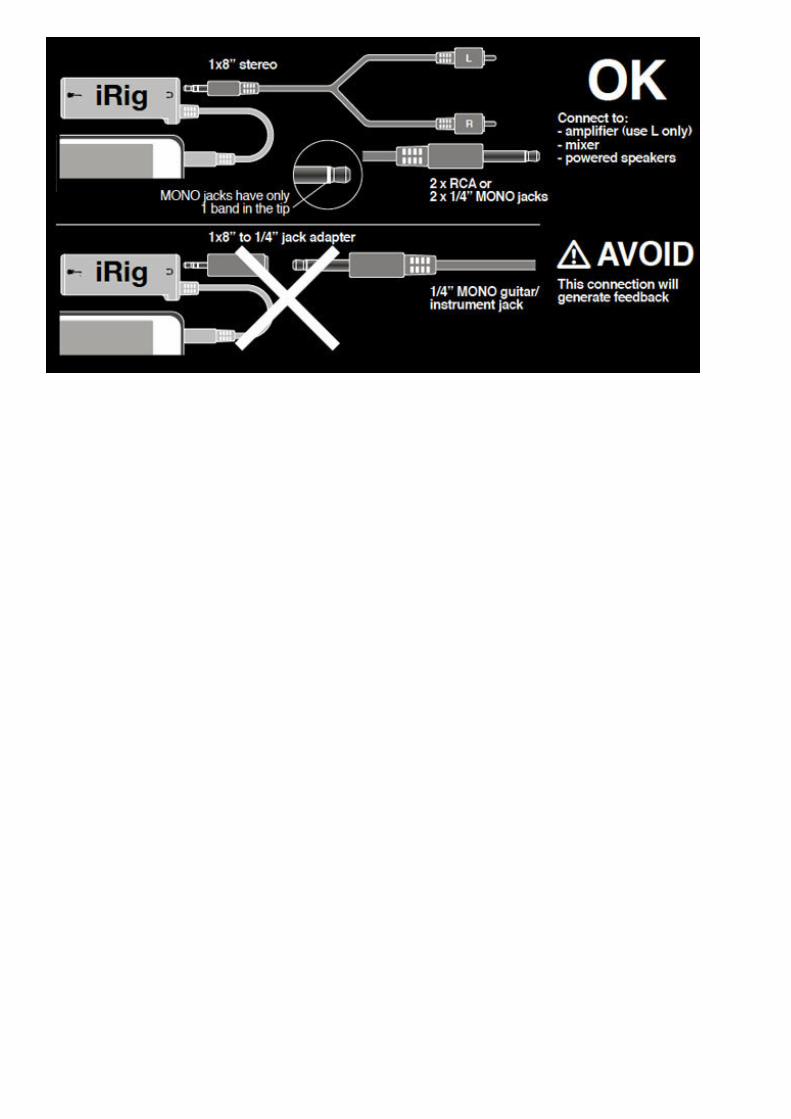
IMPORTANT: To avoid feedback ALWAYS use 1/8" stereo jack to 2 x RCA or 2x 1/4"MONO jack cables to connect to amplifiers, powered speakers or mixers. NEVER useSTEREO headphone 1/8" to 1/4" adapters or splitters.
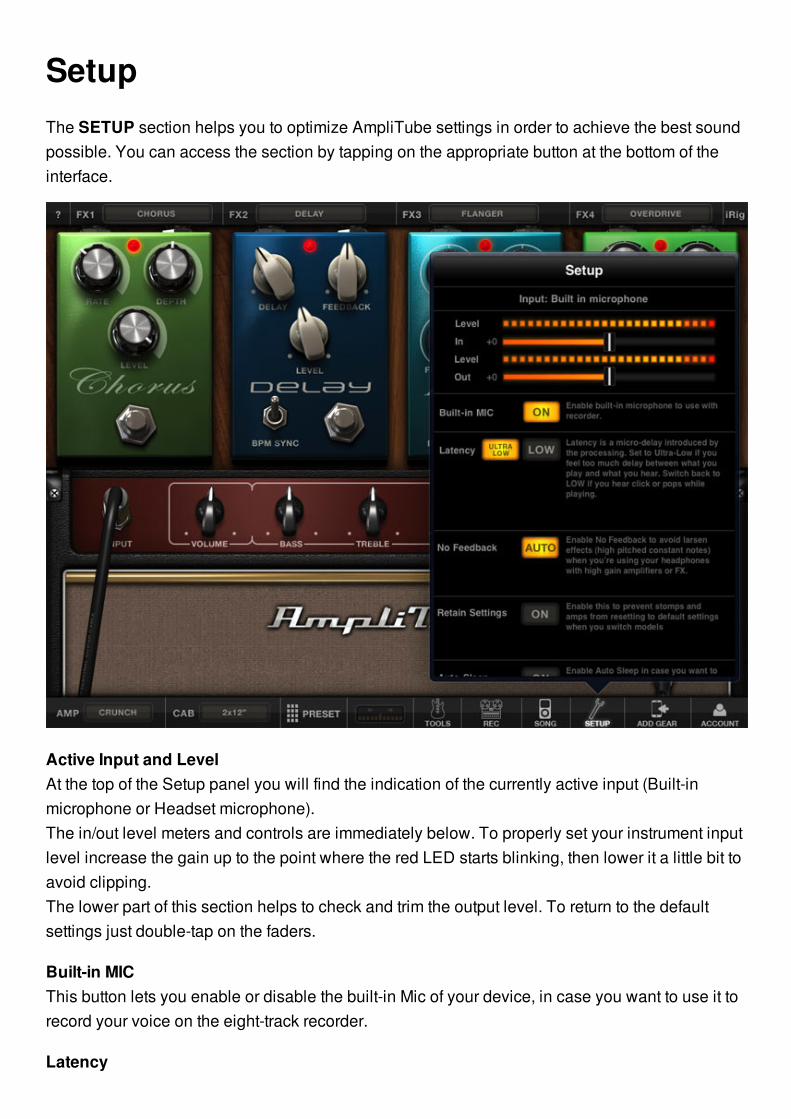
SetupThe SETUP section helps you to optimize AmpliTube settings in order to achieve the best soundpossible. You can access the section by tapping on the appropriate button at the bottom of theinterface.
Active Input and Level At the top of the Setup panel you will find the indication of the currently active input (Built-inmicrophone or Headset microphone).The in/out level meters and controls are immediately below. To properly set your instrument inputlevel increase the gain up to the point where the red LED starts blinking, then lower it a little bit toavoid clipping.The lower part of this section helps to check and trim the output level. To return to the defaultsettings just double-tap on the faders.
Built-in MIC This button lets you enable or disable the built-in Mic of your device, in case you want to use it torecord your voice on the eight-track recorder.
Latency
Latency is a slight delay introduced by the processing. Set this to ULTRA-LOW if you experiencetoo much delay between what you play and what you hear. Switch back to LOW if you hear clicksor pops while playing.
No Feedback Enable "No Feedback" to avoid "Larsen" effects (high pitched constant notes) when you’re usingheadphones with high gain amplifiers or FX.Set this option to ON or OFF to permanently enable or disable it (consider that turning "NoFeedback" ON when listening from the device built-in speaker will mute the sound). ChoosingAUTO the No Feedback option will be automatically turned ON when you connect headphonesor the iRig, and turned OFF when listening from the device built-in speaker. Important Notice: "NoFeedback" is the default setting when using headphones. It is strongly recommended keeping iton when using headphones or earbuds; turning it off may result in a loud feedback sound.
Retain SettingsEnable this option to maintain last custom setting on each module. In case “Retain Settings” isOFF switching to another model within the same slot will reset the parameters of the previouslyselected model to the default values.
Auto SleepEnable "Auto Sleep" to reduce battery consumption during long playing sessions. The devicedisplay will turn off after the "Auto-Lock" time has passed (set the "Auto-Lock" time in the Generalsettings of your iPad).Disable “Auto Sleep” if you hear clicks and pops while playing.
Background AudioEnable this option if you want to hear AmpliTube’s sound also when the app is running inbackground.
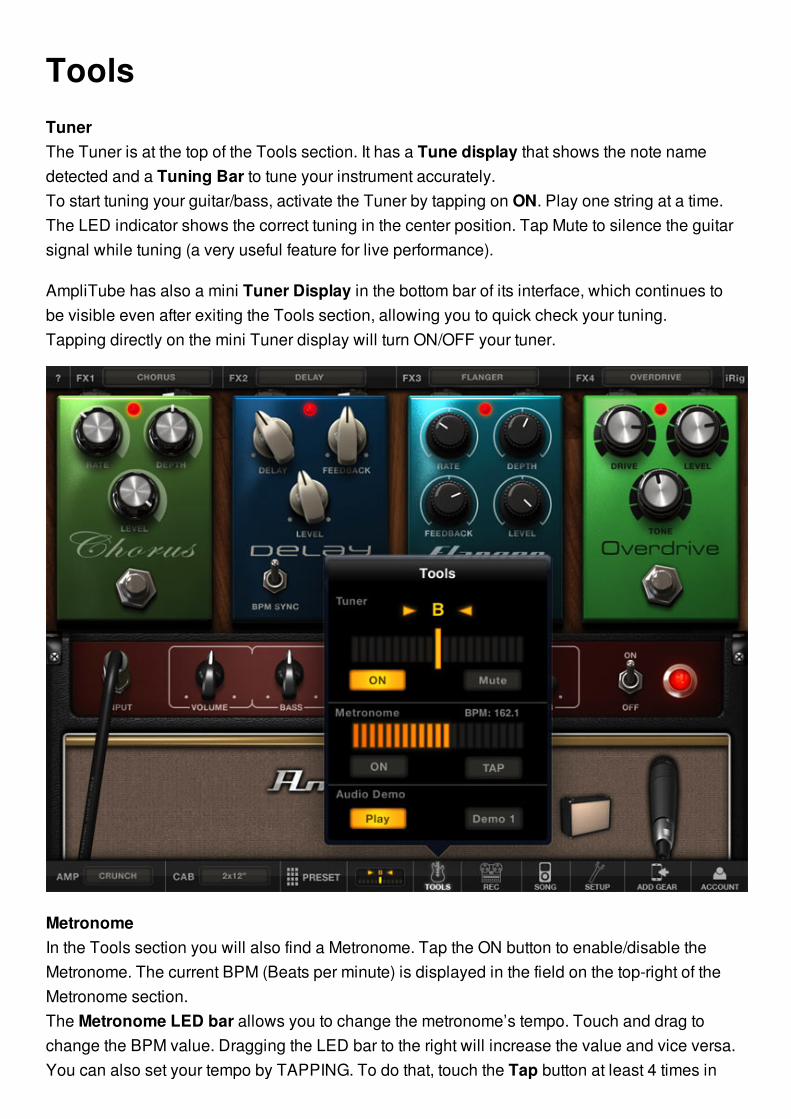
ToolsTuner The Tuner is at the top of the Tools section. It has a Tune display that shows the note namedetected and a Tuning Bar to tune your instrument accurately.To start tuning your guitar/bass, activate the Tuner by tapping on ON. Play one string at a time.The LED indicator shows the correct tuning in the center position. Tap Mute to silence the guitarsignal while tuning (a very useful feature for live performance).
AmpliTube has also a mini Tuner Display in the bottom bar of its interface, which continues tobe visible even after exiting the Tools section, allowing you to quick check your tuning.Tapping directly on the mini Tuner display will turn ON/OFF your tuner.
MetronomeIn the Tools section you will also find a Metronome. Tap the ON button to enable/disable theMetronome. The current BPM (Beats per minute) is displayed in the field on the top-right of theMetronome section.The Metronome LED bar allows you to change the metronome’s tempo. Touch and drag tochange the BPM value. Dragging the LED bar to the right will increase the value and vice versa.You can also set your tempo by TAPPING. To do that, touch the Tap button at least 4 times in

sync with the material you try to match the tempo with. If you need to fine adjust the tempo tap on the BPM value and a Scroll Wheel will appear,allowing you to increase/decrease the BPM by tenth.
Audio Demo The Audio Demo panel allows you to experiment with AmpliTube sounds when there is no guitarconnected by playing pre-recorded audio demo files included in the app.Choose one of the 8 audio demo files by tapping on the Demo button on the right, and play it bytapping Play. When the Demo button is set on Auto, all the 8 audio demos will be played insequence.
Stomp EffectsYou can add up to four stompboxes in front of your amp. Just tap on the FX buttons on the top ofthe interface to display the FX menus and select the one you need.When you insert an effect for the first time, it will be disabled. To activate it simply tap thestompbox bypass switch.Now you are ready for tweaking! By tapping on each knob its current value will be displayed inthe mini Tuner display that is located between the PRESET and TOOLS buttons on the bottom ofthe interface.To change any of the effect parameter touch the parameter knob and drag up/down. To return tothe default settings just double-tap on the knobs. Let’s see all the available effects!
• Delay• Reverb• Fuzz• Distorsion• Overdrive• Compressor• Limiter• Parametric EQ• Six Band Graphic Equalizer• Wah• Envelope Filter• Chorus• Flanger• Phazer• Octave• Noise Filter
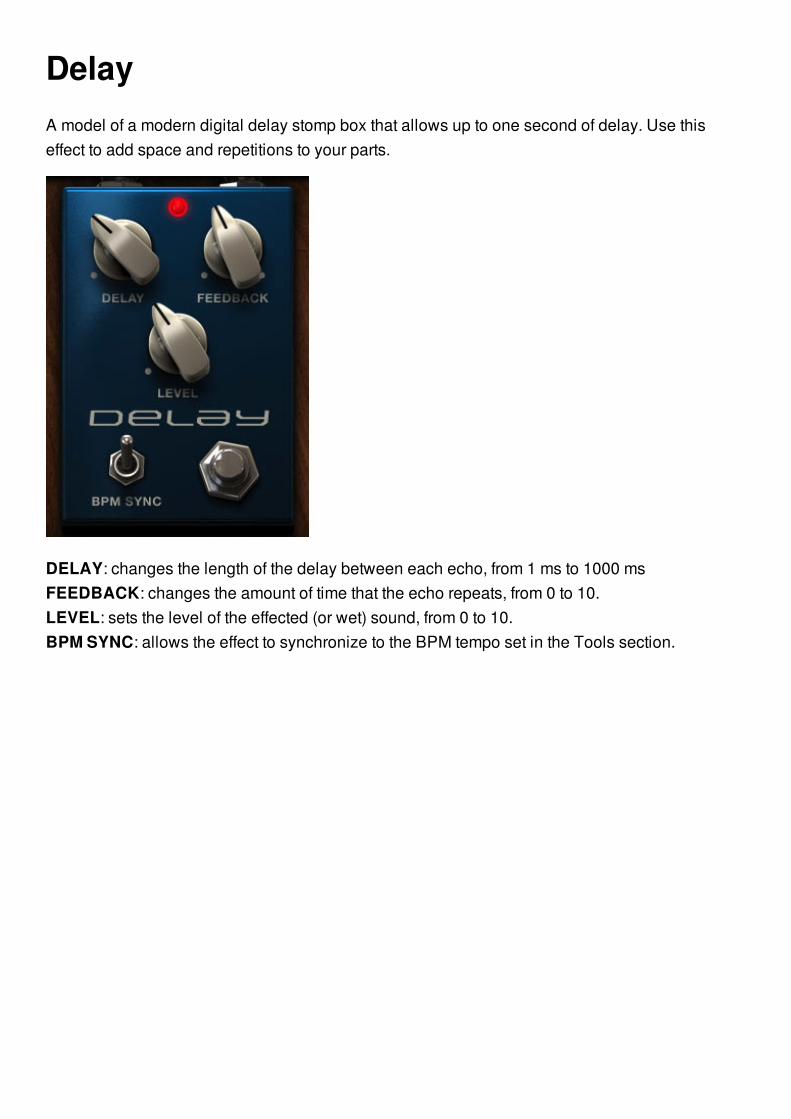
DelayA model of a modern digital delay stomp box that allows up to one second of delay. Use thiseffect to add space and repetitions to your parts.
DELAY: changes the length of the delay between each echo, from 1 ms to 1000 ms FEEDBACK: changes the amount of time that the echo repeats, from 0 to 10. LEVEL: sets the level of the effected (or wet) sound, from 0 to 10.BPM SYNC: allows the effect to synchronize to the BPM tempo set in the Tools section.
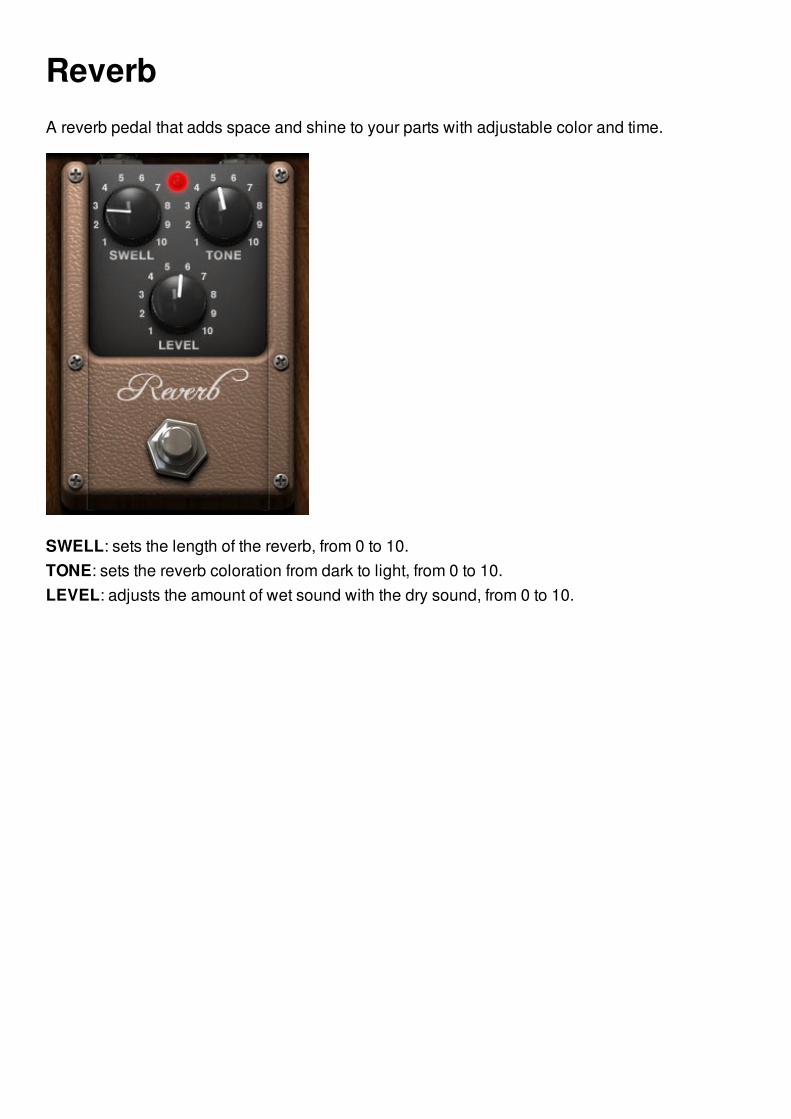
ReverbA reverb pedal that adds space and shine to your parts with adjustable color and time.
SWELL: sets the length of the reverb, from 0 to 10.TONE: sets the reverb coloration from dark to light, from 0 to 10.LEVEL: adjusts the amount of wet sound with the dry sound, from 0 to 10.
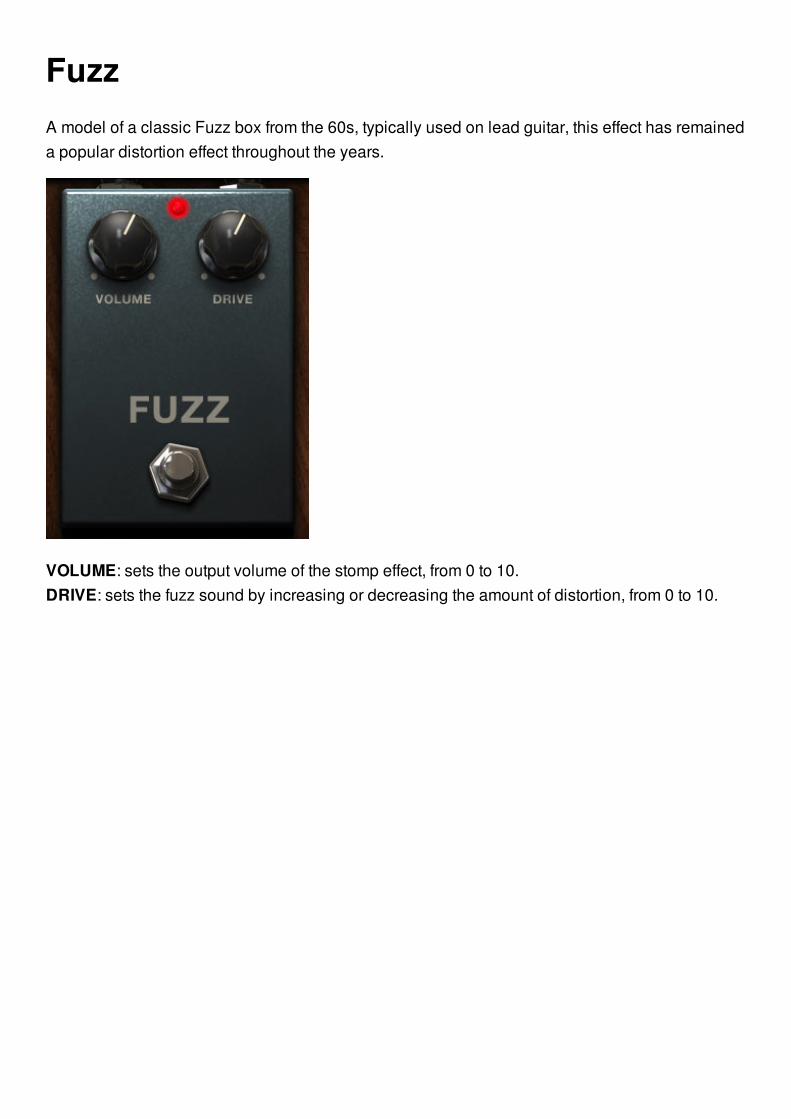
FuzzA model of a classic Fuzz box from the 60s, typically used on lead guitar, this effect has remaineda popular distortion effect throughout the years.
VOLUME: sets the output volume of the stomp effect, from 0 to 10. DRIVE: sets the fuzz sound by increasing or decreasing the amount of distortion, from 0 to 10.
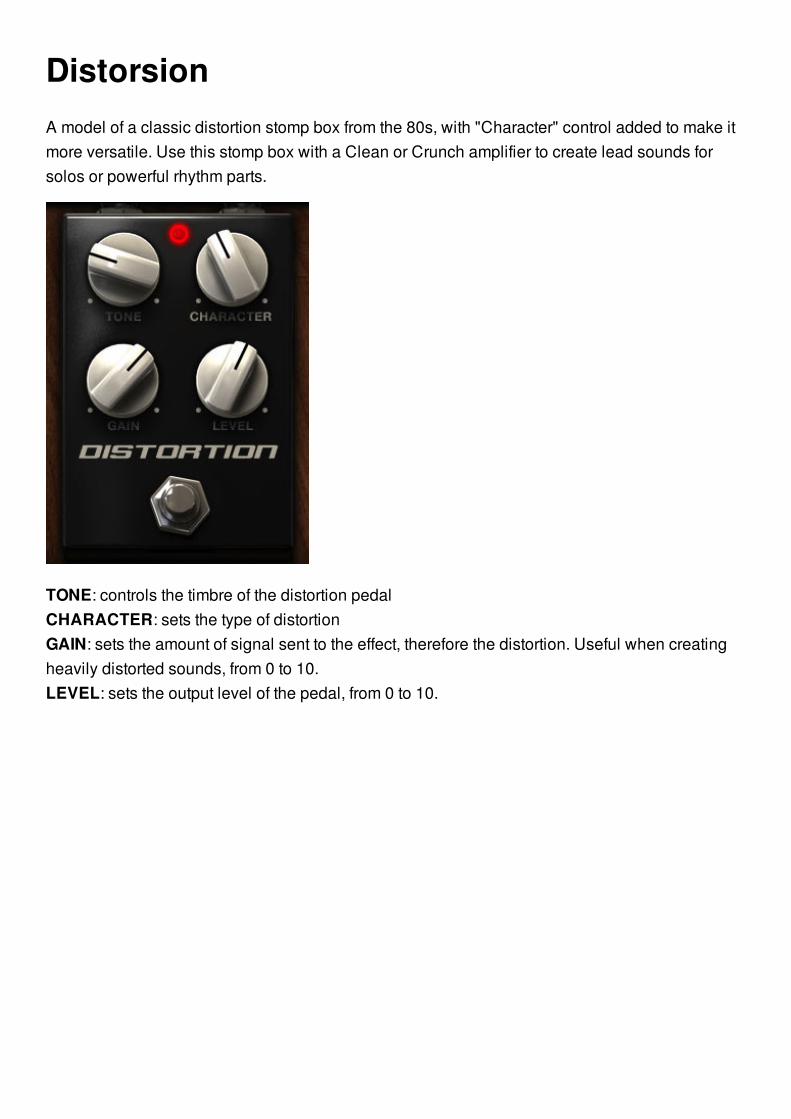
DistorsionA model of a classic distortion stomp box from the 80s, with "Character" control added to make itmore versatile. Use this stomp box with a Clean or Crunch amplifier to create lead sounds forsolos or powerful rhythm parts.
TONE: controls the timbre of the distortion pedalCHARACTER: sets the type of distortionGAIN: sets the amount of signal sent to the effect, therefore the distortion. Useful when creatingheavily distorted sounds, from 0 to 10.LEVEL: sets the output level of the pedal, from 0 to 10.
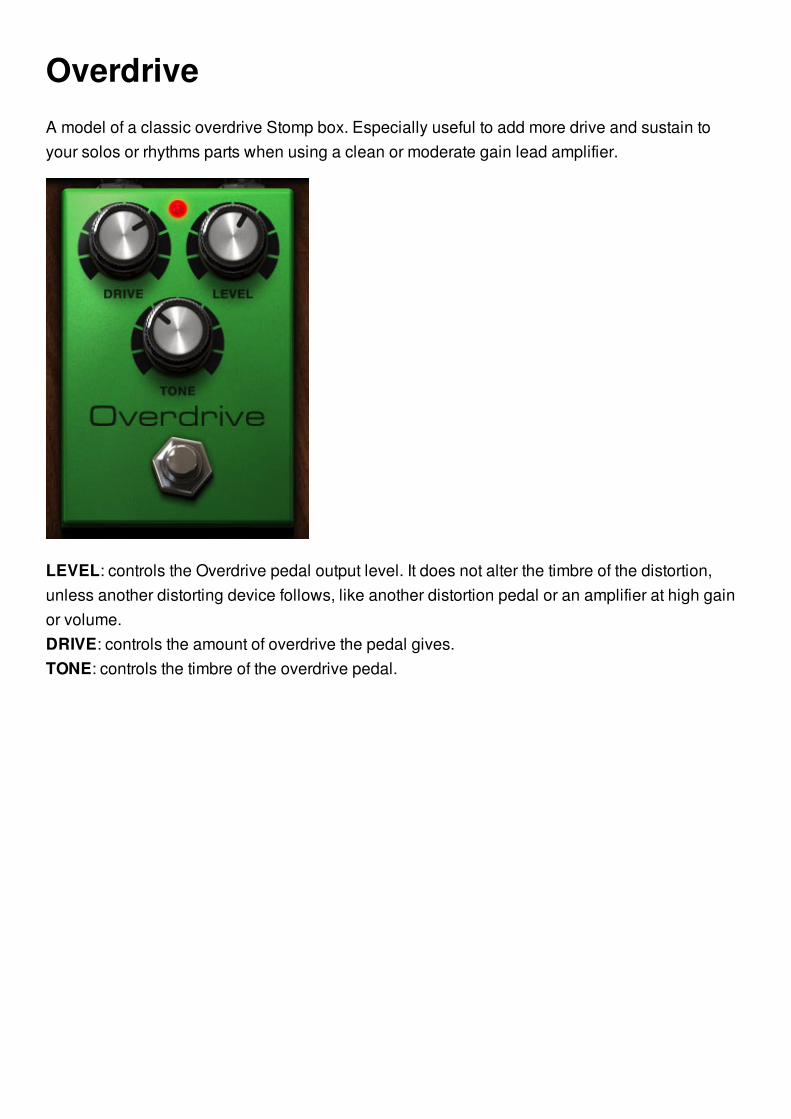
OverdriveA model of a classic overdrive Stomp box. Especially useful to add more drive and sustain toyour solos or rhythms parts when using a clean or moderate gain lead amplifier.
LEVEL: controls the Overdrive pedal output level. It does not alter the timbre of the distortion,unless another distorting device follows, like another distortion pedal or an amplifier at high gainor volume.DRIVE: controls the amount of overdrive the pedal gives.TONE: controls the timbre of the overdrive pedal.
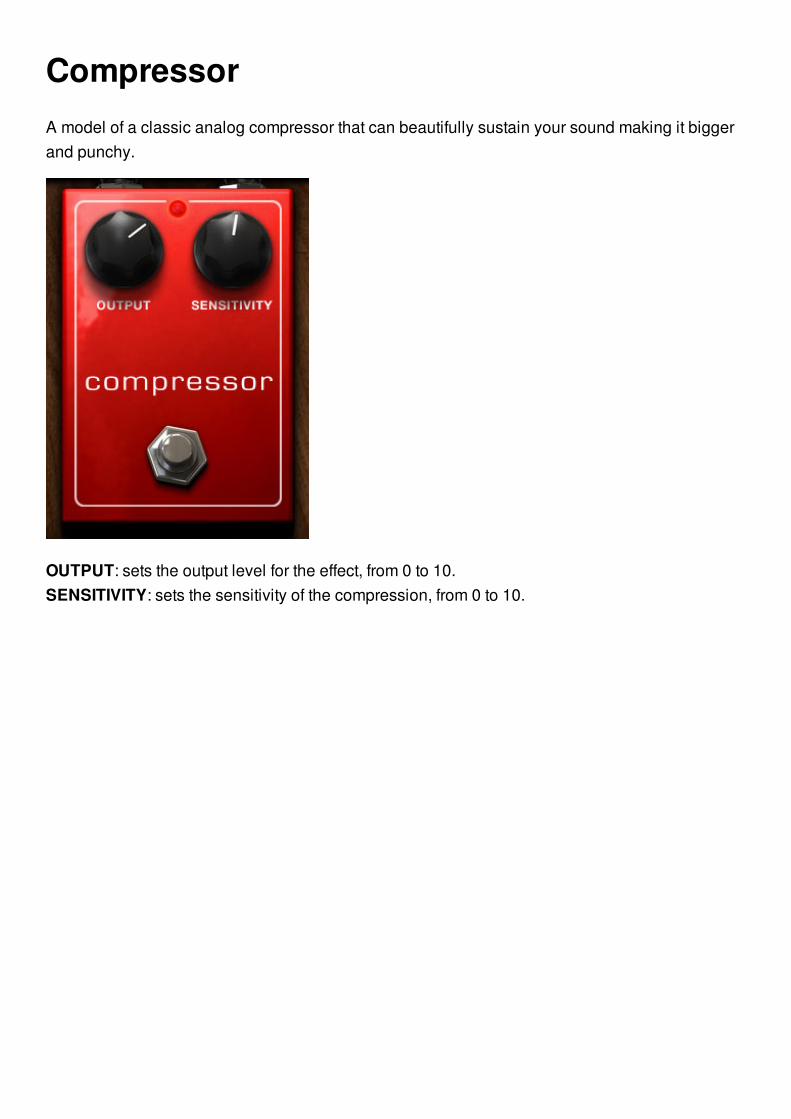
CompressorA model of a classic analog compressor that can beautifully sustain your sound making it biggerand punchy.
OUTPUT: sets the output level for the effect, from 0 to 10. SENSITIVITY: sets the sensitivity of the compression, from 0 to 10.
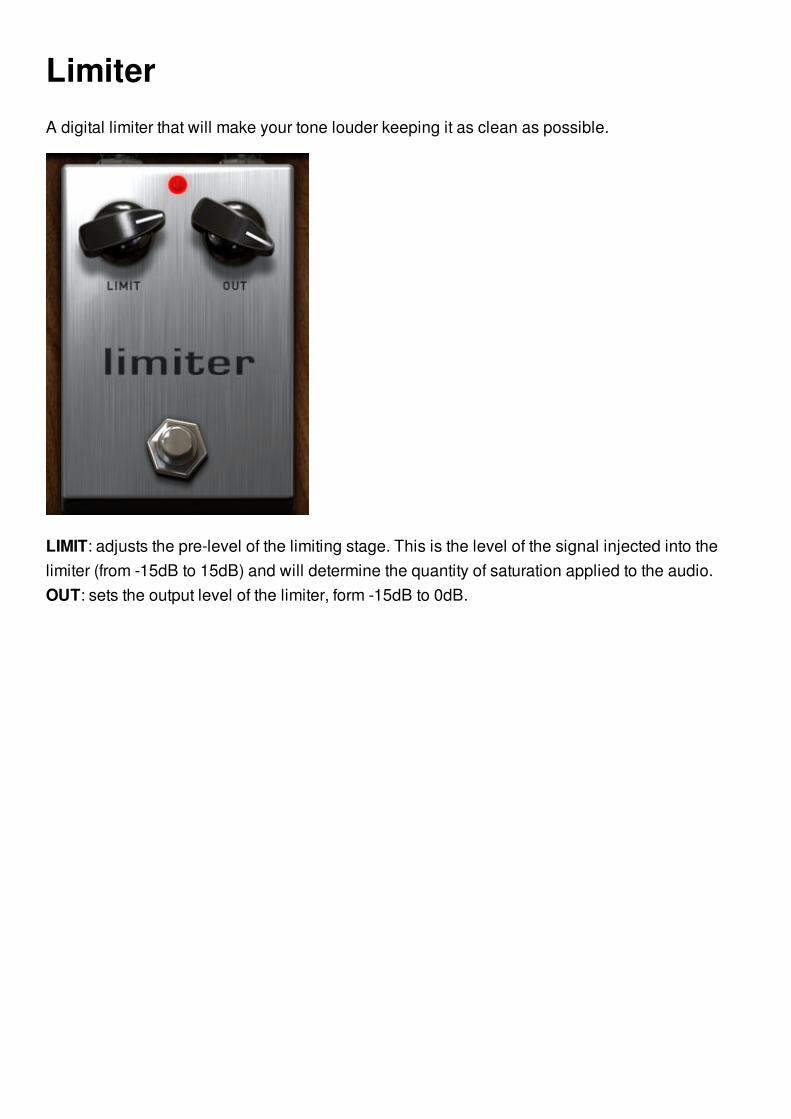
LimiterA digital limiter that will make your tone louder keeping it as clean as possible.
LIMIT: adjusts the pre-level of the limiting stage. This is the level of the signal injected into thelimiter (from -15dB to 15dB) and will determine the quantity of saturation applied to the audio. OUT: sets the output level of the limiter, form -15dB to 0dB.
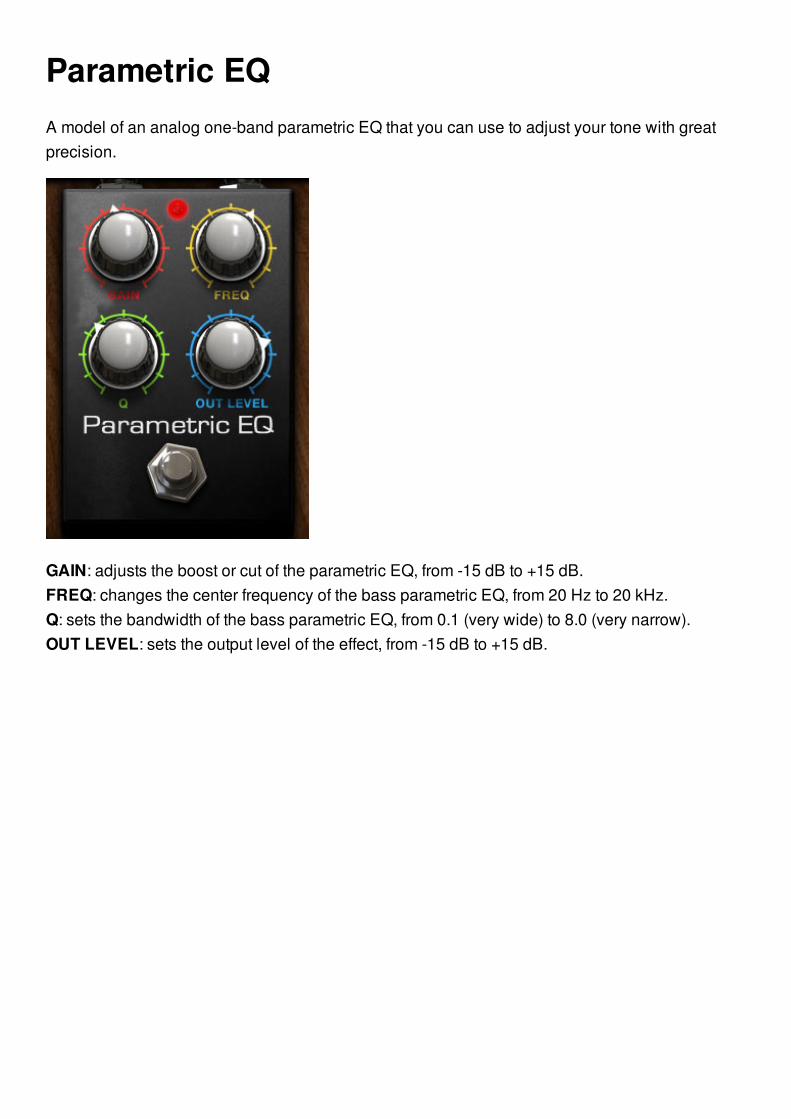
Parametric EQA model of an analog one-band parametric EQ that you can use to adjust your tone with greatprecision.
GAIN: adjusts the boost or cut of the parametric EQ, from -15 dB to +15 dB. FREQ: changes the center frequency of the bass parametric EQ, from 20 Hz to 20 kHz. Q: sets the bandwidth of the bass parametric EQ, from 0.1 (very wide) to 8.0 (very narrow). OUT LEVEL: sets the output level of the effect, from -15 dB to +15 dB.
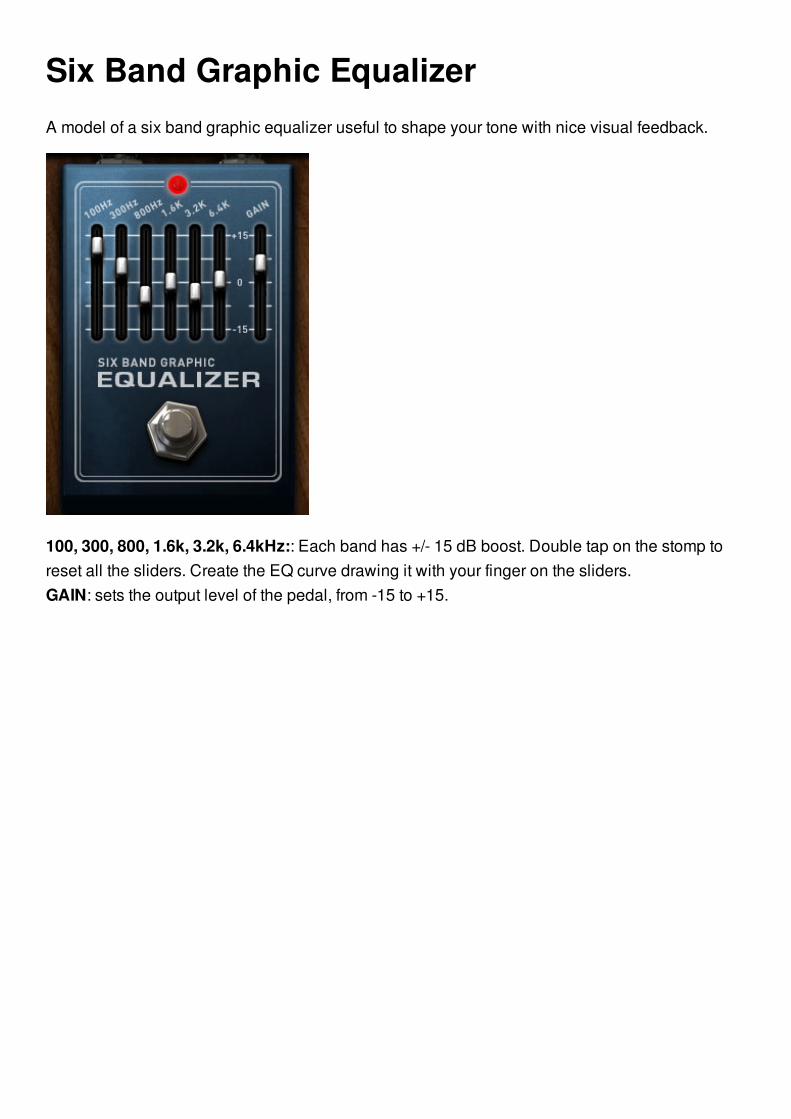
Six Band Graphic EqualizerA model of a six band graphic equalizer useful to shape your tone with nice visual feedback.
100, 300, 800, 1.6k, 3.2k, 6.4kHz:: Each band has +/- 15 dB boost. Double tap on the stomp toreset all the sliders. Create the EQ curve drawing it with your finger on the sliders. GAIN: sets the output level of the pedal, from -15 to +15.

WahBased on a classic Wah unit from the 60s. Move its pedal to create a funky and catchy sweepeffect used on countless hits since 40 years. Very useful on rock solos to add expression to thenotes and bends.
OFF/ON/AUTO: sets the mode of the Wah effect, Off, On, or Auto. The auto function allows it tobe used easily without an external controllerTILT: choose Tilt to control the Wah with the accelerometer!WAH: this directly controls the Wah effect, from 0 to 10.
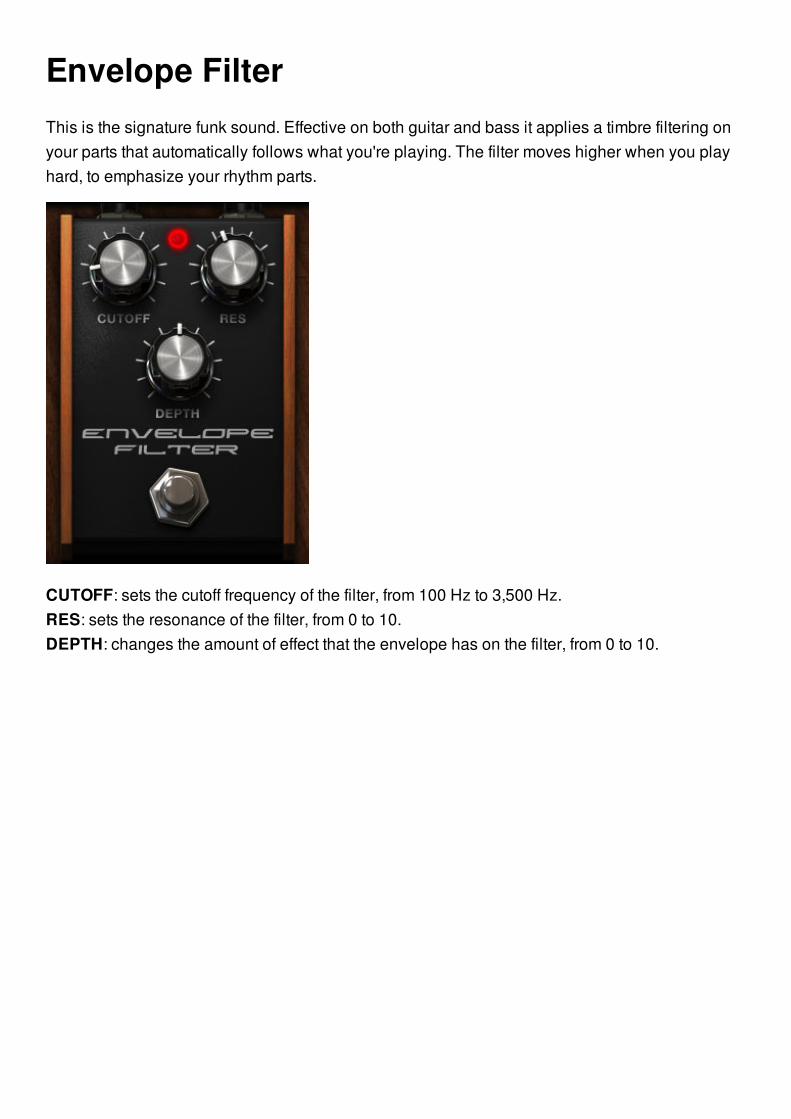
Envelope FilterThis is the signature funk sound. Effective on both guitar and bass it applies a timbre filtering onyour parts that automatically follows what you're playing. The filter moves higher when you playhard, to emphasize your rhythm parts.
CUTOFF: sets the cutoff frequency of the filter, from 100 Hz to 3,500 Hz.RES: sets the resonance of the filter, from 0 to 10.DEPTH: changes the amount of effect that the envelope has on the filter, from 0 to 10.
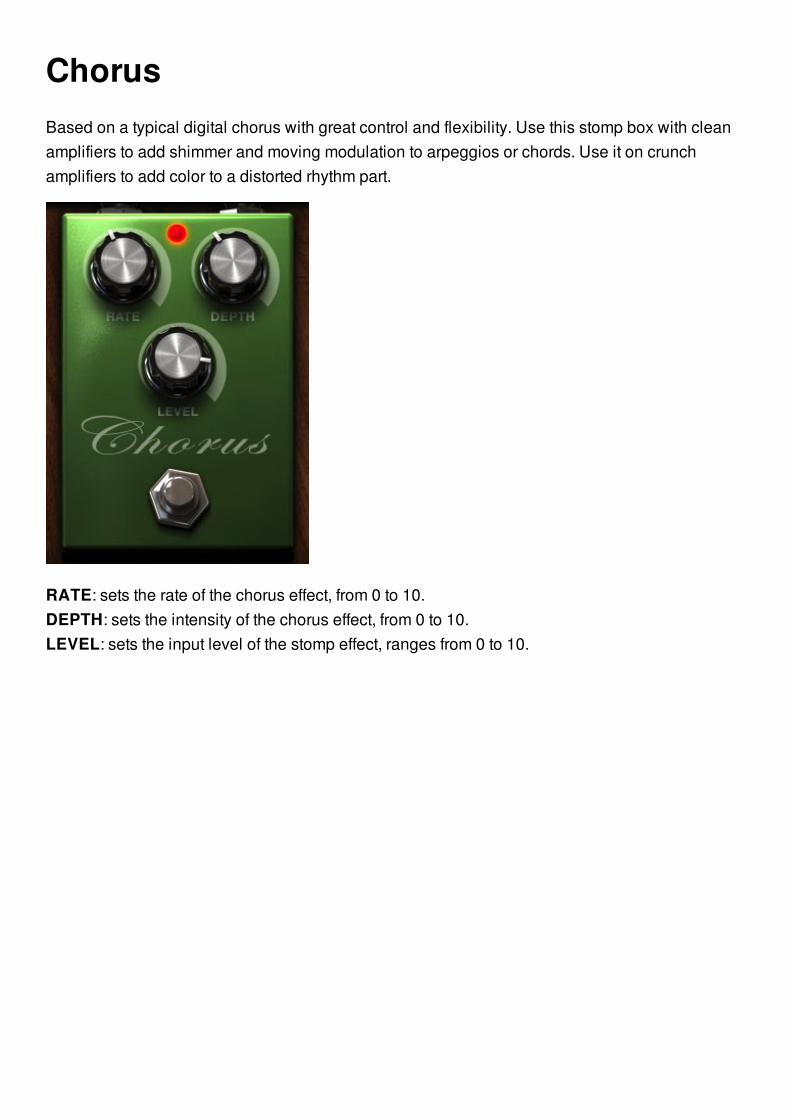
ChorusBased on a typical digital chorus with great control and flexibility. Use this stomp box with cleanamplifiers to add shimmer and moving modulation to arpeggios or chords. Use it on crunchamplifiers to add color to a distorted rhythm part.
RATE: sets the rate of the chorus effect, from 0 to 10.DEPTH: sets the intensity of the chorus effect, from 0 to 10.LEVEL: sets the input level of the stomp effect, ranges from 0 to 10.
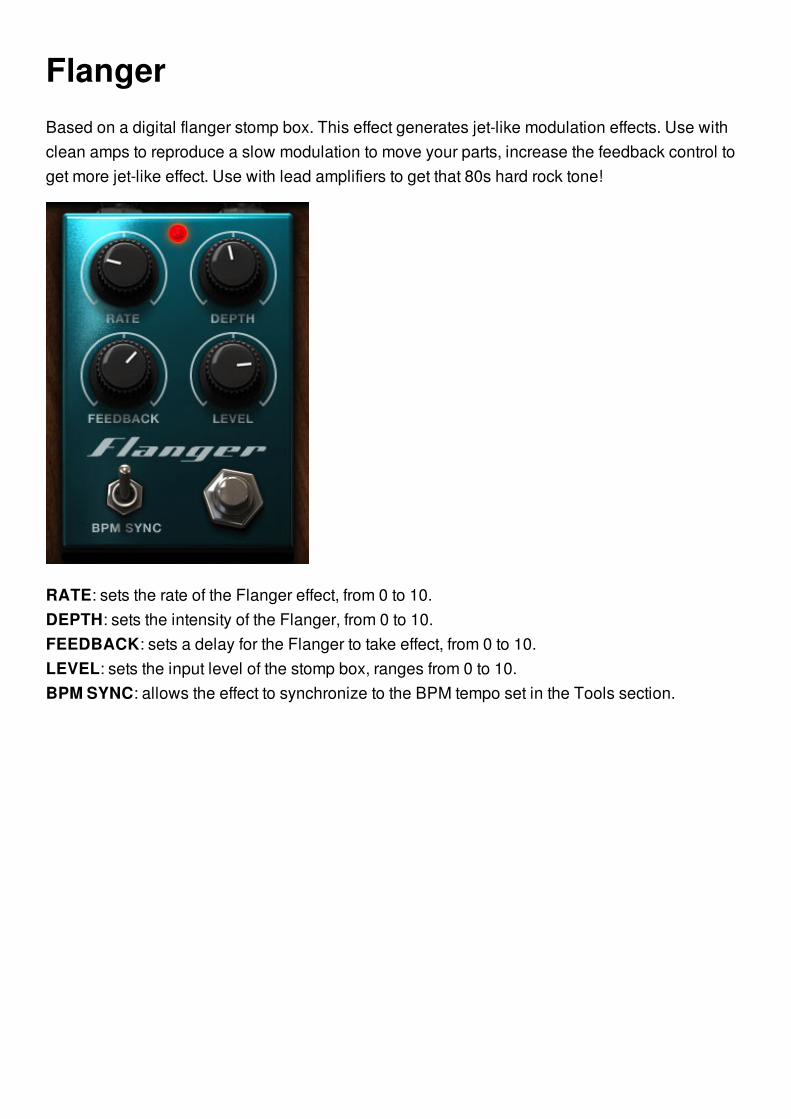
FlangerBased on a digital flanger stomp box. This effect generates jet-like modulation effects. Use withclean amps to reproduce a slow modulation to move your parts, increase the feedback control toget more jet-like effect. Use with lead amplifiers to get that 80s hard rock tone!
RATE: sets the rate of the Flanger effect, from 0 to 10.DEPTH: sets the intensity of the Flanger, from 0 to 10.FEEDBACK: sets a delay for the Flanger to take effect, from 0 to 10.LEVEL: sets the input level of the stomp box, ranges from 0 to 10.BPM SYNC: allows the effect to synchronize to the BPM tempo set in the Tools section.
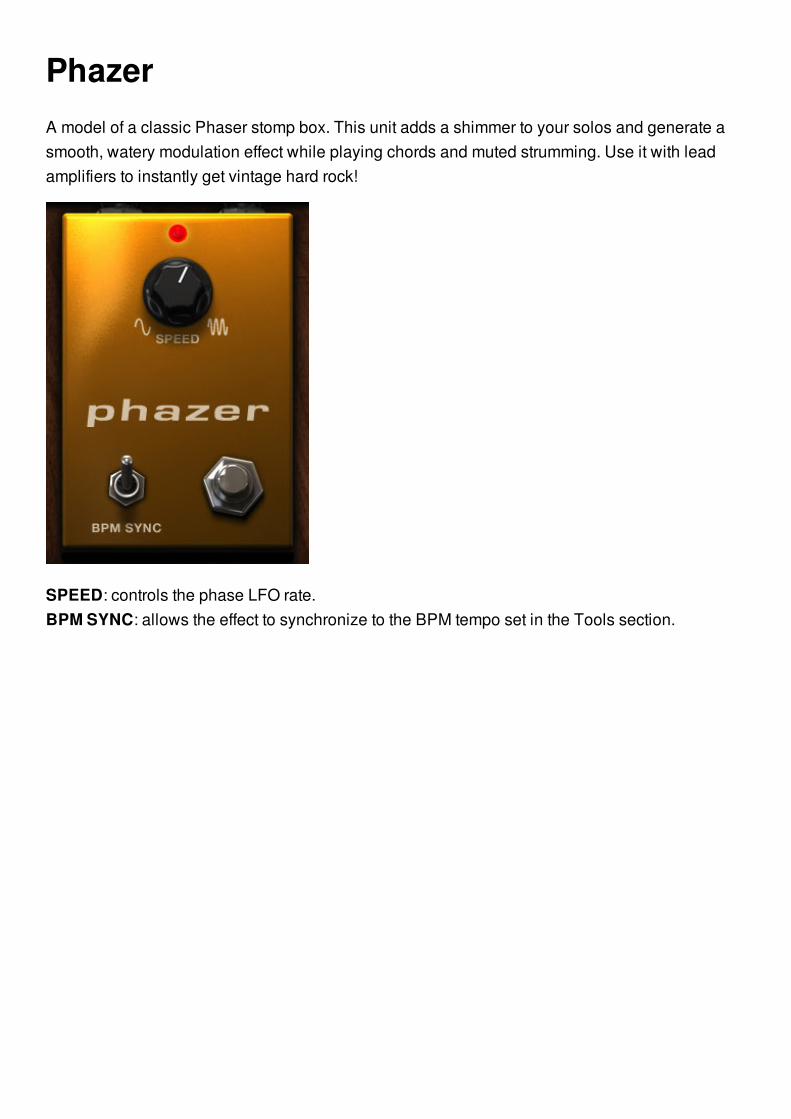
PhazerA model of a classic Phaser stomp box. This unit adds a shimmer to your solos and generate asmooth, watery modulation effect while playing chords and muted strumming. Use it with leadamplifiers to instantly get vintage hard rock!
SPEED: controls the phase LFO rate.BPM SYNC: allows the effect to synchronize to the BPM tempo set in the Tools section.
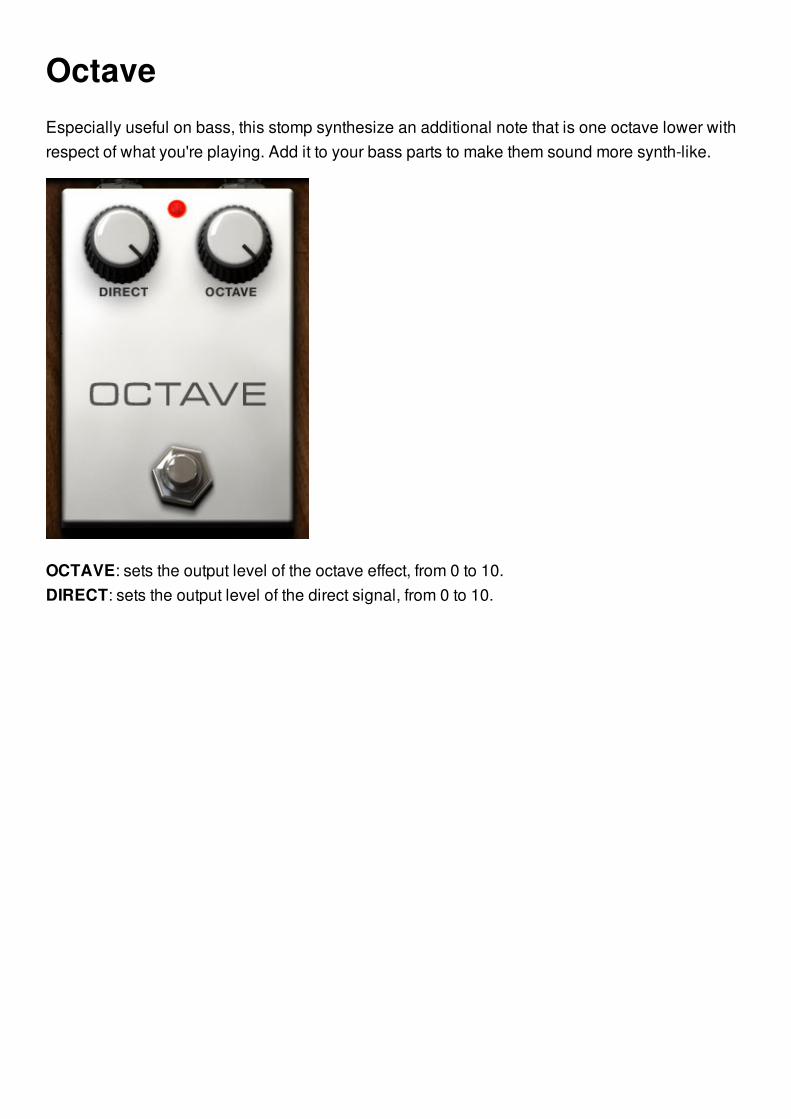
OctaveEspecially useful on bass, this stomp synthesize an additional note that is one octave lower withrespect of what you're playing. Add it to your bass parts to make them sound more synth-like.
OCTAVE: sets the output level of the octave effect, from 0 to 10.DIRECT: sets the output level of the direct signal, from 0 to 10.
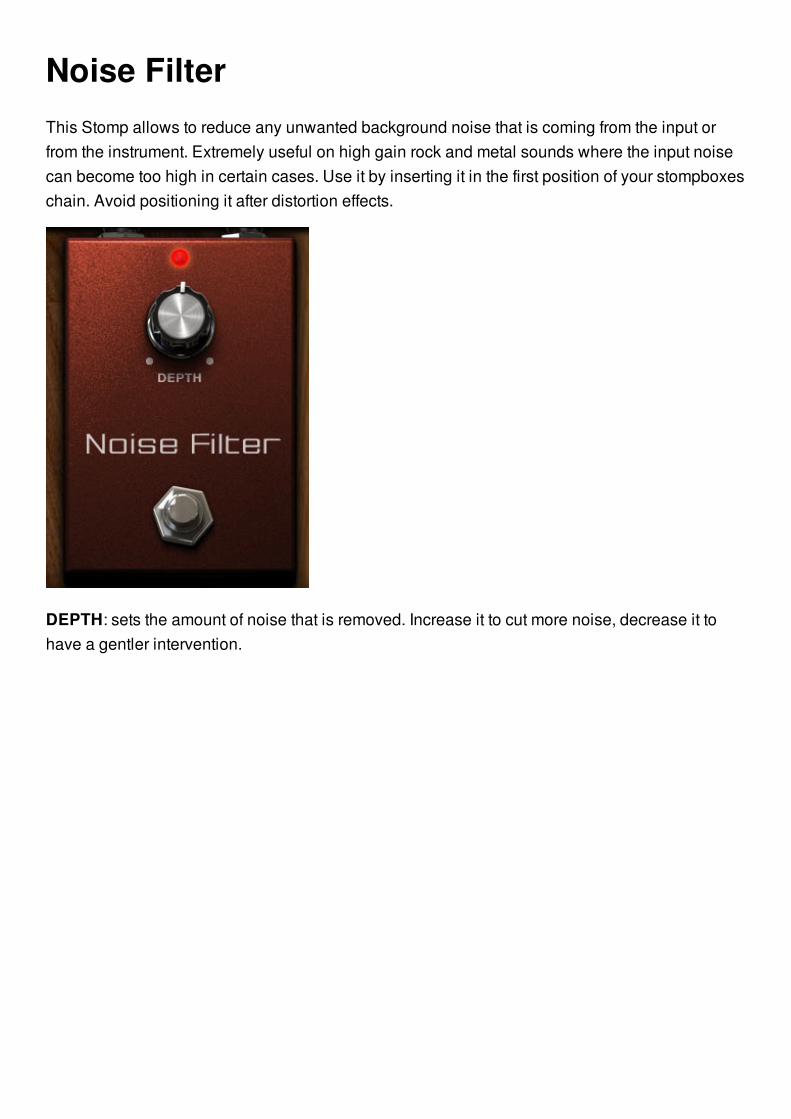
Noise FilterThis Stomp allows to reduce any unwanted background noise that is coming from the input orfrom the instrument. Extremely useful on high gain rock and metal sounds where the input noisecan become too high in certain cases. Use it by inserting it in the first position of your stompboxeschain. Avoid positioning it after distortion effects.
DEPTH: sets the amount of noise that is removed. Increase it to cut more noise, decrease it tohave a gentler intervention.
AmpTo change your amp tap on the AMP button on the bottom-left of the interface and choose theone you need in the menu that appears. Choose your cabinet by tapping on the CAB button, rightnext to the AMP button. You can insert the Cabinets also by tapping on the cab picture icon. Tapping on the microphonepicture will change the mic model.Tap on the amp ON/OFF switch to turn off the whole amp section (amp+cab+mic). To change anyof the amp parameter touch the parameter knob and drag up/down. To return to the defaultsettings just double-tap on the knobs. And now lets have a quick tour of all the models in theAMP section.
• Clean• Crunch• Lead• Metal• Bass• Mics
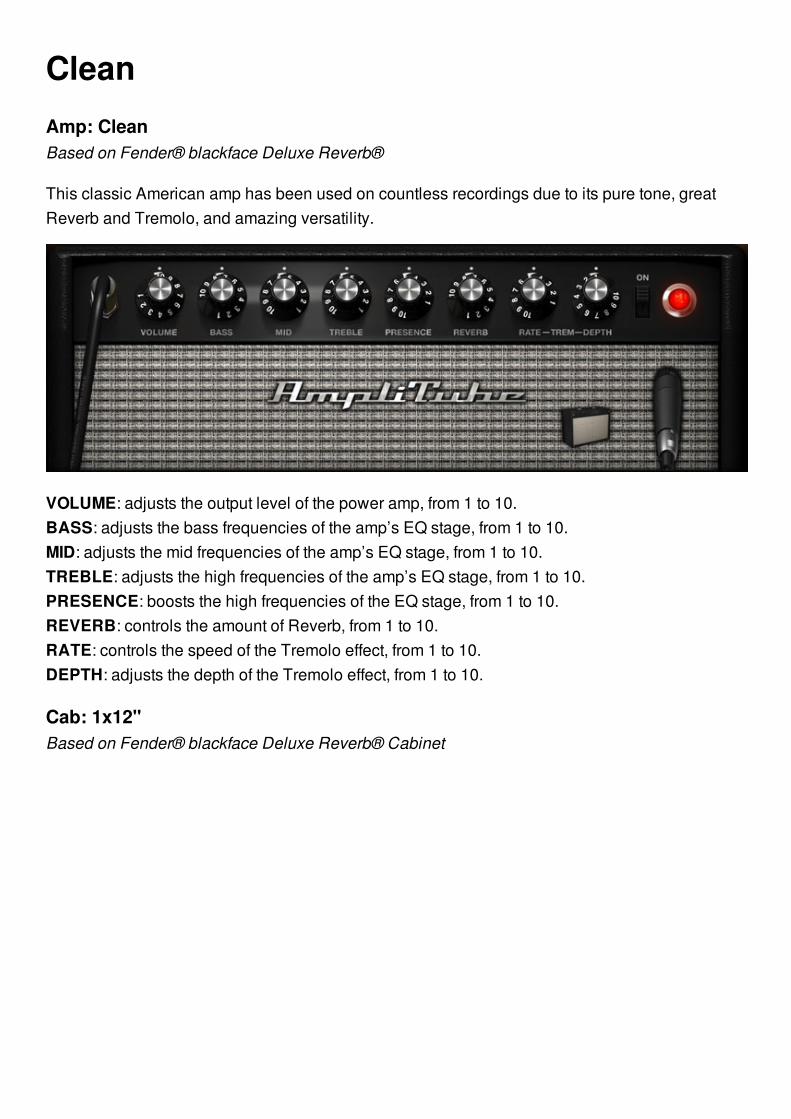
CleanAmp: CleanBased on Fender® blackface Deluxe Reverb®
This classic American amp has been used on countless recordings due to its pure tone, greatReverb and Tremolo, and amazing versatility.
VOLUME: adjusts the output level of the power amp, from 1 to 10.BASS: adjusts the bass frequencies of the amp’s EQ stage, from 1 to 10.MID: adjusts the mid frequencies of the amp’s EQ stage, from 1 to 10.TREBLE: adjusts the high frequencies of the amp’s EQ stage, from 1 to 10.PRESENCE: boosts the high frequencies of the EQ stage, from 1 to 10.REVERB: controls the amount of Reverb, from 1 to 10.RATE: controls the speed of the Tremolo effect, from 1 to 10.DEPTH: adjusts the depth of the Tremolo effect, from 1 to 10.
Cab: 1x12"Based on Fender® blackface Deluxe Reverb® Cabinet
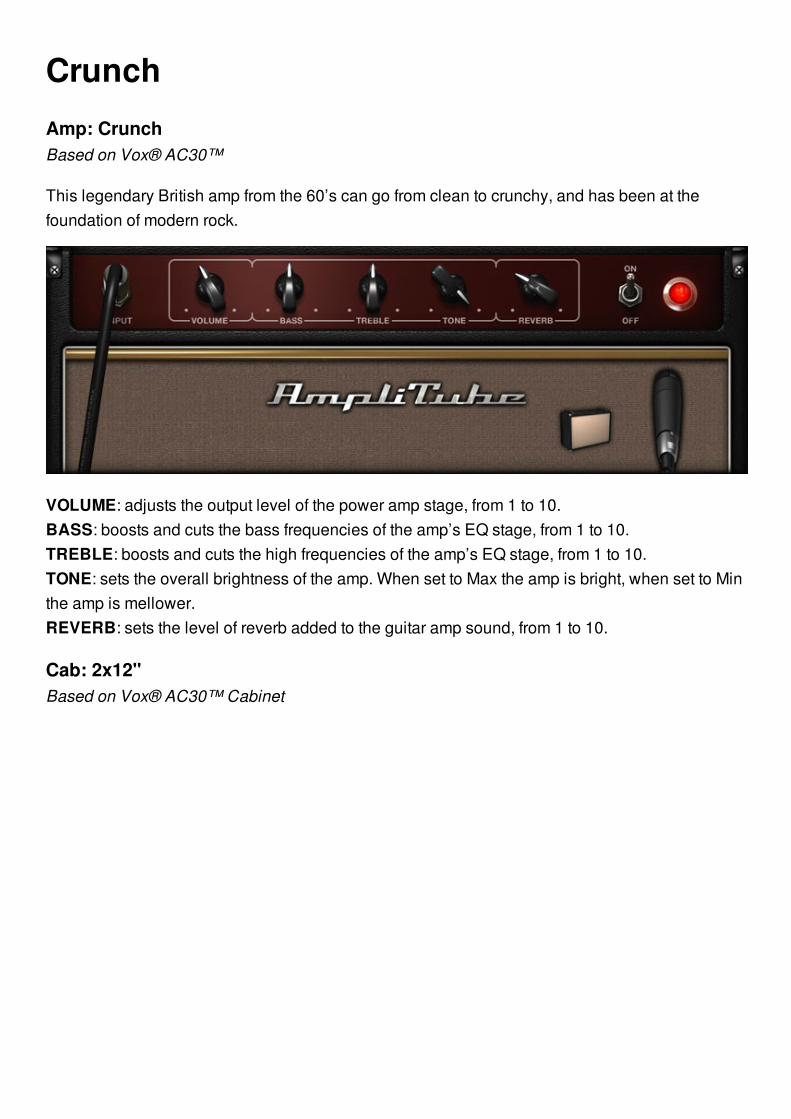
CrunchAmp: CrunchBased on Vox® AC30™
This legendary British amp from the 60’s can go from clean to crunchy, and has been at thefoundation of modern rock.
VOLUME: adjusts the output level of the power amp stage, from 1 to 10.BASS: boosts and cuts the bass frequencies of the amp’s EQ stage, from 1 to 10.TREBLE: boosts and cuts the high frequencies of the amp’s EQ stage, from 1 to 10.TONE: sets the overall brightness of the amp. When set to Max the amp is bright, when set to Minthe amp is mellower.REVERB: sets the level of reverb added to the guitar amp sound, from 1 to 10.
Cab: 2x12"Based on Vox® AC30™ Cabinet
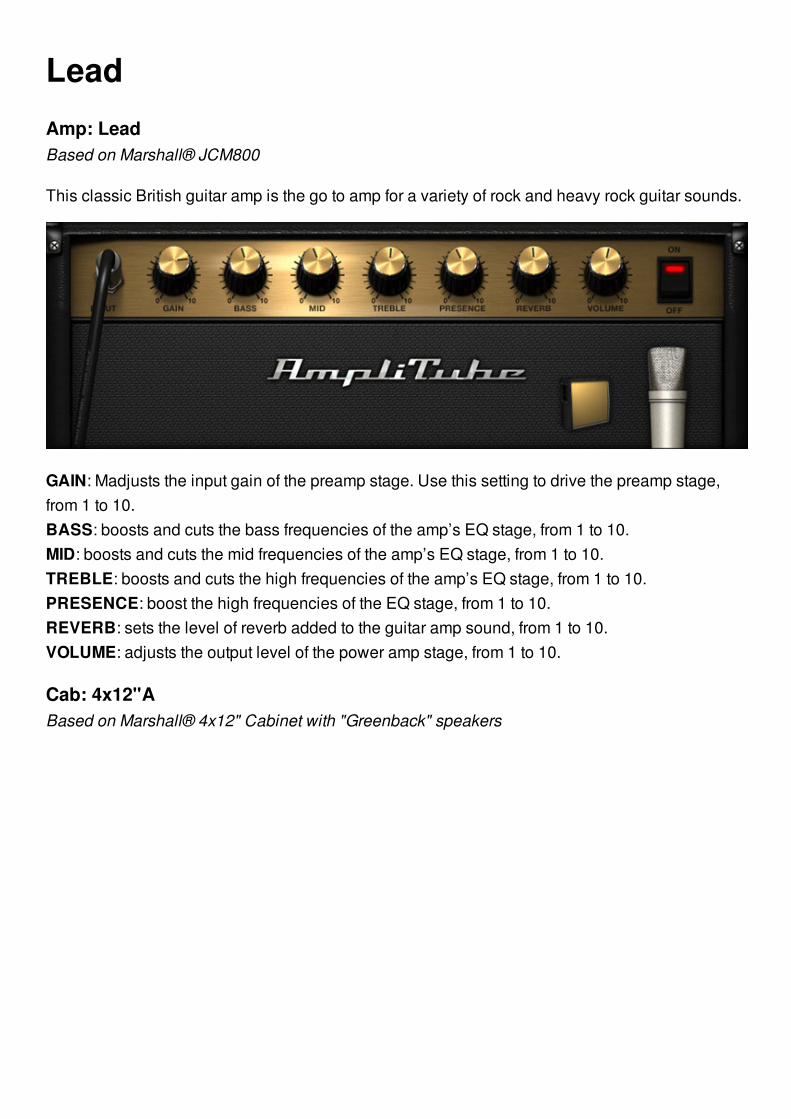
LeadAmp: LeadBased on Marshall® JCM800
This classic British guitar amp is the go to amp for a variety of rock and heavy rock guitar sounds.
GAIN: Madjusts the input gain of the preamp stage. Use this setting to drive the preamp stage,from 1 to 10.BASS: boosts and cuts the bass frequencies of the amp’s EQ stage, from 1 to 10.MID: boosts and cuts the mid frequencies of the amp’s EQ stage, from 1 to 10.TREBLE: boosts and cuts the high frequencies of the amp’s EQ stage, from 1 to 10.PRESENCE: boost the high frequencies of the EQ stage, from 1 to 10.REVERB: sets the level of reverb added to the guitar amp sound, from 1 to 10.VOLUME: adjusts the output level of the power amp stage, from 1 to 10.
Cab: 4x12"ABased on Marshall® 4x12" Cabinet with "Greenback" speakers
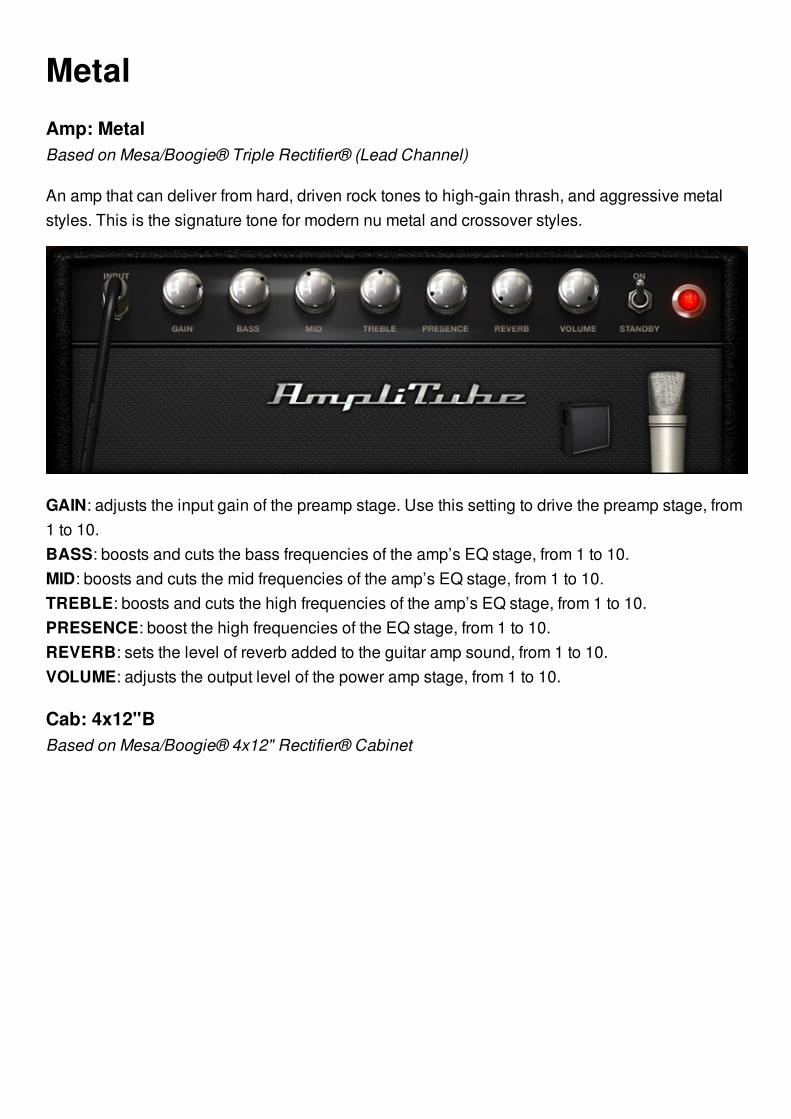
MetalAmp: MetalBased on Mesa/Boogie® Triple Rectifier® (Lead Channel)
An amp that can deliver from hard, driven rock tones to high-gain thrash, and aggressive metalstyles. This is the signature tone for modern nu metal and crossover styles.
GAIN: adjusts the input gain of the preamp stage. Use this setting to drive the preamp stage, from1 to 10.BASS: boosts and cuts the bass frequencies of the amp’s EQ stage, from 1 to 10.MID: boosts and cuts the mid frequencies of the amp’s EQ stage, from 1 to 10.TREBLE: boosts and cuts the high frequencies of the amp’s EQ stage, from 1 to 10.PRESENCE: boost the high frequencies of the EQ stage, from 1 to 10.REVERB: sets the level of reverb added to the guitar amp sound, from 1 to 10.VOLUME: adjusts the output level of the power amp stage, from 1 to 10.
Cab: 4x12"BBased on Mesa/Boogie® 4x12" Rectifier® Cabinet
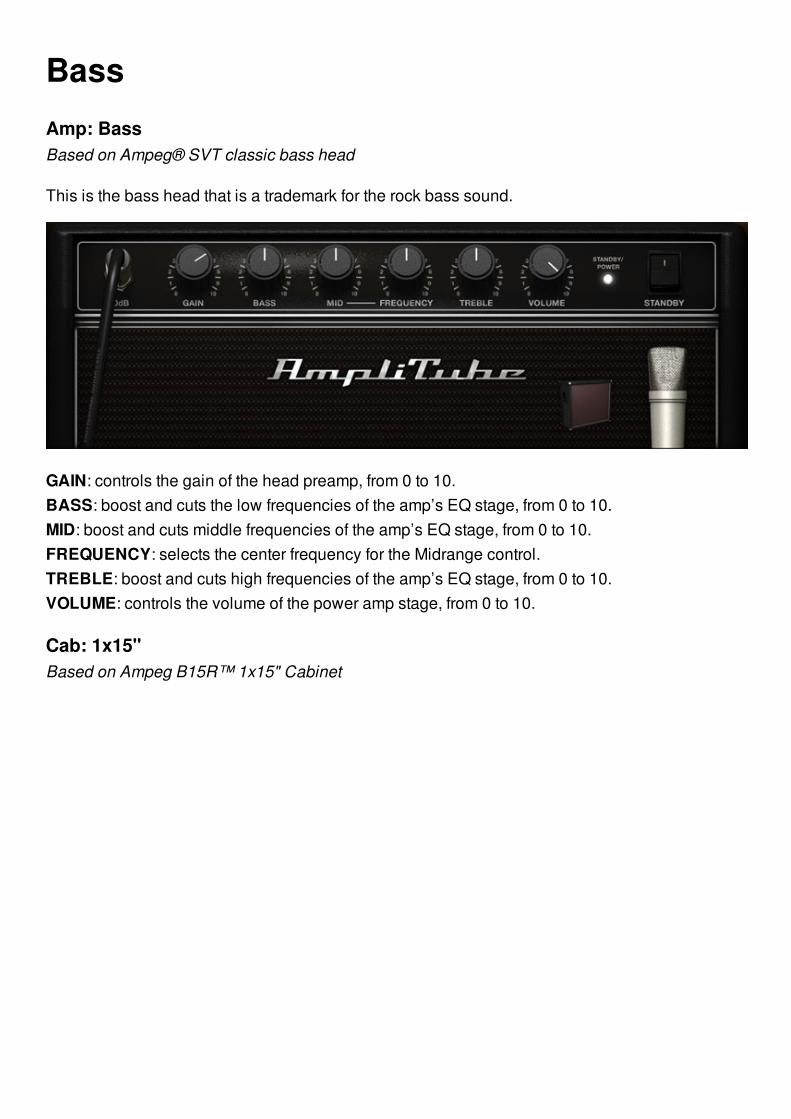
BassAmp: BassBased on Ampeg® SVT classic bass head
This is the bass head that is a trademark for the rock bass sound.
GAIN: controls the gain of the head preamp, from 0 to 10.BASS: boost and cuts the low frequencies of the amp’s EQ stage, from 0 to 10.MID: boost and cuts middle frequencies of the amp’s EQ stage, from 0 to 10.FREQUENCY: selects the center frequency for the Midrange control.TREBLE: boost and cuts high frequencies of the amp’s EQ stage, from 0 to 10.VOLUME: controls the volume of the power amp stage, from 0 to 10.
Cab: 1x15"Based on Ampeg B15R™ 1x15" Cabinet
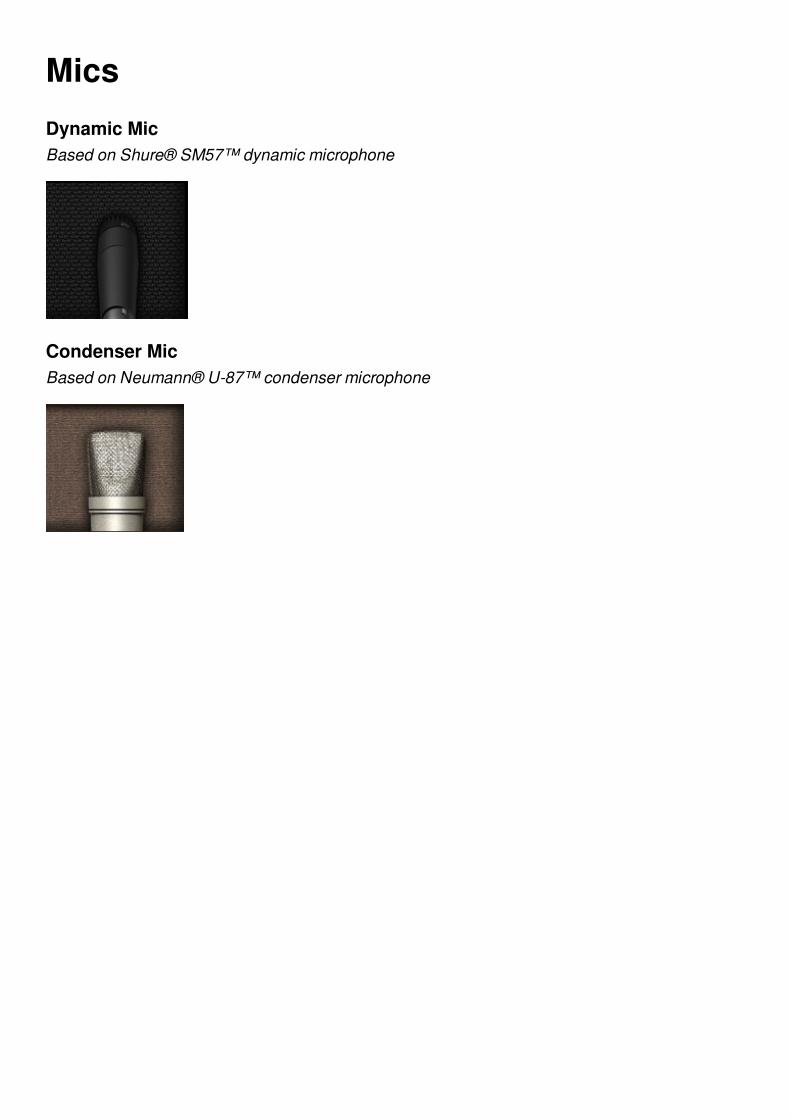
MicsDynamic MicBased on Shure® SM57™ dynamic microphone
Condenser MicBased on Neumann® U-87™ condenser microphone
Recording and Mastering
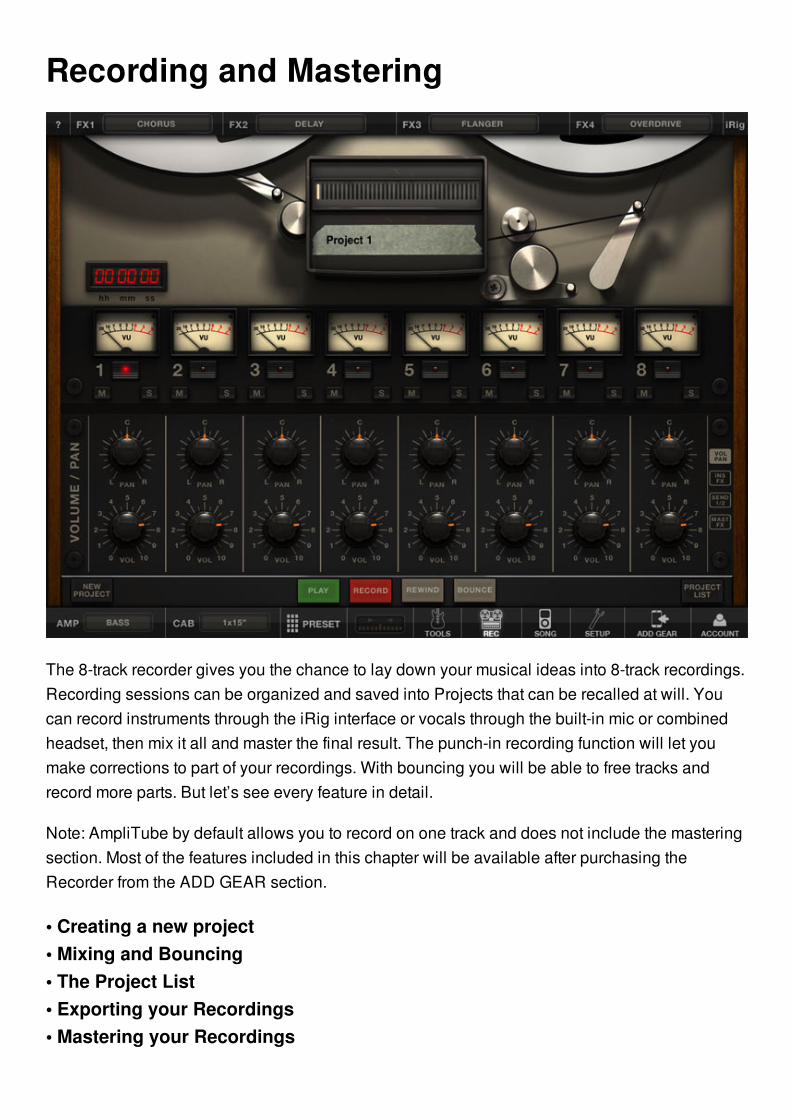
The 8-track recorder gives you the chance to lay down your musical ideas into 8-track recordings.Recording sessions can be organized and saved into Projects that can be recalled at will. Youcan record instruments through the iRig interface or vocals through the built-in mic or combinedheadset, then mix it all and master the final result. The punch-in recording function will let youmake corrections to part of your recordings. With bouncing you will be able to free tracks andrecord more parts. But let’s see every feature in detail.
Note: AmpliTube by default allows you to record on one track and does not include the masteringsection. Most of the features included in this chapter will be available after purchasing theRecorder from the ADD GEAR section.
• Creating a new project• Mixing and Bouncing• The Project List• Exporting your Recordings• Mastering your Recordings
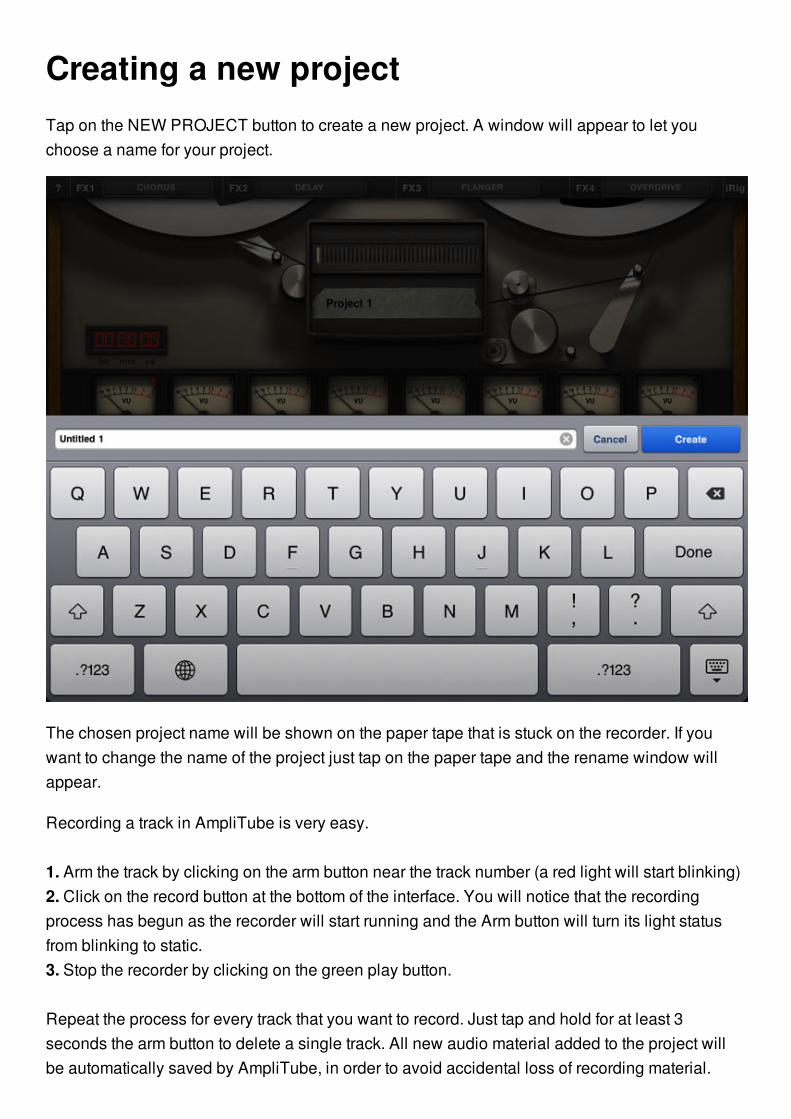
Creating a new projectTap on the NEW PROJECT button to create a new project. A window will appear to let youchoose a name for your project.
The chosen project name will be shown on the paper tape that is stuck on the recorder. If youwant to change the name of the project just tap on the paper tape and the rename window willappear.
Recording a track in AmpliTube is very easy.
1. Arm the track by clicking on the arm button near the track number (a red light will start blinking)2. Click on the record button at the bottom of the interface. You will notice that the recordingprocess has begun as the recorder will start running and the Arm button will turn its light statusfrom blinking to static.3. Stop the recorder by clicking on the green play button.
Repeat the process for every track that you want to record. Just tap and hold for at least 3seconds the arm button to delete a single track. All new audio material added to the project willbe automatically saved by AmpliTube, in order to avoid accidental loss of recording material.
Tap on the Play button to listen to your recorded material. You can also scroll within yourrecording by sliding on the Recording Position progress bar. The Recording Position displayshows the current position within your recording.Tap the Back button once to move the cassette back to the last point where you started playingfrom, tap it twice to start from the beginning of the recording. This function is very useful anytimeyou want to relisten to a specific section of your recording or replace a part using punch-in.
Punch-in RecordingMake small corrections to your tracks with punch-in recording. Slide on the progress bar tochoose where you will begin to listen to your recorded material. Tap on play to listen to yourrecording and when you reach the point that you want to record again tap the rec button; fromnow on the recorder will write everything coming from the input; by tapping on the rec buttonagain the recording process will stop and you will hear the previously recorded material.

Mixing and BouncingWhen all the tracks are full and you need to record more instruments you can free some space byusing the Bounce function. Tap on the Bounce button (at the bottom of the window), choose"Bounce" and all the 8 tracks will be merged and put on the first track. You now have seven moreempty tracks to record instruments in.
Important: remember that the bounce will apply to the merged track all the effects and mixersettings, but not the Eq and Compressor settings in the MASTER section.
As we just mentioned the mixer settings, let’s see how the mixer controls work.
The lower part of the interface is dedicated to the mixer controls. On the top of the mixer you havethe arm, mute and solo buttons. The Mute button mutes the track, while Solo allows you to listenjust to that single track. Tap the Arm button to activate the track input monitoring (the button willstart blinking). While recording the red light of the Arm button will change its status from blinkingto static. Keep the Arm button pressed for more than 3 seconds to delete the audio content of thetrack. The mixer has different sections that can be accessed by sliding through the differentpages.
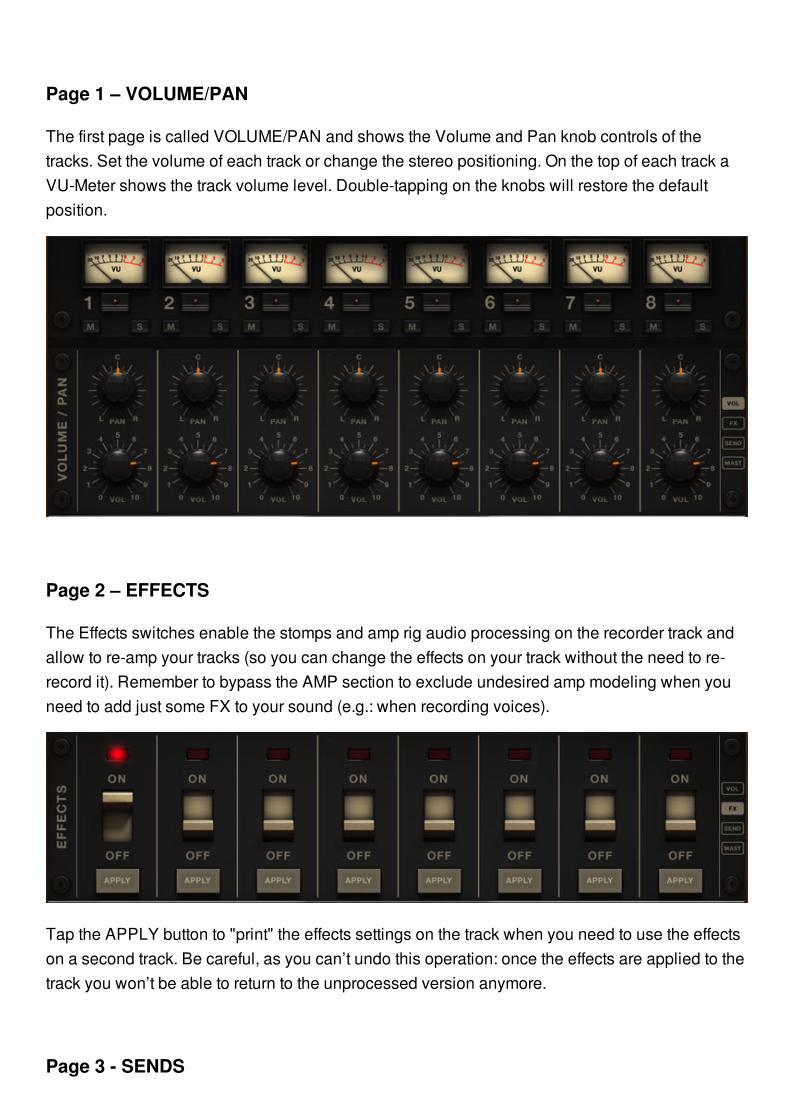
Page 1 – VOLUME/PAN
The first page is called VOLUME/PAN and shows the Volume and Pan knob controls of thetracks. Set the volume of each track or change the stereo positioning. On the top of each track aVU-Meter shows the track volume level. Double-tapping on the knobs will restore the defaultposition.
Page 2 – EFFECTS
The Effects switches enable the stomps and amp rig audio processing on the recorder track andallow to re-amp your tracks (so you can change the effects on your track without the need to re-record it). Remember to bypass the AMP section to exclude undesired amp modeling when youneed to add just some FX to your sound (e.g.: when recording voices).
Tap the APPLY button to "print" the effects settings on the track when you need to use the effectson a second track. Be careful, as you can’t undo this operation: once the effects are applied to thetrack you won’t be able to return to the unprocessed version anymore.
Page 3 - SENDS

The Sends page shows the levels of the multi-effect sends. The sliders allow to select theamount of the track signal that will be processed by the multi-effects included in the Mastersection.
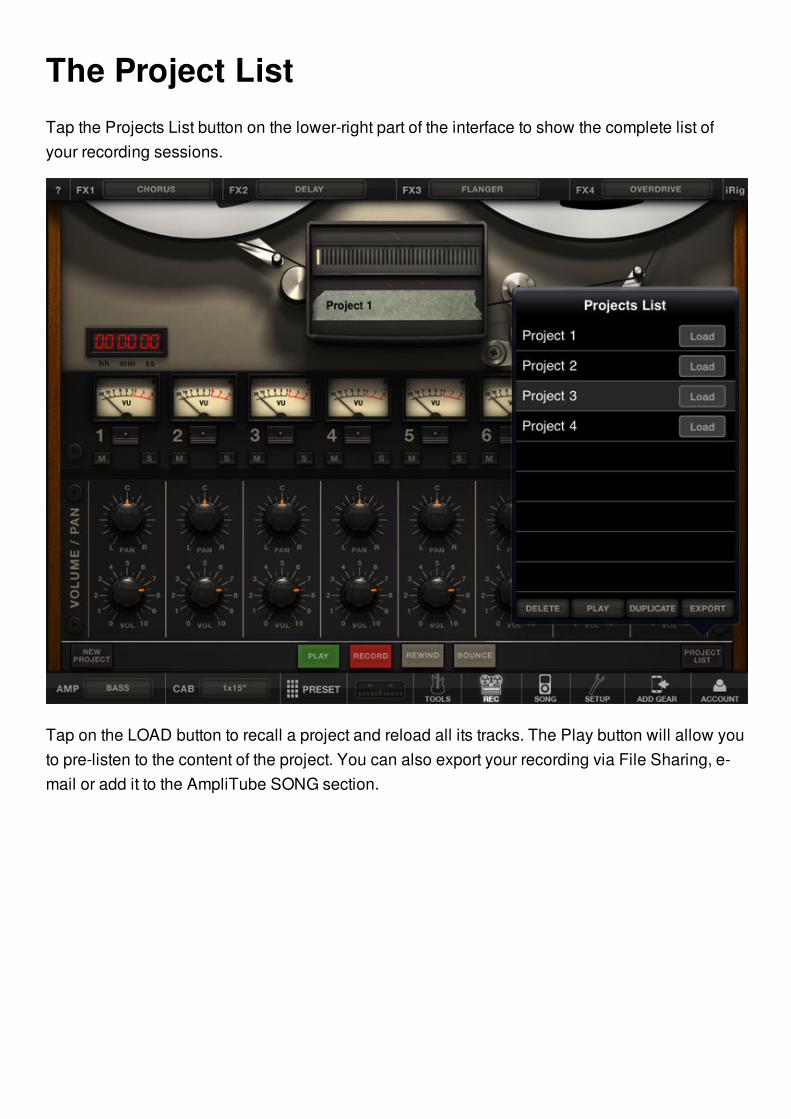
The Project ListTap the Projects List button on the lower-right part of the interface to show the complete list ofyour recording sessions.
Tap on the LOAD button to recall a project and reload all its tracks. The Play button will allow youto pre-listen to the content of the project. You can also export your recording via File Sharing, e-mail or add it to the AmpliTube SONG section.
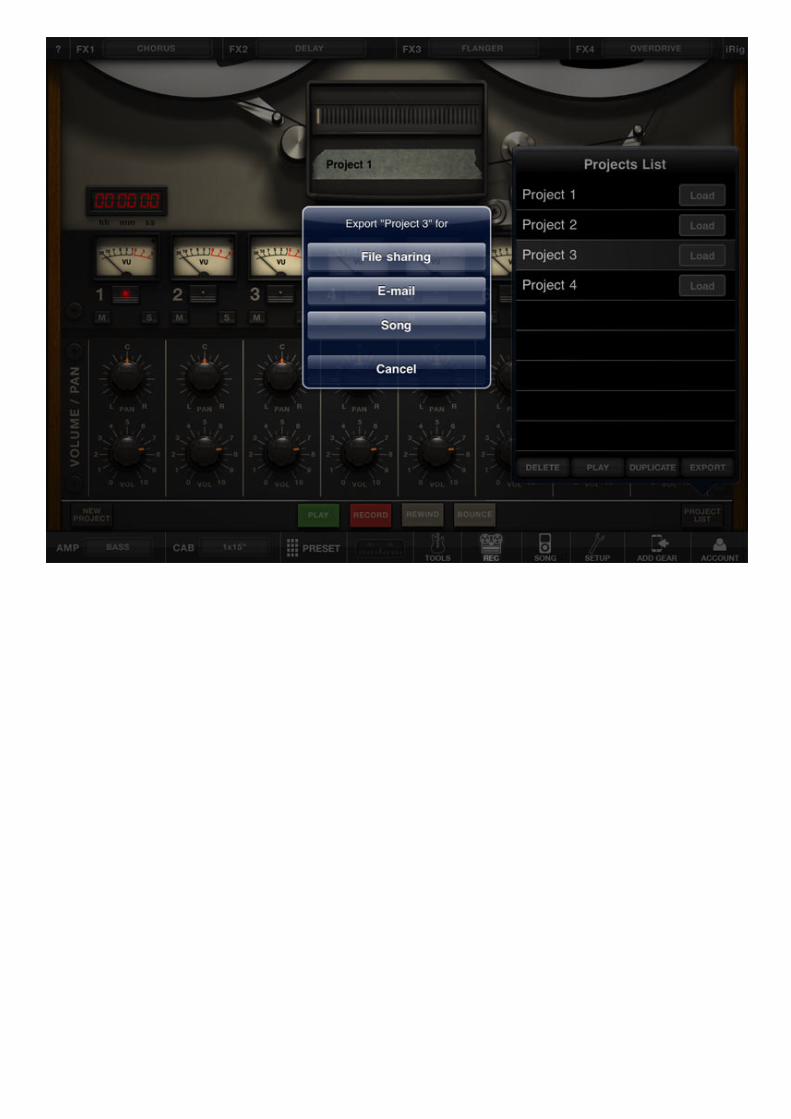

Exporting your RecordingsOnce your project is ready, you can export your recording in 3 different ways:
a) Using File Sharing as a WAV fileb) Via E-mail as M4A filec) Add it to the Song section of AmpliTube
• File Sharing• E-mail• Song
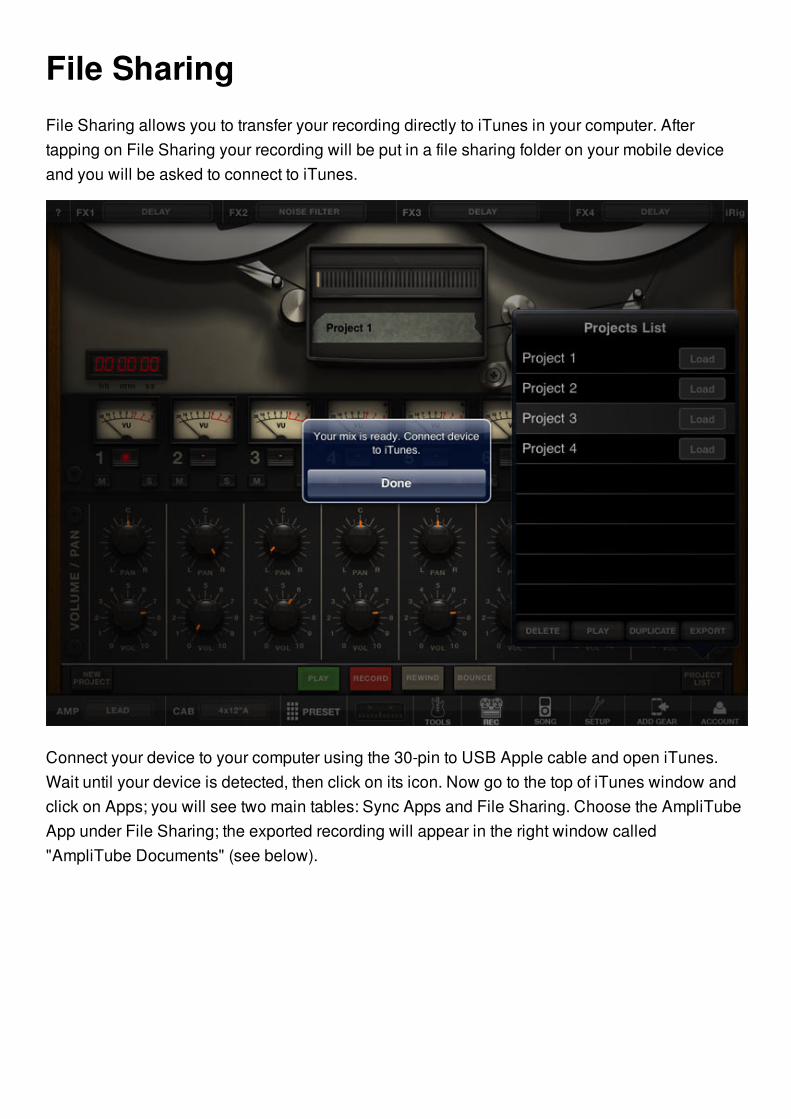
File SharingFile Sharing allows you to transfer your recording directly to iTunes in your computer. Aftertapping on File Sharing your recording will be put in a file sharing folder on your mobile deviceand you will be asked to connect to iTunes.
Connect your device to your computer using the 30-pin to USB Apple cable and open iTunes.Wait until your device is detected, then click on its icon. Now go to the top of iTunes window andclick on Apps; you will see two main tables: Sync Apps and File Sharing. Choose the AmpliTubeApp under File Sharing; the exported recording will appear in the right window called"AmpliTube Documents" (see below).
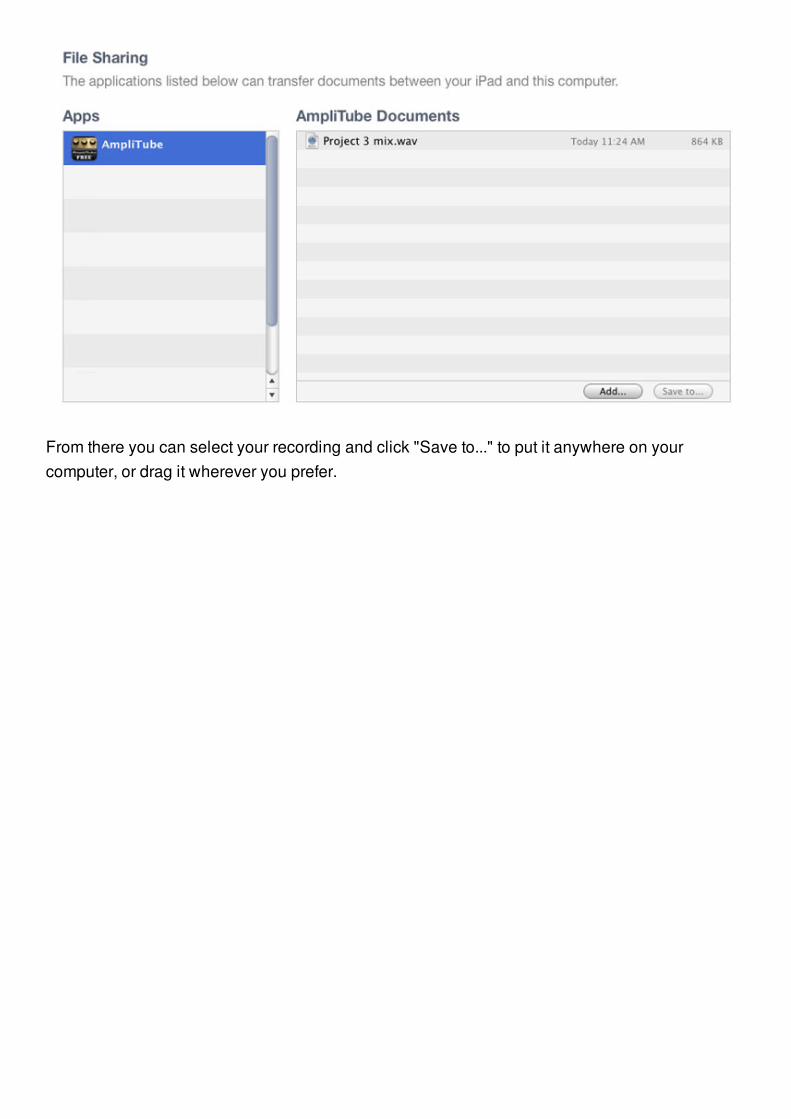
From there you can select your recording and click "Save to..." to put it anywhere on yourcomputer, or drag it wherever you prefer.
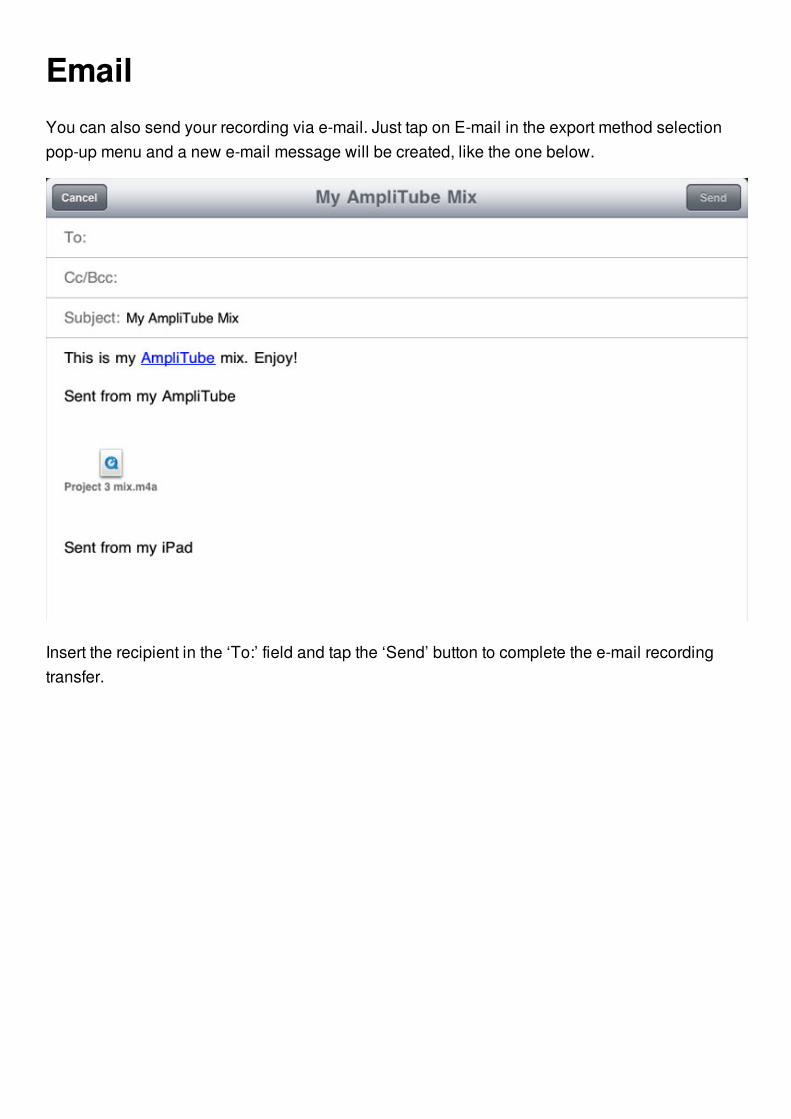
EmailYou can also send your recording via e-mail. Just tap on E-mail in the export method selectionpop-up menu and a new e-mail message will be created, like the one below.
Insert the recipient in the ‘To:’ field and tap the ‘Send’ button to complete the e-mail recordingtransfer.
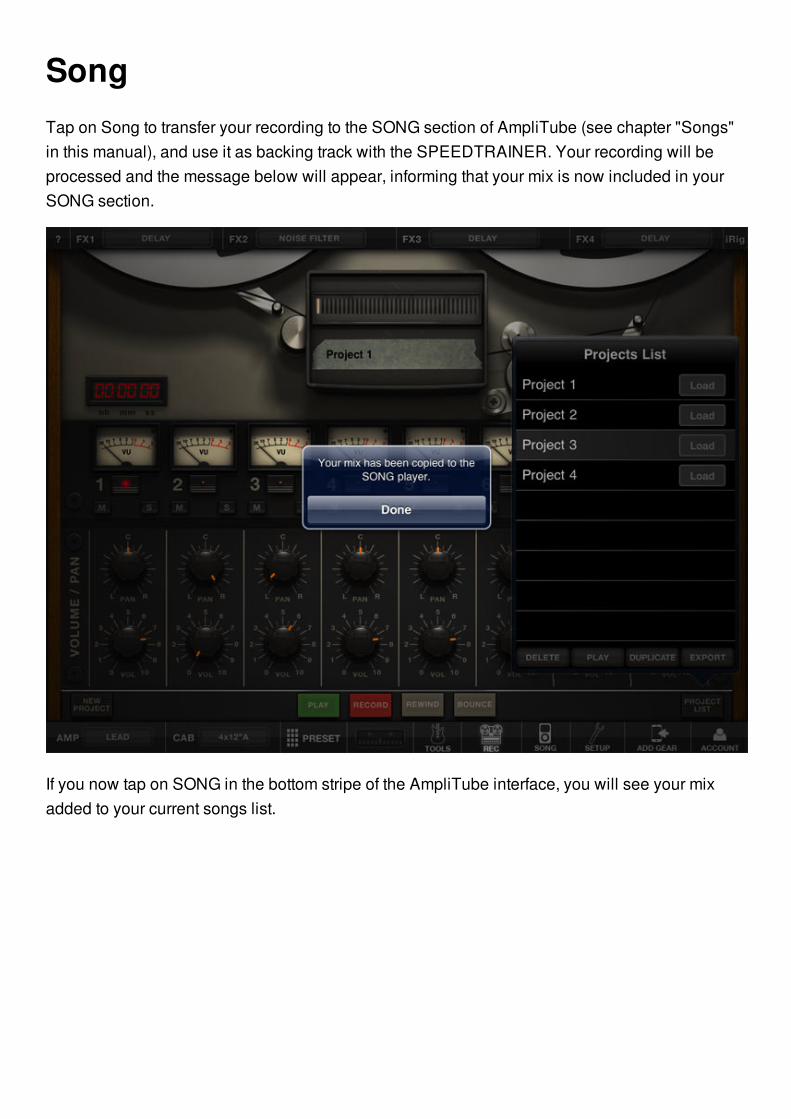
SongTap on Song to transfer your recording to the SONG section of AmpliTube (see chapter "Songs"in this manual), and use it as backing track with the SPEEDTRAINER. Your recording will beprocessed and the message below will appear, informing that your mix is now included in yourSONG section.
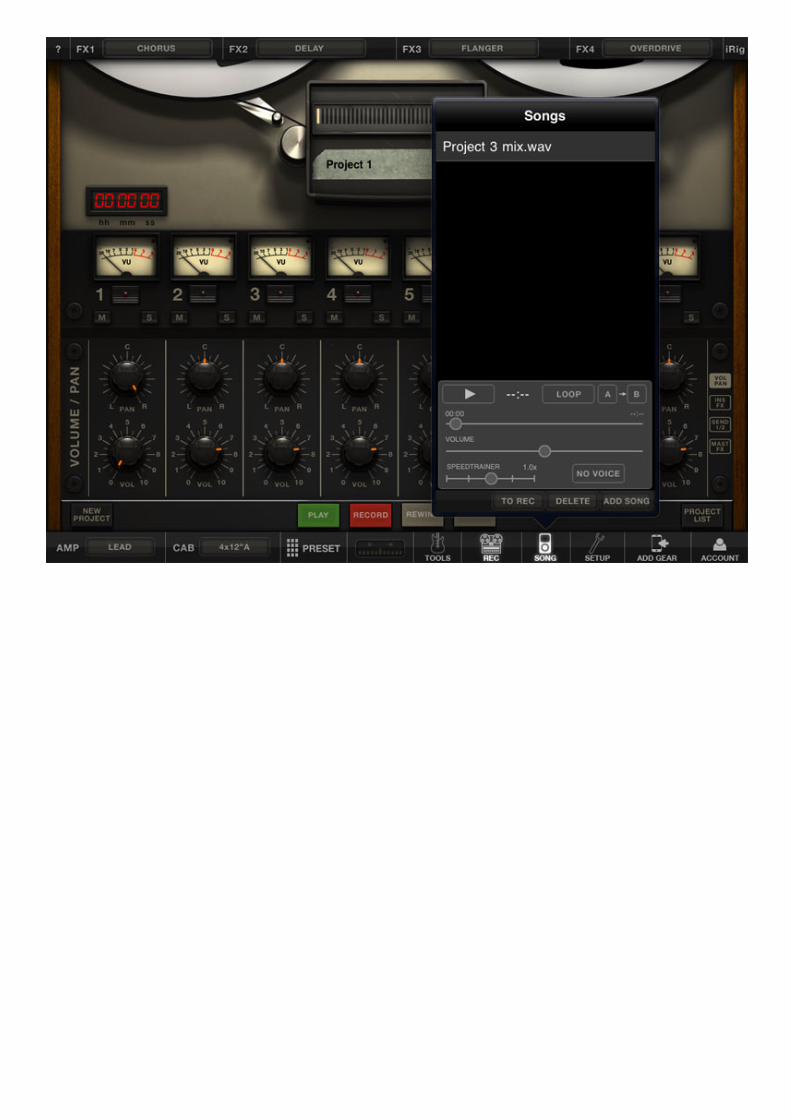
If you now tap on SONG in the bottom stripe of the AmpliTube interface, you will see your mixadded to your current songs list.
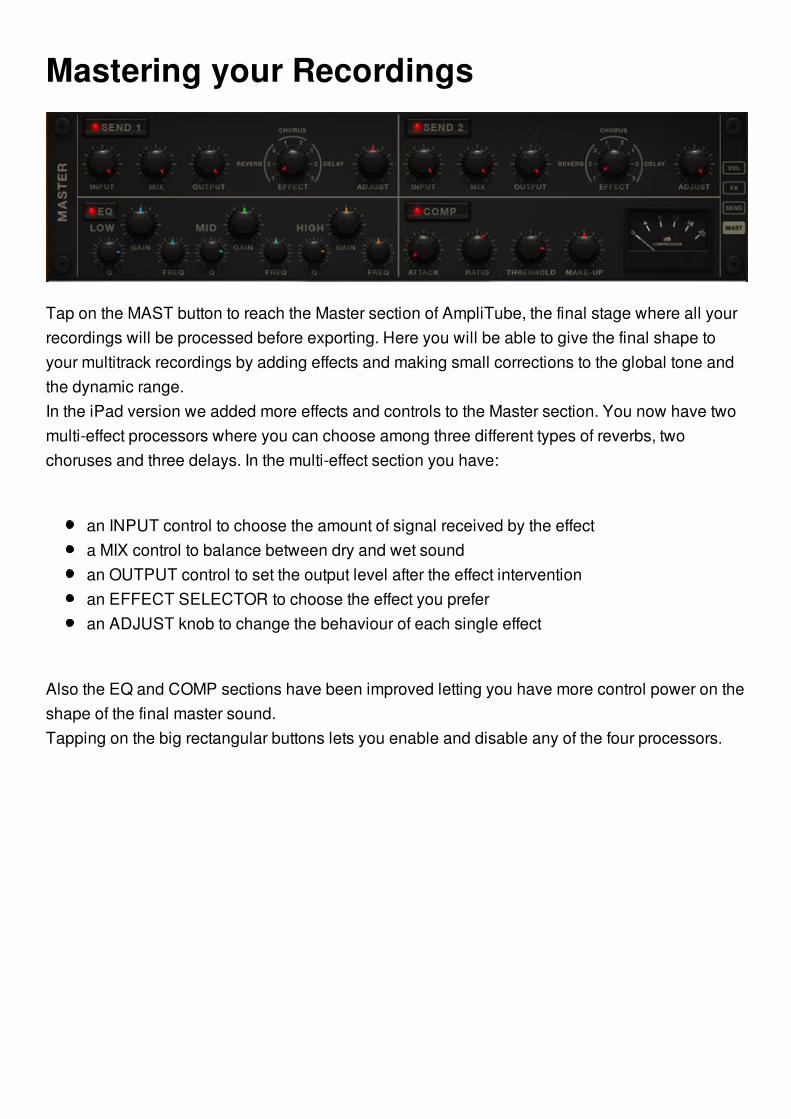
Mastering your Recordings
Tap on the MAST button to reach the Master section of AmpliTube, the final stage where all yourrecordings will be processed before exporting. Here you will be able to give the final shape toyour multitrack recordings by adding effects and making small corrections to the global tone andthe dynamic range.In the iPad version we added more effects and controls to the Master section. You now have twomulti-effect processors where you can choose among three different types of reverbs, twochoruses and three delays. In the multi-effect section you have:
an INPUT control to choose the amount of signal received by the effecta MIX control to balance between dry and wet soundan OUTPUT control to set the output level after the effect interventionan EFFECT SELECTOR to choose the effect you preferan ADJUST knob to change the behaviour of each single effect
Also the EQ and COMP sections have been improved letting you have more control power on theshape of the final master sound.Tapping on the big rectangular buttons lets you enable and disable any of the four processors.
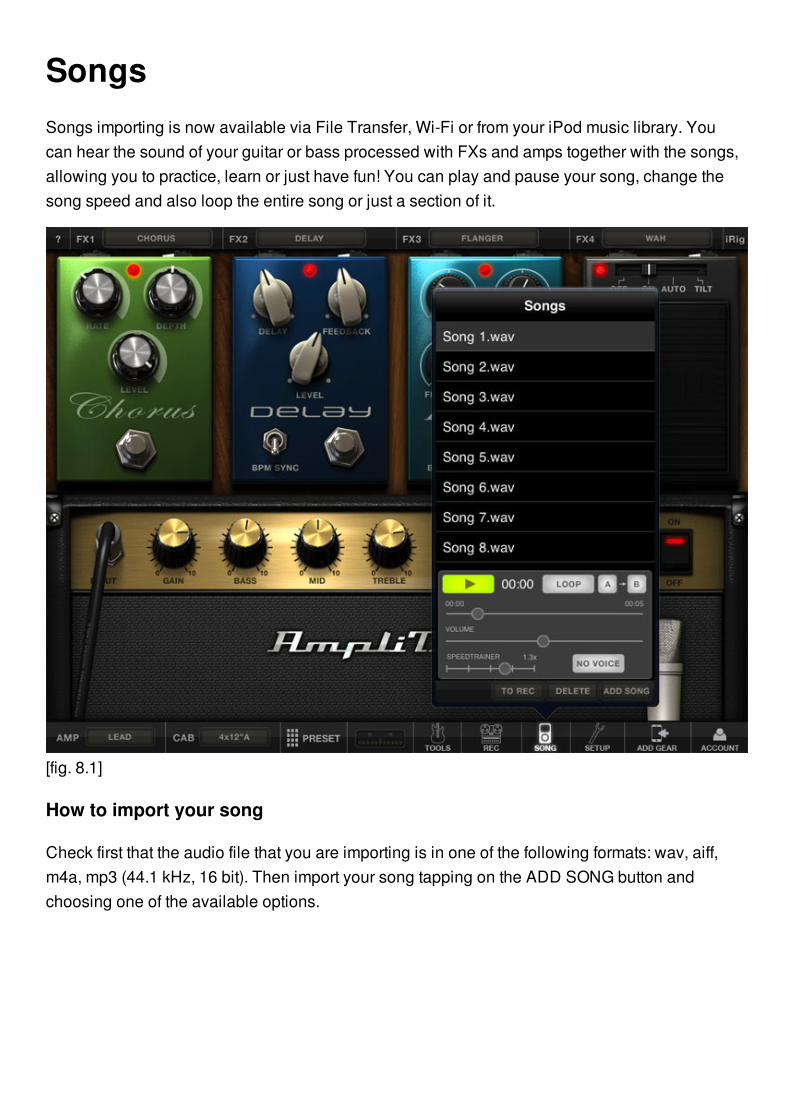
SongsSongs importing is now available via File Transfer, Wi-Fi or from your iPod music library. Youcan hear the sound of your guitar or bass processed with FXs and amps together with the songs,allowing you to practice, learn or just have fun! You can play and pause your song, change thesong speed and also loop the entire song or just a section of it.
[fig. 8.1]
How to import your song
Check first that the audio file that you are importing is in one of the following formats: wav, aiff,m4a, mp3 (44.1 kHz, 16 bit). Then import your song tapping on the ADD SONG button andchoosing one of the available options.
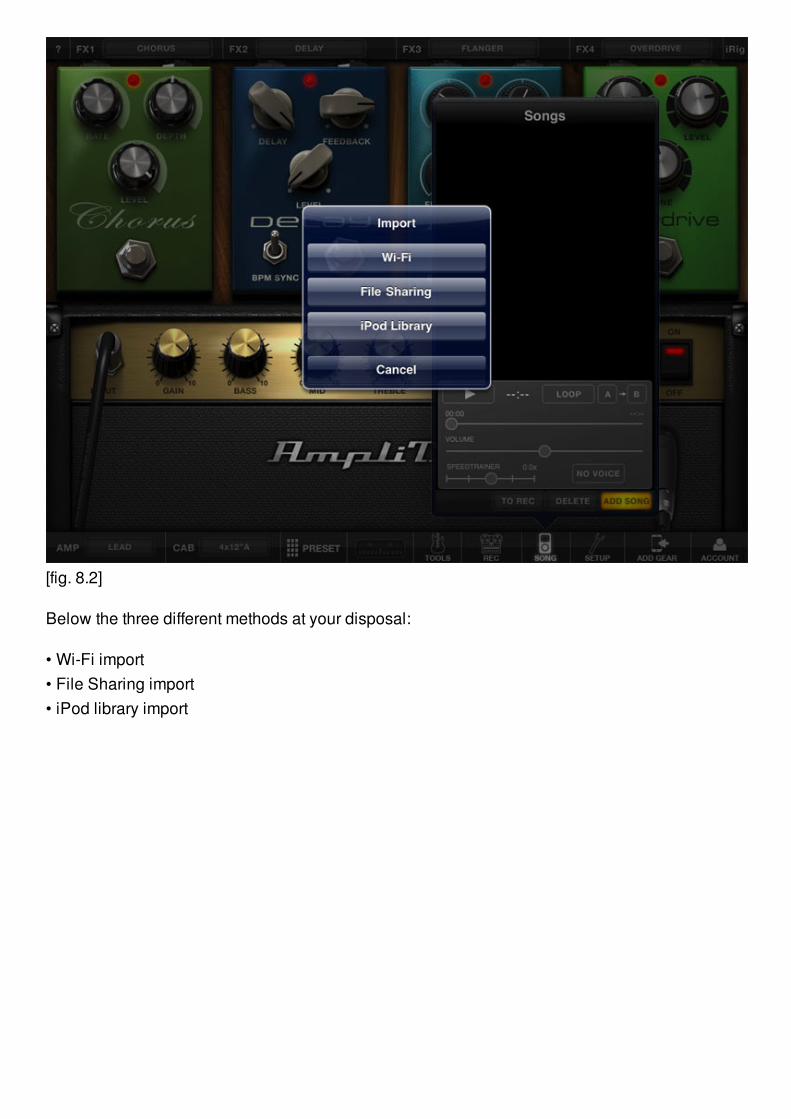
[fig. 8.2]
Below the three different methods at your disposal:
• Wi-Fi import• File Sharing import• iPod library import
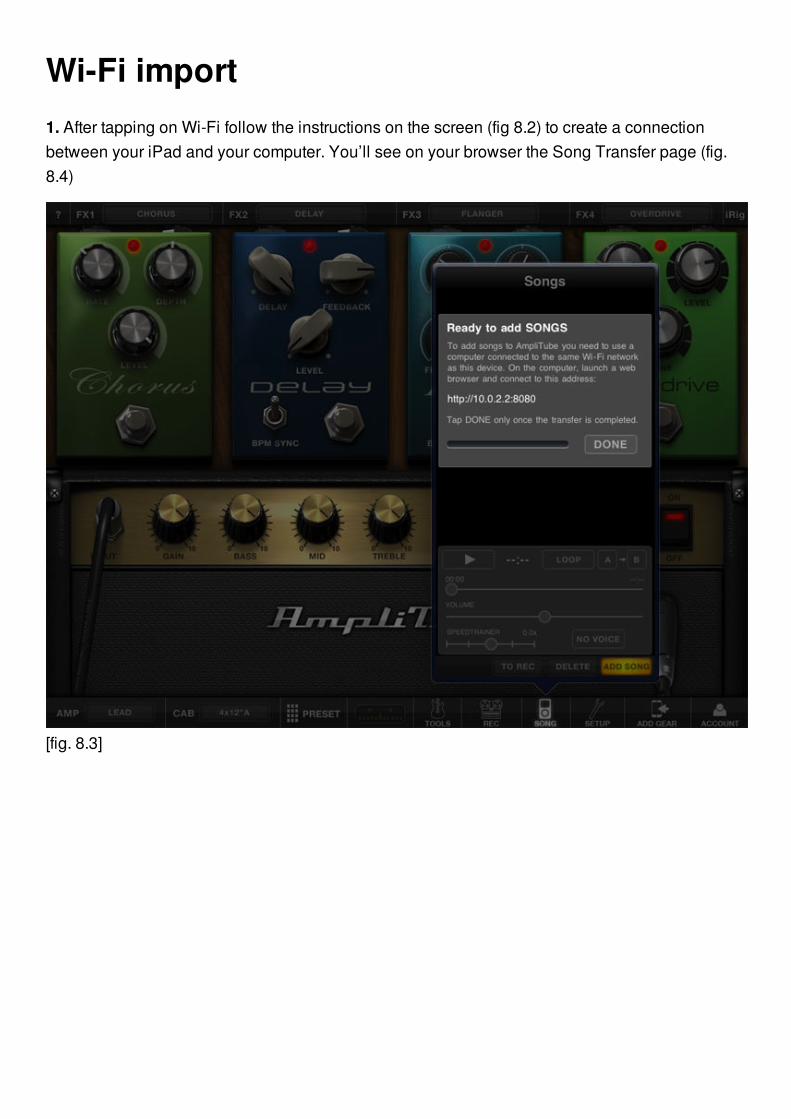
Wi-Fi import1. After tapping on Wi-Fi follow the instructions on the screen (fig 8.2) to create a connectionbetween your iPad and your computer. You’ll see on your browser the Song Transfer page (fig.8.4)
[fig. 8.3]
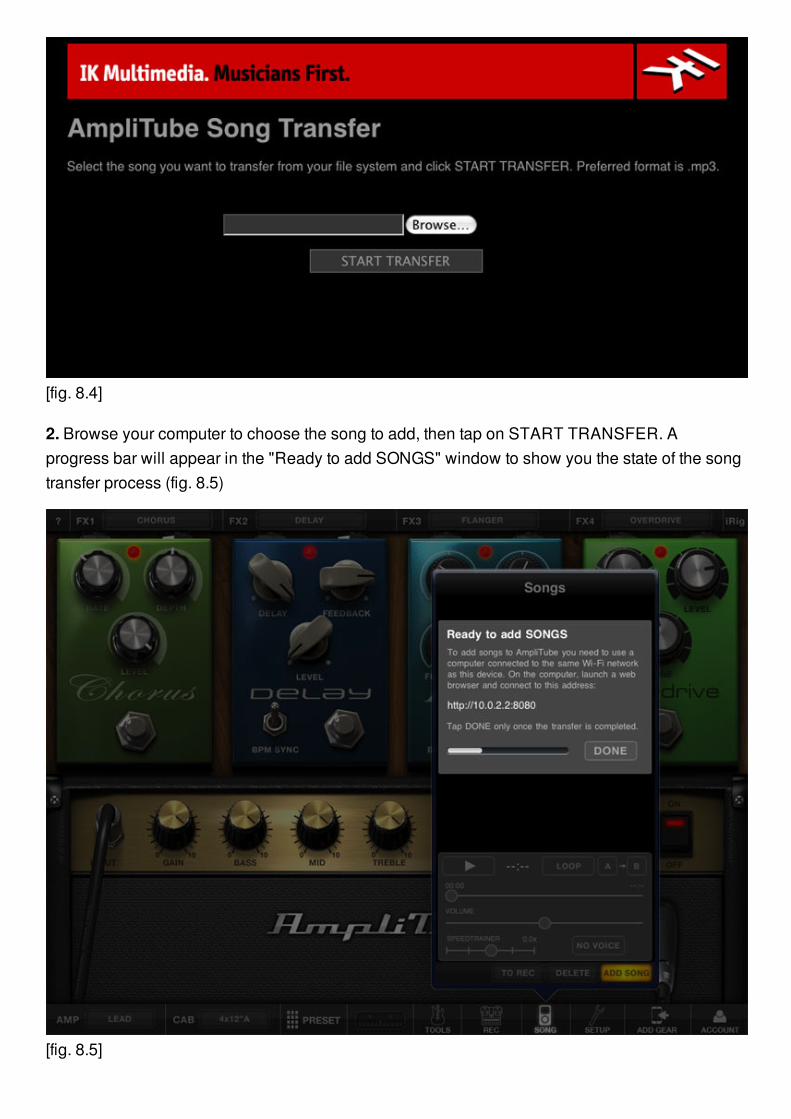
[fig. 8.4]
2. Browse your computer to choose the song to add, then tap on START TRANSFER. Aprogress bar will appear in the "Ready to add SONGS" window to show you the state of the songtransfer process (fig. 8.5)
[fig. 8.5]

3. Tap on DONE, back in the Songs List page (fig. 8.3).Important!: Tap on "Done" only after the transfer process has been completed.
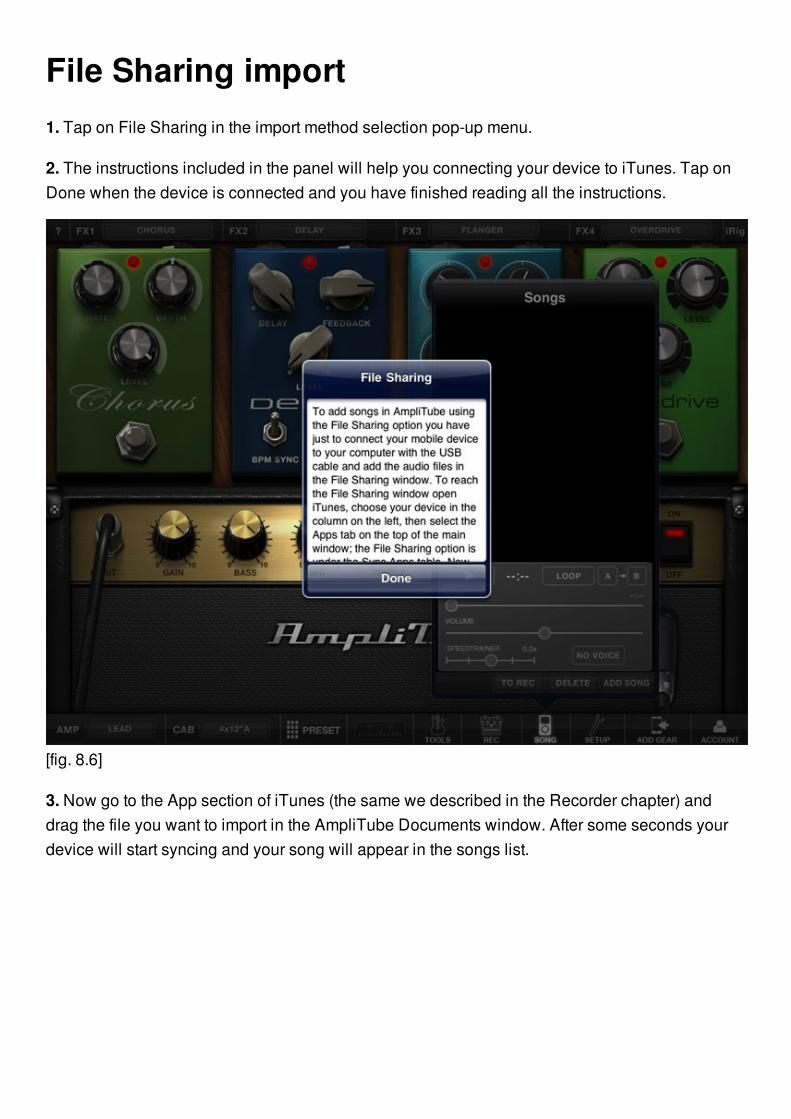
File Sharing import1. Tap on File Sharing in the import method selection pop-up menu.
2. The instructions included in the panel will help you connecting your device to iTunes. Tap onDone when the device is connected and you have finished reading all the instructions.
[fig. 8.6]
3. Now go to the App section of iTunes (the same we described in the Recorder chapter) anddrag the file you want to import in the AmpliTube Documents window. After some seconds yourdevice will start syncing and your song will appear in the songs list.
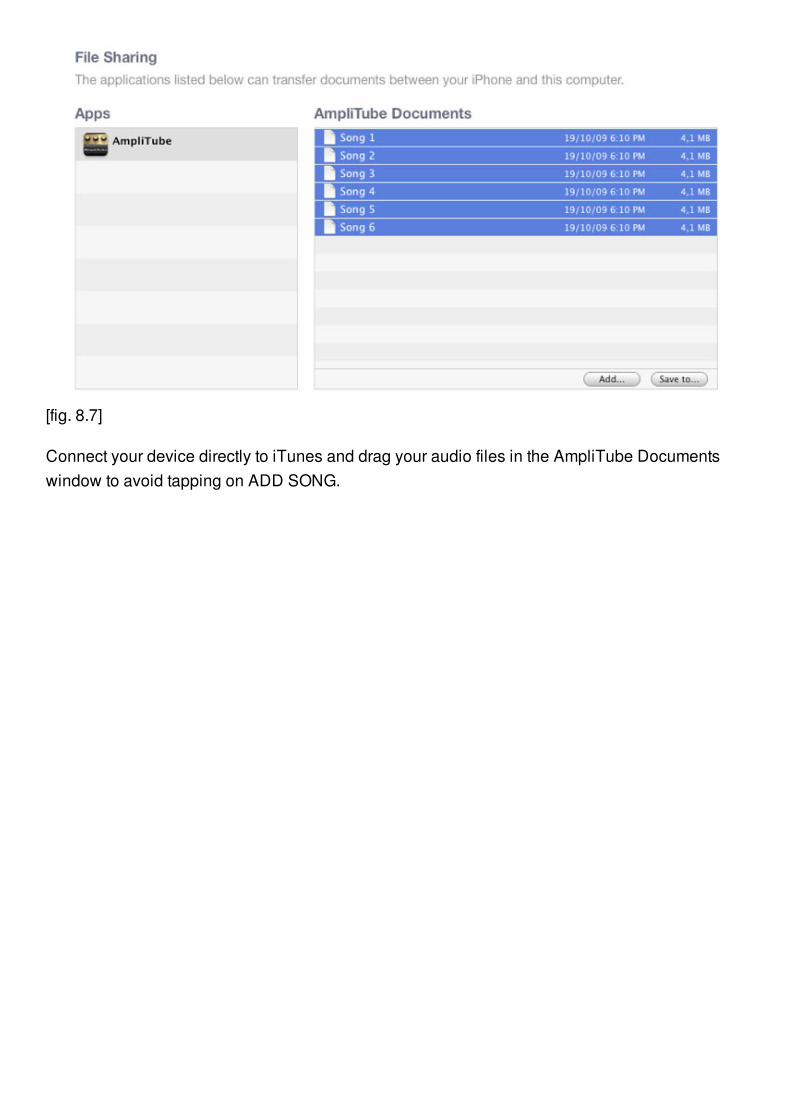
[fig. 8.7]
Connect your device directly to iTunes and drag your audio files in the AmpliTube Documentswindow to avoid tapping on ADD SONG.
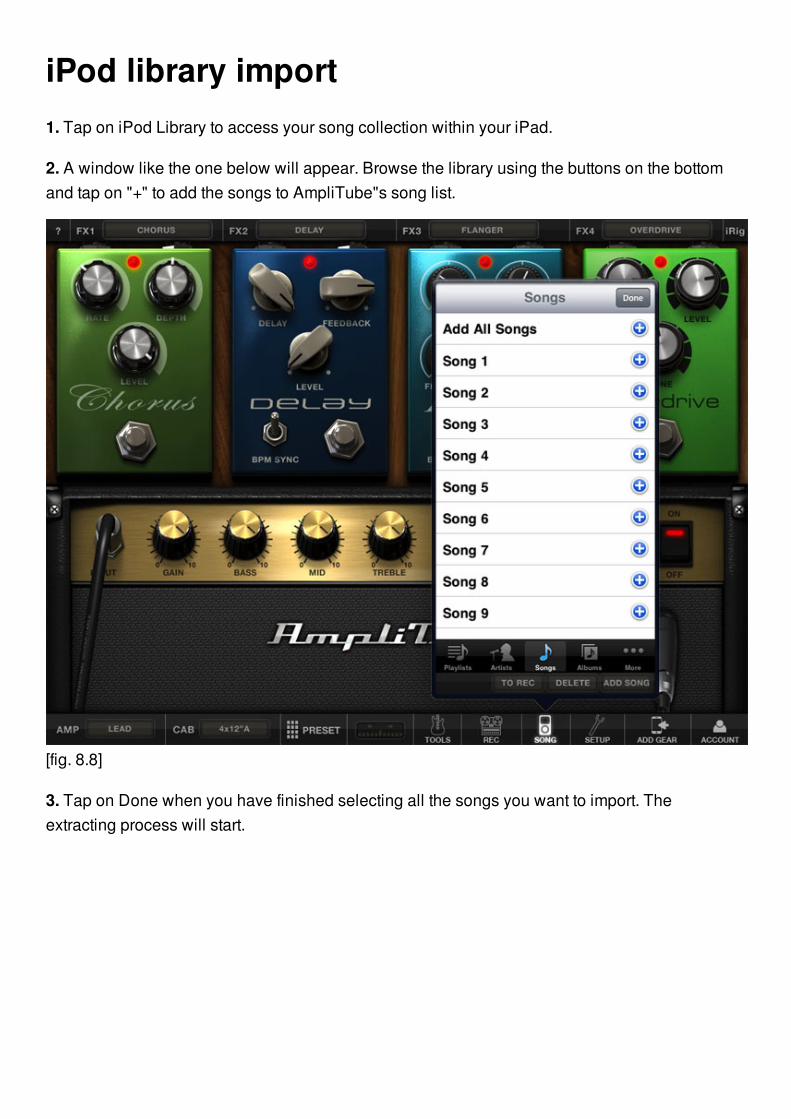
iPod library import1. Tap on iPod Library to access your song collection within your iPad.
2. A window like the one below will appear. Browse the library using the buttons on the bottomand tap on "+" to add the songs to AmpliTube"s song list.
[fig. 8.8]
3. Tap on Done when you have finished selecting all the songs you want to import. Theextracting process will start.
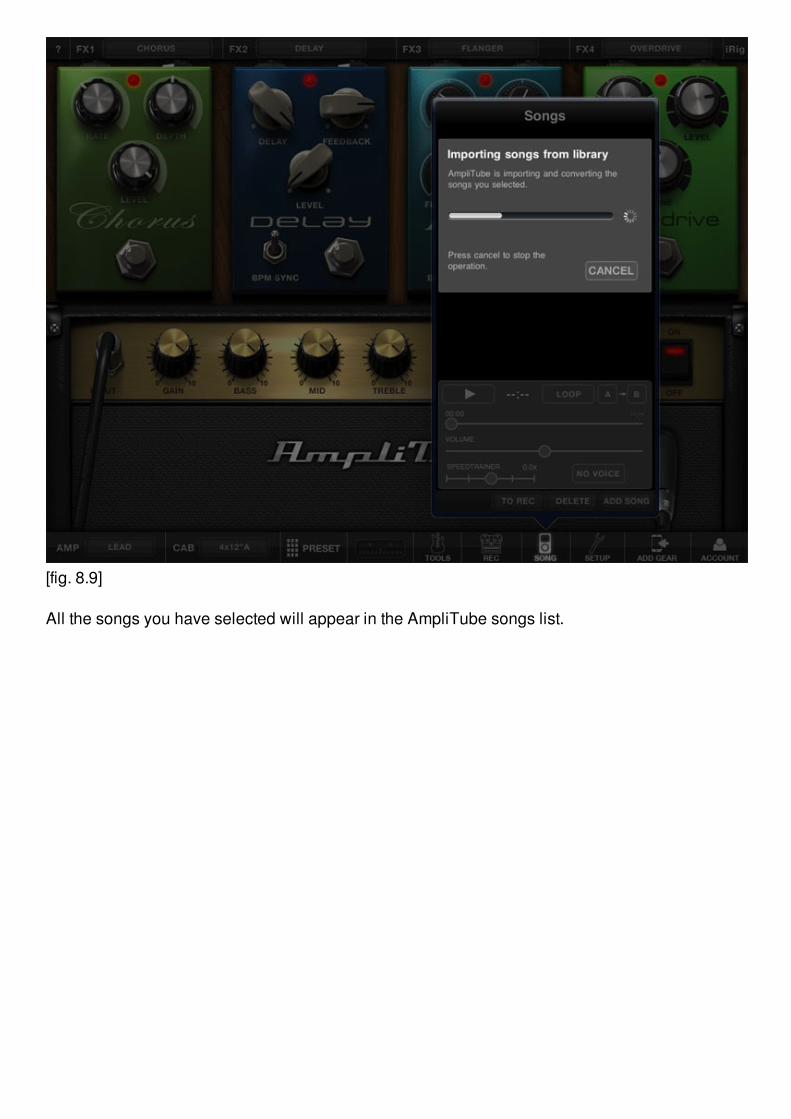
[fig. 8.9]
All the songs you have selected will appear in the AmpliTube songs list.
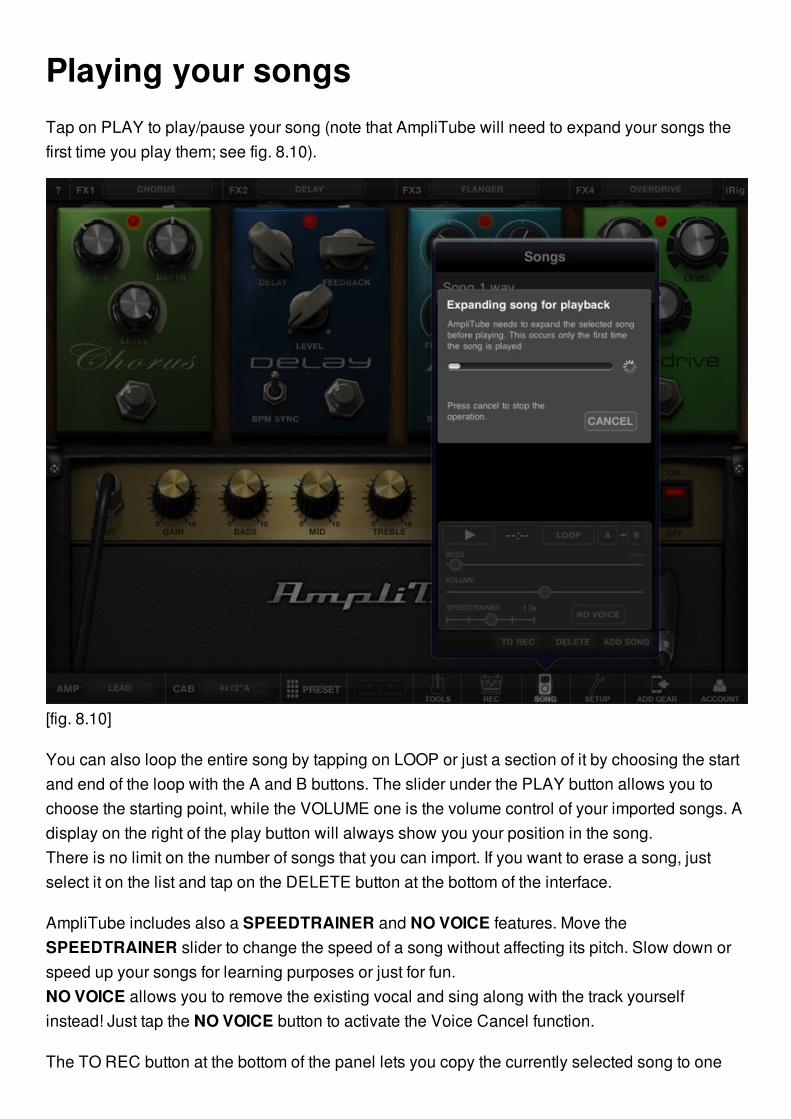
Playing your songsTap on PLAY to play/pause your song (note that AmpliTube will need to expand your songs thefirst time you play them; see fig. 8.10).
[fig. 8.10]
You can also loop the entire song by tapping on LOOP or just a section of it by choosing the startand end of the loop with the A and B buttons. The slider under the PLAY button allows you tochoose the starting point, while the VOLUME one is the volume control of your imported songs. Adisplay on the right of the play button will always show you your position in the song.There is no limit on the number of songs that you can import. If you want to erase a song, justselect it on the list and tap on the DELETE button at the bottom of the interface.
AmpliTube includes also a SPEEDTRAINER and NO VOICE features. Move theSPEEDTRAINER slider to change the speed of a song without affecting its pitch. Slow down orspeed up your songs for learning purposes or just for fun.NO VOICE allows you to remove the existing vocal and sing along with the track yourselfinstead! Just tap the NO VOICE button to activate the Voice Cancel function.
The TO REC button at the bottom of the panel lets you copy the currently selected song to one
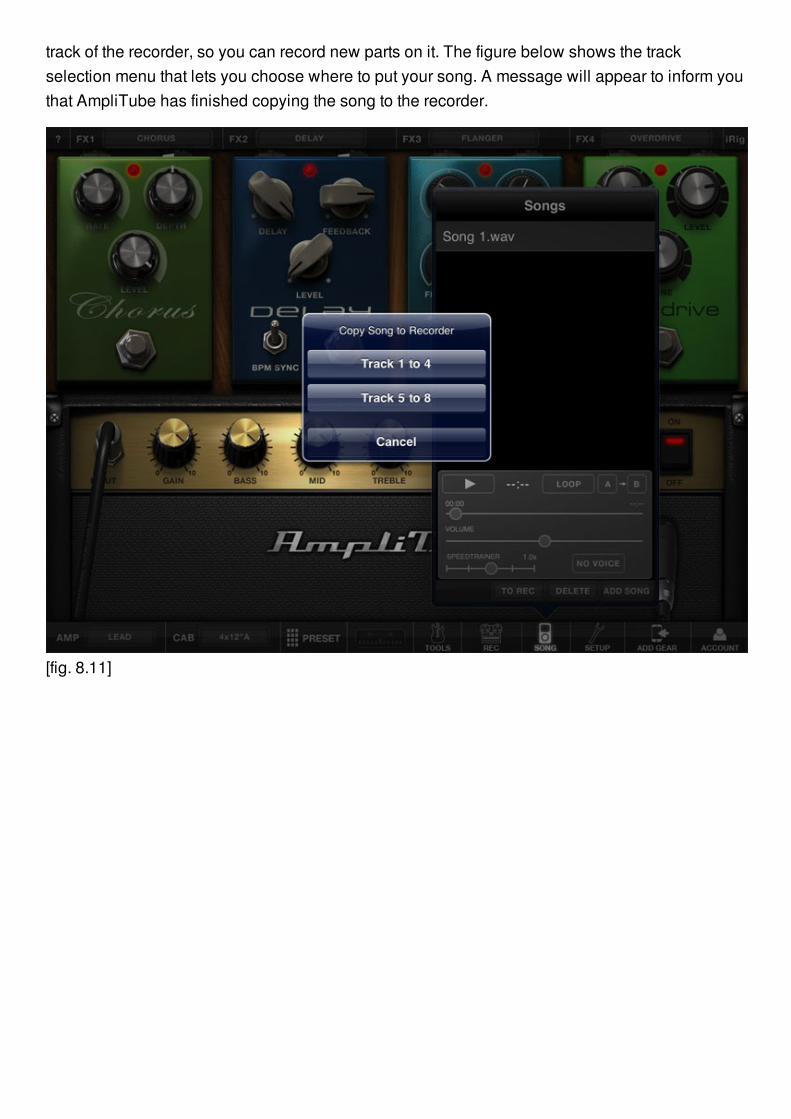
track of the recorder, so you can record new parts on it. The figure below shows the trackselection menu that lets you choose where to put your song. A message will appear to inform youthat AmpliTube has finished copying the song to the recorder.
[fig. 8.11]
Creating a direct wireless connectionbetween your iPad and your computerIf you experience problems creating the network between your iPad and your computer, this canbe due to a firewall that is stopping the connection request to your iPad from the computer.If your computer has a net adapter you can overcome this problem by establishing a directconnection. To connect your iPad directly to your computer follow these steps:
MAC1) Turn your AirPort On 2) Choose "Create Network" from the "Network Preferences" drop downmenu and give a name to the network you"ve just created 3) Tap the Settings button on youriPad, then on "Wi-Fi" and choose your new Network
PC1) Check that you have a Wi-Fi adapter and that it is enabled 2) Create a new an "ad-hoc"Network and give it a name (the "ad hoc" connection can also be called "computer-to-computer")3) Tap the Settings button on your iPad, then on "Wi-Fi" and choose your new Network
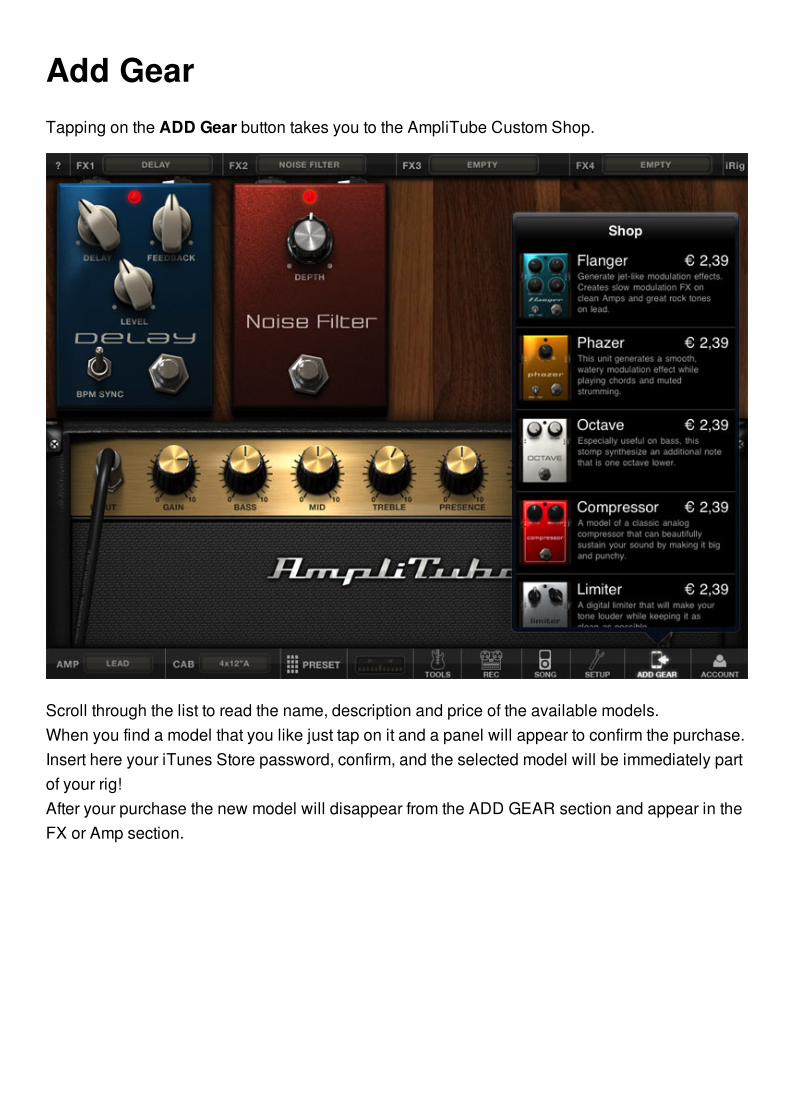
Add GearTapping on the ADD Gear button takes you to the AmpliTube Custom Shop.
Scroll through the list to read the name, description and price of the available models.When you find a model that you like just tap on it and a panel will appear to confirm the purchase.Insert here your iTunes Store password, confirm, and the selected model will be immediately partof your rig!After your purchase the new model will disappear from the ADD GEAR section and appear in theFX or Amp section.
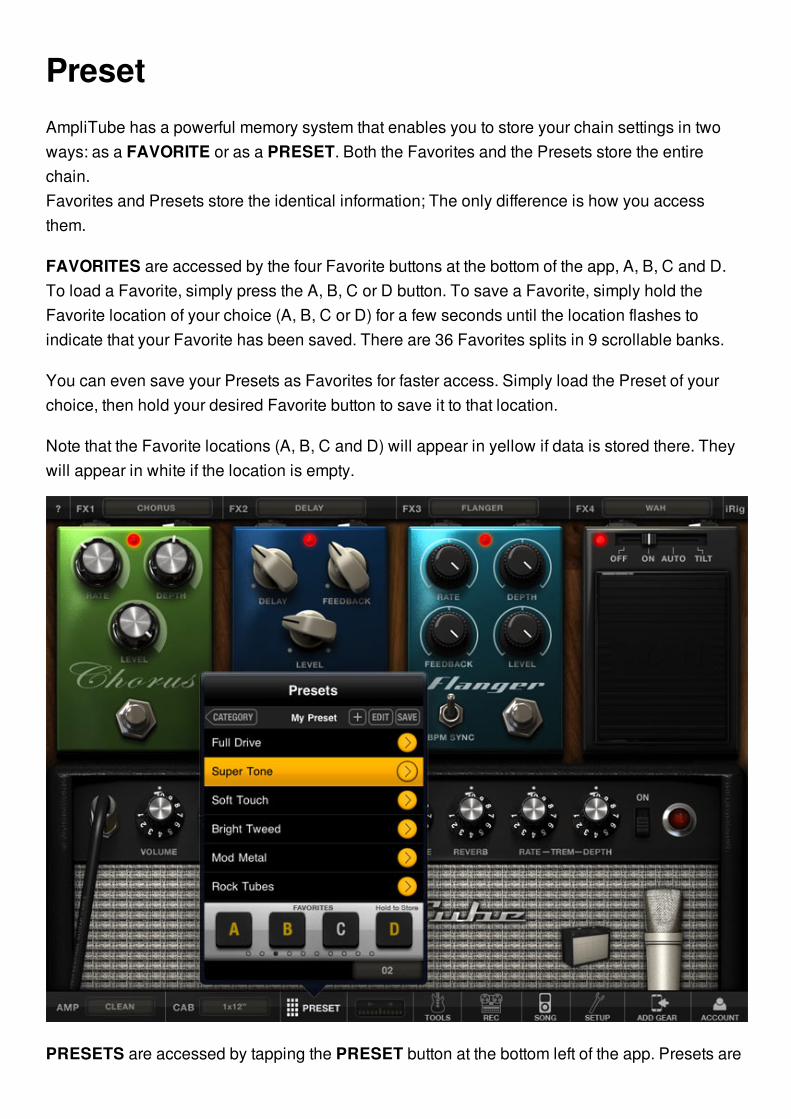
PresetAmpliTube has a powerful memory system that enables you to store your chain settings in twoways: as a FAVORITE or as a PRESET. Both the Favorites and the Presets store the entirechain.Favorites and Presets store the identical information; The only difference is how you accessthem.
FAVORITES are accessed by the four Favorite buttons at the bottom of the app, A, B, C and D.To load a Favorite, simply press the A, B, C or D button. To save a Favorite, simply hold theFavorite location of your choice (A, B, C or D) for a few seconds until the location flashes toindicate that your Favorite has been saved. There are 36 Favorites splits in 9 scrollable banks.
You can even save your Presets as Favorites for faster access. Simply load the Preset of yourchoice, then hold your desired Favorite button to save it to that location.
Note that the Favorite locations (A, B, C and D) will appear in yellow if data is stored there. Theywill appear in white if the location is empty.
PRESETS are accessed by tapping the PRESET button at the bottom left of the app. Presets are
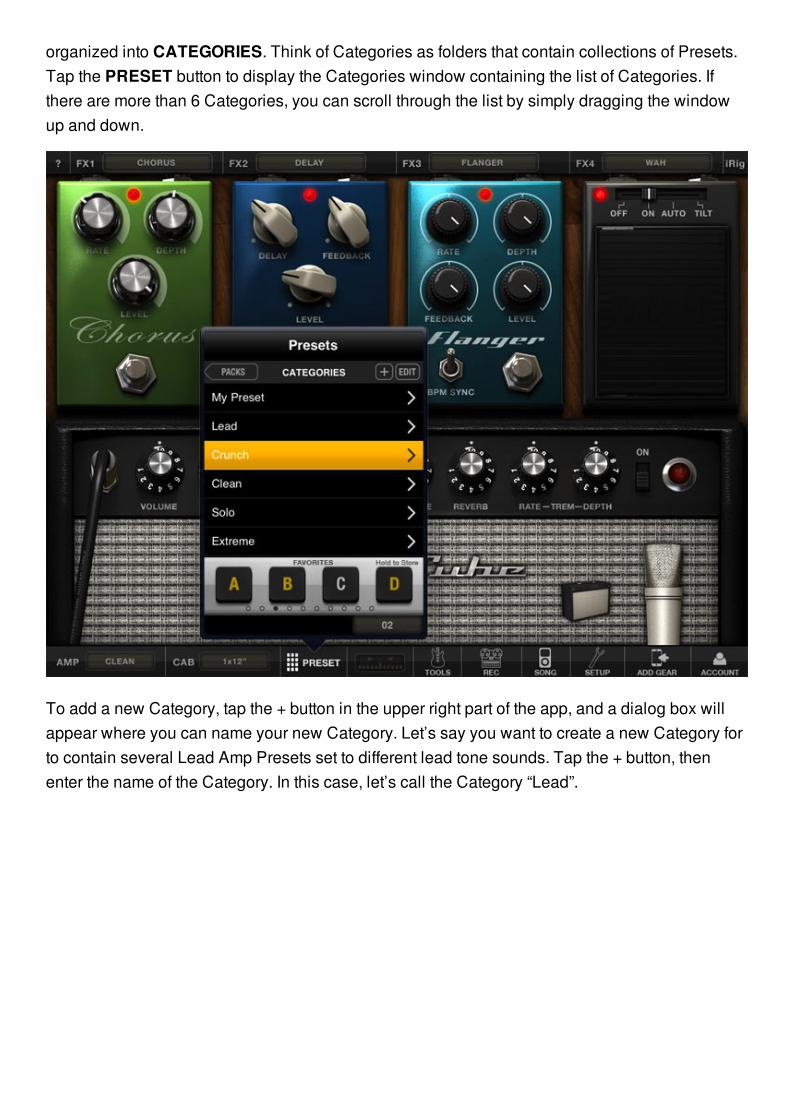
organized into CATEGORIES. Think of Categories as folders that contain collections of Presets.Tap the PRESET button to display the Categories window containing the list of Categories. Ifthere are more than 6 Categories, you can scroll through the list by simply dragging the windowup and down.
To add a new Category, tap the + button in the upper right part of the app, and a dialog box willappear where you can name your new Category. Let’s say you want to create a new Category forto contain several Lead Amp Presets set to different lead tone sounds. Tap the + button, thenenter the name of the Category. In this case, let’s call the Category “Lead”.
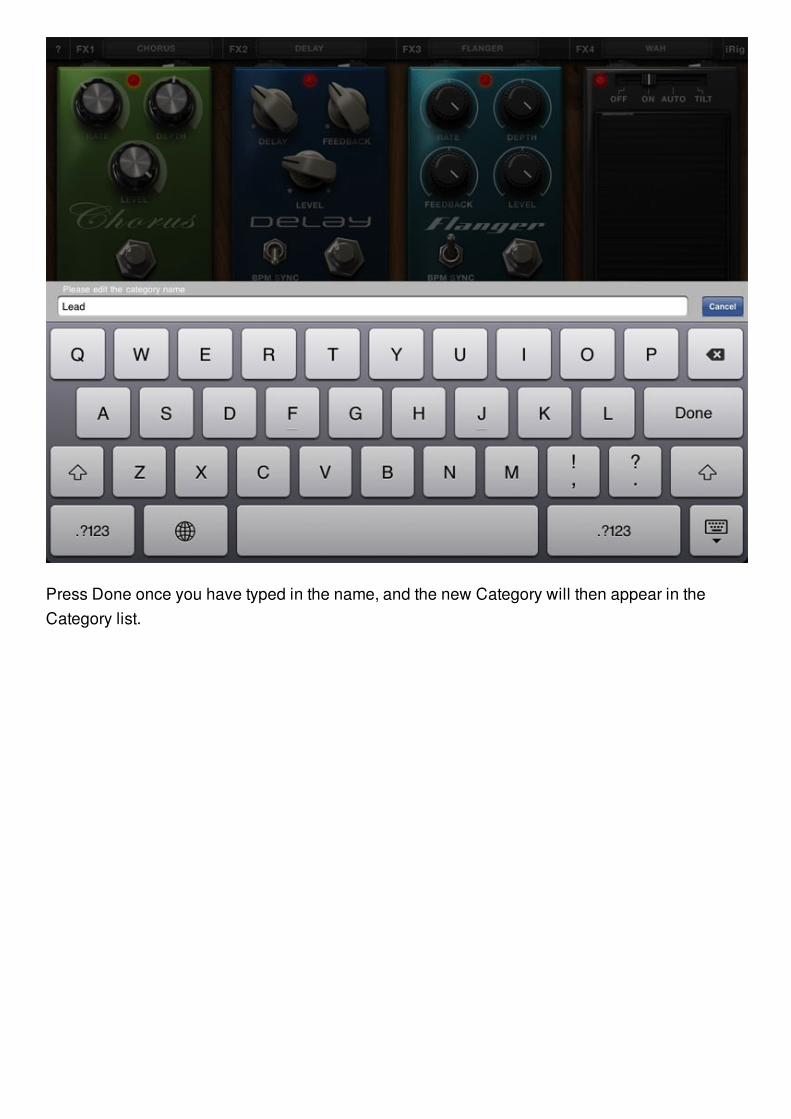
Press Done once you have typed in the name, and the new Category will then appear in theCategory list.
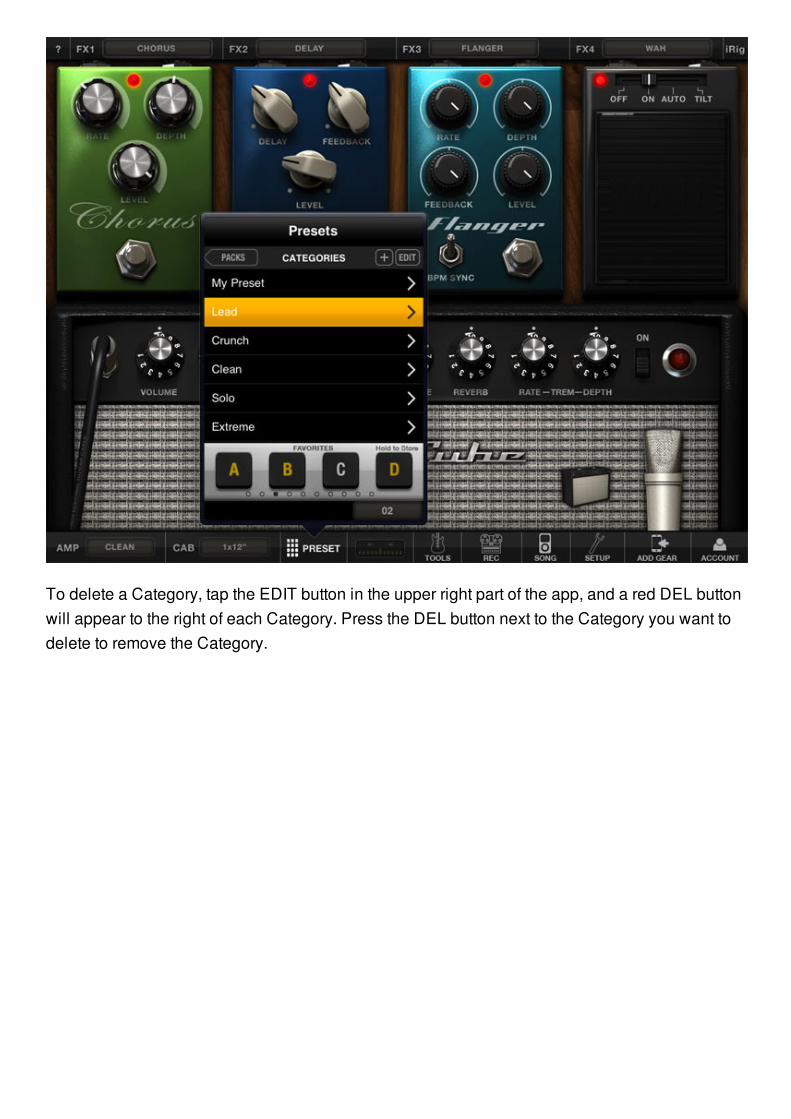
To delete a Category, tap the EDIT button in the upper right part of the app, and a red DEL buttonwill appear to the right of each Category. Press the DEL button next to the Category you want todelete to remove the Category.
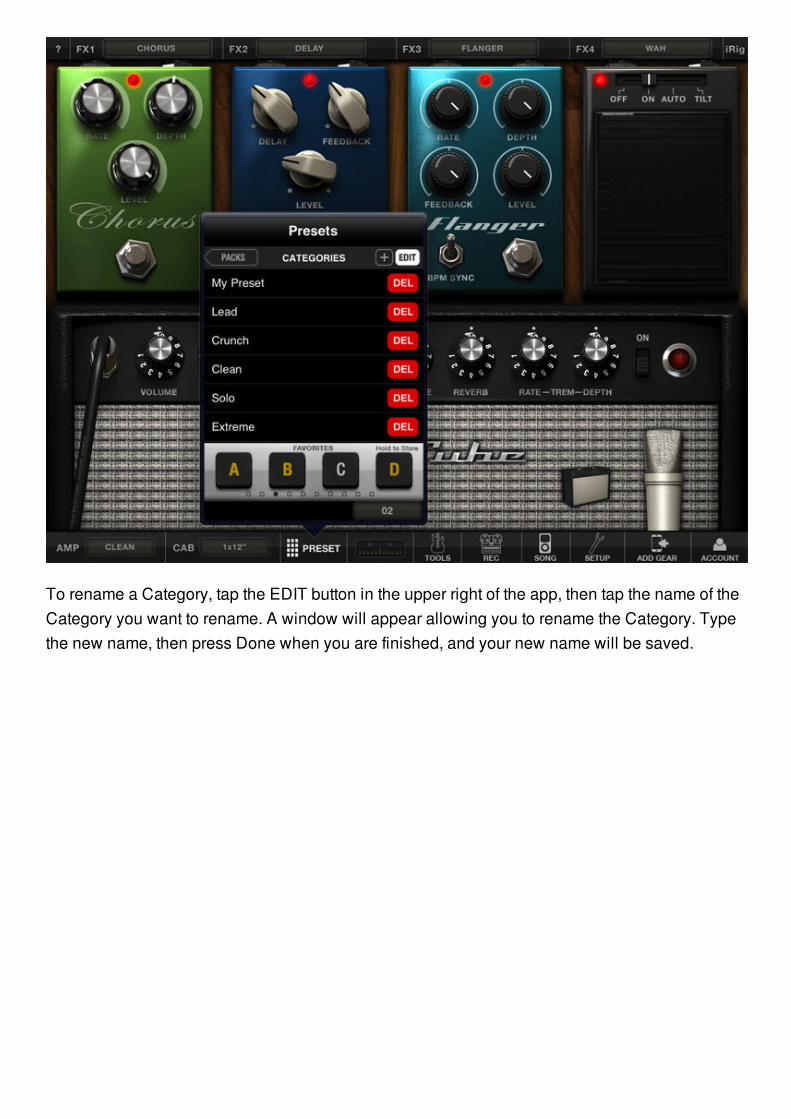
To rename a Category, tap the EDIT button in the upper right of the app, then tap the name of theCategory you want to rename. A window will appear allowing you to rename the Category. Typethe new name, then press Done when you are finished, and your new name will be saved.

To open a Category to get to the Presets inside, simply tap the Category name, and the Presetswill appear. Think of this as opening a folder. As with Categories, if there are more than 6 Presetsin a Category, you can scroll up and down through list by dragging the window.
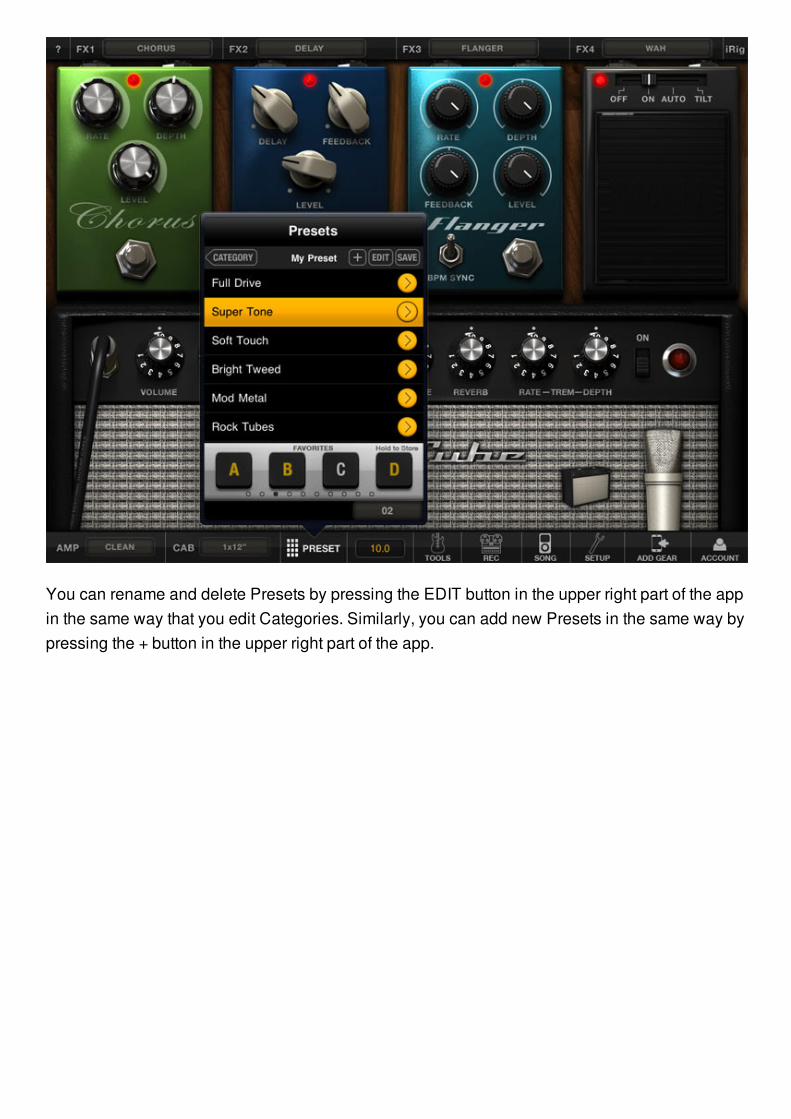
You can rename and delete Presets by pressing the EDIT button in the upper right part of the appin the same way that you edit Categories. Similarly, you can add new Presets in the same way bypressing the + button in the upper right part of the app.
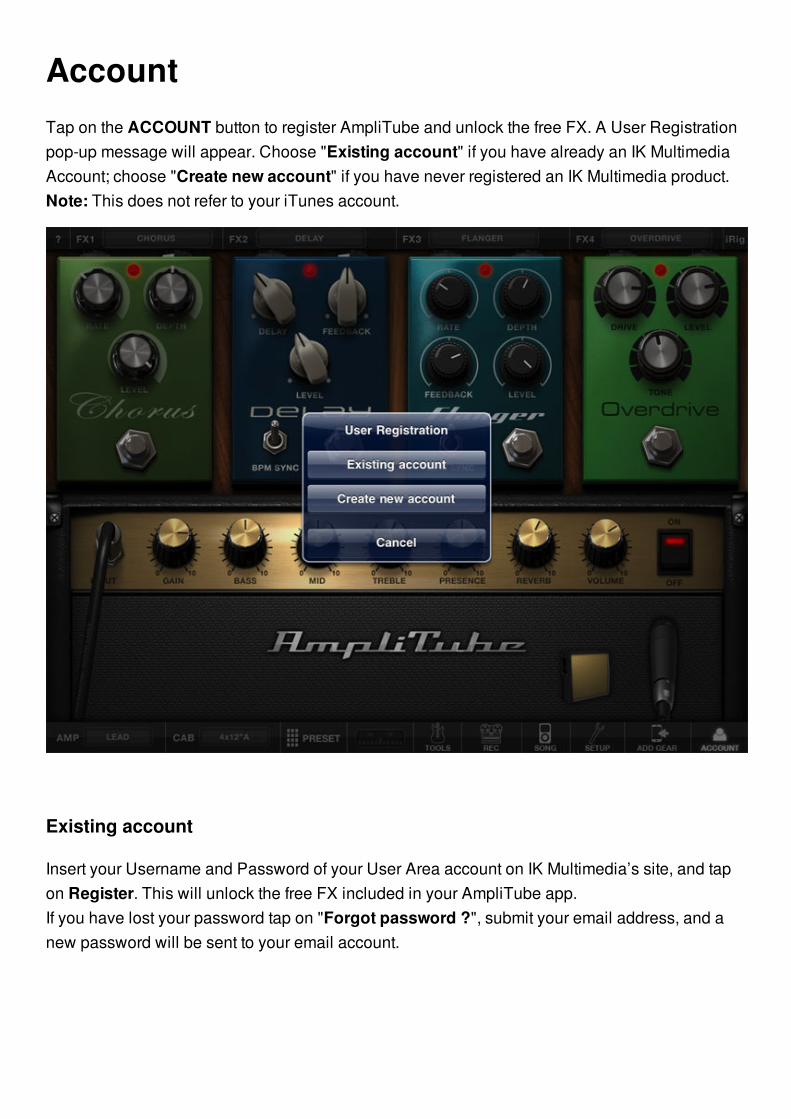
AccountTap on the ACCOUNT button to register AmpliTube and unlock the free FX. A User Registrationpop-up message will appear. Choose "Existing account" if you have already an IK MultimediaAccount; choose "Create new account" if you have never registered an IK Multimedia product.Note: This does not refer to your iTunes account.
Existing account
Insert your Username and Password of your User Area account on IK Multimedia’s site, and tapon Register. This will unlock the free FX included in your AmpliTube app.If you have lost your password tap on "Forgot password ?", submit your email address, and anew password will be sent to your email account.
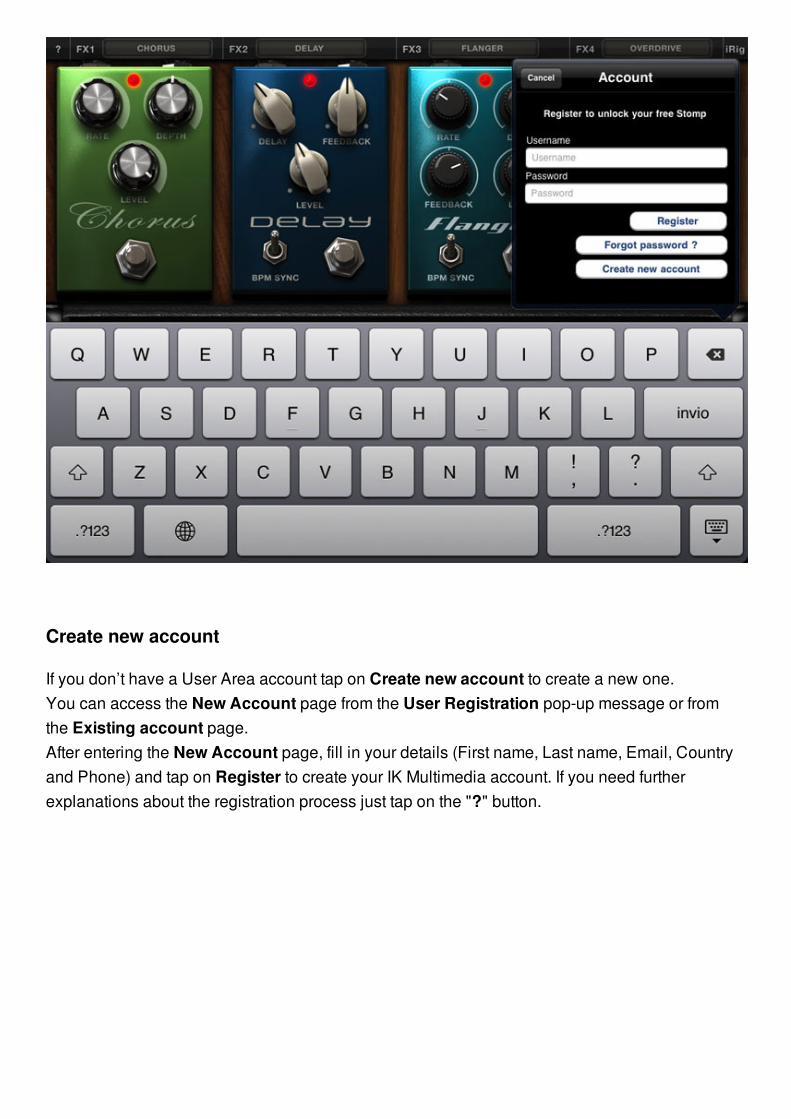
Create new account
If you don’t have a User Area account tap on Create new account to create a new one.You can access the New Account page from the User Registration pop-up message or fromthe Existing account page.After entering the New Account page, fill in your details (First name, Last name, Email, Countryand Phone) and tap on Register to create your IK Multimedia account. If you need furtherexplanations about the registration process just tap on the "?" button.