Embed Size (px)
Citation preview

Notes on Usage
This e-book is protected by copyright. By purchasing this e-book, you have agreed to accept and adhere to the copyrights. You are entitled to use this e-book for personal purposes. You may print and copy it, too, but also only for personal use. Sharing an electronic or printed copy with others, however, is not permitted, neither as a whole nor in parts. Of course, making them available on the Internet or in a company network is illegal as well.
For detailed and legally binding usage conditions, please refer to the section Legal Notes.
This e-book copy contains a digital watermark, a signature that indicates which person may use this copy:
Copy No. 7frq-8et4-kbyn-6vh5for personal use ofAntonio Di Perna, user id 335eb981-6644-4783-ba40-78f36ac50abf
Marcus Banner, Heinzpeter Klein, and Christian Riesener
Mastering SAP NetWeaver® PI – Administration
Bonn � Boston
Imprint
This e-book is a publication many contributed to, specifically:
Editor Florian ZimniakEnglish Edition Editor Justin LowryTranslation Lemoine International, Inc., Salt Lake City, UTCopyeditor Ruth SaavedraCover Design Jill WinitzerPhoto Credit fotolia/UlistxProduction E-Book Graham GearyTypesetting E-Book Publishers’ Design and Production Services, Inc.
We hope that you liked this e-book. Please share your feedback with us and read the Service Pages to find out how to contact us.
The Library of Congress has cataloged the printed edition as follows:Banner, Marcus.
[Praxisleitfaden SAP NetWeaver PI — Administration. English]
Mastering SAP NetWeaver PI — administration / Marcus Banner, Heinzpeter
Klein, Christian Riesener. — 2nd ed., English ed. / editor , Justin Lowry.
p. cm.
Includes bibliographical references and index.
ISBN-13: 978-1-59229-321-6 (alk. paper)
ISBN-10: 1-59229-321-2 (alk. paper)
1. Information technology — Management. 2. Computer network architectures.
3. SAP NetWeaver. I. Klein, Heinzpeter. II. Riesener, Christian III.
Lowry, Justin IV. Title.
HD30.2.B358 2010
005.7’13 — dc22
2009037257
ISBN 978-1-59229-321-6 (print) ISBN 978-1-59229-657-6 (e-book) ISBN 978-1-59229-658-3 (print and e-book)
© 2010 by Galileo Press Inc., Boston (MA) 2nd edition 2010 2nd German edition published 2009 by Galileo Press, Bonn, Germany
5
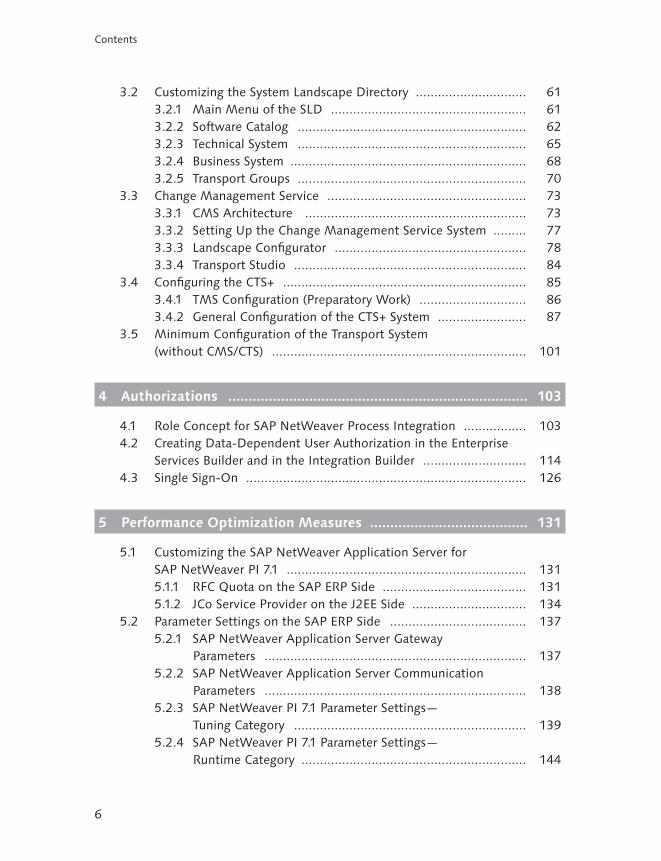
Contents
Introduction ............................................................................................... 9
1 Architecture of the System Landscape with SAP NetWeaver Process Integration ................................................................... 13
1.1 SAP NetWeaver .......................................................................... 131.2 SAP NetWeaver Process Integration ............................................ 141.3 Architecture of SAP NetWeaver Process Integration .................... 181.4 Landscape Topology of SAP NetWeaver PI .................................. 20
2 Basic Configuration of the SAP NetWeaver PI Interface System ....................................................................... 23
2.1 System Data and Sizing ............................................................... 232.1.1 System Data of the Example ............................................. 242.1.2 Sizing SAP NetWeaver PI .................................................. 24
2.2 Configuring the System Parameters ............................................. 242.3 Setting Up Business Content for SAP NetWeaver PI 7.1 ............... 30
2.3.1 Importing Business Systems .............................................. 322.3.2 Creating Communication Channels ................................... 342.3.3 Importing the Configuration Scenario ............................... 37
2.4 Finding and Installing Business Content ...................................... 46
3 Configuring the System Landscape .......................................... 51
3.1 Basic Administration of the SLD .................................................. 513.1.1 Starting and Stopping the SLD Service .............................. 523.1.2 Server Log ........................................................................ 523.1.3 Displaying System Information ......................................... 533.1.4 Setting Up Data Persistence .............................................. 533.1.5 Configuring the SLD Profiles ............................................. 543.1.6 Setting Up the SLD Bridge ................................................ 563.1.7 System Messages .............................................................. 593.1.8 Administration of the SLD Namespace .............................. 59
6
Contents
3.2 Customizing the System Landscape Directory .............................. 613.2.1 Main Menu of the SLD ..................................................... 613.2.2 Software Catalog .............................................................. 623.2.3 Technical System .............................................................. 653.2.4 Business System ................................................................ 683.2.5 Transport Groups .............................................................. 70
3.3 Change Management Service ...................................................... 733.3.1 CMS Architecture ............................................................ 733.3.2 Setting Up the Change Management Service System ......... 773.3.3 Landscape Configurator .................................................... 783.3.4 Transport Studio ............................................................... 84
3.4 Configuring the CTS+ .................................................................. 853.4.1 TMS Configuration (Preparatory Work) ............................. 863.4.2 General Configuration of the CTS+ System ........................ 87
3.5 Minimum Configuration of the Transport System (without CMS/CTS) ..................................................................... 101
4 Authorizations .......................................................................... 103
4.1 Role Concept for SAP NetWeaver Process Integration ................. 1034.2 Creating Data-Dependent User Authorization in the Enterprise
Services Builder and in the Integration Builder ............................ 1144.3 Single Sign-On ............................................................................ 126
5 Performance Optimization Measures ....................................... 131
5.1 Customizing the SAP NetWeaver Application Server for SAP NetWeaver PI 7.1 ................................................................. 1315.1.1 RFC Quota on the SAP ERP Side ....................................... 1315.1.2 JCo Service Provider on the J2EE Side ............................... 134
5.2 Parameter Settings on the SAP ERP Side ..................................... 1375.2.1 SAP NetWeaver Application Server Gateway
Parameters ....................................................................... 1375.2.2 SAP NetWeaver Application Server Communication
Parameters ....................................................................... 1385.2.3 SAP NetWeaver PI 7.1 Parameter Settings—
Tuning Category ............................................................... 1395.2.4 SAP NetWeaver PI 7.1 Parameter Settings—
Runtime Category ............................................................. 144
7
Contents
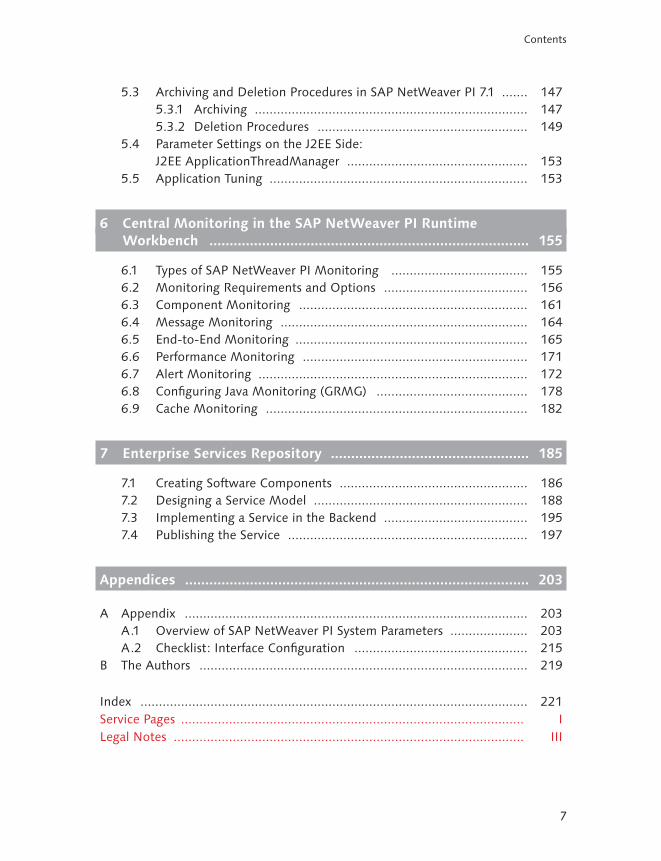
5.3 Archiving and Deletion Procedures in SAP NetWeaver PI 7.1 ....... 1475.3.1 Archiving .......................................................................... 1475.3.2 Deletion Procedures ......................................................... 149
5.4 Parameter Settings on the J2EE Side: J2EE ApplicationThreadManager ................................................. 153
5.5 Application Tuning ...................................................................... 153
6 Central Monitoring in the SAP NetWeaver PI Runtime Workbench ............................................................................... 155
6.1 Types of SAP NetWeaver PI Monitoring ..................................... 1556.2 Monitoring Requirements and Options ....................................... 1566.3 Component Monitoring .............................................................. 1616.4 Message Monitoring ................................................................... 1646.5 End-to-End Monitoring ............................................................... 1656.6 Performance Monitoring ............................................................. 1716.7 Alert Monitoring ......................................................................... 1726.8 Configuring Java Monitoring (GRMG) ......................................... 1786.9 Cache Monitoring ....................................................................... 182
7 Enterprise Services Repository ................................................. 185
7.1 Creating Software Components ................................................... 1867.2 Designing a Service Model .......................................................... 1887.3 Implementing a Service in the Backend ....................................... 1957.4 Publishing the Service ................................................................. 197
Appendices ..................................................................................... 203
A Appendix ............................................................................................. 203A.1 Overview of SAP NetWeaver PI System Parameters ..................... 203A.2 Checklist: Interface Configuration ............................................... 215
B The Authors ......................................................................................... 219
Index ......................................................................................................... 221 Service Pages ............................................................................................. ILegal Notes ............................................................................................... III

9
Introduction
The authors of this book at RealCore Consulting deal mainly with the topic of SAP NetWeaver® Process Integration (PI). We have done so for a number of years and in many customer projects, both large and small. In this way, we have been able to build up a comprehensive body of specialized knowledge of real-world SAP NetWeaver PI issues. Our aim in this book is to share this knowledge with you in a compact and readable format, thus enabling you to enjoy complete control of your current and future SAP NetWeaver PI projects.
SAP NetWeaver Process Integration 7.1 is based on an established architecture for implementing cross-system business processes, and is a further development of the SAP Exchange Infrastructure (XI) product. Like its successful predecessor, SAP NetWeaver PI is based on generally accepted standards so that external sys-tems can be integrated. Therefore, as before, the central concept is XML-based communication via HTTP. The focus of the new SAP NetWeaver PI release is on service-based application integration. This functional enhancement means that SAP NetWeaver PI 7.1 now plays a central role in supporting a service-oriented architecture (SOA) for business applications.
In our daily work with SAP enterprise application integration (EAI) software, from SAP XI to SAP NetWeaver PI, we have found that the SAP NetWeaver PI platform is a significant advantage when it comes to optimizing and consolidating systems and loosely and flexibly interconnecting individual systems. We now regard it as a necessary component of every large system landscape. EAI providers were largely unaffected by SAP products up to 2004, but the new, stable SAP NetWeaver PI release seems to have finally put an end to that trend. For years, larger compa-nies with complex, mature SAP landscapes have been using the integration tool that is shipped with SAP products to integrate their systems with legacy systems and third-party systems. It will thus become increasingly difficult for the remain-ing EAI specialists in the market to compete with SAP NetWeaver PI. In recent years, SAP has further improved the stability and performance of its product in comparison to its competitors (by adding message packaging and local processing to the Advanced Adapter Engine in Release 7.1, for example); in addition, SAP is
Personal Copy for Antonio Di Perna, user id 335eb981-6644-4783-ba40-78f36ac50abf

10
Introduction
investing a lot of developer hours into extending the existing functionality, and is enhancing the design of the EAI solution with every new release. In doing so, SAP leverages and benefits from the close relationships it enjoys with its customers in various industries, and incorporates the knowledge it gains in this way into the product development process.
The selection of adapters is now much wider than it was with SAP XI. Several adapters are shipped with SAP NetWeaver PI, and other special adapters can be procured from SAP partners, such as those that connect non-SAP systems or leg-acy systems to SAP NetWeaver PI. The existing Adapter Engine has also been extended in the latest SAP NetWeaver PI release (Support Package stack 04). The Advanced Adapter Engine provides local mapping and routing to enable you to define local message processing by means of the integrated configuration func-tion. Message processing is executed on the Advanced Adapter Engine only, by a variety of adapters, without the involvement of the Integration Engine. What this means for you is significantly enhanced performance, which in turn makes an SAP NetWeaver PI 7.1–based enterprise service bus layer a much more feasible and attractive option.
The new functions and extensions to existing functions in the latest release are described in detail and compared to the previous release in the SAP Help Portal (SAP NetWeaver • SAP NetWeaver PI/ Mobile/Idm 7.1). For additional relevant information on the progression from SAP XI 2.0 to SAP NetWeaver PI 7.0, see the SAP Community Network at https://www.sdn.sap.com/irj/scn/wiki and follow the menu path SAP NetWeaver and Technology • Process Integration • Children • PI 7.1 Components and its features over XI 2.0, XI 3.0, PI 7.
This site clearly describes all stages of the developmental process and the main features of each stage in chronological order and compares them to the previous release.
The many new technological features and functions in the new release, SAP NetWeaver PI 7.1, make it necessary for us to thoroughly revise the information in our previous publications on the subject of SAP XI. In this book, we include all of the relevant additions and changes either by describing them in detail or by incorporating them into the many practical examples.
This book is intended for readers who are responsible for administrating and mon-itoring SAP systems and who already have the relevant in-depth knowledge of SAP system administration. Our aim is to describe to you the individual steps in
© 2013 by Galileo Press Inc., Boston (MA)
11
Introduction
setting up SAP NetWeaver PI, using a number of examples from projects that we have worked on.
Chapter 1 describes the architecture of SAP NetWeaver PI and the system landscape.
Chapter 2 goes into detail about the basic configuration of the SAP NetWeaver PI system, with a particular focus on system data and sizing, implementing the architecture, setting up the system parameters, importing business content, and configuration in the directory. We use a detailed example to explain how to use SAP Business Content and how to set up the sending system and distribution. Lastly, we describe the adapter configuration and how to use the SAP NetWeaver PI tool.
Chapter 3 describes the main steps in configuring the system landscape in the System Landscape Directory (SLD). These steps include basic administration for the landscape, analyzing the relevant server logs, starting and stopping the SLD service, configuring the SLD profile, and setting up the SLD bridge.
Chapter 4 deals with the topics of authorization, the SAP NetWeaver PI role con-cept, and single sign-on. The main focus of this chapter is on the new additions in the release upgrade.
Chapter 5 describes how the SAP NetWeaver Application Server was adapted for SAP NetWeaver PI. Among other things, it explains in detail the most important parameters to be set for the SAP NetWeaver PI system. You can use these param-eters to effectively tune the system in accordance with the requirements for avail-ability, stability, and performance.
Chapter 6 describes the various SAP NetWeaver PI monitoring types (message, end-to-end, performance, alert, and cache monitoring). In this chapter, we explain how to set up monitoring, define the purpose of monitoring, and describe daily monitoring.
Chapter 7 deals with the Enterprise Services Repository, which is the central tool for creating and managing services and processes within SAP NetWeaver PI.
Lastly, the Appendix provides an overview of all of the relevant SAP NetWeaver PI system parameters and a checklist for interface configuration.
As an extension of this book, you can contact the authors via the forum at http://www.realcore.de/sappi/. In this forum, we answer your questions and provide
Personal Copy for Antonio Di Perna, user id 335eb981-6644-4783-ba40-78f36ac50abf

12
Introduction
you with tips and advice that supplement the information in the book. It is our hope that this forum will also facilitate new connections and contacts in the SAP NetWeaver PI world. We are also happy to hear suggestions for improvements and new ideas from our readers.
Acknowledgments
Marcus Banner: I would like to thank my family for their understanding and sup-port throughout the project. Many hours that could have been spent together were sacrificed for this book. The book is dedicated to my wife, Tanja, and my daughter, Cassandra, who are the two most important people in my life and whom I love more than anything else in this world.
Heinzpeter Klein: I would like to thank my coauthors, Marcus Banner and Chris-tian Riesener, for their support, help, and inspiration during the many hours of writing.
Christian Riesener: I would like to thank my colleagues, Marcus Banner and Hein-zpeter Klein, for their support and inspiration. Thanks are also due to my partner, Alexandra Brennscheidt, for allowing me to invest what little free time we have together in this book.
The authors would like to extend joint thanks to our editor, Florian Zimniak, and the general manager of Galileo Press, Tomas Wehren, for their support and under-standing, and for their assistance with proofreading and editing.
© 2013 by Galileo Press Inc., Boston (MA)
13
1 Architecture of the System Landscape with SAP NetWeaver Process Integration
This chapter gives you a comprehensive overview of the structural concepts of the system landscape. We also explain the technical terms that you’re likely to encoun-ter most frequently in your work with SAP NetWeaver Process Integration (PI) and any associated support activities.
1.1 SAP NetWeaver
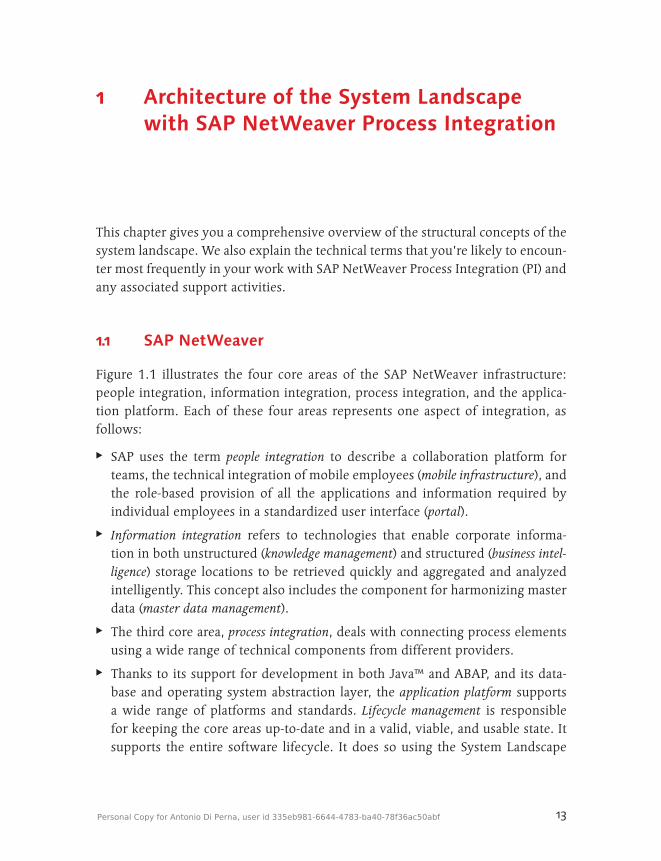
Figure 1.1 illustrates the four core areas of the SAP NetWeaver infrastructure: people integration, information integration, process integration, and the applica-tion platform. Each of these four areas represents one aspect of integration, as follows:
EE SAP uses the term people integration to describe a collaboration platform for teams, the technical integration of mobile employees (mobile infrastructure), and the role-based provision of all the applications and information required by individual employees in a standardized user interface (portal).
EE Information integration refers to technologies that enable corporate informa-tion in both unstructured (knowledge management) and structured (business intel-ligence) storage locations to be retrieved quickly and aggregated and analyzed intelligently. This concept also includes the component for harmonizing master data (master data management).
EE The third core area, process integration, deals with connecting process elements using a wide range of technical components from different providers.
EE Thanks to its support for development in both Java™ and ABAP, and its data-base and operating system abstraction layer, the application platform supports a wide range of platforms and standards. Lifecycle management is responsible for keeping the core areas up-to-date and in a valid, viable, and usable state. It supports the entire software lifecycle. It does so using the System Landscape
Personal Copy for Antonio Di Perna, user id 335eb981-6644-4783-ba40-78f36ac50abf
14
ArchitectureoftheSystemLandscapewithSAPNetWeaverProcessIntegration1
Directory (SLD), implementation tools, change management, software logistics, upgrade options, and installation utilities.
DB and OS Abstraction
People Integration
Process IntegrationIntegration
BrokerBusiness Process
Management
Information IntegrationBusiness
IntelligenceKnowledge
Management
Portal Collaboration
J2EE ABAP
Application Platform
Multi-Channel Access
DB and OS Abstraction
Master Data Management
Figure 1.1 Overview of SAP NetWeaver
In this book, we focus on the core area of SAP NetWeaver PI and describe many aspects and solutions that are relevant to your daily work.
1.2 SAP NetWeaver Process Integration
As described in the Introduction, the architecture of SAP NetWeaver PI 7.1 is based on an established architecture that is used to implement cross-system business pro-cesses and is an enhancement of previous SAP XI releases. Also, with the release of SAP NetWeaver PI 7.1, SAP has taken another big step toward a service-oriented architecture (SOA) for business applications and has thus met an important market requirement. In recent years, successful companies have implemented fully inte-grated, automated, and synchronized end-to-end processes with a flexible business infrastructure that is based on open standards. This agility is an important part of keeping up with and adapting to the dynamics of the market and to customer requirements. In terms of technology, this kind of process-oriented company is based on business integration and business intelligence with SOA, and requires a
© 2013 by Galileo Press Inc., Boston (MA)
15
SAPNetWeaverProcessIntegration 1.2
new way of thinking that marks a departure from fixed, old-fashioned proprietary IT concepts.
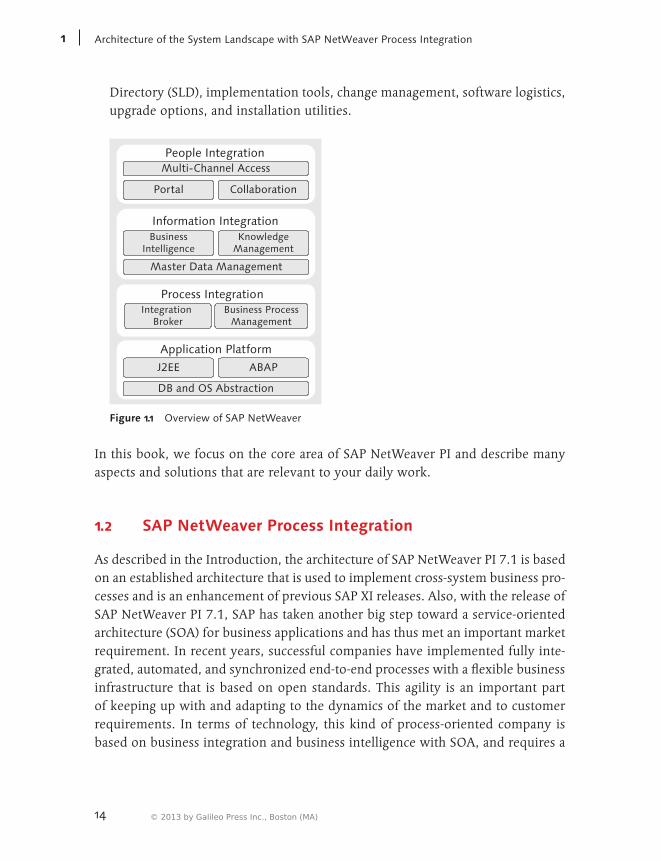
Figure 1.2 illustrates the entire lifecycle of this kind of application, including busi-ness requirements, design and modeling, definition, implementation, discovery, and description using central registration via the Universal Description, Discovery and Integration (UDDI) directory service, and actual live service consumption.
Business Requirements
Service Implementation
Dis
cove
ry &
Des
crip
tio
nSe
rvic
e C
onsu
mpt
ion
Serv
ice
Def
init
ion
Serv
ice
Mod
elin
g
SOA
InterfaceImplementation
ServicesRegistry
Model
GDT
UDDI
Figure 1.2 SOA with SAP NetWeaver PI 7.1
SAP implements this mission-critical requirement by means of three things: inte-grated automation of message processing; an Enterprise Services Repository and Registry based on UDDI 3.0 for quick and easy registration of Web services; and event-based, process-specific, and automatic monitoring of data processing using the new business activity monitoring (BAM) infrastructure. In a supporting capacity, the integration server, which is part of the service bus, uses various options to ensure that the applications can send messages to each other, that a sender’s mes-sages reach the intended recipient, and that this separation of the communication partners, along with the additional integration services (mapping, routing, service orchestration via integration processes), means that even the most diverse applica-tions can be successfully integrated.
Personal Copy for Antonio Di Perna, user id 335eb981-6644-4783-ba40-78f36ac50abf
16
ArchitectureoftheSystemLandscapewithSAPNetWeaverProcessIntegration1
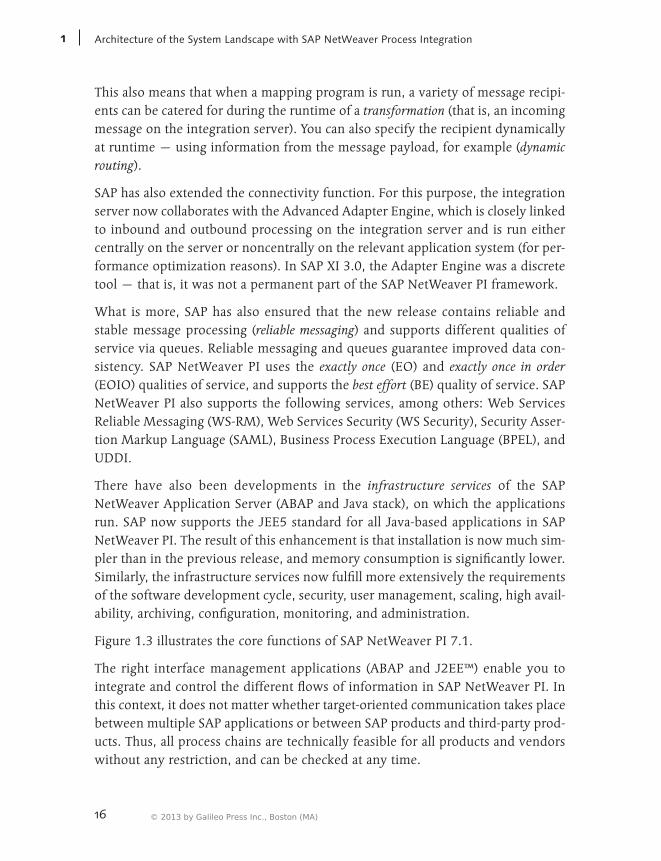
This also means that when a mapping program is run, a variety of message recipi-ents can be catered for during the runtime of a transformation (that is, an incoming message on the integration server). You can also specify the recipient dynamically at runtime — using information from the message payload, for example (dynamic routing).
SAP has also extended the connectivity function. For this purpose, the integration server now collaborates with the Advanced Adapter Engine, which is closely linked to inbound and outbound processing on the integration server and is run either centrally on the server or noncentrally on the relevant application system (for per-formance optimization reasons). In SAP XI 3.0, the Adapter Engine was a discrete tool — that is, it was not a permanent part of the SAP NetWeaver PI framework.
What is more, SAP has also ensured that the new release contains reliable and stable message processing (reliable messaging) and supports different qualities of service via queues. Reliable messaging and queues guarantee improved data con-sistency. SAP NetWeaver PI uses the exactly once (EO) and exactly once in order (EOIO) qualities of service, and supports the best effort (BE) quality of service. SAP NetWeaver PI also supports the following services, among others: Web Services Reliable Messaging (WS-RM), Web Services Security (WS Security), Security Asser-tion Markup Language (SAML), Business Process Execution Language (BPEL), and UDDI.
There have also been developments in the infrastructure services of the SAP NetWeaver Application Server (ABAP and Java stack), on which the applications run. SAP now supports the JEE5 standard for all Java-based applications in SAP NetWeaver PI. The result of this enhancement is that installation is now much sim-pler than in the previous release, and memory consumption is significantly lower. Similarly, the infrastructure services now fulfill more extensively the requirements of the software development cycle, security, user management, scaling, high avail-ability, archiving, configuration, monitoring, and administration.
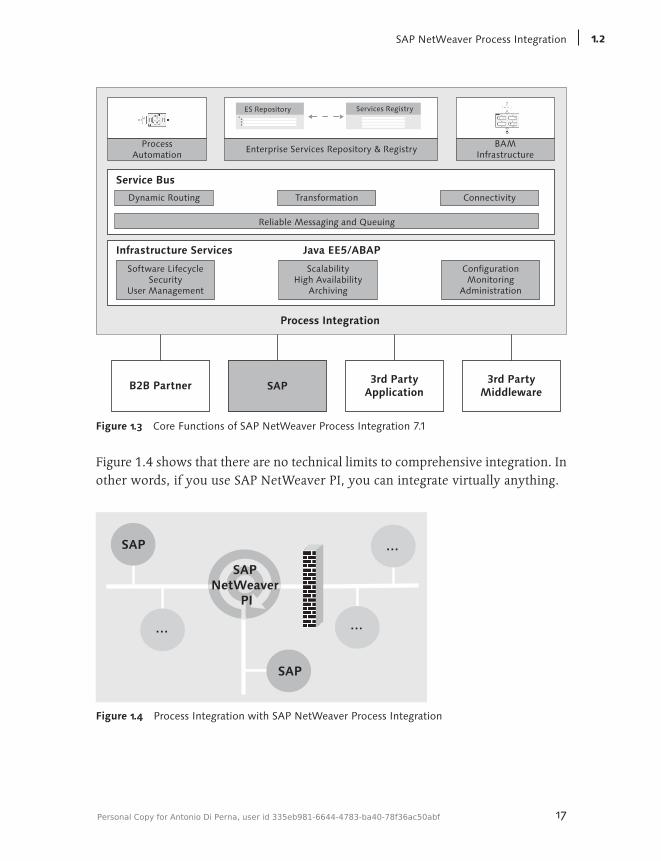
Figure 1.3 illustrates the core functions of SAP NetWeaver PI 7.1.
The right interface management applications (ABAP and J2EE™) enable you to integrate and control the different flows of information in SAP NetWeaver PI. In this context, it does not matter whether target-oriented communication takes place between multiple SAP applications or between SAP products and third-party prod-ucts. Thus, all process chains are technically feasible for all products and vendors without any restriction, and can be checked at any time.
© 2013 by Galileo Press Inc., Boston (MA)
17
SAPNetWeaverProcessIntegration 1.2
Process Integration
Service Bus
Dynamic Routing Transformation Connectivity
BAMInfrastructure
Reliable Messaging and Queuing
Infrastructure Services
Software LifecycleSecurity
User Management
ScalabilityHigh Availability
Archiving
ConfigurationMonitoring
Administration
Java EE5/ABAP
B2B Partner SAP3rd Party
Application3rd Party
Middleware
ProcessAutomation
Enterprise Services Repository & Registry
ES Repository Services Registry
Figure 1.3 Core Functions of SAP NetWeaver Process Integration 7.1
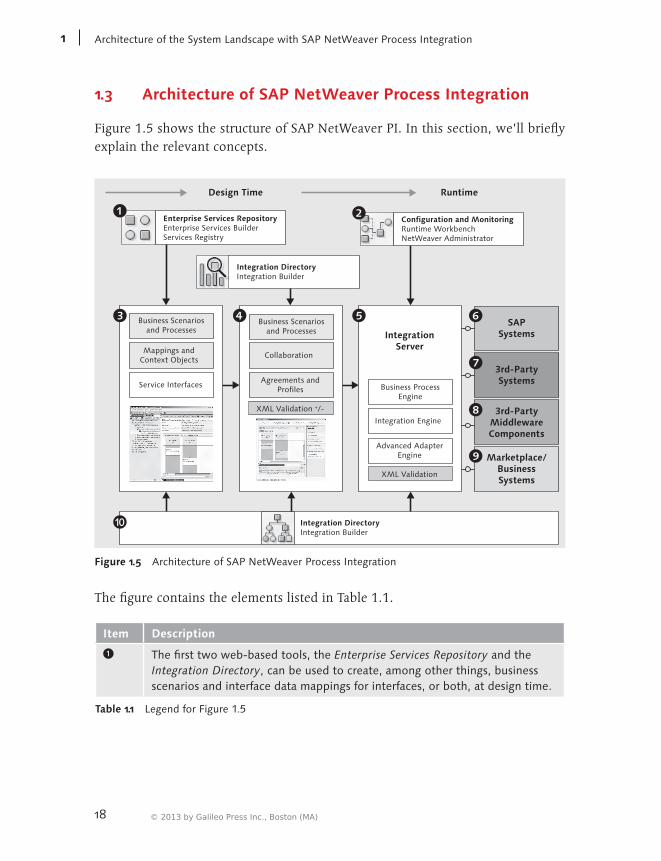
Figure 1.4 shows that there are no technical limits to comprehensive integration. In other words, if you use SAP NetWeaver PI, you can integrate virtually anything.
SAP
SAP
…
…
SAP NetWeaver
PI
…
Figure 1.4 Process Integration with SAP NetWeaver Process Integration
Personal Copy for Antonio Di Perna, user id 335eb981-6644-4783-ba40-78f36ac50abf
18
ArchitectureoftheSystemLandscapewithSAPNetWeaverProcessIntegration1
1.3 Architecture of SAP NetWeaver Process Integration
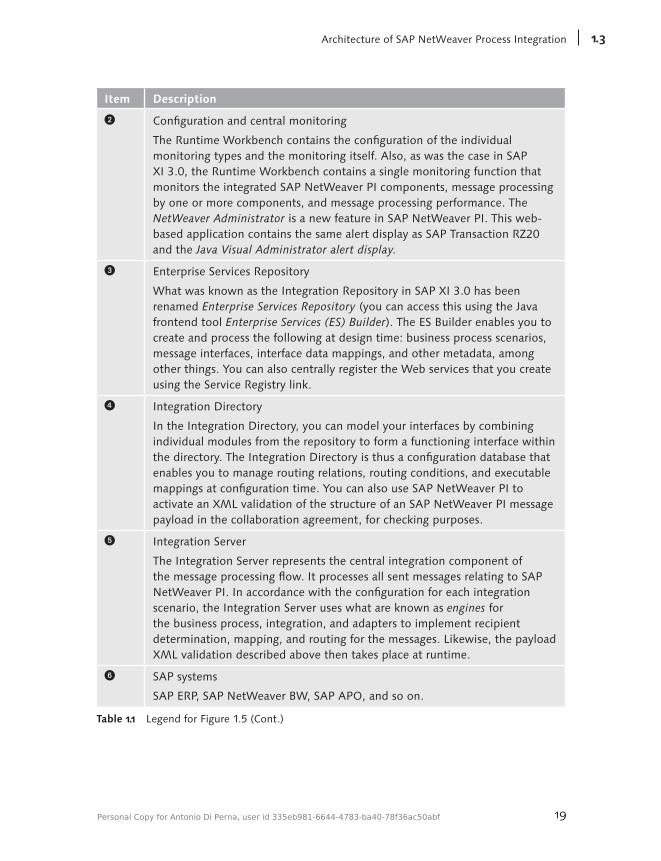
Figure 1.5 shows the structure of SAP NetWeaver PI. In this section, we’ll briefly explain the relevant concepts.
Design Time Runtime
Enterprise Services RepositoryEnterprise Services BuilderServices Registry
Integration DirectoryIntegration Builder
Configuration and MonitoringRuntime WorkbenchNetWeaver Administrator
Business Scenariosand Processes
Mappings andContext Objects
Service Interfaces
Collaboration
Agreements andProfiles
XML Validation +/-
Business ProcessEngine
Integration Engine
Advanced AdapterEngine
XML Validation
IntegrationServer
SAPSystems
3rd-PartySystems
3rd-PartyMiddlewareComponents
Marketplace/BusinessSystems
Integration DirectoryIntegration Builder
Business Scenariosand Processes
Figure 1.5 Architecture of SAP NetWeaver Process Integration
The figure contains the elements listed in Table 1.1.
Item Description
1 The first two web-based tools, the Enterprise Services Repository and the Integration Directory, can be used to create, among other things, business scenarios and interface data mappings for interfaces, or both, at design time.
Table 1.1 Legend for Figure 1.5
© 2013 by Galileo Press Inc., Boston (MA)
19
ArchitectureofSAPNetWeaverProcessIntegration 1.3
Item Description
2 Configuration and central monitoring
The Runtime Workbench contains the configuration of the individual monitoring types and the monitoring itself. Also, as was the case in SAP XI 3.0, the Runtime Workbench contains a single monitoring function that monitors the integrated SAP NetWeaver PI components, message processing by one or more components, and message processing performance. The NetWeaver Administrator is a new feature in SAP NetWeaver PI. This web-based application contains the same alert display as SAP Transaction RZ20 and the Java Visual Administrator alert display.
3 Enterprise Services Repository
What was known as the Integration Repository in SAP XI 3.0 has been renamed Enterprise Services Repository (you can access this using the Java frontend tool Enterprise Services (ES) Builder). The ES Builder enables you to create and process the following at design time: business process scenarios, message interfaces, interface data mappings, and other metadata, among other things. You can also centrally register the Web services that you create using the Service Registry link.
4 Integration Directory
In the Integration Directory, you can model your interfaces by combining individual modules from the repository to form a functioning interface within the directory. The Integration Directory is thus a configuration database that enables you to manage routing relations, routing conditions, and executable mappings at configuration time. You can also use SAP NetWeaver PI to activate an XML validation of the structure of an SAP NetWeaver PI message payload in the collaboration agreement, for checking purposes.
5 Integration Server
The Integration Server represents the central integration component of the message processing flow. It processes all sent messages relating to SAP NetWeaver PI. In accordance with the configuration for each integration scenario, the Integration Server uses what are known as engines for the business process, integration, and adapters to implement recipient determination, mapping, and routing for the messages. Likewise, the payload XML validation described above then takes place at runtime.
6 SAP systems
SAP ERP, SAP NetWeaver BW, SAP APO, and so on.
Table 1.1 Legend for Figure 1.5 (Cont.)
Personal Copy for Antonio Di Perna, user id 335eb981-6644-4783-ba40-78f36ac50abf
20
ArchitectureoftheSystemLandscapewithSAPNetWeaverProcessIntegration1
Item Description
7 Third-party systems
SeeBeyond®, Baan®, Broadvision®, IDE World Software, Oracle® Application, Peoplesoft®, Siebel®, and so on.
8 Third-party middleware components
webMethods® Integration Server and Seeburger™ BIS
9 Marketplace and business systems
Business Warehouse Java components: BI UDI 3.5 (Business Interface Universal Data Integration)
J System Landscape Directory (SLD)
The System Landscape Directory records all of the information on the system landscape and makes that information available in a central location. The technical systems in the landscape are recorded along with their technical attributes, such as computer name and system ID (technical system). To be able to map business processes, the technical systems are assigned business system names that represent logical business systems (business landscape). As shown in Figure 1.5, this data is made available to the individual SAP NetWeaver PI components.
Table 1.1 Legend for Figure 1.5 (Cont.)
The SAP document Technical Infrastructure Guide – SAP NetWeaver PI 7.1 Document Version 1.1 – December 2007 describes the technical infrastructure (including sys-tem architecture and high availability) of the SAP NetWeaver PI 7.1 system. You can access this information via the following path on the SAP SDN Community Network: Home • SAP NetWeaver Product • Complementary Offerings • SAP NetWeaver Process Integration. You can also find additional up-to-date infor-mation on business benefits, new features, installation, updates, landscape design, and SAP Notes in the same location.
1.4 Landscape Topology of SAP NetWeaver PI
For the purposes of our example, we have followed SAP’s recommendations and created a central SLD (central information provider) for SAP NetWeaver PI. For Web Dynpro and other J2EE developments, we’ll use local SLDs together with the central SLD. The two local SLDs are synchronized using the data supplier bridge. In your case, this can be a test system or a development system. When you’re imple-
© 2013 by Galileo Press Inc., Boston (MA)
21
LandscapeTopologyofSAPNetWeaverPI 1.4
menting and testing J2EE applications (such as Web Dynpro), the local SLDs can be used to reduce the workload on the central SLD so that the latter can be made available primarily to the productive J2EE and XI applications.
In our example, the central SLD is an SAP NetWeaver 7.1 system called P71 (sapp71.realcore.net). The data from all existing and new reporting systems (both SAP and third-party systems) is stored centrally in this system and is automatically syn-chronized with the local SLDs via the data supplier bridge (SLD data bridge). This way, the system information is available throughout the entire system landscape for interface configuration and development purposes. Section 3.1.6, in Chapter 3, uses an example to describe how to set up the SLD data bridge.
Separating SLD instances on the basis of processes can be useful if the systems have to be separated to preserve the security of highly sensitive data (such as per-sonal information, commissions data, or sales data). This kind of separation may be mandatory owing to legal regulations or a company’s security policy. Organi-zational constraints can also be a reason for separation, such as the separation of independent company areas, or simply the fact that different SAP NetWeaver PI or SAP XI releases are being used. Needless to say, these measures add significantly to administration costs.
Now, you can use not only an internal transport (import and export) system or the Change Management Service (CMS) to synchronize settings (Customizing) and devel-opment (source code) in the integration repositories and directories on the test and quality systems and on the live repository and directory; as of SAP NetWeaver PI 7.1 SP06, you can use the new Enhanced Change and Transport System (CTS+) as well. The new CTS+ extends the existing functionality of the CMS by creating a close connection between the SAP NetWeaver PI development tools (Enterprise Services Repository and Integration Directory) and the CTS itself. Transportation manage-ment system configuration and administration, and maintenance of both ABAP and Java development are also considerably improved in CTS+. Section 3.5, in Chapter 3, deals with the local import and export functions, briefly describes the old CMS, and explains how to set up the CTS+ using the SAP configuration guide How To ... Configure Enhanced CTS for SAP NetWeaver Process Integration 7.1 SP06.
SAP Note 764393 (currently version 11), Configuration of the SAP System Land-scape Directory, describes the problems and special features of a new SLD infra-structure. Make sure to read this SAP Note, because it contains many useful
Personal Copy for Antonio Di Perna, user id 335eb981-6644-4783-ba40-78f36ac50abf
22
ArchitectureoftheSystemLandscapewithSAPNetWeaverProcessIntegration1
concepts and tips, which we have used ourselves in our projects. It covers the fol-lowing issues:
EE Optimally configuring the SLD server instances Resources required for operating the SLD instances, uniqueness in the network structure, security concept, transport landscapes, system landscape upgrades (SLD is backward compatible)
EE Configuring the SLD address Host name, port information, logon data
EE Synchronizing the content of SLD server instances Export-import procedure, transport, SLD bridge, automatic SLD synchroniza-tion with the full automatic content synchronization feature
Chapter 3 also contains information on these topics.
The next chapter describes how you can create an interface configuration in just a few steps.
© 2013 by Galileo Press Inc., Boston (MA)
23
2 Basic Configuration of the SAP NetWeaver PI Interface System
This chapter describes the basic principles of setting up an SAP NetWeaver PI system configuration. After a brief description of our sample landscape and some general remarks about sizing SAP NetWeaver PI systems, Section 2.2 will continue with the basic configuration of the SAP NetWeaver PI system parameters. Sections 2.3 and 2.4 will then deal with importing and finding SAP NetWeaver PI business content.
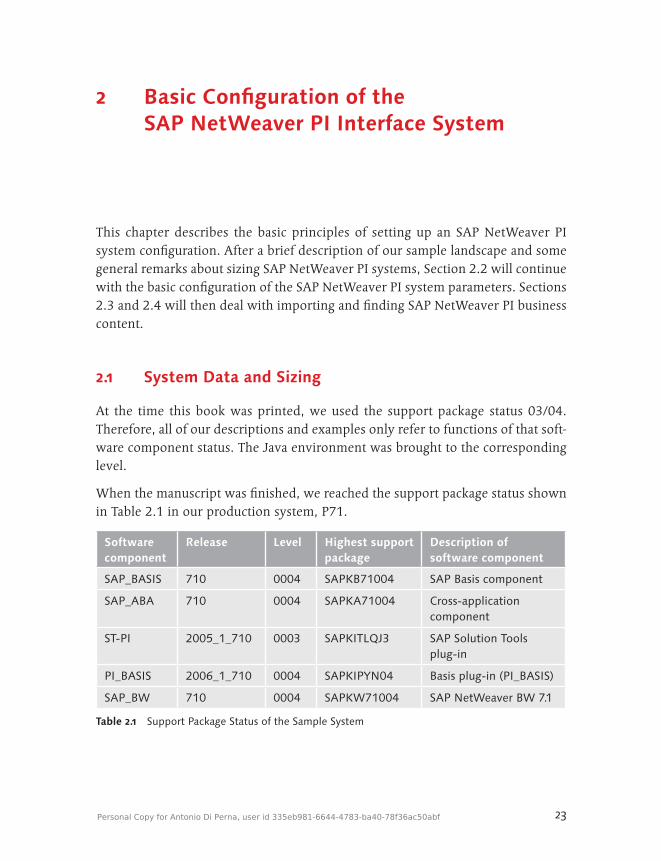
2.1 System Data and Sizing
At the time this book was printed, we used the support package status 03/04. Therefore, all of our descriptions and examples only refer to functions of that soft-ware component status. The Java environment was brought to the corresponding level.
When the manuscript was finished, we reached the support package status shown in Table 2.1 in our production system, P71.
Software component
Release Level Highest support package
Description of software component
SAP_BASIS 710 0004 SAPKB71004 SAP Basis component
SAP_ABA 710 0004 SAPKA71004 Cross-application component
ST-PI 2005_1_710 0003 SAPKITLQJ3 SAP Solution Tools plug-in
PI_BASIS 2006_1_710 0004 SAPKIPYN04 Basis plug-in (PI_BASIS)
SAP_BW 710 0004 SAPKW71004 SAP NetWeaver BW 7.1
Table 2.1 Support Package Status of the Sample System
Personal Copy for Antonio Di Perna, user id 335eb981-6644-4783-ba40-78f36ac50abf
24
BasicConfigurationoftheSAPNetWeaverPIInterfaceSystem2
2.1.1 System Data of the Example
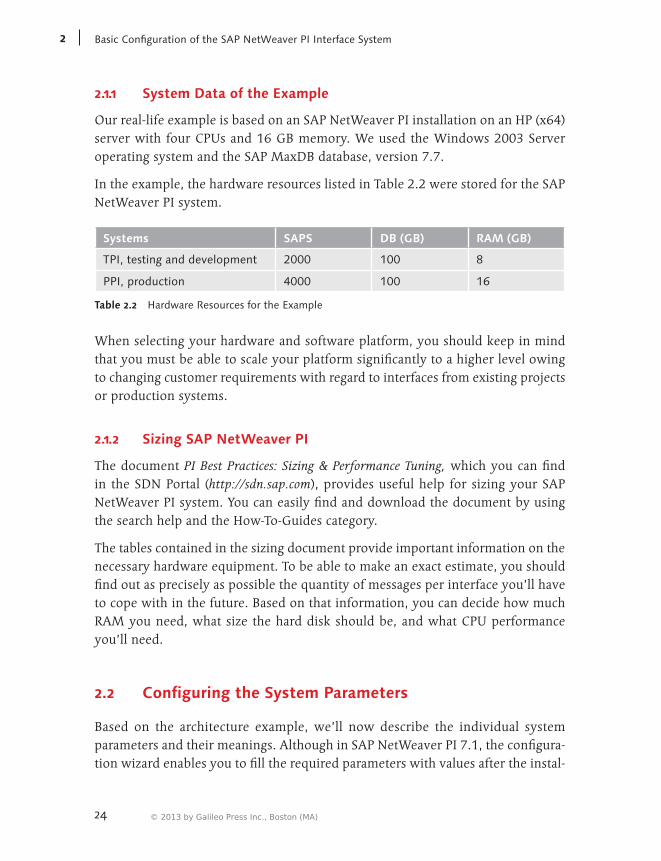
Our real-life example is based on an SAP NetWeaver PI installation on an HP (x64) server with four CPUs and 16 GB memory. We used the Windows 2003 Server operating system and the SAP MaxDB database, version 7.7.
In the example, the hardware resources listed in Table 2.2 were stored for the SAP NetWeaver PI system.
Systems SAPS DB (GB) RAM (GB)
TPI, testing and development 2000 100 8
PPI, production 4000 100 16
Table 2.2 Hardware Resources for the Example
When selecting your hardware and software platform, you should keep in mind that you must be able to scale your platform significantly to a higher level owing to changing customer requirements with regard to interfaces from existing projects or production systems.
2.1.2 Sizing SAP NetWeaver PI
The document PI Best Practices: Sizing & Performance Tuning, which you can find in the SDN Portal (http://sdn.sap.com), provides useful help for sizing your SAP NetWeaver PI system. You can easily find and download the document by using the search help and the How-To-Guides category.
The tables contained in the sizing document provide important information on the necessary hardware equipment. To be able to make an exact estimate, you should find out as precisely as possible the quantity of messages per interface you’ll have to cope with in the future. Based on that information, you can decide how much RAM you need, what size the hard disk should be, and what CPU performance you’ll need.
2.2 Configuring the System Parameters
Based on the architecture example, we’ll now describe the individual system parameters and their meanings. Although in SAP NetWeaver PI 7.1, the configura-tion wizard enables you to fill the required parameters with values after the instal-
© 2013 by Galileo Press Inc., Boston (MA)
25
ConfiguringtheSystemParameters 2.2
lation process, you must be aware that manual changes will become necessary once the configuration or architecture changes (for example, if you want to target the testing system to the central SLD, move the hardware, and so on). Therefore, we’ll now describe how to set up the system manually.
As described earlier, we want to equip our multilevel SAP NetWeaver PI landscape with a central SLD. The central SLD runs on the P71 system. The development plat-form T71 and the quality assurance system Q71 are also supposed to use the SLD. The individual repositories and directories will be used per system, that is, they’ll be used for the T system, the Q system, and the P system individually, whereas changes will be transported via CMS from the T platform to the Q and P platforms. We’ll describe the settings by using the sample configuration of the production platform (sapp71.realcore.net). Based on the P71 configuration, you can then copy the necessary settings to your own systems.
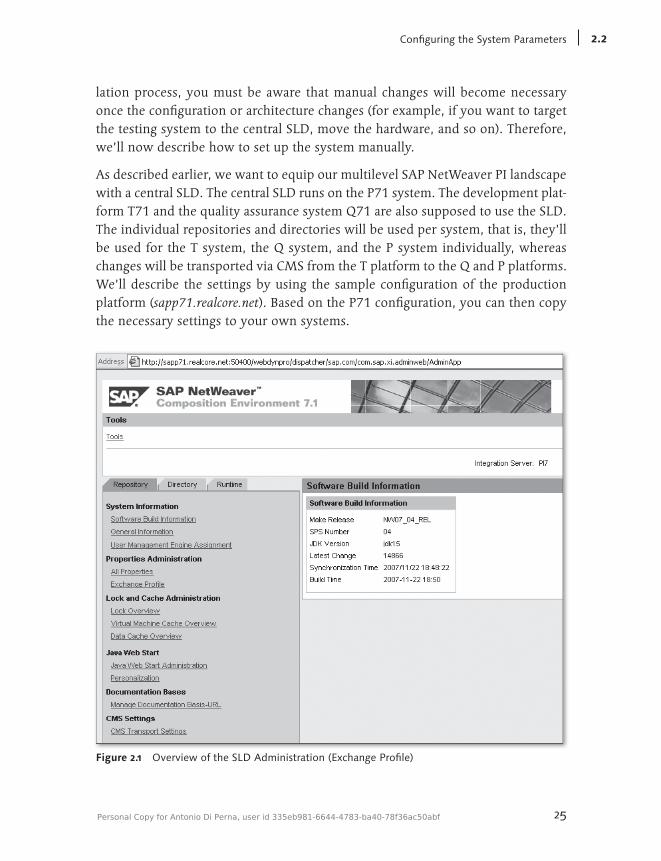
Figure 2.1 Overview of the SLD Administration (Exchange Profile)
Personal Copy for Antonio Di Perna, user id 335eb981-6644-4783-ba40-78f36ac50abf
26
BasicConfigurationoftheSAPNetWeaverPIInterfaceSystem2
You can access the settings by selecting the Administration menu item from the SAP NetWeaver PI start page, http://[hostname]:[port]/rep. When you’re in the Administration menu, select Administration of Properties and click on Exchange Profile. Figure 2.1 shows the corresponding navigation.
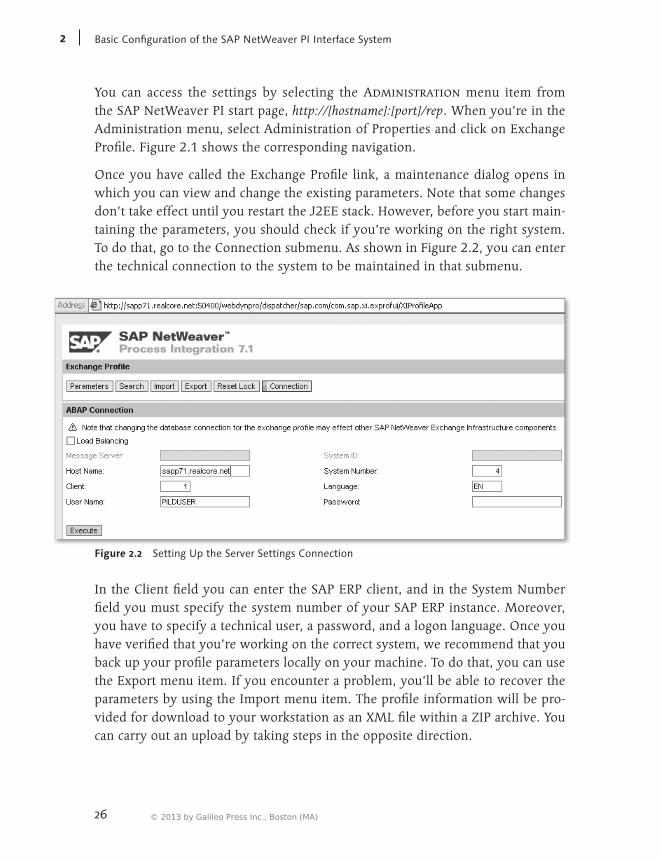
Once you have called the Exchange Profile link, a maintenance dialog opens in which you can view and change the existing parameters. Note that some changes don’t take effect until you restart the J2EE stack. However, before you start main-taining the parameters, you should check if you’re working on the right system. To do that, go to the Connection submenu. As shown in Figure 2.2, you can enter the technical connection to the system to be maintained in that submenu.
Figure 2.2 Setting Up the Server Settings Connection
In the Client field you can enter the SAP ERP client, and in the System Number field you must specify the system number of your SAP ERP instance. Moreover, you have to specify a technical user, a password, and a logon language. Once you have verified that you’re working on the correct system, we recommend that you back up your profile parameters locally on your machine. To do that, you can use the Export menu item. If you encounter a problem, you’ll be able to recover the parameters by using the Import menu item. The profile information will be pro-vided for download to your workstation as an XML file within a ZIP archive. You can carry out an upload by taking steps in the opposite direction.
© 2013 by Galileo Press Inc., Boston (MA)
27
ConfiguringtheSystemParameters 2.2
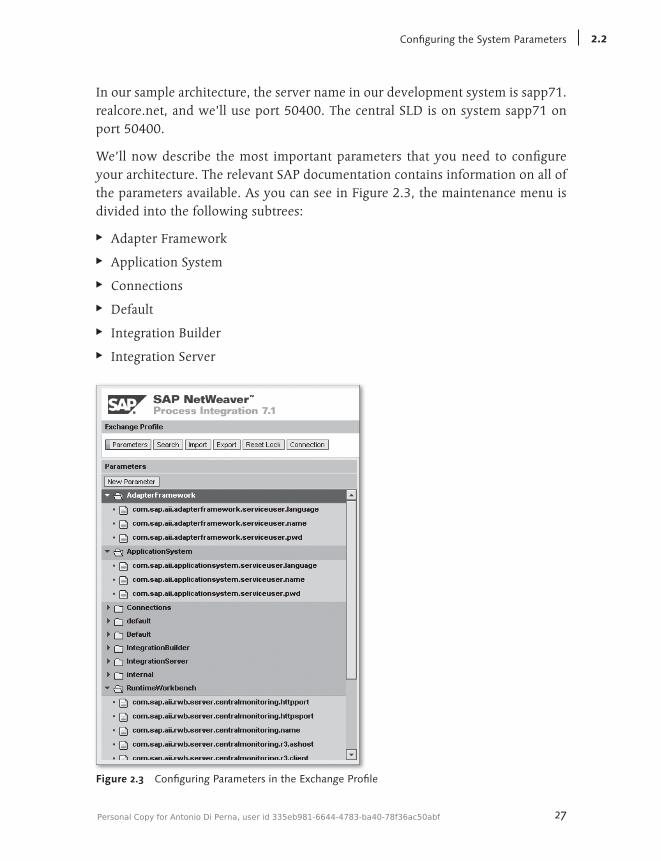
In our sample architecture, the server name in our development system is sapp71.realcore.net, and we’ll use port 50400. The central SLD is on system sapp71 on port 50400.
We’ll now describe the most important parameters that you need to configure your architecture. The relevant SAP documentation contains information on all of the parameters available. As you can see in Figure 2.3, the maintenance menu is divided into the following subtrees:
EE Adapter Framework
EE Application System
EE Connections
EE Default
EE Integration Builder
EE Integration Server
Figure 2.3 Configuring Parameters in the Exchange Profile
Personal Copy for Antonio Di Perna, user id 335eb981-6644-4783-ba40-78f36ac50abf
28
BasicConfigurationoftheSAPNetWeaverPIInterfaceSystem2
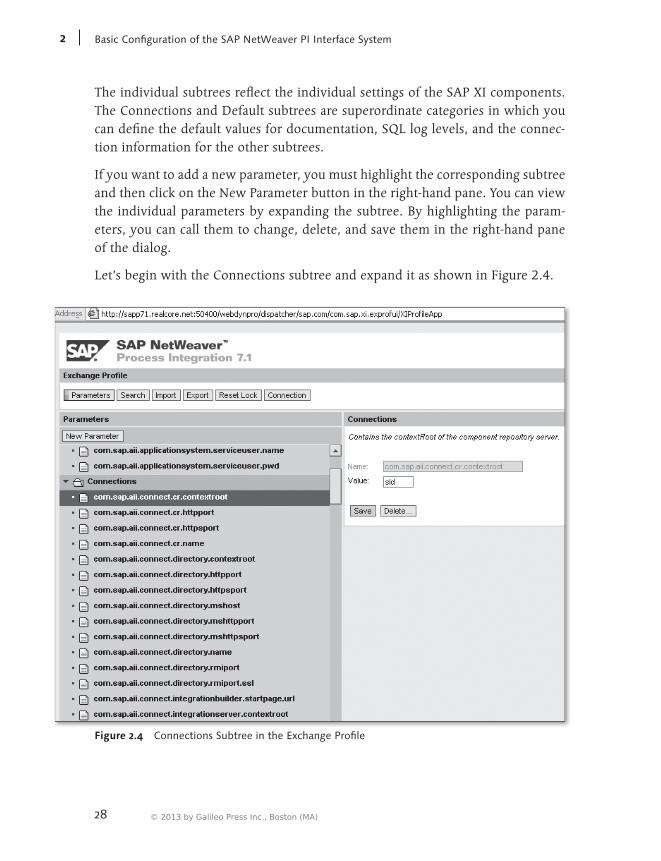
The individual subtrees reflect the individual settings of the SAP XI components. The Connections and Default subtrees are superordinate categories in which you can define the default values for documentation, SQL log levels, and the connec-tion information for the other subtrees.
If you want to add a new parameter, you must highlight the corresponding subtree and then click on the New Parameter button in the right-hand pane. You can view the individual parameters by expanding the subtree. By highlighting the param-eters, you can call them to change, delete, and save them in the right-hand pane of the dialog.
Let’s begin with the Connections subtree and expand it as shown in Figure 2.4.
Figure 2.4 Connections Subtree in the Exchange Profile
© 2013 by Galileo Press Inc., Boston (MA)
29
ConfiguringtheSystemParameters 2.2
The first parameter we’ll work with is com.sap.aii.connect.cr.contextroot.1 This parameter defines the context root of the SLD. In our example, we’ll keep using the default name, SLD. The cr.httpport parameter is much more interest-ing. Because we want to use our SLD on the P71 system (production), we must specify the port of the P71 system here. The parameter expects the http port, 50400 in our example. As you may have already guessed, the cr.name parameter expects the name of the corresponding server; in our example this is sapp71.real-core.net.
The structure and meanings of the parameters directory.contextroot, directory.httpport, and directory.name are similar to the parameters just described. Here you can define which directory is to be used at which port and on which server. Because we want to use a local directory, we’ll store the server and the port of our development system here. Thus, for our example we’ll store the value 50400 for the directory.httpport parameter and the value sapp71.realcore.net for the direc-tory.name parameter. We won’t change the default value dir for the context root for the parameter directory.contextroot.
The parameters that contain the prefix IntegrationServer define the server and port of your runtime. Here, you must specify the local server and the corresponding ports.
The next parameters we want to take a look at are the SLD settings. You can use the parameters landscape.contextroot, landscape.httpport, and landscape.name to define the SLD that is to be used by the SAP NetWeaver PI system you want to administrate. Because in our example we decided to use a central SLD on the P71 system, we’ll enter the value sapp71.realcore.net for the landscape.name param-eter, and the value 50400 for the landscape.httpport parameter. We’ll keep the value sld for the context root.
Because we have now set up the central SLD for our development system, we must set the parameters for our repository in the next step. As described above, we want the repository to run locally on the development platform. The relevant parameters are repository.contextroot, repository.httpport, and repository.name. For the repository.contextroot parameter we’ll use the default value rep. The repository.httpport parameter should be set to 50400, and the value for the repository.name
1 To improve readability, we’ll use abbreviations for the parameter names in the explanations and therefore use only the essential parts of their names.
Personal Copy for Antonio Di Perna, user id 335eb981-6644-4783-ba40-78f36ac50abf

30
BasicConfigurationoftheSAPNetWeaverPIInterfaceSystem2
parameter is the server sapp71.realcore.net. The runtime parameters rwb are also set up using the values of the local system, that is, sapp71.realcore.net.
Figure 2.5 illustrates the architecture that we have just described with a CMS con-nection. You must now connect the individual SAP systems to the central SLD via a data supplier bridge. Section 3.1, in Chapter 3, contains detailed information on how you should do this configuration. The appendix contains an overview of the individual parameters, including sample values and short descriptions.
Development System T-PI7.1
Quality System Q-PI7.1
Production System P-PI7.1 SLD
Tran
spor
t St
udio
(CM
S)
CMS
Figure 2.5 Sample Architecture — Overview
2.3 Setting Up Business Content for SAP NetWeaver PI 7.1
SAP provides business content for SAP NetWeaver PI that can be used for connec-tions between different standard SAP products. This way, SAP enables its custom-ers to reduce their own development costs.
The following section discusses business content. Business content for SAP NetWeaver PI 7.1 contains prefabricated SAP scenarios in which all possible stan-dard connections between different SAP products have been developed. This enables you to create data connections between your systems without having to develop your own configurations. For example, SAP provides business content for SAP NetWeaver Master Data Management (MDM) so that you can send items via IDocs (ARTMAS) from your SAP Retail system through SAP NetWeaver PI to your MDM system in a compatible file format and in only a few configuration steps.
© 2013 by Galileo Press Inc., Boston (MA)
31
SettingUpBusinessContentforSAPNetWeaverPI7.1 2.3
In the following, we’ll describe the configuration steps that are necessary for using the SFLIGHT demo business content. After that, we’ll show you where you can find business content for SAP products in SAP Service Marketplace and how you can install it in your SAP NetWeaver PI system.
Once you have installed your SAP NetWeaver PI system, your Integration Reposi-tory already contains business content for the SFLIGHT demo example. Based on this business content we’ll use the SingleFlightBooking scenario to demonstrate how easily you can use business content in general. This scenario is a proxy-to-IDoc interface that you can configure in your SAP NetWeaver PI system. In the demo scenario, the travel agency (client 105) sends a booking request via IDoc to airline LH (client 107). After posting the IDoc, airline LH returns a booking confir-mation to the travel agency via a proxy (Figure 2.6).
Figure 2.6 Scenario Description
The descriptions of the example were taken from the document Demo Examples – Configuration Guide (SAP NetWeaver PI 7.1). You can find this document in the fol-lowing location in the SAP Developer Network: https://www.sdn.sap.com/irj/sdn/soa-servicebus. Then go to the Getting Started area under Use Cases and Examples. However, before we can start, you must first carry out the configuration steps described in Chapter 4 of the demo guide. These steps will guide you through the creation and configuration of additional clients that would go beyond the scope of
Personal Copy for Antonio Di Perna, user id 335eb981-6644-4783-ba40-78f36ac50abf
32
BasicConfigurationoftheSAPNetWeaverPIInterfaceSystem2
this section of the book. Our descriptions will therefore start with the configura-tion in the Integration Directory.
2.3.1 Importing Business Systems
Use the following URL to call the Integration Directory in your browser: http:// <servername>:5<systemnumber>/dir. Then select Integration Directory.
Once you have started the Integration Directory, you can take advantage of a new function in SAP NetWeaver PI 7.1. Folder structures enable you to establish a bet-ter overview of the Integration Directory. Therefore, you’ll create a folder in which you can store all objects you’re going to create from now on. Click on the Create New Object button in the upper part of the screen. Then select Folder from the selection bar under Administration on the left, and name the folder Demo Sample (see Figure 2.7).
Figure 2.7 Creating a Scenario Folder
© 2013 by Galileo Press Inc., Boston (MA)
33
SettingUpBusinessContentforSAPNetWeaverPI7.1 2.3
Next, you must import the business systems between which you want to exchange data. Expand the Communication component list in the objects list on the left and right-click on Business System. Then select Assign Business System from the con-text menu (see Figure 2.8).
Figure 2.8 Assigning a Business System
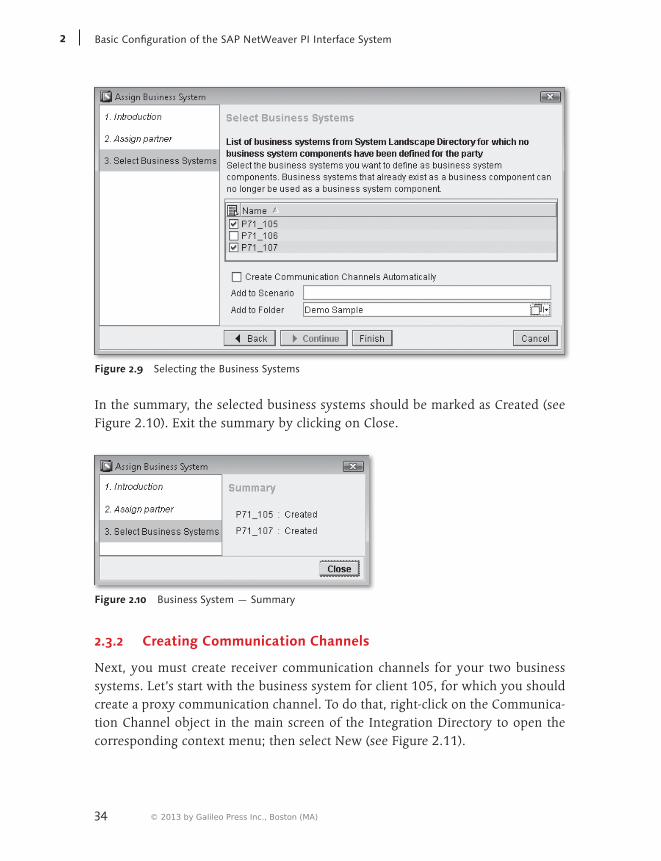
A dialog opens that guides you through the required steps for importing business systems; skip the first two steps by clicking on Continue. In the third step, the sys-tem displays a list of all business systems in your SLD that haven’t been imported yet; select the business systems you created in Chapter 4 of the demo configuration guide for your clients 105 and 107. Remember to select the Demo Sample folder under the Add to Folder option. Then finish the selection process by clicking on the Finish button (see Figure 2.9).
Personal Copy for Antonio Di Perna, user id 335eb981-6644-4783-ba40-78f36ac50abf
34
BasicConfigurationoftheSAPNetWeaverPIInterfaceSystem2
Figure 2.9 Selecting the Business Systems
In the summary, the selected business systems should be marked as Created (see Figure 2.10). Exit the summary by clicking on Close.
Figure 2.10 Business System — Summary
2.3.2 Creating Communication Channels
Next, you must create receiver communication channels for your two business systems. Let’s start with the business system for client 105, for which you should create a proxy communication channel. To do that, right-click on the Communica-tion Channel object in the main screen of the Integration Directory to open the corresponding context menu; then select New (see Figure 2.11).
© 2013 by Galileo Press Inc., Boston (MA)

35
SettingUpBusinessContentforSAPNetWeaverPI7.1 2.3
Figure 2.11 New Communication Channel
In the creation dialog, select the relevant business system under Communication Component and call the communication channel “PROXY_RCV_<business_sys-tem>.” Enter a description and again select the Demo Sample folder for the Add to Folder option. Then click on the Create button to activate the editing mode (see Figure 2.12).
Figure 2.12 Proxy Communication Channel
Personal Copy for Antonio Di Perna, user id 335eb981-6644-4783-ba40-78f36ac50abf
36
BasicConfigurationoftheSAPNetWeaverPIInterfaceSystem2
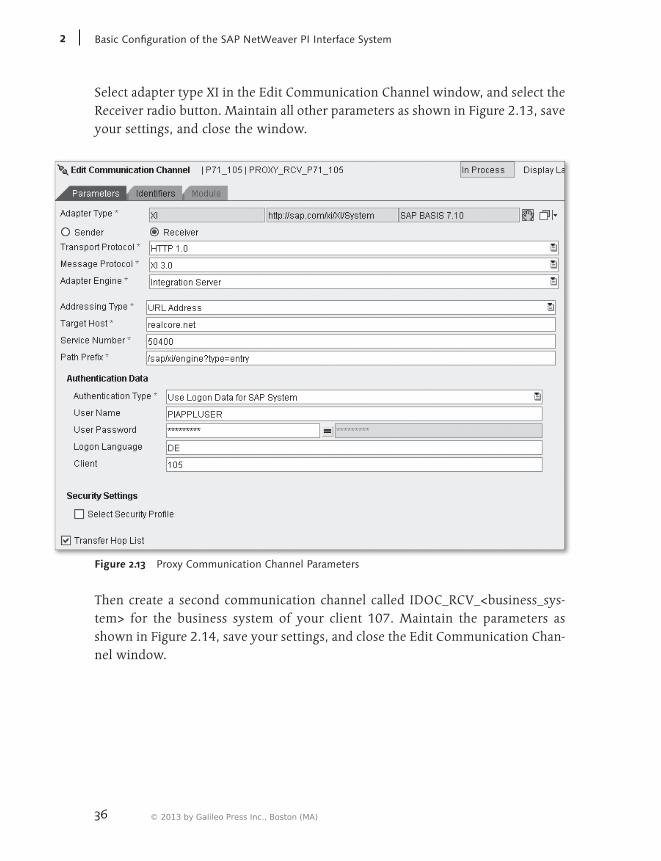
Select adapter type XI in the Edit Communication Channel window, and select the Receiver radio button. Maintain all other parameters as shown in Figure 2.13, save your settings, and close the window.
Figure 2.13 Proxy Communication Channel Parameters
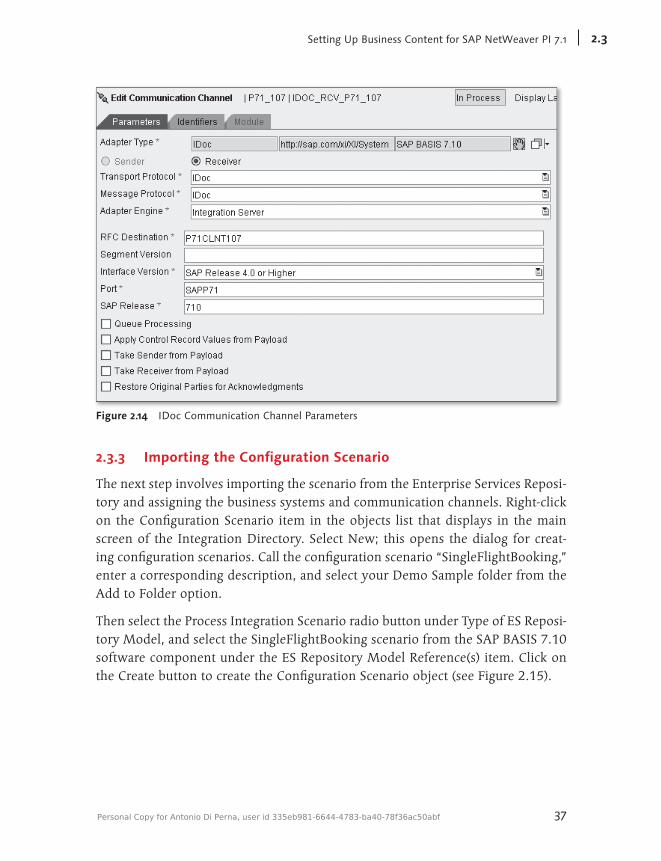
Then create a second communication channel called IDOC_RCV_<business_sys-tem> for the business system of your client 107. Maintain the parameters as shown in Figure 2.14, save your settings, and close the Edit Communication Chan-nel window.
© 2013 by Galileo Press Inc., Boston (MA)
37
SettingUpBusinessContentforSAPNetWeaverPI7.1 2.3
Figure 2.14 IDoc Communication Channel Parameters
2.3.3 Importing the Configuration Scenario
The next step involves importing the scenario from the Enterprise Services Reposi-tory and assigning the business systems and communication channels. Right-click on the Configuration Scenario item in the objects list that displays in the main screen of the Integration Directory. Select New; this opens the dialog for creat-ing configuration scenarios. Call the configuration scenario “SingleFlightBooking,” enter a corresponding description, and select your Demo Sample folder from the Add to Folder option.
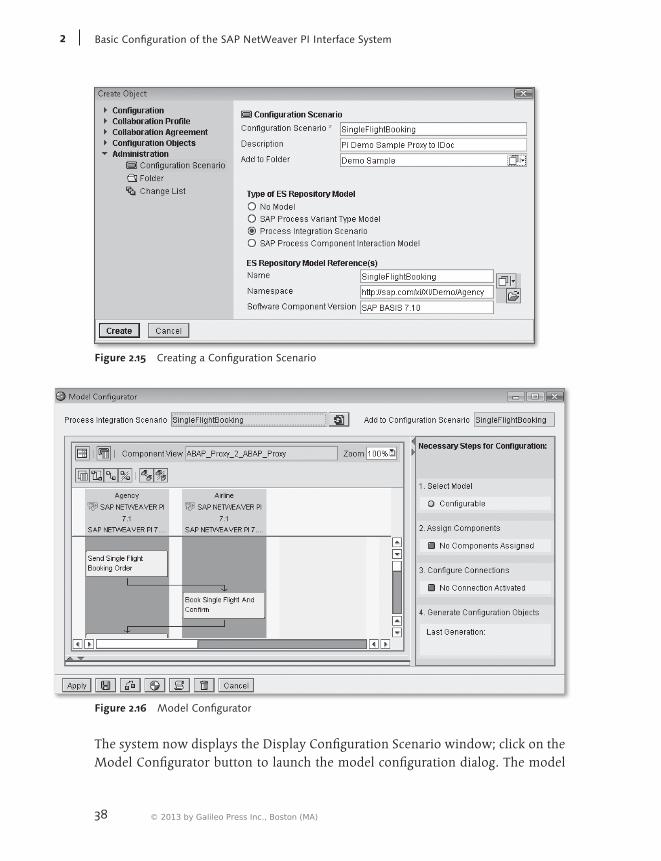
Then select the Process Integration Scenario radio button under Type of ES Reposi-tory Model, and select the SingleFlightBooking scenario from the SAP BASIS 7.10 software component under the ES Repository Model Reference(s) item. Click on the Create button to create the Configuration Scenario object (see Figure 2.15).
Personal Copy for Antonio Di Perna, user id 335eb981-6644-4783-ba40-78f36ac50abf
38
BasicConfigurationoftheSAPNetWeaverPIInterfaceSystem2
Figure 2.15 Creating a Configuration Scenario
Figure 2.16 Model Configurator
The system now displays the Display Configuration Scenario window; click on the Model Configurator button to launch the model configuration dialog. The model
© 2013 by Galileo Press Inc., Boston (MA)
39
SettingUpBusinessContentforSAPNetWeaverPI7.1 2.3
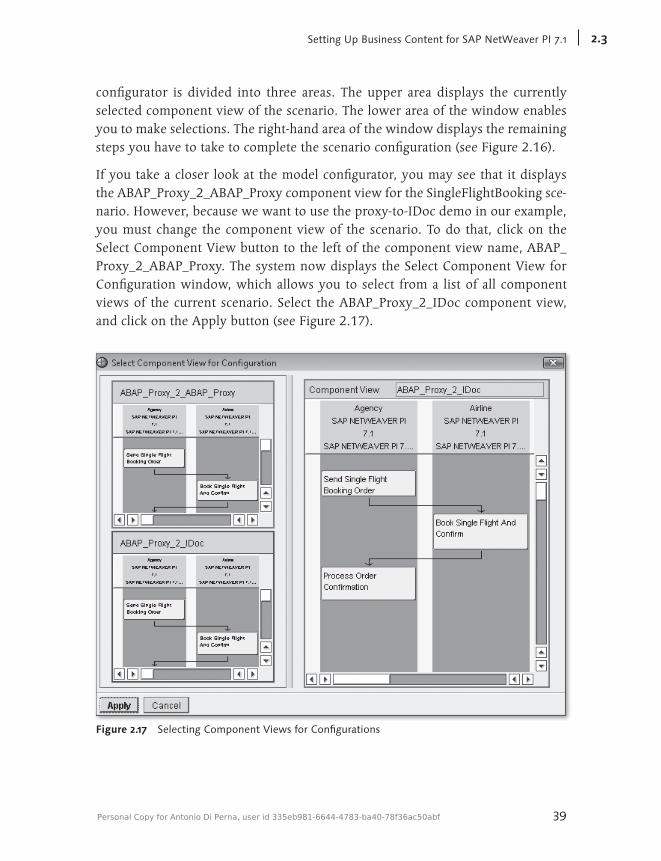
configurator is divided into three areas. The upper area displays the currently selected component view of the scenario. The lower area of the window enables you to make selections. The right-hand area of the window displays the remaining steps you have to take to complete the scenario configuration (see Figure 2.16).
If you take a closer look at the model configurator, you may see that it displays the ABAP_Proxy_2_ABAP_Proxy component view for the SingleFlightBooking sce-nario. However, because we want to use the proxy-to-IDoc demo in our example, you must change the component view of the scenario. To do that, click on the Select Component View button to the left of the component view name, ABAP_Proxy_2_ABAP_Proxy. The system now displays the Select Component View for Configuration window, which allows you to select from a list of all component views of the current scenario. Select the ABAP_Proxy_2_IDoc component view, and click on the Apply button (see Figure 2.17).
Figure 2.17 Selecting Component Views for Configurations
Personal Copy for Antonio Di Perna, user id 335eb981-6644-4783-ba40-78f36ac50abf

40
BasicConfigurationoftheSAPNetWeaverPIInterfaceSystem2
Back in the model configurator, you can now see that the ABAP_Proxy_2_IDoc view has been selected as the component view to be used. Next, you must assign your business systems to the Agency and Airline components. Click on the Assign Component button, which is located in the far left-hand part of the list, below the component view name. The lower part of the window now displays a selection for the communication component assignment in which you can assign your business systems (see Figure 2.18). For a better overview, the currently selected component is highlighted in the upper area. Use the input help to assign your business system for client 105 as a communication component to the Agency component.
Figure 2.18 Assigning a Business System to the Agency Component
© 2013 by Galileo Press Inc., Boston (MA)
41
SettingUpBusinessContentforSAPNetWeaverPI7.1 2.3
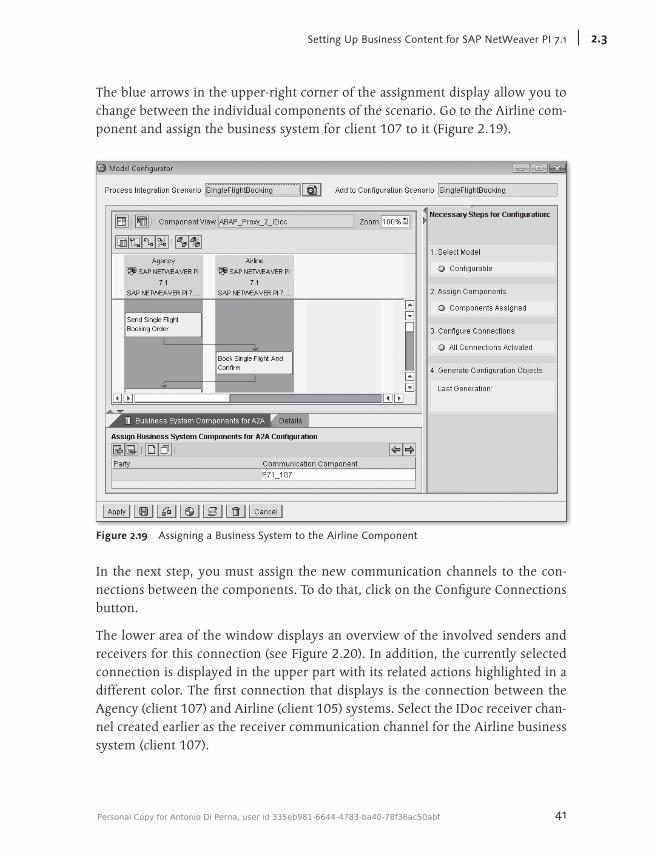
The blue arrows in the upper-right corner of the assignment display allow you to change between the individual components of the scenario. Go to the Airline com-ponent and assign the business system for client 107 to it (Figure 2.19).
Figure 2.19 Assigning a Business System to the Airline Component
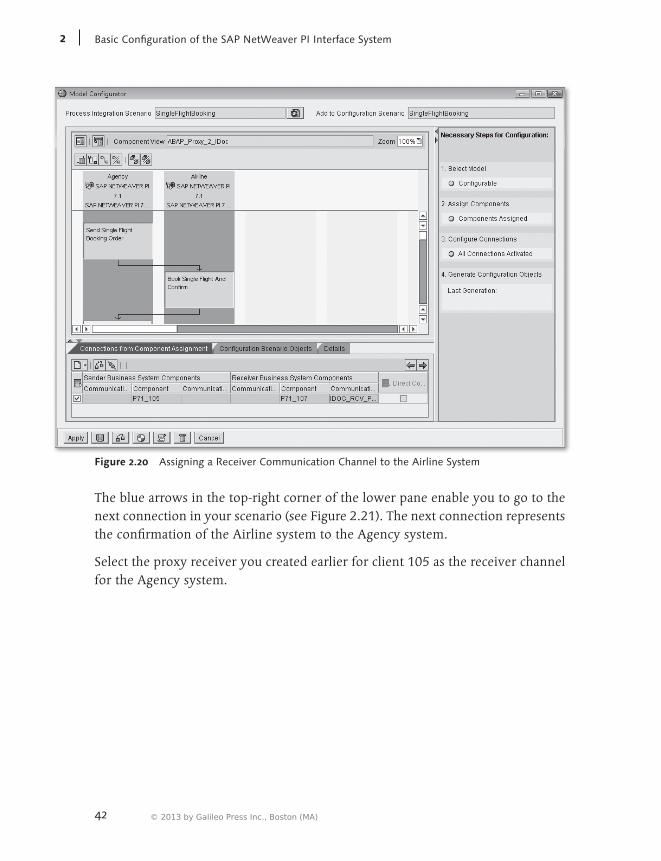
In the next step, you must assign the new communication channels to the con-nections between the components. To do that, click on the Configure Connections button.
The lower area of the window displays an overview of the involved senders and receivers for this connection (see Figure 2.20). In addition, the currently selected connection is displayed in the upper part with its related actions highlighted in a different color. The first connection that displays is the connection between the Agency (client 107) and Airline (client 105) systems. Select the IDoc receiver chan-nel created earlier as the receiver communication channel for the Airline business system (client 107).
Personal Copy for Antonio Di Perna, user id 335eb981-6644-4783-ba40-78f36ac50abf
42
BasicConfigurationoftheSAPNetWeaverPIInterfaceSystem2
Figure 2.20 Assigning a Receiver Communication Channel to the Airline System
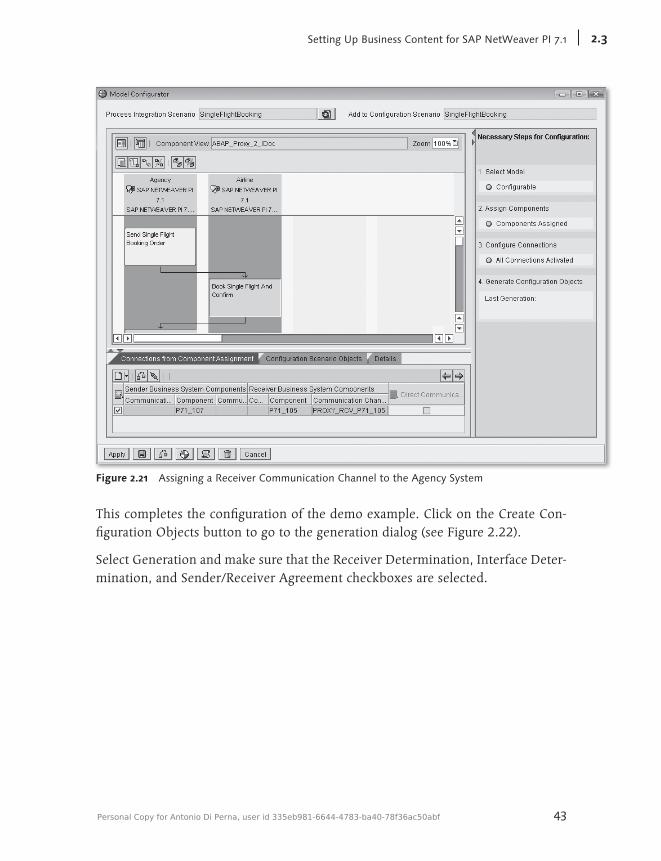
The blue arrows in the top-right corner of the lower pane enable you to go to the next connection in your scenario (see Figure 2.21). The next connection represents the confirmation of the Airline system to the Agency system.
Select the proxy receiver you created earlier for client 105 as the receiver channel for the Agency system.
© 2013 by Galileo Press Inc., Boston (MA)
43
SettingUpBusinessContentforSAPNetWeaverPI7.1 2.3
Figure 2.21 Assigning a Receiver Communication Channel to the Agency System
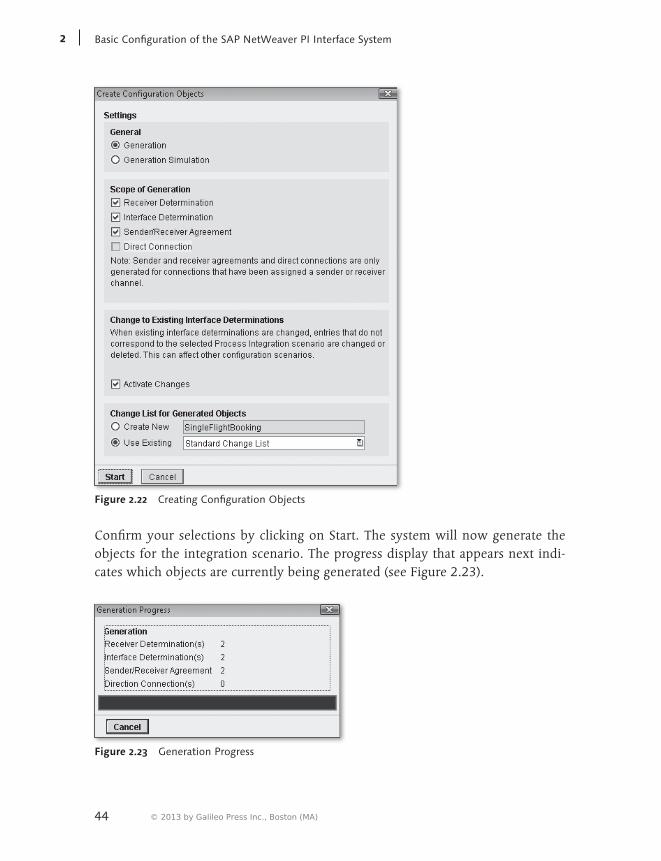
This completes the configuration of the demo example. Click on the Create Con-figuration Objects button to go to the generation dialog (see Figure 2.22).
Select Generation and make sure that the Receiver Determination, Interface Deter-mination, and Sender/Receiver Agreement checkboxes are selected.
Personal Copy for Antonio Di Perna, user id 335eb981-6644-4783-ba40-78f36ac50abf
44
BasicConfigurationoftheSAPNetWeaverPIInterfaceSystem2
Figure 2.22 Creating Configuration Objects
Confirm your selections by clicking on Start. The system will now generate the objects for the integration scenario. The progress display that appears next indi-cates which objects are currently being generated (see Figure 2.23).
Figure 2.23 Generation Progress
© 2013 by Galileo Press Inc., Boston (MA)

45
SettingUpBusinessContentforSAPNetWeaverPI7.1 2.3
Once the generation process has completed, you must activate the new objects. After that, the interface is completely configured, and you can start testing it. Log on to the ABAP stack of your SAP NetWeaver PI system and select the follow-ing path from the user menu: Process Integration • Demo Examples • Travel Agency: Execute Demo Examples (Figure 2.24).
Figure 2.24 Executing Demo Examples
The browser for the SAP NetWeaver PI demo examples opens. Select the Book Single Flight scenario and click on the Start button. Select a flight and click on the Create Booking Order button. Your interface is now called in the background; while that happens, the browser displays the order status “Flight Booking order sent. Awaiting confirmation.” Once the interface has been processed successfully, the status should change to “Flight booking successful” after a short period.
Transaction SXI_MONITOR enables you to view the message flow and the status of interface messages at any time (see Figure 2.25).
Figure 2.25 SXI_MONITOR — Message Statuses
Personal Copy for Antonio Di Perna, user id 335eb981-6644-4783-ba40-78f36ac50abf
46
BasicConfigurationoftheSAPNetWeaverPIInterfaceSystem2
2.4 Finding and Installing Business Content
In the previous section of this chapter you learned how to configure business con-tent. This section will now describe how you can find and install business content for products you use in your company.
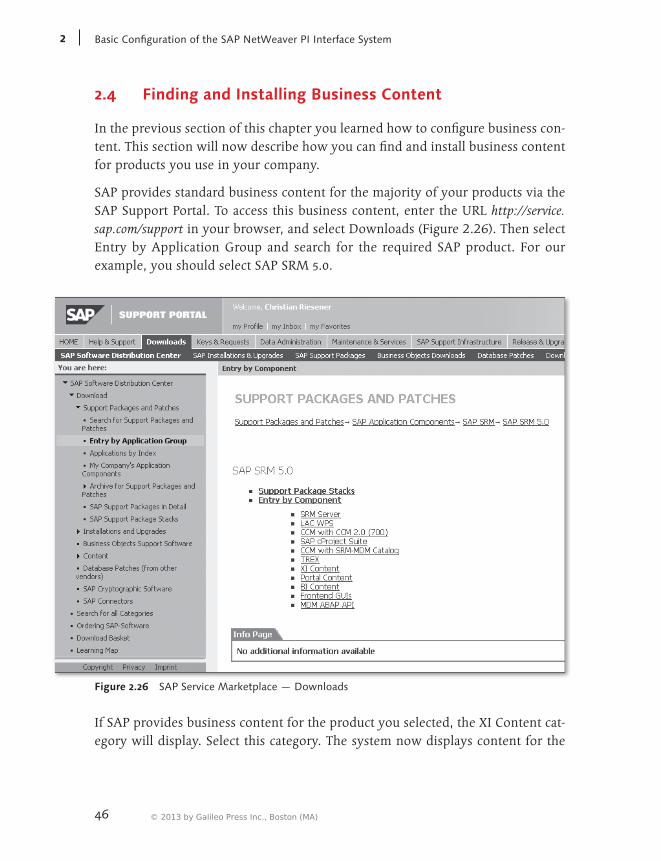
SAP provides standard business content for the majority of your products via the SAP Support Portal. To access this business content, enter the URL http://service.sap.com/support in your browser, and select Downloads (Figure 2.26). Then select Entry by Application Group and search for the required SAP product. For our example, you should select SAP SRM 5.0.
Figure 2.26 SAP Service Marketplace — Downloads
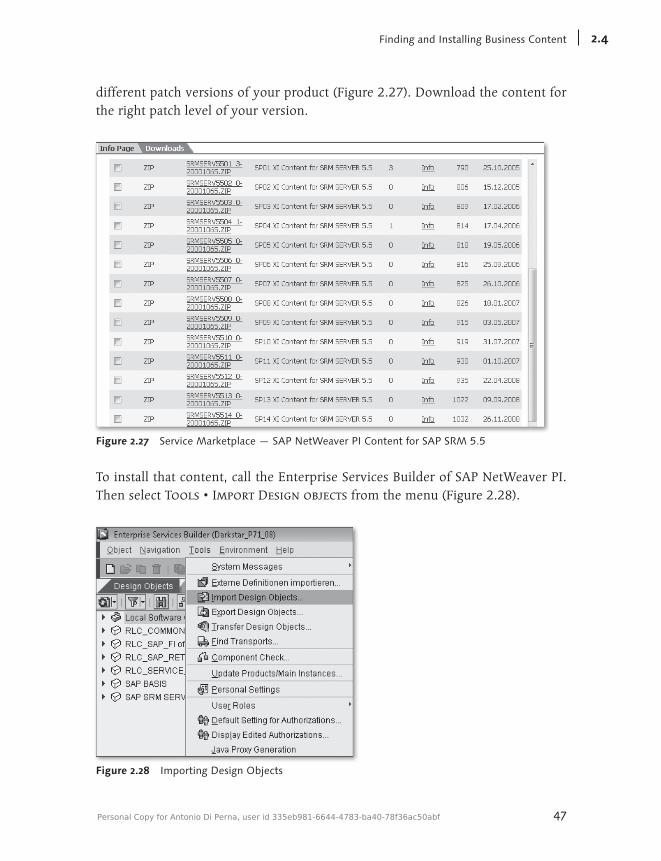
If SAP provides business content for the product you selected, the XI Content cat-egory will display. Select this category. The system now displays content for the
© 2013 by Galileo Press Inc., Boston (MA)
47
FindingandInstallingBusinessContent 2.4
different patch versions of your product (Figure 2.27). Download the content for the right patch level of your version.
Figure 2.27 Service Marketplace — SAP NetWeaver PI Content for SAP SRM 5.5
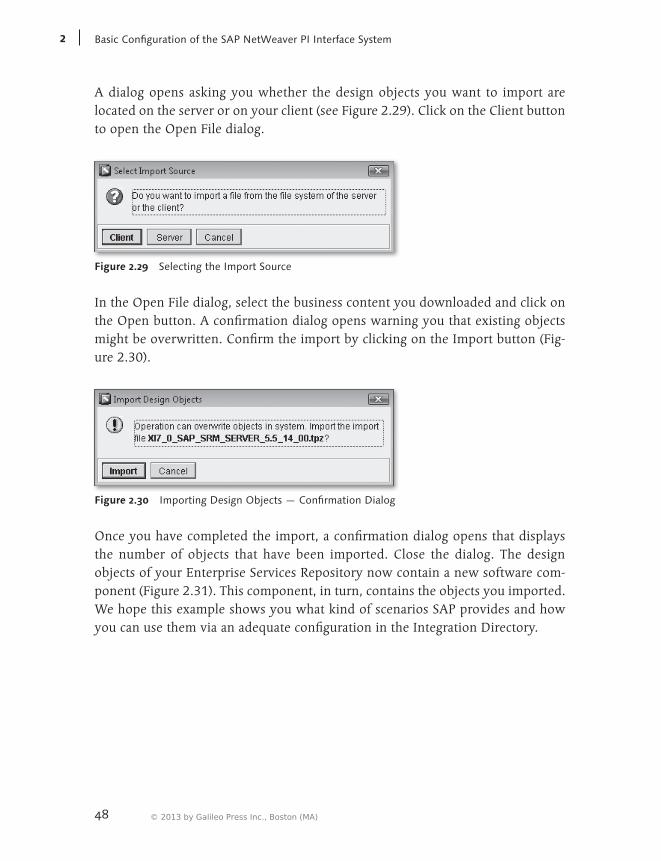
To install that content, call the Enterprise Services Builder of SAP NetWeaver PI. Then select Tools • Import Design objects from the menu (Figure 2.28).
Figure 2.28 Importing Design Objects
Personal Copy for Antonio Di Perna, user id 335eb981-6644-4783-ba40-78f36ac50abf
48
BasicConfigurationoftheSAPNetWeaverPIInterfaceSystem2
A dialog opens asking you whether the design objects you want to import are located on the server or on your client (see Figure 2.29). Click on the Client button to open the Open File dialog.
Figure 2.29 Selecting the Import Source
In the Open File dialog, select the business content you downloaded and click on the Open button. A confirmation dialog opens warning you that existing objects might be overwritten. Confirm the import by clicking on the Import button (Fig-ure 2.30).
Figure 2.30 Importing Design Objects — Confirmation Dialog
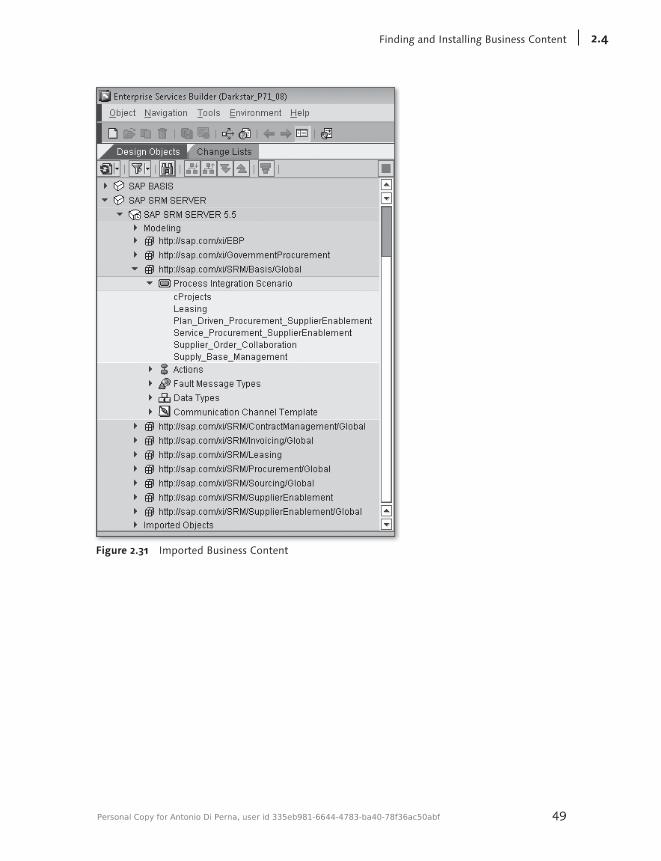
Once you have completed the import, a confirmation dialog opens that displays the number of objects that have been imported. Close the dialog. The design objects of your Enterprise Services Repository now contain a new software com-ponent (Figure 2.31). This component, in turn, contains the objects you imported. We hope this example shows you what kind of scenarios SAP provides and how you can use them via an adequate configuration in the Integration Directory.
© 2013 by Galileo Press Inc., Boston (MA)
49
FindingandInstallingBusinessContent 2.4
Figure 2.31 Imported Business Content
Personal Copy for Antonio Di Perna, user id 335eb981-6644-4783-ba40-78f36ac50abf

© 2013 by Galileo Press Inc., Boston (MA)
51
3 Configuring the System Landscape
On the basis of several examples, this chapter will provide you with an under-standing of the minimum configuration required for the first interface we’ll use. For this purpose, we’ll divide the chapter into three sections:
EE Configuring the System Landscape Directory (SLD)
EE Setting up the Change Management Service (CMS)
EE Setting up and using the CTS+
Sections 3.1 and 3.2, which focus on the SLD, explain the basic setup steps, the creation of technical and business systems, and required parameter settings and the associated SAP NetWeaver PI tools. Section 3.3, Change Management Service, describes the required parameters and concisely explains the basic service setup for those readers who prefer to do it the “old” way on an existing system (below Release 7.1). Lastly, in Section 3.4 we’ll describe the more interesting variant, which enables you to use the new CTS+ in the SAP NetWeaver PI environment. In the final sections of this chapter, we’ll address the tools that SAP provides for carrying out transport without CMS and CTS.
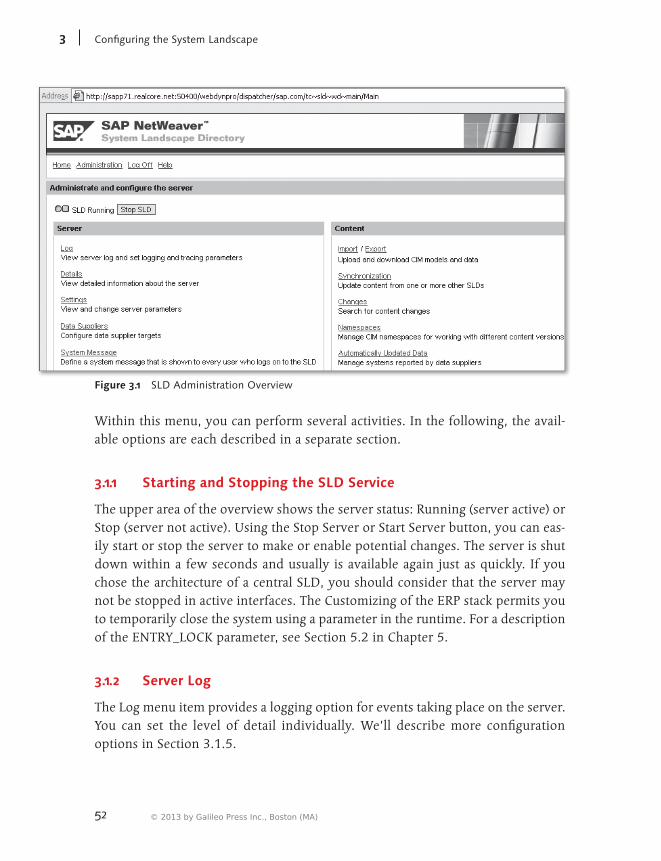
3.1 Basic Administration of the SLD
To navigate to the required settings, call the following URL: http://[Hostname]:Port/sld/.
Then click on the Administration menu item. This brings you to the basic admin-istration of the SLD. The corresponding submenu is shown in Figure 3.1.
Personal Copy for Antonio Di Perna, user id 335eb981-6644-4783-ba40-78f36ac50abf
52
ConfiguringtheSystemLandscape3
Figure 3.1 SLD Administration Overview
Within this menu, you can perform several activities. In the following, the avail-able options are each described in a separate section.
3.1.1 Starting and Stopping the SLD Service
The upper area of the overview shows the server status: Running (server active) or Stop (server not active). Using the Stop Server or Start Server button, you can eas-ily start or stop the server to make or enable potential changes. The server is shut down within a few seconds and usually is available again just as quickly. If you chose the architecture of a central SLD, you should consider that the server may not be stopped in active interfaces. The Customizing of the ERP stack permits you to temporarily close the system using a parameter in the runtime. For a description of the ENTRY_LOCK parameter, see Section 5.2 in Chapter 5.
3.1.2 Server Log
The Log menu item provides a logging option for events taking place on the server. You can set the level of detail individually. We’ll describe more configuration options in Section 3.1.5.
© 2013 by Galileo Press Inc., Boston (MA)
53
BasicAdministrationoftheSLD 3.1
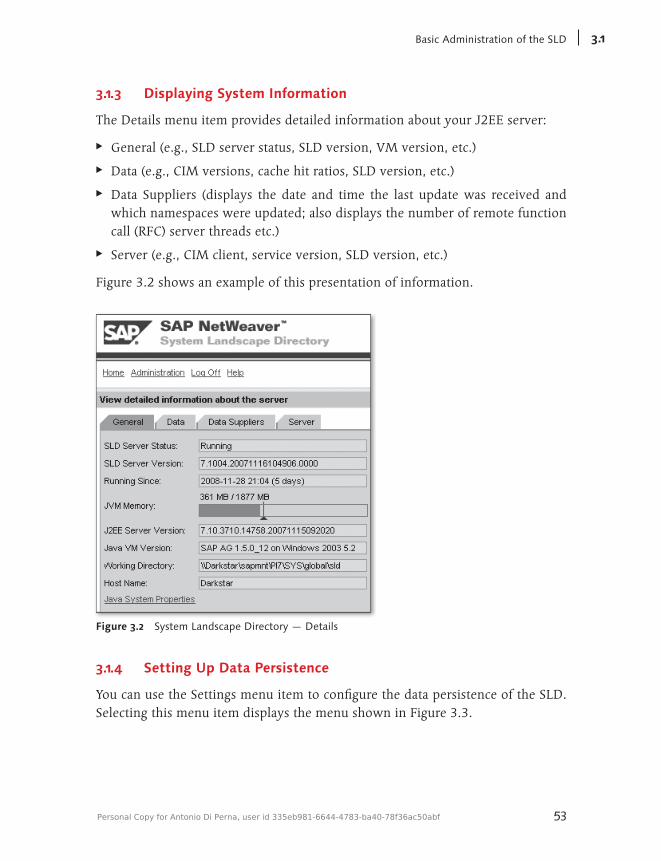
3.1.3 Displaying System Information
The Details menu item provides detailed information about your J2EE server:
EE General (e.g., SLD server status, SLD version, VM version, etc.)
EE Data (e.g., CIM versions, cache hit ratios, SLD version, etc.)
EE Data Suppliers (displays the date and time the last update was received and which namespaces were updated; also displays the number of remote function call (RFC) server threads etc.)
EE Server (e.g., CIM client, service version, SLD version, etc.)
Figure 3.2 shows an example of this presentation of information.
Figure 3.2 System Landscape Directory — Details
3.1.4 Setting Up Data Persistence
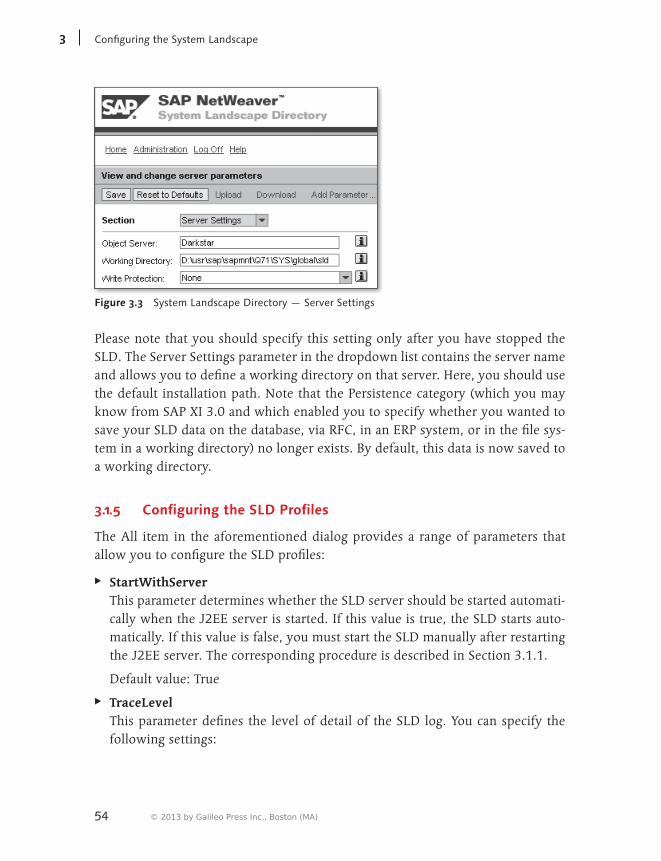
You can use the Settings menu item to configure the data persistence of the SLD. Selecting this menu item displays the menu shown in Figure 3.3.
Personal Copy for Antonio Di Perna, user id 335eb981-6644-4783-ba40-78f36ac50abf
54
ConfiguringtheSystemLandscape3
Figure 3.3 System Landscape Directory — Server Settings
Please note that you should specify this setting only after you have stopped the SLD. The Server Settings parameter in the dropdown list contains the server name and allows you to define a working directory on that server. Here, you should use the default installation path. Note that the Persistence category (which you may know from SAP XI 3.0 and which enabled you to specify whether you wanted to save your SLD data on the database, via RFC, in an ERP system, or in the file sys-tem in a working directory) no longer exists. By default, this data is now saved to a working directory.
3.1.5 Configuring the SLD Profiles
The All item in the aforementioned dialog provides a range of parameters that allow you to configure the SLD profiles:
EE StartWithServer This parameter determines whether the SLD server should be started automati-cally when the J2EE server is started. If this value is true, the SLD starts auto-matically. If this value is false, you must start the SLD manually after restarting the J2EE server. The corresponding procedure is described in Section 3.1.1.
Default value: True
EE TraceLevel This parameter defines the level of detail of the SLD log. You can specify the following settings:
© 2013 by Galileo Press Inc., Boston (MA)

55
BasicAdministrationoftheSLD 3.1
Levels of Detail
Effect on Log Details
0 Errors (error messages cannot be suppressed)
1 Plus warnings
2 Plus information
3 Plus debug
4 Plus fine debug
5 Plus finer debug
6 Plus finest debug
We recommend that you set the trace level to a higher value at the beginning and that you lower it to the default value at a later stage to avoid unnecessary log information.
Default value: 2
EE UserCacheLifetime This value describes the maximum lifetime of the internal user cache for HTTP requests. If you set this value to 0, caching will be turned off. We don’t recom-mend that you do this; instead you should leave the default value as is to avoid performance problems.
Default value: 300
EE BufferInstances If the parameter is set as true, a cache for the CIM instances is used for the object manager in the main memory. This results in performance improve-ments. However, this option is not yet available for cluster systems, so we recommend that you set this parameter to false in such an environment. Other-wise, we recommend the default value of true.
Default value: True
EE DateFormat This parameter describes the format used for presenting and entering date fields.
Default value: mm/dd/yyyy
Personal Copy for Antonio Di Perna, user id 335eb981-6644-4783-ba40-78f36ac50abf
56
ConfiguringtheSystemLandscape3
3.1.6 Setting Up the SLD Bridge
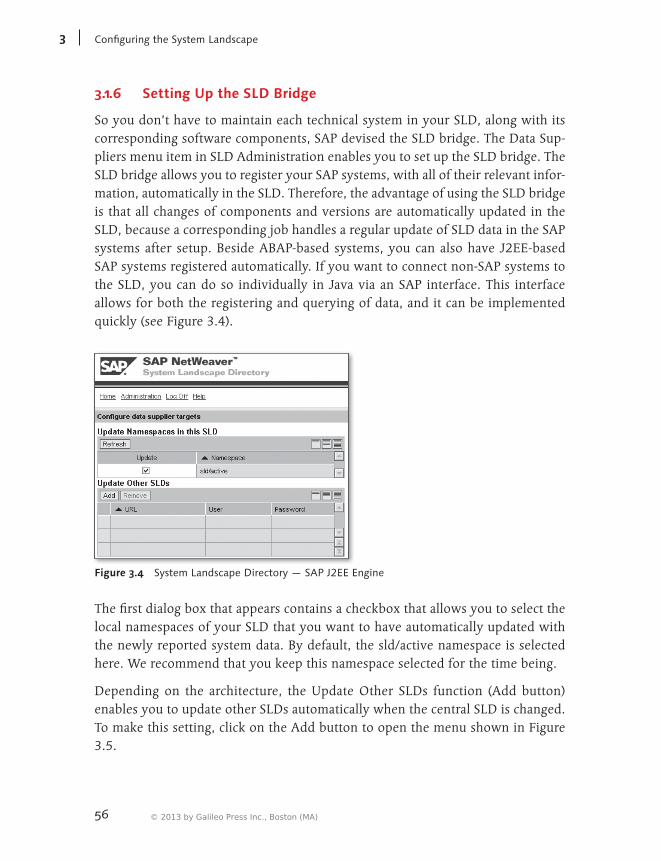
So you don’t have to maintain each technical system in your SLD, along with its corresponding software components, SAP devised the SLD bridge. The Data Sup-pliers menu item in SLD Administration enables you to set up the SLD bridge. The SLD bridge allows you to register your SAP systems, with all of their relevant infor-mation, automatically in the SLD. Therefore, the advantage of using the SLD bridge is that all changes of components and versions are automatically updated in the SLD, because a corresponding job handles a regular update of SLD data in the SAP systems after setup. Beside ABAP-based systems, you can also have J2EE-based SAP systems registered automatically. If you want to connect non-SAP systems to the SLD, you can do so individually in Java via an SAP interface. This interface allows for both the registering and querying of data, and it can be implemented quickly (see Figure 3.4).
Figure 3.4 System Landscape Directory — SAP J2EE Engine
The first dialog box that appears contains a checkbox that allows you to select the local namespaces of your SLD that you want to have automatically updated with the newly reported system data. By default, the sld/active namespace is selected here. We recommend that you keep this namespace selected for the time being.
Depending on the architecture, the Update Other SLDs function (Add button) enables you to update other SLDs automatically when the central SLD is changed. To make this setting, click on the Add button to open the menu shown in Figure 3.5.
© 2013 by Galileo Press Inc., Boston (MA)
57
BasicAdministrationoftheSLD 3.1
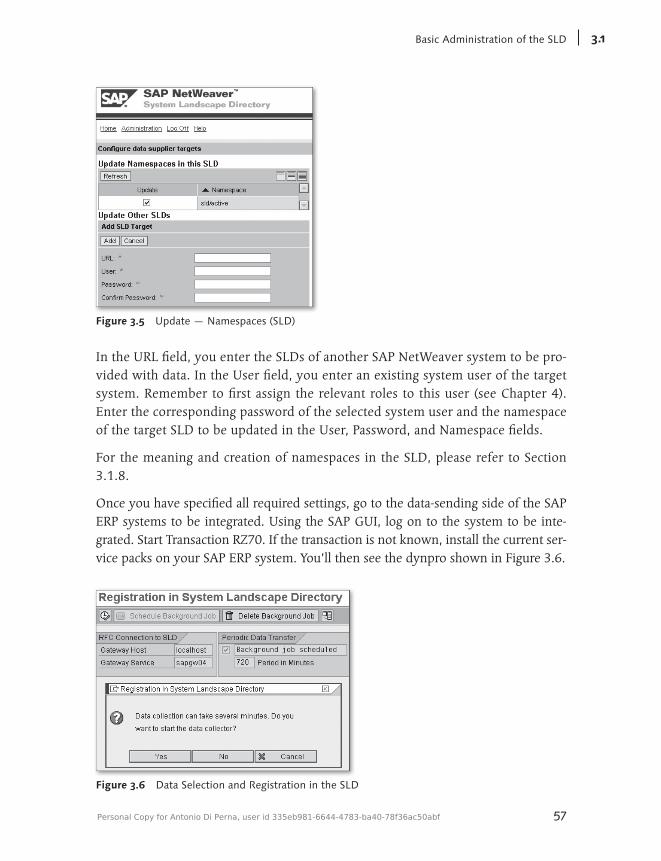
Figure 3.5 Update — Namespaces (SLD)
In the URL field, you enter the SLDs of another SAP NetWeaver system to be pro-vided with data. In the User field, you enter an existing system user of the target system. Remember to first assign the relevant roles to this user (see Chapter 4). Enter the corresponding password of the selected system user and the namespace of the target SLD to be updated in the User, Password, and Namespace fields.
For the meaning and creation of namespaces in the SLD, please refer to Section 3.1.8.
Once you have specified all required settings, go to the data-sending side of the SAP ERP systems to be integrated. Using the SAP GUI, log on to the system to be inte-grated. Start Transaction RZ70. If the transaction is not known, install the current ser-vice packs on your SAP ERP system. You’ll then see the dynpro shown in Figure 3.6.
Figure 3.6 Data Selection and Registration in the SLD
Personal Copy for Antonio Di Perna, user id 335eb981-6644-4783-ba40-78f36ac50abf
58
ConfiguringtheSystemLandscape3
Using this transaction, you can enable the relevant data collection programs and enter your SLD as the target system for these data flows. In our example, we’ll send the system information of an ERP system to the SLD of our development sys-tem, localhost. The data collection programs listed in Table 3.1 are automatically scheduled after executing the transaction:
Data Collection Program Data Contents Reported to the SLD
_SLD_APPL_SERV Application server and instances
_SLD_BCSYS SAP system
_SLD_CLIENT System clients
_SLD_COMPSYS Hosts
_SLD_DBSYS Database
_SLD_INSTSC Installed software components
_SLD_INSTSP Installed support packages
_SLD_MSGSERV SAP message server
_SLD_RFC RFC destinations
_SLD_ASSOC CIM dependencies between generated objects
Table 3.1 Data Collection Programs
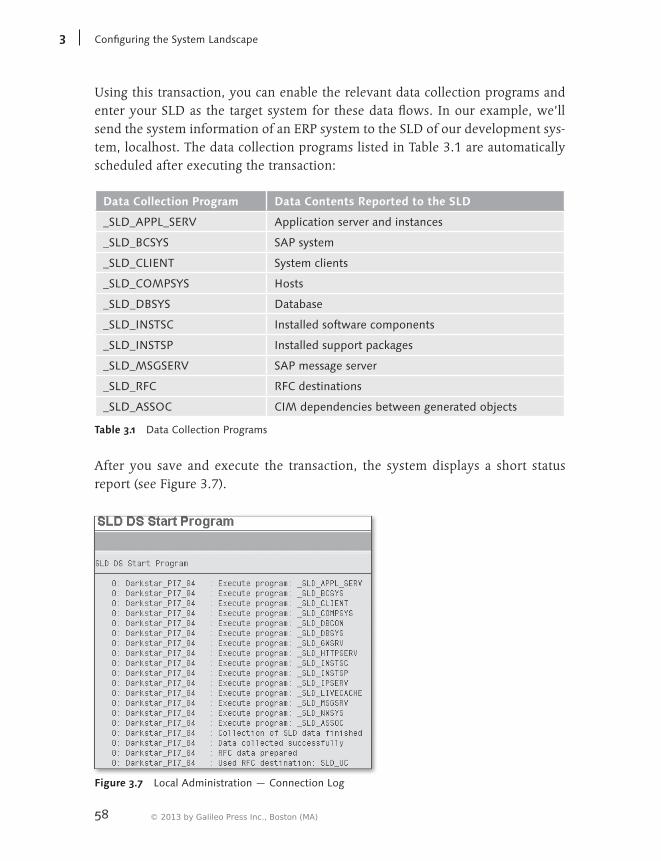
After you save and execute the transaction, the system displays a short status report (see Figure 3.7).
Figure 3.7 Local Administration — Connection Log
© 2013 by Galileo Press Inc., Boston (MA)
59
BasicAdministrationoftheSLD 3.1
The figure shows that the report confirms the start of the selected data selection programs and displays the RFC destination. Additionally, it informs you about the automatic job scheduling of these data selection programs. It will notify you if problems occur during execution or job scheduling.
3.1.7 System Messages
Using the System Message menu item, you can write a system message that is dis-played on every user screen at logon. This function is comparable to the familiar SAP ERP system Transaction SM02 (system messages).
3.1.8 Administration of the SLD Namespace
To simulate or test future SLD scenarios, or to build up multilevel SLDs, you can create several logical areas in the SLD, provide them with individual settings, and switch between these areas. To create a new namespace for the SLD, from the administration main menu of the SLD, go to the Namespaces submenu.
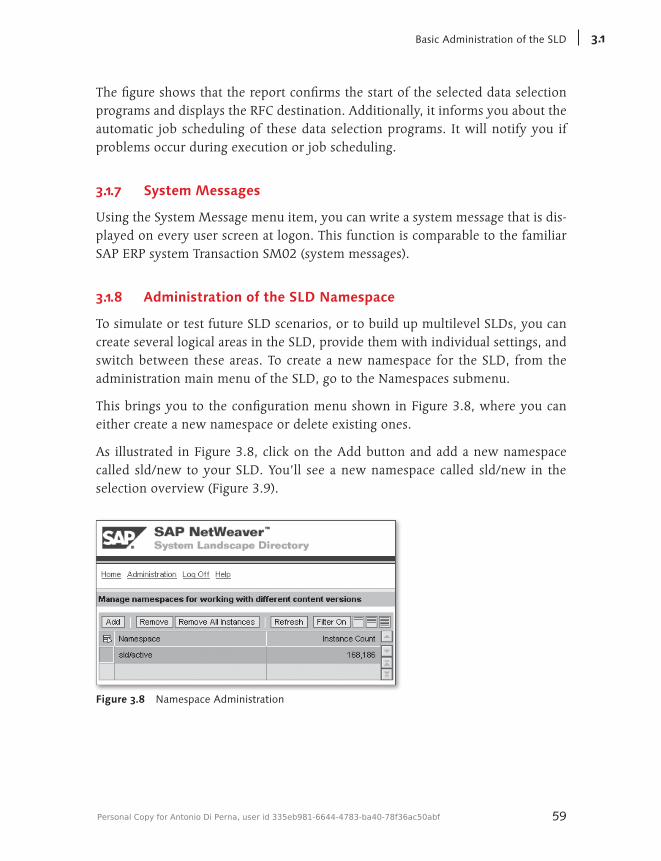
This brings you to the configuration menu shown in Figure 3.8, where you can either create a new namespace or delete existing ones.
As illustrated in Figure 3.8, click on the Add button and add a new namespace called sld/new to your SLD. You’ll see a new namespace called sld/new in the selection overview (Figure 3.9).
Figure 3.8 Namespace Administration
Personal Copy for Antonio Di Perna, user id 335eb981-6644-4783-ba40-78f36ac50abf
60
ConfiguringtheSystemLandscape3
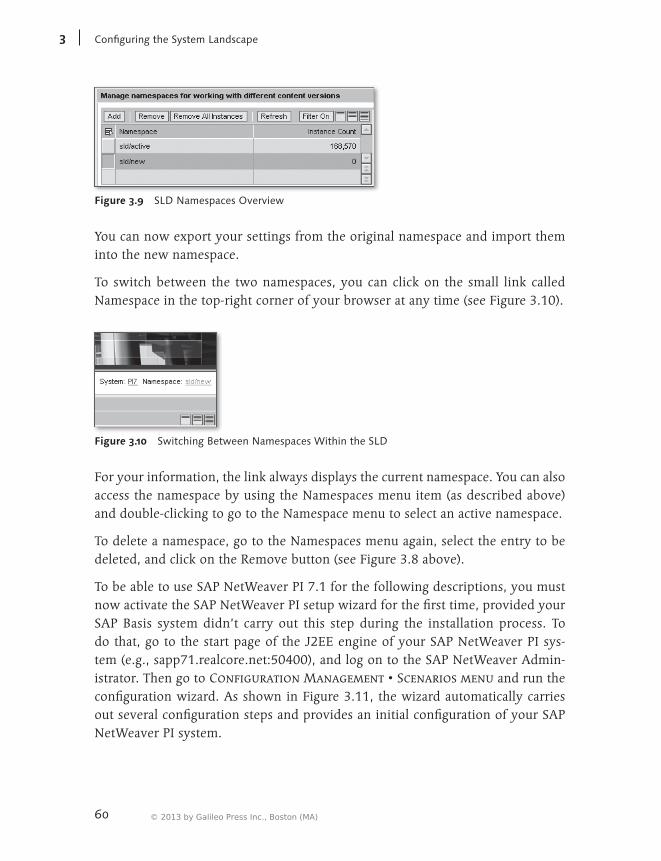
Figure 3.9 SLD Namespaces Overview
You can now export your settings from the original namespace and import them into the new namespace.
To switch between the two namespaces, you can click on the small link called Namespace in the top-right corner of your browser at any time (see Figure 3.10).
Figure 3.10 Switching Between Namespaces Within the SLD
For your information, the link always displays the current namespace. You can also access the namespace by using the Namespaces menu item (as described above) and double-clicking to go to the Namespace menu to select an active namespace.
To delete a namespace, go to the Namespaces menu again, select the entry to be deleted, and click on the Remove button (see Figure 3.8 above).
To be able to use SAP NetWeaver PI 7.1 for the following descriptions, you must now activate the SAP NetWeaver PI setup wizard for the first time, provided your SAP Basis system didn’t carry out this step during the installation process. To do that, go to the start page of the J2EE engine of your SAP NetWeaver PI sys-tem (e.g., sapp71.realcore.net:50400), and log on to the SAP NetWeaver Admin-istrator. Then go to Configuration Management • Scenarios menu and run the configuration wizard. As shown in Figure 3.11, the wizard automatically carries out several configuration steps and provides an initial configuration of your SAP NetWeaver PI system.
© 2013 by Galileo Press Inc., Boston (MA)
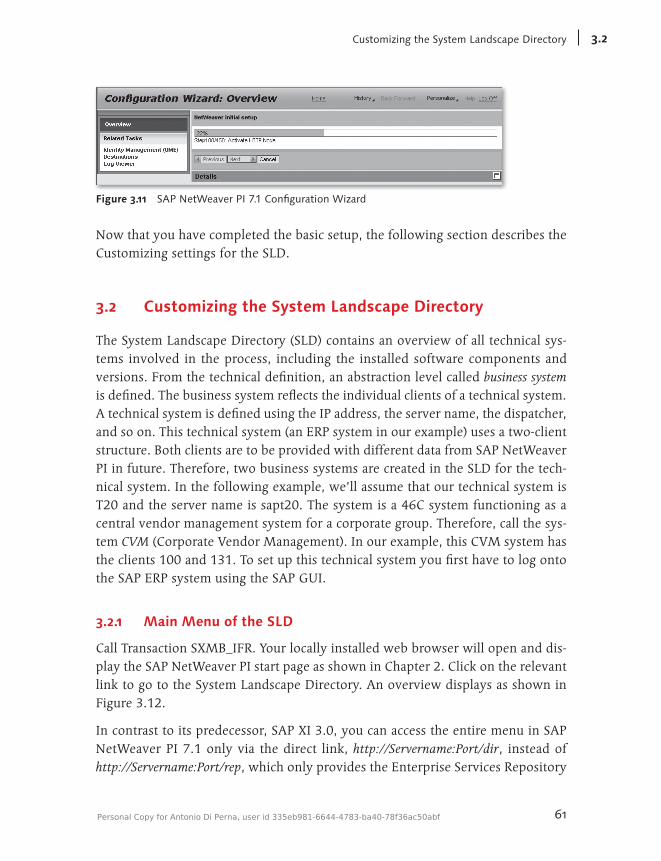
61
CustomizingtheSystemLandscapeDirectory 3.2
Figure 3.11 SAP NetWeaver PI 7.1 Configuration Wizard
Now that you have completed the basic setup, the following section describes the Customizing settings for the SLD.
3.2 Customizing the System Landscape Directory
The System Landscape Directory (SLD) contains an overview of all technical sys-tems involved in the process, including the installed software components and versions. From the technical definition, an abstraction level called business system is defined. The business system reflects the individual clients of a technical system. A technical system is defined using the IP address, the server name, the dispatcher, and so on. This technical system (an ERP system in our example) uses a two-client structure. Both clients are to be provided with different data from SAP NetWeaver PI in future. Therefore, two business systems are created in the SLD for the tech-nical system. In the following example, we’ll assume that our technical system is T20 and the server name is sapt20. The system is a 46C system functioning as a central vendor management system for a corporate group. Therefore, call the sys-tem CVM (Corporate Vendor Management). In our example, this CVM system has the clients 100 and 131. To set up this technical system you first have to log onto the SAP ERP system using the SAP GUI.
3.2.1 Main Menu of the SLD
Call Transaction SXMB_IFR. Your locally installed web browser will open and dis-play the SAP NetWeaver PI start page as shown in Chapter 2. Click on the relevant link to go to the System Landscape Directory. An overview displays as shown in Figure 3.12.
In contrast to its predecessor, SAP XI 3.0, you can access the entire menu in SAP NetWeaver PI 7.1 only via the direct link, http://Servername:Port/dir, instead of http://Servername:Port/rep, which only provides the Enterprise Services Repository
Personal Copy for Antonio Di Perna, user id 335eb981-6644-4783-ba40-78f36ac50abf
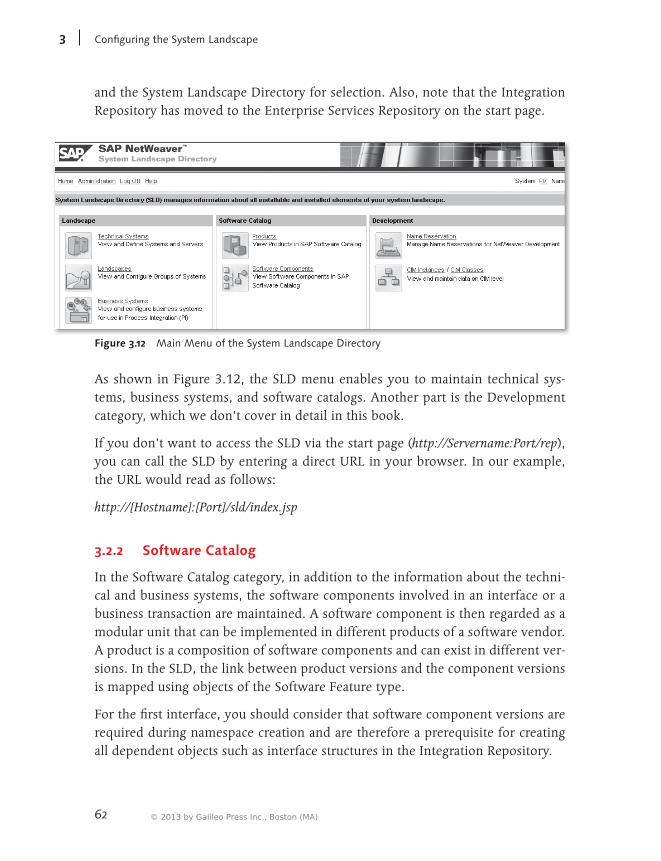
62
ConfiguringtheSystemLandscape3
and the System Landscape Directory for selection. Also, note that the Integration Repository has moved to the Enterprise Services Repository on the start page.
Figure 3.12 Main Menu of the System Landscape Directory
As shown in Figure 3.12, the SLD menu enables you to maintain technical sys-tems, business systems, and software catalogs. Another part is the Development category, which we don’t cover in detail in this book.
If you don’t want to access the SLD via the start page (http://Servername:Port/rep), you can call the SLD by entering a direct URL in your browser. In our example, the URL would read as follows:
http://[Hostname]:[Port]/sld/index.jsp
3.2.2 Software Catalog
In the Software Catalog category, in addition to the information about the techni-cal and business systems, the software components involved in an interface or a business transaction are maintained. A software component is then regarded as a modular unit that can be implemented in different products of a software vendor. A product is a composition of software components and can exist in different ver-sions. In the SLD, the link between product versions and the component versions is mapped using objects of the Software Feature type.
For the first interface, you should consider that software component versions are required during namespace creation and are therefore a prerequisite for creating all dependent objects such as interface structures in the Integration Repository.
© 2013 by Galileo Press Inc., Boston (MA)
63
CustomizingtheSystemLandscapeDirectory 3.2
From the main menu, you therefore go to the Software Catalog category first to define the necessary settings. The web page shown in Figure 3.13 displays.
Figure 3.13 System Landscape Directory — Software Catalog SAP_CR 1.0
In the selection, you can now decide whether you want to create a new project or a new software component. After you make this selection, click on the New… button to create a new entry. We want to create a new product, so select Products under Software Type. Clicking on the New… button creates a new product, and the wizard dialog shown in Figure 3.14 displays.
Once you have entered the relevant information in the wizard and assigned the new unit name in step 3 of the wizard, click on the Create button to create the product with this name (see Figure 3.15).
Figure 3.14 Creation Wizard — Step 2
Personal Copy for Antonio Di Perna, user id 335eb981-6644-4783-ba40-78f36ac50abf
64
ConfiguringtheSystemLandscape3
Figure 3.15 Creation Wizard — Step 4
After you have created the product, the system automatically displays a dialog that enables you to enter another software component for this product, if required. To do that, go to the Software Components tab, as shown in Figure 3.16.
Figure 3.16 Software Catalog — Overview
© 2013 by Galileo Press Inc., Boston (MA)
65
CustomizingtheSystemLandscapeDirectory 3.2
The New... button enables you to automatically assign a new software component to the product you have just created.
To assign the newly created products or software components to a technical sys-tem, go to the Technical System Browser of the SLD and select the corresponding system. Under the Installed Software category, you can assign the information previously created in the system (see Figure 3.17).
Figure 3.17 Installed Products of a Technical System
3.2.3 Technical System
The Technical Landscape link from the SLD main menu (see Figure 3.12) opens the Technical System Browser, which displays a list of configured technical systems of the landscape (see Figure 3.18).
Figure 3.18 System Landscape Directory — Technical System Browser
Personal Copy for Antonio Di Perna, user id 335eb981-6644-4783-ba40-78f36ac50abf
66
ConfiguringtheSystemLandscape3
All systems involved in a business transaction or an interface must be added as technical systems to the technical landscape. It would be ideal if the SLD was globally catalogued as a map of all systems existing in a company, including their software versions and inventories. To make our first interface work, however, it is sufficient to maintain the systems involved.
You create a new technical system by clicking on the New Technical System but-ton (see Figure 3.18). After you create the system, you register it under a technical system name with all relevant technical attributes. You register a technical system in several small dialog steps. We’ll describe the individual steps and show our new technical system in Figure 3.21 below.
In the first step, you define the type of the technical system. The following types are available for selection:
EE SAP NetWeaver AS ABAP
EE SAP NetWeaver AS Java
EE Stand-alone Java
EE Third-party
EE System Landscape Directory
For our example, we’ll select the AS ABAP type. You’re now taken to a second dia-log in which you need to enter the SID, the installation number, and the host name of your database server. After you have entered these values, a dialog is displayed in which you must register your message server (host name plus port and logon group) and information about your application server (host name plus instance number). After you have entered these values, you can register the clients of the system in another dialog so that you can assign them to a business system later. In our example, we’ll again use the two clients previously described (100 and 131). In the last dialog of this creation wizard, from the existing products of your SLD, you select those entries that describe which software components and versions are installed on this system.
In our example, the technical system is called T20. After the previously described creation of the technical system, you can change to the detail view as shown in Figure 3.19 to specify or correct additional settings.
Now we’ll explain each maintenance option shown in Figure 3.19:
© 2013 by Galileo Press Inc., Boston (MA)
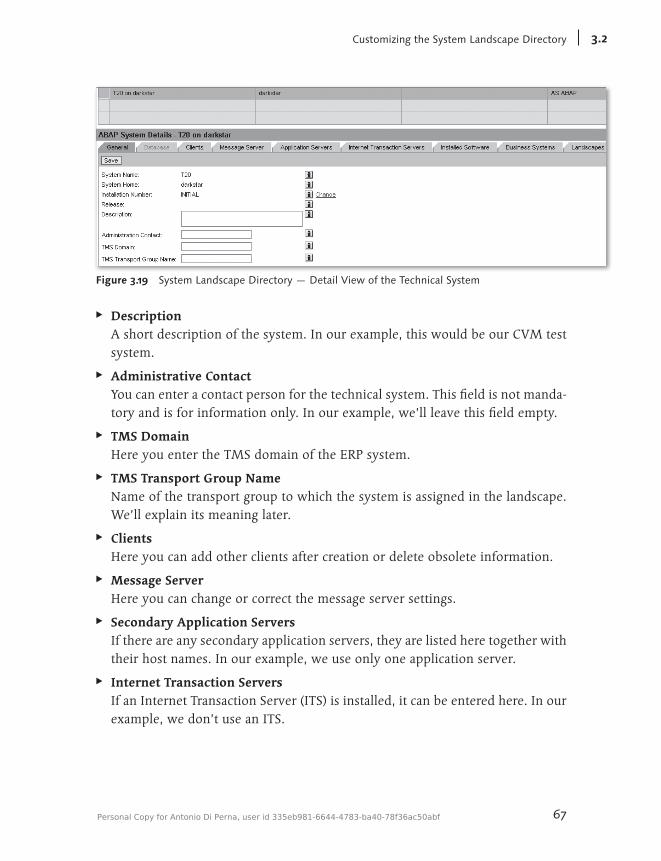
67
CustomizingtheSystemLandscapeDirectory 3.2
Figure 3.19 System Landscape Directory — Detail View of the Technical System
EE Description A short description of the system. In our example, this would be our CVM test system.
EE Administrative Contact You can enter a contact person for the technical system. This field is not manda-tory and is for information only. In our example, we’ll leave this field empty.
EE TMS Domain Here you enter the TMS domain of the ERP system.
EE TMS Transport Group Name Name of the transport group to which the system is assigned in the landscape. We’ll explain its meaning later.
EE Clients Here you can add other clients after creation or delete obsolete information.
EE Message Server Here you can change or correct the message server settings.
EE Secondary Application Servers If there are any secondary application servers, they are listed here together with their host names. In our example, we use only one application server.
EE Internet Transaction Servers If an Internet Transaction Server (ITS) is installed, it can be entered here. In our example, we don’t use an ITS.
Personal Copy for Antonio Di Perna, user id 335eb981-6644-4783-ba40-78f36ac50abf
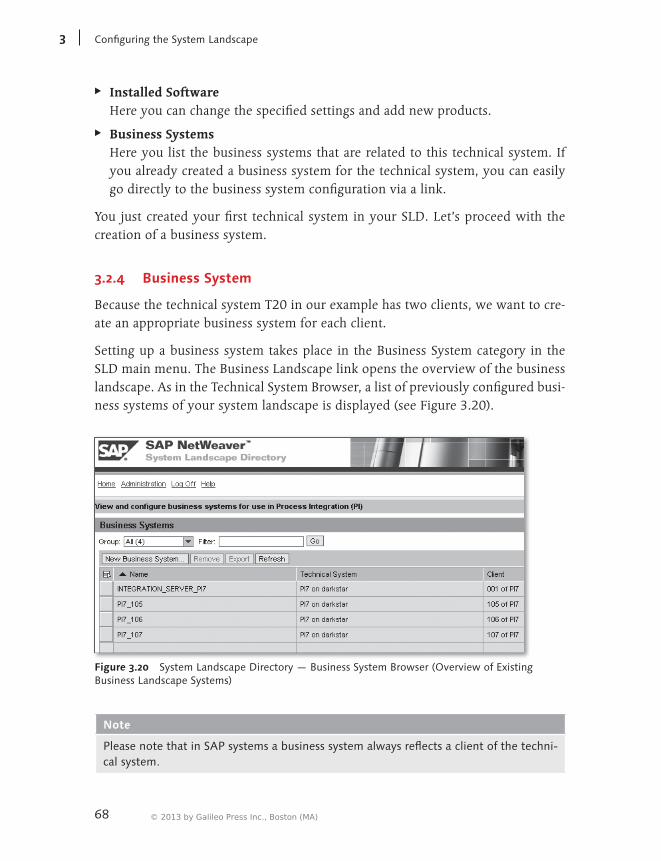
68
ConfiguringtheSystemLandscape3
EE Installed Software Here you can change the specified settings and add new products.
EE Business Systems Here you list the business systems that are related to this technical system. If you already created a business system for the technical system, you can easily go directly to the business system configuration via a link.
You just created your first technical system in your SLD. Let’s proceed with the creation of a business system.
3.2.4 Business System
Because the technical system T20 in our example has two clients, we want to cre-ate an appropriate business system for each client.
Setting up a business system takes place in the Business System category in the SLD main menu. The Business Landscape link opens the overview of the business landscape. As in the Technical System Browser, a list of previously configured busi-ness systems of your system landscape is displayed (see Figure 3.20).
Figure 3.20 System Landscape Directory — Business System Browser (Overview of Existing Business Landscape Systems)
Note
Please note that in SAP systems a business system always reflects a client of the techni-cal system.
© 2013 by Galileo Press Inc., Boston (MA)
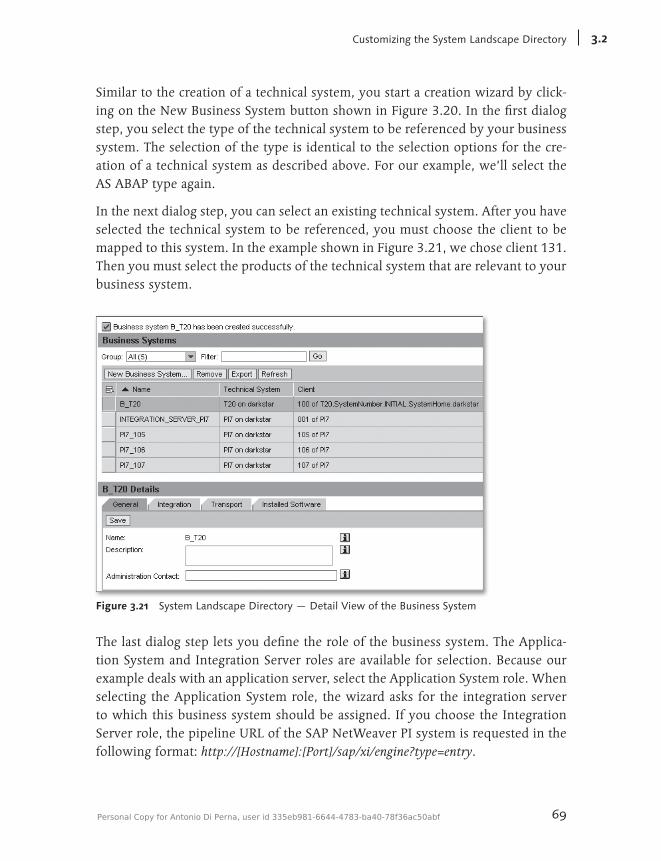
69
CustomizingtheSystemLandscapeDirectory 3.2
Similar to the creation of a technical system, you start a creation wizard by click-ing on the New Business System button shown in Figure 3.20. In the first dialog step, you select the type of the technical system to be referenced by your business system. The selection of the type is identical to the selection options for the cre-ation of a technical system as described above. For our example, we’ll select the AS ABAP type again.
In the next dialog step, you can select an existing technical system. After you have selected the technical system to be referenced, you must choose the client to be mapped to this system. In the example shown in Figure 3.21, we chose client 131. Then you must select the products of the technical system that are relevant to your business system.
Figure 3.21 System Landscape Directory — Detail View of the Business System
The last dialog step lets you define the role of the business system. The Applica-tion System and Integration Server roles are available for selection. Because our example deals with an application server, select the Application System role. When selecting the Application System role, the wizard asks for the integration server to which this business system should be assigned. If you choose the Integration Server role, the pipeline URL of the SAP NetWeaver PI system is requested in the following format: http://[Hostname]:[Port]/sap/xi/engine?type=entry.
Personal Copy for Antonio Di Perna, user id 335eb981-6644-4783-ba40-78f36ac50abf
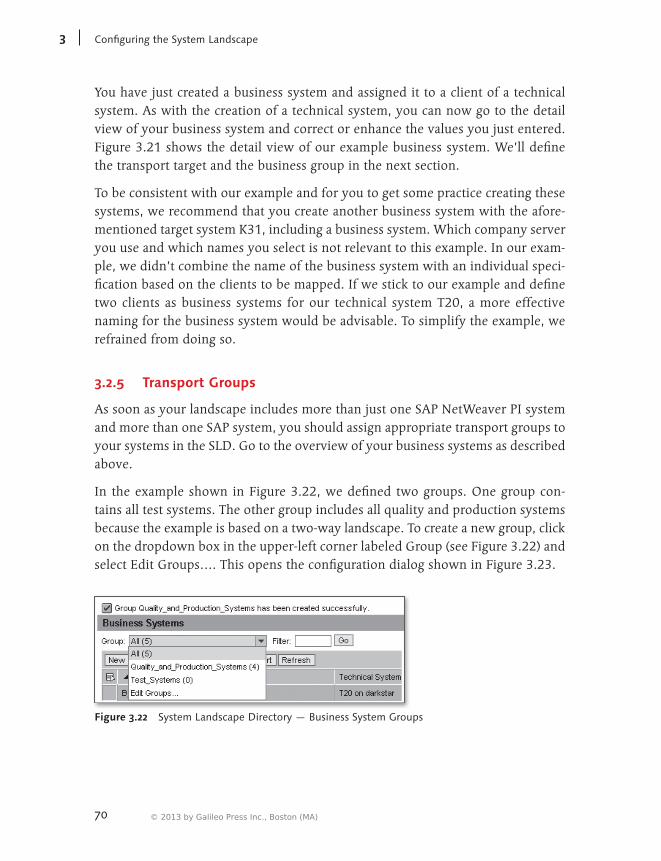
70
ConfiguringtheSystemLandscape3
You have just created a business system and assigned it to a client of a technical system. As with the creation of a technical system, you can now go to the detail view of your business system and correct or enhance the values you just entered. Figure 3.21 shows the detail view of our example business system. We’ll define the transport target and the business group in the next section.
To be consistent with our example and for you to get some practice creating these systems, we recommend that you create another business system with the afore-mentioned target system K31, including a business system. Which company server you use and which names you select is not relevant to this example. In our exam-ple, we didn’t combine the name of the business system with an individual speci-fication based on the clients to be mapped. If we stick to our example and define two clients as business systems for our technical system T20, a more effective naming for the business system would be advisable. To simplify the example, we refrained from doing so.
3.2.5 Transport Groups
As soon as your landscape includes more than just one SAP NetWeaver PI system and more than one SAP system, you should assign appropriate transport groups to your systems in the SLD. Go to the overview of your business systems as described above.
In the example shown in Figure 3.22, we defined two groups. One group con-tains all test systems. The other group includes all quality and production systems because the example is based on a two-way landscape. To create a new group, click on the dropdown box in the upper-left corner labeled Group (see Figure 3.22) and select Edit Groups…. This opens the configuration dialog shown in Figure 3.23.
Figure 3.22 System Landscape Directory — Business System Groups
© 2013 by Galileo Press Inc., Boston (MA)
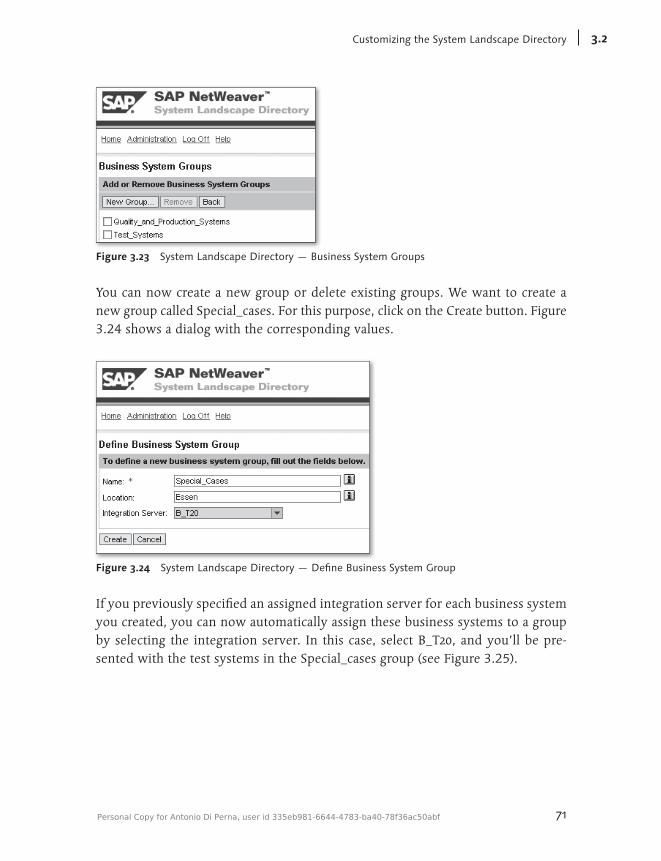
71
CustomizingtheSystemLandscapeDirectory 3.2
Figure 3.23 System Landscape Directory — Business System Groups
You can now create a new group or delete existing groups. We want to create a new group called Special_cases. For this purpose, click on the Create button. Figure 3.24 shows a dialog with the corresponding values.
Figure 3.24 System Landscape Directory — Define Business System Group
If you previously specified an assigned integration server for each business system you created, you can now automatically assign these business systems to a group by selecting the integration server. In this case, select B_T20, and you’ll be pre-sented with the test systems in the Special_cases group (see Figure 3.25).
Personal Copy for Antonio Di Perna, user id 335eb981-6644-4783-ba40-78f36ac50abf
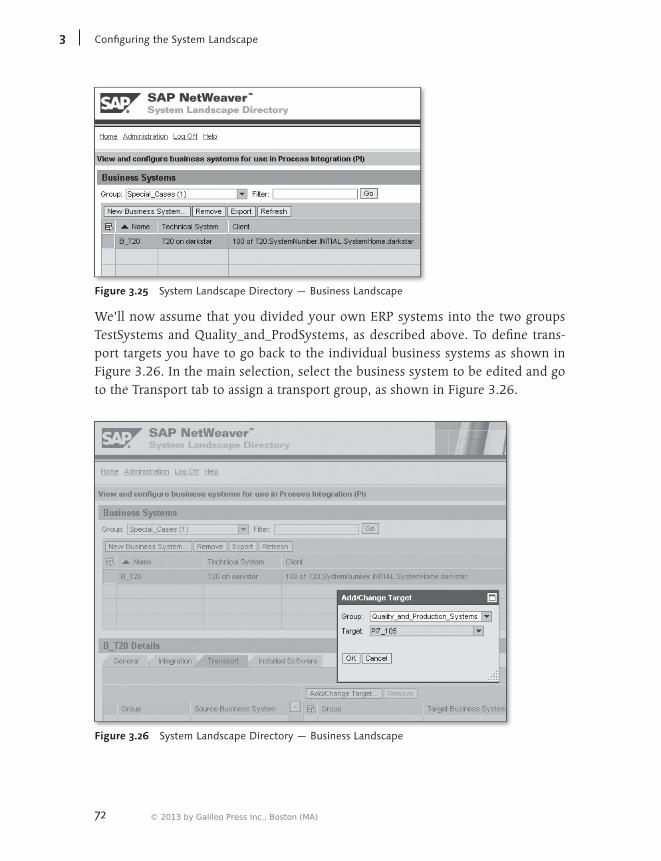
72
ConfiguringtheSystemLandscape3
Figure 3.25 System Landscape Directory — Business Landscape
We’ll now assume that you divided your own ERP systems into the two groups TestSystems and Quality_and_ProdSystems, as described above. To define trans-port targets you have to go back to the individual business systems as shown in Figure 3.26. In the main selection, select the business system to be edited and go to the Transport tab to assign a transport group, as shown in Figure 3.26.
Figure 3.26 System Landscape Directory — Business Landscape
© 2013 by Galileo Press Inc., Boston (MA)
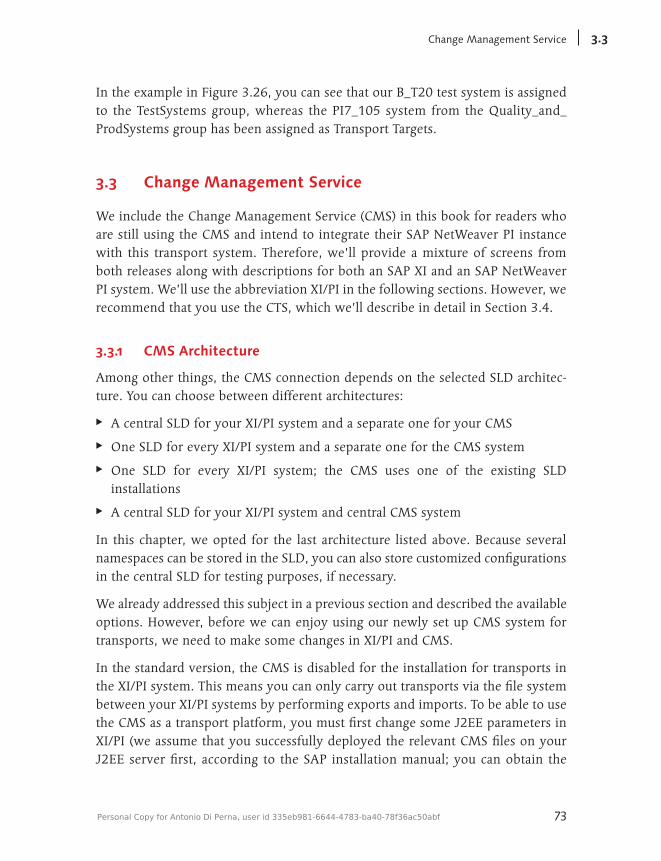
73
ChangeManagementService 3.3
In the example in Figure 3.26, you can see that our B_T20 test system is assigned to the TestSystems group, whereas the PI7_105 system from the Quality_and_ProdSystems group has been assigned as Transport Targets.
3.3 Change Management Service
We include the Change Management Service (CMS) in this book for readers who are still using the CMS and intend to integrate their SAP NetWeaver PI instance with this transport system. Therefore, we’ll provide a mixture of screens from both releases along with descriptions for both an SAP XI and an SAP NetWeaver PI system. We’ll use the abbreviation XI/PI in the following sections. However, we recommend that you use the CTS, which we’ll describe in detail in Section 3.4.
3.3.1 CMS Architecture
Among other things, the CMS connection depends on the selected SLD architec-ture. You can choose between different architectures:
EE A central SLD for your XI/PI system and a separate one for your CMS
EE One SLD for every XI/PI system and a separate one for the CMS system
EE One SLD for every XI/PI system; the CMS uses one of the existing SLD installations
EE A central SLD for your XI/PI system and central CMS system
In this chapter, we opted for the last architecture listed above. Because several namespaces can be stored in the SLD, you can also store customized configurations in the central SLD for testing purposes, if necessary.
We already addressed this subject in a previous section and described the available options. However, before we can enjoy using our newly set up CMS system for transports, we need to make some changes in XI/PI and CMS.
In the standard version, the CMS is disabled for the installation for transports in the XI/PI system. This means you can only carry out transports via the file system between your XI/PI systems by performing exports and imports. To be able to use the CMS as a transport platform, you must first change some J2EE parameters in XI/PI (we assume that you successfully deployed the relevant CMS files on your J2EE server first, according to the SAP installation manual; you can obtain the
Personal Copy for Antonio Di Perna, user id 335eb981-6644-4783-ba40-78f36ac50abf
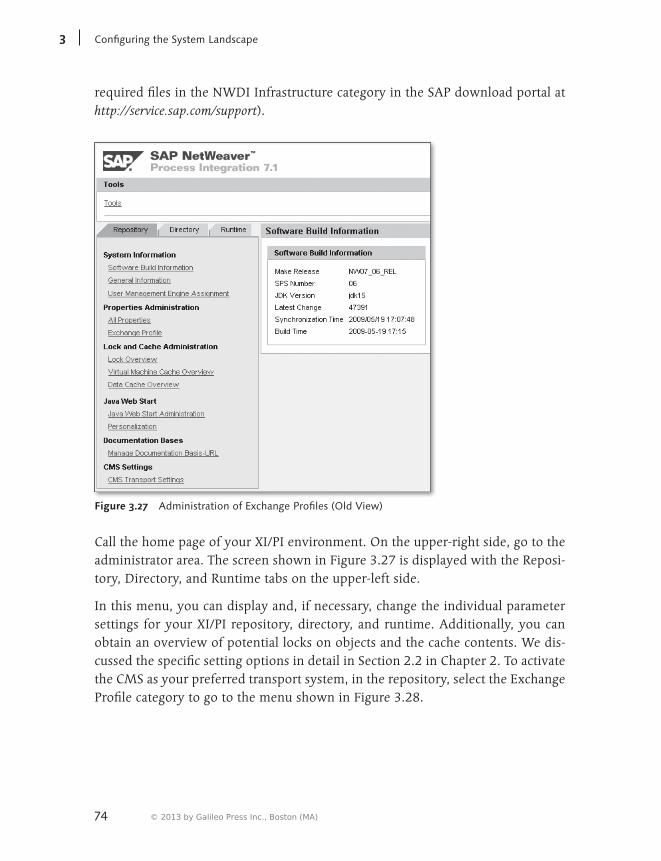
74
ConfiguringtheSystemLandscape3
required files in the NWDI Infrastructure category in the SAP download portal at http://service.sap.com/support).
Figure 3.27 Administration of Exchange Profiles (Old View)
Call the home page of your XI/PI environment. On the upper-right side, go to the administrator area. The screen shown in Figure 3.27 is displayed with the Reposi-tory, Directory, and Runtime tabs on the upper-left side.
In this menu, you can display and, if necessary, change the individual parameter settings for your XI/PI repository, directory, and runtime. Additionally, you can obtain an overview of potential locks on objects and the cache contents. We dis-cussed the specific setting options in detail in Section 2.2 in Chapter 2. To activate the CMS as your preferred transport system, in the repository, select the Exchange Profile category to go to the menu shown in Figure 3.28.
© 2013 by Galileo Press Inc., Boston (MA)
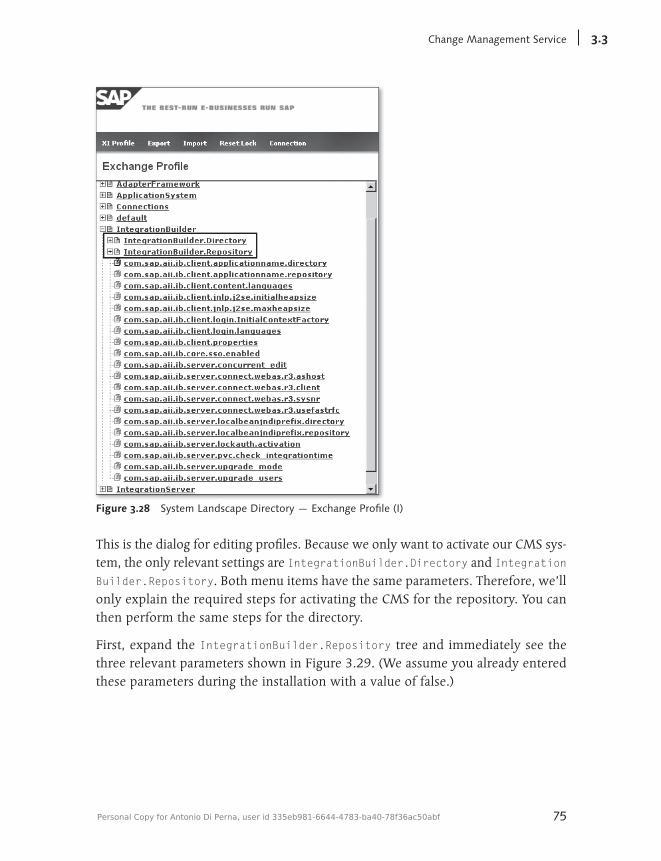
75
ChangeManagementService 3.3
Figure 3.28 System Landscape Directory — Exchange Profile (I)
This is the dialog for editing profiles. Because we only want to activate our CMS sys-tem, the only relevant settings are IntegrationBuilder.Directory and Integration Builder.Repository. Both menu items have the same parameters. Therefore, we’ll only explain the required steps for activating the CMS for the repository. You can then perform the same steps for the directory.
First, expand the IntegrationBuilder.Repository tree and immediately see the three relevant parameters shown in Figure 3.29. (We assume you already entered these parameters during the installation with a value of false.)
Personal Copy for Antonio Di Perna, user id 335eb981-6644-4783-ba40-78f36ac50abf
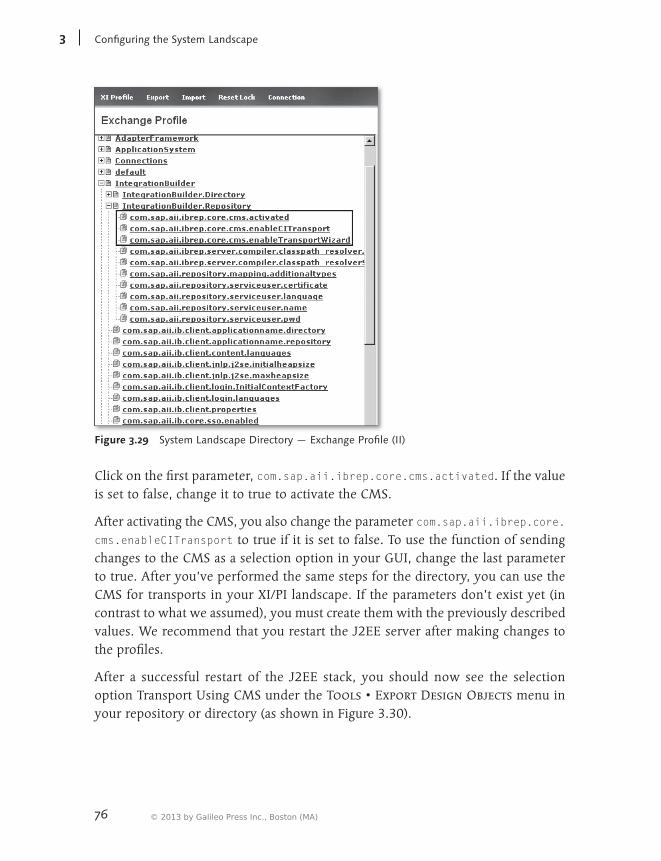
76
ConfiguringtheSystemLandscape3
Figure 3.29 System Landscape Directory — Exchange Profile (II)
Click on the first parameter, com.sap.aii.ibrep.core.cms.activated. If the value is set to false, change it to true to activate the CMS.
After activating the CMS, you also change the parameter com.sap.aii.ibrep.core.cms.enableCITransport to true if it is set to false. To use the function of sending changes to the CMS as a selection option in your GUI, change the last parameter to true. After you’ve performed the same steps for the directory, you can use the CMS for transports in your XI/PI landscape. If the parameters don’t exist yet (in contrast to what we assumed), you must create them with the previously described values. We recommend that you restart the J2EE server after making changes to the profiles.
After a successful restart of the J2EE stack, you should now see the selection option Transport Using CMS under the Tools • Export Design Objects menu in your repository or directory (as shown in Figure 3.30).
© 2013 by Galileo Press Inc., Boston (MA)
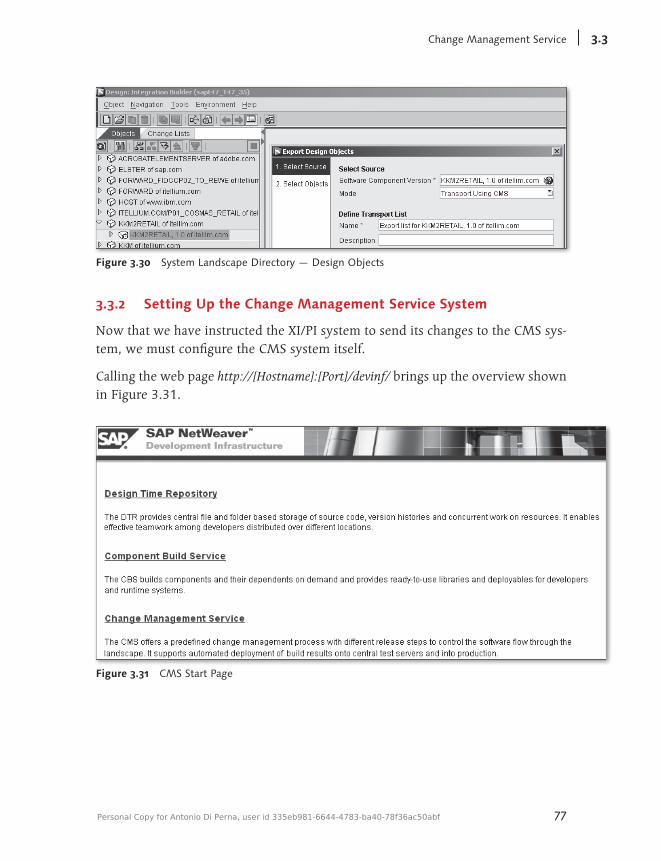
77
ChangeManagementService 3.3
Figure 3.30 System Landscape Directory — Design Objects
3.3.2 Setting Up the Change Management Service System
Now that we have instructed the XI/PI system to send its changes to the CMS sys-tem, we must configure the CMS system itself.
Calling the web page http://[Hostname]:[Port]/devinf/ brings up the overview shown in Figure 3.31.
Figure 3.31 CMS Start Page
Personal Copy for Antonio Di Perna, user id 335eb981-6644-4783-ba40-78f36ac50abf
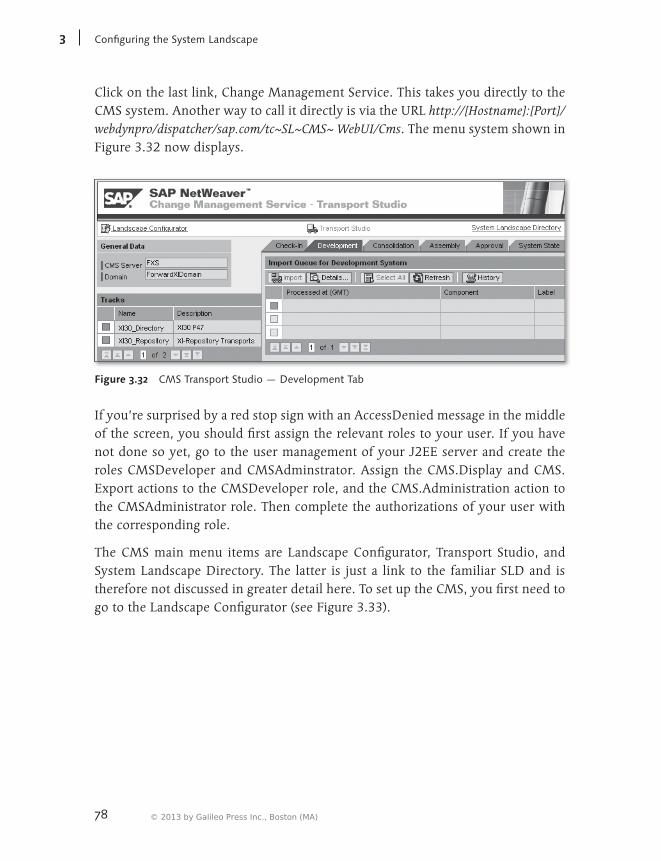
78
ConfiguringtheSystemLandscape3
Click on the last link, Change Management Service. This takes you directly to the CMS system. Another way to call it directly is via the URL http://[Hostname]:[Port]/webdynpro/dispatcher/sap.com/tc~SL~CMS~ WebUI/Cms. The menu system shown in Figure 3.32 now displays.
Figure 3.32 CMS Transport Studio — Development Tab
If you’re surprised by a red stop sign with an AccessDenied message in the middle of the screen, you should first assign the relevant roles to your user. If you have not done so yet, go to the user management of your J2EE server and create the roles CMSDeveloper and CMSAdminstrator. Assign the CMS.Display and CMS.Export actions to the CMSDeveloper role, and the CMS.Administration action to the CMSAdministrator role. Then complete the authorizations of your user with the corresponding role.
The CMS main menu items are Landscape Configurator, Transport Studio, and System Landscape Directory. The latter is just a link to the familiar SLD and is therefore not discussed in greater detail here. To set up the CMS, you first need to go to the Landscape Configurator (see Figure 3.33).
© 2013 by Galileo Press Inc., Boston (MA)
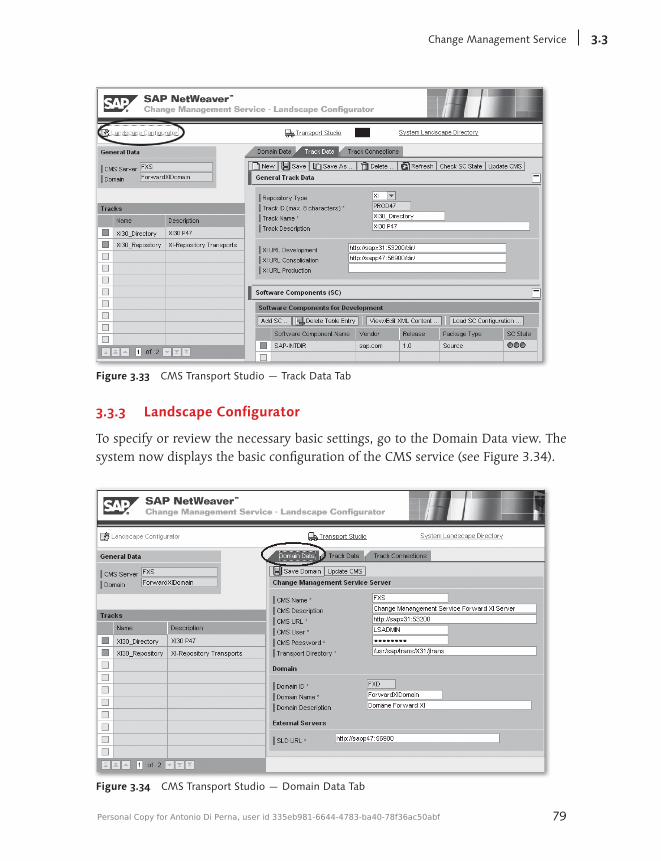
79
ChangeManagementService 3.3
Figure 3.33 CMS Transport Studio — Track Data Tab
3.3.3 Landscape Configurator
To specify or review the necessary basic settings, go to the Domain Data view. The system now displays the basic configuration of the CMS service (see Figure 3.34).
Figure 3.34 CMS Transport Studio — Domain Data Tab
Personal Copy for Antonio Di Perna, user id 335eb981-6644-4783-ba40-78f36ac50abf
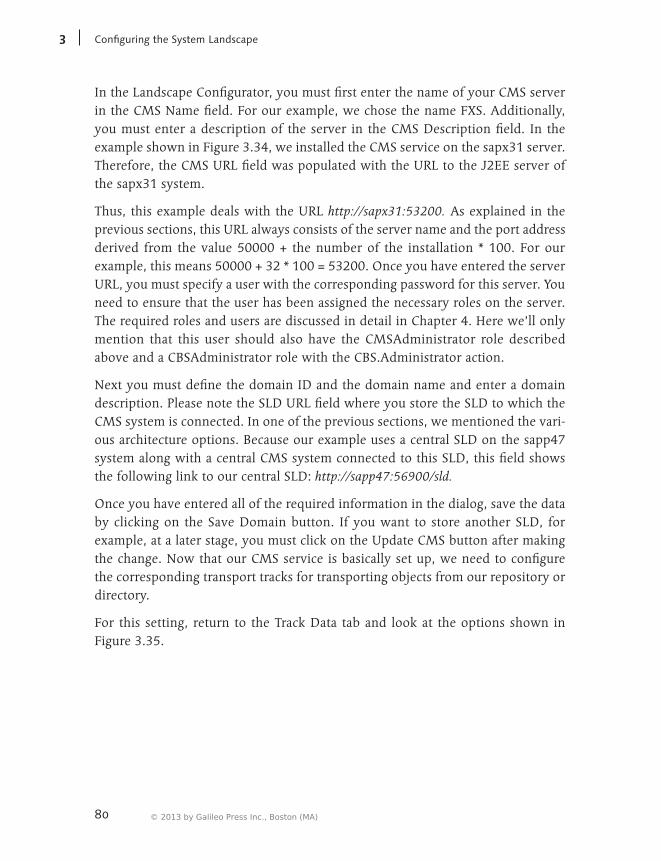
80
ConfiguringtheSystemLandscape3
In the Landscape Configurator, you must first enter the name of your CMS server in the CMS Name field. For our example, we chose the name FXS. Additionally, you must enter a description of the server in the CMS Description field. In the example shown in Figure 3.34, we installed the CMS service on the sapx31 server. Therefore, the CMS URL field was populated with the URL to the J2EE server of the sapx31 system.
Thus, this example deals with the URL http://sapx31:53200. As explained in the previous sections, this URL always consists of the server name and the port address derived from the value 50000 + the number of the installation * 100. For our example, this means 50000 + 32 * 100 = 53200. Once you have entered the server URL, you must specify a user with the corresponding password for this server. You need to ensure that the user has been assigned the necessary roles on the server. The required roles and users are discussed in detail in Chapter 4. Here we’ll only mention that this user should also have the CMSAdministrator role described above and a CBSAdministrator role with the CBS.Administrator action.
Next you must define the domain ID and the domain name and enter a domain description. Please note the SLD URL field where you store the SLD to which the CMS system is connected. In one of the previous sections, we mentioned the vari-ous architecture options. Because our example uses a central SLD on the sapp47 system along with a central CMS system connected to this SLD, this field shows the following link to our central SLD: http://sapp47:56900/sld.
Once you have entered all of the required information in the dialog, save the data by clicking on the Save Domain button. If you want to store another SLD, for example, at a later stage, you must click on the Update CMS button after making the change. Now that our CMS service is basically set up, we need to configure the corresponding transport tracks for transporting objects from our repository or directory.
For this setting, return to the Track Data tab and look at the options shown in Figure 3.35.
© 2013 by Galileo Press Inc., Boston (MA)
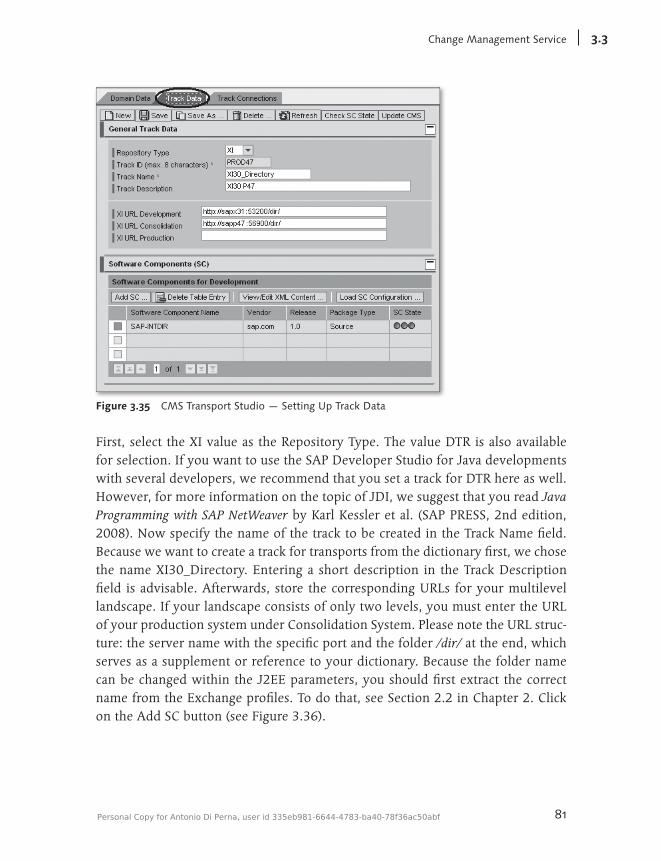
81
ChangeManagementService 3.3
Figure 3.35 CMS Transport Studio — Setting Up Track Data
First, select the XI value as the Repository Type. The value DTR is also available for selection. If you want to use the SAP Developer Studio for Java developments with several developers, we recommend that you set a track for DTR here as well. However, for more information on the topic of JDI, we suggest that you read Java Programming with SAP NetWeaver by Karl Kessler et al. (SAP PRESS, 2nd edition, 2008). Now specify the name of the track to be created in the Track Name field. Because we want to create a track for transports from the dictionary first, we chose the name XI30_Directory. Entering a short description in the Track Description field is advisable. Afterwards, store the corresponding URLs for your multilevel landscape. If your landscape consists of only two levels, you must enter the URL of your production system under Consolidation System. Please note the URL struc-ture: the server name with the specific port and the folder /dir/ at the end, which serves as a supplement or reference to your dictionary. Because the folder name can be changed within the J2EE parameters, you should first extract the correct name from the Exchange profiles. To do that, see Section 2.2 in Chapter 2. Click on the Add SC button (see Figure 3.36).
Personal Copy for Antonio Di Perna, user id 335eb981-6644-4783-ba40-78f36ac50abf
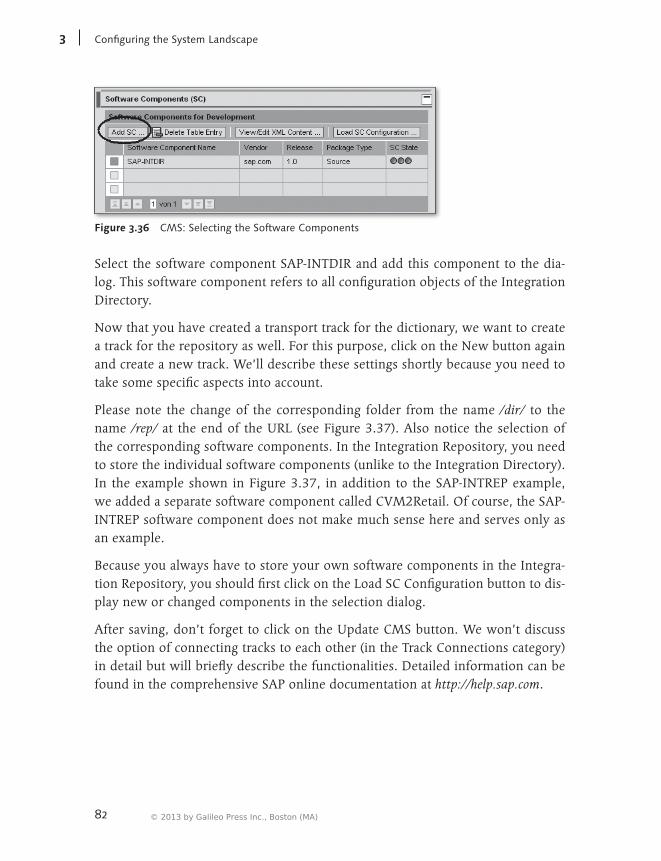
82
ConfiguringtheSystemLandscape3
Figure 3.36 CMS: Selecting the Software Components
Select the software component SAP-INTDIR and add this component to the dia-log. This software component refers to all configuration objects of the Integration Directory.
Now that you have created a transport track for the dictionary, we want to create a track for the repository as well. For this purpose, click on the New button again and create a new track. We’ll describe these settings shortly because you need to take some specific aspects into account.
Please note the change of the corresponding folder from the name /dir/ to the name /rep/ at the end of the URL (see Figure 3.37). Also notice the selection of the corresponding software components. In the Integration Repository, you need to store the individual software components (unlike to the Integration Directory). In the example shown in Figure 3.37, in addition to the SAP-INTREP example, we added a separate software component called CVM2Retail. Of course, the SAP-INTREP software component does not make much sense here and serves only as an example.
Because you always have to store your own software components in the Integra-tion Repository, you should first click on the Load SC Configuration button to dis-play new or changed components in the selection dialog.
After saving, don’t forget to click on the Update CMS button. We won’t discuss the option of connecting tracks to each other (in the Track Connections category) in detail but will briefly describe the functionalities. Detailed information can be found in the comprehensive SAP online documentation at http://help.sap.com.
© 2013 by Galileo Press Inc., Boston (MA)
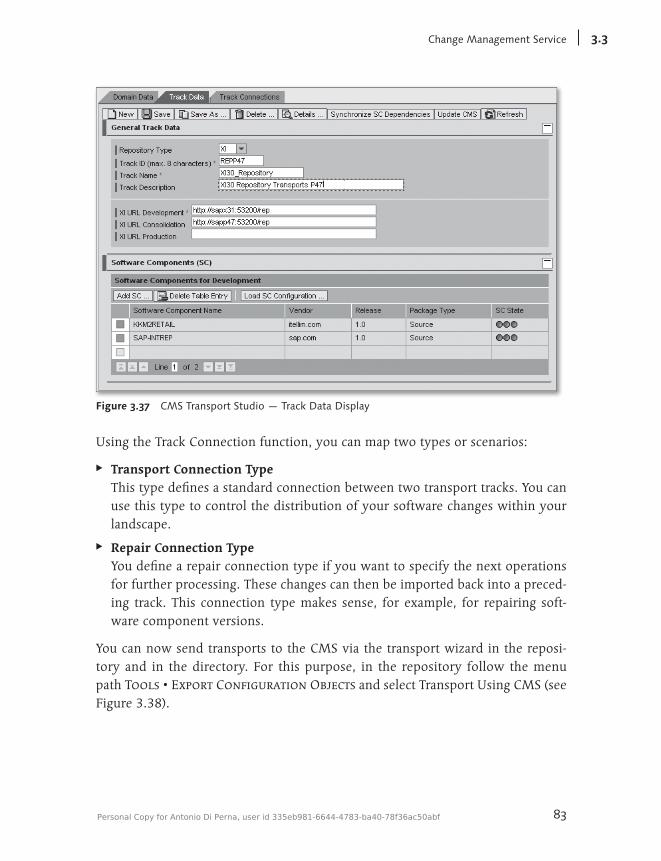
83
ChangeManagementService 3.3
Figure 3.37 CMS Transport Studio — Track Data Display
Using the Track Connection function, you can map two types or scenarios:
EE Transport Connection Type This type defines a standard connection between two transport tracks. You can use this type to control the distribution of your software changes within your landscape.
EE Repair Connection Type You define a repair connection type if you want to specify the next operations for further processing. These changes can then be imported back into a preced-ing track. This connection type makes sense, for example, for repairing soft-ware component versions.
You can now send transports to the CMS via the transport wizard in the reposi-tory and in the directory. For this purpose, in the repository follow the menu path Tools • Export Configuration Objects and select Transport Using CMS (see Figure 3.38).
Personal Copy for Antonio Di Perna, user id 335eb981-6644-4783-ba40-78f36ac50abf
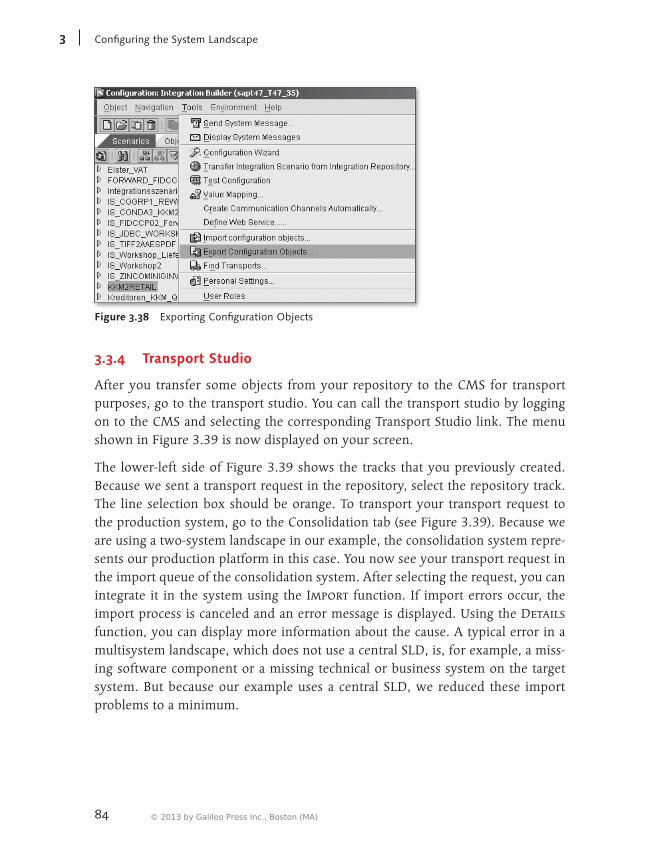
84
ConfiguringtheSystemLandscape3
Figure 3.38 Exporting Configuration Objects
3.3.4 Transport Studio
After you transfer some objects from your repository to the CMS for transport purposes, go to the transport studio. You can call the transport studio by logging on to the CMS and selecting the corresponding Transport Studio link. The menu shown in Figure 3.39 is now displayed on your screen.
The lower-left side of Figure 3.39 shows the tracks that you previously created. Because we sent a transport request in the repository, select the repository track. The line selection box should be orange. To transport your transport request to the production system, go to the Consolidation tab (see Figure 3.39). Because we are using a two-system landscape in our example, the consolidation system repre-sents our production platform in this case. You now see your transport request in the import queue of the consolidation system. After selecting the request, you can integrate it in the system using the Import function. If import errors occur, the import process is canceled and an error message is displayed. Using the Details function, you can display more information about the cause. A typical error in a multisystem landscape, which does not use a central SLD, is, for example, a miss-ing software component or a missing technical or business system on the target system. But because our example uses a central SLD, we reduced these import problems to a minimum.
© 2013 by Galileo Press Inc., Boston (MA)
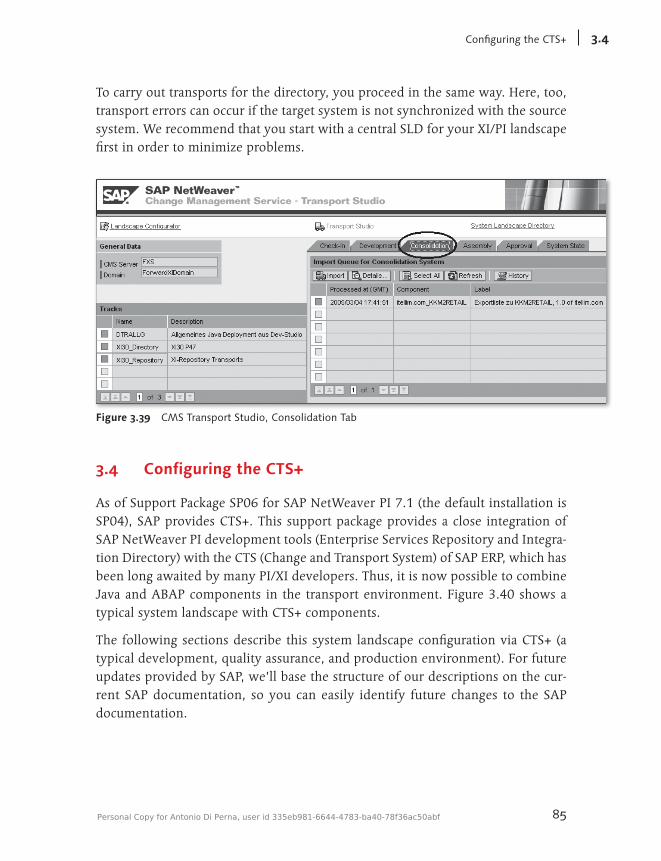
85
ConfiguringtheCTS+ 3.4
To carry out transports for the directory, you proceed in the same way. Here, too, transport errors can occur if the target system is not synchronized with the source system. We recommend that you start with a central SLD for your XI/PI landscape first in order to minimize problems.
Figure 3.39 CMS Transport Studio, Consolidation Tab
3.4 Configuring the CTS+
As of Support Package SP06 for SAP NetWeaver PI 7.1 (the default installation is SP04), SAP provides CTS+. This support package provides a close integration of SAP NetWeaver PI development tools (Enterprise Services Repository and Integra-tion Directory) with the CTS (Change and Transport System) of SAP ERP, which has been long awaited by many PI/XI developers. Thus, it is now possible to combine Java and ABAP components in the transport environment. Figure 3.40 shows a typical system landscape with CTS+ components.
The following sections describe this system landscape configuration via CTS+ (a typical development, quality assurance, and production environment). For future updates provided by SAP, we’ll base the structure of our descriptions on the cur-rent SAP documentation, so you can easily identify future changes to the SAP documentation.
Personal Copy for Antonio Di Perna, user id 335eb981-6644-4783-ba40-78f36ac50abf
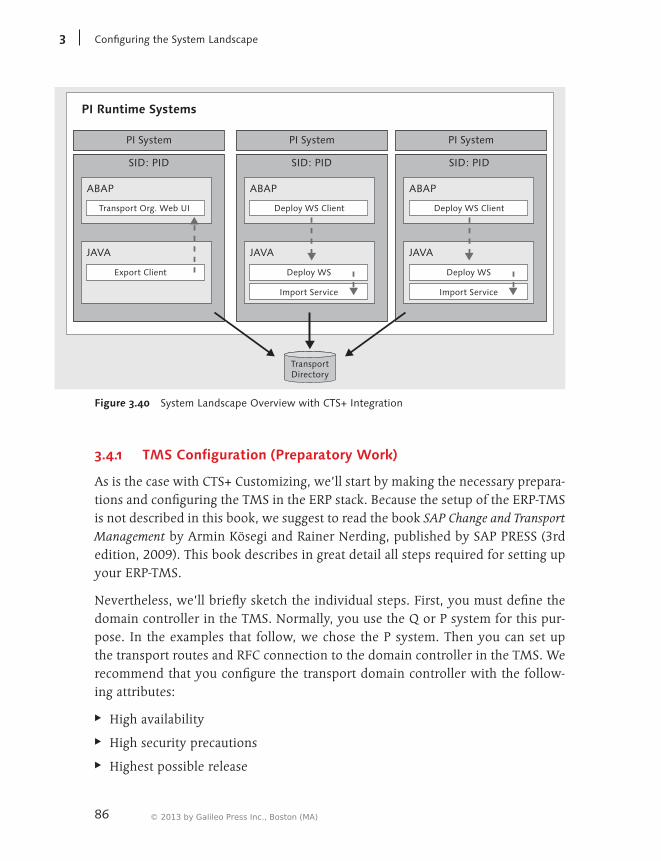
86
ConfiguringtheSystemLandscape3
SID: PID
PI System
ABAP
JAVA
Transport Org. Web UI
Export Client
SID: PID
PI System
ABAP
JAVA
Deploy WS Client
SID: PID
PI System
ABAP
JAVA
Deploy WS Client
PI Runtime Systems
Deploy WS
Import Service
Deploy WS
Import Service
TransportDirectory
Figure 3.40 System Landscape Overview with CTS+ Integration
3.4.1 TMS Configuration (Preparatory Work)
As is the case with CTS+ Customizing, we’ll start by making the necessary prepara-tions and configuring the TMS in the ERP stack. Because the setup of the ERP-TMS is not described in this book, we suggest to read the book SAP Change and Transport Management by Armin Kösegi and Rainer Nerding, published by SAP PRESS (3rd edition, 2009). This book describes in great detail all steps required for setting up your ERP-TMS.
Nevertheless, we’ll briefly sketch the individual steps. First, you must define the domain controller in the TMS. Normally, you use the Q or P system for this pur-pose. In the examples that follow, we chose the P system. Then you can set up the transport routes and RFC connection to the domain controller in the TMS. We recommend that you configure the transport domain controller with the follow-ing attributes:
EE High availability
EE High security precautions
EE Highest possible release
© 2013 by Galileo Press Inc., Boston (MA)
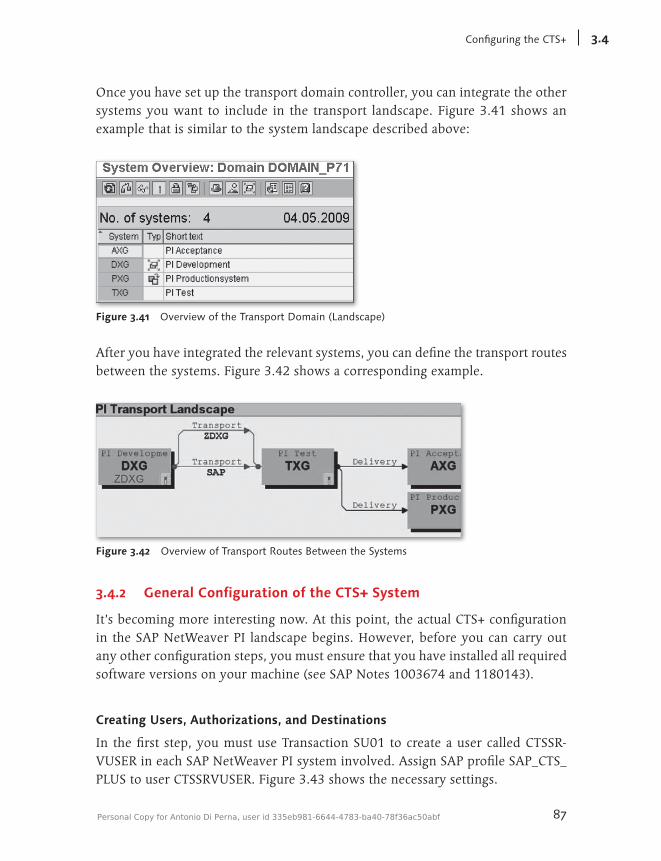
87
ConfiguringtheCTS+ 3.4
Once you have set up the transport domain controller, you can integrate the other systems you want to include in the transport landscape. Figure 3.41 shows an example that is similar to the system landscape described above:
Figure 3.41 Overview of the Transport Domain (Landscape)
After you have integrated the relevant systems, you can define the transport routes between the systems. Figure 3.42 shows a corresponding example.
Figure 3.42 Overview of Transport Routes Between the Systems
3.4.2 General Configuration of the CTS+ System
It’s becoming more interesting now. At this point, the actual CTS+ configuration in the SAP NetWeaver PI landscape begins. However, before you can carry out any other configuration steps, you must ensure that you have installed all required software versions on your machine (see SAP Notes 1003674 and 1180143).
Creating Users, Authorizations, and Destinations
In the first step, you must use Transaction SU01 to create a user called CTSSR-VUSER in each SAP NetWeaver PI system involved. Assign SAP profile SAP_CTS_PLUS to user CTSSRVUSER. Figure 3.43 shows the necessary settings.
Personal Copy for Antonio Di Perna, user id 335eb981-6644-4783-ba40-78f36ac50abf
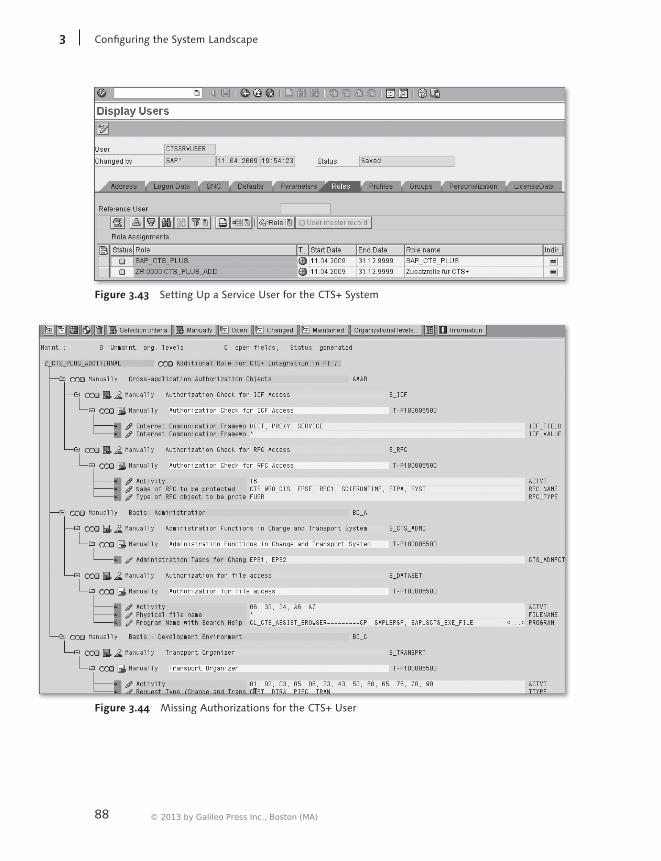
88
ConfiguringtheSystemLandscape3
Figure 3.43 Setting Up a Service User for the CTS+ System
Figure 3.44 Missing Authorizations for the CTS+ User
© 2013 by Galileo Press Inc., Boston (MA)

89
ConfiguringtheCTS+ 3.4
Unfortunately, in SAP NetWeaver PI 7.1, the authorizations provided with SP06 are incomplete. Therefore, to avoid future problems, we recommend that you enhance the ZR:0000:CTS_PLUS_ADD role with the authorizations that are dis-played in Figure 3.44 and analogous to Figure 3.43.
Now that you have assigned the required authorizations to the service user, you should create an RFC destination called sap.com/com.sap.tc.di.CTSserver on the Java stack.
To do that, go to the NetWeaver Administrator of your SAP NetWeaver PI system and call the Destinations function in the Infrastructure submenu under Configura-tions Management. Start the wizard by clicking on the Create button and create the connection, as shown in Figure 3.45.
Figure 3.45 Creating the Destination on the Java Stack—General Data
Click on the Next button, and then enter the values as shown in Figure 3.46.
Click on the Next button again to enter the remaining configuration data as shown in Figure 3.47.
After clicking on Next for the third time, the system takes you to the final dia-log of the setup wizard. In this dialog, click on the Finish button to create the destination.
Personal Copy for Antonio Di Perna, user id 335eb981-6644-4783-ba40-78f36ac50abf

90
ConfiguringtheSystemLandscape3
Figure 3.46 Creating the Destination on the Java Stack — Connection and Transport Security Settings
Figure 3.47 Creating the Destination on the Java Stack — Logon Data
© 2013 by Galileo Press Inc., Boston (MA)
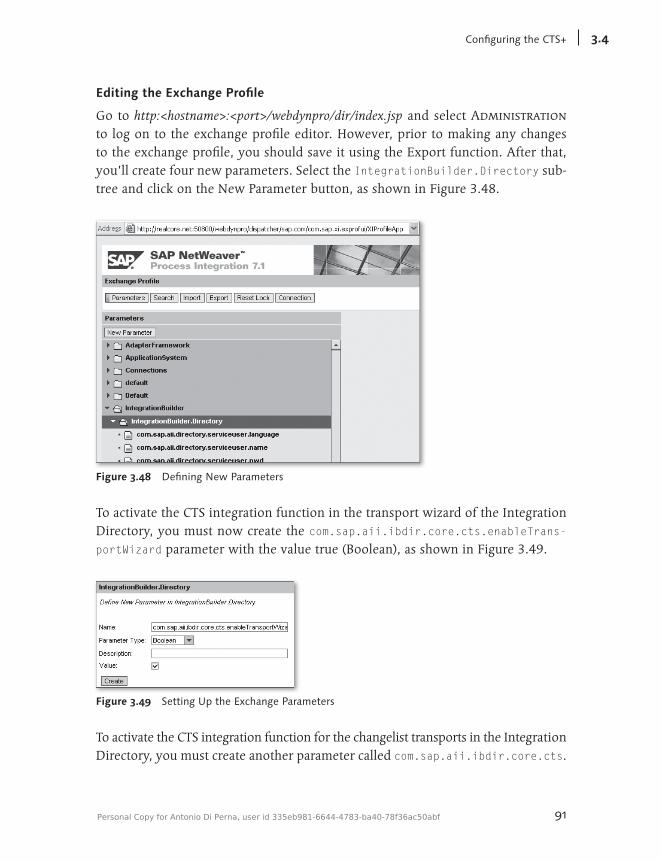
91
ConfiguringtheCTS+ 3.4
Editing the Exchange Profile
Go to http:<hostname>:<port>/webdynpro/dir/index.jsp and select Administration to log on to the exchange profile editor. However, prior to making any changes to the exchange profile, you should save it using the Export function. After that, you’ll create four new parameters. Select the IntegrationBuilder.Directory sub-tree and click on the New Parameter button, as shown in Figure 3.48.
Figure 3.48 Defining New Parameters
To activate the CTS integration function in the transport wizard of the Integration Directory, you must now create the com.sap.aii.ibdir.core.cts.enableTrans-portWizard parameter with the value true (Boolean), as shown in Figure 3.49.
Figure 3.49 Setting Up the Exchange Parameters
To activate the CTS integration function for the changelist transports in the Integration Directory, you must create another parameter called com.sap.aii.ibdir.core.cts.
Personal Copy for Antonio Di Perna, user id 335eb981-6644-4783-ba40-78f36ac50abf
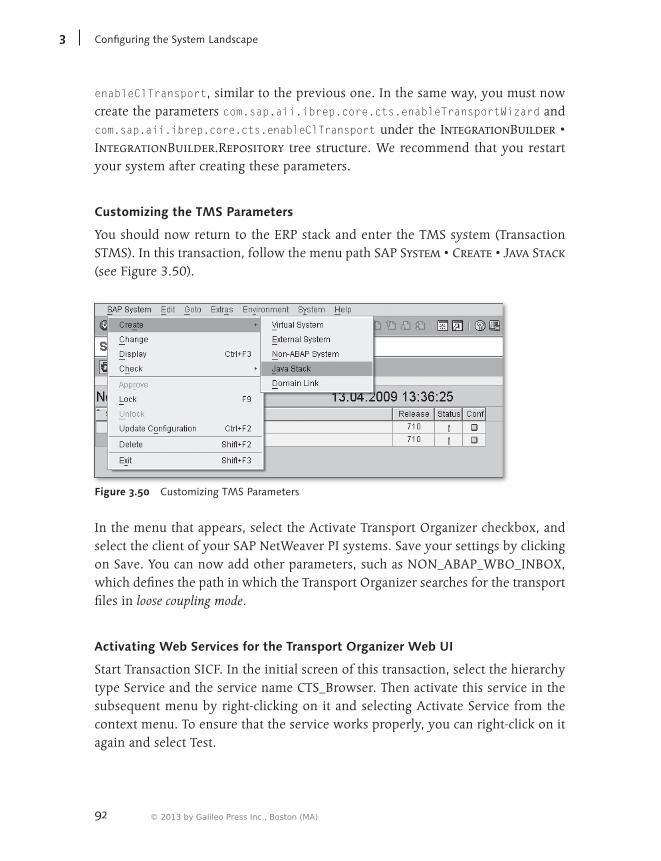
92
ConfiguringtheSystemLandscape3
enableClTransport, similar to the previous one. In the same way, you must now create the parameters com.sap.aii.ibrep.core.cts.enableTransportWizard and com.sap.aii.ibrep.core.cts.enableClTransport under the IntegrationBuilder • IntegrationBuilder.Repository tree structure. We recommend that you restart your system after creating these parameters.
Customizing the TMS Parameters
You should now return to the ERP stack and enter the TMS system (Transaction STMS). In this transaction, follow the menu path SAP System • Create • Java Stack (see Figure 3.50).
Figure 3.50 Customizing TMS Parameters
In the menu that appears, select the Activate Transport Organizer checkbox, and select the client of your SAP NetWeaver PI systems. Save your settings by clicking on Save. You can now add other parameters, such as NON_ABAP_WBO_INBOX, which defines the path in which the Transport Organizer searches for the transport files in loose coupling mode.
Activating Web Services for the Transport Organizer Web UI
Start Transaction SICF. In the initial screen of this transaction, select the hierarchy type Service and the service name CTS_Browser. Then activate this service in the subsequent menu by right-clicking on it and selecting Activate Service from the context menu. To ensure that the service works properly, you can right-click on it again and select Test.
© 2013 by Galileo Press Inc., Boston (MA)
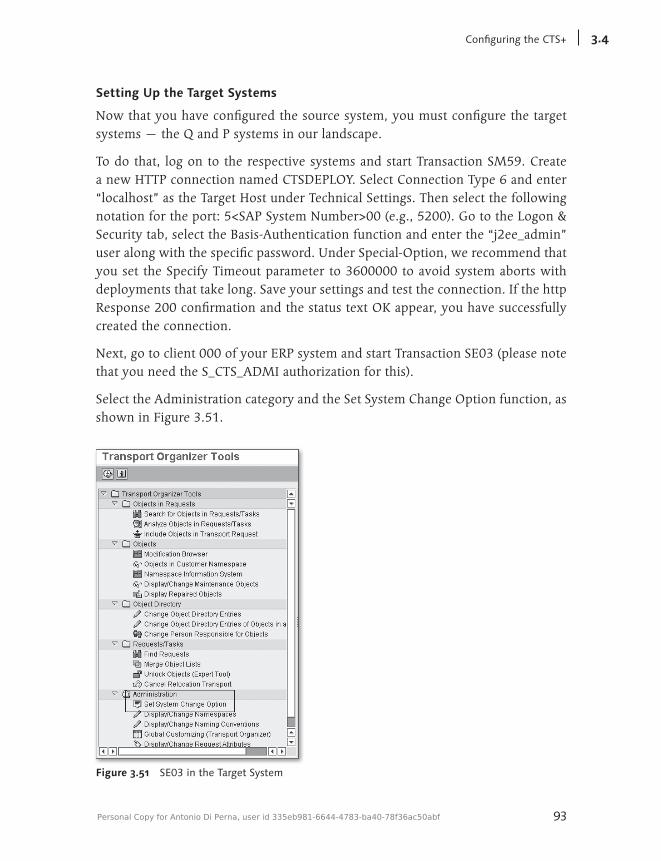
93
ConfiguringtheCTS+ 3.4
Setting Up the Target Systems
Now that you have configured the source system, you must configure the target systems — the Q and P systems in our landscape.
To do that, log on to the respective systems and start Transaction SM59. Create a new HTTP connection named CTSDEPLOY. Select Connection Type 6 and enter “localhost” as the Target Host under Technical Settings. Then select the following notation for the port: 5<SAP System Number>00 (e.g., 5200). Go to the Logon & Security tab, select the Basis-Authentication function and enter the “j2ee_admin” user along with the specific password. Under Special-Option, we recommend that you set the Specify Timeout parameter to 3600000 to avoid system aborts with deployments that take long. Save your settings and test the connection. If the http Response 200 confirmation and the status text OK appear, you have successfully created the connection.
Next, go to client 000 of your ERP system and start Transaction SE03 (please note that you need the S_CTS_ADMI authorization for this).
Select the Administration category and the Set System Change Option function, as shown in Figure 3.51.
Figure 3.51 SE03 in the Target System
Personal Copy for Antonio Di Perna, user id 335eb981-6644-4783-ba40-78f36ac50abf

94
ConfiguringtheSystemLandscape3
In the dialog that appears next, click on the Client Settings button and select cli-ent 000 from the menu. Then click on the Edit button and confirm all subsequent dialogs. Select the Details function for client 000 and then the Automatic recording of changes function, as shown in Figure 3.52.
Figure 3.52 Settings for Client 000
Save your settings. After that, start Transaction LPCONFIG. Select the CO_TFLDE-PLOY_PROXY_VI_DOCUMENT proxy class, as shown in Figure 3.53, and press the [F4] key.
Next, select the logical port, CTSDEPLOY, and select the Default checkbox. Remem-ber to enter a brief description in the Description field. Under General Settings, go to the Call Parameters tab. As shown in Figure 3.54, select HTTP Destination CTSDEPLOY and enter the suffix “/DeployProxy/default?style=document.”
© 2013 by Galileo Press Inc., Boston (MA)
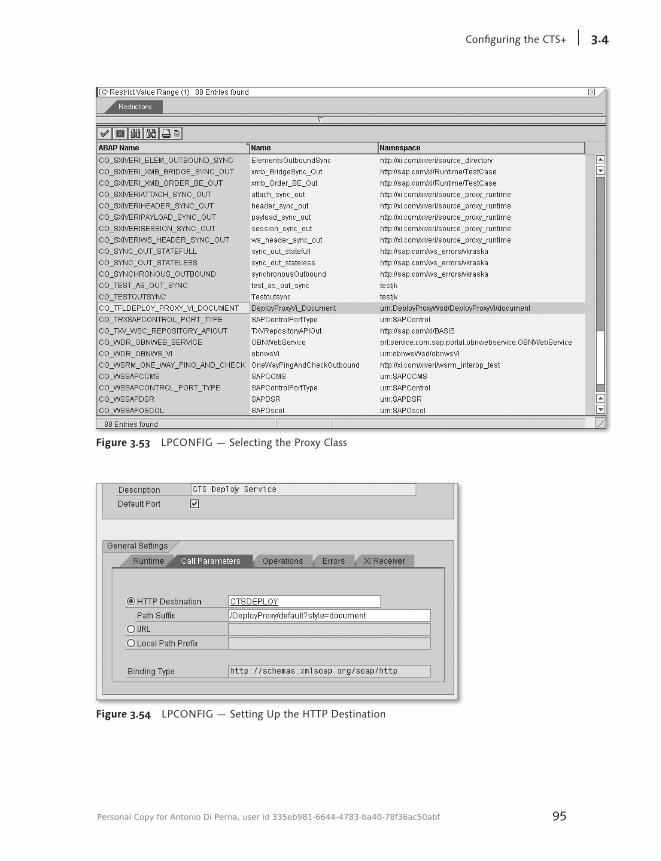
95
ConfiguringtheCTS+ 3.4
Figure 3.53 LPCONFIG — Selecting the Proxy Class
Figure 3.54 LPCONFIG — Setting Up the HTTP Destination
Personal Copy for Antonio Di Perna, user id 335eb981-6644-4783-ba40-78f36ac50abf
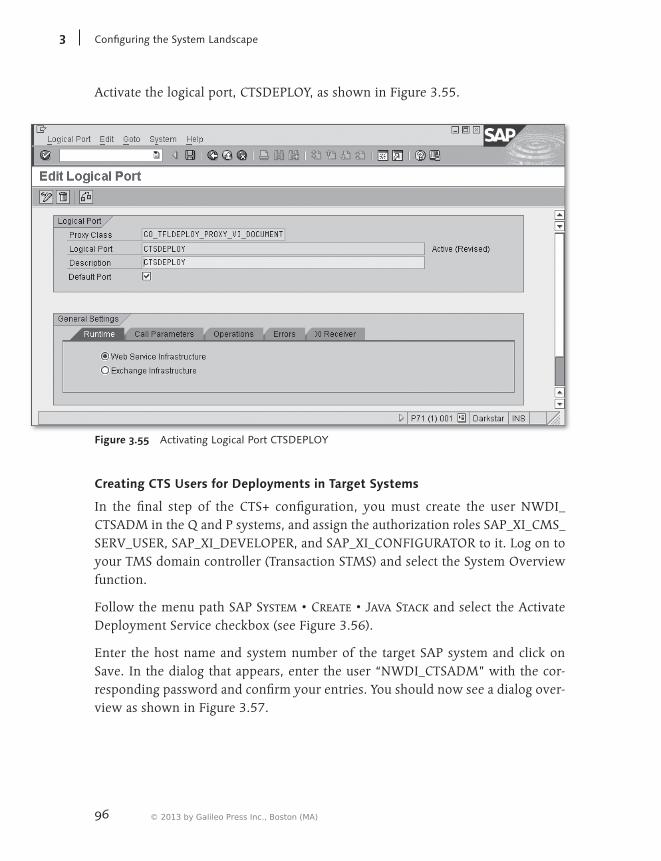
96
ConfiguringtheSystemLandscape3
Activate the logical port, CTSDEPLOY, as shown in Figure 3.55.
Figure 3.55 Activating Logical Port CTSDEPLOY
Creating CTS Users for Deployments in Target Systems
In the final step of the CTS+ configuration, you must create the user NWDI_CTSADM in the Q and P systems, and assign the authorization roles SAP_XI_CMS_SERV_USER, SAP_XI_DEVELOPER, and SAP_XI_CONFIGURATOR to it. Log on to your TMS domain controller (Transaction STMS) and select the System Overview function.
Follow the menu path SAP System • Create • Java Stack and select the Activate Deployment Service checkbox (see Figure 3.56).
Enter the host name and system number of the target SAP system and click on Save. In the dialog that appears, enter the user “NWDI_CTSADM” with the cor-responding password and confirm your entries. You should now see a dialog over-view as shown in Figure 3.57.
© 2013 by Galileo Press Inc., Boston (MA)
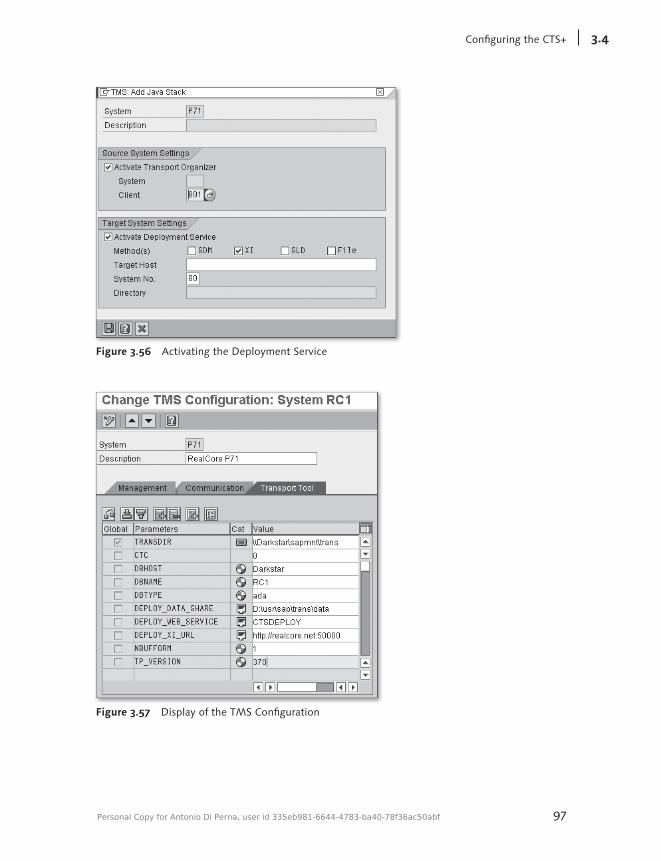
97
ConfiguringtheCTS+ 3.4
Figure 3.56 Activating the Deployment Service
Figure 3.57 Display of the TMS Configuration
Personal Copy for Antonio Di Perna, user id 335eb981-6644-4783-ba40-78f36ac50abf
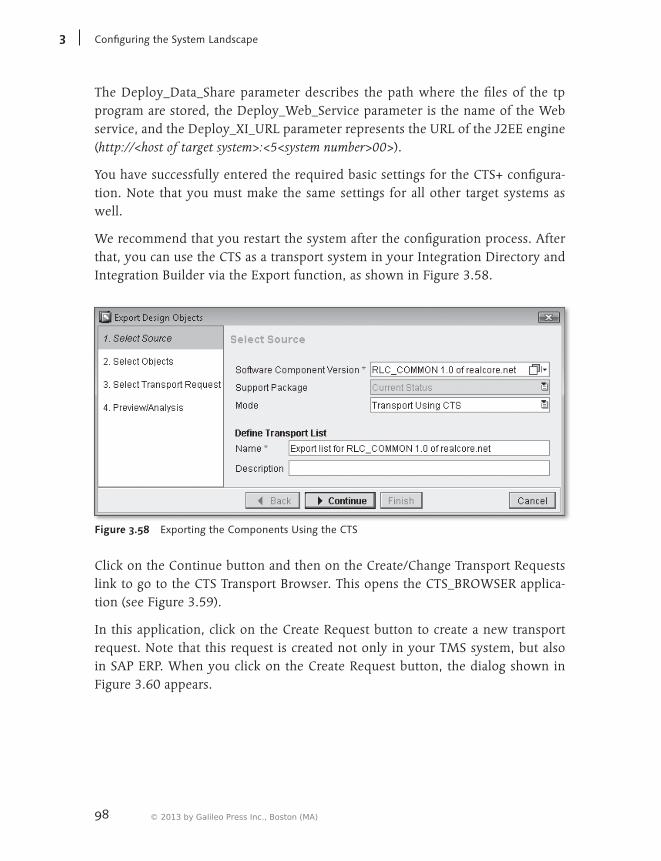
98
ConfiguringtheSystemLandscape3
The Deploy_Data_Share parameter describes the path where the files of the tp program are stored, the Deploy_Web_Service parameter is the name of the Web service, and the Deploy_XI_URL parameter represents the URL of the J2EE engine (http://<host of target system>:<5<system number>00>).
You have successfully entered the required basic settings for the CTS+ configura-tion. Note that you must make the same settings for all other target systems as well.
We recommend that you restart the system after the configuration process. After that, you can use the CTS as a transport system in your Integration Directory and Integration Builder via the Export function, as shown in Figure 3.58.
Figure 3.58 Exporting the Components Using the CTS
Click on the Continue button and then on the Create/Change Transport Requests link to go to the CTS Transport Browser. This opens the CTS_BROWSER applica-tion (see Figure 3.59).
In this application, click on the Create Request button to create a new transport request. Note that this request is created not only in your TMS system, but also in SAP ERP. When you click on the Create Request button, the dialog shown in Figure 3.60 appears.
© 2013 by Galileo Press Inc., Boston (MA)
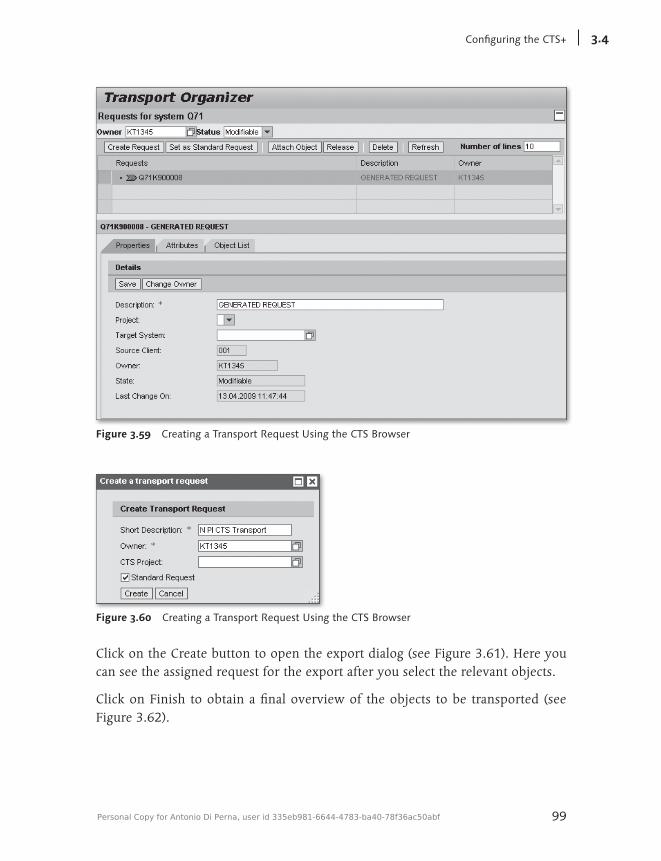
99
ConfiguringtheCTS+ 3.4
Figure 3.59 Creating a Transport Request Using the CTS Browser
Figure 3.60 Creating a Transport Request Using the CTS Browser
Click on the Create button to open the export dialog (see Figure 3.61). Here you can see the assigned request for the export after you select the relevant objects.
Click on Finish to obtain a final overview of the objects to be transported (see Figure 3.62).
Personal Copy for Antonio Di Perna, user id 335eb981-6644-4783-ba40-78f36ac50abf
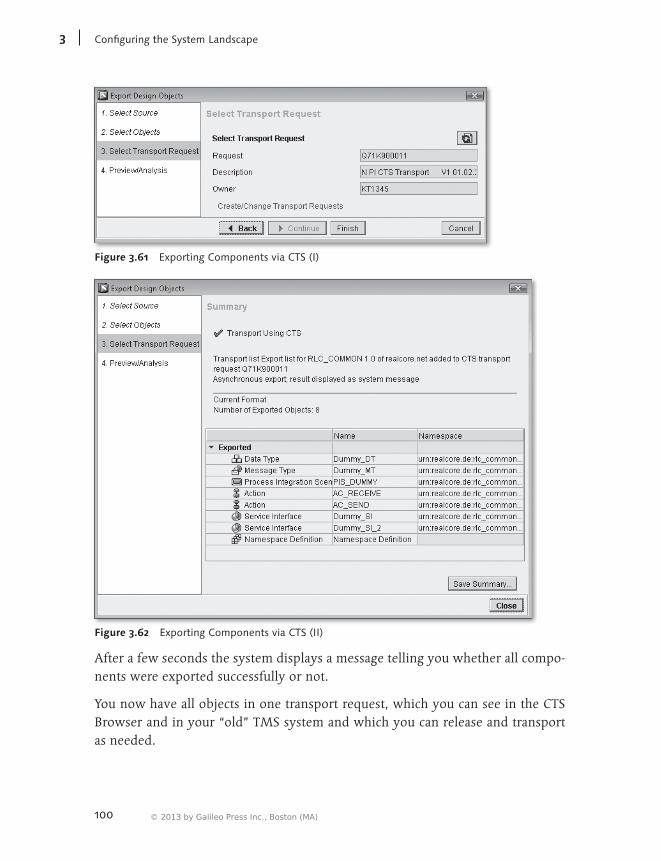
100
ConfiguringtheSystemLandscape3
Figure 3.61 Exporting Components via CTS (I)
Figure 3.62 Exporting Components via CTS (II)
After a few seconds the system displays a message telling you whether all compo-nents were exported successfully or not.
You now have all objects in one transport request, which you can see in the CTS Browser and in your “old” TMS system and which you can release and transport as needed.
© 2013 by Galileo Press Inc., Boston (MA)
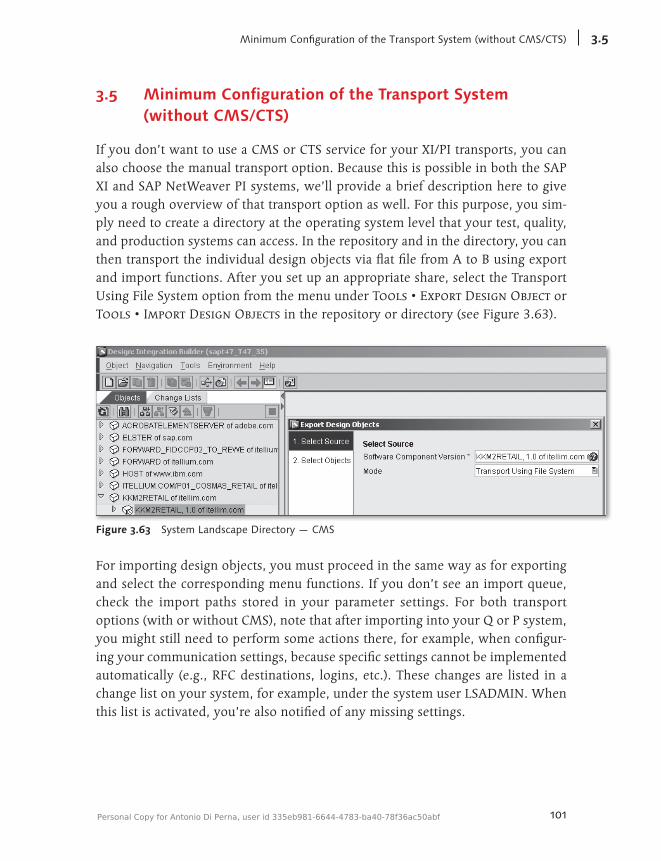
101
MinimumConfigurationoftheTransportSystem(withoutCMS/CTS) 3.5
3.5 Minimum Configuration of the Transport System (without CMS/CTS)
If you don’t want to use a CMS or CTS service for your XI/PI transports, you can also choose the manual transport option. Because this is possible in both the SAP XI and SAP NetWeaver PI systems, we’ll provide a brief description here to give you a rough overview of that transport option as well. For this purpose, you sim-ply need to create a directory at the operating system level that your test, quality, and production systems can access. In the repository and in the directory, you can then transport the individual design objects via flat file from A to B using export and import functions. After you set up an appropriate share, select the Transport Using File System option from the menu under Tools • Export Design Object or Tools • Import Design Objects in the repository or directory (see Figure 3.63).
Figure 3.63 System Landscape Directory — CMS
For importing design objects, you must proceed in the same way as for exporting and select the corresponding menu functions. If you don’t see an import queue, check the import paths stored in your parameter settings. For both transport options (with or without CMS), note that after importing into your Q or P system, you might still need to perform some actions there, for example, when configur-ing your communication settings, because specific settings cannot be implemented automatically (e.g., RFC destinations, logins, etc.). These changes are listed in a change list on your system, for example, under the system user LSADMIN. When this list is activated, you’re also notified of any missing settings.
Personal Copy for Antonio Di Perna, user id 335eb981-6644-4783-ba40-78f36ac50abf

© 2013 by Galileo Press Inc., Boston (MA)
103
4 Authorizations
Before you can start configuring, developing, and monitoring SAP NetWeaver PI, you must assign the relevant authorizations, for example, to administrators, devel-opers, or users to access the ABAP and Java applications, which allows them to monitor and/or configure SAP NetWeaver PI. To do that, you can use the standard groups and roles that SAP provides.
This chapter describes the role concept used in SAP NetWeaver PI (Section 4.1) and then explains how you can create data-dependent user authorizations for develop-ment purposes (Section 4.2). Lastly, Section 4.3 describes how you can activate the single sign-on function for SAP NetWeaver PI menus, which will greatly facilitate your work as an administrator.
4.1 Role Concept for SAP NetWeaver Process Integration
Normally, the SAP authorizations and SAP NetWeaver PI reference users that come with the standard version are sufficient for the initial setup and for creating an efficient role concept, and we’ll describe the purpose of these authorizations and reference users in greater detail in this chapter.
SAP provides authorization administrators with specific single and composite roles that can be assigned to the SAP NetWeaver PI developers and system administra-tors depending on the application and their requirements via Transaction SU01 or the User Management Engine (UME). The composite roles include the autho-rization for ABAP transactions and for the web-based Java tools. You can easily recognize the Java authorization by its ending: *_J2EE. These roles contain only the authorization for the S_RFC object (RFC access) along with the corresponding values for the function groups to be executed. Nearly every J2EE role has a cor-responding counterpart on the ABAP side. These roles contain the relevant autho-rizations for accessing SAP applications.
Table 4.1 lists some of the ABAP roles relevant to SAP NetWeaver PI dialog and/or system users (Transaction PFCG, Profile Generator).
Personal Copy for Antonio Di Perna, user id 335eb981-6644-4783-ba40-78f36ac50abf
104
Authorizations4
Role (S = single role, C = composite role, M = transaction menu)
Description
C
S
S
S
M
SAP_XI_DISPLAY_USER
SAP_SLD_GUEST
SAP_XI_DISPLAY_USER_ABAP
SAP_XI_DISPLAY_USER_J2EE (UME)
Display role:
Mere display authorization for the entire SAP NetWeaver PI functionality
C
S
S
S
S
M
M
SAP_XI_DEVELOPER
SAP_SLD_DEVELOPER
SAP_XI_DEMOAPP
SAP_XI_DEVELOPER_ABAP
SAP_XI_DEVELOPER_J2EE (UME)
Developer role:
Design of business scenarios, interfaces, and mappings in the Integration Repository using the Integration Builder and import of existing interfaces from business systems
C
S
S
S
M
SAP_XI_CONTENT_ORGANIZER
SAP_SLD_ORGANIZER
SAP_XI_CONTENT_ORGANIZER_ABAP
SAP_XI_CONTENT_ORGANIZER_J2EE (UME)
Organizer role:
Configuration and maintenance of the Integration Repository and Directory, SLD, and software components
C
S
S
S
S
S
M
M
M
SAP_XI_MONITOR
SAP_SLD_GUEST
SAP_XI_BPE_MONITOR_ABAP
SAP_XI_DEMOAPP
SAP_XI_MONITOR_ABAP
SAP_XI_MONITOR_J2EE (UME)
Monitor role:
Authorization for all activities within SAP NetWeaver PI that are related to monitoring
C
S
S
S
S
S
S
S
S
S
M
M
M
M
M
M
M
SAP_XI_ADMINISTRATOR
SAP_ALM_ADMINISTRATOR
SAP_ALM_CUSTOMIZER
SAP_ESF_ADMIN
SAP_PAF_ADMIN
SAP_SLD_ADMINISTRATOR
SAP_XI_ADMINISTRATOR_ABAP
SAP_XI_ADMINISTRATOR_J2EE
SAP_XI_BPE_ADMINISTRATOR_ABAP
SAP_XI_DEMOAPP
Administrator role:
Technical configuration and administration
Table 4.1 Selected Roles for SAP NetWeaver PI Users
© 2013 by Galileo Press Inc., Boston (MA)
105
RoleConceptforSAPNetWeaverProcessIntegration 4.1
Role (S = single role, C = composite role, M = transaction menu)
Description
S SAP_SLD_ADMINISTRATOR SLD administrator role:
System Landscape Directory administration
S SAP_SLD_CONFIGURATOR SLD configurator role:
System Landscape Directory configuration
C
S
S
S
S
M
M
M
SAP_XI_CONFIGURATOR
SAP_BC_WEBSERVICE_PI_CFG_SRV
SAP_SLD_CONFIGURATOR
SAP_XI_BPE_CONFIGURATOR_ABAP
SAP_XI_CONFIGURATOR_ABAP
SAP_XI_CONFIGURATOR_J2EE (UME)
SAP_XI_DEMOAPP
PI configurator:
Responsible for all activities within SAP NetWeaver PI that are related to configuring business processes (integration content); or composite role SAP_XI_TA_CFG.
C
S
S
S
SAP_XI_ID_SERV_USER_MAIN
SAP_BC_WEBSERVICE_PI_CFG_SRV
SAP_SLD_CONFIGURATOR
SAP_XI_ID_SERV_USER
Service user role for the Integration Directory:
Within SAP NetWeaver PI, this role provides all authorizations required by the Integration Directory for non-dialog-based access to other SAP NetWeaver PI components
C
S
S
S
S
S
M
M
SAP_XI_SUPPORT
SAP_SLD_GUEST
SAP_XI_DISPLAY_USER_ABAP
SAP_XI_DISPLAY_USER_J2EE (UME)
SAP_XI_SUPPORT_ABAP
SAP_XI_SUPPORT_J2EE (UME)
PI support user:
Display of all contents from the Integration Repository and Directory, the System Landscape Directory, the Integration Engine/Server, and so on; access to the display of administration content.
Table 4.1 Selected Roles for SAP NetWeaver PI Users (Cont.)
Personal Copy for Antonio Di Perna, user id 335eb981-6644-4783-ba40-78f36ac50abf
106
Authorizations4
Role (S = single role, C = composite role, M = transaction menu)
Description
C
S
S
S
S
S
S
M
M
M
M
SAP_XI_MONITOR_ENHANCED
SAP_SLD_GUEST
SAP_XI_BPE_MONITOR_ABAP
SAP_XI_DEMOAPP
SAP_XI_MESSAGE_MODIFY
SAP_XI_MONITOR_ABAP
SAP_XI_MONITOR_J2EE
Monitoring (display):
Access to the entire SAP NetWeaver PI system
Table 4.1 Selected Roles for SAP NetWeaver PI Users (Cont.)
The SAP roles delivered with the system were only partially created with transac-tion menus. Many roles don’t require calling transactions because these applica-tions are started via special SAP NetWeaver PI web applications. In terms of autho-rization, the system only checks whether the roles exist during the startup process of the web application.
The role authorizations make up both SAP NetWeaver AS and pure SAP transac-tions. Please make changes to existing predefined roles only after you have copied them to the customer-specific namespace; that is, the role names should start with Z* or Y*. When designing the concept, you should ensure that you don’t change the names of ABA roles that end with *_J2EE. You can use these roles only in your own composite roles and cannot change them in any way. If you do want to change the authorizations on the Java side, you must customize them in the so-called building blocks in SAP NetWeaver Administrator (repository, directory, runtime).
Note
If you want to change the authorizations of single roles that are already mapped to com-posite roles, you must copy the corresponding composite roles to the customer-specific namespace as well. Do not change the technical names of J2EE roles.
© 2013 by Galileo Press Inc., Boston (MA)
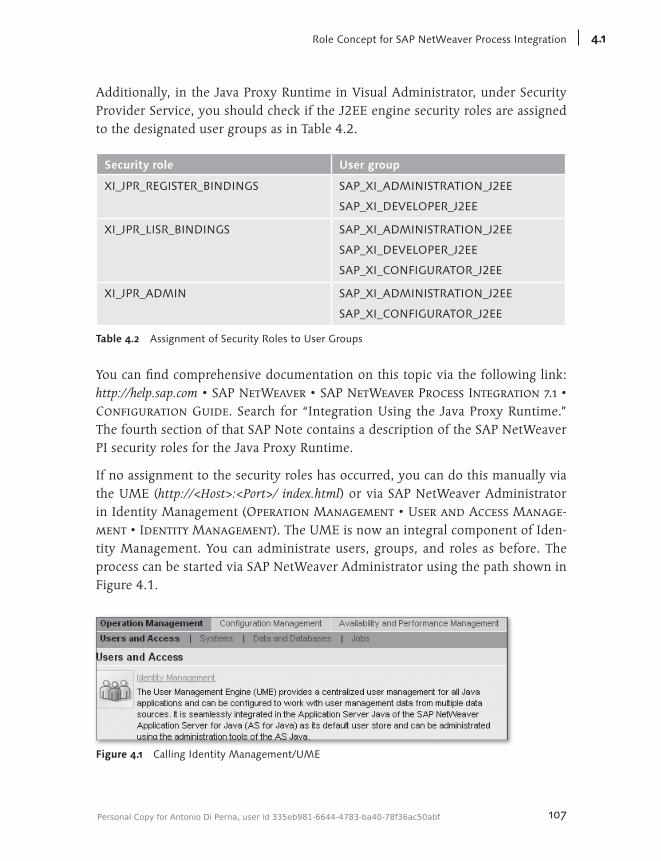
107
RoleConceptforSAPNetWeaverProcessIntegration 4.1
Additionally, in the Java Proxy Runtime in Visual Administrator, under Security Provider Service, you should check if the J2EE engine security roles are assigned to the designated user groups as in Table 4.2.
Security role User group
XI_JPR_REGISTER_BINDINGS SAP_XI_ADMINISTRATION_J2EE
SAP_XI_DEVELOPER_J2EE
XI_JPR_LISR_BINDINGS SAP_XI_ADMINISTRATION_J2EE
SAP_XI_DEVELOPER_J2EE
SAP_XI_CONFIGURATOR_J2EE
XI_JPR_ADMIN SAP_XI_ADMINISTRATION_J2EE
SAP_XI_CONFIGURATOR_J2EE
Table 4.2 Assignment of Security Roles to User Groups
You can find comprehensive documentation on this topic via the following link: http://help.sap.com • SAP NetWeaver • SAP NetWeaver Process Integration 7.1 • Configuration Guide. Search for “Integration Using the Java Proxy Runtime.” The fourth section of that SAP Note contains a description of the SAP NetWeaver PI security roles for the Java Proxy Runtime.
If no assignment to the security roles has occurred, you can do this manually via the UME (http://<Host>:<Port>/ index.html) or via SAP NetWeaver Administrator in Identity Management (Operation Management • User and Access Manage-ment • Identity Management). The UME is now an integral component of Iden-tity Management. You can administrate users, groups, and roles as before. The process can be started via SAP NetWeaver Administrator using the path shown in Figure 4.1.
Figure 4.1 Calling Identity Management/UME
Personal Copy for Antonio Di Perna, user id 335eb981-6644-4783-ba40-78f36ac50abf
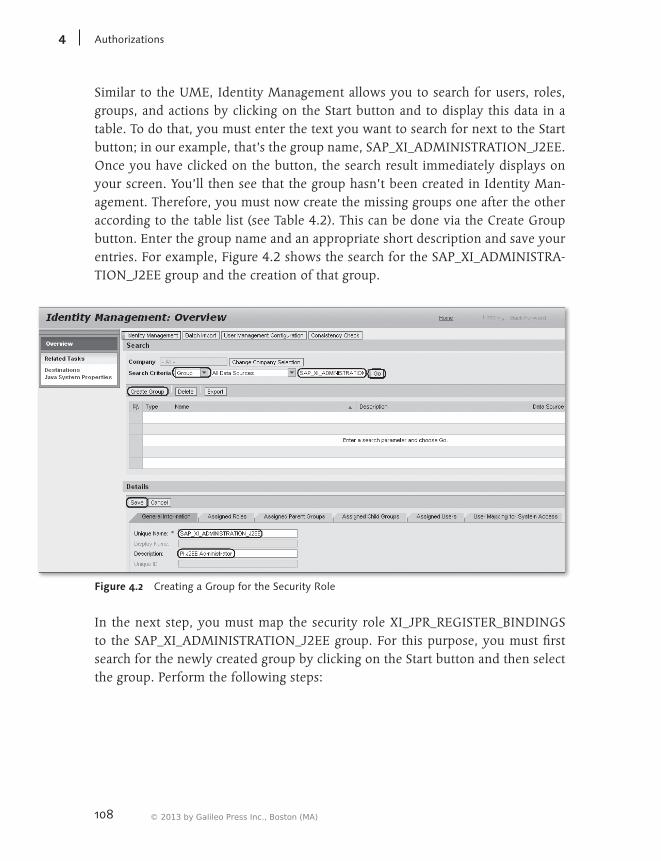
108
Authorizations4
Similar to the UME, Identity Management allows you to search for users, roles, groups, and actions by clicking on the Start button and to display this data in a table. To do that, you must enter the text you want to search for next to the Start button; in our example, that’s the group name, SAP_XI_ADMINISTRATION_J2EE. Once you have clicked on the button, the search result immediately displays on your screen. You’ll then see that the group hasn’t been created in Identity Man-agement. Therefore, you must now create the missing groups one after the other according to the table list (see Table 4.2). This can be done via the Create Group button. Enter the group name and an appropriate short description and save your entries. For example, Figure 4.2 shows the search for the SAP_XI_ADMINISTRA-TION_J2EE group and the creation of that group.
Figure 4.2 Creating a Group for the Security Role
In the next step, you must map the security role XI_JPR_REGISTER_BINDINGS to the SAP_XI_ADMINISTRATION_J2EE group. For this purpose, you must first search for the newly created group by clicking on the Start button and then select the group. Perform the following steps:
© 2013 by Galileo Press Inc., Boston (MA)
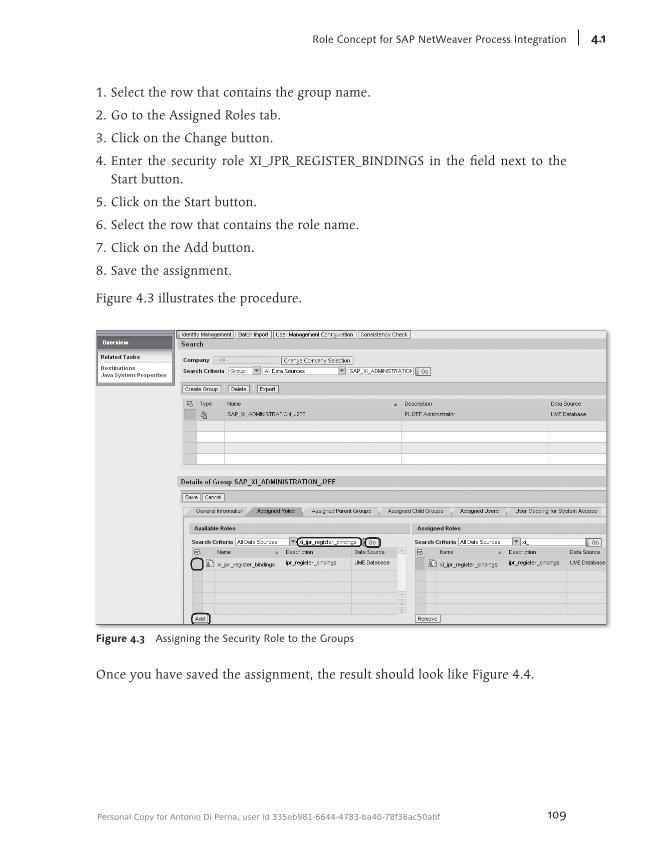
109
RoleConceptforSAPNetWeaverProcessIntegration 4.1
1. Select the row that contains the group name.
2. Go to the Assigned Roles tab.
3. Click on the Change button.
4. Enter the security role XI_JPR_REGISTER_BINDINGS in the field next to the Start button.
5. Click on the Start button.
6. Select the row that contains the role name.
7. Click on the Add button.
8. Save the assignment.
Figure 4.3 illustrates the procedure.
Figure 4.3 Assigning the Security Role to the Groups
Once you have saved the assignment, the result should look like Figure 4.4.
Personal Copy for Antonio Di Perna, user id 335eb981-6644-4783-ba40-78f36ac50abf

110
Authorizations4
Figure 4.4 Group Assignment Result
Repeat this process until every group has been assigned its respective security role. In the final step, you can assign the relevant groups to the SAP NetWeaver PI users. Note that you must carry out the same steps when assigning groups to users.
The following service users, which are not dialog-enabled, are created automati-cally during the installation of SAP NetWeaver PI and should not be modified in any way.
User Description
PISUPER Superuser with authorizations for all tasks involved
PIRWBUSER User for the Runtime Workbench
PIREPUSER User for the Enterprise Services Repository
PIPPUSER The inheritance of user identities ensures that the user context is maintained during message processing across all asynchronous barriers and restarts.
PILSADMIN User for the Change Management Service (CMS) servers
PILDUSER User for the System Landscape Directory
PIISUSER User for the Integration Server
PIDIRUSER User for the Integration Directory
Table 4.3 Automatically Created Service Users
© 2013 by Galileo Press Inc., Boston (MA)
111
RoleConceptforSAPNetWeaverProcessIntegration 4.1
User Description
PIAPPLUSER User for sender application systems that represent sender business systems
PIAFUSER User for the Advanced Adapter Engine (communication between SLD, Integration Server, and Adapter Framework)
PI_JCO_RFC User for the RFC communication between ABAP and Java
Table 4.3 Automatically Created Service Users (Cont.)
Please note the following:
EE The SAP NetWeaver PI service users contain the most important roles and can be used as an orientation help for your own authorization concepts.
EE You can view the assigned roles on the Java side via the UME and those on the ABAP side via Transaction PFCG (Profile Generator).
EE On the Description tab of Transaction PFCG is a brief explanation of the pur-pose of the SAP NetWeaver PI roles that have been created (for example, the role of service users).
You can find a more detailed description in the SAP Help Portal by entering the search term “Creating ABAP Users – PILSADMIN” in the online documentation for SAP NetWeaver PI 7.1.
Passwords for these special background users are assigned during the installation. Please don’t change the passwords until you have read SAP Note 721584. This note provides a detailed description of the procedure.
We recommend that you define the passwords for the service users once and change them as rarely as possible, that is, only in an emergency or for special security reasons.
Please note the following:
EE The new password is effective only after restarting the J2EE engine.
EE For sender applications, the password needs to be changed for the HTTP desti-nations as well.
EE When copying clients, copy all roles as well.
EE For the delivery roles, mass generation must be carried out via Transaction PFCG.
Personal Copy for Antonio Di Perna, user id 335eb981-6644-4783-ba40-78f36ac50abf
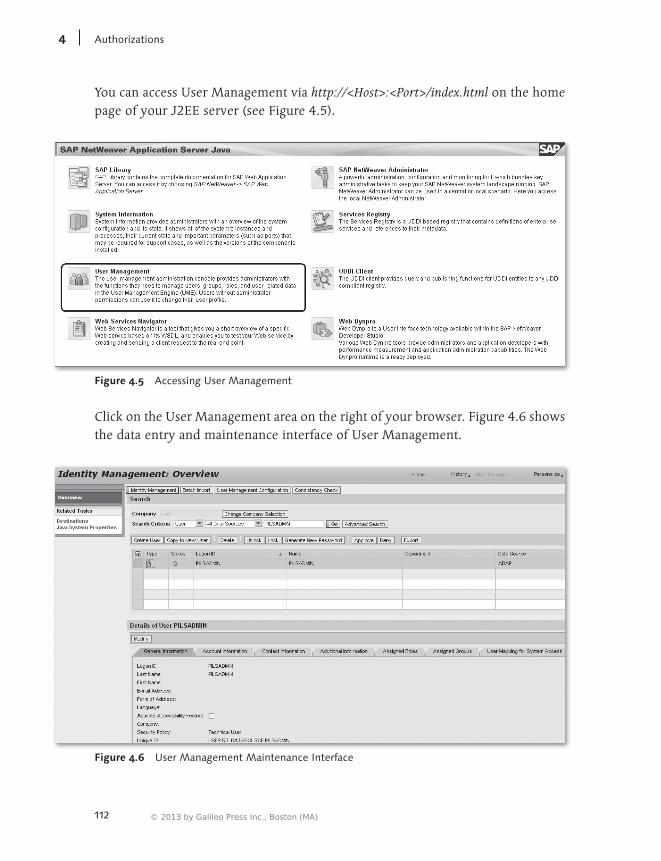
112
Authorizations4
You can access User Management via http://<Host>:<Port>/index.html on the home page of your J2EE server (see Figure 4.5).
Figure 4.5 Accessing User Management
Click on the User Management area on the right of your browser. Figure 4.6 shows the data entry and maintenance interface of User Management.
Figure 4.6 User Management Maintenance Interface
© 2013 by Galileo Press Inc., Boston (MA)
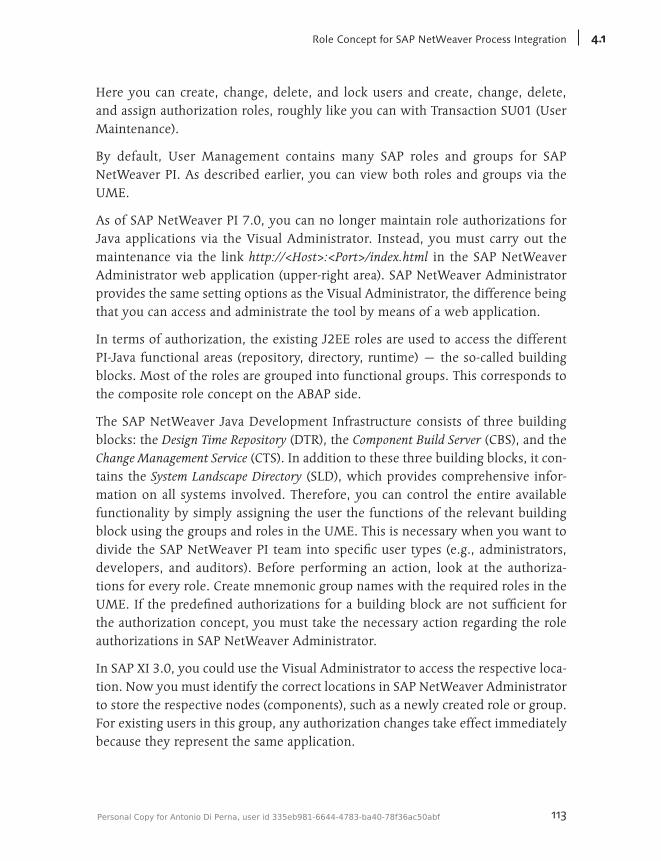
113
RoleConceptforSAPNetWeaverProcessIntegration 4.1
Here you can create, change, delete, and lock users and create, change, delete, and assign authorization roles, roughly like you can with Transaction SU01 (User Maintenance).
By default, User Management contains many SAP roles and groups for SAP NetWeaver PI. As described earlier, you can view both roles and groups via the UME.
As of SAP NetWeaver PI 7.0, you can no longer maintain role authorizations for Java applications via the Visual Administrator. Instead, you must carry out the maintenance via the link http://<Host>:<Port>/index.html in the SAP NetWeaver Administrator web application (upper-right area). SAP NetWeaver Administrator provides the same setting options as the Visual Administrator, the difference being that you can access and administrate the tool by means of a web application.
In terms of authorization, the existing J2EE roles are used to access the different PI-Java functional areas (repository, directory, runtime) — the so-called building blocks. Most of the roles are grouped into functional groups. This corresponds to the composite role concept on the ABAP side.
The SAP NetWeaver Java Development Infrastructure consists of three building blocks: the Design Time Repository (DTR), the Component Build Server (CBS), and the Change Management Service (CTS). In addition to these three building blocks, it con-tains the System Landscape Directory (SLD), which provides comprehensive infor-mation on all systems involved. Therefore, you can control the entire available functionality by simply assigning the user the functions of the relevant building block using the groups and roles in the UME. This is necessary when you want to divide the SAP NetWeaver PI team into specific user types (e.g., administrators, developers, and auditors). Before performing an action, look at the authoriza-tions for every role. Create mnemonic group names with the required roles in the UME. If the predefined authorizations for a building block are not sufficient for the authorization concept, you must take the necessary action regarding the role authorizations in SAP NetWeaver Administrator.
In SAP XI 3.0, you could use the Visual Administrator to access the respective loca-tion. Now you must identify the correct locations in SAP NetWeaver Administrator to store the respective nodes (components), such as a newly created role or group. For existing users in this group, any authorization changes take effect immediately because they represent the same application.
Personal Copy for Antonio Di Perna, user id 335eb981-6644-4783-ba40-78f36ac50abf
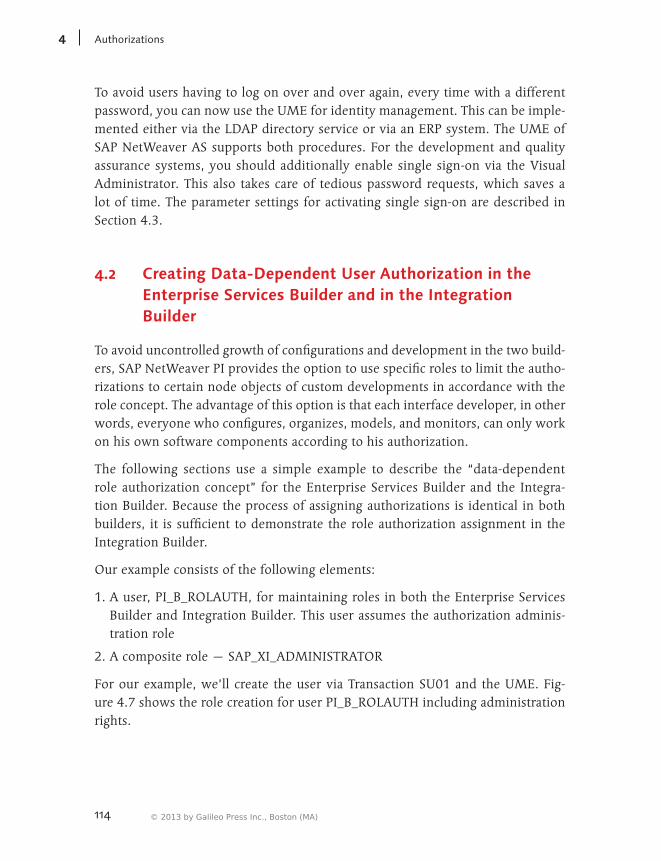
114
Authorizations4
To avoid users having to log on over and over again, every time with a different password, you can now use the UME for identity management. This can be imple-mented either via the LDAP directory service or via an ERP system. The UME of SAP NetWeaver AS supports both procedures. For the development and quality assurance systems, you should additionally enable single sign-on via the Visual Administrator. This also takes care of tedious password requests, which saves a lot of time. The parameter settings for activating single sign-on are described in Section 4.3.
4.2 Creating Data-Dependent User Authorization in the Enterprise Services Builder and in the Integration Builder
To avoid uncontrolled growth of configurations and development in the two build-ers, SAP NetWeaver PI provides the option to use specific roles to limit the autho-rizations to certain node objects of custom developments in accordance with the role concept. The advantage of this option is that each interface developer, in other words, everyone who configures, organizes, models, and monitors, can only work on his own software components according to his authorization.
The following sections use a simple example to describe the “data-dependent role authorization concept” for the Enterprise Services Builder and the Integra-tion Builder. Because the process of assigning authorizations is identical in both builders, it is sufficient to demonstrate the role authorization assignment in the Integration Builder.
Our example consists of the following elements:
1. A user, PI_B_ROLAUTH, for maintaining roles in both the Enterprise Services Builder and Integration Builder. This user assumes the authorization adminis-tration role
2. A composite role — SAP_XI_ADMINISTRATOR
For our example, we’ll create the user via Transaction SU01 and the UME. Fig-ure 4.7 shows the role creation for user PI_B_ROLAUTH including administration rights.
© 2013 by Galileo Press Inc., Boston (MA)
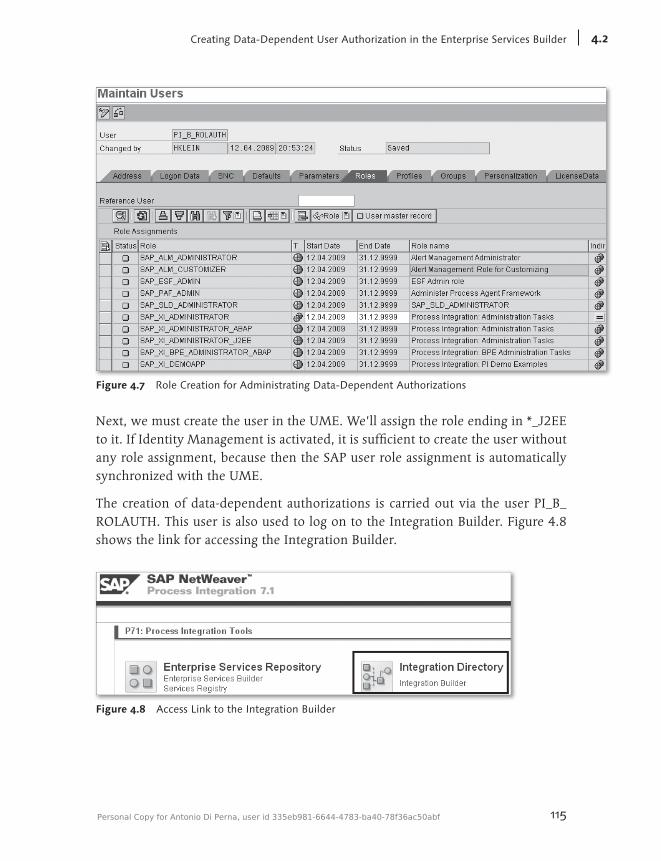
115
4.2CreatingData-DependentUserAuthorizationintheEnterpriseServicesBuilder
Figure 4.7 Role Creation for Administrating Data-Dependent Authorizations
Next, we must create the user in the UME. We’ll assign the role ending in *_J2EE to it. If Identity Management is activated, it is sufficient to create the user without any role assignment, because then the SAP user role assignment is automatically synchronized with the UME.
The creation of data-dependent authorizations is carried out via the user PI_B_ROLAUTH. This user is also used to log on to the Integration Builder. Figure 4.8 shows the link for accessing the Integration Builder.
Figure 4.8 Access Link to the Integration Builder
Personal Copy for Antonio Di Perna, user id 335eb981-6644-4783-ba40-78f36ac50abf
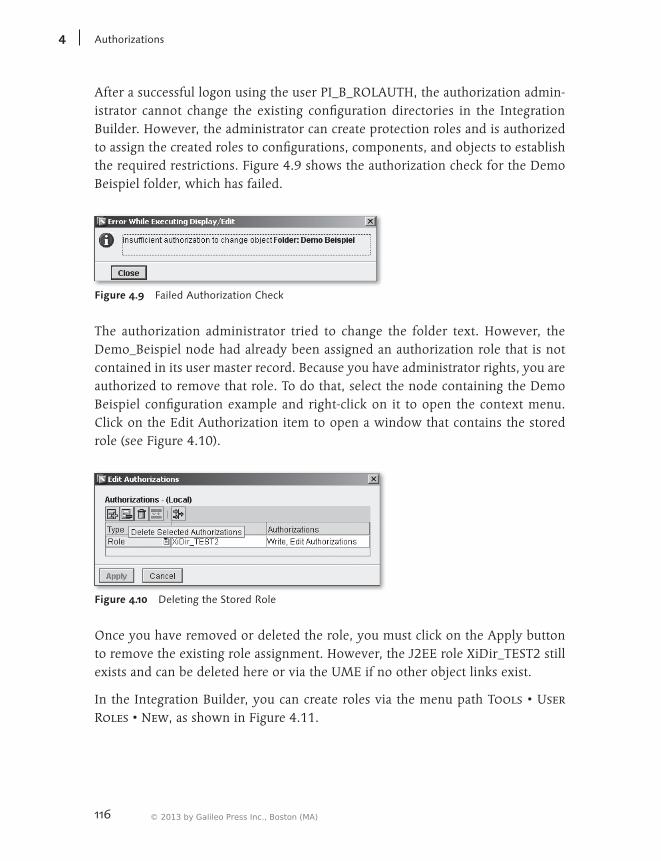
116
Authorizations4
After a successful logon using the user PI_B_ROLAUTH, the authorization admin-istrator cannot change the existing configuration directories in the Integration Builder. However, the administrator can create protection roles and is authorized to assign the created roles to configurations, components, and objects to establish the required restrictions. Figure 4.9 shows the authorization check for the Demo Beispiel folder, which has failed.
Figure 4.9 Failed Authorization Check
The authorization administrator tried to change the folder text. However, the Demo_Beispiel node had already been assigned an authorization role that is not contained in its user master record. Because you have administrator rights, you are authorized to remove that role. To do that, select the node containing the Demo Beispiel configuration example and right-click on it to open the context menu. Click on the Edit Authorization item to open a window that contains the stored role (see Figure 4.10).
Figure 4.10 Deleting the Stored Role
Once you have removed or deleted the role, you must click on the Apply button to remove the existing role assignment. However, the J2EE role XiDir_TEST2 still exists and can be deleted here or via the UME if no other object links exist.
In the Integration Builder, you can create roles via the menu path Tools • User Roles • New, as shown in Figure 4.11.
© 2013 by Galileo Press Inc., Boston (MA)
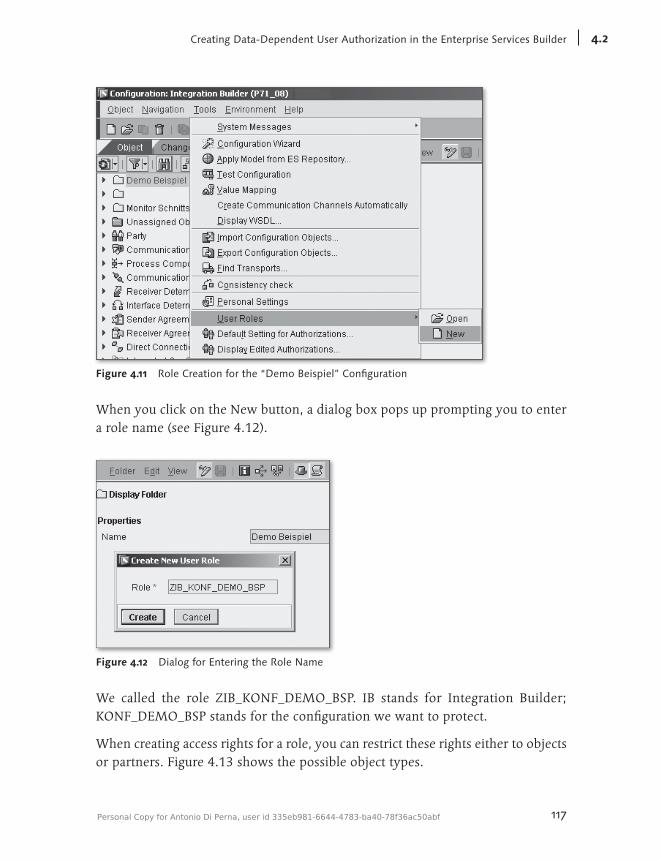
117
4.2CreatingData-DependentUserAuthorizationintheEnterpriseServicesBuilder
Figure 4.11 Role Creation for the “Demo Beispiel” Configuration
When you click on the New button, a dialog box pops up prompting you to enter a role name (see Figure 4.12).
Figure 4.12 Dialog for Entering the Role Name
We called the role ZIB_KONF_DEMO_BSP. IB stands for Integration Builder; KONF_DEMO_BSP stands for the configuration we want to protect.
When creating access rights for a role, you can restrict these rights either to objects or partners. Figure 4.13 shows the possible object types.
Personal Copy for Antonio Di Perna, user id 335eb981-6644-4783-ba40-78f36ac50abf

118
Authorizations4
Figure 4.13 Object Types for Authorization Restrictions
Alternatively, you can either include authorization checks (Include) or exclude those checks for individual objects (Exclude); the former requires the user to have the role, whereas in the latter case it would be better for the user not to have it. In this way, you can establish very efficient, but also very complex, role concepts for protecting objects. However, note that an increasing degree of complexity makes it much more difficult to manage your roles. In addition, you can maintain actions such as creating, changing, or deleting for those objects you want to protect. Fig-ure 4.14 shows the authorization rule editor for roles in the Integration Builder.
As you can see, you can store a number of rules per role; however, it will certainly not facilitate a retroactive error identification if you store many roles with many different rules. In our example, we only maintain the line that’s highlighted in the screenshot in the editor.
If you restrict an authorization via the partners, you can also restrict the party accounts. Moreover, the rule editor enables you to use two operators to include or exclude objects. The first operator allows you to include or exclude parties, whereas the second — combined — operator lets you include or exclude the types per party and per rule. The possible actions you can maintain are the same as those for objects. Figure 4.15 shows the rule editor for parties.
© 2013 by Galileo Press Inc., Boston (MA)
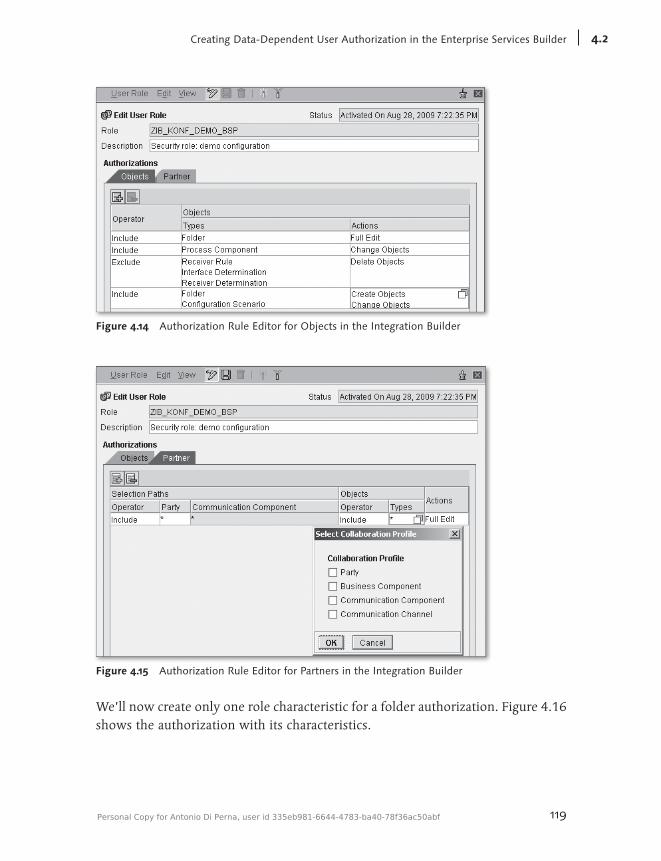
119
4.2CreatingData-DependentUserAuthorizationintheEnterpriseServicesBuilder
Figure 4.14 Authorization Rule Editor for Objects in the Integration Builder
Figure 4.15 Authorization Rule Editor for Partners in the Integration Builder
We’ll now create only one role characteristic for a folder authorization. Figure 4.16 shows the authorization with its characteristics.
Personal Copy for Antonio Di Perna, user id 335eb981-6644-4783-ba40-78f36ac50abf
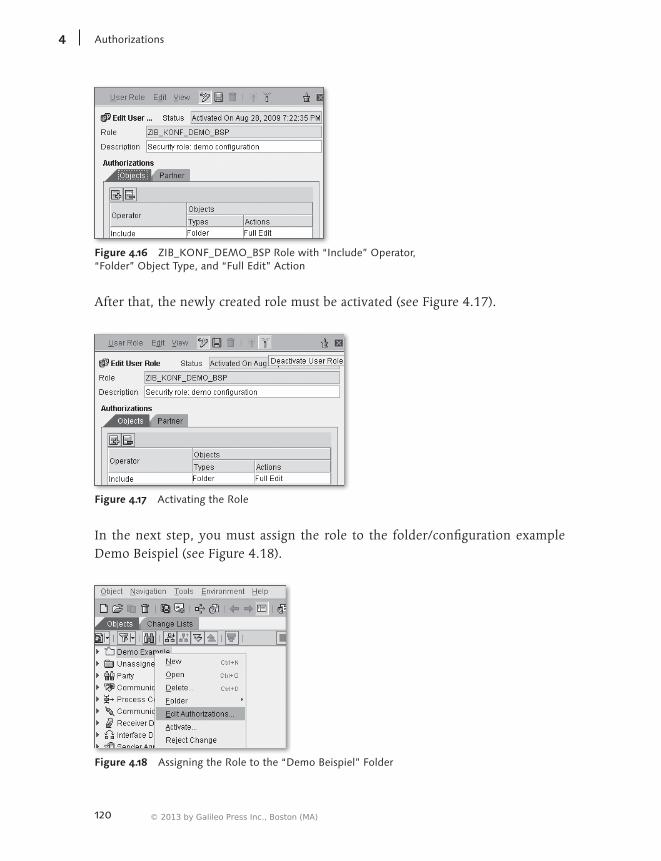
120
Authorizations4
Figure 4.16 ZIB_KONF_DEMO_BSP Role with “Include” Operator, “Folder” Object Type, and “Full Edit” Action
After that, the newly created role must be activated (see Figure 4.17).
Figure 4.17 Activating the Role
In the next step, you must assign the role to the folder/configuration example Demo Beispiel (see Figure 4.18).
Figure 4.18 Assigning the Role to the “Demo Beispiel” Folder
© 2013 by Galileo Press Inc., Boston (MA)
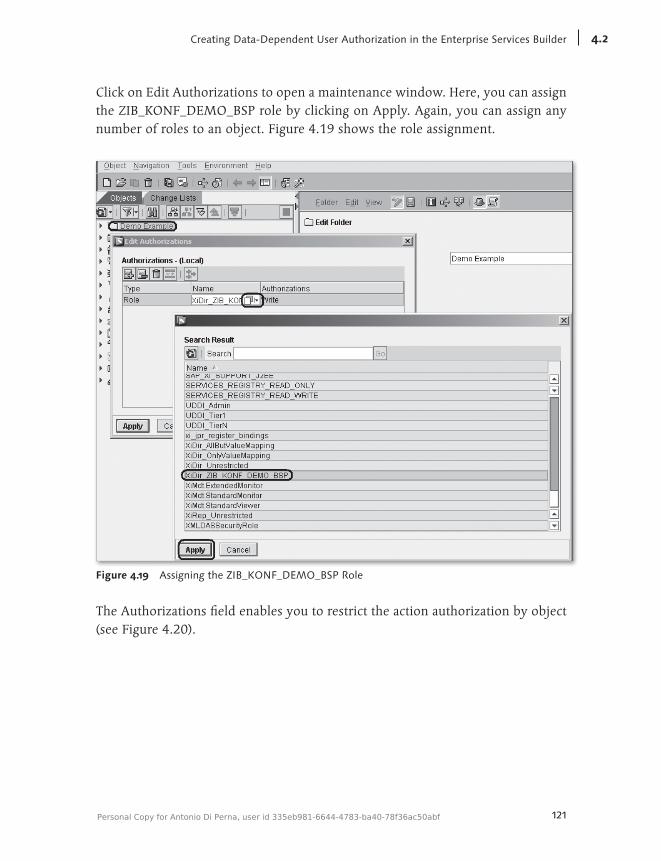
121
4.2CreatingData-DependentUserAuthorizationintheEnterpriseServicesBuilder
Click on Edit Authorizations to open a maintenance window. Here, you can assign the ZIB_KONF_DEMO_BSP role by clicking on Apply. Again, you can assign any number of roles to an object. Figure 4.19 shows the role assignment.
Figure 4.19 Assigning the ZIB_KONF_DEMO_BSP Role
The Authorizations field enables you to restrict the action authorization by object (see Figure 4.20).
Personal Copy for Antonio Di Perna, user id 335eb981-6644-4783-ba40-78f36ac50abf
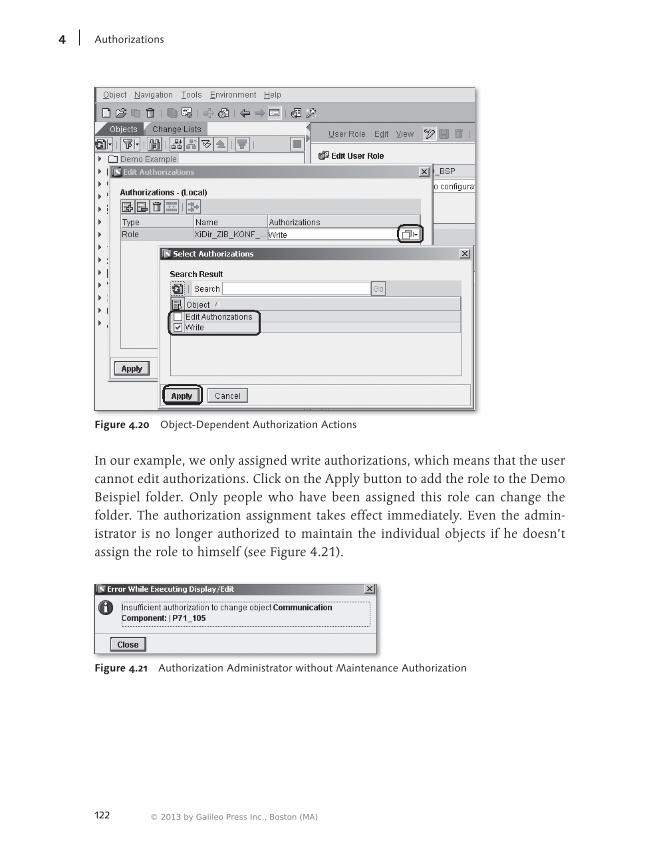
122
Authorizations4
Figure 4.20 Object-Dependent Authorization Actions
In our example, we only assigned write authorizations, which means that the user cannot edit authorizations. Click on the Apply button to add the role to the Demo Beispiel folder. Only people who have been assigned this role can change the folder. The authorization assignment takes effect immediately. Even the admin-istrator is no longer authorized to maintain the individual objects if he doesn’t assign the role to himself (see Figure 4.21).
Figure 4.21 Authorization Administrator without Maintenance Authorization
© 2013 by Galileo Press Inc., Boston (MA)
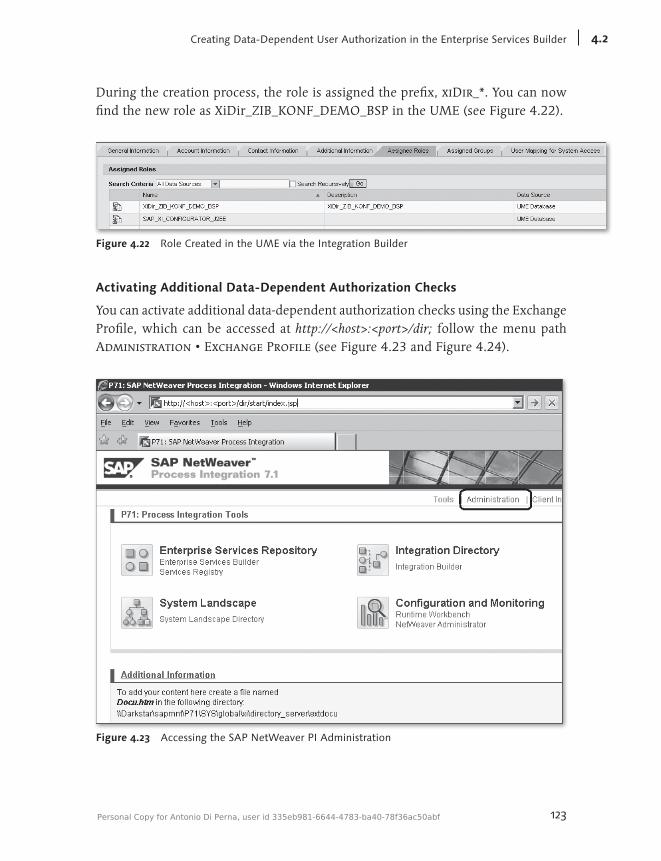
123
4.2CreatingData-DependentUserAuthorizationintheEnterpriseServicesBuilder
During the creation process, the role is assigned the prefix, xiDir_*. You can now find the new role as XiDir_ZIB_KONF_DEMO_BSP in the UME (see Figure 4.22).
Figure 4.22 Role Created in the UME via the Integration Builder
Activating Additional Data-Dependent Authorization Checks
You can activate additional data-dependent authorization checks using the Exchange Profile, which can be accessed at http://<host>:<port>/dir; follow the menu path Administration • Exchange Profile (see Figure 4.23 and Figure 4.24).
Figure 4.23 Accessing the SAP NetWeaver PI Administration
Personal Copy for Antonio Di Perna, user id 335eb981-6644-4783-ba40-78f36ac50abf
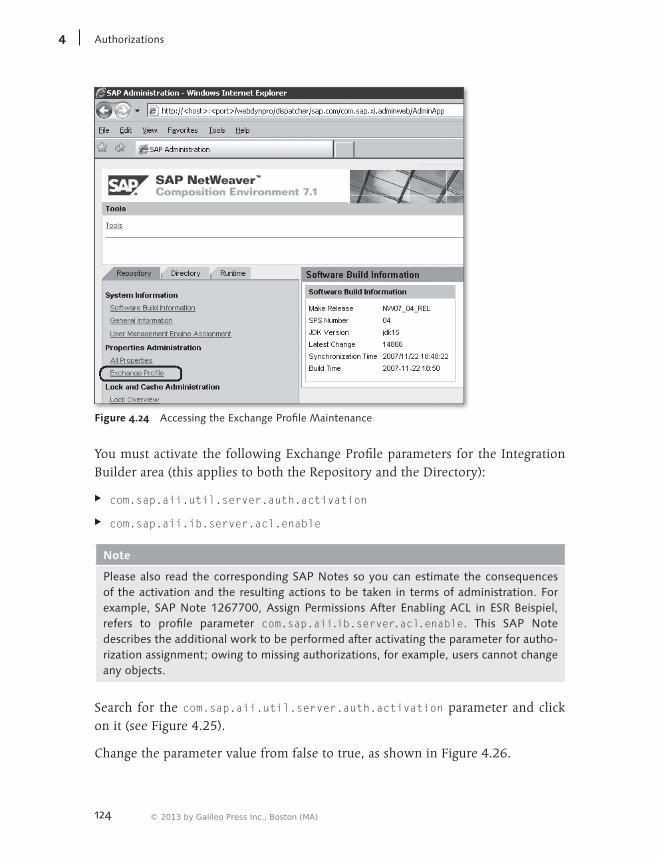
124
Authorizations4
Figure 4.24 Accessing the Exchange Profile Maintenance
You must activate the following Exchange Profile parameters for the Integration Builder area (this applies to both the Repository and the Directory):
EE com.sap.aii.util.server.auth.activation
EE com.sap.aii.ib.server.acl.enable
Note
Please also read the corresponding SAP Notes so you can estimate the consequences of the activation and the resulting actions to be taken in terms of administration. For example, SAP Note 1267700, Assign Permissions After Enabling ACL in ESR Beispiel, refers to profile parameter com.sap.aii.ib.server.acl.enable. This SAP Note describes the additional work to be performed after activating the parameter for autho-rization assignment; owing to missing authorizations, for example, users cannot change any objects.
Search for the com.sap.aii.util.server.auth.activation parameter and click on it (see Figure 4.25).
Change the parameter value from false to true, as shown in Figure 4.26.
© 2013 by Galileo Press Inc., Boston (MA)
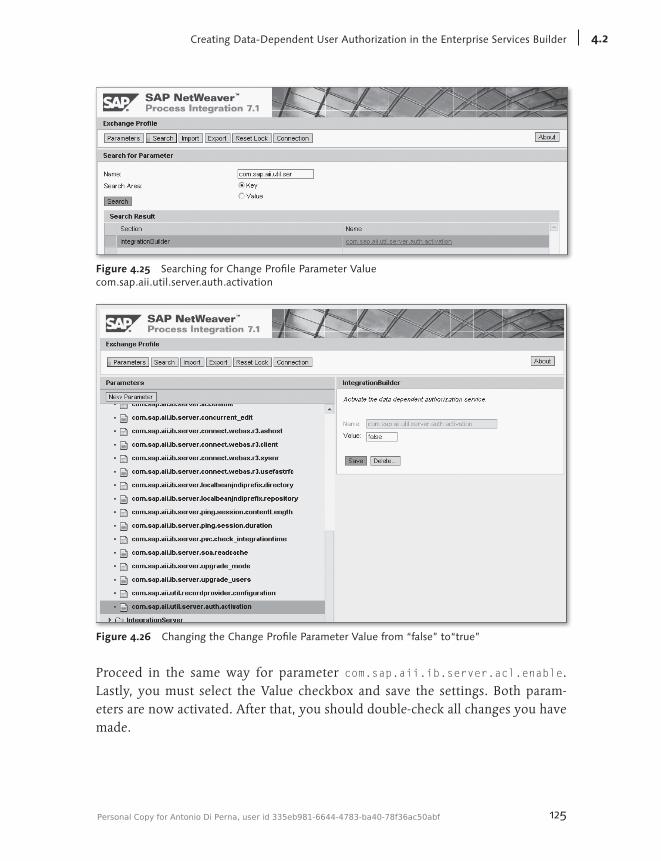
125
4.2CreatingData-DependentUserAuthorizationintheEnterpriseServicesBuilder
Figure 4.25 Searching for Change Profile Parameter Value com.sap.aii.util.server.auth.activation
Figure 4.26 Changing the Change Profile Parameter Value from “false” to“true”
Proceed in the same way for parameter com.sap.aii.ib.server.acl.enable. Lastly, you must select the Value checkbox and save the settings. Both param-eters are now activated. After that, you should double-check all changes you have made.
Personal Copy for Antonio Di Perna, user id 335eb981-6644-4783-ba40-78f36ac50abf
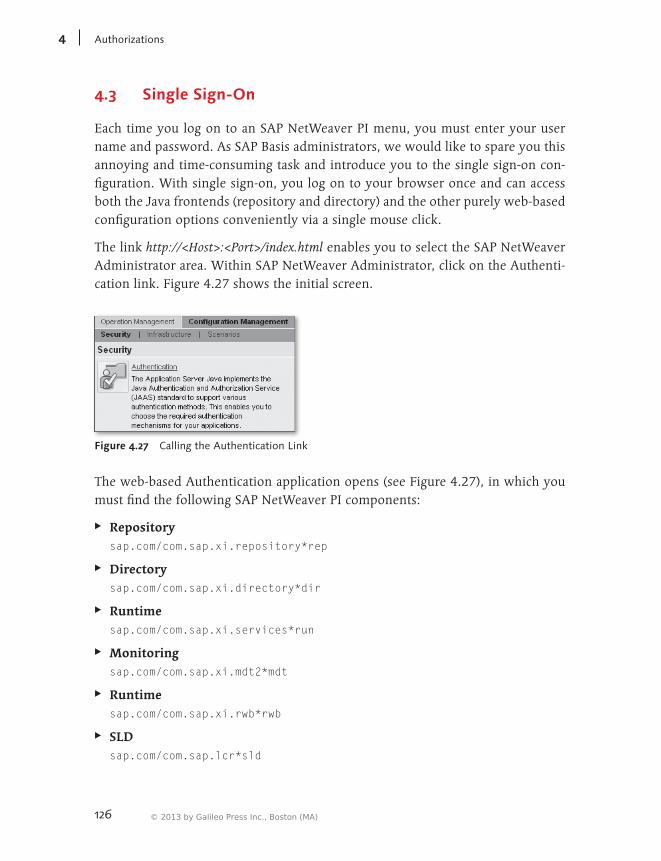
126
Authorizations4
4.3 Single Sign-On
Each time you log on to an SAP NetWeaver PI menu, you must enter your user name and password. As SAP Basis administrators, we would like to spare you this annoying and time-consuming task and introduce you to the single sign-on con-figuration. With single sign-on, you log on to your browser once and can access both the Java frontends (repository and directory) and the other purely web-based configuration options conveniently via a single mouse click.
The link http://<Host>:<Port>/index.html enables you to select the SAP NetWeaver Administrator area. Within SAP NetWeaver Administrator, click on the Authenti-cation link. Figure 4.27 shows the initial screen.
Figure 4.27 Calling the Authentication Link
The web-based Authentication application opens (see Figure 4.27), in which you must find the following SAP NetWeaver PI components:
EE Repository sap.com/com.sap.xi.repository*rep
EE Directory sap.com/com.sap.xi.directory*dir
EE Runtime sap.com/com.sap.xi.services*run
EE Monitoring sap.com/com.sap.xi.mdt2*mdt
EE Runtime sap.com/com.sap.xi.rwb*rwb
EE SLD sap.com/com.sap.lcr*sld
© 2013 by Galileo Press Inc., Boston (MA)
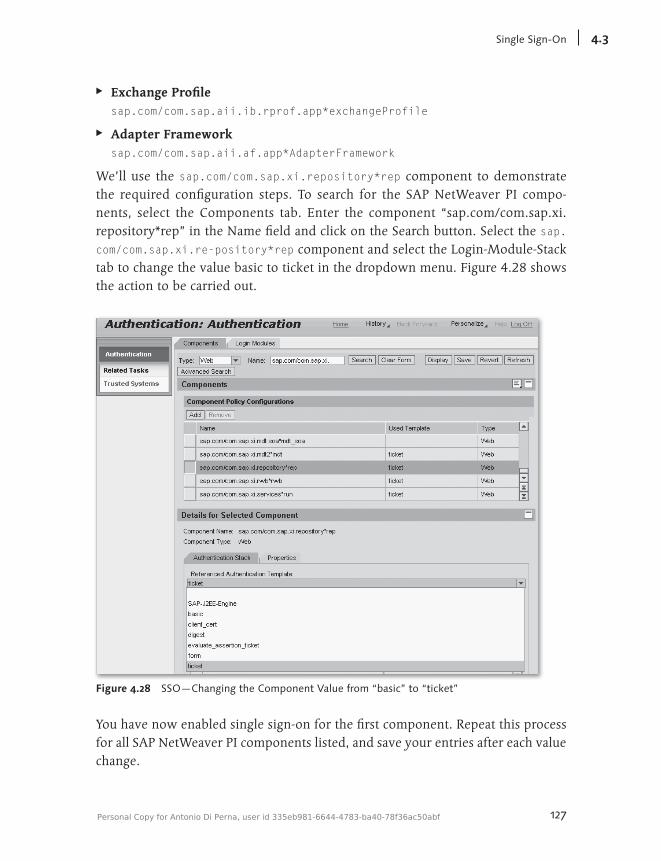
127
SingleSign-On 4.3
EE Exchange Profile sap.com/com.sap.aii.ib.rprof.app*exchangeProfile
EE Adapter Framework sap.com/com.sap.aii.af.app*AdapterFramework
We’ll use the sap.com/com.sap.xi.repository*rep component to demonstrate the required configuration steps. To search for the SAP NetWeaver PI compo-nents, select the Components tab. Enter the component “sap.com/com.sap.xi. repository*rep” in the Name field and click on the Search button. Select the sap.com/com.sap.xi.re-pository*rep component and select the Login-Module-Stack tab to change the value basic to ticket in the dropdown menu. Figure 4.28 shows the action to be carried out.
Figure 4.28 SSO—Changing the Component Value from “basic” to “ticket”
You have now enabled single sign-on for the first component. Repeat this process for all SAP NetWeaver PI components listed, and save your entries after each value change.
Personal Copy for Antonio Di Perna, user id 335eb981-6644-4783-ba40-78f36ac50abf
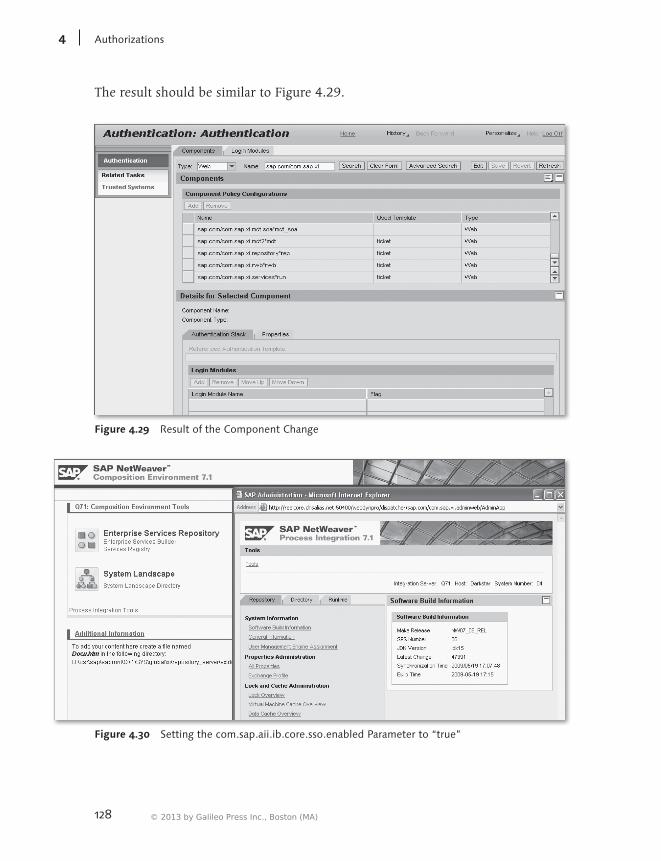
128
Authorizations4
The result should be similar to Figure 4.29.
Figure 4.29 Result of the Component Change
Figure 4.30 Setting the com.sap.aii.ib.core.sso.enabled Parameter to “true”
© 2013 by Galileo Press Inc., Boston (MA)
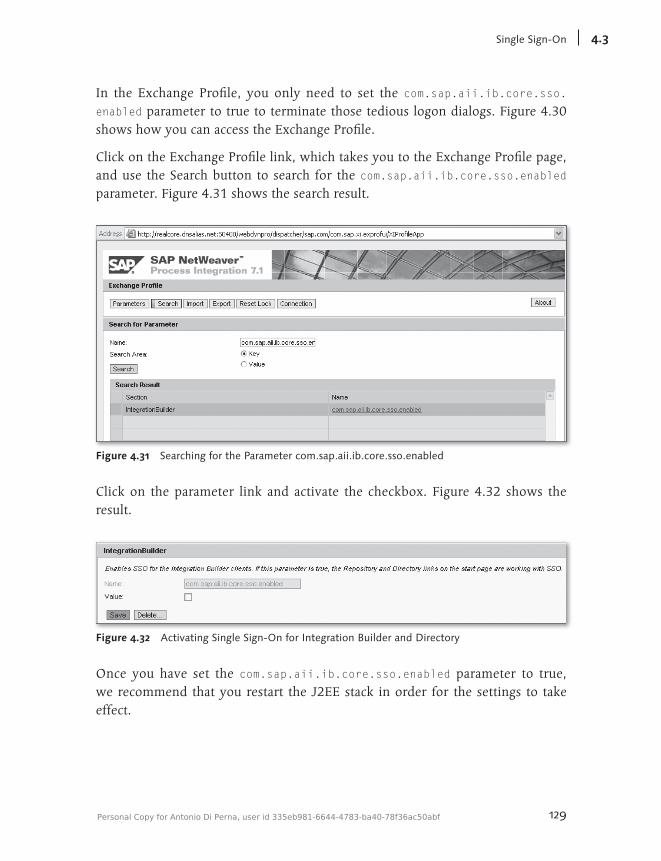
129
SingleSign-On 4.3
In the Exchange Profile, you only need to set the com.sap.aii.ib.core.sso.enabled parameter to true to terminate those tedious logon dialogs. Figure 4.30 shows how you can access the Exchange Profile.
Click on the Exchange Profile link, which takes you to the Exchange Profile page, and use the Search button to search for the com.sap.aii.ib.core.sso.enabled parameter. Figure 4.31 shows the search result.
Figure 4.31 Searching for the Parameter com.sap.aii.ib.core.sso.enabled
Click on the parameter link and activate the checkbox. Figure 4.32 shows the result.
Figure 4.32 Activating Single Sign-On for Integration Builder and Directory
Once you have set the com.sap.aii.ib.core.sso.enabled parameter to true, we recommend that you restart the J2EE stack in order for the settings to take effect.
Personal Copy for Antonio Di Perna, user id 335eb981-6644-4783-ba40-78f36ac50abf
130
Authorizations4
You can find comprehensive documentation on this topic at http://help.sap.com; follow the menu path SAP NetWeaver • SAP NetWeaver Process Integration 7.1 • Configuration Guide. Search for “Single Sign-on Configuration – Procedure for PI Web Components.”
The SAP Help Portal provides additional technical information about setting up and configuring logon tickets and certificates to enable communication between the Workbench Runtime and AS ABAP.
© 2013 by Galileo Press Inc., Boston (MA)
131
5 Performance Optimization Measures
Within SAP NetWeaver PI, there are many ways to improve the performance of individual interfaces, or even of the whole system. Of course, the available mea-sures depend on the specific hardware used and the corresponding operating sys-tem of your application server, as well as on the installed patch levels. In this chapter, we’ll share tips and tricks that are platform-independent and are therefore applicable in most architectures. The topic structure is based on the existing SAP documents (especially the SAP NetWeaver Process Integration Tuning Guide from the SAP Developer Network, sdn.sap.com), which we enhanced with examples from our own experience. Here we address only those topics that are most relevant to the subject matter.
5.1 Customizing the SAP NetWeaver Application Server for SAP NetWeaver PI 7.1
Because SAP NetWeaver PI uses remote function call (RFC) connectivity exten-sively, we’ll focus on the optimization of RFC settings on both the SAP ERP side and the J2EE side. Thereafter, we’ll discuss the individual parameter settings for the RFC and the gateway parameterization on the SAP ERP side.
Because configuring the RFC quota and the JCo service provider requires specific configuration steps, we’ll deal with these individually in the following two sec-tions before we specifically describe each parameter setting in detail.
5.1.1 RFC Quota on the SAP ERP Side
Depending on the number of existing CPUs and the main memory, the ABAP side of the SAP NetWeaver PI server can be optimized as usual by different param-eterizations. Examples include the number of work processes that are available in the SAP ERP basis stack for processing the queues. You should note that the J2EE stack logs on to the SAP ERP basis stack per RFC dialog user. This means you don’t
Personal Copy for Antonio Di Perna, user id 335eb981-6644-4783-ba40-78f36ac50abf
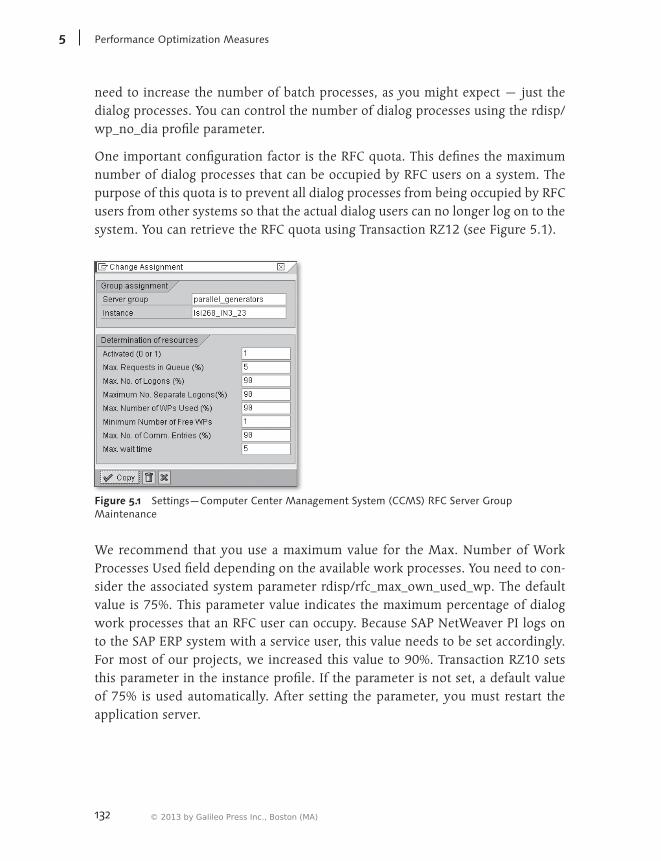
132
PerformanceOptimizationMeasures5
need to increase the number of batch processes, as you might expect — just the dialog processes. You can control the number of dialog processes using the rdisp/wp_no_dia profile parameter.
One important configuration factor is the RFC quota. This defines the maximum number of dialog processes that can be occupied by RFC users on a system. The purpose of this quota is to prevent all dialog processes from being occupied by RFC users from other systems so that the actual dialog users can no longer log on to the system. You can retrieve the RFC quota using Transaction RZ12 (see Figure 5.1).
Figure 5.1 Settings—Computer Center Management System (CCMS) RFC Server Group Maintenance
We recommend that you use a maximum value for the Max. Number of Work Processes Used field depending on the available work processes. You need to con-sider the associated system parameter rdisp/rfc_max_own_used_wp. The default value is 75%. This parameter value indicates the maximum percentage of dialog work processes that an RFC user can occupy. Because SAP NetWeaver PI logs on to the SAP ERP system with a service user, this value needs to be set accordingly. For most of our projects, we increased this value to 90%. Transaction RZ10 sets this parameter in the instance profile. If the parameter is not set, a default value of 75% is used automatically. After setting the parameter, you must restart the application server.
© 2013 by Galileo Press Inc., Boston (MA)
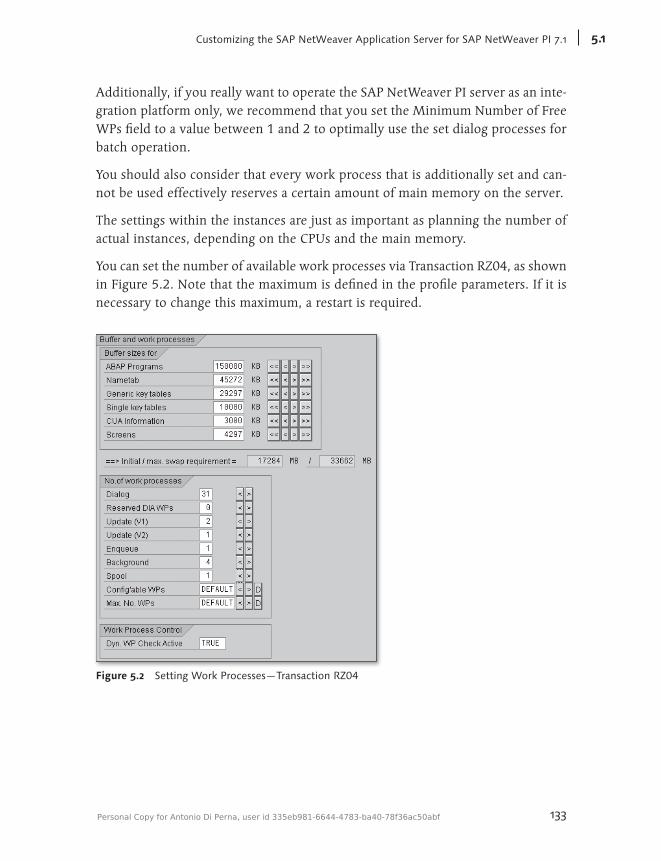
133
CustomizingtheSAPNetWeaverApplicationServerforSAPNetWeaverPI7.1 5.1
Additionally, if you really want to operate the SAP NetWeaver PI server as an inte-gration platform only, we recommend that you set the Minimum Number of Free WPs field to a value between 1 and 2 to optimally use the set dialog processes for batch operation.
You should also consider that every work process that is additionally set and can-not be used effectively reserves a certain amount of main memory on the server.
The settings within the instances are just as important as planning the number of actual instances, depending on the CPUs and the main memory.
You can set the number of available work processes via Transaction RZ04, as shown in Figure 5.2. Note that the maximum is defined in the profile parameters. If it is necessary to change this maximum, a restart is required.
Figure 5.2 Setting Work Processes—Transaction RZ04
Personal Copy for Antonio Di Perna, user id 335eb981-6644-4783-ba40-78f36ac50abf
134
PerformanceOptimizationMeasures5
Now that you’ve looked at the number of instances and the number of processes per instance, don’t forget to check the number of existing queues per basis instance as well. The number of queues that accept incoming data in parallel and then send it simultaneously (qRFC queues) is hard to configure and depends largely on the average parallel requests and on the size of the messages to be processed, which must be dealt with by the SAP NetWeaver PI system. Later we’ll discuss in detail the necessary parameterizations and some recommended values based on our proj-ect experience.
5.1.2 JCo Service Provider on the J2EE Side
Now that we’ve looked at the settings within the ABAP instances and at the num-ber of ABAP instances, we should also consider the J2EE instances.
The first item to clarify is the number of J2EE instances to be installed. A good ini-tial value is two instances, but the actual number of J2EE instances depends largely on the number of activities to be carried out simultaneously (e.g., mappings) and the used adapters on your J2EE stack. In our implementations, we did quite well with two initial instances, even for high-performing interfaces. However, for more intense activities and parallel operations on the J2EE stack, a scaling according to the J2EE instances is recommended. Because this is a very singular characteristic that depends on the used interfaces and systems, there is no general formula that we can recommend you apply.
As we did for the for the ABAP stack, here also, we must consider the number of processes running within a single instance on the J2EE side as well. You should note the number of processes required for the individual RFC destinations of the JCo RFC Provider service. In our experience, values are between 15 and 20 pro-cesses for this service per instance.
Conversely, if you’re using multiple J2EE server nodes and find that there is no effective load distribution, the reason might be that the number of RfcEngine threads per server is set too high. In this case, reduce the number of threads for the RFC destination AI_RUNTIME_* depending on the number of parallel mapping requests. This problem exists because the SAP gateway does not know the J2EE configuration. To achieve an effective load distribution, you should observe this information and configure your system accordingly.
© 2013 by Galileo Press Inc., Boston (MA)
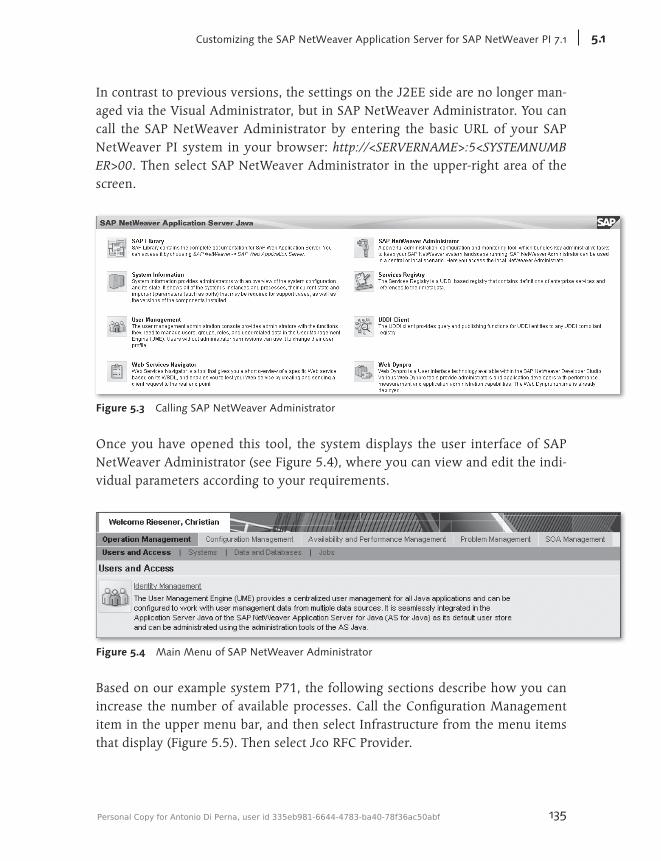
135
CustomizingtheSAPNetWeaverApplicationServerforSAPNetWeaverPI7.1 5.1
In contrast to previous versions, the settings on the J2EE side are no longer man-aged via the Visual Administrator, but in SAP NetWeaver Administrator. You can call the SAP NetWeaver Administrator by entering the basic URL of your SAP NetWeaver PI system in your browser: http://<SERVERNAME>:5<SYSTEMNUMBER>00. Then select SAP NetWeaver Administrator in the upper-right area of the screen.
Figure 5.3 Calling SAP NetWeaver Administrator
Once you have opened this tool, the system displays the user interface of SAP NetWeaver Administrator (see Figure 5.4), where you can view and edit the indi-vidual parameters according to your requirements.
Figure 5.4 Main Menu of SAP NetWeaver Administrator
Based on our example system P71, the following sections describe how you can increase the number of available processes. Call the Configuration Management item in the upper menu bar, and then select Infrastructure from the menu items that display (Figure 5.5). Then select Jco RFC Provider.
Personal Copy for Antonio Di Perna, user id 335eb981-6644-4783-ba40-78f36ac50abf
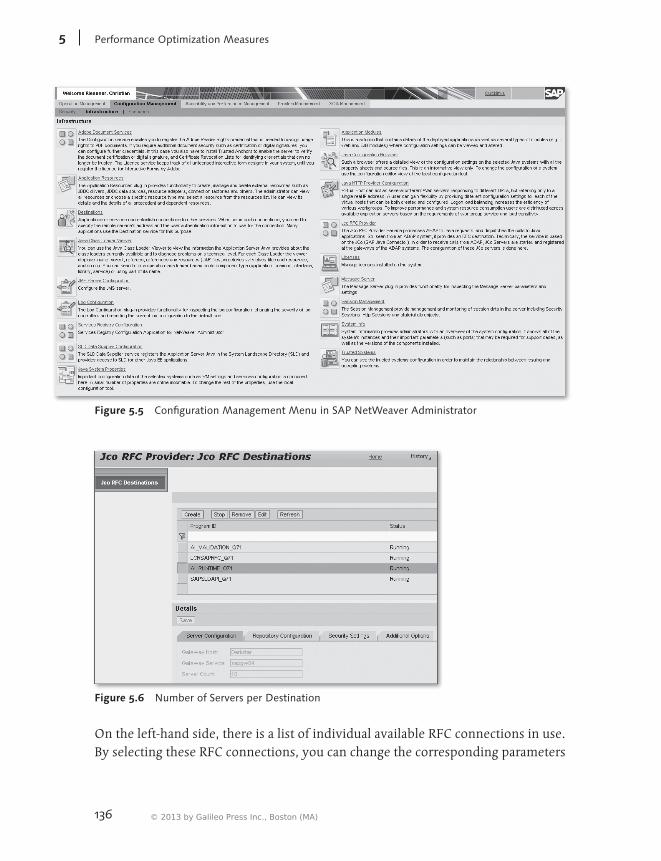
136
PerformanceOptimizationMeasures5
Figure 5.5 Configuration Management Menu in SAP NetWeaver Administrator
Figure 5.6 Number of Servers per Destination
On the left-hand side, there is a list of individual available RFC connections in use. By selecting these RFC connections, you can change the corresponding parameters
© 2013 by Galileo Press Inc., Boston (MA)
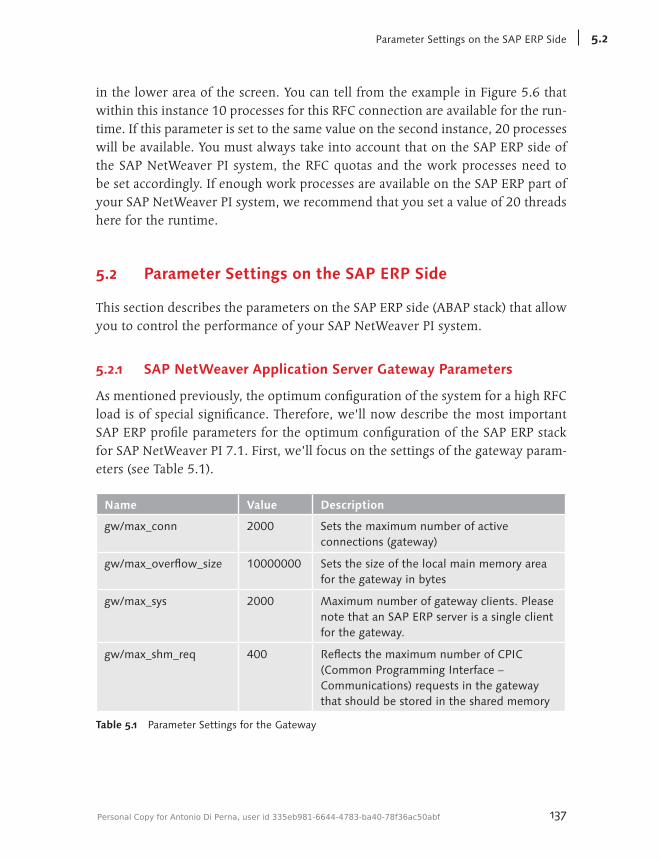
137
ParameterSettingsontheSAPERPSide 5.2
in the lower area of the screen. You can tell from the example in Figure 5.6 that within this instance 10 processes for this RFC connection are available for the run-time. If this parameter is set to the same value on the second instance, 20 processes will be available. You must always take into account that on the SAP ERP side of the SAP NetWeaver PI system, the RFC quotas and the work processes need to be set accordingly. If enough work processes are available on the SAP ERP part of your SAP NetWeaver PI system, we recommend that you set a value of 20 threads here for the runtime.
5.2 Parameter Settings on the SAP ERP Side
This section describes the parameters on the SAP ERP side (ABAP stack) that allow you to control the performance of your SAP NetWeaver PI system.
5.2.1 SAP NetWeaver Application Server Gateway Parameters
As mentioned previously, the optimum configuration of the system for a high RFC load is of special significance. Therefore, we’ll now describe the most important SAP ERP profile parameters for the optimum configuration of the SAP ERP stack for SAP NetWeaver PI 7.1. First, we’ll focus on the settings of the gateway param-eters (see Table 5.1).
Name Value Description
gw/max_conn 2000 Sets the maximum number of active connections (gateway)
gw/max_overflow_size 10000000 Sets the size of the local main memory area for the gateway in bytes
gw/max_sys 2000 Maximum number of gateway clients. Please note that an SAP ERP server is a single client for the gateway.
gw/max_shm_req 400 Reflects the maximum number of CPIC (Common Programming Interface – Communications) requests in the gateway that should be stored in the shared memory
Table 5.1 Parameter Settings for the Gateway
Personal Copy for Antonio Di Perna, user id 335eb981-6644-4783-ba40-78f36ac50abf
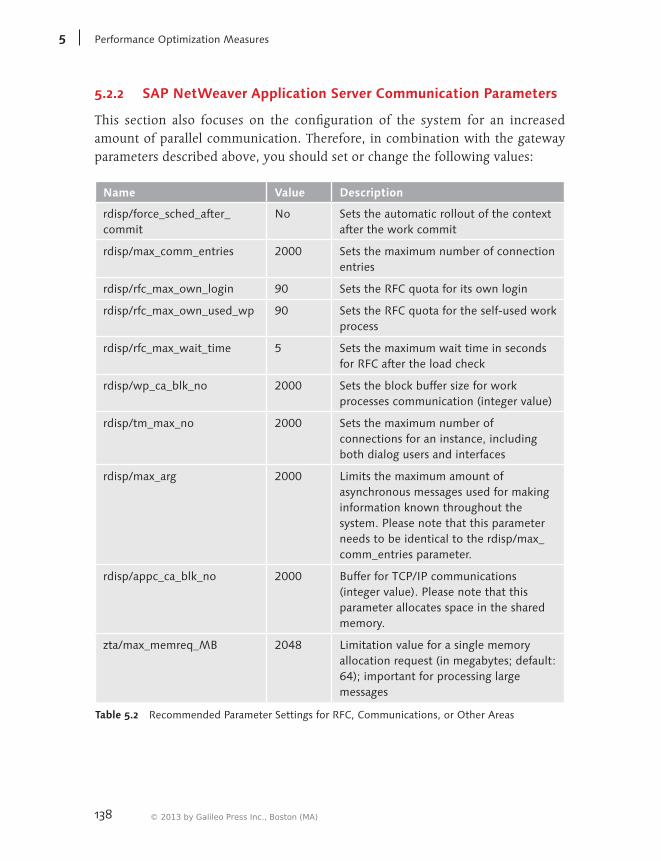
138
PerformanceOptimizationMeasures5
5.2.2 SAP NetWeaver Application Server Communication Parameters
This section also focuses on the configuration of the system for an increased amount of parallel communication. Therefore, in combination with the gateway parameters described above, you should set or change the following values:
Name Value Description
rdisp/force_sched_after_commit
No Sets the automatic rollout of the context after the work commit
rdisp/max_comm_entries 2000 Sets the maximum number of connection entries
rdisp/rfc_max_own_login 90 Sets the RFC quota for its own login
rdisp/rfc_max_own_used_wp 90 Sets the RFC quota for the self-used work process
rdisp/rfc_max_wait_time 5 Sets the maximum wait time in seconds for RFC after the load check
rdisp/wp_ca_blk_no 2000 Sets the block buffer size for work processes communication (integer value)
rdisp/tm_max_no 2000 Sets the maximum number of connections for an instance, including both dialog users and interfaces
rdisp/max_arg 2000 Limits the maximum amount of asynchronous messages used for making information known throughout the system. Please note that this parameter needs to be identical to the rdisp/max_comm_entries parameter.
rdisp/appc_ca_blk_no 2000 Buffer for TCP/IP communications (integer value). Please note that this parameter allocates space in the shared memory.
zta/max_memreq_MB 2048 Limitation value for a single memory allocation request (in megabytes; default: 64); important for processing large messages
Table 5.2 Recommended Parameter Settings for RFC, Communications, or Other Areas
© 2013 by Galileo Press Inc., Boston (MA)
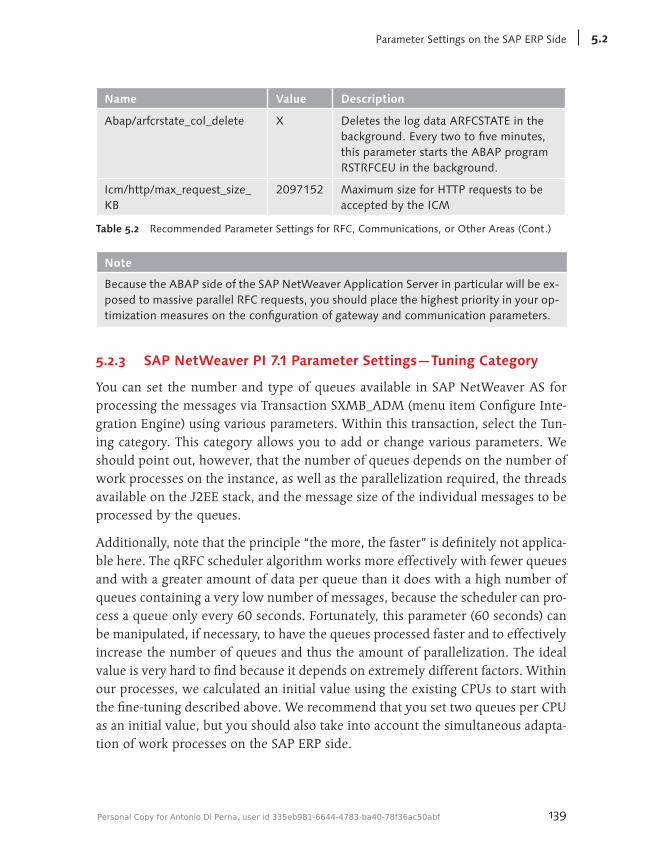
139
ParameterSettingsontheSAPERPSide 5.2
Name Value Description
Abap/arfcrstate_col_delete X Deletes the log data ARFCSTATE in the background. Every two to five minutes, this parameter starts the ABAP program RSTRFCEU in the background.
Icm/http/max_request_size_KB
2097152 Maximum size for HTTP requests to be accepted by the ICM
Table 5.2 Recommended Parameter Settings for RFC, Communications, or Other Areas (Cont.)
Note
Because the ABAP side of the SAP NetWeaver Application Server in particular will be ex-posed to massive parallel RFC requests, you should place the highest priority in your op-timization measures on the configuration of gateway and communication parameters.
5.2.3 SAP NetWeaver PI 7.1 Parameter Settings—Tuning Category
You can set the number and type of queues available in SAP NetWeaver AS for processing the messages via Transaction SXMB_ADM (menu item Configure Inte-gration Engine) using various parameters. Within this transaction, select the Tun-ing category. This category allows you to add or change various parameters. We should point out, however, that the number of queues depends on the number of work processes on the instance, as well as the parallelization required, the threads available on the J2EE stack, and the message size of the individual messages to be processed by the queues.
Additionally, note that the principle “the more, the faster” is definitely not applica-ble here. The qRFC scheduler algorithm works more effectively with fewer queues and with a greater amount of data per queue than it does with a high number of queues containing a very low number of messages, because the scheduler can pro-cess a queue only every 60 seconds. Fortunately, this parameter (60 seconds) can be manipulated, if necessary, to have the queues processed faster and to effectively increase the number of queues and thus the amount of parallelization. The ideal value is very hard to find because it depends on extremely different factors. Within our processes, we calculated an initial value using the existing CPUs to start with the fine-tuning described above. We recommend that you set two queues per CPU as an initial value, but you should also take into account the simultaneous adapta-tion of work processes on the SAP ERP side.
Personal Copy for Antonio Di Perna, user id 335eb981-6644-4783-ba40-78f36ac50abf
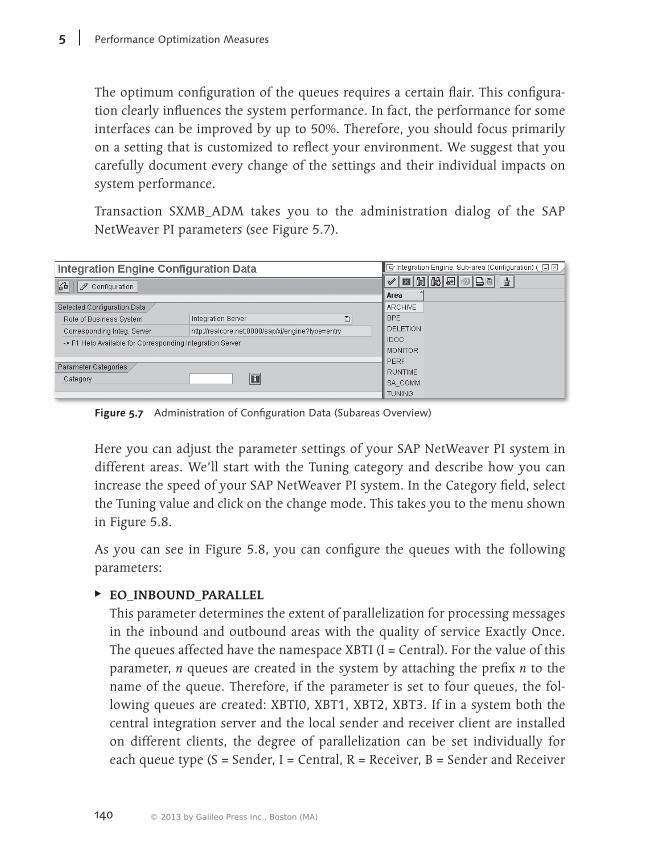
140
PerformanceOptimizationMeasures5
The optimum configuration of the queues requires a certain flair. This configura-tion clearly influences the system performance. In fact, the performance for some interfaces can be improved by up to 50%. Therefore, you should focus primarily on a setting that is customized to reflect your environment. We suggest that you carefully document every change of the settings and their individual impacts on system performance.
Transaction SXMB_ADM takes you to the administration dialog of the SAP NetWeaver PI parameters (see Figure 5.7).
Figure 5.7 Administration of Configuration Data (Subareas Overview)
Here you can adjust the parameter settings of your SAP NetWeaver PI system in different areas. We’ll start with the Tuning category and describe how you can increase the speed of your SAP NetWeaver PI system. In the Category field, select the Tuning value and click on the change mode. This takes you to the menu shown in Figure 5.8.
As you can see in Figure 5.8, you can configure the queues with the following parameters:
EE EO_INBOUND_PARALLEL This parameter determines the extent of parallelization for processing messages in the inbound and outbound areas with the quality of service Exactly Once. The queues affected have the namespace XBTI (I = Central). For the value of this parameter, n queues are created in the system by attaching the prefix n to the name of the queue. Therefore, if the parameter is set to four queues, the fol-lowing queues are created: XBTI0, XBT1, XBT2, XBT3. If in a system both the central integration server and the local sender and receiver client are installed on different clients, the degree of parallelization can be set individually for each queue type (S = Sender, I = Central, R = Receiver, B = Sender and Receiver
© 2013 by Galileo Press Inc., Boston (MA)
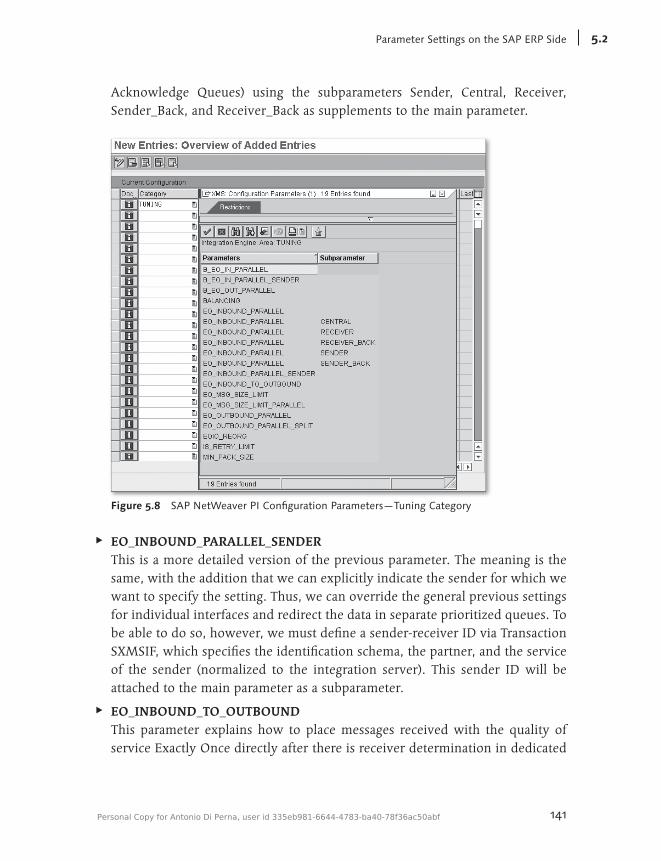
141
ParameterSettingsontheSAPERPSide 5.2
Acknowledge Queues) using the subparameters Sender, Central, Receiver, Sender_Back, and Receiver_Back as supplements to the main parameter.
Figure 5.8 SAP NetWeaver PI Configuration Parameters—Tuning Category
EE EO_INBOUND_PARALLEL_SENDER This is a more detailed version of the previous parameter. The meaning is the same, with the addition that we can explicitly indicate the sender for which we want to specify the setting. Thus, we can override the general previous settings for individual interfaces and redirect the data in separate prioritized queues. To be able to do so, however, we must define a sender-receiver ID via Transaction SXMSIF, which specifies the identification schema, the partner, and the service of the sender (normalized to the integration server). This sender ID will be attached to the main parameter as a subparameter.
EE EO_INBOUND_TO_OUTBOUND This parameter explains how to place messages received with the quality of service Exactly Once directly after there is receiver determination in dedicated
Personal Copy for Antonio Di Perna, user id 335eb981-6644-4783-ba40-78f36ac50abf
142
PerformanceOptimizationMeasures5
outbound queues for output processing. You can force this behavior by set-ting this parameter to 1. If you keep the default parameter value of 0, these messages are processed during inbound processing. Depending on the type of messages to be processed, you can increase the performance by having the mes-sages processed in separate queues.
EE EO_OUTBOUND_PARALLEL This parameter is very significant for the sending speed of your messages with the quality of service Exactly Once, because it defines the degree of paralleliza-tion of outbound processing for the messages on the integration server. The integration server places an outbound message with this attribute in a sepa-rate internal queue called XBTO+<Receiver ID>+<Number> or XBTB+<Receiver ID>+<Number> for the confirmation of receipt. The number is a four-digit value generated at runtime. To fine-tune individual interfaces, you can define an individual degree of parallelization specifically for this key using a subpa-rameter by combining the values of an identification schema, the partner, and the service. However, we recommend that you don’t set this degree of paral-lelization too high (even if your SAP NetWeaver PI system could handle it), because you might cause problems on your target system. The processing speed of your target system should therefore determine the degree of parallelization that is defined. The default value is 3. On average, we increased this value to 10 and did quite well with this setting in our SAP landscape. Possible values for this parameter are between 1 and 10,000.
EE IS_RETRY_LIMIT This parameter defines the maximum total number of retries when the asyn-chronous processing finds a repeatable error and the integration server sets the retry status during queue processing. This parameter will only be effective if a bigger retry value was set within the affected qRFC queue. If not, the value of this parameter will be ignored and overridden by the queue parameter. Pos-sible values for this parameter are between 0 and 100. We recommend a value between 10 and 15.
EE EO_MSG_SIZE_LIMIT This parameter defines a threshold for the size of a message. If a message exceeds this threshold, the message is processed serially in its own special queue called XBTL. If the integration server must process several larger messages simultane-ously, you can increase performance considerably with this parameter, because there might not be enough main memory for processing several bigger mes-
© 2013 by Galileo Press Inc., Boston (MA)
143
ParameterSettingsontheSAPERPSide 5.2
sages concurrently. Furthermore, your system produces a higher I/O rate owing to paging, for example, which might affect the whole system. Serial processing within this special queue ensures that only one bigger message can impact the main memory at a time. The integration server can then continue to process the smaller messages in parallel. If this situation occurs in your integration sce-narios, we recommend you that you enable this parameter and set it to reflect the size of your messages.
EE EO_MSG_SIZE_LIMIT_PARALLEL This parameter enables you to adjust the parameter described above even fur-ther to fine-tune the main memory load. All messages exceeding the thresh-old value of the EO_MSG_SIZE_LIMIT parameter are edited serially. Via this parameter, you can still determine a user-defined parallelization. The messages are processed in the special queue XBTL with a counter. Possible values for this parameter are between 1 and 10,000. Depending on the main memory of your integration server and the size of your messages, you should choose this value very carefully so as not to achieve the opposite effect for your performance.
EE B_EO_IN_PARALLEL This parameter is dependent on the EO_INBOUND_PARALLEL parameter described previously. It ensures an even distribution of the individual messages to the queues defined in the EO_INBOUND_PARALLEL parameter. The value of this parameter represents the maximum number of messages per queue. Acti-vate this parameter if you previously increased the number of parallelizations in the EO_INBOUND_PARALLEL parameter to force a redistribution of mes-sages to the individual queues. Thus, a quicker processing of these queues can be achieved. However, please note that the value of the EO_INBOUND_PAR-ALLEL parameter multiplied by the value of the B_EO_IN_PARALLEL param-eter should be bigger than the number of entries in the corresponding queues because otherwise a sensible redistribution of messages is not possible. Possible values for this parameter are between 1 and 100,000. The parameter can be activated only via the BALANCING parameter. If this parameter is not active, these settings will not take effect.
EE B_EO_OUT_PARALLEL This parameter is the counterpart of the B_EO_IN_PARALLEL parameter. It defines the message distribution for the sender process, that is, for outbound queues. The definitions are identical to the parameter described above. Note that this parameter is activated only by setting the BALANCING parameter. Pos-sible values for this parameter are between 1 and 100,000.
Personal Copy for Antonio Di Perna, user id 335eb981-6644-4783-ba40-78f36ac50abf

144
PerformanceOptimizationMeasures5
EE B_EO_IN_PARALLEL_SENDER Like the two parameters described above, this parameter refers to a redistribu-tion or equal distribution of messages to specific queues. In this case, equal distribution refers to the queues defined in the B_EO_IN_PARALLEL_SENDER parameter. This parameter can take values between 1 and 100,000 and is depen-dent on the BALANCING parameter
EE BALANCING The BALANCING parameter activates the parameters described above and ensures an equal distribution of messages to the individual queues, which were described in their respective parameters. If the redistribution of queues was successful, the parameter is disabled automatically so that the messages are processed normally again. Because the customizing table is locked by the trans-action in which you set the parameter, we recommend that you leave the trans-action immediately after setting this value so that the integration server can change the value accordingly after a successful redistribution of queues.
5.2.4 SAP NetWeaver PI 7.1 Parameter Settings—Runtime Category
In the previously described transaction, you can maintain various parameters under the Runtime category as well. The following parameters can affect the per-formance of your system in a positive or negative way:
EE ENGINE_TYPE With this parameter, you define the type of your SAP NetWeaver PI server depending on the current client. If you do not set the parameter, the client is configured as a non–SAP NetWeaver PI engine by default. The HUB value causes the client to be configured as an integration server. If you enter the value LOC, the client is configured as a sender-receiver system.
EE HTTP_TIMEOUT This parameter defines the timeout for an HTTP connection between two data packages in your network. Note that when you set this parameter, the icm/server_port_n profile parameter is overridden. If you want to prevent this from occurring, you should set its value to 0 to use the profile setting. If the network connection of your company is slow, we recommend that you increase the value accordingly. Otherwise, a timeout between 700 and 1000 should suffice in most instances. If a faster termination is needed, you can reduce this value to improve your system’s response time.
© 2013 by Galileo Press Inc., Boston (MA)
145
ParameterSettingsontheSAPERPSide 5.2
EE ERROR_ON_NO_RECV_FOUND This parameter determines the two qualities of service — Exactly Once and Exactly Once in Order — if the queue is stopped when an error occurs and no receiver can be detected or if the processing is finished and considered to be accurate. If you want to mark the processing as faulty in this situation and stop the entire qRFC queue, you must set this parameter to 1. Otherwise, you need to set this parameter to 0. With regard to performance, the respective queue is stopped, and error-free messages are not processed until you manually intervene.
EE ACK_SYSTEM_FAILURE This parameter defines whether your system should report system errors for asynchronous messages expecting an acknowledgment. Enabling this param-eter results in a slight overhead on your system. The value 1 enables the report-ing of system errors. The value 0 disables the reporting of errors.
EE CACHE_DIRTY_READ SAP NetWeaver PI uses a cache to optimize message processing. This cache needs to be updated on a regular basis. You can do this either manually or auto-matically. If messages are being processed at the time, the system can choose between two options:
EE It can interrupt processing messages and wait for the cache refresh
EE It can use the old cache contents and continue processing
This parameter controls these two options. If you set it to 0, the system waits until the cache has been refreshed. If the parameter is set to 1, processing is not interrupted, and the old cache contents are used. This parameter thus influences the performance during data processing. You should understand that messages are not necessarily affected by a change in the cache. If, for example, a target system that was not involved in processing current messages was changed, the old contents of the cache can be used free of problems. Therefore, if you can implement changes that do not affect interfaces in productive operation or that are currently being processed, you can set this parameter to 1 to improve performance. If you cannot ensure that the interfaces will not be adversely affected, we recommend that you use a value of 0.
EE CACHE_REFRESH_PACKAGES_SIZE When setting this parameter, you should reduce the default value of 10 MB to a value of 7 MB. SAP NetWeaver PI copies the configuration files per HTTP from the Integration Directory into the SAP NetWeaver PI cache. This parameter
Personal Copy for Antonio Di Perna, user id 335eb981-6644-4783-ba40-78f36ac50abf
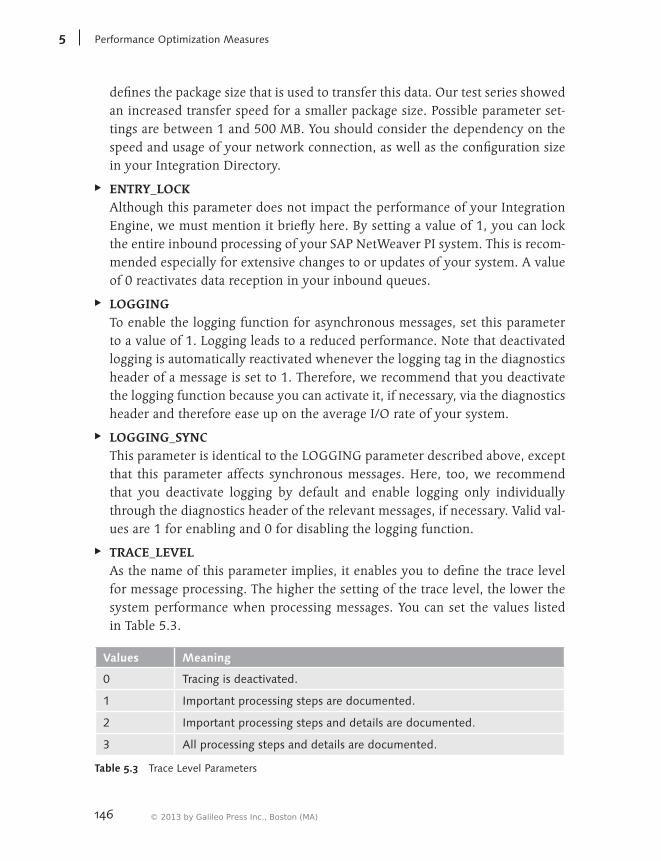
146
PerformanceOptimizationMeasures5
defines the package size that is used to transfer this data. Our test series showed an increased transfer speed for a smaller package size. Possible parameter set-tings are between 1 and 500 MB. You should consider the dependency on the speed and usage of your network connection, as well as the configuration size in your Integration Directory.
EE ENTRY_LOCK Although this parameter does not impact the performance of your Integration Engine, we must mention it briefly here. By setting a value of 1, you can lock the entire inbound processing of your SAP NetWeaver PI system. This is recom-mended especially for extensive changes to or updates of your system. A value of 0 reactivates data reception in your inbound queues.
EE LOGGING To enable the logging function for asynchronous messages, set this parameter to a value of 1. Logging leads to a reduced performance. Note that deactivated logging is automatically reactivated whenever the logging tag in the diagnostics header of a message is set to 1. Therefore, we recommend that you deactivate the logging function because you can activate it, if necessary, via the diagnostics header and therefore ease up on the average I/O rate of your system.
EE LOGGING_SYNC This parameter is identical to the LOGGING parameter described above, except that this parameter affects synchronous messages. Here, too, we recommend that you deactivate logging by default and enable logging only individually through the diagnostics header of the relevant messages, if necessary. Valid val-ues are 1 for enabling and 0 for disabling the logging function.
EE TRACE_LEVEL As the name of this parameter implies, it enables you to define the trace level for message processing. The higher the setting of the trace level, the lower the system performance when processing messages. You can set the values listed in Table 5.3.
Values Meaning
0 Tracing is deactivated.
1 Important processing steps are documented.
2 Important processing steps and details are documented.
3 All processing steps and details are documented.
Table 5.3 Trace Level Parameters
© 2013 by Galileo Press Inc., Boston (MA)
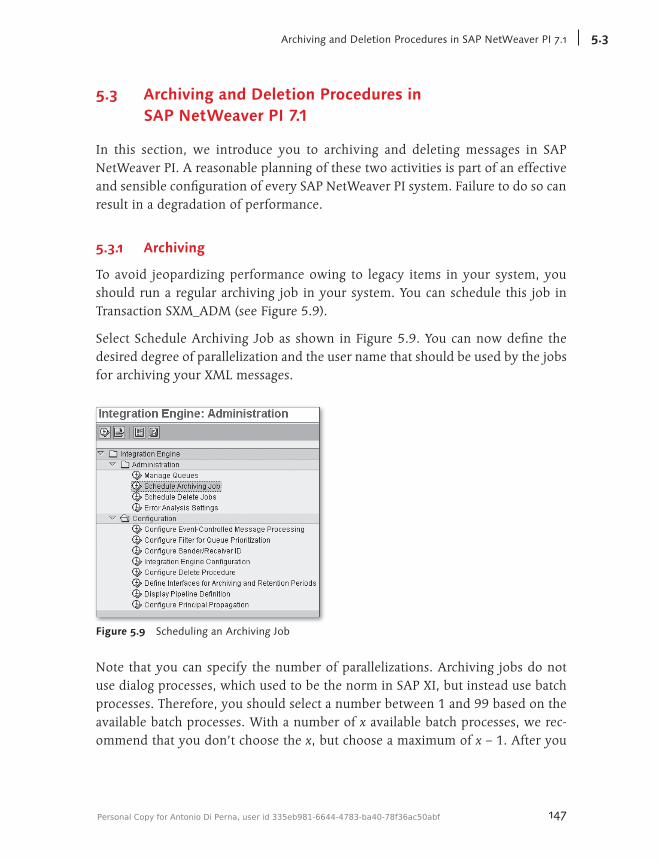
147
ArchivingandDeletionProceduresinSAPNetWeaverPI7.1 5.3
5.3 Archiving and Deletion Procedures in SAP NetWeaver PI 7.1
In this section, we introduce you to archiving and deleting messages in SAP NetWeaver PI. A reasonable planning of these two activities is part of an effective and sensible configuration of every SAP NetWeaver PI system. Failure to do so can result in a degradation of performance.
5.3.1 Archiving
To avoid jeopardizing performance owing to legacy items in your system, you should run a regular archiving job in your system. You can schedule this job in Transaction SXM_ADM (see Figure 5.9).
Select Schedule Archiving Job as shown in Figure 5.9. You can now define the desired degree of parallelization and the user name that should be used by the jobs for archiving your XML messages.
Figure 5.9 Scheduling an Archiving Job
Note that you can specify the number of parallelizations. Archiving jobs do not use dialog processes, which used to be the norm in SAP XI, but instead use batch processes. Therefore, you should select a number between 1 and 99 based on the available batch processes. With a number of x available batch processes, we rec-ommend that you don’t choose the x, but choose a maximum of x – 1. After you
Personal Copy for Antonio Di Perna, user id 335eb981-6644-4783-ba40-78f36ac50abf
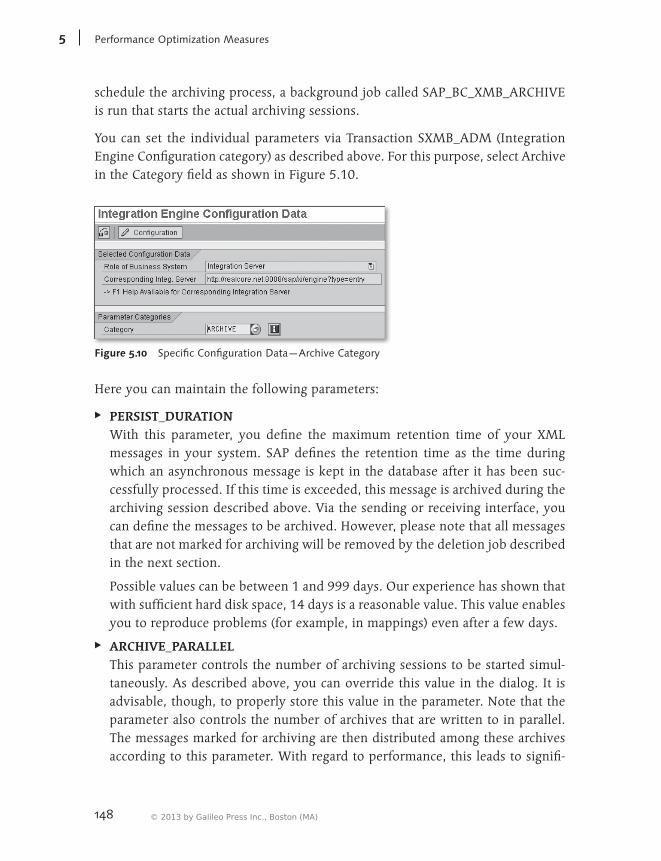
148
PerformanceOptimizationMeasures5
schedule the archiving process, a background job called SAP_BC_XMB_ARCHIVE is run that starts the actual archiving sessions.
You can set the individual parameters via Transaction SXMB_ADM (Integration Engine Configuration category) as described above. For this purpose, select Archive in the Category field as shown in Figure 5.10.
Figure 5.10 Specific Configuration Data—Archive Category
Here you can maintain the following parameters:
EE PERSIST_DURATION With this parameter, you define the maximum retention time of your XML messages in your system. SAP defines the retention time as the time during which an asynchronous message is kept in the database after it has been suc-cessfully processed. If this time is exceeded, this message is archived during the archiving session described above. Via the sending or receiving interface, you can define the messages to be archived. However, please note that all messages that are not marked for archiving will be removed by the deletion job described in the next section.
Possible values can be between 1 and 999 days. Our experience has shown that with sufficient hard disk space, 14 days is a reasonable value. This value enables you to reproduce problems (for example, in mappings) even after a few days.
EE ARCHIVE_PARALLEL This parameter controls the number of archiving sessions to be started simul-taneously. As described above, you can override this value in the dialog. It is advisable, though, to properly store this value in the parameter. Note that the parameter also controls the number of archives that are written to in parallel. The messages marked for archiving are then distributed among these archives according to this parameter. With regard to performance, this leads to signifi-
© 2013 by Galileo Press Inc., Boston (MA)
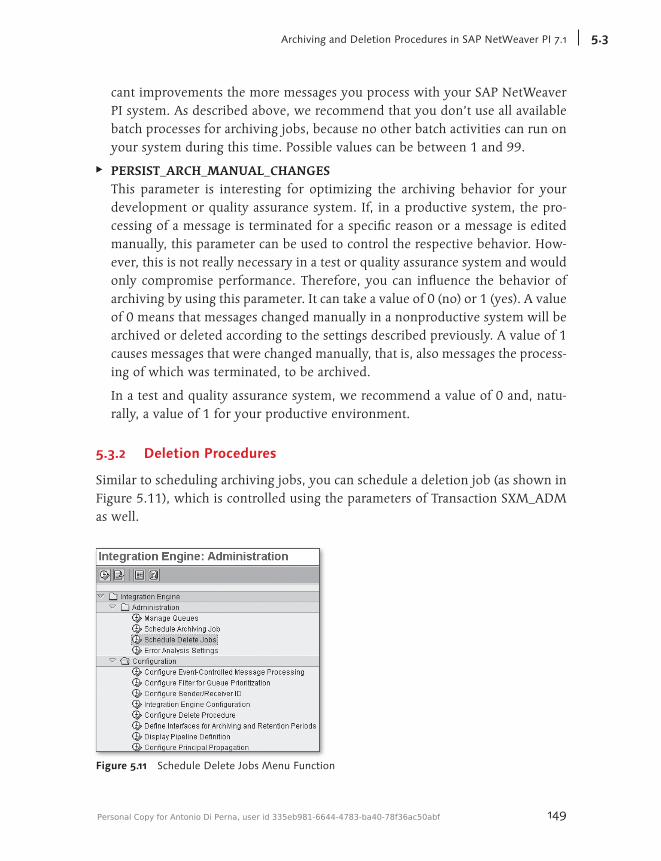
149
ArchivingandDeletionProceduresinSAPNetWeaverPI7.1 5.3
cant improvements the more messages you process with your SAP NetWeaver PI system. As described above, we recommend that you don’t use all available batch processes for archiving jobs, because no other batch activities can run on your system during this time. Possible values can be between 1 and 99.
EE PERSIST_ARCH_MANUAL_CHANGES This parameter is interesting for optimizing the archiving behavior for your development or quality assurance system. If, in a productive system, the pro-cessing of a message is terminated for a specific reason or a message is edited manually, this parameter can be used to control the respective behavior. How-ever, this is not really necessary in a test or quality assurance system and would only compromise performance. Therefore, you can influence the behavior of archiving by using this parameter. It can take a value of 0 (no) or 1 (yes). A value of 0 means that messages changed manually in a nonproductive system will be archived or deleted according to the settings described previously. A value of 1 causes messages that were changed manually, that is, also messages the process-ing of which was terminated, to be archived.
In a test and quality assurance system, we recommend a value of 0 and, natu-rally, a value of 1 for your productive environment.
5.3.2 Deletion Procedures
Similar to scheduling archiving jobs, you can schedule a deletion job (as shown in Figure 5.11), which is controlled using the parameters of Transaction SXM_ADM as well.
Figure 5.11 Schedule Delete Jobs Menu Function
Personal Copy for Antonio Di Perna, user id 335eb981-6644-4783-ba40-78f36ac50abf
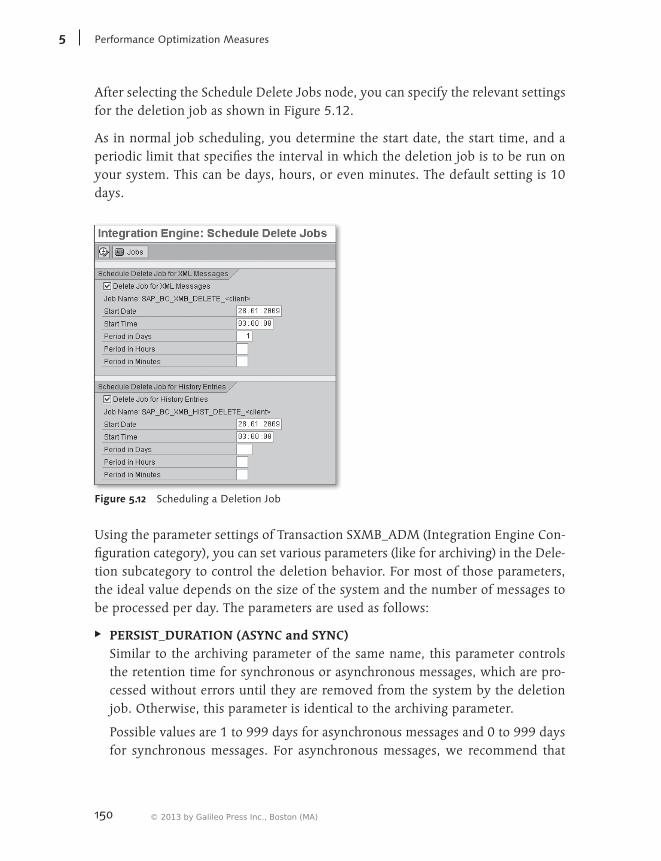
150
PerformanceOptimizationMeasures5
After selecting the Schedule Delete Jobs node, you can specify the relevant settings for the deletion job as shown in Figure 5.12.
As in normal job scheduling, you determine the start date, the start time, and a periodic limit that specifies the interval in which the deletion job is to be run on your system. This can be days, hours, or even minutes. The default setting is 10 days.
Figure 5.12 Scheduling a Deletion Job
Using the parameter settings of Transaction SXMB_ADM (Integration Engine Con-figuration category), you can set various parameters (like for archiving) in the Dele-tion subcategory to control the deletion behavior. For most of those parameters, the ideal value depends on the size of the system and the number of messages to be processed per day. The parameters are used as follows:
EE PERSIST_DURATION (ASYNC and SYNC) Similar to the archiving parameter of the same name, this parameter controls the retention time for synchronous or asynchronous messages, which are pro-cessed without errors until they are removed from the system by the deletion job. Otherwise, this parameter is identical to the archiving parameter.
Possible values are 1 to 999 days for asynchronous messages and 0 to 999 days for synchronous messages. For asynchronous messages, we recommend that
© 2013 by Galileo Press Inc., Boston (MA)
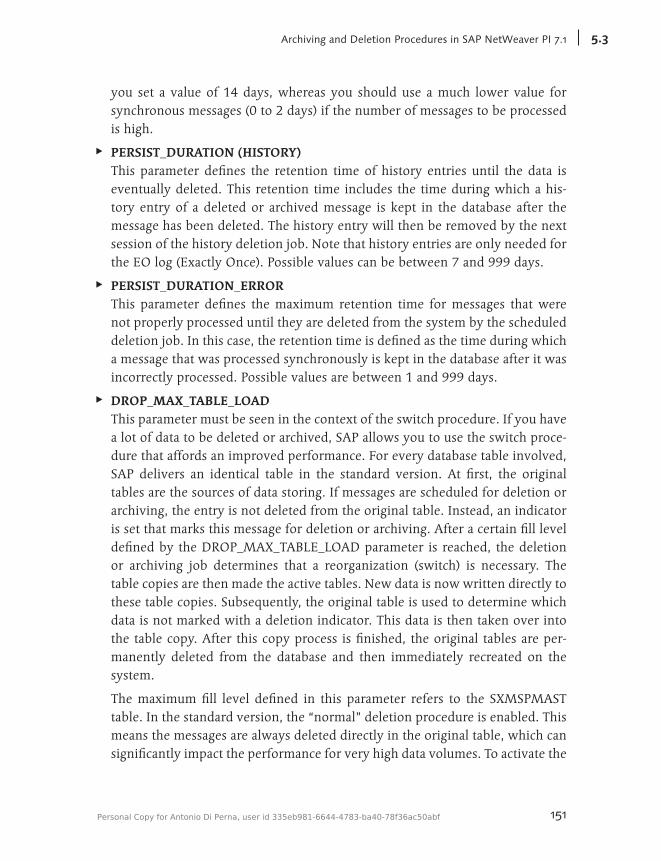
151
ArchivingandDeletionProceduresinSAPNetWeaverPI7.1 5.3
you set a value of 14 days, whereas you should use a much lower value for synchronous messages (0 to 2 days) if the number of messages to be processed is high.
EE PERSIST_DURATION (HISTORY) This parameter defines the retention time of history entries until the data is eventually deleted. This retention time includes the time during which a his-tory entry of a deleted or archived message is kept in the database after the message has been deleted. The history entry will then be removed by the next session of the history deletion job. Note that history entries are only needed for the EO log (Exactly Once). Possible values can be between 7 and 999 days.
EE PERSIST_DURATION_ERROR This parameter defines the maximum retention time for messages that were not properly processed until they are deleted from the system by the scheduled deletion job. In this case, the retention time is defined as the time during which a message that was processed synchronously is kept in the database after it was incorrectly processed. Possible values are between 1 and 999 days.
EE DROP_MAX_TABLE_LOAD This parameter must be seen in the context of the switch procedure. If you have a lot of data to be deleted or archived, SAP allows you to use the switch proce-dure that affords an improved performance. For every database table involved, SAP delivers an identical table in the standard version. At first, the original tables are the sources of data storing. If messages are scheduled for deletion or archiving, the entry is not deleted from the original table. Instead, an indicator is set that marks this message for deletion or archiving. After a certain fill level defined by the DROP_MAX_TABLE_LOAD parameter is reached, the deletion or archiving job determines that a reorganization (switch) is necessary. The table copies are then made the active tables. New data is now written directly to these table copies. Subsequently, the original table is used to determine which data is not marked with a deletion indicator. This data is then taken over into the table copy. After this copy process is finished, the original tables are per-manently deleted from the database and then immediately recreated on the system.
The maximum fill level defined in this parameter refers to the SXMSPMAST table. In the standard version, the “normal” deletion procedure is enabled. This means the messages are always deleted directly in the original table, which can significantly impact the performance for very high data volumes. To activate the
Personal Copy for Antonio Di Perna, user id 335eb981-6644-4783-ba40-78f36ac50abf
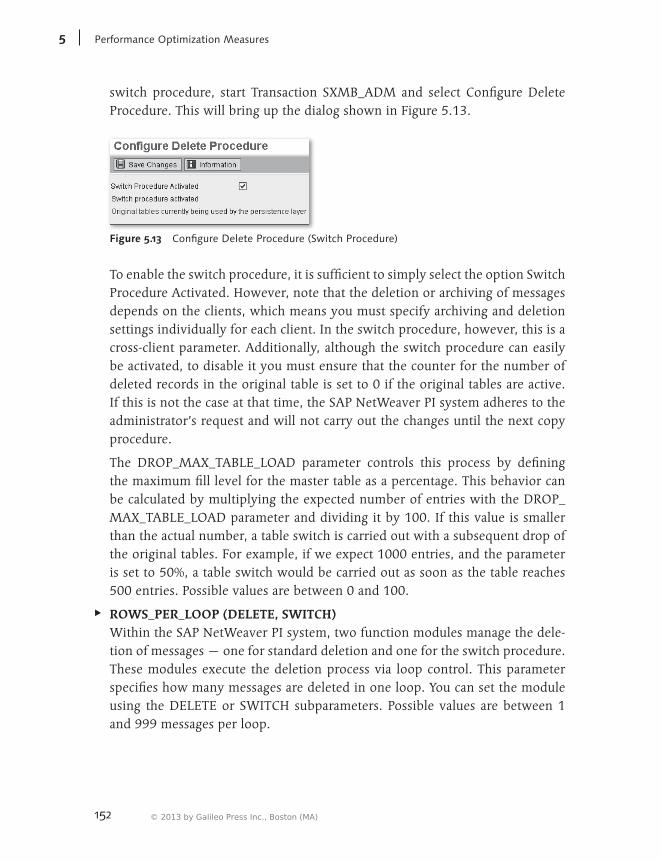
152
PerformanceOptimizationMeasures5
switch procedure, start Transaction SXMB_ADM and select Configure Delete Procedure. This will bring up the dialog shown in Figure 5.13.
Figure 5.13 Configure Delete Procedure (Switch Procedure)
To enable the switch procedure, it is sufficient to simply select the option Switch Procedure Activated. However, note that the deletion or archiving of messages depends on the clients, which means you must specify archiving and deletion settings individually for each client. In the switch procedure, however, this is a cross-client parameter. Additionally, although the switch procedure can easily be activated, to disable it you must ensure that the counter for the number of deleted records in the original table is set to 0 if the original tables are active. If this is not the case at that time, the SAP NetWeaver PI system adheres to the administrator’s request and will not carry out the changes until the next copy procedure.
The DROP_MAX_TABLE_LOAD parameter controls this process by defining the maximum fill level for the master table as a percentage. This behavior can be calculated by multiplying the expected number of entries with the DROP_MAX_TABLE_LOAD parameter and dividing it by 100. If this value is smaller than the actual number, a table switch is carried out with a subsequent drop of the original tables. For example, if we expect 1000 entries, and the parameter is set to 50%, a table switch would be carried out as soon as the table reaches 500 entries. Possible values are between 0 and 100.
EE ROWS_PER_LOOP (DELETE, SWITCH) Within the SAP NetWeaver PI system, two function modules manage the dele-tion of messages — one for standard deletion and one for the switch procedure. These modules execute the deletion process via loop control. This parameter specifies how many messages are deleted in one loop. You can set the module using the DELETE or SWITCH subparameters. Possible values are between 1 and 999 messages per loop.
© 2013 by Galileo Press Inc., Boston (MA)
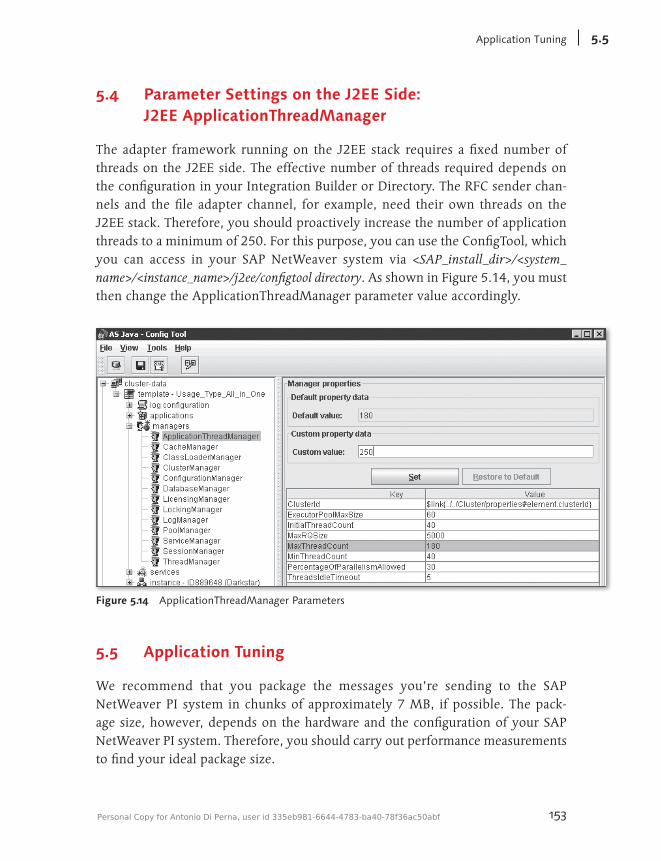
153
ApplicationTuning 5.5
5.4 Parameter Settings on the J2EE Side: J2EE ApplicationThreadManager
The adapter framework running on the J2EE stack requires a fixed number of threads on the J2EE side. The effective number of threads required depends on the configuration in your Integration Builder or Directory. The RFC sender chan-nels and the file adapter channel, for example, need their own threads on the J2EE stack. Therefore, you should proactively increase the number of application threads to a minimum of 250. For this purpose, you can use the ConfigTool, which you can access in your SAP NetWeaver system via <SAP_install_dir>/<system_name>/<instance_name>/j2ee/configtool directory. As shown in Figure 5.14, you must then change the ApplicationThreadManager parameter value accordingly.
Figure 5.14 ApplicationThreadManager Parameters
5.5 Application Tuning
We recommend that you package the messages you’re sending to the SAP NetWeaver PI system in chunks of approximately 7 MB, if possible. The pack-age size, however, depends on the hardware and the configuration of your SAP NetWeaver PI system. Therefore, you should carry out performance measurements to find your ideal package size.
Personal Copy for Antonio Di Perna, user id 335eb981-6644-4783-ba40-78f36ac50abf
154
PerformanceOptimizationMeasures5
As of SAP NetWeaver PI 7.0 SPS 13, you can also package the processing of received asynchronous messages in SAP NetWeaver PI. This function enables the SAP NetWeaver PI system to group multiple messages into packages and to run these packages through the individual processing steps of the Integration Engine and Adapter Engine. This function does not depend on the packaging of the IDocs of a sender system. Especially with regard to the mapping step, this function can increase your system performance, because it ensures that a mapping for 500 messages, for example, is instantiated only once. The packaging function does not affect the displays of the monitoring programs of SAP NetWeaver PI, because there all messages continue to be displayed as single messages. Similarly, the communi-cation channels of the Adapter Engine process only single messages.
You can activate the message packaging function in the parameter settings of Trans-action SXMB_ADM (Runtime category) by setting the PACKAGING parameter to 1. By setting the LOGGING_AMF_ERR parameter to 1, you can enable the logging of errors during package processing. Based on our experience, we recommend that you enable the logging parameter only in your development system.
SAP uses the following default package configuration:
EE Wait time = 0
EE Number = 100
EE Maximum package size in KB = 1000
You can create your own package configurations using Transaction SXMS_BCM and map these configurations to the individual steps within the Integration Server via Transaction SXMS_BCONF. This transaction also allows you to map your own package configurations to individual sender systems and sender-interface combi-nations. SAP Note 1037176 contains detailed information about this.
© 2013 by Galileo Press Inc., Boston (MA)
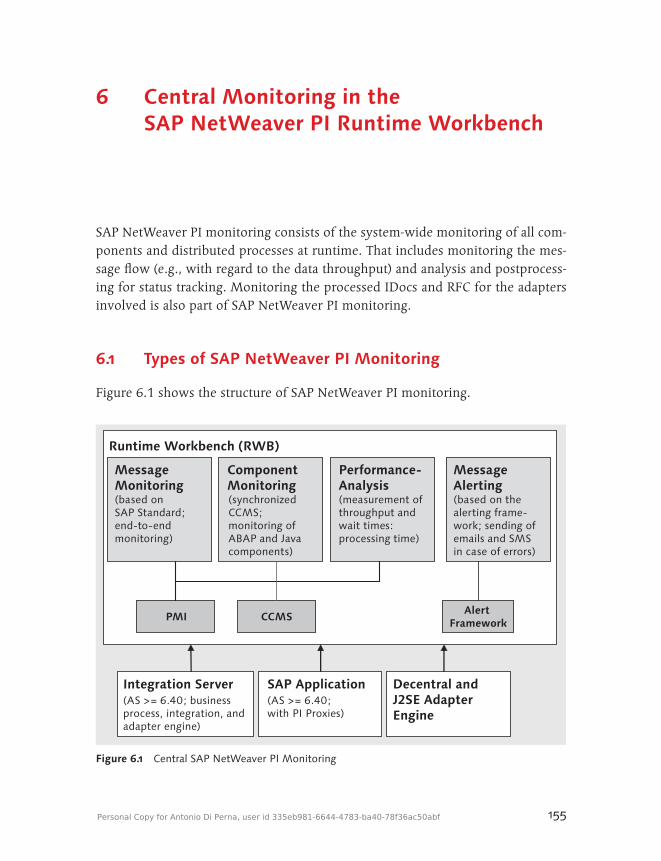
155
6 Central Monitoring in the SAP NetWeaver PI Runtime Workbench
SAP NetWeaver PI monitoring consists of the system-wide monitoring of all com-ponents and distributed processes at runtime. That includes monitoring the mes-sage flow (e.g., with regard to the data throughput) and analysis and postprocess-ing for status tracking. Monitoring the processed IDocs and RFC for the adapters involved is also part of SAP NetWeaver PI monitoring.
6.1 Types of SAP NetWeaver PI Monitoring
Figure 6.1 shows the structure of SAP NetWeaver PI monitoring.
Runtime Workbench (RWB)
PMIPMI CCMSCCMS Alert Framework
Alert Framework
Message Monitoring(based on SAP Standard; end-to-endmonitoring)
Component Monitoring(synchronized CCMS; monitoring ofABAP and Java components)
Performance- Analysis(measurement of throughput and wait times: processing time)
Message Alerting(based on the alerting frame-work; sending of emails and SMS in case of errors)
Integration Server(AS >= 6.40; businessprocess, integration, andadapter engine)
SAP Application (AS >= 6.40;with PI Proxies)
Decentral andJ2SE AdapterEngine
Figure 6.1 Central SAP NetWeaver PI Monitoring
Personal Copy for Antonio Di Perna, user id 335eb981-6644-4783-ba40-78f36ac50abf
156
CentralMonitoringintheSAPNetWeaverPIRuntimeWorkbench6
SAP NetWeaver PI monitoring provides several types of monitoring. These moni-toring types are specific SAP transactions, the Computing Center Management System (CCMS), the web-based applications for message monitoring, component monitor-ing, alert monitoring (the entire alerting framework), and performance analysis. The process monitoring infrastructure (PMI) is based on the message monitoring and performance analysis data. The basis for the performance analysis consists of the statistical data of the integration server and the PMI information for message processing. Component monitoring for the runtime itself is part of the CCMS. All of this may sound rather confusing, but the purpose of SAP NetWeaver PI moni-toring is simple: to monitor all areas of the Runtime Workbench (RWB), such as engines, applications, adapters, tools, and settings, and to analyze the Runtime Workbench for troubleshooting and performance.
For the activation and configuration of the alerting framework and end-to-end monitoring, you must make various settings in the SAP NetWeaver PI system so that system monitoring is carried out in an event-driven mode and the notification about erroneous statuses actually works.
6.2 Monitoring Requirements and Options
You must activate the following parameters in the exchange profile (administra-tion) for the CCMS monitor, the PMI server, and the alert server:
EE com.sap.aii.rwb.server.centralmonitoring.r3.ashost
EE com.sap.aii.rwb.server.centralmonitoring.r3.client
EE com.sap.aii.rwb.server.centralmonitoring.r3.sysnr
EE com.sap.aii.rwb.server.centralmonitoring.r3.httppport
For technical user PIRWBUSER, you must set the following additional parameters for the RWB:
EE com.sap.aii.rwb.serviceuser.name
EE com.sap.aii.rwb.serviceuser.pwd
EE com.sap.aii.rwb.serviceuser.language
Moreover, the Internet Transaction Server (ITS) plug-in must run on the integra-tion server and the central monitoring server so that you can call CCMS Transac-tion RZ20 via the ITS from the web-based message monitoring. You can check the service status via Transaction SICF.
© 2013 by Galileo Press Inc., Boston (MA)

157
MonitoringRequirementsandOptions 6.2
SAP also points out that the profile parameter em/global_area_MB must be set to 512 for the ITS operations to function properly. To check the current values, call Transaction SA38 and view the RSPARAM report. You can easily determine the cur-rently set system profile parameter by using the search function in that report.
Note
The relevant services for end-to-end and alert monitoring can be automatically started using the RSXMB_ACTIVATE_ICF_ SERVICES report. Start this program via Transactions SE38 and SE80 and make the settings listed in Table 6.1. You can also start the services manually via Transaction SICF.
Function Path to service
ITS plug-in /sap/bc/gui/sap/its/webgui
End-to-end monitoring /sap/bc/bsp/sap/spi_monitor
/sap/bc/bsp/sap/spi_admin
/sap/public/bsp/sap/public/graphics/jnet_handler
/sap/public/bsp/sap/public/graphics/mimes
/sap/bc/bsp/sap/public/graphics
/sap/bc/graphics/net
/sap/bc/bsp/sap/graph_bsp_test
/sap/bc/bsp/sap/graph_bsp_test/mimes
Alert monitoring /sap/bc/bsp/sap/alertinbox
/sap/bc/bsp/sap/sxms_alertrules
/sap/bc/bsp/sap/system
/sap/bc/bsp/sap/public/bc
/sap/public/bsp/sap/public/bc
/sap/public/bsp/sap/system
/sap/public/bsp/sap/htmlb
/sap/public/bc/icons
/sap/public/bc/icons_rtl
/sap/public/bc/ur
Table 6.1 Services for End-to-End and Alert Monitoring
Note
You can easily find the services by using the search help (above the tree structure).
Personal Copy for Antonio Di Perna, user id 335eb981-6644-4783-ba40-78f36ac50abf
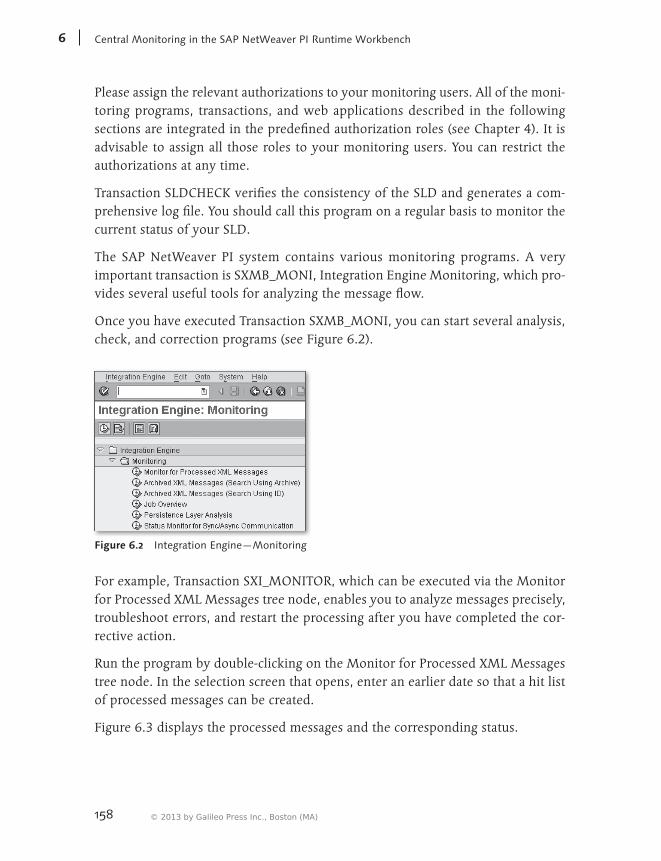
158
CentralMonitoringintheSAPNetWeaverPIRuntimeWorkbench6
Please assign the relevant authorizations to your monitoring users. All of the moni-toring programs, transactions, and web applications described in the following sections are integrated in the predefined authorization roles (see Chapter 4). It is advisable to assign all those roles to your monitoring users. You can restrict the authorizations at any time.
Transaction SLDCHECK verifies the consistency of the SLD and generates a com-prehensive log file. You should call this program on a regular basis to monitor the current status of your SLD.
The SAP NetWeaver PI system contains various monitoring programs. A very important transaction is SXMB_MONI, Integration Engine Monitoring, which pro-vides several useful tools for analyzing the message flow.
Once you have executed Transaction SXMB_MONI, you can start several analysis, check, and correction programs (see Figure 6.2).
Figure 6.2 Integration Engine—Monitoring
For example, Transaction SXI_MONITOR, which can be executed via the Monitor for Processed XML Messages tree node, enables you to analyze messages precisely, troubleshoot errors, and restart the processing after you have completed the cor-rective action.
Run the program by double-clicking on the Monitor for Processed XML Messages tree node. In the selection screen that opens, enter an earlier date so that a hit list of processed messages can be created.
Figure 6.3 displays the processed messages and the corresponding status.
© 2013 by Galileo Press Inc., Boston (MA)
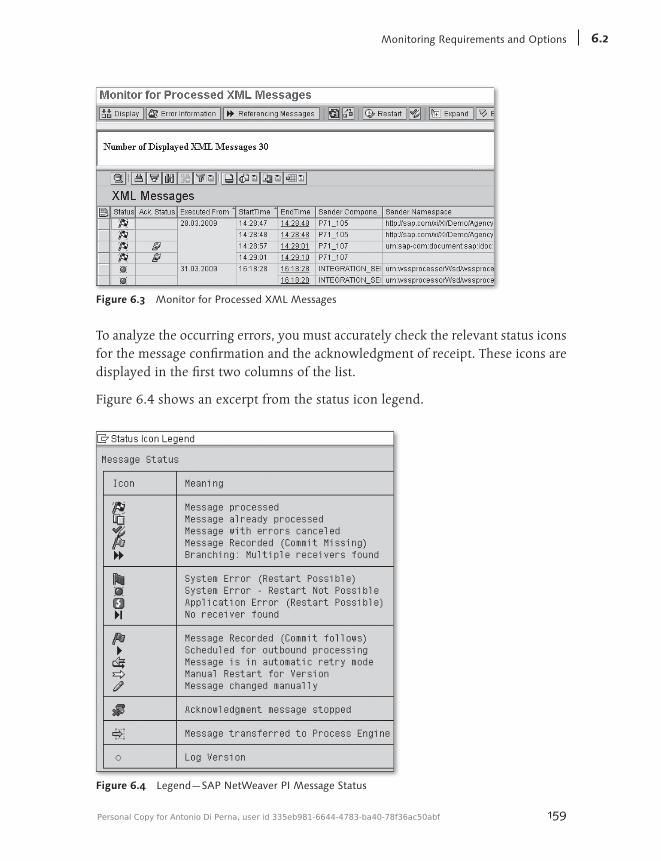
159
MonitoringRequirementsandOptions 6.2
Figure 6.3 Monitor for Processed XML Messages
To analyze the occurring errors, you must accurately check the relevant status icons for the message confirmation and the acknowledgment of receipt. These icons are displayed in the first two columns of the list.
Figure 6.4 shows an excerpt from the status icon legend.
Figure 6.4 Legend—SAP NetWeaver PI Message Status
Personal Copy for Antonio Di Perna, user id 335eb981-6644-4783-ba40-78f36ac50abf
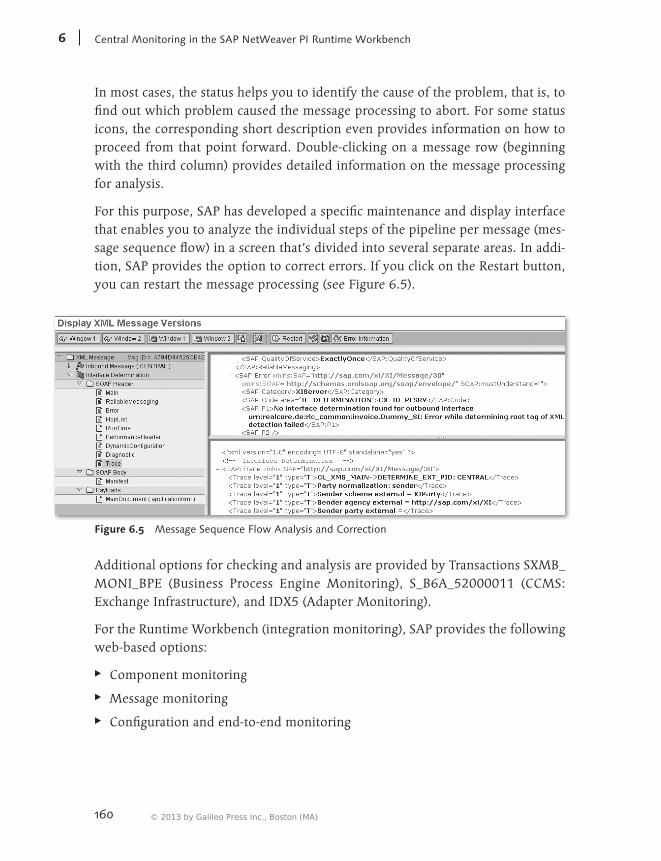
160
CentralMonitoringintheSAPNetWeaverPIRuntimeWorkbench6
In most cases, the status helps you to identify the cause of the problem, that is, to find out which problem caused the message processing to abort. For some status icons, the corresponding short description even provides information on how to proceed from that point forward. Double-clicking on a message row (beginning with the third column) provides detailed information on the message processing for analysis.
For this purpose, SAP has developed a specific maintenance and display interface that enables you to analyze the individual steps of the pipeline per message (mes-sage sequence flow) in a screen that’s divided into several separate areas. In addi-tion, SAP provides the option to correct errors. If you click on the Restart button, you can restart the message processing (see Figure 6.5).
Figure 6.5 Message Sequence Flow Analysis and Correction
Additional options for checking and analysis are provided by Transactions SXMB_MONI_BPE (Business Process Engine Monitoring), S_B6A_52000011 (CCMS: Exchange Infrastructure), and IDX5 (Adapter Monitoring).
For the Runtime Workbench (integration monitoring), SAP provides the following web-based options:
EE Component monitoring
EE Message monitoring
EE Configuration and end-to-end monitoring
© 2013 by Galileo Press Inc., Boston (MA)

161
ComponentMonitoring 6.3
EE Performance monitoring
EE Index administration
EE Alert configuration and alert inbox
EE Cache monitoring
You must always start the integration monitoring (http://[Hostname]:[Port]/rep/start/index.jsp) from the Runtime Workbench (see Figure 6.6).
Figure 6.6 Runtime Workbench—Initial Page (Monitoring)
6.3 Component Monitoring
Figure 6.7 displays the web-based component monitoring in the Runtime Workbench.
Component monitoring is used to perform the following checking activities:
EE You can check the status of individual SAP NetWeaver PI components of the Runtime Workbench (integration server, integration engines, decentral adapt-ers, J2SE adapters, and tools) and perform a “dead-or-alive” test.
EE You can check the component settings (archive, deletion, IDoc, monitor, RFC adapters, RFC system information, runtime, SA_COMM, and tuning).
Personal Copy for Antonio Di Perna, user id 335eb981-6644-4783-ba40-78f36ac50abf
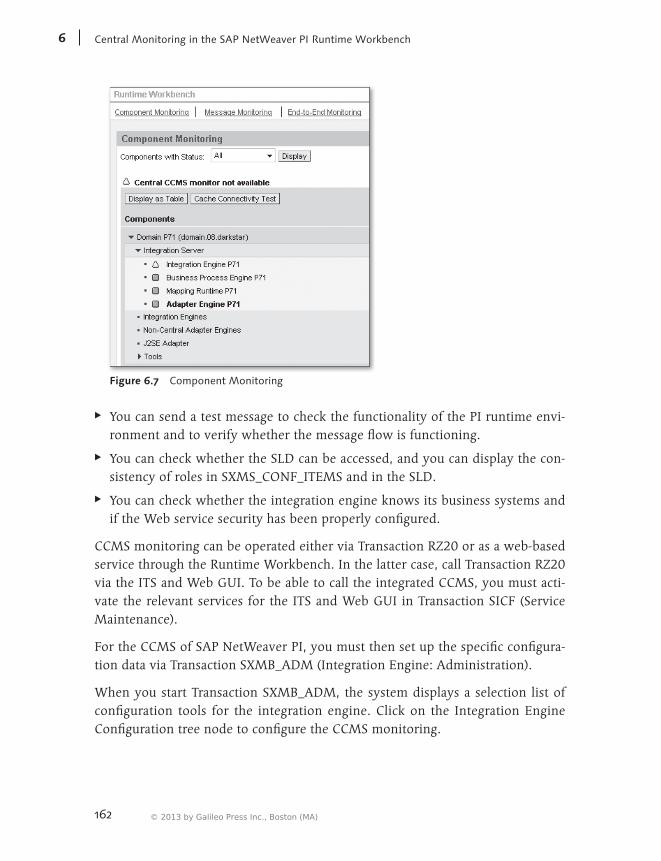
162
CentralMonitoringintheSAPNetWeaverPIRuntimeWorkbench6
Figure 6.7 Component Monitoring
EE You can send a test message to check the functionality of the PI runtime envi-ronment and to verify whether the message flow is functioning.
EE You can check whether the SLD can be accessed, and you can display the con-sistency of roles in SXMS_CONF_ITEMS and in the SLD.
EE You can check whether the integration engine knows its business systems and if the Web service security has been properly configured.
CCMS monitoring can be operated either via Transaction RZ20 or as a web-based service through the Runtime Workbench. In the latter case, call Transaction RZ20 via the ITS and Web GUI. To be able to call the integrated CCMS, you must acti-vate the relevant services for the ITS and Web GUI in Transaction SICF (Service Maintenance).
For the CCMS of SAP NetWeaver PI, you must then set up the specific configura-tion data via Transaction SXMB_ADM (Integration Engine: Administration).
When you start Transaction SXMB_ADM, the system displays a selection list of configuration tools for the integration engine. Click on the Integration Engine Configuration tree node to configure the CCMS monitoring.
© 2013 by Galileo Press Inc., Boston (MA)
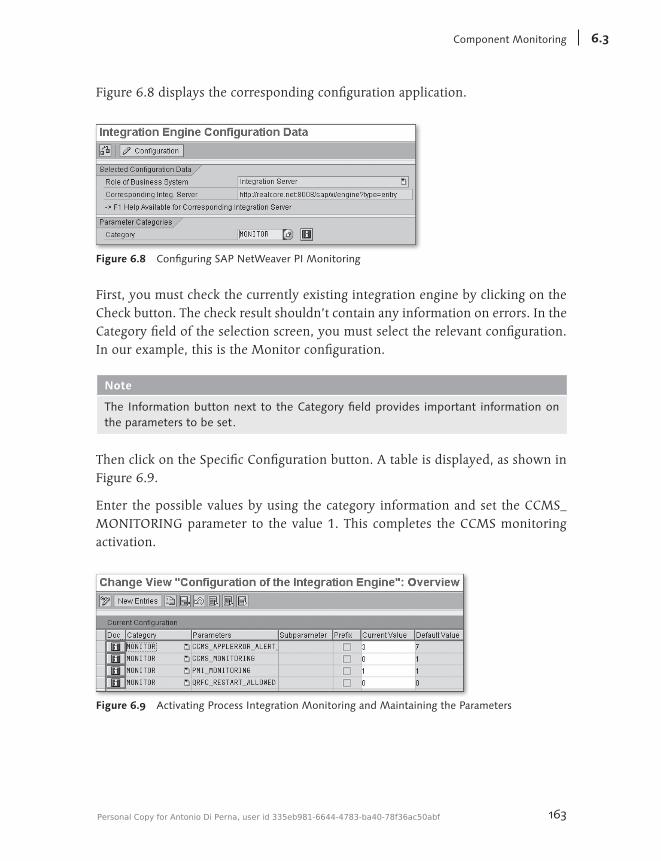
163
ComponentMonitoring 6.3
Figure 6.8 displays the corresponding configuration application.
Figure 6.8 Configuring SAP NetWeaver PI Monitoring
First, you must check the currently existing integration engine by clicking on the Check button. The check result shouldn’t contain any information on errors. In the Category field of the selection screen, you must select the relevant configuration. In our example, this is the Monitor configuration.
Note
The Information button next to the Category field provides important information on the parameters to be set.
Then click on the Specific Configuration button. A table is displayed, as shown in Figure 6.9.
Enter the possible values by using the category information and set the CCMS_MONITORING parameter to the value 1. This completes the CCMS monitoring activation.
Figure 6.9 Activating Process Integration Monitoring and Maintaining the Parameters
Personal Copy for Antonio Di Perna, user id 335eb981-6644-4783-ba40-78f36ac50abf
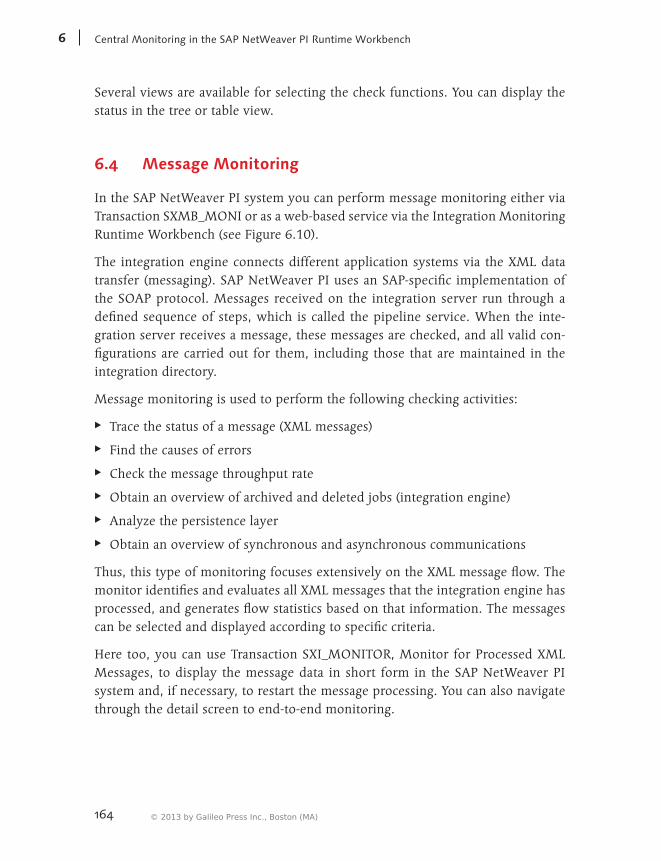
164
CentralMonitoringintheSAPNetWeaverPIRuntimeWorkbench6
Several views are available for selecting the check functions. You can display the status in the tree or table view.
6.4 Message Monitoring
In the SAP NetWeaver PI system you can perform message monitoring either via Transaction SXMB_MONI or as a web-based service via the Integration Monitoring Runtime Workbench (see Figure 6.10).
The integration engine connects different application systems via the XML data transfer (messaging). SAP NetWeaver PI uses an SAP-specific implementation of the SOAP protocol. Messages received on the integration server run through a defined sequence of steps, which is called the pipeline service. When the inte-gration server receives a message, these messages are checked, and all valid con-figurations are carried out for them, including those that are maintained in the integration directory.
Message monitoring is used to perform the following checking activities:
EE Trace the status of a message (XML messages)
EE Find the causes of errors
EE Check the message throughput rate
EE Obtain an overview of archived and deleted jobs (integration engine)
EE Analyze the persistence layer
EE Obtain an overview of synchronous and asynchronous communications
Thus, this type of monitoring focuses extensively on the XML message flow. The monitor identifies and evaluates all XML messages that the integration engine has processed, and generates flow statistics based on that information. The messages can be selected and displayed according to specific criteria.
Here too, you can use Transaction SXI_MONITOR, Monitor for Processed XML Messages, to display the message data in short form in the SAP NetWeaver PI system and, if necessary, to restart the message processing. You can also navigate through the detail screen to end-to-end monitoring.
© 2013 by Galileo Press Inc., Boston (MA)
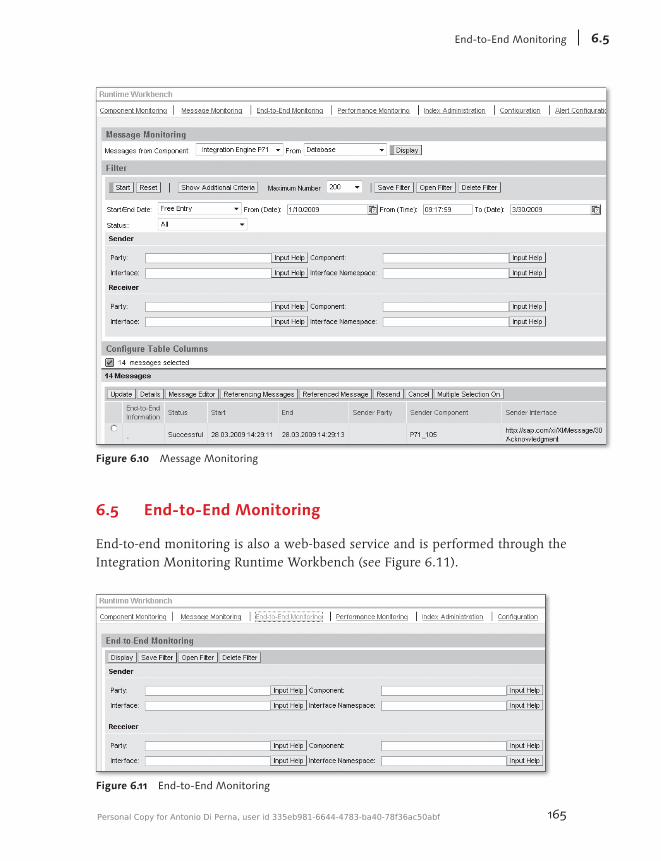
165
End-to-EndMonitoring 6.5
Figure 6.10 Message Monitoring
6.5 End-to-End Monitoring
End-to-end monitoring is also a web-based service and is performed through the Integration Monitoring Runtime Workbench (see Figure 6.11).
Figure 6.11 End-to-End Monitoring
Personal Copy for Antonio Di Perna, user id 335eb981-6644-4783-ba40-78f36ac50abf
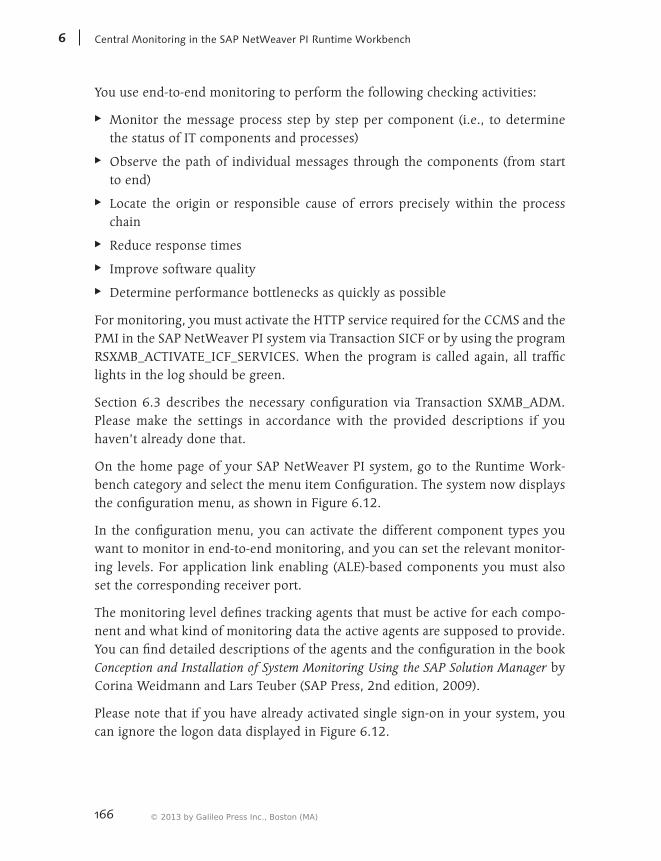
166
CentralMonitoringintheSAPNetWeaverPIRuntimeWorkbench6
You use end-to-end monitoring to perform the following checking activities:
EE Monitor the message process step by step per component (i.e., to determine the status of IT components and processes)
EE Observe the path of individual messages through the components (from start to end)
EE Locate the origin or responsible cause of errors precisely within the process chain
EE Reduce response times
EE Improve software quality
EE Determine performance bottlenecks as quickly as possible
For monitoring, you must activate the HTTP service required for the CCMS and the PMI in the SAP NetWeaver PI system via Transaction SICF or by using the program RSXMB_ACTIVATE_ICF_SERVICES. When the program is called again, all traffic lights in the log should be green.
Section 6.3 describes the necessary configuration via Transaction SXMB_ADM. Please make the settings in accordance with the provided descriptions if you haven’t already done that.
On the home page of your SAP NetWeaver PI system, go to the Runtime Work-bench category and select the menu item Configuration. The system now displays the configuration menu, as shown in Figure 6.12.
In the configuration menu, you can activate the different component types you want to monitor in end-to-end monitoring, and you can set the relevant monitor-ing levels. For application link enabling (ALE)-based components you must also set the corresponding receiver port.
The monitoring level defines tracking agents that must be active for each compo-nent and what kind of monitoring data the active agents are supposed to provide. You can find detailed descriptions of the agents and the configuration in the book Conception and Installation of System Monitoring Using the SAP Solution Manager by Corina Weidmann and Lars Teuber (SAP Press, 2nd edition, 2009).
Please note that if you have already activated single sign-on in your system, you can ignore the logon data displayed in Figure 6.12.
© 2013 by Galileo Press Inc., Boston (MA)
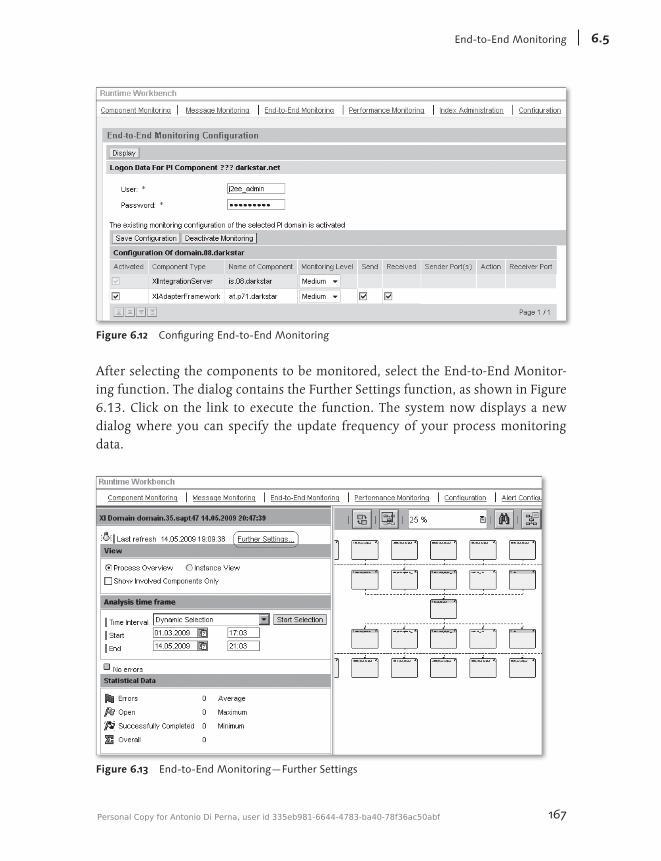
167
End-to-EndMonitoring 6.5
Figure 6.12 Configuring End-to-End Monitoring
After selecting the components to be monitored, select the End-to-End Monitor-ing function. The dialog contains the Further Settings function, as shown in Figure 6.13. Click on the link to execute the function. The system now displays a new dialog where you can specify the update frequency of your process monitoring data.
Figure 6.13 End-to-End Monitoring—Further Settings
Personal Copy for Antonio Di Perna, user id 335eb981-6644-4783-ba40-78f36ac50abf
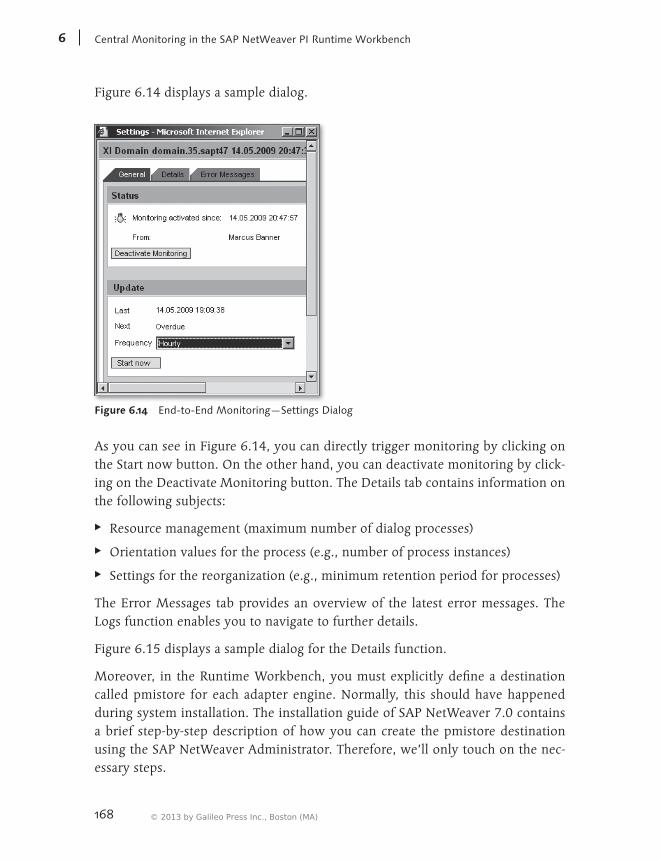
168
CentralMonitoringintheSAPNetWeaverPIRuntimeWorkbench6
Figure 6.14 displays a sample dialog.
Figure 6.14 End-to-End Monitoring—Settings Dialog
As you can see in Figure 6.14, you can directly trigger monitoring by clicking on the Start now button. On the other hand, you can deactivate monitoring by click-ing on the Deactivate Monitoring button. The Details tab contains information on the following subjects:
EE Resource management (maximum number of dialog processes)
EE Orientation values for the process (e.g., number of process instances)
EE Settings for the reorganization (e.g., minimum retention period for processes)
The Error Messages tab provides an overview of the latest error messages. The Logs function enables you to navigate to further details.
Figure 6.15 displays a sample dialog for the Details function.
Moreover, in the Runtime Workbench, you must explicitly define a destination called pmistore for each adapter engine. Normally, this should have happened during system installation. The installation guide of SAP NetWeaver 7.0 contains a brief step-by-step description of how you can create the pmistore destination using the SAP NetWeaver Administrator. Therefore, we’ll only touch on the nec-essary steps.
© 2013 by Galileo Press Inc., Boston (MA)
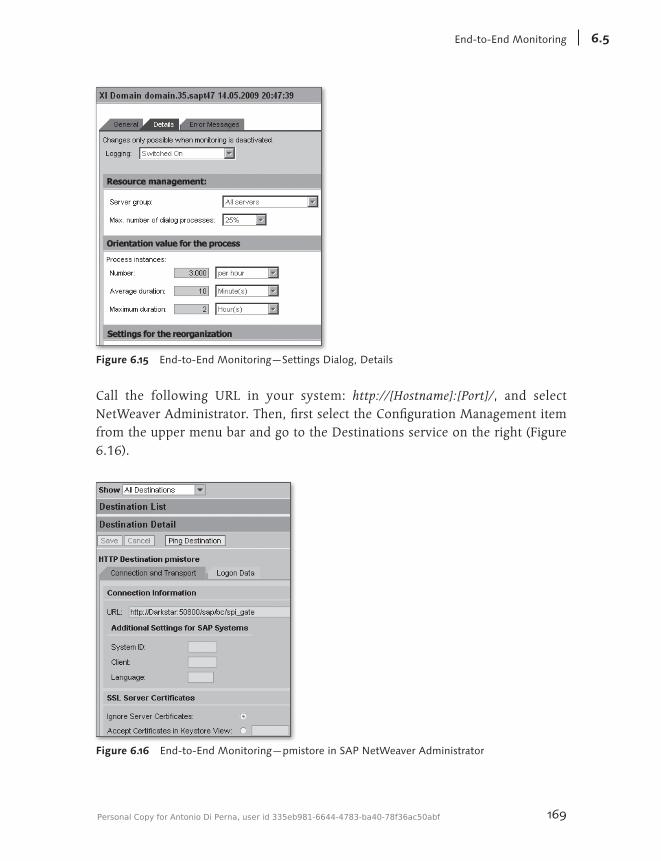
169
End-to-EndMonitoring 6.5
Figure 6.15 End-to-End Monitoring—Settings Dialog, Details
Call the following URL in your system: http://[Hostname]:[Port]/, and select NetWeaver Administrator. Then, first select the Configuration Management item from the upper menu bar and go to the Destinations service on the right (Figure 6.16).
Figure 6.16 End-to-End Monitoring—pmistore in SAP NetWeaver Administrator
Personal Copy for Antonio Di Perna, user id 335eb981-6644-4783-ba40-78f36ac50abf
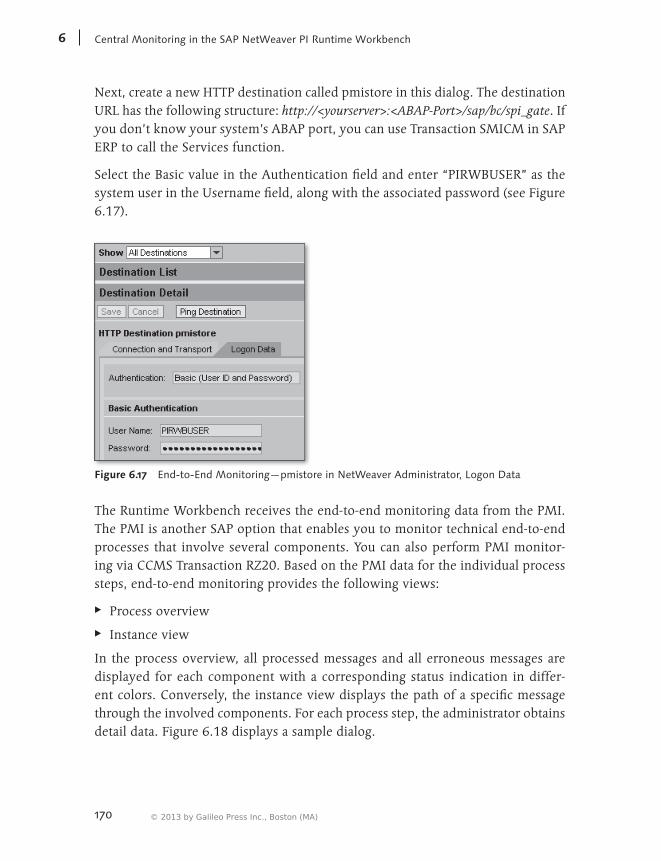
170
CentralMonitoringintheSAPNetWeaverPIRuntimeWorkbench6
Next, create a new HTTP destination called pmistore in this dialog. The destination URL has the following structure: http://<yourserver>:<ABAP-Port>/sap/bc/spi_gate. If you don’t know your system’s ABAP port, you can use Transaction SMICM in SAP ERP to call the Services function.
Select the Basic value in the Authentication field and enter “PIRWBUSER” as the system user in the Username field, along with the associated password (see Figure 6.17).
Figure 6.17 End-to-End Monitoring—pmistore in NetWeaver Administrator, Logon Data
The Runtime Workbench receives the end-to-end monitoring data from the PMI. The PMI is another SAP option that enables you to monitor technical end-to-end processes that involve several components. You can also perform PMI monitor-ing via CCMS Transaction RZ20. Based on the PMI data for the individual process steps, end-to-end monitoring provides the following views:
EE Process overview
EE Instance view
In the process overview, all processed messages and all erroneous messages are displayed for each component with a corresponding status indication in differ-ent colors. Conversely, the instance view displays the path of a specific message through the involved components. For each process step, the administrator obtains detail data. Figure 6.18 displays a sample dialog.
© 2013 by Galileo Press Inc., Boston (MA)
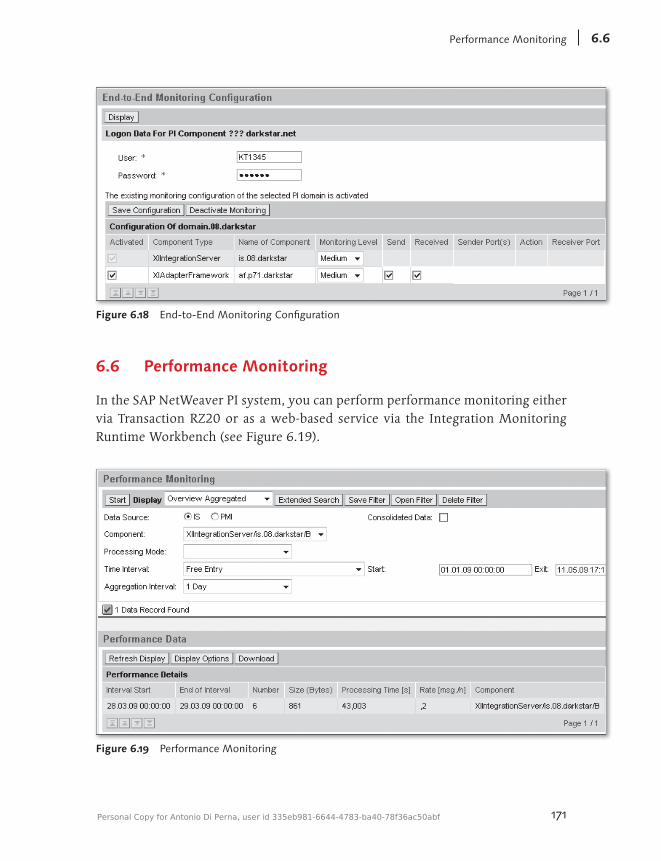
171
PerformanceMonitoring 6.6
Figure 6.18 End-to-End Monitoring Configuration
6.6 Performance Monitoring
In the SAP NetWeaver PI system, you can perform performance monitoring either via Transaction RZ20 or as a web-based service via the Integration Monitoring Runtime Workbench (see Figure 6.19).
Figure 6.19 Performance Monitoring
Personal Copy for Antonio Di Perna, user id 335eb981-6644-4783-ba40-78f36ac50abf

172
CentralMonitoringintheSAPNetWeaverPIRuntimeWorkbench6
Performance monitoring is used to perform the following checking activities:
EE Obtain an aggregated overview of the message process data
EE Obtain an overview of individual message process data
EE Obtain an aggregated overview of the message process detail data on the per-formance (throughput)
EE Obtain an overview of individual message process detail data on the perfor-mance (throughput)
The statistical data provided by the integration server, or the data provided by the PMI for message processing, forms the basis for the performance process analysis.
Table ALXMBPFALERT provides additional monitoring options. You can maintain this table via Transaction SM30 and store alert threshold values for the interface processing performance measurement in it. Store the necessary technical details and specify the threshold value for triggering yellow and red alerts in milliseconds. SAP Note 730193 contains detailed information on this table.
6.7 Alert Monitoring
Web-based alert configuration and receipt of alert messages is possible. Figure 6.20 shows the web-based access to alert messages.
Figure 6.20 Alert Inbox
© 2013 by Galileo Press Inc., Boston (MA)
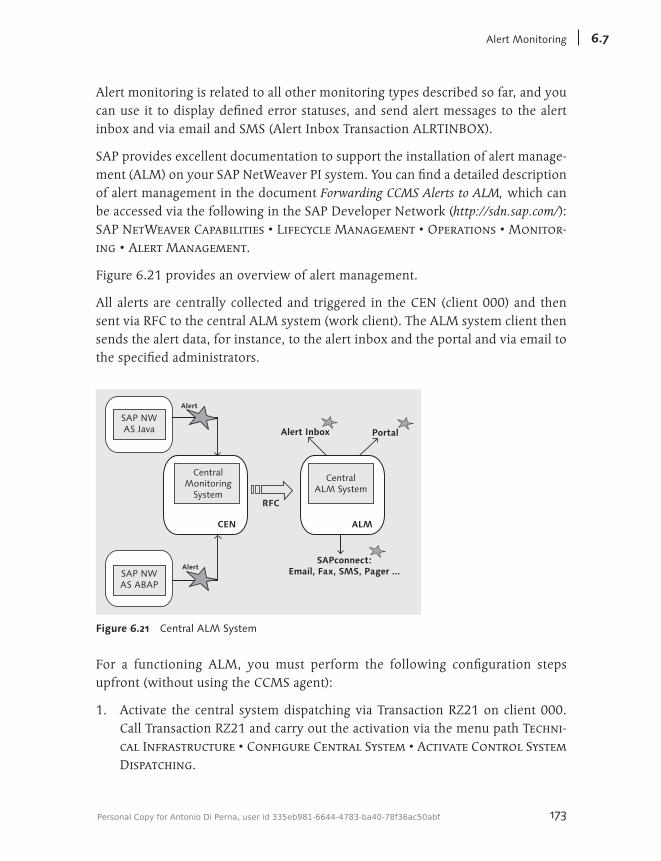
173
AlertMonitoring 6.7
Alert monitoring is related to all other monitoring types described so far, and you can use it to display defined error statuses, and send alert messages to the alert inbox and via email and SMS (Alert Inbox Transaction ALRTINBOX).
SAP provides excellent documentation to support the installation of alert manage-ment (ALM) on your SAP NetWeaver PI system. You can find a detailed description of alert management in the document Forwarding CCMS Alerts to ALM, which can be accessed via the following in the SAP Developer Network (http://sdn.sap.com/): SAP NetWeaver Capabilities • Lifecycle Management • Operations • Monitor-ing • Alert Management.
Figure 6.21 provides an overview of alert management.
All alerts are centrally collected and triggered in the CEN (client 000) and then sent via RFC to the central ALM system (work client). The ALM system client then sends the alert data, for instance, to the alert inbox and the portal and via email to the specified administrators.
SAP NWAS Java
CentralMonitoring
System
CentralALM System
SAP NWAS ABAP
Alert
Alert
RFC
Alert Inbox Portal
SAPconnect:Email, Fax, SMS, Pager ...
CEN ALM
Figure 6.21 Central ALM System
For a functioning ALM, you must perform the following configuration steps upfront (without using the CCMS agent):
1. Activate the central system dispatching via Transaction RZ21 on client 000. Call Transaction RZ21 and carry out the activation via the menu path Techni-cal Infrastructure • Configure Central System • Activate Control System Dispatching.
Personal Copy for Antonio Di Perna, user id 335eb981-6644-4783-ba40-78f36ac50abf

174
CentralMonitoringintheSAPNetWeaverPIRuntimeWorkbench6
2. Activate background dispatching for all systems to be monitored and for the CEN on client 000. Call Transaction RZ21 and carry out the activation via the menu path Technical Infrastructure • Local Method Execution • Activate Background Dispatching.
3. Activate the alertinbox and alertinboxwap services via Transaction SICF (Default_host • SAP • BC • BSP • SAP • alertinbox/alertinboxwap).
4. Create an RFC user with the role assignment SAP_BC_ALM_ALERT_USER in the SAP NetWeaver PI work client (in our example, client 100) via Transaction SU01. If the SAP role wasn’t previously generated, you must first create it via Transaction PFCG.
5. Create an RFC connection on client 000 via Transaction SM59. Enter the pre-viously created RFC user in the Logon/Security tab. Check the remote connec-tion to the work client and the authorizations in the connections maintenance menu (menu path Test • Authorization Test).
6. Enter the previously created RFC connection to the work client in client 000 via Transaction SALRT1, RFC Destination for Central Alert Server. The RFC destination must be specified even if the CEN and the alert management (ALM) are located in the same client.
7. To be able to send emails, faxes, and SMS, you must perform the SAPconnect configuration on the work client (Transaction SCOT etc.). You can find infor-mation on that configuration in SAP Support Portal (http://service.sap.com/notes) in the SAP Notes Search web interface under the topic BC-SRV-COM.
8. Call Transaction RZ21 in the work client. Go to the Methods group box and select the Method definitions radio button. Click on the Overview but-ton. Search for the method CCMS_Send_Alert_to_ALM_V2 (up to and includ-ing support package status 11, you must search for the method CCMS_Send_Alert_to_ALM). Copy the method into the customer-specific namespace (e.g., ZPI_CCMS_Send_Alert_to_ALM_V2).
9. Double-click on the copied method. Check whether the Any Server radio but-ton is selected. If it isn’t, select it now.
10. Select the Parameters tab. There we have specified the following values:
© 2013 by Galileo Press Inc., Boston (MA)
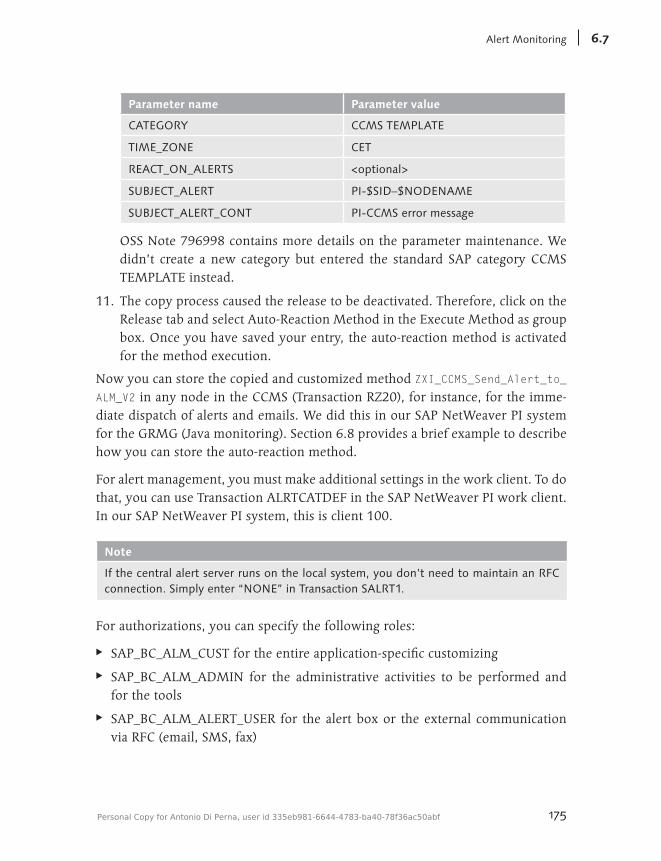
175
AlertMonitoring 6.7
Parameter name Parameter value
CATEGORY CCMS TEMPLATE
TIME_ZONE CET
REACT_ON_ALERTS <optional>
SUBJECT_ALERT PI-$SID–$NODENAME
SUBJECT_ALERT_CONT PI-CCMS error message
OSS Note 796998 contains more details on the parameter maintenance. We didn’t create a new category but entered the standard SAP category CCMS TEMPLATE instead.
11. The copy process caused the release to be deactivated. Therefore, click on the Release tab and select Auto-Reaction Method in the Execute Method as group box. Once you have saved your entry, the auto-reaction method is activated for the method execution.
Now you can store the copied and customized method ZXI_CCMS_Send_Alert_to_ALM_V2 in any node in the CCMS (Transaction RZ20), for instance, for the imme-diate dispatch of alerts and emails. We did this in our SAP NetWeaver PI system for the GRMG (Java monitoring). Section 6.8 provides a brief example to describe how you can store the auto-reaction method.
For alert management, you must make additional settings in the work client. To do that, you can use Transaction ALRTCATDEF in the SAP NetWeaver PI work client. In our SAP NetWeaver PI system, this is client 100.
Note
If the central alert server runs on the local system, you don’t need to maintain an RFC connection. Simply enter “NONE” in Transaction SALRT1.
For authorizations, you can specify the following roles:
EE SAP_BC_ALM_CUST for the entire application-specific customizing
EE SAP_BC_ALM_ADMIN for the administrative activities to be performed and for the tools
EE SAP_BC_ALM_ALERT_USER for the alert box or the external communication via RFC (email, SMS, fax)
Personal Copy for Antonio Di Perna, user id 335eb981-6644-4783-ba40-78f36ac50abf
176
CentralMonitoringintheSAPNetWeaverPIRuntimeWorkbench6
Alert configuration is predominantly carried out via Transaction ALRTCAT-DEF, Defining an Alert Category in the Work Client (or web-based via http://[hostname]:[portnumber]/rwb/index.jsp • Alert Configuration).
Once all of the requirements have been met and you have entered a recipient for a specific category (e.g., CCMS TEMPLATE), all SAP NetWeaver PI system alert messages will be stored in your alert inbox. The alert messages are triggered when an error occurs in the CCMS (caused by a job), by clicking on a link, when a func-tion module is used, or by the Post Processing Framework (PPF). The most impor-tant thing is that the RFC destination has been maintained for the central alert server in Transaction SALRT1 (client 000). SAP provides a sample report called RSALERTDEMO01 that you can use to trigger your own defined alert events. You can copy that program into the customer-specific namespace to define objects with the properties for events that can then be triggered through the function module. In Transaction SWE2, you can store the event triggering for the alert category, the recipient type, for function module SALRT_CREATE_VIA_EVENT, and for the receiver function model in the SAP NetWeaver PI system.
In the alert configuration, you can define restrictive alerting rules via Transaction SXMSALRT, for example, regarding the alert categories that are supposed to notify you about errors. You can also perform this setting through the Web via http://[hostname]:[portnumber]/rwb/index.sp • Alert Configuration.
Transaction ALRTCATDEF also enables you to make additional settings in the work client (see Figure 6.22).
For central monitoring (CEN), we have stored the CCMS Template category when we entered the parameters for the auto-reaction method. The texts for the alerts are dynamically generated by the stored parameterization in the auto-reaction method. Therefore, you must select the Dynamic Text checkbox (see Figure 6.22).
To activate the escalation, you must schedule Report RSALERTPROC as a job. For that job, you must create a report variant and select the Escalation Active option. Only then can the required escalation to the specified person be performed at a predefined time in Transaction ALRTCATDEF. Moreover, you need this program for reorganization purposes and for the multiple dispatch of unconfirmed alerts. You should therefore create several variants of this report for the job scheduling.
© 2013 by Galileo Press Inc., Boston (MA)
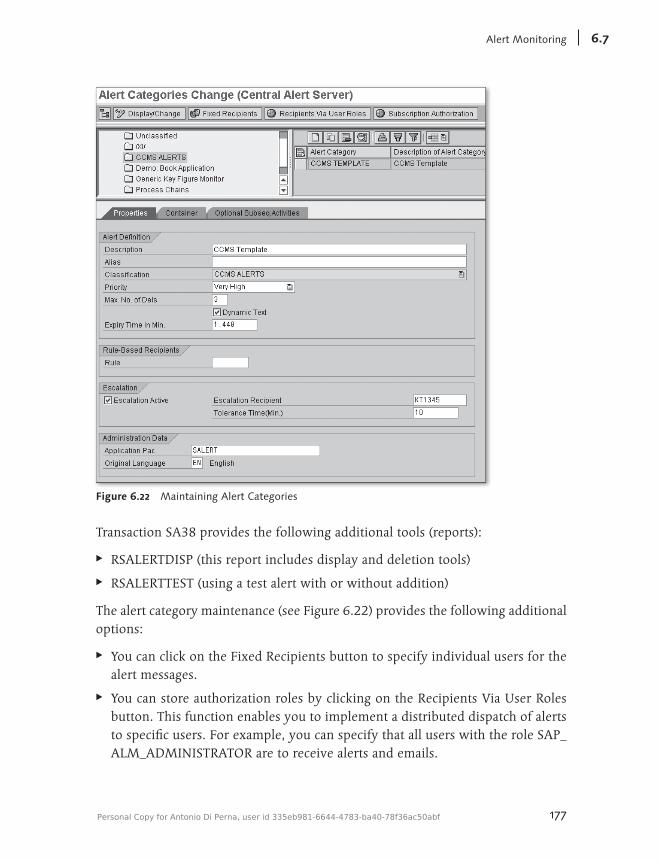
177
AlertMonitoring 6.7
Figure 6.22 Maintaining Alert Categories
Transaction SA38 provides the following additional tools (reports):
EE RSALERTDISP (this report includes display and deletion tools)
EE RSALERTTEST (using a test alert with or without addition)
The alert category maintenance (see Figure 6.22) provides the following additional options:
EE You can click on the Fixed Recipients button to specify individual users for the alert messages.
EE You can store authorization roles by clicking on the Recipients Via User Roles button. This function enables you to implement a distributed dispatch of alerts to specific users. For example, you can specify that all users with the role SAP_ALM_ADMINISTRATOR are to receive alerts and emails.
Personal Copy for Antonio Di Perna, user id 335eb981-6644-4783-ba40-78f36ac50abf
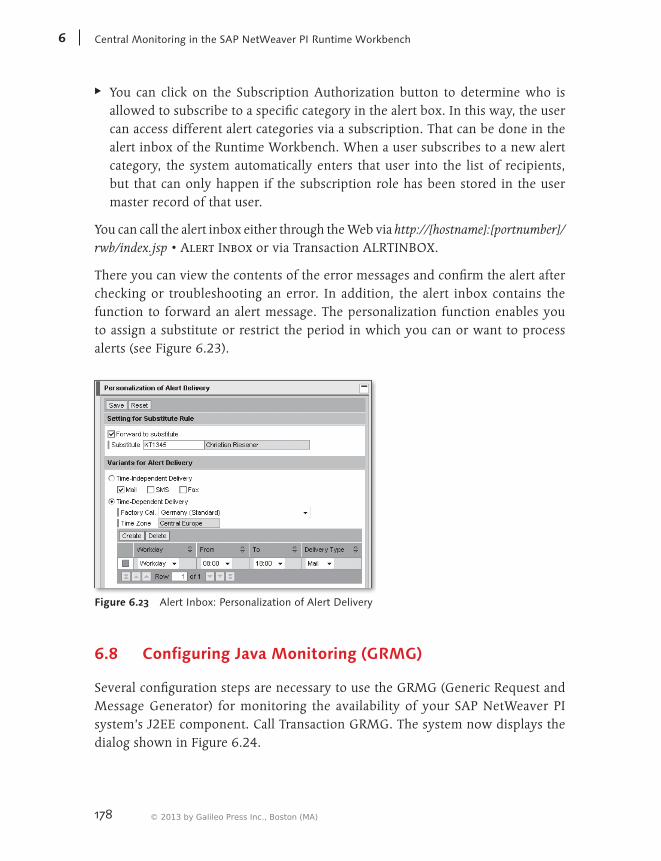
178
CentralMonitoringintheSAPNetWeaverPIRuntimeWorkbench6
EE You can click on the Subscription Authorization button to determine who is allowed to subscribe to a specific category in the alert box. In this way, the user can access different alert categories via a subscription. That can be done in the alert inbox of the Runtime Workbench. When a user subscribes to a new alert category, the system automatically enters that user into the list of recipients, but that can only happen if the subscription role has been stored in the user master record of that user.
You can call the alert inbox either through the Web via http://[hostname]:[portnumber]/rwb/index.jsp • Alert Inbox or via Transaction ALRTINBOX.
There you can view the contents of the error messages and confirm the alert after checking or troubleshooting an error. In addition, the alert inbox contains the function to forward an alert message. The personalization function enables you to assign a substitute or restrict the period in which you can or want to process alerts (see Figure 6.23).
Figure 6.23 Alert Inbox: Personalization of Alert Delivery
6.8 Configuring Java Monitoring (GRMG)
Several configuration steps are necessary to use the GRMG (Generic Request and Message Generator) for monitoring the availability of your SAP NetWeaver PI system’s J2EE component. Call Transaction GRMG. The system now displays the dialog shown in Figure 6.24.
© 2013 by Galileo Press Inc., Boston (MA)
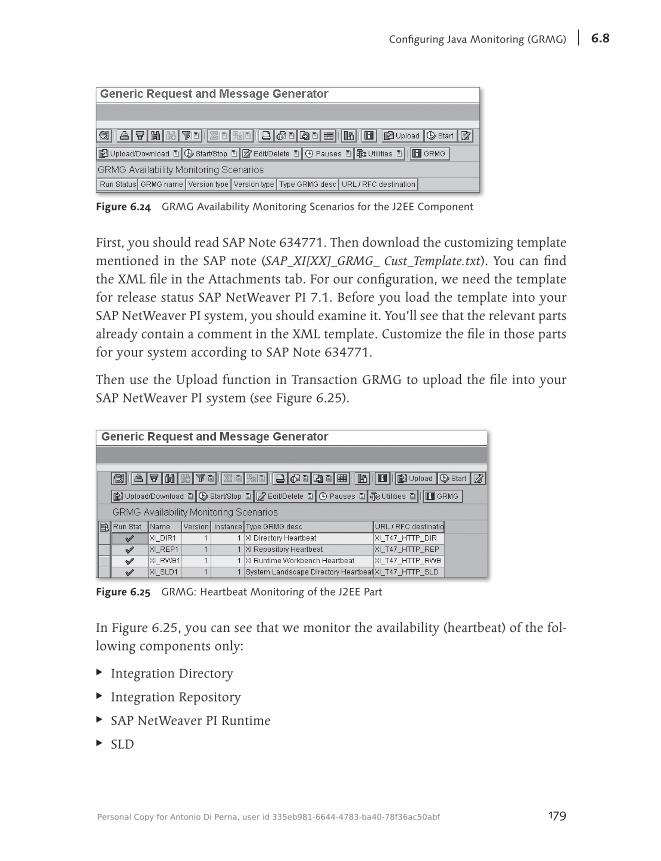
179
ConfiguringJavaMonitoring(GRMG) 6.8
Figure 6.24 GRMG Availability Monitoring Scenarios for the J2EE Component
First, you should read SAP Note 634771. Then download the customizing template mentioned in the SAP note (SAP_XI[XX]_GRMG_ Cust_Template.txt). You can find the XML file in the Attachments tab. For our configuration, we need the template for release status SAP NetWeaver PI 7.1. Before you load the template into your SAP NetWeaver PI system, you should examine it. You’ll see that the relevant parts already contain a comment in the XML template. Customize the file in those parts for your system according to SAP Note 634771.
Then use the Upload function in Transaction GRMG to upload the file into your SAP NetWeaver PI system (see Figure 6.25).
Figure 6.25 GRMG: Heartbeat Monitoring of the J2EE Part
In Figure 6.25, you can see that we monitor the availability (heartbeat) of the fol-lowing components only:
EE Integration Directory
EE Integration Repository
EE SAP NetWeaver PI Runtime
EE SLD
Personal Copy for Antonio Di Perna, user id 335eb981-6644-4783-ba40-78f36ac50abf
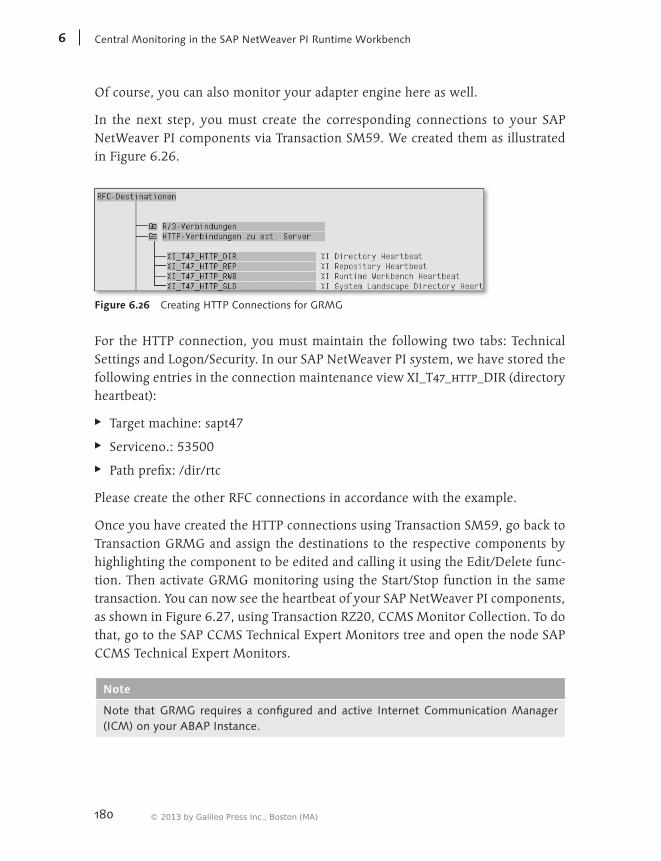
180
CentralMonitoringintheSAPNetWeaverPIRuntimeWorkbench6
Of course, you can also monitor your adapter engine here as well.
In the next step, you must create the corresponding connections to your SAP NetWeaver PI components via Transaction SM59. We created them as illustrated in Figure 6.26.
Figure 6.26 Creating HTTP Connections for GRMG
For the HTTP connection, you must maintain the following two tabs: Technical Settings and Logon/Security. In our SAP NetWeaver PI system, we have stored the following entries in the connection maintenance view XI_T47_http_DIR (directory heartbeat):
EE Target machine: sapt47
EE Serviceno.: 53500
EE Path prefix: /dir/rtc
Please create the other RFC connections in accordance with the example.
Once you have created the HTTP connections using Transaction SM59, go back to Transaction GRMG and assign the destinations to the respective components by highlighting the component to be edited and calling it using the Edit/Delete func-tion. Then activate GRMG monitoring using the Start/Stop function in the same transaction. You can now see the heartbeat of your SAP NetWeaver PI components, as shown in Figure 6.27, using Transaction RZ20, CCMS Monitor Collection. To do that, go to the SAP CCMS Technical Expert Monitors tree and open the node SAP CCMS Technical Expert Monitors.
Note
Note that GRMG requires a configured and active Internet Communication Manager (ICM) on your ABAP Instance.
© 2013 by Galileo Press Inc., Boston (MA)
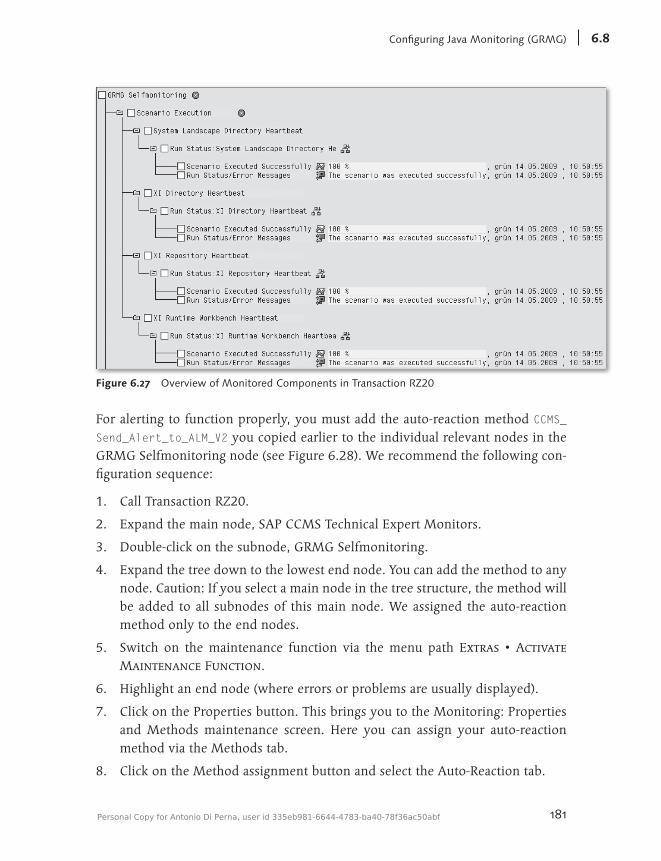
181
ConfiguringJavaMonitoring(GRMG) 6.8
Figure 6.27 Overview of Monitored Components in Transaction RZ20
For alerting to function properly, you must add the auto-reaction method CCMS_Send_Alert_to_ALM_V2 you copied earlier to the individual relevant nodes in the GRMG Selfmonitoring node (see Figure 6.28). We recommend the following con-figuration sequence:
1. Call Transaction RZ20.
2. Expand the main node, SAP CCMS Technical Expert Monitors.
3. Double-click on the subnode, GRMG Selfmonitoring.
4. Expand the tree down to the lowest end node. You can add the method to any node. Caution: If you select a main node in the tree structure, the method will be added to all subnodes of this main node. We assigned the auto-reaction method only to the end nodes.
5. Switch on the maintenance function via the menu path Extras • Activate Maintenance Function.
6. Highlight an end node (where errors or problems are usually displayed).
7. Click on the Properties button. This brings you to the Monitoring: Properties and Methods maintenance screen. Here you can assign your auto-reaction method via the Methods tab.
8. Click on the Method assignment button and select the Auto-Reaction tab.
Personal Copy for Antonio Di Perna, user id 335eb981-6644-4783-ba40-78f36ac50abf
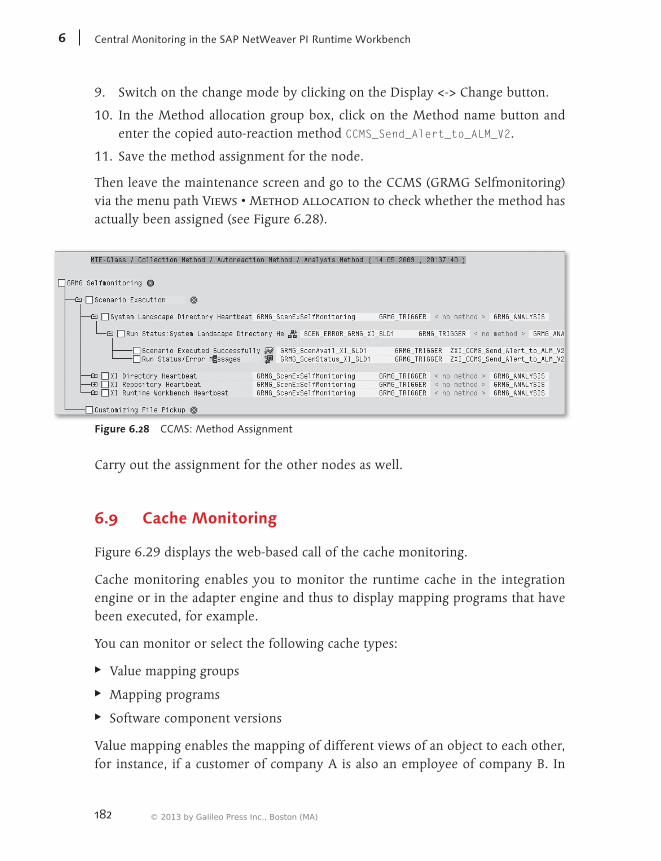
182
CentralMonitoringintheSAPNetWeaverPIRuntimeWorkbench6
9. Switch on the change mode by clicking on the Display <-> Change button.
10. In the Method allocation group box, click on the Method name button and enter the copied auto-reaction method CCMS_Send_Alert_to_ALM_V2.
11. Save the method assignment for the node.
Then leave the maintenance screen and go to the CCMS (GRMG Selfmonitoring) via the menu path Views • Method allocation to check whether the method has actually been assigned (see Figure 6.28).
Figure 6.28 CCMS: Method Assignment
Carry out the assignment for the other nodes as well.
6.9 Cache Monitoring
Figure 6.29 displays the web-based call of the cache monitoring.
Cache monitoring enables you to monitor the runtime cache in the integration engine or in the adapter engine and thus to display mapping programs that have been executed, for example.
You can monitor or select the following cache types:
EE Value mapping groups
EE Mapping programs
EE Software component versions
Value mapping enables the mapping of different views of an object to each other, for instance, if a customer of company A is also an employee of company B. In
© 2013 by Galileo Press Inc., Boston (MA)
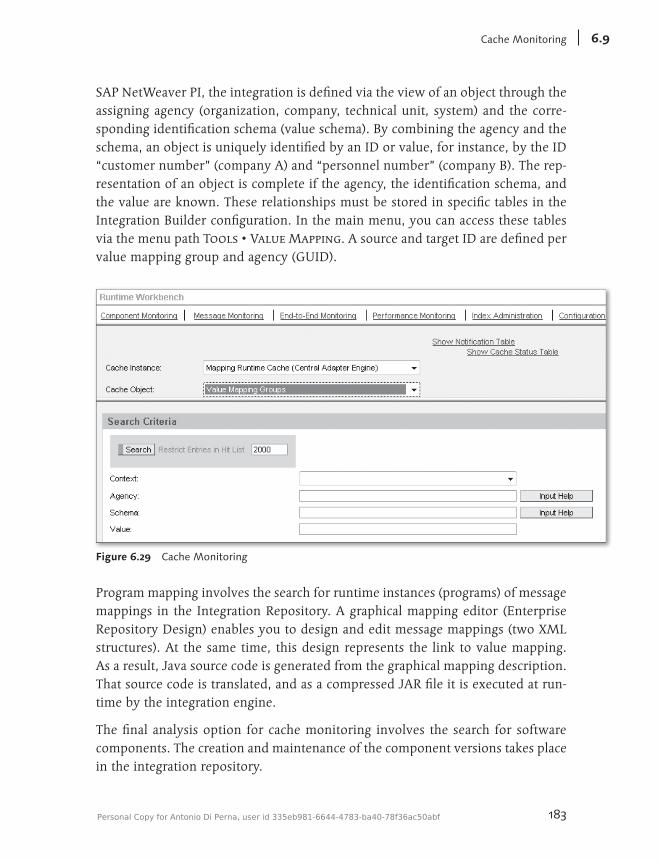
183
CacheMonitoring 6.9
SAP NetWeaver PI, the integration is defined via the view of an object through the assigning agency (organization, company, technical unit, system) and the corre-sponding identification schema (value schema). By combining the agency and the schema, an object is uniquely identified by an ID or value, for instance, by the ID “customer number” (company A) and “personnel number” (company B). The rep-resentation of an object is complete if the agency, the identification schema, and the value are known. These relationships must be stored in specific tables in the Integration Builder configuration. In the main menu, you can access these tables via the menu path Tools • Value Mapping. A source and target ID are defined per value mapping group and agency (GUID).
Figure 6.29 Cache Monitoring
Program mapping involves the search for runtime instances (programs) of message mappings in the Integration Repository. A graphical mapping editor (Enterprise Repository Design) enables you to design and edit message mappings (two XML structures). At the same time, this design represents the link to value mapping. As a result, Java source code is generated from the graphical mapping description. That source code is translated, and as a compressed JAR file it is executed at run-time by the integration engine.
The final analysis option for cache monitoring involves the search for software components. The creation and maintenance of the component versions takes place in the integration repository.
Personal Copy for Antonio Di Perna, user id 335eb981-6644-4783-ba40-78f36ac50abf
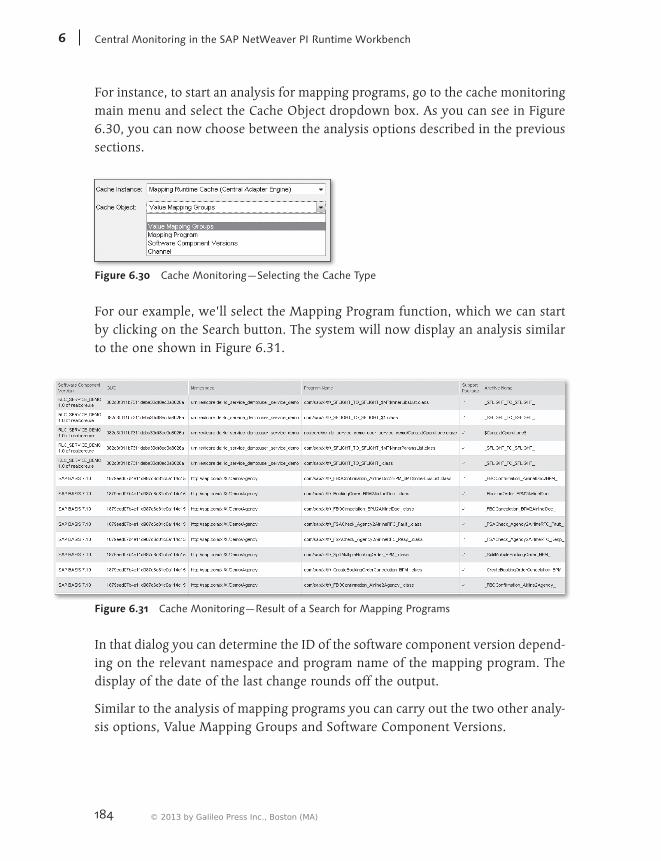
184
CentralMonitoringintheSAPNetWeaverPIRuntimeWorkbench6
For instance, to start an analysis for mapping programs, go to the cache monitoring main menu and select the Cache Object dropdown box. As you can see in Figure 6.30, you can now choose between the analysis options described in the previous sections.
Figure 6.30 Cache Monitoring—Selecting the Cache Type
For our example, we’ll select the Mapping Program function, which we can start by clicking on the Search button. The system will now display an analysis similar to the one shown in Figure 6.31.
Figure 6.31 Cache Monitoring—Result of a Search for Mapping Programs
In that dialog you can determine the ID of the software component version depend-ing on the relevant namespace and program name of the mapping program. The display of the date of the last change rounds off the output.
Similar to the analysis of mapping programs you can carry out the two other analy-sis options, Value Mapping Groups and Software Component Versions.
© 2013 by Galileo Press Inc., Boston (MA)
185
7 Enterprise Services Repository
Speaking about the Enterprise Services Repository without first mentioning the service-oriented architecture (SOA) is impossible. Therefore, we’ll first briefly discuss the theoretical concept of SOA.
Although the term SOA was coined several years ago, it started to gain significance in the IT world as late as 2006. Basically, SOA refers to the process of providing certain functions or business processes as services instead of mapping them in inflexible interfaces. An important feature is that those services are published in a central location and that other systems can call the services without the need to make any changes in a source system. In particular, with regard to enhancing business processes, this approach is very useful because it allows you to create new processes on the basis of existing developments, which prevents you from generating new development costs.
Since 2007, SAP has increasingly employed the SOA concept and extended its product range by a number of functionalities. The most significant enhancement was implemented in SAP NetWeaver PI, which already plays an essential role as a middleware product in most enterprises, as it represents the ideal tool for pub-lishing services and linking those services to new processes. In Version 7.1, SAP NetWeaver PI was extended by two new central components. One of these com-ponents is the Enterprise Services Repository, which enables you to create central services and processes. The other component is the Enterprise Services Registry, in which you can publish and manage the newly created services.
The following sections describe how you can create a new service that returns the first and last names of a user from an SAP ERP system for the purpose of user identification. The service will be designed in the Enterprise Services Repository. To enable backend functionality, you either need an SAP ERP system based on SAP NetWeaver 7.0 SP14 or higher, which is integrated with your SAP NetWeaver PI system via proxy, or you use the demo client 107, which was introduced in Chapter 2.
Personal Copy for Antonio Di Perna, user id 335eb981-6644-4783-ba40-78f36ac50abf
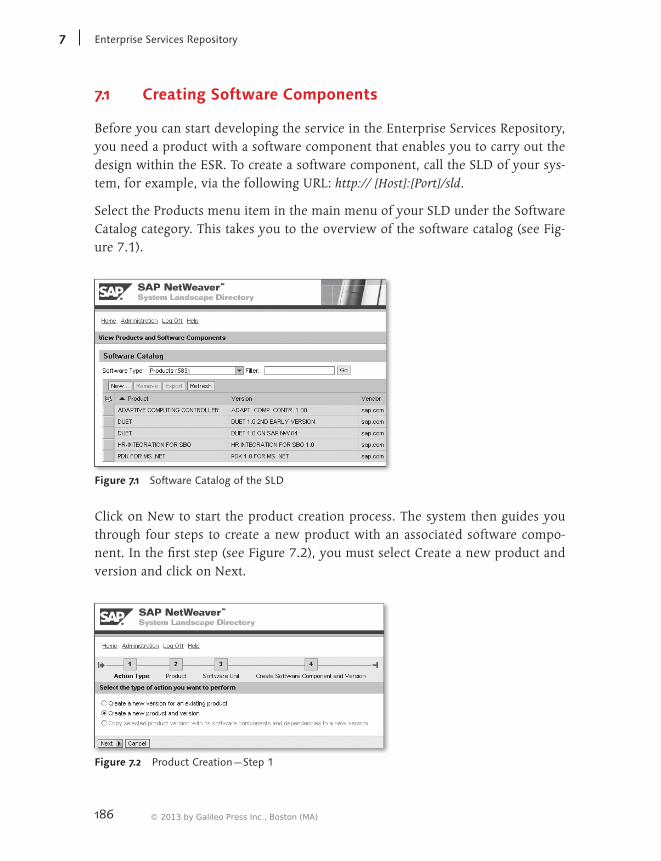
186
EnterpriseServicesRepository7
7.1 Creating Software Components
Before you can start developing the service in the Enterprise Services Repository, you need a product with a software component that enables you to carry out the design within the ESR. To create a software component, call the SLD of your sys-tem, for example, via the following URL: http:// [Host]:[Port]/sld.
Select the Products menu item in the main menu of your SLD under the Software Catalog category. This takes you to the overview of the software catalog (see Fig-ure 7.1).
Figure 7.1 Software Catalog of the SLD
Click on New to start the product creation process. The system then guides you through four steps to create a new product with an associated software compo-nent. In the first step (see Figure 7.2), you must select Create a new product and version and click on Next.
Figure 7.2 Product Creation—Step 1
© 2013 by Galileo Press Inc., Boston (MA)
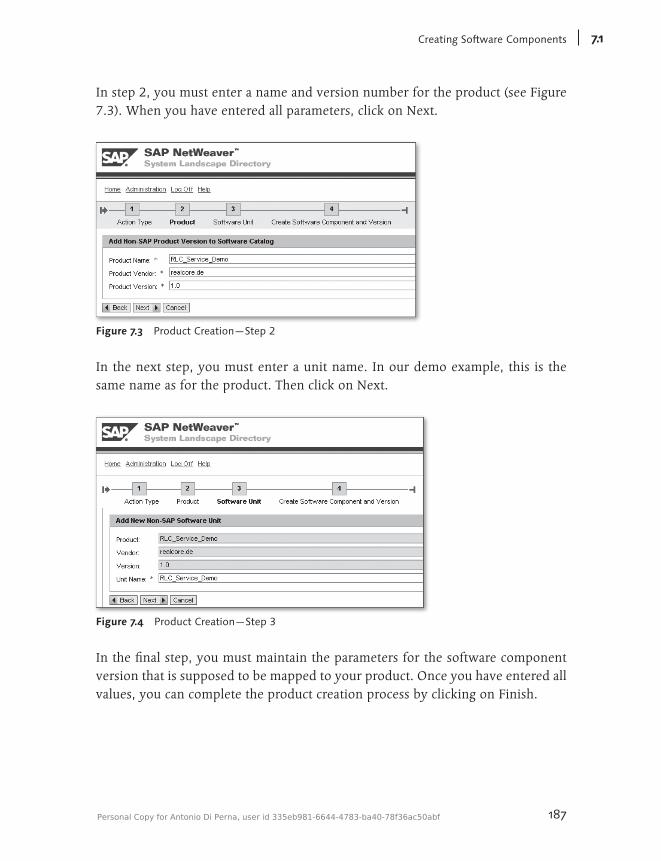
187
CreatingSoftwareComponents 7.1
In step 2, you must enter a name and version number for the product (see Figure 7.3). When you have entered all parameters, click on Next.
Figure 7.3 Product Creation—Step 2
In the next step, you must enter a unit name. In our demo example, this is the same name as for the product. Then click on Next.
Figure 7.4 Product Creation—Step 3
In the final step, you must maintain the parameters for the software component version that is supposed to be mapped to your product. Once you have entered all values, you can complete the product creation process by clicking on Finish.
Personal Copy for Antonio Di Perna, user id 335eb981-6644-4783-ba40-78f36ac50abf

188
EnterpriseServicesRepository7
Figure 7.5 Product Creation—Step 4
You have now created the required software component and can start designing within the Enterprise Services Repository.
7.2 Designing a Service Model
Call the Enterprise Services Builder on the home page of SAP NetWeaver PI: http://[Host]:[Port]/dir.
In the first step of this sample development, you must import the software com-ponent created in the previous section into the Enterprise Services Builder. Click on the New button in the upper left to open the Create Object dialog. In the dia-log that opens, expand the Work Areas category on the left and select Software Component version.
You can now define whether you want to create a local software component ver-sion or import a software component version from the SLD. Select Import from SLD, and click on the Display button to obtain a list of all software component versions (see Figure 7.6). Double-click on the software component you created previously; the values are adopted into the object creation screen. Then click on Create.
Your imported software component now displays in the left-hand area of the Repository under Objects. However, to be able to store objects in the software component version, you need a namespace. Double-click on your software com-ponent to open the Edit Software Component Version dialog. The lower area of
© 2013 by Galileo Press Inc., Boston (MA)
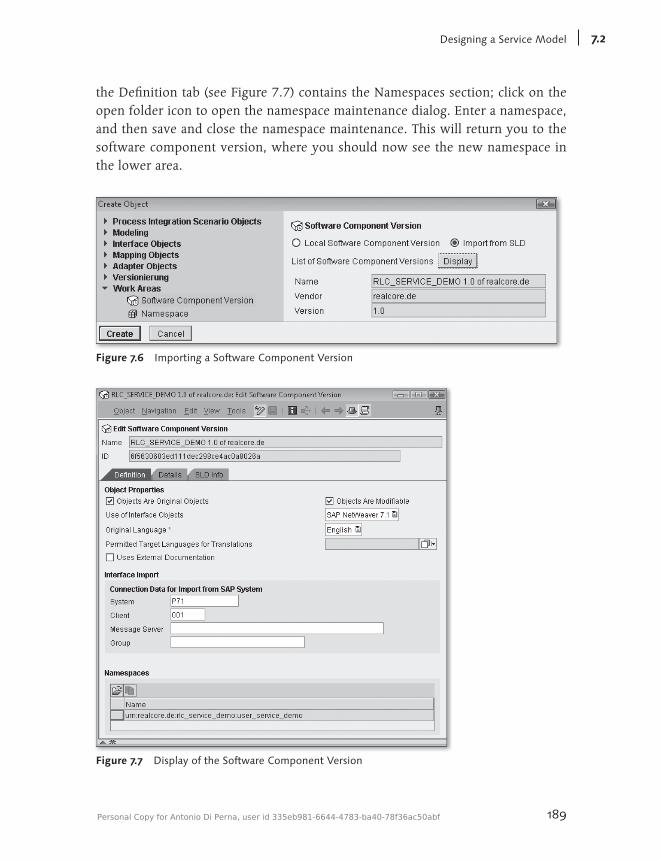
189
DesigningaServiceModel 7.2
the Definition tab (see Figure 7.7) contains the Namespaces section; click on the open folder icon to open the namespace maintenance dialog. Enter a namespace, and then save and close the namespace maintenance. This will return you to the software component version, where you should now see the new namespace in the lower area.
Figure 7.6 Importing a Software Component Version
Figure 7.7 Display of the Software Component Version
Personal Copy for Antonio Di Perna, user id 335eb981-6644-4783-ba40-78f36ac50abf
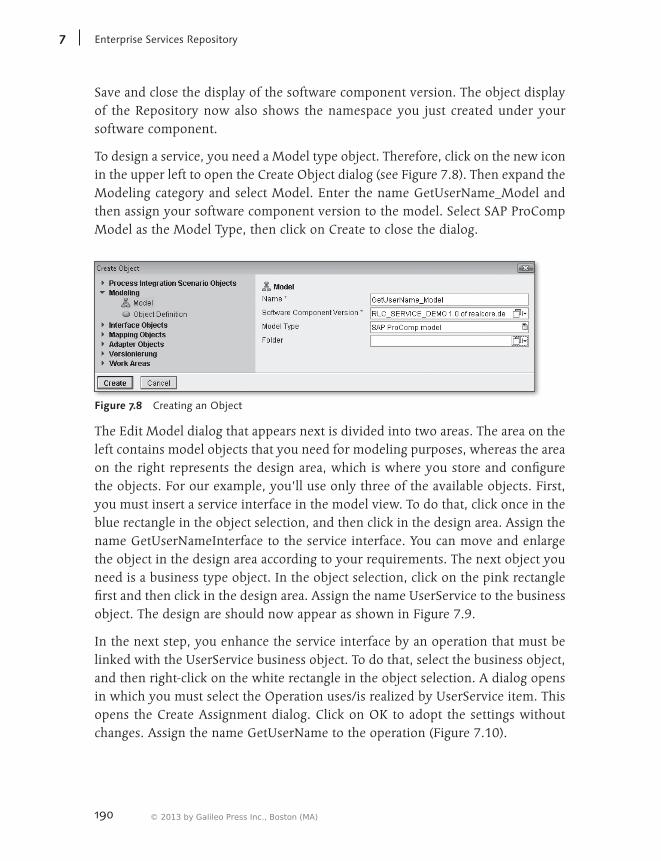
190
EnterpriseServicesRepository7
Save and close the display of the software component version. The object display of the Repository now also shows the namespace you just created under your software component.
To design a service, you need a Model type object. Therefore, click on the new icon in the upper left to open the Create Object dialog (see Figure 7.8). Then expand the Modeling category and select Model. Enter the name GetUserName_Model and then assign your software component version to the model. Select SAP ProComp Model as the Model Type, then click on Create to close the dialog.
Figure 7.8 Creating an Object
The Edit Model dialog that appears next is divided into two areas. The area on the left contains model objects that you need for modeling purposes, whereas the area on the right represents the design area, which is where you store and configure the objects. For our example, you’ll use only three of the available objects. First, you must insert a service interface in the model view. To do that, click once in the blue rectangle in the object selection, and then click in the design area. Assign the name GetUserNameInterface to the service interface. You can move and enlarge the object in the design area according to your requirements. The next object you need is a business type object. In the object selection, click on the pink rectangle first and then click in the design area. Assign the name UserService to the business object. The design are should now appear as shown in Figure 7.9.
In the next step, you enhance the service interface by an operation that must be linked with the UserService business object. To do that, select the business object, and then right-click on the white rectangle in the object selection. A dialog opens in which you must select the Operation uses/is realized by UserService item. This opens the Create Assignment dialog. Click on OK to adopt the settings without changes. Assign the name GetUserName to the operation (Figure 7.10).
© 2013 by Galileo Press Inc., Boston (MA)
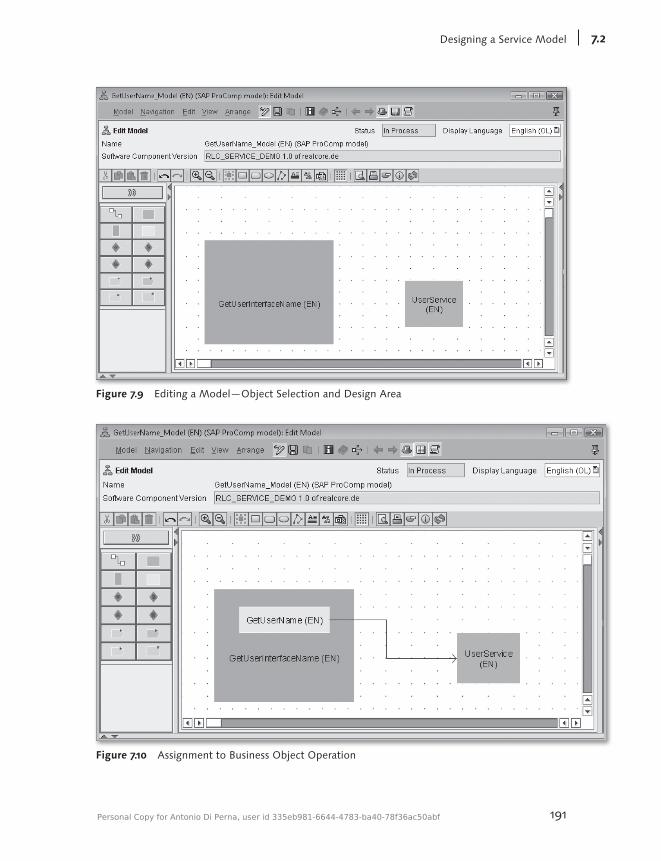
191
DesigningaServiceModel 7.2
Figure 7.9 Editing a Model—Object Selection and Design Area
Figure 7.10 Assignment to Business Object Operation
Personal Copy for Antonio Di Perna, user id 335eb981-6644-4783-ba40-78f36ac50abf
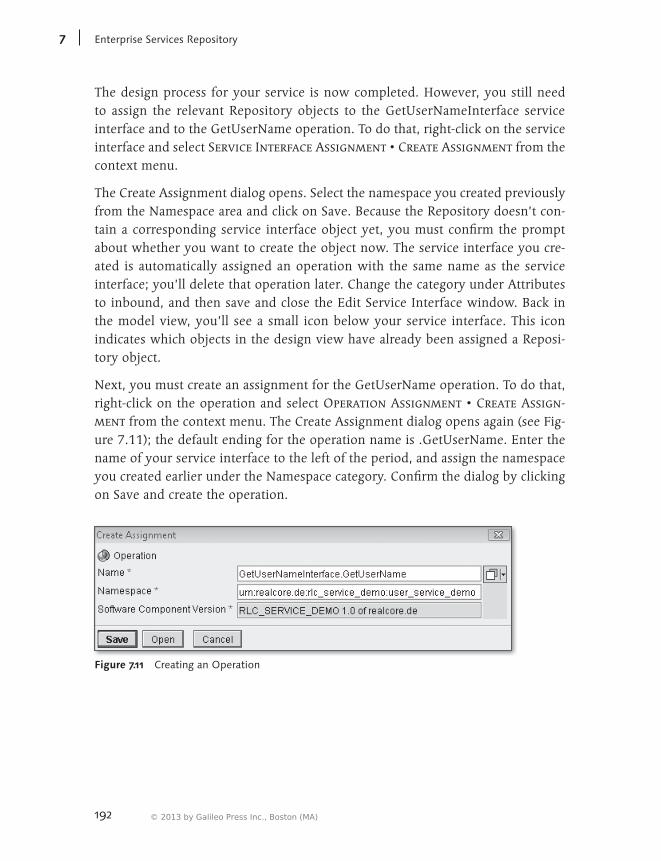
192
EnterpriseServicesRepository7
The design process for your service is now completed. However, you still need to assign the relevant Repository objects to the GetUserNameInterface service interface and to the GetUserName operation. To do that, right-click on the service interface and select Service Interface Assignment • Create Assignment from the context menu.
The Create Assignment dialog opens. Select the namespace you created previously from the Namespace area and click on Save. Because the Repository doesn’t con-tain a corresponding service interface object yet, you must confirm the prompt about whether you want to create the object now. The service interface you cre-ated is automatically assigned an operation with the same name as the service interface; you’ll delete that operation later. Change the category under Attributes to inbound, and then save and close the Edit Service Interface window. Back in the model view, you’ll see a small icon below your service interface. This icon indicates which objects in the design view have already been assigned a Reposi-tory object.
Next, you must create an assignment for the GetUserName operation. To do that, right-click on the operation and select Operation Assignment • Create Assign-ment from the context menu. The Create Assignment dialog opens again (see Fig-ure 7.11); the default ending for the operation name is .GetUserName. Enter the name of your service interface to the left of the period, and assign the namespace you created earlier under the Namespace category. Confirm the dialog by clicking on Save and create the operation.
Figure 7.11 Creating an Operation
© 2013 by Galileo Press Inc., Boston (MA)
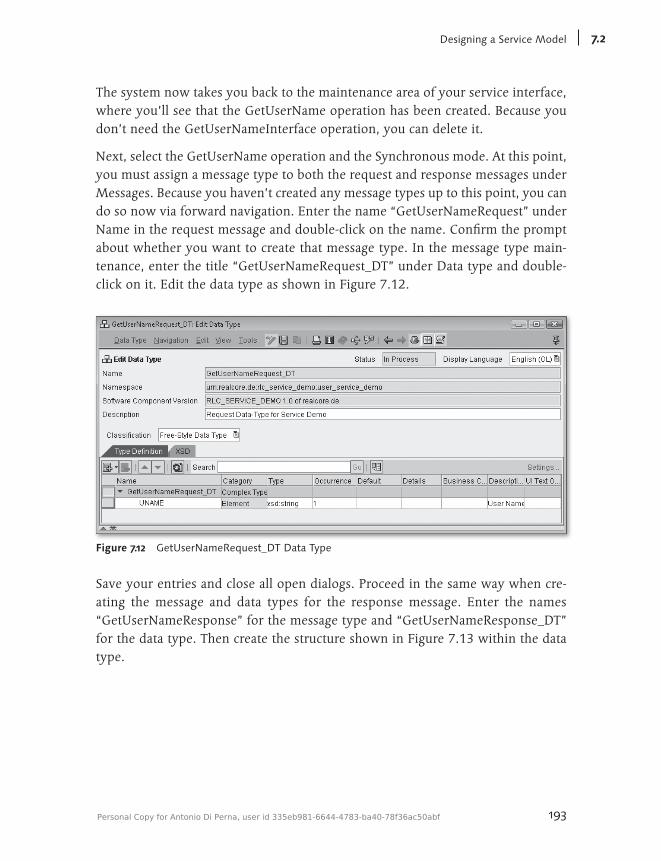
193
DesigningaServiceModel 7.2
The system now takes you back to the maintenance area of your service interface, where you’ll see that the GetUserName operation has been created. Because you don’t need the GetUserNameInterface operation, you can delete it.
Next, select the GetUserName operation and the Synchronous mode. At this point, you must assign a message type to both the request and response messages under Messages. Because you haven’t created any message types up to this point, you can do so now via forward navigation. Enter the name “GetUserNameRequest” under Name in the request message and double-click on the name. Confirm the prompt about whether you want to create that message type. In the message type main-tenance, enter the title “GetUserNameRequest_DT” under Data type and double-click on it. Edit the data type as shown in Figure 7.12.
Figure 7.12 GetUserNameRequest_DT Data Type
Save your entries and close all open dialogs. Proceed in the same way when cre-ating the message and data types for the response message. Enter the names “GetUserNameResponse” for the message type and “GetUserNameResponse_DT” for the data type. Then create the structure shown in Figure 7.13 within the data type.
Personal Copy for Antonio Di Perna, user id 335eb981-6644-4783-ba40-78f36ac50abf
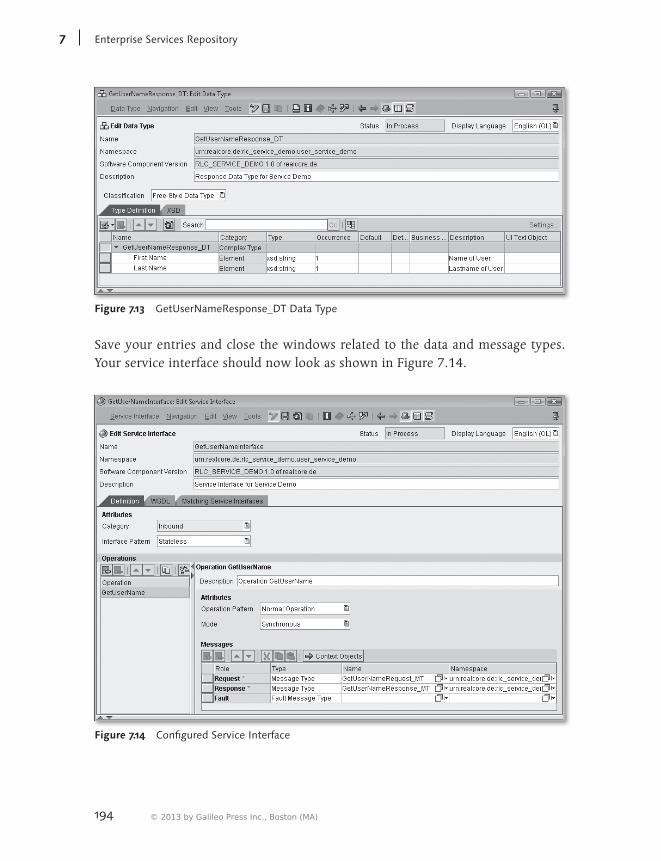
194
EnterpriseServicesRepository7
Figure 7.13 GetUserNameResponse_DT Data Type
Save your entries and close the windows related to the data and message types. Your service interface should now look as shown in Figure 7.14.
Figure 7.14 Configured Service Interface
© 2013 by Galileo Press Inc., Boston (MA)
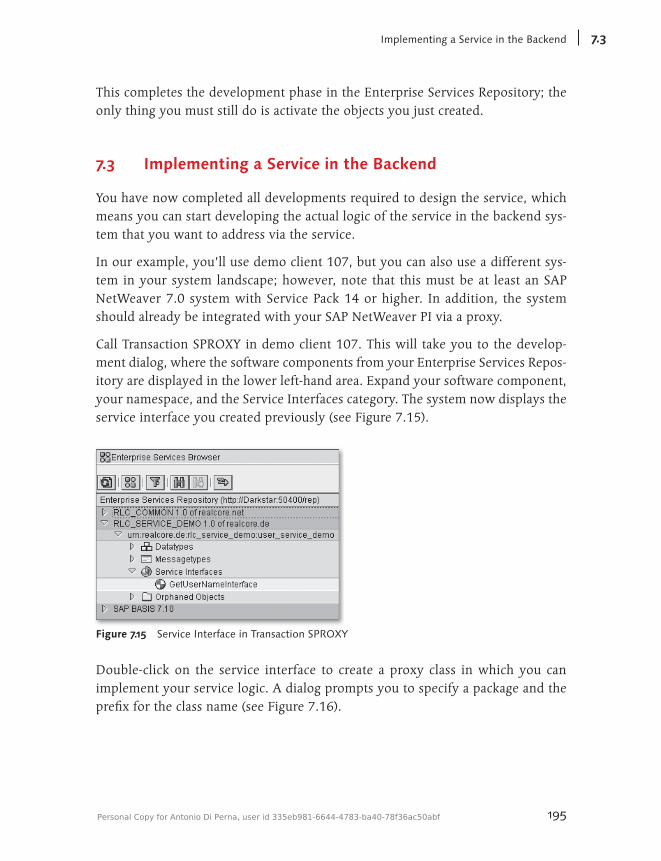
195
ImplementingaServiceintheBackend 7.3
This completes the development phase in the Enterprise Services Repository; the only thing you must still do is activate the objects you just created.
7.3 Implementing a Service in the Backend
You have now completed all developments required to design the service, which means you can start developing the actual logic of the service in the backend sys-tem that you want to address via the service.
In our example, you’ll use demo client 107, but you can also use a different sys-tem in your system landscape; however, note that this must be at least an SAP NetWeaver 7.0 system with Service Pack 14 or higher. In addition, the system should already be integrated with your SAP NetWeaver PI via a proxy.
Call Transaction SPROXY in demo client 107. This will take you to the develop-ment dialog, where the software components from your Enterprise Services Repos-itory are displayed in the lower left-hand area. Expand your software component, your namespace, and the Service Interfaces category. The system now displays the service interface you created previously (see Figure 7.15).
Figure 7.15 Service Interface in Transaction SPROXY
Double-click on the service interface to create a proxy class in which you can implement your service logic. A dialog prompts you to specify a package and the prefix for the class name (see Figure 7.16).
Personal Copy for Antonio Di Perna, user id 335eb981-6644-4783-ba40-78f36ac50abf
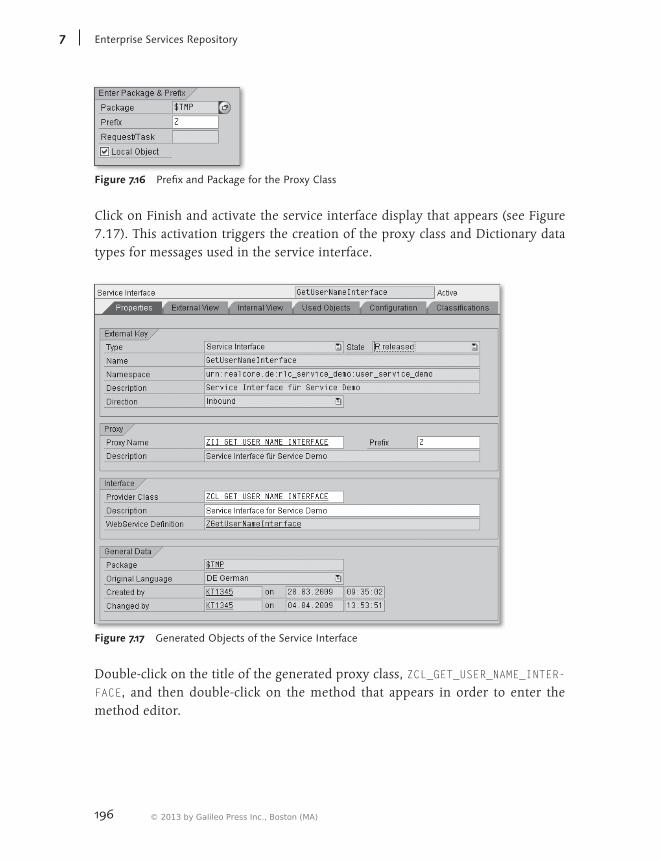
196
EnterpriseServicesRepository7
Figure 7.16 Prefix and Package for the Proxy Class
Click on Finish and activate the service interface display that appears (see Figure 7.17). This activation triggers the creation of the proxy class and Dictionary data types for messages used in the service interface.
Figure 7.17 Generated Objects of the Service Interface
Double-click on the title of the generated proxy class, ZCL_GET_USER_NAME_INTER-FACE, and then double-click on the method that appears in order to enter the method editor.
© 2013 by Galileo Press Inc., Boston (MA)
197
PublishingtheService 7.4
Here, you should store the following coding:
METHOD zii_get_user_name_interface~get_user_name. DATA: w_request TYPE zget_user_name_request_dt, w_response TYPE zget_user_name_response_dt, w_addr TYPE bapiaddr3, i_return TYPE STANDARD TABLE OF bapiret2, g_uname TYPE sy-uname. w_request = input-get_user_name_request_mt. g_uname = w_request-uname. CALL FUNCTION ‘BAPI_USER_GET_DETAIL’ EXPORTING username = g_uname IMPORTING address = w_addr TABLES return = i_return. w_response-vorname = w_addr-firstname. w_response-name = w_addr-lastname. output-get_user_name_response_mt = w_response. ENDMETHOD.
Save and activate your development. You have now stored a logic in your service.
7.4 Publishing the Service
To make your service available to other systems in your system landscape, you must publish it in the Enterprise Services Registry. To do that, call Transaction SOAMANAGER in your backend system. This should open the SOA Management application in your browser. If that doesn’t happen, you haven’t activated all of the necessary services in your system yet. Check whether the /sap/bc/webdynpro/sap/APPL_SOAP_MANAGEMENT service is activated in Transaction SICF. Perhaps there are also other services for Web Dynpro applications that haven’t been acti-
Personal Copy for Antonio Di Perna, user id 335eb981-6644-4783-ba40-78f36ac50abf
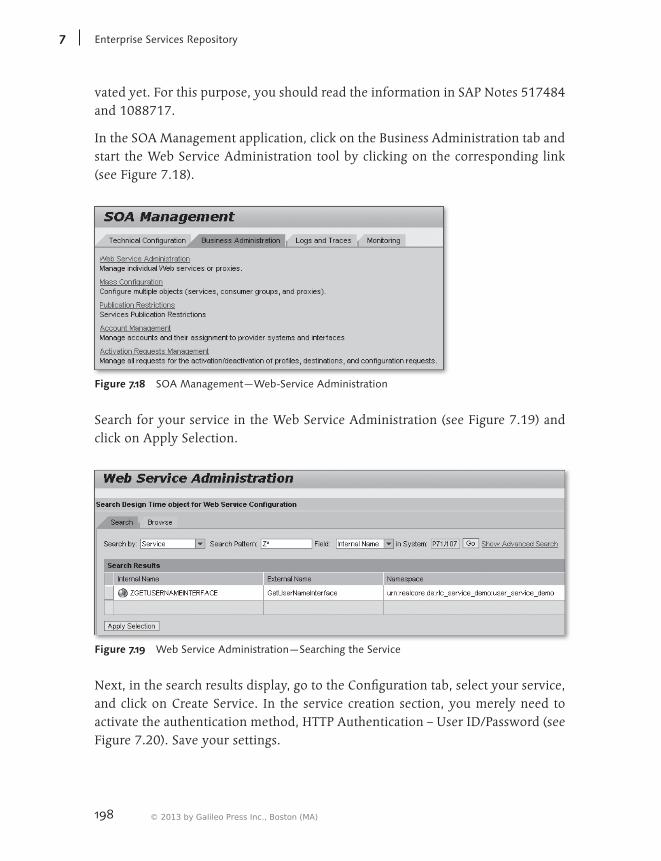
198
EnterpriseServicesRepository7
vated yet. For this purpose, you should read the information in SAP Notes 517484 and 1088717.
In the SOA Management application, click on the Business Administration tab and start the Web Service Administration tool by clicking on the corresponding link (see Figure 7.18).
Figure 7.18 SOA Management—Web-Service Administration
Search for your service in the Web Service Administration (see Figure 7.19) and click on Apply Selection.
Figure 7.19 Web Service Administration—Searching the Service
Next, in the search results display, go to the Configuration tab, select your service, and click on Create Service. In the service creation section, you merely need to activate the authentication method, HTTP Authentication – User ID/Password (see Figure 7.20). Save your settings.
© 2013 by Galileo Press Inc., Boston (MA)
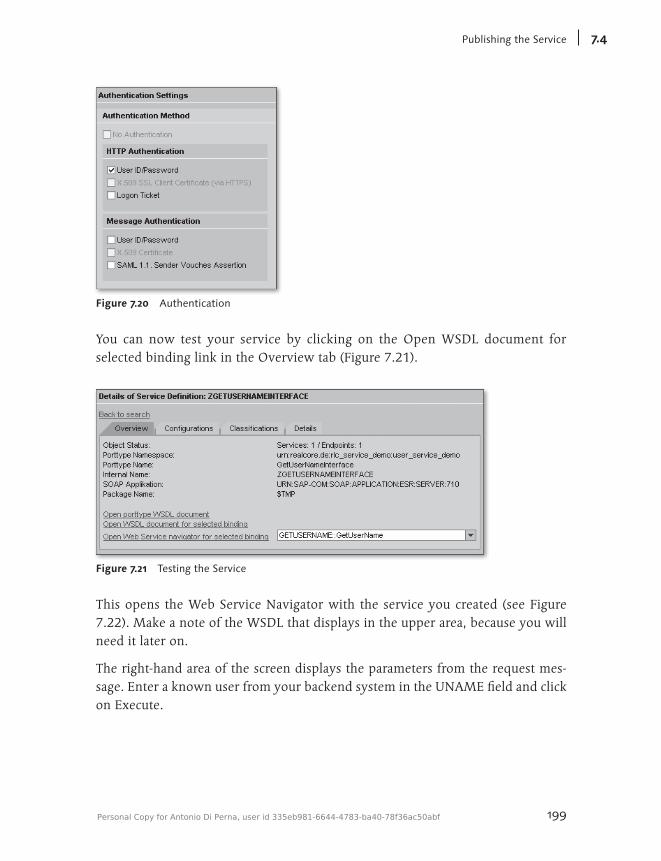
199
PublishingtheService 7.4
Figure 7.20 Authentication
You can now test your service by clicking on the Open WSDL document for selected binding link in the Overview tab (Figure 7.21).
Figure 7.21 Testing the Service
This opens the Web Service Navigator with the service you created (see Figure 7.22). Make a note of the WSDL that displays in the upper area, because you will need it later on.
The right-hand area of the screen displays the parameters from the request mes-sage. Enter a known user from your backend system in the UNAME field and click on Execute.
Personal Copy for Antonio Di Perna, user id 335eb981-6644-4783-ba40-78f36ac50abf
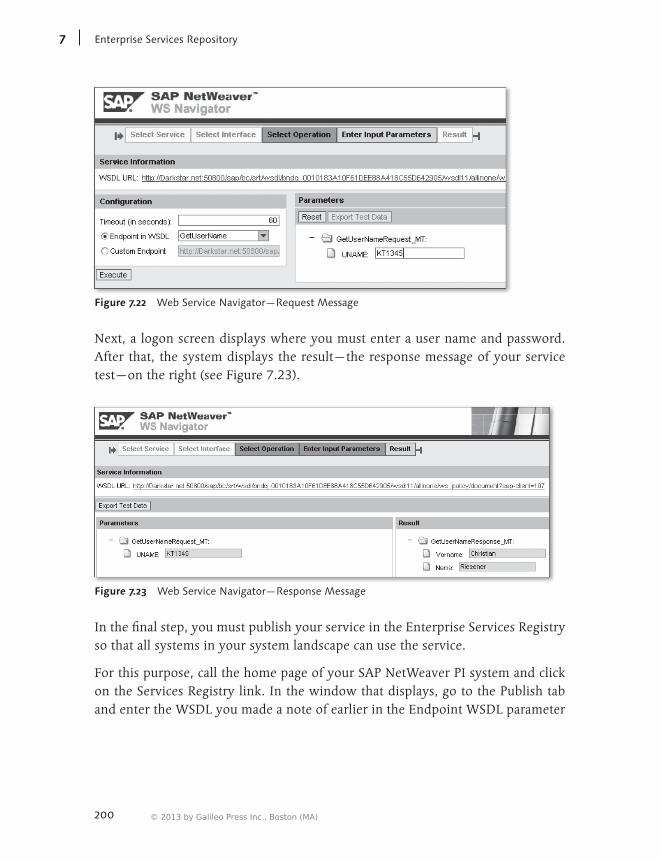
200
EnterpriseServicesRepository7
Figure 7.22 Web Service Navigator—Request Message
Next, a logon screen displays where you must enter a user name and password. After that, the system displays the result—the response message of your service test—on the right (see Figure 7.23).
Figure 7.23 Web Service Navigator—Response Message
In the final step, you must publish your service in the Enterprise Services Registry so that all systems in your system landscape can use the service.
For this purpose, call the home page of your SAP NetWeaver PI system and click on the Services Registry link. In the window that displays, go to the Publish tab and enter the WSDL you made a note of earlier in the Endpoint WSDL parameter
© 2013 by Galileo Press Inc., Boston (MA)

201
PublishingtheService 7.4
field. Then click on Publish. Your service will now be published in the Enterprise Services Registry and can be used by other systems.
Figure 7.24 Services Registry—Publishing the Service
Personal Copy for Antonio Di Perna, user id 335eb981-6644-4783-ba40-78f36ac50abf

© 2013 by Galileo Press Inc., Boston (MA)
203
A Appendix
A.1 Overview of SAP NetWeaver PI System Parameters
Area Parameter Description
AdapterFramework com.sap.aii.adapterframework.serviceuser.name
Service user. The Adapter Framework uses this user once a connection to another server is established.
AdapterFramework com.sap.aii.adapterframework.serviceuser.pwd
Service user password.
AdapterFramework com.sap.aii.adapterframework.serviceuser.language
Service user language.
ApplicationSystem com.sap.aii.applicationsystem.serviceuser.name
Service user. The application uses this user when it connects to the integration server.
ApplicationSystem com.sap.aii.applicationsystem.serviceuser.pwd
Service user password.
ApplicationSystem com.sap.aii.applicationsystem.serviceuser.language
Service user language.
Connections com.sap.aii.connect.cr.contextroot Contains the context root of the component repository server.
Connections com.sap.aii.connect.cr.httpport Contains the HTTP port number of the component repository server.
Connections com.sap.aii.connect.cr.name Contains the host name of the component repository server.
Connections com.sap.aii.connect.directory.contextroot
Contains the context root for the directory’s HTTP services.
Connections com.sap.aii.connect.directory.httpport
Contains the HTTP port number of the directory server.
Connections com.sap.aii.connect.directory.mshost
Contains the host name of the message server on the directory server.
Connections com.sap.aii.connect.directory.mshttpport
Contains the HTTP port number of the message server on the directory server.
Personal Copy for Antonio Di Perna, user id 335eb981-6644-4783-ba40-78f36ac50abf
204
AppendixA
Area Parameter Description
Connections com.sap.aii.connect.directory.name
Contains the host name of the directory server.
Connections com.sap.aii.connect.directory.rmiport
Contains the RMI port number of the directory server.
Connections com.sap.aii.connect.directory.rmiport.ssl
Contains the RMI SSL port number of the directory server.
Connections com.sap.aii.connect.integrationbuilder.startpage.url
Specifies a relative address of the SAP NetWeaver PI tool start page (on the repository server).
Connections com.sap.aii.connect.integrationserver.contextroot
Contains the context root of the integration server.
Connections com.sap.aii.connect.integrationserver.httpport
HTTP port of the J2EE engine on the integration server. The integration directory uses this port to connect to the SAP NetWeaver PI runtime environment.
Connections com.sap.aii.connect.integrationserver.name
Contains the host name of the integration server.
Connections com.sap.aii.connect.integrationserver.r3.client
SAP client of the integration server (see the JCo documentation of the jco.client.sysnr property).
Connections com.sap.aii.connect.integrationserver.r3.httpport
HTTP port of the integration server. This port is used to connect to the Internet Communication Framework (ICF) (ABAP).
Connections com.sap.aii.connect.integrationserver.r3.mshost
Host name of the message server on the integration server (see the JCo documentation of the jco.client.mshost property).
Connections com.sap.aii.connect.integrationserver.r3.r3name
Name of the SAP system on the integration server (see the Jco documentation of the jco.client.r3name property).
Connections com.sap.aii.connect.integrationserver.r3.sysnr
SAP system number of the integration server (see the JCo documentation of the jco.client.sysnr property).
© 2013 by Galileo Press Inc., Boston (MA)
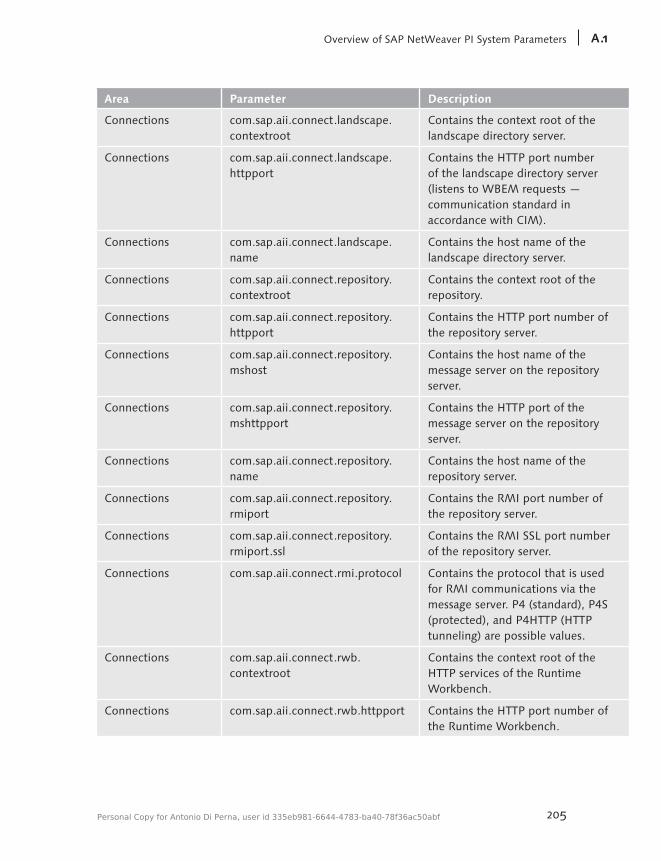
205
OverviewofSAPNetWeaverPISystemParameters A.1
Area Parameter Description
Connections com.sap.aii.connect.landscape.contextroot
Contains the context root of the landscape directory server.
Connections com.sap.aii.connect.landscape.httpport
Contains the HTTP port number of the landscape directory server (listens to WBEM requests — communication standard in accordance with CIM).
Connections com.sap.aii.connect.landscape.name
Contains the host name of the landscape directory server.
Connections com.sap.aii.connect.repository.contextroot
Contains the context root of the repository.
Connections com.sap.aii.connect.repository.httpport
Contains the HTTP port number of the repository server.
Connections com.sap.aii.connect.repository.mshost
Contains the host name of the message server on the repository server.
Connections com.sap.aii.connect.repository.mshttpport
Contains the HTTP port of the message server on the repository server.
Connections com.sap.aii.connect.repository.name
Contains the host name of the repository server.
Connections com.sap.aii.connect.repository.rmiport
Contains the RMI port number of the repository server.
Connections com.sap.aii.connect.repository.rmiport.ssl
Contains the RMI SSL port number of the repository server.
Connections com.sap.aii.connect.rmi.protocol Contains the protocol that is used for RMI communications via the message server. P4 (standard), P4S (protected), and P4HTTP (HTTP tunneling) are possible values.
Connections com.sap.aii.connect.rwb.contextroot
Contains the context root of the HTTP services of the Runtime Workbench.
Connections com.sap.aii.connect.rwb.httpport Contains the HTTP port number of the Runtime Workbench.
Personal Copy for Antonio Di Perna, user id 335eb981-6644-4783-ba40-78f36ac50abf
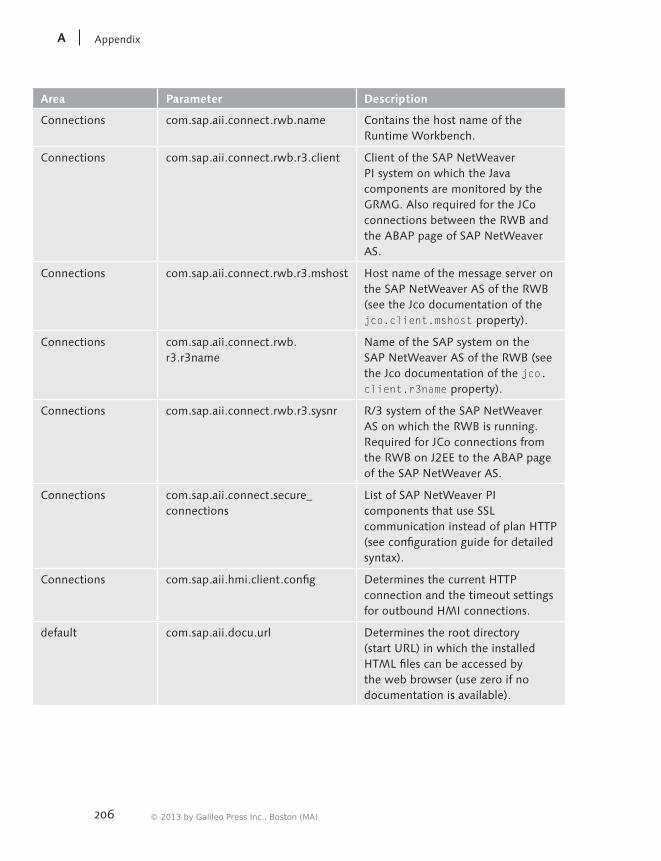
206
AppendixA
Area Parameter Description
Connections com.sap.aii.connect.rwb.name Contains the host name of the Runtime Workbench.
Connections com.sap.aii.connect.rwb.r3.client Client of the SAP NetWeaver PI system on which the Java components are monitored by the GRMG. Also required for the JCo connections between the RWB and the ABAP page of SAP NetWeaver AS.
Connections com.sap.aii.connect.rwb.r3.mshost Host name of the message server on the SAP NetWeaver AS of the RWB (see the Jco documentation of the jco.client.mshost property).
Connections com.sap.aii.connect.rwb.r3.r3name
Name of the SAP system on the SAP NetWeaver AS of the RWB (see the Jco documentation of the jco.client.r3name property).
Connections com.sap.aii.connect.rwb.r3.sysnr R/3 system of the SAP NetWeaver AS on which the RWB is running. Required for JCo connections from the RWB on J2EE to the ABAP page of the SAP NetWeaver AS.
Connections com.sap.aii.connect.secure_connections
List of SAP NetWeaver PI components that use SSL communication instead of plan HTTP (see configuration guide for detailed syntax).
Connections com.sap.aii.hmi.client.config Determines the current HTTP connection and the timeout settings for outbound HMI connections.
default com.sap.aii.docu.url Determines the root directory (start URL) in which the installed HTML files can be accessed by the web browser (use zero if no documentation is available).
© 2013 by Galileo Press Inc., Boston (MA)
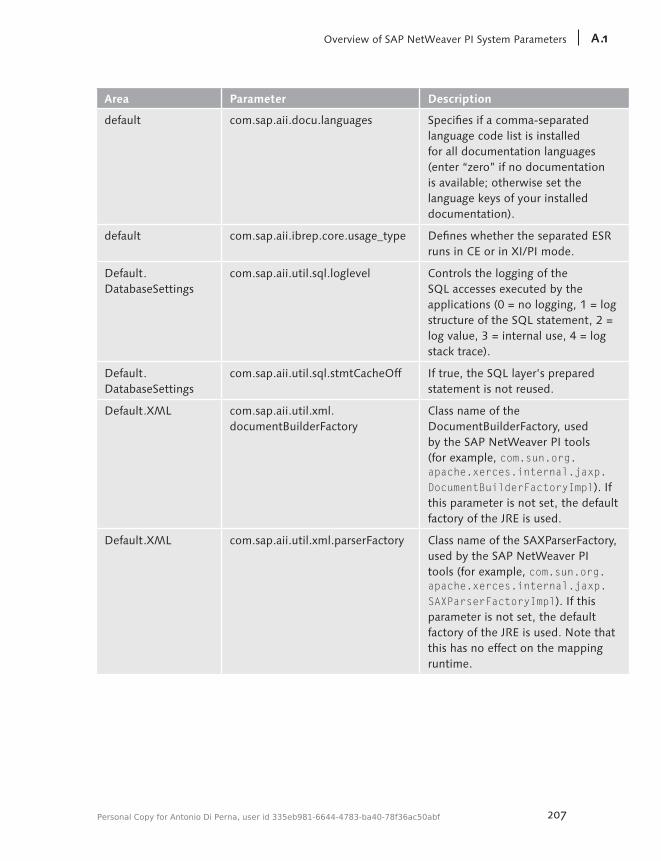
207
OverviewofSAPNetWeaverPISystemParameters A.1
Area Parameter Description
default com.sap.aii.docu.languages Specifies if a comma-separated language code list is installed for all documentation languages (enter “zero” if no documentation is available; otherwise set the language keys of your installed documentation).
default com.sap.aii.ibrep.core.usage_type Defines whether the separated ESR runs in CE or in XI/PI mode.
Default.DatabaseSettings
com.sap.aii.util.sql.loglevel Controls the logging of the SQL accesses executed by the applications (0 = no logging, 1 = log structure of the SQL statement, 2 = log value, 3 = internal use, 4 = log stack trace).
Default.DatabaseSettings
com.sap.aii.util.sql.stmtCacheOff If true, the SQL layer’s prepared statement is not reused.
Default.XML com.sap.aii.util.xml.documentBuilderFactory
Class name of the DocumentBuilderFactory, used by the SAP NetWeaver PI tools (for example, com.sun.org.apache.xerces.internal.jaxp.DocumentBuilderFactoryImpl). If this parameter is not set, the default factory of the JRE is used.
Default.XML com.sap.aii.util.xml.parserFactory Class name of the SAXParserFactory, used by the SAP NetWeaver PI tools (for example, com.sun.org.apache.xerces.internal.jaxp.SAXParserFactoryImpl). If this parameter is not set, the default factory of the JRE is used. Note that this has no effect on the mapping runtime.
Personal Copy for Antonio Di Perna, user id 335eb981-6644-4783-ba40-78f36ac50abf
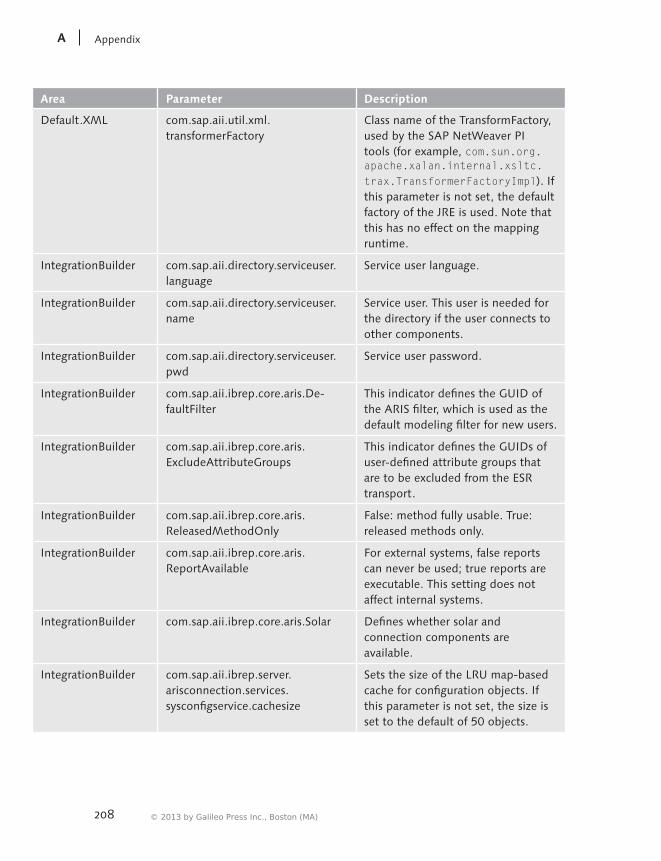
208
AppendixA
Area Parameter Description
Default.XML com.sap.aii.util.xml.transformerFactory
Class name of the TransformFactory, used by the SAP NetWeaver PI tools (for example, com.sun.org.apache.xalan.internal.xsltc.trax.TransformerFactoryImpl). If this parameter is not set, the default factory of the JRE is used. Note that this has no effect on the mapping runtime.
IntegrationBuilder com.sap.aii.directory.serviceuser.language
Service user language.
IntegrationBuilder com.sap.aii.directory.serviceuser.name
Service user. This user is needed for the directory if the user connects to other components.
IntegrationBuilder com.sap.aii.directory.serviceuser.pwd
Service user password.
IntegrationBuilder com.sap.aii.ibrep.core.aris.De-faultFilter
This indicator defines the GUID of the ARIS filter, which is used as the default modeling filter for new users.
IntegrationBuilder com.sap.aii.ibrep.core.aris.ExcludeAttributeGroups
This indicator defines the GUIDs of user-defined attribute groups that are to be excluded from the ESR transport.
IntegrationBuilder com.sap.aii.ibrep.core.aris.ReleasedMethodOnly
False: method fully usable. True: released methods only.
IntegrationBuilder com.sap.aii.ibrep.core.aris.ReportAvailable
For external systems, false reports can never be used; true reports are executable. This setting does not affect internal systems.
IntegrationBuilder com.sap.aii.ibrep.core.aris.Solar Defines whether solar and connection components are available.
IntegrationBuilder com.sap.aii.ibrep.server.arisconnection.services.sysconfigservice.cachesize
Sets the size of the LRU map-based cache for configuration objects. If this parameter is not set, the size is set to the default of 50 objects.
© 2013 by Galileo Press Inc., Boston (MA)
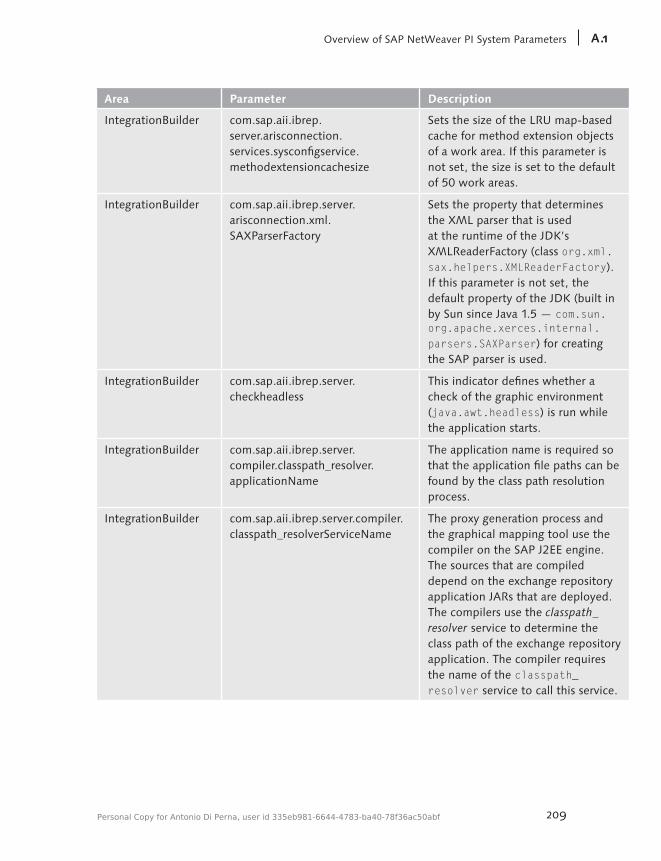
209
OverviewofSAPNetWeaverPISystemParameters A.1
Area Parameter Description
IntegrationBuilder com.sap.aii.ibrep.server.arisconnection.services.sysconfigservice.methodextensioncachesize
Sets the size of the LRU map-based cache for method extension objects of a work area. If this parameter is not set, the size is set to the default of 50 work areas.
IntegrationBuilder com.sap.aii.ibrep.server.arisconnection.xml.SAXParserFactory
Sets the property that determines the XML parser that is used at the runtime of the JDK’s XMLReaderFactory (class org.xml.sax.helpers.XMLReaderFactory). If this parameter is not set, the default property of the JDK (built in by Sun since Java 1.5 — com.sun.org.apache.xerces.internal.parsers.SAXParser) for creating the SAP parser is used.
IntegrationBuilder com.sap.aii.ibrep.server.checkheadless
This indicator defines whether a check of the graphic environment (java.awt.headless) is run while the application starts.
IntegrationBuilder com.sap.aii.ibrep.server.compiler.classpath_resolver.applicationName
The application name is required so that the application file paths can be found by the class path resolution process.
IntegrationBuilder com.sap.aii.ibrep.server.compiler.classpath_resolverServiceName
The proxy generation process and the graphical mapping tool use the compiler on the SAP J2EE engine. The sources that are compiled depend on the exchange repository application JARs that are deployed. The compilers use the classpath_resolver service to determine the class path of the exchange repository application. The compiler requires the name of the classpath_resolver service to call this service.
Personal Copy for Antonio Di Perna, user id 335eb981-6644-4783-ba40-78f36ac50abf
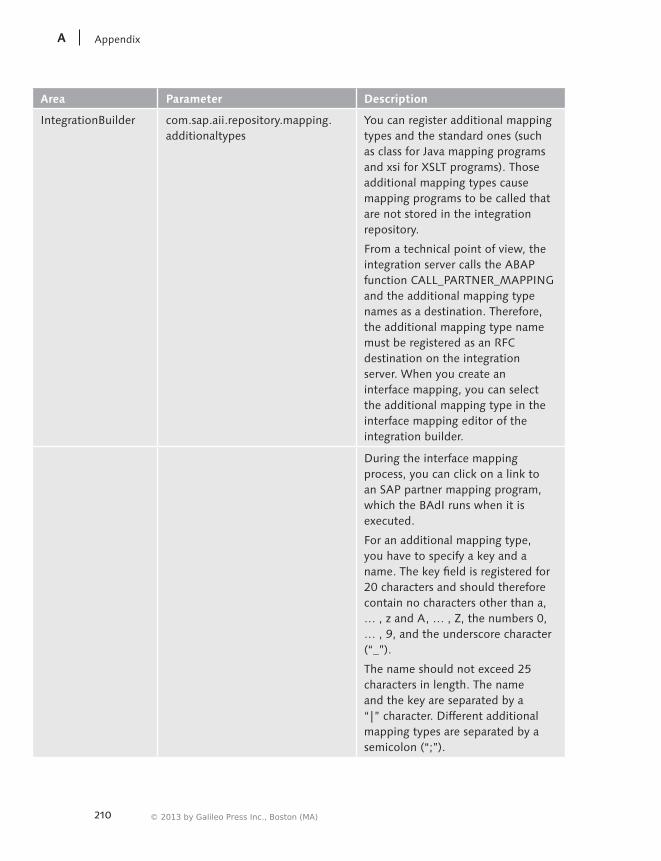
210
AppendixA
Area Parameter Description
IntegrationBuilder com.sap.aii.repository.mapping.additionaltypes
You can register additional mapping types and the standard ones (such as class for Java mapping programs and xsi for XSLT programs). Those additional mapping types cause mapping programs to be called that are not stored in the integration repository.
From a technical point of view, the integration server calls the ABAP function CALL_PARTNER_MAPPING and the additional mapping type names as a destination. Therefore, the additional mapping type name must be registered as an RFC destination on the integration server. When you create an interface mapping, you can select the additional mapping type in the interface mapping editor of the integration builder.
During the interface mapping process, you can click on a link to an SAP partner mapping program, which the BAdI runs when it is executed.
For an additional mapping type, you have to specify a key and a name. The key field is registered for 20 characters and should therefore contain no characters other than a, … , z and A, … , Z, the numbers 0, … , 9, and the underscore character (“_”).
The name should not exceed 25 characters in length. The name and the key are separated by a “|” character. Different additional mapping types are separated by a semicolon (“;”).
© 2013 by Galileo Press Inc., Boston (MA)
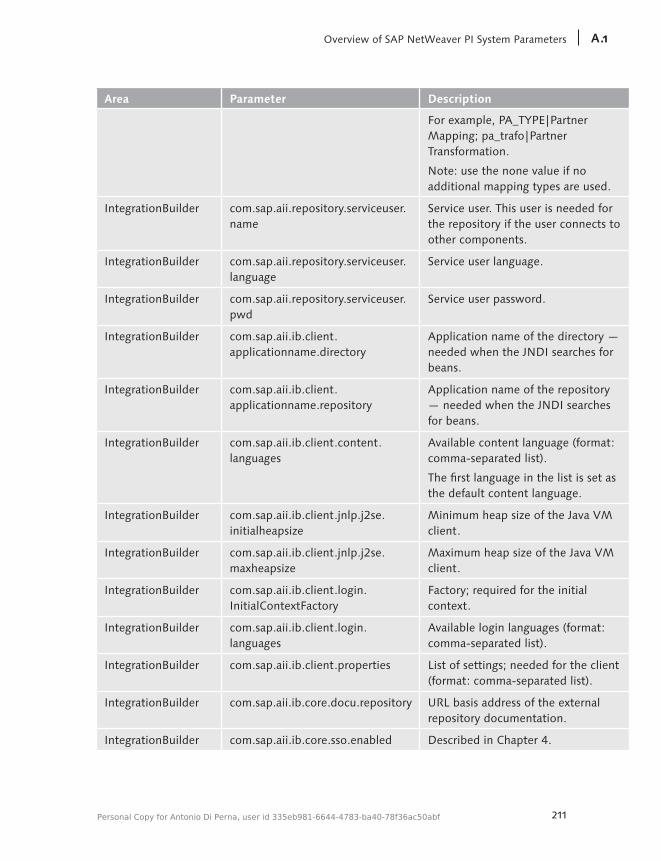
211
OverviewofSAPNetWeaverPISystemParameters A.1
Area Parameter Description
For example, PA_TYPE|Partner Mapping; pa_trafo|Partner Transformation.
Note: use the none value if no additional mapping types are used.
IntegrationBuilder com.sap.aii.repository.serviceuser.name
Service user. This user is needed for the repository if the user connects to other components.
IntegrationBuilder com.sap.aii.repository.serviceuser.language
Service user language.
IntegrationBuilder com.sap.aii.repository.serviceuser.pwd
Service user password.
IntegrationBuilder com.sap.aii.ib.client.applicationname.directory
Application name of the directory — needed when the JNDI searches for beans.
IntegrationBuilder com.sap.aii.ib.client.applicationname.repository
Application name of the repository — needed when the JNDI searches for beans.
IntegrationBuilder com.sap.aii.ib.client.content.languages
Available content language (format: comma-separated list).
The first language in the list is set as the default content language.
IntegrationBuilder com.sap.aii.ib.client.jnlp.j2se.initialheapsize
Minimum heap size of the Java VM client.
IntegrationBuilder com.sap.aii.ib.client.jnlp.j2se.maxheapsize
Maximum heap size of the Java VM client.
IntegrationBuilder com.sap.aii.ib.client.login.InitialContextFactory
Factory; required for the initial context.
IntegrationBuilder com.sap.aii.ib.client.login.languages
Available login languages (format: comma-separated list).
IntegrationBuilder com.sap.aii.ib.client.properties List of settings; needed for the client (format: comma-separated list).
IntegrationBuilder com.sap.aii.ib.core.docu.repository URL basis address of the external repository documentation.
IntegrationBuilder com.sap.aii.ib.core.sso.enabled Described in Chapter 4.
Personal Copy for Antonio Di Perna, user id 335eb981-6644-4783-ba40-78f36ac50abf
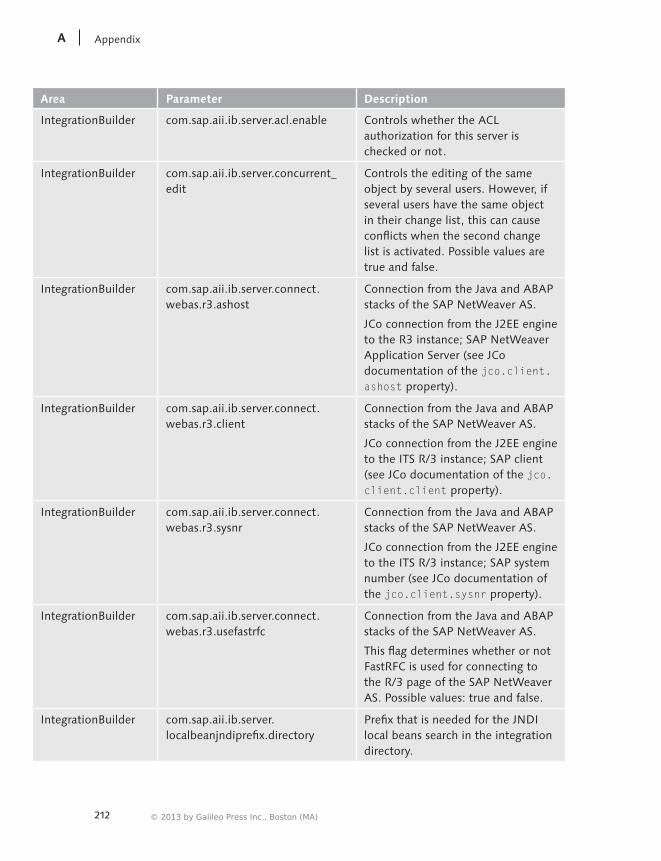
212
AppendixA
Area Parameter Description
IntegrationBuilder com.sap.aii.ib.server.acl.enable Controls whether the ACL authorization for this server is checked or not.
IntegrationBuilder com.sap.aii.ib.server.concurrent_edit
Controls the editing of the same object by several users. However, if several users have the same object in their change list, this can cause conflicts when the second change list is activated. Possible values are true and false.
IntegrationBuilder com.sap.aii.ib.server.connect.webas.r3.ashost
Connection from the Java and ABAP stacks of the SAP NetWeaver AS.
JCo connection from the J2EE engine to the R3 instance; SAP NetWeaver Application Server (see JCo documentation of the jco.client.ashost property).
IntegrationBuilder com.sap.aii.ib.server.connect.webas.r3.client
Connection from the Java and ABAP stacks of the SAP NetWeaver AS.
JCo connection from the J2EE engine to the ITS R/3 instance; SAP client (see JCo documentation of the jco.client.client property).
IntegrationBuilder com.sap.aii.ib.server.connect.webas.r3.sysnr
Connection from the Java and ABAP stacks of the SAP NetWeaver AS.
JCo connection from the J2EE engine to the ITS R/3 instance; SAP system number (see JCo documentation of the jco.client.sysnr property).
IntegrationBuilder com.sap.aii.ib.server.connect.webas.r3.usefastrfc
Connection from the Java and ABAP stacks of the SAP NetWeaver AS.
This flag determines whether or not FastRFC is used for connecting to the R/3 page of the SAP NetWeaver AS. Possible values: true and false.
IntegrationBuilder com.sap.aii.ib.server.localbeanjndiprefix.directory
Prefix that is needed for the JNDI local beans search in the integration directory.
© 2013 by Galileo Press Inc., Boston (MA)
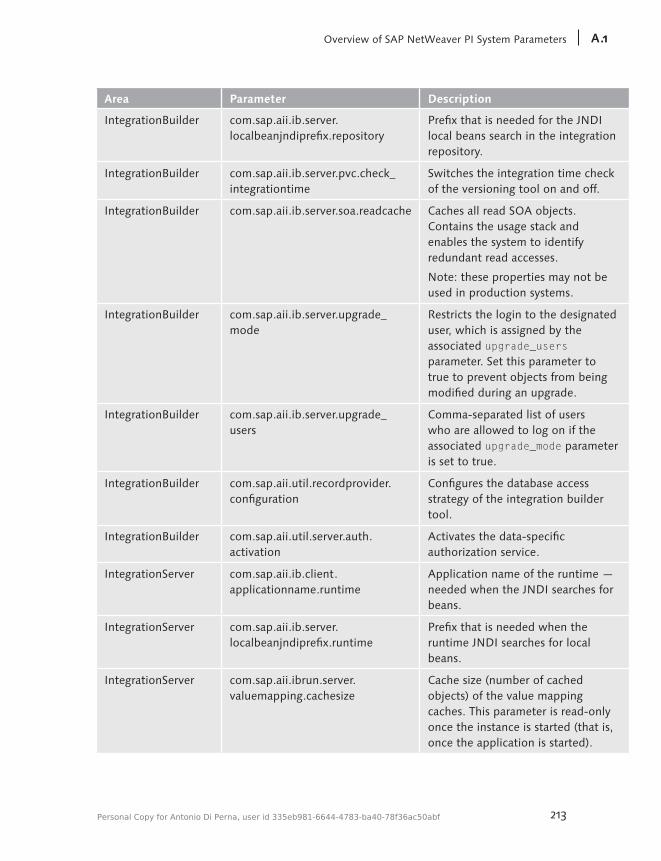
213
OverviewofSAPNetWeaverPISystemParameters A.1
Area Parameter Description
IntegrationBuilder com.sap.aii.ib.server.localbeanjndiprefix.repository
Prefix that is needed for the JNDI local beans search in the integration repository.
IntegrationBuilder com.sap.aii.ib.server.pvc.check_integrationtime
Switches the integration time check of the versioning tool on and off.
IntegrationBuilder com.sap.aii.ib.server.soa.readcache Caches all read SOA objects. Contains the usage stack and enables the system to identify redundant read accesses.
Note: these properties may not be used in production systems.
IntegrationBuilder com.sap.aii.ib.server.upgrade_mode
Restricts the login to the designated user, which is assigned by the associated upgrade_users parameter. Set this parameter to true to prevent objects from being modified during an upgrade.
IntegrationBuilder com.sap.aii.ib.server.upgrade_users
Comma-separated list of users who are allowed to log on if the associated upgrade_mode parameter is set to true.
IntegrationBuilder com.sap.aii.util.recordprovider.configuration
Configures the database access strategy of the integration builder tool.
IntegrationBuilder com.sap.aii.util.server.auth.activation
Activates the data-specific authorization service.
IntegrationServer com.sap.aii.ib.client.applicationname.runtime
Application name of the runtime — needed when the JNDI searches for beans.
IntegrationServer com.sap.aii.ib.server.localbeanjndiprefix.runtime
Prefix that is needed when the runtime JNDI searches for local beans.
IntegrationServer com.sap.aii.ibrun.server.valuemapping.cachesize
Cache size (number of cached objects) of the value mapping caches. This parameter is read-only once the instance is started (that is, once the application is started).
Personal Copy for Antonio Di Perna, user id 335eb981-6644-4783-ba40-78f36ac50abf
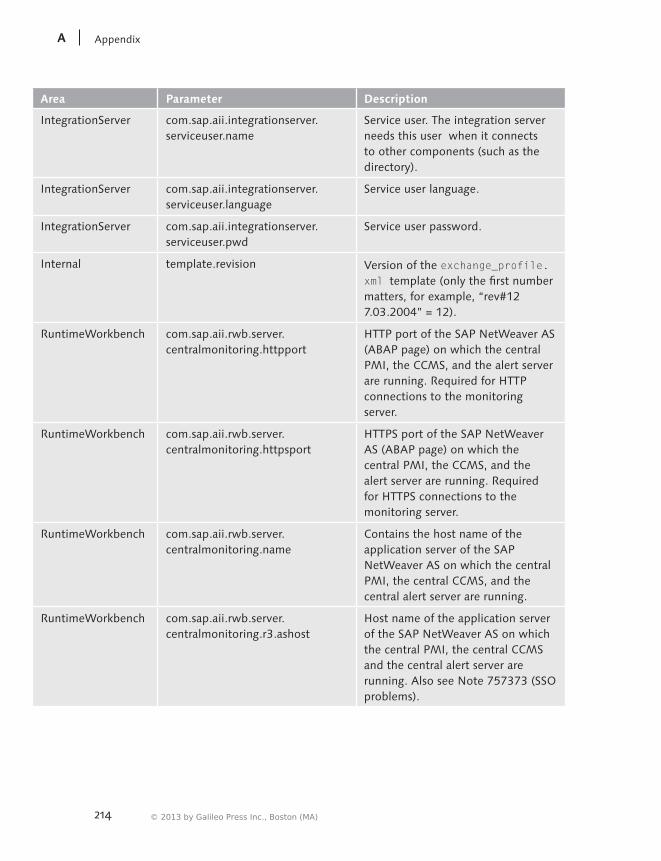
214
AppendixA
Area Parameter Description
IntegrationServer com.sap.aii.integrationserver.serviceuser.name
Service user. The integration server needs this user when it connects to other components (such as the directory).
IntegrationServer com.sap.aii.integrationserver.serviceuser.language
Service user language.
IntegrationServer com.sap.aii.integrationserver.serviceuser.pwd
Service user password.
Internal template.revision Version of the exchange_profile.xml template (only the first number matters, for example, “rev#12 7.03.2004” = 12).
RuntimeWorkbench com.sap.aii.rwb.server.centralmonitoring.httpport
HTTP port of the SAP NetWeaver AS (ABAP page) on which the central PMI, the CCMS, and the alert server are running. Required for HTTP connections to the monitoring server.
RuntimeWorkbench com.sap.aii.rwb.server.centralmonitoring.httpsport
HTTPS port of the SAP NetWeaver AS (ABAP page) on which the central PMI, the CCMS, and the alert server are running. Required for HTTPS connections to the monitoring server.
RuntimeWorkbench com.sap.aii.rwb.server.centralmonitoring.name
Contains the host name of the application server of the SAP NetWeaver AS on which the central PMI, the central CCMS, and the central alert server are running.
RuntimeWorkbench com.sap.aii.rwb.server.centralmonitoring.r3.ashost
Host name of the application server of the SAP NetWeaver AS on which the central PMI, the central CCMS and the central alert server are running. Also see Note 757373 (SSO problems).
© 2013 by Galileo Press Inc., Boston (MA)

215
Checklist:InterfaceConfiguration A.2
Area Parameter Description
RuntimeWorkbench com.sap.aii.rwb.server.centralmonitoring.r3.client
Client on which the central PMI, the CCMS, and the alert server are running. Required for JCo connections.
RuntimeWorkbench com.sap.aii.rwb.server.centralmonitoring.r3.mshost
Host name of the message server on the central monitoring server (see the Jco documentation of the jco.client.mshost property).
RuntimeWorkbench com.sap.aii.rwb.server.centralmonitoring.r3.r3name
Name of the SAP system on the central monitoring server (see the Jco documentation for the jco.client.r3name property).
RuntimeWorkbench com.sap.aii.rwb.server.centralmonitoring.r3.sysnr
System number of the SAP NetWeaver AS on which the central PMI, the CCMS, and the alert server are running. Required for JCo connections.
RuntimeWorkbench com.sap.aii.rwb.serviceuser.name Service user. The runtime workbench needs this user when a connection to another server is established.
RuntimeWorkbench com.sap.aii.rwb.serviceuser.language
Service user language.
RuntimeWorkbench com.sap.aii.rwb.serviceuser.pwd Service user password.
A.2 Checklist: Interface Configuration
The following list is intended as a checklist for verifying the completeness of the implementation activities that you perform for an interface configuration. You can also download it in PDF format from the book’s catalog page at www.sap-press.de/1987.
Step Activity Transaction or Link
Completed
1 Sending System
1.1 Create logical systems (system, SAP NetWeaver PI, and recipient)
BD54
Personal Copy for Antonio Di Perna, user id 335eb981-6644-4783-ba40-78f36ac50abf
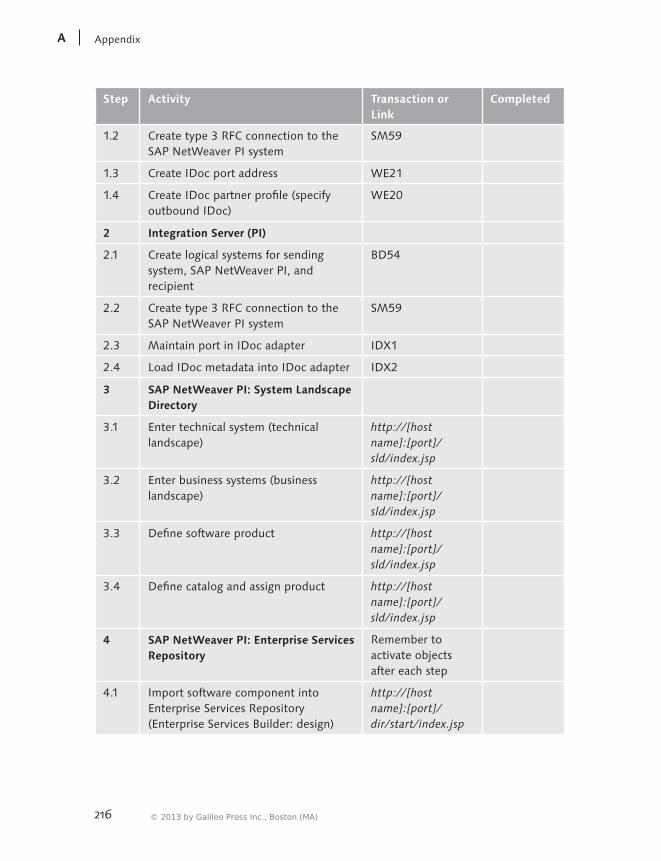
216
AppendixA
Step Activity Transaction or Link
Completed
1.2 Create type 3 RFC connection to the SAP NetWeaver PI system
SM59
1.3 Create IDoc port address WE21
1.4 Create IDoc partner profile (specify outbound IDoc)
WE20
2 Integration Server (PI)
2.1 Create logical systems for sending system, SAP NetWeaver PI, and recipient
BD54
2.2 Create type 3 RFC connection to the SAP NetWeaver PI system
SM59
2.3 Maintain port in IDoc adapter IDX1
2.4 Load IDoc metadata into IDoc adapter IDX2
3 SAP NetWeaver PI: System Landscape Directory
3.1 Enter technical system (technical landscape)
http://[host name]:[port]/ sld/index.jsp
3.2 Enter business systems (business landscape)
http://[host name]:[port]/ sld/index.jsp
3.3 Define software product http://[host name]:[port]/ sld/index.jsp
3.4 Define catalog and assign product http://[host name]:[port]/ sld/index.jsp
4 SAP NetWeaver PI: Enterprise Services Repository
Remember to activate objects after each step
4.1 Import software component into Enterprise Services Repository (Enterprise Services Builder: design)
http://[host name]:[port]/ dir/start/index.jsp
© 2013 by Galileo Press Inc., Boston (MA)
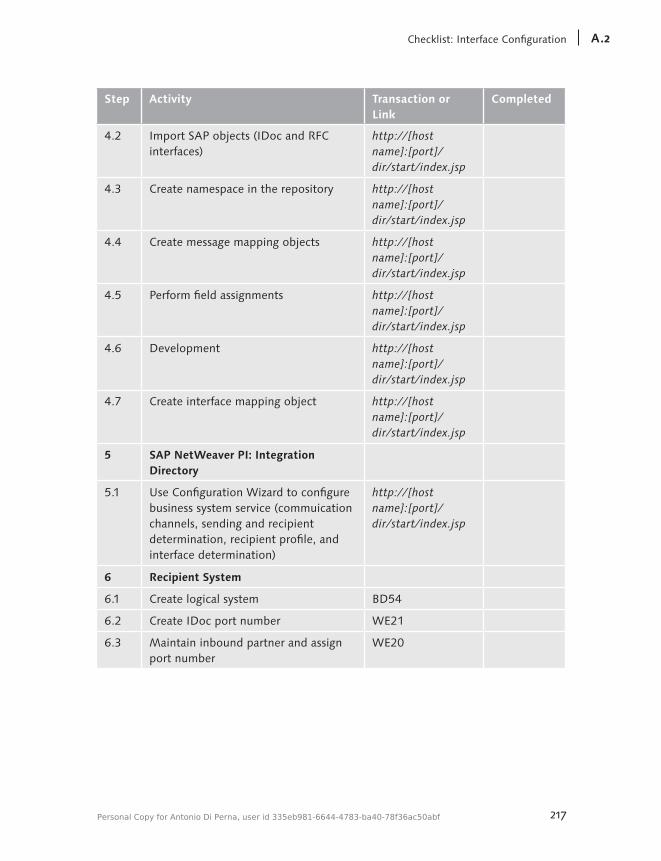
217
Checklist:InterfaceConfiguration A.2
Step Activity Transaction or Link
Completed
4.2 Import SAP objects (IDoc and RFC interfaces)
http://[host name]:[port]/ dir/start/index.jsp
4.3 Create namespace in the repository http://[host name]:[port]/ dir/start/index.jsp
4.4 Create message mapping objects http://[host name]:[port]/ dir/start/index.jsp
4.5 Perform field assignments http://[host name]:[port]/ dir/start/index.jsp
4.6 Development http://[host name]:[port]/ dir/start/index.jsp
4.7 Create interface mapping object http://[host name]:[port]/ dir/start/index.jsp
5 SAP NetWeaver PI: Integration Directory
5.1 Use Configuration Wizard to configure business system service (commuication channels, sending and recipient determination, recipient profile, and interface determination)
http://[host name]:[port]/ dir/start/index.jsp
6 Recipient System
6.1 Create logical system BD54
6.2 Create IDoc port number WE21
6.3 Maintain inbound partner and assign port number
WE20
Personal Copy for Antonio Di Perna, user id 335eb981-6644-4783-ba40-78f36ac50abf

© 2013 by Galileo Press Inc., Boston (MA)
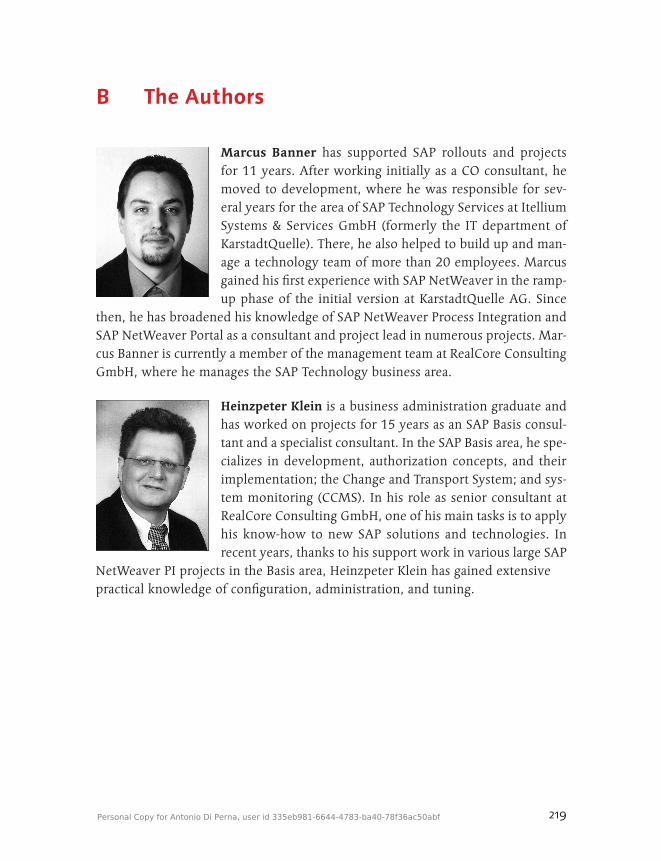
219
B The Authors
Marcus Banner has supported SAP rollouts and projects for 11 years. After working initially as a CO consultant, he moved to development, where he was responsible for sev-eral years for the area of SAP Technology Services at Itellium Systems & Services GmbH (formerly the IT department of KarstadtQuelle). There, he also helped to build up and man-age a technology team of more than 20 employees. Marcus gained his first experience with SAP NetWeaver in the ramp-up phase of the initial version at KarstadtQuelle AG. Since
then, he has broadened his knowledge of SAP NetWeaver Process Integration and SAP NetWeaver Portal as a consultant and project lead in numerous projects. Mar-cus Banner is currently a member of the management team at RealCore Consulting GmbH, where he manages the SAP Technology business area.
Heinzpeter Klein is a business administration graduate and has worked on projects for 15 years as an SAP Basis consul-tant and a specialist consultant. In the SAP Basis area, he spe-cializes in development, authorization concepts, and their implementation; the Change and Transport System; and sys-tem monitoring (CCMS). In his role as senior consultant at RealCore Consulting GmbH, one of his main tasks is to apply his know-how to new SAP solutions and technologies. In recent years, thanks to his support work in various large SAP
NetWeaver PI projects in the Basis area, Heinzpeter Klein has gained extensive practical knowledge of configuration, administration, and tuning.
Personal Copy for Antonio Di Perna, user id 335eb981-6644-4783-ba40-78f36ac50abf
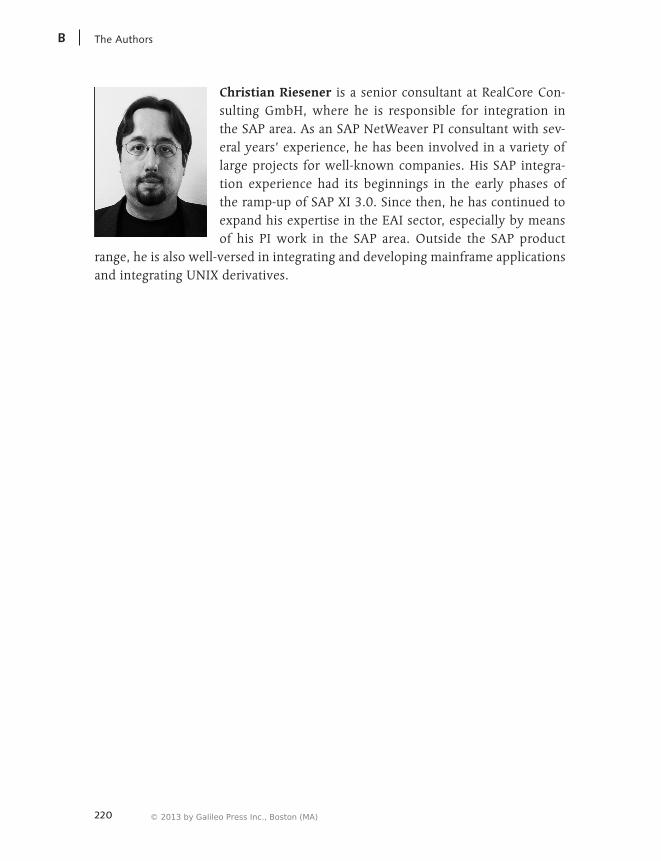
220
TheAuthorsB
Christian Riesener is a senior consultant at RealCore Con-sulting GmbH, where he is responsible for integration in the SAP area. As an SAP NetWeaver PI consultant with sev-eral years’ experience, he has been involved in a variety of large projects for well-known companies. His SAP integra-tion experience had its beginnings in the early phases of the ramp-up of SAP XI 3.0. Since then, he has continued to expand his expertise in the EAI sector, especially by means of his PI work in the SAP area. Outside the SAP product
range, he is also well-versed in integrating and developing mainframe applications and integrating UNIX derivatives.
© 2013 by Galileo Press Inc., Boston (MA)
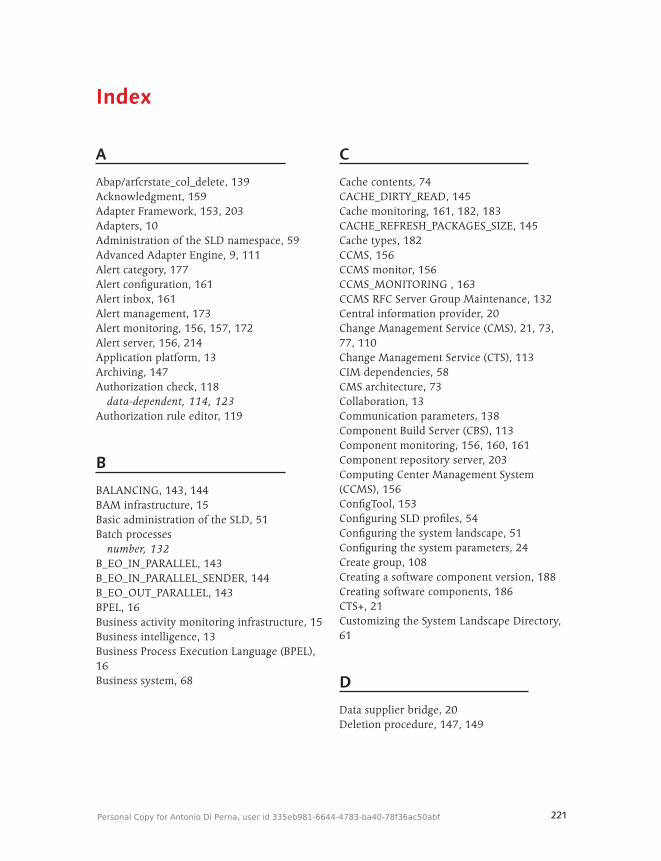
221
A
Abap/arfcrstate_col_delete, 139Acknowledgment, 159Adapter Framework, 153, 203Adapters, 10Administration of the SLD namespace, 59Advanced Adapter Engine, 9, 111Alert category, 177Alert configuration, 161Alert inbox, 161Alert management, 173Alert monitoring, 156, 157, 172Alert server, 156, 214Application platform, 13Archiving, 147Authorization check, 118
data-dependent, 114, 123Authorization rule editor, 119
B
BALANCING, 143, 144BAM infrastructure, 15Basic administration of the SLD, 51Batch processes
number, 132B_EO_IN_PARALLEL, 143B_EO_IN_PARALLEL_SENDER, 144B_EO_OUT_PARALLEL, 143BPEL, 16Business activity monitoring infrastructure, 15Business intelligence, 13Business Process Execution Language (BPEL), 16Business system, 68
C
Cache contents, 74CACHE_DIRTY_READ, 145Cache monitoring, 161, 182, 183CACHE_REFRESH_PACKAGES_SIZE, 145Cache types, 182CCMS, 156CCMS monitor, 156CCMS_MONITORING , 163CCMS RFC Server Group Maintenance, 132Central information provider, 20Change Management Service (CMS), 21, 73, 77, 110Change Management Service (CTS), 113CIM dependencies, 58CMS architecture, 73Collaboration, 13Communication parameters, 138Component Build Server (CBS), 113Component monitoring, 156, 160, 161Component repository server, 203Computing Center Management System (CCMS), 156ConfigTool, 153Configuring SLD profiles, 54Configuring the system landscape, 51Configuring the system parameters, 24Create group, 108Creating a software component version, 188Creating software components, 186CTS+, 21Customizing the System Landscape Directory, 61
D
Data supplier bridge, 20Deletion procedure, 147, 149
Index
Personal Copy for Antonio Di Perna, user id 335eb981-6644-4783-ba40-78f36ac50abf
222
Index
Design Time Repository (DTR), 113Dialog processes
number, 132Directory server, 203Discovery and description, 15Displaying system information, 53DROP_MAX_TABLE_LOAD, 151, 152Dynamic routing, 16
E
EAI software, 9em/global_area_MB, 157End-to-end monitoring, 156, 157, 160, 165ENGINE_TYPE, 144Enhanced Change and Transport System (CTS+), 21Enterprise Services Builder, 188
authorizations, 114Enterprise Services Builder , 19Enterprise Services Registry, 15, 185Enterprise Services Repository, 15, 18, 19, 110, 185, 207ENTRY_LOCK, 146EO_INBOUND_PARALLEL, 140EO_INBOUND_PARALLEL_SENDER, 141EO_INBOUND_TO_OUTBOUND, 141EO_MSG_SIZE_LIMIT, 142EO_MSG_SIZE_LIMIT_PARALLEL, 143EO_OUTBOUND_PARALLEL, 142ERROR_ON_NO_RECV_FOUND, 145Exchange Profile, 123
F
FastRFC, 212File adapter channel, 153Full automatic content synchronization, 22
G
Gateway parameterization, 131Gateway parameters, 137
Graphical mapping tool, 209GRMG, 175, 178, 206Group assignment, 110gw/max_conn, 137gw/max_overflow_size, 137gw/max_shm_req, 137gw/max_sys, 137
H
HTTP_TIMEOUT, 144
I
Icm/http/max_request_size_KB, 139Identity Management, 107Index administration, 161Information integration, 13Integration Builder
authorizations, 114Integration Directory, 19, 110, 212Integration Repository, 19, 213Integration server, 19, 110, 204, 214Internet Communication Framework (ICF), 204Internet Communication Manager (ICM), 180Internet Transaction Server (ITS), 162IS_RETRY_LIMIT, 142ITS, 162ITS plug-in , 157
J
J2EE ApplicationThreadManager, 153J2EE instances
number, 134J2EE security roles, 106Java Monitoring, 178JCo service provider, 131JCo service provider on the J2EE side, 134JEE5, 16Job scheduling, 59
© 2013 by Galileo Press Inc., Boston (MA)
223
Index
K
Knowledge management, 13
L
Landscape Configurator, 78Landscape directory server, 205Lifecycle management, 13Local processing , 9Locks on objects, 74LOGGING, 146LOGGING_AMF_ERR, 154LOGGING_SYNC, 146LRU map-based cache, 208
M
Mapping editor, 183Mapping types, 210Master data management, 13Message monitoring, 156, 160, 164Message packaging, 9Message sequence flow, 160Message-server, 204Message type, 193Minimum configuration of the transport system, 101Mobile infrastructure, 13Monitoring, 155Monitoring server, 214
N
Namespace, 59, 189NetWeaver Administrator, 19, 113
P
Packaging, 153PACKAGING, 154People integration, 13
Performance monitoring, 161, 171Performance optimization, 131PERSIST_ARCH_MANUAL_CHANGES, 149PERSIST_DURATION, 148PERSIST_DURATION (ASYNC and SYNC), 150PERSIST_DURATION_ERROR, 151PERSIST_DURATION (HISTORY), 151Persistence, 53Pipeline service, 164PMI, 156PMI server, 156pmistore , 168Portal, 13Post Processing Framework (PPF), 176Processes, Java
number, 134Process monitoring infrastructure (PMI), 156, 170Profile Generator, 103Proxy class, 196
Q
qRFC queues, 134Qualities of service, 16Queues
number, 134, 139
R
rdisp/appc_ca_blk_no, 138rdisp/force_sched_after_commit, 138rdisp/max_arg, 138rdisp/max_comm_entries, 138rdisp/rfc_max_own_login, 138rdisp/rfc_max_own_used_wp, 132, 138rdisp/rfc_max_wait_time, 138rdisp/tm_max_no, 138rdisp/wp_ca_blk_no, 138rdisp/wp_no_dia, 132Reliable messaging, 16Repository server, 204, 205RFC connectivity, 131RFC parameterization, 131
Personal Copy for Antonio Di Perna, user id 335eb981-6644-4783-ba40-78f36ac50abf
224
Index
RFC quota, 131RFC sender channel, 153Role authorizations, 113Role concept, 103ROWS_PER_LOOP (DELETE, SWITCH), 152Rule editor
authorizations, 119Runtime cache, 182Runtime Workbench (RWB), 19, 110, 155, 156, 205
S
SAML, 16SAP_BC_XMB_ARCHIVE, 148SAP NetWeaver, 13SAP NetWeaver Administrator, 135SAP NetWeaver Application Server, 16SAP NetWeaver Java Development Infrastructure, 113SAP NetWeaver Process Integration, 9, 14
architecture, 18Landscape Topology, 20roles, 104, 105, 106runtime parameters, 144tuning parameters, 139
SAP roles, 106Security Assertion Markup Language (SAML), 16Security role, 107, 108Server log, 52Service consumption, 15Service implementation, 195Service interface, 190Service model, 188Service-oriented architecture (SOA), 9, 185Service publication, 197Service user, 110Set up data persistence, 53Single sign-on (SSO), 126Sizing SAP Exchange Infrastructure 3.0, 24SLD, 20, 113, 186SLD bridge setup, 56SLD data bridge, 21SLD profiles, 54SOA Management, 197
Software catalogSLD, 62, 186
Software component versions, 62Support package, 23System data and sizing, 23System landscape, 51System Landscape Directory (SLD), 20, 110, 113, 186System parameter, 203
T
Technical system, 65Threads
number, 153TRACE_LEVEL, 146Transaction
ALRTCATDEF, 176ALRTINBOX, 173, 178GRMG, 178IDX5, 160PFCG, 174RZ04, 133RZ10, 132RZ12, 132RZ20, 156, 171RZ21, 173RZ70, 21SA38, 157, 177SALRT1, 174, 175S_B6A_52000011, 160SE38, 157SE80, 157SICF, 162, 166SLDCHECK, 158SM30, 172SM59, 174, 180SOAMANAGER , 197SPROXY, 195SU01, 103, 113, 114, 174SWE2, 176SXI_MONITOR, 158, 164SXM_ADM, 147, 149SXMB_ADM, 139, 148, 162SXMB_MONI, 158, 164SXMB_MONI_BPE, 160
© 2013 by Galileo Press Inc., Boston (MA)
225
Index
SXMSALRT, 176SXMS_BCM, 154SXMS_BCONF, 154SXMSIF, 141
Transaction PFCG, 103, 111
Transaction SCOT, 174Transaktion
ALRTCATDEF , 175Transport groups, 70Transport system, 74
U
UDDI directory service, 15UME, 103Universal Description, Discovery, and Integration (UDDI), 16User group, 107User Management Engine (UME), 103, 114
V
Value mapping, 182Visual Administrator, 19, 113, 135
W
Web Service Administration, 198Web Service Navigator, 199Web Services Reliable Messaging (WS-RM), 16Web Services Security (WS Security), 16Work processes
number, 131WS-RM, 16WS Security, 16
X
XML data transfer, 164XML validation, 19
Z
zta/max_memreq_MB, 138
Personal Copy for Antonio Di Perna, user id 335eb981-6644-4783-ba40-78f36ac50abf
Service Pages
The following sections contain notes on how you can contact us.
Praise and Criticism
We hope that you enjoyed reading this book. If it met your expectations, please do recommend it, for example, by writing a review on http://www.sap-press.com. If you think there is room for improvement, please get in touch with the editor of the book: [email protected]. We welcome every suggestion for improvement but, of course, also any praise!
You can also navigate to our web catalog page for this book to submit feedback or share your reading experience via Facebook, Google+, Twitter, email, or by writing a book review. Simply follow this link: http://www.sap-press.com/H3092.
Supplements
Supplements (sample code, exercise materials, lists, and so on) are provided in your online library and on the web catalog page for this book. You can directly navigate to this page using the following link: http://www.sap-press.com/H3092. Should we learn about typos that alter the meaning or content errors, we will provide a list with corrections there, too.
Technical Issues
If you experience technical issues with your e-book or e-book account at SAP PRESS, please feel free to contact our reader service: [email protected].
i

ii
About Us and Our Program
The website http://www.sap-press.com provides detailed and first-hand information on our current publishing program. Here, you can also easily order all of our books and e-books. For information on Galileo Press Inc. and for additional contact options please refer to our company website: http://www.galileo-press.com.
iii
Legal Notes
This section contains the detailed and legally binding usage conditions for this e-book.
Copyright Note
This publication is protected by copyright in its entirety. All usage and exploitation rights are reserved by the author and Galileo Press; in particular the right of repro-duction and the right of distribution, be it in printed or electronic form.
© 2010 by Galileo Press Inc., Boston (MA)
Your Rights as a User
You are entitled to use this e-book for personal purposes only. In particular, you may print the e-book for personal use or copy it as long as you store this copy on a device that is solely and personally used by yourself. You are not entitled to any other usage or exploitation.
In particular, it is not permitted to forward electronic or printed copies to third parties. Furthermore, it is not permitted to distribute the e-book on the Internet, in intranets, or in any other way or make it available to third parties. Any public exhibition, other publication, or any reproduction of the e-book beyond personal use are expressly prohibited. The aforementioned does not only apply to the e-book in its entirety but also to parts thereof (e.g., charts, pictures, tables, sections of text).
Copyright notes, brands, and other legal reservations as well as the digital watermark may not be removed from the e-book.
Digital Watermark
This e-book copy contains a digital watermark, a signature that indicates which person may use this copy. If you, dear reader, are not this person, you are violating the copyright. So please refrain from using this e-book and inform us about this violation. A brief email to [email protected] is sufficient. Thank you!
iv
Trademarks
The common names, trade names, descriptions of goods, and so on used in this publication may be trademarks without special identification and subject to legal regulations as such.
All of the screenshots and graphics reproduced in this book are subject to copyright © SAP AG, Dietmar-Hopp-Allee 16, 69190 Walldorf, Germany. SAP, the SAP logo, mySAP, mySAP.com, SAP Business Suite, SAP NetWeaver, SAP R/3, SAP R/2, SAP B2B, SAPtronic, SAPscript, SAP BW, SAP CRM, SAP EarlyWatch, SAP ArchiveLink, SAP HANA, SAP GUI, SAP Business Workflow, SAP Business Engineer, SAP Business Navigator, SAP Business Framework, SAP Business Information Warehouse, SAP interenterprise solutions, SAP APO, AcceleratedSAP, InterSAP, SAPoffice, SAPfind, SAPfile, SAPtime, SAPmail, SAP-access, SAP-EDI, R/3 Retail, Accelerated HR, Acceler-ated HiTech, Accelerated Consumer Products, ABAP, ABAP/4, ALE/WEB, Alloy, BAPI, Business Framework, BW Explorer, Duet, Enjoy-SAP, mySAP.com e-business platform, mySAP Enterprise Portals, RIVA, SAPPHIRE, TeamSAP, Webflow, and SAP PRESS are registered or unregistered trademarks of SAP AG, Walldorf, Germany.
Limitation of Liability
Regardless of the care that has been taken in creating texts, figures, and programs, neither the publisher nor the author, editor, or translator assume any legal respon-sibility or any liability for possible errors and their consequences.