Embed Size (px)
Citation preview
WELCOME to VALHALLA’s MaxSea 10.3.2.1
INSTALLATION GUIDE (rev 1 Jan 09)
(for USE of the program see “MaxSea
10.3.2.1 Tutorial)
.
.
This installation guide is written for the Microsoft XP operating system. It is also applicable to the Microsoft Vista operating
system although there are interruptions along the way asking for permissions, etc. In each case allow or continue with the
installation, assuming you have administrator privileges. The biggest problem with installing on a Vista machine is getting
the boat’s position displayed on the screen. The problem has been traced to the GPS drivers which need the Vista version.
In the folder ‘Pirates Chest’ is the folder ‘USB GPS DRIVERS’. In this folder are three folders containing drivers for the USB
GPS BU-353 (Globalsat), the USB GPS GR-213 (Hollux), and the Prolific USB-RS232 adapter. The USB GPS folders contain
drivers for both XP and Vista. The appropriate driver should be installed prior to connecting the GPS. Anyone finding
additional Vista drivers, please contact me, Terry, at [email protected]
AS A MATTER OF CONVENIENCE, I SUGGEST YOU SAVE THIS INSTALLATION GUIDE TO THE DESKTOP ON YOUR
COMPUTER. DURING INSTALLATION YOU WILL NEED TO RESTART THE COMPUTER AND HAVING THE INSTALLATION
GUIDE ON THE DESKTOP MAKES IT EASY TO RE-OPEN THIS INSTALLATION GUIDE. Once the program is installed you will
probably want to delete it from the desktop.
BEFORE YOU GO FURTHER: If you now have or have in the past had a prior version of MaxSea installed on your computer there are steps you should take to minimize problems when installing this newer version.
a. Uninstall the old program using 'Control Panel/Add or remove Programs'.b. Then uninstall the 'Sentinel System Driver' program (you will reinstall it later along
with the program) found further down the list.c. Then ... PLEASE DO THIS CAREFULLY. In Windows Explorer, navigate to C:\
Program Files. Right-click on the folder 'I&M'and select 'Delete'. Still in Windows Explorer, navigate to C:\Windows. Select the folder 'WINDOWS' by clicking on it (the word 'WINDOWS' will be backlighted). Click on 'Search' at the top of the screen. Select 'All files and folders'. In the box titled 'All or part of the file name:', enter "sea". (It should already say 'Look in: WINDOWS') Click on 'Search'. You should get a list with a folder "MaxSea' and a list of other files beginning with 'Max' or 'Sea'. Click on 'Edit/Select all'. Now all of the folders and files you found should be highlighted. If any of the files found DO NOT begin with either 'Max' or 'Sea' (such as 'AdvSearch') you de-select that file by holding down the 'Ctl' key and clicking on it. Right-click on the remaining highlighted folder and files then click on 'Delete'.
d. You have now cleaned out most of the extraneous files left over from removing the previous version. A problem which sometimes prevents a successful installation stems from the entries in the computer ‘Registry’. There are three programs that I find will do a good job of cleaning the Registry. These programs are located in the ‘Pirates Chest’ folder in the folder “Cleaning Programs”. The READ ME file describes installation of the three programs. From the Desktop run these three programs using the ‘Registry’ feature of them. When any program finds problem files in the Registry they can be safely deleted (CCleaner asks if you want to save a backup of the registry which really isn’t necessary). After running these programs restart the computer and return to these instructions.
NOW FOR THE INSTALLATION PROCEDURE:
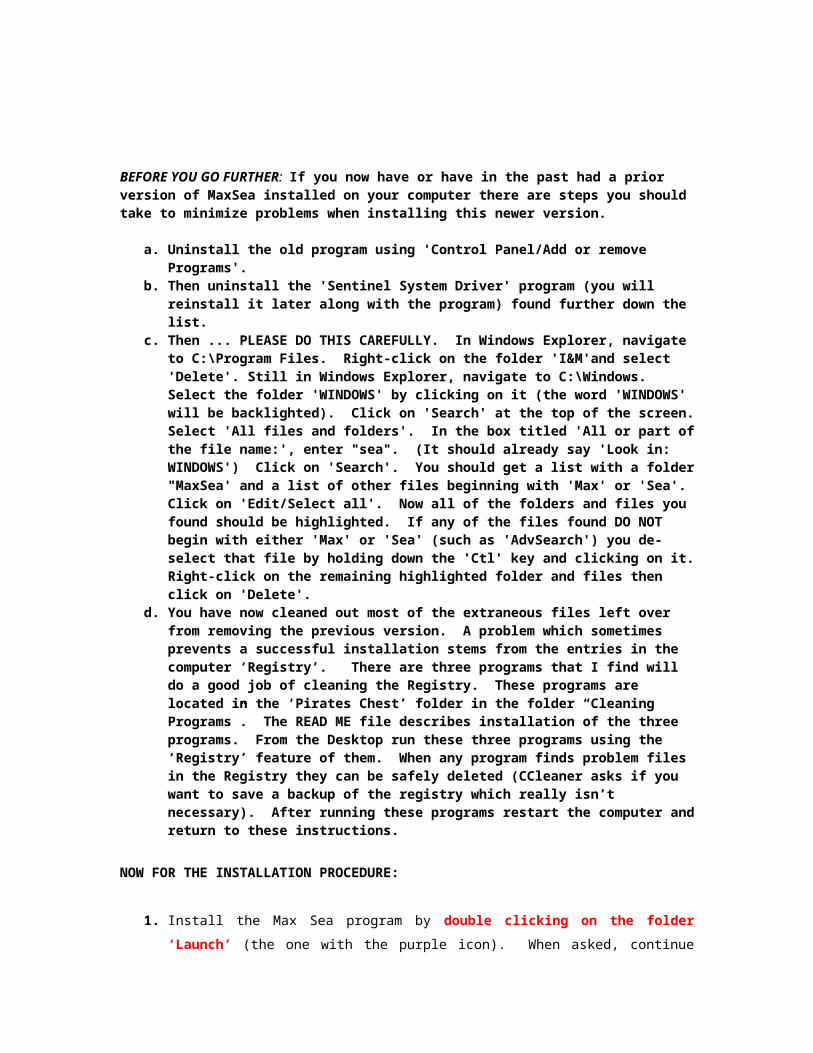
1. Install the Max Sea program by double clicking on the folder ‘Launch’ (the one with
the purple icon). When asked, continue with each step during the installation by
answering all questions in the affirmative.
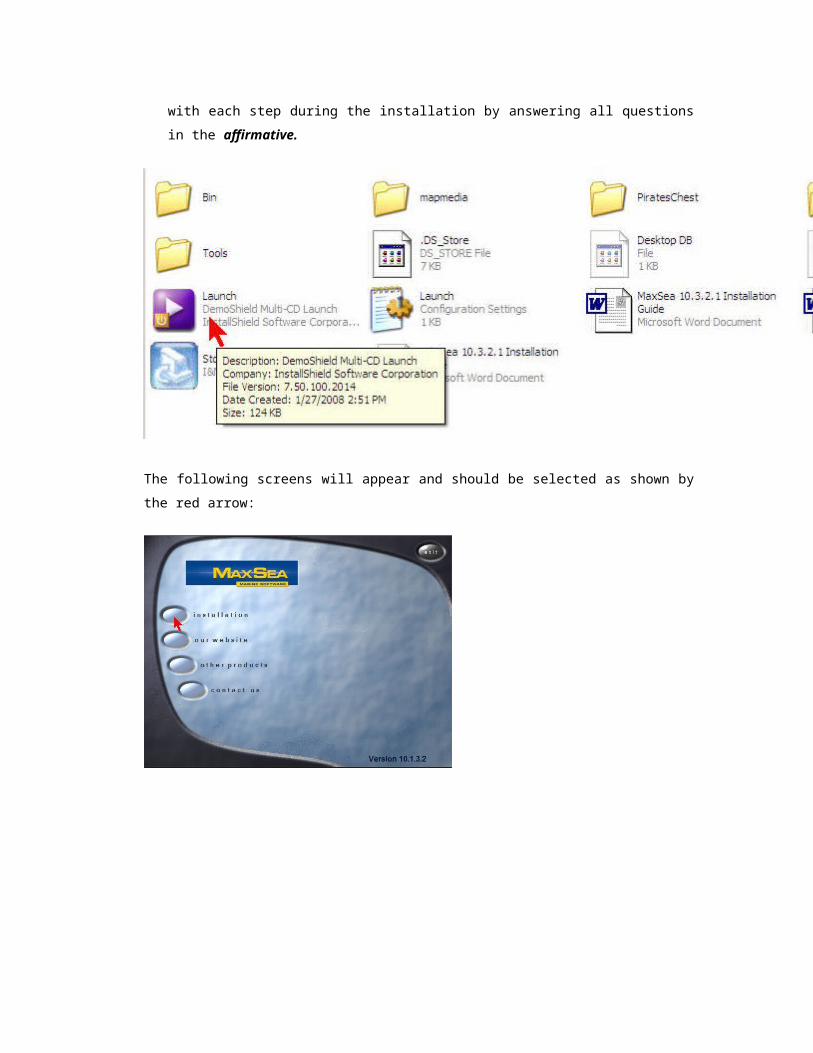
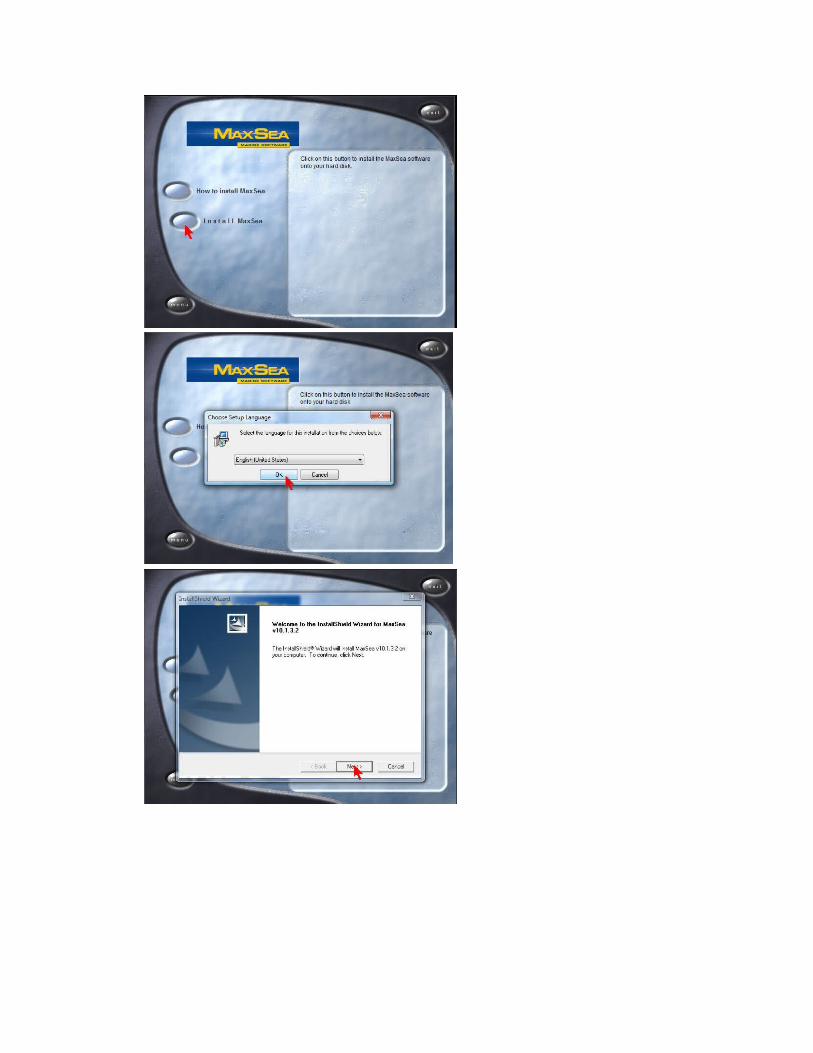
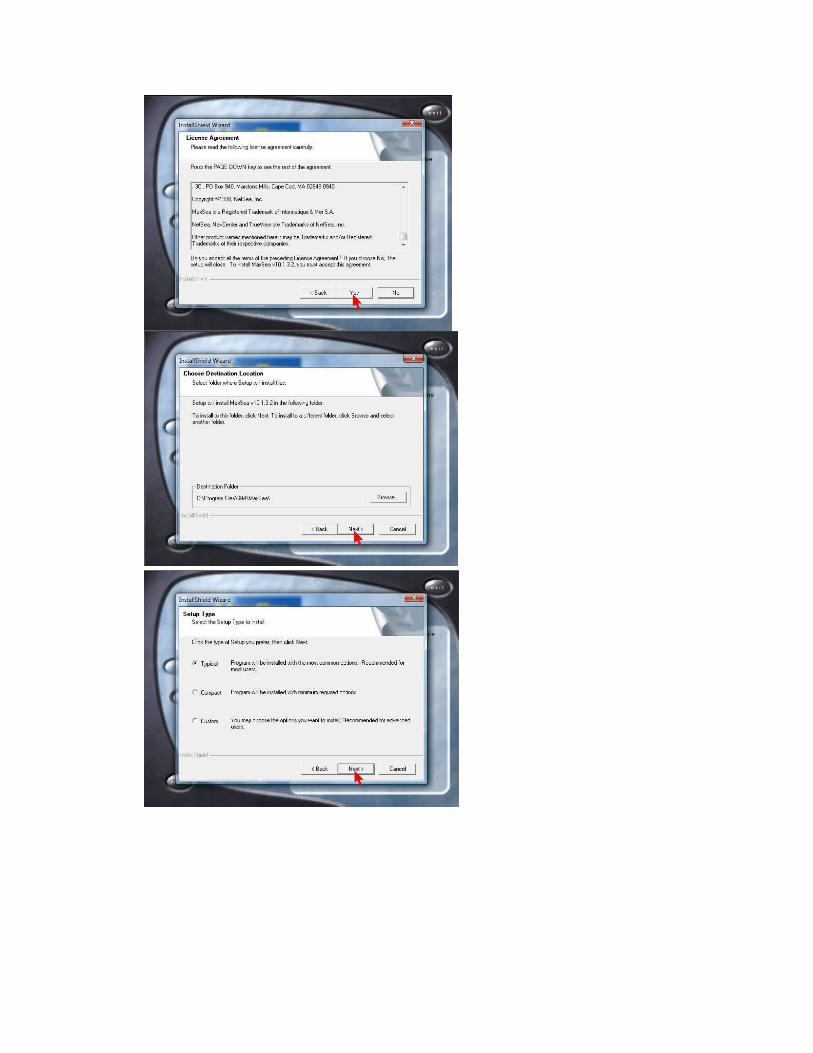
The following screens will appear and should be selected as shown by the red arrow:
BEFORE CLICKING ON THE ‘FINISH’ BOX YOU MUST UNCHECK THE BOX ASKING TO
LAUNCH THE PROGRAM
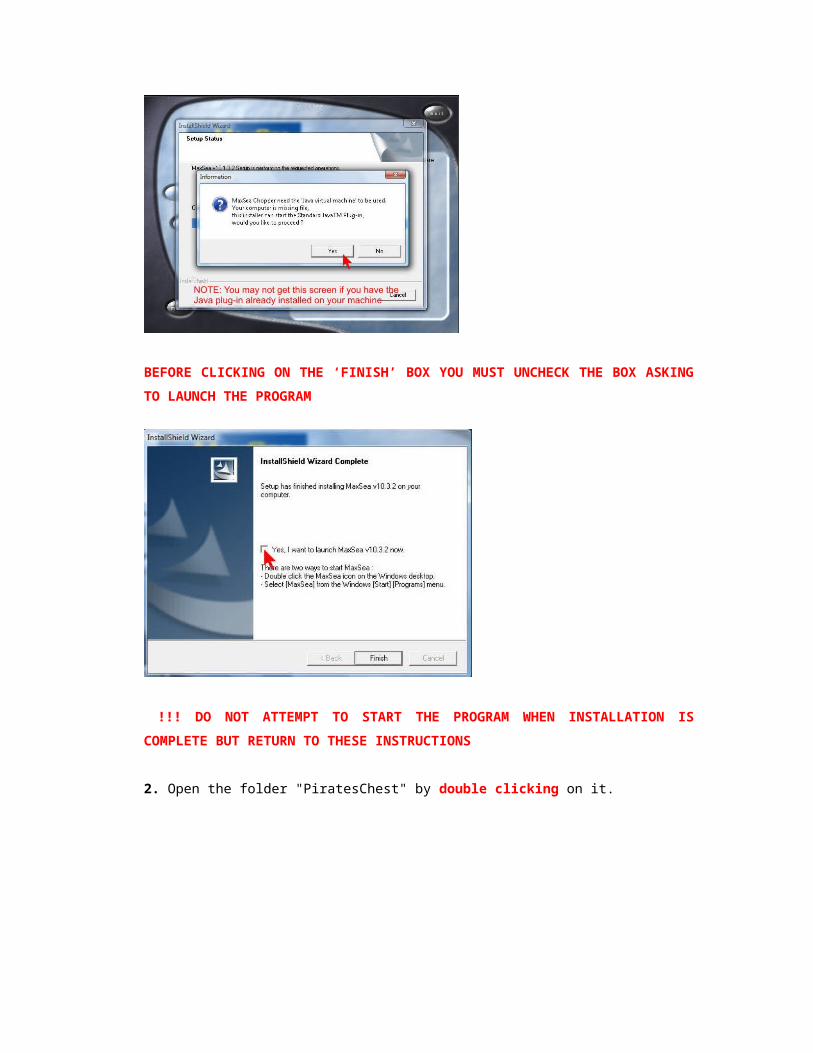
!!! DO NOT ATTEMPT TO START THE PROGRAM WHEN INSTALLATION IS
COMPLETE BUT RETURN TO THESE INSTRUCTIONS
2. Open the folder "PiratesChest" by double clicking on it.
3. In the ‘Pirates Chest’ folder double click on the registry editor
“MS10.3.2.1_ProRouting_AIS_...”.

When asked, click on ‘Yes’,
Then click on ‘OK’ after notice of successful installation,
4. Install the emulator by double clicking on the folder "SENTEMUL".
When asked, check the box for automatic start with Windows. PLEASE REMEMBER
TO DO THIS!
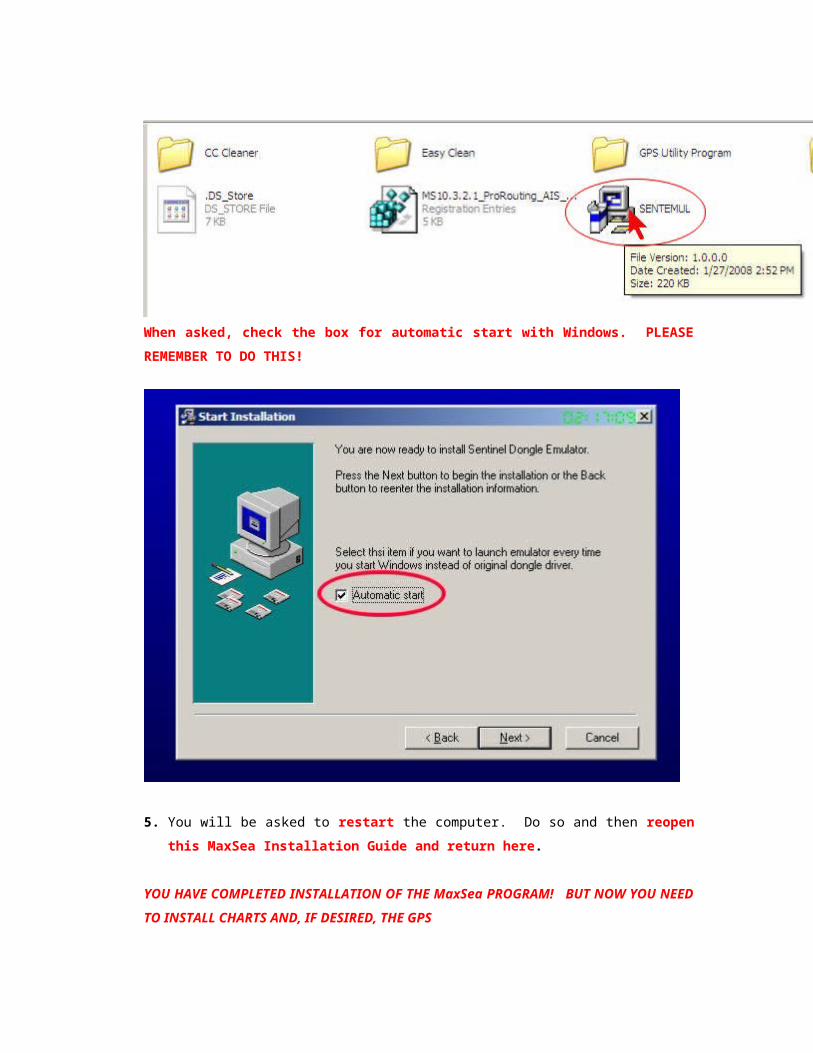
5. You will be asked to restart the computer. Do so and then reopen this MaxSea
Installation Guide and return here.
YOU HAVE COMPLETED INSTALLATION OF THE MaxSea PROGRAM! BUT NOW YOU
NEED TO INSTALL CHARTS AND, IF DESIRED, THE GPS
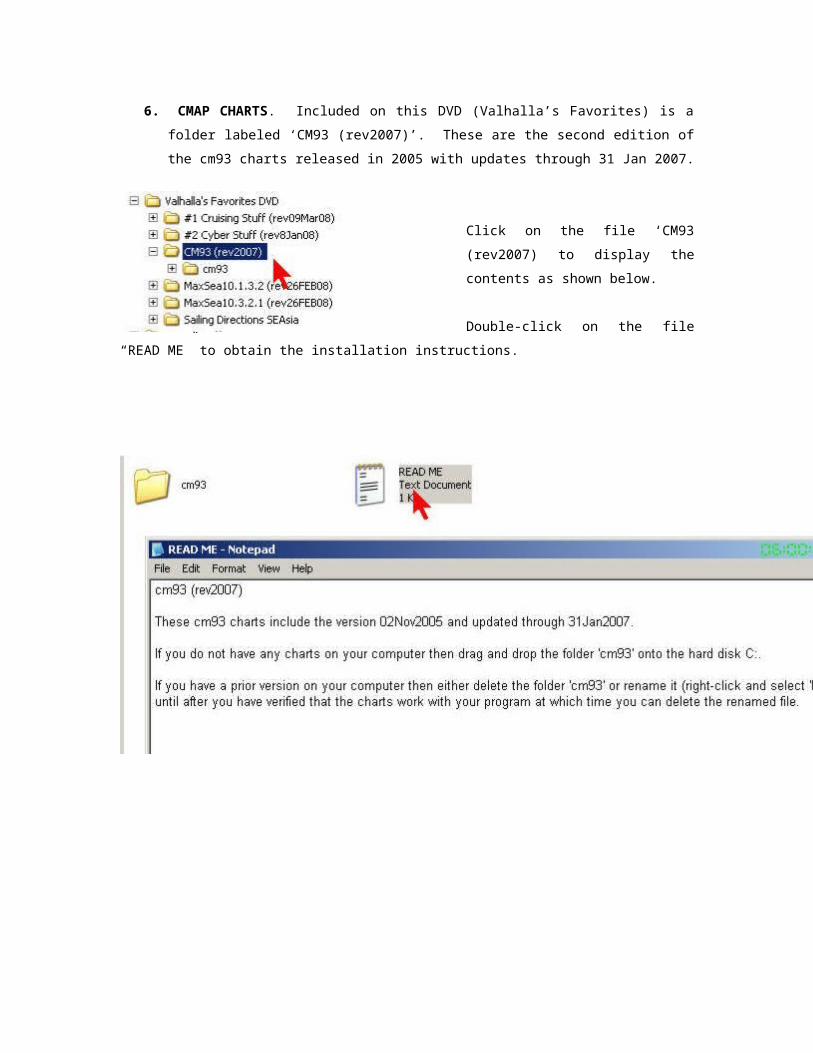
6. CMAP CHARTS. Included on this DVD (Valhalla’s Favorites) is a folder labeled ‘CM93
(rev2007)’. These are the second edition of the cm93 charts released in 2005 with
updates through 31 Jan 2007.
Click on the file ‘CM93 (rev2007) to
display the contents as shown below.
Double-click on the file “READ ME” to
obtain the installation instructions.
SAVING HARD DISK SPACE
If you are limited in the amount of space on your hard drive, you can select regions of the world, based on latitude, to be displayed by
the program. To do this you must delete (or move to another location) the folders under ‘cm93’ for those regions you do not want to be
displayed. In the ‘cm93’ folder there are some small overhead files (452KB) that must be in that folder. The regions are as follows:
LATITUDE RANGE FOLDERS SIZE ON DISK
0-40N 02100000-02701020 183 MB
40N-80N 03300000-04501020 1.07 GB
0-40S 01500000-01501020 65.8 MB
40S-80S 00300000-00901020 32.7 MB
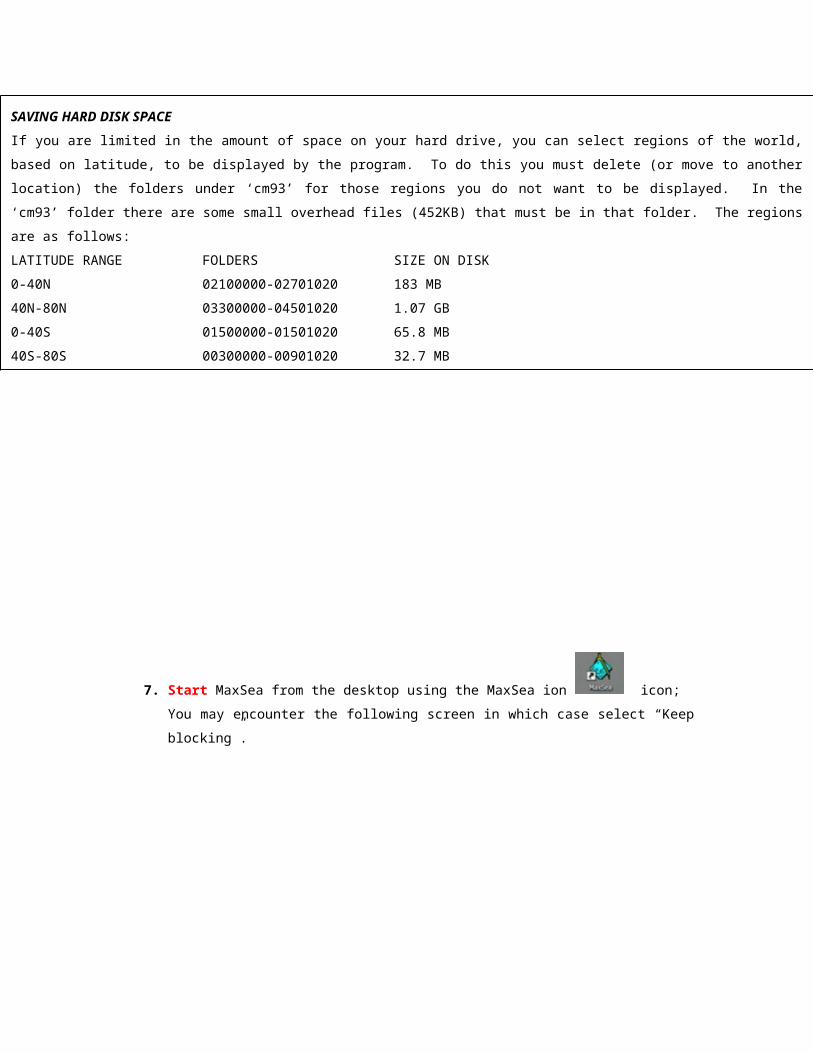
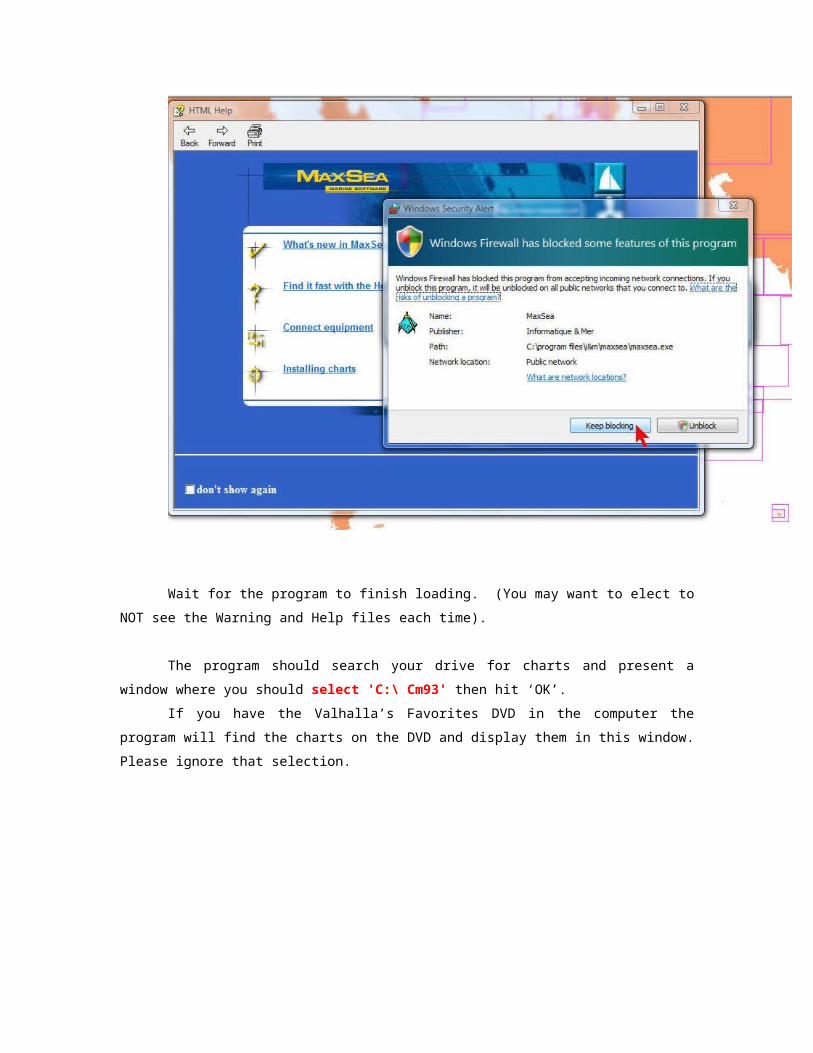
7. Start MaxSea from the desktop using the MaxSea ion icon;
You may encounter the following screen in which case select “Keep blocking”.
Wait for the program to finish loading. (You may want to elect to NOT see the Warning
and Help files each time).
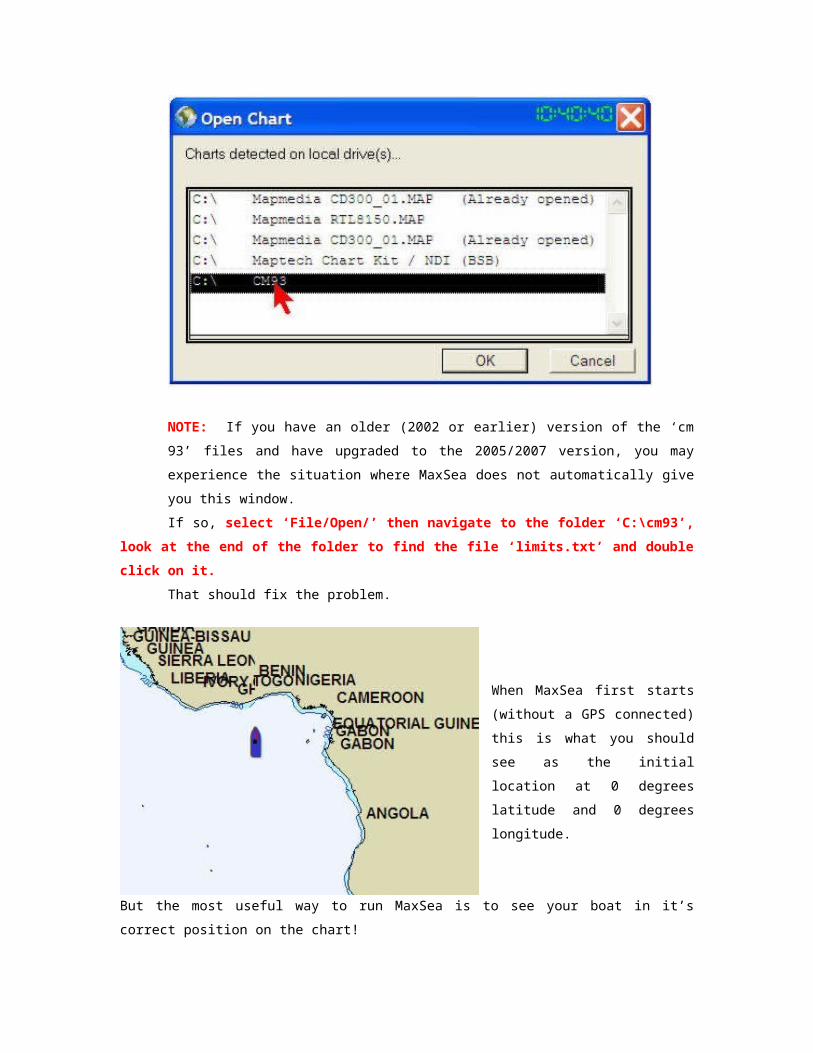
The program should search your drive for charts and present a window where you should
select 'C:\ Cm93' then hit ‘OK’.
If you have the Valhalla’s Favorites DVD in the computer the program will find the charts
on the DVD and display them in this window. Please ignore that selection.
NOTE: If you have an older (2002 or earlier) version of the ‘cm 93’ files and have
upgraded to the 2005/2007 version, you may experience the situation where MaxSea
does not automatically give you this window.
If so, select ‘File/Open/’ then navigate to the folder ‘C:\cm93’, look at the end of the
folder to find the file ‘limits.txt’ and double click on it.
That should fix the problem.
When MaxSea first starts (without
a GPS connected) this is what
you should see as the initial
location at 0 degrees latitude and
0 degrees longitude.
But the most useful way to run
MaxSea is to see your boat in it’s
correct position on the chart!
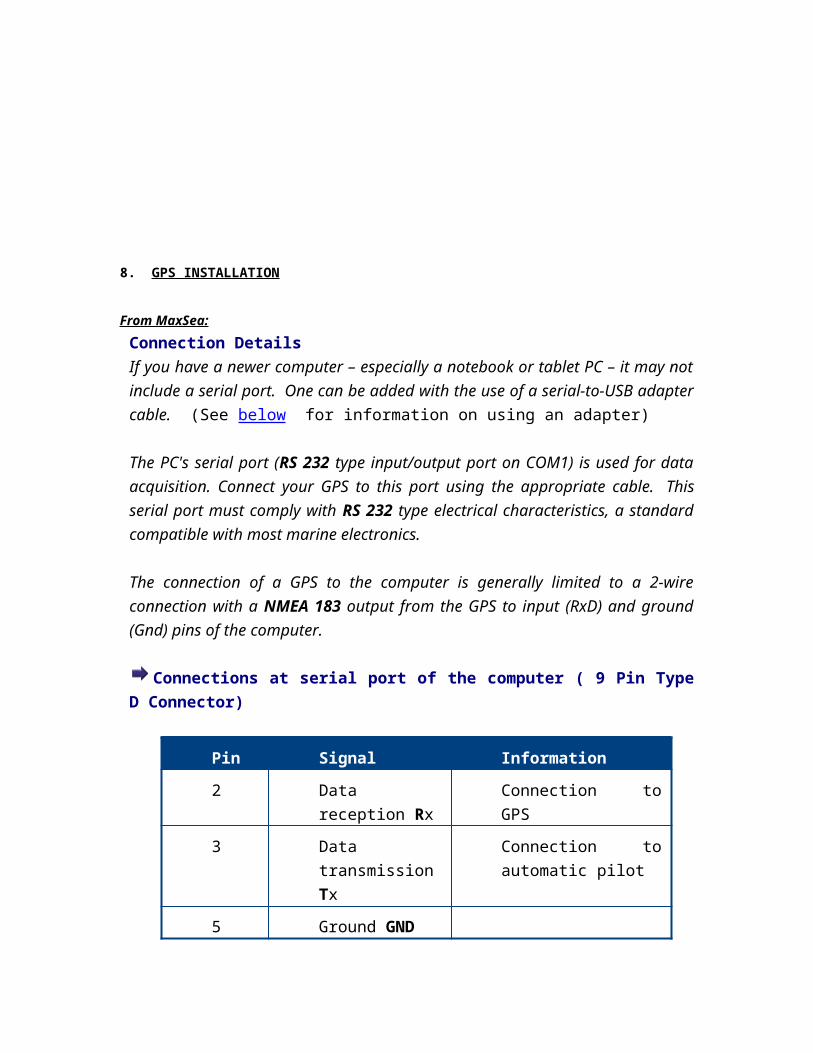
8. GPS INSTALLATION
From MaxSea:
Connection Details
If you have a newer computer – especially a notebook or tablet PC – it may not include
a serial port. One can be added with the use of a serial-to-USB adapter cable. (See
below for information on using an adapter)
The PC's serial port (RS 232 type input/output port on COM1) is used for data
acquisition. Connect your GPS to this port using the appropriate cable. This serial port
must comply with RS 232 type electrical characteristics, a standard compatible with
most marine electronics.
The connection of a GPS to the computer is generally limited to a 2-wire connection
with a NMEA 183 output from the GPS to input (RxD) and ground (Gnd) pins of the
computer.
Connections at serial port of the computer ( 9 Pin Type D Connector)
Pin Signal Information
2 Data reception Rx Connection to GPS
3 Data transmission
Tx
Connection to automatic
pilot
5 Ground GND
From VALHALLA:
1.) You need to establish the com port that the GPS is using for connection to the computer.
a. If you are
connecting
the GPS
directly to the
computer
with a cable
you would be
making the
connection to
a com port
(9-pin),
usually
designated
as COM 1. But that's probably not the case for later model computers, especially laptops.
For these you need a USB-serial (RS232) adapter.
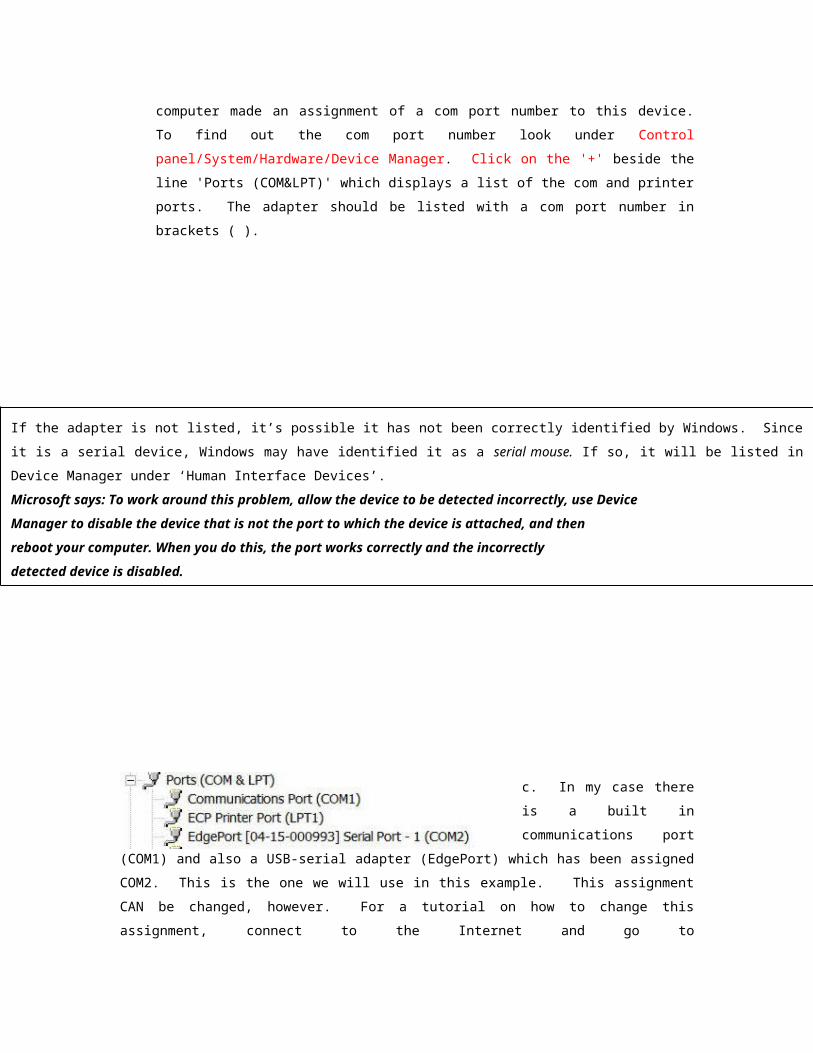
b. If you are using a USB-serial adapter, when it was installed, the computer made an
assignment of a com port number to this device. To find out the com port number look
under Control panel/System/Hardware/Device Manager. Click on the '+' beside the line
'Ports (COM&LPT)' which displays a list of the com and printer ports. The adapter should
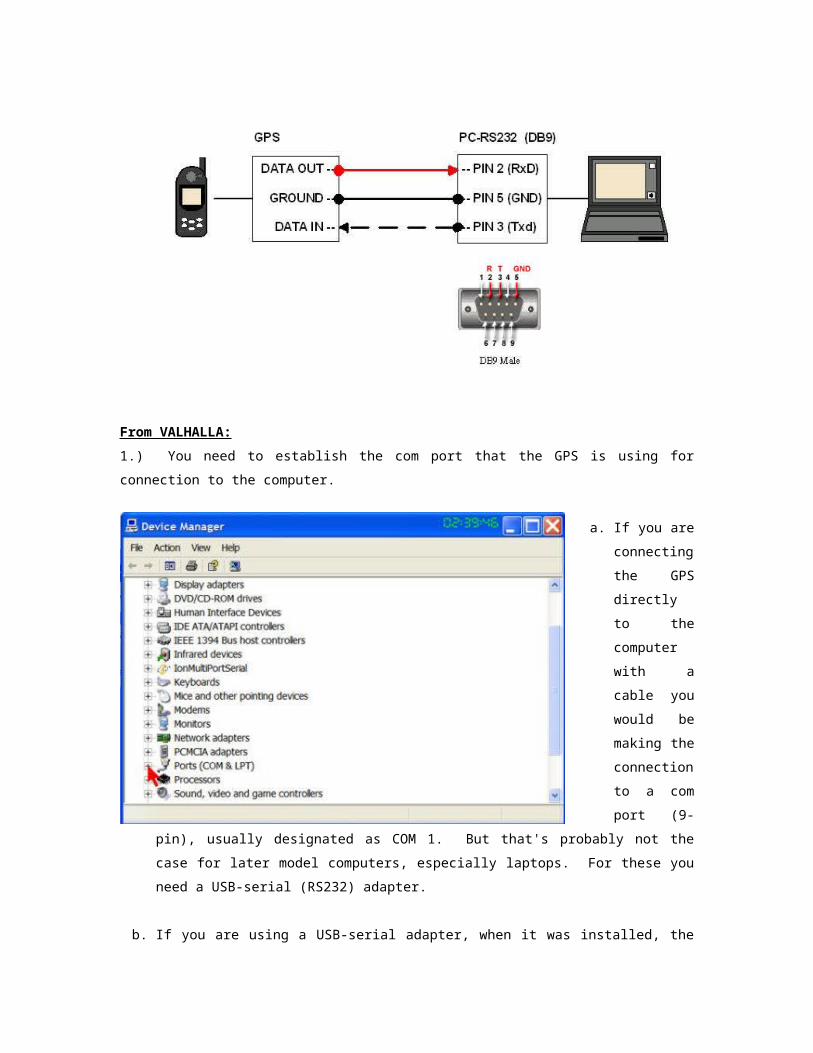
be listed with a com port number in brackets ( ).
c. In my case there is a built
in communications port
(COM1) and also a USB-
serial adapter (EdgePort) which has been assigned COM2. This is the one we will use in this
example. This assignment CAN be changed, however. For a tutorial on how to change this
assignment, connect to the Internet and go to http://yachtvalhalla.net/projects/wink/wink/htm
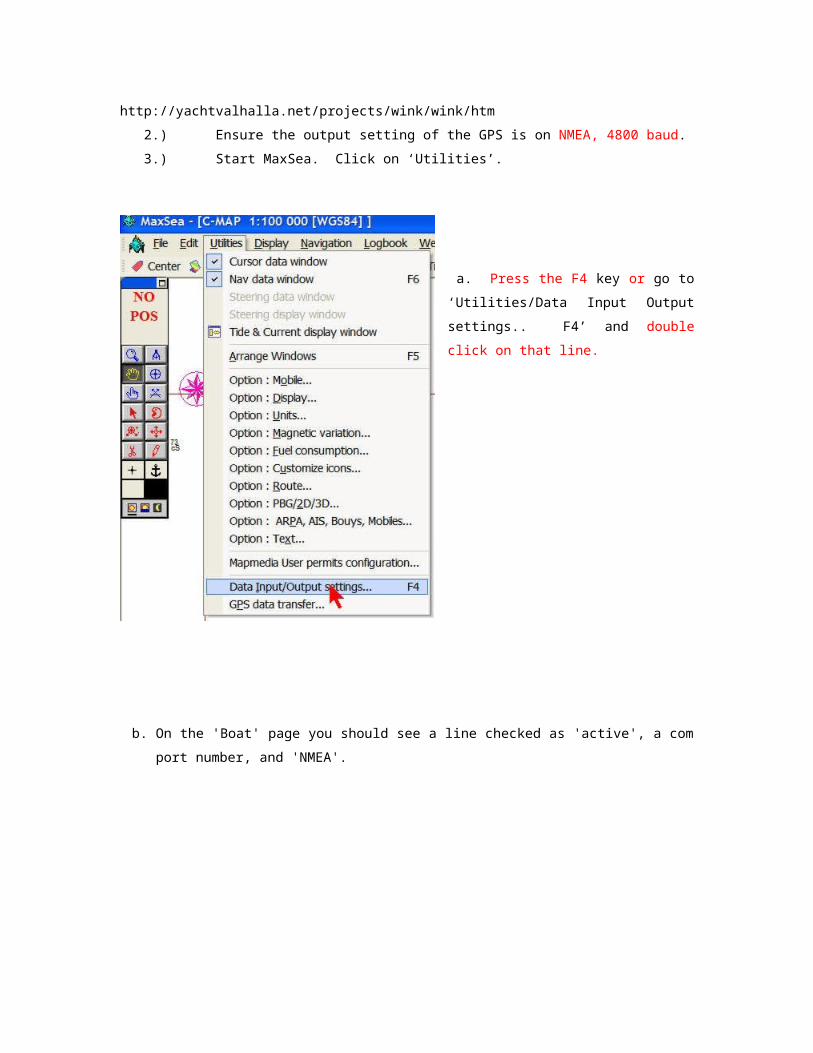
2.) Ensure the output setting of the GPS is on NMEA, 4800 baud.
3.) Start MaxSea. Click on ‘Utilities’.
If the adapter is not listed, it’s possible it has not been correctly identified by Windows. Since it is a serial device, Windows may have
identified it as a serial mouse. If so, it will be listed in Device Manager under ‘Human Interface Devices’.
Microsoft says: To work around this problem, allow the device to be detected incorrectly, use Device
Manager to disable the device that is not the port to which the device is attached, and then
reboot your computer. When you do this, the port works correctly and the incorrectly
detected device is disabled.
a. Press the F4 key or go to
‘Utilities/Data Input Output settings.. F4’
and double click on that line.
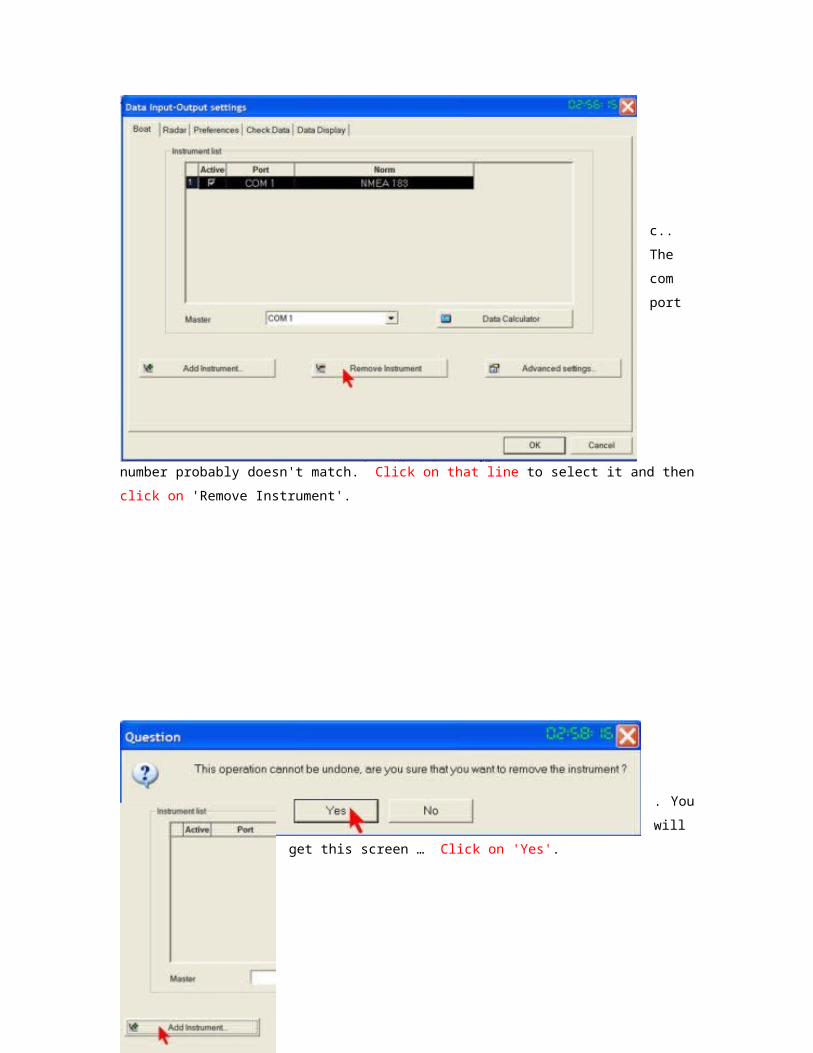
b. On the 'Boat' page you should see a line checked as 'active', a com port number, and
'NMEA'.
c.. The
com
port
number probably doesn't match. Click on that line to select it and then click on 'Remove
Instrument'.
. You
will get
this screen … Click on 'Yes'.
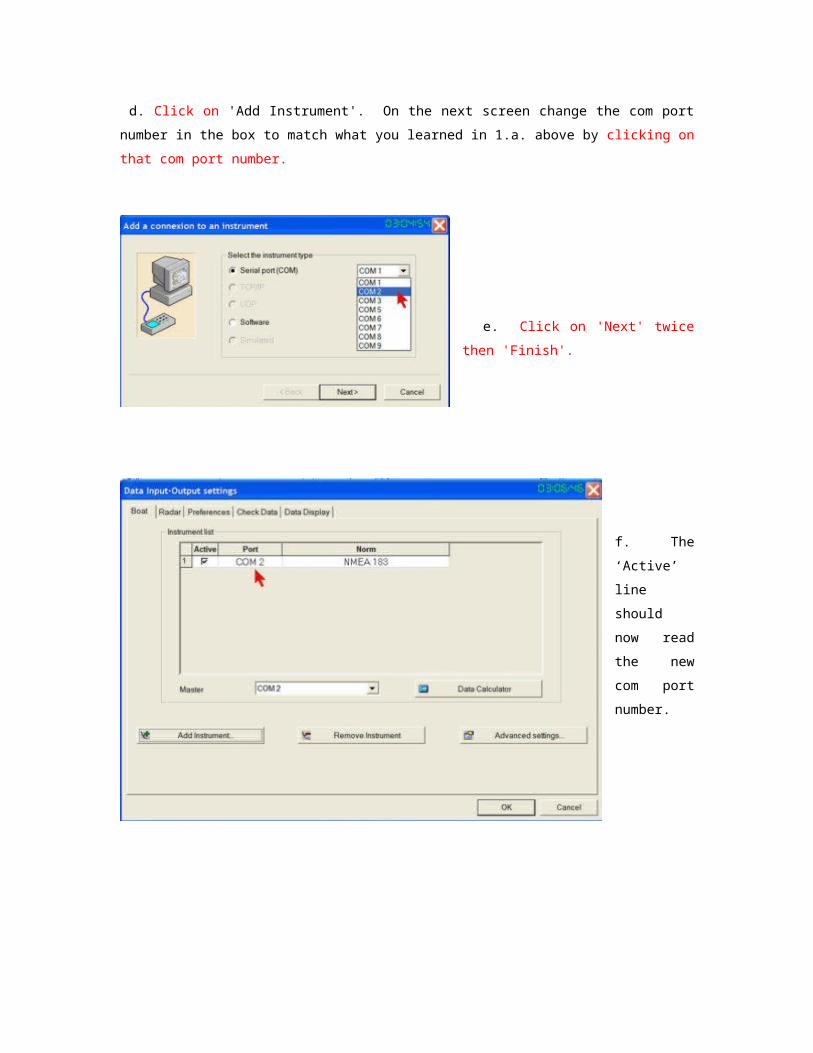
d. Click on 'Add Instrument'. On the next screen change the com
port number in the box to match what you learned in 1.a. above by
clicking on that com port number.
e. Click
on 'Next' twice then 'Finish'.
f. The
‘Active’ line
should now
read the new
com port
number.
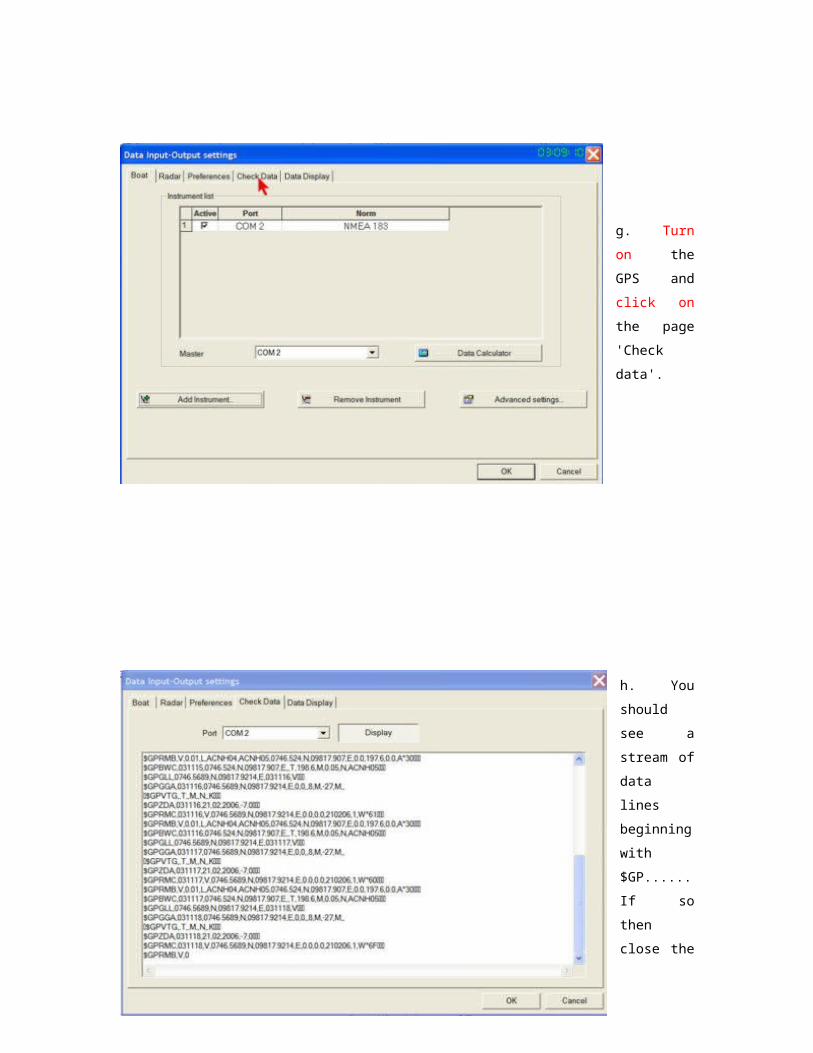
g. Turn on
the GPS and
click on the
page 'Check
data'.
h. You
should see
a stream of
data lines
beginning
with
$GP...... If
so then
close the
'Data Input
Output
settings'
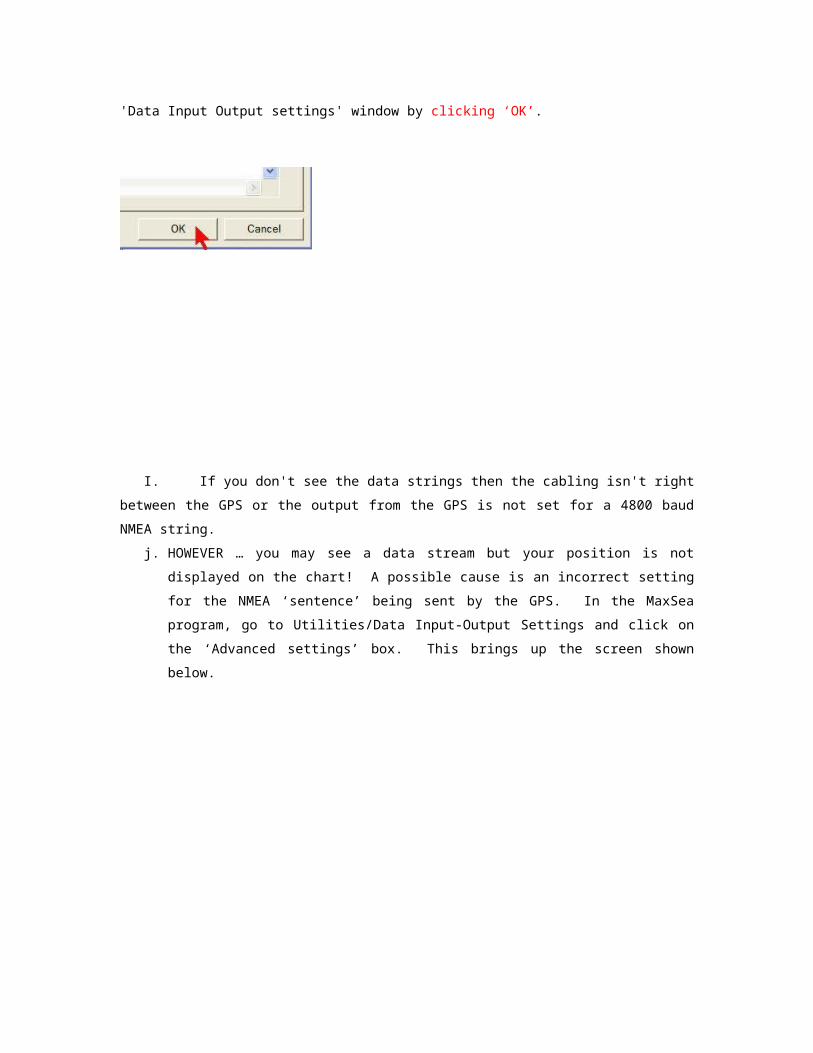
window by
clicking
‘OK’.
I. If you don't see the data strings then the cabling isn't right between the GPS or the output
from the GPS is not set for a 4800 baud NMEA string.
j. HOWEVER … you may see a data stream but your position is not displayed on the chart!
A possible cause is an incorrect setting for the NMEA ‘sentence’ being sent by the GPS.
In the MaxSea program, go to Utilities/Data Input-Output Settings and click on the
‘Advanced settings’ box. This brings up the screen shown below.
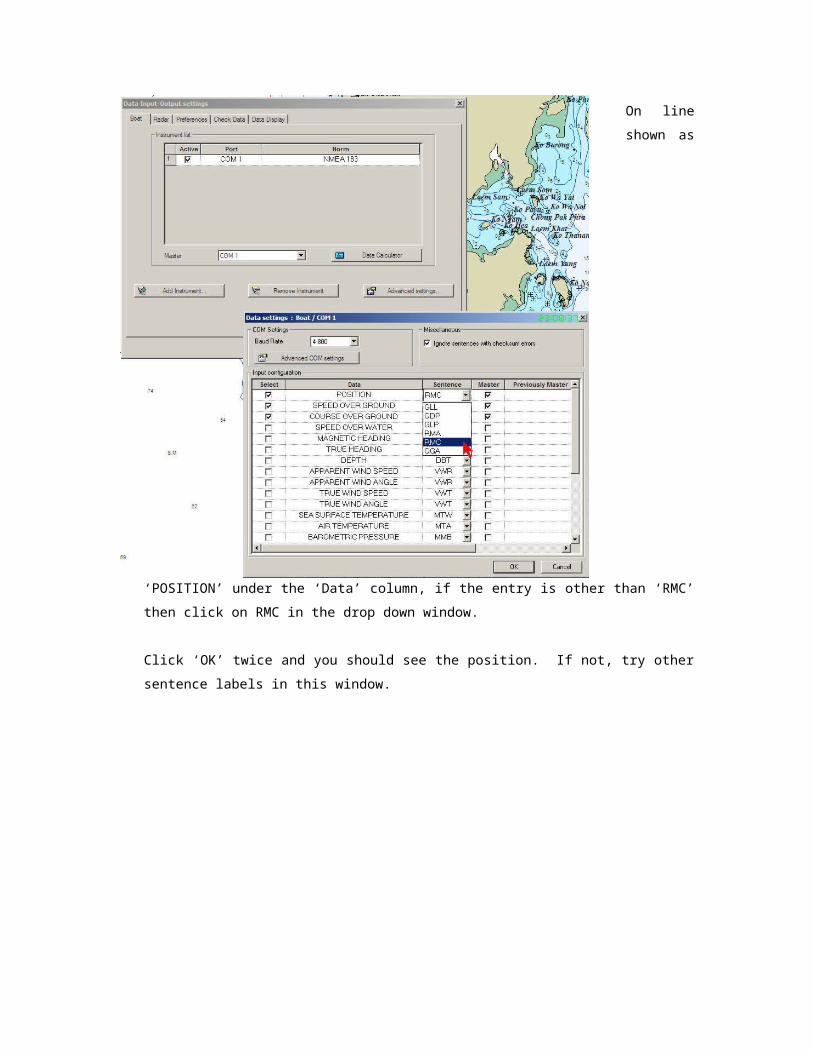
On line
shown as
‘POSITION’ under the ‘Data’ column, if the entry is other than ‘RMC’ then click on RMC in the
drop down window.
Click ‘OK’ twice and you should see the position. If not, try other sentence labels in this
window.
8. VIRTUAL NULL MODEM
Within the Pirates Chest is a folder ‘Virtual Null Modem’. Double click on this folder.
The contents are:
I have included a program that creates a pair of virtual null modems. This program allows the
output (in RS232 format) from one program to be sent to the input of another program.
I use this program to link the output of my radar-style AIS display program (Yacht-AIS Pro) to the
AIS input of the MaxSea 10.3.2.1 program. See SECTION 8: AUTOMATIC IDENTIFICATION
SYSTEM (AIS)
in the MaxSea 10.3.2.1 Tutorial for information on the AIS feature.
The setup program is ‘vnullmod20’, the registration is ‘Terrence-Sargent’ and an update is
‘vnullmod250b8update’.
I will leave the detailed installation and settings to your capable hands. The Help files are quite
good.
I hope this Installation Guide has been useful. If you have any questions or
problems I might be able to help you with, please email me at
Terry Sargent
Yacht VALHALLA
Back to the top


![MaxSea Time Zero v1 - GIC voile - Accueilgic-voile.fr/gc_notices/FR_MaxSea_Manual_1_9.pdf · Données MapMedia [.mm3d] ... Comme potentiellement toute source de données, ces cartes](https://img.pdfslide.net/doc/110x75/5b9a1fea09d3f210688d2cff/maxsea-time-zero-v1-gic-voile-accueilgic-voilefrgcnoticesfrmaxseamanual19pdf.jpg)