Embed Size (px)
Citation preview
McIDAS-V Tutorial: Manipulating GeoTIFFs
McIDAS-V Tutorial: GeoTIFF 1
Contents
1. Getting Started ..................................................................................................................................... 1
2. Installing the GNCA_Sep2016 Plugin ................................................................................................... 2
3. Selecting and Displaying GeoTIFF Images ........................................................................................... 4
4. Applying Color Tables and Projections ................................................................................................ 7
5. Saving the Display as an Image .......................................................................................................... 11
6. Saving the Bundle File ........................................................................................................................ 11
7. Additional Practice ............................................................................................................................. 12
8. McIDAS-V Shortcuts ........................................................................................................................... 14
1. Getting Started
McIDAS-V
This tutorial assumes that you have already installed McIDAS-V on your computer. McIDAS-V is
a visualization and data analysis software package. For a list of references, the following online
documentation page includes a current user’s guide, tutorials and instructional videos:
http://www.ssec.wisc.edu/mcidas/software/v/documentation.html
GeoTIFF
TIFF is the file name extension used for the Tagged Image File Format, where GeoTIFF is a
metadata format that has the added ability to embed georeferencing information within the
image data. This includes map projection and coordinate systems in order to establish the spatial
reference for the file.
This guide explains the basics of manipulating a GeoTIFF file in McIDAS-V.
McIDAS-V Tutorial: GeoTIFF 2
2. Installing the GNCA_Sep2016 Plugin
2.1 Download the GNCA_Sep2016.jar plugin file and save it to a local directory.
a) For example, C:\Program Files\McIDAS-V-System\McIDAS_Plugins.
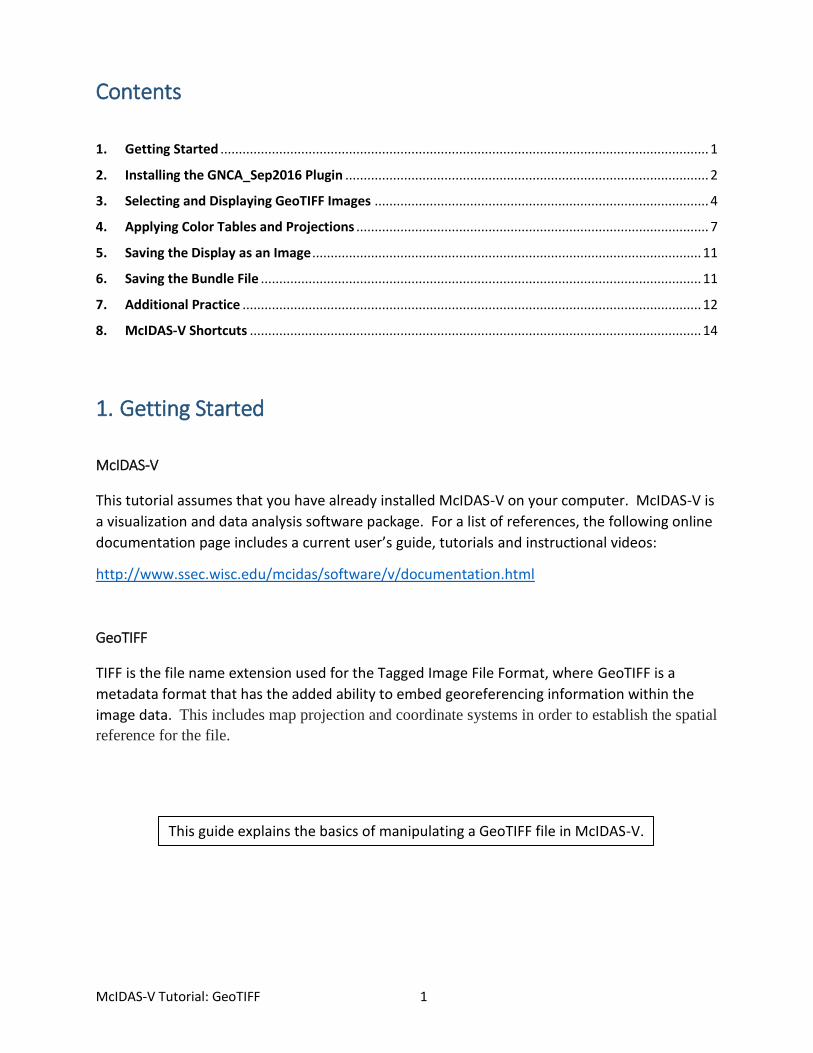
2.2 Open McIDAS-V. The following 3 windows will pop up:
a) Help Tips – gives helpful hints (you can close this window)
b) Main Display Window – shows a map projection and any selected data
c) Data Explorer – where data is selected
*NOTE: When you start McIDAS-V the Data Explorer window will open automatically. If you
accidentally close it or have multiple open, you can pull up the one belonging to a given
Main Display window by clicking on the blue McIDAS-V icon in the top left of the Main
Display window.
McIDAS-V Tutorial: GeoTIFF 3
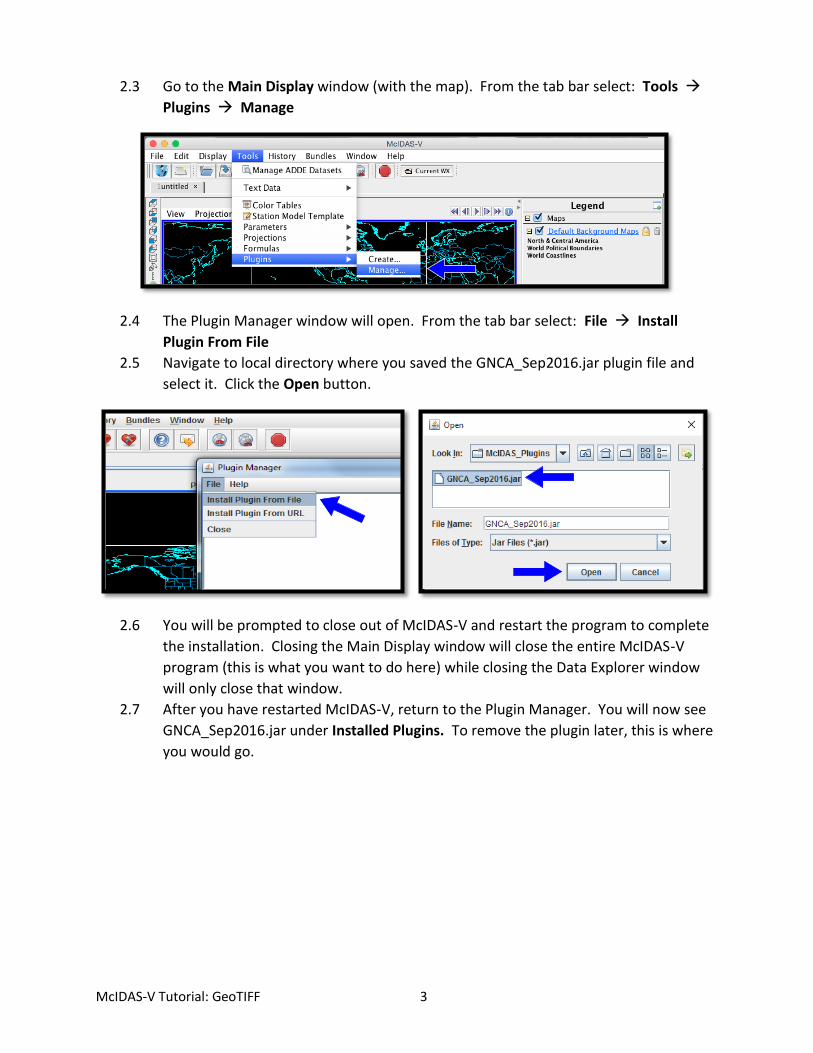
2.3 Go to the Main Display window (with the map). From the tab bar select: Tools
Plugins Manage
2.4 The Plugin Manager window will open. From the tab bar select: File Install
Plugin From File
2.5 Navigate to local directory where you saved the GNCA_Sep2016.jar plugin file and
select it. Click the Open button.
2.6 You will be prompted to close out of McIDAS-V and restart the program to complete
the installation. Closing the Main Display window will close the entire McIDAS-V
program (this is what you want to do here) while closing the Data Explorer window
will only close that window.
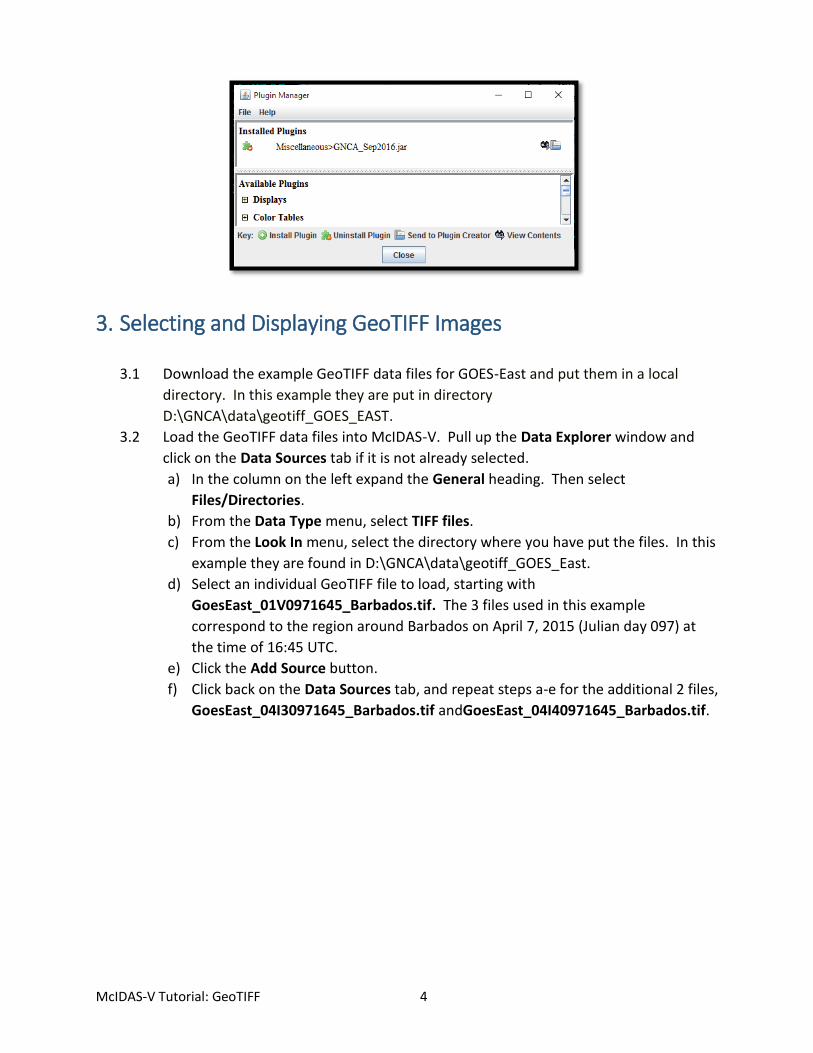
2.7 After you have restarted McIDAS-V, return to the Plugin Manager. You will now see
GNCA_Sep2016.jar under Installed Plugins. To remove the plugin later, this is where
you would go.
McIDAS-V Tutorial: GeoTIFF 4
3. Selecting and Displaying GeoTIFF Images
3.1 Download the example GeoTIFF data files for GOES-East and put them in a local
directory. In this example they are put in directory
D:\GNCA\data\geotiff_GOES_EAST.
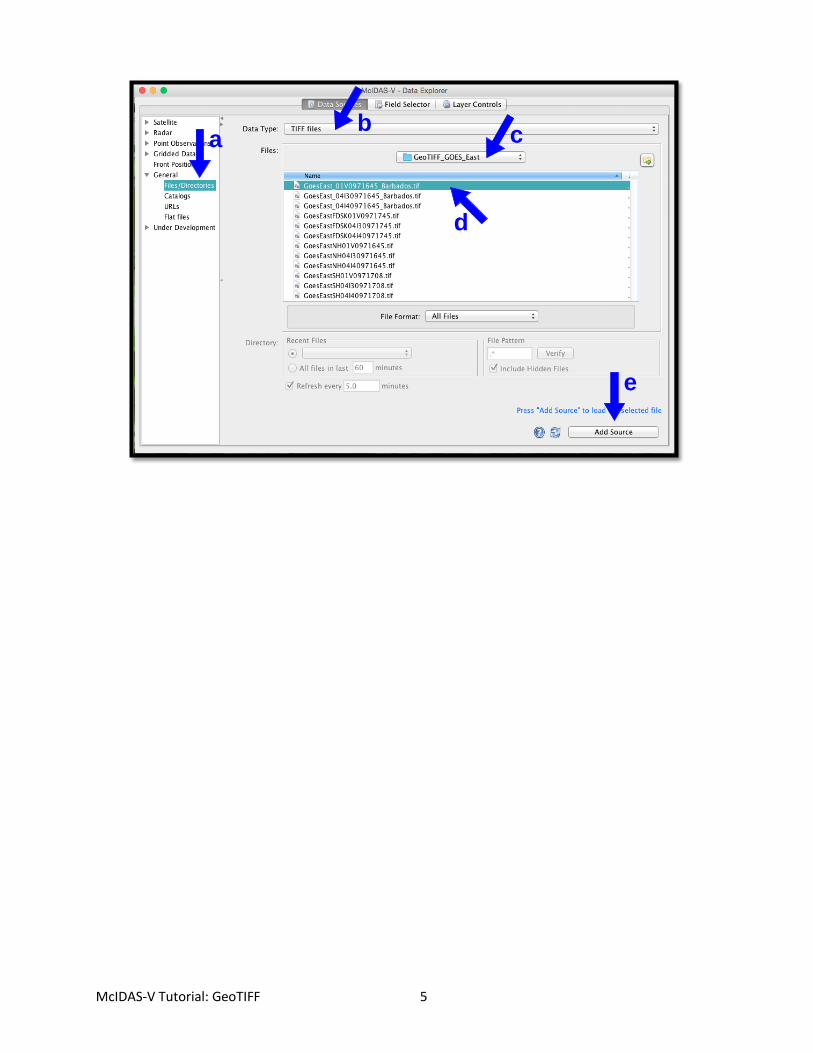
3.2 Load the GeoTIFF data files into McIDAS-V. Pull up the Data Explorer window and
click on the Data Sources tab if it is not already selected.
a) In the column on the left expand the General heading. Then select
Files/Directories.
b) From the Data Type menu, select TIFF files.
c) From the Look In menu, select the directory where you have put the files. In this
example they are found in D:\GNCA\data\geotiff_GOES_East.
d) Select an individual GeoTIFF file to load, starting with
GoesEast_01V0971645_Barbados.tif. The 3 files used in this example
correspond to the region around Barbados on April 7, 2015 (Julian day 097) at
the time of 16:45 UTC.
e) Click the Add Source button.
f) Click back on the Data Sources tab, and repeat steps a-e for the additional 2 files,
GoesEast_04I30971645_Barbados.tif andGoesEast_04I40971645_Barbados.tif.
McIDAS-V Tutorial: GeoTIFF 5
a b
d
c
e
McIDAS-V Tutorial: GeoTIFF 6
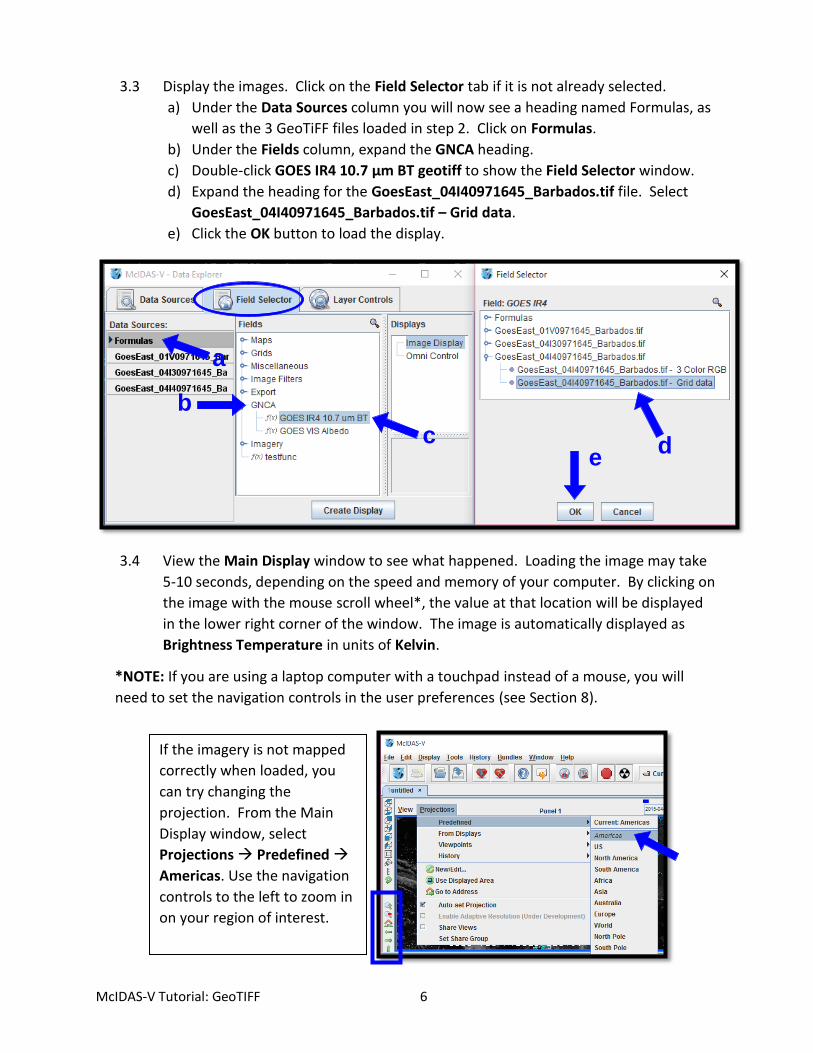
3.3 Display the images. Click on the Field Selector tab if it is not already selected.
a) Under the Data Sources column you will now see a heading named Formulas, as
well as the 3 GeoTiFF files loaded in step 2. Click on Formulas.
b) Under the Fields column, expand the GNCA heading.
c) Double-click GOES IR4 10.7 µm BT geotiff to show the Field Selector window.
d) Expand the heading for the GoesEast_04I40971645_Barbados.tif file. Select
GoesEast_04I40971645_Barbados.tif – Grid data.
e) Click the OK button to load the display.
3.4 View the Main Display window to see what happened. Loading the image may take
5-10 seconds, depending on the speed and memory of your computer. By clicking on
the image with the mouse scroll wheel*, the value at that location will be displayed
in the lower right corner of the window. The image is automatically displayed as
Brightness Temperature in units of Kelvin.
*NOTE: If you are using a laptop computer with a touchpad instead of a mouse, you will
need to set the navigation controls in the user preferences (see Section 8).
a
e
b
c d
If the imagery is not mapped
correctly when loaded, you
can try changing the
projection. From the Main
Display window, select
Projections Predefined
Americas. Use the navigation
controls to the left to zoom in
on your region of interest.
McIDAS-V Tutorial: GeoTIFF 7
4. Applying Color Tables and Projections
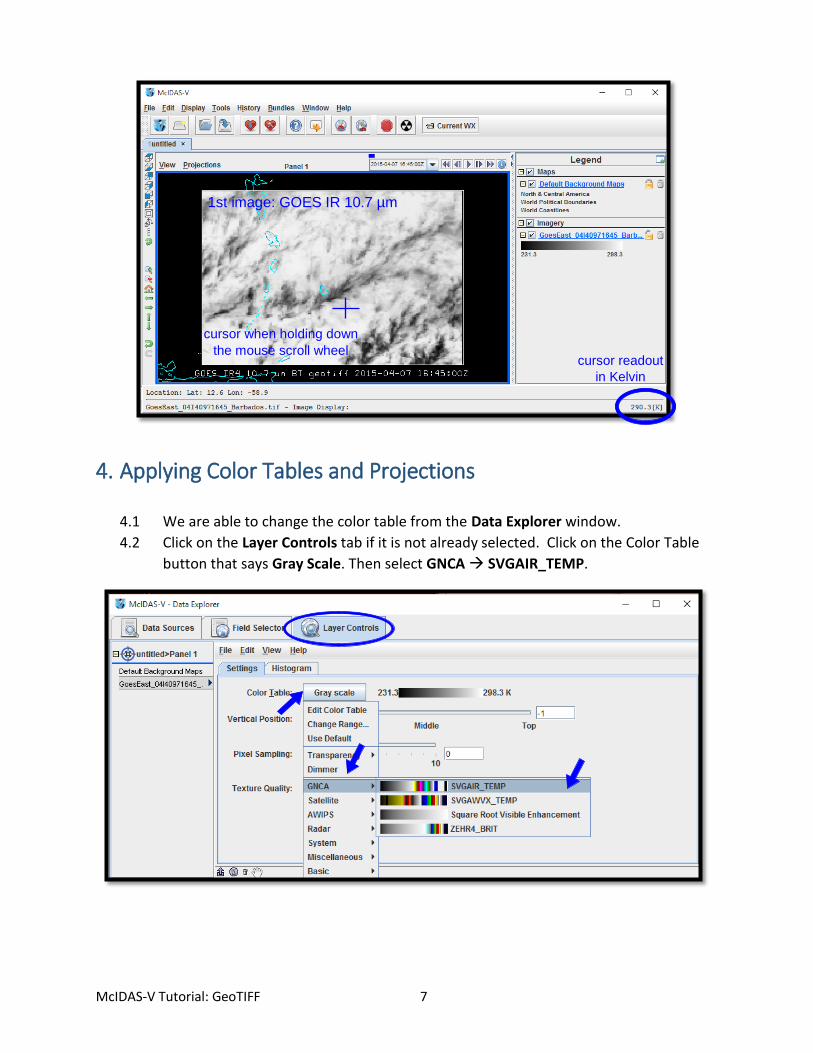
4.1 We are able to change the color table from the Data Explorer window.
4.2 Click on the Layer Controls tab if it is not already selected. Click on the Color Table
button that says Gray Scale. Then select GNCA SVGAIR_TEMP.
cursor readout
in Kelvin
1st image: GOES IR 10.7 µm
cursor when holding down
the mouse scroll wheel
McIDAS-V Tutorial: GeoTIFF 8
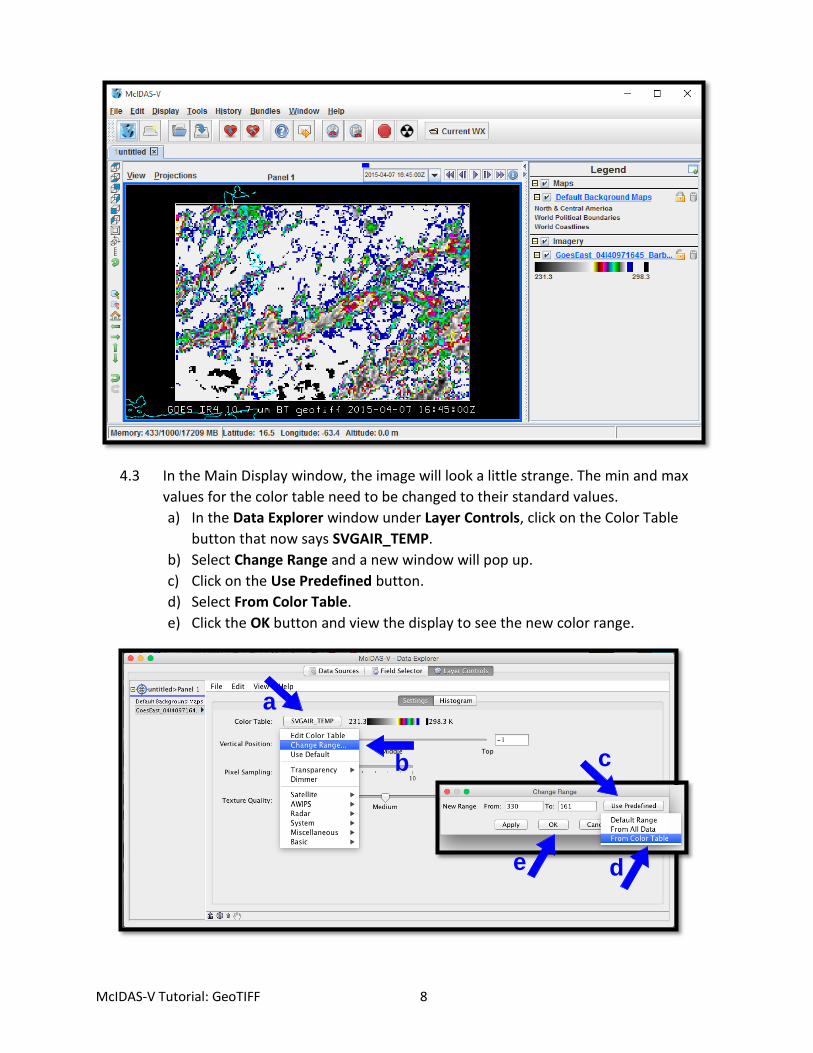
4.3 In the Main Display window, the image will look a little strange. The min and max
values for the color table need to be changed to their standard values.
a) In the Data Explorer window under Layer Controls, click on the Color Table
button that now says SVGAIR_TEMP.
b) Select Change Range and a new window will pop up.
c) Click on the Use Predefined button.
d) Select From Color Table.
e) Click the OK button and view the display to see the new color range.
a
b c
d e
McIDAS-V Tutorial: GeoTIFF 9
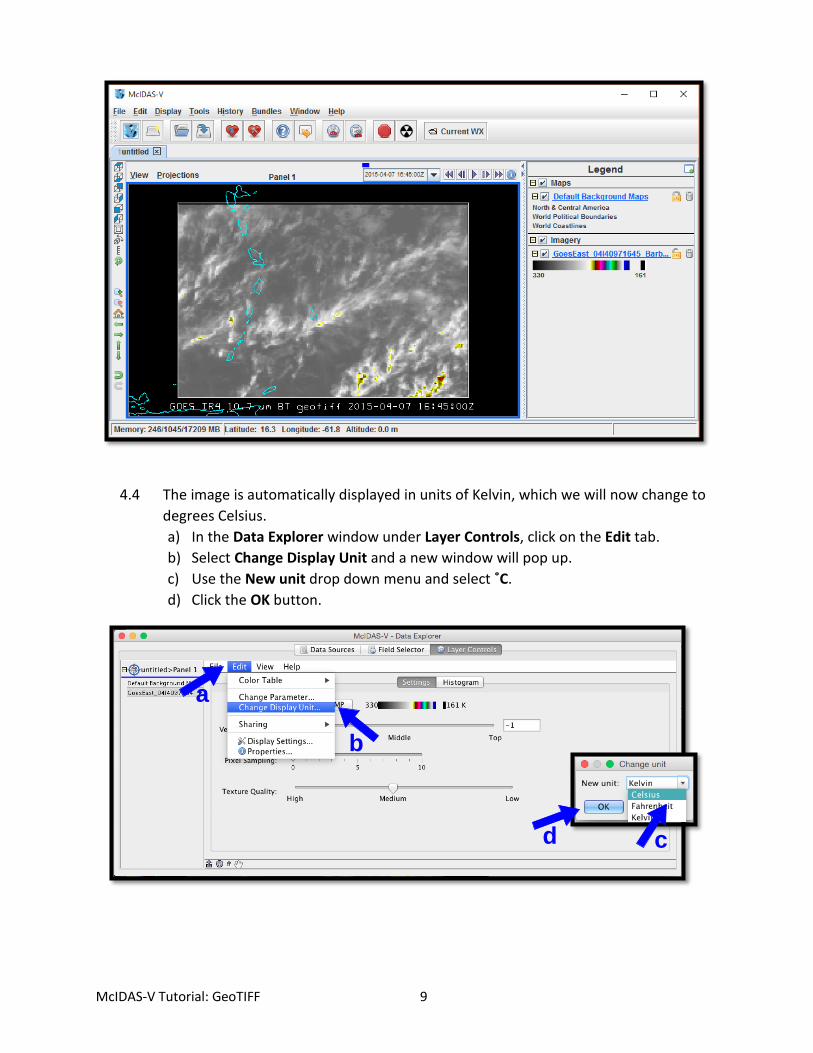
4.4 The image is automatically displayed in units of Kelvin, which we will now change to
degrees Celsius.
a) In the Data Explorer window under Layer Controls, click on the Edit tab.
b) Select Change Display Unit and a new window will pop up.
c) Use the New unit drop down menu and select ˚C.
d) Click the OK button.
d c
b
a
a
McIDAS-V Tutorial: GeoTIFF 10
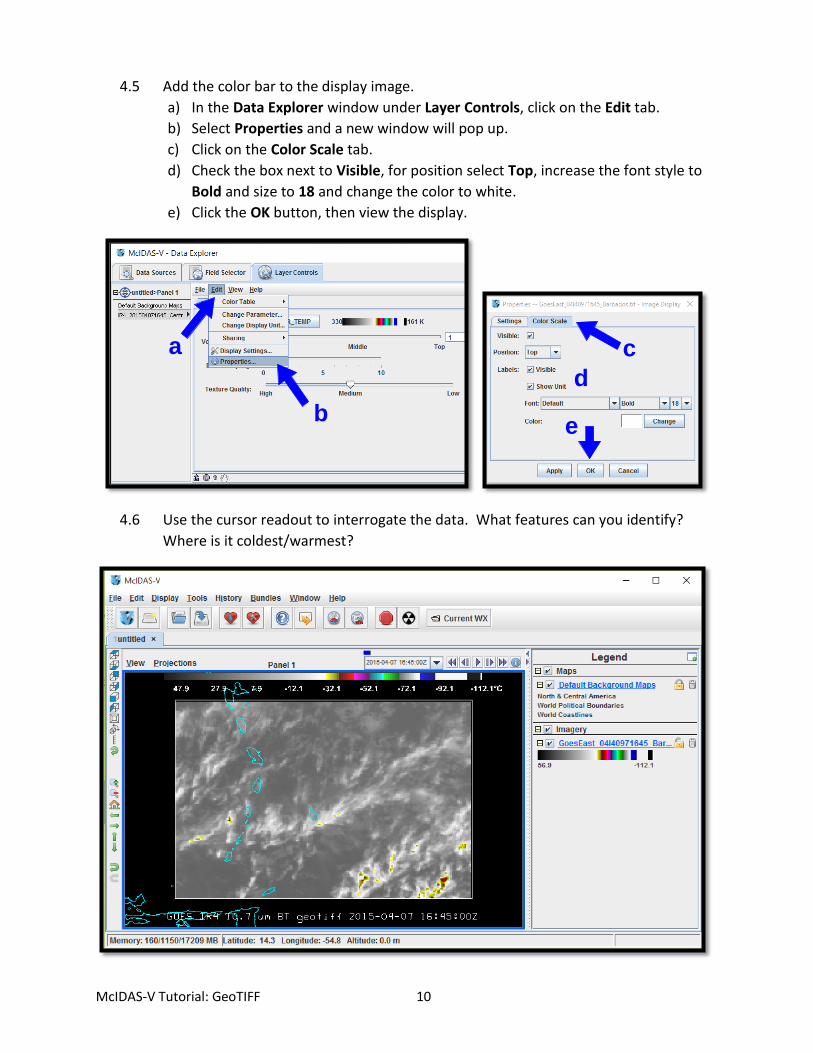
4.5 Add the color bar to the display image.
a) In the Data Explorer window under Layer Controls, click on the Edit tab.
b) Select Properties and a new window will pop up.
c) Click on the Color Scale tab.
d) Check the box next to Visible, for position select Top, increase the font style to
Bold and size to 18 and change the color to white.
e) Click the OK button, then view the display.
4.6 Use the cursor readout to interrogate the data. What features can you identify?
Where is it coldest/warmest?
a
e
c
d
b
McIDAS-V Tutorial: GeoTIFF 11
5. Saving the Display as an Image
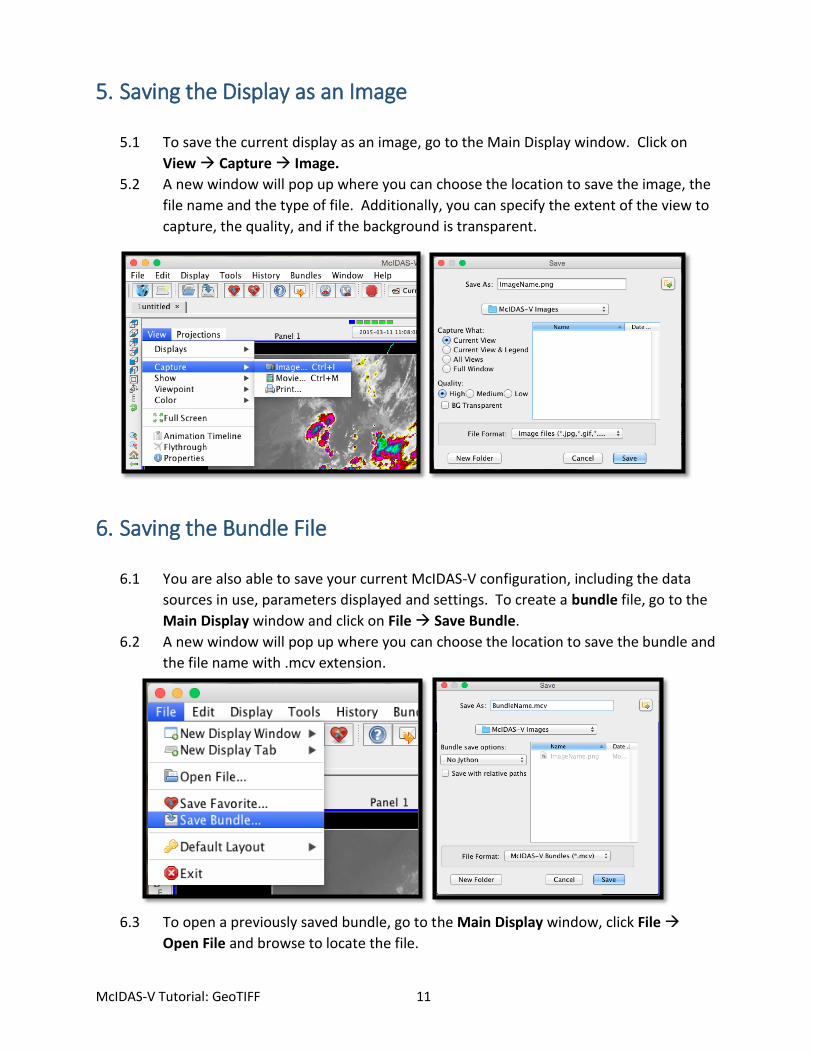
5.1 To save the current display as an image, go to the Main Display window. Click on
View Capture Image.
5.2 A new window will pop up where you can choose the location to save the image, the
file name and the type of file. Additionally, you can specify the extent of the view to
capture, the quality, and if the background is transparent.
6. Saving the Bundle File
6.1 You are also able to save your current McIDAS-V configuration, including the data
sources in use, parameters displayed and settings. To create a bundle file, go to the
Main Display window and click on File Save Bundle.
6.2 A new window will pop up where you can choose the location to save the bundle and
the file name with .mcv extension.
6.3 To open a previously saved bundle, go to the Main Display window, click File
Open File and browse to locate the file.
McIDAS-V Tutorial: GeoTIFF 12
7. Additional Practice
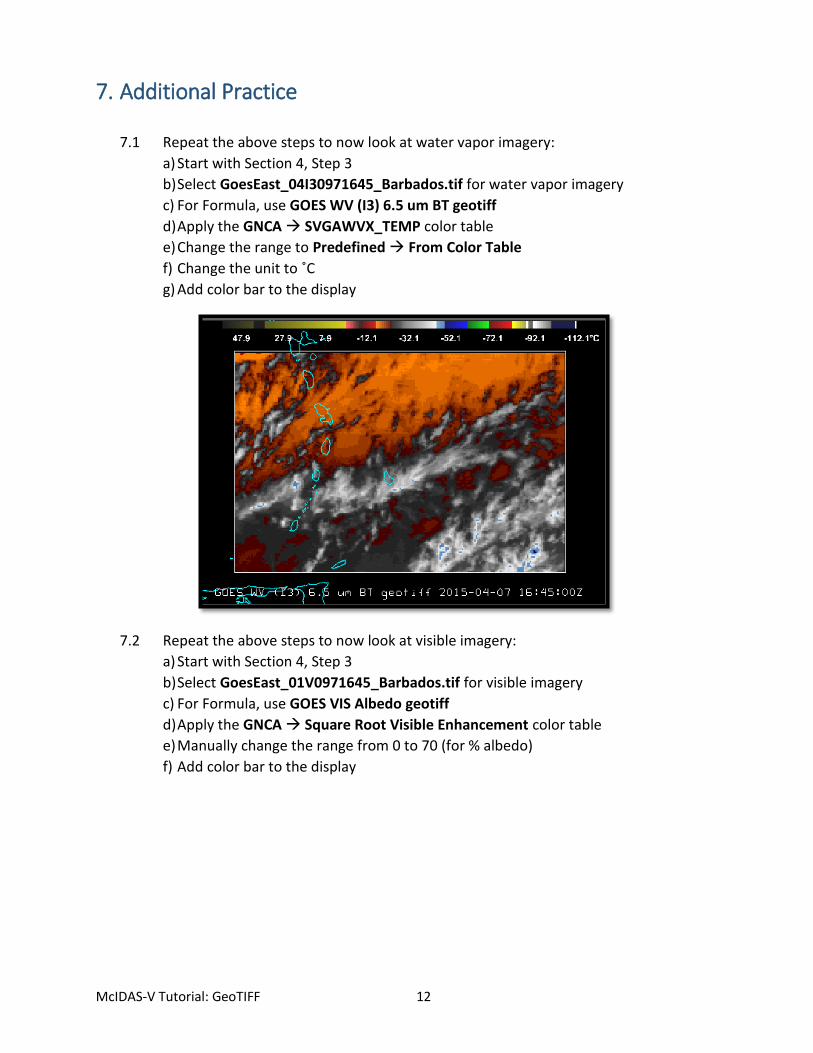
7.1 Repeat the above steps to now look at water vapor imagery:
a) Start with Section 4, Step 3
b) Select GoesEast_04I30971645_Barbados.tif for water vapor imagery
c) For Formula, use GOES WV (I3) 6.5 um BT geotiff
d) Apply the GNCA SVGAWVX_TEMP color table
e) Change the range to Predefined From Color Table
f) Change the unit to ˚C
g) Add color bar to the display
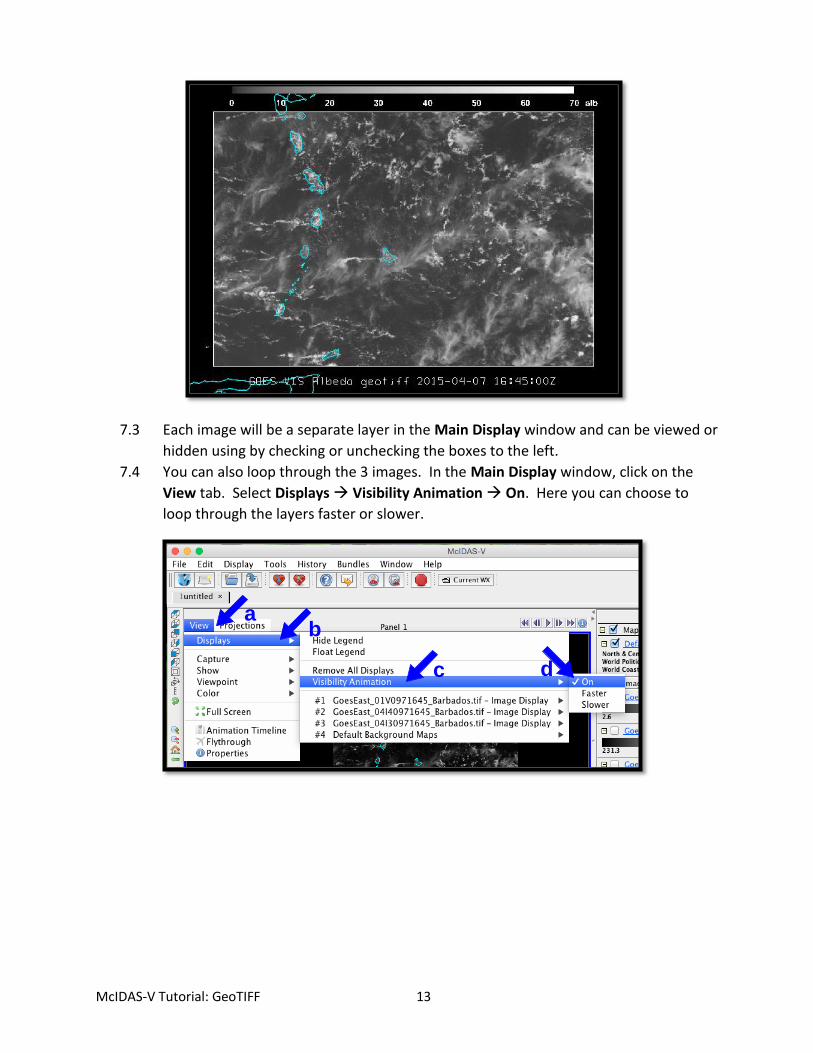
7.2 Repeat the above steps to now look at visible imagery:
a) Start with Section 4, Step 3
b) Select GoesEast_01V0971645_Barbados.tif for visible imagery
c) For Formula, use GOES VIS Albedo geotiff
d) Apply the GNCA Square Root Visible Enhancement color table
e) Manually change the range from 0 to 70 (for % albedo)
f) Add color bar to the display
McIDAS-V Tutorial: GeoTIFF 13
7.3 Each image will be a separate layer in the Main Display window and can be viewed or
hidden using by checking or unchecking the boxes to the left.
7.4 You can also loop through the 3 images. In the Main Display window, click on the
View tab. Select Displays Visibility Animation On. Here you can choose to
loop through the layers faster or slower.
d c
b a
McIDAS-V Tutorial: GeoTIFF 14
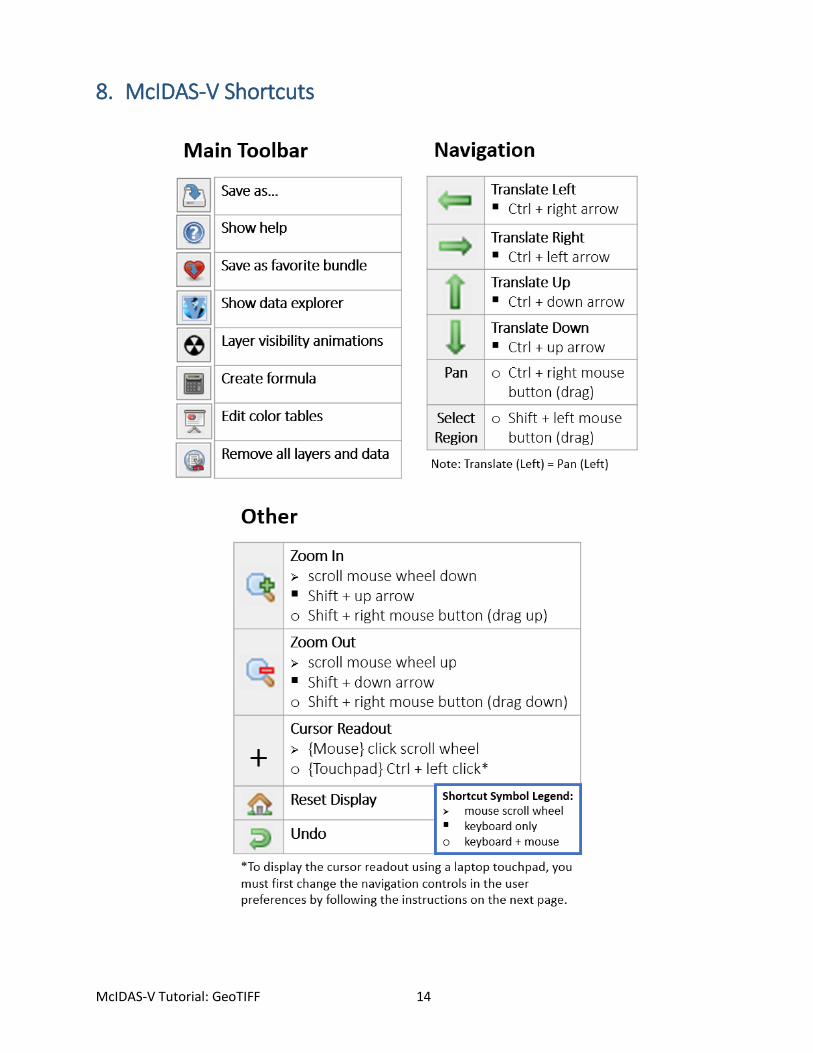
8. McIDAS-V Shortcuts
McIDAS-V Tutorial: GeoTIFF 15
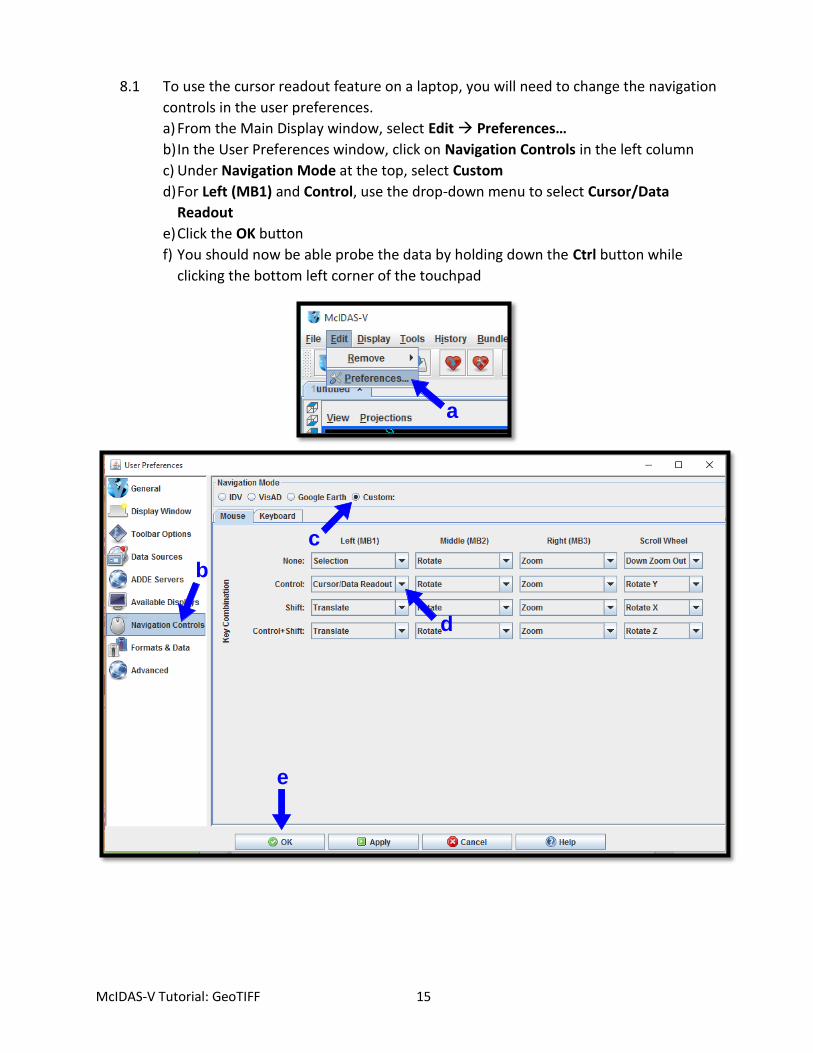
8.1 To use the cursor readout feature on a laptop, you will need to change the navigation
controls in the user preferences.
a) From the Main Display window, select Edit Preferences…
b) In the User Preferences window, click on Navigation Controls in the left column
c) Under Navigation Mode at the top, select Custom
d) For Left (MB1) and Control, use the drop-down menu to select Cursor/Data
Readout
e) Click the OK button
f) You should now be able probe the data by holding down the Ctrl button while
clicking the bottom left corner of the touchpad
a
e
d
c
b