Embed Size (px)
Citation preview
1
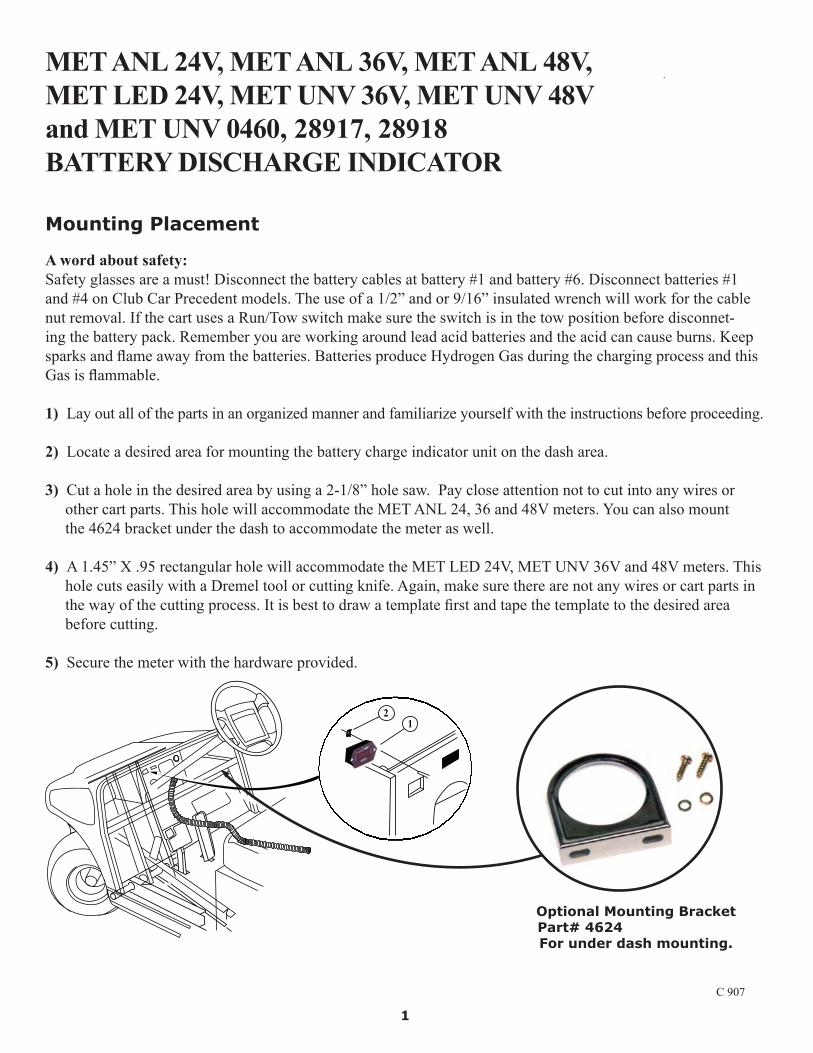
Mounting Placement
A word about safety:Safety glasses are a must! Disconnect the battery cables at battery #1 and battery #6. Disconnect batteries #1 and #4 on Club Car Precedent models. The use of a 1/2” and or 9/16” insulated wrench will work for the cable nut removal. If the cart uses a Run/Tow switch make sure the switch is in the tow position before disconnet-ing the battery pack. Remember you are working around lead acid batteries and the acid can cause burns. Keep sparks and fl ame away from the batteries. Batteries produce Hydrogen Gas during the charging process and this Gas is fl ammable.
1) Lay out all of the parts in an organized manner and familiarize yourself with the instructions before proceeding.
2) Locate a desired area for mounting the battery charge indicator unit on the dash area.
3) Cut a hole in the desired area by using a 2-1/8” hole saw. Pay close attention not to cut into any wires or other cart parts. This hole will accommodate the MET ANL 24, 36 and 48V meters. You can also mount the 4624 bracket under the dash to accommodate the meter as well.
4) A 1.45” X .95 rectangular hole will accommodate the MET LED 24V, MET UNV 36V and 48V meters. This hole cuts easily with a Dremel tool or cutting knife. Again, make sure there are not any wires or cart parts in the way of the cutting process. It is best to draw a template fi rst and tape the template to the desired area before cutting.
5) Secure the meter with the hardware provided.
Optional Mounting Bracket Part# 4624For under dash mounting.
MET ANL 24V, MET ANL 36V, MET ANL 48V, MET LED 24V, MET UNV 36V, MET UNV 48V and MET UNV 0460, 28917, 28918BATTERY DISCHARGE INDICATOR
C 907
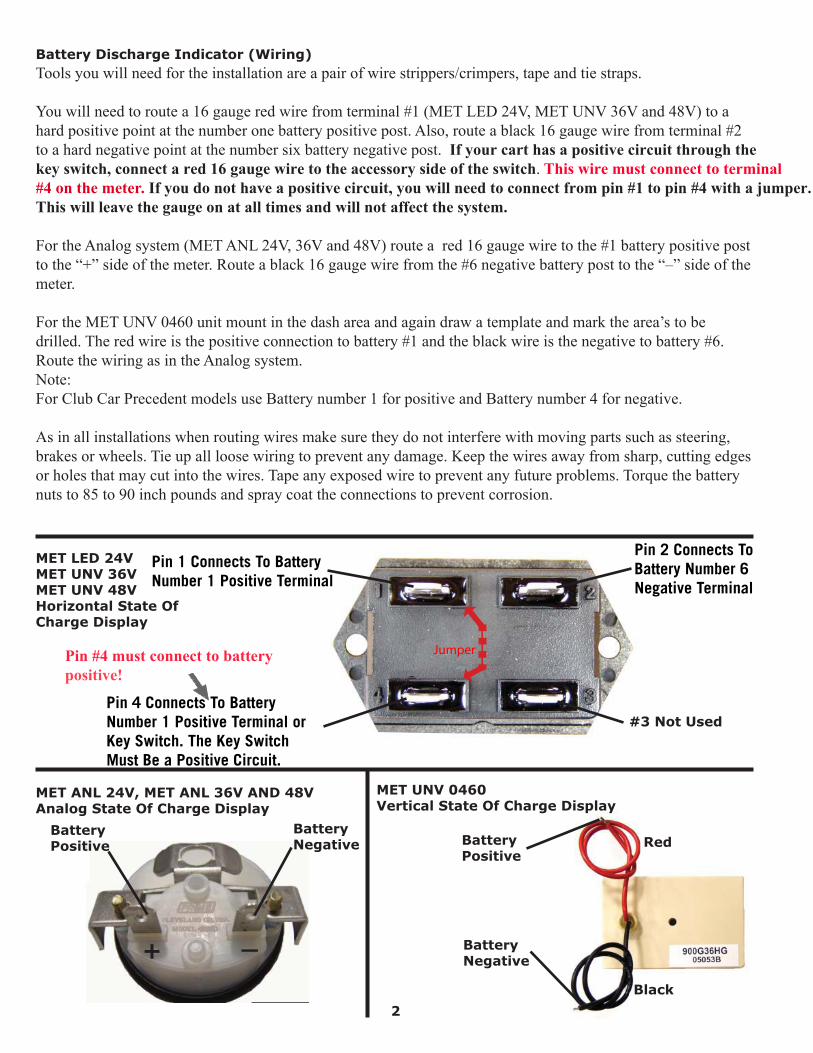
MET LED 24VMET UNV 36VMET UNV 48VHorizontal State Of Charge Display
MET ANL 24V, MET ANL 36V AND 48VAnalog State Of Charge Display
MET UNV 0460Vertical State Of Charge Display
#3 Not Used
BatteryPositive
BatteryNegative Battery
Positive
BatteryNegative
2
+ _
Red
Black
Battery Discharge Indicator (Wiring)Tools you will need for the installation are a pair of wire strippers/crimpers, tape and tie straps.
You will need to route a 16 gauge red wire from terminal #1 (MET LED 24V, MET UNV 36V and 48V) to a hard positive point at the number one battery positive post. Also, route a black 16 gauge wire from terminal #2 to a hard negative point at the number six battery negative post. If your cart has a positive circuit through the key switch, connect a red 16 gauge wire to the accessory side of the switch. This wire must connect to terminal #4 on the meter. If you do not have a positive circuit, you will need to connect from pin #1 to pin #4 with a jumper.
This will leave the gauge on at all times and will not affect the system.
For the Analog system (MET ANL 24V, 36V and 48V) route a red 16 gauge wire to the #1 battery positive post to the “+” side of the meter. Route a black 16 gauge wire from the #6 negative battery post to the “–” side of the meter.
For the MET UNV 0460 unit mount in the dash area and again draw a template and mark the area’s to be drilled. The red wire is the positive connection to battery #1 and the black wire is the negative to battery #6. Route the wiring as in the Analog system. Note:For Club Car Precedent models use Battery number 1 for positive and Battery number 4 for negative.
As in all installations when routing wires make sure they do not interfere with moving parts such as steering, brakes or wheels. Tie up all loose wiring to prevent any damage. Keep the wires away from sharp, cutting edges or holes that may cut into the wires. Tape any exposed wire to prevent any future problems. Torque the battery nuts to 85 to 90 inch pounds and spray coat the connections to prevent corrosion.
Pin #4 must connect to battery positive!
Jumper
Pin 1 Connects To Battery Number 1 Positive Terminal
Pin 2 Connects To Battery Number 6Negative Terminal
Pin 4 Connects To Battery Number 1 Positive Terminal orKey Switch. The Key Switch Must Be a Positive Circuit.
3
+
-
+
-
+
-
+
-
+
-
+
-
12
3
65
4
1
23
6
54
+
-
+
-
+-
+
-
+-
+-
1
2
+-
+-
+-
+-
+-
+-
5
6
4
3
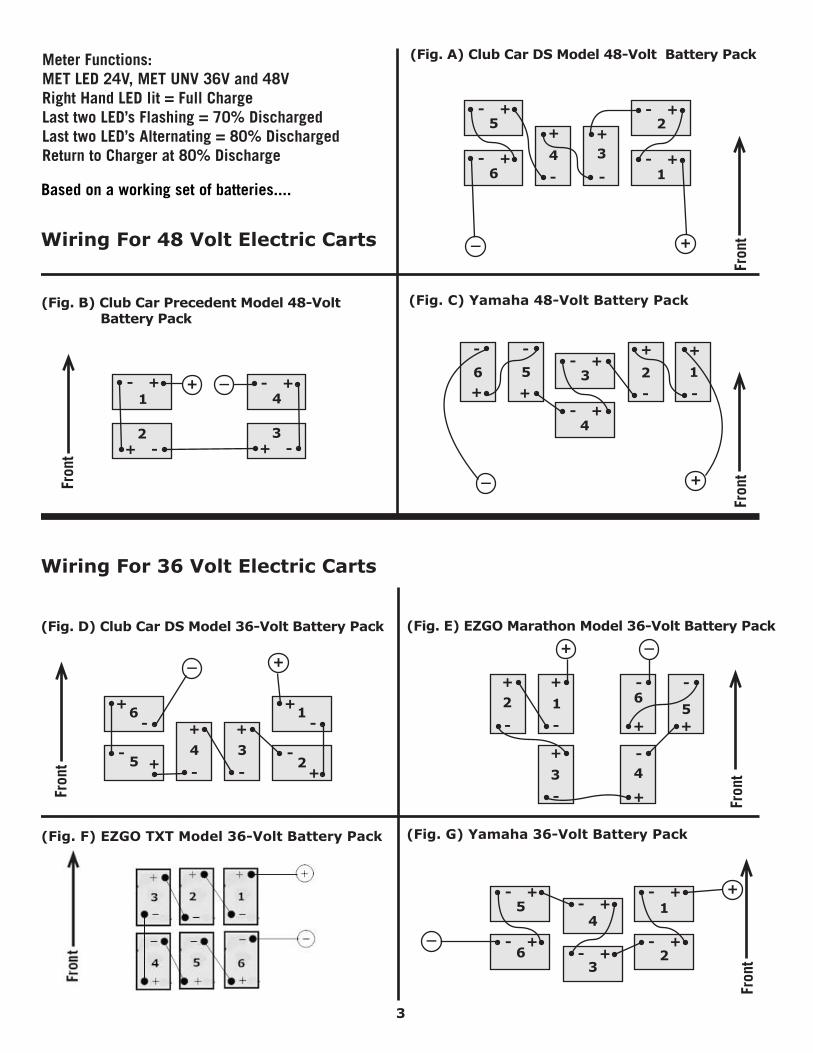
(Fig. E) EZGO Marathon Model 36-Volt Battery Pack(Fig. D) Club Car DS Model 36-Volt Battery Pack
(Fig. G) Yamaha 36-Volt Battery Pack
Wiring For 36 Volt Electric Carts
(Fig. B) Club Car Precedent Model 48-Volt Battery Pack
1
2
+-
+ -
+-
+ -
4
3
_+
_+
_
+
_+
1
2+-
+-
+-
+-
+
-
+
-
5
64 3
(Fig. A) Club Car DS Model 48-Volt Battery Pack
(Fig. C) Yamaha 48-Volt Battery Pack
4
3+-
+-
6 5
+
-
+
-
+
-
+
-
2 1
Wiring For 48 Volt Electric Carts _+
_+
Fron
tFr
ont
Fron
tFr
ont
tno rFtno rF
Meter Functions:MET LED 24V, MET UNV 36V and 48V Right Hand LED lit = Full ChargeLast two LED’s Flashing = 70% DischargedLast two LED’s Alternating = 80% Discharged Return to Charger at 80% Discharge
(Fig. F) EZGO TXT Model 36-Volt Battery Pack
Based on a working set of batteries....