Embed Size (px)
Citation preview
8/13/2019 Micro Armour the Game-WWII 2nd Edition (Full Color)
http://slidepdf.com/reader/full/micro-armour-the-game-wwii-2nd-edition-full-color 1/136
Burfield (order #5184631)
8/13/2019 Micro Armour the Game-WWII 2nd Edition (Full Color)
http://slidepdf.com/reader/full/micro-armour-the-game-wwii-2nd-edition-full-color 2/136
Book Design and Miniatures Photos: Nicole Martinez
Diagrams and Scenario Maps: Sven Lugar
Produced by GHQ, 28100 Woodside Road, Shorewood, MN 55331 U.S.A.Micro Armour® is a registered trademark of GHQ. © Copyright GHQ, 2012. All rights reserved.
Printed in the United States of America
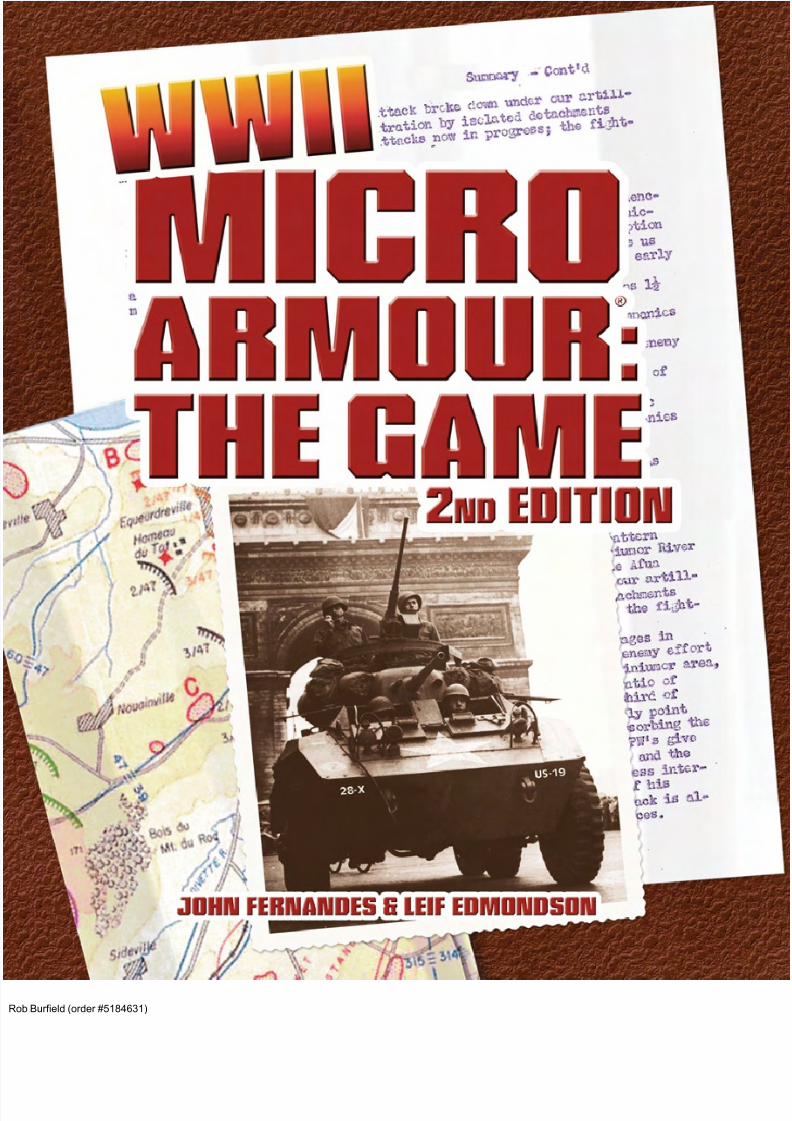
sECOND Edition
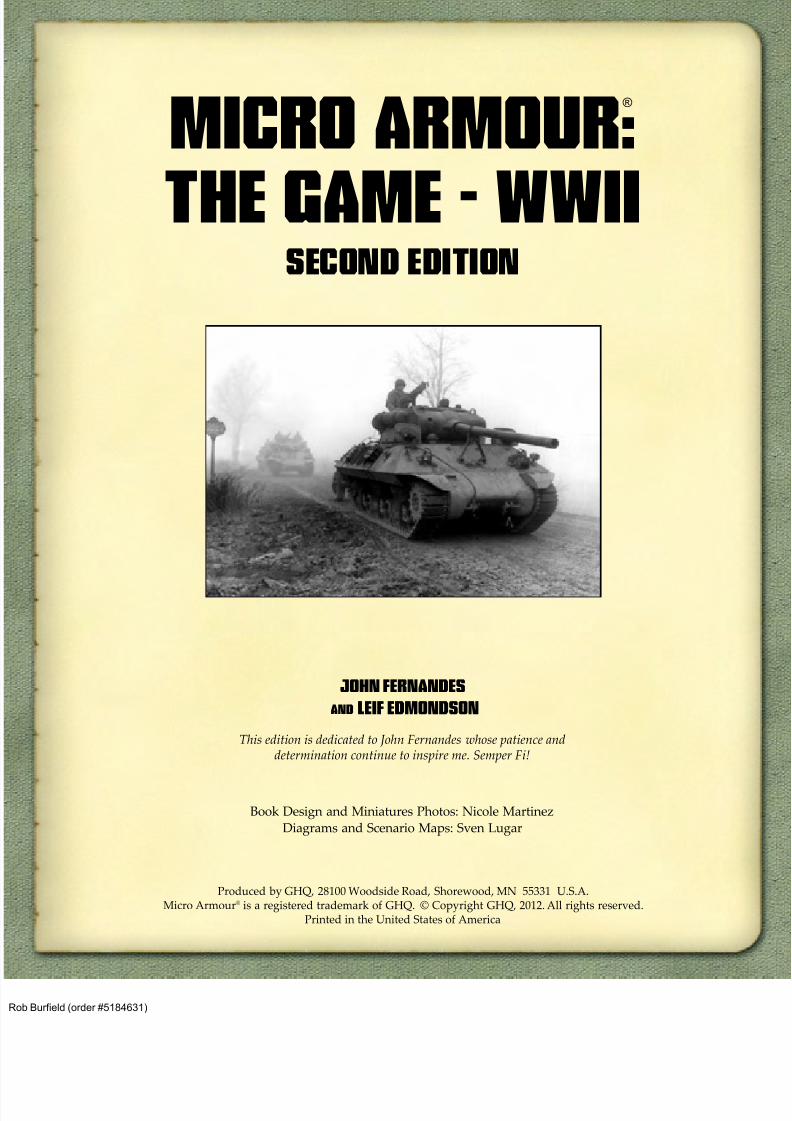
Micro Armour:
the Game - WWII
JOHN FERNANDES
AND Leif Edmondson
®
This edition is dedicated to John Fernandes whose patience anddetermination continue to inspire me. Semper Fi!
Burfield (order #5184631)
8/13/2019 Micro Armour the Game-WWII 2nd Edition (Full Color)
http://slidepdf.com/reader/full/micro-armour-the-game-wwii-2nd-edition-full-color 3/136
FORWARD. . . . . . . . . . . . . . . . . . . . . . . . . . . . . . . iv
1.0 INTRODUCTION . . . . . . . . . . . . . . . . . . . . . 1
2.0 DESCRIPTION OF PLAY . . . . . . . . . . . . . . . 1
3.0 EQUIPMENT
3.1 Playing Surface . . . . . . . . . . . . . . . . . . . . . . . . 1
3.2 Playing Pieces. . . . . . . . . . . . . . . . . . . . . . . . . . 1
3.3 Charts and Tables . . . . . . . . . . . . . . . . . . . . . . 1
3.4 Dice . . . . . . . . . . . . . . . . . . . . . . . . . . . . . . . . . . 1
4.0 SEQUENCE OF PLAY . . . . . . . . . . . . . . . . . . 1
5.0 COHESION . . . . . . . . . . . . . . . . . . . . . . . . . . . 2
5.1 Cohesion Rolls . . . . . . . . . . . . . . . . . . . . . . . . . 2
5.2 Cohesion States . . . . . . . . . . . . . . . . . . . . . . . . 2
5.3 Marker Removal, Recover, and Rally . . . . . . 3
6.0 SPOTTING . . . . . . . . . . . . . . . . . . . . . . . . . . . 3
6.1 Line of Sight . . . . . . . . . . . . . . . . . . . . . . . . . . . 3
6.2 Stands and LOS . . . . . . . . . . . . . . . . . . . . . . . . 3
6.3 Terrain and LOS. . . . . . . . . . . . . . . . . . . . . . . . 3
6.4 Range and LOS . . . . . . . . . . . . . . . . . . . . . . . . 4
6.5 When in Doubt. . . . . . . . . . . . . . . . . . . . . . . . . 5
7.0 COMBAT . . . . . . . . . . . . . . . . . . . . . . . . . . . . . 57.1 General Principles &
Standard Fire Procedure. . . . . . . . . . . . . . . . . 5
7.2 Combat Results . . . . . . . . . . . . . . . . . . . . . . . . 7
7.3 Facing and Range . . . . . . . . . . . . . . . . . . . . . . 7
7.4 Artillery Fire (General) . . . . . . . . . . . . . . . . . . 8
7.5 Direct Artillery Fire . . . . . . . . . . . . . . . . . . . . 10
7.6 Indirect Artillery Fire . . . . . . . . . . . . . . . . . . 10
7.7 Off-Map Artillery Fire. . . . . . . . . . . . . . . . . . 14
7.8 National Artillery Efficiency . . . . . . . . . . . . 14
7.9 Fire Support Allocation. . . . . . . . . . . . . . . . . 15
Examples: Artillery Fire. . . . . . . . . . . . . . . . 15
8.0 MOVEMENT
8.1 Basic Principles . . . . . . . . . . . . . . . . . . . . . . . 19
8.2 Movement Orders . . . . . . . . . . . . . . . . . . . . . 20
8.3 Movement Execution, Restrictions,and Limitations . . . . . . . . . . . . . . . . . . . . . . . 21
8.4 Transport . . . . . . . . . . . . . . . . . . . . . . . . . . . . . 22
8.5 Opportunity Fire . . . . . . . . . . . . . . . . . . . . . . 23
8.6 Covering Fire . . . . . . . . . . . . . . . . . . . . . . . . . 23
8.7 Overrun. . . . . . . . . . . . . . . . . . . . . . . . . . . . . . 23
8.8 Close Assault . . . . . . . . . . . . . . . . . . . . . . . . . 25
8.9 Amphibious Movement . . . . . . . . . . . . . . . . 26
8.10 Airborne Landings. . . . . . . . . . . . . . . . . . . . 27
Example: Parachute Landing . . . . . . . . . . . . 29
Example: Glider Landing . . . . . . . . . . . . . . . 32
9.0 TERRAIN . . . . . . . . . . . . . . . . . . . . . . . . . . . . 33
9.1 Effects . . . . . . . . . . . . . . . . . . . . . . . . . . . . . . . 33
9.2 Wrecks . . . . . . . . . . . . . . . . . . . . . . . . . . . . . . . 33
9.3 Hedgerows and Bocage . . . . . . . . . . . . . . . . 34
9.4 Buildings . . . . . . . . . . . . . . . . . . . . . . . . . . . . . 34
9.5 Water . . . . . . . . . . . . . . . . . . . . . . . . . . . . . . . . 35
9.6 Weather Effects. . . . . . . . . . . . . . . . . . . . . . . . 35
10.0 WEAPONS SPECIFICS &
SPECIAL WEAPONS
10.1 Command Units. . . . . . . . . . . . . . . . . . . . . . 36
10.2 Stands with Facing Restrictions . . . . . . . . 36
10.3 “P” Stands. . . . . . . . . . . . . . . . . . . . . . . . . . . 36
10.4 MMG, Light Mortar,
& Infantry Support Stands . . . . . . . . . . . . . 3710.5 Weapons Stands . . . . . . . . . . . . . . . . . . . . . . 37
10.6 [R]econ Stands. . . . . . . . . . . . . . . . . . . . . . . . 37
10.7 Dual Purpose Guns . . . . . . . . . . . . . . . . . . . 37
10.8 Infantry Close Support ArtilleryWeapons . . . . . . . . . . . . . . . . . . . . . . . . . . . . 37
10.9 “Land Ships” . . . . . . . . . . . . . . . . . . . . . . . . 37
10.10 Horse Cavalry . . . . . . . . . . . . . . . . . . . . . . 38
10.11 Bicycle Infantry . . . . . . . . . . . . . . . . . . . . . 38
10.12 Boats. . . . . . . . . . . . . . . . . . . . . . . . . . . . . . . 38
10.13 Ski Troops . . . . . . . . . . . . . . . . . . . . . . . . . . 3810.14 Personal Infantry AT Weapons . . . . . . . . 38
11.0 FORTIFICATIONS &
COMBAT ENGINEERING
11.1 Mines . . . . . . . . . . . . . . . . . . . . . . . . . . . . . . . 39
11.2 Barbed Wire Obstacles . . . . . . . . . . . . . . . . 40
11.3 Anti-Tank Ditches . . . . . . . . . . . . . . . . . . . . 40
TABLE OF CONTENTS
ii
Burfield (order #5184631)
8/13/2019 Micro Armour the Game-WWII 2nd Edition (Full Color)
http://slidepdf.com/reader/full/micro-armour-the-game-wwii-2nd-edition-full-color 4/136
iii
11.4 Improved Positions . . . . . . . . . . . . . . . . . . . 40
11.5 Combat Engineers &Engineering Vehicles. . . . . . . . . . . . . . . . . . 41
11.6 Flame Throwing Vehicles. . . . . . . . . . . . . . 43
12.0 OPTIONAL RULES
12.1 Unit Determination . . . . . . . . . . . . . . . . . . . 43
12.2 Unmodified or “Natural” CohesionRoll Options . . . . . . . . . . . . . . . . . . . . . . . . . 45
12.2.1 The Hot Shot. . . . . . . . . . . . . . . . . . . . 45
12.2.2 We’re Running Low Sir . . . . . . . . . . . 45
12.2.3 Communications Breakdown . . . . . . . 45
12.2.4 Intuitive Action . . . . . . . . . . . . . . . . . 45
12.2.5 Conflicting Orders . . . . . . . . . . . . . . . . 45
12.3 Air Strikes . . . . . . . . . . . . . . . . . . . . . . . . . . . 45
12.4 Charge for the Guns!. . . . . . . . . . . . . . . . . . 47
12.5 Tank Marines!. . . . . . . . . . . . . . . . . . . . . . . . 47
12.6 Nobody Moves ‘Til I Say So, Get Me? . . . 47
12.7 Loaded & Overloaded Transport . . . . . . . 48
12.8 Pour It On! . . . . . . . . . . . . . . . . . . . . . . . . . . 48
12.9 That’ll Leave a Mark . . . . . . . . . . . . . . . . . . 48
12.10 Big Game Hunters. . . . . . . . . . . . . . . . . . . 48
12.11 A Little HEAT . . . . . . . . . . . . . . . . . . . . . . . 48
12.12 The Registered Fire Mission . . . . . . . . . . . 49
12.13 The Polar Artillery Plotting Method . . . . 49
AUTHOR’S NOTES . . . . . . . . . . . . . . . . . . . . . . 50
DESIGNING SCENARIOS . . . . . . . . . . . . . . . . 54
WEAPONS DATA
Introduction to the Weapons Data. . . . . . . . . . . 65
Belgium. . . . . . . . . . . . . . . . . . . . . . . . . . . . . . . . . . 67
Finland . . . . . . . . . . . . . . . . . . . . . . . . . . . . . . . . . . 68
Finland (Winter War) . . . . . . . . . . . . . . . . . . . . . . 70
France . . . . . . . . . . . . . . . . . . . . . . . . . . . . . . . . . . . 71Germany. . . . . . . . . . . . . . . . . . . . . . . . . . . . . . . . . 73
Hungary . . . . . . . . . . . . . . . . . . . . . . . . . . . . . . . . . 77
Italy . . . . . . . . . . . . . . . . . . . . . . . . . . . . . . . . . . . . . 79
Japan . . . . . . . . . . . . . . . . . . . . . . . . . . . . . . . . . . . . 81
Poland. . . . . . . . . . . . . . . . . . . . . . . . . . . . . . . . . . . 83
Romania . . . . . . . . . . . . . . . . . . . . . . . . . . . . . . . . . 84
Soviet Union . . . . . . . . . . . . . . . . . . . . . . . . . . . . . 86
United Kingdom . . . . . . . . . . . . . . . . . . . . . . . . . . 89
United States . . . . . . . . . . . . . . . . . . . . . . . . . . . . . 92
Non-Motorized Transport (All Nations) . . . . . . 95
AIRCRAFT DATA
Introduction to Aircraft Data . . . . . . . . . . . . . . . 96
France . . . . . . . . . . . . . . . . . . . . . . . . . . . . . . . . . . . 97
Germany. . . . . . . . . . . . . . . . . . . . . . . . . . . . . . . . . 97
Italy . . . . . . . . . . . . . . . . . . . . . . . . . . . . . . . . . . . . . 97
Japan . . . . . . . . . . . . . . . . . . . . . . . . . . . . . . . . . . . . 97
Poland. . . . . . . . . . . . . . . . . . . . . . . . . . . . . . . . . . . 97
Soviet Union . . . . . . . . . . . . . . . . . . . . . . . . . . . . . 98
United Kingdom . . . . . . . . . . . . . . . . . . . . . . . . . . 98
United States . . . . . . . . . . . . . . . . . . . . . . . . . . . . . 99
SCENARIOS
Introductory Scenario - Eastern Front, 1943. . 100
State Farm #79 - Stalingrad, 1942 . . . . . . . . . . . 102
A Costly Setback - Market Garden, 1944. . . . . 104
Black Monday - Italy, 1943. . . . . . . . . . . . . . . . . 107
Bir El Gubi - Libya, 1941 . . . . . . . . . . . . . . . . . . 109
Run to Sidi Suleiman - Libya, 1941 . . . . . . . . . 111
A Throw at Stonne - France, 1940 . . . . . . . . . . 112
Stark Resistance - Tunisia, 1943 . . . . . . . . . . . . 114
COMBAT TABLES. . . . . . . . . . . . . . . . . . . . . . . 117
MARKERS & TEMPLATES . . . . . . . . . . . . . . . 126
BIBLIOGRAPHY & SOURCES . . . . . . . . . . . 128
PHOTO CREDITS . . . . . . . . . . . . . . . . . . . . . . . 130
Burfield (order #5184631)

8/13/2019 Micro Armour the Game-WWII 2nd Edition (Full Color)
http://slidepdf.com/reader/full/micro-armour-the-game-wwii-2nd-edition-full-color 5/136
iv
As I write this, I believe it has been 16 years since I began playing with the rules we now know as“Micro Armour: The Game - WWII.” GHQ published the first edition in 2001, 12 years ago. Overthose years I always knew why I liked these rules, but some things just kept bothering me about themtoo. So I put fingers to keyboard and some metal on the table.
I had two goals in mind while editing John’s WWII rules; first was to make them more easilyunderstood by the reader. I consider myself fortunate; John taught me the rules at the table. However,
John liked to write as few words as possible to describe the game mechanics, and that’s not alwaysthe clearest way to teach someone how to play a game. I’ve added a number of examples to many ofthe rules to illustrate how they work. I re-organized bits of the rules to read more logically, and re-wrote passages to make certain aspects of the game more easily understood by someone that onlyhad the rules, charts and tables, and weapons data available to them.
John shared with many folks that he created his rules to simulate battles in his own fictional, alternatetimeline of the 30’s and 40’s. However, he had a larger vision for the rules he was working on. Hisearliest versions of the rules were called “A Century of Conflict: the Great Crusade.” So after theypublished his WWII rules, when GHQ asked him for a set of modern rules, he had a framework inwhich to fit them. I know he saw the modern rules as an extension of the WWII rules. He said on anumber of occasions that WWII battles should be completely playable with the modern rules set.Thus it is in the “Modern” book that he lays out rules for weather effects, deployments by parachute,and a more comprehensive morale system (unit determination) to name only a few additions.
Therefore my second goal was to bring certain concepts from the “Modern” rule book (and later,George Chrestensen’s “Micro Squad” rules) into the WWII (platoon scale) game. The motivation
behind this goal was really a selfish one, and that was to have only one book to haul around when Iwanted to play games and create scenarios. The side effect of this was to make the game a morecomplete system as a whole. I think I threw in just about everything; the fire/move posture, moreterrain, airborne landings, water and amphibious operations, and lots of engineering detail that mayrarely be needed.
First I must thank Gregg and Channing Scott for their enthusiasm and unfailing support for thisproject. This book would not have come about without them.
I must recognize and thank the following people for help with these rules: George Chrestensen,Nicole Martinez, Maurilio Tamaio, Gary Rhay, DJ Weise, Travis Hardinger, Daryl Nichols, SvenLugar, Mike Dryden, Kirk Reed, and David Sagirashvili. Without their contributions this updatewould not have been possible. Finally, I’d like to recognize my family: Tanya, Sergei, and Alex for allof their love, understanding, and patience.
My hope is that you find that my revision of these rules is useful, helpful, and fun.
Regards,Leif Edmondson
“Life’s too short for games that suck!” - John Fernandes
FORWARD
Burfield (order #5184631)
8/13/2019 Micro Armour the Game-WWII 2nd Edition (Full Color)
http://slidepdf.com/reader/full/micro-armour-the-game-wwii-2nd-edition-full-color 6/136
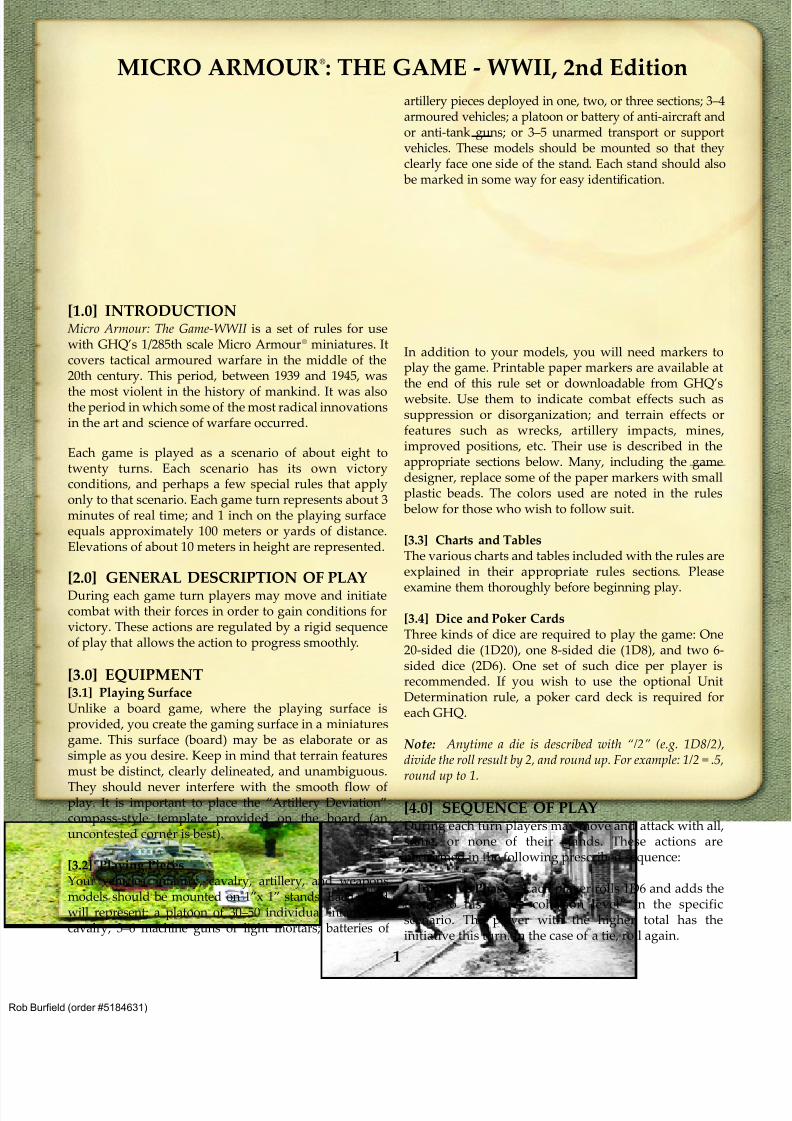
[1.0] INTRODUCTION Micro Armour: The Game-WWII is a set of rules for usewith GHQ’s 1/285th scale Micro Armour® miniatures. Itcovers tactical armoured warfare in the middle of the20th century. This period, between 1939 and 1945, was
the most violent in the history of mankind. It was alsothe period in which some of the most radical innovationsin the art and science of warfare occurred.
Each game is played as a scenario of about eight totwenty turns. Each scenario has its own victoryconditions, and perhaps a few special rules that applyonly to that scenario. Each game turn represents about 3minutes of real time; and 1 inch on the playing surfaceequals approximately 100 meters or yards of distance.Elevations of about 10 meters in height are represented.
[2.0] GENERAL DESCRIPTION OF PLAYDuring each game turn players may move and initiatecombat with their forces in order to gain conditions forvictory. These actions are regulated by a rigid sequenceof play that allows the action to progress smoothly.
[3.0] EQUIPMENT[3.1] Playing SurfaceUnlike a board game, where the playing surface isprovided, you create the gaming surface in a miniaturesgame. This surface (board) may be as elaborate or assimple as you desire. Keep in mind that terrain featuresmust be distinct, clearly delineated, and unambiguous.
They should never interfere with the smooth flow ofplay. It is important to place the “Artillery Deviation”compass-style template provided on the board (anuncontested corner is best).
[3.2] Playing PiecesYour vehicles, infantry, cavalry, artillery, and weaponsmodels should be mounted on 1”x 1” stands. Each standwill represent: a platoon of 30–50 individual infantry orcavalry; 3–6 machine guns or light mortars; batteries of
artillery pieces deployed in one, two, or three sections; 3–4armoured vehicles; a platoon or battery of anti-aircraft andor anti-tank guns; or 3–5 unarmed transport or supportvehicles. These models should be mounted so that theyclearly face one side of the stand. Each stand should also be marked in some way for easy identification.
In addition to your models, you will need markers toplay the game. Printable paper markers are available atthe end of this rule set or downloadable from GHQ’swebsite. Use them to indicate combat effects such assuppression or disorganization; and terrain effects orfeatures such as wrecks, artillery impacts, mines,improved positions, etc. Their use is described in theappropriate sections below. Many, including the gamedesigner, replace some of the paper markers with smallplastic beads. The colors used are noted in the rules
below for those who wish to follow suit.
[3.3] Charts and TablesThe various charts and tables included with the rules areexplained in their appropriate rules sections. Please
examine them thoroughly before beginning play.
[3.4] Dice and Poker CardsThree kinds of dice are required to play the game: One20-sided die (1D20), one 8-sided die (1D8), and two 6-sided dice (2D6). One set of such dice per player isrecommended. If you wish to use the optional UnitDetermination rule, a poker card deck is required foreach GHQ.
Note: Anytime a die is described with “/2” (e.g. 1D8/2),divide the roll result by 2, and round up. For example: 1/2 = .5,round up to 1.
[4.0] SEQUENCE OF PLAYDuring each turn players may move and attack with all,some, or none of their stands. These actions areperformed in the following prescribed sequence:
1. Initiative Phase – Each player rolls 1D6 and adds theresult to his “force cohesion level” in the specificscenario. The player with the higher total has theinitiative this turn. In the case of a tie, roll again.
MICRO ARMOUR®: THE GAME - WWII, 2nd Edition
1
Burfield (order #5184631)
8/13/2019 Micro Armour the Game-WWII 2nd Edition (Full Color)
http://slidepdf.com/reader/full/micro-armour-the-game-wwii-2nd-edition-full-color 7/136
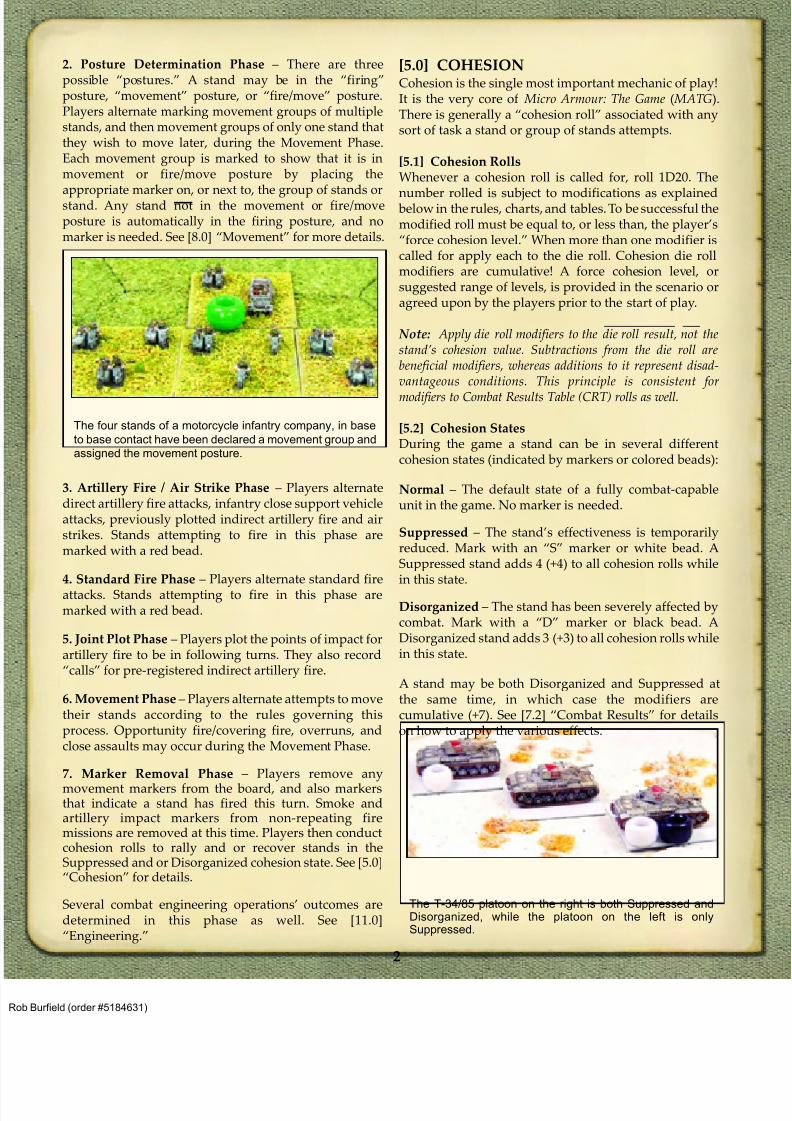
2. Posture Determination Phase – There are threepossible “postures.” A stand may be in the “firing”posture, “movement” posture, or “fire/move” posture.Players alternate marking movement groups of multiplestands, and then movement groups of only one stand thatthey wish to move later, during the Movement Phase.Each movement group is marked to show that it is inmovement or fire/move posture by placing the
appropriate marker on, or next to, the group of stands orstand. Any stand not in the movement or fire/moveposture is automatically in the firing posture, and nomarker is needed. See [8.0] “Movement” for more details.
3. Artillery Fire / Air Strike Phase – Players alternatedirect artillery fire attacks, infantry close support vehicleattacks, previously plotted indirect artillery fire and airstrikes. Stands attempting to fire in this phase aremarked with a red bead.
4. Standard Fire Phase – Players alternate standard fireattacks. Stands attempting to fire in this phase aremarked with a red bead.
5. Joint Plot Phase – Players plot the points of impact forartillery fire to be in following turns. They also record“calls” for pre-registered indirect artillery fire.
6. Movement Phase – Players alternate attempts to movetheir stands according to the rules governing thisprocess. Opportunity fire/covering fire, overruns, andclose assaults may occur during the Movement Phase.
7. Marker Removal Phase – Players remove any
movement markers from the board, and also markersthat indicate a stand has fired this turn. Smoke andartillery impact markers from non-repeating firemissions are removed at this time. Players then conductcohesion rolls to rally and or recover stands in theSuppressed and or Disorganized cohesion state. See [5.0]“Cohesion” for details.
Several combat engineering operations’ outcomes aredetermined in this phase as well. See [11.0]“Engineering.”
[5.0] COHESIONCohesion is the single most important mechanic of play!It is the very core of Micro Armour: The Game ( MATG).There is generally a “cohesion roll” associated with anysort of task a stand or group of stands attempts.
[5.1] Cohesion RollsWhenever a cohesion roll is called for, roll 1D20. The
number rolled is subject to modifications as explained below in the rules, charts, and tables. To be successful themodified roll must be equal to, or less than, the player’s“force cohesion level.” When more than one modifier iscalled for apply each to the die roll. Cohesion die rollmodifiers are cumulative! A force cohesion level, orsuggested range of levels, is provided in the scenario oragreed upon by the players prior to the start of play.
Note: Apply die roll modifiers to the die roll result, not thestand’s cohesion value. Subtractions from the die roll arebeneficial modifiers, whereas additions to it represent disad-vantageous conditions. This principle is consistent for
modifiers to Combat Results Table (CRT) rolls as well.
[5.2] Cohesion StatesDuring the game a stand can be in several differentcohesion states (indicated by markers or colored beads):
Normal – The default state of a fully combat-capableunit in the game. No marker is needed.
Suppressed – The stand’s effectiveness is temporarilyreduced. Mark with an “S” marker or white bead. ASuppressed stand adds 4 (+4) to all cohesion rolls whilein this state.
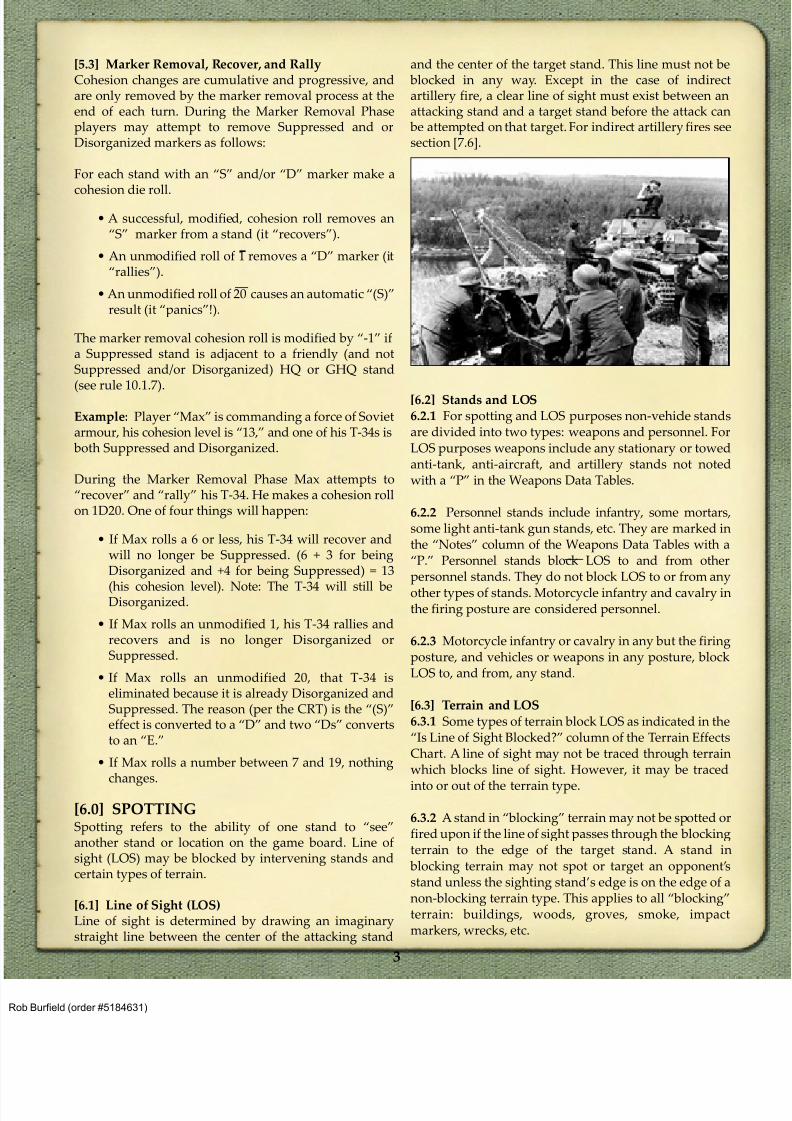
Disorganized – The stand has been severely affected bycombat. Mark with a “D” marker or black bead. ADisorganized stand adds 3 (+3) to all cohesion rolls whilein this state.
A stand may be both Disorganized and Suppressed atthe same time, in which case the modifiers arecumulative (+7). See [7.2] “Combat Results” for detailson how to apply the various effects.
The four stands of a motorcycle infantry company, in base
to base contact have been declared a movement group and
assigned the movement posture.
The T-34/85 platoon on the right is both Suppressed andDisorganized, while the platoon on the left is onlySuppressed.
2
Burfield (order #5184631)
8/13/2019 Micro Armour the Game-WWII 2nd Edition (Full Color)
http://slidepdf.com/reader/full/micro-armour-the-game-wwii-2nd-edition-full-color 8/136
[5.3] Marker Removal, Recover, and RallyCohesion changes are cumulative and progressive, andare only removed by the marker removal process at theend of each turn. During the Marker Removal Phaseplayers may attempt to remove Suppressed and orDisorganized markers as follows:
For each stand with an “S” and/or “D” marker make a
cohesion die roll.
• A successful, modified, cohesion roll removes an“S” marker from a stand (it “recovers”).
• An unmodified roll of 1 removes a “D” marker (it“rallies”).
• An unmodified roll of 20 causes an automatic “(S)”result (it “panics”!).
The marker removal cohesion roll is modified by “-1” ifa Suppressed stand is adjacent to a friendly (and notSuppressed and/or Disorganized) HQ or GHQ stand
(see rule 10.1.7).
Example: Player “Max” is commanding a force of Sovietarmour, his cohesion level is “13,” and one of his T-34s is
both Suppressed and Disorganized.
During the Marker Removal Phase Max attempts to“recover” and “rally” his T-34. He makes a cohesion rollon 1D20. One of four things will happen:
• If Max rolls a 6 or less, his T-34 will recover andwill no longer be Suppressed. (6 + 3 for beingDisorganized and +4 for being Suppressed) = 13
(his cohesion level). Note: The T-34 will still beDisorganized.
• If Max rolls an unmodified 1, his T-34 rallies andrecovers and is no longer Disorganized orSuppressed.
• If Max rolls an unmodified 20, that T-34 iseliminated because it is already Disorganized andSuppressed. The reason (per the CRT) is the “(S)”effect is converted to a “D” and two “Ds” convertsto an “E.”
• If Max rolls a number between 7 and 19, nothing
changes.
[6.0] SPOTTINGSpotting refers to the ability of one stand to “see”another stand or location on the game board. Line ofsight (LOS) may be blocked by intervening stands andcertain types of terrain.
[6.1] Line of Sight (LOS)Line of sight is determined by drawing an imaginarystraight line between the center of the attacking stand
and the center of the target stand. This line must not be blocked in any way. Except in the case of indirectartillery fire, a clear line of sight must exist between anattacking stand and a target stand before the attack can
be attempted on that target. For indirect artillery fires seesection [7.6].
[6.2] Stands and LOS6.2.1 For spotting and LOS purposes non-vehicle standsare divided into two types: weapons and personnel. ForLOS purposes weapons include any stationary or towedanti-tank, anti-aircraft, and artillery stands not notedwith a “P” in the Weapons Data Tables.
6.2.2 Personnel stands include infantry, some mortars,some light anti-tank gun stands, etc. They are marked inthe “Notes” column of the Weapons Data Tables with a“P.” Personnel stands block LOS to and from otherpersonnel stands. They do not block LOS to or from any
other types of stands. Motorcycle infantry and cavalry inthe firing posture are considered personnel.
6.2.3 Motorcycle infantry or cavalry in any but the firingposture, and vehicles or weapons in any posture, blockLOS to, and from, any stand.
[6.3] Terrain and LOS6.3.1 Some types of terrain block LOS as indicated in the“Is Line of Sight Blocked?” column of the Terrain EffectsChart. A line of sight may not be traced through terrainwhich blocks line of sight. However, it may be traced
into or out of the terrain type.
6.3.2 A stand in “blocking” terrain may not be spotted orfired upon if the line of sight passes through the blockingterrain to the edge of the target stand. A stand in
blocking terrain may not spot or target an opponent’sstand unless the sighting stand’s edge is on the edge of anon-blocking terrain type. This applies to all “blocking”terrain: buildings, woods, groves, smoke, impactmarkers, wrecks, etc.
3
Burfield (order #5184631)
8/13/2019 Micro Armour the Game-WWII 2nd Edition (Full Color)
http://slidepdf.com/reader/full/micro-armour-the-game-wwii-2nd-edition-full-color 9/136
Note: The target of the LOS check or the “spotting unit”must have its stand’s edge at the edge of the blocking terrainto be “in” it but still see out of, or be seen in, that terrain. One guideline is if the stand edge is more than 1/8th of an inchinside the blocking terrain feature its LOS is blocked. Another guideline is if 75% of a stand occupies the blocking terrain itis “in” the blocking terrain. The key here is communicationsbetween players. If a stand is being positioned to fire out of
blocking terrain, or conversely, being positioned to “hide” inblocking terrain, ask or tell your opponent your intention atthe beginning of the phase, before it can become a problem. Ambiguous situations should fall in favor of the defender.Please be reasonable.
6.3.3 Certain terrain features may conceal standsoccupying that terrain type. Concealing terrain may ormay not “block” LOS. See the Terrain Effects Chart forthe effects of specific terrain types. Attacks againsttargets in concealing terrain ignore the cohesionmodifier specified in the Terrain Effects Chart if thedefender has fired previously in the turn or the defender
and attacker are adjacent. However, the CRT die rollmodifiers, due to the terrain, are still applied if thecohesion roll is successful.
6.3.4 A stand is always considered to be in clear terrainfor spotting and line-of-sight purposes in any phase ofthe current turn after it has fired.
Note: It is often advisable to wait for an enemy stand in coverto fire at you before you fire at him. This doesn’t negate theeffect of the cover for combat purposes but it does makespotting it a lot easier!
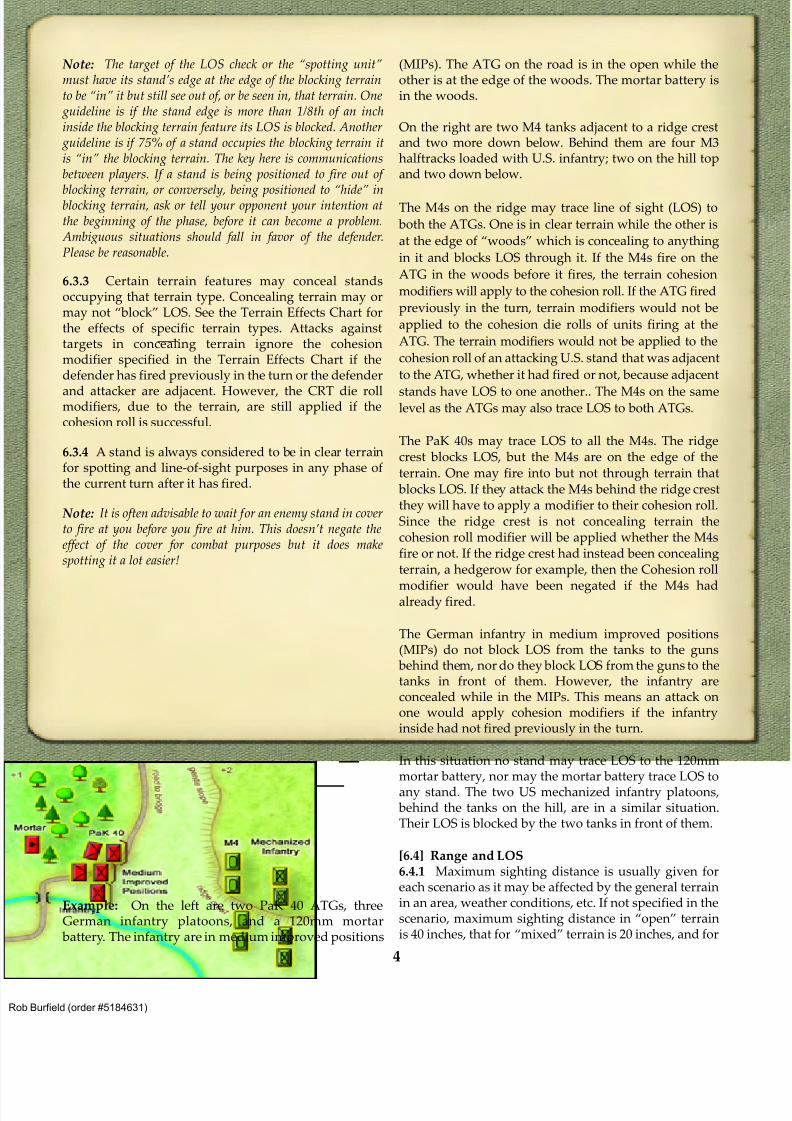
Example: On the left are two PaK 40 ATGs, threeGerman infantry platoons, and a 120mm mortar
battery. The infantry are in medium improved positions
(MIPs). The ATG on the road is in the open while theother is at the edge of the woods. The mortar battery isin the woods.
On the right are two M4 tanks adjacent to a ridge crestand two more down below. Behind them are four M3halftracks loaded with U.S. infantry; two on the hill topand two down below.
The M4s on the ridge may trace line of sight (LOS) to
both the ATGs. One is in clear terrain while the other is
at the edge of “woods” which is concealing to anything
in it and blocks LOS through it. If the M4s fire on the
ATG in the woods before it fires, the terrain cohesion
modifiers will apply to the cohesion roll. If the ATG fired
previously in the turn, terrain modifiers would not be
applied to the cohesion die rolls of units firing at the
ATG. The terrain modifiers would not be applied to the
cohesion roll of an attacking U.S. stand that was adjacent
to the ATG, whether it had fired or not, because adjacent
stands have LOS to one another.. The M4s on the samelevel as the ATGs may also trace LOS to both ATGs.
The PaK 40s may trace LOS to all the M4s. The ridgecrest blocks LOS, but the M4s are on the edge of theterrain. One may fire into but not through terrain that
blocks LOS. If they attack the M4s behind the ridge crestthey will have to apply a modifier to their cohesion roll.Since the ridge crest is not concealing terrain thecohesion roll modifier will be applied whether the M4sfire or not. If the ridge crest had instead been concealingterrain, a hedgerow for example, then the Cohesion roll
modifier would have been negated if the M4s hadalready fired.
The German infantry in medium improved positions(MIPs) do not block LOS from the tanks to the guns
behind them, nor do they block LOS from the guns to thetanks in front of them. However, the infantry areconcealed while in the MIPs. This means an attack onone would apply cohesion modifiers if the infantryinside had not fired previously in the turn.
In this situation no stand may trace LOS to the 120mmmortar battery, nor may the mortar battery trace LOS toany stand. The two US mechanized infantry platoons,
behind the tanks on the hill, are in a similar situation.Their LOS is blocked by the two tanks in front of them.
[6.4] Range and LOS6.4.1 Maximum sighting distance is usually given foreach scenario as it may be affected by the general terrainin an area, weather conditions, etc. If not specified in thescenario, maximum sighting distance in “open” terrainis 40 inches, that for “mixed” terrain is 20 inches, and for
4
Burfield (order #5184631)
8/13/2019 Micro Armour the Game-WWII 2nd Edition (Full Color)
http://slidepdf.com/reader/full/micro-armour-the-game-wwii-2nd-edition-full-color 10/136
“closed” terrain it is 10 inches. For further definitions ofthese general surface types see [9.0] “Terrain.” There areno movement costs or cohesion die roll effects associatedwith these general surface designations.
6.4.2 Adjacent stands have LOS to one anotherregardless of the Terrain Effects Chart. If an attacker anddefender are adjacent and the defender is in concealing
terrain the cohesion die roll modifier is not applied.However, the Combat Results Table (CRT) die rollmodifiers are still applied.
Example: Blue Tanks A and C are attacking Red Tank #1.Red #1 fired this turn. Blue A can “spot” Red #1 becauseadjacent stands have LOS to each other. Red #1 is inconcealing terrain; however Blue A does not addcohesion modifiers due to concealing terrain becausethey are adjacent. Blue C can also spot Red #1 because itis on the “edge” of the wood terrain. Blue C is notadjacent to Red #1. However, because Red #1 firedpreviously in the turn Blue C does not add cohesionmodifiers due to concealing terrain. Due to itssuppressed status Blue C does have to add the +4
modifier to his cohesion roll.
6.4.3 Stands gain a five inch (5”) additional sightingdistance for each level of height they occupy above thelevel they are spotting, subject to scenario restrictions.
[6.5] When in DoubtIf the LOS is ambiguous, rule in favor of the defender. Ifagreed to by all parties prior to play, a die roll can beused to resolve ambiguous LOS situations.
[7.0] COMBATIn Micro Armour: The Game-WWII combat events occurfirst in the Artillery Fire Phase, then in the Standard FirePhase, and finally in the Movement Phase. However, therules for standard fire are the basis on which mostof the other phases are built, so those will be coveredfirst. Then artillery fire will be covered, and finally,in [8.0] “Movement” the last types of combat events will
be described.
Note: Each type of combat event, no matter where it occurs inthe sequence of play, is described in a step-by-step process in theProcedures Tables accompanying these rules. It is stronglyrecommended that readers examine the appropriate procedureimmediately after, or even while, reading the rules found herein.
[7.1] General Principles and Standard Fire ProcedureAn “attack” is defined as the application of the firepowerof one or more stands against the defense strength of asingle stand. Each stand taking part in the attack isrequired to resolve their fire individually – referred to asa combat event. This means that the cohesion tests foreach firing stand are considered and rolled separately.The combat results of each combat event on thedesignated target, are applied separately, but arecumulative and progressive.
7.1.1 The player with the initiative for the turn decideswho executes the first attack of the Standard Fire Phase.The players then alternate attacks until both players“pass.” At this point, the Standard Fire Phase ends. Aplayer may choose to pass at any time during the phasewhile it is his turn to attack, but once the option to passhas been exercised, no further attacks may be made by
that player for the remainder of the phase.
Note: This same process of alternating attacks is also usedduring the Artillery Fire Phase.
7.1.2 To conduct an attack during the Standard Fire Phasethe attacker first identifies the target stand. The attackerthen identifies each of his stands attempting to fire on thetarget. During the Standard Fire Phase a stand may only beattacked once but may be fired upon, during that attack, byas many stands as the player designates.
Note: The target stand may have been attacked previously in
the turn during the Artillery Fire Phase, or may be attackedlater, during the Movement Phase. But it may not be thesubject of a second attack later in the Standard Fire Phase.
7.1.3 A clear line of sight must exist between thedesignated attacking stand and the defending stand forthe standard fire combat event to proceed.
7.1.4 Unless optional rules are being used no stand mayfire more than once per turn.
5
Burfield (order #5184631)
8/13/2019 Micro Armour the Game-WWII 2nd Edition (Full Color)
http://slidepdf.com/reader/full/micro-armour-the-game-wwii-2nd-edition-full-color 11/136
Note: If a stand has fired, but is then the target of an overrunor close assault during the Movement Phase, it may conductthe defensive die rolls called for in those rules. Also see theoptional rules [12.3] “Air Strikes” and [12.8] “Pour It On,” for the two instances in which a stand may fire more than oncein the same turn.
7.1.5 Each of the attacking player’s participatingstands should be designated with a red bead or otherdistinct marker.
7.1.6 For each designated firing stand in an attack, makea cohesion roll to determine if the stand may fire.This may be referred to as the “to fire” roll. This roll isunique to each participant and subject to modifiers forvarious conditions or events. For attacks in the StandardFire Phase these include the attacker’s cohesion state(“S” and or “D” states), the attacker’s posture (+3 if in thefire/move posture), and the terrain occupied bythe target stand. See the Terrain Effects Chart forapplicable modifiers.
A successful cohesion roll indicates the fire was effectiveand combat results must be determined. A failedcohesion roll indicates the fire was uncoordinated and/orineffective. In this case, a roll on the CRT is not conductedand the stand may not fire for the rest of the turn.
7.1.7 All stands have two firepower values: one for useagainst armoured targets (the “AP” value), and one foruse against unarmoured targets and personnel (the“HE” value).
7.1.8 All stands belong to one of three defense classes:armoured vehicles, unarmoured equipment or weapons,
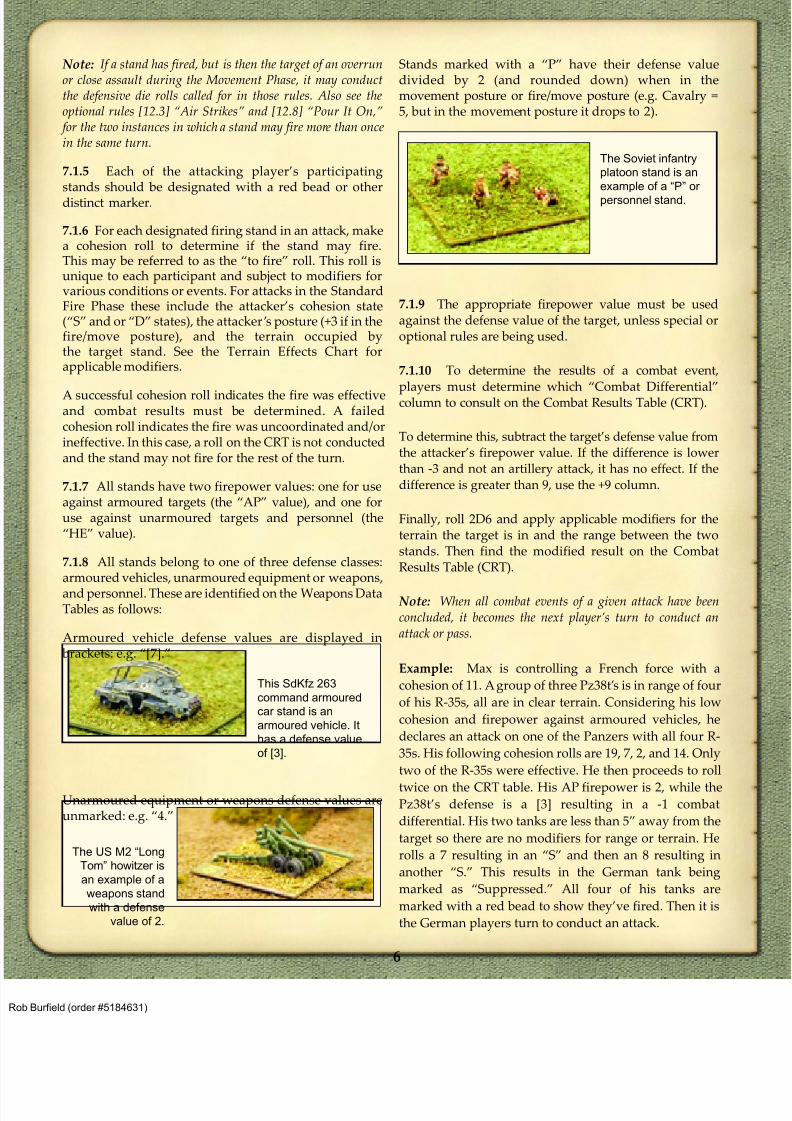
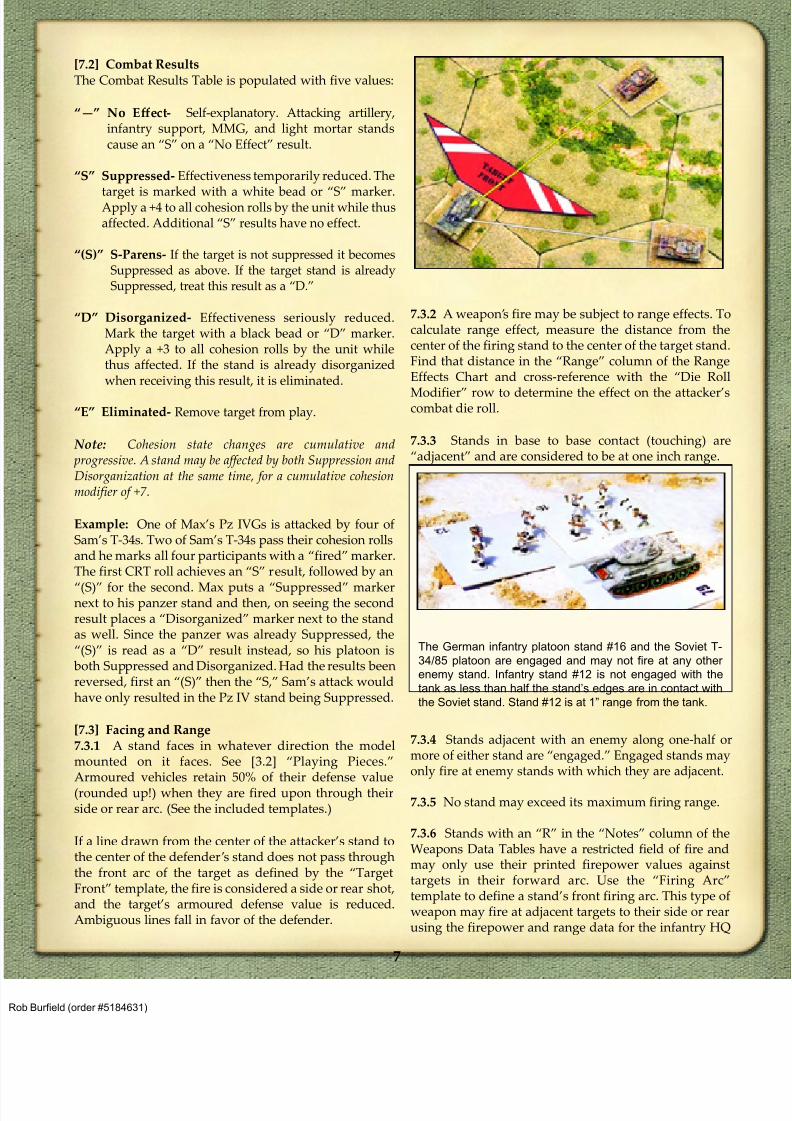
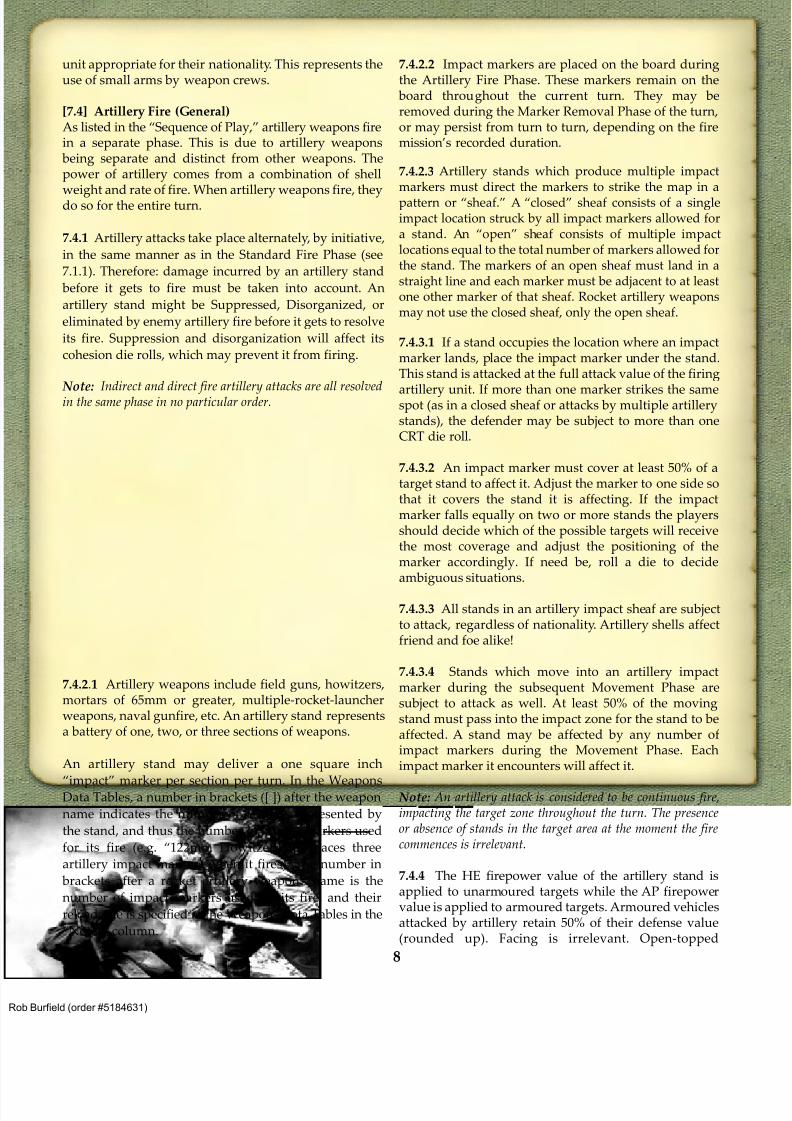
and personnel. These are identified on the Weapons DataTables as follows:
Armoured vehicle defense values are displayed in brackets: e.g. “[7].”
Unarmoured equipment or weapons defense values areunmarked: e.g. “4.”
Stands marked with a “P” have their defense valuedivided by 2 (and rounded down) when in themovement posture or fire/move posture (e.g. Cavalry =5, but in the movement posture it drops to 2).
7.1.9 The appropriate firepower value must be usedagainst the defense value of the target, unless special oroptional rules are being used.
7.1.10 To determine the results of a combat event,
players must determine which “Combat Differential”column to consult on the Combat Results Table (CRT).
To determine this, subtract the target’s defense value fromthe attacker’s firepower value. If the difference is lowerthan -3 and not an artillery attack, it has no effect. If the
difference is greater than 9, use the +9 column.
Finally, roll 2D6 and apply applicable modifiers for theterrain the target is in and the range between the twostands. Then find the modified result on the CombatResults Table (CRT).
Note: When all combat events of a given attack have beenconcluded, it becomes the next player’s turn to conduct anattack or pass.
Example: Max is controlling a French force with a
cohesion of 11. Agroup of three Pz38t’s is in range of four
of his R-35s, all are in clear terrain. Considering his low
cohesion and firepower against armoured vehicles, he
declares an attack on one of the Panzers with all four R-
35s. His following cohesion rolls are 19, 7, 2, and 14. Only
two of the R-35s were effective. He then proceeds to roll
twice on the CRT table. His AP firepower is 2, while thePz38t’s defense is a [3] resulting in a -1 combat
differential. His two tanks are less than 5” away from the
target so there are no modifiers for range or terrain. He
rolls a 7 resulting in an “S” and then an 8 resulting in
another “S.” This results in the German tank being
marked as “Suppressed.” All four of his tanks are
marked with a red bead to show they’ve fired. Then it is
the German players turn to conduct an attack.
This SdKfz 263
command armoured
car stand is an
armoured vehicle. It
has a defense value
of [3].
The US M2 “Long
Tom” howitzer is
an example of a
weapons stand
with a defense
value of 2.
The Soviet infantry
platoon stand is an
example of a “P” or
personnel stand.
6
Burfield (order #5184631)
8/13/2019 Micro Armour the Game-WWII 2nd Edition (Full Color)
http://slidepdf.com/reader/full/micro-armour-the-game-wwii-2nd-edition-full-color 12/136
[7.2] Combat ResultsThe Combat Results Table is populated with five values:
“—” No Effect- Self-explanatory. Attacking artillery,infantry support, MMG, and light mortar standscause an “S” on a “No Effect” result.
“S” Suppressed- Effectiveness temporarily reduced. The
target is marked with a white bead or “S” marker.Apply a +4 to all cohesion rolls by the unit while thusaffected. Additional “S” results have no effect.
“(S)” S-Parens- If the target is not suppressed it becomesSuppressed as above. If the target stand is alreadySuppressed, treat this result as a “D.”
“D” Disorganized- Effectiveness seriously reduced.Mark the target with a black bead or “D” marker.Apply a +3 to all cohesion rolls by the unit whilethus affected. If the stand is already disorganizedwhen receiving this result, it is eliminated.
“E” Eliminated- Remove target from play.
Note: Cohesion state changes are cumulative and progressive. A stand may be affected by both Suppression andDisorganization at the same time, for a cumulative cohesionmodifier of +7.
Example: One of Max’s Pz IVGs is attacked by four ofSam’s T-34s. Two of Sam’s T-34s pass their cohesion rollsand he marks all four participants with a “fired” marker.The first CRT roll achieves an “S” result, followed by an
“(S)” for the second. Max puts a “Suppressed” markernext to his panzer stand and then, on seeing the secondresult places a “Disorganized” marker next to the standas well. Since the panzer was already Suppressed, the“(S)” is read as a “D” result instead, so his platoon is
both Suppressed and Disorganized. Had the results beenreversed, first an “(S)” then the “S,” Sam’s attack wouldhave only resulted in the Pz IV stand being Suppressed.
[7.3] Facing and Range7.3.1 A stand faces in whatever direction the modelmounted on it faces. See [3.2] “Playing Pieces.”Armoured vehicles retain 50% of their defense value(rounded up!) when they are fired upon through theirside or rear arc. (See the included templates.)
If a line drawn from the center of the attacker’s stand tothe center of the defender’s stand does not pass throughthe front arc of the target as defined by the “TargetFront” template, the fire is considered a side or rear shot,and the target’s armoured defense value is reduced.Ambiguous lines fall in favor of the defender.
7.3.2 A weapon’s fire may be subject to range effects. Tocalculate range effect, measure the distance from thecenter of the firing stand to the center of the target stand.Find that distance in the “Range” column of the RangeEffects Chart and cross-reference with the “Die Roll
Modifier” row to determine the effect on the attacker’scombat die roll.
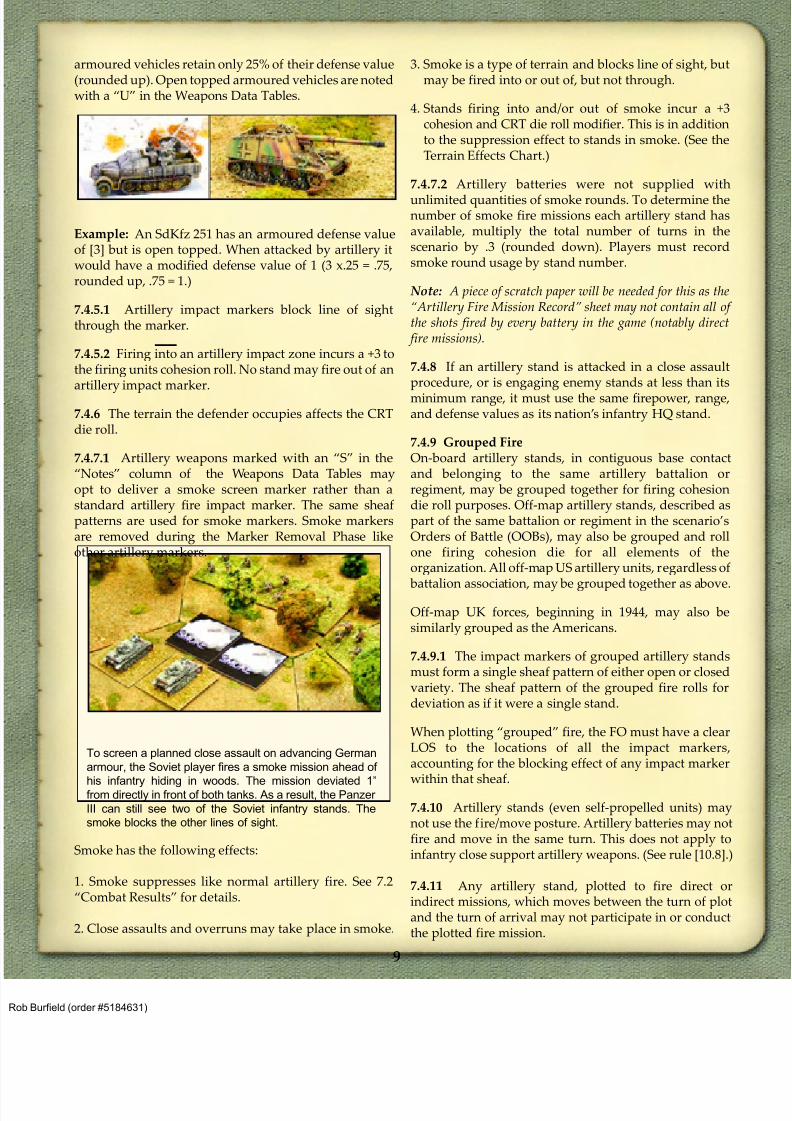
7.3.3 Stands in base to base contact (touching) are“adjacent” and are considered to be at one inch range.
7.3.4 Stands adjacent with an enemy along one-half ormore of either stand are “engaged.” Engaged stands mayonly fire at enemy stands with which they are adjacent.
7.3.5 No stand may exceed its maximum firing range.
7.3.6 Stands with an “R” in the “Notes” column of theWeapons Data Tables have a restricted field of fire andmay only use their printed firepower values againsttargets in their forward arc. Use the “Firing Arc”template to define a stand’s front firing arc. This type ofweapon may fire at adjacent targets to their side or rearusing the firepower and range data for the infantry HQ
The German infantry platoon stand #16 and the Soviet T-
34/85 platoon are engaged and may not fire at any other
enemy stand. Infantry stand #12 is not engaged with the
tank as less than half the stand’s edges are in contact with
the Soviet stand. Stand #12 is at 1” range from the tank.
7
Burfield (order #5184631)
8/13/2019 Micro Armour the Game-WWII 2nd Edition (Full Color)
http://slidepdf.com/reader/full/micro-armour-the-game-wwii-2nd-edition-full-color 13/136
unit appropriate for their nationality. This represents theuse of small arms by weapon crews.
[7.4] Artillery Fire (General)As listed in the “Sequence of Play,” artillery weapons firein a separate phase. This is due to artillery weapons
being separate and distinct from other weapons. Thepower of artillery comes from a combination of shell
weight and rate of fire. When artillery weapons fire, theydo so for the entire turn.
7.4.1 Artillery attacks take place alternately, by initiative,
in the same manner as in the Standard Fire Phase (see
7.1.1). Therefore: damage incurred by an artillery stand
before it gets to fire must be taken into account. An
artillery stand might be Suppressed, Disorganized, or
eliminated by enemy artillery fire before it gets to resolve
its fire. Suppression and disorganization will affect its
cohesion die rolls, which may prevent it from firing.
Note:Indirect and direct fire artillery attacks are all resolvedin the same phase in no particular order.
7.4.2.1 Artillery weapons include field guns, howitzers,mortars of 65mm or greater, multiple-rocket-launcherweapons, naval gunfire, etc. An artillery stand representsa battery of one, two, or three sections of weapons.
An artillery stand may deliver a one square inch
“impact” marker per section per turn. In the WeaponsData Tables, a number in brackets ([ ]) after the weapon
name indicates the number of sections represented by
the stand, and thus the number of impact markers used
for its fire (e.g. “122mm Howitzer [3]” places three
artillery impact markers when it fires). The number in
brackets after a rocket artillery weapon’s name is the
number of impact markers used for its fire, and their
reload rate is specified in the Weapons Data Tables in the
“Notes” column.
7.4.2.2 Impact markers are placed on the board duringthe Artillery Fire Phase. These markers remain on the
board throughout the current turn. They may beremoved during the Marker Removal Phase of the turn,or may persist from turn to turn, depending on the firemission’s recorded duration.
7.4.2.3 Artillery stands which produce multiple impactmarkers must direct the markers to strike the map in apattern or “sheaf.” A “closed” sheaf consists of a singleimpact location struck by all impact markers allowed fora stand. An “open” sheaf consists of multiple impactlocations equal to the total number of markers allowed forthe stand. The markers of an open sheaf must land in astraight line and each marker must be adjacent to at leastone other marker of that sheaf. Rocket artillery weaponsmay not use the closed sheaf, only the open sheaf.
7.4.3.1 If a stand occupies the location where an impactmarker lands, place the impact marker under the stand.This stand is attacked at the full attack value of the firing
artillery unit. If more than one marker strikes the samespot (as in a closed sheaf or attacks by multiple artillerystands), the defender may be subject to more than oneCRT die roll.
7.4.3.2 An impact marker must cover at least 50% of atarget stand to affect it. Adjust the marker to one side sothat it covers the stand it is affecting. If the impactmarker falls equally on two or more stands the playersshould decide which of the possible targets will receivethe most coverage and adjust the positioning of themarker accordingly. If need be, roll a die to decideambiguous situations.
7.4.3.3 All stands in an artillery impact sheaf are subjectto attack, regardless of nationality. Artillery shells affectfriend and foe alike!
7.4.3.4 Stands which move into an artillery impactmarker during the subsequent Movement Phase aresubject to attack as well. At least 50% of the movingstand must pass into the impact zone for the stand to beaffected. A stand may be affected by any number ofimpact markers during the Movement Phase. Eachimpact marker it encounters will affect it.
Note: An artillery attack is considered to be continuous fire,impacting the target zone throughout the turn. The presenceor absence of stands in the target area at the moment the firecommences is irrelevant.
7.4.4 The HE firepower value of the artillery stand isapplied to unarmoured targets while the AP firepowervalue is applied to armoured targets. Armoured vehiclesattacked by artillery retain 50% of their defense value(rounded up). Facing is irrelevant. Open-topped
8
Burfield (order #5184631)
8/13/2019 Micro Armour the Game-WWII 2nd Edition (Full Color)
http://slidepdf.com/reader/full/micro-armour-the-game-wwii-2nd-edition-full-color 14/136
armoured vehicles retain only 25% of their defense value(rounded up). Open topped armoured vehicles are notedwith a “U” in the Weapons Data Tables.
Example: An SdKfz 251 has an armoured defense valueof [3] but is open topped. When attacked by artillery itwould have a modified defense value of 1 (3 x.25 = .75,rounded up, .75 = 1.)
7.4.5.1 Artillery impact markers block line of sightthrough the marker.
7.4.5.2 Firing into an artillery impact zone incurs a +3 tothe firing units cohesion roll. No stand may fire out of an
artillery impact marker.7.4.6 The terrain the defender occupies affects the CRTdie roll.
7.4.7.1 Artillery weapons marked with an “S” in the“Notes” column of the Weapons Data Tables mayopt to deliver a smoke screen marker rather than astandard artillery fire impact marker. The same sheafpatterns are used for smoke markers. Smoke markersare removed during the Marker Removal Phase likeother artillery markers.
Smoke has the following effects:
1. Smoke suppresses like normal artillery fire. See 7.2“Combat Results” for details.
2. Close assaults and overruns may take place in smoke.
3. Smoke is a type of terrain and blocks line of sight, butmay be fired into or out of, but not through.
4. Stands firing into and/or out of smoke incur a +3cohesion and CRT die roll modifier. This is in additionto the suppression effect to stands in smoke. (See theTerrain Effects Chart.)
7.4.7.2 Artillery batteries were not supplied with
unlimited quantities of smoke rounds. To determine thenumber of smoke fire missions each artillery stand hasavailable, multiply the total number of turns in thescenario by .3 (rounded down). Players must recordsmoke round usage by stand number.
N ote: A piece of scratch paper will be needed for this as the“Artillery Fire Mission Record” sheet may not contain all of the shots fired by every battery in the game (notably direct
fire missions).
7.4.8 If an artillery stand is attacked in a close assaultprocedure, or is engaging enemy stands at less than itsminimum range, it must use the same firepower, range,and defense values as its nation’s infantry HQ stand.
7.4.9 Grouped FireOn-board artillery stands, in contiguous base contactand belonging to the same artillery battalion orregiment, may be grouped together for firing cohesiondie roll purposes. Off-map artillery stands, described aspart of the same battalion or regiment in the scenario’sOrders of Battle (OOBs), may also be grouped and rollone firing cohesion die for all elements of theorganization. All off-map US artillery units, regardless of
battalion association, may be grouped together as above.
Off-map UK forces, beginning in 1944, may also besimilarly grouped as the Americans.
7.4.9.1 The impact markers of grouped artillery standsmust form a single sheaf pattern of either open or closedvariety. The sheaf pattern of the grouped fire rolls fordeviation as if it were a single stand.
When plotting “grouped” fire, the FO must have a clearLOS to the locations of all the impact markers,accounting for the blocking effect of any impact marker
within that sheaf.
7.4.10 Artillery stands (even self-propelled units) maynot use the fire/move posture. Artillery batteries may notfire and move in the same turn. This does not apply toinfantry close support artillery weapons. (See rule [10.8].)
7.4.11 Any artillery stand, plotted to fire direct orindirect missions, which moves between the turn of plotand the turn of arrival may not participate in or conductthe plotted fire mission.
To screen a planned close assault on advancing German
armour, the Soviet player fires a smoke mission ahead of
his infantry hiding in woods. The mission deviated 1”from directly in front of both tanks. As a result, the Panzer
III can still see two of the Soviet infantry stands. The
smoke blocks the other lines of sight.
9
Burfield (order #5184631)
8/13/2019 Micro Armour the Game-WWII 2nd Edition (Full Color)
http://slidepdf.com/reader/full/micro-armour-the-game-wwii-2nd-edition-full-color 15/136
[7.5] Direct Artillery FireAll artillery weapons are capable of direct fire. This typeof fire represents the artillery battery (stand) using itsown integrated observers to direct and correct their fire.It may be referred to as self-observed fire. Theseweapons are firing continuously throughout the turn atcoordinates (or a target) they can trace a line of sight toand that is in its range. See the Direct Artillery Fire
procedure for the step by step process to conductingthese attacks.
7.5.1 The artillery stand(s) must have a clear line of sightto the target as in standard fire. The firing stand musthave a clear line of sight to every location covered by thesheaf pattern chosen for this attack.
Note: You may not use sheaf patterns to fire on stands thatwould not otherwise be legitimate standard fire targets.
7.5.2 Direct artillery fire does not have to be plotted inadvance (but may be plotted if desired).
Note: Since the Joint Plot Phase comes after the fire phases,and artillery is not allowed to perform opportunity fire, it isimpossible to bring artillery fire down on a hidden target whichreveals itself by firing. Therefore: By pre-plotting directartillery fire, you can attack concealed stands which exposethemselves in the above manner in the following turn’s Artillery Fire Phase. Plotted direct artillery fire missionsshould be plotted to arrive in the next turn and are not delayedby the nationality of the firing unit.
7.5.3 You must roll for cohesion in order to conductdirect artillery fire, like other combat events.
7.5.4 Mortar and rocket artillery stands must roll fordeviation when executing direct fire. (See [7.6] below.)
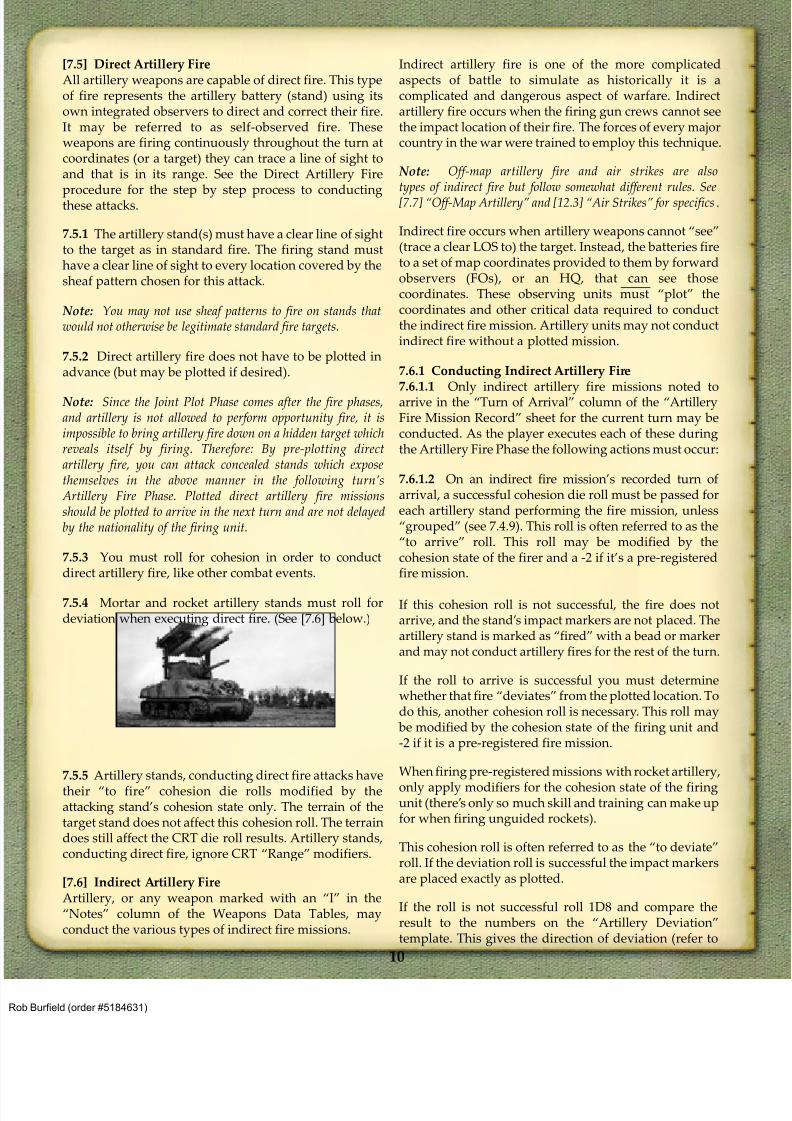
7.5.5 Artillery stands, conducting direct fire attacks havetheir “to fire” cohesion die rolls modified by theattacking stand’s cohesion state only. The terrain of thetarget stand does not affect this cohesion roll. The terraindoes still affect the CRT die roll results. Artillery stands,conducting direct fire, ignore CRT “Range” modifiers.
[7.6] Indirect Artillery FireArtillery, or any weapon marked with an “I” in the“Notes” column of the Weapons Data Tables, mayconduct the various types of indirect fire missions.
Indirect artillery fire is one of the more complicatedaspects of battle to simulate as historically it is acomplicated and dangerous aspect of warfare. Indirectartillery fire occurs when the firing gun crews cannot seethe impact location of their fire. The forces of every majorcountry in the war were trained to employ this technique.
Note: Off-map artillery fire and air strikes are alsotypes of indirect fire but follow somewhat different rules. See[7.7] “Off-Map Artillery” and [12.3] “Air Strikes” for specifics
.
Indirect fire occurs when artillery weapons cannot “see”(trace a clear LOS to) the target. Instead, the batteries fireto a set of map coordinates provided to them by forwardobservers (FOs), or an HQ, that can see thosecoordinates. These observing units must “plot” thecoordinates and other critical data required to conductthe indirect fire mission. Artillery units may not conductindirect fire without a plotted mission.
7.6.1 Conducting Indirect Artillery Fire
7.6.1.1 Only indirect artillery fire missions noted toarrive in the “Turn of Arrival” column of the “ArtilleryFire Mission Record” sheet for the current turn may beconducted. As the player executes each of these duringthe Artillery Fire Phase the following actions must occur:
7.6.1.2 On an indirect fire mission’s recorded turn ofarrival, a successful cohesion die roll must be passed foreach artillery stand performing the fire mission, unless“grouped” (see 7.4.9). This roll is often referred to as the“to arrive” roll. This roll may be modified by thecohesion state of the firer and a -2 if it’s a pre-registeredfire mission.
If this cohesion roll is not successful, the fire does notarrive, and the stand’s impact markers are not placed. Theartillery stand is marked as “fired” with a bead or markerand may not conduct artillery fires for the rest of the turn.
If the roll to arrive is successful you must determinewhether that fire “deviates” from the plotted location. Todo this, another cohesion roll is necessary. This roll may
be modified by the cohesion state of the firing unit and-2 if it is a pre-registered fire mission.
When firing pre-registered missions with rocket artillery,
only apply modifiers for the cohesion state of the firingunit (there’s only so much skill and training can make upfor when firing unguided rockets).
This cohesion roll is often referred to as the “to deviate”roll. If the deviation roll is successful the impact markersare placed exactly as plotted.
If the roll is not successful roll 1D8 and compare theresult to the numbers on the “Artillery Deviation”template. This gives the direction of deviation (refer to
10
Burfield (order #5184631)
8/13/2019 Micro Armour the Game-WWII 2nd Edition (Full Color)
http://slidepdf.com/reader/full/micro-armour-the-game-wwii-2nd-edition-full-color 16/136
the compass marker placed on the board at the beginning of play). A roll of 1D8/2 (rounded up) givesthe distance in inches that the sheaf-pattern deviatesfrom the original target location.
When determining rocket deviation distance, roll 1D6.
At this point in the process players should see rules 7.4.2through 7.4.4 above, for guidance on marker placement
and their effects on stands under which they are placed.
7.6.1.3 To determine the results of a combat event,calculate the combat differential for each impact marker.To do this, subtract the defender’s modified defensevalue from the appropriate firepower of the artillerystand represented by the impact marker. If the differenceis less than -3, or the roll results in a “no effect,” it istreated as “Suppressed.” If the difference is greater than9, use the +9 column.
Finally, roll 2D6 and apply applicable modifiers for theterrain the target is in. If the fire mission is a barrageapply a +2 die roll modifier as well. (See 7.6.2 for types offire mission.) Then find the modified result on theCombat Results Table (CRT).
7.6.1.4 Indirect artillery attacks ignore CRT “Range”modifiers.
7.6.1.5 Final Protective FireAn artillery stand plotted to fire an indirect fire mission,may cancel that mission, and perform direct fire instead.If the artillery stand can spot an enemy unit in itsallowed field of fire (use the “Firing Arc” template if theweapon has a restricted field of fire), it may roll acohesion check with a +2 modifier applied. If this rollsucceeds, it has canceled the current mission and mayconduct direct fire instead (with the required successful“to fire” cohesion roll). If the cancellation cohesion checkfails, the artillery unit may not fire at all.
7.6.2 Types of Indirect Artillery Fire Missions7.6.2.1 The dedicated support fire mission is the standardindirect fire mission in these rules. It is available to bothdefender and attacker in all types of scenarios.
The plotting FO or HQ must be able to trace LOS to all ofthe impact location coordinates of a support mission, onthe turn of plot during the Joint Plot Phase. This missionmust have all fields of the “Artillery Fire MissionRecord” completed. The earliest possible turn of arrivalis determined by the nationality rules below ([7.8]“National Artillery Efficiency”).
The support mission follows the standard combatprocess described in section 7.6.1 to resolve attacks. Forthe complete process use the “Indirect ArtilleryProcedure” included with the rules.
7.6.2.2 Pre-registered fire missions are established andfired upon by supporting artillery units prior to the startof the scenario. These missions have been plotted,corrected, and recorded by the gun crews and FOs
before play begins. As such, these missions are “plotted”after the terrain is placed and the defender has set up,
but prior to the attacking player’s deployment.
This mission type is available only to defendingplayers in any type of scenario except the “meetingengagement,” where it is not allowed for either force.
A pre-registered mission plot only needs to contain themission name, firing unit IDs, impact locationcoordinates, sheaf pattern, and ammunition type. For the“Turn of Plot” field enter “pre” or “PR.” It does notrequire a plotting FO ID, turn of impact, turn of arrival,or duration.
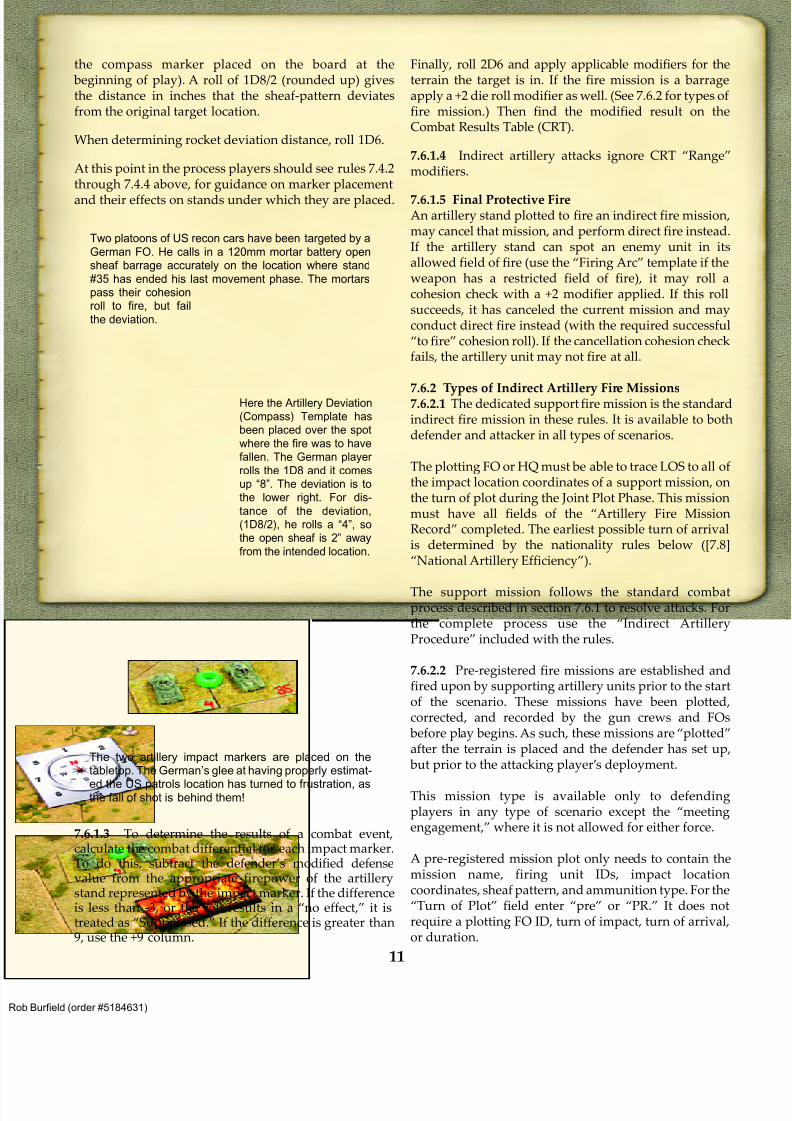
Two platoons of US recon cars have been targeted by aGerman FO. He calls in a 120mm mortar battery opensheaf barrage accurately on the location where stand#35 has ended his last movement phase. The mortarspass their cohesionroll to fire, but failthe deviation.
The two artillery impact markers are placed on thetabletop. The German’s glee at having properly estimat-
ed the US patrols location has turned to frustration, asthe fall of shot is behind them!
Here the Artillery Deviation(Compass) Template hasbeen placed over the spot
where the fire was to havefallen. The German player
rolls the 1D8 and it comesup “8”. The deviation is tothe lower right. For dis-
tance of the deviation,(1D8/2), he rolls a “4”, sothe open sheaf is 2” away
from the intended location.
11
Burfield (order #5184631)
8/13/2019 Micro Armour the Game-WWII 2nd Edition (Full Color)
http://slidepdf.com/reader/full/micro-armour-the-game-wwii-2nd-edition-full-color 17/136
During the Joint Plot Phase, an FO or HQ doesn’t plot thecoordinates for this mission. Instead they record a “call”for a named pre-registered mission. The “calling” FO orHQ must be able to trace a clear LOS to at least one of themissions’ impact locations on the turn of call. On the turnof the call, the player records the turn of call, the callingFO or HQ’s ID, turn of impact, and duration.
The turn of arrival may be 1 or more turns after the turnthe fire was called for. This is true for all nations’ forces.
The batteries designated to conduct a pre-registered firemission may not move between the establishment of themission (before the game starts) and “Turn of Arrival.” Ifthey move, the pre-registered mission is canceled.
Note: Using pre-registered missions allows one to respond faster than the limits imposed by [7.8] “National ArtilleryEfficiency.”
When rolling the “to arrive” and the “to deviate”cohesion checks apply a “-2” to the roll for pre-registeredfire missions.
Players receive one pre-registered fire mission for everythree stands of artillery in the scenario’s Order of Battlesection and 1 additional pre-registered plot if on thedefense in a Hasty Attack, Delaying Action, or an Attackon a Prepared Position. The players also may receiveadditional pre-registered plots based on the force’scohesion level. Use the “Additional Targets Table” below,to determine how many of these a player receives.
7.6.2.3 The adjusted fire mission represents a newlocation of fire, but is an adjustment from a pre-registered fire mission. These missions may be plottedon or after turn one of the game by a force that hasrecorded one or more pre-registered fire missions.
A plot for an adjusted fire mission must contain data inall fields of the “Artillery Fire Mission Record” sheet.An FO or HQ must have a clear LOS to all of the impactlocations of the sheaf pattern in the Joint Plot Phase onthe turn of plot. The coordinates of this mission may beno further than 4 inches from the pre-registeredcoordinates on which this is based. The turn of arrivalfollows the nationality rules (section [7.8]) below.
7.6.2.4 The barrage fire mission is a pre-planned type ofindirect artillery attack used to engage “suspected”
enemy units in a given area, disrupt possibleconcentration areas, or disrupt the defenses of the enemyon the axis of advance of friendly troops. It can be usedto simulate creeping or rolling barrages.
These missions have been worked up by artillery fireplanners prior to the start of the action. As such thesemissions are “plotted” after the terrain is placed, butprior to either player’s deployment. They may only beplotted before play begins.
The barrage fire mission is available to either attacker ordefender in all scenario types except for the MeetingEngagement and Hasty Attack.
A barrage mission must have all fields of the “ArtilleryFire Mission Record” completed, except the ID of theplotting unit. They may be plotted to arrive as early asturn 1. The barrage mission coordinates may not bechanged once play begins. The mission may be stopped,using the same procedure for canceling a multi-turnmission (see. 7.6.5 below), by an FO or HQ that can see
at least one of the missions impact markers at the time ofthe request for cancelation.
Barrage mission attacks apply a +2 to CRT die rollsresulting from this mission. If a barrage mission fails toarrive it simply delays the arrival by one turn.
7.6.3 Plotting Artillery Fire MissionsAn artillery fire mission must be “plotted” in order toperform indirect artillery fire missions. Use the “ArtilleryFire Mission Record” sheet to record the followinginformation for each plotted fire mission. The fields ofthis “Artillery Fire Mission Record” sheet include:
1. “Turn of Plot/Call”: The turn in which the mission isplotted or called. For missions created prior to thegame “pre” should be noted in this column.
2. “ID of Plotter/Caller”: The ID of the FO or HQ standmaking the plot.
3. “Mission Name/Type”: The type of mission (Support,Barrage, or Adjusted) or in the case of a pre-registeredmission, its name or number (e.g. “Bravo,” “village
bridge,” or “FM02”).
4. “ID of Firing Unit(s)”
5. “Turn of Arrival”: This must be calculated at the timeof plot, factoring in the type of mission and nationalityof the force. The turn number recorded will be “when”it is available.
6. “Duration”: The duration of the mission in numbers ofturns, inclusive of the first turn of arrival. A durationof “1” means the mission lasts for only the one turn itarrives on.
Cohes ion Addi ti onal Targets
<12 0
>13 +1
>17 +2
Additional Targets Table
12
Burfield (order #5184631)
8/13/2019 Micro Armour the Game-WWII 2nd Edition (Full Color)
http://slidepdf.com/reader/full/micro-armour-the-game-wwii-2nd-edition-full-color 18/136
For example, a recorded duration of 4 would meanit would last for the first turn of arrival plus threemore turns.
7. “Impact Location”: The location of impact should benoted in standard “right and up” format. This formatrecords the number of inches from the left hand sideof the board (as the player faces it) to the right untilone reaches the target location. Then the number ofinches ”up” from the edge of the board closest to theplayer, to the target location, is recorded.
For example: A recorded coordinate location of“0426” would be “4 inches right, then 26 inches up.”“1722” would be “17 inches right, then 22 inches up.”
For pre-registered missions, specific geographiclocations on the board may be given coordinates (i.e. atown at 1422 or hill at 0730). These pre-registeredmission coordinates are pre-measured.
For example, Hill 324 = “0730”
Support and adjusted missions may be plotted inrelation to pre-registered mission coordinates.
For example, a support mission could be written as‘5” E of Hill 324’
8. “Sheaf Pattern”: Note the sheaf pattern for themission. Make sure to note the direction an open sheafis to be laid out in. It is also a good idea to note howmany impact markers to deploy.
For example: Notation “1722 Open 2E” is read: “17inches right, 22 inches up, open sheaf, 2 impactmarkers starting at 1722 and going east.”
9. “Ammo Type”: Note the type of ammunition beingused – HE or Smoke. HE is the default if no notationis made.
The plotting sheet is also used to record “calls” for pre-registered fire missions (see above). It should be used toplot direct fire artillery the turn before it fires. See [7.5]“Direct Artillery Fire” and [12.3] “Air Strikes.”
7.6.4 Forward Observers, Calling and ObservingIndirect ArtilleryDuring WWII forward observer teams (FOs) wereequipped with radios (or preferably telephones, when inestablished defensive positions). These small teams ofsoldiers were trained to provide accurate artilleryindirect fire mission coordinates and adjust and correctthe fire once it began arriving.
7.6.4.1 The scenario Order of Battle will detail thenumber of FO teams available to the player. These must
be assigned to a stand, in writing, prior to the
beginning of play. Any stand may “host” an FO. Unlessotherwise noted in the scenario, all HQ stands may alsoperform the FO functions; however, GHQ’s may notperform as FOs. See [7.8] “National ArtilleryEfficiency” rule for further description of the number ofFOs a player may designate.
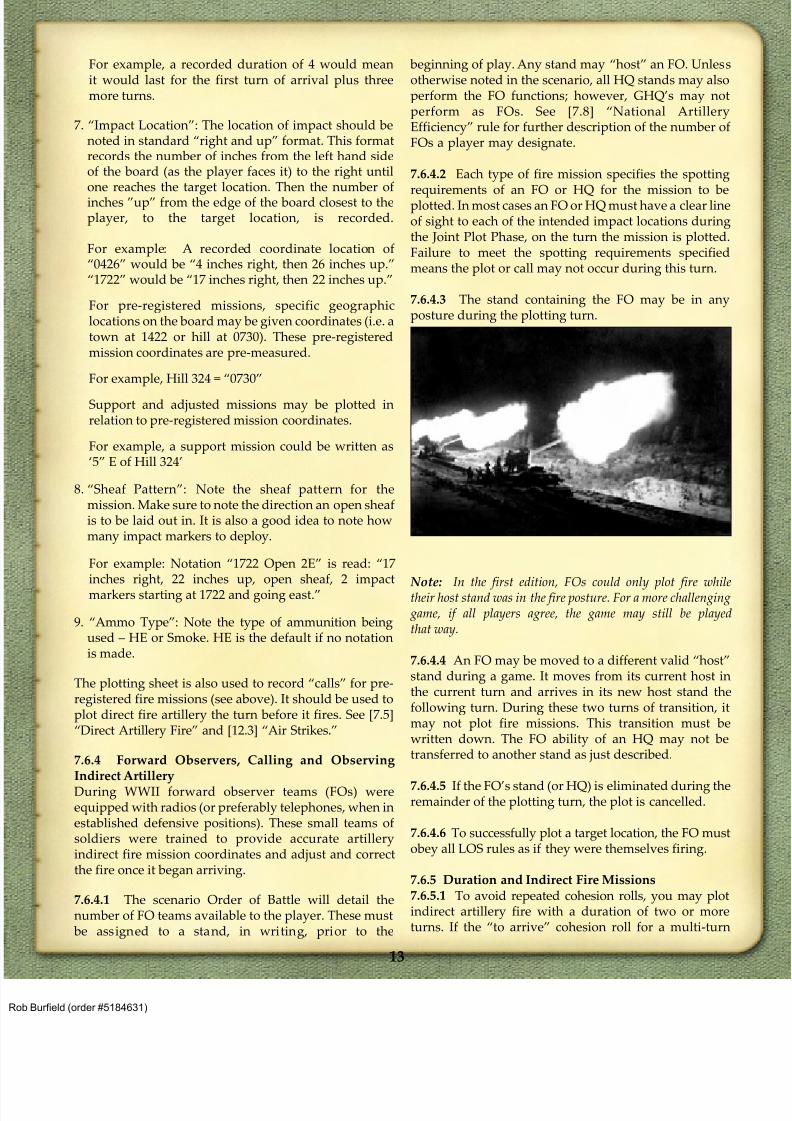
7.6.4.2 Each type of fire mission specifies the spotting
requirements of an FO or HQ for the mission to beplotted. In most cases an FO or HQ must have a clear lineof sight to each of the intended impact locations duringthe Joint Plot Phase, on the turn the mission is plotted.Failure to meet the spotting requirements specifiedmeans the plot or call may not occur during this turn.
7.6.4.3 The stand containing the FO may be in anyposture during the plotting turn.
Note:
In the first edition, FOs could only plot fire whiletheir host stand was in the fire posture. For a more challenging game, if all players agree, the game may still be playedthat way.
7.6.4.4 An FO may be moved to a different valid “host”stand during a game. It moves from its current host inthe current turn and arrives in its new host stand thefollowing turn. During these two turns of transition, itmay not plot fire missions. This transition must bewritten down. The FO ability of an HQ may not betransferred to another stand as just described.
7.6.4.5 If the FO’s stand (or HQ) is eliminated during theremainder of the plotting turn, the plot is cancelled.
7.6.4.6 To successfully plot a target location, the FO mustobey all LOS rules as if they were themselves firing.
7.6.5 Duration and Indirect Fire Missions7.6.5.1 To avoid repeated cohesion rolls, you may plotindirect artillery fire with a duration of two or moreturns. If the “to arrive” cohesion roll for a multi-turn
13
Burfield (order #5184631)
8/13/2019 Micro Armour the Game-WWII 2nd Edition (Full Color)
http://slidepdf.com/reader/full/micro-armour-the-game-wwii-2nd-edition-full-color 19/136
duration fire mission succeeds, subsequent attacks inthat mission do not require a “to-arrive” cohesion roll.
7.6.5.2 The “deviation” cohesion roll for a multi-turnduration mission is rolled on the turn of arrival.
If the mission is on target, it remains so through theduration of the mission, and additional deviation rolls
are not required (even for mortars).
If the fire deviates, the impact makers are placed as perthe standard deviation procedure. The impact markersremain in that new location for the duration recorded oruntil it is canceled. On any turn after its arrival, if an FOor HQ can spot any of the off-target missions’ impactmarkers during the turn’s Joint Plot Phase, a successfulcohesion roll will permit the player to move the deviatingfire to its plotted coordinates in the following turn.
7.6.5.3 If a player wishes to end the fire before theduration mission has begun or is complete, they may
make a “termination” cohesion roll during the Joint PlotPhase. If terminating a future planned mission and theroll is successful, the mission is canceled. If the missionis in progress the fire will cease the turn following thesuccessful cohesion roll.
7.6.5.4 “Duration fire” is continuous from turn to turn.Artillery impact markers are not removed between turnsof a multi-turn fire mission. In this way enemyobservation of troops masked by smoke or artillery fireis prevented.
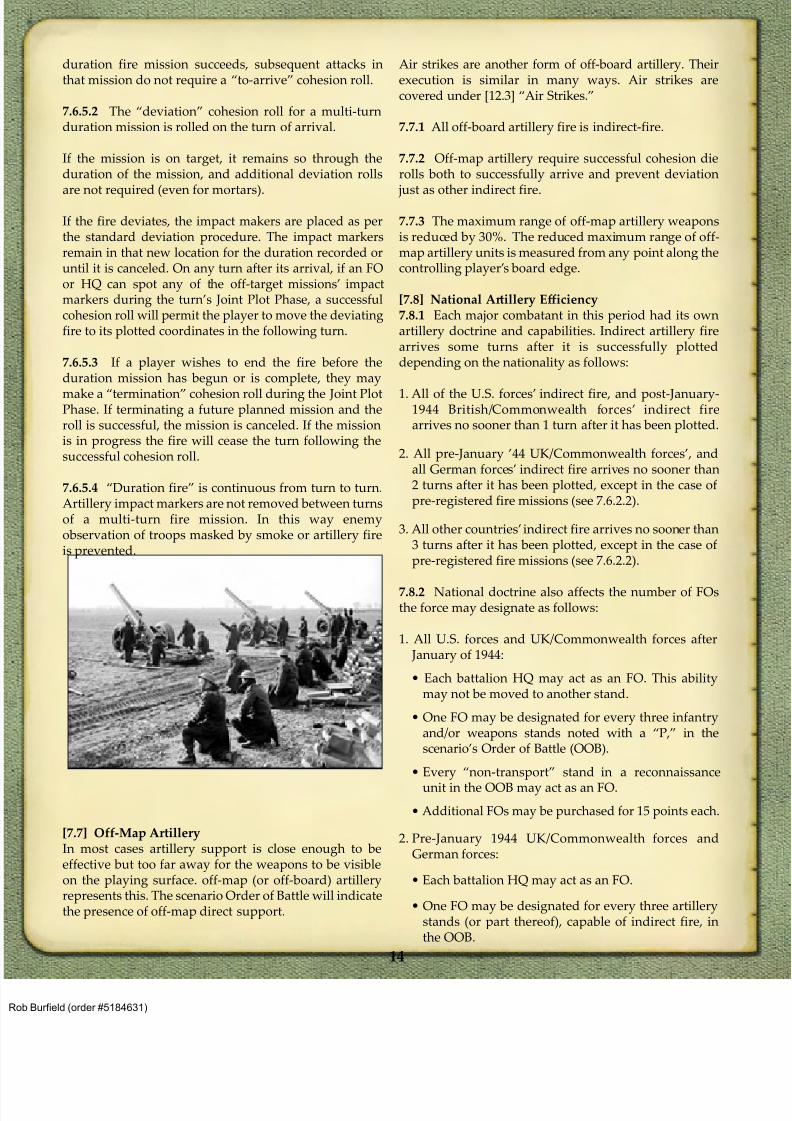
[7.7] Off-Map ArtilleryIn most cases artillery support is close enough to beeffective but too far away for the weapons to be visibleon the playing surface. off-map (or off-board) artilleryrepresents this. The scenario Order of Battle will indicatethe presence of off-map direct support.
Air strikes are another form of off-board artillery. Theirexecution is similar in many ways. Air strikes arecovered under [12.3] “Air Strikes.”
7.7.1 All off-board artillery fire is indirect-fire.
7.7.2 Off-map artillery require successful cohesion dierolls both to successfully arrive and prevent deviation
just as other indirect fire.
7.7.3 The maximum range of off-map artillery weaponsis reduced by 30%. The reduced maximum range of off-map artillery units is measured from any point along thecontrolling player’s board edge.
[7.8] National Artillery Efficiency7.8.1 Each major combatant in this period had its ownartillery doctrine and capabilities. Indirect artillery firearrives some turns after it is successfully plotteddepending on the nationality as follows:
1. All of the U.S. forces’ indirect fire, and post-January-1944 British/Commonwealth forces’ indirect firearrives no sooner than 1 turn after it has been plotted.
2. All pre-January ’44 UK/Commonwealth forces’, andall German forces’ indirect fire arrives no sooner than2 turns after it has been plotted, except in the case ofpre-registered fire missions (see 7.6.2.2).
3. All other countries’ indirect fire arrives no sooner than3 turns after it has been plotted, except in the case ofpre-registered fire missions (see 7.6.2.2).
7.8.2 National doctrine also affects the number of FOsthe force may designate as follows:
1. All U.S. forces and UK/Commonwealth forces after January of 1944:
• Each battalion HQ may act as an FO. This abilitymay not be moved to another stand.
• One FO may be designated for every three infantryand/or weapons stands noted with a “P,” in thescenario’s Order of Battle (OOB).
• Every “non-transport” stand in a reconnaissance
unit in the OOB may act as an FO.
• Additional FOs may be purchased for 15 points each.
2. Pre-January 1944 UK/Commonwealth forces andGerman forces:
• Each battalion HQ may act as an FO.
• One FO may be designated for every three artillerystands (or part thereof), capable of indirect fire, inthe OOB.
14
Burfield (order #5184631)
8/13/2019 Micro Armour the Game-WWII 2nd Edition (Full Color)
http://slidepdf.com/reader/full/micro-armour-the-game-wwii-2nd-edition-full-color 20/136
• One FO may be designated for every three “non-transport” stands (or part thereof) of an armouredcar or reconnaissance company or battalion in theOOB for the scenario.
• Additional FOs may be purchased for 25 points each.
3. All other countries:
• Each battalion HQ may act as an FO.
• One FO may be designated for every nine artillerystands (or part thereof), capable of indirect fire, inthe OOB.
• One FO may be designated for every armouredcar or reconnaissance battalion (or part thereof) inthe OOB.
• Additional FOs may be purchased for 35 points each.
7.8.3 The U.S. indirect artillery control was the mostagile in the war. If a U.S. artillery stand is in the fireposture and not already assigned to a plotted indirectfire mission during the turns Artillery Fire Phase, it may
be added to any plotted or called fire mission scheduledfor the current turn. Add “+2” to the cohesion roll “toarrive” when a stand fires in this manner.
[7.9] Fire Support AllocationAs one examines the costs of fielding heavy artillery it
becomes apparent that it is expensive. Often, the cost of
even a battery (stand), not to mention a battalion, isprohibitive in small games. In addition, historicalreferences show that the tremendous amounts ofammunition used by large formations, conflictingpriorities, and many other factors restricted the use ofartillery on the battlefield. The Fire Support Allocationrule allows a number of barrages of off-map artillery to
be “purchased” during the scenario design process,
without paying for all of the guns for the whole length ofthe scenario. All artillery units deployed “on the map”must be paid for in full.
7.9.1 Use the following formula to determine the cost ofallocating battery fire for a known number of turns offire per battery. Divide the number of turns duringwhich fire may occur by the total number of turns in thescenario to find a decimal representation of the cost ofthe fire missions. Then multiply the cost of the battery bythe ratio to find the total cost.
For example, 3 turns of fire by a 122mm Howitzer [3]
stand in a 15 turn game has a ratio of 3/15 = .2, .2 * batterycost of 308 = 62 points for 3 turns of fire from the battery.
7.9.2 All off-map fire procedures must be followed whenusing these allocated shots. If the cohesion roll “to fire”does not succeed, that turn’s fire is lost.
7.9.3 Allocated off-map fire missions are not limited tofiring in consecutive turns
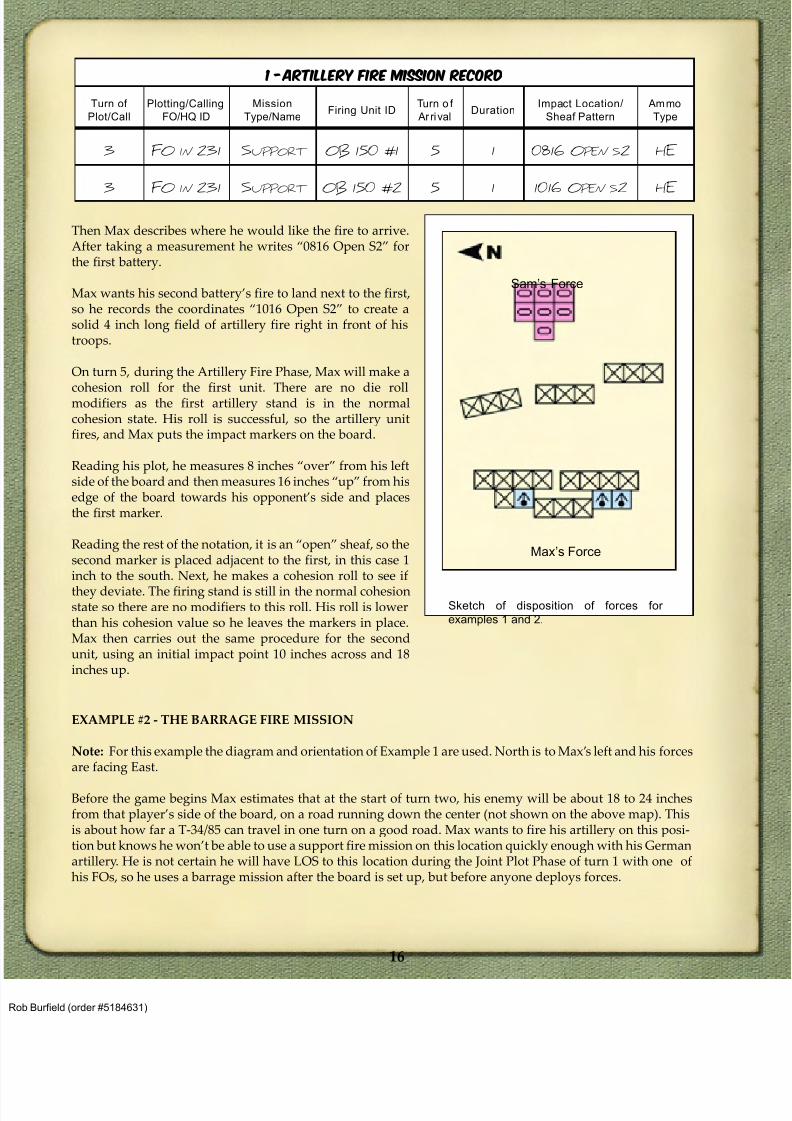
EXAMPLE #1 - THE SUPPORT FIRE MISSIONNote: The compass rose for this example is oriented such that north is to player Max’s left. Max’s forces arefacing east.
On turn 3, during the Joint Plot Phase Max decides he would like to direct his two off-map “150mm sFH 18[2]” batteries to fire onto a location he hopes will help protect his infantry company from attacking forces. Hewrites the following on the next two lines of his Artillery Fire Mission Record:
a. The “Turn of Plot” is 3 for both lines as this is the current turn.
b. The plotting stand field is “FO in 231” for both lines, as he is using the FO in stand 231 because it can see
all the locations he intends the markers to hit.
c. The “Type of Mission” field for both lines is “support.” The firing units don’t have stands as they aredesignated off-map in his order of battle. He explains this to his opponent and says “I’ll designate these as“OB150 #1 and OB150 #2” and he writes each as a separate line on the record sheet.
d. The “Turn of Arrival” field is filled in with a 5 because it is currently turn 3 and German artillery takes aminimum of two turns to arrive after it is called.
e. These fire missions will only last 1 turn so duration for each is 1.
ARTILLERY FIRE EXAMPLES
15
Burfield (order #5184631)
8/13/2019 Micro Armour the Game-WWII 2nd Edition (Full Color)
http://slidepdf.com/reader/full/micro-armour-the-game-wwii-2nd-edition-full-color 21/136
Then Max describes where he would like the fire to arrive.After taking a measurement he writes “0816 Open S2” forthe first battery.
Max wants his second battery’s fire to land next to the first,so he records the coordinates “1016 Open S2” to create asolid 4 inch long field of artillery fire right in front of histroops.
On turn 5, during the Artillery Fire Phase, Max will make a
cohesion roll for the first unit. There are no die rollmodifiers as the first artillery stand is in the normalcohesion state. His roll is successful, so the artillery unitfires, and Max puts the impact markers on the board.
Reading his plot, he measures 8 inches “over” from his leftside of the board and then measures 16 inches “up” from hisedge of the board towards his opponent’s side and placesthe first marker.
Reading the rest of the notation, it is an “open” sheaf, so thesecond marker is placed adjacent to the first, in this case 1inch to the south. Next, he makes a cohesion roll to see if
they deviate. The firing stand is still in the normal cohesionstate so there are no modifiers to this roll. His roll is lowerthan his cohesion value so he leaves the markers in place.Max then carries out the same procedure for the secondunit, using an initial impact point 10 inches across and 18inches up.
EXAMPLE #2 - THE BARRAGE FIRE MISSION
Note: For this example the diagram and orientation of Example 1 are used. North is to Max’s left and his forcesare facing East.
Before the game begins Max estimates that at the start of turn two, his enemy will be about 18 to 24 inchesfrom that player’s side of the board, on a road running down the center (not shown on the above map). Thisis about how far a T-34/85 can travel in one turn on a good road. Max wants to fire his artillery on this posi-tion but knows he won’t be able to use a support fire mission on this location quickly enough with his Germanartillery. He is not certain he will have LOS to this location during the Joint Plot Phase of turn 1 with one ofhis FOs, so he uses a barrage mission after the board is set up, but before anyone deploys forces.
1 -Artillery Fire Mission Record
Turn of
Plot/Call
Plotting/Calling
FO/HQ ID
Mission
Type/NameFiring Unit ID
Turn o f
ArrivalDuration
Impact Location/
Sheaf Pattern
Ammo
Type
3 FO IN 231 SUPPORT OB 150 #1 5 1 0816 O PEN S2 HE
3 FO IN 231 SUPPORT OB 150 #2 5 1 1016 O PEN S2 HE
Sam’s Force
Max’s Force
Sketch of disposition of forces for
examples 1 and 2.
16
Burfield (order #5184631)
8/13/2019 Micro Armour the Game-WWII 2nd Edition (Full Color)
http://slidepdf.com/reader/full/micro-armour-the-game-wwii-2nd-edition-full-color 22/136
a. Max records the plot turn as “pre-game.”
b. He fills in the ID of the calling stand and writes “barrage” in the mission type field.
c. He identifies the firing units: two off-map 150mm sFH [2]’s, He writes “G1” after each battery’s name (or hemight bracket them on the page) to indicate he has grouped the batteries together.
d. He records the turn he wants the fire to arrive and how long it will last.
e. He then records where he wants the impact markers to arrive, the sheaf pattern, and the direction anddistance the markers of the sheaf will land.
The plot is designed to land on the road 12 inches over from the left side of the board, and 24 inches up fromMax’s edge of the board. The open sheaf of 4 impact markers will extend to the east, on the road.
In the artillery fire phase of turn 2 Max rolls 1D20 for the cohesion roll to see if the grouped barrage missionarrives. He rolls 7. There are no other modifiers as the firing unit is in the normal cohesion state. The result iswell below his cohesion of 15, so the first artillery marker is placed on the board.
Max then checks to see if the fire arrives on target. He rolls only 1D20 a second time and scores a 12. Again theroll is lower than his cohesion indicating the sheaf lands on target.
Max places the remaining three markers of the grouped barrage mission, under three T-34/85 tanks of hisopponent. He then calculates which “combat differential column” to use (i.e. “-1” column).
When Max rolls 2D6 on the CRT for these attacks, he will add +2 to the result because this is a barrage mis-sion. If the impacts and enemy stands had been in terrain that provided a CRT die roll modifier, such as woodsor buildings, it would have been added to the CRT die roll as well.
Max did not use a pre-registered fire mission for this because he was concerned that he would not have astand with an FO in a position to see the location “1224” during the plot phase of turn 1. If he was confidentof having the location under observation the pre-registered mission would have been a better choice becauseit does not have the CRT die roll modifiers.
EXAMPLE #3 - THE PRE-REGISTERED FIRE MISSION
Note: In this example the map and compass rose are oriented as in the diagram above but the forcesare different. Max has three 105mm M2A1 [2] batteries supporting his infantry battalion defending a town.Before the game starts he records the following two pre-registered missions. The first will be a defensive pat-tern right in front of his eastern facing position. The second will be along a road leading from his opponents’side of the board towards the town.
2 -Artillery Fire Mission Record
Turn o f
Plot/Call
Plotting/Calling
FO/HQ ID
Mission
Type/NameFiring Unit ID
Turn of
Ar rivalDuration
Impact Location/
Sheaf Pattern
Ammo
Type
P REGAME 110 HQ BARRAGE OB150#1 G1 2 1 1224 O PEN E2 HE
P REGAME 110 HQ BARRAGE OB150#2 G1 2 1 1226 O PEN E2 HE
17
Burfield (order #5184631)
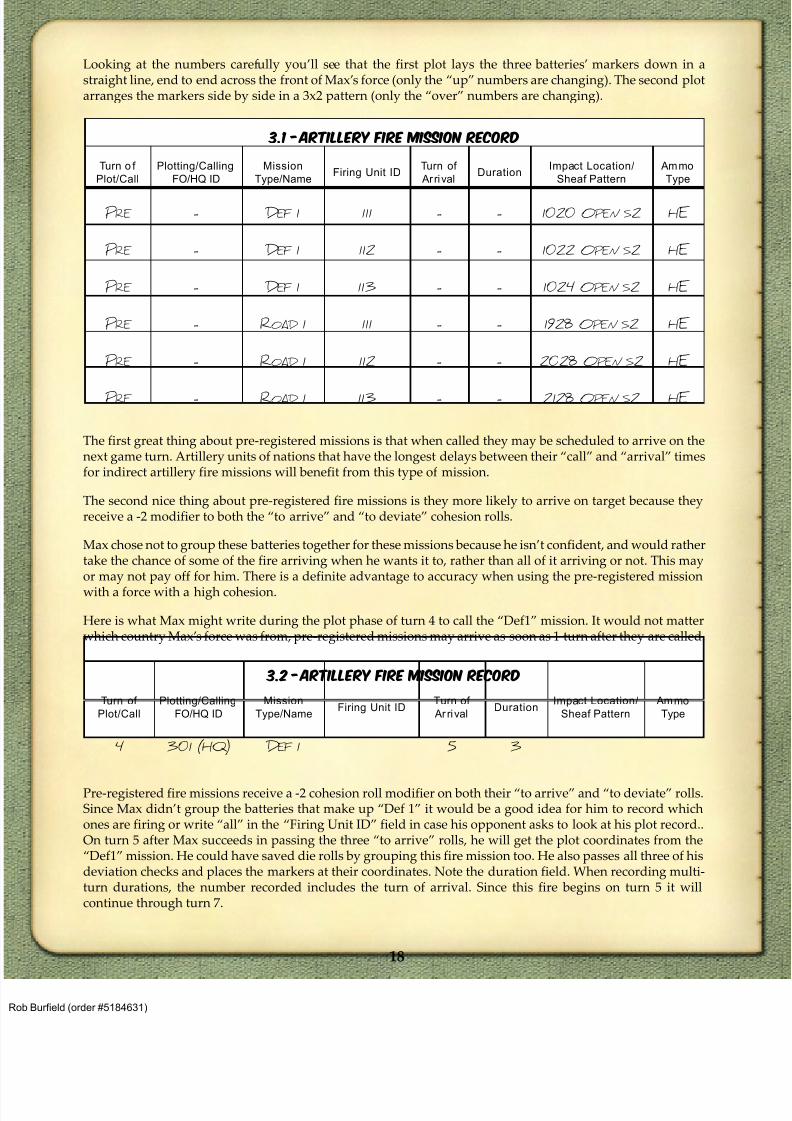
8/13/2019 Micro Armour the Game-WWII 2nd Edition (Full Color)
http://slidepdf.com/reader/full/micro-armour-the-game-wwii-2nd-edition-full-color 23/136
Looking at the numbers carefully you’ll see that the first plot lays the three batteries’ markers down in astraight line, end to end across the front of Max’s force (only the “up” numbers are changing). The second plotarranges the markers side by side in a 3x2 pattern (only the “over” numbers are changing).
The first great thing about pre-registered missions is that when called they may be scheduled to arrive on thenext game turn. Artillery units of nations that have the longest delays between their “call” and “arrival” timesfor indirect artillery fire missions will benefit from this type of mission.
The second nice thing about pre-registered fire missions is they more likely to arrive on target because theyreceive a -2 modifier to both the “to arrive” and “to deviate” cohesion rolls.
Max chose not to group these batteries together for these missions because he isn’t confident, and would rathertake the chance of some of the fire arriving when he wants it to, rather than all of it arriving or not. This mayor may not pay off for him. There is a definite advantage to accuracy when using the pre-registered mission
with a force with a high cohesion.
Here is what Max might write during the plot phase of turn 4 to call the “Def1” mission. It would not matterwhich country Max’s force was from, pre-registered missions may arrive as soon as 1 turn after they are called.
Pre-registered fire missions receive a -2 cohesion roll modifier on both their “to arrive” and “to deviate” rolls.Since Max didn’t group the batteries that make up “Def 1” it would be a good idea for him to record whichones are firing or write “all” in the “Firing Unit ID” field in case his opponent asks to look at his plot record..On turn 5 after Max succeeds in passing the three “to arrive” rolls, he will get the plot coordinates from the“Def1” mission. He could have saved die rolls by grouping this fire mission too. He also passes all three of hisdeviation checks and places the markers at their coordinates. Note the duration field. When recording multi-turn durations, the number recorded includes the turn of arrival. Since this fire begins on turn 5 it willcontinue through turn 7.
3.2 -Artillery Fire Mission Record
Turn of
Plot/Call
Plotting/Calling
FO/HQ ID
Mission
Type/NameFiring Unit ID
Turn of
Ar rivalDuration
Impact Location/
Sheaf Pattern
Ammo
Type
4 301 (HQ) D EF 1 5 3
3.1 -Artillery Fire Mission Record
Turn o f
Plot/Call
Plotting/Calling
FO/HQ ID
Mission
Type/NameFiring Unit ID
Turn of
ArrivalDuration
Impact Location/
Sheaf Pattern
Ammo
Type
P RE - D EF 1 111 - - 1020 O PEN S2 HE
P RE - D EF 1 112 - - 1022 O PEN S2 HE
P RE - D EF 1 113 - - 1024 O PEN S2 HE
P RE - R OAD 1 111 - - 1928 O PEN S2 HE
P RE - R OAD 1 112 - - 2028 O PEN S2 HE
P RE - R OAD 1 113 - - 2128 O PEN S2 HE
18
Burfield (order #5184631)
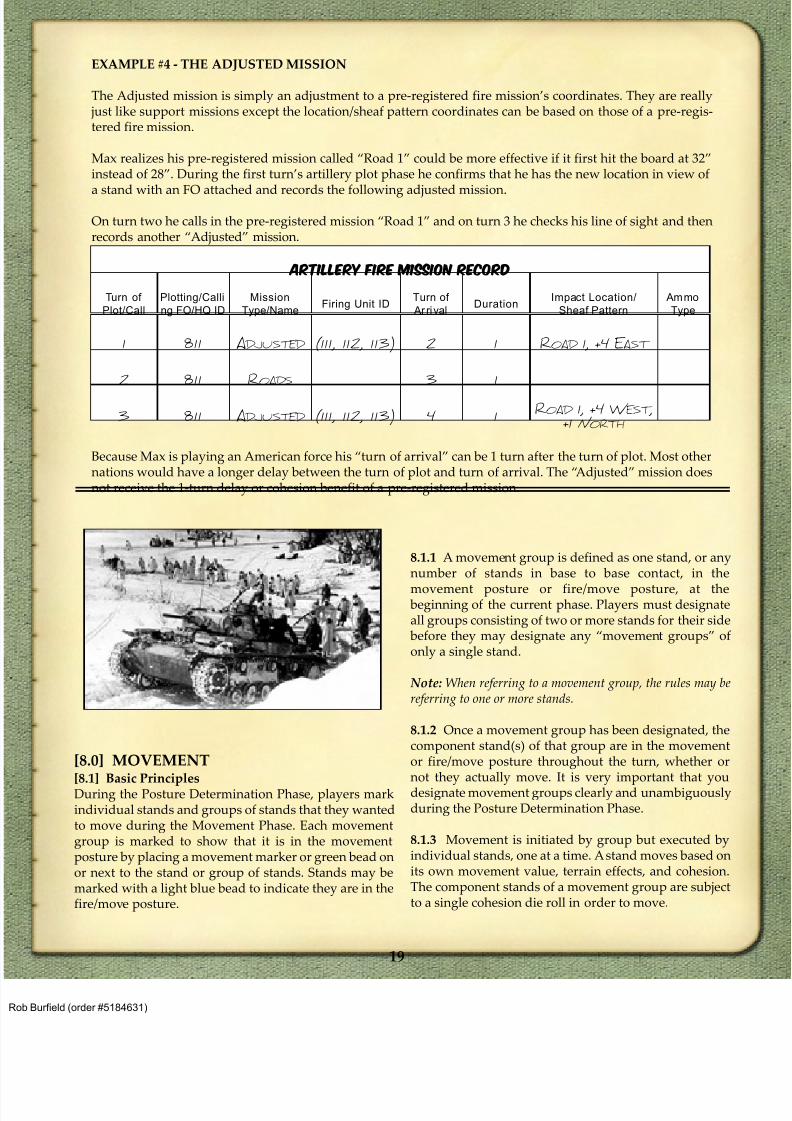
8/13/2019 Micro Armour the Game-WWII 2nd Edition (Full Color)
http://slidepdf.com/reader/full/micro-armour-the-game-wwii-2nd-edition-full-color 24/136
8/13/2019 Micro Armour the Game-WWII 2nd Edition (Full Color)
http://slidepdf.com/reader/full/micro-armour-the-game-wwii-2nd-edition-full-color 25/136
8.1.4 There are two kinds of movement: “ordered”movement and “independent” movement.
[8.2] Movement Orders
8.2.1 Orders
At the beginning of each Movement Phase players mustdetermine how many movement orders their GHQ will
be able to issue this turn. Each turn players roll 2D6 and
modify the result by applying the “quality” value of theGHQ stand. The GHQ quality value is listed next to theGHQ in the Order of Battle (e.g. GHQ+1 or GHQ +0) andis assigned during the scenario design process. Comparethe modified die result to the “Movement Orders Table”for the number of movement orders each GHQ mayissue this turn. See section 10.1.4 for more details aboutGHQ quality.
8.2.2 If the GHQ stand is eliminated, that player may nolonger issue orders until a new GHQ is appointed andassumes command (see [10.1]). This does not mean theplayer cannot move units (see 8.2.7 below).
8.2.3 The player with the initiative decides who attemptsthe first movement in each turn. Players alternate move-ment attempts using movement orders, until all move-ment orders have been expended, or each playerdeclines movement once. A similar process is then fol-lowed while attempting to move groups independently.
If a player elects not to move a group when it is their turnto do so, they may make no further ordered movement.
Note: You are never forced to move a stand simply because it
is in the movement posture. Actual movement is voluntary.
8.2.4 To begin ordered movement, roll 1D20 to determine
a base cohesion roll value for the group. For each
component stand of the movement group, apply
appropriate modifiers to this base roll to determine if it
may move as a result of this order. The base value may be
modified by +4 for suppression and/or +3 for disorganiza-
tion, if the stand is in either of those states. The roll is also
modified by -2 for each HQ and GHQ in the movement
group. A successful result allows the stand to move.
The modified cohesion roll may be passed by somestands of a multi-stand group but not by all. Those that
pass may move and leave those that failed behind. The
unmoving stands now constitute a new group, or
groups, if they are no longer in contiguous contact. In
following movement actions, one may expend addi-
tional orders on these new groups in an attempt to
move them with orders, if not, the player may attempt
to move them independently (see 8.2.8 below).
Note: The stands of a multi-stand movement group that passed their cohesion rolls are not required to stay together ormove in the same direction.
For each attempted ordered movement action, theplayer’s total number of orders is decreased by one (1)for the remainder of the movement phase, regardless ofthe success or failure of the cohesion roll.
8.2.5 If a movement group fails to move with an order,it may be given additional orders, one per movementaction, up to the maximum number of orders the playerhas for this phase (see 8.2.1). These additional ordersmust be resolved with a cohesion roll independently,and each spent order decreases the player’s total by one(1), as above.
8.2.6 Movement orders may not be accumulated fromturn to turn. Unused orders are lost at the end of theMovement Phase.
8.2.7 Movement without OrdersAfter a player has used all their movement orders theymay attempt independent movement. Any group thattries to move without a movement order is attempting tomove on its own initiative or independently. Eachunmoved group, in the movement posture, may attemptindependent movement once a turn.
8.2.8 To execute independent movement a successfulcohesion check must be made. Just as in orderedmovement, roll 1D20 to determine a base cohesion rollvalue for the group. For each component stand of themovement group, apply appropriate modifiers to this
base roll to determine if it may move by its owninitiative. The base value is modified by +3 because thestand is trying to move on its own initiative. The basevalue may be modified by +4 for suppression and/or +3for disorganization, if the stand is in either of thosestates. The roll is also modified by -2 for each HQ orGHQ in the movement group. A successful result allowsthe stand to move.
20
Burfield (order #5184631)
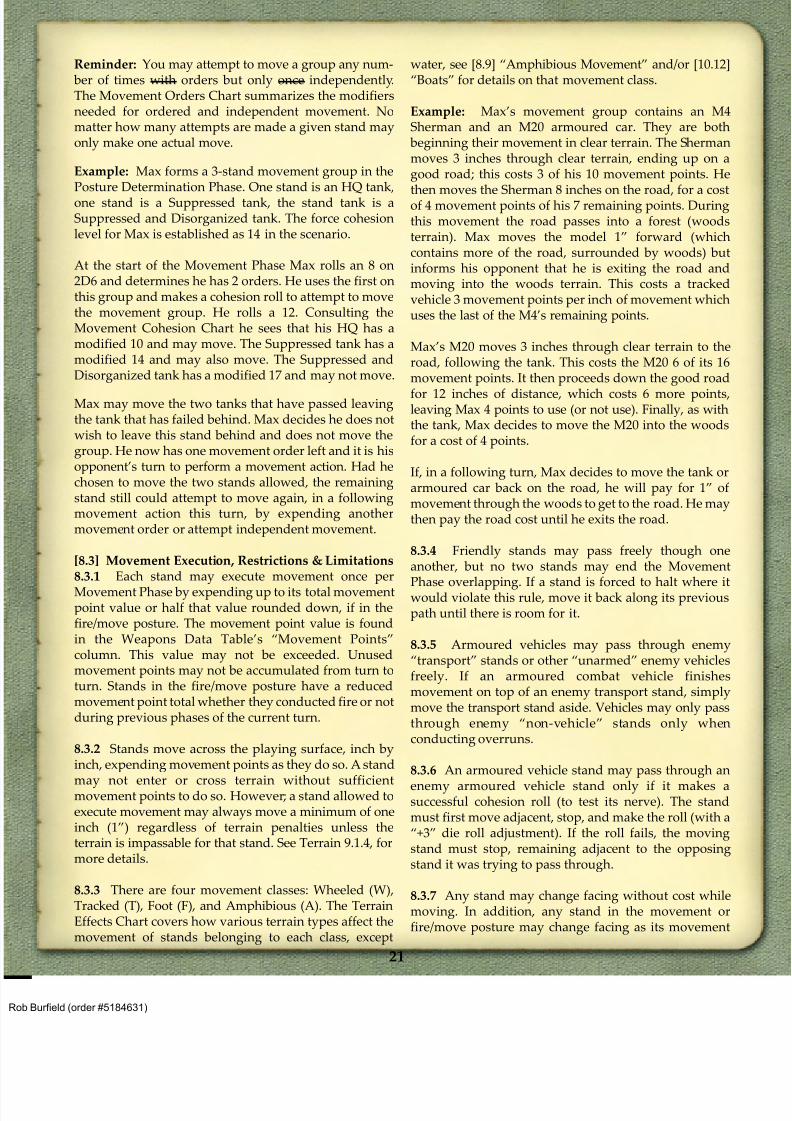
8/13/2019 Micro Armour the Game-WWII 2nd Edition (Full Color)
http://slidepdf.com/reader/full/micro-armour-the-game-wwii-2nd-edition-full-color 26/136
Reminder: You may attempt to move a group any num- ber of times with orders but only once independently.The Movement Orders Chart summarizes the modifiersneeded for ordered and independent movement. Nomatter how many attempts are made a given stand mayonly make one actual move.
Example: Max forms a 3-stand movement group in thePosture Determination Phase. One stand is an HQ tank,one stand is a Suppressed tank, the stand tank is aSuppressed and Disorganized tank. The force cohesionlevel for Max is established as 14 in the scenario.
At the start of the Movement Phase Max rolls an 8 on2D6 and determines he has 2 orders. He uses the first onthis group and makes a cohesion roll to attempt to movethe movement group. He rolls a 12. Consulting theMovement Cohesion Chart he sees that his HQ has amodified 10 and may move. The Suppressed tank has amodified 14 and may also move. The Suppressed andDisorganized tank has a modified 17 and may not move.
Max may move the two tanks that have passed leavingthe tank that has failed behind. Max decides he does notwish to leave this stand behind and does not move thegroup. He now has one movement order left and it is hisopponent’s turn to perform a movement action. Had hechosen to move the two stands allowed, the remainingstand still could attempt to move again, in a followingmovement action this turn, by expending anothermovement order or attempt independent movement.
[8.3] Movement Execution, Restrictions & Limitations8.3.1 Each stand may execute movement once per
Movement Phase by expending up to its total movementpoint value or half that value rounded down, if in thefire/move posture. The movement point value is foundin the Weapons Data Table’s “Movement Points”column. This value may not be exceeded. Unusedmovement points may not be accumulated from turn toturn. Stands in the fire/move posture have a reducedmovement point total whether they conducted fire or notduring previous phases of the current turn.
8.3.2 Stands move across the playing surface, inch byinch, expending movement points as they do so. A stand
may not enter or cross terrain without sufficientmovement points to do so. However; a stand allowed toexecute movement may always move a minimum of oneinch (1”) regardless of terrain penalties unless theterrain is impassable for that stand. See Terrain 9.1.4, formore details.
8.3.3 There are four movement classes: Wheeled (W),Tracked (T), Foot (F), and Amphibious (A). The TerrainEffects Chart covers how various terrain types affect themovement of stands belonging to each class, except
water, see [8.9] “Amphibious Movement” and/or [10.12]“Boats” for details on that movement class.
Example: Max’s movement group contains an M4Sherman and an M20 armoured car. They are both
beginning their movement in clear terrain. The Shermanmoves 3 inches through clear terrain, ending up on agood road; this costs 3 of his 10 movement points. He
then moves the Sherman 8 inches on the road, for a costof 4 movement points of his 7 remaining points. Duringthis movement the road passes into a forest (woodsterrain). Max moves the model 1” forward (whichcontains more of the road, surrounded by woods) butinforms his opponent that he is exiting the road andmoving into the woods terrain. This costs a trackedvehicle 3 movement points per inch of movement whichuses the last of the M4’s remaining points.
Max’s M20 moves 3 inches through clear terrain to theroad, following the tank. This costs the M20 6 of its 16movement points. It then proceeds down the good road
for 12 inches of distance, which costs 6 more points,leaving Max 4 points to use (or not use). Finally, as withthe tank, Max decides to move the M20 into the woodsfor a cost of 4 points.
If, in a following turn, Max decides to move the tank orarmoured car back on the road, he will pay for 1” ofmovement through the woods to get to the road. He maythen pay the road cost until he exits the road.
8.3.4 Friendly stands may pass freely though oneanother, but no two stands may end the Movement
Phase overlapping. If a stand is forced to halt where itwould violate this rule, move it back along its previouspath until there is room for it.
8.3.5 Armoured vehicles may pass through enemy“transport” stands or other “unarmed” enemy vehiclesfreely. If an armoured combat vehicle finishesmovement on top of an enemy transport stand, simplymove the transport stand aside. Vehicles may only passthrough enemy “non-vehicle” stands only whenconducting overruns.
8.3.6 An armoured vehicle stand may pass through an
enemy armoured vehicle stand only if it makes asuccessful cohesion roll (to test its nerve). The standmust first move adjacent, stop, and make the roll (with a“+3” die roll adjustment). If the roll fails, the movingstand must stop, remaining adjacent to the opposingstand it was trying to pass through.
8.3.7 Any stand may change facing without cost whilemoving. In addition, any stand in the movement orfire/move posture may change facing as its movement
21
Burfield (order #5184631)
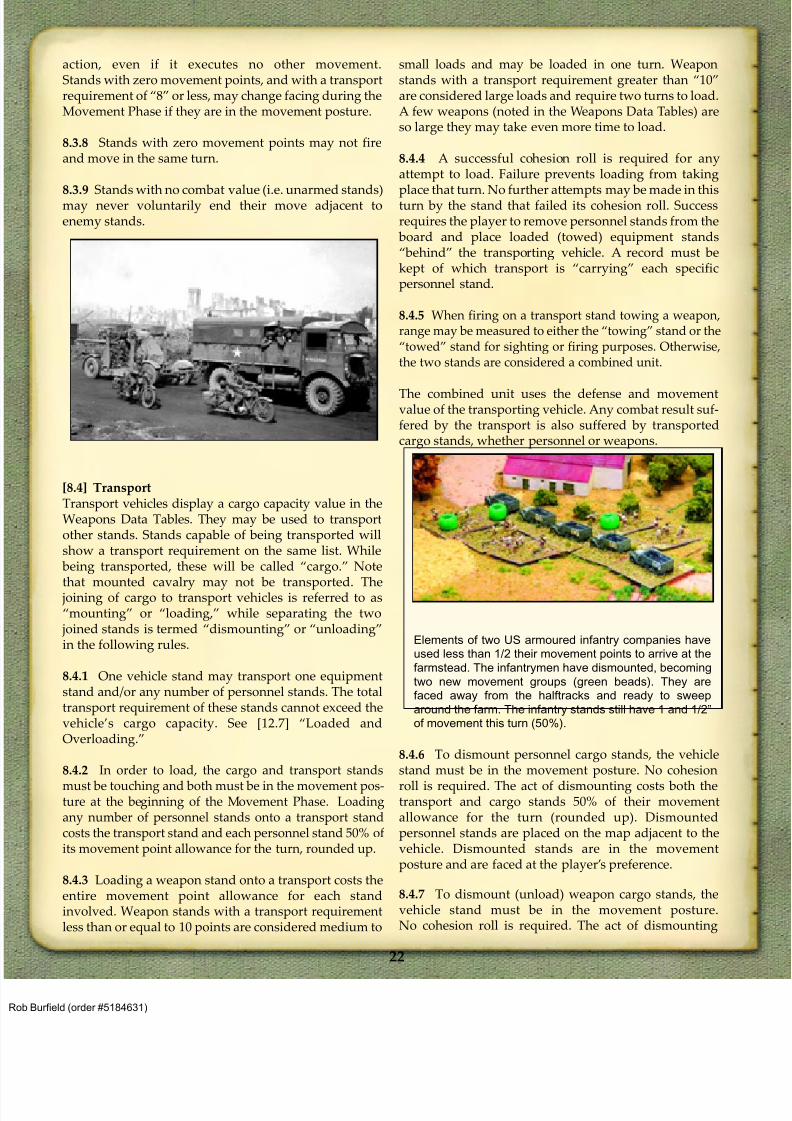
8/13/2019 Micro Armour the Game-WWII 2nd Edition (Full Color)
http://slidepdf.com/reader/full/micro-armour-the-game-wwii-2nd-edition-full-color 27/136
action, even if it executes no other movement.Stands with zero movement points, and with a transportrequirement of “8” or less, may change facing during theMovement Phase if they are in the movement posture.
8.3.8 Stands with zero movement points may not fireand move in the same turn.
8.3.9
Stands with no combat value (i.e. unarmed stands)may never voluntarily end their move adjacent toenemy stands.
[8.4] TransportTransport vehicles display a cargo capacity value in theWeapons Data Tables. They may be used to transportother stands. Stands capable of being transported willshow a transport requirement on the same list. While
being transported, these will be called “cargo.” Note
that mounted cavalry may not be transported. The joining of cargo to transport vehicles is referred to as“mounting” or “loading,” while separating the two
joined stands is termed “dismounting” or “unloading”in the following rules.
8.4.1 One vehicle stand may transport one equipmentstand and/or any number of personnel stands. The totaltransport requirement of these stands cannot exceed thevehicle’s cargo capacity. See [12.7] “Loaded andOverloading.”
8.4.2 In order to load, the cargo and transport stands
must be touching and both must be in the movement pos-ture at the beginning of the Movement Phase. Loadingany number of personnel stands onto a transport standcosts the transport stand and each personnel stand 50% ofits movement point allowance for the turn, rounded up.
8.4.3 Loading a weapon stand onto a transport costs theentire movement point allowance for each standinvolved. Weapon stands with a transport requirementless than or equal to 10 points are considered medium to
small loads and may be loaded in one turn. Weaponstands with a transport requirement greater than “10”are considered large loads and require two turns to load.A few weapons (noted in the Weapons Data Tables) areso large they may take even more time to load.
8.4.4 A successful cohesion roll is required for anyattempt to load. Failure prevents loading from taking
place that turn. No further attempts may be made in thisturn by the stand that failed its cohesion roll. Successrequires the player to remove personnel stands from the
board and place loaded (towed) equipment stands“behind” the transporting vehicle. A record must bekept of which transport is “carrying” each specificpersonnel stand.
8.4.5 When firing on a transport stand towing a weapon,range may be measured to either the “towing” stand or the“towed” stand for sighting or firing purposes. Otherwise,the two stands are considered a combined unit.
The combined unit uses the defense and movementvalue of the transporting vehicle. Any combat result suf-fered by the transport is also suffered by transportedcargo stands, whether personnel or weapons.
8.4.6 To dismount personnel cargo stands, the vehiclestand must be in the movement posture. No cohesion
roll is required. The act of dismounting costs both thetransport and cargo stands 50% of their movementallowance for the turn (rounded up). Dismountedpersonnel stands are placed on the map adjacent to thevehicle. Dismounted stands are in the movementposture and are faced at the player’s preference.
8.4.7 To dismount (unload) weapon cargo stands, thevehicle stand must be in the movement posture.No cohesion roll is required. The act of dismounting
Elements of two US armoured infantry companies have
used less than 1/2 their movement points to arrive at the
farmstead. The infantrymen have dismounted, becoming
two new movement groups (green beads). They are
faced away from the halftracks and ready to sweep
around the farm. The infantry stands still have 1 and 1/2”
of movement this turn (50%).
22
Burfield (order #5184631)
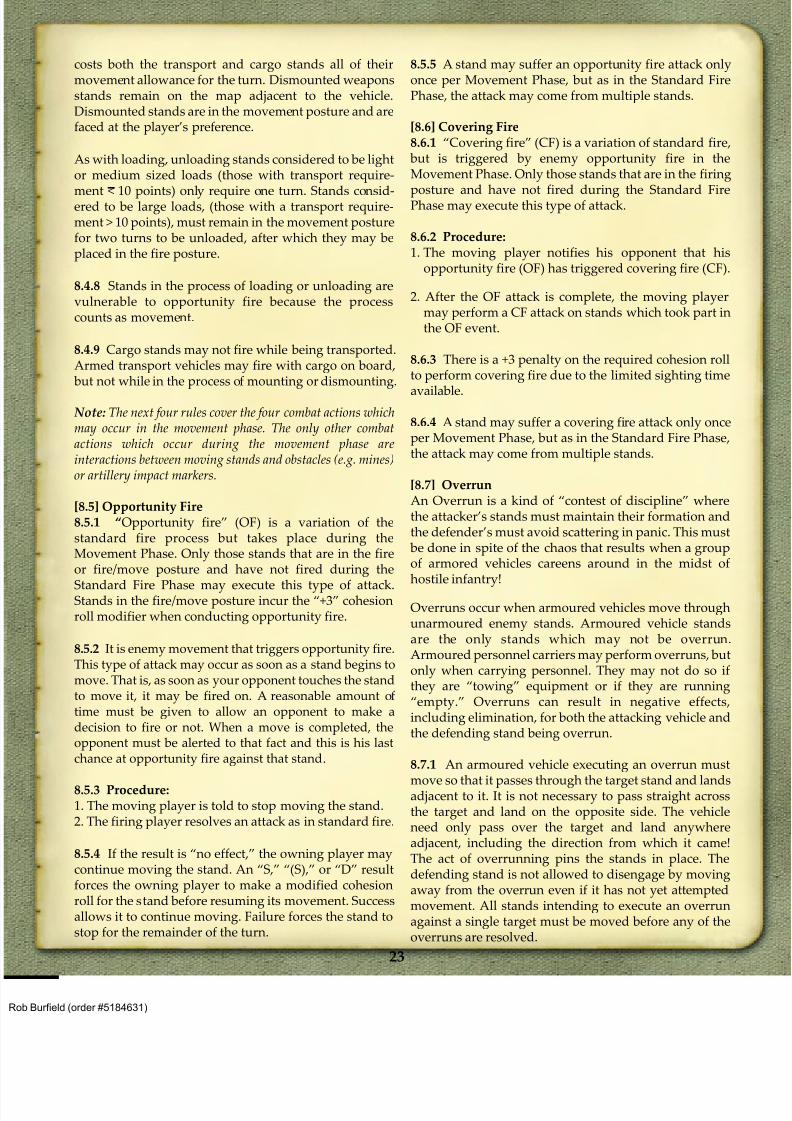
8/13/2019 Micro Armour the Game-WWII 2nd Edition (Full Color)
http://slidepdf.com/reader/full/micro-armour-the-game-wwii-2nd-edition-full-color 28/136
costs both the transport and cargo stands all of theirmovement allowance for the turn. Dismounted weaponsstands remain on the map adjacent to the vehicle.Dismounted stands are in the movement posture and arefaced at the player’s preference.
As with loading, unloading stands considered to be lightor medium sized loads (those with transport require-
ment < 10 points) only require one turn. Stands consid-ered to be large loads, (those with a transport require-ment > 10 points), must remain in the movement posturefor two turns to be unloaded, after which they may beplaced in the fire posture.
8.4.8 Stands in the process of loading or unloading arevulnerable to opportunity fire because the processcounts as movement.
8.4.9 Cargo stands may not fire while being transported.Armed transport vehicles may fire with cargo on board, but not while in the process of mounting or dismounting.
Note: The next four rules cover the four combat actions whichmay occur in the movement phase. The only other combatactions which occur during the movement phase areinteractions between moving stands and obstacles (e.g. mines)or artillery impact markers.
[8.5] Opportunity Fire8.5.1 “Opportunity fire” (OF) is a variation of thestandard fire process but takes place during theMovement Phase. Only those stands that are in the fireor fire/move posture and have not fired during the
Standard Fire Phase may execute this type of attack.Stands in the fire/move posture incur the “+3” cohesionroll modifier when conducting opportunity fire.
8.5.2 It is enemy movement that triggers opportunity fire.This type of attack may occur as soon as a stand begins tomove. That is, as soon as your opponent touches the standto move it, it may be fired on. A reasonable amount oftime must be given to allow an opponent to make adecision to fire or not. When a move is completed, theopponent must be alerted to that fact and this is his lastchance at opportunity fire against that stand.
8.5.3 Procedure:1. The moving player is told to stop moving the stand.2. The firing player resolves an attack as in standard fire.
8.5.4 If the result is “no effect,” the owning player maycontinue moving the stand. An “S,” “(S),” or “D” resultforces the owning player to make a modified cohesionroll for the stand before resuming its movement. Successallows it to continue moving. Failure forces the stand tostop for the remainder of the turn.
8.5.5 A stand may suffer an opportunity fire attack onlyonce per Movement Phase, but as in the Standard FirePhase, the attack may come from multiple stands.
[8.6] Covering Fire8.6.1 “Covering fire” (CF) is a variation of standard fire,
but is triggered by enemy opportunity fire in theMovement Phase. Only those stands that are in the firing
posture and have not fired during the Standard FirePhase may execute this type of attack.
8.6.2 Procedure:1. The moving player notifies his opponent that his
opportunity fire (OF) has triggered covering fire (CF).
2. After the OF attack is complete, the moving playermay perform a CF attack on stands which took part inthe OF event.
8.6.3 There is a +3 penalty on the required cohesion rollto perform covering fire due to the limited sighting time
available.
8.6.4 A stand may suffer a covering fire attack only onceper Movement Phase, but as in the Standard Fire Phase,the attack may come from multiple stands.
[8.7] OverrunAn Overrun is a kind of “contest of discipline” wherethe attacker’s stands must maintain their formation andthe defender’s must avoid scattering in panic. This must
be done in spite of the chaos that results when a groupof armored vehicles careens around in the midst ofhostile infantry!
Overruns occur when armoured vehicles move throughunarmoured enemy stands. Armoured vehicle standsare the only stands which may not be overrun.Armoured personnel carriers may perform overruns, butonly when carrying personnel. They may not do so ifthey are “towing” equipment or if they are running“empty.” Overruns can result in negative effects,including elimination, for both the attacking vehicle andthe defending stand being overrun.
8.7.1 An armoured vehicle executing an overrun must
move so that it passes through the target stand and landsadjacent to it. It is not necessary to pass straight acrossthe target and land on the opposite side. The vehicleneed only pass over the target and land anywhereadjacent, including the direction from which it came!The act of overrunning pins the stands in place. Thedefending stand is not allowed to disengage by movingaway from the overrun even if it has not yet attemptedmovement. All stands intending to execute an overrunagainst a single target must be moved before any of theoverruns are resolved.
23
Burfield (order #5184631)
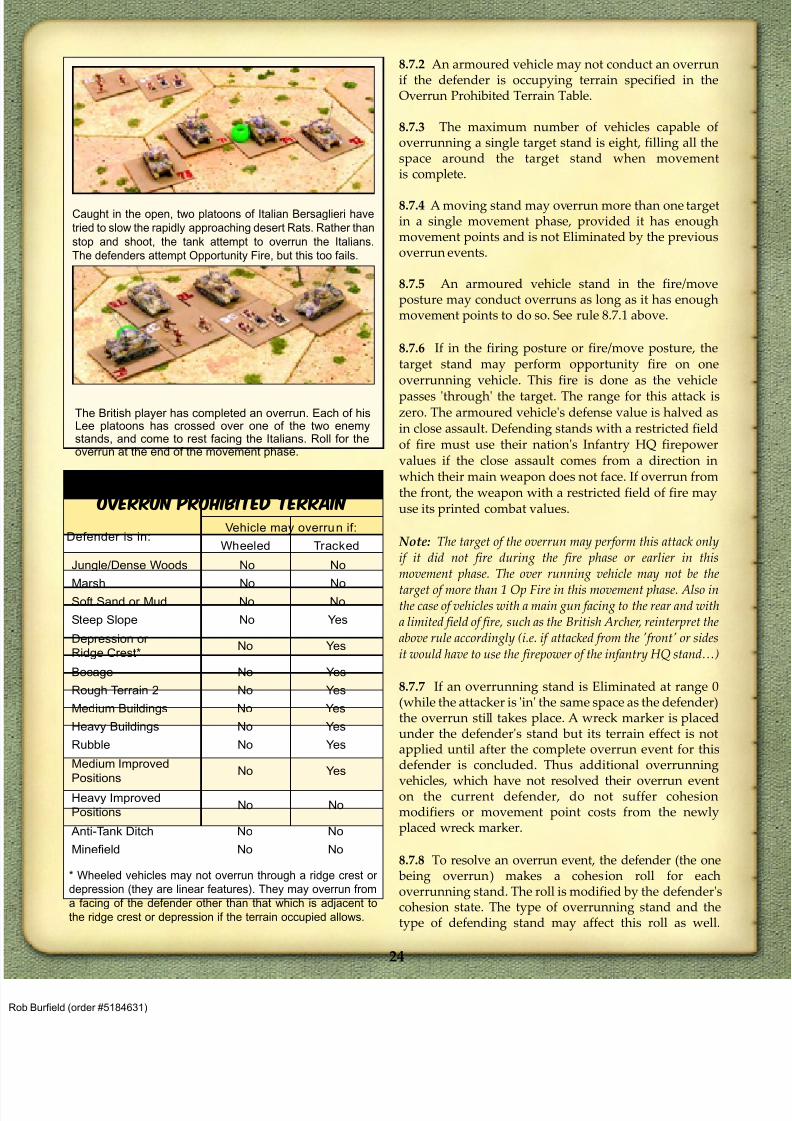
8/13/2019 Micro Armour the Game-WWII 2nd Edition (Full Color)
http://slidepdf.com/reader/full/micro-armour-the-game-wwii-2nd-edition-full-color 29/136
8.7.2 An armoured vehicle may not conduct an overrunif the defender is occupying terrain specified in theOverrun Prohibited Terrain Table.
8.7.3 The maximum number of vehicles capable ofoverrunning a single target stand is eight, filling all thespace around the target stand when movementis complete.
8.7.4 A moving stand may overrun more than one targetin a single movement phase, provided it has enoughmovement points and is not Eliminated by the previousoverrun events.
8.7.5 An armoured vehicle stand in the fire/moveposture may conduct overruns as long as it has enoughmovement points to do so. See rule 8.7.1 above.
8.7.6 If in the firing posture or fire/move posture, thetarget stand may perform opportunity fire on oneoverrunning vehicle. This fire is done as the vehicle
passes 'through' the target. The range for this attack iszero. The armoured vehicle's defense value is halved asin close assault. Defending stands with a restricted fieldof fire must use their nation's Infantry HQ firepowervalues if the close assault comes from a direction inwhich their main weapon does not face. If overrun fromthe front, the weapon with a restricted field of fire mayuse its printed combat values.
Note: The target of the overrun may perform this attack onlyif it did not fire during the fire phase or earlier in thismovement phase. The over running vehicle may not be the
target of more than 1 Op Fire in this movement phase. Also inthe case of vehicles with a main gun facing to the rear and witha limited field of fire, such as the British Archer, reinterpret theabove rule accordingly (i.e. if attacked from the 'front' or sidesit would have to use the firepower of the infantry HQ stand…)
8.7.7 If an overrunning stand is Eliminated at range 0(while the attacker is 'in' the same space as the defender)the overrun still takes place. A wreck marker is placedunder the defender's stand but its terrain effect is notapplied until after the complete overrun event for thisdefender is concluded. Thus additional overrunning
vehicles, which have not resolved their overrun eventon the current defender, do not suffer cohesionmodifiers or movement point costs from the newlyplaced wreck marker.
8.7.8 To resolve an overrun event, the defender (the one being overrun) makes a cohesion roll for eachoverrunning stand. The roll is modified by the defender'scohesion state. The type of overrunning stand and thetype of defending stand may affect this roll as well.
Caught in the open, two platoons of Italian Bersaglieri have
tried to slow the rapidly approaching desert Rats. Rather than
stop and shoot, the tank attempt to overrun the Italians.
The defenders attempt Opportunity Fire, but this too fails.
Defender is in:Vehicle may overrun if:
Wheeled Tracked
Jungle/Dense Woods No No
Marsh No NoSoft Sand or Mud No No
Steep Slope No Yes
Depression or
Ridge Crest*No Yes
Bocage No Yes
Rough Terrain 2 No Yes
Medium Buildings No Yes
Heavy Buildings No Yes
Rubble No Yes
Medium Improved
PositionsNo Yes
Heavy Improved
PositionsNo No
Anti-Tank Ditch No No
Minefield No No
* Wheeled vehicles may not overrun through a ridge crest or
depression (they are linear features). They may overrun from
a facing of the defender other than that which is adjacent to
the ridge crest or depression if the terrain occupied allows.
The British player has completed an overrun. Each of hisLee platoons has crossed over one of the two enemystands, and come to rest facing the Italians. Roll for theoverrun at the end of the movement phase.
Overrun Prohibited Terrain
24
Burfield (order #5184631)
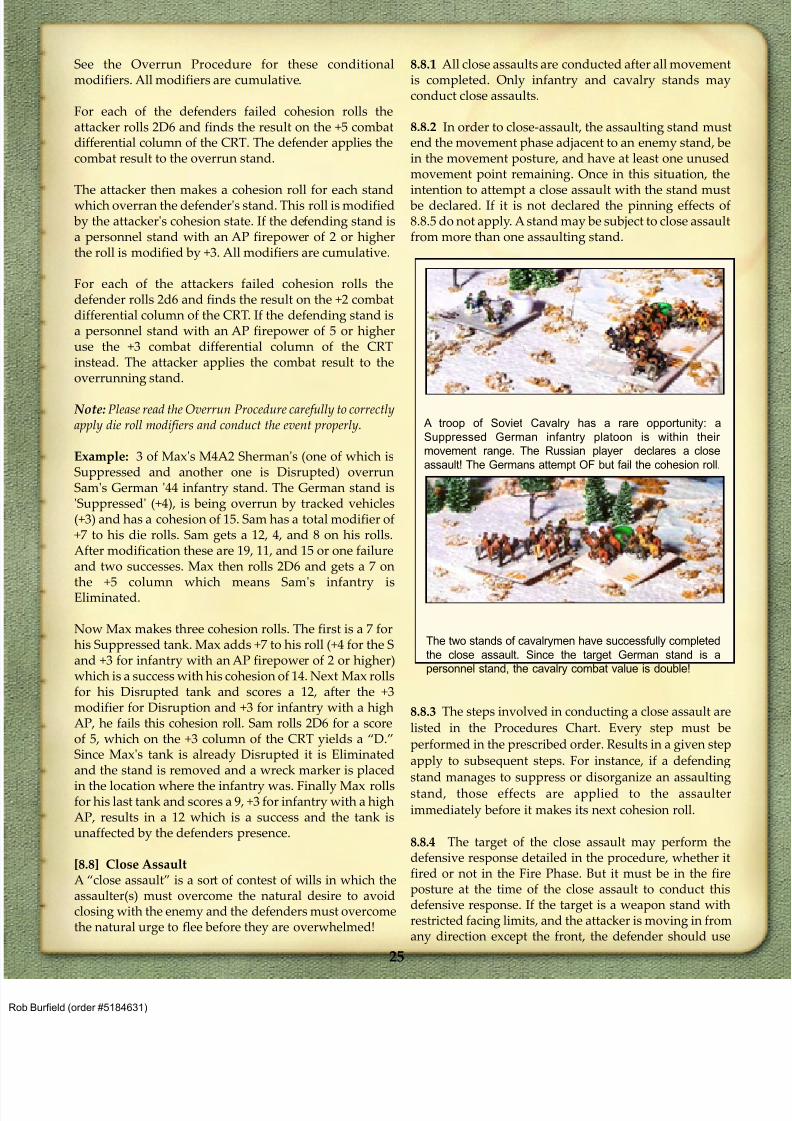
8/13/2019 Micro Armour the Game-WWII 2nd Edition (Full Color)
http://slidepdf.com/reader/full/micro-armour-the-game-wwii-2nd-edition-full-color 30/136
See the Overrun Procedure for these conditionalmodifiers. All modifiers are cumulative.
For each of the defenders failed cohesion rolls theattacker rolls 2D6 and finds the result on the +5 combatdifferential column of the CRT. The defender applies thecombat result to the overrun stand.
The attacker then makes a cohesion roll for each standwhich overran the defender's stand. This roll is modified by the attacker's cohesion state. If the defending stand isa personnel stand with an AP firepower of 2 or higherthe roll is modified by +3. All modifiers are cumulative.
For each of the attackers failed cohesion rolls thedefender rolls 2d6 and finds the result on the +2 combatdifferential column of the CRT. If the defending stand isa personnel stand with an AP firepower of 5 or higheruse the +3 combat differential column of the CRTinstead. The attacker applies the combat result to theoverrunning stand.
Note: Please read the Overrun Procedure carefully to correctlyapply die roll modifiers and conduct the event properly.
Example: 3 of Max's M4A2 Sherman's (one of which isSuppressed and another one is Disrupted) overrunSam's German '44 infantry stand. The German stand is'Suppressed' (+4), is being overrun by tracked vehicles(+3) and has a cohesion of 15. Sam has a total modifier of+7 to his die rolls. Sam gets a 12, 4, and 8 on his rolls.After modification these are 19, 11, and 15 or one failureand two successes. Max then rolls 2D6 and gets a 7 on
the +5 column which means Sam's infantry isEliminated.
Now Max makes three cohesion rolls. The first is a 7 forhis Suppressed tank. Max adds +7 to his roll (+4 for the Sand +3 for infantry with an AP firepower of 2 or higher)which is a success with his cohesion of 14. Next Max rollsfor his Disrupted tank and scores a 12, after the +3modifier for Disruption and +3 for infantry with a highAP, he fails this cohesion roll. Sam rolls 2D6 for a scoreof 5, which on the +3 column of the CRT yields a “D.”Since Max's tank is already Disrupted it is Eliminatedand the stand is removed and a wreck marker is placed
in the location where the infantry was. Finally Max rollsfor his last tank and scores a 9, +3 for infantry with a highAP, results in a 12 which is a success and the tank isunaffected by the defenders presence.
[8.8] Close AssaultA “close assault” is a sort of contest of wills in which theassaulter(s) must overcome the natural desire to avoidclosing with the enemy and the defenders must overcomethe natural urge to flee before they are overwhelmed!
8.8.1 All close assaults are conducted after all movementis completed. Only infantry and cavalry stands mayconduct close assaults.
8.8.2 In order to close-assault, the assaulting stand mustend the movement phase adjacent to an enemy stand, bein the movement posture, and have at least one unusedmovement point remaining. Once in this situation, the
intention to attempt a close assault with the stand must be declared. If it is not declared the pinning effects of8.8.5 do not apply. A stand may be subject to close assaultfrom more than one assaulting stand.
8.8.3 The steps involved in conducting a close assault are
listed in the Procedures Chart. Every step must be
performed in the prescribed order. Results in a given step
apply to subsequent steps. For instance, if a defending
stand manages to suppress or disorganize an assaulting
stand, those effects are applied to the assaulter
immediately before it makes its next cohesion roll.
8.8.4 The target of the close assault may perform thedefensive response detailed in the procedure, whether itfired or not in the Fire Phase. But it must be in the fireposture at the time of the close assault to conduct thisdefensive response. If the target is a weapon stand withrestricted facing limits, and the attacker is moving in fromany direction except the front, the defender should use
A troop of Soviet Cavalry has a rare opportunity: a
Suppressed German infantry platoon is within their
movement range. The Russian player declares a close
assault! The Germans attempt OF but fail the cohesion roll.
The two stands of cavalrymen have successfully completed
the close assault. Since the target German stand is a
personnel stand, the cavalry combat value is double!
25
Burfield (order #5184631)
8/13/2019 Micro Armour the Game-WWII 2nd Edition (Full Color)
http://slidepdf.com/reader/full/micro-armour-the-game-wwii-2nd-edition-full-color 31/136
the appropriate firepower values of the infantry HQ standfor its nationality to conduct the defensive response. Ifclose assaulted from the front, the weapon with arestricted field of fire may use its own combat values.
8.8.5 The act of close assaulting pins the target stand inplace. The target stand is not allowed to disengage bymoving away from the assault even if it has not yet
attempted movement. If, as a result of the close assaultprocess a disorganization result is achieved, then thedefender must still move 1” away from the attackingstand that inflicted the result. If the defender was subjectto close assault from more than one stand, it moves awayfrom the stand that first caused the Disorganized result.
8.8.6 A stand may be subjected to close assault by morethan one assaulting stand.
8.8.7 Close assaulting stands might themselves becomethe object of assault. All close assaults are conductedafter all movement has taken place. When more than one
close assault must be resolved, players alternate com-pleting assaults. The player with the initiative decideswho goes first.
8.8.8 Armoured vehicles subjected to close assault retain50% of their defense value (rounded up) regardless ofthe direction from which they are attacked.
8.8.9 Cavalry double their printed combat value when
close assaulting personnel or other non-vehicle stands.
They may not close assault stands occupying any type of
building, medium or heavy improved positions.
8.8.10 Terrain effects (including improved positions) are
ignored in a close assault.
8.8.11 Any firepower with a range of 0 (zero) may be
used in close assault actions only.
[8.9] Amphibious Movement
Some stands are capable of amphibious movement asindicated in the Weapons Data Tables by a value in the
movement points column followed by an “A” (e.g. the
U.S. DUKW = 15W/3A). Unless specifically prohibited in
scenario descriptions, these stands may move acrossnon-fordable streams or unbridgeable rivers and
through water terrain. See [9.5] “Water” for more details
on the effects of water type terrain.
8.9.1 A stand may not use amphibious movement points
and land movement points in the same movement
phase. A stand must begin its Movement Phase adjacent
to the water terrain feature to be entered or crossed.
8.9.2 Movement into the water terrain feature is
determined by a successful cohesion roll. If successful
the stand(s) may move their full amphibious movement
rate. If the roll is unsuccessful the stands may not move,
unless another order is expended as per standard
movement rules.
8.9.3 A stand, moving through water, but then exiting
onto land during the current movement phase, may useany remaining amphibious movement points once on
land during the current movement phase. An
amphibious unit may not use its “land” movement
points if it begins the movement phase in water.
Note: An amphibious unit, moving through water, may only
resume using its “land” movement points at the beginning of
a Movement Phase in which its front edge is “clearly” on a
land terrain type.
Example: A DUKW begins its movement adjacent to a 2
inch wide river with “clear” terrain on the other side. Its3 amphibious movement points allows it to cross the
river in one turn of amphibious movement, and continue
moving 1 more inch into the clear terrain, on the other
side. It may move normally in the next turn. If it were
trying to move across a bay that was 3” wide, it would
not end “clearly” on dry land (it would be adjacent to the
land), and thus it would only be allowed to spend its 3
movement points the following turn, despite most of its
movement being on land that turn.
8.9.4 Amphibious Infantry
Infantry stands may become temporarily amphibiousand ford any water terrain type (water, river, or stream)
with fording boats. There are two types of fording boats,
and both, if they don’t start the scenario adjacent to
water, must be transported by a transport stand with a
cargo capacity of 8 or higher. Fast fording boats have a
small outboard motor, convey an amphibious movement
rate of 3 to any infantry stand and cost 15 points per
deployment. Slow fording boats, are man powered
(rowed), convey an amphibious movement rate of 1 to
any infantry stand and cost 5 points per deployment.
Fording boats may not be used by motorcycle, bicycle, or
cavalry stands of any type despite these types of stands being classed as infantry.
To use fording boats, the infantry stand must spend one
turn adjacent to both the transport stand carrying the
boats, and the water feature to be crossed, in the
movement posture. This represents the boarding process.
On the following turn, place a fording boat marker on theinfantry and it may move amphibiously through the
water after a successful cohesion roll as in 8.9.2.
26
Burfield (order #5184631)
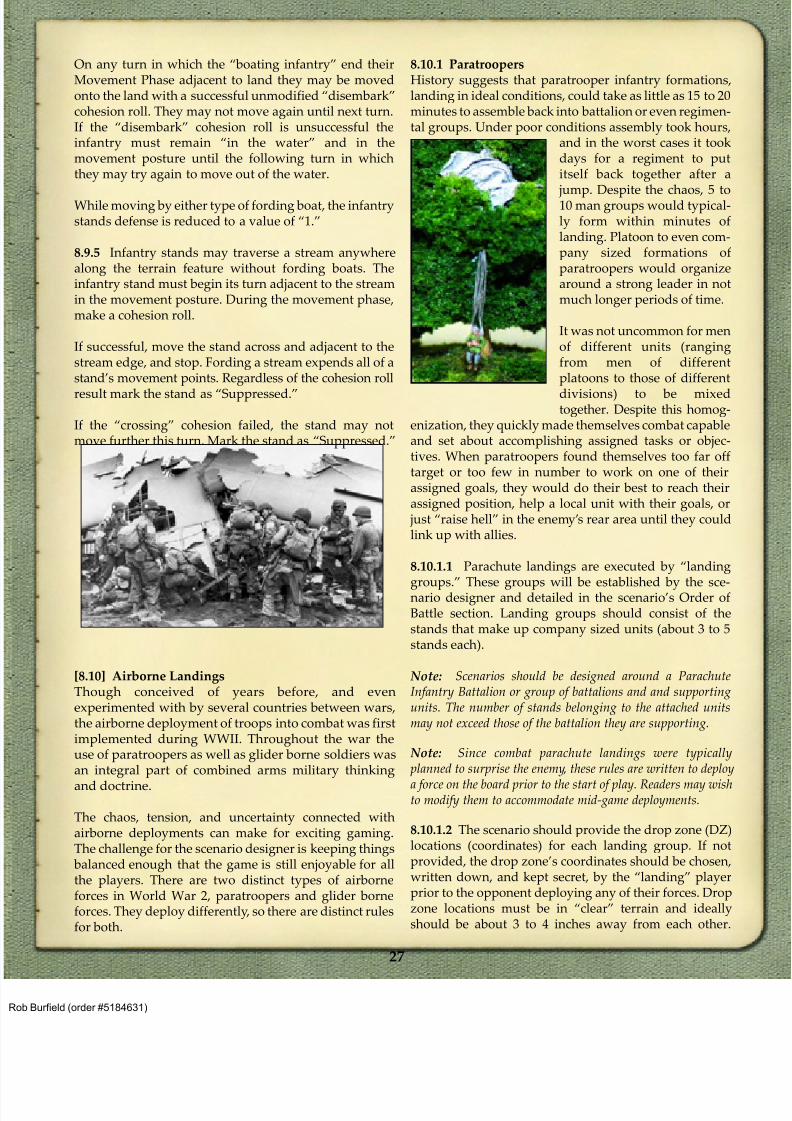
8/13/2019 Micro Armour the Game-WWII 2nd Edition (Full Color)
http://slidepdf.com/reader/full/micro-armour-the-game-wwii-2nd-edition-full-color 32/136
On any turn in which the “boating infantry” end theirMovement Phase adjacent to land they may be movedonto the land with a successful unmodified “disembark”cohesion roll. They may not move again until next turn.If the “disembark” cohesion roll is unsuccessful theinfantry must remain “in the water” and in themovement posture until the following turn in whichthey may try again to move out of the water.
While moving by either type of fording boat, the infantrystands defense is reduced to a value of “1.”
8.9.5 Infantry stands may traverse a stream anywherealong the terrain feature without fording boats. Theinfantry stand must begin its turn adjacent to the streamin the movement posture. During the movement phase,make a cohesion roll.
If successful, move the stand across and adjacent to thestream edge, and stop. Fording a stream expends all of astand’s movement points. Regardless of the cohesion roll
result mark the stand as “Suppressed.”
If the “crossing” cohesion failed, the stand may notmove further this turn. Mark the stand as “Suppressed.”
[8.10] Airborne LandingsThough conceived of years before, and evenexperimented with by several countries between wars,the airborne deployment of troops into combat was firstimplemented during WWII. Throughout the war theuse of paratroopers as well as glider borne soldiers wasan integral part of combined arms military thinking
and doctrine.
The chaos, tension, and uncertainty connected withairborne deployments can make for exciting gaming.The challenge for the scenario designer is keeping things
balanced enough that the game is still enjoyable for allthe players. There are two distinct types of airborneforces in World War 2, paratroopers and glider borneforces. They deploy differently, so there are distinct rulesfor both.
8.10.1 ParatroopersHistory suggests that paratrooper infantry formations,landing in ideal conditions, could take as little as 15 to 20minutes to assemble back into battalion or even regimen-tal groups. Under poor conditions assembly took hours,
and in the worst cases it tookdays for a regiment to putitself back together after a
jump. Despite the chaos, 5 to10 man groups would typical-ly form within minutes oflanding. Platoon to even com-pany sized formations ofparatroopers would organizearound a strong leader in notmuch longer periods of time.
It was not uncommon for menof different units (rangingfrom men of differentplatoons to those of different
divisions) to be mixedtogether. Despite this homog-
enization, they quickly made themselves combat capableand set about accomplishing assigned tasks or objec-tives. When paratroopers found themselves too far offtarget or too few in number to work on one of theirassigned goals, they would do their best to reach theirassigned position, help a local unit with their goals, or
just “raise hell” in the enemy’s rear area until they couldlink up with allies.
8.10.1.1 Parachute landings are executed by “landing
groups.” These groups will be established by the sce-nario designer and detailed in the scenario’s Order ofBattle section. Landing groups should consist of thestands that make up company sized units (about 3 to 5stands each).
Note: Scenarios should be designed around a ParachuteInfantry Battalion or group of battalions and and supportingunits. The number of stands belonging to the attached unitsmay not exceed those of the battalion they are supporting.
Note: Since combat parachute landings were typically planned to surprise the enemy, these rules are written to deploy
a force on the board prior to the start of play. Readers may wishto modify them to accommodate mid-game deployments.
8.10.1.2 The scenario should provide the drop zone (DZ)locations (coordinates) for each landing group. If notprovided, the drop zone’s coordinates should be chosen,written down, and kept secret, by the “landing” playerprior to the opponent deploying any of their forces. Dropzone locations must be in “clear” terrain and ideallyshould be about 3 to 4 inches away from each other.
27
Burfield (order #5184631)
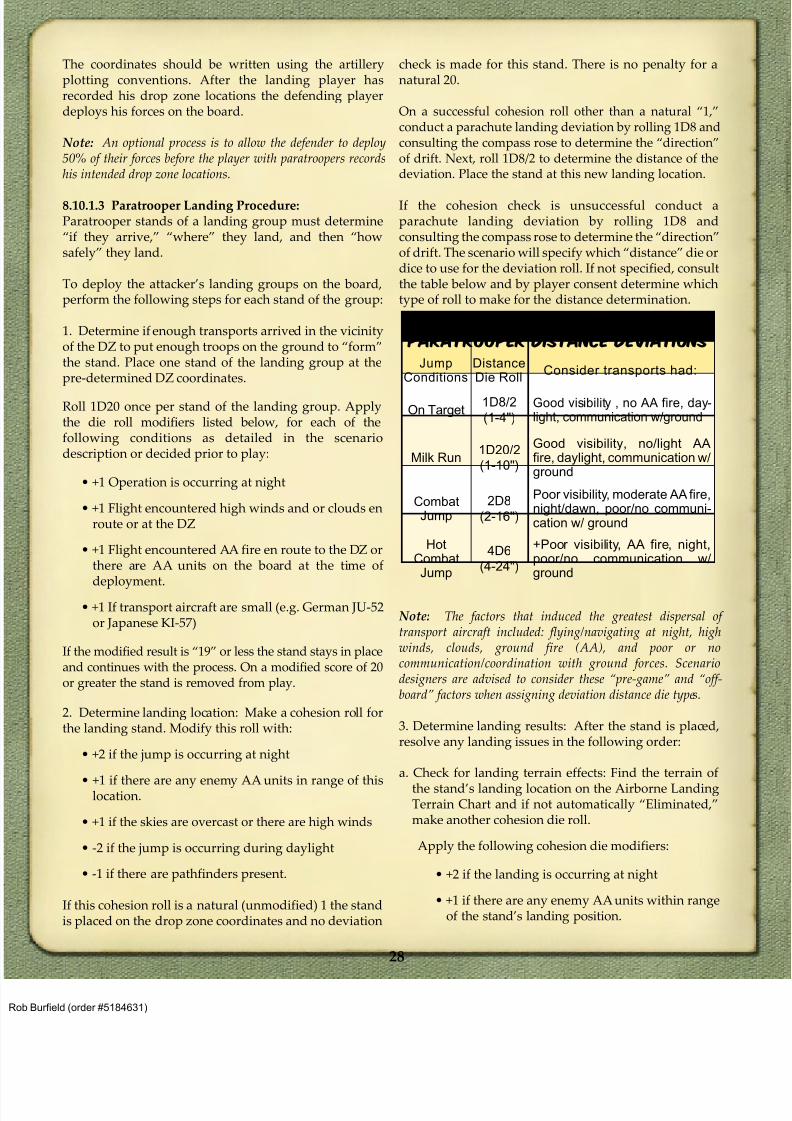
8/13/2019 Micro Armour the Game-WWII 2nd Edition (Full Color)
http://slidepdf.com/reader/full/micro-armour-the-game-wwii-2nd-edition-full-color 33/136
The coordinates should be written using the artilleryplotting conventions. After the landing player hasrecorded his drop zone locations the defending playerdeploys his forces on the board.
Note: An optional process is to allow the defender to deploy50% of their forces before the player with paratroopers recordshis intended drop zone locations.
8.10.1.3 Paratrooper Landing Procedure:Paratrooper stands of a landing group must determine“if they arrive,” “where” they land, and then “howsafely” they land.
To deploy the attacker’s landing groups on the board,perform the following steps for each stand of the group:
1. Determine if enough transports arrived in the vicinityof the DZ to put enough troops on the ground to “form”the stand. Place one stand of the landing group at thepre-determined DZ coordinates.
Roll 1D20 once per stand of the landing group. Applythe die roll modifiers listed below, for each of thefollowing conditions as detailed in the scenariodescription or decided prior to play:
• +1 Operation is occurring at night
• +1 Flight encountered high winds and or clouds enroute or at the DZ
• +1 Flight encountered AA fire en route to the DZ orthere are AA units on the board at the time ofdeployment.
• +1 If transport aircraft are small (e.g. German JU-52or Japanese KI-57)
If the modified result is “19” or less the stand stays in placeand continues with the process. On a modified score of 20or greater the stand is removed from play.
2. Determine landing location: Make a cohesion roll forthe landing stand. Modify this roll with:
• +2 if the jump is occurring at night
• +1 if there are any enemy AA units in range of thislocation.
• +1 if the skies are overcast or there are high winds
• -2 if the jump is occurring during daylight
• -1 if there are pathfinders present.
If this cohesion roll is a natural (unmodified) 1 the standis placed on the drop zone coordinates and no deviation
check is made for this stand. There is no penalty for anatural 20.
On a successful cohesion roll other than a natural “1,”conduct a parachute landing deviation by rolling 1D8 andconsulting the compass rose to determine the “direction”of drift. Next, roll 1D8/2 to determine the distance of thedeviation. Place the stand at this new landing location.
If the cohesion check is unsuccessful conduct aparachute landing deviation by rolling 1D8 andconsulting the compass rose to determine the “direction”of drift. The scenario will specify which “distance” die ordice to use for the deviation roll. If not specified, consultthe table below and by player consent determine whichtype of roll to make for the distance determination.
Note: The factors that induced the greatest dispersal of transport aircraft included: flying/navigating at night, highwinds, clouds, ground fire (AA), and poor or nocommunication/coordination with ground forces. Scenariodesigners are advised to consider these “pre-game” and “off-board” factors when assigning deviation distance die types.
3. Determine landing results: After the stand is placed,resolve any landing issues in the following order:
a. Check for landing terrain effects: Find the terrain of
the stand’s landing location on the Airborne LandingTerrain Chart and if not automatically “Eliminated,”make another cohesion die roll.
Apply the following cohesion die modifiers:
• +2 if the landing is occurring at night
• +1 if there are any enemy AA units within rangeof the stand’s landing position.
JumpConditions
DistanceDie Roll
Consider transports had:
On Target1D8/2
(1-4")Good visibility , no AA fire, day-light, communication w/ground
Milk Run1D20/2
(1-10")
Good visibility, no/light AAfire, daylight, communication w/ground
CombatJump
2D8
(2-16")
Poor visibility, moderate AA fire,night/dawn, poor/no communi-cation w/ ground
HotCombatJump
4D6
(4-24")
+Poor visibility, AA fire, night,poor/no communication w/ground
Paratrooper Distance Deviations
28
Burfield (order #5184631)
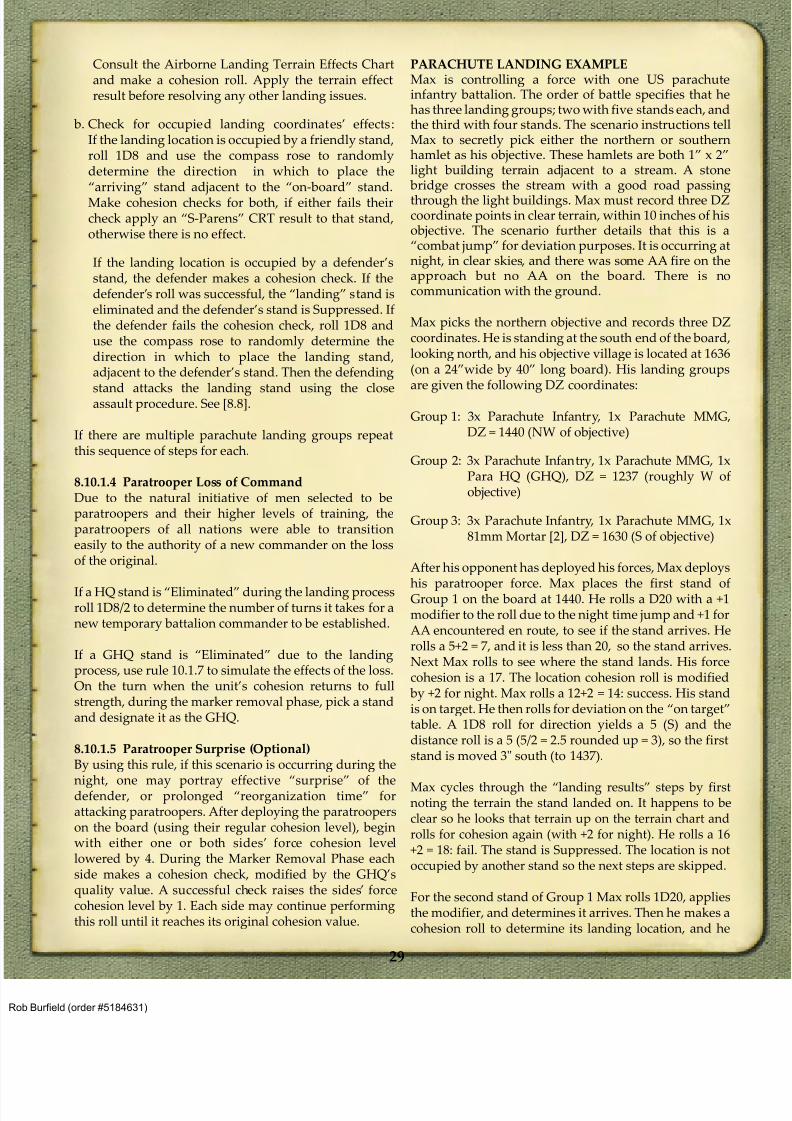
8/13/2019 Micro Armour the Game-WWII 2nd Edition (Full Color)
http://slidepdf.com/reader/full/micro-armour-the-game-wwii-2nd-edition-full-color 34/136
Consult the Airborne Landing Terrain Effects Chartand make a cohesion roll. Apply the terrain effectresult before resolving any other landing issues.
b. Check for occupied landing coordinates’ effects:If the landing location is occupied by a friendly stand,roll 1D8 and use the compass rose to randomlydetermine the direction in which to place the“arriving” stand adjacent to the “on-board” stand.Make cohesion checks for both, if either fails theircheck apply an “S-Parens” CRT result to that stand,otherwise there is no effect.
If the landing location is occupied by a defender’sstand, the defender makes a cohesion check. If thedefender’s roll was successful, the “landing” stand iseliminated and the defender’s stand is Suppressed. Ifthe defender fails the cohesion check, roll 1D8 anduse the compass rose to randomly determine thedirection in which to place the landing stand,adjacent to the defender’s stand. Then the defending
stand attacks the landing stand using the closeassault procedure. See [8.8].
If there are multiple parachute landing groups repeatthis sequence of steps for each.
8.10.1.4 Paratrooper Loss of CommandDue to the natural initiative of men selected to beparatroopers and their higher levels of training, theparatroopers of all nations were able to transitioneasily to the authority of a new commander on the lossof the original.
If a HQ stand is “Eliminated” during the landing processroll 1D8/2 to determine the number of turns it takes for anew temporary battalion commander to be established.
If a GHQ stand is “Eliminated” due to the landingprocess, use rule 10.1.7 to simulate the effects of the loss.On the turn when the unit’s cohesion returns to fullstrength, during the marker removal phase, pick a standand designate it as the GHQ.
8.10.1.5 Paratrooper Surprise (Optional)By using this rule, if this scenario is occurring during the
night, one may portray effective “surprise” of thedefender, or prolonged “reorganization time” forattacking paratroopers. After deploying the paratrooperson the board (using their regular cohesion level), beginwith either one or both sides’ force cohesion levellowered by 4. During the Marker Removal Phase eachside makes a cohesion check, modified by the GHQ’squality value. A successful check raises the sides’ forcecohesion level by 1. Each side may continue performingthis roll until it reaches its original cohesion value.
PARACHUTE LANDING EXAMPLEMax is controlling a force with one US parachuteinfantry battalion. The order of battle specifies that hehas three landing groups; two with five stands each, andthe third with four stands. The scenario instructions tellMax to secretly pick either the northern or southernhamlet as his objective. These hamlets are both 1” x 2”light building terrain adjacent to a stream. A stone
bridge crosses the stream with a good road passing
through the light buildings. Max must record three DZcoordinate points in clear terrain, within 10 inches of hisobjective. The scenario further details that this is a“combat jump” for deviation purposes. It is occurring atnight, in clear skies, and there was some AA fire on theapproach but no AA on the board. There is nocommunication with the ground.
Max picks the northern objective and records three DZcoordinates. He is standing at the south end of the board,looking north, and his objective village is located at 1636(on a 24”wide by 40” long board). His landing groupsare given the following DZ coordinates:
Group 1: 3x Parachute Infantry, 1x Parachute MMG,DZ = 1440 (NW of objective)
Group 2: 3x Parachute Infantry, 1x Parachute MMG, 1xPara HQ (GHQ), DZ = 1237 (roughly W ofobjective)
Group 3: 3x Parachute Infantry, 1x Parachute MMG, 1x81mm Mortar [2], DZ = 1630 (S of objective)
After his opponent has deployed his forces, Max deploys
his paratrooper force. Max places the first stand ofGroup 1 on the board at 1440. He rolls a D20 with a +1modifier to the roll due to the night time jump and +1 forAA encountered en route, to see if the stand arrives. Herolls a 5+2 = 7, and it is less than 20, so the stand arrives.Next Max rolls to see where the stand lands. His forcecohesion is a 17. The location cohesion roll is modified
by +2 for night. Max rolls a 12+2 = 14: success. His standis on target. He then rolls for deviation on the “on target”table. A 1D8 roll for direction yields a 5 (S) and thedistance roll is a 5 (5/2 = 2.5 rounded up = 3), so the firststand is moved 3" south (to 1437).
Max cycles through the “landing results” steps by firstnoting the terrain the stand landed on. It happens to beclear so he looks that terrain up on the terrain chart androlls for cohesion again (with +2 for night). He rolls a 16+2 = 18: fail. The stand is Suppressed. The location is notoccupied by another stand so the next steps are skipped.
For the second stand of Group 1 Max rolls 1D20, appliesthe modifier, and determines it arrives. Then he makes acohesion roll to determine its landing location, and he
29
Burfield (order #5184631)
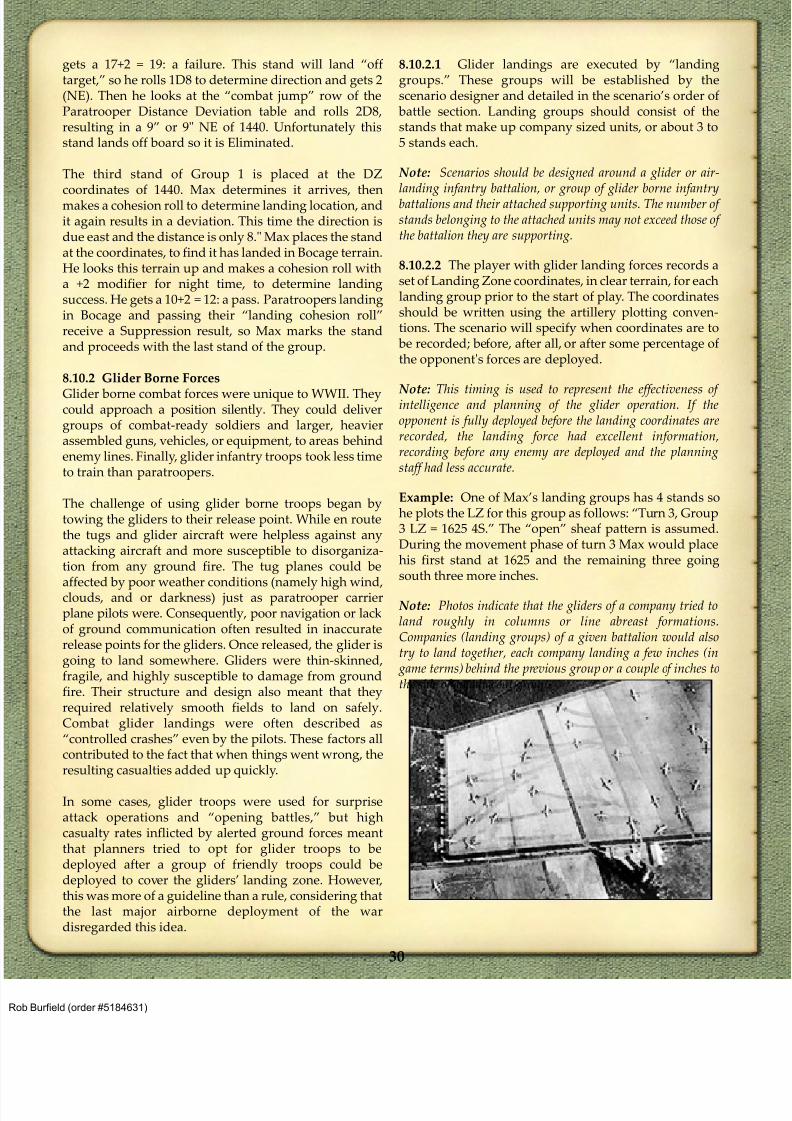
8/13/2019 Micro Armour the Game-WWII 2nd Edition (Full Color)
http://slidepdf.com/reader/full/micro-armour-the-game-wwii-2nd-edition-full-color 35/136
gets a 17+2 = 19: a failure. This stand will land “offtarget,” so he rolls 1D8 to determine direction and gets 2(NE). Then he looks at the “combat jump” row of theParatrooper Distance Deviation table and rolls 2D8,resulting in a 9” or 9" NE of 1440. Unfortunately thisstand lands off board so it is Eliminated.
The third stand of Group 1 is placed at the DZ
coordinates of 1440. Max determines it arrives, thenmakes a cohesion roll to determine landing location, andit again results in a deviation. This time the direction isdue east and the distance is only 8." Max places the standat the coordinates, to find it has landed in Bocage terrain.He looks this terrain up and makes a cohesion roll witha +2 modifier for night time, to determine landingsuccess. He gets a 10+2 = 12: a pass. Paratroopers landingin Bocage and passing their “landing cohesion roll”receive a Suppression result, so Max marks the standand proceeds with the last stand of the group.
8.10.2 Glider Borne Forces
Glider borne combat forces were unique to WWII. Theycould approach a position silently. They could delivergroups of combat-ready soldiers and larger, heavierassembled guns, vehicles, or equipment, to areas behindenemy lines. Finally, glider infantry troops took less timeto train than paratroopers.
The challenge of using glider borne troops began bytowing the gliders to their release point. While en routethe tugs and glider aircraft were helpless against anyattacking aircraft and more susceptible to disorganiza-tion from any ground fire. The tug planes could be
affected by poor weather conditions (namely high wind,clouds, and or darkness) just as paratrooper carrierplane pilots were. Consequently, poor navigation or lackof ground communication often resulted in inaccuraterelease points for the gliders. Once released, the glider isgoing to land somewhere. Gliders were thin-skinned,fragile, and highly susceptible to damage from groundfire. Their structure and design also meant that theyrequired relatively smooth fields to land on safely.Combat glider landings were often described as“controlled crashes” even by the pilots. These factors allcontributed to the fact that when things went wrong, theresulting casualties added up quickly.
In some cases, glider troops were used for surpriseattack operations and “opening battles,” but highcasualty rates inflicted by alerted ground forces meantthat planners tried to opt for glider troops to bedeployed after a group of friendly troops could bedeployed to cover the gliders’ landing zone. However,this was more of a guideline than a rule, considering thatthe last major airborne deployment of the wardisregarded this idea.
8.10.2.1 Glider landings are executed by “landinggroups.” These groups will be established by thescenario designer and detailed in the scenario’s order of
battle section. Landing groups should consist of thestands that make up company sized units, or about 3 to5 stands each.
Note: Scenarios should be designed around a glider or air-landing infantry battalion, or group of glider borne infantrybattalions and their attached supporting units. The number of stands belonging to the attached units may not exceed those of the battalion they are supporting.
8.10.2.2 The player with glider landing forces records aset of Landing Zone coordinates, in clear terrain, for eachlanding group prior to the start of play. The coordinatesshould be written using the artillery plotting conven-tions. The scenario will specify when coordinates are to
be recorded; before, after all, or after some percentage ofthe opponent's forces are deployed.
Note: This timing is used to represent the effectiveness of intelligence and planning of the glider operation. If theopponent is fully deployed before the landing coordinates arerecorded, the landing force had excellent information,recording before any enemy are deployed and the planningstaff had less accurate.
Example: One of Max’s landing groups has 4 stands sohe plots the LZ for this group as follows: “Turn 3, Group3 LZ = 1625 4S.” The “open” sheaf pattern is assumed.During the movement phase of turn 3 Max would placehis first stand at 1625 and the remaining three goingsouth three more inches.
Note: Photos indicate that the gliders of a company tried toland roughly in columns or line abreast formations.Companies (landing groups) of a given battalion would alsotry to land together, each company landing a few inches (in
game terms) behind the previous group or a couple of inches tothe side of an adjacent group.
30
Burfield (order #5184631)
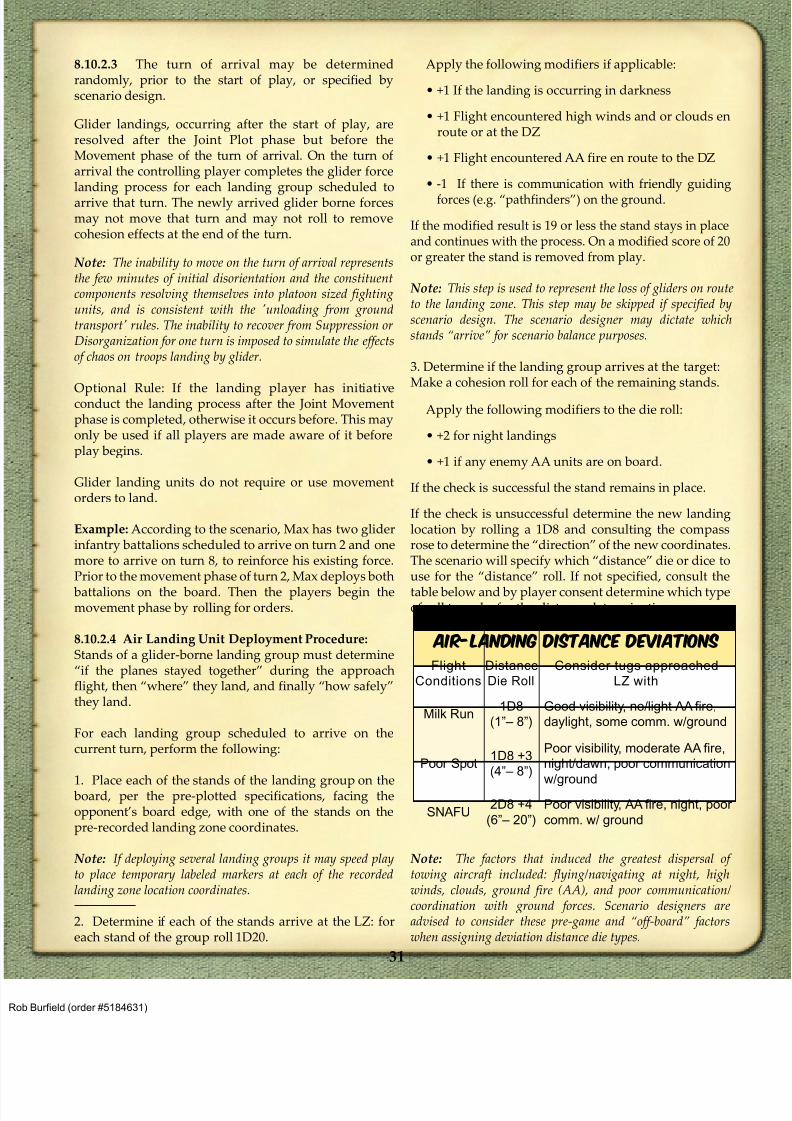
8/13/2019 Micro Armour the Game-WWII 2nd Edition (Full Color)
http://slidepdf.com/reader/full/micro-armour-the-game-wwii-2nd-edition-full-color 36/136
8.10.2.3 The turn of arrival may be determinedrandomly, prior to the start of play, or specified byscenario design.
Glider landings, occurring after the start of play, areresolved after the Joint Plot phase but before theMovement phase of the turn of arrival. On the turn ofarrival the controlling player completes the glider forcelanding process for each landing group scheduled toarrive that turn. The newly arrived glider borne forcesmay not move that turn and may not roll to removecohesion effects at the end of the turn.
Note: The inability to move on the turn of arrival representsthe few minutes of initial disorientation and the constituentcomponents resolving themselves into platoon sized fightingunits, and is consistent with the 'unloading from groundtransport' rules. The inability to recover from Suppression orDisorganization for one turn is imposed to simulate the effectsof chaos on troops landing by glider.
Optional Rule: If the landing player has initiativeconduct the landing process after the Joint Movementphase is completed, otherwise it occurs before. This mayonly be used if all players are made aware of it beforeplay begins.
Glider landing units do not require or use movementorders to land.
Example: According to the scenario, Max has two gliderinfantry battalions scheduled to arrive on turn 2 and onemore to arrive on turn 8, to reinforce his existing force.Prior to the movement phase of turn 2, Max deploys both
battalions on the board. Then the players begin themovement phase by rolling for orders.
8.10.2.4 Air Landing Unit Deployment Procedure:Stands of a glider-borne landing group must determine“if the planes stayed together” during the approachflight, then “where” they land, and finally “how safely”they land.
For each landing group scheduled to arrive on thecurrent turn, perform the following:
1. Place each of the stands of the landing group on the board, per the pre-plotted specifications, facing theopponent’s board edge, with one of the stands on thepre-recorded landing zone coordinates.
Note: If deploying several landing groups it may speed playto place temporary labeled markers at each of the recordedlanding zone location coordinates.
2. Determine if each of the stands arrive at the LZ: foreach stand of the group roll 1D20.
Apply the following modifiers if applicable:
• +1 If the landing is occurring in darkness
• +1 Flight encountered high winds and or clouds enroute or at the DZ
• +1 Flight encountered AA fire en route to the DZ
• -1 If there is communication with friendly guiding
forces (e.g. “pathfinders”) on the ground.
If the modified result is 19 or less the stand stays in placeand continues with the process. On a modified score of 20or greater the stand is removed from play.
Note: This step is used to represent the loss of gliders on routeto the landing zone. This step may be skipped if specified byscenario design. The scenario designer may dictate whichstands “arrive” for scenario balance purposes.
3. Determine if the landing group arrives at the target:Make a cohesion roll for each of the remaining stands.
Apply the following modifiers to the die roll:
• +2 for night landings
• +1 if any enemy AA units are on board.
If the check is successful the stand remains in place.
If the check is unsuccessful determine the new landinglocation by rolling a 1D8 and consulting the compassrose to determine the “direction” of the new coordinates.The scenario will specify which “distance” die or dice touse for the “distance” roll. If not specified, consult the
table below and by player consent determine which typeof roll to make for the distance determination.
Note: The factors that induced the greatest dispersal of towing aircraft included: flying/navigating at night, highwinds, clouds, ground fire (AA), and poor communication/coordination with ground forces. Scenario designers areadvised to consider these pre-game and “off-board” factorswhen assigning deviation distance die types.
31
Flight
Conditions
Distance
Die Roll
Consider tugs approached
LZ with
Milk Run1D8
(1”– 8”)
Good visibility, no/light AA fire,
daylight, some comm. w/ground
Poor Spot1D8 +3
(4”– 8”)
Poor visibility, moderate AA fire,
night/dawn, poor communication
w/ground
SNAFU2D8 +4
(6”– 20”)
Poor visibility, AA fire, night, poor
comm. w/ ground
Air-Landing Distance Deviations
Burfield (order #5184631)
8/13/2019 Micro Armour the Game-WWII 2nd Edition (Full Color)
http://slidepdf.com/reader/full/micro-armour-the-game-wwii-2nd-edition-full-color 37/136
Once the new landing location is determined, positionthe stand at the new location. If the location is off boardthe stand is eliminated.
4. After each stand is placed resolve any landing issuesin the order below.
a. Check for landing terrain effects: For each stand findthe terrain of the stand’s landing location on the
airborne landing terrain effects chart and if notautomatically “Eliminated,” make a cohesion die roll.
Apply the following cohesion die modifiers:
• +2 if the landing is occurring at night
• +1 if there are any enemy AA units within range ofthe stands landing position
Apply the determined cohesion change (if any).
b. If the landing location is “Occupied”: If the landinglocation is occupied by a friendly stand, place
the”arriving” stand adjacent to the “on board” standrandomly by rolling 1D8 to find the direction using thecompass rose. Then make cohesion checks for bothstands, if either fails their check apply an S-Parens “(S)”CRT result to that stand, otherwise there is no effect.
If the landing location is occupied by a defender’sstand, the defender makes a cohesion check. If thedefender’s roll was successful the “landing” stand is“Eliminated” and the defender’s stand is“Suppressed.” If the defender fails the cohesion checkplace the landing stand adjacent to the defenders standrandomly by rolling 1D8 to find the direction using the
compass rose. Then conduct a close assault using onlythese two stands. The defending ground forces stand isthe attacker in the close assault while the landing standis the defender.
c. Account for glider landing path: If, after conducting thepreceding steps, the stand is not Suppressed, disrupted,or did not encounter an occupied position, move thestand forward 1” and repeat steps a. and b. above. If thestand was Suppressed, disrupted, or it encountered anoccupied position, the stand remains in place.
After conducting the landing process for each landing
group scheduled to arrive in the current turn, playresumes as normal. The newly deployed forces maynot move nor do they conduct marker removal checksthis turn.
GLIDER LANDING EXAMPLE
Max is controlling a force with one US glider infantry battalion. The order of battle specifies that he has threelanding groups, all with four stands each. The scenarioinstructions tell Max to secretly pick either the northern orsouthern hamlet as his objective. These hamlets are both
1” x 2” of light building terrain adjacent to a stream.A stone bridge crosses the stream with a good road passingthrough the light buildings. Max must record three LZcoordinate points in clear terrain, within 10 inches of hisobjective before the defender places any forces.
The scenario further details that this is a “poor spot” fordeviation purposes. It is occurring at night, in clear skies,there was some AA fire on the approach but no AA on
the board. There is no communication with the ground.Finally, the instructions relay that the game will beginafter Max deploys his glider forces on the board.
Max picks the northern objective and records three LZcoordinates. He is standing at the south end of the board,looking north and his objective village is located at 1636(on a 24” wide by 40” long board). His landing groupsare given the following LZ coordinates:
Group 1: 2x Infantry, 2x Infantry Support, LZCoordinates = “1625 4E”(S of objective)
Group 2: 2x Infantry, 1x Infantry Support, 1x InfantryHQ (GHQ), LZ Coordinates = “1629 4E”(S of objective)
Group 3: 2x Infantry, 1x Infantry Support, 1x 81mmMortar [3], LZ Coordinates = “1633 4E”(S of objective)
After his opponent has deployed his forces, Max deployshis glider force. Max places the first group of stands onthe board in a line from 1625 to 1925. He starts thelanding process by rolling to see if each stand “arrives”
by rolling 1D20 with a +1 modifier to the roll due thenight time landing and +1 for AA fire en route. Hedetermines by these rolls that 1 of the stands isEliminated before it makes it to the LZ. The remaining 3stands are repositioned to be adjacent.
Next Max determines where the platoons actually“land.” Max makes a cohesion roll for each to see if itlands on target or not. His force cohesion is a 17. For thefirst he rolls a 16 +2 for night = 18. He fails his check andconsults the Poor Spot deviation table for its location. A1D8 roll for direction yields a “5” (South) and thedistance roll (1D8+3) yields a 4+3=7", so the group moved
7" South. The other three stands pass their cohesion rollsso remain in place.
He then moves on to determine the condition of thegroup's stands. Three of the four stands land in clearterrain and both pass the cohesion check. Looking at theAirborne Landing Terrain Effects Chart, these stands arefine, for now. The fourth stand initially lands in Bocageterrain. It rolls for cohesion with a “+2” modifier for nighttime. His check fails and checking the terrain effectschart for glider troops finds the stand is “Disrupted.”
32
Burfield (order #5184631)
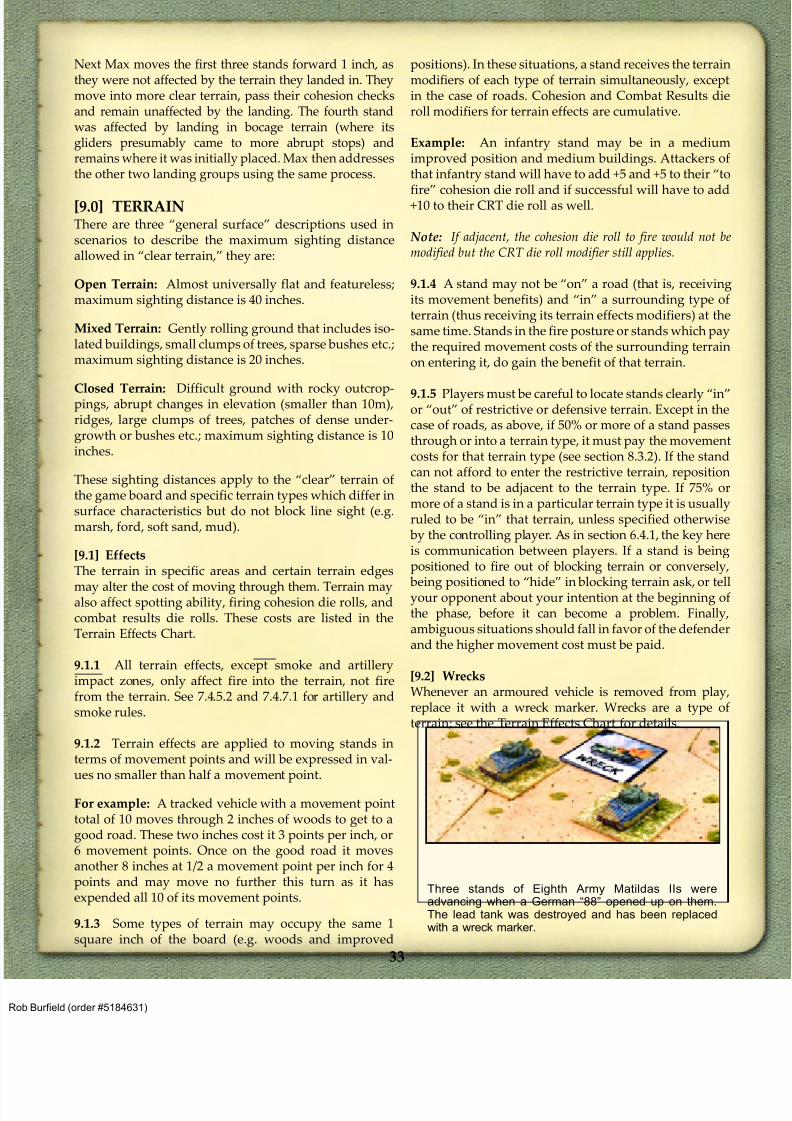
8/13/2019 Micro Armour the Game-WWII 2nd Edition (Full Color)
http://slidepdf.com/reader/full/micro-armour-the-game-wwii-2nd-edition-full-color 38/136
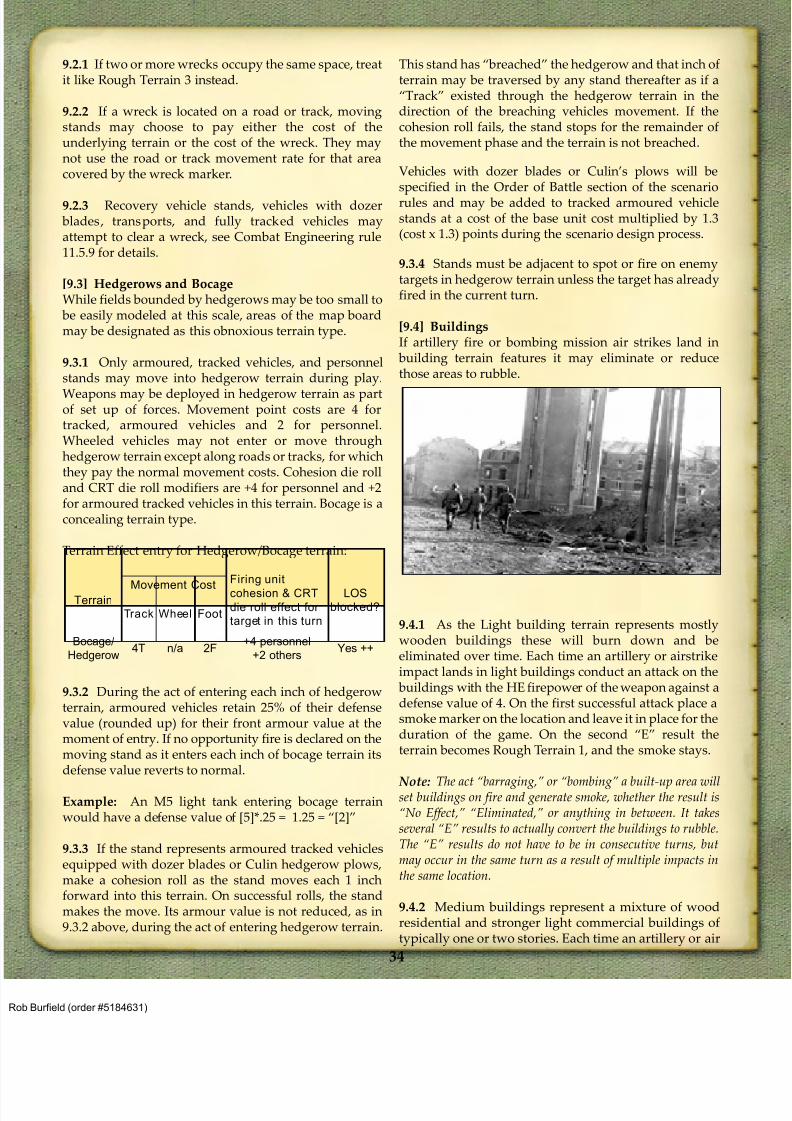
8/13/2019 Micro Armour the Game-WWII 2nd Edition (Full Color)
http://slidepdf.com/reader/full/micro-armour-the-game-wwii-2nd-edition-full-color 39/136
9.2.1 If two or more wrecks occupy the same space, treatit like Rough Terrain 3 instead.
9.2.2 If a wreck is located on a road or track, movingstands may choose to pay either the cost of theunderlying terrain or the cost of the wreck. They maynot use the road or track movement rate for that areacovered by the wreck marker.
9.2.3 Recovery vehicle stands, vehicles with dozer blades, transports, and fully tracked vehicles mayattempt to clear a wreck, see Combat Engineering rule11.5.9 for details.
[9.3] Hedgerows and BocageWhile fields bounded by hedgerows may be too small to
be easily modeled at this scale, areas of the map boardmay be designated as this obnoxious terrain type.
9.3.1 Only armoured, tracked vehicles, and personnelstands may move into hedgerow terrain during play.
Weapons may be deployed in hedgerow terrain as partof set up of forces. Movement point costs are 4 fortracked, armoured vehicles and 2 for personnel.Wheeled vehicles may not enter or move throughhedgerow terrain except along roads or tracks, for whichthey pay the normal movement costs. Cohesion die rolland CRT die roll modifiers are +4 for personnel and +2for armoured tracked vehicles in this terrain. Bocage is aconcealing terrain type.
Terrain Effect entry for Hedgerow/Bocage terrain:
9.3.2 During the act of entering each inch of hedgerowterrain, armoured vehicles retain 25% of their defensevalue (rounded up) for their front armour value at themoment of entry. If no opportunity fire is declared on themoving stand as it enters each inch of bocage terrain itsdefense value reverts to normal.
Example: An M5 light tank entering bocage terrainwould have a defense value of [5]*.25 = 1.25 = “[2]”
9.3.3 If the stand represents armoured tracked vehiclesequipped with dozer blades or Culin hedgerow plows,make a cohesion roll as the stand moves each 1 inchforward into this terrain. On successful rolls, the standmakes the move. Its armour value is not reduced, as in9.3.2 above, during the act of entering hedgerow terrain.
This stand has “breached” the hedgerow and that inch ofterrain may be traversed by any stand thereafter as if a“Track” existed through the hedgerow terrain in thedirection of the breaching vehicles movement. If thecohesion roll fails, the stand stops for the remainder ofthe movement phase and the terrain is not breached.
Vehicles with dozer blades or Culin’s plows will bespecified in the Order of Battle section of the scenariorules and may be added to tracked armoured vehiclestands at a cost of the base unit cost multiplied by 1.3(cost x 1.3) points during the scenario design process.
9.3.4 Stands must be adjacent to spot or fire on enemytargets in hedgerow terrain unless the target has alreadyfired in the current turn.
[9.4] BuildingsIf artillery fire or bombing mission air strikes land in
building terrain features it may eliminate or reducethose areas to rubble.
9.4.1 As the Light building terrain represents mostlywooden buildings these will burn down and beeliminated over time. Each time an artillery or airstrikeimpact lands in light buildings conduct an attack on the
buildings with the HE firepower of the weapon against adefense value of 4. On the first successful attack place asmoke marker on the location and leave it in place for theduration of the game. On the second “E” result theterrain becomes Rough Terrain 1, and the smoke stays.
Note: The act “barraging,” or “bombing” a built-up area willset buildings on fire and generate smoke, whether the result is“No Effect,” “Eliminated,” or anything in between. It takesseveral “E” results to actually convert the buildings to rubble.The “E” results do not have to be in consecutive turns, butmay occur in the same turn as a result of multiple impacts inthe same location.
9.4.2 Medium buildings represent a mixture of woodresidential and stronger light commercial buildings oftypically one or two stories. Each time an artillery or air
Terrain
Movement CostFiring unit
cohesion & CRTdie roll effect for
target in this turn
LOS
blocked?Track Wheel Foot
Bocage/
Hedgerow4T n/a 2F
+4 personnel
+2 othersYes ++
34
Burfield (order #5184631)
8/13/2019 Micro Armour the Game-WWII 2nd Edition (Full Color)
http://slidepdf.com/reader/full/micro-armour-the-game-wwii-2nd-edition-full-color 40/136
strike impact lands in medium buildings conduct anattack on the buildings with the HE firepower of theartillery against a defense value of 5 for the buildings.On the second attack on this position, place a smokemarker on the location (the CRT result doesn't matter,flammable material will ignite). On the third “E”result the location converts to rubble and the smokemarker remains.
9.4.3 Heavy buildings represent dense urban regions orheavy commercial\industrial districts, often with tallmultistory structures built with heavy or reinforcedmaterials. Each time artillery or Air strikes land in Heavy
buildings conduct an attack on the buildings with theHE firepower of the artillery against a defense value of 6for the buildings. On the second 'on target' attack on thisposition, place a smoke marker on the location (the CRTresult doesn't matter, flammable material will ignite). Onthe fifth “E” result the location converts to rubble andthe smoke marker remains.
9.4.4 All building terrain ignores CRT results otherthan “E.”
[9.5] WaterThere are three types of Water Terrain depicted in theserules; Water, Rivers and Streams.
9.5.1 Water terrain may be featured along one edge ofthe board in “beach landing” scenarios of the game, or itmay represent a lake or lake edge. Water terrain mayonly be traversed by stands with an amphibiousmovement rating.
9.5.2 Rivers are defined as linear watercourses, whichare impassable to all stands except those with anamphibious movement rating. Non-amphibious capablestands may only cross rivers via bridges (Exception:infantry in fording boats, see 8.9.4). Typically engineer-ing troops or vehicles may not bridge rivers during thescenarios represented in this game.
Rivers should be represented clearly on the board,preferably by something 1 or more inches wide. This sizefeature may not be “to scale” but will aid in play.
9.5.3 Streams are defined as linear watercourses, whichimpede and may prevent movement. Streams may becrossed by non-amphibious capable stands only at“fords” or via bridges. Streams may be bridged byengineering troops, or bridging vehicles, during thescenarios represented in this game, see 11.5 for details.Streams may be crossed by infantry at fords or via
bridges. Amphibious infantry may cross a stream atany point. For details on amphibious infantry see (8.9.4and 8.9.5).
Streams should be represented clearly on the board,preferably by something about ½” to ¼” wide. This sizefeature may not be “to scale” but will aid in play.
[9.6] Weather EffectsWeather conditions can have an impact on visibility,movement, and cohesion.
9.6.1 Unless they are contradictory all effects of weatheron visibility and or movement are cumulative.
9.6.2 Conditions and their impact:
Light Rain: Reduce maximum sighting distance to 3D6”
Haze or Light Fog: Reduce maximum sighting distanceto 2D8” or by 1D20%.
Heavy Rain or Light Snow: Reduce maximum sightingdistance to 2D6” or by 3D6%.
Heavy Snow or Fog, Dust or Sand Storm:Reducemaximum sighting distance to 1D6”
Snow: Treat all “clear” terrain as Rough Terrain 1.
Deep Snow: Treat all “clear” terrain as Rough Terrain 1and double all movement point costs.
Extreme Cold: Treat water terrain types (lakes, rivers orstreams) as Rough Terrain 1
Extreme Heat or Cold: Modify “Movement” cohesionrolls by +2 for dismounted personnel and weaponsnoted with a “P” in the Weapons Data Tables.
Darkness: If the scenario is occurring in the dark lowerthe force cohesion level by as much as 4. Flares orillumination artillery rounds may temporarily negatethis cohesion penalty. Maximum sighting distanceduring night engagements should typically be 1 to 5inches but no more than 10” under ideal atmosphericand lunar conditions. Scenarios occurring in darknessmust specify the effects on play.
Designers may impose modifiers to combat cohesionrolls for scenarios involving rain, fog, dust, snow, or sand
storms in addition to the sighting distance limitations.
9.6.3 Unless otherwise specified in the scenariodescription, any reduction in visibility will bedetermined at the beginning of the initiative phaseof the turn in which the weather condition occurs.The determined reduction will remain constantthroughout the turn. The reduction may remain constantfrom turn to turn, until the weather changes or may bevariable from turn to turn, depending on the scenariodescription. Experiment and have fun with this!
35
Burfield (order #5184631)
8/13/2019 Micro Armour the Game-WWII 2nd Edition (Full Color)
http://slidepdf.com/reader/full/micro-armour-the-game-wwii-2nd-edition-full-color 41/136
[10.0] WEAPONS SPECIFICS &SPECIAL WEAPONS
[10.1] Command Units10.1.1 HQsThe HQ stand is used to represent the battalion (orequivalent) command in the game. Scenario designersshould assign one HQ for each Battalion sized unit in ascenario. More may be added by paying the additionalcosts. An Infantry HQ stand may be used for this at theprinted cost. A weapon stand may be designated as anHQ, at 1.5x the cost of that stand. HQs don’t have a“quality level,” as that property is unique to GHQs.However, HQs do provide some tactical benefits, as below.
10.1.2 When one or more GHQ or HQ stand is part of amovement group, each GHQ and HQ stand provides a-2 cohesion die roll modifier to the movement cohesionroll, regardless of its quality value.
10.1.3 During the Marker Removal Phase, if a
Suppressed stand is adjacent to (1” away from) a non-Suppressed and/or non-Disorganized HQ or GHQ stand,that stand may apply a -1 to their recovery cohesion dieroll. This modifier does not apply to the “natural 1”required to recover from a Disorganized state.
10.1.4 GHQsGHQs are typically designated when a force contains 3or more battalions (regiment/brigade level), but aminimum of 1 GHQ is required per side regardless offorce composition, unless specified in the scenario.In a particularly large game multiple GHQs per sidemay be specified.
GHQs may be represented by Infantry HQ stands orweapon stands at the following cost, based on theirquality level:
Note: Infantry HQ stands must pay the above cost when usedas a GHQ.
10.1.5 GHQs are the source of movement orders for aforce in play. If a player’s GHQ is eliminated or leavesthe board, that player may no longer issue movementorders until a new GHQ is appointed and assumescommand (see section 10.1.7).
10.1.6 A GHQ’s quality value (+ or -) is a directdie roll modifier to the Movement Orders Table, thus
influencing the number of issuable orders each turn.
10.1.7 Loss of a Command UnitIn the first phase after an HQ or GHQ stand is lost, theplayer must designate, in writing, the stand which will“take command.”
During the Marker Removal Phase of the turn of loss, theplayer must roll a successful cohesion check, modified
by the factors below, for the “change in command” totake place.
German, American force: +3
British/Commonwealth force: +4
All Other forces: +5
If the force, which has lost its GHQ, has a cohesion levelof 14 or less, it may only be replaced by an HQ. If theforce, which has lost its GHQ or an HQ, has a cohesionlevel of 12 or less, it may not replace the GHQ or HQwith a unit in play. This represents the training and
capability of junior officers to assume command with-out approval by higher authority, and the possible
inability of the subordinate units to recognize thechange during the course of battle. When a force with acohesion of 15 or higher succeeds in getting a new GHQ,roll 1D20. If the result is 5 or lower the GHQ has a -1modifier, a roll of 6 to 16 the new GHQ has no modifier,a roll of 17 to 19 the GHQ has a +1 modifier and on a 20the GHQ has a +2 modifier.
[10.2] Stands with Facing Restrictions
Any weapon, marked with an 'R' in the notes column ofthe Weapons Data Tables may only fire on targets foundto be in the direction in which their main weapon facesand within the angle of the Firing Template. They mayfire at targets to their side or rear using the firepowerand range data for the Infantry HQ unit appropriate fortheir nationality in cases of overrun or close assault.
[10.3] “P” Stands
The defense value of stands marked with a “P” in theWeapons Data Tables is halved (rounded down – i.e.Cavalry: round to a defense of 2) when they are in thefire/move posture.
GHQ Quality Cost
-2 GHQ x 1.2 points
-1 GHQ x 1.6 points
0 GHQ x 2 points
+1 GHQ x 2.4 points
+2 GHQ x 2.8 points
+3 GHQ x 3.2 points
36
Burfield (order #5184631)
8/13/2019 Micro Armour the Game-WWII 2nd Edition (Full Color)
http://slidepdf.com/reader/full/micro-armour-the-game-wwii-2nd-edition-full-color 42/136
[10.4] MMG, Light Mortar, & Infantry Support StandsThese types of Stands represent groups of mediummachine guns, heavy machine guns, and/or mortars of40mm to 60mm. These are used to provide closesupporting fire for other units. They are “special” in that,when they fire, all “No Effect” combat results are treatedas “Suppressed” results. See the Combat Results Table.They are considered personnel stands for all purposes.
[10.5] Weapons StandsWeapons stands represent groups of anti-tank guns,anti-aircraft guns, etc. As stated in rule section [6.0]“Spotting,” these stands can sight and fire overintervening personnel stands. They are generally notarmoured, though they may be mounted on armouredvehicles, in which case they take on the defense class ofthat vehicle. (The U.S. M3 GMC is an example) If theirdefense value (as listed in the Weapons Data Tables) hasno brackets they are unarmoured targets. Stands firingon unarmoured targets use only their HE attack value.
They generally have a movement value of zero (0) andmay only move when “mounted” to transport vehicles.
[10.6] [R]econ Stands
Stands marked with an [R] in a scenario’s Order of Battleor “Forces” section are considered reconnaissance unitsor units with particularly high initiative compared toother stands. Stands with this designation do not sufferthe +3 cohesion die roll penalty when attempting to movewithout an order. Any stands given this designation andability cost an additional 10 points above their basic valuefound in the Weapons Data Tables.
Note: This designation was not to be applied to all of thearmoured car, halftrack, jeep, motorcycle, or personnel standsof a reconnaissance battalion. All the stands of a “Recon”battalion may be given a slightly higher cohesion than otherbattalions in a scenario, but they should follow all the normalmovement rules as other formations in play. Some nations list“Recon Infantry” as a weapon type, and are usually part of aRecon Company. While these are excellent candidates for the[R] designation they do not automatically receive it.
[10.7] Dual Purpose Guns10.7.1 The British 25lbr. and the Soviet 76.2mm Division
artillery units are dual-purpose weapons which arehandled differently from other field artillery. In a giventurn they may fire either as “artillery” weapons usingthe artillery rules, or they may be used as anti-tank gunsat the players’ discretion.
10.7.2 The German 88mm, Italian 90mm, and Soviet85mm AA guns performed in two roles, both as AA gunsand AT guns. In a given turn they may fire either as anti-aircraft guns or against ground forces.
When firing at ground targets these weapons use thefollowing range effects table:
All of these guns had reliable direct-fire sights and were
supplied with effective armour-piercing ammunition.
It was also “doctrine” that really makes these weapons
different. The forces deliberately deployed these guns in
both roles and gun crews were trained accordingly. The
Weapon Data Tables includes the necessary specifica-
tions for all the guns in either role.
Note: The US 90mm (mid 43 on) and British 3.7” (94mm)
guns could have been used in this manner and did on occasion
fire at ground targets in self-defense, but doctrinally were not put in the role of anti-tank guns like the German, Italian, and
Soviet units.
[10.8] Infantry Close Support Artillery Weapons
Certain weapons employed artillery guns and ammuni-
tion in aimed fires to suppress or destroy enemy strong
points and positions. These are known as Infantry Close
Support Artillery weapons and behave in all ways like
other artillery weapons conducting direct fire artillery
attacks with the following exceptions:
1. They do not use impact markers – Their fire is directedat an individual stand and does not continuethroughout the turn.
2. They may not fire at less than –3 Combat Differentials.However, like artillery weapons “No Effect” results onthe CRT are treated as “S” results instead.
3. They ignore the “range” effects modifiers to CRTdie rolls.
4. They may use the Fire/Move posture (unlike other
'artillery' weapons).
[10.9] “Land Ships”Tanks with multiple turrets or weapons (such as the M3Grant/Lee, Char B1, and the T-35, etc.) have firepowerand range values, as well as restrictions or notes listedfor the various weapons they were equipped with. Onlyone weapon may be fired per turn and that weapon mustadhere to any specified restrictions unique to its use.
Range1” or
less
2” to
8”
9” to
16”
17” to
24”
Each
additional
8”
Die Roll
Modifier
-1 0 +1 +2 +1
37
Burfield (order #5184631)
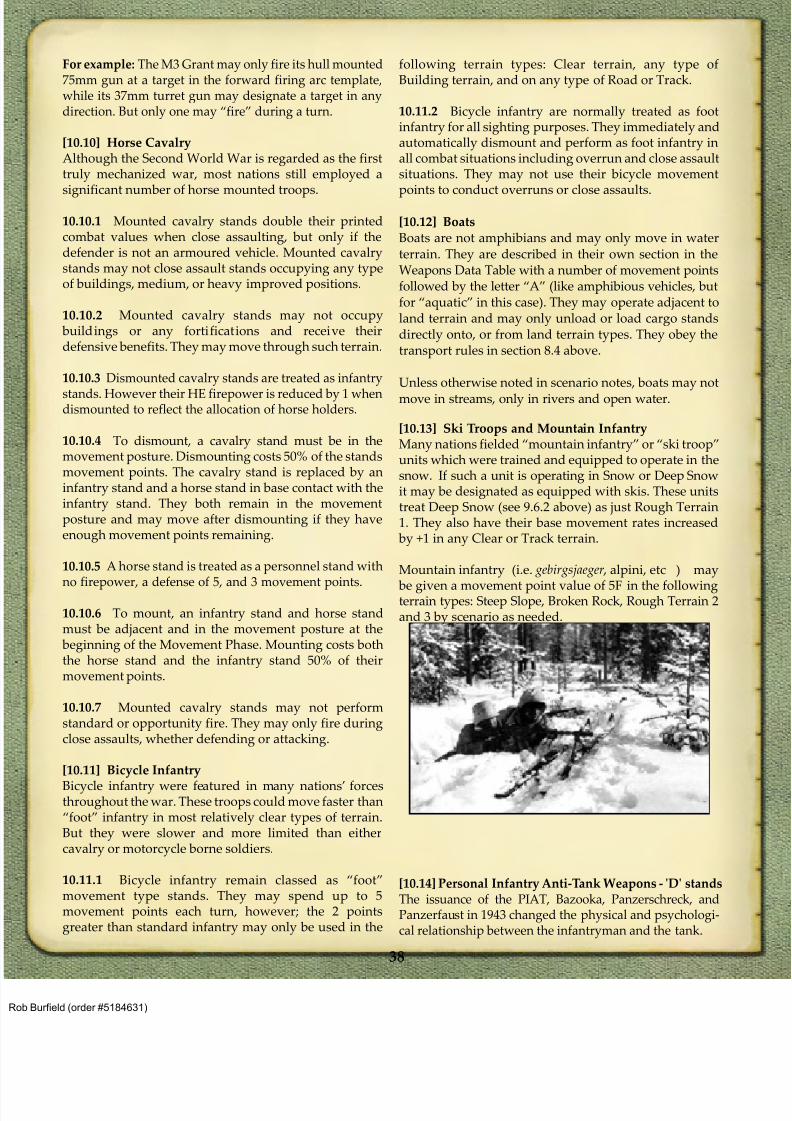
8/13/2019 Micro Armour the Game-WWII 2nd Edition (Full Color)
http://slidepdf.com/reader/full/micro-armour-the-game-wwii-2nd-edition-full-color 43/136
For example: The M3 Grant may only fire its hull mounted75mm gun at a target in the forward firing arc template,while its 37mm turret gun may designate a target in anydirection. But only one may “fire” during a turn.
[10.10] Horse CavalryAlthough the Second World War is regarded as the firsttruly mechanized war, most nations still employed a
significant number of horse mounted troops.
10.10.1 Mounted cavalry stands double their printedcombat values when close assaulting, but only if thedefender is not an armoured vehicle. Mounted cavalrystands may not close assault stands occupying any typeof buildings, medium, or heavy improved positions.
10.10.2 Mounted cavalry stands may not occupy buildings or any fortifications and receive theirdefensive benefits. They may move through such terrain.
10.10.3 Dismounted cavalry stands are treated as infantry
stands. However their HE firepower is reduced by 1 whendismounted to reflect the allocation of horse holders.
10.10.4 To dismount, a cavalry stand must be in themovement posture. Dismounting costs 50% of the standsmovement points. The cavalry stand is replaced by aninfantry stand and a horse stand in base contact with theinfantry stand. They both remain in the movementposture and may move after dismounting if they haveenough movement points remaining.
10.10.5 A horse stand is treated as a personnel stand with
no firepower, a defense of 5, and 3 movement points.
10.10.6 To mount, an infantry stand and horse standmust be adjacent and in the movement posture at the
beginning of the Movement Phase. Mounting costs boththe horse stand and the infantry stand 50% of theirmovement points.
10.10.7 Mounted cavalry stands may not performstandard or opportunity fire. They may only fire duringclose assaults, whether defending or attacking.
[10.11] Bicycle Infantry
Bicycle infantry were featured in many nations’ forcesthroughout the war. These troops could move faster than“foot” infantry in most relatively clear types of terrain.But they were slower and more limited than eithercavalry or motorcycle borne soldiers.
10.11.1 Bicycle infantry remain classed as “foot”movement type stands. They may spend up to 5movement points each turn, however; the 2 pointsgreater than standard infantry may only be used in the
following terrain types: Clear terrain, any type ofBuilding terrain, and on any type of Road or Track.
10.11.2 Bicycle infantry are normally treated as footinfantry for all sighting purposes. They immediately andautomatically dismount and perform as foot infantry inall combat situations including overrun and close assaultsituations. They may not use their bicycle movement
points to conduct overruns or close assaults.
[10.12] BoatsBoats are not amphibians and may only move in waterterrain. They are described in their own section in theWeapons Data Table with a number of movement pointsfollowed by the letter “A” (like amphibious vehicles, butfor “aquatic” in this case). They may operate adjacent toland terrain and may only unload or load cargo standsdirectly onto, or from land terrain types. They obey thetransport rules in section 8.4 above.
Unless otherwise noted in scenario notes, boats may notmove in streams, only in rivers and open water.
[10.13] Ski Troops and Mountain InfantryMany nations fielded “mountain infantry” or “ski troop”units which were trained and equipped to operate in thesnow. If such a unit is operating in Snow or Deep Snowit may be designated as equipped with skis. These unitstreat Deep Snow (see 9.6.2 above) as just Rough Terrain1. They also have their base movement rates increased
by +1 in any Clear or Track terrain.
Mountain infantry (i.e. gebirgsjaeger , alpini, etc ) may
be given a movement point value of 5F in the followingterrain types: Steep Slope, Broken Rock, Rough Terrain 2and 3 by scenario as needed.
[10.14] Personal Infantry Anti-Tank Weapons - 'D' standsThe issuance of the PIAT, Bazooka, Panzerschreck, andPanzerfaust in 1943 changed the physical and psychologi-cal relationship between the infantryman and the tank.
38
Burfield (order #5184631)
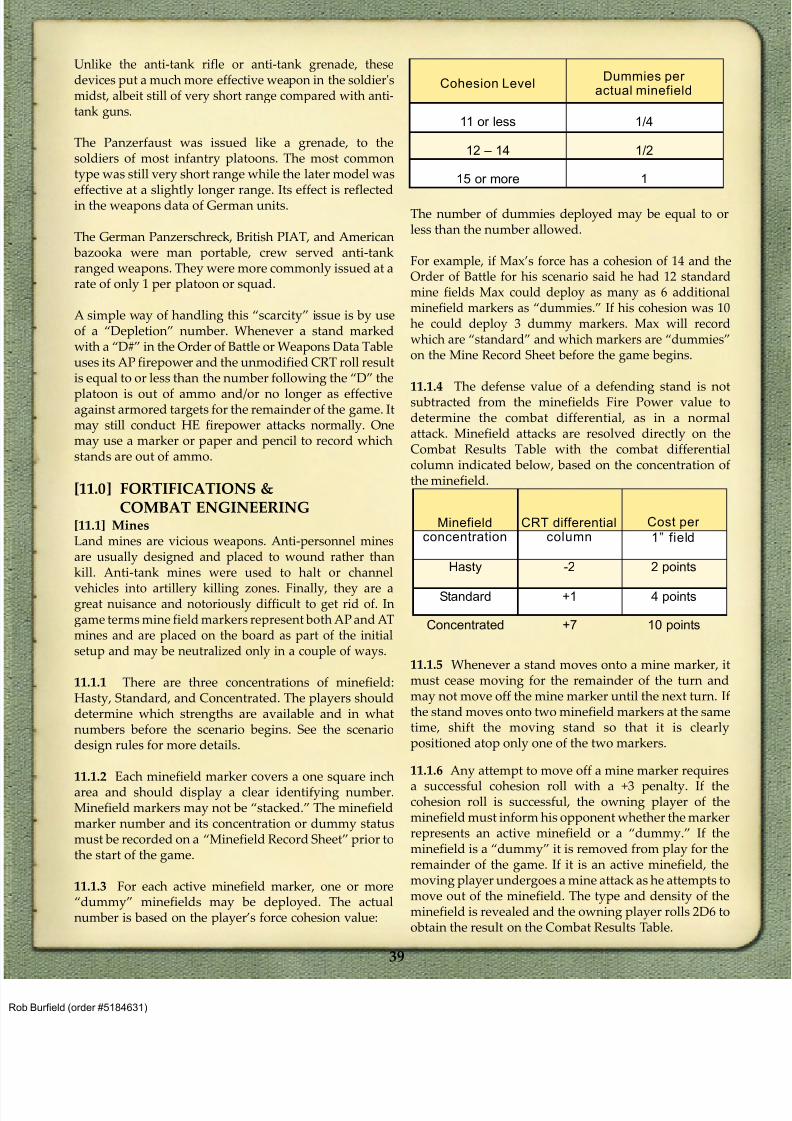
8/13/2019 Micro Armour the Game-WWII 2nd Edition (Full Color)
http://slidepdf.com/reader/full/micro-armour-the-game-wwii-2nd-edition-full-color 44/136
Unlike the anti-tank rifle or anti-tank grenade, thesedevices put a much more effective weapon in the soldier'smidst, albeit still of very short range compared with anti-tank guns.
The Panzerfaust was issued like a grenade, to thesoldiers of most infantry platoons. The most commontype was still very short range while the later model was
effective at a slightly longer range. Its effect is reflectedin the weapons data of German units.
The German Panzerschreck, British PIAT, and American bazooka were man portable, crew served anti-tankranged weapons. They were more commonly issued at arate of only 1 per platoon or squad.
A simple way of handling this “scarcity” issue is by useof a “Depletion” number. Whenever a stand markedwith a “D#” in the Order of Battle or Weapons Data Tableuses its AP firepower and the unmodified CRT roll resultis equal to or less than the number following the “D” the
platoon is out of ammo and/or no longer as effectiveagainst armored targets for the remainder of the game. Itmay still conduct HE firepower attacks normally. Onemay use a marker or paper and pencil to record whichstands are out of ammo.
[11.0] FORTIFICATIONS &
COMBAT ENGINEERING
[11.1] Mines
Land mines are vicious weapons. Anti-personnel minesare usually designed and placed to wound rather thankill. Anti-tank mines were used to halt or channel
vehicles into artillery killing zones. Finally, they are agreat nuisance and notoriously difficult to get rid of. Ingame terms mine field markers represent both AP and ATmines and are placed on the board as part of the initialsetup and may be neutralized only in a couple of ways.
11.1.1 There are three concentrations of minefield:Hasty, Standard, and Concentrated. The players shoulddetermine which strengths are available and in whatnumbers before the scenario begins. See the scenariodesign rules for more details.
11.1.2 Each minefield marker covers a one square incharea and should display a clear identifying number.Minefield markers may not be “stacked.” The minefieldmarker number and its concentration or dummy statusmust be recorded on a “Minefield Record Sheet” prior tothe start of the game.
11.1.3 For each active minefield marker, one or more“dummy” minefields may be deployed. The actualnumber is based on the player’s force cohesion value:
The number of dummies deployed may be equal to orless than the number allowed.
For example, if Max’s force has a cohesion of 14 and theOrder of Battle for his scenario said he had 12 standardmine fields Max could deploy as many as 6 additionalminefield markers as “dummies.” If his cohesion was 10he could deploy 3 dummy markers. Max will recordwhich are “standard” and which markers are “dummies”on the Mine Record Sheet before the game begins.
11.1.4The defense value of a defending stand is notsubtracted from the minefields Fire Power value to
determine the combat differential, as in a normalattack. Minefield attacks are resolved directly on theCombat Results Table with the combat differentialcolumn indicated below, based on the concentration ofthe minefield.
11.1.5 Whenever a stand moves onto a mine marker, itmust cease moving for the remainder of the turn andmay not move off the mine marker until the next turn. Ifthe stand moves onto two minefield markers at the sametime, shift the moving stand so that it is clearlypositioned atop only one of the two markers.
11.1.6 Any attempt to move off a mine marker requires
a successful cohesion roll with a +3 penalty. If thecohesion roll is successful, the owning player of theminefield must inform his opponent whether the markerrepresents an active minefield or a “dummy.” If theminefield is a “dummy” it is removed from play for theremainder of the game. If it is an active minefield, themoving player undergoes a mine attack as he attempts tomove out of the minefield. The type and density of theminefield is revealed and the owning player rolls 2D6 toobtain the result on the Combat Results Table.
Cohesion LevelDummies per
actual minefield
11 or less 1/4
12 – 14 1/2
15 or more 1
Minefieldconcentration
CRT differentialcolumn
Cost per
1” field
Hasty -2 2 points
Standard +1 4 points
Concentrated +7 10 points
39
Burfield (order #5184631)
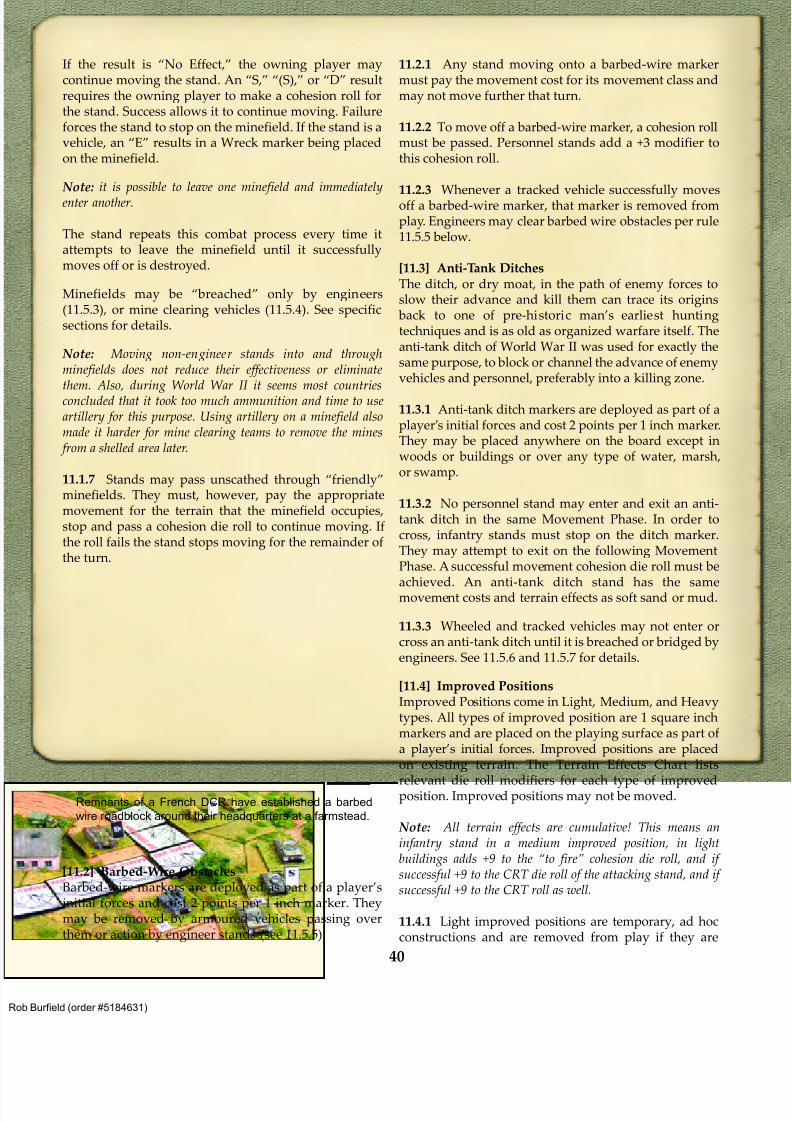
8/13/2019 Micro Armour the Game-WWII 2nd Edition (Full Color)
http://slidepdf.com/reader/full/micro-armour-the-game-wwii-2nd-edition-full-color 45/136
If the result is “No Effect,” the owning player maycontinue moving the stand. An “S,” “(S),” or “D” resultrequires the owning player to make a cohesion roll forthe stand. Success allows it to continue moving. Failureforces the stand to stop on the minefield. If the stand is avehicle, an “E” results in a Wreck marker being placedon the minefield.
Note: it is possible to leave one minefield and immediatelyenter another.
The stand repeats this combat process every time itattempts to leave the minefield until it successfullymoves off or is destroyed.
Minefields may be “breached” only by engineers(11.5.3), or mine clearing vehicles (11.5.4). See specificsections for details.
Note: Moving non-engineer stands into and throughminefields does not reduce their effectiveness or eliminate
them. Also, during World War II it seems most countriesconcluded that it took too much ammunition and time to useartillery for this purpose. Using artillery on a minefield alsomade it harder for mine clearing teams to remove the mines from a shelled area later.
11.1.7 Stands may pass unscathed through “friendly”minefields. They must, however, pay the appropriatemovement for the terrain that the minefield occupies,stop and pass a cohesion die roll to continue moving. Ifthe roll fails the stand stops moving for the remainder ofthe turn.
[11.2] Barbed-Wire ObstaclesBarbed-wire markers are deployed as part of a player’sinitial forces and cost 2 points per 1 inch marker. Theymay be removed by armoured vehicles passing overthem or action by engineer stands (see 11.5.5).
11.2.1 Any stand moving onto a barbed-wire markermust pay the movement cost for its movement class andmay not move further that turn.
11.2.2 To move off a barbed-wire marker, a cohesion rollmust be passed. Personnel stands add a +3 modifier tothis cohesion roll.
11.2.3 Whenever a tracked vehicle successfully movesoff a barbed-wire marker, that marker is removed fromplay. Engineers may clear barbed wire obstacles per rule11.5.5 below.
[11.3] Anti-Tank DitchesThe ditch, or dry moat, in the path of enemy forces toslow their advance and kill them can trace its origins
back to one of pre-historic man’s earliest huntingtechniques and is as old as organized warfare itself. Theanti-tank ditch of World War II was used for exactly thesame purpose, to block or channel the advance of enemyvehicles and personnel, preferably into a killing zone.
11.3.1 Anti-tank ditch markers are deployed as part of aplayer’s initial forces and cost 2 points per 1 inch marker.They may be placed anywhere on the board except inwoods or buildings or over any type of water, marsh,or swamp.
11.3.2 No personnel stand may enter and exit an anti-tank ditch in the same Movement Phase. In order tocross, infantry stands must stop on the ditch marker.They may attempt to exit on the following MovementPhase. A successful movement cohesion die roll must be
achieved. An anti-tank ditch stand has the samemovement costs and terrain effects as soft sand or mud.
11.3.3 Wheeled and tracked vehicles may not enter orcross an anti-tank ditch until it is breached or bridged byengineers. See 11.5.6 and 11.5.7 for details.
[11.4] Improved PositionsImproved Positions come in Light, Medium, and Heavytypes. All types of improved position are 1 square inchmarkers and are placed on the playing surface as part ofa player’s initial forces. Improved positions are placedon existing terrain. The Terrain Effects Chart lists
relevant die roll modifiers for each type of improvedposition. Improved positions may not be moved.
Note: All terrain effects are cumulative! This means aninfantry stand in a medium improved position, in lightbuildings adds +9 to the “to fire” cohesion die roll, and if successful +9 to the CRT die roll of the attacking stand, and if successful +9 to the CRT roll as well.
11.4.1 Light improved positions are temporary, ad hocconstructions and are removed from play if they are
Remnants of a French DCR have established a barbed
wire roadblock around their headquarters at a farmstead.
40
Burfield (order #5184631)
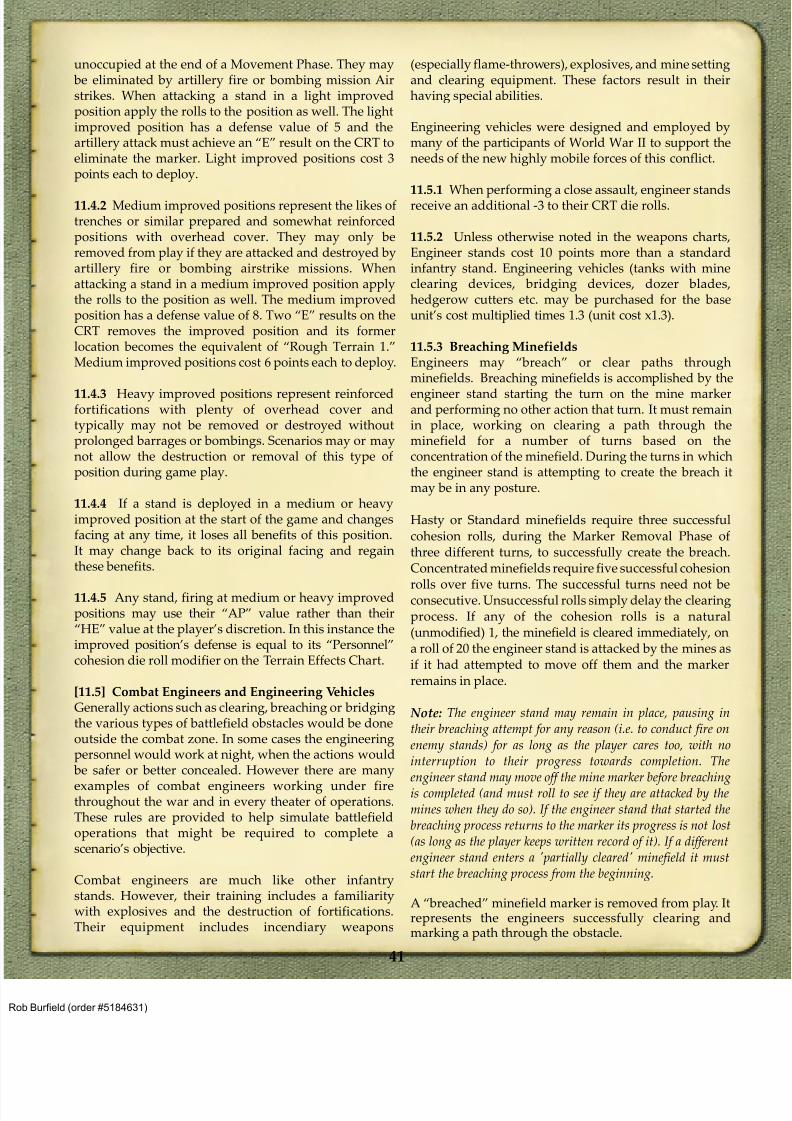
8/13/2019 Micro Armour the Game-WWII 2nd Edition (Full Color)
http://slidepdf.com/reader/full/micro-armour-the-game-wwii-2nd-edition-full-color 46/136
unoccupied at the end of a Movement Phase. They may be eliminated by artillery fire or bombing mission Airstrikes. When attacking a stand in a light improvedposition apply the rolls to the position as well. The lightimproved position has a defense value of 5 and theartillery attack must achieve an “E” result on the CRT toeliminate the marker. Light improved positions cost 3points each to deploy.
11.4.2 Medium improved positions represent the likes oftrenches or similar prepared and somewhat reinforcedpositions with overhead cover. They may only beremoved from play if they are attacked and destroyed byartillery fire or bombing airstrike missions. Whenattacking a stand in a medium improved position applythe rolls to the position as well. The medium improvedposition has a defense value of 8. Two “E” results on theCRT removes the improved position and its formerlocation becomes the equivalent of “Rough Terrain 1.”Medium improved positions cost 6 points each to deploy.
11.4.3 Heavy improved positions represent reinforcedfortifications with plenty of overhead cover andtypically may not be removed or destroyed withoutprolonged barrages or bombings. Scenarios may or maynot allow the destruction or removal of this type ofposition during game play.
11.4.4 If a stand is deployed in a medium or heavyimproved position at the start of the game and changesfacing at any time, it loses all benefits of this position.It may change back to its original facing and regainthese benefits.
11.4.5 Any stand, firing at medium or heavy improvedpositions may use their “AP” value rather than their“HE” value at the player’s discretion. In this instance theimproved position’s defense is equal to its “Personnel”cohesion die roll modifier on the Terrain Effects Chart.
[11.5] Combat Engineers and Engineering VehiclesGenerally actions such as clearing, breaching or bridgingthe various types of battlefield obstacles would be doneoutside the combat zone. In some cases the engineeringpersonnel would work at night, when the actions would
be safer or better concealed. However there are many
examples of combat engineers working under firethroughout the war and in every theater of operations.These rules are provided to help simulate battlefieldoperations that might be required to complete ascenario’s objective.
Combat engineers are much like other infantrystands. However, their training includes a familiaritywith explosives and the destruction of fortifications.Their equipment includes incendiary weapons
(especially flame-throwers), explosives, and mine settingand clearing equipment. These factors result in theirhaving special abilities.
Engineering vehicles were designed and employed bymany of the participants of World War II to support theneeds of the new highly mobile forces of this conflict.
11.5.1 When performing a close assault, engineer standsreceive an additional -3 to their CRT die rolls.
11.5.2 Unless otherwise noted in the weapons charts,Engineer stands cost 10 points more than a standardinfantry stand. Engineering vehicles (tanks with mineclearing devices, bridging devices, dozer blades,hedgerow cutters etc. may be purchased for the baseunit’s cost multiplied times 1.3 (unit cost x1.3).
11.5.3 Breaching MinefieldsEngineers may “breach” or clear paths throughminefields. Breaching minefields is accomplished by the
engineer stand starting the turn on the mine markerand performing no other action that turn. It must remainin place, working on clearing a path through theminefield for a number of turns based on theconcentration of the minefield. During the turns in whichthe engineer stand is attempting to create the breach itmay be in any posture.
Hasty or Standard minefields require three successfulcohesion rolls, during the Marker Removal Phase ofthree different turns, to successfully create the breach.Concentrated minefields require five successful cohesion
rolls over five turns. The successful turns need not beconsecutive. Unsuccessful rolls simply delay the clearingprocess. If any of the cohesion rolls is a natural(unmodified) 1, the minefield is cleared immediately, ona roll of 20 the engineer stand is attacked by the mines asif it had attempted to move off them and the markerremains in place.
Note: The engineer stand may remain in place, pausing intheir breaching attempt for any reason (i.e. to conduct fire onenemy stands) for as long as the player cares too, with nointerruption to their progress towards completion. Theengineer stand may move off the mine marker before breachingis completed (and must roll to see if they are attacked by themines when they do so). If the engineer stand that started thebreaching process returns to the marker its progress is not lost(as long as the player keeps written record of it). If a differentengineer stand enters a 'partially cleared' minefield it muststart the breaching process from the beginning.
A “breached” minefield marker is removed from play. Itrepresents the engineers successfully clearing andmarking a path through the obstacle.
41
Burfield (order #5184631)
8/13/2019 Micro Armour the Game-WWII 2nd Edition (Full Color)
http://slidepdf.com/reader/full/micro-armour-the-game-wwii-2nd-edition-full-color 47/136
11.5.4 Mine Clearing VehiclesMine clearing armoured vehicles are those designed ormodified to counter mines. The presence of thesevehicles will be noted in the Order of Battle section of ascenario. Adding mine rollers, flails, plows etc., toarmored vehicles costs 1.3 times the unit's base cost (e.g.if a tank stand cost 70 points, deploying the anti-mineflail variant would cost 91 points).
Breaching minefields with these vehicles is accomplished
by the vehicle driving onto the mine marker, stopping onit and performing no other action that turn. It mustremain in place, working on clearing a path through theminefield for a number of turns based on theconcentration of the minefield. During these turns themine clearing vehicle must be in the movement posture.
When the engineering vehicle moves onto the minefield,the minefield’s concentration is revealed. If the markerrepresents a hasty minefield it may be “breached” afterone successful clearing attempt, two turns are requiredfor standard minefields, while three turns are required
for concentrated fields. During the Marker RemovalPhase of each turn on the minefield, a cohesion roll ismade. If the roll succeeds, the stand has made progressin clearing a pathway through the minefield. If multiplesuccesses are required, the successful turns need not beconsecutive. Unsuccessful rolls simply delay the clearingprocess. If any of the cohesion rolls results in a natural(unmodified) 1, the minefield is cleared immediately, onroll of 20 the mine clearing vehicle stand is attacked bythe mines as if it had attempted to move off them and themarker remains in place.
11.5.5 Breaching Barbed Wire ObstaclesEngineers may clear barbed wire markers. The clearingprocess begins by the engineer stand moving onto the
barbed wire and performing no other action that turn. Asuccessful cohesion roll, during the Marker RemovalPhase, clears a path through the barbed wire obstacle.The engineer stand must be in the movement posturewhile performing this function. An unsuccessful rollsimply delays the clearing process.
11.5.6 Breaching Anti-Tank DitchesEngineers or vehicles with bulldozer blades may attemptto collapse an anti-tank ditch with their explosives andtools. To do this the engineer or vehicle stand must startthe turn adjacent to the anti-tank ditch marker and mayperform no other action that turn. The engineer stand isin the “firing” posture for this function. A vehicle with adozer blade requires two turns of successful cohesion
rolls, while an Engineer stand requires 4 turns. Successfulcohesion rolls, during the Marker Removal Phase arerequired to breach the anti-tank ditch. Unsuccessful rollssimply delay the work. Once “breached,” the anti-tankditch marker is removed from play.
11.5.7 Bridging ObstaclesBridging tanks and engineer stands with accompanyingtransports carrying bridging materials, may erecttemporary bridges over small streams, anti-tank ditches,and other obstacles. Scenario special rules will clarifywhat terrain features may be bridged and indicate thepresence of these vehicles in the Order of Battle section.
Note: Building bridges over obstacles wider than 1 inch(100m) are not possible during typical scenario lengths andthus are not modeled in game terms. Bridging tanks typicallyonly carried equipment to span about a 9m obstacle. Bridgingcolumns of an engineer battalion could cross wider obstaclesbut likely require construction times outside the duration of any of the scenarios in these rules.
To bridge an obstacle, the bridging tank or engineerstand must begin its turn adjacent to (in base to basecontact with) the obstacle, and in the movement posture.If the bridge is being built by Engineers a transport,
carrying bridging materials must begin its turn adjacentto the “bridging engineer” stand performing theconstruction. The transport’s posture is irrelevant to the
bridge building process.
A bridge marker may be placed over the obstacle after 2turns of successful cohesion rolls for bridging vehiclesand 4 turns of successes in the case of engineer personnel.The cohesion die roll for bridge building is conductedduring the Marker Removal Phase of each turn.
42
Burfield (order #5184631)
8/13/2019 Micro Armour the Game-WWII 2nd Edition (Full Color)
http://slidepdf.com/reader/full/micro-armour-the-game-wwii-2nd-edition-full-color 48/136
The bridge simply remains incomplete if the roll fails.The bridging stand, and supply transport, must remainin place until the bridge is complete. If the engineer standmoves away before the bridge is complete it must beginthe building process over again.
Bridge markers are considered “clear” terrain forspotting and combat effects purposes but Rough Terrain
2 for movement purposes.
11.5.8 Destroying BridgesDestroying, or preventing the destruction of a bridge is a
common objective in any theatre of conflict. The decisionto destroy a bridge is an important one as it limits boththe enemy’s and your own options for movement. Theweight of this decision is determined by the size of theobstacle being crossed; the size and materials used in the
bridge itself and of course the resources available toeffect the destruction. Consider a wooden beam foot
bridge over a creek compared with a 4 lane steel andconcrete truss or suspension bridge over a major river.The resources needed to destroy these two example
bridges are different. Game scenarios, concerned withthis topic, may need special rules concerning when, how,
and with what a bridge may be destroyed.
To destroy a bridge built by combat engineers (as in11.5.7 above) an attack must be directed against the
bridge itself (not stands on the bridge). The bridge has anunarmoured Defense Value of 2, and will be unusable ona “D” or “E” result.
11.5.9 Clearing WrecksRecovery vehicles equipped with dozer blades orwrecker booms may clear roads or tracks that areobstructed by wreck markers. Non-engineering vehiclesmay also do so, as detailed below.
11.5.9.1 To clear wrecks with a wrecker, or recoveryvehicle move its stand onto a wreck marker and pay themovement penalty for its movement class. It may notmove further that turn. On the following turns, duringthe marker removal phase, a cohesion roll may be madeto clear the road. If successful, the road is cleared,otherwise not. The wrecker vehicle is considered in themovement posture during all turns in which it isattempting to clear the road.
11.5.9.2 Unloaded transports with a transport capacityof 10 or higher and fully tracked armoured fightingvehicles (basically tanks) with an defense value of [5] orhigher may also clear roadways of wrecks. Move theclearing stand onto a wreck marker and pay themovement penalty for its movement class. It may notmove further that turn. It must remain in place for twoadditional turns in the movement posture. At the end of
the second turn, and thereafter, during the markerremoval phase, a cohesion roll may be made to clear theroad. If successful, the road is cleared, otherwise it is not.
11.5.9.3 After the road is cleared, the wreck markerremains in place but is marked to note that the road iscleared. The wreck still provides its terrain effects if astand is moved into it (by paying the appropriate costs)
but now moving stands may resume using the roadmovement rate through this area.
[11.6] Flame Throwing VehiclesSome vehicles are designated as “flame thrower” types.These should not be confused with the man-packedflame-throwers used by combat engineers. They arespecial-purpose high-pressure types mounted ontracked vehicles.
11.6.1 Whenever one of these weapons fires, thedefender must make a successful cohesion roll. Failurerequires the defender to retreat at the end of the phase.This retreat must be at least one inch and place thedefender one inch farther away from the flame-throwerthan it started. If this is not possible, the defender iseliminated. (They surrendered!)
11.6.2 If one of these vehicles performs an overrun, thedefender suffers an additional +3 penalty to its requiredcohesion roll.
[12.0] OPTIONAL RULES[12.1] Unit DeterminationThe standard rules have no control mechanism to dealwith “unit” or “force” cohesion or morale. Essentially,players may “fight to the last platoon” without anyconsequences, yet this extreme was a very rareconclusion to engagements in WWII. The following rulesprovide an effective set of mechanics, known as Unit orFormation Determination, to simulate a force’swillingness to stay in the fight. Their use is optional buthighly recommended.
A unit’s “determination” is based on the percentage ofcasualties that formation can endure before self-preservation asserts itself. Much post-war research andanalysis has shown that once a WWII unit (really, anycombat unit) fell below 65% of its starting strength, itscombat effectiveness dropped dramatically. The basic
Marker
Name
Movement Cost Firing unitcohesion & CRTdie roll effect for target in this turn
LOS
blocked?Track Wheel Foot
Engineer
Bridge 2 5 1.5F none no
43
Burfield (order #5184631)
8/13/2019 Micro Armour the Game-WWII 2nd Edition (Full Color)
http://slidepdf.com/reader/full/micro-armour-the-game-wwii-2nd-edition-full-color 49/136
35% determination level may be modified to reflectcertain conditions or national philosophies but should bedone so sparingly and carefully by scenario designers.
Changing the determination level may have a bigimpact on a unit that really is beyond the scope of atactical war game, yet these consequences were veryimportant to higher commands. For example, both the
Soviets and Germans at Stalingrad fought with greatcourage and savagery. The determination levels for bothsides should reflect this, rising to as much as sixty oreven seventy percent.
A broken formation will remain unreliable in combatfor the foreseeable future. These units were oftendescribed as brittle, as they could rarely be countedto bear much more strain. Any formation whichcontinues fighting until it is down to only thirty or fortypercent of its original strength will require a great deal oftime to replace and retrain, as too many of itsexperienced NCOs and talented junior officers have
become casualties.
Both the Soviets and Germans often “disbanded” suchshattered units and redistributed the remaining soldiersto other units or formed cadres for a new unit altogether.Despite the high cost of this level of commitment, it wasasked for and received, on numerous occasionsthroughout the war.
Simply put, each unit in play will have a “break point”value. Every time that unit loses a stand the playerdraws a poker card. When the total drawn exceeds the
unit’s break point it begins behaving very differently.The specifics are detailed in the following rules
12.1.1 The “Unit Determination” rules require the use ofone poker deck of playing cards, for each GHQ in play.The decks are not mixed, but kept separate for eachGHQ. Remove the jokers. The values of the numberedcards are as printed (Ace = 1). “Face” cards have thefollowing values J=11, Q=12, K=13.
12.1.2 The scenario designer must calculate the units’ break point as follows: first count the number of armedcombat stands in each formation for which a value will
be used, add 2 for HQs and 3 for a GHQ. Disregardunarmed stands. Record the “total combat stand points”for each formation. Next, using 35% as a base andpossibly modifying it based on criteria in table 12.1.9
below, convert the percentage to decimal notation (e.g.35% becomes .35). This is the “force determinationlevel.” Then multiply each unit’s “combat stand pointstotal” by the force determination level. Finally multiplythis product by 7 to arrive at the unit’s break point.
Example: A force has 32 infantry, tank, and artillerystands, 3 HQs, and 1 GHQ. It also has 16 unarmedtransports. This unit has a break point of 100 and wascalculated as follows: 32+6+3 =41. 41*.35 = 14.35. 14.35 * 7= 100.45 rounded = 100. For another example see theScenario Design rules.
12.1.3 When a stand is “Eliminated” for any reason, draw
a card from the deck. Draw two cards if the stand was anHQ or three cards if it was a GHQ. Players are not requiredand encouraged not to show opponents the drawn cards.They may show them to allied players if desired.
12.1.4 When the total value of the cards in a player’shand exceeds the break point of the unit it has reached a“crisis of command” and is “broken.”
12.1.5 On the next turn, after “breaking,” the followingconditions go into effect:
1. The cohesion value of all components of the broken
formation is reduced by 5 (-5) for all purposes exceptmovement for the rest of the game.
2. Stands of a broken formation may only fire if firedupon that turn. They may fire at any enemy unitswithin 5 inches.
3. Off-map artillery belonging to the broken formationmay complete any multi-turn fire missions. No furtherindirect fire may be plotted by units of the brokenformation.
4. Any unused air strikes assigned to that formation
are canceled.
5. The cohesion of units of a broken unit is increased by 2 (+2) for movement purposes for remainder ofthe game.
6. Units belonging to the broken formation must movetowards a friendly map edge, as agreed upon by theplayers, they must use their full movement allowanceif possible.
7. Units of the broken formation are assumed to be
in the Movement Posture, even if they fire during theFire Phase. Recall they may only fire if fired upon(per 2 above) and may not move if they fire (perstandard rules).
8. If and when all formations of one side have broken, theopposing side must make a successful cohesion roll atthe beginning of each ensuing turn to keep fighting.This die roll is modified by +2 for each additional turn.If the opposing player fails this cohesion roll the gameis over as everyone has ceased fire.
44
Burfield (order #5184631)
8/13/2019 Micro Armour the Game-WWII 2nd Edition (Full Color)
http://slidepdf.com/reader/full/micro-armour-the-game-wwii-2nd-edition-full-color 50/136
12.1.6 In games where one side has more than one GHQ,the forces under the command of each GHQ are assignedseparate break points.
12.1.7 More than one formation may exceed its breakpoint in the same turn.
12.1.8 All players must reveal their cards at the end of
the game regardless of whether anyone exceeded their break point or not.
12.1.9 The casualty percentage sustainable by a specificforce may be difficult to decide upon. Below you willfind some suggested modifications to the 35% basedetermination rule, based on troop quality and situation.
1. A force on the defense in an “assault on a preparedposition” scenario: +5%
2. A force taking part in a “meeting engagement”scenario: -5%
3. A force on the offense in a “reconnaissance in force”scenario: -5%
4. Any force starting a scenario with less than 75% of itsauthorized (TO&E) strength: -10%
5. Any 'Green' or 'Militia' force on the offense in ascenario: -10%
6. Any force facing enemy tanks in a scenario of 1939 or1940: -10%
7. US forces in North Africa during 1942: -5%
8. Italian forces on the offense: -5%
9. Soviet forces before Sept. '41: -10%
10. Soviet force on the defense Nov. '41 or later: +5%
11. Soviet force in '44: +5%
12. Soviet force in '45: +10%
13. USMC force in Pacific Theater: +10%
14. Japanese force: +10%
15. Japanese force on a Pacific Island: +5%
[12.2] Unmodified or “Natural” Cohesion Roll Options12.2.1 Hot ShotWhen a player makes a cohesion roll for firing purposesand rolls an unmodified “1,” it means that this stand hasachieved a remarkable success. Shift the attack twocolumns to the right on the CRT before determiningcombat results.
12.2.2 We’re Running Low SirWhen a player makes a cohesion roll for firing and rollsan unmodified “20” the stand is nearly out of ammo andmay only fire at enemy stands which have fired at itpreviously in the current Fire Phase. This result stays ineffect for the duration of the game.
12.2.3 Communications Breakdown
When a player makes a cohesion roll for deviation ofartillery fire, and rolls an unmodified or natural “20,” itmeans there has been a serious error in fire directioncontrol. The fire deviates 1D20/2 inches from the originalplotted target!
12.2.4 Intuitive ActionFor forces with a cohesion level of 15 or higher, if amovement cohesion roll for a group moving with anorder, results in an unmodified “1,” the leadership ofthis group has anticipated your intentions and has thegroup moving on its own initiative. The “order”intended for this group is not spent and may be used to
assist another group during the player’s next movementaction this turn.
12.2.5 Conflicting OrdersIf a movement cohesion roll for a group, results in anunmodified “20,” the leaders have received conflictingorders and are in doubt about their superiors intentions.This group may not move for the remainder of the turn.
[12.3] Air StrikesThe Germans pioneered the coordination of air andground forces during the Spanish Civil War and it wasone of the “shocking” tenets of Blitzkrieg in WWII. Closeair support was in its infancy at the start of WWII and bythe end had matured considerably as experience,techniques, and technology were brought to bear by Axisand Allied air forces. The effects of aircraft involved withattacking ground forces ranged from “disastrous tofriendly forces” to “devastating total destruction of
45
Burfield (order #5184631)
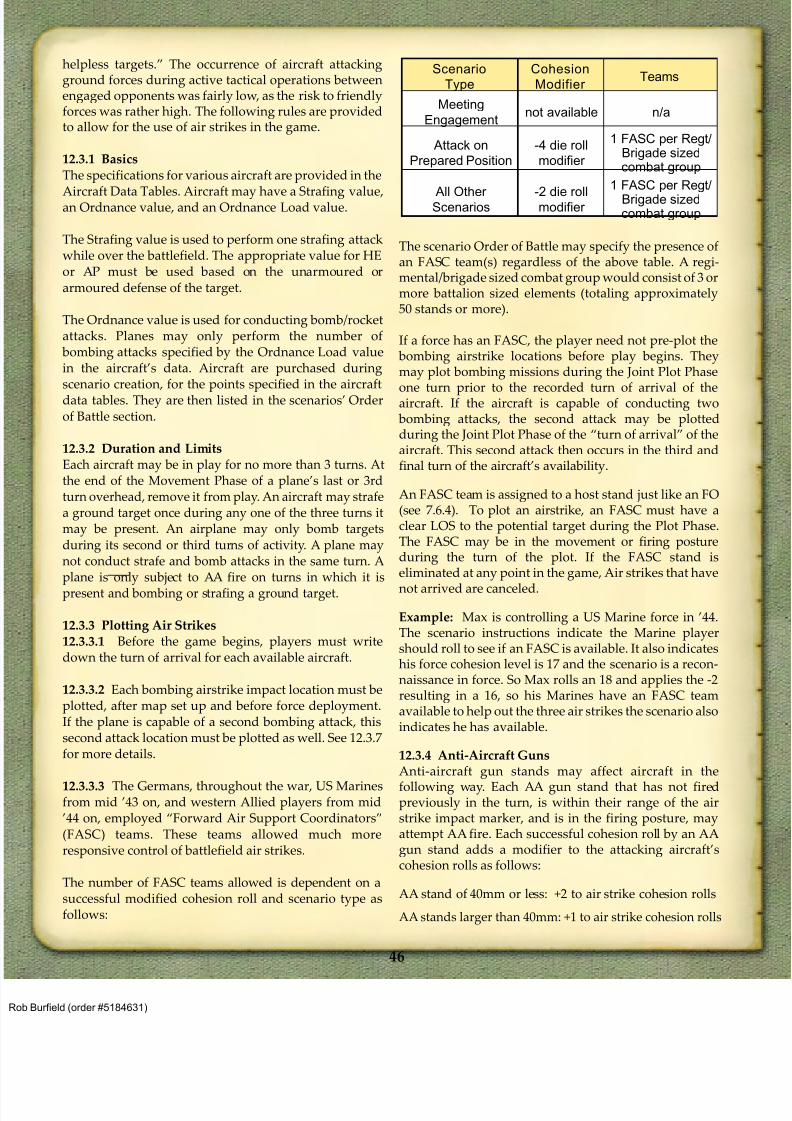
8/13/2019 Micro Armour the Game-WWII 2nd Edition (Full Color)
http://slidepdf.com/reader/full/micro-armour-the-game-wwii-2nd-edition-full-color 51/136
helpless targets.” The occurrence of aircraft attackingground forces during active tactical operations betweenengaged opponents was fairly low, as the risk to friendlyforces was rather high. The following rules are providedto allow for the use of air strikes in the game.
12.3.1 Basics
The specifications for various aircraft are provided in the
Aircraft Data Tables. Aircraft may have a Strafing value,an Ordnance value, and an Ordnance Load value.
The Strafing value is used to perform one strafing attackwhile over the battlefield. The appropriate value for HEor AP must be used based on the unarmoured orarmoured defense of the target.
The Ordnance value is used for conducting bomb/rocketattacks. Planes may only perform the number of
bombing attacks specified by the Ordnance Load valuein the aircraft’s data. Aircraft are purchased duringscenario creation, for the points specified in the aircraftdata tables. They are then listed in the scenarios’ Orderof Battle section.
12.3.2 Duration and LimitsEach aircraft may be in play for no more than 3 turns. Atthe end of the Movement Phase of a plane’s last or 3rdturn overhead, remove it from play. An aircraft may strafea ground target once during any one of the three turns itmay be present. An airplane may only bomb targetsduring its second or third turns of activity. A plane maynot conduct strafe and bomb attacks in the same turn. Aplane is only subject to AA fire on turns in which it is
present and bombing or strafing a ground target.
12.3.3 Plotting Air Strikes12.3.3.1 Before the game begins, players must writedown the turn of arrival for each available aircraft.
12.3.3.2 Each bombing airstrike impact location must beplotted, after map set up and before force deployment.If the plane is capable of a second bombing attack, thissecond attack location must be plotted as well. See 12.3.7for more details.
12.3.3.3 The Germans, throughout the war, US Marinesfrom mid ’43 on, and western Allied players from mid’44 on, employed “Forward Air Support Coordinators”(FASC) teams. These teams allowed much moreresponsive control of battlefield air strikes.
The number of FASC teams allowed is dependent on asuccessful modified cohesion roll and scenario type asfollows:
The scenario Order of Battle may specify the presence ofan FASC team(s) regardless of the above table. A regi-mental/brigade sized combat group would consist of 3 ormore battalion sized elements (totaling approximately50 stands or more).
If a force has an FASC, the player need not pre-plot the bombing airstrike locations before play begins. Theymay plot bombing missions during the Joint Plot Phase
one turn prior to the recorded turn of arrival of theaircraft. If the aircraft is capable of conducting two bombing attacks, the second attack may be plottedduring the Joint Plot Phase of the “turn of arrival” of theaircraft. This second attack then occurs in the third andfinal turn of the aircraft’s availability.
An FASC team is assigned to a host stand just like an FO(see 7.6.4). To plot an airstrike, an FASC must have aclear LOS to the potential target during the Plot Phase.The FASC may be in the movement or firing postureduring the turn of the plot. If the FASC stand iseliminated at any point in the game, Air strikes that have
not arrived are canceled.
Example: Max is controlling a US Marine force in ’44.The scenario instructions indicate the Marine playershould roll to see if an FASC is available. It also indicateshis force cohesion level is 17 and the scenario is a recon-naissance in force. So Max rolls an 18 and applies the -2resulting in a 16, so his Marines have an FASC teamavailable to help out the three air strikes the scenario alsoindicates he has available.
12.3.4 Anti-Aircraft GunsAnti-aircraft gun stands may affect aircraft in the
following way. Each AA gun stand that has not firedpreviously in the turn, is within their range of the airstrike impact marker, and is in the firing posture, mayattempt AA fire. Each successful cohesion roll by an AAgun stand adds a modifier to the attacking aircraft’scohesion rolls as follows:
AA stand of 40mm or less: +2 to air strike cohesion rolls
AA stands larger than 40mm: +1 to air strike cohesion rolls
Scenario
Type
Cohesion
Modifier Teams
Meeting
Engagementnot available n/a
Attack on
Prepared Position
-4 die roll
modifier
1 FASC per Regt/Brigade sizedcombat group
All OtherScenarios -2 die rollmodifier
1 FASC per Regt/
Brigade sizedcombat group
46
Burfield (order #5184631)
8/13/2019 Micro Armour the Game-WWII 2nd Edition (Full Color)
http://slidepdf.com/reader/full/micro-armour-the-game-wwii-2nd-edition-full-color 52/136
These airstrike modifiers are cumulative for eachsuccessful AA stand roll. AA stands that “fire” at aircraftmay not fire in another phase of the same turn.
12.3.5 Conducting Air Strikes
To conduct an airstrike of any type, the player mustmake a successful cohesion roll, modified by AAfire andthe target’s terrain. If unsuccessful, the attack doesn’t
occur. If successful, a second, modified cohesion roll ismade to prevent deviation. If successful the attack occurswhere it was plotted to arrive. If unsuccessful, roll 1D8 todetermine direction of the deviation. Roll 1D6 todetermine its distance from the original plot location.The airstrike attacks any stand at this new location(friend or foe). If unoccupied the airstrike has no effect.For the complete step-by-step guide see the proceduresincluded with the rules.
12.3.6 Strafing RunsStrafing attacks are not pre-plotted; they represent thepilot’s initiative to attack targets of opportunity. Theaircraft must still have its turn of arrival recorded priorto the start of game.
To conduct a strafing run, the attacker declares atarget stand to be strafed and the defender may thenconduct AA fire prior to the strafing run as detailed in12.3.4 above. The attacker must then conduct an airstrike as in 12.3.5 above, however if a deviation occursduring a strafing attack only use 1D6/2 for distancedetermination. For the complete step-by-step processuse the “Strafing Procedure” included with the rules.
If the aircraft is attacking a column or linear formation of(adjacent) stands and the first cohesion roll to attacksucceeds, the airplane may attempt to attack the nextstand in the line with a +3 to the cohesion roll. Only onesuch second target may be attempted and only if the firstsucceeds. Only one turn of the three permitted may beused to conduct a strafing attack.
12.3.7 Bomb AttacksBomb attack locations must be plotted with thefollowing in mind: the first bomb attack may occur in thesecond turn after arrival on board and if equipped, asecond bomb attack may occur in the third turn afterarrival. Dropping both bomb loads on one location,during either the second or third turn, is permitted.
Airplanes may carry multiple bomb loads and may thus bomb one location with both bomb loads in one turn ormake two bombing attacks, one per turn. Bombing attacksuse the airplane’s Ordnance value against the target’sdefense value (HE vs. unarmoured, AP vs. ½ thearmoured value) to determine the differential column on
the CRT. Bombing attacks may only be conducted in thesecond and or third turn after the airplanes turn of arrival.
To conduct a bomb attack, the attacker places the impactmarker at the pre-plotted location. The defender maythen conduct AA fire prior to the bombing run asdetailed in 12.3.4 above. The attacker must then conductan airstrike as in 12.3.5 above. For the complete step-by-
step process use the “Bombing Procedure” includedwith the rules.
12.3.8 Artillery impact markers are used to note thelocation of a bombing mission airstrike, but these areremoved at the end of the Artillery Fire Phase in whichthey are placed. Bomb attacks do not persist into theMovement Phase as artillery does.
12.3.9 Armoured vehicles retain 50% of their defensevalue whenever attacked by air strikes. Open toppedarmoured vehicles retain 25% of their defense valueswhenever attacked by air strikes.
[12.4] Charge for the Guns!For each “armed” stand that exits anywhere along youropponent’s map edge, one enemy off-map artillery standis rendered inactive for the remainder of the scenario.This reflects the dislocation that would result from theappearance of enemy combat troops in the rear areas.Their artillery would be forced to either displace to asafer position or deploy to deal with the new threat, thusrendering it unavailable.
[12.5] Tank Marines!
Players may use armoured fighting vehicles as transport.In this case, the AFV stand has a transport capacity of 8points. Any combat result suffered by the AFV forcesany personnel stands or towed weapons to dismountimmediately with an automatic “S” combat result.
The “cargo” may be attacked separately from the AFV. Inthis case the defense value of the cargo stands is “1”(unarmoured).
If the AFV, with a mounted stand, fires during any phaseof a turn, the mounted stand may automaticallydismount. The AFV pays no movement cost to do this.
The newly dismounted stand pays 50% of its movementpoints to do this. If the carried stand is to remainmounted on the AFV it must pass a cohesion check witha +3 die roll modifier.
[12.6] Nobody Moves ’til I Say So, Get me?In the standard rules, the players alternate movingstands at the option of the player with initiative. If eitherplayer opts to “pass,” it means that he wishes to ceasemovement for the turn.
47
Burfield (order #5184631)
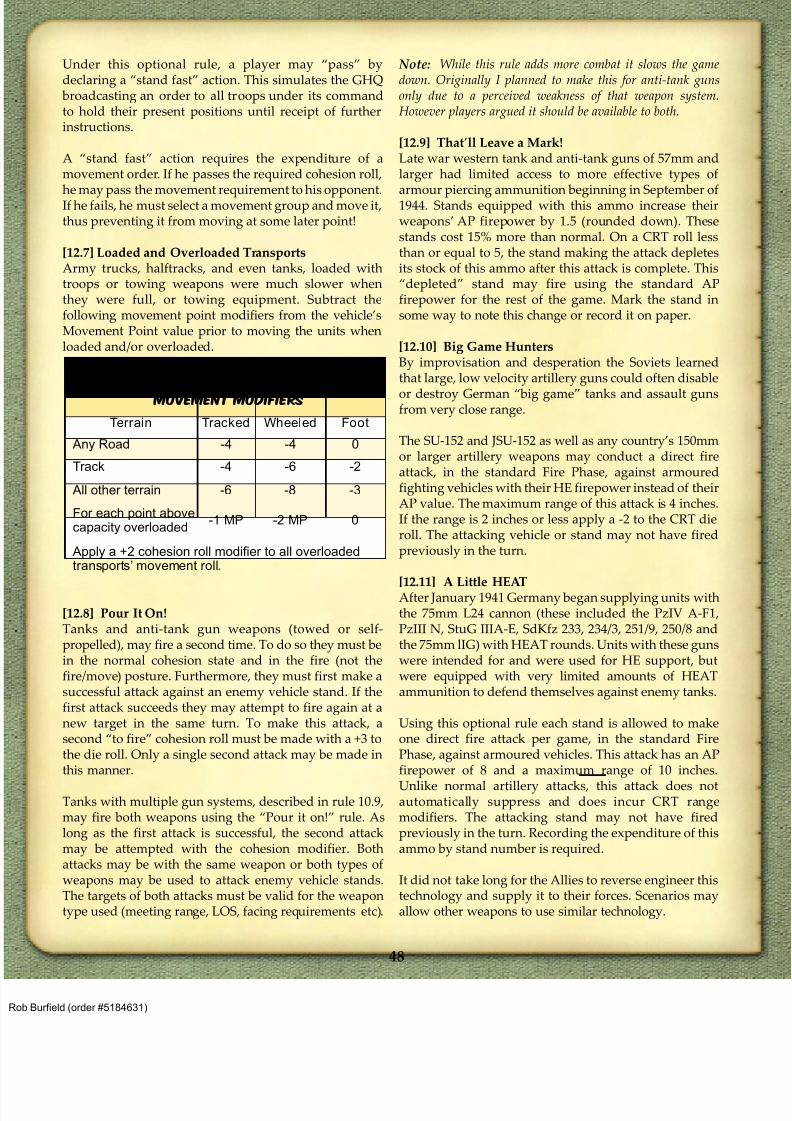
8/13/2019 Micro Armour the Game-WWII 2nd Edition (Full Color)
http://slidepdf.com/reader/full/micro-armour-the-game-wwii-2nd-edition-full-color 53/136
48
Under this optional rule, a player may “pass” bydeclaring a “stand fast” action. This simulates the GHQ
broadcasting an order to all troops under its commandto hold their present positions until receipt of furtherinstructions.
A “stand fast” action requires the expenditure of amovement order. If he passes the required cohesion roll,
he may pass the movement requirement to his opponent.If he fails, he must select a movement group and move it,thus preventing it from moving at some later point!
[12.7] Loaded and Overloaded TransportsArmy trucks, halftracks, and even tanks, loaded withtroops or towing weapons were much slower whenthey were full, or towing equipment. Subtract thefollowing movement point modifiers from the vehicle’sMovement Point value prior to moving the units whenloaded and/or overloaded.
[12.8] Pour It On!Tanks and anti-tank gun weapons (towed or self-propelled), may fire a second time. To do so they must bein the normal cohesion state and in the fire (not thefire/move) posture. Furthermore, they must first make asuccessful attack against an enemy vehicle stand. If thefirst attack succeeds they may attempt to fire again at anew target in the same turn. To make this attack, asecond “to fire” cohesion roll must be made with a +3 tothe die roll. Only a single second attack may be made inthis manner.
Tanks with multiple gun systems, described in rule 10.9,may fire both weapons using the “Pour it on!” rule. Aslong as the first attack is successful, the second attackmay be attempted with the cohesion modifier. Bothattacks may be with the same weapon or both types ofweapons may be used to attack enemy vehicle stands.The targets of both attacks must be valid for the weapontype used (meeting range, LOS, facing requirements etc).
Note: While this rule adds more combat it slows the gamedown. Originally I planned to make this for anti-tank gunsonly due to a perceived weakness of that weapon system.However players argued it should be available to both.
[12.9] That’ll Leave a Mark!Late war western tank and anti-tank guns of 57mm andlarger had limited access to more effective types of
armour piercing ammunition beginning in September of1944. Stands equipped with this ammo increase theirweapons’ AP firepower by 1.5 (rounded down). Thesestands cost 15% more than normal. On a CRT roll lessthan or equal to 5, the stand making the attack depletesits stock of this ammo after this attack is complete. This“depleted” stand may fire using the standard APfirepower for the rest of the game. Mark the stand insome way to note this change or record it on paper.
[12.10] Big Game HuntersBy improvisation and desperation the Soviets learnedthat large, low velocity artillery guns could often disable
or destroy German “big game” tanks and assault gunsfrom very close range.
The SU-152 and JSU-152 as well as any country’s 150mmor larger artillery weapons may conduct a direct fireattack, in the standard Fire Phase, against armouredfighting vehicles with their HE firepower instead of theirAP value. The maximum range of this attack is 4 inches.If the range is 2 inches or less apply a -2 to the CRT dieroll. The attacking vehicle or stand may not have firedpreviously in the turn.
[12.11] A Little HEATAfter January 1941 Germany began supplying units withthe 75mm L24 cannon (these included the PzIV A-F1,PzIII N, StuG IIIA-E, SdKfz 233, 234/3, 251/9, 250/8 andthe 75mm lIG) with HEAT rounds. Units with these gunswere intended for and were used for HE support, butwere equipped with very limited amounts of HEATammunition to defend themselves against enemy tanks.
Using this optional rule each stand is allowed to makeone direct fire attack per game, in the standard FirePhase, against armoured vehicles. This attack has an APfirepower of 8 and a maximum range of 10 inches.
Unlike normal artillery attacks, this attack does notautomatically suppress and does incur CRT rangemodifiers. The attacking stand may not have firedpreviously in the turn. Recording the expenditure of thisammo by stand number is required.
It did not take long for the Allies to reverse engineer thistechnology and supply it to their forces. Scenarios mayallow other weapons to use similar technology.
Terrain Tracked Wheeled Foot
Any Road -4 -4 0
Track -4 -6 -2
All other terrain -6 -8 -3
For each point abovecapacity overloaded
-1 MP -2 MP 0
Apply a +2 cohesion roll modifier to all overloadedtransports’ movement roll.
Loaded and Overloaded vehicle
movement modifiers
Burfield (order #5184631)

8/13/2019 Micro Armour the Game-WWII 2nd Edition (Full Color)
http://slidepdf.com/reader/full/micro-armour-the-game-wwii-2nd-edition-full-color 54/136
49
[12.12] The Registered Fire MissionA Registered Fire Mission is an artillery fire mission thathas been prepared and fired previously during thegame. Any Support or Adjusted fire mission may bedeclared a Registered Fire Mission, as long as it hits thetarget coordinates accurately (that is, it did not deviate).
The Registered Fire Mission is available to both attacker
and defender in any scenario and is called for as the pre-registered fire mission is called for. The Support missionplot that the registered mission is based upon should begiven a name and contain all the plot informationneeded as required for a Pre-registered fire mission(see7.6.2.2). The “calling” FO or HQ must be able to tracea clear LOS to at least one of the mission’s impactlocations on the turn of call. On the turn of the call, theplayer records the turn of call, the unique mission name,the calling FO’s or HQ’s ID, turn of impact, and duration.
The turn of arrival may be one or more turns after theturn the mission was called for. This is true for all
nations’ forces.
The batteries designated to conduct a Registered firemission may not move between the establishment of themission (turn of creation) and the “Turn of Arrival.” Ifthey do move, the Registered mission is canceled.
Note: Using registered missions allows one to respond fasterthan the limits imposed by 7.8 National Artillery Efficiency.
Apply -2 only to the deviation cohesion checks roll forRegistered fire missions. (This is different from the Pre-
registered fire mission.)
A player may create as many Registered fire missions asthey want during the course of game play.
[12.13] The Polar Artillery Plotting MethodThe Polar Plot is simple and is available to any nation’sartillery plotting units.
Support and Adjusted fire missions may be plottedusing this method.
The Polar Plot method is based on the known position ofthe calling FO or HQ’s position. If the plotting FO or HQmove between the turn of plot and the turn of arrival thePolar plot(s) are canceled.
Plotting using the Polar system requires the followinginformation:
1. The turn of plot. (e.g. “3”)
2. The ID of the plotting unit. (e.g. “FO in stand #212”)
3. The type of mission (e.g. “Support”)
4. The IDs of the firing units (e.g. “105mm battery #1, off board”)
5. The turn of arrival. (e.g. “5”)
6. The duration of the mission (e.g. “1”)
7. The location of the impact including: the distance fromthe FO or HQ unit in inches to the intended initialpoint of impact and the direction from the plotting FOor HQ unit (using the compass directions established
by the compass rose on the board). Example: “8”North East”
8. Note the sheaf pattern for the mission. Make sure tonote the direction an open sheaf is to be laid out in. Itis also a good idea to note how many impact markersto deploy. For example, “Open 2N” means an opensheaf of two markers, one at the impact point, and the
other 1” North of the first.
9. The type of ammunition used (Smoke or HE)
Note: If you like or prefer this plotting method you are free tomake an improved compass rose with 16 points on it, or evenuse a protractor for more precision.
Burfield (order #5184631)
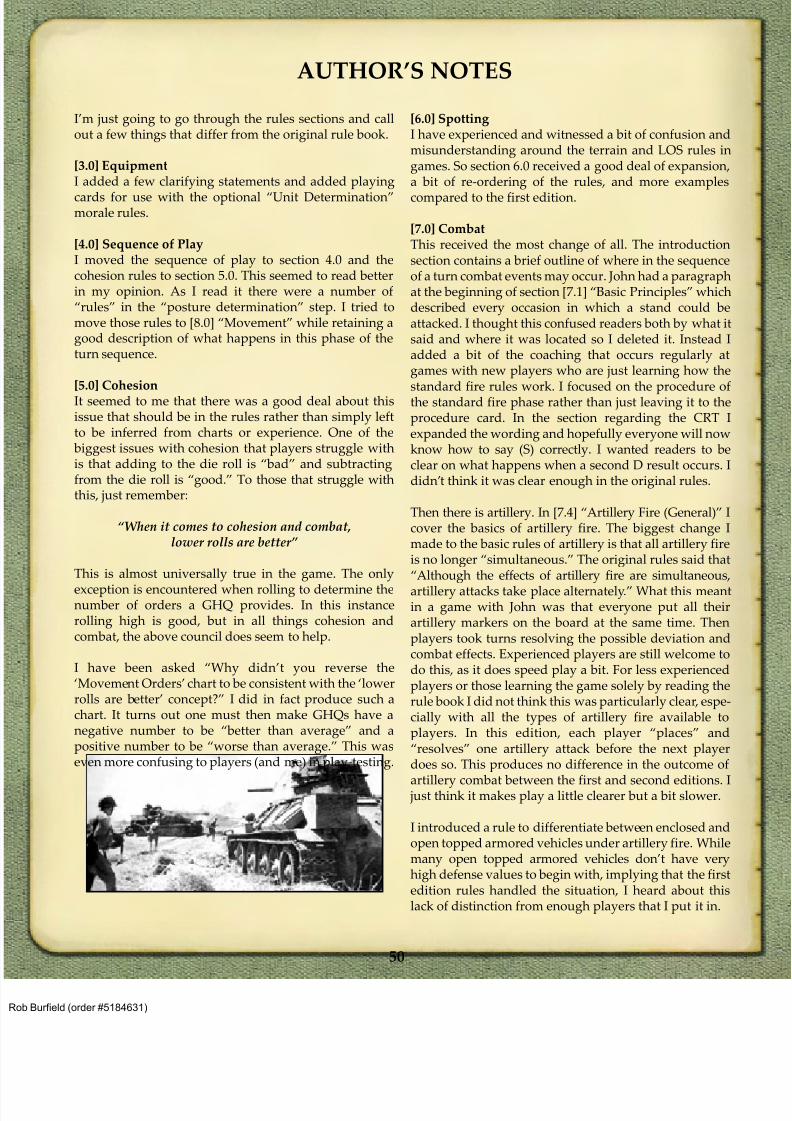
8/13/2019 Micro Armour the Game-WWII 2nd Edition (Full Color)
http://slidepdf.com/reader/full/micro-armour-the-game-wwii-2nd-edition-full-color 55/136
I’m just going to go through the rules sections and callout a few things that differ from the original rule book.
[3.0] EquipmentI added a few clarifying statements and added playing
cards for use with the optional “Unit Determination”morale rules.
[4.0] Sequence of PlayI moved the sequence of play to section 4.0 and thecohesion rules to section 5.0. This seemed to read betterin my opinion. As I read it there were a number of“rules” in the “posture determination” step. I tried tomove those rules to [8.0] “Movement” while retaining agood description of what happens in this phase of theturn sequence.
[5.0] CohesionIt seemed to me that there was a good deal about thisissue that should be in the rules rather than simply leftto be inferred from charts or experience. One of the
biggest issues with cohesion that players struggle withis that adding to the die roll is “bad” and subtractingfrom the die roll is “good.” To those that struggle withthis, just remember:
“When it comes to cohesion and combat,
lower rolls are better”
This is almost universally true in the game. The only
exception is encountered when rolling to determine thenumber of orders a GHQ provides. In this instancerolling high is good, but in all things cohesion andcombat, the above council does seem to help.
I have been asked “Why didn’t you reverse the‘Movement Orders’ chart to be consistent with the ‘lowerrolls are better’ concept?” I did in fact produce such achart. It turns out one must then make GHQs have anegative number to be “better than average” and apositive number to be “worse than average.” This waseven more confusing to players (and me) in play-testing.
[6.0] SpottingI have experienced and witnessed a bit of confusion andmisunderstanding around the terrain and LOS rules ingames. So section 6.0 received a good deal of expansion,a bit of re-ordering of the rules, and more examples
compared to the first edition.
[7.0] CombatThis received the most change of all. The introductionsection contains a brief outline of where in the sequenceof a turn combat events may occur. John had a paragraphat the beginning of section [7.1] “Basic Principles” whichdescribed every occasion in which a stand could beattacked. I thought this confused readers both by what itsaid and where it was located so I deleted it. Instead Iadded a bit of the coaching that occurs regularly atgames with new players who are just learning how the
standard fire rules work. I focused on the procedure ofthe standard fire phase rather than just leaving it to theprocedure card. In the section regarding the CRT Iexpanded the wording and hopefully everyone will nowknow how to say (S) correctly. I wanted readers to beclear on what happens when a second D result occurs. Ididn’t think it was clear enough in the original rules.
Then there is artillery. In [7.4] “Artillery Fire (General)” Icover the basics of artillery fire. The biggest change Imade to the basic rules of artillery is that all artillery fireis no longer “simultaneous.” The original rules said that“Although the effects of artillery fire are simultaneous,
artillery attacks take place alternately.” What this meantin a game with John was that everyone put all theirartillery markers on the board at the same time. Thenplayers took turns resolving the possible deviation andcombat effects. Experienced players are still welcome todo this, as it does speed play a bit. For less experiencedplayers or those learning the game solely by reading therule book I did not think this was particularly clear, espe-cially with all the types of artillery fire available toplayers. In this edition, each player “places” and“resolves” one artillery attack before the next playerdoes so. This produces no difference in the outcome of
artillery combat between the first and second editions. I just think it makes play a little clearer but a bit slower.
I introduced a rule to differentiate between enclosed andopen topped armored vehicles under artillery fire. Whilemany open topped armored vehicles don’t have veryhigh defense values to begin with, implying that the firstedition rules handled the situation, I heard about thislack of distinction from enough players that I put it in.
AUTHOR’S NOTES
50
Burfield (order #5184631)
8/13/2019 Micro Armour the Game-WWII 2nd Edition (Full Color)
http://slidepdf.com/reader/full/micro-armour-the-game-wwii-2nd-edition-full-color 56/136
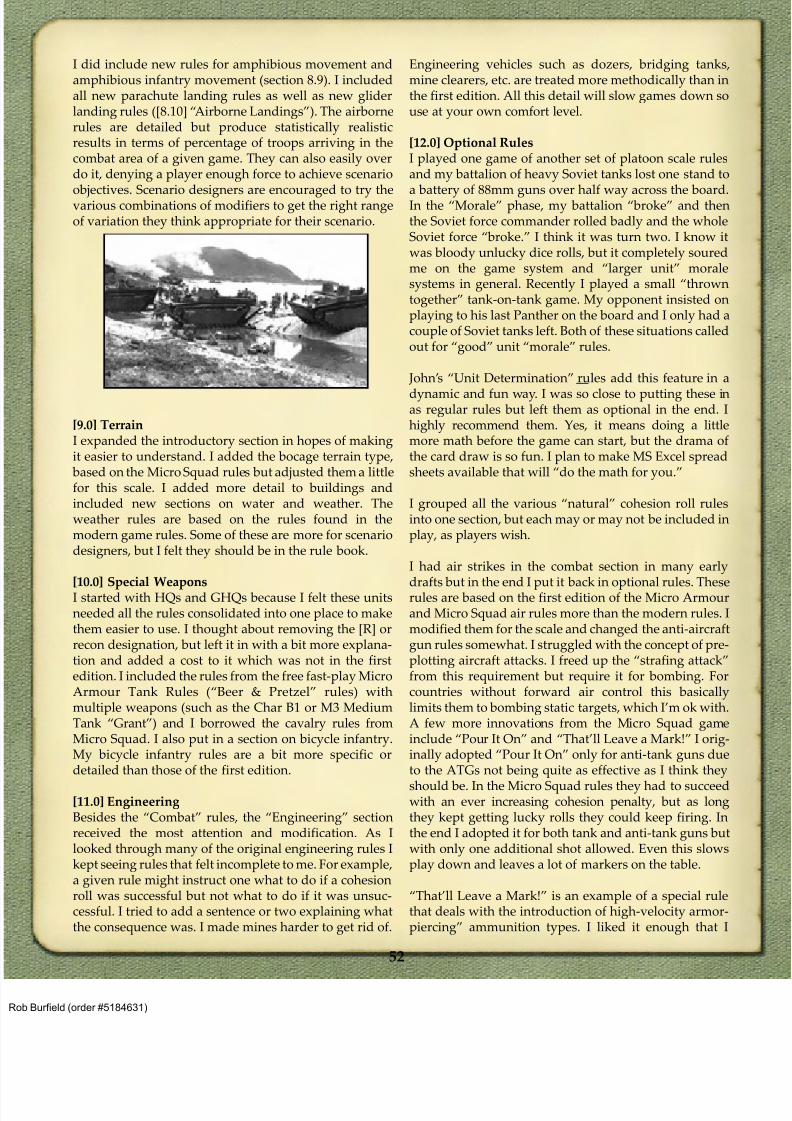
8/13/2019 Micro Armour the Game-WWII 2nd Edition (Full Color)
http://slidepdf.com/reader/full/micro-armour-the-game-wwii-2nd-edition-full-color 57/136
I did include new rules for amphibious movement andamphibious infantry movement (section 8.9). I includedall new parachute landing rules as well as new gliderlanding rules ([8.10] “Airborne Landings”). The airbornerules are detailed but produce statistically realisticresults in terms of percentage of troops arriving in thecombat area of a given game. They can also easily overdo it, denying a player enough force to achieve scenario
objectives. Scenario designers are encouraged to try thevarious combinations of modifiers to get the right rangeof variation they think appropriate for their scenario.
[9.0] TerrainI expanded the introductory section in hopes of makingit easier to understand. I added the bocage terrain type,
based on the Micro Squad rules but adjusted them a littlefor this scale. I added more detail to buildings andincluded new sections on water and weather. Theweather rules are based on the rules found in themodern game rules. Some of these are more for scenariodesigners, but I felt they should be in the rule book.
[10.0] Special WeaponsI started with HQs and GHQs because I felt these unitsneeded all the rules consolidated into one place to makethem easier to use. I thought about removing the [R] orrecon designation, but left it in with a bit more explana-tion and added a cost to it which was not in the firstedition. I included the rules from the free fast-play MicroArmour Tank Rules (“Beer & Pretzel” rules) withmultiple weapons (such as the Char B1 or M3 MediumTank “Grant”) and I borrowed the cavalry rules fromMicro Squad. I also put in a section on bicycle infantry.My bicycle infantry rules are a bit more specific ordetailed than those of the first edition.
[11.0] EngineeringBesides the “Combat” rules, the “Engineering” sectionreceived the most attention and modification. As Ilooked through many of the original engineering rules Ikept seeing rules that felt incomplete to me. For example,a given rule might instruct one what to do if a cohesionroll was successful but not what to do if it was unsuc-cessful. I tried to add a sentence or two explaining whatthe consequence was. I made mines harder to get rid of.
Engineering vehicles such as dozers, bridging tanks,mine clearers, etc. are treated more methodically than inthe first edition. All this detail will slow games down souse at your own comfort level.
[12.0] Optional RulesI played one game of another set of platoon scale rulesand my battalion of heavy Soviet tanks lost one stand to
a battery of 88mm guns over half way across the board.In the “Morale” phase, my battalion “broke” and thenthe Soviet force commander rolled badly and the wholeSoviet force “broke.” I think it was turn two. I know itwas bloody unlucky dice rolls, but it completely souredme on the game system and “larger unit” moralesystems in general. Recently I played a small “throwntogether” tank-on-tank game. My opponent insisted onplaying to his last Panther on the board and I only had acouple of Soviet tanks left. Both of these situations calledout for “good” unit “morale” rules.
John’s “Unit Determination” rules add this feature in a
dynamic and fun way. I was so close to putting these inas regular rules but left them as optional in the end. Ihighly recommend them. Yes, it means doing a littlemore math before the game can start, but the drama ofthe card draw is so fun. I plan to make MS Excel spreadsheets available that will “do the math for you.”
I grouped all the various “natural” cohesion roll rulesinto one section, but each may or may not be included inplay, as players wish.
I had air strikes in the combat section in many early
drafts but in the end I put it back in optional rules. Theserules are based on the first edition of the Micro Armourand Micro Squad air rules more than the modern rules. Imodified them for the scale and changed the anti-aircraftgun rules somewhat. I struggled with the concept of pre-plotting aircraft attacks. I freed up the “strafing attack”from this requirement but require it for bombing. Forcountries without forward air control this basicallylimits them to bombing static targets, which I’m ok with.A few more innovations from the Micro Squad gameinclude “Pour It On” and “That’ll Leave a Mark!” I orig-inally adopted “Pour It On” only for anti-tank guns dueto the ATGs not being quite as effective as I think they
should be. In the Micro Squad rules they had to succeedwith an ever increasing cohesion penalty, but as longthey kept getting lucky rolls they could keep firing. Inthe end I adopted it for both tank and anti-tank guns butwith only one additional shot allowed. Even this slowsplay down and leaves a lot of markers on the table.
“That’ll Leave a Mark!” is an example of a special rulethat deals with the introduction of high-velocity armor-piercing” ammunition types. I liked it enough that I
52
Burfield (order #5184631)
8/13/2019 Micro Armour the Game-WWII 2nd Edition (Full Color)
http://slidepdf.com/reader/full/micro-armour-the-game-wwii-2nd-edition-full-color 58/136
added my own special rule called “A Little HEAT” todeal with the introduction of “High Explosive Anti-Tank” rounds. Another case of a historical circumstanceinspiring a special rule was the “Big Game Hunters” rulewhich gives a little better kill probability to the largecaliber artillery used in self-propelled mounts againstenemy tanks. These are all “flavor” rules and more willappear in scenarios as designers see fit. They can slow
the game down or imbalance games if checks or costsaren’t introduced to counter balance or restrict them. Butthey can also be a lot of fun.
Weapons Data
I recalculated all of the “points” values for each weaponin the this edition. I used a spreadsheet “calculator” withformulas derived from those produced by John in hisdocument “Producing Weapon Statistics for MicroArmour®:The Game.” My formulas are very close tothose published by John. I know this because theyproduce very similar costs to those of the original editionwhen I use those original stats. My formula tends to
output values that disagree with the first editionnumbers only when the points are very small. I only hadto adjust a couple of values by hand for systems like
jeeps or kubelwagens, but I’d estimate 98 to 99% of thesecond edition points are right off my spreadsheet. Myintent is to rework the spreadsheet’s layout a bit, to makeit easier for others to use and then give it to GHQ to putup on their website. If players feel the need or desire tomake their own units this spreadsheet will help. Forexample, some may wish to play with artillery standswith more or less “sheaf” values than those published.The spread sheet will facilitate this.
John had established a system of special characters ingiven columns to represent various additional character-istics of a weapon stand. For example the “**” sign afterthe defense value meant that the value was halved when
the stand was in the movement posture. These werearound even in his earliest lists when he was desktoppublishing the rules. I changed this system in the currentedition to a single column titled “Notes” and I replacedall the various special characters with letters, which areoften the first letter of the descriptive word of the char-acteristic. For example, “R” stands for “restricted field offire.” If I knew that a weapon had a minimum range I
noted it with the letter “M” followed by the minimumrange, e.g. “M3.” A guide to each of the codes precedesthe weapons data tables and a legend is on each page ofthe tables themselves. I hope these mnemonics in thesingle column are easier for old and new players alike.
If you find data that suggests our published values are“off” then by all means fix it in your own games. Noneof us that worked on this project are perfect. Despite ourefforts, I’m certain there is an error somewhere in thedata tables, and probably more than one.
The aircraft data were harder for me. As I didn’t have a
good guide from John on how to establish their points Ihad to do more research and cross reference his 1stedition data with the models and configurations Iwanted to include and found data on. This proved to bechallenging as some of his values didn’t match the con-figurations I was finding data for. Another challenge wasfitting aircraft with bomb or rocket loads into the systemI had for aircraft. This last problem was solved by simplyoffering multiple “configurations” of the same plane.And at the last minute I felt my firepower values were alittle too high so I resumed analyzing the data. In the endI made the best decisions I could and began a crash
course of play testing to make sure they worked well onthe table. I hope you enjoy the results.
My final words to you all are simple: Have fun.
- Leif Edmondson
aka RedLeif
53
Burfield (order #5184631)
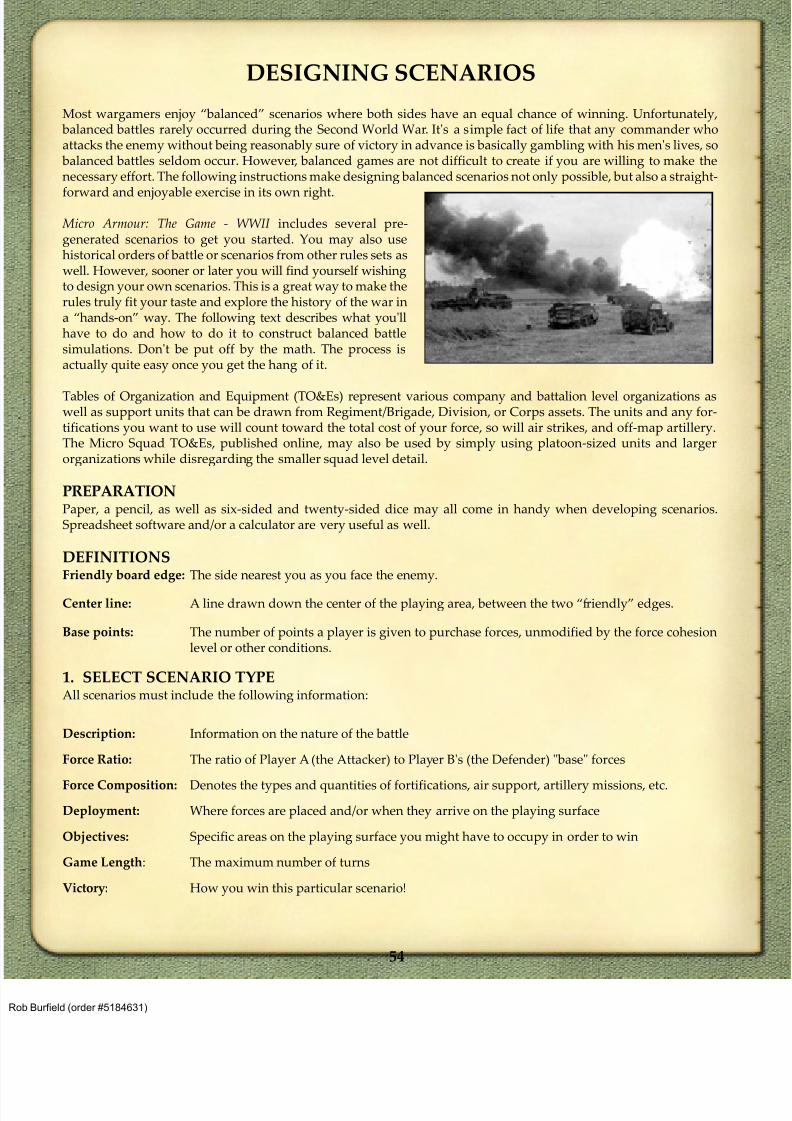
8/13/2019 Micro Armour the Game-WWII 2nd Edition (Full Color)
http://slidepdf.com/reader/full/micro-armour-the-game-wwii-2nd-edition-full-color 59/136
54
Most wargamers enjoy “balanced” scenarios where both sides have an equal chance of winning. Unfortunately, balanced battles rarely occurred during the Second World War. It's a simple fact of life that any commander whoattacks the enemy without being reasonably sure of victory in advance is basically gambling with his men's lives, so
balanced battles seldom occur. However, balanced games are not difficult to create if you are willing to make thenecessary effort. The following instructions make designing balanced scenarios not only possible, but also a straight-
forward and enjoyable exercise in its own right.
Micro Armour: The Game - WWII includes several pre-generated scenarios to get you started. You may also usehistorical orders of battle or scenarios from other rules sets aswell. However, sooner or later you will find yourself wishingto design your own scenarios. This is a great way to make therules truly fit your taste and explore the history of the war ina “hands-on” way. The following text describes what you'llhave to do and how to do it to construct balanced battlesimulations. Don't be put off by the math. The process isactually quite easy once you get the hang of it.
Tables of Organization and Equipment (TO&Es) represent various company and battalion level organizations aswell as support units that can be drawn from Regiment/Brigade, Division, or Corps assets. The units and any for-tifications you want to use will count toward the total cost of your force, so will air strikes, and off-map artillery.The Micro Squad TO&Es, published online, may also be used by simply using platoon-sized units and largerorganizations while disregarding the smaller squad level detail.
PREPARATIONPaper, a pencil, as well as six-sided and twenty-sided dice may all come in handy when developing scenarios.Spreadsheet software and/or a calculator are very useful as well.
DEFINITIONSFriendly board edge: The side nearest you as you face the enemy.
Center line: A line drawn down the center of the playing area, between the two “friendly” edges.
Base points: The number of points a player is given to purchase forces, unmodified by the force cohesionlevel or other conditions.
1. SELECT SCENARIO TYPEAll scenarios must include the following information:
Description: Information on the nature of the battle
Force Ratio: The ratio of Player A (the Attacker) to Player B's (the Defender) "base" forces
Force Composition: Denotes the types and quantities of fortifications, air support, artillery missions, etc.
Deployment: Where forces are placed and/or when they arrive on the playing surface
Objectives: Specific areas on the playing surface you might have to occupy in order to win
Game Length: The maximum number of turns
Victory: How you win this particular scenario!
DESIGNING SCENARIOS
Burfield (order #5184631)
8/13/2019 Micro Armour the Game-WWII 2nd Edition (Full Color)
http://slidepdf.com/reader/full/micro-armour-the-game-wwii-2nd-edition-full-color 60/136
55
TYPE A: “MEETING ENGAGEMENT”Description: Meeting engagements usually occur either at the beginning of a campaign, (the so-called
"Battle of the Frontiers"), or when an attacker is exploiting a "breakthrough" and the defenderis determined to close the breach. This kind of action is fluid, confused, and desperate; a realtest of experience and cohesion.
Force Ratio: Player A and Player B receive equal "base" points.
Force Composition: No types of mines or field fortifications are allowed for either player. Off-map artillery and/orair strikes are not allowed. On-board artillery may only employ support missions plotted onor after turn 1.
Deployment: Each player's force enters anywhere along his "friendly" board edge.
Objective: Any agreed-upon terrain feature (river crossing, village, or high ground located in the centerof playing area)
Game Length: 10 turns
Victory: Both sides attempt to occupy the “objective” at the end of the game.
TYPE B: “RECONNAISSANCE IN FORCE”Description: Once a new front line has been established in a series of meeting engagements, there is usually
a short pause while both sides reorganize. This does not necessarily mean a lull in the action,however. Both sides will begin active patrolling, both to establish security and to gauge enemycapabilities and intentions. This may often escalate into skirmishes and sometimes to moreserious engagements. If one side wants information badly enough, a major raid may beordered to obtain it.
Force Ratio: Player A (The Attacker) and Player B (The Defender) each receive equal "base" points.
Force Composition: Player B is allowed to purchase light improved positions for his personnel and weapons standsonly. Player A only may purchase air strikes. Both sides may employ support and barrageindirect artillery fire missions. Player B may use pre-registered and adjusted missions.
Deployment: Player B deploys anywhere on his side of the center line. Player A deploys anywhere on hisside of the center line and at least five (5) inches from it.
Objective: A marker placed in the center of a significant terrain feature located close to the center of themap (agreed upon in advance).
Game Length: 15 turns
Victory: Player A: Enter or pass through the “objective” with one or more of your stands by the end ofturn twelve. Player B: Prevent a Player A victory.
TYPE C: “HASTY ATTACK”Description: There are various reasons for a "hasty" attack. One side may hope to throw the enemy off
balance and drive him out of a newly occupied position before he can dig in properly. TheAttacker may have found some weak point and wants to crack it before the enemy canstrengthen it. Or, higher headquarters may hope to surprise the enemy by not making thenormal preparations for a major assault, which often tip the Defender off to the danger he isin. Whatever the reason, a hasty attack can sometimes be more effective than a prepared one,and allows the momentum of the offensive to be maintained.
Force Ratio: Player A (The Attacker) receives twice as many "base" points as Player B (The Defender).
Burfield (order #5184631)
8/13/2019 Micro Armour the Game-WWII 2nd Edition (Full Color)
http://slidepdf.com/reader/full/micro-armour-the-game-wwii-2nd-edition-full-color 61/136
56
Force Composition: Player B is allowed to purchase hasty and normal minefields only, barbed wire, an light ormedium improved positions only. Both sides may employ support and barrage indirectartillery fire missions. Player B may use pre-registered and adjusted missions. Barragemissions may not be plotted before the start of the game.
Deployment: Player B deploys to defend the objective, anywhere on his side of the center line. Player Adeploys at least fifteen (15) inches in front of the Defender's most forward stand.
Objective: A previously agreed-upon terrain feature (river crossing, village, or high ground two-thirdsof the battlefield length from Player A's friendly edge).
Game Length: 15 turns
Victory: Player A/Player B: Occupy the “objective” at the end of the game.
TYPE D: “ASSAULT ON A PREPARED POSITION”Description: This is the grunt's nightmare. The bad guys know you're coming. They know where you're
coming from. They may even know when you're coming. And, they're ready!
Force Ratio: Player A(The Attacker) receives three times as many "base" points as Player B (The Defender).
Force Composition: Player B is allowed to purchase all types of minefields, anti-tank ditches, barbed wire, and alltypes of improved positions. Both sides may employ support and barrage indirect artilleryfire missions. Player B may use pre-registered and adjusted missions.
Deployment: The Defender deploys to defend the objective. The Attacker deploys at least fifteen (15) inchesin front of an imaginary line drawn along the Defender's most forward stands.
Objective: A terrain feature. For example: river crossing, village, or high ground two-thirds of battlefieldlength from the Attacker's edge.
Game Length: 20 turns
Victory: Player A/Player B: Occupy the “objective” at the end of the game.
TYPE E: “DELAYING ACTION”Description: The Attacker has broken the line. The Defender has nothing to close the gap with and must
fight for time. The Attacker is fighting against time to maintain his forward momentum. Askillfully executed delaying action can mean the difference between a simple defeat andcomplete disaster.
Force Ratio: Player A(The Attacker) receives three times as many "base" points as Player B (The Defender).
Force Composition: Player B is allowed to purchase all types of minefields, anti-tank ditches, barbed wire, andlight improved positions only. Both sides may employ support and barrage indirect artilleryfire missions. Player B may use pre-registered and adjusted missions.
Deployment: Player B deploys at least 25% of the battlefield length from the enemy edge. Player A's forcesenter anywhere along his "friendly" board edge.
Objectives: The Defender's (Player B's) board edge
Game Length: 20 turns
Burfield (order #5184631)
8/13/2019 Micro Armour the Game-WWII 2nd Edition (Full Color)
http://slidepdf.com/reader/full/micro-armour-the-game-wwii-2nd-edition-full-color 62/136
57
Victory: Player B must prevent Player A from exiting 10% of his stands off Defender's edge as longas possible.
< 11 Turns - Decisive Attacker (Player A) Victory
< 16 Turns - Tactical Attacker (Player A) Victory
< 20 Turns - Minor Attacker (Player A) Victory
> 10 Turns - Minor Defender (Player B) Victory
> 15 Turns - Tactical Defender (Player B) Victory
> 19 Turns - Decisive Defender (Player B) Victory
2. DETERMINE HISTORICAL CONTEXTYou must now agree on the nationality of the forces involved and where and when the battle takes place. The TO&Edata provides the information you'll need to do this. Simply pick a country, a combat theater, and a time frame.
The designer or players must now decide what their force cohesion levels will be. The TO&E section provides arange of these for the historical context you have decided on.
3. LAYOUT BATTLEFIELD MAPThe layout of the battlefield should be considered carefully. Battlefield size should be in proportion to the size of theaction you want to simulate. A rule of thumb would be to lay outabout a foot of frontage for each defending battalion to bedeployed. A second “rule of thumb” is that the map should be longenough to allow for the deployment of infantry support weaponsat their normal tactical range. Four feet is a good working size. A2’x3’ or 2’x4’ board makes for a great battalion on battalion action.This size works for a pair of reinforced battalions as well. A 4’x4’or 4’x6’ board can accommodate a regiment or brigade sizedaction.
“Terrain density” determines what percentage of the total battlearea will include some sort of terrain feature. There are three levels
of terrain density: “Open,” “Mixed,” and “Closed.” Each allows aspecific range of terrain density and a maximum sighting distanceas follows:
Open - 2 x 2D6% various terrain features. Maximum sighting distance = 40"
Mixed - 4 x 2D6% various terrain features. Maximum sighting distance = 20"
Closed - 7 x 2D6% various terrain features Maximum sighting distance = 10"
Terrain features should be made up by the players as they wish, with the qualification that the area taken up by agiven piece of terrain should be recorded. (i.e. a woods of 12 sq. inches, a town of 4 sq. inches, a section of river oneinch wide by 24 inches long equaling 24 sq. inches, a single level hill of 36 sq. inches etc.) Players may alternateplacing terrain features until they reach the agreed upon terrain density or the designer may determine all of this.
Example: A 24"x36" battlefield with a 25% terrain density would require 216 sq. inches of terrain features.
The "Artillery Deviation" template should be placed on the map at this time.
4. ESTABLISH FORCE POINT VALUESIf an ad-hoc game is being created by players they should agree on a "point base" based on the board size. Playersusing Micro Armour 1/285 scale figures, where 1 model or stand = 1 platoon and where 1" = 100 meters, shouldallocate each defending battalion about 10 to 12 inches of frontage. This will prevent units from being outflanked
Burfield (order #5184631)

8/13/2019 Micro Armour the Game-WWII 2nd Edition (Full Color)
http://slidepdf.com/reader/full/micro-armour-the-game-wwii-2nd-edition-full-color 63/136
58
easily or allow the enemy to break through a line so thin as to be indefensible. In addition, you should keep in mindthat it would be a good idea to provide for some sort of reserve, if possible. A good ratio of "line" to "reserve" unitsis 2 / 1. That is, for every two battalions in the line, it is prudent to have one in reserve.
With all this in mind, calculate how many points one will need to cover the width of the board with a reasonableforce density. Each player may then secretly record a Point Base "bid" he thinks he can win with, based on the abovecriteria. When these bids are revealed, the lowest bid will be the one used in the scenario.
At the top of each TO&E, you will find the four pieces of information necessary for building a force you will committo battle: year(s) in which the TO&E is applicable, nationality of the force (and theater), and finally the suggestedforce cohesion levels for the forces used. Example: The players agree on a point base of 1000 points.
4.1 Alternate Method -Using an Historic SourceAs an alternative to the above method, a designer may pick an attacking or defending force based on a historicalsituation and then build its opposing force based on the force ratio for the type of scenario being portrayed. In thiscase the point base is determined by finding the sum of all of the stands called for in the historical unit, plus anyfield works and special units, as detailed below.
5. DETERMINE MAP ORIENTATIONFor ad-hoc designed scenarios each player now secretly bids a portion of his "point base" to decide the orientationof the battlefield. When these bids are revealed, the highest bidder chooses which board edge he wants as his
"friendly" edge. All points used in the bidding are forfeit by both sides, so bid carefully. (In case of ties, roll the diceto decide.)
Example: Player A bids 50 points, Player B 100 points. Player A's point base is now 950 points, Player B's is now900 points.
Note: This "auction" to decide who gets to deploy on which side of the map can be extremely important. The players must notbe allowed to know what the map orientation will be until after the battlefield is laid out.
6. ACQUIRE FORCESPurchasing Player A's ForcePlayer Anow gets to "buy" forces for the scenario based on his “point base.” The point costs for various weapons are
listed in the Weapons Data Tables An additional list below shows the cost of items other than weapons.
6.1 HQs and GHQs
Headquarters Stands: Scenario designers should assign one HQ for each battalion-sized unit in a scenario. Aninfantry HQ stand may be used for this at the printed cost listed in the Weapons Data Tables. A weapon stand may
be designated as an HQ, at 1.5x the cost of that stand. HQs don't have a “quality level,” as that property is uniqueto GHQs.
General Headquarter Stands: Scenario designers should assign one GHQ for each regiment or brigade in play.Infantry HQ stands and weapons may be used for this function at the printed cost multiplied by the cost modifier
below, based on the GHQ's quality.
GHQ Quality Cost Modifier
-2 GHQ x 1.2 points
-1 GHQ x 1.6 points
0 GHQ x 2 points
+1 GHQ x 2.4 points
+2 GHQ x 2.8 points
+3 GHQ x 3.2 points
Burfield (order #5184631)

8/13/2019 Micro Armour the Game-WWII 2nd Edition (Full Color)
http://slidepdf.com/reader/full/micro-armour-the-game-wwii-2nd-edition-full-color 64/136
59
6.2 Engineers and Field WorksEngineers: Combat engineer stands maybe purchased by paying the given infantry stands printed point cost plusten points (+10) each. Engineering vehicles equipped with dozer blades, mine clearing devices, or bridging devicesmay be procured at a cost of the units base cost multiplied by 1.3 (cost x 1.3).
Example: A designer wishes to add a platoon of Churchills with bridging devices to the attackers force. This standwould cost 44 x 1.3 = 57 points. The designer also wants to add a company of three engineer stands to the force. Hisscenario is set in 1944 so the standard British infantry stand costs 13 points. So each stand is 13 + 10 = 23 points and
there are 3 stands so 23 x 3 = 69 points total.
Improved Positions: "Improved Position" markers may be purchased at the rates shown below:
Mines: Minefields may be purchased at the rates shown below:The number of dummy minefield markers may be equal to or less than the number of actual minefields purchased.
Barbed-Wire: Barbed-wire markers cost 2 points per 1" marker.
Anti-Tank Ditches: Anti-tank ditch markers cost 2 points per 1" marker.
6.3 Other Weapons and Units
Off-Map Artillery: Off-map artillery is purchased at the standard cost but never requires transport. Off-mapartillery may not be purchased in increments smaller than single two-gun sections.
Air Strikes: Air strikes are purchased based on the Aircraft Data Table. If the scenario calls for a force to include anFASC unit it must be designated as being in another stand in the players force at no additional cost.
Forward Observers: Forward observers (FOs) are not separate stands. A stand designated as an FO performs thisfunction in addition to its other capabilities. The number of FOs each force has depends on the nationality of theforce. For details see [7.8] “National Artillery Efficiency” and 7.6.4 for complete details.
Forward Observers must be designated as “in” another stand in the player’s force at no additional cost. Note: The total force fielded may never exceed the total number of points allocated.
Improved Posi ti on Type Cost
Light 3 points
Medium 6 points
Heavy 10 points
MinefieldConcentration
Cost CRT Column
Hasty 2 points -2
Standard 4 points +1
Concentrated 10 points +7
US, UK &
Commonwealth
after January 1944
Battalion HQ
may act as FO
1 per every 3 infantry
stands in the OOB
Each non-transport stand in a
recon unit may act as an FO
15 points for
each addtional
German, UK &
Commonwealth
before January 1944
Battalion HQ
may act as HQ
1 per every 3 artillery
stands capable of
indirect fire in the OOB
1 per every 3 non-transport
stands in a recon unit
may act as an FO
25 points for
each additional
All OthersBattalion HQ
may act as HQ
1 per every 9 artillery
stands capable of
indirect fire in the OOB
1 per every “recon”
battalion in the OOB
35 points for
each addtional
Burfield (order #5184631)
8/13/2019 Micro Armour the Game-WWII 2nd Edition (Full Color)
http://slidepdf.com/reader/full/micro-armour-the-game-wwii-2nd-edition-full-color 65/136
60
Purchasing Player B's ForceTo begin with, divide Player A's Force Cohesion Level (FCL) by Player B's FCL and multiply the number obtained
by Player B's "point base." Next, he should consult the scenario type to see what the "Force Ratio" for that scenariois and modify this number accordingly.
Example: Player A's FCL is 15, Player B's is 13. 15/13 = 1.153 (round to 1.15).
1.15 x 900 (B's Point Base) =1035.
The scenario is a “Hasty Attack.” B's point base is multiplied by .5. 1035 x .5 = 518 (rounded up).
Player B gets to purchase a force of 518 points.
Alternate Method:If the scenario is being designed using a “historical,” or pre-determined Order of Battle (OOB), calculate the point
base for the known force (Player A) by totaling the points for all of the stands in the OOB (values from the WeaponsData Tables), plus any field works and any other special units, as detailed above.
Next decide on a cohesion level for the known force (Player A) as well as the cohesion of the (uncreated) opposingforce (Player B). Once both cohesions are determined, divide Player A's cohesion by Player B's to determine the"cohesion ratio."
Finally use the following formulas:
Player B is defending and the scenario is a:• Meeting Engagement
or Recon in Force (1:1 Force Ratio): Cohesion Ratio x Player A's Point Base = Player B's Points
• Hasty Attack (1:2 Force Ratio): (Cohesion Ration x Player A's point base) x .5 = Player B's Points
• Assault on Prepared Positionor Delaying Action (1:3 Force Ratio): (Cohesion Ration x Player A's point base) x .33 = Player B's Points
Player B is attacking and the scenario is a:• Meeting Engagement or
Recon in Force (1:1 Force Ratio): Cohesion Ratio x Player A's Point Base = Player B's Points
• Hasty Attack (2:1 Force Ratio): (Cohesion Ratio x Player A's point base) x 2 = Player B's Points
• Assault on Prepared Position orDelaying Action (3:1 Force Ratio): (Cohesion Ration x Player A's point base) x 3 = Player B's Points
Alternate method example:Force Point Calculator
Player A's Point Base:900
Player A's Cohesion: 15Player B's Cohesion 13
Cohesion Ratio 1.15
Player B is Defending: Player B is Attacking:1:1 force ratio = 1035 1:1 force ratio = 1035
1:2 force ratio = 518 2:1 force ratio = 20701:3 force ratio = 342 3:1 force ratio = 3105
After each player has finished their order of battle it is convenient to calculate the “break points” if using the optionalUnit Determination rules.
The Unit Determination rules introduce another level of imbalance between forces. So if you care to create fully balanced scenarios the following procedure will compensate for the differences introduced by the unitdetermination rules.
Burfield (order #5184631)
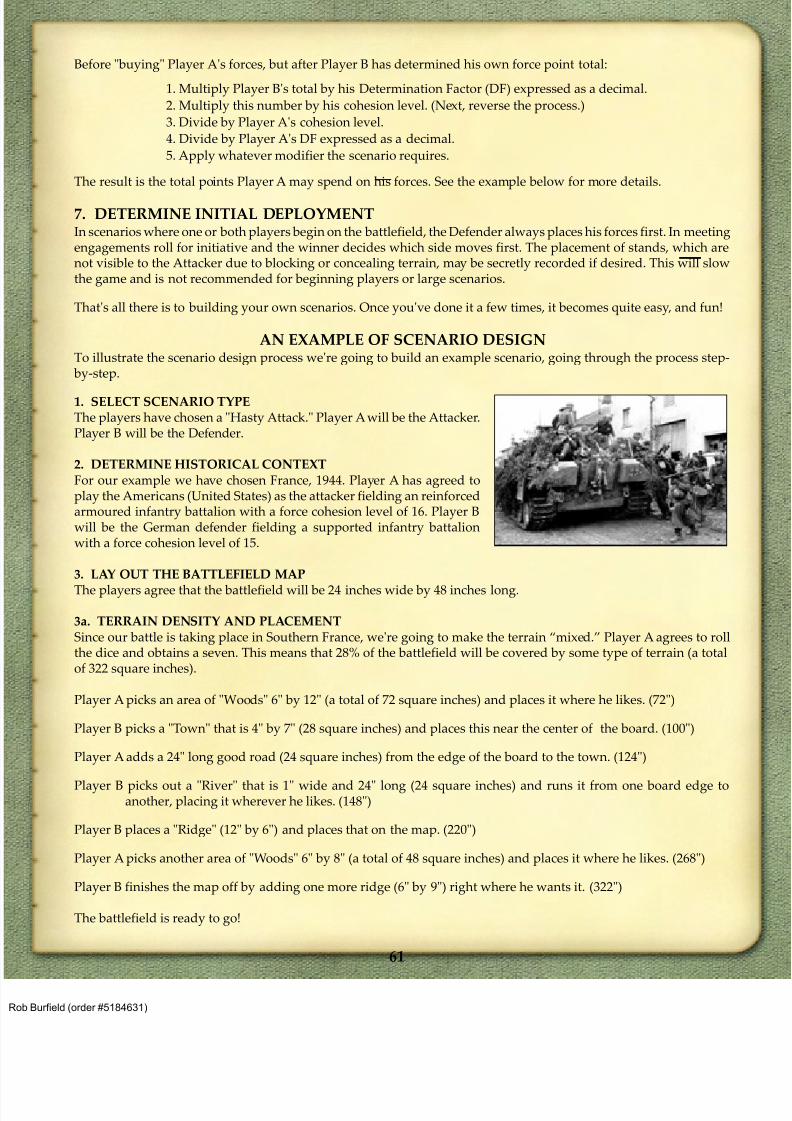
8/13/2019 Micro Armour the Game-WWII 2nd Edition (Full Color)
http://slidepdf.com/reader/full/micro-armour-the-game-wwii-2nd-edition-full-color 66/136
61
Before "buying" Player A's forces, but after Player B has determined his own force point total:
1. Multiply Player B's total by his Determination Factor (DF) expressed as a decimal.
2. Multiply this number by his cohesion level. (Next, reverse the process.)
3. Divide by Player A's cohesion level.
4. Divide by Player A's DF expressed as a decimal.
5. Apply whatever modifier the scenario requires.
The result is the total points Player A may spend on his forces. See the example below for more details.
7. DETERMINE INITIAL DEPLOYMENT
In scenarios where one or both players begin on the battlefield, the Defender always places his forces first. In meetingengagements roll for initiative and the winner decides which side moves first. The placement of stands, which arenot visible to the Attacker due to blocking or concealing terrain, may be secretly recorded if desired. This will slowthe game and is not recommended for beginning players or large scenarios.
That's all there is to building your own scenarios. Once you've done it a few times, it becomes quite easy, and fun!
AN EXAMPLE OF SCENARIO DESIGN
To illustrate the scenario design process we're going to build an example scenario, going through the process step- by-step.
1. SELECT SCENARIO TYPE
The players have chosen a "Hasty Attack." Player Awill be the Attacker.Player B will be the Defender.
2. DETERMINE HISTORICAL CONTEXT
For our example we have chosen France, 1944. Player A has agreed toplay the Americans (United States) as the attacker fielding an reinforcedarmoured infantry battalion with a force cohesion level of 16. Player Bwill be the German defender fielding a supported infantry battalionwith a force cohesion level of 15.
3. LAY OUT THE BATTLEFIELD MAP
The players agree that the battlefield will be 24 inches wide by 48 inches long.
3a. TERRAIN DENSITY AND PLACEMENT
Since our battle is taking place in Southern France, we're going to make the terrain “mixed.” Player A agrees to rollthe dice and obtains a seven. This means that 28% of the battlefield will be covered by some type of terrain (a totalof 322 square inches).
Player A picks an area of "Woods" 6" by 12" (a total of 72 square inches) and places it where he likes. (72")
Player B picks a "Town" that is 4" by 7" (28 square inches) and places this near the center of the board. (100")
Player A adds a 24" long good road (24 square inches) from the edge of the board to the town. (124")
Player B picks out a "River" that is 1" wide and 24" long (24 square inches) and runs it from one board edge toanother, placing it wherever he likes. (148")
Player B places a "Ridge" (12" by 6") and places that on the map. (220")
Player A picks another area of "Woods" 6" by 8" (a total of 48 square inches) and places it where he likes. (268")
Player B finishes the map off by adding one more ridge (6" by 9") right where he wants it. (322")
The battlefield is ready to go!
Burfield (order #5184631)
8/13/2019 Micro Armour the Game-WWII 2nd Edition (Full Color)
http://slidepdf.com/reader/full/micro-armour-the-game-wwii-2nd-edition-full-color 67/136
62
4. ESTABLISH FORCE POINT VALUESGiven a battlefield width of 24 inches, the theater, and the time frame involved, as well as the amount of time theplayers actually have to play, the players agree to a point base of 1500.
5. DETERMINE MAP ORIENTATIONNow we auction off "Map Orientation." Player Abids 40 points. Player B bids 50. As winner of the auction, Player Bgets to decide which side of the map will be his "friendly" side. Player A forfeits 40 points, reducing his base to 1460.Player B forfeits 50 points. The players agree to make the town on Player B's side of the board as the scenario
objective. The Americans must have at least one combat stand in the town by the end of turn 15.
6. ACQUIRE FORCESPlayer A (The US attacker) has 1460 points to spend and "buys" the following:
Organization Point Cost Sub Total
1 x Battalion Headquarters - 1951 x Infantry GHQ(0) /M3 Halftrack (“HT”) 40 + 221x Recon Infantry/ Jeep, 1x M8 HMC [1] 10 + 6, 541x M21 81mm Mortar[1], 1x Inf. Support/M3 HT 27,14 + 22
Company A 2023x Arm. Inf/M3 HT's, 1x Inf Support/M3 HT 3 x (14 + 22), 17 + 221x 57mm ATG/M3 HT 33 + 22
Company B 2023x Arm. Inf/M3 HT's, 1x Inf Support/M3 HT "
Company C 2023x Arm. Inf/M3 HT's, 1x Inf Support/M3 HT "
Battalion Total 801
He then adds some supporting units:
Medium Tank Company4 x M4 Sherman 72 x4 288
Armoured Engineer Company3 x Engineer Infantry/ M3 Halftrack 3 x (24 + 22) 198
2x 4.2" Mortars [2] /Medium trucks 2 x (71 + 10) 162
Support Total 648
Player A's Force Total (11 unused points) 1449
Before we can purchase Player B's troops we have to "balance" his forces against those of Player A as follows:
First Player B determines his force point number by subtracting his map bid from the base point value (1500-50 =1450). Then he determines the Cohesion Ratio (16/15) is 1.07. Next he multiplies his current force point value by thecohesion ratio (1450 *1.07) for a sub total of 1552. Finally he adjusts this for the scenario type. He is defending in aHasty Attack and thus gets half his sub-total (1552/2) for a force point total of 776 points. Player B gets to spend 776points to defend the objective and chooses the following:
Organization Point Cost Sub TotalBattalion Headquarters - 48
1x Infantry GHQ (0) 24 x 2
1st Company 593x '44 Infantry, 1x 81mm Mortar [1] (3 x 14) + 17
Burfield (order #5184631)
8/13/2019 Micro Armour the Game-WWII 2nd Edition (Full Color)
http://slidepdf.com/reader/full/micro-armour-the-game-wwii-2nd-edition-full-color 68/136
63
Organization Point Cost Sub Total2nd Company 59
3x '44 Infantry, 1x 81mm Mortar [1] (3 x 14) + 17
3rd Company 593x '44 Infantry, 1x 81mm Mortar [1] (3 x 14) + 17
Heavy Company
3x Infantry Support, 1x 120mm Mortar [2] (3 x 15) + 109 154
Battalion Fortifications17 light improved positions (17 x 3) 5115 standard mine fields (and up to 15 dummies) (4 x 15) 60
Battalion Sub Total 490
Support Units:Panzerjaeger detachment
2x STuG IIIF 74 x 3 148
Anti-Tank Gun Unit
2x 75mm Pak40/Med. Improved Position (49 + 6) x 2 110
Anti-Aircraft Detachment1x Quad 20mm AAG/Med. Improved Position 22 + 6 28
Additional Units Sub Total 286
Player B Points Total (All points were used): 776
The example above is a good size for a 2 player game on a small board. It was put together as an example of howyou can build an effective force by combining battalion level units with support units. Note that some of thecomponents are under strength. Historically, units were seldom at authorized strengths, having sustained losses that
have not been made good or having units detached for other duties.
UNIT DETERMINATION CALCULATIONSIf you wish to use Optional Rule 12.1 "Unit Determination" it is best to do the calculations while setting up thescenario as follows:
Determine the number of each player's combat units (disregard unarmed stands and factor in any HQs [+2] and theGHQ [+3]):
• Player A's force (from above) has 51 combat stand points
• Player B's force has 24 combat stand points
Determine each player's “force determination factor”:
• The attacking American's will have a .3 (they don't need this town that badly)
• The defending German's will get the standard .35
Multiply the stands by the force determination factor for each force and then multiply the sum by 7 to arrive at eachforce's “breaking point”:
• The American force gets a Break Point of ([51 x .3] x 7) 107
• The German force gets a Break Point of ([24 x .35] x 7) 59
Burfield (order #5184631)
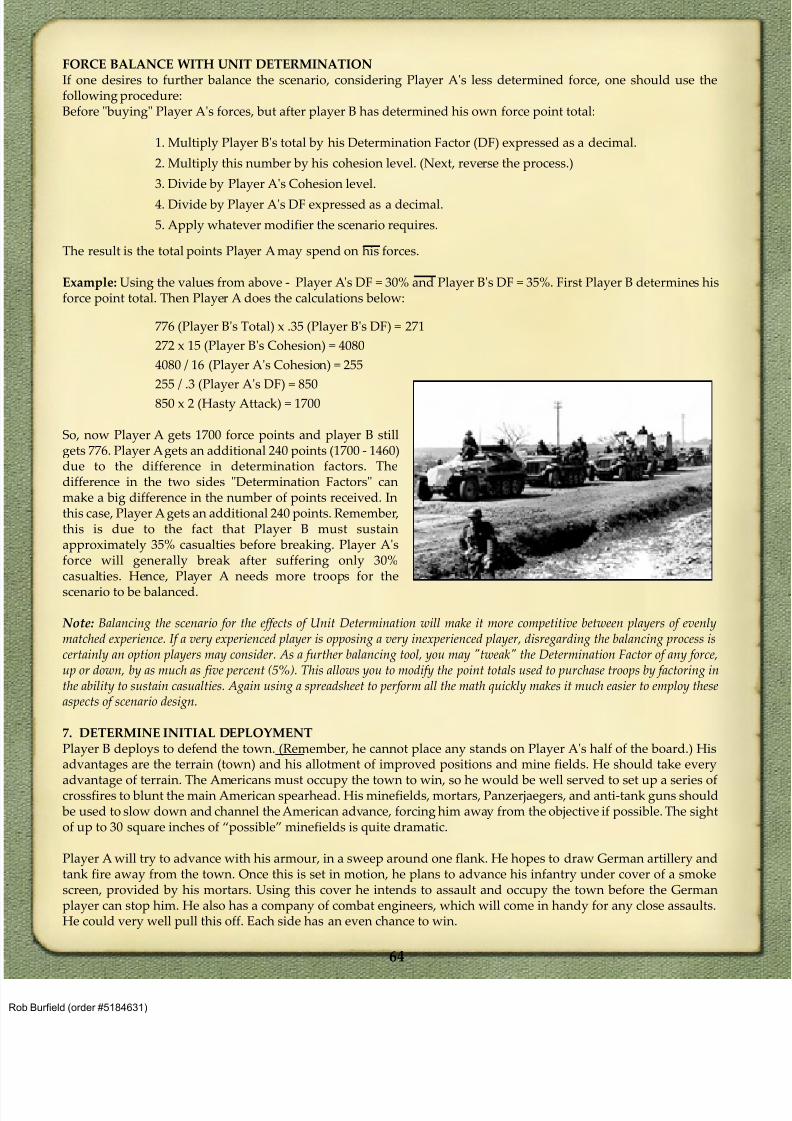
8/13/2019 Micro Armour the Game-WWII 2nd Edition (Full Color)
http://slidepdf.com/reader/full/micro-armour-the-game-wwii-2nd-edition-full-color 69/136
8/13/2019 Micro Armour the Game-WWII 2nd Edition (Full Color)
http://slidepdf.com/reader/full/micro-armour-the-game-wwii-2nd-edition-full-color 70/136
65
WEAPON: The nomenclature, name or designation of the stand. Artillery stands include a numberin brackets, e.g. [1], [3]. This is the number of sections the stand represents and thenumber of impact markers it places when it fires. Aircraft names, followed by a numberin parentheses, e.g. P-47D Thunderbolt (1), represent different armament or ordnanceloads of the same aircraft.
POINTS: A comparative value or “price” for the stand to be used during the scenario designprocess as a means of “balancing” scenarios.
FIREPOWER: There are two firepower values possible for a stand: an “Armour Piercing” firepower(AP), and a “High Explosive” or “small arms” firepower (HE). The “AP” value is usedwhen firing at “Armored Vehicle” stands. The “HE” value is used for all other attacks. An
“F”in the firepower column indicates a flame throwing weapon (see rule section 11.6).
RANGE: This is the maximum range in inches at which a weapon may be used.
DEF: “Defense.” This number represents the basic “Defense Value” of the stand. If the“Defense Value” of the stand is in brackets, e.g. [8], the stand is an “armoured” vehicle.A value without brackets refers to “unarmoured” vehicles, weapons, or equipment.
MOV POINTS: “Movement Points.” The maximum number of “Movement Points” the stand mayexpend in one “Movement Phase.” There are three movement classes: Wheeled (W),Tracked (T), and Foot (F). Some stands are capable of “swimming” and have anamphibious movement rate designated with an “A”, e.g. 10T/3A.
CARGO CAP: “Cargo Capacity.” If a stand is capable of “transporting” other stands there will be anumber in this column representing the stand’s maximum capacity.
TRAN REQ: “Transportation requirement.” If a stand may be “transported” by another stand, this isthe amount of “Cargo Capacity” required to do this. See above.
NOTES: If the stand has restrictions, limitations, or other issues that affect play, the appropriatemnemonic code is entered in the “Notes” column. See below.
YEAR: This represents the year of introduction of the weapon system.
MODELS: Recommended GHQ product number(s) for this unit. Product numbers in parentheses,
e.g. (G141), are suggestions of GHQ models that may not be nationally correct or are aclose variant of the specified vehicle in the data. For example, a player may choose to useG141 (German Motorcycles with Sidecars) to model Soviet Motorcycle Infantry as GHQ(at time of this writing) does not produce a Soviet version of motorcycles with sidecars.
In the following pages you will be presented with with a wide variety of weapons, vehicles, andpersonnel. For clarity’s sake, the various data pertaining to these unit stands have been put into chart form.Each chart column details a different aspect of a specific stand’s performance in the game.
INTRODUCTION TO THE WEAPONS DATA
Burfield (order #5184631)
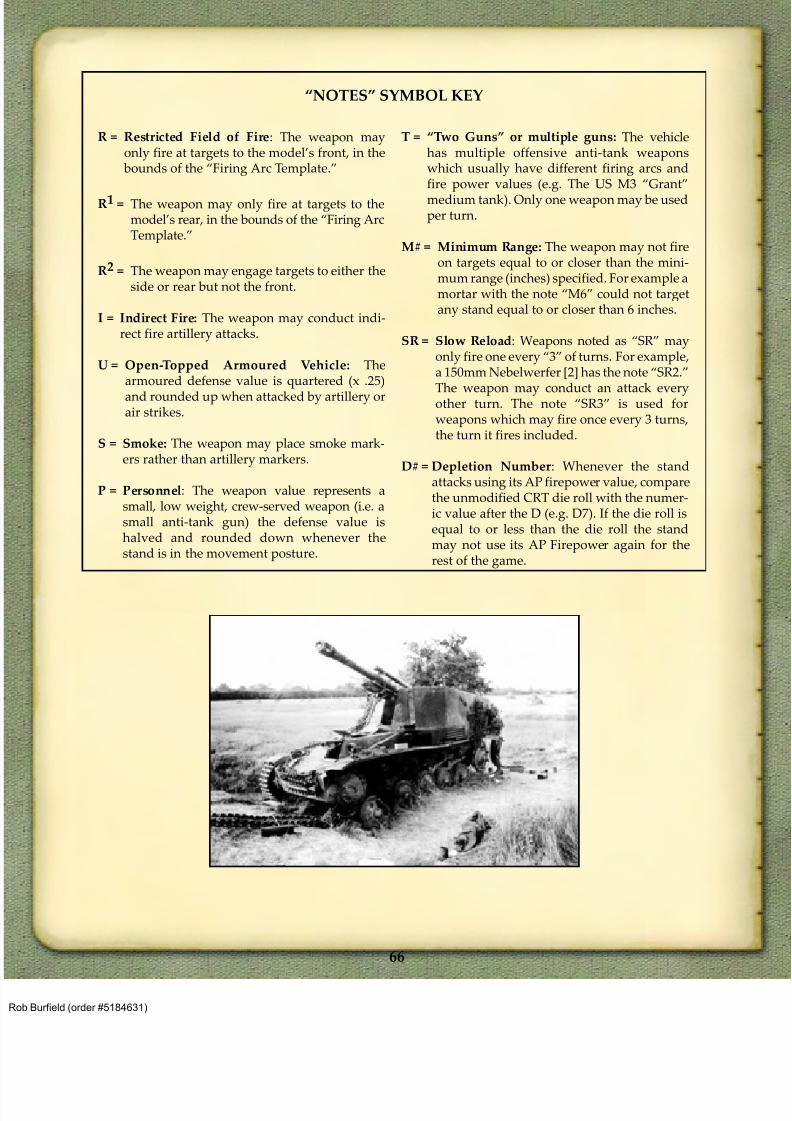
8/13/2019 Micro Armour the Game-WWII 2nd Edition (Full Color)
http://slidepdf.com/reader/full/micro-armour-the-game-wwii-2nd-edition-full-color 71/136
66
R = Restricted Field of Fire: The weapon mayonly fire at targets to the model’s front, in the
bounds of the “Firing Arc Template.”
R1 = The weapon may only fire at targets to themodel’s rear, in the bounds of the “Firing ArcTemplate.”
R2 = The weapon may engage targets to either theside or rear but not the front.
I = Indirect Fire: The weapon may conduct indi-rect fire artillery attacks.
U = Open-Topped Armoured Vehicle: Thearmoured defense value is quartered (x .25)
and rounded up when attacked by artillery orair strikes.
S = Smoke: The weapon may place smoke mark-ers rather than artillery markers.
P = Personnel: The weapon value represents asmall, low weight, crew-served weapon (i.e. asmall anti-tank gun) the defense value ishalved and rounded down whenever thestand is in the movement posture.
T = “Two Guns” or multiple guns: The vehiclehas multiple offensive anti-tank weaponswhich usually have different firing arcs andfire power values (e.g. The US M3 “Grant”
medium tank). Only one weapon may be usedper turn.
M# = Minimum Range: The weapon may not fireon targets equal to or closer than the mini-mum range (inches) specified. For example amortar with the note “M6” could not targetany stand equal to or closer than 6 inches.
SR = Slow Reload: Weapons noted as “SR” mayonly fire one every “3” of turns. For example,a 150mm Nebelwerfer [2] has the note “SR2.”
The weapon may conduct an attack everyother turn. The note “SR3” is used forweapons which may fire once every 3 turns,the turn it fires included.
D# = Depletion Number: Whenever the standattacks using its AP firepower value, comparethe unmodified CRT die roll with the numer-ic value after the D (e.g. D7). If the die roll isequal to or less than the die roll the standmay not use its AP Firepower again for therest of the game.
“NOTES” SYMBOL KEY
Burfield (order #5184631)
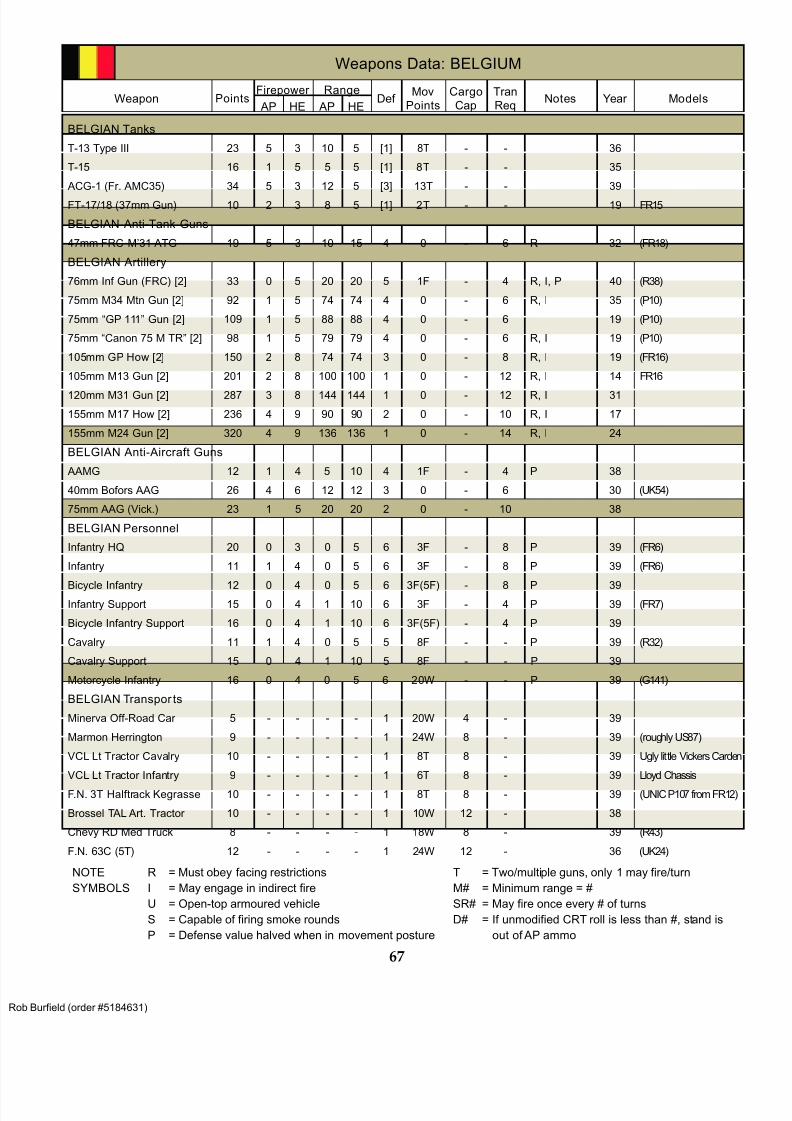
8/13/2019 Micro Armour the Game-WWII 2nd Edition (Full Color)
http://slidepdf.com/reader/full/micro-armour-the-game-wwii-2nd-edition-full-color 72/136
67
R = Must obey facing restrictions
I = May engage in indirect fire
U = Open-top armoured vehicle
S = Capable of firing smoke rounds
P = Defense value halved when in movement posture
T = Two/multiple guns, only 1 may fire/turn
M# = Minimum range = #
SR# = May fire once every # of turns
D# = If unmodified CRT roll is less than #, stand is
out of AP ammo
NOTE
SYMBOLS
Weapons Data: BELGIUM
Weapon PointsFirepower Range
Def Mov
Points
Cargo
Cap
Tran
Req Notes Year Models
AP HE AP HE
BELGIAN Tanks
T-13 Type III 23 5 3 10 5 [1] 8T - - 36
T-15 16 1 5 5 5 [1] 8T - - 35
ACG-1 (Fr. AMC35) 34 5 3 12 5 [3] 13T - - 39
FT-17/18 (37mm Gun) 10 2 3 8 5 [1] 2T - - 19 FR15
BELGIAN Anti-Tank Guns
47mm FRC M’31 ATG 19 5 3 10 15 4 0 - 6 R 32 (FR18)
BELGIAN Artillery
76mm Inf Gun (FRC) [2] 33 0 5 20 20 5 1F - 4 R, I, P 40 (R38)
75mm M34 Mtn Gun [2] 92 1 5 74 74 4 0 - 6 R, I 35 (P10)
75mm “GP 111” Gun [2] 109 1 5 88 88 4 0 - 6 19 (P10)
75mm “Canon 75 M TR” [2] 98 1 5 79 79 4 0 - 6 R, I 19 (P10)
105mm GP How [2] 150 2 8 74 74 3 0 - 8 R, I 19 (FR16)
105mm M13 Gun [2] 201 2 8 100 100 1 0 - 12 R, I 14 FR16
120mm M31 Gun [2] 287 3 8 144 144 1 0 - 12 R, I 31
155mm M17 How [2] 236 4 9 90 90 2 0 - 10 R, I 17
155mm M24 Gun [2] 320 4 9 136 136 1 0 - 14 R, I 24
BELGIAN Anti-Aircraft Guns
AAMG 12 1 4 5 10 4 1F - 4 P 38
40mm Bofors AAG 26 4 6 12 12 3 0 - 6 30 (UK54)
75mm AAG (Vick.) 23 1 5 20 20 2 0 - 10 38
BELGIAN Personnel
Infantry HQ 20 0 3 0 5 6 3F - 8 P 39 (FR6)
Infantry 11 1 4 0 5 6 3F - 8 P 39 (FR6)
Bicycle Infantry 12 0 4 0 5 6 3F(5F) - 8 P 39Infantry Support 15 0 4 1 10 6 3F - 4 P 39 (FR7)
Bicycle Infantry Support 16 0 4 1 10 6 3F(5F) - 4 P 39
Cavalry 11 1 4 0 5 5 8F - - P 39 (R32)
Cavalry Support 15 0 4 1 10 5 8F - - P 39
Motorcycle Infantry 16 0 4 0 5 6 20W - - P 39 (G141)
BELGIAN Transpor ts
Minerva Off-Road Car 5 - - - - 1 20W 4 - 39
Marmon Herrington 9 - - - - 1 24W 8 - 39 (roughly US87)
VCL Lt Tractor Cavalry 10 - - - - 1 8T 8 - 39 Ugly little Vickers Carden
VCL Lt Tractor Infantry 9 - - - - 1 6T 8 - 39 Lloyd Chassis
F.N. 3T Halftrack Kegrasse 10 - - - - 1 8T 8 - 39 (UNIC P107 fromFR12)
Brossel TAL Art. Tractor 10 - - - - 1 10W 12 - 38
Chevy RD Med Truck 8 - - - - 1 18W 8 - 39 (R43)
F.N. 63C (5T) 12 - - - - 1 24W 12 - 36 (UK24)
Burfield (order #5184631)
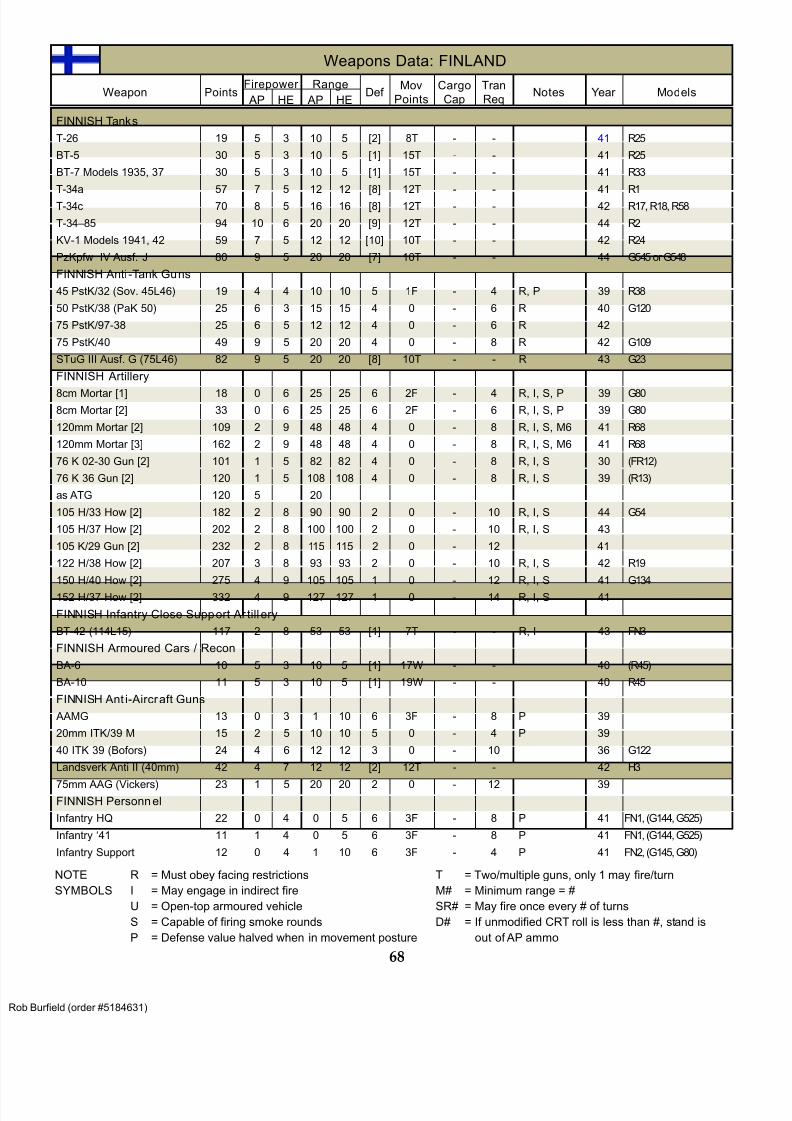
8/13/2019 Micro Armour the Game-WWII 2nd Edition (Full Color)
http://slidepdf.com/reader/full/micro-armour-the-game-wwii-2nd-edition-full-color 73/136
68
Weapons Data: FINLAND
Weapon Points Firepower Range
Def Mov
Points
Cargo
Cap
Tran
Req Notes Year Models
AP HE AP HE
FINNISH Tanks
T-26 19 5 3 10 5 [2] 8T - - 41 R25
BT-5 30 5 3 10 5 [1] 15T - - 41 R25
BT-7 Models 1935, 37 30 5 3 10 5 [1] 15T - - 41 R33
T-34a 57 7 5 12 12 [8] 12T - - 41 R1
T-34c 70 8 5 16 16 [8] 12T - - 42 R17, R18, R58
T-34–85 94 10 6 20 20 [9] 12T - - 44 R2
KV-1 Models 1941, 42 59 7 5 12 12 [10] 10T - - 42 R24
PzKpfw IV Ausf. J 80 9 5 20 20 [7] 10T - - 44 G545 orG548
FINNISH Anti -Tank Guns
45 PstK/32 (Sov. 45L46) 19 4 4 10 10 5 1F - 4 R, P 39 R38
50 PstK/38 (PaK 50) 25 6 3 15 15 4 0 - 6 R 40 G120
75 PstK/97-38 25 6 5 12 12 4 0 - 6 R 42
75 PstK/40 49 9 5 20 20 4 0 - 8 R 42 G109
STuG III Ausf. G (75L46) 82 9 5 20 20 [8] 10T - - R 43 G23
FINNISH Artillery
8cm Mortar [1] 18 0 6 25 25 6 2F - 4 R, I, S, P 39 G80
8cm Mortar [2] 33 0 6 25 25 6 2F - 6 R, I, S, P 39 G80
120mm Mortar [2] 109 2 9 48 48 4 0 - 8 R, I, S, M6 41 R68
120mm Mortar [3] 162 2 9 48 48 4 0 - 8 R, I, S, M6 41 R68
76 K 02-30 Gun [2] 101 1 5 82 82 4 0 - 8 R, I, S 30 (FR12)
76 K 36 Gun [2] 120 1 5 108 108 4 0 - 8 R, I, S 39 (R13)
as ATG 120 5 20
105 H/33 How [2] 182 2 8 90 90 2 0 - 10 R, I, S 44 G54
105 H/37 How [2] 202 2 8 100 100 2 0 - 10 R, I, S 43
105 K/29 Gun [2] 232 2 8 115 115 2 0 - 12 41
122 H/38 How [2] 207 3 8 93 93 2 0 - 10 R, I, S 42 R19
150 H/40 How [2] 275 4 9 105 105 1 0 - 12 R, I, S 41 G134
152 H/37 How [2] 332 4 9 127 127 1 0 - 14 R, I, S 41
FINNISH Infantry Close Support Ar till ery
BT-42 (114L15) 117 2 8 53 53 [1] 7T - - R, I 43 FN3
FINNISH Armoured Cars / Recon
BA-6 10 5 3 10 5 [1] 17W - - 40 (R45)
BA-10 11 5 3 10 5 [1] 19W - - 40 R45
FINNISH Ant i-Aircraft Guns
AAMG 13 0 3 1 10 6 3F - 8 P 39
20mm ITK/39 M 15 2 5 10 10 5 0 - 4 P 39
40 ITK 39 (Bofors) 24 4 6 12 12 3 0 - 10 36 G122
Landsverk Anti II (40mm) 42 4 7 12 12 [2] 12T - - 42 H3
75mm AAG (Vickers) 23 1 5 20 20 2 0 - 12 39FINNISH Personnel
Infantry HQ 22 0 4 0 5 6 3F - 8 P 41 FN1, (G144, G525)
Infantry ‘41 11 1 4 0 5 6 3F - 8 P 41 FN1, (G144, G525)
Infantry Support 12 0 4 1 10 6 3F - 4 P 41 FN2, (G145, G80)
R = Must obey facing restrictions
I = May engage in indirect fire
U = Open-top armoured vehicle
S = Capable of firing smoke rounds
P = Defense value halved when in movement posture
T = Two/multiple guns, only 1 may fire/turn
M# = Minimum range = #
SR# = May fire once every # of turns
D# = If unmodified CRT roll is less than #, stand is
out of AP ammo
NOTE
SYMBOLS
Burfield (order #5184631)
8/13/2019 Micro Armour the Game-WWII 2nd Edition (Full Color)
http://slidepdf.com/reader/full/micro-armour-the-game-wwii-2nd-edition-full-color 74/136
69
R = Must obey facing restrictions
I = May engage in indirect fire
U = Open-top armoured vehicle
S = Capable of firing smoke rounds
P = Defense value halved when in movement posture
T = Two/multiple guns, only 1 may fire/turn
M# = Minimum range = #
SR# = May fire once every # of turns
D# = If unmodified CRT roll is less than #, stand is
out of AP ammo
NOTE
SYMBOLS
Weapon Points
Firepower Range
Def
Mov
Points
Cargo
Cap
Tran
Req Notes Year Models AP HE AP HE
FINNISH Personnel, continued
ATR Infantry ‘40 12 3 3 1 10 6 3F - 8 P 41 FN2
Panzerjaeger Infantry ‘43 13 6 6 0 5 6 3F - 8 P 43 FN1, (G144, G525)
Panzerjaeger Infantry ‘45 14 6 6 1 5 6 3F - 8 P 44 FN1, (G144, G525)
Bicycle Infantry ‘41 11 1 4 0 5 6 3F(5F) - 8 P 41 (G144, G525)
FINNISH Transports
Car 5 - - - - 3 25W 4 - 35 G40 or R12
Lt Truck Daimler-Steyr 9 - - - - 1 27W 8 - 40 G37,G79, R42
Md Truck Opel 10 - - - - 1 25W 10 - 36 G25, G66, R43
Burfield (order #5184631)
8/13/2019 Micro Armour the Game-WWII 2nd Edition (Full Color)
http://slidepdf.com/reader/full/micro-armour-the-game-wwii-2nd-edition-full-color 75/136
8/13/2019 Micro Armour the Game-WWII 2nd Edition (Full Color)
http://slidepdf.com/reader/full/micro-armour-the-game-wwii-2nd-edition-full-color 76/136
71
R = Must obey facing restrictions
I = May engage in indirect fire
U = Open-top armoured vehicle
S = Capable of firing smoke rounds
P = Defense value halved when in movement posture
T = Two/multiple guns, only 1 may fire/turn
M# = Minimum range = #
SR# = May fire once every # of turns
D# = If unmodified CRT roll is less than #, stand is
out of AP ammo
NOTE
SYMBOLS
Weapons Data: FRANCE
Weapon Points Firepower Range
Def Mov
Points
Cargo
Cap
Tran
Req Notes Year Models
AP HE AP HE
FRENCH Tanks
AMC-35 (47L32) 34 5 3 12 5 [3] 13T - - 38
AMR-35 (7mm MG) 22 0 4 5 5 [1] 16T - - 33 FR20
AMR-35 ZT (25mm) 26 2 3 5 5 [2] 16T - - 33 FR20
Char B1 (bis) 75L17 How. 53 1 5 15 15 [6] 7T - - R, T 36 FR1B1 Turret (47L34) 5 3 12 5 - - T
FCM-36 (37L21) 21 2 3 8 5 [4] 7T - - 38
Char D2 (47L34) 31 5 4 12 5 [4] 7T - - 37
FT-17 (MG) 9 0 5 1 5 [1] 2T - - 17 FR15
FT-17 (37L21) 10 2 3 8 5 [1] 2T - - 17 FR15
H-35 (37L21) 20 2 3 8 5 [3] 8T - - 36
H-39 (37L21) 25 2 3 8 5 [4] 11T - - 39 FR3
H-40 (37L35) 30 4 3 10 5 [4] 11T - - 40 FR9
R-35 (37L21) 20 2 3 8 5 [4] 6T - - 36 FR5
R-40 (37L35) 27 4 3 10 5 [4] 8T - - 40 FR8
S-35 (47L34) 33 5 3 12 5 [4] 10T - - 36 FR2FRENCH Anti-Tank Guns
25mm ATG 9 3 1 7 5 5 1F - 4 R, P 34 FR13
47mm ATG (Fr. APX) 19 5 3 12 12 4 0 - 6 R 37 FR18
75mm 97/33 ATG 36 5 5 20 20 4 0 - 4 R 40
W-15 TCC 18 5 2 12 5 2 15W - - R 38 FR19
FRENCH Artil lery
75L36 Canon M97 [2] 67 1 5 54 54 4 0 - 6 R, I, S 97 P10
75L36 Canon M36 [2] 67 1 5 54 54 4 0 - 6 R, I, S 36 FR12
75L36 Canon M36 [3] 99 1 5 54 54 4 0 - 6 R, I, S 36 FR12
Cavalry 60mm Mortars [2] 13 0 4 10 10 5 8F - - P, S 35 FR10, FR11
81mm Mortar [2] 33 0 6 24 24 6 2F - 6 R, I, S 27 FR11105L17 Howitzer [2] 166 2 8 82 82 2 0 - 8 R, I 36
105L28 Canon M13 [2] 194 2 8 96 96 2 0 - 8 R, I, S 13 FR16
155L14 M17 Howitzer [2] 218 3 9 90 90 2 0 - 10 R, I 16
155L14 M17 Howitzer [3] 326 3 9 90 90 2 0 - 10 R, I 16
155L38 GPF Canon M17 [2] 301 3 9 156 156 2 0 - 14 R, I 17
155L38 GPF Canon M17 [3] 451 3 9 156 156 2 0 - 14 R, I 17
FRENCH Anti-Aircraft Guns
13mm AAMG (Hotchkiss) 13 1 4 5 10 5 0 - 6 39
25mm AAG (Hotchkiss) 18 2 6 10 10 4 0 - 6 38 (IT12)
75mm AAG M39 23 1 5 20 20 2 0 - 12 39
FRENCH Armoured Cars / ReconPanhard AMD-178 18 3 4 7 5 [2] 20W - - 37 FR4
FRENCH Armoured Personnel Carriers
UE Chenillette 15 0 4 1 5 [1] 9T - - R 32 RA4, FR13
Lorraine 37L 11 - - - - [2] 10T 8 - 39 FR7
Burfield (order #5184631)
8/13/2019 Micro Armour the Game-WWII 2nd Edition (Full Color)
http://slidepdf.com/reader/full/micro-armour-the-game-wwii-2nd-edition-full-color 77/136
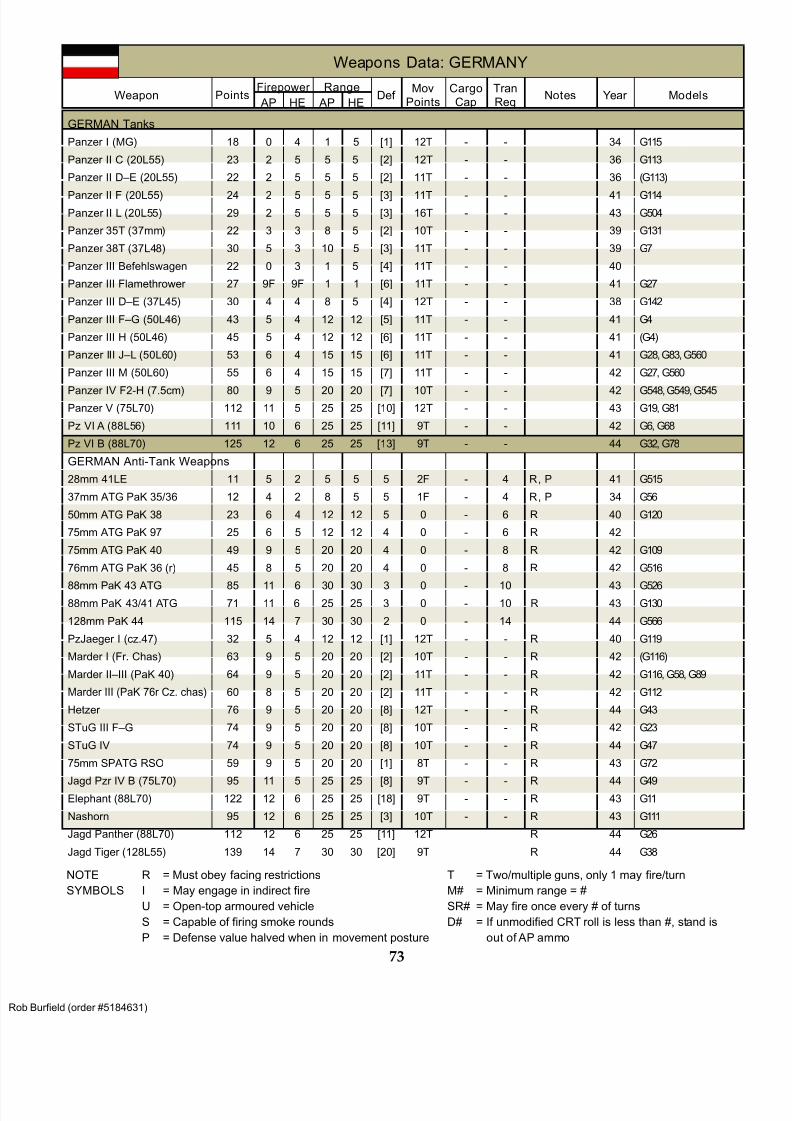
8/13/2019 Micro Armour the Game-WWII 2nd Edition (Full Color)
http://slidepdf.com/reader/full/micro-armour-the-game-wwii-2nd-edition-full-color 78/136
73
R = Must obey facing restrictions
I = May engage in indirect fire
U = Open-top armoured vehicle
S = Capable of firing smoke rounds
P = Defense value halved when in movement posture
T = Two/multiple guns, only 1 may fire/turn
M# = Minimum range = #
SR# = May fire once every # of turns
D# = If unmodified CRT roll is less than #, stand is
out of AP ammo
NOTE
SYMBOLS
Weapons Data: GERMANY
Weapon Points Firepower Range
Def Mov
Points
Cargo
Cap
Tran
Req Notes Year Models
AP HE AP HE
GERMAN Tanks
Panzer I (MG) 18 0 4 1 5 [1] 12T - - 34 G115
Panzer II C (20L55) 23 2 5 5 5 [2] 12T - - 36 G113
Panzer II D–E (20L55) 22 2 5 5 5 [2] 11T - - 36 (G113)
Panzer II F (20L55) 24 2 5 5 5 [3] 11T - - 41 G114Panzer II L (20L55) 29 2 5 5 5 [3] 16T - - 43 G504
Panzer 35T (37mm) 22 3 3 8 5 [2] 10T - - 39 G131
Panzer 38T (37L48) 30 5 3 10 5 [3] 11T - - 39 G7
Panzer III Befehlswagen 22 0 3 1 5 [4] 11T - - 40
Panzer III Flamethrower 27 9F 9F 1 1 [6] 11T - - 41 G27
Panzer III D–E (37L45) 30 4 4 8 5 [4] 12T - - 38 G142
Panzer III F–G (50L46) 43 5 4 12 12 [5] 11T - - 41 G4
Panzer III H (50L46) 45 5 4 12 12 [6] 11T - - 41 (G4)
Panzer III J–L (50L60) 53 6 4 15 15 [6] 11T - - 41 G28, G83, G560
Panzer III M (50L60) 55 6 4 15 15 [7] 11T - - 42 G27, G560
Panzer IV F2-H (7.5cm) 80 9 5 20 20 [7] 10T - - 42 G548, G549, G545Panzer V (75L70) 112 11 5 25 25 [10] 12T - - 43 G19, G81
Pz VI A (88L56) 111 10 6 25 25 [11] 9T - - 42 G6, G68
Pz VI B (88L70) 125 12 6 25 25 [13] 9T - - 44 G32, G78
GERMAN Anti-Tank Weapons
28mm 41LE 11 5 2 5 5 5 2F - 4 R, P 41 G515
37mm ATG PaK 35/36 12 4 2 8 5 5 1F - 4 R, P 34 G56
50mm ATG PaK 38 23 6 4 12 12 5 0 - 6 R 40 G120
75mm ATG PaK 97 25 6 5 12 12 4 0 - 6 R 42
75mm ATG PaK 40 49 9 5 20 20 4 0 - 8 R 42 G109
76mm ATG PaK 36 (r) 45 8 5 20 20 4 0 - 8 R 42 G516
88mm PaK 43 ATG 85 11 6 30 30 3 0 - 10 43 G52688mm PaK 43/41 ATG 71 11 6 25 25 3 0 - 10 R 43 G130
128mm PaK 44 115 14 7 30 30 2 0 - 14 44 G566
PzJaeger I (cz.47) 32 5 4 12 12 [1] 12T - - R 40 G119
Marder I (Fr. Chas) 63 9 5 20 20 [2] 10T - - R 42 (G116)
Marder II–III (PaK 40) 64 9 5 20 20 [2] 11T - - R 42 G116, G58, G89
Marder III (PaK 76r Cz. chas) 60 8 5 20 20 [2] 11T - - R 42 G112
Hetzer 76 9 5 20 20 [8] 12T - - R 44 G43
STuG III F–G 74 9 5 20 20 [8] 10T - - R 42 G23
STuG IV 74 9 5 20 20 [8] 10T - - R 44 G47
75mm SPATG RSO 59 9 5 20 20 [1] 8T - - R 43 G72
Jagd Pzr IV B (75L70) 95 11 5 25 25 [8] 9T - - R 44 G49Elephant (88L70) 122 12 6 25 25 [18] 9T - - R 43 G11
Nashorn 95 12 6 25 25 [3] 10T - - R 43 G111
Jagd Panther (88L70) 112 12 6 25 25 [11] 12T R 44 G26
Jagd Tiger (128L55) 139 14 7 30 30 [20] 9T R 44 G38
Burfield (order #5184631)
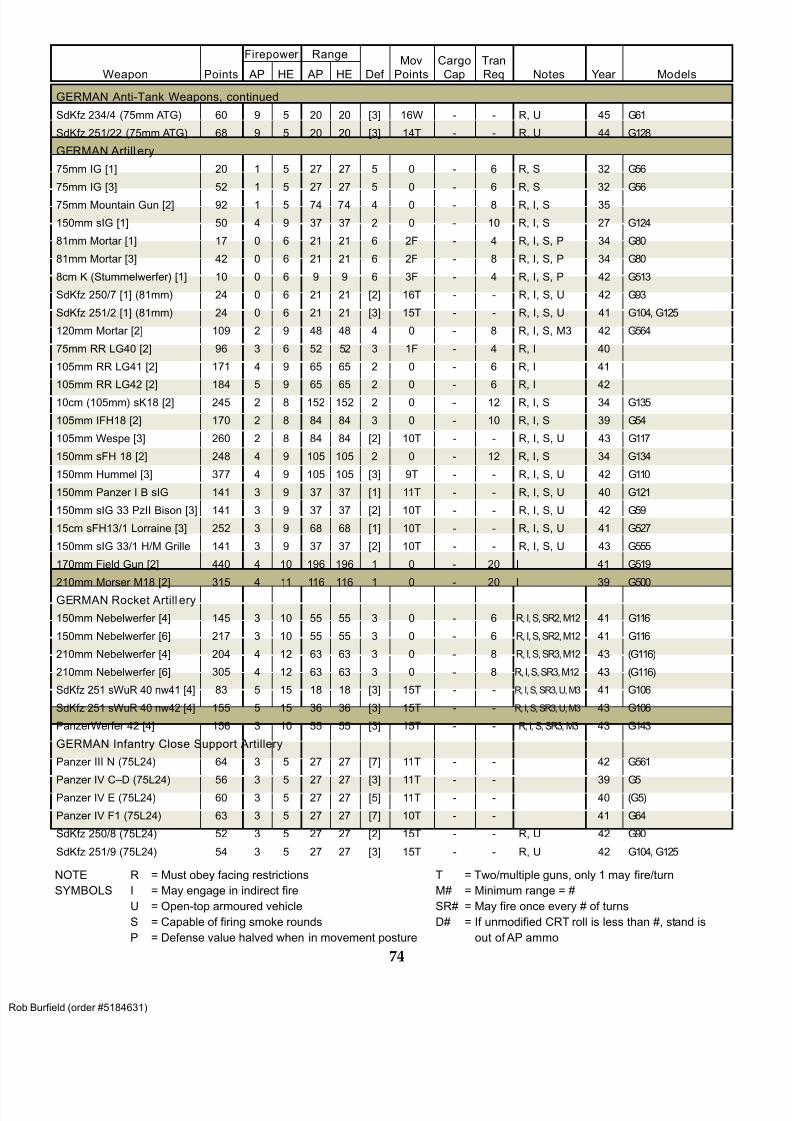
8/13/2019 Micro Armour the Game-WWII 2nd Edition (Full Color)
http://slidepdf.com/reader/full/micro-armour-the-game-wwii-2nd-edition-full-color 79/136
74
R = Must obey facing restrictions
I = May engage in indirect fire
U = Open-top armoured vehicle
S = Capable of firing smoke rounds
P = Defense value halved when in movement posture
T = Two/multiple guns, only 1 may fire/turn
M# = Minimum range = #
SR# = May fire once every # of turns
D# = If unmodified CRT roll is less than #, stand is
out of AP ammo
NOTE
SYMBOLS
Weapon Points
Firepower Range
Def
Mov
Points
Cargo
Cap
Tran
Req Notes Year Models AP HE AP HE
GERMAN Anti-Tank Weapons, continued
SdKfz 234/4 (75mm ATG) 60 9 5 20 20 [3] 16W - - R, U 45 G61
SdKfz 251/22 (75mm ATG) 68 9 5 20 20 [3] 14T - - R, U 44 G128
GERMAN Artill ery
75mm IG [1] 20 1 5 27 27 5 0 - 6 R, S 32 G56
75mm IG [3] 52 1 5 27 27 5 0 - 6 R, S 32 G56
75mm Mountain Gun [2] 92 1 5 74 74 4 0 - 8 R, I, S 35
150mm sIG [1] 50 4 9 37 37 2 0 - 10 R, I, S 27 G124
81mm Mortar [1] 17 0 6 21 21 6 2F - 4 R, I, S, P 34 G80
81mm Mortar [3] 42 0 6 21 21 6 2F - 8 R, I, S, P 34 G80
8cm K (Stummelwerfer) [1] 10 0 6 9 9 6 3F - 4 R, I, S, P 42 G513
SdKfz 250/7 [1] (81mm) 24 0 6 21 21 [2] 16T - - R, I, S, U 42 G93
SdKfz 251/2 [1] (81mm) 24 0 6 21 21 [3] 15T - - R, I, S, U 41 G104, G125
120mm Mortar [2] 109 2 9 48 48 4 0 - 8 R, I, S, M3 42 G564
75mm RR LG40 [2] 96 3 6 52 52 3 1F - 4 R, I 40
105mm RR LG41 [2] 171 4 9 65 65 2 0 - 6 R, I 41
105mm RR LG42 [2] 184 5 9 65 65 2 0 - 6 R, I 42
10cm (105mm) sK18 [2] 245 2 8 152 152 2 0 - 12 R, I, S 34 G135
105mm IFH18 [2] 170 2 8 84 84 3 0 - 10 R, I, S 39 G54
105mm Wespe [3] 260 2 8 84 84 [2] 10T - - R, I, S, U 43 G117
150mm sFH 18 [2] 248 4 9 105 105 2 0 - 12 R, I, S 34 G134
150mm Hummel [3] 377 4 9 105 105 [3] 9T - - R, I, S, U 42 G110
150mm Panzer I B sIG 141 3 9 37 37 [1] 11T - - R, I, S, U 40 G121
150mm sIG 33 PzII Bison [3] 141 3 9 37 37 [2] 10T - - R, I, S, U 42 G59
15cm sFH13/1 Lorraine [3] 252 3 9 68 68 [1] 10T - - R, I, S, U 41 G527
150mm sIG 33/1 H/M Grille 141 3 9 37 37 [2] 10T - - R, I, S, U 43 G555
170mm Field Gun [2] 440 4 10 196 196 1 0 - 20 I 41 G519
210mm Morser M18 [2] 315 4 11 116 116 1 0 - 20 I 39 G500
GERMAN Rocket Artill ery
150mm Nebelwerfer [4] 145 3 10 55 55 3 0 - 6 R, I, S, SR2, M12 41 G116
150mm Nebelwerfer [6] 217 3 10 55 55 3 0 - 6 R, I, S, SR2, M12 41 G116
210mm Nebelwerfer [4] 204 4 12 63 63 3 0 - 8 R, I, S, SR3, M12 43 (G116)
210mm Nebelwerfer [6] 305 4 12 63 63 3 0 - 8 R, I, S, SR3, M12 43 (G116)
SdKfz 251 sWuR 40 nw41 [4] 83 5 15 18 18 [3] 15T - - R, I, S, SR3, U, M3 41 G106
SdKfz 251 sWuR 40 nw42 [4] 155 5 15 36 36 [3] 15T - - R, I, S, SR3, U, M3 43 G106
PanzerWerfer 42 [4] 156 3 10 55 55 [3] 15T - - R, I, S, SR3, M3 43 G143
GERMAN Infantry Close Support Artillery
Panzer III N (75L24) 64 3 5 27 27 [7] 11T - - 42 G561
Panzer IV C–D (75L24) 56 3 5 27 27 [3] 11T - - 39 G5
Panzer IV E (75L24) 60 3 5 27 27 [5] 11T - - 40 (G5)
Panzer IV F1 (75L24) 63 3 5 27 27 [7] 10T - - 41 G64
SdKfz 250/8 (75L24) 52 3 5 27 27 [2] 15T - - R, U 42 G90
SdKfz 251/9 (75L24) 54 3 5 27 27 [3] 15T - - R, U 42 G104, G125
Burfield (order #5184631)
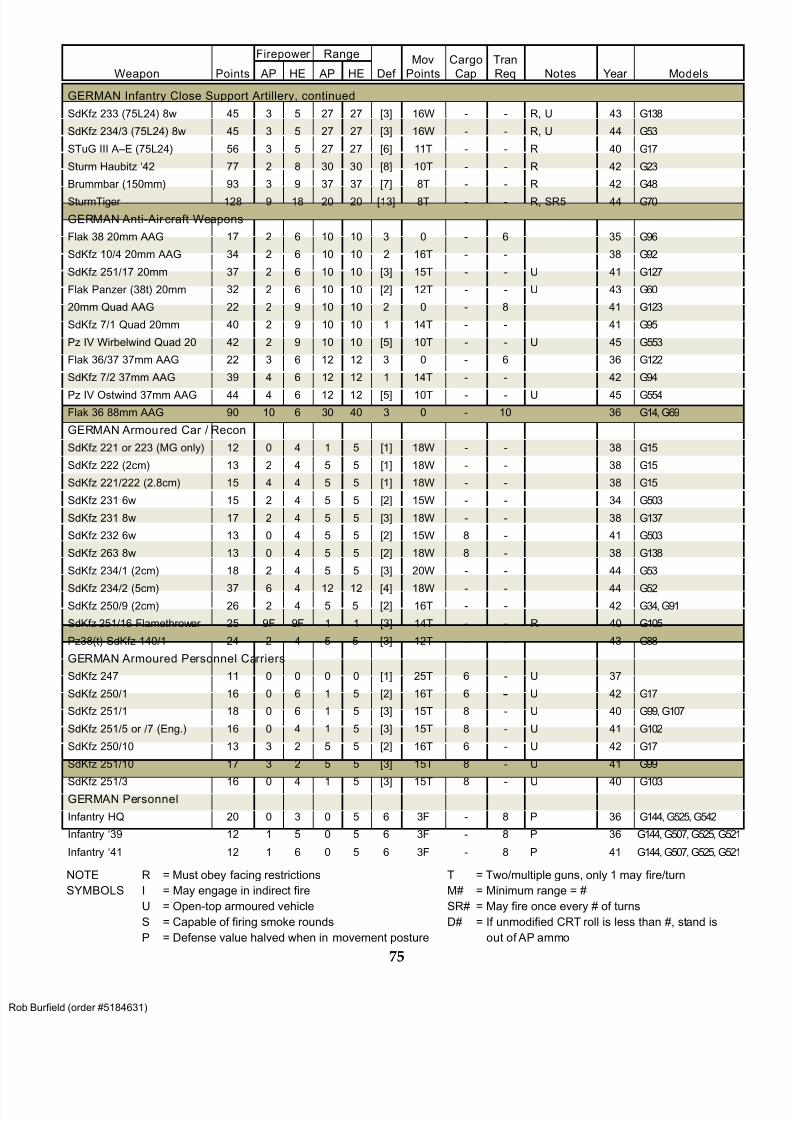
8/13/2019 Micro Armour the Game-WWII 2nd Edition (Full Color)
http://slidepdf.com/reader/full/micro-armour-the-game-wwii-2nd-edition-full-color 80/136
75
Weapon Points
Firepower Range
Def
Mov
Points
Cargo
Cap
Tran
Req Notes Year Models AP HE AP HE
GERMAN Infantry Close Support Artillery, continued
SdKfz 233 (75L24) 8w 45 3 5 27 27 [3] 16W - - R, U 43 G138
SdKfz 234/3 (75L24) 8w 45 3 5 27 27 [3] 16W - - R, U 44 G53
STuG III A–E (75L24) 56 3 5 27 27 [6] 11T - - R 40 G17
Sturm Haubitz ‘42 77 2 8 30 30 [8] 10T - - R 42 G23
Brummbar (150mm) 93 3 9 37 37 [7] 8T - - R 42 G48
SturmTiger 128 9 18 20 20 [13] 8T - - R, SR5 44 G70
GERMAN Anti-Air craft Weapons
Flak 38 20mm AAG 17 2 6 10 10 3 0 - 6 35 G96
SdKfz 10/4 20mm AAG 34 2 6 10 10 2 16T - - 38 G92
SdKfz 251/17 20mm 37 2 6 10 10 [3] 15T - - U 41 G127
Flak Panzer (38t) 20mm 32 2 6 10 10 [2] 12T - - U 43 G60
20mm Quad AAG 22 2 9 10 10 2 0 - 8 41 G123
SdKfz 7/1 Quad 20mm 40 2 9 10 10 1 14T - - 41 G95
Pz IV Wirbelwind Quad 20 42 2 9 10 10 [5] 10T - - U 45 G553
Flak 36/37 37mm AAG 22 3 6 12 12 3 0 - 6 36 G122
SdKfz 7/2 37mm AAG 39 4 6 12 12 1 14T - - 42 G94
Pz IV Ostwind 37mm AAG 44 4 6 12 12 [5] 10T - - U 45 G554
Flak 36 88mm AAG 90 10 6 30 40 3 0 - 10 36 G14, G69
GERMAN Armoured Car / Recon
SdKfz 221 or 223 (MG only) 12 0 4 1 5 [1] 18W - - 38 G15
SdKfz 222 (2cm) 13 2 4 5 5 [1] 18W - - 38 G15
SdKfz 221/222 (2.8cm) 15 4 4 5 5 [1] 18W - - 38 G15
SdKfz 231 6w 15 2 4 5 5 [2] 15W - - 34 G503
SdKfz 231 8w 17 2 4 5 5 [3] 18W - - 38 G137
SdKfz 232 6w 13 0 4 5 5 [2] 15W 8 - 41 G503
SdKfz 263 8w 13 0 4 5 5 [2] 18W 8 - 38 G138
SdKfz 234/1 (2cm) 18 2 4 5 5 [3] 20W - - 44 G53
SdKfz 234/2 (5cm) 37 6 4 12 12 [4] 18W - - 44 G52
SdKfz 250/9 (2cm) 26 2 4 5 5 [2] 16T - - 42 G34, G91
SdKfz 251/16 Flamethrower 25 9F 9F 1 1 [3] 14T - - R 40 G105
Pz38(t) SdKfz 140/1 24 2 4 5 5 [3] 12T - - 43 G88
GERMAN Armoured Personnel Carriers
SdKfz 247 11 0 0 0 0 [1] 25T 6 - U 37
SdKfz 250/1 16 0 6 1 5 [2] 16T 6 - U 42 G17
SdKfz 251/1 18 0 6 1 5 [3] 15T 8 - U 40 G99, G107
SdKfz 251/5 or /7 (Eng.) 16 0 4 1 5 [3] 15T 8 - U 41 G102
SdKfz 250/10 13 3 2 5 5 [2] 16T 6 - U 42 G17
SdKfz 251/10 17 3 2 5 5 [3] 15T 8 - U 41 G99
SdKfz 251/3 16 0 4 1 5 [3] 15T 8 - U 40 G103GERMAN Personnel
Infantry HQ 20 0 3 0 5 6 3F - 8 P 36 G144, G525, G542
Infantry ‘39 12 1 5 0 5 6 3F - 8 P 36 G144, G507, G525, G521
Infantry ‘41 12 1 6 0 5 6 3F - 8 P 41 G144, G507, G525, G521
R = Must obey facing restrictions
I = May engage in indirect fire
U = Open-top armoured vehicle
S = Capable of firing smoke rounds
P = Defense value halved when in movement posture
T = Two/multiple guns, only 1 may fire/turn
M# = Minimum range = #
SR# = May fire once every # of turns
D# = If unmodified CRT roll is less than #, stand is
out of AP ammo
NOTE
SYMBOLS
Burfield (order #5184631)
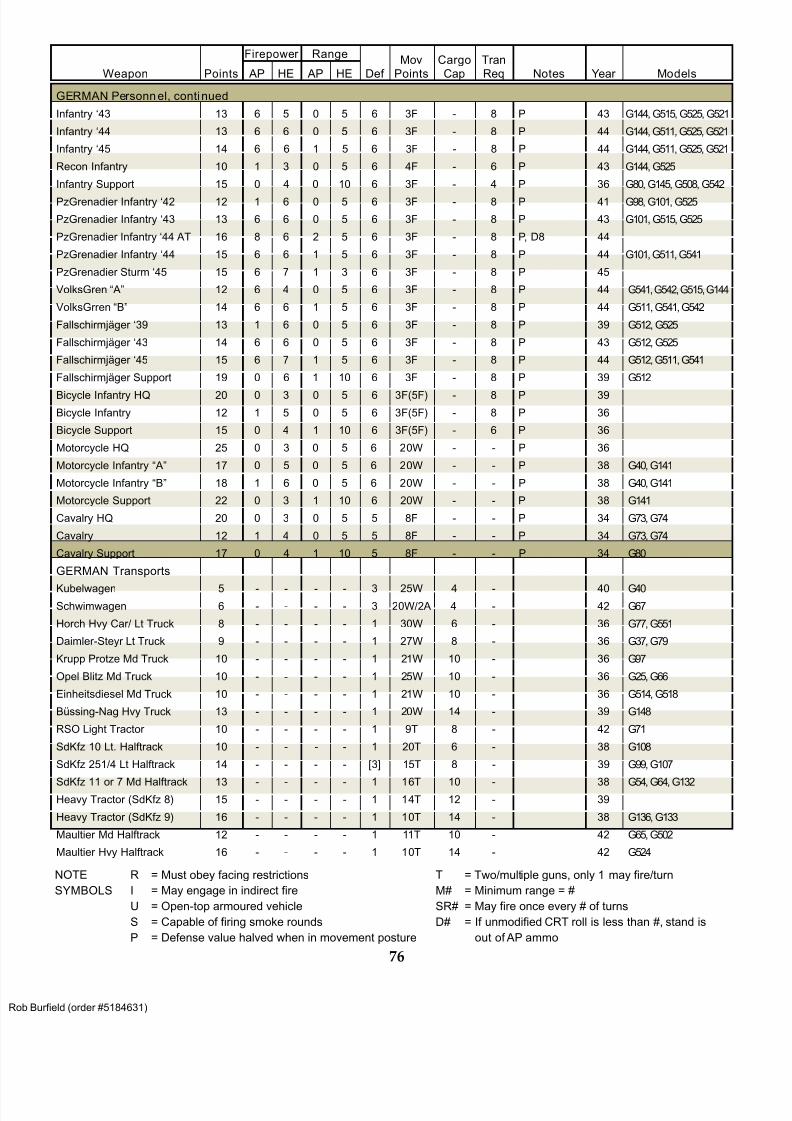
8/13/2019 Micro Armour the Game-WWII 2nd Edition (Full Color)
http://slidepdf.com/reader/full/micro-armour-the-game-wwii-2nd-edition-full-color 81/136
76
R = Must obey facing restrictions
I = May engage in indirect fire
U = Open-top armoured vehicle
S = Capable of firing smoke rounds
P = Defense value halved when in movement posture
T = Two/multiple guns, only 1 may fire/turn
M# = Minimum range = #
SR# = May fire once every # of turns
D# = If unmodified CRT roll is less than #, stand is
out of AP ammo
NOTE
SYMBOLS
Weapon Points
Firepower Range
Def
Mov
Points
Cargo
Cap
Tran
Req Notes Year Models AP HE AP HE
GERMAN Personnel, continued
Infantry ‘43 13 6 5 0 5 6 3F - 8 P 43 G144, G515, G525, G521
Infantry ‘44 13 6 6 0 5 6 3F - 8 P 44 G144, G511, G525, G521
Infantry ‘45 14 6 6 1 5 6 3F - 8 P 44 G144, G511, G525, G521
Recon Infantry 10 1 3 0 5 6 4F - 6 P 43 G144, G525
Infantry Support 15 0 4 0 10 6 3F - 4 P 36 G80, G145, G508, G542
PzGrenadier Infantry ‘42 12 1 6 0 5 6 3F - 8 P 41 G98, G101, G525
PzGrenadier Infantry ‘43 13 6 6 0 5 6 3F - 8 P 43 G101, G515, G525
PzGrenadier Infantry ‘44 AT 16 8 6 2 5 6 3F - 8 P, D8 44
PzGrenadier Infantry ‘44 15 6 6 1 5 6 3F - 8 P 44 G101, G511, G541
PzGrenadier Sturm ‘45 15 6 7 1 3 6 3F - 8 P 45
VolksGren “A” 12 6 4 0 5 6 3F - 8 P 44 G541, G542, G515, G144
VolksGrren “B” 14 6 6 1 5 6 3F - 8 P 44 G511, G541, G542
Fallschirmjäger ‘39 13 1 6 0 5 6 3F - 8 P 39 G512, G525
Fallschirmjäger ‘43 14 6 6 0 5 6 3F - 8 P 43 G512, G525
Fallschirmjäger ‘45 15 6 7 1 5 6 3F - 8 P 44 G512, G511, G541
Fallschirmjäger Support 19 0 6 1 10 6 3F - 8 P 39 G512
Bicycle Infantry HQ 20 0 3 0 5 6 3F(5F) - 8 P 39
Bicycle Infantry 12 1 5 0 5 6 3F(5F) - 8 P 36
Bicycle Support 15 0 4 1 10 6 3F(5F) - 6 P 36
Motorcycle HQ 25 0 3 0 5 6 20W - - P 36
Motorcycle Infantry “A” 17 0 5 0 5 6 20W - - P 38 G40, G141
Motorcycle Infantry “B” 18 1 6 0 5 6 20W - - P 38 G40, G141
Motorcycle Support 22 0 3 1 10 6 20W - - P 38 G141
Cavalry HQ 20 0 3 0 5 5 8F - - P 34 G73, G74
Cavalry 12 1 4 0 5 5 8F - - P 34 G73, G74
Cavalry Support 17 0 4 1 10 5 8F - - P 34 G80
GERMAN Transports
Kubelwagen 5 - - - - 3 25W 4 - 40 G40
Schwimwagen 6 - - - - 3 20W/2A 4 - 42 G67
Horch Hvy Car/ Lt Truck 8 - - - - 1 30W 6 - 36 G77, G551
Daimler-Steyr Lt Truck 9 - - - - 1 27W 8 - 36 G37, G79
Krupp Protze Md Truck 10 - - - - 1 21W 10 - 36 G97
Opel Blitz Md Truck 10 - - - - 1 25W 10 - 36 G25, G66
Einheitsdiesel Md Truck 10 - - - - 1 21W 10 - 36 G514, G518
Büssing-Nag Hvy Truck 13 - - - - 1 20W 14 - 39 G148
RSO Light Tractor 10 - - - - 1 9T 8 - 42 G71
SdKfz 10 Lt. Halftrack 10 - - - - 1 20T 6 - 38 G108
SdKfz 251/4 Lt Halftrack 14 - - - - [3] 15T 8 - 39 G99, G107
SdKfz 11 or 7 Md Halftrack 13 - - - - 1 16T 10 - 38 G54, G64, G132Heavy Tractor (SdKfz 8) 15 - - - - 1 14T 12 - 39
Heavy Tractor (SdKfz 9) 16 - - - - 1 10T 14 - 38 G136, G133
Maultier Md Halftrack 12 - - - - 1 11T 10 - 42 G65, G502
Maultier Hvy Halftrack 16 - - - - 1 10T 14 - 42 G524
Burfield (order #5184631)
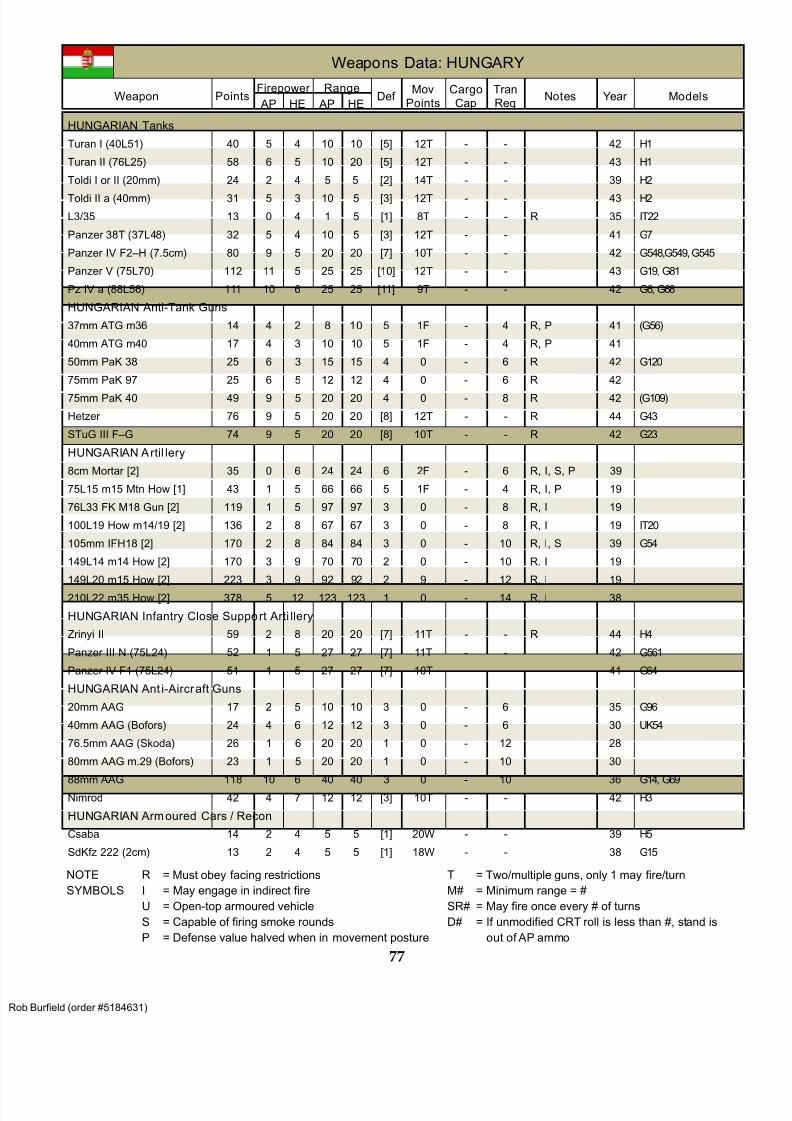
8/13/2019 Micro Armour the Game-WWII 2nd Edition (Full Color)
http://slidepdf.com/reader/full/micro-armour-the-game-wwii-2nd-edition-full-color 82/136
77
R = Must obey facing restrictions
I = May engage in indirect fire
U = Open-top armoured vehicle
S = Capable of firing smoke rounds
P = Defense value halved when in movement posture
T = Two/multiple guns, only 1 may fire/turn
M# = Minimum range = #
SR# = May fire once every # of turns
D# = If unmodified CRT roll is less than #, stand is
out of AP ammo
NOTE
SYMBOLS
Weapons Data: HUNGARY
Weapon Points Firepower Range
Def Mov
Points
Cargo
Cap
Tran
Req Notes Year Models
AP HE AP HE
HUNGARIAN Tanks
Turan I (40L51) 40 5 4 10 10 [5] 12T - - 42 H1
Turan II (76L25) 58 6 5 10 20 [5] 12T - - 43 H1
Toldi I or II (20mm) 24 2 4 5 5 [2] 14T - - 39 H2
Toldi II a (40mm) 31 5 3 10 5 [3] 12T - - 43 H2
L3/35 13 0 4 1 5 [1] 8T - - R 35 IT22
Panzer 38T (37L48) 32 5 4 10 5 [3] 12T - - 41 G7
Panzer IV F2–H (7.5cm) 80 9 5 20 20 [7] 10T - - 42 G548,G549, G545
Panzer V (75L70) 112 11 5 25 25 [10] 12T - - 43 G19, G81
Pz IV a (88L56) 111 10 6 25 25 [11] 9T - - 42 G6, G68
HUNGARIAN Anti-Tank Guns
37mm ATG m36 14 4 2 8 10 5 1F - 4 R, P 41 (G56)
40mm ATG m40 17 4 3 10 10 5 1F - 4 R, P 41
50mm PaK 38 25 6 3 15 15 4 0 - 6 R 42 G120
75mm PaK 97 25 6 5 12 12 4 0 - 6 R 42
75mm PaK 40 49 9 5 20 20 4 0 - 8 R 42 (G109)
Hetzer 76 9 5 20 20 [8] 12T - - R 44 G43
STuG III F–G 74 9 5 20 20 [8] 10T - - R 42 G23
HUNGARIAN Artil lery
8cm Mortar [2] 35 0 6 24 24 6 2F - 6 R, I, S, P 39
75L15 m15 Mtn How [1] 43 1 5 66 66 5 1F - 4 R, I, P 19
76L33 FK M18 Gun [2] 119 1 5 97 97 3 0 - 8 R, I 19
100L19 How m14/19 [2] 136 2 8 67 67 3 0 - 8 R, I 19 IT20
105mm IFH18 [2] 170 2 8 84 84 3 0 - 10 R, I, S 39 G54
149L14 m14 How [2] 170 3 9 70 70 2 0 - 10 R. I 19
149L20 m15 How [2] 223 3 9 92 92 2 9 - 12 R, I 19
210L22 m35 How [2] 378 5 12 123 123 1 0 - 14 R, I 38
HUNGARIAN Infantry Close Support Arti llery
Zrinyi II 59 2 8 20 20 [7] 11T - - R 44 H4
Panzer III N (75L24) 52 1 5 27 27 [7] 11T - - 42 G561
Panzer IV F1 (75L24) 51 1 5 27 27 [7] 10T - - 41 G64
HUNGARIAN Ant i-Aircraft Guns
20mm AAG 17 2 5 10 10 3 0 - 6 35 G96
40mm AAG (Bofors) 24 4 6 12 12 3 0 - 6 30 UK54
76.5mm AAG (Skoda) 26 1 6 20 20 1 0 - 12 28
80mm AAG m.29 (Bofors) 23 1 5 20 20 1 0 - 10 30
88mm AAG 118 10 6 40 40 3 0 - 10 36 G14, G69
Nimrod 42 4 7 12 12 [3] 10T - - 42 H3
HUNGARIAN Armoured Cars / Recon
Csaba 14 2 4 5 5 [1] 20W - - 39 H5
SdKfz 222 (2cm) 13 2 4 5 5 [1] 18W - - 38 G15
Burfield (order #5184631)
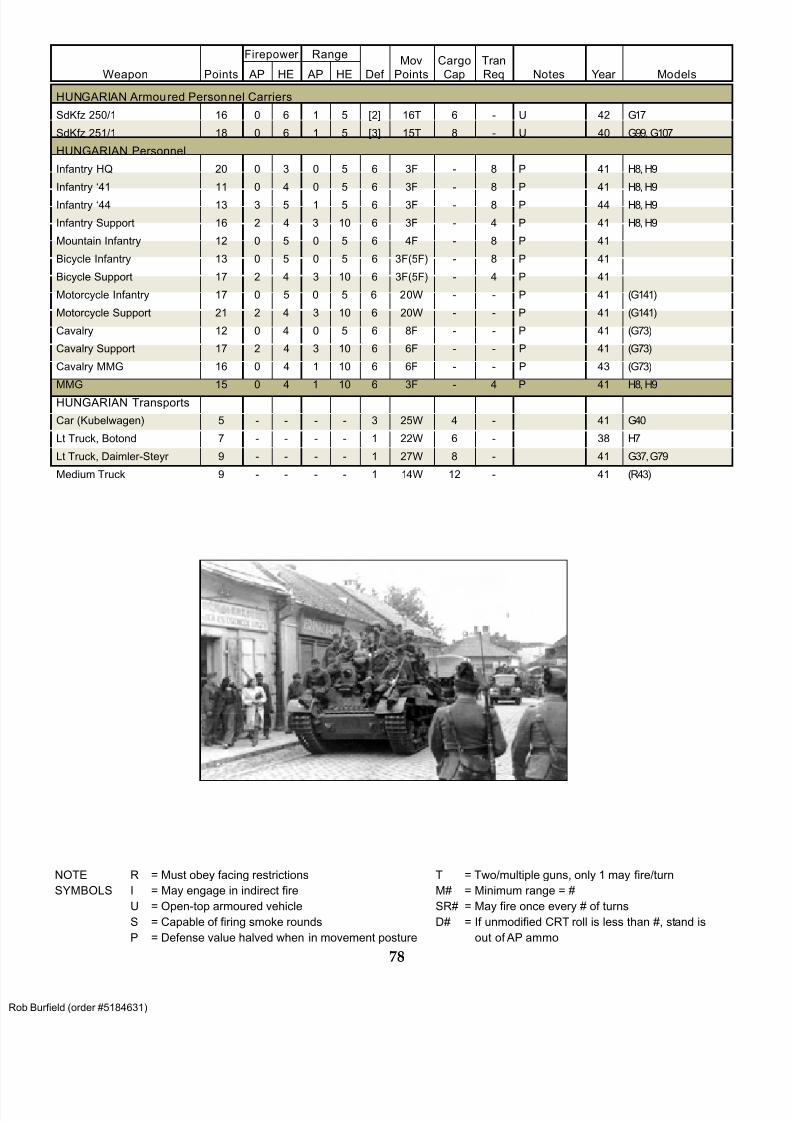
8/13/2019 Micro Armour the Game-WWII 2nd Edition (Full Color)
http://slidepdf.com/reader/full/micro-armour-the-game-wwii-2nd-edition-full-color 83/136
78
R = Must obey facing restrictions
I = May engage in indirect fire
U = Open-top armoured vehicle
S = Capable of firing smoke rounds
P = Defense value halved when in movement posture
T = Two/multiple guns, only 1 may fire/turn
M# = Minimum range = #
SR# = May fire once every # of turns
D# = If unmodified CRT roll is less than #, stand is
out of AP ammo
NOTE
SYMBOLS
Weapon Points
Firepower Range
Def
Mov
Points
Cargo
Cap
Tran
Req Notes Year Models AP HE AP HE
HUNGARIAN Armoured Personnel Carriers
SdKfz 250/1 16 0 6 1 5 [2] 16T 6 - U 42 G17
SdKfz 251/1 18 0 6 1 5 [3] 15T 8 - U 40 G99, G107
HUNGARIAN Personnel
Infantry HQ 20 0 3 0 5 6 3F - 8 P 41 H8, H9
Infantry ‘41 11 0 4 0 5 6 3F - 8 P 41 H8, H9
Infantry ‘44 13 3 5 1 5 6 3F - 8 P 44 H8, H9
Infantry Support 16 2 4 3 10 6 3F - 4 P 41 H8, H9
Mountain Infantry 12 0 5 0 5 6 4F - 8 P 41
Bicycle Infantry 13 0 5 0 5 6 3F(5F) - 8 P 41
Bicycle Support 17 2 4 3 10 6 3F(5F) - 4 P 41
Motorcycle Infantry 17 0 5 0 5 6 20W - - P 41 (G141)
Motorcycle Support 21 2 4 3 10 6 20W - - P 41 (G141)
Cavalry 12 0 4 0 5 6 8F - - P 41 (G73)
Cavalry Support 17 2 4 3 10 6 6F - - P 41 (G73)
Cavalry MMG 16 0 4 1 10 6 6F - - P 43 (G73)
MMG 15 0 4 1 10 6 3F - 4 P 41 H8, H9
HUNGARIAN Transports
Car (Kubelwagen) 5 - - - - 3 25W 4 - 41 G40
Lt Truck, Botond 7 - - - - 1 22W 6 - 38 H7
Lt Truck, Daimler-Steyr 9 - - - - 1 27W 8 - 41 G37, G79
Medium Truck 9 - - - - 1 14W 12 - 41 (R43)
Burfield (order #5184631)
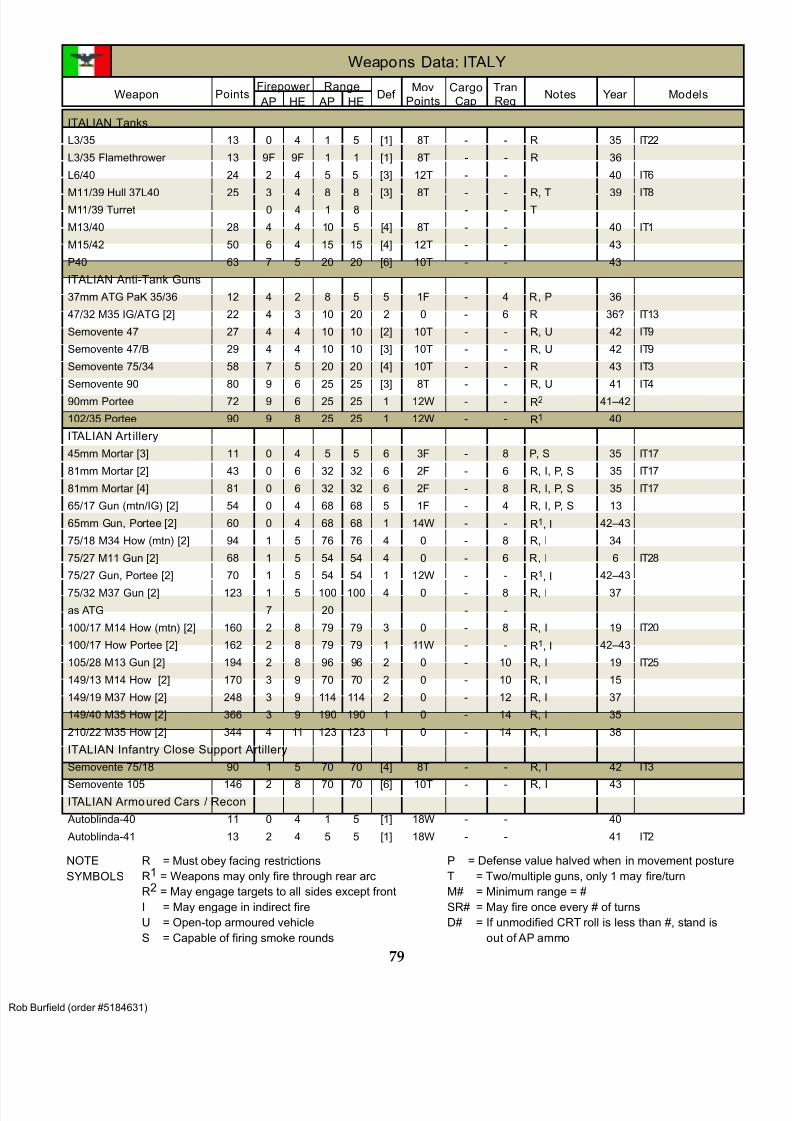
8/13/2019 Micro Armour the Game-WWII 2nd Edition (Full Color)
http://slidepdf.com/reader/full/micro-armour-the-game-wwii-2nd-edition-full-color 84/136
79
R = Must obey facing restrictions
R1 = Weapons may only fire through rear arc
R2 = May engage targets to all sides except front
I = May engage in indirect fire
U = Open-top armoured vehicle
S = Capable of firing smoke rounds
P = Defense value halved when in movement posture
T = Two/multiple guns, only 1 may fire/turn
M# = Minimum range = #
SR# = May fire once every # of turns
D# = If unmodified CRT roll is less than #, stand is
out of AP ammo
NOTE
SYMBOLS
Weapons Data: ITALY
Weapon Points Firepower Range
Def Mov
Points
Cargo
Cap
Tran
Req Notes Year Models
AP HE AP HE
ITALIAN Tanks
L3/35 13 0 4 1 5 [1] 8T - - R 35 IT22
L3/35 Flamethrower 13 9F 9F 1 1 [1] 8T - - R 36
L6/40 24 2 4 5 5 [3] 12T - - 40 IT6
M11/39 Hull 37L40 25 3 4 8 8 [3] 8T - - R, T 39 IT8
M11/39 Turret 0 4 1 8 - - T
M13/40 28 4 4 10 5 [4] 8T - - 40 IT1
M15/42 50 6 4 15 15 [4] 12T - - 43
P40 63 7 5 20 20 [6] 10T - - 43
ITALIAN Anti-Tank Guns
37mm ATG PaK 35/36 12 4 2 8 5 5 1F - 4 R, P 36
47/32 M35 IG/ATG [2] 22 4 3 10 20 2 0 - 6 R 36? IT13
Semovente 47 27 4 4 10 10 [2] 10T - - R, U 42 IT9
Semovente 47/B 29 4 4 10 10 [3] 10T - - R, U 42 IT9
Semovente 75/34 58 7 5 20 20 [4] 10T - - R 43 IT3
Semovente 90 80 9 6 25 25 [3] 8T - - R, U 41 IT4
90mm Portee 72 9 6 25 25 1 12W - - R2 41–42
102/35 Portee 90 9 8 25 25 1 12W - - R1 40
ITALIAN Art illery
45mm Mortar [3] 11 0 4 5 5 6 3F - 8 P, S 35 IT17
81mm Mortar [2] 43 0 6 32 32 6 2F - 6 R, I, P, S 35 IT17
81mm Mortar [4] 81 0 6 32 32 6 2F - 8 R, I, P, S 35 IT17
65/17 Gun (mtn/IG) [2] 54 0 4 68 68 5 1F - 4 R, I, P, S 13
65mm Gun, Portee [2] 60 0 4 68 68 1 14W - - R1, I 42–43
75/18 M34 How (mtn) [2] 94 1 5 76 76 4 0 - 8 R, I 34
75/27 M11 Gun [2] 68 1 5 54 54 4 0 - 6 R, I 6 IT28
75/27 Gun, Portee [2] 70 1 5 54 54 1 12W - - R1, I 42–43
75/32 M37 Gun [2] 123 1 5 100 100 4 0 - 8 R, I 37
as ATG 7 20 - -
100/17 M14 How (mtn) [2] 160 2 8 79 79 3 0 - 8 R, I 19 IT20
100/17 How Portee [2] 162 2 8 79 79 1 11W - - R1, I 42–43
105/28 M13 Gun [2] 194 2 8 96 96 2 0 - 10 R, I 19 IT25
149/13 M14 How [2] 170 3 9 70 70 2 0 - 10 R, I 15
149/19 M37 How [2] 248 3 9 114 114 2 0 - 12 R, I 37
149/40 M35 How [2] 366 3 9 190 190 1 0 - 14 R, I 35
210/22 M35 How [2] 344 4 11 123 123 1 0 - 14 R, I 38
ITALIAN Infantry Close Support Artillery
Semovente 75/18 90 1 5 70 70 [4] 8T - - R, I 42 IT3
Semovente 105 146 2 8 70 70 [6] 10T - - R, I 43ITALIAN Armoured Cars / Recon
Autoblinda-40 11 0 4 1 5 [1] 18W - - 40
Autoblinda-41 13 2 4 5 5 [1] 18W - - 41 IT2
Burfield (order #5184631)
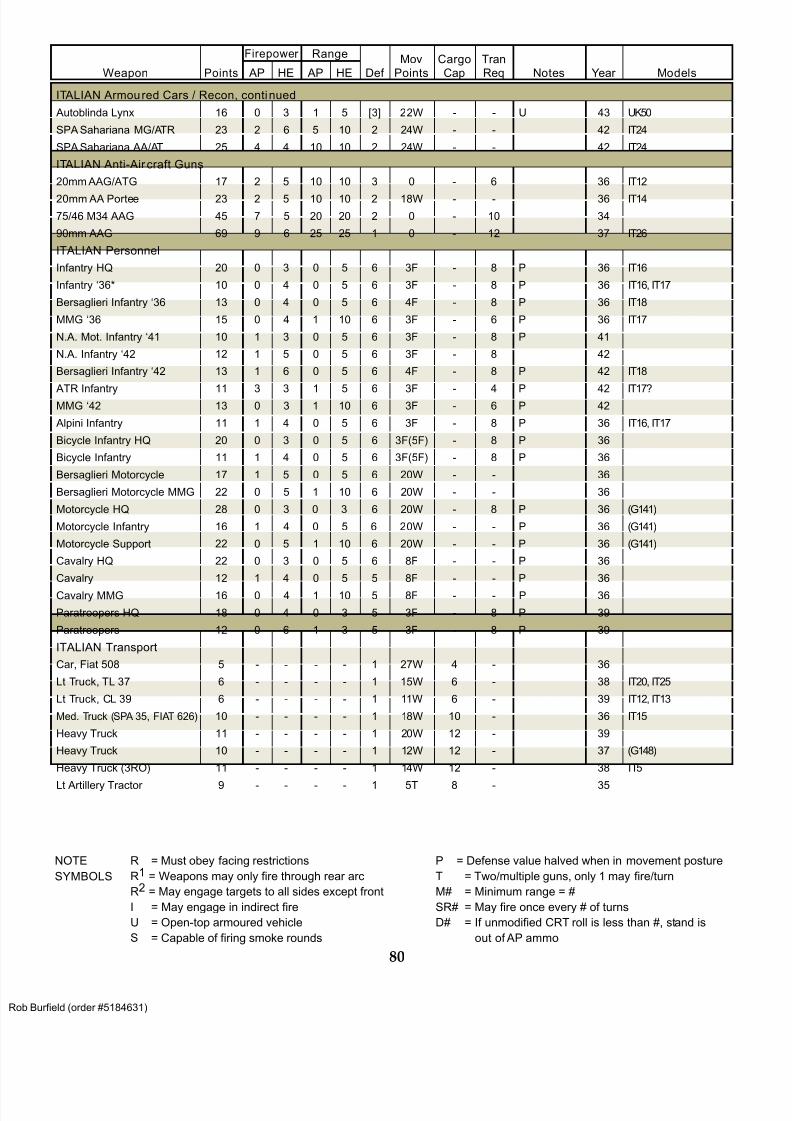
8/13/2019 Micro Armour the Game-WWII 2nd Edition (Full Color)
http://slidepdf.com/reader/full/micro-armour-the-game-wwii-2nd-edition-full-color 85/136
80
Weapon Points
Firepower Range
Def
Mov
Points
Cargo
Cap
Tran
Req Notes Year Models AP HE AP HE
ITALIAN Armoured Cars / Recon, continued
Autoblinda Lynx 16 0 3 1 5 [3] 22W - - U 43 UK50
SPA Sahariana MG/ATR 23 2 6 5 10 2 24W - - 42 IT24
SPA Sahariana AA/AT 25 4 4 10 10 2 24W - - 42 IT24
ITALIAN Anti-Air craft Guns
20mm AAG/ATG 17 2 5 10 10 3 0 - 6 36 IT12
20mm AA Portee 23 2 5 10 10 2 18W - - 36 IT14
75/46 M34 AAG 45 7 5 20 20 2 0 - 10 34
90mm AAG 69 9 6 25 25 1 0 - 12 37 IT26
ITALIAN Personnel
Infantry HQ 20 0 3 0 5 6 3F - 8 P 36 IT16
Infantry ‘36* 10 0 4 0 5 6 3F - 8 P 36 IT16, IT17
Bersaglieri Infantry ‘36 13 0 4 0 5 6 4F - 8 P 36 IT18
MMG ‘36 15 0 4 1 10 6 3F - 6 P 36 IT17
N.A. Mot. Infantry ‘41 10 1 3 0 5 6 3F - 8 P 41
N.A. Infantry ‘42 12 1 5 0 5 6 3F - 8 42
Bersaglieri Infantry ‘42 13 1 6 0 5 6 4F - 8 P 42 IT18
ATR Infantry 11 3 3 1 5 6 3F - 4 P 42 IT17?MMG ‘42 13 0 3 1 10 6 3F - 6 P 42
Alpini Infantry 11 1 4 0 5 6 3F - 8 P 36 IT16, IT17
Bicycle Infantry HQ 20 0 3 0 5 6 3F(5F) - 8 P 36
Bicycle Infantry 11 1 4 0 5 6 3F(5F) - 8 P 36
Bersaglieri Motorcycle 17 1 5 0 5 6 20W - - 36
Bersaglieri Motorcycle MMG 22 0 5 1 10 6 20W - - 36
Motorcycle HQ 28 0 3 0 3 6 20W - 8 P 36 (G141)
Motorcycle Infantry 16 1 4 0 5 6 20W - - P 36 (G141)
Motorcycle Support 22 0 5 1 10 6 20W - - P 36 (G141)
Cavalry HQ 22 0 3 0 5 6 8F - - P 36
Cavalry 12 1 4 0 5 5 8F - - P 36
Cavalry MMG 16 0 4 1 10 5 8F - - P 36
Paratroopers HQ 18 0 4 0 3 5 3F - 8 P 39
Paratroopers 12 0 6 1 3 5 3F - 8 P 39
ITALIAN Transport
Car, Fiat 508 5 - - - - 1 27W 4 - 36
Lt Truck, TL 37 6 - - - - 1 15W 6 - 38 IT20, IT25
Lt Truck, CL 39 6 - - - - 1 11W 6 - 39 IT12, IT13
Med. Truck (SPA 35, FIAT 626) 10 - - - - 1 18W 10 - 36 IT15
Heavy Truck 11 - - - - 1 20W 12 - 39
Heavy Truck 10 - - - - 1 12W 12 - 37 (G148)
Heavy Truck (3RO) 11 - - - - 1 14W 12 - 38 IT5
Lt Artillery Tractor 9 - - - - 1 5T 8 - 35
R = Must obey facing restrictions
R1 = Weapons may only fire through rear arc
R2 = May engage targets to all sides except front
I = May engage in indirect fire
U = Open-top armoured vehicle
S = Capable of firing smoke rounds
P = Defense value halved when in movement posture
T = Two/multiple guns, only 1 may fire/turn
M# = Minimum range = #
SR# = May fire once every # of turns
D# = If unmodified CRT roll is less than #, stand is
out of AP ammo
NOTE
SYMBOLS
Burfield (order #5184631)
8/13/2019 Micro Armour the Game-WWII 2nd Edition (Full Color)
http://slidepdf.com/reader/full/micro-armour-the-game-wwii-2nd-edition-full-color 86/136
8/13/2019 Micro Armour the Game-WWII 2nd Edition (Full Color)
http://slidepdf.com/reader/full/micro-armour-the-game-wwii-2nd-edition-full-color 87/136
82
R = Must obey facing restrictions
I = May engage in indirect fire
U = Open-top armoured vehicle
S = Capable of firing smoke rounds
P = Defense value halved when in movement posture
T = Two/multiple guns, only 1 may fire/turn
M# = Minimum range = #
SR# = May fire once every # of turns
D# = If unmodified CRT roll is less than #, stand is
out of AP ammo
NOTE
SYMBOLS
Weapon Points
Firepower Range
Def
Mov
Points
Cargo
Cap
Tran
Req Notes Year Models AP HE AP HE
JAPANESE Personnel
Infantry HQ 20 0 3 1 5 6 3F - 8 P 36 J7
Infantry 12 0 5 1 5 6 3F - 8 P 36 J6, J7
ATR Infantry 14 3 3 1 5 6 3F - 8 P 36 J7?
Infantry Support 15 0 4 1 10 6 3F - 8 P 36 J4, J7
Cavalry HQ 20 0 3 1 5 5 8F - - P 36
Cavalry 11 0 4 1 5 5 8F - - P 36
Cavalry Support 15 0 4 1 10 5 6F - - P 36
JAPANESE Transports
Car, Type 95 6 - - - - 2 25W 4 - 37
Lt Truck, Isuzu Type 95/97 8 - - - - 1 22W 8 - 35
Md Truck, Nissan Type 94 10 - - - - 1 18W 10 - 34 J9
Hvy Truck, Isuzu Type 2 12 - - - - 1 16W 14 - 42
Amph. Truck (Su-Ki) 9 - - - - 1 20W/1A 8 - 43
Med Artillery Tractor I-Ke 11 - - - - 1 7T 10 - 31
Hvy Artillery Tractor Ne-Ku 13 - - - - 1 3T 12 - 32
JAPANESE Boats
Shohatsu Class (10m) 9 0 3 1 5 2 4A 8 - 27
Daihatsu Class (14m) 15 0 3 1 5 2 5A 16 - 30
Daihatsu Class (14m) 18 2 5 5 5 2 5A 16 - 30
Daihatsu Class (14m) 20 4 6 12 12 [4] 5A 8 - U 30
Toku Daihatsu Class (17m) 22 0 3 1 5 [3] 6A 24 - U 40 (J11)
Toku Daihatsu Class (17m) 25 2 5 5 5 [3] 6A 24 - U 40
Burfield (order #5184631)

8/13/2019 Micro Armour the Game-WWII 2nd Edition (Full Color)
http://slidepdf.com/reader/full/micro-armour-the-game-wwii-2nd-edition-full-color 88/136
83
R = Must obey facing restrictions
I = May engage in indirect fire
U = Open-top armoured vehicle
S = Capable of firing smoke rounds
P = Defense value halved when in movement posture
T = Two/multiple guns, only 1 may fire/turn
M# = Minimum range = #
SR# = May fire once every # of turns
D# = If unmodified CRT roll is less than #, stand is
out of AP ammo
NOTE
SYMBOLS
Weapons Data: POLAND
Weapon Points Firepower Range
Def Mov
Points
Cargo
Cap
Tran
Req Notes Year Models
AP HE AP HE
POLISH Tanks
7TP-D (2 MGs) 17 0 5 1 5 [2] 8T - - 34 P2
7TP-J (37mm) 23 2 4 8 5 [4] 8T - - 36 P3
TKS (MG) 11 0 4 1 5 [1] 6T - - R 33 P1
TKS (20mm) 11 2 2 5 5 [1] 6T - - R 33 P1
Vickers-E “A” (2 MGs) 16 0 5 1 5 [1] 9T - - 36
Vickers-E “B” (47mm) 23 4 4 10 5 [1] 9T - - 36 R25
POLISH Anti-Tank Guns
37mm ATG m.36 (Bofors) 13 4 2 7 10 5 1F - 4 R, P 36 P11
POLISH Armoured Cars/Recon
WZ-29 (37L21) 12 2 3 8 5 [1] 11W - - 29 P4
WZ-34 (MG only) 8 0 4 1 5 [1] 11W - - 34 P5
WZ-34 (37L21) 12 2 3 8 5 [1] 11W - - 34 P5
POLISH Artill ery
81mm Mortar [2] 42 0 6 30 30 6 2F - 6 R, I, P 31 P7
75mm/76mm Inf. Gun [2] 30 1 5 5 20 5 0 - 4 R, S 20 G56 or R38
75L36 M97 Gun [2] 67 1 5 54 54 4 0 - 6 R, I, S 26 P10
100mm M14/19 How [2] 160 2 8 79 79 3 0 - 8 R, I, S 33 (IT20)
105L28 Gun M28 [2] 194 2 8 96 96 2 0 - 8 R, I, S 20 P9
155L14 M17 How [2] 217 3 9 90 90 1 0 - 12 R, I 20
POLISH Anti-Aircraft Guns
40mm Bofors AAG 21 4 6 12 12 3 0 - 6 30 UK54
POLISH Personnel
Infantry HQ 20 0 3 0 5 6 3F - 8 P 20 P6, P7
Infantry 11 1 4 0 5 6 3F - 8 P 20 P6, P7
Infantry Support 15 3 3 1 10 6 3F - 4 P 20 P6, P7
MMG 15 0 4 1 10 6 3F - 4 P 20
Bicycle Infantry 13 1 5 0 5 6 3F/5F - 8 P 20
Bicycle Support 16 0 4 1 10 6 3F/5F - 4 P 20
Bicycle Recon 9 0 2 0 5 6 3F/5F - 4 P 20
Motorcycle Infantry 16 1 4 0 5 6 20W - - P 20 (G141)
Motorcycle Recon 14 0 2 0 5 6 20W - - P 20
Cavalry HQ 22 0 3 0 5 6 8F - - P 20 R33
Cavalry 11 3 4 1 5 5 8F - - P 20 P8
Cavalry Support 16 0 4 1 10 5 8F - - P 20 P8
Cavalry Recon 10 0 2 0 5 5 8F - - P 20
Taczanka (Support) 11 0 4 1 10 3 8F - - R 20 P12
Motorized Cavalry Support 11 0 2 1 10 3 3F - - R 20 P12
POLISH Transports
Lt Truck, PzinZ 302, PF 508 5 - - - - 1 18W 4 - 36 P11
Lt Truck, PF 618 8 - - - - 1 18W 8 - 37 (R42)
Md Truck, Ursus PF 621 9 - - - - 1 16W 10 - 28 (R43)
Lt Halftrack, Ctrn Keg 10 - - - - 1 8T 8 - 32 (FR12)
Med Halftrack, C4P 12 - - - - 1 11T 10 - 36 (FR6)
Lt Tractor, C2P 8 - - - - 1 12T 6 - 30 (RA4 or UK98)
Hvy Tractor, C7P 15 - - - - [1] 8T 12 - 34 (R59)
Burfield (order #5184631)
8/13/2019 Micro Armour the Game-WWII 2nd Edition (Full Color)
http://slidepdf.com/reader/full/micro-armour-the-game-wwii-2nd-edition-full-color 89/136
84
R = Must obey facing restrictions
I = May engage in indirect fire
U = Open-top armoured vehicle
S = Capable of firing smoke rounds
P = Defense value halved when in movement posture
T = Two/multiple guns, only 1 may fire/turn
M# = Minimum range = #
SR# = May fire once every # of turns
D# = If unmodified CRT roll is less than #, stand is
out of AP ammo
NOTE
SYMBOLS
Weapons Data: ROMANIA
Weapon Points Firepower Range
Def Mov
Points
Cargo
Cap
Tran
Req Notes Year Models
AP HE AP HE
ROMANIAN Tanks
FT Light Tank (MG) 9 0 5 1 5 [1] 2T - - 19 FR15
FT Light Tank (37L21) 10 2 3 8 5 [1] 2T - - 19 FR15
R-1 (AH-IV-R) 13 0 5 1 5 [1] 7T - - 38
R-2 (Czech vz. 35) 25 4 4 8 5 [2] 11T - - 37 G131
T-38 (Ger. Pz 38t) 32 5 4 10 5 [3] 12T - - 43 G7
R-35/45 “Vanatorul de Care” 26 5 2 10 5 [4] 6T - - 44 FR5
T4 (Pz IV G) 74 9 5 20 20 [8] 10T - - 42 G545
ROMANIAN Anti-Tank Guns
25mm ATG (Fr.) 9 3 1 7 5 5 1F - 4 R, P 41 FR13
37mm ATG (Bofors) 13 4 2 7 10 5 1F - 4 R, P 42 P11
47mm M35 (It. IG/ATG) 23 4 3 10 20 4 0 - 6 R 41 RA3
50mm PaK 38 (Ger.) 25 6 3 15 15 4 0 - 6 R 42 G120
75mm PaK 97 (Ger./Fr.) 25 6 5 12 12 4 0 - 6 R 42
75mm Resita M43 49 9 5 20 20 4 0 - 6 R 44
75mm PaK 40 (Ger.) 49 9 5 20 20 4 0 - 8 R 44 G109
TACAM T-60 (Zis3 on T60) 61 8 5 20 20 [3] 10T - - R, U 44
TACAM R2 (Zis3 on R2) 58 8 5 20 20 [2] 8T - - R, U 44
Tas (STuG III G) 74 9 5 20 20 [8] 10T - - R 44 G23
ROMANIAN Artil lery
47mm Infantry Gun [2] 30 2 4 10 56 5 1F - 4 R, I, P 41 IT13
81mm Mortar [3] 38 0 6 30 30 6 2F - 8 R, I, S, P 41 G80
65L17 Gun [2] It. 58 0 4 68 68 5 1F - 4 R, I, S, P 41
75L16 Mtn How [2] 82 1 5 66 66 4 0 - 6 R, I, S 41
75L36 Gun [2] Fr. 68 1 5 54 54 4 0 - 6 R, I, S 41 P10
76L46 Gun [2] Sov. 120 1 5 108 108 4 0 - 8 R, I, S 42 R13
105L24 Mtn How [2] Cz. 178 2 8 88 88 3 0 - 6 R, I, S 41
105L28 How [2] Ger. 170 2 8 84 84 3 0 - 10 R, I, S 42 G54
105L37 M36 [2] Fr. 232 2 8 128 128 2 0 - 12 R, I, S 41
149L27 M34 [2] Cz. 261 3 9 120 120 2 0 - 12 R, I 41
155L30 M17 [2] Fr. 218 3 9 90 90 2 0 - 12 R, I 41
ROMANIAN Infantry Close Support Ar tillery
T3 (PzIII M 75L24) 52 1 5 27 27 [7] 11T - - 42 G561
PzIV F1 51 1 5 27 27 [7] 10T - - 42 G64
SdKfz 251/9 (75L24) 48 1 5 27 27 [3] 15T - - R, U 42 G104, G125
ROMANIAN Anti-Aircraft Guns
AAMG (Fr.) 12 1 4 5 10 4 1F - 4 P 39 (IT20)
20mm AAG (Oerlikon) 17 2 5 10 10 3 1F - 4 P 39 (IT20)
25mm AAG (Fr.) 17 2 5 10 10 3 0 - 6 39 (IT20)
37mm AAG (FlaK 36/37) 21 4 6 12 12 3 0 - 6 41 G122
40mm AAG (Bofors) 21 4 6 12 12 3 0 - 6 39 UK54
Burfield (order #5184631)
8/13/2019 Micro Armour the Game-WWII 2nd Edition (Full Color)
http://slidepdf.com/reader/full/micro-armour-the-game-wwii-2nd-edition-full-color 90/136
85
Weapon Points
Firepower Range
Def
Mov
Points
Cargo
Cap
Tran
Req Notes Year Models AP HE AP HE
ROMANIAN Anti-Ai rcraft Guns, continued
75mm AAG (Vickers) 23 1 5 20 20 2 0 - 10 39
88mm FlaK 36 AAG 118 10 6 40 40 3 0 - 10 41 G14, G69
ROMANIAN Armoured Cars / Recon
OA vz30 17 0 4 1 5 [1] 18W - - 34
BA-10 25 5 3 10 5 [1] 16W - - 41 R45
AB (SdKfz 222) 13 2 4 5 5 [1] 18W - - 43 G15
AB 41 (Autoblinda ‘41) 13 2 4 5 5 [1] 18W - - 43 IT2
ROMANIAN Armoured Personnel Carriers
T (SdKfz 250) 16 0 6 1 5 [2] 16T 6 - U 42 G17
TB (SdKfz 251) 18 0 6 1 5 [3] 15T 8 - U 40 G99, G107
ROMANIAN Personnel
Infantry HQ 20 0 3 0 5 6 3F - 8 P 39 RA1, RA2
Infantry ‘41 11 0 4 0 5 6 3F - 8 P 41 RA1, RA2
Infantry ‘42 12 1 5 0 5 6 3F - 8 P 42 RA1, RA2
Infantry ‘44 13 3 5 1 5 6 3F - 8 P 44
Infantry Support 15 0 4 1 10 6 3F - 4 P 39 RA1, RA2
Mtn. Infantry 12 0 5 0 5 6 4F - 8 P 39
Mot. Infantry ‘41 12 0 5 0 5 6 3F - 8 P 41
Mot. Infantry ‘42 13 1 6 0 5 6 3F - 8 P 42
Mot. Infantry ‘44 14 3 6 1 5 6 3F - 8 P 44
Motorcycle Infantry 17 0 5 0 5 6 20W - - P 41 (G141)
Cavalry 11 0 4 0 5 5 8F - - P 39
Cavalry Support 15 0 4 1 10 5 6F - - P 39 (R32 or G73)
ROMANIAN Transports
Kubelwagen 5 - - - - 3 25W 4 - 41 G40
Praga RV Light Truck 9 - - - - 1 20W 8 - 35
Opel Blitz Medium Truck 10 - - - - 1 25W 10 - 41 G25, G66
Malaxa Tractor 7 - - - - [1] 9T 4 - 39 RA4
Lt Tractor (Konsomoletz) 6 - - - - 1 10T 4 - 42 R38
Hvy Tractor (STZ) 13 - - - - 1 6T 12 - 42
R = Must obey facing restrictions
I = May engage in indirect fire
U = Open-top armoured vehicle
S = Capable of firing smoke rounds
P = Defense value halved when in movement posture
T = Two/multiple guns, only 1 may fire/turn
M# = Minimum range = #
SR# = May fire once every # of turns
D# = If unmodified CRT roll is less than #, stand is
out of AP ammo
NOTE
SYMBOLS
Burfield (order #5184631)
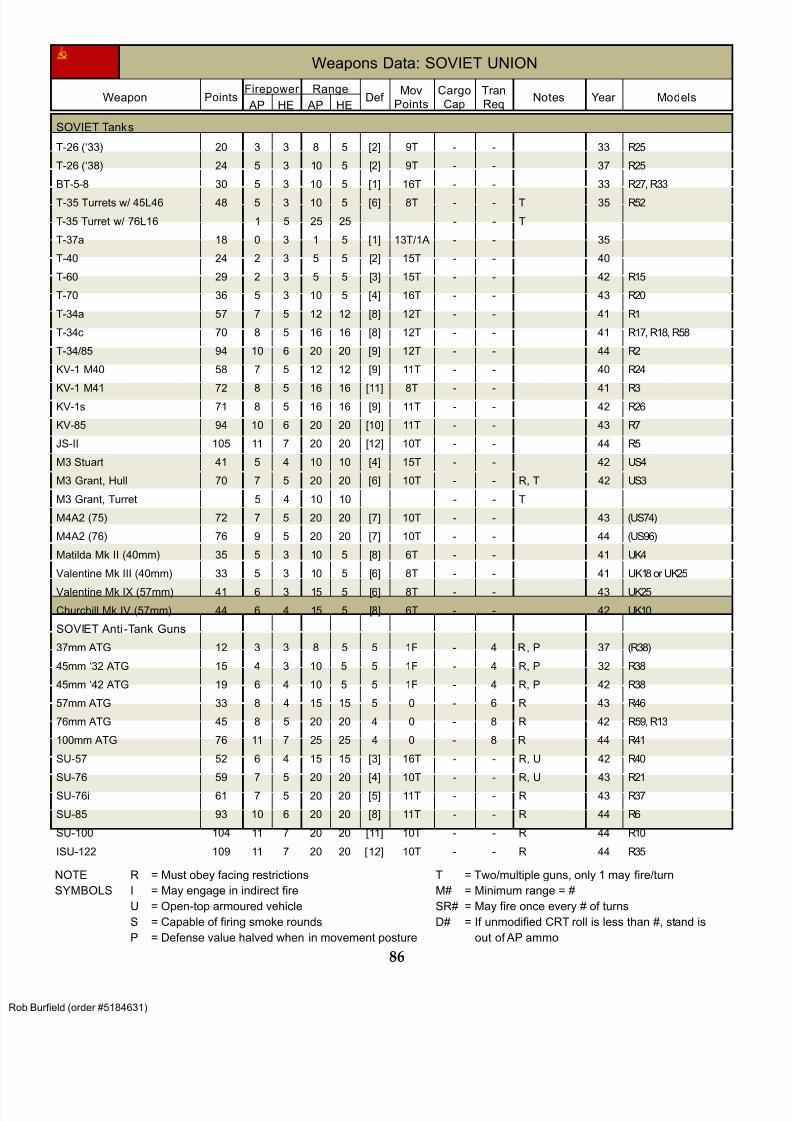
8/13/2019 Micro Armour the Game-WWII 2nd Edition (Full Color)
http://slidepdf.com/reader/full/micro-armour-the-game-wwii-2nd-edition-full-color 91/136
86
R = Must obey facing restrictions
I = May engage in indirect fire
U = Open-top armoured vehicle
S = Capable of firing smoke rounds
P = Defense value halved when in movement posture
T = Two/multiple guns, only 1 may fire/turn
M# = Minimum range = #
SR# = May fire once every # of turns
D# = If unmodified CRT roll is less than #, stand is
out of AP ammo
NOTE
SYMBOLS
Weapons Data: SOVIET UNION
Weapon PointsFirepower Range
Def Mov
Points
Cargo
Cap
Tran
Req Notes Year Models
AP HE AP HE
SOVIET Tanks
T-26 (‘33) 20 3 3 8 5 [2] 9T - - 33 R25
T-26 (‘38) 24 5 3 10 5 [2] 9T - - 37 R25
BT-5-8 30 5 3 10 5 [1] 16T - - 33 R27, R33
T-35 Turrets w/ 45L46 48 5 3 10 5 [6] 8T - - T 35 R52
T-35 Turret w/ 76L16 1 5 25 25 - - T
T-37a 18 0 3 1 5 [1] 13T/1A - - 35
T-40 24 2 3 5 5 [2] 15T - - 40
T-60 29 2 3 5 5 [3] 15T - - 42 R15
T-70 36 5 3 10 5 [4] 16T - - 43 R20
T-34a 57 7 5 12 12 [8] 12T - - 41 R1
T-34c 70 8 5 16 16 [8] 12T - - 41 R17, R18, R58
T-34/85 94 10 6 20 20 [9] 12T - - 44 R2
KV-1 M40 58 7 5 12 12 [9] 11T - - 40 R24
KV-1 M41 72 8 5 16 16 [11] 8T - - 41 R3KV-1s 71 8 5 16 16 [9] 11T - - 42 R26
KV-85 94 10 6 20 20 [10] 11T - - 43 R7
JS-II 105 11 7 20 20 [12] 10T - - 44 R5
M3 Stuart 41 5 4 10 10 [4] 15T - - 42 US4
M3 Grant, Hull 70 7 5 20 20 [6] 10T - - R, T 42 US3
M3 Grant, Turret 5 4 10 10 - - T
M4A2 (75) 72 7 5 20 20 [7] 10T - - 43 (US74)
M4A2 (76) 76 9 5 20 20 [7] 10T - - 44 (US96)
Matilda Mk II (40mm) 35 5 3 10 5 [8] 6T - - 41 UK4
Valentine Mk III (40mm) 33 5 3 10 5 [6] 8T - - 41 UK18 or UK25
Valentine Mk IX (57mm) 41 6 3 15 5 [6] 8T - - 43 UK25
Churchill Mk IV (57mm) 44 6 4 15 5 [8] 6T - - 42 UK10
SOVIET Anti -Tank Guns
37mm ATG 12 3 3 8 5 5 1F - 4 R, P 37 (R38)
45mm ‘32 ATG 15 4 3 10 5 5 1F - 4 R, P 32 R38
45mm ‘42 ATG 19 6 4 10 5 5 1F - 4 R, P 42 R38
57mm ATG 33 8 4 15 15 5 0 - 6 R 43 R46
76mm ATG 45 8 5 20 20 4 0 - 8 R 42 R59, R13
100mm ATG 76 11 7 25 25 4 0 - 8 R 44 R41
SU-57 52 6 4 15 15 [3] 16T - - R, U 42 R40
SU-76 59 7 5 20 20 [4] 10T - - R, U 43 R21
SU-76i 61 7 5 20 20 [5] 11T - - R 43 R37
SU-85 93 10 6 20 20 [8] 11T - - R 44 R6
SU-100 104 11 7 20 20 [11] 10T - - R 44 R10
ISU-122 109 11 7 20 20 [12] 10T - - R 44 R35
Burfield (order #5184631)
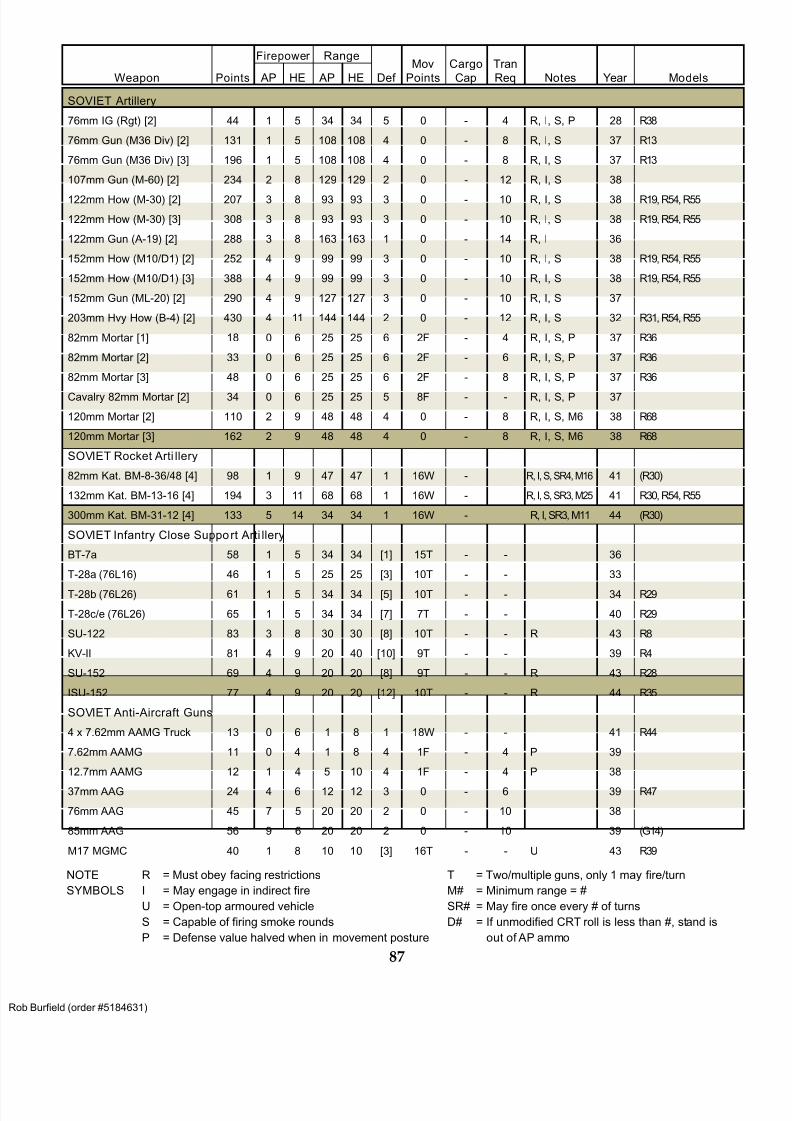
8/13/2019 Micro Armour the Game-WWII 2nd Edition (Full Color)
http://slidepdf.com/reader/full/micro-armour-the-game-wwii-2nd-edition-full-color 92/136
87
Weapon Points
Firepower Range
Def
Mov
Points
Cargo
Cap
Tran
Req Notes Year Models AP HE AP HE
SOVIET Artillery
76mm IG (Rgt) [2] 44 1 5 34 34 5 0 - 4 R, I, S, P 28 R38
76mm Gun (M36 Div) [2] 131 1 5 108 108 4 0 - 8 R, I, S 37 R13
76mm Gun (M36 Div) [3] 196 1 5 108 108 4 0 - 8 R, I, S 37 R13
107mm Gun (M-60) [2] 234 2 8 129 129 2 0 - 12 R, I, S 38
122mm How (M-30) [2] 207 3 8 93 93 3 0 - 10 R, I, S 38 R19, R54, R55
122mm How (M-30) [3] 308 3 8 93 93 3 0 - 10 R, I, S 38 R19, R54, R55
122mm Gun (A-19) [2] 288 3 8 163 163 1 0 - 14 R, I 36
152mm How (M10/D1) [2] 252 4 9 99 99 3 0 - 10 R, I, S 38 R19, R54, R55
152mm How (M10/D1) [3] 388 4 9 99 99 3 0 - 10 R, I, S 38 R19, R54, R55
152mm Gun (ML-20) [2] 290 4 9 127 127 3 0 - 10 R, I, S 37
203mm Hvy How (B-4) [2] 430 4 11 144 144 2 0 - 12 R, I, S 32 R31, R54, R55
82mm Mortar [1] 18 0 6 25 25 6 2F - 4 R, I, S, P 37 R36
82mm Mortar [2] 33 0 6 25 25 6 2F - 6 R, I, S, P 37 R36
82mm Mortar [3] 48 0 6 25 25 6 2F - 8 R, I, S, P 37 R36
Cavalry 82mm Mortar [2] 34 0 6 25 25 5 8F - - R, I, S, P 37
120mm Mortar [2] 110 2 9 48 48 4 0 - 8 R, I, S, M6 38 R68
120mm Mortar [3] 162 2 9 48 48 4 0 - 8 R, I, S, M6 38 R68
SOVIET Rocket Arti llery
82mm Kat. BM-8-36/48 [4] 98 1 9 47 47 1 16W - R, I, S, SR4, M16 41 (R30)
132mm Kat. BM-13-16 [4] 194 3 11 68 68 1 16W - R, I, S, SR3, M25 41 R30, R54, R55
300mm Kat. BM-31-12 [4] 133 5 14 34 34 1 16W - R, I, SR3, M11 44 (R30)
SOVIET Infantry Close Support Arti llery
BT-7a 58 1 5 34 34 [1] 15T - - 36
T-28a (76L16) 46 1 5 25 25 [3] 10T - - 33
T-28b (76L26) 61 1 5 34 34 [5] 10T - - 34 R29
T-28c/e (76L26) 65 1 5 34 34 [7] 7T - - 40 R29
SU-122 83 3 8 30 30 [8] 10T - - R 43 R8
KV-II 81 4 9 20 40 [10] 9T - - 39 R4
SU-152 69 4 9 20 20 [8] 9T - - R 43 R28
ISU-152 77 4 9 20 20 [12] 10T - - R 44 R35
SOVIET Anti-Aircraft Guns
4 x 7.62mm AAMG Truck 13 0 6 1 8 1 18W - - 41 R44
7.62mm AAMG 11 0 4 1 8 4 1F - 4 P 39
12.7mm AAMG 12 1 4 5 10 4 1F - 4 P 38
37mm AAG 24 4 6 12 12 3 0 - 6 39 R47
76mm AAG 45 7 5 20 20 2 0 - 10 38
85mm AAG 56 9 6 20 20 2 0 - 10 39 (G14)
M17 MGMC 40 1 8 10 10 [3] 16T - - U 43 R39
R = Must obey facing restrictions
I = May engage in indirect fire
U = Open-top armoured vehicle
S = Capable of firing smoke rounds
P = Defense value halved when in movement posture
T = Two/multiple guns, only 1 may fire/turn
M# = Minimum range = #
SR# = May fire once every # of turns
D# = If unmodified CRT roll is less than #, stand is
out of AP ammo
NOTE
SYMBOLS
Burfield (order #5184631)

8/13/2019 Micro Armour the Game-WWII 2nd Edition (Full Color)
http://slidepdf.com/reader/full/micro-armour-the-game-wwii-2nd-edition-full-color 93/136
88
R = Must obey facing restrictions
I = May engage in indirect fire
U = Open-top armoured vehicle
S = Capable of firing smoke rounds
P = Defense value halved when in movement posture
T = Two/multiple guns, only 1 may fire/turn
M# = Minimum range = #
SR# = May fire once every # of turns
D# = If unmodified CRT roll is less than #, stand is
out of AP ammo
NOTE
SYMBOLS
Weapon Points
Firepower Range
Def
Mov
Points
Cargo
Cap
Tran
Req Notes Year Models AP HE AP HE
SOVIET Armoured Cars / Recon
White Scout Car 15 1 3 10 10 [1] 16W 6 - U 42 US59
BA-20 11 0 4 0 5 [1] 16W - - 36 R53
BA-10 20 5 3 10 5 [1] 16W - - 34 R45
BA-64 16 0 4 0 5 [1] 20W - - 42 R14
Universal Carrier 19 0 4 1 5 [1] 14T 6 - U, R 39 UK98
SOVIET Personnel
Infantry HQ 20 0 3 0 5 6 3F - 8 P 39 R64, R49, R60, R61
Infantry ‘39 11 0 5 0 5 6 3F - 8 P 39 R64, R49, R60, R61
Infantry L ‘41 10 1 3 0 5 6 3F - 8 P 41 R64, R49, R60, R61
Infantry M‘42 11 1 4 0 5 6 3F - 8 P 42 R64, R49, R60, R61
Infantry ‘43–’45 12 1 6 0 5 6 3F - 8 P 43 R64, R49, R60, R61
Infantry SMG 11 1 6 0 3 6 3F - 8 P 41 R48
Infantry MMG ‘39 15 0 4 1 10 6 3F - 8 P 41 R36, R49, R61
Infantry Support L ‘44 15 1 4 1 10 6 3F - 8 P 44 R36, R49, R61
ATR Infantry 13 2 3 4 8 6 3F - 8 P 41 R64
Motorized Infantry ‘40 12 1 5 0 5 6 3F - 8 P 40
Motorized SMG L ‘43 11 1 7 0 3 6 3F - 8 P 43
Desant Infantry L ‘43 11 1 6 0 3 6 3F - 8 P 43
Motorized MMG 13 0 3 1 10 6 3F - 8 P 42
Recon Infantry 12 0 5 0 5 6 4F - 8 P 42
Motorcycle Infantry ‘39 22 0 4 1 5 6 20W - - P 39 (G141)
Motorcycle Infantry ‘42 22 0 4 7 5 6 25W - - P 39 (G141)
Cavalry Headquarters 20 0 4 0 5 5 8F - - P 39 R32
Cavalry 11 1 4 0 5 5 8F - - P 39 R32
Cavalry Support 14 0 4 1 10 5 8F - - P 39 R32
Taczanka 13 0 5 1 10 3 6F - - 39 (P12)
SOVIET Transports
GAZ 67 (Jeep) 4 - - - - 3 25W 4 - 39 R12
Light Truck (Dodge 3/4T) 7 - - - - 1 25W 6 - 42 US39, US54, US87
Light Truck (Dodge 1.5T) 8 - - - - 1 25W 8 - 42 US38, US9
Light Truck (GAZ AA 1T) 7 - - - - 1 21W 6 - 39 R42
Light Truck (GAZ AAA 1.5T) 8 - - - - 1 20W 8 - 39 R42
Med Truck (Studebaker) 10 - - - - 1 22W 10 - 42 R22
Med Truck (Zis 5 3T) 11 - - - - 1 18W 12 - 39 R43
Hvy Truck (YAG 10 8T) 12 - - - - 1 12W 16 - 39
Lt Tractor (T20 Kons.) 6 - - - - 1 10T 4 - 37 R38
Med Halftrack (Zis 42) 13 - - - - 1 14T 10 - 42 R57
Med Tractor (STZ5) 12 - - - - 1 10T 10 - 37 (G71)
Hvy Tractor (Voroshilovits) 16 - - - - 1 10T 14 - 31
Hvy Tractor (CHTZ 65, STZ2) 14 - - - - 1 2T 14 - 37 R31, R19
Burfield (order #5184631)
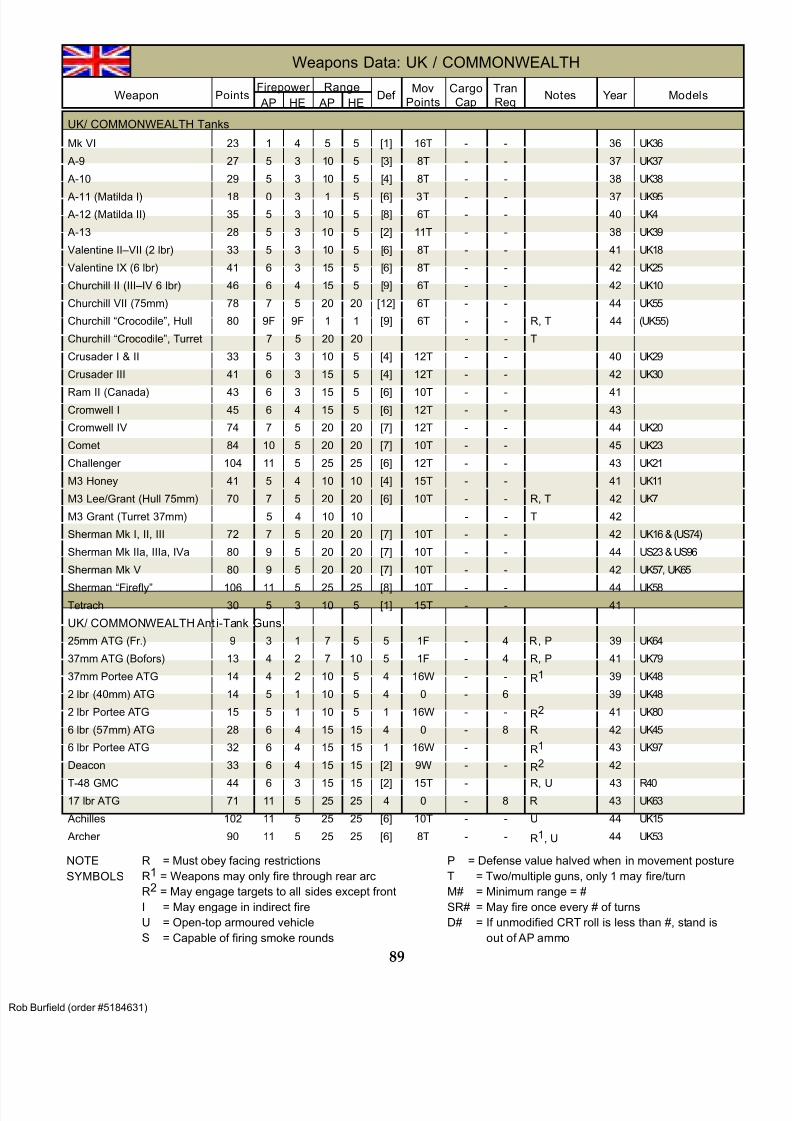
8/13/2019 Micro Armour the Game-WWII 2nd Edition (Full Color)
http://slidepdf.com/reader/full/micro-armour-the-game-wwii-2nd-edition-full-color 94/136
89
Weapons Data: UK / COMMONWEALTH
Weapon Points Firepower Range
Def Mov
Points
Cargo
Cap
Tran
Req Notes Year Models
AP HE AP HE
UK/ COMMONWEALTH Tanks
Mk VI 23 1 4 5 5 [1] 16T - - 36 UK36
A-9 27 5 3 10 5 [3] 8T - - 37 UK37
A-10 29 5 3 10 5 [4] 8T - - 38 UK38
A-11 (Matilda I) 18 0 3 1 5 [6] 3T - - 37 UK95
A-12 (Matilda II) 35 5 3 10 5 [8] 6T - - 40 UK4
A-13 28 5 3 10 5 [2] 11T - - 38 UK39
Valentine II–VII (2 lbr) 33 5 3 10 5 [6] 8T - - 41 UK18
Valentine IX (6 lbr) 41 6 3 15 5 [6] 8T - - 42 UK25
Churchill II (III–IV 6 lbr) 46 6 4 15 5 [9] 6T - - 42 UK10
Churchill VII (75mm) 78 7 5 20 20 [12] 6T - - 44 UK55
Churchill “Crocodile”, Hull 80 9F 9F 1 1 [9] 6T - - R, T 44 (UK55)
Churchill “Crocodile”, Turret 7 5 20 20 - - T
Crusader I & II 33 5 3 10 5 [4] 12T - - 40 UK29
Crusader III 41 6 3 15 5 [4] 12T - - 42 UK30
Ram II (Canada) 43 6 3 15 5 [6] 10T - - 41
Cromwell I 45 6 4 15 5 [6] 12T - - 43
Cromwell IV 74 7 5 20 20 [7] 12T - - 44 UK20
Comet 84 10 5 20 20 [7] 10T - - 45 UK23
Challenger 104 11 5 25 25 [6] 12T - - 43 UK21
M3 Honey 41 5 4 10 10 [4] 15T - - 41 UK11
M3 Lee/Grant (Hull 75mm) 70 7 5 20 20 [6] 10T - - R, T 42 UK7
M3 Grant (Turret 37mm) 5 4 10 10 - - T 42
Sherman Mk I, II, III 72 7 5 20 20 [7] 10T - - 42 UK16 & (US74)
Sherman Mk IIa, IIIa, IVa 80 9 5 20 20 [7] 10T - - 44 US23 & US96
Sherman Mk V 80 9 5 20 20 [7] 10T - - 42 UK57, UK65
Sherman “Firefly” 106 11 5 25 25 [8] 10T - - 44 UK58Tetrach 30 5 3 10 5 [1] 15T - - 41
UK/ COMMONWEALTH Ant i-Tank Guns
25mm ATG (Fr.) 9 3 1 7 5 5 1F - 4 R, P 39 UK64
37mm ATG (Bofors) 13 4 2 7 10 5 1F - 4 R, P 41 UK79
37mm Portee ATG 14 4 2 10 5 4 16W - - R1 39 UK48
2 lbr (40mm) ATG 14 5 1 10 5 4 0 - 6 39 UK48
2 lbr Portee ATG 15 5 1 10 5 1 16W - - R2 41 UK80
6 lbr (57mm) ATG 28 6 4 15 15 4 0 - 8 R 42 UK45
6 lbr Portee ATG 32 6 4 15 15 1 16W - R1 43 UK97
Deacon 33 6 4 15 15 [2] 9W - - R2 42
T-48 GMC 44 6 3 15 15 [2] 15T - R, U 43 R4017 lbr ATG 71 11 5 25 25 4 0 - 8 R 43 UK63
Achilles 102 11 5 25 25 [6] 10T - - U 44 UK15
Archer 90 11 5 25 25 [6] 8T - - R1, U 44 UK53
R = Must obey facing restrictions
R1 = Weapons may only fire through rear arc
R2 = May engage targets to all sides except front
I = May engage in indirect fire
U = Open-top armoured vehicle
S = Capable of firing smoke rounds
P = Defense value halved when in movement posture
T = Two/multiple guns, only 1 may fire/turn
M# = Minimum range = #
SR# = May fire once every # of turns
D# = If unmodified CRT roll is less than #, stand is
out of AP ammo
NOTE
SYMBOLS
Burfield (order #5184631)
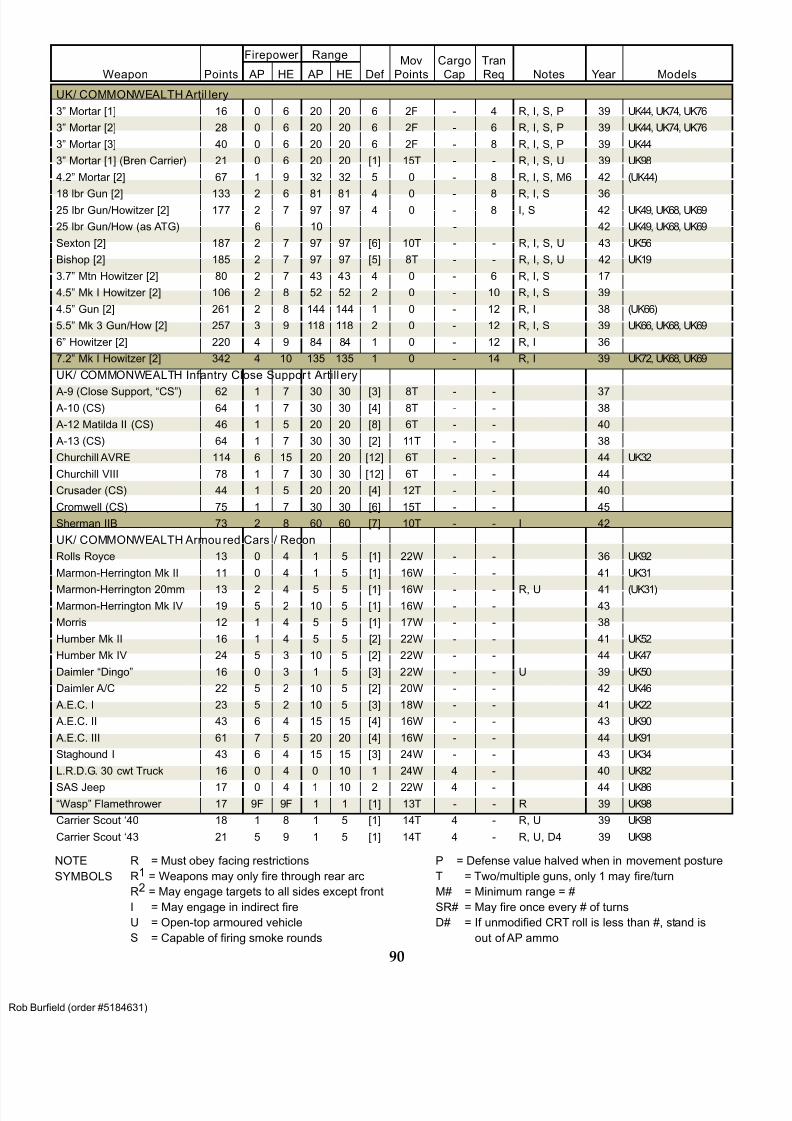
8/13/2019 Micro Armour the Game-WWII 2nd Edition (Full Color)
http://slidepdf.com/reader/full/micro-armour-the-game-wwii-2nd-edition-full-color 95/136
90
Weapon Points
Firepower Range
Def
Mov
Points
Cargo
Cap
Tran
Req Notes Year Models AP HE AP HE
UK/ COMMONWEALTH Artil lery
3” Mortar [1] 16 0 6 20 20 6 2F - 4 R, I, S, P 39 UK44, UK74, UK76
3” Mortar [2] 28 0 6 20 20 6 2F - 6 R, I, S, P 39 UK44, UK74, UK76
3” Mortar [3] 40 0 6 20 20 6 2F - 8 R, I, S, P 39 UK44
3” Mortar [1] (Bren Carrier) 21 0 6 20 20 [1] 15T - - R, I, S, U 39 UK98
4.2” Mortar [2] 67 1 9 32 32 5 0 - 8 R, I, S, M6 42 (UK44)
18 lbr Gun [2] 133 2 6 81 81 4 0 - 8 R, I, S 3625 lbr Gun/Howitzer [2] 177 2 7 97 97 4 0 - 8 I, S 42 UK49, UK68, UK69
25 lbr Gun/How (as ATG) 6 10 - 42 UK49, UK68, UK69
Sexton [2] 187 2 7 97 97 [6] 10T - - R, I, S, U 43 UK56
Bishop [2] 185 2 7 97 97 [5] 8T - - R, I, S, U 42 UK19
3.7” Mtn Howitzer [2] 80 2 7 43 43 4 0 - 6 R, I, S 17
4.5” Mk I Howitzer [2] 106 2 8 52 52 2 0 - 10 R, I, S 39
4.5” Gun [2] 261 2 8 144 144 1 0 - 12 R, I 38 (UK66)
5.5” Mk 3 Gun/How [2] 257 3 9 118 118 2 0 - 12 R, I, S 39 UK66, UK68, UK69
6” Howitzer [2] 220 4 9 84 84 1 0 - 12 R, I 36
7.2” Mk I Howitzer [2] 342 4 10 135 135 1 0 - 14 R, I 39 UK72, UK68, UK69
UK/ COMMONWEALTH Infantry Close Suppor t Artill ery
A-9 (Close Support, “CS”) 62 1 7 30 30 [3] 8T - - 37 A-10 (CS) 64 1 7 30 30 [4] 8T - - 38
A-12 Matilda II (CS) 46 1 5 20 20 [8] 6T - - 40
A-13 (CS) 64 1 7 30 30 [2] 11T - - 38
Churchill AVRE 114 6 15 20 20 [12] 6T - - 44 UK32
Churchill VIII 78 1 7 30 30 [12] 6T - - 44
Crusader (CS) 44 1 5 20 20 [4] 12T - - 40
Cromwell (CS) 75 1 7 30 30 [6] 15T - - 45
Sherman IIB 73 2 8 60 60 [7] 10T - - I 42
UK/ COMMONWEALTH Armoured Cars / Recon
Rolls Royce 13 0 4 1 5 [1] 22W - - 36 UK92
Marmon-Herrington Mk II 11 0 4 1 5 [1] 16W - - 41 UK31
Marmon-Herrington 20mm 13 2 4 5 5 [1] 16W - - R, U 41 (UK31)Marmon-Herrington Mk IV 19 5 2 10 5 [1] 16W - - 43
Morris 12 1 4 5 5 [1] 17W - - 38
Humber Mk II 16 1 4 5 5 [2] 22W - - 41 UK52
Humber Mk IV 24 5 3 10 5 [2] 22W - - 44 UK47
Daimler “Dingo” 16 0 3 1 5 [3] 22W - - U 39 UK50
Daimler A/C 22 5 2 10 5 [2] 20W - - 42 UK46
A.E.C. I 23 5 2 10 5 [3] 18W - - 41 UK22
A.E.C. II 43 6 4 15 15 [4] 16W - - 43 UK90
A.E.C. III 61 7 5 20 20 [4] 16W - - 44 UK91
Staghound I 43 6 4 15 15 [3] 24W - - 43 UK34
L.R.D.G. 30 cwt Truck 16 0 4 0 10 1 24W 4 - 40 UK82
SAS Jeep 17 0 4 1 10 2 22W 4 - 44 UK86
“Wasp” Flamethrower 17 9F 9F 1 1 [1] 13T - - R 39 UK98
Carrier Scout ‘40 18 1 8 1 5 [1] 14T 4 - R, U 39 UK98
Carrier Scout ‘43 21 5 9 1 5 [1] 14T 4 - R, U, D4 39 UK98
R = Must obey facing restrictions
R1 = Weapons may only fire through rear arc
R2 = May engage targets to all sides except front
I = May engage in indirect fire
U = Open-top armoured vehicle
S = Capable of firing smoke rounds
P = Defense value halved when in movement posture
T = Two/multiple guns, only 1 may fire/turn
M# = Minimum range = #
SR# = May fire once every # of turns
D# = If unmodified CRT roll is less than #, stand is
out of AP ammo
NOTE
SYMBOLS
Burfield (order #5184631)

8/13/2019 Micro Armour the Game-WWII 2nd Edition (Full Color)
http://slidepdf.com/reader/full/micro-armour-the-game-wwii-2nd-edition-full-color 96/136
91
Weapon Points
Firepower Range
Def
Mov
Points
Cargo
Cap
Tran
Req Notes Year Models AP HE AP HE
UK/ COMMONWEALTH Armored Personnel Carriers
Universal Carrier 14 0 4 1 5 [1] 14T 4 - R, U 39 UK98
“Kangaroo” 17 0 4 1 10 [5] 10T 8 - U 44 UK81
M5 Halftrack 19 0 3 1 10 [2] 20T 8 - U 43 UK33, UK35
C15 TA 8 0 0 0 0 [1] 20W 6 - U 43 UK41
UK/ COMMONWEALTH Anti-Aircraft Guns
Dual .303 AAMG 11 0 5 1 8 4 0 - 4 4020mm AAG 17 2 6 10 10 3 0 - 4 44
4x 20mm Polsten AAG 22 2 9 10 10 2 0 - 8 44
40mm (Bofors) AAG 24 4 6 12 12 3 0 - 6 39 UK54
3.7” AAG 82 9 6 30 30 2 0 - 14 39 UK79
Staghound AA (2x .50) 24 1 5 5 10 [3] 24W - - U 43
40mm AAG on Morris 31 4 6 12 12 2 18W - - 44
Vickers Mk VI AA (4x .30) 26 0 6 1 8 [2] 12T - - 42 UK36
Crusader Mk I AA (40mm) 44 4 6 12 12 [4] 12T - - U 43
Crusader Mk II AA (2x 2cm) 36 2 6 10 10 [4] 12T - - 44
UK/ COMMONWEALTH Personnel
Infantry HQ 20 0 3 0 5 6 3F - 8 P 39 UK96
Infantry ‘39 10 0 4 0 5 6 3F - 8 P 39 UK59, UK96, UK73, UK75
Infantry ‘41 11 1 4 0 5 6 3F - 8 P 42 UK59, UK96, UK73, UK75
Infantry ‘43 13 5 5 1 5 6 3F - 8 P 43 UK59, UK44
Motor Infantry ‘40 11 1 4 0 5 6 3F - 8 P 39 UK59, UK96, UK73, UK75
Motor Infantry ‘43 13 5 5 1 5 6 3F - 8 P, D5 39 UK59, UK96, UK73, UK75
Infantry Support 14 0 4 1 10 6 3F - 4 P 39 UK44, UK60, UK74, UK76
Motorcycle Infantry 17 1 5 0 5 6 20W - - P 39
Paratroopers ‘42 12 2 5 0 5 6 3F - 8 P 42 UK83
Paratroopers ‘43 13 5 5 1 5 6 3F - 8 P, D5 43 UK84, UK44
Engineers ‘39–’42 11 2 4 0 5 6 3F - 8 P 39 UK59, UK60
Engineers ‘43 13 5 5 1 5 6 3F - 8 P, D5 43 UK59, UK60
Cavalry 11 0 4 0 5 5 8F - - P 39
UK/ COMMONWEALTH Transpor ts
Car, Humber Snipe 6 - - - - 1 30W 4 - 39
Car, Humber Utility “Tilly” 5 - - - - 1 22W 4 - 41
Light Truck, 15 cwt 7 - - - - 1 20W 6 - 39 UK28, UK42
Light Truck, 30 cwt 9 - - - - 1 20W 8 - 39 UK88
Medium Truck, 3-ton 10 - - - - 1 20W 10 - 41 UK89, UK52, UK24, UK26
Heavy Truck, 4-ton 11 - - - - 1 16W 12 - 41 UK94
Heavy Truck, 10-ton 13 - - - - 1 12W 16 - 44
Hvy Tractor, Matador, etc. 12 - - - - 1 11W 14 - 39 UK66, UK72
Crusader Prime Mover 18 - - - - [1] 13T 14 - U 44
UK/ COMMONWEALTH Boats
LCA 12 0 4 0 3 1 (6A) 10 - R 39LCM 1 22 0 4 0 3 2 (4A) 20 - 41
LCM 3 23 0 4 0 3 3 (6A) 20 - 41
LCT Mk4 70 5 1 10 5 4 (4A) 60 - 41
R = Must obey facing restrictions
R1 = Weapons may only fire through rear arc
R2 = May engage targets to all sides except front
I = May engage in indirect fire
U = Open-top armoured vehicle
S = Capable of firing smoke rounds
P = Defense value halved when in movement posture
T = Two/multiple guns, only 1 may fire/turn
M# = Minimum range = #
SR# = May fire once every # of turns
D# = If unmodified CRT roll is less than #, stand is
out of AP ammo
NOTE
SYMBOLS
Burfield (order #5184631)
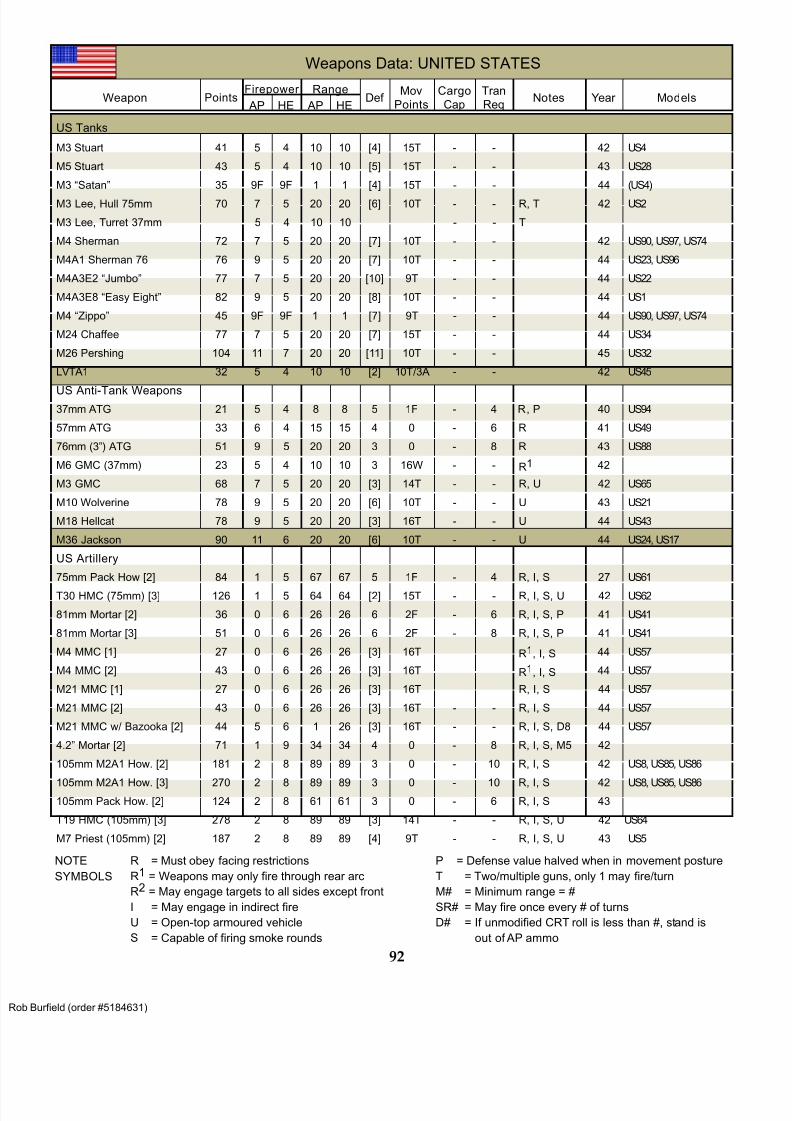
8/13/2019 Micro Armour the Game-WWII 2nd Edition (Full Color)
http://slidepdf.com/reader/full/micro-armour-the-game-wwii-2nd-edition-full-color 97/136
92
Weapons Data: UNITED STATES
Weapon PointsFirepower Range
Def Mov
Points
Cargo
Cap
Tran
Req Notes Year Models
AP HE AP HE
US Tanks
M3 Stuart 41 5 4 10 10 [4] 15T - - 42 US4
M5 Stuart 43 5 4 10 10 [5] 15T - - 43 US28
M3 “Satan” 35 9F 9F 1 1 [4] 15T - - 44 (US4)
M3 Lee, Hull 75mm 70 7 5 20 20 [6] 10T - - R, T 42 US2
M3 Lee, Turret 37mm 5 4 10 10 - - T
M4 Sherman 72 7 5 20 20 [7] 10T - - 42 US90, US97, US74
M4A1 Sherman 76 76 9 5 20 20 [7] 10T - - 44 US23, US96
M4A3E2 “Jumbo” 77 7 5 20 20 [10] 9T - - 44 US22
M4A3E8 “Easy Eight” 82 9 5 20 20 [8] 10T - - 44 US1
M4 “Zippo” 45 9F 9F 1 1 [7] 9T - - 44 US90, US97, US74
M24 Chaffee 77 7 5 20 20 [7] 15T - - 44 US34
M26 Pershing 104 11 7 20 20 [11] 10T - - 45 US32
LVTA1 32 5 4 10 10 [2] 10T/3A - - 42 US45
US Anti-Tank Weapons37mm ATG 21 5 4 8 8 5 1F - 4 R, P 40 US94
57mm ATG 33 6 4 15 15 4 0 - 6 R 41 US49
76mm (3”) ATG 51 9 5 20 20 3 0 - 8 R 43 US88
M6 GMC (37mm) 23 5 4 10 10 3 16W - - R1 42
M3 GMC 68 7 5 20 20 [3] 14T - - R, U 42 US65
M10 Wolverine 78 9 5 20 20 [6] 10T - - U 43 US21
M18 Hellcat 78 9 5 20 20 [3] 16T - - U 44 US43
M36 Jackson 90 11 6 20 20 [6] 10T - - U 44 US24, US17
US Artillery
75mm Pack How [2] 84 1 5 67 67 5 1F - 4 R, I, S 27 US61
T30 HMC (75mm) [3] 126 1 5 64 64 [2] 15T - - R, I, S, U 42 US62
81mm Mortar [2] 36 0 6 26 26 6 2F - 6 R, I, S, P 41 US41
81mm Mortar [3] 51 0 6 26 26 6 2F - 8 R, I, S, P 41 US41
M4 MMC [1] 27 0 6 26 26 [3] 16T R1, I, S 44 US57
M4 MMC [2] 43 0 6 26 26 [3] 16T R1, I, S 44 US57
M21 MMC [1] 27 0 6 26 26 [3] 16T R, I, S 44 US57
M21 MMC [2] 43 0 6 26 26 [3] 16T - - R, I, S 44 US57
M21 MMC w/ Bazooka [2] 44 5 6 1 26 [3] 16T - - R, I, S, D8 44 US57
4.2” Mortar [2] 71 1 9 34 34 4 0 - 8 R, I, S, M5 42
105mm M2A1 How. [2] 181 2 8 89 89 3 0 - 10 R, I, S 42 US8, US85, US86
105mm M2A1 How. [3] 270 2 8 89 89 3 0 - 10 R, I, S 42 US8, US85, US86105mm Pack How. [2] 124 2 8 61 61 3 0 - 6 R, I, S 43
T19 HMC (105mm) [3] 278 2 8 89 89 [3] 14T - - R, I, S, U 42 US64
M7 Priest (105mm) [2] 187 2 8 89 89 [4] 9T - - R, I, S, U 43 US5
R = Must obey facing restrictions
R1 = Weapons may only fire through rear arc
R2 = May engage targets to all sides except front
I = May engage in indirect fire
U = Open-top armoured vehicle
S = Capable of firing smoke rounds
P = Defense value halved when in movement posture
T = Two/multiple guns, only 1 may fire/turn
M# = Minimum range = #
SR# = May fire once every # of turns
D# = If unmodified CRT roll is less than #, stand is
out of AP ammo
NOTE
SYMBOLS
Burfield (order #5184631)
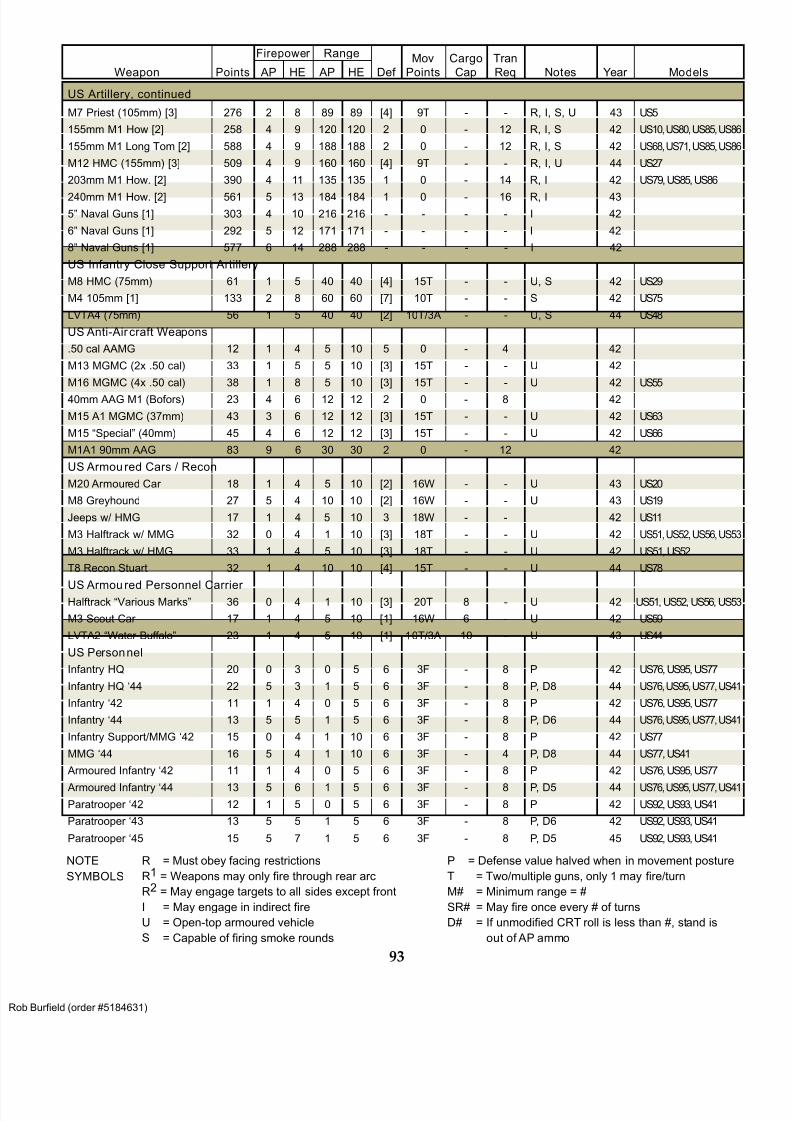
8/13/2019 Micro Armour the Game-WWII 2nd Edition (Full Color)
http://slidepdf.com/reader/full/micro-armour-the-game-wwii-2nd-edition-full-color 98/136
93
Weapon Points
Firepower Range
Def
Mov
Points
Cargo
Cap
Tran
Req Notes Year Models AP HE AP HE
US Artillery, continued
M7 Priest (105mm) [3] 276 2 8 89 89 [4] 9T - - R, I, S, U 43 US5
155mm M1 How [2] 258 4 9 120 120 2 0 - 12 R, I, S 42 US10, US80, US85, US86
155mm M1 Long Tom [2] 588 4 9 188 188 2 0 - 12 R, I, S 42 US68, US71, US85, US86
M12 HMC (155mm) [3] 509 4 9 160 160 [4] 9T - - R, I, U 44 US27
203mm M1 How. [2] 390 4 11 135 135 1 0 - 14 R, I 42 US79, US85, US86
240mm M1 How. [2] 561 5 13 184 184 1 0 - 16 R, I 43
5” Naval Guns [1] 303 4 10 216 216 - - - - I 42
6” Naval Guns [1] 292 5 12 171 171 - - - - I 42
8” Naval Guns [1] 577 6 14 288 288 - - - - I 42
US Infantry Close Support Artillery
M8 HMC (75mm) 61 1 5 40 40 [4] 15T - - U, S 42 US29
M4 105mm [1] 133 2 8 60 60 [7] 10T - - S 42 US75
LVTA4 (75mm) 56 1 5 40 40 [2] 10T/3A - - U, S 44 US48
US Anti-Air craft Weapons
.50 cal AAMG 12 1 4 5 10 5 0 - 4 42
M13 MGMC (2x .50 cal) 33 1 5 5 10 [3] 15T - - U 42
M16 MGMC (4x .50 cal) 38 1 8 5 10 [3] 15T - - U 42 US55
40mm AAG M1 (Bofors) 23 4 6 12 12 2 0 - 8 42
M15 A1 MGMC (37mm) 43 3 6 12 12 [3] 15T - - U 42 US63
M15 “Special” (40mm) 45 4 6 12 12 [3] 15T - - U 42 US66
M1A1 90mm AAG 83 9 6 30 30 2 0 - 12 42
US Armoured Cars / Recon
M20 Armoured Car 18 1 4 5 10 [2] 16W - - U 43 US20
M8 Greyhound 27 5 4 10 10 [2] 16W - - U 43 US19
Jeeps w/ HMG 17 1 4 5 10 3 18W - - 42 US11
M3 Halftrack w/ MMG 32 0 4 1 10 [3] 18T - - U 42 US51, US52, US56, US53
M3 Halftrack w/ HMG 33 1 4 5 10 [3] 18T - - U 42 US51, US52
T8 Recon Stuart 32 1 4 10 10 [4] 15T - - U 44 US78
US Armoured Personnel Carrier Halftrack “Various Marks” 36 0 4 1 10 [3] 20T 8 - U 42 US51, US52, US56, US53
M3 Scout Car 17 1 4 5 10 [1] 16W 6 - U 42 US59
LVTA2 “Water Buffalo” 23 1 4 5 10 [1] 10T/3A 10 - U 43 US44
US Personnel
Infantry HQ 20 0 3 0 5 6 3F - 8 P 42 US76, US95, US77
Infantry HQ ‘44 22 5 3 1 5 6 3F - 8 P, D8 44 US76, US95, US77, US41
Infantry ‘42 11 1 4 0 5 6 3F - 8 P 42 US76, US95, US77
Infantry ‘44 13 5 5 1 5 6 3F - 8 P, D6 44 US76, US95, US77, US41
Infantry Support/MMG ‘42 15 0 4 1 10 6 3F - 8 P 42 US77
MMG ‘44 16 5 4 1 10 6 3F - 4 P, D8 44 US77, US41
Armoured Infantry ‘42 11 1 4 0 5 6 3F - 8 P 42 US76, US95, US77
Armoured Infantry ‘44 13 5 6 1 5 6 3F - 8 P, D5 44 US76, US95, US77, US41
Paratrooper ‘42 12 1 5 0 5 6 3F - 8 P 42 US92, US93, US41
Paratrooper ‘43 13 5 5 1 5 6 3F - 8 P, D6 42 US92, US93, US41
Paratrooper ‘45 15 5 7 1 5 6 3F - 8 P, D5 45 US92, US93, US41
R = Must obey facing restrictions
R1 = Weapons may only fire through rear arc
R2 = May engage targets to all sides except front
I = May engage in indirect fire
U = Open-top armoured vehicle
S = Capable of firing smoke rounds
P = Defense value halved when in movement posture
T = Two/multiple guns, only 1 may fire/turn
M# = Minimum range = #
SR# = May fire once every # of turns
D# = If unmodified CRT roll is less than #, stand is
out of AP ammo
NOTE
SYMBOLS
Burfield (order #5184631)
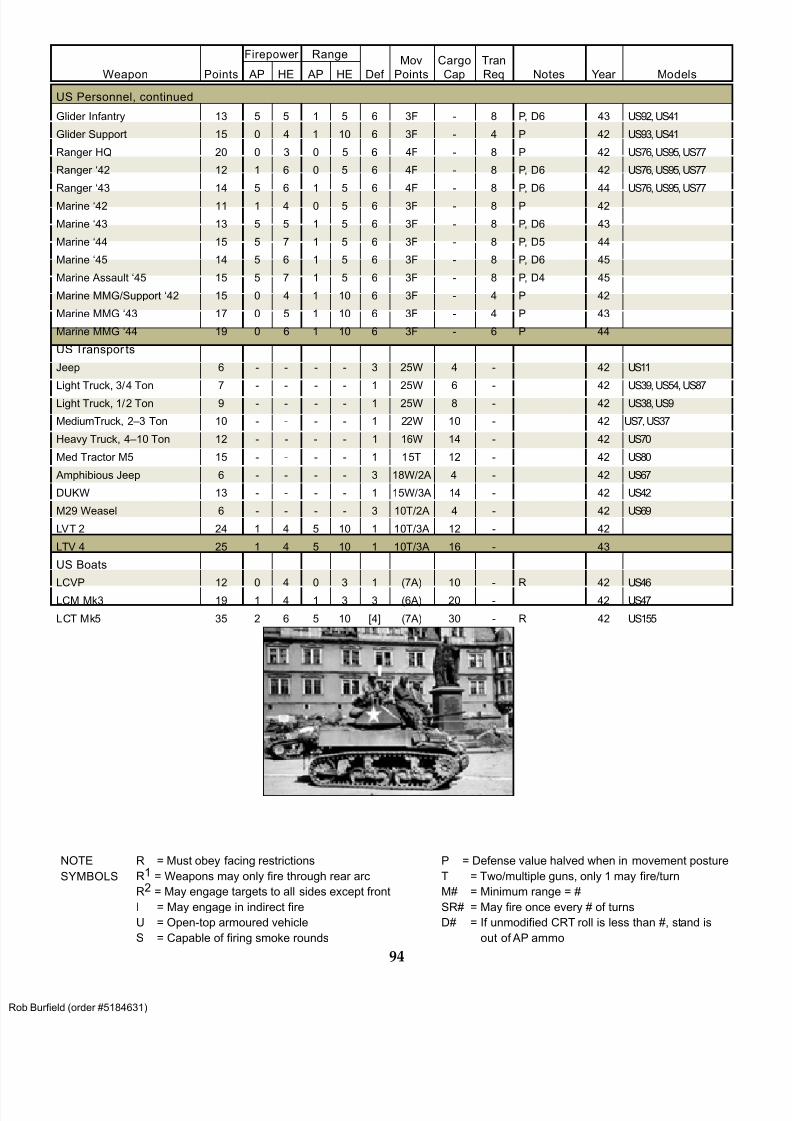
8/13/2019 Micro Armour the Game-WWII 2nd Edition (Full Color)
http://slidepdf.com/reader/full/micro-armour-the-game-wwii-2nd-edition-full-color 99/136
94
R = Must obey facing restrictions
R1 = Weapons may only fire through rear arc
R2 = May engage targets to all sides except front
I = May engage in indirect fire
U = Open-top armoured vehicle
S = Capable of firing smoke rounds
P = Defense value halved when in movement posture
T = Two/multiple guns, only 1 may fire/turn
M# = Minimum range = #
SR# = May fire once every # of turns
D# = If unmodified CRT roll is less than #, stand is
out of AP ammo
NOTE
SYMBOLS
Weapon Points
Firepower Range
Def
Mov
Points
Cargo
Cap
Tran
Req Notes Year Models AP HE AP HE
US Personnel, continued
Glider Infantry 13 5 5 1 5 6 3F - 8 P, D6 43 US92, US41
Glider Support 15 0 4 1 10 6 3F - 4 P 42 US93, US41
Ranger HQ 20 0 3 0 5 6 4F - 8 P 42 US76, US95, US77
Ranger ‘42 12 1 6 0 5 6 4F - 8 P, D6 42 US76, US95, US77
Ranger ‘43 14 5 6 1 5 6 4F - 8 P, D6 44 US76, US95, US77
Marine ‘42 11 1 4 0 5 6 3F - 8 P 42
Marine ‘43 13 5 5 1 5 6 3F - 8 P, D6 43
Marine ‘44 15 5 7 1 5 6 3F - 8 P, D5 44
Marine ‘45 14 5 6 1 5 6 3F - 8 P, D6 45
Marine Assault ‘45 15 5 7 1 5 6 3F - 8 P, D4 45
Marine MMG/Support ‘42 15 0 4 1 10 6 3F - 4 P 42
Marine MMG ‘43 17 0 5 1 10 6 3F - 4 P 43
Marine MMG ‘44 19 0 6 1 10 6 3F - 6 P 44
US Transpor ts
Jeep 6 - - - - 3 25W 4 - 42 US11
Light Truck, 3/4 Ton 7 - - - - 1 25W 6 - 42 US39, US54, US87
Light Truck, 1/2 Ton 9 - - - - 1 25W 8 - 42 US38, US9
MediumTruck, 2–3 Ton 10 - - - - 1 22W 10 - 42 US7, US37
Heavy Truck, 4–10 Ton 12 - - - - 1 16W 14 - 42 US70
Med Tractor M5 15 - - - - 1 15T 12 - 42 US80
Amphibious Jeep 6 - - - - 3 18W/2A 4 - 42 US67
DUKW 13 - - - - 1 15W/3A 14 - 42 US42
M29 Weasel 6 - - - - 3 10T/2A 4 - 42 US69
LVT 2 24 1 4 5 10 1 10T/3A 12 - 42
LTV 4 25 1 4 5 10 1 10T/3A 16 - 43
US Boats
LCVP 12 0 4 0 3 1 (7A) 10 - R 42 US46
LCM Mk3 19 1 4 1 3 3 (6A) 20 - 42 US47
LCT Mk5 35 2 6 5 10 [4] (7A) 30 - R 42 US155
Burfield (order #5184631)
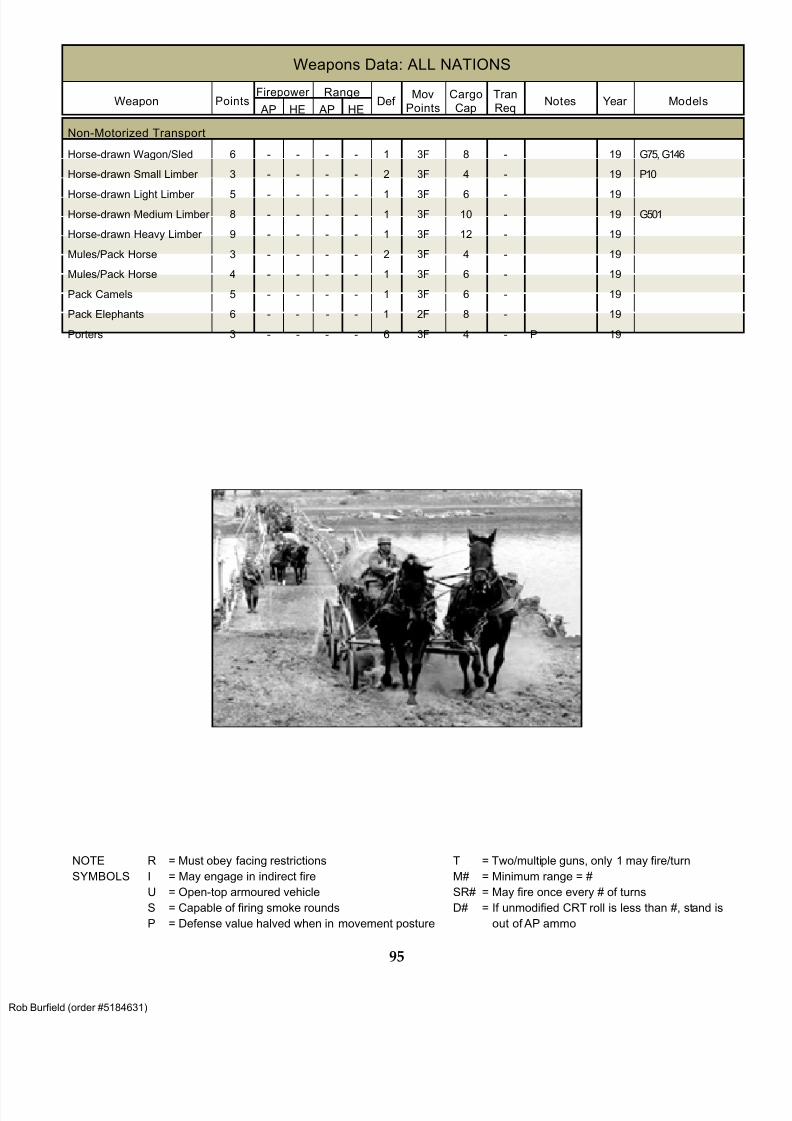
8/13/2019 Micro Armour the Game-WWII 2nd Edition (Full Color)
http://slidepdf.com/reader/full/micro-armour-the-game-wwii-2nd-edition-full-color 100/136
95
R = Must obey facing restrictions
I = May engage in indirect fire
U = Open-top armoured vehicle
S = Capable of firing smoke rounds
P = Defense value halved when in movement posture
T = Two/multiple guns, only 1 may fire/turn
M# = Minimum range = #
SR# = May fire once every # of turns
D# = If unmodified CRT roll is less than #, stand is
out of AP ammo
NOTE
SYMBOLS
Weapons Data: ALL NATIONS
Weapon PointsFirepower Range
Def Mov
Points
Cargo
Cap
Tran
Req Notes Year Models
AP HE AP HE
Non-Motorized Transport
Horse-drawn Wagon/Sled 6 - - - - 1 3F 8 - 19 G75, G146
Horse-drawn Small Limber 3 - - - - 2 3F 4 - 19 P10
Horse-drawn Light Limber 5 - - - - 1 3F 6 - 19
Horse-drawn Medium Limber 8 - - - - 1 3F 10 - 19 G501
Horse-drawn Heavy Limber 9 - - - - 1 3F 12 - 19
Mules/Pack Horse 3 - - - - 2 3F 4 - 19
Mules/Pack Horse 4 - - - - 1 3F 6 - 19
Pack Camels 5 - - - - 1 3F 6 - 19
Pack Elephants 6 - - - - 1 2F 8 - 19
Porters 3 - - - - 6 3F 4 - P 19
Burfield (order #5184631)
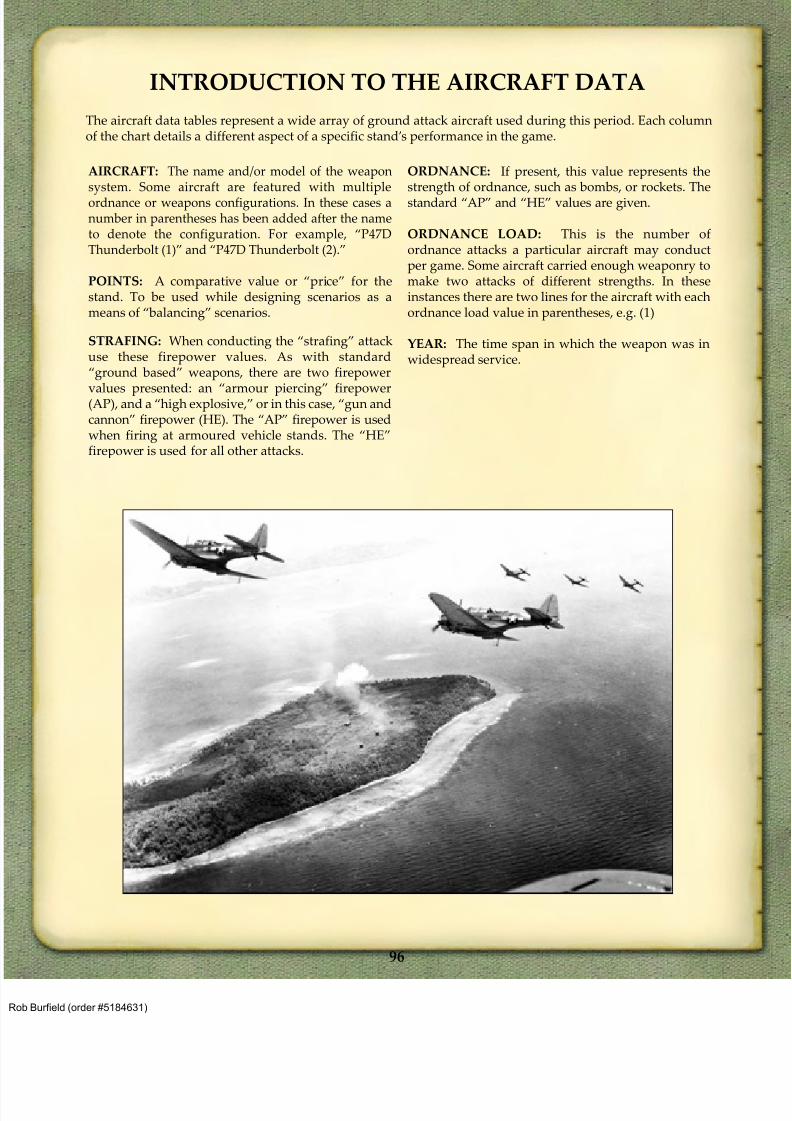
8/13/2019 Micro Armour the Game-WWII 2nd Edition (Full Color)
http://slidepdf.com/reader/full/micro-armour-the-game-wwii-2nd-edition-full-color 101/136
96
AIRCRAFT: The name and/or model of the weaponsystem. Some aircraft are featured with multipleordnance or weapons configurations. In these cases anumber in parentheses has been added after the nameto denote the configuration. For example, “P47DThunderbolt (1)” and “P47D Thunderbolt (2).”
POINTS: A comparative value or “price” for thestand. To be used while designing scenarios as ameans of “balancing” scenarios.
STRAFING: When conducting the “strafing” attackuse these firepower values. As with standard“ground based” weapons, there are two firepower
values presented: an “armour piercing” firepower(AP), and a “high explosive,” or in this case, “gun andcannon” firepower (HE). The “AP” firepower is usedwhen firing at armoured vehicle stands. The “HE”firepower is used for all other attacks.
ORDNANCE: If present, this value represents thestrength of ordnance, such as bombs, or rockets. Thestandard “AP” and “HE” values are given.
ORDNANCE LOAD: This is the number ofordnance attacks a particular aircraft may conductper game. Some aircraft carried enough weaponry tomake two attacks of different strengths. In theseinstances there are two lines for the aircraft with eachordnance load value in parentheses, e.g. (1)
YEAR: The time span in which the weapon was inwidespread service.
The aircraft data tables represent a wide array of ground attack aircraft used during this period. Each columnof the chart details a different aspect of a specific stand’s performance in the game.
INTRODUCTION TO THE AIRCRAFT DATA
Burfield (order #5184631)
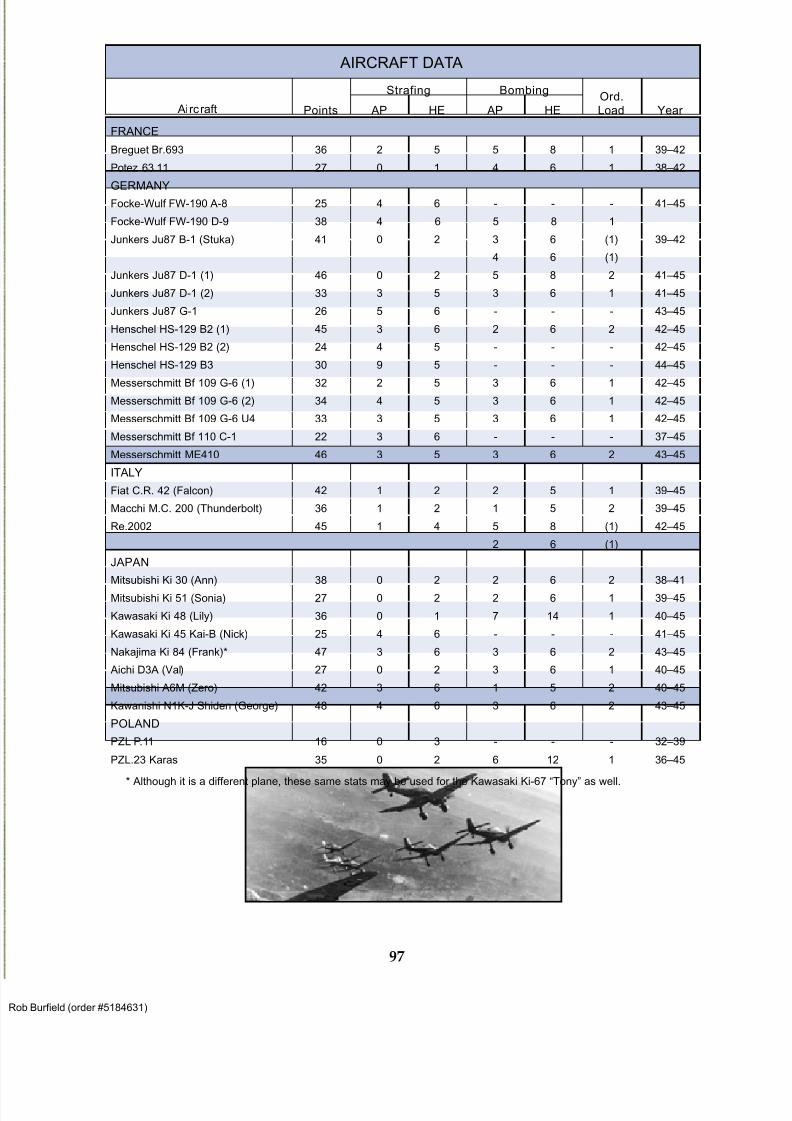
8/13/2019 Micro Armour the Game-WWII 2nd Edition (Full Color)
http://slidepdf.com/reader/full/micro-armour-the-game-wwii-2nd-edition-full-color 102/136
97
AIRCRAFT DATA
Aircraft Points
Strafing BombingOrd.
Load Year AP HE AP HE
FRANCE
Breguet Br.693 36 2 5 5 8 1 39–42
Potez 63.11 27 0 1 4 6 1 38–42
GERMANY
Focke-Wulf FW-190 A-8 25 4 6 - - - 41–45
Focke-Wulf FW-190 D-9 38 4 6 5 8 1
Junkers Ju87 B-1 (Stuka) 41 0 2 3 6 (1) 39–42
4 6 (1)
Junkers Ju87 D-1 (1) 46 0 2 5 8 2 41–45
Junkers Ju87 D-1 (2) 33 3 5 3 6 1 41–45
Junkers Ju87 G-1 26 5 6 - - - 43–45
Henschel HS-129 B2 (1) 45 3 6 2 6 2 42–45
Henschel HS-129 B2 (2) 24 4 5 - - - 42–45
Henschel HS-129 B3 30 9 5 - - - 44–45
Messerschmitt Bf 109 G-6 (1) 32 2 5 3 6 1 42–45
Messerschmitt Bf 109 G-6 (2) 34 4 5 3 6 1 42–45
Messerschmitt Bf 109 G-6 U4 33 3 5 3 6 1 42–45
Messerschmitt Bf 110 C-1 22 3 6 - - - 37–45
Messerschmitt ME410 46 3 5 3 6 2 43–45
ITALY
Fiat C.R. 42 (Falcon) 42 1 2 2 5 1 39–45
Macchi M.C. 200 (Thunderbolt) 36 1 2 1 5 2 39–45
Re.2002 45 1 4 5 8 (1) 42–45
2 6 (1)
JAPAN
Mitsubishi Ki 30 (Ann) 38 0 2 2 6 2 38–41
Mitsubishi Ki 51 (Sonia) 27 0 2 2 6 1 39–45
Kawasaki Ki 48 (Lily) 36 0 1 7 14 1 40–45
Kawasaki Ki 45 Kai-B (Nick) 25 4 6 - - - 41–45
Nakajima Ki 84 (Frank)* 47 3 6 3 6 2 43–45
Aichi D3A (Val) 27 0 2 3 6 1 40–45
Mitsubishi A6M (Zero) 42 3 6 1 5 2 40–45
Kawanishi N1K-J Shiden (George) 48 4 6 3 6 2 43–45
POLAND
PZL P.11 16 0 3 - - - 32–39
PZL.23 Karas 35 0 2 6 12 1 36–45
* Although it is a different plane, these same stats may be used for the Kawasaki Ki-67 “Tony” as well.
Burfield (order #5184631)
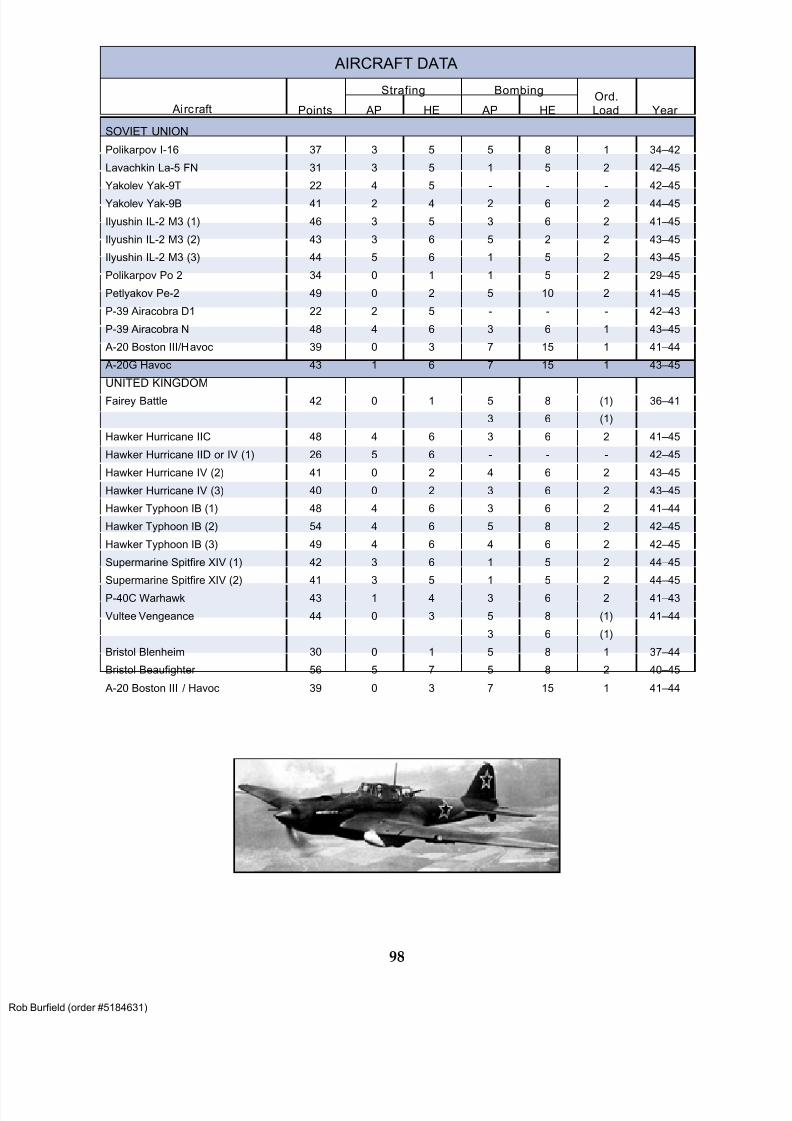
8/13/2019 Micro Armour the Game-WWII 2nd Edition (Full Color)
http://slidepdf.com/reader/full/micro-armour-the-game-wwii-2nd-edition-full-color 103/136
98
AIRCRAFT DATA
Aircraft Points
Strafing BombingOrd.
Load Year AP HE AP HE
SOVIET UNION
Polikarpov I-16 37 3 5 5 8 1 34–42
Lavachkin La-5 FN 31 3 5 1 5 2 42–45
Yakolev Yak-9T 22 4 5 - - - 42–45
Yakolev Yak-9B 41 2 4 2 6 2 44–45
Ilyushin IL-2 M3 (1) 46 3 5 3 6 2 41–45
Ilyushin IL-2 M3 (2) 43 3 6 5 2 2 43–45
Ilyushin IL-2 M3 (3) 44 5 6 1 5 2 43–45
Polikarpov Po 2 34 0 1 1 5 2 29–45
Petlyakov Pe-2 49 0 2 5 10 2 41–45
P-39 Airacobra D1 22 2 5 - - - 42–43
P-39 Airacobra N 48 4 6 3 6 1 43–45
A-20 Boston III/Havoc 39 0 3 7 15 1 41–44
A-20G Havoc 43 1 6 7 15 1 43–45
UNITED KINGDOM
Fairey Battle 42 0 1 5 8 (1) 36–41
3 6 (1)
Hawker Hurricane IIC 48 4 6 3 6 2 41–45
Hawker Hurricane IID or IV (1) 26 5 6 - - - 42–45
Hawker Hurricane IV (2) 41 0 2 4 6 2 43–45
Hawker Hurricane IV (3) 40 0 2 3 6 2 43–45
Hawker Typhoon IB (1) 48 4 6 3 6 2 41–44
Hawker Typhoon IB (2) 54 4 6 5 8 2 42–45
Hawker Typhoon IB (3) 49 4 6 4 6 2 42–45
Supermarine Spitfire XIV (1) 42 3 6 1 5 2 44–45
Supermarine Spitfire XIV (2) 41 3 5 1 5 2 44–45
P-40C Warhawk 43 1 4 3 6 2 41–43
Vultee Vengeance 44 0 3 5 8 (1) 41–44
3 6 (1)
Bristol Blenheim 30 0 1 5 8 1 37–44
Bristol Beaufighter 56 5 7 5 8 2 40–45
A-20 Boston III / Havoc 39 0 3 7 15 1 41–44
Burfield (order #5184631)
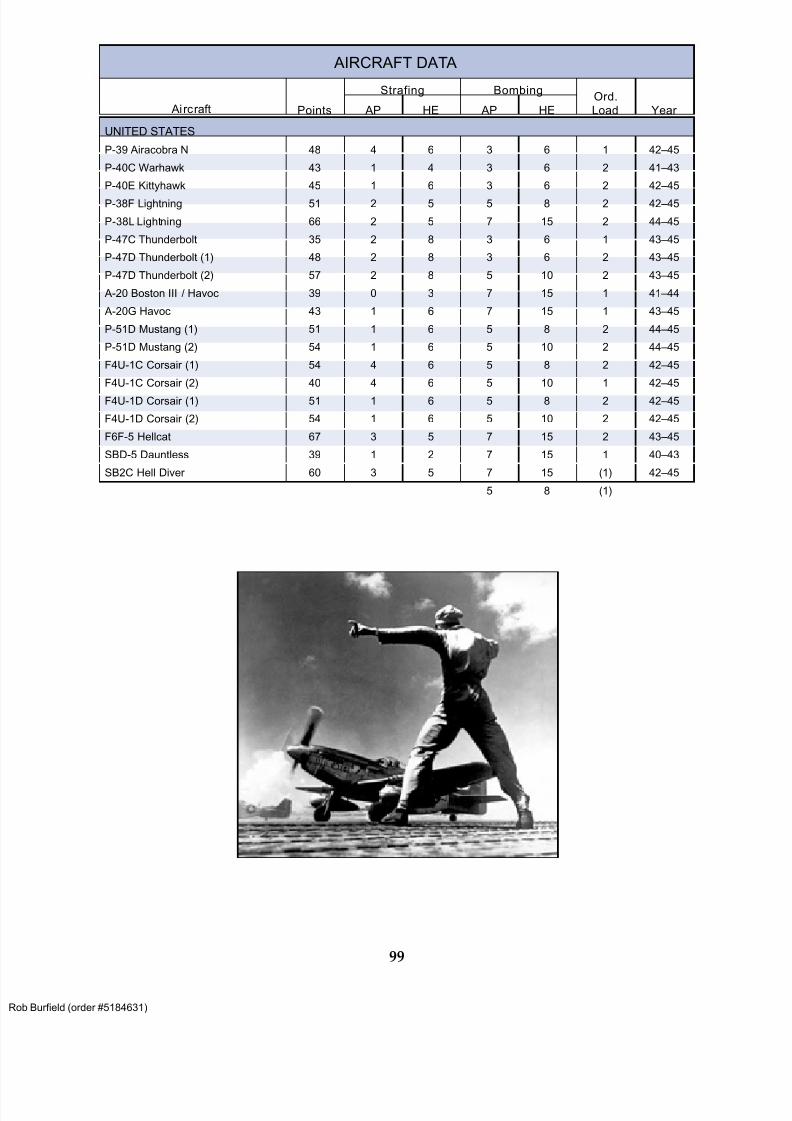
8/13/2019 Micro Armour the Game-WWII 2nd Edition (Full Color)
http://slidepdf.com/reader/full/micro-armour-the-game-wwii-2nd-edition-full-color 104/136
99
AIRCRAFT DATA
Ai rcraft Points
Strafing BombingOrd.
Load Year AP HE AP HE
UNITED STATES
P-39 Airacobra N 48 4 6 3 6 1 42–45
P-40C Warhawk 43 1 4 3 6 2 41–43
P-40E Kittyhawk 45 1 6 3 6 2 42–45
P-38F Lightning 51 2 5 5 8 2 42–45
P-38L Lightning 66 2 5 7 15 2 44–45
P-47C Thunderbolt 35 2 8 3 6 1 43–45
P-47D Thunderbolt (1) 48 2 8 3 6 2 43–45
P-47D Thunderbolt (2) 57 2 8 5 10 2 43–45
A-20 Boston III / Havoc 39 0 3 7 15 1 41–44
A-20G Havoc 43 1 6 7 15 1 43–45
P-51D Mustang (1) 51 1 6 5 8 2 44–45
P-51D Mustang (2) 54 1 6 5 10 2 44–45
F4U-1C Corsair (1) 54 4 6 5 8 2 42–45
F4U-1C Corsair (2) 40 4 6 5 10 1 42–45
F4U-1D Corsair (1) 51 1 6 5 8 2 42–45
F4U-1D Corsair (2) 54 1 6 5 10 2 42–45
F6F-5 Hellcat 67 3 5 7 15 2 43–45
SBD-5 Dauntless 39 1 2 7 15 1 40–43
SB2C Hell Diver 60 3 5 7 15 (1) 42–45
5 8 (1)
Burfield (order #5184631)
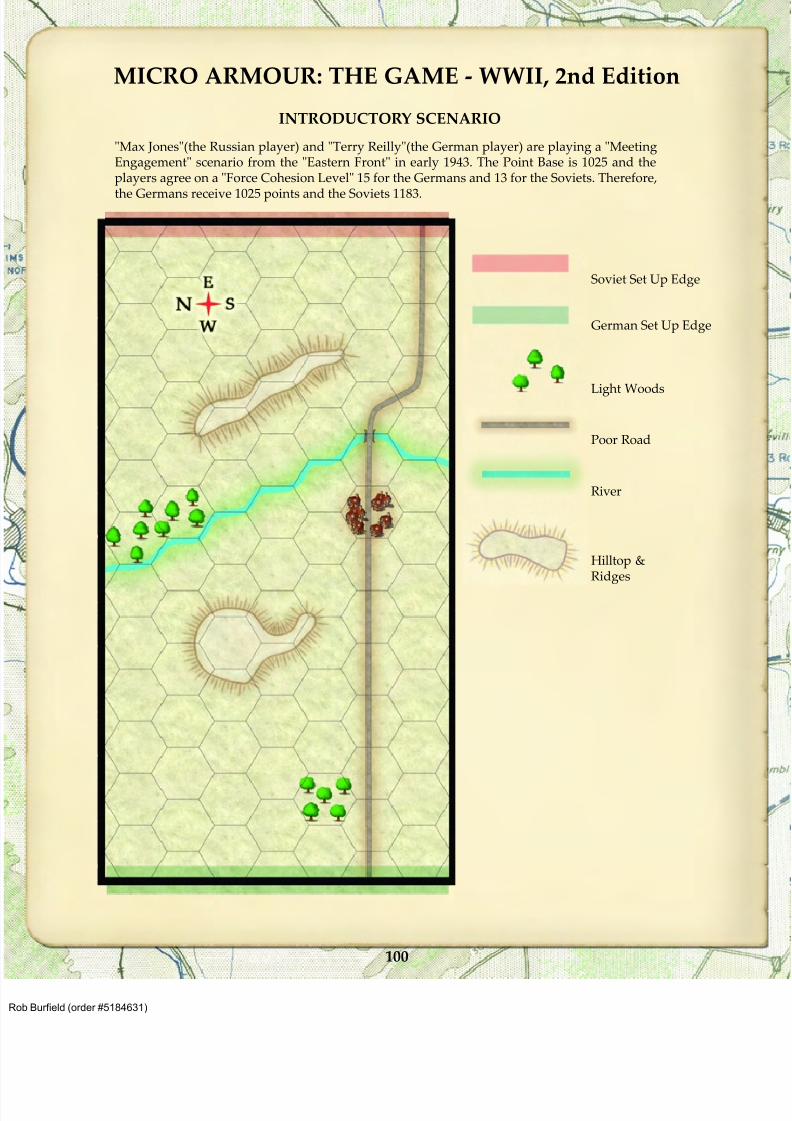
8/13/2019 Micro Armour the Game-WWII 2nd Edition (Full Color)
http://slidepdf.com/reader/full/micro-armour-the-game-wwii-2nd-edition-full-color 105/136
100
MICRO ARMOUR: THE GAME - WWII, 2nd Edition
"Max Jones"(the Russian player) and "Terry Reilly"(the German player) are playing a "MeetingEngagement" scenario from the "Eastern Front" in early 1943. The Point Base is 1025 and theplayers agree on a "Force Cohesion Level" 15 for the Germans and 13 for the Soviets. Therefore,
the Germans receive 1025 points and the Soviets 1183.
INTRODUCTORY SCENARIO
German Set Up Edge
Soviet Set Up Edge
Light Woods
Poor Road
River
Hilltop &Ridges
Burfield (order #5184631)
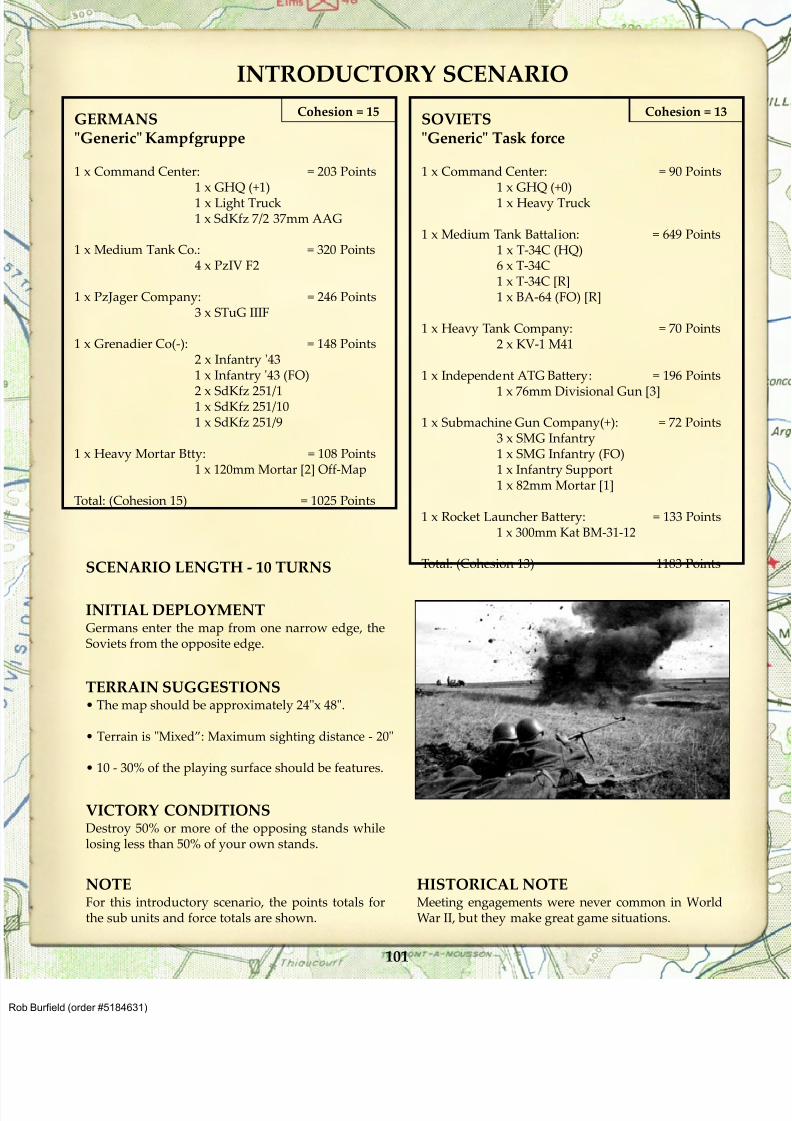
8/13/2019 Micro Armour the Game-WWII 2nd Edition (Full Color)
http://slidepdf.com/reader/full/micro-armour-the-game-wwii-2nd-edition-full-color 106/136
101
INTRODUCTORY SCENARIO
GERMANS"Generic" Kampfgruppe
1 x Command Center: = 203 Points1 x GHQ (+1)1 x Light Truck1 x SdKfz 7/2 37mm AAG
1 x Medium Tank Co.: = 320 Points4 x PzIV F2
1 x PzJager Company: = 246 Points3 x STuG IIIF
1 x Grenadier Co(-): = 148 Points2 x Infantry '431 x Infantry '43 (FO)
2 x SdKfz 251/11 x SdKfz 251/101 x SdKfz 251/9
1 x Heavy Mortar Btty: = 108 Points1 x 120mm Mortar [2] Off-Map
Total: (Cohesion 15) = 1025 Points
SOVIETS"Generic" Task force
1 x Command Center: = 90 Points1 x GHQ (+0)1 x Heavy Truck
1 x Medium Tank Battalion: = 649 Points1 x T-34C (HQ)6 x T-34C1 x T-34C [R]1 x BA-64 (FO) [R]
1 x Heavy Tank Company: = 70 Points2 x KV-1 M41
1 x Independent ATG Battery: = 196 Points
1 x 76mm Divisional Gun [3]
1 x Submachine Gun Company(+): = 72 Points3 x SMG Infantry1 x SMG Infantry (FO)1 x Infantry Support1 x 82mm Mortar [1]
1 x Rocket Launcher Battery: = 133 Points1 x 300mm Kat BM-31-12
Total: (Cohesion 13) 1183 Points
Cohesion = 15 Cohesion = 13
SCENARIO LENGTH - 10 TURNS
TERRAIN SUGGESTIONS• The map should be approximately 24"x 48".
• Terrain is "Mixed”: Maximum sighting distance - 20"
• 10 - 30% of the playing surface should be features.
VICTORY CONDITIONSDestroy 50% or more of the opposing stands whilelosing less than 50% of your own stands.
INITIAL DEPLOYMENTGermans enter the map from one narrow edge, theSoviets from the opposite edge.
HISTORICAL NOTEMeeting engagements were never common in WorldWar II, but they make great game situations.
NOTEFor this introductory scenario, the points totals forthe sub units and force totals are shown.
Burfield (order #5184631)
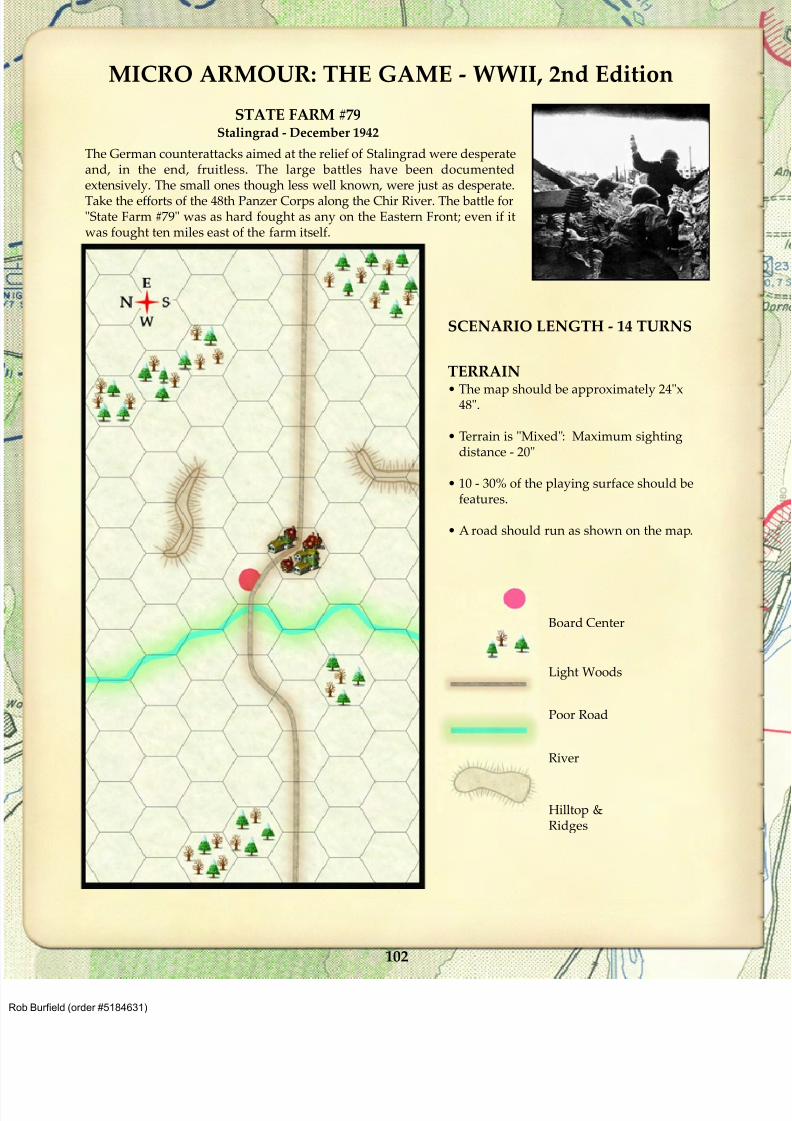
8/13/2019 Micro Armour the Game-WWII 2nd Edition (Full Color)
http://slidepdf.com/reader/full/micro-armour-the-game-wwii-2nd-edition-full-color 107/136
102
MICRO ARMOUR: THE GAME - WWII, 2nd Edition
The German counterattacks aimed at the relief of Stalingrad were desperateand, in the end, fruitless. The large battles have been documentedextensively. The small ones though less well known, were just as desperate.
Take the efforts of the 48th Panzer Corps along the Chir River. The battle for"State Farm #79" was as hard fought as any on the Eastern Front; even if itwas fought ten miles east of the farm itself.
SCENARIO LENGTH - 14 TURNS
TERRAIN
• The map should be approximately 24"x48".
• Terrain is "Mixed": Maximum sightingdistance - 20"
• 10 - 30% of the playing surface should befeatures.
• A road should run as shown on the map.
STATE FARM #79Stalingrad - December 1942
Board Center
Light Woods
Poor Road
River
Hilltop &Ridges
Burfield (order #5184631)
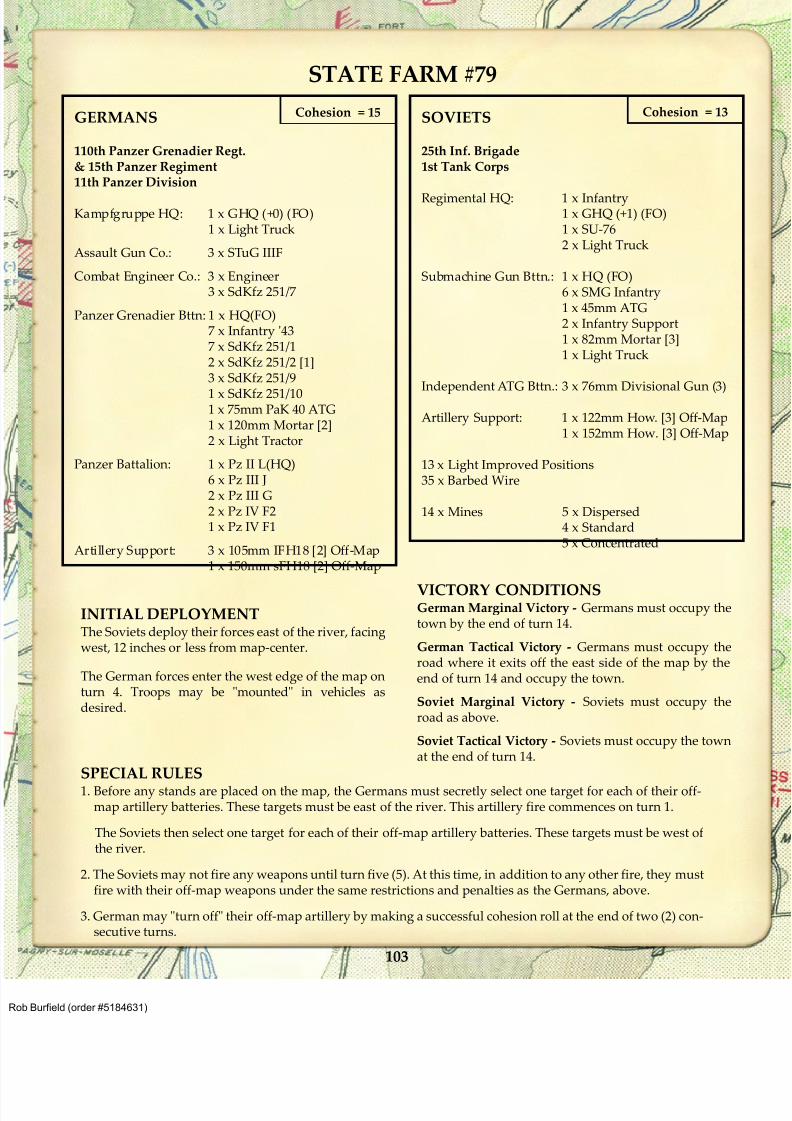
8/13/2019 Micro Armour the Game-WWII 2nd Edition (Full Color)
http://slidepdf.com/reader/full/micro-armour-the-game-wwii-2nd-edition-full-color 108/136
STATE FARM #79
GERMANS
110th Panzer Grenadier Regt.& 15th Panzer Regiment11th Panzer Division
Kampfgruppe HQ: 1 x GHQ (+0) (FO)1 x Light Truck
Assault Gun Co.: 3 x STuG IIIF
Combat Engineer Co.: 3 x Engineer3 x SdKfz 251/7
Panzer Grenadier Bttn: 1 x HQ(FO)7 x Infantry '437 x SdKfz 251/12 x SdKfz 251/2 [1]3 x SdKfz 251/9
1 x SdKfz 251/101 x 75mm PaK 40 ATG1 x 120mm Mortar [2]2 x Light Tractor
Panzer Battalion: 1 x Pz II L(HQ)6 x Pz III J2 x Pz III G2 x Pz IV F21 x Pz IV F1
Artillery Support: 3 x 105mm IFH18 [2] Off-Map1 x 150mm sFH18 [2] Off-Map
Cohesion = 15 SOVIETS
25th Inf. Brigade1st Tank Corps
Regimental HQ: 1 x Infantry1 x GHQ (+1) (FO)1 x SU-762 x Light Truck
Submachine Gun Bttn.: 1 x HQ (FO)6 x SMG Infantry1 x 45mm ATG2 x Infantry Support1 x 82mm Mortar [3]1 x Light Truck
Independent ATG Bttn.: 3 x 76mm Divisional Gun (3)
Artillery Support: 1 x 122mm How. [3] Off-Map1 x 152mm How. [3] Off-Map
13 x Light Improved Positions35 x Barbed Wire
14 x Mines 5 x Dispersed4 x Standard5 x Concentrated
Cohesion = 13
SPECIAL RULES1. Before any stands are placed on the map, the Germans must secretly select one target for each of their off-
map artillery batteries. These targets must be east of the river. This artillery fire commences on turn 1.
The Soviets then select one target for each of their off-map artillery batteries. These targets must be west ofthe river.
2. The Soviets may not fire any weapons until turn five (5). At this time, in addition to any other fire, they mustfire with their off-map weapons under the same restrictions and penalties as the Germans, above.
3. German may "turn off" their off-map artillery by making a successful cohesion roll at the end of two (2) con-secutive turns.
INITIAL DEPLOYMENTThe Soviets deploy their forces east of the river, facingwest, 12 inches or less from map-center.
The German forces enter the west edge of the map onturn 4. Troops may be "mounted" in vehicles asdesired.
VICTORY CONDITIONSGerman Marginal Victory - Germans must occupy thetown by the end of turn 14.
German Tactical Victory - Germans must occupy theroad where it exits off the east side of the map by theend of turn 14 and occupy the town.
Soviet Marginal Victory - Soviets must occupy theroad as above.
Soviet Tactical Victory - Soviets must occupy the townat the end of turn 14.
103
Burfield (order #5184631)
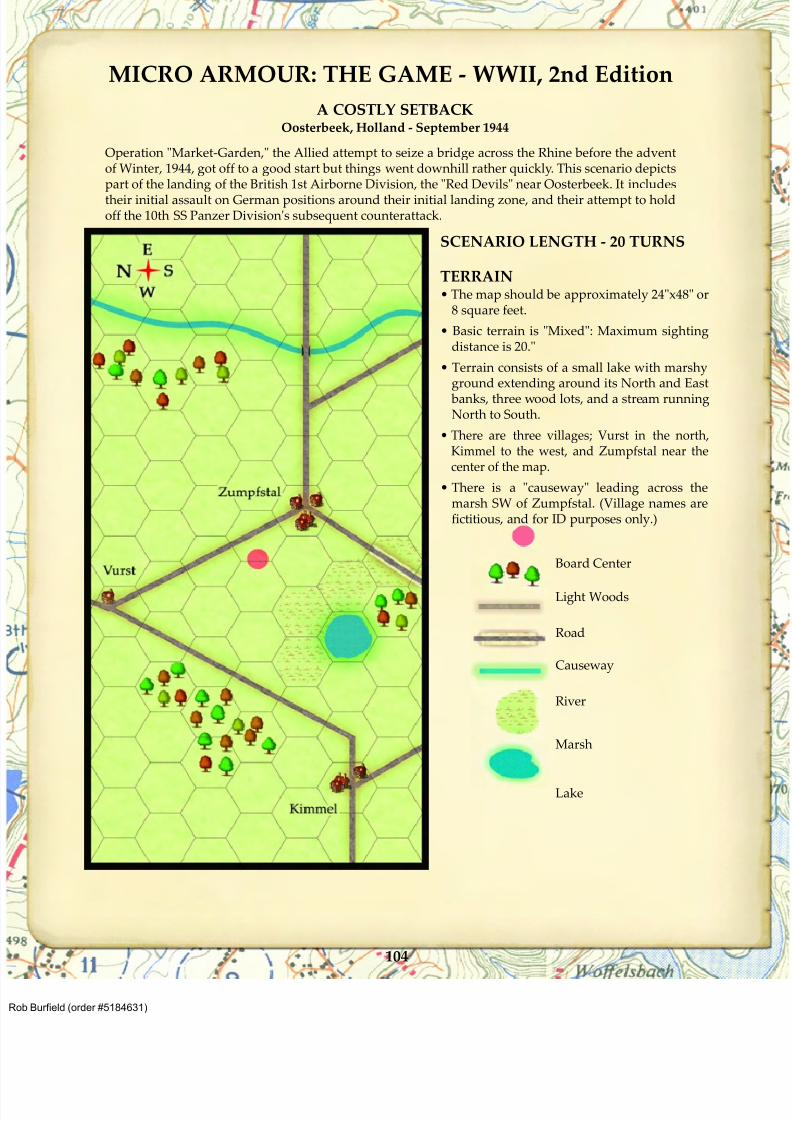
8/13/2019 Micro Armour the Game-WWII 2nd Edition (Full Color)
http://slidepdf.com/reader/full/micro-armour-the-game-wwii-2nd-edition-full-color 109/136
104
MICRO ARMOUR: THE GAME - WWII, 2nd Edition
Operation "Market-Garden," the Allied attempt to seize a bridge across the Rhine before the adventof Winter, 1944, got off to a good start but things went downhill rather quickly. This scenario depictspart of the landing of the British 1st Airborne Division, the "Red Devils" near Oosterbeek. It includes
their initial assault on German positions around their initial landing zone, and their attempt to holdoff the 10th SS Panzer Division's subsequent counterattack.
SCENARIO LENGTH - 20 TURNS
TERRAIN• The map should be approximately 24"x48" or
8 square feet.
• Basic terrain is "Mixed": Maximum sightingdistance is 20."
• Terrain consists of a small lake with marshyground extending around its North and East
banks, three wood lots, and a stream runningNorth to South.
• There are three villages; Vurst in the north,Kimmel to the west, and Zumpfstal near thecenter of the map.
• There is a "causeway" leading across themarsh SW of Zumpfstal. (Village names arefictitious, and for ID purposes only.)
A COSTLY SETBACKOosterbeek, Holland - September 1944
Board Center
Light Woods
Road
Causeway
River
Marsh
Lake
Burfield (order #5184631)
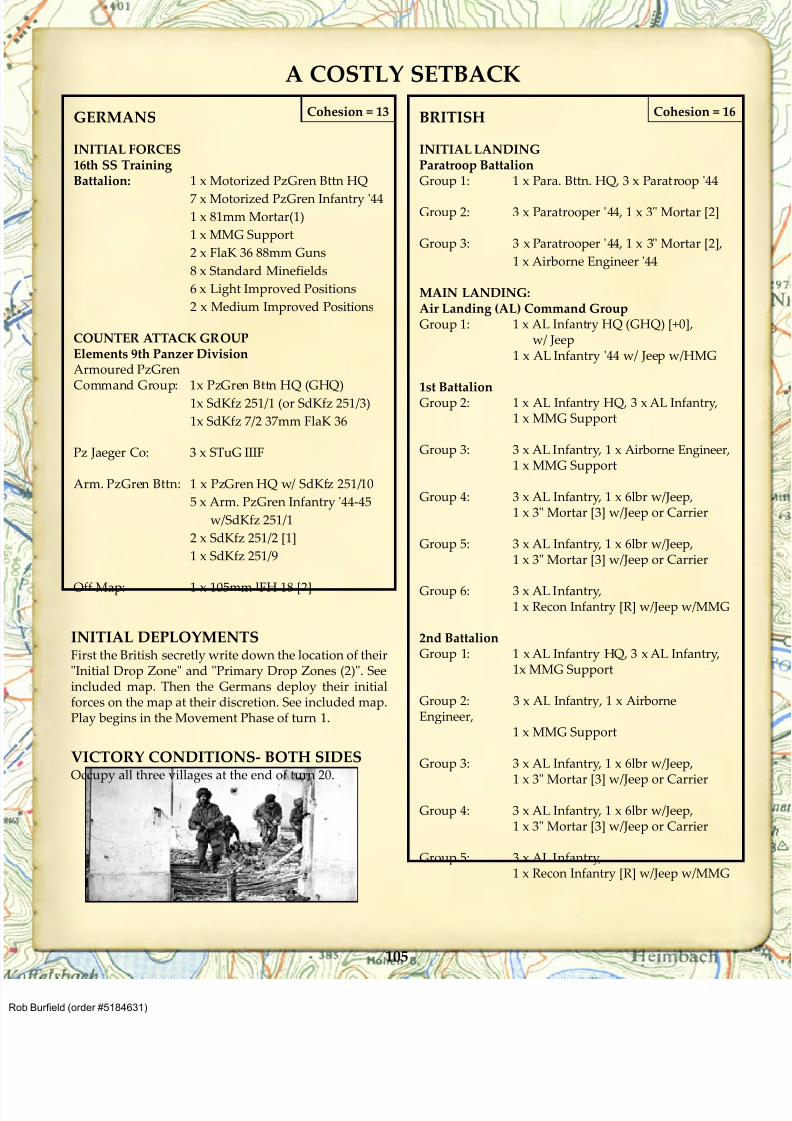
8/13/2019 Micro Armour the Game-WWII 2nd Edition (Full Color)
http://slidepdf.com/reader/full/micro-armour-the-game-wwii-2nd-edition-full-color 110/136
105
A COSTLY SETBACK
GERMANS
INITIAL FORCES16th SS TrainingBattalion: 1 x Motorized PzGren Bttn HQ
7 x Motorized PzGren Infantry '441 x 81mm Mortar(1)
1 x MMG Support
2 x FlaK 36 88mm Guns
8 x Standard Minefields
6 x Light Improved Positions
2 x Medium Improved Positions
COUNTER ATTACK GROUPElements 9th Panzer DivisionArmoured PzGren
Command Group: 1x PzGren Bttn HQ (GHQ)1x SdKfz 251/1 (or SdKfz 251/3)
1x SdKfz 7/2 37mm FlaK 36
Pz Jaeger Co: 3 x STuG IIIF
Arm. PzGren Bttn: 1 x PzGren HQ w/ SdKfz 251/10
5 x Arm. PzGren Infantry '44-45
w/SdKfz 251/1
2 x SdKfz 251/2 [1]
1 x SdKfz 251/9
Off Map: 1 x 105mm lFH 18 [2]
Cohesion = 13
INITIAL DEPLOYMENTSFirst the British secretly write down the location of their"Initial Drop Zone" and "Primary Drop Zones (2)". Seeincluded map. Then the Germans deploy their initialforces on the map at their discretion. See included map.Play begins in the Movement Phase of turn 1.
VICTORY CONDITIONS- BOTH SIDESOccupy all three villages at the end of turn 20.
BRITISH
INITIAL LANDINGParatroop BattalionGroup 1: 1 x Para. Bttn. HQ, 3 x Paratroop '44
Group 2: 3 x Paratrooper '44, 1 x 3" Mortar [2]
Group 3: 3 x Paratrooper '44, 1 x 3" Mortar [2],
1 x Airborne Engineer '44
MAIN LANDING:Air Landing (AL) Command GroupGroup 1: 1 x AL Infantry HQ (GHQ) [+0],
w/ Jeep1 x AL Infantry '44 w/ Jeep w/HMG
1st BattalionGroup 2: 1 x AL Infantry HQ, 3 x AL Infantry,1 x MMG Support
Group 3: 3 x AL Infantry, 1 x Airborne Engineer,1 x MMG Support
Group 4: 3 x AL Infantry, 1 x 6lbr w/Jeep,1 x 3" Mortar [3] w/Jeep or Carrier
Group 5: 3 x AL Infantry, 1 x 6lbr w/Jeep,1 x 3" Mortar [3] w/Jeep or Carrier
Group 6: 3 x AL Infantry,1 x Recon Infantry [R] w/Jeep w/MMG
2nd BattalionGroup 1: 1 x AL Infantry HQ, 3 x AL Infantry,
1x MMG Support
Group 2: 3 x AL Infantry, 1 x AirborneEngineer,
1 x MMG Support
Group 3: 3 x AL Infantry, 1 x 6lbr w/Jeep,
1 x 3" Mortar [3] w/Jeep or Carrier
Group 4: 3 x AL Infantry, 1 x 6lbr w/Jeep,1 x 3" Mortar [3] w/Jeep or Carrier
Group 5: 3 x AL Infantry,1 x Recon Infantry [R] w/Jeep w/MMG
Cohesion = 16
Burfield (order #5184631)
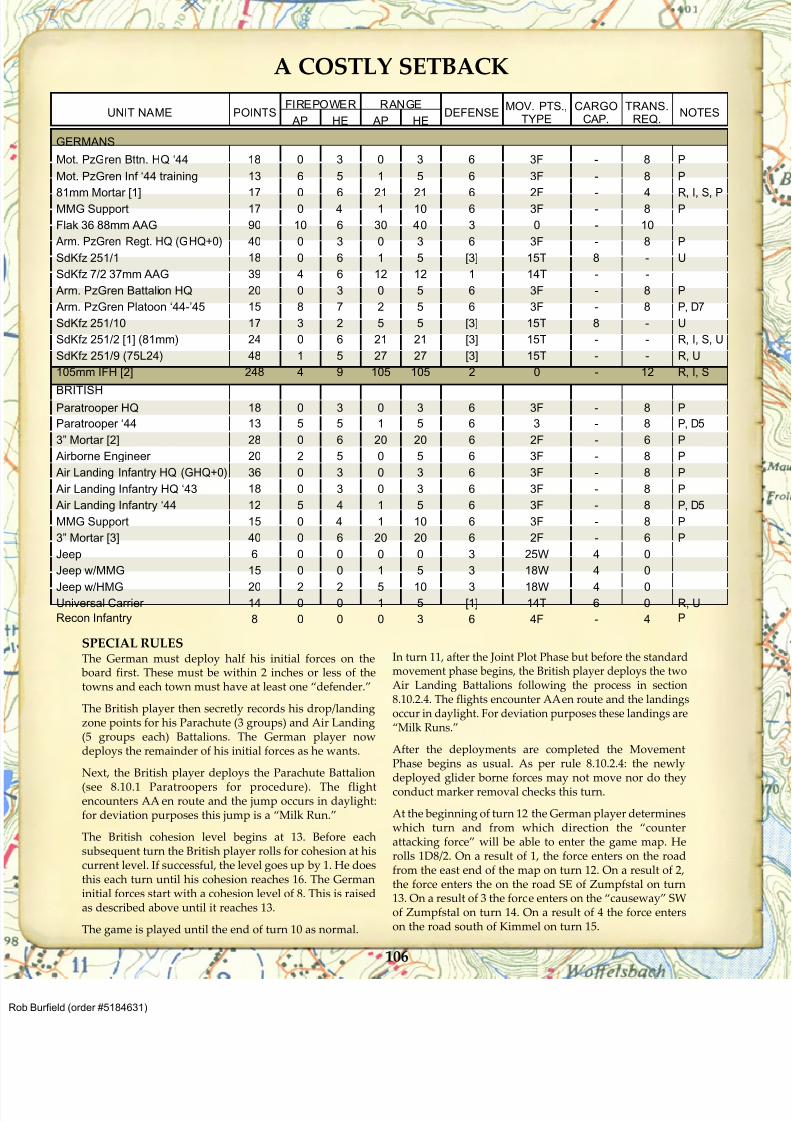
8/13/2019 Micro Armour the Game-WWII 2nd Edition (Full Color)
http://slidepdf.com/reader/full/micro-armour-the-game-wwii-2nd-edition-full-color 111/136
106
A COSTLY SETBACK
UNIT NAME POINTS FIREPOWER RANGE
DEFENSE MOV. PTS.,
TYPE
CARGO
CAP.
TRANS.
REQ. NOTES
AP HE AP HE
GERMANS
Mot. PzGren Bttn. HQ ‘44 18 0 3 0 3 6 3F - 8 P
Mot. PzGren Inf ‘44 training 13 6 5 1 5 6 3F - 8 P
81mm Mortar [1] 17 0 6 21 21 6 2F - 4 R, I, S, PMMG Support 17 0 4 1 10 6 3F - 8 P
Flak 36 88mm AAG 90 10 6 30 40 3 0 - 10
Arm. PzGren Regt. HQ (GHQ+0) 40 0 3 0 3 6 3F - 8 P
SdKfz 251/1 18 0 6 1 5 [3] 15T 8 - U
SdKfz 7/2 37mm AAG 39 4 6 12 12 1 14T - -
Arm. PzGren Battalion HQ 20 0 3 0 5 6 3F - 8 P
Arm. PzGren Platoon ‘44-’45 15 8 7 2 5 6 3F - 8 P, D7
SdKfz 251/10 17 3 2 5 5 [3] 15T 8 - U
SdKfz 251/2 [1] (81mm) 24 0 6 21 21 [3] 15T - - R, I, S, U
SdKfz 251/9 (75L24) 48 1 5 27 27 [3] 15T - - R, U
105mm IFH [2] 248 4 9 105 105 2 0 - 12 R, I, S
BRITISHParatrooper HQ 18 0 3 0 3 6 3F - 8 P
Paratrooper ‘44 13 5 5 1 5 6 3 - 8 P, D5
3” Mortar [2] 28 0 6 20 20 6 2F - 6 P
Airborne Engineer 20 2 5 0 5 6 3F - 8 P
Air Landing Infantry HQ (GHQ+0) 36 0 3 0 3 6 3F - 8 P
Air Landing Infantry HQ ‘43 18 0 3 0 3 6 3F - 8 P
Air Landing Infantry ‘44 12 5 4 1 5 6 3F - 8 P, D5
MMG Support 15 0 4 1 10 6 3F - 8 P
3” Mortar [3] 40 0 6 20 20 6 2F - 6 P
Jeep 6 0 0 0 0 3 25W 4 0
Jeep w/MMG 15 0 0 1 5 3 18W 4 0
Jeep w/HMG 20 2 2 5 10 3 18W 4 0Universal Carrier 14 0 0 1 5 [1] 14T 6 0 R, U
Recon Infantry 8 0 0 0 3 6 4F - 4 P
SPECIAL RULES
The German must deploy half his initial forces on the board first. These must be within 2 inches or less of thetowns and each town must have at least one “defender.”
The British player then secretly records his drop/landingzone points for his Parachute (3 groups) and Air Landing(5 groups each) Battalions. The German player nowdeploys the remainder of his initial forces as he wants.
Next, the British player deploys the Parachute Battalion
(see 8.10.1 Paratroopers for procedure). The flightencounters AA en route and the jump occurs in daylight:for deviation purposes this jump is a “Milk Run.”
The British cohesion level begins at 13. Before eachsubsequent turn the British player rolls for cohesion at hiscurrent level. If successful, the level goes up by 1. He doesthis each turn until his cohesion reaches 16. The Germaninitial forces start with a cohesion level of 8. This is raisedas described above until it reaches 13.
The game is played until the end of turn 10 as normal.
In turn 11, after the Joint Plot Phase but before the standardmovement phase begins, the British player deploys the twoAir Landing Battalions following the process in section8.10.2.4. The flights encounter AAen route and the landingsoccur in daylight. For deviation purposes these landings are“Milk Runs.”
After the deployments are completed the MovementPhase begins as usual. As per rule 8.10.2.4: the newlydeployed glider borne forces may not move nor do theyconduct marker removal checks this turn.
At the beginning of turn 12 the German player determineswhich turn and from which direction the “counterattacking force” will be able to enter the game map. Herolls 1D8/2. On a result of 1, the force enters on the roadfrom the east end of the map on turn 12. On a result of 2,the force enters the on the road SE of Zumpfstal on turn13. On a result of 3 the force enters on the “causeway” SWof Zumpfstal on turn 14. On a result of 4 the force enterson the road south of Kimmel on turn 15.
Burfield (order #5184631)
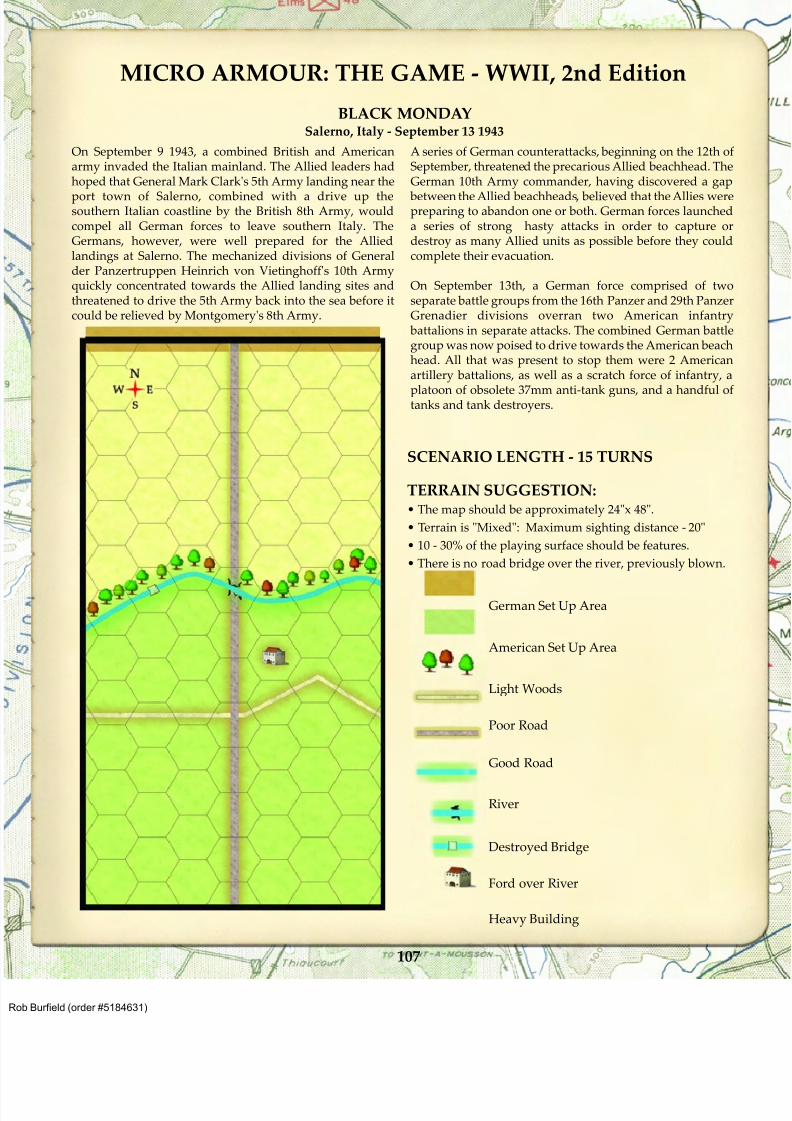
8/13/2019 Micro Armour the Game-WWII 2nd Edition (Full Color)
http://slidepdf.com/reader/full/micro-armour-the-game-wwii-2nd-edition-full-color 112/136
107
MICRO ARMOUR: THE GAME - WWII, 2nd Edition
On September 9 1943, a combined British and Americanarmy invaded the Italian mainland. The Allied leaders hadhoped that General Mark Clark's 5th Army landing near the
port town of Salerno, combined with a drive up thesouthern Italian coastline by the British 8th Army, wouldcompel all German forces to leave southern Italy. TheGermans, however, were well prepared for the Alliedlandings at Salerno. The mechanized divisions of Generalder Panzertruppen Heinrich von Vietinghoff's 10th Armyquickly concentrated towards the Allied landing sites andthreatened to drive the 5th Army back into the sea before itcould be relieved by Montgomery's 8th Army.
A series of German counterattacks, beginning on the 12th ofSeptember, threatened the precarious Allied beachhead. TheGerman 10th Army commander, having discovered a gap
between the Allied beachheads, believed that the Allies werepreparing to abandon one or both. German forces launcheda series of strong hasty attacks in order to capture ordestroy as many Allied units as possible before they couldcomplete their evacuation.
On September 13th, a German force comprised of twoseparate battle groups from the 16th Panzer and 29th PanzerGrenadier divisions overran two American infantry
battalions in separate attacks. The combined German battlegroup was now poised to drive towards the American beachhead. All that was present to stop them were 2 Americanartillery battalions, as well as a scratch force of infantry, a
platoon of obsolete 37mm anti-tank guns, and a handful oftanks and tank destroyers.
SCENARIO LENGTH - 15 TURNS
TERRAIN SUGGESTION:• The map should be approximately 24"x 48".
• Terrain is "Mixed": Maximum sighting distance - 20"
• 10 - 30% of the playing surface should be features.
• There is no road bridge over the river, previously blown.
BLACK MONDAYSalerno, Italy - September 13 1943
German Set Up Area
American Set Up Area
Light Woods
Poor Road
Good Road
Destroyed Bridge
River
Ford over River
Heavy Building
Burfield (order #5184631)
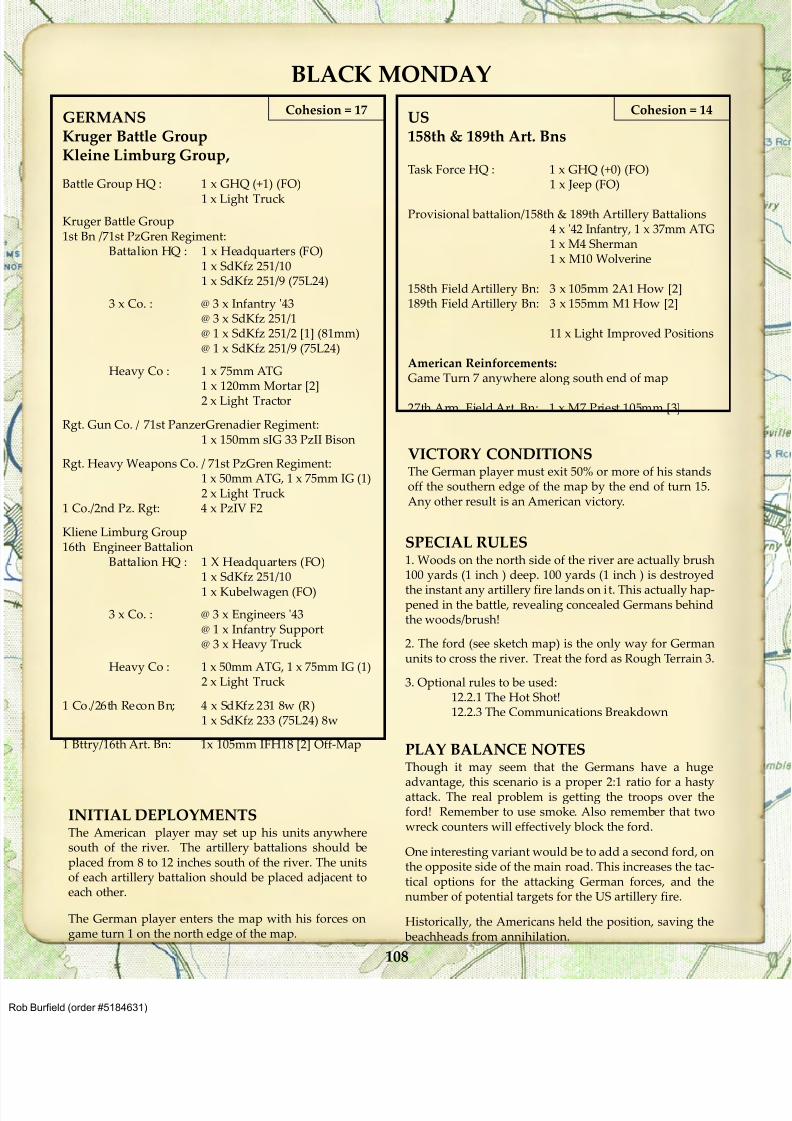
8/13/2019 Micro Armour the Game-WWII 2nd Edition (Full Color)
http://slidepdf.com/reader/full/micro-armour-the-game-wwii-2nd-edition-full-color 113/136
BLACK MONDAY
GERMANSKruger Battle GroupKleine Limburg Group,
Battle Group HQ : 1 x GHQ (+1) (FO)
1 x Light Truck
Kruger Battle Group1st Bn /71st PzGren Regiment:
Battalion HQ : 1 x Headquarters (FO)1 x SdKfz 251/101 x SdKfz 251/9 (75L24)
3 x Co. : @ 3 x Infantry '43@ 3 x SdKfz 251/1@ 1 x SdKfz 251/2 [1] (81mm)@ 1 x SdKfz 251/9 (75L24)
Heavy Co : 1 x 75mm ATG
1 x 120mm Mortar [2]2 x Light Tractor
Rgt. Gun Co. / 71st PanzerGrenadier Regiment:1 x 150mm sIG 33 PzII Bison
Rgt. Heavy Weapons Co. / 71st PzGren Regiment:1 x 50mm ATG, 1 x 75mm IG (1)2 x Light Truck
1 Co./2nd Pz. Rgt: 4 x PzIV F2
Kliene Limburg Group16th Engineer Battalion
Battalion HQ : 1 X Headquarters (FO)1 x SdKfz 251/10
1 x Kubelwagen (FO)
3 x Co. : @ 3 x Engineers '43@ 1 x Infantry Support@ 3 x Heavy Truck
Heavy Co : 1 x 50mm ATG, 1 x 75mm IG (1)2 x Light Truck
1 Co./26th Recon Bn; 4 x SdKfz 231 8w (R)1 x SdKfz 233 (75L24) 8w
1 Bttry/16th Art. Bn: 1x 105mm IFH18 [2] Off-Map
Cohesion = 17US158th & 189th Art. Bns
Task Force HQ : 1 x GHQ (+0) (FO)1 x Jeep (FO)
Provisional battalion/158th & 189th Artillery Battalions4 x '42 Infantry, 1 x 37mm ATG1 x M4 Sherman1 x M10 Wolverine
158th Field Artillery Bn: 3 x 105mm 2A1 How [2]189th Field Artillery Bn: 3 x 155mm M1 How [2]
11 x Light Improved Positions
American Reinforcements:Game Turn 7 anywhere along south end of map
27th Arm. Field Art. Bn: 1 x M7 Priest 105mm [3]
Cohesion = 14
PLAY BALANCE NOTESThough it may seem that the Germans have a huge
advantage, this scenario is a proper 2:1 ratio for a hastyattack. The real problem is getting the troops over theford! Remember to use smoke. Also remember that twowreck counters will effectively block the ford.
One interesting variant would be to add a second ford, onthe opposite side of the main road. This increases the tac-tical options for the attacking German forces, and thenumber of potential targets for the US artillery fire.
Historically, the Americans held the position, saving the beachheads from annihilation.
SPECIAL RULES1. Woods on the north side of the river are actually brush100 yards (1 inch ) deep. 100 yards (1 inch ) is destroyed
the instant any artillery fire lands on it. This actually hap-pened in the battle, revealing concealed Germans behindthe woods/brush!
2. The ford (see sketch map) is the only way for Germanunits to cross the river. Treat the ford as Rough Terrain 3.
3. Optional rules to be used:12.2.1 The Hot Shot!12.2.3 The Communications Breakdown
INITIAL DEPLOYMENTSThe American player may set up his units anywheresouth of the river. The artillery battalions should beplaced from 8 to 12 inches south of the river. The unitsof each artillery battalion should be placed adjacent toeach other.
The German player enters the map with his forces ongame turn 1 on the north edge of the map.
VICTORY CONDITIONSThe German player must exit 50% or more of his standsoff the southern edge of the map by the end of turn 15.Any other result is an American victory.
108
Burfield (order #5184631)
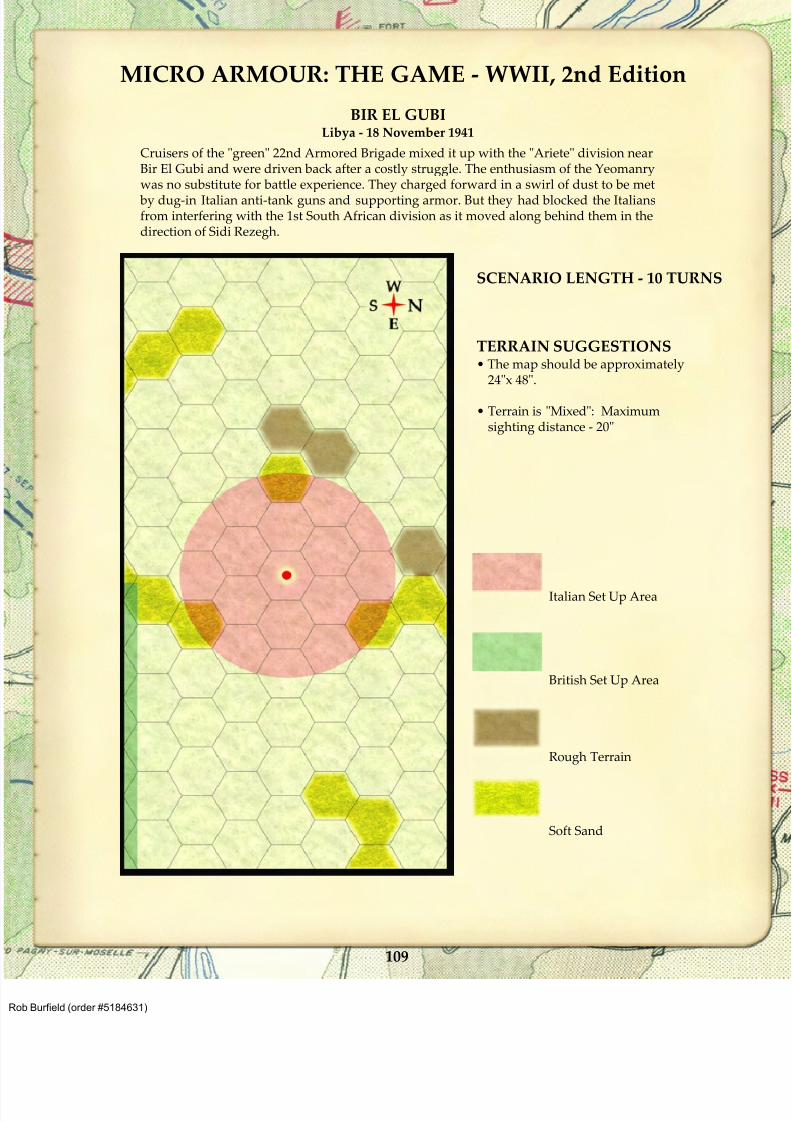
8/13/2019 Micro Armour the Game-WWII 2nd Edition (Full Color)
http://slidepdf.com/reader/full/micro-armour-the-game-wwii-2nd-edition-full-color 114/136
109
MICRO ARMOUR: THE GAME - WWII, 2nd Edition
Cruisers of the "green" 22nd Armored Brigade mixed it up with the "Ariete" division nearBir El Gubi and were driven back after a costly struggle. The enthusiasm of the Yeomanrywas no substitute for battle experience. They charged forward in a swirl of dust to be met
by dug-in Italian anti-tank guns and supporting armor. But they had blocked the Italiansfrom interfering with the 1st South African division as it moved along behind them in thedirection of Sidi Rezegh.
SCENARIO LENGTH - 10 TURNS
TERRAIN SUGGESTIONS• The map should be approximately
24"x 48".
• Terrain is "Mixed": Maximumsighting distance - 20"
BIR EL GUBILibya - 18 November 1941
Italian Set Up Area
British Set Up Area
Rough Terrain
Soft Sand
Burfield (order #5184631)
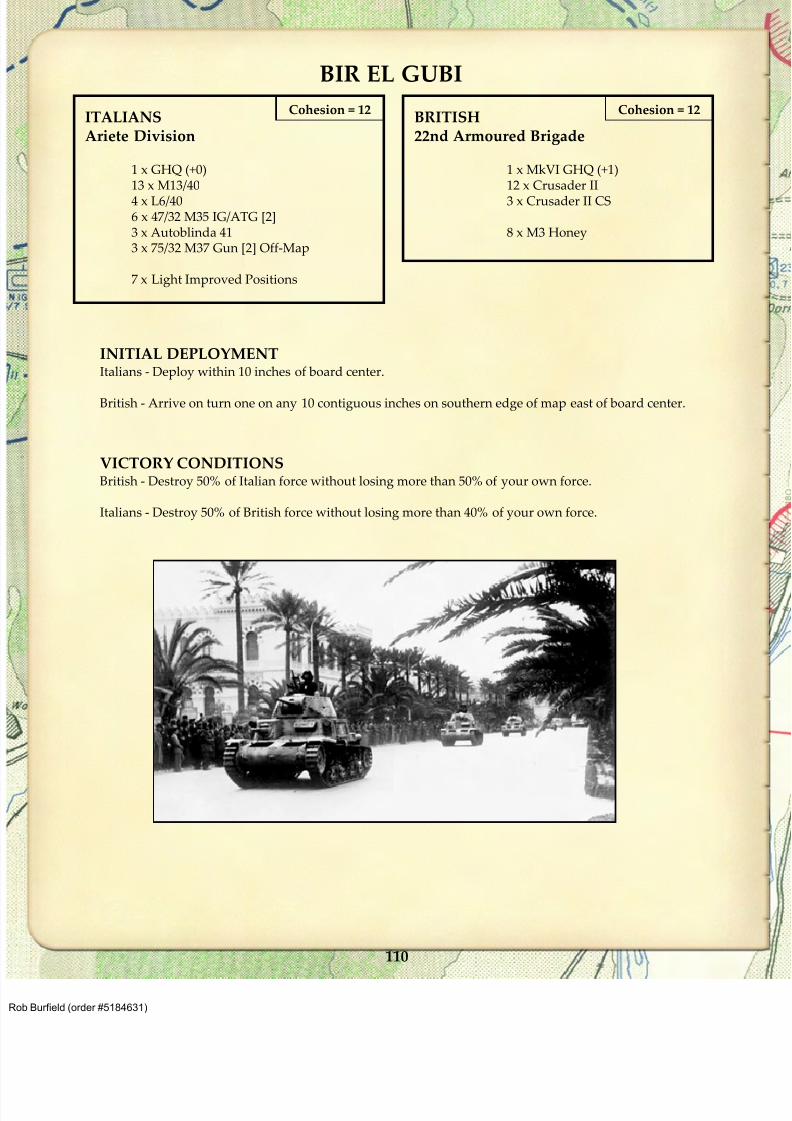
8/13/2019 Micro Armour the Game-WWII 2nd Edition (Full Color)
http://slidepdf.com/reader/full/micro-armour-the-game-wwii-2nd-edition-full-color 115/136
110
BIR EL GUBI
ITALIANSAriete Division
1 x GHQ (+0)13 x M13/404 x L6/406 x 47/32 M35 IG/ATG [2]3 x Autoblinda 413 x 75/32 M37 Gun [2] Off-Map
7 x Light Improved Positions
Cohesion = 12BRITISH22nd Armoured Brigade
1 x MkVI GHQ (+1)12 x Crusader II3 x Crusader II CS
8 x M3 Honey
Cohesion = 12
VICTORY CONDITIONSBritish - Destroy 50% of Italian force without losing more than 50% of your own force.
Italians - Destroy 50% of British force without losing more than 40% of your own force.
INITIAL DEPLOYMENTItalians - Deploy within 10 inches of board center.
British - Arrive on turn one on any 10 contiguous inches on southern edge of map east of board center.
Burfield (order #5184631)
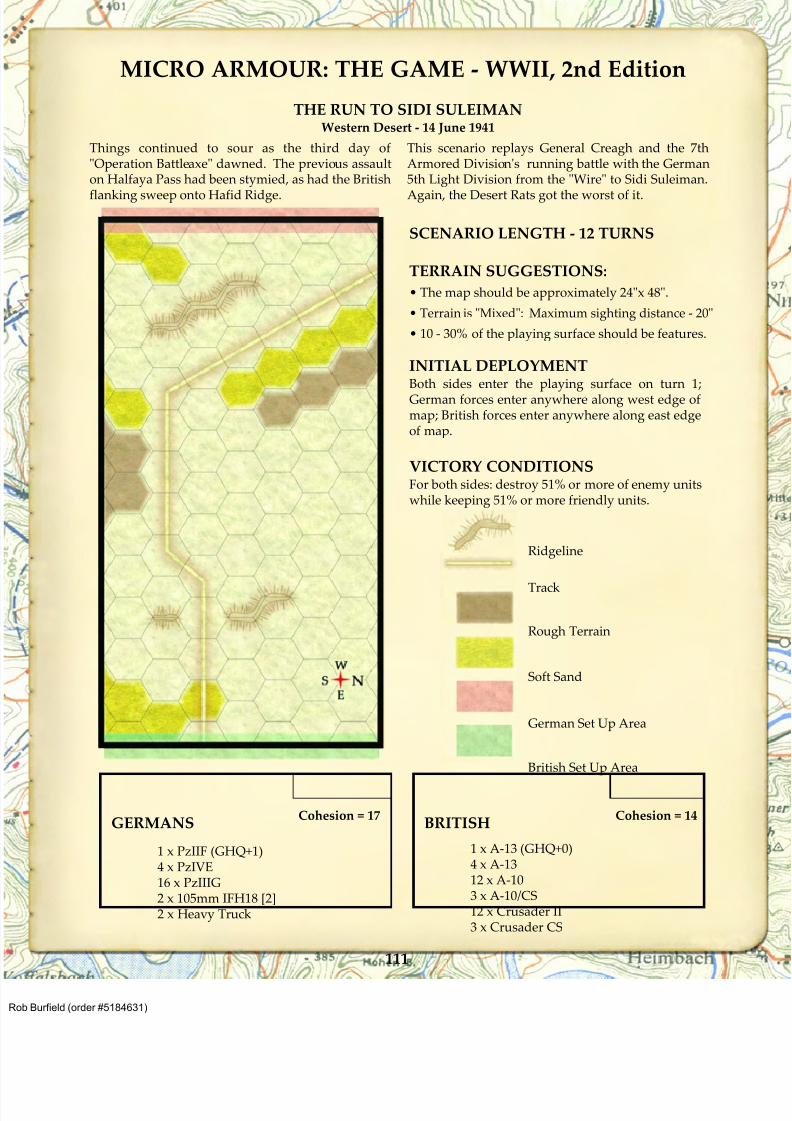
8/13/2019 Micro Armour the Game-WWII 2nd Edition (Full Color)
http://slidepdf.com/reader/full/micro-armour-the-game-wwii-2nd-edition-full-color 116/136
GERMANS
1 x PzIIF (GHQ+1)4 x PzIVE16 x PzIIIG2 x 105mm IFH18 [2]2 x Heavy Truck
Cohesion = 17BRITISH
1 x A-13 (GHQ+0)4 x A-1312 x A-103 x A-10/CS12 x Crusader II3 x Crusader CS
Cohesion = 14
MICRO ARMOUR: THE GAME - WWII, 2nd Edition
Things continued to sour as the third day of"Operation Battleaxe" dawned. The previous assaulton Halfaya Pass had been stymied, as had the British
flanking sweep onto Hafid Ridge.
This scenario replays General Creagh and the 7thArmored Division's running battle with the German5th Light Division from the "Wire" to Sidi Suleiman.
Again, the Desert Rats got the worst of it.
SCENARIO LENGTH - 12 TURNS
INITIAL DEPLOYMENTBoth sides enter the playing surface on turn 1;German forces enter anywhere along west edge ofmap; British forces enter anywhere along east edgeof map.
VICTORY CONDITIONSFor both sides: destroy 51% or more of enemy unitswhile keeping 51% or more friendly units.
TERRAIN SUGGESTIONS:
• The map should be approximately 24"x 48".
• Terrain is "Mixed": Maximum sighting distance - 20"
• 10 - 30% of the playing surface should be features.
THE RUN TO SIDI SULEIMANWestern Desert - 14 June 1941
Ridgeline
Track
Rough Terrain
Soft Sand
British Set Up Area
German Set Up Area
111
Burfield (order #5184631)
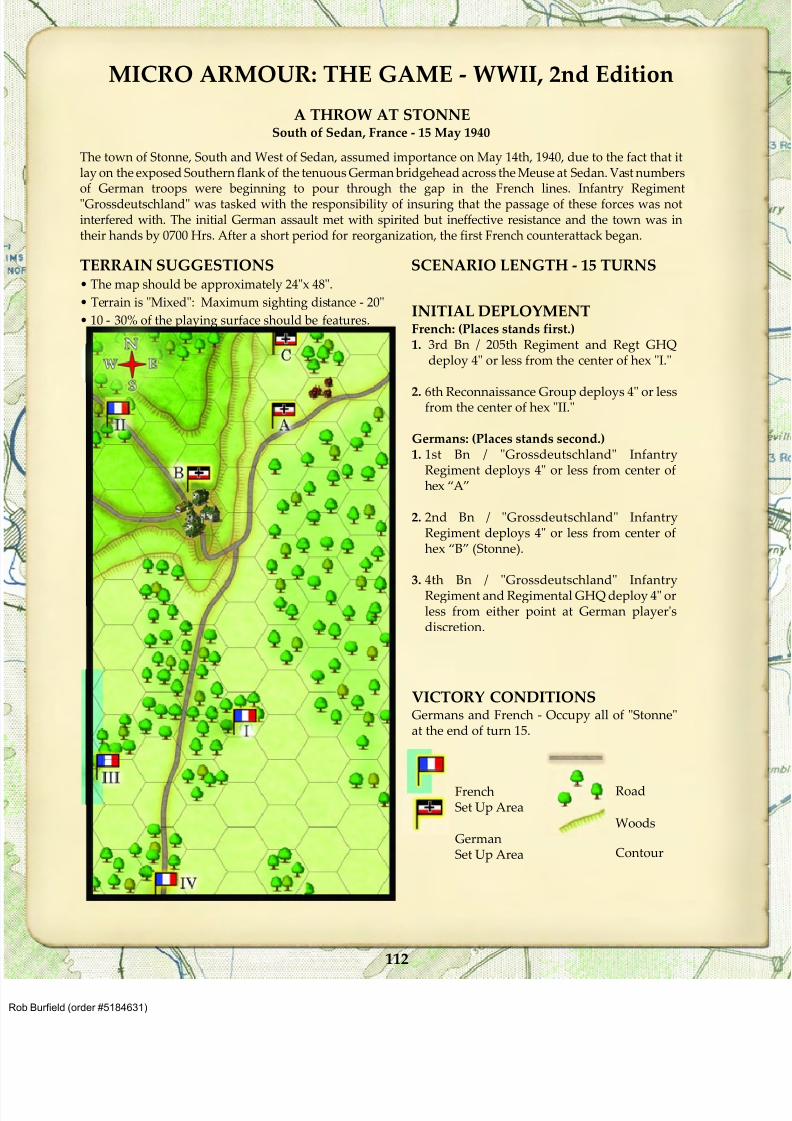
8/13/2019 Micro Armour the Game-WWII 2nd Edition (Full Color)
http://slidepdf.com/reader/full/micro-armour-the-game-wwii-2nd-edition-full-color 117/136
112
MICRO ARMOUR: THE GAME - WWII, 2nd Edition
The town of Stonne, South and West of Sedan, assumed importance on May 14th, 1940, due to the fact that itlay on the exposed Southern flank of the tenuous German bridgehead across the Meuse at Sedan. Vast numbersof German troops were beginning to pour through the gap in the French lines. Infantry Regiment"Grossdeutschland" was tasked with the responsibility of insuring that the passage of these forces was notinterfered with. The initial German assault met with spirited but ineffective resistance and the town was intheir hands by 0700 Hrs. After a short period for reorganization, the first French counterattack began.
SCENARIO LENGTH - 15 TURNS
INITIAL DEPLOYMENTFrench: (Places stands first.)1. 3rd Bn / 205th Regiment and Regt GHQ
deploy 4" or less from the center of hex "I."
2. 6th Reconnaissance Group deploys 4" or lessfrom the center of hex "II."
Germans: (Places stands second.)1. 1st Bn / "Grossdeutschland" Infantry
Regiment deploys 4" or less from center ofhex “A”
2. 2nd Bn / "Grossdeutschland" InfantryRegiment deploys 4" or less from center ofhex “B” (Stonne).
3. 4th Bn / "Grossdeutschland" InfantryRegiment and Regimental GHQ deploy 4" orless from either point at German player'sdiscretion.
TERRAIN SUGGESTIONS• The map should be approximately 24"x 48".
• Terrain is "Mixed": Maximum sighting distance - 20"
• 10 - 30% of the playing surface should be features.
VICTORY CONDITIONSGermans and French - Occupy all of "Stonne"at the end of turn 15.
A THROW AT STONNESouth of Sedan, France - 15 May 1940
FrenchSet Up Area
GermanSet Up Area
Road
Woods
Contour
Burfield (order #5184631)
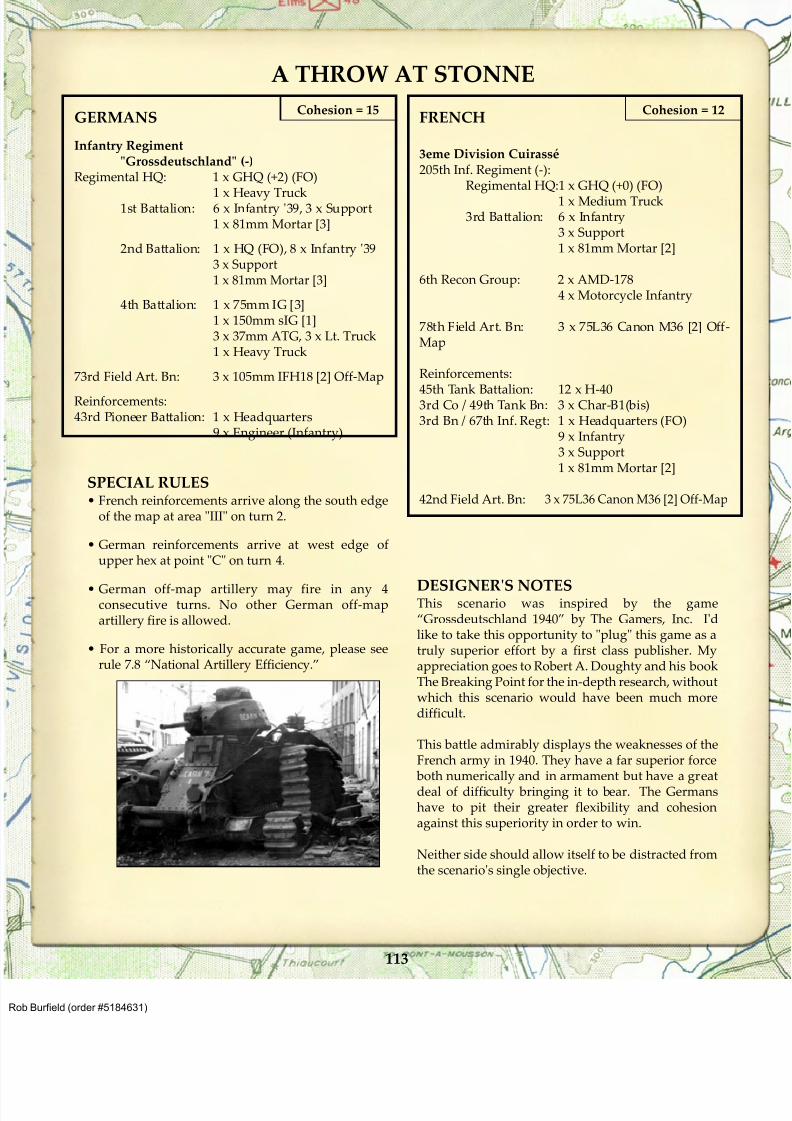
8/13/2019 Micro Armour the Game-WWII 2nd Edition (Full Color)
http://slidepdf.com/reader/full/micro-armour-the-game-wwii-2nd-edition-full-color 118/136
113
A THROW AT STONNE
GERMANS
Infantry Regiment"Grossdeutschland" (-)
Regimental HQ: 1 x GHQ (+2) (FO)
1 x Heavy Truck1st Battalion: 6 x Infantry '39, 3 x Support
1 x 81mm Mortar [3]
2nd Battalion: 1 x HQ (FO), 8 x Infantry '393 x Support1 x 81mm Mortar [3]
4th Battalion: 1 x 75mm IG [3]1 x 150mm sIG [1]3 x 37mm ATG, 3 x Lt. Truck1 x Heavy Truck
73rd Field Art. Bn: 3 x 105mm IFH18 [2] Off-Map
Reinforcements:43rd Pioneer Battalion: 1 x Headquarters
9 x Engineer (Infantry)
Cohesion = 15FRENCH
3eme Division Cuirassé205th Inf. Regiment (-):
Regimental HQ:1 x GHQ (+0) (FO)1 x Medium Truck
3rd Battalion: 6 x Infantry3 x Support1 x 81mm Mortar [2]
6th Recon Group: 2 x AMD-1784 x Motorcycle Infantry
78th Field Art. Bn: 3 x 75L36 Canon M36 [2] Off-Map
Reinforcements:
45th Tank Battalion: 12 x H-403rd Co / 49th Tank Bn: 3 x Char-B1(bis)3rd Bn / 67th Inf. Regt: 1 x Headquarters (FO)
9 x Infantry3 x Support1 x 81mm Mortar [2]
42nd Field Art. Bn: 3 x 75L36 Canon M36 [2] Off-Map
Cohesion = 12
SPECIAL RULES• French reinforcements arrive along the south edge
of the map at area "III" on turn 2.
• German reinforcements arrive at west edge ofupper hex at point "C" on turn 4.
• German off-map artillery may fire in any 4consecutive turns. No other German off-mapartillery fire is allowed.
• For a more historically accurate game, please seerule 7.8 “National Artillery Efficiency.”
DESIGNER'S NOTESThis scenario was inspired by the game“Grossdeutschland 1940” by The Gamers, Inc. I'dlike to take this opportunity to "plug" this game as atruly superior effort by a first class publisher. Myappreciation goes to Robert A. Doughty and his bookThe Breaking Point for the in-depth research, withoutwhich this scenario would have been much moredifficult.
This battle admirably displays the weaknesses of theFrench army in 1940. They have a far superior force
both numerically and in armament but have a greatdeal of difficulty bringing it to bear. The Germanshave to pit their greater flexibility and cohesionagainst this superiority in order to win.
Neither side should allow itself to be distracted fromthe scenario's single objective.
Burfield (order #5184631)
8/13/2019 Micro Armour the Game-WWII 2nd Edition (Full Color)
http://slidepdf.com/reader/full/micro-armour-the-game-wwii-2nd-edition-full-color 119/136
114
MICRO ARMOUR: THE GAME - WWII, 2nd Edition
"Stark Resistance" depicts the second assault onFebruary 19th, 1943 by the DAK Assault Group against"Stark Force", an ad hoc regimental-sized task force
defending the pass. Led by Colonel Robert Stark, StarkForce consisted of a battalion of the 26th InfantryRegiment (Colonel Stark's original command) and a bat-talion of the 19th Combat Engineer Regiment (rear eche-lon troops devoid of heavy weapons). Supporting unitsincluded the 805th Tank Destroyer Battalion, the 33rdField Artillery Battalion, and one battery of 75mm gunsfrom the French 67th African Artillery.
The DAK Assault Group, temporarily commanded byGeneral Karl Buelowius, consisted of two separateKampfgruppes and elements of the 33rd ReconBattalion. Kampfgruppe Menton consisted of two battal-
ions of panzer grenadiers and two batteries of the muchfeared 88mm anti-tank gun. Kampfgruppe Stotten con-sisted of the 1st Battalion of the 8th Panzer Regiment.
The DAK Assault Group could also call on one battalionof 105mm howitzers and 1 battalion of Corps artillery.
Colonel Stark deployed the majority of his forces alongthe lower slopes of the pass with most of his infantry andsome of the tank destroyers occupying hastily builtimproved positions. Unaware of the American disposi-tions, General Buelowius sent his forces barreling downthe pass on both sides of the Hatab River, which effec-tively divided the pass in two. Intense American smallarms, anti-tank, and artillery fire pinned down theGerman forces before they could close with theAmericans. Stark Force repulsed this initial assault.
The American position in the pass was turned later thatnight by German units infiltrating the heights on either
side of the American flanks. However, Stark Force haddelayed the DAK Assault Group advance by a day and,in doing so, bought the Allies critical time to organize adefense further to the north and west of Kasserine Pass.
INITIAL DEPLOYMENTA. Before play begins, both players may plot indirect fire for
Game Turns 1 and 2 before any stands are placed on the table.
B. The US player deploys all of his forces first. All US stands belonging to the 1st /26th Infantry and 19th EngineerRegiment, and all minefields are placed west of and within 8
inches of their designated start lines (see sketch map).
C. All other US stands are placed per above.
D. All US minefields are placed west of and within 8 inches ofeither US designated start lines (see sketch map). Each roadmay have no more than 2 minefields placed along it.
E. The German player deploys his forces last. All German stands belonging to the 1st Battalion/ Afrika Regiment, 2nd Battalion/Afrika Regiment placed east of and within 12 inches of theirdesignated start lines (see sketch map).
F. All other German. stands are placed per above.
G. Maximum sighting distance is 30 inches.
H. Optional US Hidden Placement: All US minefields andstands occupying improved positions may be initiallyhidden. If the US player elects to use hidden placement, he isadvised to record these positions on a fine grid paper, so thateach grid represents 1 inch of terrain. The US player places aminefield on the board once a German stand enters it. The USplayer places a hidden stand on the board once it fires orwhenever a German stand moves adjacent.
STARK RESISTANCEKasserine Pass - February 19, 1943
SCENARIO LENGTH - 20 TURNS
VICTORY CONDITIONSThere were 2 roads leading northwest fromKasserine Pass. One road led northwest from
the pass towards the Tunisian town of Thala.The other road led northwest from the passtowards Tebessa, an important logistical centerdeep in the American rear. The DAK AssaultGroup was ordered to blow a hole through theAmerican positions in the pass so thatsucceeding forces could exploit the breakthrough and head towards Thala,Tebessa, or both.
German Victory: Exit at least twelve (12) ormore stands off either the north or west edge ofthe map by the end of turn 20. Suppressed
and/or Disorganized stands may be used tofulfill this requirement. Empty transportstands do not count towards this requirement.
U.S. Victory: Eliminate 12 or more Germanstands before the German player achieves hisvictory conditions.
Burfield (order #5184631)
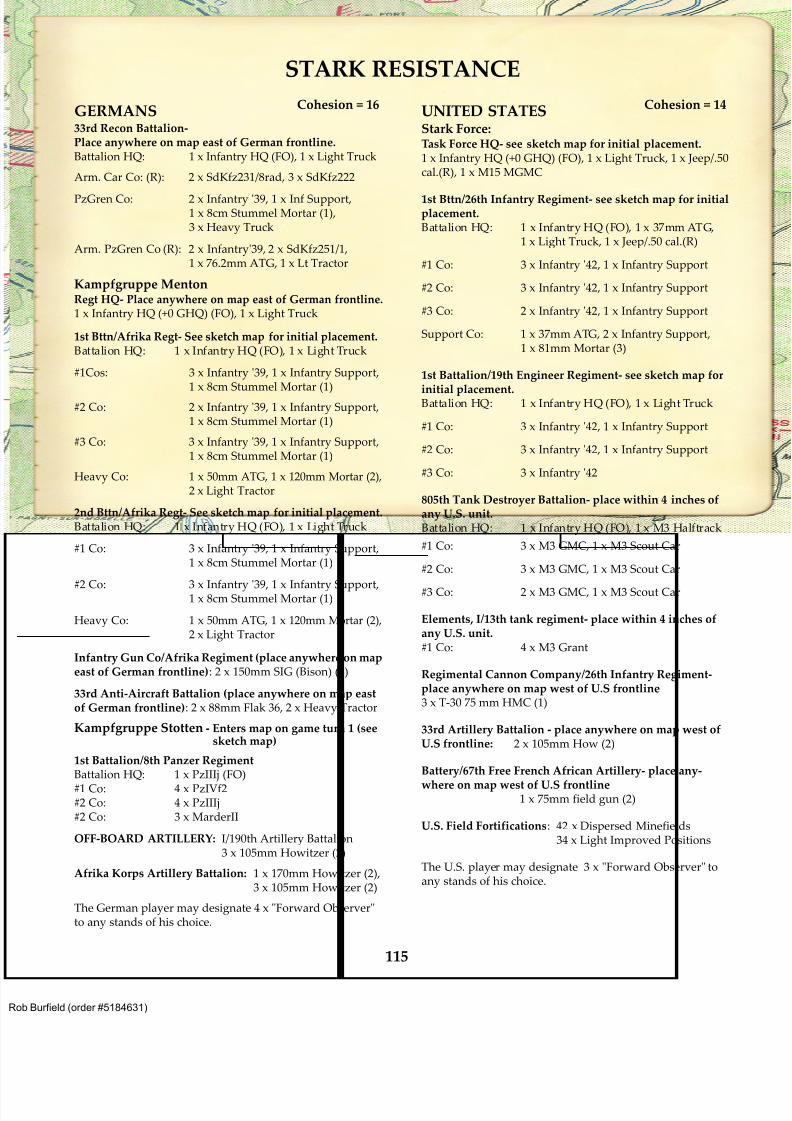
8/13/2019 Micro Armour the Game-WWII 2nd Edition (Full Color)
http://slidepdf.com/reader/full/micro-armour-the-game-wwii-2nd-edition-full-color 120/136
STARK RESISTANCE
GERMANS33rd Recon Battalion-Place anywhere on map east of German frontline.Battalion HQ: 1 x Infantry HQ (FO), 1 x Light Truck
Arm. Car Co: (R): 2 x SdKfz231/8rad, 3 x SdKfz222
PzGren Co: 2 x Infantry '39, 1 x Inf Support,1 x 8cm Stummel Mortar (1),3 x Heavy Truck
Arm. PzGren Co (R): 2 x Infantry'39, 2 x SdKfz251/1,1 x 76.2mm ATG, 1 x Lt Tractor
Kampfgruppe MentonRegt HQ- Place anywhere on map east of German frontline.1 x Infantry HQ (+0 GHQ) (FO), 1 x Light Truck
1st Bttn/Afrika Regt- See sketch map for initial placement.Battalion HQ: 1 x Infantry HQ (FO), 1 x Light Truck
#1Cos: 3 x Infantry '39, 1 x Infantry Support,
1 x 8cm Stummel Mortar (1)#2 Co: 2 x Infantry '39, 1 x Infantry Support,
1 x 8cm Stummel Mortar (1)
#3 Co: 3 x Infantry '39, 1 x Infantry Support,1 x 8cm Stummel Mortar (1)
Heavy Co: 1 x 50mm ATG, 1 x 120mm Mortar (2),2 x Light Tractor
2nd Bttn/Afrika Regt- See sketch map for initial placement.Battalion HQ: 1 x Infantry HQ (FO), 1 x Light Truck
#1 Co: 3 x Infantry '39, 1 x Infantry Support,1 x 8cm Stummel Mortar (1)
#2 Co: 3 x Infantry '39, 1 x Infantry Support,1 x 8cm Stummel Mortar (1)
Heavy Co: 1 x 50mm ATG, 1 x 120mm Mortar (2),2 x Light Tractor
Infantry Gun Co/Afrika Regiment (place anywhere on mapeast of German frontline): 2 x 150mm SIG (Bison) (1)
33rd Anti-Aircraft Battalion (place anywhere on map eastof German frontline): 2 x 88mm Flak 36, 2 x Heavy Tractor
Kampfgruppe Stotten - Enters map on game turn 1 (seesketch map)
1st Battalion/8th Panzer RegimentBattalion HQ: 1 x PzIIIj (FO)
#1 Co: 4 x PzIVf2#2 Co: 4 x PzIIIj#2 Co: 3 x MarderII
OFF-BOARD ARTILLERY: I/190th Artillery Battalion3 x 105mm Howitzer (2)
Afrika Korps Artillery Battalion: 1 x 170mm Howitzer (2),3 x 105mm Howitzer (2)
The German player may designate 4 x "Forward Observer"to any stands of his choice.
Cohesion = 16 UNITED STATESStark Force:Task Force HQ- see sketch map for initial placement.1 x Infantry HQ (+0 GHQ) (FO), 1 x Light Truck, 1 x Jeep/.50cal.(R), 1 x M15 MGMC
1st Bttn/26th Infantry Regiment- see sketch map for initialplacement.Battalion HQ: 1 x Infantry HQ (FO), 1 x 37mm ATG,
1 x Light Truck, 1 x Jeep/.50 cal.(R)
#1 Co: 3 x Infantry '42, 1 x Infantry Support
#2 Co: 3 x Infantry '42, 1 x Infantry Support
#3 Co: 2 x Infantry '42, 1 x Infantry Support
Support Co: 1 x 37mm ATG, 2 x Infantry Support,1 x 81mm Mortar (3)
1st Battalion/19th Engineer Regiment- see sketch map for
initial placement.Battalion HQ: 1 x Infantry HQ (FO), 1 x Light Truck
#1 Co: 3 x Infantry '42, 1 x Infantry Support
#2 Co: 3 x Infantry '42, 1 x Infantry Support
#3 Co: 3 x Infantry '42
805th Tank Destroyer Battalion- place within 4 inches ofany U.S. unit.Battalion HQ: 1 x Infantry HQ (FO), 1 x M3 Halftrack
#1 Co: 3 x M3 GMC, 1 x M3 Scout Car
#2 Co: 3 x M3 GMC, 1 x M3 Scout Car
#3 Co: 2 x M3 GMC, 1 x M3 Scout Car
Elements, I/13th tank regiment- place within 4 inches ofany U.S. unit.#1 Co: 4 x M3 Grant
Regimental Cannon Company/26th Infantry Regiment-place anywhere on map west of U.S frontline3 x T-30 75 mm HMC (1)
33rd Artillery Battalion - place anywhere on map west ofU.S frontline: 2 x 105mm How (2)
Battery/67th Free French African Artillery- place any-
where on map west of U.S frontline1 x 75mm field gun (2)
U.S. Field Fortifications: 42 x Dispersed Minefields34 x Light Improved Positions
The U.S. player may designate 3 x "Forward Observer" toany stands of his choice.
Cohesion = 14
115
Burfield (order #5184631)
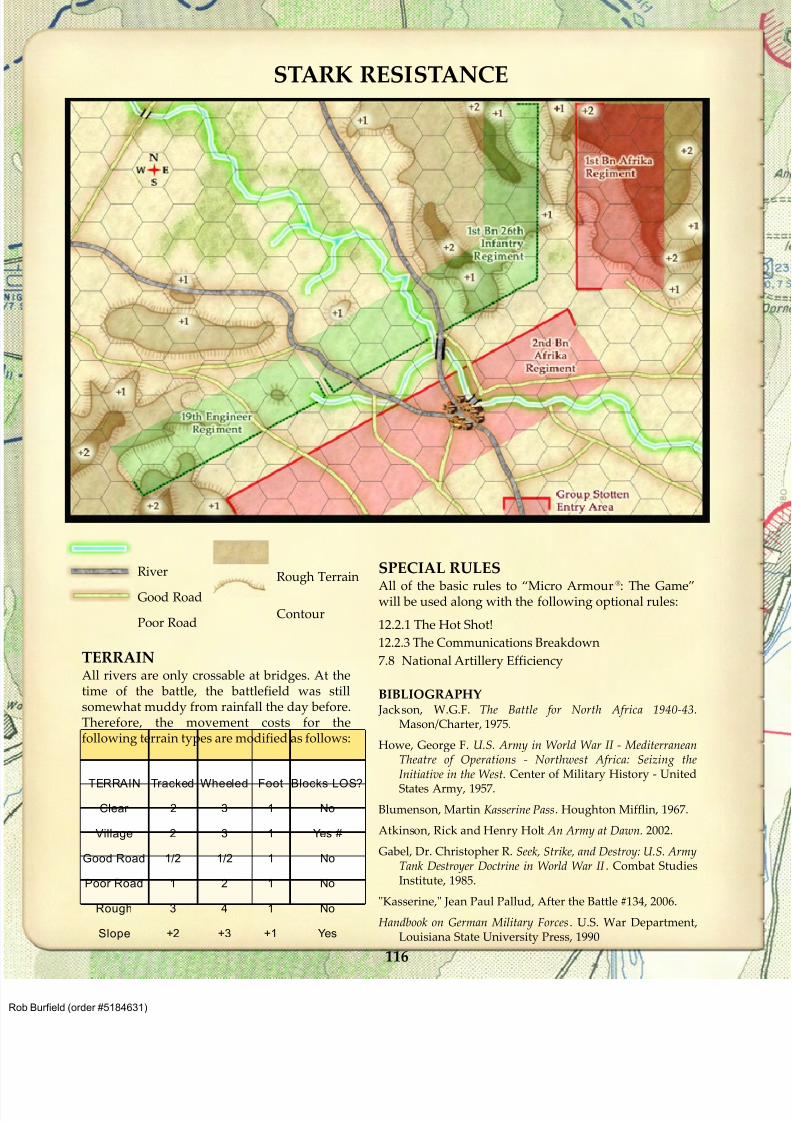
8/13/2019 Micro Armour the Game-WWII 2nd Edition (Full Color)
http://slidepdf.com/reader/full/micro-armour-the-game-wwii-2nd-edition-full-color 121/136
116
STARK RESISTANCE
River
Good Road
Poor Road
Rough Terrain
Contour
TERRAIN
All rivers are only crossable at bridges. At thetime of the battle, the battlefield was stillsomewhat muddy from rainfall the day before.Therefore, the movement costs for thefollowing terrain types are modified as follows:
TERRAIN Tracked Wheeled Foot Blocks LOS?
Clear 2 3 1 No
Village 2 3 1 Yes #
Good Road 1/2 1/2 1 No
Poor Road 1 2 1 No
Rough 3 4 1 No
Slope +2 +3 +1 Yes
SPECIAL RULES
All of the basic rules to “Micro Armour®
: The Game”will be used along with the following optional rules:
12.2.1 The Hot Shot!
12.2.3 The Communications Breakdown
7.8 National Artillery Efficiency
BIBLIOGRAPHY
Jackson, W.G.F. The Battle for North Africa 1940-43.Mason/Charter, 1975.
Howe, George F. U.S. Army in World War II - MediterraneanTheatre of Operations - Northwest Africa: Seizing theInitiative in the West. Center of Military History - United
States Army, 1957.
Blumenson, Martin Kasserine Pass. Houghton Mifflin, 1967.
Atkinson, Rick and Henry Holt An Army at Dawn. 2002.
Gabel, Dr. Christopher R. Seek, Strike, and Destroy: U.S. ArmyTank Destroyer Doctrine in World War II . Combat StudiesInstitute, 1985.
"Kasserine," Jean Paul Pallud, After the Battle #134, 2006.
Handbook on German Military Forces. U.S. War Department,Louisiana State University Press, 1990
Burfield (order #5184631)
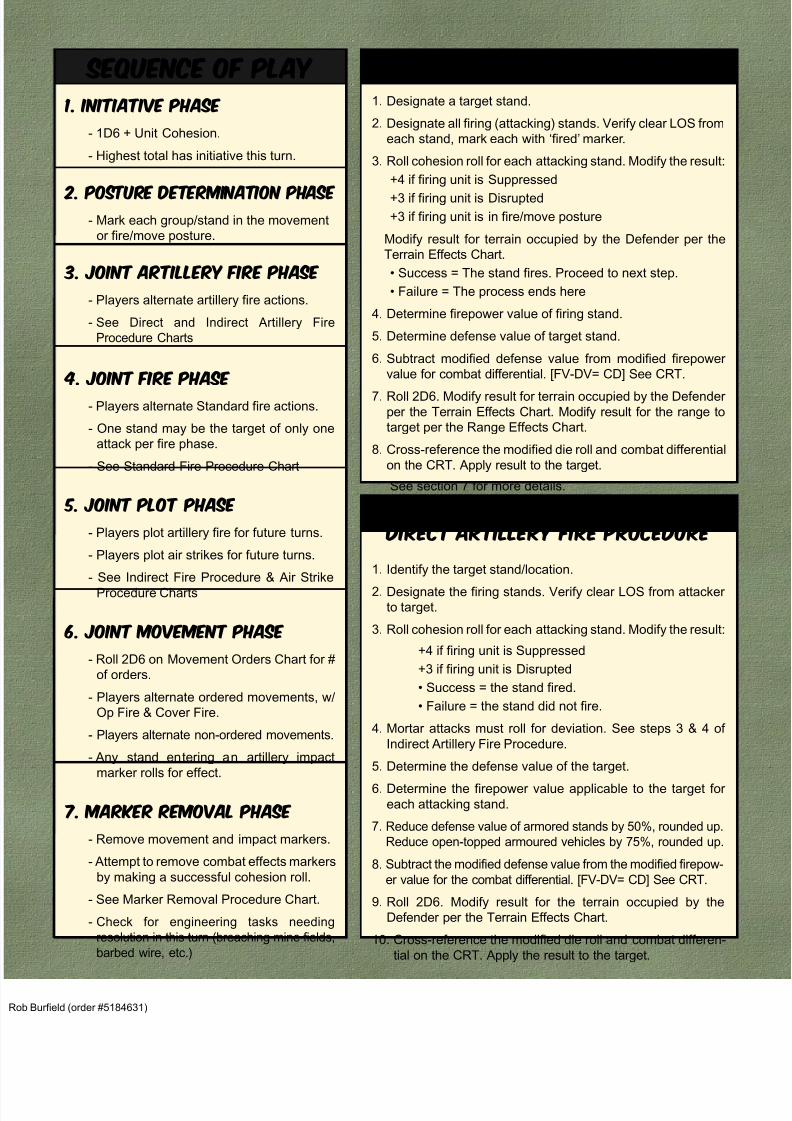
8/13/2019 Micro Armour the Game-WWII 2nd Edition (Full Color)
http://slidepdf.com/reader/full/micro-armour-the-game-wwii-2nd-edition-full-color 122/136
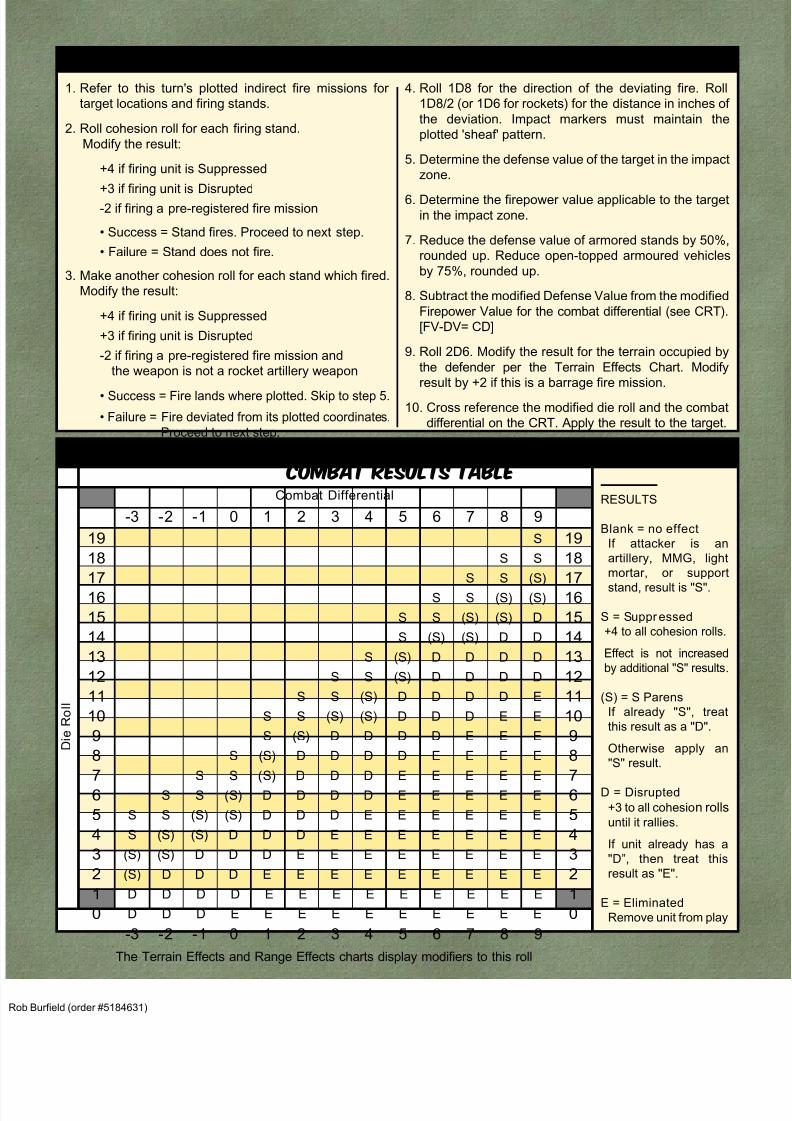
8/13/2019 Micro Armour the Game-WWII 2nd Edition (Full Color)
http://slidepdf.com/reader/full/micro-armour-the-game-wwii-2nd-edition-full-color 123/136
1. Refer to this turn's plotted indirect fire missions for
target locations and firing stands.
2. Roll cohesion roll for each firing stand.
Modify the result:
+4 if firing unit is Suppressed
+3 if firing unit is Disrupted
-2 if firing a pre-registered fire mission
• Success = Stand fires. Proceed to next step.
• Failure = Stand does not fire.
3. Make another cohesion roll for each stand which fired.
Modify the result:
+4 if firing unit is Suppressed
+3 if firing unit is Disrupted
-2 if firing a pre-registered fire mission and
the weapon is not a rocket artillery weapon
• Success = Fire lands where plotted. Skip to step 5.
• Failure = Fire deviated from its plotted coordinates.
Proceed to next step.
4. Roll 1D8 for the direction of the deviating fire. Roll
1D8/2 (or 1D6 for rockets) for the distance in inches of
the deviation. Impact markers must maintain the
plotted 'sheaf' pattern.
5. Determine the defense value of the target in the impact
zone.
6. Determine the firepower value applicable to the targetin the impact zone.
7. Reduce the defense value of armored stands by 50%,
rounded up. Reduce open-topped armoured vehicles
by 75%, rounded up.
8. Subtract the modified Defense Value from the modified
Firepower Value for the combat differential (see CRT).
[FV-DV= CD]
9. Roll 2D6. Modify the result for the terrain occupied by
the defender per the Terrain Effects Chart. Modify
result by +2 if this is a barrage fire mission.
10. Cross reference the modified die roll and the combat
differential on the CRT. Apply the result to the target.
indirect artillery fire procedure
Combat Differential RESULTS
Blank = no effect
If attacker is an
artillery, MMG, light
mortar, or support
stand, result is "S".
S = Suppressed
+4 to all cohesion rolls.
Effect is not increased
by additional "S" results.
(S) = S Parens
If already "S", treat
this result as a "D".
Otherwise apply an
"S" result.
D = Disrupted
+3 to all cohesion rollsuntil it rallies.
If unit already has a
"D”, then treat this
result as "E".
E = Eliminated
Remove unit from play
D i e R o l l
-3 -2 -1 0 1 2 3 4 5 6 7 8 9
19 S 19
18 S S 18
17 S S (S) 17
16 S S (S) (S) 16
15 S S (S) (S) D 15
14 S (S) (S) D D 14
13 S (S) D D D D 13
12 S S (S) D D D D 12
11 S S (S) D D D D E 11
10 S S (S) (S) D D D E E 10
9 S (S) D D D D E E E 9
8 S (S) D D D D E E E E 8
7 S S (S) D D D E E E E E 7
6 S S (S) D D D D E E E E E 6
5 S S (S) (S) D D D E E E E E E 5
4 S (S) (S) D D D E E E E E E E 4
3 (S) (S) D D D E E E E E E E E 3
2 (S) D D D E E E E E E E E E 2
1 D D D D E E E E E E E E E 1
0 D D D E E E E E E E E E E 0
-3 -2 -1 0 1 2 3 4 5 6 7 8 9
The Terrain Effects and Range Effects charts display modifiers to this roll
Combat results table
Burfield (order #5184631)
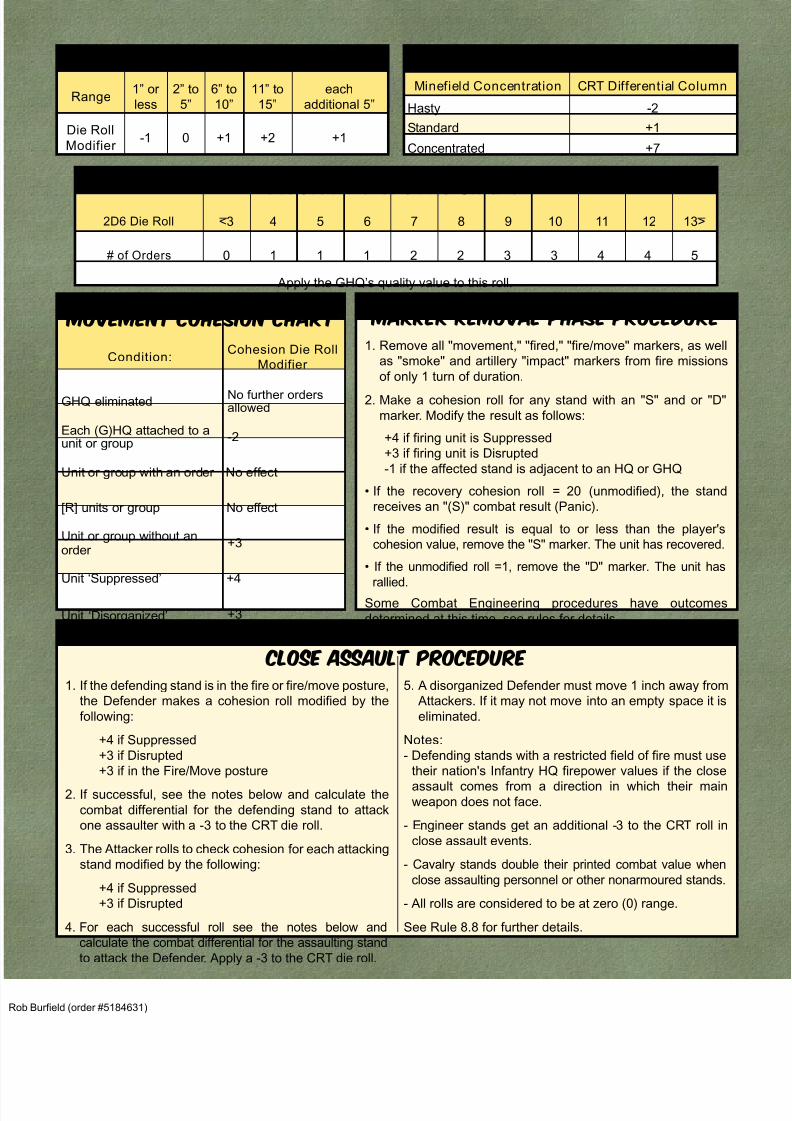
8/13/2019 Micro Armour the Game-WWII 2nd Edition (Full Color)
http://slidepdf.com/reader/full/micro-armour-the-game-wwii-2nd-edition-full-color 124/136
Range1” or
less
2” to
5”
6” to
10”
11” to
15”
each
additional 5”
Die Roll
Modifier -1 0 +1 +2 +1
2D6 Die Roll <3 4 5 6 7 8 9 10 11 12 13>
# of Orders 0 1 1 1 2 2 3 3 4 4 5
Apply the GHQ’s quality value to this roll.
Condition:Cohesion Die Roll
Modifier
GHQ eliminated No further ordersallowed
Each (G)HQ attached to aunit or group
-2
Unit or group with an order No effect
[R] units or group No effect
Unit or group without anorder
+3
Unit ‘Suppressed’ +4
Unit ‘Disorganized’ +3
1. Remove all "movement," "fired," "fire/move" markers, as well
as "smoke" and artillery "impact" markers from fire missions
of only 1 turn of duration.
2. Make a cohesion roll for any stand with an "S" and or "D"
marker. Modify the result as follows:
+4 if firing unit is Suppressed
+3 if firing unit is Disrupted
-1 if the affected stand is adjacent to an HQ or GHQ
• If the recovery cohesion roll = 20 (unmodified), the stand
receives an "(S)" combat result (Panic).
• If the modified result is equal to or less than the player's
cohesion value, remove the "S" marker. The unit has recovered.
• If the unmodified roll =1, remove the "D" marker. The unit has
rallied.
Some Combat Engineering procedures have outcomes
determined at this time, see rules for details.
movement cohesion chart
movement orders chart
Minefield Concentration CRT Differential Column
Hasty -2
Standard +1
Concentrated +7
Marker Removal Phase Procedure
Minefield chart Range Effects Chart
1. If the defending stand is in the fire or fire/move posture,
the Defender makes a cohesion roll modified by the
following:
+4 if Suppressed
+3 if Disrupted
+3 if in the Fire/Move posture
2. If successful, see the notes below and calculate the
combat differential for the defending stand to attack
one assaulter with a -3 to the CRT die roll.
3. The Attacker rolls to check cohesion for each attacking
stand modified by the following:
+4 if Suppressed
+3 if Disrupted
4. For each successful roll see the notes below and
calculate the combat differential for the assaulting stand
to attack the Defender. Apply a -3 to the CRT die roll.
5. A disorganized Defender must move 1 inch away from
Attackers. If it may not move into an empty space it is
eliminated.
Notes:
- Defending stands with a restricted field of fire must use
their nation's Infantry HQ firepower values if the close
assault comes from a direction in which their mainweapon does not face.
- Engineer stands get an additional -3 to the CRT roll in
close assault events.
- Cavalry stands double their printed combat value when
close assaulting personnel or other nonarmoured stands.
- All rolls are considered to be at zero (0) range.
See Rule 8.8 for further details.
close assault procedure
Burfield (order #5184631)
8/13/2019 Micro Armour the Game-WWII 2nd Edition (Full Color)
http://slidepdf.com/reader/full/micro-armour-the-game-wwii-2nd-edition-full-color 125/136
1. Perform all movement connected with this overrun.
Vehicles may not overrun stands in terrain as follows:
2. The Defender makes one cohesion roll per overrunning
stand with the following modifiers:
+4 if Defender is Suppressed
+3 if Defender is Disrupted.
+3 if Attacker is a tracked vehicle and Defender is a
personnel stand.
+4 if Attacker is a tracked vehicle and Defender is a
weapons stand.
+3 if Attacker is a wheeled vehicle and Defender is a
weapons stand.
All modifiers are cumulative.3. For each failed cohesion roll, the Attacker rolls 2D6.
The Defender applies the die result from the +5 combat
differential column of the CRT to his overrun stand.
4. The Attacker makes one cohesion roll for each overrun-
ning stand.
+4 if Attacker is Suppressed
+3 if Attacker is Disrupted
+3 if Defender is a personnel stand with an AP
firepower of 2 or higher.
All modifiers are cumulative.
5. For each failed cohesion roll the Defender rolls 2D6.
The Attacker applies the die result from the +2 combat
differential column of the CRT to the overrunning stand.
If the Defender is a personnel stand with an AP of 5 or
higher use the +3 combat differential column.
See rule 8.7 for further details
Defender is in:Vehicle may overrun if:
Wheeled Tracked
Jungle No No
Marsh No No
Soft Sand or Mud No No
Steep Slope No Yes
Depression or
Ridge Crest*No Yes
Bocage No Yes
Rough Terrain 2 No Yes
Medium Buildings No Yes
Heavy Buildings No Yes
Rubble No Yes
Med Improved Positions No Yes
Hvy Improved Positions No No
Anti-Tank Ditch No No
Minefield No No
Overrun Procedure
Cards: 1 poker deck per GHQ, minus the jokers.
# cards = face values, A=1, J=11, Q=12, K=13
Basic Rule:
• Whenever a stand is Eliminated from play ("E" result),
for any reason, draw one 1 card.
• If an HQ stand is Eliminated, draw 2 cards. For GHQ
stands, draw 3 cards.
• You are not required to show your cards to your oppo-
nents during play. You may show them to allied players.
• Whenever the sum of your cards exceeds the unit's
“determination value,” your force has reached a crisis of
command and is broken. At this point you must reveal
your cards to your opponents.
• If more than one GHQ is in use on one side, separate
“draw piles” are kept for each GHQ.
• More than one formation may reach its break point in
the same turn.
• All players must reveal their drawn cards at the end of the
game, regardless if anyone reached their break point or not.
Effects - On the next turn:
1. The cohesion value of all components of the broken
formation is reduced by 5 (-5) for all purposes except
movement for the rest of the game.
2. Stands of a broken formation may only fire if fired upon
that turn. They may fire at any enemy units within 5
inches after they have been fired upon.
3. Off-map artillery belonging to the broken formation
may complete any multi-turn fire missions. No further
indirect fire may be plotted for that formation.
4. Any unused air strikes assigned to that formation are
canceled.
5. The cohesion value of all components of a broken for-
mation is increased by 2 (+2) for movement purposes
for remainder of the game.
6. Units belonging to the broken formation must move towards
a friendly map edge, as agreed upon by the players. They
must use their full movement allowance if possible.
7. Units of the broken formation are assumed to be in the
movement posture, even if they fire during the fire
phase. Recall that they may only fire if fired upon (per
step 2 above) and may not move if they fire (per stan-
dard rules).
8. If, and when, all formations of one side have broken,
the opposing side must make a successful cohesion
roll at the beginning of each ensuing turn to keep fight-
ing. This die roll is modified by +2 for each additional
turn. If the opposing player fails this cohesion roll the
game is over as everyone has ceased fire.
force Determination summary
Burfield (order #5184631)
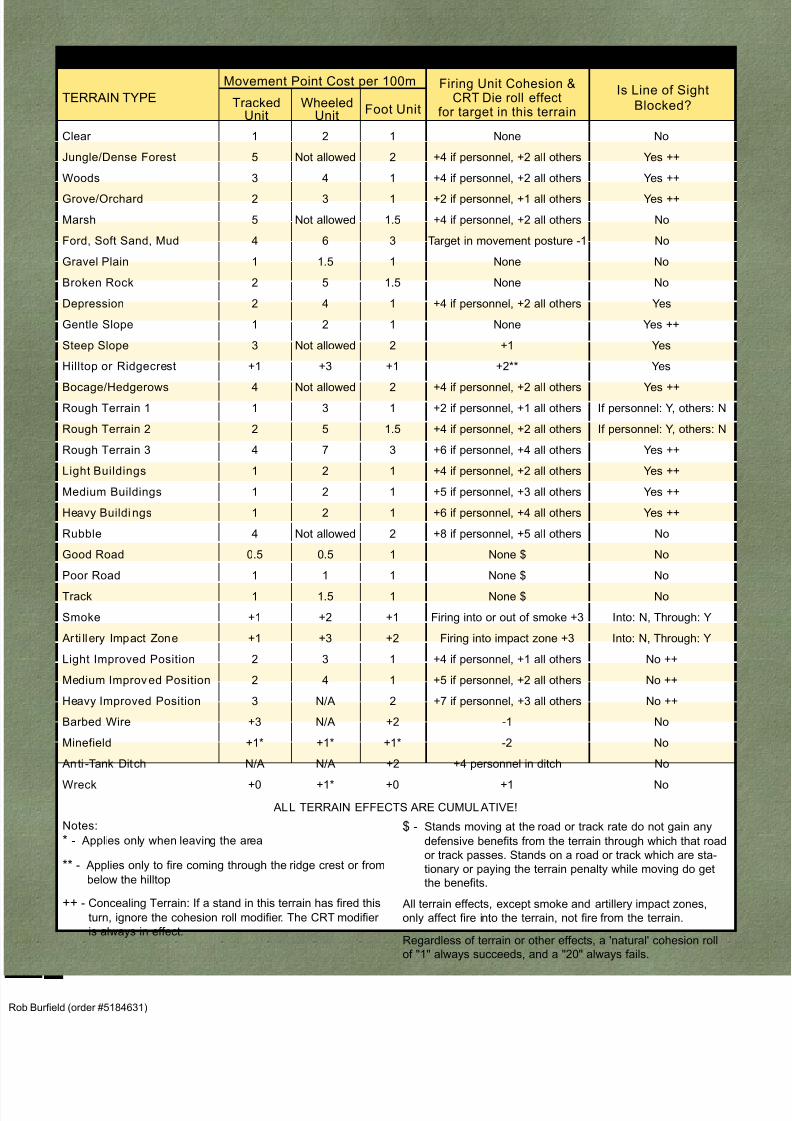
8/13/2019 Micro Armour the Game-WWII 2nd Edition (Full Color)
http://slidepdf.com/reader/full/micro-armour-the-game-wwii-2nd-edition-full-color 126/136

8/13/2019 Micro Armour the Game-WWII 2nd Edition (Full Color)
http://slidepdf.com/reader/full/micro-armour-the-game-wwii-2nd-edition-full-color 127/136
air strike Procedures
1. The Attacker places an impact marker on the target of the
strafing attack. Position the airplane model on the board
adjacent to the marker/target, facing the impact marker.
2. The Defender may then use any anti-aircraft (AA)
weapons to affect the attack as follows:
For each AA gun in the fire posture that has not fired
previously in the turn, and is within range of the impact
marker, make a cohesion roll. Each successful cohesion
roll by AA gun stands adds a modifier to the attacking
aircraft's cohesion rolls:
• AA stand of 40mm or less: +2 to air strike cohesion rolls
• AA stand larger than 40mm: +1 to air strike cohesion
rolls
These airstrike modifiers are cumulative for each
successful AA stand roll.
3. The Attacker then makes a cohesion die roll, modified by
any AA fire
• Failure: Remove marker and plane model, attack
doesn't occur.
• Success: Proceed
4. The Attacker then rolls a 2nd cohesion die roll, also
modified by the previous AA fire.
• Failure: The attack location deviates. Roll 1D8 to
determine direction (see compass rose) and 1D6/2 to
determine distance. If this location is empty, the strafing
run was ineffective, and no attack occurs. If this location
contains any stand, it is attacked. Proceed to step 5.
• Success: Proceed to step 5
5. Determine the defense value of the target in the impact
zone.
6. Determine the attack value applicable to the target in the
impact zone.
7. Reduce the defense value of armoured stands by 50%,
rounded up. Reduce open-topped armoured vehicles by
75%, rounded up.
8. Subtract the modified defense value from the modified
firepower value to determine the "combat differential" (see
CRT). [FV-DV= CD]
9. Roll 2D6. Modify the rolled total by the targets' terrain
10. Cross-reference the modified die roll and the combat
differential on the CRT. Apply the result to the target.
11. If the attack succeeded in step 4 and there is a stand
adjacent to the target, and the airplane model is facing
toward that adjacent stand, it too may be attacked now
beginning with step 3, but with an additional +3 modifier
and no roll for deviation. This second attack may beperformed only once and only if the first attack was a
success, and not a result of deviation.
1. Consult the Artillery Plotting Record Sheet for the location
of the bombing mission's intended location. Place the
bomb markers on the board at the recorded location.
Place the airplane model on the board adjacent to the
impact marker.
2. The Defender may then use any AA weapons to affect
the attack (see AA Procedure).
3. The Attacker then makes a cohesion die roll and modified
by AA fire.
• Failure: Remove marker and plane model. Attack
doesn't occur.
• Success: Proceed.
4. The Attacker then rolls a 2nd cohesion die roll, also
modified by the previous AA fire.
• Failure: The attack location deviates. Roll 1D8 to
determine direction (see compass rose) and 1D6 to
determine distance. If this location is empty the
bombing mission was ineffective. If this location
contains any stand, it is attacked. Proceed to step 5.
• Success: Proceed to step 5
5. Determine the defense value of the target in the impact zone.
6. Determine the attack value applicable to the target in the
impact zone.
7. the defense value of armoured stands by 50%, rounded
up. Reduce open-topped armoured vehicles by 75%,
rounded up.
8. Subtract the modified defense value from the modified
attack value to determine the "combat differential" (see
CRT). [AV - DV = CD]
9. Roll 2D6. Modify the rolled total by the targets' terrain
10. Cross reference the modified die roll and the combat
differential on the CRT. Apply the result to the target.
PRIOR TO START OF PLAY:
Record the 'turn of arrival' of each aircraft, provided in the
Order of Battle (OOB). If the OOB does not provide the force
with a FASC team: Plot bombing missions of all aircraft, after
terrain setup but before forces are deployed.
DURING PLAY:
If the OOB provides the force with a FASC team: Plot bombing
missions of each aircraft during the Joint Plot Phase, 1 turn
prior to the aircraft's 'turn of arrival.' If the plane is capable of
2 ordnance attacks, the 2nd attack may be plotted in the Joint
Plot Phase during the aircraft's 'turn of arrival.'
STRAFING ATTACKS (NOT PLOTTED):
BOMBING ATTACKS:
Burfield (order #5184631)
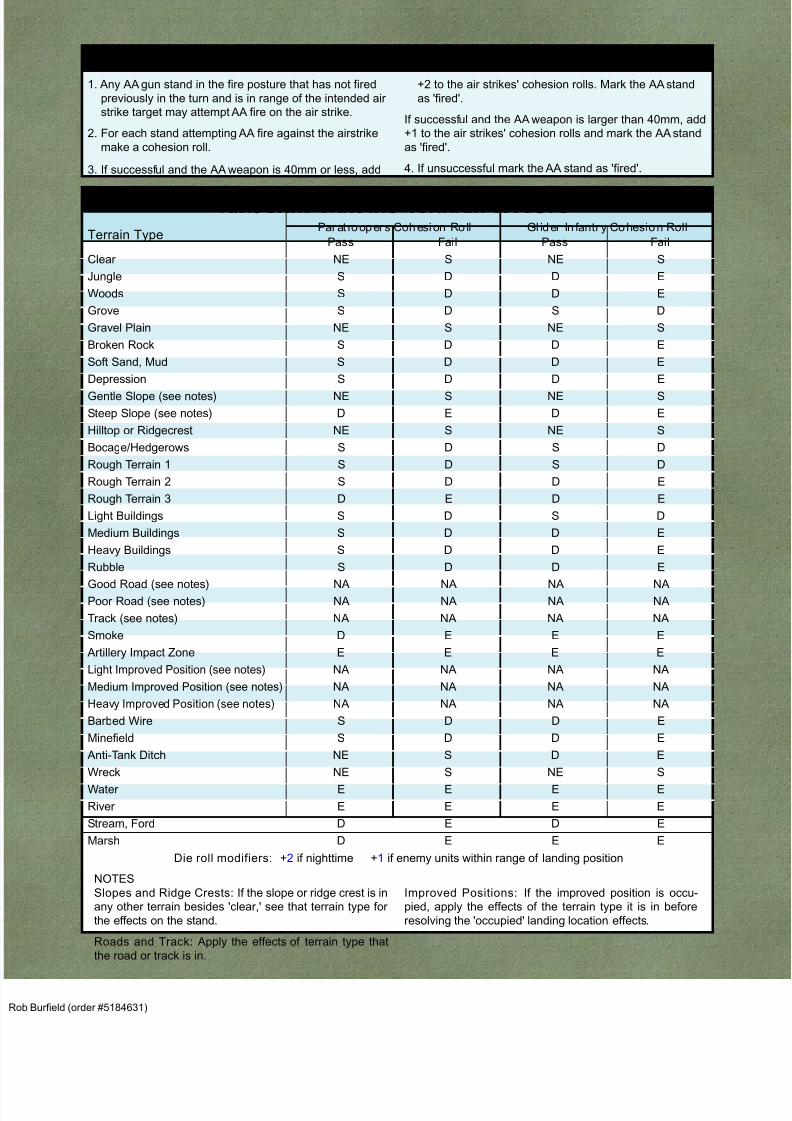
8/13/2019 Micro Armour the Game-WWII 2nd Edition (Full Color)
http://slidepdf.com/reader/full/micro-armour-the-game-wwii-2nd-edition-full-color 128/136
1. Any AA gun stand in the fire posture that has not fired
previously in the turn and is in range of the intended air
strike target may attempt AA fire on the air strike.
2. For each stand attempting AA fire against the airstrike
make a cohesion roll.
3. If successful and the AA weapon is 40mm or less, add
+2 to the air strikes' cohesion rolls. Mark the AA stand
as 'fired'.
If successful and the AA weapon is larger than 40mm, add
+1 to the air strikes' cohesion rolls and mark the AA stand
as 'fired'.
4. If unsuccessful mark the AA stand as 'fired'.
anti-aircraft fire
Terrain TypeParat roopers Cohesion Ro ll Gl ider In fantry Cohesion Roll
Pass Fail Pass Fail
Clear NE S NE S
Jungle S D D E
Woods S D D E
Grove S D S D
Gravel Plain NE S NE S
Broken Rock S D D E
Soft Sand, Mud S D D E
Depression S D D E
Gentle Slope (see notes) NE S NE S
Steep Slope (see notes) D E D E
Hilltop or Ridgecrest NE S NE S
Bocage/Hedgerows S D S D
Rough Terrain 1 S D S D
Rough Terrain 2 S D D E
Rough Terrain 3 D E D E
Light Buildings S D S D
Medium Buildings S D D E
Heavy Buildings S D D E
Rubble S D D E
Good Road (see notes) NA NA NA NAPoor Road (see notes) NA NA NA NA
Track (see notes) NA NA NA NA
Smoke D E E E
Artillery Impact Zone E E E E
Light Improved Position (see notes) NA NA NA NA
Medium Improved Position (see notes) NA NA NA NA
Heavy Improved Position (see notes) NA NA NA NA
Barbed Wire S D D E
Minefield S D D E
Anti-Tank Ditch NE S D E
Wreck NE S NE S
Water E E E E
River E E E E
Stream, Ford D E D E
Marsh D E E E
Die roll modifiers: +2 if nighttime +1 if enemy units within range of landing position
NOTES
Slopes and Ridge Crests: If the slope or ridge crest is in
any other terrain besides 'clear,' see that terrain type for
the effects on the stand.
Roads and Track: Apply the effects of terrain type that
the road or track is in.
Improved Positions: If the improved position is occu-
pied, apply the effects of the terrain type it is in before
resolving the 'occupied' landing location effects.
Airborne landing terrain effects
Burfield (order #5184631)
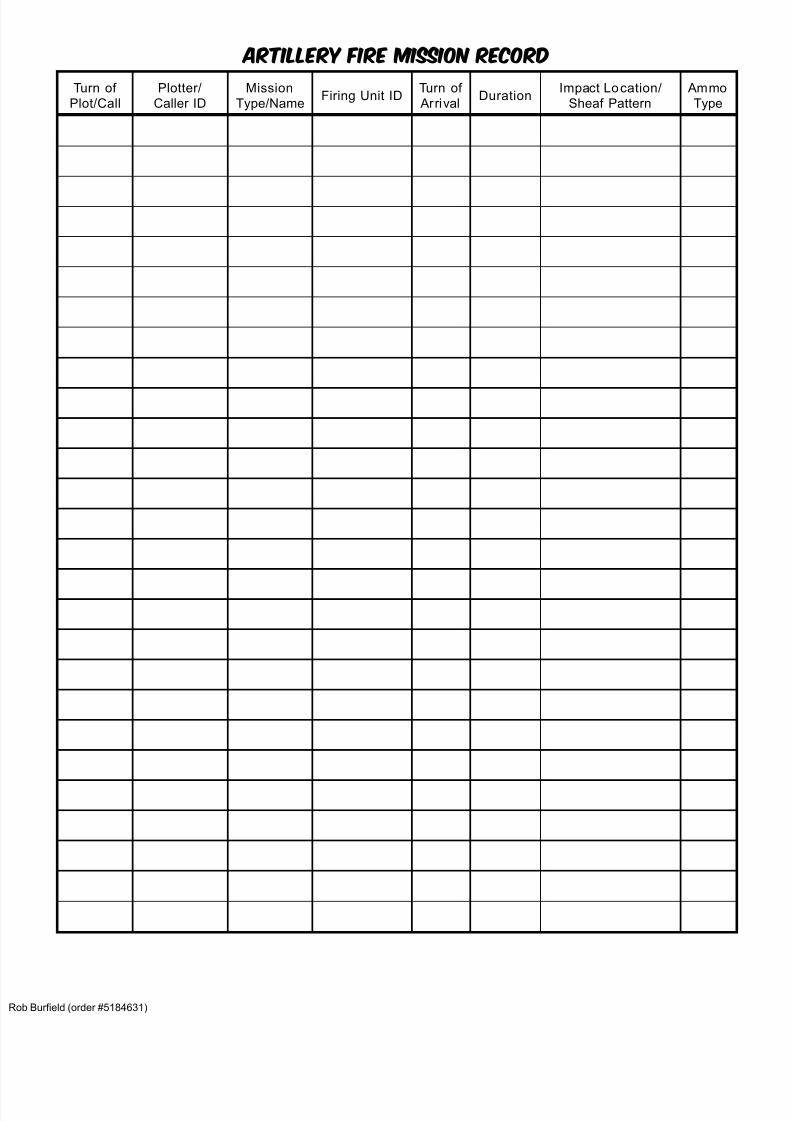
8/13/2019 Micro Armour the Game-WWII 2nd Edition (Full Color)
http://slidepdf.com/reader/full/micro-armour-the-game-wwii-2nd-edition-full-color 129/136
Turn of
Plot/Call
Plotter/
Caller ID
Mission
Type/NameFiring Unit ID
Turn of
ArrivalDuration
Impact Location/
Sheaf Pattern
Ammo
Type
Artillery fire Mission Record
Burfield (order #5184631)

8/13/2019 Micro Armour the Game-WWII 2nd Edition (Full Color)
http://slidepdf.com/reader/full/micro-armour-the-game-wwii-2nd-edition-full-color 130/136
Minefield record Sheet
Minefield
Marker ID
Minefield
Type
Minefield
Marker ID
Minefield
Type
Minefield
Marker ID
Minefield
Type
Hasty minefields attack all exiting stands at -2 Standard mine fields attack exiting enemy stands at +1
Concentrated mine fields attack exiting enemy stands at +7
Burfield (order #5184631)
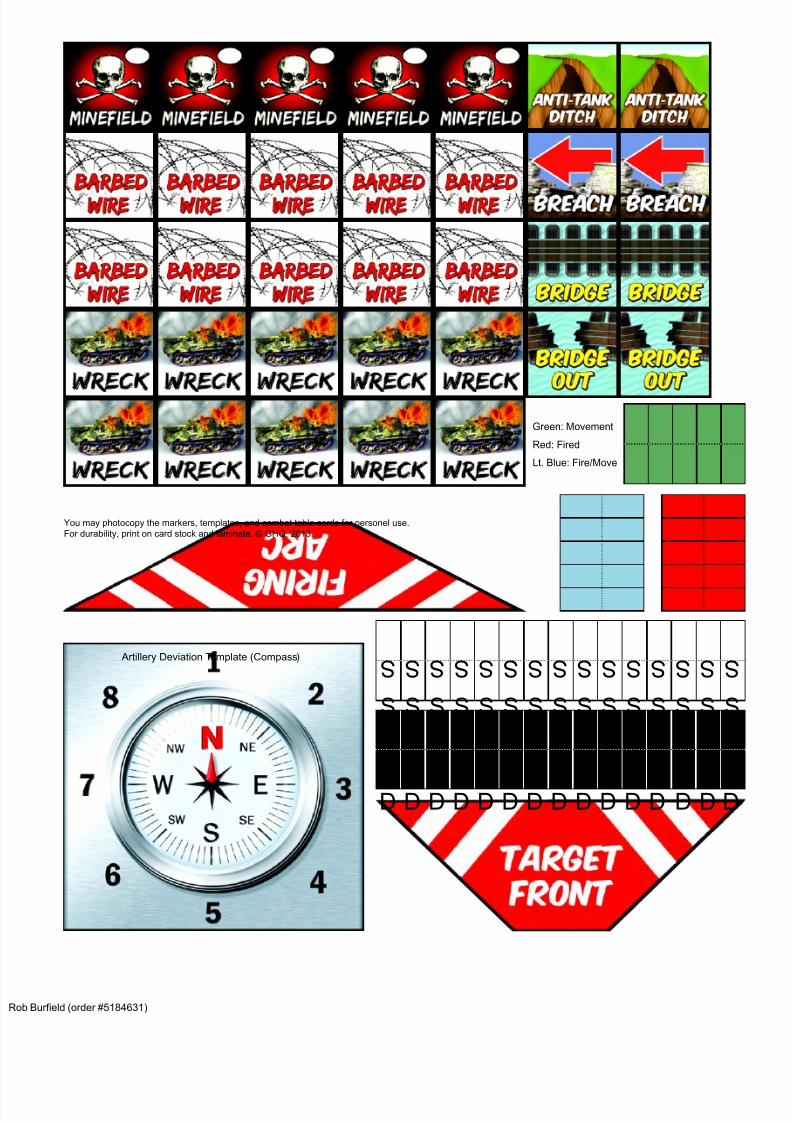
8/13/2019 Micro Armour the Game-WWII 2nd Edition (Full Color)
http://slidepdf.com/reader/full/micro-armour-the-game-wwii-2nd-edition-full-color 131/136
S S S S S S S S S S S S S S S
S S S S S S S S S S S S S S S
Green: Movement
Red: Fired
Lt. Blue: Fire/Move
Artillery Deviation Template (Compass)
You may photocopy the markers, templates, and combat table cards for personel use.
For durability, print on card stock and laminate. © GHQ, 2013.
D D D D D D D D D D D D DD D
D D D D D D D D D D D D D D D
Burfield (order #5184631)
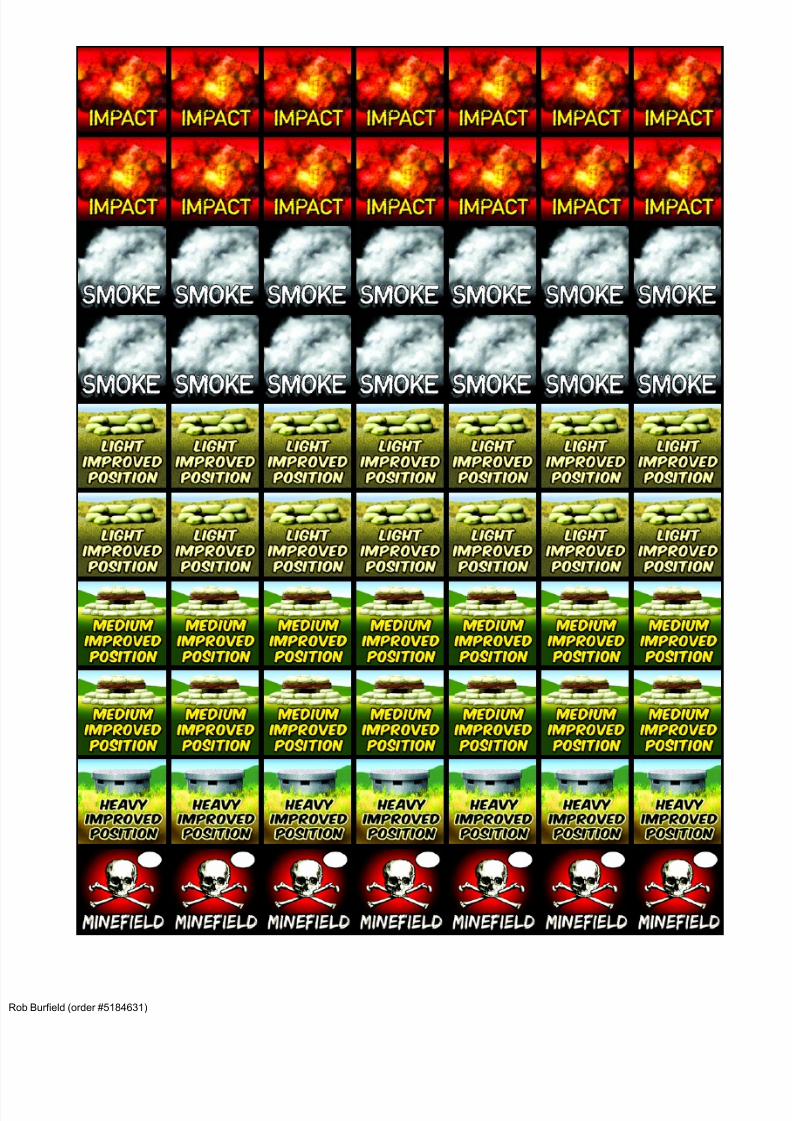
8/13/2019 Micro Armour the Game-WWII 2nd Edition (Full Color)
http://slidepdf.com/reader/full/micro-armour-the-game-wwii-2nd-edition-full-color 132/136
Burfield (order #5184631)
8/13/2019 Micro Armour the Game-WWII 2nd Edition (Full Color)
http://slidepdf.com/reader/full/micro-armour-the-game-wwii-2nd-edition-full-color 133/136
8/13/2019 Micro Armour the Game-WWII 2nd Edition (Full Color)
http://slidepdf.com/reader/full/micro-armour-the-game-wwii-2nd-edition-full-color 134/136
129
Strawson, John. The Battle for North Africa. New York: Scribner, 1969.
United States. War Department. . Handbook on German Military Forces. Baton Rouge: Louisiana State UniversityPress, 1990
Zaloga, Steven. US Armored Units in the North African and Italian Campaigns 1942-45. Oxford: Osprey Publishing,
2006 (I haven't found anything by Steven J Zaloga I didn't like)
Zaloga, Steven and Richard Chasemore. Panzer IV vs Char B1 bis: France 1940 (Duel). Oxford: Osprey Publishing,2011.
Zamulin, Valeriy. Demolishing the Myth: The Tank Battle at Prokhorovka, Kursk, July 1943: An Operational Narrative .Trans. Stuart Britton. Solihull, UK: Helion Publishing, 2011.
This is such a small list of what I've read and there are so many more I want to read…
A VERY SHORT LIST OF FAVORITE INTERNET RESOURCES
(available at the time of this writing)
Organizational data (available at the time of this writing):
http://niehorster.orbat.com/index.htm
http://www.bayonetstrength.150m.com/
Vehicle data and images (available at the time of this writing):
http://www.armchairgeneral.com/rkkaww2/index.htm
http://ww2drawings.jexiste.fr
http://www.dieselpunks.org/profiles/blogs/lord-ks-garage-88-belgian
http://www.o5m6.de/http://www.german.o5m6.de/
http://www.autogallery.org.ru/gal.htm
http://www.tarrif.net/
http://wwiitanks.co.uk/
http://www.japaneseammunition.com/start.php?main_cat=1&sub_cat=1&access=view&exp_sub_cat=1
http://www3.plala.or.jp/takihome
http://www.kfzderwehrmacht.de/Homepage_english/homepage_english.html
http://denes.us/forums/YaBB.pl?board=HUGround
Burfield (order #5184631)
8/13/2019 Micro Armour the Game-WWII 2nd Edition (Full Color)
http://slidepdf.com/reader/full/micro-armour-the-game-wwii-2nd-edition-full-color 135/136
Front cover: U.S. Office of War Information. We couldn’t stickaround long though... August 1944. National Archives and RecordsAdministration. ARC Identifier 535975
p.i: U.S. Army: Battle of the Bulge - American tank destroyers move for-ward during heavy fog to stem German spearhead near Werbomont,Belgium. December 20, 1944. U.S. Army Center of Military History.
p.1: Laws, G. (Sgt). House to House fighting at Riva Bella nearOuistreham. June 6, 1944. Imperial War Museum- MH 2012 collec-tion No. 4904-04
p.3: Bieling. Russland, leichte Flak und Panzer. 21 June 1941. GermanFederal Archives. Bundesarchiv, Bild 101I-265-0026A-30 / Bieling /CC-BY-SA
p.8: Ustinov. RIAN archive 603595 Soldiers of the Great Patriotic War.1941. RIANovosti archive, image #603595 / Ustinov / CC-BY-SA 3.0
p.10: U.S. Army Signal Corps. Firing 4.5 inch rockets from M4-Sherman "Calliope" multiple rocket launcher, mounted on M-4, No. A-3tank. 14th Armored, France. (Wikimedia)
p.13: Finnish heavy train artillery harasses the enemy's sleep at nightnear to Vanozero in Karelia during the Continuation War. 1940s.MaveTeam
p.14: Puttnam L A (Lt), . British 7.2 inch howitzers France Feb 1940IWM F 2507. February 12, 1940. Imperial War Museum- PhotographNo. F 2507
p.19: Russland, Kesselschlacht von Demjansk. March 21, 1942.Bundesarchiv, Bild 146-1972-042-42 / CC-BY-SA
p.20: Soviet tanks of the 4th Guards mechanized corps in Belgrade offen-sive. 1944. (Wikimedia)
p.22: Hardy (Sgt.). Ruined Caen Convoy. August 7, 1944. ImperialWar Museum. No. B 8768, collection No. 4700-29
p.27: US Army Signal Corps. 101st Airborne inspecting broken gliderin Holland army.mil-2007-09-12-112355. September 1944. .US ArmyMilitary History Institute
p.27: Paratrooper modeled and photographed by Chris Shaffer, 2012.
p.30: Operation Market I - 04. 17 September 17, 1944. Imperial WarMuseum- Photo No.: CL 1173
p.34: US Army Signal Corps. 101st Airborne in Bastogne, Christmas1944. December 25, 1944. (Wikimedia)
p.38: WSOY kuva-arkisto. Finnish-lightmachinegun-skis-winterwar.1940. Talvisodan pikkujättiläinen (1999) p. 459, originally fromWSOY kuva-arkisto (WSOY archive)
p.45: U.S. Office of War Information. The first big raid by the 8th Air Forcewas on a Focke Wulf plant at Marienburg. October 9, 1943. NationalArchives and Records Administration ARC Identifier 535972
p.49: Christie (Sgt.). The British Army in the Normandy Campaign 1944.Sherman tanks and 6-pdr anti-tank gun in the centre of Caen. July 10, 1944.Imperial War Museum- No. B 6924, collection no. 4700-29
p.50: A counterattack of the soviet troops (Kharkov August 1943).(Wikimedia)
p.51: U.S. Government. Landings on the beach of Ibeya. - NationalPark Service - (National Archives, USMC Hdqtrs 126, 988)
p.53: Reimers. Russland, Soldaten auf Kettenkrad. December 22,1943. Bundesarchiv, Bild 101I-725-0184-22 / Reimers / CC-BY-SA
p.54: Laing (Sgt.). The British Army in the Normandy Campaign 1944. An ammunition lorry of 11th Armoured Division explodes after being hitby mortar fire during Operation 'Epsom.' June 26, 1944. Imperial WarMuseum- No. B 6017, collection No. 4700-29
p.57: Bocage country at Cotentin Peninsula. Archives Normandie1939-45
p.61: Kurth. Nordfrankreich, Panzer V (Panther) mit Infanterie. June21, 1944. Bundesarchiv, Bild 101I-301-1955-15 / Kurth / CC-BY-SA
p.64: Otto. Russland, motorisierte Truppen beim Marsch. June 1941.Bundesarchiv, Bild 101I-186-0184-02A / Otto / CC-BY-SA
p.66: Destroyed german self-propelled gun carriage near Mortrée. June- July 1944. Archives Normandie 1939-45
p.69: SA-kuva. Finnish-artillery-76k02-1902-winterwar. March 9,1940. Talvisodan pikkujättiläinen (1999) p. 317, originally from SA-kuva (Finnish Army Pictures)
p.72: Fremke, Heinz. Im Westen, zerstörter französischer Panzer CharB1. May 1940. Attribution: Bundesarchiv, Bild 101I-127-0369-21 /Fremke, Heinz / CC-BY-SA
p.78: Bauer. Ostfront, Rückzug ungarischer Truppen. August 1944.Bundesarchiv, Bild 101I-244-2306-15 / Bauer / CC-BY-SA
p. 82: japanese Type 95 Ha-Go captured by soviet troops after battle of Khalkhin Gol 1938. Public Domain (Wikimedia)
p.94: Coburg 1945. U.S. Army. National Archives and RecordsAdministration. April 25 1945. NARA ARC Identifier: 535534
p.95: Koll. Polen, bespannte Einheiten bei Flussüberquerung. September1939. Bundesarchiv, Bild 101I-318-0071-16A / Koll / CC-BY-SA
p.96: U.S. Navy. Dive bomber over Truk. February 17 1944. U.S.Navy National Museum of Naval Aviation photo No. 1996.253.688
p.97: Opitz. Flugzeuge Junkers Ju 87. 22 December 1943.Bundesarchiv, Bild 101I-646-5188-17 / Opitz / CC-BY-SA
p.98: An Ilyushin Il-2 Sturmovik ground attack aircraft. (Wikimedia)
p.99: U.S. Air Force. 1940's "MY GIRL" ANorth American P-51 takesoff from Iwo Jima, in the Bonin Islands. PD-USGOV-MILITARY-AIRFORCE.
p.101: Bode, Natalia Fedorovna. Anti-tank riflemen on the Kursksalient. July 20, 1940. RIA Novosti archive, image #4408 / N. Bode /CC-BY-SA 3.0
p.102: Stalingrad-250. Public Domain (Wikimedia)
p.105: Smith D M (Sgt). British paratroopers in Oosterbeek. 23September 1944. Imperial War Museum- No. BU 1121
p.110: Sturm. Nordafrika, Truppenparade in Tripolis. March 1941.Bundesarchiv, Bild 183-B16002 / CC-BY-SA
p113: Fremke, Heinz. Im Westen, zerstörter französischer Panzer CharB1. May 1940. Bundesarchiv, Bild 101I-125-0277-09 / Fremke,Heinz / CC-BY-SA
PHOTOS
130
Burfield (order #5184631)
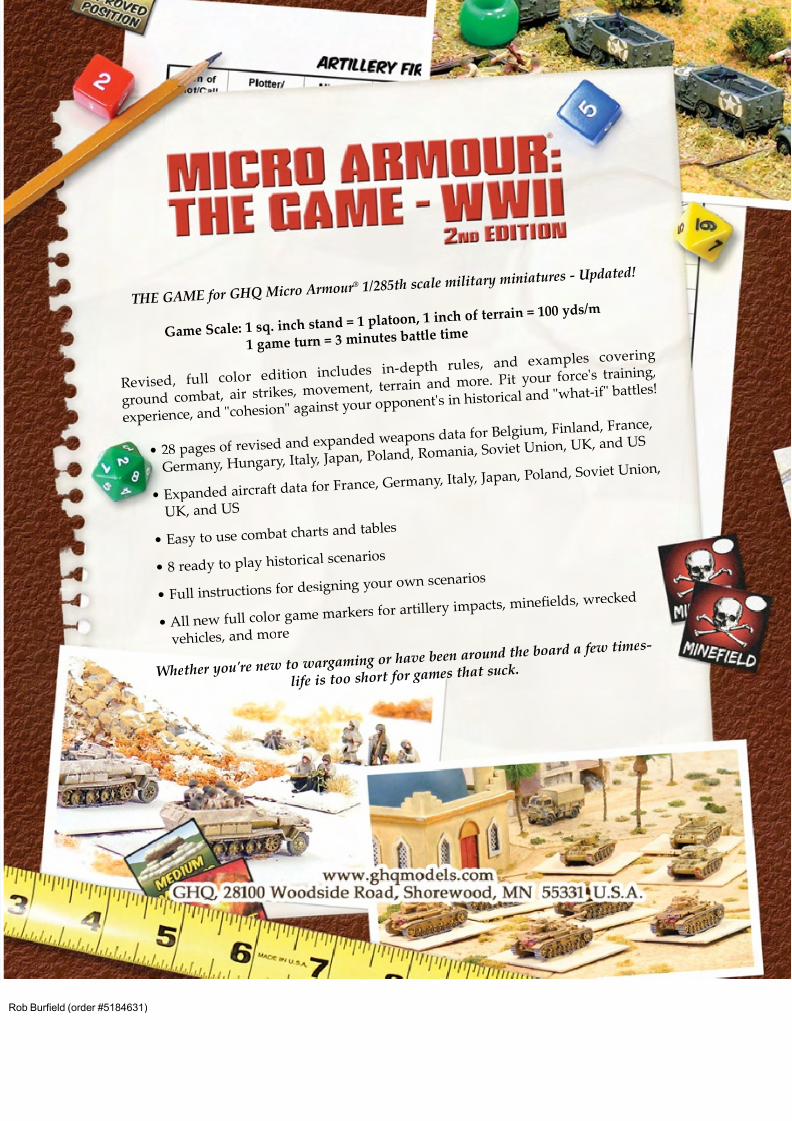
8/13/2019 Micro Armour the Game-WWII 2nd Edition (Full Color)
http://slidepdf.com/reader/full/micro-armour-the-game-wwii-2nd-edition-full-color 136/136
T HE G A ME f or G HQ Micro Armour ® 1/285th scale militar y
mi niatures - U pdated!
Game Sca le: 1 sq. i nc h sta nd = 1 p latoo n, 1 i nc h of terrai n = 100 yds /m
1 game t ur n = 3 mi n utes batt le time
Re v ised, f u l l co lor ed it io n i nc l udes i n-
de pt h r u les, a nd e xa m p les co ver i ng
gro u nd co m bat, a ir str i kes, mo ve me nt, terra i n a nd more. P it yo ur force's
tra i n i ng,
e x per ie nce, a nd "co hes io n" aga i nst yo ur o p p
o ne nt's i n h istor ica l a nd " w hat- if" batt les!
• 28 pages of re v ised a nd e x pa nded wea po
ns data for Be lg i u m, F i n la nd, Fra nce,
Ger ma n y, H u ngar y, Ita l y, Ja pa n, Po la nd, Ro ma n ia, So v iet U n io n, U K
, a nd US
• E x pa nded a ircraft data for Fra nce, Ger ma n y, Ita l y, Ja pa n, Po la
nd, So v iet U n io n,
U K, a nd US
• Eas y to use co m bat c harts a nd ta b les
• 8 read y to p la y h istor ica l sce nar ios
F ll i i f d i i sce nar ios