Embed Size (px)
Citation preview
Microsoft Office
Outlook 2016 for Windows Using Outlook with Zimbra
Copyright © 2016 KSU Division of University Information Technology Services
This document may be downloaded, printed, or copied for educational use without further permission
of the University Information Technology Services Division (UITS), provided the content is not modified
and this statement is not removed. Any use not stated above requires the written consent of the UITS
Division. The distribution of a copy of this document via the Internet or other electronic medium
without the written permission of the KSU - UITS Division is expressly prohibited.
Published by Kennesaw State University – UITS 2016
The publisher makes no warranties as to the accuracy of the material contained in this document and
therefore is not responsible for any damages or liabilities incurred from UITS use.
Microsoft product screenshot(s) reprinted with permission from Microsoft Corporation.
Microsoft, Microsoft Office, and Microsoft Visio are trademarks of the Microsoft Corporation.
University Information Technology Services
Microsoft Office: Outlook 2016 for Windows
Using Outlook with Zimbra
Table of Contents
Introduction ................................................................................................................................................ 5
Learning Objectives ..................................................................................................................................... 5
Connecting Outlook 2016 to your Zimbra Account .................................................................................... 6
Creating an Email Message ......................................................................................................................... 6
Addressing the Email Message ............................................................................................................... 6
Setting the Global Address List as Default .......................................................................................... 9
Formatting your Message ..................................................................................................................... 10
Changing the Background of your Message ......................................................................................... 11
To apply a solid color background .................................................................................................... 11
To apply any other type of background ............................................................................................ 12
To insert a picture as a background .................................................................................................. 14
Proofing your Message ......................................................................................................................... 16
Adding New Words to the Dictionary ............................................................................................... 17
Attachments .......................................................................................................................................... 18
To attach a file: ................................................................................................................................. 18
To attach another message or appointment: ................................................................................... 19
Creating Signatures in Outlook ................................................................................................................. 20
Setting Message Importance Level ....................................................................................................... 22
Delay Message Delivery ........................................................................................................................ 22
Saving a Message as a File ........................................................................................................................ 23
Tell Me and Smart Lookup .................................................................................................................... 24
The Smart Lookup Tool ......................................................................................................................... 26
Accessing the Calendar ............................................................................................................................. 27
Creating an Appointment ..................................................................................................................... 27
Creating a Recurring Appointment ....................................................................................................... 29
Scheduling a Meeting............................................................................................................................ 30
New E-mail Notifications .......................................................................................................................... 32
Automatically Archiving Emails ................................................................................................................. 34
Manually Archive Emails ........................................................................................................................... 35
Additional Help ......................................................................................................................................... 36
Revised: 6/29/2016 Page 5 of 36
Introduction
Using Microsoft Outlook 2016 as a “desktop client” for Zimbra gives the end-user added functionality
not available in Zimbra, due to the fact that the latter is a web-based application. This document
covers the basic use of the Mail and Calendar features of Outlook 2016.
Learning Objectives
After completing the instructions in this booklet, you will be able to:
Create, format, and proof an email message before sending it to recipients
Add attachments to your email message
Save email messages as a file
Access the calendar
Customize email notifications
Create appointments and invite others
Automatically/manually archive email folders
Page 6 of 36
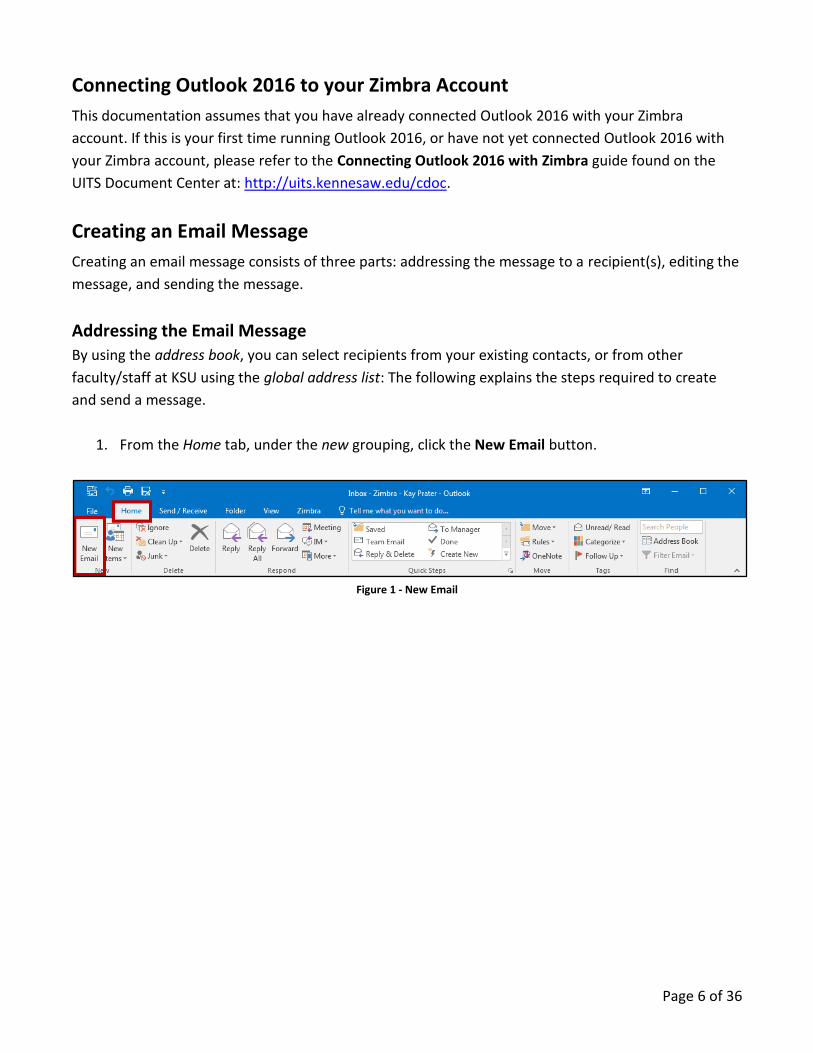
Connecting Outlook 2016 to your Zimbra Account
This documentation assumes that you have already connected Outlook 2016 with your Zimbra
account. If this is your first time running Outlook 2016, or have not yet connected Outlook 2016 with
your Zimbra account, please refer to the Connecting Outlook 2016 with Zimbra guide found on the
UITS Document Center at: http://uits.kennesaw.edu/cdoc.
Creating an Email Message
Creating an email message consists of three parts: addressing the message to a recipient(s), editing the
message, and sending the message.
Addressing the Email Message
By using the address book, you can select recipients from your existing contacts, or from other
faculty/staff at KSU using the global address list: The following explains the steps required to create
and send a message.
1. From the Home tab, under the new grouping, click the New Email button.
Figure 1 - New Email
Page 7 of 36
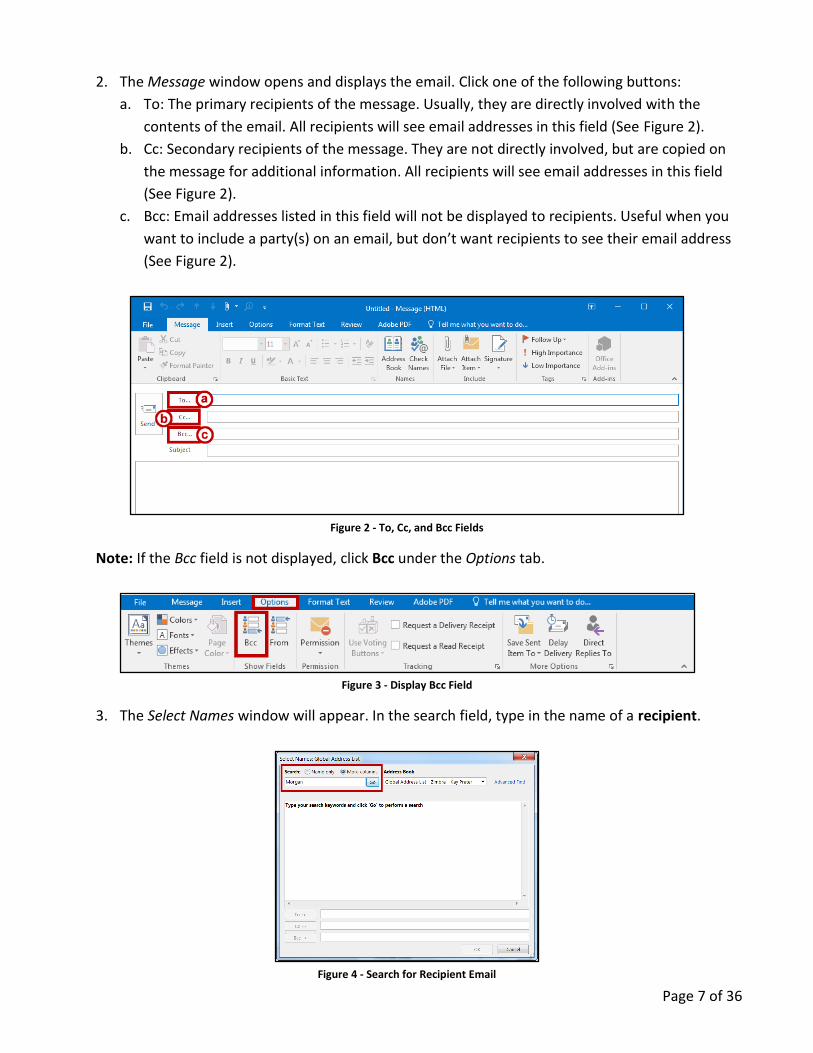
2. The Message window opens and displays the email. Click one of the following buttons:
a. To: The primary recipients of the message. Usually, they are directly involved with the
contents of the email. All recipients will see email addresses in this field (See Figure 2).
b. Cc: Secondary recipients of the message. They are not directly involved, but are copied on
the message for additional information. All recipients will see email addresses in this field
(See Figure 2).
c. Bcc: Email addresses listed in this field will not be displayed to recipients. Useful when you
want to include a party(s) on an email, but don’t want recipients to see their email address
(See Figure 2).
Figure 2 - To, Cc, and Bcc Fields
Note: If the Bcc field is not displayed, click Bcc under the Options tab.
Figure 3 - Display Bcc Field
3. The Select Names window will appear. In the search field, type in the name of a recipient.
Figure 4 - Search for Recipient Email
Page 8 of 36
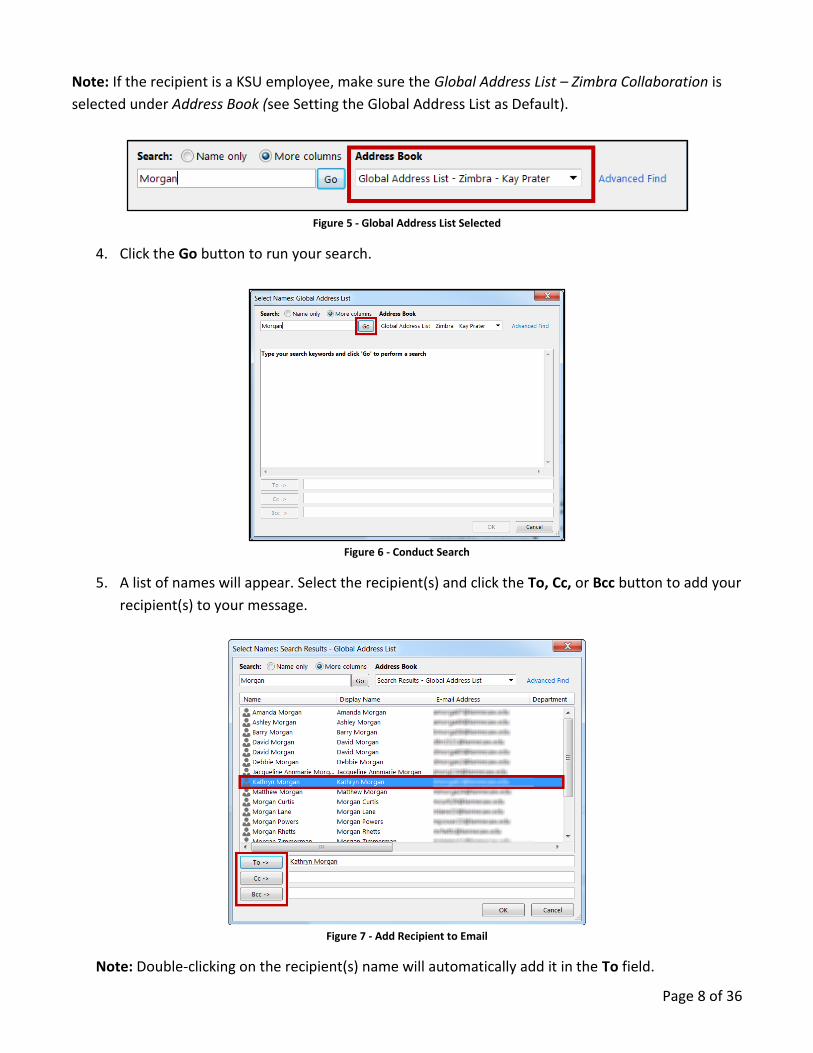
Note: If the recipient is a KSU employee, make sure the Global Address List – Zimbra Collaboration is
selected under Address Book (see Setting the Global Address List as Default).
Figure 5 - Global Address List Selected
4. Click the Go button to run your search.
Figure 6 - Conduct Search
5. A list of names will appear. Select the recipient(s) and click the To, Cc, or Bcc button to add your
recipient(s) to your message.
Figure 7 - Add Recipient to Email
Note: Double-clicking on the recipient(s) name will automatically add it in the To field.
Page 9 of 36
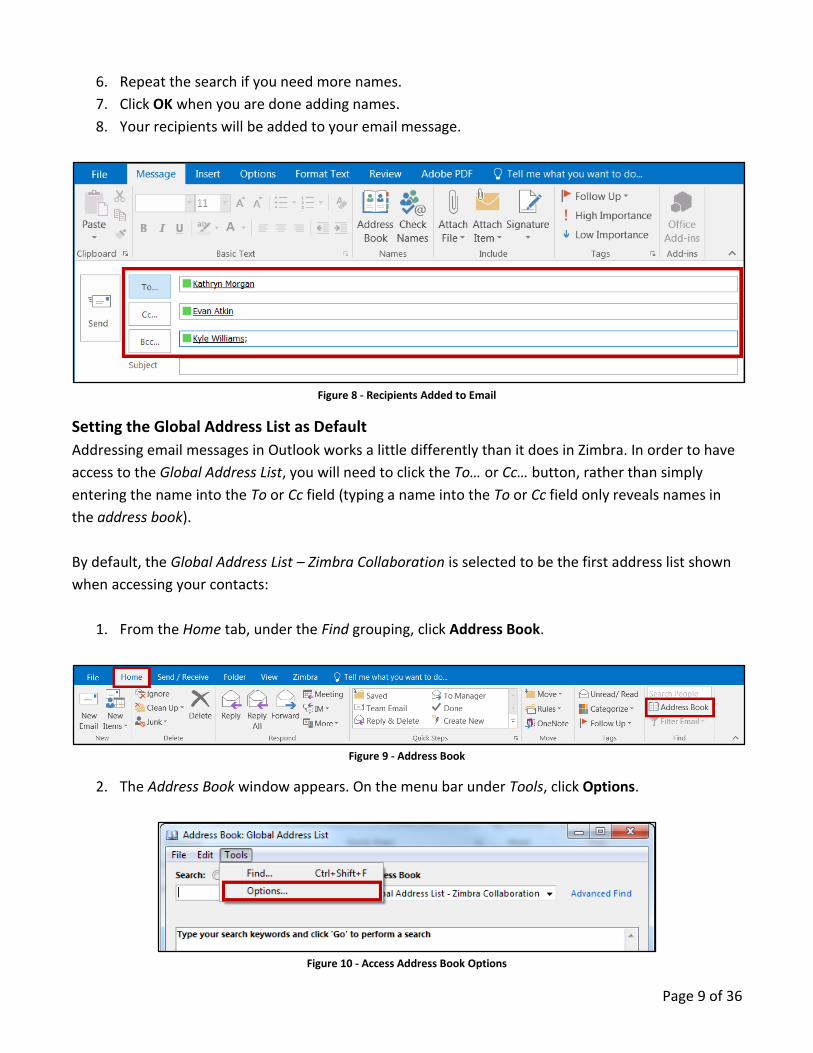
6. Repeat the search if you need more names.
7. Click OK when you are done adding names.
8. Your recipients will be added to your email message.
Figure 8 - Recipients Added to Email
Setting the Global Address List as Default
Addressing email messages in Outlook works a little differently than it does in Zimbra. In order to have
access to the Global Address List, you will need to click the To… or Cc… button, rather than simply
entering the name into the To or Cc field (typing a name into the To or Cc field only reveals names in
the address book).
By default, the Global Address List – Zimbra Collaboration is selected to be the first address list shown
when accessing your contacts:
1. From the Home tab, under the Find grouping, click Address Book.
Figure 9 - Address Book
2. The Address Book window appears. On the menu bar under Tools, click Options.
Figure 10 - Access Address Book Options
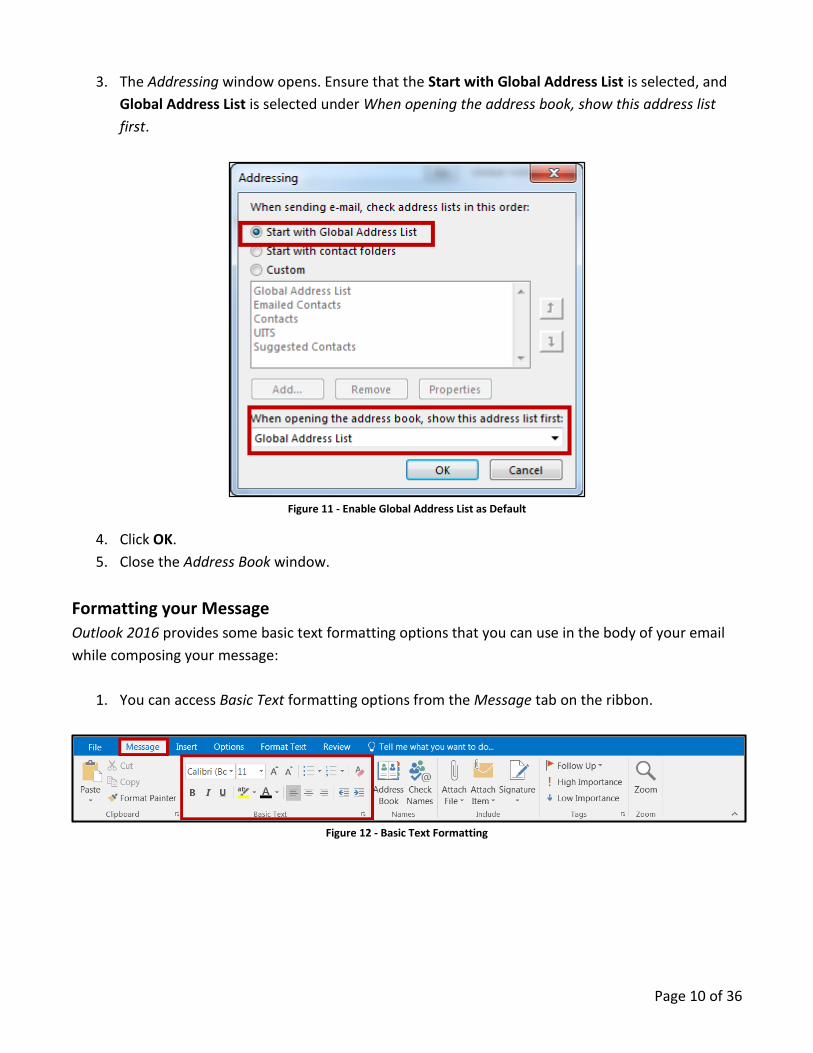
Page 10 of 36
3. The Addressing window opens. Ensure that the Start with Global Address List is selected, and
Global Address List is selected under When opening the address book, show this address list
first.
Figure 11 - Enable Global Address List as Default
4. Click OK.
5. Close the Address Book window.
Formatting your Message
Outlook 2016 provides some basic text formatting options that you can use in the body of your email
while composing your message:
1. You can access Basic Text formatting options from the Message tab on the ribbon.
Figure 12 - Basic Text Formatting

Page 11 of 36
2. You can access additional formatting options from the Format Text tab, including font,
paragraph and styles properties.
Figure 13 - Additional Formatting Options
3. From the Format Text tab, you can also format your message in html, plain text, or rich text:
HTML Default message format. Best for making messages that look like traditional documents with various fonts, colors, bulleted/numbered lists and showing pictures (See Figure 14).
Plain Text
This format works for all email programs, but it doesn’t support bold or italic text, colored fonts, other text formatting, and showing pictures inside the message (pictures can still be included as an attachment) (See Figure 14).
Rich Text
Only supported by Microsoft Exchange Client 4.0, 5.0, and all versions of Microsoft Outlook. This can format text with bullets, alignment, and other options, and you can include linked objects. Attachments appear as icons in the message body (See Figure 14).
Figure 14 - Message Format
Note: How the message appears to the person receiving it depends on their email program. This
cannot be controlled by the sender.
Changing the Background of your Message
You can apply different types of backgrounds to your message such as a solid color, gradient fill,
textured, patterned, or you can use a picture as a background.
To apply a solid color background
1. From the Options tab, click Page Color.
Figure 15 - Page Color
Page 12 of 36
2. A dropdown will appear with several Theme Colors and Standard Colors to choose from. Click a
color to select it as your background.
Figure 16 - Color Options
3. The selected background color will be applied to your email message.
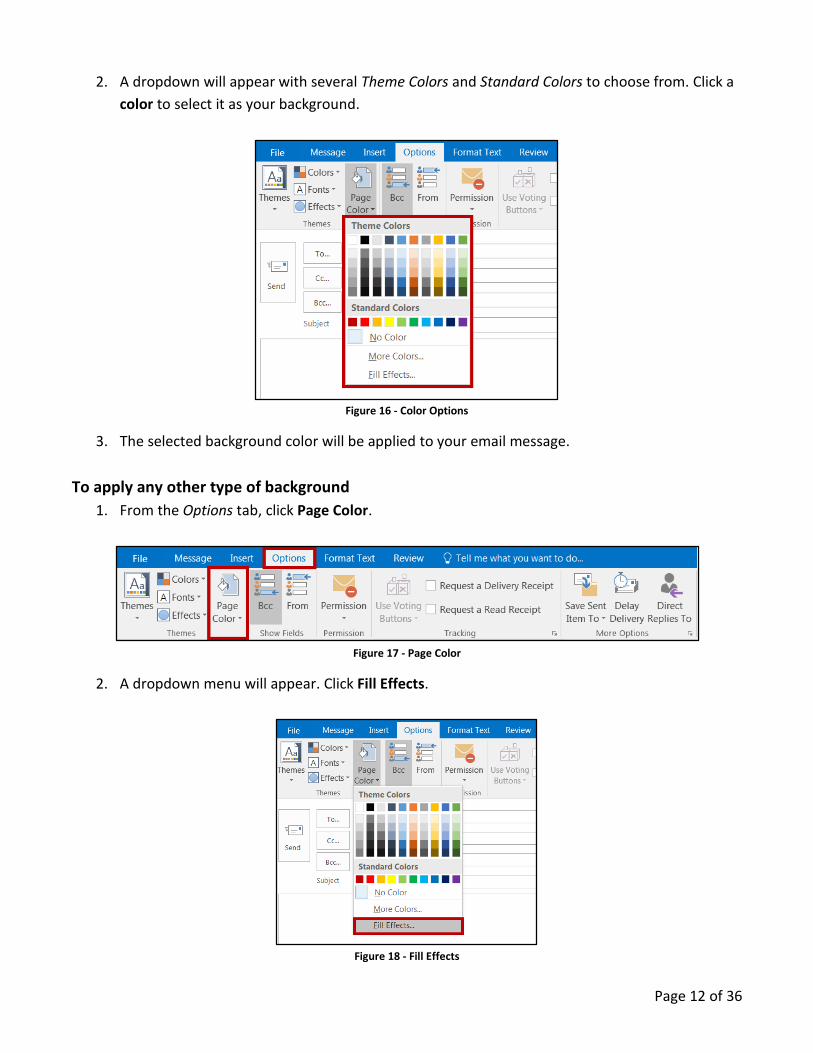
To apply any other type of background
1. From the Options tab, click Page Color.
Figure 17 - Page Color
2. A dropdown menu will appear. Click Fill Effects.
Figure 18 - Fill Effects
Page 13 of 36
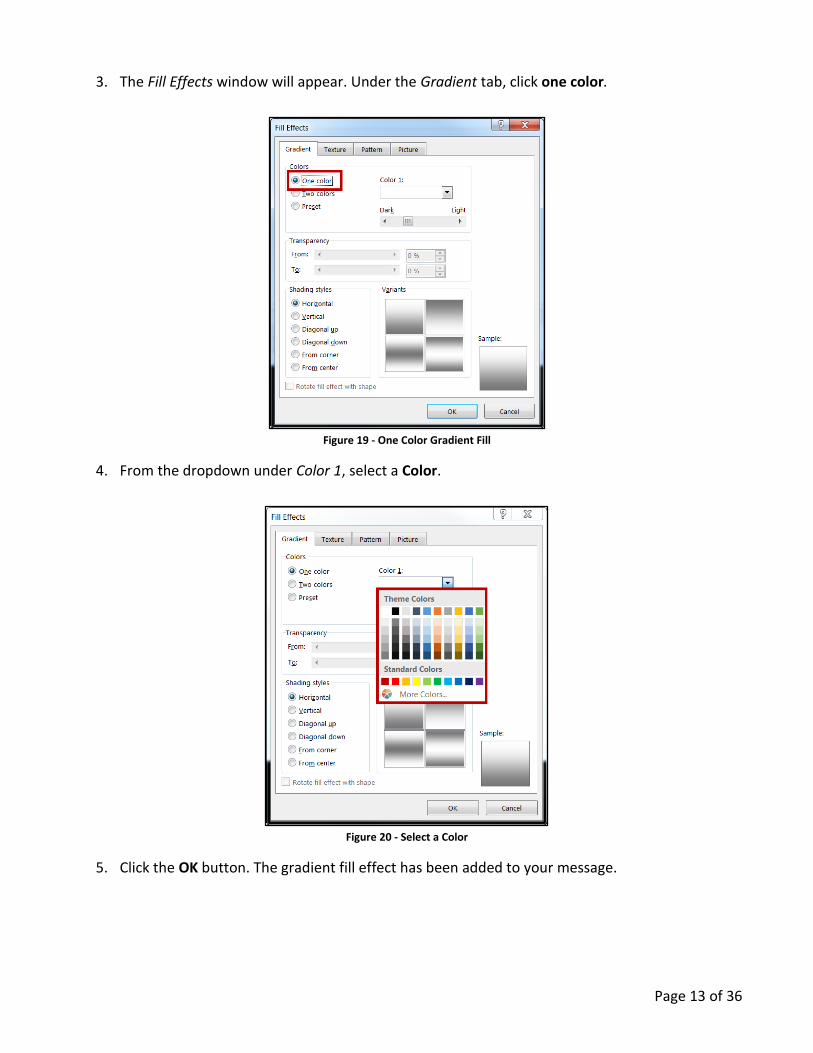
3. The Fill Effects window will appear. Under the Gradient tab, click one color.
Figure 19 - One Color Gradient Fill
4. From the dropdown under Color 1, select a Color.
Figure 20 - Select a Color
5. Click the OK button. The gradient fill effect has been added to your message.
Page 14 of 36
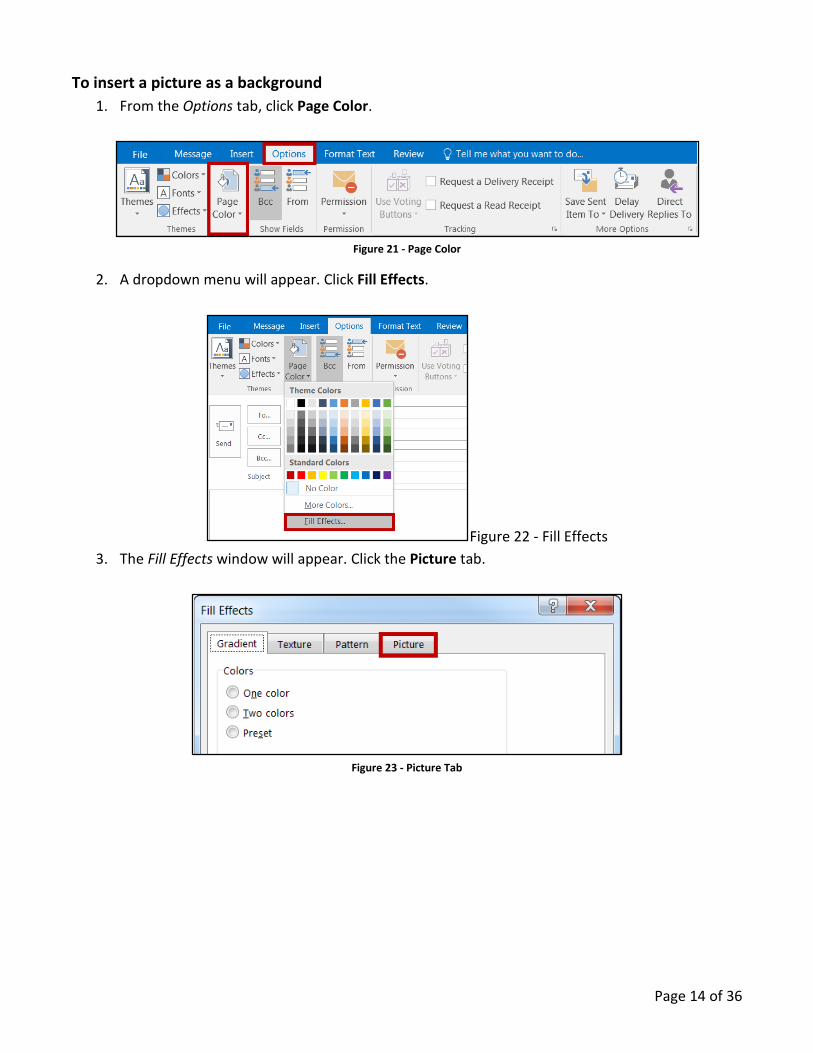
To insert a picture as a background
1. From the Options tab, click Page Color.
Figure 21 - Page Color
2. A dropdown menu will appear. Click Fill Effects.
Figure 22 - Fill Effects
3. The Fill Effects window will appear. Click the Picture tab.
Figure 23 - Picture Tab
Page 15 of 36
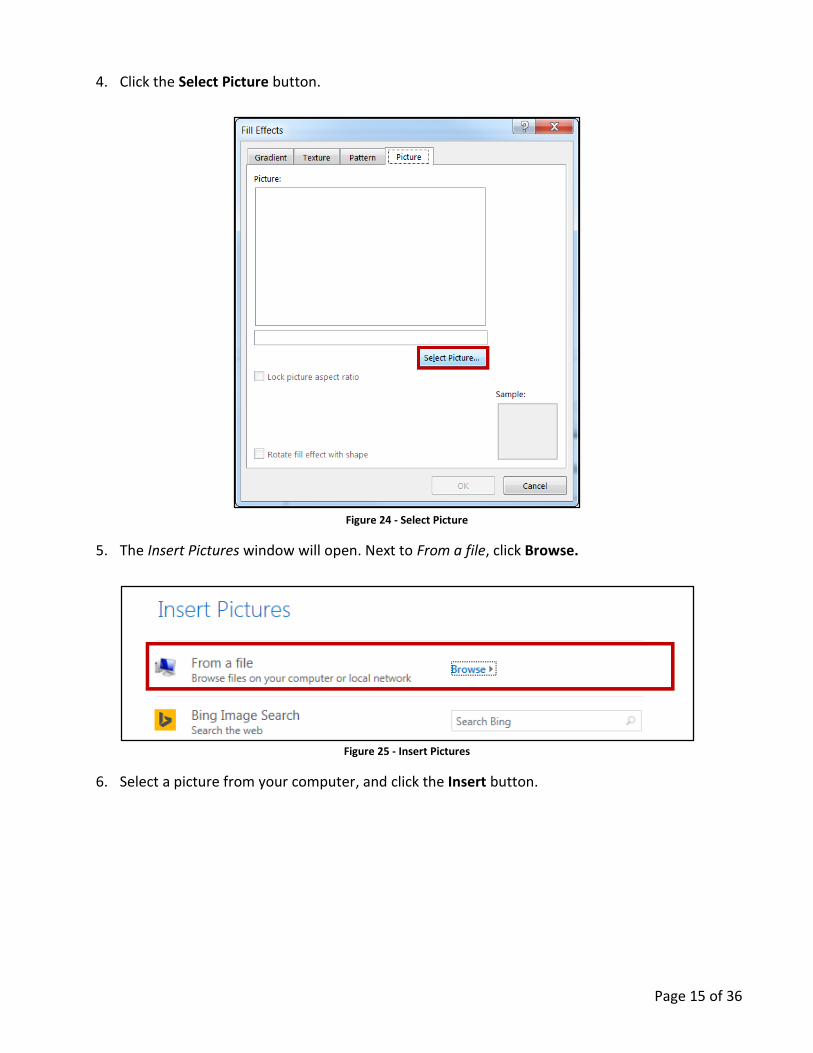
4. Click the Select Picture button.
Figure 24 - Select Picture
5. The Insert Pictures window will open. Next to From a file, click Browse.
Figure 25 - Insert Pictures
6. Select a picture from your computer, and click the Insert button.
Page 16 of 36
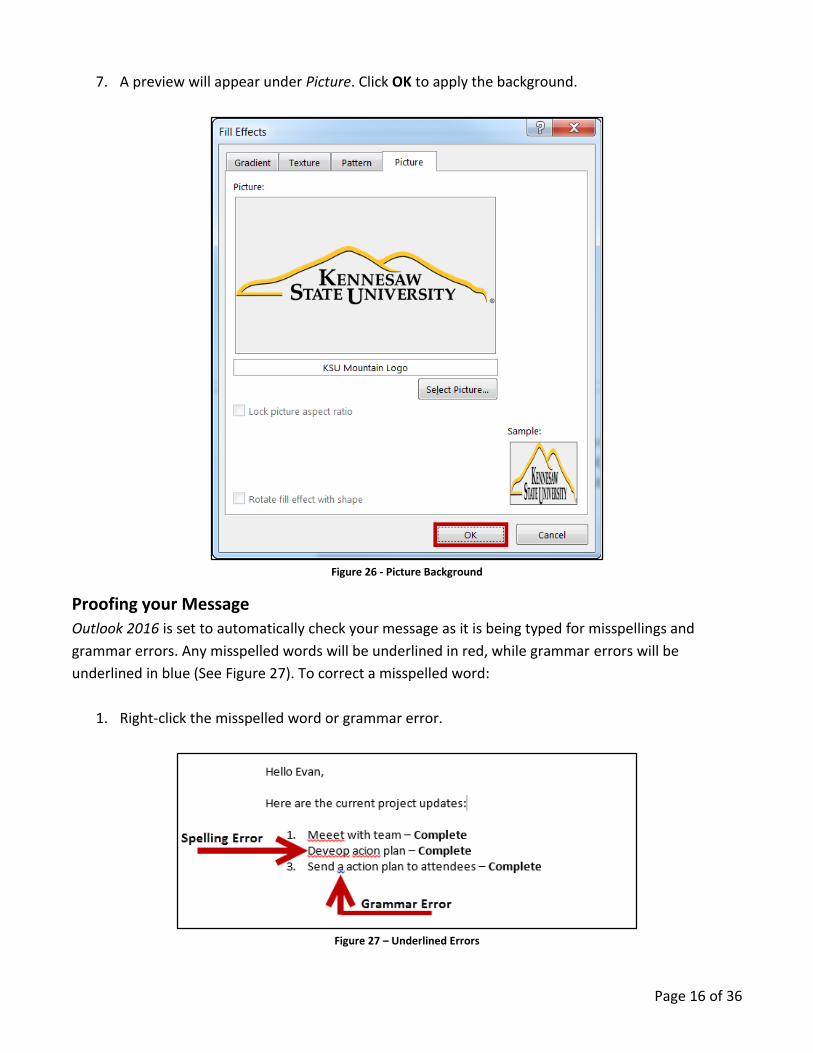
7. A preview will appear under Picture. Click OK to apply the background.
Figure 26 - Picture Background
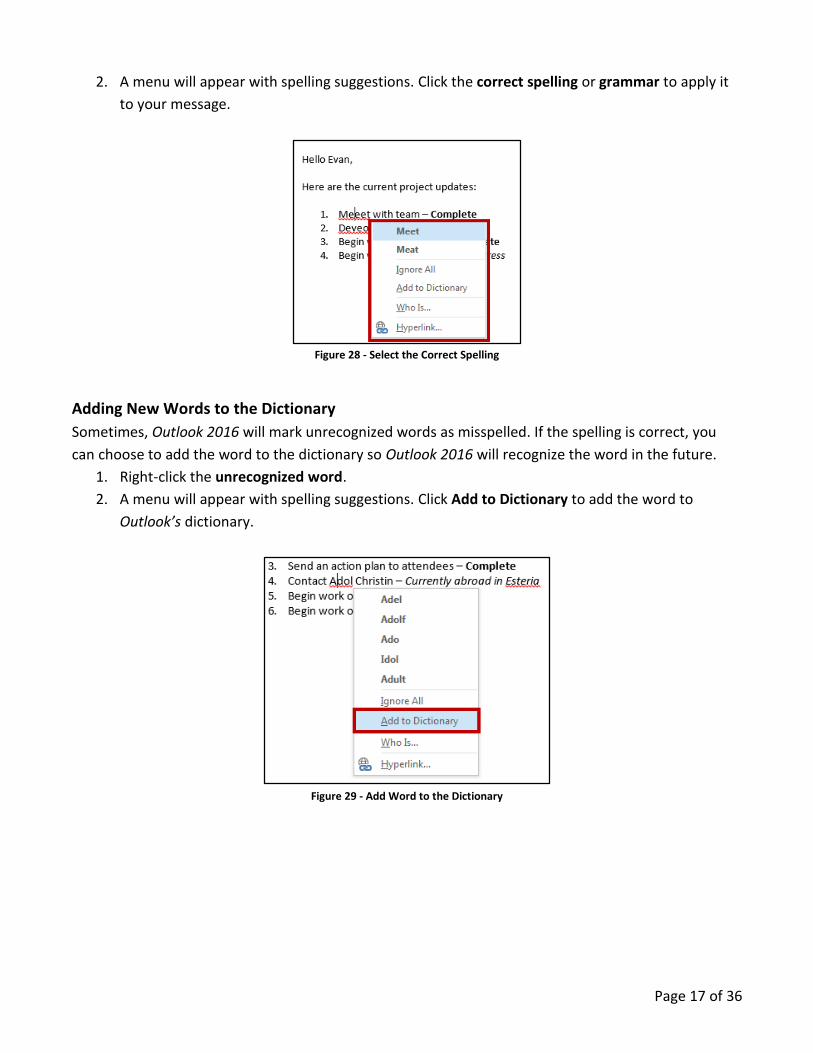
Proofing your Message
Outlook 2016 is set to automatically check your message as it is being typed for misspellings and
grammar errors. Any misspelled words will be underlined in red, while grammar errors will be
underlined in blue (See Figure 27). To correct a misspelled word:
1. Right-click the misspelled word or grammar error.
Figure 27 – Underlined Errors
Page 17 of 36
2. A menu will appear with spelling suggestions. Click the correct spelling or grammar to apply it
to your message.
Figure 28 - Select the Correct Spelling
Adding New Words to the Dictionary
Sometimes, Outlook 2016 will mark unrecognized words as misspelled. If the spelling is correct, you
can choose to add the word to the dictionary so Outlook 2016 will recognize the word in the future.
1. Right-click the unrecognized word.
2. A menu will appear with spelling suggestions. Click Add to Dictionary to add the word to
Outlook’s dictionary.
Figure 29 - Add Word to the Dictionary
Page 18 of 36
Attachments
In Outlook 2016, you can attach files to an email message, as well as other Outlook items like
messages, contacts, or tasks.
To attach a file:
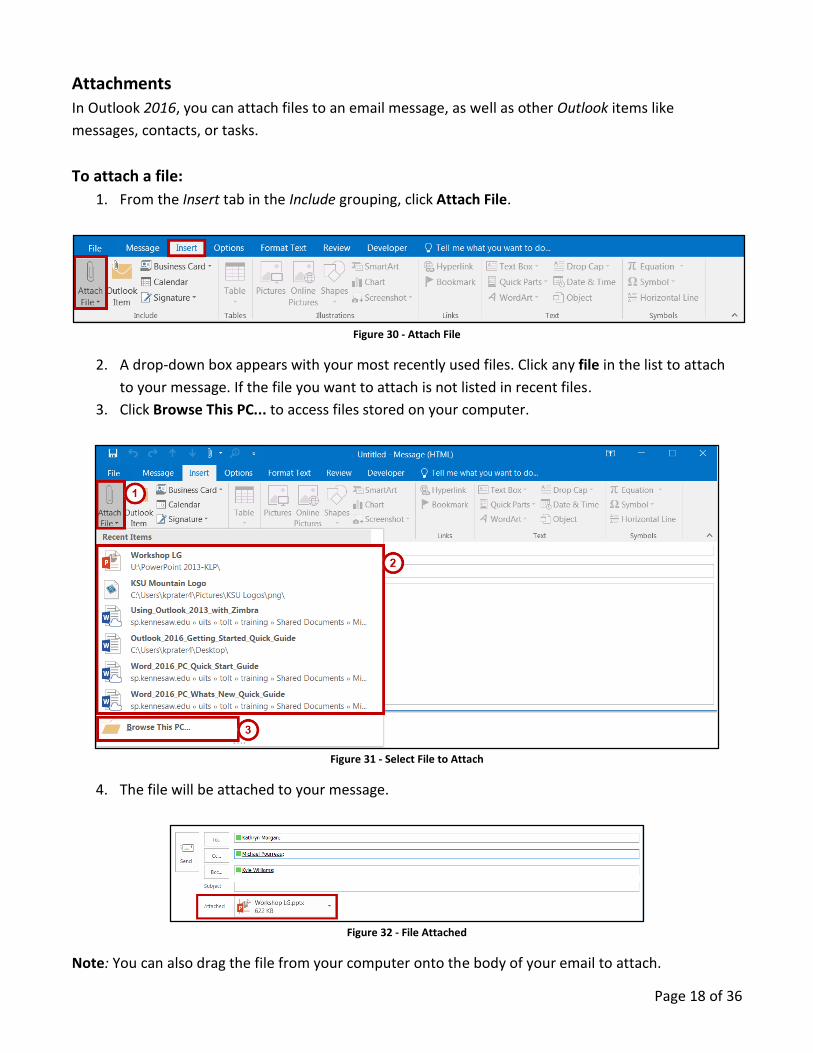
1. From the Insert tab in the Include grouping, click Attach File.
Figure 30 - Attach File
2. A drop-down box appears with your most recently used files. Click any file in the list to attach
to your message. If the file you want to attach is not listed in recent files.
3. Click Browse This PC... to access files stored on your computer.
Figure 31 - Select File to Attach
4. The file will be attached to your message.
Figure 32 - File Attached
Note: You can also drag the file from your computer onto the body of your email to attach.
Page 19 of 36
To attach another message or appointment:
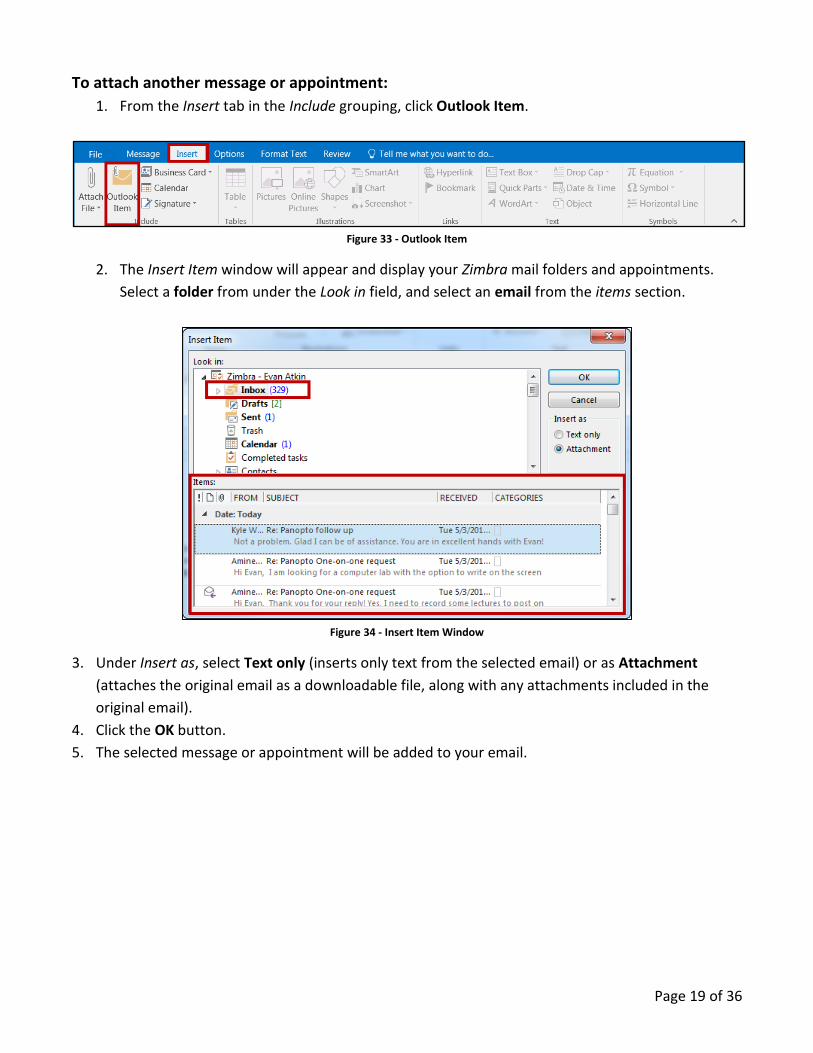
1. From the Insert tab in the Include grouping, click Outlook Item.
Figure 33 - Outlook Item
2. The Insert Item window will appear and display your Zimbra mail folders and appointments.
Select a folder from under the Look in field, and select an email from the items section.
Figure 34 - Insert Item Window
3. Under Insert as, select Text only (inserts only text from the selected email) or as Attachment
(attaches the original email as a downloadable file, along with any attachments included in the
original email).
4. Click the OK button.
5. The selected message or appointment will be added to your email.
Page 20 of 36
Creating Signatures in Outlook
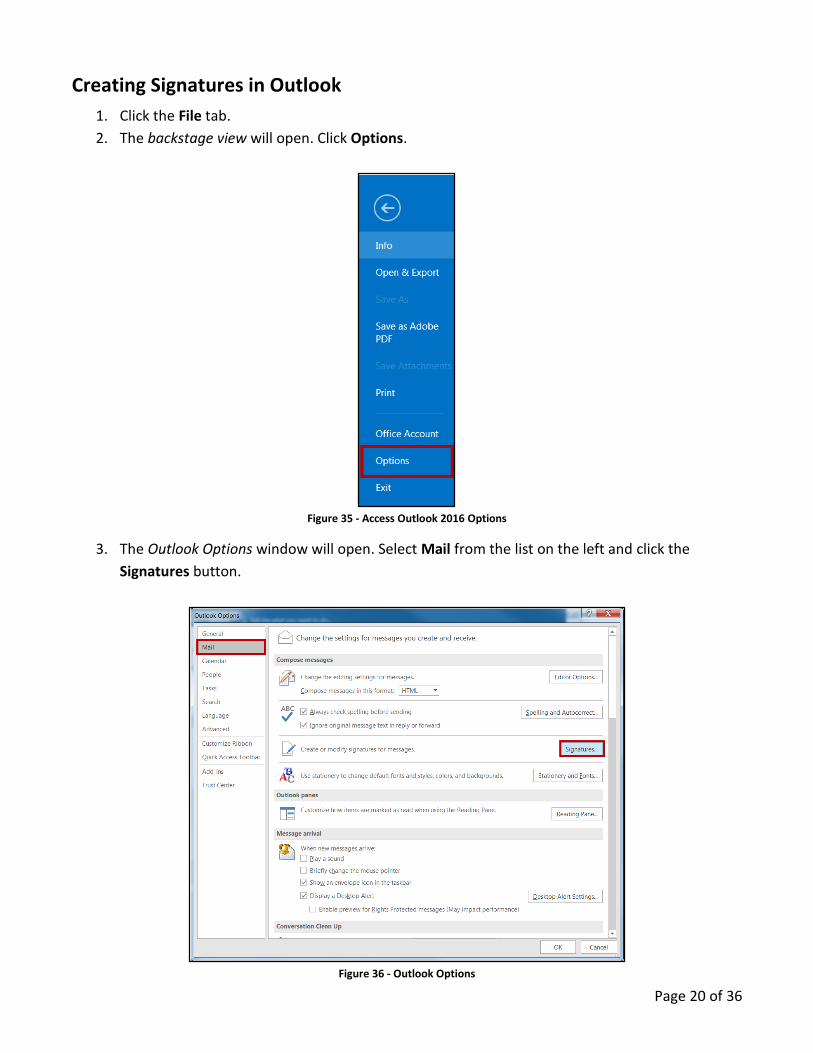
1. Click the File tab.
2. The backstage view will open. Click Options.
Figure 35 - Access Outlook 2016 Options
3. The Outlook Options window will open. Select Mail from the list on the left and click the
Signatures button.
Figure 36 - Outlook Options
Page 21 of 36
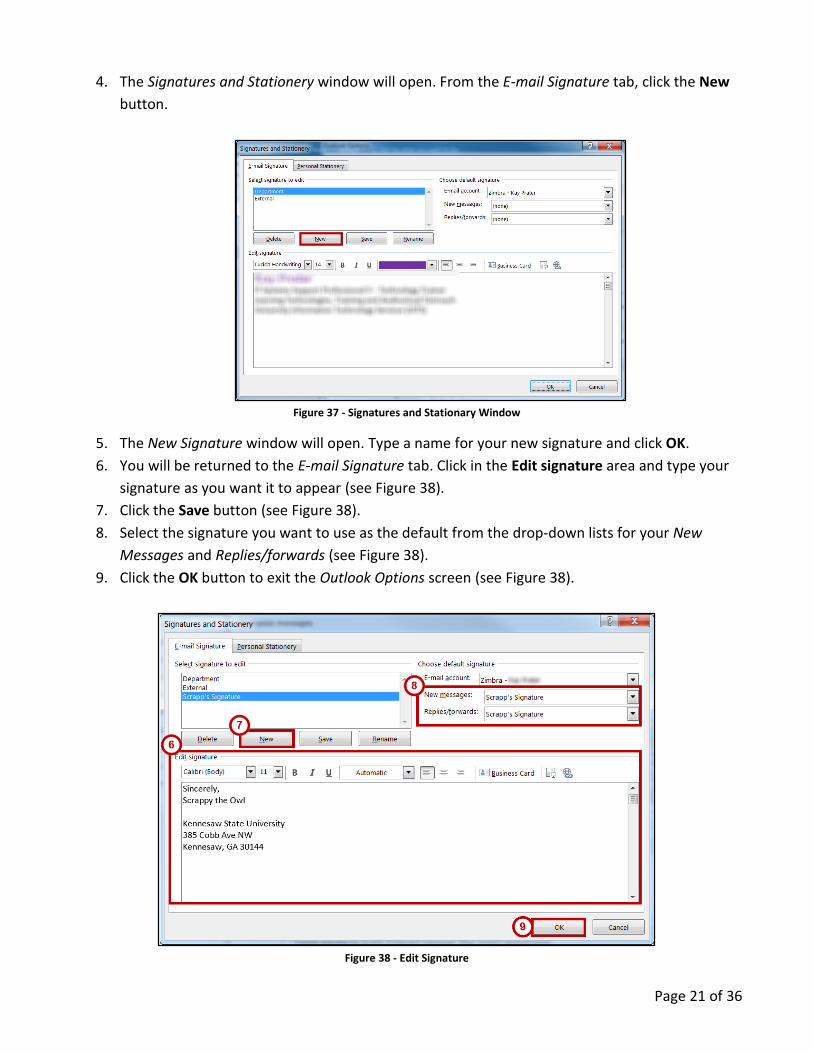
4. The Signatures and Stationery window will open. From the E-mail Signature tab, click the New
button.
Figure 37 - Signatures and Stationary Window
5. The New Signature window will open. Type a name for your new signature and click OK.
6. You will be returned to the E-mail Signature tab. Click in the Edit signature area and type your
signature as you want it to appear (see Figure 38).
7. Click the Save button (see Figure 38).
8. Select the signature you want to use as the default from the drop-down lists for your New
Messages and Replies/forwards (see Figure 38).
9. Click the OK button to exit the Outlook Options screen (see Figure 38).
Figure 38 - Edit Signature
Page 22 of 36
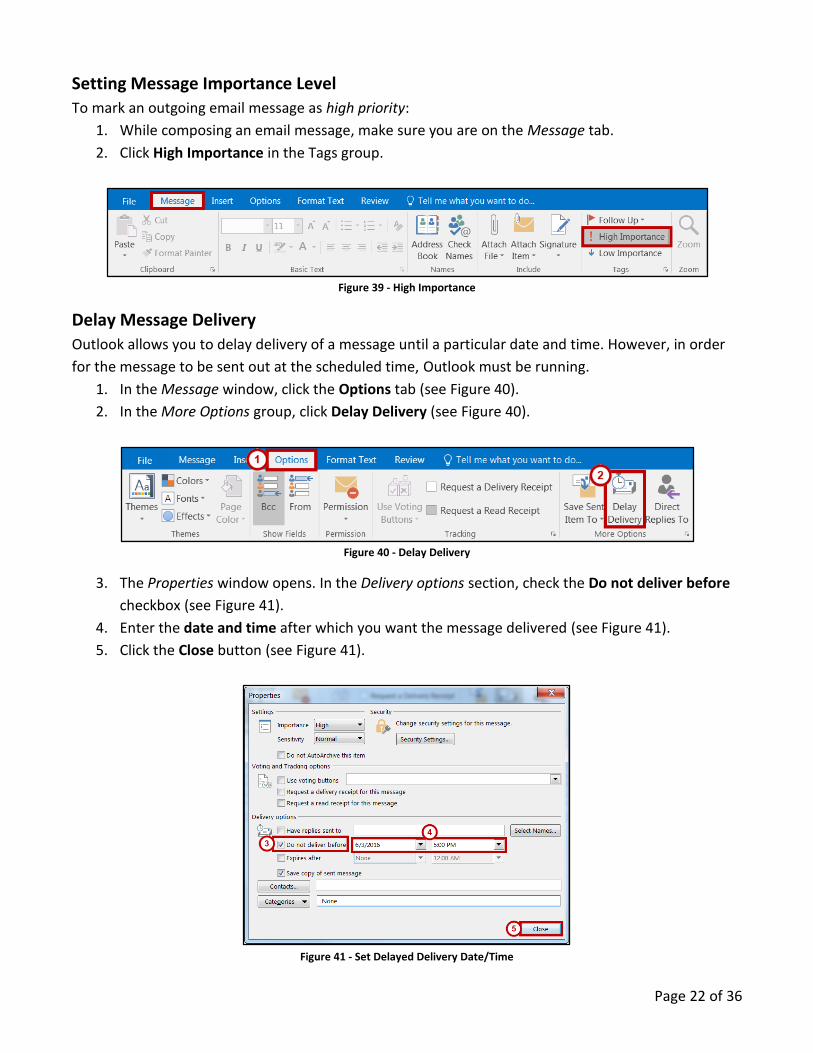
Setting Message Importance Level
To mark an outgoing email message as high priority:
1. While composing an email message, make sure you are on the Message tab.
2. Click High Importance in the Tags group.
Figure 39 - High Importance
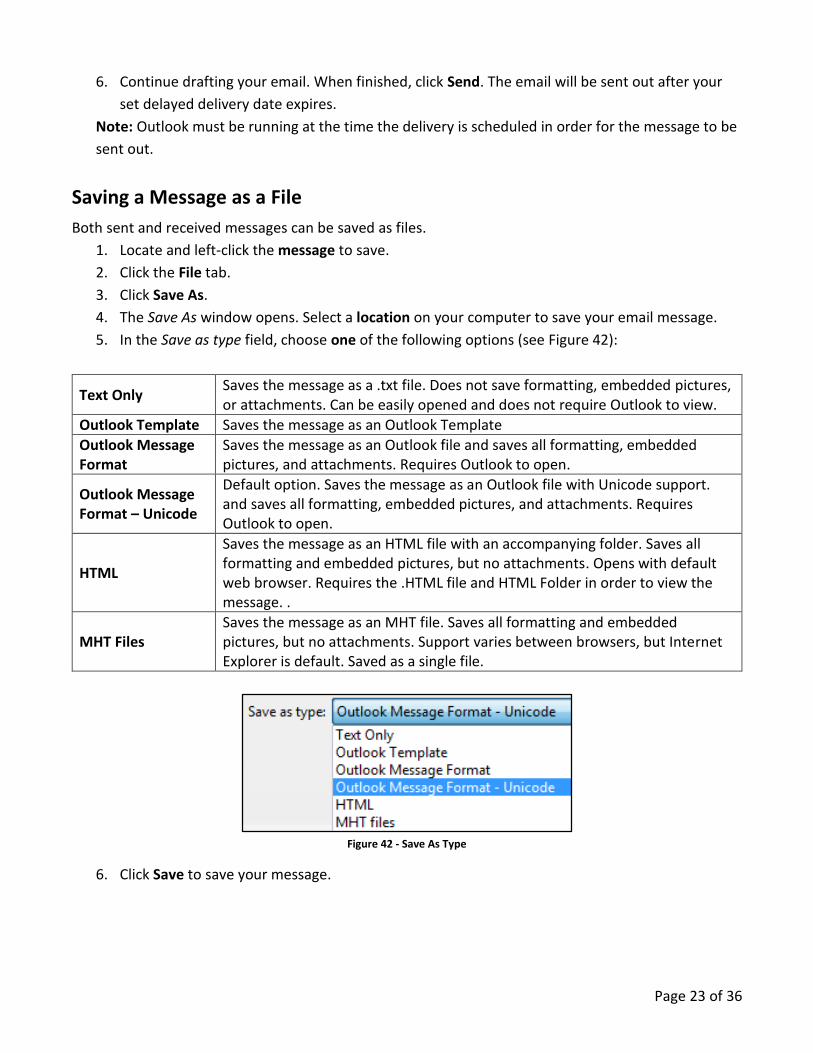
Delay Message Delivery
Outlook allows you to delay delivery of a message until a particular date and time. However, in order
for the message to be sent out at the scheduled time, Outlook must be running.
1. In the Message window, click the Options tab (see Figure 40).
2. In the More Options group, click Delay Delivery (see Figure 40).
Figure 40 - Delay Delivery
3. The Properties window opens. In the Delivery options section, check the Do not deliver before
checkbox (see Figure 41).
4. Enter the date and time after which you want the message delivered (see Figure 41).
5. Click the Close button (see Figure 41).
Figure 41 - Set Delayed Delivery Date/Time
Page 23 of 36
6. Continue drafting your email. When finished, click Send. The email will be sent out after your
set delayed delivery date expires.
Note: Outlook must be running at the time the delivery is scheduled in order for the message to be
sent out.
Saving a Message as a File
Both sent and received messages can be saved as files.
1. Locate and left-click the message to save.
2. Click the File tab.
3. Click Save As.
4. The Save As window opens. Select a location on your computer to save your email message.
5. In the Save as type field, choose one of the following options (see Figure 42):
Text Only Saves the message as a .txt file. Does not save formatting, embedded pictures, or attachments. Can be easily opened and does not require Outlook to view.
Outlook Template Saves the message as an Outlook Template
Outlook Message Format
Saves the message as an Outlook file and saves all formatting, embedded pictures, and attachments. Requires Outlook to open.
Outlook Message Format – Unicode
Default option. Saves the message as an Outlook file with Unicode support. and saves all formatting, embedded pictures, and attachments. Requires Outlook to open.
HTML
Saves the message as an HTML file with an accompanying folder. Saves all formatting and embedded pictures, but no attachments. Opens with default web browser. Requires the .HTML file and HTML Folder in order to view the message. .
MHT Files Saves the message as an MHT file. Saves all formatting and embedded pictures, but no attachments. Support varies between browsers, but Internet Explorer is default. Saved as a single file.
Figure 42 - Save As Type
6. Click Save to save your message.
Page 24 of 36
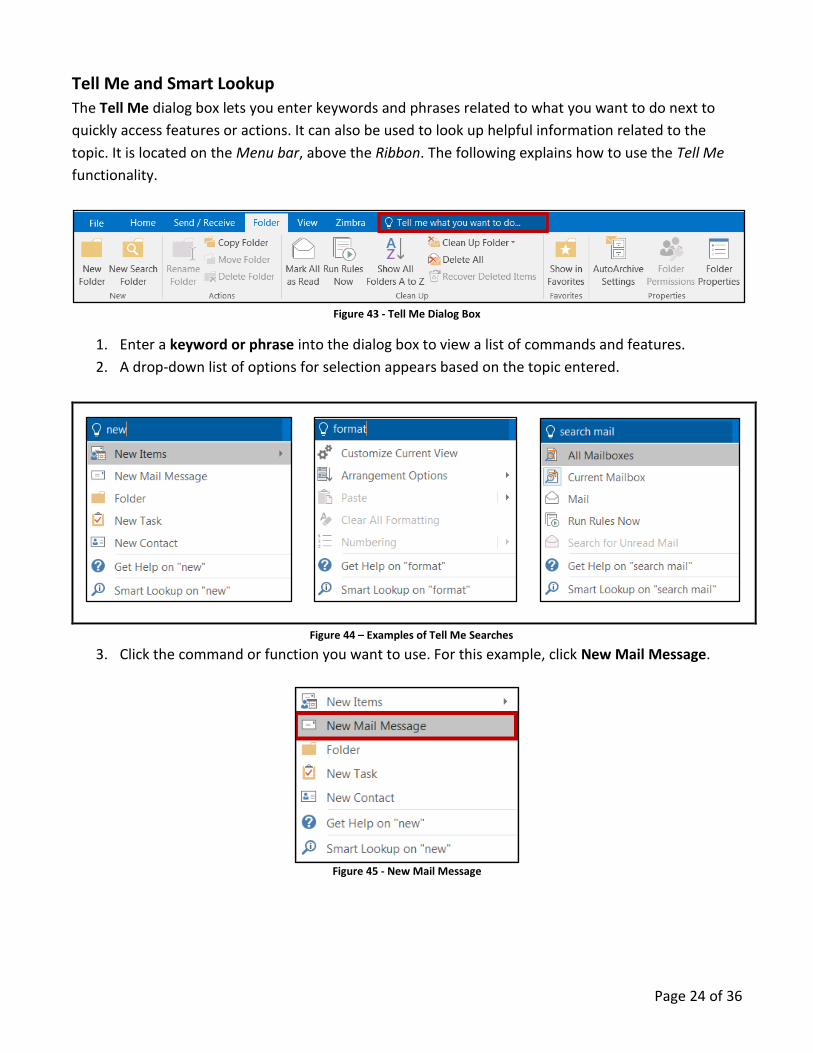
Tell Me and Smart Lookup
The Tell Me dialog box lets you enter keywords and phrases related to what you want to do next to
quickly access features or actions. It can also be used to look up helpful information related to the
topic. It is located on the Menu bar, above the Ribbon. The following explains how to use the Tell Me
functionality.
Figure 43 - Tell Me Dialog Box
1. Enter a keyword or phrase into the dialog box to view a list of commands and features.
2. A drop-down list of options for selection appears based on the topic entered.
3. Click the command or function you want to use. For this example, click New Mail Message.
Figure 45 - New Mail Message
Figure 44 – Examples of Tell Me Searches
Page 25 of 36
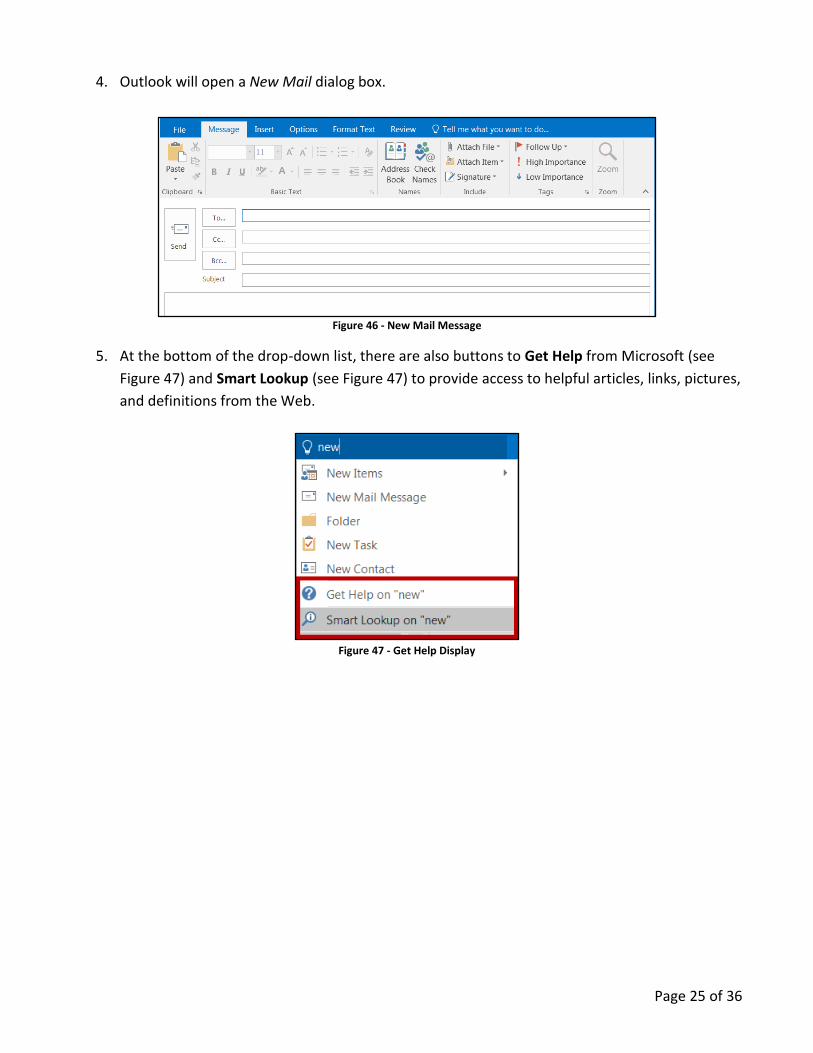
4. Outlook will open a New Mail dialog box.
Figure 46 - New Mail Message
5. At the bottom of the drop-down list, there are also buttons to Get Help from Microsoft (see
Figure 47) and Smart Lookup (see Figure 47) to provide access to helpful articles, links, pictures,
and definitions from the Web.
Figure 47 - Get Help Display
Page 26 of 36
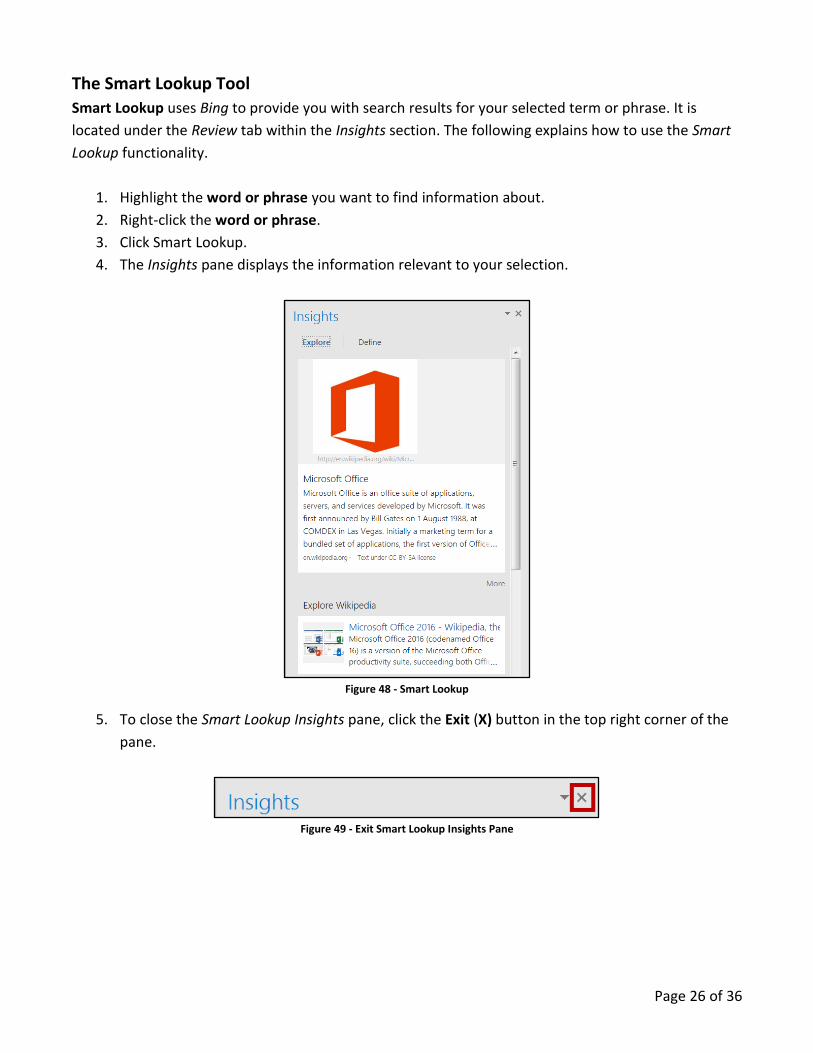
The Smart Lookup Tool
Smart Lookup uses Bing to provide you with search results for your selected term or phrase. It is
located under the Review tab within the Insights section. The following explains how to use the Smart
Lookup functionality.
1. Highlight the word or phrase you want to find information about.
2. Right‐click the word or phrase.
3. Click Smart Lookup.
4. The Insights pane displays the information relevant to your selection.
Figure 48 - Smart Lookup
5. To close the Smart Lookup Insights pane, click the Exit (X) button in the top right corner of the
pane.
Figure 49 - Exit Smart Lookup Insights Pane
Page 27 of 36
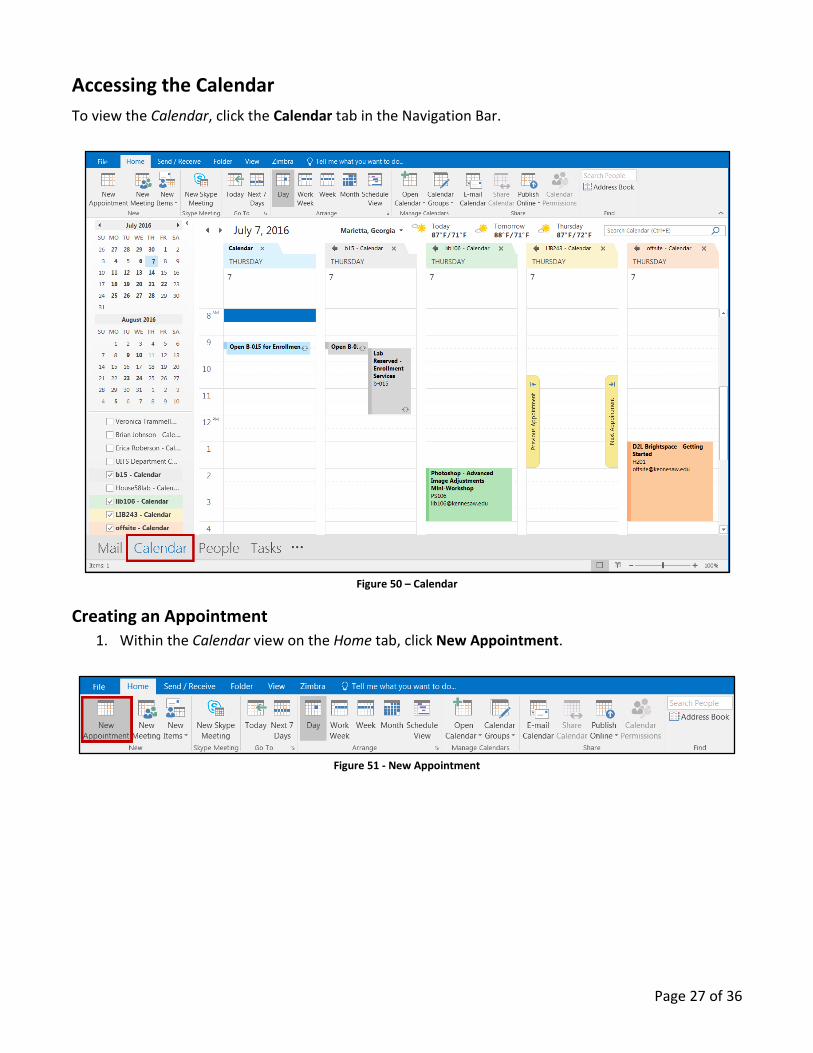
Accessing the Calendar
To view the Calendar, click the Calendar tab in the Navigation Bar.
Figure 50 – Calendar
Creating an Appointment
1. Within the Calendar view on the Home tab, click New Appointment.
Figure 51 - New Appointment
Page 28 of 36
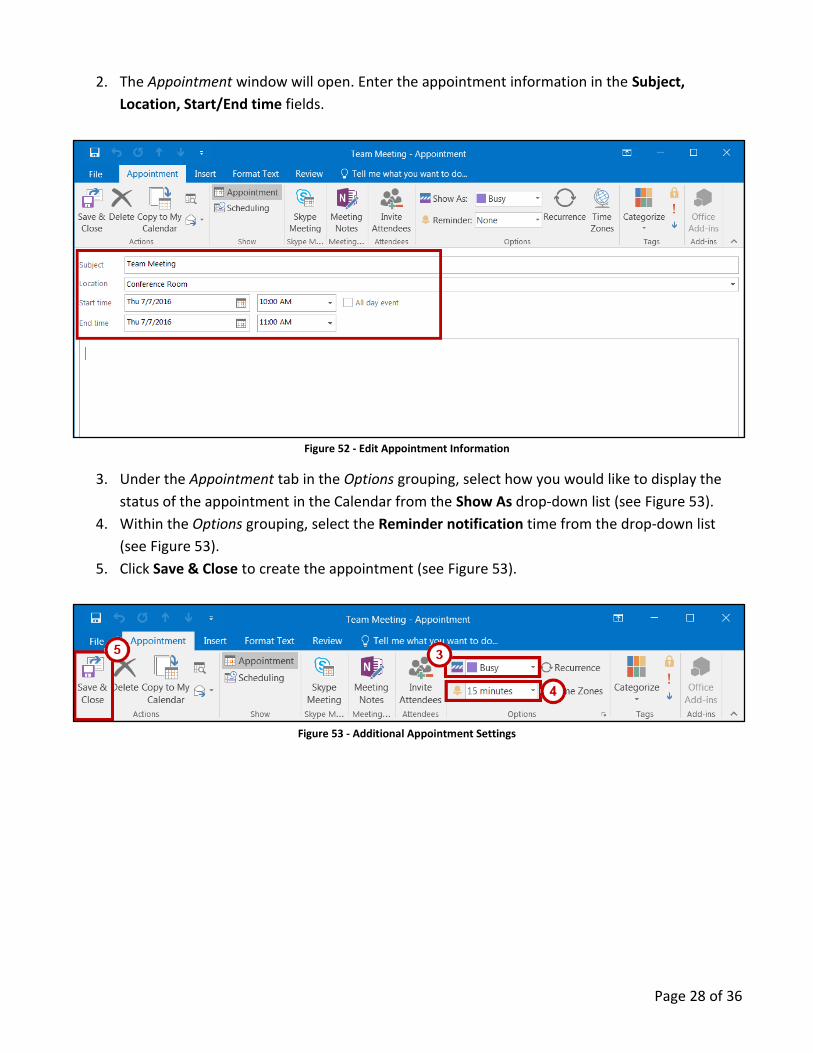
2. The Appointment window will open. Enter the appointment information in the Subject,
Location, Start/End time fields.
Figure 52 - Edit Appointment Information
3. Under the Appointment tab in the Options grouping, select how you would like to display the
status of the appointment in the Calendar from the Show As drop-down list (see Figure 53).
4. Within the Options grouping, select the Reminder notification time from the drop-down list
(see Figure 53).
5. Click Save & Close to create the appointment (see Figure 53).
Figure 53 - Additional Appointment Settings
Page 29 of 36
Creating a Recurring Appointment
1. Follow steps 1-4 in the Creating an Appointment section.
2. Under the Appointments tab in the Options group, click Recurrence.
Figure 54 - Click Recurrence
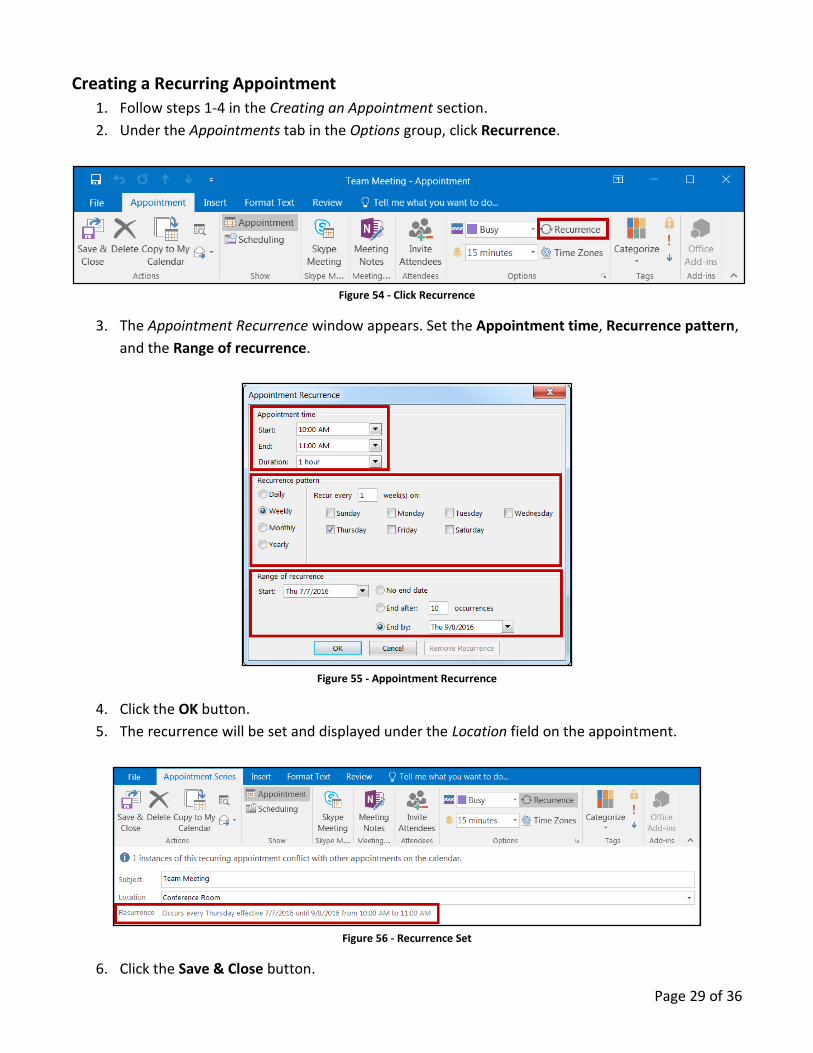
3. The Appointment Recurrence window appears. Set the Appointment time, Recurrence pattern,
and the Range of recurrence.
Figure 55 - Appointment Recurrence
4. Click the OK button.
5. The recurrence will be set and displayed under the Location field on the appointment.
Figure 56 - Recurrence Set
6. Click the Save & Close button.
Page 30 of 36
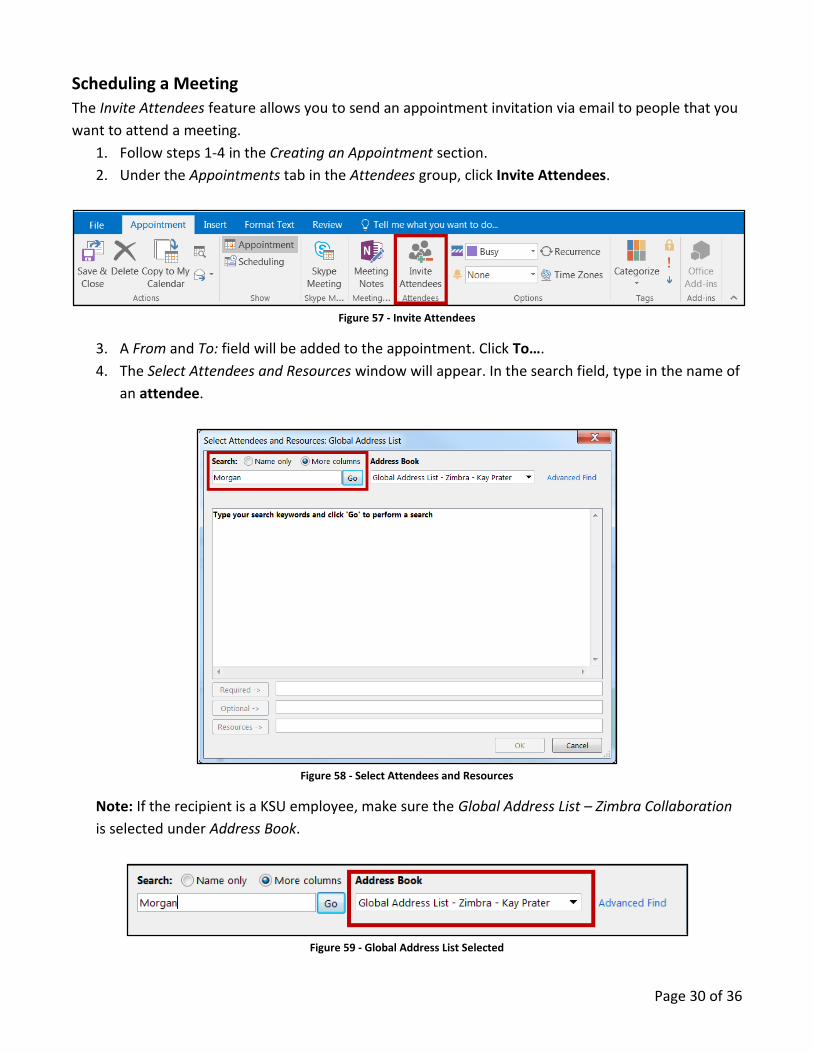
Scheduling a Meeting
The Invite Attendees feature allows you to send an appointment invitation via email to people that you
want to attend a meeting.
1. Follow steps 1-4 in the Creating an Appointment section.
2. Under the Appointments tab in the Attendees group, click Invite Attendees.
Figure 57 - Invite Attendees
3. A From and To: field will be added to the appointment. Click To….
4. The Select Attendees and Resources window will appear. In the search field, type in the name of
an attendee.
Figure 58 - Select Attendees and Resources
Note: If the recipient is a KSU employee, make sure the Global Address List – Zimbra Collaboration
is selected under Address Book.
Figure 59 - Global Address List Selected
Page 31 of 36
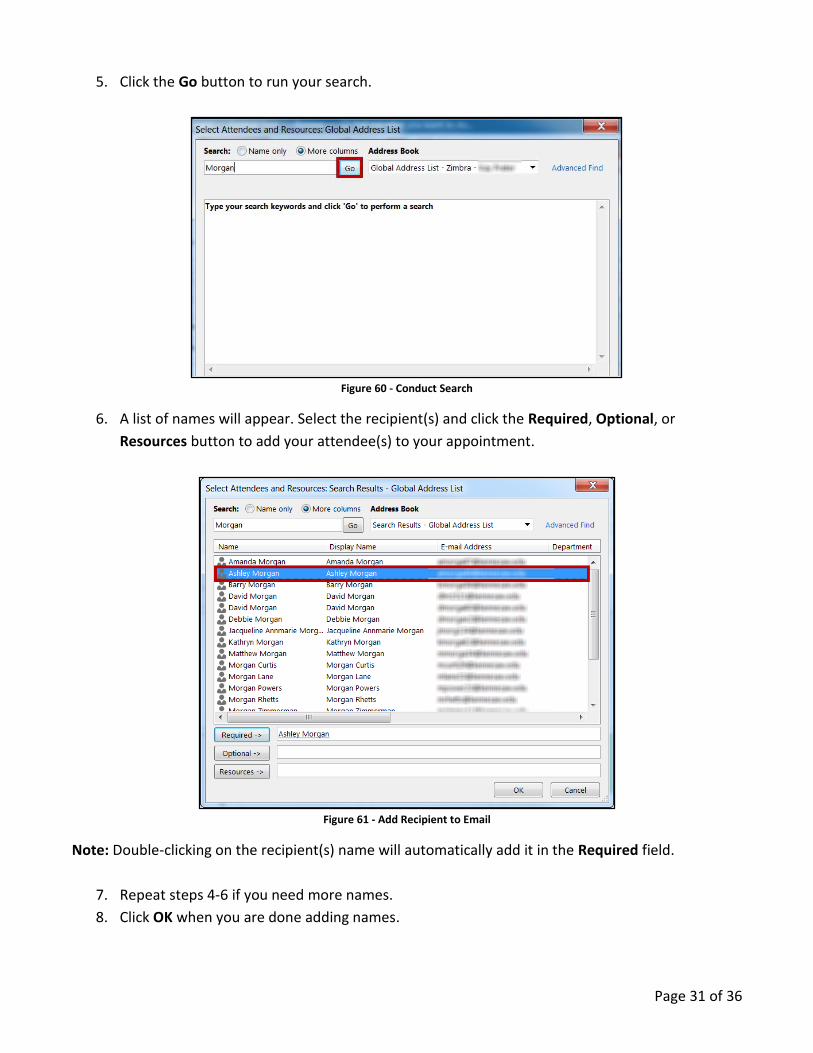
5. Click the Go button to run your search.
Figure 60 - Conduct Search
6. A list of names will appear. Select the recipient(s) and click the Required, Optional, or
Resources button to add your attendee(s) to your appointment.
Figure 61 - Add Recipient to Email
Note: Double-clicking on the recipient(s) name will automatically add it in the Required field.
7. Repeat steps 4-6 if you need more names.
8. Click OK when you are done adding names.
Page 32 of 36
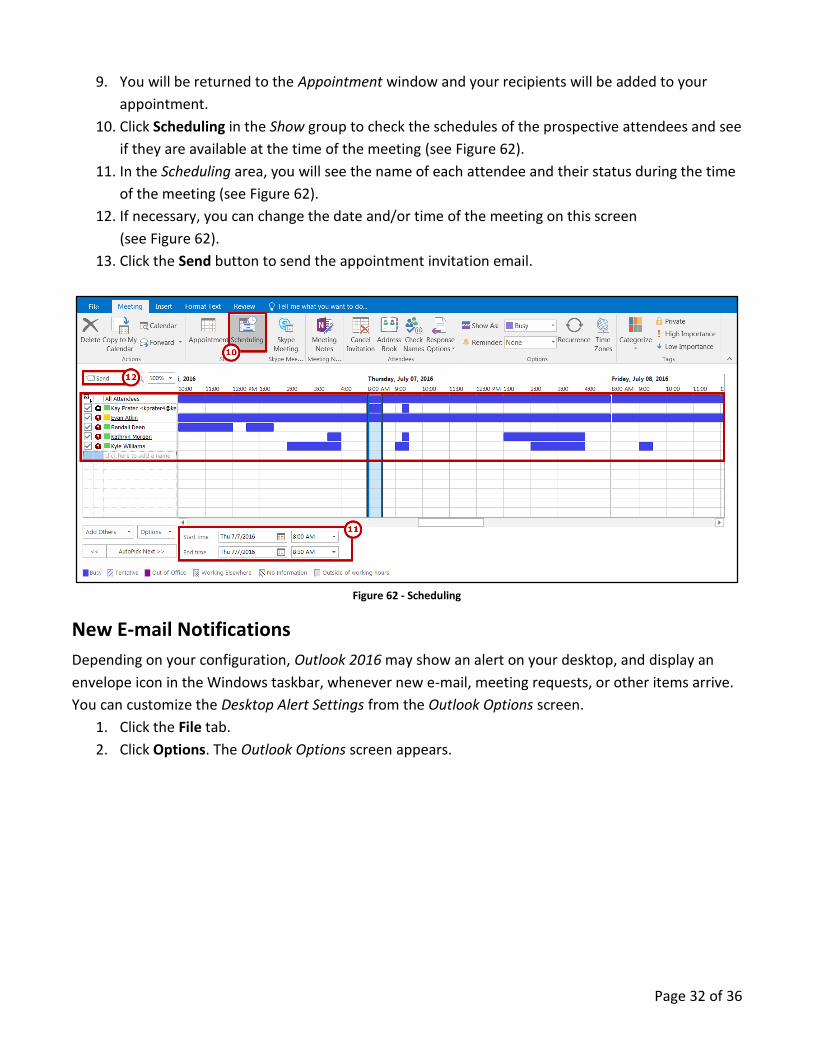
9. You will be returned to the Appointment window and your recipients will be added to your
appointment.
10. Click Scheduling in the Show group to check the schedules of the prospective attendees and see
if they are available at the time of the meeting (see Figure 62).
11. In the Scheduling area, you will see the name of each attendee and their status during the time
of the meeting (see Figure 62).
12. If necessary, you can change the date and/or time of the meeting on this screen
(see Figure 62).
13. Click the Send button to send the appointment invitation email.
Figure 62 - Scheduling
New E-mail Notifications
Depending on your configuration, Outlook 2016 may show an alert on your desktop, and display an
envelope icon in the Windows taskbar, whenever new e-mail, meeting requests, or other items arrive.
You can customize the Desktop Alert Settings from the Outlook Options screen.
1. Click the File tab.
2. Click Options. The Outlook Options screen appears.
Page 33 of 36
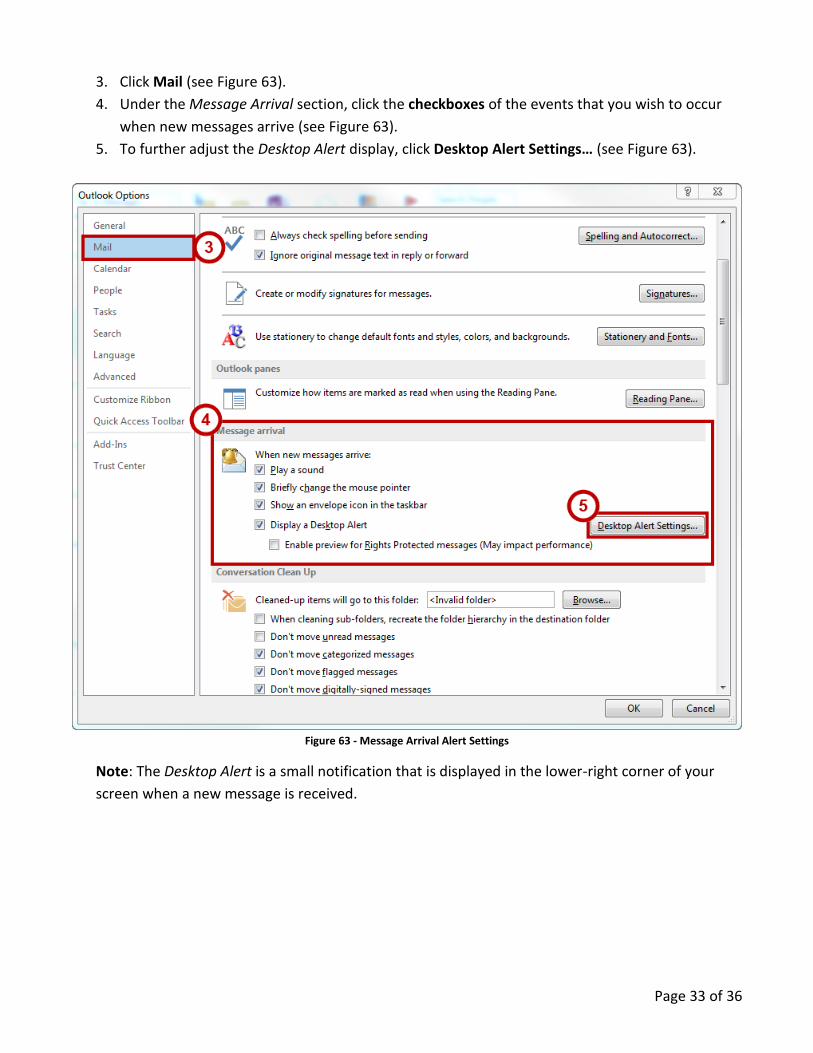
3. Click Mail (see Figure 63).
4. Under the Message Arrival section, click the checkboxes of the events that you wish to occur
when new messages arrive (see Figure 63).
5. To further adjust the Desktop Alert display, click Desktop Alert Settings… (see Figure 63).
Figure 63 - Message Arrival Alert Settings
Note: The Desktop Alert is a small notification that is displayed in the lower-right corner of your
screen when a new message is received.

Page 34 of 36
Automatically Archiving Emails
AutoArchive is turned off by default. To adjust the AutoArchive settings to automatically archive an
email folder:
1. Click the folder you would like to archive. (e.g. Inbox).
2. Click the Folder tab (see Figure 64).
3. In the Properties grouping, click AutoArchive Settings (see Figure 64).
Figure 64 - AutoArchive Settings
4. The Folder Properties screen appears. Select Archive this folder using these settings:
(see Figure 65).
5. Next to Clean out items older than, enter a time (see Figure 65).
6. Select Move old items to: (see Figure 65).
7. Click Browse… (see Figure 65)
8. The File Explorer window will open. Select a location on your computer to store your Outlook
archive and click OK.
9. Click Apply (see Figure 65).
10. Click OK (see Figure 65).
Figure 65 - Set Up AutoArchive
Page 35 of 36
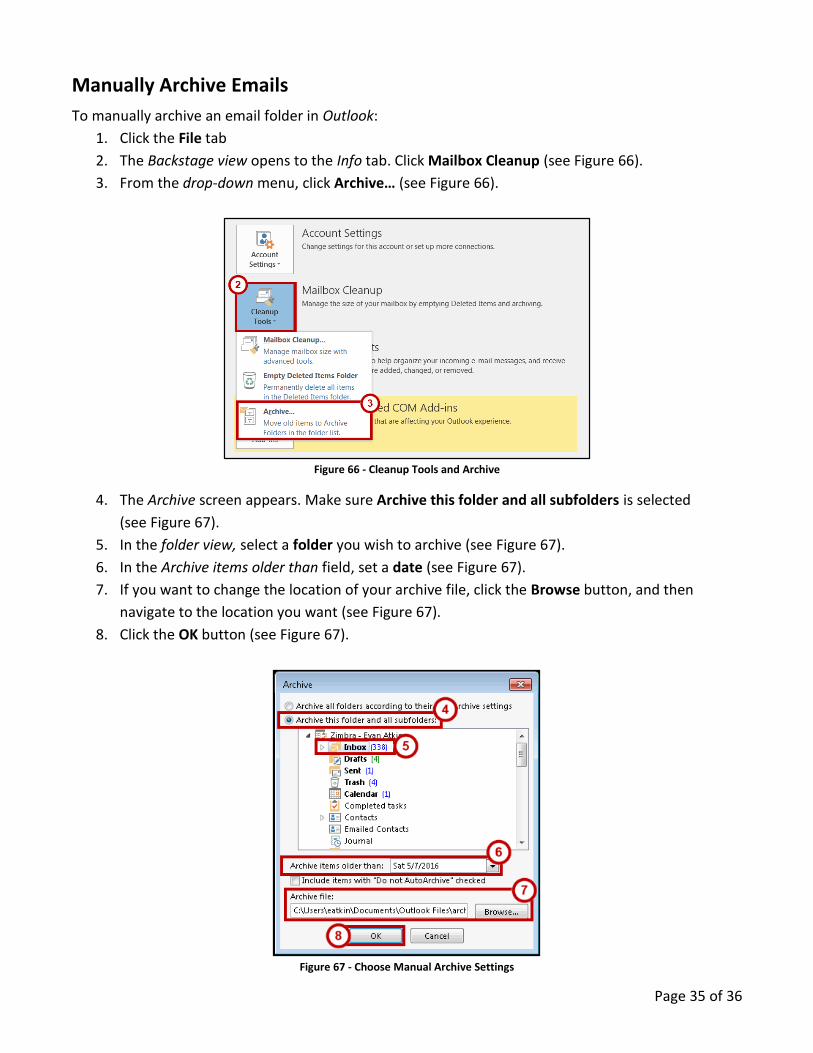
Manually Archive Emails
To manually archive an email folder in Outlook:
1. Click the File tab
2. The Backstage view opens to the Info tab. Click Mailbox Cleanup (see Figure 66).
3. From the drop-down menu, click Archive… (see Figure 66).
Figure 66 - Cleanup Tools and Archive
4. The Archive screen appears. Make sure Archive this folder and all subfolders is selected
(see Figure 67).
5. In the folder view, select a folder you wish to archive (see Figure 67).
6. In the Archive items older than field, set a date (see Figure 67).
7. If you want to change the location of your archive file, click the Browse button, and then
navigate to the location you want (see Figure 67).
8. Click the OK button (see Figure 67).
Figure 67 - Choose Manual Archive Settings
Page 36 of 36
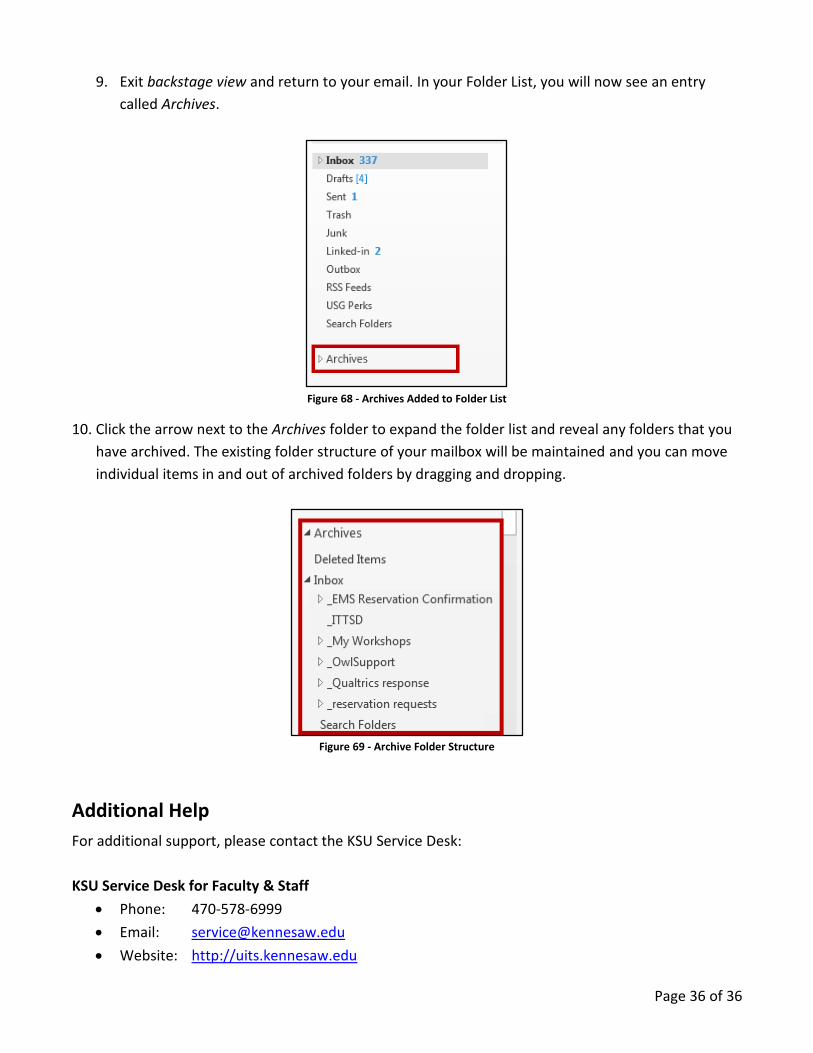
9. Exit backstage view and return to your email. In your Folder List, you will now see an entry
called Archives.
Figure 68 - Archives Added to Folder List
10. Click the arrow next to the Archives folder to expand the folder list and reveal any folders that you
have archived. The existing folder structure of your mailbox will be maintained and you can move
individual items in and out of archived folders by dragging and dropping.
Figure 69 - Archive Folder Structure
Additional Help
For additional support, please contact the KSU Service Desk:
KSU Service Desk for Faculty & Staff
Phone: 470-578-6999
Email: [email protected]
Website: http://uits.kennesaw.edu