Embed Size (px)
Citation preview
Microsoft Word Notes
Computer Literacy BASICS
Computer Literacy BASICS2
Microsoft Word
Microsoft Word is a powerful word processing application.
You can use word to create tables, reports, memos, letters, and Web pages.
Computer Literacy BASICS3
Entering Text in a Document
As you enter text, the insertion point moves to the right.
Word automatically flags spelling and grammar errors as you type.– A red wavy underline is a spelling error.– A green wavy underline is a grammar error.
Computer Literacy BASICS4
Entering Text in a Document (cont.)
You can use the Backspace key to delete characters to the left of the insertion point and then you can rekey the text correctly.
As you reach the end of a line, Word wraps the text to the next line if you keep typing.
To insert a blank line between paragraphs, press the Enter key twice.
Computer Literacy BASICS5
Moving Through the Document
To scroll:– Drag the vertical and horizontal scroll boxes.– Click the scroll arrows.– Click in the scroll bar channel.
To reposition the insertion point:– Move the pointer to the desired location.– Click the mouse button.

Computer Literacy BASICS6
Keyboard Shortcuts for Moving the Insertion Point
Computer Literacy BASICS7
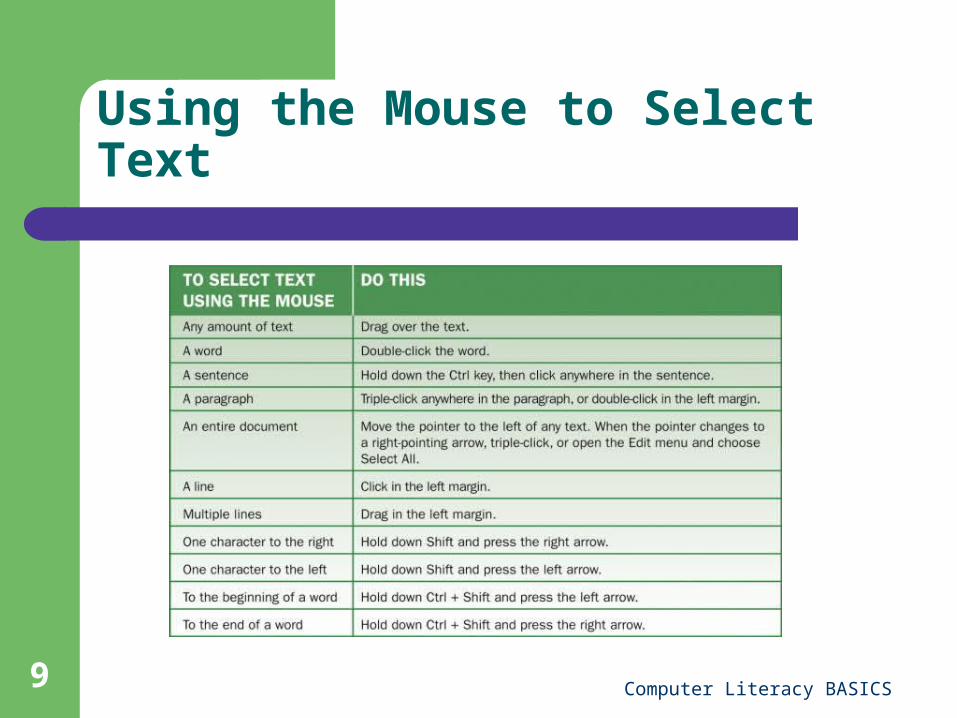
Selecting Text
You select text to identify blocks of text you want to move, copy, delete, or replace.
A block of text can be a single character, a word, a paragraph, or an entire document.
The Select All command on the Home Tab (or Ctrl + A) will select everything in a document.
Computer Literacy BASICS8
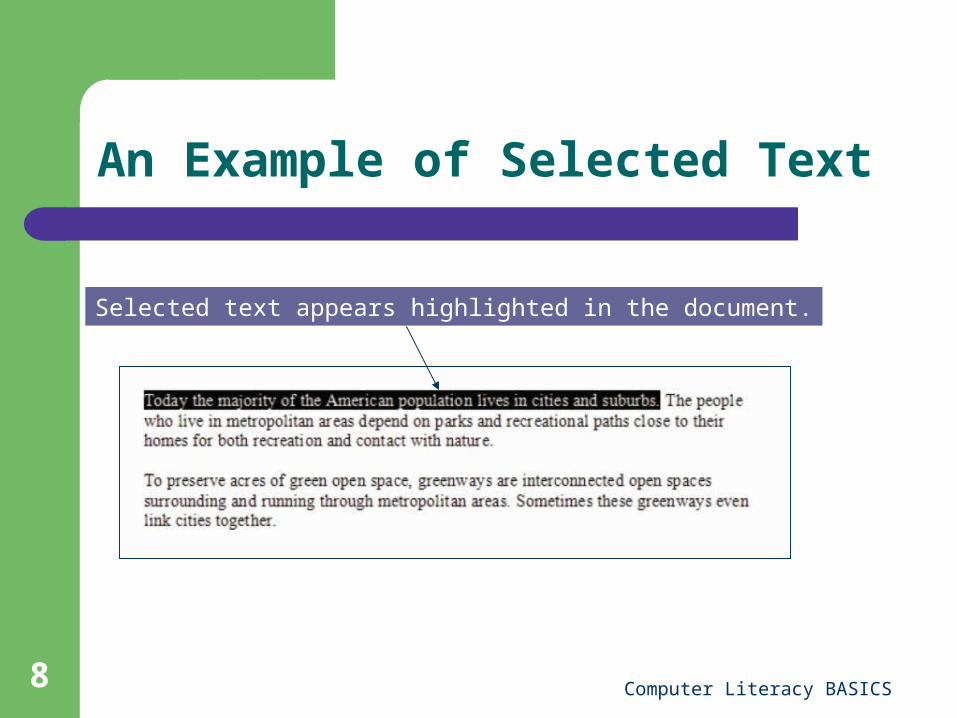
An Example of Selected Text
Selected text appears highlighted in the document.
Computer Literacy BASICS9
Using the Mouse to Select Text
Computer Literacy BASICS10
Changing Views in Word
You can change views in any Office application from the View Tab. Word offers several different options for viewing a document:
Print Layout view shows how a document will look when it is printed; this is the default view.
Full Screen Reading view shows a maximized screen space for reading; two pages are shown side by side.
Computer Literacy BASICS11
Other Views Available in Word
Web Layout view displays a document as it would appear in a Web browser.
Outline view shows on the screen in an outline format.
Draft view shows only the basic document, without headers, footers, and page numbers.
Computer Literacy BASICS12
Deleting Characters
You can delete characters one character at a time by
Using the Backspace key– This deletes the character to the left of the insertion
point each time the key is pressed. Using the Delete key
– This deletes the character to the right of the insertion point each time the key is pressed.
Holding down either key will continue to delete characters until the key is released.
Computer Literacy BASICS13
Inserting Characters
Word enters text in Insert mode by default.– When you type new text in front of existing text, the
existing text shifts to the right to make room for the new text.
Turning off Insert mode activates Overtype mode.– When you type new text, it replaces existing text.
Toggle between these modes by– Pressing the Insert key on the keyboard
Computer Literacy BASICS14
Undo, Redo, and Repeat
The Undo command on the Quick Access Toolbar(or the Undo button) can be used to reverse the last edit that you made to the text or document.
The Redo command on the Quick Access Toolbar (or the Redo button) can be used to reverse an Undo action.
You can use the Repeat command on the Quick Access Toolbar to repeat your last action or edit.
Shortcut keys for these commands are Ctrl + Z for Undo and Ctrl + Y for Redo or Repeat.
Computer Literacy BASICS15
Copying and Moving Text
Selected text can be copied or moved from its location in the active document to– Some other location in the active document– Some other Word document– Some other application’s document
The most common methods of doing this are– Drag-and-drop editing– Cut, Copy, and Paste commands
Computer Literacy BASICS16
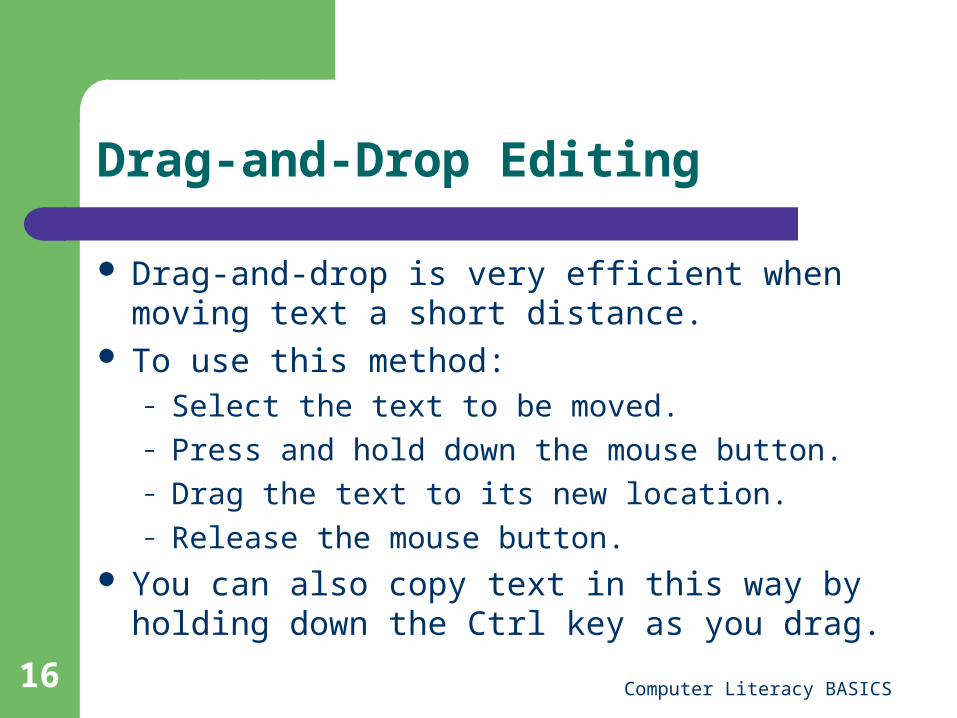
Drag-and-Drop Editing
Drag-and-drop is very efficient when moving text a short distance.
To use this method:– Select the text to be moved.– Press and hold down the mouse button.– Drag the text to its new location.– Release the mouse button.
You can also copy text in this way by holding down the Ctrl key as you drag.
Computer Literacy BASICS17
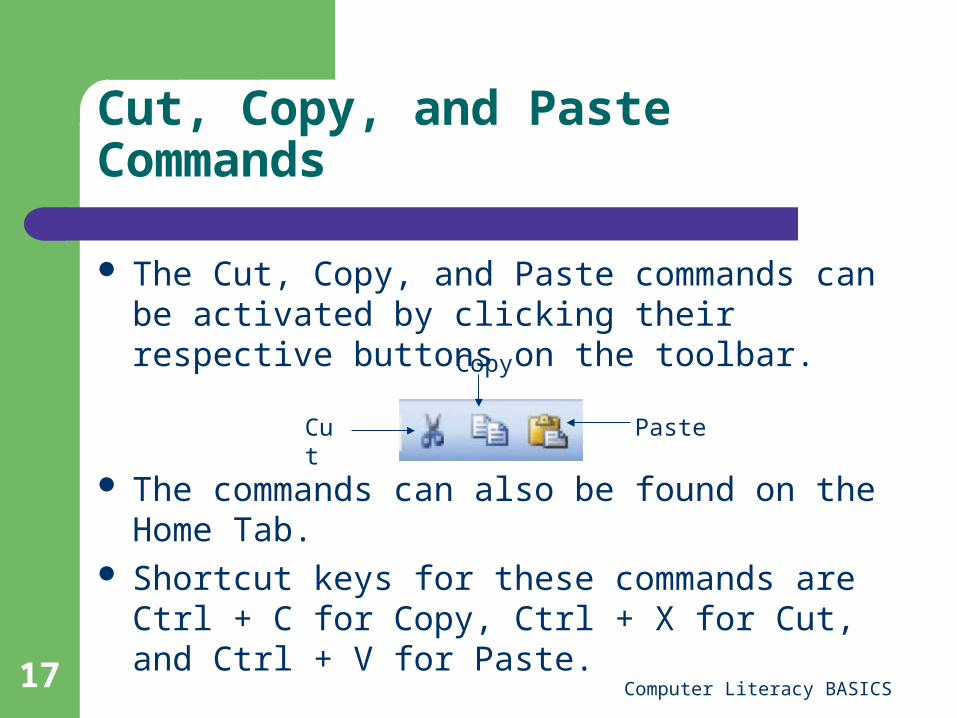
Cut, Copy, and Paste Commands
The Cut, Copy, and Paste commands can be activated by clicking their respective buttons on the toolbar.
The commands can also be found on the Home Tab.
Shortcut keys for these commands are Ctrl + C for Copy, Ctrl + X for Cut, and Ctrl + V for Paste.
Cut Paste
Copy
Computer Literacy BASICS18
Cut, Copy, and Paste Commands (cont.)
Cut is used to remove selected text from the document.
Copy is used to copy selected text. Cut and copied text is placed on the
Clipboard, a temporary storage area. Paste is used to insert text from the
Clipboard back into the document at the location of the insertion point.
Computer Literacy BASICS19
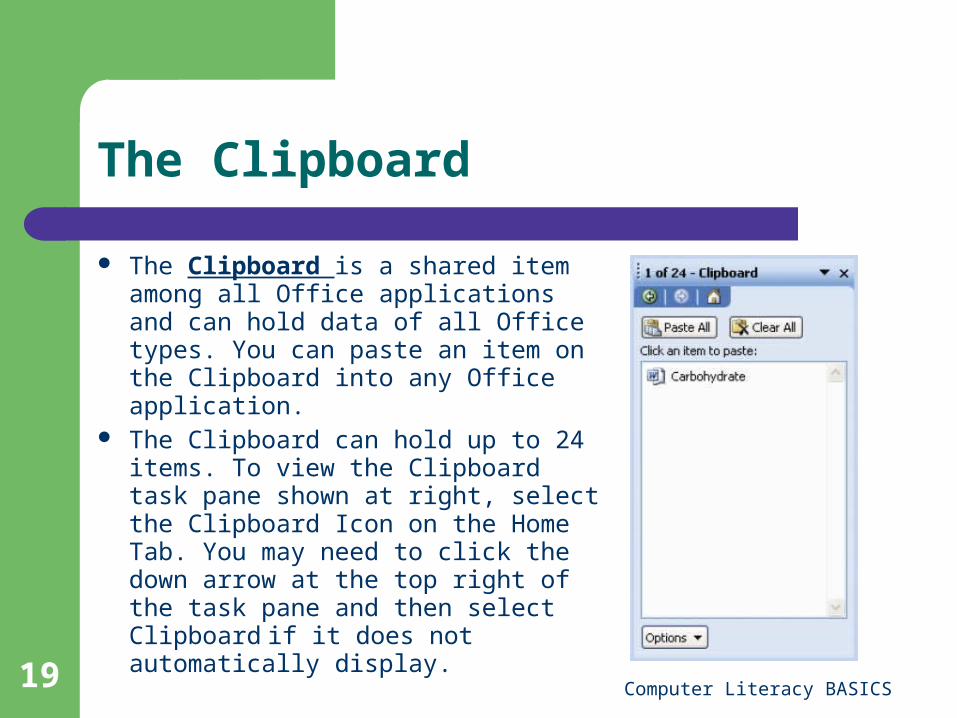
The Clipboard
The Clipboard is a shared item among all Office applications and can hold data of all Office types. You can paste an item on the Clipboard into any Office application.
The Clipboard can hold up to 24 items. To view the Clipboard task pane shown at right, select the Clipboard Icon on the Home Tab. You may need to click the down arrow at the top right of the task pane and then select Clipboard if it does not automatically display.
Computer Literacy BASICS20
Finding Text
Use Word’s Find command to search for one or all occurrences of a word or phrase in your document. Select the Find command on the Edit menu to open the Find and Replace dialog box.
Enter the word or phrase to find in the text box and then click the Find Next button.
Each time you click Find Next, Word will search for another occurrence.
Computer Literacy BASICS21
Replacing Text
Use the Replace feature to search for text and replace it with new text. Select the Replace command on the Edit menu to open the Replace tab in the Find and Replace dialog box.
Enter the Find criteria, enter the Replace with criteria, and click the Find Next button.
Click Replace and Find Next or just Find Next to selectively replace text, or click Replace All to replace all occurrences.
Computer Literacy BASICS22
Formatting Text
Formats are applied to text to manipulate the appearance of the text.
You can change the size, font, attributes, indents, or list styles when you add a format to text.
There are three categories of formats in Word:– Character formats, such as text color and underline– Paragraph formats, such as line spacing and
alignment– Document formats, such as paper orientation and
margins
Computer Literacy BASICS23
Character Formats: Fonts
A font is the design of a typeface. Fonts come in many styles, and you can use
more than one font in a document. The size of the type is measured in points
(the larger the point size, the bigger the text). Use the Home Tab to change the font,
attribute, or size for selected text.
Computer Literacy BASICS24
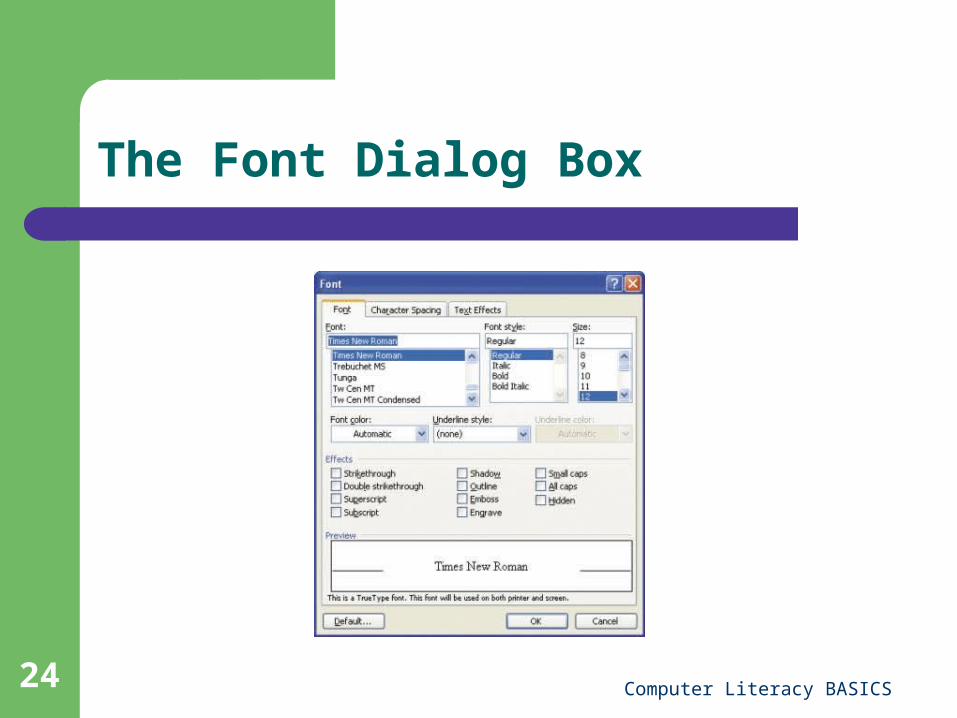
The Font Dialog Box
Computer Literacy BASICS25
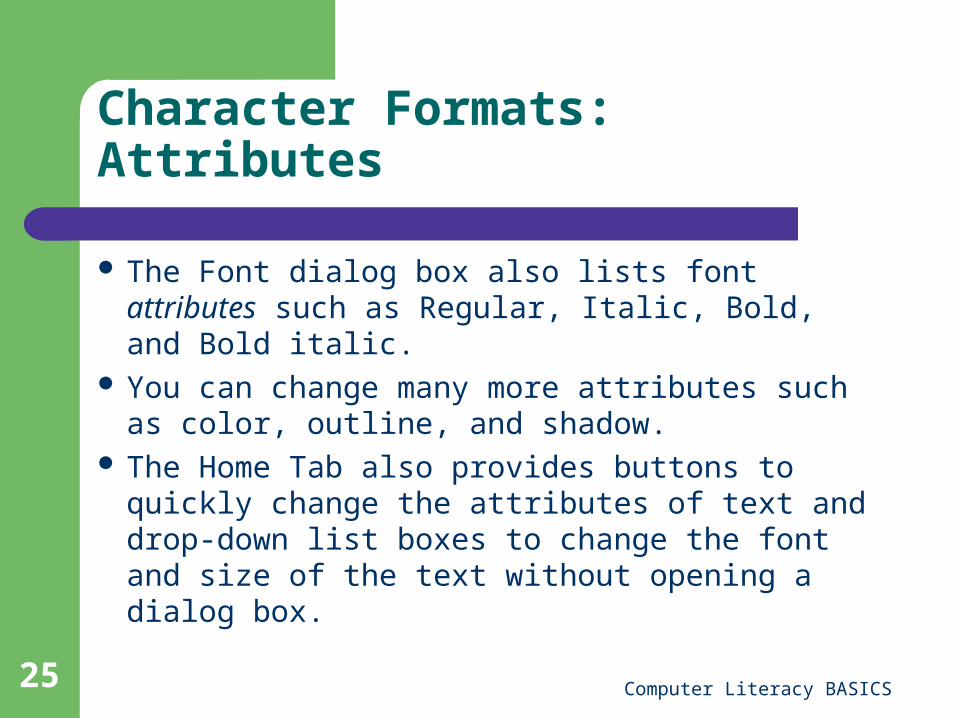
Character Formats: Attributes
The Font dialog box also lists font attributes such as Regular, Italic, Bold, and Bold italic.
You can change many more attributes such as color, outline, and shadow.
The Home Tab also provides buttons to quickly change the attributes of text and drop-down list boxes to change the font and size of the text without opening a dialog box.
Computer Literacy BASICS26
Paragraph Formats: Line Spacing
The default line spacing in Word is 1.15 lines– When text is double-spaced, there is a blank
line between text lines.– The blank line between text lines is half the
space for 1½-line spacing.
Computer Literacy BASICS27
Paragraph Formats: Line Spacing (cont.)
You can change line spacing by– Using the Line Spacing button on the Home
Tab.– Clicking the Paragraph Dialog box button, and
then changing the spacing option in the Paragraph dialog box.
You can also adjust the spacing before and after paragraphs in the Paragraph dialog box.
Computer Literacy BASICS28
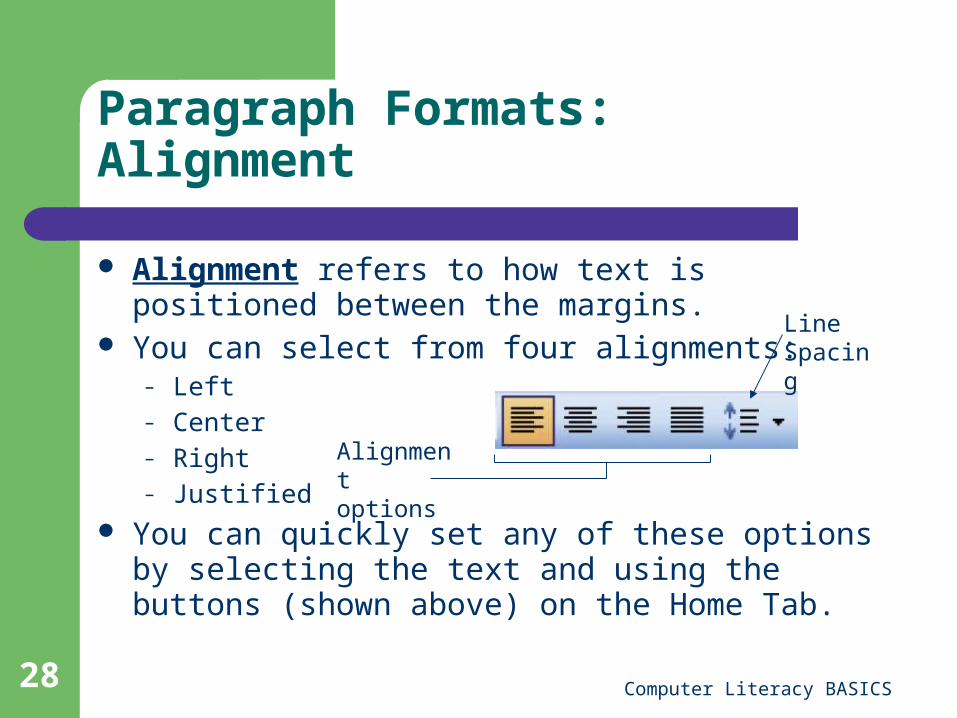
Paragraph Formats: Alignment
Alignment refers to how text is positioned between the margins.
You can select from four alignments:– Left– Center– Right– Justified
You can quickly set any of these options by selecting the text and using the buttons (shown above) on the Home Tab.
Alignment options
Line Spacing
Computer Literacy BASICS29
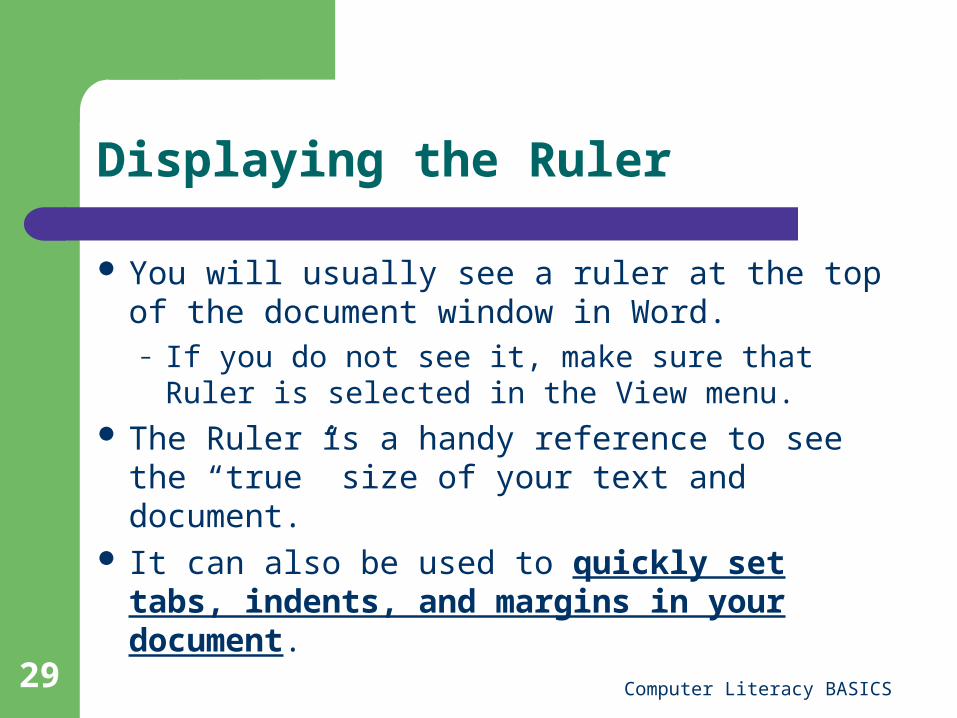
Displaying the Ruler
You will usually see a ruler at the top of the document window in Word.– If you do not see it, make sure that Ruler is
selected in the View menu. The Ruler is a handy reference to see the
“true” size of your text and document. It can also be used to quickly set tabs,
indents, and margins in your document.

Computer Literacy BASICS30
Paragraph Formats: Tabs
Tabs are used to indent text and to line up columns of data.
Word’s default tabs are set at half-inch intervals. You can set custom tabs using tab markers and the
Ruler. You can set left, center, right, and decimal tabs.
Left Tab
Right Tab
Center Tab
Change tab symbols here
Decimal Tab
The Ruler displays at the top of a Word document.

Computer Literacy BASICS31
Paragraph Formats: Indents
An indent is a space between the margin and where the text appears.
Text can be indented from the left or right margin, or from both.
You can create first line indents. You can create hanging indents. Indents are set by dragging indent
markers (at right) along the ruler.
Left Indent marker
Hanging Indent marker
First Line Indent marker
Computer Literacy BASICS32
Inserting Page Breaks
A soft page break is automatically inserted for you when you fill a page with text or graphics.
You can also break pages manually by inserting a hard page break, which forces a page break at a specific location.– To insert a hard page break, select Break from the
Insert menu and then select the Page break option in the Break dialog box.
– Or you can use the shortcut key combination for inserting a hard page break, Ctrl + Enter.
Computer Literacy BASICS33
Page Breaks and Section Breaks
In Normal view, a page break displays as a dotted line.– In Page Layout and Reading Layout views, the pages
actually look like separate sheets of paper.– You may not see any indication of page breaks in Web
Layout and Outline views. In addition to page breaks, you can also insert
section breaks in your documents. A section break allows you to vary the layout of a
document within a page or between pages.
Computer Literacy BASICS34
Bullets and Numbers
Create lists using bullets and numbers.– Bullet lists are called unordered lists since the order
does not matter.– Numbered lists are called ordered lists since they
have a sequence number. Select the text and click the Bullets or Numbering
button on the Formatting toolbar to create the list.– Both lists are automatically formatted with a hanging
indent.– You can change the bullet or number style in the
Bullets and Number dialog box on the Format menu.
Computer Literacy BASICS35
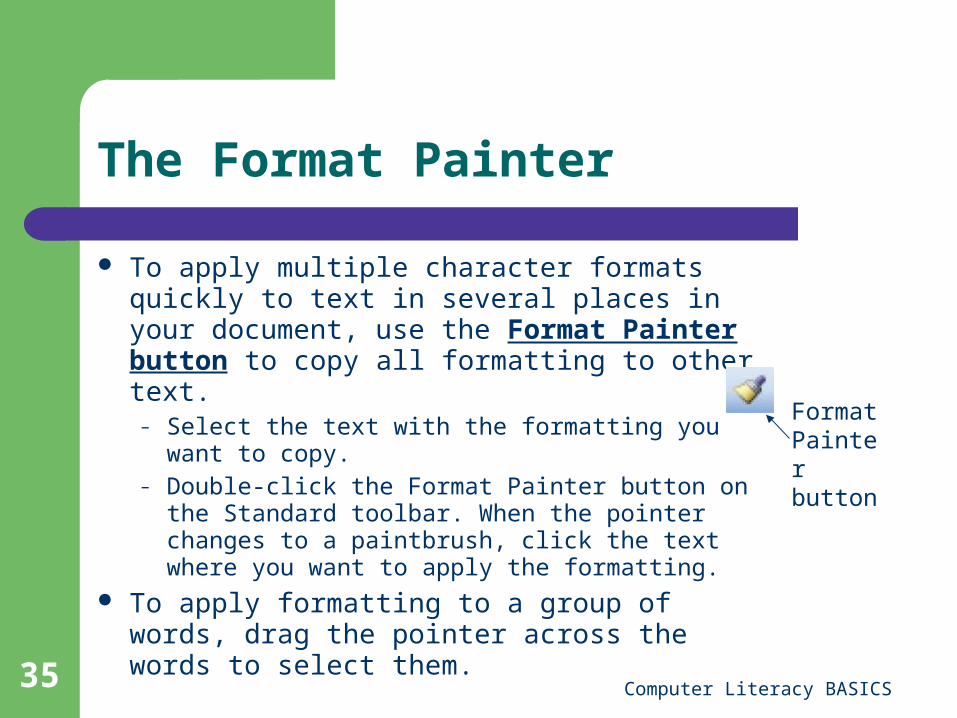
The Format Painter
To apply multiple character formats quickly to text in several places in your document, use the Format Painter button to copy all formatting to other text.
– Select the text with the formatting you want to copy.
– Double-click the Format Painter button on the Standard toolbar. When the pointer changes to a paintbrush, click the text where you want to apply the formatting.
To apply formatting to a group of words, drag the pointer across the words to select them.
Format Painter button
Computer Literacy BASICS36
Checking Spelling and Grammar
Word has a spell checker that can be used to search for misspelled words in your document.– Misspelled words are indicated in text with a red wavy
underline. It also has a grammar checker to look for common
grammar mistakes.– Grammar mistakes are underlined in the document
with a green wavy line. Right-click an underline to view suggestions for
changes to correct an error.
Computer Literacy BASICS37
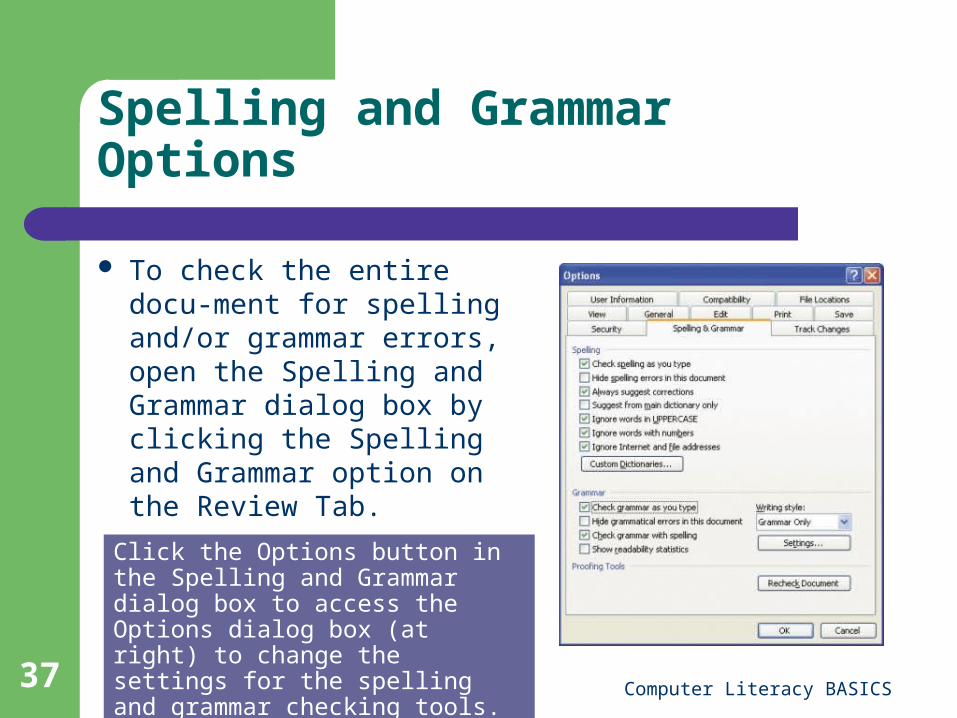
Spelling and Grammar Options
To check the entire docu-ment for spelling and/or grammar errors, open the Spelling and Grammar dialog box by clicking the Spelling and Grammar option on the Review Tab.
Click the Options button in the Spelling and Grammar dialog box to access the Options dialog box (at right) to change the settings for the spelling and grammar checking tools.

Computer Literacy BASICS38
Page Orientation and Margins
Documents can be oriented two ways:– Portrait: The document is taller than it is wide.– Landscape: The document is wider than it is tall.– Set either option by selecting the Orientation option on
the Page Setup Tab. Margins are the blank space around the edges of
the document.– The default margins are 1 inch for top and bottom
margins and 1 inch for left and right margins.– Margins can also be set in the Page Layout Tab.
Computer Literacy BASICS39
Print Preview
To avoid wasteful printing, preview your document and make adjustments before you print it.
Print Preview is an on-screen, reduced view of the layout of a completed page or pages.
Click the Print Preview button on the Standard toolbar to see how your document will look when printed.
Computer Literacy BASICS40
Tables
Word makes the task of arranging text and numbers in columns both quick and easy by providing features to create tables in a document.
Tables consist of cells to which you add text or graphics.
A cell represents the intersection of a row and a column.
Computer Literacy BASICS41
Creating a Table
The button on the Insert Tab places a table structure in your document.
Word formats a border around tables by default, but it can be removed.
Boundary lines within a table are called gridlines and are for layout purposes. They do not print.
Computer Literacy BASICS42
Inserting Rows or Columns in a Table
To insert a new row at the end of a table, simply position the insertion point in the last cell of the table and press Tab.
Use the Table command on the Layout Tab to insert a row or column anywhere else in the table.
Computer Literacy BASICS43
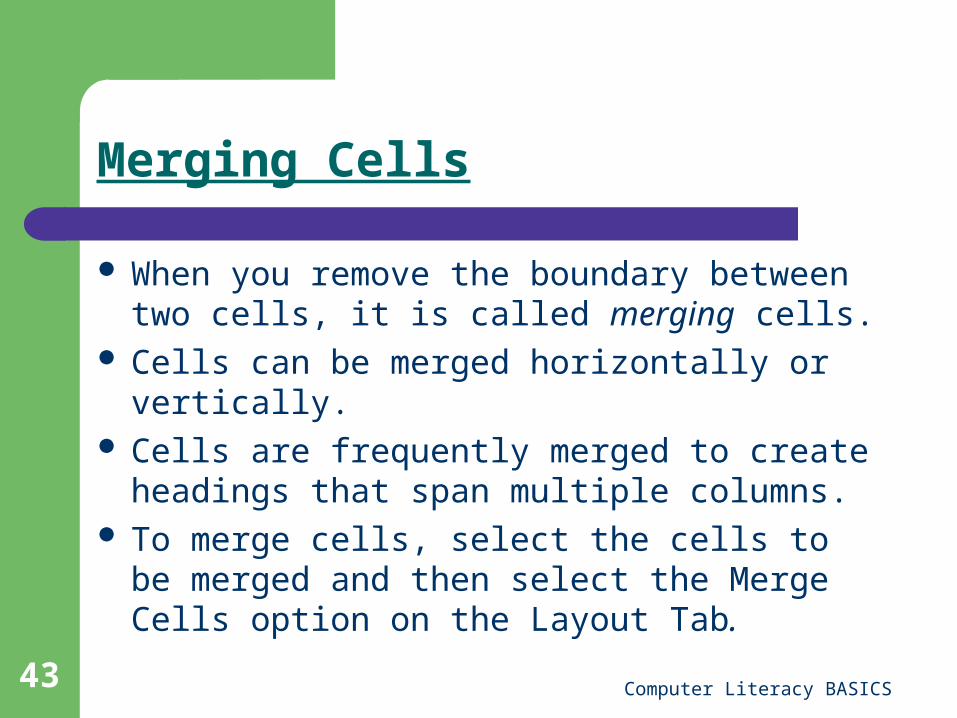
Merging Cells
When you remove the boundary between two cells, it is called merging cells.
Cells can be merged horizontally or vertically. Cells are frequently merged to create headings
that span multiple columns. To merge cells, select the cells to be merged
and then select the Merge Cells option on the Layout Tab.
Computer Literacy BASICS44
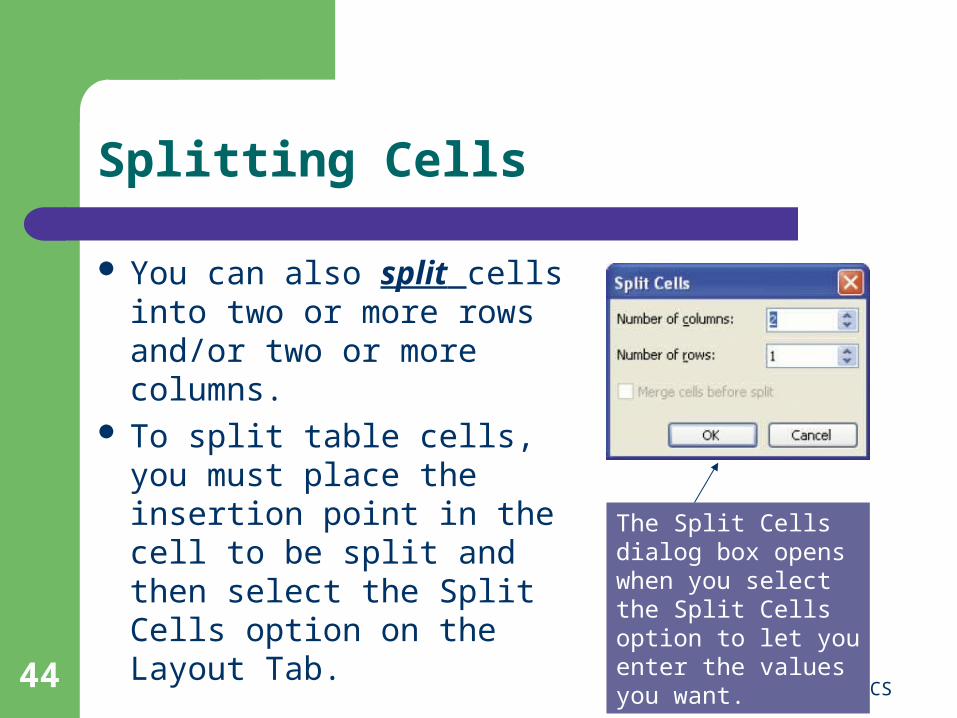
Splitting Cells
You can also split cells into two or more rows and/or two or more columns.
To split table cells, you must place the insertion point in the cell to be split and then select the Split Cells option on the Layout Tab.
The Split Cells dialog box opens when you select the Split Cells option to let you enter the values you want.

Computer Literacy BASICS45
Entering Text in a Table
Adding text to cells in a table is similar to entering characters in a document.
Place the insertion point in a cell and key text. You can move from cell to cell using the arrow
keys or the Tab key. If the text is wider than the column, Word will wrap
the text to the next line in the same cell. When you press Tab at the last cell in a row, Word
goes to the first cell of the next row.
Computer Literacy BASICS46
Editing Table Text
Editing text in a table is basically the same as editing text in any other part of the document.
You can insert, delete, copy, or move text from cell to cell.
Use drag-and-drop editing to move text from one cell to another location in the table.
You can apply formatting attributes to one or more cells.
Computer Literacy BASICS47
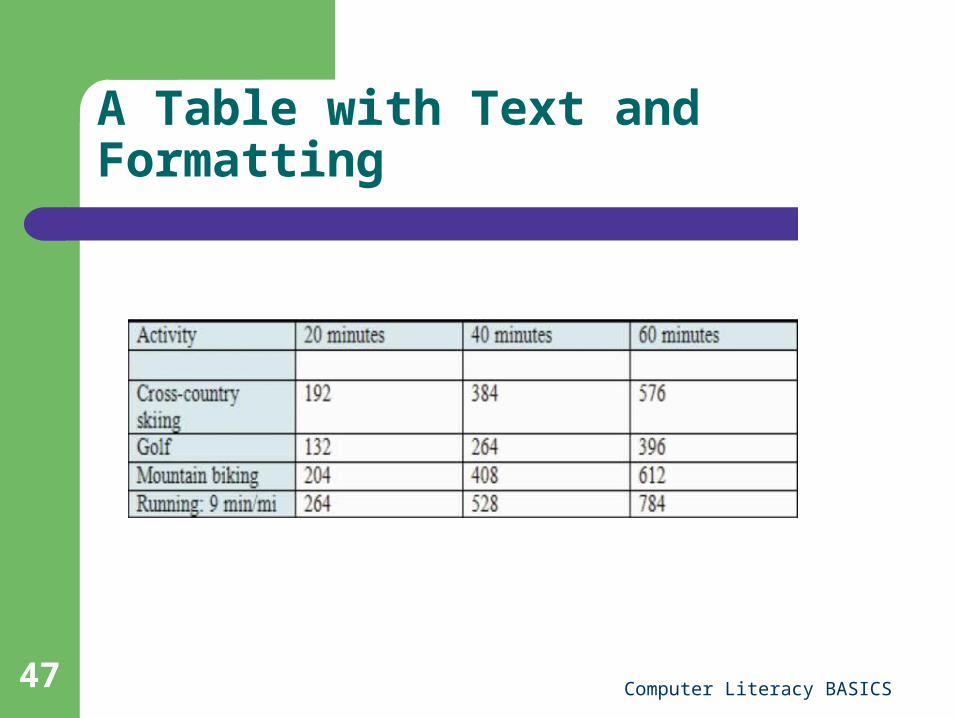
A Table with Text and Formatting
Computer Literacy BASICS48
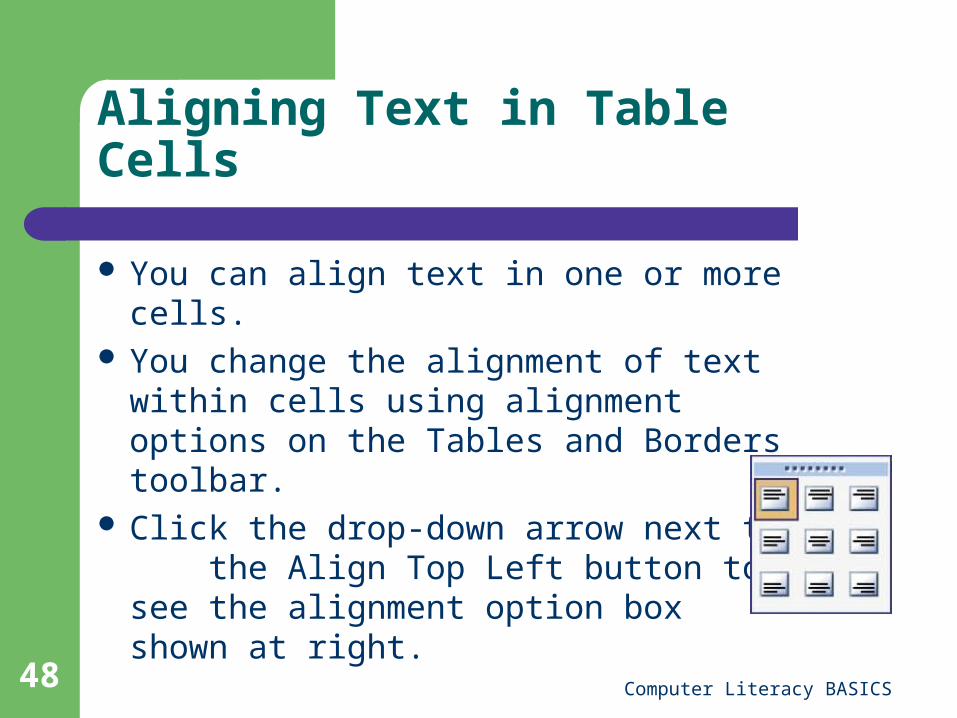
Aligning Text in Table Cells
You can align text in one or more cells. You change the alignment of text within
cells using alignment options on the Tables and Borders toolbar.
Click the drop-down arrow next to the Align Top Left button to see the alignment option box shown at right.
Computer Literacy BASICS49
Modifying the Table Structure
When you create a table grid, Word makes all columns the same width.
To change row height or column width:– Drag the cell borders to the desired size.– Use the Table Properties dialog box to specify
exact values.– Use the AutoFit to Contents feature to let Word
size each column and row based on cell contents.
Computer Literacy BASICS50
Modifying and Aligning a Table
If a table cell is formatted for AutoFit, Word will automatically adjust the cell width each time the cell contents change.
To align a table on the page horizontally:– First select the entire table.– Then format the alignment of the table using the
alignment buttons (Left, Center, Right) on the Formatting toolbar in the same way you would format paragraphs in a Word document.
Computer Literacy BASICS51
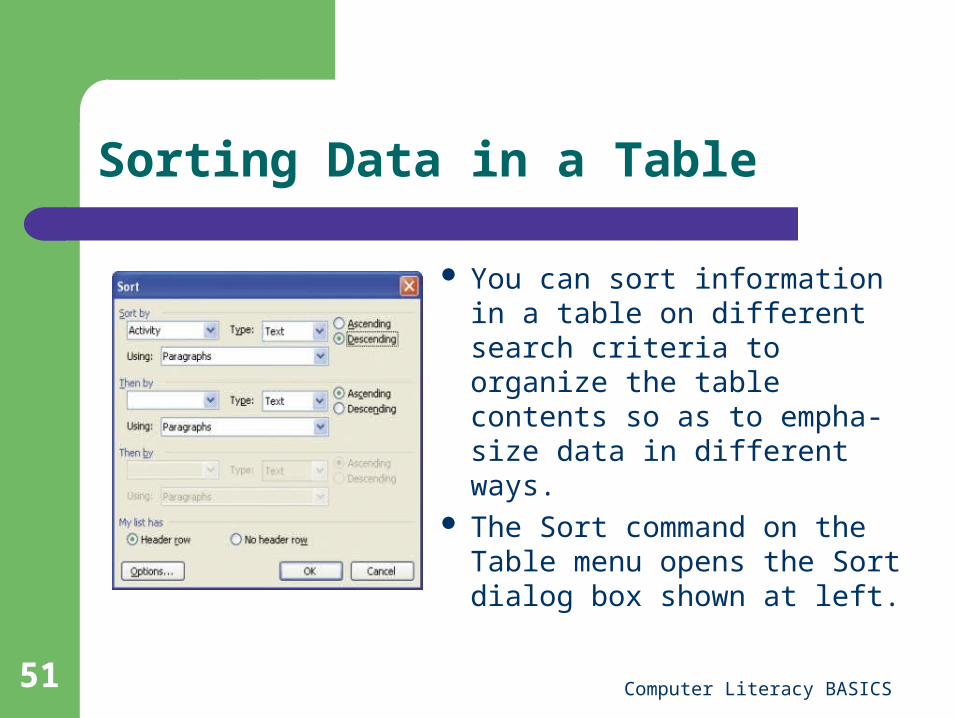
Sorting Data in a Table
You can sort information in a table on different search criteria to organize the table contents so as to empha-size data in different ways.
The Sort command on the Table menu opens the Sort dialog box shown at left.

Computer Literacy BASICS52
Sorting Data in a Table (cont.)
You can also sort data in a table by using the Sort Ascending and Sort Descending buttons on the Tables and Borders toolbar.– Sorting data in ascending order rearranges it
into alphabetical order from A to Z or numerical order from lowest number to highest number.
– Sorting data in descending order rearranges it in alphabetical order from Z to A or numerical order from highest number to lowest number.
Computer Literacy BASICS53
Converting Text to a Table
Word document data in tabular format can be converted to a table.
The data must be separated by tabs, commas, paragraph marks, or other characters.
Word determines the number of columns and rows required based on the selected data.
Computer Literacy BASICS54
Using AutoFormat
The AutoFormat feature provides several predefined table formats that you can apply to your table.
These formats include border, shading, and color options to make the tables more attractive and easier to read.
Apply a format by selecting the Table AutoFormat option on the Table menu.
Computer Literacy BASICS55
Desktop Publishing
Desktop publishing makes it possible to create professional-looking documents using a personal computer.
Word provides tools to enhance documents with features such as columnar text, borders and shading, graphics, and footnotes.
Templates and text styles make creating well-designed and consistent documents quick and efficient.
Computer Literacy BASICS56
Page Numbers
When your document has multiple pages, you may want to insert page numbers.
The Page Numbers command on the Insert menu quickly adds page numbers to a document. – The command actually creates a header or
footer with a page number as the only text.
Computer Literacy BASICS57
Headers and Footers
Headers and footers are information that prints in the top and bottom margins of each page of a document.
A document can have a header, a footer, or both. Creating a header or footer is another way to add
page numbers to a document.– Using headers or footers instead of the Page
Numbers command on the Insert menu allows you to include text with the page number.
Computer Literacy BASICS58
Footnotes and Endnotes
Notes are added to a document to show the source of borrowed material or provide extra or explanatory information about the text.
Footnotes are inserted at the bottom of the page on which the note is referenced in the document.
Endnotes are placed together at the end of a document.
Computer Literacy BASICS59
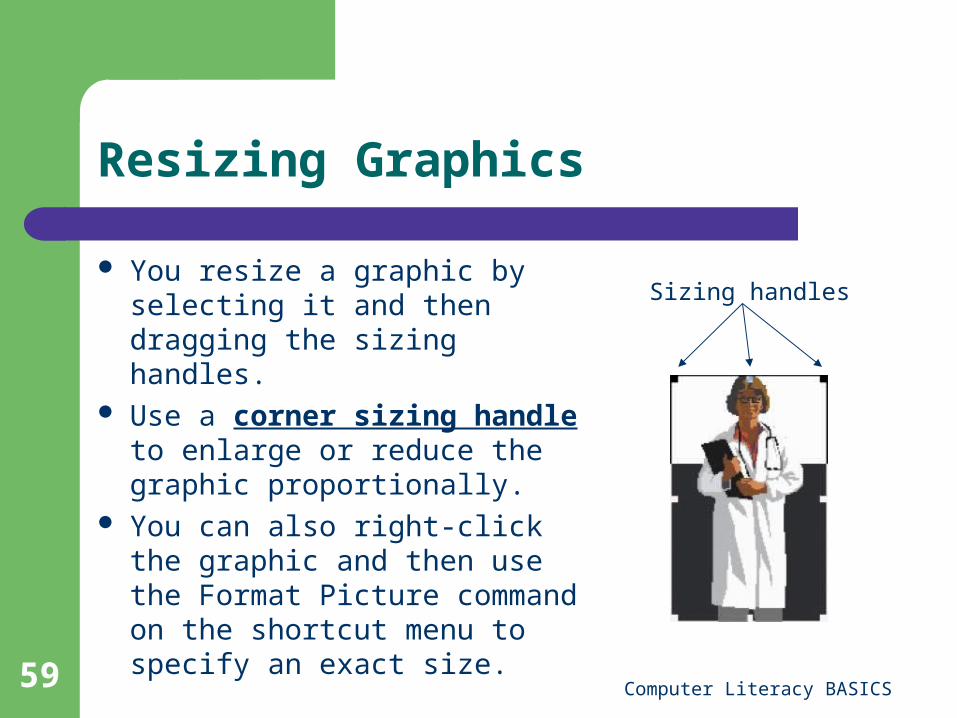
Resizing Graphics
You resize a graphic by selecting it and then dragging the sizing handles.
Use a corner sizing handle to enlarge or reduce the graphic proportionally.
You can also right-click the graphic and then use the Format Picture command on the shortcut menu to specify an exact size.
Sizing handles
Computer Literacy BASICS60
Cropping Graphics
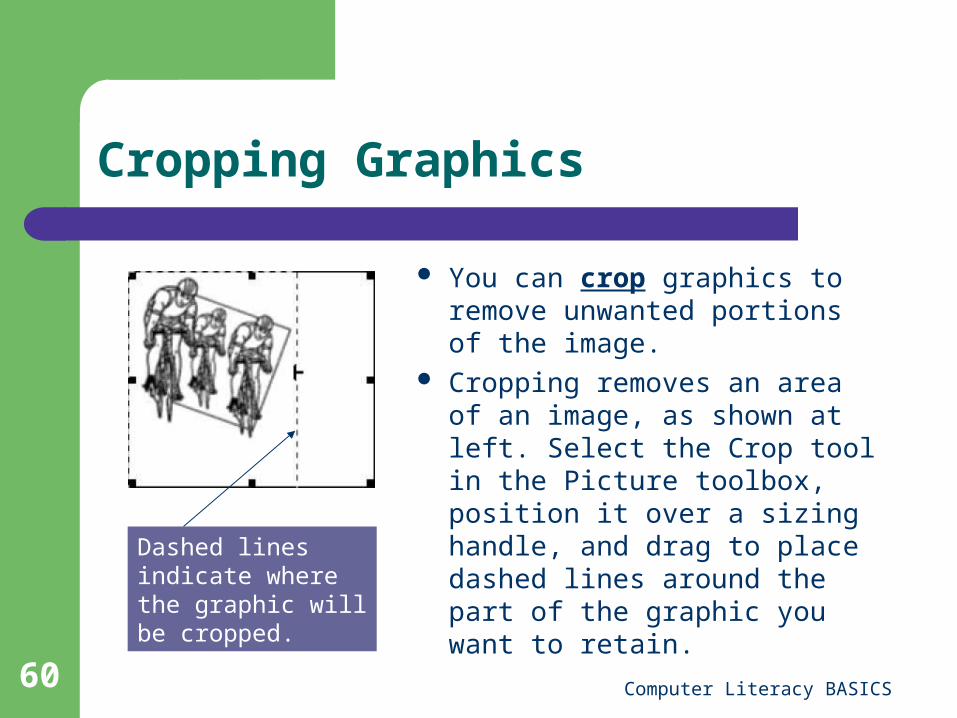
You can crop graphics to remove unwanted portions of the image.
Cropping removes an area of an image, as shown at left. Select the Crop tool in the Picture toolbox, position it over a sizing handle, and drag to place dashed lines around the part of the graphic you want to retain.
Dashed lines indicate where the graphic will be cropped.
Computer Literacy BASICS61
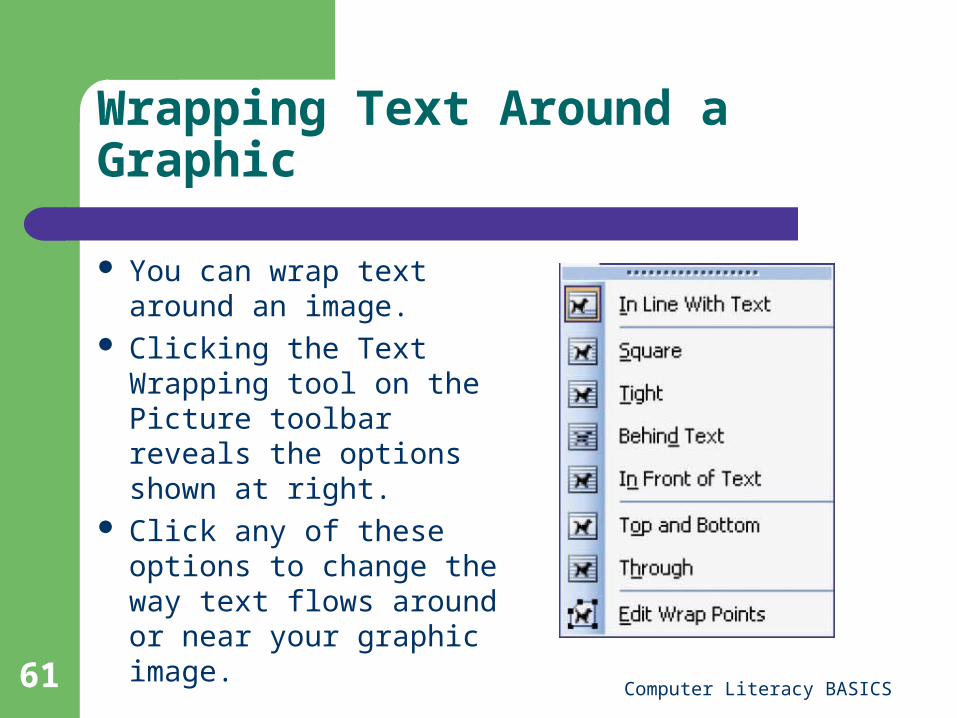
Wrapping Text Around a Graphic
You can wrap text around an image.
Clicking the Text Wrapping tool on the Picture toolbar reveals the options shown at right.
Click any of these options to change the way text flows around or near your graphic image.
Computer Literacy BASICS62
Moving a Graphic
A text-wrapping format must be applied to the graphic before you can reposition it in your document.
You can then move a graphic by selecting it and dragging it to a new location.
Computer Literacy BASICS63
Text Boxes
A text box is a graphic that lets you add text to art. To create a text box, click the Text Box button on the
Drawing toolbar.– Point anywhere on the screen and drag the crosshair to
create the box.– Enter your text inside the box.
You can change the formatting of a text box using buttons on the Drawing toolbar.
You can change the text characteristics (font, font style, and size) using the Formatting toolbar.
Computer Literacy BASICS64
AutoShapes
Word’s AutoShapes feature allows you to create a variety of predesigned drawing objects such as stars, arrows, shapes, and callouts.
AutoShapes can be moved and resized just like any other graphic object.

Computer Literacy BASICS65
AutoShapes (cont.)
To create an AutoShape, select the shape that you want to create from the AutoShape options available from the Drawing toolbar.– Drag the crosshair to create the shape for the
size that you want.– Set a color option for your shape using the
Drawing toolbar line and fill color buttons.

Computer Literacy BASICS66
Templates
A template is a file that contains document, paragraph, and character formats for documents that you create frequently.
As all standard text and formatting options are already applied to the document, you just enter the variable text.
Templates increase the speed and efficiency of your work.
Computer Literacy BASICS67
Styles
A style is a set of formatting characteristics that can be applied to text in a document.
There are four types of styles:– Paragraph– Character– Table– List
You can create, view, and apply styles from the Styles and Formatting task pane, which you open by selecting the Styles and Formatting option on the Format menu.
Computer Literacy BASICS68
The Thesaurus
A thesaurus is a compilation of alternative words or synonyms.
The Thesaurus feature in Word searches for a perfect synonym.