Embed Size (px)
Citation preview
1 | P a g e
Month End Procedures– Cheat Sheet
Use this cheat sheet as a guide to assist in running recommended reports for your month
end procedures in PestPac. Feel free to print this out separately as a cheat sheet if your
company uses these processes. If you require additional training or support please do not
hesitate to contact us!
Month End Procedure – Service Order and Payment Entry and Reports
Service Orders:
1. Post all service orders for the month you are closing
2. Release Service Order batches for the month you are closing
3. Leave service orders for next month in an open (unreleased) batch
Payments:
1. Post all payments for the month you are closing
2. Release Payment batches for the month you are closing
3. Leave payments for next month in an open (unreleased) batch
Credit Memos:
1. Post all credit memos that you need to create for accounting purposes
2. Release any credit memo batches for the month you are closing
3. Leave credit memos for next month in an open (unreleased) batch
Adjustments:
1. Post all adjustments that you can create for accounting purposes
2. Release any adjustment batches for the month you are closing
3. Leave adjustments for next month in an open (unreleased) batch
To confirm all ORDERS for the month you are closing have been released:
1. Go to Reports, All Reports, Uncommitted Orders Report.
2. Leave Starting Invoice Date blank (this will help catch errors in data entry, like orders
still sitting in a batch from an old month)
3. Enter Ending Invoice Date of the last day of the month you are closing (so orders for
next month are not included)
4. Choose the branch
5. Choose your sorting options and check Group By if you’d like to see totals for each
grouping category (this will not affect what data displays on the report, just the
order/grouping)
6. Include all order types (Service Order, Call Back etc.).
7. Display/Print/Export. If anything comes up on this report, that means it is sitting in a
batch and needs to be released.
2 | P a g e
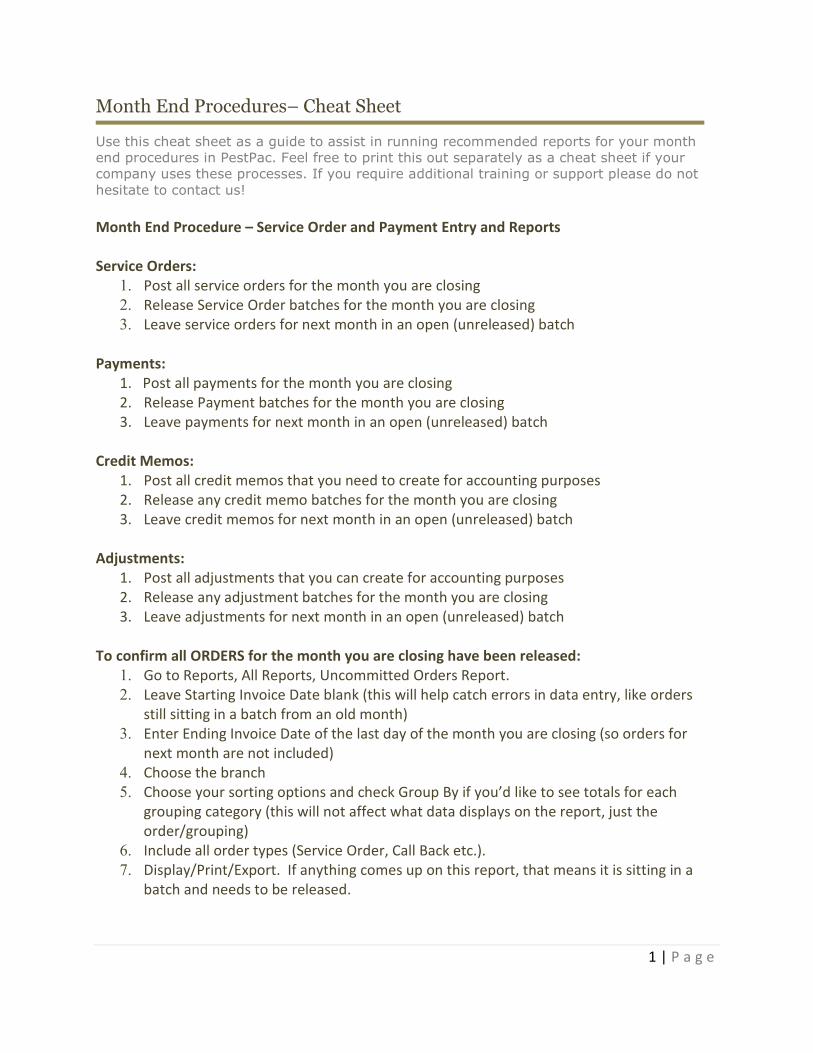
To confirm all PAYMENTS for the month you’re closing have been released:
1. Go to Reports, Payment Register
2. Leave Starting Payment Date blank (this will help catch errors in data entry, like an
incorrect payment date)
3. Enter Ending Payment Date of the last day of the month you are closing
4. Choose the branch
5. Choose your sorting options and check Group By if you’d like to see totals for each
grouping category (this will not affect what data displays on the report, just the
order/grouping)
6. Change ‘Include’ to Uncommitted (this means payments still sitting in a batch)
7. Check Payment Types of Adjustment, Reverse Payments and Payments
8. Run in Detail
9. Display/Print/Export. If anything comes up on this report, that means it is sitting in a
batch and needs to be released.
To confirm that no orders have been released for next month:
1. Go to Reports, Invoice Register
2. Enter Starting Invoice Date of the first day of next month
3. Leave the Ending Invoice Date blank (this will help find any invoices posted with
incorrect dates in the future)
4. Choose the branch
5. Choose your sort/group by options
6. Include all order types (Service Order, Estimate, etc.)
7. Run in Detail
8. Display/Print/Export
To confirm that no payments have been released for next month
1. Go to Reports, Payment Register
2. Enter Starting Payment Date of the first day of next month
3. Leave the Ending Payment Date blank (this will help find any payments posted in error)
4. Choose the branch
5. Choose your sort/group by options
6. Look in Current
7. Look for Committed (Committed means it’s been released. Uncommitted means it’s still
in a batch waiting to be released.)
8. Check Adjustments, Reverse Payments, Payments
9. Run in Detail
10. Display/Print/Export
3 | P a g e
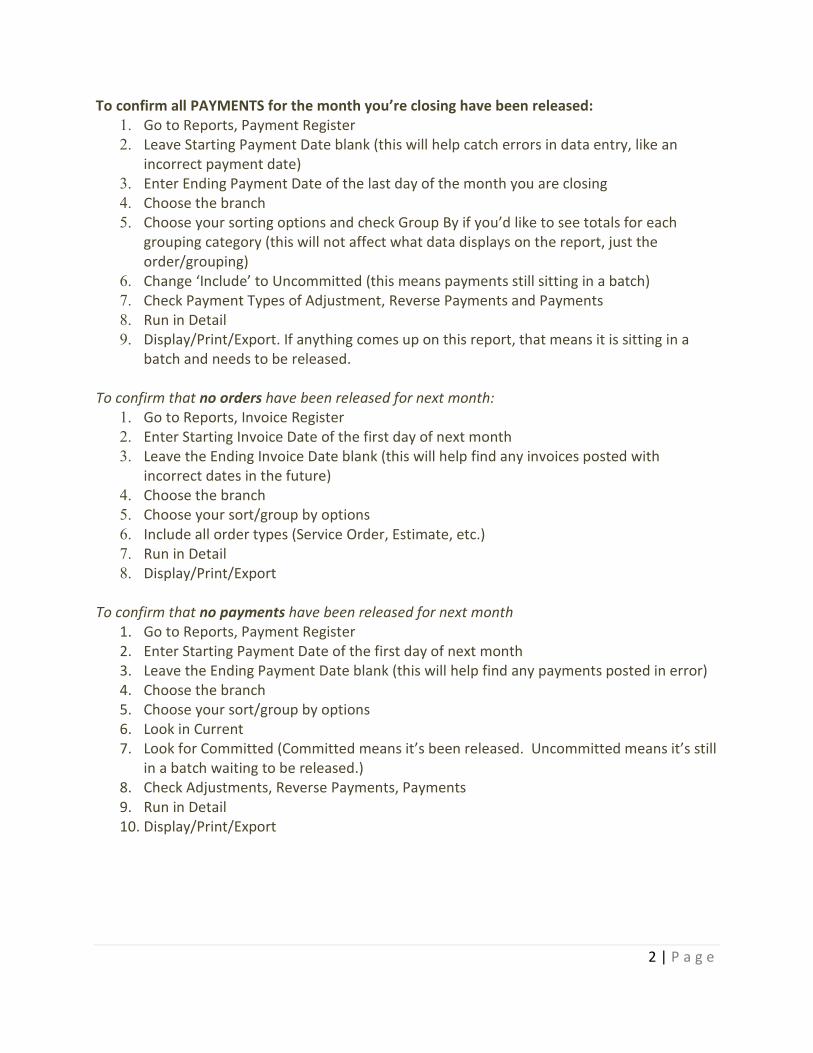
Period Lockdown
**Please note that there is a period lockdown module that will help with the above process.
The period lockdown module allows you to set preferences for the prohibiting of releasing after
the period is closed along with setting warning preferences for users who enter in dates before
or after certain events. If a user enters a date that falls outside of the preferences, they will
receive a pop up warning indicating that the date they entered does not fall within the
acceptable range of dates based on the preferences below. The Period Lockdown Module
affects invoices, payments, reverse payments, adjustments and credit memos. To enable go to
Company > Company Setup > Period Lockdown > Check the settings you’d like and click Save.
By turning this option on, you can run the AR Report ‘as of’ a date. The "Run as of Date" must
be a date after a period was closed in a 1.39.0 or higher database in order to return an accurate
report. The ""As of Date"" used will include all transactions for that date. Please refer to the
‘Instructions & Limitations link on the AR Report screen for more details.
Month End Procedure – Reports
Once you have confirmed that batches are released properly, you can print reports of the total
billable work and the total payments for the month.
Report for Billable work for the month
Go to Reports, Invoice Register
Enter Starting Invoice Date of the first day of the month you are closing
Enter Ending Invoice Date of the last day of the month you are closing
Choose the branch if applicable and Choose the sorting/group by options
Select Non-Voided (defaulted)
Select from Both (Invoices and Credit Memos)
Include Records from Current
Format of Summary (if you want to see the invoices detailed out, choose format of Detail)
Display/Print/Export
Report for Payments received for the month
Go to Reports, Payment Register
Enter Starting Payment Date of first day of the month you are closing
Enter Ending Payment Date of last day of the month you are closing
Choose the branch if applicable and Choose the sorting/group by options
Include Records from Current
Include Committed
Select the Payment Types of Payments and Reverse Payments
Include all Credit Statuses
Format of Summary (if you want to see payments detailed out, choose format of Detail)
Display/Print/Export
4 | P a g e
Month End Procedure - Additional Reports
Adjustments Created for the month
Go to Reports, Payment Register
Enter Starting Payment Date of the first day of the month you are closing
Enter Ending Payment Date of the last day of the month you are closing
Choose the branch
Choose the sorting/group by options
Include Records from Current
Include Committed
Select the Payment Types of Adjustments
Uncheck Payments and Reverse Payments
Include all Credit Statuses
Format of Summary (if you want to see payments detailed out, choose format of Detail)
Display/Print/Export
**Feel free to combine the adjustment report with the payment report above. You will get
separate totals for adjustments and payments/reverse payments. Then PestPac will take the
total for adjustments and the total for payments/reverse payments to give you a grand total.
So, adjustments will inflate your Payment Register.
Payments with balances (to help find payments that have not been applied to an invoice)
Go to Reports, Payment Register
Enter Starting Payment Date of the first day of the month you are closing
Enter Ending Payment Date of the last day of the month you are closing
Choose the branch
Choose the Sort/Group by options
Include Records from Current
Include Committed
Select the Payment Types of Payments, Reverse Payments and Adjustments
Include all Credit Statuses
Format of Detail
Check ‘Show Payments with Balances Only’
Display/Print/Export
**After running this report, if you want to run the auto-apply utility and then re-run the report
described above to see if the auto-apply helped with any payments that were applied.
To run the auto-apply credits utility:
Go to Tools, Data Update Tools
Click on Auto-Apply Credits
Select Branch
Leave Exact Matches only Unchecked
5 | P a g e
Apply
**This will follow the rules set forth in your Company Setup under the heading of Auto
Apply. **
Annual Prepayments
This report will show amount collected in annual prepayments, where a user on the enter
payment screen checked the Prepayment box.
Go to Reports, Payment Register
Enter Starting Payment Date of the first day of the month you are closing
Enter Ending Payment Date of the last day of the month you are closing
Choose the branch
Choose the Sort/Group by options
Include Records from Current
Include Committed
Select the Payment Types of Payments and Adjustments
Uncheck Reverse Payments
Include all Credit Statuses
Format of Detail (or Summary)
Check ‘Show Annual Prepayments Only
Display/Print/Export
Credit Memo Report by Reason
A credit memo is a negative invoice. The Credit Memo Report by reason will show you why you
are writing off invoices (i.e. bad debt, collections, etc).
Go to Reports, All Reports, Credit Memo Reason Report
Enter Starting Date of the first day of the month you are closing
Enter Ending Date of the last day of the month you are closing
Choose the branch
Choose the Sort/Group by options (to see just totals for each Credit Reason, sort by Credit
Reason and check Group by then run in Summary)
Select Non-Voided
Include Records from Current
Format of Summary or Detail (detail to see each credit memo)
Display/Print Export
Credit Memos with a Balance
Most credit memos should be applied at the time they are created. They are sometimes left
unapplied in error, so this report will help catch any mistakes.
Go to Reports, All Reports, Invoice List Report
Enter Starting Invoice Date of the first day of the month you are closing
Enter Ending Invoice Date of the last day of the month you are closing
Choose the branch
Choose your Sort/Group by options
6 | P a g e
Format of Detail
Include Records from Current
Uncheck Include Invoices, Pre-Bill, Production, Re-Do, Estimate, Finance Charge, Not Serviced
Check Credit Memo
Leave all items in Origin Checked
Uncheck Include Invoices with Zero Balance (we are looking for credit memo invoices with a
balance)
Choose your show columns at the right
Display/Print/Export
Not Serviced Invoices (these are invoices posted with an order type of Not Serviced)
Go to Reports, All Reports, Invoice List Report
Enter Starting Invoice Date of the first day of the month you are closing
Enter Ending Invoice Date of the last day of the month you are closing
Choose the branch
Set Void Status to Voided (about mid-way down in selection criteria)
Choose your Sort/Group by options
Format of Detail
Include Records from Current
Uncheck Include Invoices, Pre-Bill, Production, Credit Memo, Re-Do, Estimate, Finance Charge
Check Not Serviced
Leave all items in Origin Checked
Choose your show columns on the right
Display/Print/Export
7 | P a g e
Month End Procedure - Reports to help reconcile AR
First, let’s review dates associated to transactions in PestPac.
Invoices
-Invoice Date is the date manually keyed by the user on the invoice.
-Add Date is the date it becomes an invoice. (In other words, when the batch is released.)
Let me give an example to be more specific, I am posting work today 1/4/09 for 12/31/08. The
invoice date is 12/31/08 (because it’s pulling from the work date). The add date is 1/4/09. The
add date is based upon the system date of the program.
Payments
-Payment Date is the date manually keyed by the user on the payment.
-Entry Date is the date the payment is actually entered.
-Application Date is the date the payment is applied to an invoice.
Example, I enter a payment today 1/4/09 for 12/31/08. The payment date is 12/31/08. The
entry date is 1/4/09. If the payment is applied directly to an invoice, the application date will be
equal to the entry date (1/4/09). If the payment is an open credit (in other words, it’s a
prepayment), then whatever date the invoice is posted and released will be the application date.
So if a payment is sitting on an account from 12/15/08 and the invoice is posted today (1/4/09),
the application date of the payment is 1/4/09.
You can run an Invoice Register Report or a Payment Register Report by any of the dates
mentioned above.
So, when it comes to reconciling your AR running an Invoice Register by Invoice Date does not
give you a full picture. Most companies will run the Invoice Register by Add Date and a
Payment Register by Entry Date to help reconcile their AR.
First, let’s see what the add dates are for invoices in the current month:
Invoice Register sorted by Add Date
Go to Reports, Invoice Register
Enter Starting Invoice Date of the first day of the month you are closing
Entering Ending Invoice Date of the last day of the month you are closing
Choose the branch
Primary sort by Add Date
Check group by
Select Non Voided
Select From Both Invoices and Credit memos
Include Records from Current
Format of Summary
Display
8 | P a g e
Now we have the starting and ending dates for when invoices for this month were entered.
Let’s see if there were any other invoices entered one those dates for the previous month or the
next month.
Invoice Register by Add Date sorted by Invoice Date
Go to Reports, Invoice Register
Enter Starting Add Date of the first day of the month you are closing
Enter Ending Add Date of today
Choose the branch
Primary sort by Invoice Date
Check Group By
Select Non Voided
Select From Both Invoices and Credit memos
Include Records from Current
Format of Summary
Display
This will show you the dates on invoices that were released from a batch within the date range.
Looking at your live data, invoices for the month you are closing that were posted in the next
month.
If you want to get a better picture, change your primary sort to Add Date and check group by.
Change your secondary sort to Invoice Date and check group by. This will show you the days
that users are posting invoices (add date) and the dates assigned to the invoices (invoice date).
Go to Reports, Invoice Register
Enter Starting Add Date of the first day of the month you are closing
Enter Ending Add Date of today
Choose your branch
Primary sort by Add Date
Check Group By
Secondary sort by Invoice Date
Check Group By
Select Non Voided
Select From Both Invoices and Credit memos
Include Records from Current
Format of Summary
Display
This report will help you find if invoices for next month were released before the current month
was closed. Since PestPac does not have the ability to run a historical AR report, it becomes
very difficult to balance out the AR report if this happens. This is why we suggest not releasing
next month’s batches until the previous month is closed.
You would need to follow similar steps on the Payment Register.
9 | P a g e
Payment Register sorted by Entry Date
Go to Reports, Payment Register
Enter Starting Payment Date of the first day of the month you are closing
Entering Ending Payment Date of the last day of the month you are closing
Choose the branch
Primary sort by Entry Date
Check group by
Include Records from Current
Include Committed
Check Payment Type of Adjustments, Payments and Reverse Payments
Include all Credit Statuses
Format of Summary
Display
This will show you payments dated for the current month and their entry dates. This will help
you see if any payments for this month were posted in the next month.
Payment Register by Add Date sorted by Invoice Date
Enter Starting Entry Date of the first day of the month you are closing
Enter Ending Entry Date of today
Choose the branch
Primary sort by Payment Date
Check Group By
Include Records from Current
Include Committed
Check Payment Type of Adjustments, Payments and Reverse Payments
Include all Credit Statuses
Format of Summary
Display
If you want to get a better picture, change your primary sort to Entry Date and check group by.
Change your secondary sort to Payment Date and check group by. This will show you the days
that users are entering payments (entry date) and the dates assigned to the payments
(payment date).
Enter Starting Entry Date of the first day of the month you are closing
Enter Ending Entry Date of today
Choose the branch
Primary sort by Entry date
Check Group By
Secondary sort by Payment Date
Check Group By
Include Records from Current
Include Committed

10 | P a g e
Check Payment Type of Adjustments, Payments and Reverse Payments
Include all Credit Statuses
Format of Summary
Display