Embed Size (px)
Citation preview
NAV - 399 1
Installation instructions:
AKRAPOVIC CARBON-FIBER PARTS for the
SUZUKI B-KING (2008) Congratulations on purchasing an Akrapovic carbon-fiber part. Please read these installation instructions carefully. If you have any trouble installing the part please contact your authorized dealer! IMPORTANT INFORMATION Exclusion of Certain Liability
1. The manufacturer, importer or dealer shall not be liable for any incidental damage including personal injury or any other damages caused by improper installation or operation of the Akrapovic carbon-fiber part.
2. Akrapovic makes no representation or warranties with regard to damage caused by the improper installation, use and
maintenance of the Akrapovic carbon-fiber part. The warranty is limited to defects recognized by our technical department and to normal use. The guarantee is void in case of accident, modification, improper or competition use.
3. Do not attempt to install the Akrapovic carbon-fiber part on a motorcycle for which it was not made or tested by
Akrapovic.
4. Technical specifications of Akrapovic carbon-fiber parts and related products subject to change without notice. Trademarks
The Akrapovic Exhaust System Technology logo is a registered trademark of Akrapovic d.d. Akrapovic website
Information about Akrapovic exhaust systems and related products is available on the Akrapovic website at: http://www.akrapovic.com/ Copyright
No part of the Akrapovic carbon-fiber part or its documentation may be reproduced or distributed in any form or by any means without the prior written authorization of the Akrapovic company.
© Akrapovic, d.d. All rights reserved.
Symbols The following symbols are used throughout these installation instructions:
! CAUTION OR WARNING INSTALLATION TIP
TOOLS
REQUIRED
TIGHTENING
TORQUE
*502102*
NAV - 399 2
INSTALLATION INSTRUCTIONS
THESE INSTALLATION INSTRUCTIONS MUST BE READ CAREFULLY IN ORDER TO ENSURE PROPER INSTALLATION AND OPERATION OF THE AKRAPOVIC CARBON-FIBER PART.
BEFORE INSTALLING CHECK SCHEMATIC OF THE CARBON-FIBER PART!
! IF ANY ITEMS IN THE AKRAPOVIC CARBON-FIBER PART PACKAGE ARE MISSING PLEASE CONTACT YOUR AUTHORIZED DEALER. KEEP THE SCHEMATIC FOR FUTURE REFERENCE.
! THE MOTORCYCLE CAN BECOME EXTREMELY HOT WHEN RUNNING. ALLOW THE MOTORCYCLE TO COOL DOWN BEFORE BEGINNING INSTALLATION.
! DO NOT USE AUTOMOTIVE WHEEL CLEANERS OR ANY CLEANING PRODUCTS WHICH CONTAIN ACIDIC ADDITIVES TO CLEAN AKRAPOVIC CARBON-FIBER PARTS.
! CARBON-FIBER PARTS MAY HAVE SHARP EDGES, POINTED SECTIONS AND SHARP CUTTINGS WHICH COULD DAMAGE YOUR SKIN AND/OR EYES.
BEFORE INSTALLING MAKE SURE YOU ARE WEARING PROTECTIVE EQUIPMENT. RECOMMENDED: PROTECTIVE EYEWEAR AND GLOVES.
! DO NOT BEND CARBON-FIBER PARTS DURING INSTALLATION AND DO NOT USE FORCE: CARBON-FIBER PARTS CAN BE DAMAGED OR BREAK.
USE ONLY PROFESSIONAL TOOLS DURING INSTALLATION.
WE ADVISE YOU TO LEAVE INSTALLATION TO A QUALIFIED SERVICEMAN. IMPROPER INSTALLATION MAY RESULT IN A SHORTER LIFETIME OF THE CARBON-FIBER PART AND/OR DAMAGE TO THE MOTORCYCLE.
1. INSTALLATION OF THE AKRAPOVIC CARBON-FIBER FRONT FENDER:
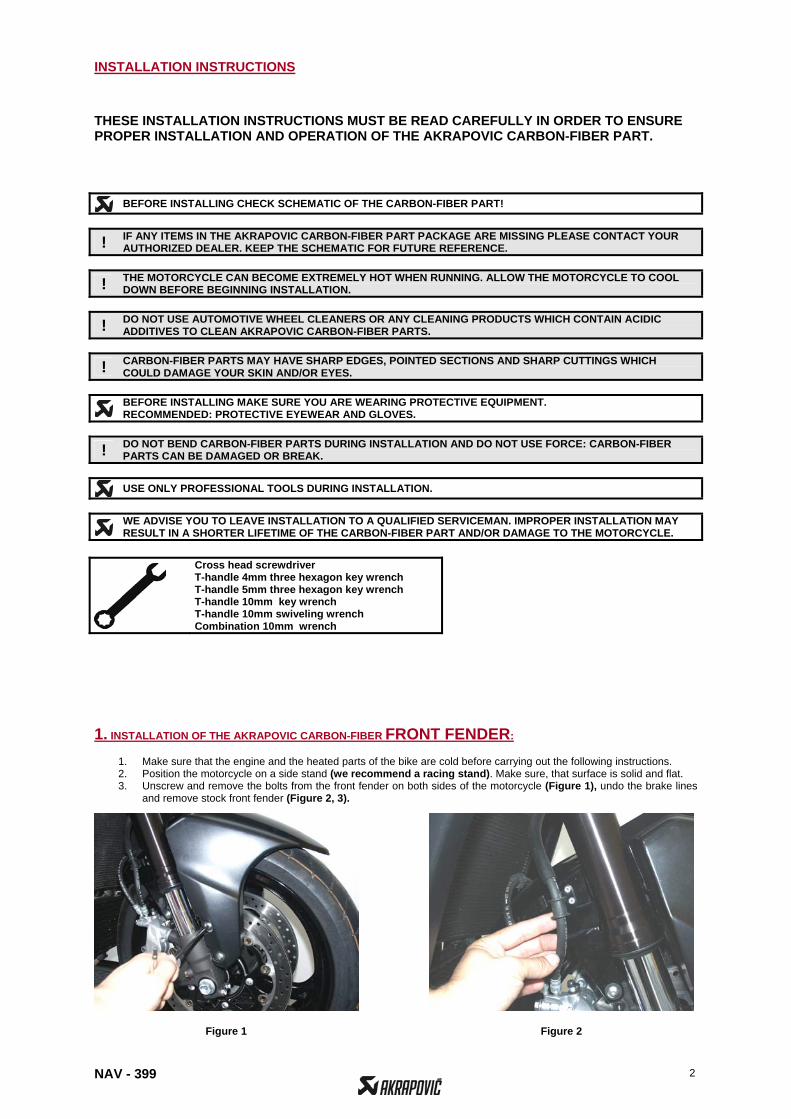
1. Make sure that the engine and the heated parts of the bike are cold before carrying out the following instructions. 2. Position the motorcycle on a side stand (we recommend a racing stand). Make sure, that surface is solid and flat. 3. Unscrew and remove the bolts from the front fender on both sides of the motorcycle (Figure 1), undo the brake lines
and remove stock front fender (Figure 2, 3).
Cross head screwdriver T-handle 4mm three hexagon key wrench T-handle 5mm three hexagon key wrench T-handle 10mm key wrench T-handle 10mm swiveling wrench Combination 10mm wrench
Figure 1 Figure 2
NAV - 399 3
Figure 7
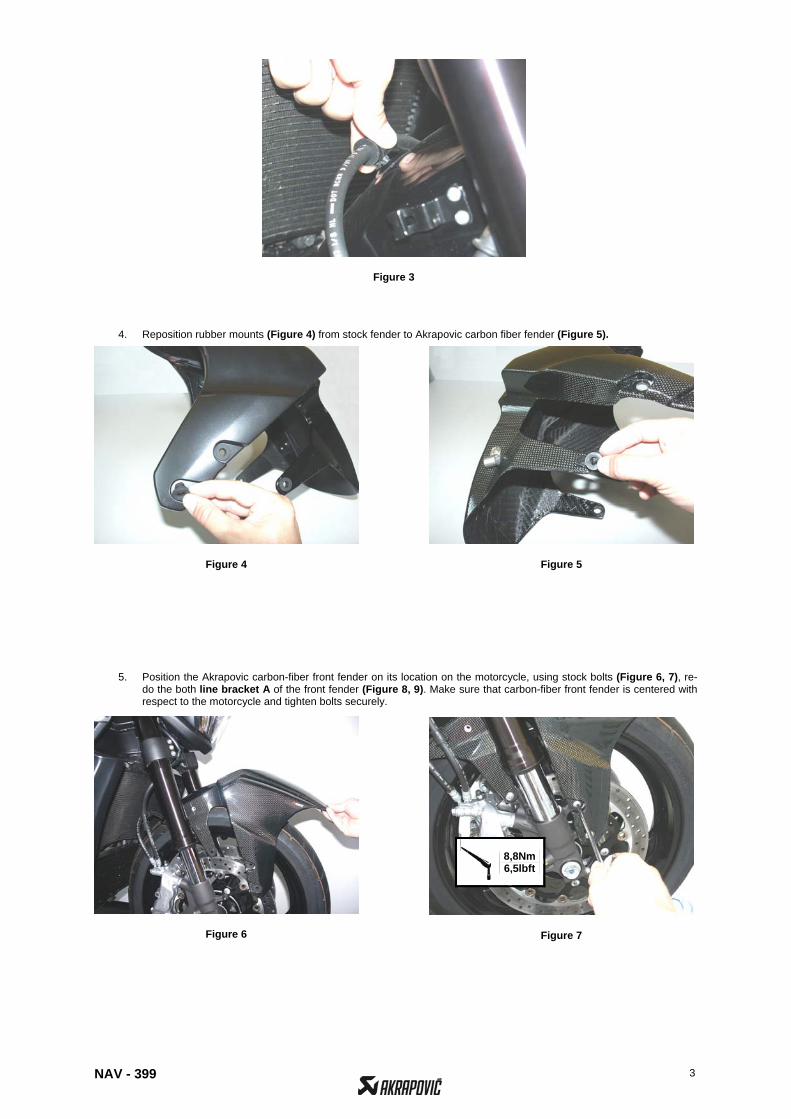
4. Reposition rubber mounts (Figure 4) from stock fender to Akrapovic carbon fiber fender (Figure 5).
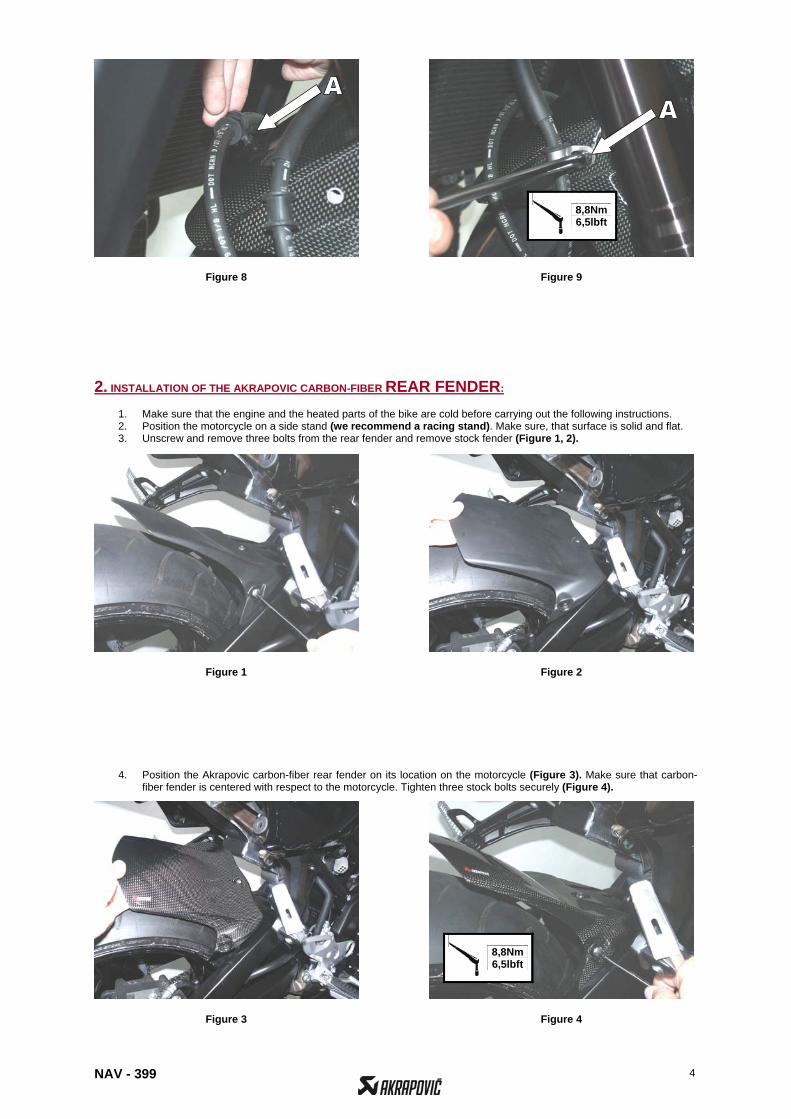
5. Position the Akrapovic carbon-fiber front fender on its location on the motorcycle, using stock bolts (Figure 6, 7), re-do the both line bracket A of the front fender (Figure 8, 9). Make sure that carbon-fiber front fender is centered with respect to the motorcycle and tighten bolts securely.
8,8Nm 6,5lbft
Figure 3
Figure 4 Figure 5
Figure 6
NAV - 399 4
Figure 8 Figure 9
Figure 4
2. INSTALLATION OF THE AKRAPOVIC CARBON-FIBER REAR FENDER:
1. Make sure that the engine and the heated parts of the bike are cold before carrying out the following instructions. 2. Position the motorcycle on a side stand (we recommend a racing stand). Make sure, that surface is solid and flat. 3. Unscrew and remove three bolts from the rear fender and remove stock fender (Figure 1, 2).
4. Position the Akrapovic carbon-fiber rear fender on its location on the motorcycle (Figure 3). Make sure that carbon-fiber fender is centered with respect to the motorcycle. Tighten three stock bolts securely (Figure 4).
8,8Nm 6,5lbft
8,8Nm 6,5lbft
Figure 1 Figure 2
Figure 3
NAV - 399 5
Figure 1 Figure 2
Figure 3 Figure 4
Figure 5
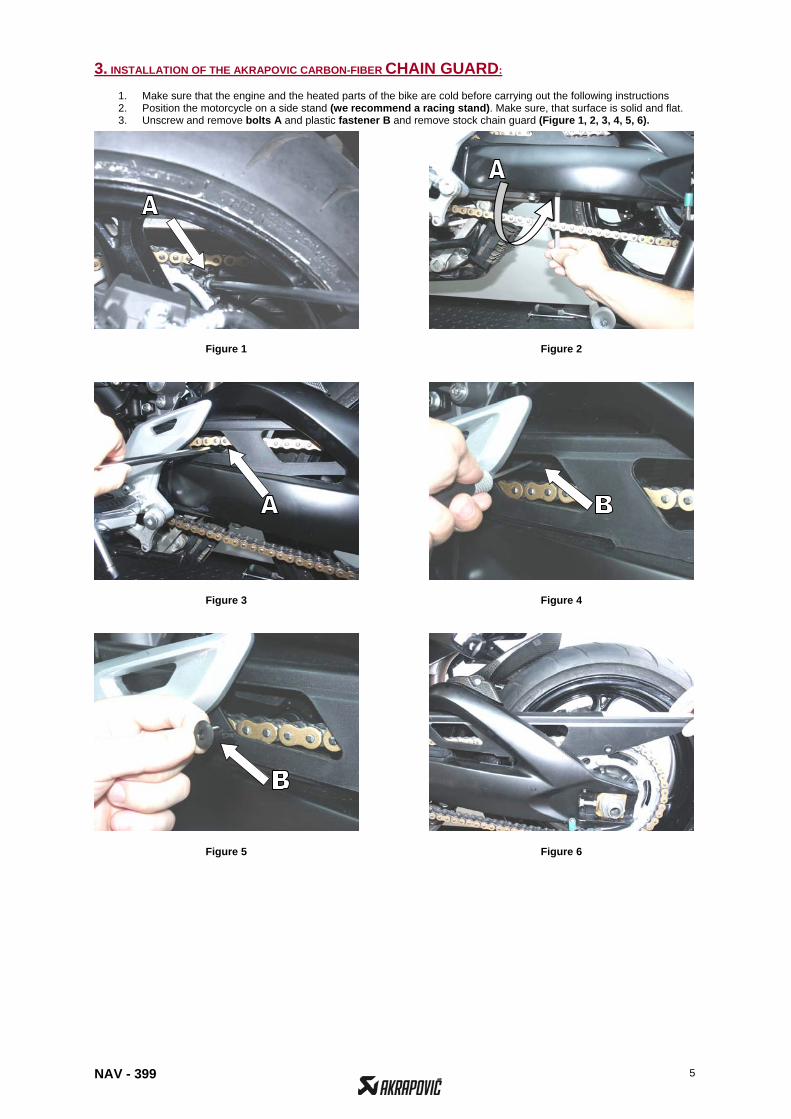
3. INSTALLATION OF THE AKRAPOVIC CARBON-FIBER CHAIN GUARD:
1. Make sure that the engine and the heated parts of the bike are cold before carrying out the following instructions 2. Position the motorcycle on a side stand (we recommend a racing stand). Make sure, that surface is solid and flat. 3. Unscrew and remove bolts A and plastic fastener B and remove stock chain guard (Figure 1, 2, 3, 4, 5, 6).
Figure 6

NAV - 399 6
Figure 9
4. Position the Akrapovic carbon-fiber chain guard on its location on the motorcycle (Figure 7). Make sure that carbon-fiber chain guard is centered with respect to the motorcycle. Attach the plastic fastener and tighten stock bolts securely (Figure 8, 9).
4. INSTALLATION OF THE AKRAPOVIC CARBON-FIBER SEAT PANELS:
1. Make sure that the engine and the heated parts of the bike are cold before carrying out the following instructions. 2. Position the motorcycle on a side stand (we recommend a racing stand). Make sure, that surface is solid and flat. 3. Remove the driver’s seat. Pull of the stock seat panels and replace them with the Akrapovic carbon-fiber seat panels
(Figure 1, 2).
8,8 Nm 6,5ftlb
Figure 7 Figure 8
Figure 1 Figure 2
NAV - 399 7
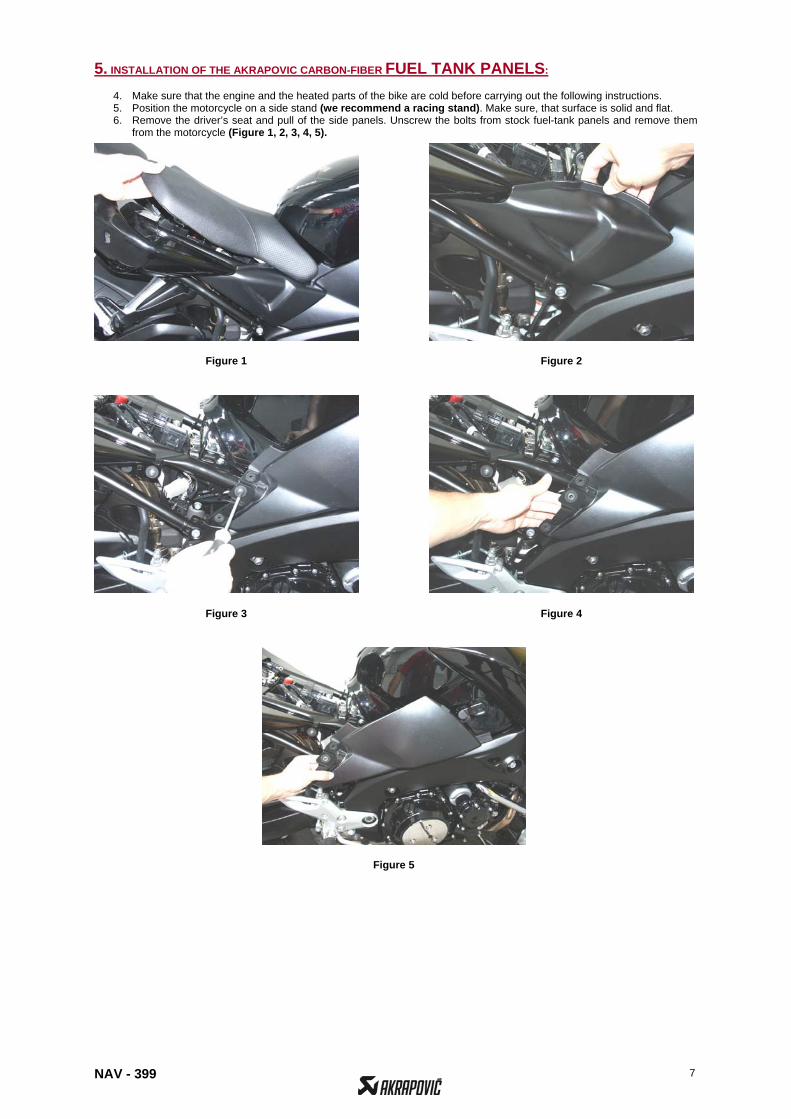
5. INSTALLATION OF THE AKRAPOVIC CARBON-FIBER FUEL TANK PANELS:
4. Make sure that the engine and the heated parts of the bike are cold before carrying out the following instructions. 5. Position the motorcycle on a side stand (we recommend a racing stand). Make sure, that surface is solid and flat. 6. Remove the driver’s seat and pull of the side panels. Unscrew the bolts from stock fuel-tank panels and remove them
from the motorcycle (Figure 1, 2, 3, 4, 5).
Figure 3 Figure 4
Figure 5
Figure 1 Figure 2
NAV - 399 8
Figure 11
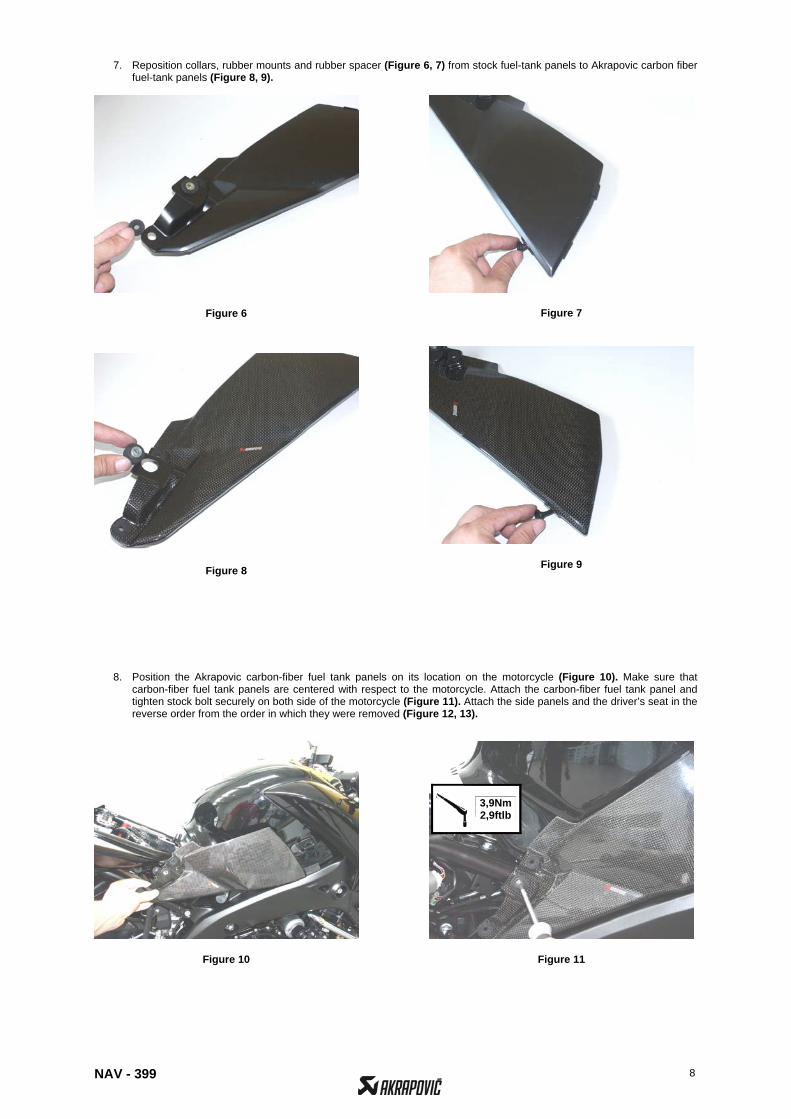
7. Reposition collars, rubber mounts and rubber spacer (Figure 6, 7) from stock fuel-tank panels to Akrapovic carbon fiber fuel-tank panels (Figure 8, 9).
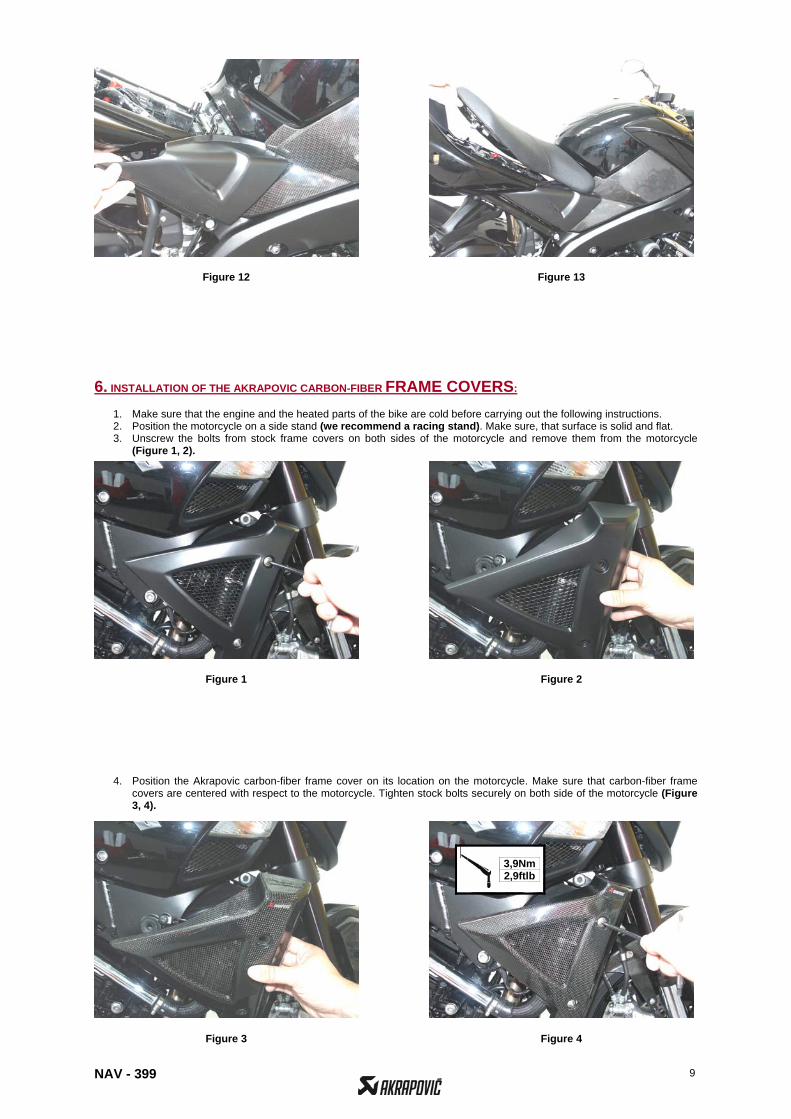
8. Position the Akrapovic carbon-fiber fuel tank panels on its location on the motorcycle (Figure 10). Make sure that carbon-fiber fuel tank panels are centered with respect to the motorcycle. Attach the carbon-fiber fuel tank panel and tighten stock bolt securely on both side of the motorcycle (Figure 11). Attach the side panels and the driver’s seat in the reverse order from the order in which they were removed (Figure 12, 13).
3,9Nm 2,9ftlb
Figure 6 Figure 7
Figure 8 Figure 9
Figure 10
NAV - 399 9
Figure 4
6. INSTALLATION OF THE AKRAPOVIC CARBON-FIBER FRAME COVERS:
1. Make sure that the engine and the heated parts of the bike are cold before carrying out the following instructions. 2. Position the motorcycle on a side stand (we recommend a racing stand). Make sure, that surface is solid and flat. 3. Unscrew the bolts from stock frame covers on both sides of the motorcycle and remove them from the motorcycle
(Figure 1, 2).
4. Position the Akrapovic carbon-fiber frame cover on its location on the motorcycle. Make sure that carbon-fiber frame covers are centered with respect to the motorcycle. Tighten stock bolts securely on both side of the motorcycle (Figure 3, 4).
3,9Nm 2,9ftlb
Figure 12 Figure 13
Figure 1 Figure 2
Figure 3

NAV - 399 10
FINAL INSTALLATION
1. Check the positioning of the Akrapovic carbon-fiber parts. 2. Tighten nuts, bolts and mounting elements completely to the same torque tolerances as the stock hardware.
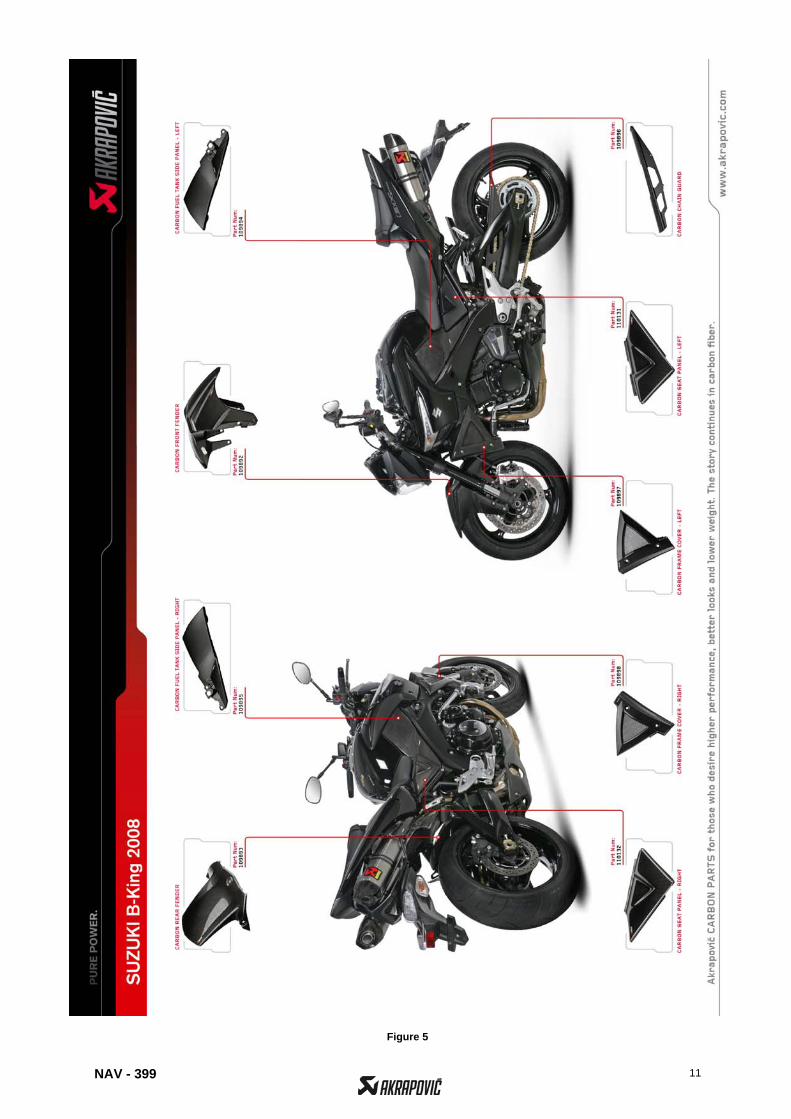
WARNING! do not over tighten, since this can lead to damage to the nut, bolt or carbon-fiber part. 3. Schematic of the installed Akrapovic carbon-fiber parts (Figure 5).
MAINTENANCE OF THE AKRAPOVIC CARBON-FIBER PART General: - Periodically ensure that all nuts and bolts are sufficiently tight. - Cleaning: use a soft dry cloth.
NAV - 399 11
Figure 5