Embed Size (px)
Citation preview

NETCOMM LIBERTY™ SERIES
NetComm MyZone
USER GUIDE
Mobile 3G WiFi Router
MyZone User Guide YML24W-RAU2 www.netcomm.com.au
PrefaceThis manual provides information related to the installation, operation, and application of this device. The individual reading this manual is presumed to have a basic
understanding of telecommunications terminology and concepts.
If you find the product to be broken or malfunctioning, please contact technical support for immediate service by email at [email protected]
For product update, new product release, manual revision, or software upgrades, please visit our website at www.netcomm.com.au
Important Safety InstructionsWith reference to unpacking, installation, use and maintenance of your electronic device, the following basic guidelines are recommended:
• Do not use or install this product near water, to avoid fire or shock hazard. For example, near a bathtub, kitchen sink or laundry tub, or near a
swimming pool. Also, do not expose the equipment to rain or damp areas (e.g. a wet basement).
• Do not connect the power supply cord on elevated surfaces. Allow it to lie freely. There should be no obstructions in its path and no heavy items
should be placed on the cord. In addition, do not walk on, step on or mistreat the cord.
• Use only the power cord and adapter that are shipped with this device.
• To safeguard the equipment against overheating, make sure that all openings in the unit that offer exposure to air are not blocked.
• Avoid using a telephone (other than a cordless type) during an electrical storm. There may be a remote risk of electric shock from lightening. Also, do
not use the telephone to report a gas leak in the vicinity of the leak.
• Never install telephone wiring during stormy weather conditions.
WARNING
• Disconnect the power line from the device before servicing.
Copyright
Copyright©2010 NetComm Limited. All rights reserved. The information contained herein is proprietary to NetComm Limited. No part of this document may
be translated, transcribed, reproduced, in any form, or by any means without prior written consent of NetComm Limited
NOTE:This document is subject to change without notice.
Save Our EnvironmentWhen this equipment has reached the end of its useful life, it must be taken to a recycling centre and processed separate from domestic waste.
The cardboard box, the plastic contained in the packaging, and the parts that make up this router can be recycled in accordance with regionally established
regulations. Never dispose of this electronic equipment along with your household waste. You may be subject to penalties or sanctions under the law.
Instead, ask for disposal instructions from your municipal government.
Please be responsible and protect our environment.
YML24W-RAU MyZone User Guidewww.netcomm.com.au 3
NETCOMM LIBERTY SERIES - MyZone Mobile 3G WiFi Router
Table Of ContentsPreface ....................................................................................................................................................................................................................................2
Welcome .................................................................................................................................................................................................................................51.1 What’s in the box?.......................................................................................................................................................................................................51.2 Key Features ...............................................................................................................................................................................................................51.3 Technical Specifications ..............................................................................................................................................................................................6
Getting Started ........................................................................................................................................................................................................................82.1 Network and System Requirements ............................................................................................................................................................................82.2 Placement of your MyZone ..........................................................................................................................................................................................82.3 Avoid obstacles and interferences ...............................................................................................................................................................................82.4 Cordless Phones .........................................................................................................................................................................................................82.5 Choose the “Quietest” Channel for your Wireless Network ..........................................................................................................................................92.6 LED Indicators, Inputs and Outputs .............................................................................................................................................................................92.7 Getting Online in 5 Minutes .......................................................................................................................................................................................112.8 Further Configuration and Reset ................................................................................................................................................................................12
MyZone Configuration Manager .............................................................................................................................................................................................153.1 Connecting to your MyZone Network in Mac OS X ....................................................................................................................................................153.2 Connecting to your MyZone Network from an iPhone or iPad ....................................................................................................................................163.3 Connecting to your MyZone Network from a Windows PC ........................................................................................................................................173.4 Settings in the MyZone Configuration Manager .........................................................................................................................................................20
Advanced Settings ................................................................................................................................................................................................................234.1. Status Menu.............................................................................................................................................................................................................234.2. WWAN (3G) Configuring MyZone ............................................................................................................................................................................244.3. Wireless LAN ...........................................................................................................................................................................................................264.4. Services ...................................................................................................................................................................................................................274.5. System .....................................................................................................................................................................................................................32
Troubleshooting .....................................................................................................................................................................................................................34
Appendices ...........................................................................................................................................................................................................................37
Safety and Legal Information .................................................................................................................................................................................................40
Legal & Regulatory Information ..............................................................................................................................................................................................41

WELCOME
YML24W-RAU MyZone User Guidewww.netcomm.com.au 5
NETCOMM LIBERTY SERIES - MyZone Mobile 3G WiFi Router
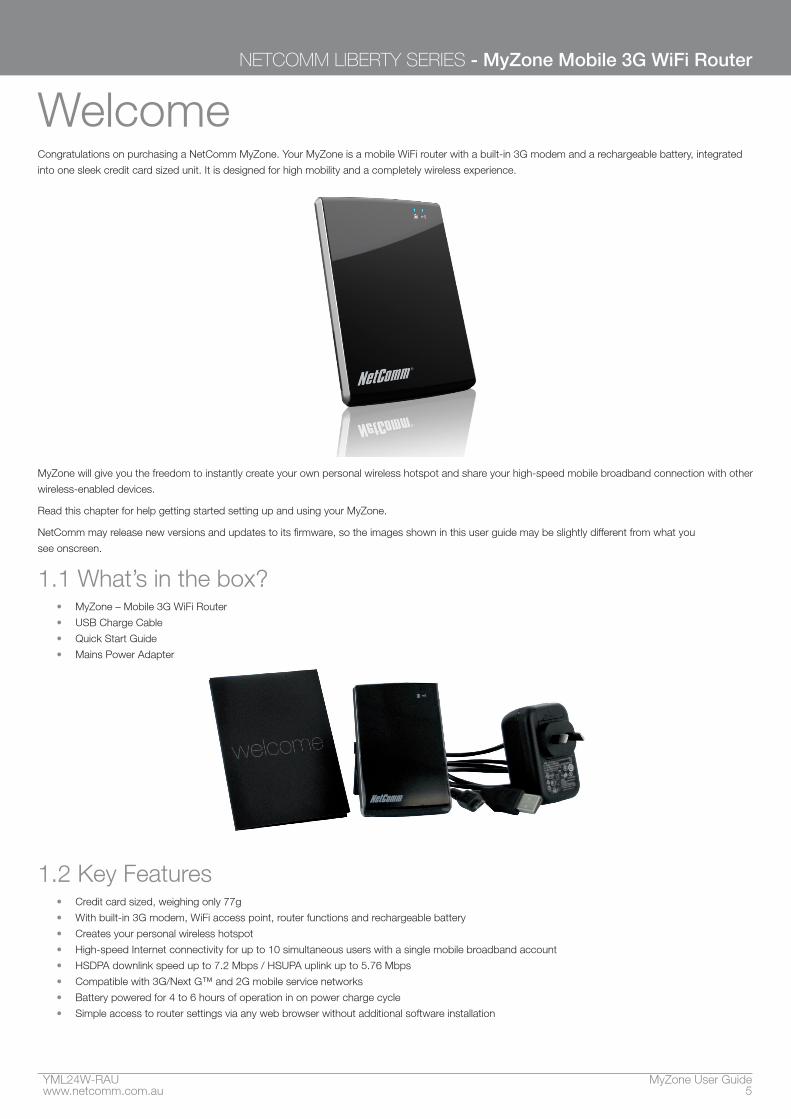
WelcomeCongratulations on purchasing a NetComm MyZone. Your MyZone is a mobile WiFi router with a built-in 3G modem and a rechargeable battery, integrated
into one sleek credit card sized unit. It is designed for high mobility and a completely wireless experience.
MyZone will give you the freedom to instantly create your own personal wireless hotspot and share your high-speed mobile broadband connection with other
wireless-enabled devices.
Read this chapter for help getting started setting up and using your MyZone.
NetComm may release new versions and updates to its firmware, so the images shown in this user guide may be slightly different from what you
see onscreen.
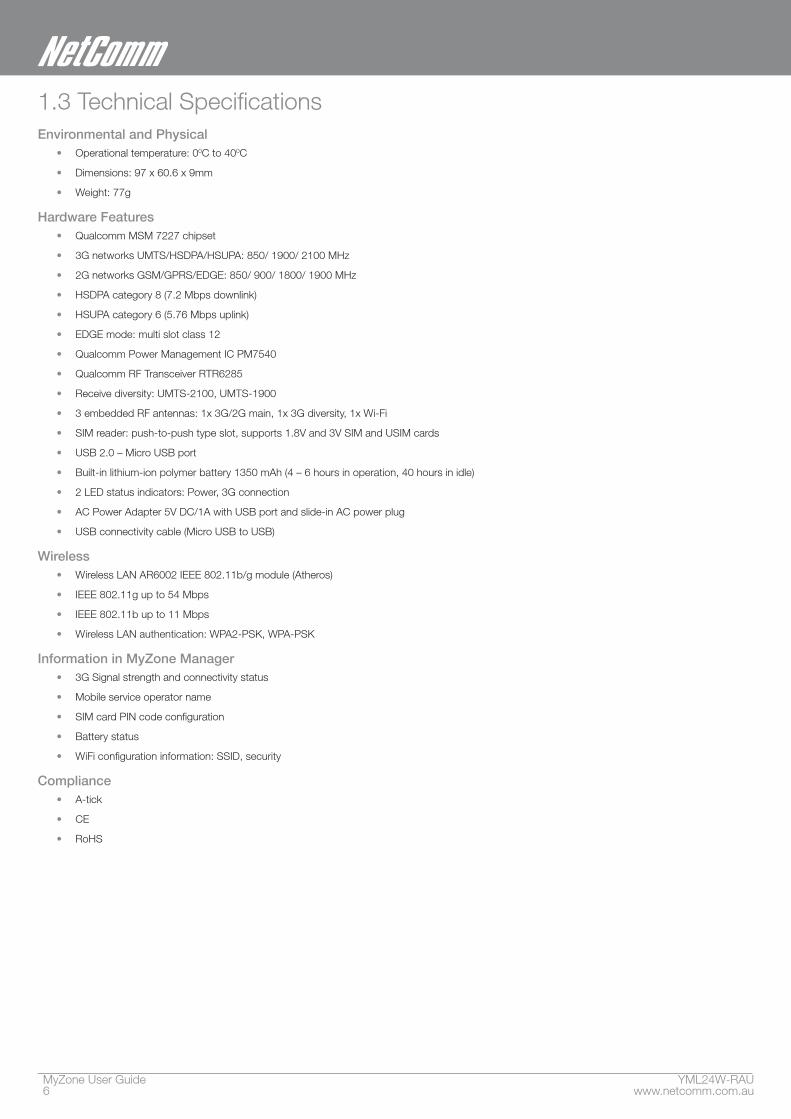
1.1 What’s in the box?• MyZone – Mobile 3G WiFi Router
• USB Charge Cable
• Quick Start Guide
• Mains Power Adapter
1.2 Key Features• Credit card sized, weighing only 77g
• With built-in 3G modem, WiFi access point, router functions and rechargeable battery
• Creates your personal wireless hotspot
• High-speed Internet connectivity for up to 10 simultaneous users with a single mobile broadband account
• HSDPA downlink speed up to 7.2 Mbps / HSUPA uplink up to 5.76 Mbps
• Compatible with 3G/Next G™ and 2G mobile service networks
• Battery powered for 4 to 6 hours of operation in on power charge cycle
• Simple access to router settings via any web browser without additional software installation
MyZone User Guide YML24W-RAU6 www.netcomm.com.au
1.3 Technical SpecificationsEnvironmental and Physical
• Operational temperature: 00C to 400C
• Dimensions: 97 x 60.6 x 9mm
• Weight: 77g
Hardware Features• Qualcomm MSM 7227 chipset
• 3G networks UMTS/HSDPA/HSUPA: 850/ 1900/ 2100 MHz
• 2G networks GSM/GPRS/EDGE: 850/ 900/ 1800/ 1900 MHz
• HSDPA category 8 (7.2 Mbps downlink)
• HSUPA category 6 (5.76 Mbps uplink)
• EDGE mode: multi slot class 12
• Qualcomm Power Management IC PM7540
• Qualcomm RF Transceiver RTR6285
• Receive diversity: UMTS-2100, UMTS-1900
• 3 embedded RF antennas: 1x 3G/2G main, 1x 3G diversity, 1x Wi-Fi
• SIM reader: push-to-push type slot, supports 1.8V and 3V SIM and USIM cards
• USB 2.0 – Micro USB port
• Built-in lithium-ion polymer battery 1350 mAh (4 – 6 hours in operation, 40 hours in idle)
• 2 LED status indicators: Power, 3G connection
• AC Power Adapter 5V DC/1A with USB port and slide-in AC power plug
• USB connectivity cable (Micro USB to USB)
Wireless • Wireless LAN AR6002 IEEE 802.11b/g module (Atheros)
• IEEE 802.11g up to 54 Mbps
• IEEE 802.11b up to 11 Mbps
• Wireless LAN authentication: WPA2-PSK, WPA-PSK
Information in MyZone Manager• 3G Signal strength and connectivity status
• Mobile service operator name
• SIM card PIN code configuration
• Battery status
• WiFi configuration information: SSID, security
Compliance• A-tick
• CE
• RoHS

GETTING STARTED
MyZone User Guide YML24W-RAU8 www.netcomm.com.au
Getting Started2.1 Network and System RequirementsBefore continuing with the setup of your Myzone, please confirm that you comply with the minimum system requirements below.
• Activated SIM card
• Computer or smart phone with Windows, Nokia Symbian, Android, Macintosh or Linux-based operating systems with TCP/IP protocol installed and
working IEEE 802.11g or IEEE 802.11b comliant wireless adapter
• Web browser such as Internet Explorer, Safari, Mozilla Firefox, Opera, Google Chrome, Netscape Navigator etc.
2.2 Placement of your MyZoneJust like a mobile phone, the MyZone’s location will affect its signal strength from the mobile base station (cell tower). The data speed achievable from the
MyZone is relative to this signal strength, which is affected by many environmental factors. When choosing a location to place your MyZone, please keep in
mind that the MyZone will need adequate signal strength in order to provide Internet connectivity.
Similarly, the wireless connection between your Myzone and your WiFi devices will be stronger the closer your connected devices are to your MyZone. Your
wireless connection and performance will degrade as the distance between your MyZone and connected devices increases. This may or may not be directly
noticable, and is greatly affected by the individual setup environment.
If you have concerns about your network’s performance that might be related to range or obstruction factors, try moving the computer (or Wi-Fi device)
to a position between 3 to 5 metres from your MyZone in order to see if distance is the problem. If difficulties persist even at close range, please contact
NetComm Technical Support.
Note: While some of the items listed below can affect network performance, they will not prohibit your wireless network from functioning; if you are concerned that your network is not operating at its maximum effectiveness, this checklist may help.
NOTE: It is highly recommended that the MyZone must be kept at least 20cm distances away from human body.
(This is a regulatory requirement and applies to all 3G / Wi-Fi capable devices meeting standard regulatory compliance - See the section on Safety and Legal
Information for more information).
Place your MyZone as close as possible to the centre of your wireless network devices. To achieve the best wireless network coverage for your “wireless
clients” (i.e. computers with built-in or USB wireless adapters, laptops with built-in wireless, wireless PDA / iPhone, wirless enabled gaming consoles etc):
• Ensure that your MyZone is positioned vertically.
• In multi-storey homes, place your MyZone on a floor that is as close to the centre of the home as possible. This may mean placing your MyZone on
an upper floor.
• Try not to place your MyZone near a cordless telephone that operates at the same radio frequency as the MyZone (2.4GHz).
2.3 Avoid obstacles and interferencesAvoid placing your MyZone near devices that may emit radio “noise,” such as microwave ovens. Dense objects that can inhibit wireless
communication include:
• Refrigerators
• Washers and/or dryers
• Metal cabinets
• Large aquariums
• Metallic-based, UV-tinted windows
If your wireless signal seems weak in some spots, make sure that objects such as these are not blocking the signal’s path (between your devices and
your MyZone).
2.4 Cordless PhonesIf the performance of your wireless network is impaired after considering the above issues, and you have a cordless phone:
• Try moving cordless phones away from your MyZone and your wireless-enabled computers.
• Unplug and remove the battery from any cordless phone that operates on the 2.4GHz band (check manufacturer’s information). If this fixes the
problem, your phone may be interfering with the Wi-Fi of your MyZone.
• If your phone supports channel selection, change the channel on the phone to the farthest channel from your wireless network. For example, change
the phone to channel 1 and set your MyZone to channel 11. See your phones user manual for detailed instructions.
• If necessary, consider switching to a 900MHz or 5GHz cordless phone.
YML24W-RAU MyZone User Guidewww.netcomm.com.au 9
NETCOMM LIBERTY SERIES - MyZone Mobile 3G WiFi Router
2.5 Choose the “Quietest” Channel for your Wireless NetworkIn locations where homes or offices are close together, such as apartment buildings or office complexes, there may be wireless networks nearby that can
conflict with your wireless network.
Use the site survey capabilities found in the wireless utility of your wireless adapter to locate any other wireless networks that are available (see your wireless
adapter’s user manual), and switch your MyZone and computers to a channel as far away from other networks as possible.
Hint: Most Wi-Fi routers set their Wireless G networks to channel 6. Changing the channel to something other than 6 may help improve your wireless
network performance.
• Experiment with more than one of the available channels, in order to find the clearest connection and avoid interference from neighbouring cordless
phones or other wireless devices.
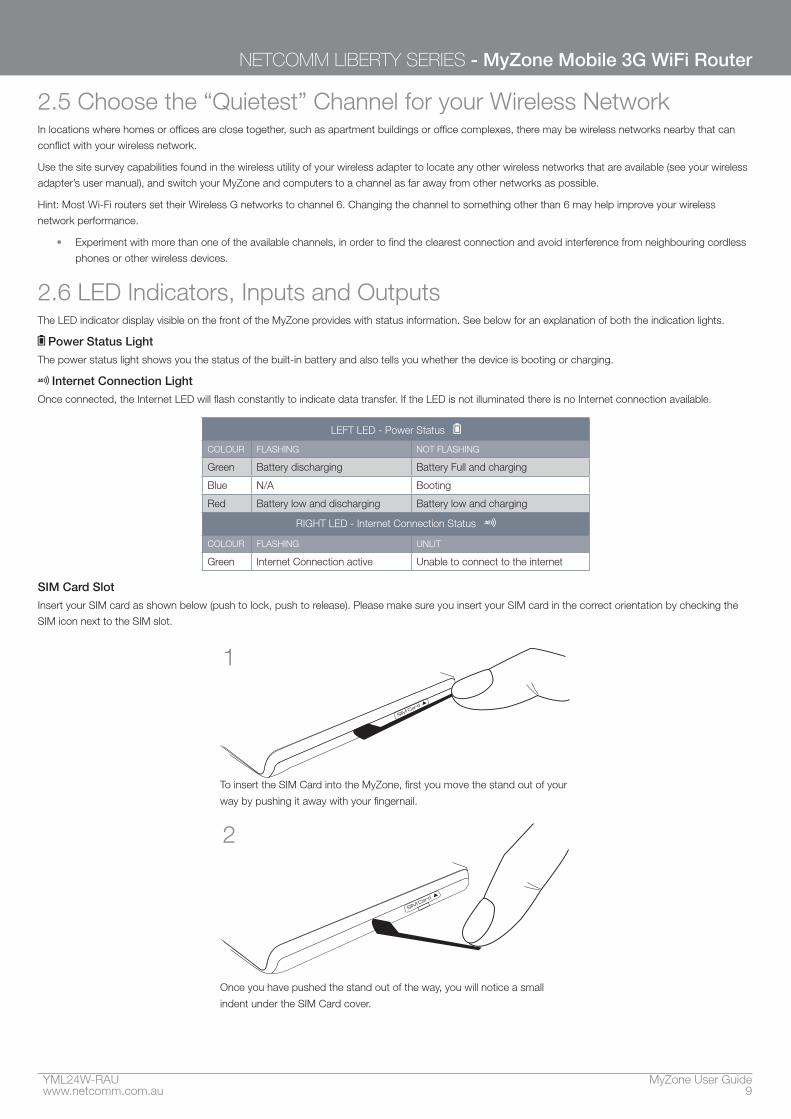
2.6 LED Indicators, Inputs and OutputsThe LED indicator display visible on the front of the MyZone provides with status information. See below for an explanation of both the indication lights.
Power Status Light
The power status light shows you the status of the built-in battery and also tells you whether the device is booting or charging.
Internet Connection Light
Once connected, the Internet LED will flash constantly to indicate data transfer. If the LED is not illuminated there is no Internet connection available.
LEFT LED - Power Status
COLOUR FLASHING NOT FLASHING
Green Battery discharging Battery Full and charging
Blue N/A Booting
Red Battery low and discharging Battery low and charging
RIGHT LED - Internet Connection Status
COLOUR FLASHING UNLIT
Green Internet Connection active Unable to connect to the internet
SIM Card Slot
Insert your SIM card as shown below (push to lock, push to release). Please make sure you insert your SIM card in the correct orientation by checking the
SIM icon next to the SIM slot.
To insert the SIM Card into the MyZone, first you move the stand out of your
way by pushing it away with your fingernail.
1
Once you have pushed the stand out of the way, you will notice a small
indent under the SIM Card cover.
2
MyZone User Guide YML24W-RAU10 www.netcomm.com.au
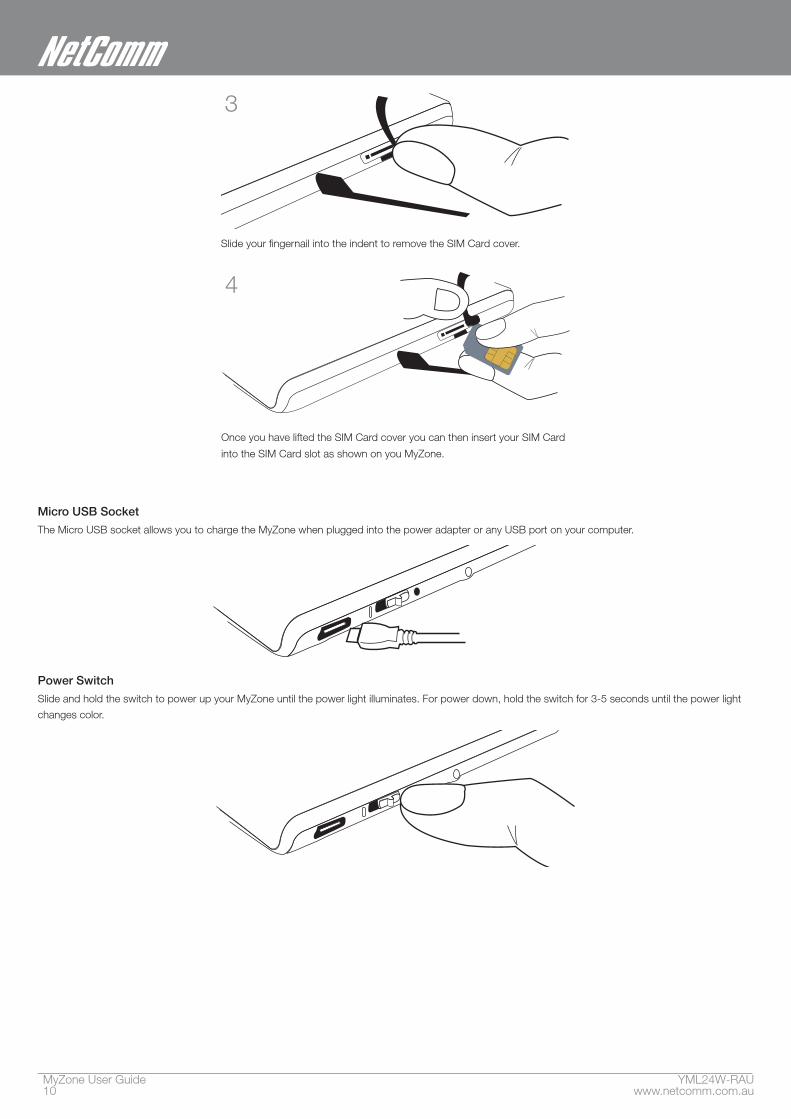
Slide your fingernail into the indent to remove the SIM Card cover.
3
Once you have lifted the SIM Card cover you can then insert your SIM Card
into the SIM Card slot as shown on you MyZone.
4
Micro USB Socket
The Micro USB socket allows you to charge the MyZone when plugged into the power adapter or any USB port on your computer.
Power Switch
Slide and hold the switch to power up your MyZone until the power light illuminates. For power down, hold the switch for 3-5 seconds until the power light
changes color.
YML24W-RAU MyZone User Guidewww.netcomm.com.au 11
NETCOMM LIBERTY SERIES - MyZone Mobile 3G WiFi Router
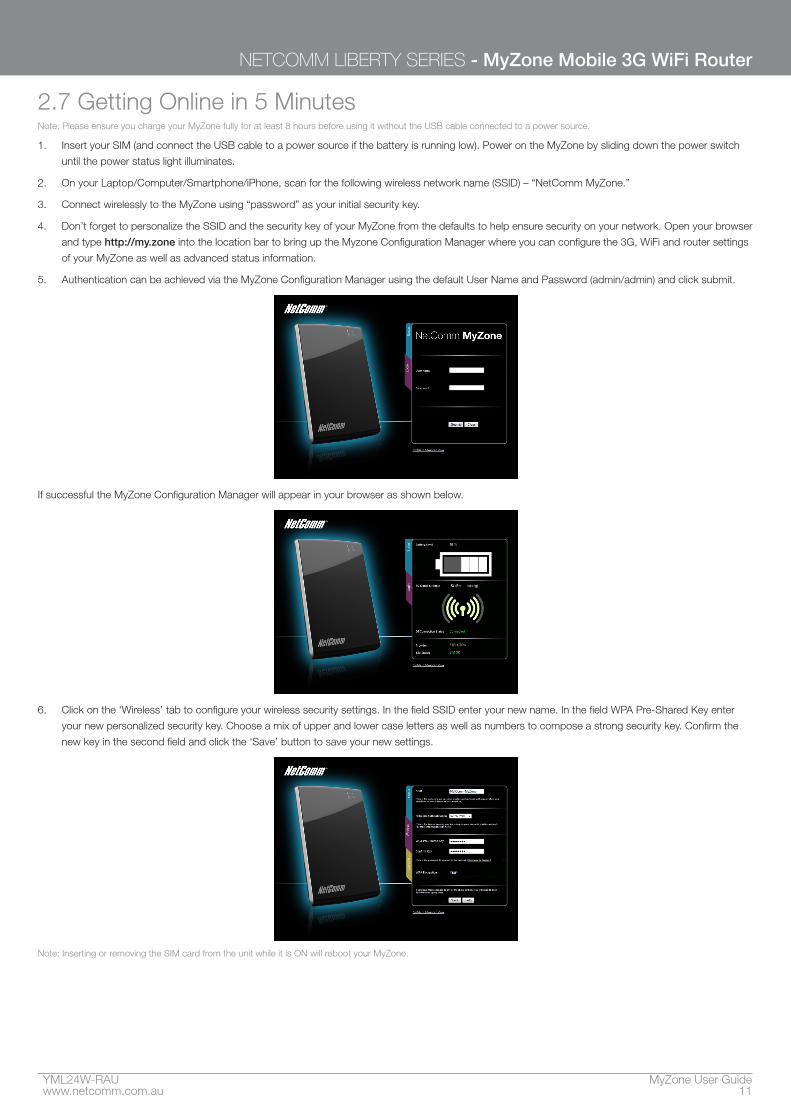
2.7 Getting Online in 5 MinutesNote: Please ensure you charge your MyZone fully for at least 8 hours before using it without the USB cable connected to a power source.
1. Insert your SIM (and connect the USB cable to a power source if the battery is running low). Power on the MyZone by sliding down the power switch
until the power status light illuminates.
2. On your Laptop/Computer/Smartphone/iPhone, scan for the following wireless network name (SSID) – “NetComm MyZone.”
3. Connect wirelessly to the MyZone using “password” as your initial security key.
4. Don’t forget to personalize the SSID and the security key of your MyZone from the defaults to help ensure security on your network. Open your browser
and type http://my.zone into the location bar to bring up the Myzone Configuration Manager where you can configure the 3G, WiFi and router settings
of your MyZone as well as advanced status information.
5. Authentication can be achieved via the MyZone Configuration Manager using the default User Name and Password (admin/admin) and click submit.
If successful the MyZone Configuration Manager will appear in your browser as shown below.
6. Click on the ‘Wireless’ tab to configure your wireless security settings. In the field SSID enter your new name. In the field WPA Pre-Shared Key enter
your new personalized security key. Choose a mix of upper and lower case letters as well as numbers to compose a strong security key. Confirm the
new key in the second field and click the ‘Save’ button to save your new settings.
Note: Inserting or removing the SIM card from the unit while it is ON will reboot your MyZone.
MyZone User Guide YML24W-RAU12 www.netcomm.com.au
2.7.1. Checking the 3G Status1. Login to the MyZone Configuration Manager as previously described, click on the ‘Status’ tab.
2. Check the 3G connection status, signal strength, SIM status and battery level of your MyZone.
3. If you have 3G reception, the 3G Auto-Connect feature (default setting) should have your MyZone connect to your Mobile Broadband provider within
2-5 minutes after powering up your MyZone.
You should now be connected to the Internet. If your MyZone has not connected to your provider, please complete the following steps.
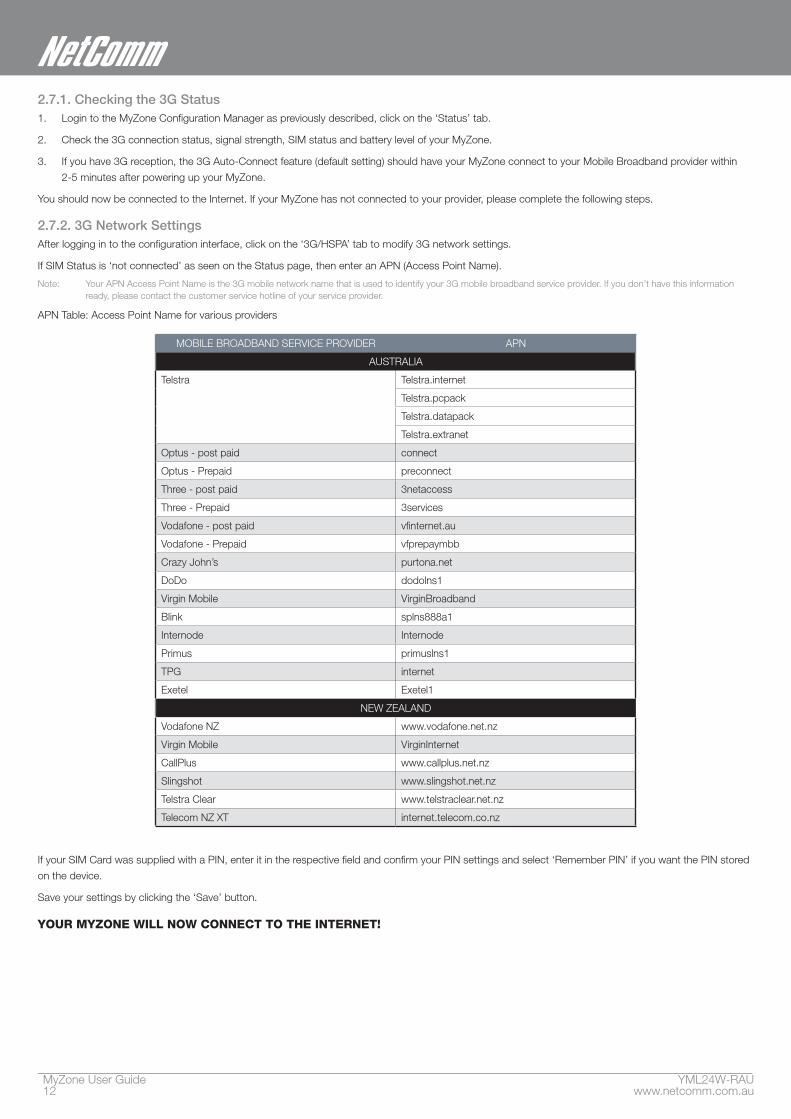
2.7.2. 3G Network SettingsAfter logging in to the configuration interface, click on the ‘3G/HSPA’ tab to modify 3G network settings.
If SIM Status is ‘not connected’ as seen on the Status page, then enter an APN (Access Point Name).
Note: Your APN Access Point Name is the 3G mobile network name that is used to identify your 3G mobile broadband service provider. If you don’t have this information ready, please contact the customer service hotline of your service provider.
APN Table: Access Point Name for various providers
MOBILE BROADBAND SERVICE PROVIDER APN
AUSTRALIA
Telstra Telstra.internet
Telstra.pcpack
Telstra.datapack
Telstra.extranet
Optus - post paid connect
Optus - Prepaid preconnect
Three - post paid 3netaccess
Three - Prepaid 3services
Vodafone - post paid vfinternet.au
Vodafone - Prepaid vfprepaymbb
Crazy John’s purtona.net
DoDo dodolns1
Virgin Mobile VirginBroadband
Blink splns888a1
Internode Internode
Primus primuslns1
TPG internet
Exetel Exetel1
NEW ZEALAND
Vodafone NZ www.vodafone.net.nz
Virgin Mobile VirginInternet
CallPlus www.callplus.net.nz
Slingshot www.slingshot.net.nz
Telstra Clear www.telstraclear.net.nz
Telecom NZ XT internet.telecom.co.nz
If your SIM Card was supplied with a PIN, enter it in the respective field and confirm your PIN settings and select ‘Remember PIN’ if you want the PIN stored
on the device.
Save your settings by clicking the ‘Save’ button.
YOUR MYZONE WILL NOW CONNECT TO THE INTERNET!
YML24W-RAU MyZone User Guidewww.netcomm.com.au 13
NETCOMM LIBERTY SERIES - MyZone Mobile 3G WiFi Router
2.8 Further Configuration and ResetThe MyZone has been designed to work with minimal user configuration. However if you would like to set any advanced options this can be done using the
browser based Advanced View in the MyZone Configuration Manager.
Advanced SettingsTo access the advanced menu click on ‘Switch to Advanced View’ located at the bottom of the configuration interface
A login screen will appear, enter the default User Name and Password (admin/admin) and click submit.
Learning more about the status of your MyZoneAfter logging in to the Advanced View of the MyZone Configuration Manager as described above, click on the status tab to learn more about the
connection and battery status of your MyZone.
Changing wireless settingsAfter logging in to the web configuration as described above, click on the wireless tab to modify your network name, password or encryption strength. Save
your settings by clicking the Save/Apply button.
Setting a custom APN or other 3G Network settingsAfter logging in to the web configuration as described above, click on the 3G Settings tab to modify 3G network settings. Don’t forget to save your changes
by clicking the Save/Apply button.
Reset to factory defaultsIf you make any errors the MyZone can be reset to factory defaults by sliding and holding the power switch for 10 seconds.
Hardware ResetIn the unlikely event that something goes wrong and your Myzone requires a hardware reboot, you can reset the device rather than waiting for the battery to
flatten. To achieve this, use a pen or other pointed object to briefly depress the small button next to the SIM slot (behind the rubber cap).
MyZone Configuration Manager
YML24W-RAU MyZone User Guidewww.netcomm.com.au 15
NETCOMM LIBERTY SERIES - MyZone Mobile 3G WiFi Router
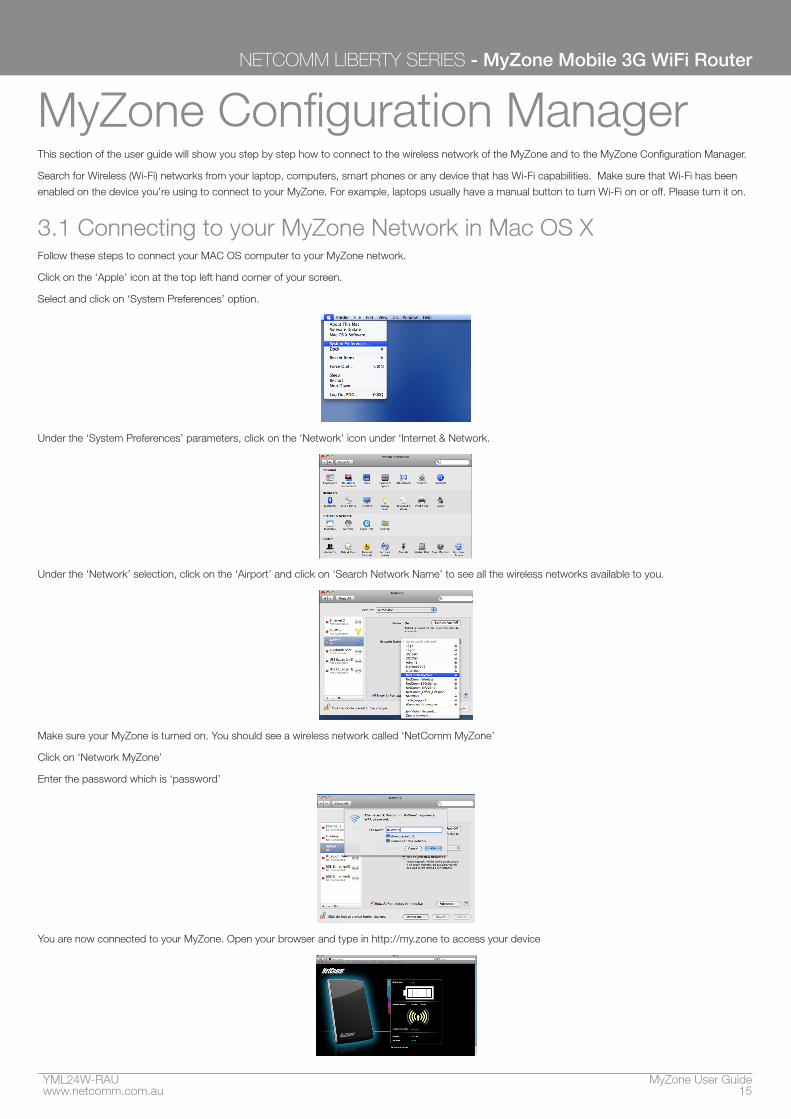
MyZone Configuration ManagerThis section of the user guide will show you step by step how to connect to the wireless network of the MyZone and to the MyZone Configuration Manager.
Search for Wireless (Wi-Fi) networks from your laptop, computers, smart phones or any device that has Wi-Fi capabilities. Make sure that Wi-Fi has been
enabled on the device you’re using to connect to your MyZone. For example, laptops usually have a manual button to turn Wi-Fi on or off. Please turn it on.
3.1 Connecting to your MyZone Network in Mac OS XFollow these steps to connect your MAC OS computer to your MyZone network.
Click on the ‘Apple’ icon at the top left hand corner of your screen.
Select and click on ‘System Preferences’ option.
Under the ‘System Preferences’ parameters, click on the ‘Network’ icon under ‘Internet & Network.
Under the ‘Network’ selection, click on the ‘Airport’ and click on ‘Search Network Name’ to see all the wireless networks available to you.
Make sure your MyZone is turned on. You should see a wireless network called ‘NetComm MyZone’
Click on ‘Network MyZone’
Enter the password which is ‘password’
You are now connected to your MyZone. Open your browser and type in http://my.zone to access your device
MyZone User Guide YML24W-RAU16 www.netcomm.com.au
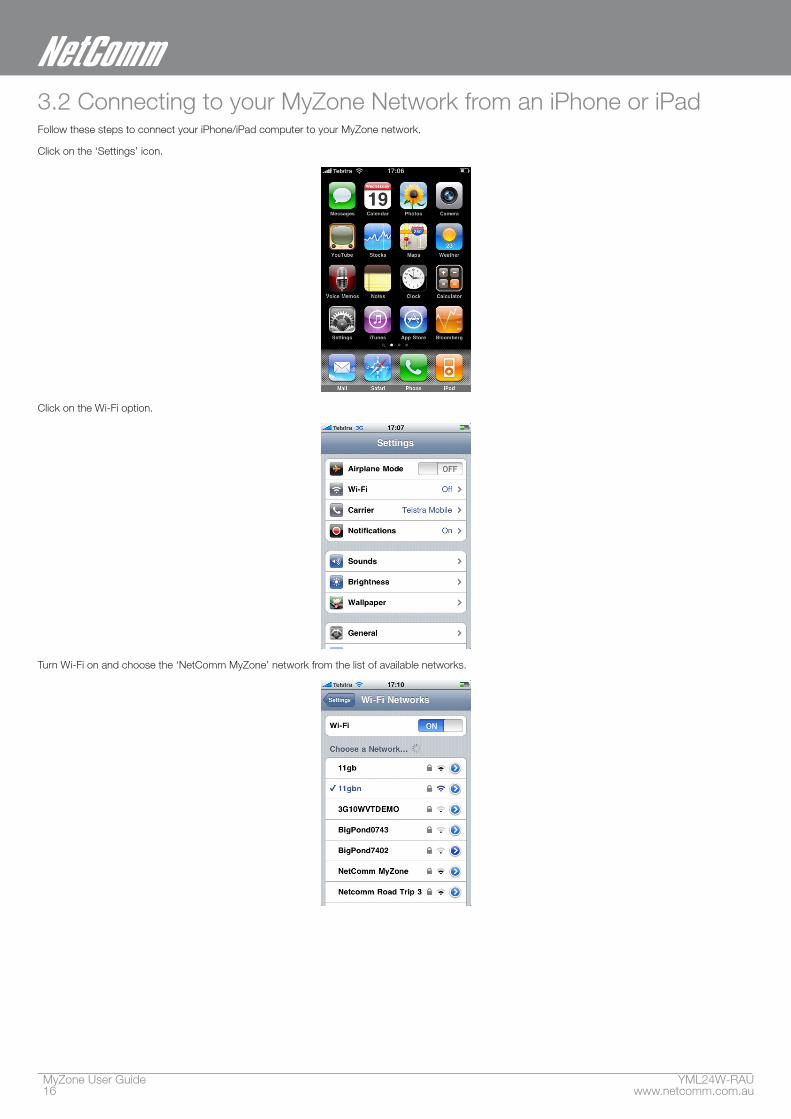
3.2 Connecting to your MyZone Network from an iPhone or iPadFollow these steps to connect your iPhone/iPad computer to your MyZone network.
Click on the ‘Settings’ icon.
Click on the Wi-Fi option.
Turn Wi-Fi on and choose the ‘NetComm MyZone’ network from the list of available networks.
YML24W-RAU MyZone User Guidewww.netcomm.com.au 17
NETCOMM LIBERTY SERIES - MyZone Mobile 3G WiFi Router
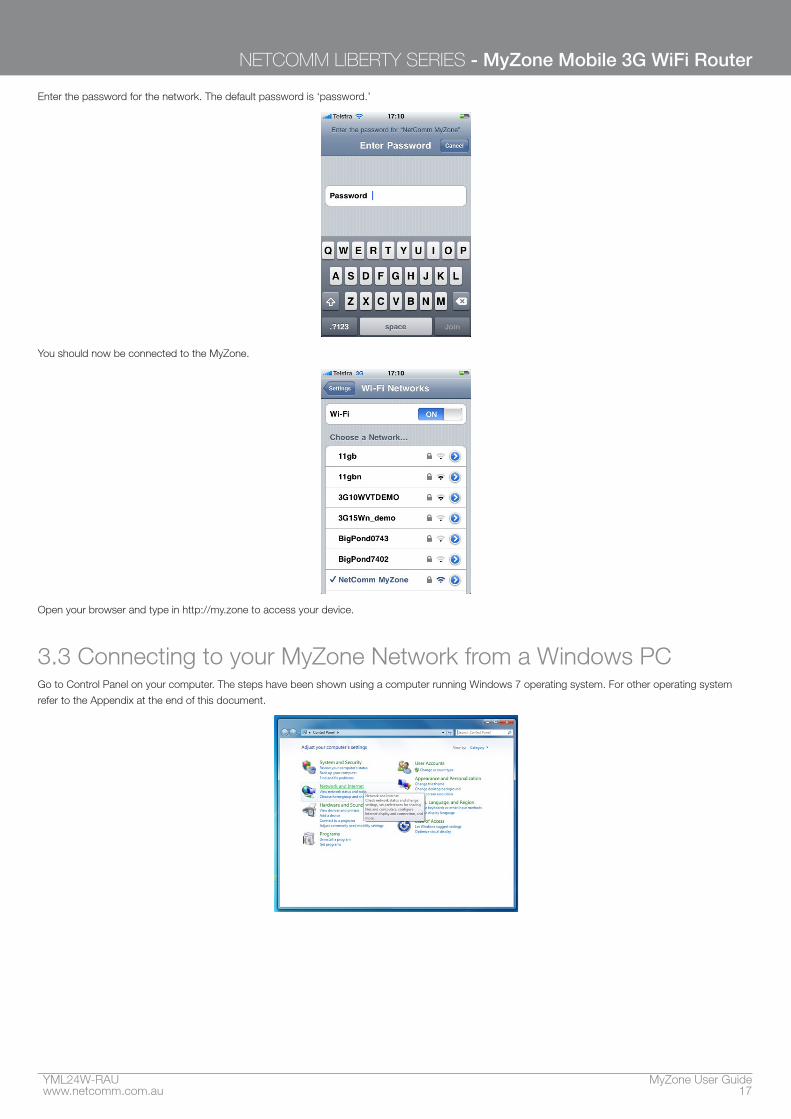
Enter the password for the network. The default password is ‘password.’
You should now be connected to the MyZone.
Open your browser and type in http://my.zone to access your device.
3.3 Connecting to your MyZone Network from a Windows PCGo to Control Panel on your computer. The steps have been shown using a computer running Windows 7 operating system. For other operating system
refer to the Appendix at the end of this document.
MyZone User Guide YML24W-RAU18 www.netcomm.com.au
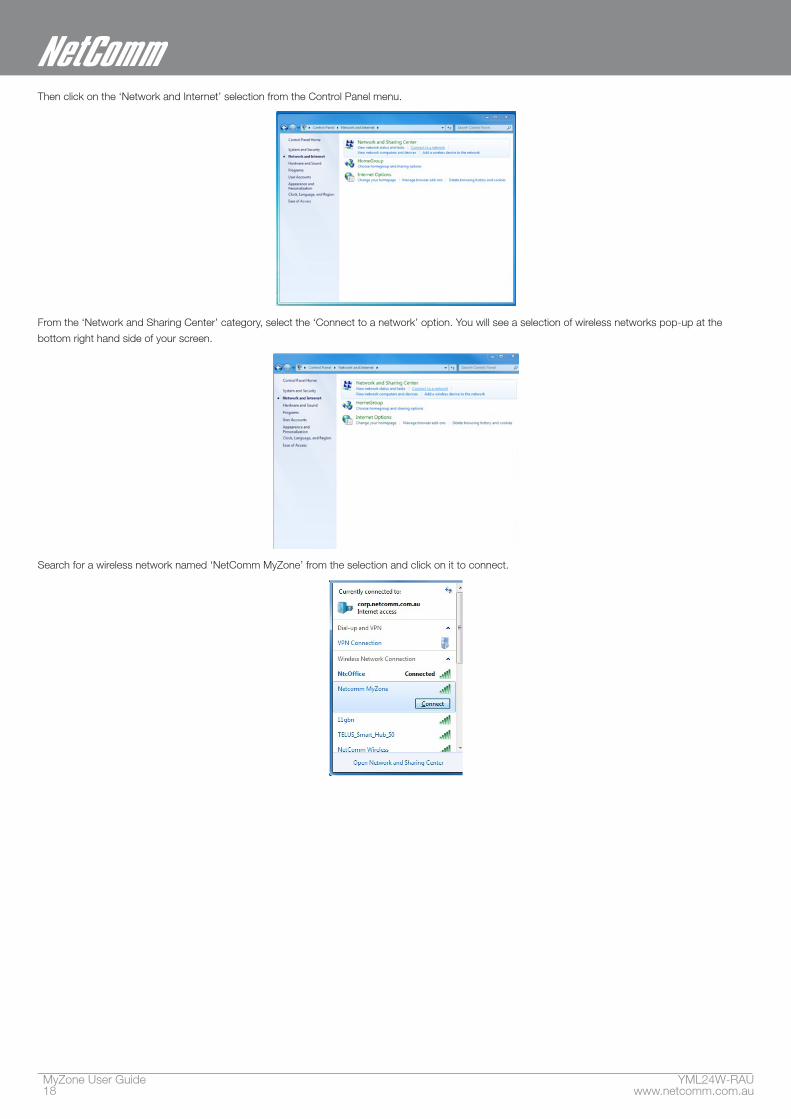
Then click on the ‘Network and Internet’ selection from the Control Panel menu.
From the ‘Network and Sharing Center’ category, select the ‘Connect to a network’ option. You will see a selection of wireless networks pop-up at the
bottom right hand side of your screen.
Search for a wireless network named ‘NetComm MyZone’ from the selection and click on it to connect.
YML24W-RAU MyZone User Guidewww.netcomm.com.au 19
NETCOMM LIBERTY SERIES - MyZone Mobile 3G WiFi Router
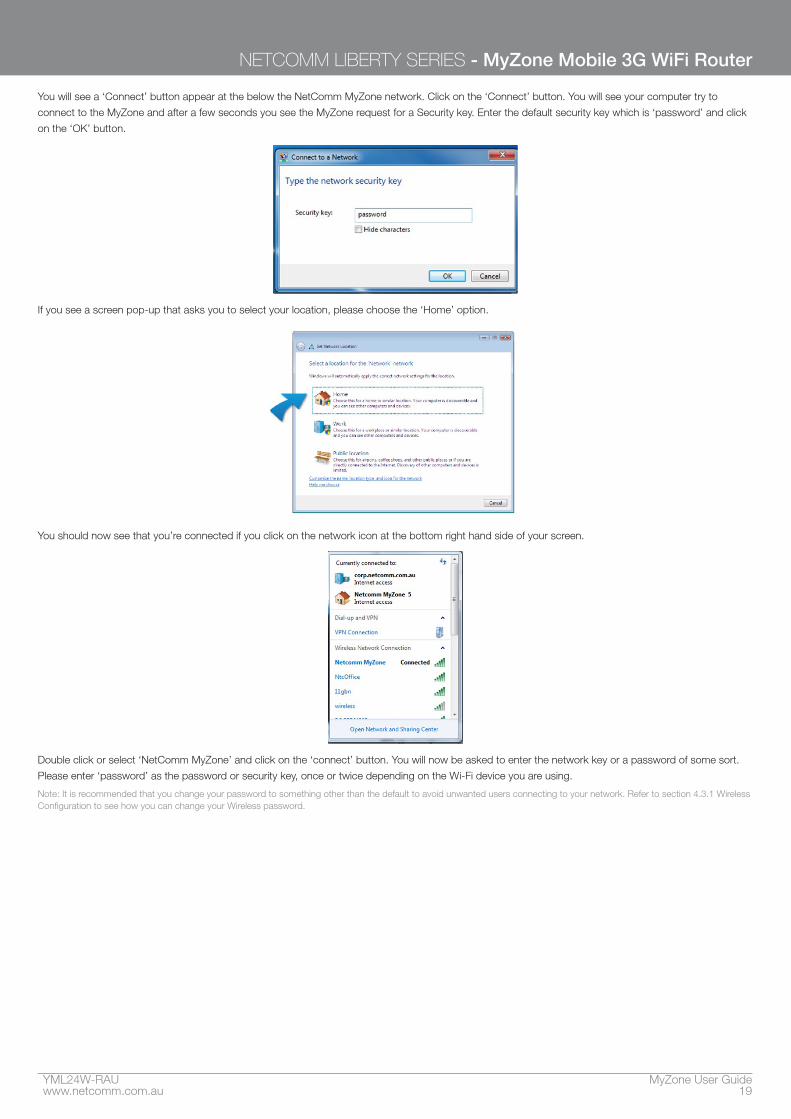
You will see a ‘Connect’ button appear at the below the NetComm MyZone network. Click on the ‘Connect’ button. You will see your computer try to
connect to the MyZone and after a few seconds you see the MyZone request for a Security key. Enter the default security key which is ‘password’ and click
on the ‘OK’ button.
If you see a screen pop-up that asks you to select your location, please choose the ‘Home’ option.
You should now see that you’re connected if you click on the network icon at the bottom right hand side of your screen.
Double click or select ‘NetComm MyZone’ and click on the ‘connect’ button. You will now be asked to enter the network key or a password of some sort.
Please enter ‘password’ as the password or security key, once or twice depending on the Wi-Fi device you are using.
Note: It is recommended that you change your password to something other than the default to avoid unwanted users connecting to your network. Refer to section 4.3.1 Wireless Configuration to see how you can change your Wireless password.
MyZone User Guide YML24W-RAU20 www.netcomm.com.au
3.4 Settings in the MyZone Configuration ManagerTo access the MyZone Configuration Manager open a web browser (Internet Explorer, Safari, Mozilla Firefox, Google Chrome, etc.) and type http://my.zone
in the location bar and hit ‘Enter’ on your keyboard or click on the green arrow button to the right of the address.
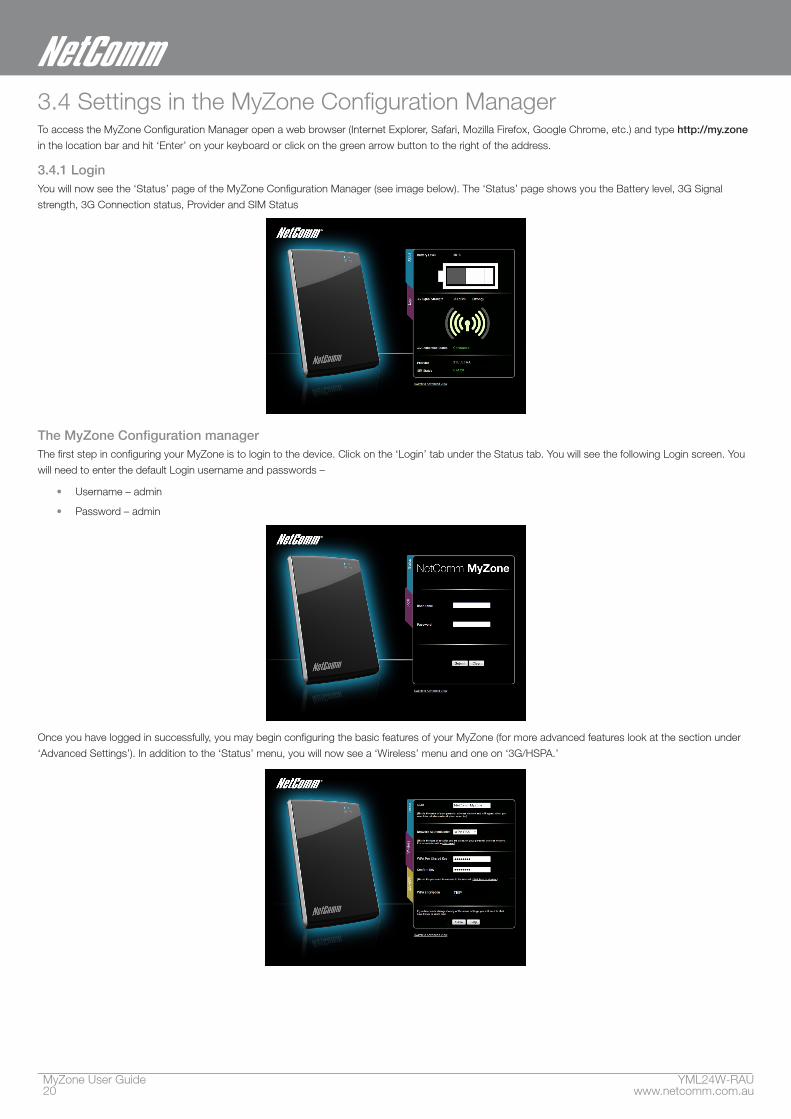
3.4.1 LoginYou will now see the ‘Status’ page of the MyZone Configuration Manager (see image below). The ‘Status’ page shows you the Battery level, 3G Signal
strength, 3G Connection status, Provider and SIM Status
The MyZone Configuration managerThe first step in configuring your MyZone is to login to the device. Click on the ‘Login’ tab under the Status tab. You will see the following Login screen. You
will need to enter the default Login username and passwords –
• Username – admin
• Password – admin
Once you have logged in successfully, you may begin configuring the basic features of your MyZone (for more advanced features look at the section under
‘Advanced Settings’). In addition to the ‘Status’ menu, you will now see a ‘Wireless’ menu and one on ‘3G/HSPA.’
YML24W-RAU MyZone User Guidewww.netcomm.com.au 21
NETCOMM LIBERTY SERIES - MyZone Mobile 3G WiFi Router
3.4.2 Changing the Wireless SettingsIn the Wireless menu, change the Wireless Network Name (SSID) from the default ‘NetComm MyZone’ to something more personal. Similarly you should
personalise the wireless security key (WPA Pre Shared Key). The default security key which is ‘password.’
You can increase or decrease the network authentication level. However, WPA-PSK is fairly secure and compatible with most wireless devices. Please note
that reducing the Network Authentication to WEP maybe increase security threat, while increasing it to WPA2, though more secure, might raise compatibility
issues with some older Wireless devices.
Once you’ve completed all the settings, click on ‘Save’ to store the settings on to the device.
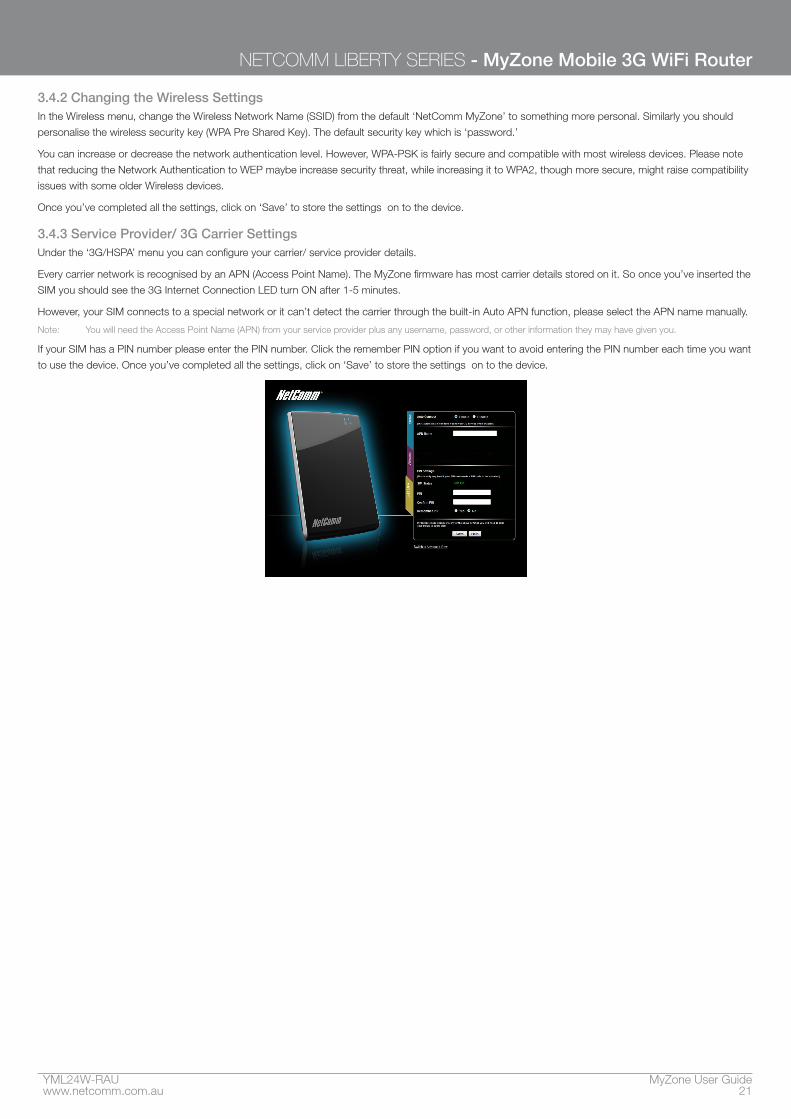
3.4.3 Service Provider/ 3G Carrier SettingsUnder the ‘3G/HSPA’ menu you can configure your carrier/ service provider details.
Every carrier network is recognised by an APN (Access Point Name). The MyZone firmware has most carrier details stored on it. So once you’ve inserted the
SIM you should see the 3G Internet Connection LED turn ON after 1-5 minutes.
However, your SIM connects to a special network or it can’t detect the carrier through the built-in Auto APN function, please select the APN name manually.
Note: You will need the Access Point Name (APN) from your service provider plus any username, password, or other information they may have given you.
If your SIM has a PIN number please enter the PIN number. Click the remember PIN option if you want to avoid entering the PIN number each time you want
to use the device. Once you’ve completed all the settings, click on ‘Save’ to store the settings on to the device.

Advanced Settings
YML24W-RAU MyZone User Guidewww.netcomm.com.au 23
NETCOMM LIBERTY SERIES - MyZone Mobile 3G WiFi Router
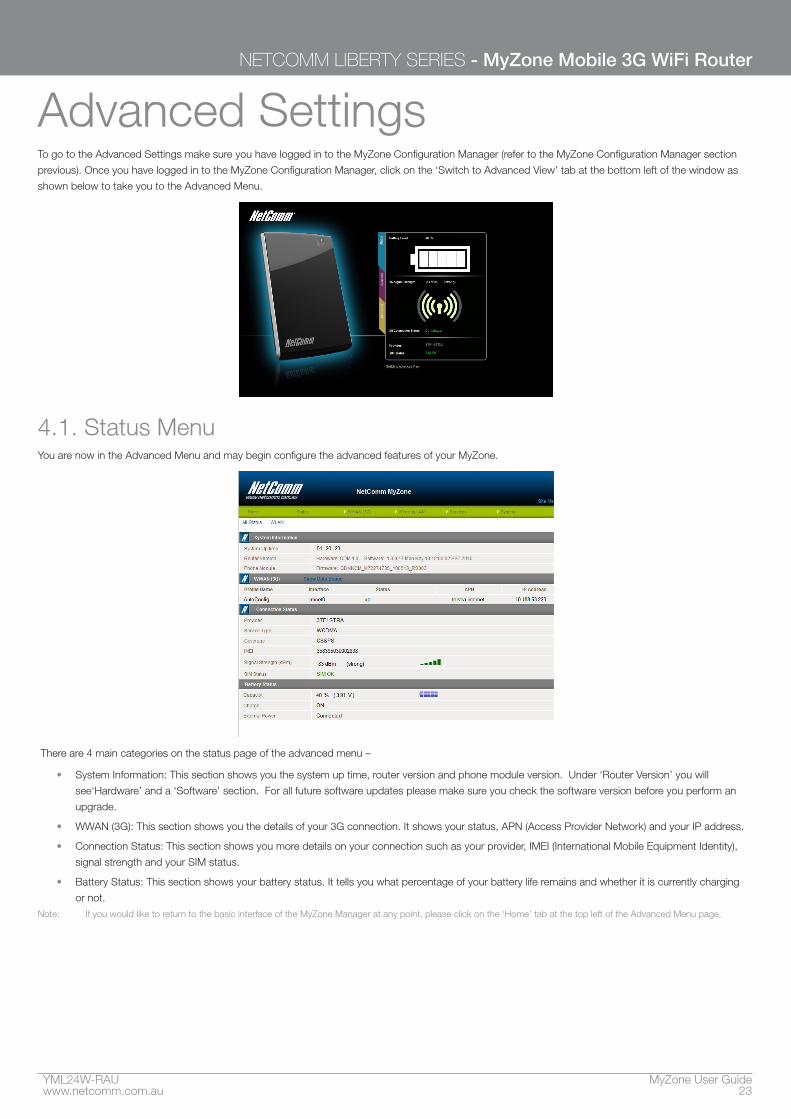
Advanced SettingsTo go to the Advanced Settings make sure you have logged in to the MyZone Configuration Manager (refer to the MyZone Configuration Manager section
previous). Once you have logged in to the MyZone Configuration Manager, click on the ‘Switch to Advanced View’ tab at the bottom left of the window as
shown below to take you to the Advanced Menu.
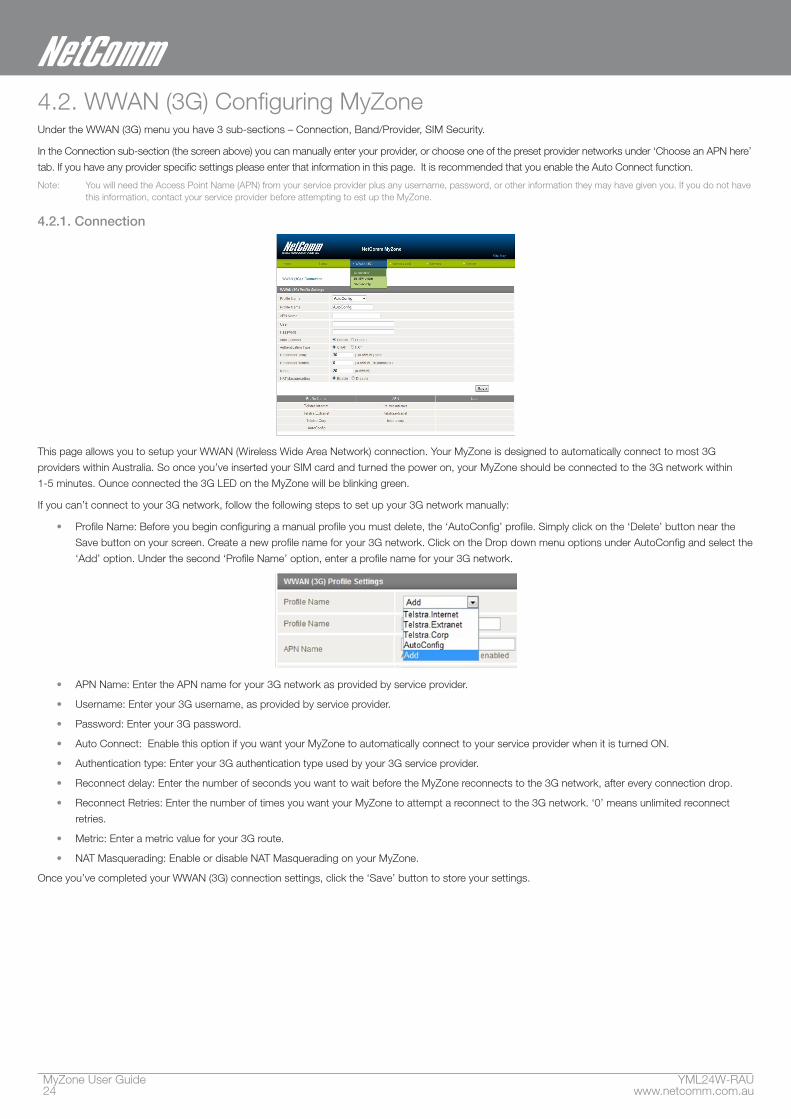
4.1. Status MenuYou are now in the Advanced Menu and may begin configure the advanced features of your MyZone.
There are 4 main categories on the status page of the advanced menu –
• System Information: This section shows you the system up time, router version and phone module version. Under ‘Router Version’ you will
see‘Hardware’ and a ‘Software’ section. For all future software updates please make sure you check the software version before you perform an
upgrade.
• WWAN (3G): This section shows you the details of your 3G connection. It shows your status, APN (Access Provider Network) and your IP address.
• Connection Status: This section shows you more details on your connection such as your provider, IMEI (International Mobile Equipment Identity),
signal strength and your SIM status.
• Battery Status: This section shows your battery status. It tells you what percentage of your battery life remains and whether it is currently charging
or not.
Note: If you would like to return to the basic interface of the MyZone Manager at any point, please click on the ‘Home’ tab at the top left of the Advanced Menu page.
MyZone User Guide YML24W-RAU24 www.netcomm.com.au
4.2. WWAN (3G) Configuring MyZone Under the WWAN (3G) menu you have 3 sub-sections – Connection, Band/Provider, SIM Security.
In the Connection sub-section (the screen above) you can manually enter your provider, or choose one of the preset provider networks under ‘Choose an APN here’
tab. If you have any provider specific settings please enter that information in this page. It is recommended that you enable the Auto Connect function.
Note: You will need the Access Point Name (APN) from your service provider plus any username, password, or other information they may have given you. If you do not have this information, contact your service provider before attempting to est up the MyZone.
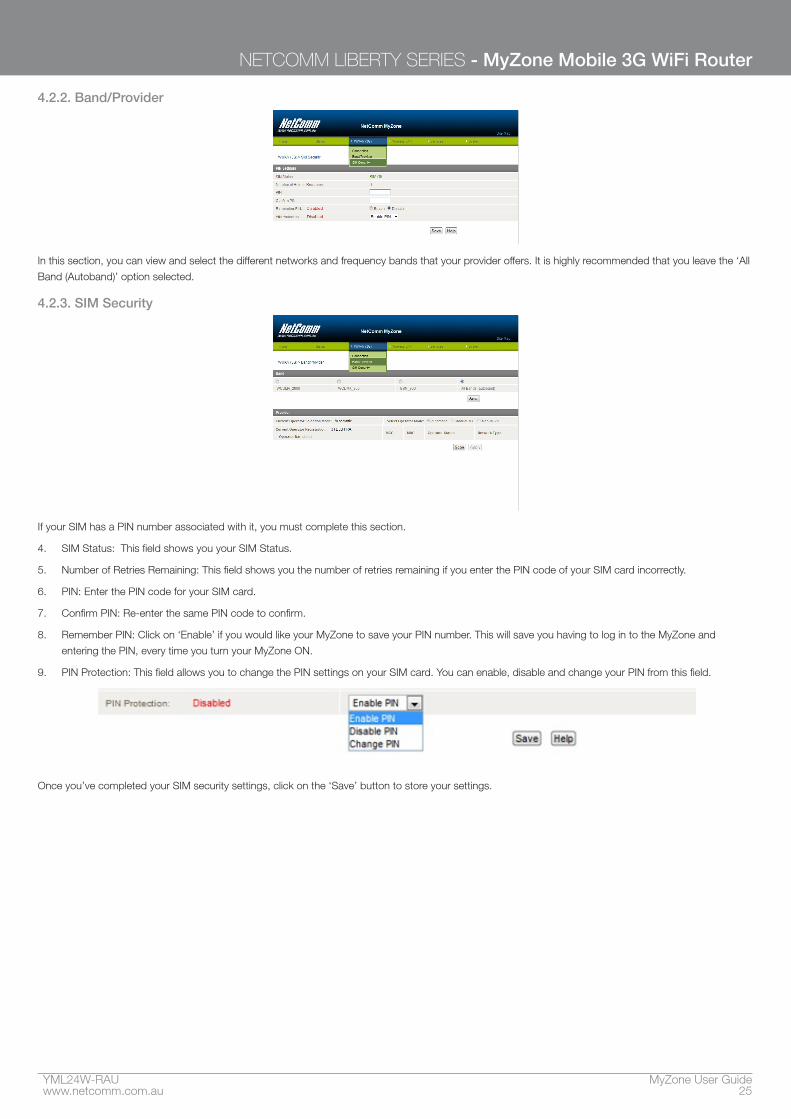
4.2.1. Connection
This page allows you to setup your WWAN (Wireless Wide Area Network) connection. Your MyZone is designed to automatically connect to most 3G
providers within Australia. So once you’ve inserted your SIM card and turned the power on, your MyZone should be connected to the 3G network within
1-5 minutes. Ounce connected the 3G LED on the MyZone will be blinking green.
If you can’t connect to your 3G network, follow the following steps to set up your 3G network manually:
• Profile Name: Before you begin configuring a manual profile you must delete, the ‘AutoConfig’ profile. Simply click on the ‘Delete’ button near the
Save button on your screen. Create a new profile name for your 3G network. Click on the Drop down menu options under AutoConfig and select the
‘Add’ option. Under the second ‘Profile Name’ option, enter a profile name for your 3G network.
• APN Name: Enter the APN name for your 3G network as provided by service provider.
• Username: Enter your 3G username, as provided by service provider.
• Password: Enter your 3G password.
• Auto Connect: Enable this option if you want your MyZone to automatically connect to your service provider when it is turned ON.
• Authentication type: Enter your 3G authentication type used by your 3G service provider.
• Reconnect delay: Enter the number of seconds you want to wait before the MyZone reconnects to the 3G network, after every connection drop.
• Reconnect Retries: Enter the number of times you want your MyZone to attempt a reconnect to the 3G network. ‘0’ means unlimited reconnect
retries.
• Metric: Enter a metric value for your 3G route.
• NAT Masquerading: Enable or disable NAT Masquerading on your MyZone.
Once you’ve completed your WWAN (3G) connection settings, click the ‘Save’ button to store your settings.
YML24W-RAU MyZone User Guidewww.netcomm.com.au 25
NETCOMM LIBERTY SERIES - MyZone Mobile 3G WiFi Router
4.2.2. Band/Provider
In this section, you can view and select the different networks and frequency bands that your provider offers. It is highly recommended that you leave the ‘All
Band (Autoband)’ option selected.
4.2.3. SIM Security
If your SIM has a PIN number associated with it, you must complete this section.
4. SIM Status: This field shows you your SIM Status.
5. Number of Retries Remaining: This field shows you the number of retries remaining if you enter the PIN code of your SIM card incorrectly.
6. PIN: Enter the PIN code for your SIM card.
7. Confirm PIN: Re-enter the same PIN code to confirm.
8. Remember PIN: Click on ‘Enable’ if you would like your MyZone to save your PIN number. This will save you having to log in to the MyZone and
entering the PIN, every time you turn your MyZone ON.
9. PIN Protection: This field allows you to change the PIN settings on your SIM card. You can enable, disable and change your PIN from this field.
Once you’ve completed your SIM security settings, click on the ‘Save’ button to store your settings.
MyZone User Guide YML24W-RAU26 www.netcomm.com.au
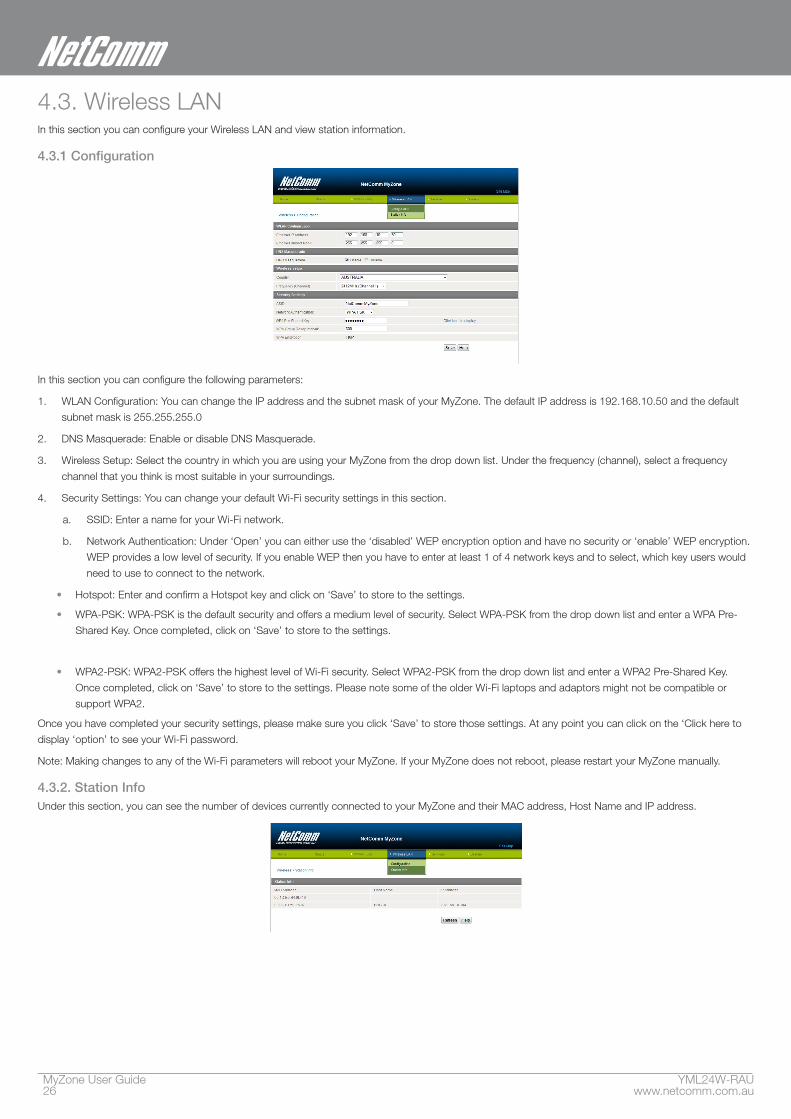
4.3. Wireless LANIn this section you can configure your Wireless LAN and view station information.
4.3.1 Configuration
In this section you can configure the following parameters:
1. WLAN Configuration: You can change the IP address and the subnet mask of your MyZone. The default IP address is 192.168.10.50 and the default
subnet mask is 255.255.255.0
2. DNS Masquerade: Enable or disable DNS Masquerade.
3. Wireless Setup: Select the country in which you are using your MyZone from the drop down list. Under the frequency (channel), select a frequency
channel that you think is most suitable in your surroundings.
4. Security Settings: You can change your default Wi-Fi security settings in this section.
a. SSID: Enter a name for your Wi-Fi network.
b. Network Authentication: Under ‘Open’ you can either use the ‘disabled’ WEP encryption option and have no security or ‘enable’ WEP encryption.
WEP provides a low level of security. If you enable WEP then you have to enter at least 1 of 4 network keys and to select, which key users would
need to use to connect to the network.
• Hotspot: Enter and confirm a Hotspot key and click on ‘Save’ to store to the settings.
• WPA-PSK: WPA-PSK is the default security and offers a medium level of security. Select WPA-PSK from the drop down list and enter a WPA Pre-
Shared Key. Once completed, click on ‘Save’ to store to the settings.
• WPA2-PSK: WPA2-PSK offers the highest level of Wi-Fi security. Select WPA2-PSK from the drop down list and enter a WPA2 Pre-Shared Key.
Once completed, click on ‘Save’ to store to the settings. Please note some of the older Wi-Fi laptops and adaptors might not be compatible or
support WPA2.
Once you have completed your security settings, please make sure you click ‘Save’ to store those settings. At any point you can click on the ‘Click here to
display ‘option’ to see your Wi-Fi password.
Note: Making changes to any of the Wi-Fi parameters will reboot your MyZone. If your MyZone does not reboot, please restart your MyZone manually.
4.3.2. Station InfoUnder this section, you can see the number of devices currently connected to your MyZone and their MAC address, Host Name and IP address.
YML24W-RAU MyZone User Guidewww.netcomm.com.au 27
NETCOMM LIBERTY SERIES - MyZone Mobile 3G WiFi Router
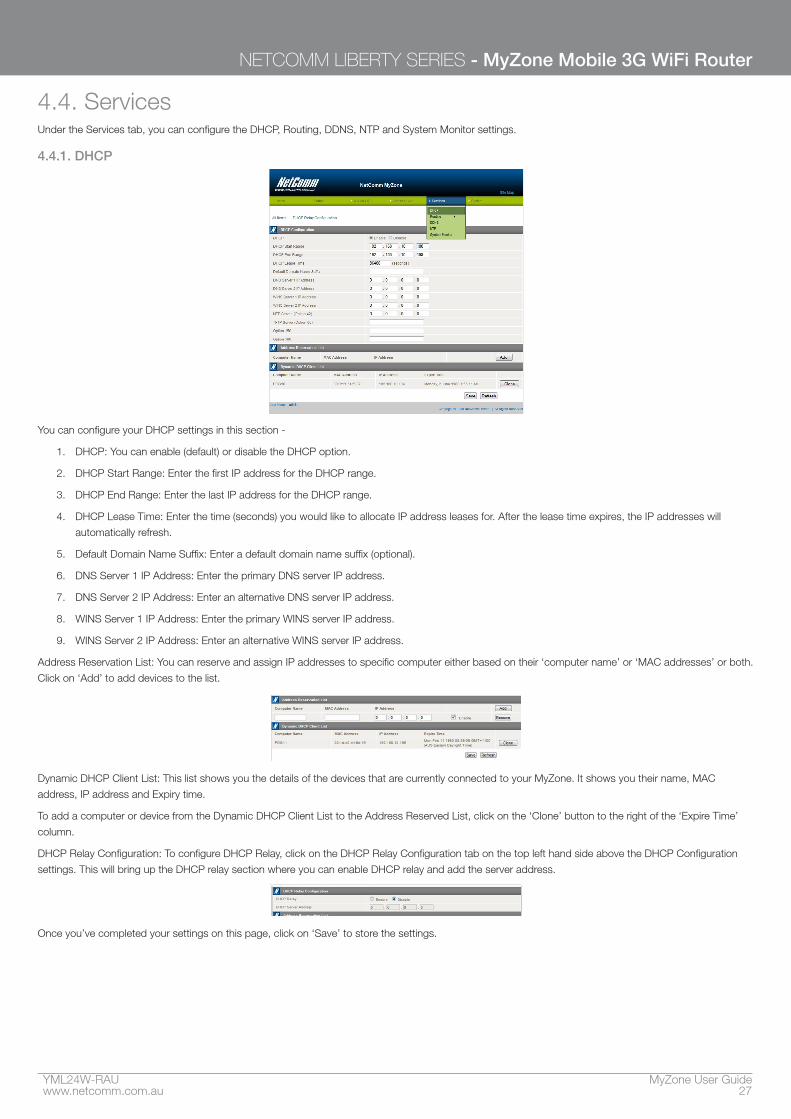
4.4. ServicesUnder the Services tab, you can configure the DHCP, Routing, DDNS, NTP and System Monitor settings.
4.4.1. DHCP
You can configure your DHCP settings in this section -
1. DHCP: You can enable (default) or disable the DHCP option.
2. DHCP Start Range: Enter the first IP address for the DHCP range.
3. DHCP End Range: Enter the last IP address for the DHCP range.
4. DHCP Lease Time: Enter the time (seconds) you would like to allocate IP address leases for. After the lease time expires, the IP addresses will
automatically refresh.
5. Default Domain Name Suffix: Enter a default domain name suffix (optional).
6. DNS Server 1 IP Address: Enter the primary DNS server IP address.
7. DNS Server 2 IP Address: Enter an alternative DNS server IP address.
8. WINS Server 1 IP Address: Enter the primary WINS server IP address.
9. WINS Server 2 IP Address: Enter an alternative WINS server IP address.
Address Reservation List: You can reserve and assign IP addresses to specific computer either based on their ‘computer name’ or ‘MAC addresses’ or both.
Click on ‘Add’ to add devices to the list.
Dynamic DHCP Client List: This list shows you the details of the devices that are currently connected to your MyZone. It shows you their name, MAC
address, IP address and Expiry time.
To add a computer or device from the Dynamic DHCP Client List to the Address Reserved List, click on the ‘Clone’ button to the right of the ‘Expire Time’
column.
DHCP Relay Configuration: To configure DHCP Relay, click on the DHCP Relay Configuration tab on the top left hand side above the DHCP Configuration
settings. This will bring up the DHCP relay section where you can enable DHCP relay and add the server address.
Once you’ve completed your settings on this page, click on ‘Save’ to store the settings.
MyZone User Guide YML24W-RAU28 www.netcomm.com.au
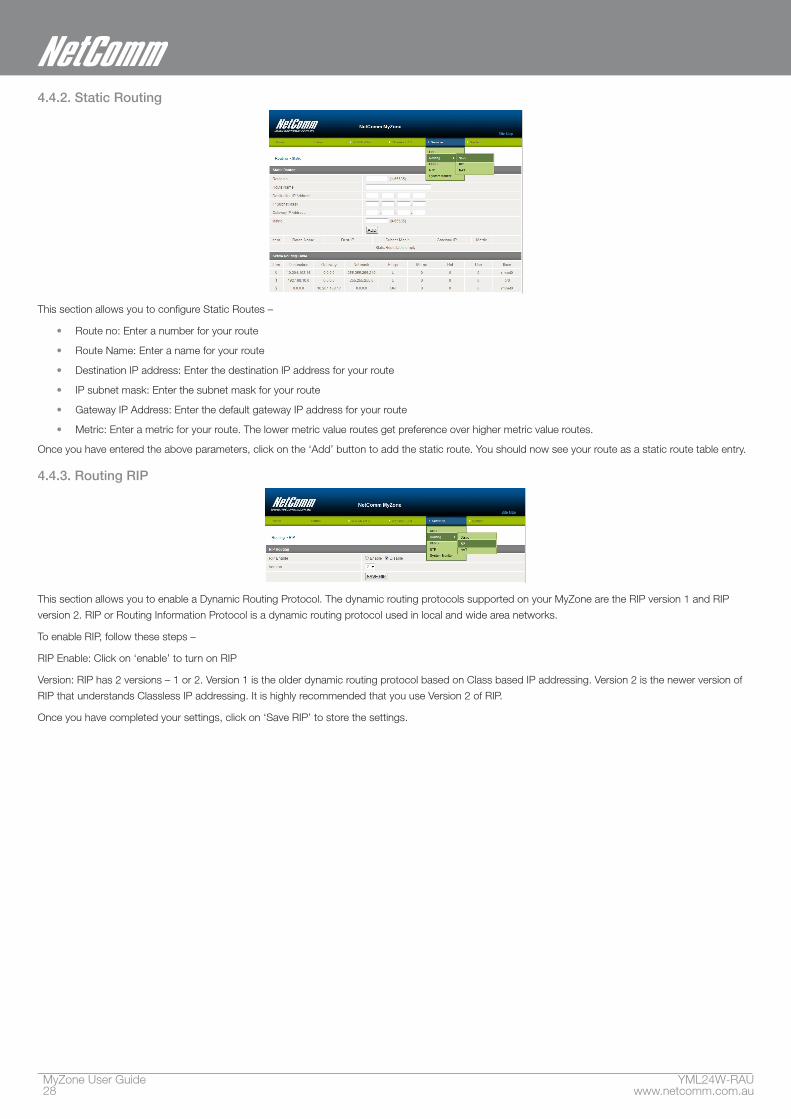
4.4.2. Static Routing
This section allows you to configure Static Routes –
• Route no: Enter a number for your route
• Route Name: Enter a name for your route
• Destination IP address: Enter the destination IP address for your route
• IP subnet mask: Enter the subnet mask for your route
• Gateway IP Address: Enter the default gateway IP address for your route
• Metric: Enter a metric for your route. The lower metric value routes get preference over higher metric value routes.
Once you have entered the above parameters, click on the ‘Add’ button to add the static route. You should now see your route as a static route table entry.
4.4.3. Routing RIP
This section allows you to enable a Dynamic Routing Protocol. The dynamic routing protocols supported on your MyZone are the RIP version 1 and RIP
version 2. RIP or Routing Information Protocol is a dynamic routing protocol used in local and wide area networks.
To enable RIP, follow these steps –
RIP Enable: Click on ‘enable’ to turn on RIP
Version: RIP has 2 versions – 1 or 2. Version 1 is the older dynamic routing protocol based on Class based IP addressing. Version 2 is the newer version of
RIP that understands Classless IP addressing. It is highly recommended that you use Version 2 of RIP.
Once you have completed your settings, click on ‘Save RIP’ to store the settings.
YML24W-RAU MyZone User Guidewww.netcomm.com.au 29
NETCOMM LIBERTY SERIES - MyZone Mobile 3G WiFi Router
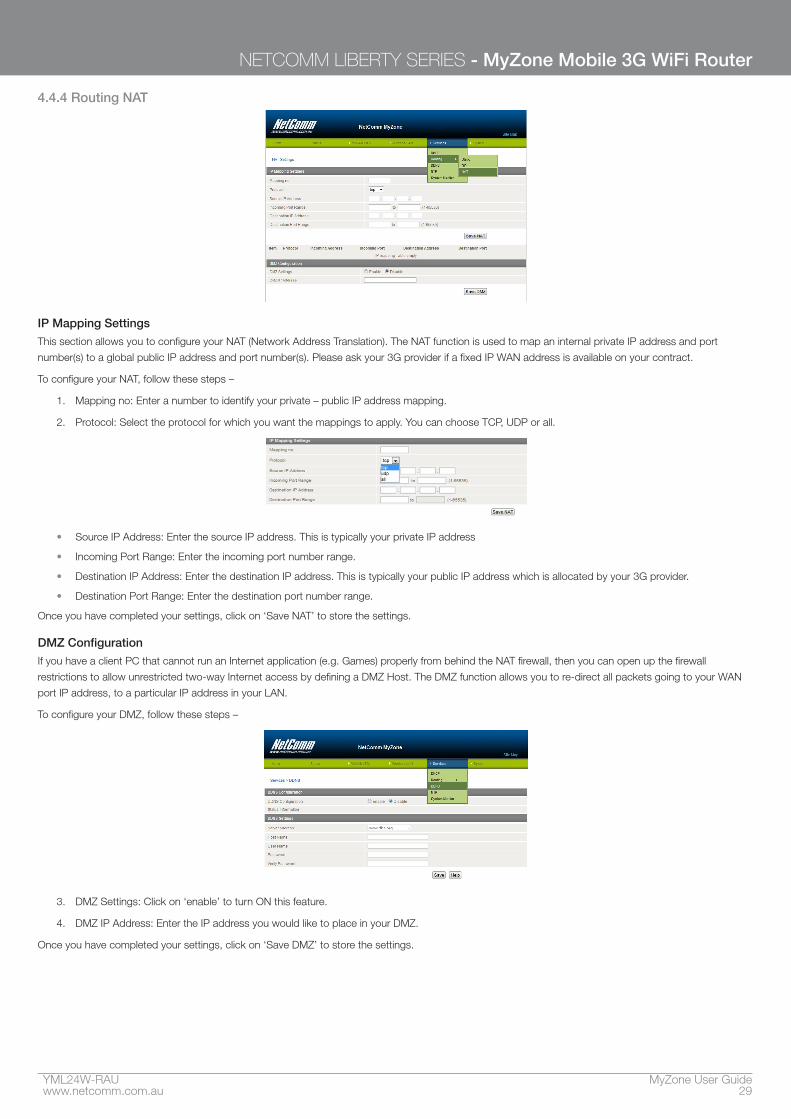
4.4.4 Routing NAT
IP Mapping Settings
This section allows you to configure your NAT (Network Address Translation). The NAT function is used to map an internal private IP address and port
number(s) to a global public IP address and port number(s). Please ask your 3G provider if a fixed IP WAN address is available on your contract.
To configure your NAT, follow these steps –
1. Mapping no: Enter a number to identify your private – public IP address mapping.
2. Protocol: Select the protocol for which you want the mappings to apply. You can choose TCP, UDP or all.
• Source IP Address: Enter the source IP address. This is typically your private IP address
• Incoming Port Range: Enter the incoming port number range.
• Destination IP Address: Enter the destination IP address. This is typically your public IP address which is allocated by your 3G provider.
• Destination Port Range: Enter the destination port number range.
Once you have completed your settings, click on ‘Save NAT’ to store the settings.
DMZ Configuration
If you have a client PC that cannot run an Internet application (e.g. Games) properly from behind the NAT firewall, then you can open up the firewall
restrictions to allow unrestricted two-way Internet access by defining a DMZ Host. The DMZ function allows you to re-direct all packets going to your WAN
port IP address, to a particular IP address in your LAN.
To configure your DMZ, follow these steps –
3. DMZ Settings: Click on ‘enable’ to turn ON this feature.
4. DMZ IP Address: Enter the IP address you would like to place in your DMZ.
Once you have completed your settings, click on ‘Save DMZ’ to store the settings.

MyZone User Guide YML24W-RAU30 www.netcomm.com.au
4.4.5. DDNS
This section allows you to configure DDNS (Dynamic Domain Name Service). DDNS allows you to map a static domain name to a dynamic IP address.
To use this feature, you must sign up for an account from a DDNS service provider. The list of supported DDNS service providers is provided in a drop
down selection.
To configure DDNS, follow these steps –
DDNS Configuration: Click ‘enable’ to turn ON the DDNS feature.
Server Address: Select a server from the drop down list.
Host Name: Enter your host name.
Username: Enter your username.
Password: Enter your password.
Verify Password: Re-enter the same password that you typed in the password field.
Once you completed your settings, click on ‘Save’ to store the settings.
4.4.6. NTP
This section allows you to configure your NTP (Network Time Protocol) settings. The NTP settings allow your router to synchronise its internal clock with the
global Internet Time. These settings will affect functions such as System Log entries and Firewall settings.
Follow these steps to configure NTP –
1. Enable NTP server: Enable your NTP server.
2. NTP Server Address: Enter your NTP server address.
3. Time Zone: Select the time zone you are located in from the drop down box.
4. Once you’ve completed your settings, click on ‘Save’ to store them.

YML24W-RAU MyZone User Guidewww.netcomm.com.au 31
NETCOMM LIBERTY SERIES - MyZone Mobile 3G WiFi Router
4.4.7. System Monitor
This section allows you to set up System Monitoring on your MyZone. To configure System Monitoring follow these steps –
1. Destination Address: Enter the destination address you would like to test.
2. Second Address: Enter a secondary destination address you would like to test.
3. Periodic PING Timer: Enter a value for the PING timer in seconds.
4. Periodic PING Accelerated Timer: Enter a value for the PING accelerated timer in seconds.
5. Fail Count: Enter a fail count.
6. Force reset every: Enter a value to force a reset in minutes.
Once you’ve completed your settings, click on ‘Save’ to store them.
MyZone User Guide YML24W-RAU32 www.netcomm.com.au
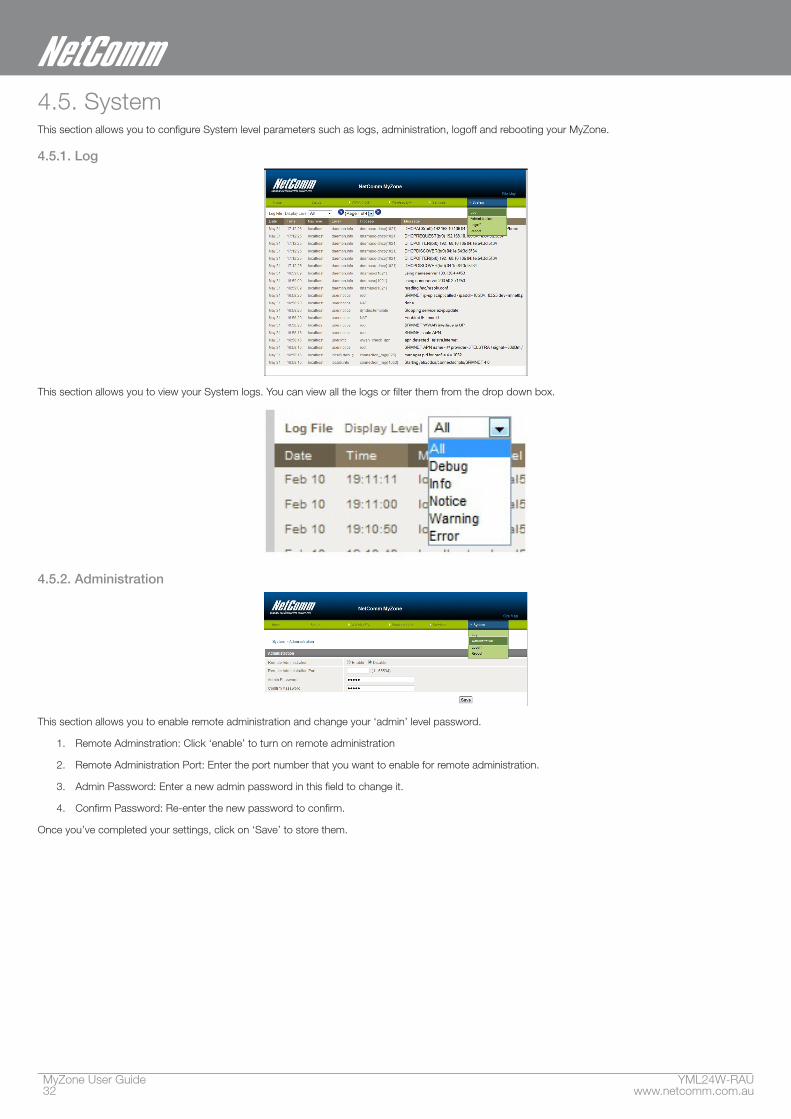
4.5. SystemThis section allows you to configure System level parameters such as logs, administration, logoff and rebooting your MyZone.
4.5.1. Log
This section allows you to view your System logs. You can view all the logs or filter them from the drop down box.
4.5.2. Administration
This section allows you to enable remote administration and change your ‘admin’ level password.
1. Remote Adminstration: Click ‘enable’ to turn on remote administration
2. Remote Administration Port: Enter the port number that you want to enable for remote administration.
3. Admin Password: Enter a new admin password in this field to change it.
4. Confirm Password: Re-enter the new password to confirm.
Once you’ve completed your settings, click on ‘Save’ to store them.
YML24W-RAU MyZone User Guidewww.netcomm.com.au 33
NETCOMM LIBERTY SERIES - MyZone Mobile 3G WiFi Router
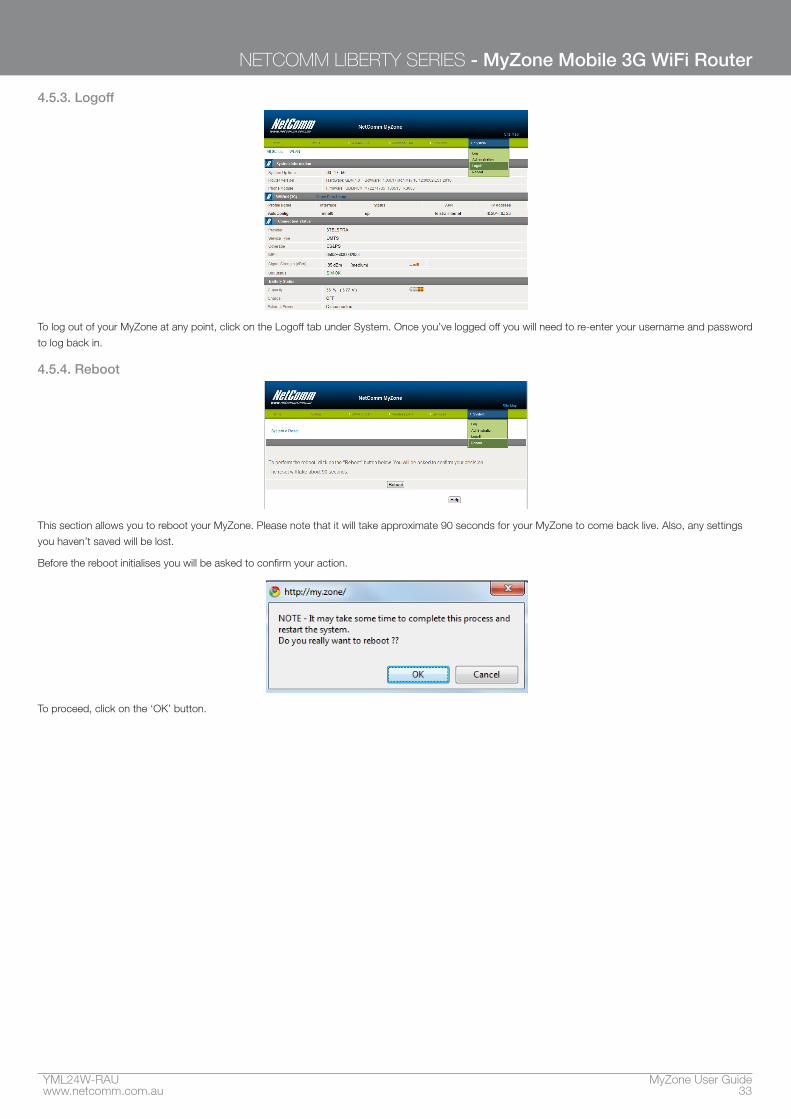
4.5.3. Logoff
To log out of your MyZone at any point, click on the Logoff tab under System. Once you’ve logged off you will need to re-enter your username and password
to log back in.
4.5.4. Reboot
This section allows you to reboot your MyZone. Please note that it will take approximate 90 seconds for your MyZone to come back live. Also, any settings
you haven’t saved will be lost.
Before the reboot initialises you will be asked to confirm your action.
To proceed, click on the ‘OK’ button.
PlacementTroubleshooting
YML24W-RAU MyZone User Guidewww.netcomm.com.au 35
NETCOMM LIBERTY SERIES - MyZone Mobile 3G WiFi Router
TroubleshootingAre you having trouble connecting wirelessly?
1. Make sure that the Wi-Fi device you are using to connect to the MyZone is turned ON. For example, most laptops have a manual Wi-Fi ON/OFF
button that is typically located to the front or the side of the laptop, depending on the brand.
2. Ensure that the MyZone is turned ON and that the Wi-Fi LED is blinking (working on battery) or steady (charging).
3. Search for Wireless Network ‘NetComm MyZone’ and make sure you enter the right password which is ‘password.’
4. Make sure DHCP is turned ON correctly on your Wi-Fi device.
Are you having trouble accessing the Internet?5. Make sure the SIM is inserted correctly. Check the SIM direction on the left side of the MyZone for reference.
6. Check to ensure that the 3G LED is blinking correctly. Refer to the table on ‘Deciphering the Blinking Coloured Lights.’
7. If you are using a Prepaid SIM, make sure that the SIM carries sufficient credit.
8. If you are using a SIM from a service provider in Australia, the Auto APN feature should pick up the network automatically. (Access Point Name) you
will have to manually enter the APN in the MyZone Manager. If you don’t know the APN, please contact your mobile service provider or check the
selection of APN’s listed at www.netcomm.com.au/myzone.

Appendices
YML24W-RAU MyZone User Guidewww.netcomm.com.au 37
NETCOMM LIBERTY SERIES - MyZone Mobile 3G WiFi Router
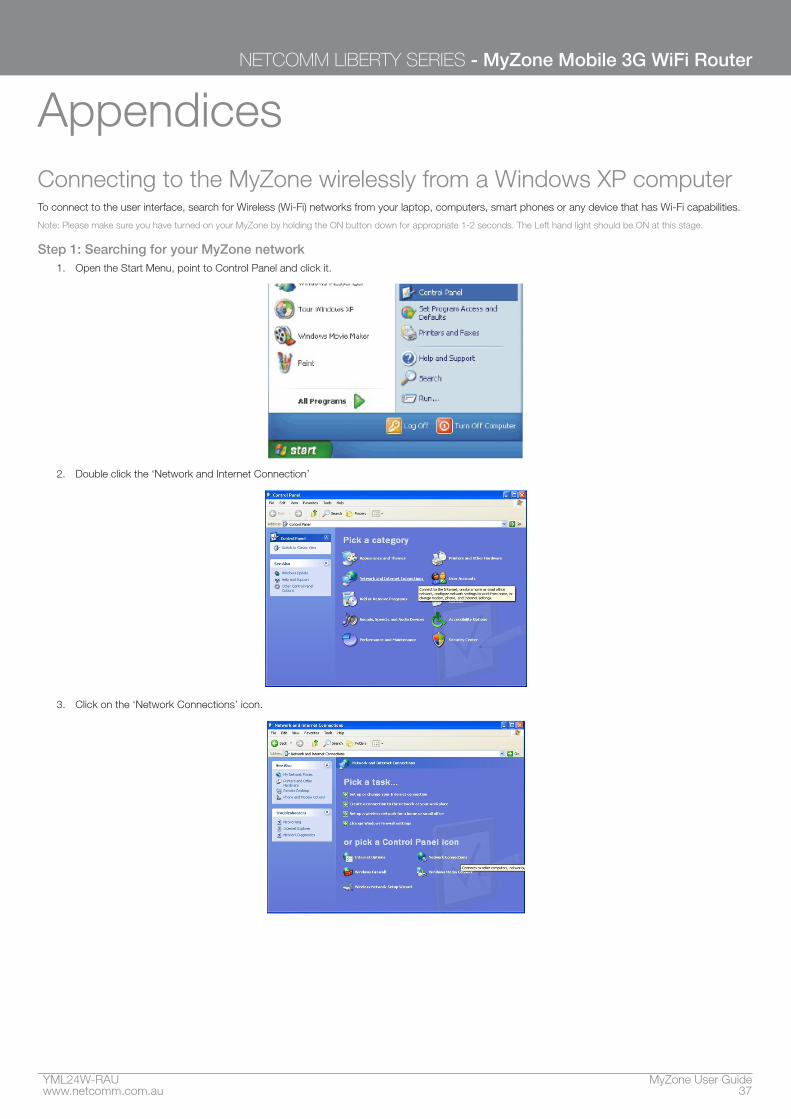
AppendicesConnecting to the MyZone wirelessly from a Windows XP computerTo connect to the user interface, search for Wireless (Wi-Fi) networks from your laptop, computers, smart phones or any device that has Wi-Fi capabilities.
Note: Please make sure you have turned on your MyZone by holding the ON button down for appropriate 1-2 seconds. The Left hand light should be ON at this stage.
Step 1: Searching for your MyZone network1. Open the Start Menu, point to Control Panel and click it.
2. Double click the ‘Network and Internet Connection’
3. Click on the ‘Network Connections’ icon.
MyZone User Guide YML24W-RAU38 www.netcomm.com.au
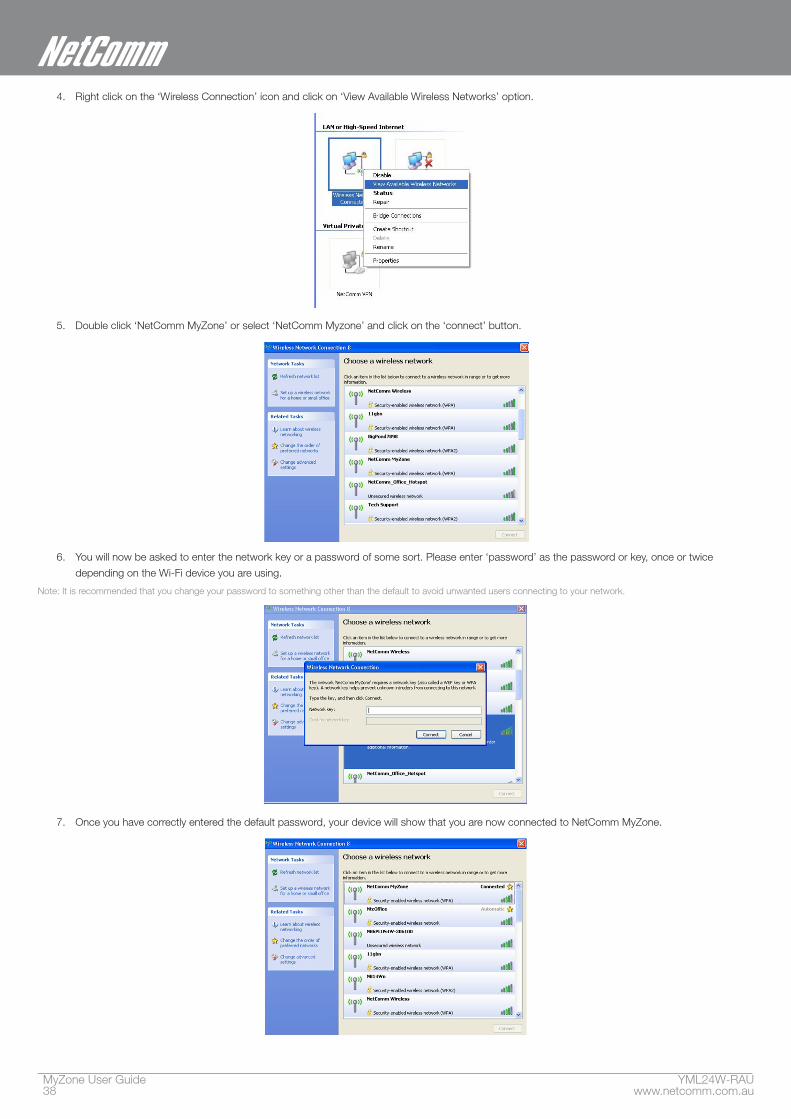
4. Right click on the ‘Wireless Connection’ icon and click on ‘View Available Wireless Networks’ option.
5. Double click ‘NetComm MyZone’ or select ‘NetComm Myzone’ and click on the ‘connect’ button.
6. You will now be asked to enter the network key or a password of some sort. Please enter ‘password’ as the password or key, once or twice
depending on the Wi-Fi device you are using.
Note: It is recommended that you change your password to something other than the default to avoid unwanted users connecting to your network.
7. Once you have correctly entered the default password, your device will show that you are now connected to NetComm MyZone.
YML24W-RAU MyZone User Guidewww.netcomm.com.au 39
NETCOMM LIBERTY SERIES - MyZone Mobile 3G WiFi Router
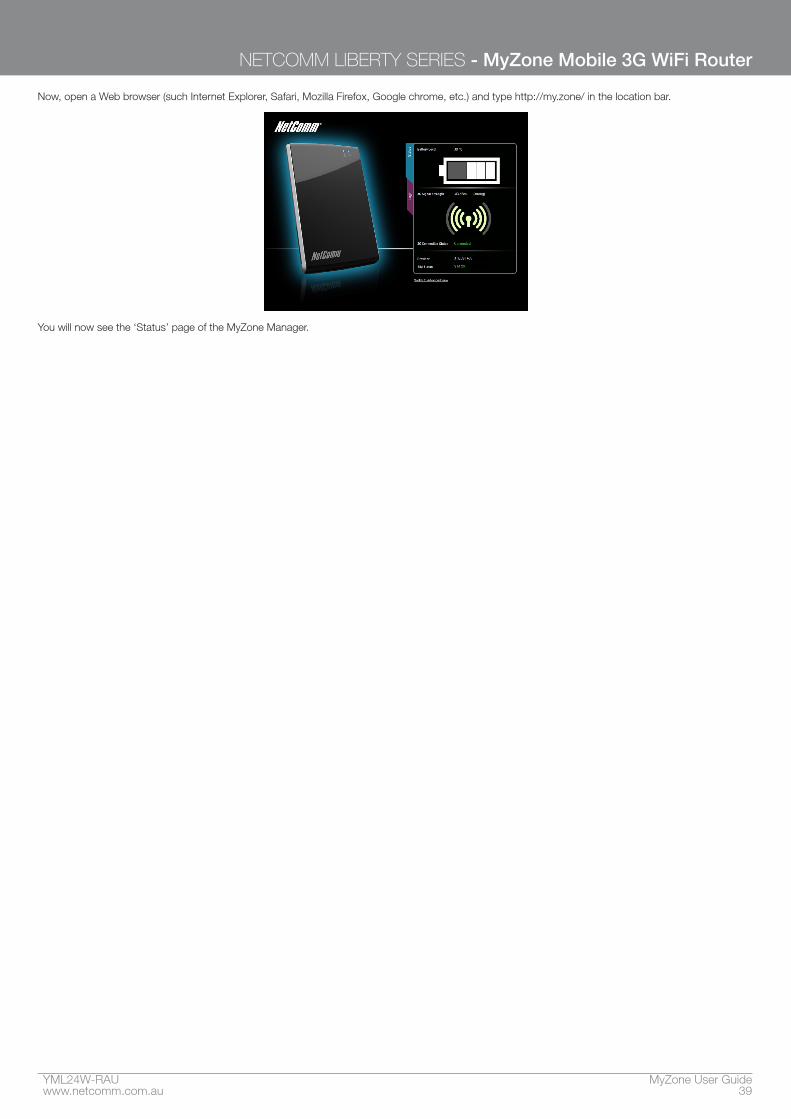
Now, open a Web browser (such Internet Explorer, Safari, Mozilla Firefox, Google chrome, etc.) and type http://my.zone/ in the location bar.
You will now see the ‘Status’ page of the MyZone Manager.
MyZone User Guide YML24W-RAU40 www.netcomm.com.au
Safety and Legal InformationThis manual is copyright. Apart from any fair dealing for the purposes of private study, research, criticism or review, as permitted under the Copyright Act, no
part may be reproduced, stored in a retrieval system or transmitted in any form, by any means, be it electronic, mechanical, recording or otherwise, without
the prior written permission of NetComm Limited. NetComm Limited accepts no liability or responsibility, for consequences arising from the use of this
product.
NetComm Limited reserves the right to change the specifications and operating details of this product without notice.
NetComm is a registered trademark of NetComm Limited.
CE Marking
This device has been tested to and conforms to the regulatory requirements of the European Union and attained CE Marking. The CE Mark is a conformity
marking consisting of the letters “CE.” The CE Mark applies to the products regulated by the central European health, safety and environmental protection
legislation. The CE Mark is obligatory for products it applies to: the manufacturer affixes the marking in order to be allowed to sell his product in the European
market.
This product conforms to the essential requirements of the R&TTE directive 1995/5/EC issued by the commission of the European Community. Compliance
with this directive implies conformity to the following European Norms – N 60950 – Product Safety, EN 301 489 EMC, EN301511 GSM RF, EN301908
UMTS RF, EN 62311 SAR Technical requirement for radio equipment. A notified body has determined that this device has properly demonstrated that the
requirements of the directive have been met and has issued a favourable certificate of expert opinion. As such the device will bear the notified body number
0700 after the CE mark.
The CE Marking is not a quality mark. Foremost, it refers to the safety rather than to the quality of the product. Secondly, CE Marking is mandatory for the
product it applies to whereas most quality markings are voluntary.
Marking: The product shall bear the CE mark, the notified body number(s) as depicted to the right. CE0700.
CE 0700
This product has also passed the following certification standards –
CE SAR- EN62311/EN62209-2
CE RF – EN301511, EN301908-1/-2, EN300328
CE EMC – EN301489-1/-7/-17/-24, EN55022/EN55024
CE Saftey – EN60950
NOTE: It is highly recommended that the MyZone must be kept at least 20cm distances away from human body.
This is a regulatory requirement and applies to all 3G/Wi-Fi capable devices meeting standard regulatory compliance such as the compliance standards
listed above.
YML24W-RAU MyZone User Guidewww.netcomm.com.au 41
NETCOMM LIBERTY SERIES - MyZone Mobile 3G WiFi Router
Legal & Regulatory InformationThis manual is copyright. Apart from any fair dealing for the purposes of private study, research, criticism or review, as permitted under the Copyright Act, no
part may be reproduced, stored in a retrieval system or transmitted in any form, by any means, be it electronic, mechanical, recording or otherwise, without
the prior written permission of NetComm Limited. NetComm Limited accepts no liability or responsibility, for consequences arising from the use of this
product.
NetComm Limited reserves the right to change the specifications and operating details of this product without notice.
NetComm is a registered trademark of NetComm Limited.
All other trademarks are acknowledged the property of their respective owners.
Customer Information — ACAACA (Australian Communications Authority) requires you to be aware of the following information and warnings:
(1) This unit shall be connected to the Telecommunication Network through a line cord which meets the requirements of the ACA TS008 Standard.
(2) This equipment has been tested and found to comply with the Standards for C-Tick and or A-Tick as set by the ACA . These standards are designed to
provide reasonable protection against harmful interference in a residential installation. This equipment generates, uses, and can radiate radio noise and,
if not installed and used in accordance with the instructions detailed within this manual, may cause interference to radio communications. However, there
is no guarantee that interference will not occur with the installation of this product in your home or office. If this equipment does cause some degree of
interference to radio or television reception, which can be determined by turning the equipment off and on, we encourage the user to try to correct the
interference by one or more of the following measures:
• Change the direction or relocate the receiving antenna.
• Increase the separation between this equipment and the receiver.
• Connect the equipment to an alternate power outlet on a different power circuit from that to which the receiver/TV is connected.
• Consult an experienced radio/TV technician for help.
(3) The power supply that is provided with this unit is only intended for use with this product. Do not use this power supply with any other product or do not
use any other power supply that is not approved for use with this product by NetComm. Failure to do so may cause damage to this product, fire or result
in personal injury.
Radio Exposure Information — FCCYour MyZone - Mobile 3G WiFi Router is a radio transmitter and receiver. It is designed and manufactured not to exceed the emission limits for exposure
to radio frequency (RF) energy set by the Federal Communications Commission of the U.S. Government. The guidelines are based on standards that
were developed by independent scientific organizations through periodic and thorough evaluation of scientific studies. The standards include a substantial
safety margin designed to assure the safety of all persons, regardless of age and health. The exposure standard for wireless handsets employs a unit of
measurement known as the Specific Absorption Rate, or SAR. This equipment should be installed and operated with minimum distance 10mm between the
radiator & your body. The tests are performed in positions and locations (e.g., at the ear and worn on the body) as required by the FCC for each model. The
SAR value for this model handset when worn on the body, as described in this user guide, is 1.26 W/Kg.
MyZone User Guide YML24W-RAU42 www.netcomm.com.au
Federal Communication Commission Interference StatementThis equipment has been tested and found to comply with the limits for a Class B digital device, pursuant to Part 15 of the FCC Rules. These limits are
designed to provide reasonable protection against harmful interference in a residential installation. This equipment generates, uses and can radiate radio
frequency energy and, if not installed and used in accordance with the instructions, may cause harmful interference to radio communications. However,
there is no guarantee that interference will not occur in a particular installation. If this equipment does cause harmful interference to radio or television
reception, which can be determined by turning the equipment off and on, the user is encouraged to try to correct the interference by one of the following
measures:
• Reorient or relocate the receiving antenna.
• Increase the separation between the equipment and receiver.
• Connect the equipment into an outlet on a circuit different from that to which the receiver is connected.
• Consult the dealer or an experienced radio/TV technician for help.
FCC Caution: Any changes or modifications not expressly approved by the party responsible for compliance could void the user’s authority to operate
this equipment.
This device complies with Part 15 of the FCC Rules. Operation is subject to the following two conditions: (
(1) This device may not cause harmful interference, and (2) this device must accept any interference received, including interference that may cause
undesired operation.
Product WarrantyThe warranty is granted on the following conditions:
1. This warranty extends to the original purchaser (you) and is not transferable;
2. This warranty shall not apply to software programs, batteries, power supplies, cables or other accessories supplied in or with the product;
3. The customer complies with all of the terms of any relevant agreement with NetComm and any other reasonable requirements of NetComm
including producing such evidence of purchase as NetComm may require;
4. The cost of transporting product to and from NetComm’s nominated premises is your responsibility; and,
5. NetComm does not have any liability or responsibility under this warranty where any cost, loss, injury or damage of any kind, whether direct, indirect,
consequential, incidental or otherwise arises out of events beyond NetComm’s reasonable control. This includes but is not limited to: acts of God,
war, riot, embargoes, acts of civil or military authorities, fire, floods, electricity outages, lightning, power surges, or shortages of materials or labour.
6. The customer is responsible for the security of their computer and network at all times. Security features may be disabled within the factory default
settings. NetComm recommends that you enable these features to enhance your security.

YML24W-RAU MyZone User Guidewww.netcomm.com.au 43
NETCOMM LIBERTY SERIES - MyZone Mobile 3G WiFi Router
GNU General Public LicenseThis product includes software code that is subject to the GNU General Public License (“GPL”) or GNU Lesser General Public License (“LGPL”). This code is
subject to the copyrights of one or more authors and is distributed without any warranty. A copy of this software can be obtained by contacting NetComm
Limited on +61 2 9424 2059.
The warranty is automatically voided if:
1. You, or someone else, use the product, or attempts to use it, other than as specified by NetComm;
2. The fault or defect in your product is the result of a voltage surge subjected to the product either by the way of power supply or communication line,
whether caused by thunderstorm activity or any other cause(s);
3. The fault is the result of accidental damage or damage in transit, including but not limited to liquid spillage;
4. Your product has been used for any purposes other than that for which it is sold, or in any way other than in strict accordance with the user manual
supplied;
5. Your product has been repaired or modified or attempted to be repaired or modified, other than by a qualified person at a service centre authorised
by NetComm; and,
6. The serial number has been defaced or altered in any way or if the serial number plate has been removed.
Limitations of WarrantyThe Trade Practices Act 1974 and corresponding State and Territory Fair Trading Acts or legalisation of another Government (“the relevant acts”) in certain
circumstances imply mandatory conditions and warranties which cannot be excluded. This warranty is in addition to and not in replacement for such
conditions and warranties.
To the extent permitted by the Relevant Acts, in relation to your product and any other materials provided with the product (“the Goods”) the liability of
NetComm under the Relevant Acts is limited at the option of NetComm to:
• Replacement of the Goods; or
• Repair of the Goods; or
• Payment of the cost of replacing the Goods; or
• Payment of the cost of having the Goods repaired.
All NetComm ACN 002 490 486 products have a standard 12 months warranty from date of purchase. However some products have an extended warranty
option (refer to packaging). To be eligible for the extended warranty you must supply the requested warranty information to NetComm within 30 days of the
original purchase by registering on-line via the NetComm web site at
www.netcomm.com.au
MyZone User Guide YML24W-RAU44 www.netcomm.com.au
Product WarrantyNetComm products have a standard 12 months warranty from date of purchase. However some products have an extended warranty option, via registering your product online at the NetComm website www.netcomm.com.au
Technical SupportIf you have any technical difficulties with your product, please refer to the support section of our website.
www.netcomm.com.au/supportNote: NetComm Technical Support for this product only covers the basic installation and features outlined in the Quick Start Guide. For further information regarding the advanced features of this product, please
refer to the configuring sections in the User Guide or contact a Network Specialist.
DYNALINK NZ 12c Tea Kea Place, Albany, Auckland, New Zealand P: 09 448 5548 F: 09 448 5549E: [email protected] W: www.dynalink.co.nz
Trademarks and registered trademarks are the property of NetComm Limited or their respective owners. Specifications are subject to change without notice. Images shown may vary slightly from the actual product.
NETCOMM LIMITED Head Office PO Box 1200, Lane Cove NSW 2066 AustraliaP: 02 9424 2070 F: 02 9424 2010 E: [email protected] W: www.netcomm.com.au