Embed Size (px)
Citation preview

NetSuite for Outlook
February 28, 2018 2018.1
Copyright © 2005, 2018, Oracle and/or its affiliates. All rights reserved.
This software and related documentation are provided under a license agreement containingrestrictions on use and disclosure and are protected by intellectual property laws. Except as expresslypermitted in your license agreement or allowed by law, you may not use, copy, reproduce, translate,broadcast, modify, license, transmit, distribute, exhibit, perform, publish, or display any part, in anyform, or by any means. Reverse engineering, disassembly, or decompilation of this software, unlessrequired by law for interoperability, is prohibited.
The information contained herein is subject to change without notice and is not warranted to be error-free. If you find any errors, please report them to us in writing.
If this is software or related documentation that is delivered to the U.S. Government or anyonelicensing it on behalf of the U.S. Government, then the following notice is applicable:
U.S. GOVERNMENT END USERS: Oracle programs, including any operating system, integrated software,any programs installed on the hardware, and/or documentation, delivered to U.S. Government endusers are "commercial computer software" pursuant to the applicable Federal Acquisition Regulationand agency-specific supplemental regulations. As such, use, duplication, disclosure, modification,and adaptation of the programs, including any operating system, integrated software, any programsinstalled on the hardware, and/or documentation, shall be subject to license terms and licenserestrictions applicable to the programs. No other rights are granted to the U.S. Government.
This software or hardware is developed for general use in a variety of information managementapplications. It is not developed or intended for use in any inherently dangerous applications, includingapplications that may create a risk of personal injury. If you use this software or hardware in dangerousapplications, then you shall be responsible to take all appropriate fail-safe, backup, redundancy, andother measures to ensure its safe use. Oracle Corporation and its affiliates disclaim any liability for anydamages caused by use of this software or hardware in dangerous applications.
Oracle and Java are registered trademarks of Oracle and/or its affiliates. Other names may betrademarks of their respective owners.
Intel and Intel Xeon are trademarks or registered trademarks of Intel Corporation. All SPARCtrademarks are used under license and are trademarks or registered trademarks of SPARCInternational, Inc. AMD, Opteron, the AMD logo, and the AMD Opteron logo are trademarks orregistered trademarks of Advanced Micro Devices. UNIX is a registered trademark of The Open Group.
This software or hardware and documentation may provide access to or information about content,products, and services from third parties. Oracle Corporation and its affiliates are not responsiblefor and expressly disclaim all warranties of any kind with respect to third-party content, products,and services unless otherwise set forth in an applicable agreement between you and Oracle. OracleCorporation and its affiliates will not be responsible for any loss, costs, or damages incurred due toyour access to or use of third-party content, products, or services, except as set forth in an applicableagreement between you and Oracle.
If this document is in public or private pre-General Availability status:
This documentation is in pre-General Availability status and is intended for demonstration andpreliminary use only. It may not be specific to the hardware on which you are using the software.Oracle Corporation and its affiliates are not responsible for and expressly disclaim all warranties of anykind with respect to this documentation and will not be responsible for any loss, costs, or damagesincurred due to the use of this documentation.
If this document is in private pre-General Availability status:
The information contained in this document is for informational sharing purposes only and should beconsidered in your capacity as a customer advisory board member or pursuant to your pre-GeneralAvailability trial agreement only. It is not a commitment to deliver any material, code, or functionality,
and should not be relied upon in making purchasing decisions. The development, release, and timingof any features or functionality described in this document remains at the sole discretion of Oracle.
This document in any form, software or printed matter, contains proprietary information that is theexclusive property of Oracle. Your access to and use of this confidential material is subject to the termsand conditions of your Oracle Master Agreement, Oracle License and Services Agreement, OraclePartnerNetwork Agreement, Oracle distribution agreement, or other license agreement which hasbeen executed by you and Oracle and with which you agree to comply. This document and informationcontained herein may not be disclosed, copied, reproduced, or distributed to anyone outside Oraclewithout prior written consent of Oracle. This document is not part of your license agreement nor can itbe incorporated into any contractual agreement with Oracle or its subsidiaries or affiliates.
For information about Oracle's commitment to accessibility, visit the Oracle Accessibility Programwebsite at http://www.oracle.com/pls/topic/lookup?ctx=acc&id=docacc
Oracle customers that have purchased support have access to electronic support through My OracleSupport. For information, visit http://www.oracle.com/pls/topic/lookup?ctx=acc&id=info or visit http://www.oracle.com/pls/topic/lookup?ctx=acc&id=trs if you are hearing impaired.
Sample Code
Oracle may provide sample code in SuiteAnswers, the Help Center, User Guides, or elsewhere throughhelp links. All such sample code is provided "as is” and “as available”, for use only with an authorizedNetSuite Service account, and is made available as a SuiteCloud Technology subject to the SuiteCloudTerms of Service at www.netsuite.com/tos.
Oracle may modify or remove sample code at any time without notice.
No Excessive Use of the Service
As the Service is a multi-tenant service offering on shared databases, Customer may not use theService in excess of limits or thresholds that Oracle considers commercially reasonable for the Service.If Oracle reasonably concludes that a Customer’s use is excessive and/or will cause immediate orongoing performance issues for one or more of Oracle’s other customers, Oracle may slow down orthrottle Customer’s excess use until such time that Customer’s use stays within reasonable limits. IfCustomer’s particular usage pattern requires a higher limit or threshold, then the Customer shouldprocure a subscription to the Service that accommodates a higher limit and/or threshold that moreeffectively aligns with the Customer’s actual usage pattern.
Beta Features
Oracle may make available to Customer certain features that are labeled “beta” that are not yetgenerally available. To use such features, Customer acknowledges and agrees that such beta featuresare subject to the terms and conditions accepted by Customer upon activation of the feature, or in theabsence of such terms, subject to the limitations for the feature described in the User Guide and asfollows: The beta feature is a prototype or beta version only and is not error or bug free and Customeragrees that it will use the beta feature carefully and will not use it in any way which might result inany loss, corruption or unauthorized access of or to its or any third party’s property or information.Customer must promptly report to Oracle any defects, errors or other problems in beta featuresto [email protected] or other designated contact for the specific beta feature. Oracle cannotguarantee the continued availability of such beta features and may substantially modify or ceaseproviding such beta features without entitling Customer to any refund, credit, or other compensation.Oracle makes no representations or warranties regarding functionality or use of beta features andOracle shall have no liability for any lost data, incomplete data, re-run time, inaccurate input, workdelay, lost profits or adverse effect on the performance of the Service resulting from the use of betafeatures. Oracle’s standard service levels, warranties and related commitments regarding the Serviceshall not apply to beta features and they may not be fully supported by Oracle’s customer support.These limitations and exclusions shall apply until the date that Oracle at its sole option makes a betafeature generally available to its customers and partners as part of the Service without a “beta” label.
Table of ContentsNetSuite for Outlook .............................................................................................................. 1
NetSuite for Outlook: Quick Start Guide for Users .................................................................. 4NetSuite for Outlook User Guide ......................................................................................... 7
Configuring NetSuite for Outlook ................................................................................... 11Duplicate Records and NetSuite for Outlook .................................................................... 18Working with NetSuite for Outlook ................................................................................. 19Saving Email with NetSuite for Outlook ........................................................................... 20Synchronizing Contacts with NetSuite for Outlook ............................................................ 26Synchronizing Events with NetSuite for Outlook ............................................................... 28Synchronizing Tasks with NetSuite for Outlook ................................................................. 31Synchronizing Phone Calls with NetSuite for Outlook ........................................................ 32Resolving Conflicts in NetSuite for Outlook ...................................................................... 33Resolving Sync Errors with NetSuite for Outlook .............................................................. 34Updates to NetSuite for Outlook .................................................................................... 34Reporting Problems with NetSuite for Outlook ................................................................. 34
NetSuite for Outlook: Quick Start for Administrators ............................................................. 35NetSuite for Outlook Administrator's Guide ......................................................................... 37
Outlook Sync Configurations ......................................................................................... 39Creating an Outlook Sync Configuration .......................................................................... 41
Troubleshooting NetSuite for Outlook ................................................................................ 45Sync Issues with NetSuite for Outlook ............................................................................ 46Installation and Setup Issues with NetSuite for Outlook .................................................... 48Outlook Sync Configuration and Login Issues with NetSuite for Outlook .............................. 50Miscellaneous Issues with NetSuite for Outlook ............................................................... 52
NetSuite for Outlook 1
NetSuite for Outlook
NetSuite for OutlookNetSuite for Outlook is a Windows-based application that enables you to save email messages fromOutlook into NetSuite and to synchronize your events, tasks, phone calls, and contacts. To get theSuiteApp, see Installing the NetSuite for Outlook SuiteApp.
You can control how frequently you sync, which records from your account are synced, and howconflicts between NetSuite and Outlook are resolved, enabling you to configure the application to workseamlessly with your current business processes.
If you need information on Outlook integration 2.0 (2008), see the Outlook Integration 2.0 (2008) UserGuide.
LimitationsCurrently, the NetSuite for Outlook SuiteApp has the following limitations:
■ NetSuite for Outlook is not available for roles that do not have an Outlook permission. For example,the application is not available to the Employee Center role.
■ NetSuite for Outlook is not supported in the NetSuite Japan edition.
■ If you want to log in to the SuiteApp using either Two-factor Authentication or Single Sign-On roles,you can only do so by using access tokens.
■ NetSuite for Outlook uses the native NetSuite design for token-based authentication, and will alsohave the same limitations.
■ Syncing to mobile devices such as smartphones and tablets are not supported.
■ NetSuite for Outlook is not compatible with Mac.
■ NetSuite for Outlook cannot be used with web-based email clients. You must have a supportedMicrosoft Outlook version installed in your local machine. NetSuite for Outlook is compatible withOffice 365 but requires that you have a supported Microsoft Outlook version installed in your localmachine.
■ Customers logged in to NetSuite using the Partner Center role will not be able to sync phone calland task records. This is due to the insufficient permissions on the Partner Centre role, which makesthe fields required to sync the records, unavailable to the role.
For more information about supported Microsoft Outlook versions, see System Requirements.
EmailEmail messages from Outlook can be saved to contact, customers, jobs or projects, opportunities,estimates, sales orders, invoices, and cash sales in NetSuite, to enable you to track your businesscommunication.
When you write and receive email in Outlook, you are presented with a list of records in NetSuitebased on the email addresses you are corresponding with. You can choose which NetSuite recordsyou want to attach email to. Email you write is saved to those records in NetSuite immediately uponsending. Messages you receive in Outlook are saved to NetSuite when you select records and click SaveChanges in the message pane.
For more information, see Saving Email with NetSuite for Outlook.
NetSuite for Outlook 2
NetSuite for Outlook
Contacts, Events, Tasks, and Phone CallsIf you sync from Outlook into NetSuite, your records are saved immediately to your NetSuite accountwhenever you add, edit, or delete a record in Outlook. Synchronization of contacts, events, tasks, andphone calls runs behind the scenes as you work, keeping your data current and consistent acrossapplications.
Synchronization from NetSuite into Outlook can be scheduled to run automatically at regular times,and you can also initiate a sync manually at any time.
If a record is created in one application, NetSuite for Outlook can create that record in the otherapplication and link the records so that whenever they are changed in one place, they are updated inthe other.
For more information on each type of record you can sync, see the following:
■ Synchronizing Events with NetSuite for Outlook
■ Synchronizing Contacts with NetSuite for Outlook
■ Synchronizing Tasks with NetSuite for Outlook
■ Synchronizing Phone Calls with NetSuite for Outlook
Administrator ControlsNetSuite for Outlook includes extensive controls that let administrators pre-configure the application tocontrol how users synchronize their data.
To do this, administrators create NetSuite for Outlook configurations based on NetSuite roles. Thisincludes being able to:
■ Choose which record types are available for synchronization.
■ Set criteria that determine which records can be synced.
■ Define other sync preferences like how conflicts between records are resolved and the frequencyand direction of synchronization.
■ Select the required fields for contacts in Outlook.
These administrator settings can either be the defaults settings for individual users, or administratorscan choose to lock settings so they cannot be modified by individual users.
System RequirementsTo install the application, you must either have administrator rights to your computer, or it must beinstalled by your company's system administrator.
NetSuite for Outlook is compatible with:
■ Microsoft Outlook 2007
■ Microsoft Outlook 2010 (both the 32- and 64-bit versions)
■ Microsoft Outlook 2013 (both the 32- and 64-bit versions)
■ Microsoft Outlook 2016 (both the 32- and 64-bit versions)
NetSuite for Outlook 3
NetSuite for Outlook
■ Click-to-Run installations of Microsoft Outlook (both the 32- and 64-bit versions)
Important: NetSuite for Outlook requires that you have one of these versions of MicrosoftOutlook installed locally. NetSuite for Outlook cannot be used with web-based email clients.
Important: NetSuite for Outlook is compatible with Office 365 but requires that you have asupported Microsoft Outlook version installed in your local machine.
NetSuite for Outlook has the following network requirements:
■ NetSuite for Outlook is supported by Outlook running in Exchange, Citrix, or Terminal Serverenvironments.
■ NetSuite for Outlook supports folder redirection. This can be useful in a Terminal Serverenvironment that uses roaming profiles.
To use a roaming profile, redirect your profile folder on the client terminal to its location on theserver.
It can be used with the following operating systems:
■ Windows XP
Service Pack 2 is required for 64-bit, and Service Pack 3 is required for the 32-bit.
■ Windows Vista
■ Windows 7
■ Windows 8
■ Windows 10
Note: Some features may not yet be available in Windows 10. If you encounter issues,please contact your NetSuite administrator.
NetSuite for Outlook also requires a supported version of Internet Explorer. For a list of supportedbrowsers, see the help topic Supported Browsers for NetSuite.
If you do not have Microsoft .NET Framework 4.0 and Microsoft Visual Studio Tools for Office (VSTO) 4.0installed on your computer, they are installed automatically before NetSuite for Outlook is installed.If you work in a terminal server environment, .NET and VSTO need to be installed for all users, andNetSuite for Outlook must be installed for each user individually.
Note: The NetSuite for Outlook administrator tools (used to create Outlook configurations) arenot compatible with Internet Explorer versions 8 and up in compatibility mode.
To get started using NetSuite for Outlook, refer to the following:
■ NetSuite for Outlook: Quick Start Guide for Users
■ NetSuite for Outlook: Quick Start for Administrators
For more detailed information on NetSuite for Outlook, refer to the following:
■ NetSuite for Outlook User Guide
■ NetSuite for Outlook Administrator's Guide
■ Troubleshooting NetSuite for Outlook
NetSuite for Outlook: Quick Start Guide for Users 4
NetSuite for Outlook
NetSuite for Outlook: Quick Start Guide for UsersUse the following procedures to install and set up NetSuite for Outlook.
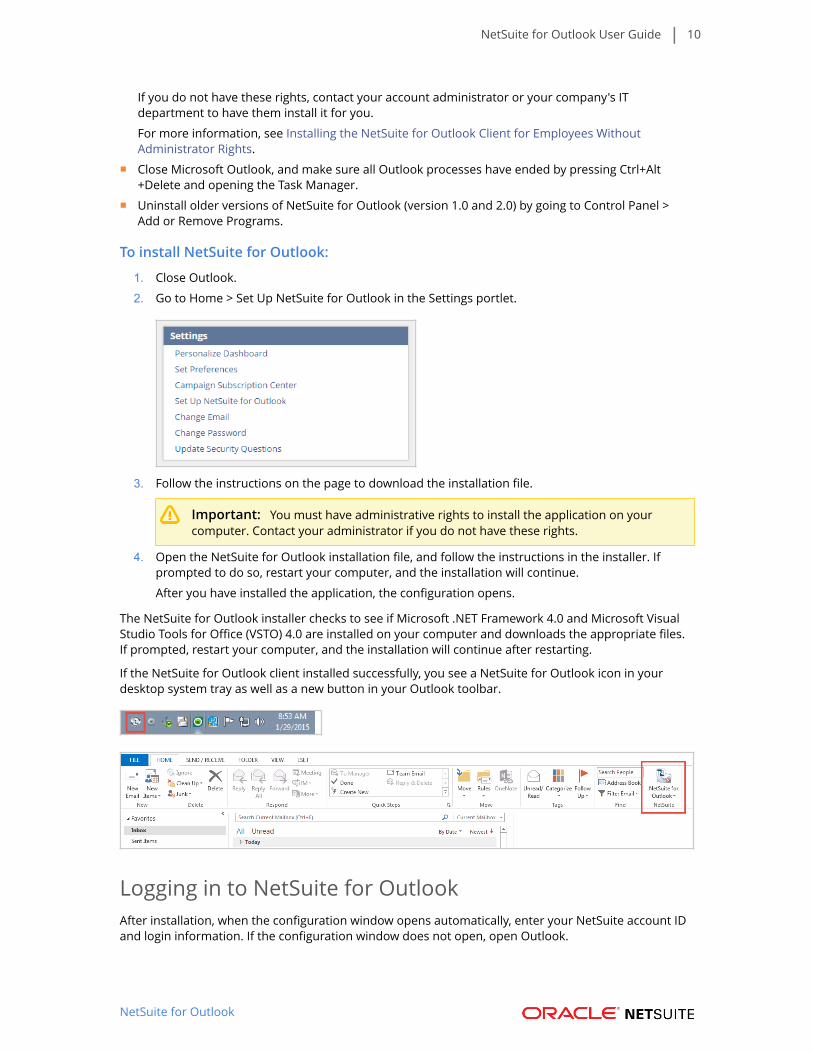
1. Go to Home > Set Up NetSuite for Outlook in the Settings portlet.
2. Click the link in step 3 to install NetSuite for Outlook. If you are using Internet Explorer or Safari,select Run. If you are using Firefox or Chrome, after the installer downloads, open and run thefile.
Important: You must have administrative rights to install the application on yourcomputer. Contact your administrator if you do not have these rights.
3. Close Outlook, and then run the NetSuite for Outlook installation file, and follow theinstructions in the installer. If prompted to do so, restart your computer, and the installationwill continue.
After you have installed the application, the configuration opens.
4. Enter your login information and the account ID for the NetSuite role you are syncing with. Youcan find the account ID in step 5 at Home > Set Up NetSuite for Outlook.
If you are using the NetSuite for Outlook version that supports token-based authentication, anadditional login option will be available to you. From the Logon using dropdown, select yourpreferred option to log in to NetSuite for Outlook:
■ NetSuite Credentials — Enter your login information and the account ID for the NetSuiterole you are syncing with. You can find the account ID at Home > Set Up NetSuite forOutlook.
■ Access Token — Log in using the User Token and User Secret provided by youradministrator.
NetSuite for Outlook: Quick Start Guide for Users 5
NetSuite for Outlook
5. Select the role you are syncing with, and choose the types of records you want to sync.
Note: When using access tokens to log in to the application, the Role selection willautomatically be set to the role associated with the token. The Role dropdown is alsodisabled.
6. Set preferences for each record type you are syncing.
You must choose the Outlook folder you want to sync with.
You can also optionally set filters to limit which records are synced.

NetSuite for Outlook: Quick Start Guide for Users 6
NetSuite for Outlook
7. Choose the types of records you want to save email to.
8. Review the number of records from NetSuite that will sync to Outlook.
NetSuite for Outlook: Quick Start Guide for Users 7
NetSuite for Outlook
9. Save your configuration, and initiate the first sync.
NetSuite for Outlook User GuideTo begin using NetSuite for Outlook, complete the procedures below and familiarize yourself with howto work with the client.
This guide is intended for users of the NetSuite for Outlook client. For information on the administratorconfiguration and installation information, see NetSuite for Outlook Administrator's Guide.
To set up NetSuite for Outlook, first complete the following steps:
1. Uninstall all previous versions of NetSuite for Outlook.
2. Make sure you have administrator rights to install applications on your computer. For moreinformation, see Installing the NetSuite for Outlook Client for Employees Without AdministratorRights.
3. Creating Sync Folders in Outlook for Contacts, Events, and Tasks
4. Downloading and Installing NetSuite for Outlook
5. Logging in to NetSuite for Outlook
6. Configuring NetSuite for Outlook
Note: If you encounter an error saying your role does not have access to NetSuite for Outlook,contact your administrator to request for access.
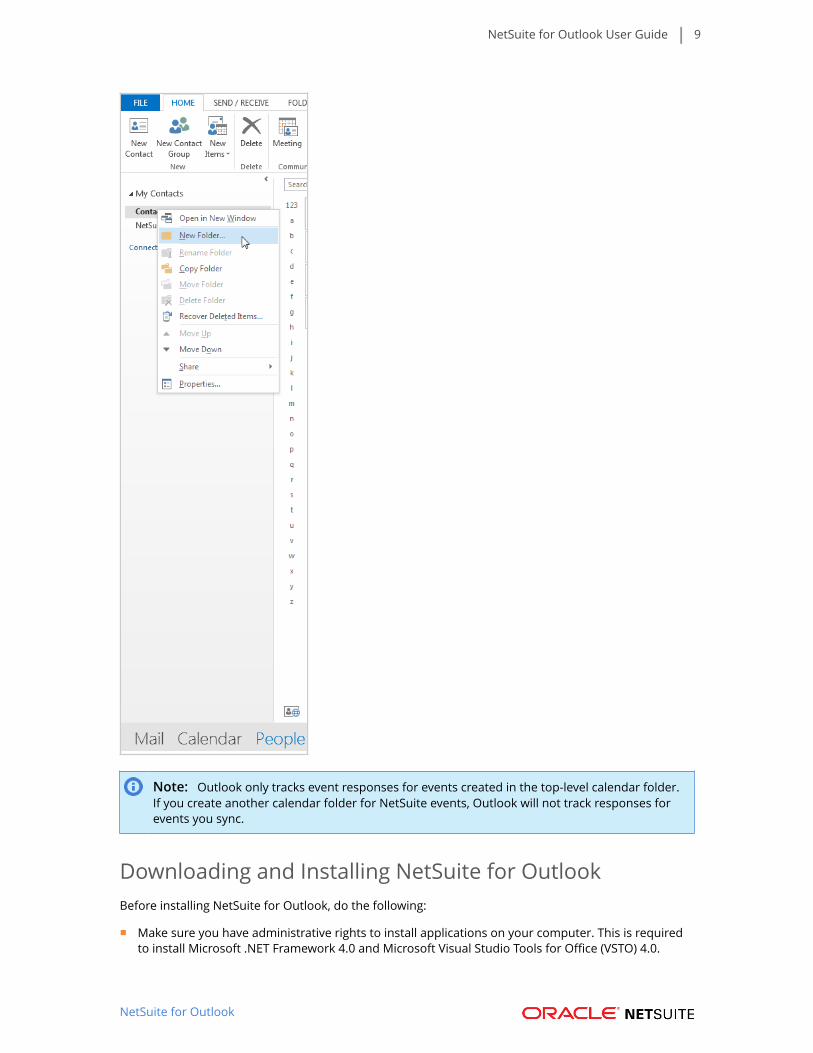
Creating Sync Folders in Outlook for Contacts, Events,and TasksNetSuite for Outlook enables you to choose specific folders in Outlook that you want to synchronizewith NetSuite.
NetSuite for Outlook User Guide 8
NetSuite for Outlook
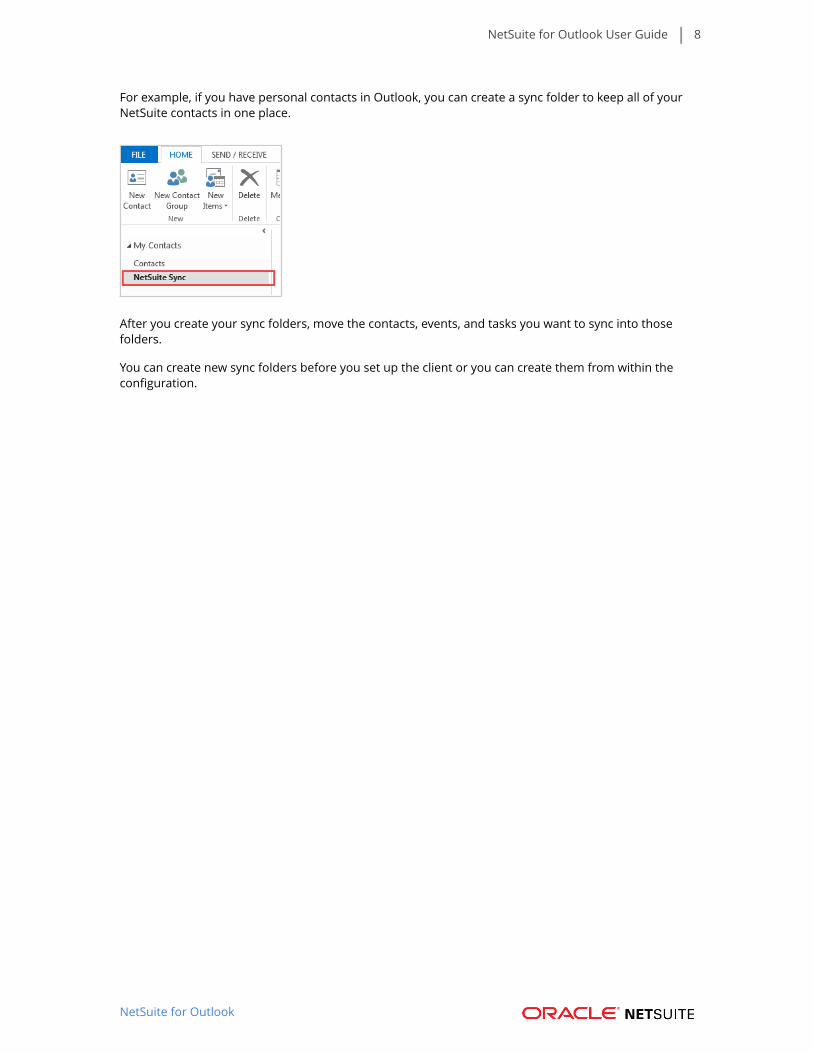
For example, if you have personal contacts in Outlook, you can create a sync folder to keep all of yourNetSuite contacts in one place.
After you create your sync folders, move the contacts, events, and tasks you want to sync into thosefolders.
You can create new sync folders before you set up the client or you can create them from within theconfiguration.
NetSuite for Outlook User Guide 9
NetSuite for Outlook
Note: Outlook only tracks event responses for events created in the top-level calendar folder.If you create another calendar folder for NetSuite events, Outlook will not track responses forevents you sync.
Downloading and Installing NetSuite for OutlookBefore installing NetSuite for Outlook, do the following:
■ Make sure you have administrative rights to install applications on your computer. This is requiredto install Microsoft .NET Framework 4.0 and Microsoft Visual Studio Tools for Office (VSTO) 4.0.
NetSuite for Outlook User Guide 10
NetSuite for Outlook
If you do not have these rights, contact your account administrator or your company's ITdepartment to have them install it for you.
For more information, see Installing the NetSuite for Outlook Client for Employees WithoutAdministrator Rights.
■ Close Microsoft Outlook, and make sure all Outlook processes have ended by pressing Ctrl+Alt+Delete and opening the Task Manager.
■ Uninstall older versions of NetSuite for Outlook (version 1.0 and 2.0) by going to Control Panel >Add or Remove Programs.
To install NetSuite for Outlook:
1. Close Outlook.
2. Go to Home > Set Up NetSuite for Outlook in the Settings portlet.
3. Follow the instructions on the page to download the installation file.
Important: You must have administrative rights to install the application on yourcomputer. Contact your administrator if you do not have these rights.
4. Open the NetSuite for Outlook installation file, and follow the instructions in the installer. Ifprompted to do so, restart your computer, and the installation will continue.
After you have installed the application, the configuration opens.
The NetSuite for Outlook installer checks to see if Microsoft .NET Framework 4.0 and Microsoft VisualStudio Tools for Office (VSTO) 4.0 are installed on your computer and downloads the appropriate files.If prompted, restart your computer, and the installation will continue after restarting.
If the NetSuite for Outlook client installed successfully, you see a NetSuite for Outlook icon in yourdesktop system tray as well as a new button in your Outlook toolbar.
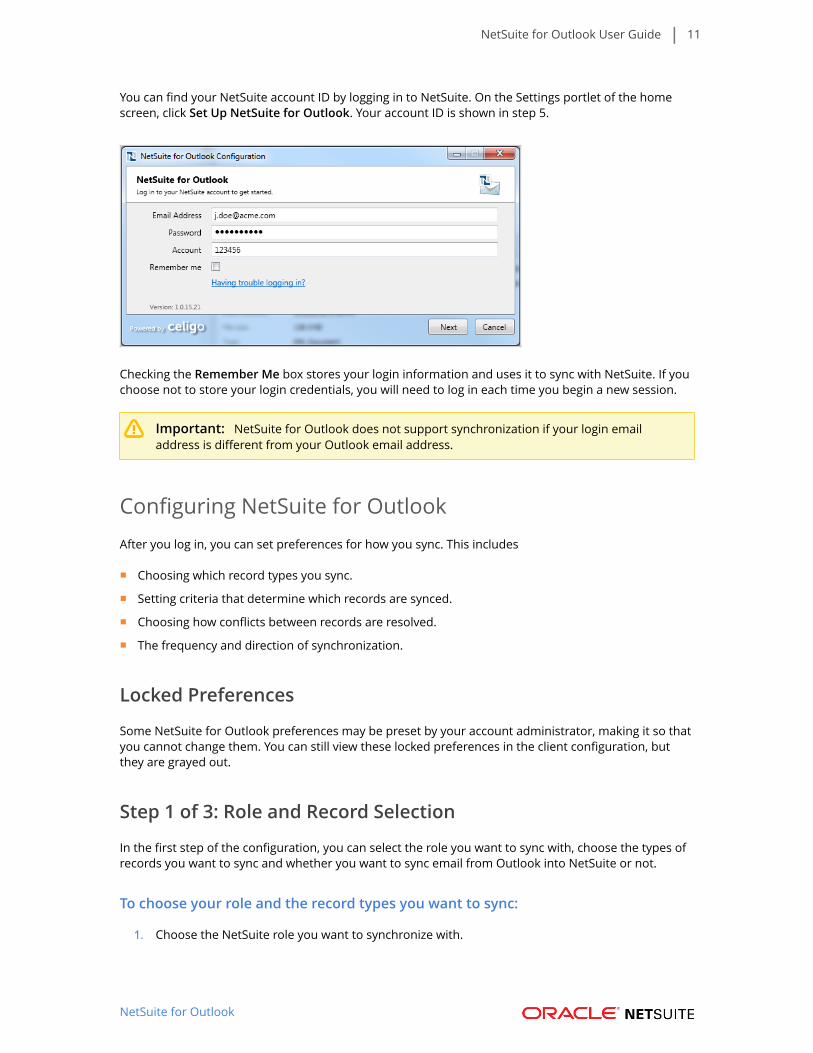
Logging in to NetSuite for OutlookAfter installation, when the configuration window opens automatically, enter your NetSuite account IDand login information. If the configuration window does not open, open Outlook.
NetSuite for Outlook User Guide 11
NetSuite for Outlook
You can find your NetSuite account ID by logging in to NetSuite. On the Settings portlet of the homescreen, click Set Up NetSuite for Outlook. Your account ID is shown in step 5.
Checking the Remember Me box stores your login information and uses it to sync with NetSuite. If youchoose not to store your login credentials, you will need to log in each time you begin a new session.
Important: NetSuite for Outlook does not support synchronization if your login emailaddress is different from your Outlook email address.
Configuring NetSuite for OutlookAfter you log in, you can set preferences for how you sync. This includes
■ Choosing which record types you sync.
■ Setting criteria that determine which records are synced.
■ Choosing how conflicts between records are resolved.
■ The frequency and direction of synchronization.
Locked Preferences
Some NetSuite for Outlook preferences may be preset by your account administrator, making it so thatyou cannot change them. You can still view these locked preferences in the client configuration, butthey are grayed out.
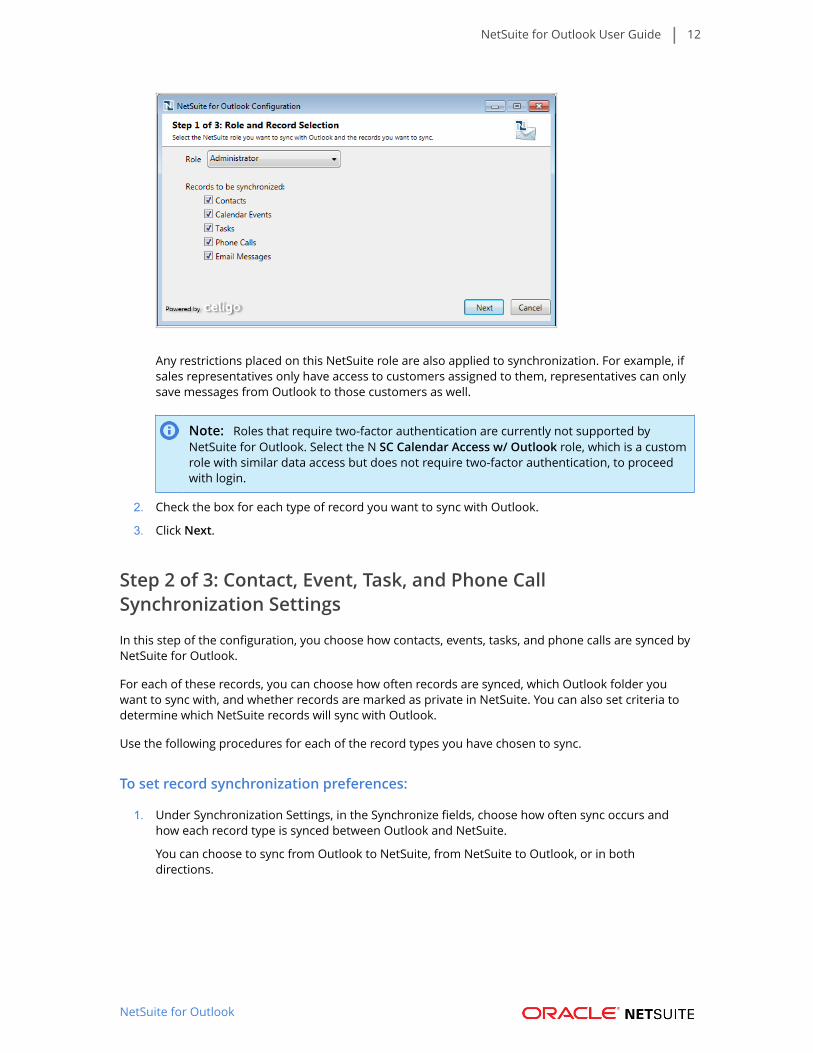
Step 1 of 3: Role and Record Selection
In the first step of the configuration, you can select the role you want to sync with, choose the types ofrecords you want to sync and whether you want to sync email from Outlook into NetSuite or not.
To choose your role and the record types you want to sync:
1. Choose the NetSuite role you want to synchronize with.
NetSuite for Outlook User Guide 12
NetSuite for Outlook
Any restrictions placed on this NetSuite role are also applied to synchronization. For example, ifsales representatives only have access to customers assigned to them, representatives can onlysave messages from Outlook to those customers as well.
Note: Roles that require two-factor authentication are currently not supported byNetSuite for Outlook. Select the N SC Calendar Access w/ Outlook role, which is a customrole with similar data access but does not require two-factor authentication, to proceedwith login.
2. Check the box for each type of record you want to sync with Outlook.
3. Click Next.
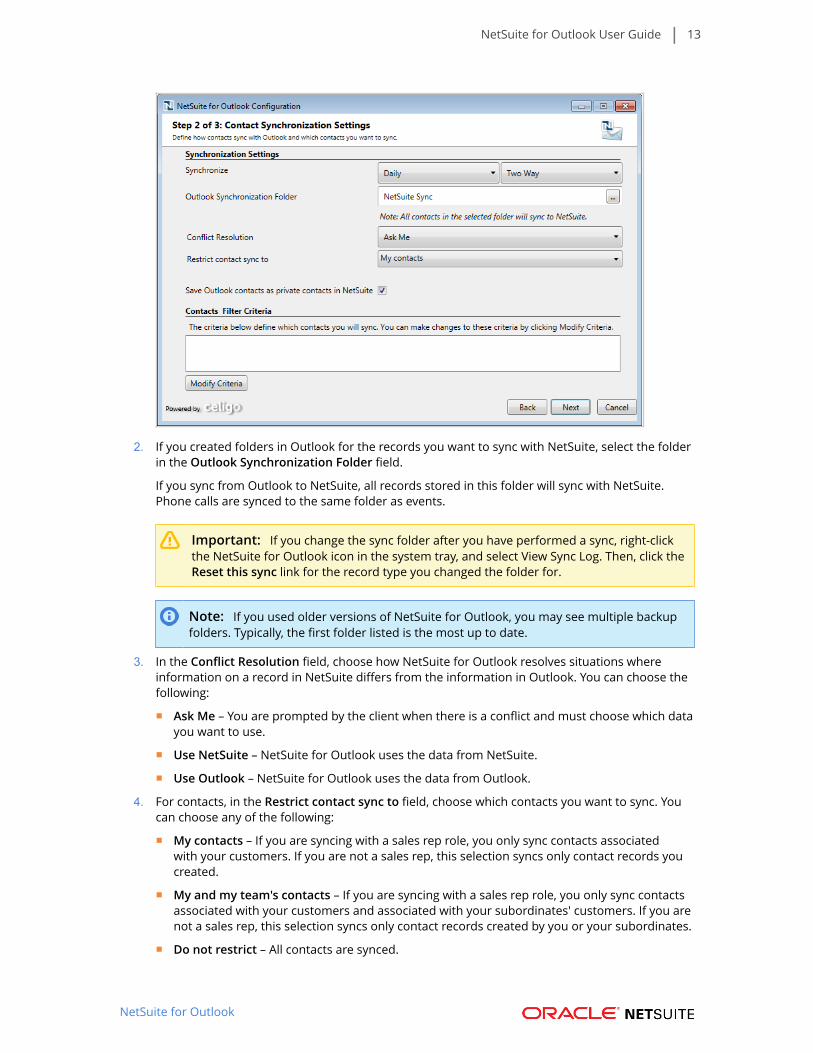
Step 2 of 3: Contact, Event, Task, and Phone CallSynchronization Settings
In this step of the configuration, you choose how contacts, events, tasks, and phone calls are synced byNetSuite for Outlook.
For each of these records, you can choose how often records are synced, which Outlook folder youwant to sync with, and whether records are marked as private in NetSuite. You can also set criteria todetermine which NetSuite records will sync with Outlook.
Use the following procedures for each of the record types you have chosen to sync.
To set record synchronization preferences:
1. Under Synchronization Settings, in the Synchronize fields, choose how often sync occurs andhow each record type is synced between Outlook and NetSuite.
You can choose to sync from Outlook to NetSuite, from NetSuite to Outlook, or in bothdirections.
NetSuite for Outlook User Guide 13
NetSuite for Outlook
2. If you created folders in Outlook for the records you want to sync with NetSuite, select the folderin the Outlook Synchronization Folder field.
If you sync from Outlook to NetSuite, all records stored in this folder will sync with NetSuite.Phone calls are synced to the same folder as events.
Important: If you change the sync folder after you have performed a sync, right-clickthe NetSuite for Outlook icon in the system tray, and select View Sync Log. Then, click theReset this sync link for the record type you changed the folder for.
Note: If you used older versions of NetSuite for Outlook, you may see multiple backupfolders. Typically, the first folder listed is the most up to date.
3. In the Conflict Resolution field, choose how NetSuite for Outlook resolves situations whereinformation on a record in NetSuite differs from the information in Outlook. You can choose thefollowing:
■ Ask Me – You are prompted by the client when there is a conflict and must choose which datayou want to use.
■ Use NetSuite – NetSuite for Outlook uses the data from NetSuite.
■ Use Outlook – NetSuite for Outlook uses the data from Outlook.
4. For contacts, in the Restrict contact sync to field, choose which contacts you want to sync. Youcan choose any of the following:
■ My contacts – If you are syncing with a sales rep role, you only sync contacts associatedwith your customers. If you are not a sales rep, this selection syncs only contact records youcreated.
■ My and my team's contacts – If you are syncing with a sales rep role, you only sync contactsassociated with your customers and associated with your subordinates' customers. If you arenot a sales rep, this selection syncs only contact records created by you or your subordinates.
■ Do not restrict – All contacts are synced.
NetSuite for Outlook User Guide 14
NetSuite for Outlook
Note: This restriction is applied along with any other additional contact criteria youdefine below.
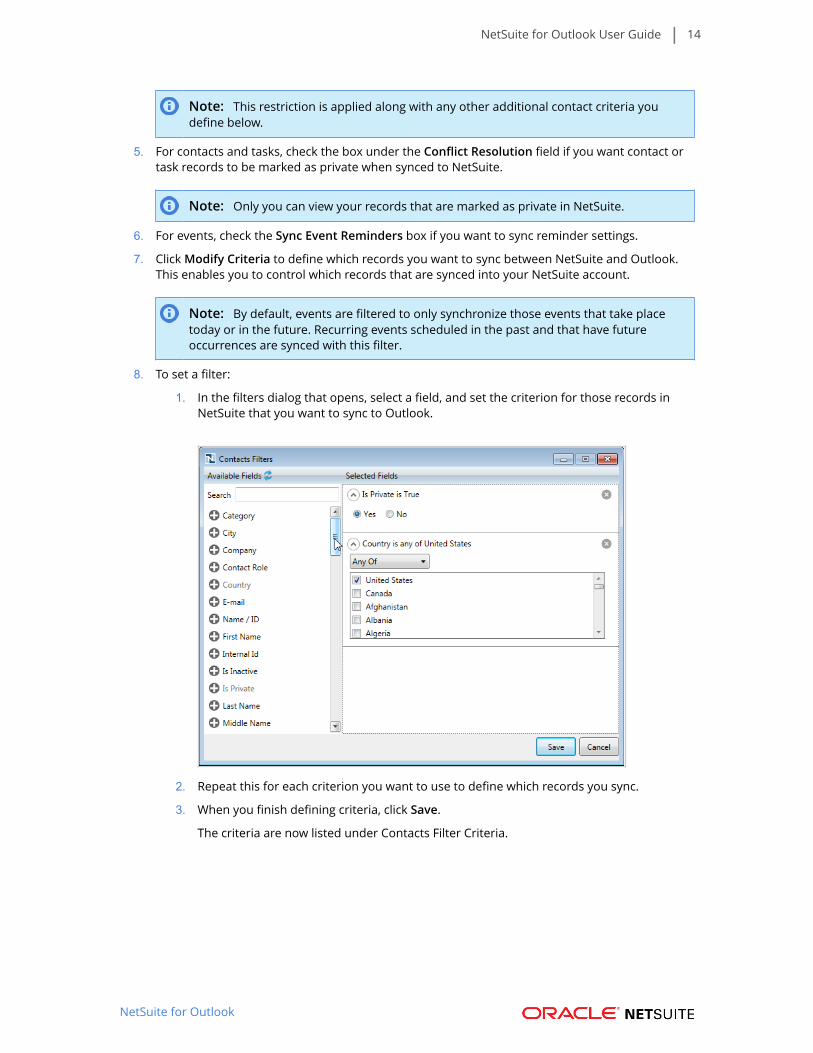
5. For contacts and tasks, check the box under the Conflict Resolution field if you want contact ortask records to be marked as private when synced to NetSuite.
Note: Only you can view your records that are marked as private in NetSuite.
6. For events, check the Sync Event Reminders box if you want to sync reminder settings.
7. Click Modify Criteria to define which records you want to sync between NetSuite and Outlook.This enables you to control which records that are synced into your NetSuite account.
Note: By default, events are filtered to only synchronize those events that take placetoday or in the future. Recurring events scheduled in the past and that have futureoccurrences are synced with this filter.
8. To set a filter:
1. In the filters dialog that opens, select a field, and set the criterion for those records inNetSuite that you want to sync to Outlook.
2. Repeat this for each criterion you want to use to define which records you sync.
3. When you finish defining criteria, click Save.
The criteria are now listed under Contacts Filter Criteria.
NetSuite for Outlook User Guide 15
NetSuite for Outlook
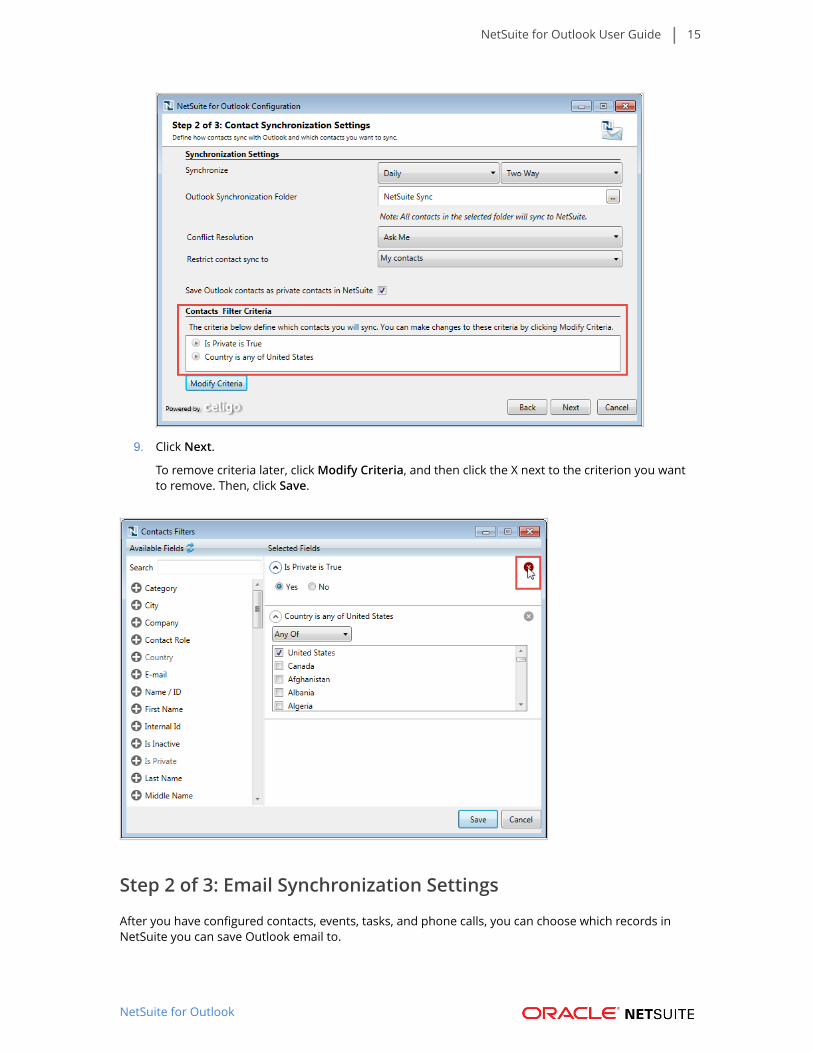
9. Click Next.
To remove criteria later, click Modify Criteria, and then click the X next to the criterion you wantto remove. Then, click Save.
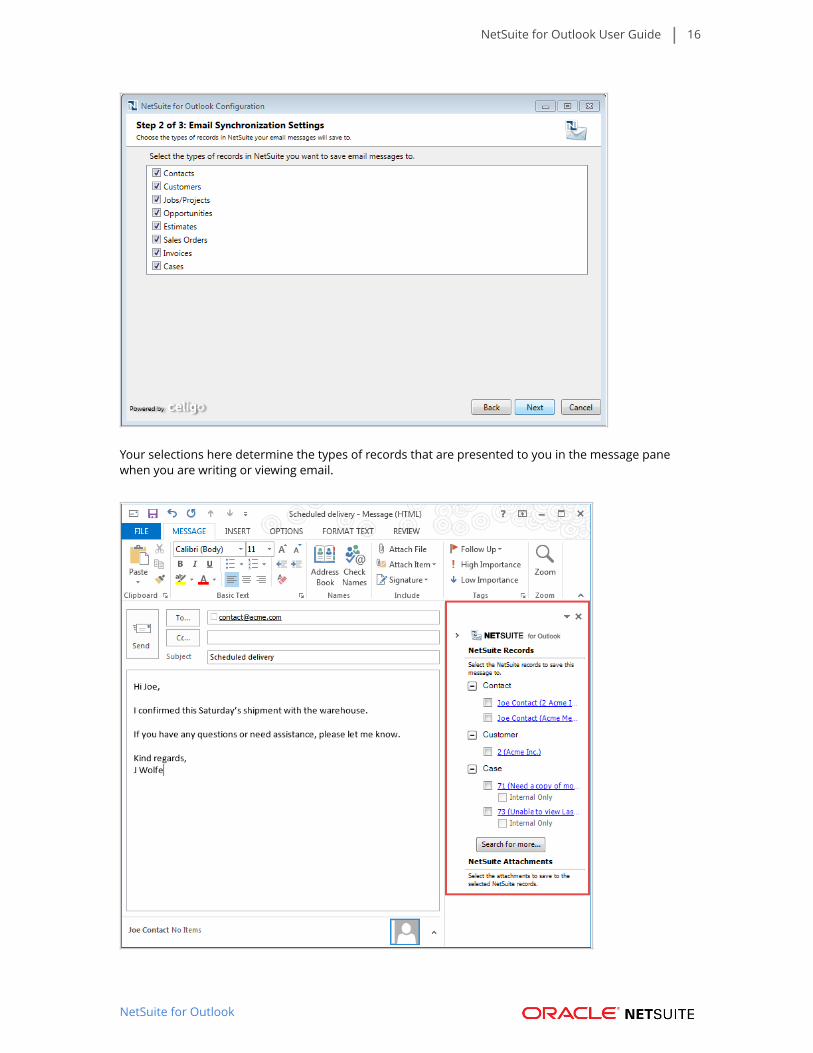
Step 2 of 3: Email Synchronization Settings
After you have configured contacts, events, tasks, and phone calls, you can choose which records inNetSuite you can save Outlook email to.
NetSuite for Outlook User Guide 16
NetSuite for Outlook
Your selections here determine the types of records that are presented to you in the message panewhen you are writing or viewing email.
NetSuite for Outlook User Guide 17
NetSuite for Outlook
You can choose to save email to contacts, customers, jobs and projects, opportunities, estimates, salesorders, invoices, and support cases.
Note: You can only save email from Outlook to NetSuite. You cannot sync email sent from yourNetSuite account.
For more information on saving email, see Saving Email with NetSuite for Outlook.
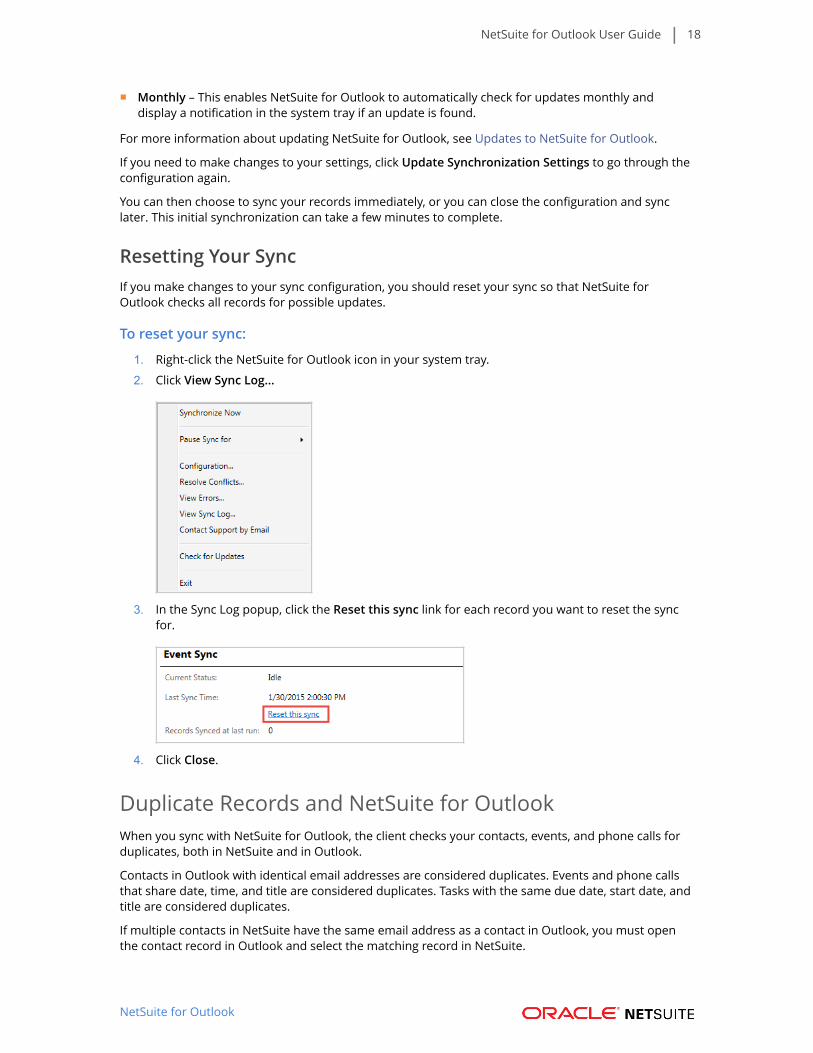
Step 3 of 3: Saving Your Client ConfigurationAfter you have configured NetSuite for Outlook, you are presented with an estimate of the number ofeach type of record that will be synced when you save your configuration.
NetSuite for Outlook can sync a maximum of 3000 records at a time. If the number of records tobe synced exceeds this, the Close and Sync button will be disabled. If this occurs, click UpdateSynchronization Settings and modify the filter criteria, such as the Start Date, to reduce the number ofrecords to be synced. If the settings are locked, inform your NetSuite administrator.
Popup notification lets you know that sync has begun and also when it is completed.
You can also select how frequently NetSuite for Outlook will check for and notify you about updates:
■ Manual – Check for updates manually by right-clicking the NetSuite for Outlook icon in your systemtray and clicking Check for Updates. This option also displays when NetSuite for Outlook was lastupdated.
■ Daily – This enables NetSuite for Outlook to automatically check for updates daily and display anotification in the system tray if an update is found.
NetSuite for Outlook User Guide 18
NetSuite for Outlook
■ Monthly – This enables NetSuite for Outlook to automatically check for updates monthly anddisplay a notification in the system tray if an update is found.
For more information about updating NetSuite for Outlook, see Updates to NetSuite for Outlook.
If you need to make changes to your settings, click Update Synchronization Settings to go through theconfiguration again.
You can then choose to sync your records immediately, or you can close the configuration and synclater. This initial synchronization can take a few minutes to complete.
Resetting Your SyncIf you make changes to your sync configuration, you should reset your sync so that NetSuite forOutlook checks all records for possible updates.
To reset your sync:
1. Right-click the NetSuite for Outlook icon in your system tray.
2. Click View Sync Log...
3. In the Sync Log popup, click the Reset this sync link for each record you want to reset the syncfor.
4. Click Close.
Duplicate Records and NetSuite for OutlookWhen you sync with NetSuite for Outlook, the client checks your contacts, events, and phone calls forduplicates, both in NetSuite and in Outlook.
Contacts in Outlook with identical email addresses are considered duplicates. Events and phone callsthat share date, time, and title are considered duplicates. Tasks with the same due date, start date, andtitle are considered duplicates.
If multiple contacts in NetSuite have the same email address as a contact in Outlook, you must openthe contact record in Outlook and select the matching record in NetSuite.
NetSuite for Outlook User Guide 19
NetSuite for Outlook
If attendees to events match the email addresses of multiple records in NetSuite, you must open theevent in Outlook and choose which records in NetSuite you want to associate with the event.
When you have resolved the duplicates, the records you chose are synchronized the next time aNetSuite for Outlook sync occurs.
Working with NetSuite for OutlookNetSuite for Outlook enables you save messages from Outlook to records in your NetSuite account andto synchronize contacts, events, tasks, and phone calls between NetSuite and Outlook.
Note: You can only use NetSuite for Outlook when you are connected to the Internet.
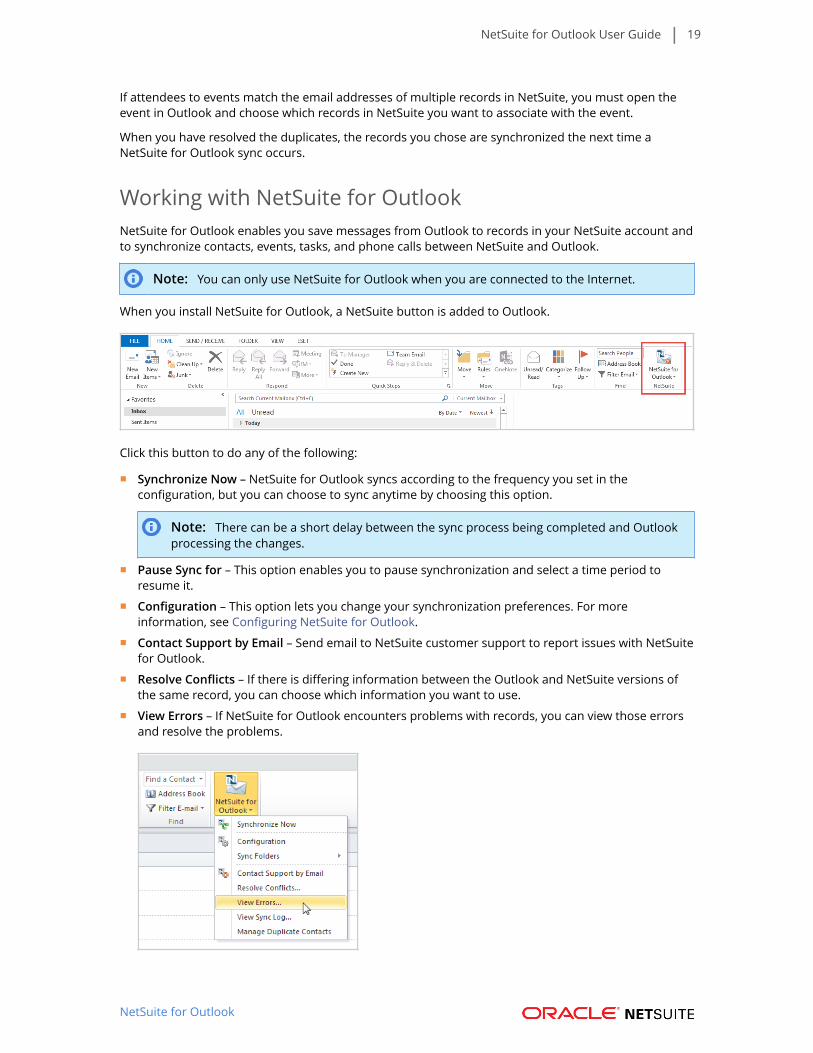
When you install NetSuite for Outlook, a NetSuite button is added to Outlook.
Click this button to do any of the following:
■ Synchronize Now – NetSuite for Outlook syncs according to the frequency you set in theconfiguration, but you can choose to sync anytime by choosing this option.
Note: There can be a short delay between the sync process being completed and Outlookprocessing the changes.
■ Pause Sync for – This option enables you to pause synchronization and select a time period toresume it.
■ Configuration – This option lets you change your synchronization preferences. For moreinformation, see Configuring NetSuite for Outlook.
■ Contact Support by Email – Send email to NetSuite customer support to report issues with NetSuitefor Outlook.
■ Resolve Conflicts – If there is differing information between the Outlook and NetSuite versions ofthe same record, you can choose which information you want to use.
■ View Errors – If NetSuite for Outlook encounters problems with records, you can view those errorsand resolve the problems.
NetSuite for Outlook User Guide 20
NetSuite for Outlook
■ Manage Duplicate Contacts – If there are duplicate contacts in your sync folder in Outlook, you canchoose which of these contacts you want to sync with NetSuite.
The contacts you select are synced going forward; the remaining duplicates remain in the syncfolder but are not synced.
■ View Sync Log – This enables you to see the status, last sync time, and number of records of eachtype that synced the last time the sync ran.
If you make changes to your configuration, view the sync log and click Reset this sync for the recordtype you changed settings for.
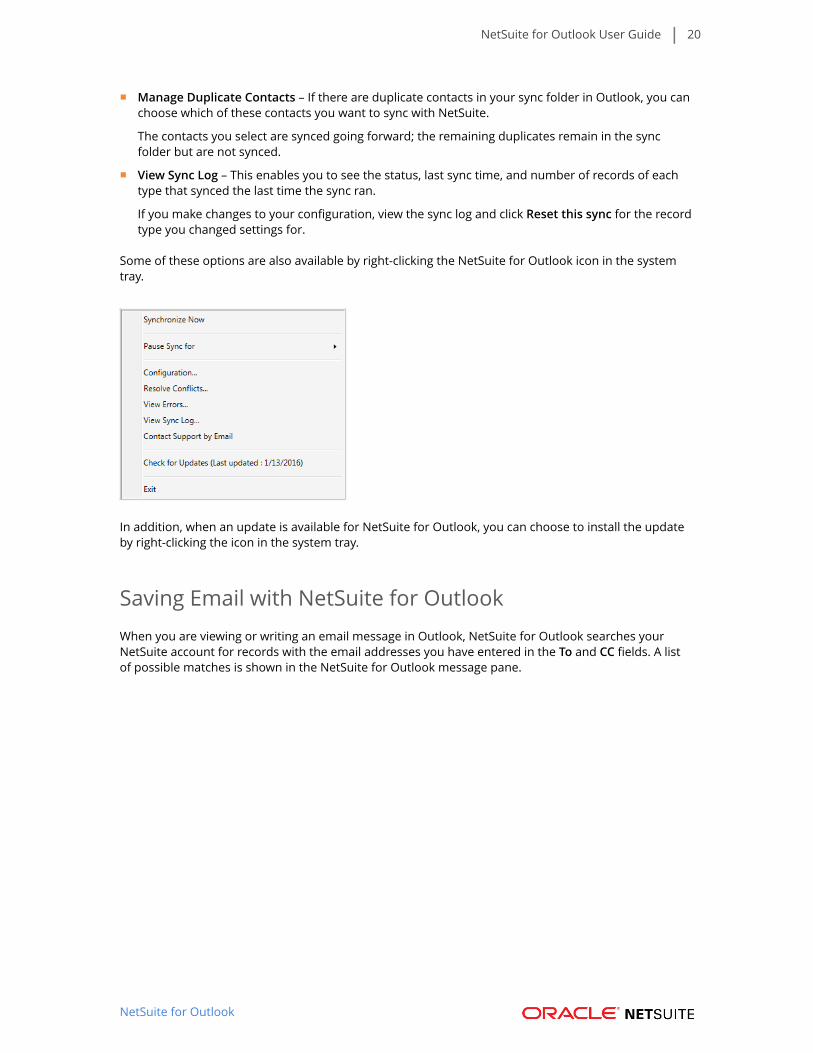
Some of these options are also available by right-clicking the NetSuite for Outlook icon in the systemtray.
In addition, when an update is available for NetSuite for Outlook, you can choose to install the updateby right-clicking the icon in the system tray.
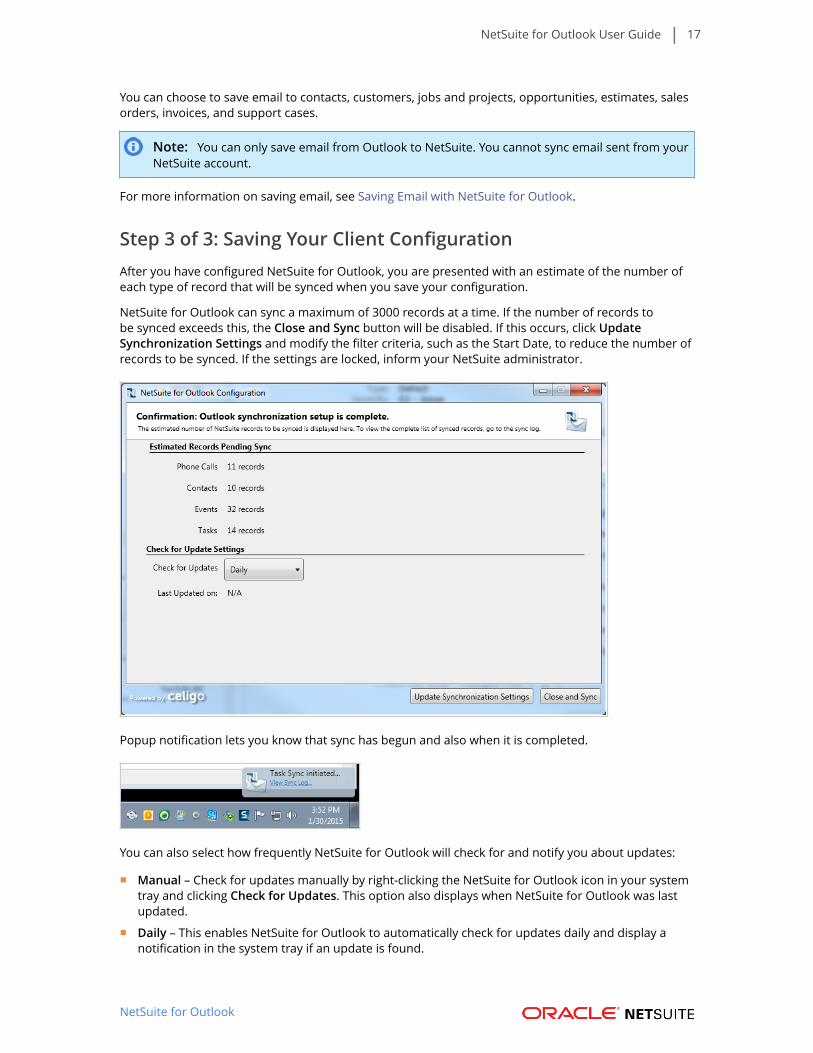
Saving Email with NetSuite for OutlookWhen you are viewing or writing an email message in Outlook, NetSuite for Outlook searches yourNetSuite account for records with the email addresses you have entered in the To and CC fields. A listof possible matches is shown in the NetSuite for Outlook message pane.
NetSuite for Outlook User Guide 21
NetSuite for Outlook
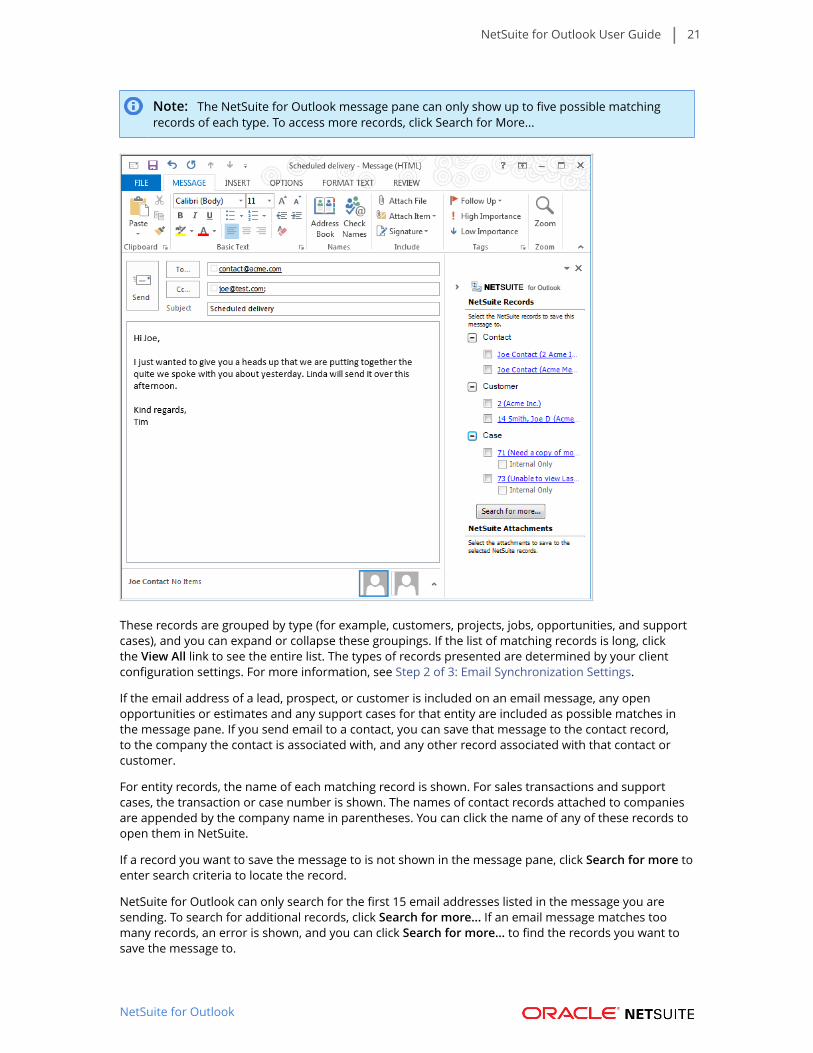
Note: The NetSuite for Outlook message pane can only show up to five possible matchingrecords of each type. To access more records, click Search for More...
These records are grouped by type (for example, customers, projects, jobs, opportunities, and supportcases), and you can expand or collapse these groupings. If the list of matching records is long, clickthe View All link to see the entire list. The types of records presented are determined by your clientconfiguration settings. For more information, see Step 2 of 3: Email Synchronization Settings.
If the email address of a lead, prospect, or customer is included on an email message, any openopportunities or estimates and any support cases for that entity are included as possible matches inthe message pane. If you send email to a contact, you can save that message to the contact record,to the company the contact is associated with, and any other record associated with that contact orcustomer.
For entity records, the name of each matching record is shown. For sales transactions and supportcases, the transaction or case number is shown. The names of contact records attached to companiesare appended by the company name in parentheses. You can click the name of any of these records toopen them in NetSuite.
If a record you want to save the message to is not shown in the message pane, click Search for more toenter search criteria to locate the record.
NetSuite for Outlook can only search for the first 15 email addresses listed in the message you aresending. To search for additional records, click Search for more... If an email message matches toomany records, an error is shown, and you can click Search for more... to find the records you want tosave the message to.
NetSuite for Outlook User Guide 22
NetSuite for Outlook
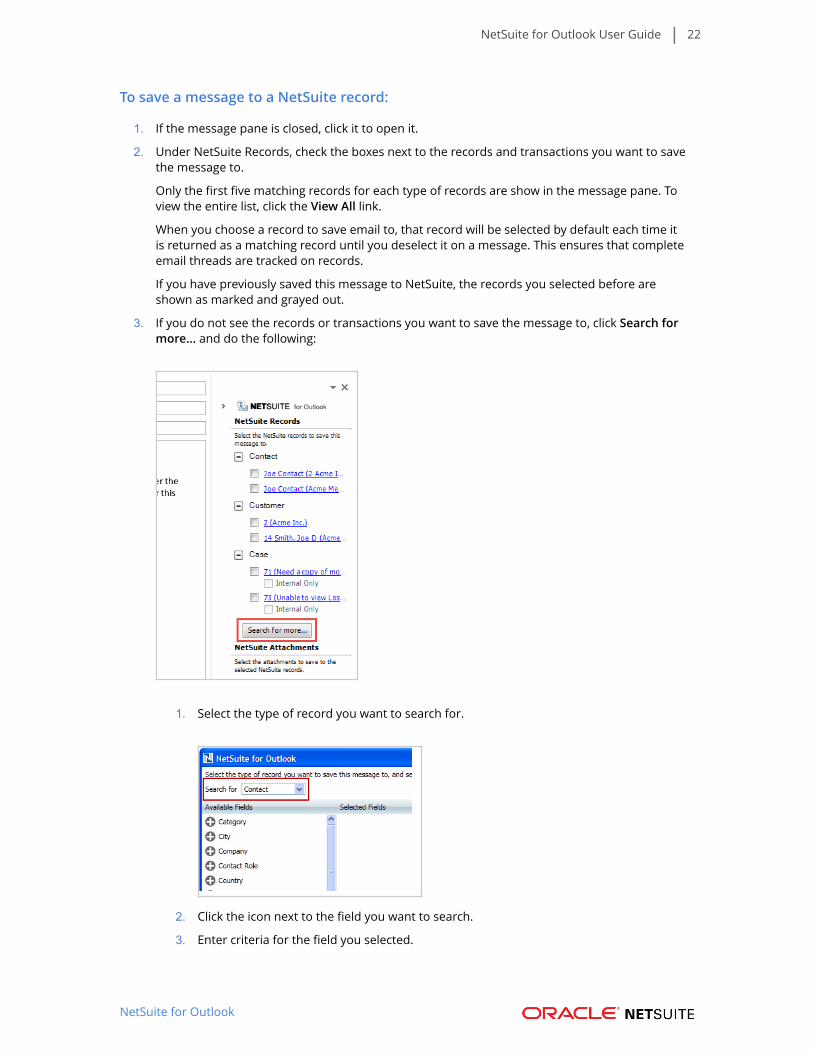
To save a message to a NetSuite record:
1. If the message pane is closed, click it to open it.
2. Under NetSuite Records, check the boxes next to the records and transactions you want to savethe message to.
Only the first five matching records for each type of records are show in the message pane. Toview the entire list, click the View All link.
When you choose a record to save email to, that record will be selected by default each time itis returned as a matching record until you deselect it on a message. This ensures that completeemail threads are tracked on records.
If you have previously saved this message to NetSuite, the records you selected before areshown as marked and grayed out.
3. If you do not see the records or transactions you want to save the message to, click Search formore... and do the following:
1. Select the type of record you want to search for.
2. Click the icon next to the field you want to search.
3. Enter criteria for the field you selected.

NetSuite for Outlook User Guide 23
NetSuite for Outlook
4. Repeat these steps to set additional criteria for finding the record you want to save themessage to.
5. Click Search.
6. When the search results are returned, select the records you want to save the messageto.
7. Click Select.
4. Under Attachments, select the attachments you want to save to the records you selected.
These attachments are saved to the Files subtab of the records and transactions you selected.They are saved in the NetSuite file cabinet in a folder selected by your administrator. You canonly save attachments that are supported file types. For a list of these, see the help topic FileTypes Recognized in the File Cabinet.
NetSuite for Outlook User Guide 24
NetSuite for Outlook
Note: You cannot save a message and attachments larger than 10 MB total in a singlesave. Additionally, each attachment cannot be larger than 5 MB in size individually.
If your message has multiple files with a total size of more than 10 MB, you can save some of theattachments now and then open the message again to save the others.
For more information regarding email attachments, see the help topic Working with FilesAttached to Email Messages.
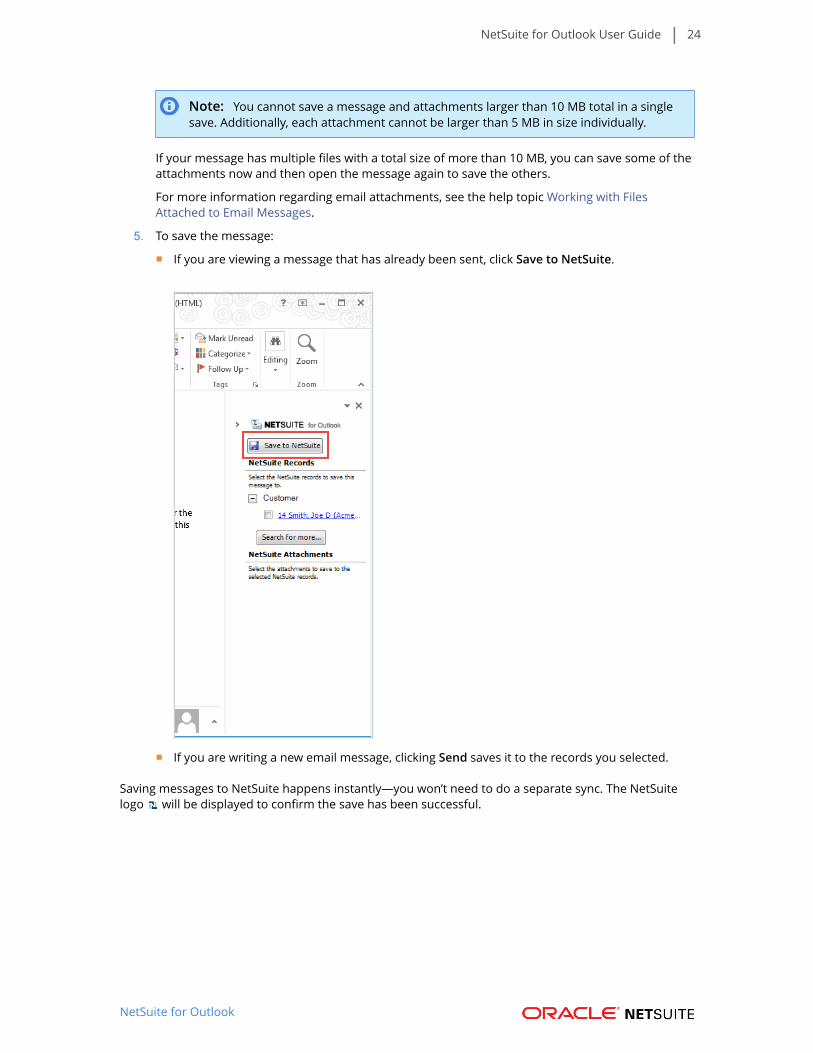
5. To save the message:
■ If you are viewing a message that has already been sent, click Save to NetSuite.
■ If you are writing a new email message, clicking Send saves it to the records you selected.
Saving messages to NetSuite happens instantly—you won’t need to do a separate sync. The NetSuitelogo will be displayed to confirm the save has been successful.
NetSuite for Outlook User Guide 25
NetSuite for Outlook
Note: If a message has multiple recipients in Outlook, when you view that message on anentity record in NetSuite, the email address for that entity record shows in the Recipient columnon the messages list. All other recipients are shown in the CC column.
Note: NetSuite for Outlook does not search for email sent to you as part of this default search.If you want to save email to your contact record, you must click Search for more... and searchfor your contact record.
Note: If a message has multiple recipients in Outlook and is saved to an employee record,NetSuite saves several copies of the message, depending on the number of recipients. Forexample, if you save an email with five recipients including the employee, NetSuite will save themessage five times on the employee record.
Saving Messages to Transactions
You can only save email messages to open estimates and opportunities in NetSuite.
If you save a message to a transaction, a copy is also saved to the lead, prospect, or customer recordon that transaction. If you save the same message to two different transactions, the lead, prospect, orcustomer record will show that message listed twice.
Saving Messages to Cases
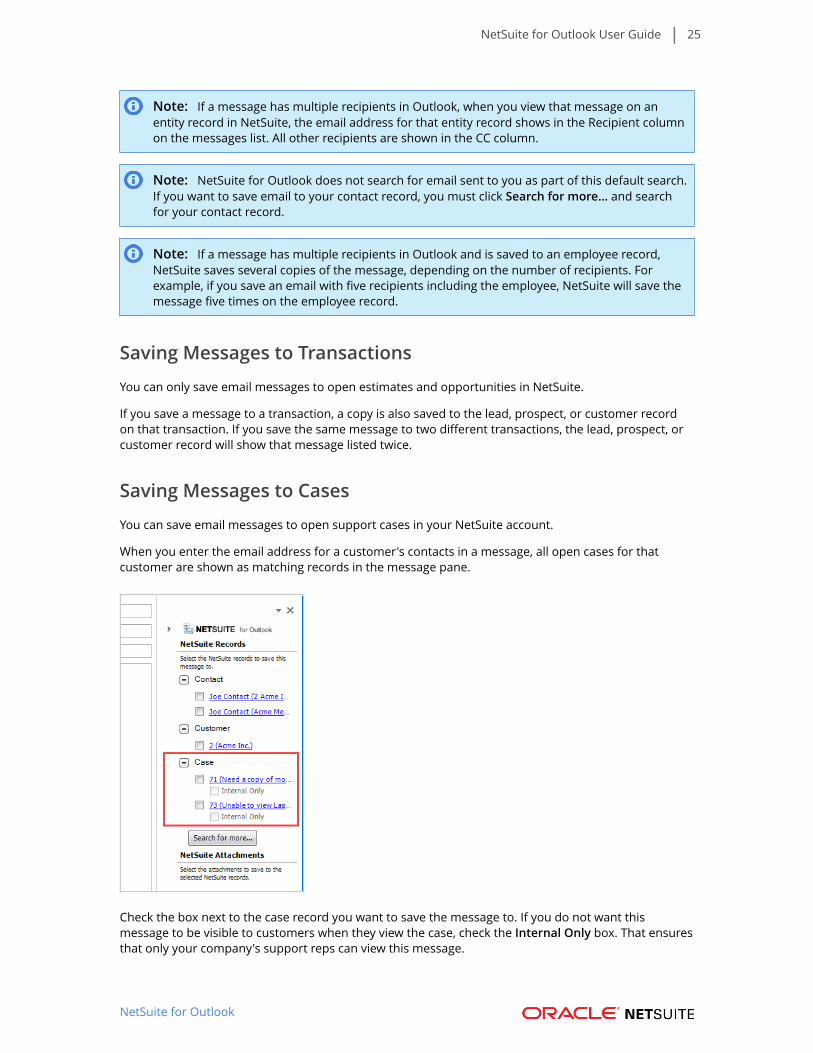
You can save email messages to open support cases in your NetSuite account.
When you enter the email address for a customer's contacts in a message, all open cases for thatcustomer are shown as matching records in the message pane.
Check the box next to the case record you want to save the message to. If you do not want thismessage to be visible to customers when they view the case, check the Internal Only box. That ensuresthat only your company's support reps can view this message.
NetSuite for Outlook User Guide 26
NetSuite for Outlook
Note: If you check the Internal Only box, only the sender and the message itself is saved.NetSuite does not save the recipients, subject, and any attachments on the case record. To saveall information on the email message, you must add it manually to the record.
Email messages are saved on the Communication subtab under the Message subtab.
Synchronizing Contacts with NetSuite for OutlookNetSuite for Outlook keeps your contacts in NetSuite and in Outlook synchronized with the most up-to-date information. Contacts are synced to the contact sync folder you chose in the NetSuite for Outlookconfiguration.
Required Contact Fields
Your account administrator might require that certain fields in Outlook be filled in before a contact canbe synced into NetSuite. For a list of these required fields, contact your account administrator.
Linking Outlook Contacts to NetSuite Companies
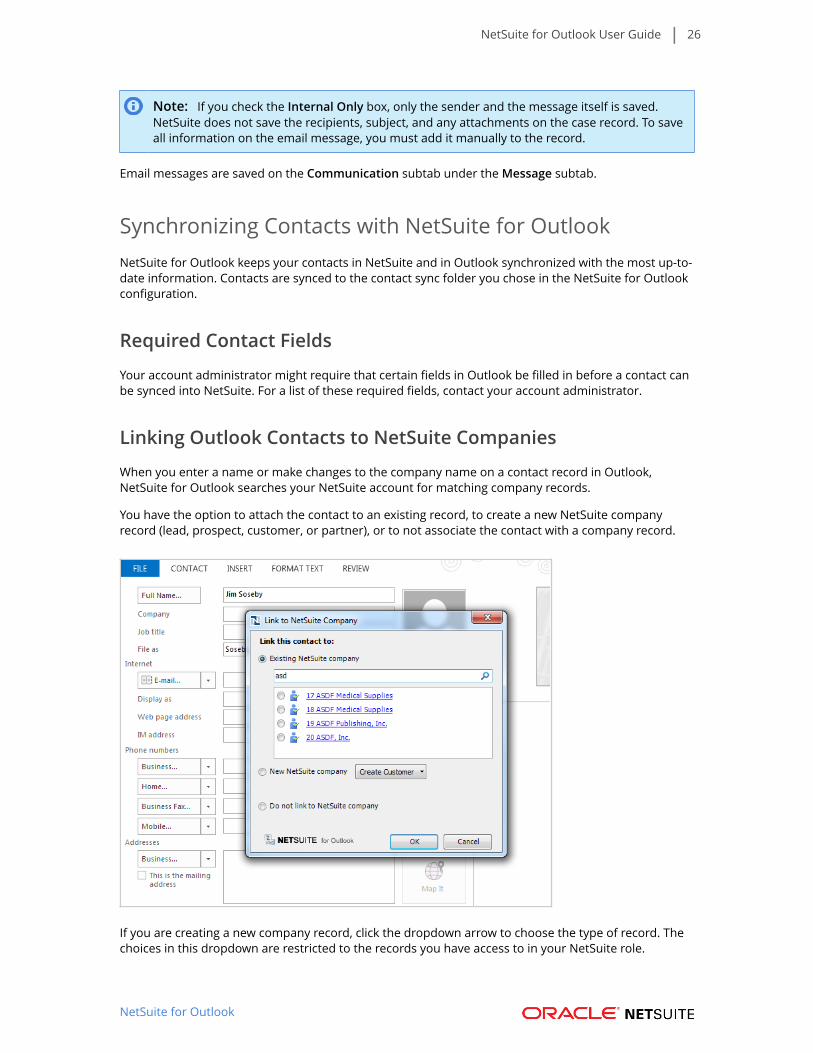
When you enter a name or make changes to the company name on a contact record in Outlook,NetSuite for Outlook searches your NetSuite account for matching company records.
You have the option to attach the contact to an existing record, to create a new NetSuite companyrecord (lead, prospect, customer, or partner), or to not associate the contact with a company record.
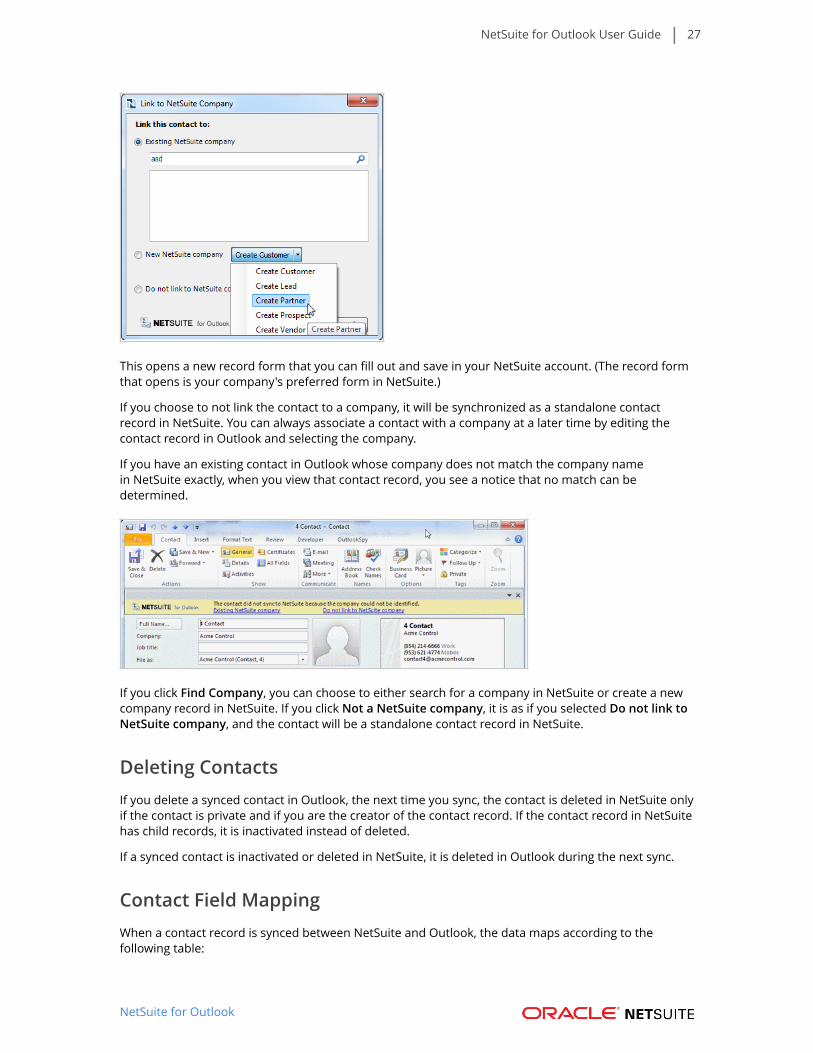
If you are creating a new company record, click the dropdown arrow to choose the type of record. Thechoices in this dropdown are restricted to the records you have access to in your NetSuite role.
NetSuite for Outlook User Guide 27
NetSuite for Outlook
This opens a new record form that you can fill out and save in your NetSuite account. (The record formthat opens is your company's preferred form in NetSuite.)
If you choose to not link the contact to a company, it will be synchronized as a standalone contactrecord in NetSuite. You can always associate a contact with a company at a later time by editing thecontact record in Outlook and selecting the company.
If you have an existing contact in Outlook whose company does not match the company namein NetSuite exactly, when you view that contact record, you see a notice that no match can bedetermined.
If you click Find Company, you can choose to either search for a company in NetSuite or create a newcompany record in NetSuite. If you click Not a NetSuite company, it is as if you selected Do not link toNetSuite company, and the contact will be a standalone contact record in NetSuite.
Deleting ContactsIf you delete a synced contact in Outlook, the next time you sync, the contact is deleted in NetSuite onlyif the contact is private and if you are the creator of the contact record. If the contact record in NetSuitehas child records, it is inactivated instead of deleted.
If a synced contact is inactivated or deleted in NetSuite, it is deleted in Outlook during the next sync.
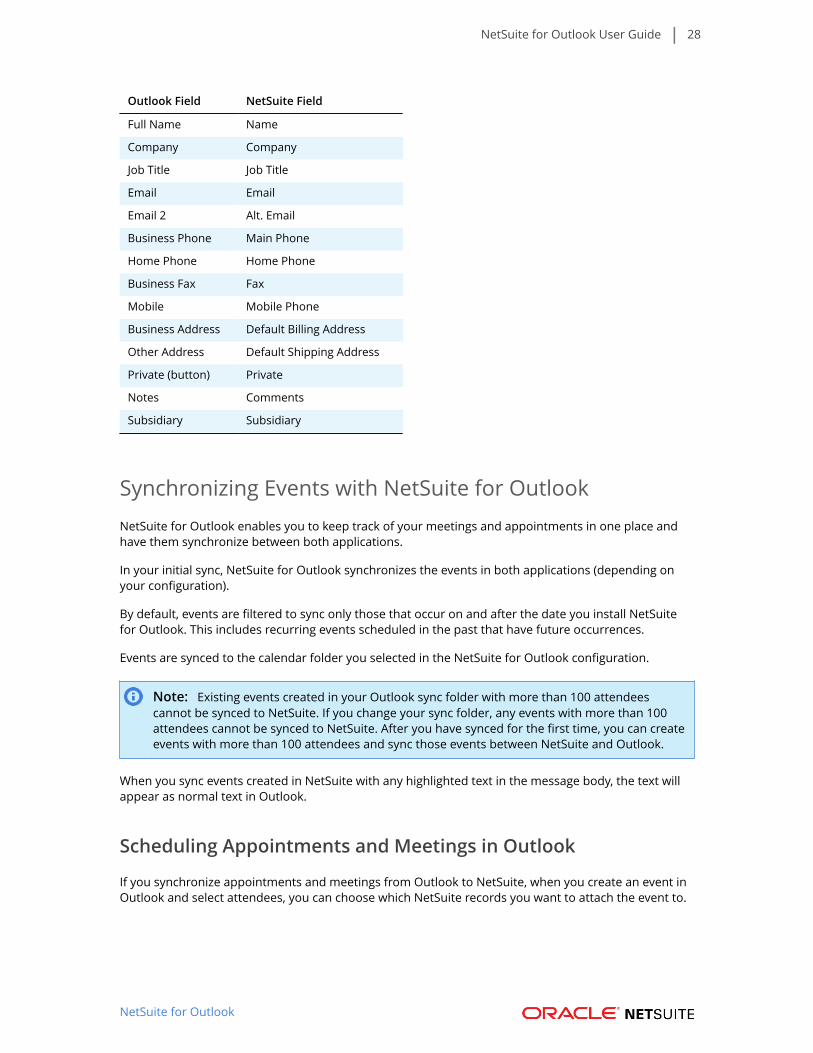
Contact Field MappingWhen a contact record is synced between NetSuite and Outlook, the data maps according to thefollowing table:
NetSuite for Outlook User Guide 28
NetSuite for Outlook
Outlook Field NetSuite Field
Full Name Name
Company Company
Job Title Job Title
Email Email
Email 2 Alt. Email
Business Phone Main Phone
Home Phone Home Phone
Business Fax Fax
Mobile Mobile Phone
Business Address Default Billing Address
Other Address Default Shipping Address
Private (button) Private
Notes Comments
Subsidiary Subsidiary
Synchronizing Events with NetSuite for OutlookNetSuite for Outlook enables you to keep track of your meetings and appointments in one place andhave them synchronize between both applications.
In your initial sync, NetSuite for Outlook synchronizes the events in both applications (depending onyour configuration).
By default, events are filtered to sync only those that occur on and after the date you install NetSuitefor Outlook. This includes recurring events scheduled in the past that have future occurrences.
Events are synced to the calendar folder you selected in the NetSuite for Outlook configuration.
Note: Existing events created in your Outlook sync folder with more than 100 attendeescannot be synced to NetSuite. If you change your sync folder, any events with more than 100attendees cannot be synced to NetSuite. After you have synced for the first time, you can createevents with more than 100 attendees and sync those events between NetSuite and Outlook.
When you sync events created in NetSuite with any highlighted text in the message body, the text willappear as normal text in Outlook.
Scheduling Appointments and Meetings in Outlook
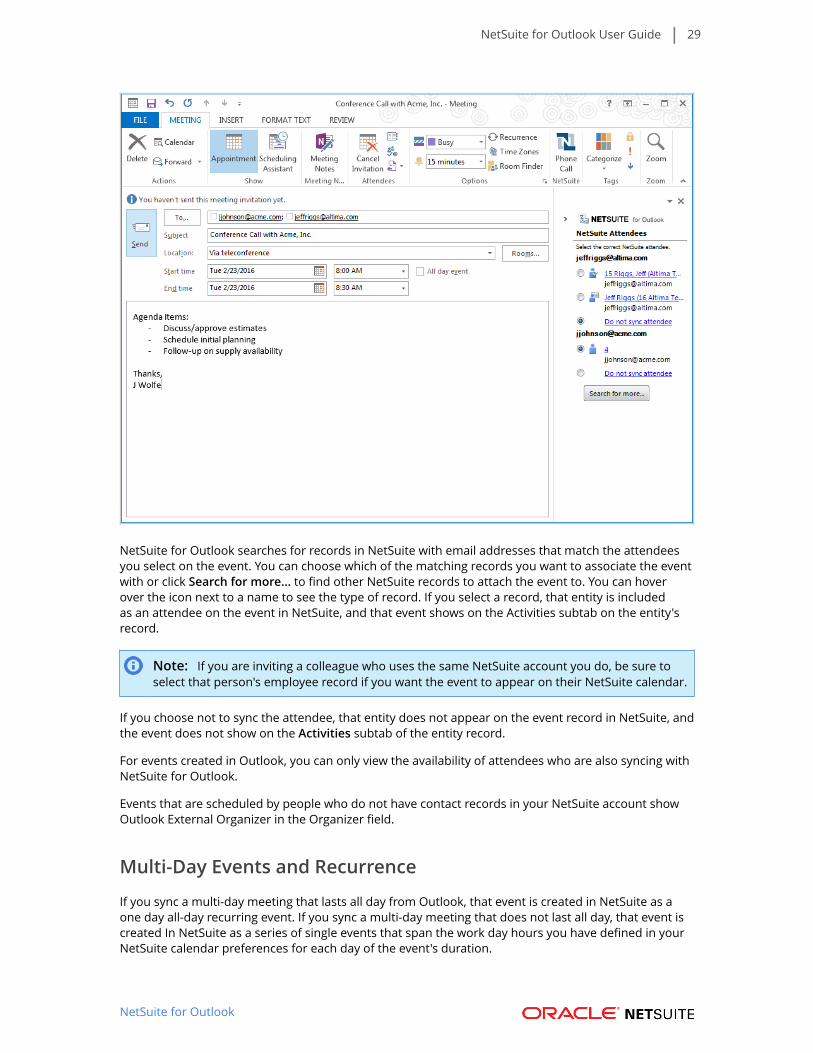
If you synchronize appointments and meetings from Outlook to NetSuite, when you create an event inOutlook and select attendees, you can choose which NetSuite records you want to attach the event to.
NetSuite for Outlook User Guide 29
NetSuite for Outlook
NetSuite for Outlook searches for records in NetSuite with email addresses that match the attendeesyou select on the event. You can choose which of the matching records you want to associate the eventwith or click Search for more... to find other NetSuite records to attach the event to. You can hoverover the icon next to a name to see the type of record. If you select a record, that entity is includedas an attendee on the event in NetSuite, and that event shows on the Activities subtab on the entity'srecord.
Note: If you are inviting a colleague who uses the same NetSuite account you do, be sure toselect that person's employee record if you want the event to appear on their NetSuite calendar.
If you choose not to sync the attendee, that entity does not appear on the event record in NetSuite, andthe event does not show on the Activities subtab of the entity record.
For events created in Outlook, you can only view the availability of attendees who are also syncing withNetSuite for Outlook.
Events that are scheduled by people who do not have contact records in your NetSuite account showOutlook External Organizer in the Organizer field.
Multi-Day Events and Recurrence
If you sync a multi-day meeting that lasts all day from Outlook, that event is created in NetSuite as aone day all-day recurring event. If you sync a multi-day meeting that does not last all day, that event iscreated In NetSuite as a series of single events that span the work day hours you have defined in yourNetSuite calendar preferences for each day of the event's duration.
NetSuite for Outlook User Guide 30
NetSuite for Outlook
For example, an all-day meeting scheduled in Outlook lasts from July 1 to July 5. It will be created asone all-day event, recurring on July 1 to 5.
For a multi-day meeting scheduled in Outlook that does not last all day on July 1 to July 5, five eventsare created when it is synced in NetSuite - one event for each day from July 1 through July 5 lastingfrom your calendar's daily start time to its end time.
If the synchronization setting is configured as two-way, Outlook will also create five separate events tomatch what is in NetSuite.
Note: If you edit any single occurrence within a recurring series, that instance will be removedfrom the recurrence and recreated as a single independent event in Outlook and in NetSuite.
Some recurrence patterns that are available in Outlook are not supported by NetSuite. Events that usethese recurrence patterns will not sync. This includes events that occur:
■ monthly on day 29 or later
■ on the last date of a month
■ monthly on a weekday or weekend day
■ yearly on a day, weekday, or weekend day
Important: Recurring events will only sync from Outlook when the time zone of the event isthe same as your time zone in NetSuite.
Event ResponsesWhen someone accepts an event you created in NetSuite, that person's status is updated in Outlook toreflect that they accepted. If an invitee's response changes (from accepted to declined, for example), itis updated in Outlook when it syncs.
Outlook only tracks responses for appointments in your main Outlook calendar. If you have a separateOutlook calendar folder that you use for your NetSuite events, the responses for those events will notbe tracked in Outlook.
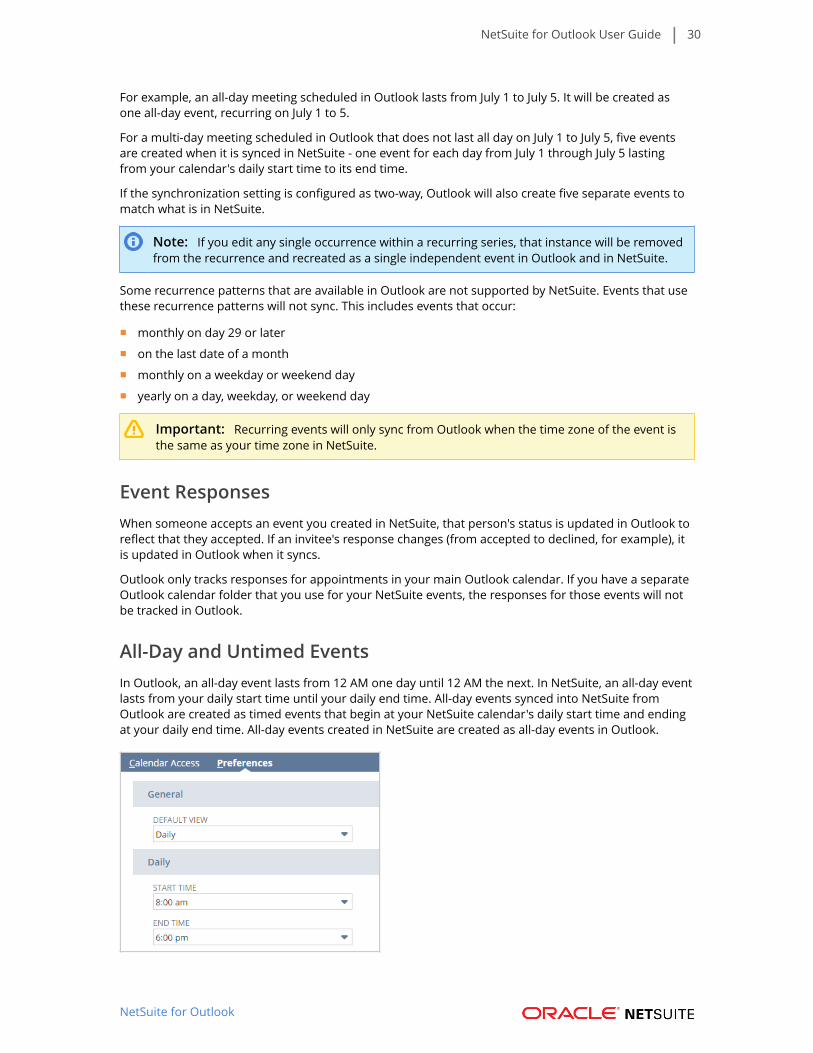
All-Day and Untimed EventsIn Outlook, an all-day event lasts from 12 AM one day until 12 AM the next. In NetSuite, an all-day eventlasts from your daily start time until your daily end time. All-day events synced into NetSuite fromOutlook are created as timed events that begin at your NetSuite calendar's daily start time and endingat your daily end time. All-day events created in NetSuite are created as all-day events in Outlook.
NetSuite for Outlook User Guide 31
NetSuite for Outlook
Untimed events in NetSuite are synced to Outlook as all-day events.
Syncing Outlook with Smartphones
Many smartphones and similar devices can only sync with the top-level Calendar folder in Outlook. Ifyou want your NetSuite events to sync to those devices, you must set NetSuite to sync to the top-levelCalendar folder.
Event Field Mapping
When an event is synced between NetSuite and Outlook, the data maps according to the followingtable:
Outlook Field NetSuite Field
Subject Title
Location Location
Start Time (Date) Date
Start Time (Time) Start Time
End Time (Time) End Time
All Day Event All Day
Reminder * Reminder *
Show Time as Busy Event Access: Show as Busy
Show Time as Free Event Access: Private
Show Time as Tentative Status: TentativeEvent Access: Public (unless events are synced as private)
Message ** Message **
* If you set your NetSuite for Outlook configuration to sync reminder settings, the default remindertype is used in both applications, and the reminder timing is synced.
** The message length limit in NetSuite is 4000 characters. Messages longer than this are truncated inNetSuite which may affect formatting.
Synchronizing Tasks with NetSuite for OutlookNetSuite for Outlook can synchronize task records between both applications. Tasks sync to the taskfolder you selected in the NetSuite for Outlook configuration.
You can only sync tasks that are assigned to you; tasks you create for others are not synced. The Ownerfield in Outlook is only synced to NetSuite if you use the same login email address in both applications.
Additionally, if you sync a task that is later reassigned in NetSuite to another person, that task isdeleted from Outlook with the next sync. If you reassign a task in Outlook to another person, the newassignee will not sync to NetSuite.
When a task is synced between NetSuite and Outlook, the data maps according to the following table:
NetSuite for Outlook User Guide 32
NetSuite for Outlook
Outlook Field NetSuite Field
Subject Title
Due Date* Due Date
Start Date* Start Date
Status Status
Priority Priority
Owner** Assigned To**
Reminder Reminder
Message Notes
* Tasks in Outlook must have start and due dates to sync to NetSuite.
** For the Owner field in Outlook to sync to the Assigned To field in NetSuite, the login address used tolog in to NetSuite for Outlook must match the login you use in NetSuite.
The following fields in NetSuite are not synced to Outlook:
■ Reserve Time
■ From
■ To
■ Date Completed
■ Send Email
■ Insert Below
The % Complete field in Outlook is not synced.
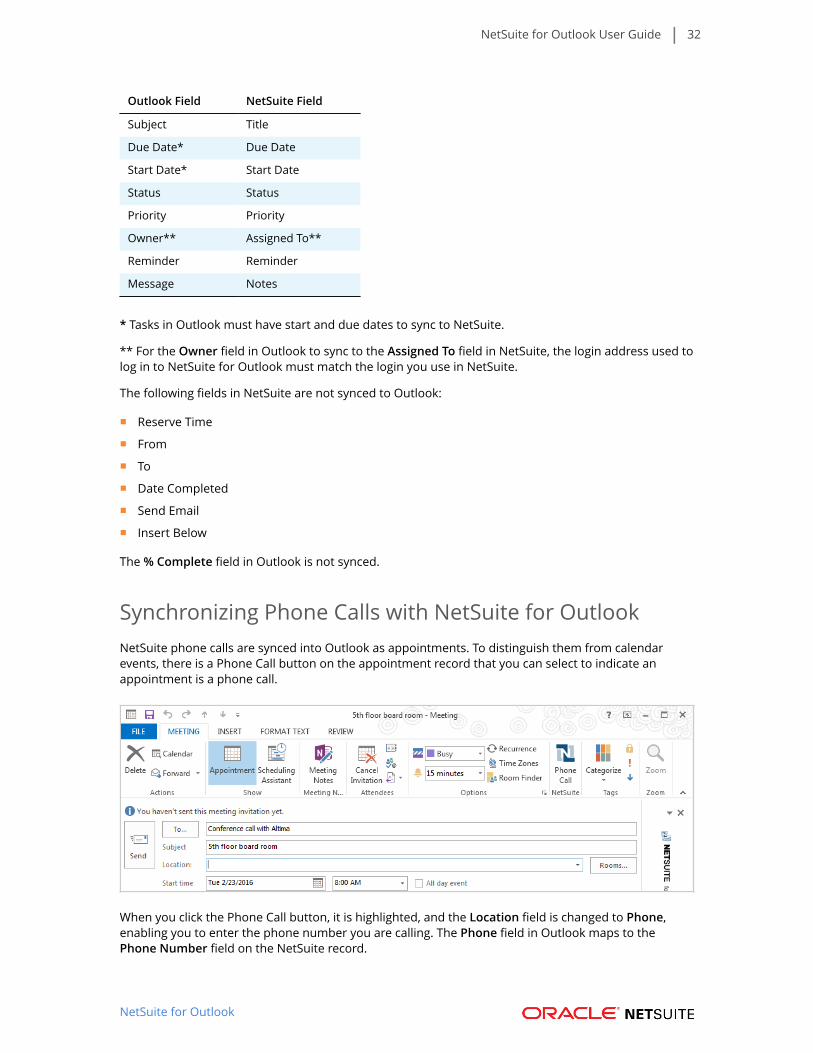
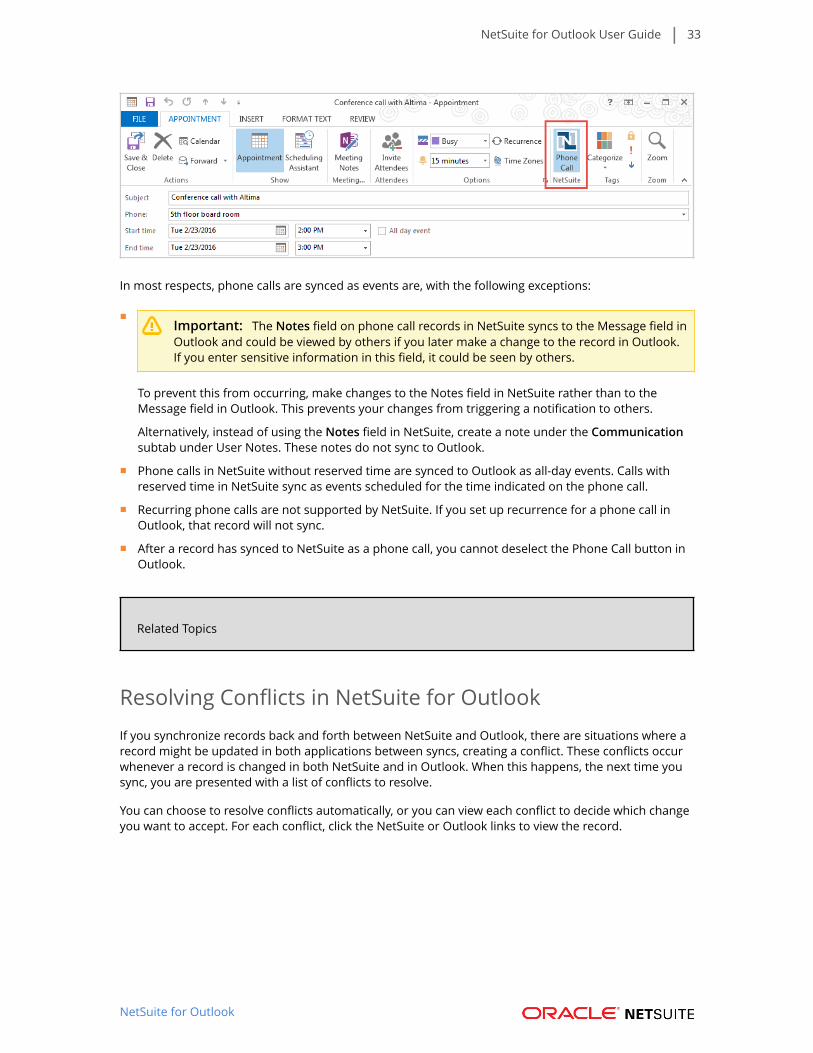
Synchronizing Phone Calls with NetSuite for OutlookNetSuite phone calls are synced into Outlook as appointments. To distinguish them from calendarevents, there is a Phone Call button on the appointment record that you can select to indicate anappointment is a phone call.
When you click the Phone Call button, it is highlighted, and the Location field is changed to Phone,enabling you to enter the phone number you are calling. The Phone field in Outlook maps to thePhone Number field on the NetSuite record.
NetSuite for Outlook User Guide 33
NetSuite for Outlook
In most respects, phone calls are synced as events are, with the following exceptions:
■Important: The Notes field on phone call records in NetSuite syncs to the Message field inOutlook and could be viewed by others if you later make a change to the record in Outlook.If you enter sensitive information in this field, it could be seen by others.
To prevent this from occurring, make changes to the Notes field in NetSuite rather than to theMessage field in Outlook. This prevents your changes from triggering a notification to others.
Alternatively, instead of using the Notes field in NetSuite, create a note under the Communicationsubtab under User Notes. These notes do not sync to Outlook.
■ Phone calls in NetSuite without reserved time are synced to Outlook as all-day events. Calls withreserved time in NetSuite sync as events scheduled for the time indicated on the phone call.
■ Recurring phone calls are not supported by NetSuite. If you set up recurrence for a phone call inOutlook, that record will not sync.
■ After a record has synced to NetSuite as a phone call, you cannot deselect the Phone Call button inOutlook.
Related Topics
Resolving Conflicts in NetSuite for OutlookIf you synchronize records back and forth between NetSuite and Outlook, there are situations where arecord might be updated in both applications between syncs, creating a conflict. These conflicts occurwhenever a record is changed in both NetSuite and in Outlook. When this happens, the next time yousync, you are presented with a list of conflicts to resolve.
You can choose to resolve conflicts automatically, or you can view each conflict to decide which changeyou want to accept. For each conflict, click the NetSuite or Outlook links to view the record.

NetSuite for Outlook User Guide 34
NetSuite for Outlook
If such a conflict occurs, the sync continues for other records, and an alert notifies you that a conflictrequires your attention.
Resolving Sync Errors with NetSuite for OutlookWhen NetSuite for Outlook syncs, it presents a list of records that were not able to be synced and thereasons they could not sync. Links are also provided that let you open the record in Outlook and inNetSuite.
To view the errors that occurred during a sync, you can click the popup that opens over the system trayafter a sync, or you can click the NetSuite for Outlook button in Outlook, then click View Errors.
Updates to NetSuite for OutlookPeriodically, updates are made to NetSuite for Outlook. When an update is available, a notificationappears in the system tray, and a Download Update... option appears in the NetSuite for Outlookmenu in Outlook and when you right-click the system tray icon.
You can disable automatic update notifications in the NetSuite for Outlook Configuration wizard. Formore information, see Configuring NetSuite for Outlook.
Click any of these links to download the new update. After it has downloaded, close Outlook, and openthe downloaded file. Follow the installation prompts, and when it has installed, you can open Outlookand continue working.
Reporting Problems with NetSuite for OutlookIf you encounter a problem with NetSuite for Outlook, you can enter a support ticket with NetSuite byclicking the NetSuite for Outlook button in Outlook and clicking Contact Support by Email. The emailincludes log files and information about your computer that can be used to diagnose your problem.
NetSuite for Outlook: Quick Start for Administrators 35
NetSuite for Outlook
NetSuite for Outlook: Quick Start forAdministratorsComplete the following procedures to set up your NetSuite account so that users can sync usingNetSuite for Outlook.
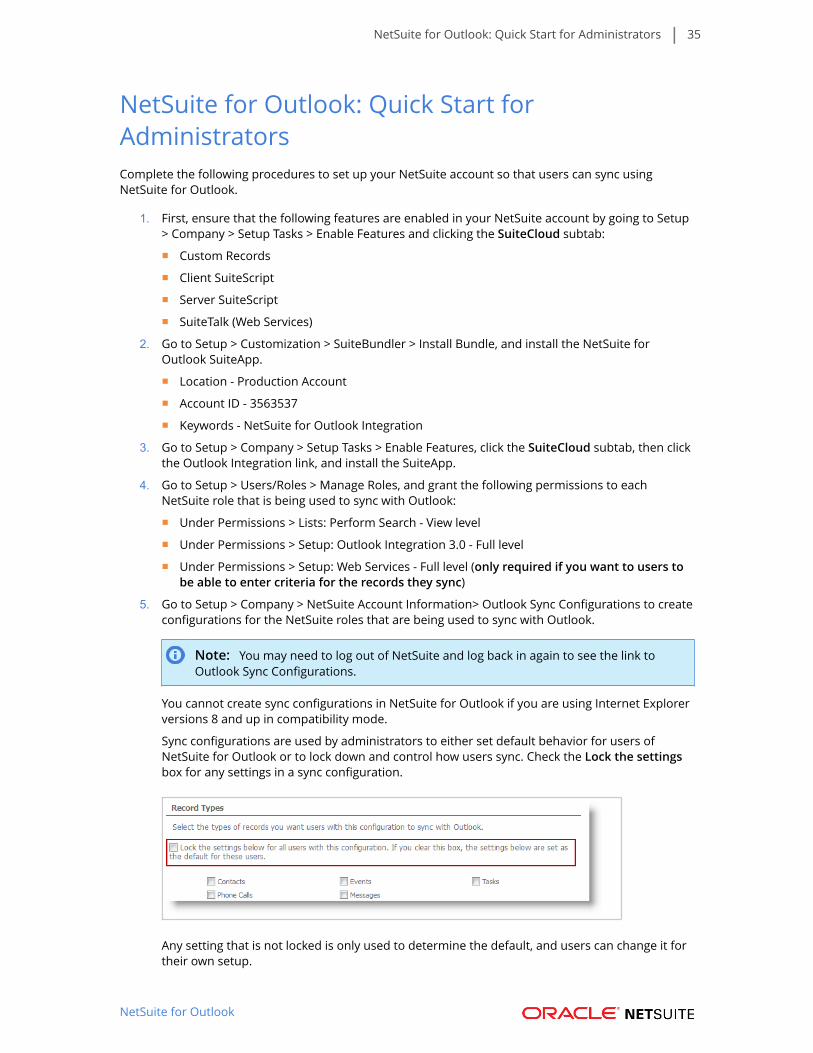
1. First, ensure that the following features are enabled in your NetSuite account by going to Setup> Company > Setup Tasks > Enable Features and clicking the SuiteCloud subtab:
■ Custom Records
■ Client SuiteScript
■ Server SuiteScript
■ SuiteTalk (Web Services)
2. Go to Setup > Customization > SuiteBundler > Install Bundle, and install the NetSuite forOutlook SuiteApp.
■ Location - Production Account
■ Account ID - 3563537
■ Keywords - NetSuite for Outlook Integration
3. Go to Setup > Company > Setup Tasks > Enable Features, click the SuiteCloud subtab, then clickthe Outlook Integration link, and install the SuiteApp.
4. Go to Setup > Users/Roles > Manage Roles, and grant the following permissions to eachNetSuite role that is being used to sync with Outlook:
■ Under Permissions > Lists: Perform Search - View level
■ Under Permissions > Setup: Outlook Integration 3.0 - Full level
■ Under Permissions > Setup: Web Services - Full level (only required if you want to users tobe able to enter criteria for the records they sync)
5. Go to Setup > Company > NetSuite Account Information> Outlook Sync Configurations to createconfigurations for the NetSuite roles that are being used to sync with Outlook.
Note: You may need to log out of NetSuite and log back in again to see the link toOutlook Sync Configurations.
You cannot create sync configurations in NetSuite for Outlook if you are using Internet Explorerversions 8 and up in compatibility mode.
Sync configurations are used by administrators to either set default behavior for users ofNetSuite for Outlook or to lock down and control how users sync. Check the Lock the settingsbox for any settings in a sync configuration.
Any setting that is not locked is only used to determine the default, and users can change it fortheir own setup.
NetSuite for Outlook: Quick Start for Administrators 36
NetSuite for Outlook
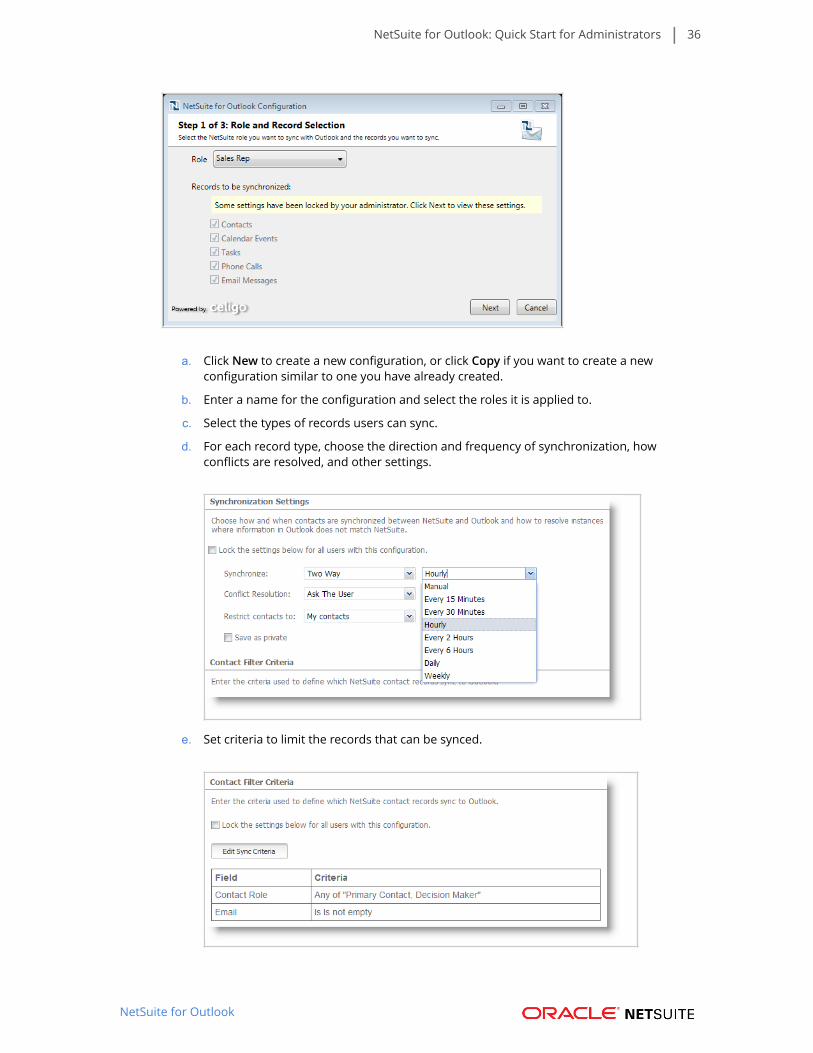
a. Click New to create a new configuration, or click Copy if you want to create a newconfiguration similar to one you have already created.
b. Enter a name for the configuration and select the roles it is applied to.
c. Select the types of records users can sync.
d. For each record type, choose the direction and frequency of synchronization, howconflicts are resolved, and other settings.
e. Set criteria to limit the records that can be synced.
NetSuite for Outlook: Quick Start for Administrators 37
NetSuite for Outlook
f. For contacts, choose which fields in Outlook must have data before a contact can besynced to NetSuite.
g. For email messages, select the types of records users can save messages to, and choosethe file cabinet folders used to store attachments in Outlook email saved to yourNetSuite account.
h. Click Finish.
6. For any users who do not have administrator rights to their computers, you must either installNetSuite for Outlook for them or give them temporary administrator rights for the purpose ofinstalling the application.
Now, your users can download and begin using NetSuite for Outlook.
NetSuite for Outlook Administrator's GuideNetSuite for Outlook enables administrators to configure the application for their company'sprocesses. Installation tasks for administrators includes the following steps:
1. Preparing for Installation
2. Installing the NetSuite for Outlook SuiteApp
3. Granting the Required Permissions for NetSuite for Outlook
4. Installing the NetSuite for Outlook Client for Employees Without Administrator Rights
5. Creating Outlook Sync Configurations
Preparing for InstallationPrior to installing the NetSuite for Outlook SuiteApp, you must ensure that the following features areenabled in your NetSuite account:
■ Custom Records
■ Client SuiteScript
■ Server SuiteScript
■ SuiteTalk (Web Services)
Important: If your company uses Single Sign-On (SSO), you cannot use NetSuite for Outlookwith a Single Sign-On-only role. If you are not sure if your role is compatible, please contact youraccount administrator.
NetSuite also strongly recommends that you remove or merge duplicate records in your NetSuiteaccount.
When users open email messages, events, tasks, or contacts in NetSuite, they are presented with listsof matching records in NetSuite. Having duplicate records can make it difficult for users to choose theNetSuite record they want to sync with.
Installing the NetSuite for Outlook SuiteAppBefore users can use NetSuite for Outlook, the NetSuite for Outlook SuiteApp must be installed in yourNetSuite account.
The NetSuite for Outlook SuiteApp is a managed SuiteApp. This means that when updates to theSuiteApp are available, they are automatically applied to the SuiteApp. No action is required for theseupdates.

NetSuite for Outlook Administrator's Guide 38
NetSuite for Outlook
To install the NetSuite for Outlook SuiteApp:
1. Go to Setup > Company > Enable Features.
2. Click the SuiteCloud subtab.
3. Under Integration Add-ons, click the Outlook Integration link.
The NetSuite for Outlook SuiteApp page opens.
4. Install the SuiteApp.
Installing the SuiteApp adds the ability to create Outlook Sync Configurations. After installing theSuiteApp, you may need to log out of NetSuite and log back in again to see the link to Outlook SyncConfigurations.
Note: The link to this page can be seen by anyone with the Outlook Integration 3.0 permission,but only administrators can access the page.
Required Permissions for NetSuite for OutlookThe following permissions are required for each role used to sync with NetSuite for Outlook:
■ Outlook Integration 3.0 (Full level)
This permission is added when the NetSuite for Outlook SuiteApp is installed in your account. Bydefault, only your NetSuite account administrator has this permission.
■ Perform Search (View level)
■ Web Services (Full level)
Note: The Web Services permission is only required if you want to users to be able toenter criteria for the records they sync.
■ Calendar, Events, Phone Calls
These permissions are required to sync events. Note that the Phone Calls permission is requiredeven if you do not sync phone calls but sync events.
■ Tasks
Any other roles, you want to be able to use NetSuite for Outlook, must also be granted Full access tothe Outlook Integration 3.0 permission.
Additionally, the Perform Search (View level) permission is required to use the application.
To apply the required permission to a role:
1. Customize the role you want to use NetSuite for Outlook.
2. Under the Permissions subtab, click the Lists subtab.
3. Verify that the role has the Perform Search permission set to View or Full level.
4. Click the Setup subtab.
5. In the Permission column, select Outlook Integration 3.0.
6. In the Level column, select Full.
7. If you use NetSuite OneWorld, in the Permission column, select Web Services, and in the Levelcolumn, select Full.
8. Click Add.
9. Click Save.
NetSuite for Outlook Administrator's Guide 39
NetSuite for Outlook
10. Repeat these steps for each role you want to use NetSuite for Outlook.
Installing the NetSuite for Outlook Client for EmployeesWithout Administrator RightsAfter you have installed the NetSuite for Outlook SuiteApp, users can install the application on theircomputers.
If the users do not have administrator rights to their computers, they must be granted temporaryadministrator rights, or a system administrator must install the application on their computers directly.
Setting Up Token-based Authentication for NetSuite forOutlookTo set up token-based authentication for NetSuite for Outlook, follow these steps, and read thefollowing help topics:
■ Step 1: Enable the Token-based Authentication feature in your account. See the help topic Enablingthe Token-based Authentication Feature.
■ Step 2: Set up roles to use token-based authentication. See the help topic Setting Up Token-basedAuthentication Roles.
■ Step 3: Set the necessary permissions for the role. See the help topic Token-based AuthenticationPermissions.
□ Make sure that the Access Token Management permission is added only to the administratorrole.
□ You must also add the Web Services permission to both the end user and the administratorroles.
■ Step 4: Assign token-based authentication roles to users. See the help topic Assigning Users toToken-based Authentication Roles.
■ Step 5: Create access tokens for users. See the help topic Access Token Management – Create andAssign a TBA Token.
When your role already has the necesary permissions, you can also change or create additionaltokens for users. For more information, see the help topic Viewing, Editing, Creating, and RevokingTBA Tokens.
Important: Make sure to note down the Token ID and Token Secret generated from thisstep. The values are displayed only on the confirmation page. When you leave the page, thevalues can no longer be retrieved. You can save the token values in a text file and secure it inthe user’s computer for reference.
Important: When using token-based authentication with NetSuite for Outlook, newcontacts cannot be created through NetSuite for Outlook message pane. You can, however,create a contact in NetSuite and then use the application to sync the new contact to Outlook.
Outlook Sync ConfigurationsWith NetSuite for Outlook, administrators can create Outlook sync configurations to control how userssync.
NetSuite for Outlook Administrator's Guide 40
NetSuite for Outlook
Configurations are created for NetSuite roles. The configuration each role is assigned determines howthe application is set up by default.
Any preferences you set in a sync configuration are set by default when users install the application,making setup faster for users.
Note: You may need to log out of NetSuite and log back in again to see the Outlook SyncConfigurations link.
Note: You cannot create sync configurations in NetSuite for Outlook if you are using InternetExplorer versions 8 and up in compatibility mode.
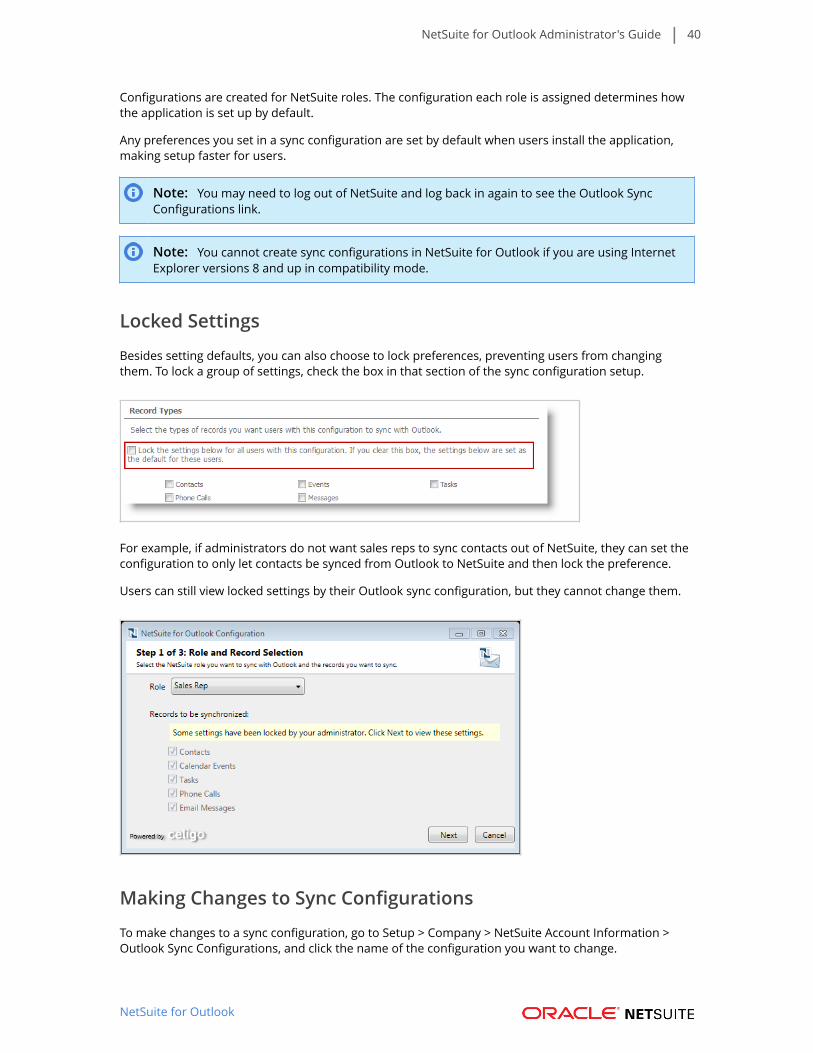
Locked Settings
Besides setting defaults, you can also choose to lock preferences, preventing users from changingthem. To lock a group of settings, check the box in that section of the sync configuration setup.
For example, if administrators do not want sales reps to sync contacts out of NetSuite, they can set theconfiguration to only let contacts be synced from Outlook to NetSuite and then lock the preference.
Users can still view locked settings by their Outlook sync configuration, but they cannot change them.
Making Changes to Sync Configurations
To make changes to a sync configuration, go to Setup > Company > NetSuite Account Information >Outlook Sync Configurations, and click the name of the configuration you want to change.
NetSuite for Outlook Administrator's Guide 41
NetSuite for Outlook
If administrators make changes to a sync configuration after users have installed and configured theapplication, those changes are only applied to:
■ the end user configuration for preferences that the administrator has locked
■ required contact fields and the email attachment folder settings (preferences that only theadministrator can set)
Creating an Outlook Sync ConfigurationYou can create an Outlook sync configuration at Setup > Company > NetSuite Account Information >Outlook Sync Configuration.
Note: This link shows for anyone with the Outlook Integration 3.0 permission, but onlyadministrators can access the page.
To create an Outlook sync configuration:
1. Go to Setup > Company > NetSuite Account Information > Outlook Sync Configuration.
2. Do one of the following:
■ Click New to create an entirely new sync configuration.
■ Click Copy next to an existing sync configuration
A new sync configuration record opens.
3. Complete the following tasks:
1. Basic Information (1 of 6)
2. Contact Sync Settings (2 of 6)
3. Event, Task, and Phone Call Sync Settings (3, 4, and 5 of 6)
4. Message Sync Settings (6 of 6)
4. After you complete the configuration, click Finish.
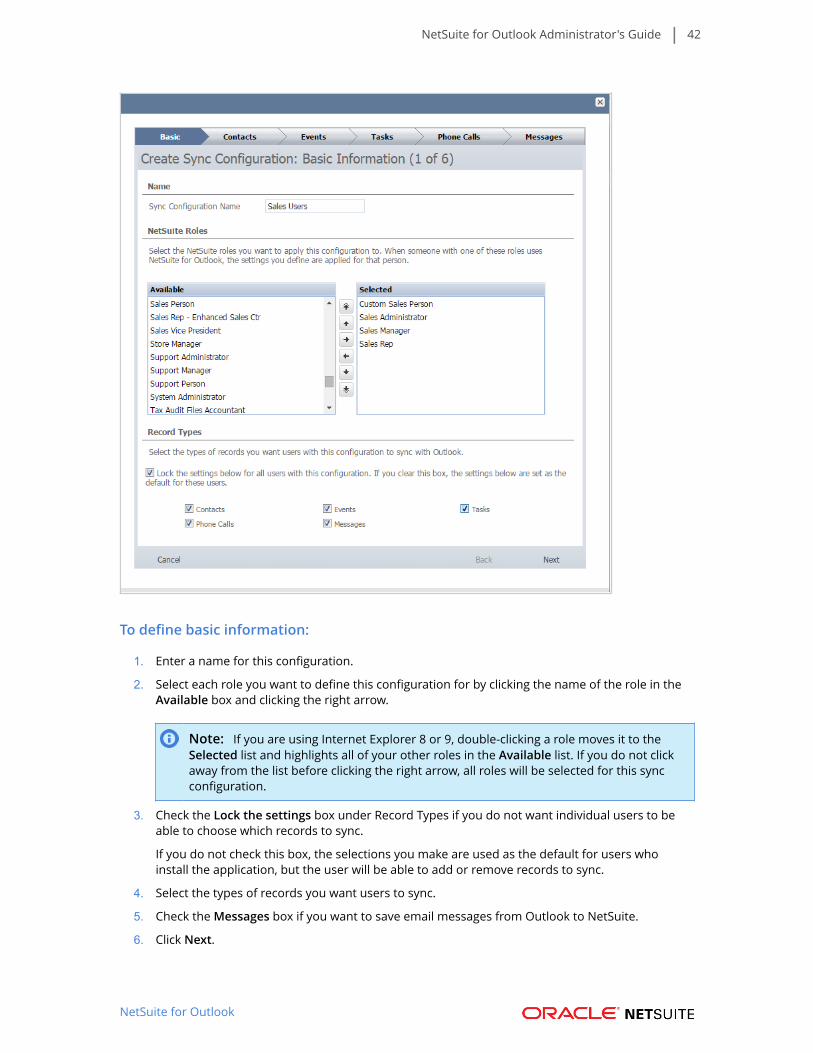
Basic Information (1 of 6)
In this step, name the configuration, select the NetSuite roles it is applied to, and choose the type ofrecords users with these roles will sync.
NetSuite for Outlook Administrator's Guide 42
NetSuite for Outlook
To define basic information:
1. Enter a name for this configuration.
2. Select each role you want to define this configuration for by clicking the name of the role in theAvailable box and clicking the right arrow.
Note: If you are using Internet Explorer 8 or 9, double-clicking a role moves it to theSelected list and highlights all of your other roles in the Available list. If you do not clickaway from the list before clicking the right arrow, all roles will be selected for this syncconfiguration.
3. Check the Lock the settings box under Record Types if you do not want individual users to beable to choose which records to sync.
If you do not check this box, the selections you make are used as the default for users whoinstall the application, but the user will be able to add or remove records to sync.
4. Select the types of records you want users to sync.
5. Check the Messages box if you want to save email messages from Outlook to NetSuite.
6. Click Next.
NetSuite for Outlook Administrator's Guide 43
NetSuite for Outlook
Contact Sync Settings (2 of 6)In this step, you choose how and when contacts are synchronized between NetSuite and Outlook, howconflicting updates to records are resolved, and also enter criteria to define which NetSuite contactsare synced.
Then, you can also choose the fields that must be included in a contact record in NetSuite for it to besynced to NetSuite.
To set contact synchronization preferences:
1. Check the Lock the settings box under Synchronization Settings if you do not want individualusers to be able to be able to configure contact sync settings.
If you do not check this box, the selections you make are used as the default for users whoinstall the application, but users will be able to adjust their sync settings.
2. In the Synchronize fields, choose which direction sync occurs and how often records are syncedbetween Outlook and NetSuite.
Users can choose to sync from Outlook to NetSuite, from NetSuite to Outlook, or in bothdirections.
3. In the Conflict Resolution field, choose how NetSuite for Outlook resolves situations whereinformation on records in NetSuite differs from the information in Outlook. You can choose thefollowing:
■ Ask the User – Users are prompted by the client when there is a conflict and must choosewhich data is used.
■ NetSuite Always Wins – NetSuite for Outlook syncs the data from NetSuite.
■ Outlook Always Wins – NetSuite for Outlook syncs the data from Outlook.
4. For contacts, in the Restrict contacts to field, choose which contacts you want users to sync. Youcan choose any of the following:
■ My contacts – If users are syncing with a sales rep role, only contacts associated with thatuser's customers and contacts created by the user are synced. If you are not a sales rep, thisselection syncs only contact records you created.
■ My and my team's contacts – If you are syncing with a sales rep role, you only sync contactsassociated with your customers and associated with your subordinates' customers. If you arenot a sales rep, this selection syncs only contact records created by you or your subordinates.
■ Do not restrict – All contacts are synced.
Note: This restriction is applied along with any other additional contact criteria youdefine below.
5. Check the Save as Private box if you want records created in Outlook and then synced intoNetSuite to be marked as private. Private contacts cannot be viewed by other NetSuite users.
6. Click Edit Sync Criteria to define which records you want to sync between NetSuite and Outlook.This enables you to control which records are synced into your NetSuite account.
7. To set a filter:
1. In the filters dialog that opens, select a field, and set the criterion for those records inNetSuite that you want to sync to Outlook.
2. Repeat this for each criterion you want to use to define which records you sync.
3. When you finish defining criteria, click Save.
The criteria are now listed under Contacts Filter Criteria.

NetSuite for Outlook Administrator's Guide 44
NetSuite for Outlook
8. Click Next.
To remove criteria later, click Modify Criteria, and then click the X next to the criterion you wantto remove. Then, click Save.
Next, you can choose the fields that must have data to be synced to NetSuite.
On the Required Outlook Contact Fields page, choose the fields that must have data in the Outlookcontact record to be synced to NetSuite. If a contact does not include information in one of these fields,it cannot be synced to NetSuite.
Event, Task, and Phone Call Sync Settings (3, 4, and 5 of 6)For each of these records, you can choose how often records are synced, which Outlook folder youwant to sync with, and whether records are marked as private in NetSuite. You can also set criteria todetermine which NetSuite records will sync with Outlook.
To set activity record synchronization preferences:
1. Check the Lock the settings box under Synchronization Settings if you do not want individualusers to be able to be able to configure these settings.
If you do not check this box, the selections you make are used as the default for those whoinstall the application. Users can still change these default settings.
2. In the Synchronize fields, choose which direction sync occurs and how often records are syncedbetween Outlook and NetSuite.
Users can choose to sync from Outlook to NetSuite, from NetSuite to Outlook, or in bothdirections.
3. In the Conflict Resolution field, choose how NetSuite for Outlook resolves situations whereinformation on records in NetSuite differs from the information in Outlook. You can choose thefollowing:
■ Ask the User – Users are prompted by the client when there is a conflict and must choosewhich data is used.
■ NetSuite Always Wins – NetSuite for Outlook syncs the data from NetSuite.
■ Outlook Always Wins – NetSuite for Outlook syncs the data from Outlook.
4. For events and phone calls, check the Sync Reminders box if you want to sync reminder settings.With this preference enabled, you will receive reminders from both NetSuite and Outlook if youhave set up reminders in either application.
If you clear this box, users will only receive reminders from the application that the event or callwas created in.
5. For tasks, check the Save as Private box if you want records created in NetSuite throughsynchronization to be marked as private.
Note: Tasks marked as private in NetSuite can only be viewed by the creator of therecord.
6. Check the box in the Filter Criteria section if you want to lock criteria for events, tasks, and phonecalls that users can sync.
7. Click Edit Sync Criteria to define which records you want to sync between NetSuite and Outlook.This enables you to control which records are synced into your NetSuite account.
To set a filter:
1. In the filters dialog that opens, select a field, and set the criterion for those records inNetSuite that you want to sync to Outlook.
NetSuite for Outlook Administrator's Guide 45
NetSuite for Outlook
2. Repeat this for each criterion you want to use to define which records you sync.
3. When you finish defining criteria, click Save.
The criteria are now listed under Filter Criteria.
Note: By default, events are filtered to only synchronize those events that take placetoday or in the future. Recurring events created in the past that have future occurrencesare synced with this filter.
To remove criteria later, click Modify Criteria, and then click the X next to the criterion you wantto remove. Then, click Save.
8. Click Next.
Message Sync Settings (6 of 6)
After you have configured contacts, events, tasks, and phone calls, you can choose which records inNetSuite users can save Outlook email to.
Your selections here determine the types of records that are presented to users in the message panewhen they are writing or viewing email. You can choose to let users save email to contacts, customers,jobs and projects, opportunities, estimates, sales orders, invoices, and support cases.
To set email message sync preferences:
1. Check the box under Synchronization Settings if you do not want individual users to be able tobe able to configure these settings.
If you do not check this box, the selections you make are used as the default for users whoinstall the application but can be changed.
2. Select the NetSuite record types users can save Outlook email messages to.
3. Check the box if you want to automatically save new email messages to NetSuite when there isonly one record in NetSuite with an email address that matches.
4. Under Saving Email Attachments, select the folders in the NetSuite file cabinet you want to saveemail attachments to.
Two folders are created when you install the NetSuite for Outlook SuiteApp: OutlookAttachments Received and Outlook Attachments Sent. These folders are used as the defaults.
Note: You cannot use the Attachments Received or Attachments Sent folders or theirsubfolders for Outlook attachments.
5. Click Finish.
Now, users can configure and begin using NetSuite for Outlook.
Troubleshooting NetSuite for Outlook■ Sync Issues with NetSuite for Outlook
■ Installation and Setup Issues with NetSuite for Outlook
■ Outlook Sync Configuration and Login Issues with NetSuite for Outlook
■ Miscellaneous Issues with NetSuite for Outlook
Troubleshooting NetSuite for Outlook 46
NetSuite for Outlook
Sync Issues with NetSuite for Outlook
My contacts, events, tasks, or phone calls are not syncing with Outlook.
If you encounter problems syncing contacts, events, tasks, or phone call with Outlook, try any of thefollowing solutions.
Check permissions for your role
Contact your NetSuite account administrator and make sure that your role has the following requiredpermissions:
■ Perform Search - View
■ Outlook Integration 3.0
■ Web Services - View (for NetSuite OneWorld)
Check your configuration settings
■ If changes were made to your Exchange server recently, you may need to reset the sync folder inyour configuration.
■ Make sure the records meet the criteria you have defined in your configuration settings.
■ Make sure the records are in the sync folder that you selected in your configuration settings.
■ Make sure your contacts match the mine/my and my subordinates setting.
Check the error logs
Check for errors in the error log for the record. You can check this by clicking the NetSuite for Outlookbutton in Outlook and selecting View Errors.
Check your time zone
Make sure the time zone in NetSuite is the same as the time zone setting on your computer. Thissetting is required for events to sync.
Make sure you are not using a roaming user profile
NetSuite for Outlook requires a local user profile. To determine if you have a roaming profile:
1. From the Windows start menu, right-click Computer, and select Properties.
2. Click Advanced Settings, and in the System Properties dialog, click the Advanced tab.
3. Under User Profiles, click Settings.
4. Find your user profile in the list, and make sure it is of type Local. You can change the profileback to type Roaming after installing NetSuite for Outlook.
Make sure you are not syncing more than 3000 records at a time
NetSuite can sync a maximum of 3000 event records only. Update the filter criteria to lessen therecords that need to be synced and try again. For example, setting the Start Date to using the currentmonth may lower the number of records being synced.
Update your data if you recently switched between 32-bit and 64-bit version of Microsoft Outlook
You must edit the registry to update the data. Click here for a guide to update the data on yourcomputer. When the data has been updated, uninstall and reinstall NetSuite for Outlook to resolve theerror.
Troubleshooting NetSuite for Outlook 47
NetSuite for Outlook
If you changed the sync folder in your configuration, reset the sync
When you change the sync folder in your configuration, you must reset the sync so that NetSuite forOutlook syncs properly.
To reset the sync, right-click the NetSuite for Outlook icon in the system tray, and select View Sync Log.Click the Reset this sync link for the record type you changed the folder for. For more information, seeResetting Your Sync.
If your Outlook event is not showing in your NetSuite calendar, check the following:
■ Make sure the event is created in the same Outlook calendar that you chose in the configuration.
■ Make sure the event takes place within the work day hours you have set up in your NetSuitecalendar preferences or in Outlook.
If you are syncing multi-day events, contact the event organizer
Multi-day events can be synced to NetSuite only by the event organizer. If you are the event organizer,check your Outlook sync configuration to make sure that events are synced in both directions (Outlookto NetSuite and NetSuite to Outlook). For more information, see Event, Task, and Phone Call SyncSettings (3, 4, and 5 of 6).
When I sync events on my mobile device, I get an error sayingsynchronization failed for one or more items.
This error occurs due to a limitation on the Microsoft Exchange server that prevents events from beingsynced properly on mobile devices. It may be caused by Accepted or Declined responses to eventsthat are unread. Events that are not marked as standard events, such as private events or those with a“Working Elsewhere” status, may also cause this error.
To remove the error, change the status of your event. Right-click on the event, set the status to adifferent option, and try the sync again. You can also access Outlook or the Outlook Web App to markall items as read and then retry the sync.
Changes to event details (such as subject, location, and time) on a single occurrence of a recurringevent may also cause this error. When a single occurrence is modified, it is removed from the recurringevent series, and recreated as a standalone event. In this case, you can try syncing the event to yourcalendar again.
Note: NetSuite for Outlook currently does not support syncing to mobile devices.
Attendees’ responses are not synced to NetSuite.
If responses to Outlook events are not being synced to NetSuite, try closing and reopening Outlook.
When I try to sync an event, the NetSuite Attendees pane in Outlookbecomes unresponsive.
NetSuite for Outlook can sync a maximum of 500 attendees for a single event or 1000 attendees acrossseveral events at one time. If you sync more attendees, the Attendees pane will become unresponsive.
To prevent this error from occurring, disable Event Sync before viewing or editing a single event withmore than 500 attendees. When you have viewed or edited it, enable Event Sync again.
If you are syncing several events with a total of more than 1000 attendees, set a date filter to minimizethe number of events (and thus, attendees) being synced at one time.

Troubleshooting NetSuite for Outlook 48
NetSuite for Outlook
When I try to sync a contact, it does not sync because the companycannot be identified.
You may have an existing contact with a company name that does not match any NetSuite contactrecords. The company name may be misspelled, or you need to select whether to link the contactto a NetSuite company or not. For more information, go to Linking Outlook Contacts to NetSuiteCompanies.
When I sync an event, the formatting of the message is lost.
The message field in NetSuite has a 4000-character limit. If you enter more than 4000 characters,or use applications like Webex, that insert information in the message field, your message may betruncated. The resulting message can have a different format or information may be left out of thesynced event
When I sync an event, I get an error saying an inactive attendee wasdetected in the Recipient fields.
When you sync an event record, it will be unsuccessful if there are inactive attendees in the To and Ccfields. Inactive attendees refer to contact and customer records that have been marked as Inactive. Youneed to remove these inactive records and sync again.
To prevent this error from occurring, set your preferences to let NetSuite for Outlook to search forinactive records and automatically remove them from the recipient fields.
To enable search for inactive records:
1. Go to Home > Set Preferences.
2. In the Analytics subtab, check the INCLUDE INACTIVES IN GLOBAL & QUICK SEARCH box.
3. Click Save.
Changes to events or other records are not visible in Outlook.
This problem sometimes happens when you open a record in a new window in Outlook.
If you are not seeing changes to event or other records in Outlook, close the folder or calendar you areviewing. Open a different folder or calendar, and then re-open the sync folder.
■ Installation and Setup Issues with NetSuite for Outlook
■ Outlook Sync Configuration and Login Issues with NetSuite for Outlook
■ Miscellaneous Issues with NetSuite for Outlook
■ NetSuite for Outlook: Quick Start Guide for Users
■ NetSuite for Outlook User Guide
■ NetSuite for Outlook: Quick Start for Administrators
Installation and Setup Issues with NetSuite for Outlook
When installing NetSuite for Outlook, the installer tells me to closeOutlook, but I have already closed it.
Even though you have closed Outlook, it might still be running in the background. Open the TaskManager, and end any running Outlook processes.

Troubleshooting NetSuite for Outlook 49
NetSuite for Outlook
If I uninstall NetSuite for Outlook, are the records I've synced removedfrom Outlook as they were in older versions of NetSuite for Outlook?
No. Records synced to Outlook will remain after uninstalling NetSuite for Outlook.
If I uninstall, and later reinstall NetSuite for Outlook, are duplicaterecords created when I sync?
No. When you perform the initial sync for an installation, NetSuite for Outlook compares the emailaddresses for any existing contacts and the title, date, and time for existing events. If there are existingrecords that match these criteria, a new (duplicate) record is not created.
How do I uninstall and reinstall NetSuite for Outlook?
To uninstall NetSuite for Outlook:
1. Exit Microsoft Outlook and NetSuite for Outlook.
2. Go to Control Panel > Programs and Features > Uninstall or change a program.
3. Locate NetSuite for Outlook on the list.
4. Click Uninstall.
5. Delete the Metadata file located at C:\Users\<Username>\AppData\Roaming\Celigo\NetSuite forOutlook.
6. Go to C:\Users\<username>\AppData\Roaming\NetSuite\NetSuite for Outlook and create abackup of the logs.
7. Rename the Logs folder and save it on your Desktop.
8. Go to C:\Users\<username>\AppData\Local\Microsoft\Outlook and delete the NetSuite forOutlook 3.0 backup folder.
9. Sync Microsoft Outlook to make sure the folder is deleted.
10. Exit Microsoft Outlook and NetSuite for Outlook.
11. Run the NetSuite for Outlook installer and complete the installation steps.
When installing the NetSuite for Outlook SuiteApp, I get an installationerror saying that it was unable to create the Outlook External Organizer.
When you install the NetSuite for Outlook SuiteApp, a placeholder employee record is created. Thisplaceholder is used for the Organizer field on events when you sync an event from Outlook that isorganized by a non-employee.
This error can occur if you have scripts on the employee record that prevent the SuiteApp from creatingthe record. To install the SuiteApp, do the following:
1. Create an employee record. For more information, see the help topic Adding an Employee.
2. Go to Setup > Company > Preferences > General Preferences (Administrator).
3. On the Custom Preferences subtab under NetSuite for Outlook, select the employee record inthe Outlook External Organizer field.
This error can also occur because the Outlook External Organizer may be set as an inactive record onyour account. It must be active to install or update NetSuite for Outlook.
To determine the status of the record and resolve the error, do the following:
Troubleshooting NetSuite for Outlook 50
NetSuite for Outlook
1. Type “Outlook External Organizer” in the search bar.
2. If no record appears, it is inactive. Inactive records do not show up in the global search results.
3. To view the inactive record, type “Outlook External Organizer+” in the search bar.
4. Click Edit.
5. On the System Information subtab, clear the Inactive box.
6. Click Save.
When setting preferences for NetSuite for Outlook, I am asked to runScheduledTasksCleanup.exe.
For security reasons, some Windows networks need additional privileges to work with the WindowsTask Scheduler used by NetSuite for Outlook. If you see this message when setting up NetSuite forOutlook, contact your administrator.
After installing NetSuite for Outlook, when trying to complete theconfiguration, I get an error saying there were problems connecting withOutlook or Microsoft Exchange.
A problem has been encountered with selecting the synchronization folder, because the MicrosoftOutlook configuration on your computer is incorrect. The data for Outlook on your computer mustbe updated to prevent this error from occurring even for other Outlook add-ons. You must edit theregistry to update the data. Click here for a guide to resolve this error.
Note: You must have administrator rights to update the registry.
■ Sync Issues with NetSuite for Outlook
■ Outlook Sync Configuration and Login Issues with NetSuite for Outlook
■ Miscellaneous Issues with NetSuite for Outlook
■ NetSuite for Outlook: Quick Start Guide for Users
■ NetSuite for Outlook User Guide
■ NetSuite for Outlook: Quick Start for Administrators
Outlook Sync Configuration and Login Issues withNetSuite for Outlook
I installed the NetSuite for Outlook SuiteApp, but I do not see the link toOutlook Sync Configurations.
Make sure you have enabled the other required features. For more information, see NetSuite forOutlook: Quick Start for Administrators.
The Outlook Sync Configuration popup is blank or is not loading.
Clear your browser cache. If the NetSuite for Outlook SuiteApp has been upgraded, it is possible thatyour browser has cached an older version of the page.

Troubleshooting NetSuite for Outlook 51
NetSuite for Outlook
If the problem still persists, contact NetSuite technical support.
I made changes to my sync configuration, but NetSuite for Outlook is notrespecting these changes.
Open the NetSuite for Outlook Configuration, click through your settings, and save them again.
The NetSuite for Outlook configuration does not open or shows a blankpage.
Some applications and services can prevent NetSuite for Outlook from loading properly. For example:
■ With some graphics processors (cards), you must first disable hardware acceleration beforeconfiguring NetSuite for Outlook. For more information, click here.
■ In some cases, you may need to delete the Windows Presentation Foundation (WPF) font cache. Formore information, click here.
When I try to login, I get an error saying two-factor authentication is notsupported.
This error occurs if you use an email address that requires two-factor authentication, which is currentlynot supported by NetSuite for Outlook. NetSuite has provided a custom role, NSC Calendar Access w/Outlook, which has similar data access but does not require two-factor authentication to proceed withlogin.
To use this role, do the following:
1. In your NetSuite account, point to your role on the top right corner.
2. Click View all Roles.
3. On the Choose Role page, select the NSC Calendar Access w/ Outlook role.
Note: If you check the box next to this role, it will become the default role. The page forthis role will automatically display every time you log in.
4. On Outlook, click the NetSuite for Outlook icon.
5. Click Configuration.
6. Enter your NetSuite login credentials and account information.
7. Select the role and complete the configuration process.
When I try to login, I get an error saying my role does not give me accessto NetSuite for Outlook.
This error occurs if your role has not been granted access. Contact your administrator to request foraccess.
■ Sync Issues with NetSuite for Outlook
■ Installation and Setup Issues with NetSuite for Outlook
■ Miscellaneous Issues with NetSuite for Outlook
■ NetSuite for Outlook: Quick Start Guide for Users
Troubleshooting NetSuite for Outlook 52
NetSuite for Outlook
■ NetSuite for Outlook User Guide
■ NetSuite for Outlook: Quick Start for Administrators
Miscellaneous Issues with NetSuite for Outlook
How do I find my NetSuite account number?
Log in to your NetSuite account. In the Settings portlet, go to Home > Setting Up Synchronization. Youraccount number is shown in the middle of the page.
The message pane is not showing on email messages.
In your configuration, make sure you have done both of the following:
■ Check Email Messages under the types of records to sync, and
■ Select at least one type of record you want to save messages to.
When I'm writing an email message, NetSuite for Outlook does notsearch for NetSuite records that match the email addresses I've enteredon the message.
The first time you use an email address in an email message, there can be a delay between the timeyou enter the address and the time Outlook resolves the address. NetSuite for Outlook does not searchfor a matching record until the address is resolved.
To force Outlook to resolve an email address, click Check Names, or press Ctrl+K.
Can I save more than one message at a time?
No. You can only save a single message at a time. Additionally, you must open a message to save it.
My attendees’ responses are not showing on events in Outlook.
Outlook only tracks responses for events in the top level default calendar. If you create a separatecalendar folder for NetSuite events, responses for those events are not tracked by Outlook.
The NetSuite for Outlook icon is not showing in my system tray, and theoptions on the NetSuite for Outlook button in Outlook are not working.
Try ending the Celigo.SyncManager.exe process in your task manager, and then restarting NetSuite forOutlook through your Start menu. If the problem still persists, reboot your computer.
My events, tasks, and phone calls have been deleted from NetSuite andOutlook.
You can retrieve and restore the deleted items to the original Outlook folder by navigating to Folder >Recover Deleted Items.
All retrieved items will automatically be treated as new items to sync with NetSuite for Outlook.

Troubleshooting NetSuite for Outlook 53
NetSuite for Outlook
Note: If the sync settings are locked or you are unable to sync records, contact youradministrator to resolve these issues.
Note: You should retrieve any deleted items as soon as possible. Deleted items are retainedfor a certain time before they are deleted from the Outlook server and become completelyirretrievable. For example, Office 365 keeps deleted items for 14 days only before they areremoved from the server permanently.
My new sync folder is not appearing in Outlook.
With Outlook 2013, you may need to restart Outlook to make your new folders show if you create newsync folders through the NetSuite for Outlook user configuration.
One of my Outlook add-ons is gone or is not loading after I installedNetSuite for Outlook.
Occasionally, when you open NetSuite for Outlook for the first time, an Outlook add-on is disabled. Tofix the problem, try to re-enable the add-on. If the problem continues, uninstall and reinstall the add-on.
If your add-on supports the Repair function, go to Control Panel > Programs and Features (or Add orRemove Programs in Windows XP and earlier versions) and try to repair the add-on. If the problem stillpersists, or the function is not supported, try uninstalling and re-installing the add-on.